

Page 1
Operation Manual
(For touch panel operation types)
DVD Navigation Unit
AVIC-80DVD
DVD Map - USA / Canada
CNDV-21
ENGLISH
Page 2

Page 3

Introduction
License Agreement
PIONEER AVIC-80DVD
(CNDV-21) - for U.S.A.
THIS IS A LEGAL AGREEMENT BETWEEN YOU,
AS THE END USER, AND PIONEER ELECTRONICS (USA) INC. (“PIONEER”). PLEASE CAREFULLY READ THE TERMS AND CONDITIONS OF
THIS AGREEMENT BEFORE USING THE SOFTWARE INSTALLED ON THE PIONEER PRODUCTS. BY USING THE SOFTWARE INSTALLED
ON THE PIONEER PRODUCTS, YOU ARE
AGREEING TO BE BOUND BY THE TERMS OF
THIS AGREEMENT. THE SOFTWARE INSTALLED
ON THE PIONEER PRODUCTS INCLUDES DATABASE OF Geographic Data Technology, Inc.
(“GDT”) AND NAVTECH Data OF Navigation Technologies Corporation (“NAVTACH”) AND SEPARATE TERMS ATTACHED SHALL BE APPLIED TO
THE DATABASE BY GDT AND THE NAVTECH
Data BY NAVTECH RESPECTIVELY. IF YOU DO
NOT AGREE WITH THESE TERMS, PLEASE
RETURN THE PIONEER PRODUCTS (INCLUDING
THE SOFTWARE AND ANY WRITTEN MATERIALS) WITHIN FIVE (5) DAYS OF RECEIPT OF THE
PRODUCTS, TO THE PLACE FROM WHICH YOU
PURCHASED THEM, FOR A FULL REFUND OF
THE PURCHASE PRICE OF THE PIONEER PRODUCTS.
1. GRANT OF LICENSE
Pioneer grants to you a non-transferable, non
exclusive license to use the software installed on
the Pioneer products (the “Software”) and the
related documentation solely for your own personal use or for internal use by your business,
only on such Pioneer products.
You shall not copy, reverse engineer, translate,
port, modify or make derivative works of the Software. You shall not loan, rent, disclose, publish,
sell, assign, lease, sublicense, market or otherwise transfer the Software or use it in any manner not expressly authorized by this agreement.
You shall not derive or attempt to derive the
source code or structure of all or any portion of
the Software by reverse engineering, disassembly, decompilation, or any other means. You shall
not use the Software to operate a service bureau
or for any other use involving the processing of
data for other persons or entities.
Pioneer and its licensor(s) shall retain all copyright, trade secret, patent and other proprietary
ownership rights in the Software. The Software is
copyrighted and may not be copied, even if modified or merged with other products. You shall not
alter or remove any copyright notice or proprietary legend contained in or on the Software.
You may transfer all of your license rights in the
Software, the related documentation and a copy
of this License Agreement to another party, provided that the party reads and agrees to accept
the terms and conditions of this License Agreement.
2. DISCLAIMER OF WARRANTY
The Software and related documentation are provided to you “AS IS”. PIONEER AND ITS LICENSOR(S) (for the purpose of provisions 2 and 3,
Pioneer and its licensor(s) shall be collectively
referred to as “Pioneer”) MAKES AND YOU
RECEIVE NO WARRANTY, WHETHER EXPRESS
OR IMPLIED, AND ALL WARRANTIES OF MERCHANTABILITY AND FITNESS FOR ANY PARTICULAR PURPOSE ARE EXPRESSLY EXCLUDED.
SOME STATES DO NOT ALLOW EXCLUSION OF
IMPLIED WARRANTIES, SO THE ABOVE EXCLUSION MAY NOT APPLY TO YOU. The Software is
complex and may contain some nonconformities,
defects or errors. For example, the voice recognition function as implemented by the Software
may not recognize your voice. Pioneer does not
warrant that the Software will meet your needs or
expectations, that operation of the Software will
be error free or uninterrupted, or that all non-conformities can or will be corrected. Furthermore,
Pioneer does not make any representations or
warranties regarding the use or results of the use
of the Software in terms of its accuracy, reliability
or otherwise.
1
Page 4

3. LIMITATION OF LIABILITY
IN NO EVENT SHALL PIONEER BE LIABLE FOR
ANY DAMAGES, CLAIM OR LOSS INCURRED BY
YOU (INCLUDING, WITHOUT LIMITATION, COMPENSATORY, INCIDENTAL, INDIRECT, SPECIAL,
CONSEQUENTIAL, OR EXEMPLARY DAMAGES,
LOST PROFITS, LOST SALES OR BUSINESS,
EXPENDITURES, INVESTMENTS, OR COMMITMENTS IN CONNECTION WITH ANY BUSINESS,
LOSS OF ANY GOODWILL, OR DAMAGES)
RESULTING FROM THE USE OF OR INABILITY TO
USE THE SOFTWARE, EVEN IF PIONEER HAS
BEEN INFORMED OF, KNEW OF, OR SHOULD
HAVE KNOWN OF THE LIKELIHOOD OF SUCH
DAMAGES. THIS LIMITATION APPLIES TO ALL
CAUSES OF ACTION IN THE AGGREGATE,
INCLUDING WITHOUT LIMITATION BREACH OF
CONTRACT, BREACH OF WARRANTY, NEGLIGENCE, STRICT LIABILITY, MISREPRESENTATION, AND OTHER TORTS. IF PIONEER’S
WARRANTY DISCLAIMER OR LIMITATION OF
LIABILITY SET FORTH IN THIS AGREEMENT
SHALL OR FOR ANY REASON WHATSOEVER BE
HELD UNENFORCEABLE OR INAPPLICABLE,
YOU AGREE THAT PIONEER’S LIABILITY SHALL
NOT EXCEED FIFTY PERCENT (50%) OF THE
PRICE PAID BY YOU FOR THE ENCLOSED PIONEER PRODUCT.
Some states do not allow the exclusion or limitation of incidental or consequential damages, so
the above limitation or exclusion may not apply to
you. This warranty disclaimer and limitation of
liability shall not be applicable to the extent that
any provision of this warranty is prohibited by any
federal, state or local law which cannot be preempted.
4. EXPORT LAW ASSURANCES
You agree and certify that neither the Software
nor any other technical data received from Pioneer, nor the direct product thereof, will be
exported outside the United States except as
authorized and as permitted by the laws and regulations of the United States. If the Software has
been rightfully obtained by you outside of the
United States, you agree that you will not reexport the Software nor any other technical data
received from Pioneer, nor the direct product
thereof, except as permitted by the laws and regulations of the United States and the laws and
regulations of the jurisdiction in which you
obtained the Software.
5. TERMINATION
This Agreement is effective until terminated. You
may terminate it at any time by destroying the
Software. The Agreement also will terminate if
you do not comply with any terms or conditions
of this Agreement. Upon such termination, you
agree to destroy the Software.
6. U.S. GOVERNMENT END USERS
If the Software is being acquired by or on behalf
of the United States government or any other
entity seeking or applying rights similar to those
customarily claimed by the United States government, the Data is licensed with “Limited Rights.”
Utilization of the Software is subject to the
restrictions specified in the “Rights in Technical
Data” clause at DFARS 252.227-7013, or the
equivalent clause for non-defense agencies. Pioneer Electronics (USA) Inc., 2265 East220th
Street, Long Beach, CA 90810.
2
7. MISCELLANEOUS
This is the entire Agreement between Pioneer
and you regarding its subject matter. No change
in this Agreement shall be effective unless
agreed to in writing by Pioneer. This Agreement
shall be governed by and construed in accordance with the internal laws of the State of California. If any provision of this Agreement is
declared invalid or unenforceable, the remaining
provisions of this Agreement shall remain in full
force and effect.
Page 5

PIONEER AVIC-80DVD
(CNDV-21) - for Canada
THIS IS A LEGAL AGREEMENT BETWEEN YOU,
AS THE END USER, AND PIONEER ELECTRONICS OF CANADA, INC. (“PIONEER”). PLEASE
CAREFULLY READ THE TERMS AND CONDITIONS OF THIS AGREEMENT BEFORE USING
THE SOFTWARE INSTALLED ON THE PIONEER
PRODUCTS. BY USING THE SOFTWARE
INSTALLED ON THE PIONEER PRODUCTS, YOU
ARE AGREEING TO BE BOUND BY THE TERMS
OF THIS AGREEMENT. THE SOFTWARE
INSTALLED ON THE PIONEER PRODUCTS
INCLUDES DATABASE OF Geographic Data
Technology, Inc. (“GDT”) AND NAVTECH Data OF
Navigation Technologies Corporation
(“NAVTECH”) AND SEPARATE TERMS
ATTACHED SHALL BE APPLIED TO THE DATABASE BY GDT AND THE NAVTECH Data BY
NAVTECH RESPECTIVELY. IF YOU DO NOT
AGREE WITH THESE TERMS, PLEASE RETURN
THE PIONEER PRODUCTS (INCLUDING THE
SOFTWARE AND ANY WRITTEN MATERIALS)
WITHIN FIVE (5) DAYS OF RECEIPT OF THE
PRODUCTS, TO THE PLACE FROM WHICH YOU
PURCHASED THEM, FOR A FULL REFUND OF
THE PURCHASE PRICE OF THE PIONEER PRODUCTS.
1. GRANT OF LICENSE
Pioneer grants to you a non-transferable, nonexclusive license to use the software installed on
the Pioneer products (the “Software”) and the
related documentation solely for your own personal use or for internal use by your business,
only on such Pioneer products.
You shall not copy, reverse engineer, translate,
port, modify or make derivative works of the Software. You shall not loan, rent, disclose, publish,
sell, assign, lease, sublicense, market or otherwise transfer the Software or use it in any manner not expressly authorized by this agreement.
You shall not derive, or attempt to derive, the
source code or structure of all or any portion of
the Software by reverse engineering, disassembly, decompilation, or any other means. You shall
not use the Software to operate a service bureau
or for any other use involving the processing of
data for other persons or entities.
Pioneer and its licensor(s) shall retain all copyright, trade secret, patent and other proprietary
ownership rights in the Software. The Software is
copyrighted and may not be copied, even if modified or merged with other products. You shall not
alter or remove any copyright notice or proprietary legend contained in or on the Software.
You may transfer all of your license rights in the
Software, the related documentation and a copy
of this License Agreement to another party, provided that the party reads and agrees to accept
the terms and conditions of this License Agreement.
2. DISCLAIMER OF WARRANTY
The Software and related documentation are provided to you “AS IS”. PIONEER AND ITS LICENSOR(S) (for the purpose of provisions 2 and 3,
Pioneer and its licensor(s) shall be collectively
referred to as “Pioneer”) MAKES AND YOU
RECEIVE NO WARRANTY, WHETHER EXPRESS
OR IMPLIED, AND ALL WARRANTIES OF MERCHANTABILITY AND FITNESS FOR ANY PARTICULAR PURPOSE ARE EXPRESSLY EXCLUDED.
SOME STATES DO NOT ALLOW EXCLUSION OF
IMPLIED WARRANTIES, SO THE ABOVE EXCLUSION MAY NOT APPLY TO YOU. The Software is
complex and may contain some nonconformities,
defects or errors. For example, the voice recognition function as implemented by the Software
may not recognize your voice. Pioneer does not
warrant that the Software will meet your needs or
expectations, that operation of the Software will
be error-free or uninterrupted, or that all non-conformities can or will be corrected. Furthermore,
Pioneer does not make any representations or
warranties regarding the use or results of the use
of the Software in terms of its accuracy, reliability
or otherwise.
3
Page 6

3. LIMITATION OF LIABILITY
IN NO EVENT SHALL PIONEER BE LIABLE FOR
ANY DAMAGES, CLAIM OR LOSS INCURRED BY
YOU (INCLUDING, WITHOUT LIMITATION, COMPENSATORY, INCIDENTAL, INDIRECT, SPECIAL,
CONSEQUENTIAL, OR EXEMPLARY DAMAGES,
LOST PROFITS, LOST SALES OR BUSINESS,
EXPENDITURES, INVESTMENTS, OR COMMITMENTS IN CONNECTION WITH ANY BUSINESS,
LOSS OF ANY GOODWILL, OR DAMAGES)
RESULTING FROM THE USE OF OR INABILITY TO
USE THE SOFTWARE, EVEN IF PIONEER HAS
BEEN INFORMED OF, KNEW OF, OR SHOULD
HAVE KNOWN OF THE LIKELIHOOD OF SUCH
DAMAGES. THIS LIMITATION APPLIES TO ALL
CAUSES OF ACTION IN THE AGGREGATE,
INCLUDING WITHOUT LIMITATION BREACH OF
CONTRACT, BREACH OF WARRANTY, NEGLIGENCE, STRICT LIABILITY, MISREPRESENTATION, AND OTHER TORTS. IF PIONEER’S
WARRANTY DISCLAIMER OR LIMITATION OF
LIABILITY SET FORTH IN THIS AGREEMENT
SHALL OR FOR ANY REASON WHATSOEVER BE
HELD UNENFORCEABLE OR INAPPLICABLE,
YOU AGREE THAT PIONEER’S LIABILITY SHALL
NOT EXCEED FIFTY PERCENT (50%) OF THE
PRICE PAID BY YOU FOR THE ENCLOSED PIONEER PRODUCT.
Some states do not allow the exclusion or limitation of incidental or consequential damages, so
the above limitation or exclusion may not apply to
you. This warranty disclaimer and limitation of
liability shall not be applicable to the extent that
any provision of this warranty is prohibited by any
federal, state or local law which cannot be preempted.
5. TERMINATION
This Agreement is effective until terminated. You
may terminate it at any time by destroying the
Software. The Agreement also will terminate if
you do not comply with any terms or conditions
of this Agreement. Upon such termination, you
agree to destroy the Software.
6. MISCELLANEOUS
This is the entire Agreement between Pioneer
and you regarding its subject matter. No change
in this Agreement shall be effective unless
agreed to in writing by Pioneer. This Agreement
shall be governed by and construed in accordance with the internal laws of the Province of
Ontario and the federal laws of Canada applicable therein. If any provision of this Agreement is
declared invalid or unenforceable, the remaining
provisions of this Agreement shall remain in full
force and effect.
4. EXPORT LAW ASSURANCES
You agree and certify that neither the Software
nor any other technical data received from Pioneer, nor the direct product thereof, will be
exported outside Canada except as authorized
and as permitted by the laws and regulations of
Canada. If the Software has been rightfully
obtained by you outside of Canada, you agree
that you will not re-export the Software nor any
other technical data received from Pioneer, nor
the direct product thereof, except as permitted by
the laws and regulations of Canada and the laws
and regulations of the jurisdiction in which you
obtained the Software.
4
Page 7

NAVTECH
TERMS AND CONDITIONS for the
NAVTECH Data
This is a legal agreement (“Agreement”) between
you, the end user, and Navigation Technologies
Corporation (NAVTECH) and its suppliers, the
terms and conditions of which are set forth
below. By using your copy of the NAVTECH Data,
you agree to the terms and conditions of this
Agreement.
Personal Use Only. You are granted a non-exclusive, personal license to use this information
solely for your personal, non-commercial purposes, and not for service bureau, time-sharing
or other similar purposes. You may make one
copy of the NAVTECH Data for archival or backup
purposes only. You may not otherwise reproduce, copy, modify, decompile, disassemble or
reverse engineer any portion of the NAVTECH
Data, and may not transfer or distribute it in any
form, for any purpose.
Ownership
Data, related documentation and other proprietary rights therein are owned by NAVTECH and/
or its suppliers. All rights not expressly granted
in this Agreement are expressly retained by and
for NAVTECH and its suppliers.
No Warranty. This NAVTECH Data is provided to
you “as is,” and you agree to use it at your own
risk. NAVTECH and its licensors (and their licensors and suppliers) make no guarantees, representations or warranties of any kind, express or
implied, arising by law or otherwise, including
but not limited to, content, quality, accuracy,
completeness, effectiveness, reliability, fitness
for a particular purpose, usefulness, use or
results to be obtained from the NAVTECH Data.
Disclaimer of Warranty: NAVTECH AND ITS
LICENSORS (INCLUDING THEIR LICENSORS
AND SUPPLIERS) DISCLAIM ANY WARRANTIES,
EXPRESS OR IMPLIED, OF QUALITY, PERFORMANCE, MERCHANTABILITY, FITNESS FOR A
PARTICULAR PURPOSE OR NON-INFRINGEMENT. Some States, Territories and Countries do
not allow certain warranty exclusions, so to that
extent the above exclusion may not apply to you.
. You acknowledge that the NAVTECH
Disclaimer of Liability
LICENSORS (INCLUDING THEIR LICENSORS
AND SUPPLIERS) SHALL NOT BE LIABLE TO
YOU: IN RESPECT OF ANY CLAIM, DEMAND OR
ACTION, IRRESPECTIVE OF THE NATURE OF
THE CAUSE OF THE CLAIM, DEMAND OR
ACTION ALLEGING ANY LOSS, INJURY OR DAMAGES, DIRECT OR INDIRECT, WHICH MAY
RESULT FROM THE USE OR POSSESSION OF
THE NAVTECH DATA; OR FOR ANY LOSS OF
PROFIT, REVENUE, CONTRACTS OR SAVINGS,
OR ANY OTHER DIRECT, INDIRECT, INCIDENTAL, SPECIAL OR CONSEQUENTIAL DAMAGES
ARISING OUT OF YOUR USE OF OR INABILITY
TO USE THE NAVTECH DATA, ANY DEFECT IN
THE NAVTECH DATA, OR THE BREACH OF
THESE TERMS OR CONDITIONS, WHETHER IN
AN ACTION IN CONTRACT OR TORT OR BASED
ON A WARRANTY, EVEN IF NAVTECH OR ITS
LICENSORS HAVE BEEN ADVISED OF THE POSSIBILITY OF SUCH DAMAGES. Some States, Territories and Countries do not allow certain
liability exclusions or damages limitations, so to
that extent the above may not apply to you.
Limitation of Liability
going, in no event shall NAVTECH’s and/or its
suppliers’ liability to you for any cause under any
theory exceed the amount paid by you for your
copy of the NAVTECH Data.
Termination. NAVTECH and its suppliers may
terminate this Agreement at any time upon your
breach of any term of this Agreement. Upon any
such termination, you shall return your copy of
the NAVTECH Data and all related documentation to NAVTECH and/or its suppliers.
Export Control. You agree not to export from anywhere any part of the NAVTECH Data except in
compliance with, and with all licenses and
approvals required under, applicable export laws,
rules and regulations.
: NAVTECH AND ITS
. Without limiting the fore-
5
Page 8

Government End Users
. If the NAVTECH Data is
being acquired by or on behalf of the United
States government or any other entity seeking or
applying rights similar to those customarily
claimed by the United States government, the
Data is licensed with “Restricted Rights.” Utilization of the Data is subject to the restrictions
specified in the “Rights in Technical Data and
Computer Data” clause at DFARS 252.227-7013,
or the equivalent clause for non-defense agencies. Manufacturer is Navigation Technologies
Corporation, 10400 West Higgins Road, Rosemont, Illinois 60018.
Indemnity
. You agree to indemnify, defend and
hold NAVTECH and its licensors (including their
respective licensors, suppliers, assignees, subsidiaries, affiliated companies, and the respective
officers, directors, employees, shareholders,
agents and representatives of each of them) free
and harmless from and against any liability, loss,
injury (including injuries resulting in death),
demand, action, cost, expense, or claim of any
kind or character, including but not limited to
attorney’s fees, arising out of or in connection
with any use or possession by you of the
NAVTECH Data.
THE NAVTECH DATA MAY INCLUDE OR
REFLECT DATA OF LICENSORS, INCLUDING
HER MAJESTY THE QUEEN IN RIGHT OF CANADA. SUCH DATA IS LICENSED ON AN “AS IS”
BASIS. THE LICENSORS, INCLUDING HER MAJESTY THE QUEEN, MAKE NO GUARANTEES,
REPRESENTATIONS OR WARRANTIES
RESPECTING SUCH DATA, EITHER EXPRESS OR
IMPLIED, ARISING BY LAW OR OTHERWISE,
INCLUDING BUT NOT LIMITED TO, EFFECTIVENESS, COMPLETENESS, ACCURACY OR FITNESS FOR A PARTICULAR PURPOSE.
THE LICENSORS, INCLUDING HER MAJESTY
THE QUEEN, SHALL NOT BE LIABLE IN
RESPECT OF ANY CLAIM, DEMAND OR ACTION,
IRRESPECTIVE OF THE NATURE OF THE CAUSE
OF THE CLAIM, DEMAND OR ACTION ALLEGING
ANY LOSS, INJURY OR DAMAGES, DIRECT OR
INDIRECT, WHICH MAY RESULT FROM THE USE
OR POSSESSION OF THE DATA OR THE
NAVTECH DATA. THE LICENSORS, INCLUDING
HER MAJESTY THE QUEEN, SHALL NOT BE LIABLE IN ANY WAY FOR LOSS OF REVENUES OR
CONTRACTS, OR ANY OTHER CONSEQUENTIAL
LOSS OF ANY KIND RESULTING FROM ANY
DEFECT IN THE DATA OR THE NAVTECH DATA.
Entire Agreement. These terms and conditions
constitute the entire agreement between
NAVTECH (and its licensors, including their
licensors and suppliers) and you pertaining to the
subject matter hereof, and supersedes in their
entirety any and all written or oral agreements
previously existing between us with respect to
such subject matter.
Governing Law. The above terms and conditions
shall be governed by the laws of the Illinois, without giving effect to (i) its conflict of laws provisions, or (ii) the United Nations Convention for
Contracts for the International Sale of Goods,
which is explicitly excluded. You agree to submit
to the jurisdiction of Illinois for any and all disputes, claims and actions arising from or in connection with the information provided to you
hereunder.
END USER SHALL INDEMNIFY AND SAVE
HARMLESS THE LICENSORS, INCLUDING HER
MAJESTY THE QUEEN AND THE MINISTER, AND
THEIR OFFICERS, EMPLOYEES AND AGENTS
FROM AND AGAINST ANY CLAIM, DEMAND OR
ACTION, IRRESPECTIVE OF THE NATURE OF
THE CAUSE OF THE CLAIM, DEMAND OR
ACTION, ALLEGING LOSS, COSTS, EXPENSES,
DAMAGES OR INJURIES (INCLUDING INJURIES
RESULTING IN DEATH) ARISING OUT OF THE
USE OR POSSESSION OF THE DATA OR THE
NAVTECH DATA.
6
Page 9

GDT
END USER LICENSE AGREEMENT
PLEASE READ THIS AGREEMENT CAREFULLY BEFORE USING THE NAVIGATION
SYSTEM
THIS IS A LICENSE AGREEMENT FOR YOUR
COPY OF THE MAP DATABASE (“The DATABASE”), ORIGINALLY MADE BY Geographic Data
Technology, Inc. (“GDT”), USED IN THE NAVIGATION SYSTEM. BY USING THE DATABASE, YOU
ACCEPT AND AGREE TO ALL TERMS AND CONDITIONS SET FORTH BELOW.
DISCLAIMER OF WARRANTY
GDT does not warrant or make any representations regarding, either express or implied, regarding the use or results of the use of the
DATABASE in terms of its correctness, accuracy,
reliability, or otherwise, and expressly disclaims
any implied warranties of quality, performance,
merchantability, fitness for a particular purpose
or non-infringement. GDT does not warrant that
the DATABASE is or will be error free. No oral or
written information or advice provided by GDT,
your supplier or any other person shall create a
warranty.
OWNERSHIP
The DATABASE and the copyrights and intellectual property or neighboring rights therein are
owned by GDT or its licensors.
LICENSE GRANT
GDT grants you a non-exclusive license to use
your copy of the DATABASE for your personal
use or for use in your business’ internal operations. This license does not include the right to
grant sub-licenses.
LIMITATIONS ON USE
The DATABASE is restricted for use in the specific system for which it was created. Except to
the extent explicitly permitted by mandatory laws,
you may not extract or re-utilize any portion of the
contents of the DATABASE, nor reproduce, copy,
modify, adapt, translate, disassemble, decompile, or reverse engineer any portion of the DATABASE.
TRANSFER
You may not transfer the DATABASE to third parties, except together with the system for which it
was created, provided that you do not retain any
copy of the DATABASE, and provided that the
transferee agrees to all terms and conditions of
this AGREEMENT.
LIMITATION OF LIABILITY
The price of the DATABASE does not include any
consideration for assumption of risk of consequential, indirect or unlimited direct damages
which may arise in connection with your use of
the DATABASE. Accordingly, in no event shall
GDT or supplier of the navigation system using
the DATABASE (“Supplier”) be liable for any consequential, special, incidental or indirect damages, including without limitation, loss of
revenue, data, or use, incurred by you or any third
party arising out of your use of the DATABASE,
whether in an action in contract or tort or based
on a warranty, even if GDT or the Supplier has
been advised of the possibility of such damages.
In any event GDT’s liability for direct damages is
limited to the price of your copy of the DATABASE.
THE DISCLAIMER OF WARRANTY AND LIMITATION OF LIABILITY, SET FORTH IN THIS AGREEMENT, DO NOT AFFECT OR PREJUDICE YOUR
STATUTORY RIGHTS WHERE YOU HAVE
ACQUIRED THE DATABASE OTHERWISE THAN
IN THE COURSE OF A BUSINESS. Some states
and laws do not allow the exclusion of implied
warranties, so the above disclaimer may not
apply to you.
7
Page 10

WARNINGS
The DATABASE reflects reality as existing before
you received the DATABASE and it comprises
data and information from government and other
sources, which may contain errors and omissions. Accordingly, the DATABASE may contain
inaccurate or incomplete information due to the
passage of time, changing circumstances, and
due to the nature of the sources used. The DATABASE does not include or reflect information on inter alia - neighborhood safety; law enforcement;
emergency assistance; construction work; road
or lane closures; car or speed restrictions; road
slope or grade; bridge height, weight or other limits; road or traffic conditions; special events; traffic congestion; or travel time.
GOVERNMENT END USERS
If the DATABASE is for a region of North America
and is being acquired by or on behalf of the
United States government or any other entity
seeking or applying rights similar to those customarily claimed by the United States government, the DATABASE is licensed with “limited
rights.” Utilization of the DATABASE is subject to
the restrictions specified in the “Rights in Technical Data and Computer Database” clause at
DFARS 252.227-7013, or the equivalent clause for
non-defense agencies. Manufacturer of the
DATABASE for North America is Geographic
Data Technology, Inc., at 11 Lafayette Street, Lebanon, New Hampshire 03766, USA.
8
Page 11

Table of Contents
Introduction 1
License Agreement 1
PIONEER AVIC-80DVD (CNDV-21) - for
U.S.A. 1
PIONEER AVIC-80DVD (CNDV-21) - for
Canada 3
NAVTECH 5
GDT 7
Table of Contents 9
Important Safety Information 11
Notes Before Using the System 11
Precaution 11
After-sales service for Pioneer products 11
Product registration 12
How to Read This Manual 13
How to use this manual 13
Terminology 14
Chapter 1
Basic Operation 15
Flow from Startup to Termination 15
Basic Navigation 16
How to Use Menu Screens 19
Main menu 19
Shortcut menu 20
How to Use the Map 21
Switching the Current Position Screen Display Mode 21
How to view the map of the current
location 21
Changing the scale of the map 23
Moving the map to the location you want to
see 23
Chapter 2
Setting a Route to Your
Destination 25
Selecting the country/area where you want to
search 25
Finding Your Destination by Selecting the Type of
Facility 25
Searching for Points of Interest (POI) 25
Finding a POI in your surroundings 26
Displaying Certain Points Of Interest on the
Map 26
Searching for Your Destination by Specifying the
Telephone Number 27
Setting an Entrance or Exit of a Freeway as Your
Destination 27
Route Calculation to Your Home Location or to
Your Favorite Location 28
Selecting Destination from the Destination Histo-
ry and Address Book 28
Modifying the Route Calculation Conditions 29
Items that Users can Change 29
Perform the route calculation of the several
route options, and select one 30
Checking the Set Route 31
Checking the set route with the map 31
Checking the set route with text 31
Checking the set route from the Information
menu 32
Recalculating the Route to Your Destination 32
Cancelling the Route Guidance 33
Adding Way Points to the Current Route 33
Adding a way point 33
Skipping a way point 34
Deleting a way point from the route 34
9
Page 12

Chapter 3
Utilizing Various Information 35
Editing Registered Locations 35
Registering Your Home and Your Favorite
Location 35
Registering a previous location in the Address Book 36
Editing a location’s information 36
Deleting Address Book or Destination History
Information 38
Changing the Position of Locations Registered in the Address Book 38
Setting Areas to Avoid 39
Registering an Area to Avoid 39
Changing or deleting an Area to Avoid 39
Using a PC Card 40
Initializing a PC card 40
Storing the data of registered locations in the
PC card 40
Loading registered locations data from a PC
card 41
Deleting PC card data 41
Changing Background Picture 42
Checking the Navigation Status 43
Checking sensor learning status and driving
status 43
Checking the connections of leads and installation positions 44
Chapter 4
Customizing Your Navigation
System 45
Modifying the Default Settings 45
Items Users can Change 45
Chapter 5
Operating Your Navigation System
with Voice 49
Basics of Voice Operation 49
Flow of voice operation 49
Operating by only voice when the Navigation
System is started 49
Available voice commands related to
Navigation 49
Available voice commands related to
audio 50
Scrolling through the Voice Help Menu 50
To cancel voice operation 50
An example of voice operation 51
Tips for Voice Operation 52
Appendix 53
Installing the Program 53
Combining and Using Pioneer AV Equipment 55
To Ensure Safe Driving 55
Characteristics of the Navigation System
when combined with Pioneer AV Head
Unit 55
Touch Panel Operation When Using NAVI
Source 56
Cautions When Connecting a Rear Display to
the Front Display 56
Cars that Cannot Obtain Speed Pulse Data 57
Conditions Likely to Cause Noticeable Positioning
Errors 57
Troubleshooting 57
Messages and How to React to Them 59
Route Setting Information 61
Route search specifications 61
Route highlighting 62
Intersection enlargement 62
Tracking 63
Copyright 64
Glossary 65
Display Information 66
Main Menu 66
Shortcut Menu 68
10
Page 13

Important Safety Information
Before using your Navigation System, be sure to
read and fully understand the following safety
information:
• Read the manual before operating this Navigation System.
• This Navigation System is intended solely as
an aid to you in the operation of your car. It is
not a substitute for your attentiveness, judgment, and care when driving.
• Do not operate this Navigation System if doing
so in any way will divert your attention from the
safe operation of your car. Always observe safe
driving rules and follow all existing traffic regulations.
• Never allow others to use the system unless
they have read and understood the operating
instructions.
• Never use this Navigation System to route to
hospitals, police stations, or similar facilities in
an emergency. The map data may not include
a comprehensive list of emergency service
facilities.
• Route and guidance information displayed by
this equipment is for reference purposes only.
It may not accurately reflect the latest permissible routes, road conditions, or traffic restrictions.
• Traffic restrictions and advisories currently in
force should always take precedence over
guidance given by this product. Always obey
current traffic restrictions, even if this product
provides contrary advice.
• Failure to input correct information about the
local time may result in the product providing
improper routing and guidance instructions.
• Never set the volume of your Navigation System so high that you cannot hear outside traffic and emergency cars.
• To promote safety, certain functions are disabled unless the parking brake is on.
• The data encoded in the disc for this product is
the intellectual property of the provider, and
the provider is responsible for such content.
• As with any accessory in your car’s interior,
you should not allow this Navigation System to
divert your attention from the safe operation of
your car. If you experience difficulty in operating the system or reading the display, please
make adjustments while safely parked.
Notes Before Using the System
Precaution
• This software can be used with the following
models:
AVIC-80DVD, AVIC-9DVD, AVIC-90DVD
• Should this product fail to operate properly,
contact your dealer or the nearest authorized
Pioneer service facility.
After-sales service for Pioneer
products
Please contact the dealer or distributor from
where you purchased the product for its aftersales service (including warranty conditions) or
any other information. In case the necessary
information is not available, please contact the
companies listed below:
Please do not ship your product to the companies at the addresses listed below for repair without making advance contact.
U.S.A
Pioneer Electronics
(USA) Inc.
CUSTOMER SUPPORT DIVISION
P.O. Box 1760
Long Beach, CA
90801-1760
800 421-1404
For warranty information, please see the Limited
Warranty sheet included with your product.
CANADA
Pioneer Electronics of
Canada, Inc.
CUSTOMER
SATISFACTION
DEPARTMENT
300 Allstate Parkway
Markham, Ontario
L3R OP2
(905) 479-4411
1-877-283-5901
11
Page 14
Product registration
Visit us at the following site:
1. Register your product. We will keep the details
of your purchase on file to help you refer to this
information in the event of an insurance claim
such as loss or theft.
2. Receive updates on the latest products and
technologies.
3. Download owner's manuals, order product catalogues, research new products, and much
more.
Parking brake interlock
Certain functions offered by this Navigation System
could be dangerous if used while driving. To prevent
them being used while in motion, there is an interlock with your car’s parking brake. If you attempt to
use these functions during driving, their onscreen
touch keys may be indicated in grey and inoperable.
If so, stop in a safe place, apply the parking brake,
then operate.
About this disc
Only use the Pioneer Map disc with Pioneer DVD
Navigation Unit. You cannot use other discs.
DVD-Videos and CDs can be played on AVIC9DVD, and AVIC-90DVD. When using AVIC9DVD, refer to the DVD section in the “Operation
Manual” provided with AVIC-9DVD. When using
AVIC-90DVD, refer to the DVD section in their
respective “Hardware Manual”.
Color difference of the map display
between day and night
Night display
The examples in this manual are illustrated using
the daytime display. When driving at night, the
colors you see may differ from those shown.
To use this function, the Orange/white lead to
this unit must be connected correctly.
➲ “Day/Night Display” ➞ Page 46
Avoiding low battery
When using this Navigation System, make sure
to start your engine first. Using this Navigation
System without starting the engine will run down
the battery.
12
Page 15

How to Read This Manual
This manual provides the important information you need to make full use of your new Navigation System. The beginning sections outline the Navigation System and describe its basic operation. The later
sections describe the details of the navigation functions.
Please note that when you have decided what you want to do, you can find the page you need from the
Table of Contents. If you want to check the meaning of a term displayed on the screen, you will find the
necessary page from the “Display Information” at the end of the manual.
How to use this manual
For reasons of safety, it is particularly important that you fully understand your Navigation System
before using it. Be sure to read Chapter 1 in particular.
Basic Operation
If you want to use the Navigation System immediately, please read this section. It will explain
the basis of operating the system, including items appearing on the display and how to use
the different menus.
Setting a Route to Your Destination
This section describes various ways of searching the destination, changing the route search
2
conditions, and the route operation during route guidance.
3
4
5
Utilizing Various Information
Describes convenient functions for navigation, including how to organise information on
places you have visited and how to store data on the PC card.
Customizing Your Navigation System
The behavior of your Navigation System depends on a number of settings. If you need to
change any of the initial settings (default settings), read the relevant section of this chapter.
Operating Your Navigation System with Voice
Describes navigation operations such as searching the destination and performing audio
operations by voice.
Appendix
Read the appendix to learn more about your Navigation System and such information as the
availability of after-care. Please see “Display Information” in the end of this manual for
checking the details of each item on the menu.
13
Page 16

Terminology
Before moving on, take a few minutes to read the following information about the conventions used in
this manual. Familiarity with these conventions will help you greatly as you learn how to use your new
equipment.
• Buttons on your Remote Control or display are referred to as:
Ex.) NAVI button, NAVI MENU button.
• Items in various menus or touch keys displayed on the screen are referred to like this:
Ex.) “Destination”, “Settings”.
• Extra information, alternative use and other notes are presented like this:
Ex.)
❒ After removing the disc from the slot, keep it in the case.
• The references are indicated like this:
Ex.)
➲ Setting the Route Options ➞ Page 29
14
Page 17
Basic Operation
Chapter 1
Chapter 1 Basic Operation
Flow from Startup to Termination
Caution
If this disc (CNDV-21) is not installed, see
page 53 and install the disc.
1
Start the engine.
After a little time, the navigation opening
screen comes on for a few seconds. Then, a
message screen is displayed.
❒ If the disc is not set, the message asking to
insert the disc appears. After you set the
disc correctly, your Navigation System
starts up.
2
Press the display’s NAVI/AV button to
switch the Navigation map screen.
3
Check the screen content and touch
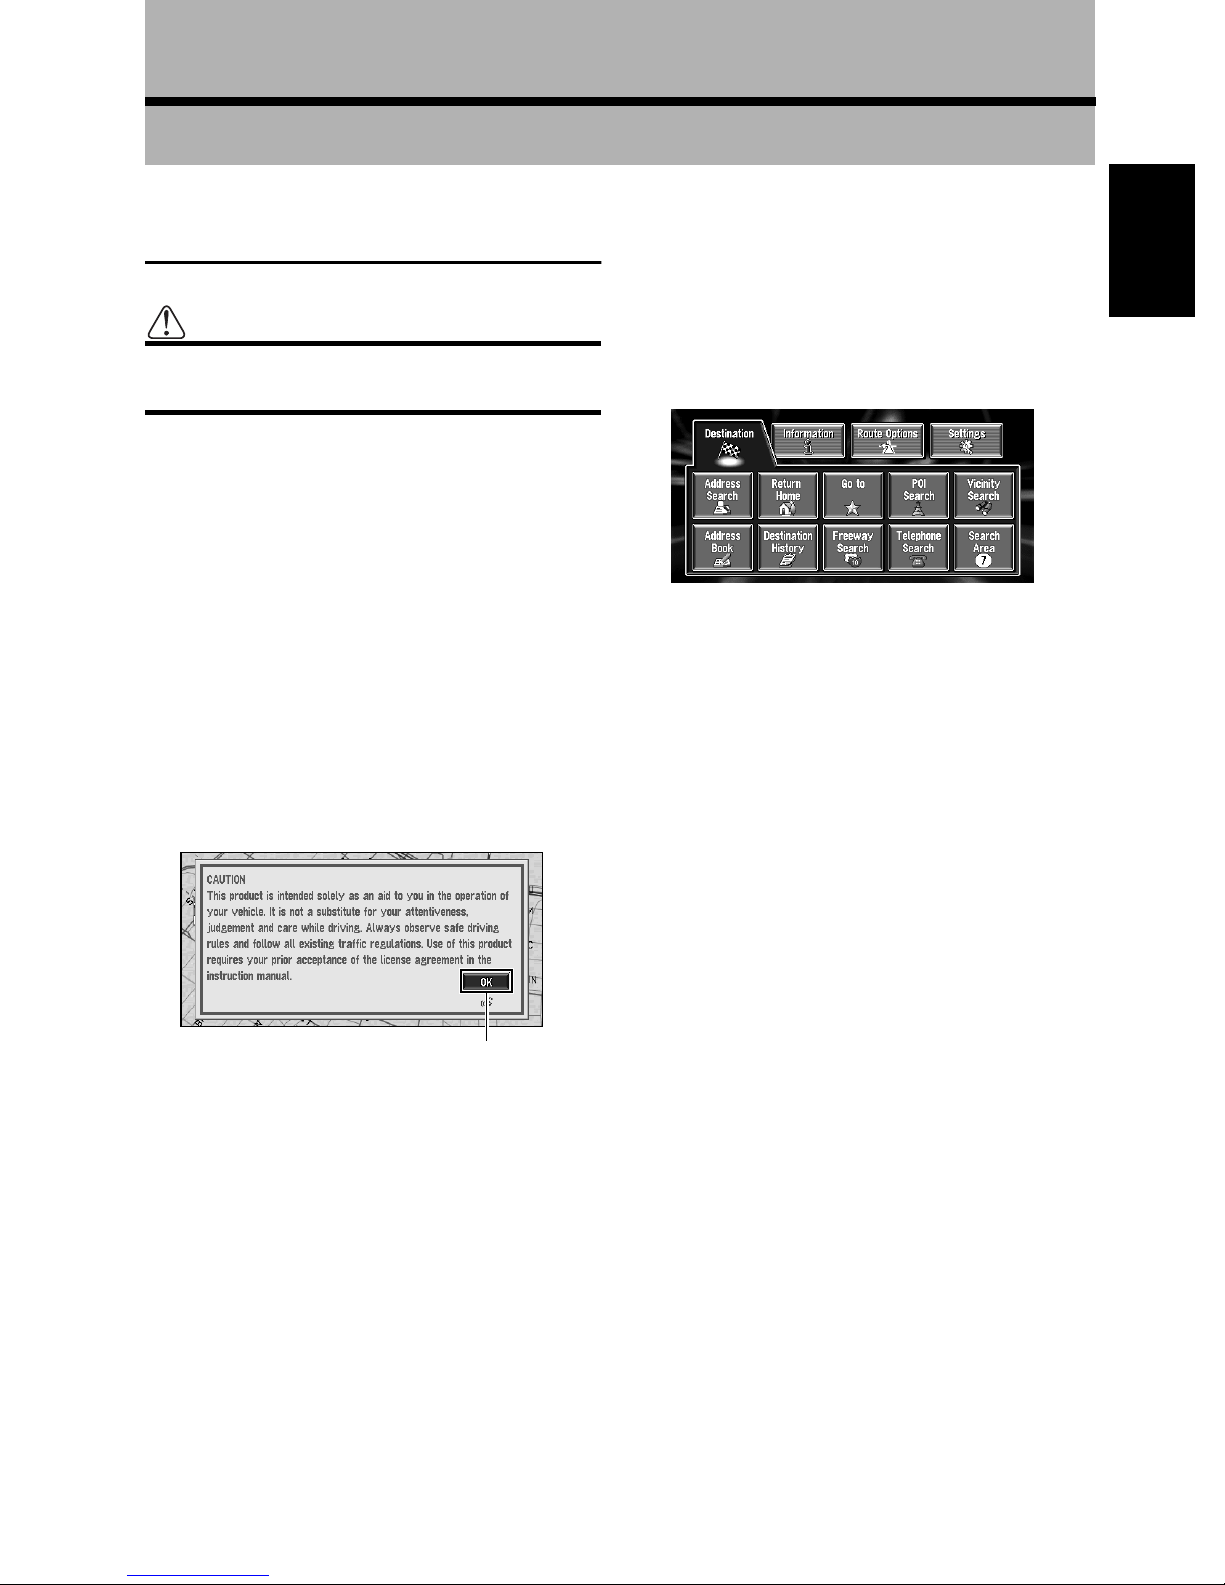
“OK”.
You can operate the Navigation System by
touching keys displayed on the screen.
❒ Be sure to touch the touch keys with a fin-
ger. Touch keys cannot be operated by a
pen or similar object.
4
Press the display’s NAVI MENU button.
Displays the main menu.
5
Searches the destination and gives route
guidance.
➲ Specifying the address and searching the
destination ➞ Page 16
➲ Searching the destination by map ➞
Page 24
➲ Other search methods ➞ Chapter 2
6
Turn off the car engine.
This Navigation System also turns off.
❒ Until the vicinity of the destination is reached,
the set route will not be deleted even if the
power is turned off.
Touch key (“OK”)
If the route is already set, switches to route
guidance mode. The map of your surroundings is displayed.
➲ Starting the operation with voice com-
mands only ➞ Page 46
➲ How to read the current position screen ➞
Page 21
➲ Time settings ➞ Page 54
❒ Press the VOICE button of the steering
remote control to proceed instead of
touching “OK”.
❒ The text of touch keys which are not effec-
tive is indicated in grey.
15
Page 18
Basic Navigation
The most frequently used function is the Address
Search, in which the address is specified and the
destination searched. This section describes how
to use the Address Search and the basics of
using the Navigation System.
3
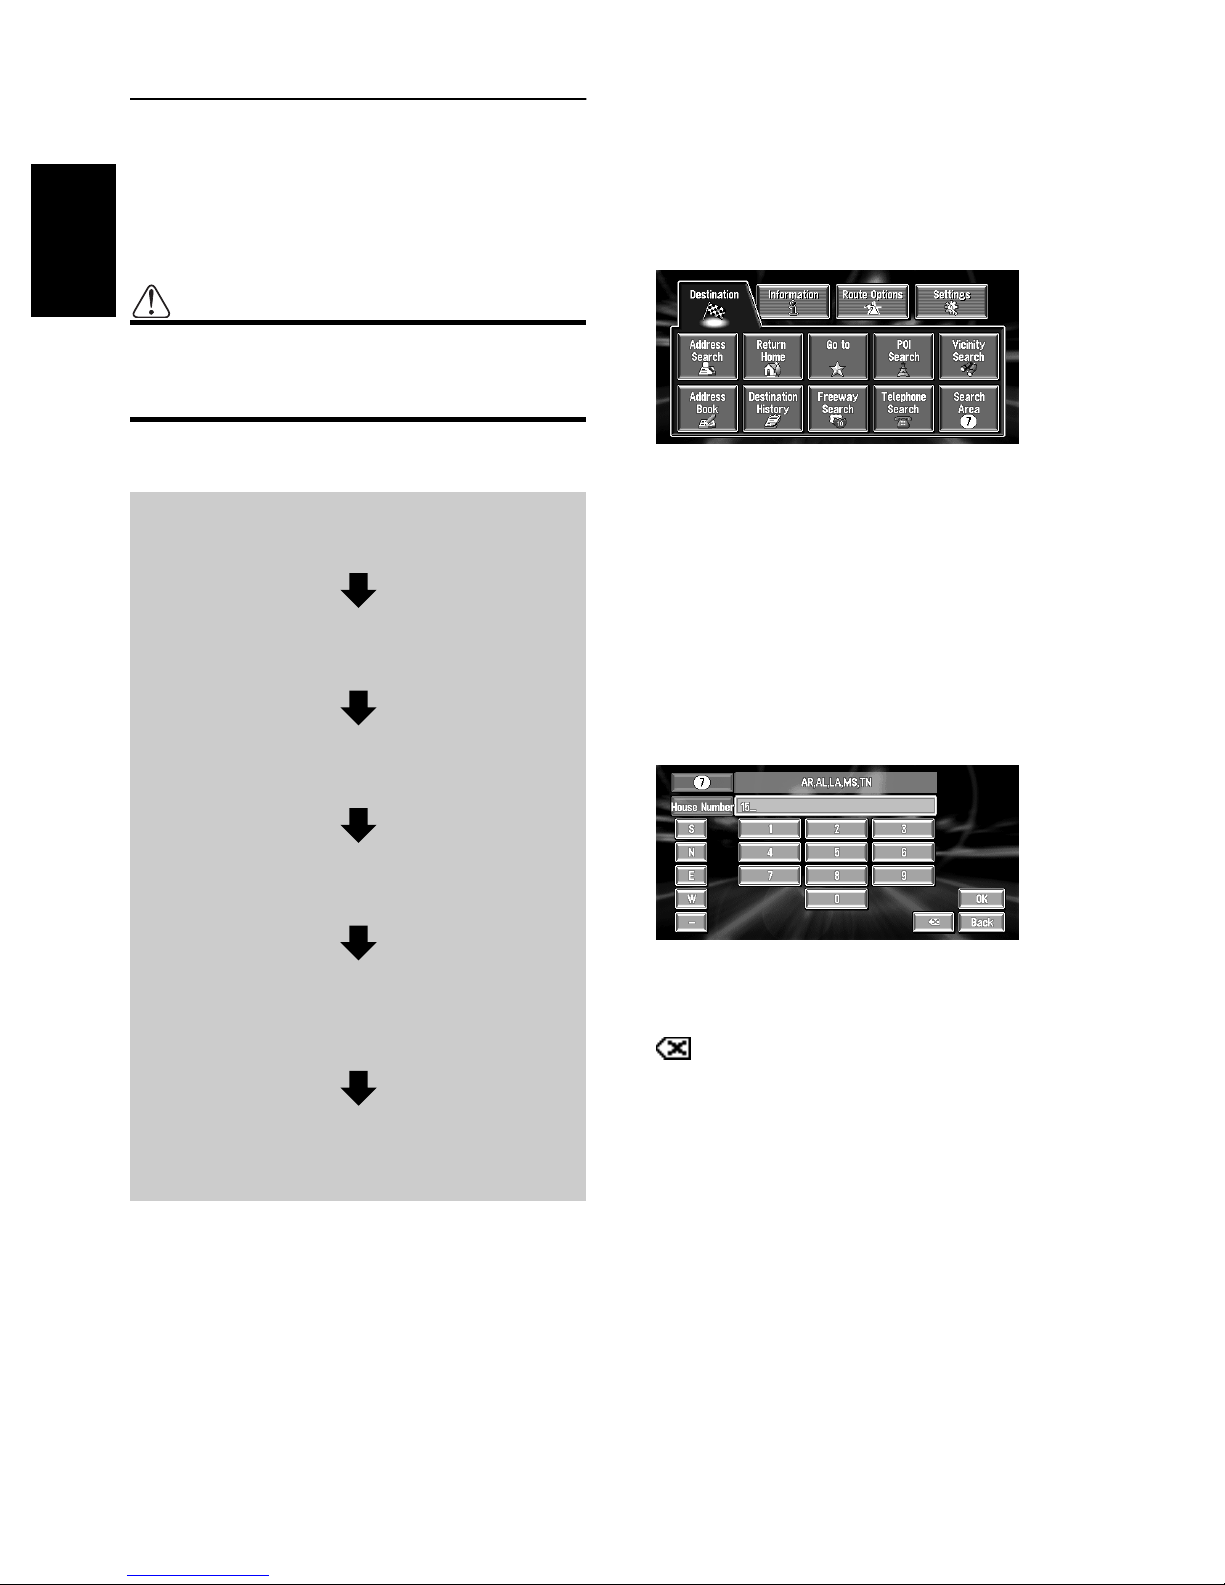
Touch the area code of the destination
and touch “OK”.
Modifies the country/area setting and returns
you to the Destination menu.
4
Touch “Address Search”.
Selects the method for searching the destination.
Chapter 1
Basic Operation
Caution
For safety reasons, you cannot use these
functions while your car is in motion. Stop
and put the parking brake on before use.
Basic flow of operation
1
Press the NAVI MENU button to display the Main menu.
2
Select “Destination” from the Main
menu.
3
Select the method of searching for
your destination.
4
Enter the information about your destination.
➲ Return Home ➞ Page 28
➲ Go to ➞ Page 28
➲ POI Search ➞ Page 25
➲ Vicinity Search ➞ Page 26
➲ Address Book ➞ Page 28
➲ Destination History ➞ Page 28
➲ Freeway Search ➞ Page 27
➲ Telephone Search ➞ Page 27
5
Input the house number.
Touch the characters you wish to input.
5
Your Navigation System sets the route
to your destination, and the map of
your surroundings appears.
6
Driving in accordance with the navigation information.
1
If the map is not displayed, press the display’s NAVI MENU button to display the
main menu.
2
Touch “Search Area”.
If the destination is in another country/area,
this changes the country/area setting.
16
“Zone Number” :
Specifies the area you wish to search (➞
steps 2 and 3).
:
The input text is deleted letter by letter from
the end of the text. Continuing to press
deletes all of the text.
“Back” :
Returns you to previous screen.
❒ Also input a prefix to the house number.
Page 19

6
Input the street name.
Touch the text you wish to input. If the next
screen is not automatically displayed even
though the street name is input, try touching
“OK”.
The input text.
The number of applicable candidates.
“Zone Number” :
Specifies the area you wish to search (see steps 2
and 3).
“City” :
Touch if you wish to first specify the destination
town or area.
:
The input text is deleted letter by letter for the end
of the text. Continuing to press deletes all of the
text.
“Sym.” :
You can input text with marks such as “&”and
“+”.
“0-9” :
You can input text with numbers.
“Back” :
Returns you to previous screen.
Searching your destination after
specifying the name of city or township
You can narrow down the searching candidates
by initially specifying the name of city or township
where your destination is located. Inputting the
name of the town or area then selecting the destination town or area from the list returns you to
the Street Name input screen. Now input the
street name, select the street from the list, and
proceed to step 9.
In the selected area, if you touch “City” without
entering the name of city or township, you can
check the list of the cities or townships, which
you have searched in the past. (This item cannot
be selected when searching for the first time with
this system or when you have selected an area
that you have never searched before.)
7
Touch the street from the list.
Chapter 1 Basic Operation
❒ For example, for “West Higgins Road”, you
can just enter part of the name, such as “Higgins”.
❒ While entering characters, if there is only one
possible character following the next, that
character is automatically entered.
❒ When touching “Back” on the text input
screen to return to the previous screen, you
may not be able to input text. In such case,
delete the letters entered in the text box.
Scroll bar Map icon
Touching the or on the scroll bar scrolls you
through the list and allows you to view the
remaining items.
• Touching the displays a map of the place
you have selected.
➲ Searching the destination by map ➞ Page 24
• In the case of an item that cannot be displayed
in a line, touching the to the right of the
item allows you to see the whole line.
17
Page 20

• Touching the specifies the selected street
and streets intersecting it, allowing you to set
an intersection as your destination. This is useful when you don’t know the house number of
your destination or cannot input the house
number of the specified street.
8
Input the destination town or area.
If the list screen is displayed, proceed to step
Chapter 1
Basic Operation
9.
9
Touch the city or township where your
destination is located.
Route calculation starts. When the route calculation is completed, the map of your surroundings appears. (The route is displayed in
green.)
❒ If the selected street is very long, and
passes through several cities or townships, the screen for entering the name of
the city or township appears.
❒ If there is more than one place for the
house number input in step 5, or if there is
no such house number in that place, displays a list of a certain range. To start the
route calculation, touch the range within
the list you wish to specify as the destination. You can also see the destination on
the map by touching the to the right of
the list.
➲ Searching the destination by map ➞
Page 24
❒ If you press the NAVI button during route
calculation, the calculation is cancelled
and the map display appears.
❒ When performing an area search with the
route already set, select whether to make
the specified area your destination and
search for a new route, or search for a
route via that area.
10
Drive in accordance with the screen and
voice information.
Your Navigation System gives you the following information with the timing adjusted to
the speed of your car:
• Distance to the next turning point
• Direction of travel
• Road number of the freeway
• Way point (If this is set)
• Your destination
➲ How to view the screen ➞ Page 21
➲ Searching for another route ➞ Page 32
➲ Cancelling route guidance ➞ Page 33
❒ Touching the or pressing the
remote control’s GUIDE button allows you to
hear the information again.
❒ If you deviate from the route with the Guid-
ance set to Route View or Guide View and
enter a street not recorded on the disc, the
screen changes to Map View. When you
return to the route, returns to the original
mode and resumes route guidance.
❒ If you stop at a gas station or a restaurant dur-
ing the route guidance, your Navigation System remembers your destination and route
Information. When you start the engine and
get back on the road, the route guidance
resumes.
➲ Adding way points to the route ➞ Page 33
➲ Once searched for, a location is automati-
cally stored in the “Destination History”
➞ Page 36
18
Page 21

How to Use Menu Screens
The basic operation of the navigation is performed by using menus.
There are two types of menu: the “Main menu”
and the “Shortcut menu”.
Main menu
You use this menu for basic operation of your
Navigation System.
1
With the map displayed, press the display’s NAVI MENU button.
2
To change to the menu you want to use,
touch the name of the menu displayed at
the top of the screen.
The main menu is divided into four: “Destination”, “Information”, “Route Options”, and
“Settings”.
3
If you want to return to the map, press the
NAVI (or NAVI MENU) button.
Information menu
Chapter 1 Basic Operation
Used to check the route you set or check the navigation status. Also operates from this menu
when you use a PC card.
➲ Checking the set route ➞ Page 31
➲ Checking the navigation status ➞ Page 43
➲ Using a PC card ➞ Page 40
Route Options menu
Destination menu
Select the destination search method. Also operates from this menu when you change the country/area you want to search.
➲ Specifying the address and searching the des-
tination ➞ Page 16
➲ Searching the destination by map ➞ Page 24
➲ Other search methods ➞ Chapter 2
Used to specify the conditions for setting the
route to the destination.
➲ Setting the Route Options ➞ Page 29
Settings menu
Set the navigation functions so they can be used
easily.
➲ Settings menu ➞ Chapter 4
❒ If the contents of the menu are not fully dis-
played on the screen, touch “Next” to view
the remaining contents.
19
Page 22
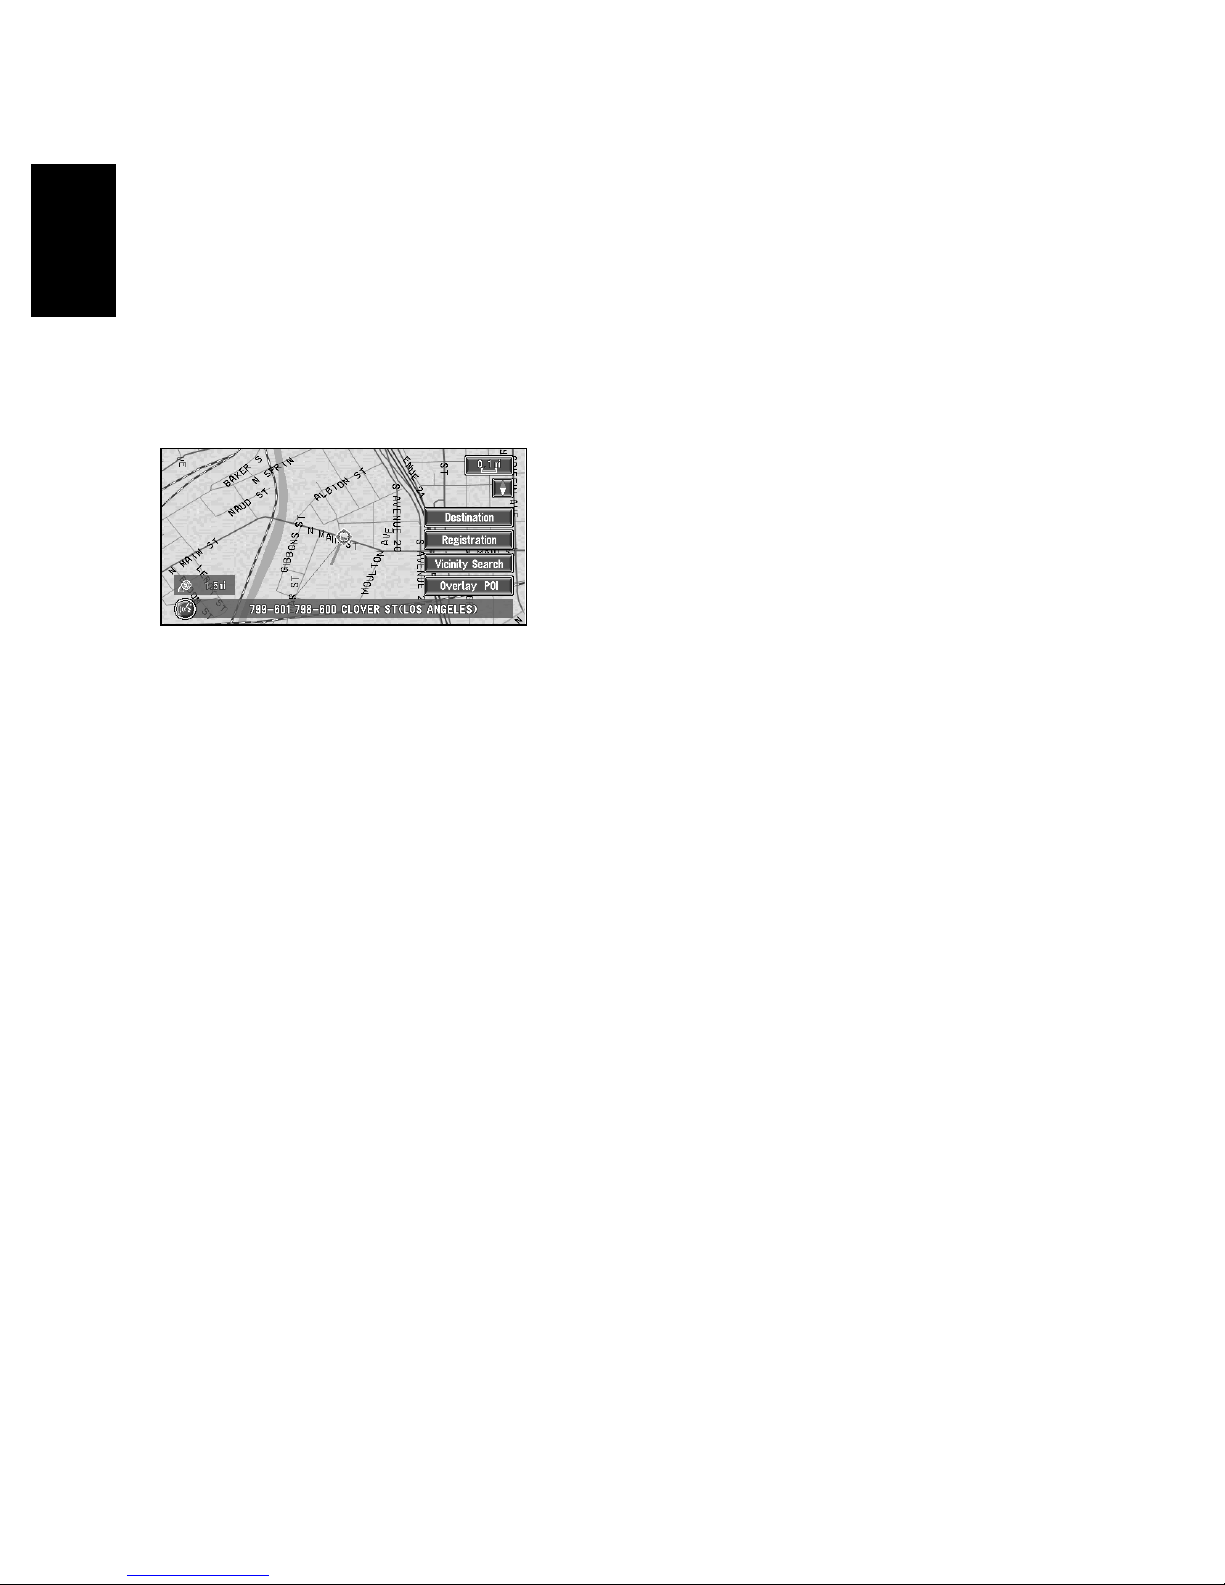
Shortcut menu
Shortcuts allow you to perform various tasks,
such as route calculation for the location indicated by the cross pointer, or registering a location in the Address Book, faster than using the
Main menu.
1
With the map displayed, lightly touch
Chapter 1
Basic Operation
anywhere on the map.
If you continue to touch the map, it will start
scrolling.
➲ Moving the map to view the part you want
to see ➞ Page 23
Destination
Displayed when the map is scrolled. Set the
route to the place specified with the cross
pointer.
Overlay POI
Displays on the map the mark for surrounding
facilities (POI).
➲ Viewing POI information ➞ Page 24
➲ Searching the destination by map ➞
Page 24
Chg.Route
Can be selected only during route guidance.
You can add changes to the routes in the
route guidance.
➲ Searching another route ➞ Page 32
➲ Detour for a specified distance ➞ Page 32
➲ Checking the route ➞ Page 31
➲ Cancelling route guidance ➞ Page 33
➲ Skipping a way point ➞ Page 34
Registration
Registering the location indicated by the
cross pointer to Address Book.
➲ Registering a place ➞ Page 35
Vicinity Search
You select a location with the cross pointer.
Nearby POIs (Points Of Interest) will also be
found.
➲ Searching the facilities surrounding a cer-
tain place ➞ Page 26
20
Page 23

How to Use the Map
How to view the map of the cur-
Most of the information provided by your Navigation System can be seen on the map. You need to
get to know how the information appears on the
map.
Switching the Current Position
Screen Display Mode
This section describes how to display the current
position screen and change the map display
mode.
There are four types of map display.
• Map View
• Driver’s View
• Guide View (during route guidance only)
• Route View (during route guidance only)
1
Press the NAVI button to display a map of
the area around your current position.
2
Press the NAVI button again.
3
Touch the mode name or press the NAVI
button to select the mode you want to display.
rent location
Caution
In Driver’s View, the speedometer is indicated on the screen, but this will differ from
the actual speed of your car. Use the speedometer of your car for confirming the speed.
Map View
Displays standard map.
(1)(2)
(9)
(15)
(3)
(4)
(8) (5) (11) (10)
Driver’s View
The map from the driver’s viewpoint is shown.
(7) (6)
Chapter 1 Basic Operation
❒ If the mode is selected by pressing the
NAVI button, the screen soon automatically switches to the selected map display
mode.
(10)
(14)
(2)
(4)
(1)
(8) (5) (15) (3)(12)(11)
(7)(9) (6)
21
Page 24

Guide View
The map of your surroundings is shown on the
left, and an arrow indicating the direction of
travel is shown on the right.
Enlarged map of the intersection
When “Close-up of Junction” in the “Settings
Menu” is “On”, an enlarged map of the junction
appears.
(9)
(3)
Chapter 1
(15)
(11)
(4)
(8) (5) (10) (2)
Basic Operation
(1) (7)
(14)
Route View
Displays the name of the street you will next
travel along and an arrow indicating the direction
of travel.
Normal condition
(2)
(14)
(4)
(8) (5) (15) (12) (11)
When approaching an intersection
(When “Close-up of Junction” is off)
(14)
(13)
(7)(9)(10)(1) (6)
(13)
(6)
❒ When set to Driver’s View, cannot be
changed to an enlarged intersection map.
Display items
Guidance point*
The next guidance point (next turning point, etc.)
is shown by a yellow flag.
Destination*
The checker-flag indicates your destination.
(1) Name of the next street to be used*
(3)
(2) Distance to the guidance point*
Touch to access the next information.
(3) Current location
The current location of your car. The arrow shows
your heading, and the display moves automatically as you drive.
(4) Distance to the destination (or distance
to way point)*
If way points are set, the display changes with
each touch.
(12)(3)
(4) (10) (12)
22
(5) Name of the street your car is traveling
along (or City Name, etc.)
(6) Compass
The red arrow shows North. Each touch changes
the map’s display direction. (North is UP or
Heading Up.)
(7) Map scale
The scale of the map is indicated at distance. In
Route View and Driver’s View, it shows the
scale of the map displayed on the right-hand side
of the screen. Touch to change the map’s scale.
➲ Changing the map’s scale ➞ Page 23
Page 25
(8) VOICE button
Touch to change to voice recognition mode.
➲ The voice operation of the navigation system
➞ Chapter 5
(9) Current time
(10) Estimated time of arrival (or travel time
to your destination)*
The display changes with each touch.
(11) Tracking mark
The tracking mark shows the route your car has
travelled.
➲ Select the tracking setting ➞ Page 47
(12) Map of your surroundings (Side map)
Touching this takes you to the map scroll screen.
(13) Distance to an intersection*
Displayed on the enlarged intersection map. The
green bar gets shorter as your car approaches an
intersection.
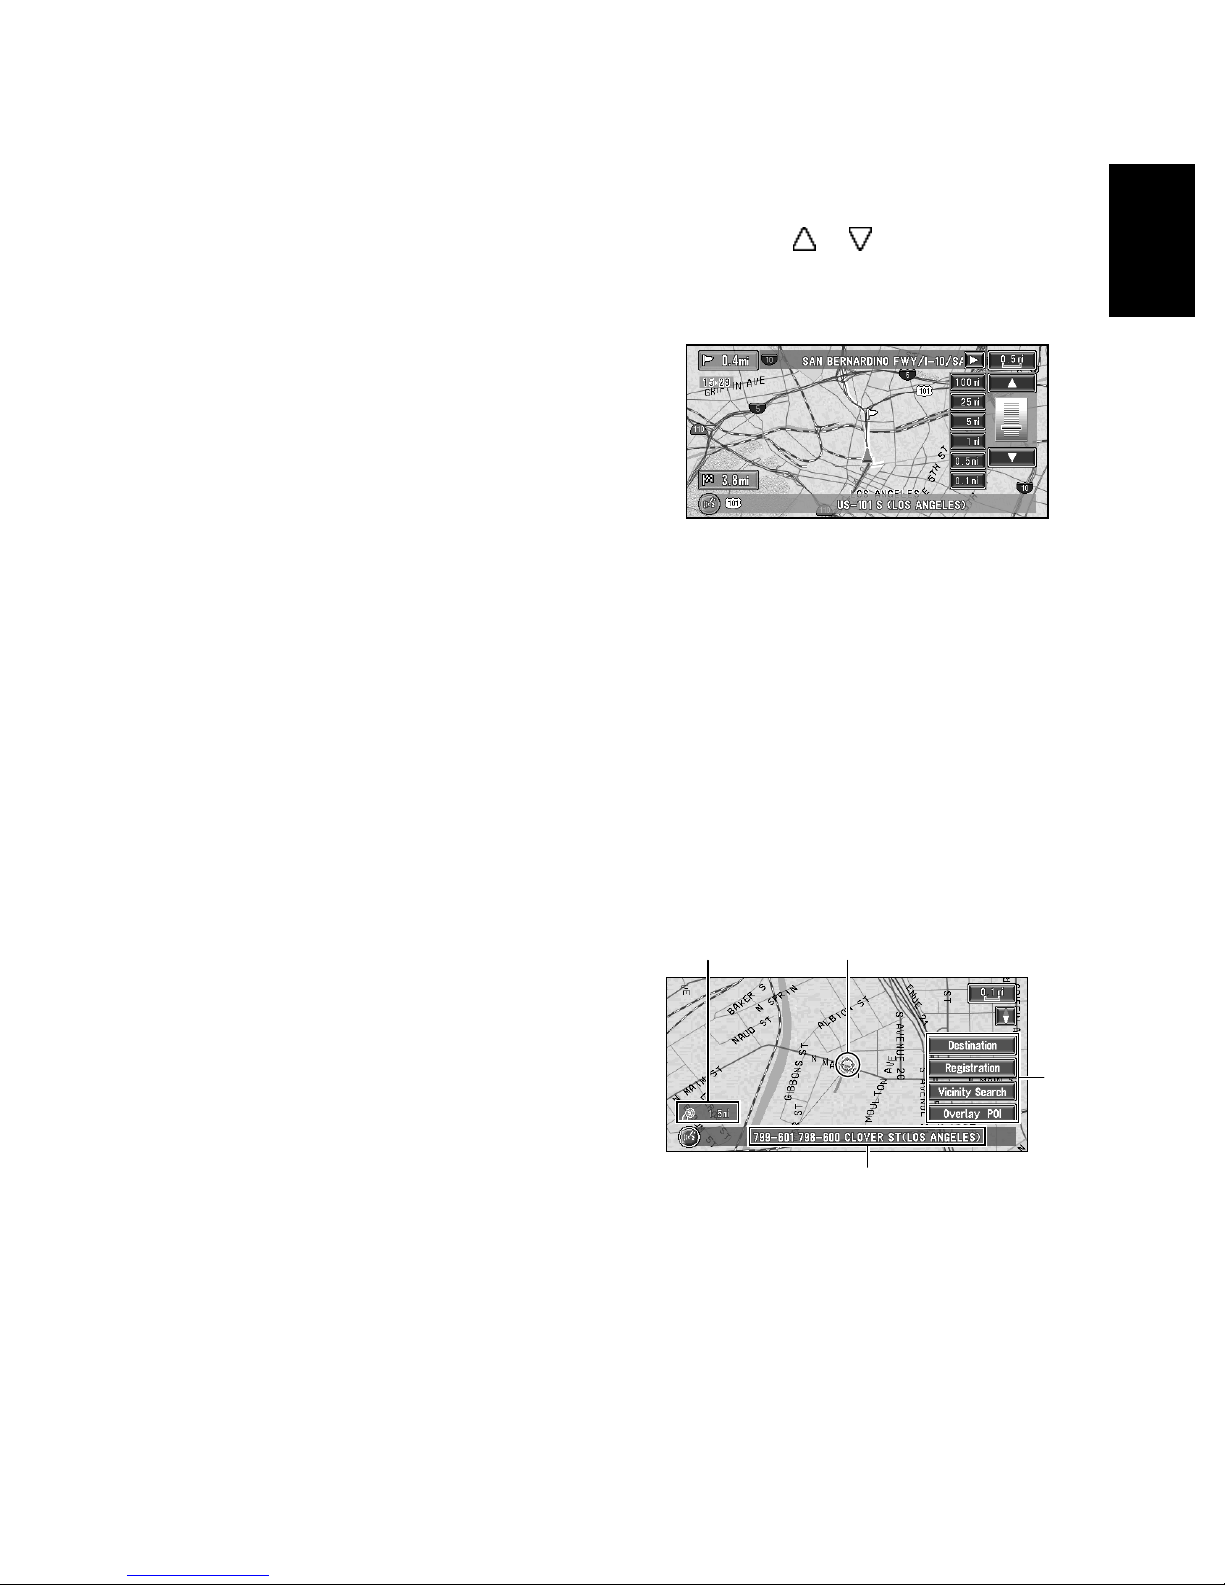
Changing the scale of the map
Touching the “Map scale” key displayed on the
upper right of the screen displays the scale
gauge and “Map scale” key. Directly touching the
“Map scale” key changes the map to the selected
scale. Touching or on the scale gauge
allows you to specify the scale in greater detail
within a range of 25 yards - 1000 miles (25 meters
- 2000 kilometers).
Moving the map to the location
you want to see
Chapter 1 Basic Operation
(14) Next direction of travel*
(15) Area to Avoid*
This is indicated only when “Designate Areas to
Avoid” is set to “On”.
➲ About detour area ➞ Page 39
❒ Information with the mark (*) appears only
when the route is set.
❒ Depending on the conditions and settings,
some items may not be displayed.
Touching anywhere on the map for at least 2 seconds changes the map to Scroll mode and the
map begins scrolling in the direction you
touched. The scrolling stops when you remove
your finger from the screen. At this time, the
cross pointer appears at the center of the screen.
Also a line connecting between the current location and cross pointer appears.
Pressing the display’s NAVI button returns you
to the map of your surroundings.
(2)
(1) Scroll location
The position of cross pointer shows the location
selected on the current map.
(1)
(4)
(3)
23
Page 26
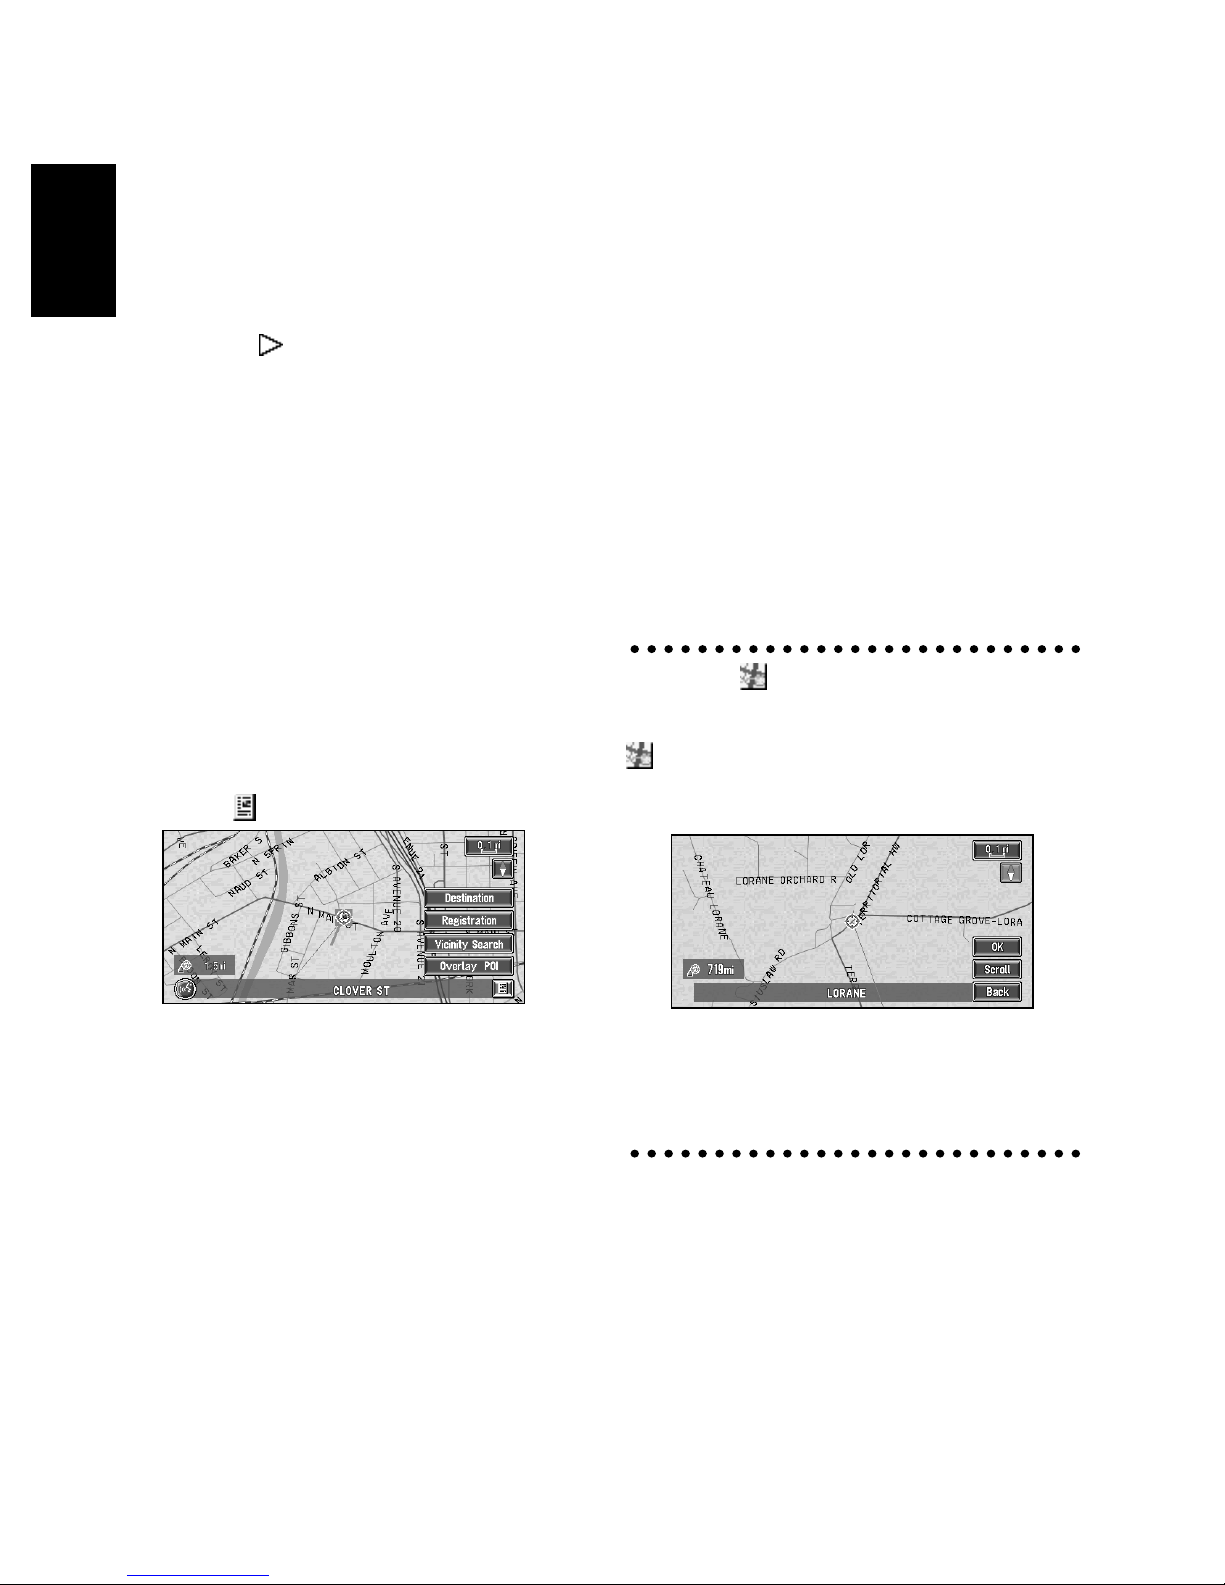
(2) Distance from the current location
Shows the distance in a straight line between the
location indicated by the cross pointer and your
current location.
❒ Touch the area close to the center of the
screen to scroll slowly; touch near the sides of
the screen to scroll through quickly.
Chapter 1
(3) The street name, city name, area name
and other information for this place.
Touching the on the right displays hidden
text.
➲ Displaying information on the specified loca-
tion ➞ Page 24
Basic Operation
(4) Shortcut menu
➲ How to view shortcut menu ➞ Page 20
Viewing the information of a specified
location
The icon appears at registered places (home
location, specific places, address book entries)
and places where there is a POI. Place the cross
pointer over the icon to view detailed information.
1
Scroll the map and move the cross
pointer to the place you want to view.
2
Touch .
Finding a destination on the map
If you search the location you want to visit by
scrolling the map, and touch “Destination” in
the Shortcut menu, you can specify your destination on the map.
1
Press the NAVI button to access the map
screen.
2
Touch the map for at least 2 seconds.
The map display changes to Scroll mode.
3
Scroll the map and move the cross
pointer to the place you want to make
your destination.
➲ Moving the map to view the part you want
to see ➞ Page 23
4
Touch “Destination”.
❒ If you press the NAVI button during route cal-
culation, the calculation is cancelled and the
map display appears.
When the appear on the right of
the list
You can also set a destination by touching the
to the right of the list. Touch “OK” to confirm. The location pointed by the cross pointer
will be set as a destination.
Information for a specified location appears.
The information shown varies according to
the location. (There may be no information for
that location.)
➲ Registering places ➞ Page 36
➲ Displaying facilities (POI) mark on the map
➞ Page 26
3
Press the NAVI button.
You are returned to the map of your surroundings.
24
Alternative option:
Scroll :
The map display changes to Scroll mode, and the
Shortcut menu appears.
Page 27

Setting a Route to Your Destination
Chapter 2
Caution
For safety reasons, these functions are not
available while your car is in motion. Stop
and apply the parking brake before use.
❒ Some information on traffic regulations by
days or time is indicated according to the time
when the route calculation is performed.
Thus, it may not correspond with a certain
traffic regulation when your car actually
passes the location. Also, the information of
the traffic regulations provided will be for a
passenger car, and not for a truck/lorry or
other delivery cars. When driving your car, follow the actual traffic regulations.
❒ If you press the NAVI button during route cal-
culation, the calculation is cancelled and the
map display appears.
Selecting the country/area
where you want to search
When searching for your destination, your Navigation System searches for it in the country/area
currently selected. Therefore, if your destination
is in another country/area, you must change the
country/area setting before starting the destination search.
1
From the Main menu, select “Destination”.
2
Touch “Search Area”.
3
Touch the area code of the destination
area and touch “OK’.
When you have returned to the previous display, go to the search operation.
Finding Your Destination by
Selecting the Type of Facility
Information about various facilities (Points Of
Interest - POI), such as gas stations, amusement
parks or restaurants is available. By selecting the
category (or entering the POI Name), you can
search for a Point Of Interest.
❒ You can also narrow down the search range
by initially specifying the name of the city or
township where your destination is located.
Searching for Points of Interest
(POI)
1
Touch “Destination” in the Main menu,
and then touch “POI Search”.
2
Touch “Category”.
If you already know the name of the facility,
then proceed to Step 5.
“City” :
Touch if you wish to first specify the destination town or area.
➲ “Selecting the country/area where you
want to search” ➞ Page 25
3
Touch the category.
POI’s are divided into several categories.
If the category is not sub-divided into more
detailed categories, the list will not be displayed. Proceed to Step 5.
Chapter 2 Setting a Route to Your Destination
“Name”
Touch if you wish to first specify the POI
Name.
25
Page 28

“City” :
Touch if you wish to first specify the destination town or area.
4
Touch the subcategory.
5
Enter the name of the POI.
If the list does not automatically appear when
the name of the POI has been entered, try
touching “OK”.
➲ Searching your destination after specifying
the name of the city or township ➞
Page 17
6
Touch POI for your destination.
Chapter 2
❒ Touching the displays a map of the
surroundings of the selected POI.
➲ Searching the destination by map ➞
Page 24
❒ If the selected POI is the name of a chain
of outlets and consequently the same
store name applies to different locations
(the number of outlets appears next to the
chain’s name), touch the name of the POI
to display a list of those POIs and touch
the particular POI that is your destination.
Setting a Route to Your Destination
Finding a POI in your surroundings
You can search for Points Of Interest in your surroundings on the map. Use it to find a POI to visit
during a journey.
1
Touch “Destination” in the Main menu,
and then touch “Vicinity Search”.
The list of Points Of Interest categories
appears.
2
Touch the category.
❒ If you want to search with more detailed
categories, touch . When the subcategory list appears, touch the item and proceed to step 3.
3
Touch POI.
Names of POIs and their distance from your
current location appear. They are listed in
nearest-to-furthest order. To the left of each
item is an icon indicating the category.
➲ Searching the destination by map ➞
Page 24
❒ Searching range is approximately 10miles
(16km) square from the current location or
the location indicated to by the cross
pointer.
❒ “Vicinity Search” in the Main menu
searches your surroundings. On the other
hand, in the case of “Vicinity Search” in
the Shortcut menu (➞ Page 20), the area
around the cross pointer will be searched.
Displaying Certain Points Of
Interest on the Map
Selected Points Of Interest (POI) in a certain category can be shown on the map, and you can
check the location on the display while driving.
1
Touch any part of the map screen.
The Shortcut menu appears.
2
Touch “Overlay POI”.
The list of POI categories appears.
3
Touch the category you want to display.
The selected item is marked. If you want to
select other categories, repeat this step.
❒ If you want to search with more detailed
categories, touch . When the subcategory list appears, touch the item you want
to display and touch “OK”.
4
Touch “OK”.
POI’s in the selected category appear on the
map.
➲ Searching the destination by map ➞
Page 24
➲ Viewing the information of POI ➞ Page 24
❒ When just one sub-category is selected,
the corresponding category is marked
blue. When all the sub-categories within a
category are selected, that category is
marked red.
❒ When you touch , the POIs around the
specified location are shown on a map.
26
Page 29

Searching for Your Destination
by Specifying the Telephone
Number
If you know the telephone number of your destination, you can quickly search for your destination by specifying the telephone number.
1
Touch “Destination” in the Main menu,
and then touch “Telephone Search”.
The telephone number entry screen appears.
2
Input a telephone number.
❒ If you cannot find the matching telephone
numbers, a message confirming whether
to enter the telephone number again,
appears. Touch “Yes” and re-input the telephone number. (Touching “No” cancels
the search.)
❒ If there is more than one place for the
number input, a list of those places is displayed. Touch the item you want in the list
and proceed to step 3.
3
If the displayed place is satisfactory,
touch “OK”.
Touching “Scroll” changes the destination.
➲ Searching the destination by map ➞
Page 24
Setting an Entrance or Exit of a
Freeway as Your Destination
You can set the entrance or exit of a freeway as
your destination.
1
Touch “Destination” in the Main menu,
and then touch “Freeway Search”.
The display for entering the name of the freeway appears.
➲ “Selecting the country/area where you
want to search” ➞ Page 25
2
Enter the name of the freeway and touch
“OK”.
The list of the freeways matching the name
appears.
3
Touch the freeway.
The display for selecting your destination to
the entrance or to the exit of the freeway
appears.
4
Touch “Entrance” or “Exit”.
The list of entrances to, or exits from, the
selected freeway appears.
5
Touch your destination.
❒ You can also see the destination by touch-
ing the on the right of the list.
➲ Searching the destination by map ➞
Page 24
Chapter 2 Setting a Route to Your Destination
27
Page 30

Route Calculation to Your Home
Location or to Your Favorite
Location
Selecting Destination from the
Destination History and Address
Book
If your home location is registered, the route
home can be calculated, by a single touch of the
key from the Main menu. Also, you can register
one location, such as your workplace, as your
favorite location, and the route is calculated in a
similar way.
1
Touch “Destination” in the Main menu,
and then touch “Return Home” or “Go to”.
Chapter 2
➲ “Registering Your Home and Your Favorite
Location” ➞ Page 35
Setting a Route to Your Destination
Any place that has been searched before is
stored in the “Destination History”. Places that
you have registered manually, such as your
home, are stored in the “Address Book”. Simply
select the place you want to go to from the list
and a route to that place will be calculated.
1
Touch “Destination” in the Main menu,
and then touch “Address Book” or “Desti-
nation History”.
2
Touch your destination.
Route calculation starts.
➲ For information on the Address Book ➞
Chapter 3
➲ For information on the Destination His-
tory ➞ Chapter 3
❒ You can also see the destination by touch-
ing the on the right of the list.
➲ Searching the destination by map ➞
Page 24
28
Page 31
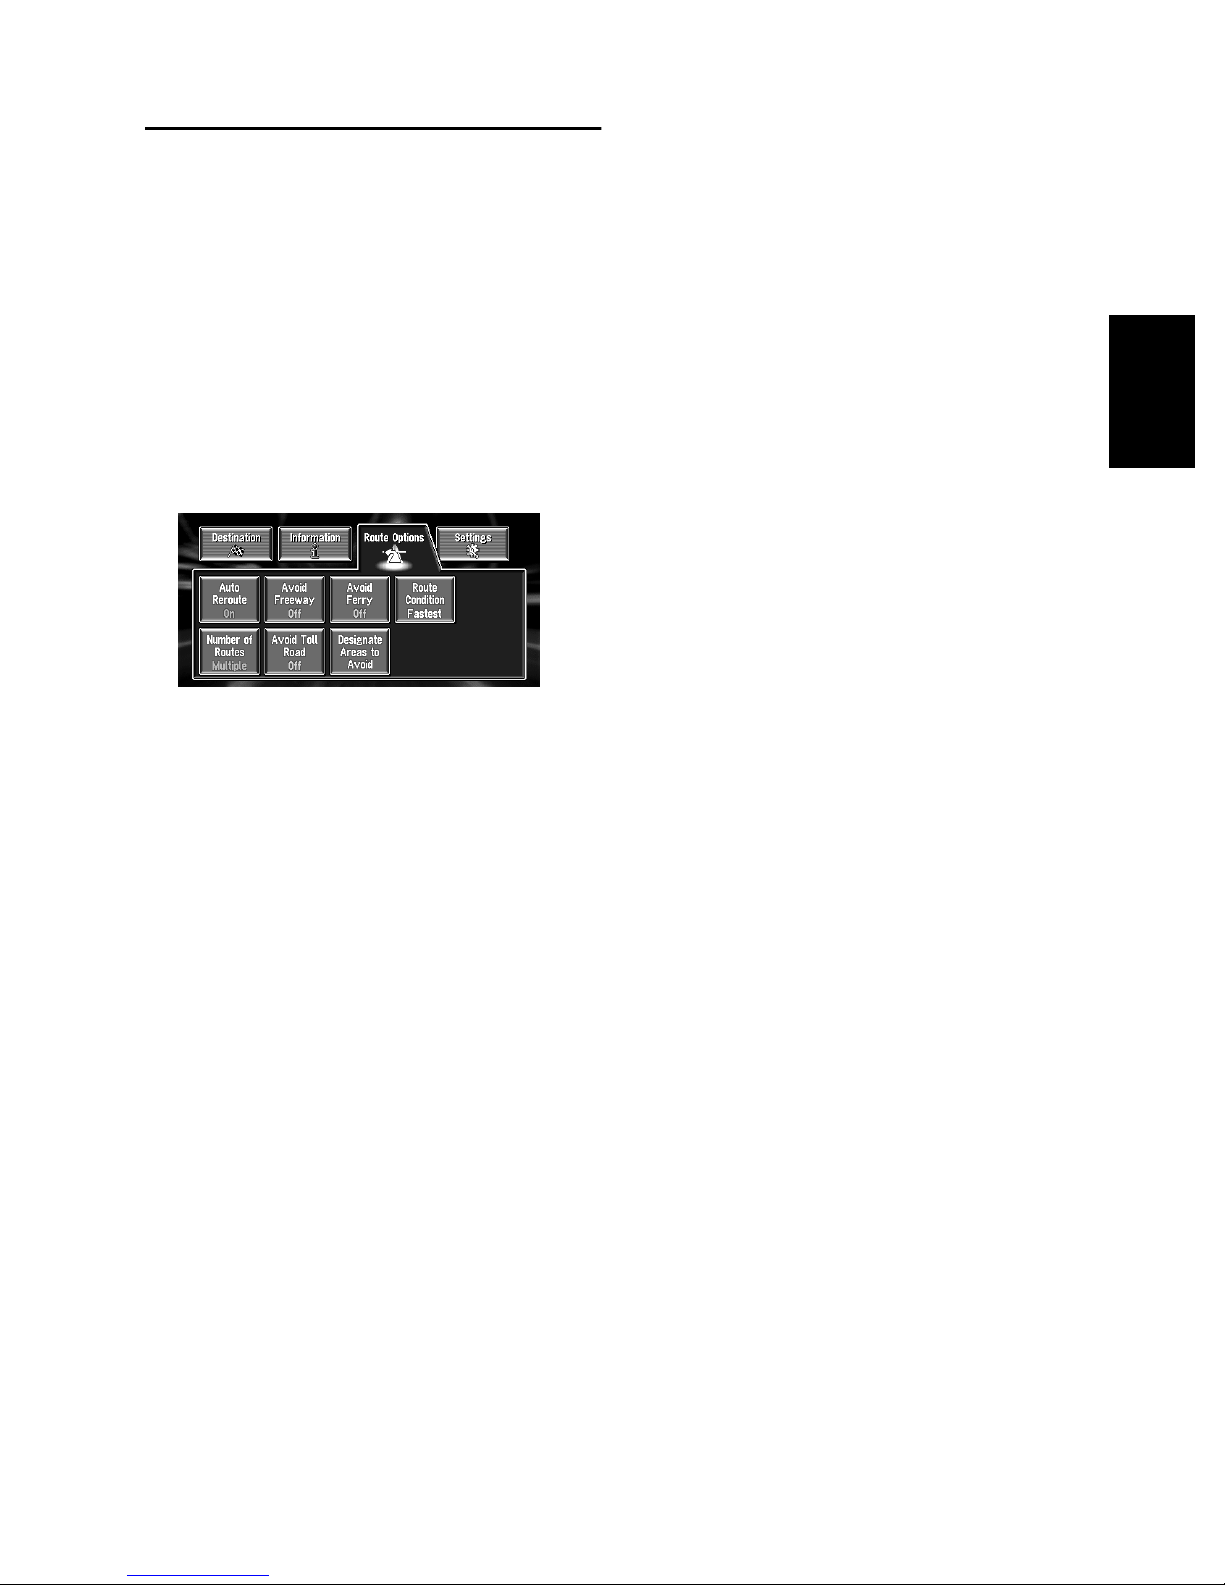
Modifying the Route Calculation
Conditions
You can change the route calculation conditions
using the Route Options menu. The following
description features an example of changing the
number of the route to be searched.
1
Touch “Route Options” in the Main menu.
The Route Options menu appears.
2
Touch “Number of Routes”.
The content currently set appears under the
name of the item. Each time you touch the
item, the setting changes. Repeatedly touch
the item until the value you want to set
appears.
Items that Users can Change
This section describes the details of the setting
for each menu. Settings marked with an asterisk
(*) show that they are default or factory settings.
Auto Reroute
This setting controls whether, when you stray
from the guided route, the system automatically
recalculates the route to your destination.
On* :
Auto Reroute function is turned on.
Off :
Auto Reroute function is turned off.
Avoid Freeway
This setting controls whether or not freeways
maybe included in the road calculation. (A route
using freeway may be calculated in some cases,
such as when setting your destination far away.)
On :
Calculate a route that avoids freeways.
Off* :
Calculate a route that may include freeways.
Fastest/Shortest
This setting controls whether the fastest or the
shortest route should be calculated.
Shortest :
Calculate a route with the shortest distance to
your destination as a priority.
Fastest* :
Calculate a route with the shortest travel time to
your destination as a priority.
Number of Routes
This setting controls whether the system should
calculate only one route, or several routes.
1*:
Route options are not shown, and only one route
judged as being optimum by your Navigation System is calculated.
Multiple :
Several route options are calculated (maximum 6
routes).
Avoid Toll Road
This setting controls whether or not toll roads
should be taken into account.
On :
Calculate a route that avoids toll roads.
Off* :
Calculate a route that may include toll roads.
Designate Areas to Avoid
About Designate Areas to Avoid➞ Page 39
➲
Avoid Ferry
This setting controls whether or not ferry crossings should be taken into account.
On :
Calculate a route that avoids ferries.
Off* :
Calculate a route that may include ferries.
Chapter 2 Setting a Route to Your Destination
29
Page 32
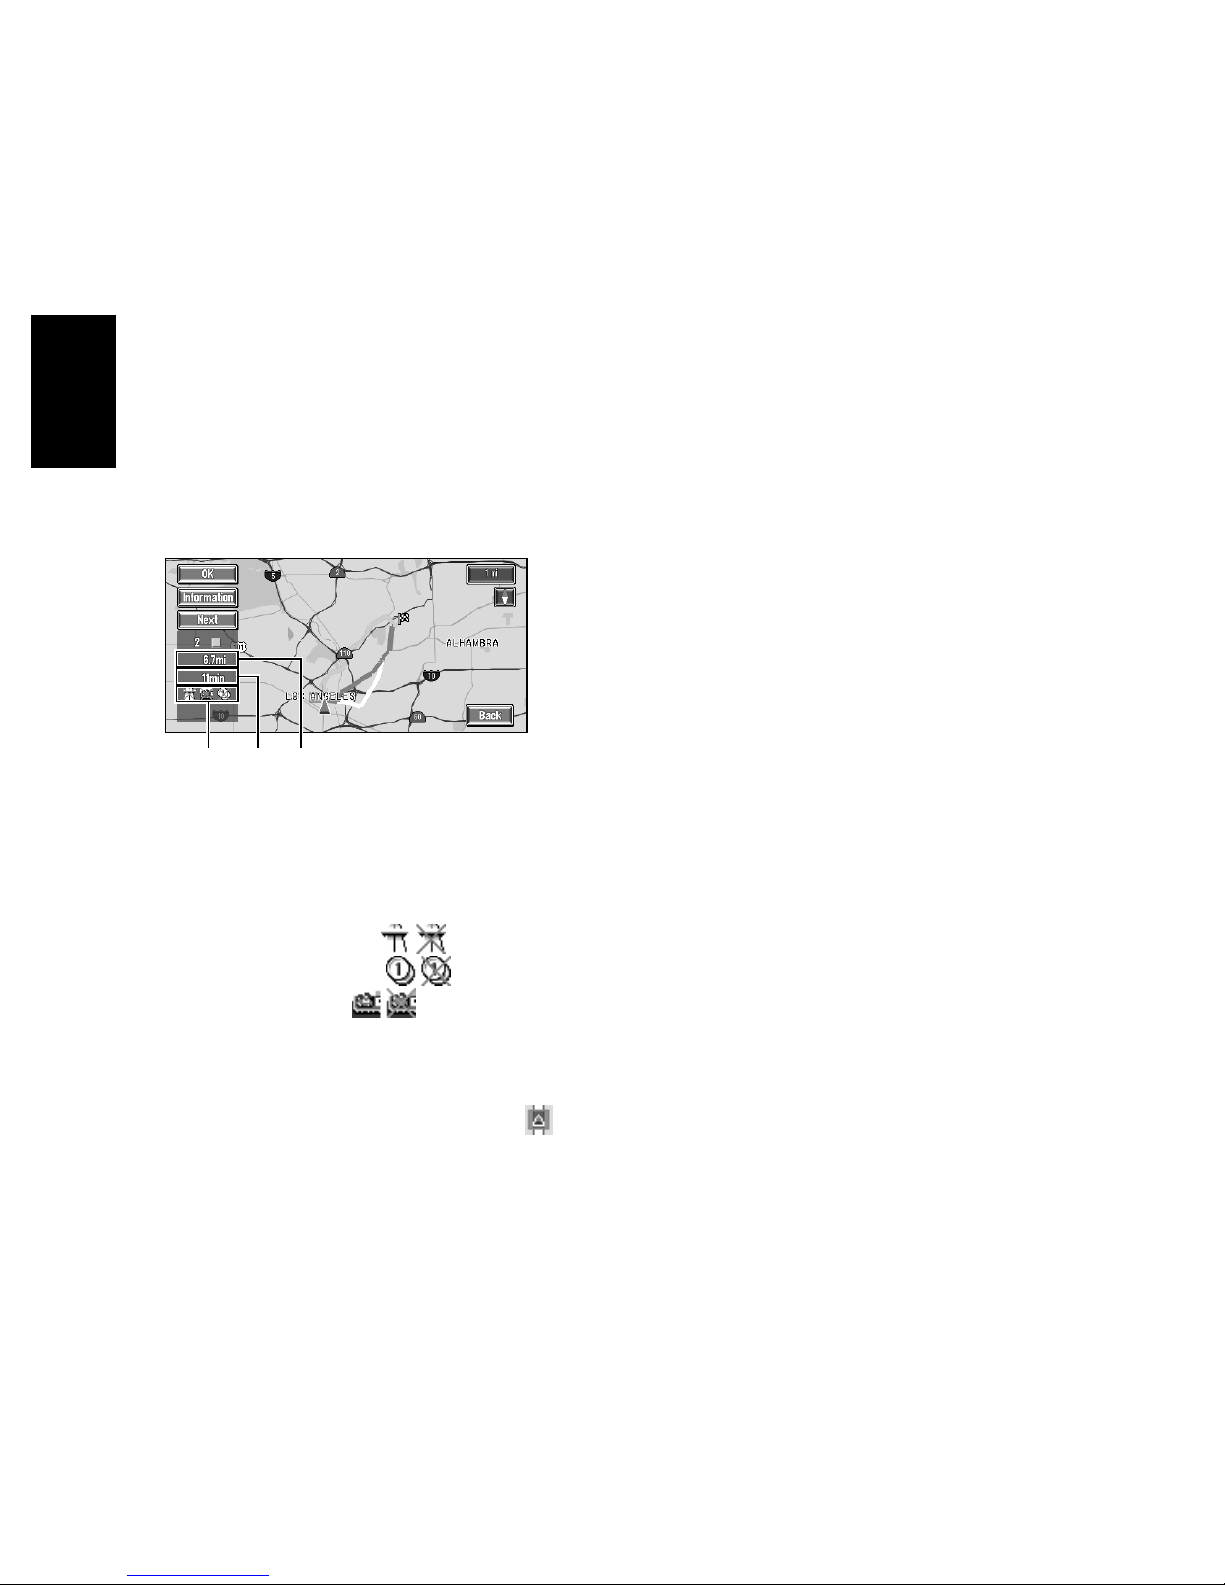
Perform the route calculation of
the several route options, and
select one
You can get route calculations of several route
options. After route options are calculated, select
the one you want.
1
Set the “Number of Routes” to “Multiple”.
➲ Changing the search conditions ➞
Page 29
2
Search your destination and set the route.
Chapter 2
Calculated routes are shown in different colors (from two to six routes).
3
Touch “Next” to change the displayed
route.
4
Touch “Information” to check the infor-
mation of the selected route.
You can also check details of the roads along
the selected route. (If you touch “Back”, you
can return to the previous display.)
➲ “Route Scroll” ➞ Page 31 (Step 3 and 4)
➲ “Route Profile” ➞ Page 31 (Step 3 and 4)
❒ After the route is calculated, it may take
some time until the detailed route information (Route Profile) can be confirmed.
5
Touch “OK”.
The route you selected is accepted, and the
map of your surroundings appears. When you
start driving, the route guidance begins.
➲ For information on Route Guidance ➞
Page 18
❒ If the above operations are not performed
within 30 seconds after the route calculation is completed and you have already
started your car, the route selected at the
time is automatically chosen.
(3) (2)(1)
Setting a Route to Your Destination
The following information is displayed on this
screen:
(1)Route calculation condition
Displaying the conditions set by the Route
Options menu by icon.
• Use/avoid freeway
• Use/avoid toll road
• Use/avoid ferry
Displaying impracticability of fulfilling the
conditions by icon.
• Pass through Area to Avoid against the
setting “Areas to Avoid” is “On”.
• Use toll road against the setting “Avoid
Toll Road” is “On”.
(2)Distance to your destination
(3)Travel time to your destination
❒ The “Avoid Freeway” setting may not be
reflected, depending on the distance to the
destination.
30
Page 33

Checking the Set Route
You can check information about the route
between your current location and your destination.
You can select two methods: checking the passing streets with a list; and checking the shape of
the route by scrolling the map along the route.
You can select the following items:
Map :
The scroll screen is displayed.
➲ Searching the destination by map ➞
Page 24
6
Touch “Back”.
You can return to the previous display.
Checking the set route with the
map
1
Touch the map screen.
The Shortcut menu appears.
2
Touch “Chg.Route”.
The Route/Detour menu appears.
3
Touch “Route Scroll”.
The screen to select the point to start scrolling
appears.
4
Touch the point to start scrolling.
(3) (2)(1)
You can select the following items:
(1) Starting Point
(2) Way Point (If this is set)
(3) Destination
❒ If you have selected “Way Point”, a list of
the way points on the route is displayed.
Touch the place you want to start scrolling
from and proceed to step 5.
5
Touch or to scroll the
map.
If necessary, the scale of the map can be
changed.
Checking the set route with text
This function is not available if your car has deviated from the set route.
1
Touch the map screen.
The Shortcut menu appears.
2
Touch “Chg.Route”.
The Route/Detour menu appears.
3
Touch “Route Profile”.
4
Check the contents on the display.
As necessary, scroll the list.
Name of the streets you are driving through
Driving distance
5
Touch “Back”.
You can return to the previous display.
❒ When a long distance route is calculated,
your Navigation System may not be able to
list all the roads. (In this case, the remaining roads will be shown in the list as you
drive on.)
Chapter 2 Setting a Route to Your Destination
Current Route Cross Pointer
31
Page 34

Checking the set route from the
Information menu
You can also check the information about the set
route from the Information menu.
1
After touching “Information” in the Main
menu, touch “Route Profile” or “Route
Scroll”.
2
Check the contents on the display.
➲ “Route Scroll” ➞ Page 31 (Step 3 and 4)
➲ “Route Profile” ➞ Page 31 (Step 3 and 4)
3
Touch “Back”.
Chapter 2
You can return to the previous display.
Recalculating the Route to Your
Destination
You can set the length of the area, and avoid just
that area, or you can even search a new route
from the current location to your destination. (On
the map screen during route guidance, try the following operations.)
1
Touch the map screen.
The Shortcut menu appears.
2
Touch “Chg.Route”.
The Route/Detour menu appears.
3
Touch “Reroute” or the distance from the
list.
Setting a Route to Your Destination
After the route is calculated, the map screen
shows your surroundings and route guidance
is resumed.
On this display, you can select the following
items:
Reroute :
The route from the current position to your
destination is recalculated.
The distance of the detour (1-50 mile/km) :
Searches detours of a specified distance in
the route ahead of your current position.
➲ For details of switching the display between
“mi”(miles) and “km”. “KM/Mile Setting” ➞
Page 47.
32
Page 35
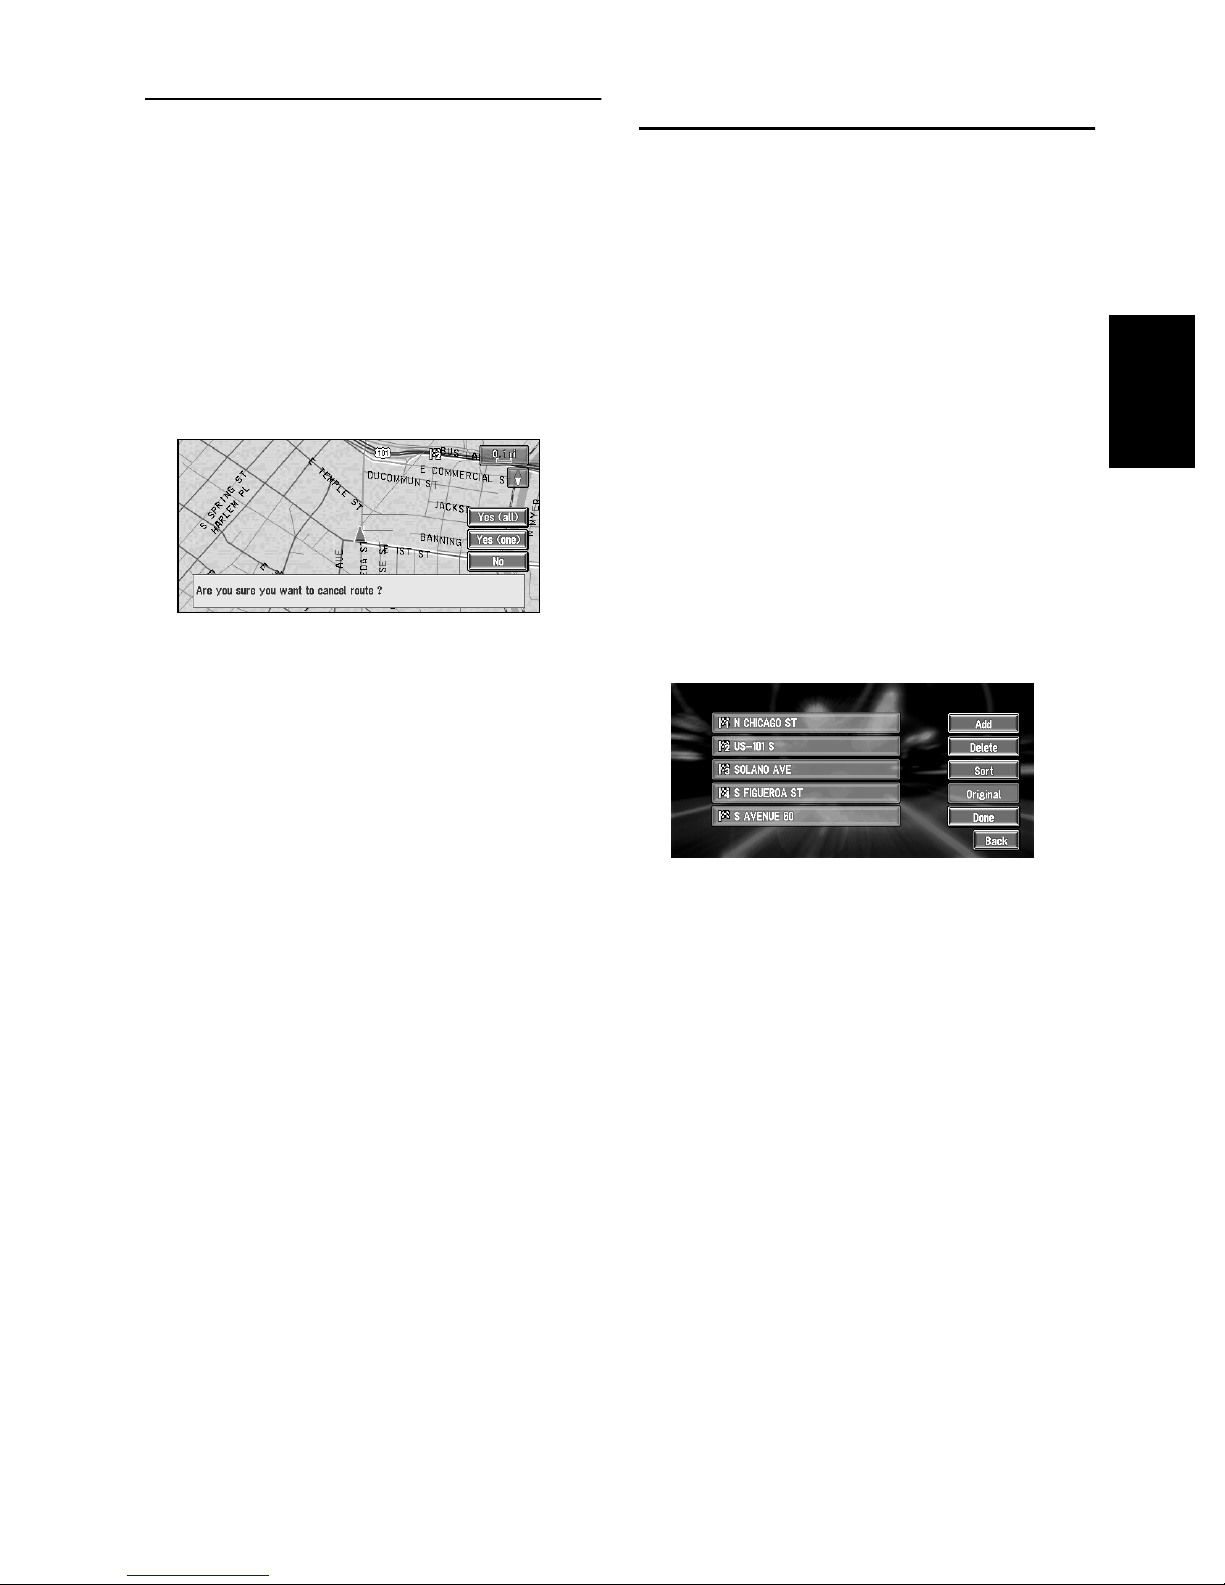
Cancelling the Route Guidance
If you no longer need to travel to your destination
or if you want to change your destination, follow
the steps below to cancel the route guidance.
1
Touch the map screen.
The Shortcut menu appears.
2
Touch “Chg.Route”.
The Route/Detour menu appears.
3
Touch “Cancel Route”.
The message confirming whether to cancel
the current route appears.
4
Touch “Yes (all)”.
The current route is deleted, and a map of
your surroundings reappears.
On this screen, you can also select the following items:
Yes (one) :
Route is recalculated by canceling the
selected way point.
No :
Returns to the map of your surroundings without deleting the route.
Adding Way Points to the Current Route
You can select way points (locations you want to
visit on the way to your destination) and you can
recalculate the route to pass through these locations.
Adding a way point
You can add up to five way points. This is
achieved as follows :
1
Specify the location you want to visit.
Specify a way point in the same way as specifying a destination.
At completion of the location search, a message is displayed asking whether or not to set
that specified as the destination, or as a passthrough location.
2
Touch “Way Point”.
3
Confirm the contents of the list, and touch
“Done”.
Route calculation with the specified location
as a way point starts when you touch “Done”.
On this display, you can select the following
items:
Add :
Return to Destination menu and add way
points (you can add up to five way points).
Delete :
You can delete way points from the list.
Sort :
You can sort your destination and way points
in the order of the nearest (distance in a
straight line) from the current location.
Original :
You can return the way points and destination
to their original order.
Chapter 2 Setting a Route to Your Destination
33
Page 36

Skipping a way point
If the points are set, the next way point along the
route can be skipped.
1
Touch the map screen.
The Shortcut menu appears.
2
Touch “Chg.Route”.
The Route/Detour menu appears.
3
Touch “Skip Way Point”.
A message asking whether you want to skip
the next way point appears.
4
Touch “Yes”.
Chapter 2
A new route to your destination through all
the remaining way points, except for the
skipped way point, is calculated.
Deleting a way point from the
route
If you no longer need to pass through a way point
you have not yet reached, you can delete that
place from the list of way points and calculate a
new route.
1
Touch the map screen.
The Shortcut menu appears.
Setting a Route to Your Destination
2
Touch “Chg.Route”.
The Route/Detour menu appears.
3
Touch “Cancel Route”.
A message asking whether you want to cancel the route appears.
4
Touch “Yes (one)”.
5
Touch the way point you want to delete.
6
Touch “Delete”.
❒ If you want to delete other way points,
repeat Steps 5 and 6 above.
7
Touch “Done”.
A new route to your destination via the
remaining way points is calculated.
34
Page 37
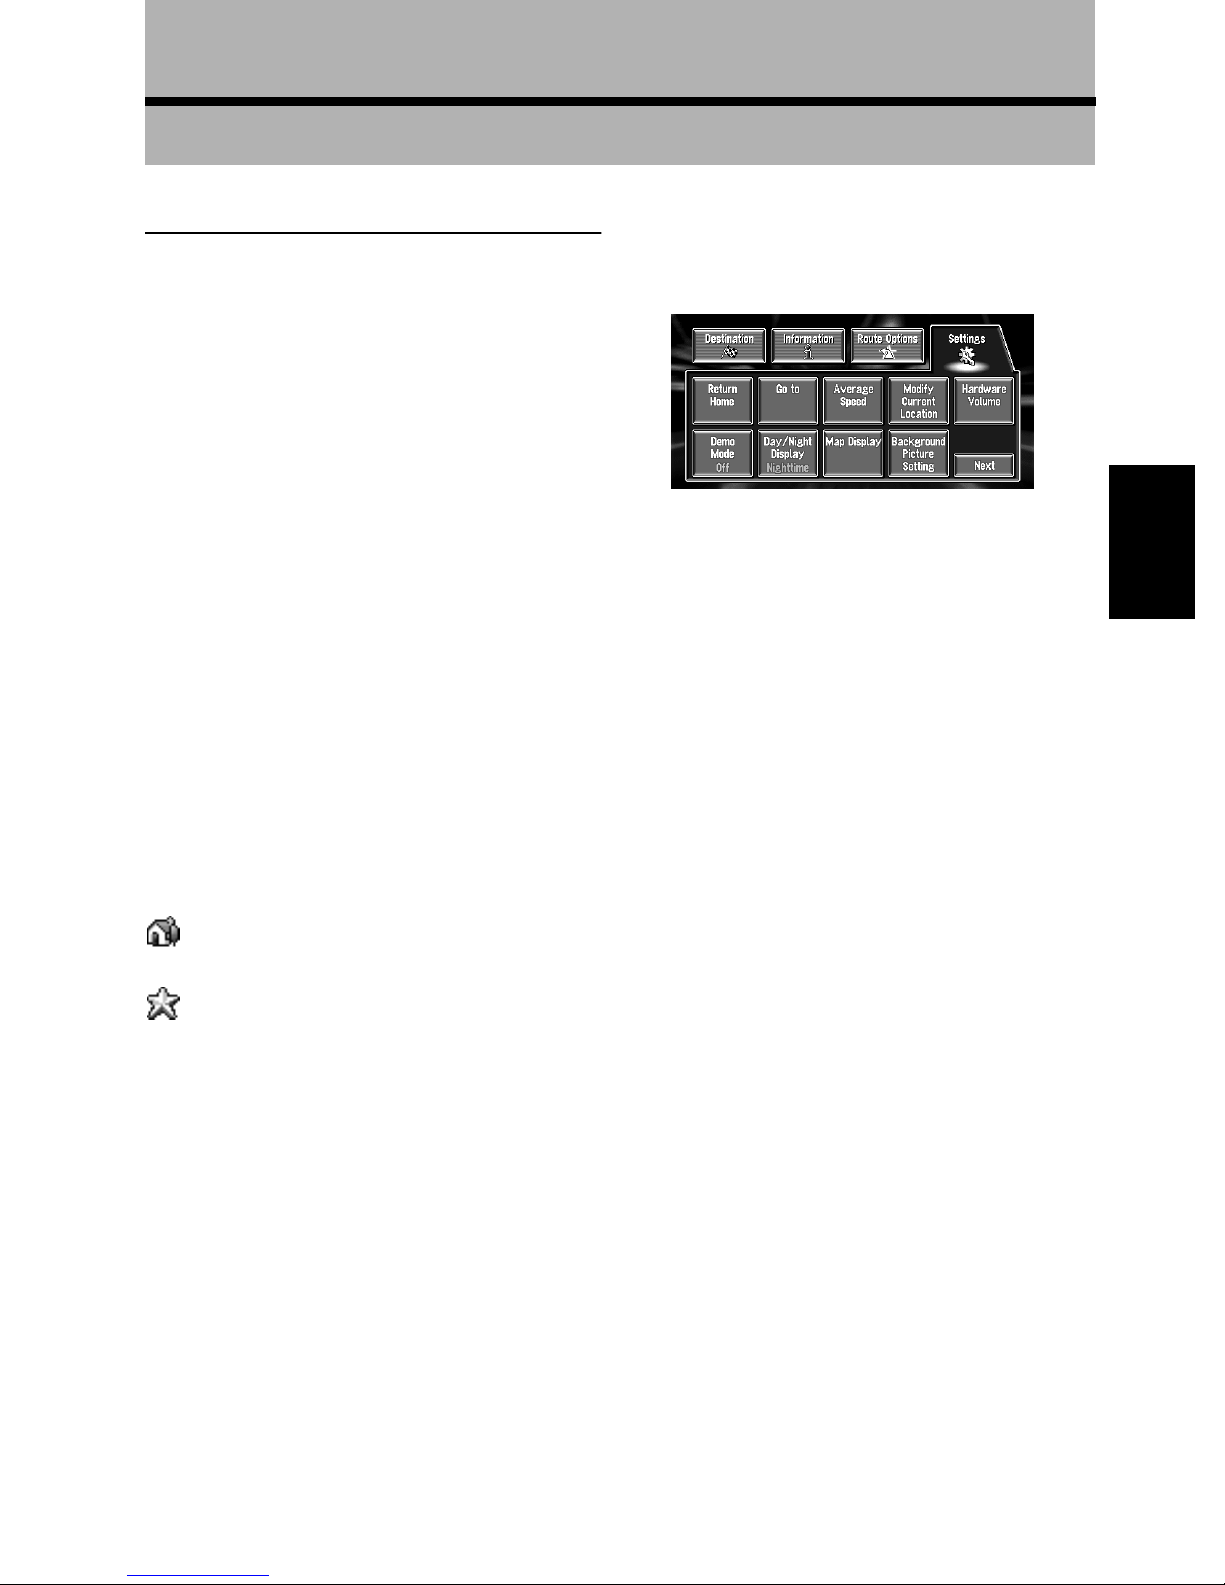
Utilizing Various Information
1
Editing Registered Locations
The Address Book can store up to 300 registered locations. These can include home location, favorite places, and destinations you have
already searched. This registered location information can also be modified. Also, routes to registered locations can be calculated by touch
screen or voice. Registering places you visit frequently saves you time and effort.
❒ You can register up to 100 entries for voice
operation.
Touch “Settings” in the Main menu, then
touch “Go to”.
When registering your home location, touch
“Return Home”.
You can select a method of location search on
the display.
Chapter 3
Chapter 3 Utilizing Various Information
Registering Your Home and
Your Favorite Location
Of the 300 registered locations that can be
stored, home location and favorite locations can
be stored separately in the Address Book. Registering your favorite location for the first time is
described here. You can change the registered
information later. You might find it useful to register your workplace or a relative’s home as your
favorite location.
Map icons :
:
Home location icon
:
Favorite location icon
❒ The items already registered under
“Return Home” or “Go to” can be modified.
2
Search for a location to register.
➲ Information on searching locations to reg-
ister ➞ Chapter 2
3
Point the cross pointer to the location you
want to register and touch “OK”.
Complete the registration and return to the
Main menu.
❒ Items registered under “Go to” can be
edited and used for voice recognition.
➲ “Editing a location’s information” ➞
Page 36
35
Page 38

Registering a previous location
Editing a location’s information
in the Address Book
Once a destination or way point is searched, it is
automatically retained and stored in the Desti-
nation History. If a search is cancelled while
still in progress, only the places where the map
was displayed and scrolled through or places
where the short-cut menu was displayed are
retained and stored. Note that after 100 places
are stored, new places are automatically overwritten on top of old ones, in oldest to most recent
order. Therefore, to ensure that certain places are
kept and not overwritten, be sure to register them
in the Address Book.
1
Touch “Destination” in the Main menu,
then touch “Destination History”.
2
Touch on the right-hand side of the
Chapter 3
Utilizing Various Information
place you want to register in the Address
Book.
:
That place can be registered or deleted.
:
The map of that place can be displayed.
In the Address Book menu, touching the on
the right-hand side of the place displays the
Address Book Operate menu.
To edit the information about the location:
1
Touch “Destination” in the Main menu,
then touch “Address Book”.
2
Touch on the right-hand side of the
place whose information you want to edit.
:
The information related to that place can be
edited.
:
The map of that place can be displayed.
➲ Searching the destination by map ➞
Page 24
:
Displayed on the left-hand side of places that
can be searched by voice command.
3
Touch “Edit Information”.
➲ Searching the destination by map ➞
Page 24
3
Touch “Registration”.
Registration is now complete.
➲ “Editing a location’s information” ➞
Page 36
➲ “Registration” in the Shortcut menu ➞
Page 20
36
The Address Information menu appears.
Refer to the item corresponding to the subsequent operation. After finishing the operation,
the Address Book menu appears. You can
continue to edit other information items if
necessary.
Page 39

1. Name
The name can be used as a command for
voice operation.
2. Address
The address is registered when the search
was made for the first time. (Not editable.)
3. Phone number
You can search by registered telephone
number.
4. Pictograph
The symbol displayed on the map.
5. Sound
The selected operating sound is played.
❒ Apart from the Address, these items can
be edited freely.
Changing a name
1
Touch “Edit Name” and touch “Yes”.
The message confirming whether or not to
register the entered name as voice command
is displayed.
Alternative option :
No :
When not registering a name as a voice command, select “No”.
2
Enter a new name; touch “OK”.
The name of the current location appears in
the text box. Delete the current name, and
enter a new name between 6 and 23 characters long.
3
If the pronunciation is correct, touch
1
2
3
4
5
“Yes”.
The details you set are registered, and the
Address Book menu appears.
Alternative options :
No :
Select to return to the display for entering
characters.
Repeat :
You can reconfirm the pronunciation of the
name you entered.
Chapter 3 Utilizing Various Information
❒ When you change the name, a mark is shown
on the left side of the location name displayed
in the Address Book menu. This mark indicates that this name can be used as a voice
command during voice operation.
➲ You can also store locations in the Address
Book on a PC card ➞ Page 40
❒ You cannot change the name of your home.
❒ During voice operation, you can get a route
calculated by saying the registered name.
➲ Information on voice operation ➞ Chapter 5
Entering or changing a phone number
1
Touch “Edit Phone Number”.
2
Enter a phone number; touch “OK”.
The Address Information menu appears.
❒ To change a registered phone number,
delete the existing number and then enter
a new one.
Selecting a pictograph to appear on the
map
1
Touch “Select Image”.
2
Touch the Pictograph to appear on the
map.
The Address Information menu appears.
❒ You cannot change the mark of your home
or of your favorite location.
37
Page 40
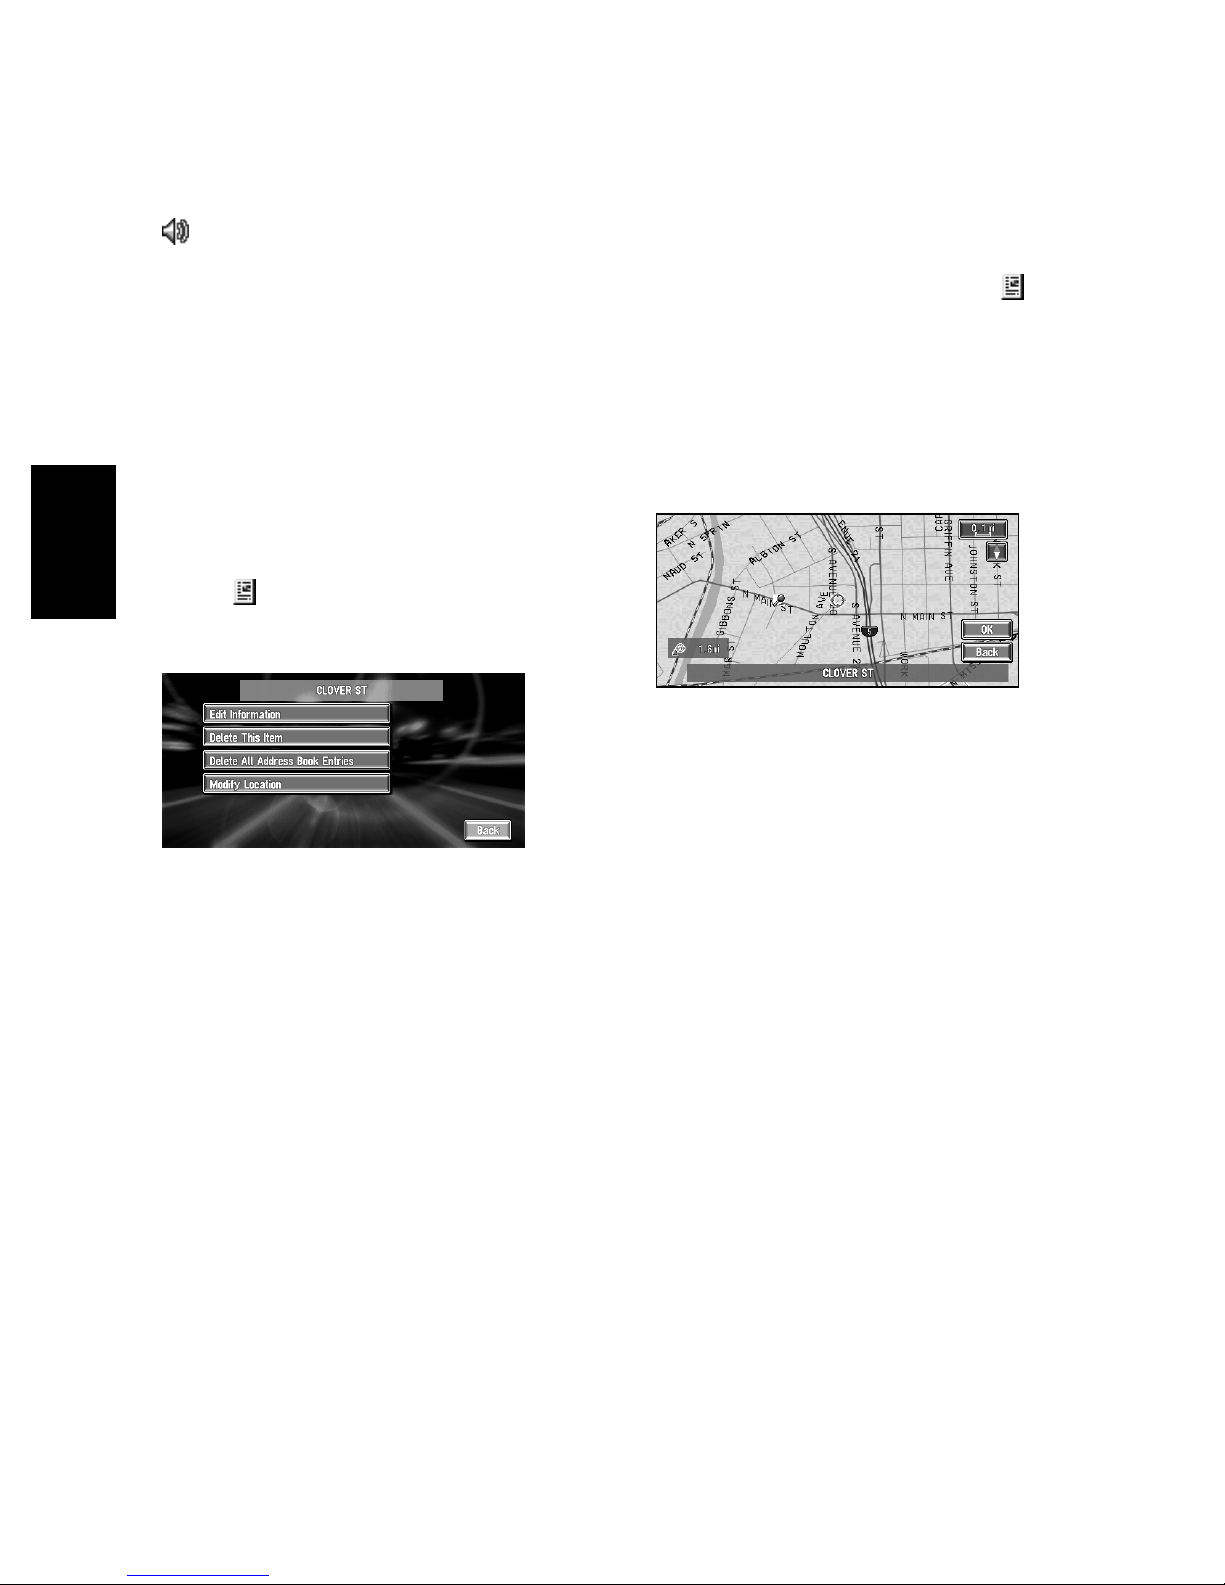
Selecting sound
1
Touch “Select Sound”.
2
Select the sound.
The Address Information menu appears.
If you want to hear the operating sound, touch
.
Deleting Address Book or Destination History Information
Items registered in the Address Book or Destination History can be deleted. Several entries of
data can be deleted at once.
1
Touch “Destination” in the Main menu,
then touch “Address Book”.
To delete items in the “Destination History”,
touch “Destination History”.
2
Chapter 3
Touch on the right-hand side of the
place you want to delete.
3
Select the deletion method.
Changing the Position of Locations Registered in the Address
Book
You can select a location registered in the
Address Book, display a map of its surroundings, and change its position.
1
In the Address Book menu, touch on
the right-hand side of the place whose
position you want to change.
2
Touch “Modify Location”.
The map of the selected area and its surroundings appears.
3
Touch the display to change its position,
then touch “OK”.
Utilizing Various Information
A message confirming deletion appears.
Alternative options :
Delete This Item :
Delete the location selected in Step 2.
Delete All Destinations (or Delete All
Address Book Entries) :
Delete all the Address Book or Destination
History data.
4
Select “Yes”.
The data you selected is deleted.
Alternative option:
No :
The display shown in Step 3 appears.
❒ Because deleted data cannot be restored,
take extra care not to select “Delete All
Address Book Entries” by mistake.
The position is changed.
38
Page 41
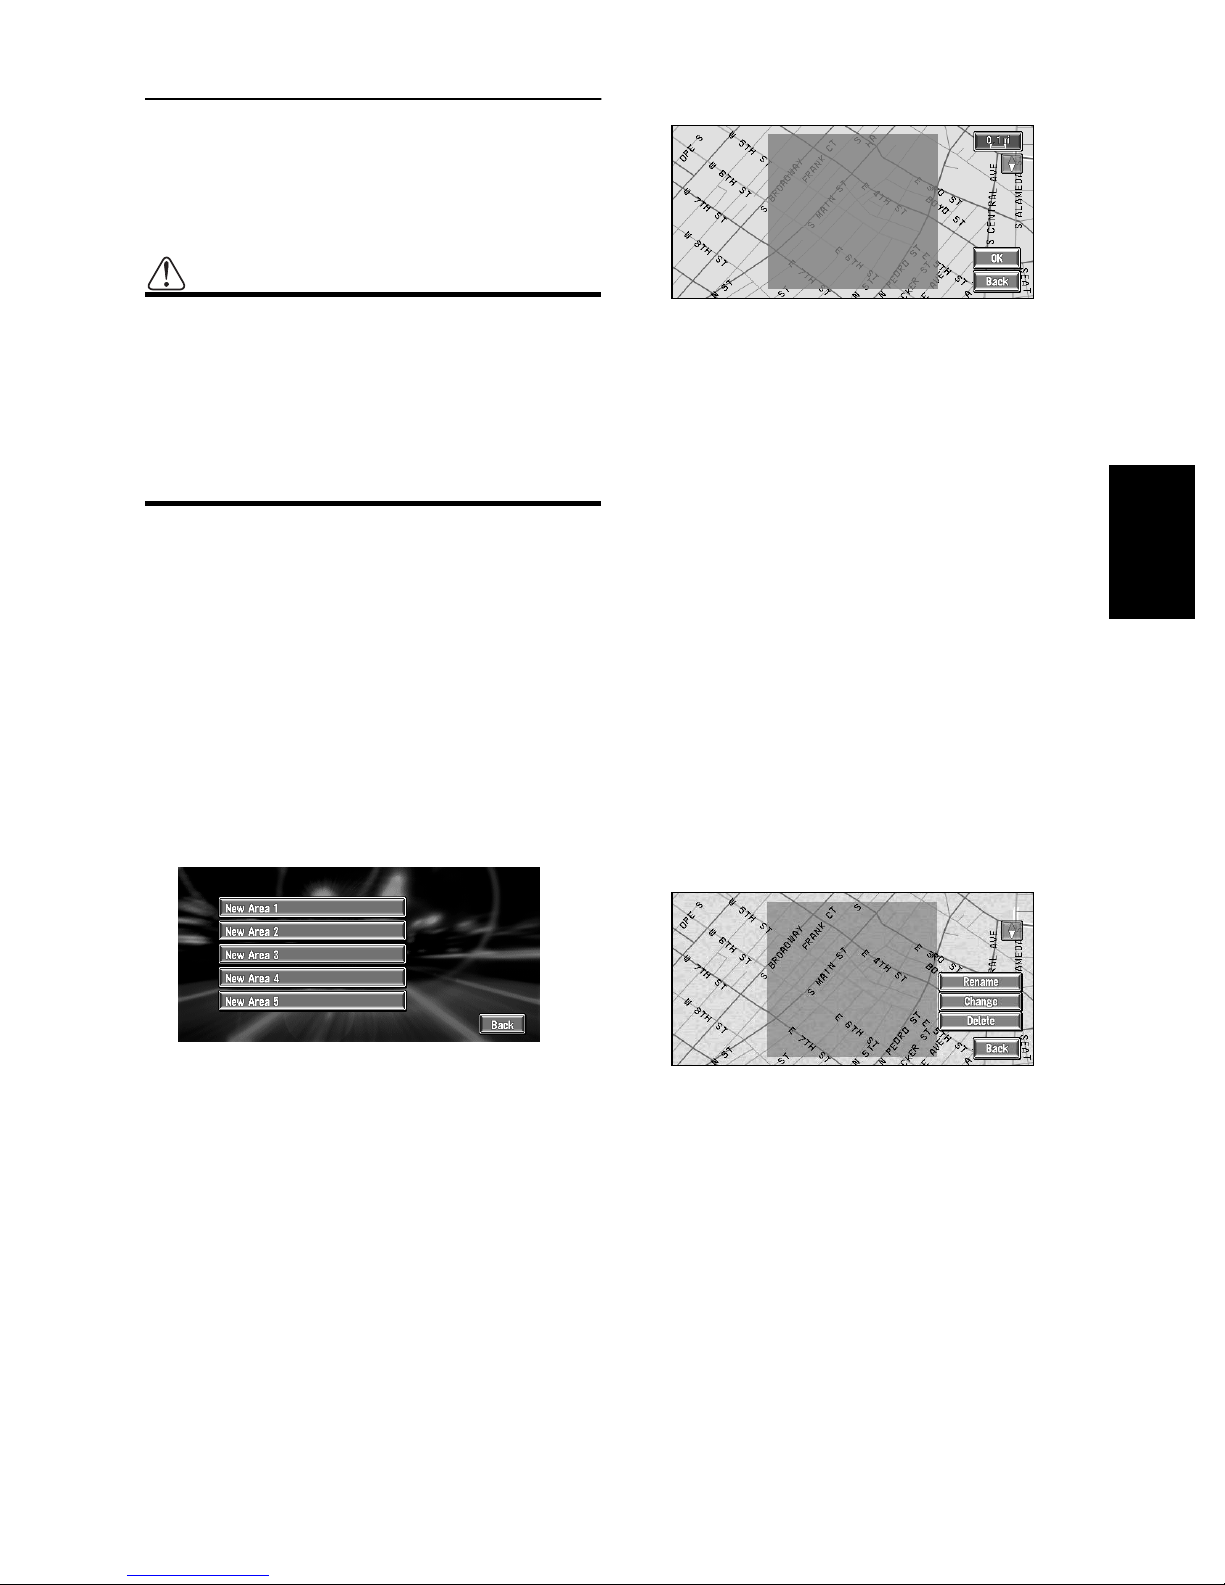
Setting Areas to Avoid
If you register Areas to Avoid, such as crowded
intersections or congested areas, routes can be
calculated that avoid those areas. Areas to
Avoid can be set from the Route Options menu.
Caution
If “Areas to Avoid” is set to “Off”, route calculation will be performed without considering Areas to Avoid. If you want a route
calculation which takes Areas to Avoid into
account, set “Areas to Avoid” to “On”.
➲ Information on “Areas to Avoid” ➞
Page 47
Registering an Area to Avoid
5
Scroll the map, adjust the position of the
red frame, and touch “OK”.
• If you want to stop registration, touch
“Back”.
❒ Depending on the setting of route search con-
ditions, you may not be able to avoid the specified areas. The confirmation message is
displayed on the screen at this time.
➲ Information on route calculation conditions ➞
Page 29
Chapter 3 Utilizing Various Information
This section describes how to register an Area to
Avoid for the first time. You can register up to five
Areas to Avoid.
1
Touch “Route Options” in the Main menu,
then touch “Designate Areas to Avoid”.
2
Select one of the items shown in “New
Area”.
When registering for the first time, any item
on the list is shown as “New Area”.
3
Select the place to register and display
the map.
➲ Searching places to register ➞ Chapter 2
Once a search is complete, a map with the
specified location at its center appears.
4
Change the map scale and decide the size
of the Area to Avoid.
The Area to avoid is enclosed in a red frame.
The maximum map scale for registering Areas
to Avoid is 0.1 miles (100 m).
Changing or deleting an Area to
Avoid
You can subsequently change/rename/delete an
Area to Avoid.
1
Touch “Route Options” in the Main menu,
then touch “Designate Areas to Avoid”.
2
Select the area you want to change or
delete.
3
Select the desired operation.
On this screen, you can select the following
options:
Rename :
Changes the name. Enter the new name and
touch “OK”. This returns you to the Route
Options menu.
Change :
A specified area can be changed. For the next
steps, see Step 2 in the “Registering an Area
to Avoid” above.
Delete :
Delete the selected Area to Avoid.
39
Page 42

Using a PC Card
Storing the data of registered
You can store the following information on a PC
Card:
• Locations registered manually such as your
home, your favorite location, or a location
whose information was edited (Registered
Locations)
• Background image when navigation or audio
is operated (Background Picture)
❒ The PC card is very useful for sharing the data
in the Address Book with friends or for storing the data as backup.
Initializing a PC card
Before using a brand new PC card, you must initialize it.
1
Touch “Information” in the Main menu,
Chapter 3
Utilizing Various Information
then touch “PC card” and “Initialize PC
Card”.
❒ Do not stop the engine until initialization of
the PC card is complete.
2
Touch “Yes”.
Once initialization is complete, a message to
select the operation of the PC card automatically appears. (If you want to cancel the initialization, touch “No”.)
locations in the PC card
You can select any entry registered in the
Address Book and store the data on the PC
card. Data can be stored in groups. A new group
can be created.
❒ The volume of data you can register depends
on the capacity of the PC card.
1
Touch “Information” in the Main menu,
then touch “PC card” and “Save to PC
Card”.
2
Touch the desired item for storage.
Free space in the PC card
Number of groups you can store
The selected entry is marked. To register other
locations, repeat this step.
Alternative option:
Select All :
All the locations are selected at once.
3
After finishing the selection of locations,
touch “OK”.
4
Touch “New Group”.
40
❒ If the data is to be stored in a group
already registered in the PC card, select
the group name in the list.
5
After entering a group name, touch “OK” .
The data of the registered location is stored in
the entered group.
Page 43
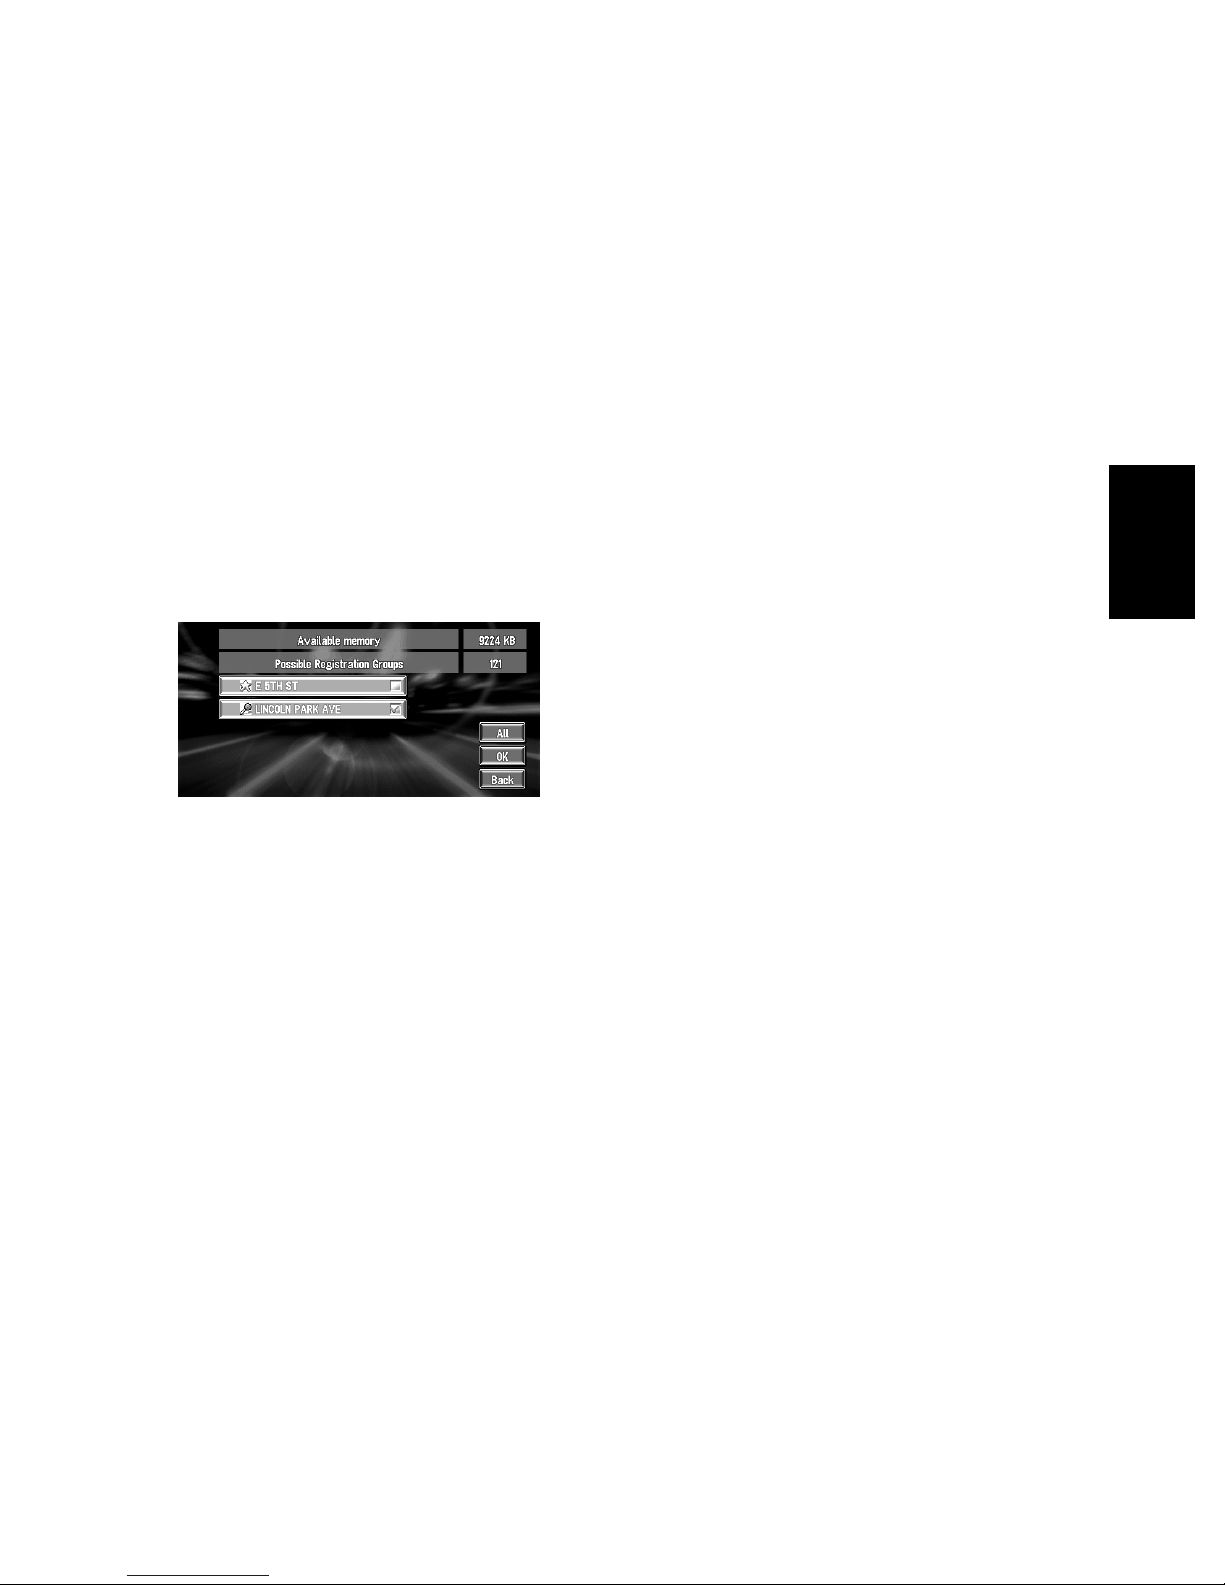
Loading registered locations
Deleting PC card data
data from a PC card
Address Book data stored on a PC card can be
loaded to the Navigation System.
❒ Replaces the Address Book registered place
data stored on the System with the registered
place data stored on the PC card. At this time,
the Address Book registered place data on the
System may be lost.
➲ If a message about PC card is displayed ➞
Page 61
1
Touch “Information” in the Main menu,
then touch “PC card” and “Read from PC
Card”.
The list of groups appears.
2
Touch the desired group.
3
Touch the desired locations.
You can delete data for a specified location or a
whole group.
1
Touch “Information” in the Main menu,
then touch “PC card” and “Delete PC
Card Data”.
2
Touch a group where the location you
want to delete is stored.
3
Touch a location you want to delete and
touch “OK”.
The selected location is marked. To delete
other locations, repeat this step.
Alternative option:
Select All :
Select all locations in a group.
4
Touch “Yes”.
The specified location is deleted.
Chapter 3 Utilizing Various Information
Selected locations are marked. To load the
data from other locations, repeat this step.
Alternative option:
Select All :
All the locations are selected at once.
4
Touch “OK”.
The data of the selected locations is stored in
the Address Book.
41
Page 44
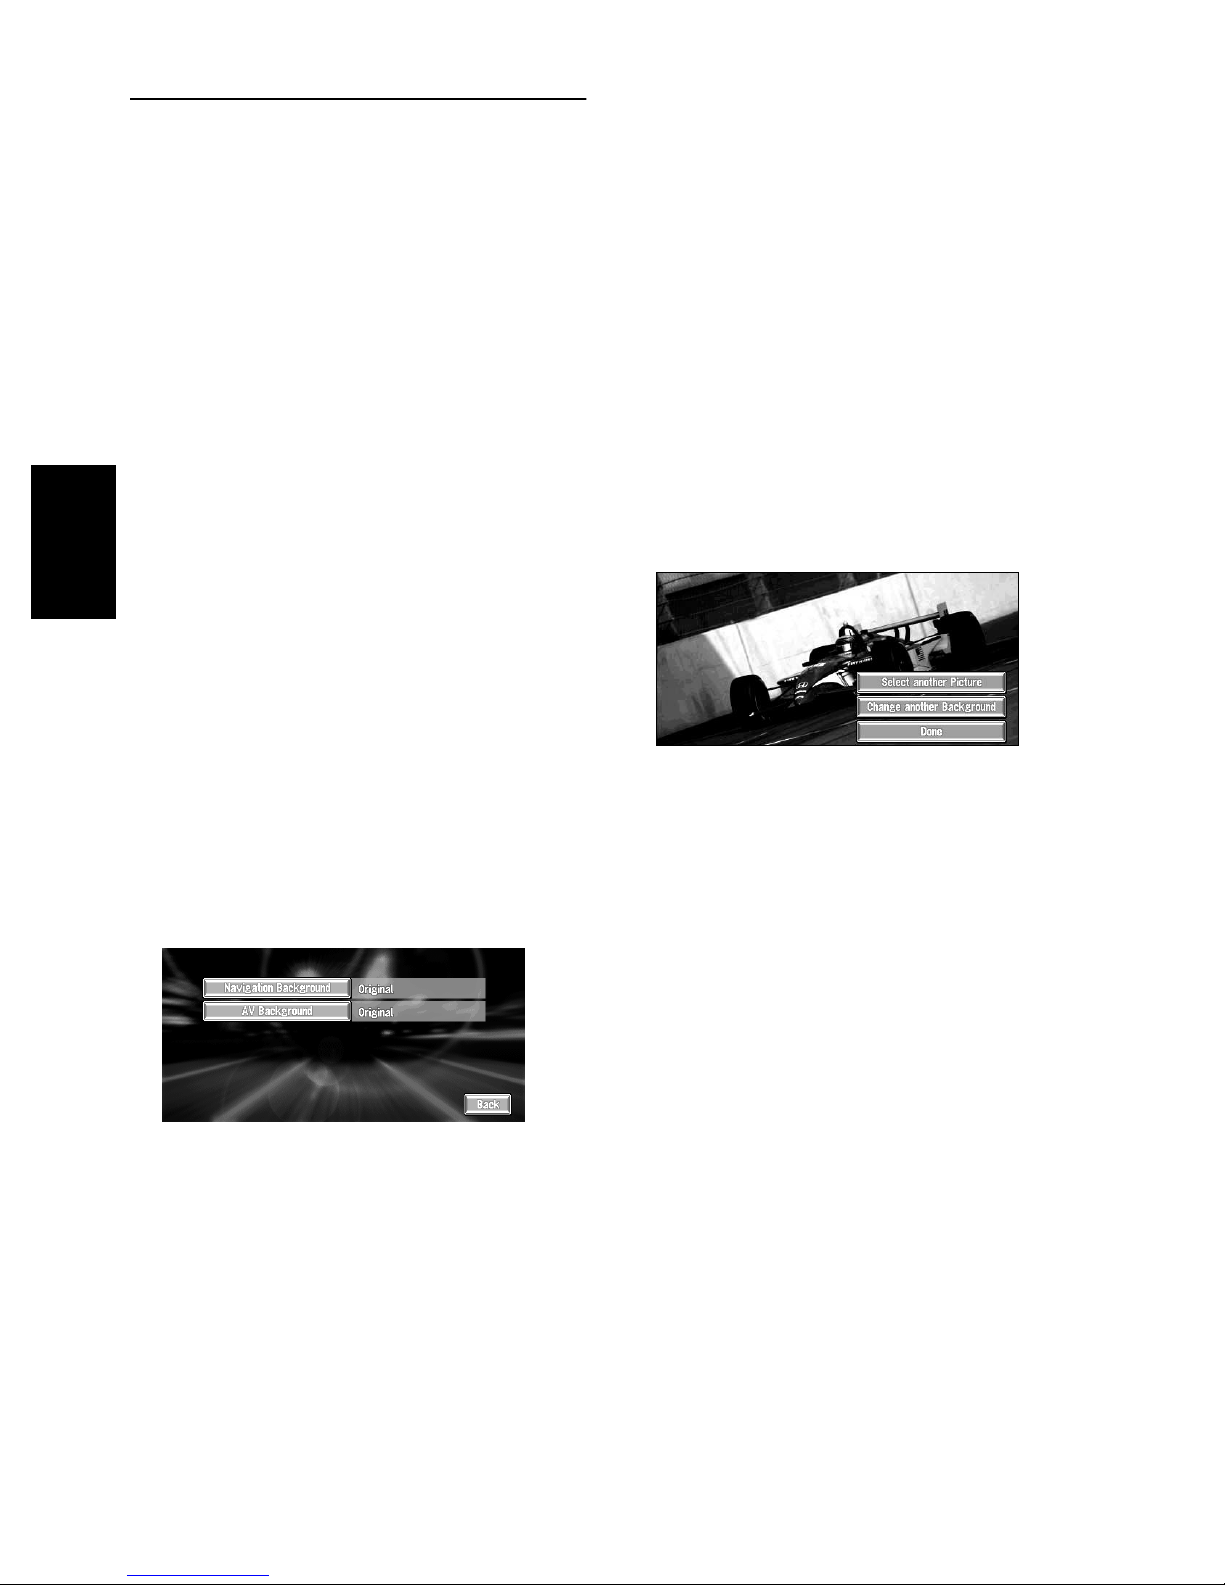
Changing Background Picture
In the menu operation screen, you can indicate a
picture you like on the background. Some pictures are already stored, but you can also use pictures (JPEG format data) created by a personal
computer or a digital camera. The following two
types of background pictures can be changed:
• AV Background : Background for the screen
during the operation of audio, or during playback.
• Navigation Background : Background of
navigation menu screen.
Here, a method of changing background picture
is described with an example of loading the picture stored on a PC card to the background picture of the navigation.
❒ The “AV Background” cannot be used with
the AVD-W6210.
Chapter 3
❒ When storing original pictures on a PC card,
create a folder named “BG” in a PC card, and
store the picture files in this folder. Up to 20
picture files can be used in the BG folder.
1
Insert a PC card to the main unit.
2
Touch “Settings” in the Main menu, then
touch “Background Picture Setting”.
The picture selected at each screen is indicated on the right side of “AV Background”
and “Navigation Background” items.
Utilizing Various Information
3
Touch “Navigation Background” or “AV
Background”.
5
Touch a picture you want for the background.
6
Select how to display the picture.
You can select the following items:
“Center” :
Selected picture is displayed at the center of
the screen.
“Repeat” :
Selected picture is patterned, and displayed
as covering the whole screen.
❒ When selecting images already stored on
the Pioneer DVD map disc, you cannot
select the layout method for those images.
The background image starts changing. After
a short while, the new background image
appears.
7
Touch “Done”.
On this screen, you can select the following
items:
Select another Picture :
This is selected when you want to change to
another picture. Return to Step 4.
Change another Background :
Select if you want to successively change the
Audio Operating screen backgrounds or the
Navigation backgrounds. Return to step 3.
4
Touch “Import from PC Card”.
The list of the pictures stored in a PC card is
displayed.
On this screen, you can select the following
item:
Back to Original :
The picture when purchased is selected.
❒ In step 4, touching other than “Import
from PC Card” allows you to select a
background image stored on the disc.
42
❒ Only JPEG format (“.jpg” or “.JPG”) pictures
can be used as a background picture.
❒ You can only use standard characters (alpha-
bets of both cases: A-Z, a-z) and numbers (0-9)
for the file name of a background picture
(international (accented) characters cannot
be used).
❒ Up to maximum 2048×1536 pixels picture can
be used. We cannot guarantee a proper operation for a picture bigger than this size.
❒ Progressive format JPEG pictures cannot be
used.
Page 45

❒ When changing a picture starts, do not cut off
the car engine until the message informing
the completion of changing a picture is indicated. Otherwise a picture file may be
destroyed.
❒ If a map disc is not set to the Navigation Sys-
tem, the background picture function is not
available.
❒ When the Navigation System is reset, or the
language setting is changed, the background
picture may change back to the original picture. (There is also a possibility that the system will revert to the original picture for some
other reason). If this happens, set the background picture again.
Checking the Navigation Status
The navigation status, including the driving status of a car, positioning status by satellite, learning status of the 3D sensor, and cable
connection status can be checked.
Checking sensor learning status
and driving status
1
Touch “Information” in the Main menu,
then touch “3D Calibration”.
The 3D Calibration Status screen appears.
1
2
3
4
675
Chapter 3 Utilizing Various Information
1. Distance
Driving distance is indicated.
2. Speed Pulse
Total number of speed pulses is indicated.
3. Learning Status
Current driving mode is indicated.
4. Degree of learning
Learning situations of Distance, Right Turn,
Left Turn, and 3D detection are indicated by
the length of bars.
5. Speed
Speed detected by this unit is indicated.
(This indication may be different from the
actual speed of your car, so please do not
use this instead of the speedometer of your
car.)
6. Front and back G/Rotational speed
Accelerated velocity of your car to front /
back direction is indicated. Also, rotational
speed when your car turns to left or right is
shown.
7. Inclination
Degree of slope of the street is indicated.
43
Page 46
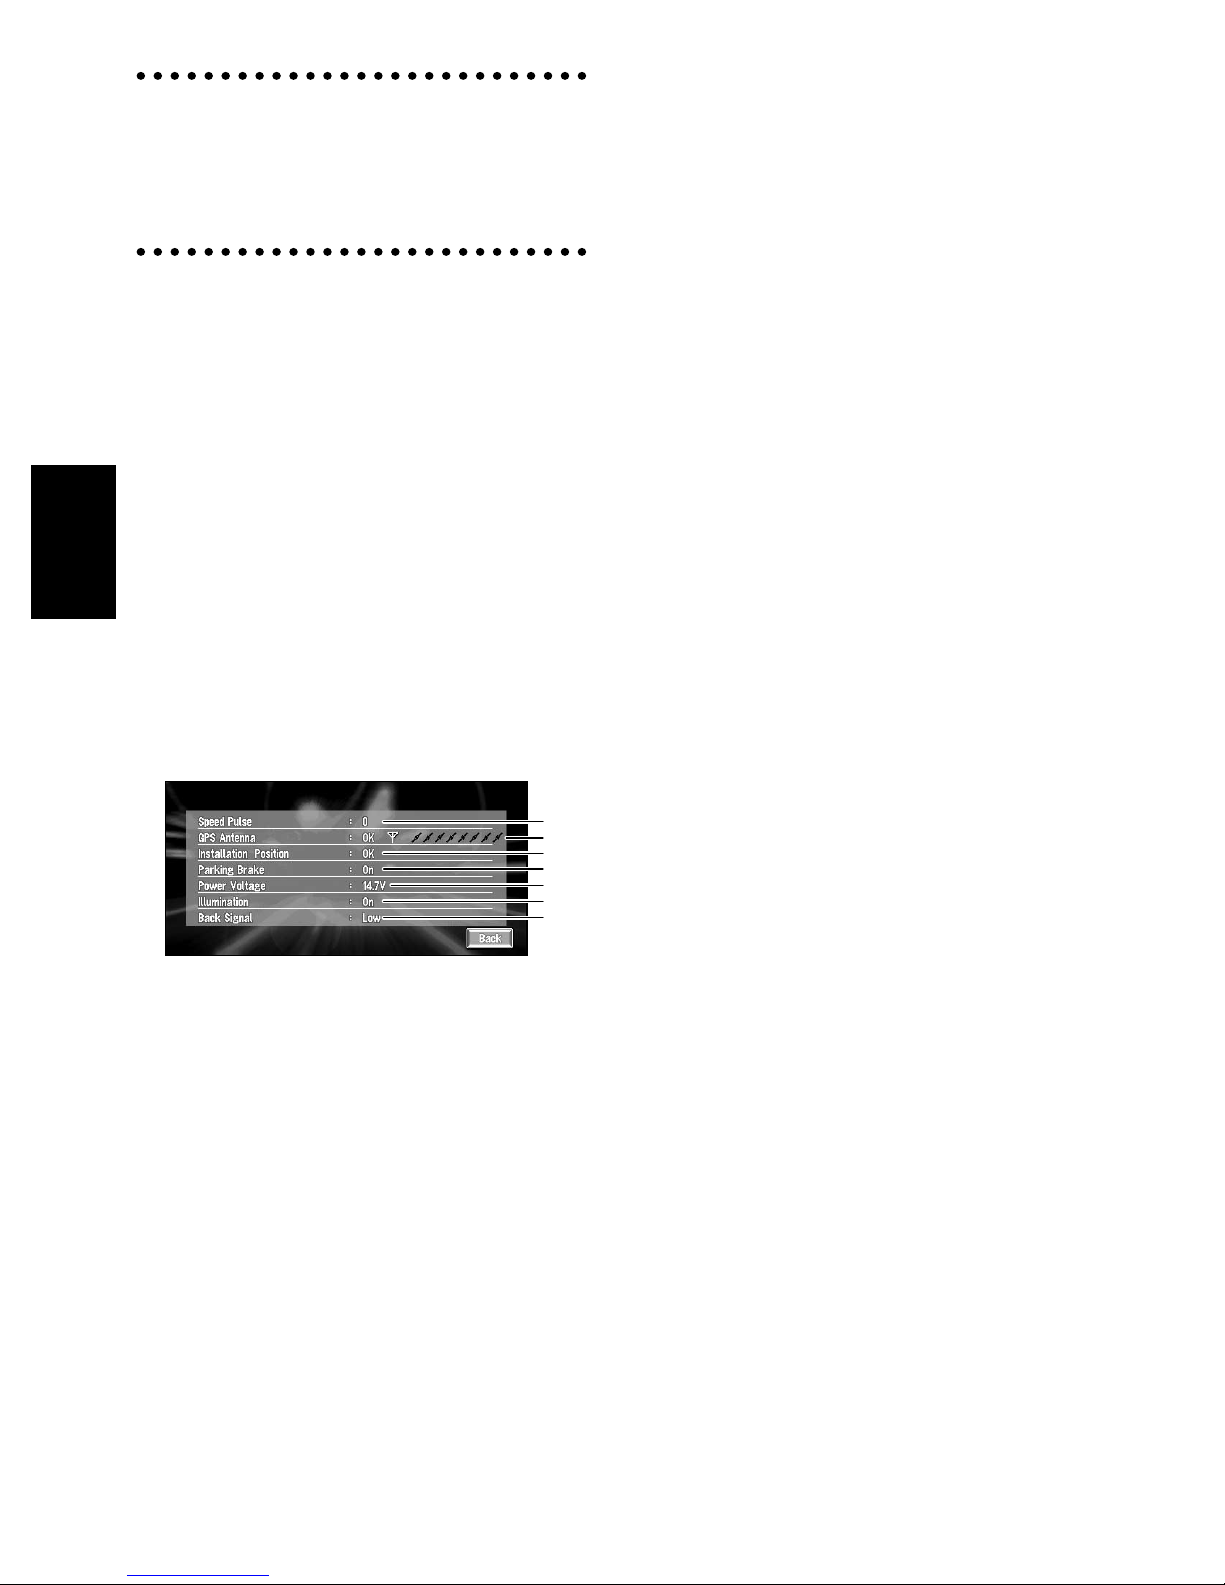
To clear values...
If you want to delete the learned results stored in
“Distance”, “Speed Pulse” or “Learning Sta-
tus”, touch the relevant result, then touch
“Clear”.
❒ This unit can automatically use two types of
sensor memory based on the outer dimensions of the tires.
Checking the connections of
leads and installation positions
Check that leads are properly connected between
the main unit and the car. Please also check
whether they are connected in the correct positions.
Chapter 3
1
Touch “Information” in the Main menu,
then touch “Connection Status”.
The Connection Status screen appears. Either
“OK” or “NG” (or “No”) appears on the
screen, and the connection status of each
cable is shown.
5. Power Voltage
The power supply (reference value) provided from the car battery to this unit is
shown. If the voltage does not fall within the
range of 11 to 15V, check that power cable
connection is correct.
6. Illumination
When the headlights or small lamps of a
car are on, “On” is displayed. (If the orange/
white lead is not connected, “Off” appears.)
7. Back Signal
When the gear lever is shifted to “R”, the
signal switches to “High” or “Low”. (Which
of these is displayed depends on the car.)
Utilizing Various Information
1. Speed Pulse
The Speed Pulse value detected by this unit
is shown. “0” is shown while the car is stationary.
2. GPS Antenna
Indicates the connection status of the GPS
antenna, the reception sensitivity, and from
how many satellites the signal is received.
3. Installation Position
The Installation position of the main unit is
shown.
4. Parking Brake
When the parking brake is applied, “On” is
displayed. When the parking brake is
released, “Off” is displayed.
1
2
3
4
5
6
7
44
Page 47
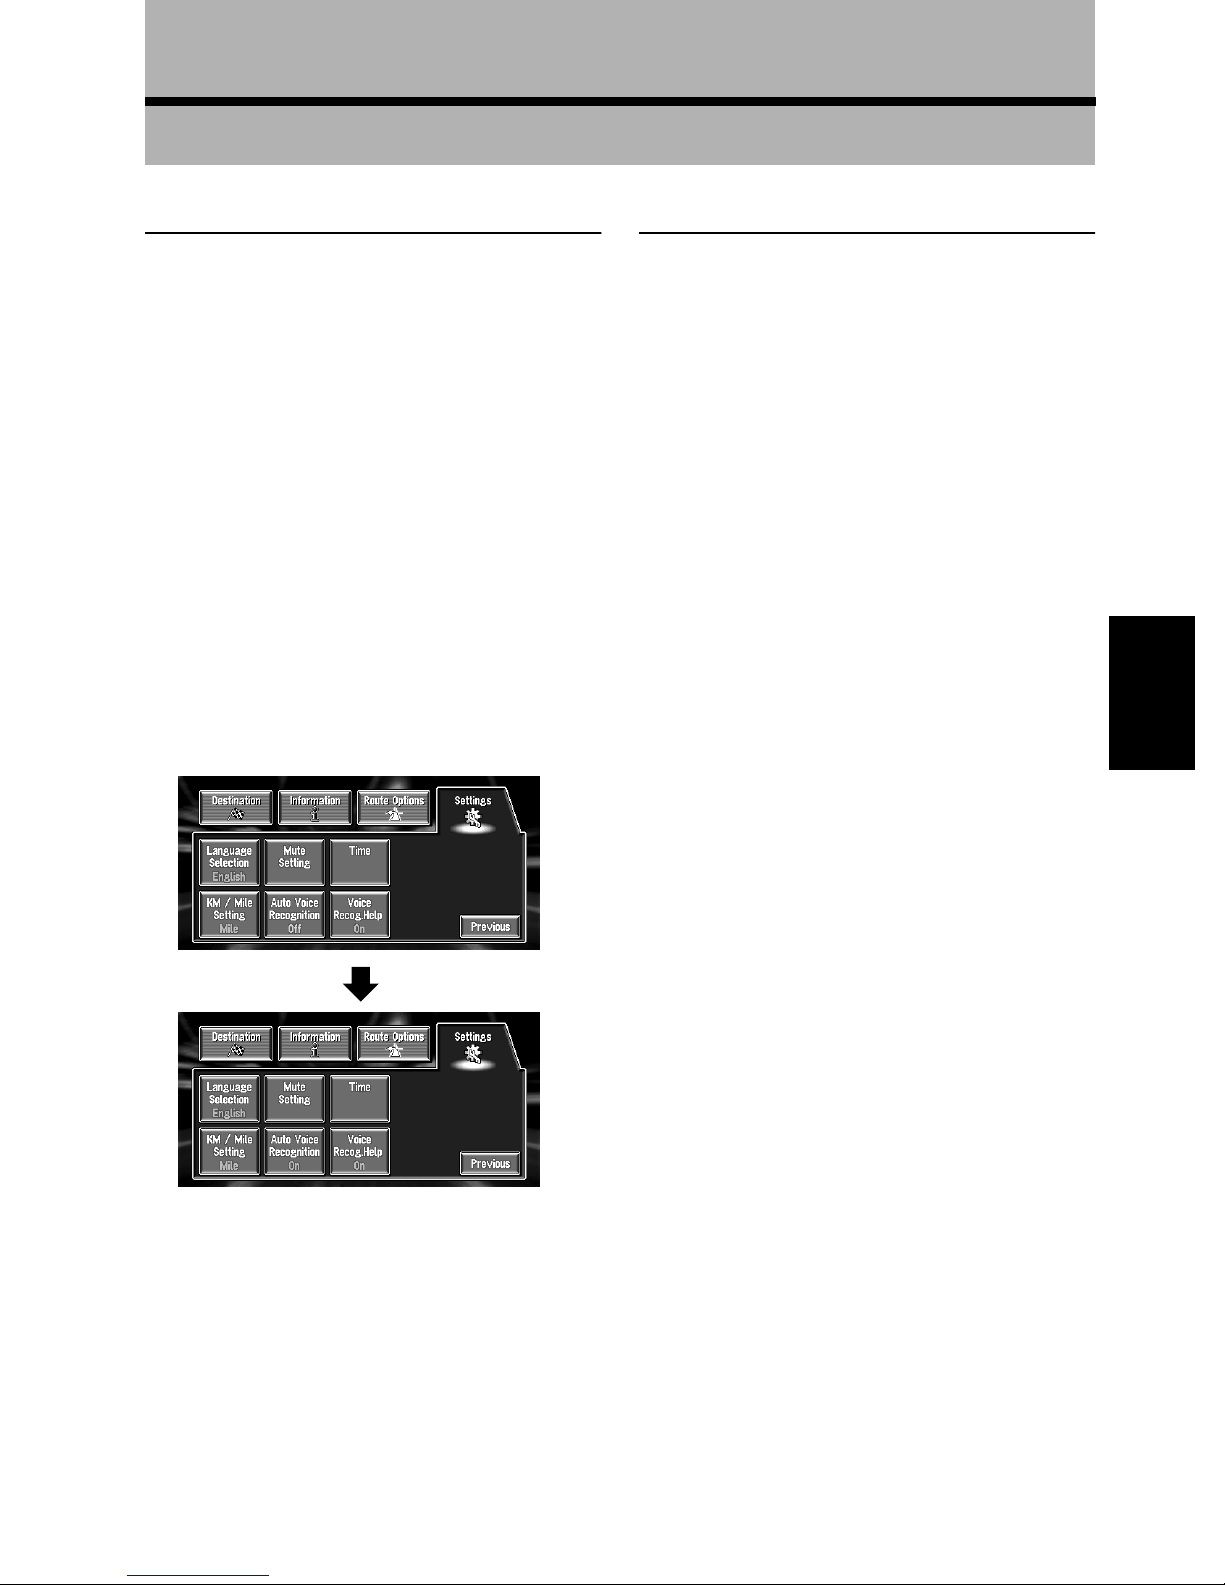
Customizing Your Navigation System
Chapter 4
Modifying the Default Settings
You can tailor default settings such as navigation
functions and information display for ease of use.
The following example describes how to change
settings. In this example, the “Auto Voice Rec-
ognition” settings is turned on.
1
Touch “Settings” in the Main menu.
The Settings menu appears.
2
Touch “Next”.
The screen changes. “Off” is displayed below
“Auto Voice Recognition”, indicating that
this function is currently turned “Off”.
❒ When you touch items with a setting below
them, their setting changes. When you
touch items with no setting below them, a
setting screen appears.
❒ Touching “Next” or “Previous” changes the
screen and displays another item.
3
Touch “Auto Voice Recognition”.
Items Users can Change
This section describes the details of the setting
for each item. Settings marked with an asterisk
(*) show that they are default or factory settings.
Return Home
Registering and changing your home location
➲
➞ Page 35
Go to
Registering and changing your favorite loca-
➲
tion ➞ Page 35
Average Speed
When calculating expected time of arrival and
the number of hours to the destination, the average speed for the freeway or ordinary road used
is set.
• Freeway
• When the “KM/Mile Setting” is set to “Mile”,
it can be set in 5-mile increments from 30
miles to 120 miles (60 mile*).
• When the “KM/Mile Setting” is set to “km”, it
can be set in 5-km increments from 60 km to
150 km (95 km*).
Chapter 4 Customizing Your Navigation System
“On” is displayed below “Auto Voice Recognition”, indicating that “Auto Voice Recognition” is set “On”.
If you want to change another setting, select
the item you want to change and repeat the
procedure in step 3.
• Ordinary Road
• When the “KM/Mile Setting” is set to “Mile”,
it can be set in 5-mile increments from 10
miles to 100 miles (35 mile*).
• When the “KM/Mile Setting” is set to “km”, it
can be set in 5-km increments from 20 km to
110 km (55 km*).
Modify Current Location
Touch the screen to adjust the current position
and direction of the car displayed on the map.
45
Page 48

Demo Mode
This is a demonstration function for shops. After
a route is set, the simulation of the route guidance to a destination is automatically displayed.
Normally, set this to “Off”.
Repeat :
Repeat demo drive.
Off* :
Demo Mode is set off.
Day/Night Display
To improve the visibility of the map during the
evening, you can change the combination of the
colors of the map.
Nighttime* :
You can change the combination of the colors of
a map according to whether the car lights are On
or Off.
Daytime :
The map is always displayed with bright colors.
Hardware Volume
The sound volume of this product can be set.
Chapter 4
Language Selection
The language displayed can be set ➞ Page 53
➲
Once you change the language, installation of
the program starts.
Caution
Once the installation of the program starts,
do not stop the engine of your car and switch
off the Navigation System until the installation is completed and the map of your sur-
Customizing Your Navigation System
roundings appears.
Mute Setting
Items related to muting of sound volume can be
set.
• Voice Recognition
This can be set when your Navigation System is
combined with the Pioneer Head Unit with a muting function. This setting controls whether the
volume of the Pioneer Head Unit is automatically
muted during voice operation.
On* :
During voice operation, the volume of the Pioneer
Head Unit is muted automatically.
Off :
The volume of Pioneer Head Unit stays the same
during voice operation.
❒ If you select “Off”, the sound from the Pioneer
Head Unit may interfere with the voice recognition system.
• Voice Guidance
This can be set when your Navigation System is
combined with the Pioneer Head Unit with a muting function. This setting controls whether the
volume of the Pioneer Head Unit is automatically
muted during voice guidance.
On* :
During voice guidance, the volume of Pioneer
Head Unit is muted automatically.
Off :
Volume of Pioneer Head Unit stays the same during voice guidance.
Auto Voice Recognition
After you have started the engine, turn on voice
recognition and set whether or not to perform all
operations up to route searching by voice.
(This function is effective only when a route is not
set.)
46
On :
The automatic voice recognition is engaged each
time your car is started.
Off* :
Voice operation starts after pressing the TALK
button or VOICE button.
Background Picture Setting
The background picture can be changed ➞
➲
Page 42
Page 49

KM/Mile Setting
This setting controls the unit of distance displayed on your Navigation System.
km :
Show distances in kilometers.
Mile * :
Show distances in miles.
Mile & Yard :
Show distances in miles and yards.
Map Display
Screen display-related items can be set.
• Arrow in AV
Set whether to display the guidance information by arrow on the Audio Operation screen of
the Pioneer AV Head Unit.
❒ Can be used only when the AVH-P7500DVD or
AVH-P6500DVD is connected.
On* :
Display guidance information by arrow on the
Audio Operation screen.
Off :
Do not display guidance information by arrow on
the Audio Operation screen.
• Current Time
This setting controls whether to display the current time on the screen.
• Areas to Avoid
This setting activates Area to Avoid being set.
On* :
Areas to Avoid are displayed on the screen, and
these areas are avoided as much as possible during route calculation.
Off :
Areas to Avoid are not indicated, and are not
taken into account during route calcutation.
Caution
When “Areas to Avoid” is turned “Off”, Area
to Avoid will not be considered during route
calculation. If you want a route calculation
while avoiding some areas, change the setting to “On”.
• AV Guide Mode
Setting whether or not to switch to navigation
screen automatically when the navigation guidance voice is played while displaying a screen
other than navigation.
On* :
Switching from audio operation screen to navigation screen.
Off :
Screen is not switched.
Chapter 4 Customizing Your Navigation System
On* :
The current time is shown.
Off :
The current time is not shown.
• Tracking Display
The tracking display setting has following
options.
Always :
Display tracking for all journeys.
This Trip :
Display tracking dots but erase them when the
navigation system is turned off (when turning off
the engine of your car).
Off* :
Do not display tracking dots.
• Close-up of Junction
This setting enables to switch to an enlarged
map around the point when your car is approaching to an intersection, entrance/exit of freeway, or
a junction.
On* :
Display switches to an enlarged map.
Off :
Does not switch to an enlarged map.
Voice Recog.Help
This setting controls the list of available voice
commands displayed during voice operation.
On* :
The list of commands is shown.
Off :
The list of commands is not shown.
47
Page 50

Time
Adjusts the systems clock. The time difference
(+, –) between the time originally set in this unit
is set here.
You can also select summer time On/Off.
➲ Time settings ➞ Page 54
On :
DTS is taken into account.
Off* :
DTS is not taken into account.
❒ When the period of DTS comes, or when the
DTS ends, this unit does not automatically
change the DTS setting.
➲ Change the DTS setting ➞ Page 54
Chapter 4
Customizing Your Navigation System
48
Page 51
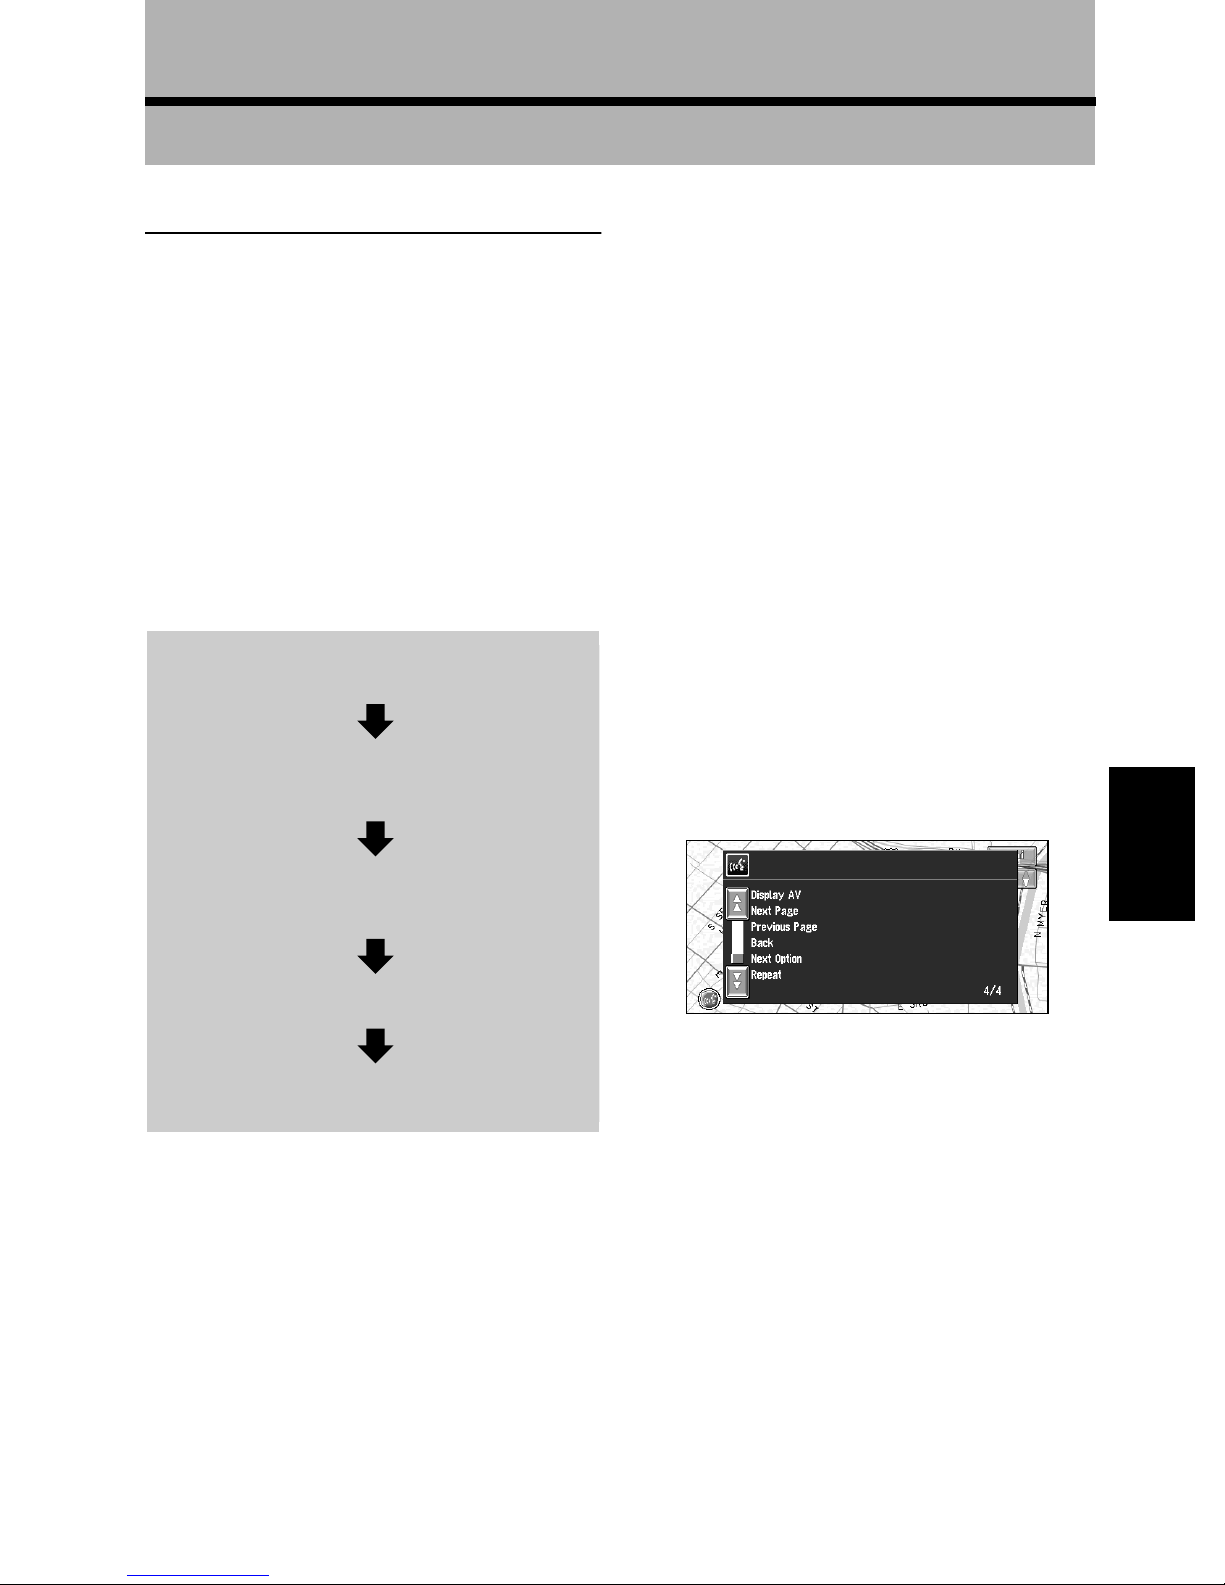
Chapter 5
Operating Your Navigation System with Voice
Basics of Voice Operation
Your Pioneer Navigation System comes with the
latest in voice recognition technology. You can
use voice commands to operate many of its functions. This chapter describes where you can use
voice commands, and also what commands the
system accepts.
Flow of voice operation
You can start voice operation any time even when
the map screen is displayed or audio is operated.
The basic steps of voice operation are as follows.
The steps are almost the same as when using the
Remote Control.
1
Press the TALK (or VOICE) button to
activate voice operation.
2
Speak a command into the microphone.
Operating by only voice when
the Navigation System is
started
Turning on “Auto Voice Recognition” in the
Settings menu allows all settings to be implemented by voice from after the engine is started
and until the route is set (applies only if the route
is not yet set).
❒ If you press the button on the Remote Control
in the middle of the operation, voice operation
mode is cancelled.
Available voice commands
related to Navigation
You can say the following commands:
Common commands for all the operations
Next Page, Previous Page, Back, Next Option,
Repeat
Chapter 5 Operating Your Navigation System with Voice
3
When the command is recognized, it is
repeated.
4
As necessary, repeat Steps 2 and 3.
5
The voice command is carried out.
❒ With the “CD-SR80” Steering Remote Control
(sold separately), you can press the BAND
button and the F button to switch on the operation mode of the Steering Remote Control.
When the operation mode is switched on, by
pressing the BAND button of the Steering
Remote Control, you can activate voice operation, which is equivalent of pressing the TALK
button. (“CD-SR90” and “CD-SR100” can be
used. For the details of their operation, see the
instruction manuals attached to them.)
❒ If you want to listen to the message of the
Navigation System, say “Repeat”.
❒ If you want to return to the previous screen,
say “Back”.
❒ If the system fails to recognize the command
you speak, press the TALK button or VOICE
button or say “Next option” and other operable
commands will be displayed. If you then press
the TALK button or VOICE button within 3
seconds, yet more commands are shown.
Repeat this until the command you want to
use is shown.
49
Page 52

Specifying your destination
New Destination, Address Book, Return Home,
<Registered name>, Restaurants, Shopping,
Hotel, GAS Station
Operating the route being guided
Rerouting, XX mi/km detour, Cancel Route, Cancel Way Point, Route Profile, Use/Avoid Freeway,
Use/Avoid Ferry, Use/Avoid Tollroad, Fastest
Route, Shortest Route
For TV source
Preset 1-12, Band Change, Seek Up/Down,
<Registered name>
For DVD (M-DVD) source
Random Play, Disc 1-6, ITS Play, Next Disc, Previous Disc
For NAVI source
Track 1-20, Repeat Play, Random Play
Changing map display
Street Map Scale, City Map Scale, Region Map
Scale, Zoom IN/Out, Driver’s View, Map View,
Route View, Guide View, Overlay POI, Cancel
Overlay POI
Available voice commands
related to audio
❒ When the AVD-W6210 is connected, only
NAVI Source-related commands can be used.
❒ When you use the AVIC-80DVD, NAVI Source-
related commands cannot be used.
Common to each source
Equalizer Up/Down, CD, Radio, Multi CD, Source
by NAVI, DVD Changer, Monitor DVD, DVD, XM
Radio, Digital Audio Broadcasting, TV Tuner,
Video IN, Auxiliary, Source On, Source Off, Dis-
Chapter 5
play NAVIGATION, Display AV, Next Page, Previous Page, Back, Repeat
❒ Some commands may be cancelled accord-
ing to the condition of audio unit being combined.
Scrolling through the Voice
Help Menu
Scroll through the remaining commands using
the scroll bar or the remote control. You can also
display the commands by saying the words “Next
page” (or “Previous page”).
To cancel voice operation
You can cancel voice operation features at any
time by pressing the NAVI button on the Remote
Control. After you cancel voice operation, the
map is displayed.
➲ When you are used to voice operation fea-
tures and no longer need Voice Help, you can
it off ➞ Page 47
For TUNER source
Preset 1-6, Band Change, Seek Up/Down, <Registered name>
For CD source
Track 1-20, Repeat Play, Random Play
For Multi-CD (M-CD) source
Track 1-20, Random Play, Disc 1-12, ITS Play,
Next Disc, Previous Disc
For DAB source
Preset 1-6, Band Change
Operating Your Navigation System with Voice
For XM source
Preset 1-6, Band Change
50
Page 53

An example of voice operation
In this example, you want to search for the nearest city hall. When presented with a list of search
options, you say the number to the left of the
option you want to select.
1
Press the TALK button or VOICE button.
A list of commands for voice operation
appears. After the message, the beep indicates that the system is ready to accept your
voice command. You say a command after
this beep.
If you are not used to voice operation
Until you are familiar with this system, it is recommended to stop the car in a safe place and
refer to the commands displayed in the Voice
Help menu (a list of the words you can speak).
When your car is parked with the parking brake
on, press the TALK button or VOICE button to
display a list of available voice commands (Voice
Help menu). Display of the Voice Help menu can
be turned on /off with “Voice Recog.Help” in
the Settings menu.
2
Say “New Destination”.
A message to prompt the next operation is
given.
3
Say “POI in Vicinity”.
You say the contents you want to operate.
Here, selection method of your destination is
specified. When you want to search the city
hall nearest to the current location, say “POI
in Vicinity”.
4
Say “City Hall”.
The map of the nearest city hall is shown. The
message, “Would you like to stop by?” follows.
5
After confirming the location, say “Yes”.
Chapter 5 Operating Your Navigation System with Voice
When voice command is possible
When voice command is not accepted
❒ If no command is made in the next 6 sec-
onds, voice recognition is cancelled and
the Navigation System is on hold until the
next operation. Press the TALK button or
VOICE button to reactivate voice operation.
With the location shown on the map set as
the destination (or way point), the route calculation starts.
❒ If you want to see maps with other options,
at Step 5 say “Next” (or “Previous”).
❒ If you say “No”, voice operation is can-
celled, and the map screen appears.
51
Page 54

Tips for Voice Operation
For your voice commands to be correctly recognized and interpreted, ensure that conditions are
suitable for recognition.
Reduce the volume setting on your car audio
system
➲ If your Pioneer Head Unit has a Mute lead,
the sound volume of the Head Unit is automatically reduced during voice operation ➞
Page 46
❒ Some Pioneer Head Unit models have a Mute
control function. For further details, refer to
the manual for that model.
Close the car windows
Please note that wind through the car window or
miscellaneous noise from outside the car can
interfere with voice operation.
Position the microphone carefully
For optimum pick-up, the microphone should be
fixed at a suitable distance directly in front of the
driver.
Pause before giving a command
Speaking too soon may cause the recognition to
fail.
Pronounce your commands carefully
Speak slowly, deliberately and clearly.
Chapter 5
Operating Your Navigation System with Voice
52
Page 55
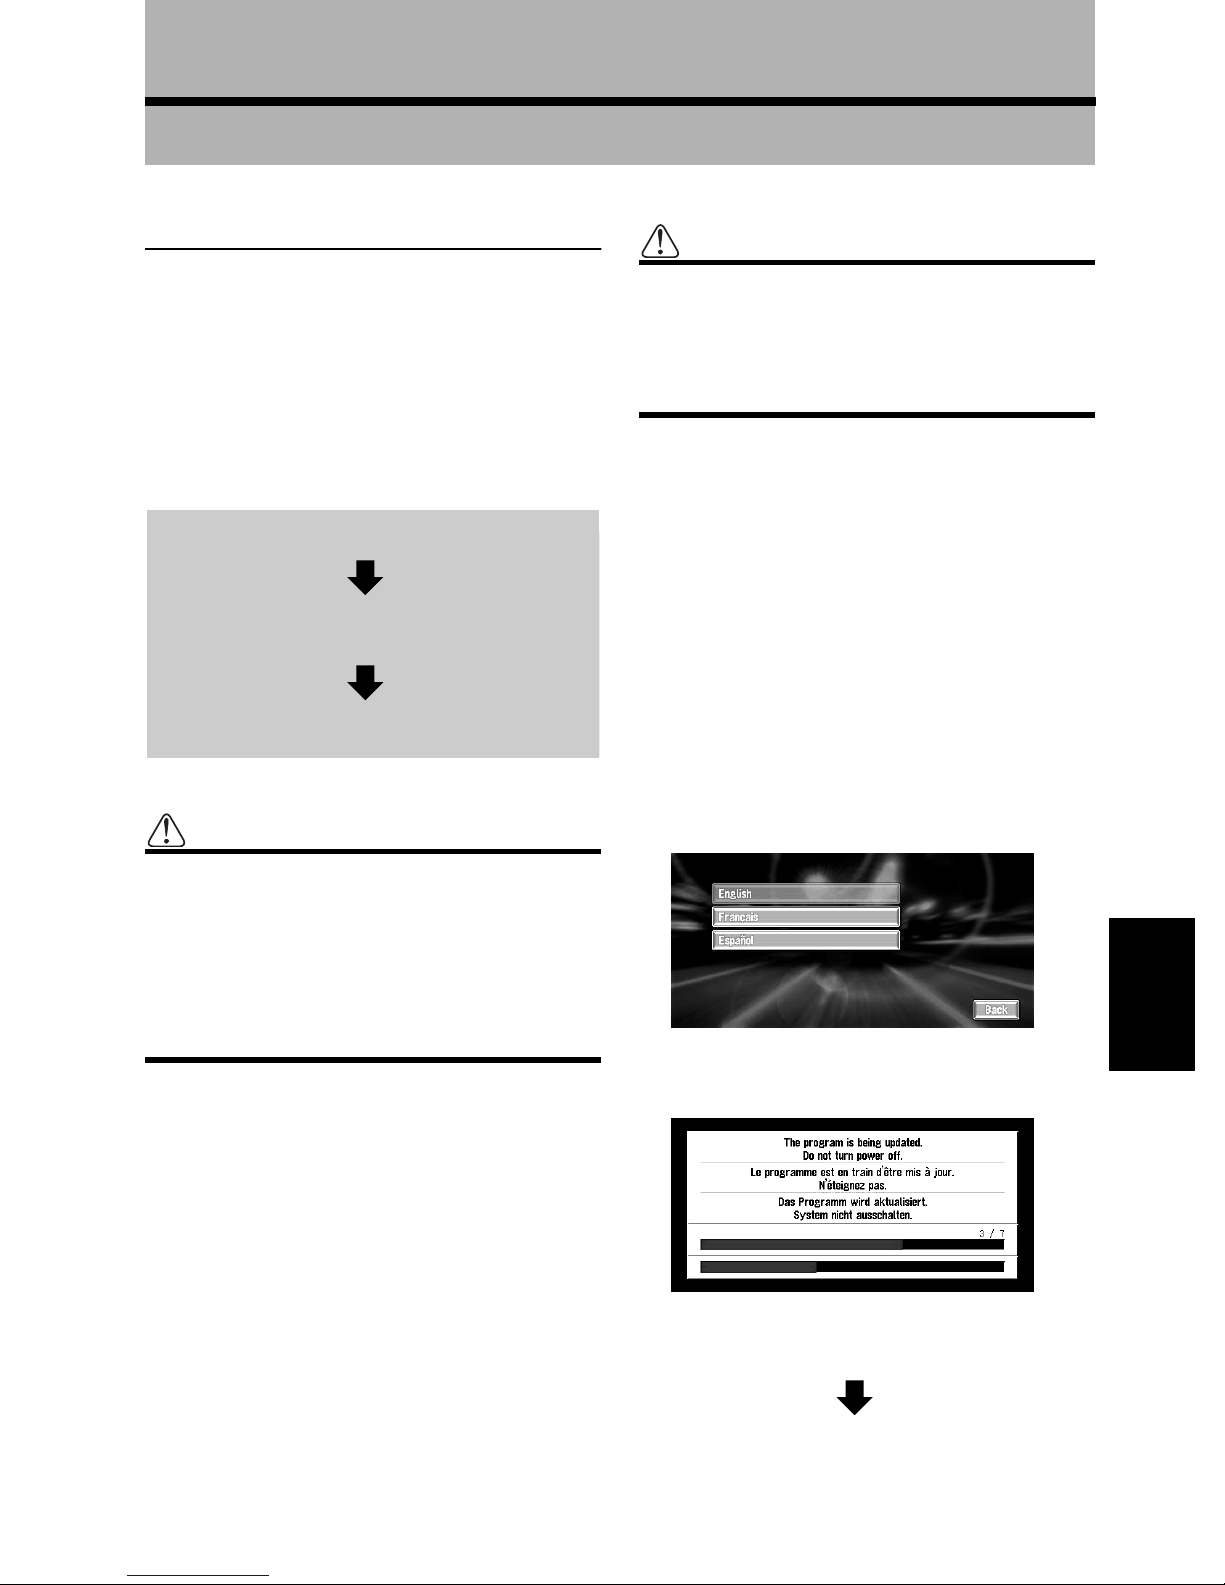
Appendix
Installing the Program
The program is installed to the main unit of the
Navigation System using the disc sold separately.
This is not necessary if your dealer already performed the installation.
When installing the program, you carry out the
following operations. When all the setup procedures are completed, the map of your surroundings appears, and you can use the Navigation
System.
1 Insert the disc while the car is parked.
2 Select the language used for the Navi-
gation System.
3 Setting the clock.
Caution
Users of the AVIC-9DVD or AVIC-90DVD
who upgraded to a more recent version using
the version upgrade disc (CNDV-21) cannot
return to their pre-upgrade version. You
should also note that you can no longer use
the discs included in the set of this Navigation System.
1 Park your car in a safe place.
Leave the engine on, and make sure that the
parking brake is on.
2 Insert the disc to the main unit of the Nav-
igation System.
When upgrading from AVIC-9DVD or AVIC90DVD, installation of the version upgrade
program starts immediately.
Caution
Once the installation of the program starts,
do not stop the engine of your car and switch
off the Navigation System until the installation is completed and the map of your surroundings appears.
3 Touch “Yes/Oui”.
When you start this unit for the first time, the
message confirming if you select another language.
English is the default language of the Navigation System. If desired, you can select another
language is shown.
❒ To keep English, touch “No/Non”. After
this, proceed to Step 5.
❒ When you want to select another lan-
guage, touch “Yes/Oui”, and proceed to
the next step.
4 Select the language from the list.
Touch the language you want to use.
Installation of the program, in the language
you chose, begins.
Appendix
When the installation is complete, the opening display appears.
53
Page 56
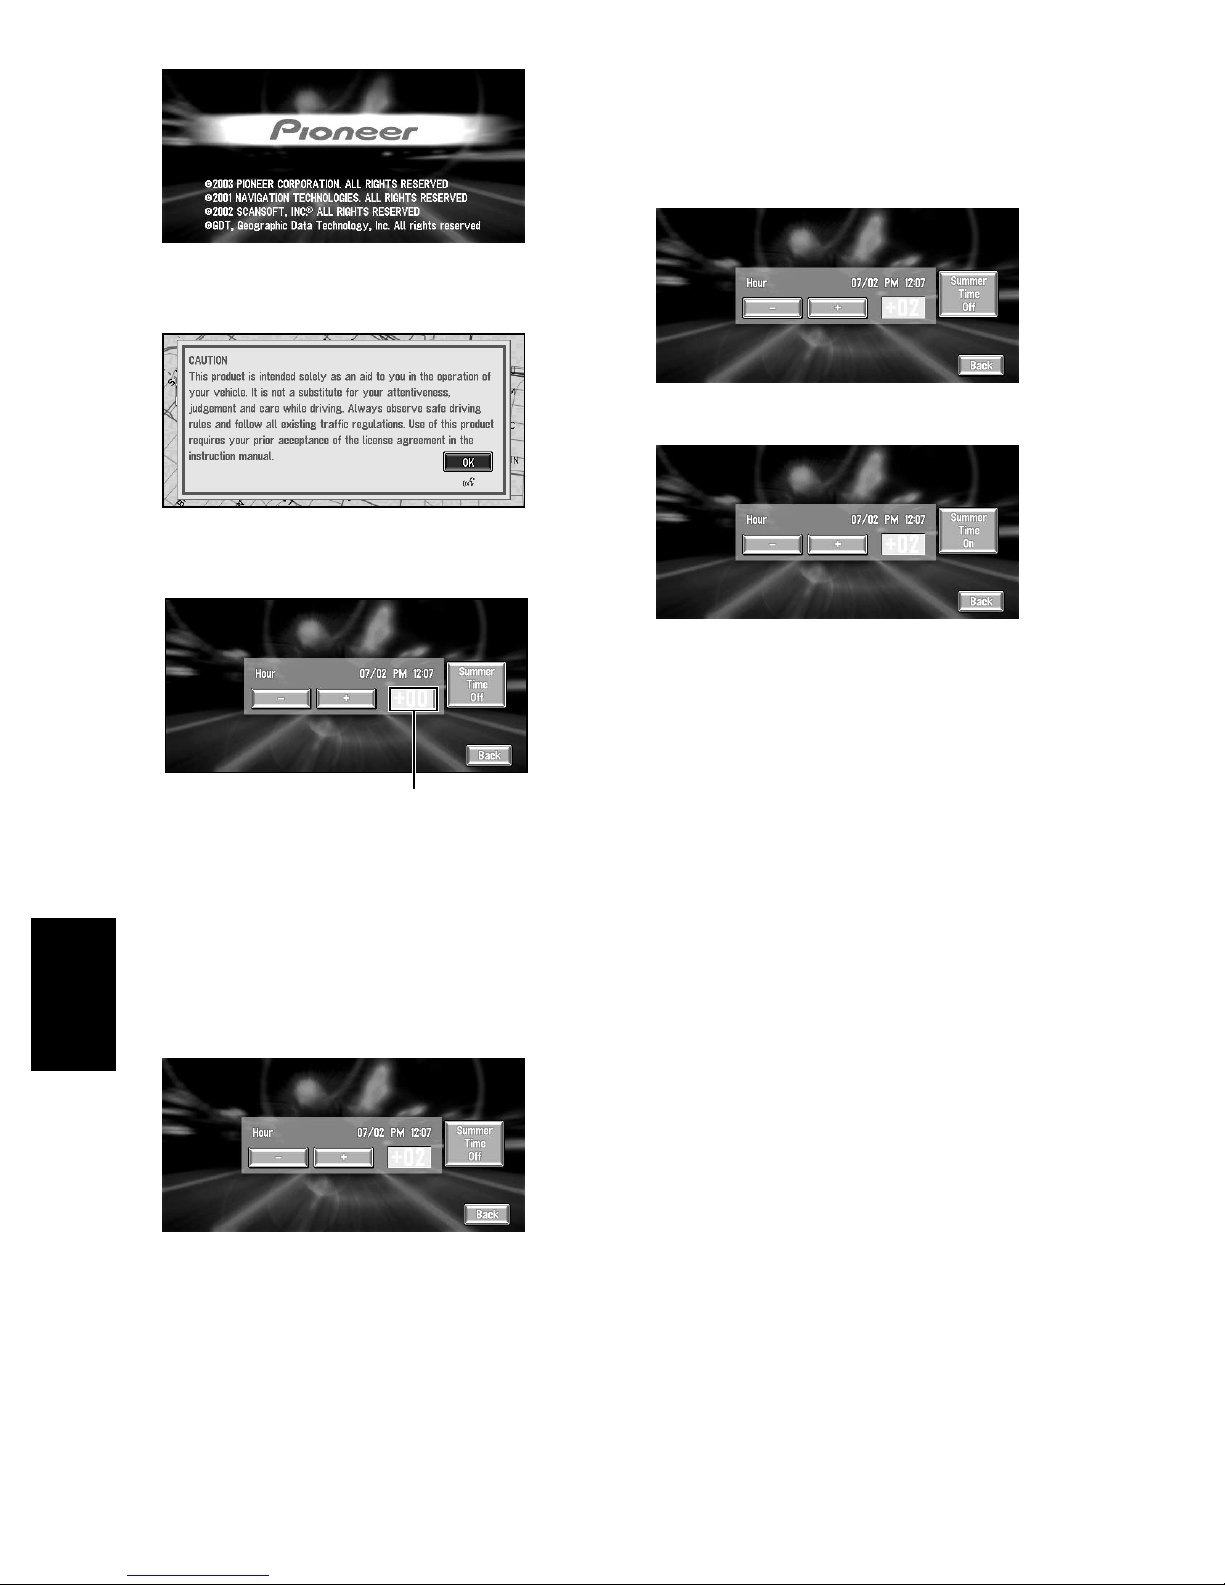
5 Check the details of the cautionary mes-
sage and touch “OK”.
6 To set the time difference, touch “+” or
“–”.
7 If necessary, set to summer time.
Daylight Saving Time (DTS) is off by default.
Touch “Summer Time” to change the time if
you are in the daylight saving period. This
turns the display below DTS “On”.
8 To complete the setting, touch “Back”.
The time difference between the time originally set in this unit (Pacific Standard Time)
and the current location of your car is shown.
If necessary, adjust the time difference.
Touching “+” or “–” changes the time difference display in one-hour increments. The time
difference can be set from +3 to –3 hours.
Appendix
Time difference
The map of your surroundings appears.
This completes the setup of your Navigation System. Chapter 1 explains the basic operation of
your Navigation System.
➲ To change the language and time later ➞
Chapter 4.
54
Page 57
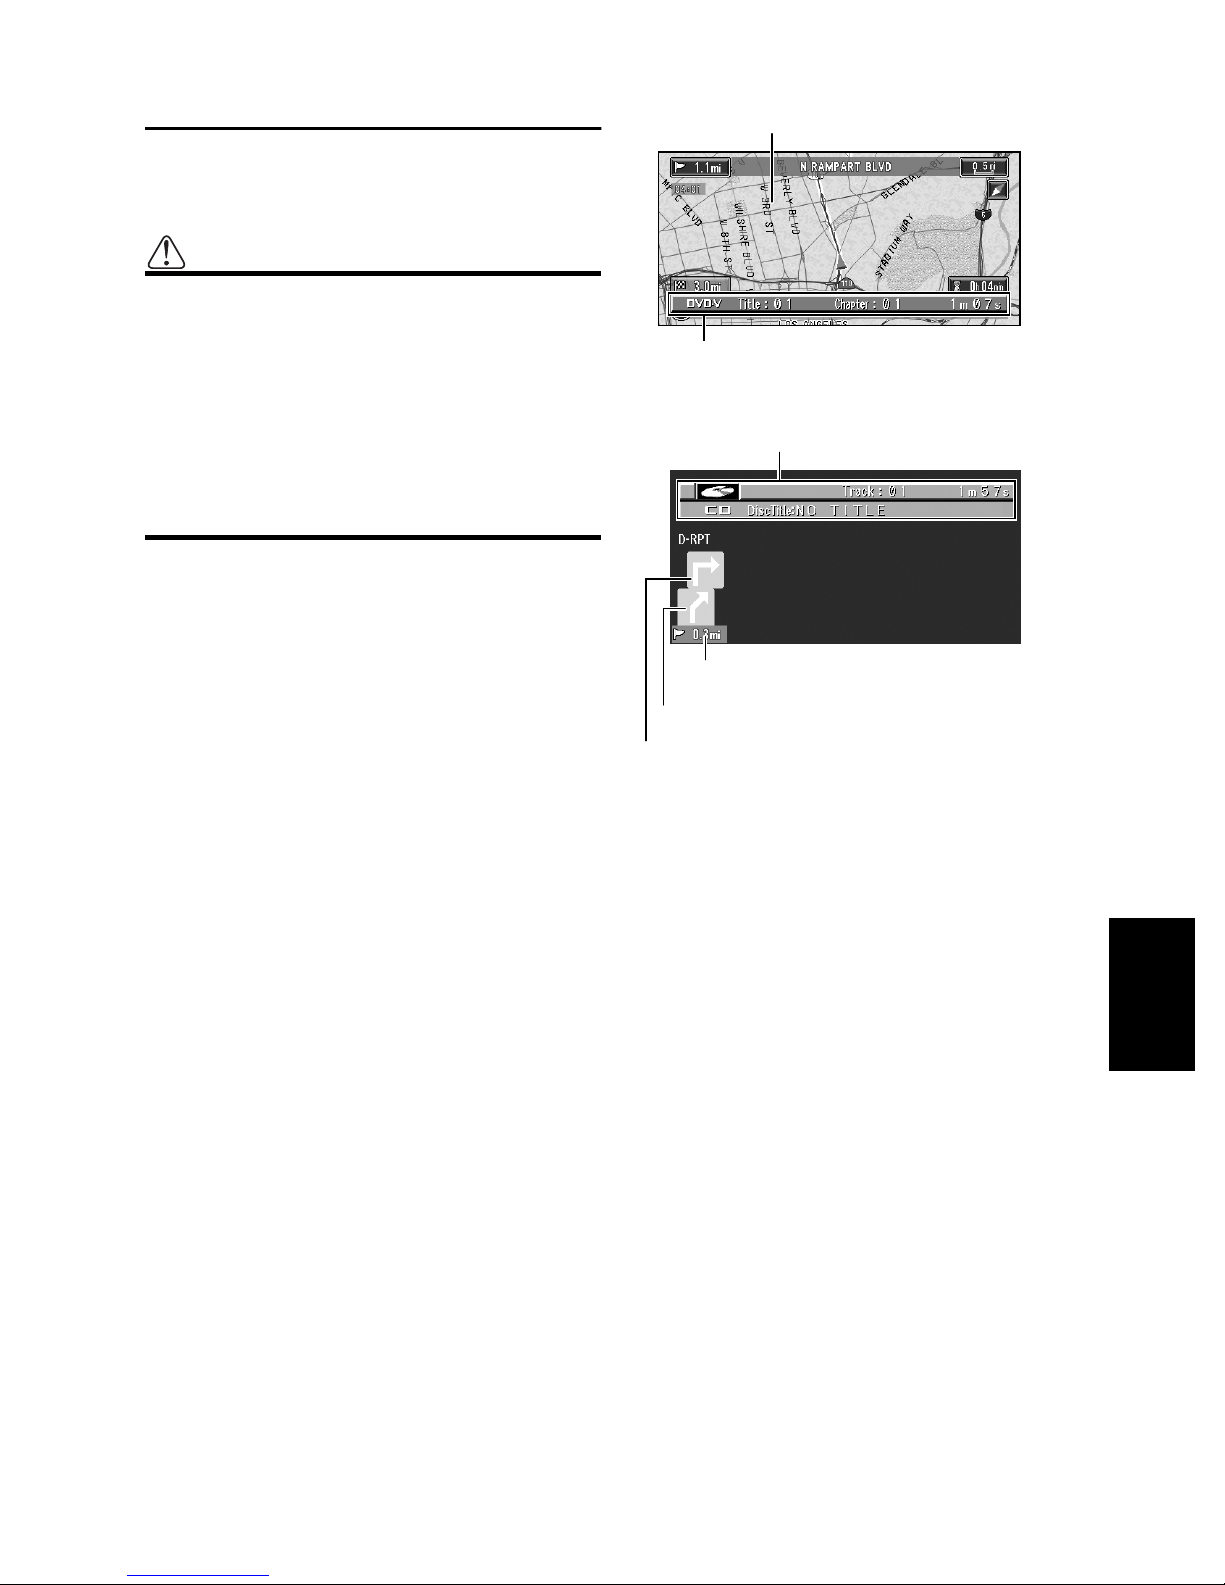
Combining and Using Pioneer
AV Equipment
To Ensure Safe Driving
WARNING
• To avoid the risk of an accident and the
potential violation of applicable laws, this
product is not for use with a video screen
that is visible to the driver.
• In some countries or states the viewing of
images on a display inside a car even by
persons other than the driver may be illegal. Where such regulations apply, they
must be obeyed.
Characteristics of the Navigation System when combined
(example) Navigation screen
Map display
Information of AV being played
(example) Arrow display on CD screen
Information of AV being played
with Pioneer AV Head Unit
When this product is combined with a Pioneer
AV Head Unit (AVH-P7500DVD or AVHP6500DVD), you can use the Navigation screen to
confirm information on the audio equipment
being played or you can use the Pioneer AV Head
Unit’s Audio Operation screen to confirm route
guidance information. Also, you can use the Pioneer AV Head Unit to select the built-in DVD
player of the Navigation System as a “NAVI
Source”. (Navigation unit that cannot play DVDVideos or CDs on the built-in DVD-ROM drive
cannot be selected as a source.)
When you approach an intersection with the
Audio Operation screen displayed, an enlarged
map of the intersection appears. When you have
passed through the intersection, the display
reverts to the Audio Operation screen.
➲ You can also operate audio equipment by
voice ➞ Chapter 5
❒ When AVD-W6210 is connected, you cannot
operate audio equipment by voice.
Distance to the guidance point
Current direction of travel
Next direction of travel
❒ If you want to operate the Navigation System
while the enlarged intersection map is displayed, press the NAVI/AV button on the display to switch to the navigation map.
❒ When pushing the display’s NAVI/AV button
with the map disc inside the Navigation unit,
the NAVI source screen may show “DISC
DATA READING” or may be blank.
➲ The Arrow display or enlarged intersection
map display can be turned on or off ➞
Page 47
➲ NAVI Source ➞ “Switching the source” of the
Pioneer AV Head Unit combined with the
product.
➲ For the connection methods ➞ see the instal-
lation manuals of AV equipment, or consult
the shop or dealer where you purchased the
product.
Appendix
55
Page 58

When resetting AV Head Unit
When pressing the reset button of AV Head Unit
while Navigation System and AV Head Unit are
combined, make sure that ACC (ignition) is tuned
OFF. If the reset button is pressed while ACC
(ignition) is ON, it may not work properly.
Cautions When Connecting a
Rear Display to the Front Display
When combining a rear display with the front display, you can use the front display settings to
select whether to display the images of the
sources or navigation screen on the rear display.
Touch Panel Operation When
Using NAVI Source
When the system is combined with the Pioneer
AV Head Unit (AVH-P7500DVD or AVHP6500DVD), if you use the built-in DVD player to
play a DVD-Video or CD when using the NAVI
Source, the operation buttons are displayed on
the screen and a few limited operations can be
performed.
qer
tw
(ex. When AVH-P6500DVD is connected)
➲ Switching the rear display ➞ the manual for
the display you are combining.
q Switching the source
w During DVD playback : Forwarding/
rewinding the chapter.
During CD playback : Forwarding/rewinding the track.
e During DVD playback : Title up/down.
During CD playback : Not used.
r Displaying the audio menu. For details,
refer to the Pioneer AV Head Unit’s Oper-
Appendix
ation Manual.
t Cancelling the operation buttons.
❒ When the AVD-W6210 is connected, the oper-
ation buttons are not displayed.
56
Page 59

Cars that Cannot Obtain Speed
Pulse Data
❒ The speed pulse data comes from the speed
sensing circuit. The location of this speed
sensing circuit depends on your car model. In
some cases, it is impossible to make a connection to it, and in such a case we recommend that the ND-PG1 speed pulse generator
(sold separately) be used.
Conditions Likely to Cause
Noticeable Positioning Errors
For various reasons such as the state of the road
you are traveling on and the state of reception of
the GPS signal, the actual position of your car
may differ from the position displayed on the map
screen.
Some types of car may not output a speed signal
while driving at just a few kilometers per hour. In
such a case, the current location of your car may
not be displayed correctly while in a traffic jam or
in a parking lot.
Troubleshooting
If you have problems operating your Navigation
System, refer to this section. The most common
problems are listed below, along with likely
causes and solutions. While this list is not comprehensive, it should answer your most common
problems. If a solution to your problem cannot be
found here, contact your dealer or the nearest
authorized Pioneer service facility.
You cannot position your car on the
map or the positioning error is large.
Possible causes:
(1) The quality of signals from the GPS satellites
is poor, causing reduced positioning accuracy.
Such a loss of signal quality may happen for
the following reasons:
•The GPS antenna is in an unsuitable location.
•Obstacles are blocking signals from the
satellites.
•The position of satellites relative to your car
is bad.
•Signals from the GPS satellites have been
modified to reduce accuracy. (GPS satellites are operated by the US Department of
Defense, and the US government reserves
the right to distort positioning data for military reasons. This may lead to greater positioning errors.)
•If a car phone or cellular phone is used
near the GPS antenna, GPS reception may
be lost temporarily.
•Do not cover the GPS antenna with spray
paint or car wax, because this may block
the reception of GPS signals. Snow buildup
can also degrade the signals.
(2) Signals from the car’s speed pulse are not
being picked up properly.
(3) The main unit may not be mounted securely
in your car.
(4) Your car is operating in Simple hybrid mode.
(5) Setting of the Installation direction lever is
wrong.
(6) Main unit is installed with an extreme angle
exceeding the limitation of the installation
angle.
(7) Indication of the position of your car is mis-
aligned after a U-turn or reversing.
Appendix
57
Page 60

Solutions:
(1) Check the GPS signal reception (➞ Page 44)
and the position of the GPS antenna if necessary, or continue driving until reception
improves. Keep the antenna clear.
(2) Check that the cables are properly con-
nected. If necessary, consult the dealer that
installed the system.
(3) Check that the main unit is securely
mounted and, if necessary, consult the
dealer that installed the system.
(4) Connect the speed signal input (pink lead
wire) of the power cable correctly, and reset
the 3D Hybrid Sensor (“Learning Status”).
(5) Check the installation position of the main
unit of your Navigation System and the setting of the Installation direction lever (➞
“Installation Manual”).
(6) Confirm the installation angle. (This unit
must be installed within +30 degrees to –15
degrees of the horizontal, or within five
degrees of your car’s direction of travel.)
(7) Check whether or not the reverse gear signal
input lead (purple) is connected properly.
(The Navigation System works properly without the lead connected, but positioning accuracy will be adversely affected.)
The map continually reorients itself.
Possible causes:
The display is set to “Heading Up”.
Solutions:
Check the settings (➞ Page 22) and change the
setting to “North Up”.
Tracking marks are not displayed.
Possible causes:
The “Tracking Display” is turned off.
Solutions:
Appendix
Check the “Tracking Display” settings (➞
Page 47) and make sure “Always” or “This
Trip” is selected.
The daylight display is used even when
the car lights are on.
Possible causes:
(1) “Daytime” is selected on “Day/Night Dis-
play.”
(2) The Orange/white lead is not connected.
Solutions:
(1) Check the “Day/Night Display” setting (➞
Page 46) and make sure “Nighttime” is
selected.
(2) Check the connection.
The system will not switch on or will
not operate.
Possible causes:
Installation or connection has been carried out
incorrectly.
Solutions:
Check with your dealer.
The display is very dim.
Possible causes:
(1) The car’s light is turned ON, and “Night-
time” is selected on “Day/Night Display”.
(2) The car cabin temperature is extremely low.
Solutions:
(1) Read about the “Day/Night Display” set-
ting (➞ Page 46) and, if desired, select “Day-
time”.
(2) A Liquid Crystal Display (LCD) is used, and
such displays tend to darken when cold. Wait
for the car to warm up.
There is no voice guidance or the volume is low.
Possible causes:
The volume setting is low.
Solutions:
Check the volume setting on the display or turn
the volume up according to “Hardware Vol-
ume” (➞ Page 46) and/or turn up the volume on
the display.
58
Page 61

The Remote Control fails to work.
Possible causes:
(1) The batteries are low.
(2) The batteries have been inserted incorrectly.
(3) The Remote Control is pointing at the floor or
a seat.
(4) The signal receptor on the display is exposed
to direct sunlight.
Solutions:
(1) Change the batteries.
(2) Check that the batteries are properly inserted
according to the + and – markings.
(3) Ensure that the Remote Control has a clear
line of sight to the display unit.
(4) Move the Remote Control closer to the
receiver on the display unit.
When the screen is frozen...
Park your car at a safe place, and cut the
engine off. Turn the ignition key back to “Acc
off”. Then start the engine again, and turn the
power to the main unit back on. If this does
not solve the problem, press the reset button
on the main unit.
If the display suddenly disappears
(For AVIC-9DVD)
When using the Navigation System with
another manufacturer’s display, if the display
suddenly disappears, setting of the image
output may have changed.
Set again by following the instructions below.
1. Park your car in a safe place, and pull the
side brake.
2. Turn the power of the main unit off (cut off
the engine).
3. While pressing [ ] (AUDIO) button on the
bottom left of the numeric keypad of the
Remote Control, turn the ACC on (start the
engine).
Image output is switched, as the image of the
navigation (RGB image) is output from RCA
Video output, and the image is displayed on
the screen.
•
Messages and How to React to
Them
The following messages may be displayed by your
Navigation System.
❒ There are occasions when you may see error
messages other than those shown here. In
such a case, follow the instructions given on
the display.
(1) “You cannot use this function while
driving.”
When:
While trying to make a menu selection.
What to do:
Pull over and come safely to a halt, put the parking brake on, and then try again.
(2) “This is not the appropriate disc.
Please insert the appropriate disc.”
When:
(1) If you try to use a disc which is incompatible
with this system (including the old version
map disc).
(2) If you insert a disc upside down.
(3) If the disc is dirty.
(4) If the disc is cracked or otherwise damaged.
What to do:
(1) Insert a suitable disc.
(2) Insert the disc with the label upward.
(3) Clean the disc.
(4) Insert a normal, round disc.
(3) “Irregular speed pulse signal is
detected. Please power off the system
and check the installation. After you
have checked, please re-boot the sys-
tem and press “OK”.”
When:
If the Navigation unit does not receive the car
speed pulse.
What to do:
Consult your Pioneer dealer.
Appendix
59
Page 62

(4) “Speed pulse wire is not connected.
System will start to learn without
speed pulse. Please keep in mind that
accuracy is not fully ensured without
speed pulse.”
(8) “Your route could not be found.”
When:
If the distance to the destination is too far and
cannot be set.
When:
The speed signal input (pink lead wire) of the
power cable is not connected.
What to do:
To operate with 3D hybrid mode, connect the
speed signal input (pink lead wire) of the power
cable correctly. Although it can be operated with
Simple hybrid mode without connecting the
speed signal input, the precision of the positioning will be less accurate.
(5) “Vibration is detected. Please power
off the system and check the installation. After you have checked, please
re-boot the system and press “OK” .”
When:
While the car is stationary, the Navigation System is installed in a place where the main unit
may be affected by a large vibration.
What to do:
Re-install the main unit of the Navigation System
in a place where the main unit will not be
affected by vibration.
(6) “Direction of G sensor is not correct.
Please power off the system and
check the installation. After you have
checked, please re-boot the system
and press “OK” .”
When:
Direction of G sensor is set incorrectly.
What to do:
See the “Installation Manual” and set the direction of G sensor correctly.
Appendix
(7) “Gyro Sensor is not working properly.
Please consult your dealer or Pioneer
service center.”
When:
Abnormal output of Gyrosensor is detected.
What to do:
Note down the error code shown on the screen;
turn off the power, and then contact your nearest
Pioneer service facility.
What to do:
Change the destination to a location that is
closer and divide up the route.
(9) “The route could not avoid the speci-
fied area.”
When:
If route setting cannot avoid specified Areas to
Avoid.
What to do:
Choose whether or not to try setting a route
through the area.
(10)“Memory is Full.”
When:
If there are already 300 items when you attempt
to register an item in the Address Book.
What to do:
Delete some destinations as appropriate.
(11)“Memory Full.”
When:
When there is no more free space in the PC card.
What to do:
Delete unnecessary data.
(12)“Irregular character strings. Please
input again.”
When:
A symbol that cannot be pronounced was
entered.
What to do:
Enter a word that can be pronounced.
(13)“An error has occurred. Please note
the following error code and switch
power off.”
When:
In the case of a system failure.
What to do:
Note down the error code shown on the screen;
turn off the power, and then contact your nearest
Pioneer service facility.
60
Page 63

(14)“DVD Player is overheating. Discon-
tinue until temperature drops.”
Route Setting Information
When:
The DVD-ROM drive has overheated.
What to do:
Cut the power off, and wait for a while before
turning the power on again.
(15)“DISC DATA READING”
When:
With the map disc inside the Navigation unit, the
NAVI source screen has been displayed by pressing the display’s NAVI/AV button.
What to do:
Select any other source besides “NAVI SOURCE”,
or press the display’s NAVI/AV button to switch
to the Navigation map.
If a message about the PC card is displayed
• If there is no more space on the PC card or 300
items of data are already stored in one group,
either delete unnecessary data or create a new
group.
• If the data read from the PC card combined
with the data registered in the Address Book
exceeds 300 items, either delete unnecessary
data or reduce the amount of data read from
the PC card.
Route search specifications
Your Navigation System sets a route to your destination by applying certain built-in rules to the
map data. This section provides some useful
information about how a route is set.
Caution
When a route is calculated, the route and
voice guidance for the route is automatically
set. Also, for day or time traffic regulations,
only information about traffic regulations at
the time when the route was calculated is
shown. For example, if a street is open during the morning only, but you arrive later, it
would be against the traffic regulations so
you cannot drive along the set route. When
driving, please follow the actual traffic signs.
Also, the system may not know some traffic
regulations.
About the route condition
When the calculation of only one route is set, you
can search a route option by combining the following conditions.
➲ How to set the calculation conditions ➞
Page 29
For example, when “Shortest” and “Avoid Free-
way” (“On”) are combined, the route, which
avoids freeway, and has the shortest travel time,
will be calculated and displayed on the screen.
Condition 1 :whether to put priority on the
distance, or time
Shortest :
Calculate a route with the shortest distance to
your destination as a priority.
Fastest :
Calculate a route with the shortest travel time to
your destination as a priority.
Appendix
61
Page 64

Condition 2 :whether to use freeway or not
Avoid Freeway :
Calculate a route that avoids freeway. (A route
using the freeway may be set if your destination
is far away.)
• The system assumes the driver deviated either
intentionally or inadvertently from the route
and searches for another route (intelligent
rerouting). Depending on the situation, the
system may search a new route that does not
return to the original one.
• The calculated route is one example of the
route to your destination decided by the Navigation System whilst taking the type of streets
or traffic regulations into account. It is not necessarily an optimum route. (In some cases, you
may not be able to set the streets you want to
pass. If you want to pass a certain street, set
the way point on that street.)
• The route set by your Navigation System is
based on the assumption that the driver does
not know the area. Thus, the streets known to
local drivers, such as small streets or special
roads, may not be used for the set route.
• Some route options may become the same
route. If visiting points are set, or the route is
set by voice operation, only one route is calculated.
• Route setting is limited to the range of the disc
in use.
• The destination is too far, there may be
instances where the route cannot be set. (If
you want to set a long-distance route going
across several areas, set way points along the
way.)
• During voice guidance, turns and junctions
from the freeway are announced. However, if
you pass junctions, turns, and other guide
points in rapid succession, some may not be
Appendix
announced.
• It is possible that guidance may direct you off a
freeway and then back on again.
• In some cases, the set route may require you to
travel in the opposite direction to your current
heading. In such cases, you are instructed to
turn around, so please turn around safely by
following the actual traffic rules.
• In some cases, guidance may direct you past
your destination and then indicate a U-turn to
get back to it.
• In some cases, a route may begin on the opposite side of a railway or river from your actual
current location. If this happens, drive towards
your destination for a while, and try route calculation again.
• In the following cases, the route that passes
through an Area to Avoid may be set:
- when your car is in the Area to Avoid
- when your destination or way points are in
the Area to Avoid
- when it is not possible to avoid doing so
• If a suitable route cannot be set in compliance
with the specified “Detour” distance, or your
preference to avoid freeways, toll roads, ferry
route, the setting or parameter may be
ignored.
• There may be instances when the starting
point and the destination point are not on the
highlighted route.
• The number of roundabout exits displayed on
the screen may differ from the actual number
of roads.
•“Auto Reroute” function does not work in the
following cases:
- when your car is not on a street
- when your car is on a ferry
- when driving on a road inside a facility
- when driving on a roundabout
Route highlighting
• Once set, the route is highlighted in bright
green on the map.
• The immediate vicinity of your starting point
and destination may not be highlighted, and
neither will areas with particularly complex
road layouts. Consequently, the route may
appear to be cut off on the display, but voice
guidance will continue.
Intersection enlargement
• When “Close-up of Junction” is on, the map
scale increases to show more detail as you
approach an intersection.
• If the intersection is approached in a gentle
curve, the map displayed may differ from the
actual road layout.
62
Page 65

Tracking
• Your Navigation System marks your course on
the map in certain increments. This is called
tracking. It is handy when you want to check a
route traveled without guidance or if returning
along a complex route.
• A maximum of about 145 miles (230 km) is
marked and, as you travel beyond this limit,
tracking marks are erased in order from the
most distant. Tracking display shows about
200km tracking of your car with a white dots.
When your car speed is under 3mile/h (5km/h),
the dots are red. When your car speed is more
than 3mile/h (5km/h), but less than 12mile/h
(20km/h), tracking shows in orange dots.
➲ Tracking can also be set for automatic erasing
whenever the Navigation System is switched
off ➞ Page 47
Appendix
63
Page 66

Copyright
©1993-2001 Navigation Technologies All rights
reserved
Canada:
This data includes information taken with permission
from Canadian authorities, including © Her Majesty the
Queen in Right of Canada, © Queen’s Printer for
Ontario.
© GDT, Geographic Data Technology, Inc. All rights
reserved
© 2003 DENSO CORPORATION, All rights reserved
© 2002 SCANSOFT, INC.
Data by info USA
Copyright © 2001, All Rights Reserved
ScanSoft
®
is a registered trademark of ScanSoft, Inc.
®
ALL RIGHTS RESERVED
Limited Guidance Areas :
These areas exist in the United States map database
only. Any area that is not included in the detailed area
list is a limited guidance area. These areas include the
road maps but may not contain complete road network
attribute information. Road network attributes include
information such as street names, street address, turn
restrictions, etc. Complete road network attribute information is needed to provide full route guidance. Due to
the incomplete road network attributes, route guidance
is available only on some of the major roads in the limited guidance areas. The surrounding streets will be displayed on the map display but route guidance may not
be given on these streets. The navigation system will
inform you when you are traveling into a limited guidance area where route guidance will not be available.
The street maps displayed on the navigation system can
then be used to determine the remaining route to your
destination.
Non-detailed Areas :
These areas exist in the Canadian map database only.
Any area that is not included in the detailed area list is a
non-detailed area. Some of the major roads are available
in the non-detailed areas and may be selected through
the intersection and the freeway entrance/exit route
planning options. The city center category is available in
the all point of interest planning option. Residential
roads, service roads, points of interest (except city center) and street addresses are not included in the nondetailed map areas.
Map Database :
The entire United States (excluding Alaska and Hawaii)
and portions of Canada are contained in one disc. The
United States map database includes the interstate freeways, state highways, country roads, major and general
streets. The Canadian map database includes some of
the highways, country roads, major and general streets.
The Canadian map may show a higher level of detail in
large populated areas than in less populated areas.
Detailed Areas :
The detailed areas are primarily located around metropolitan centers. All of the roads and the road network
attributes are contained in the map database for these
Appendix
detailed areas. Road network attributes include information such as street names, street address, turn restrictions, etc. A detailed area will include all major
highways, service roads, and residential roads. The
detailed areas include points of interest (POI). The map
database may not include data for newly constructed
areas or map database corrections that are completed
after the production of the disc. The Navigation System
will provide full route guidance in the detailed map
areas.
64
Page 67

Glossary
This glossary explains some of the terms used in
the manual.
Point of Interest (POI)
Point Of Interest; any of a range of locations stored in
the data, such as railway stations, shops, restaurants,
and amusement parks.
3D Hybrid sensor
The built-in sensor which enables the system to estimate
your car’s position. A learning function increases its
accuracy and two sets of learning data can be stored in
memory.
Address Book
A list of previously searched destinations, way points
and locations registered manually.
Current location
The present location of your car; your current location is
shown on the map by a red triangle mark.
Default setting
A factory setting which applies when you first switch on
the system; you can change default settings to suit your
own needs in the Route Options menu or the Settings
menu.
Destination
A location you choose as the end point of your journey.
DVD-ROM
A disc used to store data.
Favorite location
A frequently visited location (such as your workplace or
a relative’s home) that you can register to allow easy
routing.
Remote Control
The remote control unit for the system (➞ Chapter 1 of
the “Hardware Manual”).
Route setting
The process of determining the ideal route to a specific
location; route setting is done automatically by the system when you specify a destination.
Set route
The route marked out by the system to your destination.
It is highlighted in bright green on the map.
Tracking
Marks on the map indicating the route you have traveled.
Voice guidance
The giving of directions by a recorded voice while in
guidance mode.
Voice recognition
The technology that allows the system to understand the
driver’s voice commands.
Way Point
A location that you choose to visit before your destination; a journey can be built up from multiple way points
and the destination.
GPS
Global Positioning System. A network of satellites that
provides navigation signals for a variety of purposes.
Guidance mode
The mode in which guidance is given as you drive to your
destination; the system automatically switches to this
mode as soon as a route has been set.
Guidance point
These are important landmarks along your route, generally intersections. The next way point along your route is
indicated on the map by the yellow flag icon.
Home location
Your registered home location.
Menu
A list of options shown on the display; choices are
selected touching the display.
PC card
Card-type peripheral equipment mainly used for personal computers. The Navigation System can use a
memory card to store data.
Appendix
65
Page 68
Display Information
Main Menu
Destination
Address Search
P. 16
P. 28, 35Return Home
P. 28, 35Go to
P. 25POI Search
P. 26Vicinity Search
P. 28, 36Address Book
P. 28, 36Destination History
P. 27Freeway Search
P. 27Telephone Search
P. 25Search Area
Information
Appendix
PC card
P. 31Route Profile
P. 26Overlay POI
P. 44Connection Status
P. 31Route Scroll
P. 41Read from PC Card
P. 433D Calibration
Initialize PC Card
P. 40Save to PC Card
P. 41Delete PC Card Data
P. 40
66
Page 69
Route Options
Settings
P. 29Auto Reroute
P. 29Avoid Freeway
P. 29Fastest / Shortest
P. 29Number of Routes
P. 29Avoid Toll Road
P. 39Designate Areas to Avoid
P. 29Avoid Ferry
P. 35Return Home
Map Display
Mute Setting
P. 35Go to
P. 45Average Speed
P. 45Modify Current Location
P. 46Hardware Volume
P. 46Demo Mode
P. 46Day/Night Display
P. 47Current Time
P. 42Background Picture Setting
P. 46Language Selection
P. 48, 54Time
P. 47KM/Mile Setting
P. 47Tracking Display
P. 47AV Guide Mode
P. 47Areas to Avoid
P. 47Close-up of Junction
P. 47Arrow in AV
Appendix
P. 46Auto Voice Recognition
P. 47Voice Recog.Help
P. 46Voice Recognition
P. 46Voice Guidance
67
Page 70

Shortcut Menu
Shortcut menu
P. 24Destination
Chg.Route
P. 32Reroute
P. 35Registration
P. 20Vicinity Search
P. 26Overlay POI
P. 33Cancel Route
P. 31Route Profile
P. 31Route Scroll
P. 34Skip Way Point
P. 321 mile(km) – 50 mile(km) detour
Appendix
68
Page 71

Page 72

 Loading...