

Page 1
EJECT
OUT EXIT
RELOOP
IN/REALTIME CUE
0
OUT ADJUST OUT ADJUST
TRACK SEARCH
4¢
SEARCH
1¡
CUE
PLAY/PAUSE
6
LOOP
TRACK
TEMPO
16
10
6
MSF
REMAIN
A.CUE
1765432
131211109
148
1718 19201615
LOOP
RELOOP
REV FWD
BPM
TIME MODE TEMPO
AUTO CUE
±6/±10/±16
MASTER
0
EJECT
OUT EXIT RELOOP
IN/REALTIME CUE
0
AUTO MIX PLAY
PLAY MODE SELECT
CLEAR
TRACKDISC PROGRAM
MT
TRACK SEARCH
TEMPO
4¢
PLAYER SELECT
AB
SEARCH
BPM/TRACK
1¡
BPM
BPM/TRACK
NEXT
PUSH ENTER
REMAIN
BPM SYNC
INSTANT
SHORT TIME CHANGE MIX TIME
CHANGE
SHORT TIME
MIX MODE SELECT
A.CUE
CUE
1765432
PLAY/PAUSE
MINMAX
6
REV FWD
CU-V160
'
A
PLAYER
EJECT
DISC
0
A•B AUDIO-OUT SELECT
EJECT
DISC
0
MONITOR
PHONES
MIN MAX
AB
A•B A•B/
PLAYER SELECT
AUTO MIX
POWER
CMX-5000
COMPACT DISC PLAYER
CMX-5000
REMOTE CONTROLLER
CU-V160
TRACK
LOOP
1718 19201615
LOOP
TEMPO
16
10
6
MSF
131211109
148
RELOOP
BPM
TIME MODE TEMPO
AUTO CUE
DJ TWIN CD PLAYER
CMX-5000
±6/±10/±16
MT
MASTER
TEMPO
0
B
PLAYER
ORDER NO.
RRV2260
THIS MANUAL IS APPLICABLE TO THE FOLLOWING MODEL(S) AND TYPE(S).
Type
CMX-5000 CU-V160
KUC AC120V
TL AC110-240V
WY AC220-240V
Model
Power Requirement Remarks
CONTENTS
1. SAFETY INFORMATION
2. EXPLODED VIEWS AND PARTS LIST
.......................................
.................
3. BLOCK DIAGRAM AND SCHEMATIC DIAGRAM
4. PCB CONNECTION DIAGRAM
5. PCB PARTS LIST
6. ADJUSTMENT
................................................
.....................................................
...........................
...
12
45
59
64
2
4
7. GENERAL INFORMATION
7.1 DIAGNOSIS
..................................................
7.1.1 TEST MODE
7.1.2 POWER ON SEQUENCE
7.1.3 DISASSEMBLY
7.2 PARTS
7.2.1 IC
7.2.2 DISPLAY
..........................................................
..........................................................
...............................................
8. PANEL FACILITIES AND SPECIFICATIONS
................................
.........................................
....................................
....................
....
66
66
66
71
72
75
75
78
80
PIONEER CORPORATION 4-1, Meguro 1-chome, Meguro-ku, Tokyo 153-8654, Japan
PIONEER ELECTRONICS SERVICE, INC. P.O. Box 1760, Long Beach, CA 90801-1760, U.S.A.
PIONEER EUROPE N.V. Haven 1087, Keetberglaan 1, 9120 Melsele, Belgium
PIONEER ELECTRONICS ASIACENTRE PTE. LTD. 253 Alexandra Road, #04-01, Singapore 159936
c
PIONEER CORPORATION 2000
T – IZK FEB. 2000 Printed in Japan
Page 2

CMX-5000, CU-V160
1. SAFETY INFORMATION
This service manual is intended for qualified service technicians ; it is not meant for the casual do-ityourselfer. Qualified technicians have the necessary test equipment and tools, and have been trained
to properly and safely repair complex products such as those covered by this manual.
Improperly performed repairs can adversely affect the safety and reliability of the product and may
void the warranty. If you are not qualified to perform the repair of this product properly and safely, you
should not risk trying to do so and refer the repair to a qualified service technician.
WARNING
This product contains lead in solder and certain electrical parts contain chemicals which are known to the state of California to cause
cancer, birth defects or other reproductive harm.
Health & Safety Code Section 25249.6 – Proposition 65
NOTICE
(FOR CANADIAN MODEL ONLY)
Fuse symbols (fast operating fuse) and/or (slow operating fuse) on PCB indicate that replacement parts must
be of identical designation.
REMARQUE
(POUR MODÈLE CANADIEN SEULEMENT)
Les symboles de fusible (fusible de type rapide) et/ou (fusible de type lent) sur CCI indiquent que les pièces
de remplacement doivent avoir la même désignation.
(FOR USA MODEL ONLY)
1. SAFETY PRECAUTIONS
The following check should be performed for the
continued protection of the customer and service
technician.
LEAKAGE CURRENT CHECK
Measure leakage current to a known earth ground (water
pipe, conduit, etc.) by connecting a leakage current tester
such as Simpson Model 229-2 or equivalent between the
earth ground and all exposed metal parts of the appliance
(input/output terminals, screwheads, metal overlays, control
shaft, etc.). Plug the AC line cord of the appliance directly
into a 120V AC 60Hz outlet and turn the AC power switch
on. Any current measured must not exceed 0.5mA.
Reading should
not be above
0.5mA
Earth
ground
Device
under
test
Also test with
plug reversed
(Using AC adapter
plug as required)
Leakage
current
tester
Test all
exposed metal
surfaces
ANY MEASUREMENTS NOT WITHIN THE LIMITS
OUTLINED ABOVE ARE INDICATIVE OF A POTENTIAL
SHOCK HAZARD AND MUST BE CORRECTED BEFORE
RETURNING THE APPLIANCE TO THE CUSTOMER.
2. PRODUCT SAFETY NOTICE
Many electrical and mechanical parts in the appliance
have special safety related characteristics. These are
often not evident from visual inspection nor the protection
afforded by them necessarily can be obtained by using
replacement components rated for voltage, wattage, etc.
Replacement parts which have these special safety
characteristics are identified in this Service Manual.
Electrical components having such features are identified
by marking with a
in this Service Manual.
The use of a substitute replacement component which does
not have the same safety characteristics as the PIONEER
recommended replacement one, shown in the parts list in
this Service Manual, may create shock, fire, or other hazards.
Product Safety is continuously under review and new
instructions are issued from time to time. For the latest
information, always consult the current PIONEER Service
Manual. A subscription to, or additional copies of, PIONEER
Service Manual may be obtained at a nominal charge from
PIONEER.
on the schematics and on the parts list
AC Leakage Test
2
Page 3
CMX-5000, CU-V160
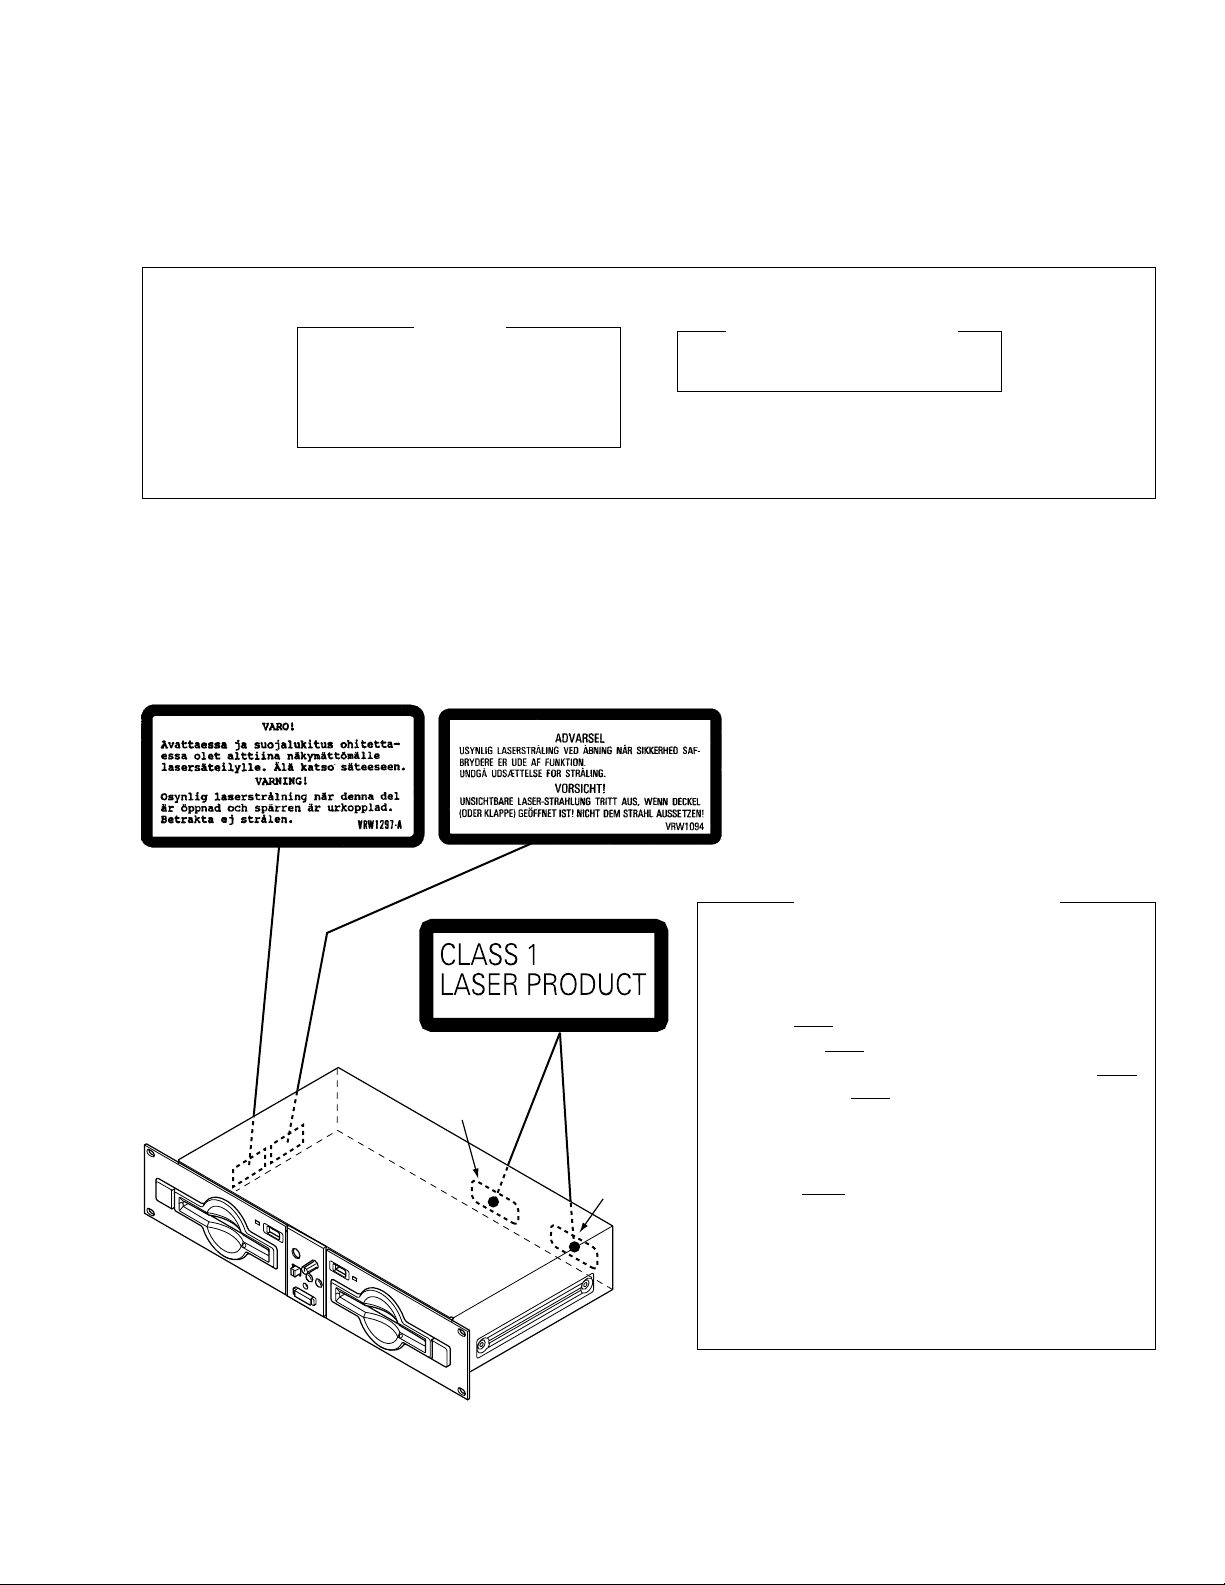
IMPORTANT
THIS PIONEER APPARATUS CONTAINS
LASER OF CLASS 1.
SERVICING OPERATION OF THE APPARATUS
SHOULD BE DONE BY A SPECIALLY
INSTRUCTED PERSON.
LABEL CHECK (for WY and TL types)
(Printed on the Rear Panel)
WY type
TL type
LASER DIODE CHARACTERISTICS
MAXIMUM OUTPUT POWER: 5 mW
WAVELENGTH: 780 – 785 nm
Additional Laser Caution
1. Laser Interlock Mechanism
The position of the switch (S1) for detecting loading
completion is detected by the system microprocessor, and
the design prevents laser diode oscillation when the s witch
is not in LPS1 terminal side (when the mechanism is not
clamped and LPS1 signal is high level.) Thus, the interlock
will no longer function if the switch is deliberately set to LPS1
terminal side. ( if LPS1 signal is low level ).
In the test mode∗ the interlock mechanism will not function.
Laser diode oscillation will continue, if pin 2 of AN8847SB
(IC201) on the CDPB Assy is connected to GND, or pin 19
of IC201 (LDON) is connected to low level (ON), or else the
terminals of Q201 are shorted to each other (fault condition).
2. When the cover is opened, close viewing of the objective
lens with the naked eye will cause exposure to a Class 1
laser beam.
∗ : Refer to page 69.
3
Page 4
CMX-5000, CU-V160
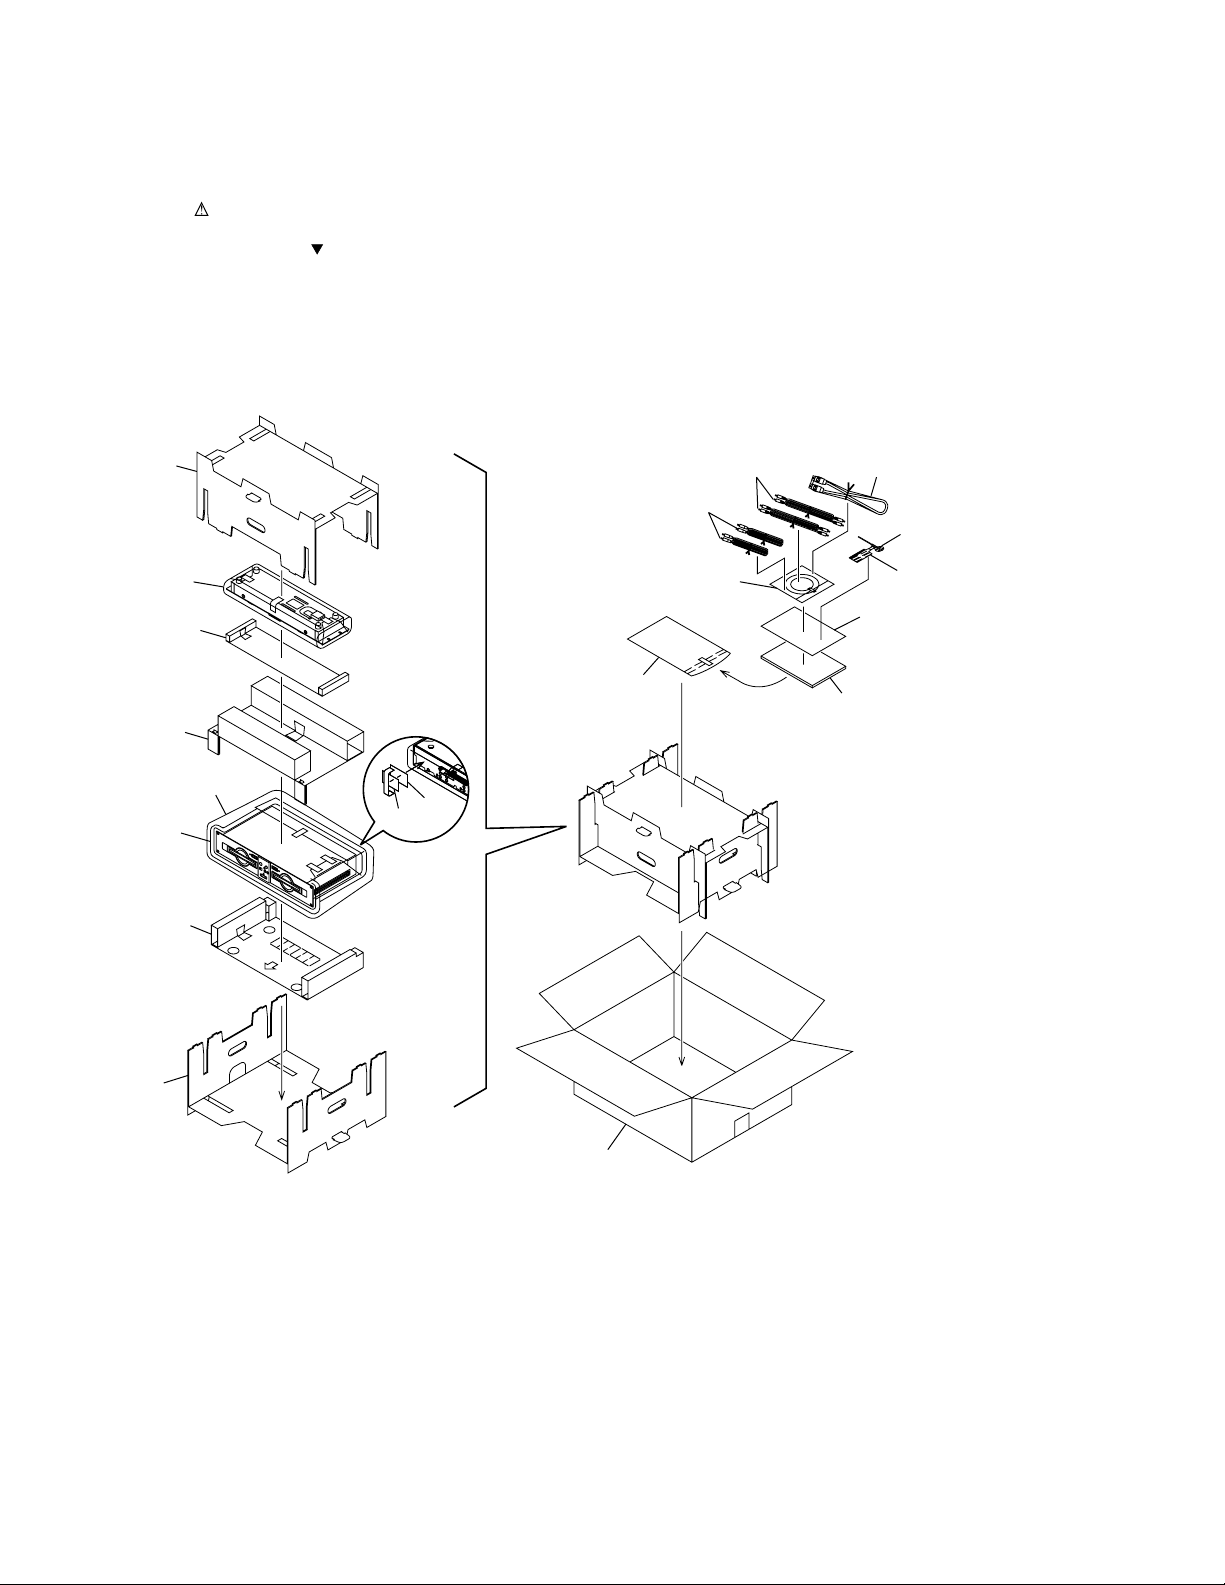
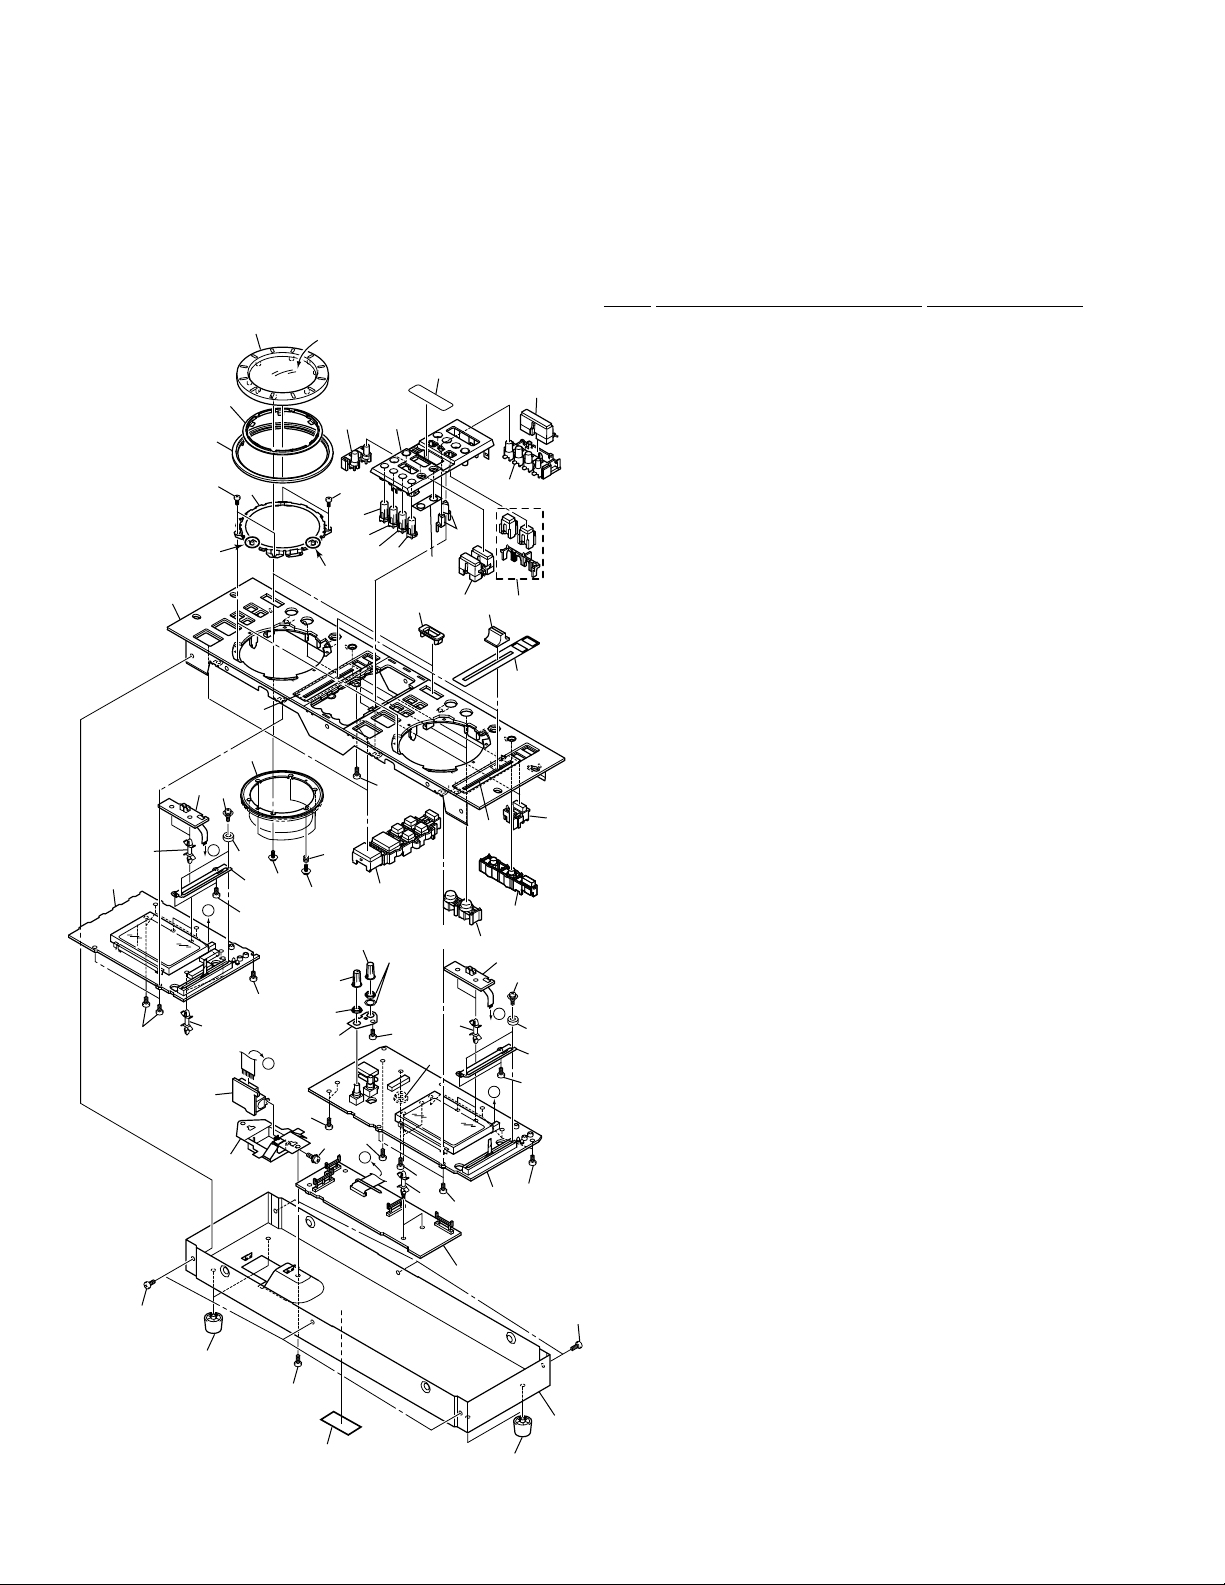
2. EXPLODED VIEWS AND PARTS LIST
NOTES:• Parts marked by "NSP" are generally unavailable because they are not in our Master Spare Parts List.
2.1 PACKING
The mark found on some component parts indicates the importance of the safety factor of the part.
•
Therefore, when replacing, be sure to use parts of identical designation.
Screws adjacent to mark on the product are used for disassembly.
•
1
9
2
3
21
20
8
4
7
(TL Type Only)
19
16
22
17
11
12
15
10 (KUC Type Only)
13
5
6
4
Page 5
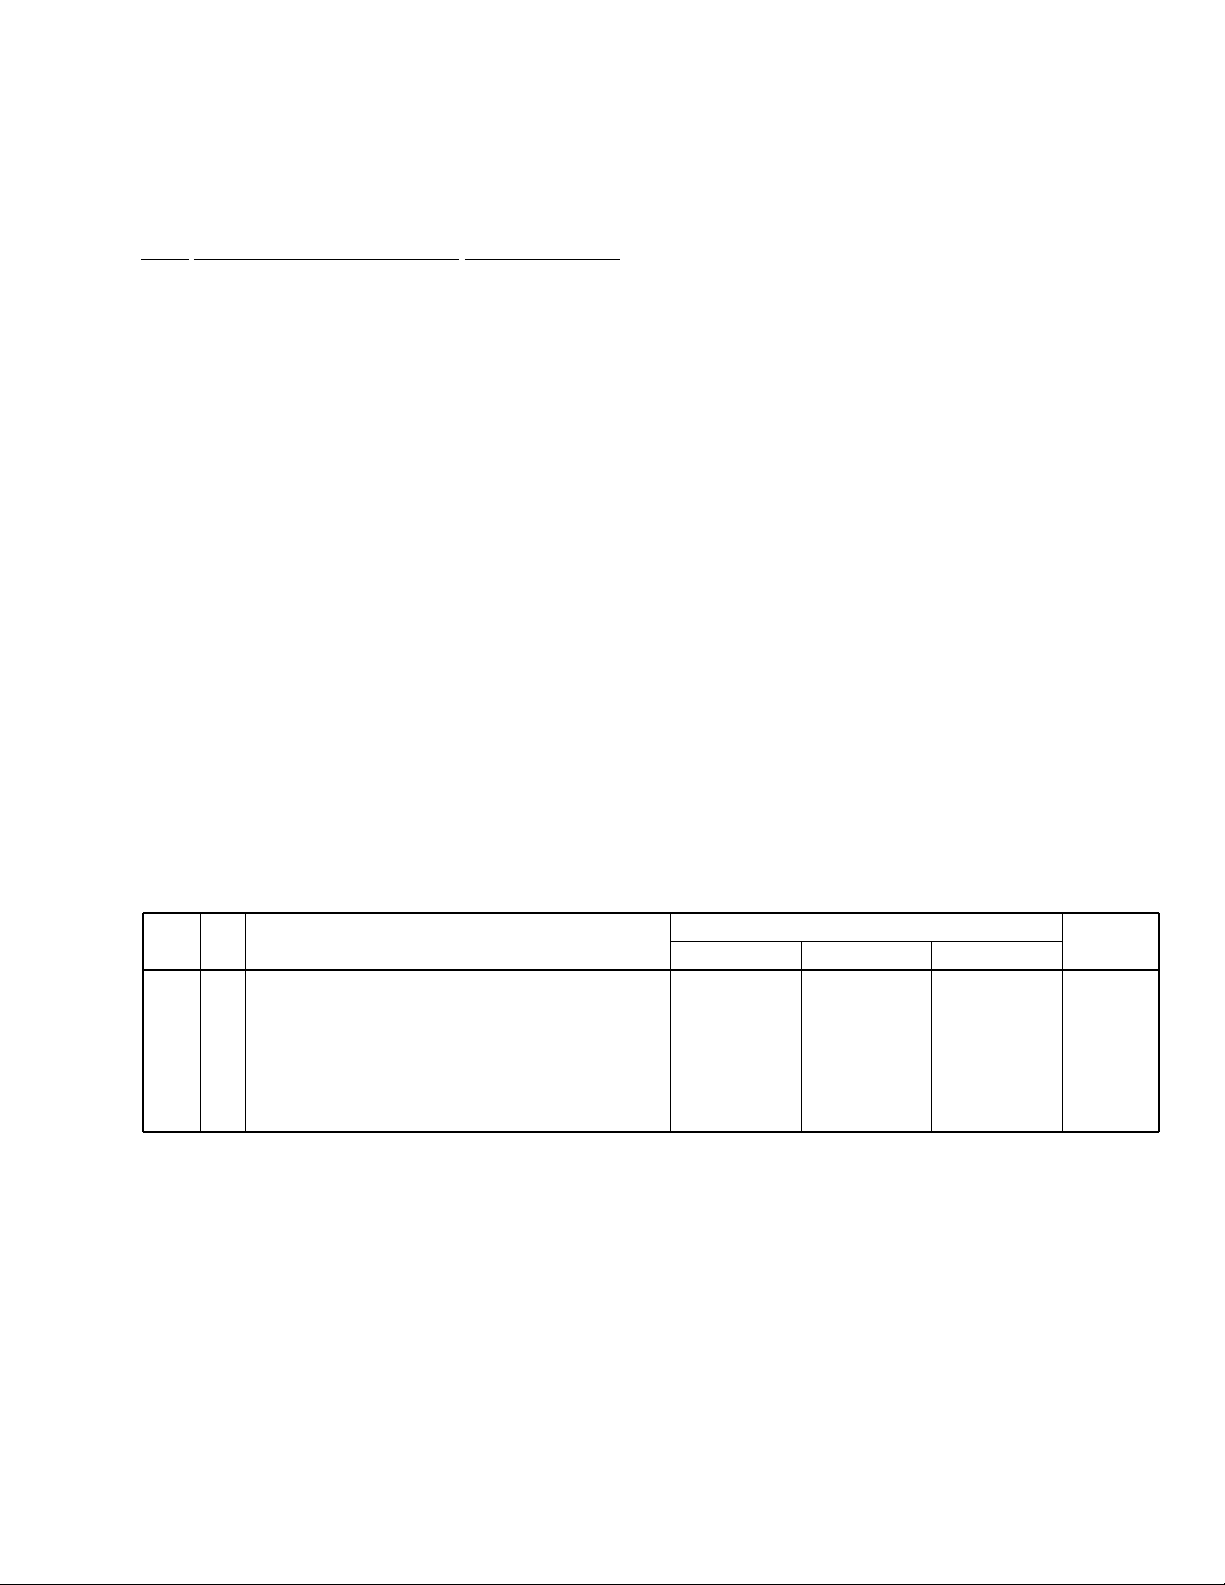
(1) PACKING PARTS LIST
Mark No. Description Part No.
1 Pad A DHA1448
2 Pad B DHA1449
3 Pad C DHA1450
4 Pad D DHA1451
5 Pad E DHA1474
CMX-5000, CU-V160
NSP 7 Caution SG DRM1199
NSP 10 Limited Warranty See Contrast table (2)
NSP 20 Silica Gel AEN7001
NSP 21 Polyethylene Bag AHG7047
6 Packing Case See Contrast table (2)
8 Sheet RHX1006
9 Mirror Mat Sheet Z23-026
(550 × 550 × 0.5)
11 Specialized Connection Cable DDE1115
for The Remote Controller
12 Forced Ejection Pin DEX1013
13 Operating Instructions See Contrast table (2)
14 • • • • •
15 Caution Tag AP DRW1897
16 Control Cord PDE1247
17 Audio Cable (L=1.5m) VDE1033
18 • • • • •
19 Polyethylene Bag Z21-038
(0.03 × 230 × 340)
22 Adaptor for 8cm discs See Contrast table (2)
(2) CONTRAST TABLE
CMX-5000/KUC, TL and WY are constructed the same except for the following :
Mark No. Symbol and Description
NSP610
Packing Case
Limited Warranty
13
Operating Instructions (English)
13
Operating Instructions (English/Spanish/Chinese)
13
Operating Instructions
(English/French/German/Italian/Dutch/Spanish)
KUC Type TL Type WY Type
DHG1961
ARY7043
DRB1254
Not used
Not used
Part No.
DHG1960
Not used
Not used
DRB1256
Not used
Remarks
DHG1953
Not used
Not used
Not used
DRB1255
22
Adaptor for 8cm discs
Not used
DEX1012
Not used
5
Page 6
CMX-5000, CU-V160
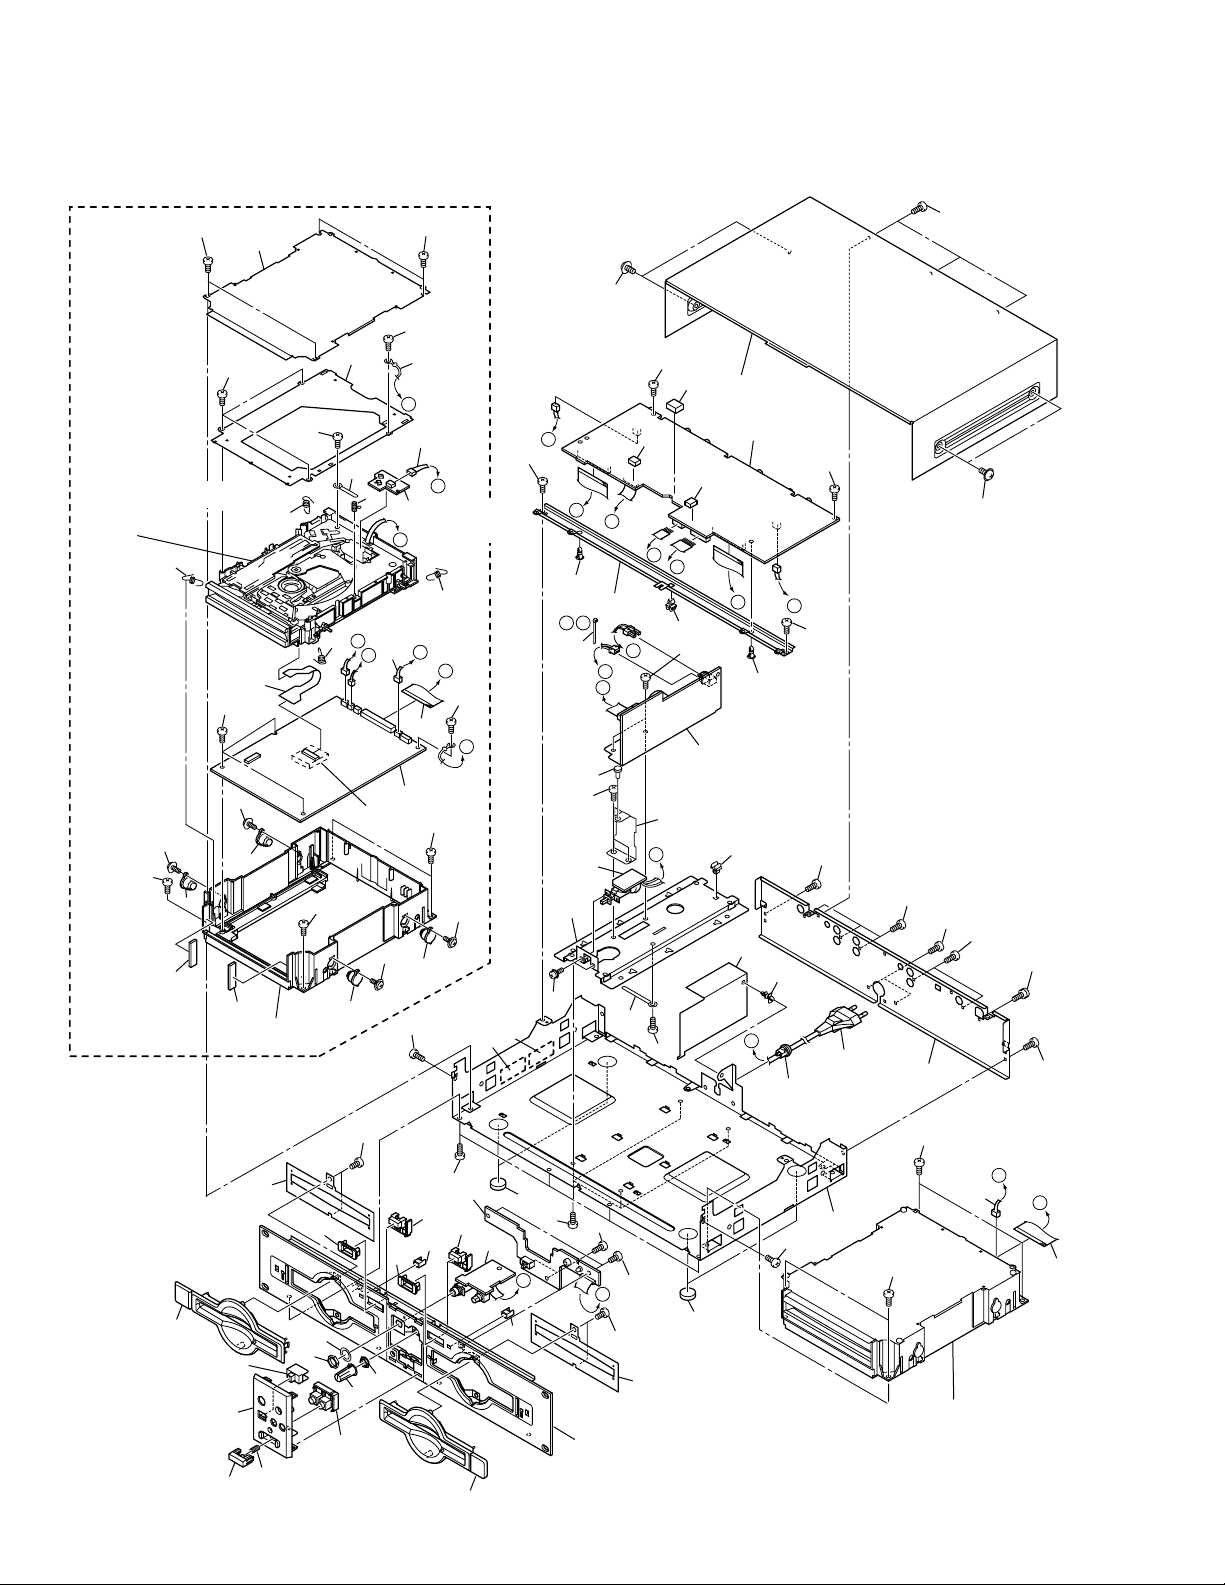
2.2 EXTERIOR
A PLAYER
56
36
56
56
Refer to
"2.3 SLOT-IN MECHANISM
ASSY".
16
34
60
54
35
24
34
15
56
60
35
54
24
38
34
35
37
51
33
H
G
18
60
56
56
12
I
13
H
4 (A PLAYER)
5 (B PLAYER)
G
34
14
F
E
11
1
54
35
TL and WY
Types Only
54
60
54
54
55
54
31
43
6
54
54
F
19
19
E
J
A
B
55
30
20
54
L
K
54
30
8
29
DCC
52
D
J
I
50
54
25
20
22
32
54
57
54
57
62
28
2
D
62
64
63
53
54
C
10
9
27
54
44
49
45
41
21
17
61
46
58
42
39
56
59
46
47
40
54
40
44
3
23
54
56
7
A
47
54
B
23
56
26
54
21
48
This component is same as A PLAYER.
54
54
14
B PLAYER
K
L
11
6
Page 7
(1) EXTERIOR PARTS LIST
CMX-5000, CU-V160
Mark No. Description Part No.
1 CDPB ASSY DWG1540
2 PSWB ASSY DWS1301
3 SELB ASSY DWS1302
4 SLM1 ASSY DWS1303
5 SLM2 ASSY DWS1304
6 TRMB ASSY DWX2066
7 HPJB ASSY DWX2067
8 SW POWER SUPPLY ASSY DWR1330
9 AC Power Cord See Contrast table (2)
10 Strain Relief See Contrast table (2)
11 37P F•F•C/60V DDD1159
12 Earth Lead Unit DDF1010
13 SL Connecto Assy 3P DKP3403
14 Connector Assy 3P DKP3514
15 S Flexible Cable DNP1748
NSP 16 Slot-in Mechanism Assy DXA1845
17 Power Knob Spring DBH1469
18 Silicon Seat DEB1449
19 Rubber Spacer DEB1455
20 PCB Holder DEC1231
21 Bezel Sheet DEC2346
22 Power Supply Cover DEC2347
23 Insulator DEC2348
24 Bezel Cushion C DEC2350
25 Power Supply Shield DEC2391
NSP 26 Chassis DNA1253
27 Rear Panel See Contrast table (2)
28 Power Supply Plate DNF1637
29 PCB Frame DNH2446
NSP 30 PCB Holder PNW1861
Mark No. Description Part No.
NSP 31 Spacer VEC1585
32 PCB Spacer VEC2077
33 Earth Spring DBH1398
34 Float Spring DBH1428
35 Damper DEC2236
36 Cover A DNF1636
37 Mecha Holder DNH2339
38 Damper Stay DNK3751
39 VR Knob DAA1145
40 Eject Knob DAC1924
41 Slide SW Knob DAC1926
42 Monitor Select Knob DAC1939
43 Bonnet DNE1382
44 Front Bezel DNK3724
45 Power Knob DNK3725
46 Eject Guide DNK3727
47 Disc Indicator DNK3729
48 Front Panel Assy DXB1729
49 Function Panel Assy DXB1732
50 Nylon Rivet (3 × 4.5) RBM-003
51 Cord Clamper RNH-184
52 Binder ZCA-SKB90BK
NSP 53 Cord Stopper ZCB-069Z
54 Screw BBZ30P060FZK
55 Screw BBZ40P060FZK
56 Screw BPZ30P080FMC
57 Screw BPZ30P080FZK
58 Washer DBE1010
59 Flange Nut DBN1004
60 Screw IPZ20P080FMC
61 Nut NKX2FUC
62 Screw PMH30P060FMC
NSP 64 Caution Label HE See Contrast table (2)
63 Caution Label See Contrast table (2)
(2) CONTRAST TABLE
CMX-5000/KUC, TL and WY are constructed the same except for the following :
Mark No. Symbol and Description
9
AC Power Cord
10
Strain Relief
27
Rear Panel
63
NSP
Caution Label
64
Caution Label HE
KUC Type TL Type WY Type
ADG7024
CM-22C
DNC1520
Not used
Not used
Part No.
VDG1061
CM-22B
DNC1519
VRW1094
VRW1297
Remarks
VDG1061
CM-22B
DNC1516
VRW1094
VRW1297
7
Page 8
CMX-5000, CU-V160
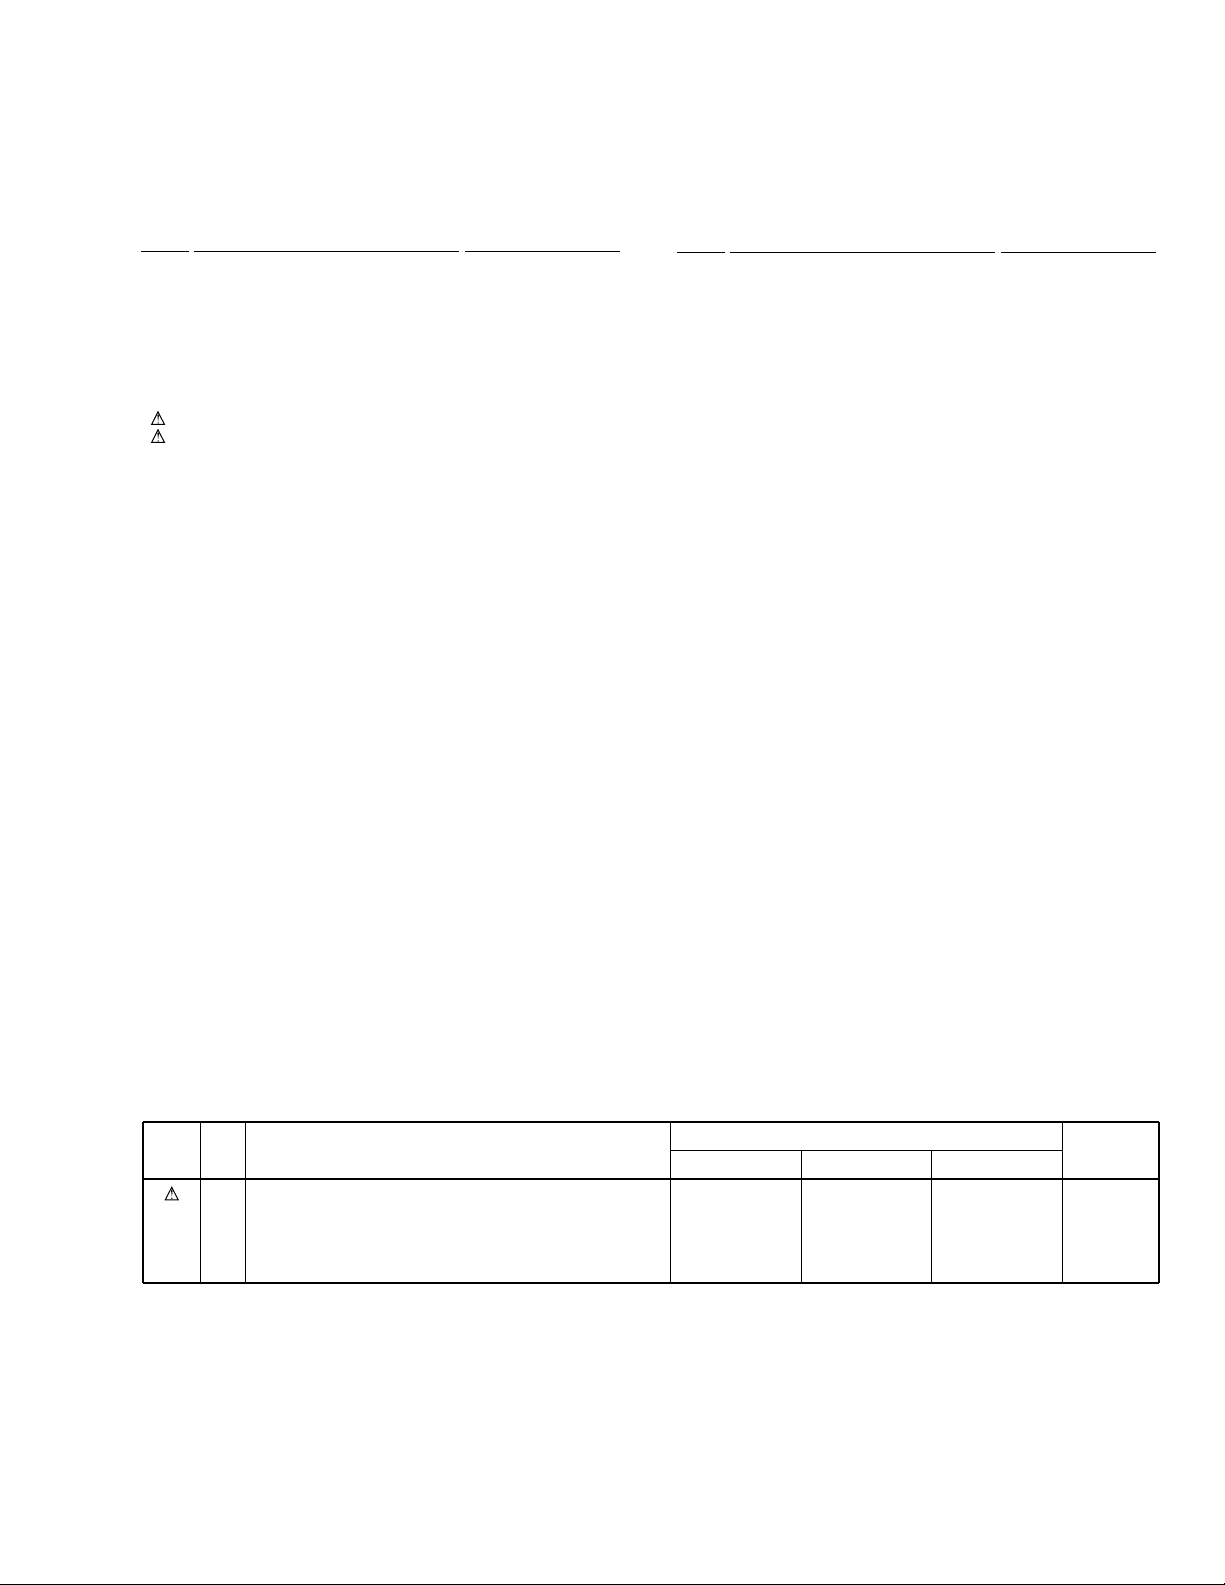
2.3 SLOT-IN MECHANISM ASSY
1
2
11
3
17
22
∗1
∗2
6
∗1
Dyefree ME-413A: ZLX-ME413A
∗2
Froil PN-397B: ZLB-PN397B
12
7
∗2
20
16
∗2
15
19
18
14
4
23
8
9
9
5
To CDPB Assy CN502
9
21
Refer to
" 2.4 SERVO MECHANISM ASSY".
25
24
13
10
8
Page 9
SLOT-IN MECHANISM ASSY PARTS LIST
•
Mark No. Description Part No.
1 Clamper Assy DXA1821
2 Clamp Spring DBH1374
3 Guide Spring DBH1375
4 Lever B DNK3558
5 Loading Motor Assy-S DEA1008
CMX-5000, CU-V160
Mark No. Description Part No.
11 Clamp Arm DNK3404
12 Drive Gear DNK3565
13 Float Base Assy DXB1683
14 Disc Guide DNK3478
15 Front Sheet DED1132
6 Main Cam DNK3407
7 Loading Gear DNK3409
NSP 8 Worm Gear DNK3410
9 Mount Bush DEB1328
10 Connector Assy PF02PY-B27
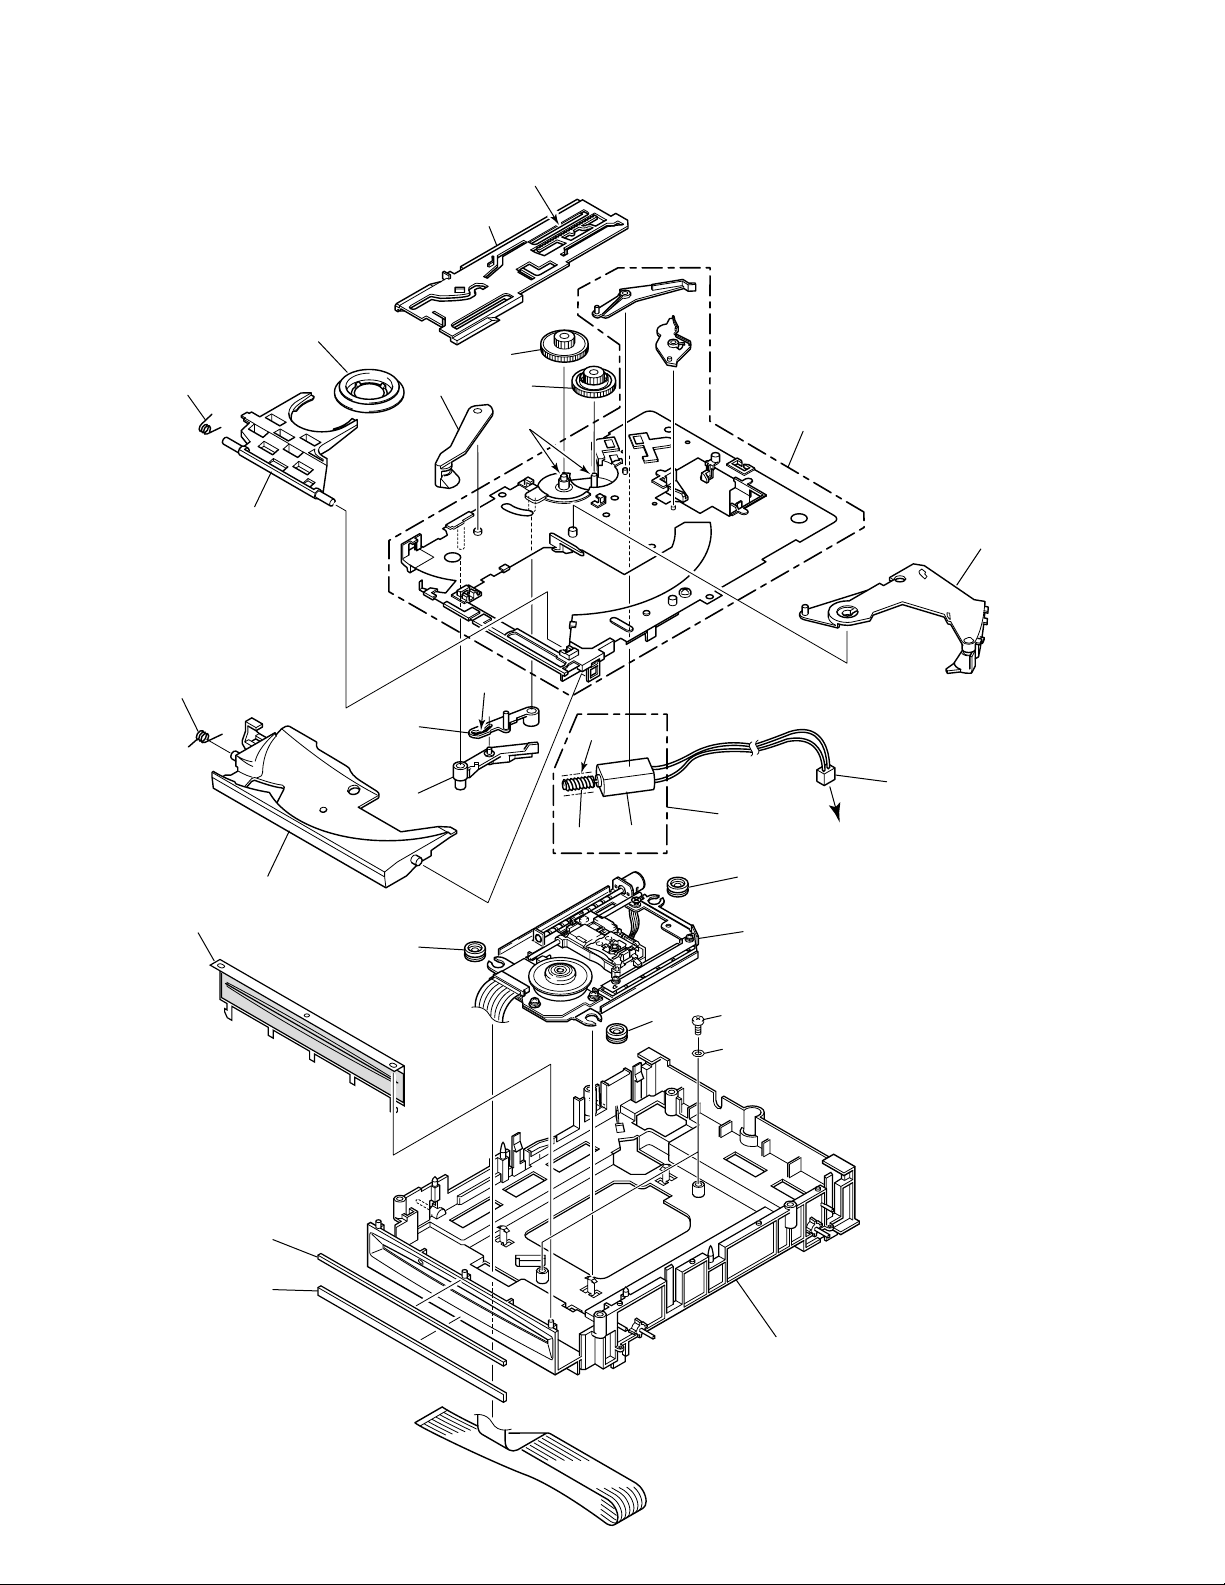
2.4 SERVO MECHANISM ASSY
∗2
14
1
16 Eject Lever DNK3684
17 Loading Lever DNK3406
18 Bezel Cushion A DEC2257
NSP 20 Loading Base DNK3637
NSP 23 Loading Motor DXM1093
7
12
6
∗3
2
9
19 Bezel Cushion B DEC2258
21 Servo Mechanism Assy DXB1684
22 Lever A DNK3564
24 PC Washer DEC2332
25 Screw BPZ30P080FZK
6
13
10
∗1
8
To CDPB Assy
CN501
11
3
SERVO MECHANISM ASSY PARTS LIST
•
Mark No. Description Part No.
1 Spindle Motor DXM1122
2 Screw Guide DNK3238
3 Pulse Motor Frame DXM1125
4 • • • • •
5 • • • • •
6 Screw CMZ20P060FMC
7 Guide Shaft DLA1731
8 Sub Guide Shaft DNK3638
9 Screw ABA7022
10 Stopper DNH2355
To CDPB Assy CN551
Mark No. Description Part No.
11 SPD Card DDX1165
NSP 12 Pickup Assy DWY1069
13 Screw PMA20P080FMC
14 Screw PMH20P040FMC
∗1
Dyefree ME-413A: ZLX-ME413A
∗2
Froil PN-948P: ZLB-PN948P
∗3
Froil C-1Z: ZLB-C1Z
9
Page 10
CMX-5000, CU-V160
2.5 REMOTE CONTROLLER (CU-V160)
∗1
Grease PN-92KB
Check that the JOG dial moves
smoothly after a small quantity
put grease on.
42
41
43
∗1
(Inner)
16
17
19
Do not use the alcohol when
cleans a JOG dial because
acrylic section clouds over.
35
38
30
43
31
32
∗1
(Inner)
33
34
9
39
22
26
40
37
28
29
(1) REMOTE CONTROLLER (CU-V160)
PARTS LIST
Mark No. Description Part No.
1 CNNB ASSY DWG1534
2 PHT1 ASSY DWG1535
3 PHT2 ASSY DWG1536
4 CTJB ASSY DWG1537
5 FLK1 ASSY DWG1538
6 FLK2 ASSY DWG1539
7 Foot Assy AEC1531
8 PCB Spacer (10) DEC1388
9 Rotary VR Packing DED1151
10 Slide VR Packing DED1154
11 Cover DNE1383
12 VR Stay DNF1635
13 VR Holder DNF1638
14 Terminal Holder DNH2448
15 Jog Spring DBH1460
16 Jog Dial DNK3797
36
10
18
3
46
8
6
44
44
A
52
48
13
44
48
21
47
12
C
45
49
44
53
A
44
8
4
14
7
15
45
23
Accessories
20
of VR.
45
C
44
50
10
24
8
51
8
44
1
27
25
2
46
B
52
13
44
B
44
5
44
11
7
17 J Ring A DNK3723
18 J Ring B DNK3732
19 Jog Stay Assy DXB1727
20 BPM Knob DAA1144
21 VR Knob DAA1145
22 BPM Knob DAC1925
23 Knob (PLAY) DAC1927
24 Knob (LOOP) DAC1928
25 Knob (TEMPO) DAC1929
26 Mode Select Knob DAC1930
27 MT Knob DAC1931
28 MIX Knob DAC1932
29 Player Select Knob DAC1933
30 Start Knob DAC1934
31 Knob A DAC1935
32 Knob B DAC1936
33 Knob C DAC1937
34 Knob D DAC1938
35 Display Plate DAH1937
36 Slide Sheet DAH1938
37 Slide Knob DNK2936
38 Function Panel (C) DNK3726
39 Eject Guide DNK3727
40 Lens DNK3730
41 Jog Guard DNK3731
42 Control Panel Assy DXB1728
43 Screw BBZ26P060FMC
44 Screw BBZ30P060FZK
45 Screw BPZ30P080FMC
46 Screw PMB20P060FMC
47 Flange Nut M9 DBN1004
48 Screw PBA1062
49 Screw PMH30P060FMC
50 Screw BPZ30P120FCU
51 POM Bush DEC2397
52 Spacer DLA1801
53 Label See Contrast table (2)
10
Page 11

(2) CONTRAST TABLE
CMX-5000/KUC, TL and WY are constructed the same except for the following :
Mark No. Symbol and Description
53 Label DAL1134 DAL1134 DAL1135
KUC Type TL Type WY Type
Part No.
CMX-5000, CU-V160
Remarks
11
Page 12
1
23
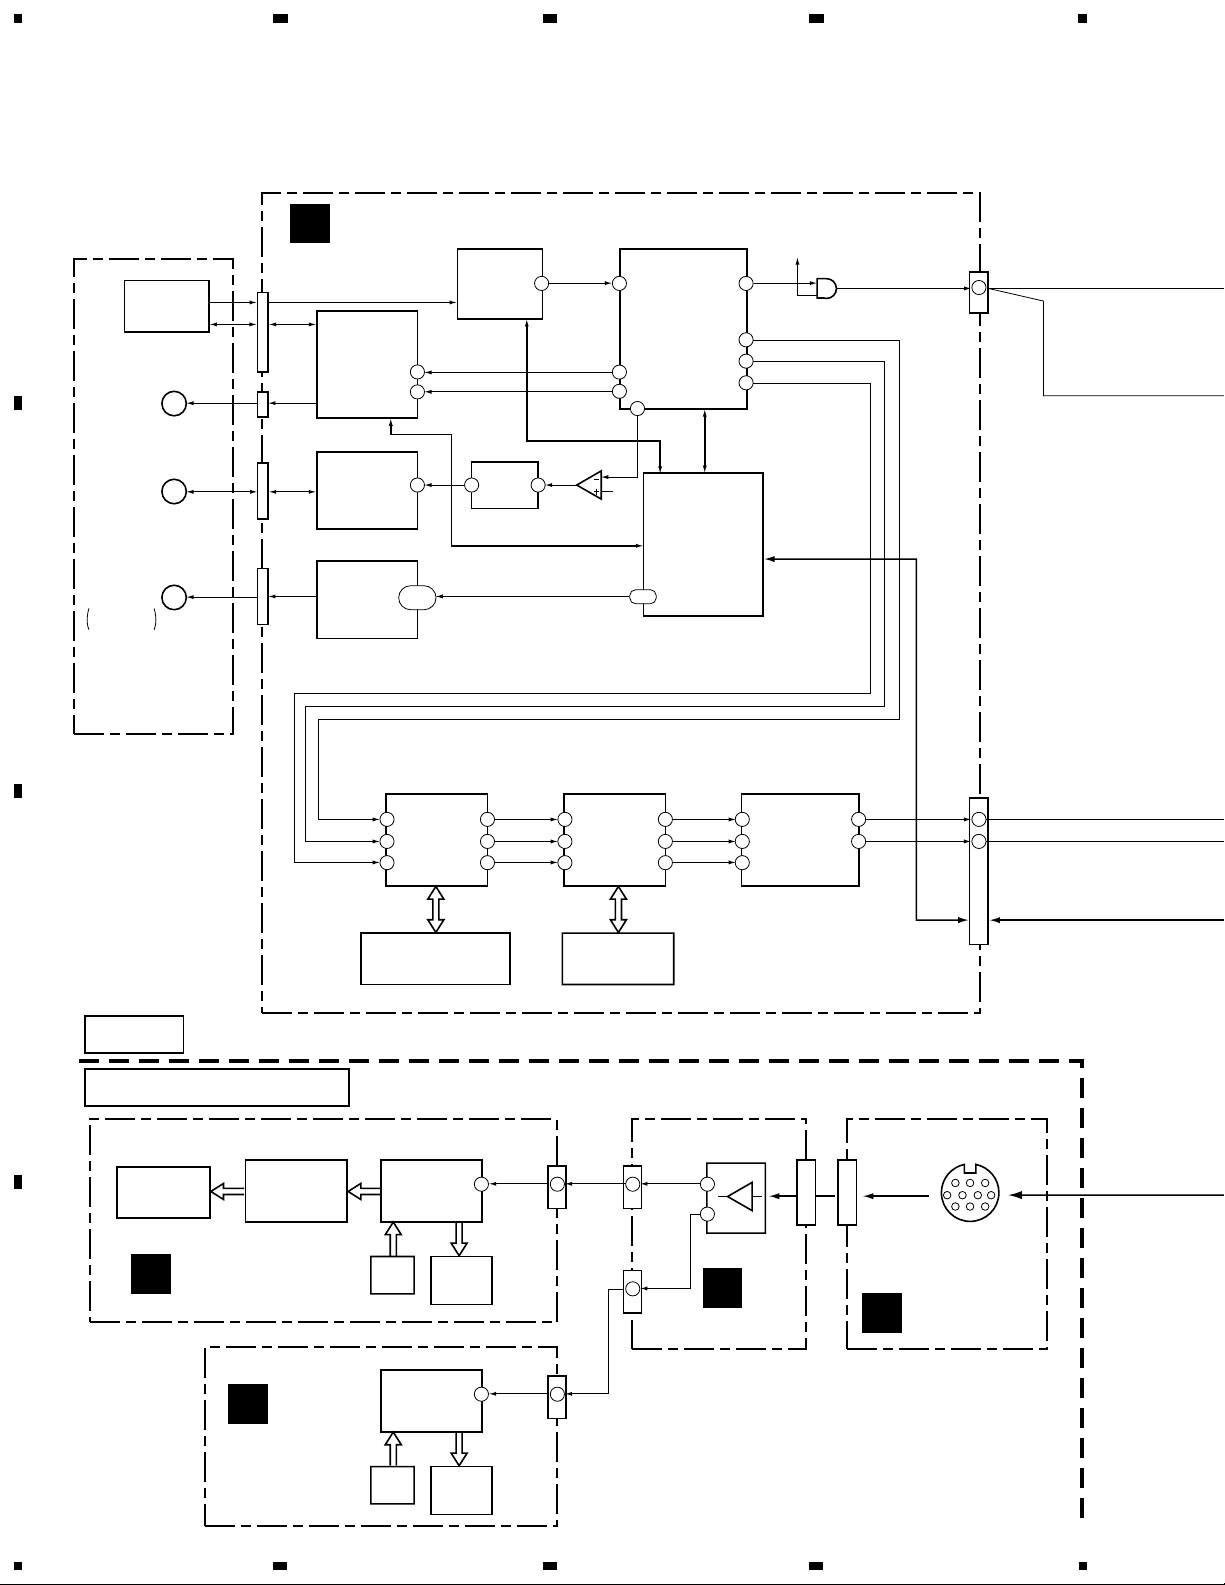
CMX-5000, CU-V160
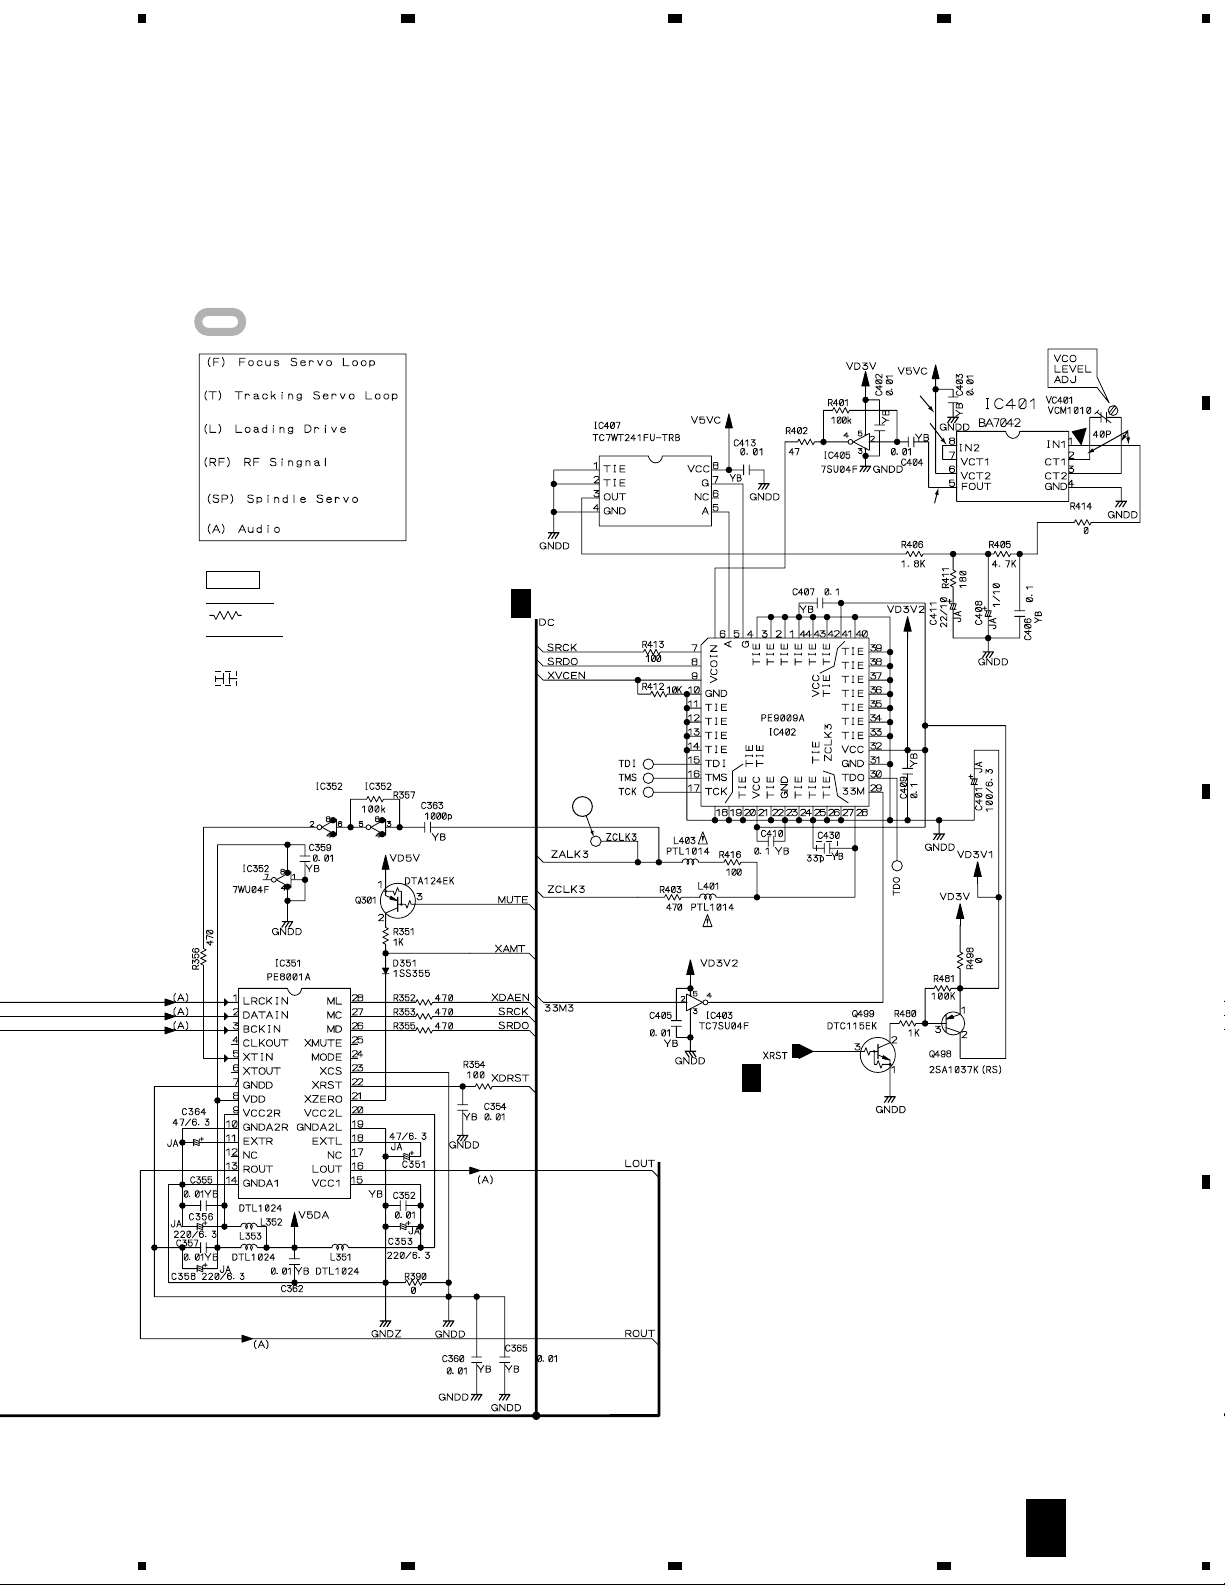
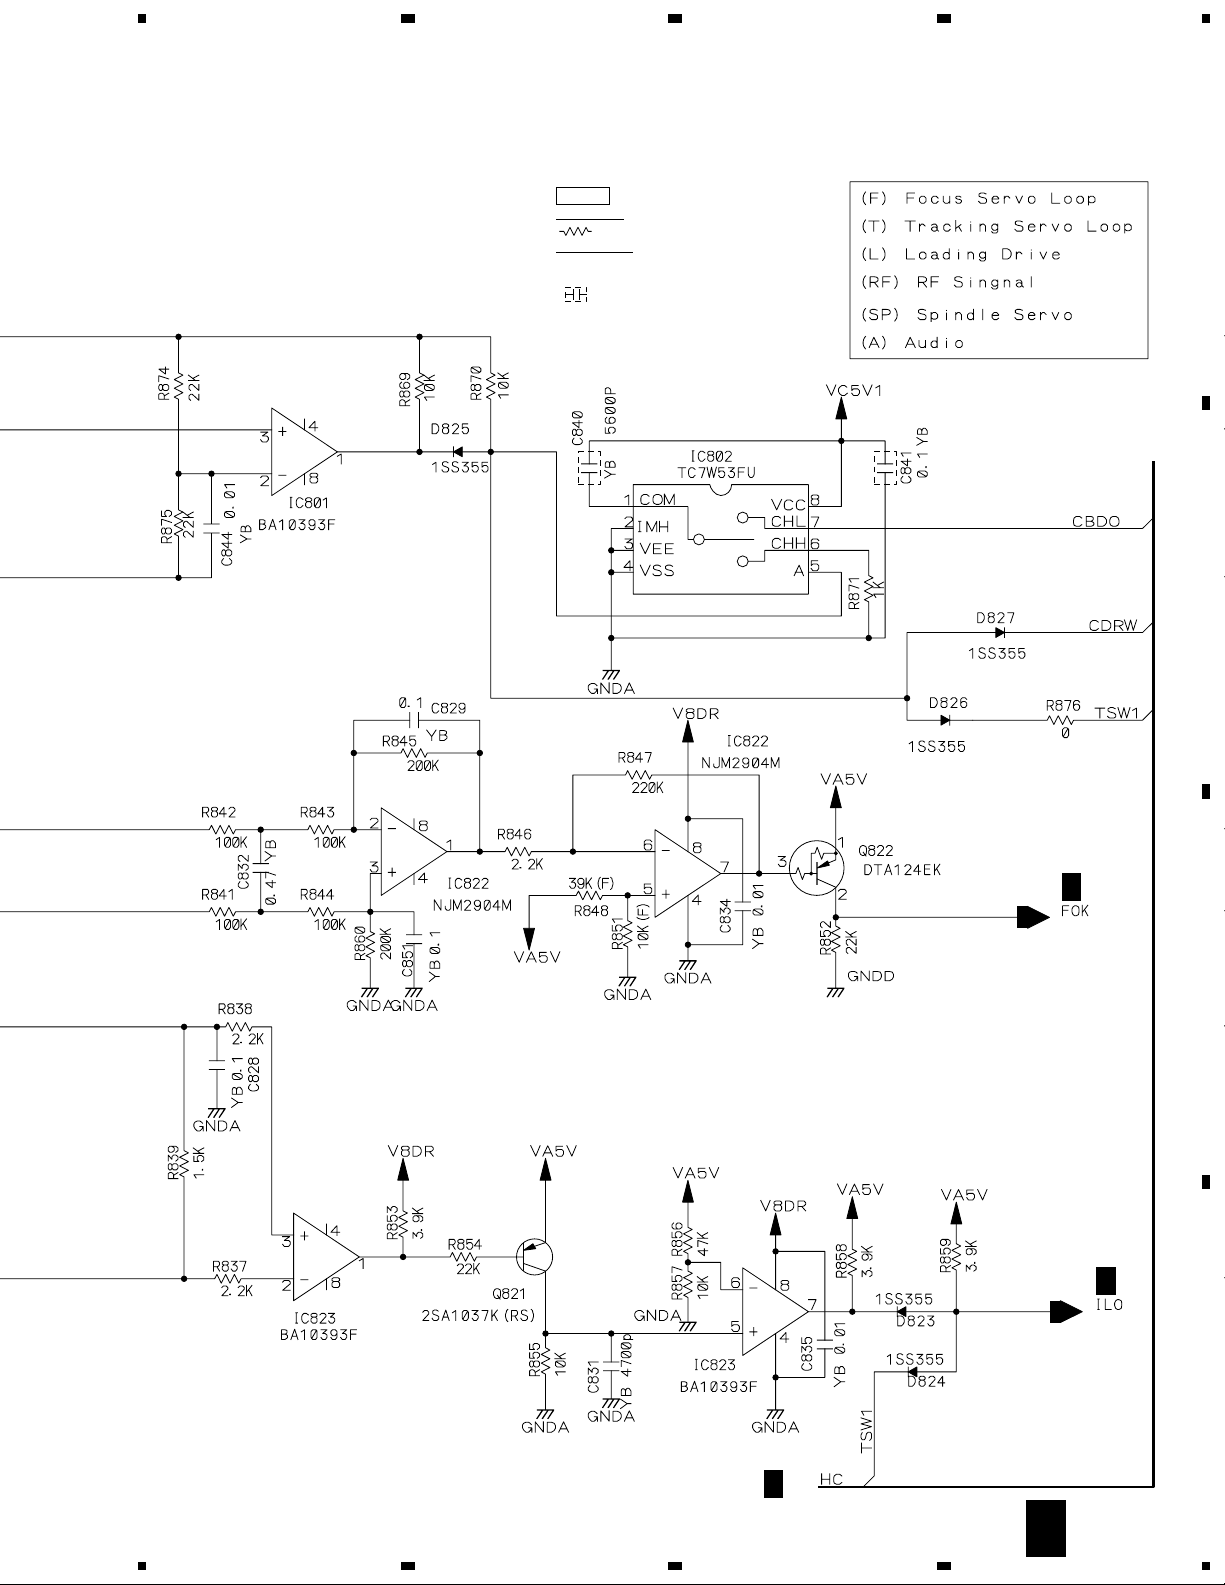
3. BLOCK DIAGRAM AND SCHEMATIC DIAGRAM
3.1 BLOCK DIAGRAM
4
A
B
A PLAYER
(B PLAYER)
PICKUP
ASSY
(DWY1069)
LOADING
MOTOR
SPINDLE
MOTOR
PULSE
MOTOR
FRAME
STEPPING
MOTOR
M
M
M
CN201
CN502
CN501
CN551
CDPB ASSY (A or B PLAYER)
C
IC451
M56783AFP
Actuator &
Loading Motor
Driver
IC501
AN8483NSB
Spindle
Driver
IC551
LB1836M
Stepping
Motor
Driver
IC201
AN8847SB
Head Amp
FMO
42
TMO
18
17 1 7
2,6,8,
9,13
IC503
4W53F
RF
10 58 10
IC502-2/2
NJM2904M
ST0-ST3,PS
IC232
TC7SET08F
1
DOUT DOUT
ARF
IC231
MN662754CEA
Digital Servo
Processor
36
38
86
ECS
6
7
5
IC701
PD3426A9
System Control
2-6
4
2
5
ALRCK
ABCK
ADATA
4
2
CN706
1
SLOT-IN
MECHANISM
ASSY
CN702
ALRCK
ABCK
ADATA
5 14
IC301
XCB56364
7
Audio DSP
20
4
6
DDATA
DLRCK
DBCK
6 10
IC901
MN19413A
5
Audio DSP
4
SCKO
WSO
9
SDO1
8
BCK IN
3 16
1
2
LRCK IN
DATA IN
IC351
PE8001A
LOUT
ROUT
13
36
34
IC302
MSM51V17805D-60TS-K
C
DRAM
IC902
GLT44016-40J4
DRAM
Player
Remote Controller
IC2201
D2301
7 Seg. Display
I
FLK1 ASSY
IC2002
LB1740
7 Seg. Driver
IC2001
PE5127A
FL CONTROL
KEY
SW
V2001
DEL1033
FL TUBE
CN2202
SDO1
CN2202
CN2205
9
TC74HC241AF
123316
9
M
CNNB ASSY
D
K
IC2101
PE5127A
FL CONTROL
CN2102
SDO2
916
FLK2 ASSY
KEY
SW
V2101
DEL1033
FL TUBE
J2201
CN2601
N
CTJB ASSY
CN2602
REMOTE
CONTROL
12
1234
Page 13
5
678
CMX-5000, CU-V160
A PLAYER
B PLAYER
LOUT
ROUT
CN1006
1
CN1005
1
CN1001: A PLAYER
CN1002: B PLAYER
36
34
TC74HCU04AF
TC74HCU04AF
BLCH
BRCH
TC74HC241AF
IC1801
IC1501
D
TRMB ASSY
ALCH
ARCH
IC1004
L1801
L1501
BLCH
BRCH
TC9162AF
8 10
21 19
2 4
27 25
12 11
17 18
TC9162AF
8 10
21 19
2 4
27 25
12 11
17 18
JA1005
CONTROL
JA1006
CONTROL
A
DIGITAL
OUT
B
IC1007
IC1003
S1 POWER
H
PSWB
A
ASSY
FLAC2
FLAC1
VLOD
V+5V
V+8V
J1010
J1
CN101
1
8
2
7
3
6
4
5
8
1
CN2
G
SW POWER
J1
CN1
LIVE
1
2
NEUTRAL
SUPPLY
ASSY
B
IC1101-2/2
NJM4558MD
3
1
2
6
7
5
IC1101-1/2
IC1201-1/2
3
1
2
6
7
5
IC1201-2/2
NJM4558MD
IC1302-1/2
2
3
6
5
IC1302-2/2
IC1301, IC1302:
A
B
2
1
3
6
7
5
IC1301-2/2
NJM4558MD
IC1301-1/2
L
AUDIO
OUT
R
A
L
AUDIO
OUT
R
B
1
L
MIX
AUDIO
7
OUT
R
C
CN1007
REMOTE
CONTROL
5
IC1401-1/2
NJM4558MD
2
3
IC1401-2/2
5
6
CN1011 J1101
1
7
HPL
2
HPR
4
2
4
IC1402-2/2
NJM4556AD
5
6
3
2
IC1402-1/2
VR1401
MONITOR
E
HPJB ASSY
JA1101
7
PHONES
1
D
13
6
7
8
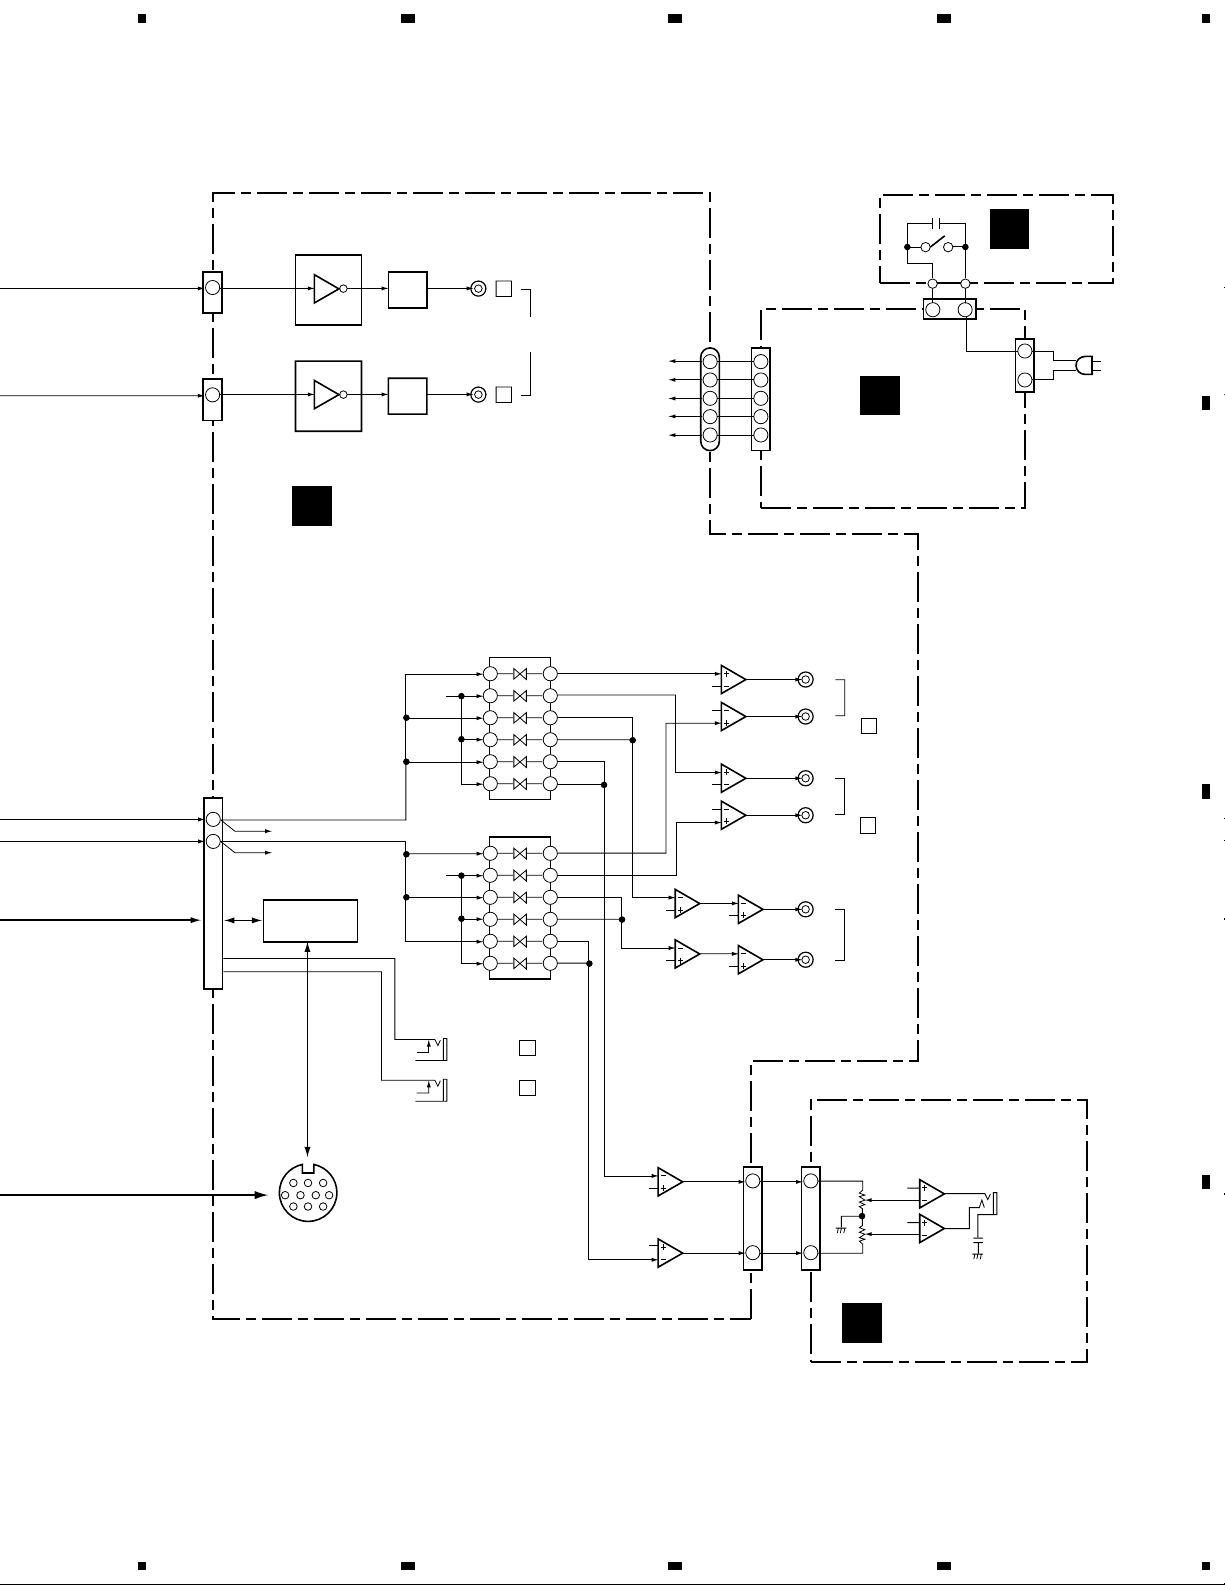
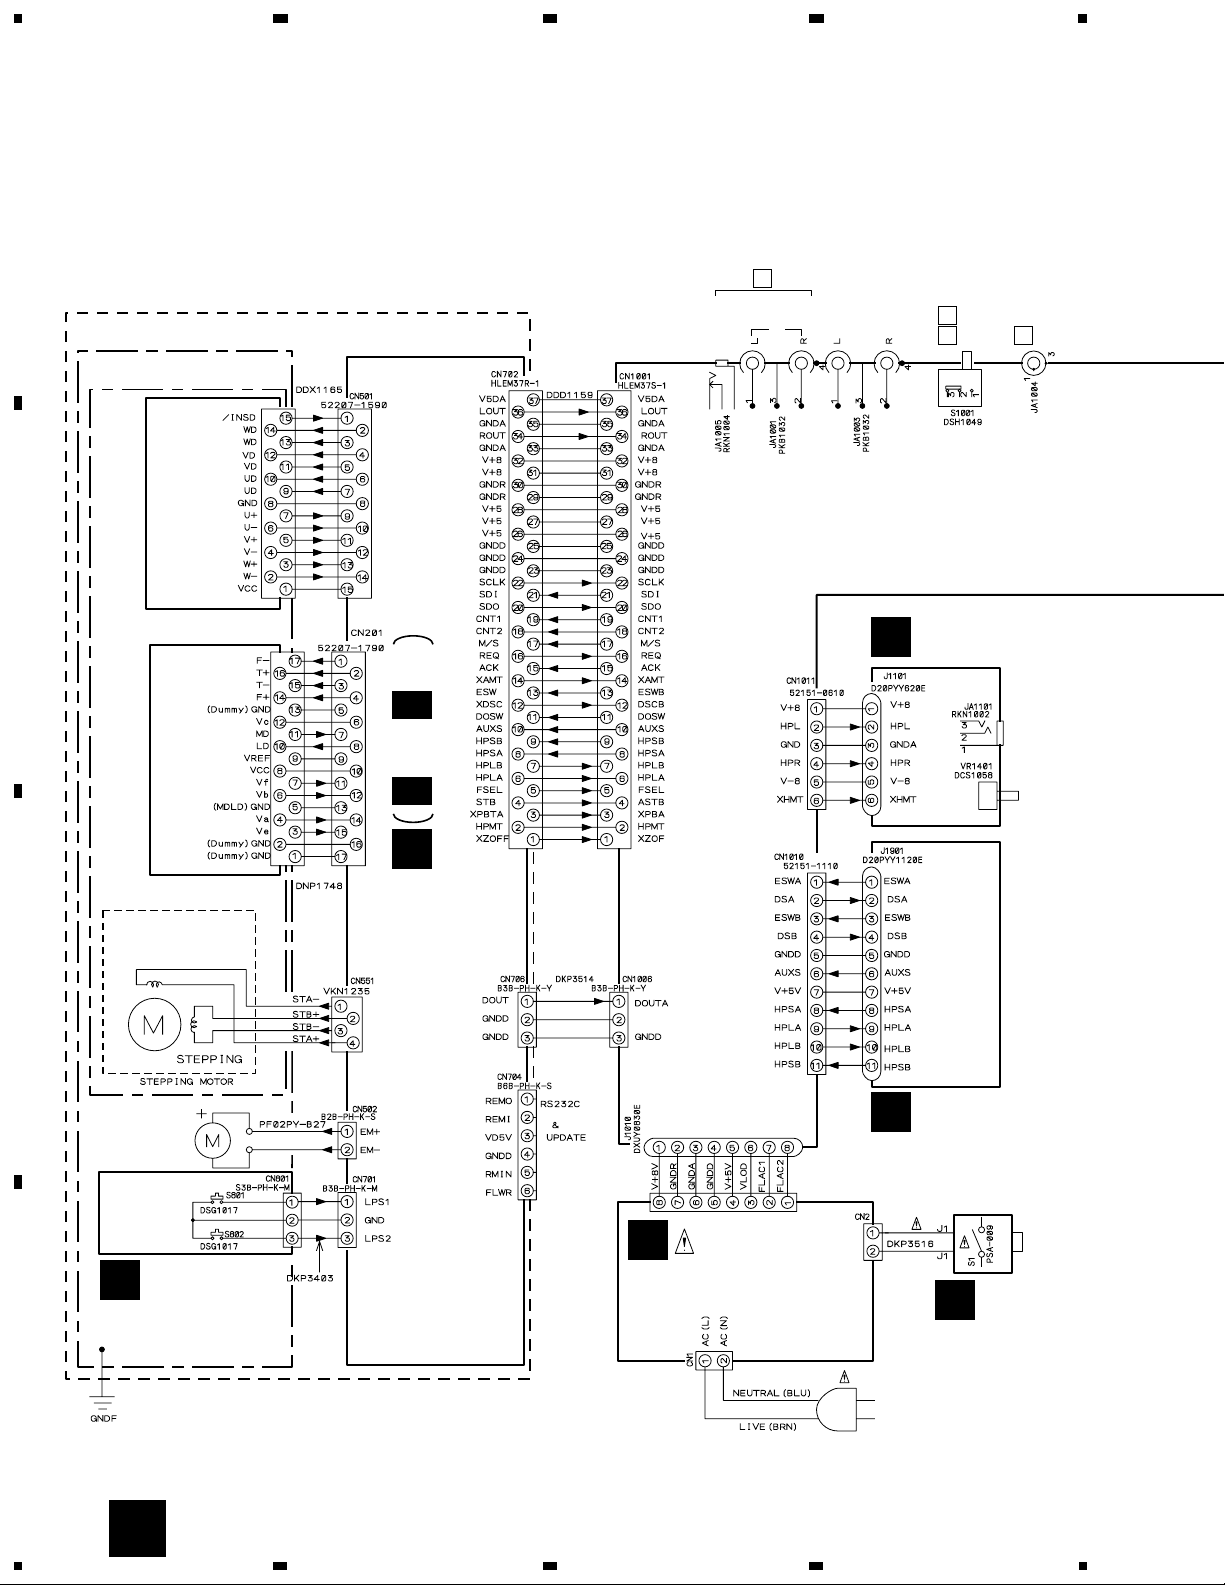
Page 14
1
23
CMX-5000, CU-V160
3.2 OVERALL WIRING DIAGRAM, SLM1 and SLM2 ASSYS
A
4
B
A PLAYER
SLOT-IN MECHANISM
ASSY (DXA1845)
SERVO MECHANISM
ASSY (DXB1684)
SPINDLE
MOTOR
(DXM1122)
PICKUP
ASSY
(DWY1069)
C 1/5- C 5/5
C
CDPB ASSY (DWG1540)
A
CONTROL
AUDIO OUT
AUTO MIX OUT
HPJB ASSY
E
(DWX2067)
PLAYER
A B
DIGITAL OUT
ON_OFF
PLAYER
A
PHONES
MONITOR
DIGITAL OUT
PULSE MOTOR
FRAME
(DXM1125)
C
MOTOR
SELB ASSY
F
(DWG1302)
LOADING
MOTOR
(DXM1093)
CLAMP
SW
CONTROL
CN101
G
SLM1 ASSY
A
(DWS1303)
D
EARTH LUG ASSY
DDF1020
SW POWER SUPPLY
ASSY (DWR1330)
AC POWER CORD
: ADG7024 (KUC)
: VDG1061 (TL, WY)
H
PSWB ASSY
(DWS1301)
14
A
1234
Page 15
5
678
CMX-5000, CU-V160
Note : When ordering service parts, be sure to refer to "EXPLODED VIEWS and PAR TS LIST" or "PCB PARTS LIST".
B
PLAYER
B
D
DIGITAL OUT
D 1/3- D 3/3
AUDIO OUT
CONTROL
TRMB ASSY (DWX2066)
SLOT-IN MECHANISM
ASSY (DXA1845)
SERVO MECHANISM
ASSY (DXB1684)
SPINDLE
(DXM1122)
PICKUP
(DWY1069)
B PLAYER
MOTOR
ASSY
C 1/5- C 5/5
A
B
PLA
(For Service)
PLB
(For Service)
REMOTE CONTROL
CONNECTION CABLE
: DDE1115
REMOTE
CONTROLLER
(CU-V160)
Refer to "3.13 REMOTE CONTROLLER (CU-V160) CONNECTION DIAGRAM".
C
CDPB ASSY (DWG1540)
PULSE MOTOR
FRAME
(DXM1125)
SLM2 ASSY
B
(DWS1304)
MOTOR
LOADING
MOTOR
(DXM1093)
CLAMP SW
EARTH LUG ASSY
DDF1020
C
D
B
5
6
7
8
15
Page 16
1
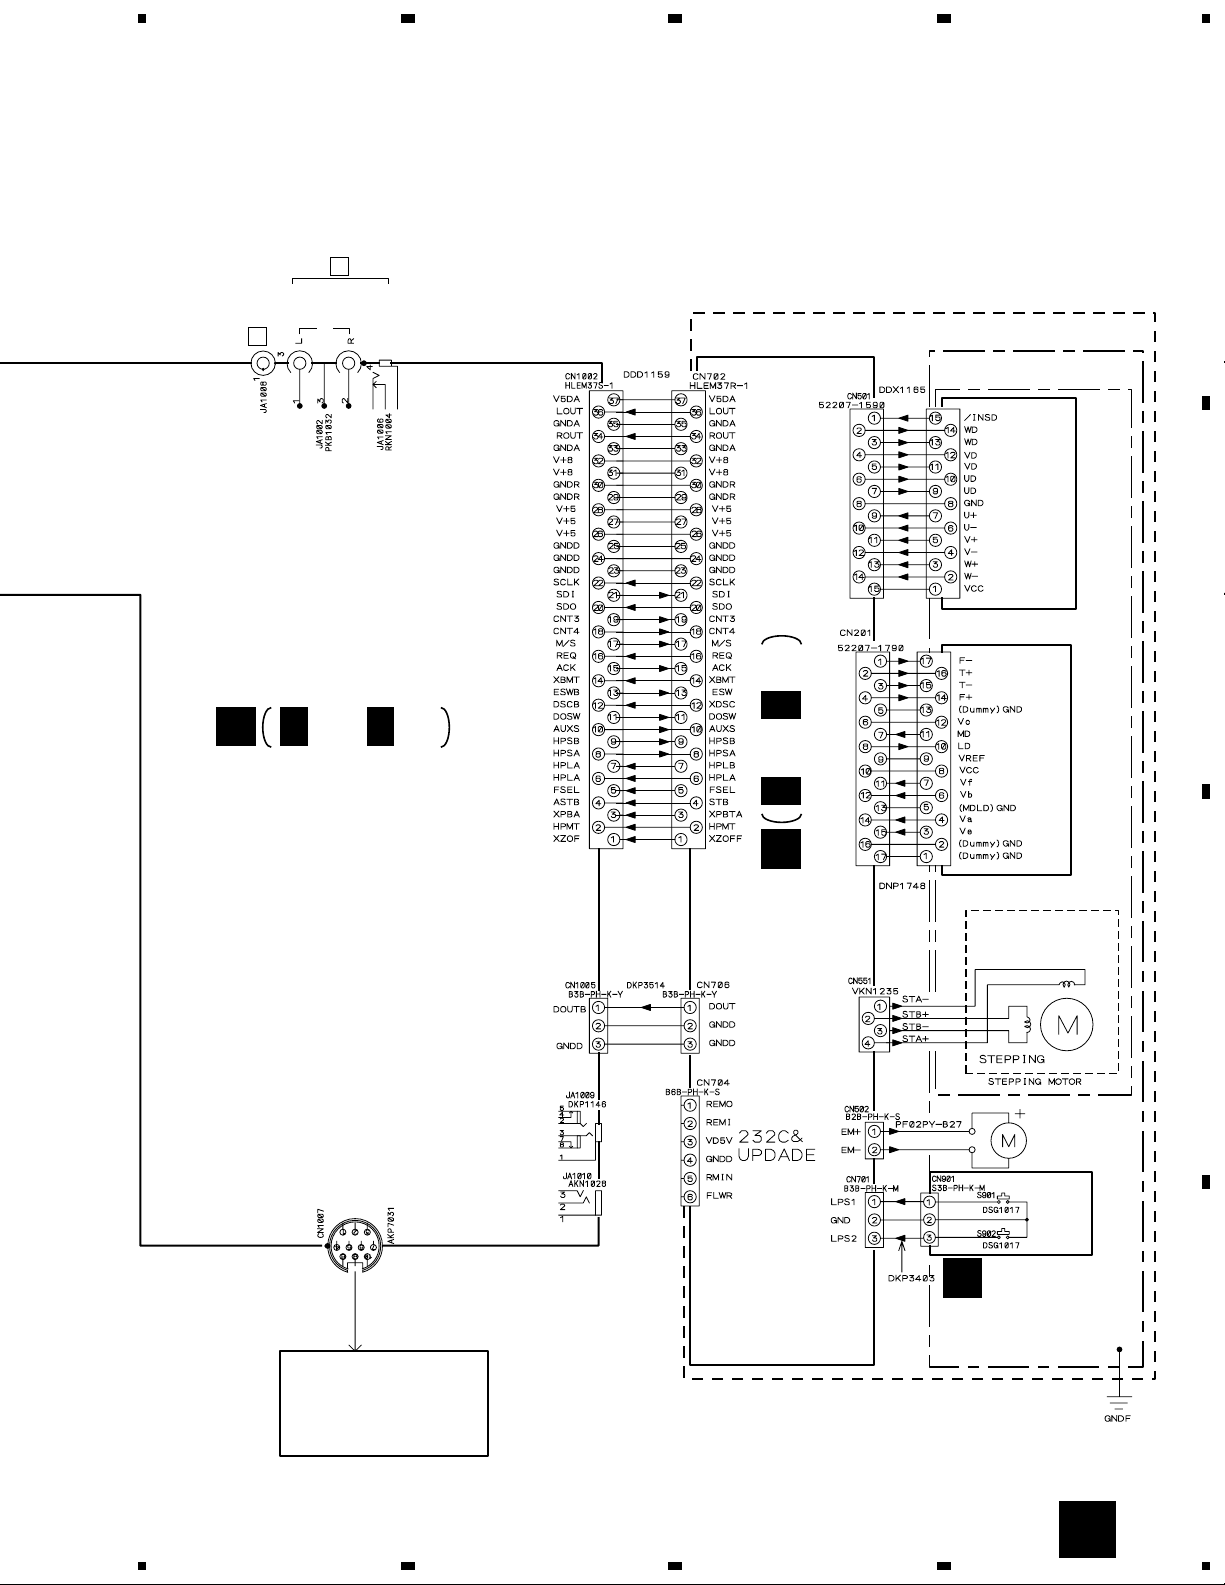
CMX-5000, CU-V160
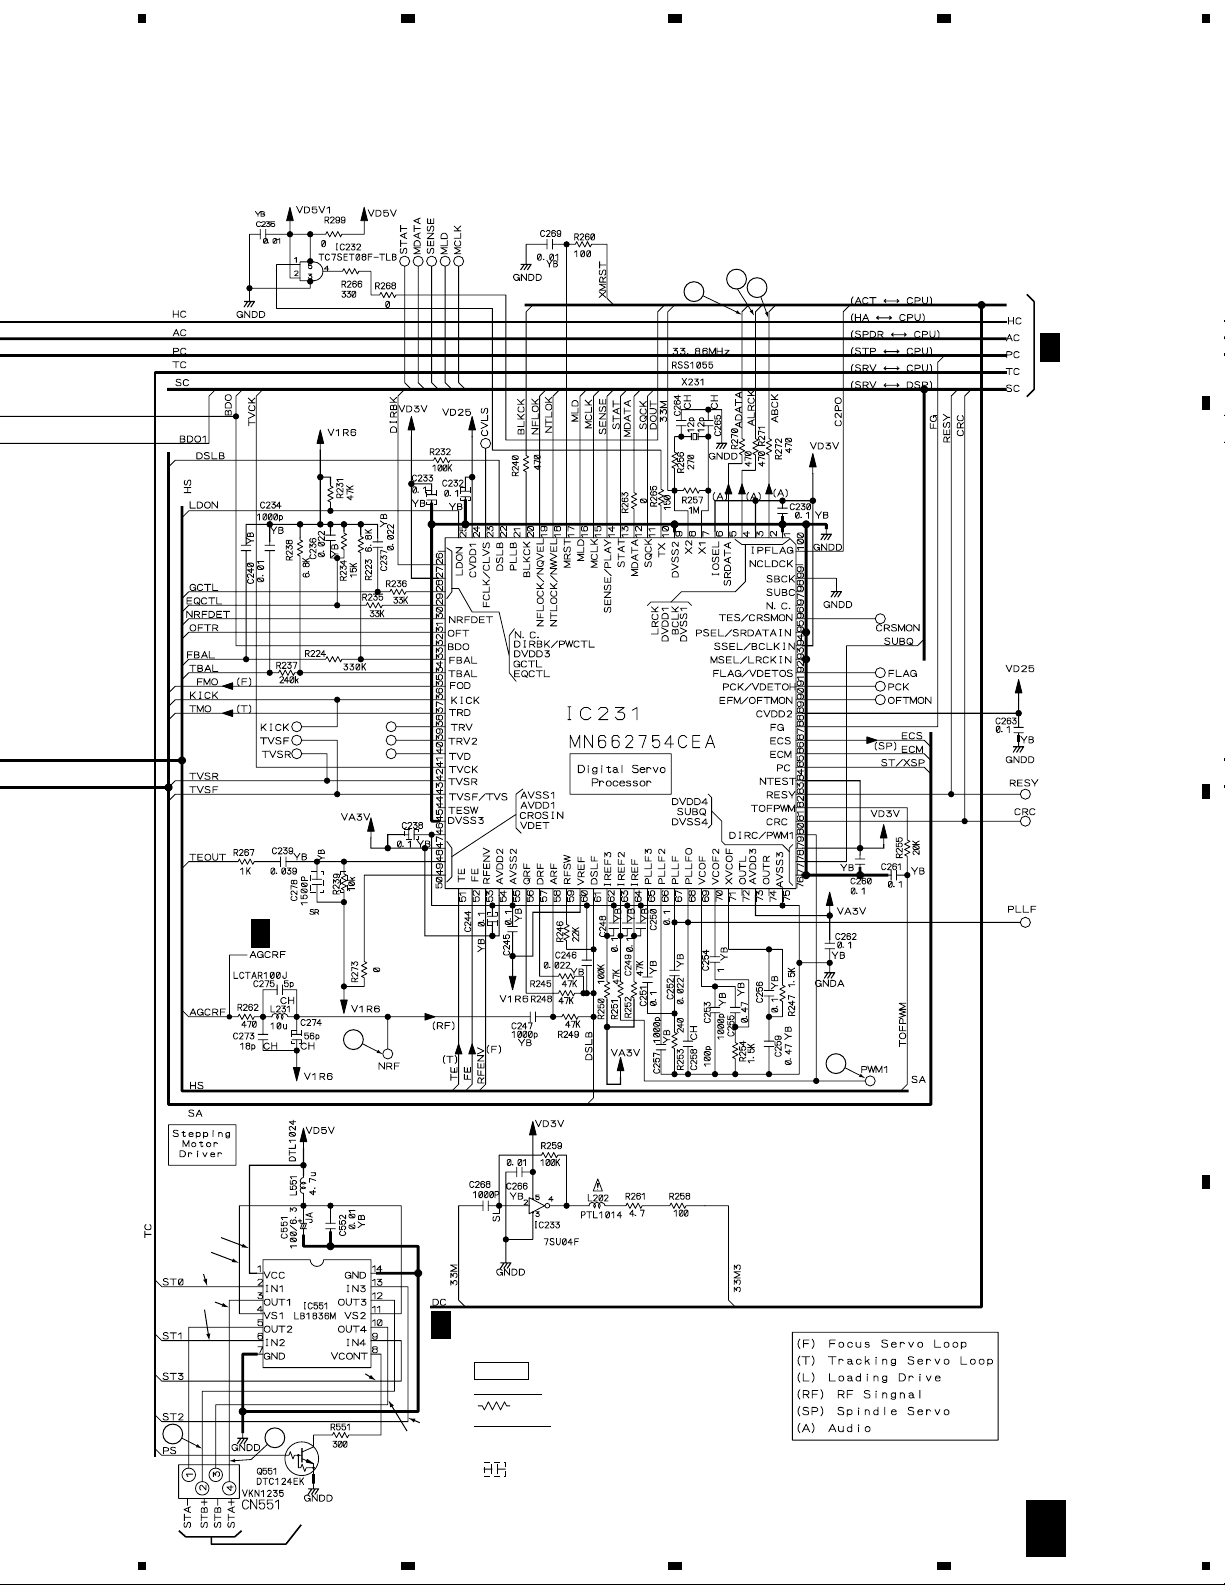
3.3 CDPB ASSY (1/5)
23
4
C 1/5
A
A
(For A PLAYER)
B
(For B PLAYER)
D 3/3
CN1006
(For A PLAYER)
B
CN1005
(For B PLAYER)
CDPB ASSY (DWG1540)
C 2/5
C 4/5
CN801
CN901
C 5/5
4.8V
0V
1.29V
3
C
232C & UPDATE
2
C 5/5
(UCOMGND)
0-4.8V
D
0-3.16V
0-4.8V
0-4.8V
4.8V
0V
0-3.16V
0-3.16V
4.8V
0-4.8V
0-4.8V
4.8V
0-3.16V
0-4.8V
0-3.16V
0-4.8V
0-4.8V
16
1/5
C
1234
CN1001 (For A PLAYER)
D 2/3
CN1002 (For B PLAYER)
D 2/3
Page 17
5
678
CMX-5000, CU-V160
NOTES
RESISTORS : Ω
: RS1/10S&&&J
CAPACITORS : µF
YB : CKSQYB (2125 CHIP), CKSR (1608 CHIP)
CH : CCSQCH (2125 CHIP), CCSR (1608 CHIP)
1
: 1608 SIZE CHIP
A
C 4/5
B
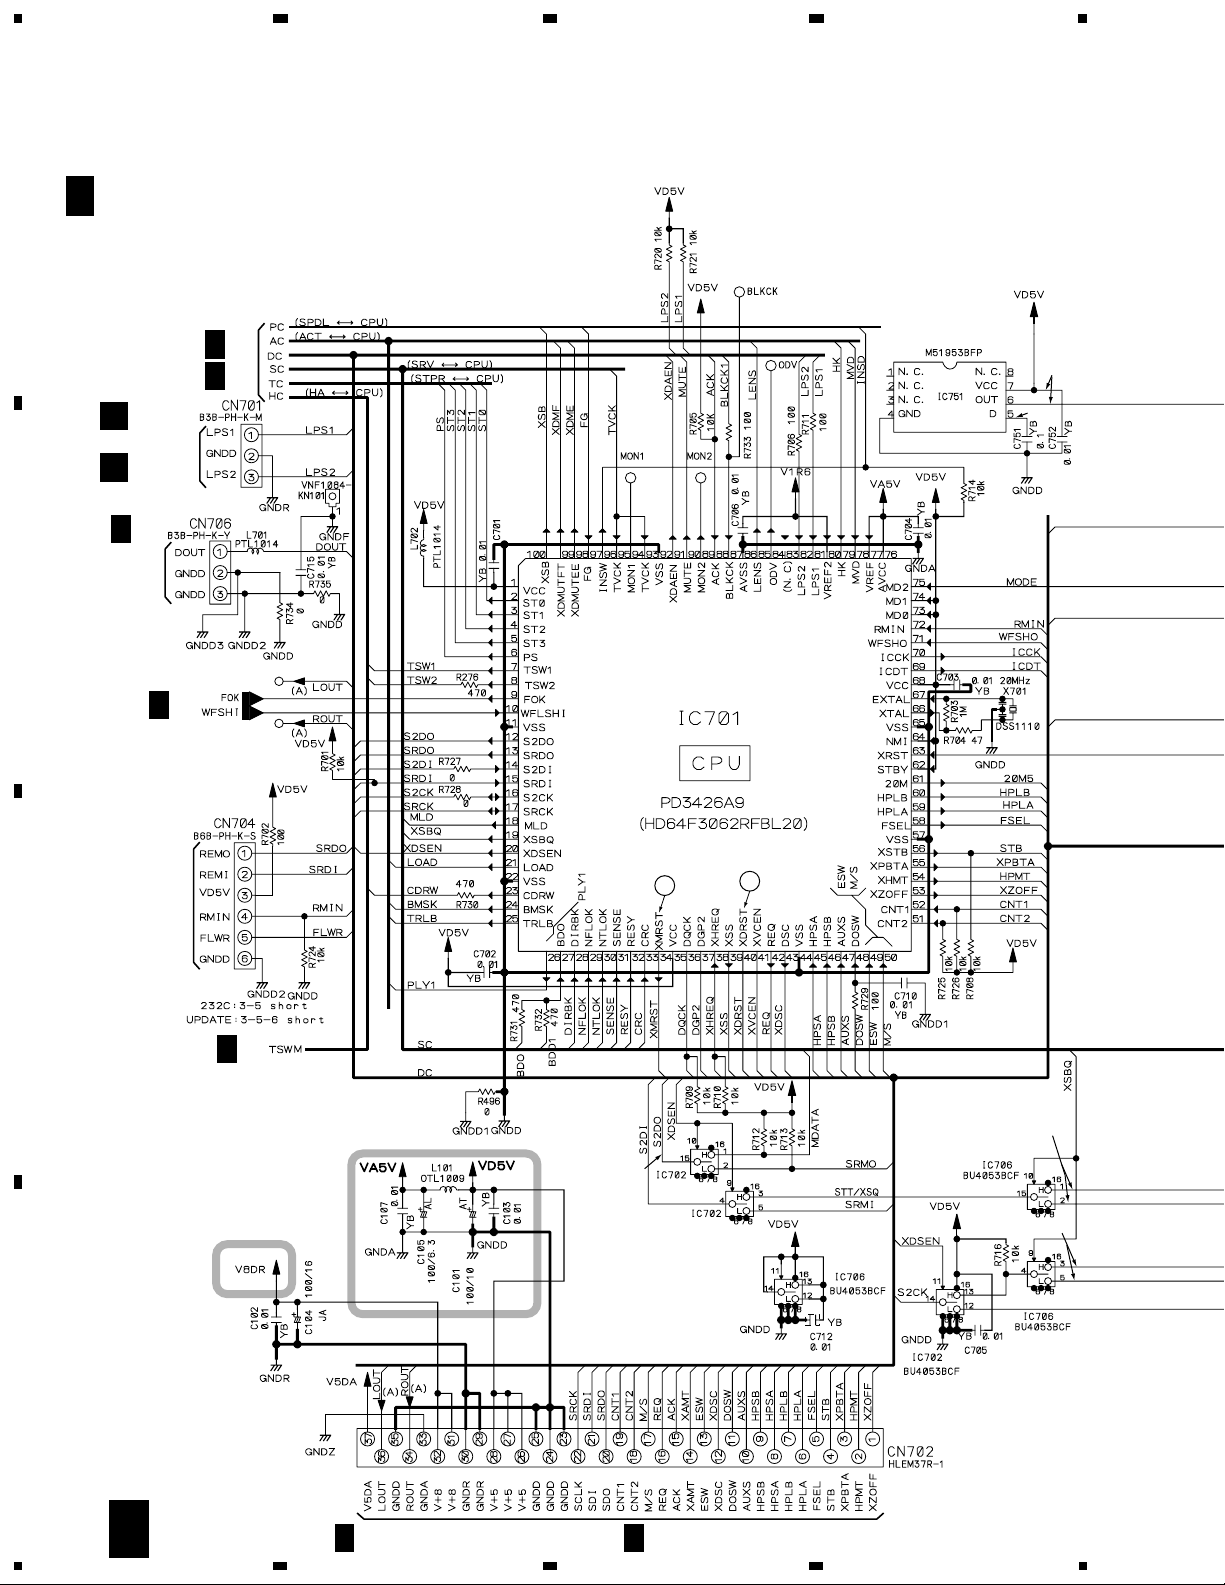
IC701
C 3/5
Pin
Voltage (V)
No.
1 4.8 26 0 51 4.8 76 4.8
2 4.8 27 0 52 0 77 0
3 0 to 4.8 28 3.3 53 0 78 2.2
4 0 to 4.8 29 0 54 4.8 79 2.2
5 4.8 30 0 to 3.3 55 0 to 4.8 80 2.2
6 4.8 31 0 to 3.3 56 0 81 4.8
7 0 32 0 to 3.3 57 0 82 0 to 3.3
8 4.8 33 0 to 3.3 58 0 83 0
9 4.8 34 4.8 59 0 to 4.8 84 0
10 0 35 4.8 60 0 85 2.2
11 0 36 0 61 0 to 4.8 86 0
12 0 to 4.8 37 3.3 62 4.8 87 0 to 3.3
13 0 to 4.8 38 0 63 0 88 0 to 4.8
14 0 to 3.3 39 4.8 64 0 89 0
15 0 to 4.8 40 4.8 65 0 90 0
16 0 to 4.8 41 4.8 66 0 91 4.8
17 0 to 4.8 42 0 to 4.8 67 1.0 to 3.8 92 0
18 0 to 4.8 43 0 68 4.8 93 0
19 0 to 4.8 44 0 69 4.8 94 0
20 0 to 4.8 45 4.8 70 4.8 95 0
21 0 46 4.8 71 0 96 4.8
22 0 47 4.8 72 0 97 0 to 4.8
23 0 48 4.8 73 0 98 0
24 0 to 4.8 49 4.8 74 4.8 99 4.8
25 0 50 4.8 75 4.8 100 0
Pin
No.
Voltage (V)
Pin
No.
Voltage (V)
Pin
No.
Voltage (V)
C
D
: The power supply is shown with the marked box.
1/5
C
5
6
7
8
17
Page 18
1
CMX-5000, CU-V160
3.4 CDPB ASSY (2/5)
23
4
A
B
C 2/5
To
PICKUP
ASSY
CDPB ASSY (DWG1540)
H : inner
H : approach the disc
6
7
4
5
H : away from the disc
L : approach the disc
3.16V
1.61V
0V
4.8V
1.61V
0.613V
1.61V
1.61V
1.61V
10
RF ADJ
1.61V
8 9
12
1.61V
1.61V
T+ H for inner
F+ : H
for approach
the disc
C
1.61V
1.61V
1.61V
4.8V
1.61V1.61V
1.61V
0V
4.8V
15
0V
0V
1.61V
13
D
TMO H for inner
18
C 5/5
2/5
C
1234
To LOADING MOTOR
To SPINDLE MOTOR
Page 19
5
678
CMX-5000, CU-V160
A
19
18
20
C 1/5
B
17
4.8V
4.8V
4.8V
0-4.8V
C 5/5
11
0V
0V
0V
0V
4.8V
16
To PULSE MOTOR FRAME
5
0.613V
0-4.8V
C 3/5
NOTES
RESISTORS : Ω
: RS1/10S&&&J
CAPACITORS : µF
0-4.8V
YB : CKSQYB (2125 CHIP), CKSR (1608 CHIP)
CH : CCSQCH (2125 CHIP), CCSR (1608 CHIP)
: 1608 SIZE CHIP
6
C
14
D
2/5
C
7
8
19
Page 20
1
CMX-5000, CU-V160
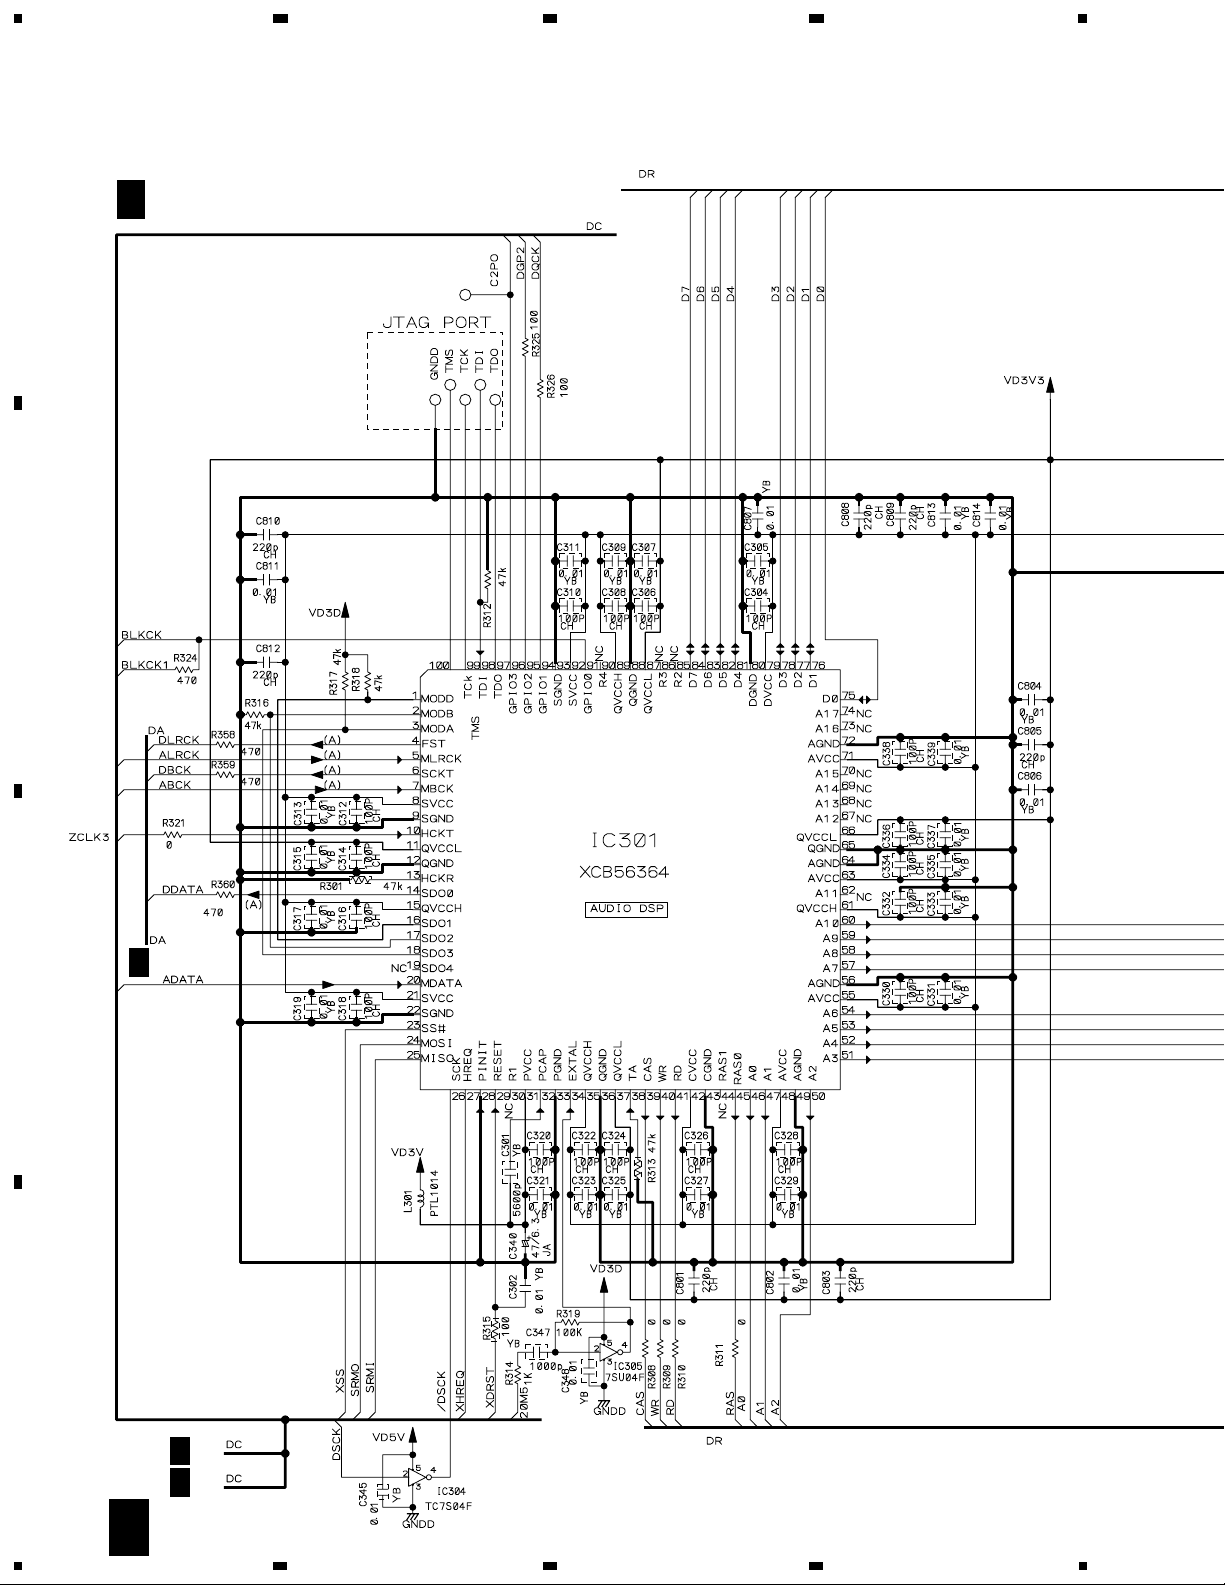
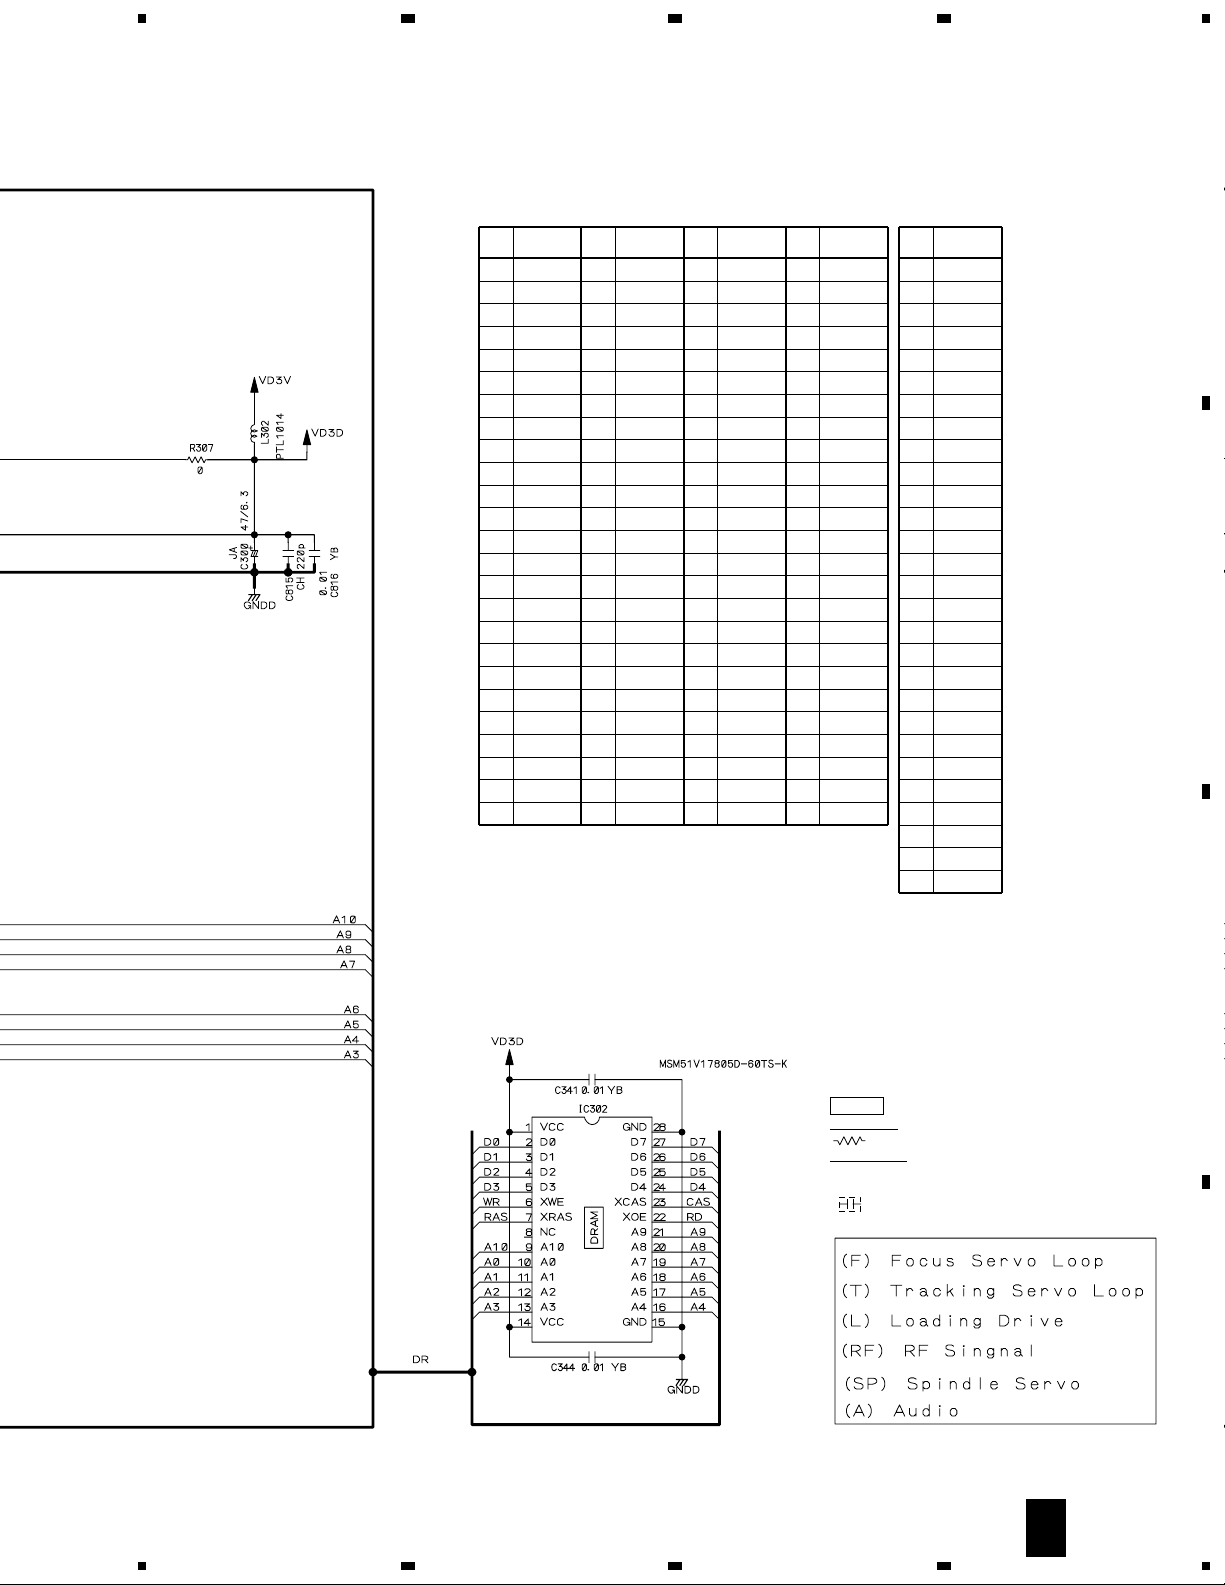
3.5 CDPB ASSY (3/5)
23
4
A
B
C 3/5
CDPB ASSY (DWG1540)
C 4/5
C
D
C 2/5
C 1/5
20
3/5
C
1234
Page 21
5
678
CMX-5000, CU-V160
IC301
Pin
Voltage (V)
No.
1 3.16 26 0 51 3.16 76 0
2 3.16 27 0 52 3.16 77 0
3 3.16 28 0 53 3.16 78 0
4 0 to 3.16 29 4.8 54 0 79 3.16
5 0 to 3.16 30 0 55 3.16 80 0
6 0 to 3.16 31 3.16 56 0 81 0
7 0 to 3.16 32 1.2 57 0 82 0
8 3.16 33 0 58 0 83 0
9 0 34 0.8 to 2.0 59 3.16 84 0
10 1.0 to 2.5 35 3.16 60 0 85 0
11 0 36 0 61 3.16 86 0
12 0 37 3.16 62 3.16 87 3.16
13 0 38 0 63 3.16 88 0
14 0 39 0 to 3.16 64 0 89 3.16
15 3.16 40 3.16 65 0 90 0
16 3.16 41 3.16 66 3.16 91 0 to 3.16
17 3.16 42 3.16 67 0 92 3.16
18 3.16 43 0 68 3.16 93 0
19 0 to 3.16 44 3.16 69 3.16 94 0
20 0 to 3.16 45 0 to 3.16 70 3.16 95 3.16
21 3.16 46 3.16 71 3.16 96 0
22 0 47 3.16 72 0 97 0
23 4.8 48 3.16 73 3.16 98 1.5
24 4.8 49 0 74 3.16 99 3.16
25 0 50 3.16 75 0 100 3.16
Pin
No.
Voltage (V)
Pin
No.
Voltage (V)
Pin
No.
Voltage (V)
IC302
Pin
Voltage (V)
No.
1 3.16
20
3 3.16
4 3.16
5 3.16
6 3.16
7 3.16
80
9 0 to 3.16
10 0 to 3.16
11 0 to 3.16
12 0 to 3.16
13 0 to 3.16
14 3.16
15 0
16 0 to 3.16
17 0 to 3.16
18 0 to 3.16
19 0 to 3.16
20 0 to 3.16
21 0 to 3.16
22 0 to 3.16
23 0 to 3.16
24 0 to 3.16
25 0 to 3.16
26 0 to 3.16
27 0 to 3.16
28 0
A
B
C
NOTES
RESISTORS : Ω
: RS1/10S&&&J
CAPACITORS : µF
YB : CKSQYB (2125 CHIP), CKSR (1608 CHIP)
CH : CCSQCH (2125 CHIP), CCSR (1608 CHIP)
: 1608 SIZE CHIP
D
3/5
C
5
6
7
8
21
Page 22
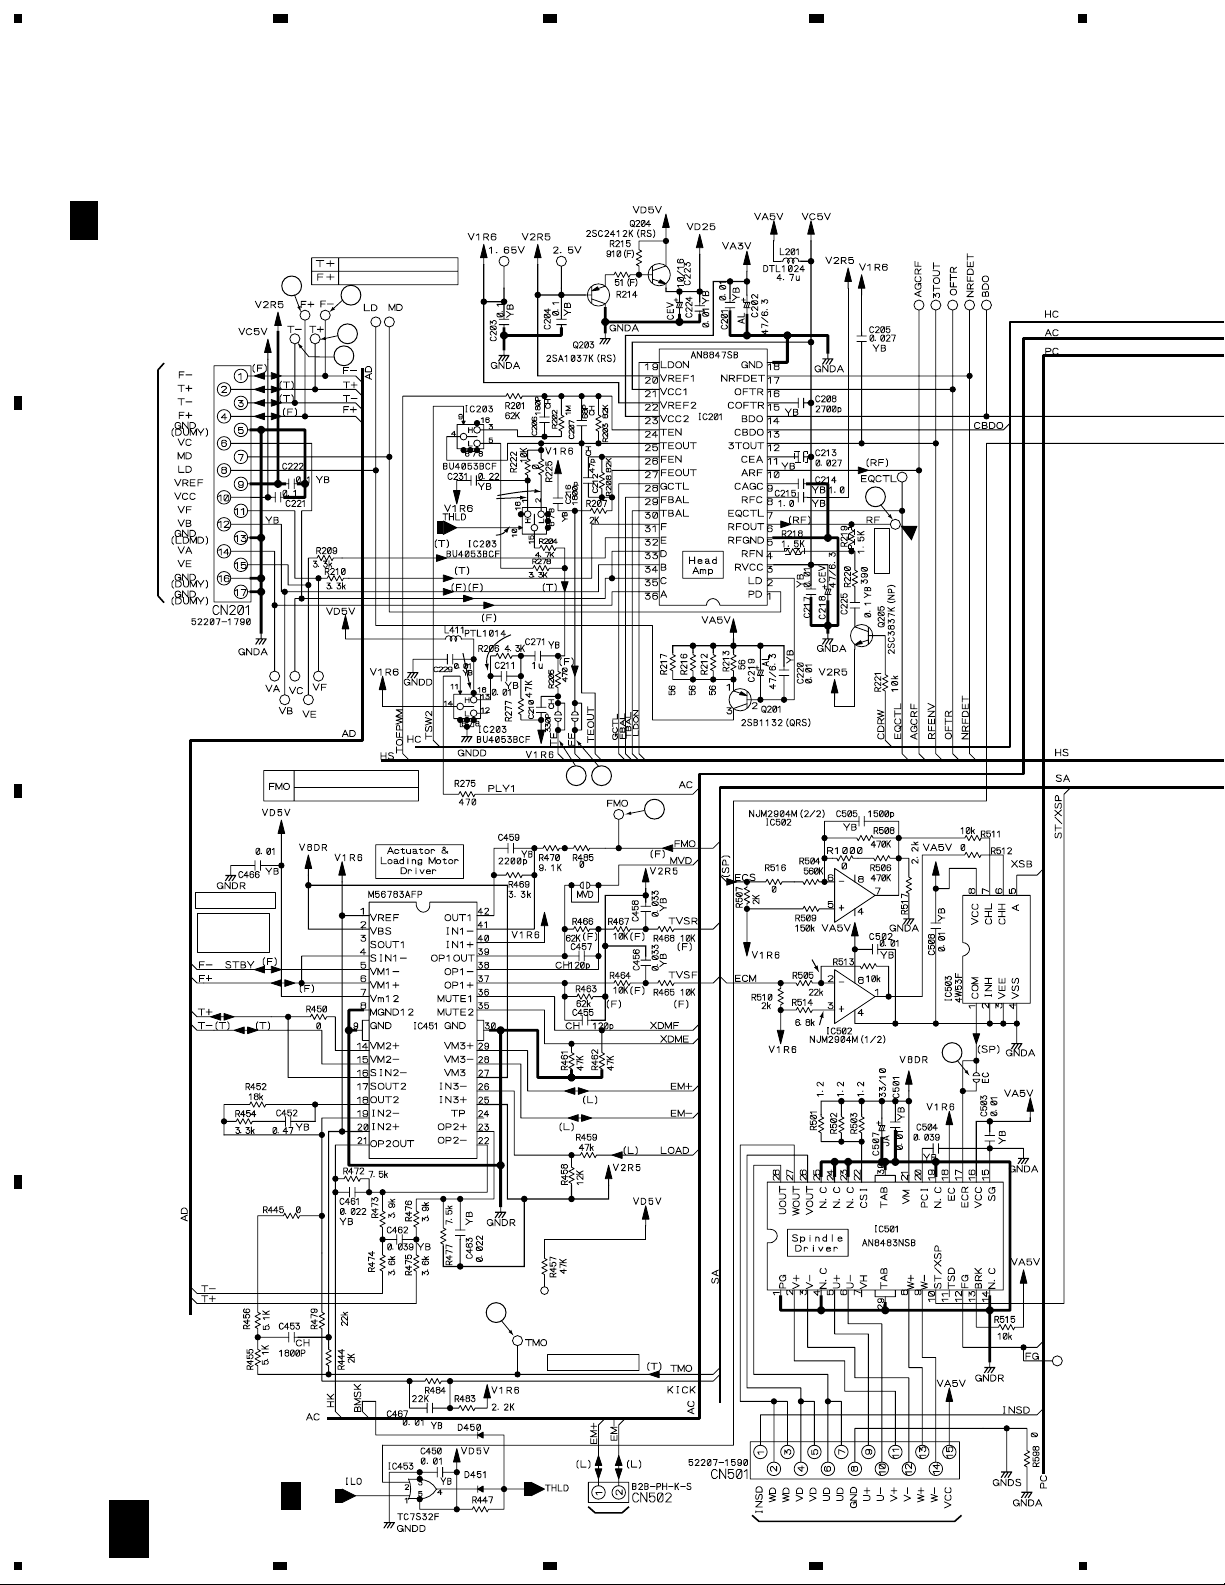
1
CMX-5000, CU-V160
3.6 CDPB ASSY (4/5)
A
23
4
C 4/5
B
CDPB ASSY (DWG1540)
C 1/5
C
0-4.8V
4.8V
C 3/5
D
22
4/5
C
1234
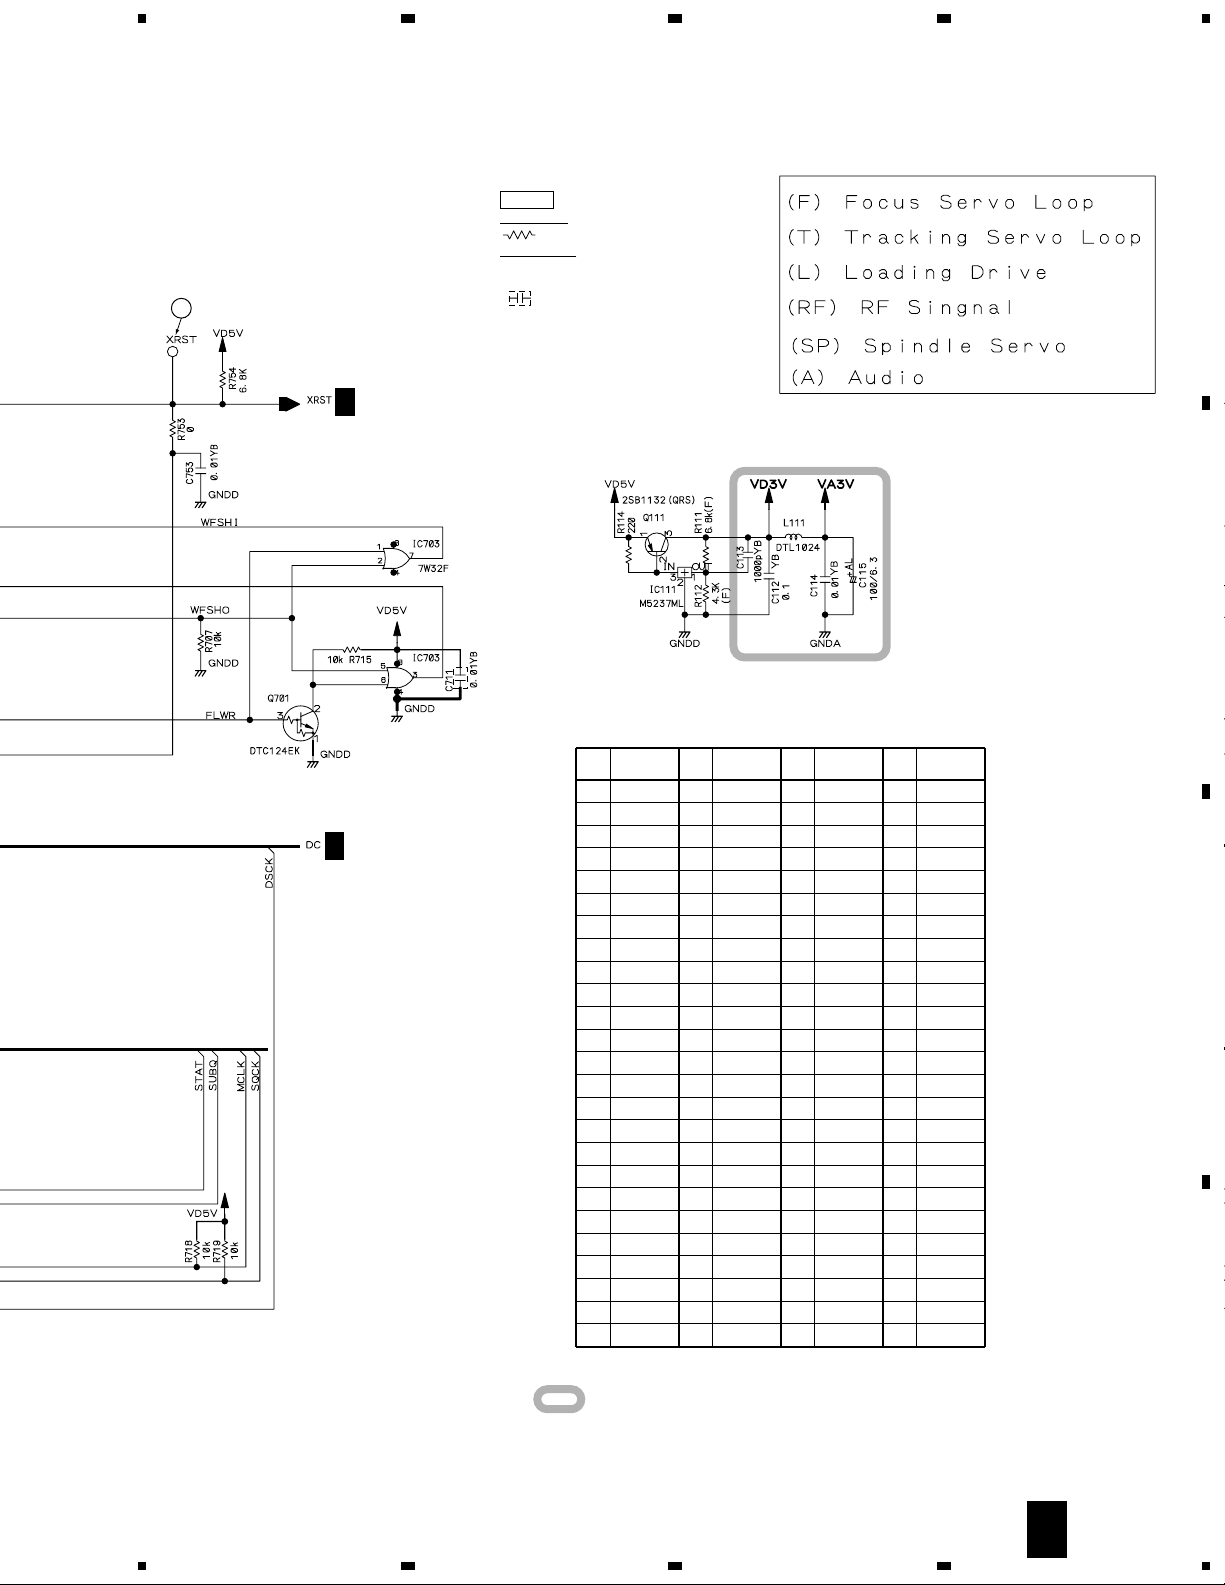
Page 23
5
678
: The power supply is shown with the marked box.
NOTES
RESISTORS : Ω
: RS1/10S&&&J
CAPACITORS : µF
YB : CKSQYB (2125 CHIP), CKSR (1608 CHIP)
CH : CCSQCH (2125 CHIP), CCSR (1608 CHIP)
: 1608 SIZE CHIP
C 1/5
CMX-5000, CU-V160
4.8V
2.6V
3-4.8V
2.25V
0V
A
B
21
C
C 1/5
D
4/5
C
5
6
7
8
23
Page 24

1
CMX-5000, CU-V160
3.7 CDPB ASSY (5/5)
23
4
A
B
C 5/5
CDPB ASSY (DWG1540)
C
C 2/5
D
24
5/5
C
1234
Page 25
5
678
CMX-5000, CU-V160
NOTES
RESISTORS : Ω
: RS1/10S&&&J
CAPACITORS : µF
YB : CKSQYB (2125 CHIP), CKSR (1608 CHIP)
CH : CCSQCH (2125 CHIP), CCSR (1608 CHIP)
: 1608 SIZE CHIP
A
B
4.8V
3.85V
8.4V
0.613V
0V
C 1/5
C
8.4V
C 2/5
0V
0V
D
C 1/5
5/5
C
5
6
7
8
25
Page 26

1
CMX-5000, CU-V160
3.8 TRMB ASSY (1/3)
A
D 2/3
B
23
D 1/3
TRMB ASSY (DWX2066)
4
D 2/3
C
8.4V
-2 - 2V
-2 - 2V
E
-8.4V
D
J1101
26
-2 - 2V
-2 - 2V
D 2/3
1/3
D
1234
Page 27

5
678
CMX-5000, CU-V160
NOTES
RESISTORS : Ω
: RS1/4W&&&J or RS1/10W&&&J
VM : RD1/4VM&&&J
CAPACITORS : µF (CEAT)
JA : CEJA
YB : CKSQYB
CH : CCSQCH
M : CQMA
D 2/3
-2 - 2V
-2 - 2V
-2 - 2V
8V
-8.4V
0V
0V
0V
A
-2 - 2V
A
AUDIO OUT
-2 - 2V
B
B
AUDIO OUT
-2 - 2V
-2 - 2V
-2 - 2V
-8.4V
8.4V
-2 - 2V
D 2/3
-2 - 2V
-2 - 2V
-2 - 2V
8V
0V
0V
-8.4V
0V
C
8.4V
0V
0V
0V
MIX
-8.4V
-2 - 2V
AUDIO OUT
D
D 2/3
5
1/3
D
6
7
8
27
Page 28

1
CMX-5000, CU-V160
23
4
3.9 TRMB ASSY (2/3)
A
D 2/3
B
CN702 (To A PLAYER)
TRMB ASSY (DWX2066)
C 1/5
D 1/3
D 1/3
0-4.8V
0-4.8V
D 1/3
0-4.8V
0-4.8V
0-4.8V
0-4.8V
0-4.8V
REMOTE
CONTROL
0-4.8V
CN2602
N
(CU-V160)
STATE
4.8V
0-4.8V
D 1/3
PLA
D 1/3
C
CN702 (To B PLAYER)
C 1/5
D
D 3/3
CONTROL
A
D 1/3
PLB
D 1/3
28
CONTROL
B
2/3
D
1234
Page 29

0-4.8V
0-4.8V
5
678
CMX-5000, CU-V160
CN101
G
0-4.8V
0-4.8V
CABLE HOLDER
: The power supply is shown with the marked box.
NOTES
RESISTORS : Ω
: RS1/4W&&&J or RS1/10W&&&J
VM : RD1/4VM&&&J
CAPACITORS : µF (CEAT)
JA : CEJA
YB : CKSQYB
CH : CCSQCH
M : CQMA
IC1004
Pin
Voltage (V)
No.
1 0 to 4.8
20
30
4 0 to 4.8
5 0 to 4.8
6 0 to 4.8
7 0 to 4.8
8 0 to 4.8
9 0 to 4.8
10 0
11 0 to 4.8
12 0 to 4.8
13 0 to 4.8
14 0 to 4.8
15 0 to 4.8
16 0 to 4.8
17 0
18 0
19 0 to 4.8
20 4.8
A
B
C
D 1/3
D 1/3
J1901
F
CAUTION : FOR CONTINUED PROTECTION AGAINST
D 1/3
CAUTION : FOR CONTINUED PROTECTION AGAINST
5
RISK OF FIRE.
REPLACE ONLY WITH SAME TYPE NO.
ICP-N15 MFD, BY ROHM CO., LTD. FOR
IC1011, IC1013 AND IC1018.
RISK OF FIRE.
REPLACE ONLY WITH SAME TYPE NO.
ICP-N20 MFD, BY ROHM CO., LTD. FOR
IC1010.
6
CAUTION : FOR CONTINUED PROTECTION AGAINST
CAUTION : FOR CONTINUED PROTECTION AGAINST
RISK OF FIRE.
REPLACE ONLY WITH SAME TYPE NO.
ICP-N25 MFD, BY ROHM CO., LTD. FOR
IC1012 AND IC1014.
RISK OF FIRE.
REPLACE ONLY WITH SAME TYPE NO.
491.500 MFD, BY LITTELFUSE INK. FOR
IC1017 (AEK7005).
D
7
2/3
8
D
29
Page 30

1
CMX-5000, CU-V160
3.10 TRMB ASSY (3/3)
A
23
4
D 3/3
C 1/5
B
C
TRMB ASSY (DWX2066)
CN706
(To B PLAYER)
0V
4.8V
0V
0V
4.8V
0V
0V
5.1V
0V
5.1V
0V
0V
4.8V
0V
5.1V
0V
4.8V
5.1V
4.8V
0V
0V
5.1V
0V
0V
D 2/3
B
A
PLAYER
DIGITAL OUT
B
DIGITAL
OUT
A
DIGITAL
OUT
CN706
C 1/5
(To A PLAYER)
D
30
3/3
D
1234
Page 31

1
3.11 HPJB and SELB ASSYS
HPJB ASSY (DWX2067)
E
MONITOR
CN1011
234
CMX-5000, CU-V160
A
PHONES
D 1/3
CN1010
D 2/3
CABLE HOLDER
SELB ASSY (DWS1302)
F
SELB ASSY
S1701 : A PLAYER EJECT ())
S1901 : A • B AUDIO OUT SELECT
A • B _ A • B/AUTO MIX
S1902 : B PLAYER EJECT ())
S1903 : PLAYER SELECT A
S1904 : PLAYER SELECT B
B
C
CABLE HOLDER
1
D
FE
2
3
4
31
Page 32

1
23
CMX-5000, CU-V160
3.12 SW POWER SUPPLY and PSWB ASSYS
A
4
POWER
PSWB ASSY
H
(DWS1301)
CN2
CN1
LIVE
B
C
AC IN
NEUTRAL
GND
NTC1F1
Z1
R1C1
D21
Q21
Q22
L2L1
C3
C2
R21
R22
R24
R25
D22
C56
IFB DVP Vcc VD GNDCLM CT AT SS
R23
C32
C31
C4
R50
D14
D54
D12
D11
IC51
D13
R56
EEA52
R54
C55
D56
R52R58
R61
C5
R62
C53
R55
R53
C52
R57
R71
Q71
R73
C10R5
R59
C54
R51
C51
PC1
R74
R72
D71
C8
Q1
EEA1
D55
D53
• NOTE FOR FUSE REPLACEMENT
CAUTION -
D
32
G H
1234
FOR CONTINUED PROTECTION AGAINST RISK OF FIRE.
REPLACE WITH SAME TYPE AND RATINGS ONLY.
Page 33

5
678
CMX-5000, CU-V160
SW POWER SUPPLY ASSY (DWR1330)
G
POWER TRANSFORMER
T1
D103
D102
L101
PC1
IC201
R201
C105
R202
C201
A
R203
VR201
R205
R204
CN101
8
V + 8V
B
4
V + 5V
C112
D107
C102
D305 D302IC302
C301
C107
C302
L301
C305
R102
R106
R309
VR301
P103
C303
C106
D111
R101
R302
Q101
R103
Q102
R104
R105
5
6
7
3
1
2
GND D
GND A
GND R
VLOD
FLAC 2
FLAC 1
2/3
D
J1010
C
D
G
5
6
7
8
33
Page 34

1
23
CMX-5000, CU-V160
3.13 OVERALL WIRING DIAGRAM FOR REMOTE CONTROLLER (CU-V160)
A
REMOTE CONTROLLER (CU-V160)
PHT1 ASSY
J
(DWG1535)
B
4
FLK1 ASSY
I
(DWG1538)
C
D
CONNECTION CABLE
: DDE1115
34
1234
CN2602
AKP7031
CTJB ASSY
N
(DWG1537)
Page 35

5
678
CMX-5000, CU-V160
A
PHT2 ASSY
L
(DWG1536)
B
K
CNNB ASSY
M
(DWG1534)
FLK2 ASSY
(DWG1539)
C
D
35
5
6
7
8
Page 36

1
CMX-5000, CU-V160
3.14 FLK1 and PHT1 ASSYS
A
CN2202
M
B
23
FL HOLDER
VEC1144
4
C
D
36
I
1234
Page 37

5
678
CMX-5000, CU-V160
A
FLK1 ASSY (DWG1538)
I
EARTH LUG ASSY
B
ENCODER
ON/OFF
KEY MATRIX
NOTE
DIODE
1SS355 UNLESS OTHERWISE DIODES
SWITHES
C
PHT1 ASSY (DWG1535)
J
D
CN2203
M
JI
5
6
7
8
37
Page 38

1
CMX-5000, CU-V160
3.15 FLK2 and PHT2 ASSYS
A
CN2205
M
B
23
FL HOLDER
VEC1144
4
C
D
38
K
1234
Page 39

5
678
CMX-5000, CU-V160
A
FLK2 ASSY (DWG1539)
K
EARTH LUG ASSY
B
KEY MATRIX
NOTE
DIODE
1SS355 UNLESS OTHERWISE DIODES
TRANSISTOR
SWITCH
C
PHT2 ASSY (DWG1536)
L
D
CN2204
M
LK
5
6
7
8
39
Page 40

1
CMX-5000, CU-V160
3.16 CNNB and CTJB ASSYS
A
I
CN2002
23
CNNB ASSY (DWG1534)
M
4
B
CTJB ASSY (DWG1537)
N
C
IC2202
Pin
Voltage (V)
No.
1 0 to 5.0
2 0 to 5.0
3 0 to 5.0
4 0 to 5.0
5 0 to 5.0
6 0 to 5.0
70
8 0 to 5.0
9 0 to 5.0
10 0 to 5.0
11 0 to 5.0
12 0 to 5.0
13 0 to 5.0
14 5
D
To PLAYER
2/3
CN1007
D
40
M N
1234
Page 41

5
678
CMX-5000, CU-V160
A
K
CN2101
B
IC2201
Pin
Voltage (V)
No.
1 0 to 5.1
2 0 to 5.1
3 0 to 5.1
4 0 to 5.1
50
6 0 to 5.1
7 0 to 5.1
8 0 to 5.1
9 0 to 5.1
10 0
Pin
Voltage (V)
No.
11 0 to 5.1
12 0 to 5.1
13 0 to 5.1
14 0 to 5.1
15 0
16 0 to 5.1
17 0 to 5.1
18 0
19 0 to 5.1
20 5.1
I
CN2001
C
K
CN2102
D
M
5
6
7
8
41
Page 42

CMX-5000, CU-V160
WAVEFORMS and VOLTAGES
Note :
The encircled numbers denote measuring point in the schematic diagram.
CDPB ASSY
TP XRST
1
V: 2V/div. H: 10msec/div.
IC701 - pin 40 (XDRST)
2
V: 2V/div. H: 10msec/div.
(Power ON)
1
2
TP FE
9
V: 0.5V/div. H: 2msec/div.
(Focus up/down)
TP PWM1
14
V: 1V/div. H: 2µsec/div.
(Trase ×4 only)
IC231 - pin 2 (ABCK)
20
V: 0.1V/div. H: 0.1µsec/div.
(×4 Play mode)
TP XRST
1
V: 2V/div. H: 0.2sec/div.
IC701 - pin 34 (XMRST)
3
V: 2V/div. H: 0.2sec/div.
(Power ON)
TP T+
4
V: 2V/div. H: 0.1msec/div.
TP T–
5
V: 2V/div. H: 0.1msec/div.
TP TE
8
V: 2V/div. H: 0.1msec/div. (Search)
TP F+
6
V: 2V/div. H: 10msec/div.
TP F–
7
V: 2V/div. H: 10msec/div.
TP FE
9
V: 0.5V/div. H: 10msec/div. (Focus in)
TP RF
10
V: 20mV/div. H: 100nsec/div.
(Play mode ×4)
TP EC
15
V: 1.772V/div. H: 20msec/div.
(Play)
TP ZCLK3
21
V: 1V/div. H: 50nsec/div.
1
3
TP NRF (AGCRF)
11
V: 20mV/div. H: 100nsec/div.
(×4 Play mode)
CN551 - pin 4 (STA+)
16
V: 4.75V/div. H: 10µsec/div.
CN551 - pin 2 (STB+)
17
V: -0.07V/div. H: 10µsec/div.
(Play)
8
16
4
5
TP FMO
12
V: 0.1V/div. H: 5µsec/div.
(Play mode)
IC231 - pin 5 (ADATA)
18
V: 0.1V/div. H: 0.1µsec/div.
(×4 Play mode)
17
TP TE
8
V: 0.5V/div. H: 2msec/div.
(1 Tr Jump)
42
9
6
7
TP TMO
13
V: 0.1V/div. H: 5µsec/div.
(Play mode)
IC231 - pin 4 (ALRCK)
19
V: 0.1V/div. H: 2µsec/div.
(×4 Play mode)
Page 43

CDPB ASSY
C
2/5
IC201
Pin
Voltage (V)
No.
1 0 19 1.61
2 3.33 20 2.35
3 4.8 21 4.8
4 2.35 22 1.61
5 0 23 3.16
6 2.35 24 1.61
7 1.61 25 1.61
8 2.35 26 1.61
9 1.61 27 1.61
10 1.61 28 0.8
11 3.33 29 1.61
12 1.61 30 1.61
13 2.8 31 2.35
14 0 32 2.35
15 2.8 33 2.35
16 0 34 2.35
17 0 35 2.35
18 0 36 2.35
Pin
No.
Voltage (V)
C
2/5
IC451
Pin
Voltage (V)
No.
1 1.61 22 2.35
2 8.4 23 2.35
3 1.61 24 0
4 2.35 25 2.35
5 2.35 26 1.61
6 2.35 27 8.4
7 4.8 28 0
8 0 29 0
9 0 30 0
10 - 31 11 - 32 12 - 33 13 - 34 14 2.35 35 0
15 2.35 36 4.8
16 2.35 37 2.35
17 1.61 38 2.35
18 1.61 39 2.35
19 1.61 40 1.61
20 1.61 41 1.61
21 2.35 42 1.61
Pin
No.
Voltage (V)
CMX-5000, CU-V160
C
2/5
IC231
Pin
Voltage (V)
No.
1 0 26 0 51 1.61 76 0
2 0 to 3.16 27 3.16 52 1.61 77 0 to 3.16
3 3.16 28 3.16 53 1.61 78 3.16
4 0 to 3.16 29 0 54 3.16 79 0 to 3.16
5 0 to 3.16 30 0 to 3.16 55 0 80 3.16
6 3.16 31 0 56 1.61 81 0 to 3.16
7 1.0 to 2.5 32 0 57 1.61 82 0 to 3.16
8 0 to 3.16 33 0 58 1.61 83 3.16
9 0 34 0 59 1.61 84 3.16
10 0 35 0 to 1.5 60 1.61 85 0 to 3.16
11 0 to 4.8 36 0 to 3.16 61 1.61 86 0 to 3.16
12 0 to 4.8 37 0 to 3.16 62 3.16 87 0 to 4.8
13 0 to 3.16 38 0 to 3.16 63 1 88 2.35
14 0 39 0 to 3.16 64 1 89 0 to 3.16
15 0 to 4.8 40 0 65 1 90 0
16 0 to 4.8 41 0 66 1 91 0
17 0 to 4.8 42 0 67 1 92 0
18 0 to 3.16 43 2.35 68 1 93 3.16
19 0 44 2.35 69 1 94 0
20 0 to 3.16 45 0 70 0 95 0 to 3.16
21 1 46 0 71 0 96 0
22 0 to 3.16 47 0 72 1.61 97 0
23 0 to 3.16 48 0 73 3.16 98 0
24 3.16 49 1.61 74 1.61 99 0 to 3.16
25 0 50 1.61 75 0 100 0 to 3.16
Pin
No.
Voltage (V)
Pin
No.
Voltage (V)
Pin
No.
Voltage (V)
C
2/5
IC501
Pin
Voltage (V)
No.
1 0 16 4.8
2 2.2 to 2.6 17 1.61
3 2.2 to 2.6 18 1.61
4 0 19 0
5 2.2 to 2.6 20 0.613
6 2.2 to 2.6 21 8.25
7 0.613 22 8.25
8 2.2 to 2.6 23 0
9 2.2 to 2.6 24 0
10 3.16 25 0
11 4.8 26 4.0 to 8.25
12 0 to 4.8 27 4.0 to 8.25
13 3.83 28 4.0 to 8.25
14 0 29 0
15 0 30 0
Pin
No.
Voltage (V)
C
4/5
IC303
Pin
Voltage (V)
No.
1 0 to 3.0
2 0 to 4.8
3 0 to 3.0
4 0 to 4.8
5 0 to 3.0
6 0 to 4.8
70
80
90
10 0
11 0
12 0
13 0
14 4.8
C
4/5
Pin
Voltage (V)
No.
1 0 to 4.8
2 0 to 4.8
3 0 to 4.8
4 0 to 4.8
5 0 to 4.8
6 0 to 4.8
70
8 4.8
9 4.8
10 0
11 2.38
12 0
13 2.38
14 0
15 4.8
16 0.8 to 4.8
17 0
18 2.38
19 0
20 4.8
21 3.5
22 4.8
23 0
24 4.8
25 4.8
26 0 to 4.8
27 0 to 4.8
28 4.8
C
4/5
IC402IC351
Pin
Voltage (V)
No.
1 0 23 0
2 0 24 0
3 0 25 0
4 0 26 0
5 3.16 27 0
6 0 to 3.0 28 0 to 3.0
7 0 to 4.8 29 0
8 0 to 4.8 30 0
9 4.8 31 0
10 0 32 3.16
11 0 33 0
12 0 34 0
13 0 35 0
14 0 36 0
15 3.16 37 0
16 3.16 38 0
17 0 39 0
18 0 40 0
19 0 41 3.16
20 0 42 0
21 3.16 43 0
22 0 44 0
Pin
No.
Voltage (V)
43
Page 44

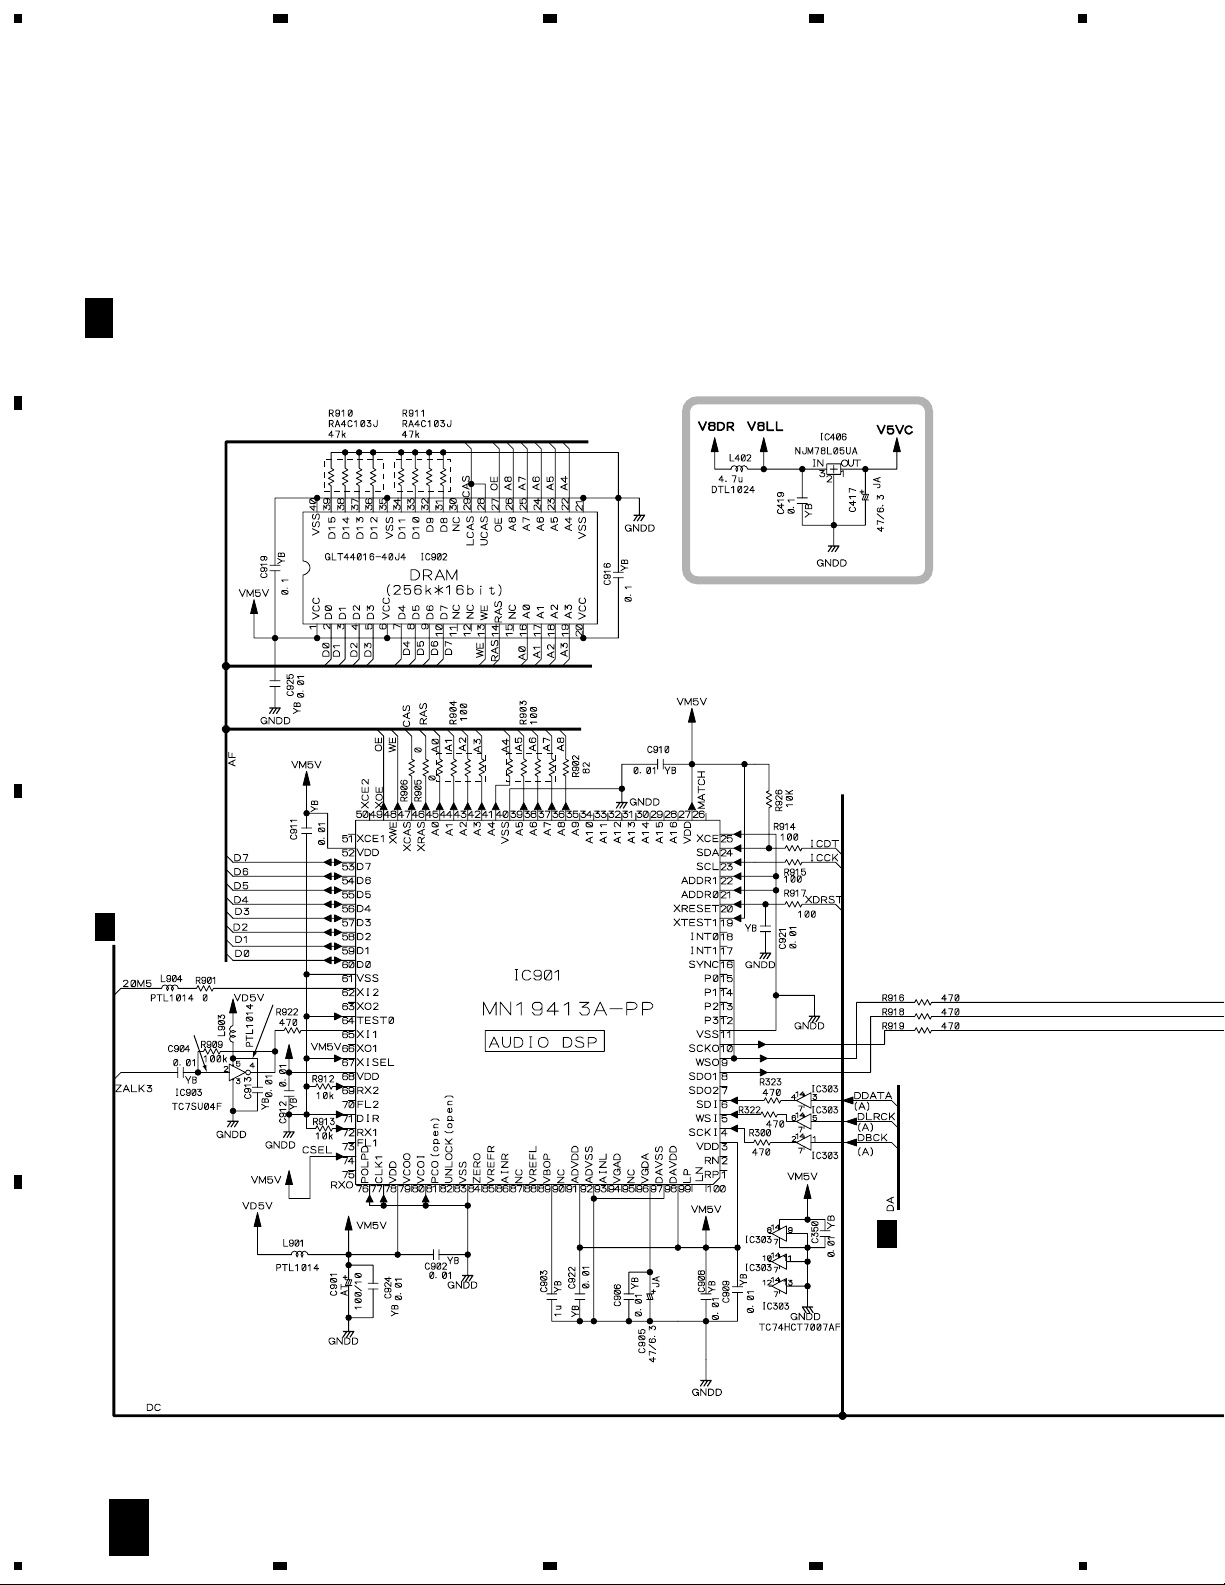
CMX-5000, CU-V160
C
4/5
IC901 IC902
Pin
Voltage (V)
No.
1 1.45 26 0 51 4.8 76 0
2 1.45 27 4.8 52 4.8 77 0
3 4.8 28 0 53 0 78 4.8
4 0 to 4.8 29 0 54 0 79 0
5 0 to 4.8 30 0 55 0 80 0
6 0 to 4.8 31 0 56 0 81 4.8
7 0 32 0 57 0 82 4.8
8 0 to 4.8 33 0 58 0 83 0
9 0 to 4.8 34 0 59 0 84 0
10 0 to 4.8 35 0 60 0 85 1
11 0 36 0 61 0 86 0
12 4.8 37 4.8 62 0.5 to 4.0 87 0
13 4.8 38 4.8 63 0 to 4.8 88 1
14 4.8 39 0 64 0 89 2.38
15 4.8 40 0 65 0 to 4.8 90 0
16 0 to 4.8 41 4.8 66 0 to 4.8 91 4.8
17 0 42 4.8 67 0 92 0
18 0 43 4.8 68 4.8 93 0
19 4.8 44 4.8 69 0 94 2.38
20 4.8 45 0 70 0 95 0
21 0 46 4.8 71 4.8 96 1.45
22 0 47 4.8 72 0 97 0
23 4.8 48 4.8 73 4.8 98 4.8
24 4.8 49 4.8 74 4.8 99 1.45
25 0 50 4.8 75 0 100 1.45
FLK1 ASSY
I
IC2001
Pin
Voltage (V)
No.
1 -35 to 4.8 21 0 41 0 61 -35 to 4.8
2 -35 to 4.8 22 0 42 0 62 -35 to 4.8
3 -35 to 4.8 23 0 43 0 63 -35 to 4.8
4 -35 to 4.8 24 0 44 0 64 -35 to 4.8
5 -35 to 4.8 25 0 to 4.8 45 0 65 -35 to 4.8
6 -35 to 4.8 26 0 to 4.8 46 0 66 0
7 -35 to 4.8 27 2.8 47 4.8 67 -35 to 4.8
8 4.8 28 0 48 0 68 -35 to 4.8
9 0 29 4.8 49 7.6 69 -35 to 4.8
10 0 30 4.8 50 0 70 0
11 0 31 0 51 0 71 -35.0
12 4.8 32 4.8 52 4.8 72 -35 to 4.8
13 0 33 0 53 -35 to 4.8 73 0
14 0 to 4.8 34 0 to 4.8 54 -35 to 4.8 74 -35 to 4.8
15 0 to 4.8 35 0 to 4.8 55 -35 to 4.8 75 -35 to 4.8
16 0 to 4.8 36 4.8 56 -35 to 4.8 76 -35 to 4.8
17 4.8 37 0 57 -35 to 4.8 77 -35 to 4.8
18 0 38 4.8 58 -35 to 4.8 78 -35 to 4.8
19 0 39 0 59 -35 to 4.8 79 -35 to 4.8
20 0 40 0 60 -35 to 4.8 80 -35 to 4.8
Pin
No.
Pin
No.
Voltage (V)
Voltage (V)
Pin
No.
Pin
No.
Voltage (V)
Voltage (V)
Pin
No.
Pin
No.
Voltage (V)
Voltage (V)
C
4/5
Pin
No.
1 4.8 21 0
2 0 22 0 to 4.8
3 0 23 0 to 4.8
4 0 24 0 to 4.8
5 0 25 0 to 4.8
6 4.8 26 0 to 4.8
7 0 27 0 to 4.8
8 0 28 0 to 4.8
9 0 29 0 to 4.8
10 0 30 0
11 0 31 0
12 0 32 0
13 0 to 4.8 33 0
14 0 to 4.8 34 0
15 0 35 0
16 0 to 4.8 36 0
17 0 to 4.8 37 0
18 0 to 4.8 38 0
19 0 to 4.8 39 0
20 4.8 40 0
FLK2 ASSY
K
IC2101
Pin
No.
1 -35 to 4.8 21 0 41 0 61 -35 to 5.0
2 -35 to 4.8 22 0 42 4.8 62 -35 to 5.0
3 -35 to 4.8 23 0 43 0 63 -35 to 5.0
4 -35 to 4.8 24 0 44 0 64 -35 to 5.0
5 -35 to 4.8 25 0 45 4.8 65 -35 to 5.0
6 -35 to 4.8 26 4.8 46 4.8 66 -35 to 5.0
7 -35 to 4.8 27 0 47 0 67 -35 to 5.0
8 4.8 28 0 48 0 68 -35 to 5.0
9 0 29 4.8 49 0 69 -35 to 5.0
10 0 30 4.8 50 0 70 -35 to 5.0
11 0 31 0 51 8.4 71 -35
12 0 32 4.8 52 4.8 72 -35 to 5.0
13 0 33 0 53 -35 to 5.0 73 -35 to 5.0
14 0 to 4.8 34 0 to 4.8 54 -35 to 5.0 74 -35 to 5.0
15 0 to 4.8 35 0 to 4.8 55 -35 to 5.0 75 -35 to 5.0
16 0 to 4.8 36 4.8 56 -35 to 5.0 76 -35 to 5.0
17 4.8 37 0 57 -35 to 5.0 77 -35 to 5.0
18 0 38 4.8 58 -35 to 5.0 78 -35 to 5.0
19 0 39 0 59 -35 to 5.0 79 -35 to 5.0
20 0 40 4.8 60 -35 to 5.0 80 -35 to 5.0
Voltage (V)
Voltage (V)
Pin
No.
Pin
No.
Voltage (V)
Voltage (V)
TRMB ASSY
D
1/3
IC1003
Pin
Voltage (V)
No.
1 -8.4 15 0 to 4.8
2 -2.0 to 2.0 16 0 to 4.8
3 -2.0 to 2.0 17 0
4 -2.0 to 2.0 18 0
5 -2.0 to 2.0 19 0
6 0 20 0
7 -2.0 to 2.0 21 0
8 -2.0 to 2.0 22 0
9 0 23 0
10 -2.0 to 2.0 24 0
11 -2.0 to 2.0 25 0
12 -2.0 to 2.0 26 0
13 0 27 0
14 0 28 8.4
D
1/3
IC1007
Pin
Voltage (V)
No.
1 -8.4 15 0 to 4.8
2 -1.0 to 1.0 16 0 to 4.8
3 0 17 0
4 -1.0 to 1.0 18 0
5 -1.0 to 1.0 19 0
6 0 20 0
7 -1.0 to 1.0 21 0
8 -1.0 to 1.0 22 0
9 0 23 0
10 -1.0 to 1.0 24 -1.0 to 1.0
11 -1.0 to 1.0 25 -1.0 to 1.0
12 -1.0 to 1.0 26 -1.0 to 1.0
13 0 to 4.8 27 -1.0 to 1.0
14 0 28 8.4
Pin
Voltage (V)
No.
Pin
No.
Pin
No.
Pin
No.
Voltage (V)
Voltage (V)
Voltage (V)
44
Page 45

1
NOTE FOR PCB DIAGRAMS :
1. Part numbers in PCB diagrams match those in the schematic
diagrams.
2. A comparison between the main parts of PCB and schematic
diagrams is shown below.
3. The parts mounted on this PCB include all necessary parts for
several destinations.
For further information for respective destinations, be sure to
check with the schematic diagram.
4. View point of PCB diagrams.
Symbol In PCB
Diagrams
Symbol In Schematic
Diagrams
Part Name
BCE
D
DGGSS
BCE
BCE
DGS
BCEBCE
BCE
Transistor
Transistor
with resistor
Field effect
transistor
Resistor array
3-terminal
regulator
Capacitor
Connector
P.C.Board
Chip Part
SIDE A
SIDE B
234
4. PCB CONNECTION DIAGRAM
CMX-5000, CU-V160
A
B
4.1 SLM1 and SLM2 ASSYS
SLM1 ASSY
A
CN701
C
(A PLAYER)
SLM2 ASSY
B
CN701
C
(B PLAYER)
SIDE A SIDE B
(DNP1935-C)
(DNP1935-C)
SLM1 ASSY
A
SLM2 ASSY
B
(DNP1935-C)
(DNP1935-C)
C
D
1
BA
2
3
4
45
Page 46

1
CMX-5000, CU-V160
4.2 CDPB ASSY
CDPB ASSY
C
CN801 (A PLAYER)
A
B
FRAME
PULSE MOTOR
A
CN901 (B PLAYER)
B
23
CN1001 (A PLAYER)
D
CN1002 (B PLAYER)
D
CN1006 (A PLAYER)
D
CN1005 (B PLAYER)
D
LOADING
MOTOR
4
RS232C CONTROL
& UPDATE
Q301
IC903
IC353
IC901 IC902
IC351
IC303
IC551
Q701
Q551
IC703
IC751
IC701
IC452
ASSY
PICKUP
C
MOTOR
SPINDLE
D
IC401
IC405
IC404
IC407
Q201
IC402
IC203
IC702
IC451
IC403
IC201
Q822
IC823
IC304
IC706 IC301
IC231
IC503
IC501
46
IC502 IC302
IC233
(DNP1934-C)
SIDE A
C
1234
Page 47

SIDE B
CDPB ASSY
C
(DNP1934-C)
IC352
IC401
Q498
Q204
Q205
Q825
Q824
IC821
IC232
Q823
IC822
Q203
Q821
IC453
1
234
CMX-5000, CU-V160
A
B
C
D
1
2
3
C
4
47
Page 48

1
23
CMX-5000, CU-V160
4.3 TRMB and HPJB ASSYS
4
A
N
B
TRMB ASSY
D
IC1008 Q1203 Q1204
IC1009 IC1010 IC1016 IC1013 IC1014
CN2602
(CU-V106)
C
CN706
C
B PLAYER
D
HPJB ASSY
E
48
D
E
1234
C
CN702
F
J1901
(DNP1935-C)
IC1402
Page 49

5
678
CMX-5000, CU-V160
Q1303 Q1304
Q1103 Q1104
IC1017 IC1015
IC1018 IC1011 IC1001
IC1012 Q1006
A
B
C
(DNP1935-C)
G
CN101
C
CN702
C
CN706
A PLAYER
SIDE A
D
5
6
7
8
49
D
Page 50

1
CMX-5000, CU-V160
A
TRMB ASSY
D
B
IC1801 Q1106 IC1101 IC1301
23
Q1001 Q1105 Q1102 IC1302Q1101 Q1302 Q1301 IC1007 IC1003
4
C
D
50
D
1234
SIDE B
Page 51

5
678
CMX-5000, CU-V160
Q1204 Q1203
IC1201
003 Q1202 Q1201 Q1004 Q1003 Q1002 Q1005 Q1407 Q1009 Q1010IC1005 IC1004
Q1206 Q1401 Q1402 Q1306
Q1205 IC1016 Q1408 Q1305 IC1006 IC1002
IC1401 IC1501
A
B
5
Q1410
Q1409
Q1406
Q1405
(DNP1935-C)
6
HPJB ASSY
E
C
(DNP1935-C)
D
ED
7
8
51
Page 52

1
CMX-5000, CU-V160
4.4 SELB ASSY
23
4
A
B
SELB ASSY
F
CN1010
D
SELB ASSY
F
C
(DNP1935-C) (DNP1935-C)
D
52
SIDE A
F
1234
SIDE B
Page 53

1
SIDE A
SIDE B
SIDE A
PSWB ASSY
H
(DNP1935-C)
PSWB ASSY
H
SW POWER SUPPLY ASSY
G
(DNP1935-C)
J1010
D
AC IN
LIVE
NEUTRAL
VR201
VR301
Q22
Q21
Q71
PC1
IC201
IC302
Q101
Q102
IC51
234
4.5 SW POWER SUPPLYand PSWB ASSYS
CMX-5000, CU-V160
A
B
C
1
D
HG
2
3
4
53
Page 54

1
CMX-5000, CU-V160
4.6 FLK1 and PHT1 ASSYS
(DNP1936-A)
23
4
A
PHT1
J
VR2001
ASSY
B
FLK1
I
ASSY
IC2003
M
C
CN2202
M
CN2203
D
SIDE A
54
JI
1234
Page 55

1
SIDE B
FLK1
ASSY
I
PHT1
ASSY
J
(DNP1936-A)
Q2015 Q2016
IC2001
IC2002
Q2002
Q2001
Q2009-Q2011
Q2017-Q2021
Q2003-Q2008
234
CMX-5000, CU-V160
A
B
C
D
JI
1
2
3
4
55
Page 56

1
CMX-5000, CU-V160
4.7 FLK2 and PHT2 ASSYS
A
23
4
M
PHT2
L
FLK2 ASSY
ASSY
B
(DNP1936-A)
K
CN2204
M
CN2205
VR2101
C
(DNP1936-A)
D
SIDE A
56
LK
1234
Page 57

1
234
CMX-5000, CU-V160
A
PHT2
L
FLK2 ASSY
K
ASSY
B
Q2112
Q2115-Q2124
IC2101
Q2113
Q2114
Q2125-Q2129
(DNP1936-A)
C
(DNP1936-A)
D
SIDE B
LK
1
2
3
4
57
Page 58

1
CMX-5000, CU-V160
4.8 CNNB and CTJB ASSYS
CTJB
N
A
ASSY
23
D
CN1007
N
CTJB
ASSY
4
(DNP1936-A)
CNNB
M
ASSY
M
(DNP1936-A)
CNNB
ASSY
K
CN2101
K
CN2102
B
IC2203
IC2202
IC2201
C
I
CN2002
D
I
CN2001
58
SIDE A SIDE B
NM
1234
Page 59

CMX-5000, CU-V160
Mark No. Description Part No.
Mark No. Description Part No.
5. PCB PARTS LIST
NOTES:•Parts marked by "NSP" are generally unavailable because they are not in our Master Spare Parts List.
The mark found on some component parts indicates the importance of the safety factor of the part.
•
Therefore, when replacing, be sure to use parts of identical designation.
When ordering resistors, first convert resistance values into code form as shown in the following examples.
•
Ex.1 When there are 2 effective digits (any digit apart from 0), such as 560 ohm and 47k ohm (tolerance is shown by J=5%,
and K=10%).
560 Ω→56 × 10
47k Ω→47 × 103→ 473 ........................................................ RD1/4PU 4 7 3 J
0.5 Ω→R50 ..................................................................................... RN2H
1 Ω→1R0 ..................................................................................... RS1P
Ex.2 When there are 3 effective digits (such as in high precision metal film resistors).
5.62k Ω→ 562 × 10
Mark No. Description Part No.
LIST OF ASSEMBLIES
CDPB ASSY DWG1540
JACB ASSY DWM2113
SLM1 ASSY DWS1303
SLM2 ASSY DWS1304
TRMB ASSY DWX2066
HPJB ASSY DWX2067
SELB ASSY DWS1302
PSWB ASSY DWS1301
SW POWER SUPPLY ASSY DWR1330
NSP REMOTE CONTROLLER CU-V160
DISP ASSY DWM2114
FLK1 ASSY DWG1538
PHT1 ASSY DWG1535
FLK2 ASSY DWG1539
PHT2 ASSY DWG1536
CNNB ASSY DWG1534
CTJB ASSY DWG1537
1
→ 561 ........................................................ RD1/4PU 5 6 1 J
R 5 0
1 R 0
1
→ 5621 ...................................................... RN1/4PC 5 6 2 1 F
Mark No. Description Part No.
CDPB ASSY
C
SEMICONDUCTORS
IC501 AN8483NSB
IC201 AN8847SB
IC801,IC823 BA10393F
IC401 BA7042
IC203,IC702,IC706 BU4053BCF
IC902 GLT44016-40J4
IC551 LB1836M
IC751 M51953BFP
IC111 M5237ML
IC451 M56783AFP
IC901 MN19413A-PP
IC231 MN662754CEA
IC302 MSM51V17805D-60TS-K
IC502,IC822 NJM2904M
IC821 NJM4580ED
K
K
SLM1 ASSY
A
SWITCHES
S801,S802 DSG1017
OTHERS
CN801 KR CONNECTOR (3P) S3B-PH-K
SLM2 ASSY
B
SWITCHES
S901,S902 DSG1017
OTHERS
CN901 KR CONNECTOR (3P) S3B-PH-K
IC406 NJM78L05UA
IC701 PD3426A9
IC351 PE8001A
IC402 PE9009A
IC503 TC4W53F
IC303 TC74HCT7007AF
IC304 TC7S04F
IC453 TC7S32F
IC232 TC7SET08F
IC233,IC305,IC403,IC405,IC903 TC7SU04F
IC703 TC7W32F
IC802 TC7W53FU
IC407 TC7WT241FU
IC352 TC7WU04F
IC301 XCB56364
Q203,Q498,Q821,Q823,Q827 2SA1037K
Q111,Q201 2SB1132
Q204,Q824,Q826 2SC2412K
Q205 2SC3837K
Q825 2SD2114K
Q301,Q822 DTA124EK
Q499 DTC115EK
Q551,Q701 DTC124EK
D351,D450,D451,D821-D828 1SS355
59
Page 60

CMX-5000, CU-V160
Mark No. Description Part No.
COILS
L111,L201,L351-L353,L402 DTL1024
L551 DTL1024
L231 LCTA100J2520
L101 OTL1009
L202,L401,L403 PTL1014
L301,L302 PTL1014
L411,L701,L702,L901 PTL1014
L903,L904 PTL1014
CAPACITORS
C258,C824,C826,C821,C822 CCSQCH101J50
C264,C265 CCSQCH120J50
C455,C457 CCSQCH121J50
C273 CCSQCH180J50
C206 CCSQCH181J50
C801,C803,C805,C808-C810 CCSQCH221J50
C812,C815,C843 CCSQCH221J50
C210 CCSQCH331J50
C212 CCSQCH470J50
C275 CCSQCH5R0C50
C207 CCSQCH680J50
C304,C306,C308,C310,C312 CCSRCH101J50
C314,C316,C318,C320,C322 CCSRCH101J50
C324,C326,C328,C330,C332 CCSRCH101J50
C334,C336,C338 CCSRCH101J50
C430 CCSRCH330J50
C274 CCSRCH560J50
C105,C115 CEAL101M6R3
C202,C219 CEAL470M6R3
C101,C901 CEAT101M10
C104 CEJA101M16
C401,C551 CEJA101M6R3
C408 CEJA1R0M50
C411 CEJA220M10
C353,C356,C358 CEJA221M6R3
C507 CEJA330M10
C300,C340,C351,C364,C417 CEJA470M6R3
C905 CEJA470M6R3
C223 CEV100M16
C218 CEV470M6R3
C113,C234,C247,C253,C257 CKSQYB102K50
C363 CKSQYB102K50
C102,C103,C107,C114,C201 CKSQYB103K50
C211,C217,C220,C224,C229 CKSQYB103K50
C235,C240,C266,C268,C269 CKSQYB103K50
C341,C344,C350,C352 CKSQYB103K50
C354,C355,C357,C359,C360 CKSQYB103K50
C362,C402-C405,C450 CKSQYB103K50
C466,C467,C501-C503,C508 CKSQYB103K50
C552,C701-C706,C710,C711 CKSQYB103K50
C715,C752,C753,C802,C804 CKSQYB103K50
C806,C807,C811,C813,C814 CKSQYB103K50
C816,C833-C835,C844,C902 CKSQYB103K50
C904,C906,C908-C913 CKSQYB103K50
C921,C922,C924,C925 CKSQYB103K50
C112,C203,C204,C221,C222 CKSQYB104K25
C225,C230,C245,C248-C251 CKSQYB104K25
C256,C260-C263,C365 CKSQYB104K25
C406,C407,C409,C410,C413 CKSQYB104K25
C419,C751,C828,C829,C839 CKSQYB104K25
Mark No. Description Part No.
C851,C916,C919 CKSQYB104K25
C214,C215,C254,C271 CKSQYB105K10
C903 CKSQYB105K10
C823,C825 CKSQYB122K50
C505,C837 CKSQYB152K50
C216,C453 CKSQYB182K50
C459 CKSQYB222K50
C236,C237,C246,C252,C461 CKSQYB223K50
C463 CKSQYB223K50
C231 CKSQYB224K16
C208 CKSQYB272K50
C205 CKSQYB273K50
C838 CKSQYB332K50
C456,C458 CKSQYB333K50
C239,C462,C504 CKSQYB393K50
C831 CKSQYB472K50
C255,C259,C452 CKSQYB474K16
C827,C832 CKSQYB474K16
C347 CKSRYB102K50
C302,C305,C307,C309,C311 CKSRYB103K50
C313,C315,C317,C319,C321 CKSRYB103K50
C323,C325,C327,C329,C331 CKSRYB103K50
C333,C335,C337,C339,C345 CKSRYB103K50
C348,C712 CKSRYB103K50
C232,C233,C238,C244,C836 CKSRYB104K16
C841 CKSRYB104K16
C278 CKSRYB152K50
C213 CKSRYB273K16
C301,C840 CKSRYB562K50
C842 CSZSR100M16
VC401 (40pF) VCM1010
RESISTORS
R903,R904 RA4C101J
R910,R911 RA4C473J
R464,R465,R467,R468,R851 RS1/10S1002F
R848 RS1/10S3902F
R112 RS1/10S4301F
R214 RS1/10S51R0F
R463,R466 RS1/10S6202F
R111 RS1/10S6801F
R215 RS1/10S9100F
R315 RS1/16S101J
R861 RS1/16S102J
R239 RS1/16S103J
R218,R219 RS1/16S152J
R862,R863 RS1/16S473J
Other Resistors RS1/10S J
OTHERS
CN501 CONNECTOR (15P) 52207-1590
CN201 CONNECTOR (17P) 52207-1790
CN502 KR CONNECTOR (2P) B2B-PH-K-S
CN701 KR CONNECTOR (3P) B3B-PH-K
CN706 KR CONNECTOR (3P) B3B-PH-K-Y
CN704 KR CONNECTOR (6P) B6B-PH-K-S
PC BOARD CDPB DNP1934
X701 CHIP CERAMIC RESONATOR DSS1110
(20MHz)
CN702 FFC CONNECTOR (37P) HLEM37R-1
X231 CRYSTAL RESONATOR RSS1055
(33.8MHz)
CN551 4P FFC CONNECTOR VKN1235
KN101 EARTH METAL FITTING VNF1084
60
Page 61

CMX-5000, CU-V160
Mark No. Description Part No.
TRMB ASSY
D
SEMICONDUCTORS
IC1017 (0.5A) AEK7005
IC1011,IC1013,IC1018 (0.6A) ICP-N15
IC1010 (0.8A) ICP-N20
IC1012,IC1014 (1A) ICP-N25
IC1015,IC1016 NJM78L05A
IC1005 BU4053BCF
IC1001 IR3M03A
IC1101,IC1201,IC1301,IC1302,IC1401 NJM4558MD
IC1002,IC1006 TC74AC04F
IC1004 TC74HC241AF
IC1501,IC1801 TC74HCU04AF
IC1003,IC1007 TC9162AF
Q1101,Q1102,Q1201,Q1202 2SD2114K
Q1301,Q1302,Q1401,Q1402 2SD2114K
Q1103,Q1104,Q1203,Q1204 2SD2144S
Q1303,Q1304 2SD2144S
Q1002-Q1005,Q1105,Q1205,Q1305 DTA124EK
Q1407,Q1408 DTA124EK
Q1009,Q1010,Q1106,Q1206,Q1306 DTC124EK
Q1307 DTC124EK
D1105,D1205,D1305 1SR154-400
D1003,D1006,D1101-D1103 1SS355
D1201-D1203,D1301-D1304 1SS355
D1001 EC10QS04
D1061,D1062 MTZJ5.1C
D1002,D1004,D1005,D1007 UDZS10B
COILS
L1001 (470µH) DTL1083
L1405,L1406 LFA101J
L1002-L1004 LFA470J
L1501,L1801 PTL1003
L1502,L1802 PTL1014
L1021,L1022 PTL1017
L1005-L1010 VTH1020
SWITCH
S1001 DSH1025
CAPACITORS
C1046,C1047,C1049,C1301,C1302 CCSQCH101J50
C1325,C1326,C1401,C1402 CCSQCH101J50
C1012 CCSQCH201J50
C1303,C1304 CEANP101M6R3
C1027-C1030,C1103,C1104 CEANP220M16
C1203,C1204,C1327,C1328 CEANP220M16
C1403,C1404 CEANP220M16
C1062 CEAT100M50
C1006 CEAT101M10
C1001 CEAT101M16
C1501,C1801 CEAT101M6R3
C1003 CEAT331M16
C1503,C1803 CEAT470M10
C1061 CEAT470M50
C1007,C1051,C1052,C1417,C1418 CEAT471M10
C1031,C1032 CEAT471M16
C1036 CEAT471M6R3
C1507,C1809 CGCYX104M25
C1048 CKSQYB102K50
C1041,C1043,C1508,C1808 CKSQYB103K50
Mark No. Description Part No.
C1008,C1009,C1011,C1013 CKSQYB104K25
C1016-C1026,C1034,C1038-C1040 CKSQYB104K25
C1042,C1044,C1107,C1108 CKSQYB104K25
C1207,C1208,C1307,C1308 CKSQYB104K25
C1329,C1330,C1405,C1406,C1502 CKSQYB104K25
C1504,C1606,C1802,C1804,C1806 CKSQYB104K25
C1101,C1102,C1105,C1106 CQMA152J50
C1201,C1202,C1205,C1206 CQMA152J50
C1305,C1306 CQMA152J50
RESISTORS
R1061,R1327,R1328,R1405,R1406 RD1/4VM103J
R1325,R1326 RD1/4VM203J
R1105,R1106,R1205,R1206 RD1/4VM223J
R1305,R1306 RN1/10SE2202D
R1023,R1025 RD1/4VM271J
R1103,R1104,R1111-R1114 RD1/4VM471J
R1203,R1204,R1211-R1214 RD1/4VM471J
R1411,R1412 RD1/4VM471J
R1311-R1314 RN1/10SE4700D
R1329-R1332 RN1/10SE5100D
R1303,R1304 RD1/4VM752J
R1006 RS1/10S2002F
R1005 RS1/10S3601F
Other Resistors RS1/10S
OTHERS
CN1011 6P JUMPER CONNECTOR 52151-0610
CN1009 MINI JACK AKN1028
CN1007 10P MINI DIN SOCKET AKP7031
CN1005,CN1006 B3B-PH-K-Y
JA1010 MINI JACK DKN1146
J1010 JUMPER WIRE DXUY0830E
CN1001,CN1002 HLEM37S-1
JA1004,JA1008 1P JACK PKB1028
JA1001-JA1003 2P PIN JACK PKB1032
JA1005,JA1006 JACK (REMOTE) RKN1004
HPJB ASSY
E
CABLE HOLDER (8P) 51052-0800
KR CONNECTOR (3P)
FFC CONNECTOR 37P
SEMICONDUCTORS
IC1402 NJM4556AD
Q1405,Q1406,Q1409,Q1410 2SC3326
D1405 1SR154-400
COILS
L1401-L1403 LCTA1R0J3225
CAPACITORS
C1413,C1414 CCSQCH820J50
C1415,C1416 CEANP221M16
C1409-C1411 CKSQYB103K50
C1407,C1408 CKSQYB104K25
RESISTORS
VR1401 (10kΩ-B) DCS1058
Other Resistors RS1/10S J
J
61
Page 62

CMX-5000, CU-V160
Mark No. Description Part No.
OTHERS
J1101 JUMPER WIRE D20PYY0620E
JA1101 HEADPHONE JACK RKN1002
SELB ASSY
F
6P CABLE HOLDER 51048-0600
SEMICONDUCTORS
D1903,D1904 EMAY3864X-HM
D1701,D1901 SLP3118C51H
D1902 SLP9118C51H
SWITCHES
S1701,S1902-S1904 ASG7013
S1901 DSH1049
CAPACITOR
C1901 CKSQYB104K25
RESISTORS
All Resistors RS1/10S J
OTHERS
J1901 JUMPER WIRE 11P D20PYY1120E
SW POWER SUPPLY ASSY
G
There is no service parts.
11P CABLE HOLDER 51048-1100
Mark No. Description Part No.
SWITCHES
S2004-S2029 ASG7013
S2002,S2003 DSG1063
S2001 DSX1056
CAPACITORS
C2001,C2011 CEAL470M6R3
C2004,C2005,C2010,C2012,C2013 CKSQYB103K50
C2015 CKSQYB103K50
C2002,C2009 CKSQYB104K25
RESISTORS
VR2002 (10kΩ-B) DCS1059
VR2001 (50kΩ-B) DCV1011
Other Resistors RS1/10S
OTHERS
X2001 CERAMIC RESONATOR VSS1014
CN2004 4P JUMPER CONNECTOR 52147-0410
V2001 FL INDICATOR TUBE DEL1033
CN2001,CN2002 TKC-A10X-B1
PHT1 ASSY
J
(4.19MHz)
IC SOCKET 6P DKN1203
B TO B CONNECTOR
SEMICONDUCTORS
D2401,D2402 GP1S94
CAPACITOR
C2401 CKSQYB103K50
J
PSWB ASSY
H
SWITCH
S1 PSA-009
CAPACITOR
C1 ACG7033
OTHERS
J1 DKP3516
FLK1 ASSY
I
SEMICONDUCTORS
IC2002 LB1740
IC2001 PE5127A
IC2003 S-806D
Q2003,Q2009-Q2011,Q2017-Q2021 2SC2412K
Q2001,Q2002,Q2012-Q2014 DTA124EK
Q2004-Q2008,Q2015,Q2016 DTC124EK
D2001-D2017,D2049-D2051,D2057 1SS355
D2021-D2023,D2025-D2034 EMAY3864X-HM
D2036-D2042,D2047,D2048 EMAY3864X-HM
D2052-D2056 EMAY3864X-HM
D2301 LB-303VK222
D2043,D2044 MAY5364X
D2045,D2046 SLP3118C51H
D2018,D2019 SLP9118C51H
RESISTORS
All Resistors RS1/10S J
OTHERS
J2401 JUMPER WIRE 4P D20PWY0405E
FLK2 ASSY
K
SEMICONDUCTORS
IC2101 PE5127A
Q2125-Q2129 2SC2412K
Q2113-Q2116,Q2124 DTA124EK
Q2112,Q2117-Q2123 DTC124EK
D2108-D2117 1SS355
D2137-D2142 EMAY3864X-HM
D2143,D2144 MAY5364X
D2145,D2146 SLP3118C51H
SWITCHES
S2104-S2114 ASG7013
S2102,S2103 DSG1063
CAPACITORS
C2101 CEAL101M6R3
C2111 CEAL220M6R3
C2110,C2115 CKSQYB103K50
C2102 CKSQYB104K25
62
Page 63

CMX-5000, CU-V160
Mark No. Description Part No.
RESISTORS
VR2101 (50kΩ-B) DCV1011
Other Resistors RS1/10S J
OTHERS
X2101 CERAMIC RESONATOR VSS1014
CN2103 4P JUMPER CONNECTOR 52147-0410
V2101 FL INDICATOR TUBE DEL1033
CN2101 B TO B CONNECTOR TKC-A08X-B1
CN2102 B TO B CONNECTOR TKC-A12X-B1
PHT2 ASSY
L
(4.19MHz)
SEMICONDUCTORS
D2501,D2502 GP1S94
CAPACITOR
C2501 CKSQYB103K50
RESISTORS
All Resistors RS1/10S J
OTHERS
J2501 JUMPER WIRE 4P D20PWY0405E
Mark No. Description Part No.
CNNB ASSY
M
SEMICONDUCTORS
IC2203 BA05T
IC2202 TC74AC04F
IC2201 TC74HC241AF
CAPACITORS
C2208,C2209,C2221 CCSQCH101J50
C2204 CEJA101M10
C2202 CEJA101M6R3
C2201,C2203,C2210 CKSQYB104K25
RESISTORS
All Resistors RS1/10S J
OTHERS
J2201 JUMPER WIRE 10P D20PDY1025E
CN2204 CONNECTOR PLUG TKC-A08P-B1
CN2202,CN2203 TKC-A10P-B1
CN2205 B TO B CONNECTOR TKC-A12P-B1
CTJB ASSY
N
10P CABLE HOLDER 51048-1000
CONNECTOR PLUG
PCB BINDER VEF1040
CAPACITOR
C2601 CKSQYB104K25
OTHERS
CN2602 10P MINI DIN SOCKET AKP7031
63
Page 64

CMX-5000, CU-V160
6. ADJUSTMENT
6.1 ADJUSTMENT ITEMS AND LOCATION
Adjustment Points (PCB Part)
CDPB ASSY
C
SIDE A
1
VC401
IC401
1
SIDE B
TRMB ASSY
D
SIDE B
J1010 (PLB)
J1009 (PLA)
Adjustment Items
[Electrical Part]
1
VCO Free-running Adjustment
RF Level Adjustment
2
6.2 JIGS AND MEASURING
INSTRUMENTS
CD Test Disc
(YEDS-7)
Screwdriver (small)
Dual-trace oscilloscope
(10:1 probe)
CH1 CH2
(X) (Y)
6.3 NECESSARY ADJUSTMENT POINTS
When Adjustment Points
Exchange
CDPB ASSY
Exchange
SERVO MECHANISM ASSY
1, 2
2
= Page 65
= Page 65
64
Page 65

6.4 ELECTRICAL ADJUSTMENT
1
VCO Free-running Adjustment
CMX-5000, CU-V160
Objective : To optimize the VCO free-running frequency
Note: Adjustment of VC401 may not be made if the
SLOT-IN MECHANISM ASSY is installed.
Before adjustment, remove the SLOT-IN
MECHANISM ASSY..
• Power ON
• None disc
Player
START
CDPB ASSY
IC401 - pin 1
GND
2
RF Level Adjustment
• Test mode
Enter the RF ADJ mode by
pressing "C-MODE" button on the
remote control unit for servicing.
• Move the pickup to the RF ADJ
position(disc outer circumference)
by pressing the "PLAY" button on
the remote control unit for servicing.
TEST DISC
PLAY
TRMB ASSY
CDPB ASSY
VC401
Probe (10:1)
PICKUP
ASSY
LD POWER
VR
JA1009 (PLA)
JA1010 (PLB)
When not properly adjusted :
• Master Tempo does not function normally
• The output does not appear in indication and occasion
when turned a Tempo adjustment into + side.
DC voltage
2.5±0.2V
CH1 CH2
(X) (Y)
Oscilloscope
V: 50mV/div.
H: 10msec/div.
DC mode
Objective : To adjust the amplitude of playback RF signal
When not properly adjusted :
Player does not playback, track search is impossible.
0.5Vp-p
START
CDPB ASSY
RF
GNDA
SIDE B
Player
Remote control
unit for servicing
or
(RU-V101)
Probe (10:1)
CH1 CH2
(X) (Y)
Oscilloscope
V: 50mV/div.
H: 10msec/div.
AC mode
65
Page 66

CMX-5000, CU-V160
7. GENERAL INFORMATION
7.1 DIAGNOSIS
7.1.1 TEST MODE
7.1.1.1 Outline of the Test Mode
Three kinds of test modes (Mode 1-3) are prepared.
(1) Confirm the button and display function of the
Controller with the test mode
Mode 1 When connect the Controller to the Player, and confirm it.
Mode 2 When confirm it with Controller being simple (use DC
power supply). However, FL cannot confirm.
(2) Confirm the button display function and
movement of the Player, with the test mode
+7V ± 1V
CNNB ASSY
Front
Mode 3 When connect the remote control unit (RU-V101) for
service only with the player, and confirm it.
7.1.1.2 How to enter the test mode of the
controller, and the function that can
confirm with the test mode
(1) How to enter the test mode
Mode 1
Enter the test mode when power is turned on while pressing the
PLAYER SELECT A and B buttons of monitor section of the player.
Indication of the controller becomes an as follows. (Refer to Fig. 2.)
"TEST" is indicated by time display part of the FL. TRACK (Fig. 2
- 1), TEMPO (Fig. 2- 3), M S F (Fig. 2- 678), calendar
indication "1" (Fig. 2- 0), REMAIN (Fig. 2- 4), ± 16 (Fig. 2- 2),
BPM (Fig. 2- -) and : (Fig. 2- @) are lighted in the FL indication.
BPM/TRACK number indication (three columns of LED) and the
AUTO MIX PLAY button of the controller light.
Mode 2
When confirm the function only with the Controller
Use a DC (direct current) power supply, and connect GND and
VLOD of land for the test mode of CNNB Assy to ground together
and connect +7V to a power supply (+7V ± 1V).
Fig.2 Land position for the test mode
Following LEDs blink less than about 1 second when inputs DC
power supply while pressing the TEMPO button and AUTO MIX
PLAY button of the PLAYER A simultaneously.
(CUE, PLAY/PAUSE, LOOP IN•LOOP OUT and MT LED)
LEDs of BPM/TRACK No. indication (three columns of LED) and
AUTO MIX PLAY turns on, and become the test mode. However,
FL does not light.
14
6
15
1
REMAIN
4
A.CUE
5
2 3
±
16
±
10
±
6
M
TEMPOTRACK
14
SF
8
7
9
10
14
1234567
8 9 10 11 12 13 14
15 16 17 18 19 20
LOOP
RELOOP
BPM
14
13 1112
1
TRACK No. indication
2
Tempo setting (± 6•10•16%)
3
Tempo setting (± 6 to 16%)
4
REMAIN indication
5
AUTO CUE indication
6
MINUTES (time indication)
7
SECONDS (time indication)
8
FRAMES (frame indication)
Fig. 2 FL indication for Mode 1
9
Music performance position
indication
10
Calendar indication
11
BPM indication
12
LOOP indication
13
RELOOP indication
14
Player indication at AUTO
MIX PLAY
15
Colon
66
Page 67

CMX-5000, CU-V160
(2) The function that can confirm (controller section)
Perform the following movement with the function button of the
product.
Mode 1
1. EJECT button:
Indicate "EJECT" in the time indication segment section of FL,
and lights/turns off the light whenever pressing the button.
2. TRACK SEARCH button:
TRACK No. in FL indication (Fig. 2-1) and number of the
calendar (Fig. 2-0) do UP/DOWN in sequence.
TRACK : 00, 11, 22, …………, 99, 00, ……
Calendar : 1, 2, 3, ………… 20, = 1, ……
3. SEARCH button:
Indication of music performance position indication (Fig. 2-9)
changes at the same time that the value of MIN • SEC • FRAME
in FL indication (Fig. 2-678 ) changes like next.
00:0000, …… 99:9999, XX:XXXX, …… ZZ:ZZZZ
4. CUE button:
Lights/turns off the light whenever pressing the button.
5. PLAY/PAUSE button:
Lights/turns off the light whenever pressing the button.
6. TIME MODE button:
A. CUE (Fig. 2-5) and REMAIN of FL indication (Fig. 2-4)
indicate it in alternately whenever pressing the button, and turn
on.
7. TEMPO button:
± 16, ± 10 and ± 6 of FL indication (Fig. 2-2 ) turn on
sequentially whenever pressing the button.
• TEMPO
+ direction +1.1 +2.2 ……… +10.0
Center 0.0
- direction - 1.1 -2.2 ……… - 10.0
• BPM
+ direction 11 22 ……… 100
Center 00
- direction 11 22 ……… 100
14. CLEAR button of PLAY MODE SELECT:
Following LEDs turn on sequentially whenever pressing the
button.
AUTO MIX PLAY, DISC, TRACK, PROGRAM, A, @, #, B,
BPM, NEXT, BPM SYNC, SHORT TIME, Cut in button, ZIP
button, Echo button, Cross fade button
15. Perform 1 to 9 and A to F indication corresponding to a figure of
1 of BPM/TRACK No. indication (three digits of LED) by
pressing the following buttons.
AUTO MIX PLAY button : [1]
DISC button : [2]
TRACK button : [3]
PROGRAM button : [4]
PLAYER SELECT A button : [5]
PLAYER SELECT B button : [6]
BPM/NEXT button : [7]
BPM SYNC button : [8]
PUSH ENTER button : [9]
INSTANT CHANGE button : [A]
SHORT TIME button : [b]
Cut in button : [C]
ZIP button : [d]
Echo button : [E]
Cross fade button : [F]
8. MASTER TEMPO button:
MT button lights/turns off the light.
9. RELOOP button:
Lights/turns off the “RELOOP” of the FL indication whenever
pressing the button.
10. IN/REALTIME CUE button:
Lights/turns off the IN/REALTIME CUE button and "LOOP"
(Fig. 2-=) of the FL indication whenever pressing the button.
11. OUT/EXIT button:
Lights/turns off the OUT/EXIT button whenever pressing the
button.
12. JOG:
A segment in FL indication (Fig. 2 -!) flashes according to the
direction to turn.
13. Slider:
A value of TEMPO and BPM (Fig. 2-3, -) in FL indication
change by moving the slider to + direction and - direction as
follows.
16. BPM/TRACK knob:
A number of 0-9 is indicated sequentially in the figure of 10 of
BPM/TRACK No. indication of center part (three digits of LED)
as turns it.
17. MIX TIME:
A number of 0-9 is indicated sequentially in the figure of 100 of
BPM/TRACK No. indication (three digits of LED) as turns it.
67
Page 68

CMX-5000, CU-V160
Mode 2
1. EJECT button:
While pressing a button, an IN/REAL TIME CUE button of
pressed the player side lights up.
2. TRACK SEARCH BACK button:
While pressing a button, an IN/REAL TIME CUE button of
pressed the player side lights up.
TRACK SEARCH FWD button:
While pressing a button, an OUT/EXIT button of pressed the
player side lights up.
3. SEARCH BACK button:
While pressing a button, an IN/REAL TIME CUE button of
pressed the player side lights up.
SEARCH FWD button:
While pressing a button, an OUT/EXIT button of pressed the
player side lights up.
4. CUE button:
While pressing a button, a CUE button of pressed the player
side lights up.
5. PLAY/PAUSE button:
While pressing a button, a PLAY/PAUSE button of pressed the
player side lights up.
6. TIME MODE button:
While pressing a button, an OUT/EXIT button of pressed the
player side lights up.
13. slider:
An IN/REALTIME CUE button lights up during movement of
the slider. Turn off the light after 0.5 second.
* AUTO MIX PLAY section is the same as that of Mode 1 .
(steps 14 to 17).
(3) The function that can confirm (Player section)
Mode 1
1. LED of EJECT:
Both players of A and B always flashes on and off.
2. EJECT button:
Eject the DISC.
3. PLAYER SELECT button of the monitor section:
Both LEDs of A and B players turn on whenever pressing the
button, and turn off the light.
4. Audio output select switch (A/B • MIX):
LED of monitor A turns on when switch is selected to A•B side.
LED of monitor B turns on when switch is selected to A•B
AUTO MIX side.
5. Digital out ON/OFF switch:
Sound does not out when pressing the PLAY button of Mode 3
with OFF (in fourfold speed playback) state, and sound outputs
by ON (in normal speed playback) state.
7. TEMPO button:
While pressing a button, an OUT/EXIT button of pressed the
player side lights up.
8. MASTER TEMPO button:
While pressing a button, a MASTER TEMPO button of pressed
the player side lights up.
9. RELOOP button:
While pressing a button, an OUT/EXIT button of pressed the
player side lights up.
10. IN/REALTIME CUE button:
While pressing a button, an IN/REAL TIME CUE button of
pressed the player side lights up.
11. OUT/EXIT button:
While pressing a button, an OUT/EXIT button of pressed the
player side lights up.
12. JOG
BACK : An IN/REALTIME CUE button of correspondence
player side lights up.
FWD : An OUT/EXIT button lights up in the same way.
(Turn off the lights when you stop the rotation of the
JOG dial.)
* As for the lighting of A and B button LEDs, mode 3 takes first
priority.
68
Page 69

CMX-5000, CU-V160
7.1.1.3 How to enter the test mode of the
player, and the function that can
confirm with the test mode
(1) How to enter the test mode
Mode 3
Enter the test mode when the power is on while pressing the
PLAYER SELECT A and B buttons of monitor section of the player.
Connect the remote control unit (RU-V101) for service to JA1009
(A PLAYER) or JA1010 (B PLAYER) of the TRMB Assy.
REJECT PAUSE
PLAY
STILL/STEP
– MULTI-SPEED +
SCAN
TRMB ASSY
JA1009
oror
PLA
PLB
JA1010
REJECT : stop
PAUSE : Pause
PLAY : Play
STILL/STEP E : 1 track FWD jump
STILL/STEP e : 1 track REV jump
MULTI-SPEED + : Multi FWD jump
MULTI-SPEED – : Multi REV jump
SCAN ¡ : Not used
SCAN 1 : Not used
CLEAR : Clear
FRAME : Not used
TIME : Time set
CHAPTER : Track set
SEARCH : Search
10 key : Numerical input
DISPLAY (FUNC + 1) : Not used
STILL (FUNC + 2) : Not used
C-MODE (FUNC + 3) : RF Level Adjustment
VIDEO (FUNC + 4) : Not used
STOP.M (FUNC + 5) : Not used
START (FUNC + 6) : Search for first piece of
music and pause
AUDIO (FUNC + 7) : Track search
SPEED (FUNC + 8) : Tempo
OPEN (FUNC + 9) : Disc eject
789
AUDIO SPEED OPEN
456
VIDEO STOP.M START
123
DISPLAY STILL C-MODE
0
FRAME TIME CHAPTER
ABC
FUNCCLEAR
Remote control unit
for service
SEARCH
(RU-V101)
CR
Fig. 3 Connection of the remote control unit for service
Function of the remote control unit for service
(RU-V101)
REJECT PAUSE
789
AUDIO SPEED OPEN
456
VIDEO STOP.M START
123
DISPLAY STILL C-MODE
0
FRAME TIME CHAPTER
ABC
PLAY
STILL/STEP
– MULTI-SPEED +
SCAN
FUNCCLEAR
SEARCH
CR
(2) The function that can confirm (Player section)
Note: • ON side of DIGITAL OUT select switch on the Rear Panel
is normal speed, and OFF side is fourfold speed.
• Show explanation about operation content of the remote
control unit (RU-V101) for service and a state of the player.
1. Insert a DISC, and enter the play mode when pressing the PLAY
button of the remote control unit in the state that there is a loading
mechanism at the clamp position. (Both normal and fourfold
speeds can confirm a sound.)
2. Search TRk No. when pressing the Trk (number) = FUNC =
AUDIO button sequentially, and output a sound. (Both normal
and fourfold speeds can confirm a sound.)
¶ Only operation of steps 3 and 4 can perform when this
operation was done.
¶ When the operation after step 5 is done, eject a disc and insert
it again.
3. When pressing the FUNC = OPEN button sequentially, eject
the DISC.
4. When pressing the ∗ ∗ ∗ (number three columns of input) =
SPEED button sequentially, tempo will be able to change. (only
fourfold speed)
100-place is 0 : - (minus) or
1 : Specify + ( plus)
Set the tempo by rest of two columns. (until ±16%)
69
Page 70

CMX-5000, CU-V160
[Example]
101 = SPEED button : +1%
010 = SPEED button : -10%
116 = SPEED button : +16%
5. Play by pressing the PLAY button. (Confirmation by playback
sound is possibly only in normal speed. Fourfold speed is no
sound.)
6. Stop by pressing the REJECT button. (Stops the disk rotation,
and servo is off.)
7. During plays, pause by pressing the FUNC = PAUSE button
sequentially.
8. During plays, search the first piece and pause by pressing the
FUNC = START button sequentially.
9. During plays, perform 1Tr JUMP FWD by pressing the right side
of the STILL/STEP button.
10. During plays, perform 1Tr JUMP REW by pressing the left side
of the STILL/STEP button.
11. During plays, perform the MULTI REV JUMP only the number
that was specified by pressing the number = - (minus) side of
MULTI•SPEED.
12. During plays, perform the MULTI FWD JUMP only the number
that was specified by pressing the number = + (plus) side of
SPEED/SPEED. (until 999 track jump)
¶ When there is not number appointment, perform the 10 Tr
FWD/REV JUMP.
13. Search for time appointment by pressing the TIME button =
time appointment = SEARCH sequentially ,then pause.
¶ How to set the time appointment: ∗ ∗ ∗ ∗ (four columns)
[Example]
When search for 50 minutes:
TIME button = 5000 (for 00 minutes 00 seconds) = SEARCH
¶ When pressing the SEARCH button without time
appointment:
Search for two minutes ago of the disc end time and after two
seconds of the disc start time whenever pressing the key.
[Example]
Time of DISC is 70 minutes. Search for 68 minutes before two
minutes of disc end time whenever pressing the SEARCH button,
and pause. j Search for after two seconds of the playback
start time of DISC, and pause.
14. Search for appointted Tr No. by pressing the CHAPTER button
= Tr No. appointment (number) = SEARCH sequentially ,then
pause.
¶ When pressing the SEARCH button without time
appointment:
Search for two minutes ago of the disc end time and after two
seconds of the disc start time whenever pressing the key.
[Example]
Time of DISC is 70 minutes. Search for 68 minutes before two
minutes of disc end time whenever pressing the SEARCH button,
and pause. j Search for after two seconds of the playback
start time of DISC, and pause.
15. Enter the RF level adjustment mode by pressing the FUNC =
C-MODE button sequentially. (Refer to 6. ADJUSTMENT.)
16. Cannot operate the following buttons of the remote control unit.
VIDEO, STOP M., DISPLAY, STILL, FRAME and SCAN
7.1.1.4 Error Indication
When trouble occurred in movement of the player in normal use,
indicate the error number in FL.
Error Number Error Name Contents Cause Example
E-72 01 TOC READ ERROR Even if TOC data of a disc passed for Disc is dirty.
20 seconds, was not readable.
E-83 01 PLAYER ERROR Disc does not PLAY normally. Disc is dirty.
FOCUS NG There is crack on the disc.
E-83 02 PLAYER ERROR DISC does not PLAY normally. Disc is dirty.
TRACKING NG There is crack on the disc.
E-83 03 PLAYER ERROR DISC does not PLAY normally. Disc is dirty.
QDATA NG There is crack on the disc.
70
Page 71

7.1.2 POWER ON SEQUENCE
POWER ON
Focus and Tracking
Offset Adjustments
SPDL acceleration 500 rpm
LD lights
CMX-5000, CU-V160
Focus Up and Down
Disc existence check by detecting
the FE S curve signal.
Disc exist
Focus In
×1 ×4
Tracking Balance Adjustment
Focus Balance Adjustment
Focus and Tracking
Gain Adjustment
Turn off the tracking servo, and
measure the amount of eccentric.
(SPDL two turns)
TOC read If TOC read is made,
a calendar is displayed.
Search for Track No. 1
No disc
SPDL Accelerate until 2000 rpm
Unloading
PLAY (sound out) Start
71
Page 72

CMX-5000, CU-V160
7.1.3 DISASSEMBLY
(1) CMX-5000
Bonnet
Bonnet
×2
1
×3
1
12
TRMB Assy - PLAYER Section
A PLAYER
×2
1
CDPB Assy
CDPB Assy
Diagnosis
B PLAYER
Front Panel Section
Remove the Bonnet
1
Rear View
×4
5
Nylon Rivet
2
×4
2
×2
1
5
TRMB Assy
4
5
×4
5
36
33
33
36
4
6
Unhook
×2
5
7
HPJB Assy
×4
SELB Assy
33
33
4
×2
6
Unhook
72
Page 73

CMX-5000, CU-V160
SLOT-IN MECHANISM Assy SERVO MECHANISM Assy
A procedure of B PLAYER is same as A PLAYER.
Cover A
×2
1
Mechanism Holder
×3
3
Earth Spring
Loading Base Block
×2
1
12
2
3
14
4
Servo Mechanism Assy
SLM1 Assy
6
(A PLAYER)
5
49
SLM2 Assy
(B PLAYER)
SLOT-IN
MECHANISM Assy
1
1
×2
3
1
1
10
×2
Float Base Assy
×2
8
Damper
CDPB Assy
10
7
Unhook the Float Spring
Note :
CDPB Assy can diagnose from the backside.
Damper Stay
Damper
×2
8
73
Page 74

CMX-5000, CU-V160
(2) REMOTE CONTROLLER (CU-V160)
Cover
×3
1
12
×3
1
FLK1, FLK2 Assy
×12
1
∗
1
12
×9
3
Cover
CNNB Assy
Cover
CTJB Assy
PCB Spacer (10)
12
Front Side
14
FLK1 Assy
FLK2 Assy
Note ∗1 :
When cuts PC Board with a nipper and replaced slide VR,
positioning becomes invalid. Please aline it by visual inspection
when installs it. (Refer to the following diagram.)
∗
1
CNNB Assy
74
1
Cutting Pliers
13
2
Remove the Connectors
Cut Point
This illustration is FLK1 Assy.
×5
Page 75

CMX-5000, CU-V160
7.2 PARTS
7.2.1 IC
• The information shown in the list is basic information and may not correspond exactly to that shown in the schematic diagrams.
List of IC
•
NSM51V17805D-60TS-K, GLT44016-40J4, PE9009A, TC74HC241AF
MSM51V17805D-60TS-K (CDPB ASSY : IC302)
• 16M DRAM with EDO
Block Diagram
10
OE
22
Column
Deocders
Output
88
Buffers
2-5
8
24-27
RAS
CAS
23
WE
6
7
Timing
Generator
Column
Address
10
Buffers
I/O
Controller
DQ1-DQ8
10
Internal
Address
Counter
Row
Address
Buffers
On Chip
BB
Generator
V
Refresh
Control Clock
11
Decoders
A0-A9
A10R
VCC
VCC
10-13
16-21
9
1
14
Pin Function
No. Pin Name Pin Function
1 VCC Power supply (3.3V)
2 DQ1
3 DQ2 Data input/Data output
4 DQ3
5 DQ4
6 WE Write enable
7 RAS Row address strobe
8 NC Non connection
9 A10R
10 A0
11 A1 Address input
12 A2
13 A3
14 VCC Power supply (3.3V)
Row
Word
Drivers
15 28
Vss Vss
Sense
Amplifiers
Memory
Cells
8
I/O
Selector
88
Input
Buffers
No. Pin Name Pin Function
15 VSS Ground (0V)
16 A4
17 A5
18 A6 Address input
19 A7
20 A8
21 A9
22 OE Output enable
23 CAS Column address strobe
24 DQ5
25 DQ6 Data input/Data output
26 DQ7
27 DQ8
28 VSS Ground (0V)
8
75
Page 76

CMX-5000, CU-V160
GLT44016-40J4 (CDPB ASSY : IC902)
• 256k X 16 CMOS Dynamic RAM
Block Diagram
14
RAS
29
LCAS
UCAS
Vss
A0-A8
WE
Vcc
Vcc
Vcc
28
13
1
6
20
21,35
40
16-19
22-26
Clock
Generator
CAS before
RAS Counter
Row
Address
Buffer
Column
Address
Buffer
512
Row Decoder
X0-X8
Y0-Y8
Upper
Byte
Control
Memory
Array
512×512×16
512×16
Sense Amplifier
Column Decoder
Lower
Control
512
Byte
×16
×8
×8
×8
×8
Data
Output
Buffer
Data
Input
Buffer
Data
Output
Buffer
Data
Input
Buffer
27
OE
×8
2-5
DQ1-DQ8
7-10
×8
×8
31-34
DQ9-DQ16
36-39
×8
Pin Function
No. Pin Name Pin Function
1 VCC +5V power supply
2 DQ1
3 DQ2 Data inputs / Outputs
4 DQ3
5 DQ4
6 VCC +5V power supply
7 DQ5
8 DQ6 Data inputs / Outputs
9 DQ7
10 DQ8
11 NC No connection
12 NC No connection
13 WE Write enable
14 RAS Row address strobe
15 NC No connection
16 A0
17 A1 Address inputs
18 A2
19 A3
20 VCC +5V power supply
No. Pin Name Pin Function
21 Vss Ground
22 A4
23 A5
24 A6 Address inputs
25 A7
26 A8
27 OE Output enable
28 UCAS Column address strobe/Upper byte control
29 LCAS Column address strobe/Lower byte control
30 NC No connection
31 DQ9
32 DQ10 Data inputs / Outputs
33 DQ11
34 DQ12
35 Vss Ground
36 DQ13
37 DQ14 Data inputs / Outputs
38 DQ15
39 DQ16
40 Vss Ground
76
Page 77

PE9009A (CDPB ASSY : IC402)
• In-System Programming (ISP) CPLD
Block Diagram
3
TDO
I/O
15-17
30
1
44
5-7
39
40,42
JTAG
Controller
I/O
Blocks
3
2
TDI,TMS,TCK
I/O/GCK
I/O/GSR
I/O/GTS
In-System Programming Controller
54
18
Function Block 1
Macrocells
1 to 18
54
18
Function Block 2
Macrocells
1 to 18
54
54
Function Block 3
Macrocells
1 to 18
Function Block 4
Macrocells
18
Fast CONNECT II Switch Matrix
18
1 to 18
CMX-5000, CU-V160
TC74HC241AF (TRMB ASSY : IC1004)
• Octal Bus Buffer
Pin Assignment (Top view)
1G
1A1
2Y4
1A2
2Y3
1A3
2Y2
1A4
2Y1
GND
1
2
3
4
5
6
7
8
9
10
20
19
18
17
16
15
14
13
12
11
VCC
2G
1Y1
2A4
1Y2
2A3
1Y3
2A2
1Y4
2A1
Truth Table
INPUTS OUTPUTS
GAn Yn
HL L
HH H
LX Z
X : Don't care
Z : High impedance
IEC Logic Symbol
1
1G
1A1
1A2
1A3
1A4
2G
2A1
2A2
2A3
2A4
EN
2
4
6
8
EN
19
11
13
15
17
18
1Y1
16
1Y2
1Y3
14
1Y4
12
2Y1
9
2Y2
7
2Y3
5
2Y4
3
77
Page 78

CMX-5000, CU-V160
7.2.2 DISPLAY
DEL1033 (FLKY1 ASSY: V2001, FLKY2 ASSY: V2101)
• FL Display
Pin Assignment
TEMPOTRACK
±
16
±
10
±
6
REMAIN
A.CUE
M
SF
1234567
8 9 10 11 12 13 14
15 16 17 18 19 20
LOOP
RELOOP
BPM
431
Pin Connection
Pin No.
Assignment
Pin No.
Assignment
F1, F2 : Filament, G1 - G11 : Grid, S1 - S23 : Anode, NP : No Pin, NL : No Lead
123456789101112
NL
(F1)NL(F1)
F1 NP G1 G2 G3 G4 G5 G6 G7 G8
23 24 25 26 27 28 29 30 31 32 33 34
S7 S8 S9 S10 S11 S12 S13 S14 S15 S16 S17 S18
Anode and Grid Assignment
G1
S15
S16
S17
S18
G2 G3 G4
TEMPOTRACK
S17
S13
S9
S3
S1
S14
S11
S10
S7
S8
S5
S4
S2
S12
S6
±
±
±
16
10
6
S18
S18
M
S13
S9
S15
S7
S3
S15
S1
G7G6G5
SF
S14
S11
S10
S8
S5
S4
S2
S6
G8
S6
REMAIN
13 14 15 16 17 18 19 20 21 22
G9 G10 G11 NL S1 S2 S3 S4 S5 S6
35 36 37 38 39 40 41 42 43
S19 S20 S21 S22 S23 NP F2
S16
S12
S17
S18
S19
G1, G4 to G8
S15
S1
S5
S6
S4
S7S8
(F2)NL(F2)
S3
S2
NL
78
A.CUE
S1 S2 S3 S4 S5 S6 S7 S8 S9 S10 S11 S12 S13 S14 S15 S16 S17 S18 S19
S20
S2 S1
S6
S15
S15
S12
S14 S13
RELOOP
S15
G8
S16
1234567
8 9 10 11 12 13 14
15 16 17 18 19 20
S17
S18
LOOP
S22
S4
S10
S13
S12
S14
S11
S10
S9
S15
G9
BPM
S5
S3
S11
S7S8
S9
S17
S18
S19
S20
G11G10
Page 79

Anode and Grid Assignment
CMX-5000, CU-V160
G1 G2 G3 G4 G5
S1
S2
S3
S4
S5
S6 S6
S7 S7 S7
S8 S8 S8
S9 S9 S9
S10 S10 S10
S11 S11 S11
S12 S12 S12
S13 S13
S14
S15
S16 S16 S16
S17 S17 S17
S18
S19
S20
S21
S22
S23
S1
S2
S3
S4
S5
S6
S7
S8
S9
S10
S11
S12
S13
S14
S15
S16
S17
S18 S18 S18
REMAIN
A. CUE
S1
S2
S3
S4
S5
S14 S14
TRACK F M S
S1
S2
S3
S4
S5
S6
S7
S8
S9
S10
S11
S12
S13
S15
±16
±10
±6
TEMPO
S1
S2
S3
S4
S5
S6
S7
S8
S9
S10
S11
S12
S13
S14
S19
S1
S2
S3
S4
S5
S6
S13
S14
G6 G7 G8
S1 S1 S1
S2 S2 S2
S3
S4 S4
S5
S6 S6 S6
S7 S7 S7
S8
S9 S9 S9
S10
S11
S12
S13
S14 S14 S14
S15 S15
S3
S5
S8
S10
S11
S12 S12
S13
S3
S4
S5
S8
S10
S11
S13
S16
S17
S18
G9
S1
S2
S3
S4
S5
S6
S7
S8
S9
S10
S11
S12
S13
S14
S15
S16
S17
S18
S19
S20
G10
1
2
3
4
5
6
7
8
9
10
11
12
13
14
15
16
17
18
19
20
S22
LOOP
G11
S1
S2
S3
S4
S5
S6
S7
S8
S9
S10
S11
S12
S13
S14
S15
BPM
S17
S18
S19
S20
RELOOP
79
Page 80

CMX-5000, CU-V160
09
8. PANEL FACILITIES AND SPECIFICATIONS
8.1 PANEL FACILITIES
Player
'
A
PLAYER
DISC
EJECT
0
1 Manual ejection hole
2 Disc insertion slot
When using 3 inch/8 cm discs, discs must be inserted in the
commercially available CD adapter before insertion.
3 Disc loading indicator (DISC)
This indicator flashes when a disc is being inserted into or ejected
from the disc insertion slot and lights up when a disc has been
inserted.
4 Eject button (EJECT 0)
Pressing this button while cueing is on standby or play is paused
will eject the disc from the player.
Remote control unit
EJECT
IN/REALTIME CUE
0
OUT ADJUST OUT ADJUST
TRACK SEARCH
4¢
SEARCH
1¡
CUE
PLAY/PAUSE
6
RELOOP
OUT EXIT
LOOP
TRACK
TEMPO
16
10
6
MSF
REMAIN
A.CUE
BPM
1765432
131211109
148
17 1819 201615
LOOP
RELOOP
REV FWD
TIME MODE TEMPO
AUTO CUE
0
PHONES
A•B AUDIO-OUT SELECT
A•BA•B/
±6/±10/±16
MT
MASTER
TEMPO
BPM
NEXT
INSTANT
CHANGE
EJECT
DISC
0
AUTO MIX
POWER
MONITOR
MIN MAX
AB
PLAYER SELECT
5 Headphone jack (PHONES)
6 Headphone volume (MONITOR)
7 Audio output select switch
(A/B AUDIO OUT SELECT)
Used to switch between A and B audio output.
8 Power switch (POWER) and indicator
9 Monitor select button (PLAYER SELECT)
EJECT
IN/REALTIME CUE
AUTO MIX PLAY
PLAY MODE SELECT
TRACKDISC PROGRAM
CLEAR
PLAYER SELECT
AB
BPM/TRACK
BPM/TRACK
PUSH ENTER
BPM SYNC
SHORT TIME CHANGE MIX TIME
SHORT TIME
MIN MAX
MIX MODE SELECT
0
TRACK SEARCH
4¢
SEARCH
1¡
CUE
PLAY/PAUSE
6
OUT EXIT RELOOP
REMAIN
A.CUE
1765432
REV FWD
LOOP
TRACK
MSF
17 1819 201615
LOOP
TIME MODE TEMPO
±6/±10/±16
AUTO CUE
MT
MASTER
TEMPO
16
10
6
131211109
148
RELOOP
TEMPO
0
BPM
CMX-5000
DJ TWIN CD PLAYER
B
PLAYER
2 4
EJECT
IN/REALTIME CUE
0
TRACK SEARCH
5
6
7
8
4¢
SEARCH
1¡
CUE
PLAY/PAUSE
6
1 Eject button (EJECT 0)
2 Loop control button (LOOP)
3 Time mode/Auto cueing button
(TIME MODE/AUTO CUE)
TIME MODE:
Pressing this button causes the elapsed time and remaining time
(REMAIN) of the current track to be displayed in succession on
the time display of the display unit.
80
OUT EXIT RELOOP
LOOP
OUT ADJUST
TRACK
TEMPO
16
10
6
MSF
REMAIN
A.CUE
1765432
131211109
148
17 18 19 201615
LOOP
RELOOP
REV FWD
BPM
31
TIME MODE TEMPO
±6/±10/±16
AUTO CUE
MT
MASTER
TEMPO
0
=
~
!
@
#
$
%
AUTO MIX PLAY
PLAY MODE SELECT
TRACKDISC PROGRAM
PLAYER SELECT
AB
BPM/TRACK
BPM
NEXT
BPM SYNC
INSTANT
SHORT TIME CHANGE MIX TIME
CHANGE
SHORT TIME
MIX MODE SELECT
CLEAR
BPM/TRACK
PUSH ENTER
MIN MAX
^
&
*
(
)
÷ When unit is first powered on, time displayed consists of
remaining time.
AUTO CUE:
÷ When unit is first powered on, auto cueing is set to on.
4 Tempo controls (TEMPO)
Tempo control range button (±6, ±10, ±16):
Pressing this button causes the variable range of the tempo
adjustment knob to change each time the button is pressed.
Page 81

÷ Variable range is set to ±10% when power to the unit is first
turned on.
Master tempo button (MASTER TEMPO) and indicator:
Pressing this button causes the master tempo feature to be
powered on or off each time it is pressed.
Tempo control slide:
Moving this dial in the positive (+) direction away from the center
position (normal playback tempo) causes the tempo to become
faster, and moving it in the negative (–) direction causes the
tempo to become slower.
5 Track search button (TRACK SEARCH 4, ¢)
6 Search button (SEARCH 1, ¡)
7 Cue button (CUE) and indicator
Cueing point settings
Cueing point sampler
Back cueing
Cueing point adjust
8 Play/Pause button (PLAY 3/PAUSE 8) and indicator
9 Display
0 Jog dial (+ FWD/– REV)
- Auto mix play button (AUTO MIX PLAY) and indicator
Pressing this button causes auto mixing to be turned on or off
each time it is pressed.
= Play mode select button (PLAY MODE SELECT)
This button is used to select the auto mixing play mode and to
specify program settings.
~ Player select button (PLAYER SELECT) and indicator
This button is used to select discs when using auto mixing.
! BPM indicator
@ NEXT indicator
# BPM/NEXT button
$ Instant change button (INSTANT CHANGE) and indi-
cator
% Short time change button (SHORT TIME) and indicator
Pressing this button causes short time changing to be turned on
or off each time it is pressed.
^ BPM/TRACK display (BPM/TRACK)
This display is used to display the track number and BPM when
using auto mixing or preprogrammed program settings.
& BPM/TRACK dial (BPM/TRACK, PUSH ENTER)
This dial is used to switch between different BPM values when
using BPM synchro playback and to select and confirm track
numbers when playing in program mode.
* Press down on the dial after making a selection to confirm your
choice. (Note that this does not include the switching of BPM
settings.)
* BPM synchro button (BPM SYNC)
When BPM SYNC is turned on (i.e., when the BPM SYNC button
is lit), the tempo will be automatically changed so that the number
of beats per minute matches between tracks mixing into each
other. Pressing this button causes the BPM synchro count feature
to be turned on or off each time it is pressed.
( Mix time control dial (MIX TIME)
This dial is used to specify the mixing time when using the mix
button to perform cross fade mixing.
) Mix mode selection button (MIX MODE SELECT) and
indicator
This button is used to select cut-in, zip, echo or cross fade mixing
as the type of mixing to be used when segueing between tracks.
CMX-5000, CU-V160
Display Section
1 2
3
TRACK
REMAIN
4
A.CUE
5
6 8
3
1765432
17 18 19 201615
LOOP
9 0
1 Track number display
Displays the track number of the track currently being played.
2 Playback speed display
Tempo control range display (±6, ±10, ±16)
Displays the variable range mode specified using the tempo
control slide.
Tempo change rate display
Displays the rate of change of the tempo as specified using the
tempo control slide.
3 Auto mixing playback player display
The display on the side of the player currently in operation will
flash.
4 Auto cueing indicator (A. CUE)
Lights up when auto cueing is turned on.
5 Playback position display
Used to display a full-scale bar graph for the track being played to
make it possible to get an intuitive feel of the elapsed and
remaining play time.
÷ Display as it appears when displaying elapsed time:
All indicators unlit and then indicators light up in sequence
from left
÷ Display as it appears when displaying remaining time:
All indicators lit and then indicators are turned off in sequence
from left
÷ Display as it appears when there are less than 30 seconds
remaining in a track: Slow flashing
÷ Display as it appears when there are less than 15 seconds
remaining in a track: Rapid flashing
6 Track number calendar display
The number corresponding to the track currently being played is
lit. The right-facing arrow is lit for tracks with a track number of 21
or higher.
Programmed track numbers are lit, and the light for each number
for tracks which have already been played are turned off once the
tracks are played.
7 Time display
Used to display the elapsed playback time (when the remain
indicator is unlit) or the remaining playback time (when the remain
indicator is lit) of the current track in minutes (M), seconds (S),
and frames (F). Note that the amount of time remaining is
displayed by default when the power is first turned on.
8 BPM display
Used to display the number of BPM for the current track. Note that
depending on the track there may be times when the BPM
counter is unable to count the number of BPM.
9 Looping indicator (LOOP)
Lights up when playing back in loop mode.
0 Relooping indicator (RELOOP)
Lights up when recording a loop.
TEMPO
16
10
6
MS F
131211109
148
RELOOP
BPM
3
7
3
81
Page 82

CMX-5000, CU-V160
8.2 SPECIFICATIONS
1. General
System ........................... Compact disc digital audio system
Discs used.....................................................Compact discs
Power requirements ...................................AC 120 V, 60 Hz
Power consumption...................................................... 40 W
Operating temperature .......+5˚C to +35˚C (+41°F to +95°F)
Operating humidity .............................................. 5% to 85%
(There should be no condensation of moisture.)
Weight
Remote controller ..............................2.1 kg (4 lbs 10 oz)
Player .............................................. 5.4 kg (11 lbs 15 oz)
Dimensions
Remote controller ........... 482 (W) x 73 (D) x 132 (H) mm
18-31/32 (W) x 2-7/8 (D) x 5-3/16 (H) in.
Player ............................. 482 (W) x 268 (D) x 90 (H) mm
18-31/32 (W) x 10-9/16 (D) x 3-9/16 (H) in.
2. Audio section
Frequency response .....................................4 Hz to 20 kHz
Signal-to-noise ratio .....................................115 dB or more
Distortion rate........................................................... 0.006%
3. Accessories
÷ Operating instructions.................................................... 1
÷ Audio cable.................................................................... 2
÷ Control cord ................................................................... 2
÷ Forced ejection pin......................................................... 1
÷ Specialized connection cable for the remote controller . 1
÷ Limited warranty............................................................. 1
NOTE:
Specifications and design are subject to possible modification
without notice.
82
 Loading...