

Pioneer CLD-D604 Owner’s Manual
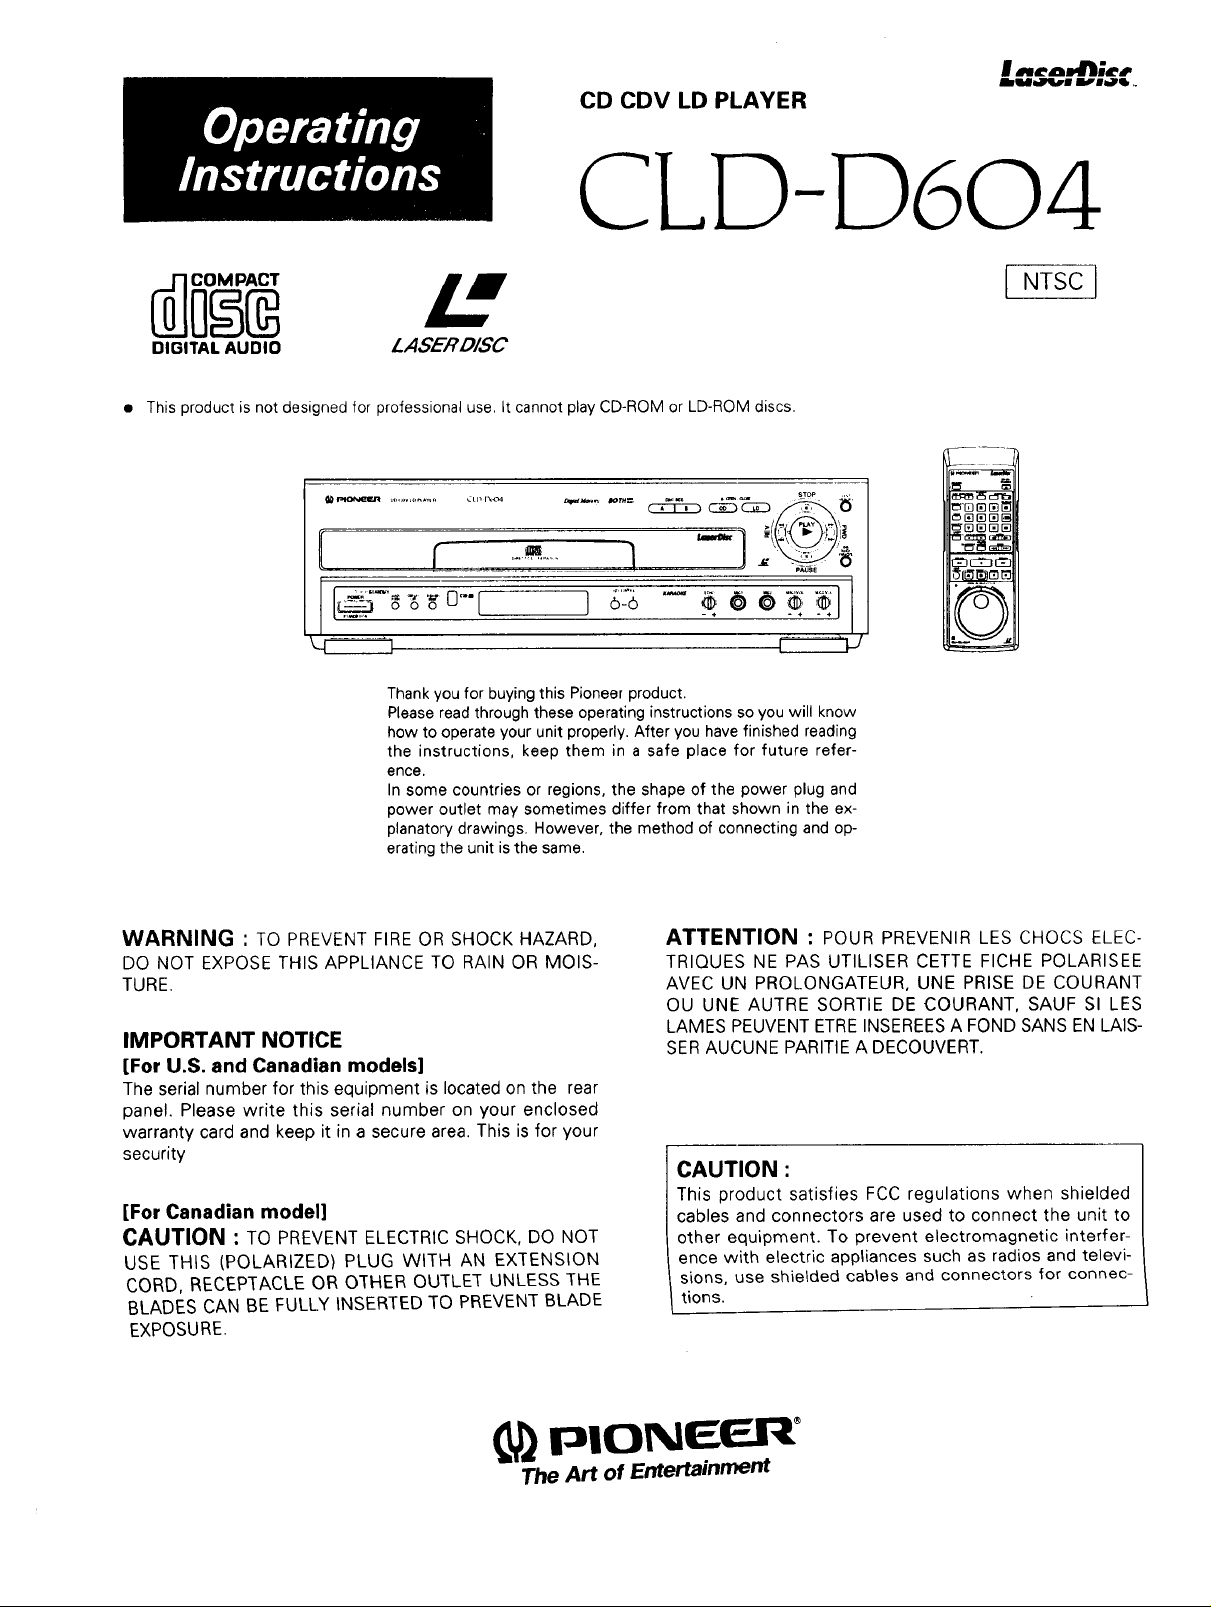
CD CDV LD PLAYER
CLD D604
INTSC
DIGITAL AUDIO
• This product is not designed for professional use It cannot play CDROM or LDROM discs
LASER DISC
Thank you for buying this Pioneer product.
Please read through these operating instructions so you will know
how to operate your unit properly. After you have finished reading
the instructions, keep them in a safe place for future refer-
ence.
In some countries or regions, the shape of the power plug and
power outlet may sometimes differ from that shown in the ex-
planatory drawings. However, the method of connecting and op-
erating the unit is the same.
3
/
WARNING " TO PREVENT FIRE OR SHOCK HAZARD,
DO NOT EXPOSE THIS APPLIANCE TO RAIN OR MOIS-
TURE.
IMPORTANT NOTICE
[For U.S. and Canadian models]
The serial number for this equipment is located on the rear
panel. Please write this serial number on your enclosed
warranty card and keep it in a secure area. This is for your
security
[For Canadian model]
CAUTION : TO PREVENT ELECTRIC SHOCK, DO NOT
USE THiS (POLARIZED) PLUG WITH AN EXTENSION
CORD, RECEPTACLE OR OTHER OUTLET UNLESS THE
BLADES CAN BE FULLY INSERTED TO PREVENT BLADE
EXPOSURE.
PIONE ER+
The Art of Entertainment
ATTENTION : POUR PREVENIR LES CHOCS ELEC-
TRIQUES NE PAS UTILISER CETTE FICHE POLARISEE
AVEC UN PROLONGATEUR, UNE PRISE DE COURANT
OU UNE AUTRE SORTIE DE COURANT, SAUF SI LES
LAMES PEUVENT ETRE INSEREES A FOND SANS EN LAIS-
SER AUCUNE PARITIE A DECOUVERT.
CAUTION :
This product satisfies FCC regulations when shielded
cables and connectors are used to connect the unit to
other equipment. To prevent electromagnetic interfer-
ence with electric appliances such as radios and televi-
sions, use shielded cables and connectors for connec-
tions.
IMPORTANT
CAUTION
The lightning flash with a[_uwhead, withi_ ar__:qulLa[e_al
triangle, is intended to alert the user to the presence of
uninsulated "dangerous voltage' within the product's
enclosure that may be of sufficient magnitude to
constitute a risk of electric shock to persons.
SAFETY INSTRUCTIONS
READ INSTRUCTIONS - All the safety and operating
instructions should be read before the appliance
is operated.
RETAIN INSTRUCTIONS - The safety and operating
instructions should be retained for future refer-
ence.
HEED WARNINGS - All warnings on the appliance
and in the operating instructions should be ad-
hered to.
FOLLOW INSTRUCTIONS - All operating and use in-
structions should be followed
CLEANING - Unplug this video product from the wall
outlet before cleaning. Do not use liquid or aero-
sol cleaners. Use a clamp cloth for cleaning,
ATTACHMENTS - Do not use attachments not rec-
ommended by the video product manufacturer as
they may cause hazards.
WATER AND MOISTURE - Do not use this video
product near water- for example, near a bathtub,
wash bowl, kitchen sink, or laundry tub; in a wet
basement, or near a swimming pool, etc.
ACCESSORIES - Do not place this video product on
an unstable cart, stand, tripod, bracket, or table.
The video product may fall, causing serious injury
to a child or adult, and serious damage to the ap-
pliance. Use only with a cart, stand, tripod, brack-
et, or table recommended by the manufacturer,
or sold with the video product. Any mounting of
the appliance should follow the manufacturer's in-
structions, and should use a mounting accessory
recommended by the manufacturer,
CART - An appliance and cart combination should be
moved with care, Quick stops, excessive force,
and uneven surfaces may cause the appliance and
cart combination to overturn.
VENTILATION - Slots and openings in the cabinet
are provided for ventilation and to ensure reliable
operation of the video product and to protect it
from overheating, These openings must not be
blocked or covered. They should never be blocked
by placing the video product on a bed, sofa, rug,
or other similar surface. This video product should
never be placed near or over a radiator or heat
register, This video product should not be placed
in a built-in installation such as a bookcase or rack
unless proper ventilation is provided or the manu-
facturer's instructions have been adhered to.
POWER SOURCES - This video product should be
operated only from the type of power source indi-
cated on the marking label. If you are not sure of
the type of power supply to your home, consult
your appliance dealer or local power company.
For video products intended to operate from bat-
tery power, or other sources, refer to the operat-
ing instructions,
POWER-CORD PROTECTION
Power-supply cords should be routed so that they
are not likely to be walked on or pinched by items
placed upon or against them. Pay particular atten-
tion to cords at plugs, convenience receptacles,
and the point where they exit from the appliance.
LAU 1ION:
TO PREVENT 1 HE RISK OF ELEC I RIC SHOCK, DO NOT
REMOVE COVER (OR BACK). NO USER-SERVICEABLE
PARTS INSIDE. REFER SERVICING TO QUALIFIED
SERVICE PERSONNEL.
POLARIZATION -This video product is equipped with
a polarized alternating current line plug (a plug
having one blade wider than the other), This plug
will fit into the power outlet only one way. This is
a safety feature. If you are unable to insert the
plug fully into the outlet, try reversing the plug. If
the plug should still fail to fit, contact your electri-
cian to replace your obsolete outlet. Do not de-
feat the safety purpose of the polarized plug.
LIGHTNING - For added protection for this video pro-
duct receiver during a lightning storm, or when it
is left unattended and unused for long periods of
time, unplug it from the wall outlet and discon-
nect the antenna or cable system. This will pre-
vent damage to the video product due to light-
ning and power-line surges.
POWER LINES - An outside antenna system should
not be located in the vicinity of overhead power
lines or other electric light or power circuits, or
where it can fall into such power lines or circuits.
When installing an outside antenna system, ex-
treme care should be taken to keep from touch-
ing such power lines or circuits as contact with
them might be fatal.
OVERLOADING - Do not overload wall outlets and
extension cords as this can result in the risk of
fire or electric shock.
OBJECT AND LIQUID ENTRY - Never push objects
of any kind into this video product through open-
ings as they may touch dangerous voltage points
or short-out parts that could result in a fire or
electric shock. Never spill liquid of any kind on the
video product.
SERVICING - Do not attempt to service this video
product yourself as opening or removing covers
may expose you to dangerous voltage or other
hazards Refer all servicing to qualified service per-
sonnel.
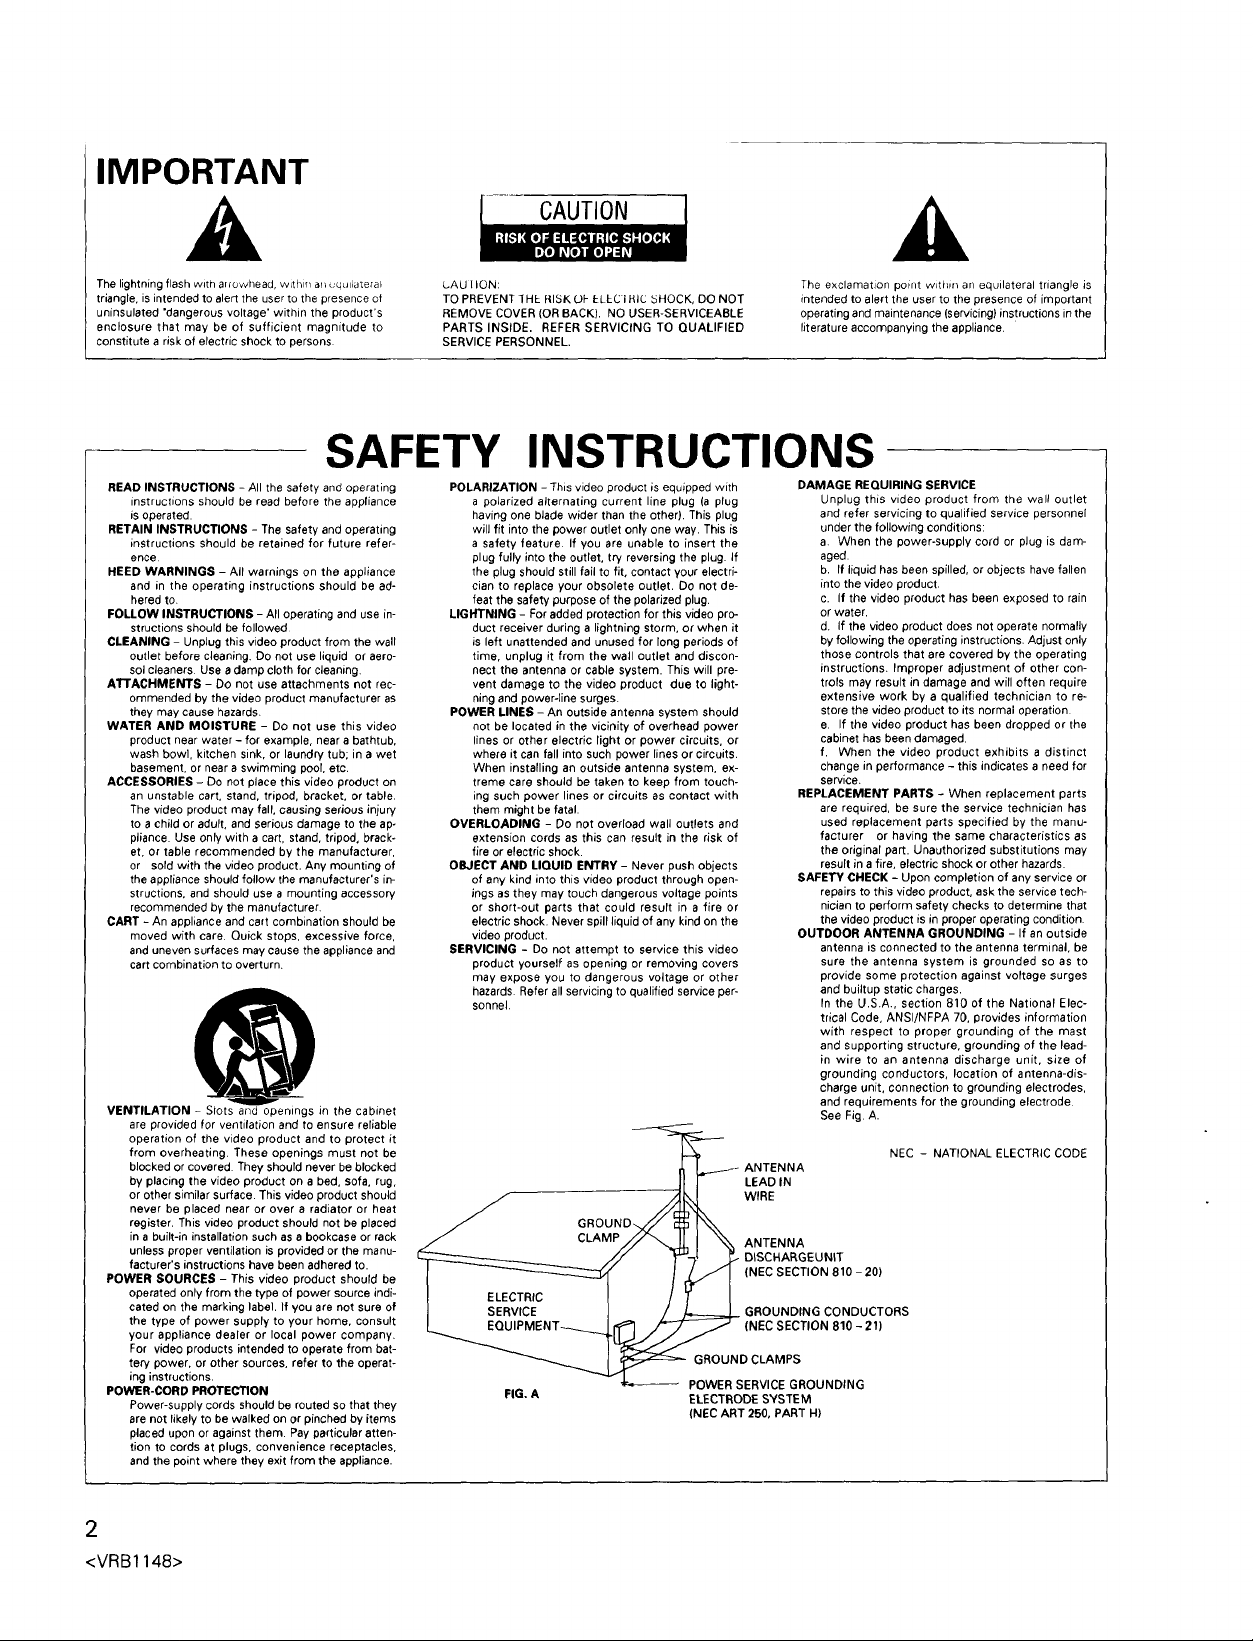
_- ANTENNA
_---Jl i LEAD IN
GROUND >__ WIRE
" o_20,
_ GROUNDING CONDUCTORS
_ y ANTENNA
FIG. A
(NEC SECTION 810 - 21)
GROUND CLAMPS
POWER SERVICE GROUNDING
ELECTRODE SYSTEM
(NEC ART 250, PART H)
The exclamation point within an equilateral triangle is
intended to alert the user to the presence of important
operating and maintenance (servicing) instructions inthe
literature accompanying the appliance,
DAMAGE REQUIRING SERVICE
Unplug this video product from the wall outlet
and refer servicing to qualified service personnel
under the following conditions:
a. When the power-supply cord or plug is dam-
aged.
b. If liquid has been spilled, or objects have fallen
into the video product.
c. If the video product has been exposed to rain
or water.
d. If the video product does not operate normally
by following the operating instructions, Adjust only
those controls that are covered by the operating
instructions. Improper adjustment of other con-
trois may result in damage and will often require
extensive work by a qualified technician to re-
store the video product to its normal operation.
e. If the video product has been dropped or the
cabinet has been damaged.
f. When the video product exhibits a distinct
change in performance - this indicates a need for
service.
REPLACEMENT PARTS - When replacement parts
are required, be sure the service technician has
used replacement parts specified by the manu-
facturer or having the same characteristics as
the original part. Unauthorized substitutions may
result in a fire, electric shock or other hazards.
SAFETY CHECK - Upon completion of any service or
repairs to this video product, ask the service tech-
nician to perform safety checks to determine that
the video product is in proper operating condition.
OUTDOOR ANTENNA GROUNDING - If an outside
antenna is connected to the antenna terminal, be
sure the antenna system is grounded so as to
provide some protection against voltage surges
and builtup static charges.
In the U.S.A., section 810 of the National Elec-
trical Code, ANSI/NFPA 70, provides information
with respect to proper grounding of the mast
and supporting structure, grounding of the lead-
in wire to an antenna discharge unit, size of
grounding conductors, location of antenna-dis-
charge unit, connection to grounding electrodes,
and requirements for the grounding electrode
See Fig, A.
NEC - NATIONAL ELECTRIC CODE
2
<VRB1148>
_[his equipment has been tested and found to comply with the limits for a Class B digital device, pursuant to Part 15 of the FCC
Rules. These limits are designed to provide reasonable protection against harmful interference ina residential installation. This
equipment generates, uses, and can radiate radio frequency energy and, if not installed and used in accordance with the
instructions, may cause harmful interference to radio communications. However, there is no guarantee that interference will not
occur in a particular installation. If this equipment does cause harmful interference to radio or television reception, which can be
determined by turning the equipment off and on, the user is encouraged to try to correct the interference by one or more of the
following measures:
- Reorient or relocate the receiving antenna.
- Increase the separation between the equipment and receiver.
- Connect the equipment into an outlet on a circuit different from that to which the receiver is connected.
- Consult the dealer or an experienced radio/TV technician for help.
Information to User
Alteration or modifications carried out without appropriate authorization may invalidate the user's right to operate the equipment.
CAUTION
• Use of controls or adjustments or performance of procedures other than those specified herein may result in hazardous radiation
exposure.
• The use optical instruments with this product will increase eye hazard.
[For Canadian model]
This digital apparatus does not exceed the Class B limits for radio noise emissions from digital apparatus set out in the Radio Interference
Regulations of the Canadian Department of Communications.
IJSTENING
and enjoyment. Since hearing damage from loud noise is often undetect-
able until it is too late, this manufacturer and the Electronic Industries
Association's Consumer Electronics Group recommend you avoid pro-
longed exposure to excessive noise. This list of sound levels is included
for your protection.
Selecting fine audio equipment such as the unit you've just purchased Decibel
is only the start of your musical enjoyment. Now it's time to consider Level
how you can maximize the fun and excitement your equipment offers.
This manufacturer and the Electronic Industries Association's Consumer 30
Electronics Group want you to get the most out of your equipment by 40
playing it at a safe level. One that lets the sound come through loud and 50
clear without annoying blaring or distortion-and, most importantly, with- 60
out affecting your sensitive heating. 70
80
Sound can be deceiving. Over time your hearing "comfort level" adapts
to higher volumes of sound. So what sounds "normal" can actually be
loud and harmful to your hearing. Guard against this by setting your
equipment at a safe level BEFORE your hearing adapts.
To establish a safe level:
• Start your ,_o\ume control at alow setting.
• Slowly increase the sound until you can hear it comfortably and
clearly, and without distortion.
THE FOLLOWING NOISES CAN BE DANGEROUS UNDER
CONSTANT EXPOSURE
90 Subway, motorcycle, truck traffic, lawn mower
100 Garbage truck, chain saw, pneumatic drill
120 Rock band concert in front of speakers, thunderclap
140 Gunshot blast, jet plane
180 Rocket launching pad
Information courtesy of the Deafness Research Foundation.
Once you have established a comfortable sound level:
• Set the dial and leave it there.
Taking a minute to do this now will help to prevent hearing damage or
loss in the future. After all, we want you listening for a lifetime.
We Want You Listening For A Lifetime
Used wisely, your new sound equipment will provide a lifetime of fun
Example
Quiet library, soft whispers
Living room, refrigerator, bedroom away from traffic
Light traffic, normal conversation, quiet office
Air conditioner at 20 feet, sewing machine
Vacuum cleaner, hair dryer, noisy restaurant
Average city traffic, garbage disposals, alarm clock
at two feet.
LIS'I_,N IN G
3
<VRB1148>

j PRECAUTIONS
If it becomes necessary to transport Or ship this unit in the
future, be sure to first remove the disc (if loaded), and retract
the disc table to its closed position. Then turn the power off,
and, after the 'OFF" display stops blinking on the display, dis-
connect the power cord.
INSTALLING THE PLAYER
• Place the player on a stable platform next to the television and
stereo system to be used with the player.
• Do not place heavy objects such as a television or TV monitor
on top of the player.
• Do not place the player on top of your TV set or TV monitor.
Also, keep the player away from devices such as cassette decks
which are sensitive to magnetic fields.
DO NOT INSTALL THE PLAYER IN THE FOLLOWING
LOCATIONS
• In a place subject to direct sunlight.
• In humid or poorly ventilated places.
• In extremely hot or cold places.
• In a place subject to vibrations.
• In a dusty place.
• In a place subject to soot, steam or heat (in a kitchen, etc.)
AVOID SOURCES OF HEAT
Do not put the player on sources of heat, such as an amplifier.
When installing with audio components that generate heat, by
placing the player below such components where there is ade-
quate ventilation and not much dust. Avoid placing the player on
surfaces such as shaggy carpets, beds, and sofas which may block
ventilation under the player and cause damage.
CAUTION
Even when the player is in the pause mode, the disc-drive motor is
still revolving. Since leaving the player in this condition can shorten
the lifetime of the motor, do not leave the player in the pause
mode for long periods of time. Also, to prevent damage to the
screen, do not use the unit for long periods of time under condi-
tions in which the screen display (monitor) is displaying characters
(for example, power-ON mode, CD PLAYER, PAUSE) With an LD
disc, if playback is paused for about 20 minutes, the player will
automatically enter stop mode.
When FM or AM stations are being received, signal noise may be
generated if the player is turned on. Turn off the player when not
in use. Also, if there is signal noise when receiving radio stations
with an indoor antenna, adjust the position or direction of the
antenna.
CONDENSATION
Moisture will form in the operating section of the player if the
player is brought from cool surroundings into a warm room or
if the temperature of the room rises suddenly. When this hap-
pens, player's performance will be impaired.
To prevent this, let the player stand in its new surroundings
for about an hour before switching it on, or make sure that
the room temperature rises gradually.
Condensation may also form during the summer if the player is
exposed to the breeze from an air conditioner. In such cases,
change the location of the player.
POWER-CORD CAUTION
Handle the power cord by the plug. Do not pull out the plug by
tugging the cord and never touch the power cord when your hands
are wet as this could cause a short circuit or electric shock. Do not
place the unit, a piece of furniture, etc., on the power cord, or
pinch the cord. Never make a knot in the cord or tie it with other
cords. The power cords should be routed in such a way that they
are not likely to be stepped on. A damaged power cord can cause
a fire or give you an electrical shock. Check the power cord once in
a while. When you find it damaged, ask your nearest PIONEER
authorized service center or your dealer for a replacement.
I CLEANING CARE I
Use a soft, dry cloth for cleaning. For stubborn dirt, soak the cloth
in a weak detergent solution; wring well first and wipe. Use a dry
cloth to wipe it dry. Do not use any volatile agents such as benzine
or paint thinner, as they may damage the surface of the player.
Abnormal functioning of this unit may be caused by static
electricity or other external interference. To restore normal
operation, unplug the AC power cord and then plug it in
again.
STRIPE PATTERNS APPEARING ON A TV PROGRAM
Stripe patterns may appear during a TV program if the player unit is
turned on, depending on the quality of reception of the TV station.
This is neither a malfunction of the television nor the player. If
stripes appear while watching the TV, or whin watching the -IV for
long periods of time, turn the player off.
4
<VRB 1148>
Only one disc can be loaded at any one time. Loading a Laser-
Disc, a Compact Disc, a 3-inch (8-cm) Compact Disc or a Com-
pact Disc with Video on top of one another may result in a
breakdown, or in scratching of the discs. Please only load one
disc at a time.
This player is to be used exclusively with the NTSC color
system. Please use an NTSC LaserDisc only. PAL and SECAM
system discs cannot be used with this player.
- CUNTENTS
PRECAUIION5 ................................................. 4
ACCESSORIES .......................................................................... 5
TYPES OF DISCS WHICH CAN BE PLAYED
WITH THIS UNIT ....................................................................... 6
GLOSSARY ............................................................................... 7
CONNECTIONS ......................................................................... 8
NAMES OF PARTS
Front panel ......................................................................... 10
Display window .................................................................. 10
Remote control unit ........................................................... 11
BASIC OPERATION (PLAYBACK OF A DISC) ........................ 12
MOVIE DISC ENTERTAINMENT ............................................. 14
SINGING ALONG WITH KARAOKE ENTERTAIN M ENT .......... 15
APPLIED OPERATIONS .......................................................... 16
QUICK SCANNING OF DISC CONTENTS ............................... 20
RANDOM PLAYBACK (PLAYBACK IN ORDER
SELECTED BY THE PLAYER) ................................................. 20
TO SEARCH FOR A DESIRED FRAME ................................... 21
PROGRAMMED PLAYBACK (PLAYING CHAPTER /
TRACKS BY CHANGING THEIR ORDER AS REQUIRED) ....... 22
REPEAT PLAYBACK ................................................................ 23
ON-SCREEN DISPLAY ............................................................ 24
TROUBLESHOOTING ............................................................. 25
SPECIFICATIONS .................................................................... 27
ACCESSORIES
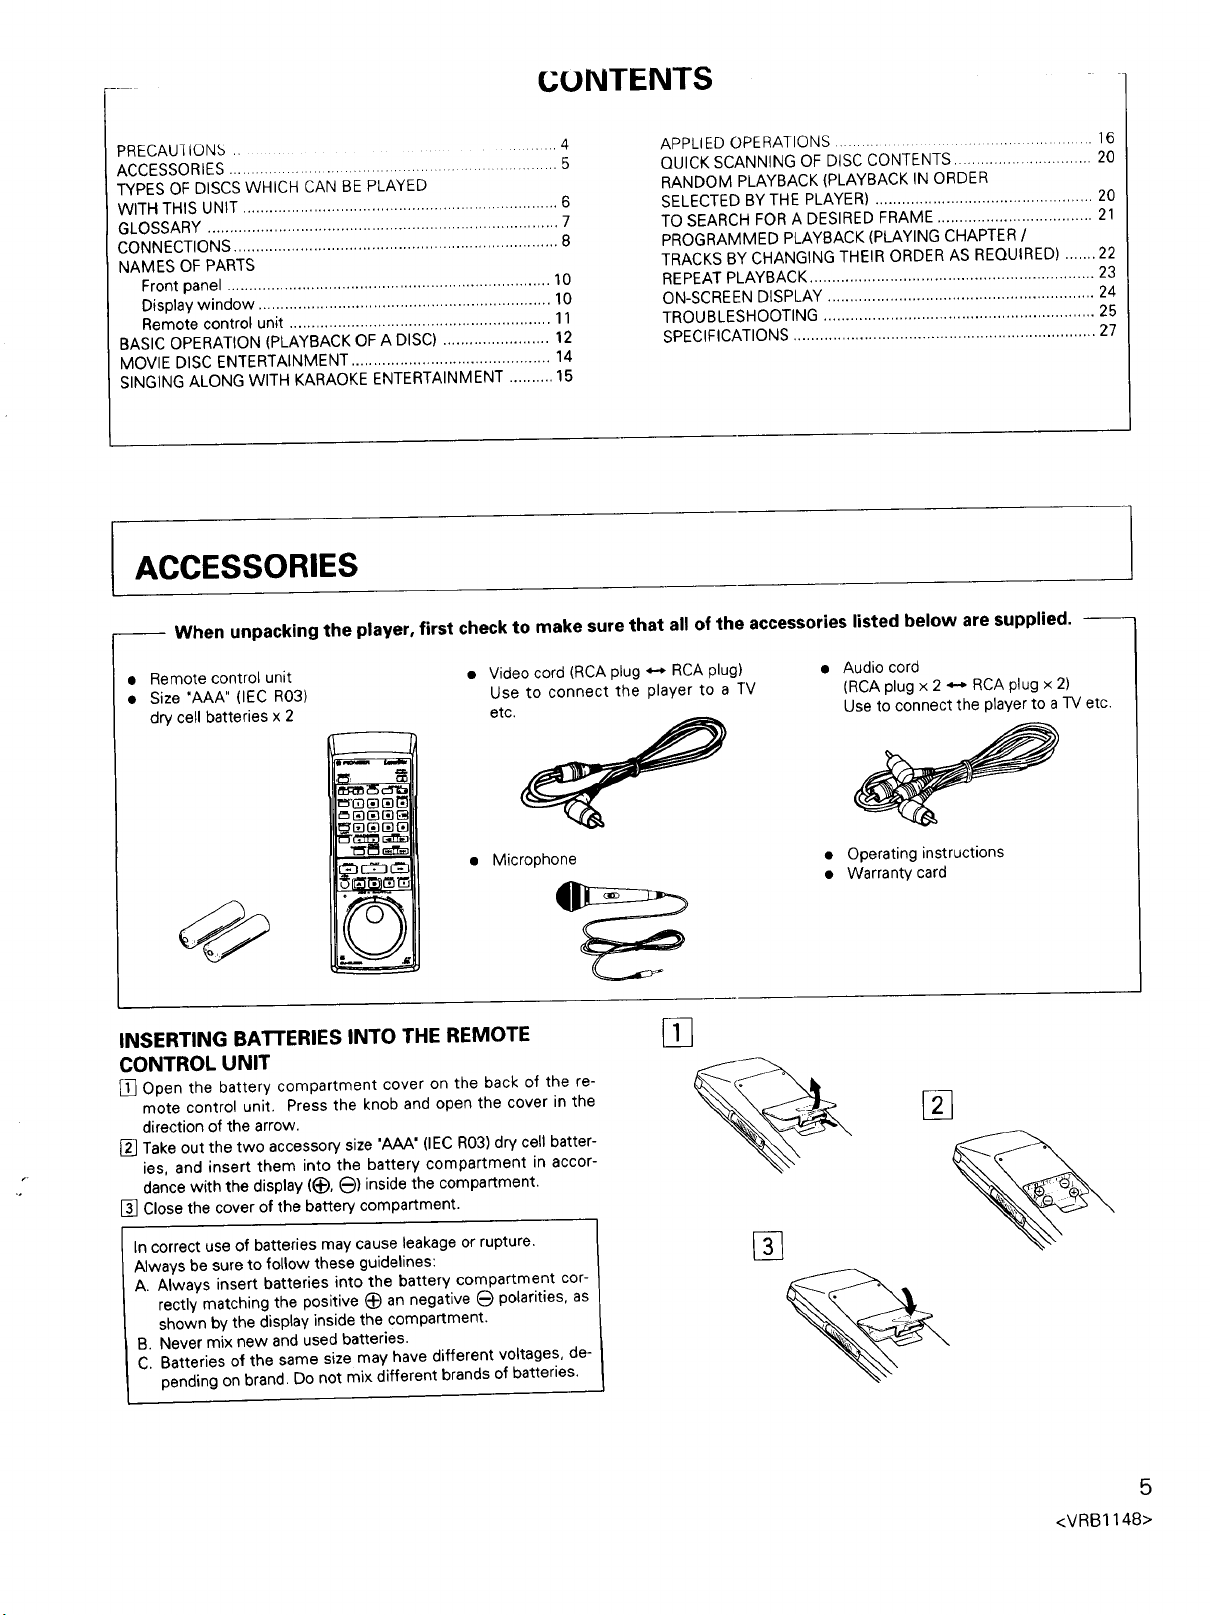
-- When unpacking the player, first check to make sure that all of the accessories listed below are supplied. --
• Remote control unit
• Size 'AAA" (IEC R03)
dry cell batteries x 2
• Video cord (RCA plug _ RCA plug)
Use to connect the player to a TV
etc.
Audio cord
(RCA plug x 2 _ RCA plug x 2)
Use to connect the player to a -rv etc.
- c%1_
Microphone • Operating instructions
INSERTING BATTERIES INTO THE REMOTE
CONTROL UNIT
[] Open the battery compartment cover on the back of the re-
mote control unit. Press the knob and open the cover in the
direction of the arrow.
[] Take out the two accessory size "AAA" (IEC R03) dry cell batter-
ies, and insert them into the battery compartment in accor-
dance with the display ((_, _)) inside the compartment.
[] Close the cover of the battery compartment.
In correct use of batteries may cause leakage or rupture.
Always be sure to follow these guidelines:
A. Always insert batteries into the battery compartment cor-
rectly matching the positive (_) an negative (_ polarities, as
shown by the disp(ay inside the compartment.
B. Never mix new and used batteries.
C. Batteries of the same size may have different voltages, de-
pending on brand. Do not mix different brands of batteries.
• Warranty card
<VRB1148>
5
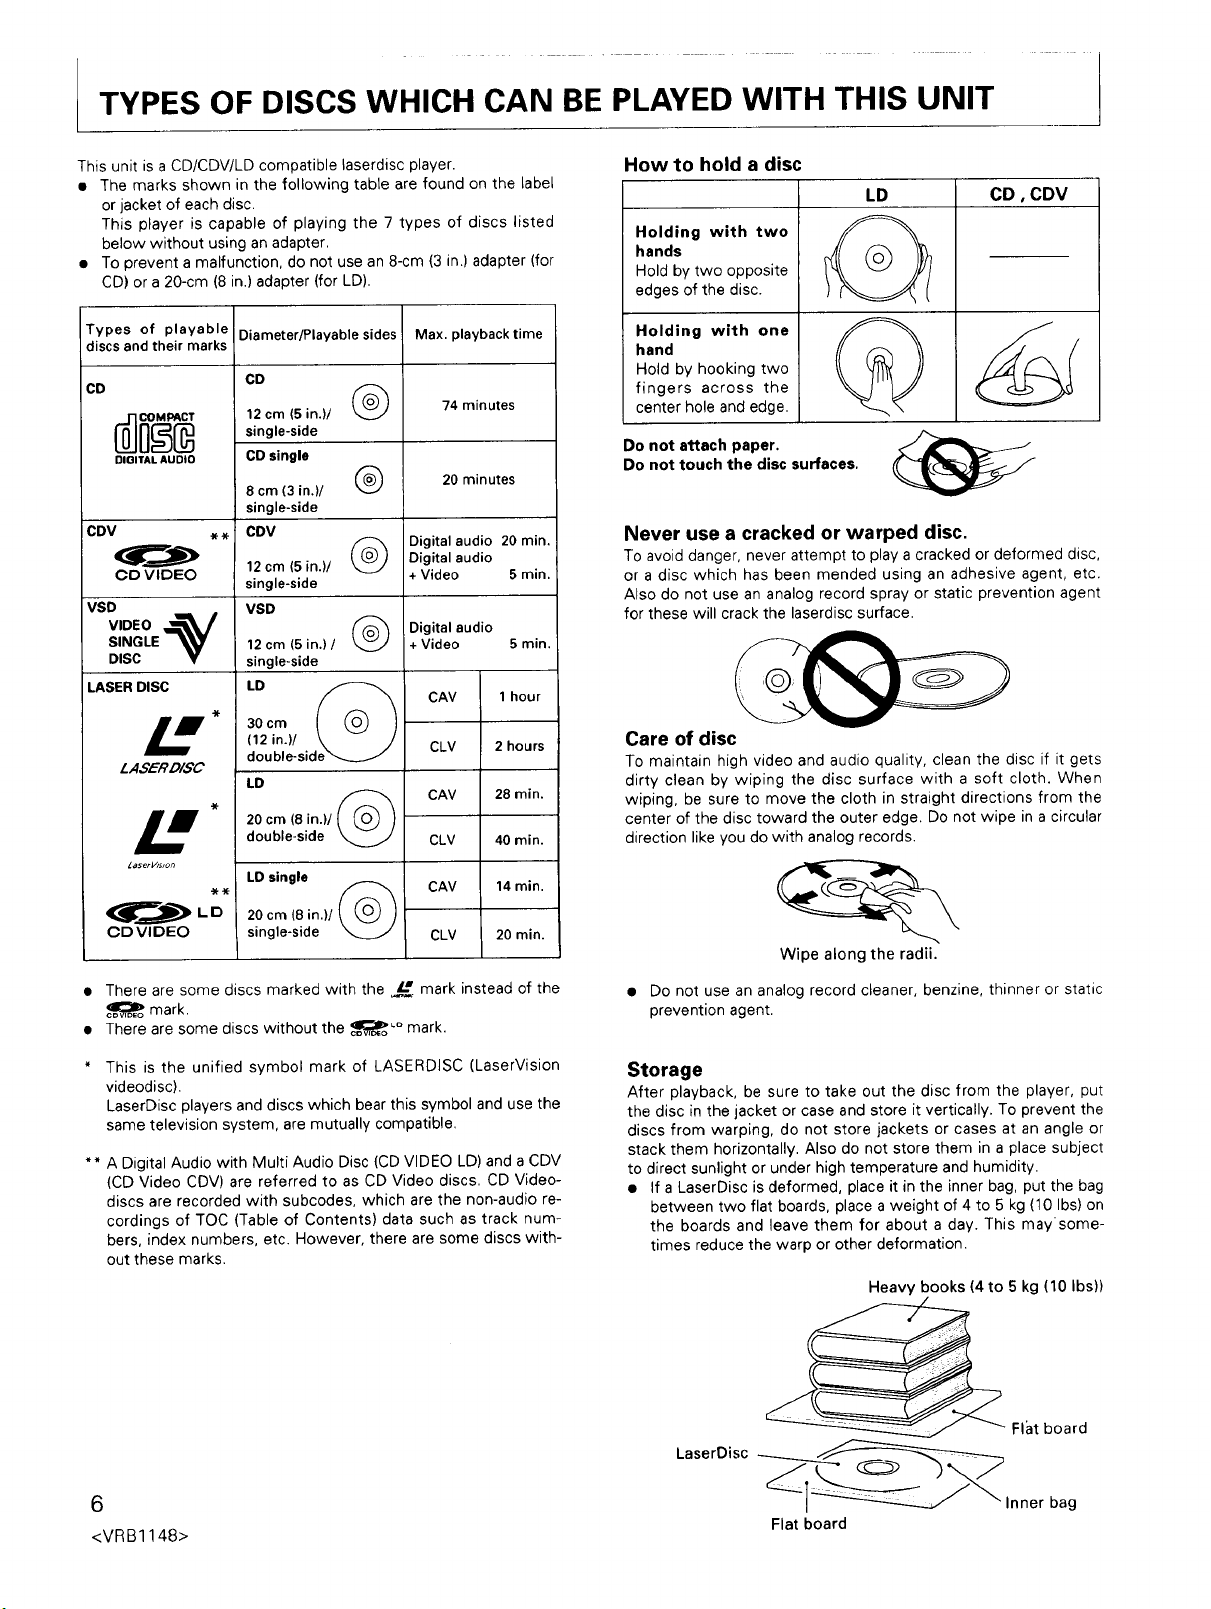
TYPES OF DISCS WHICH CAN BE PLAYED WITH THIS UNIT
This unit is a CD/CDV/LD compatible laserdisc player.
• The marks shown in the following table are found on the label
or jacket of each disc.
This player is capable of playing the 7 types of discs listed
below without using an adapter.
• To prevent a malfunction, do not use an 8-cm (3 in.) adapter (for
CD) or a 20-cm (8 in.) adapter (for LD).
Types of playable
discs and their marks
CD
DIGITAL AUDIO
CDV ..
OD VIDEO
VSD
LASERDISC
Diameter/Playable sides
CD
12 cm (5 in.)/ {k_
single-side
CD single
8 cm (3 in,)/
single-side
CDV
12cm (5 in.)/ ___
single-side
VSD
12 cm (5 in.) /
single-side
Max. playback time
74 minutes
20 minutes
Digital audio 20 rain.
Digital audio
+ Video 5 rain.
Digital audio
+ Video 5 rain,
CAV 1 hour
30 cm
I ASER DISC
LaserVIslon
(12 in.)/ \ J
double-side_
LD
20cm(8in.)/( @ /
double-side
LD single
CLV 2 hours
CAV 28 rain.
CLV 40 rain.
CAV 14 min,
20 cm (8 in,)/ ( @ )
CD VIDEO
single-side
CLV 20 min.
• There are some discs marked with the _L_ mark instead of the
mark.
• There are some discs without the _,_o _°mark.
How to hold a disc
LD
Holding with two
hands
Hold by two opposite
edges of the disc.
Holding with one
hand
Hold by hooking two
fingers across the
center hole and edge,
Do not attach paper.
Do not touch the disc surfaces.
CD, CDV
Never use a cracked or warped disc.
To avoid danger, never attempt to play a cracked or deformed disc,
or a disc which has been mended using an adhesive agent, etc.
Also do not use an analog record spray or static prevention agent
for these will crack the laserdisc surface.
Care of disc
To maintain high video and audio quality, clean the disc if it gets
dirty clean by wiping the disc surface with a soft cloth. When
wiping, be sure to move the cloth in straight directions from the
center of the disc toward the outer edge. Do not wipe in a circular
direction like you do with analog records.
Wipe along the radii.
• Do not use an analog record cleaner, benzine, thinner or static
prevention agent.
This is the unified symbol mark of LASERDISC (LaserVision
videodisc).
LaserDisc players and discs which bear this symbol and use the
same television system, are mutually compatible.
** A Digital Audio with Multi Audio Disc (CD VIDEO LD) and a CDV
(CD Video CDV) are referred to as CD Video discs. CD Video-
discs are recorded with subcodes, which are the non-audio re-
cordings of TOC (Table of Contents) data such as track num-
bers, index numbers, etc. However, there are some discs with-
out these marks.
6
<VRB1148>
Storage
After playback, be sure to take out the disc from the player, put
the disc in the jacket or case and store it vertically. To prevent the
discs from warping, do not store jackets or cases at an angle or
stack them horizontally. Also do not store them in a place subject
to direct sunlight or under high temperature and humidity.
• If a LaserDisc is deformed, place it in the inner bag, put the bag
between two flat boards, place a weight of 4 to 5 kg (10 Ibs) on
the boards and leave them for about a day. This maysome-
times reduce the warp or other deformation.
Heavy books (4to 5 kg (10 Ibs))
_Flat board
LaserDisc "_[_lnner bag
Flat board
I GLOSSARY
LD terms
Chapter number
Just like the numbers assigned to chapters of a book, the
LD disc is divided into several chapters and each of them is
assigned a chapter number. If the chapter numbers are
recorded on the disc, it is possible to perform operations
such as the chapter search which quickly searches the de-
sired chapter.
• Some LD discs do not contain recorded chapter num-
bers.
Frame number
A frame number is assigned to every frame on a CAV disc.
This makes possible operations such as the frame search
which searches desired images based on their frame num-
bers.
Time number
This refers to the elapsed playing time from the beginning
of the disc that is recorded on CLV discs as well as on CAV
discs with a TOC*I. This allows operations such as the
time number search which searches desired images based
on their time numbers.
CDVICD terms
Track number
The CDV or CD disc is divided into several tracks and each
of them is assigned a track number. With the CDV disc, the
track numbers are recorded across the audio and video
parts. This allows operations such as the track search which
quickly searches the desired track.
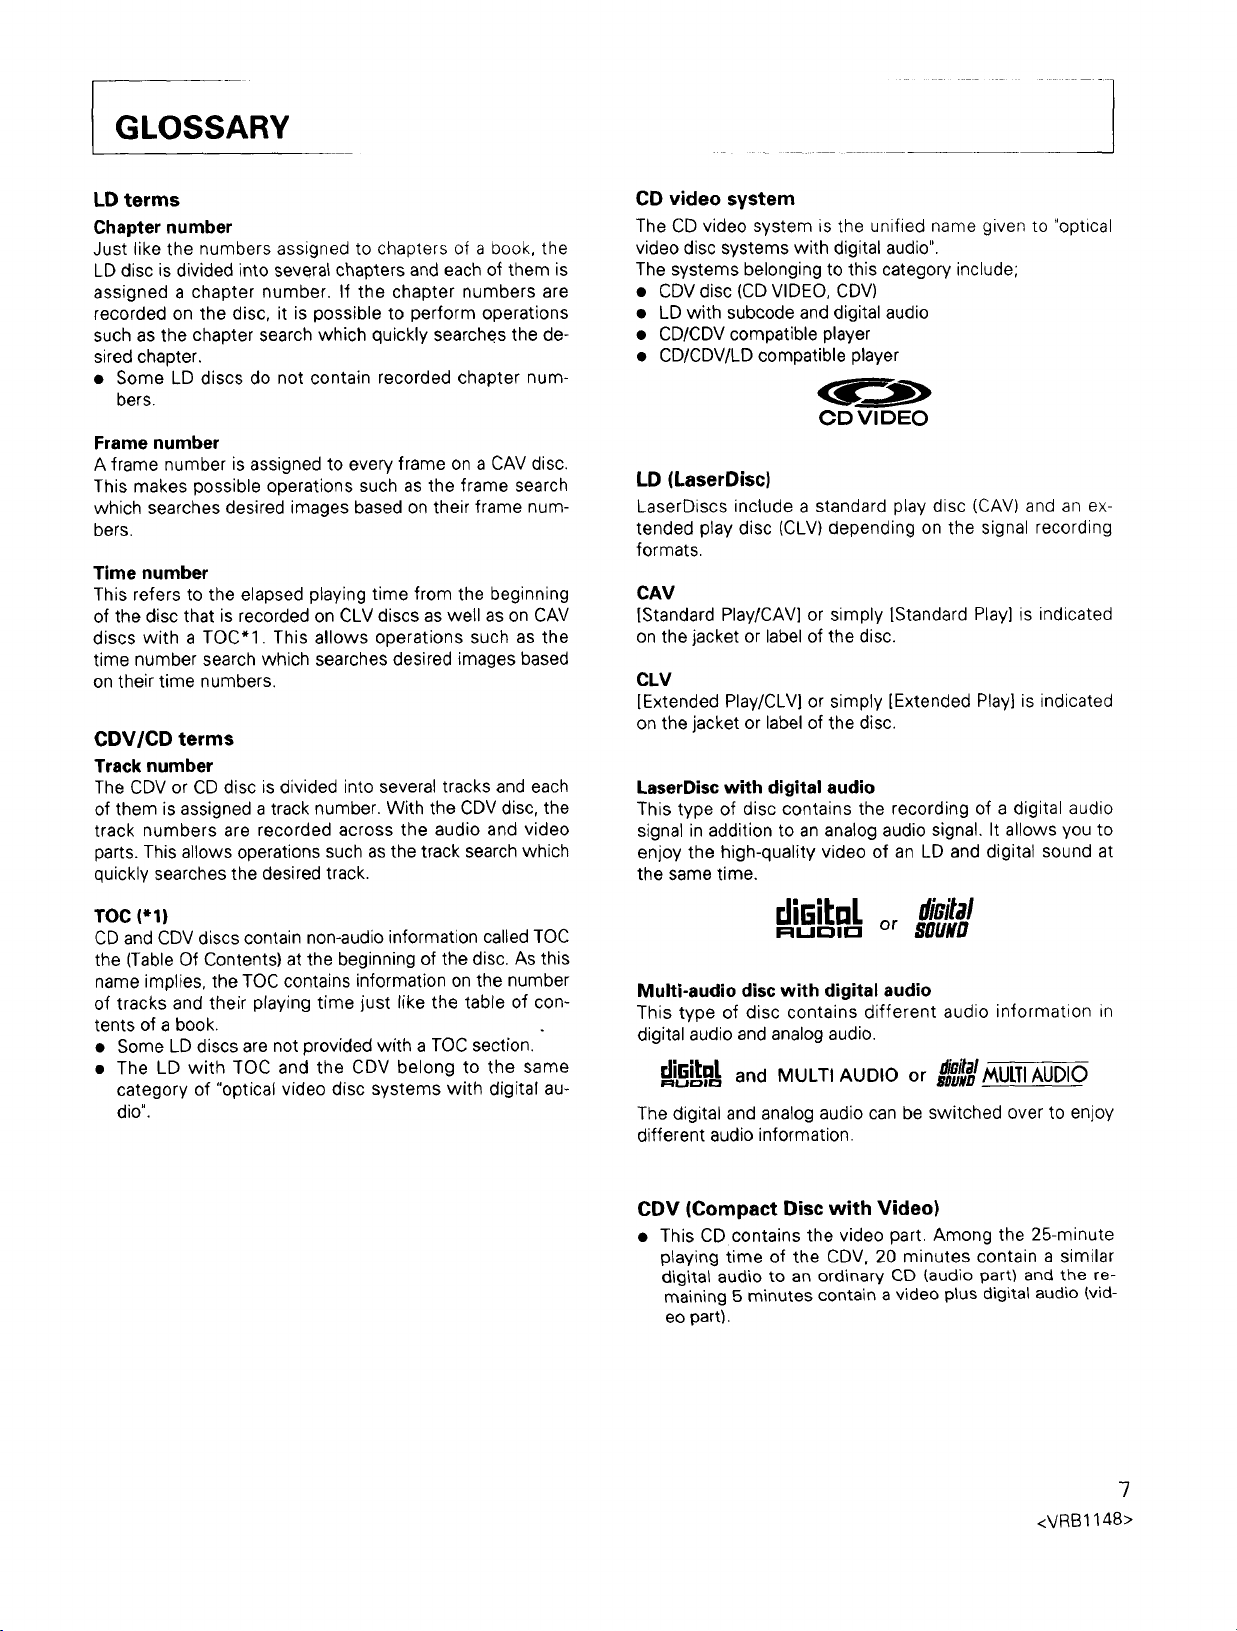
CD video system
The CD video system is the unified name given to "optical
video disc systems with digital audio".
The systems belonging to this category include;
• CDV disc (CD VIDEO, CDV)
• LD with subcode and digital audio
• CD/CDV compatible player
• CD/CDV/LD compatible player
OD Vl DEO
LD (LaserDisc)
LaserDiscs include a standard play disc (CAV) and an ex-
tended play disc (CLV) depending on the signal recording
formats.
CAV
[Standard PlaylCAV] or simply ]Standard Play] is indicated
on the jacket or label of the disc.
CLV
[Extended Play/CLV] or simply [Extended Play] is indicated
on the jacket or label of the disc.
LaserDisc with digital audio
This type of disc contains the recording of a digital audio
signal in addition to an analog audio signal, It allows you to
enjoy the high-quality video of an LD and digital sound at
the same time,
TOC ('1)
CD and CDV discs contain non-audio information called TOC
the (Table Of Contents) at the beginning of the disc. As this
name implies, the TOC contains information on the number
of tracks and their playing time just like the table of con-
tents of a book.
• Some LD discs are not provided with a TOC section.
• The LD with TOC and the CDV belong to the same
category of "optical video disc systems with digital au-
dio".
rJir,iLaLor dieital
i=lu,-,la BOUND
Multi-audio disc with digital audio
This type of disc contains different audio information in
digital audio and analog audio.
di6itut and MULTI AUDIO or 80uxDMULTIAUDIO
I=:lLlC;_lr_
The digital and analog audio can be switched over to enjoy
different audio information.
CDV (Compact Disc with Video)
• This CD contains the video part. Among the 25-minute
playing time of the CDV, 20 minutes contain a similar
digita_ audio to an ordinary CO (audio part) and the re-
maining 5 minutes contain a video plus digital audio (vid-
eo part).
dioital
<VRB1148>
7
CONNECTIONS
1
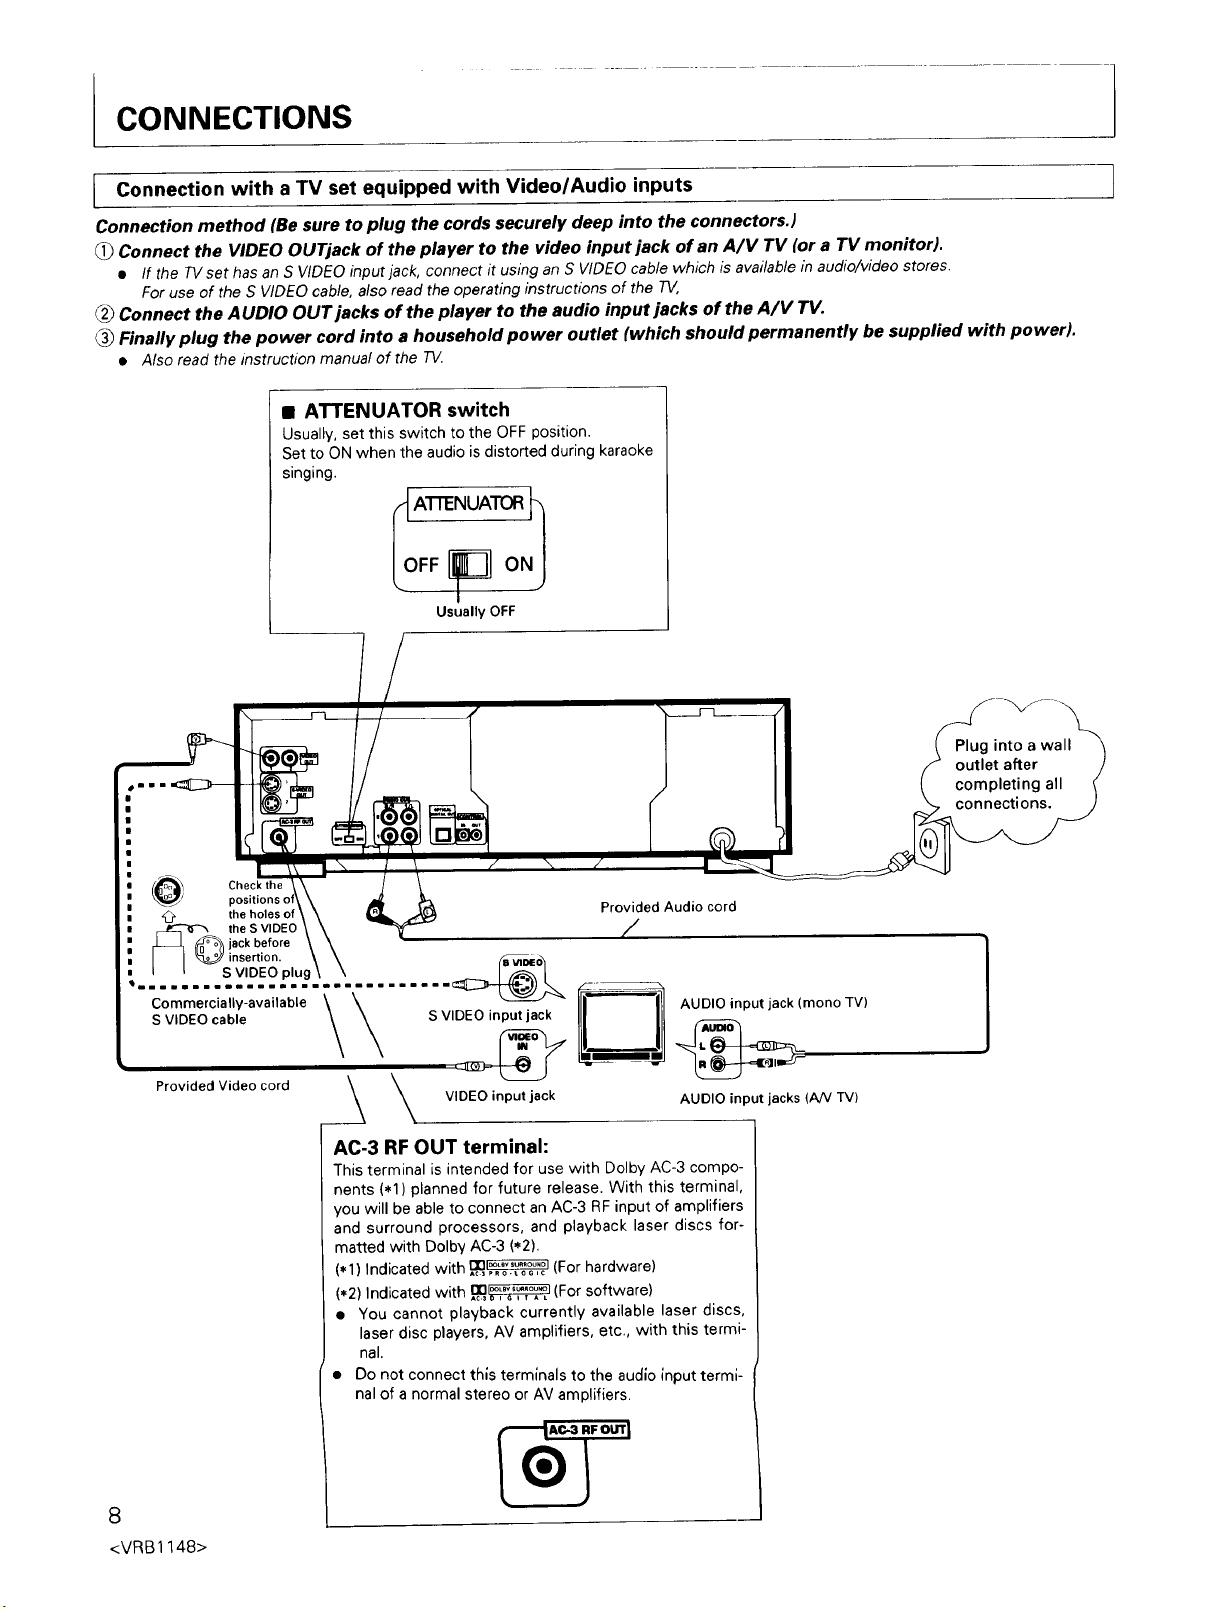
Connection with TV set with Video/Audio
Connection method (Be sure to plug the cords securely deep into the connectors.)
Connect the VIDEO OUTjack of the player to the video input jack of an A/V TV (or a TV monitor).
• If the TVset has an S VIDEO input jack, connect it using an S VIDEO cable which is available in audio/video stores.
For use of the S VIDEO cable, also read the operating instructions of the T_,
Connect the AUDIO OUT jacks of the player to the audio input jacks of the A/V TV.
Finafly plug the power cord into a household power outlet (which should permanently be supplied with power).
• Also read the instruction manual of the TV.
a
equipped inputs
• ATTENUATOR switch
Usually, set this switch to the OFF position.
Set to ON when the audio is distorted during karaoke
singing.
LO,F o.j
Usually OFF
Plug into a wall
@ml=
outlet after
completing all
connections.
J
I
i O_ Check the
•_ the holes of
r_ _ !ack before
i _ the S VIDEO
I _ S VIDEO plug
• m= i IwmB=lRmn llm= =mmml_ml =mml==
I I _ insertion.
S VIDEO cable S VIDEO input jack
Commercially-available _
Provided Video cord
positions
_, , VIDEO input jack
AC-3 RF OUT terminal:
This terminal is intended for use with Dolby AC-3 compo-
nents (.1) planned for future release. With this terminal,
you will be able to connect an AC-3 RF input of amplifiers
and surround processors, and playback laser discs for-
matted with Dolby AC-3 (*2),
(.1) Indicated with .1_,_ (For hardware)
(*2) Indicated with .1_,_ (For software)
• You cannot playback currently available laser discs,
laser disc players, AV amplifiers, etc., with this termi-
nal.
• Do not connect this terminals to the audio input terml-
nal of a normal stereo or AV amplifiers.
Provided Audio cord
AUDIO input jack (mono TV)
AUDIO input jacks (AN TV)
<VRB1148>
CONNECTIONS
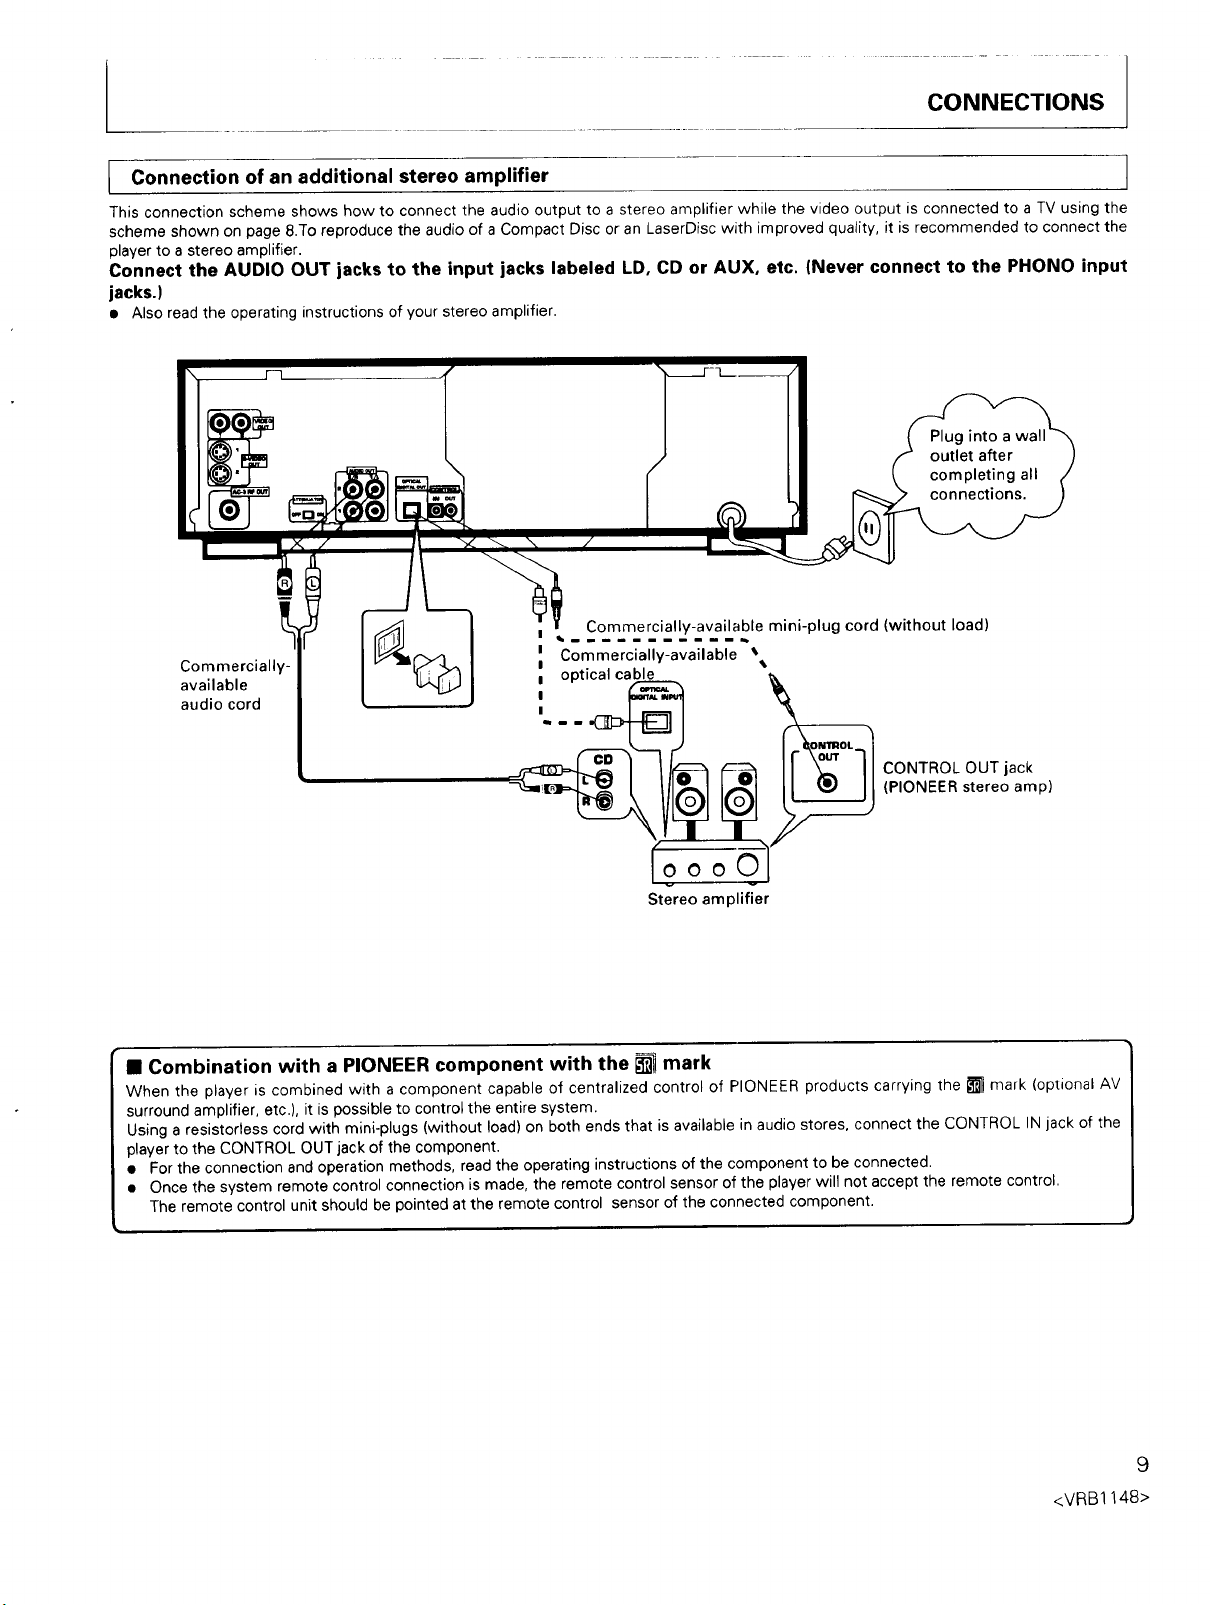
Connection of additional stereo amplifier
This connection scheme shows how to connect the audio output to a stereo amplifier while the video output is connected to a TV using the
scheme shown on page 8.To reproduce the audio of a Compact Disc or an LaserDisc with improved quafity, it is recommended to connect the
player to a stereo amplifier.
Connect the AUDIO OUT jacks to the input jacks labeled LD, CD or AUX, etc. (Never connect to the PHONO input
jacks.)
• Also read the operating instructions of your stereo amplifier.
Commercially- __
available
audio cord
an
Commercially-available mini-plug cord (without load)
.immmi i lmm ml=_
Commercially-available '_
Plug into a
outlet after
completing all
connections.
CONTROL OUT jack
•,. optical cable
Stereo amplifier
(PIONEER stereo amp)
• Combination with a PIONEER component with the _ mark
When the player is combined with a component capable of centralized control of PIONEER products carrying the _ mark (optional AV
surround amplifier, etc.), it is possible to control the entire system.
Using a resistorless cord with mini-plugs (without load) on both ends that is available in audio stores, connect the CONTROL IN jack of the
player to the CONTROL OUT jack of the component.
• For the connection and operation methods, read the operating instructions of the component to be connected.
• Once the system remote control connection is made, the remote control sensor of the player will not accept the remote control.
The remote control unit should be pointed at the remote control sensor of the connected component.
<VRB1148>
9
 Loading...