

Page 1

Owner’s Manual
Mode d’emploi
iPod®adapter
Adaptateur iPod
®
English ItalianoFrançaisDeutschEspañol
CD-IB100
II
Page 2
Contents
Thank you for buying this Pioneer product.
Please read through these operating instructions so you will know how to operate
your model properly. After you have finished reading the instructions, keep this man-
ual in a safe place for future reference.
Before You Start
Information to User 3
About this unit 3
About this manual 3
About handling the iPod 4
– About iPod settings 4
Connecting and disconnecting the iPod 4
Playing songs on iPod
Listening to songs on your iPod 5
Browsing for a song 5
Pausing a song 6
Displaying text information on iPod 6
Repeating play 6
Playing songs in a random order (shuffle) 6
Operating with different head units
Using as an external unit 7
Function compatibility charts 7
– Head unit group 1 7
– Head unit group 2 7
– Head unit group 3 8
– Head unit group 4 8
Overview of playlist selection and preference
modes 9
– Playback by selecting a playlist from
PLAYLIST 9
– Searching for a desired track from
GENRE (list of genres), ARTIST (list of
artists) and ALBUM (list of albums) 9
Searching for a desired track 10
– Other preference setting
procedures 10
Playback by selecting a playlist 11
Displaying text information on iPod 11
Repeating play 11
Playing songs in a random order
(shuffle) 12
Connections
Connecting the units 14
Installation
Installing this unit 15
– Mounting with Velcro fasteners 15
Additional Information
Troubleshooting 16
Understanding error messages 16
Specifications 16
2
En
Page 3
Before You Start
Section
01
English
Information to User
Alteration or modifications carried out without
appropriate authorization may invalidate the
user’s right to operate the equipment.
This device complies with part 15 of the FCC
Rules. Operation is subject to the following
two conditions:
(1) This device may not cause harmful interference, and (2) this device must accept any interference received, including interference that
may cause undesired operation.
About this unit
This unit is the adapter for a Pioneer head unit
to control and listen to songs on an iPod with
Dock Connector.
! iPod is a trademark of Apple Computer,
Inc., registered in the U.S. and other countries.
! This unit is designed to use only in a vehi-
cle.
! This unit supports only an iPod with Dock
Connector.
! This unit does not support software ver-
sions prior to iPod update 2004-10-20. For
supported versions, consult your nearest
Pioneer dealer.
! Operations may vary depending on the soft-
ware version of iPod.
WARNING: For U.S. models
Handling the cord on this product or cords associated with accessories sold with the product
may expose you to chemicals listed on proposition 65 known to the State of California and other
governmental entities to cause cancer and birth
defects or other reproductive harm. Wash hands
after handling.
CAUTION
! Do not allow this unit to come into contact
with liquids. Electrical shock could result.
Also, this unit damage, smoke, and overheat
could result from contact with liquids.
! Keep this manual handy as a reference for op-
erating procedures and precautions.
! Always keep the volume low enough so that
you can hear sounds from outside the vehicle.
! Protect this unit from moisture.
! Should this product fail to operate properly,
contact your dealer or nearest authorized Pioneer Service Station.
Important (Serial number)
The serial number is located on the bottom of
this unit. For your own security and convenience,
be sure to record this number on the enclosed
warranty card.
About this manual
Operate this unit with the connected head
unit. Instructions in this manual use AVHP5700DVD (AVH-P5750DVD) as an example of
head unit.
When using the head units other than AVHP5700DVD (AVH-P5750DVD), refer to Operat-
ing with different head units on page 7.
We recommend that you familiarize yourself
with the functions and their operation by reading through the manual before you begin
using this unit. It is especially important that
you read and observe WARNINGs and CAU-
TIONs in this manual.
En
3
Page 4
Section
01
Before You Start
About handling the iPod
CAUTION
! Pioneer accepts no responsibility for lost data
on the iPod even if that data is lost while
using this unit.
! Do not allow direct sunlight to fall on the iPod
when it is not being used. Extended exposure
to direct sunlight can result in iPod malfunction due to the resulting high temperatures.
! Do not leave the iPod in high temperatures or
direct sunlight.
! Fix the iPod securely when using with this
unit. Do not let the iPod fall onto the floor,
where it may become jammed under the
brake or accelerator pedal.
For details, refer to the iPod’s manuals.
About iPod settings
! You cannot operate the iPod Equalizer on
the Pioneer products. We recommend that
you set the iPod Equalizer to off, before connecting the iPod to this unit.
! You cannot set Repeat to off on the iPod
when using this unit. Even if you set Repeat
to off on the iPod, Repeat is changed to All
automatically when connecting the iPod to
this unit.
! The Shuffle function of the iPod is operated
as Random on the Pioneer products.
% Connect the iPod to this unit.
As soon as the iPod is connected, its power is
automatically turned on.
While the iPod is connected to this unit,
PIONEER (or
the iPod.
! When the ignition switch is set to ACC or
ON, the iPod’s battery is charged while the
iPod is connected to this unit.
! While the iPod is connected to this unit, the
iPod itself cannot be turned on or off.
# The iPod connected to this unit is turned off
about two minutes after the ignition switch is set
to OFF.
% Remove the iPod from this unit.
When removing the iPod from this unit, the
iPod main menu is displayed after a few seconds.
(check mark)) is displayed on
Connecting and
disconnecting the iPod
! Connect only the dock connector to the
iPod so that this unit works properly.
! Before connecting the dock connector to
the iPod, disconnect the headphones from
the iPod.
4
En
Page 5

1
3
2
465
Playing songs on iPod
Section
02
English
Listening to songs on your
iPod
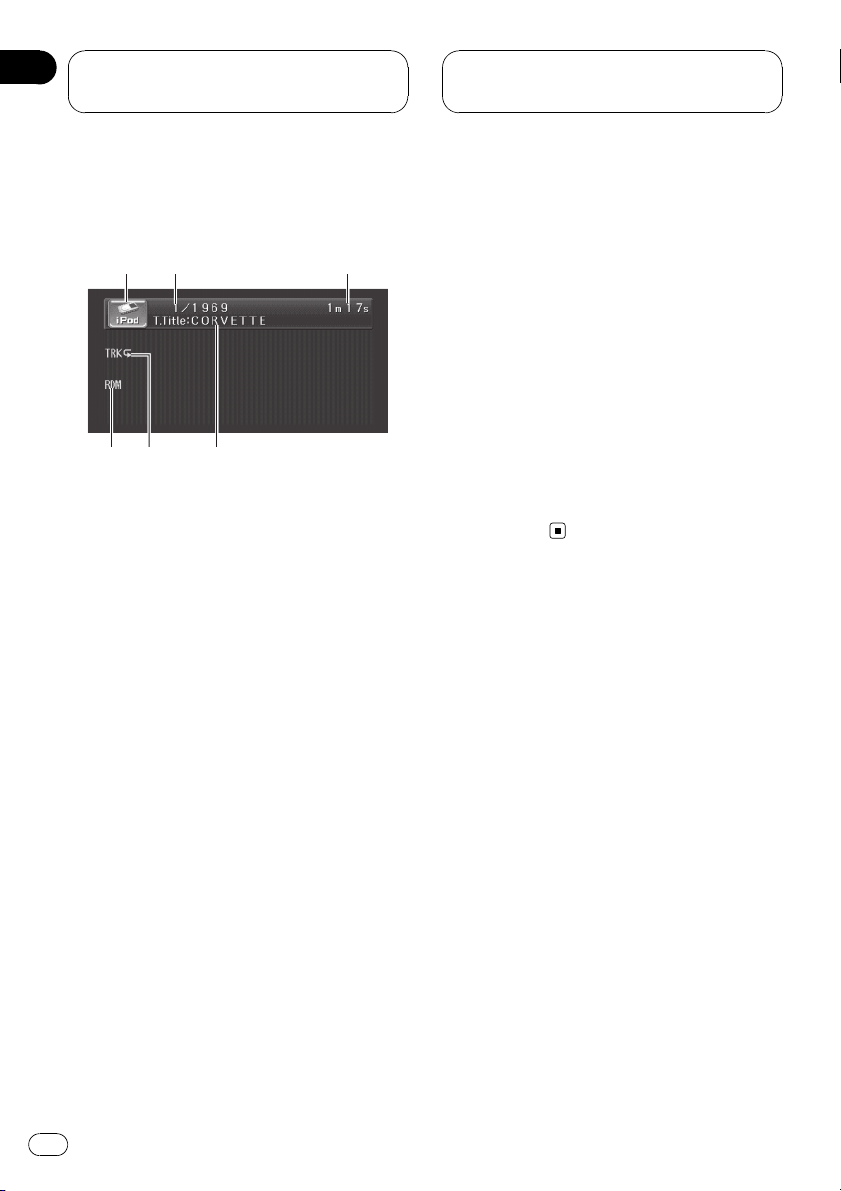
1 Source icon
Shows which source has been selected.
2 Song number indicator
Shows the number of song played in the selected list.
3 Play time indicator
Shows the elapsed playing time of the current song.
4 Song title indicator
Shows the title of the currently playing
song.
5 Repeat indicator
Shows when repeat range is selected to current track.
6 RDM indicator
Shows when random play is set to TRACK
or ALBUM.
1 Touch the source icon and then touch
iPod to select the iPod.
# You can also select the iPod source by pressing SOURCE repeatedly.
# When the iPod is not connected to this unit,
you cannot select the iPod as a source.
2 Touch the screen to display the touch
panel keys.
3 To skip back or forward to another
song, touch o or p.
Touching p skips to the start of the next
song. Touching o once skips to the start of
the current song. Touching it again will skip to
the previous song.
# You can also skip back or forward to another
song by pressing c or d.
4 To perform fast forward or reverse,
keep touching o or p.
# You can also perform fast reverse/fast forward
by pressing and holding c or d.
Browsing for a song
The operation of this unit to control an iPod is
designed to be as close to the operation of the
iPod as possible for easy operation and song
search.
1 Touch TOP to display the top menu.
2 Touch one of the categories in which
you want to search for a song.
! PLAYLISTS (playlists)
! GENRES (genres)
! ARTISTS (artists)
! ALBUMS (albums)
! SONGS (songs)
3 Touch a list title that you want to play.
Repeat this operation until you find the desired song.
# You can start playback throughout the selected list if you keep touching a list title.
# To go to the next group of list titles, touch
# To return to the previous group of list titles,
touch
.
# To return to the previous menu, touch
# To go to the top menu of the list search, touch
TOP.
.
.
En
5
Page 6
Section
02
Playing songs on iPod
Pausing a song
Pause lets you temporarily stop playback of a
song.
% Touch f during playback.
PAUSE appears in the display.
# To resume playback at the same point that you
turned pause on, touch f again.
# You can also turn pause on or off by pressing
PGM.
Displaying text
information on iPod
Text information recorded on the iPod can be
displayed.
% Touch DISP.
Touch DISP repeatedly to switch between the
following settings:
T. Title (song title)—Artist (artist name)—
Album (album title)
# If the characters recorded on the iPod are not
compatible with a head unit, those characters
will not be displayed.
Note
You can scroll the title to the left by keeping
touching DISP.
2 Touch REPEAT to select the repeat
range.
Touch REPEAT repeatedly until the desired repeat range appears in the display.
! TRACK – Repeat just the current song
! ALL – Repeat all songs in the selected
list
Playing songs in a random
order (shuffle)
For playback of the songs on the iPod, there
are two random play methods: TRACK (play
back songs in a random order) and ALBUM
(play back albums in a random order).
1 Press A.MENU and then touch FUNC to
display the function names.
2 Touch RANDOM to select the random
play method.
Touch RANDOM repeatedly until the desired
random play method appears in the display.
! TRACK – Play back songs in a random
order within the selected list
! ALBUM – Select an album randomly, and
then play back all the songs in it in order
Repeating play
For playback of the songs on the iPod, there
are two repeat play ranges: TRACK (repeat
one song) and ALL (repeat all songs in the
list).
! While REPEAT is set to TRACK, you cannot
select the other songs.
1 Press A.MENU and then touch FUNC to
display the function names.
6
En
Page 7

Operating with different
head units
Section
03
English
Using as an external unit
The following head units operate this unit as
an external unit. For more details about the external unit, refer to the head unit’s manual.
! FUNC4 (F4), FUNCTION4 and 1–6KEY
doesn’t be used to operate this unit.
Head unit group 1
The following head units featuring FUNCTION
button operation or SOFT KEY operation.
DEH-P9450MP, DEH-P9400MP, DEH-P7700MP
(European model), DEH-P6880MP, DEHP6800MP (European model), DEH-P6750MP,
DEH-P6700MP, DEH-P5850MP, DEHP5850MPH, DEH-P5800MP, DEH-P5750MP,
DEH-P5730MP, DEH-P5700MP, DEH-P4880MP,
DEH-P4850MP, DEH-P4850MPH, DEHP4800MP, DEH-P4770MP, DEH-P4750MP, DEHP4700MP, DEH-P3800MP, DEH-P940MP, DEHP670MP, DEH-P580MP, DEH-P480MP, DEHP470MP, DVH-P5850MP, DVH-P5650MP, DVHP580MP, FH-P9200MP, FH-P4200MP
Head unit group 2
The following head units featuring
MULTI-CONTROL operation.
DEH-P8650MP, DEH-P8600MP, DEH-P7750MP,
DEH-P7700MP (North American model), DEHP860MP, DEH-P770MP, DEH-P80MP, DEHP8MP, DEH-P1Y
Head unit group 3
The following head units featuring touch
panel key operation.
AVH-P7650DVD, AVH-P7600DVD, AVHP7550DVD, AVH-P7500DVDN, AVH-P7500DVD,
AVH-P6650DVD, AVH-P6600DVD, AVHP6550DVD, AVH-P6500DVD
Head unit group 4
The following head units are navigation units
featuring touch panel key operation.
AVIC-D2, AVIC-N1, AVIC-X1
Function compatibility charts
Head unit group 1
Controls
Select iPod as a
source
Select a category Press BAND (BAND/ESC).
Select a list Press a or b.
Skip back or forward
to another song
Fast forward/re-
*2
verse
Select a function Press FUNCTION (FUNC).
Pause a song Press a or b in FUNC1 (F1).
Select a repeat range Press a or b in FUNC2 (F2).
Select a random play
method
Switch the display Press a or b in FUNC3 (F3).
Scroll the title
Switch between
AUTO and MANUAL
Head unit group 2
Controls
Select iPod as a
source
Select a category Press BAND (BAND/ESC).
Press SOURCE.
Press c or d.
*1
Press and hold c or d.
Press and hold a or b in
FUNC2 (F2).
Press and hold a or b in
FUNC3 (F3).
Press c or d in AUTO/
MANUAL (A/M).
Press SOURCE.
*1You can use this function when you select AUTO in AUTO/MANUAL (A/M).
2
*
You can use this function when you select MANUAL in AUTO/MANUAL (A/M).
En
7
Page 8
Section
03
Operating with different
head units
Controls
Select a list
Skip back or forward
to another song
Fast forward/re-
*2
verse
Select a function Use MULTI-CONTROL.
Pause a song
Select a repeat range
Select a random play
method
Switch the display
Scroll the title
Switch between
AUTO and MANUAL
Push MULTI-CONTROL up
or down.
Push MULTI-CONTROL left
*1
or right.
Push and hold MULTI-CON-
TROL left or right.
Press MULTI-CONTROL in
FUNC1 (F1).
Press MULTI-CONTROL in
FUNC2 (F2).
Press and hold MULTI-CON-
TROL in FUNC2 (F2).
Press MULTI-CONTROL in
FUNC3 (F3).
Press and hold MULTI-CON-
TROL in FUNC3 (F3).
Press MULTI-CONTROL in
AUTO/MANUAL (A/M).
Head unit group 3
Controls
Select iPod as a
source
Select a category Touch BAND.
Select a list Touch a or b.
Skip back or forward
to another song
Fast forward/re-
*2
verse
Select a function
Pause a song Touch ab in FUNCTION1.
Press SOURCE.
Tou ch c or d.
*1
Keep touching c or d.
Tou ch A.MENU and then
touch FUNCTION.
Controls
Select a repeat range Touch ab in FUNCTION2.
Select a random play
method
Switch the display Touch ab in FUNCTION3.
Scroll the title
Switch between
AUTO and MANUAL
Keep touching ab in FUNC-
TION2.
Keep touching ab in FUNC-
TION3.
Tou ch c or d in AUTO/
MANUAL.
Head unit group 4
Controls
Select iPod as a
source
Select a category Touch BAND.
Select a list Touch a or b.
Skip back or forward
to another song
Fast forward/re-
*2
verse
Select a function
Pause a song Touch SEND in FUNCTION1.
Select a repeat range Touch SEND in FUNCTION2.
Select a random play
method
Switch the display Touch SEND in FUNCTION3.
Scroll the title
Switch between
AUTO and MANUAL
Press SOURCE.
Tou ch c or d.
*1
Keep touching c or d.
Tou ch A.MENU or press the
joystick and then touch
FUNCTION
Keep touching SEND in
FUNCTION2.
Keep touching SEND in
FUNCTION3.
Tou ch AUTO/MANUAL.
*3
.
*1You can use this function when you select AUTO in AUTO/MANUAL (A/M).
2
*
You can use this function when you select MANUAL in AUTO/MANUAL (A/M).
3
*
In case of AVIC-D2, you can not use A.MENU.
8
En
Page 9
Operating with different
head units
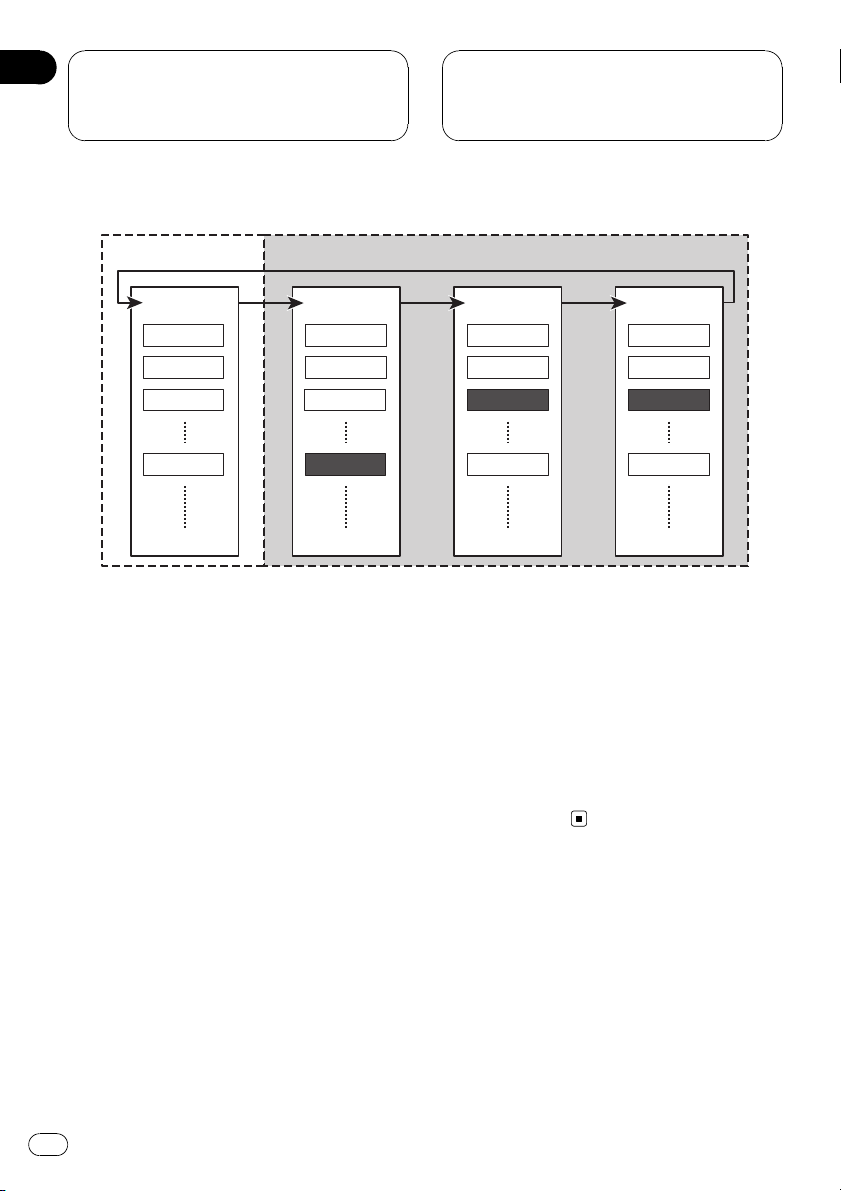
Overview of playlist selection and preference modes
Section
03
English
1
Playlist 1
Playlist 2
Playlist 3
Playlist 9
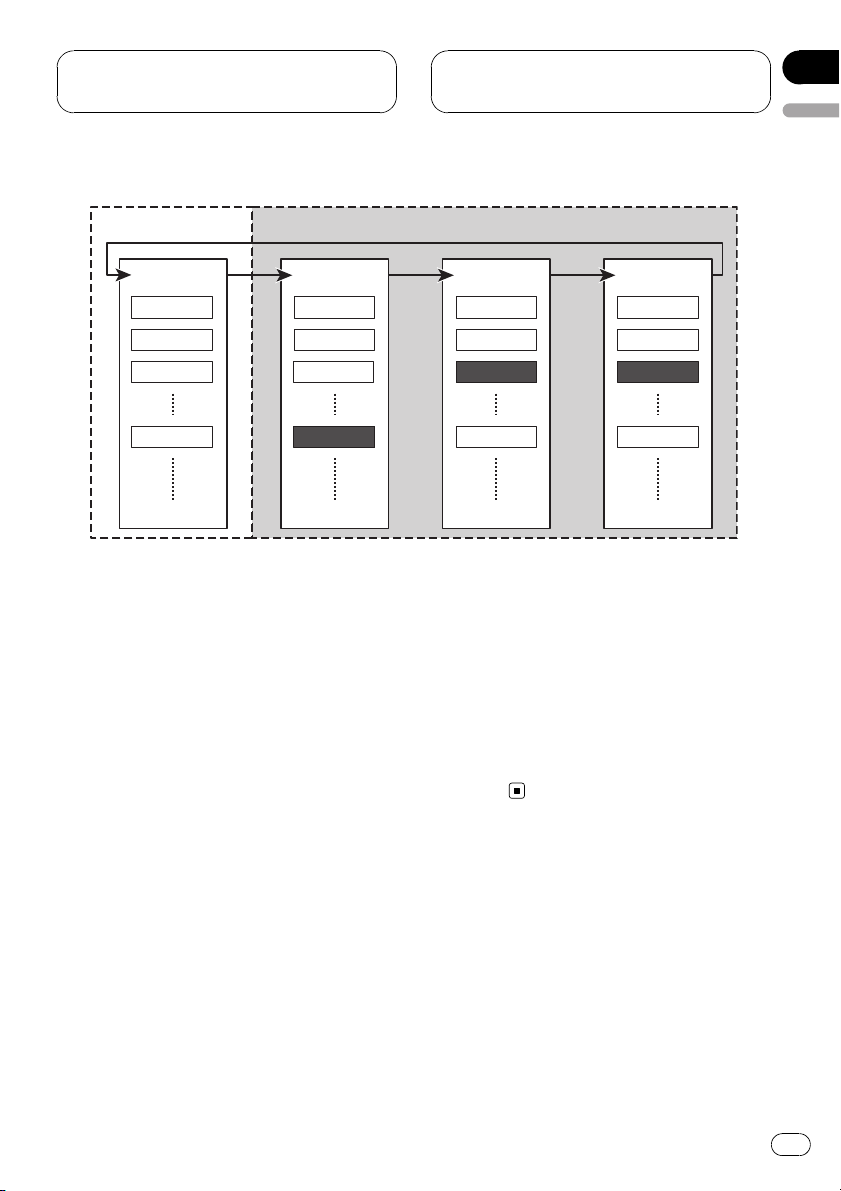
1 Playlist Selection Mode
2 Preference Mode
The iPod link-compatible head unit lets you select a list of tracks you want to listen to (playlist, albums, etc.) using the Playlist Selection
Mode and Preference Mode. An overview of
the Playlist Selection Mode and Preference
Mode is provided above with reference to the
illustrations.
2
All
Alternative
Animation
Jazz
ALBUMARTISTGENREPLAYLIST
All
Artist 1
Artist 2
Artist 9
All
Album A
Album B
Album J
Searching for a desired track
from GENRE (list of genres),
ARTIST (list of artists) and
ALBUM (list of albums)
Choose a favorite genre, artist or album in the
Preference Mode. The Preference Mode lets
you search for your favorite tracks from separate lists of genres, artists and albums in that
order.
Refer to Searching for a desired track on the
next page.
Playback by selecting a playlist
from PLAYLIST
Choose a favorite playlist in the Playlist Selection Mode.
Refer to Playback by selecting a playlist on
page 11.
En
9
Page 10

Section
03
Operating with different
head units
Searching for a desired track
You can select and play back tracks of your favorite artists and albums, etc. from GENRE,
ARTIST and ALBUM. As an example, the following provides an explanation of the procedure for selecting “Jazz” for GENRE,
“Artist 2” for ARTIST and “Album B” for
ALBUM using the illustration in the previous
section entitled, Overview of playlist selection
and preference modes.
1 Use BAND (BAND/ESC) to switch to
GENRE.
GENRE is displayed for about two seconds.
Each time you press BAND (BAND/ESC) the
display changes in the following order:
PLAYLIST (playlists)—GENRE (genres)—
ARTIST (artists)—ALBUM (albums)
! ALL is set for the default setting of GENRE,
ARTIST and ALBUM.
! Preference conditions are canceled when
switching from ALBUM to PLAYLIST. How-
ever, the list currently being played (under
the most recent preference conditions) continues to play until either of the following
procedures are performed with the a or b
(or MULTI-CONTROL) button.
— A different list is selected
— A new preference list has been started
5 Use BAND (BAND/ESC) to switch to
ALBUM.
ALBUM is displayed for about two seconds.
6 Use a or b (or MULTI-CONTROL) to select “Album B”.
Playback of tracks from “Album B” will start.
7 Use c or d (or MULTI-CONTROL) to select the track you want to listen to.
Playback of the selected track will start.
Other preference setting
procedures
Preferences can also be set starting from
ARTIST or ALBUM.
When the genre of “Album B” is not
known
First switch to GENRE in step 1 and then cancel the preference conditions. Next, continue
the procedure starting from step 3.
When the genre and artist of “Album B”
are not known
First switch to GENRE in step 1 and then cancel the preference conditions. Next, continue
the procedure starting from step 5.
2 Use a or b (or MULTI-CONTROL) to select “Jazz”.
Playback of “Jazz” tracks will start.
3 Use BAND (BAND/ESC) to switch to
ARTIST.
ARTIST is displayed for about two seconds.
4 Use a or b (or MULTI-CONTROL) to select “Artist 2”.
Playback of tracks from “Album B” will start.
10
En
Notes
! If the genre has already been selected, only ar-
tists and albums of the selected genre can be
selected. If you want to select artists and albums of a different genre, repeat the procedure starting from step 1.
! ALL is set for the default setting of GENRE,
ARTIST and ALBUM.
Page 11

Operating with different
head units
Section
03
English
! Preference conditions are canceled when
switching from ALBUM to PLAYLIST. How-
ever, the list currently being played (under the
most recent preference conditions) continues
to play until either of the following procedures
are performed with the a or b (or
MULTI-CONTROL) button.
— A different list is selected
— A new preference list has been started
Playback by selecting a
playlist
You can select and play back a playlist you
want to listen to from PLAYLIST of the iPod.
1 Use BAND (BAND/ESC) to switch to
PLAYLIST.
PLAYLIST is displayed for about two seconds.
Each time you press BAND (BAND/ESC) the
display changes in the following order:
PLAYLIST (playlists)—GENRE (genres)—
ARTIST (artists)—ALBUM (albums)
2 Use a or b (or MULTI-CONTROL) to select the playlist you want to listen to.
Using a (or pushing MULTI-CONTROL up) selects the previous playlist. Using b (or pushing MULTI-CONTROL down) selects the next
playlist.
The name of the playlist is displayed for about
two seconds, then playback of the selected
playlist starts.
3 Use c or d (or MULTI-CONTROL) to select the track you want to listen to.
Playback of the selected track will start.
Displaying text
information on iPod
Text information recorded on the iPod can be
displayed.
% Select the desired information.
Refer to Function compatibility charts on page
7.
Play time—Song title—Artist name—Album
title—Repeat play status—Random play status
# If the characters recorded on the iPod are not
compatible with a head unit, those characters
will not be displayed.
Notes
! When using this unit as an external unit, head
units can display the first 8 letters of the song
title, the artist name and the album title.
! You can scroll to the left the song title, the ar-
tist name and the album title.
Repeating play
For playback of the songs on the iPod, there
are two repeat play ranges: TRK (repeat one
song) and ALL (repeat all songs in the list).
! While RPT is set to TRK, you cannot select
the other songs.
% Select the repeat range.
Refer to Function compatibility charts on page
7.
! TRK – Repeat just the current song
! ALL – Repeat all songs in the list
En
11
Page 12

Section
03
Operating with different
head units
Playing songs in a random
order (shuffle)
For playback of the songs on the iPod, there
are two random play methods: TRK (play back
songs in a random order) and ALBUM (play
back albums in a random order).
% Select the random play method.
Refer to Function compatibility charts on page
7.
! TRK – Play back songs in a random order
within the list
! ALBUM – Select an album randomly, and
then play back all the songs in it in order
12
En
Page 13

Connections
Section
04
English
Important
! This unit is for vehicles with a 12-volt battery
and negative grounding. Before installing it in
a recreational vehicle, truck, or bus, check the
battery voltage.
! To avoid shorts in the electrical system, be
sure to disconnect the * battery cable before
beginning installation.
! Refer to the owner’s manual for details on
connecting the power amp and other units,
then make connections correctly.
! Secure the wiring with cable clamps or adhe-
sive tape. To protect the wiring, wrap adhesive
tape around them where they lie against
metal parts.
! Route and secure all wiring so it cannot touch
any moving parts, such as the gear shift,
handbrake and seat rails. Do not route wiring
in places that get hot, such as near the heater
outlet. If the insulation of the wiring melts or
gets torn, there is a danger of the wiring shortcircuiting to the vehicle body.
! Don’t pass the yellow lead through a hole into
the engine compartment to connect to the
battery. This will damage the lead insulation
and cause a very dangerous short.
! Do not shorten any leads. If you do, the protec-
tion circuit may fail to work when it should.
! Never feed power to other equipment by cut-
ting the insulation of the power supply lead of
the unit and tapping into the lead. The current
capacity of the lead will be exceeded, causing
overheating.
! When replacing the fuse, be sure to only use a
fuse of the rating prescribed on the fuse
holder.
! To prevent incorrect connection, the input side
of the IP-BUS connector is blue, and the output side is black. Connect the connectors of
the same colors correctly.
! Connect only the dock connector to the iPod
so that this unit works properly.
! Before connecting the dock connector to the
iPod, disconnect the headphones from the
iPod.
Cords for this product and those for other products may be different colors even if they have
the same function. When connecting this product to another product, refer to the supplied
manuals of both products and connect cords
that have the same function.
En
13
Page 14
Section
04
Connections
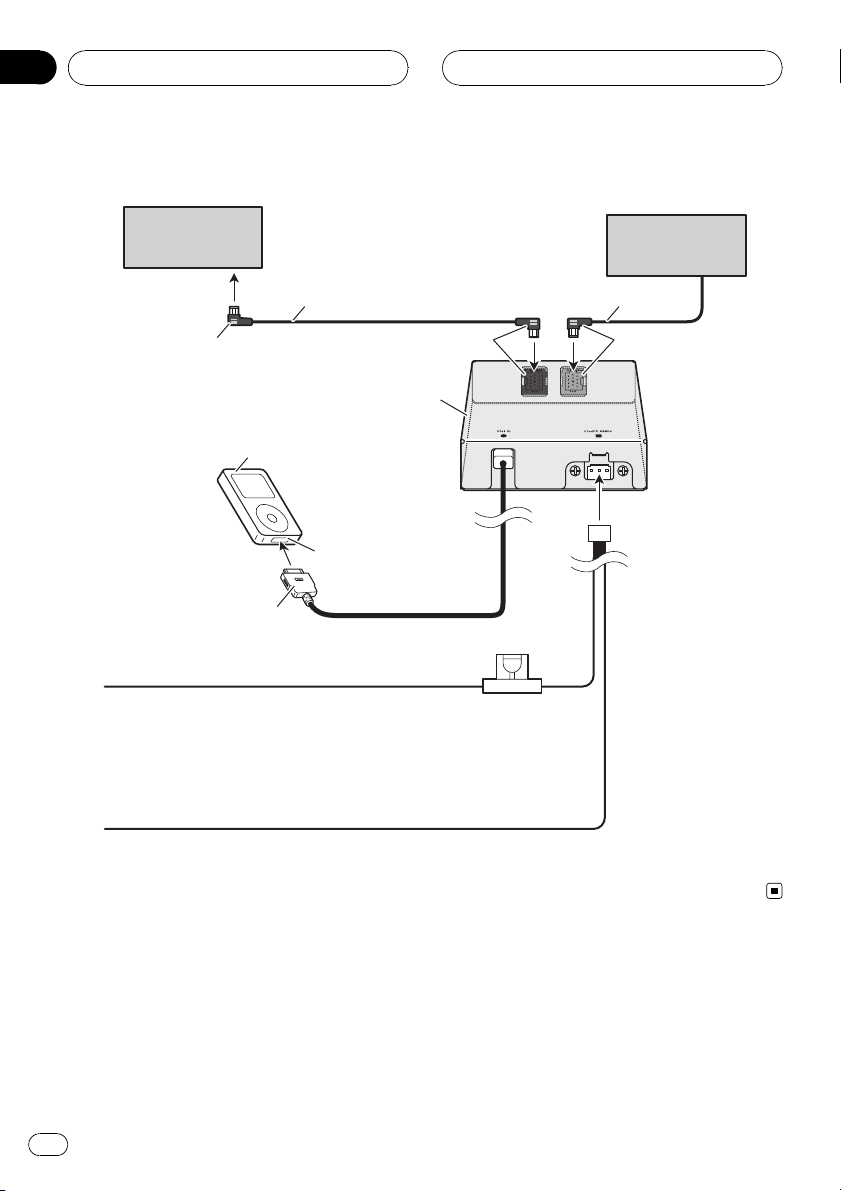
Connecting the units
Head unit
To IP-BUS input
(blue)
iPod with Dock Connector
Dock connector
Yellow
To terminal always supplied
with power regardless of
ignition switch position.
1.5 m (4 ft. 11 in.)
This unit
Dock connector port
1.5 m (4 ft. 11 in.)
Black
Multi-CD player
(sold separately)
IP-BUS cableIP-BUS cable
Blue
Fuse (2 A)
14
Black (ground)
To vehicle (metal) body.
En
Page 15
Installation
Section
05
English
Important
! Before making a final installation of the unit,
temporarily connect the wiring to confirm that
the connections are correct and the system
work properly.
! Use only the parts included with the unit to
ensure proper installation. The use of unauthorized parts can cause malfunctions.
! Consult with your nearest dealer if installation
requires the drilling of holes or other modifications of the vehicle.
! Install the unit where it does not get in the dri-
ver’s way and cannot injure the passenger if
there is a sudden stop, like an emergency
stop.
! When mounting this unit, make sure none of
the leads are trapped between this unit and
the surrounding metalwork or fittings.
! Do not mount this unit near the heater outlet,
where it would be affected by heat, or near the
doors, where rainwater might splash onto it.
! Before drilling any mounting holes always
check behind where you want to drill the
holes. Do not drill into the gas line, brake line,
electrical wiring or other important parts.
! If this unit installed in the passenger compart-
ment, anchor it securely so it does not break
free while the vehicle is moving, and cause injury or an accident.
! If this unit is installed under a front seat,
make sure it does not obstruct seat movement. Route all leads and cords carefully
around the sliding mechanism so they do not
caught or pinched in the mechanism and
cause a short-circuit.
! If the Velcro fasteners (hard) adhere to the
car mat directly, you may install this unit
without using the Velcro fasteners (soft).
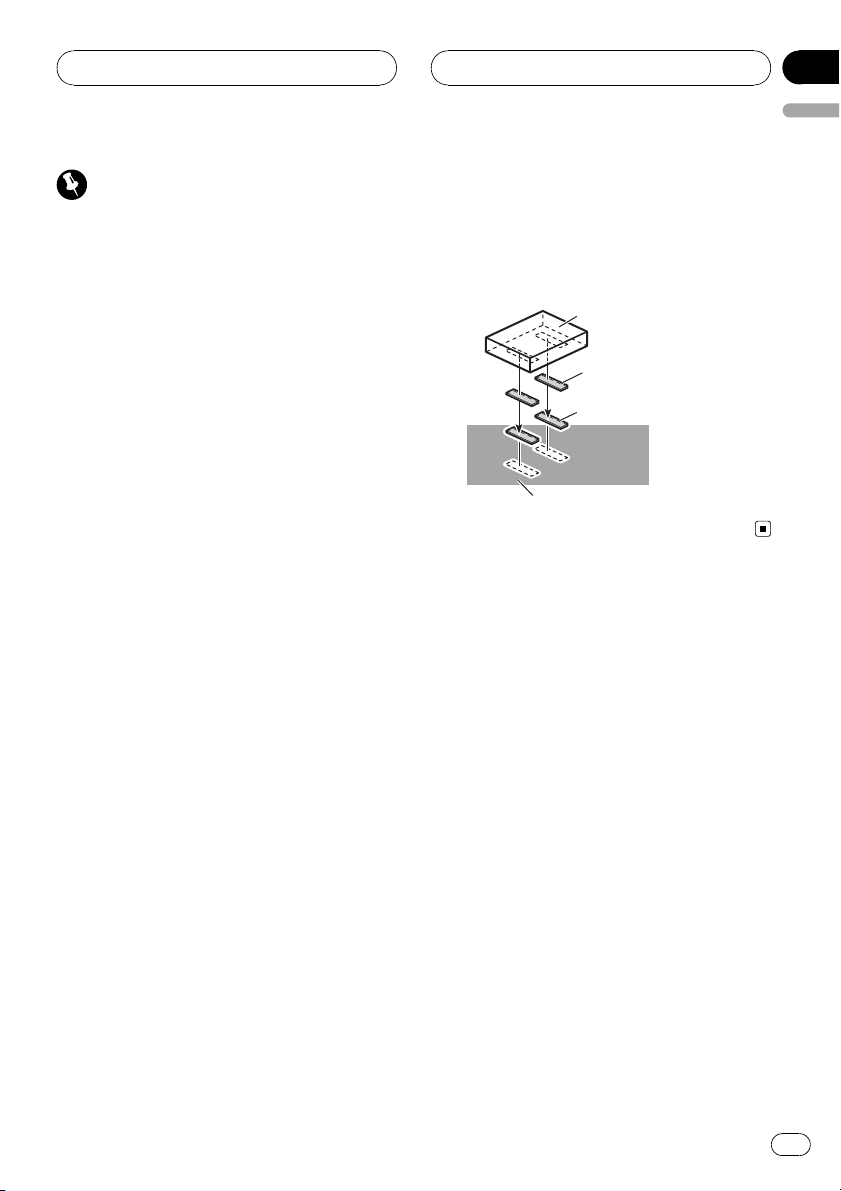
% Mount this unit using the Velcro fasteners.
This unit
Velcro fastener (hard)
Velcro fastener (soft)
Car mat or chassis
Installing this unit
Mounting with Velcro fasteners
Thoroughly wipe off the surface before affixing
the Velcro fasteners.
En
15
Page 16
Appendix
Additional Information
Troubleshooting
Symptom Cause Action
iPod doesn’t
operate correctly.
Cables are incorrectly connected.
Disconnect the
cable from iPod.
Once iPod main
menu is displayed,
connect the cable
again.
Reset the iPod.
Understanding error
messages
When you contact your dealer or your nearest
Pioneer Service Center, be sure to record the
error message.
Message Cause Action
ERROR-11 Communication
failure
ERROR-21 Old version of
iPod
ERROR-30 iPod failure Reset the iPod.
NO TRACK No songs Transfer the songs
STOP No songs in the
current list
Disconnect the
cable from iPod.
Once iPod main
menu is displayed,
connect the cable
again.
Reset the iPod.
Update the version
of iPod.
to iPod.
Select a list that
contains the
songs.
Specifications
General
Power source ............................. 14.4 V DC (10.8 V to 15.1 V
allowable)
Grounding system ...................Negative type
Max. current consumption
..................................................... 2.0 A
Dimensions (W × H × D) ...95 × 25 × 91 mm
(3-3/4 × 1 × 3-5/8 in.)
Weight .......................................... 0.33 kg (0.7 lbs)
Note
Specifications and the design are subject to possible modifications without notice due to improvements.
16
En
Page 17
Contenido
Gracias por haber comprado este producto Pioneer.
Lea con detenimiento estas instrucciones sobre el funcionamiento del aparato,
para que pueda dar el mejor uso posible a su modelo. Una vez que las haya leído,
guarde este manual en un lugar seguro para consultarlo en el futuro.
Español
Antes de comenzar
Acerca de esta unidad 18
Acerca de este manual 18
Acerca del manejo del iPod 18
– Acerca de los ajustes del iPod 19
Para conectar y desconectar el iPod 19
Para reproducir canciones en el iPod
Para escuchar canciones en su iPod 20
Para buscar una canción 20
Para poner en pausa una canción 21
Visualización de información de texto en el
iPod 21
Repetición de reproducción 21
Reproducción de las canciones en un orden
aleatorio (selección aleatoria) 21
Funcionamiento con diferentes unidades
principales
Uso como una unidad externa 23
Tablas de compatibilidad de funciones 23
– Grupo 1 de unidades principales 23
– Grupo 2 de unidades principales 24
– Grupo 3 de unidades principales 24
– Grupo 4 de unidades principales 24
Descripción general del modo de selección
de lista de reproducción y del modo de
preferencias 26
– Reproducción seleccionando una lista
de reproducción de PLAYLIST 26
– Búsqueda de una pista deseada de
GENRE (lista de géneros), ARTIST (lista
de artistas) y ALBUM (lista de
álbumes) 26
Búsqueda de la pista deseada 27
– Otros procedimientos de ajuste de
preferencias 27
Reproducción seleccionando una lista de
reproducción 28
Visualización de información de texto en el
iPod 28
Repetición de reproducción 29
Reproducción de las canciones en un orden
aleatorio (selección aleatoria) 29
Conexiones
Conexión de las unidades 31
Instalación
Instalación de esta unidad 32
– Montaje con sujetadores de Velcro 32
Información adicional
Solución de problemas 33
Para comprender los mensajes de error 33
Especificaciones 33
17
Es
Page 18
Sección
01
Antes de comenzar
Acerca de esta unidad
Esta unidad es el adaptador para el control y
la escucha de canciones en un iPod con un
conector del Dock mediante una unidad principal Pioneer.
! iPod es una marca comercial de Apple
Computer, Inc., registrada en los EE.UU. y
otros países.
! Esta unidad está diseñada para ser utili-
zada únicamente en un vehículo.
! Esta unidad soporta sólo un iPod con co-
nector del Dock.
! Esta unidad no es compatible con versio-
nes de software anteriores a la actualización de iPod 2004-10-20. Para obtener
información sobre versiones compatibles,
consulte al concesionario Pioneer más próximo a su domicilio.
! Las funciones pueden variar según la ver-
sión de software del iPod.
PRECAUCIÓN
! No permita que esta unidad entre en contacto
con líquidos, ya que ello puede producir una
descarga eléctrica. Además, el contacto con
líquidos puede causar daños en la unidad,
humo y recalentamiento.
! Conserve este manual a mano para que
pueda consultar los procedimientos de operación y las precauciones cuando sea necesario.
! Mantenga siempre el volumen lo suficiente-
mente bajo como para que pueda escuchar
los sonidos que provienen del exterior del vehículo.
! Proteja esta unidad de la humedad.
! En caso de que este producto no funcione co-
rrectamente, comuníquese con su concesionario o el Servicio técnico oficial Pioneer más
próximo a su domicilio.
Acerca de este manual
Haga funcionar esta unidad con la unidad
principal conectada. En las instrucciones de
este manual se utiliza el reproductor AVHP5700DVD (AVH-P5750DVD) como ejemplo de
unidad principal.
Si se utilizan unidades principales que no
sean AVH-P5700DVD (AVH-P5750DVD), consulte Funcionamiento con diferentes unidades
principales en la página 23.
Recomendamos que se familiarice con las
funciones y su operación, leyendo el manual
antes de comenzar a usar esta unidad. Es particularmente importante que lea y tenga en
cuenta los mensajes de ADVERTENCIA y
PRECAUCIÓN en este manual.
Acerca del manejo del iPod
PRECAUCIÓN
! Pioneer no asume responsabilidades por la
pérdida de datos en el iPod, incluso si la pérdida ocurre durante el uso de esta unidad.
! Mantenga el iPod fuera del alcance de la luz
solar directa cuando no se utilice. La exposición prolongada a la luz solar puede causar
un fallo de funcionamiento del iPod como
consecuencia de las altas temperaturas generadas.
! No deje el iPod en lugares expuestos a altas
temperaturas o a la luz solar directa.
! Coloque el iPod de manera segura al usarlo
con esta unidad. No lo deje caer al suelo, en
donde puede atascarse bajo el pedal del freno
o del acelerador.
Consulte los manuales del iPod para obtener
mayores detalles.
18
Es
Page 19

Antes de comenzar
Acerca de los ajustes del iPod
! No se puede utilizar el Ecualizador del iPod
en los productos Pioneer. Recomendamos
que desactive el Ecualizador del iPod antes
de conectar el iPod a esta unidad.
! Al usar esta unidad no se puede desactivar
la Repetición del iPod. Incluso si la desactiva, la Repetición cambiará automáticamente a Todos cuando conecte el iPod a esta
unidad.
! La función de Selección aleatoria (Shuffle)
del iPod funciona como Reproducción
aleatoria en los productos Pioneer.
Para conectar y desconectar
el iPod
! Conecte únicamente el conector del Dock
al iPod para que esta unidad funcione adecuadamente.
! Antes de conectar el conector del Dock al
iPod, desconecte los auriculares del iPod.
Sección
01
Español
% Conecte el iPod a esta unidad.
En cuanto se conecta el iPod, se enciende
automáticamente.
Mientras el iPod está conectado a esta unidad,
aparece en él PIONEER (o
cación)).
! Cuando la llave de encendido está fijada en
ACC u ON, la batería del iPod se carga
mientras esté conectado a esta unidad.
! Cuando el iPod está conectado a esta uni-
dad, no se puede encender ni apagar.
# El iPod conectado a esta unidad se apaga
aproximadamente dos minutos después de que
la llave de encendido se fije en OFF.
% Retire el iPod de esta unidad.
Al retirar el iPod de esta unidad, el menú principal del iPod se visualiza después de unos
cuantos segundos.
(marca de verifi-
19
Es
Page 20
1
3
2
465
Sección
02
Para reproducir
canciones en el iPod
Para escuchar canciones en
su iPod
1 Icono de fuente
Muestra la fuente seleccionada.
2 Indicador del número de canción
Muestra el número de la canción reproducida en la lista seleccionada.
3 Indicador de tiempo de reproducción
Muestra el tiempo transcurrido de reproducción de la canción actual.
4 Indicador del título de la canción
Muestra el título de la canción que se está
reproduciendo actualmente.
2 Toque la pantalla para visualizar el teclado táctil.
3 Para saltar y retroceder o avanzar a
otra canción, toque o o p.
Al tocar p se salta al comienzo de la siguiente canción. Al tocar una vez o,se
salta al comienzo de la canción actual. Si se
vuelve a tocar esta tecla, se saltará a la canción anterior.
# También puede saltar y retroceder o avanzar,
presionando c o d.
4 Para realizar el avance rápido o retroceso, toque continuamente o o p.
# También se puede realizar el retroceso rápido/
avance rápido, presionando y manteniendo presionado c o d.
Para buscar una canción
El manejo de esta unidad para controlar un
iPod está diseñado para imitar del modo más
fidedigno posible el manejo del iPod, para facilitar su uso y la búsqueda de canciones.
1 Toque TOP para visualizar el menú superior.
5 Indicador de repetición
Aparece cuando se selecciona la gama de
repetición para la pista actual.
6 Indicador RDM
Aparece cuando la reproducción aleatoria
está fijada en TRACK o ALBUM.
1 Toque el icono de fuente y luego toque
iPod para seleccionar el iPod.
# También puede seleccionar el iPod como
fuente presionando SOURCE repetidamente.
# Cuando el iPod no está conectado a esta unidad, no puede seleccionarlo como fuente.
20
Es
2 Toque una de las categorías en que
desea buscar una canción.
! PLAYLISTS (listas de reproducción)
! GENRES (géneros)
! ARTISTS (artistas)
! ALBUMS (álbumes)
! SONGS (canciones)
3 Toque el título de una lista que desee
reproducir.
Repita este procedimiento hasta encontrar la
canción deseada.
Page 21
Para reproducir
canciones en el iPod
Sección
02
# Puede comenzar la reproducción de la lista
seleccionada si continúa tocando el título de una
lista.
# Para ir al siguiente grupo de títulos de listas,
toque
.
# Para volver al grupo de títulos de listas anterior, toque
# Para volver al menú anterior, toque
# Para ir al menú superior de la búsqueda de lis-
tas, toque TOP.
.
.
Para poner en pausa una
canción
La pausa le permite detener temporalmente la
reproducción de una canción.
% Toque f durante la reproducción.
PAUSE aparece en el display.
# Para reanudar la reproducción en el mismo
lugar en el que se activó la pausa, vuelva a tocar
f.
# También se puede activar o desactivar la
pausa presionando PGM.
Nota
Puede desplazar el título hacia la izquierda, tocando y manteniendo pulsado DISP.
Español
Repetición de reproducción
Hay dos gamas de repetición de reproducción
de las canciones en el iPod: TRACK (repetición de una canción) y ALL (repetición de
todas las canciones de la lista).
! Mientras REPEAT está fijado en TRACK,no
es posible seleccionar las demás canciones.
1 Presione A.MENU y luego toque FUNC
para visualizar los nombres de las funciones.
2 Toque REPEAT para seleccionar la gama
de repetición.
Toque REPEAT repetidamente hasta que la
gama de repetición deseada aparezca en el
display.
! TRACK – Sólo repite la canción actual
! ALL: Repite todas las canciones de la lista
seleccionada
Visualización de información
de texto en el iPod
Se puede visualizar la información de texto
grabada en el iPod.
% Toque DISP.
Toque DISP repetidamente para cambiar entre
los siguientes ajustes:
T. Title (título de la canción)—Artist (nombre
del artista)—Album (título del álbum)
# Si los caracteres grabados en el iPod no son
compatibles con una unidad principal, no aparecerán en el display.
Reproducción de las canciones
en un orden aleatorio
(selección aleatoria)
Para la reproducción de las canciones en el
iPod existen dos métodos de reproducción
aleatoria: TRACK (reproducir canciones en un
orden aleatorio) y ALBUM (reproducir álbumes en un orden aleatorio).
1 Presione A.MENU y luego toque FUNC
para visualizar los nombres de las funciones.
Es
21
Page 22

Sección
02
Para reproducir
canciones en el iPod
2 Toque RANDOM para seleccionar el método de reproducción aleatoria.
Toque RANDOM repetidamente hasta que el
método de reproducción aleatoria deseado
aparezca en el display.
! TRACK – Reproduce canciones en un
orden aleatorio dentro de la lista seleccionada
! ALBUM – Selecciona un álbum de manera
aleatoria y luego reproduce todas las canciones en el orden en que se encuentran en
el álbum
22
Es
Page 23

Funcionamiento con
diferentes unidades
principales
Sección
03
Uso como una unidad externa
Las siguientes unidades principales manejan
esta unidad como una unidad externa. Para
obtener más detalles sobre la unidad externa,
consulte el manual de la unidad principal.
! FUNC4 (F4), FUNCTION4 y 1–6KEY no se
usan para hacer funcionar esta unidad.
Grupo 1 de unidades principales
Las siguientes unidades utilizan el botón
FUNCTION o utilizan una SOFT KEY (tecla de
función variable).
DEH-P9450MP, DEH-P9400MP, DEH-P7700MP
(modelo para Europa), DEH-P6880MP, DEHP6800MP (modelo para Europa), DEHP6750MP, DEH-P6700MP, DEH-P5850MP, DEHP5850MPH, DEH-P5800MP, DEH-P5750MP,
DEH-P5730MP, DEH-P5700MP, DEH-P4880MP,
DEH-P4850MP, DEH-P4850MPH, DEHP4800MP, DEH-P4770MP, DEH-P4750MP, DEHP4700MP, DEH-P3800MP, DEH-P940MP, DEHP670MP, DEH-P580MP, DEH-P480MP, DEHP470MP, DVH-P5850MP, DVH-P5650MP, DVHP580MP, FH-P9200MP, FH-P4200MP
Grupo 2 de unidades principales
Las siguientes unidades principales utilizan el
MULTI-CONTROL.
DEH-P8650MP, DEH-P8600MP, DEH-P7750MP,
DEH-P7700MP (modelo para Norteamérica),
DEH-P860MP, DEH-P770MP, DEH-P80MP,
DEH-P8MP, DEH-P1Y
Grupo 3 de unidades principales
Las siguientes unidades principales utilizan el
teclado táctil.
AVH-P7650DVD, AVH-P7600DVD, AVHP7550DVD, AVH-P7500DVDN, AVH-P7500DVD,
AVH-P6650DVD, AVH-P6600DVD, AVHP6550DVD, AVH-P6500DVD
Grupo 4 de unidades principales
Las siguientes unidades principales son unidades de navegación que utilizan el teclado
táctil.
AVIC-D2, AVIC-N1, AVIC-X1
Tablas de compatibilidad
de funciones
Grupo 1 de unidades principales
Controles
Seleccionar el iPod
como fuente
Seleccionar una categoría
Seleccionar una lista Presione a o b.
Saltar para retroceder
o avanzar a otra can-
*1
ción
Avance rápido/retro-
*2
ceso
Seleccionar una función
Poner en pausa una
canción
Seleccionar una
gama de repetición
Seleccionar un método de reproducción
aleatoria
Cambiar la visualización
Desplazar el título
Cambiar entre AUTO
y MANUAL
Presione SOURCE.
Presione BAND (BAND/
ESC).
Presione c o d.
Presione y mantenga presionado c o d.
Presione FUNCTION (FUNC).
Presione a o b en FUNC1
(F1).
Presione a o b en FUNC2
(F2).
Presione y mantenga presionado a o b en FUNC2 (F2).
Presione a o b en FUNC3
(F3).
Presione y mantenga presionado a o b en FUNC3 (F3).
Presione c o d en AUTO/
MANUAL (A/M).
Español
*1Puede usar esta función si selecciona AUTO en AUTO/MANUAL (A/M).
2
*
Puede usar esta función si selecciona MANUAL en AUTO/MANUAL (A/M).
23
Es
Page 24

Sección
03
Funcionamiento con
diferentes unidades
principales
Grupo 2 de unidades principales
Controles
Seleccionar el iPod
como fuente
Seleccionar una categoría
Seleccionar una lista
Saltar para retroceder
o avanzar a otra can-
*1
ción
Avance rápido/retro-
*2
ceso
Seleccionar una función
Poner en pausa una
canción
Seleccionar una
gama de repetición
Seleccionar un método de reproducción
aleatoria
Cambiar la visualización
Desplazar el título
Cambiar entre AUTO
y MANUAL
Presione SOURCE.
Presione BAND (BAND/
ESC).
Pulse MULTI-CONTROL
hacia arriba o abajo.
Pulse MULTI-CONTROL
hacia la izquierda o derecha.
Pulse y mantenga pulsado
MULTI-CONTROL hacia la izquierda o derecha.
Use MULTI-CONTROL.
Presione MULTI-CONTROL
en FUNC1 (F1).
Presione MULTI-CONTROL
en FUNC2 (F2).
Presione y mantenga presionado MULTI-CONTROL en
FUNC2 (F2).
Presione MULTI-CONTROL
en FUNC3 (F3).
Presione y mantenga presionado MULTI-CONTROL en
FUNC3 (F3).
Presione MULTI-CONTROL
en AUTO/MANUAL (A/M).
Grupo 3 de unidades principales
Controles
Seleccionar el iPod
como fuente
Seleccionar una categoría
Seleccionar una lista Toque a o b.
Saltar para retroceder
o avanzar a otra can-
*1
ción
Avance rápido/retro-
*2
ceso
Seleccionar una función
Poner en pausa una
canción
Seleccionar una
gama de repetición
Seleccionar un método de reproducción
aleatoria
Cambiar la visualización
Desplazar el título
Cambiar entre AUTO
y MANUAL
Presione SOURCE.
Toque BAND.
Toque c o d.
Continúe tocando c o d.
Toque A.MENU y luego
FUNCTION.
Toque ab en FUNCTION1.
Toque ab en FUNCTION2.
Continúe tocando ab en
FUNCTION2.
Toque ab en FUNCTION3.
Continúe tocando ab en
FUNCTION3.
Toque c o d en AUTO/MA-
NUAL.
Grupo 4 de unidades principales
Controles
Seleccionar el iPod
como fuente
Seleccionar una categoría
Seleccionar una lista Toque a o b.
*1Puede usar esta función si selecciona AUTO en AUTO/MANUAL (A/M).
2
*
Puede usar esta función si selecciona MANUAL en AUTO/MANUAL (A/M).
24
Es
Presione SOURCE.
Toque BAND.
Page 25
Funcionamiento con
diferentes unidades
principales
Controles
Saltar para retroceder
o avanzar a otra can-
*1
ción
Avance rápido/retro-
*2
ceso
Seleccionar una función
Poner en pausa una
canción
Seleccionar una
gama de repetición
Seleccionar un método de reproducción
aleatoria
Cambiar la visualización
Desplazar el título
Cambiar entre AUTO
y MANUAL
Toque c o d.
Continúe tocando c o d.
Toque A.MENU o presione el
joystick y luego toque FUNC-
*3
TION
.
Toque SEND en FUNCTION1.
Toque SEND en FUNCTION2.
Continúe tocando SEND en
FUNCTION2.
Toque SEND en FUNCTION3.
Continúe tocando SEND en
FUNCTION3.
Toque AUTO/MANUAL.
Sección
03
Español
*1Puede usar esta función si selecciona AUTO en AUTO/MANUAL (A/M).
2
*
Puede usar esta función si selecciona MANUAL en AUTO/MANUAL (A/M).
3
*
En la unidad AVIC-D2 no es posible utilizar A.MENU.
25
Es
Page 26
Sección
03
Funcionamiento con
diferentes unidades
principales
Descripción general del modo de selección de lista de
reproducción y del modo de preferencias
1
Playlist 1
Playlist 2
Playlist 3
Playlist 9
1 Modo de selección de lista de reproducción
2 Modo de preferencias
La unidad principal compatible con conexión
para iPod le permite seleccionar una lista de
pistas que desee escuchar (lista de reproducción, álbumes, etc.) mediante el modo de selección de lista de reproducción y el modo de
preferencias. Más arriba se incluye una descripción general del modo de selección de
lista de reproducción y el modo de preferencias, con referencias a las ilustraciones.
2
All
Alternative
Animation
Jazz
ALBUMARTISTGENREPLAYLIST
All
Artist 1
Artist 2
Artist 9
All
Album A
Album B
Album J
Búsqueda de una pista deseada
de GENRE (lista de géneros),
ARTIST (lista de artistas) y
ALBUM (lista de álbumes)
Seleccione un género, artista o álbum en el
modo de preferencias. El modo de preferencias le permite buscar sus pistas favoritas
desde listas de géneros, artistas y álbumes específicas, en este orden.
Consulte Búsqueda de la pista deseada en la
página siguiente.
Reproducción seleccionando una
lista de reproducción de PLAYLIST
Seleccione su lista de reproducción favorita
en el modo de selección de lista de reproducción.
Consulte Reproducción seleccionando una lista
de reproducción en la página 28.
26
Es
Page 27

Funcionamiento con
diferentes unidades
principales
Sección
03
Búsqueda de la pista deseada
Puede seleccionar y reproducir pistas de sus
artistas y álbumes favoritos, etc. desde
GENRE, ARTIST y ALBUM. A modo de ejemplo, a continuación se incluye una descripción
del procedimiento de selección de “Jazz” para
GENRE, “Artist 2” para ARTIST y “Album B”
para ALBUM, según la ilustración que se indica en la sección anterior, Descripción general
del modo de selección de lista de reproducción
y del modo de preferencias.
1 Utilice BAND (BAND/ESC) para cambiar
a GENRE.
GENRE se muestra durante dos segundos
aproximadamente.
Cada vez que presiona BAND (BAND/ESC) la
visualización cambia en el siguiente orden:
PLAYLIST (listas de reproducción) —GENRE
(géneros)—ARTIST (artistas)—ALBUM (álbumes)
! Se ajusta ALL para el ajuste predefinido de
GENRE, ARTIST y ALBUM.
! Las condiciones de preferencia se cancelan
cuando se cambia de ALBUM a PLAYLIST.
Sin embargo, la lista que se reproduce actualmente (bajo las últimas condiciones de
preferencias) se sigue reproduciendo hasta
que se ejecute uno de los siguientes procedimientos con el botón a o b (o
MULTI-CONTROL).
— Se selecciona una lista diferente
— Se inicia una nueva lista de preferencias
2 Utilice a o b (o MULTI-CONTROL) para
seleccionar “Jazz”.
Se iniciará la reproducción de las pistas
“Jazz”.
3 Utilice BAND (BAND/ESC) para cambiar
a ARTIST.
ARTIST se muestra durante dos segundos
aproximadamente.
4 Utilice a o b (o MULTI-CONTROL) para
seleccionar “Artist 2”.
Se iniciará la reproducción de las pistas
“Album B”.
Español
5 Utilice BAND (BAND/ESC) para cambiar
a ALBUM.
ALBUM se muestra durante dos segundos
aproximadamente.
6 Utilice a o b (o MULTI-CONTROL) para
seleccionar “Album B”.
Se iniciará la reproducción de las pistas
“Album B”.
7 Utilice c o d (o MULTI-CONTROL) para
seleccionar la pista que desee escuchar.
Se iniciará la reproducción de la pista seleccionada.
Otros procedimientos de ajuste
de preferencias
También es posible ajustar las preferencias
desde ARTIST o ALBUM.
Cuando se desconoce el género de
“Album B”
Cambie primero a GENRE en el paso 1 y luego
cancele las condiciones de preferencia. A continuación, realice el procedimiento a partir del
paso 3.
Cuando se desconocen el género y el
artista de “Album B”
Cambie primero a GENRE en el paso 1 y luego
cancele las condiciones de preferencia. A continuación, realice el procedimiento a partir del
paso 5.
27
Es
Page 28

Sección
03
Funcionamiento con
diferentes unidades
principales
Notas
! Si ya ha seleccionado el género, sólo puede
seleccionar los artistas y álbumes del género
seleccionado. Si desea seleccionar artistas y
álbumes de un género diferente, repita el procedimiento a partir del paso 1.
! Se ajusta ALL para el ajuste predefinido de
GENRE, ARTIST y ALBUM.
! Las condiciones de preferencia se cancelan
cuando se cambia de ALBUM a PLAYLIST.
Sin embargo, la lista que se reproduce actualmente (bajo las últimas condiciones de preferencias) se sigue reproduciendo hasta que se
ejecute uno de los siguientes procedimientos
con el botón a o b (o MULTI-CONTROL).
— Se selecciona una lista diferente
— Se inicia una nueva lista de
preferencias
Reproducción seleccionando
una lista de reproducción
Puede seleccionar y reproducir una lista de reproducción que desee escuchar desde
PLAYLIST en el iPod.
1 Utilice BAND (BAND/ESC) para cambiar
a PLAYLIST.
PLAYLIST se muestra durante dos segundos
aproximadamente.
Cada vez que presiona BAND (BAND/ESC) la
visualización cambia en el siguiente orden:
PLAYLIST (listas de reproducción) —GENRE
(géneros)—ARTIST (artistas)—ALBUM (álbumes)
2 Utilice a o b (o MULTI-CONTROL) para
seleccionar la lista de reproducción que
desea escuchar.
Si utiliza a (o si pulsa MULTI-CONTROL arriba) se selecciona la lista de reproducción anterior. Si utiliza b (o si pulsa MULTI-CONTROL
abajo) se selecciona la lista de reproducción
siguiente.
El nombre de la lista de reproducción se
muestra durante dos segundos aproximadamente, y luego se inicia la reproducción de la
lista seleccionada.
3 Utilice c o d (o MULTI-CONTROL) para
seleccionar la pista que desee escuchar.
Se iniciará la reproducción de la pista
seleccionada.
Visualización de información
de texto en el iPod
Se puede visualizar la información de texto
grabada en el iPod.
% Seleccione la información deseada.
Consulte Tablas de compatibilidad de funciones
en la página 23.
Tiempo de reproducción—Título de la canción
—Nombre del artista—Título del álbum—Estado de repetición de reproducción—Estado
de reproducción aleatoria
# Si los caracteres grabados en el iPod no son
compatibles con una unidad principal, no aparecerán en el display.
Notas
! Cuando utilice esta unidad como una unidad
externa, las unidades principales pueden
mostrar las primeras 8 letras del título de la
canción, el nombre del artista y el título del
álbum.
! Puede desplazar hacia la izquierda el título de
la canción, el nombre del artista y el título del
álbum.
28
Es
Page 29

Funcionamiento con
diferentes unidades
principales
Repetición de reproducción
Hay dos gamas de repetición de reproducción
de las canciones en el iPod: TRK (repetición
de una canción) y ALL (repetición de todas las
canciones de la lista).
! Cuando RPT está fijado en TRK, no es posi-
ble seleccionar las demás canciones.
% Seleccione la gama de repetición.
Consulte Tablas de compatibilidad de funciones
en la página 23.
! TRK – Sólo repite la canción actual
! ALL – Repite todas las canciones de la
lista
Reproducción de las canciones
en un orden aleatorio
(selección aleatoria)
Para la reproducción de las canciones en el
iPod existen dos métodos de reproducción
aleatoria: TRK (reproducir canciones en un
orden aleatorio) y ALBUM (reproducir álbumes en un orden aleatorio).
Sección
03
Español
% Seleccione el método de reproducción
aleatoria.
Consulte Tablas de compatibilidad de funciones
en la página 23.
! TRK – Reproduce canciones en un orden
aleatorio dentro de la lista
! ALBUM – Selecciona un álbum de manera
aleatoria y luego reproduce todas las canciones en el orden en que se encuentran en
el álbum
29
Es
Page 30

Sección
04
Conexiones
Importante
! Esta unidad es para vehículos con una batería
de 12 voltios y conexión a tierra negativa.
Antes de instalarla en un vehículo recreacional, camión o bus, compruebe el voltaje de la
batería.
! Para evitar cortocircuitos en el sistema eléctri-
co, asegúrese de desconectar el cable * de la
batería antes de comenzar la instalación.
! Consulte el manual del propietario para obte-
ner detalles acerca de la conexión del amplificador de potencia y otras unidades, y luego
haga las conexiones de manera correcta.
! Asegure el cableado con pinzas para cables o
cinta adhesiva. Para proteger el cableado, envuelva con cinta adhesiva las partes en donde
esté en contacto con piezas metálicas.
! Direccione y fije todo el cableado, de modo
que no toque piezas en movimiento, como la
palanca de cambios, el freno de mano y los
rieles de los asientos. No instale el cableado
en lugares que se calienten, como cerca de la
salida del calefactor. Si la aislación del cableado se derrite o rompe, hay peligro de que provoque un cortocircuito en la carrocería del
vehículo.
! No haga pasar el cable amarillo a través de
un orificio hacia el compartimiento del motor
para conectarlo a la batería. Esto dañará la
aislación del cable y causará un cortocircuito
muy peligroso.
! No acorte ningún cable. Si lo hace, el circuito
de protección puede no funcionar cuando
deba hacerlo.
! Nunca alimente a otro equipo, cortando la ais-
lación del cable de la fuente de alimentación
de la unidad y derivándolo hacia el cable. Se
superará la capacidad actual del cable, causando un sobrecalentamiento.
! Al reemplazar el fusible, asegúrese de usar
únicamente un fusible con la tensión nominal
que se indica en el portafusibles.
! Para prevenir una conexión incorrecta, el lado
de entrada del conector IP-BUS es azul, y el
lado de salida es negro. Conecte correctamente los conectores de los mismos colores.
! Conecte únicamente el conector del Dock al
iPod para que esta unidad funcione adecuadamente.
! Antes de conectar el conector del Dock al
iPod, desconecte los auriculares del iPod.
Los cables de este producto y los de otros productos pueden tener diferentes colores, incluso si cumplen la misma función. Al conectar
este producto a otro producto, consulte los
manuales de ambos y conecte los cables que
cumplan la misma función.
30
Es
Page 31

Conexiones
Conexión de las unidades
Sección
04
Unidad principal
A la entrada de
IP-BUS (azul)
iPod con conector del Dock
Puerto del conector
del Dock
Conector del Dock
Amarillo
Siempre posee potencia hacia
el terminal, independientemente
de la posición de la llave de
encendido.
1,5 m
Esta unidad
1,5 m
Negro
Fusible (2 A)
Reproductor de CD
múltiple (se vende
por separado)
Cable IP-BUSCable IP-BUS
Azul
Español
Negro (tierra)
A la carrocería (metal) del vehículo.
31
Es
Page 32

Sección
05
Instalación
Importante
! Antes de hacer la instalación final de la uni-
dad, conecte temporalmente el cableado para
confirmar que las conexiones sean correctas
y que el sistema funcione adecuadamente.
! Use sólo las piezas incluidas junto con la uni-
dad para asegurar una instalación correcta. El
uso de piezas no autorizadas puede causar fallos de funcionamiento.
! Consulte al concesionario más próximo a su
domicilio si para la instalación es necesario
perforar orificios u hacer otras modificaciones
al vehículo.
! Instale la unidad en un lugar donde no obsta-
culice los movimientos de conductor y no
pueda causar lesiones al pasajero en caso de
una detención repentina, como un frenado de
emergencia.
! Al montar esta unidad, asegúrese de que nin-
guno de los cables quede atrapado entre esta
unidad y los accesorios o piezas metálicas
que la rodeen.
! No monte esta unidad cerca de la salida del
calefactor, en donde podría resultar afectada
por el calor, o cerca de las puertas, donde
puede sufrir salpicaduras de agua de lluvia.
! Antes de perforar orificios de montaje, siem-
pre revise detrás de donde desee hacer la perforación. No perfore hacia la línea de
combustible, la línea de frenos, el cableado
eléctrico u otras partes importantes.
! Si la unidad se instala en el compartimiento
del pasajero, fíjela firmemente de modo que
no se suelte cuando el vehículo se encuentre
en movimiento, pudiendo causar lesiones o
un accidente.
! Si la unidad se instala debajo de uno de los
asientos delanteros, asegúrese de que no obstruya el movimiento del asiento. Direccione
todos los cables y cordones cuidadosamente
alrededor del mecanismo de deslizamiento,
de modo que no queden atascados o atrapados en el mecanismo y sufran un cortocircuito.
Instalación de esta unidad
Montaje con sujetadores de
Velcro
Limpie completamente la superficie antes de
fijar los sujetadores de Velcro.
! Si los sujetadores de Velcro (duros) se ad-
hieren directamente al tapete del automóvil, puede instalar esta unidad sin utilizar
los sujetadores de Velcro (suaves).
% Monte esta unidad usando los sujetadores de Velcro.
Esta unidad
Sujetador de Velcro (duro)
Sujetador de Velcro (suave)
Tapete o chasís del automóvil
32
Es
Page 33

Información adicional
Apéndice
Solución de problemas
Síntoma Causa Acción
El iPod no funciona correctamente.
Los cables están
conectados incorrectamente.
Desconecte el
cable del iPod. Una
vez que aparezca el
menú principal del
iPod, conecte el
cable nuevamente.
Reinicie el iPod.
Para comprender los
mensajes de error
Al comunicarse con su concesionario o con el
Servicio Técnico Oficial de Pioneer más próximo a su domicilio, asegúrese de anotar el
mensaje de error.
Mensaje Causa Acción
ERROR-11 Falla de comuni-
cación
ERROR-21 Versión de iPod
antigua
ERROR-30 Falla del iPod Reinicie el iPod.
NO TRACK No hay cancio-
nes
STOP No hay cancio-
nes en la lista actual
Desconecte el
cable del iPod. Una
vez que aparezca el
menú principal del
iPod, conecte el
cable nuevamente.
Reinicie el iPod.
Actualice la versión del iPod.
Transfiera canciones al iPod.
Seleccione una
lista que contenga
canciones.
Especificaciones
Generales
Fuente de alimentación ........ 14,4 V CC (10,8 V a 15,1 V
permisible)
Sistema de conexión a tierra
..................................................... Tipo negativo
Consumo máximo de corriente
..................................................... 2,0 A
Dimensiones (An × Al × Pr)
..................................................... 95 × 25 × 91 mm
Peso ............................................... 0,33 kg
Nota
Las especificaciones y el diseño están sujetos a
posibles modificaciones sin previo aviso.
Español
33
Es
Page 34

Inhalt
Vielen Dank, dass Sie sich für dieses Pioneer-Produkt
entschieden haben.
Lesen Sie sich diese Bedienungsanleitung bitte aufmerksam durch, um sich mit
der richtigen Bedienungsweise für Ihr Modell vertraut zu machen. An schließend
sollten Sie die Bedienungsanleitung an einem sicheren Ort griffbereit aufbewahren.
Bevor Sie beginnen
Zu diesem Gerät 35
Zu dieser Anleitung 35
Zur Handhabung des iPod 35
– Zu den iPod-Einstellungen 36
Anschließen und Trennen des iPod 36
Wiedergabe von Musiktiteln auf dem
iPod
Abspielen von Titeln auf dem iPod 37
Durchsuchen der Listen nach Titeln 37
Vorübergehendes Unterbrechen der
Titelwiedergabe 38
Anzeigen der Textinformationen auf dem
iPod 38
Wiederholwiedergabe 38
Abspielen von Titeln in zufälliger Reihenfolge
(Shuffle) 39
Unterschiedliche Bedienung je nach
Hauptgerät
Gebrauch als externes Gerät 40
Kompatibilität der Funktionen 40
– Hauptgeräte - Gruppe 1 40
– Hauptgeräte - Gruppe 2 41
– Hauptgeräte - Gruppe 3 41
– Hauptgeräte - Gruppe 4 41
Überblick über die Modi Spiellistenwahl und
Individuelle Wahl 43
– Wiedergabe durch Auswählen einer
Spielliste unter PLAYLIST 43
– Suchen nach dem gewünschten Titel
unter GENRE (Liste der Musik-Genres),
ARTIST (Liste der Künstler) und
ALBUM (Liste der Musikalben) 43
Suchen nach einem bestimmten Titel 44
– Weitere Möglichkeiten bei einer
individuellen Wahl 44
Wiedergabe durch Auswählen einer
Spielliste 45
Anzeigen der Textinformationen auf dem
iPod 45
Wiederholwiedergabe 46
Abspielen von Titeln in zufälliger Reihenfolge
(Shuffle) 46
Anschlüsse
Anschließen der Geräte 48
Installation
Installieren dieses Geräts 49
– Anbringen mithilfe von
Klettverschlüssen 49
Zusätzliche Informationen
Fehlerbehebung 50
Bedeutung der Fehlermeldungen 50
Technische Daten 50
34
De
Page 35

Bevor Sie beginnen
Abschnitt
01
Zu diesem Gerät
Bei diesem Gerät handelt es sich um einen
Adapter für ein Pioneer-Hauptgerät, über das
ein iPod mit Dock-Anschluss gesteuert werden kann. Damit können Sie sich die auf dem
iPod gespeicherten Musiktitel anhören.
! iPod ist eine in den USA sowie in anderen
Ländern eingetragene Marke der Apple
Computer, Inc.
! Dieses Gerät wurde ausschließlich für den
Einsatz in einem Fahrzeug konzipiert.
! Dieses Gerät unterstützt ausschließlich
iPods, die über einen Dock-Anschluss verfügen.
! Das Gerät bietet keine Unterstützung für
Softwareversionen vor der iPod-Aktualisierung 2004-10-20. Eine Liste der unterstützten Versionen erhalten Sie bei Ihrem
Pioneer-Fachhändler.
! Je nach der iPod-Softwareversion gestaltet
sich die Bedienung ggf. etwas unterschiedlich.
VORSICHT
! Dieses Gerät darf keinesfalls mit Flüssigkeit in
Berührung kommen, da dies einen elektrischen Schlag verursachen könnte. Darüber
hinaus kann der Kontakt mit Flüssigkeit eine
Beschädigung des Geräts, Rauchentwicklung
und Überhitzung nach sich ziehen.
! Bewahren Sie diese Anleitung zum Nach-
schlagen stets griffbereit auf.
! Wählen Sie stets eine Lautstärke, bei der Sie
Umgebungsgeräusche noch deutlich wahrnehmen können.
! Setzen Sie dieses Gerät keiner Feuchtigkeit
aus.
! Sollte dieses Produkt nicht ordnungsgemäß
funktionieren, dann wenden Sie sich bitte an
Ihren Händler oder an eine Pioneer-Kundendienststelle in Ihrer Nähe.
Zu dieser Anleitung
Die Bedienung dieses Geräts erfolgt über das
angeschlossene Hauptgerät. Die Anweisungen in diesem Handbuch nehmen stellvertretend für das Hauptgerät Bezug auf das Gerät
AVH-P5700DVD (AVH-P5750DVD).
Bei Verwendung eines anderen Hauptgeräts
als AVH-P5700DVD (AVH-P5750DVD), siehe
Unterschiedliche Bedienung je nach Hauptgerät auf Seite 40.
Wir empfehlen Ihnen, sich vor dem eigentlichen Betrieb mit den Funktionen des Geräts
und deren Bedienung vertraut zu machen,
indem Sie sich die Bedienungsanleitung
durchlesen. Beachten Sie dabei besonders die
Hinweise WARNUNG und VORSICHT und
halten Sie sich daran.
Zur Handhabung des iPod
VORSICHT
! Pioneer haftet in keinem Fall für den Verlust
von Daten auf dem iPod, selbst dann nicht,
wenn der Datenverlust während der Verwendung dieses Geräts aufgetreten ist.
! Schützen Sie den iPod vor direktem Sonnen-
licht, wenn Sie ihn nicht verwenden. Sollte der
iPod über einen längeren Zeitraum hinweg direkter Sonneneinstrahlung ausgesetzt sein,
dann kann es aufgrund der daraus resultierenden hohen Temperaturen zu einer Funktionsstörung kommen.
! Bewahren Sie den iPod nicht bei hohen Tem-
peraturen oder direkter Sonneneinstrahlung
auf.
! Sorgen Sie für eine sichere und stabile An-
bringung des iPod, wenn Sie ihn gemeinsam
mit diesem Gerät verwenden. Lassen Sie den
iPod nicht auf den Boden fallen, wo er unter
der Bremse oder dem Gaspedal eingeklemmt
werden könnte.
Deutsch
De
35
Page 36

Abschnitt
01
Bevor Sie beginnen
Detaillierte Informationen diesbezüglich finden Sie in den Handbüchern Ihres iPod.
Zu den iPod-Einstellungen
! Der iPod-Equalizer kann in Verbindung mit
Pioneer-Produkten nicht eingesetzt werden.
Aus diesem Grund sollten Sie den iPodEqualizer ausschalten, bevor Sie den iPod
an dieses Gerät anschließen.
! Bei der Verwendung dieses Geräts lässt
sich die Wiederholfunktion (Repeat) auf
dem iPod nicht ausschalten. Selbst wenn
Sie die Wiederholfunktion auf dem iPod
deaktivieren, wird sie automatisch auf All
(Alle) zurückgesetzt, sobald Sie den iPod
an dieses Gerät anschließen.
! Die Shuffle-Funktion des iPod wird auf den
Pioneer-Produkten über die Random-Funktion (Zufallsgesteuerte Wiedergabe)
bedient.
Anschließen und Trennen
des iPod
! Die Verbindung zum iPod darf ausschließ-
lich über den Dock-Anschluss erfolgen,
damit dieses Gerät ordnungsgemäß funktioniert.
! Vor der Verbindung mit dem iPod über den
Dock-Anschluss müssen Sie die Kopfhörer
vom iPod trennen.
Ihres iPod aufgeladen, sofern der iPod mit
diesem Gerät verbunden ist.
! Solange der iPod an dieses Gerät ange-
schlossen ist, kann er nicht unabhängig
ein- oder ausgeschaltet werden.
# Wenn die Zündung des Wagens ausgeschaltet wird (Zündschalter in Position OFF), wird der
mit diesem Gerät verbundene iPod nach etwa
zwei Minuten ausgeschaltet.
% Trennen Sie den iPod von diesem Gerät.
Wenn Sie die Verbindung zwischen dem iPod
und diesem Gerät trennen, erscheint auf dem
iPod nach ein paar Sekunden das
Hauptmenü.
% Schließen Sie den iPod an dieses Gerät
an.
Sobald der iPod angeschlossen ist, wird er automatisch eingeschaltet.
Solange der iPod mit diesem Gerät verbunden
ist, erscheint die Angabe PIONEER (bzw. ein
Häkchen
! Wenn Sie den Zündschalter des Wagens
36
De
) auf dem iPod.
auf ACC oder ON stellen, wird der Akku
Page 37

1
3
2
465
Wiedergabe von
Musiktiteln auf dem iPod
Abschnitt
02
Abspielen von Titeln auf
dem iPod
1 Programmquellensymbol
Zeigt an, welche Programmquelle gewählt
ist.
2 Titelnummernanzeige
Zeigt die Nummer des gerade gespielten Titels in der gewählten Liste an.
3 Wiedergabezeitanzeige
Zeigt die bereits abgelaufene Spielzeit des
momentanen Titels an.
4 Titelnamenanzeige
Zeigt den Namen des gerade spielenden Titels an.
1 Berühren Sie das Programmquellensymbol und anschließend iPod, um den
iPod zu wählen.
# Zur Wahl des iPod als Programmquelle können Sie auch wiederholt SOURCE drücken.
# Wenn der iPod nicht an dieses Gerät angeschlossen wurde, steht er nicht als Programmquelle zur Auswahl.
2 Berühren Sie den Bildschirm, um die
Sensortasten anzuzeigen.
3 Um zu einem anderen Titel vor- oder
zurückzuspringen, berühren Sie o bzw.
p.
Durch Berühren von p erfolgt ein Sprung
zum Anfang des nächsten Titels. Durch einmaliges Berühren von o erfolgt ein Sprung
zum Anfang des momentanen Titels. Erneutes
Berühren bewirkt einen Sprung zum vorhergehenden Titel.
# Sie können auch c oder d drücken, um zu
einem anderen Titel vor- oder zurückzuspringen.
4 Für einen schnellen Vor- oder Rücklauf
berühren Sie o oder p etwas länger.
# Sie können auch c oder d drücken und ge-
drückt halten, um einen Schnellrücklauf/-vorlauf
auszuführen.
Deutsch
5 Wiederholanzeige
Erscheint, wenn ein Wiederholwiedergabebereich für den momentanen Titel gewählt
wurde.
6 RDM-Anzeige
Erscheint, wenn die zufallsgesteuerte Wiedergabe auf TRACK oder ALBUM eingestellt wurde.
Durchsuchen der Listen
nach Titeln
Bei der Bedienung dieses Geräts zur Steuerung eines iPods wird die direkte iPod-Bedienung weitgehend nachgeahmt, um
Bedienung und Titelsuche so einfach wie
möglich zu gestalten.
1 Berühren Sie TOP, um das Hauptmenü
anzuzeigen.
De
37
Page 38

Abschnitt
02
Wiedergabe von
Musiktiteln auf dem iPod
2 Berühren Sie die Kategorie, in der Sie
nach dem gewünschten Titel suchen möchten.
! PLAYLISTS (Spiellisten)
! GENRES (Musik-Genres)
! ARTISTS (Künstler)
! ALBUMS (Alben)
! SONGS (Musiktitel)
3 Berühren Sie den Titel der zutreffenden
Liste.
Wiederholen Sie diesen Schritt, bis Sie den gewünschten Musiktitel gefunden haben.
# Sie können jeden beliebigen Titel in der gewählten Liste wiedergeben, indem Sie ihn länger
berühren.
# Um zur nächsten Listengruppe zu wechseln,
berühren Sie
# Um zur vorherigen Listengruppe zurückzukehren, berühren Sie
# Um zum vorhergehenden Menü zurückzuschalten, berühren Sie
# Um direkt zum Hauptmenü der Listensuche
zu gelangen, berühren Sie TOP.
.
.
.
Vorübergehendes
Unterbrechen der
Titelwiedergabe
Die Pausenfunktion ermöglicht Ihnen, die Wiedergabe eines Titels vorübergehend anzuhalten.
% Berühren Sie f während der Wieder-
gabe.
PAUSE erscheint im Display.
# Um die Wiedergabe an derselben Stelle fortzusetzen, an der zuvor die Pause eingeschaltet
wurde, berühren Sie f erneut.
# Sie können auch PGM drücken, um die Pause
ein- oder auszuschalten.
Anzeigen der
Textinformationen auf dem
iPod
Die auf dem iPod aufgezeichneten Textinformationen können angezeigt werden.
% Berühren Sie DISP.
Berühren Sie DISP wiederholt, um zwischen
den folgenden Einstellungen umzuschalten:
T. Title (Titelname)—Artist (Künstlername)—
Album (Albumtitel)
# Wenn die auf dem iPod gespeicherten Zeichen nicht mit dem Hauptgerät kompatibel sind,
werden sie nicht angezeigt.
Hinweis
Sie können den Titel im Display nach links abrollen, indem Sie DISP etwas länger berühren.
Wiederholwiedergabe
Für die Wiedergabe der Musiktitel auf dem
iPod stehen zwei Wiederholwiedergabebereiche zur Auswahl: TRACK (Wiederholung eines
Titels) und ALL (Wiederholung aller Titel i n der
Liste).
! Solange REPEAT auf TRACK eingestellt ist,
können keine anderen Musiktitel gewählt
werden.
1 Drücken Sie A.MENU und berühren Sie
dann FUNC, um die Namen der Funktionen
anzuzeigen.
2 Berühren Sie REPEAT, um den Wiederholwiedergabebereich zu wählen.
Berühren Sie REPEAT wiederholt, bis der gewünschte Wiederholwiedergabebereich angezeigt wird.
! TRACK – Nur Wiederholung des momenta-
nen Titels
! ALL – Wiederholung aller Titel in der ge-
wählten Liste
38
De
Page 39

Wiedergabe von
Musiktiteln auf dem iPod
Abspielen von Titeln in
zufälliger Reihenfolge
(Shuffle)
Für die Wiedergabe der Musiktitel auf dem
iPod stehen zwei zufallsgesteuerte Wiedergabemethoden zur Auswahl: TRACK (Zufallsgesteuerte Wiedergabe von Titeln) und ALBUM
(Zufallsgesteuerte Wiedergabe von Alben).
1 Drücken Sie A.MENU und berühren Sie
dann FUNC, um die Namen der Funktionen
anzuzeigen.
2 Berühren Sie RANDOM, um die zufallsgesteuerte Wiedergabe zu wählen.
Berühren Sie RANDOM wiederholt, bis die gewünschte zufallsgesteuerte Wiedergabemethode angezeigt wird.
! TRACK – Zufallsgesteuerte Wiedergabe der
Titel in der gewählten Liste
! ALBUM – Zufallsgesteuerte Auswahl eines
Albums und Wiedergabe aller enthaltenen
Titel in der vorgegebenen Reihenfolge
Abschnitt
02
Deutsch
De
39
Page 40

Abschnitt
03
Unterschiedliche
Bedienung je nach
Hauptgerät
Gebrauch als externes Gerät
Die nachstehend aufgeführten Hauptgeräte
ermöglichen eine externe Bedienung dieses
Geräts. Detaillierte Informationen zum jeweiligen Hauptgerät finden Sie im zugehörigen
Handbuch.
! FUNC4 (F4), FUNCTION4 und 1–6KEY fin-
den bei der Bedienung dieses Geräts keine
Verwendung.
Hauptgeräte - Gruppe 1
Die folgenden Hauptgeräte ermöglichen eine
Bedienung über die Taste FUNCTION bzw. per
SOFTKEY.
DEH-P9450MP, DEH-P9400MP, DEH-P7700MP
(europäisches Modell), DEH-P6880MP, DEHP6800MP (europäisches Modell), DEHP6750MP, DEH-P6700MP, DEH-P5850MP, DEHP5850MPH, DEH-P5800MP, DEH-P5750MP,
DEH-P5730MP, DEH-P5700MP, DEH-P4880MP,
DEH-P4850MP, DEH-P4850MPH, DEHP4800MP, DEH-P4770MP, DEH-P4750MP, DEHP4700MP, DEH-P3800MP, DEH-P940MP, DEHP670MP, DEH-P580MP, DEH-P480MP, DEHP470MP, DVH-P5850MP, DVH-P5650MP, DVHP580MP, FH-P9200MP, FH-P4200MP
Hauptgeräte - Gruppe 2
Die folgenden Hauptgeräte ermöglichen eine
Bedienung über MULTI-CONTROL.
DEH-P8650MP, DEH-P8600MP, DEH-P7750MP,
DEH-P7700MP (US-Modell), DEH-P860MP,
DEH-P770MP, DEH-P80MP, DEH-P8MP, DEHP1Y
Hauptgeräte - Gruppe 3
Die folgenden Hauptgeräte ermöglichen eine
Bedienung über Sensortasten.
AVH-P7650DVD, AVH-P7600DVD, AVHP7550DVD, AVH-P7500DVDN, AVH-P7500DVD,
AVH-P6650DVD, AVH-P6600DVD, AVHP6550DVD, AVH-P6500DVD
Hauptgeräte - Gruppe 4
Bei den folgenden Hauptgeräten handelt es
sich um Navigationsgeräte, die eine Bedienung über Sensortasten ermöglichen.
AVIC-D2, AVIC-N1, AVIC-X1
Kompatibilität der Funktionen
Hauptgeräte - Gruppe 1
Funktionssteuerung
Wahl von iPod als
Programmquelle
Wahl einer Kategorie
Wahl einer Liste Drücken Sie a oder b.
Vor- oder Zurückspringen zu einem
anderen Titel
Schnellvorlauf/-rücklauf
Wahl einer Funktion
Pausieren der Titelwiedergabe
Wahl eines Wiederholwiedergabebereichs
Wahl einer zufallsgesteuerten Wiedergabemethode
Umschalten der Anzeige
Abrollen des Titels
Umschalten zwischen AUTO und
MANUAL
*1
*2
Drücken Sie SOURCE.
Drücken Sie BAND (BAND/
ESC).
Drücken Sie c oder d.
Drücken und halten Sie c
oder d gedrückt.
Drücken Sie FUNCTION
(FUNC).
Drücken Sie a oder b in
FUNC1 (F1).
Drücken Sie a oder b in
FUNC2 (F2).
Drücken und halten Sie a
oder b in FUNC2 (F2) gedrückt.
Drücken Sie a oder b in
FUNC3 (F3).
Drücken und halten Sie a
oder b in FUNC3 (F3) gedrückt.
Drücken Sie c oder d in
AUTO/MANUAL (A/M).
*1Sie können diese Funktion durch Auswahl von AUTO in AUTO/MANUAL (A/M) verwenden.
2
*
Sie können diese Funktion durch Auswahl von MANUAL in AUTO/MANUAL (A/M) verwenden.
40
De
Page 41

Unterschiedliche
Bedienung je nach
Hauptgerät
Abschnitt
03
Hauptgeräte - Gruppe 2
Funktionssteuerung
Wahl von iPod als
Programmquelle
Wahl einer Kategorie
Wahl einer Liste
Vor- oder Zurückspringen zu einem
anderen Titel
Schnellvorlauf/-rücklauf
Wahl einer Funktion
Pausieren der Titelwiedergabe
Wahl eines Wiederholwiedergabebereichs
Wahl einer zufallsgesteuerten Wiedergabemethode
Umschalten der Anzeige
Abrollen des Titels
Umschalten zwischen AUTO und
MANUAL
*1
*2
Drücken Sie SOURCE.
Drücken Sie BAND (BAND/
ESC).
Drücken Sie MULTI-CON-
TROL nach oben oder unten.
Drücken Sie MULTI-CON-
TROL nach links oder rechts.
Drücken und halten Sie
MULTI-CONTROL nach links
oder rechts gedrückt.
Verwenden Sie MULTI-CON-
TROL.
Drücken Sie MULTI-CON-
TROL in FUNC1 (F1).
Drücken Sie MULTI-CON-
TROL in FUNC2 (F2).
Drücken und halten Sie
MULTI-CONTROL in FUNC2
(F2) gedrückt.
Drücken Sie MULTI-CONTROL in FUNC3 (F3).
Drücken und halten Sie
MULTI-CONTROL in FUNC3
(F3) gedrückt.
Drücken Sie MULTI-CONTROL in AUTO/MANUAL
(A/M).
Hauptgeräte - Gruppe 3
Funktionssteuerung
Wahl von iPod als
Programmquelle
Wahl einer Kategorie Berühren Sie BAND.
Wahl einer Liste Berühren Sie a oder b.
Vor- oder Zurückspringen zu einem
anderen Titel
Schnellvorlauf/-rücklauf
Wahl einer Funktion
Pausieren der Titelwiedergabe
Wahl eines Wiederholwiedergabebereichs
Wahl einer zufallsgesteuerten Wiedergabemethode
Umschalten der Anzeige
Abrollen des Titels
Umschalten zwischen AUTO und
MANUAL
*1
*2
Drücken Sie SOURCE.
Berühren Sie c oder d.
Berühren Sie c oder d
etwas länger.
Berühren Sie A.MENU und
anschließend FUNCTION.
Berühren Sie ab in FUNC-
TION1.
Berühren Sie ab in FUNC-
TION2.
Berühren Sie ab in FUNC-
TION2 etwas länger.
Berühren Sie ab in FUNC-
TION3.
Berühren Sie ab in FUNC-
TION3 etwas länger.
Berühren Sie c oder d in
AUTO/MANUAL.
Hauptgeräte - Gruppe 4
Deutsch
Funktionssteuerung
Wahl von iPod als
Programmquelle
Wahl einer Kategorie Berühren Sie BAND.
Wahl einer Liste Berühren Sie a oder b.
*1Sie können diese Funktion durch Auswahl von AUTO in AUTO/MANUAL (A/M) verwenden.
2
*
Sie können diese Funktion durch Auswahl von MANUAL in AUTO/MANUAL (A/M) verwenden.
Drücken Sie SOURCE.
De
41
Page 42

Abschnitt
03
Funktionssteuerung
Vor- oder Zurückspringen zu einem
anderen Titel
Schnellvorlauf/-rücklauf
Wahl einer Funktion
Pausieren der Titelwiedergabe
Wahl eines Wiederholwiedergabebereichs
Wahl einer zufallsgesteuerten Wiedergabemethode
Umschalten der Anzeige
Abrollen des Titels
Umschalten zwischen AUTO und
MANUAL
Unterschiedliche
Bedienung je nach
Hauptgerät
*1
*2
Berühren Sie c oder d.
Berühren Sie c oder d
etwas länger.
Berühren Sie A.MENU oder
drücken Sie den Joystick und
berühren Sie anschließend
FUNCTION
Berühren Sie SEND in FUNCTION1.
Berühren Sie SEND in FUNCTION2.
Berühren Sie SEND in FUNCTION2 etwas länger.
Berühren Sie SEND in FUNCTION3.
Berühren Sie SEND in FUNCTION3 etwas länger.
Berühren Sie AUTO/MANUAL.
*3
.
*1Sie können diese Funktion durch Auswahl von AUTO in AUTO/MANUAL (A/M) verwenden.
2
*
Sie können diese Funktion durch Auswahl von MANUAL in AUTO/MANUAL (A/M) verwenden.
3
*
Bei einem AVIC-D2 steht A.MENU nicht zur Verfügung.
42
De
Page 43

Unterschiedliche
Bedienung je nach
Hauptgerät
Überblick über die Modi Spiellistenwahl und Individuelle Wahl
Abschnitt
03
1
Playlist 1
Playlist 2
Playlist 3
Playlist 9
1 Modus Spiellistenwahl
2 Modus Individuelle Wahl
Das iPod-kompatible Hauptgerät stellt die
Modi Spiellistenwahl und Individuelle Wahl
bereit, in denen Sie eine ganz spezifische Liste
mit Titeln wählen können, um sich diese anzuhören (Spielliste, Musikalbum usw.). Einen
Überblick über die Modi Spiellistenwahl und
Individuelle Wahl liefert die voranstehende Illustration.
2
All
Alternative
Animation
Jazz
ALBUMARTISTGENREPLAYLIST
All
Artist 1
Artist 2
Artist 9
All
Album A
Album B
Album J
Suchen nach dem gewünschten
Titel unter GENRE (Liste der MusikGenres), ARTIST (Liste der Künstler)
und ALBUM (Liste der Musikalben)
Wählen Sie im Modus Individuelle Wahl ein
Musik-Genre, einen Künstler oder ein Musikalbum. Der Modus Individuelle Wahl ermöglicht
Ihnen eine Suche nach Titeln in separaten Listen in der Reihenfolge Musik-Genres - Künstler - Musikalben.
Siehe Suchen nach einem bestimmten Titel auf
Seite 44.
Deutsch
Wiedergabe durch Auswählen
einer Spielliste unter PLAYLIST
Wählen Sie im Modus Spiellistenwahl die gewünschte Spielliste.
Siehe Wiedergabe durch Auswählen einer Spiel-
liste auf Seite 45.
De
43
Page 44

Abschnitt
03
Unterschiedliche
Bedienung je nach
Hauptgerät
Suchen nach einem
bestimmten Titel
Für die Auswahl und Wiedergabe von Titeln
Ihrer Lieblingsgenres, -künstler oder -alben
können Sie unter GENRE, ARTIST und
ALBUM eine Auswahl treffen. Nachstehend
wird als Beispiel die Auswahl des Musik-Genres„Jazz“ unter GENRE, des Künstlers
„Artist 2“ unter ARTIST und des Albums
„Album B“ unter ALBUM erläutert (die im vor-
hergehenden Abschnitt Überblick über die
Modi Spiellistenwahl und Individuelle Wahl ent-
haltene Abbildung illustriert dieses Beispiel).
1 Verwenden Sie BAND (BAND/ESC), um
zu GENRE umzuschalten.
Im Display wird etwa zwei Sekunden lang
GENRE angezeigt.
Mit jedem Drücken von BAND (BAND/ESC)
ändert sich das Display in der folgenden Reihenfolge:
PLAYLIST (Spiellisten)—GENRE (Musik-Genres)—ARTIST (Künstler)—ALBUM (Alben)
! ALL entspricht der Standardeinstellung für
GENRE, ARTIST und ALBUM.
! Ihre individuelle Wahl wird annulliert, wenn
Sie von ALBUM zu PLAYLIST zurückschal-
ten. Allerdings wird die Wiedergabe der momentan spielenden Liste (in
Übereinstimmung mit der zuletzt vorgenommenen individuellen Wahl) fortgesetzt,
bis einer der zwei nachstehend aufgeführten Bedienvorgänge mit Hilfe der Taste a
oder b (bzw. MULTI-CONTROL) ausgeführt
wird.
— Auswahl einer anderen Liste
— Wiedergabestart einer neuen individuell
gewählten Liste
2 Verwenden Sie a oder b (bzw.
MULTI-CONTROL), um „Jazz“ zu wählen.
Die Wiedergabe der Titel unter „Jazz“ wird gestartet.
3 Verwenden Sie BAND (BAND/ESC), um
zu ARTIST umzuschalten.
Im Display wird etwa zwei Sekunden lang
ARTIST angezeigt.
4 Verwenden Sie a oder b (bzw.
MULTI-CONTROL), um „Artist 2“ zu wählen.
Die Wiedergabe der Titel unter „Album B“ wird
gestartet.
5 Verwenden Sie BAND (BAND/ESC), um
zu ALBUM umzuschalten.
Im Display wird etwa zwei Sekunden lang
ALBUM angezeigt.
6 Verwenden Sie a oder b (bzw.
MULTI-CONTROL), um „Album B“ zu wählen.
Die Wiedergabe der Titel unter „Album B“ wird
gestartet.
7 Verwenden Sie c oder d (bzw.
MULTI-CONTROL), um den zu spielenden
Titel zu wählen.
Die Wiedergabe des gewählten Titels wird gestartet.
Weitere Möglichkeiten bei
einer individuellen Wahl
Die individuelle Wahl kann auch von ARTIST
oder ALBUM aus gestartet werden.
Das Musik-Genre von „Album B“ ist
Ihnen nicht bekannt
Wechseln Sie zunächst zu GENRE (Schritt 1)
und annullieren Sie die individuelle Wahl. Fahren Sie dann mit Schritt 3 fort.
Das Musik-Genre und der Künstler von
„Album B“ sind Ihnen nicht bekannt
Wechseln Sie zunächst zu GENRE (Schritt 1)
und annullieren Sie die individuelle Wahl. Fahren Sie dann mit Schritt 5 fort.
44
De
Page 45

Unterschiedliche
Bedienung je nach
Hauptgerät
Abschnitt
03
Hinweise
! Nach der Auswahl eines Musik-Genres stehen
nur noch die Künstler und Alben des gewählten Genres zur Auswahl. Wenn Sie Künstler
oder Alben eines anderen Musik-Genres wählen möchten, müssen Sie den gesamten Vorgang ab Schritt 1 wiederholen.
! ALL entspricht der Standardeinstellung für
GENRE, ARTIST und ALBUM.
! Ihre individuelle Wahl wird annulliert, wenn
Sie von ALBUM zu PLAYLIST zurückschalten.
Allerdings wird die Wiedergabe der momentan spielenden Liste (in Übereinstimmung mit
der zuletzt vorgenommenen individuellen
Wahl) fortgesetzt, bis einer der zwei nachstehend aufgeführten Bedienvorgänge mit Hilfe
der Taste a oder b (bzw. MULTI-CONTROL)
ausgeführt wird.
— Auswahl einer anderen Liste
— Wiedergabestart einer neuen individuell
gewählten Liste
Wiedergabe durch
Auswählen einer Spielliste
Sie können unter PLAYLIST eine Spielliste des
iPod wählen und spielen.
1 Verwenden Sie BAND (BAND/ESC), um
zu PLAYLIST umzuschalten.
Im Display wird etwa zwei Sekunden lang
PLAYLIST angezeigt.
Mit jedem Drücken von BAND (BAND/ESC)
ändert sich das Display in der folgenden Reihenfolge:
PLAYLIST (Spiellisten)—GENRE (Musik-Genres)—ARTIST (Künstler)—ALBUM (Alben)
2 Verwenden Sie a oder b (bzw.
MULTI-CONTROL), um eine Spielliste für die
Wiedergabe zu wählen.
Mit a (bzw. durch Drücken von
MULTI-CONTROL nach oben) wird die jeweils
vorhergehende Spielliste gewählt. b (bzw. das
Drücken von MULTI-CONTROL nach unten)
ermöglicht die Auswahl der jeweils nächsten
Spielliste.
Der Name der gewählten Spielliste wird etwa
zwei Sekunden lang angezeigt, dann beginnt
deren Wiedergabe.
3 Verwenden Sie c oder d (bzw.
MULTI-CONTROL), um den zu spielenden
Titel zu wählen.
Die Wiedergabe des gewählten Titels wird
gestartet.
Anzeigen der
Textinformationen auf dem
iPod
Die auf dem iPod aufgezeichneten Textinformationen können angezeigt werden.
% Wählen Sie die gewünschten Informationen.
Siehe Kompatibilität der Funktionen auf Seite
40.
Wiedergabezeit—Titelname—Künstlername—
Albumtitel—Status der Wiederholwiedergabe
—Status der zufallsgesteuerten Wiedergabe
# Wenn die auf dem iPod gespeicherten Zeichen nicht mit dem Hauptgerät kompatibel sind,
werden sie nicht angezeigt.
Deutsch
De
45
Page 46

Abschnitt
03
Unterschiedliche
Bedienung je nach
Hauptgerät
Hinweise
! Wenn Sie dieses Gerät als externes Gerät ver-
wenden, können auf dem Hauptgerät jeweils
die ersten 8 Buchstaben des Titelnamens,
Künstlernamens und Albumtitels angezeigt
werden.
! Titelname, Künstlername und Albumtitel kön-
nen im Display nach links abgerollt
werden.
Wiederholwiedergabe
Für die Wiedergabe der Musiktitel auf dem
iPod stehen zwei Wiederholwiedergabebereiche zur Auswahl: TRK (Wiederholung eines Titels) und ALL (Wiederholung aller Titel in der
Liste).
! Solange RPT auf TRK eingestellt ist, kön-
nen keine anderen Musiktitel gewählt werden.
% Wählen Sie den Wiederholwiedergabebereich.
Siehe Kompatibilität der Funktionen auf Seite
40.
! TRK – Nur Wiederholung des momentanen
Titels
! ALL – Wiederholung aller Titel in der
Liste
% Wählen Sie eine zufallsgesteuerte Wiedergabemethode.
Siehe Kompatibilität der Funktionen auf Seite
40.
! TRK – Zufallsgesteuerte Wiedergabe der
Titel in der Liste
! ALBUM – Zufallsgesteuerte Auswahl eines
Albums und Wiedergabe aller enthaltenen
Titel in der vorgegebenen Reihenfolge
Abspielen von Titeln in
zufälliger Reihenfolge
(Shuffle)
Für die Wiedergabe der Musiktitel auf dem
iPod stehen zwei zufallsgesteuerte Wiedergabemethoden zur Auswahl: TRK (Zufallsgesteuerte Wiedergabe von Titeln) und ALBUM
(Zufallsgesteuerte Wiedergabe von Alben).
46
De
Page 47

Anschlüsse
Abschnitt
04
Wichtig
! Dieses Gerät wurde für den Einsatz in Fahr-
zeugen mit 12-V-Batterie und negativer Erdung
konzipiert. Vor der Installation des Geräts in
einem Personenkraftwagen, Lkw oder Bus
muss die Batteriespannung überprüft werden.
! Um einen Kurzschluss im elektrischen Sy-
stem zu vermeiden, muss das Batteriekabel *
vor der Installation auf jeden Fall abgetrennt
werden.
! Schlagen Sie für den Anschluss des Lei-
stungsverstärkers sowie anderer Geräte detaillierte Anweisungen in den entsprechenden
Handbüchern nach und führen Sie dann die
Anschlüsse ordnungsgemäß durch.
! Sichern Sie die Kabelführung mit Kabelklam-
mern oder Klebeband. Zum Schutz der Verkabelung sollten die Kabel an allen Stellen, an
denen sie mit Metallteilen in Berührung kommen, mit Isolierband umwickelt werden.
! Bei der Kabelführung und -sicherung sollten
Sie unbedingt darauf achten, dass die Kabel
nicht mit beweglichen Fahrzeugteilen, wie z.B.
dem Schalthebel, der Handbremse oder den
Sitzschienen, in Berührung kommen. Die
Kabel sollten keinesfalls über Stellen geführt
werden, die sich erhitzen, wie z.B. in der Nähe
der Heizungsöffnungen. Durch das Schmelzen oder die Verformung des Kabelisolierschutzes entsteht die Gefahr eines
Kurzschlusses über die Fahrzeugkarosserie.
! Führen Sie das gelbe Kabel nicht durch ein
Loch in den Motorraum, um die Verbindung
zur Fahrzeugbatterie herzustellen. Dadurch
wird die Kabelisolierung beschädigt und ein
gefährlicher Kurzschluss ausgelöst.
! Kürzen Sie die Kabel nicht, da dadurch die
Schutzschaltung bei Bedarf ggf. nicht ordnungsgemäß funktioniert.
! Schaffen Sie keinesfalls eine Stromzufuhr für
andere Geräte, indem Sie die Isolierung des
Stromversorgungskabels des Geräts durchtrennen und die Leitung anzapfen. Das führt
zu einer Überschreitung der Stromkapazität
des Leiters und damit zu einer Überhitzung.
! Beim Auswechseln der Sicherung muss dar-
auf geachtet werden, dass die neue Sicherung
dem auf der Fassung angegebenen Leistungsnennwert entspricht.
! Um einen unsachgemäßen Anschluss zu ver-
hindern, wurde der Leitungseingang des IPBUS-Anschlusses blau, der Leitungsausgang
schwarz gekennzeichnet. Verbinden Sie die
Anschlüsse derselben Farbe ordnungsgemäß
miteinander.
! Die Verbindung zum iPod darf ausschließlich
über den Dock-Anschluss erfolgen, damit dieses Gerät ordnungsgemäß funktioniert.
! Vor der Verbindung mit dem iPod über den
Dock-Anschluss müssen Sie die Kopfhörer
vom iPod trennen.
Die Kabel dieses Produkts und diejenigen anderer Produkte weisen ggf. eine unterschiedliche Farbe auf, selbst wenn sie dieselbe
Funktion erfüllen. Beim Anschluss dieses Produkts an ein anderes Produkt müssen Sie deshalb in den Handbüchern beider Produkte
nachschlagen, um die Kabel mit der jeweils
gleichen Funktion zu identifizieren und miteinander zu verbinden.
Deutsch
De
47
Page 48

Abschnitt
04
Anschlüsse
Anschließen der Geräte
Hauptgerät
An IP-BUS-Eingang
(blau)
iPod mit Dock-Anschlussstecker
Dock-Anschluss
Dock-Anschlussstecker
Gelb
An Anschlussklemme - stets unter
Strom, ungeachtet der jeweiligen
Zündschlüsselposition.
1,5 m
Dieses Gerät
1,5 m
Schwarz
Sicherung (2 A)
Multi-CD-Player
(separat erhältlich)
IP-BUS-KabelIP-BUS-Kabel
Blau
48
Schwarz (Erde)
An Fahrzeugkarosserie (Metall).
De
Page 49

Installation
Abschnitt
05
Wichtig
! Bevor Sie das Gerät definitiv installieren,
schließen Sie die Kabel versuchsweise an, um
sicherzustellen, dass die Anschlüsse ordnungsgemäß durchgeführt wurden und das
System fehlerfrei funktioniert.
! Verwenden Sie für eine sachgemäße Installa-
tion ausschließlich die im Lieferumfang des
Geräts enthaltenen Teile. Die Verwendung
nicht autorisierter Teile kann eine Funktionsstörung nach sich ziehen.
! Wenden Sie sich an einen Fachhändler in
Ihrer Nähe, wenn für die Installation Löcher
gebohrt oder andere Änderungen am Fahrzeug vorgenommen werden müssen.
! Achten Sie beim Einbau des Geräts darauf,
dass es den Fahrer in keiner Weise stört oder
behindert und bei einem plötzlichen Stopp
des Fahrzeugs, z.B. bei einer Notbremsung,
weder Bei- noch Mitfahrer verletzen kann.
! Stellen Sie bei der Anbringung dieses Geräts
sicher, dass keine Kabel zwischen dem Gerät
und den angrenzenden Metallflächen oder Armaturenteilen eingeklemmt werden.
! Bringen Sie das Gerät weder in der Nähe
einer Heizungsöffnung an, wo es der Wärmeeinwirkung ausgesetzt ist, noch neben einer
Wagentür, wo es durch Regenwasser beschädigt werden kann.
! Prüfen Sie vor dem Bohren von Montagelö-
chern die Hinterseite der zu durchbohrenden
Fläche. Sie dürfen beim Bohren keinesfalls
die Benzinleitung, die Bremskabel, die elektrischen Leiter oder andere wichtige Fahrzeugteile beschädigen.
! Bei der Installation des Geräts im Fahrgast-
raum muss dieses sicher befestigt werden,
damit es während der Fahrt nicht herunterfällt
und Mitfahrer verletzt oder einen Unfall verursacht.
! Wenn Sie das Gerät unter einem der Vordersit-
ze anbringen, vergewissern Sie sich, dass es
das Gleiten des Sitzes nicht behindert. Führen
Sie alle Leiter und Kabel sorgfältig um die
Gleitvorrichtungen herum, damit sie nicht eingeklemmt oder abgedrückt werden und dadurch einen Kurzschluss verursachen.
Installieren dieses Geräts
Anbringen mithilfe von
Klettverschlüssen
Reinigen Sie die Oberfläche sorgfältig, bevor
Sie die Klettverschlüsse anbringen.
! Sollten die glatten Verschlussstücke direkt
an der Fußmatte haften, so benötigen Sie
die rauhen Verschlussstücke für die Installation dieses Geräts ggf. überhaupt nicht.
% Bringen Sie das Gerät mithilfe der Klettverschlüsse an.
Dieses Gerät
Klettverschluss (glattes
Verschlussstück)
Klettverschluss (rauhes
Verschlussstück)
Fußmatte oder Karosserie
Deutsch
De
49
Page 50

Anhang
Zusätzliche Informationen
Fehlerbehebung
Symptom Ursache Abhilfemaßnah-
Der iPod funktioniert nicht
ordnungsgemäß.
Die Kabel wurden nicht sachgemäß angeschlossen.
me
Trennen Sie das
Kabel vom iPod.
Sobald das Hauptmenü auf dem
iPod erscheint,
schließen Sie das
Kabel erneut an.
Starten Sie den
iPod neu.
Bedeutung der
Fehlermeldungen
Vor der Kontaktaufnahme mit Ihrem Händler
oder der nächstgelegenen Pioneer-Kundendienststelle sollten Sie sich die angezeigte
Fehlermeldung notieren.
Meldung Ursache Abhilfemaßnah-
ERROR-11 Kommunikation
gestört
ERROR-21 Alte iPod-Version Aktualisieren Sie
ERROR-30 iPod gestört Starten Sie den
NO TRACK Keine Musik Übertragen Sie die
STOP Keine Musiktitel
in der aktuellen
Liste
me
Trennen Sie das
Kabel vom iPod.
Sobald das Hauptmenü auf dem
iPod erscheint,
schließen Sie das
Kabel erneut an.
Starten Sie den
iPod neu.
die iPod-Version.
iPod neu.
Musiktitel auf den
iPod.
Wählen Sie eine
Liste, die Musiktitel
enthält.
Technische Daten
Allgemein
Stromversorgung ..................... 14,4 V Gleichspannung (To-
leranz 10,8 V bis 15,1 V)
Erdungssystem ......................... Negativ
Max. Leistungsaufnahme .... 2,0 A
Abmessungen (B × H × T)
..................................................... 95 × 25 × 91 mm
Gewicht ........................................ 0,33 kg
Hinweis
Änderungen der technischen Daten und des Designs vorbehalten.
50
De
Page 51

Table des matières
Nous vous remercions d’avoir acheté cet appareil
Pioneer.
Nous vous prions de lire ces instructions d’utilisation afin que vous sachiez utiliser
votre appareil correctement. Quand vous aurez fini la lecture de ces instructions,
rangez ce mode d’emploi dans un endroit sûr pour référence ultérieure.
Avant de commencer
Quelques mots sur cet appareil 52
Quelques mots sur ce mode d’emploi 52
Quelques mots sur la manipulation du
iPod 52
– Quelques mots sur les réglages de
l’iPod 53
Connexion et déconnexion de l’iPod 53
Lecture de plages musicales sur l’iPod
Ecoute de plages musicales sur votre
iPod 54
Recherche d’une plage musicale 54
Pause d’une plage musicale 55
Affichages d’informations textuelles sur
l’iPod 55
Répétition de la lecture 55
Lecture des plages musicales dans un ordre
aléatoire (shuffle) 56
Utilisation avec différents appareils
centraux
Utilisation comme source exterieure 57
Tableaux de compatibilité des fonctions 57
– Appareils centraux du groupe 1 57
– Appareils centraux du groupe 2 58
– Appareils centraux du groupe 3 58
– Appareils centraux du groupe 4 59
Présentation générale des modes de
sélection de la liste de lecture et des
préférences 60
– Lecture par sélection d’une liste de
lecture à partir de PLAYLIST 60
– Recherche d’une plage de lecture
désirée à partir de GENRE (liste de
genres), ARTIST (liste d’interprètes) et
ALBUM (liste d’albums) 60
Recherche d’une plage particulière 61
– Autres procédures de définition des
préférences 61
Lecture par sélection d’une liste de
lecture 62
Affichages d’informations textuelles sur
l’iPod 62
Répétition de la lecture 63
Lecture des plages musicales dans un ordre
aléatoire (shuffle) 63
Connexions
Connexion des appareils 65
Installation
Installation de l’appareil 66
– Montage avec des fixations Velcro 66
Informations complémentaires
Dépannage 67
Signification des messages d’erreur 67
Caractéristiques techniques 67
Français
51
Fr
Page 52

Section
01
Avant de commencer
Quelques mots sur cet appareil
Cet appareil est un adaptateur qui permet à
un appareil central Pioneer de contrôler un
iPod avec Dock Connector (Connecteur de station d’accueil) et d’écouter les plages musicales enregistrées sur celui-ci.
! iPod est une marque commerciale de
Apple Computer, Inc. déposée aux EtatsUnis et dans d’autres pays.
! Cet appareil est conçu pour une utilisation
à bord d’un véhicule uniquement.
! Cet appareil prend en charge uniquement
un iPod avec Dock Connector.
! Il ne supporte pas les version du logiciel
antérieures à la mise à jour 2004-10-20.
Consultez votre revendeur agréé Pioneer le
plus proche pour avoir des informations
sur les versions supportées.
! Les modes opératoires peuvent différer
selon la version du logiciel iPod.
PRÉCAUTION
! Ne laissez pas cet appareil venir en contact
avec des liquides. Cela pourrait provoquer une
électrocution. Tout contact avec des liquides
pourrait aussi provoquer des dommages, de
la fumée et une surchauffe de l’appareil.
! Conservez ce mode d’emploi à portée de main
afin de vous y référer pour les modes d’opération et les précautions.
! Maintenez toujours le niveau d’écoute à une
valeur telle que vous puissiez entendre les
sons provenant de l’extérieur du véhicule.
! Protégez l’appareil contre l’humidité.
! En cas d’anomalie, consultez le distributeur
ou le centre d’entretien agréé par Pioneer le
plus proche.
Quelques mots sur ce mode
d’emploi
Utilisez cet appareil avec l’appareil central
connecté. Les instructions de ce mode d’emploi utilisent AVH-P5700DVD (AVH-P5750DVD)
comme exemple d’appareil central.
Si vous utilisez un appareil central autre que
AVH-P5700DVD (AVH-P5750DVD), reportezvous à la page 57, Utilisation avec différents ap-
pareils centraux.
Nous vous recommandons de vous familiariser avec les fonctions et leur utilisation en lisant l’ensemble du mode d’emploi avant de
commencer à utiliser l’appareil. Il est particulièrement important que vous lisiez et respectiez les indications ATTENTION et
PRÉCAUTION de ce mode d’emploi.
Quelques mots sur la
manipulation du iPod
PRÉCAUTION
! Pioneer n’accepte aucune responsabilité pour
une perte de données sur l’iPod même si cette
perte de données se produit pendant l’utilisation de cet appareil.
! Ne laissez pas l’iPod exposé à la lumière di-
recte du soleil quand il n’est pas utilisé. Une
exposition prolongée à la lumière directe du
soleil peut entraîner un mauvais fonctionnement de l’iPod à cause des températures élevées qui en résulteraient.
! Ne laissez pas l’iPod exposé à des températu-
res élevées ou à la lumière directe du soleil.
! Attachez l’iPod d’une manière sure quand
vous l’utilisez avec cet appareil. Ne laissez pas
l’iPod tomber sur le plancher, où il pourrait
gêner le bon fonctionnement de la pédale de
frein ou d’accélérateur.
52
Fr
Page 53

Avant de commencer
Section
01
Pour les détails, reportez-vous aux manuels de
l’iPod.
Quelques mots sur les réglages
de l’iPod
! Vous ne pouvez pas utiliser l’Egaliseur iPod
sur les produits Pioneer. Nous vous recommandons de mettre l’Egaliseur iPod hors
service avant de connecter l’iPod à cet appareil.
! Vous ne pouvez pas mettre Repeat hors ser-
vice sur l’iPod quand vous utilisez cet appareil. Même si vous mettez Repeat hors
service sur l’iPod, Repeat est positionné automatiquement sur All quand vous connectez l’iPod à cet appareil.
! La fonction Shuffle de l’iPod est utilisée en
mode Random sur les produits Pioneer.
Connexion et déconnexion
de l’iPod
! Pour que cet appareil fonctionne correcte-
ment, connectez uniquement le connecteur de station d’accueil à l’iPod.
! Avant de connecter le connecteur de sta-
tion d’accueil à l’iPod, déconnectez les
écouteurs de l’iPod.
# L’iPod connecté à cet appareil est mis hors
service environ deux minutes après que le
commutateur d’allumage est mis en position OFF
(coupé).
% Retirez l’iPod de l’appareil.
Quand vous retirez l’iPod de l’appareil, le
menu principal de l’iPod est affiché pendant
quelques secondes.
Français
% Connectez l’iPod à l’appareil.
Dès que l’iPod est connecté, son alimentation
est automatiquement mise en service.
Lorsque l’iPod est connecté à cet appareil,
PIONEER (ou
l’iPod.
! Quand le contact d’allumage est sur ACC
ou ON, la batterie de l’iPod est chargée
quand celui-ci est connecté à cet appareil.
! Lorsque l’iPod est connecté à cet appareil,
il ne peut pas lui-même être mis en service
ou hors service.
(une coche)) est affiché(e) sur
53
Fr
Page 54

1
3
2
465
Section
02
Lecture de plages
musicales sur l’iPod
Ecoute de plages musicales
sur votre iPod
1 Icône de la source
Elle indique la source choisie.
2 Indicateur du numéro de plage musicale
Affiche le numéro de la plage lue dans la
liste sélectionnée.
3 Indicateur du temps de lecture
Indique le temps de lecture depuis le début
de la plage musicale en cours.
4 Indicateur du titre de la plage
Indique le titre de la plage musicale en
cours de lecture.
5 Indicateur de répétition
Indique quand l’étendue de répétition choisie est la plage musicale en cours.
6 Indicateur RDM
Indique quant la lecture au hasard est positionnée sur TRACK ou ALBUM.
1 Touchez l’icône de la source puis touchez iPod pour choisir l’iPod.
# Vous pouvez aussi choisir la source iPod en
appuyant répétitivement sur SOURCE.
# Quand l’iPod n’est pas connecté à l’appareil,
vous ne pouvez pas le sélectionner comme
source.
2 Touchez l’écran pour afficher les touches du clavier tactile.
3 Pour atteindre une plage précédente
ou suivante, touchez o ou p.
Effleurer p fait passer au début de la plage
suivante. Effleurer o une fois fait passer au
début de la plage en cours. Effleurer la touche
une nouvelle fois fera passer à la plage précédente.
# Vous pouvez aussi sauter à une plage précédente ou suivante en appuyant sur c ou d.
4 Pour effectuer une avance rapide ou un
retour rapide, maintenez le contact du
doigt sur o ou p.
# Vous pouvez aussi effectuer un retour rapide
ou une avance rapide en appuyant de façon prolongée sur c ou d.
Recherche d’une plage
musicale
Pour faciliter l’utilisation d’un l’iPod et la recherche de plages musicales, le mode de
contrôle de l’iPod par cet appareil est aussi
proche que possible de l’utilisation habituelle
d’un iPod.
1 Touchez TOP pour afficher le menu
principal.
2 Touchez une des catégories dans laquelle vous voulez rechercher une plage
musicale.
! PLAYLISTS (listes de lecture)
! GENRES (genres)
! ARTISTS (artistes)
! ALBUMS (albums)
54
Fr
Page 55

Lecture de plages
musicales sur l’iPod
Section
02
! SONGS (plages musicales)
3 Touchez un titre de liste que vous voulez lire.
Répétez cette opération jusqu’à ce que vous
trouviez la plage musicale désirée.
# Vous pouvez commencer la lecture de l’en-
semble de la liste sélectionnée en touchant un
titre de la liste de façon prolongée.
# Pour passer au groupe suivant de titres de
liste, touchez
# Pour revenir au groupe précédent de titres de
liste, touchez
# Pour revenir au menu précédent, touchez
# Pour aller au menu principal de la recherche
par liste, touchez TOP.
.
.
.
Pause d’une plage musicale
La pause est un arrêt momentané de la lecture
d’une plage musicale.
% Touchez f pendant la lecture.
PAUSE apparaît sur l’afficheur.
# Pour reprendre la lecture au point où vous
avez activé la pause, touchez à nouveau f.
# Vous pouvez également activer ou désactiver
la pause en appuyant sur PGM.
Affichages d’informations
textuelles sur l’iPod
Vous pouvez afficher les informations textuelles enregistrées sur l’iPod.
# Si les caractères enregistrés sur l’iPod ne sont
pas compatibles avec l’appareil central, ils ne seront pas affichés.
Remarque
Vous pouvez faire défiler le titre vers la gauche en
touchant DISP de façon prolongée.
Répétition de la lecture
Pour la lecture de plages musicales sur l’iPod,
il existe deux étendues de répétition de la lecture : TRACK (répétition d’une plage musicale)
et ALL (répétition de toutes les plages musicales de la liste).
! Si REPEAT est positionné sur TRACK, vous
ne pouvez pas sélectionner les autres plages.
1 Appuyez sur A.MENU puis touchez
FUNC pour afficher les noms des fonctions.
2 Touchez REPEAT pour choisir le mode
de répétition.
Touchez répétitivement REPEAT jusqu’àce
que le mode de répétition désiré apparaisse
sur l’écran.
! TRACK – Répétition de la plage en cours de
lecture seulement
! ALL – Répétition de toutes les plages musi-
cales de la liste sélectionnée
Français
% Touchez DISP.
Touchez de manière répétée DISP pour passer
d’un des paramètres suivants à l’autre :
T. Title (titre de la plage musicale)—Artist
(nom de l’artiste)—Album (nom de l’album)
55
Fr
Page 56

Section
02
Lecture de plages
musicales sur l’iPod
Lecture des plages
musicales dans un ordre
aléatoire (shuffle)
Pour la lecture de plages musicales sur l’iPod,
il existe deux méthodes de lecture aléatoire :
TRACK (lecture des plages musicales dans un
ordre aléatoire) et ALBUM (lecture des albums
dans un ordre aléatoire).
1 Appuyez sur A.MENU puis touchez
FUNC pour afficher les noms des fonctions.
2 Touchez RANDOM pour sélectionner la
méthode de lecture au hasard.
Touchez répétitivement RANDOM jusqu’àce
que le mode de lecture au hasard désiré apparaisse sur l’écran.
! TRACK – Lecture des plages musicales
dans un ordre aléatoire à l’intérieur de la
liste sélectionnée
! ALBUM – Sélectionne un album au hasard,
puis lit toutes les plages musicales de cet
album dans l’ordre
56
Fr
Page 57

Utilisation avec différents
appareils centraux
Section
03
Utilisation comme source
exterieure
Les appareils centraux suivants peuvent
contrôler cet appareil en tant que source extérieure. Pour avoir plus de détails sur la source
extérieure correspondante, reportez vous au
mode d’emploi de l’appareil central.
! FUNC4 (F4), FUNCTION4 et 1–6KEY ne
sont pas utilisés pour faire fonctionner cet
appareil.
Appareils centraux du groupe 1
Les appareils centraux suivants supportant le
fonctionnement de la touche FUNCTION ou le
fonctionnement en SOFT KEY (touches logicielles).
DEH-P9450MP, DEH-P9400MP, DEH-P7700MP
(modèle européen), DEH-P6880MP, DEHP6800MP (modèle européen), DEH-P6750MP,
DEH-P6700MP, DEH-P5850MP, DEHP5850MPH, DEH-P5800MP, DEH-P5750MP,
DEH-P5730MP, DEH-P5700MP, DEH-P4880MP,
DEH-P4850MP, DEH-P4850MPH, DEHP4800MP, DEH-P4770MP, DEH-P4750MP, DEHP4700MP, DEH-P3800MP, DEH-P940MP, DEHP670MP, DEH-P580MP, DEH-P480MP, DEHP470MP, DVH-P5850MP, DVH-P5650MP, DVHP580MP, FH-P9200MP, FH-P4200MP
Appareils centraux du groupe 2
Les appareils centraux suivants disposant
d’un MULTI-CONTROL.
DEH-P8650MP, DEH-P8600MP, DEH-P7750MP,
DEH-P7700MP (modèle Amérique du Nord),
DEH-P860MP, DEH-P770MP, DEH-P80MP,
DEH-P8MP, DEH-P1Y
Appareils centraux du groupe 3
Les appareils centraux suivants disposant
d’un clavier tactile.
AVH-P7650DVD, AVH-P7600DVD, AVHP7550DVD, AVH-P7500DVDN, AVH-P7500DVD,
AVH-P6650DVD, AVH-P6600DVD, AVHP6550DVD, AVH-P6500DVD
Appareils centraux du groupe 4
Les appareils centraux suivants sont des appareils de navigation disposant d’ un clavier tactile.
AVIC-D2, AVIC-N1, AVIC-X1
Tableaux de compatibilité
des fonctions
Appareils centraux du groupe 1
Commandes
Sélection de l’iPod
comme source
Sélection d’une catégorie
Sélection d’une liste Appuyez sur a ou b.
Saut à une plage précédente ou suivante
Avance/retour ra-
*2
pide
Sélection d’une fonction
Pause d’une plage
musicale
Sélection d’une étendue de répétition
Appuyez sur SOURCE.
Appuyez sur BAND (BAND/
ESC).
Appuyez sur c ou d.
*1
Appuyez de façon continue
sur c ou d.
Appuyez sur FUNCTION
(FUNC).
Appuyez sur a ou b dans
FUNC1 (F1).
Appuyez sur a ou b dans
FUNC2 (F2).
Français
*1Vous pouvez utiliser cette fonction quand vous sélectionnez AUTO dans AUTO/MANUAL (A/M).
2
*
Vous pouvez utiliser cette fonction quand vous sélectionnez MANUAL dans
AUTO/MANUAL (A/M).
57
Fr
Page 58

Section
03
Utilisation avec différents
appareils centraux
Commandes
Sélection d’un mode
de lecture au hasard
Changement de l’affi-
chage
Défilement du titre
Basculement entre
AUTO et MANUAL
Appuyez de façon continue
sur a ou b dans FUNC2
(F2).
Appuyez sur a ou b dans
FUNC3 (F3).
Appuyez de façon continue
sur a ou b dans FUNC3
(F3).
Appuyez sur c ou d dans
AUTO/MANUAL (A/M).
Appareils centraux du groupe 2
Commandes
Sélection de l’iPod
comme source
Sélection d’une catégorie
Sélection d’une liste
Saut à une plage précédente ou suivante
Avance/retour ra-
*2
pide
Sélection d’une fonction
Pause d’une plage
musicale
Sélection d’une étendue de répétition
Sélection d’un mode
de lecture au hasard
Changement de l’affi-
chage
Appuyez sur SOURCE.
Appuyez sur BAND (BAND/
ESC).
Poussez MULTI-CONTROL
vers le haut ou vers le bas.
Poussez MULTI-CONTROL
vers la gauche ou vers la
*1
droite.
Poussez de façon continue
MULTI-CONTROL vers la
gauche ou vers la droite.
Utilisez MULTI-CONTROL.
Appuyez sur MULTI-
CONTROL dans FUNC1 (F1).
Appuyez sur MULTI-
CONTROL dans FUNC2 (F2).
Appuyez de façon continue
sur MULTI-CONTROL dans
FUNC2 (F2).
Appuyez sur MULTI-
CONTROL dans FUNC3 (F3).
Commandes
Défilement du titre
Basculement entre
AUTO et MANUAL
Appuyez de façon continue
sur MULTI-CONTROL dans
FUNC3 (F3).
Appuyez sur MULTI-
CONTROL dans AUTO/MANUAL (A/M).
Appareils centraux du groupe 3
Commandes
Sélection de l’iPod
comme source
Sélection d’une catégorie
Sélection d’une liste Touchez a ou b.
Saut à une plage précédente ou suivante
Avance/retour ra-
*2
pide
Sélection d’une fonction
Pause d’une plage
musicale
Sélection d’une étendue de répétition
Sélection d’un mode
de lecture au hasard
Changement de l’affi-
chage
Défilement du titre
Basculement entre
AUTO et MANUAL
Appuyez sur SOURCE.
Touchez BAND.
Touchez c ou d.
*1
Touchez c ou d de façon
continue.
Touchez A.MENU puis
FUNCTION.
Touchez ab dans FUNC-
TION1.
Touchez ab dans FUNC-
TION2.
Touchez ab dans FUNC-
TION2 de façon continue.
Touchez ab dans FUNC-
TION3.
Touchez ab dans FUNC-
TION3 de façon continue.
Touchez c ou d dans
AUTO/MANUAL.
*1Vous pouvez utiliser cette fonction quand vous sélectionnez AUTO dans AUTO/MANUAL (A/M).
2
*
Vous pouvez utiliser cette fonction quand vous sélectionnez MANUAL dans
AUTO/MANUAL (A/M).
58
Fr
Page 59

Utilisation avec différents
appareils centraux
Appareils centraux du groupe 4
Commandes
Sélection de l’iPod
comme source
Sélection d’une catégorie
Sélection d’une liste Touchez a ou b.
Saut à une plage précédente ou suivante
Avance/retour ra-
*2
pide
Sélection d’une fonction
Pause d’une plage
musicale
Sélection d’une étendue de répétition
Sélection d’un mode
de lecture au hasard
Changement de l’affi-
chage
Défilement du titre
Basculement entre
AUTO et MANUAL
Appuyez sur SOURCE.
Touchez BAND.
Touchez c ou d.
*1
Touchez c ou d de façon
continue.
Touchez A.MENU ou appuyez sur le joystick puis touchez FUNCTION
Touchez SEND dans FUNC-
TION1.
Touchez SEND dans FUNC-
TION2.
Touchez SEND dans FUNC-
TION2 de façon continue.
Touchez SEND dans FUNC-
TION3.
Touchez SEND dans FUNC-
TION3 de façon continue.
Touchez AUTO/MANUAL.
*3
.
Section
03
Français
*1Vous pouvez utiliser cette fonction quand vous sélectionnez AUTO dans AUTO/MANUAL (A/M).
2
*
Vous pouvez utiliser cette fonction quand vous sélectionnez MANUAL dans
AUTO/MANUAL (A/M).
3
*
Dans le cas de AVIC-D2, vous ne pouvez pas utiliser A.MENU.
59
Fr
Page 60

Section
03
Utilisation avec différents
appareils centraux
Présentation générale des modes de sélection de la liste
de lecture et des préférences
1
Playlist 1
Playlist 2
Playlist 3
Playlist 9
1 Mode sélection de la liste de lecture
2 Mode préférences
L’appareil central compatible avec une liaison
iPod vous permet de sélectionner une liste de
plages musicales que vous voulez écouter
(liste de lecture, albums, etc.) en utilisant le
Mode sélection de liste de lecture et le Mode
préférences. Une présentation générale du
Mode sélection de liste de lecture et du Mode
préférences est donnée plus haut, avec référence aux illustrations.
2
All
Alternative
Animation
Jazz
ALBUMARTISTGENREPLAYLIST
All
Artist 1
Artist 2
Artist 9
All
Album A
Album B
Album J
Recherche d’une plage de lecture
désirée à partir de GENRE (liste de
genres), ARTIST (liste d’interprètes)
et ALBUM (liste d’albums)
Choisissez un genre, un interprète ou un
album favori dans le Mode préférences. Le
Mode préférences vous permet de rechercher
vos plages musicales favorites à partir de listes séparées de genres, d’interprètes et d’albums, dans cet ordre.
Reportez-vous à la page suivante, Recherche
d’une plage particulière.
Lecture par sélection d’une liste
de lecture à partir de PLAYLIST
Choisissez une liste de lecture favorite en
Mode sélection de liste de lecture.
Reportez-vous à la page 62, Lecture par sélec-
tion d’une liste de lecture.
60
Fr
Page 61

Utilisation avec différents
appareils centraux
Section
03
Recherche d’une plage
particulière
Vous pouvez sélectionner et lire des plages
musicales de vos interprètes et de vos albums
favoris, etc., à partir de GENRE, ARTIST et
ALBUM. A titre d’exemple, ce qui suit donne
une explication de la procédure à suivre pour
sélectionner “Jazz” pour GENRE, “Artist 2”
pour ARTIST et “Album B” pour ALBUM en
utilisant l’illustration de la section précédente
intitulée Présentation générale des modes de
sélection de la liste de lecture et des préférences.
1 Utilisez BAND (BAND/ESC) pour passer
à GENRE.
GENRE s’affiche pendant environ deux secon-
des.
Chaque fois que vous appuyez sur
BAND (BAND/ESC) l’affichage change dans
l’ordre suivant :
PLAYLIST (listes de lecture)—GENRE (genres)
—ARTIST (artistes)—ALBUM (albums)
! ALL est programmé pour le réglage par dé-
faut de GENRE, ARTIST et ALBUM.
! Les conditions de préférence sont annulées
quand on passe de ALBUM à PLAYLIST.
Toutefois, la lecture de la liste en cours de
lecture (sous les conditions de préférence
les plus récentes) se poursuit jusqu’àce
que l’on exécute l’une ou l’autre des procédures suivantes avec la touche a ou b (ou
MULTI-CONTROL).
— Une liste différente est sélectionnée
— Une nouvelle liste de préférence a été
démarrée
2 Utilisez a ou b (ou MULTI-CONTROL)
pour sélectionner “Jazz”.
La lecture des plages musicales “Jazz”
commence.
3 Utilisez BAND (BAND/ESC) pour passer
à ARTIST.
ARTIST s’affiche pendant environ deux secon-
des.
4 Utilisez a ou b (ou MULTI-CONTROL)
pour sélectionner “Artist 2”.
La lecture des plages musicales de “Album B”
commence.
5 Utilisez BAND (BAND/ESC) pour passer
à ALBUM.
ALBUM s’affiche pendant environ deux secon-
des.
6 Utilisez a ou b (ou MULTI-CONTROL)
pour sélectionner “Album B”.
La lecture des plages musicales de “Album B”
commence.
7 Utilisez c ou d (ou MULTI-CONTROL)
pour sélectionner la plage musicale que
vous voulez écouter.
La lecture de la plage musicale sélectionnée
commence.
Autres procédures de
définition des préférences
Vous pouvez aussi fixer les préférences à partir
de ARTIST ou ALBUM.
Quand le genre de “Album B” n’est pas
connu
Basculez d’abord sur GENRE dans l’étape 1
puis annulez les conditions de préférence. Ensuite, continuez la procédure à partir de l’étape 3.
Français
61
Fr
Page 62

Section
03
Utilisation avec différents
appareils centraux
Quand le genre et l’interprète de
“Album B” ne sont pas connus
Basculez d’abord sur GENRE dans l’étape 1
puis annulez les conditions de préférence. Ensuite, continuez la procédure à partir de l’étape 5.
Remarques
! Si le genre a déjà été sélectionné, seuls les in-
terprètes et les albums du genre sélectionné
peuvent être sélectionnés. Si vous voulez sélectionner des artistes et des albums d’un
genre différent, répétez la procédure à partir
de l’étape 1.
! ALL est programmé pour le réglage par défaut
de GENRE, ARTIST et ALBUM.
! Les conditions de préférence sont annulées
quand on passe de ALBUM à PLAYLIST. Tou-
tefois, la lecture de la liste en cours de lecture
(sous les conditions de préférence les plus récentes) se poursuit jusqu’à ce que l’on exécute l’une ou l’autre des procédures suivantes
avec la touche a ou b (ou MULTI-CONTROL).
— Une liste différente est sélectionnée
— Une nouvelle liste de préférence a été
démarrée
PLAYLIST (listes de lecture)—GENRE (genres)
—ARTIST (artistes)—ALBUM (albums)
2 Utilisez a ou b (ou MULTI-CONTROL)
pour sélectionner la liste de lecture que
vous voulez écouter.
Utiliser a (ou pousser MULTI-CONTROL vers
le haut) sélectionne la liste de lecture précédente. Utiliser b (ou pousser
MULTI-CONTROL vers le bas) sélectionne la
liste de lecture suivante.
Le nom de la liste de lecture s’affiche pendant
environ deux secondes, puis la lecture de la
liste de lecture sélectionnée commence.
3 Utilisez c ou d (ou MULTI-CONTROL)
pour sélectionner la plage musicale que
vous voulez écouter.
La lecture de la plage musicale sélectionnée
commence.
Affichages d’informations
textuelles sur l’iPod
Vous pouvez afficher les informations textuelles enregistrées sur l’iPod.
Lecture par sélection d’une
liste de lecture
Vous pouvez sélectionner et lire une liste de
lecture que vous voulez écouter à partir de
PLAYLIST sur l’iPod.
1 Utilisez BAND (BAND/ESC) pour passer
à PLAYLIST.
PLAYLIST s’affiche pendant environ deux se-
condes.
Chaque fois que vous appuyez sur
BAND (BAND/ESC) l’affichage change dans
l’ordre suivant :
62
Fr
% Sélectionnez les informations désirées.
Reportez-vous à la page 57, Tableaux de compatibilité des fonctions.
Durée de lecture—Titre de la plage—Nom de
l’artiste—Titre de l’album—Mode de répétition
de lecture en cours—Mode de lecture au hasard en cours
# Si les caractères enregistrés sur l’iPod ne sont
pas compatibles avec l’appareil central, ils ne seront pas affichés.
Page 63

Utilisation avec différents
appareils centraux
Section
03
Remarques
! Quand vous utilisez cet appareil comme une
source extérieure, les appareils centraux peuvent afficher les 8 premières lettres du titre de
la plage musicale, le nom de l’artiste et le titre
de l’album.
! Vous pouvez faire défiler vers la gauche le titre
de la plage, le nom de l’artiste et le titre de
l’album.
Répétition de la lecture
Pour la lecture de plages musicales sur l’iPod,
il existe deux étendues de répétition de la lecture : TRK (répétition d’une plage musicale) et
ALL (répétition de toutes les plages musicales
de la liste).
! Si RPT est positionné sur TRK, vous ne pou-
vez pas sélectionner les autres plages.
% Choisissez l’étendue de répétition.
Reportez-vous à la page 57, Tableaux de compatibilité des fonctions.
! TRK – Répétition de la plage en cours de
lecture seulement
! ALL – Répétition de toutes les plages musi-
cales de la liste
% Sélectionnez le mode de lecture au hasard.
Reportez-vous à la page 57, Tableaux de compatibilité des fonctions.
! TRK – Lecture des plages musicales dans
un ordre au hasard à l’intérieur de la liste
! ALBUM – Sélectionne un album au hasard,
puis lit toutes les plages musicales de cet
album dans l’ordre
Français
Lecture des plages
musicales dans un ordre
aléatoire (shuffle)
Pour la lecture de plages musicales sur l’iPod,
il existe deux méthodes de lecture au hasard :
TRK (lecture des plages musicales dans un
ordre au hasard) et ALBUM (lecture des albums dans un ordre au hasard).
63
Fr
Page 64

Section
04
Connexions
Important
! Cet appareil est utilisable sur des véhicules
équipés d’une batterie 12 volts avec mise à la
masse du négatif. Avant de l’installer dans un
véhicule de loisirs, un camion ou un bus, vérifiez la tension de la batterie.
! Pour éviter des courts-circuits dans le système
électrique, n’oubliez pas de déconnecter le
câble * de la batterie avant de commencer
l’installation.
! Reportez-vous au manuel de l’utilisateur pour
avoir des détails sur la connexion de l’amplificateur de puissance et d’autres appareils,
puis effectuez correctement les connexions.
! Fixez le câblage avec des serre-fils ou de la
bande adhésive. Pour protéger les câbles, enroulez-les de bande adhésive là où ils sont en
contact avec des parties métalliques.
! Positionnez les câbles et attachez-les de façon
àcequ’ils ne puissent pas toucher des parties
mobiles telles que le levier de changement de
vitesse, le frein à main et les rails des sièges.
Ne faites pas passer les câbles dans des endroits qui deviennent chauds, tels que les orifices de chauffage. Si l’isolation des fils fond
ou est arrachée, il y a risque de court-circuit
avec le châssis du véhicule.
! Ne faîtes pas passer le fil jaune dans le
compartiment moteur à travers un trou pour
le connecter à la batterie. Cela endommagera
l’isolation du fil et provoquera un court-circuit
très dangereux.
! Ne raccourcissez pas les fils. Cela pourrait
empêcher le fonctionnement adéquat du circuit de protection.
! N’alimentez jamais un autre matériel en cou-
pant l’isolation du fil d’alimentation de l’appareil et en vous raccordant sur ce fil. La
capacité en courant du fil sera dépassée, ce
qui provoquera une surchauffe.
! Lors du remplacement du fusible, assurez-
vous que vous utilisez uniquement un fusible
correspondant aux spécifications indiquées
sur le porte-fusibles.
! Pour empêcher une connexion incorrecte, le
côté entrée du connecteur du IP-BUS est bleu,
et le côté sortie est noir. Raccordez les
connecteur de même couleur correctement.
! Pour que cet appareil fonctionne correcte-
ment, connectez uniquement le connecteur
de station d’accueil à l’iPod.
! Avant de connecter le connecteur de station
d’accueil à l’iPod, déconnectez les écouteurs
de l’iPod.
Les cordons fournis pour ce produit et ceux
d’autre produits peuvent avoir des couleurs différentes mêmes s’ils ont la même fonction. Si
vous connectez ce produit à un autre produit,
reportez-vous aux modes d’emploi des deux
produits et utilisez des cordons qui ont la
même fonction.
64
Fr
Page 65

Connexions
Connexion des appareils
Section
04
Appareil central
Vers l’entrée IP-BUS
(bleu)
iPod avec connecteur Dock
Port de connexion Dock
Connecteur Dock
Jaune
Vers la borne toujours alimentée
quelle que soit la position du
contact d’allumage.
1,5 m
Cet appareil
1,5 m
Noir
Fusible (2 A)
Lecteur de CD à
chargeur (vendu
séparément)
Câble IP-BUSCâble IP-BUS
Bleu
Français
Noir (terre)
Au châssis (métallique) du véhicule.
65
Fr
Page 66

Section
05
Installation
Important
! Avant d’effectuer l’installation définitive de
l’appareil, réalisez un câblage temporaire
pour vérifier que les connexions sont correctes et que le système fonctionne normalement.
! Pour assurer une installation correcte, utilisez
uniquement des pièces fournies avec l’appareil. L’utilisation de pièces non autorisées peut
provoquer des dysfonctionnements.
! Consultez votre revendeur le plus proche si
l’installation nécessite le percement de trous
ou d’autres modifications du véhicule.
! Installez l’appareil à un endroit où il ne gêne
pas le conducteur et où il ne peut pas blesser
le passager en cas d’arrêt soudain, par exemple un arrêt d’urgence.
! Lors du montage de cet appareil, assurez-vous
qu’aucun fil n’est coincé entre l’appareil et les
parties métalliques ou les équipements environnants.
! Ne montez pas cet appareil dans un endroit
situé près d’un orifice de chauffage, où il serait affecté par la chaleur, ou près des portes,
où il pourrait être mouillé par la pluie.
! Avant de percer un trou de montage vérifiez
toujours derrière l’emplacement où vous voulez percer le trou. Ne percez pas de trou dans
le conduit d’essence, le conduit de frein, un
câble électrique ou d’autres pièces importantes.
! Si l’appareil est installé dans le compartiment
passager, fixez-le solidement de façon qu’il ne
se détache pas quand le véhicule est en mouvement, ce qui risquerait de provoquer des
blessures ou un accident.
! Si l’appareil est installé sous un siège avant,
assurez-vous qu’il ne gêne pas le déplacement du siège. Faites passer tous les fils et les
cordons soigneusement autour du mécanisme de glissière de façon qu’ils ne soient
pas coincés dans le mécanisme ou pincés par
lui, et provoquent pas de court-circuit.
Installation de l’appareil
Montage avec des fixations
Velcro
Essuyez parfaitement la surface avant de
poser les fixations Velcro.
! Si les fixations Velcro (dures) adhèrent di-
rectement au tapis de la voiture, vous pouvez installer cet appareil sans utiliser les
fixations Velcro (souples).
% Montez cet appareil en utilisant les fixations Velcro.
Cet appareil
Fixation Velcro (dure)
Fixation Velcro (souple)
Tapis ou châssis de la voiture
66
Fr
Page 67

Informations
complémentaires
Annexe
Dépannage
Symptôme Causes possi-
L’iPod ne fonc-
tionne pas correctement.
bles
Les câbles ne
sont pas connectés correctement.
Action corrective
Déconnectez le
câble de l’iPod.
Quand le menu
principal de l’iPod
est affiché, reconnectez le câble.
Réinitialisez l’iPod.
Signification des messages
d’erreur
Quand vous contactez votre distributeur ou le
Service d’entretien agréé par Pioneer le plus
proche, n’oubliez pas de noter le message
d’erreur.
Message Causes possi-
bles
ERROR-11 Panne de
communication
ERROR-21 Version iPod an-
cienne
ERROR-30 Panne iPod Réinitialisez l’iPod.
NO TRACK Aucune plages
musicales
STOP Aucune plage
musicale dans la
liste en cours
Action corrective
Déconnectez le
câble de l’iPod.
Quand le menu
principal de l’iPod
est affiché, reconnectez le câble.
Réinitialisez l’iPod.
Mettez à jour la version d’iPod.
Transférez les plages musicales sur
l’iPod.
Sélectionnez une
liste qui contient
les plages musicales.
Caractéristiques techniques
Généralités
Alimentation .............................. 14,4 V DC (10,8 V à 15,1 V
acceptable)
Mise à la masse ....................... Pôle négatif
Consommation maximale ... 2,0 A
Dimensions (L x H x P) ......... 95 × 25 × 91 mm
Poids .............................................. 0,33 kg
Remarque
Les caractéristiques et la présentation peuvent
être modifiées sans avis préalable à fin
d’amélioration.
Français
67
Fr
Page 68

Sommario
Grazie per aver acquistato questo prodotto Pioneer.
Leggere attentamente queste istruzioni operative, in modo da imparare come azionare correttamente il modello. Dopo aver terminato la lettura delle istruzioni, conser-
vare questo manuale in un luogo sicuro, per consultazione futura.
Prima di iniziare
Informazioni sull’unità 69
Informazioni su questo manuale 69
Informazioni sul dispositivo iPod 69
– Informazioni sulle impostazioni
dell’iPod 70
Collegamento e disconnessione
dell’iPod 70
Riproduzione di brani sull’iPod
Riproduzione di brani sull’iPod 71
Scorrimento dei brani 71
Messa in pausa di un brano 72
Visualizzazione delle informazioni di testo
sull’iPod 72
Riproduzione ripetuta 72
Riproduzione di brani in ordine casuale
(shuffle) 72
Funzionamento con unità principali
differenti
Uso del dispositivo come unità esterna 73
Tabelle di compatibilità delle funzioni 73
– Gruppo di unità principali 1 73
– Gruppo di unità principali 2 74
– Gruppo di unità principali 3 74
– Gruppo di unità principali 4 75
Panoramica sulle modalità di selezione delle
liste di riproduzione e delle preferenze 76
– Riproduzione selezionando una lista di
riproduzione da PLAYLIST 76
– Ricerca del brano desiderato da
GENRE (elenco dei generi), ARTIST
(elenco degli artisti) e ALBUM (elenco
degli album) 76
Ricerca del brano desiderato 77
– Altre procedure per l’impostazione
delle preferenze 77
Riproduzione selezionando una lista di
riproduzione 78
Visualizzazione delle informazioni di testo
sull’iPod 78
Riproduzione ripetuta 79
Riproduzione di brani in ordine casuale
(shuffle) 79
Collegamenti
Collegamento delle unità 81
Installazione
Installazione dell’unità 82
– Installazione con fermi in Velcro 82
Informazioni supplementari
Risoluzione dei problemi 83
Spiegazione dei messaggi di errore 83
Dati tecnici 83
68
It
Page 69

Prima di iniziare
Sezione
01
Informazioni sull’unità
Questa unità è l’adattatore che consente di
controllare e ascoltare brani, tramite un’unità
principale Pioneer, con dispositivi iPod dotati
di connettore Dock.
! iPod è un marchio di Apple Computer, Inc.,
registrato negli Stati Uniti e in altri Paesi.
! Questa unità è progettata per l’utilizzo
esclusivo su veicoli.
! L’unità è compatibile esclusivamente con
dispositivi iPod dotati di connettore Dock.
! Questa unità non è compatibile con versio-
ni del software precedenti all’aggiornamento iPod 2004-10-20. Per informazioni sulle
versioni compatibili, consultare il rivenditore Pioneer più vicino.
! Il funzionamento può variare a seconda
della versione del software di iPod.
ATTENZIONE
! Non lasciare che questa unità entri a contatto
con liquidi, in caso contrario possono verificarsi scosse elettriche. Inoltre, se questa unità
entra a contatto con liquidi, può subire danni
oppure emettere fumo o surriscaldarsi.
! Tenere questo manuale a portata di mano
come riferimento per le procedure e le precauzioni operative.
! Mantenere sempre il volume abbastanza
basso, in modo da poter udire i suoni provenienti dall’esterno del veicolo.
! Proteggere questa unità dall’umidità.
! Nel caso che questo prodotto non funzioni
correttamente, contattare il rivenditore o il
Centro di assistenza autorizzato Pioneer più vicino.
Informazioni su questo
manuale
Azionare questa unità tramite l’unità principale collegata. Le istruzioni in questo manuale
usano l’unità AVH-P5700DVD (AVHP5750DVD) come unità principale di esempio.
Se si utilizzano unità principali diverse dal modello AVH-P5700DVD (AVH-P5750DVD), vedere
Funzionamento con unità principali differenti a
pagina 73.
Raccomandiamo di familiarizzarsi con le funzioni e il loro significato leggendo completamente il manuale prima di iniziare a usare
l’unità. È particolarmente importante leggere
e osservare le precauzioni contrassegnate da
AVVERTENZA e ATTENZIONE in questo
manuale.
Informazioni sul
dispositivo iPod
ATTENZIONE
! Pioneer non si assume alcuna responsabilità
per l’eventuale perdita di dati dall’iPod se i
dati vengono persi durante l’uso con questa
unità.
! Non esporre l’iPod alla luce solare diretta
quando non viene utilizzato. L’esposizione pro-
lungata alla luce solare diretta può provocare
malfunzionamenti dell’iPod provocati dalle
conseguenti alte temperature.
! Non lasciare l’iPod a temperature elevate o in
una posizione esposta alla luce solare diretta.
! Assicurare saldamente l’iPod quando viene
utilizzato con questa unità. Non lasciar cadere
l’iPod sul fondo della vettura, dove potrebbe
incastrarsi sotto il pedale del freno o dell’acceleratore.
Italiano
Per dettagli, vedere la documentazione dell’i-
Pod.
69
It
Page 70

Sezione
01
Prima di iniziare
Informazioni sulle
impostazioni dell’iPod
! Non è possibile utilizzare l’equalizzatore
dell’iPod sui prodotti Pioneer. Si consiglia
di disattivare l’equalizzatore dell’iPod prima
di collegare l’iPod a questa unità.
! Non è possibile disattivare l’opzione di ripe-
tizione dell’iPod se il dispositivo viene utilizzato con questa unità. Anche se si disattiva
l’opzione di ripetizione sull’iPod, l’opzione
viene automaticamente attivata per tutti i
brani quando si collega l’iPod a questa
unità.
! La funzione di riproduzione casuale dell’i-
Pod viene controllata dall’opzione Random
dei prodotti Pioneer.
Collegamento e
disconnessione dell’iPod
! Collegare solo il connettore dock all’iPod in
modo che questa unità funzioni correttamente.
! Prima di collegare il connettore dock all’i-
Pod, scollegare gli auricolari dall’iPod.
% Rimuovere l’iPod da questa unità.
Quando si rimuove l’iPod da questa unità,
dopo alcuni istanti viene visualizzato il menu
principale dell’iPod.
% Collegare l’iPod a questa unità.
Appena l’iPod viene collegato, si accende
automaticamente.
Quando l’iPod è collegato a questa unità, sull’iPod viene visualizzata l’indicazione PIONEER
(o
(un segno di spunta)).
! Quando l’interruttore della chiave di avvia-
mento è posizionato su ACC o ON, la batteria dell’iPod si carica se il dispositivo è
collegato a questa unità.
! Quando l’iPod è collegato a questa unità,
non è possibile accendere o spegnere auto-
nomamente l’iPod.
# L’iPod collegato a questa unità si spegne circa
due minuti dopo che l’interruttore della chiave di
avviamento è stato portato in posizione OFF.
70
It
Page 71

1
3
2
465
Riproduzione di brani
sull’iPod
Sezione
02
Riproduzione di brani sull’iPod
1 Icona della sorgente
Mostra la sorgente selezionata.
2 Indicatore del numero del brano
Mostra il numero del brano riprodotto nell’elenco selezionato.
3 Indicatore del tempo di riproduzione
Mostra il tempo di riproduzione trascorso
del brano corrente.
4 Indicatore del titolo del brano
Mostra il titolo del brano correntemente in
riproduzione.
5 Indicatore di ripetizione
Indica quando per il brano corrente è stato
selezionato l’intervallo di ripetizione.
6 Indicatore RDM
Mostra se la riproduzione casuale è impostata su TRACK o ALBUM.
1 Toccare l’icona della sorgente e quindi
iPod per selezionare l’iPod.
# È inoltre possibile selezionare l’iPod come sor-
gente premendo ripetutamente SOURCE.
# Se l’iPod non è collegato a questa unità, non
è possibile selezionare l’iPod come sorgente.
2 Toccare lo schermo per visualizzare i
tasti del touch panel.
3 Per passare a un altro brano all’indietro
o in avanti, toccare o o p.
Toccando p si passa all’inizio del brano successivo. Toccando una volta o si passa all’i-
nizio del brano corrente. Toccando di nuovo lo
stesso tasto si salta al brano precedente.
# È inoltre possibile passare a un altro brano all’indietro o in avanti premendo c o d.
4 Per eseguire l’avanzamento rapido o la
modalità inversa, mantenere premuto o
o p.
# È inoltre possibile eseguire la modalità inversa
rapida o l’avanzamento rapido premendo e tenendo premuto c o d.
Scorrimento dei brani
Il funzionamento di questa unità per controllare l’iPod è concepito per essere quanto più simile possibile a quello dell’iPod e semplificare
le operazioni e la ricerca dei brani.
1 Toccare TOP per visualizzare il menu superiore.
2 Toccare una delle categorie in cui si desidera ricercare i brani.
! PLAYLISTS (liste di riproduzione)
! GENRES (generi)
! ARTISTS (artisti)
! ALBUMS (album)
! SONGS (brani)
3 Toccare il titolo della lista che si desidera riprodurre.
Ripetere questa operazione fino a quando si
individua il brano desiderato.
# È possibile avviare la riproduzione tramite la
lista selezionata se si tocca e si tiene premuto il
titolo della lista.
Italiano
71
It
Page 72

Sezione
02
Riproduzione di brani
sull’iPod
# Per passare al gruppo successivo di titoli delle
liste, toccare
# Per passare al gruppo precedente di titoli
delle liste, toccare
# Per tornare al menu precedente, toccare .
# Per passare al menu superiore della ricerca
delle liste, toccare TOP.
.
.
Messa in pausa di un brano
La pausa consente di arrestare temporaneamente la riproduzione di un brano.
% Toccare f durante la riproduzione.
Sul display viene visualizzata l’indicazione
PAUSE.
# Per riprendere la riproduzione dallo stesso
punto nel quale si è attivata la pausa, toccare
nuovamente f.
# È possibile inoltre attivare o disattivare la
pausa premendo PGM.
Visualizzazione delle
informazioni di testo sull’iPod
È possibile visualizzare le informazioni di testo
sull’iPod.
% Toccare DISP.
Se si tocca ripetutamente DISP, sul display
vengono visualizzate le impostazioni seguenti:
T. Title (titolo del brano)— Artist (nome degli
artisti)—Album (titolo dell’album)
# Se i caratteri registrati sull’iPod non sono
compatibili con l’unità principale, tali caratteri
non verranno visualizzati.
Nota
È possibile scorrere a sinistra del titolo premendo
ripetutamente DISP.
Riproduzione ripetuta
Per la riproduzione dei brani dell’iPod, sono disponibili due intervalli di riproduzione ripetuta:
TRACK (ripete un brano) e ALL (ripete tutti i
brani della lista).
! Se l’opzione REPEAT è impostata su
TRACK, non è possibile selezionare gli altri
brani.
1 Premere A.MENU e quindi toccare FUNC
per visualizzare i nomi delle funzioni.
2 Toccare REPEAT per selezionare l’intervallo di ripetizione.
Toccare ripetutamente REPEAT fino a quando
l’intervallo di ripetizione desiderato viene visualizzato sul display.
! TRACK – Ripete solo il brano corrente
! ALL – Ripete tutti i brani dell’elenco selezio-
nato
Riproduzione di brani in
ordine casuale (shuffle)
Per la riproduzione dei brani dell’iPod, sono disponibili due metodi di riproduzione casuale:
TRACK (riproduce i brani in ordine casuale) e
ALBUM (riproduce gli album in ordine casua-
le).
1 Premere A.MENU e quindi toccare FUNC
per visualizzare i nomi delle funzioni.
2 Toccare RANDOM per selezionare il metodo di riproduzione casuale.
Toccare ripetutamente RANDOM fino a quando il metodo di riproduzione casuale desiderato viene visualizzato sul display.
! TRACK – Riproduce in ordine casuale i
brani contenuti nell’elenco selezionato
! ALBUM – Seleziona casualmente un album
e quindi riproduce in ordine tutti i relativi
brani
72
It
Page 73

Funzionamento con unità
principali differenti
Sezione
03
Uso del dispositivo come
unità esterna
Le unità principali elencate di seguito controllano questa unità come un’unità esterna. Per
ulteriori dettagli sulle unità esterne, vedere il
manuale dell’unità principale.
! Non è possibile utilizzare FUNC4 (F4),
FUNCTION4 e 1–6KEY per controllare que-
sta unità.
Gruppo di unità principali 1
Le unità principali riportate di seguito vengono
controllate tramite il tasto FUNCTION o tramite tasto SOFT KEY.
DEH-P9450MP, DEH-P9400MP, DEH-P7700MP
(modello europeo), DEH-P6880MP, DEHP6800MP (modello europeo), DEH-P6750MP,
DEH-P6700MP, DEH-P5850MP, DEHP5850MPH, DEH-P5800MP, DEH-P5750MP,
DEH-P5730MP, DEH-P5700MP, DEH-P4880MP,
DEH-P4850MP, DEH-P4850MPH, DEHP4800MP, DEH-P4770MP, DEH-P4750MP, DEHP4700MP, DEH-P3800MP, DEH-P940MP, DEHP670MP, DEH-P580MP, DEH-P480MP, DEHP470MP, DVH-P5850MP, DVH-P5650MP, DVHP580MP, FH-P9200MP, FH-P4200MP
Gruppo di unità principali 2
Le unità principali riportate di seguito vengono
controllate tramite MULTI-CONTROL.
DEH-P8650MP, DEH-P8600MP, DEH-P7750MP,
DEH-P7700MP (modello del Nordamerica),
DEH-P860MP, DEH-P770MP, DEH-P80MP,
DEH-P8MP, DEH-P1Y
Gruppo di unità principali 3
Le unità principali riportate di seguito vengono
controllate tramite i tasti del touch panel.
AVH-P7650DVD, AVH-P7600DVD, AVHP7550DVD, AVH-P7500DVDN, AVH-P7500DVD,
AVH-P6650DVD, AVH-P6600DVD, AVHP6550DVD, AVH-P6500DVD
Gruppo di unità principali 4
Le unità principali e le unità di navigazione riportate di seguito vengono controllate tramite
i tasti del touch panel.
AVIC-D2, AVIC-N1, AVIC-X1
Tabelle di compatibilità
delle funzioni
Gruppo di unità principali 1
Comandi
Selezione dell’iPod
come sorgente
Selezione di una categoria
Selezione di una una
lista
Passaggio a un altro
brano all’indietro o in
*1
avanti
Avanzamento rapido/
modalità inversa rapi-
*2
da
Selezione di una funzione
Messa in pausa di un
brano
Selezione di un intervallo di ripetizione
Selezione di un metodo di riproduzione casuale
Commutazione del display
Premere SOURCE.
Premere BAND (BAND/ESC).
Premere a o b.
Premere c o d.
Premere e tenere premuto c
o d.
Premere FUNCTION (FUNC).
Premere a o b in FUNC1
(F1).
Premere a o b in FUNC2
(F2).
Premere e tenere premuto a
o b in FUNC2 (F2).
Premere a o b in FUNC3
(F3).
Italiano
*1È possibile utilizzare questa funzione se si seleziona AUTO in AUTO/MANUAL (A/M).
2
*
È possibile utilizzare questa funzione se si seleziona MANUAL in AUTO/MANUAL (A/M).
73
It
Page 74

Sezione
03
Funzionamento con unità
principali differenti
Comandi
Scorrimento del titolo
Commutazione tra
AUTO e MANUAL
Premere e tenere premuto a
o b in FUNC3 (F3).
Premere c o d in AUTO/
MANUAL (A/M).
Gruppo di unità principali 2
Comandi
Selezione dell’iPod
come sorgente
Selezione di una categoria
Selezione di una una
lista
Passaggio a un altro
brano all’indietro o in
*1
avanti
Avanzamento rapido/
modalità inversa rapi-
*2
da
Selezione di una funzione
Messa in pausa di un
brano
Selezione di un intervallo di ripetizione
Selezione di un metodo di riproduzione casuale
Commutazione del display
Scorrimento del titolo
Commutazione tra
AUTO e MANUAL
Premere SOURCE.
Premere BAND (BAND/ESC).
Spingere MULTI-CONTROL
in alto o in basso.
Spingere MULTI-CONTROL a
sinistra o a destra.
Spingere e tenere premuto
MULTI-CONTROL a sinistra
o a destra.
Utilizzare MULTI-CONTROL.
Premere MULTI-CONTROL
in FUNC1 (F1).
Premere MULTI-CONTROL
in FUNC2 (F2).
Premere e tenere premuto
MULTI-CONTROL in FUNC2
(F2).
Premere MULTI-CONTROL
in FUNC3 (F3).
Premere e tenere premuto
MULTI-CONTROL in FUNC3
(F3).
Premere MULTI-CONTROL
in AUTO/MANUAL (A/M).
Gruppo di unità principali 3
Comandi
Selezione dell’iPod
come sorgente
Selezione di una categoria
Selezione di una una
lista
Passaggio a un altro
brano all’indietro o in
*1
avanti
Avanzamento rapido/
modalità inversa rapi-
*2
da
Selezione di una funzione
Messa in pausa di un
brano
Selezione di un intervallo di ripetizione
Selezione di un metodo di riproduzione casuale
Commutazione del display
Scorrimento del titolo
Commutazione tra
AUTO e MANUAL
Premere SOURCE.
Toccare BAND.
Toccare a o b.
Toccare c o d.
Toccare e tenere premuto c
o d.
Toccare A.MENU e quindi
toccare FUNCTION.
Toccare ab in FUNCTION1.
Toccare ab in FUNCTION2.
Toccare e tenere premuto
ab in FUNCTION2.
Toccare ab in FUNCTION3.
Toccare e tenere premuto
ab in FUNCTION3.
Toccare c o d in AUTO/MA-
NUAL.
*1È possibile utilizzare questa funzione se si seleziona AUTO in AUTO/MANUAL (A/M).
2
*
È possibile utilizzare questa funzione se si seleziona MANUAL in AUTO/MANUAL (A/M).
74
It
Page 75

Funzionamento con unità
principali differenti
Gruppo di unità principali 4
Comandi
Selezione dell’iPod
come sorgente
Selezione di una categoria
Selezione di una una
lista
Passaggio a un altro
brano all’indietro o in
*1
avanti
Avanzamento rapido/
modalità inversa rapi-
*2
da
Selezione di una funzione
Messa in pausa di un
brano
Selezione di un intervallo di ripetizione
Selezione di un metodo di riproduzione casuale
Commutazione del display
Scorrimento del titolo
Commutazione tra
AUTO e MANUAL
Premere SOURCE.
Toccare BAND.
Toccare a o b.
Toccare c o d.
Toccare e tenere premuto c
o d.
Toccare A.MENU o premere
il joystick e quindi toccare
FUNCTION
Toccare SEND in FUNCTION1.
Toccare SEND in FUNCTION2.
Toccare e tenere premuto
SEND in FUNCTION2.
Toccare SEND in FUNC-
TION3.
Toccare e tenere premuto
SEND in FUNCTION3.
Toccare AUTO/MANUAL.
*3
.
Sezione
03
Italiano
*1È possibile utilizzare questa funzione se si seleziona AUTO in AUTO/MANUAL (A/M).
2
*
È possibile utilizzare questa funzione se si seleziona MANUAL in AUTO/MANUAL (A/M).
3
*
In caso di utilizzo di dispositivi AVIC-D2, non è possibile utilizzare A.MENU.
75
It
Page 76

Sezione
03
Funzionamento con unità
principali differenti
Panoramica sulle modalità di selezione delle liste di
riproduzione e delle preferenze
1
Playlist 1
Playlist 2
Playlist 3
Playlist 9
1 Modalità di selezione delle liste di riproduzione
2 Modalità preferenze
L’unità principale compatibile con collega-
mento all’iPod consente di selezionare una
lista di brani che si desidera ascoltare (liste di
riproduzione, album, ecc.) utilizzando la modalità di selezione delle liste di riproduzione e
delle preferenze. Sopra viene fornita una panoramica sulle modalità di selezione delle liste di
riproduzione e delle preferenze, completa di riferimenti alle illustrazioni.
2
All
Alternative
Animation
Jazz
ALBUMARTISTGENREPLAYLIST
All
Artist 1
Artist 2
Artist 9
All
Album A
Album B
Album J
Ricerca del brano desiderato da
GENRE (elenco dei generi),
ARTIST (elenco degli artisti) e
ALBUM (elenco degli album)
Scelta di un genere, artista o album preferito
in modalità preferenze. La modalità preferenze
consente di ricercare il brano preferito da liste
separate di generi, artisti e album, secondo
questo ordine.
Vedere Ricerca del brano desiderato nella pagina seguente.
Riproduzione selezionando una
lista di riproduzione da PLAYLIST
Scegliere una lista di riproduzione preferita
nella modalità di selezione delle liste di riproduzione.
Vedere Riproduzione selezionando una lista di
riproduzione a pagina 78.
76
It
Page 77

Funzionamento con unità
principali differenti
Sezione
03
Ricerca del brano desiderato
È possibile selezionare e riprodurre brani di artisti, album, ecc. preferiti dalle opzioni GENRE,
ARTIST e ALBUM. Come esempio, viene riportata una spiegazione della procedura per selezionare “Jazz” per l’opzione GENRE, “Artist 2”
per l’opzione ARTIST e “Album B” per l’opzione ALBUM, utilizzando l’illustrazione della sezione precedente, denominata Panoramica
sulle modalità di selezione delle liste di riproduzione e delle prefer enze.
1 Utilizzare BAND (BAND/ESC) per selezionare GENRE.
Viene visualizzata l’indicazione GENRE per
circa due secondi.
Ogni volta che si preme BAND (BAND/ESC) il
display cambia nell’ordine seguente:
PLAYLIST (liste di riproduzione)—GENRE (generi)—ARTIST (artisti)—ALBUM (album)
! L’opzione ALL viene impostata come impo-
stazione predefinita per GENRE, ARTIST e
ALBUM.
! Le condizioni delle preferenze vengono can-
cellate quando si passa da ALBUM a
PLAYLIST. Tuttavia, la lista correntemente
in riproduzione (nelle condizioni delle preferenze più recenti) continua a essere riprodotta finché una delle seguenti procedure
non viene eseguita tramite i pulsanti a o b
(oppure MULTI-CONTROL).
— Viene selezionata una lista diversa
— Viene avviata una nuova lista delle prefe-
renze
2 Utilizzare a o b (oppure
MULTI-CONTROL) per selezionare “Jazz” .
Viene avviata la riproduzione dei brani per l’opzione “Jazz”.
3 Utilizzare BAND (BAND/ESC) per selezionare ARTIST.
Viene visualizzata l’indicazione ARTIST per
circa due secondi.
4 Utilizzare a o b (oppure
MULTI-CONTROL) per selezionare
“Artist 2”.
Viene avviata la riproduzione dei brani per l’opzione “Album B”.
5 Utilizzare BAND (BAND/ESC) per selezionare ALBUM.
Viene visualizzata l’indicazione ALBUM per
circa due secondi.
6 Utilizzare a o b (oppure
MULTI-CONTROL) per selezionare
“Album B”.
Viene avviata la riproduzione dei brani per l’opzione “Album B”.
7 Utilizzare c o d (oppure
MULTI-CONTROL) per selezionare il brano
che si desidera ascoltare.
Viene avviata la riproduzione del brano selezionato.
Altre procedure per
l’impostazione delle preferenze
È inoltre possibile impostare le preferenze da
ARTIST o ALBUM.
Se il genere per l’opzione “Album B” è
sconosciuto
Passare prima all’opzione GENRE del passaggio 1, quindi annullare le condizioni per la preferenza. Successivamente, continuare la
procedura a partire dal passaggio 3.
Se il genere e l’artista per l’opzione
“Album B” sono sconosciuti
Passare prima all’opzione GENRE del passaggio 1, quindi annullare le condizioni per la preferenza. Successivamente, continuare la
procedura a partire dal passaggio 5.
Italiano
77
It
Page 78

Sezione
03
Funzionamento con unità
principali differenti
Note
! Se il genere è già stato selezionato, sarà possi-
bile selezionare esclusivamente gli artisti e gli
album per il genere selezionato. Se si desidera
selezionare artisti e album di un genere diverso, ripetere la procedura a partire dal passaggio 1.
! L’opzione ALL viene impostata come imposta-
zione predefinita per GENRE, ARTIST e
ALBUM.
! Le condizioni delle preferenze vengono can-
cellate quando si passa da ALBUM a
PLAYLIST. Tuttavia, la lista correntemente in
riproduzione (nelle condizioni delle preferenze
più recenti) continua a essere riprodotta finché una delle seguenti procedure non viene
eseguita tramite i pulsanti a o b (oppure
MULTI-CONTROL).
— Viene selezionata una lista diversa
— Viene avviata una nuova lista delle prefe-
renze
Riproduzione selezionando
una lista di riproduzione
È possibile selezionare e riprodurre la lista di
riproduzione che si desidera ascoltare dall’opzione PLAYLIST dell’iPod.
1 Utilizzare BAND (BAND/ESC) per selezionare PLAYLIST.
Viene visualizzata l’indicazione PLAYLIST per
circa due secondi.
Ogni volta che si preme BAND (BAND/ESC) il
display cambia nell’ordine seguente:
PLAYLIST (liste di riproduzione)—GENRE (generi)—ARTIST (artisti)—ALBUM (album)
2 Utilizzare a o b (oppure
MULTI-CONTROL) per selezionare la lista di
riproduzione che si desidera ascoltare.
Utilizzando a (o spingendo MULTI-CONTROL
in alto) viene selezionata la lista di riproduzione precedente. Utilizzando b (o spingendo
MULTI-CONTROL in basso) viene selezionata
la lista di riproduzione successiva.
Il nome della lista di riproduzione viene visualizzato per circa due secondi, quindi viene avviata la riproduzione della lista selezionata.
3 Utilizzare c o d (oppure
MULTI-CONTROL) per selezionare il brano
che si desidera ascoltare.
Viene avviata la riproduzione del brano selezionato.
Visualizzazione delle
informazioni di testo sull’iPod
È possibile visualizzare le informazioni di testo
sull’iPod.
% Selezionare le informazioni desiderate.
Vedere Tabelle di compatibilità delle funzioni a
pagina 73.
Tempo di riproduzione—Titolo del brano—
Nome degli artisti—Titolo dell’album—Stato
della riproduzione ripetuta—Stato della riproduzione casuale
# Se i caratteri registrati sull’iPod non sono
compatibili con l’unità principale, tali caratteri
non verranno visualizzati.
Note
! Se si utilizza questa unità come unità esterna,
le unità principali possono visualizzare le
prime 8 lettere del titolo del brano, del nome
degli artisti e del titolo dell’album.
78
It
Page 79

Funzionamento con unità
principali differenti
! È possibile scorrere a sinistra il titolo del
brano, il nome degli artisti e il titolo dell’album.
Riproduzione ripetuta
Per la riproduzione dei brani dell’iPod, sono disponibili due intervalli di riproduzione ripetuta:
TRK (ripete un brano) e ALL (ripete tutti i brani
della lista).
! Se l’opzione RPT è impostata su TRK, non è
possibile selezionare gli altri brani.
% Selezionare l’intervallo di ripetizione.
Vedere Tabelle di compatibilità delle funzioni a
pagina 73.
! TRK – Ripete solo il brano corrente
! ALL – Ripete tutti i brani della lista
Sezione
03
Riproduzione di brani in
ordine casuale (shuffle)
Per la riproduzione dei brani dell’iPod, sono disponibili due metodi di riproduzione casuale:
TRK (riproduce i brani in ordine casuale) e
ALBUM (riproduce gli album in ordine casua-
le).
% Selezionare il metodo di riproduzione
casuale.
Vedere Tabelle di compatibilità delle funzioni a
pagina 73.
! TRK – Riproduce in ordine casuale i brani
contenuti nella lista
! ALBUM – Seleziona casualmente un album
e quindi riproduce in ordine tutti i relativi
brani
Italiano
79
It
Page 80

Sezione
04
Collegamenti
Importante
! Questa unità è compatibile con i veicoli dotati
di batteria da 12 volt e messa a terra negativa.
Prima di installarla in un veicolo per uso privato, su un camion o un bus, controllare la tensione della batteria.
! Per evitare cortocircuiti dell’impianto elettrico,
accertarsi di scollegare il cavo della batteria
* prima di cominciare l’installazione.
! Vedere il manuale utente per dettagli sul colle-
gamento dell’amplificatore di potenza e delle
altre unità, quindi eseguire correttamente i
collegamenti.
! Assicurare i cavi con morsetti per cavi o na-
stro adesivo. Per proteggere i cavi, avvolgere
nastro adesivo attorno agli stessi nei punti in
cui entrano in contatto con parti metalliche.
! Installare e fissare tutti i cavi in modo che non
possano entrare in contatto con componenti
mobili, come la leva del cambio, la leva del
freno di stazionamento e i binari dei sedili.
Non installare i cavi in luoghi soggetti a surriscaldamento, come le bocchette dell’impianto
di riscaldamento. Se l’isolante dei cavi fonde o
si usura, sussiste il pericolo di cortocircuito
dei cavi con la scocca del veicolo.
! Non instradare il cavo giallo attraverso fori del
vano motore per collegare la batteria, in caso
contrario l’isolante del cavo può subire danni,
provocando un cortocircuito estremamente
pericoloso.
! Non mettere in cortocircuito i cavi. In caso
contrario, il circuito di protezione potrebbe
non funzionare correttamente in caso di necessità.
! Non erogare mai alimentazione ad altri appa-
recchi tagliando l’isolante del cavo di alimentazione dell’unità e collegando un secondo
cavo. La capacità di corrente del cavo risulterebbe insufficiente, provocando surriscaldamento.
! Quando si sostituisce il fusibile, accertarsi di
utilizzare esclusivamente un fusibile della
stessa portata del portafusibili.
! Per evitare collegamenti errati, il lato di ingres-
so del connettore IP-BUS è blu, mentre il lato
di uscita è nero. Collegare correttamente i
connettori dello stesso colore.
! Collegare solo il connettore dock all’iPod in
modo che questa unità funzioni correttamente.
! Prima di collegare il connettore dock all’iPod,
scollegare gli auricolari dall’iPod.
I cavi di questo prodotto potrebbero essere di
colore diverso da quelli di altri prodotti anche
se hanno la stessa funzione. Quando si collega
questo prodotto ad altri prodotti, vedere la documentazione fornita con entrambi i prodotti e
collegare i cavi che hanno la stessa funzione.
80
It
Page 81

Collegamenti
Collegamento delle unità
Sezione
04
Unità principale
All’ingresso IP-BUS
(blu)
iPod con connettore Dock
Porta connettore Dock
Connettore Dock
Giallo
Al terminale sempre alimentato,
indipendentemente dalla posizione
dell’interruttore della chiave di
avviamento.
1,5 m
Questa unità
1,5 m
Nero
Fusibile (2 A)
Lettore multi-CD
(venduto a parte)
Cavo IP-BUSCavo IP-BUS
Blu
Italiano
Nero (terra)
Alla scocca del veicolo (in metallo).
81
It
Page 82

Sezione
05
Installazione
Importante
! Prima di installare l’unità in modo definitivo,
collegare temporaneamente i cavi per verificare che i collegamenti siano stati eseguiti in
modo corretto e che il sistema funzioni adeguatamente.
! Per garantire la corretta installazione, utilizza-
re esclusivamente i componenti inclusi con
l’unità. L’uso di componenti non approvati
può provocare malfunzionamenti.
! Consultare il rivenditore più vicino se l’instal-
lazione richiede la trapanatura di fori o altre
modifiche del veicolo.
! Installare l’unità in modo che non ostacoli i
movimenti del conducente e non possa procurare lesioni al passeggero in caso di arresto
improvviso del veicolo, ad esempio in situazioni di emergenza.
! Quando si installa questa unità, accertarsi
che nessuno dei cavi sia collegato tra l’unità e
i raccordi o le parti metalliche circostanti.
! Non installare questa unità in prossimità delle
bocchette dell’impianto di riscaldamento,
dove potrebbe surriscaldarsi, o in prossimità
delle portiere, dove potrebbe entrare in contatto con acqua piovana.
! Prima di trapanare eventuali fori di montag-
gio, controllare l’altro lato della superfici su
cui si intende praticare il foro. Fare attenzione
a non trapanare i condotti del carburante, i
condotti dell’impianto frenante, il cablaggio
elettrico o altri componenti importanti.
! Se questa unità viene installata nel vano del
passeggero, fissarla saldamente in modo che
non posso muoversi liberamente quando il
veicolo è in movimento, provocando eventuali
lesioni o incidenti.
! Se questa unità viene installata al di sotto di
un sedile anteriore, accertarsi che non impedisca i movimenti del sedile. Installare con
cura tutti i cavi e i fili in prossimità del meccanismo di scorrimento, in modo che non possano incastrarsi nel meccanismo e provocare
un cortocircuito.
Installazione dell’unità
Installazione con fermi in
Velcro
Pulire con cura la superficie prima di fissare i
fermi in Velcro.
! Se i fermi in Velcro (duri) aderiscono diret-
tamente al pianale del veicolo, è possibile
installare questa unità senza utilizzare i
fermi in Velcro (morbidi).
% Installazione dell’unità utilizzando i
fermi in Velcro.
Questa unità
Fermo in Velcro (duro)
Fermo in Velcro (morbido)
Telaio o pianale del veicolo
82
It
Page 83

Informazioni
supplementari
Appendice
Risoluzione dei problemi
Sintomo Causa Azione
L’iPod non fun-
ziona correttamente.
I cavi sono collegati in modo non
corretto.
Scollegare il cavo
dall’iPod. Quando
viene visualizzato il
menu principale
dell’iPod, collegare
nuovamente il
cavo.
Reimpostare
l’iPod.
Spiegazione dei messaggi
di errore
Quando si contatta il rivenditore o il Centro assistenza Pioneer più vicino, accertarsi di riportare il messaggio di errore.
Messaggio Causa Azione
ERROR-11 Errore di comuni-
cazione
ERROR-21 Versione dell’i-
Pod obsoleta
ERROR-30 Errore dell’iPod Reimpostare
NO TRACK Nessun brano Scaricare i brani
STOP Nessun brano
presente nella
lista corrente
Scollegare il cavo
dall’iPod. Quando
viene visualizzato il
menu principale
dell’iPod, collegare
nuovamente il
cavo.
Reimpostare
l’iPod.
Aggiornare la versione dell’iPod.
l’iPod.
sull’iPod.
Selezionare una
lista che contenga
brani.
Dati tecnici
Generali
Alimentazione ........................... 14,4 V di c.c. (variazioni con-
sentite da 10,8 Va 15,1 V)
Messa a terra ............................. Negativa
Consumo massimo di corrente
..................................................... 2,0 A
Dimensioni (L × A × P) ....... 95 × 25 × 91 mm
Peso ............................................... 0,33 kg
Nota
Caratteristiche tecniche e design sono soggetti a
modifiche senza preavviso a causa di migliorie.
Italiano
83
It
Page 84

PIONEER CORPORATION
4-1, MEGURO 1-CHOME, MEGURO-KU, TOKYO 153-8654, JAPAN
PIONEER ELECTRONICS (USA) INC.
P.O. Box 1540, Long Beach, California 90801-1540, U.S.A.
TEL: (800) 421-1404
PIONEER EUROPE NV
Haven 1087, Keetberglaan 1, B-9120 Melsele, Belgium
TEL: (0) 3/570.05.11
PIONEER ELECTRONICS ASIACENTRE PTE. LTD.
253 Alexandra Road, #04-01, Singapore 159936
TEL: 65-6472-7555
PIONEER ELECTRONICS AUSTRALIA PTY. LTD.
178-184 Boundary Road, Braeside, Victoria 3195, Australia
TEL: (03) 9586-6300
PIONEER ELECTRONICS OF CANADA, INC.
300 Allstate Parkway, Markham, Ontario L3R OP2, Canada
TEL: 1-877-283-5901
PIONEER ELECTRONICS DE MEXICO, S.A. de C.V.
Blvd.Manuel Avila Camacho 138 10 piso
Col.Lomas de Chapultepec, Mexico, D.F. 11000
TEL: 55-9178-4270
先鋒股份有限公司
總公司 : 台北市中山北路二段44號13樓
電話 : (02) 2521-3588
先鋒電子(香港)有限公司
香港九龍尖沙咀海港城世界商業中心
9樓901-6室
電話 : (0852) 2848-6488
<KMIZX> <05K00000>
Published byPioneer Corporation.
Copyright ©2005 by Pioneer Corporation.
All rights reserved.
Publié par Pioneer Corporation. Copyright
© 2005 par Pioneer Corporation. Tous
droits réservés.
Printed in Malaysia
Imprimé en Malaisie
<CZR2997-A> E
 Loading...