

Page 1

A-
70DA
-K/-S
A-
50DA
-K/-S
Integrated Amplifier | Amplificateur Intégré |
Eingebauter Verstärker | Amplificatore Integrato |
Geïntegreerde versterker | Amplificador integrado |
Operating Instructions | Mode d’emploi | Bedienungsanleitung |
Istruzioni per I’uso | Handleiding | Manual de instrucciones |
Инструкции по эксплуатации
Интегральный усилитель
Page 2
WARNING
This equipment is not waterproof. To prevent a fire or
shock hazard, do not place any container filled with
liquid near this equipment (such as a vase or flower
pot) or expose it to dripping, splashing, rain or
moisture.
D3-4-2-1-3_A1_En
WARNING
To prevent a fire hazard, do not place any naked flame
sources (such as a lighted candle) on the equipment.
D3-4-2-1-7a_A1_En
VENTILATION CAUTION
When installing this unit, make sure to leave space
around the unit for ventilation to improve heat radiation
(at least 30 cm at top, 10 cm at rear, and 10 cm at each
side).
WARNING
Slots and openings in the cabinet are provided for
ventilation to ensure reliable operation of the product,
and to protect it from overheating. To prevent fire
hazard, the openings should never be blocked or
covered with items (such as newspapers, table-cloths,
curtains) or by operating the equipment on thick carpet
or a bed.
D3-4-2-1-7b*_A1_En
Information for users on collection and disposal of old equipment and used batteries
These symbols on the products, packaging, and/or accompanying documents mean
that used electrical and electronic products and batteries should not be mixed with
general household waste.
For proper treatment, recovery and recycling of old products and used batteries,
please take them to applicable collection points in accordance with your national
legislation.
By disposing of these products and batteries correctly, you will help to save valuable
resources and prevent any potential negative effects on human health and the
environment which could otherwise arise from inappropriate waste handling.
For more information about collection and recycling of old products and batteries,
please contact your local municipality, your waste disposal service or the point of sale
where you purchased the items.
These symbols are only valid in the European Union.
For countries outside the European Union:
If you wish to discard these items, please contact your local authorities or dealer and
ask for the correct method of disposal.
K058a_A1_En
Symbol examples
for batteries
Symbol for
equipment
Pb
CAUTION
TO PREVENT THE RISK OF ELECTRIC SHOCK, DO NOT
REMOVE COVER (OR BACK). NO USER-SERVICEABLE
PARTS INSIDE. REFER SERVICING TO QUALIFIED
SERVICE PERSONNEL.
D3-4-2-1-1_B1_En
Page 3

3
CAUTION
The /I STANDBY/ON switch on this unit will not
completely shut off all power from the AC outlet.
Since the power cord serves as the main disconnect
device for the unit, you will need to unplug it from the
AC outlet to shut down all power. Therefore, make
sure the unit has been installed so that the power
cord can be easily unplugged from the AC outlet in
case of an accident. To avoid fire hazard, the power
cord should also be unplugged from the AC outlet
when left unused for a long period of time (for
example, when on vacation).
D3-4-2-2-2a*_A1_En
Operating Environment
Operating environment temperature and humidity:
+5 °C to +35 °C (+41 °F to +95 °F); less than 85 %RH
(cooling vents not blocked)
Do not install this unit in a poorly ventilated area, or in
locations exposed to high humidity or direct sunlight (or
strong artificial light)
D3-4-2-1-7c*_A1_En
This product is for general household purposes. Any
failure due to use for other than household purposes
(such as long-term use for business purposes in a
restaurant or use in a car or ship) and which requires
repair will be charged for even during the warranty
period.
K041_A1_En
POWER-CORD CAUTION
Handle the power cord by the plug. Do not pull out the
plug by tugging the cord and never touch the power
cord when your hands are wet as this could cause a
short circuit or electric shock. Do not place the unit, a
piece of furniture, etc., on the power cord, or pinch the
cord. Never make a knot in the cord or tie it with other
cords. The power cords should be routed such that they
are not likely to be stepped on. A damaged power cord
can cause a fire or give you an electrical shock. Check
the power cord once in a while. When you find it
damaged, ask your nearest PIONEER authorized
service center or your dealer for a replacement.
S002*_A1_En
Thank you for buying this Pioneer
product.
Please read through these operating instructions so that
you will know how to operate your model properly. After
you have finished reading the instructions, put them in a
safe place for future reference.
Contents
01 Before you start
What’s in the box. . . . . . . . . . . . . . . . . . . . . . . . . . 4
Loading the batteries in the remote control . . . . . .4
Using the remote control. . . . . . . . . . . . . . . . . . . . .4
Installing the amplifier. . . . . . . . . . . . . . . . . . . . . . 4
02 Connecting up
Making cable connections. . . . . . . . . . . . . . . . . . .5
About “Bi-wiring” . . . . . . . . . . . . . . . . . . . . . . . . . .5
Connecting speaker cables . . . . . . . . . . . . . . . . . .6
Connecting audio cables . . . . . . . . . . . . . . . . . . . . 6
Connecting to the balanced input terminals (A-70DA
only). . . . . . . . . . . . . . . . . . . . . . . . . . . . . . . . . . . . 6
Digital audio input connections. . . . . . . . . . . . . . . 7
Using a USB cable to connect to a computer . . . .7
Using centralized control with other Pioneer
components . . . . . . . . . . . . . . . . . . . . . . . . . . . . .7
Plugging in . . . . . . . . . . . . . . . . . . . . . . . . . . . . . . 7
03 Controls and displays
Front panel . . . . . . . . . . . . . . . . . . . . . . . . . . . . . . 8
Rear panel . . . . . . . . . . . . . . . . . . . . . . . . . . . . . . .9
Remote control . . . . . . . . . . . . . . . . . . . . . . . . . . 10
04 Operation
Playback . . . . . . . . . . . . . . . . . . . . . . . . . . . . . . . 11
Set the power to Standby. . . . . . . . . . . . . . . . . . . .11
When using the unit as a power amplifier . . . . . . .11
Playing music from a digital audio component . . .11
Making an audio recording . . . . . . . . . . . . . . . . .12
To set for automatic standby status (Auto Power
Down) . . . . . . . . . . . . . . . . . . . . . . . . . . . . . . . . .12
Restoring all the settings to the factory default
settings . . . . . . . . . . . . . . . . . . . . . . . . . . . . . . . . 12
05 Using the USB DAC function
Install the driver. . . . . . . . . . . . . . . . . . . . . . . . . . 13
Playing music from a computer. . . . . . . . . . . . . . 13
06 Additional information
Troubleshooting. . . . . . . . . . . . . . . . . . . . . . . . . .14
About the USB DAC function . . . . . . . . . . . . . . . .15
Cleaning the unit . . . . . . . . . . . . . . . . . . . . . . . . . 15
Specifications . . . . . . . . . . . . . . . . . . . . . . . . . . .16
Page 4
01 Before you start
4
En
Chapter 1:
Before you start
What’s in the box
Please confirm that the following accessories are in the
box when you open it.
•Remote control
• AAA/IEC R03 dry cell batteries x2
• Short pin plug x 2
(At time of purchase, these plugs have been factory
installed in the rear panel’s PHONO IN terminals.)
• Power cord (Length: 1.8 m)
• Warranty card
• Caution sheet (To first-time users)
• Operating instructions (This document)
WARNING
• Store small parts out of the reach of children and
infants. If accidentally swallowed, contact a doctor
immediately.
Note
• Illustrations featured in the Operating Instructions
may have been modified or simplified for ease of
explanation, and may therefore differ from the
actual product appearance.
• The illustrations used here are mainly of the A70DA.
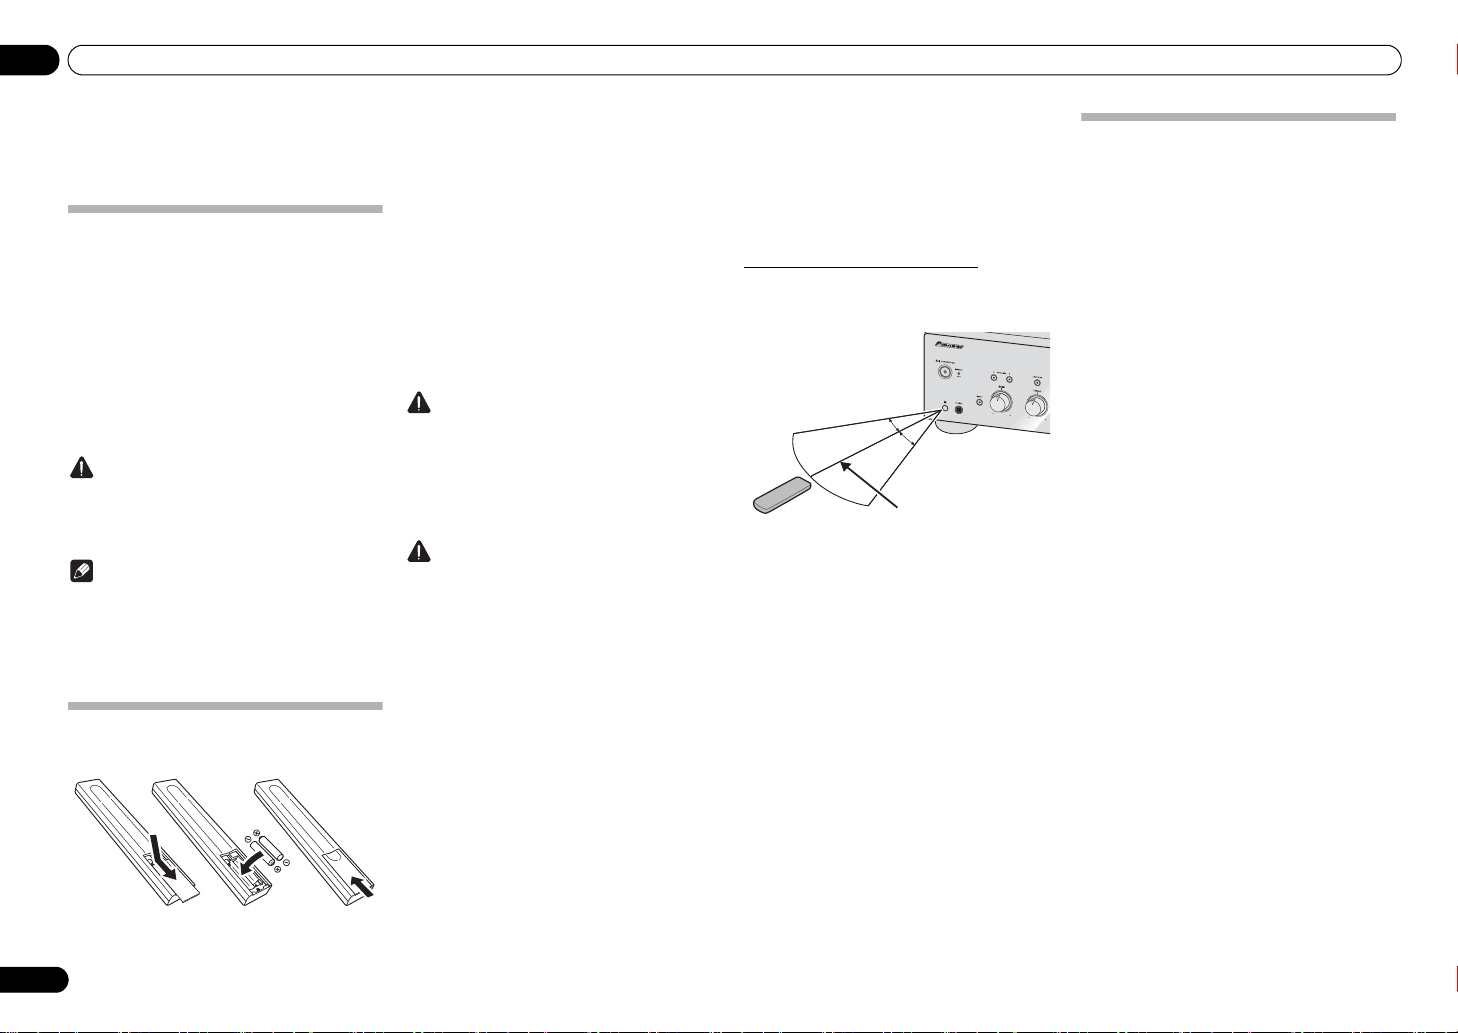
Loading the batteries in the remote
control
1 Open the rear lid.
2 Insert the new batteries, matching the
polarities as indicated inside the case.
3 Close the rear lid.
The batteries included with the unit have been provided
to allow you check product operation and may not last
long. We recommend using alkaline batteries that have
a longer life.
WARNING
• Do not use or store batteries in direct sunlight or
other excessively hot place, such as inside a car or
near a heater. This can cause batteries to leak,
overheat, explode or catch fire. It can also reduce
the life or performance of batteries.
Caution
Incorrect use of batteries may result in such hazards as
leakage and bursting. Observe the following
precautions:
• When inserting the batteries, make sure not to
damage the springs on the battery’s terminals.
This can cause batteries to leak or overheat.
• Do not use any batteries other than the ones
specified. Also, do not use a new battery together
with an old one.
• When loading the batteries into the remote control,
set them in the proper direction, as indicated by the
polarity marks ( and ).
• Do not heat batteries, disassemble them, or throw
them into flames or water.
• Batteries may have different voltages, even if they
are the same size and shape. Do not use different
types of batteries together.
• To prevent leakage of battery fluid, remove the
batteries if you do not plan to use the remote
control for a long period of time (1 month or more).
If the fluid should leak, wipe it carefully off the
inside of the case, then insert new batteries. If a
battery should leak and the fluid should get on your
skin, flush it off with large quantities of water.
• When disposing of used batteries, please comply
with governmental regulations or environmental
public institution’s rules that apply in your country/
area.
1
2
3
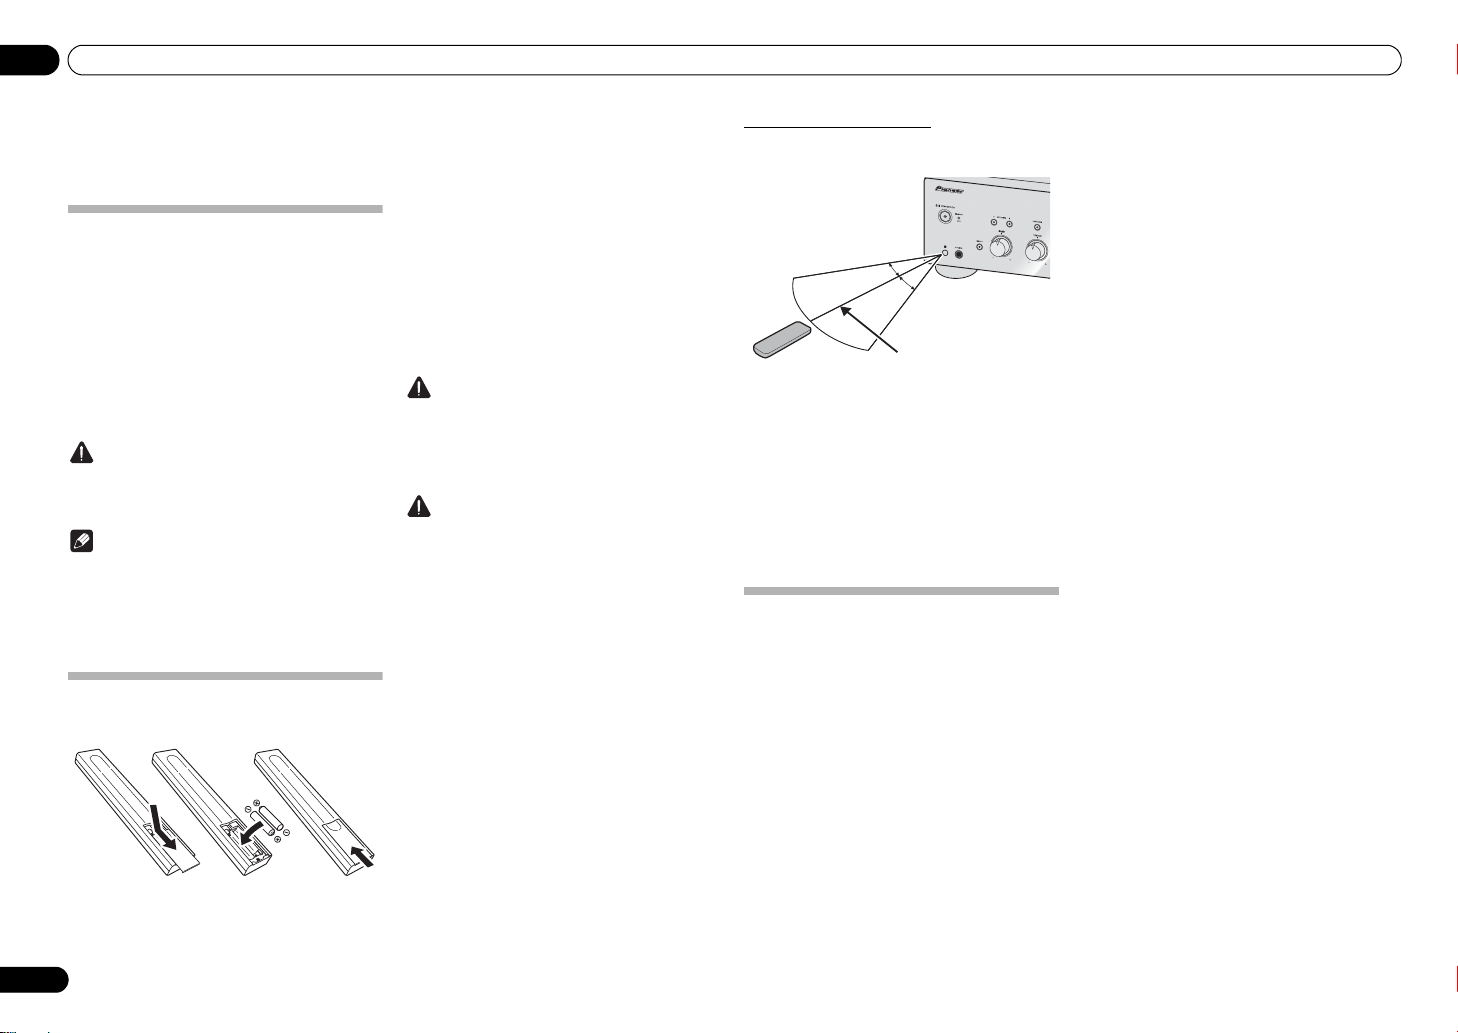
Using the remote control
The remote has a range of about 7 m at an angle of about
30º from the remote sensor.
Keep in mind the following when using the remote
control:
• Make sure that there are no obstacles between the
remote and the remote sensor on the unit.
• Remote operation may become unreliable if strong
sunlight or fluorescent light is shining on the unit’s
remote sensor.
• Remote controllers for different devices can
interfere with each other. Avoid using remotes for
other equipment located close to this unit.
• Replace the batteries when you notice a fall off in
the operating range of the remote.
Installing the amplifier
When installing this unit, make sure to put it on a level
and stable surface.
• Don’t install it on the following places:
– on a color TV (the screen may distort)
– near a cassette deck (or close to a device that
gives off a magnetic field). This may interfere with
the sound.
– in direct sunlight
– in damp or wet areas
– in extremely hot or cold areas
– in places where there is vibration or other
movement
– in places that are very dusty
– in places that have hot fumes or oils (such as a
kitchen)
• Do not mount the unit on a sofa or other object or
material with absorbent qualities, since sound
quality may be adversely affected.
7 m
30 °
30 °
Page 5
Connecting up 02
5
En
English
DeutschFrançais
Nederlands
Italiano Español Русский
Chapter 2:
Connecting up
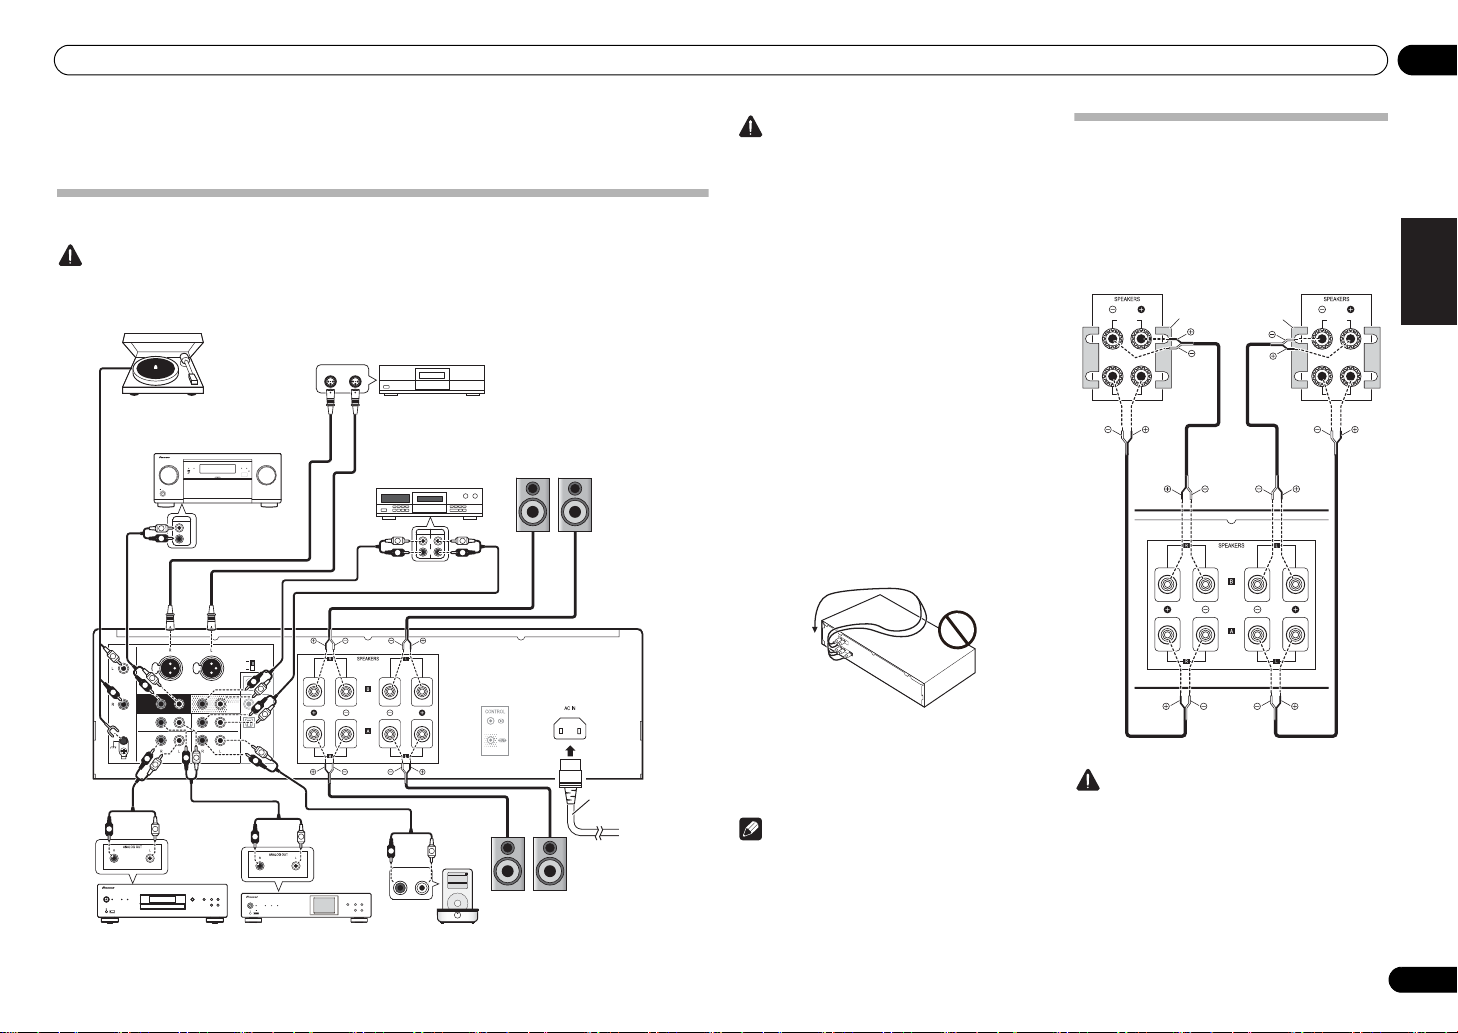
Making cable connections
Caution
• Before making or changing the connections, switch off the power and disconnect the power cord from the AC outlet.
• Connect the power cord after all the connections between devices have been completed.
REC
R
L
RL
PLAY
RL
AUDIO
OUTPUT
PREOUT
R
L
NORMAL
NORMAL
INVERSION
INVERSION
PHASE
PHASE
LINE2
LINE2
LINE1
LINE1
USB
USB
COAXIAL
COAXIAL
PHONO
PHONO
(MM/MC)
(MM/MC)
SIGNAL
SIGNAL
GND
GND
NETWORK
NETWORK
SACD/CD
SACD/CD
DIGITAL IN
DIGITAL IN
ANALOG IN
ANALOG IN
OPTICAL
OPTICAL
LINE2
LINE2
OUT
OUT
POWER
POWER
AMP
AMP
DIRECT
DIRECT
BALANCED IN
BALANCED IN
L
R
L
R
L
R
L
R
L
R
L
R
L
R
L
R
L
R
L
R
L
R
L
R
L
R
L
R
L
R
L
R
L
R
L
R
L
R
L
R
L
R
MENU
iPod
Music>
Extras>
Settings>
Shuffle Songs
Backlight
MASTER
VOLUME
STANDBY/ON
INPUT
SELECTOR
iPodiPhoneiPadHDMI
ADVANCED
MCACC
FLOFF
SOURCE
/I STANDBY/ON
STANDBY
iPod/iPhone
5V1A
DIRECT Hi-Bit 32Up Sampling
SOURCE
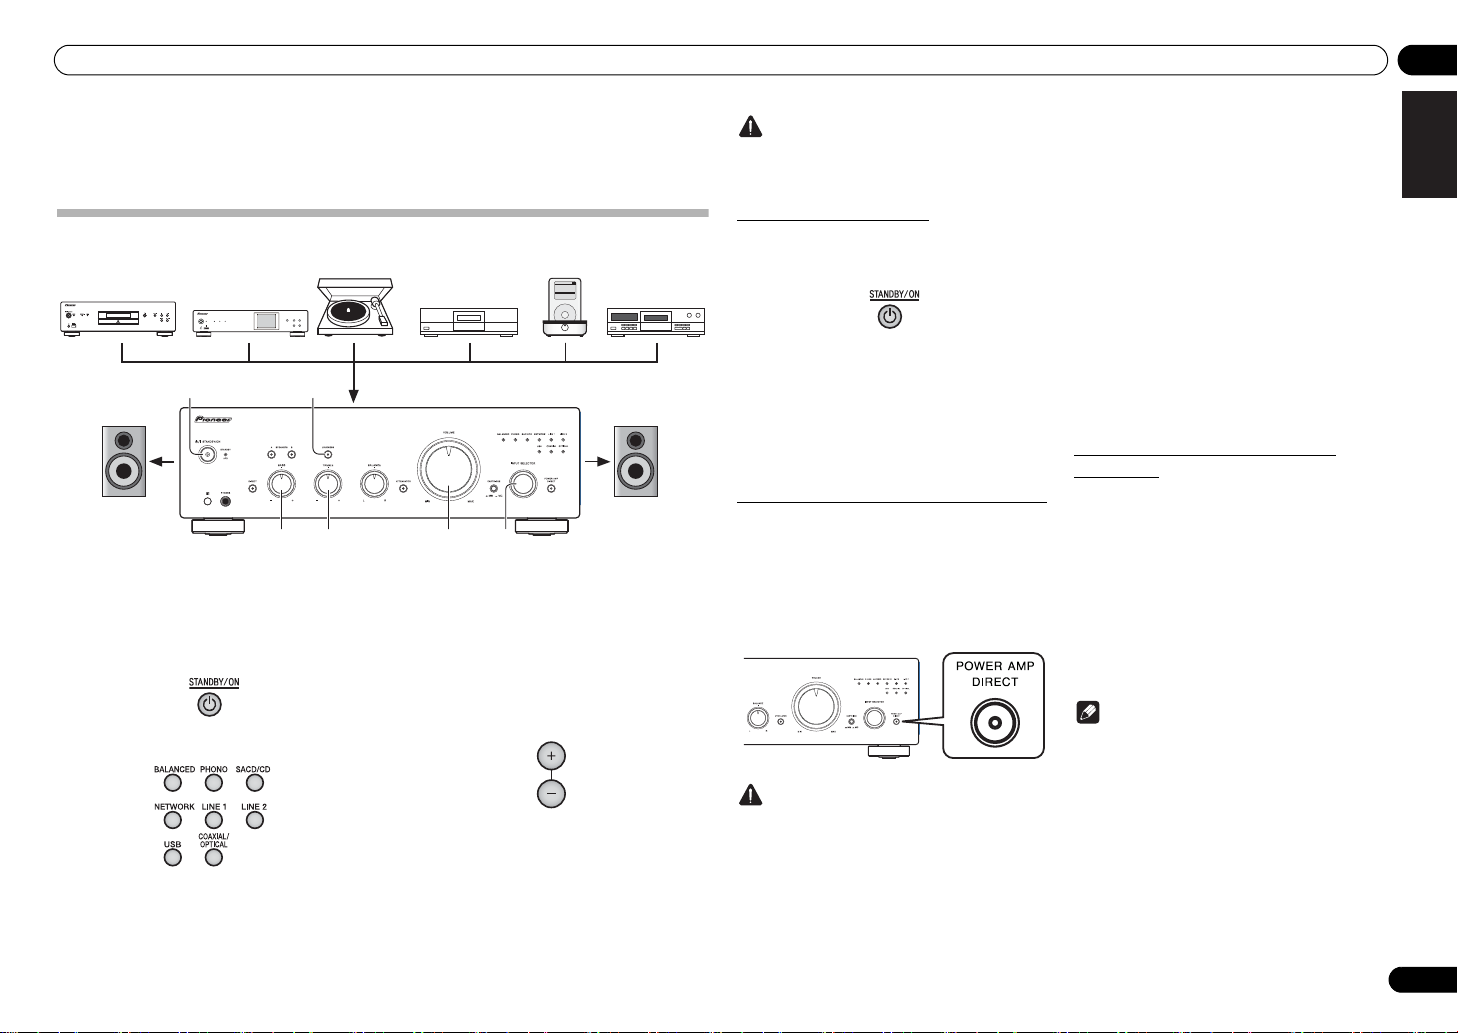
SACD/CD player
Network audio player
PRE OUT jacks on preamplifier or AV amplifier
Speaker system B
Speaker system A
Turntable
Audio device with
balanced output terminals
iPod dock, etc.
Recording device
or other device
Right Left
Right
Left
Power cord
(included)
This unit’s
rear panel
Caution
•The SIGNAL GND terminal is provided to reduce
noise when connecting the unit to components
such as an analog turntable.
•The PHONO IN terminals are factory equipped with
short pin plugs. These should not be removed
except when connecting a turntable. Be sure to
save the short pin plugs in a safe place.
• Do not insert the short pin plugs in any connectors
other than the PHONO IN terminals. Connecting
them to any other terminals may cause
malfunctions.
• Do not connect the PHONO IN terminals to any
component other than a turntable; also, do not
connect to a turntable equipped with built-in
equalizer. An excessively high sound output may be
produced, resulting in damage to your speakers or
other devices.
• The A-50DA’s PHONO IN terminals are designed to
be used only with turntables equipped with MM
(moving-magnet) type cartridges. Turntables
equipped with MC (moving-coil) cartridges cannot
be used.
• Make sure not to bend the cables over the top of
this unit (as shown in the illustration). If this
happens, the magnetic field produced by the
transformers in this unit may cause a humming
noise from the speakers.
• The unit’s POWER AMP DIRECT terminals should
never be connected to any other component’s
connectors except PRE-AMP OUT.
• If your turntable has a grounding wire, secure it to
the ground terminal on this amplifier.
Note
• When connecting a tape cassette deck, playback
noise may be heard, depending on the installation
location. This noise is caused by leakage flux from
the amplifier’s transformer. In this event, change
the installation location, or move the deck farther
from the amplifier.
• iPod is a trademark of Apple Inc., registered in the
U.S. and other countries.
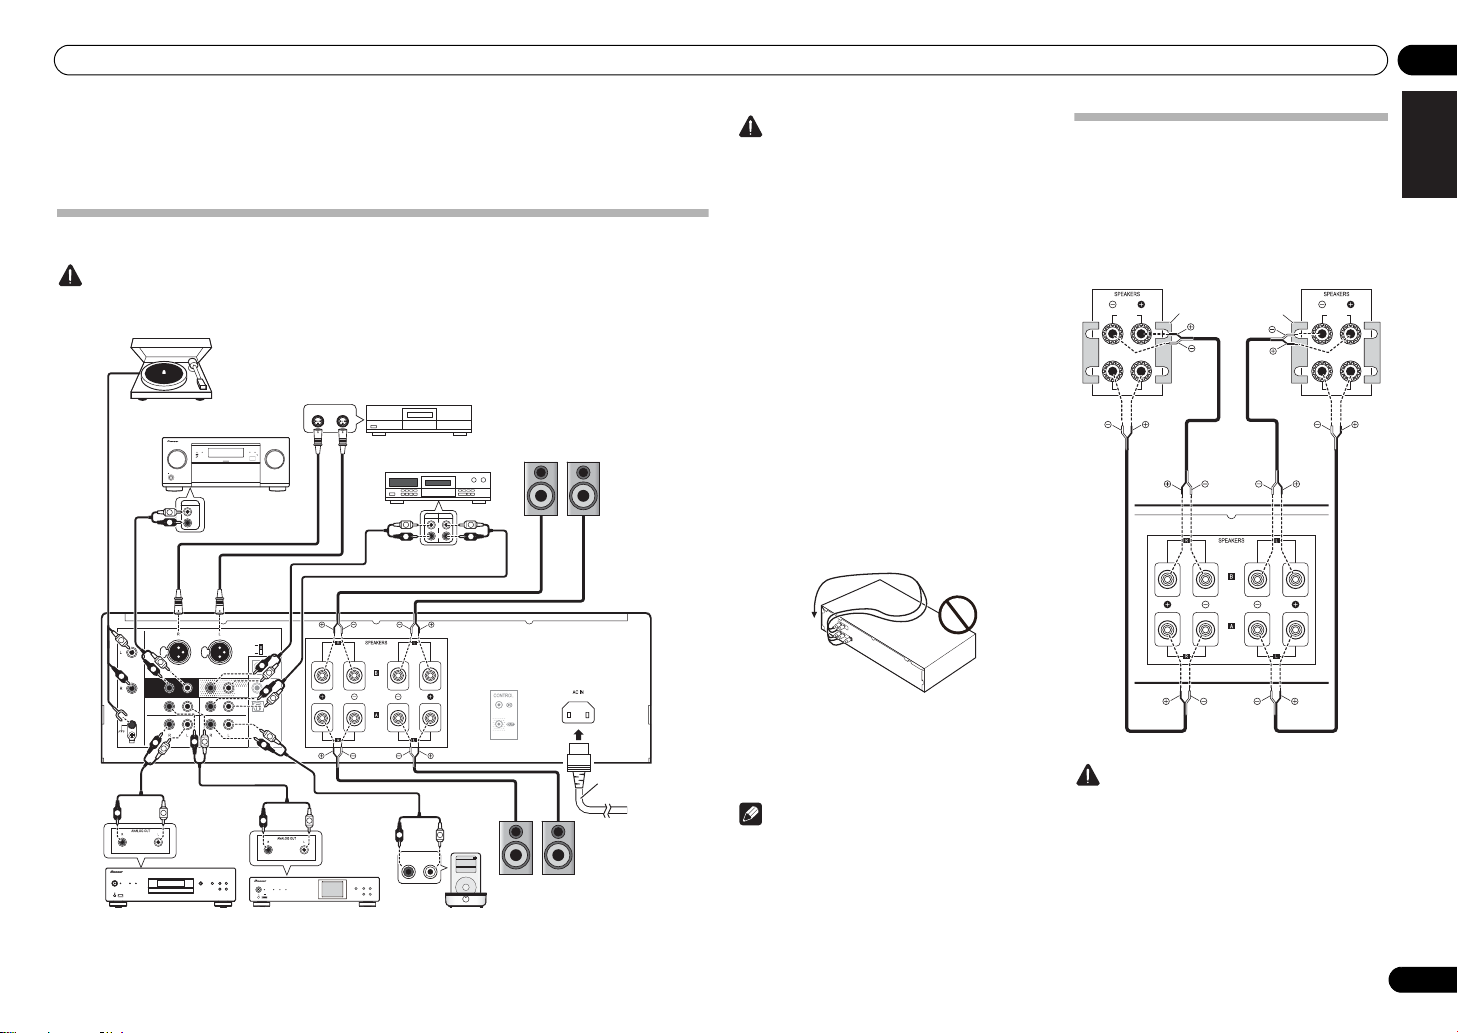
About “Bi-wiring”
This unit can be used with speakers that support biwiring. Be sure to connect the high-frequency and
low-frequency connections correctly.
• During playback, be sure that both the SPEAKERS
A button and SPEAKERS B button are set to ON
(page 8).
Caution
• When using bi-wiring to connect speakers, avoid
adverse affects on the amplifier by being sure to
remove the HIGH and LOW short bars provided
with the speakers. For detailed information, consult
the instructions provided with the speakers.
HIGH
LOW
HIGH
LOW
Speaker system
Left
Speaker system
Right
This unit’s
rear panel
Remove the shorting
bar between the +
and – terminals.
Page 6
02 Connecting up
6
En
• When using speakers with removable network
circuits, note that if the network is removed, no
effect will be produced and damage may be caused
to the speaker.
• Another method of connection is to connect the
SPEAKERS A terminals to HIGH and the SPEAKERS
B terminals to LOW (reverse that shown in the
illustration).
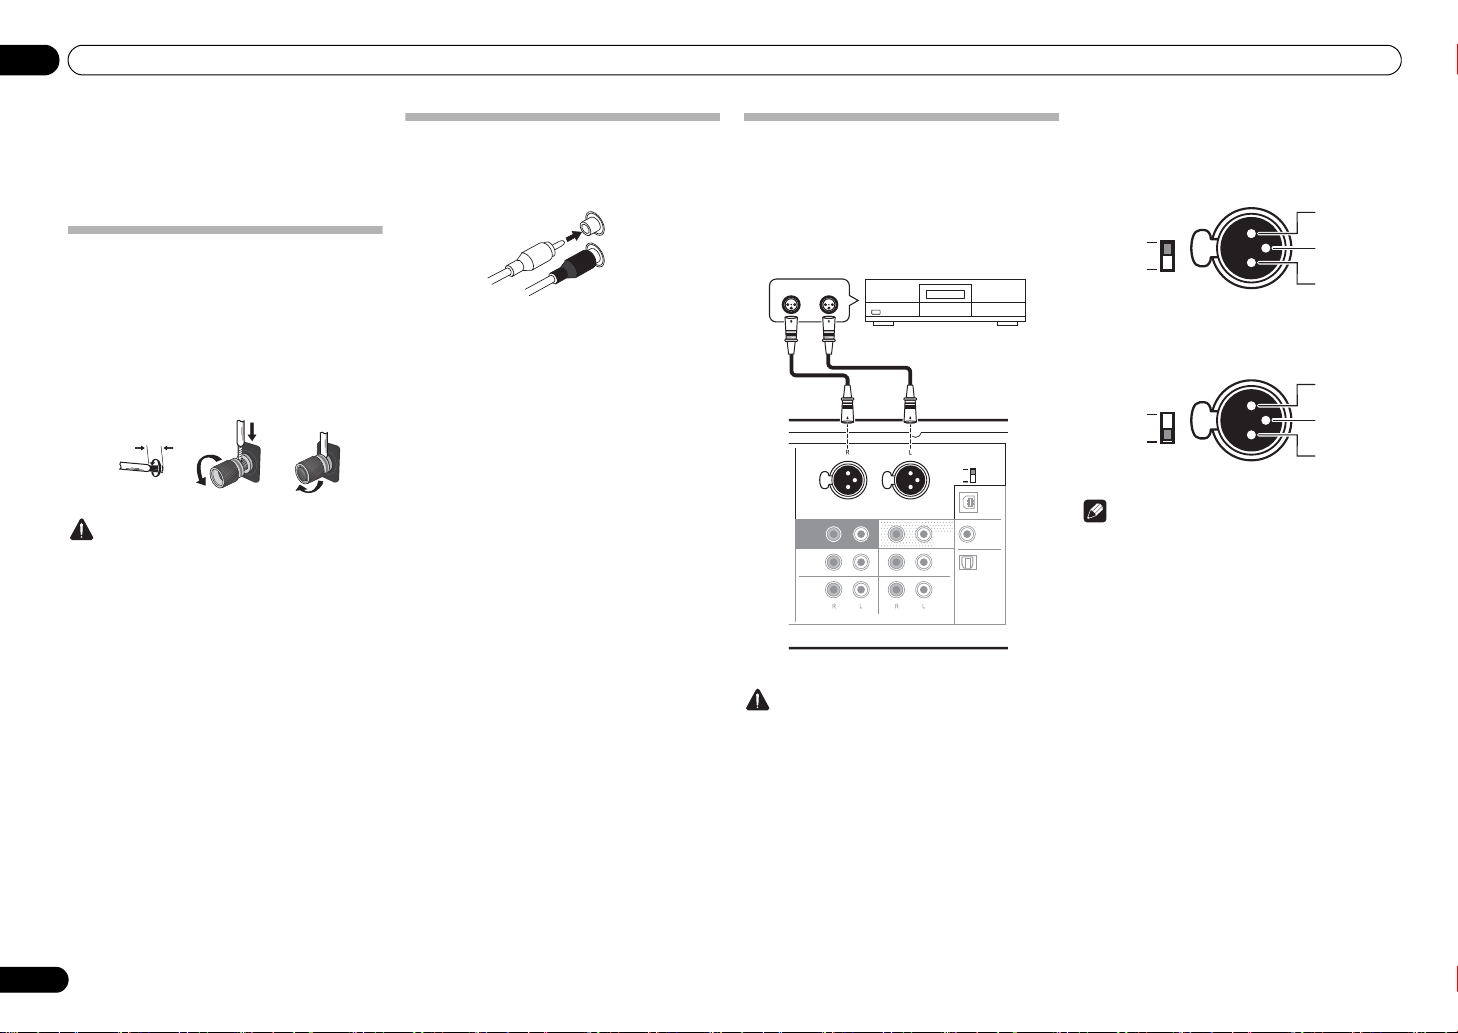
Connecting speaker cables
1 Twist the cable cores.
2 Loosen the nut on the
SPEAKERS
terminal, and insert the speaker cable into
the exposed hole in the terminal shaft.
3 Retighten the terminal nut.
Caution
• When using only one set of speaker terminals
(SPEAKERS A or SPEAKERS B), or when utilizing
bi-wiring connections, the speaker used should
have a nominal impedance between 4 and
16 . When using both sets of terminals, the
connected speakers should have nominal
impedance between 8 and 32 . Consult the
instructions accompanying your speakers for
details regarding the impedance value.
• Make sure the positive and negative (+/–) terminals
on the amplifier match those on the speakers.
• These speaker terminals carry HAZARDOUS live
voltage. To prevent the risk of electric shock when
connecting or disconnecting the speaker cables,
disconnect the power cord before touching any
uninsulated parts.
• Make sure that all the bare speaker wire is twisted
together and inserted fully into the speaker
terminal. If any of the bare speaker wire touches the
back panel it may cause the power to cut off as a
safety measure.
Connecting audio cables
Connect the white plug to the left (L) jack, and the red
plug to the right (R) jack. Be sure to insert the plugs fully
into the jacks.
123
10 mm
Left (white)
Right (red)Right (red)
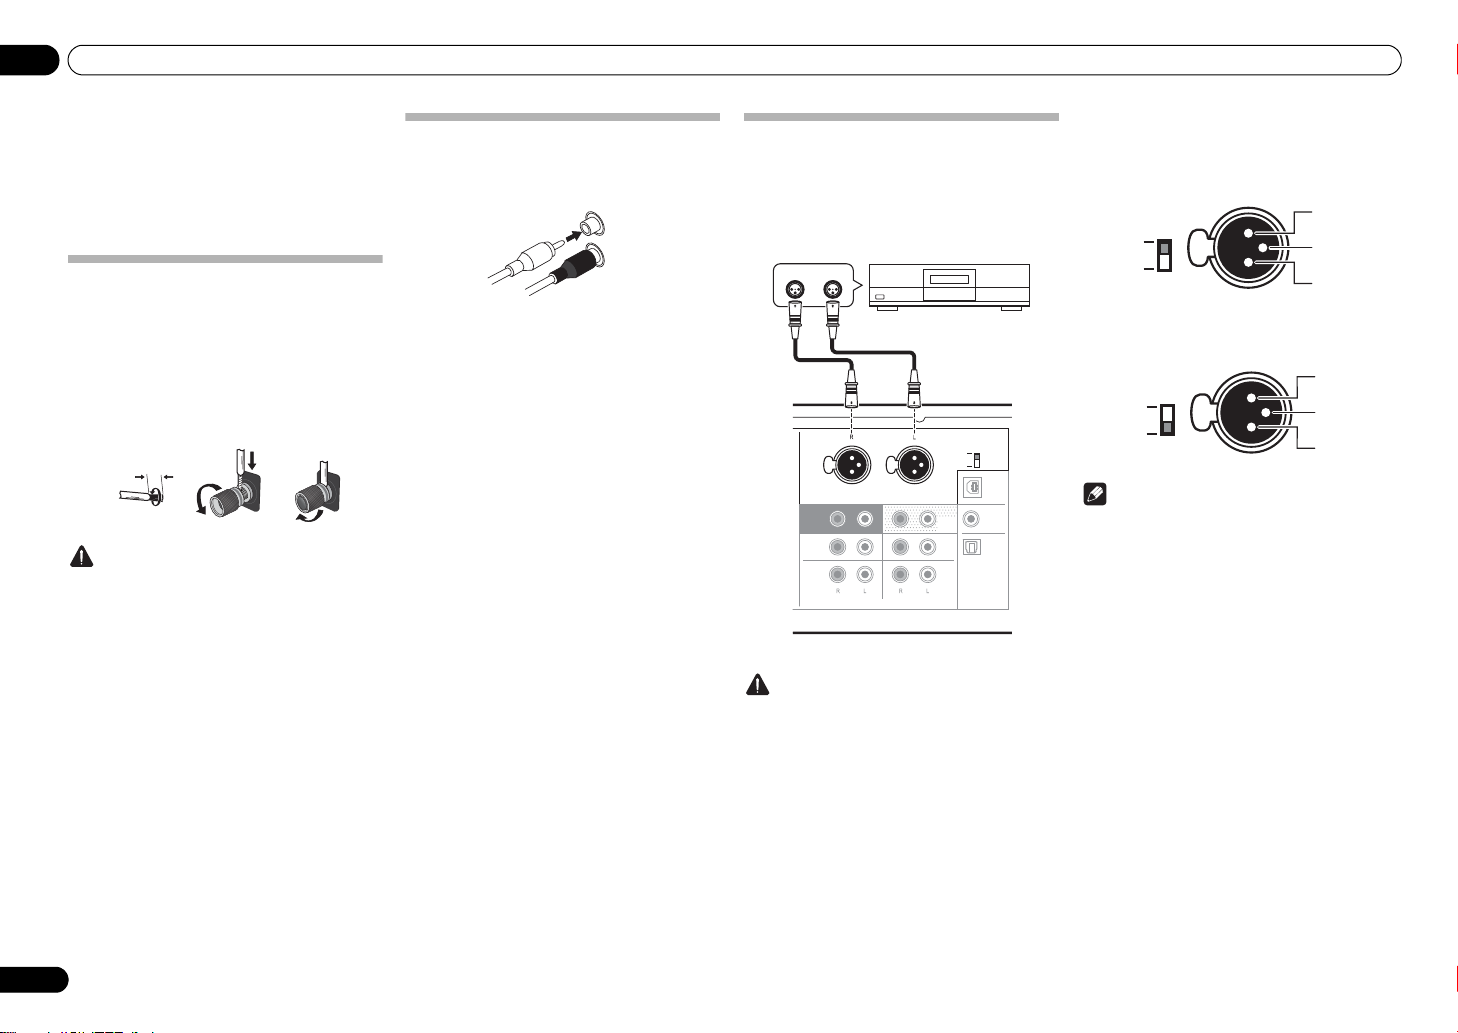
Connecting to the balanced input
terminals (A-70DA only)
Connect the BALANCED IN terminals of the unit to a
SACD player, USB DAC, network player, or other device
with balanced output terminals.
Caution
•The BASS, TREBLE, BALANCE, and LOUDNESS
functions do not work for a device connected to the
BALANCED IN terminals.
The phase may differ depending on the device to be
connected. Use the phase selector switch on the rear
panel of the unit to match the phase.
• Initial setting (No. 2 HOT)
• Settings when polarity changed
(No. 3 HOT)
Note
• For details on the phase of the balanced output
terminals of the device to be connected, refer to the
instruction manual of the device.
• When connecting the unit to a Pioneer player,
match the phase to the initial setting (No. 2 HOT).
LINE2
LINE2
LINE1
LINE1
USB
USB
COAXIAL
COAXIAL
NETWORK
NETWORK
SACD/CD
SACD/CD
DIGITAL IN
DIGITAL IN
ANALOG IN
ANALOG IN
OPTICAL
OPTICAL
LINE2
LINE2
OUT
OUT
P.
P.
AMP
AMP
DIRECT
DIRECT
BALANCED IN
BALANCED IN
NORMAL
NORMAL
INVERSION
INVERSION
PHASE
PHASE
RL
Audio device with
balanced output terminals
Balanced cable
(sold separately)
Balanced cable
(sold separately)
A-70DA’s rear panel
NORMALNORMAL
INVERSIONINVERSION
PHASE
PHASE
1 Ground
3 COLD (-)
2 HOT (+)
NORMAL
NORMAL
INVERSION
INVERSION
PHASE
PHASE
1 Ground
3 HOT (+)
2 COLD (-)
Page 7
Connecting up 02
7
En
English
DeutschFrançais
Nederlands
Italiano Español Русский
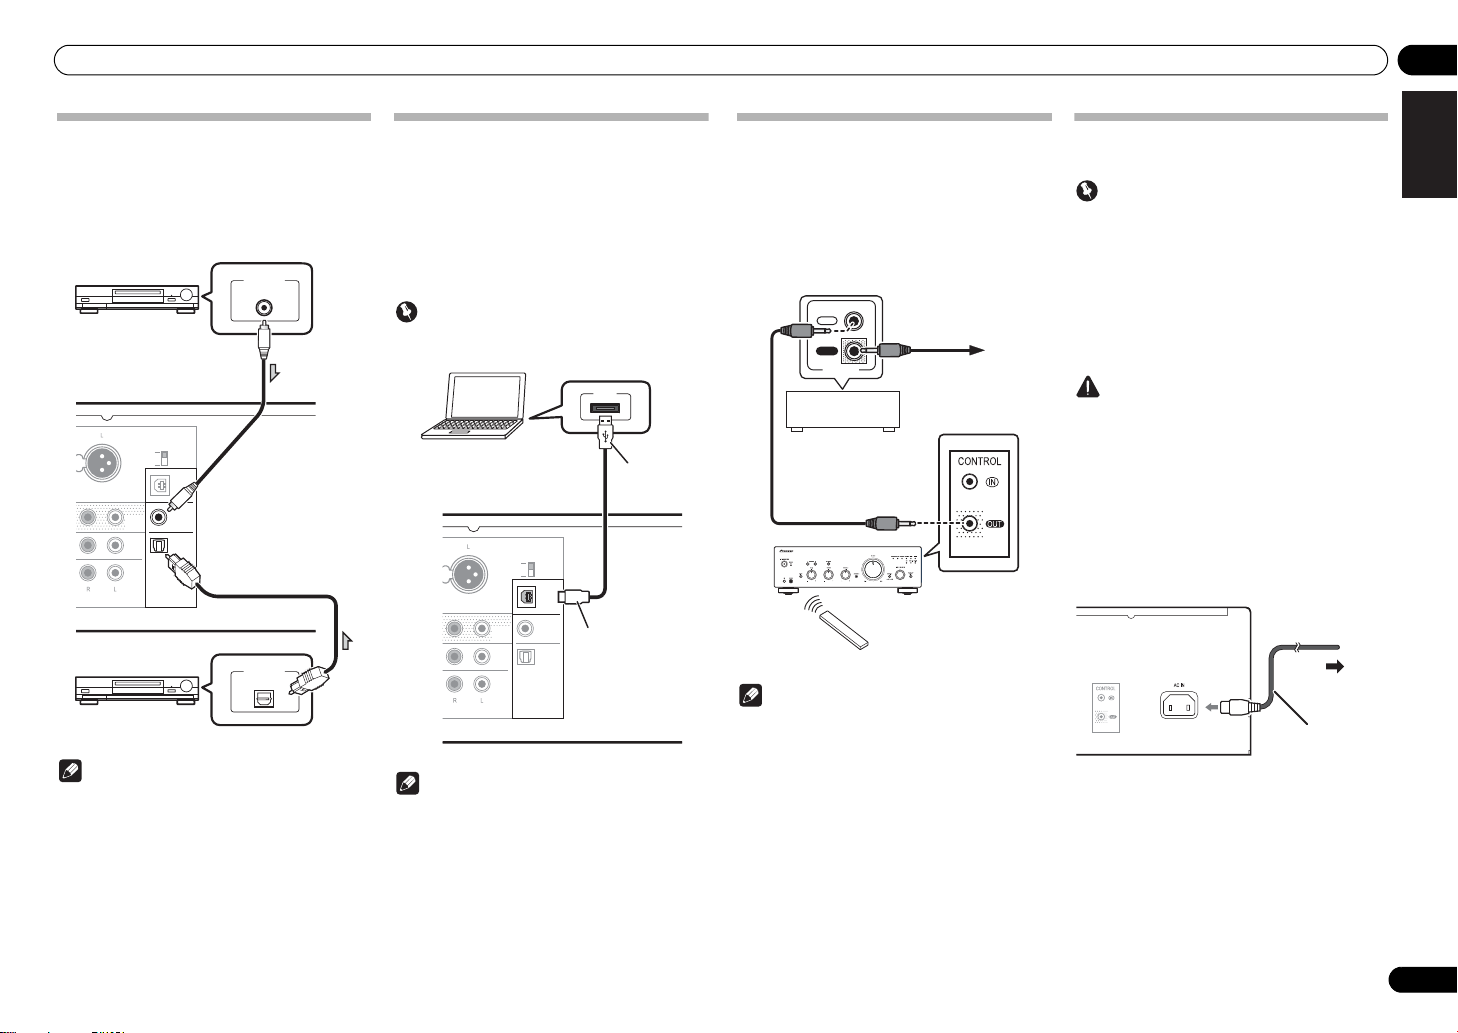
Digital audio input connections
If you connect the DIGITAL IN terminal of the unit and
the digital audio output of a digital audio device with a
separately sold digital cable, you can play the audio of
the digital audio device with the unit.
For details on the output of audio input to the DIGITAL
IN terminal, refer to page 11.
Note
• Digital signal formats that can be input to this unit
include linear PCM signals with sampling rate and
quantitative bits up to 192 kHz/32 bits. (Depending
on the connected device and environment,
operation may not be successful).
Using a USB cable to connect to a
computer
If a USB cable (sold separately) is used to connect this
unit’s DIGITAL IN USB terminal to a computer’s USB
port, music files located on the computer can be played
through this unit.
For more information regarding the output of audio
signals input to the DIGITAL IN USB terminal, consult
page 13.
Important
• A dedicated driver needs to be installed on your
computer (page 13).
Note
• This unit cannot be used to play audio files from a
computer unless Media Player is installed on the
connected computer.
LINE2
LINE2
LINE1
LINE1
USB
USB
COAXIAL
COAXIAL
DIGITAL IN
DIGITAL IN
IN
OPTICAL
OPTICAL
LINE2
LINE2
OUT
OUT
ED IN
NORMAL
NORMAL
INVERSION
INVERSION
PHASE
PHASE
DIGITAL OUT
COAXIAL
DIGITAL OUT
OPTICAL
Digital audio
equipment, etc.
Coaxial digital audio cable
(sold separately)
A-70DA’s rear panel
Optical digital audio cable
(sold separately)
Digital audio
equipment, etc.
LINE2LINE2
LINE1
LINE1
USBUSB
COAXIALCOAXIAL
DIGITAL INDIGITAL IN
OPTICAL
OPTICAL
LINE2
LINE2
OUT
OUT
NORMALNORMAL
INVERSION
INVERSION
PHASE
PHASE
USB
USB cable
(sold separately)
A-type
B-type
PC
A-70DA’s rear panel
Using centralized control with other
Pioneer components
Multiple Pioneer components equipped with CONTROL
IN/OUT jacks can be connected to the unit, allowing
centralized control of the components via the remote
sensor on the unit. This also allows remote control of
components not equipped with a remote sensor, or
installed in places where the component’s remote
sensor cannot be accessed.
Note
• For connections use a commercially available
monaural miniplug cord (without resistor).
• When connecting the CONTROL IN/OUT jacks,
commercially available audio cords must also be
used to make analog connections. Merely
connecting the CONTROL IN/OUT jacks alone will
not allow proper system control.
• When a control cord is connected to the unit’s
CONTROL IN jack, the unit cannot be controlled by
pointing the remote control at the unit (the remote
sensor is automatically disabled).
Plugging in
Important
• When going on a trip or otherwise not using the
unit for an extended period, always disconnect the
power cord from its outlet. Note that various
internal settings will not be lost even if the power
cord is disconnected from its outlet for an extended
time.
• If it is necessary to detach the power cord, first be
sure to press the
/I
STANDBY/ON button on the
front panel of the unit so the unit is turned OFF
before detaching the cord.
Caution
• The use of a power cord other than the one provided
will invalidate the warranty, since Pioneer will not
be responsible for any damage incurred. (The
power cord provided with the unit has a rated
current capacity of 10 A.)
• Do not use any power cord other than the one
supplied with this unit.
• Do not use the supplied power cord for any purpose
other than that described below.
After you’ve finished making all connections, plug the
unit into an AC outlet.
1 Plug the supplied power cord into the
AC IN
socket on the rear panel of the unit.
2 Plug the other end into an AC outlet.
IN
OUT
CONTROL
Other Pioneer
component equipped
with CONTROL IN/
OUT jacks
To other Pioneer
component
equipped with
CONTROL IN jack
A-70DA
Aim remote control
at the sensor on the
unit.
Remote
control
To AC outlet
This unit’s rear panel
Power cord
(included)
Page 8
03 Controls and displays
8
En
Chapter 3:
Controls and displays
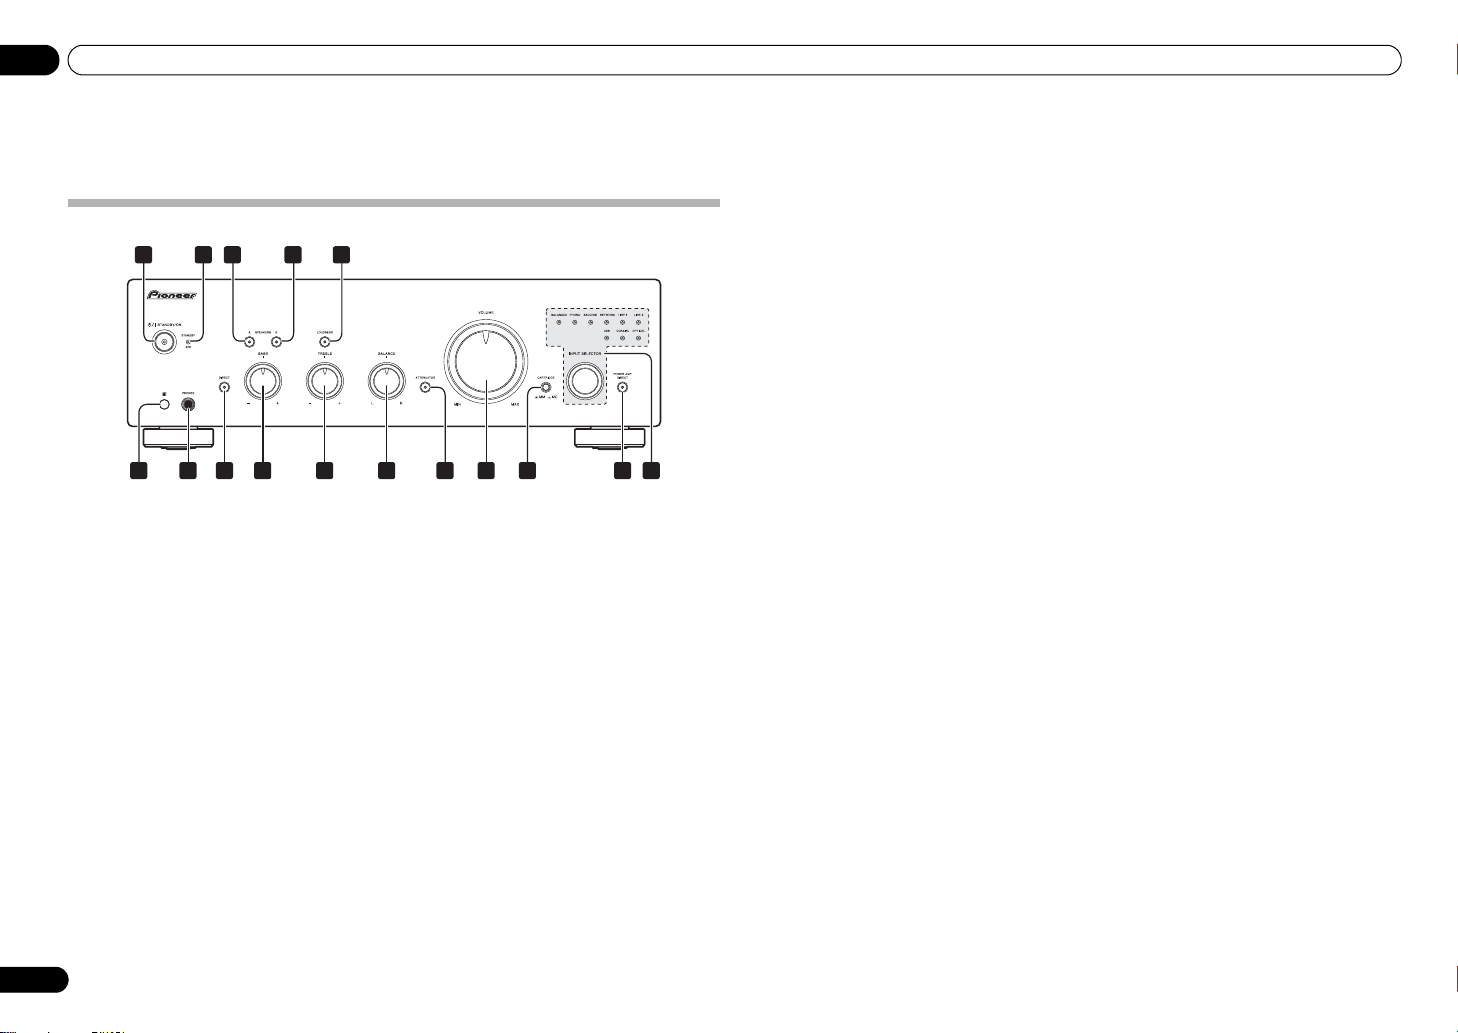
Front panel
1/I
STANDBY/ON
Switches the amplifier between off and on.
When power is turned on, the power indicator in the
center of the button will light.
2
STANDBY/APD
indicator
When power is set to standby, the indicator lights red.
When the Auto Power Down (APD) function is on, the
indicator lights green (page 12).
3
SPEAKERS A
button/indicator
Use this button to listen to the speaker system
connected to SPEAKERS A terminals.
On : The indicator lights. Sound is heard from the
speaker system.
Off : The indicator goes off. No sound is heard from the
speaker system.
4
SPEAKERS B
button/indicator
Use this button to listen to the speaker system
connected to SPEAKERS B terminals.
On : The indicator lights. Sound is heard from the
speaker system.
Off : The indicator goes off. No sound is heard from the
speaker system.
5
LOUDNESS
button/indicator
Use when listening at low volume levels.
On : The indicator lights: Boosts low and high
frequencies to give added punch to playback even at a
low volume level.
Off : The indicator goes off: Should normally be left in
this position.
• This button does not operate when the DIRECT
button is in the on position.
• When sound volume is raised, the amount of
change produced by the LOUDNESS circuit is
reduced.
A-70DA
31
6
2 54
7
14 1612
9
10 11 13 15
8
6 Remote sensor
Receives the signals from the remote control (page 4).
7
PHONES
jack
Use to connect headphones (when connected, there is
no sound output from the speakers). No sound is
produced when the POWER AMP DIRECT button is ON.
8 DIRECT button/indicator
On : The indicator lights: When this button is set to ON,
sound signals are output directly, without being passed
through the various adjustment circuits (BASS, TREBLE,
BALANCE, LOUDNESS). This allows reproduction of the
signals with greater fidelity, but it disables any settings
made with the BASS, TREBLE, BALANCE or LOUDNESS
controls. When a device connected to the BALANCED IN
terminals is played, DIRECT turns on and cannot be
turned off.
Off : The indicator goes off: The signal passes through
the various frequency adjusting circuits. When the
indicator is OFF, adjustments can be made with the
BASS, TREBLE, BALANCE, and LOUDNESS controls.
9
BASS
tone control
Use to adjust the low-frequency tone. The center position
is the flat (normal) position. When turned to the right,
low-frequency tones are emphasized; when turned to the
left, low-frequency tones are de-emphasized.
• This button does not operate when the DIRECT
button is in the on position.
10
TREBLE
tone control
Use to adjust the high-frequency tone. The center
position is the flat (normal) position. When turned to the
right, high-frequency tones are emphasized; when
turned to the left, high-frequency tones are deemphasized.
• This button does not operate when the DIRECT
button is in the on position.
11
BALANCE
control
Should normally be left in the center position. Adjust
balance if the sound is louder from one of the speakers.
If the right side is louder, turn toward the L (left) position
and if the left side is louder, turn toward the R (right)
position.
• This button does not operate when the DIRECT
button is in the on position.
12
ATTENUATOR
button (A-70DA only)
Press when you wish to make fine adjustments to the
sound volume when playing at very low sound volume
levels.
13 VOLUME control
Use to adjust the volume level. (Also allows adjustment
of the headphone sound volume.)
14
CARTRIDGE
select switch (A-70DA only)
Select the type of cartridge used with your turntable.
15
POWER AMP DIRECT
button/indicator
Press this button when the unit is to be used as a power
amplifier (page 11).
16
INPUT SELECTOR
knob/indicators
Turn the knob clockwise or counterclockwise so that the
indicator lights for your desired input source. Turning
the knob clockwise causes the lit indicator to right.
Turning counterclockwise causes it to left. When the
remote control’s MUTE button is pressed to mute the
sound, the indicator for the input source selected with
the INPUT SELECTOR knob flashes.
Page 9
Controls and displays 03
9
En
English
DeutschFrançais
Nederlands
Italiano Español Русский
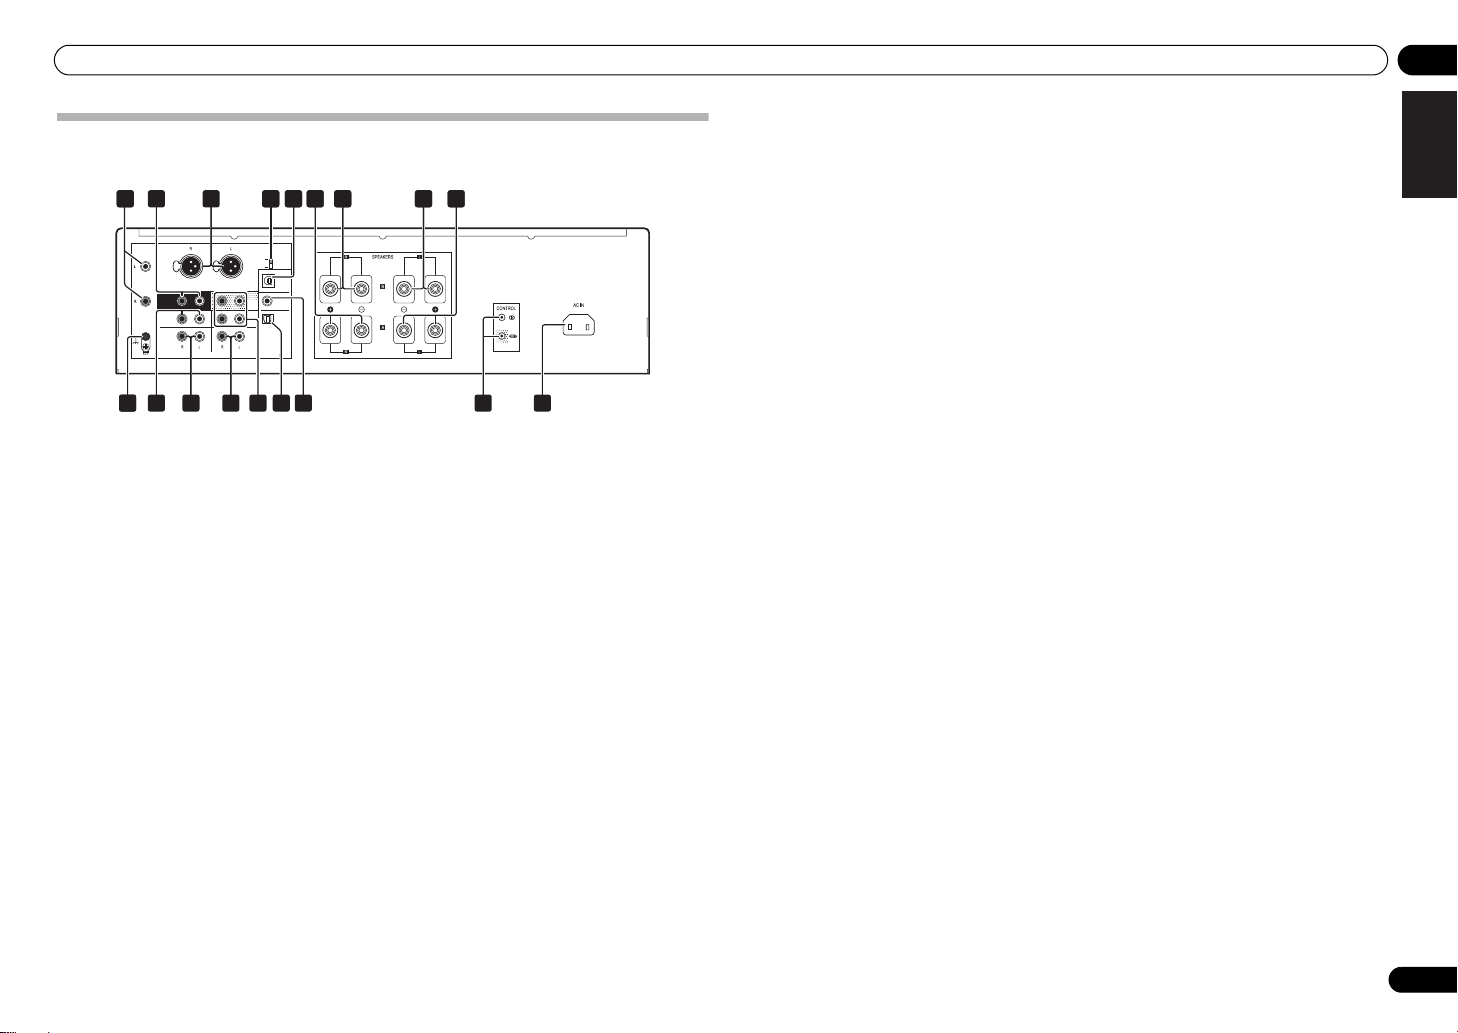
Rear panel
See pages 5-7 for details regarding connections.
1
PHONO IN (MM/MC)
terminals
(A-70DA)
PHONO IN (MM) terminals (A-50DA)
2
POWER AMP DIRECT IN
terminals
When using the unit as a power amplifier, connect the
pre-amplifier here (page 11).
3 BALANCED IN terminals (A-70DA only)
4 Phase selector switch (A-70DA only)
Switches the phase of the BALANCED IN terminals.
5
DIGITAL IN USB
terminal
6
SPEAKERS A
terminals (Right channel)
7
SPEAKERS B
terminals (Right channel)
8
SPEAKERS B
terminals (Left channel)
9
SPEAKERS A
terminals (Left channel)
10 GND (Turntable ground) terminal
This ground terminal is designed to help reduce noise
when a turntable is connected. It is not a safety ground.
11
NETWORK IN
terminals
12
SACD/CD IN
terminals
13
LINE 1 terminals
14
LINE
2
IN/OUT
terminals
15
DIGITAL IN OPTICAL
terminal
16
DIGITAL IN COAXIAL
terminal
17
CONTROL IN/OUT
jack
18
AC IN
jack
Connect power cord to here and an AC wall socket.
LINE2
LINE2
LINE1
LINE1
USB
USB
COAXIAL
COAXIAL
PHONO
PHONO
(MM/MC)
(MM/MC)
SIGNAL
SIGNAL
GND
GND
NETWORK
NETWORK
SACD/CD
SACD/CD
DIGITAL IN
DIGITAL IN
ANALOG IN
ANALOG IN
OPTICAL
OPTICAL
LINE2
LINE2
OUT
OUT
POWER
POWER
AMP
AMP
DIRECT
DIRECT
BALANCED IN
BALANCED IN
NORMAL
NORMAL
INVERSION
INVERSION
PHASE
PHASE
21 2 2724
2
10 11 15 16 1817
29
3 28
12 13
5 26
14
Page 10
03 Controls and displays
10
En
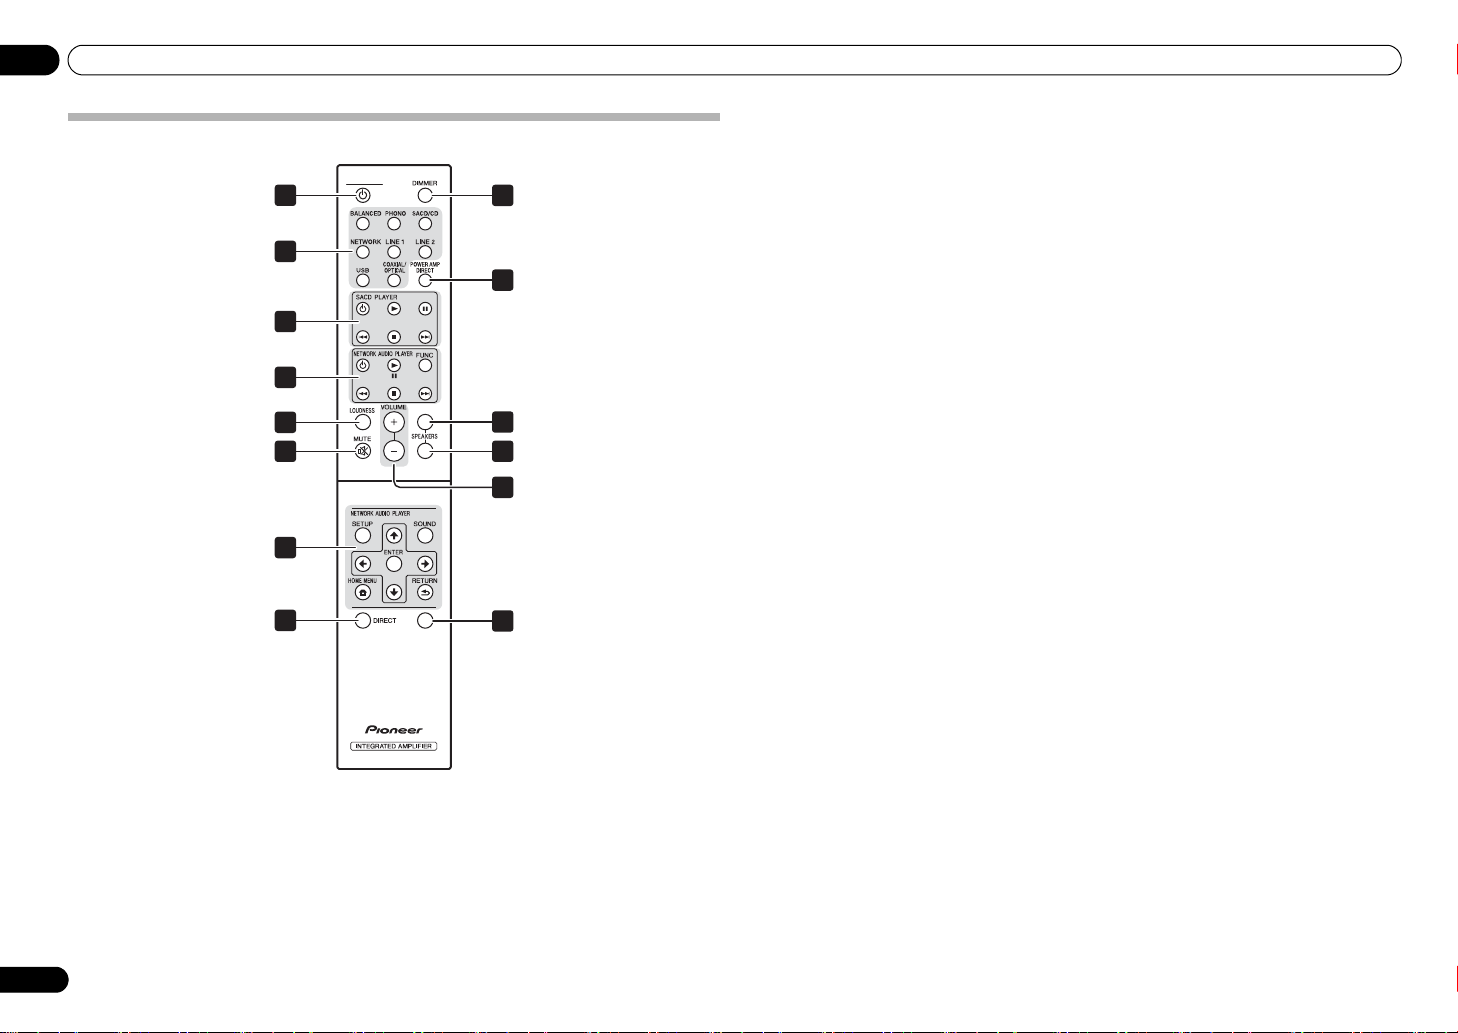
Remote control
STANDBY/ON
A
B
APD
1
8
10
9
12
11
13
2
3
4
6
4
7
5
1
STANDBY/ON
Switches the amplifier between standby and on.
2 Input selector buttons
Press to select an input source. These select the
component connected to the corresponding input on the
rear panel.
•The BALANCED button cannot be used with the A-
50DA.
3 SACD PLAYER control buttons
Use to control Pioneer SACD player.
4 NETWORK AUDIO PLAYER control
buttons
Use to control Pioneer network audio player.
5
LOUDNESS
Use to set the loudness circuit ON/OFF (page 8).
6
MUTE
Mutes/unmutes the sound.
7
DIRECT
Press to access Direct listening (page 8).
8
DIMMER
This button allows the illumination of the unit's front
panel indicators to be set in three levels (does not affect
the STANDBY indicator).
9
POWER AMP DIRECT
Press this button when the unit is to be used as a power
amplifier (page 11).
10
SPEAKERS A
Use this button to listen to the speaker system
connected to SPEAKERS A terminals.
11
SPEAKERS B
Use this button to listen to the speaker system
connected to SPEAKERS B terminals.
12
VOLUME +/–
Use to set the listening volume.
13
APD
Use to set the Auto Power Down function to ON/OFF
(page 12).
Page 11
Operation 04
11
En
English
DeutschFrançais
Nederlands
Italiano Español Русский
Chapter 4:
Operation
Playback
1 Turn on the power of the playback
component.
2 Turn power ON to the unit.
• If the unit is in the standby mode, press the remote
control’s STANDBY/ON button.
3 Select the source you want to playback.
Select the playback component.
• When using the front panel controls, rotate the
INPUT SELECTOR knob.
• In the case of the A-70DA, if PHONO is selected,
use the CARTRIDGE select switch to designate the
type of cartridge used with your turntable, either
MM () or MC ().
4 Start playback of the component you
selected in step 1.
5 Adjust playback volume with
VOLUME
control.
6 Adjust the tone to your preference using
the
BASS
and
TREBLE
controls, and
LOUDNESS
button.
If the DIRECT button has been set to ON, these controls
are disabled.
3566
62
MENU
iPod
Music>
Extras>
Settings>
Shuffle Songs
Backlight
SOURCE
/I STANDBY/ON
STANDBY
iPod/iPhone
5V1A
DIRECT Hi-Bit 32 Up Sampling
SOURCE
SACD/CD player
Network audio player
Turntable
iPod dock, etc.
Recording device
or other device
Playback
Playback
Audio device with
balanced output terminals
VOLUME
Caution
•The BASS, TREBLE, BALANCE, and LOUDNESS
functions do not work for a device connected to the
BALANCED IN terminals.
Set the power to Standby
1 Press the remote control’s
STANDBY/
ON
button.
The next time you wish to turn on the power, press the
remote control’s STANDBY/ON button.
• If the front panel’s /I STANDBY/ON button is
pressed, the power will be turned off. In this case, if
the power is off, pressing the remote control’s
STANDBY/ON button will not turn on the power.
To turn on the power again, press the front panel’s
/I STANDBY/ON button.
When using the unit as a power amplifier
When a pre-amplifier is connected to the unit’s POWER
AMP DIRECT IN terminals, the unit can be used as a
power amplifier.
1 Press the
POWER AMP DIRECT
button
on the remote control or front panel of the
unit.
The POWER AMP DIRECT indicator will light.
Caution
•When the POWER AMP DIRECT indicator is
lighted, operations change as follows:
– The unit’s front-panel VOLUME, BASS, TREBLE,
and BALANCE controls are disabled. These
adjustments are controlled by the component
connected to the unit’s POWER AMP DIRECT IN
terminals.
–The LOUDNESS button and ATTENUATOR
button (A-70DA only) are disabled.
–When the POWER AMP DIRECT indicator is
lighted, sound volume from the unit will
automatically be fixed at its maximum output.
When using this unit as a power amplifier,
check the output level of the component
connected to the POWER AMP DIRECT IN
terminals and set it to a low level as appropriate
before turning on the POWER AMP DIRECT
indicator. If the sound volume of the component
connected to the POWER AMP DIRECT IN
terminals is initially set to a high output level,
loud sound may suddenly be output when the
POWER AMP DIRECT indicator lights.
– Sound is not produced from the PHONES jack
and LINE 2 OUT terminals.
• For more information, consult the operating
instructions for the component connected to the
unit’s POWER AMP DIRECT IN terminals.
Playing music from a digital audio
component
Output the digital audio input to the DIGITAL IN
COAXIAL or OPTICAL terminal.
1 Make a digital input connection.
• See Digital audio input connections on page 7.
2 Switch to the
COAXIAL
or
OPTICAL
input.
Each press of the COAXIAL/OPTICAL button on the
remote control switches the input alternately.
• When using the front panel controls, rotate the
INPUT SELECTOR knob.
• Sound is produced from the LINE 2 OUT terminals.
Note
• Digital signal formats that can be input to this unit
include linear PCM signals with sampling rates and
quantitative bits up to 192 kHz/32 bits (Depending
on the connected device and environment,
operation may not be successful).
Page 12

04 Operation
12
En
Making an audio recording
You can make an audio recording from any audio source connected to the amplifier.
1 Select the source you want to record. 2 Start recording, then start playback of
the source component.
Caution
• Confirm that the short pin plugs are not inserted in
the LINE 2 OUT terminals, since malfunction will
result if they are inserted.
• Audio connected to the following terminals cannot
be output from the LINE 2 OUT terminals.
-
LINE 2 IN
-
BALANCED IN
-
POWER AMP DIRECT IN
1
MENU
iPod
Music>
Extras>
Settings>
Shuffle Songs
Backlight
SOURCE
/I STANDBY/ON
STANDBY
iPod/iPhone
5V1A
DIRECT Hi-Bit 32 Up Sampling
SOURCE
SACD/CD player
Network audio player
Turntable
iPod dock, etc
Audio recording component
(CD recorder, tape deck, etc.)
Playback
Recording
To set for automatic standby status (Auto Power Down)
This function automatically switches the unit to standby mode if no signal or switch operation is detected for 30
minutes.
1 If the unit’s power is ON, press the
APD
button on the remote control.
When this condition is set to ON, the STANDBY/APD indicator on the unit’s front panel will light green. Press the
buttons again to disable the setting.
• This setting can also be made by pressing the front panel LOUDNESS button and POWER AMP DIRECT button
simultaneously and holding them depressed for 3 seconds.
• The factory default setting is ON.
•Rotating the TREBLE, BASS, BALANCE, or VOLUME controls will not be counted as a control operation for
purposes of resetting the Automatic Power-Down 30-minute timer.
Note
• Depending on the connected devices, the unit may not be automatically powered down for reasons such as there
being a lot of noise.
Restoring all the settings to the factory default settings
1 When power is in standby mode, hold the front-panel’s SPEAKERS A button and
POWER AMP DIRECT button depressed simultaneously for five seconds.
2 Turn power ON to the unit.
Page 13

Using the USB DAC function 05
13
En
English
DeutschFrançais
Nederlands
Italiano Español Русский
Chapter 5:
Using the USB DAC function
Install the driver
• To use the DIGITAL IN USB terminal to play back
music files on the computer with the unit, you need
to install a dedicated driver on your computer. For
details, refer to the Pioneer website. The instruction
manual also contains information regarding the
installation procedure and computer settings, so
refer to the instruction manual as well.
Playing music from a computer
Use this function to play digital audio input to the unit's
rear panel DIGITAL IN USB port.
1 Connect the unit to a computer via USB
cable (page 7).
2Press
USB
to select
DIGITAL IN USB
as
the input source.
• When using the front panel controls, rotate the
INPUT SELECTOR knob.
• Sound is produced from the LINE 2 OUT terminals.
3 Begin playback on the computer.
Note
• When the unit and a computer are connected to
play back audio with a USB cable, the unit can
input the following signals:
Linear PCM
– Quantitative bits: 16 bit, 24 bit, 32 bit
– Sampling frequency: 44.1 kHz, 48 kHz, 88.2 kHz,
96 kHz, 176.4 kHz, 192 kHz, 352.8 kHz, 384 kHz
DSD
– Sampling frequency: 2.8 MHz, 5.6 MHz, 11.2
MHz
• Playback cannot be controlled from this unit during
use of this function; use your computer to control
playback.
• When disconnecting the USB cable, always stop
playback on the computer first.
• Sound may not be produced if your computer does
not support USB 2.0 HS.
• This unit does not support use of a USB hub.
Always use a USB cable to connect the unit directly
to the computer.
Page 14
06 Additional information
14
En
Chapter 6:
Additional information
Troubleshooting
Incorrect operations are often mistaken for trouble and malfunctions. If you think that there is something wrong with
this component, check the points below. Sometimes the trouble may lie in another component. Investigate the other
components and electrical appliances being used. If the trouble cannot be rectified even after exercising the checks
listed below, ask your nearest Pioneer authorized service center or your dealer to carry out repair work.
• If the unit does not operate normally due to external effects such as static electricity disconnect the power plug
from the outlet and insert again to return to normal operating conditions.
Problem Remedy
The power does not turn on. • Is the power plug disconnected from the power outlet? Connect the power plug
correctly to its outlet (page 7).
•Is the power cord disconnected from the AC IN connector? Connect the power cord
correctly (page 7).
Power turns off. •Is the Auto Power Down function turned ON? If you do not want the power to turn off
automatically, disable the Auto Power Down function (page 12).
The power turned off and the
STANDBY/APD
indicator is flashing
three times repeatedly.
•The protection circuit has been activated. This condition will result if a very lowfrequency sound is played at a high sound volume level.
- Turn the power OFF and wait for at least one minute, then turn the power ON again;
play the music at a lower sound volume level.
- After restarting the power, if the
STANDBY/APD
indicator flashes four times, it
indicates the receiver channels are malfunctioning. Disconnect the power cord and
consult your dealer or nearest Pioneer service station.
The power turned off and the
STANDBY/APD
indicator is flashing
once every two seconds.
•The unit’s internal temperature has risen and the safety circuit has operated.
- Turn power OFF and wait for a minute or more, allowing the unit’s temperature to
cool before turning the power ON again.
- Install the unit in a location with better ventilation.
- Confirm that the unit is installed correctly; if the unit is turned on again without
being allowed to cool, the same symptoms may appear (page 4).
The power turned off and the
STANDBY/APD
indicator is flashing
twice repeatedly.
•Are you using speakers with impedance values not supported by this unit? Confirm
the speaker’s nominal impedance value (page 6).
•Are any speaker cables loose from the
SPEAKERS
terminals and touching other
wires or the surface of the rear panel? Disconnect the power cord and reconnect the
speaker cables correctly (page 6).
The power turned off and the
STANDBY/APD
indicator is flashing
six times repeatedly.
•The protection circuit has been activated. This condition will result if a very highfrequency sound is played at a high sound volume level.
- Lower the sound volume and tr y playing again.
- If the same symptom appears when the power is turned OFF then ON again, the
unit’s circuitr y may be damaged. Disconnect the power cord and consult your
dealer or nearest Pioneer service station.
The
STANDBY/APD
indicator is
flashing four times, five times, or
seven times repeatedly and the power
does not turn on.
•The unit’s circuitry is damaged. Disconnect the power cord and consult your dealer
or nearest
Pioneer authorized service center
.
No sound is output when a func tion is
selected.
•A connection cable is disconnected or connected improperly. Check your
connections (page 5).
•Connectors or pin plugs on a cable are dirty. Wipe off any dirt from connectors and
pin plugs.
•Confirm that the unit’s input selector is set to the desired playback component. Set
selector correctly (page 11).
•Press
MUTE
on the remote control to turn muting off (page 10).
No sound from one speaker. •Are the connection cables or speaker cables disconnected on one side? Reconnect
securely (page 5).
Can’t operate the remote
control.
•Replace the battery (page 4).
•Operate within 7 m, 30° of the remote sensor on the front panel (page 4).
•Remove the obstacle or operate from another position.
•Avoid exposing the remote sensor on the front panel to direct light.
•Is the control cord for one component connected improperly? Confirm correct
connections (page 7).
Can’t change input source. •Check whether
POWER AMP DIRECT
function is ON. If so, press the front panel’s
POWER AMP DIRECT
button to turn the function OFF (page 11).
Sound of the digital input is not
output.
•The digital format of the output device is not supported. If the output device is set to
an audio signal (Dolby Digital, DTS, etc.) other than PCM, change the setting to PCM.
Sound of the digital input is not output
when playing back a SACD.
•Many SACD players (including Blu-ray players and DVD players compatible with
SACD playback) are not designed to output digital when playing back a SACD. Check
the specifications of the SACD player. Alternatively, play back the audio with an analog
connection.
No sound is heard when a li near PCM
signal with frequency of 96 kHz or
more is input to the
DIGITAL IN
COAXIAL
terminal.
•Sound may not be output properly depending on the digital coaxial cable used; try
replacing the cable (sold separately) with another.
Problem Remedy
Page 15
Additional information 06
15
En
English
DeutschFrançais
Nederlands
Italiano Español Русский
About the USB DAC function
Important
• For details on the computer settings, also refer to the instruction manual of the driver software available on the
Pioneer website.
Problem Remedy
Music files on a computer connected
via USB cannot be played back.
•To connect a computer and the unit via USB and then play back music files input via
USB, you need to download a dedicated driver from the Pioneer website and then
install it on the computer. Consult the Pioneer website for instructions on installing the
driver.
No sound is produced when
attempting to play files on a computer.
•Are volume settings correct for the OS and application program? Raise the volume
settings as required.
•Is the OS audio output set to MUTE? Cancel the MUTE setting.
•Are multiple applications running simultaneously? Try closing applications that are
not in use.
•Has the audio output been set properly within the OS or application used? For audio
device select
“
Pioneer A-70DA A-50DA USB Audio”.
No sound is produced when using a
USB input.
•Is another device selected in the computer settings or is the sound muted in the
computer settings? Check the computer settings.
•Is the unit connected correct? Is the unit detected by the computer? If the unit is
switched to the USB input after it is connected to a computer, other than unit may be
selected in the sound settings of the computer. If that happens, select the unit again.
Also check the connection.
•Are the file format, operating system, and software supported? Check the supported
operating systems, software, and file sampling frequencies.
•Is the dedicated driver installed on the computer? A dedicated driver needs to be
installed on the computer. For details, refer to the Pioneer website.
Non-musical computer sounds from
the USB input are audible.
•Depending on the computer settings, the startup sound, error sounds, and other
sounds of the computer may be played back from the unit. Check the computer
settings.
When using a source other than USB
input, music files on the computer
can't be played.
•When the input is other than USB, the unit is recognized from the computer. Switch
the input to USB and then select the unit in the sound settings of the computer again.
If 384 kHz or 356 kHz is set in the
sound settings of the computer, a
certain browser or software is
terminated and the audio plays back
without sound.
•The browser or software may not support 384 kHz or 356 kHz. Check the
specifications of the browser or software.
Cleaning the unit
• Use a polishing cloth or dry cloth to wipe off dust
and dirt.
• When the surface is dirty, wipe with a soft cloth
dipped in some neutral cleanser diluted five or six
times with water, and wrung out well, and then
wipe again with a dry cloth. Do not use furniture
wax or cleansers.
• Never use thinners, benzine, insecticide sprays or
other chemicals on or near this unit, since these
will corrode the surface.
Page 16

06 Additional information
16
En
Specifications
Amplifier section
Power output specification is for when power supply is 230 V.
• Continuous power output (both
channels driven at 20 Hz to 20 kHz)
A-70DA/A-50DA. . . . . . . . . . . . . . . . . . . . . . .90 W + 90 W
(THD 0.5 %, 4 )
A-70DA/A-50DA. . . . . . . . . . . . . . . . . . . . . . .65 W + 65 W
(THD 0.5 %, 8 )
Audio section
• Input terminals (sensitivity/impedance)
BALANCED . . . . . . . . . . . . . . . . . . . . . . . . . 200 mV/82 k
SACD/CD, NETWORK, LINE 1, LINE 2 . . . 200 mV/50 k
POWER AMP DIRECT. . . . . . . . . . . . . . . . . . . . .1 V/10 k
PHONO (MM) . . . . . . . . . . . . . . . . . . . . . . . 2.8 mV/50 k
PHONO (MC). . . . . . . . . . . 0.24 mV/100 A-70DA only
COAXIAL . . . . . . . . . . . . . . . . . . . . . . . . . 500 mVp-p/75
• Output (Level/Impedance)
LINE 2 OUT . . . . . . . . . . . . . . . . . . . . . . . . 200 mV/2.2 k
• Frequency response
SACD/CD, NETWORK, LINE 1, LINE 2
. . . . . . . . . . . . . . . . . . . . . . . . . . . . 5 Hz to 50 kHz ±3 dB*
• RIAA DEVIATION
PHONO (MM) . . . . . . . . . . . . . 20 Hz to 20 kHz ±0.5 dB*
PHONO (MC)
. . . . . . . . . . . . . 20 Hz to 20 kHz ±0.5 dB*A-70DA only
* Measured with DIRECT button switched on.
• Tone control
Bass . . . . . . . . . . . . . . . . . . . . . . . . . . . . ± 10 dB (100 Hz)
Treble . . . . . . . . . . . . . . . . . . . . . . . . . . . ± 10 dB (10 kHz)
• Signal-to-Noise Ratio (IHF SHORTED,
A-NETWORK)
SACD/CD, NETWORK, LINE 1, LINE 2 . . . . . . . . 101 dB*
PHONO (MM, 5 mV input) . . . . . . . . . . . . . . . . . . .89 dB*
PHONO (MC, 0.5 mV input) . . . . . .74 dB*A-70DA only
* Measured with DIRECT button switched on.
• Guaranteed impedance
A, B. . . . . . . . . . . . . . . . . . . . . . . . . . . . . . . . . . 4 to 16
A+B . . . . . . . . . . . . . . . . . . . . . . . . . . . . . . . . . 8 to 32
Bi-wiring. . . . . . . . . . . . . . . . . . . . . . . . . . . . . . 4 to 16
Miscellaneous
Power requirements
. . . . . . . . . . . . . . . . . . . . . . . . . . AC 220 V to 230 V, 50 Hz
Power consumption
A-70DA. . . . . . . . . . . . . . . . . . . . . . . . . . . . . . . . . . . . 74 W
A-50DA. . . . . . . . . . . . . . . . . . . . . . . . . . . . . . . . . . . . 72 W
In standby . . . . . . . . . . . . . . . . . . . . . . . . . . . . . . . . .0.3 W
Dimensions
A-70DA. . . . . 435 mm (W) x 141.5 mm (H) x 370 mm (D)
A-50DA. . . . . 435 mm (W) x 138.5 mm (H) x 368 mm (D)
Weight (without package)
A-70DA. . . . . . . . . . . . . . . . . . . . . . . . . . . . . . . . . . . 17.2 kg
A-50DA. . . . . . . . . . . . . . . . . . . . . . . . . . . . . . . . . . .11.2 kg
Accessories
Remote control . . . . . . . . . . . . . . . . . . . . . . . . . . . . . . . . .1
AAA/IEC R03 dry cell batteries . . . . . . . . . . . . . . . . . . . .2
Short pin plug . . . . . . . . . . . . . . . . . . . . . . . . . . . . . . . . . . 2
Power cord
Warranty card
Caution sheet
Operating instructions (This document)
Note
• Specifications and the design are subject to
possible modifications without notice, due to
improvements.
• Corporation and product names mentioned herein
are trademarks or registered trademarks of the
respective corporations.
• “Pioneer” is a trademark of Pioneer Corporation,
and is used under license.
© 2015 Onkyo & Pioneer Corporation.
All rights reserved.
Page 17

Additional information 06
17
En
English
DeutschFrançais
Nederlands
Italiano Español Русский
Page 18

AVERTISSEMENT
Cet appareil n’est pas étanche. Pour éviter les risques
d’incendie et de décharge électrique, ne placez près de
lui un récipient rempli d’eau, tel qu’un vase ou un pot
de fleurs, et ne l’exposez pas à des gouttes d’eau, des
éclaboussures, de la pluie ou de l’humidité.
D3-4-2-1-3_A1_Fr
AVERTISSEMENT
Pour éviter les risques d’incendie, ne placez aucune
flamme nue (telle qu’une bougie allumée) sur
l’appareil.
D3-4-2-1-7a_A1_Fr
PRÉCAUTION DE VENTILATION
Lors de l’installation de l’appareil, veillez à laisser un
espace suffisant autour de ses parois de manière à
améliorer la dissipation de chaleur (au moins 30 cm sur
le dessus, 10 cm à l’arrière et 10 cm de chaque côté).
AVERTISSEMENT
Les fentes et ouvertures du coffret sont prévues pour la
ventilation, pour assurer un fonctionnement stable de
l’appareil et pour éviter sa surchauffe. Pour éviter les
risques d’incendie, ne bouchez jamais les ouvertures et
ne les recouvrez pas d’objets, tels que journaux, nappes
ou rideaux, et n’utilisez pas l’appareil posé sur un tapis
épais ou un lit.
D3-4-2-1-7b*_A1_Fr
K058a_A1_Fr
Pb
Information à destination des utilisateurs sur la collecte et l’élimination des
équipements et batteries usagés
Ces symboles qui figurent sur les produits, les emballages et/ou les documents
d’accompagnement signifient que les équipements électriques et électroniques et
batteries usagés ne doivent pas être jetés avec les déchets ménagers et font l’objet
d’une collecte sélective.
Pour assurer l’enlèvement et le traitement appropriés des produits et batteries
usagés, merci de les retourner dans les points de collecte sélective habilités
conformément à la législation locale en vigueur.
En respectant les circuits de collecte sélective mis en place pour ces produits, vous
contribuerez à économiser des ressources précieuses et à prévenir les impacts
négatifs éventuels sur la santé humaine et l’environnement qui pourraient résulter
d’une mauvaise gestion des déchets.
Pour plus d’information sur la collecte et le traitement des produits et batteries
usagés, veuillez contacter votre municipalité, votre service de gestion des déchets
ou le point de vente chez qui vous avez acheté ces produits.
Ces symboles ne sont valables que dans les pays de l’Union Européenne.
Pour les pays n’appartenant pas à l’Union Européenne :
Si vous souhaitez jeter ces articles, veuillez contacter les autorités ou revendeurs
locaux pour connaître les méthodes d’élimination appropriées.
Exemples de marquage
pour les batteries
Marquage pour les
équipements
ATTENTION
POUR ÉVITER TOUT RISQUE D’ÉLECTROCUTION, NE
PAS ENLEVER LE COUVERCLE (NI LE PANNEAU
ARRIÈRE). AUCUNE PIÈCE RÉPARABLE PAR
L’UTILISATEUR NE SE TROUVE À L’INTÉRIEUR.
CONFIER TOUT ENTRETIEN À UN PERSONNEL
QUALIFIÉ UNIQUEMENT.
D3-4-2-1-1_B1_Fr
Page 19

3
ATTENTION
L’interrupteur /I STANDBY/ON de cet appareil ne
coupe pas complètement celui-ci de sa prise secteur.
Comme le cordon d’alimentation fait office de
dispositif de déconnexion du secteur, il devra être
débranché au niveau de la prise secteur pour que
l’appareil soit complètement hors tension. Par
conséquent, veillez à installer l’appareil de telle
manière que son cordon d’alimentation puisse être
facilement débranché de la prise secteur en cas
d’accident. Pour éviter tout risque d’incendie, le
cordon d’alimentation sera débranché au niveau de
la prise secteur si vous prévoyez une période
prolongée de non utilisation (par exemple avant un
départ en vacances).
D3-4-2-2-2a*_A1_Fr
Milieu de fonctionnement
Température et humidité du milieu de fonctionnement :
De +5 °C à +35 °C (de +41 °F à +95 °F) ; Humidité
relative inférieure à 85 % (orifices de ventilation non
obstrués)
N’installez pas l’appareil dans un endroit mal ventilé ou
un lieu soumis à une forte humidité ou en plein soleil
(ou à une forte lumière artificielle).
D3-4-2-1-7c*_A1_Fr
Ce produit est destiné à une utilisation domestique
générale. Toute panne due à une utilisation autre qu'à
des fins privées (comme une utilisation à des fins
commerciales dans un restaurant, dans un autocar
ou sur un bateau) et qui nécessite une réparation
sera aux frais du client, même pendant la période de
garantie.
K041_A1_Fr
NOTE IMPORTANTE SUR LE CABLE D’ALIMENTATION
Tenir le câble d’alimentation par la fiche. Ne pas
débrancher la prise en tirant sur le câble et ne pas
toucher le câble avec les mains mouillées. Cela risque de
provoquer un court-circuit ou un choc électrique. Ne pas
poser l’appareil ou un meuble sur le câble. Ne pas pincer
le câble. Ne pas faire de noeud avec le câble ou l’attacher
à d’autres câbles. Les câbles d’alimentation doivent être
posés de façon à ne pas être écrasés. Un câble abîmé
peut provoquer un risque d’incendie ou un choc
électrique. Vérifier le câble d’alimentation de temps en
temps. Contacter le service après-vente PIONEER le plus
proche ou le revendeur pour un remplacement.
S002*_A1_Fr
Nous vous remercions pour cet
achat d’un produit Pioneer.
Nous vous demandons de lire soigneusement ce mode
d’emploi ; vous serez ainsi à même de faire fonctionner
l’appareil correctement. Après avoir bien lu le mode
d’emploi, le ranger dans un endroit sûr pour pouvoir s’y
référer ultérieurement.
Table des
matières
01 Préparatifs
Contenu de la boîte . . . . . . . . . . . . . . . . . . . . . . . .4
Chargement des piles dans la télécommande . . . .4
Utilisation de la télécommande . . . . . . . . . . . . . . . .4
Installation de l’amplificateur . . . . . . . . . . . . . . . .4
02 Raccordement
Raccordements des câbles . . . . . . . . . . . . . . . . . . 5
A propos de “bi-câblage (bi-wiring)”. . . . . . . . . . . .5
Connexion des câbles d’enceinte. . . . . . . . . . . . . . 6
Raccordement des câbles audio . . . . . . . . . . . . . . 6
Raccordement aux bornes d’entrée symétriques
(A-70DA uniquement) . . . . . . . . . . . . . . . . . . . . . . 6
Connexions d’entrée audio numérique . . . . . . . . .7
Utilisation d’un câble USB pour brancher un
ordinateur . . . . . . . . . . . . . . . . . . . . . . . . . . . . . . . 7
Utilisation de la commande centralisée avec
d’autres composants Pioneer . . . . . . . . . . . . . . . .7
Branchement. . . . . . . . . . . . . . . . . . . . . . . . . . . . .7
03 Commandes et afficheur
Panneau avant. . . . . . . . . . . . . . . . . . . . . . . . . . . .8
Panneau arrière. . . . . . . . . . . . . . . . . . . . . . . . . . .9
Télécommande . . . . . . . . . . . . . . . . . . . . . . . . . .10
04 Fonctionnement
Lecture . . . . . . . . . . . . . . . . . . . . . . . . . . . . . . . . 11
Réglage de la puissance sur la mise en veille . . . .11
Lorsque vous utilisez l’appareil
comme amplificateur de puissance. . . . . . . . . . . .11
Lecture de musique depuis un composant audio
numérique. . . . . . . . . . . . . . . . . . . . . . . . . . . . . . .11
Réalisation d’un enregistrement audio . . . . . . . . 12
Pour régler un statut de veille automatique
(fonction de mise hors tension automatique). . . .12
Pour restaurer tous les réglages
sur les valeurs par défaut. . . . . . . . . . . . . . . . . . . 12
05 Utilisation de la fonction USB DAC
Installation du pilote . . . . . . . . . . . . . . . . . . . . . . 13
Lecture de musique depuis ordinateur . . . . . . . .13
06 Informations supplémentaires
Guide de dépannage . . . . . . . . . . . . . . . . . . . . . . 14
À propos de la fonction DAC USB . . . . . . . . . . . . .15
Nettoyage de l’unité. . . . . . . . . . . . . . . . . . . . . . .15
Spécifications . . . . . . . . . . . . . . . . . . . . . . . . . . .16
Page 20
01 Préparatifs
4
Fr
Chapitre 1 :
Préparatifs
Contenu de la boîte
Veuillez confirmer que les accessoires suivants sont
présents dans la boîte quand vous l’ouvrez.
•Télécommande
• Piles sèches AAA/IEC R03 x 2
• Fiches à broche courte x 2
(Lors de l’achat, ces fiches sont déjà installées sur
les bornes PHONO IN du panneau arrière.)
• Cordon d’alimentation (Longueur : 1,8 m)
• Carte de garantie
• Feuille d’avertissements (pour la première
utilisation)
• Mode d’emploi (ce document)
AVERTISSEMENT
• Gardez les pièces de petite taille hors de la portée
des bébés et des enfants. En cas d’ingestion
accidentelle, veuillez contacter immédiatement un
médecin.
Remarque
• Les illustrations des instructions opérationnelles
peuvent avoir été modifiées ou simplifiées dans le
but de clarification et en conséquence peuvent
différer de l’apparence actuelle du produit.
• Les illustrations utilisées ici représentent
principalement l’A-70DA.
Chargement des piles dans la
télécommande
1 Ouvrez le couvercle arrière.
2 Placez les piles neuves, en faisant
correspondre la polarité à celle du boîtier.
3 Fermez le couvercle arrière.
Les piles incluses avec l’unité ont été fournies pour
permettre de contrôler le fonctionnement du produit et
ne dureront pas longtemps. Nous recommandons
d’utiliser des piles alcalines qui ont une durée de vie
utile plus longue.
AVERTISSEMENT
• N’utilisez ni ne conservez les piles sous la lumière
directe du soleil ou dans un endroit excessivement
chaud, comme une voiture ou à proximité d’un
appareil de chauffage. Les piles risqueraient de
fuir, de surchauffer, d’exploser ou de s’enflammer.
Leur durée de vie ou leur performance pourrait
également être réduite.
Attention
Toute utilisation incorrecte des piles peut entraîner des
accidents, par exemple une fuite ou une explosion.
Respectez les précautions suivantes :
• Lorsque vous placez les piles, prenez soin de ne pas
endommager les ressorts des bornes des piles .
Ceci peut entraîner la fuite ou la surchauffe des
piles.
• Ne pas utiliser de piles autres que celles qui sont
indiquées. Ne pas utiliser non plus une pile neuve
avec une pile usée.
• Lorsque vous installez les piles dans la
télécommande, orientez-les batteries dans la
bonne direction en respectant la polarité ( et ).
• Ne pas chauffer, ni démonter, ni ne jeter les piles
dans le feu ou l’eau.
• La tension des piles peut différer l’une de l’autre et
cela même si leur type et forme sont identiques.
Utiliser ensemble uniquement des piles du même
type.
• Pour éviter que les piles ne fuient, enlever les piles
lorsque le produit n’est pas censé être utilisé
pendant une période prolongée (à savoir 1 mois ou
plus). Si les piles ont fuit, nettoyer soigneusement
1
2
3
l’intérieur du compartiment et placer ensuite les
piles. Si une pile fuit et que du liquide entre en
contact avec votre peau, nettoyer à grande quantité
d’eau.
• Lorsque vous jetez des piles usées, veuillez vous
conformer aux normes gouvernementales ou à la
réglementation des institutions publiques
environnementales en vigueur dans votre pays ou
région.
Utilisation de la télécommande
La télécommande a une portée d’environ 7 mètres avec
un angle de 30° par rapport au capteur de
télécommande.
Gardez à l’esprit ce qui suit lorsque vous utilisez la
télécommande :
• Assurez-vous de l’absence d’obstacles entre la
télécommande et le capteur de l’appareil.
• La télécommande risque de ne pas fonctionner
correctement si la lumière du soleil ou une lampe
fluorescente puissante éclaire le capteur de
l’appareil.
• Les télécommandes de différents appareils
peuvent interférer entre elles. Evitez d’utiliser des
télécommandes commandant d’autres
équipements situés à proximité de cet appareil.
• Remplacez les piles lorsque vous constatez une
diminution de la portée de fonctionnement de la
télécommande.
Installation de l’amplificateur
Lors de l’installation de l’appareil, assurez-vous que ce
dernier est posé sur une surface plane et stable.
•
N’installez pas l’appareil dans les endroits suivants :
– sur un téléviseur couleur (les images à l’écran
pourraient être déformées)
– à proximité d’une platine à cassettes (ou d’un
appareil qui produit un champ magnétique). Le son
pourrait s’en trouver affecté.
– à la lumière directe du soleil
– à l’humidité
– à des températures extrêmes
– en présence de vibrations ou autres mouvements
– à la poussière
– à la fumée ou aux émanations graisseuses
(cuisine par ex.)
• Ne pas installer l’unité sur un divan ou tout autre
objet/matériau ayant des caractéristiques
absorbantes sous risque d’affecter la qualité du
son.
7 m
30 °
30 °
Page 21
Raccordement 02
5
Fr
English
DeutschFrançais
Nederlands
Italiano Español Русский
Chapitre 2:
Raccordement
Raccordements des câbles
Attention
• Avant d’effectuer ou de modifier les raccordements, mettez l’appareil hors tension et débranchez le cordon
d’alimentation de la prise secteur.
• Connectez le cordon d’alimentation après avoir effectué toutes les connexions entre les appareils.
REC
R
L
RL
PLAY
RL
AUDIO
OUTPUT
PREOUT
R
L
NORMALNORMAL
INVERSION
INVERSION
PHASE
PHASE
LINE2LINE2
LINE1
LINE1
USBUSB
COAXIAL
COAXIAL
PHONOPHONO
(MM/MC)
(MM/MC)
SIGNAL
SIGNAL
GND
GND
NETWORK
NETWORK
SACD/CD
SACD/CD
DIGITAL INDIGITAL IN
ANALOG INANALOG IN
OPTICALOPTICAL
LINE2LINE2
OUT
OUT
POWERPOWER
AMP
AMP
DIRECT
DIRECT
BALANCED INBALANCED IN
L
R
L
R
L
R
L
R
L
R
L
R
L
R
L
R
L
R
L
R
L
R
L
R
L
R
LRL
R
LRL
R
LRL
R
L
R
L
R
MENU
iPod
Music>
Extras>
Settings>
Shuffle Songs
Backlight
MASTER
VOLUME
STANDBY/ON
INPUT
SELECTOR
iPodiPhoneiPadHDMI
ADVANCED
MCACC
FLOFF
SOURCE
/I STANDBY/ON
STANDBY
iPod/iPhone
5V1A
DIRECT Hi-Bit 32Up Sampling
SOURCE
Prises PRE OUT sur le pré-amplificateur
ou amplificateur AV
Système d’enceinte B
Platine
Droite
Gauche
Panneau
arrière de cet
Périphérique audio avec
bornes de sortie symétriques
Dispositif
d’enregistrement ou
autre périphérique
Système d’enceinte A
Droite
Gauche
Cordon
d’alimentation
(fourni)
Attention
•La borne SIGNAL GND est fournie pour réduire le
bruit lors de la connexion de l’unité aux
composants, tels que la platine analogique.
• Les bornes PHONO IN sont installées en usine,
dotées de fiches à broche courte. Elles ne doivent
pas être retirées, sauf en cas de branchement
d’une platine. Assurez-vous de conserver les fiches
à broche courte en lieu sûre.
• N’insérez pas les fiches à broche courte dans des
connecteurs autres que les bornes PHONO IN.
Leur branchement sur d’autres bornes pourrait
entraîner un dysfonctionnement.
• Ne pas connecter les bornes PHONO IN à un autre
composant qu’une platine ; ne pas connecter non
plus une platine doté d’un égalisateur intégré. Un
son émis trop fort peut se produire, ce qui
endommagerait les enceintes ou les autres
appareils.
• Les bornes PHONO IN de l’unité A-50DA ont été
conçues pour être utilisées avec des platines
dotées de cartouches de type MM (à aimant
mobile). Ne pas utiliser les platines dotées de
cartouches MC (à bobine mobile).
• Assurez-vous de ne pas plier les câbles par dessus
cette unité (comme indiqué dans l’illustration). Si
cela se produit, le champ magnétique produit par
les transformateurs dans cette unité peut
provoquer un ronflement des enceintes.
• Les bornes POWER AMP DIRECT de l’unité ne
doivent jamais être branchées à des connecteurs
autres que PRE-AMP OUT.
• Si votre platine dispose d’un fil de mise à la terre,
fixez-le à la borne de terre de cet amplificateur.
Remarque
• Lors de la connexion d’un enregistreur à bande, le
bruit de fond peut être perçu, selon l’emplacement
de l’installation. Ce bruit provient d’une fuite du
transformateur de l’amplificateur. Dans ce cas,
changez l’emplacement de l’installation ou
distancez davantage la platine de l’amplificateur.
• iPod est une marque commerciale d’Apple Inc.,
enregistrées aux états-Unis et dans d’autres pays.
A propos de “bi-câblage (bi-wiring)”
Cette unité peut être utilisée avec des enceintes
prenant en charge le bi-câblage. Toujours raccorder
correctement la haute fréquence et la basse
fréquence.
• Au cours de la lecture, assurez-vous que les
boutons SPEAKERS A et SPEAKERS B sont sur
Marche (ON) (page 8).
Attention
• Lorsque vous utilisez un bi-câblage pour connecter
les enceintes, assurez-vous d’enlever les tiges de
court-circuit HIGH et LOW fournies avec les hautparleurs pour ne pas créer d’effets adverses sur
l’amplificateur. Pour de plus amples informations,
consultez les instructions fournies avec les
enceintes.
HIGH
LOW
HIGH
LOW
Système des enceintes
Gauche
Système des enceintes
Droite
Panneau
arrière de cet
appareil
Enlevez la tige de
court-circuit entre
les bornes + et –.
Lecteur SACD/CD
Lecteur audio réseau
Station d’accueil iPod, etc.
Page 22
02 Raccordement
6
Fr
• Lorsque vous utilisez des enceintes avec des
circuits de réseau amovibles, si le réseau est
enlevé, aucun effet ne se produira et les enceintes
peuvent subir des dommages.
• Vous pouvez alternativement connecter les bornes
SPEAKERS A sur HIGH et celles sur LOW
SPEAKERS B (à l’inverse de ce qui est illustré).
Connexion des câbles d’enceinte
1 Entortillez l’âme des câbles.
2 Desserrez l’écrou sur la borne
SPEAKERS
et introduisez le câble de l’enceinte dans le
trou exposé dans la borne.
3 Resserrez l’écrou de la borne.
Attention
• Lorsque vous utilisez uniquement un jeu de
bornes de l’enceinte (SPEAKERS A ou SPEAKERS
B), ou lorsque vous utilisez des connexions bicâblage, l’enceinte utilisée doit disposer d’une
impédance nominale entre 4 et 16 . Lorsque
vous utilisez des jeux de bornes, les enceintes
connectées doivent disposer d’une impédance
nominale entre 8 et 32 . Pour de plus
amples informations sur la valeur de
l’impédance, consultez les instructions jointes
aux enceintes.
• Vérifiez que les bornes positive et négative (+/–) sur
l’amplificateur correspondent à celles des
enceintes.
• Les bornes des haut-parleurs sont sous une
tension ACTIVE DANGEREUSE. Pour éviter tout
risque de décharge électrique lors du branchement
et du débranchement des câbles d’enceinte,
débranchez le cordon d’alimentation avant de
toucher des parties non isolées.
• Assurez-vous que tous les fils dénudés d’enceinte
sont entortillés ensemble et totalement introduits
dans la borne de l’enceinte. Si l’un des fils dénudés
entre en contact avec le panneau arrière,
l’alimentation sera automatiquement coupée par
mesure de sécurité.
Raccordement des câbles audio
Connectez la fiche blanche à la prise gauche (L) et la
fiche rouge à la prise droite (R). Assurez-vous de bien
brancher les fiches dans les prises.
123
10 mm
Gauche (blanche)
Droite (rouge)
Raccordement aux bornes d’entrée
symétriques (A-70DA uniquement)
Raccordez les bornes BALANCED IN de l’appareil à un
lecteur SACD, à un DAC USB, à un lecteur réseau ou à
tout autre périphérique avec des bornes de sortie
symétriques.
Attention
•Les fonctions BASS, TREBLE, BALANCE et
LOUDNESS ne fonctionnent pas sur un
périphérique raccordé aux bornes BALANCED IN.
La phase peut varier selon le périphérique à raccorder.
Utilisez le sélecteur de phase sur le panneau arrière de
l’appareil pour faire correspondre à la phase.
• Réglage initial (N° 2 POINT CHAUD)
• Réglages lorsque la polarité change
(N° 3 POINT CHAUD)
Remarque
• Pour plus d’informations sur la phase des bornes
de sortie symétriques du périphérique à raccorder,
reportez-vous au mode d’emploi du périphérique.
• Lors du raccordement de l’appareil à un lecteur
Pioneer, faites correspondre la phase au réglage
initial (N° 2 POINT CHAUD).
LINE2
LINE2
LINE1
LINE1
USB
USB
COAXIAL
COAXIAL
NETWORK
NETWORK
SACD/CD
SACD/CD
DIGITAL IN
DIGITAL IN
ANALOG IN
ANALOG IN
OPTICAL
OPTICAL
LINE2
LINE2
OUT
OUT
P.
P.
AMP
AMP
DIRECT
DIRECT
BALANCED IN
BALANCED IN
NORMAL
NORMAL
INVERSION
INVERSION
PHASE
PHASE
RL
Périphérique audio avec
bornes de sortie symétriques
Câble symétrique
(vendu séparément)
Panneau arrière A-70DA
NORMAL
NORMAL
INVERSION
INVERSION
PHASE
PHASE
1 Masse
3 POINT
FROID (-)
2 POINT
CHAUD (+)
NORMAL
NORMAL
INVERSION
INVERSION
PHASE
PHASE
1 Masse
3 POINT
CHAUD (+)
2 POINT
FROID (-)
Page 23
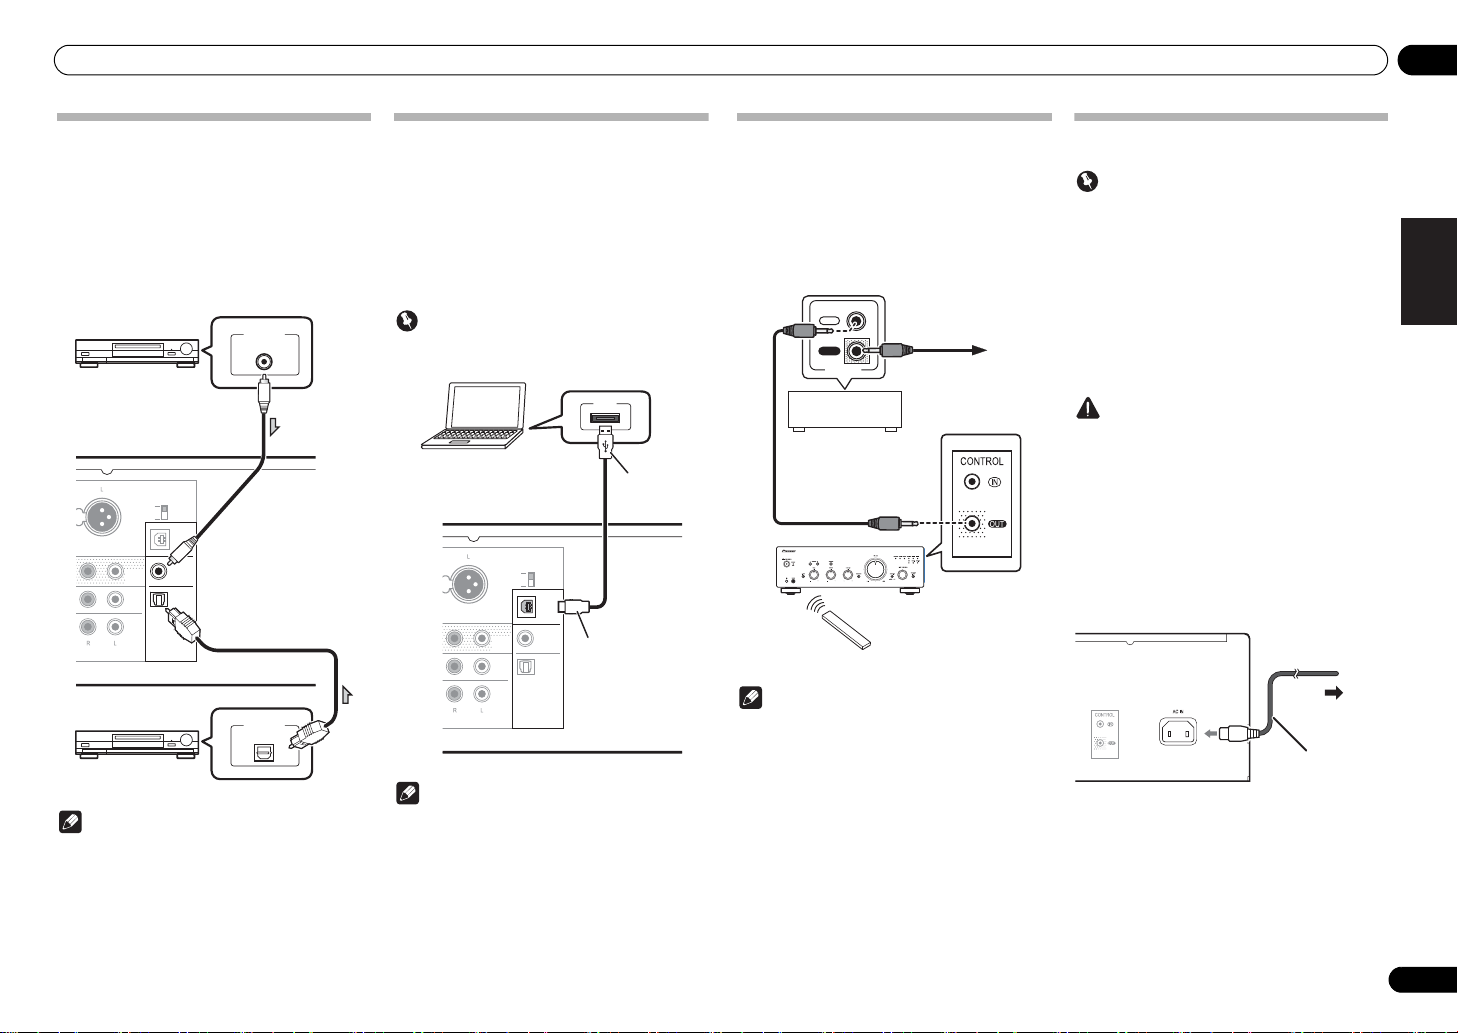
Raccordement 02
7
Fr
English
DeutschFrançais
Nederlands
Italiano Español Русский
Connexions d’entrée audio
numérique
Si vous raccordez la borne DIGITAL IN de l’appareil et la
sortie audio numérique d’un périphérique audio
numérique à l’aide d’un câble numérique vendu
séparément, vous pouvez lire l’audio du périphérique
audio numérique avec l’appareil.
Pour plus d’informations sur l’émission de l’entrée
audio sur la borne DIGITAL IN, reportez-vous à la
page 11.
Remarque
• Les signaux PCM linéaire font partie des formats de
signaux numériques pouvant être transmis à cette
unité Leurs taux d’échantillonnage et bits
quantitatifs peuvent atteindre les 192 kHz/32 bits.
(Selon l’appareil connecté et l’environnement, il est
possible que cela ne fonctionne pas).
Utilisation d’un câble USB pour
brancher un ordinateur
Les fichiers de musique stockés dans un ordinateur
peuvent se lire via cet appareil si un câble USB (vendu
séparément) est utilisé pour relier la borne DIGITAL IN
USB de l’appareil au le port USB de l’ordinateur.
Pour plus d’informations sur la récupération de l’entrée
des signaux audio par la borne DIGITAL IN USB,
consultez la page 12.
Important
• Un pilote dédié doit être installé sur votre
ordinateur (page 13).
Remarque
• Cette unité peut être utilisé pour lire les fichiers
audio d’un ordinateur si Media Player est installé
sur l’ordinateur relié.
LINE2
LINE2
LINE1
LINE1
USB
USB
COAXIAL
COAXIAL
DIGITAL IN
DIGITAL IN
IN
OPTICAL
OPTICAL
LINE2
LINE2
OUT
OUT
ED IN
NORMAL
NORMAL
INVERSION
INVERSION
PHASE
PHASE
DIGITAL OUT
COAXIAL
DIGITAL OUT
OPTICAL
Équipement audio
numérique, etc.
Câble audio numérique coaxial
(vendu séparément)
Panneau arrière A-70DA
Câble audio numérique
optique
(vendu séparément)
Équipement audio
numérique, etc.
LINE2LINE2
LINE1
LINE1
USBUSB
COAXIALCOAXIAL
DIGITAL INDIGITAL IN
OPTICAL
OPTICAL
LINE2
LINE2
OUT
OUT
NORMALNORMAL
INVERSION
INVERSION
PHASE
PHASE
USB
Câble USB
(vendu séparément)
Type A
Type B
Ordinateur
Panneau arrière A-70DA
Utilisation de la commande centralisée
avec d’autres composants Pioneer
De nombreux composants Pioneer dotés de prises
CONTROL IN/OUT peuvent être connectés à l’unité,
centralisant la commande des composants via le
télécapteur sur l’appareil. Cette centralisation permet
d’utiliser une télécommande dont les composants ne
sont pas munis d’un télécapteur ou sont installés à des
emplacements inaccessibles par le télécapteur.
Remarque
• Pour établir la connexion, utilisez un cordon minifiche mono en vente dans le commerce (sans
résistance).
• Lors de la connexion des prises CONTROL IN/OUT,
des cordons audio en vente dans le commerce
doivent être utilisés pour établir les connexions
analogiques. La connexion des prises CONTROL
IN/OUT ne suffit pas à à assurer un contrôle
adéquat du système.
• Lorsqu’un cordon de commande est connecté à la
prise CONTROL IN de l’appareil, il est impossible
de contrôler l’unité en pointant la télécommande
sur l’appareil (le télécapteur est automatiquement
désactivé).
Branchement
Important
• Lorsque vous devez vous absenter ou quelle que
soit la situation où l’unité ne sera pas utilisée
pendant une longue durée, toujours déconnecter le
cordon d’alimentation de ses prises. Les réglages
internes sont toujours conservés et cela même si le
cordon d’alimentation est déconnecté de sa prise
pendant une longue période.
• Si le cordon d’alimentation doit être déconnecté,
assurez-vous d’appuyer sur le bouton
/I
STANDBY/ON sur le panneau avant de l’unité
de manière à ce que cette dernière soit sur Arrêt
(OFF) avant de retirer le cordon.
Attention
• L’utilisation d’un cordon électrique autre que celui
fourni invalide la garantie, Pioneer n’étant pas
responsable des éventuels dommages subis.
(Le cordon d’alimentation fourni avec l’unité
présente une capacité nominale de 10 A.)
• Ne pas utiliser de cordon d’alimentation autre que
celui fourni avec cette unit.
• Ne pas utiliser le cordon d’alimentation fourni pour
un usage que celui qui est décrit ci-dessous.
Après avoir effectué toutes les connexions, branchez
l’unité dans une prise CA.
1 Branchez le cordon d’alimentation dans
la prise
AC IN
située sur le panneau arrière
de l’unité.
2 Branchez l’autre extrémité dans la prise
CA.
IN
OUT
CONTROL
Vers d’autres
composants Pioneer
munis de prises
CONTROL IN/OUT
Vers d’autres
composants
Pioneer munis
d’une prise
CONTROL IN
A-70DA
Dirigez la
télécommande sur le
capteur de l’unité.
Télécommande
Vers la prise CA
Panneau arrière de cet appareil
Cordon d’alimentation
(inclus)
Page 24
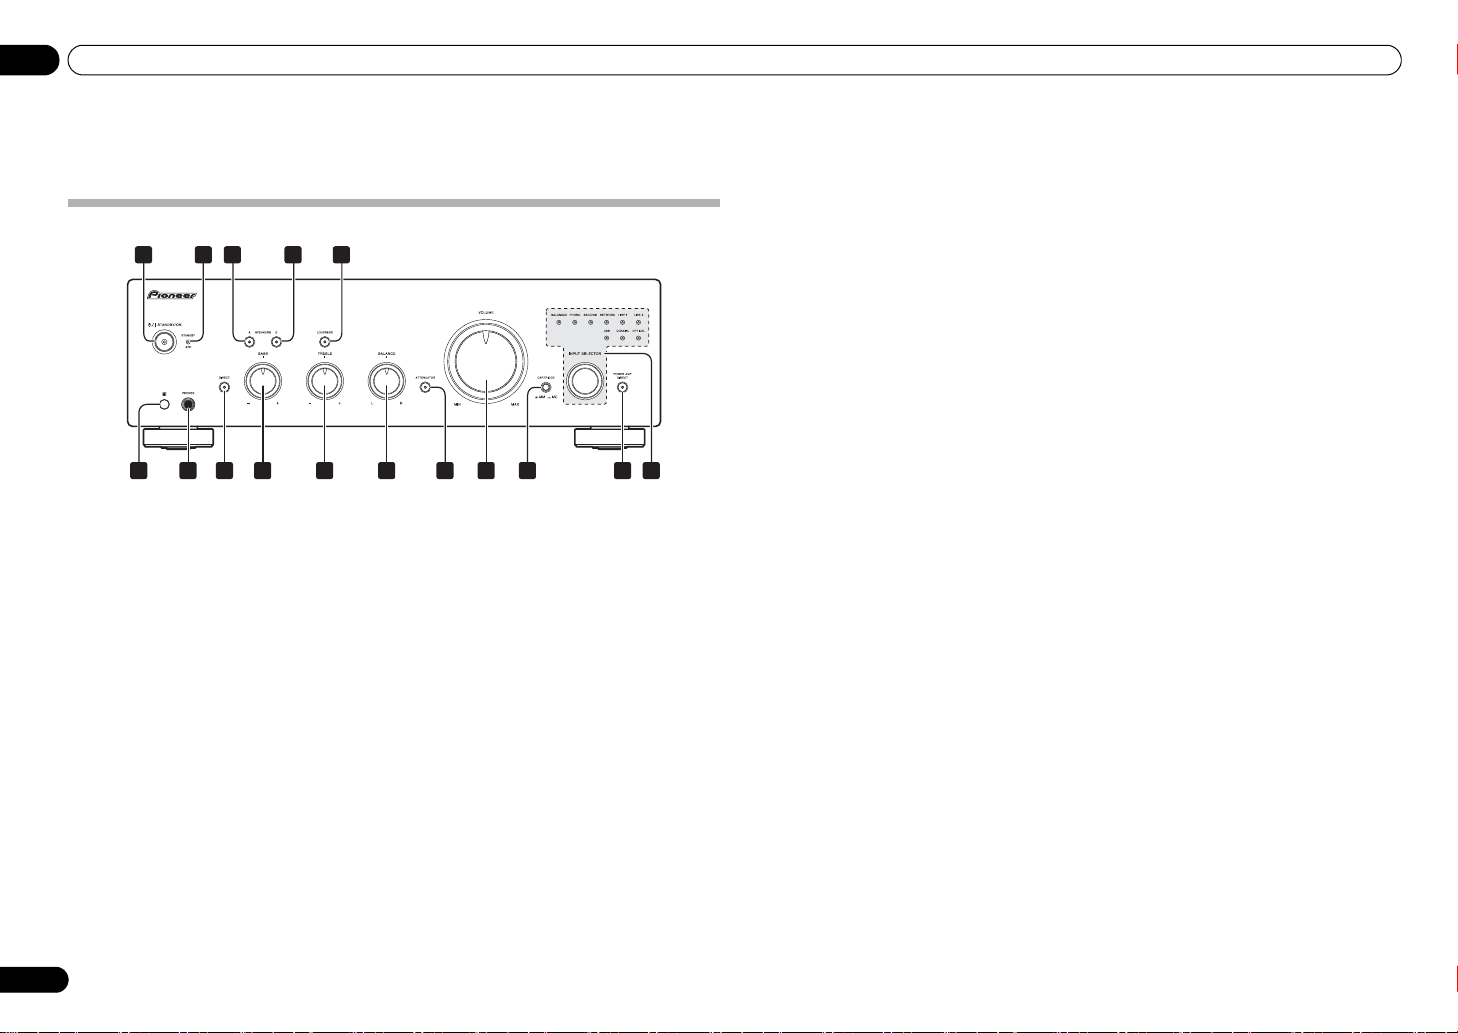
03 Commandes et afficheur
8
Fr
Chapitre 3:
Commandes et afficheur
Panneau avant
1/I
STANDBY/ON
Ce bouton permet de mettre l’amplificateur sous/hors
tension.
Lors de la mise sous tension, l’indicateur au centre du
bouton s’allume.
2
STANDBY/APD
indicateur
Lorsque l’alimentation est en mode veille, l’indicateur
s’allume en rouge. Lorsque la fonction de mise hors
tension automatique (APD) est activée, l’indicateur
s’allume en vert (page 12).
3
SPEAKERS A
bouton/indicateur
Ce bouton permet d’écouter le système d’enceinte
connecté aux bornes SPEAKERS A.
On : L’indicateur s’allume. Le son est entendu du
système d’enceinte.
Off : L’indicateur s’éteint. Aucun son n’est entendu du
système d’enceinte.
4
SPEAKERS B
bouton/indicateur
Ce bouton permet d’écouter le système d’enceinte
connecté aux bornes SPEAKERS B.
On : L’indicateur s’allume. Le son est entendu du
système d’enceinte.
Off : L’indicateur s’éteint. Aucun son n’est entendu du
système d’enceinte.
5
LOUDNESS
bouton/indicateur
Utilisez lorsque vous utilisez à des niveaux faibles.
On : L’indicateur s’allume : Augmente les fréquences
hautes et basses pour donner du punch aux lectures
même à niveau sonore faible.
Off : L’indicateur s’éteint : Doit en principe rester dans
cette position.
• Ce bouton ne fonctionne pas lorsque le bouton
DIRECT est en position de marche.
• Lorsque vous augmentez le son, la quantité de
changement produit par le circuit LOUDNESS est
réduite.
A-70DA
31
6
2 54
7
14 1612
9
10 11 13 15
8
6 Capteur de télécommande
Reçoit les signaux émis par la télécommande (page 4).
7 Prise
PHONES
Permet de raccorder des écouteurs (lorsqu’ils sont
raccordés, aucun son ne sort des enceintes). Pas de son
produit lorsque le bouton POWER AMP DIRECT est sur
ON.
8 Bouton/indicateur DIRECT
On : L’indicateur s’allume : Lorsque ce bouton est sur
ON, les signaux sonores sont émis directement sans
passer par les divers circuits de réglage (BASS, TREBLE,
BALANCE, LOUDNESS). Les signaux sont ainsi
reproduits très fidèlement mais les réglages effectués
avec les commandes BASS, TREBLE, BALANCE ou
LOUDNESS sont ignorés. Lorsqu’un périphérique
raccordé aux bornes BALANCED IN est lu, DIRECT
s’active et ne peut pas être désactivé.
Off : L’indicateur s’éteint : Le signal passe par divers
circuits d’ajustement de fréquence. Lorsque l’indicateur
est sur OFF, les réglages peuvent être effectués avec les
commandes BASS, TREBLE, BALANCE et LOUDNESS.
9
BASS
commande de la tonalité
Utilisez pour régler la tonalité basse fréquence. La
position centrale correspond à une position plate
(normale). Lorsque vous tournez sur la droite, les
tonalités basse fréquence sont accentuées ; lorsque
vous tournez sur la gauche, les tonalités basse
fréquence sont atténuées.
• Ce bouton ne fonctionne pas lorsque le bouton
DIRECT est en position de marche.
10
TREBLE
commande de la tonalité
Utilisez pour régler la tonalité haute fréquence. La
position centrale correspond à une position plate
(normale). Lorsque vous tournez sur la droite, les
tonalités haute fréquence sont accentuées ; lorsque
vous tournez sur la gauche, les tonalités haute
fréquence sont atténuées.
• Ce bouton ne fonctionne pas lorsque le bouton
DIRECT est en position de marche.
11
BALANCE
commande
Doit en principe rester au centre. Réglez l’équilibre si le
son est plus fort d’une enceinte que de l’autre. Si le côté
droit est plus fort, tournez vers la gauche (L) et si le côté
gauche est plus fort, tournez vers la droite (R).
• Ce bouton ne fonctionne pas lorsque le bouton
DIRECT est en position de marche.
12 Bouton
ATTENUATOR
(uniquement
A-70DA)
Appuyez sur ce bouton lorsque vous souhaitez effectuer
des réglages fins du volume audio lorsque la lecture
s’effectue à des niveaux sonores très faibles.
13 Commandes du VOLUME
Utilisez pour régler le niveau du volume. (Permet
également d’effectuer des réglages du volume sonore
des écouteurs).
14 Sélecteur
CARTRIDGE
(uniquement
A-70DA)
Permet de choisir le type de cartouche utilisée avec votre
platine.
15
POWER AMP DIRECT
bouton/indicateur
Appuyez sur ce bouton lorsque l’appareil sera utilisé
comme amplificateur de la puissance (page 11).
16
INPUT SELECTOR
bouton/indicateurs
Tournez le bouton dans le sens horaire ou anti-horaire de
manière à ce que l’indicateur s’allume pour la source
d’entrée souhaitée. Tournez le bouton dans le sens
horaire pour que l’indicateur s’allume sur la droite.
Tournez dans le sens anti-horaire pour que l’indicateur
s’allume sur la gauche. Lorsque vous appuyez sur le
bouton de la télécommande MUTE pour mettre le son en
sourdine, l’indicateur de la source d’entrée sélectionné
avec le bouton INPUT SELECTOR se met à clignoter.
Page 25
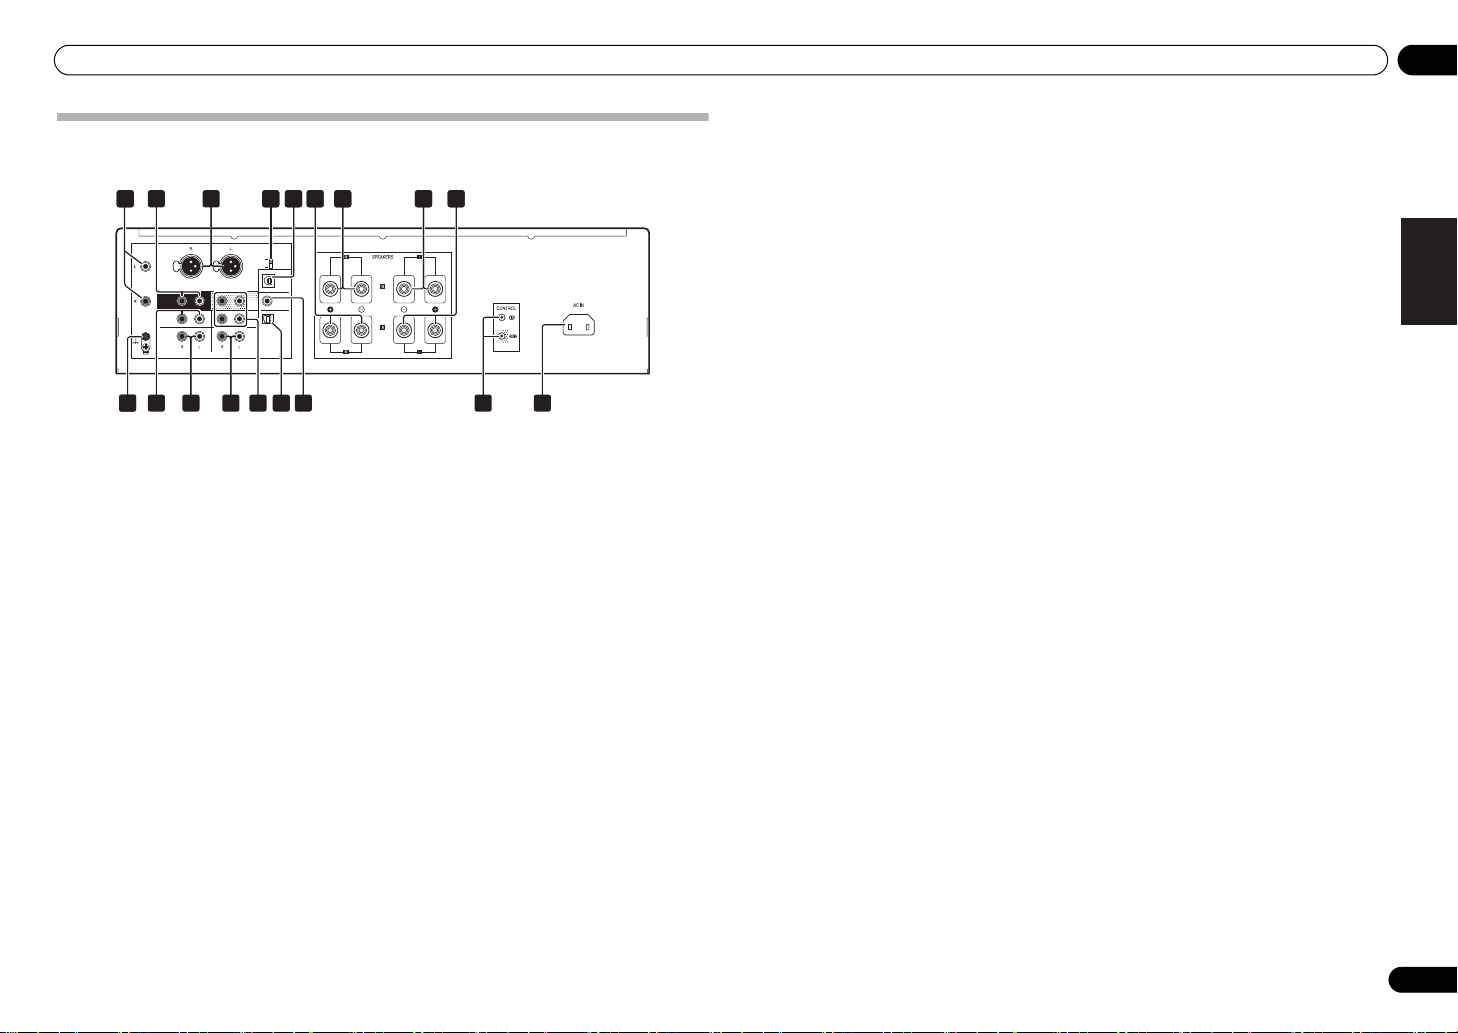
Commandes et afficheur 03
9
Fr
English
DeutschFrançais
Nederlands
Italiano Español Русский
Panneau arrière
Pour de plus amples informations sur les connexions, voir les pages 5-7.
1
PHONO IN (MM/MC)
bornes (A-70DA)
PHONO IN (MM) bornes (A-50DA)
2
POWER AMP DIRECT IN
bornes
Lorsque vous utilisez l’appareil comme amplificateur de
la puissance, connectez le pré-amplificateur ici
(page 11).
3 Bornes BALANCED IN
(A-70DA uniquement)
4 Sélecteur de phase
(A-70DA uniquement)
Change la phase des bornes BALANCED IN.
5
DIGITAL IN USB
borne
6
SPEAKERS A
bornes (canal droit)
7
SPEAKERS B
bornes (canal droit)
8
SPEAKERS B
bornes (canal gauche)
9
SPEAKERS A
bornes (canal gauche)
10 Borne GND (mise à la terre de la platine)
Cette borne de terre a été conçue pour réduire le bruit
lorsqu’un tourne-disque est branché. Il ne s’agit pas
d’une mise à la terre de sécurité.
11
NETWORK IN
bornes
12
SACD/CD IN
bornes
13 Bornes LINE 1
14 Bornes LINE 2 IN/OUT
15 Borne DIGITAL IN OPTICAL
16
DIGITAL IN COAXIAL
borne
17 Prise
CONTROL IN/OUT
18 Prise
AC IN
Connectez le cordon d’alimentation ici et à une prise
murale CA.
LINE2
LINE2
LINE1
LINE1
USB
USB
COAXIAL
COAXIAL
PHONO
PHONO
(MM/MC)
(MM/MC)
SIGNAL
SIGNAL
GND
GND
NETWORK
NETWORK
SACD/CD
SACD/CD
DIGITAL IN
DIGITAL IN
ANALOG IN
ANALOG IN
OPTICAL
OPTICAL
LINE2
LINE2
OUT
OUT
POWER
POWER
AMP
AMP
DIRECT
DIRECT
BALANCED IN
BALANCED IN
NORMAL
NORMAL
INVERSION
INVERSION
PHASE
PHASE
21 2 2724
2
10 11 15 16 1817
29
3 28
12 13
5 26
14
Page 26

03 Commandes et afficheur
10
Fr
Télécommande
STANDBY/ON
A
B
APD
1
8
10
9
12
11
13
2
3
4
6
4
7
5
1
STANDBY/ON
Cette touche permet d’allumer l’amplificateur et de le
mettre en veille.
2 Touches de sélection des entrées
Appuyez sur l’une de ces touches pour sélectionner une
source d’entrée. Elles sélectionnent le composant
raccordé à l’entrée correspondante sur le panneau
arrière.
•Le bouton BALANCED ne peut pas être utilisé avec
l’A-50DA.
3 Boutons de commande du SACD PLAYER
Permet de contrôler le lecteur SACD Pioneer.
4 Boutons de commande du NETWORK
AUDIO PLAYER
Permet de contrôler le lecteur Pioneer audio en réseau.
5
LOUDNESS
Utilisez pour activer/désactiver (ON/OFF) (page 8) le
circuit de la puissance sonore.
6
MUTE
Permet de couper/restaurer le son.
7
DIRECT
Permet d’accéder à la fonction d’écoute en mode direct
(page 8).
8
DIMMER
Ce bouton permet d’allumer les indicateurs du panneau
avant de l’unité pour régler les trois niveaux (aucune
incidence sur l’indicateur STANDBY).
9
POWER AMP DIRECT
Appuyez sur ce bouton lorsque l’appareil sera utilisé
comme amplificateur de la puissance (page 11).
10
SPEAKERS A
Ce bouton permet d’écouter le système d’enceinte
connecté aux bornes SPEAKERS A.
11
SPEAKERS B
Ce bouton permet d’écouter le système d’enceinte
connecté aux bornes SPEAKERS B.
12
VOLUME +/–
Permet de régler le volume d’écoute.
13
APD
Permet d’activer/désactiver la fonction de hors tension
automatique (page 12).
Page 27
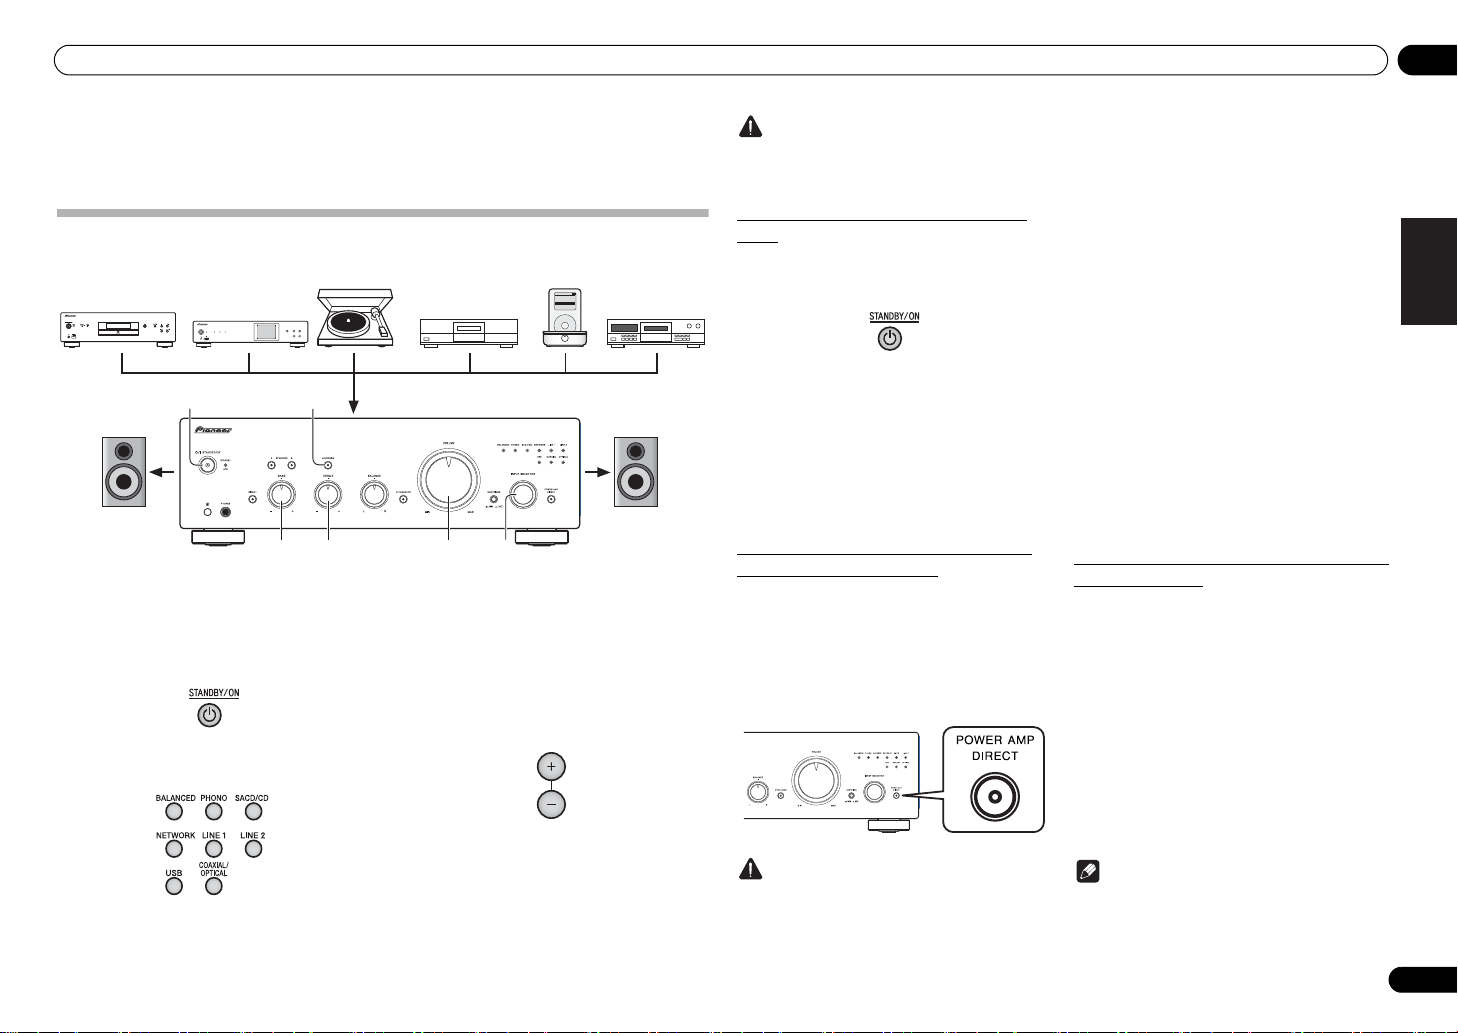
Fonctionnement 04
11
Fr
English
DeutschFrançais
Nederlands
Italiano Español Русский
Chapitre 4:
Fonctionnement
Lecture
1 Mettez sous tension le composant de
lecture.
2 Mettez l’unité sous tension.
• Si l’unité est en mode de veille, appuyez sur le
bouton de la télécommande STANDBY/ON.
3 Sélectionnez la source que vous
souhaitez lire.
Sélectionnez le composant de lecture.
• Lorsque vous utilisez les commandes du panneau
avant, tournez le bouton INPUT SELECTOR.
• Dans le cas du A-70DA, si PHONO est sélectionné,
utilisez le sélecteur CARTRIDGE pour désigner le
type de cartouche utilisé avec votre platine, soit MM
() ou MC ().
4 Débutez la lecture du composant que
vous avez sélectionné dans l’étape 1.
5 Réglez le volume de la lecture avec la
commande
VOLUME
.
6 Ajustez la tonalité à votre choix à l’aide
des commandes
BASS
et
TREBLE
et du
bouton
LOUDNESS
.
Si le bouton DIRECT a été réglé sur ON, ces commandes
sont désactivées.
3566
62
MENU
iPod
Music>
Extras>
Settings>
Shuffle Songs
Backlight
SOURCE
/I STANDBY/ON
STANDBY
iPod/iPhone
5V1A
DIRECT Hi-Bit 32 Up Sampling
SOURCE
Lecteur SACD/CD
Lecteur audio réseau
Platine
Lecture
Lecture
Périphérique audio
avec bornes de
sortie symétriques
Dispositif
d’enregistrement
ou autre
périphérique
Station d’accueil
iPod, etc.
VOLUME
Attention
•Les fonctions BASS, TREBLE, BALANCE et
LOUDNESS ne fonctionnent pas sur un
périphérique raccordé aux bornes BALANCED IN.
Réglage de la puissance sur la mise en
veille
1 Appuyez sur le bouton
STANDBY/ON
de la télécommande.
La prochaine fois que vous remettrez sous tension,
appuyez sur le bouton STANDBY/ON de la
télécommande.
• Si vous appuyez sur le bouton /I STANDBY/ON
du panneau avant, l’appareil se met hors tension.
Dans ce cas, si l’alimentation est coupée, vous ne
pourrez pas remettre sous tension en appuyant sur
le bouton de la télécommande STANDBY/ON.
Pour remettre sous tension, appuyez sur le bouton
/I STANDBY/ON.
Lorsque vous utilisez l’appareil comme
amplificateur de puissance
Lorsqu’un pré-amplificateur est connecté aux bornes
POWER AMP DIRECT IN de l’unité, l’unité peut être
utilisée comme amplificateur de puissance.
1 Appuyez sur le bouton
POWER AMP
DIRECT
de la télécommande ou du panneau
avant de l’appareil.
L’indicateur POWER AMP DIRECT s’allume.
Attention
• Lorsque l’indicateur POWER AMP DIRECT
s’allume, les opérations changent comme suit:
– Le commandes VOLUME, BASS, TREBLE, et
BALANCE du panneau avant de l’unité sont
désactivés. Ces réglages sont contrôlés par le
composant connecté aux bornes POWER AMP
DIRECT IN de l’unité.
–Les boutons LOUDNESS et ATTENUATOR (A-
70DA uniquement) sont désactivés.
– Lorsque le voyant POWER AMP DIRECT
s’allume, le volume audio de l’unité se met
automatiquement à son niveau maximum.
Lorsque vous utilisez cette unité comme
amplificateur de puissance, vérifiez le niveau de
sortie du composant connecté aux bornes
POWER AMP DIRECT IN et paramétrez-le au
niveau le plus bas avant d’allumer le voyant
POWER AMP DIRECT. Si le volume audio du
composant connecté aux bornes POWER AMP
DIRECT IN est initialement paramétré sur un
niveau de sortie élevé, vous risquez d’obtenir
une sortie audio soudainement forte lorsque le
voyant POWER AMP DIRECT s’allume.
– Le son n’est pas produit par la prise PHONES ni
les bornes LINE 2 OUT.
• Pour de plus amples informations, consultez les
instructions sur le fonctionnement du composant
connecté aux bornes POWER AMP DIRECT IN de
l’appareil.
Lecture de musique depuis un composant
audio numérique
Émettez l’entrée audio numérique sur la borne DIGITAL
IN COAXIAL ou COAXIAL.
1 Réaliser une connexion d’entrée
numérique.
•Reportez-vous à Connexions d’entrée audio
numérique à la page 7.
2 Basculez sur l’entrée
COAXIAL
ou
OPTICAL
.
Chaque appui sur le bouton COAXIAL/OPTICAL de la
télécommande bascule alternativement entre les
entrées.
• Lorsque vous utilisez les commandes du panneau
avant, tournez le bouton INPUT SELECTOR.
• Le son est reproduit depuis les bornes LINE 2 OUT.
Remarque
• Les formats de signaux numériques acceptés par
cet appareil comprennent les signaux PCM
linéaires avec taux d’échantillonnage et bits
quantitatifs pouvant atteindre les 192 kHz/32 bits
(selon l’appareil connecté et l’environnement, il est
possible que cela ne fonctionne pas).
Page 28
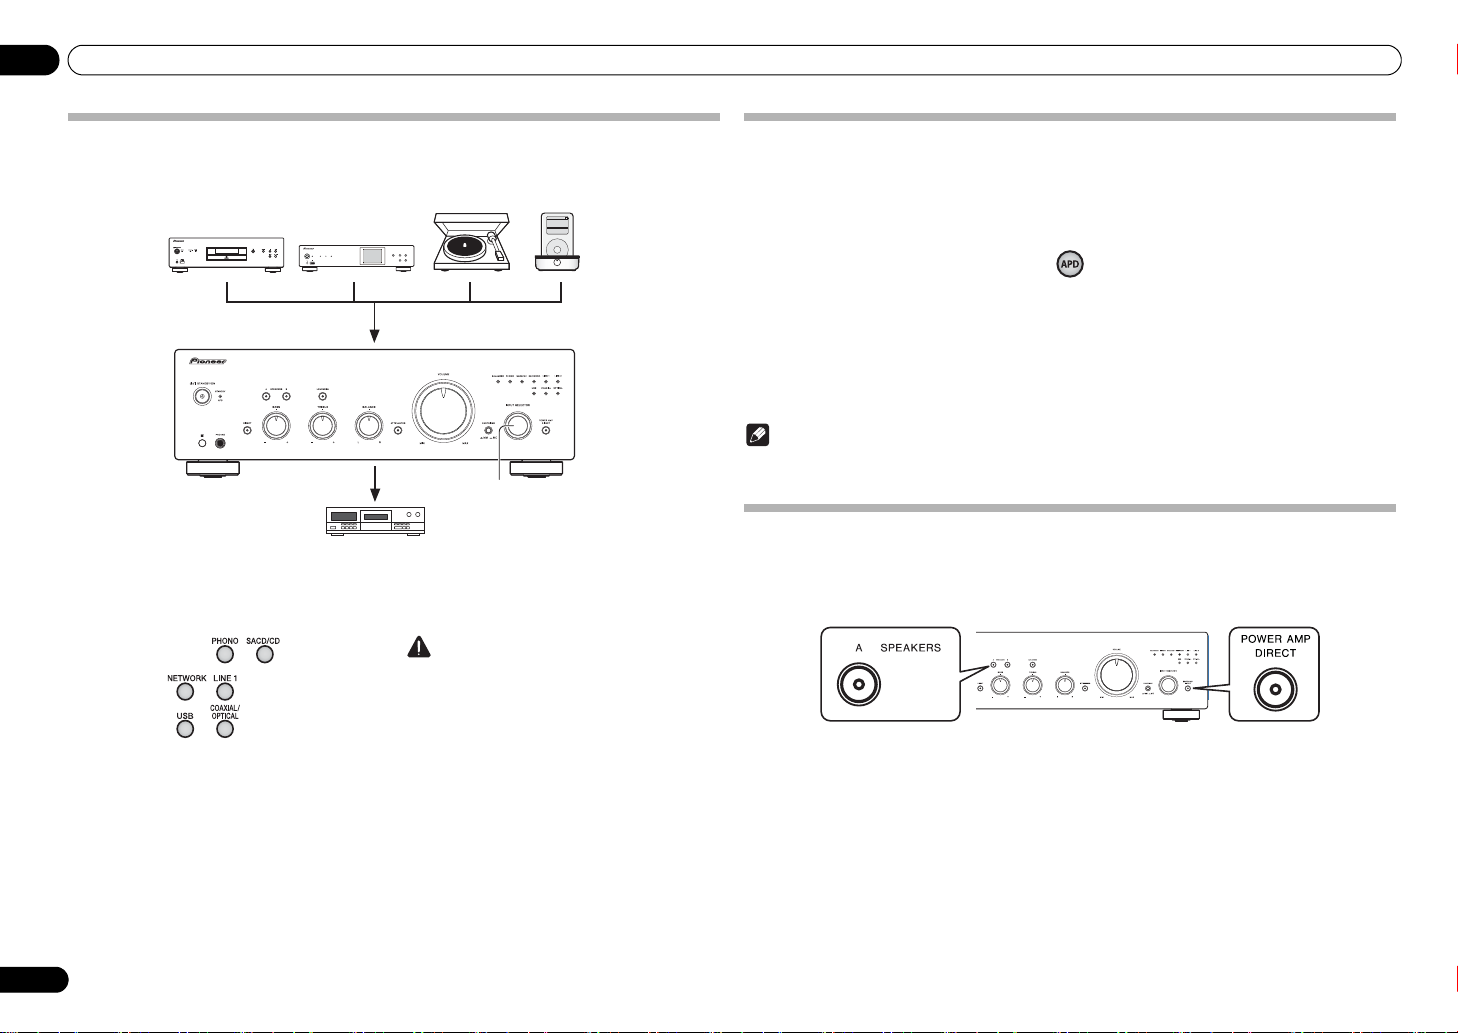
04 Fonctionnement
12
Fr
Réalisation d’un enregistrement audio
Vous pouvez faire un enregistrement audio à partir de n’importe quelle source audio raccordée à l’amplificateur.
1 Sélectionnez la source que vous
souhaitez enregistrer.
2 Commencez l’enregistrement, puis
commencez la lecture du composant source.
Attention
• Vérifiez que les fiches à broche courte ne sont pas
insérées dans les bornes LINE 2 OUT, vous risquez
sinon de provoquer un dysfonctionnement.
• L’audio connecté aux bornes suivantes ne peut pas
être émis par les bornes LINE 2 OUT.
-
LINE 2 IN
-
BALANCED IN
-
POWER AMP DIRECT IN
1
MENU
iPod
Music>
Extras>
Settings>
Shuffle Songs
Backlight
SOURCE
/I STANDBY/ON
STANDBY
iPod/iPhone
5V1A
DIRECT Hi-Bit 32 Up Sampling
SOURCE
Lecteur SACD/CD
Lecteur audio réseau
Platine
Station d’accueil
iPod, etc.
Composant d’enregistrement audio
(graveur CD, enregistreur à bande, etc.)
Lecture
Enregistrement
Pour régler un statut de veille automatique (fonction de mise hors tension
automatique)
Cette fonction fait automatiquement passer l’unité en mode veille si aucun signal ou opération du sélecteur n’est
détecté pendant 30 minutes.
1 Si l’appareil est sous tension, appuyez sur le bouton
APD
de la télécommande.
Lorsque cette fonction est définie sur ON, l’indicateur STANDBY/APD situé sur le panneau avant de l’unité s’allume
en vert. Appuyez à nouveau sur le bouton pour désactiver le réglage.
• Ce réglage peut également s’effectuer en appuyant simultanément et pendant 3 secondes sur les boutons
LOUDNESS et POWER AMP DIRECT du panneau avant.
• Par défaut, cette option est activée.
• Le fait de tourner les commandes TREBLE, BASS, BALANCE, ou VOLUME ne sera pas interprété comme une
opération de contrôle pour redéfinir la minuterie de 30 minutes de la mise hors tension automatique.
Remarque
• Selon les périphériques raccordés, l’appareil peut ne pas être mis hors tension automatiquement pour des
raisons telles qu’un bruit excessif.
Pour restaurer tous les réglages sur les valeurs par défaut
1 Lorsque l’unité est en mode de veille, appuyez simultanément les boutons sur le
panneau avant SPEAKERS A et POWER AMP DIRECT que vous maintenez enfoncés
pendant cinq secondes.
2 Mettez l’unité sous tension.
Page 29

Utilisation de la fonction USB DAC 05
13
Fr
English
DeutschFrançais
Nederlands
Italiano Español Русский
Chapitre 5:
Utilisation de la fonction USB DAC
Installation du pilote
• L’utilisation de la borne DIGITAL IN USB pour la
lecture de fichiers musicaux sur l’ordinateur avec
l’appareil nécessite l’installation d’un pilote dédié
sur votre ordinateur. Pour plus d’informations,
reportez-vous au site Web de Pioneer. Le mode
d’emploi contient également des informations
relatives à la procédure d’installation et aux
réglages de l’ordinateur, reportez-vous donc
également au mode d’emploi.
Lecture de musique depuis ordinateur
Utilisez cette fonction pour lire l’entrée audio numérique
sur le port DIGITAL IN USB du panneau arrière d’unité.
1 Connectez l’appareil sur un ordinateur
via un câble USB (page 7).
2 Appuyez sur
USB
pour sélectionner
DIGITAL IN USB
comme source d’entrée.
• Lorsque vous utilisez les commandes du panneau
avant, tournez le bouton INPUT SELECTOR.
• Le son est reproduit depuis les bornes LINE 2 OUT.
3 Lancez la lecteur sur l’ordinateur.
Remarque
• Lorsque l’appareil et un ordinateur sont raccordés
à l’aide d’un câble USB pour lire des fichiers audio,
l’appareil peut appliquer en entrée les signaux
suivants :
PCM linéaire
– Bits quantitatifs : 16 bits, 24 bits, 32 bits
– Fréquence d’échantillon nage : 44,1 kHz, 48 kHz,
88,2 kHz, 96 kHz, 176,4 kHz, 192 kHz, 352,8 kHz,
384 kHz
DSD
– Fréquence d’échantillonnage : 2,8 MHz, 5,6
MHz, 11,2 MHz
• La lecture ne peut pas se commandé depuis
l’appareil lorsque cette fonction est utilisée ; utilisez
l’ordinateur pour contrôler la lecture.
• Lorsque vous débranchez le câble USB,
commencez par stopper la lecture sur l’ordinateur.
• Le son peut ne pas être reproduit si votre ordinateur
ne supporte pas l’USB 2.0 HS.
• Cet appareil ne prend pas en charge l’utilisation
d’un concentrateur USB. Utilisez toujours un câble
USB pour brancher l’unité directement sur
l’ordinateur.
Page 30
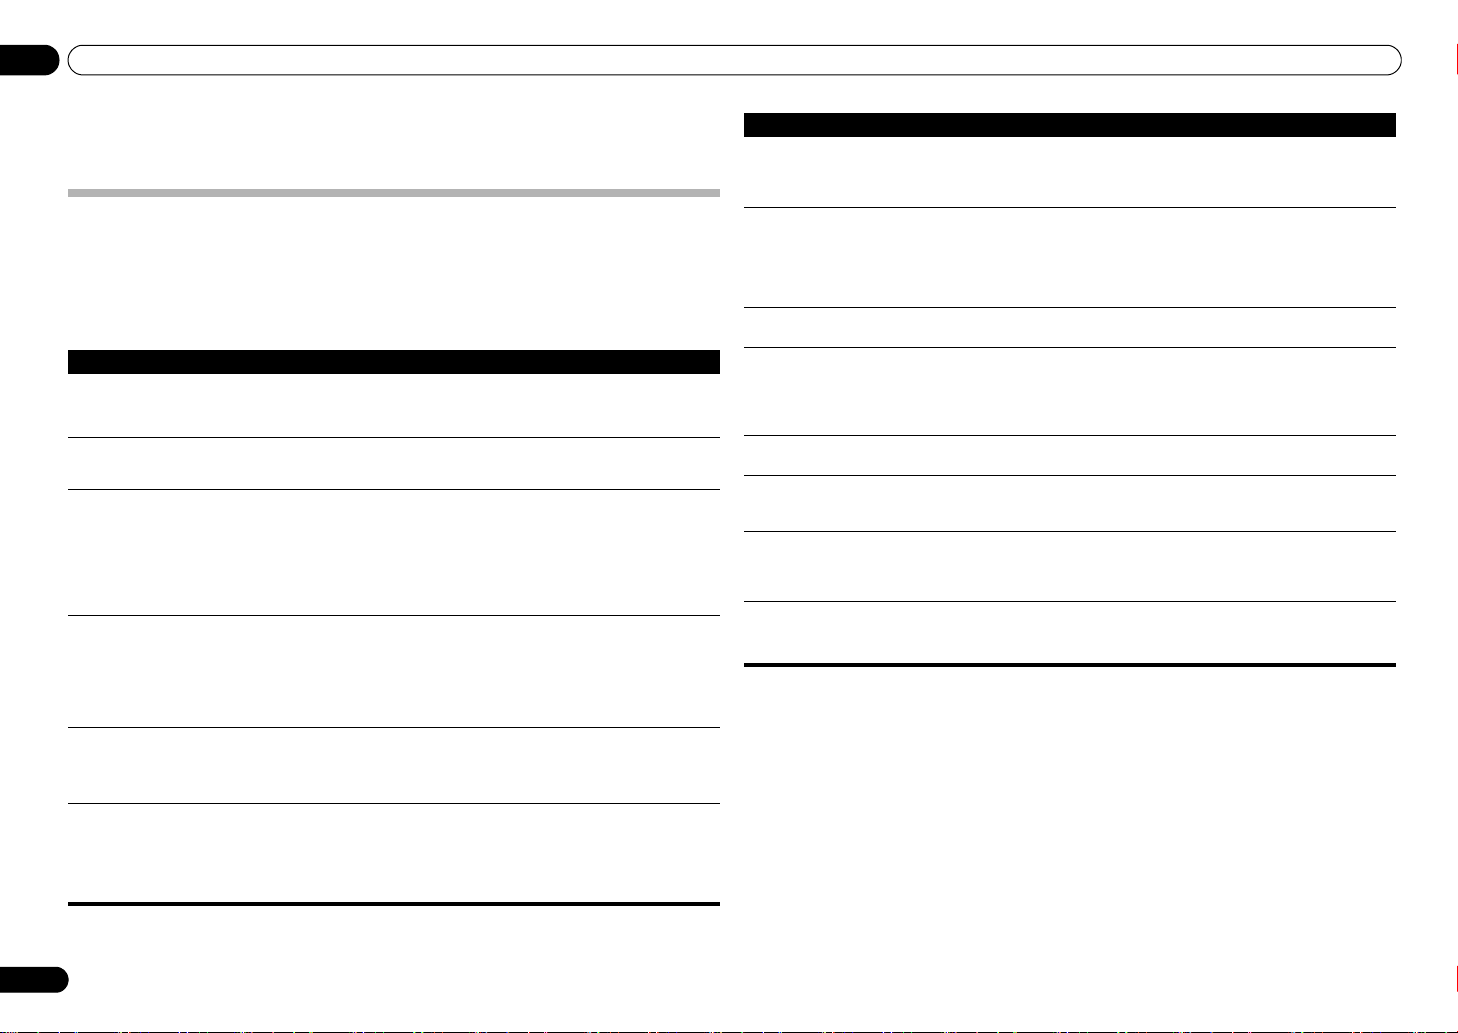
06 Informations supplémentaires
14
Fr
Chapitre 6:
Informations supplémentaires
Guide de dépannage
Des opérations incorrectes sont souvent interprétées comme des problèmes et des mauvais fonctionnements. Si
vous pensez qu’il y a un problème avec ce composant, vérifiez les points ci-dessous. Parfois le problème peut se
trouver dans un autre composant. Examinez les autres composants et les appareils électriques en usage. Si le
problème ne peut pas se résoudre malgré les indications ci-dessous, consultez votre service après-vente Pioneer le
plus proche pour le faire réparer.
• Si l’unité ne fonctionne pas normalement en raison d’effets externes comme l’électricité statique, débranchez
la fiche d’alimentation de la prise de courant et insérez-la de nouveau pour rétablir les conditions normales de
fonctionnement.
Problèmes Solutions
Impossible de mettre sous tension. •La fiche est déconnectée de la prise ? Connectez correctement la fiche à la prise
(page 7).
•Le cordon d’alimentation est déconnecté du connecteur AC IN (Entrée CA) ?
Connectez correctement le cordon d’alimentation (page 7).
L’unité s’éteint. •La fonction de mise hors tension automatique est activée ? Si vous ne voulez pas que
l’alimentation soit coupée automatiquement, désactivez la fonction Auto Power Down
(mise hors tension automatique) (page 12).
L’appareil s’éteint et l’indicateur
STANDBY/APD
clignote trois fois de
suite.
•Le circuit de protection a été activé. Cette condition se rencontre en cas de lecture
d’un son de très basse fréquence lorsque le niveau audio est élevé.
- Mettez l’appareil hors tension et patientez au moins une minute. Remettez
l’appareil sous tension ; lisez le morceau de musique à un niveau de volume plus
faible.
-
Après la remise sous tension, si l’indicateur
STANDBY/APD
clignote quatre
fois, cela indique un dysfonctionnement des canaux de l’appareil.
Déconnectez le cordon d’alimentation et consultez votre revendeur ou le centre de
service Pioneer le plus proche.
L’appareil s’éteint et l’indicateur
STANDBY/APD
clignote une fois
toutes les deux secondes.
•La température interne de l’unité a augmenté et le circuit de sécurité s’est
déclenché.
- Mettez l’appareil hors tension et patientez au moins une minute. La température de
l’unité se refroidit. Remettez ensuite l’appareil sous tension.
- Installez l’unité dans un endroit mieux ventilé.
- Confirmez l’installation appropriée de l’unité; si vous remettez l’unité en marche
sans attendre qu’elle ait refroidi, les mêmes symptômes peuvent se reproduire
(page 4).
L’appareil s’éteint et l’indicateur
STANDBY/APD
clignote deux fois de
suite.
•Utilisez-vous des enceintes avec des valeurs d’impédance non prise en charge par
cette unité ? Confirmez la valeur d’impédance nominale de l’enceinte (page 6).
•Des câbles d’enceinte sont desserrés des bornes
SPEAKERS
et touchent d’autre s fils
ou la surface du panneau arrière ? Déconnectez le cordon d’alimentation et
reconnectez correctement les câbles d’enceinte (page 6).
L’appareil s’éteint et l’indicateur
STANDBY/APD
clignote six fois de
suite.
•Le circuit de protection a été activé. Cette condition se rencontre en cas de lecture
d’un son de haute basse fréquence lorsque le niveau audio est élevé.
- Baissez le son et relancez la lecture.
- Si le même symptôme apparaît lorsque vous remettez à nouveau l’appareil sous
tension, cela indique qu e le circuit de l’unité peut être endommagé. Déconnectez le
cordon d’alimentation et consultez votre revendeur ou le centre de service Pioneer
le plus proche.
L’ i n d i ca t eu r
STANDBY/APD
clignote
quatre fois, cinq fois ou sept fois de
suite et l’appareil ne se met pas sous
tension.
•La circuitrie de l’unité est endommagée. Déconnectez le cordon d’alimentation et
consultez votre revendeur ou le
centre de service agréé par Pioneer
le plus proche.
Aucun son n’est fourni quand une
fonction est sélectionnée.
•Un câble de raccordement est déconnecté ou connecté incorrectement. Vérifiez vos
connexions (page 5).
•Les connecteurs ou les fiches à broche du câble sont sales. Nettoyez les impuretés
des connecteurs et des fiches à broche.
•Vérifiez que le sélecteur d’entrée de l’unité est réglé au composant de lecture
souhaité. Réglez le sélecteur correctement (page 11).
•Appuyez sur
MUTE
de la télécommande pour désactiver la sourdine (page 10).
Aucun son n’est entendu d’une
enceinte.
•Les câbles de raccordement ou des enceintes sont déconnectés sur un côté ?
Reconnectez fermement (page 5).
Impossible de faire fonctionner la
télécommande.
•Remplacez les piles (page 4).
•Utilisez à moins de 7 m, 30° du capteur de télécommande du panneau avant (page 4).
•Eliminez tout obstacle ou utilisez dans une autre position.
•Ne pas exposer le capteur de télécommande du panneau avant à la lumière directe.
•Le cordon de commande d’un composant est connecté incorrectement ? S’assurer
que les connexions sont correctes (page 6).
Impossible de modifier la source
d’entrée.
•Vérifiez si la fonction
POWER AMP DIRECT
est activée. Si c’est le cas, appuyez sur le
bouton du panneau avant
POWER AMP DIRECT
pour désactiver la fonction (page 11).
Le son de l’entrée numérique n’est
pas émis.
•Le format numérique du périphérique de sortie n’est pas pris en charge. Si le
périphérique de sortie est réglé sur un signal audio (Dolby Digital, DTS, etc.) autre que
PCM, changez le réglage sur PCM.
Le son de l’entrée numérique n’est
pas émis lors de la lecture d’un SACD.
•Beaucoup de lecteurs SACD (y compris les lecteurs Blu-ray et les lecteurs de DVD
compatibles avec la lecture de SACD) ne sont pas conçus pour émettre des signaux
numériques lors de la lecture d’un SACD. Vérifiez les spécifications du lecteur SACD.
Vous pouvez également lire l’audio à l’aide d’une connexion analogique.
Aucun son n’est perceptibl e lorsqu’un
signal PCM linéaire de fréquence
96 kHz ou plus est soumis à la borne
DIGITAL IN COAXIAL
.
•Le son peut ne pas être correctement reproduit selon le câble coaxial numérique
utilisé. Essayez de remplacer le câble (vendu séparément).
Problèmes Solutions
Page 31

Informations supplémentaires 06
15
Fr
English
DeutschFrançais
Nederlands
Italiano Español Русский
À propos de la fonction DAC USB
Important
• Pour plus d’informations sur les réglages de l’ordinateur, reportez-vous également au mode d’emploi du logiciel
pilote disponible sur le site Web de Pioneer.
Problèmes Solutions
Il n’est pas possible de lire les fichiers
musicaux sur un ordinateur raccordé
via USB.
•Pour raccorder un ordinateur et l’appareil via USB et lire des fichiers musicaux
via USB, vous devez télécharger un pilote dédié depuis le site Web de Pioneer et
l’installer sur l’ordinateur. Consultez le site Internet de Pioneer pour obtenir les
informations sur l’installation du pilote.
Aucun son n’est produit lorsque vous
essayez de lire des fichiers d’un
ordinateur.
•Les paramètres de volume correspondent-ils au programme du système
d’exploitation et de l’application ? Augmentez les réglages du volume.
•La sortie audio du sys tème d’exploitation est-elle mise sur MUET ? Annulez le réglage
MUET.
•Plusieurs applications sont-elles simultanément en cours d’exécution ? Fermez les
applications qui ne sont pas utilisées.
•La sortie audio a-t-elle été correctement configurée dans le système d’exploitation ou
l’application utilisée ? Pour l’appareil audio, sélectionnez "Pioneer A-70DA A-50DA
USB Audio".
Aucun son n’est obtenu à l’emploi
d’une entrée USB.
•Un autre périphérique est-il sélectionné dans les réglages de l’ordinateur ou le son
est-il coupé dans les réglages de l’ordinateur ? Vérifiez les réglages de l’ordinateur.
•L’appareil est-il raccordé correctement ? L’appareil est-il détecté par l’ordinateur ? Si
l’appareil est basculé sur l’entrée USB après le raccordement à un ordinateur, un
périphérique autre que cet appareil peut être sélecti onné dans les réglages sonores de
l’ordinateur. Si cela se produit, sélectionnez à nouveau l’appareil. Vérifiez également la
connexion.
•Le format de fichier, le système d’exploitation et le logiciel sont-ils pris en charge ?
Vérifiez les systèmes d’exploitation, logiciels et fréquences d’échantillonnage de
fichiers qui sont pris en charge.
•Le pilote dédié est-il installé sur l’ordinateur ? Un pilote dédié doit être installé sur
l’ordinateur. Pour plus d’informations, reportez-vous au site Web de Pioneer.
Des sons autres que musicaux
provenant de l’entrée USB sont
audibles.
•Selon les réglages de l’ordinateur, le son de démarrage, les sons d’erreur et les
autre s sons de l’o rdinateur peuvent êtr e émis depui s l’apparei l. Vérifi ez les régl ages de
l’ordinateur.
A l’emploi d’une source autre que
l’entrée USB, des fichiers de musique
présents sur l’ordinateur ne peuvent
pas être lus.
•Lorsque l’entrée est autre que USB, l’appareil est reconnu par l’ordinateur. Basculez
l’entrée sur USB puis sélectionnez à nouveau l’appareil dans les réglages sonores de
l’ordinateur.
Si 384 kHz ou 356 kHz est défini dans
les réglages sonores de l’ordinateur, le
fonctionnement de certains
navigateurs ou logiciels est
interrompu et l’audio est lu sans le
son.
•Le navigateur ou le logiciel peut ne pas prendre en charge le réglage 384 kHz ou 356
kHz. Vérifiez les spécifications du navigateur ou du logiciel.
Nettoyage de l’unité
• Utilisez un chiffon sec pour essuyer la poussière et
la saleté.
• Lorsque le surface est sale, essuyez avec un chiffon
doux trempé dans un nettoyant neutre dilué dans
une dose cinq ou six fois supérieure d’eau, et bien
essoré. Essuyez encore avec un chiffon sec. Ne pas
utiliser de cire ou nettoyant pour meubles.
• Ne jamais utiliser de diluants, benzine, insecticides
en bombe ou autres produits chimiques sur ou
près de cet appareil au risque d’entraîner une
corrosion.
Page 32

06 Informations supplémentaires
16
Fr
Spécifications
Section amplificateur
La spécification pour la puissance de sortie concerne les cas
où l’alimentation électrique est de 230 V.
• Puissance de sortie continue (les deux
canaux fonctionnant entre 20 Hz et 20 kHz)
A-70DA/A-50DA. . . . . . . . . . . . . . . . . . . . . . .90 W + 90 W
(THD 0,5 %, 4 )
A-70DA/A-50DA. . . . . . . . . . . . . . . . . . . . . . . 65 W +65 W
(THD 0,5 %, 8 )
Section audio
• Bornes d’entrée (sensibilité/impédance)
BALANCED . . . . . . . . . . . . . . . . . . . . . . . . . 200 mV/82 k
SACD/CD, NETWORK, LINE 1, LINE 2 . . . 200 mV/50 k
POWER AMP DIRECT. . . . . . . . . . . . . . . . . . . . .1 V/10 k
PHONO (MM) . . . . . . . . . . . . . . . . . . . . . . . 2,8 mV/50 k
PHONO (MC). . . . 0,24 mV/100 A-70DA uniquement
COAXIAL . . . . . . . . . . . . . . . . . . . . . . . . . 500 mVp-p/75
• Sortie (Niveau/impédance)
LINE 2 OUT . . . . . . . . . . . . . . . . . . . . . . . . 200 mV/2.2 k
• Réponse en fréquence
SACD/CD, NETWORK, LINE 1, LINE 2
. . . . . . . . . . . . . . . . . . . . . . . . . de 5 Hz à 50 kHz ± 3 dB*
• DÉVIATION RIAA
PHONO (MM) . . . . . . . . . . . . . . 20 Hz à 20 kHz ±0,5 dB*
PHONO (MC)
. . . . de 20 Hz à 20 kHz ±0,5 dB*A-70DA uniquement
* Mesure effectuée avec la touche DIRECT activée.
• Commande de la tonalité
Graves . . . . . . . . . . . . . . . . . . . . . . . . . . .±10 dB (100 Hz)
Aigus . . . . . . . . . . . . . . . . . . . . . . . . . . . .±10 dB (10 kHz)
• Rapport signal/bruit
(IHF COURT-CIRCUITÉ, RÉSEAU A)
SACD/CD, NETWORK, LINE 1, LINE 2 . . . . . . . . 101 dB*
PHONO (MM, entrée de 5 mV) . . . . . . . . . . . . . . .89 dB*
PHONO (MC, entrée 0,5 mV)
. . . . . . . . . . . . . . . . . . . . . .74 dB*A-70DA uniquement
* Mesure effectuée avec la touche DIRECT activée.
• Impédance garantie
A, B. . . . . . . . . . . . . . . . . . . . . . . . . . . . . . . . . . .4 à 16
A+B . . . . . . . . . . . . . . . . . . . . . . . . . . . . . . . . . .8 à 32
Bi-câblage . . . . . . . . . . . . . . . . . . . . . . . . . . . . . 4 à 16
Divers
Conditions d’alimentation requises
. . . . . . . . . . . . . . . . . . . . . . . . . . .CA 220 V à 230 V, 50 Hz
Consommation électrique
A-70DA. . . . . . . . . . . . . . . . . . . . . . . . . . . . . . . . . . . . 74 W
A-50DA. . . . . . . . . . . . . . . . . . . . . . . . . . . . . . . . . . . . 72 W
En mode veille . . . . . . . . . . . . . . . . . . . . . . . . . . . . . . 0,3 W
Dimensions
A-70DA. . . . . . 435 mm (L) x 141,5 mm (H) x 370 mm (P)
A-50DA. . . . . . 435 mm (L) x 138,5 mm (H) x 368 mm (P)
Poids (sans emballage)
A-70DA. . . . . . . . . . . . . . . . . . . . . . . . . . . . . . . . . . . 17,2 kg
A-50DA. . . . . . . . . . . . . . . . . . . . . . . . . . . . . . . . . . .11,2 kg
Accessoires
Télécommande . . . . . . . . . . . . . . . . . . . . . . . . . . . . . . . . . 1
Piles sèches AAA/IEC R03 . . . . . . . . . . . . . . . . . . . . . . . . 2
Fiche à broche courte. . . . . . . . . . . . . . . . . . . . . . . . . . . .2
Cordon d’alimentation
Carte de garantie
Feuille d’avertissements
Mode d’emploi (ce document)
Remarque
• Les spécifications et la conception sont sujettes à
de possibles modifications sans préavis, suite à des
améliorations.
• Les noms d’entreprise et de produit mentionnés
dans les présentes sont des marques de commerce
ou des marques déposées de leur propriétaire
respectif.
• «Pioneer» est une marque de commerce de
Pioneer Corporation et est utilisée sous licence.
© 2015 Onkyo & Pioneer Corporation.
Tous droits de reproduction et de traduction
réservés.
Page 33

Informations supplémentaires 06
17
Fr
English
DeutschFrançais
Nederlands
Italiano Español Русский
Page 34

WARNUNG
Dieses Gerät ist nicht wasserdicht. Zur Vermeidung der
Gefahr von Brand und Stromschlag keine Behälter mit
Flüssigkeiten (z.B. Blumenvasen und -töpfe) in die
Nähe des Gerätes bringen und dieses vor Tropfwasser,
Spritzwasser, Regen und Nässe schützen.
D3-4-2-1-3_A1_De
VORSICHTSHINWEIS ZUR BELÜFTUNG
Bei der Aufstellung dieses Gerätes muss für einen
ausreichenden Freiraum gesorgt werden, um eine
einwandfreie Wärmeabfuhr zu gewährleisten
(mindestens 30 cm oberhalb des Gerätes, 10 cm hinter
dem Gerät und jeweils 10 cm an der Seite des Gerätes).
WARNUNG
Im Gerätegehäuse sind Ventilationsschlitze und andere
Öffnungen vorgesehen, die dazu dienen, eine
Überhitzung des Gerätes zu verhindern und einen
zuverlässigen Betrieb zu gewährleisten. Um
Brandgefahr auszuschließen, dürfen diese Öffnungen
auf keinen Fall blockiert oder mit Gegenständen (z.B.
Zeitungen, Tischdecken und Gardinen) abgedeckt
werden, und das Gerät darf beim Betrieb nicht auf
einem dicken Teppich oder Bett aufgestellt sein.
D3-4-2-1-7b*_A1_De
K058a_A1_De
Pb
Informationen für Anwender zur Sammlung und Entsorgung von Altgeräten und
gebrauchten Batterien
Diese Symbole auf den Produkten, der Verpackung und/oder Begleitdokumenten
bedeuten, dass gebrauchte elektrische und elektronische Produkte und Batterien
nicht über den Haushaltsmüll entsorgt werden dürfen.
Zur richtigen Handhabung, Rückgewinnung und Wiederverwertung von Altprodukten
und gebrauchten Batterien bringen Sie diese bitte zu den gemäß der nationalen
Gesetzgebung dafür zuständigen Sammelstellen.
Mit der korrekten Entsorgung dieser Produkte und Batterien helfen Sie dabei,
wertvolle Ressourcen zu schonen und vermeiden mögliche negative Auswirkungen
auf die Gesundheit und die Umwelt, die durch eine unsachgemäße Behandlung des
Abfalls entstehen könnten.
Weitere Informationen zur Sammlung und Wiederverwertung von Altprodukten und
Batterien erhalten Sie von Ihrer örtlichen Gemeindeverwaltung, Ihrem Müllentsorger
oder dem Verkaufsort, an dem Sie die Waren erworben haben.
Diese Symbole gelten ausschließlich in der Europäischen Union.
Für Länder außerhalb der Europäischen Union:
Wenn Sie diese Gegenstände entsorgen wollen, wenden Sie sich bitte an Ihre
lokalen Behörden oder Händler und fragen Sie dort nach der korrekten
Entsorungsweise.
Symbolbeispiele
für Batterien
Symbol für
Geräte
WARNUNG
Keine Quellen offener Flammen (z.B. eine brennende
Kerze) auf dieses Gerät stellen.
D3-4-2-1-7a_A1_De
ACHTUNG
UM SICH NICHT DER GEFAHR EINES ELEKTRISCHEN
SCHLAGES AUSZUSETZEN, DÜRFEN SIE NICHT DEN
DECKEL (ODER DIE RÜCKSEITE) ENTFERNEN. IM
GERÄTEINNEREN BEFINDEN SICH KEINE VOM
BENUTZER REPARIERBAREN TEILE. ÜBERLASSEN
SIE REPARATUREN DEM QUALIFIZIERTEN
KUNDENDIENST.
D3-4-2-1-1_B1_De
Page 35

3
ACHTUNG
Der /I STANDBY/ON-Schalter dieses Gerätes
trennt das Gerät nicht vollständig vom Stromnetz. Um
das Gerät vollständig vom Netz zu trennen, muss der
Netzstecker aus der Netzsteckdose gezogen werden.
Daher sollte das Gerät so aufgestellt werden, dass
stets ein unbehinderter Zugang zur Netzsteckdose
gewährleistet ist, damit der Netzstecker in einer
Notsituation sofort abgezogen werden kann. Um
Brandgefahr auszuschließen, sollte der Netzstecker
vor einem längeren Nichtgebrauch des Gerätes,
beispielsweise während des Urlaubs, grundsätzlich
von der Netzsteckdose getrennt werden.
D3-4-2-2-2a*_A1_De
Betriebsumgebung
Betriebstemperatur und Betriebsluftfeuchtigkeit:
+5 °C bis +35 °C, 85 % rel. Feuchte max.
(Ventilationsschlitze nicht blockiert)
Eine Aufstellung dieses Gerät an einem unzureichend
belüfteten, sehr feuchten oder heißen Ort ist zu
vermeiden, und das Gerät darf weder direkter
Sonneneinstrahlung noch starken Kunstlichtquellen
ausgesetzt werden.
D3-4-2-1-7c*_A1_De
Dieses Gerät ist für den Heimgebrauch vorgesehen.
Falls bei Einsatz zu einem anderem Zweck (z.B.
Langzeitgebrauch zu gewerblichen Zwecken in einem
Restaurant oder Betrieb in einem Fahrzeug bzw.
Schiff) eine Funktionsstörung auftritt, die eine
Reparatur des Gerätes erforderlich macht, werden
die Reparaturkosten dem Kunden selbst dann in
Rechnung gestellt, wenn die Garantiefrist noch nicht
abgelaufen ist.
K041_A1_De
VORSICHT MIT DEM NETZKABEL
Fassen Sie das Netzkabel immer am Stecker. Ziehen Sie
nicht am Kabel selbst, und fassen Sie das Netzkabel
niemals mit nassen Händen an, da dies einen
Kurzschluss oder elektrischen Schlag verursachen kann.
Stellen Sie nicht das Gerät, Möbelstücke o.ä. auf das
Netzkabel; sehen Sie auch zu, dass es nicht eingeklemmt
wird. Machen Sie niemals einen Knoten in das Netzkabel,
und binden Sie es nicht mit anderen Kabeln. Das
Netzkabel sollte so gelegt werden, dass niemand darauf
tritt. Ein beschädigtes Netzkabel kann einen Brand oder
elektrischen Schlag verursachen. Prüfen Sie das
Netzkabel von Zeit zu Zeit. Sollte es beschädigt sein,
wenden Sie sich an Ihre nächste autorisierte
PIONEER-Kundendienststelle oder Ihren Händler, um
es zu ersetzen.
S002*_A1_De
Wir danken lhnen für den Kauf
dieses Pioneer-Produkts.
Lesen Sie sich bitte diese Bedienungsanleitung durch.
Dann wissen Sie, wie Sie lhr Gerät richtig bedienen.
Bewahren Sie sie an einem sicheren Platz auf, um auch
zukünftig nachschlagen zu können.
Inhalt
01 Bevor Sie beginnen
Prüfung des Kartoninhalts. . . . . . . . . . . . . . . . . . . 4
Batterien in Fernbedienung einlegen. . . . . . . . . . .4
Verwendung der Fernbedienung . . . . . . . . . . . . . . .4
Aufstellung des Verstärkers. . . . . . . . . . . . . . . . . .4
02 Anschlüsse
Anschließen der Kabel. . . . . . . . . . . . . . . . . . . . . .5
“Bi-wiring” (Doppelverkabelung) . . . . . . . . . . . . . .5
Lautsprecherkabel anschließen . . . . . . . . . . . . . . . 6
Audiokabel anschließen. . . . . . . . . . . . . . . . . . . . .6
Anschluss an die symmetrischen Eingänge
(nur A-70DA) . . . . . . . . . . . . . . . . . . . . . . . . . . . . .6
Digitale Audioeingänge . . . . . . . . . . . . . . . . . . . . . 7
Einen Computer per USB-Kabel anschließen. . . . .7
Zentrale Steuerung mit anderen Pioneer-
Komponenten verwenden . . . . . . . . . . . . . . . . . . .7
Anschließen. . . . . . . . . . . . . . . . . . . . . . . . . . . . . .7
03 Bedienelemente und Anzeigen
Vorderseite . . . . . . . . . . . . . . . . . . . . . . . . . . . . . . 8
Rückwand . . . . . . . . . . . . . . . . . . . . . . . . . . . . . . .9
Fernbedienung . . . . . . . . . . . . . . . . . . . . . . . . . . 10
04 Bedienung
Wiedergabe . . . . . . . . . . . . . . . . . . . . . . . . . . . . . 11
Bereitschaftsmodus einstellen . . . . . . . . . . . . . . .11
Beim Einsatz des Gerätes als Verstärker . . . . . . . .11
Musik von einer digitalen Audiokomponenten
wiedergeben . . . . . . . . . . . . . . . . . . . . . . . . . . . . .11
Vornahme eine Audioaufnahme . . . . . . . . . . . . . 12
Automatisch in den Bereitschaftsmodus wechseln
(Auto-Abschaltung) . . . . . . . . . . . . . . . . . . . . . . .12
Alle Einstellungen auf die Werkseinstellungen
rücksetzen . . . . . . . . . . . . . . . . . . . . . . . . . . . . . .12
05 Verwendung der USB DACFunktion
Installieren Sie den Treiber . . . . . . . . . . . . . . . . . 13
Musik von einem Computer wiedergeben . . . . . .13
06 Zusätzliche Informationen
Fehlerbehandlung . . . . . . . . . . . . . . . . . . . . . . . . 14
Über die USB DAC-Funktion . . . . . . . . . . . . . . . . . 15
Reinigung des Geräts . . . . . . . . . . . . . . . . . . . . . 15
Technische Daten . . . . . . . . . . . . . . . . . . . . . . . .16
Page 36

01 Bevor Sie beginnen
4
De
Kapitel 1:
Bevor Sie beginnen
Prüfung des Kartoninhalts
Achten Sie bitte darauf, dass sich beim Öffnen des
Kartons folgendes Zubehör darin befindet:
• Fernbedienung
• AAA/IEC R03-Trockenbatterien x2
• Stecker mit kurzem Stift x2
(Diese Stecker wurden zum Zeitpunkt des Kaufs
werkseitig an den PHONO IN-Anschlüssen an der
Rückblende angebracht.)
• Netzkabel (Länge: 1,8 m)
• Garantiekarte
• Sicherheitsblatt (für Einsteiger)
• Bedienungsanleitung (dieses Dokument)
WARNUNG
• Kleine Teile auserhalb der Reichweite von
Kleinkindern und Kindern aufbewahren. Bei
unbeabsichtigtem Verschlucken ist unverzuglich
ein Arzt aufzusuchen.
Hinweis
• Die Abbildungen in der Bedienungsanleitung
wurden zur besseren Erkennbarkeit vereinfacht,
können daher etwas vom Aussehen des
tatsächlichen Produktes abweichen.
• Bei den Illustrationen wird meist die A-70DA
dargestellt.
Batterien in Fernbedienung einlegen
1 Öffnen Sie den Deckel an der Rückseite.
2 Legen Sie neue Batterien richtig herum
ein; orientieren sich dabei an den
Polaritätskennzeichnungen im Inneren des
Batteriefachs.
3 Schließen Sie den Deckel an der
Rückseite.
Die mit dem Gerät gelieferten Batterien dienen in erster
Linie zur Überprüfung, ob das Gerät richtig funktioniert;
dürften daher auch nicht übermäßig lange halten. Wir
empfehlen Alkalibatterien, die deutlich länger
durchhalten.
WARNUNG
• Vermeiden Sie Gebrauch und Lagerung von
Batterien unter direkter Sonneneinstrahlung oder
an einem anderen sehr heißen Ort, z.B. im Inneren
eines Fahrzeugs oder in der Nähe eines
Heizkörpers. Dadurch können die Batterien
auslaufen, sich überhitzen, explodieren oder in
Brand geraten. Auch kann dies die Lebensdauer
der Batterien verringern.
Vorsicht
Eine unsachgemäße Verwendung der Batterien kann zu
Gefährdungen durch Auslaufen oder Explosion führen.
Beachten Sie die folgenden Vorsichtsmaßnahmen:
• Achten Sie beim Einlegen der Batterien darauf, die
Federn an den Batteriekontakten nicht zu
beschädigen. Andernfalls können die Batterien
auslaufen oder überhitzen.
• Verwenden Sie ausschließlich Batterien vom
angegebenen Typ. Mischen Sie keine frischen mit
älteren Batterien.
• Achten Sie beim Einlegen der Batterien in die
Fernbedienung darauf, dass diese richtig herum
eingelegt werden. Orientieren Sie sich dabei an den
Polaritätsmarkierungen und .
• Batterien nicht erhitzen, nicht zerlegen, nicht
verbrennen, nicht mit Wasser in Berührung
kommen lassen.
• Batterien können auch bei identischer Größe und
Form unterschiedliche Spannungen aufweisen.
Verwenden Sie unterschiedliche Batterietypen
niemals gleichzeitig.
1
2
3
• Zum Schutz vor auslaufender Batterieflüssigkeit
nehmen Sie die Batterien heraus, wenn Sie die
Fernbedienung längere Zeit (länger als einen
Monat) nicht benutzen. Falls Batterieflüssigkeit
auslaufen sollte, wischen Sie diese sorgfältig und
restlos aus dem Inneren des Gehäuses,
anschließend legen Sie neue Batterien ein. Falls
auslaufende Batterieflüssigkeit an Ihre Haut
gelangen sollte, spülen Sie diese sofort mit viel
Wasser ab.
• Bei der Entsorgung von verbrauchten Batterien
sind die einschlägigen gesetzlichen Vorschriften
und Umweltschutzbestimmungen strikt
einzuhalten.
Verwendung der Fernbedienung
Die Fernbedienung hat einen Wirkungsbereich von ca.
7 m bei einem Winkel von ca. 30º zu ihrem Sensor.
Beachten Sie bei der Verwendung der Fernbedienung
folgende Punkte:
• Achten Sie darauf, dass sich keine Hindernisse
zwischen der Fernbedienung und ihrem Sensor am
Gerät befinden.
• Die Fernbedienung arbeitet nicht zuverlässig, wenn
ihr Sensor am Gerät starker Sonneneinstrahlung
oder dem Licht einer Leuchtstofflampe ausgesetzt
wird.
• Fernbedienungen verschiedener Geräte können
sich gegenseitig beeinflussen. Vermeiden Sie den
Gebrauch anderer Fernbedienungen in der Nähe
dieses Geräts.
• Wechseln Sie die Batterien aus, wenn die
Reichweite der Fernbedienung merklich nachlässt.
Aufstellung des Verstärkers
Achten Sie bei der Aufstellung des Geräts darauf, dass
es auf einer ebenen und stabilen Oberfläche steht.
• Stellen Sie das Gerät nicht an folgenden Orten auf:
– auf einem Farbfernsehgerät (das Bild könnte
infolgedessen verzerrt sein)
– in der Nähe eines Kassettenrekorders (oder eines
anderen Gerätes, das ein magnetisches Feld
erzeugt). Dadurch kann der Klang beeinträchtigt
werden.
– in direktem Sonnenlicht
– in feuchten oder nassen Bereichen
– in sehr heißen oder kalten Bereichen
– an Orten mit starken Vibrationen oder
Erschütterungen
– an staubigen Orten
– an Orten mit heißen Dämpfen oder Öldämpfen
(wie z. B. in einer Küche)
• Installieren Sie das Gerät nicht auf Sofas oder
anderen schallschluckenden Objekten; andernfalls
kann die Klangqualität leiden.
7 m
30 °
30 °
Page 37

Anschlüsse 02
5
De
English
DeutschFrançais
Nederlands
Italiano Español Русский
Kapitel 2:
Anschlüsse
Anschließen der Kabel
Vorsicht
• Bevor Sie Anschlüsse vornehmen oder abt rennen, schalten Sie das Gerät aus und ziehen Sie das Netzkabel aus der
Netzsteckdose.
• Schließen Sie erst dann das Netzteil an, wenn sämtliche Verbindungen zwischen den Geräten hergestellt
wurden.
REC
R
L
RL
PLAY
RL
AUDIO
OUTPUT
PREOUT
R
L
NORMALNORMAL
INVERSION
INVERSION
PHASE
PHASE
LINE2LINE2
LINE1
LINE1
USBUSB
COAXIAL
COAXIAL
PHONOPHONO
(MM/MC)
(MM/MC)
SIGNAL
SIGNAL
GND
GND
NETWORK
NETWORK
SACD/CD
SACD/CD
DIGITAL INDIGITAL IN
ANALOG INANALOG IN
OPTICALOPTICAL
LINE2LINE2
OUT
OUT
POWERPOWER
AMP
AMP
DIRECT
DIRECT
BALANCED INBALANCED IN
L
R
L
R
L
R
L
R
L
R
L
R
L
R
L
R
L
R
L
R
L
R
L
R
L
R
LRL
R
LRL
R
LRL
R
L
R
L
R
MENU
iPod
Music>
Extras>
Settings>
Shuffle Songs
Backlight
MASTER
VOLUME
STANDBY/ON
INPUT
SELECTOR
iPodiPhoneiPadHDMI
ADVANCED
MCACC
FLOFF
SOURCE
/I STANDBY/ON
STANDBY
iPod/iPhone
5V1A
DIRECT Hi-Bit 32Up Sampling
SOURCE
Vorverstärker-Buchsen (PRE OUT)
am Vorverstärker oder AV-Verstärker
Lautsprechersystem B
Plattenspiele
Rechts
Links
Netzkabel
(mitgeliefert)
Rückwand
des Gerätes
Aufnahmegerät
oder anderes Gerät
Audiogerät mit
symmetrischem Ausgang
Lautsprechersystem A
Rechts
Links
Vorsicht
•Der SIGNAL GND-Anschluss reduziert
Störgeräusche, wenn das Gerät an Komponenten
wie analoge Plattenspieler angeschlossen wird.
• Die PHONO IN-Anschlüsse sind werkseitig mit
kurzen Stiften ausgestattet. Sie sollten außer bei
Anschließen eines Plattenspielers nicht entfernt
werden. Denken Sie daran, die kurzen Stifte an
einem sicheren Ort aufzubewahren.
• Stecken Sie die Stecker mit kurzen Stiften
ausschließlich in PHONO IN-Anschlüsse. Wenn
Sie an andere Anschlüsse angeschlossen werden,
kann dies Fehlfunktionen verursachen.
• Schließen Sie die PHONO IN-Anschlüsse
ausschließlich an Plattenspieler an; schließen Sie
keine Plattenspieler mit integriertem Equalizer an.
Andernfalls kann es zu extrem lauter, verzerrter
Tonausgabe kommen, die Lautsprecher und
andere Geräte beschädigen kann.
• Die PHONO IN-Anschlüsse des A-50DA sind nur
zum Anschluss von Plattenspielern mit MMTonabnehmern (Moving Magnet) vorgesehen.
Plattenspieler mit MC-Tonabnehmern (Moving
Coil) können nicht angeschlossen werden.
• Achten Sie darauf, die Kabel nicht über die
Oberseite des Geräts zu führen (wie auf der
Abbildung gezeigt). In diesem Fall kann das von
den Transformatoren in diesem Gerät erzeugte
magnetische Feld ein Brummen in den
Lautsprechern hervorrufen.
•Mit den POWER AMP DIRECT-Anschlüssen des
Gerätes sollten niemals andere Komponenten
verbunden werden; Ausnahme:
Vorverstärkerausgänge (PRE-AMP OUT).
• Falls Ihr Plattenspieler über ein geerdetes Kabel
verfügt, schließen Sie dieses an den
Erdungsanschluss dieses Verstärkers an.
Hinweis
• Beim Anschluss eines Cassettenlaufwerks kann es
je nach Aufstellungsort zu Störgeräuschen bei der
Wiedergabe kommen. Solche Störgeräusche
entstehen durch Einstrahlungen durch das
Verstärkernetzteil. In solchen Fällen ändern Sie den
Ausstellungsort oder sorgen für mehr Abstand
zwischen Cassettenlaufwerk und Verstärker.
• iPod ist ein in den USA und anderen Ländern
eingetragenes Warenzeichen der Apple Inc.
“Bi-wiring” (Doppelverkabelung)
Das Gerät kann mit Bi-wiring-fähigen Lautsprechern
eingesetzt werden. Achten Sie darauf, die
Verbindungen zum Hochtöner und Tieftöner
korrekt herzustellen.
• Achten Sie bei der Wiedergabe darauf, dass die
Tasten SPEAKERS A und SPEAKERS B beide
EINgeschaltet sind (Seite 8).
Vorsicht
• Bei Bi-wiring-Anschluss der Lautsprecher achten
Sie unbedingt darauf, dass die mit den
Lautsprechern gelieferten und vermutlich
angebrachten HIGH- und LOWKurzschlussbrücken entfernt werden, damit der
Verstärker nicht beeinträchtigt wird. Detaillierte
Hinweise finden Sie in der mit den Lautsprechern
gelieferten Dokumentation.
HIGH
LOW
HIGH
LOW
Lautsprechersystem
Links
Lautsprechersystem
Rechts
Rückwand
des Gerätes
Entfernen Sie die
Kurzschlussbrücke
zwischen den
Anschlüssen + und –.
SACD/CD-Player
Netzwerk-Audioplayer
iPod-Dock usw.
Page 38

02 Anschlüsse
6
De
• Wenn Lautsprecher mit trennbaren
Netzwerkschaltungen verwendet werden, beachten
Sie bitte, dass nach Netztrennung kein Ton
ausgegeben wird und die Lautsprecher beschädigt
werden können.
• Eine weitere Anschlussvariante besteht darin, die
SPEAKERS A-Anschlüsse mit HIGH und die
SPEAKERS B-Anschlüsse mit LOW zu verbinden
(entgegengesetzt zur Abbildung).
Lautsprecherkabel anschließen
1 Verdrillen Sie die Seele (den Kern aus
Metalladern) des Kabels.
2 Lösen Sie die Klemmmutter am
SPEAKERS
-Anschluss, führen Sie das
Lautsprecherkabel in die nun sichtbare
Öffnung am Anschluss.
3 Ziehen Sie die Klemmmutter wieder an.
Vorsicht
• Wenn Sie nur ein einziges
Lautsprecheranschlusspaar (SPEAKERS A oder
SPEAKERS B) oder eine Bi-wiring-Verbindung
nutzen, sollte der Lautsprecher eine
Nennimpedanz zwischen 4 und 16
aufweisen. Wenn Sie beide
Lautsprecheranschlusspaare nutzen, sollten die
angeschlossenen Lautsprecher eine
Nennimpedanz zwischen 8 und 32
aufweisen. Hinweise zur Impedanz finden Sie
in der mit den Lautsprechern gelieferten
Dokumentation.
• Achten Sie darauf, dass die positiven und
negativen Anschlüsse am Verstärker (+/–) mit den
richtigen Anschlüssen an den Lautsprechern
verbunden werden.
• An den Lautsprecherklemmen dieses Gerätes liegt
eine potentiell GEFÄHRLICHE Spannung an. Zur
Vermeidung von Stromschlaggefahr ist unbedingt
darauf zu achten, den Netzstecker beim
Anschließen und Abtrennen der Lautsprecherkabel
von der Netzsteckdose zu trennen, bevor
irgendwelche nicht isolierten Teile berührt werden.
• Sorgen Sie dafür, dass sämtliche blanken
Lautsprecheradern gut verdrillt und vollständig in
den Lautsprecheranschluss eingeführt werden.
Falls blanke Adern an die Rückwand geraten, kann
sich das Gerät aus Sicherheitsgründen abschalten.
Audiokabel anschließen
Schließen Sie den weißen Stecker an die linke Buchse
(L), den roten Stecker an die rechte Buchse (R) an.
Stecken Sie die Stecker bis zum Anschlag ein.
123
10 mm
Links (weiß)
Rechts (rot)
Anschluss an die symmetrischen
Eingänge (nur A-70DA)
Verbinden Sie die BALANCED IN-Anschlüsse des Geräts
mit einem SACD-Player, USB DAC, Netzwerk-Player
oder einem anderen Gerät mit symmetrischen
Ausgängen.
Vorsicht
• Die Funktionen BASS, TREBLE, BALANCE und
LOUDNESS funktionieren nicht für ein Gerät, dass
an die BALANCED IN-Anschlüsse angeschlossen
ist.
Die Phase unterscheidet sich eventuell je nach
angeschlossenem Gerät. Verwenden Sie den
Phasenauswahlschalter an der Geräterückseite, um
die Phase anzupassen.
• Grundeinstellung (Nr. 2 HOT)
• Einstellung bei vertauschter Polarität
(Nr. 3 HOT)
Hinweis
• Weitere Einzelheiten zur Phase der
symmetrischen Ausgänge des anzuschließenden
Geräts finden Sie in der Bedienungsanleitung des
Geräts.
• Wenn Sie das Gerät an einen Pioneer-Player
anschließen, passen Sie die Phase an die
Grundeinstellung an (Nr. 2 HOT).
LINE2
LINE2
LINE1
LINE1
USB
USB
COAXIAL
COAXIAL
NETWORK
NETWORK
SACD/CD
SACD/CD
DIGITAL IN
DIGITAL IN
ANALOG IN
ANALOG IN
OPTICAL
OPTICAL
LINE2
LINE2
OUT
OUT
P.
P.
AMP
AMP
DIRECT
DIRECT
BALANCED IN
BALANCED IN
NORMAL
NORMAL
INVERSION
INVERSION
PHASE
PHASE
RL
Audiogerät mit
symmetrischem Ausgang
Symmetrisches Kabel
(als Sonderzubehör erhältlich)
NORMAL
NORMAL
INVERSION
INVERSION
PHASE
PHASE
1 Erdung
3 COLD(-)
2 HOT(+)
NORMAL
NORMAL
INVERSION
INVERSION
PHASE
PHASE
1 Erdung
3 HOT(+)
2 COLD(-)
A-70DA-Rückwand
Page 39

Anschlüsse 02
7
De
English
DeutschFrançais
Nederlands
Italiano Español Русский
Digitale Audioeingänge
Wenn Sie den DIGITAL IN-Anschluss des Geräts und
den Digitalaudioausgang eines Digitalaudiogeräts mit
einem separat erhältlichen Digitalkabel verbinden, kann
der Ton des Digitalaudiogeräts über das Gerät
ausgegeben werden.
Weitere Einzelheiten zur Ausgabe des Audioeingangs
des DIGITAL IN-Anschlusses finden Sie auf Seite 11.
Hinweis
• Digitale Signalformate können an diesem Gerät
eingegeben werden, inklusive linearer PCMSignale mit Abtastrate und quantitativen Bits bis
192 kHz/32 bit. (Je nach angeschlossenem Gerät
und Umgebung kann der Betrieb fehlschlagen.)
Einen Computer per USB-Kabel
anschließen
Falls der DIGITAL IN USB-Anschluss des Gerätes über
ein USB-Kabel (separat erhältlich) mit dem USB-Port
eines Computers verbunden wird, können Musikdateien
auf dem Computer über dieses Gerät wiedergegeben
werden.
Weitere Informationen zur Ausgabe von Audiosignalen
an den DIGITAL IN USB-Anschluss finden Sie auf
Seite 13.
Wichtig
• Ein spezieller Treiber muss auf dem Computer
installiert sein (Seite 13).
Hinweis
• Dieses Gerät kann nicht zur Wiedergabe von
Audiodateien auf einem Computer verwendet
werden, falls Media Player auf dem
angeschlossenen Computer nicht installiert ist.
LINE2
LINE2
LINE1
LINE1
USB
USB
COAXIAL
COAXIAL
DIGITAL IN
DIGITAL IN
IN
OPTICAL
OPTICAL
LINE2
LINE2
OUT
OUT
ED IN
NORMAL
NORMAL
INVERSION
INVERSION
PHASE
PHASE
DIGITAL OUT
COAXIAL
DIGITAL OUT
OPTICAL
Digitales
Audiogerät etc.
Digitales Koaxial-Audiokabel
(separat erhältlich)
A-70DA-Rückwand
Optisches
Digitalaudiokabel
(als Sonderzubehör
erhältlich)
Digitales
Audiogerät etc.
LINE2LINE2
LINE1
LINE1
USBUSB
COAXIALCOAXIAL
DIGITAL INDIGITAL IN
OPTICAL
OPTICAL
LINE2
LINE2
OUT
OUT
NORMALNORMAL
INVERSION
INVERSION
PHASE
PHASE
USB
USB-Kabel
(separat erhältlich)
A-Typ
B-Typ
PC
A-70DA-Rückwand
Zentrale Steuerung mit anderen
Pioneer-Komponenten verwenden
Mehrere mit CONTROL IN/OUT-Anschlüssen
ausgestattete Pioneer-Komponenten lassen sich mit
dem Gerät verbinden; dadurch können diese
Komponenten zentral über den Fernbedienungssensor
des Gerätes gesteuert werden. Auf diese Weise können
auch Komponenten ohne Fernbedienungssensor
gesteuert oder Komponenten an Stellen platziert
werden, die nicht mit der regulären Fernbedienung
erreicht werden.
Hinweis
• Zur Verbindung verwenden Sie ein
handelsübliches Mono-Klinkensteckerkabel (ohne
Widerstand).
• Wenn die CONTROL IN/OUT-Anschlüsse
verwendet werden, müssen analoge Verbindungen
ebenfalls über handelsübliche Audiokabel
hergestellt werden. Wenn lediglich die CONTROL
IN/OUT-Verbindungen hergestellt werden, lässt
sich das System nicht richtig steuern.
• Wenn ein Fernbedienungskabel am CONTROL IN-
Anschluss des Gerätes angeschlossen ist, kann
das Gerät nicht durch Richten der Fernbedienung
auf das Gerät gesteuert werden (der
Fernbedienungssensor wird automatisch
deaktiviert).
Anschließen
Wichtig
• Ziehen Sie grundsätzlich den Netzstecker aus der
Steckdose, wenn Sie Urlaub machen oder das
Gerät aus anderen Gründen längere Zeit nicht
nutzen. Beachten Sie, dass interne Einstellungen
auch dann nicht verloren gehen, wenn das Gerät
längere Zeit vom Stromnetz getrennt wird.
• Bevor Sie den Netzstecker ziehen: Drücken Sie
zuerst die Taste
/I
STANDBY/ON an der
Frontblende des Gerätes, damit das Gerät
abgeschaltet wird, bevor Sie die Verbindung zur
Stromversorgung trennen.
Vorsicht
• Verwenden Sie nur das mitgelieferte Netzkabel;
andernfalls erlischt die Garantie und Pioneer
übernimmt keine Verantwortung für jegliche
Schäden. (Das mit dem Gerät gelieferte Netzkabel
hat einen Nennstrom von 10 A.)
• Verwenden Sie ausschließlich das mit dem Gerät
gelieferte Netzkabel.
• Nutzen Sie das mitgelieferte Netzkabel
ausschließlich für die nachstehend beschriebenen
Zwecke.
Nachdem sämtliche sonstigen Verbindungen
hergestellt wurden, schließen Sie das Gerät an eine
Steckdose an.
1 Schließen Sie das mitgelieferte
Netzkabel an den
AC IN
-Anschluss an der
Rückwand des Gerätes an.
2 Stecken Sie den Netzstecker in eine
Steckdose.
IN
OUT
CONTROL
Andere PioneerKomponente mit
CONTROL IN/OUTAnschlüssen
Zu anderen
PioneerKomponenten mit
CONTROL INAnschluss
A-70DA
Richten Sie die
Fernbedienung auf
den Gerätesensor.
Fernbedienung
Zur Steckdose
Rückwand des Gerätes
Netzkabel
(enthalten)
Page 40

03 Bedienelemente und Anzeigen
8
De
Kapitel 3:
Bedienelemente und Anzeigen
Vorderseite
1/I
STANDBY/ON
Schaltet den Verstärker ein und aus.Im Betrieb leuchtet
die Betriebsanzeige in der Mitte der Taste auf.
2
STANDBY/APD
-Anzeige
Diese Anzeige leuchtet im Bereitschaftsmodus rot. Bei
aktiver Auto-Abschaltung (APD) leuchtet die Anzeige
grün (Seite 12).
3
SPEAKERS A
-Taste/Anzeige
Mit dieser Taste schalten Sie zu den mit den
SPEAKERS A-Anschlüssen verbundenen Lautsprechern
um.
On : Die Anzeige leuchtet auf. Ton wird über das
Lautsprechersystem ausgegeben.
Off : Die Anzeige erlischt. Die Tonausgabe über das
Lautsprechersystem ist abgeschaltet.
4
SPEAKERS B
-Taste/Anzeige
Mit dieser Taste schalten Sie zu den mit den
SPEAKERS B-Anschlüssen verbundenen Lautsprechern
um.
On : Die Anzeige leuchtet auf. Ton wird über das
Lautsprechersystem ausgegeben.
Off : Die Anzeige erlischt. Die Tonausgabe über das
Lautsprechersystem ist abgeschaltet.
5
LOUDNESS
-Taste/Anzeige
Zum Hören bei geringer Lautstärke.
On : Die Anzeige leuchtet auf: Betont die Wiedergabe
niedriger und hoher Frequenzen zum Ausgleich von
Klangverlusten bei geringer Lautstärke.
Off : Die Anzeige erlischt: Diese Einstellung empfiehlt
sich im Normalbetrieb.
• Diese Taste ist ohne Funktion, wenn die DIRECT-
Taste betätigt wurde.
• Je höher die Lautstärke, desto weniger wirkt sich
die LOUDNESS-Schaltung aus.
A-70DA
31
6
2 54
7
14 1612
9
10 11 13 15
8
6 Fernbedienungssensor
Empfängt Signale von der Fernbedienung (Seite 4).
7
PHONES
-Buchse
Zum Anschluss des Kopfhörers (bei dessen Anschluss
von den Lautsprechern kein Ton ausgegeben wird). Bei
gedrückter POWER AMP DIRECT-Taste wird kein Ton
ausgegeben.
8 DIRECT-Taste/Anzeige
On : Die Anzeige leuchtet auf: Wenn die Funktion dieser
Taste aktiv ist, wird der Klang direkt ausgegeben, ohne
zuvor durch diverse Klangeinstellungsschaltungen
(BASS, TREBLE, BALANCE, LOUDNESS) geleitet zu
werden. Dies erlaubt eine möglichst naturgetreue
Wiedergabe, setzt jedoch sämtliche BASS-, TREBLE-,
BALANCE- und LOUDNESS-Regelungen außer Kraft.
Wenn ein an den BALANCED IN-Anschlüssen
angeschlossenes Gerät abgespielt wird, schaltet sich
DIRECT ein und kann nicht abgeschaltet werden.
Off : Die Anzeige erlischt: Das Signal wird durch die
verschiedenen Klangeinstellungsschaltungen geleitet.
Wenn die Anzeige nicht leuchtet, können Anpassungen
über die BASS-, TREBLE-, BALANCE- und LOUDNESS-
Regler vorgenommen werden.
9
BASS
-Tonsteuerung
Zum Anpassen der Wiedergabe niederfrequenter Töne.
In der mittleren Position (Normal) wird der Klang nicht
beeinflusst. Bei Drehung nach rechts werden
niederfrequente Töne betont, bei Drehung nach links
entsprechend reduziert.
• Diese Taste ist ohne Funktion, wenn die DIRECTTaste betätigt wurde.
10
TREBLE
-Tonsteuerung
Zum Anpassen der Wiedergabe hochfrequenter Töne. In
der mittleren Position (Normal) wird der Klang nicht
beeinflusst. Bei Drehung nach rechts werden
hochfrequente Töne betont, bei Drehung nach links
entsprechend reduziert.
• Diese Taste ist ohne Funktion, wenn die DIRECTTaste betätigt wurde.
11
BALANCE
-Regler
Dieser Regler sollte gewöhnlich in der mittleren Position
verbleiben. Zum Anpassen der Balance, falls der Ton
eines Lautsprechers oder Lautsprecherpaares lauter
wiedergegeben wird. Wenn die rechte Seite lauter
erscheint, drehen Sie den Regler nach links; falls die
linke Seite lauter erscheint, entsprechend nach rechts.
• Diese Taste ist ohne Funktion, wenn die DIRECTTaste betätigt wurde.
12
ATTENUATOR
-Taste (nur A-70DA)
Drücken Sie diese Taste, wenn Sie Feineinstellungen an
der Lautstärke bei Wiedergabe von sehr leisen Tönen
vornehmen möchten.
13
VOLUME
-Regler
Zum Einstellen der Lautstärke. (Auch zum Einstellen der
Kopfhörerlautstärke.)
14
CARTRIDGE
-Auswahlschalter (nur A-
70DA)
Wählen Sie den Tonabnehmer, der mit Ihrem
Plattenspieler verwendet werden soll.
15
POWER AMP DIRECT
-Taste/Anzeige
Diese Taste drücken Sie, wenn das Gerät als Verstärker
eingesetzt wird (Seite 11).
16
INPUT SELECTOR
-Knöpfe/Anzeigen
Drehen Sie den Knopf im oder gegen den Uhrzeigersinn,
bis die Anzeige der gewünschten Eingangsquelle
aufleuchtet. Wenn Sie den Knopf im Uhrzeigersinn
drehen, leuchtet die Anzeige rechts, bei Drehung gegen
den Uhrzeigersinn die Anzeige links. Wenn der Ton über
die Fernbedienungstaste MUTE stummgeschaltet wird,
blinkt die Anzeige der mit dem Knopf INPUT SELECTOR
ausgewählten Eingangsquelle.
Page 41

Bedienelemente und Anzeigen 03
9
De
English
DeutschFrançais
Nederlands
Italiano Español Русский
Rückwand
Detaillierte Hinweise zu Anschlüssen finden Sie auf den Seiten 5 – 7.
1
PHONO IN (MM/MC)
-Anschlüsse
(A-70DA)
PHONO IN (MM)-Anschlüsse (A-50DA)
2
POWER AMP DIRECT IN
-Anschlüsse
Hier schließen Sie den Vorverstärker an, wenn Sie das
Gerät als Verstärker einsetzen (Seite 11).
3 BALANCED IN-Anschlüsse (nur A-70DA)
4 Phasenauswahlschalter (nur A-70DA)
Wechselt die Phasen der BALANCED IN-Anschlüsse.
5
DIGITAL IN USB
-Anschluss
6
SPEAKERS A
-Anschlüsse (rechter Kanal)
7
SPEAKERS B
-Anschlüsse (rechter Kanal)
8
SPEAKERS B
-Anschlüsse (linker Kanal)
9
SPEAKERS A
-Anschlüsse (linker Kanal)
10 GND-Anschluss (Plattenspieler-Masse)
Dieser Masseanschluss vermindert Störgeräusche beim
Anschluss eines analogen Plattenspielers. Es handelt
sich nicht um Schutzerde.
11
NETWORK IN
-Anschlüsse
12
SACD/CD IN
-Anschlüsse
13 LINE 1-Anschlüsse
14 LINE 2 IN/OUT-Anschlüsse
15 DIGITAL IN OPTICAL-Anschluss
16
DIGITAL IN COAXIAL
-Anschluss
17
CONTROL IN/OUT
-Buchse
18
AC IN
-Buchse
Diesen Anschluss verbinden Sie über das Netzkabel mit
der Steckdose.
LINE2
LINE2
LINE1
LINE1
USB
USB
COAXIAL
COAXIAL
PHONO
PHONO
(MM/MC)
(MM/MC)
SIGNAL
SIGNAL
GND
GND
NETWORK
NETWORK
SACD/CD
SACD/CD
DIGITAL IN
DIGITAL IN
ANALOG IN
ANALOG IN
OPTICAL
OPTICAL
LINE2
LINE2
OUT
OUT
POWER
POWER
AMP
AMP
DIRECT
DIRECT
BALANCED IN
BALANCED IN
NORMAL
NORMAL
INVERSION
INVERSION
PHASE
PHASE
21 2 2724
2
10 11 15 16 1817
29
3 28
12 13
5 26
14
Page 42

03 Bedienelemente und Anzeigen
10
De
Fernbedienung
STANDBY/ON
A
B
APD
1
8
10
9
12
11
13
2
3
4
6
4
7
5
1
STANDBY/ON
Umschalten des Verstärker zwischen Bereitschaft und
Einschalten.
2 Funktionswahltasten
Zur Wahl einer Signalquelle drücken. Auswahl des an
den entsprechenden Eingang an der Rückseite
angeschlossenen Geräts.
• Die BALANCED-Taste kann nicht mit dem A-50DA
verwendet werden.
3 SACD PLAYER-Bedienungstasten
Zum Steuern eines Pioneer-SACD-Players.
4 NETWORK AUDIO PLAYER-Bedientasten
Zum Steuern eines Pioneer-Netzwerk-Audioplayers.
5
LOUDNESS
Zum Ein- und Ausschalten der Loudness-Schaltung
(Seite 8).
6
MUTE
Stumm-/Einschalten des Tons.
7
DIRECT
Zum Umschalten auf Direktes Hören drücken (Seite 8).
8
DIMMER
Mit dieser Taste stellen Sie die Helligkeit der
Anzeigeleuchten an der Vorderseite des Gerätes in drei
Stufen ein (die STANDBY-Anzeige wird nicht
beeinflusst).
9
POWER AMP DIRECT
Diese Taste drücken Sie, wenn das Gerät als Verstärker
eingesetzt wird (Seite 11).
10
SPEAKERS A
Mit dieser Taste schalten Sie zu den mit den SPEAKERS
A-Anschlüssen verbundenen Lautsprechern um.
11
SPEAKERS B
Mit dieser Taste schalten Sie zu den mit den
SPEAKERS B-Anschlüssen verbundenen Lautsprechern
um.
12
VOLUME +/–
Einstellung der Hörlautstärke.
13
APD
Zum Ein- und Ausschalten der Auto-Abschaltung
(Seite 12).
Page 43

Bedienung 04
11
De
English
DeutschFrançais
Nederlands
Italiano Español Русский
Kapitel 4:
Bedienung
Wiedergabe
1 Schalten Sie den Strom des
Wiedergabegeräts ein.
2 Schalten Sie das Gerät EIN.
• Falls sich das Gerät im Bereitschaftsmodus
befindet, drücken Sie die Fernbedienungstaste
STANDBY/ON.
3 Wählen Sie die gewünschte
Wiedergabequelle.
Wählen Sie die gewünschte Wiedergabekomponente
aus.
• Zur Auswahl an der Frontblende drehen Sie den
Knopf INPUT SELECTOR.
• Wenn beim A-70DA PHONO ausgewählt ist, legen
Sie mit dem CARTRIDGE-Auswahlschalter die Art
des Tonabnehmers Ihres Plattenspielers fest: MM
() oder MC ().
4 Starten Sie die Wiedergabe des in Schritt
1 gewählten Geräts.
5 Stellen Sie die Wiedergabelautstärke
mit dem
VOLUME
-Regler ein.
6 Passen Sie den Klang mit den
BASS
- und
TREBLE
-Reglern sowie mit der
LOUDNESS
-
Taste an Ihren persönlichen Geschmack an.
Bei aktiver DIRECT-Taste sind diese Regler ohne
Funktion.
3566
62
MENU
iPod
Music>
Extras>
Settings>
Shuffle Songs
Backlight
SOURCE
/I STANDBY/ON
STANDBY
iPod/iPhone
5V1A
DIRECT Hi-Bit 32 Up Sampling
SOURCE
SACD/CD-Player
Netzwerk-Audioplayer
Plattenspieler
iPod-Dock usw.
Wiedergabe
Wiedergabe
Audiogerät mit
symmetrischem
Ausgang
Aufnahmegerät
oder anderes Gerät
VOLUME
Vorsicht
• Die Funktionen BASS, TREBLE, BALANCE und
LOUDNESS funktionieren nicht für ein Gerät, dass
an die BALANCED IN-Anschlüsse angeschlossen
ist.
Bereitschaftsmodus einstellen
1 Drücken Sie die Fernbedienungstaste
STANDBY/ON
.
Zum nächsten Einschalten drücken Sie die
Fernbedienungstaste STANDBY/ON.
• Wenn die Taste /I STANDBY/ON an der
Frontblende gedrückt wird, schaltet sich das Gerät
aus. In diesem Fall lässt sich das Gerät nicht mehr
mit der Fernbedienungstaste STANDBY/ON
einschalten. Zum Einschalten drücken Sie bitte die
Taste /I STANDBY/ON an der Frontblende.
Beim Einsatz des Gerätes als Verstärker
Wenn ein Vorverstärker an die POWER AMP DIRECT INAnschlüsse angeschlossen wird, lässt sich das Gerät als
Verstärker einsetzen.
1 Drücken Sie auf die POWER AMP
DIRECT-Taste auf der Fernbedienung oder
der Gerätevorderseite.
Die POWER AMP DIRECT-Anzeige leuchtet auf.
Vorsicht
• Wenn die POWER AMP DIRECT-Anzeige leuchtet,
ändert sich die Bedienung wie folgt:
– Die Frontblendenbedienelemente VOLUME,
BASS, TREBLE und BALANCE werden außer
Kraft gesetzt. Diese Einstellungen werden nun
durch die Komponente gesteuert, die mit den
Anschlüssen POWER AMP DIRECT IN
verbunden wurde.
– Die Tasten LOUDNESS und ATTENUATOR (nur
A-70DA) werden deaktiviert.
– Wenn die POWER AMP DIRECT-Anzeige
leuchtet, wird die Audiolautstärke vom Gerät
automatisch auf die höchste Stufe festgelegt.
Beim Einsatz des Gerätes als Verstärker prüfen
Sie bitte die Ausgabestufe der an den POWER
AMP DIRECT IN-Anschlüssen
angeschlossenen Komponente und stellen sie
auf einen geeigneten geringen Wert ein, bevor
Sie die POWER AMP DIRECT-Anzeige
einschalten. Falls die Audiolautstärke der mit
den POWER AMP DIRECT IN-Anschlüssen
verbundenen Komponente auf einen hohen
Wert eingestellt ist, kann plötzlich lauter Ton
ausgegeben werden, wenn die POWER AMP
DIRECT-Anzeige leuchtet.
– Über die Anschlüsse PHONES und LINE 2 OUT
wird kein Ton ausgegeben.
• Weitere Informationen finden Sie in der
Bedienungsanleitung des Gerätes, das mit den
POWER AMP DIRECT IN-Anschlüssen des Geräte
verbunden wurde.
Musik von einer digitalen
Audiokomponenten wiedergeben
Geben Sie den Digitalaudioeingang an den DIGITAL IN
COAXIAL- oder OPTICAL-Anschluss aus.
1 Stellen Sie eine digitale
Eingangsverbindung her.
• Siehe Digitale Audioeingänge auf Seite 7.
2 Wechseln Sie zum COAXIAL- oder
OPTIACAL-Eingang.
Mit jedem Druck der COAXIAL/OPTICAL-Taste auf der
Fernbedienung wechselt der Eingang.
• Zur Auswahl an der Frontblende drehen Sie den
Knopf INPUT SELECTOR.
• Der Ton wird von den LINE 2 OUT-Anschlüssen
produziert.
Hinweis
• Digitale Signalformate können an diesem Gerät
eingegeben werden, inklusive linearer PCMSignale mit Abtastraten und quantitativen Bits von
bis zu 192 kHz/32 bit. (Je nach angeschlossenem
Gerät und Umgebung kann der Betrieb
fehlschlagen.)
Page 44

04 Bedienung
12
De
Vornahme eine Audioaufnahme
Sie können eine Audioaufnahme von jeglicher an den Verstärker angeschlossenen Quelle vornehmen.
1 Wählen Sie die gewünschte
Aufnahmequelle.
2 Starten Sie die Aufnahme und dann die
Wiedergabe des Quellengeräts.
Vorsicht
• Vergewissern Sie sich, dass die Stecker mit kurzen
Stiften nicht in den LINE 2 OUT-Anschlüssen
eingesteckt sind, da andernfalls eine Fehlfunktion
auftreten kann.
• Mit den folgenden Anschlüssen verbundenes
Audio kann nicht über die LINE 2 OUT-Anschlüsse
ausgegeben werden.
-
LINE 2 IN
-
BALANCED IN
-
POWER AMP DIRECT IN
1
MENU
iPod
Music>
Extras>
Settings>
Shuffle Songs
Backlight
SOURCE
/I STANDBY/ON
STANDBY
iPod/iPhone
5V1A
DIRECT Hi-Bit 32 Up Sampling
SOURCE
SACD/CD-Player
Netzwerk-Audioplayer
Plattenspieler
iPod-Dock etc.
Wiedergabe
Aufnahme
Audioaufnahme-Komponente
(CD-Recorder, Cassettendeck etc.)
Automatisch in den Bereitschaftsmodus wechseln (Auto-Abschaltung)
Diese Funktion schaltet das Gerät automatisch in den Bereitschaftsmodus, falls 30 Minuten lang kein Signal und
keine Tastenbetätigung erkannt wird.
1 Falls das Gerät eingeschaltet ist, drücken Sie die Fernbedienungstaste
APD
.
Wenn diese Funktionen aktiv ist, leuchtet die STANDBY/APD-Anzeige an der Frontblende des Gerätes grün. Zum
Abschalten drücken Sie die Taste noch einmal.
• Diese Einstellung kann auch vorgenommen werden, indem Sie die Tasten LOUDNESS und POWER AMP
DIRECT an der Frontblende gleichzeitig 3 Sekunden lang gedrückt halten.
• Diese Funktion ist per Werksvorgabe eingeschaltet.
• Das Drehen der Regler TREBLE, BASS, BALANCE und VOLUME wird nicht als Bedienung ausgelegt; der
30-Minuten-Timer zum automatischen Abschalten wird dadurch also nicht neu gestartet.
Hinweis
• Je nach den angeschlossenen Geräten wird dieses Gerät eventuell nicht automatisch abgeschaltet, da
beispielsweise ein übermäßiges Rauschen als Audiosignal interpretiert wird.
Alle Einstellungen auf die Werkseinstellungen rücksetzen
1 Halten Sie im Bereitschaftsmodus die Frontblendentasten SPEAKERS A und POWER
AMP DIRECT gleichzeitig 5 Sekunden lang gedrückt.
2 Schalten Sie das Gerät EIN.
Page 45

Verwendung der USB DAC-Funktion 05
13
De
English
DeutschFrançais
Nederlands
Italiano Español Русский
Kapitel 5:
Verwendung der USB DAC-Funktion
Installieren Sie den Treiber
• Sie müssen einen speziellen Treiber auf Ihrem
Computer installieren, um über den DIGITAL IN
USB-Anschluss dieses Geräts Musikdateien des
Computers wiederzugeben. Einzelheiten finden Sie
auf der Pioneer-Website. Sie sollten ebenfalls auf
die Bedienungsanleitung Bezug nehmen, da sie
zusätzliche Informationen zum
Installationsverfahren und zu den
Computereinstellungen enthält.
Musik von einem Computer
wiedergeben
Mit dieser Funktion können Sie digitales Audio, das am
DIGITAL IN USB-Port an der Geräterückwand
eingegeben wird, wiedergeben.
1 Gerät per USB-Kabel mit einem
Computer verbinden (Seite 7).
2 Wählen Sie mit der
USB
-Taste
DIGITAL
IN USB
als Eingangsquelle.
• Zur Auswahl an der Frontblende drehen Sie den
Knopf INPUT SELECTOR.
• Der Ton wird von den LINE 2 OUT-Anschlüssen
produziert.
3 Beginnen Sie die Wiedergabe am
Computer.
Hinweis
• Wenn das Gerät und ein Computer über ein USBKabel zum Abspielen von Ton verbunden sind, kann
das Gerät folgende Signale einspeisen:
Linear PCM
– Quantitative Bits: 16 bit, 24 bit, 32 bit
– Abtastfrequenz: 44,1 kHz, 48 kHz, 88,2 kHz, 96
kHz, 176,4 kHz, 192 kHz, 352,8 kHz, 384 kHz
DSD
– Abtastfrequenz: 2,8 MHz, 5,6 MHz, 11,2 MHz
• Die Wiedergabe kann während des Einsatzes
dieser Funktion nicht über dieses Gerät gesteuert
werden; steuern Sie die Wiedergabe über Ihren
Computer.
• Beenden Sie immer zuerst die Wiedergabe am
Computer, bevor Sie das USB-Kabel trennen.
• Ton kann nicht ausgegeben werden, falls Ihr
Computer USB 2.0 HS nicht unterstützt.
• Dieses Gerät unterstützt keinen USB-Hub.
Schließen Sie das Gerät immer direkt über ein USBKabel am Computer an.
Page 46

06 Zusätzliche Informationen
14
De
Kapitel 6:
Zusätzliche Informationen
Fehlerbehandlung
Häufig ist eine vermeintliche Störung oder Fehlfunktion durch einen Bedienungsfehler bedingt. Wenn das Gerät
nicht richtig arbeitet, gehen Sie zunächst die unten stehenden Punkte durch. Manchmal könnte die Störung von
einem anderen Gerät verursacht werden. Überprüfen Sie die anderen verwendeten Geräte und elektrischen
Zusatzgeräte. Wenn Sie das Problem auch nach Prüfung der folgenden Punkte nicht beheben können, wenden Sie
sich für Reparaturen an die nächste Pioneer-Kundendienststelle oder Ihren Händler.
• Wenn das Gerät aufgrund externer Einwirkungen wie statischer Elektrizität nicht richtig funktioniert, ziehen Sie
den Stecker aus der Steckdose und stecken Sie ihn wieder ein, um den normalen Betrieb fortzusetzen.
Problem Abhilfe
Das Gerät schaltet sich nicht ein. •Wurde der Netzstecker aus der Steckdose gezogen? Schließen Sie den Netzstecker
richtig an die Steckdose an (Seite 7).
•Wurde das Netzkabel aus dem AC IN-Anschluss gezogen? Schließen Sie das
Netzkabel richtig an (Seite 7).
Das Gerät schaltet sich ab. •Ist die Auto-Abschaltung aktiv? Wenn Sie nicht möchten, dass sich das Gerät
automatisch abschaltet, deaktivieren Sie die Auto-Abschaltung (Seite 12).
Das Gerät hat sich ausgeschaltet und
die
STANDBY/APD
-Anzeige blinkt
wiederholt drei Mal.
•Die Schutzschaltung wurde aktiviert. Dies geschieht, wenn sehr ni ederfrequenter Ton
bei hoher Lautstärke wiedergegeben wird.
- Schalten Sie das Gerät aus, warten Sie mindestens eine Minute, schalten Sie das
Gerät dann wieder ein; geben Sie die Musik bei einer geringeren Lautstärke wieder.
-
Wenn nach dem erneuten Einschalten des Geräts die STANDBY/APDAnzeige vier Mal blinkt, verweist dies darauf, dass die Gerätekanäle nicht
funktionieren.
Trennen Sie das Netzkabel, wenden Sie sich an Ihren Händler oder
an den autorisierten Pioneer-Kundendienst in Ihrer Nähe.
Das Gerät hat sich ausgeschaltet und
die
STANDBY/APD
-Anzeige blinkt e in
Mal jede zwei Sekunden.
•Die Innentemperatur des Gerätes ist zu hoch, die Sicherheitsschaltung wurde
ausgelöst.
- Schalten Sie das Gerät aus, warten Sie mindestens eine Minute; lassen Sie das
Gerät abkühlen, bevor Sie es wieder einschalten.
- Stellen Sie das Gerät an einer Stelle auf, an der es besser belüftet wird.
- Überzeugen Sie sich davon, dass das Gerät richtig aufgestellt, installiert und
angeschlossen wurde. Falls das Gerät wieder eingeschaltet wird, ohne zuvor
abzukühlen, kann dasselbe Problem erneut auftreten (Seite 4).
Das Gerät hat sich ausgeschaltet und
die
STANDBY/APD
-Anzeige blinkt
wiederholt zwei Mal.
•Nutzen Sie Lautsprecher, deren Impedanz nicht von Ihrem Gerät unterstützt wird?
Überzeugen Sie sich von der richtigen Impedanz der Lautsprecher (Seite 6).
•Gibt es lose Kabel an den
SPEAKERS
-Anschlüssen, berühren diese andere Kabel
oder die Rückwand? Ziehen Sie den Netzstecker, schließen Sie die Lautsprecherkabel
richtig an (Seite 6).
Das Gerät hat sich ausgeschaltet und
die
STANDBY/APD
-Anzeige blinkt
wiederholt sechs Mal.
•Die Schutzschaltung wurde aktiviert. Dies geschieht, wenn sehr hochfrequenter Ton
bei hoher Lautstärke wiedergegeben wird.
- Verringern Sie die Lautstärke und versuchen Sie es noch einmal.
- Falls dasselbe Symptom auftritt, wenn das Gerät aus- und anschließend wieder
eingeschaltet wird, ist möglicherweise der Schaltkreis des Gerätes beschädigt.
Trennen Sie das Netzkabel, wenden Sie sich an Ihren Händler oder an den
autorisierten Pioneer-Kundendienst in Ihrer Nähe.
Die
STANDBY/APD
-Anzeige blinkt
vier Mal, fünf Mal oder sieben Mal
wiederholt und das Gerät schaltet sich
nicht aus.
•Die Schaltungen des Gerätes sind beschädigt. Trennen Sie das Netzkabel, wenden
Sie sich an Ihren Händler oder an den
autorisierten Pioneer-Kundendienst
in Ihrer
Nähe.
Bei Auswahl einer Funktion erfolgt
keine Tonausgabe.
•Ein Verbindungskabel ist nicht oder nicht richtig angeschlossen. Prüfen Sie die
Verbindungen (Seite 5).
•Stecker oder Kontakte sind verschmutzt. Wischen Sie sämtliche Verschmutzungen
von Steckern und Kontakten ab.
•Überzeugen Sie sich davon, dass der Eingangswähler des Gerätes auf die
gewünschte Wiedergabekomponente eingestellt ist. Stellen Sie den Regler richtig ein
(Seite 11).
•Schalten Sie die Stummschaltung mit der Fernbedienungstaste
MUTE
ab (Seite 10).
Kein Ton aus einem Lautsprecher. •Sind Verbindungskabel oder Lautsprecherkabel auf einer Seite nicht richtig
angeschlossen? Achten Sie auf gute, wackelfreie Verbindungen (Seite 5).
Die Fernbedienung funktioniert nicht. •Tauschen Sie die Batterien aus (Seite 4).
•Achten Sie auf einen Abstand von maximal 7 m und einen Winkel von maximal 30°
zwischen Fernbedienung und Frontblende (Seite 4).
•Beseitigen Sie Hindernisse oder begeben Sie sich an eine andere Stelle.
•Vermeiden Sie direkten Lichteinfall auf den Fernbedienungssensor an der
Fron tble nde.
•Wurde das Steuerkabel einer Komponente nicht richtig angeschlossen?
Vergewissern Sie sich, dass die Verbindungen richtig hergestellt wurden (Seite 7).
Die Eingangsquelle kann nicht
geändert werden.
•Schauen Sie nach, ob die
POWER AMP DIRECT
-Funktion eingeschaltet ist. Falls ja,
schalten Sie die Funktion mit der Frontblendentaste
POWER AMP DIRECT
AUS
(Seite 11).
Der Ton des Digitaleingangs wird
nicht ausgegeben.
•Das Digitalformat des Ausgabegeräts wird nicht unterstützt. Wenn für das
Ausgabegerät ein anderes Audiosignal als PCM (Dolby Digital, DTS usw.) eingestellt
ist, ändern Sie die Einstellung zu PCM.
Bei der Wiedergabe von SACD wird
der Ton des Digitaleingangs nicht
ausgegeben.
•Viele SACD-Player (einschließlich Blu-ray-Player und mit SACD kompatible DVDPlayer) unterstützen keine Digitalausgabe bei der Wiedergabe von SACD. Überprüfen
Sie die Spezifikationen des SACD-Players. Geben Sie den Ton alternativ mit einer
Analogverbindung wieder.
Es ist kein Ton zu hören, wenn ein
lineares PCM-Signal mit einer
Frequenz von 96 kHz oder mehr am
DIGITAL IN COAXIAL
-Anschluss
eingegeben wird.
•Möglicherweise wird der Ton nicht richtig an dem eingesetzten digitalen Koaxialkabel
ausgegeben; versuchen Sie, das Kabel (separat erhältlich) durch ein anderes zu
ersetzen.
Problem Abhilfe
Page 47

Zusätzliche Informationen 06
15
De
English
DeutschFrançais
Nederlands
Italiano Español Русский
Über die USB DAC-Funktion
Wichtig
• Weitere Einzelheiten zu den Computereinstellungen finden Sie ebenfalls in der Bedienungsanleitung der
Treibersoftware, die auf der Pioneer-Website erhältlich ist.
Problem Abhilfe
Musikdateien auf einem über USB
verbundenen Computer können nicht
wiedergegeben werden.
•
Um einen Computer und das Gerät über USB zu verbinden und dann Musikdateien
über USB wiederzugeben, müssen Sie einen speziellen Treiber von der PioneerWebsite herunterladen und dann auf dem Computer installieren.
Anweisungen zur
Treiberinstallation finden Sie auf der Pioneer-Webseite.
Beim Versuch, Dateien auf einem
Computer wiederzugeben, wird kein
Ton ausgegeben.
•Stimmen die Lautstärkeeinstellungen von Betriebssystem und
Anwendungsprogramm? Erhöhen Sie die Lautstärkeeinstellungen wie erforderlich.
•Ist die Audioausgabe des Betriebssystems stumm geschaltet? Brechen Sie die
Stummschaltung ab.
•Laufen mehrere Anwendungen gleichzeitig? Schließen Sie Anwendungen, die Sie
aktuell nicht benötigen.
•Wurde die Audioausgabe im Betriebssystem und der eingesetzten Anwendung
richtig eingestellt? Wählen Sie als Audiogerät „Pioneer A-70DA A-50DA USB Audio“.
Bei Verwendung des USB-Eingangs
erfolgt keine Tonausgabe.
•Ist ein anderes Gerät in den Computereinstellungen ausgewählt oder ist der Ton in
den Computereinstellungen stummgeschaltet? Überprüfen Sie die
Computereinstellungen.
•Ist das Gerät ordnungsgemäß verbunden? Wird das Gerät vom Computer erkannt?
Wenn das Gerät mit einem Computer verbunden wird und anschließend zum USBEingang gewechselt wird, kann in den Toneinstellungen des Computers eventuell ein
anderes Gerät ausgewählt sein. Wählen Sie das Gerät in diesem Fall noch einmal aus.
Prüfen Sie zudem die Verbindung.
•Wird das Dateiformat, das Betriebssystem und die Software unterstützt? Überprüfen
Sie, welches Betriebssystem, welche Software und welche Dateiabtastfrequenzen
unterstützt werden.
•Ist der spezielle Treiber auf dem Computer installiert? Ein spezieller Treiber muss auf
dem Computer installiert sein. Einzelheiten finden Sie auf der Pioneer-Website.
Computergeräusche (nicht Musik)
sind vom USB-Eingang hörbar.
•Je nach den Computereinstellungen wird der Startton, Fehlertöne und andere Töne
des Computers eventuell über das Gerät ausgegeben. Überprüfen Sie die
Computereinstellungen.
Wenn eine andere Eingangsquelle als
der USB-Eingang gewählt ist, kann
das Gerät keine Musikdateien am
Computer abspielen.
•Bei einem anderen Eingang als USB wird das Gerät vom Computer erkannt.
Wechseln Sie zu USB und wählen Sie anschließend erneut das Gerät in den
Toneinstellungen des Computers aus.
Wenn in den Toneinstellungen des
Computers 384 kHz oder 356 kHz
eingestellt ist, wird ein bestimmter
Browser oder eine Software beendet
und die Wiedergabe erfolgt ohne Ton.
•Der Browser oder die Software unterstützen 384 kHz oder 356 kHz eventuell nicht.
Überprüfen Sie die Spezifikationen des Browsers oder der Software.
Reinigung des Geräts
• Verwenden Sie ein trockenes Poliertuch, um Staub
und Schmutz abzuwischen.
• Bei starker Verschmutzung wischen Sie das
Gehäuse mit einem weichen, in ein fünf- oder
sechsfach mit Wasser verdünntes, neutrales
Reinigungsmittel getauchten und gründlich
ausgewrungenen Tuch ab. Wischen Sie
anschließend mit einem trockenen Tuch nach.
Verwenden Sie keine Möbelpolitur und keinen
Haushaltsreiniger.
• Auf keinen Fall dürfen Verdünner, Benzin,
Insektensprays oder andere Chemikalien mit dem
Gerät in Kontakt kommen oder in der Nähe des
Geräts verwendet werden, da hierdurch die
Oberfläche korrodiert.
Page 48

06 Zusätzliche Informationen
16
De
Technische Daten
Verstärkereinheit
Die Angaben zur Leistungsausgabe beziehen sich auf eine
Stromversorgung von 230 V.
• Kontinuierliche Leistungsausgabe
(beide Kanäle laufen auf 20 Hz bis 20 kHz)
A-70DA/A-50DA. . . . . . . . . . . . . . . . . . . . . . .90 W + 90 W
(Klirrfaktor (THD) 0,5 %, 4 )
A-70DA/A-50DA. . . . . . . . . . . . . . . . . . . . . . . 65 W +65 W
(Klirrfaktor (THD) 0,5 %, 8 )
Audioeinheit
• Eingänge (Empfindlichkeit/Impedanz)
BALANCED . . . . . . . . . . . . . . . . . . . . . . . . . 200 mV/82 k
SACD/CD, NETWORK, LINE 1, LINE 2 . . . 200 mV/50 k
POWER AMP DIRECT. . . . . . . . . . . . . . . . . . . . .1 V/10 k
PHONO (MM) . . . . . . . . . . . . . . . . . . . . . . . 2,8 mV/50 k
PHONO (MC). . . . . . . . . . . .0,24 mV/100 (nur A-70DA)
COAXIAL . . . . . . . . . . . . . . . . . . . . . . . . . 500 mVp-p/75
• Ausgabe (Pegel/Impedanz)
LINE 2 OUT . . . . . . . . . . . . . . . . . . . . . . . . 200 mV/2,2 k
• Frequenzgang
SACD/CD, NETWORK, LINE 1, LINE 2
. . . . . . . . . . . . . . . . . . . . . . . . . . 5 Hz bis 50 kHz ± 3 dB*
• RIAA-ABWEICHUNG
PHONO (MM) . . . . . . . . . . . . 20 Hz bis 20 kHz ±0,5 dB*
PHONO (MC)
. . . . . . . . . . . . .20 Hz bis 20 kHz ±0,5 dB*(nur A-70DA)
* Messung bei eingeschalteter DIRECT-Taste.
• Tonsteuerung
Bässe . . . . . . . . . . . . . . . . . . . . . . . . . . . ± 10 dB (100 Hz)
Höhen . . . . . . . . . . . . . . . . . . . . . . . . . . ± 10 dB (10 kHz)
• Signalrauschabstand (IHF SHORTED,
A-NETWORK)
SACD/CD, NETWORK, LINE 1, LINE 2 . . . . . . . . 101 dB*
PHONO (MM, 5 mV-Eingang) . . . . . . . . . . . . . . . . 89 dB*
PHONO (MC, 0,5 mV-Eingang) . . . 74 dB*(nur A-70DA)
* Messung bei eingeschalteter DIRECT-Taste.
• Garantierte Impedanz
A, B. . . . . . . . . . . . . . . . . . . . . . . . . . . . . . . . . 4 bis 16
A+B . . . . . . . . . . . . . . . . . . . . . . . . . . . . . . . . 8 bis 32
Bi-wiring. . . . . . . . . . . . . . . . . . . . . . . . . . . . . 4 bis 16
Verschiedenes
Strom-versorgung
. . . . . . . . . . . .220 V bis 230 V Wechselspannung, 50 Hz
Stromverbrauch
A-70DA. . . . . . . . . . . . . . . . . . . . . . . . . . . . . . . . . . . . 74 W
A-50DA. . . . . . . . . . . . . . . . . . . . . . . . . . . . . . . . . . . . 72 W
In Bereitschaft. . . . . . . . . . . . . . . . . . . . . . . . . . . . . . 0,3 W
Abmessungen
A-70DA. . . . . . 435 mm (B) x 141,5 mm (H) x 370 mm (T)
A-50DA. . . . . . 435 mm (B) x 138,5 mm (H) x 368 mm (T)
Gewicht (ohne Verpackung)
A-70DA. . . . . . . . . . . . . . . . . . . . . . . . . . . . . . . . . . . 17,2 kg
A-50DA. . . . . . . . . . . . . . . . . . . . . . . . . . . . . . . . . . .11,2 kg
Zubehör
Fernbedienung . . . . . . . . . . . . . . . . . . . . . . . . . . . . . . . . . 1
AAA/IEC R03-Trockenbatterien . . . . . . . . . . . . . . . . . . . . 2
Stecker mit kurzem Stift. . . . . . . . . . . . . . . . . . . . . . . . . . 2
Netzkabel
Garantiekarte
Sicherheitsblatt
Bedienungsanleitung (dieses Dokument)
Hinweis
• Technische Daten und das Design können sich
aufgrund von Verbesserungen ohne Ankündigung
ändern.
• In diesem Dokument erwähnte Firmen- und
Produktnamen sind Marken oder eingetragene
Marken ihrer jeweiligen Inhaber.
• „Pioneer” ist eine Marke der Pioneer Corporation
und wird unter Lizenz verwendet.
© 2015 Onkyo & Pioneer Corporation.
Alle Rechte vorbehalten.
Page 49

Zusätzliche Informationen 06
17
De
English
DeutschFrançais
Nederlands
Italiano Español Русский
Page 50

ATTENZIONE
Questo apparecchio non è impermeabile. Per prevenire
pericoli di incendi o folgorazioni, non posizionare nelle
vicinanze di questo apparecchio contenitori pieni di
liquidi (quali vasi da fiori, o simili), e non esporre
l’apparecchio a sgocciolii, schizzi, pioggia o umidità.
D3-4-2-1-3_A1_It
ATTENZIONE
Per evitare il pericolo di incendi, non posizionare
sull’apparecchio dispositivi con fiamme vive (ad
esempio una candela accesa, o simili).
D3-4-2-1-7a_A1_It
AVVERTENZA PER LA VENTILAZIONE
Installare l’apparecchio avendo cura di lasciare un
certo spazio all’intorno dello stesso per consentire una
adeguata circolazione dell’aria e migliorare la
dispersione del calore (almeno 30 cm sulla parte
superiore, 10 cm sul retro, e 10 cm su ciascuno dei lati).
ATTENZIONE
L’apparecchio è dotato di un certo numero di fessure e
di aperture per la ventilazione, allo scopo di garantirne
un funzionamento affidabile, e per proteggerlo dal
surriscaldamento. Per prevenire possibili pericoli di
incendi le aperture non devono mai venire bloccate o
coperte con oggetti vari (quali giornali, tovaglie, tende o
tendaggi, ecc.), e l’apparecchio non deve essere
utilizzato appoggiandolo su tappeti spessi o sul letto.
D3-4-2-1-7b*_A1_It
K058a_A1_It
Pb
Informazioni per gli utilizzatori finali sulla raccolta e lo smaltimento di vecchi
dispositivi e batterie esauste
Questi simboli sui prodotti, confezioni, e/o documenti allegati significano che vecchi
prodotti elettrici ed elettronici e batterie esauste non devono essere mischiati ai rifiuti
urbani indifferenziati.
Per l’appropriato trattamento, recupero e riciclaggio di vecchi prodotti e batterie
esauste, fate riferimento ai punti di raccolta autorizzati in conformità alla vostra
legislazione nazionale.
Con il corretto smaltimento di questi prodotti e delle batterie, aiuterai a salvaguardare
preziose risorse e prevenire i potenziali effetti negativi sull’ambiente e sulla salute
umana che altrimenti potrebbero sorgere da una inappropriata gestione dei rifiuti.
Per maggiori informazioni sulla raccolta e il riciclaggio di vecchi prodotti e batterie
esauste, contattate il vostro Comune, il Servizio di raccolta o il punto vendita dove
avete acquistato l’articolo.
Questi simboli sono validi solo nell’Unione Europea.
Per i paesi al di fuori dell’unione Europea:
Se volete liberarvi questi oggetti, contattate le vostre autorità locali o il punto vendita
per il corretto metodo di smaltimento.
Esempi di simboli
per le batterie
Simbolo per
il prodotto
ATTENZIONE
PER EVITARE IL RISCHIO DI SCOSSE ELETTRICHE,
NON RIMUOVERE IL COPERCHIO (O IL RETRO). NON
CI SONO PARTI INTERNE LA CUI MANUTENZIONE
POSSA ESSERE EFFETTUATA DALL’UTENTE. IN CASO
DI NECESSITÀ, RIVOLGERSI ESCLUSIVAMENTE A
PERSONALE DI SERVIZIO QUALIFICATO.
D3-4-2-1-1_B2_It
Page 51

3
Condizioni ambientali di funzionamento
Gamma ideale della temperatura ed umidità
dell’ambiente di funzionamento:
da +5 °C a +35 °C, umidità relativa inferiore all‘85 %
(fessure di ventilazione non bloccate)
Non installare l’apparecchio in luoghi poco ventilati, o
in luoghi esposti ad alte umidità o alla diretta luce del
sole (o a sorgenti di luce artificiale molto forti).
D3-4-2-1-7c*_A1_It
AVVERTENZA
L’interruttore principale (/I STANDBY/ON)
dell’apparecchio non stacca completamente il flusso
di corrente elettrica dalla presa di corrente alternata
di rete. Dal momento che il cavo di alimentazione
costituisce l’unico dispositivo di distacco
dell’apparecchio dalla sorgente di alimentazione, il
cavo stesso deve essere staccato dalla presa di
corrente alternata di rete per sospendere
completamente qualsiasi flusso di corrente.
Verificare quindi che l’apparecchio sia stato installato
in modo da poter procedere con facilità al distacco
del cavo di alimentazione dalla presa di corrente, in
caso di necessità. Per prevenire pericoli di incendi,
inoltre, il cavo di alimentazione deve essere staccato
dalla presa di corrente alternata di rete se si pensa di
non utilizzare l’apparecchio per periodi di tempo
relativamente lunghi (ad esempio, durante una
vacanza).
D3-4-2-2-2a*_A1_It
AVVERTIMENTO RIGUARDANTE IL FILO DI
ALIMENTAZIONE
Prendete sempre il filo di alimentazione per la spina.
Non tiratelo mai agendo per il filo stesso e non toccate
mai il filo con le mani bagnati, perchè questo potrebbe
causare cortocircuiti o scosse elettriche. Non collocate
l’unità, oppure dei mobili sopra il filo di alimentazione e
controllate che lo stesso non sia premuto. Non
annodate mai il filo di alimentazione nè collegatelo con
altri fili. I fili di alimentazione devono essere collocati in
tal modo che non saranno calpestati. Un filo di
alimentazione danneggiato potrebbe causare incendi o
scosse elettriche. Controllate il filo di alimentazione
regolarmente. Quando localizzate un eventuale danno,
rivolgetevi al più vicino centro assistenza autorizzato
della PIONEER oppure al vostro rivenditore per la
sostituzione del filo di alimentazione.
S002*_A1_It
Questo prodotto è destinato esclusivamente all'uso
domestico. Eventuali disfunzioni dovute ad usi diversi
(quali uso prolungato a scopi commerciali, in
ristoranti, o uso in auto o su navi) e che richiedano
particolari riparazioni, saranno a carico dell'utente,
anche se nel corso del periodo di garanzia.
K041_A1_It
Grazie per aver acquistato questo
prodotto Pioneer.
Leggere attentamente questo manuale di istruzioni per
familiarizzarsi con l’uso dell’apparecchio. Conservare
poi il manuale per ogni eventuale futuro riferimento.
Contenuto
01 Prima di iniziare
Contenuto della confezione . . . . . . . . . . . . . . . . . . 4
Inserimento delle batterie nel telecomando. . . . . .4
Uso del telecomando. . . . . . . . . . . . . . . . . . . . . . . .4
Installazione dell’amplificatore . . . . . . . . . . . . . . . 4
02 Collegamento
Collegamento dei cavi . . . . . . . . . . . . . . . . . . . . . . 5
Informazioni sul “biwiring”. . . . . . . . . . . . . . . . . . .5
Collegamento dei cavi degli altoparlanti . . . . . . . .6
Collegamento dei cavi audio . . . . . . . . . . . . . . . . .6
Collegamento ai terminali di ingresso bilanciati
(solo A-70DA). . . . . . . . . . . . . . . . . . . . . . . . . . . . .6
Collegamenti degli ingressi audio digitali . . . . . . .7
Utilizzo di un cavo USB per effettuare il
collegamento a un computer. . . . . . . . . . . . . . . . . 7
Utilizzo della funzione di controllo centralizzato
con altri componenti Pioneer. . . . . . . . . . . . . . . . .7
Collegamento alla presa di corrente . . . . . . . . . . . 7
03 Comandi e display
Pannello frontale . . . . . . . . . . . . . . . . . . . . . . . . . . 8
Pannello posteriore . . . . . . . . . . . . . . . . . . . . . . . .9
Telecomando . . . . . . . . . . . . . . . . . . . . . . . . . . . . 10
04 Funzionamento
Riproduzione . . . . . . . . . . . . . . . . . . . . . . . . . . . . 11
Impostare la modalità di standby. . . . . . . . . . . . . .11
Uso dell’unità come amplificatore di potenza . . . .11
Riproduzione di musica da
un componente audio digitale . . . . . . . . . . . . . . . .11
Effettuazione di una registrazione audio . . . . . . . 12
Impostazione dello stato di standby automatico
(Auto Power Down) . . . . . . . . . . . . . . . . . . . . . . . 12
Ripristino di tutte le impostazioni sui valori
predefiniti . . . . . . . . . . . . . . . . . . . . . . . . . . . . . . 12
05 Uso della funzione USB DAC
Installare il driver . . . . . . . . . . . . . . . . . . . . . . . . . 13
Riproduzione di musica da un computer. . . . . . . 13
06 Informazioni supplementari
Risoluzione dei problemi . . . . . . . . . . . . . . . . . . . 14
La funzione DAC USB . . . . . . . . . . . . . . . . . . . . . .15
Pulizia dell’unità . . . . . . . . . . . . . . . . . . . . . . . . .15
Dati tecnici . . . . . . . . . . . . . . . . . . . . . . . . . . . . .16
Page 52

01 Prima di iniziare
4
It
Capitolo 1:
Prima di iniziare
Contenuto della confezione
Verificare che i seguenti accessori siano inclusi nella
confezione.
•Telecomando
• Batterie a secco AAA/IEC R03 x2
• Spina con pin corti x2
(Al momento dell’acquisto queste spine sono di
installazione predefinita in fabbrica sui terminali
PHONO IN del pannello posteriore.)
• Cavo di alimentazione (Lunghezza: 1,8 m)
• Documento di garanzia
• Scheda avvertenze (per il primo utilizzo)
• Istruzioni per l’uso (questo documento)
AVVERTENZA
• Conservare i piccoli ricambi fuori dalla portata dei
bambini e dei bebé. Se inghiottiti accidentalmente,
recarsi immediatemente dal medico.
Nota
• Le illustrazioni delle Istruzioni per l’uso potrebbero
essere state modificate o semplificate per
comodità di spiegazione e possono quindi essere
diverse nell’aspetto rispetto al prodotto reale.
• Le illustrazioni usate in questa pubblicazione si
riferiscono principalmente al modello A-70DA.
Inserimento delle batterie nel
telecomando
1 Aprire il coperchio posteriore.
2 Inserire le batterie nuove, rispettando le
polarità come indicato all’interno dello
scomparto.
3 Chiudere il coperchio posteriore.
Le batterie in dotazione con l’unità sono state fornite per
permettere di controllare il funzionamento del prodotto e
potrebbero non durare a lungo. Per una maggiore
durata di utilizzo si raccomanda di usare batterie
alcaline.
AVVERTENZA
• Non usare né conservare le batterie alla luce diretta
del sole o in luoghi eccessivamente caldi, ad
esempio all’interno di un’automobile o in
prossimità di un calorifero. Le batterie potrebbero
perdere liquido, surriscaldarsi, esplodere o
prendere fuoco. Anche la durata e le prestazioni
delle batterie potrebbero risultare ridotte.
Attenzione
L’uso non corretto delle batterie può causare pericolo di
perdite e di esplosione. Osservare le seguenti
precauzioni:
• Quando si inseriscono le batterie, prestare
attenzione a non danneggiare le molle dei terminali
. Ciò potrebbe causare fuoriuscite di liquido dalle
batterie o il loro surriscaldamento.
• Non usare batterie diverse da quelle specificate.
Inoltre, non usare batterie nuove insieme a batterie
vecchie.
• Quando si installano le batterie nel telecomando,
inserirle nella direzione corretta, come indicato dai
segni di polarità ( e ).
• Non scaldare, smontare o gettare le batterie nel
fuoco o nell’acqua.
• Le batterie possono avere tensioni diverse, anche
se sono delle stesse dimensioni e della stessa
forma. Non usare tipi diversi di batterie insieme.
• Per evitare la fuoriuscita di elettroliti, rimuovere le
batterie se si prevede di non usare il telecomando
per un periodo di tempo prolungato (1 mese o più).
Se c’è una perdita di elettroliti, pulire
accuratamente l’interno dello scomparto batterie e
poi inserire delle nuove batterie. Se una batteria
perde elettroliti e il liquido entra in contatto con la
pelle, lavare la parte interessata con abbondante
acqua.
1
2
3
• Per lo smaltimento delle batterie usate osservare le
leggi statali o le regolamentazioni in materia di
ambiente emesse dagli enti pubblici in vigore nel
proprio paese/regione.
Uso del telecomando
Il telecomando dispone di un raggio di circa 7 m in un
angolo di circa 30º dal sensore remoto.
Quando si usa il telecomando, tenere presente quanto
segue:
• Accertarsi che non vi siano ostacoli tra il
telecomando e il relativo sensore presente
sull’unità.
• Il funzionamento del telecomando può risultare
scarsamente affidabile se la luce del sole o di una
lampada fluorescente si riflette sul sensore del
telecomando situato sull’unità.
• I telecomandi di unità differenti possono interferire
tra loro. Evitare di usare i telecomandi di apparati
differenti situati in prossimità di questa unità.
• Sostituire le batterie quando si nota una riduzione
del raggio di azione del telecomando.
Installazione dell’amplificatore
Quando si installa l’unità, avere cura di collocarla su una
superficie piana e stabile.
• Evitare di installare l’apparecchio nei seguenti
luoghi:
– su un televisore a colori (possibile distorsione
dello schermo)
– in prossimità di una piastra a cassette (o vicino a
un dispositivo che genera campi magnetici). Ciò
potrebbe interferire con il suono.
– alla luce diretta del sole
– in luoghi umidi o bagnati
– in luoghi eccessivamente caldi o freddi
– in luoghi esposti a vibrazioni o a movimenti di
altro tipo
– in luoghi molto polverosi
– in luoghi esposti a vapori caldi o ai grassi (ad
esempio in cucina)
• Non montare l’unità su un divano o altro oggetto o
materiale dotato di qualità assorbenti poiché la
qualità del suono può essere influenzata
negativamente.
7 m
30 °
30 °
Page 53

Collegamento 02
5
It
English
DeutschFrançais
Nederlands
Italiano Español Русский
Capitolo 2:
Collegamento
Collegamento dei cavi
Attenzione
• Prima di effettuare o modificare i collegamenti, spegnere l’unità e scollegare il cavo di alimentazione dalla presa di
corrente CA.
• Collegare il cavo di alimentazione dopo avere collegato tutti i dispositivi.
REC
R
L
RL
PLAY
RL
AUDIO
OUTPUT
PREOUT
R
L
NORMALNORMAL
INVERSION
INVERSION
PHASE
PHASE
LINE2LINE2
LINE1
LINE1
USBUSB
COAXIAL
COAXIAL
PHONOPHONO
(MM/MC)
(MM/MC)
SIGNAL
SIGNAL
GND
GND
NETWORK
NETWORK
SACD/CD
SACD/CD
DIGITAL INDIGITAL IN
ANALOG INANALOG IN
OPTICALOPTICAL
LINE2LINE2
OUT
OUT
POWERPOWER
AMP
AMP
DIRECT
DIRECT
BALANCED INBALANCED IN
L
R
L
R
L
R
L
R
L
R
L
R
L
R
L
R
L
R
L
R
L
R
L
R
L
R
LRL
R
LRL
R
LRL
R
L
R
L
R
MENU
iPod
Music>
Extras>
Settings>
Shuffle Songs
Backlight
MASTER
VOLUME
STANDBY/ON
INPUT
SELECTOR
iPodiPhoneiPadHDMI
ADVANCED
MCACC
FLOFF
SOURCE
/I STANDBY/ON
STANDBY
iPod/iPhone
5V1A
DIRECT Hi-Bit 32Up Sampling
SOURCE
Lettore SACD/CD
Lettore audio di rete
Jack PRE OUT del preamplificatore
o dell’amplificatore AV
Sistema di altoparlanti B
Sistema di
altoparlanti A
Giradischi
Dock iPod, eccetera
Destra Sinistra
Destra
Sinistra
Cavo di
alimentazione
(incluso)
Dispositivo audio con
terminali di uscita bilanciati
Registrazione del
dispositivo o di un
altro dispositivo
Pannello
posteriore
dell’unità
Attenzione
• Per ridurre i disturbi quando l’unità è collegata a
componenti come un giradischi analogico viene
fornito il terminale SIGNAL GND.
• I terminali PHONO IN vengono dotati di spine con
pin corti per impostazione predefinita di fabbrica.
Queste ultime non devono essere asportate tranne
nel caso in cui si colleghi un giradischi. Accertarsi
di custodire le spine con pin corti in un luogo
sicuro.
• Non inserire le spine con pin corti in connettori
diversi dai terminali PHONO IN. Collegarle ad altri
terminali potrebbe provocare problemi di
funzionamento.
• Non collegare i terminali PHONO IN a componenti
diversi dai giradischi; inoltre, non collegare
giradischi dotati di equalizzatore integrato.
Potrebbe essere prodotta un’uscita audio di
volume eccessivamente elevato, provocando danni
agli altoparlanti o ad altri dispositivi.
• I terminali PHONO IN del modello A-50DA sono
progettati per essere usati esclusivamente con
giradischi dotati di cartucce di tipo MM (a magnete
mobile). Non possono essere usati giradischi dotati
di cartucce MC (a bobina mobile).
• Avere cura di non piegare i cavi sulla parte
superiore di questa unità (come mostrato in figura).
Se ciò dovesse accadere, il campo magnetico
prodotto dai trasformatori presenti nell’unità
potrebbe causare l’emissione di un ronzio dai
diffusori.
• I terminali POWER AMP DIRECT dell’unità non
dovrebbero mai essere collegati a connettori di altri
componenti, fatta eccezione per quelli delle uscite
pre-amplificate.
• Se il giradischi dispone di un filo di massa, fissarlo
al terminale di messa a terra dell’amplificatore.
Nota
• Quando si collega un registratore di audiocassette,
si potrebbero sentire dei disturbi durante la
riproduzione, ciò dipende dal luogo d’installazione.
Questo disturbo è causato da una perdita di flusso
dal trasformatore dell’amplificatore. In questo
caso, cambiare la posizione d’installazione, o
allontanare il registratore dall’amplificatore.
• iPod è un marchio di fabbrica di Apple Inc.,
registrato negli Stati Uniti ed in altri Paesi.
Informazioni sul “biwiring”
Questa unità può essere usata con altoparlanti che
supportano il biwiring. Assicurarsi di collegare
correttamente i collegamenti ad alta frequenza e
bassa frequenza.
• Durante la riproduzione, assicurarsi che sia il
pulsante SPEAKERS A sia il pulsante SPEAKERS B
siano impostati su ON (pagina 8).
Attenzione
• Quando si usa il biwiring per collegare gli
altoparlanti, evitare effetti negativi
sull’amplificatore accertandosi di rimuovere le
barre di corto circuito HIGH e LOW fornite in
dotazione con gli altoparlanti. Per informazioni
dettagliate, consultare le istruzioni fornite con gli
altoparlanti.
HIGH
LOW
HIGH
LOW
Sistema di altoparlanti
Sinistra
Sistema di altoparlanti
Destra
Pannello
posteriore
dell’unità
Rimuovere la barra
di corto circuito tra i
terminali + e –.
Page 54

02 Collegamento
6
It
• Quando si usano altoparlanti con circuiti di rete
rimovibili, notare che se la rete è rimossa, non sarà
prodotto alcun effetto e gli altoparlanti potrebbero
subire danni.
• Un altro metodo di collegamento è quello di
collegare i terminali SPEAKERS A a HIGH e i
terminali SPEAKERS B a LOW (inversamente
rispetto a quello che è mostrato nella figura).
Collegamento dei cavi degli
altoparlanti
1 Attorcigliare i fili del cavo.
2 Allentare il dado del terminale
SPEAKERS
e inserire il cavo nel foro esposto
presente nell'asta del terminale.
3 Serrare di nuovo il dado del terminale.
Attenzione
• Quando si usa solo una serie di terminali per
altoparlanti (SPEAKERS A o SPEAKERS B), o
quando si usano collegamenti biwiring,
l'altoparlante usato deve avere un’impedenza
nominale compresa tra 4 e 16 . Quando si
usano entrambe le serie di terminali, gli
altoparlanti collegati devono avere
un’impedenza nominale compresa tra 8 e
32 . Per informazioni in dettaglio sul valore
dell'impedenza consultare le istruzioni fornite
con gli altoparlanti.
• Assicurarsi che i terminali positivo e negativo
(+/–) dell’amplificatore corrispondano a quelli
degli altoparlanti.
• I terminali degli altoparlanti sono sotto tensione,
alla stessa PERICOLOSA tensione della corrente di
rete. Per prevenire il rischio di scosse elettriche
quando si collegano o disconnettono i cavi degli
altoparlanti, staccare il cavo di alimentazione prima
di toccare qualsiasi parte non isolata.
• Assicurarsi che tutti i cavi nudi degli altoparlanti
siano attorcigliati tra loro e inseriti completamente
nel terminale dell'altoparlante. Se uno qualsiasi dei
cavi nudi degli altoparlanti tocca il pannello
posteriore, il sistema potrebbe spegnersi come
misura di sicurezza.
Collegamento dei cavi audio
Collegare la spina bianca al jack sinistro (L) e la spina
rossa al jack destro (R). Assicurarsi di inserire
completamente le spine nei jack.
123
10 mm
Sinistra (bianco)
Destra (rosso)
Collegamento ai terminali di ingresso
bilanciati (solo A-70DA)
Collegare i terminali BALANCED IN dell’unità a un
lettore SACD, a un DAC USB, a un lettore di rete o a un
altro dispositivo con terminali di uscita bilanciati.
Attenzione
• Le funzioni BASS, TREBLE, BALANCE e LOUDNESS
non possono essere utilizzate su un dispositivo
collegato ai terminali BALANCED IN.
La fase può variare a seconda del dispositivo da
collegare. Utilizzare il selettore di fase sul pannello
posteriore dell’unità per individuare la fase
corrispondente.
• Impostazioni iniziali (NORMALE n. 2)
• Impostazioni con polarità modificata
(NORMALE n. 3)
Nota
• Per dettagli sulla fase dei terminali di uscita
bilanciati del dispositivo da collegare, consultare il
manuale di istruzioni del dispositivo.
• Utilizzare la fase indicata nelle impostazioni iniziali
(NORMALE n. 2) quando si collega l’unità a un
lettore Pioneer.
LINE2
LINE2
LINE1
LINE1
USB
USB
COAXIAL
COAXIAL
NETWORK
NETWORK
SACD/CD
SACD/CD
DIGITAL IN
DIGITAL IN
ANALOG IN
ANALOG IN
OPTICAL
OPTICAL
LINE2
LINE2
OUT
OUT
P.
P.
AMP
AMP
DIRECT
DIRECT
BALANCED IN
BALANCED IN
NORMAL
NORMAL
INVERSION
INVERSION
PHASE
PHASE
RL
Dispositivo audio con
terminali di uscita bilanciati
Cavo bilanciato
(venduto a parte)
NORMAL
NORMAL
INVERSION
INVERSION
PHASE
PHASE
1 Terra
3 INVERSA
(-)
2 NORMALE
(+)
NORMALNORMAL
INVERSION
INVERSION
PHASEPHASE
1 Terra
3 NORMALE
(+)
2 INVERSA
(-)
Pannello posteriore A-70DA
Page 55

Collegamento 02
7
It
English
DeutschFrançais
Nederlands
Italiano Español Русский
Collegamenti degli ingressi audio
digitali
Collegando il terminale DIGITAL IN dell’unità e l’uscita
audio digitale di un dispositivo audio digitale con un
cavo digitale (venduto a parte), è possibile riprodurre
l’audio del dispositivo audio digitale con l’unità.
Per dettagli sull’uscita dell’ingresso audio al terminale
DIGITAL IN consultare pagina 11.
Nota
• I formati di segnale digitale accettato dall’unità
comprendono i segnali in PCM lineare con
frequenze di campionamento e velocità di
trasmissione che arrivano a 192 kHz/32 bit.
(A seconda del dispositivo collegato e
dell’ambiente, l’operazione potrebbe non andare a
buon fine).
Utilizzo di un cavo USB per effettuare
il collegamento a un computer
Se si fa ricorso a un cavo USB (venduto separatamente)
per collegare il terminale DIGITAL IN USB dell’unità a
una porta USB di un computer, è possibile riprodurre
attraverso questa unità i file musicali che si trovano sul
computer.
Per ulteriori informazioni inerenti all’ingresso al
terminale DIGITAL IN USB che consente l’uscita di
segnali audio, consultare pagina 13.
Importante
• È necessario installare un apposito driver sul
computer (pagina 13).
Nota
• L’unità non può essere usata per riprodurre file
audio salvati su un computer se sul computer ad
essa collegato non è installato Media Player.
LINE2
LINE2
LINE1
LINE1
USB
USB
COAXIAL
COAXIAL
DIGITAL IN
DIGITAL IN
IN
OPTICAL
OPTICAL
LINE2
LINE2
OUT
OUT
ED IN
NORMAL
NORMAL
INVERSION
INVERSION
PHASE
PHASE
DIGITAL OUT
COAXIAL
DIGITAL OUT
OPTICAL
Dispositivi per audio
digitale ecc.
Cavo coassiale audio digitale
(venduto separatamente)
Pannello posteriore A-70DA
Dispositivi per audio
digitale ecc.
Cavo audio digitale ottico
(venduto a parte)
LINE2
LINE2
LINE1
LINE1
USB
USB
COAXIAL
COAXIAL
DIGITAL IN
DIGITAL IN
IN
OPTICAL
OPTICAL
LINE2
LINE2
OUT
OUT
ED IN
NORMAL
NORMAL
INVERSION
INVERSION
PHASE
PHASE
USB
Cavo USB
(venduto separatamente)
tipo A
tipo B
PC
Pannello posteriore A-70DA
Utilizzo della funzione di controllo
centralizzato con altri componenti
Pioneer
Più componenti Pioneer dotati di jack CONTROL IN/
OUT possono essere collegati all’unità, consentendo il
controllo centralizzato dei componenti tramite il sensore
remoto dell’unità. Questo permette di controllare
componenti non dotati di sensore remoto, oppure che
sono installati in luoghi dove non è possibile accedere al
sensore remoto del componente.
Nota
• Per i collegamenti usare un cavo mini plug mono
(senza resistenza) reperibile in commercio.
• Quando si collegano i jack CONTROL IN/OUT, per
eseguire i collegamenti analogici devono inoltre
essere usati dei cavi audio disponibili sul mercato.
Collegare soltanto i jack CONTROL IN/OUT non
permette un adeguato controllo del sistema.
• Quando un cavo di controllo è collegato al jack
CONTROL IN dell’unità, quest’ultima non può
essere controllata puntando il telecomando in
direzione dell’unità (il sensore remoto è disabilitato
automaticamente).
Collegamento alla presa di corrente
Importante
• Quando si parte per un viaggio, oppure non si usa
l’unità per un periodo di tempo prolungato,
staccare sempre il cavo di alimentazione dalla
presa di corrente. Notare che varie impostazioni
interne non andranno perse nemmeno se il cavo di
alimentazione è staccato dalla presa di corrente
per un lungo periodo di tempo.
• Se è necessario staccare il cavo di alimentazione,
accertarsi innanzi tutto di premere il pulsante
/I
STANDBY/ON situato sul pannello frontale
dell’unità in modo che essa venga SPENTA prima
di disinserire il cavo.
Attenzione
• L’utilizzo di un cavo di alimentazione diverso da
quello fornito renderà nulla la garanzia, in quanto
Pioneer non sarà responsabile per eventuali danni
prodottisi. (Il cavo di alimentazione fornito insieme
all’unità ha una corrente nominale con capacità
pari a 10 A.)
• Non usare cavi di alimentazione diversi da quelli
forniti in dotazione con questa unità.
• Non usare il cavo di alimentazione fornito per scopi
diversi da quelli descritti di seguito.
Dopo avere eseguito tutti i collegamenti, collegare
l’unità a una presa AC.
1 Collegare il cavo di alimentazione
fornito in dotazione alla presa
AC IN
posizionata sul pannello posteriore
dell’unità.
2 Collegare l’altra estremità a una presa
AC.
IN
OUT
CONTROL
Altro dispositivo
Pioneer dotato di jack
CONTROL IN/OUT
All’altro
dispositivo
Pioneer dotato di
jack CONTROL IN
A-70DA
Puntare il
telecomando in
direzione del sensore
posizionato sull’unità.
Alla presa AC
Pannello posteriore dell’unità
Cavo di
alimentazione
(incluso)
Page 56

03 Comandi e display
8
It
Capitolo 3:
Comandi e display
Pannello frontale
1/I
STANDBY/ON
Accende e spegne l’amplificatore.
Quando l’alimentazione è attivata, la spia di
alimentazione posizionata al centro del pulsante si
accende.
2Spia
STANDBY/APD
Quando l’alimentazione è in modalità di standby, la spia
si accende assumendo un colore rosso. Quando la
funzione di spegnimento automatico (Auto Power Down
– APD) è attiva, la spia si accende assumendo un colore
verde (pagina 12).
3 Pulsante/spia
SPEAKERS A
Usare questo pulsante per ascoltare l’audio dal sistema
di altoparlanti collegato ai terminali SPEAKERS A.
On : La spia si accende. Il sistema di altoparlanti
produce del suono.
Off : La spia si spegne. Il sistema di altoparlanti non
produce suono.
4 Pulsante/spia
SPEAKERS B
Usare questo pulsante per ascoltare l’audio dal sistema
di altoparlanti collegato ai terminali SPEAKERS B.
On : La spia si accende. Il sistema di altoparlanti
produce del suono.
Off : La spia si spegne. Il sistema di altoparlanti non
produce suono.
5 Pulsante/spia
LOUDNESS
Usare per l’ascolto a volume basso.
On : La spia si accende: Potenzia le frequenze alte e
basse per conferire maggior forza alla riproduzione
anche a volume basso.
Off : La spia si spegne: Di norma il pulsante dovrebbe
essere lasciato in questa posizione.
• Questo tasto non funziona quando il pulsante
DIRECT è in posizione di accensione.
• Quando si alza il volume, la quantità di
cambiamento prodotta dal circuito LOUDNESS
viene ridotta.
A-70DA
31
6
2 54
7
14 1612
9
10 11 13 15
8
6 Sensore remoto
Riceve i segnali dal telecomando (pagina 4).
7Presa
PHONES
Usare per collegare le cuffie (quando sono collegate,
viene escluso il suono dai diffusori). Quando il pulsante
POWER AMP DIRECT è acceso non viene prodotto
suono.
8 Pulsante/spia DIRECT
On : La spia si accende: Quando questo pulsante è
posizionato su ON, i segnali audio sono emessi
direttamente, senza passare attraverso i vari circuiti di
regolazione (BASS, TREBLE, BALANCE, LOUDNESS).
Questo permette la riproduzione dei segnali con una
maggiore fedeltà, ma disabilita tutte le impostazioni
configurate per i comandi BASS, TREBLE, BALANCE o
LOUDNESS. Quando viene avviata la riproduzione da un
dispositivo collegato ai terminali BALANCED IN, DIRECT
si attiva e non può essere disattivato.
Off : La spia si spegne: Il segnale passa attraverso i vari
circuiti di regolazione della frequenza. Quando la spia è
spenta, le regolazioni possono essere eseguite con i
comandi BASS, TREBLE, BALANCE e LOUDNESS.
9 Comando per la regolazione del tono
BASS
Utilizzare per regolare i toni che operano sulle frequenze
basse. La posizione centrale è la posizione di mezzo tono
(normale). Quando il comando viene ruotato verso
destra, i toni a bassa frequenza vengono accentuati;
quando è ruotato verso sinistra, si toglie loro enfasi.
• Questo tasto non funziona quando il pulsante
DIRECT è in posizione di accensione.
10 Comando per la regolazione del tono
TREBLE
Utilizzare per regolare i toni che operano sulle frequenze
alte. La posizione centrale è la posizione di mezzo tono
(normale). Quando il comando viene ruotato verso
destra, i toni ad alta frequenza vengono accentuati;
quando è ruotato verso sinistra, si toglie loro enfasi.
• Questo tasto non funziona quando il pulsante
DIRECT è in posizione di accensione.
11 Comando
BALANCE
Di norma dovrebbe essere lasciato in posizione centrale.
Se il suono esce con più forza da uno degli altoparlanti
regolare il bilanciamento. Se il suono fuoriesce più forte
dal lato destro, ruotare il comando verso la posizione L
(sinistra), se è più forte in uscita dal lato sinistro, ruotarlo
verso la posizione R (destra).
• Questo tasto non funziona quando il pulsante
DIRECT è in posizione di accensione.
12 Pulsante
ATTENUATOR
(solo per il
modello A-70DA)
Premere il pulsante quando si desiderano eseguire
regolazioni fini del volume del suono durante
riproduzioni a volume molto basso.
13 Comando VOLUME
Utilizzare per regolare il livello del volume. (Consente
anche la regolazione del volume delle cuffie.)
14 Interruttore di selezione
CARTRIDGE
(solo per il modello A-70DA)
Selezionare il tipo di cartuccia utilizzata con il giradischi.
15 Pulsante/spia
POWER AMP DIRECT
Premere questo pulsante quando l’unità deve essere
usata come amplificatore di potenza (pagina 11).
16 Manopola/spie
INPUT SELECTOR
Girare la manopola in senso orario o antiorario per
accendere la spia indicante la sorgente di ingresso
desiderata. Girando la manopola in senso orario si
accende la spia di destra. Girandola in senso antiorario
si accende la spia di sinistra. Quando si preme il tasto
MUTE del telecomando per silenziare l’audio, la spia
indicante la sorgente di ingresso selezionata usando la
manopola INPUT SELECTOR lampeggia.
Page 57

Comandi e display 03
9
It
English
DeutschFrançais
Nederlands
Italiano Español Русский
Pannello posteriore
Per informazioni in dettaglio sui collegamenti fare riferimento alle pagine 5-7.
1 Terminali
PHONO IN (MM/MC)
(A-70DA)
PHONO IN (MM) Terminali (A-50DA)
2 Terminali
POWER AMP DIRECT IN
Quando si usa l’unità come amplificatore di potenza,
collegare qui il preamplificatore (pagina 11).
3 Terminali BALANCED IN (solo A-70DA)
4 Selettore di fase (solo A-70DA)
Commuta la fase dei terminali BALANCED IN.
5 Terminali
DIGITAL IN USB
6 Terminali
SPEAKERS A
(canale destro)
7 Terminali
SPEAKERS B
(canale destro)
8 Terminali
SPEAKERS B
(canale sinistro)
9 Terminali
SPEAKERS A
(canale sinistro)
10 Terminale GND (terra piatto giradischi)
Questo terminale di terra è stato progettato per ridurre il
disturbo quando è collegato un giradischi. Non è una
messa a terra di sicurezza.
11 Terminali
NETWORK IN
12 Terminali
SACD/CD IN
13 Terminali LINE 1
14 Terminali LINE 2 IN/OUT
15 Terminale DIGITAL IN OPTICAL
16 Terminali
DIGITAL IN COAXIAL
17
Presa CONTROL IN/OUT
18 Presa
AC IN
Collegare il cavo di alimentazione qui e a una presa a
muro di tipo AC.
LINE2
LINE2
LINE1
LINE1
USB
USB
COAXIAL
COAXIAL
PHONO
PHONO
(MM/MC)
(MM/MC)
SIGNAL
SIGNAL
GND
GND
NETWORK
NETWORK
SACD/CD
SACD/CD
DIGITAL IN
DIGITAL IN
ANALOG IN
ANALOG IN
OPTICAL
OPTICAL
LINE2
LINE2
OUT
OUT
POWER
POWER
AMP
AMP
DIRECT
DIRECT
BALANCED IN
BALANCED IN
NORMAL
NORMAL
INVERSION
INVERSION
PHASE
PHASE
21 2 2724
2
10 11 15 16 1817
29
3 28
12 13
5 26
14
Page 58

03 Comandi e display
10
It
Telecomando
STANDBY/ON
A
B
APD
1
8
10
9
12
11
13
2
3
4
6
4
7
5
1
STANDBY/ON
Accende l’amplificatore o lo pone in standby.
2 Tasti del selettore di ingresso
Premere questo tasto per selezionare una sorgente di
ingresso. In tal modo si seleziona il componente
collegato all’ingresso corrispondente del pannello
posteriore.
• Non è possibile adoperare il pulsante BALANCED
con l’A-50DA.
3 Pulsanti del comando SACD PLAYER
Usare il telecomando per impartire comandi al lettore
SACD Pioneer.
4 Pulsanti del comando NETWORK AUDIO
PLAYER
Usare per regolare il lettore audio di rete Pioneer.
5
LOUDNESS
Usare per attivare/disattivare il circuito del volume
(pagina 8).
6
MUTE
Consente di eliminare/ripristinare l’audio.
7
DIRECT
Premere per accedere a di ascolto directo (pagina 8).
8
DIMMER
Questo pulsante permette di impostare su tre livelli
l’illuminazione delle spie del pannello frontale dell’unità
(non influenza la spia STANDBY).
9
POWER AMP DIRECT
Premere questo pulsante quando l’unità deve essere
usata come amplificatore di potenza (pagina 11).
10
SPEAKERS A
Usare questo pulsante per ascoltare l’audio dal sistema
di altoparlanti collegato ai terminali SPEAKERS A.
11
SPEAKERS B
Usare questo pulsante per ascoltare l’audio dal sistema
di altoparlanti collegato ai terminali SPEAKERS B.
12
VOLUME +/–
Si utilizza per impostare il volume di ascolto.
13
APD
Usare per attivare/disattivare la funzione di spegnimento
automatico APD (Auto Power Down) (pagina 12).
Page 59

Funzionamento 04
11
It
English
DeutschFrançais
Nederlands
Italiano Español Русский
Capitolo 4:
Funzionamento
Riproduzione
1 Accendere il componente di
riproduzione.
2 Accendere l’unità.
• Se l’unità è in modalità di standby, premere il tasto
STANDBY/ON del telecomando.
3 Selezionare la sorgente che si desidera
riprodurre.
Selezionare il componente di riproduzione.
• Quando si usano i comandi del pannello frontale,
girare la manopola INPUT SELECTOR.
• Nel caso del modello A-70DA, se viene selezionato
PHONO fare uso dell’ interruttore di selezione
CARTRIDGE per designare il tipo di cartuccia
utilizzata con il giradischi: MM () o MC ().
4 Avviare la riproduzione del componente
selezionato nel punto 1.
5 Regolare il volume di riproduzione
usando il comando
VOLUME
.
6 Regolare le preferenze in materia di
tono usando i comandi
BASS
e
TREBLE
e il
pulsante
LOUDNESS
.
Se il pulsante DIRECT è stato posizionato su ON, questi
comandi sono disabilitati.
3566
62
MENU
iPod
Music>
Extras>
Settings>
Shuffle Songs
Backlight
SOURCE
/I STANDBY/ON
STANDBY
iPod/iPhone
5V1A
DIRECT Hi-Bit 32 Up Sampling
SOURCE
Lettore SACD/CD
Lettore audio di rete
Giradischi
Dock iPod,
eccetera
Riproduzione
Riproduzione
Dispositivo audio
con terminali di
uscita bilanciati
Registrazione del
dispositivo o di un
altro dispositivo
VOLUME
Attenzione
• Le funzioni BASS, TREBLE, BALANCE e LOUDNESS
non possono essere utilizzate su un dispositivo
collegato ai terminali BALANCED IN.
Impostare la modalità di standby
1 Premere il tasto
STANDBY/ON
del
telecomando.
Per riaccendere l’unità, premere il tasto STANDBY/
ON del telecomando.
• Se il pulsante /I STANDBY/ON del pannello
frontale è premuto, l’alimentazione sarà disattivata.
In questo caso, se l’unità è spenta, premendo il
tasto STANDBY/ON del telecomando l’unità
non si accenderà. Per riaccendere l’unità, premere
il pulsante /I STANDBY/ON sul pannello
frontale.
Uso dell’unità come amplificatore di
potenza
Quando un preamplificatore è collegato ai suoi terminali
POWER AMP DIRECT IN, l’unità può essere usata come
un amplificatore di potenza.
1 Premere il pulsante
POWER AMP
DIRECT
sul telecomando o sul frontalino
dell’unità.
La spia POWER AMP DIRECT si accenderà.
Attenzione
• Quando la spia POWER AMP DIRECT è accesa, le
operazioni cambiano come segue:
–I comandi VOLUME, BASS, TREBLE e BALANCE
del pannello frontale dell’unità sono disabilitati.
Queste regolazioni sono controllate dal
componente collegato ai terminali POWER
AMP DIRECT IN dell’unità.
– I pulsanti LOUDNESS e ATTENUATOR sono
disabilitati (solo modello A-70DA).
– Quando la spia POWER AMP DIRECT è accesa,
il volume del suono emesso dall’unità sarà
automaticamente regolato sul valore massimo.
Quando si fa uso dell’unità come amplificatore
di potenza, controllare il livello dell’uscita dal
componente collegato ai terminali POWER
AMP DIRECT IN e impostarlo su un valore
basso, come opportuno, prima dell’accensione
della spia POWER AMP DIRECT. Se il volume
del suono del componente collegato ai terminali
POWER AMP DIRECT IN inizialmente è
impostato su un livello elevato di uscita,
all’accendersi della spia POWER AMP DIRECT
potrebbero essere prodotti improvvisamente
suoni di volume elevato.
–Il presa PHONES e i terminali LINE 2 OUT non
producono suono.
• Per altre informazioni, consultare le istruzioni di
funzionamento relative al componente collegato ai
terminali POWER AMP DIRECT IN dell’unità.
Riproduzione di musica da un componente
audio digitale
Regolare l’uscita dell’ingresso audio digitale sul
terminale DIGITAL IN COAXIAL o OPTICAL.
1 Effettuare un collegamento all’ingresso
digitale.
•V. Collegamenti degli ingressi audio digitali a
pagina 7.
2 Passare all’ingresso
COAXIAL
o
OPTICAL
.
Premendo il pulsante COAXIAL/OPTICAL sul
telecomando commuta tra i due ingressi.
• Quando si usano i comandi del pannello frontale,
girare la manopola INPUT SELECTOR.
• Il suono viene emesso dai terminali LINE 2 OUT.
Nota
• I formati di segnale digitale accettato in ingresso
dall’unità comprendono i segnali in PCM lineare
con frequenze di campionamento e velocità di
trasmissione che raggiungono i 192 kHz /32 bit
(a seconda del dispositivo collegato e
dell’ambiente, l’operazione potrebbe non andare a
buon fine).
Page 60

04 Funzionamento
12
It
Effettuazione di una registrazione audio
È possibile effettuare una registrazione audio da qualsiasi sorgente collegata all’amplificatore.
1 Selezionare la sorgente che si desidera
registrare.
2 Avviare la registrazione, quindi avviare
la riproduzione della sorgente.
Attenzione
• Accertarsi che spine con pin corti non siano
inserite nei terminali LINE 2 OUT, dal momento
che, in caso contrario, ne deriverebbe un
malfunzionamento dell’apparecchio.
• L’audio collegato ai seguenti terminali non può
utilizzare i terminali di uscita LINE 2 OUT.
-
LINE 2 IN
-
BALANCED IN
-
POWER AMP DIRECT IN
1
MENU
iPod
Music>
Extras>
Settings>
Shuffle Songs
Backlight
SOURCE
/I STANDBY/ON
STANDBY
iPod/iPhone
5V1A
DIRECT Hi-Bit 32 Up Sampling
SOURCE
Lettore SACD/CD
Lettore audio di rete
Giradischi
Dock iPod,
eccetera
Componente per registrazione audio (registratore CD,
registratore per audiocassette, eccetera)
Riproduzione
Registrazione
Impostazione dello stato di standby automatico (Auto Power Down)
Questa funzione mette automaticamente l’unità in modalità di attesa se non vengono rilevati segnali o funzionamento
dell’interruttore per 30 minuti.
1 Se l’alimentazione dell’unità è ACCESA, premere il tasto
APD
sul telecomando.
Quando questa funzione è attivata, la spia STANDBY/APD del pannello frontale dell’unità si accenderà assumendo
un colore verde. Premere di nuovo i pulsanti per disabilitare l’impostazione.
• Si può inserire questa impostazione anche premendo simultaneamente i pulsanti LOUDNESS e POWER AMP
DIRECT del pannello frontale e mantenendoli premuti per 3 secondi.
• Per impostazione predefinita la funzione è attiva.
• Ruotare i comandi TREBLE, BASS, BALANCE o VOLUME non sarà considerato come un’operazione di controllo
ai fini dell’azzeramento del timer di spegnimento automatico (Automatic Power Down) una volta trascorsi 30
minuti di inattività.
Nota
• A seconda del dispositivo collegato, l’unità potrebbe non spegnersi automaticamente per diversi motivi, come
ad esempio per la presenza di troppo rumore.
Ripristino di tutte le impostazioni sui valori predefiniti
1 Quando l’unità è in modalità di standby, tenere premuti contemporaneamente per
cinque secondi il pulsante SPEAKERS A e il pulsante POWER AMP DIRECT del pannello
frontale.
2 Accendere l’unità.
Page 61

Uso della funzione USB DAC 05
13
It
English
DeutschFrançais
Nederlands
Italiano Español Русский
Capitolo 5:
Uso della funzione USB DAC
Installare il driver
• Per usare il terminale DIGITAL IN USB per
riprodurre file musicali su un computer con l’unità
è necessario installare un apposito driver sul
computer. Per ulteriori dettagli, consultare il sito
Web Pioneer. Il manuale di istruzioni contiene
anche informazioni in merito alla procedura di
installazione e alle impostazioni del computer.
Pertanto, è opportuno consultare anche tale
manuale.
Riproduzione di musica da un
computer
Utilizzare questa funzione per riprodurre i dati audio
digitali in ingresso alla porta DIGITAL IN USB situata sul
pannello posteriore dell’unità.
1 Collegare l’unità a un computer tramite
un cavo USB (pagina 7).
2 Premere
USB
per selezionare
DIGITAL IN
USB
come sorgente di ingresso.
• Quando si usano i comandi del pannello frontale,
girare la manopola INPUT SELECTOR.
• Il suono viene emesso dai terminali LINE 2 OUT.
3 Dare inizio alla riproduzione sul
computer.
Nota
• Quando l’unità è collegata a un computer per
riprodurre audio tramite un cavo USB, l’unità può
ricevere i seguenti segnali in ingresso:
PCM lineare
– Velocità di trasmissione: 16 bit, 24 bit, 32 bit
– Frequenza di campionamento: 44,1 kHz, 48 kHz,
88,2 kHz, 96 kHz, 176,4 kHz, 192 kHz, 352,8 kHz,
384 kHz
DSD
– Frequenza di campionamento: 2,8 MHz, 5,6
MHz, 11,2 MHz
• Quando questa funzione è in uso non è possibile
controllare la riproduzione dall’unità; controllare la
riproduzione dal computer.
• Arrestare sempre la riproduzione sul computer
prima di staccare il cavo USB.
• È possibile che non vi sia riproduzione di suoni se il
computer non supporta lo standard USB 2.0 HS.
• L’unità non supporta l’utilizzo di un hub USB. Fare
sempre ricorso a un cavo USB per collegare l’unità
direttamente al computer.
Page 62

06 Informazioni supplementari
14
It
Capitolo 6:
Informazioni supplementari
Risoluzione dei problemi
Operazioni non corrette sono spesso scambiate per guasti o malfunzionamenti. Se si ritiene che vi siano problemi a
carico di questo componente, controllare i punti indicati di seguito. A volte il guasto può essere localizzato in un altro
componente. Controllare gli altri componenti e le altre apparecchiature elettriche utilizzati. Se il guasto non può
essere riparato neanche dopo aver eseguito i controlli elencati di seguito, richiedere un intervento di riparazione al
centro di assistenza autorizzato Pioneer più vicino o al proprio rivenditore.
• Se l’unità non funziona regolarmente a causa di fattori esterni quali elettricità statica, scollegare la spina di
alimentazione dalla presa e inserirla di nuovo per ripristinare le condizioni di funzionamento normali.
Problema Soluzione
L’alimentazione non si attiva. •La spina è staccata dalla presa a muro? Collegare in modo appropriato la spina alla
sua presa di corrente (pagina 7).
•Il cavo di alimentazione è staccato dal connettore AC IN? Collegare correttamente il
cavo di alimentazione (pagina 7).
L’unità si spegne. •La funzione APD (Auto Power Down) è attivata? Se non si vuole che l’unità si spenga
automaticamente, disabilitare la funzione APD (Auto Power Down) (pagina 12).
Alimentazione disattivata e spia
STANDBY/APD
che lampeggia
ripetutamente per tre volte.
•Il circuito di protezione è stato attivato. Questa situazione si produrrà se un suono a
frequenza molto bassa viene riprodotto a un livello di volume elevato.
- SPEGNERE l’alimentazione e attendere almeno un minuto, poi RIACCENDERE
l’alimentazione; riprodurre la musica a un volume inferiore.
-
Dopo aver riavviato l’alimentazione, i canali dell’unità non funzionano
correttamente se la spia
STANDBY/APD
lampeggia per quattro volte.
Staccare il cavo di alimentazione e cont attare il proprio rivenditore di fiducia o il pi ù
vicino centro assistenza autorizzato Pioneer.
Alimentazione disattivata e spia
STANDBY/APD
che lampeggia una
volta ogni due secondi.
•La temperatura interna dell’unità è aumentata e si è attivato il circuito di sicurezza.
- SPEGNERE l’alimentazione e attendere un minuto o un intervallo di tempo più
lungo, in modo da consentire all’unità di raffreddarsi prima di ACCENDERLA
nuovamente.
- Installare l’unità in un luogo con una ventilazione migliore.
- Accertarsi che l’unità sia installata correttamente; se l’unità viene riaccesa senza
averla lasciata raffreddare, possono manifestarsi gli stessi sintomi (pagina 4).
Alimentazione disattivata e spia
STANDBY/APD
che lampeggia
ripetutamente per due volte.
•Si stanno usando degli altoparlanti con dei valori di impedenza non supportati da
questa unità? Verificare il valore nominale di impedenza degli altoparlanti (pagina 6).
•Ci sono dei cavi degli altoparlanti allentati sui terminali
SPEAKERS
e/o a contatto con
altri cavi o con la superficie del pannello posteriore? Staccare il cavo di alimentazione
e ricollegare correttamente i cavi degli altoparlanti (pagina 6).
Alimentazione disattivata e spia
STANDBY/APD
che lampeggia
ripetutamente per sei volte.
•Il circuito di protezione è stato attivato. Questa situazione si produrrà se un suono a
frequenza molto alta viene riprodotto a un livello di volume elevato.
- Abbassare il volume del suono e riprovare a eseguire la riproduzione.
- Se lo stesso indizio si manifesta quando l’alimentazione viene SPENTA e
RIACCESA, i circuiti dell’unità potrebbero essere danneggiati. Staccare il cavo di
alimentazione e contattare il proprio rivenditore di fiducia o il più vicino centro
assistenza autorizzato Pioneer.
La spia
STANDBY/APD
lampeggia
ripetutamente per quattro, cinque o
sette volte e l’alimentazione non si
riattiva.
•I circuiti dell’unità sono danneggiati. Staccare il cavo di alimentazione e contattare il
proprio rivenditore di fiducia o il più vicino
Centro Assistenza autorizzato Pioneer
.
Non viene emesso alcun suono
quando viene selezionata una
funzione.
•Un cavo di collegamento è staccato, oppure è collegato in modo inappropriato.
Verificare i collegamenti (pagina 5).
•I connettori o le spine a poli di un cavo sono sporchi. Eliminare la sporcizia dai
connettori e dalle spine a poli.
•Verificare che il selettore di ingresso dell’unità sia impostato sul componente di
riproduzione desiderato. Impostare correttamente il selettore (pagina 11).
•Premere il tasto
MUTE
del telecomando per disattivare l’esclusione audio
(pagina 10).
Uno degli altoparlanti non emette
suoni.
•I cavi di collegamento o i cavi dell'altoparlante sono staccati su un lato? Ricollegarli
bene (pagina 5).
Il telecomando non funziona. •Sostituire le batterie (pagina 4).
•Usare il telecomando entro una distanza di 7 m e 30° dal sensore remoto posto sul
pannello frontale (pagina4).
•Rimuovere eventuali ostacoli oppure mettere in funzione da un’altra posizione.
•Evitare di esporre alla luce diretta il sensore remoto posto sul pannello frontale.
•Il cavo di controllo di un componente è collegato in modo scorretto? Verificare che i
collegamenti siano corretti (pagina 6).
Non è possibile cambiare la sorgente
di ingresso.
•Controllare se la funzione
POWER AMP DIRECT
è attiva. In tal caso, premere il
pulsante
POWER AMP DIRECT
situato sul pannell o frontale per disattivare la funzi one
(pagina 11).
Il suono dall’ingresso digitale non
viene emesso.
•Il formato digitale del dispositivo di uscita non è supportato. Il dispositivo di uscita è
impostato su un segnale audio diverso da PCM (Dolby Digital, DTS, ecc.). Impostarlo
su PCM.
Il suono dall’ingresso digitale non
viene emesso durante la riproduzione
da SACD.
•Molti lettori SACD (compresi i lettori Blu-Ray e DVD compatibili con la riproduzione
SACD) non prevedono la riproduzione digitale da SACD. Verificarne le specifiche. In
alternativa, riprodurre l’audio utilizzando un collegamento analogico.
Non si avvertono suoni quando un
segnale in formato PCM lineare con
frequenza di 96 kHz o superiore è in
ingresso nel terminale
DIGITAL IN
COAXIAL
.
•Il suono potrebbe non uscire correttamente a causa del cavo coassiale digitale
utilizzato; provare a sostituire il cavo (venduto separatamente) con un altro.
Problema Soluzione
Page 63

Informazioni supplementari 06
15
It
English
DeutschFrançais
Nederlands
Italiano Español Русский
La funzione DAC USB
Importante
• Per ulteriori dettagli sulle impostazioni del computer, consultare anche il manuale di istruzioni del software del
driver disponibile sul sito Web Pioneer.
Problema Soluzione
Non è possibile riprodurre file
musicali da un computer collegato
tramite USB.
•Per collegare un computer e l’unità tramite USB e riprodurre i file musicali tramite
USB è necessario scaricare un apposito driver dal sito Web Pioneer e installarlo sul
computer.
Consultare il sito web Pioneer per avere istruzioni sulle modalità di
installazione del driver.
Non vengono prodotti suoni quando si
cerca di riprodurre file su un
computer.
•L’impostazione del volume è corretta per il sistema operativo e l’applicazione? Alzare
il volume come necessario.
•L’uscita audio del sistema operativo è impostata su MUTE? Annullare l’impostazione
MUTE.
•Ci sono svariate applicazioni in esecuzione simultaneamente? Provare a chiudere le
applicazioni al momento non in uso.
•L’uscita audio è stata configurata correttamente nel sistema operativo o
nell’applicazione utilizzati? Per l’apparecchio audio selezionare
“
Pioneer A-70DA A-
50DA USB Audio”.
L’uso di ingressi USB non produce
alcun suono.
•Nelle impostazioni del computer è stato selezionato un dispositivo diverso, oppure il
suono è stato disattivato nelle impostazioni del computer? Controllare le impostazioni
del computer.
•È stata collegata l’unità corretta? Il computer ha rilevato l’unità? Se l’unità viene
impostata su ingresso USB dopo il collegamento al computer, è possibile che nelle
impostazioni audio del computer sia stata impostata un’unità differente. Qualora ciò
accada, riselezionare l’unità. Verificare anche il collegamento.
•Il formato del file, il sistema operativo e il software sono supportati dall’unità?
Verificare i sistemi operativi, i software e le frequenze di campionamento del file
supportati.
•Vi è un driver apposito installato sul computer? È necessario installare un apposito
driver sul computer. Per ulteriori dettagli, consultare il sito Web Pioneer.
Vengono riprodotti i segnali audio di
interfaccia del computer attraverso
l’uscita USB.
•A seconda delle impostazioni del computer, è possibile che alcuni suoni del
computer come quello all’avvio o quelli in caso di errore possano essere riprodotti
dall’unità. Controllare le impostazioni del computer.
Se si sceglie un ingresso diverso da
quello USB, i file musicali del
computer non possono essere
riprodotti.
•Quando è impostato un ingresso diverso da USB, l’unità viene riconosciuta dal
computer. Impostare nuovamente l’ingresso su USB, quindi selezionare l’unità nelle
impostazioni audio del computer.
Se nelle impostazioni audio del
computer sono impostate le frequenze
a 384 kHz o 356 kHz, un browser o un
programma viene arrestato e l’audio
viene riprodotto ma non si avverte il
suono.
•Il browser o il software potrebbero non supportare le frequenze a 384 kHz o 356 kHz.
Verificarne le specifiche.
Pulizia dell’unità
• Utilizzare un panno per lucidare o un panno
asciutto per eliminare la polvere e lo sporco.
• Se la superficie è sporca, pulire con un panno
morbido immerso in un detergente neutro diluito in
cinque o sei parti di acqua e ben strizzato, quindi
strofinare con un panno asciutto. Non utilizzare
cera o detergenti per mobili.
• Non utilizzare mai solventi, benzina, spray
insetticidi o altri agenti chimici sull’unità o in
prossimità di essa, poiché potrebbero corroderne la
superficie.
Page 64

06 Informazioni supplementari
16
It
Dati tecnici
Sezione amplificatore
Specifica di potenza in uscita quando l’alimentaz ione è a 230
V.
• Potenza continua in uscita (entrambi i
canali da 20 Hz a 20 kHz)
A-70DA / A-50DA. . . . . . . . . . . . . . . . . . . . . .90 W + 90 W
(THD 0,5 %, 4 )
A-70DA / A-50DA. . . . . . . . . . . . . . . . . . . . . . 65 W +65 W
(THD 0,5 %, 8 )
Sezione audio
• Terminali di ingresso
(sensibilità/impedenza)
BALANCED . . . . . . . . . . . . . . . . . . . . . . . . . 200 mV/82 k
SACD/CD, NETWORK, LINE 1, LINE 2 . . . 200 mV/50 k
POWER AMP DIRECT. . . . . . . . . . . . . . . . . . . . .1 V/10 k
PHONO (MM) . . . . . . . . . . . . . . . . . . . . . . . 2,8 mV/50 k
PHONO (MC)
. . . . . . . . 0,24 mV/100 (
solo per il modello A-70DA)
COAXIAL . . . . . . . . . . . . . . . . . . . . . . . . . 500 mVp-p/75
• Uscita (livello/impedenza)
LINE 2 OUT . . . . . . . . . . . . . . . . . . . . . . . . 200 mV/2,2 k
• Risposta in frequenza
SACD/CD, NETWORK, LINE 1, LINE 2
. . . . . . . . . . . . . . . . . . . . . . . . . da 5 Hz a 50 kHz ± 3 dB*
• DEVIAZIONE RIAA
PHONO (MM) . . . . . . . . . . . da 20 Hz a 20 kHz ±0,5 dB*
PHONO (MC). . . . . . . . . . . .da 20 Hz a 20 kHz ± 0,5 dB*
(
solo per il modello A-70DA)
* Misurato con il tasto DIRECT acceso.
• Comando di tonalità
Bassi . . . . . . . . . . . . . . . . . . . . . . . . . . . ± 10 dB (100 Hz)
Alti . . . . . . . . . . . . . . . . . . . . . . . . . . . . . ± 10 dB (10 kHz)
• Rapporto disturbi (IHF IN CORTO,RETE A)
SACD/CD, NETWORK, LINE 1, LINE 2 . . . . . . . . 101 dB*
PHONO (MM, ingresso da 5 mV) . . . . . . . . . . . . .89 dB*
PHONO (MC, ingresso da 0,5 mV) . . . . . . . . . . . .74 dB*
(
solo per il modello A-70DA)
* Misurato con il tasto DIRECT acceso.
• Impedenza garantita
A, B. . . . . . . . . . . . . . . . . . . . . . . . . . . . . . . . da 4 a 16
A+B . . . . . . . . . . . . . . . . . . . . . . . . . . . . . . . da 8 a 32
Biwiring . . . . . . . . . . . . . . . . . . . . . . . . . . . . da 4 a 16
Varie
Requisiti di potenza . . . . . . . AC da 220 V a 230 V, 50 Hz
Consumo energetico
A-70DA. . . . . . . . . . . . . . . . . . . . . . . . . . . . . . . . . . . . 74 W
A-50DA. . . . . . . . . . . . . . . . . . . . . . . . . . . . . . . . . . . . 72 W
In standby . . . . . . . . . . . . . . . . . . . . . . . . . . . . . . . . . 0,3 W
Dimensioni
A-70DA. . . . . . 435 mm (L) x 141,5 mm (H) x 370 mm (P)
A-50DA. . . . . . 435 mm (L) x 138,5 mm (H) x 368 mm (P)
Peso (senza imballaggio)
A-70DA. . . . . . . . . . . . . . . . . . . . . . . . . . . . . . . . . . . 17,2 kg
A-50DA. . . . . . . . . . . . . . . . . . . . . . . . . . . . . . . . . . .11,2 kg
Accessori
Telecomando . . . . . . . . . . . . . . . . . . . . . . . . . . . . . . . . . .1
Batterie a cella secca AAA/IEC R03 . . . . . . . . . . . . . . . . 2
Spina con pin corti . . . . . . . . . . . . . . . . . . . . . . . . . . . . . . 2
Cavo di alimentazione
Documento di garanzia
Scheda avvertenze
Istruzioni per l’uso (questo documento)
Nota
• Dati tecnici e disegno soggetti a possibili modifiche
senza preavviso, dovute alle migliorie apportate.
• I nomi di società e prodotti citati nel presente
documento sono marchi commerciali o marchi
commerciali registrati delle rispettive società.
• “Pioneer” è un marchio di fabbrica di proprietà di
Pioneer Corporation, ed è utilizzato su licenza.
© 2015 Onkyo & Pioneer Corporation.
Tutti i diritti riservati.
Page 65

Informazioni supplementari 06
17
It
English
DeutschFrançais
Nederlands
Italiano Español Русский
Page 66

The exclamation point within an equilateral
triangle is intended to alert the user to the
presence of important operating and
maintenance (servicing) instructions in the
literature accompanying the appliance.
The lightning flash with arrowhead symbol,
within an equilateral triangle, is intended to
alert the user to the presence of uninsulated
“dangerous voltage” within the product’s
enclosure that may be of sufficient
magnitude to constitute a risk of electric
shock to persons.
CAUTION:
TO PREVENT THE RISK OF ELECTRIC
SHOCK, DO NOT REMOVE COVER (OR
BACK). NO USER-SERVICEABLE PARTS
INSIDE. REFER SERVICING TO QUALIFIED
SERVICE PERSONNEL.
CAUTION
RISK OF ELECTRIC SHOCK
DO NOT OPEN
IMPORTANT
D3-4-2-1-1_A1_En
WARNING
This equipment is not waterproof. To prevent a fire or
shock hazard, do not place any container filled with
liquid near this equipment (such as a vase or flower
pot) or expose it to dripping, splashing, rain or
moisture.
D3-4-2-1-3_A1_En
WARNING
Before plugging in for the first time, read the following
section carefully.
The voltage of the available power supply differs
according to country or region. Be sure that the
power supply voltage of the area where this unit
will be used meets the required voltage (e.g., 230 V
or 120 V) written on the rear panel.
D3-4-2-1-4*_A1_En
WARNING
To prevent a fire hazard, do not place any naked flame
sources (such as a lighted candle) on the equipment.
D3-4-2-1-7a_A1_En
VENTILATION CAUTION
When installing this unit, make sure to leave space
around the unit for ventilation to improve heat radiation
(at least 30 cm at top, 10 cm at rear, and 10 cm at each
side).
WARNING
Slots and openings in the cabinet are provided for
ventilation to ensure reliable operation of the product,
and to protect it from overheating. To prevent fire
hazard, the openings should never be blocked or
covered with items (such as newspapers, table-cloths,
curtains) or by operating the equipment on thick carpet
or a bed.
D3-4-2-1-7b*_A1_En
Information for users on collection and disposal of old equipment and used batteries
These symbols on the products, packaging, and/or accompanying documents mean
that used electrical and electronic products and batteries should not be mixed with
general household waste.
For proper treatment, recovery and recycling of old products and used batteries,
please take them to applicable collection points in accordance with your national
legislation.
By disposing of these products and batteries correctly, you will help to save valuable
resources and prevent any potential negative effects on human health and the
environment which could otherwise arise from inappropriate waste handling.
For more information about collection and recycling of old products and batteries,
please contact your local municipality, your waste disposal service or the point of sale
where you purchased the items.
These symbols are only valid in the European Union.
For countries outside the European Union:
If you wish to discard these items, please contact your local authorities or dealer and
ask for the correct method of disposal.
K058a_A1_En
Symbol examples
for batteries
Symbol for
equipment
Pb
WAARSCHUWING
Dit apparaat is niet waterdicht. Om brand of een
elektrische schok te voorkomen, mag u geen voorwerp
dat vloeistof bevat in de buurt van het apparaat zetten
(bijvoorbeeld een bloemenvaas) of het apparaat op
andere wijze blootstellen aan waterdruppels,
opspattend water, regen of vocht.
D3-4-2-1-3_A1_Nl
BELANGRIJKE INFORMATIE BETREFFENDE
DE VENTILATIE
Let er bij het installeren van het apparaat op dat er
voldoende vrije ruimte rondom het apparaat is om een
goede doorstroming van lucht te waarborgen
(tenminste 30 cm boven, 10 cm achter en 10 cm aan de
zijkanten van het apparaat).
WAARSCHUWING
De gleuven en openingen in de behuizing van het
apparaat zijn aangebracht voor de ventilatie, zodat een
betrouwbare werking van het apparaat wordt verkregen
en oververhitting wordt voorkomen. Om brand te
voorkomen, moet u ervoor zorgen dat deze openingen
nooit geblokkeerd worden of dat ze afgedekt worden
door voorwerpen (kranten, tafelkleed, gordijn e.d.) of
door gebruik van het apparaat op een dik tapijt of een
bed.
D3-4-2-1-7b*_A1_Nl
K058a_A1_Nl
Pb
Gebruikersinformatie voor het verzamelen en verwijderen van oude producten en
batterijen
De symbolen op producten, verpakkingen en bijbehorende documenten geven aan
dat de gebruikte elektronische producten en batterijen niet met het gewone
huishoudelijk afval kunnen worden samengevoegd.
Er bestaat een speciaal wettelijk voorgeschreven verzamelsysteem voor de juiste
behandling, het opnieuw bruikbaar maken en de recyclage van gebruikte producten
en batterijen.
Door een correcte verzamelhandeling zorgt u ervoor dat het verwijderde product en/of
batterij op de juiste wijze wordt behandeld, opnieuw bruikbaar wordt gemaakt, wordt
gerecycleerd en het niet schadelijk is voor de gezondheid en het milieu.
Voor verdere informatie betreffende de juiste behandling, het opnieuw bruikbaar
maken en de recyclage van gebruikte producten en batterijen kunt u contact opnemen
met de plaatselijke overheid of een verkooppunt.
Deze symbolen zijn enkel geldig in de landen van de europese unie.
Indien u zich in een ander dan bovengenoemde landen bevindt kunt u contact
opnemen met de plaatselijke overheid voor meer informatie over de juiste verwijdering
van het product.
Symbolen
voor batterijen
Symbool voor
toestellen
LET OP
OM HET GEVAAR VOOR EEN ELEKTRISCHE SHOCK TE
VOORKOMEN, DEKSEL (OF RUG) NIET
VERWIJDEREN. AAN DE BINNENZIJDE BEVINDEN
ZICH GEEN ELEMENTEN DIE DOOR DE GEBRUIKER
KUNNEN BEDIEND WORDEN. ENKEL DOOR
GEKWALIFICEERD PERSONEEL TE BEDIENEN.
D3-4-2-1-1_B2_Nl
WAARSCHUWING
Om brand te voorkomen, mag u geen open vuur (zoals
een brandende kaars) op de apparatuur zetten.
D3-4-2-1-7a_A1_Nl
Page 67

3
LET OP
De /I STANDBY/ON schakelaar van dit apparaat
koppelt het apparaat niet volledig los van het lichtnet.
Aangezien er na het uitschakelen van het apparaat
nog een kleine hoeveelheid stroom blijft lopen, moet
u de stekker uit het stopcontact halen om het
apparaat volledig van het lichtnet los te koppelen.
Plaats het apparaat zodanig dat de stekker in een
noodgeval gemakkelijk uit het stopcontact kan
worden gehaald. Om brand te voorkomen, moet u de
stekker uit het stopcontact halen wanneer u het
apparaat langere tijd niet denkt te gebruiken (bijv.
wanneer u op vakantie gaat).
D3-4-2-2-2a*_A1_Nl
Gebruiksomgeving
Temperatuur en vochtigheidsgraad op de plaats van
gebruik:
+5 °C tot +35 °C, minder dan 85 % RH
(ventilatieopeningen niet afgedekt)
Zet het apparaat niet op een slecht geventileerde plaats
en stel het apparaat ook niet bloot aan hoge
vochtigheid of direct zonlicht (of sterke kunstmatige
verlichting).
D3-4-2-1-7c*_A1_Nl
Dit apparaat is bestemd voor normaal huishoudelijk
gebruik. Indien het apparaat voor andere doeleinden
of op andere plaatsen wordt gebruikt (bijvoorbeeld
langdurig gebruik in een restaurant voor zakelijke
doeleinden, of gebruik in een auto of boot) en als
gevolg hiervan defect zou raken, zullen de reparaties
in rekening gebracht worden, ook als het apparaat
nog in de garantieperiode is.
K041_A1_Nl
WAARSCHUWING NETSNOER
Pak het netsnoer beet bij de stekker. Trek de stekker er
niet uit door aan het snoer te trekken en trek nooit aan
het netsnoer met natte handen aangezien dit
kortsluiting of een elektrische schok tot gevolg kan
hebben. Plaats geen toestel, meubelstuk o.i.d. op het
netsnoer, en klem het niet vast. Maak er nooit een
knoop in en en verbind het evenmin met andere
snoeren. De netsnoeren dienen zo te worden geleid
dat er niet per ongeluk iemand op gaat staan. Een
beschadigd netsnoer kan brand of een elektrische
schok veroorzaken. Kontroleer het netsnoer af en toe.
Wanneer u de indruk krijgt dat het beschadigd is,
dient u bij uw dichtstbijzijnde erkende PIONEER
onderhoudscentrum of uw dealer een nieuw snoer te
kopen.
S002*_A1_Nl
Hartelijk dank voor de aanschaf van
dit Pioneer produkt.
Lees de gebruiksaanwijzing aandachtig door zodat u het
apparaat op de juiste wijze kunt bedienen. Bewaar de
gebruiksaanwijzing voor het geval u deze in de toekomst
nogmaals nodig heeft.
Inhoud
01 Voordat u begint
De inhoud van de verpakking controleren . . . . . . . 4
De batterijen laden in de afstandsbediening . . . . . 4
Gebruik van de afstandsbediening. . . . . . . . . . . . . .4
De versterker installeren . . . . . . . . . . . . . . . . . . . . 4
02 Aansluitingen
De kabels aansluiten . . . . . . . . . . . . . . . . . . . . . . . 5
Over “dubbele bedrading” . . . . . . . . . . . . . . . . . . . 5
Luidsprekerkabels aansluiten . . . . . . . . . . . . . . . .6
Audiokabels aansluiten . . . . . . . . . . . . . . . . . . . . . 6
Aansluiting maken op de gebalanceerde
ingangsaansluitingen (alleen A-70DA). . . . . . . . . . 6
Digitale audio-ingangen. . . . . . . . . . . . . . . . . . . . . 7
Met een USB-kabel voor het aansluiten op een
computer. . . . . . . . . . . . . . . . . . . . . . . . . . . . . . . . 7
Met gecentraliseerde bediening met andere
Pioneer-componenten . . . . . . . . . . . . . . . . . . . . . .7
De stekker in het stopcontact steken . . . . . . . . . . .7
03 Functies en displays
Voorpaneel . . . . . . . . . . . . . . . . . . . . . . . . . . . . . .8
Achterpaneel . . . . . . . . . . . . . . . . . . . . . . . . . . . . .9
Afstandsbediening. . . . . . . . . . . . . . . . . . . . . . . . 10
04 Bediening
Afspelen . . . . . . . . . . . . . . . . . . . . . . . . . . . . . . . 11
Stel de voeding in op stand-by . . . . . . . . . . . . . . . .11
Wanneer u het apparaat gebruikt als
stroomversterker . . . . . . . . . . . . . . . . . . . . . . . . . .11
Muziek afspelen vanaf een digitale audiocomponent
. . . . . . . . . . . . . . . . . . . . . . . . . . . . . . . . . . . . . . .11
Een audioopname maken . . . . . . . . . . . . . . . . . .12
Instellen voor automatische stand-bystatus
(Auto uitschakelen) . . . . . . . . . . . . . . . . . . . . . . . 12
Alle instellingen opnieuw instellen naar de
standaard fabrieksinstellingen. . . . . . . . . . . . . . . 12
05 Gebruik van de USB DAC-functie
Het stuurprogramma installeren . . . . . . . . . . . . .13
Muziek afspelen vanaf een computer. . . . . . . . . . 13
06 Bijkomende informatie
Problemen oplossen . . . . . . . . . . . . . . . . . . . . . . 14
Over de USB DAC-functie . . . . . . . . . . . . . . . . . . .15
Reiniging van het toestel . . . . . . . . . . . . . . . . . . . 15
Specificaties . . . . . . . . . . . . . . . . . . . . . . . . . . . .16
Page 68

01 Voordat u begint
4
Nl
Hoofdstuk 1:
Voordat u begint
De inhoud van de verpakking
controleren
Verzeker u ervan dat de volgende accessoires zijn
meegeleverd in de doos als u deze opent.
• Afstandsbediening
• AAA/IEC R03 droge celbatterijen x2
• Korte pinstekker x2
(Op het ogenblik van de aankoop zijn deze stekkers
standaard aangesloten op de PHONO IN-
aansluitingen op het achterpaneel.)
• Netsnoer (Lengte: 1,8 m)
• Garantiebewijs
• Waarschuwingsblad (voor nieuwe gebruikers)
• Handleiding (dit document)
WAARSCHUWING
• Berg kleine onderdelen op buiten het bereik van
kinderen en peuters. Raadpleeg onmiddellijk een
arts indien kleine onderdelen per ongeluk worden
ingeslikt.
Opmerking
• Illustraties in de handleiding kunnen zijn gewijzigd
of vereenvoudigd voor een gemakkelijke uitleg en
kan daarom verschillen van het eigenlijke uiterlijk
van het product.
• De illustraties die hier zijn gebruikt, zijn
hoofdzakelijk van de A-70DA.
De batterijen laden in de
afstandsbediening
1 Open het deksel achteraan.
2 Plaats de nieuwe batterijen en zorg dat
de polariteiten overeenstemmen met de
aanduidingen in het batterijvak.
3 Sluit het deksel achteraan.
De batterijen bij het apparaat zijn geleverd zodat u het
gebruik van het product kunt controleren. Ze zullen
mogelijk niet lang werken. Wij raden u aan
alkalinebatterijen te gebruiken die een langere
levensduur hebben.
WAARSCHUWING
• Gebruik of bewaar batterijen niet in direct zonlicht
of op een hete plaats, zoals in de auto of bij een
kachel. Hierdoor kunnen batterijen gaan lekken,
oververhit raken, exploderen of in brand vliegen.
Bovendien reduceert dit de levensduur of prestatie
van de batterijen.
Let op
Onjuist gebruik van de batterijen kan gevaar opleveren,
zoals lekkage of ontploffen. Neem de volgende
voorzorgsmaatregelen in acht:
• Wanneer u de batterijen plaatst, moet u ervoor
zorgen dat u de veren op de -aansluitingen van de
batterijen niet beschadigt. Hierdoor kunnen de
batterijen lekken of oververhitten.
• Gebruik alleen de batterijen die zijn opgegeven.
Gebruik ook geen nieuwe batterij samen met een
oude.
• Let op, wanneer u de batterijen in de
afstandsbediening plaatst, dat ze in de juiste
richting worden geplaatst, zoals aangegeven door
de polariteitsmarkeringen ( en ).
• Verwarm geen batterijen, demonteer ze niet of gooi
ze niet in vuur of water.
• Batterijen kunnen verschillende spanningen
hebben, zelfs als ze dezelfde grootte en vorm
hebben. Gebruik nooit verschillende batterijen
tegelijk.
1
2
3
• Om lekken van batterijvloeistof te voorkomen, moet
u de batterijen verwijderen als u de
afstandsbediening gedurende langere tijd niet zult
gebruiken (1 maand of meer). Als er toch vloeistof
zou lekken, veegt u het batterijvak voorzichtig
schoon en plaatst u nieuwe batterijen. Als een
batterij zou lekken en de vloeistof in contact komt
met uw huid, moet u deze spoelen met een grote
hoeveelheid water.
• Bij het weggooien van gebruikte batterijen moet u
de milieuwetten en andere openbare
reglementeringen naleven die in uw land of streek
van toepassing zijn.
Gebruik van de afstandsbediening
De afstandsbediening heeft een bereik van ongeveer 7 m
bij een hoek van ongeveer 30º vanaf de
afstandsbedieningssensor.
Houd tijdens het gebruik van de afstandsbediening
rekening met het volgende:
• Zorg ervoor dat zich geen obstakels tussen de
afstandsbediening en de sensor op de versterker
bevinden.
• De afstandsbediening werkt mogelijk niet goed als
sterk zonlicht of TL-licht op de
afstandsbedieningssensor valt.
• De afstandsbedieningen van verschillende
apparaten kunnen elkaar storen. Het gebruik van
afstandsbedieningen voor andere apparatuur
vlakbij dit apparaat moet worden vermeden.
• Vervang de batterijen wanneer het bereik van de
afstandsbediening begint af te nemen.
De versterker installeren
Installeer dit toestel op een vlak en stabiel oppervlak.
• Installeer het niet op de volgende plaatsen:
– op een kleuren-TV (kan beeldvervorming
veroorzaken)
– dicht bij een cassettedeck (of een ander apparaat
dat een magnetisch veld opwekt). Dit kan storingen
in het geluid veroorzaken.
– in direct zonlicht
– een vochtige of natte omgeving
– een zeer warme of koude omgeving
– op plaatsen die onderhevig zijn aan trilling of
andere bewegingen
– op zeer stoffige plaatsen
– op plaatsen waar hete dampen of olie aanwezig
zijn (bv. in de keuken)
• Plaats het apparaat niet op een sofa of een ander
object of materiaal met absorberende
eigenschappen waardoor de geluidskwaliteit
negatief kan worden beïnvloed.
7 m
30 °
30 °
Page 69

Aansluitingen 02
5
Nl
English
DeutschFrançais
Nederlands
Italiano Español Русский
Hoofdstuk 2:
Aansluitingen
De kabels aansluiten
Let op
• Voordat u aansluitingen maakt of wijzigt, moet u dit toestel uitschakelen en de stekker van het netsnoer uit het
stopcontact trekken.
• Sluit de voedingskabel aan nadat alle aansluitingen tussen apparaten zijn voltooid.
REC
R
L
RL
PLAY
RL
AUDIO
OUTPUT
PREOUT
R
L
NORMALNORMAL
INVERSION
INVERSION
PHASE
PHASE
LINE2LINE2
LINE1
LINE1
USBUSB
COAXIAL
COAXIAL
PHONOPHONO
(MM/MC)
(MM/MC)
SIGNAL
SIGNAL
GND
GND
NETWORK
NETWORK
SACD/CD
SACD/CD
DIGITAL INDIGITAL IN
ANALOG INANALOG IN
OPTICALOPTICAL
LINE2LINE2
OUT
OUT
POWERPOWER
AMP
AMP
DIRECT
DIRECT
BALANCED INBALANCED IN
L
R
L
R
L
R
L
R
L
R
L
R
L
R
L
R
L
R
L
R
L
R
L
R
L
R
LRL
R
LRL
R
LRL
R
L
R
L
R
MENU
iPod
Music>
Extras>
Settings>
Shuffle Songs
Backlight
MASTER
VOLUME
STANDBY/ON
INPUT
SELECTOR
iPodiPhoneiPadHDMI
ADVANCED
MCACC
FLOFF
SOURCE
/I STANDBY/ON
STANDBY
iPod/iPhone
5V1A
DIRECT Hi-Bit 32Up Sampling
SOURCE
SACD/CD-speler
Netwerkaudiospeler
PRE OUT-aansluitingen op de
voorversterker of de AV-versterker
Luidsprekersysteem B
Luidsprekersysteem A
Platenspeler
iPod dock, enz.
Rechts
Links
Rechts Links
Voedingskabel
(bijgeleverd)
Het achterpaneel
van het apparaat
Audio-apparaat met
gebalanceerde
uitgangsaansluitingen
Opnameapparaat
of ander apparaat
Let op
•De SIGNAL GND-aansluiting is voorzien om het
lawaai te verminderen wanneer u het apparaat
aansluit op componenten, zoals een analoge
platenspeler.
•De PHONO IN-aansluitingen zijn standaard
uitgerust met korte pinstekkers. Deze mogen niet
worden verwijderd behalve wanneer u een
platendraaier aansluit. Zorg dat u de korte
pinstekkers op een veilige plaats bewaart.
• Stop de korte pinstekkers in andere aanlsuitingen
dan de PHONO IN-aansluitingen. Wanneer u ze
aansluit op andere aansluitingen, kan dit een
defect veroorzaken.
• Sluit de PHONO IN-aansluitingen op een andere
component aan dan op een platenspeler. Voer ook
geen aansluitingen uit op een platenspeler die is
uitgerust met een ingebouwde equalizer. Er kan
een extreem hoog geluid worden weergegeven
waardoor uw luidsprekers of andere apparaten
kunnen schade oplopen.
•De PHONO IN-aansluitingen van de A-50DA zijn
ontworpen om alleen te worden gebruikt met
platenspelers die zijn uitgerust met cartridges van
het MM-type (moving-magnet). De platenspelers
die zijn uitgerust met MC-cartridges (moving-coil),
kunnen niet worden gebruikt.
• Zorg ervoor dat de kabels niet over het apparaat
heen liggen (zoals aangegeven in de afbeelding).
Anders produceert het magnetische veld van de
transformatoren in het apparaat een brom in de
luidsprekers.
• De aansluitingen van POWER AMP DIRECT het
apparaat mogen nooit worden aangesloten op de
aansluitingen van een andere component, behalve
de PRE-AMP OUT.
• Als uw platenspeler is voorzien van een
aardingsdraad, dient u dit vast te maken aan de
ground-aansluiting van deze versterker.
Opmerking
• Wanneer u een cassettedeck aansluit, kan er ruis
hoorbaar zijn, afhankelijk van de installatielocatie.
Deze ruis wordt veroorzaakt door lekkage van de
transformator van de versterker. Wijzig in dat geval
de installatielocatie of plaats de deck verder van de
versterker.
• iPod is een geregistreerd handelsmerk van Apple
Inc. in de V.S. en andere landen.
Over “dubbele bedrading”
Dit apparaat kan worden gebruikt met luidsprekers
die dubbele bedrading ondersteunen. Zorg dat u de
hoog- en laagfrequentie-aansluitingen correct
aansluit.
• Zorg er tijdens het afspelen voor dat zowel de
SPEAKERS A- als de SPEAKERS B-knop zijn
ingesteld op AAN (pagina 8).
Let op
• Wanneer u dubbele bedrading gebruikt voor het
aansluiten van de luidsprekers, kunt u negatieve
invloeden op de versterker voorkomen door de
kortsluitingsbalken HOOG en LAAG die bij de
luidsprekers zijn geleverd, te verwijderen.
Raadpleeg de instructies die bij de luidsprekers zijn
geleverd voor gedetailleerde informatie.
HIGH
LOW
HIGH
LOW
Luidsprekersysteem
Links
Rechts
Het
achterpaneel
van het
apparaat
Verwijder de
kortsluitingsbalk
tussen de
aansluitingen
+ en –.
Page 70

02 Aansluitingen
6
Nl
• Wanneer u luidsprekers gebruikt met afneembare
netwerkcircuits, wordt er bij het verwijderen van het
netwerk, geen effect geproduceerd en kan de
luidspreker schade oplopen.
• Een andere methode is het aansluiten van de
SPEAKERS A-aansluitingen op HOOG en van de
SPEAKERS B-aansluitingen op LAAG (omgekeerd
dan in afbeelding).
Luidsprekerkabels aansluiten
1 Draai de kabelkernen.
2 Maak de moer los op de
SPEAKERS
aansluiting en stop de luidsprekerkabel in
de opening in de aansluitingsas.
3 Maak de moer van de aansluiting
opnieuw vast.
Let op
• Wanneer u slechts één set
luidsprekeraansluitingen gebruikt (SPEAKERS
A of SPEAKERS B) of wanneer u aansluitingen
met twee draden gebruikt, moet de gebruikte
luidsprekers een nominale impedantie hebben
tussen 4 en 16 . Wanneer u beide sets
aansluitingen gebruikt, moeten de aangesloten
luidsprekers een nominale impedantie hebben
van 8 tot 32 . Raadpleeg de instructies die
bij uw luidsprekers zijn geleverd voor meer
informatie over de impedantiewaarde.
• De positieve en negatieve (+/–) aansluitingen op de
versterker moeten overeenkomen met die van de
luidsprekers.
• Op deze luidsprekeraansluitingen staat een
GEVAARLIJKE spanning. Om een elektrische
schok te voorkomen bij het aansluiten en losmaken
van de luidsprekerkabels, moet u de stekker uit het
stopcontact halen voordat u niet geïsoleerde
onderdelen aanraakt.
• Zorg dat alle ontblote luidsprekerdraden samen zijn
gedraaid en volledig in de luidsprekeraansluiting
zijn gestopt. Als een ontblote luidsprekerdraad het
achterpaneel raakt, kan de stroom worden
uitgeschakeld als veiligheidsmaatregel.
Audiokabels aansluiten
Sluit de witte stekker aan op de linkeraansluiting (L) en
de rode op de rechteraansluiting (R). Zorg dat u de
stekkers volledig in de aansluitingen stopt.
123
10 mm
Links (wit)
Rechts (rood)
Aansluiting maken op de
gebalanceerde ingangsaansluitingen
(alleen A-70DA)
Verbind de BALANCED IN-aansluitingen van het toestel
met een SACD-speler, USB DAC, netwerkspeler of ander
apparaat met gebalanceerde uitgangsaansluitingen.
Let op
• De functies BASS, TREBLE, BALANCE en
LOUDNESS werken niet voor een apparaat dat is
aangesloten op de BALANCED IN-aansluitingen.
Afhankelijk van het aan te sluiten apparaat kan de fase
verschillen. Gebruik de faseselectieschakelaar op het
achterpaneel van het toestel om de fase af te stemmen.
• Begininstelling (nr. 2 HOT)
• Instelling bij gewijzigde polariteit
(nr. 3 HOT)
Opmerking
• Raadpleeg de instructiehandleiding van het
apparaat dat u wilt aansluiten voor details over de
fase van de gebalanceerde uitgangsaansluitingen
ervan.
• Als u het toestel op een Pioneer-speler aansluit,
stelt u de fase in op de begininstelling (nr. 2 HOT).
LINE2LINE2
LINE1
LINE1
USB
USB
COAXIALCOAXIAL
NETWORKNETWORK
SACD/CD
SACD/CD
DIGITAL IN
DIGITAL IN
ANALOG IN
ANALOG IN
OPTICAL
OPTICAL
LINE2
LINE2
OUT
OUT
P.P.AMPAMP
DIRECT
DIRECT
BALANCED INBALANCED IN
NORMALNORMAL
INVERSION
INVERSION
PHASEPHASE
RL
Audio-apparaat met
gebalanceerde
uitgangsaansluitingen
Achterpaneel A-70DA
NORMAL
NORMAL
INVERSION
INVERSION
PHASE
PHASE
1 Aarde
3 COLD (-)
2 HOT (+)
NORMAL
NORMAL
INVERSION
INVERSION
PHASE
PHASE
1 Aarde
3 HOT (+)
2 COLD (-)
Page 71

Aansluitingen 02
7
Nl
English
DeutschFrançais
Nederlands
Italiano Español Русский
Digitale audio-ingangen
Als u de aansluiting DIGITAL IN van het toestel en de
digitale audio-uitgang van een digitaal audioapparaat
met een los verkrijgbare digitale audiokabel verbindt,
kunt u de audio van het digitale audioapparaat op het
toestel afspelen.
Raadpleeg pagina 11 voor details over de uitvoer van
audio-invoer naar de DIGITAL IN-aansluiting.
Opmerking
• Digitale signaalformaten die in dit apparaat kunnen
worden ingevoerd, bevatten lineaire PCM-signalen
met een bemonsteringsfrequentie en kwantitatieve
bits tot 192 kHz/32 bits. (De bewerking kan
mislukken, afhankelijk van het aangesloten
apparaat en de omgeving).
Met een USB-kabel voor het
aansluiten op een computer
Als een USB-kabel (afzonderlijk verkrijgbaar) wordt
gebruikt om de DIGITAL IN USB-aansluiting van dit
apparaat aan te sluiten op de USB-poort van een
computer, kunnen de muziekbestanden die zich op de
computer bevinden, via dit apparaat worden afgespeeld.
Meer informatie over het uitvoeren van de audiosignalen
die zijn ingevoerd naar de DIGITAL IN USB-terminal,
vindt u op pagina 13.
Belangrijk
• Op de computer moet een speciaal
stuurprogramma geïnstalleerd zijn (pagina 13).
Opmerking
• Dit apparaat kan niet worden gebruikt om
audiobestanden af te spelen vanaf een computer,
tenzij Media Player is geïnstalleerd op de
aangesloten computer.
LINE2
LINE2
LINE1
LINE1
USB
USB
COAXIAL
COAXIAL
DIGITAL IN
DIGITAL IN
IN
OPTICAL
OPTICAL
LINE2
LINE2
OUT
OUT
ED IN
NORMAL
NORMAL
INVERSION
INVERSION
PHASE
PHASE
DIGITAL OUT
COAXIAL
DIGITAL OUT
OPTICAL
Digitale audioapparatuur, enz.
Coaxiale digitale audiokabel
(afzonderlijk verkrijgbaar)
Achterpaneel A-70DA
Optische digitale audiokabel
(afzonderlijk verkrijgbaar)
Digitale audioapparatuur, enz.
LINE2LINE2
LINE1
LINE1
USBUSB
COAXIALCOAXIAL
DIGITAL INDIGITAL IN
OPTICAL
OPTICAL
LINE2
LINE2
OUT
OUT
NORMALNORMAL
INVERSION
INVERSION
PHASE
PHASE
USB
USB-kabel
(afzonderlijk verkrijgbaar)
A-type
B-type
PC
Achterpaneel A-70DA
Met gecentraliseerde bediening met
andere Pioneer-componenten
Meerdere Pioneer-componenten die zijn uitgerust met
CONTROL IN/OUT-aansluitingen kunnen worden
aangesloten op het apparaat. Hierdoor is
gecentraliseerd beheer van de componenten mogelijk
via de afstandsbedieningssensor op het apparaat.
Hierdoor is het ook mogelijk componenten die niet zijn
uitgerust met een afstandsbedieningssensor of die zijn
geïnstalleerd op plaatsen waar de
afstandsbedieningssensor geen bereik heeft, op afstand
te bedienen.
Opmerking
• Gebruik een in de handel verkrijgbare mono
ministekkerkabel (zonder weerstand) voor
aansluitingen.
• Wanneer u de CONTROL IN/OUT-aansluitingen
aansluit, moeten ook in de handel verkrijgbare
kabels worden gebruikt voor het maken van
analoge aansluitingen. Wanneer u alleen de
CONTROL IN/OUT-aansluitingen aansluit, is er
geen goed systeembeheer mogelijk.
• Wanneer een besturingskabel is aangesloten op de
CONTROL IN-aansluiting van het apparaat, kan het
niet worden bediend door de afstandsbediening
naar het apparaat te richten
(de afstandsbedieningssensor wordt automatisch
uitgeschakeld).
De stekker in het stopcontact steken
Belangrijk
• Wanneer u op reis bent of het apparaat voor een
andere reden niet gebruik gedurende langere tijd,
moet u de voedingskabel altijd loskoppelen van het
stopcontact. De verschillende interne instellingen
gaan niet verloren, zelfs wanneer de voedingskabel
langere tijd niet is losgekoppeld van dit
stopcontact.
• Als het nodig is de voedingskabel los te koppelen,
moet u eerst drukken op de knop
/I
STANDBY/
ON op het voorpaneel van het apparaat, zodat het
apparaat wordt UITGESCHAKELD voordat u de
kabel loskoppelt.
Let op
• Het gebruik van een andere voedingskabel dan de
bijgeleverde, zal de garantie ongeldig maken
omdat Pioneer niet aansprakelijk kan worden
gehouden voor enige opgelopen schade. (De
bijgeleverde voedingskabel die bij het apparaat is
geleverd, heeft een nominaal vermogen van 10 A.)
• Gebruik alleen een voedingskabel die bij dit
apparaat is geleverd.
• Gebruik de bijgeleverde voedingskabel alleen voor
de doeleinden die hieronder zijn beschreven.
Sluit het apparaat aan op de netstroom nadat u alle
aansluitingen hebt uitgevoerd.
1 Sluit de bijgeleverde voedingskabel aan
op de
AC IN
-aansluiting op het achterpaneel
van het apparaat.
2 Sluit het andere uiteinde aan op een
stopcontact.
IN
OUT
CONTROL
Een andere Pioneercomponent die is
uitgerust met
CONTROL IN/OUTaansluitingen
Op een andere
Pioneercomponent die is
uitgerust met een
CONTROL INaansluiting
A-70DA
Richt de
afstandsbediening naar
de sensor op het
apparaat.
Afstandsbediening
Naar het stopcontact
Het achterpaneel van het apparaat
Netsnoer
(bijgeleverd)
Page 72

03 Functies en displays
8
Nl
Hoofdstuk 3:
Functies en displays
Voorpaneel
1/I
STANDBY/ON
Schakelt de versterker uit en in.
Wanneer de voeding is ingeschakeld, licht de
voedingsindicator in het midden op.
2
STANDBY/APD
-indicator
Wanneer de voeding in stand-by is, licht de indicator
rood op. Wanneer de functie Auto uitschakelen is
ingeschakeld, licht de indicator groen op (pagina 12).
3
SPEAKERS A
-knop/indicator
Gebruik deze knop om te luisteren naar het
luidsprekersysteem dat is aangesloten op de
SPEAKERS A-aansluitingen.
On : de indicator licht op. Er is geluid te horen via het
luidsprekersysteem.
Off : de indicator dooft. Er is geen geluid te horen via het
luidsprekersysteem.
4
SPEAKERS B
-knop/indicator
Gebruik deze knop om te luisteren naar het
luidsprekersysteem dat is aangesloten op de
SPEAKERS B-aansluitingen.
On : de indicator licht op. Er is geluid te horen via het
luidsprekersysteem.
Off : de indicator dooft. Er is geen geluid te horen via het
luidsprekersysteem.
5
LOUDNESS
-knop/indicator
Gebruiken wanneer u luistert met een laag volume.
On : de indicator licht op: Versterkt lage en hoge
frequenties om extra kracht te geven aan het afspelen,
zelfs bij een laag volumeniveau.
Off : de indicator dooft. Dit zou normaal op deze positie
moeten blijven.
• Deze knop werkt niet wanneer de DIRECT-knop op
AAN staat.
• Wanneer het geluidsvolume wordt verhoogd, wordt
de aanpassing die wordt geproduceerd door het
LOUDNESS-circuit verminderd.
A-70DA
31
6
2 54
7
14 1612
9
10 11 13 15
8
6 Afstandsbedieningssensor
Ontvangt de signalen van de afstandsbediening
(pagina 4).
7
PHONES
-aansluiting
Voor het aansluiten van een hoofdtelefoon (wanneer er
één is aangesloten wordt er geen geluid weergegeven
via de luidsprekers). Er wordt geen geluid weergegeven
wanneer de POWER AMP DIRECT-knop AAN is.
8 DIRECT-knop/indicator
On : de indicator licht op: Wanneer deze knop is
ingesteld op AAN, worden de geluidssignalen direct
uitgevoerd, zonder dat er via de verschillende
aanpassingcircuits wordt gegaan (BASS, TREBLE,
BALANCE, LOUDNESS). Hierdoor kunnen signalen
natuurgetrouwer worden weergegeven, maar worden
alle instellingen die u hebt gemaakt met de
bedieningselementen BASS, TREBLE, BALANCE of
LOUDNESS uitgeschakeld. Als een apparaat wordt
afgespeeld dat op de BALANCED IN-aansluitingen is
aangesloten, wordt DIRECT ingeschakeld en kan het niet
worden uitgeschakeld.
Off : de indicator dooft. Het signaal gaat door de
verschillende circuits voor frequentieaanpassingen.
Wanneer de indicator UIT is, kunnen aanpassingen
worden uitgevoerd met de bedieningselementen BASS,
TREBLE, BALANCE en LOUDNESS.
9
BASS
-toonbeheersing
Gebruiken voor het aanpassen van een
laagfrequentietoon. De middelste positie is de platte
(normale) positie. Wanneer deze naar rechts wordt
gedraaid, worden de laagfrequentietonen benadrukt en
wanneer deze naar links wordt gedraaid, wordt de
nadruk van de laagfrequentietonen verminderd.
• Deze knop werkt niet wanneer de DIRECT-knop op
AAN staat.
10
TREBLE
-toonbeheersing
Gebruiken voor het aanpassen van een
hoogfrequentietoon. De middelste positie is de platte
(normale) positie. Wanneer deze naar rechts wordt
gedraaid, worden de hoogfrequentietonen benadrukt en
wanneer deze naar links wordt gedraaid, wordt de
nadruk van de hoogfrequentietonen verminderd.
• Deze knop werkt niet wanneer de DIRECT-knop op
AAN staat.
11
BALANCE
-regeling
Dit zou normaal in de middelste positie moeten blijven.
Pas de balans aan als het geluid luider is uit een van de
luidsprekers. Als de rechterzijde luider is, draait u deze
naar links (L) en als de linkerzijde luider is, draait u deze
naar rechts (R).
• Deze knop werkt niet wanneer de DIRECT-knop op
AAN staat.
12
ATTENUATOR
-aansluitingen
(alleen A-70DA)
Indrukken wanneer u fijne aanpassingen wilt
aanbrengen aan de geluidssterkte wanneer u afspeelt op
een zeer laag volumeniveau.
13 VOLUME-regeling
Gebruiken voor het aanpassen van het volumeniveau.
(Hiermee kunt u ook het volume van de hoofdtelefoon
aanpassen.)
14
CARTRIDGE
-keuzeschakelaar
(alleen A-70DA)
Selecteer het type cartridge dat wordt gebruikt met uw
platenspeler.
15
POWER AMP DIRECT
-knop/indicator
Druk op deze knop wanneer het apparaat moet worden
gebruikt als een stroomversterker (pagina 11).
16
INPUT SELECTOR
-knop/indicators
Draai de knop naar rechts of links zodat de indicator
oplicht voor de gewenste invoerbron. Wanneer u de
knop naar rechts draait, licht de indicator naar rechts op.
Wanneer u de knop naar links draait, licht de indicator
naar links op. Wanneer u op de MUTE-knop van de
afstandsbediening drukt om het geluid te dempen,
knippert de indicator voor de invoerbron die is
geselecteerd met de INPUT SELECTOR-knop.
Page 73

Functies en displays 03
9
Nl
English
DeutschFrançais
Nederlands
Italiano Español Русский
Achterpaneel
Raadpleeg pagina’s 5-7 voor details over verbindingen.
1
PHONO IN (MM/MC)
-aansluitingen
(A-70DA)
PHONO IN (MM)-aansluitingen
(A-50DA)
2
POWER AMP DIRECT IN
-aansluitingen
Wanneer u het apparaat gebruikt als stroomversterker,
sluit u hier de voorversterker aan (pagina 11).
3 BALANCED IN-aansluitingen
(alleen A-70DA)
4 Faseselectieschakelaar
(alleen A-70DA)
Overschakelen van de fase van de BALANCED INaansluitingen.
5
DIGITAL IN USB
-aansluiting
6
SPEAKERS A
-aansluitingen
(rechterkanaal)
7
SPEAKERS B
-aansluitingen
(rechterkanaal)
8
SPEAKERS B
-aansluitingen
(linkerkanaal)
9
SPEAKERS A
-aansluitingen
(linkerkanaal)
10 GND-aansluiting (aarding platendraaier)
Deze aardingsaansluiting is ontworpen om ruis te
onderdrukken wanneer een platendraaier is
aangesloten. Dit is geen veiligheidsaarding.
11
NETWORK IN
-aansluitingen
12
SACD/CD IN
-aansluitingen
13
LINE
1-aansluitingen
14
LINE
2 IN/OUT-aansluitingen
15
DIGITAL IN OPTICAL
-aansluiting
16
DIGITAL IN COAXIAL
-aansluiting
17
CONTROL IN/OUT
-aansluiting
18
AC IN
-aansluiting
Sluit de voedingskabel hier aan en op een stopcontact.
LINE2
LINE2
LINE1
LINE1
USB
USB
COAXIAL
COAXIAL
PHONO
PHONO
(MM/MC)
(MM/MC)
SIGNAL
SIGNAL
GND
GND
NETWORK
NETWORK
SACD/CD
SACD/CD
DIGITAL IN
DIGITAL IN
ANALOG IN
ANALOG IN
OPTICAL
OPTICAL
LINE2
LINE2
OUT
OUT
POWER
POWER
AMP
AMP
DIRECT
DIRECT
BALANCED IN
BALANCED IN
NORMAL
NORMAL
INVERSION
INVERSION
PHASE
PHASE
21 2 2724
2
10 11 15 16 1817
29
3 28
12 13
5 26
14
Page 74

03 Functies en displays
10
Nl
Afstandsbediening
STANDBY/ON
A
B
APD
1
8
10
9
12
11
13
2
3
4
6
4
7
5
1
STANDBY/ON
Voor het kiezen tussen stand-by en het inschakelen van
de versterker.
2 Ingangselectietoetsen
Indrukken om een input te selecteren. Voor het
selecteren van het component dat is aangesloten op de
overeenkomstige aansluiting op het achterpaneel.
• De knop BALANCED kan niet worden gebruikt met
de A-50DA.
3 SACD PLAYER-bedieningsknoppen
Gebruiken om de Pioneer SACD-speler te bedienen.
4 NETWERKAUDIOSPELERbedieningsknoppen
Gebruiken om de Pioneer netwerkaudiospeler te
bedienen.
5
LOUDNESS
Gebruiken om het volumecircuit AAN/UIT te zetten
(pagina 8).
6
MUTE
Mute/unmute van het geluid.
7
DIRECT
Druk hierop om Direct luisteren te activeren (pagina 8).
8
DIMMER
Met deze knop kunt u het oplichten van de indicators op
het voorpaneel van het apparaat instellen op drie
niveaus (heeft geen invloed op de STANDBY-indicator).
9
POWER AMP DIRECT
Druk op deze knop wanneer het apparaat moet worden
gebruikt als een stroomversterker (pagina 11).
10
SPEAKERS A
Gebruik deze knop om te luisteren naar het
luidsprekersysteem dat is aangesloten op de
SPEAKERS A-aansluitingen.
11
SPEAKERS B
Gebruik deze knop om te luisteren naar het
luidsprekersysteem dat is aangesloten op de
SPEAKERS B-aansluitingen.
12
VOLUME +/–
Gebruik deze knop om het volume te regelen.
13
APD
Gebruiken om de functie Auto uitschakelen in te stellen
op AAN/UIT (pagina 12).
Page 75

Bediening 04
11
Nl
English
DeutschFrançais
Nederlands
Italiano Español Русский
Hoofdstuk 4:
Bediening
Afspelen
1 Schakel de stroom van de
weergaveapparatuur uit.
2 Schakel de voeding van het toestel IN.
• Als het apparaat in stand-bymodus is, drukt u op de
knop STANDBY/ON van de afstandsbediening.
3 Selecteer de bron die u wenst weer te
geven.
Selecteer de weergavecomponent.
• Wanneer u de bedieningselementen van het
voorpaneel gebruikt, draait u aan de INPUT
SELECTOR-knop.
• Als in het geval van de A-70DA, PHONO is
geselecteerd, gebruikt u de CARTRIDGEkeuzeschakelaar om het type cartridge aan te
geven dat met uw platenspeler wordt gebruikt, MM
() of MC ().
4 Start de weergave van het apparaat dat
u heeft geselecteerd in stap 1.
5 Pas het weergavevolume aan met de
VOLUME
-bediening.
6 Regel de toon volgens uw voorkeur met
de
BASS
- en
TREBLE
-bedieningselementen
en met de
LOUDNESS
-knop.
Als de DIRECT-knop is ingesteld op AAN, worden deze
bedieningselementen uitgeschakeld.
3566
62
MENU
iPod
Music>
Extras>
Settings>
Shuffle Songs
Backlight
SOURCE
/I STANDBY/ON
STANDBY
iPod/iPhone
5V1A
DIRECT Hi-Bit 32 Up Sampling
SOURCE
SACD/CD-speler
Netwerkaudiospeler
Platenspeler
iPod dock,
enz.
Afspelen
Afspelen
Audio-apparaat met
gebalanceerde
uitgangsaansluitingen
Opnameapparaat
of ander apparaat
VOLUME
Let op
• De functies BASS, TREBLE, BALANCE en
LOUDNESS werken niet voor een apparaat dat is
aangesloten op de BALANCED IN-aansluitingen.
Stel de voeding in op stand-by
1 Druk op de
STANDBY/ON
-knop van
de afstandsbediening.
Wanneer u de voeding de volgende keer wilt
inschakelen, drukt u op de STANDBY/ON-knop van
de afstandsbediening.
• Als u op het voorpaneel op de knop /I STANDBY/
ON drukt, wordt de voeding uitgeschakeld. Als de
voeding is uitgeschakeld en u in dit geval op de
STANDBY/ON-knop op de afstandsbediening
drukt, wordt de voeding niet ingeschakeld. Druk op
de /I STANDBY/ON-knop op het voorpaneel om
de voeding opnieuw in te schakelen.
Wanneer u het apparaat gebruikt als
stroomversterker
Wanneer een voorversterker is aangesloten op de
POWER AMP DIRECT IN-aansluitingen van het
apparaat, kan dit worden gebruikt als een
stroomversterker.
1 Druk op de knop
POWER AMP DIRECT
op de afstandsbediening of het voorpaneel
van het toestel.
De POWER AMP DIRECT-indicator licht op.
Let op
• Wanneer de POWER AMP DIRECT-indicator is
opgelicht, veranderen de bewerkingen als volgt:
– De bedieningselementen VOLUME, BASS,
TREBLE en BALANCE op het voorpaneel van het
apparaat, zijn uitgeschakeld. Deze
aanpassingen worden bestuurd door de
component die is aangesloten op de POWER
AMP DIRECT IN-aansluitingen van het
apparaat.
– De knoppen LOUDNESS en ATTENUATOR
(alleen A-70DA) zijn uitgeschakeld.
– Wanneer de POWER AMP DIRECT-indicator is
opgelicht, wordt het volume van het apparaat
automatisch vast ingesteld op het maximale
vermogen. Wanneer u dit apparaat gebruikt als
stroomversterker, moet u het uitvoerniveau van
de component die is aangesloten op de POWER
AMP DIRECT IN-aansluitingen controleren en
dit instellen tot een laag en geschikt niveau
voordat u de POWER AMP DIRECT-indicator
inschakelt. Als het volume van de component
die is aangesloten op de POWER AMP DIRECT
IN-aansluitingen aanvankelijk is ingesteld op
een hoog uitvoerniveau, kan plots een luid
geluid worden uitgevoerd wanneer de POWER
AMP DIRECT-indicator oplicht.
– Het geluid wordt niet geproduceerd vanaf de
PHONES-stekker en LINE 2 OUT-aansluitingen.
• Raadpleeg de bedieningsinstructies voor meer
informatie over de component die is aangesloten
op de POWER AMP DIRECT IN-aansluitingen van
het apparaat.
Muziek afspelen vanaf een digitale
audiocomponent
Voer de digitale audio-ingang uit naar de aansluiting
DIGITAL IN COAXIAL of OPTICAL.
1 Maak een digitale ingangsaansluiting.
• Zie Digitale audio-ingangen op pagina 7.
2 Schakel over naar de ingang
COAXIAL
of
OPTICAL
.
Elke keer als u op de afstandsbediening op de knop
COAXIAL/OPTICAL drukt, wordt de ingang
omgeschakeld.
• Wanneer u de bedieningselementen van het
voorpaneel gebruikt, draait u aan de INPUT
SELECTOR-knop.
• Er wordt geluid weergegeven vanaf de LINE 2 OUT-
aansluitingen.
Opmerking
• Digitale signaalformaten die kunnen worden
ingevoerd naar dit apparaat, omvatten lineaire
PCM-signalen met bemonsteringsfrequenties en
kwantitatieve bits tot 192 kHz/32 bits (afhankelijk
van het aangesloten apparaat en de omgeving, kan
de bewerking mogelijk mislukken).
Page 76

04 Bediening
12
Nl
Een audioopname maken
U kunt audio opnemen dat afkomstig is van iedere willekeurige bron die is aangesloten op de versterker.
1 Selecteer de bron waar u van wenst op
te nemen.
2 Start de opname en start daarna de
weergave van de bronapparatuur.
Let op
• Controleer of de korte pinstekkers niet in de LINE 2
OUT-aansluitingen zijn gestopt, omdat hierdoor
een defect kan ontstaan.
• Audio die op de volgende aansluitingen is
aangesloten, kan niet worden uitgevoerd via de
LINE 2 OUT-aansluitingen.
-
LINE 2 IN
-
BALANCED IN
-
POWER AMP DIRECT IN
1
MENU
iPod
Music>
Extras>
Settings>
Shuffle Songs
Backlight
SOURCE
/I STANDBY/ON
STANDBY
iPod/iPhone
5V1A
DIRECT Hi-Bit 32 Up Sampling
SOURCE
SACD/CD-speler
Netwerkaudiospeler
Platenspeler
iPod dock, enz.
Audio-opnamecomponent
(cd-recorder, cassettedeck, enz.)
Afspelen
Opnemen
Instellen voor automatische stand-bystatus (Auto uitschakelen)
Deze functie schakelt het apparaat automatisch naar de stand-bymodus als er gedurende 30 minuten geen signaal
of schakelbewerking wordt gedetecteerd.
1 Als de voeding van het apparaat is INGESCHAKELD, drukt u op de
APD
-knop op de
afstandsbediening.
Wanneer deze voorwaarde is ingesteld op AAN, zal de STANDBY/APD-indicator op het voorpaneel groen oplichten.
Druk opnieuw op de knoppen om de instelling uit te schakelen.
• Deze instelling kan ook worden uitgevoerd door de knoppen LOUDNESS en POWER AMP DIRECT tegelijkertijd
in te drukken en ze 3 seconden ingedrukt te houden.
• De standaard fabrieksinstelling is AAN.
• Het draaien van de bedieningselementen TREBLE, BASS, BALANCE of VOLUME wordt niet beschouwd als een
bediening voor het opnieuw instellen van de 30 minuten-timer voor het automatisch uitschakelen.
Opmerking
• Afhankelijk van de aangesloten apparaten wordt het toestel mogelijk niet automatisch uitgeschakeld,
bijvoorbeeld als er veel ruis is.
Alle instellingen opnieuw instellen naar de standaard fabrieksinstellingen
1 Wanneer de voeding in stand-by is, houdt u de SPEAKERS A-knop en de POWER
AMP DIRECT-knop op het voorpaneel tegelijkertijd ingedrukt gedurende vijf seconden.
2 Schakel de voeding van het toestel IN.
Page 77

Gebruik van de USB DAC-functie 05
13
Nl
English
DeutschFrançais
Nederlands
Italiano Español Русский
Hoofdstuk 5:
Gebruik van de USB DAC-functie
Het stuurprogramma installeren
• Als u de DIGITAL IN USB-aansluiting wilt
gebruiken om met het toestel muziekbestanden op
de computer af te spelen, moet u op de computer
een speciaal stuurprogramma installeren.
Raadpleeg de Pioneer-website voor meer
informatie. De instructiehandleiding bevat ook
informatie over de installatieprocedure en de
instellingen op de computer, dus raadpleeg hem.
Muziek afspelen vanaf een computer
Gebruik deze functie voor het afspelen van digitale
audio-invoer naar de DIGITAL IN USB-poort op het
achterpaneel van het apparaat.
1 Sluit het apparaat aan op een computer
via een USB-kabel (pagina 7).
2 Druk op
USB
om
DIGITAL IN USB
te
selecteren als de invoerbron.
• Wanneer u de bedieningselementen van het
voorpaneel gebruikt, draait u aan de INPUT
SELECTOR-knop.
• Er wordt geluid weergegeven vanaf de LINE 2 OUT-
aansluitingen.
3 Start het afspelen op de computer.
Opmerking
• Als u dit toestel met een USB-kabel op een
computer aansluit om muziekbestanden af te
spelen, kan het toestel de volgende signalen
invoeren:
Lineaire PCM
– Kwantitatieve bits: 16 bits, 24 bits, 32 bits
– Bemonster ingsfrequentie: 44,1 kHz, 48 kHz, 88,2
kHz, 96 kHz, 176,4 kHz, 192 kHz, 352,8 kHz, 384
kHz
DSD
– Bemonsteringsfrequentie: 2,8 MHz, 5,6 MHz,
11,2 MHz
• Het afspelen kan niet worden bediend vanaf dit
apparaat tijdens het gebruik van deze functie.
Gebruik uw computer om het afspelen te beheren.
• Wanneer u de USB-kabel loskoppelt, moet u altijd
eerst het afspelen op de computer stoppen.
• Er wordt mogelijk geen geluid weergegeven als uw
computer USB 2.0 HS niet ondersteunt.
• Dit apparaat biedt geen ondersteuning voor het
gebruik van een USB-hub. Gebruik altijd een USBkabel om het apparaat direct aan te sluiten op de
computer.
Page 78

06 Bijkomende informatie
14
Nl
Hoofdstuk 6:
Bijkomende informatie
Problemen oplossen
Vaak worden onjuiste handelingen verward met problemen of storingen. Wanneer u denkt dat er iets mis is met dit
apparaat, controleer dan eerst de onderstaande punten. Soms kan de storing veroorzaakt worden door een ander
component. Controleer daarom ook de andere componenten en elektrische apparatuur die gebruikt wordt. Als u het
probleem aan de hand van de gegeven maatregelen niet kunt verhelpen, dient u contact op te nemen met uw
dichtstbijzijnde officiële Pioneer-servicecentrum of met uw vakhandelaar om het apparaat te laten repareren.
• Als dit toestel niet naar behoren functioneert vanwege externe effecten zoals statische elektriciteit, trek dan de
stekker uit het stopcontact en steek hem weer in om het toestel weer normaal te doen werken.
Probleem Oplossing
Het apparaat gaat niet aan. •Is de voedingsstekker losgekoppeld van het stopcontact? Sluit de voedingsstekker
correct aan op het stopcontact (pagina 7).
•Is de voedingskabel losgekoppeld van de AC IN-aansluiting? Sluit de voedingskabel
correct aan (pagina 7).
De voeding wordt uitgeschakeld. •Is de functie Automatisch uitschakelen AAN? Als u niet wilt dat het apparaat
automatisch wordt uitgeschakeld, moet u de functie Automatisch uitschakelen
deactiveren (pagina 12).
De voeding is uitgeschakeld en de
STANDBY/APD
-indicator knippert
herhaaldelijk drie keer.
•Het beveiligingscircuit is geactiveerd. Dit wordt veroorzaakt wanneer een geluid met
een zeer lage frequentie wordt weergegeven aan een hoog volumeniveau.
- Schakel de voeding UIT, wacht minstens één minuut en schakel vervolgens de
voeding opnieuw IN. Speel de muziek af op een lager volumeniveau.
- Als de
STANDBY/APD
-indicator vier keer knippert nadat de voeding opnieuw is
ingeschakeld, betekent dit dat er een storing is van de kanalen van het toestel.
Koppel de voedingskabel los en raadpleeg uw leverancier of een Pioneer
servicestation in uw buurt.
De voeding werd uitgeschakeld en de
STANDBY/APD
-indicator knippert
een keer om de twee seconden.
•De interne temperatuur van het apparaat is gestegen en het veiligheidscircuit heeft
gewerkt.
- Schakel de voeding UIT en wacht een of meer minuten. Laat de temperatuur van
het apparaat afkoelen voordat u de voeding opnieuw INSCHAKELT.
- Installeer het apparaat op een locatie met een betere ventilatie.
- Controleer of het apparaat correct is geïnstalleerd. Als het apparaat opnieuw wordt
ingeschakeld zonder dat het heeft kunnen afkoelen, kunnen dezelfde symptomen
optreden (pagina 4).
De voeding werd uitgeschakeld en de
STANDBY/APD
-indicator knippert
herhaaldelijk twee keer.
•Gebruikt u luidsprekers met impedantiewaarden die niet worden ondersteund door
dit apparaat? Controleer de normale impedantiewaarde van de luidspreker (pagina 6).
•Zijn er luidsprekerkabels losgekoppeld van de
SPEAKERS
-aansluiting en zijn er
andere draden die het oppervlak van het achterpaneel raken? Koppel de voedingskabel
los en sluit de luidsprekerkabels correct aan (pagina 6).
De voeding werd uitgeschakeld en de
STANDBY/APD
-indicator knippert
herhaaldelijk zes keer.
•Het beveiligingscircuit is geactiveerd. Dit wordt veroorzaakt wanneer een geluid met
een zeer hoge frequentie wordt weergegeven aan een hoog volumeniveau.
- Verlaag het volume en probeer opnieuw af te spelen.
- Als hetzelfde symptoom verschijnt wanneer de voeding wordt UITGESCHAKELD en
opnieuw INGESCHAKELD, kan het circuit van het apparaat beschadigd raken.
Koppel de voedingskabel los en raadpleeg uw leverancier of een Pioneer
servicestation in uw buurt.
De
STANDBY/APD
-indicator knippert
herhaaldelijk vier keer, vijf keer of
zeven keer, en de voeding wordt niet
ingeschakeld.
•Het circuit van het apparaat is beschadigd. Koppel de voedingskabel los en
raadpleeg uw leverancier of een
erkend Pioneer servicepunt
in uw buurt.
Er is geen geluid als u een functie
selecteert.
•Een verbindingskabel is losgekoppeld of onjuist aangesloten. Controleer uw
verbindingen (pagina 5).
•De aansluitingen of pinstekkers op een kabel zijn vuil. Veeg eventueel vuil af van de
aansluitingen en pinstekkers.
•Controleer of de ingangsselectie voor het apparaat is ingesteld op de gewenste
weergavecomponent. Stel de selectieknop correct in (pagina 11).
•Druk op
MUTE
op de afstandsbediening om het dempen uit te schakelen (pagina 10).
Er komt geen geluid uit een
luidspreker.
•Zijn de aansluitkabels of luidsprekerkabels aan één zijde losgekoppeld. Sluit veilig
opnieuw aan (pagina 5).
De afstandsbediening doet het niet. •Vervang de batterij (pagina 4).
•Blijf binnen 7 m en 30° van de sensor op het voorpaneel (pagina 4).
•Verwijder het obstakel of ga op een andere plaats zitten of staan.
•Zorg dat er geen direct licht valt op de sensor op het voorpaneel.
•Is de besturingskabel voor een component verkeerd aangesloten? Controleer of de
aansluitingen juist zijn (pagina 6).
Kan invoerbron niet wijzigen. •Controleer of de
POWER AMP DIRECT
-functie AAN is. Indien dat zo is, drukt u op de
POWER AMP DIRECT
-knop op het voorpaneel om de functie UIT te schakelen
(pagina 11).
Geluid van de digitale ingang wordt
niet uitgevoerd.
•De digitale indeling van het uitgangsapparaat wordt niet ondersteund. Als het
uitvoerapparaat is ingesteld op een ander audiosignaal (Dolby Digital, DTS, enz.) dan
PCM, zet de instelling dan op PCM.
Geluid van de digitale ingang wordt
niet uitgevoerd als een SACD wordt
afgespeeld.
•Veel SACD-spelers (inclusief Blu-ray-spelers en dvd-spelers die compatibel zijn met
SACD-weergave) ondersteunen geen digitale uitvoer wanneer een SACD wordt
afgespeeld. Controleer de specificaties van de SACD-speler. Of speel de audio af via
een analoge aansluiting.
Er is geen geluid hoorbaar wanneer
een lineair PCM-signaal met een
frequentie van 96 kHz of meer wordt
ingevoerd naar de
DIGITAL IN
COAXIAL
-aansluiting.
•Het geluid wordt mogelijk niet juist uitgevoerd, afhankelijk van de digitale coaxiale
kabel die wordt gebrui kt. Probeer de kabel (afz onderlijk verkrijgbaar) te ver vangen door
een andere.
Probleem Oplossing
Page 79

Bijkomende informatie 06
15
Nl
English
DeutschFrançais
Nederlands
Italiano Español Русский
Over de USB DAC-functie
Belangrijk
• Raadpleeg voor details over de computerinstellingen ook de instructiehandleiding van het stuurprogramma dat
beschikbaar is op de Pioneer-website.
Probleem Oplossing
Er kunnen geen muziekbestanden
worden afgespeeld van een computer
die via USB is aangesloten.
•Als u een computer en het toestel via USB wilt verbinden en muziekbestanden via
USB-invoer wilt afspelen, moet u op de computer een speciaal stuurprogramma
installeren dat u kunt downloaden van de Pioneer-website. Raadpleeg de Pioneerwebsite voor instructies over het installeren van het stuurprogramma.
Er wordt geen geluid weergegeven
wanneer u probeert bestanden af te
spelen op een computer.
•Zijn de volumeinstellingen correct voor het besturingsprogramma en de toepassing?
Verhoog de volumeinstellingen zoals nodig.
•Is de audio-uitvoer van het besturingssysteem ingesteld op MUTE (DEMPEN)?
Annuleer de instelling MUTE (DEMPEN).
•Worden meerdere toepassingen tegelijk uitgevoerd? Probeer de toepassingen die
niet in gebruik zijn, te sluiten.
•Is de audio-uitgang goed ingesteld in het besturingssysteem of de toepassing die
wordt gebruikt? Selecteer “Pioneer A-70DA A-50DA USB Audio”.
Er is geen geluid bij gebruik van de
USB-ingang.
•Is een ander apparaat geselecteerd in de computerinstellingen, of is het geluid
gedempt in de computerinstellingen? Controleer de instellingen van de computer.
•Is het toestel juist aangesloten? Wordt het toestel door de computer gedetecteerd?
Als het toestel naar de USB-ingang wordt overgeschakeld nadat het op de computer is
aangesloten, kan een ander toestel geselecteerd zijn in de instellingen van de
computer. Selecteer in dat geval het toestel opnieuw. Controleer ook de verbinding.
•Worden de bestandsindeling, het besturingssysteem en de sof tware ondersteund?
Controleer de ondersteuning voor het besturingssysteem, de software en de
bemonsteringsfrequentie van het bestand.
•Is het speciale stuurprogramma op de computer geïnstalleerd? Op de computer
moet een speciaal stuurprogramma geïnstalleerd zijn. Raadpleeg de Pioneer-website
voor meer informatie.
Er zijn niet-muzikale
computergeluiden van de USB -ingang
hoorbaar.
•Afhankelijk van de computerinstellingen kunnen het opstartgeluid, geluiden voor
foutmeldingen en andere geluiden van de computer via het toestel worden
weergegeven. Controleer de instellingen van de computer.
Bij gebruik van een andere bron dan
de USB-ingang kunnen de
muziekbestanden op de computer niet
worden weergegeven.
•Als de ingang niet USB is, wordt het toestel door de computer herkend. Schakel de
ingang over naar USB en selecteer het toestel opnieuw in de geluidsinstellingen van
de computer.
Als in de geluidsinstellingen van de
computer 384 kHz of 356 kHz is
ingesteld, stopt een browser of
programma en wordt de audio zonder
geluid afgespeeld.
•De browser of het programma ondersteunt 384 kHz of 356 kHz niet. Controleer de
specificaties van de browser of het programma.
Reiniging van het toestel
• Gebruik een poetsdoek of een droge doek om stof
en vuil van het toestel te vegen.
• Wanneer het buitenoppervlak van het toestel vuil is,
veeg het dan schoon met een zachte doek die u in
een neutraal reinigingsmiddel, vijf- tot zesmaal
verdund in water, heeft gedompeld en goed heeft
uitgewrongen. Gebruik geen meubelwas of
meubelreinigers.
• Gebruik nooit verdunner, benzine, insectensprays
of andere chemische producten op of in de
omgeving van dit product, want deze kunnen
corrosie op het buitenoppervlak veroorzaken.
Page 80

06 Bijkomende informatie
16
Nl
Specificaties
Versterkergedeelte
Het aangeduide uitgangsvermogen is van toepassing bij
gebruik van een stroomvoorziening van 230 V.
• Continu uitgangsvermogen (beide
kanalen bij 20 Hz t/m 20 kHz)
A-70DA/A-50DA. . . . . . . . . . . . . . . . . . . . . . .90 W + 90 W
(THD 0,5 %, 4 )
A-70DA/A-50DA. . . . . . . . . . . . . . . . . . . . . . .65 W + 65 W
(THD 0,5 %, 8 )
Audiogedeelte
• Ingangsaansluitingen
(gevoeligheid/impedantie)
BALANCED . . . . . . . . . . . . . . . . . . . . . . . . . 200 mV/82 k
SACD/CD, NETWORK, LINE 1, LINE 2 . . . 200 mV/50 k
POWER AMP DIRECT. . . . . . . . . . . . . . . . . . . . .1 V/10 k
PHONO (MM) . . . . . . . . . . . . . . . . . . . . . . . 2,8 mV/50 k
PHONO (MC). . . . . . . . . .0.24 mV/100 (alleen A-70DA)
COAXIAL . . . . . . . . . . . . . . . . . . . . . . . . . 500 mVp-p/75
• Uitvoer (niveau/impedantie)
LINE 2 OUT . . . . . . . . . . . . . . . . . . . . . . . . 200 mV/2,2 k
• Frequentieresponse
SACD/CD, NETWORK, LINE 1, LINE 2
. . . . . . . . . . . . . . . . . . . . . . . . . . .5 Hz tot 50 kHz ± 3 dB*
• RIAA-AFWIJKING
PHONO (MM) . . . . . . . . . . . . 20 Hz t/m 20 kHz ±0,5 dB*
PHONO (MC)
. . . . . . . . . . . . . 20 Hz t/m 20 kHz ±0.5 dB*(alleen A-70DA)
* Gemeten terwijl de DIRECT-toets is ingeschakeld.
• Toonbeheersing
Bass . . . . . . . . . . . . . . . . . . . . . . . . . . . . ± 10 dB (100 Hz)
Treble . . . . . . . . . . . . . . . . . . . . . . . . . . . ± 10 dB (10 kHz)
• Signaal-ruisverhouding
(IHF SHORTED, A-NETWORK)
SACD/CD, NETWORK, LINE 1, LINE 2 . . . . . . . . 101 dB*
PHONO (MM, 5 mV invoer) . . . . . . . . . . . . . . . . . .89 dB*
PHONO (MC, 0,5 mV ingang)
. . . . . . . . . . . . . . . . . . . . . . . . . . . 74 dB*(alleen A-70DA)
* Gemeten terwijl de DIRECT-toets is ingeschakeld.
• Gegarandeerde impedantie
A, B. . . . . . . . . . . . . . . . . . . . . . . . . . . . . . . . . 4 tot 16
A+B . . . . . . . . . . . . . . . . . . . . . . . . . . . . . . . . 8 tot 32
Dubbele bedrading . . . . . . . . . . . . . . . . . . . . 4 tot 16
Diversen
Voeding vereiste . . . . . . . . . . . AC 220 V tot 230 V, 50 Hz
Stroomverbruik
A-70DA. . . . . . . . . . . . . . . . . . . . . . . . . . . . . . . . . . . . 74 W
A-50DA. . . . . . . . . . . . . . . . . . . . . . . . . . . . . . . . . . . . 72 W
In stand-by. . . . . . . . . . . . . . . . . . . . . . . . . . . . . . . . .0,3 W
Afmetingen
A-70DA. . . . . .435 mm (B) x 141,5 mm (H) x 370 mm (D)
A-50DA. . . . . .435 mm (B) x 138,5 mm (H) x 368 mm (D)
Gewicht (zonder verpakking)
A-70DA. . . . . . . . . . . . . . . . . . . . . . . . . . . . . . . . . . . 17,2 kg
A-50DA. . . . . . . . . . . . . . . . . . . . . . . . . . . . . . . . . . .11,2 kg
Accessoires
Afstandsbediening . . . . . . . . . . . . . . . . . . . . . . . . . . . . . .1
AAA/IEC R03 droge celbatterijen . . . . . . . . . . . . . . . . . . 2
Korte pinstekker . . . . . . . . . . . . . . . . . . . . . . . . . . . . . . . . 2
Netsnoer
Garantiebewijs
Waarschuwingsblad
Handleiding (dit document)
Opmerking
• De technische gegevens en het ontwerp kunnen
met het oog op verbeteringen zonder voorafgaande
kennisgeving worden gewijzigd.
• Bedrijfs- en productnamen die hierin worden
vermeld, zijn handelsmerken of gedeponeerde
handelsmerken van de respectieve bedrijven.
• “Pioneer” is een handelsmerk van Pioneer
Corporation en wordt gebruikt onder licentie.
© 2015 Onkyo & Pioneer Corporation.
Alle rechten voorbehouden.
Page 81

Bijkomende informatie 06
17
Nl
English
DeutschFrançais
Nederlands
Italiano Español Русский
Page 82

ADVERTENCIA
Este aparato no es impermeable. Para evitar el riesgo
de incendio y de descargas eléctricas, no ponga ningún
recipiente lleno de líquido (como pueda ser un vaso o
un florero) cerca del aparato ni lo exponga a goteo,
salpicaduras, lluvia o humedad
D3-4-2-1-3_A1_Es
ADVERTENCIA
Para evitar el peligro de incendio, no ponga nada con
fuego encendido (como pueda ser una vela) encima del
aparato.
D3-4-2-1-7a_A1_Es
PRECAUCIÓN PARA LA VENTILACIÓN
Cuando instale este aparato, asegúrese de dejar
espacio en torno al mismo para la ventilación con el fin
de mejorar la disipación de calor (por lo menos 30 cm
encima, 10 cm detrás, y 10 cm en cada lado).
ADVERTENCIA
Las ranuras y aberturas de la caja del aparato sirven
para su ventilación para poder asegurar un
funcionamiento fiable del aparato y para protegerlo
contra sobrecalentamiento. Para evitar el peligro de
incendio, las aberturas nunca deberán taparse ni
cubrirse con nada (como por ejemplo, periódicos,
manteles, cortinas) ni ponerse en funcionamiento el
aparato sobre una alfombra gruesas o una cama.
D3-4-2-1-7b*_A1_Es
K058a_A1_Es
Pb
Información para los usuarios en la recogida y tratamiento de los equipos al final de
su vida y de las pilas y baterías usadas.
Estos símbolos en los productos, embalaje, y/o en los documentos que los
acompañan significa que los productos eléctricos y electrónicos al final de su vida, las
pilas y baterías no deben mezclarse con los residuos generales de su hogar.
Para el tratamiento adecuado, recuperación y reciclado de los productos viejos y las
pilas usadas, por favor deposítelos en los puntos de recogida de acuerdo con su
legislación nacional.
Mediante el tratamiento correctamente de estos productos y pilas, ayudará a preservar
los recursos y prevenir cualquier efecto negativo en la salud humana y el medioambiente que podría surgir por una inadecuada manipulación de los desperdicios.
Para más información sobre recogida y reciclado de los productos viejos, pilas y
baterías, por favor contacte con su municipio, sobre localización de los puntos limpios
o diríjase al punto de venta donde compró los productos.
Estos símbolos sólo son válidos en la Unión Europea.
Para países fuera de la Unión europea:
Si desea eliminar estos artículos, por favor contactar con las autoridades locales o el
distribuidor y pida por el método correcto de tratamiento.
Símbolo para
pilas y baterías
Símbolo para
equipos
PRECAUCIÓN
PARA PREVENIR EL PELIGRO DE CHOQUE ELÉCTRICO
NO REMOVER LA TAPA NI LAS PARTES DENTRO NO
UTILIZADAS, LLAMAR UNA PERSONA CUALIFICADA.
D3-4-2-1-1_B2_Es
Page 83

3
PRECAUCIÓN
El interruptor de la alimentación /I STANDBY/ON
de este aparato no corta por completo toda la
alimentación de la toma de corriente de CA. Puesto
que el cable de alimentación hace las funciones de
dispositivo de desconexión de la corriente para el
aparato, para desconectar toda la alimentación del
aparato deberá desenchufar el cable de la toma de
corriente de CA. Por lo tanto, asegúrese de instalar
el aparato de modo que el cable de alimentación
pueda desenchufarse con facilidad de la toma de
corriente de CA en caso de un accidente. Para evitar
correr el peligro de incendio, el cable de
alimentación también deberá desenchufarse de la
toma de corriente de CA cuando no se tenga la
intención de utilizarlo durante mucho tiempo
seguido (por ejemplo, antes de irse de vacaciones).
D3-4-2-2-2a*_A1_Es
Entorno de funcionamiento
Temperatura y humedad del entorno de funcionamiento
+5 °C a +35 °C; menos del 85 % de humedad relativa
(rejillas de refrigeración no obstruidas)
No instale este aparato en un lugar mal ventilado, ni en
lugares expuestos a alta humedad o a la luz directa del
sol (o de otra luz artificial potente).
D3-4-2-1-7c*_A1_Es
Este producto es para tareas domésticas generales.
Cualquiera avería debida a otra utilización que tareas
domésticas (tales como el uso a largo plazo para
motivos de negocios en un restaurante o el uso en un
coche o un barco) y que necesita una reparación
hará que cobrarla incluso durante el período de
garantía.
K041_A1_Es
PRECAUCIONES CONCERNIENTES A LA
MANIPULACIÓN DEL CABLE DE
ALIMENTACIÓN
Tome el cable de alimentación por la clavija. No
extraiga la clavija tirando del cable. Nunca toque el
cable de alimentación cuando sus manos estén
mojadas, ya que esto podría causar cortocircuitos o
descargas eléctricas. No coloque la unidad, algún
mueble, etc., sobre el cable de alimentación.
Asegúrese de no hacer nudos en el cable ni de unirlo a
otros cables. Los cables de alimentación deberán ser
dispuestos de tal forma que la probabilidad de que
sean pisados sea mínima. Una cable de alimentación
dañado podrá causar incendios o descargas eléctricas.
Revise el cable de alimentación está dañado, solicite el
reemplazo del mismo al centro de servicio autorizado
PIONEER más cercano, o a su distribuidor.
S002*_A1_Es
Gracias por la adquisición de este
producto Pioneer.
Lea completamente este manual de instrucciones para
aprender a utilizar correctamente el aparato. Después
de haber terminado la lectura de las instrucciones,
guarde el manual en un lugar seguro para poderlo
consultar en el futuro.
Contenido
01 Antes de comenzar
Contenido de la caja . . . . . . . . . . . . . . . . . . . . . . .4
Cargar las pilas el mando a distancia . . . . . . . . . .4
Uso del mando a distancia . . . . . . . . . . . . . . . . . . .4
Instalación del amplificador. . . . . . . . . . . . . . . . . . 4
02 Conexión
Conexiones del cableado . . . . . . . . . . . . . . . . . . . . 5
El “cableado doble” . . . . . . . . . . . . . . . . . . . . . . . .5
Conectar los cables de los altavoces . . . . . . . . . . . 6
Conectar los cables de audio. . . . . . . . . . . . . . . . .6
Conexión a los terminales de entrada balanceados
(A-70DA solamente). . . . . . . . . . . . . . . . . . . . . . . .6
Conexiones de entradas de audio digital . . . . . . . . 7
Utilizar un cable USB para conectar un equipo . . .7
Utilizar control centralizado
con otros componentes de Pioneer . . . . . . . . . . . .7
Enchufado . . . . . . . . . . . . . . . . . . . . . . . . . . . . . . . 7
03 Controles y pantallas
Panel delantero . . . . . . . . . . . . . . . . . . . . . . . . . . .8
Panel posterior . . . . . . . . . . . . . . . . . . . . . . . . . . . 9
Mando a distancia . . . . . . . . . . . . . . . . . . . . . . . . 10
04 Funcionamiento
Reproducción . . . . . . . . . . . . . . . . . . . . . . . . . . .11
Establecer la alimentación en el modo de espera
. . . . . . . . . . . . . . . . . . . . . . . . . . . . . . . . . . . . . . .11
Cuando se utilice la unidad
como amplificador de potencia . . . . . . . . . . . . . . .11
Reproducir música procedente de un
componente de audio digital . . . . . . . . . . . . . . . . .11
Realizar una grabación de audio . . . . . . . . . . . . .12
Para establecer el estado de espera automático
(apagado automático) . . . . . . . . . . . . . . . . . . . . . 12
Restaurar los valores de fábrica de toda la
configuración . . . . . . . . . . . . . . . . . . . . . . . . . . . 12
05
Utilización de la función DAC de USB
Instalación del controlador . . . . . . . . . . . . . . . . . 13
Reproducir música procedente de un equipo . . .13
06 Información adicional
Resolución de problemas . . . . . . . . . . . . . . . . . . 14
Acerca de la función USB DAC . . . . . . . . . . . . . . .15
Limpieza de la unidad . . . . . . . . . . . . . . . . . . . . . 15
Especificaciones . . . . . . . . . . . . . . . . . . . . . . . . . 16
Page 84

01 Antes de comenzar
4
Es
Capítulo 1:
Antes de comenzar
Contenido de la caja
Verifique que los siguientes accesorios están en la caja
al abrirla.
• Mando a distancia
• Pilas secas AAA/IEC R03 x2
• Clavija corta x2
(En el momento de la compra, estas clavijas se han
instalado de fábrica en los terminales PHONO IN
del panel posterior.)
• Cable de alimentación (Longitud: 1,8 m)
• Tarjeta de garantía
• Hoja de precauciones (para usuarios principiantes)
• Manual de instrucciones (este documento)
ADVERTENCIA
• Guarde las piezas pequeñas fuera del alcance de
los niños. Si las ingirieran accidentalmente,
póngase de inmediato en contacto con un médico.
Nota
• Las ilustraciones incluidas en las instrucciones de
funcionamiento se pueden haber modificado o
simplificado para facilitar la explicación y, por
tanto, pueden no coincidir con la apariencia del
producto real.
• Las ilustraciones aquí utilizadas corresponden
principalmente a la unidad A-70DA.
Cargar las pilas el mando a distancia
1 Abra la tapa posterior.
2 Inserte las pilas nuevas, haciendo
coincidir las polaridades tal y como se indica
dentro de la carcasa.
3 Cierre la tapa posterior.
Las pilas incluidas con la unidad se han proporcionado
para que pueda comprobar el funcionamiento del
producto y es posible que no duren mucho. Es
recomendable utilizar pilas alcalinas que tengan mayor
duración.
ADVERTENCIA
• No utilice o almacene las pilas bajo la luz solar
directa o en otros lugares excesivamente calientes,
como el interior de un coche o cerca de un
calefactor. Esto puede ocasionar que las pilas
goteen, se sobrecalienten, exploten o se incendien.
También se puede reducir la vida o el rendimiento
de las mismas.
Precaución
El uso incorrecto de las pilas puede provocar que estas
se sulfaten o exploten. Siga las siguientes precauciones:
• Cuando inserte las pilas, asegúrese de no dañar los
muelles de los terminales de las mismas. Esto
puede provocar fugas o sobrecalentamiento en las
pilas.
• No utilice pilas distintas a las especificadas.
Asimismo, no utilice ninguna pila nueva con otra
usada.
• Cuando cargue las pilas en el mando a distancia,
colóquelas en la dirección adecuada tal y como
indican las marcas de polaridad ( y ).
• No caliente las pilas, no las desmonte ni las
exponga al fuego o al agua.
• Las pilas pueden tener diferentes voltajes, incluso
si tienen el mismo tamaño y forma. No utilice tipos
de pilas diferentes conjuntamente.
• Para evitar fugas del líquido de las pilas, quítelas si
no pretende utilizar el mando a distancia durante
un prolongado período de tiempo (1 mes o más). Si
el líquido de las pilas se fuga, quítelo con cuidado
1
2
3
del interior de la carcasa y, a continuación, inserte
pilas nuevas. Si el líquido de las pilas se fuga y
entra en contacto con su piel, elimínelo con
grandes cantidades de agua.
• Cuando elimine pilas usadas, asegúrese de
cumplir los requisitos de los reglamentos
gubernamentales y las normas de los organismos
públicos de medioambiente que correspondan a su
país o zona.
Uso del mando a distancia
El mando a distancia tiene un alcance de unos 7 metros
en un ángulo de 30º desde el sensor remoto.
Cuando utilice el mando a distancia, tenga en cuenta lo
siguiente:
• Asegúrese de que no haya obstáculos entre el
mando a distancia y el sensor del equipo.
• El funcionamiento del mando a distancia puede
verse alterado si incide sobre el sensor remoto del
equipo la luz fuerte del sol o de un fluorescente.
• Los mandos a distancia de diferentes dispositivos
pueden interferir entre ellos. Evite utilizar mandos a
distancia de otros dispositivos cerca de este
equipo.
• Cambie las pilas cuando observe que disminuye el
alcance de funcionamiento del mando a distancia.
Instalación del amplificador
Cuando instale este equipo, asegúrese de colocarlo
sobre una superficie nivelada y estable.
• No lo coloque en los siguientes lugares:
– sobre un televisor en color (puede distorsionar la
pantalla)
– cerca de una pletina (o cerca de un dispositivo
que emita un campo magnético). Podría interferir
en el sonido.
– expuesto a la luz directa del sol
– en zonas húmedas
– en zonas extremadamente frías o calientes
– en lugares donde esté expuesto a vibraciones u
otros movimientos
– en lugares con mucho polvo
– en lugares que tengan humos calientes o aceites
(como una cocina)
• No monte la unidad en un sofá o en otro objeto o
material absorbente, ya que la calidad del sonido
puede verse negativamente afectada.
7 m
30 °
30 °
Page 85

Conexión 02
5
Es
English
DeutschFrançais
Nederlands
Italiano Español Русский
Capítulo 2:
Conexión
Conexiones del cableado
Precaución
• Antes de hacer o cambiar las conexiones, apague la unidad y desenchufe el cable de alimentación de la toma de
CA.
• Conecte el cable de alimentación después de que todas las conexiones entre los dispositivos se hayan
completado.
REC
R
L
RL
PLAY
RL
AUDIO
OUTPUT
PREOUT
R
L
NORMALNORMAL
INVERSION
INVERSION
PHASE
PHASE
LINE2LINE2
LINE1
LINE1
USBUSB
COAXIAL
COAXIAL
PHONOPHONO
(MM/MC)
(MM/MC)
SIGNAL
SIGNAL
GND
GND
NETWORK
NETWORK
SACD/CD
SACD/CD
DIGITAL INDIGITAL IN
ANALOG INANALOG IN
OPTICALOPTICAL
LINE2LINE2
OUT
OUT
POWERPOWER
AMP
AMP
DIRECT
DIRECT
BALANCED INBALANCED IN
L
R
L
R
L
R
L
R
L
R
L
R
L
R
L
R
L
R
L
R
L
R
L
R
L
R
LRL
R
LRL
R
LRL
R
L
R
L
R
MENU
iPod
Music>
Extras>
Settings>
Shuffle Songs
Backlight
MASTER
VOLUME
STANDBY/ON
INPUT
SELECTOR
iPodiPhoneiPadHDMI
ADVANCED
MCACC
FLOFF
SOURCE
/I STANDBY/ON
STANDBY
iPod/iPhone
5V1A
DIRECT Hi-Bit 32Up Sampling
SOURCE
Conectores PRESALIDA de
preamplificador o amplificador de AV
Sistema de altavoces B
Giradiscos
Derecha
Izquierda
Dispositivo de audio con
terminales de salida balanceados
Dispositivo de
grabación u otro
dispositivo
Panel posterior
de esta unidad
Sistema de altavoces A
Derecha Izquierda
Cable de
alimentación
(incluido)
Precaución
• El terminal SIGNAL GND se proporciona para
reducir el ruido cuando la unidad se conecta a
componentes como una pletina analógica.
• Los terminales PHONO IN se proporcionan con
clavijas cortas. Estas clavijas no se deben quitar
excepto cuando se conecta una pletina. Asegúrese
de guardar las clavijas cortas en un lugar seguro.
• No inserte las clavijas cortas en ningún conector
que no sea en los terminales PHONO IN. Si se
conectan en cualquier otro terminal, se pueden
producir averías.
• No conecte los terminales PHONO IN a ningún
componente que no sea una pletina; asimismo, no
realice la conexión con una pletina que cuente con
un ecualizador integrado. Se puede producir una
salida de sonido excesivamente alta, lo que dañaría
los altavoces u otros dispositivos.
• Los terminales PHONO IN de la unidad A-50DA
están diseñados para utilizarse con pletinas
equipadas con cartuchos de tipo MM (imán móvil).
Las pletinas con cartuchos de tipo MC (bobina
móvil) no se pueden utilizar.
• Asegúrese de no doblar los cables por encima del
equipo (tal como se muestra en la ilustración). Si
esto sucede, el campo magnético producido por
los transformadores de este equipo podría provocar
un zumbido en los altavoces.
• Los terminales POWER AMP DIRECT de la unidad
nunca se deben conectar a ningún otro conector
del componente excepto a PRE-AMP OUT.
• Si su giradiscos tiene un cable de toma a tierra,
asegúrelo al terminal de toma a tierra de este
amplificador.
Nota
• Cuando conecte una pletina de casete, se puede
escuchar ruido en función de la ubicación de
instalación elegida. Este ruido está causado por el
flujo de fuga del transformador del amplificador. En
este caso, cambie la ubicación de la instalación o
aleje la pletina de amplificador.
• iPod es una marca comercial de Apple Inc.,
registrada en EE.UU. y en otros países.
El “cableado doble”
Esta unidad se puede utilizar con altavoces que
admiten cableado doble. Asegúrese de realizar las
conexiones de alta y baja frecuencia correctamente.
• Durante la reproducción, asegúrese de que tanto el
botón SPEAKERS A como el botón SPEAKERS B
están ACTIVADOS (página 8).
Precaución
• Cuando utilice cableado doble para conectar
altavoces, evite efectos adversos en el amplificador
asegurándose de quitar las barras de cortocircuito
de ALTA y BAJA proporcionadas con los altavoces.
Para obtener información detallada, consulte las
instrucciones proporcionadas con los altavoces.
HIGH
LOW
HIGH
LOW
Sistema de altavoces
Izquierda
Sistema de altavoces
Derecha
Panel
posterior de
esta unidad
Quite la barra de
cortocircuito entre
los terminales + y –.
Reproductor de
SACD/CD
Reproductor de audio
de red
Base de acoplamiento para
iPod dock, etc.
Page 86

02 Conexión
6
Es
• Cuando utilice altavoces con circuitos de red
extraíbles, tenga en cuenta que si la red se quita, no
tendrá ningún efecto y se pueden provocar daños al
altavoz.
• Otro método de conexión consiste en conectar los
terminales SPEAKERS A a ALTA y los terminales
SPEAKERS B a BAJA (a la inversa de lo que se
muestra en la ilustración).
Conectar los cables de los altavoces
1 Retuerza los núcleos de los cables.
2 Afloje la tuerca del terminal
SPEAKERS
e
inserte el cable del altavoz en el orificio
visible en el eje de dicho terminal.
3 Vuelva a apretar la tuerca del terminal.
Precaución
• Cuando utilice solamente un juego de
terminales de altavoz (SPEAKERS A o SPEAKERS
B), o cuando utilice conexiones de cableado
doble, el altavoz utilizado debe tener una
impedancia nominal de entre 4 y 16 .
Cuando utilice ambos juegos de terminales, los
altavoces conectados deben tener una
impedancia nominal de entre 8 y 32 .
Consulte las instrucciones que acompañan a los
altavoces para obtener detalles relacionados
con el valor de impedancia.
• Asegúrese de que los terminales positivo y negativo
(+/–) del amplificador coinciden con los de los
altavoces.
• Por estos terminales de altavoz circula tensión
ACTIVA que es PELIGROSA. Para evitar el peligro
de descargas eléctricas al conectar o desconectar
los cables de altavoz, desenchufe el cable de
alimentación antes de tocar las partes de los cables
que no están aisladas.
• Asegúrese de que el hilo del altavoz desnudo está
perfectamente retorcido e insertado
completamente en el terminal del altavoz. Si
cualquiera de los hilos del altavoz desnudos tocan
el panel posterior se puede provocar un corte de
alimentación como medida de seguridad.
Conectar los cables de audio
Conecte el enchufe de color blanco en el conector
izquierdo (L) y el enchufe de color rojo en el conector
derecho (R). Asegúrese de insertar los enchufes
completamente en los conectores.
123
10 mm
Izquierdo
(blanco)
Derecho (rojo)
Conexión a los terminales de entrada
balanceados (A-70DA solamente)
Conecte los terminales BALANCED IN de la unidad a un
reproductor SACD, DAC USB, un reproductor de red u
otro dispositivo con terminales de salida balanceados.
Precaución
• Las funciones BASS, TREBLE, BALANCE y
LOUDNESS no funcionan para un dispositivo
conectado a los terminales BALANCED IN.
La fase puede ser diferente en función del dispositivo
que se desee conectar. Utilice el conmutador selector de
fase del panel posterior de la unidad para ajustar la fase.
• Ajuste inicial (Núm. 2 CALIENTE)
• Ajustes con la polaridad cambiada
(Núm. 3 CALIENTE)
Nota
• Para obtener más información sobre la fase de los
terminales de salida balanceados del dispositivo
que se desea conectar, consulte el manual de
instrucciones del dispositivo.
• Cuando conecte la unidad a un reproductor
Pioneer, adapte la fase al ajuste inicial (Núm. 2
CALIENTE).
LINE2LINE2
LINE1
LINE1
USB
USB
COAXIALCOAXIAL
NETWORKNETWORK
SACD/CD
SACD/CD
DIGITAL IN
DIGITAL IN
ANALOG IN
ANALOG IN
OPTICAL
OPTICAL
LINE2
LINE2
OUT
OUT
P.P.AMPAMP
DIRECT
DIRECT
BALANCED INBALANCED IN
NORMALNORMAL
INVERSION
INVERSION
PHASEPHASE
RL
Dispositivo de audio con
terminales de salida
balanceados
Panel posterior de la unidad A-70DA
NORMAL
NORMAL
INVERSION
INVERSION
PHASE
PHASE
1 Conexión
a tierra
3
FRÍO (-)
2 CALIENTE (+)
NORMAL
NORMAL
INVERSION
INVERSION
PHASE
PHASE
1 Conexión
a tierra
2
FRÍO (-)
3 CALIENTE (+)
Page 87

Conexión 02
7
Es
English
DeutschFrançais
Nederlands
Italiano Español Русский
Conexiones de entradas de audio
digital
Si conecta el terminal DIGITAL IN de la unidad y la
salida de audio digital de un dispositivo de audio digital
con un cable digital que se vende por separado, puede
reproducir el audio del dispositivo digital con la unidad.
Para obtener más información sobre la salida de entrada
de audio al terminal DIGITAL IN, consulte la página 11.
Nota
• Los formatos de las señales digitales que se
pueden transmitir a esta unidad incluyen señales
PCM lineales con tasa de muestreo y bits
cuantitativos de hasta 192 kHz/32 bits.
(Dependiendo del dispositivo conectado y del
entorno, el funcionamiento puede no ser correcto).
Utilizar un cable USB para conectar un
equipo
Si se utiliza un cable USB (se vende por separado) para
conectar el terminal DIGITAL IN USB de esta unidad al
puerto USB de un equipo, los archivos de música que se
encuentren en dicho equipo se pueden reproducir a
través de esta unidad.
Para obtener más información acerca de la salida de
entrada de señales de audio al terminal DIGITAL IN
USB, consulte la página 13.
Importante
• Se debe instalar un controlador dedicado en el
ordenador (página 13).
Nota
• Esta unidad no se puede utilizar para reproducir
archivos de audio desde un equipo a menos que
haya un reproductor multimedia instalado en el
equipo conectado.
LINE2
LINE2
LINE1
LINE1
USB
USB
COAXIAL
COAXIAL
DIGITAL IN
DIGITAL IN
IN
OPTICAL
OPTICAL
LINE2
LINE2
OUT
OUT
ED IN
NORMAL
NORMAL
INVERSION
INVERSION
PHASE
PHASE
DIGITAL OUT
COAXIAL
DIGITAL OUT
OPTICAL
Equipo de audio
digital, etc.
Cable de audio digital coaxial
(se vende por separado)
Panel posterior de la unidad A-70DA
Cable óptico de audio digital
(se vende por separado)
Equipo de audio
digital, etc.
LINE2LINE2
LINE1
LINE1
USBUSB
COAXIALCOAXIAL
DIGITAL INDIGITAL IN
OPTICAL
OPTICAL
LINE2
LINE2
OUT
OUT
NORMALNORMAL
INVERSION
INVERSION
PHASE
PHASE
USB
Cable USB
(se vende por separado)
Tipo A
Tipo B
Ordenador
Panel posterior de la unidad A-70DA
Utilizar control centralizado con otros
componentes de Pioneer
Se pueden conectar varios componentes de Pioneer
equipados con conectores CONTROL IN/OUT a la
unidad, lo que permite un control centralizado de dichos
componentes a través del sensor remoto de dicha
unidad. De esta forma se puede controlar remotamente
los componentes que no cuentan con un sensor remoto
o que están instalados en lugares donde no se puede
acceder al sensor remoto del componente.
Nota
• Para las conexiones utilice un cable con
minienchufe monoaural (sin resistor) que puede
encontrar en cualquier tienda especializada.
• Cuando conecte los conectores CONTROL IN/
OUT, los cables de audio que puede encontrar en
cualquier tienda especializada también se deben
utilizar para realizar las conexiones analógicas. La
simple conexión de los conectores CONTROL IN/
OUT no permitirá el control del sistema adecuado.
• Cuando se conecte un cable de control al conector
CONTROL IN de la unidad, esta no se podrá
controlar apuntando a ella con el mando a
distancia (el sensor remoto se deshabilita
automáticamente).
Enchufado
Importante
• Cuando salga de viaje o no vaya a utilizar la unidad
durante un prolongado período de tiempo,
desconecte siempre el cable de alimentación de su
toma de corriente eléctrica. Tenga en cuenta que
las diferentes configuraciones internas no se
perderán aunque desconecte el cable de
alimentación de su toma de corriente eléctrica
durante mucho tiempo.
• Si es necesario desenchufar el cable de
alimentación, asegúrese antes de presionar el
botón
/I
STANDBY/ON situado en el panel
delantero de la unidad para apagar esta.
Precaución
• Si utiliza un cable de alimentación distinto al
proporcionado se invalidará la garantía, ya que
Pioneer no asumirá ninguna responsabilidad por
ningún daño producido. (El cable de alimentación
proporcionado con la unidad tiene una capacidad
de corriente nominal de 10 A.)
• No utilice ningún otro cable de alimentación que
no sea el proporcionado con esta unidad.
• No utilice el cable de alimentación proporcionado
para ninguna otra cosa que no sea la aquí descrita.
Cuando haya terminado de realizar todas las
conexiones, enchufe la unidad a una toma de corriente
eléctrica alterna (CA).
1 Enchufe el cable de alimentación
proporcionado a la toma
AC IN
situada en el
panel posterior de la unidad.
2 Enchufe el otro extremo a la toma de
corriente eléctrica alterna (CA).
IN
OUT
CONTROL
Otro componente de
Pioneer equipado
con conectores
CONTROL IN/OUT
A otro
componente de
Pioneer equipado
con el conector
CONTROL IN
A-70DA
Apunte con el
mando a distancia
al sensor de la
unidad.
Mando a
distancia
A una toma de
corriente eléctrica
alterna (CA)
Panel posterior de esta unidad
Cable de
alimentación
(incluido)
Page 88

03 Controles y pantallas
8
Es
Capítulo 3:
Controles y pantallas
Panel delantero
1/I
STANDBY/ON
Permite apagar y encender el amplificador.
Cuando la alimentación está conectada, el indicador de
alimentación situado en el centro del botón se ilumina.
2Indicador
STANDBY/APD
Cuando la alimentación está establecida en el modo de
espera, el indicador se ilumina en color rojo. Cuando la
función de apagado automático (APD, Auto Power
Down) está activada, el indicador se ilumina en color
verde (página 12).
3 Botón/Indicador
SPEAKERS A
Utilice este botón para escuchar el sistema de altavoces
conectados a los terminales SPEAKERS A.
On : el indicador se ilumina. Se escucha el sonido del
sistema de altavoces.
Off : el indicador se apaga. No se escucha el sonido del
sistema de altavoces.
4 Botón/Indicador
SPEAKERS B
Utilice este botón para escuchar el sistema de altavoces
conectados a los terminales SPEAKERS B.
On : el indicador se ilumina. Se escucha el sonido del
sistema de altavoces.
Off : el indicador se apaga. No se escucha el sonido del
sistema de altavoces.
5 Botón/Indicador
LOUDNESS
Utilícelo cuando escuche con un nivel de sonido bajo.
On : el indicador se ilumina. Realza las frecuencias
bajas y altas para proporcionar más fuerza a la
reproducción, incluso a un nivel bajo de volumen.
Off : el indicador se apaga: Normalmente se debe dejar
en esta posición.
• Este botón no funciona cuando el botón DIRECT se
encuentra en la posición de encendido.
• Cuando el nivel de volumen aumenta, la cantidad
de cambio producido por el circuito LOUDNESS se
reduce.
A-70DA
31
6
2 54
7
14 1612
9
10 11 13 15
8
6 Sensor remoto
Recibe las señales del mando a distancia (página 4).
7Toma
PHONES
Utilícela para conectar los auriculares (al conectar, no
hay salida de sonido de los altavoces). No se transmite
sonido cuando el botón POWER AMP DIRECT está
ACTIVADO.
8 Botón/Indicador DIRECT
On : el indicador se ilumina. Cuando este botón está
ACTIVADO, las señales de sonido se trasmiten
directamente sin pasar por los distintos circuitos de
ajuste (BASS, TREBLE, BALANCE y LOUDNESS). Esto
permite reproducir las señales con mayor fidelidad, pero
deshabilita cualquier configuración realizada con los
controles BASS, TREBLE, BALANCE o LOUDNESS.
Durante la reproducción en un dispositivo conectado a
los terminales BALANCED IN, DIRECT se enciende y no
se puede apagar.
Off : el indicador se apaga: La señal pasa por los
diferentes circuitos de ajuste de frecuencia. Cuando el
indicador está APAGADO, los ajustes se pueden realizar
con los controles BASS, TREBLE, BALANCE y
LOUDNESS.
9 Control del tono
BASS
Se utiliza para ajustar el tono de baja frecuencia. La
posición central es la posición plana (normal). Cuando
se gira hacia la derecha, se realzan los tonos de baja
frecuencia; cuando se gira hacia la izquierda, se
disminuyen dichos tonos.
• Este botón no funciona cuando el botón DIRECT se
encuentra en la posición de encendido.
10 Control del tono
TREBLE
Se utiliza para ajustar el tono de alta frecuencia. La
posición central es la posición plana (normal). Cuando
se gira hacia la derecha, se realzan los tonos de alta
frecuencia; cuando se gira hacia la izquierda, se
disminuyen dichos tonos.
• Este botón no funciona cuando el botón DIRECT se
encuentra en la posición de encendido.
11 Control
BALANCE
Normalmente se debe dejar en la posición central.
Ajuste el balance si el sonido es más alto en uno de los
altavoces. Si el lado derecho tiene más volumen, gire
hacia la posición L (izquierda) y, viceversa, si el lado
izquierdo se escucha más, gire hacia la posición R
(derecha).
• Este botón no funciona cuando el botón DIRECT se
encuentra en la posición de encendido.
12 Botón
ATTENUATOR
(solo A-70DA)
Presione este botón cuando desee realizar ajustes
precisos en el volumen de sonido cuando la
reproducción se realice a niveles de volumen de sonido
muy bajos.
13 Control VOLUME
Se utiliza para ajustar el nivel de volumen. (También
permite ajustar el volumen del sonido de los
auriculares.)
14 Conmutador de selección
CARTRIDGE
(solo A-70DA)
Seleccione el tipo de cartucho utilizado con la pletina.
15 Botón/Indicador
POWER AMP DIRECT
Presione este botón cuando la unidad se utilice como
amplificador de potencia (página 11).
16 Mando/Indicadores
INPUT SELECTOR
Gire el mando en el sentido de las agujas del reloj o en
sentido contrario hasta que se ilumine el indicador
correspondiente a la fuente de entrada que desea. Al
girar el mando en el sentido de las agujas del reloj el
indicador iluminado se moverá hacia la derecha. Al girar
en sentido contrario a las agujas del reloj, se moverá
hacia la izquierda. Cuando el botón MUTE del mando a
distancia se presione para silenciar el sonido, el
indicador de la fuente de entrada seleccionada con el
mando INPUT SELECTOR parpadeará.
Page 89

Controles y pantallas 03
9
Es
English
DeutschFrançais
Nederlands
Italiano Español Русский
Panel posterior
Consulte las páginas 5-7 para obtener detalles relacionados con las conexiones.
1Terminales
PHONO IN (MM/MC)
(A-70DA)
Terminales PHONO IN (MM) (A-50DA)
2Terminales
POWER AMP DIRECT IN
Cuando utiliza la unidad como amplificador de potencia,
conecte el preamplificador aquí (página 11).
3 Terminales BALANCED IN
(A-70DA solamente)
4 Conmutador selector de fase
(A-70DA solamente)
Conmuta la fase de los terminales BALANCED IN.
5Terminal
DIGITAL IN USB
6Terminales
SPEAKERS A
(canal Derecho)
7Terminales
SPEAKERS B
(canal Derecho)
8Terminales
SPEAKERS B
(canal
Izquierdo)
9Terminales
SPEAKERS A
(canal
Izquierdo)
10 Terminal GND (tierra giratoria)
Este terminal de tierra está diseñado para ayudar a
reducir el ruido cuando se conecta una pletina. No es un
terminal de seguridad.
11 Terminales
NETWORK IN
12 Terminales
SACD/CD IN
13 Terminales LINE 1
14 Terminales LINE 2 IN/OUT
15 Terminal DIGITAL IN OPTICAL
16 Terminal
DIGITAL IN COAXIAL
17 Toma
CONTROL IN/OUT
18 Toma
AC IN
Conecte el cable de alimentación aquí y a una toma de
corriente eléctrica alterna (CA).
LINE2
LINE2
LINE1
LINE1
USB
USB
COAXIAL
COAXIAL
PHONO
PHONO
(MM/MC)
(MM/MC)
SIGNAL
SIGNAL
GND
GND
NETWORK
NETWORK
SACD/CD
SACD/CD
DIGITAL IN
DIGITAL IN
ANALOG IN
ANALOG IN
OPTICAL
OPTICAL
LINE2
LINE2
OUT
OUT
POWER
POWER
AMP
AMP
DIRECT
DIRECT
BALANCED IN
BALANCED IN
NORMAL
NORMAL
INVERSION
INVERSION
PHASE
PHASE
21 2 2724
2
10 11 15 16 1817
29
3 28
12 13
5 26
14
Page 90

03 Controles y pantallas
10
Es
Mando a distancia
STANDBY/ON
A
B
APD
1
8
10
9
12
11
13
2
3
4
6
4
7
5
1
STANDBY/ON
Cambia el amplificador entre standby y on.
2 Botones del selector de entrada
Púlselos para seleccionar una fuente de entrada.
Seleccionan el componente conectado a la entrada
correspondiente del panel posterior.
•El botón BALANCED no se puede usar con A-50DA.
3 Botones de control SACD PLAYER
Utilícelos para controlar el reproductor de SACD de
Pioneer.
4 Botones de control NETWORK AUDIO
PLAYER
Utilícelos para controlar el reproductor de audio de red
de Pioneer.
5
LOUDNESS
Utilícelos para ACTIVAR o DESACTIVAR el circuito de
intensidad de volumen (página 8).
6
MUTE
Silencia/activa el sonido.
7
DIRECT
Púlselo para acceder a “Escucha directa” (página 8).
8
DIMMER
Este botón permite que la iluminación de los
indicadores del panel delantero de la unidad se
establezca en tres niveles (no afecta al indicador
STANDBY).
9
POWER AMP DIRECT
Presione este botón cuando la unidad se utilice como
amplificador de potencia (página 11).
10
SPEAKERS A
Utilice este botón para escuchar el sistema de altavoces
conectados a los terminales SPEAKERS A.
11
SPEAKERS B
Utilice este botón para escuchar el sistema de altavoces
conectados a los terminales SPEAKERS B.
12
VOLUME +/–
Utilícelo para ajustar el volumen de escucha.
13
APD
Utilícelo para ACTIVAR o DESACTIVAR la función de
apagado automático (página 12).
Page 91

Funcionamiento 04
11
Es
English
DeutschFrançais
Nederlands
Italiano Español Русский
Capítulo 4:
Funcionamiento
Reproducción
1 Apague el componente de reproducción.
2 ENCIENDA la unidad.
• Si la unidad se encuentra en el modo de espera,
presione el botón STANDBY/ON del mando a
distancia.
3 Seleccione la fuente que desea
reproducir.
Seleccione el componente de reproducción.
• Cuando utilice los controles del panel delantero,
gire el mando INPUT SELECTOR.
• En el caso de la unidad A-70DA, si selecciona
PHONO, utilice el conmutador de selección
CARTRIDGE para designar el tipo de cartucho
utilizado con la pletina, bien MM () o bien MC
().
4 Inicie la reproducción del componente
seleccionado en el paso 1.
5 Ajuste el volumen de reproducción con
el control
VOLUME
.
6 Ajuste el tono conforme a sus
preferencias utilizando los controles
BASS
y
TREBLE
, y el botón
LOUDNESS
.
Si el botón DIRECT se ha establecido en ACTIVADO,
estos controles se deshabilitan.
3566
62
MENU
iPod
Music>
Extras>
Settings>
Shuffle Songs
Backlight
SOURCE
/I STANDBY/ON
STANDBY
iPod/iPhone
5V1A
DIRECT Hi-Bit 32 Up Sampling
SOURCE
Reproductor de
SACD/CD
Reproductor
de audio de red
Giradiscos
Base de acoplamiento
para iPod dock, etc.
Reproducción
Reproducción
Dispositivo de audio
con terminales de
salida balanceados
Dispositivo de
grabación u
otro dispositivo
VOLUME
Precaución
• Las funciones BASS, TREBLE, BALANCE y
LOUDNESS no funcionan para un dispositivo
conectado a los terminales BALANCED IN.
Establecer la alimentación en el modo de
espera
1 Presione el botón
STANDBY/ON
del
mando a distancia.
La próxima vez que desee encender la alimentación,
presione el botón STANDBY/ON del mando a
distancia.
• Si presiona el botón /I STANDBY/ON del panel
delantero, la alimentación se desconectará. En
este caso, si la alimentación está apagada, al
presionar el botón STANDBY/ON del mando a
distancia, dicha alimentación no se conectará.
Para encender de nuevo la alimentación, presione
el botón /I STANDBY/ON del panel delantero.
Cuando se utilice la unidad como
amplificador de potencia
Cuando se conoce un preamplificador a los terminales
POWER AMP DIRECT IN de la unidad, esta se puede
utilizar como amplificador de potencia.
1 Presione el botón POWER AMP DIRECT
en el mando a distancia o el panel delantero
de la unidad.
El indicador POWER AMP DIRECT se iluminará.
Precaución
• Cuando el indicador POWER AMP DIRECT se
ilumine, las operaciones cambiarán tal y como se
indica a continuación:
–Los controles VOLUME, BASS, TREBLE y
BALANCE del panel delantero de la unidad se
deshabilitan. Estos ajustes están controlados
por el componente conectado a los terminales
POWER AMP DIRECT IN de la unidad.
–Los botones LOUDNESS y ATTENUATOR (solo
A-70DA) se deshabilitan.
– Cuando el indicador POWER AMP DIRECT está
iluminado, el volumen del sonido de la unidad
se fijará automáticamente en su valor de salida
máximo. Cuando utilice esta unidad como
amplificador de potencia, compruebe el nivel de
salida del componente conectado a los
terminales POWER AMP DIRECT IN y
establézcalo en un nivel bajo apropiado antes de
que se encienda el indicador POWER AMP
DIRECT. Si el volumen del sonido del
componente conectado a los terminales
POWER AMP DIRECT IN está inicialmente
establecido en un nivel de salida alto, se puede
transmitir un sonido elevado repentinamente
cuando el indicador POWER AMP DIRECT se
ilumine.
– El sonido no se genera desde el conector
PHONES y los terminales LINE 2 OUT.
• Para obtener más información, consulte las
instrucciones de funcionamiento del componente
conectado a los terminales POWER AMP DIRECT
IN de la unidad.
Reproducir música procedente de un
componente de audio digital
Emita la entrada de audio digital al terminal DIGITAL IN
COAXIAL u OPTICAL.
1 Realice una conexión de entrada digital.
• Consulte la sección Conexiones de entradas de
audio digital en la página 7.
2 Cambie a la entrada COAXIAL o
OPTIACAL.
Cada pulsación del botón COAXIAL/OPTICAL del
mando a distancia conmuta la entrada
alternativamente.
• Cuando utilice los controles del panel delantero,
gire el mando INPUT SELECTOR.
• El sonido se genera desde los terminales LINE 2
OUT.
Nota
• Los formatos de las señales digitales que se
pueden transmitir a esta unidad incluyen señales
PCM lineales con tasa de muestreo y bits
cuantitativos de hasta 192 kHz/32 bits
(Dependiendo del dispositivo conectado y del
entorno, el funcionamiento puede no ser correcto).
Page 92

04 Funcionamiento
12
Es
Realizar una grabación de audio
Puede realizar una grabación de audio desde cualquier fuente de audio conectada al amplificador.
1 Seleccione la fuente que desea grabar. 2 Inicie la grabación y, a continuación, la
reproducción del componente fuente.
Precaución
• Confirme que las clavijas cortas no están insertas
en los terminales LINE 2 OUT, ya que, si se
insertan, se puede producir una avería.
• El audio conectado a los siguientes terminales no
se puede emitir desde los terminales LINE 2 OUT.
-
LINE 2 IN
-
BALANCED IN
-
POWER AMP DIRECT IN
1
MENU
iPod
Music>
Extras>
Settings>
Shuffle Songs
Backlight
SOURCE
/I STANDBY/ON
STANDBY
iPod/iPhone
5V1A
DIRECT Hi-Bit 32 Up Sampling
SOURCE
Reproductor de
SACD/CD
Reproductor de audio
de red
Giradiscos
Base de
acoplamiento para
iPod dock, etc.
Reproducción
Grabación
Componente de grabación de audio
(grabadora de CD, pletina de cinta, etc.)
Para establecer el estado de espera automático (apagado automático)
Esta función cambia automáticamente la unidad al modo de espera si no se detecta señal o no se realiza ninguna
operación durante 30 minutos.
1 Si la alimentación de la unidad está CONECTADA, presione el botón
APD
del mando a
distancia.
Cuando esta condición está ACTIVADA, el indicador STANDBY/APD del panel delantero de la unidad se ilumina en
verde. Presione de nuevo los botones para deshabilitar la configuración.
• Esta configuración también se puede realizar presionando los botones LOUDNESS y POWER AMP DIRECT del
panel delantero simultáneamente y manteniéndolos presionados durante 3 segundos.
• La configuración predeterminada de fábrica está ACTIVADA.
• El giro de los controles TREBLE, BASS, BALANCE o VOLUME no será tenido en cuenta como funcionamiento
del control desde el punto de vista del restablecimiento del temporizador de 30 minutos de la función de
apagado automático.
Nota
• En función de los dispositivos conectados, es posible que la unidad no se apague automáticamente por motivos
tales como que haya mucho ruido.
Restaurar los valores de fábrica de toda la configuración
1 Cuando la alimentación se encuentre en el modo de espera, mantenga presionados
los botones SPEAKERS A y POWER AMP DIRECT del panel delantero simultáneamente
durante cinco segundos.
2 ENCIENDA la unidad.
Page 93

Utilización de la función DAC de USB 05
13
Es
English
DeutschFrançais
Nederlands
Italiano Español Русский
Capítulo 5:
Utilización de la función DAC de
USB
Instalación del controlador
• Para usar el terminal DIGITAL IN USB para
reproducir archivos de música en el ordenador con
esta unidad, debe instalar un controlador dedicado
en el ordenador. Para obtener más información,
visite el sitio web de Pioneer. El manual de
instrucciones también contiene información
acerca del procedimiento de instalación y la
configuración del ordenador, por lo que también
debe consultar el manual de instrucciones.
Reproducir música procedente de un
equipo
Utilice esta función para reproducir la entrada de audio
digital en el puerto DIGITAL IN USB del panel posterior
de la unidad.
1 Conectar la unidad a un equipo a través
de un cable USB (página 7).
2 Presione
USB
para seleccionar
DIGITAL
IN USB
como la fuente de entrada.
• Cuando utilice los controles del panel delantero,
gire el mando INPUT SELECTOR.
• El sonido se genera desde los terminales LINE 2
OUT.
3 Inicie la reproducción en el equipo.
Nota
• Cuando estén conectados la unidad y un ordenador
para reproducir audio con un cable USB, la unidad
podrá recibir las siguientes señales:
PCM lineal
– Bits cuantitativos: 16 bit, 24 bit, 32 bit
– Frecuencia de muestreo: 44,1 kHz, 48 kHz, 88,2
kHz, 96 kHz, 176,4 kHz, 192 kHz, 352,8 kHz, 384
kHz
DSD
– Frecuencia de muestreo: 2,8 MHz, 5,6 MHz, 11,2
MHz
• La reproducción no se puede controlar desde esta
unidad durante el uso de esta función; utilice el
equipo para controlar la reproducción.
• Cuando desconecte el cable USB, detenga siempre
primero la reproducción en el equipo.
• El sonido no se puede reproducir si el equipo no
admite HS USB 2.0.
• Esta unidad no admite el uso de un concentrador
USB. Utilice siempre un cable USB para conectar
la unidad directamente al equipo.
Page 94

06 Información adicional
14
Es
Capítulo 6:
Información adicional
Resolución de problemas
Las operaciones incorrectas se malinterpretan a menudo como problemas y errores de funcionamiento. Si cree que
este componente presenta algún defecto, compruebe los puntos siguientes. En ocasiones, el problema puede estar
en otro componente. Investigue los demás componentes y electrodomésticos que estén utilizándose. Si no puede
rectificarse el problema incluso después de haber efectuado las comprobaciones enumeradas abajo, solicite al
centro de servicio Pioneer más cercano o a su establecimiento que lleven a cabo tareas de reparación.
• Si la unidad no funciona con normalidad debido a efectos externos como la electricidad estática, desconecte el
enchufe de la toma de corriente e introdúzcalo de nuevo para volver a las condiciones de funcionamiento
normales.
Problema Solución
La unidad no se enciente. •¿Está el enchufe de alimentación desconectado de la toma de corriente eléctrica?
Conecte el enchufe de alimentación correctamente a su toma de corriente eléctrica
(página 7).
•¿Está el enchufe de alimentación desconectado del conector ENTRADA DE CA?
Conecte el cable de alimentación correctamente (página 7).
La alimentación se desconecta. •¿Está ACTIVADA la función d e apagado automático? Si no desea que la alimentación
se desconecte automáticamente, deshabilite la función de apagado automático
(página 12).
Se ha desconec tado la alimentación y
el indicador
STANDBY/APD
parpadea tres veces repetidamente.
•El circuito de protección se ha activado. Esta condición se puede producir si se
reproduce un sonido de muy baja frecuencia con un elevado nivel de volumen de
sonido.
- DESCONECTE la alimentación y espere al menos un minuto y, a continuación,
vuelva a CONECTAR la alimentación; reproduzca la música con un nivel de
volumen de sonido más bajo.
-
Tras restablecer la alimentación, si el indicador STANDBY/APD parpadea cuatro
veces, indica que los canales de la unidad tienen un funcionamiento incorrecto.
Desconecte el cable de alimentación y consulte a su distribuidor o al centro de
servicio de Pioneer más cercano.
Se ha desconec tado la alimentación y
el indicador
STANDBY/APD
una vez
cada dos segundos.
•La temperatura interna de la unidad ha aumentado y se ha activado el circuito de
seguridad.
- DESCONECTE alimentación y espere al menos un minuto para dejar que la
temperatura de la unidad descienda antes de volver a CONECTAR la alimentación.
- Instale la unidad en una ubicación con mejor ventilación.
- Confirme que la unidad está correctamente instalada; si la unidad se enciende de
nuevo sin dejar que se enfríe, pueden aparecer los mismos síntomas (página 4).
Se ha desconec tado la alimentación y
el indicador
STANDBY/APD
parpadea dos veces repetidamente.
•¿Está utilizando altavoces con valores de impedancia que no admite esta unidad?
Confirme el valor de impedancia nominal del altavoz (página 6).
•¿Están los cables del altavoz sueltos de los terminales
SPEAKERS
y tocan otros
cables o la superficie del panel posterior? Desconecte el cable de alimentación y
vuelva a conectar los cables del altavoz correctamente (página 6).
Se ha desconec tado la alimentación y
el indicador
STANDBY/APD
parpadea seis veces repetidamente.
•El circuito de protección se ha activado. Esta condición se puede producir si se
reproduce un sonido de muy alta frecuencia con un elevado nivel de volumen de
sonido.
- Reduzca el volumen del sonido e intente realizar la reproducción de nuevo.
- Si se siguen dando los mismos síntomas cuando la alimentación se DESCONECTA
y, a continuación, se CONECTA de nuevo, la circuitería de la unidad puede estar
dañada. Desconecte el cable de alimentación y consulte a su distribuidor o al
centro de servicio de Pioneer más cercano.
El indicador
STANDBY/APD
parpadea cuatro, cinco o siete veces
repetidamente y no se conecta la
alimentación.
•La circuitería de la unidad está dañada. Desconecte el cable de alimentación y
consulte a su distribuidor o al
centro de servicio autorizado de Pioneer
más
cercano.
No se emite ningún sonido cuando se
selecciona una función.
•Un cable de conexión está desconectado o no está conectado correctamente.
Compruebe las conexiones (página 5).
•Los conectores o enchufes con contactos de un cable están sucios. Quite cualquier
suciedad de los conectores y de los enchufes con contactos.
•Asegúrese de que el selector de entrada de la unidad está establecido en el
componente de reproducción que desea. Establezca el selector correctamente
(página 11).
•Presione
MUTE
en el mando a distancia para desactivar el silencio (página 10).
No hay sonido en un altavoz. •¿Están los cables de conexión o los cables del altavoz desconectados en un lado?
Vuelva a conectarlos de forma segura (página 5).
El mando a distancia no funciona. •Cambie las pilas (página 4).
•Utilícelo a una distancia no superior a 7 m y con un ángulo no mayor de 30° del
sensor remoto del panel delantero (página 4).
•Retire cualquier obstáculo o utilícelo desde otra posición.
•Evite exponer el sensor remoto del panel delantero a la luz directa.
•¿Está el cable de control para un componente conectado incor rectamente? Confirme
que las conexiones son correctas (página 7).
No se puede cambiar la fuente de
entrada.
•Compruebe si la función
POWER AMP DIRECT
está ACTIVADA. Si es así, presione el
botón
POWER AMP DIRECT
del panel delantero para DESACTIVAR dicha función
(página 11).
No se emite sonido de la entrada
digital.
•No se admite el formato digital del dispositivo de salida. Si el dispositivo de salida se
configura en una señal de audio (Dolby Digital, DTS, etc.) diferente de PCM, cambie el
ajuste a PCM.
No se emite sonido de la entrada
digital cuando se reproduce un SACD.
•Muchos reproductores SACD (incluyendo reproductores Blu-ray y reproductores de
DVD compatibles con la reproducción SACD) no están diseñados para la emisión
digital cuando reproducen en SACD. Compruebe las especificaciones del reproductor
SACD. Alternativamente, reproduzca el audio con una conexión analógica.
Nos escucha ningún sonido cuando
una señal PCM con una frecuencia de
96 kHz o superior se transmite al
terminal
DIGITAL IN COAXIAL
.
•Es posible que la salida del sonido no sea correcta dependiendo del cable coaxial
digital utilizado; intente cambiar el cable (se vende por separado) por otro.
Problema Solución
Page 95

Información adicional 06
15
Es
English
DeutschFrançais
Nederlands
Italiano Español Русский
Acerca de la función USB DAC
Importante
• Para obtener más información sobre la configuración del ordenador, consulte también el manual de
instrucciones del software del controlador disponible en el sitio web de Pioneer.
Problema Solución
No se pueden reproducir archivos de
música conectados mediante USB.
•Para conectar un ordenador y la unidad mediante USB y después reproducir los
archivos de música mediante USB, debe descargar un controlador dedicado del sitio
web de Pioneer y después instalarlo en el ordenador.
Consulte el sitio Web de Pioneer
para obtener instrucciones sobre cómo instalar el controlador.
No se genera sonido cuando se
intenta reproducir archivos en un
equipo.
•¿Es la configuración del volumen correcta para el sistema operativo y el programa de
aplicación? Establezca la configuración del volumen según sea necesario.
•¿Está la salida de audio del sistema operativo establecida en MUTE? Cancele el
parámetro MUTE.
•¿Se están ejecutando varias aplicaciones simultáneamente? Intente cerrar las
aplicaciones que no utilice.
•¿Se ha establecido la salida de audio correctamente dentro del sistema operativo o la
aplicación utilizada? Para el dispositivo de audio seleccione “Pioneer A-70DA A-50DA
USB Audio”.
No se produce sonido cuando se
utiliza una entrada USB.
•¿Se ha seleccionado otro dispositivo en la configuración del ordenador o se ha
silenciado el sonido en la configuración del ordenador? Compruebe la configuración
del ordenador.
•¿La unidad se ha conectado correctamente? ¿El ordenador ha detectado la unidad?
Si la unidad cambia a la entrada USB tras conectarse a un ordenador, se puede
seleccionar un valor diferente de la unidad en la configuración de sonido del
ordenador. En ese caso, vuelva a seleccionar la unidad. Compruebe también la
conexión.
•¿Son compatibles el formato de archivo, el sistema operativo y el software?
Compruebe los sistemas operativos, el software y las frecuencias de muestreo de
archivos compatibles.
•¿Se ha instalado el controlador dedicado en el ordenador? Debe instalarse un
controlador dedicado en el ordenador. Para obtener más información, visite el sitio
web de Pioneer.
Los sonidos del ordenador que no son
los de la música pueden oírse desde
la entrada USB.
•En función de la configurac ión del ordenador, el sonido de inicio, l os sonidos de error
y otros sonidos del ordenador pueden reproducirse desde la unidad. Compruebe la
configuración del ordenador.
Cuando utilice una fuente que no sea
la entrada USB, no podrán
reproducirse los archivos musicales
del ordenador.
•Cuando la entrada no sea USB, la unidad se reconocerá desde el ordenador. Cambie
la entrada a USB y después vuelva a seleccionar la unidad en la configuración de
sonido del ordenador.
Si se configura 384 kHz o 356 kHz en
la configuración de sonido del
ordenador, se cierra un navegador o
software y el audio se reproduce sin
sonido.
•Es posible que el navegador o el software no sea compatible con 384 kHz o 356 kHz.
Compruebe las especificaciones del navegador o del software.
Limpieza de la unidad
• Utilice un paño de pulir o uno seco para limpiar el
polvo y la suciedad.
• Cuando la superficie esté sucia, límpiela con un
paño suave mojado con un limpiador neutro,
diluido con cinco o seis partes de agua, y bien
escurrido, y limpie después con un paño seco. No
utilice cera para muebles ni detergentes.
• No utilice nunca disolventes, benceno,
pulverizadores insecticidas ni otros productos
químicos en esta unidad o cerca de ella, puesto
que corroen la superficie.
Page 96

06 Información adicional
16
Es
Especificaciones
Sección del amplificador
La especificación de la salida de potencia es para
alimentación a 230 V.
• Salida de alimentación continua (ambos
canales funcionan entre 20 Hz a 20 kHz)
A-70DA/A-50DA. . . . . . . . . . . . . . . . . . . . . . .90 W + 90 W
(THD 0,5 %, 4 )
A-70DA/A-50DA. . . . . . . . . . . . . . . . . . . . . . . 65 W +65 W
(THD 0,5 %, 8 )
Sección Audio
• Terminales de entrada
(sensibilidad/impedancia)
BALANCED . . . . . . . . . . . . . . . . . . . . . . . . . 200 mV/82 k
SACD/CD, NETWORK, LINE 1, LINE 2 . . . 200 mV/50 k
POWER AMP DIRECT. . . . . . . . . . . . . . . . . . . . .1 V/10 k
PHONO (MM) . . . . . . . . . . . . . . . . . . . . . . . 2,8 mV/50 k
PHONO (MC). . . . . . . . . . . 0,24 mV/100 (solo A-70DA)
COAXIAL . . . . . . . . . . . . . . . . . . . . . . . . . 500 mVp-p/75
• Salida (Nivel/Impedancia)
LINE 2 OUT . . . . . . . . . . . . . . . . . . . . . . . . 200 mV/2,2 k
• Frecuencia de respuesta
SACD/CD, NETWORK, LINE 1, LINE 2
. . . . . . . . . . . . . . . . . . . . . . . . . . . . 5 Hz a 50 kHz ± 3 dB*
• DESVIACIÓN RIAA
PHONO (MM) . . . . . . . . . . . . . . 20 Hz a 20 kHz ±0,5 dB*
PHONO (MC). . .20 Hz a 20 kHz ±0,5 dB*solo A-70DA
* Medición realizada con el botón DIRECT activado.
• Control del tono
Graves . . . . . . . . . . . . . . . . . . . . . . . . . . ± 10 dB (100 Hz)
Agudos. . . . . . . . . . . . . . . . . . . . . . . . . . ± 10 dB (10 kHz)
• Relación señal/ruido (NORMAS IHF,
PONDERACIÓN A)
SACD/CD, NETWORK, LINE 1, LINE 2 . . . . . . . . 101 dB*
PHONO (MM, entrada 5 mV). . . . . . . . . . . . . . . . . 89 dB*
PHONO (MC, entrada 0,5 mV). . . .74 dB*(solo A-70DA)
* Medición realizada con el botón DIRECT activado.
• Impedancia garantizada
A, B. . . . . . . . . . . . . . . . . . . . . . . . . . . . . . . . . . .4 a 16
A+B . . . . . . . . . . . . . . . . . . . . . . . . . . . . . . . . . .8 a 32
Cableado doble . . . . . . . . . . . . . . . . . . . . . . . . .4 a 16
Misceláneo
Alimentación . . . . . . . . . . . . . . . .CA 220 V a 230 V, 50 Hz
Consumo eléctrico
A-70DA. . . . . . . . . . . . . . . . . . . . . . . . . . . . . . . . . . . . 74 W
A-50DA. . . . . . . . . . . . . . . . . . . . . . . . . . . . . . . . . . . . 72 W
En standby. . . . . . . . . . . . . . . . . . . . . . . . . . . . . . . . . 0,3 W
Dimensiones
A-70DA. . . 435 mm (An) x 141,5 mm (Al) x 370 mm (Fo)
A-50DA. . . 435 mm (An) x 138,5 mm (Al) x 368 mm (Fo)
Peso (sin paquete)
A-70DA. . . . . . . . . . . . . . . . . . . . . . . . . . . . . . . . . . . 17,2 kg
A-50DA. . . . . . . . . . . . . . . . . . . . . . . . . . . . . . . . . . .11,2 kg
Accesorios
Mando a distancia . . . . . . . . . . . . . . . . . . . . . . . . . . . . . .1
Pilas secas AAA/IEC R03 . . . . . . . . . . . . . . . . . . . . . . . . . 2
Clavija corta. . . . . . . . . . . . . . . . . . . . . . . . . . . . . . . . . . . .2
Cable de alimentación
Tarjeta de garantía
Hoja de precauciones
Manual de instrucciones (este documento)
Nota
• Las características técnicas y el diseño están
sujetos a modificaciones sin previo aviso, debido a
mejoras.
• Los nombres de productos y empresas aquí
mencionados son marcas comerciales o marcas
registradas de sus respectivas compañías.
• “Pioneer” es una marca comercial de Pioneer
Corporation, y se usa bajo licencia.
© 2015 Onkyo & Pioneer Corporation.
Todos los derechos reservados.
Page 97

Información adicional 06
17
Es
English
DeutschFrançais
Nederlands
Italiano Español Русский
Page 98

ПРЕДУПРЕЖДЕНИЕ
Данное оборудование не является
водонепроницаемым. Во избежание пожара или
поражения электрическим током не помещайте
рядом с оборудованием емкости с жидкостями
(например, вазы, цветочные горшки) и не
допускайте попадания на него капель, брызг, дождя
или влаги.
D3-4-2-1-3_A1_Ru
ОБЯЗАТЕЛЬНАЯ ВЕНТИЛЯЦИЯ
При установке устройства обеспечьте достаточное
пространство для вентиляции во избежание
повышения температуры внутри устройства (не
менее 30 см сверху, 10 см сзади и по 10 см слева и
справа).
ПРЕДУПРЕЖДЕНИЕ
В корпусе устройства имеются щели и отверстия
для вентиляции, обеспечивающие надежную
работу изделия и защищающие его от перегрева.
Во избежание пожара эти отверстия ни в коем
случае не следует закрывать или заслонять
другими предметами (газетами, скатертями и
шторами) или устанавливать оборудование на
толстом ковре или постели.
D3-4-2-1-7b*_A1_Ru
K058a_A1_Ru
Pb
Информация для пользователей по сбору и утилизации
бывшего в эксплуатации оборудования и отработавших элементов питания
Эти обозначения на продукции, упаковке, и/или сопроводительных документах
означают, что бывшая в эксплуатации электротехническая и электронная продукция и
отработанные элементы питания не должны выбрасываться вместе с обычным
бытовым мусором.
Для того чтобы данная бывшая в употреблении продукция и отработанные элементы
питания были соответствующим образом обработаны, утилизированы и переработаны,
пожалуйста, передайте их в соответствующий пункт сбора использованных
электронных изделий в соответствии с местным законодательством.
Утилизируя данные устройства и элементы питания правильно, Вы помогаете
сохранить ценные ресурсы и предотвратить возможные негативные последствия для
здоровья людей и окружающей среды, которые могут возникнуть в результате
несоответствующего удаления отходов.
Для получения дополнительной информации о правильных способах сбора и
утилизации отработавшего оборудования и использованных элементов питания
обращайтесь в соответствующие местные органы самоуправления, в центры
утилизации отходов или по месту покупки данного изделия.
Данные обозначения утверждены только для Европейского Союза.
Для стран, которые не входят в состав Европейского Союза:
Если Вы желаете утилизировать данные изделия, обратитесь в соответствующие
местные учреждения или к дилерам для получения информации о правильных
способах утилизации.
Обозначения
для элементов питания
Обозначение
для оборудования
ВНИМАНИЕ
ВО ИЗБЕЖАНИЕ ПОРАЖЕНИЯ ЭЛЕКТРИЧЕСКИМ
ТОКОМ НЕ СНИМАЙТЕ КРЫШКУ (ИЛИ ЗАДНЮЮ
СТЕНКУ). ВНУТРИ НЕ СОДЕРЖАТСЯ ДЕАТЛИ,
ПРЕДНАЗНАЧЕННЫЕ ДЛЯ РЕМОНТА
ПОЛЬЗОВАТЕЛЕМ. ДЛЯ ОБСЛУЖИВАНИЯ
ОБРАТИТЕСЬ К КВАЛИФИЦИРОВАННОМУ
СОТРУДНИКУ СЕРВИСНОЙ СЛУЖБЫ.
D3-4-2-1-1_B1_Ru
ПРЕДУПРЕЖДЕНИЕ
Во избежание пожара не приближайте к
оборудованию источники открытого огня
(например, зажженные свечи).
D3-4-2-1-7a_A1_Ru
Page 99

3
ВНИМАНИЕ
Выключатель /I STANDBY/ON данного
устройства не полностью отключает его от
электросети. Чтобы полностью отключить
питание устройства, вытащите вилку кабеля
питания из электророзетки. Поэтому устройство
следует устанавливать так, чтобы вилку кабеля
питания можно было легко вытащить из розетки
в чрезвычайных обстоятельствах. Во избежание
пожара следует извлекать вилку кабеля питания
из розетки, если устройство не будет
использоваться в течение долгого времени
(например, если вы уезжаете в отпуск).
D3-4-2-2-2a*_A1_Ru
Условия эксплуатации
Изделие эксплуатируется при следующих
температуре и влажности:
+5 °C до +35 °C; влажность менее 85
% (не
заслоняйте охлаждающие вентиляторы)
Не устанавливайте изделие в плохо
проветриваемом помещении или в месте с высокой
влажностью, открытом для прямого солнечного
света (или сильного искусственного света).
D3-4-2-1-7c*_A1_Ru
K041_A1_Ru
МЕРЫ ПРЕДОСТОРОЖНОСТИ ПРИ
ОБРАЩЕНИИ С СЕТЕВЫМ ШНУРОМ
Держите сетевой шнур за вилку. Не вытаскивайте
вилку, взявшись за шнур, и никогда не касайтесь
сетевого шнура, если Ваши руки влажные, так как
это может привести к короткому замыканию или
поражению электрическим током. Не ставьте
аппарат, предметы мебели и т.д. на сетевой шнур,
не зажимайте его. Не завязывайте узлов на шнуре
и не связывайте его с другими шнурами. Сетевые
шнуры должны лежать так, чтобы на них нельзя
было наступить. Поврежденный сетевой шнур
может стать причиной возникновения пожара или
поразить Вас электрическим током. Время от
времени проверяйте сетевой шнур. В случае
обнаружения повреждения обратитесь за заменой
в ближайший официальный сервисный центр
фирмы PIONEER или к Вашему дилеру.
S002*_A1_Ru
Благодарим вас за покупку этого
изделия марки Pioneer.
Полностью прочтите настоящие инструкции по
эксплуатации, чтобы знать, как правильно обращаться с
этой моделью. Прочитав инструкции, сохраните их в
надежном месте для использования в будущем .
Содержание
01 Перед началом работы
Комплектация . . . . . . . . . . . . . . . . . . . . . . . . . . . . 4
Установка батареек в пульт ДУ . . . . . . . . . . . . . . . 4
Использование пульта дистанционного управления
. . . . . . . . . . . . . . . . . . . . . . . . . . . . . . . . . . . . . . . .4
Установка усилителя . . . . . . . . . . . . . . . . . . . . . . . 4
02 Подключение
Подключение кабелей . . . . . . . . . . . . . . . . . . . . . . 5
О “двухпроводном соединении” . . . . . . . . . . . . . . 5
Подключение кабелей АС . . . . . . . . . . . . . . . . . . . 6
Подключение аудиокабелей . . . . . . . . . . . . . . . . . . 6
Подключение к устройству с балансными входами
(только A-70DA) . . . . . . . . . . . . . . . . . . . . . . . . . . 6
Разъемы цифрового звукового сигнала. . . . . . . . . . 7
Подключение к компьютеру
с помощью USB-кабеля . . . . . . . . . . . . . . . . . . . . . 7
Использование централизованного управления с
помощью других компонентов Pioneer . . . . . . . . . .7
Подключение к сети. . . . . . . . . . . . . . . . . . . . . . . . 7
03 Органы управления и индикаторы
Передняя панель . . . . . . . . . . . . . . . . . . . . . . . . . . 8
Задняя панель . . . . . . . . . . . . . . . . . . . . . . . . . . . . 9
Пульт дистанционного управления . . . . . . . . . . . 10
04 Эксплуатация
Прослушивание . . . . . . . . . . . . . . . . . . . . . . . . . . 11
Переключение усилителя в режим ожидания . . . . .11
Использование усилителя в качестве усилителя
мощности . . . . . . . . . . . . . . . . . . . . . . . . . . . . . . .11
Воспроизведение музыки с устройства цифрового
звука . . . . . . . . . . . . . . . . . . . . . . . . . . . . . . . . . . .11
Запись аудио сигнала
(на внешнее записывающее устройство) . . . . . . . 12
Активация функции автоматического перехода в
режим ожидания (автоматического выключения)
. . . . . . . . . . . . . . . . . . . . . . . . . . . . . . . . . . . . . . 12
Восстановление заводских настроек
(перезагрузка усилителя) . . . . . . . . . . . . . . . . . . . 12
05 Использование функции USB DAC
Установка драйвера . . . . . . . . . . . . . . . . . . . . . . . 13
Воспроизведение музыки с компьютера. . . . . . . . 13
06 Дополнительная информация
Устранение неисправностей. . . . . . . . . . . . . . . . . 14
О функции USB DAC . . . . . . . . . . . . . . . . . . . . . .15
Чистка устройства . . . . . . . . . . . . . . . . . . . . . . . . 15
Технические характеристики . . . . . . . . . . . . . . . . 16
Page 100

01
Перед началом работы
4
Ru
Глава 1:
Перед началом работы
Комплектация
Когда открываете коробку, проверьте, что в ней
находятся следующие принадлежности:
• Пульт дистанционного управления
• Сухие батарейки AAA/IEC R03 х2
• Штекерная заглушка х2
(В момент приобретения эти заглушки установлены
производителем в клеммы PHONO IN задней
панели.)
• Кабель питания (Длина: 1,8 м)
• Гарантийный талон
• Лист с предупреждениями (для начинающих
пользователей)
• Инструкции по эксплуатации (этот документ)
ВНИМАНИЕ
• Храните небольшие
детали вне доступа детей. При
случайном заглатывании, немедленно обращайтесь
к врачу.
Примечание
• Иллюстрации, представленные в разделе
«Инструкции по эксплуатации», могут быть
адаптированы или упрощены для более доступного
понимания и, таким образом, могут не
соответствовать фактическому внешнему виду
изделия.
• Представленные иллюстрации в основном
относятся к модели A-70DA.
Установка батареек в пульт ДУ
1 Откройте крышку батарейного отсека
на задней стороне пульта.
2 Установите новые батарейки,
соблюдая полярность в соответствии с
маркировкой внутри отсека.
3 Закройте крышку батарейного отсека.
Батарейки, входящие в комплект поставки,
предназначены для проверки работы устройства и могут
проработать недолго. Рекомендуется использовать
щелочные батареи, имеющие более продолжительный
срок службы.
ВНИМАНИЕ
• Не используйте и не храните батарейки на прямом
солнечном свету или в местах с повышенной
температурой, например в автомобиле или возле
батареи отопления. Это может вызвать протекание,
перегрев, м
икровзрыв
или возгорание батареек.
Кроме того, это может привести к сокращению
срока службы или производительности батареек.
Осторожно
Неправильное использование батареек может привести к
таким опасным явлениям, как утечка и микровзрыв.
Придерживайтесь следующих предосторожностей:
• При установке батареек соблюдайте осторожность,
чтобы не повредить пружины контактов в
батарейном отсеке. Иначе, это мо
жет п
ривести к
протечке или перегреву батарей.
• Запрещается использовать батарейки какого-либо
другого типа, кроме указанного. Также не следует
использовать совместно новую и старую батарейки.
• Устанавливая батарейки в пульт ДУ, соблюдайте
полярность в соответствии с маркировкой ( и ).
• Запрещается нагревать, разбирать, бросать
батарейки в огонь или воду.
• Даже бат
арейки одинакового размера и формы
могут иметь различное напряжение. Не следует
использовать совместно батарейки различных
типов.
• Во избежание утечки электролита извлеките
батарейки, если не планируете использовать пульт
ДУ длительное время (более 1 месяца). В случае
утечки электролита тщательно очистите
батарейный отсек, а затем установите новые
батарейки. В случае утечки электролита из
батарейки и попадания его на
кожу смойте его
большим количеством воды.
1
2
3
• При утилизации использованных батареек
выполняйте государственные постановления и
требования учреждений по охране окружающей
среды, которые действуют в вашей стране или в
вашем регионе.
Использование пульта дистанционного
управления
Пульт дистанционного управления имеет дальность
действия около 7 м при угле отклонения от сенсора 30°.
При использовании пульта дистанционного управления
помните о следующем:
• Следите за тем, чтобы между пультом
дистанционного управления и находящимся на
усилителе приемным сенсором не было никаких
препятствий.
• Пульт дистанционного управления может работать
неустойчиво, если на приемник его сигналов
п
опадает
сильный солнечный свет или
люминесцентное излучение.
• Пульты дистанционного управления от разных
устройств могут мешать друг другу. Не
используйте дистанционные пульты другого
оборудования, расположенного рядом с этим
устройством.
• Если вы заметите уменьшение дальности действия
пульта дистанционного управления, замените в
пульте батарейку.
Установка усилителя
Устройство нужно установить на ровную и устойчивую
поверхность.
• Не устанавливайте его в следующие места:
– на телевизор (это может вызвать искажение
изображения)
– возле кассетной деки (или вблизи устройства,
генерирующего магнитное поле). Это может
вызвать искажение звука.
– на прямых солнечных лучах
– в сырых и влажных местах
– в чрезмерно холодных или горячих местах
– в местах, гд
е имеет
место вибрация или другое
движение
– в очень пыльных местах
– в местах, где присутствуют горячие испарения
или масла (например, на кухне)
• Не устанавливайте данное устройство на диван или
другой предмет или материал с поглощающими
свойствами, так как это может неблагоприятно
повлиять на качество звука.
7 м
30 °
30 °
 Loading...