


 Loading...
AVH-270BT
AVH-170DVD
AVH-271BT
AVH-171DVD
DVD RDS AV RECEIVER
AUTORADIO AV RDS LECTEUR DE DVD RADIO AV RDS CON DVD
~ Important (Serial number)
The serial number is located on the bottom of this unit. For your own security and convenience, be sure to record this number on the enclosed warranty card.
~ Important (Numero de serie)
Le numero de serie se trouve au bas de cet appareil. Pour votre securite et votre commodite, veillez anoter ce numero sur Ia carte de garantie fournie.
~ lmportante (Numero de serie)
El numero de serie se encuentra en Ia parte inferior de esta unidad. Por su propia seguridad y comodidad, asegurese de anotar este numero en Ia tarjeta de garantia que se adjunta.
Owner'sManual Mode d'emploi Manual de instrucciones


I.
I. I
Precaution
e In some countries the viewing of video image on a display inside a vehicle even by persons other than the driver may be illegal. Where such regulations apply, they must be obeyed. If you attempt to watch video image while driving, the warning
"Viewing of front seat video source while driving is strictly prohibited." will appear on the screen. To watch video image on this display, stop the vehicle in a safe place and apply the parking brake. Please keep the brake pedal pushed down before releasing the parking brake.
The video output terminal (V OUT) is for connection of a display to enable passengers in the rear seats to watch video images.
AWARNING |
|
NEVER install the rear display in a location that enables the |
|
driver to watch video images while driving. |
|
Be sure to run the vehicle engine while using this product. Using |
|
this product without running the engine can drain the battery. |
|
AWARNING |
|
Do not install this product in a vehicle that does not have an |
|
ACC wire or circuitry available. |
|
With an optional rear view camera, you are able to use this |
|
product as an aid to keep an eye on trailers, or backing into a |
|
tight parking spot. |
|
AWARNING |
|
e |
SCREEN IMAGE MAY APPEAR REVERSED. |
e |
USE INPUT ONLY FOR REVERSE OR MIRROR IMAGE |
|
REAR VIEW CAMERA. OTHER USE MAY RESULT IN |
|
INJURY OR DAMAGE. |
ACAUTION |
|
The rear view mode is to use this product as an aid to keep |
|
an eye on the trailers, or while backing up. Do not use this |
|
function for entertainment purposes. |
|
ACAUTION |
|
e |
To prevent data loss and damage to the storage device, |
|
never remove it from this product while data is being |
e |
transferred. |
Pioneer cannot guarantee compatibility with all USB mass |
|
|
storage devices and assumes no responsibility for any loss |
|
of data on media players, iPhone, smartphone, or other |
|
devices while using this product. |
After-sales service for Pioneer products |
|
Please contact the dealer or distributor from which you |
|
purchased the product for after-sales service (including |
|
warranty conditions) or any other information. In case the |
|
necessary information is not available, please contact the |
|
companies listed below. |
|
Please do not ship your product to the companies at the |
|
addresses listed below for repair without making advance |
|
contact. |
|
e |
U.S.A |
|
Pioneer Electronics (USA) Inc. |
|
CUSTOMER SUPPORT DIVISION |
|
P.O. Box 1760 Long Beach, CA 90801-1760 |
e |
800-421-1404 |
CANADA |
|
|
Pioneer Electronics of Canada, Inc. |
|
CUSTOMER SATISFACTION DEPARTMENT |
|
340 Ferrier Street, Unit 2, Markham, Ontario L3R 2Z5, |
|
Canada |
|
1-877-283-5901 |
|
905-479-4411 |
For warranty information, please see the Limited Warranty |
|
sheet included with your product. |
|
Visit us at the following site: |
|
http://www.pioneerelectronics.com |
|
http://www.pioneerelectronics.ca |
|
1 |
Register your product. |
2 |
Receive updates on the latest products and technologies. |
3 |
Download owner'smanuals, order product catalogs, |
|
research new products, and much more. |
4 |
Receive notices of software upgrades and software updates. |
e |
Do not expose the LCD screen to direct sunlight when this |
|
product is not used. This may result in LCD screen malfunc- |
e |
tion due to the resulting high temperatures. |
When using a cellular phone, keep the antenna of the cel- |
|
|
lular phone away from the LCD screen to prevent disruption |
e |
of the video in the form of spots, colored stripes, etc. |
To protect the LCD screen from damage, be sure to touch the |
|
|
touch panel keys only with your finger and do so gently. |
e |
Some of the settings and recorded contents will not be reset. |
The information is erased by disconnecting the yellow lead from |
|
the battery (or removing the battery itself). |
|
e |
Some of the settings and recorded contents will not be reset. |
ACAUTION |
|
Pressing the RESET button resets settings and recorded |
|
contents to the factory settings. |
|
e |
Do not perform this operation when a device is connected |
e |
to this product. |
Some of the settings and recorded contents will not be |
|
|
reset. |
The microprocessor must be reset under the following |
|
conditions: |
|
e |
Prior to using this product for the first time after installation. |
e |
If this product fails to operate properly. |
e |
If there appears to be problems with the operation of the |
e |
system. |
If your vehicle position is shown on the map with a signifi- |
|
|
cant positioning error. |
|
Turn the ignition switch OFF. |
6


Registration and connection |
of Bluetooth device |
|
|
to the operating instructions supplied with the Bluetooth |
:> |
device. |
Switching visibility on page 11 |
Connecting to a Bluetooth device |
|
automatically |
|
This function connects the last connected Bluetooth device to |
|
this product automatically as soon as the two devices are less |
|
than a few meters apart. |
|
:> |
Display the "Biuetooth" screen. |
Displaying the "Biuetooth "screen on page 10 |
|
2 |
Touch [Auto Connect] to switch "On" (default) |
|
or "Off". |
Deleting a registered device |
|
A cAUTION |
|
Never turn this product off while the paired Bluetooth device |
|
is |
being deleted. |
1 |
Display the "Biuetooth" screen. |
:> |
Displaying the "Biuetooth "screen on page 10 |
2Touch [Connection].
3Touch [][],
Conne~ing a r~gi$tere«Ji/" |
|
BluetQpth devi«l manuaUy |
|
Connect the Bluetooth device manually in the following cases: |
|
e |
Two or more Bluetooth devices are registered, and you want |
e |
to manually select the device to be used. |
You want to reconnect a disconnected Bluetooth device. |
|
e |
Connection cannot be established automatically for some |
|
reason. |
|
Activate the Bluetooth wireless technology on |
|
your devices. |
2 |
Display the "Biuetooth" screen. |
:> |
Displaying the "Biuetooth "screen on page 10 |
3 |
Touch [Connection]. |
4 |
Touch the name of the device that you want to |
|
connect. |
Switching visibility |
|
|
This function sets whether or not to make this product visible to |
||
the other device. |
|
|
1 |
Display the "Biuetooth" screen. |
|
:> |
Displaying the "Biuetooth" screen on page 10 |
|
2 |
Touch [Visibility] to switch "On" (default) or |
|
|
"Off". |
|
·Enteri~g .the PI~, code f~"'' |
|
|
Bluetodth wireless con11ection |
|
|
To connect your Bluetooth device to this product, you need to |
|
|
enter a PIN code. |
|
|
You can change the PIN code with this function. |
|
|
1 |
Display the "Biuetooth" screen. |
|
:> |
Displaying the "Biuetooth" screen on page 10 |
|
2 |
Touch [PIN Code Input]. |
|
3 |
Touch [0] to [9] to input the pin code (up to 8 |
|
|
-digits). |
|
4 |
Touch G;!l. |
|
0 |
The default PIN code is "0000". |
|
Displaying the device |
|
|
infor~.~tion |
|
|
1 |
Display the "Biuetooth" screen. |
|
:> |
Displaying the "Biuetooth " screen on page 10 |
|
2 |
Touch [Device Information]. |
|
The device name and address of the Bluetooth device and this |
|
|
product are displayed. |
|
|
|
- |
|
Clearing the Bluetooth memory · |
||
0 |
This setting is available only when you stop your vehicle in |
a |
|
safe place and apply the parking brake. |
|
A cAUTION |
|
|
Never turn this product off while the Bluetooth memory is |
|
|
being cleared. |
|
|
1 |
Display the "Biuetooth" screen. |
|
:> |
Displaying the "Biuetooth " screen on page 10 |
|
2 |
Touch [Biuetooth Memory Clear]. |
|
3 Touch [Clear]. The confirmation screen appears.
Updating Bluetooth software |
||
This function is used to update this product with the latest |
||
Bluetooth software. For details on Bluetooth software and updat- |
||
ing, refer to our website. |
|
|
0 |
The source is turned off and the Bl uetooth connection is |
|
|
disconnected before the process starts. |
|
0 |
This setting is available only when you stop your vehicle in a |
|
|
safe place and apply the parking brake. |
|
0 |
You need to store the version up file to the USB storage |
|
|
device in advance. |
|
A CAUTION |
|
|
Never turn this product off and never disconnect the phone |
||
while the software is being updated. |
||
|
Connect the USB storage device stored the ver- |
|
:> |
sion up file to this unit. |
|
Plugging and unplugging a USB storage device on page 8 |
||
2 |
Display the "Biuetooth" screen. |
|
:> |
Displaying the "Biuetooth " screen on page 10 |
|
3 |
Touch [BT Software Update]. |
|
4 |
Touch [Start]. |
|
Follow the on-screen instructions to finish updating the |
||
Bluetooth software. |
|
|
Display;ng the ~luetootfi soft· |
||
ware version |
"' |
|
If this product fails to operate properly, you may need to consult |
||
your dealer for repair. |
|
|
In such cases, perform the following procedure to check the |
||
software version on th1s unit. |
|
|
1 |
Display the "Biuetooth" screen. |
|
:> |
Displaying the "Biuetooth" screen on page 10 |
|
2 |
Touch [BT Version Info]. |
|
The version of this product'sBluetooth module appears. |
||
11
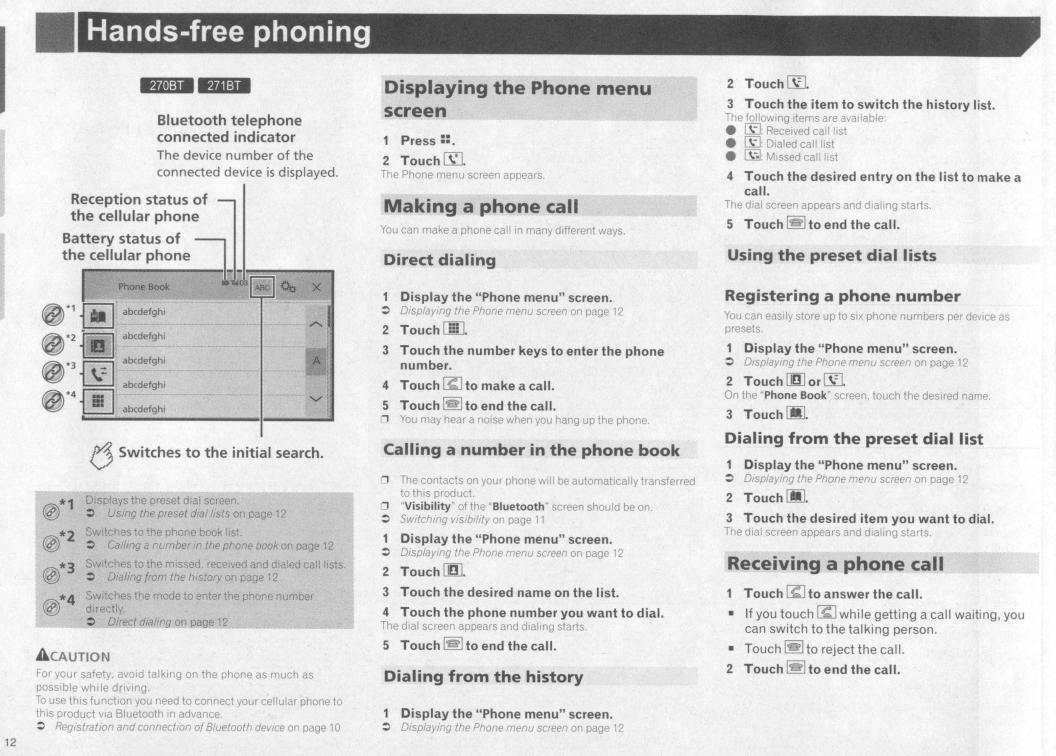
Hands-free phoning |
Setup for iPod |
Changing the phone settings |
||||||||||||
Answering a call automatically |
|
|||||||||||
:> |
Display the "Biuetooth" screen. |
|
|
|
|
|||||||
Displaying the |
"Biuetooth "screen on page 10 |
|
|
|||||||||
2 |
Touch [Auto Answer] to switch "On" or "Off" |
|||||||||||
|
(default). |
|
|
|
|
|
|
|
|
|
||
Switching the ring tone |
|
|
|
|
||||||||
You can select whether or not to use th1s product'sring tone. |
||||||||||||
1 |
Display the "Biuetooth" screen. |
|
|
|
||||||||
:> |
Displaying the |
"Biuetooth"screen on page 10 |
|
|
||||||||
2 |
Touch [Ring Tone] to switch "On" (default) or |
|||||||||||
|
"Off". |
|
|
|
|
|
|
|
|
|
|
|
Inverting names in the phone book |
||||||||||||
1 |
Display the "Biuetooth" screen. |
|
|
|
||||||||
:> |
Displaying the |
"Biuetooth"screen on page 10 |
|
|
||||||||
2 |
Touch [Invert Name]. |
|
|
|
|
|
|
|||||
Setting the private mode |
|
|
|
|
||||||||
During a conversation, you can switch to private mode (talk |
||||||||||||
directly on your cellular phone). |
|
urn pnva |
|
e mo |
|
eon or |
||||||
• |
T ouch |
|
'''""l or |
011 |
o |
|
t |
d |
||||
|
|
l ~t |
|
|
It"""' t |
|
t |
. |
|
|
||
|
off. |
|
|
|
|
|
|
|
|
|
|
|
Adjusting the other party'slistening |
||||||||||||
volume |
|
|
|
|
|
|
|
|
|
|
||
This product can be adjusted to the other party'slistening |
||||||||||||
volume. |
|
|
|
|
|
|
|
|
|
|
|
|
• |
Touch It |
~!...I to switch between the three vol- |
||||||||||
0 |
ume levels. |
|
|
|
|
|
|
|
|
|
||
Settings can be stored tor each device. |
|
|
|
|
||||||||
Notes for hands-free phoning |
|
General notes |
|
e |
Connection to all cellular phones featuring Bluetooth wire- |
e |
less technology is not guaranteed. |
The line-of-sight distance between this product and your |
|
|
cellular phone must be 10 meters or less when sending and |
e |
receiving voice and data via Bluetooth technology. |
With some cellular phones, the ring sound may not be |
|
e |
output from the speakers. |
It private mode is selected on the cellular phone, hands-tree |
|
|
phoning may be disabled. |
Registration and connection |
|
e |
Cellular phone operations vary depending on the type of cel- |
|
lular phone. Refer to the instruction manual that came with |
e |
your ce lular phone tor detailed instructions. |
When phone book transfer does not work, disconnect your |
|
|
phone and then perform pairing agam from your phone to |
|
this product. |
Making and receiving calls |
|
e |
You may hear a noise in the following situations: |
- |
When you answer the phone using the button on the |
|
phone. |
- |
When the person on the other end of the line hangs up the |
e |
phone. |
It the person on the other end of the line cannot hear the |
|
|
conversation due to an echo, decrease the volume level for |
e |
hands-tree phoning. |
With some cellular phones, even after you press the accept |
|
|
button on the cellular phone when a call comes in, hands- |
e |
free phoning may not be performed. |
The registered name will appear if the phone number is |
|
|
already registered in the phone book. When one phone |
|
number is registered under different names. only the phone |
|
number will be displayed. |
The received call and the dialed number histories |
|
e |
You cannot make a call to the entry of an unknown user (no |
e |
phone number) in the received call history. |
If calls are made by operating your cellular phone, no history |
|
|
data will be recorded 1n this product. |
Phone book transfers |
|
e |
If them are more than 1 000 phone book entries on your cel- |
e |
lular phone, not all entries may download completely. |
Depending on the phone, this product may not display the |
|
e |
phone book correctly. |
If the phone book in the phone contains image data, the |
|
e |
phone book may not be transferred correctly. |
Depending on the cellular phone, phone book transfer may |
|
|
not be available. |
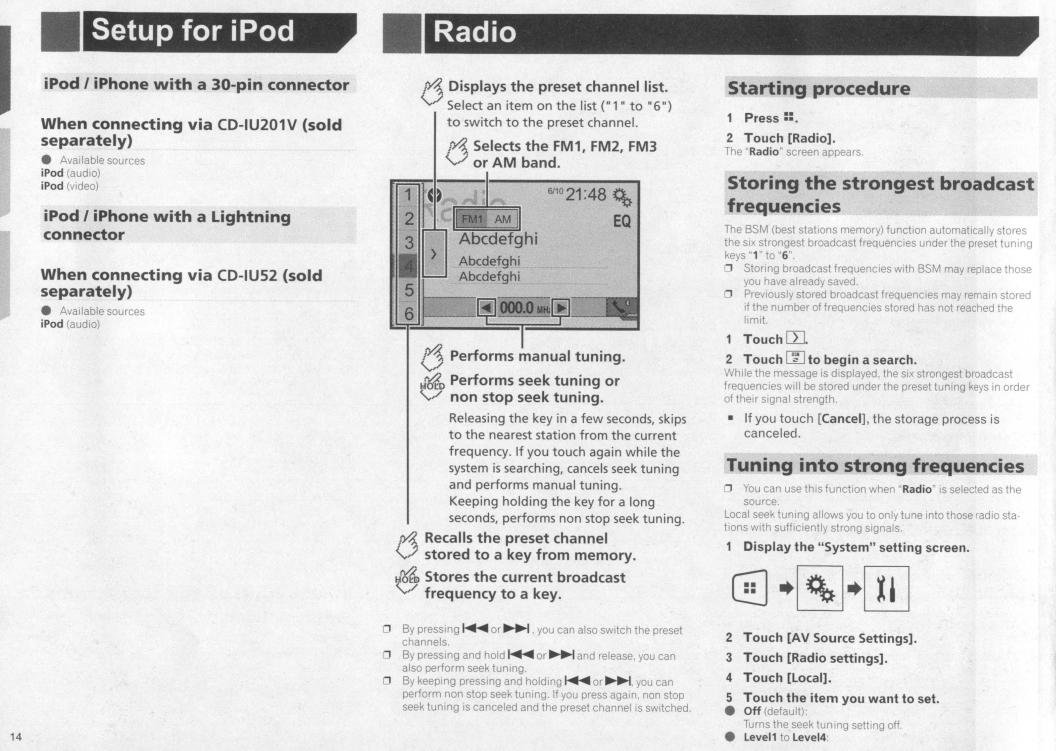
When using an iPod with this product, configure the settings of this product according to the device to be connected.
iPod compatibility |
||||
This product supports only the following iPod models and iPod |
||||
software versions. Others may not work correctly. |
||||
e |
1Phone |
4, 4s. 5, 5s, 5c: iOS 7.0 or later. |
||
e |
iPhone |
3GS: iOS 6.0.1 |
|
|
e |
iPod touch (4th, 5th generation): iOS 6.0.1 |
|||
e |
iPod touch (3rd generation): iOS 5.1.1 |
|||
e |
iPod touch (2nd generation): iOS 4 2.1 |
|||
e |
iPod classic 160GB (2009): |
Ver. 2.0.4 |
||
e |
iPod classic 160GB (2008): |
Ver. 2.0.1 |
||
e |
iPod classic 80GB: Ver. 1.1.2 |
|
||
e |
iPod nano (7th generation) |
|
|
|
e |
iPod nano (6th generation): Ver. |
1.2 |
||
e |
iPod nano (5th generation): Ver. |
1.0.2 |
||
e |
iPod nano (4th generation): Ve1·. |
1.0.4 |
||
e |
iPod nano (3rd generation): Ver. |
1.1.3 |
||
0 |
You can connect and control an iPod compatible with this |
|||
|
product by using separately sold connector cables. |
|||
0 |
Operation methods may vary depending on the iPod model |
|||
|
and the software version. |
|
|
|
0 |
Depending on the software version of the iPod, it may not be |
|||
|
compatible with this product. |
|
||
For details about iPod compatibility with this product, refer to the |
||||
information on our website. |
|
|
||
This manual applies to the following iPod models. |
||||
iPod with 30-pin connector |
|
|
||
e |
iPhone |
3GS, 4, 4s |
|
|
e |
iPod touch 2nd, 3rd. 4th generation |
|||
e |
iPod classic 80GB, 160GB |
|
|
|
e |
iPod nano 3rd, 4th, 5th, 6th generation |
|||
iPod with |
Lightning connector |
|
||
e |
iPhone |
5, 5s, 5c |
|
|
e |
iPod touch 5th generation |
|
|
|
e |
iPod nano 7th generation |
|
|
|
Information on the connections |
||||
and functions |
|
|
||
The settings and cables required for connecting each device, |
||||
and the available sources are as follows. |
||||
13
|
Radio |
|
|
|
Sets the level of sensitivity tor |
FM to Level1 |
to Level4 (tor |
|
AM Level1 or Level2). |
") setting allows reception of |
|
0 |
The FM "Level4" (AM "Level2 |
||
|
only stations with the strongest signals. |
|
|
Disc
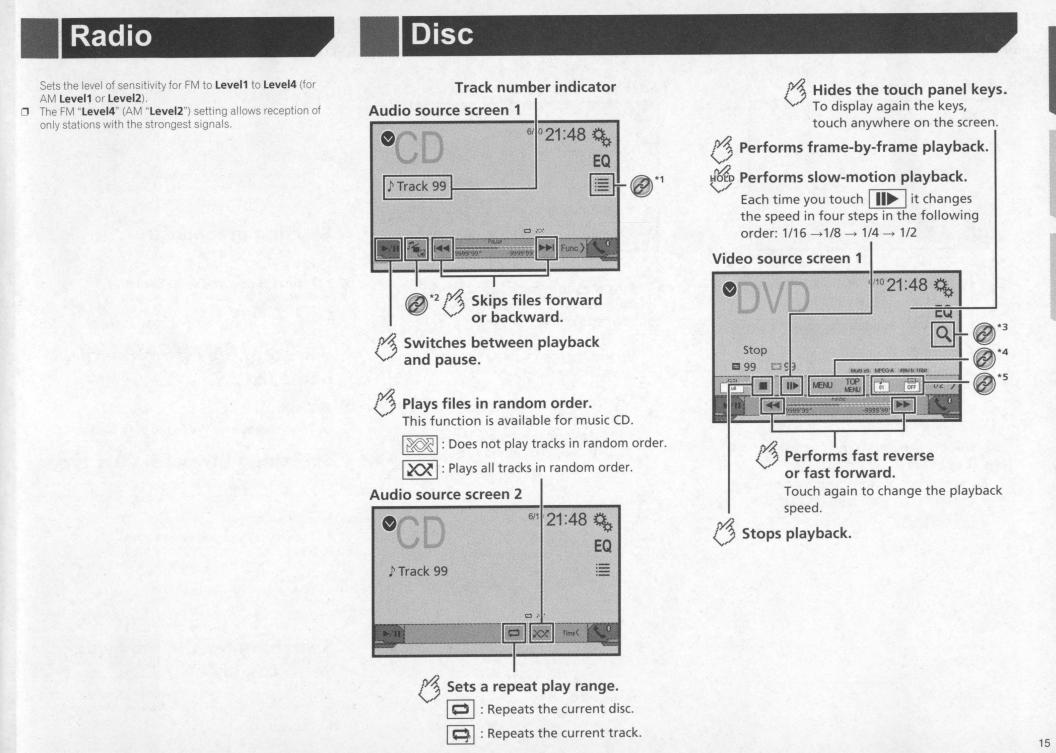
Track number indicator Audio source screen 1
~·1
|
* |
2 |
rYJ. |
Skips files forward |
|
|
|
V |
or backward. |
rYJ. |
Switches between playback |
|||
V |
and pause. |
|||
6 Plays files in random order. |
||||
|
This function is available for music CD. |
|||
|
I ~I:Does not play tracks in random order. |
|||
|
I~I: Plays all tracks in random order. |
|||
Audio source screen 2 |
||||
6 Hides the touch panel keys.
To display again the keys, touch anywhere on the screen.
6 Performs frame-by-frame playback.
~Performs slow-motion playback.
Each time you touch Ill~ Iit changes the speed in four steps in the following order: 1/16->1/8-> 1/4-> 1/2
Video source screen 1
~*3 ~*4 ~·s
6 Performs fast reverse or fast forward. Touch again to change the playback speed.
6 Stops playback.
6
Sets a repeat play range. |
|
I0 |
I :Repeats the current disc. |
I~I :Repeats the current track. |
|
15
Loading...