

Page 1

Avid Xpress® Pro HD
Effects Reference
make manage move | media
™
Avid
®
Page 2

Copyright and Disclaimer
Product specifications are subject to change without notice and do not represent a commitment on the part
of Avid Technology, Inc.
The software described in this document is furnished under a license agreement. You can obtain a copy of
that license by visiting Avid's Web site at www.avid.com. The terms of that license are also available in the
product in the same directory as the software. The software may not be reverse assembled and may be
used or copied only in accordance with the terms of the license agreement. It is against the law to copy the
software on any medium except as specifically allowed in the license agreement.
Avid products or portions thereof are protected by one or more of the following United States Patents:
4,746,994; 4,970,663; 5,045,940; 5,267,351; 5,309,528; 5,355,450; 5,396,594; 5,440,348; 5,452,378;
5,467,288; 5,513,375; 5,528,310; 5,557,423; 5,568,275; 5,577,190; 5,584,006; 5,640,601; 5,644,364;
5,654,737; 5,715,018; 5,724,605; 5,726,717; 5,729,673; 5,745,637; 5,752,029; 5,754,851; 5,799,150;
5,812,216; 5,852,435; 5,905,841; 5,929,836; 5,930,445; 5,946,445; 5,987,501; 6,016,152; 6,018,337;
6,023,531; 6,058,236; 6,061,758; 6,091,778; 6,105,083; 6,118,444; 6,128,001; 6,134,607; 6,137,919;
6,141,691; 6,198,477; 6,201,531; 6,223,211; 6,249,280; 6,269,195; 6,317,158; 6,317,515; 6,330,369;
6,351,557; 6,353,862; 6,357,047; 6,392,710; 6,404,435; 6,407,775; 6,417,891; 6,426,778; 6,477,271;
6,489,969; 6,512,522; 6,532,043; 6,546,190; 6,552,731; 6,553,142; 6,570,624; 6,571,255; 6,583,824;
6,618,547; 6,636,869; 6,665,450; 6,678,461; 6,687,407; 6,704,445; 6,747,705; 6,763,134; 6,766,063;
6,791,556; D392,269; D396,853; D398,912. Other patents are pending.
No part of this document may be reproduced or transmitted in any form or by any means, electronic or
mechanical, including photocopying and recording, for any purpose without the express written permission
of Avid Technology, Inc.
Copyright © 2004 Avid Technology, Inc. and its licensors. All rights reserved. Printed in USA.
The following disclaimer is required by Apple Computer, Inc.
APPLE COMPUTER, INC. MAKES NO WARRANTIES WHATSOEVER, EITHER EXPRESS OR IMPLIED,
REGARDING THIS PRODUCT, INCLUDING WARRANTIES WITH RESPECT TO ITS
MERCHANTABILITY OR ITS FITNESS FOR ANY PARTICULAR PURPOSE. THE EXCLUSION OF
IMPLIED WARRANTIES IS NOT PERMITTED BY SOME STATES. THE ABOVE EXCLUSION MAY NOT
APPLY TO YOU. THIS WARRANTY PROVIDES YOU WITH SPECIFIC LEGAL RIGHTS. THERE MAY BE
OTHER RIGHTS THAT YOU MAY HAVE WHICH VARY FROM STATE TO STATE.
The following disclaimer is required by Sam Leffler and Silicon Graphics, Inc. for the use of
their TIFF library:
Copyright © 1988–1997 Sam Leffler
Copyright © 1991–1997 Silicon Graphics, Inc.
Permission to use, copy, modify, distribute, and sell this software [i.e., the TIFF library] and its
documentation for any purpose is hereby granted without fee, provided that (i) the above copyright notices
and this permission notice appear in all copies of the software and related documentation, and (ii) the
names of Sam Leffler and Silicon Graphics may not be used in any advertising or publicity relating to the
software without the specific, prior written permission of Sam Leffler and Silicon Graphics.
THE SOFTWARE IS PROVIDED “AS-IS” AND WITHOUT WARRANTY OF ANY KIND, EXPRESS,
IMPLIED OR OTHERWISE, INCLUDING WITHOUT LIMITATION, ANY WARRANTY OF
MERCHANTABILITY OR FITNESS FOR A PARTICULAR PURPOSE.
IN NO EVENT SHALL SAM LEFFLER OR SILICON GRAPHICS BE LIABLE FOR ANY SPECIAL,
INCIDENTAL, INDIRECT OR CONSEQUENTIAL DAMAGES OF ANY KIND, OR ANY DAMAGES
WHATSOEVER RESULTING FROM LOSS OF USE, DATA OR PROFITS, WHETHER OR NOT ADVISED
OF THE POSSIBILITY OF DAMAGE, AND ON ANY THEORY OF LIABILITY, ARISING OUT OF OR IN
CONNECTION WITH THE USE OR PERFORMANCE OF THIS SOFTWARE.
The following disclaimer is required by the Independent JPEG Group:
Portions of this software are based on work of the Independent JPEG Group.
The following disclaimer is required by Paradigm Matrix:
Portions of this software licensed from Paradigm Matrix.
2
Page 3

The following disclaimer is required by Ray Sauers Associates, Inc.:
“Install-It” is licensed from Ray Sauers Associates, Inc. End-User is prohibited from taking any action to
derive a source code equivalent of “Install-It,” including by reverse assembly or reverse compilation, Ray
Sauers Associates, Inc. shall in no event be liable for any damages resulting from reseller’s failure to
perform reseller’s obligation; or any damages arising from use or operation of reseller’s products or the
software; or any other damages, including but not limited to, incidental, direct, indirect, special or
consequential Damages including lost profits, or damages resulting from loss of use or inability to use
reseller’s products or the software for any reason including copyright or patent infringement, or lost data,
even if Ray Sauers Associates has been advised, knew or should have known of the possibility of such
damages.
The following disclaimer is required by Videomedia, Inc.:
“Videomedia, Inc. makes no warranties whatsoever, either express or implied, regarding this product,
including warranties with respect to its merchantability or its fitness for any particular purpose.”
“This software contains V-LAN ver. 3.0 Command Protocols which communicate with V-LAN ver. 3.0
products developed by Videomedia, Inc. and V-LAN ver. 3.0 compatible products developed by third parties
under license from Videomedia, Inc. Use of this software will allow “frame accurate” editing control of
applicable videotape recorder decks, videodisc recorders/players and the like.”
The following disclaimer is required by Altura Software, Inc. for the use of its Mac2Win
software and Sample Source Code:
©1993–1998 Altura Software, Inc.
The following disclaimer is required by 3Prong.com Inc.:
Certain waveform and vector monitoring capabilities are provided under a license from 3Prong.com Inc.
Attn. Government User(s). Restricted Rights Legend
U.S. GOVERNMENT RESTRICTED RIGHTS. This Software and its documentation are “commercial
computer software” or “commercial computer software documentation.” In the event that such Software or
documentation is acquired by or on behalf of a unit or agency of the U.S. Government, all rights with
respect to this Software and documentation are subject to the terms of the License Agreement, pursuant to
FAR §12.212(a) and/or DFARS §227.7202-1(a), as applicable.
Trademarks
888 I/O, Adrenaline, AirPlay, AirSPACE, AirSPACE HD, AirSpeed, AniMatte, AudioSuite, AudioVision,
AutoSync, Avid, Avid DNA, Avid DNxcel, Avid DNxHD, AVIDdrive, AVIDdrive Towers, Avid Mojo, AvidNet,
AvidNetwork, AVIDstripe, Avid Unity, Avid Xpress, AVoption, AVX, CamCutter, ChromaCurve,
ChromaWheel, DAE, D-Fi, D-fx, Digidesign, Digidesign Audio Engine, Digidesign Intelligent Noise
Reduction, DigiDrive, Digital Nonlinear Accelerator, DigiTranslator, DINR, D-Verb, Equinox, ExpertRender,
FieldPak, Film Composer, FilmScribe, FluidMotion, HIIP, HyperSPACE, HyperSPACE HDCAM, IllusionFX,
Image Independence, Intraframe, iS9, iS18, iS23, iS36, LaunchPad, Lo-Fi, Magic Mask,
make manage move | media, Marquee, Matador, Maxim, MCXpress, Media Composer, MediaDock,
MediaDock Shuttle, Media Fusion, Media Illusion, MediaLog, Media Reader, Media Recorder, MEDIArray,
MediaShare, Meridien, MetaSync, MissionControl, NaturalMatch, Nearchive, NetReview, NewsCutter,
Nitris, OMF, OMF Interchange, OMM, Open Media Framework, Open Media Management, ProEncode,
Pro Tools, QuietDrive, Recti-Fi, RetroLoop, rS9, rS18, Sci-Fi, Softimage, Sound Designer II, SPACE,
SPACEShift, Symphony, Trilligent, UnityRAID, Vari-Fi, Video Slave Driver, VideoSPACE, and Xdeck are
either registered trademarks or trademarks of Avid Technology, Inc. in the United States and/or other
countries.
iNEWS, iNEWS ControlAir, and Media Browse are trademarks of iNews, LLC.
All other trademarks contained herein are the property of their respective owners.
Footage
Arri — Courtesy of Arri/Fauer — John Fauer, Inc.
Bell South “Anticipation” — Courtesy of Two Headed Monster — Tucker/Wayne Atlanta/GMS.
Canyonlands — Courtesy of the National Park Service/Department of the Interior.
Eco Challenge British Columbia — Courtesy of Eco Challenge Lifestyles, Inc., All Rights Reserved.
Eco Challenge Morocco — Courtesy of Discovery Communications, Inc.
It’s Shuttletime — Courtesy of BCP & Canadian Airlines.
Nestlé Coffee Crisp — Courtesy of MacLaren McCann Canada.
3
Page 4

Saturn “Calvin Egg” — Courtesy of Cossette Communications.
“Tigers: Tracking a Legend” — Courtesy of www.wildlifeworlds.com, Carol Amore, Executive Producer.
Windhorse — Courtesy of Paul Wagner Productions.
Arizona Images — KNTV Production — Courtesy of Granite Broadcasting, Inc.,
Editor/Producer Bryan Foote.
Canyonlands — Courtesy of the National Park Service/Department of the Interior.
Tornados + Belle Isle footage — Courtesy of KWTV News 9.
WCAU Fire Story — Courtesy of NBC-10, Philadelphia, PA.
Women in Sports – Paragliding — Courtesy of Legendary Entertainment, Inc.
GOT FOOTAGE?
Editors — Filmmakers — Special Effects Artists — Game Developers — Animators — Educators —
Broadcasters — Content creators of every genre — Just finished an incredible project and want to
share it with the world?
Send us your reels and we may use your footage in our show reel or demo!*
For a copy of our release and Avid’s mailing address, go to www.avid.com/footage.
*Note: Avid cannot guarantee the use of materials submitted.
Avid Xpress Pro HD Effects Reference • Part 0130-06800-01 • December 2004
4
Page 5

Contents
Using This Guide. . . . . . . . . . . . . . . . . . . . . . . . . . . . . . . . . . . . . . . 15
Symbols and Conventions . . . . . . . . . . . . . . . . . . . . . . . . . . . . . . . . . . . . . . 16
If You Need Help. . . . . . . . . . . . . . . . . . . . . . . . . . . . . . . . . . . . . . . . . . . . . . 17
Accessing the Tutorial and Online Library . . . . . . . . . . . . . . . . . . . . . . . . . . 17
How to Order Documentation . . . . . . . . . . . . . . . . . . . . . . . . . . . . . . . . . . . . 18
Avid Educational Services. . . . . . . . . . . . . . . . . . . . . . . . . . . . . . . . . . . . . . . 18
Chapter 1 2D Effects Reference . . . . . . . . . . . . . . . . . . . . . . . . . . . . . . . . . . . 19
2D Effects Parameters . . . . . . . . . . . . . . . . . . . . . . . . . . . . . . . . . . . . . . . . . 20
Global and Keyframeable Parameters . . . . . . . . . . . . . . . . . . . . . . . . . . 21
Acceleration . . . . . . . . . . . . . . . . . . . . . . . . . . . . . . . . . . . . . . . . . . . . . . 21
Avid Pan & Zoom Parameters . . . . . . . . . . . . . . . . . . . . . . . . . . . . . . . . 22
Other Options button for the Avid Pan & Zoom Effect. . . . . . . . . . . 22
Display. . . . . . . . . . . . . . . . . . . . . . . . . . . . . . . . . . . . . . . . . . . . . . . 23
Display Options . . . . . . . . . . . . . . . . . . . . . . . . . . . . . . . . . . . . . . . . 23
Size . . . . . . . . . . . . . . . . . . . . . . . . . . . . . . . . . . . . . . . . . . . . . . . . . 24
Position for the Avid Pan & Zoom Effect . . . . . . . . . . . . . . . . . . . . . 24
Velocity . . . . . . . . . . . . . . . . . . . . . . . . . . . . . . . . . . . . . . . . . . . . . . 25
Path . . . . . . . . . . . . . . . . . . . . . . . . . . . . . . . . . . . . . . . . . . . . . . . . . 26
Filtering . . . . . . . . . . . . . . . . . . . . . . . . . . . . . . . . . . . . . . . . . . . . . . 27
Background for the Avid Pan & Zoom Effect. . . . . . . . . . . . . . . . . . 28
Advanced. . . . . . . . . . . . . . . . . . . . . . . . . . . . . . . . . . . . . . . . . . . . . 28
Cache . . . . . . . . . . . . . . . . . . . . . . . . . . . . . . . . . . . . . . . . . . . . . . . 29
Render Mode. . . . . . . . . . . . . . . . . . . . . . . . . . . . . . . . . . . . . . . . . . 30
Page 6

Background . . . . . . . . . . . . . . . . . . . . . . . . . . . . . . . . . . . . . . . . . . . . . . 31
Border . . . . . . . . . . . . . . . . . . . . . . . . . . . . . . . . . . . . . . . . . . . . . . . . . . 32
Color Effect Parameters . . . . . . . . . . . . . . . . . . . . . . . . . . . . . . . . . . . . 33
Luma Adjust . . . . . . . . . . . . . . . . . . . . . . . . . . . . . . . . . . . . . . . . . . 33
Luma Range . . . . . . . . . . . . . . . . . . . . . . . . . . . . . . . . . . . . . . . . . . 34
Luma Clip . . . . . . . . . . . . . . . . . . . . . . . . . . . . . . . . . . . . . . . . . . . . 36
Chroma Adjust . . . . . . . . . . . . . . . . . . . . . . . . . . . . . . . . . . . . . . . . 37
Color Style . . . . . . . . . . . . . . . . . . . . . . . . . . . . . . . . . . . . . . . . . . . 38
Color Gain. . . . . . . . . . . . . . . . . . . . . . . . . . . . . . . . . . . . . . . . . . . . 39
Crop. . . . . . . . . . . . . . . . . . . . . . . . . . . . . . . . . . . . . . . . . . . . . . . . . . . . 40
Foreground . . . . . . . . . . . . . . . . . . . . . . . . . . . . . . . . . . . . . . . . . . . . . . 41
Illusion FX Parameters . . . . . . . . . . . . . . . . . . . . . . . . . . . . . . . . . . . . . 43
Background. . . . . . . . . . . . . . . . . . . . . . . . . . . . . . . . . . . . . . . . . . . 43
Border. . . . . . . . . . . . . . . . . . . . . . . . . . . . . . . . . . . . . . . . . . . . . . . 44
Center. . . . . . . . . . . . . . . . . . . . . . . . . . . . . . . . . . . . . . . . . . . . . . . 44
Circle. . . . . . . . . . . . . . . . . . . . . . . . . . . . . . . . . . . . . . . . . . . . . . . . 45
Core . . . . . . . . . . . . . . . . . . . . . . . . . . . . . . . . . . . . . . . . . . . . . . . . 46
Generation . . . . . . . . . . . . . . . . . . . . . . . . . . . . . . . . . . . . . . . . . . . 47
Glow . . . . . . . . . . . . . . . . . . . . . . . . . . . . . . . . . . . . . . . . . . . . . . . . 49
Illumination . . . . . . . . . . . . . . . . . . . . . . . . . . . . . . . . . . . . . . . . . . . 50
Input . . . . . . . . . . . . . . . . . . . . . . . . . . . . . . . . . . . . . . . . . . . . . . . . 51
Motion. . . . . . . . . . . . . . . . . . . . . . . . . . . . . . . . . . . . . . . . . . . . . . . 74
Movement. . . . . . . . . . . . . . . . . . . . . . . . . . . . . . . . . . . . . . . . . . . . 75
Number. . . . . . . . . . . . . . . . . . . . . . . . . . . . . . . . . . . . . . . . . . . . . . 76
Offset . . . . . . . . . . . . . . . . . . . . . . . . . . . . . . . . . . . . . . . . . . . . . . . 77
Source . . . . . . . . . . . . . . . . . . . . . . . . . . . . . . . . . . . . . . . . . . . . . . 77
Start Timecode . . . . . . . . . . . . . . . . . . . . . . . . . . . . . . . . . . . . . . . . 78
Key Parameters. . . . . . . . . . . . . . . . . . . . . . . . . . . . . . . . . . . . . . . . . . . 79
Key . . . . . . . . . . . . . . . . . . . . . . . . . . . . . . . . . . . . . . . . . . . . . . . . . 79
Secondary Key . . . . . . . . . . . . . . . . . . . . . . . . . . . . . . . . . . . . . . . . 80
6
Page 7

Spill Suppression. . . . . . . . . . . . . . . . . . . . . . . . . . . . . . . . . . . . . . . 81
Key Color. . . . . . . . . . . . . . . . . . . . . . . . . . . . . . . . . . . . . . . . . . . . . 82
Chroma Key. . . . . . . . . . . . . . . . . . . . . . . . . . . . . . . . . . . . . . . . . . . 83
Matte Control. . . . . . . . . . . . . . . . . . . . . . . . . . . . . . . . . . . . . . . . . . 84
Color Correction . . . . . . . . . . . . . . . . . . . . . . . . . . . . . . . . . . . . . . . 85
Matrix Parameters . . . . . . . . . . . . . . . . . . . . . . . . . . . . . . . . . . . . . . . . . 86
Traditional Motion Effect Parameters . . . . . . . . . . . . . . . . . . . . . . . . . . . 87
Freeze Frame Parameters . . . . . . . . . . . . . . . . . . . . . . . . . . . . . . . 87
Variable Speed and Strobe Motion Parameters . . . . . . . . . . . . . . . 89
PlasmaWipe Parameters . . . . . . . . . . . . . . . . . . . . . . . . . . . . . . . . . . . . 92
Plug-in Effect Parameters . . . . . . . . . . . . . . . . . . . . . . . . . . . . . . . . . . . 94
Position. . . . . . . . . . . . . . . . . . . . . . . . . . . . . . . . . . . . . . . . . . . . . . . . . . 94
Scroll Position . . . . . . . . . . . . . . . . . . . . . . . . . . . . . . . . . . . . . . . . . 95
Profile . . . . . . . . . . . . . . . . . . . . . . . . . . . . . . . . . . . . . . . . . . . . . . . . . . . 96
Region Stabilize Parameters . . . . . . . . . . . . . . . . . . . . . . . . . . . . . . . . . 97
Model. . . . . . . . . . . . . . . . . . . . . . . . . . . . . . . . . . . . . . . . . . . . . . . . 97
Region of Interest . . . . . . . . . . . . . . . . . . . . . . . . . . . . . . . . . . . . . . 98
Auto Zoom . . . . . . . . . . . . . . . . . . . . . . . . . . . . . . . . . . . . . . . . . . . . 98
Progressive Source . . . . . . . . . . . . . . . . . . . . . . . . . . . . . . . . . . . . . 99
Scaling . . . . . . . . . . . . . . . . . . . . . . . . . . . . . . . . . . . . . . . . . . . . . . . . . 100
Transition Parameters . . . . . . . . . . . . . . . . . . . . . . . . . . . . . . . . . . . . . 101
2D Effects . . . . . . . . . . . . . . . . . . . . . . . . . . . . . . . . . . . . . . . . . . . . . . . . . . 102
Blend Effects . . . . . . . . . . . . . . . . . . . . . . . . . . . . . . . . . . . . . . . . . . . . 103
Dip to Color . . . . . . . . . . . . . . . . . . . . . . . . . . . . . . . . . . . . . . . . . . 104
Dissolve . . . . . . . . . . . . . . . . . . . . . . . . . . . . . . . . . . . . . . . . . . . . . 105
Fade from Color. . . . . . . . . . . . . . . . . . . . . . . . . . . . . . . . . . . . . . . 106
Fade to Color. . . . . . . . . . . . . . . . . . . . . . . . . . . . . . . . . . . . . . . . . 107
Picture-in-Picture. . . . . . . . . . . . . . . . . . . . . . . . . . . . . . . . . . . . . . 108
Superimpose . . . . . . . . . . . . . . . . . . . . . . . . . . . . . . . . . . . . . . . . . 109
7
Page 8

Box Wipe Effects . . . . . . . . . . . . . . . . . . . . . . . . . . . . . . . . . . . . . . . . . 110
Bottom Box . . . . . . . . . . . . . . . . . . . . . . . . . . . . . . . . . . . . . . . . . . 111
Bottom Left to Top Right. . . . . . . . . . . . . . . . . . . . . . . . . . . . . . . . 112
Bottom Right to Top Left. . . . . . . . . . . . . . . . . . . . . . . . . . . . . . . . 113
Left Box. . . . . . . . . . . . . . . . . . . . . . . . . . . . . . . . . . . . . . . . . . . . . 114
Right Box . . . . . . . . . . . . . . . . . . . . . . . . . . . . . . . . . . . . . . . . . . . 115
Top Box . . . . . . . . . . . . . . . . . . . . . . . . . . . . . . . . . . . . . . . . . . . . 116
Top Left to Bottom Right. . . . . . . . . . . . . . . . . . . . . . . . . . . . . . . . 117
Top Right to Bottom Left. . . . . . . . . . . . . . . . . . . . . . . . . . . . . . . . 118
Conceal Effects . . . . . . . . . . . . . . . . . . . . . . . . . . . . . . . . . . . . . . . . . . 119
Bottom Left to Top Right. . . . . . . . . . . . . . . . . . . . . . . . . . . . . . . . 120
Bottom Right to Top Left. . . . . . . . . . . . . . . . . . . . . . . . . . . . . . . . 121
Bottom to Top . . . . . . . . . . . . . . . . . . . . . . . . . . . . . . . . . . . . . . . . 122
Left to Right . . . . . . . . . . . . . . . . . . . . . . . . . . . . . . . . . . . . . . . . . 123
Right to Left . . . . . . . . . . . . . . . . . . . . . . . . . . . . . . . . . . . . . . . . . 124
Top Left to Bottom Right. . . . . . . . . . . . . . . . . . . . . . . . . . . . . . . . 125
Top Right to Bottom Left. . . . . . . . . . . . . . . . . . . . . . . . . . . . . . . . 126
Top to Bottom . . . . . . . . . . . . . . . . . . . . . . . . . . . . . . . . . . . . . . . . 127
Edge Wipe Effects. . . . . . . . . . . . . . . . . . . . . . . . . . . . . . . . . . . . . . . . 128
Horizontal . . . . . . . . . . . . . . . . . . . . . . . . . . . . . . . . . . . . . . . . . . . 129
Horizontal Open . . . . . . . . . . . . . . . . . . . . . . . . . . . . . . . . . . . . . . 130
Lower Left Diagonal . . . . . . . . . . . . . . . . . . . . . . . . . . . . . . . . . . . 131
Lower Right Diagonal . . . . . . . . . . . . . . . . . . . . . . . . . . . . . . . . . . 132
Upper Left Diagonal . . . . . . . . . . . . . . . . . . . . . . . . . . . . . . . . . . . 133
Upper Right Diagonal . . . . . . . . . . . . . . . . . . . . . . . . . . . . . . . . . . 134
Vertical . . . . . . . . . . . . . . . . . . . . . . . . . . . . . . . . . . . . . . . . . . . . . 135
Vertical Open . . . . . . . . . . . . . . . . . . . . . . . . . . . . . . . . . . . . . . . . 136
Film Effects . . . . . . . . . . . . . . . . . . . . . . . . . . . . . . . . . . . . . . . . . . . . . 137
1.66 Mask . . . . . . . . . . . . . . . . . . . . . . . . . . . . . . . . . . . . . . . . . . . 138
1.85 Mask . . . . . . . . . . . . . . . . . . . . . . . . . . . . . . . . . . . . . . . . . . . 139
8
Page 9

16:9 Mask . . . . . . . . . . . . . . . . . . . . . . . . . . . . . . . . . . . . . . . . . . . 139
Anamorphic Mask . . . . . . . . . . . . . . . . . . . . . . . . . . . . . . . . . . . . . 140
Blowup. . . . . . . . . . . . . . . . . . . . . . . . . . . . . . . . . . . . . . . . . . . . . . 140
Film Dissolve . . . . . . . . . . . . . . . . . . . . . . . . . . . . . . . . . . . . . . . . . 141
Film Fade. . . . . . . . . . . . . . . . . . . . . . . . . . . . . . . . . . . . . . . . . . . . 142
Mask . . . . . . . . . . . . . . . . . . . . . . . . . . . . . . . . . . . . . . . . . . . . . . . 142
Illusion FX. . . . . . . . . . . . . . . . . . . . . . . . . . . . . . . . . . . . . . . . . . . . . . . 143
Color Mix . . . . . . . . . . . . . . . . . . . . . . . . . . . . . . . . . . . . . . . . . . . . 144
Crystal . . . . . . . . . . . . . . . . . . . . . . . . . . . . . . . . . . . . . . . . . . . . . . 145
Film Grain . . . . . . . . . . . . . . . . . . . . . . . . . . . . . . . . . . . . . . . . . . . 145
Flare . . . . . . . . . . . . . . . . . . . . . . . . . . . . . . . . . . . . . . . . . . . . . . . 146
FluidBlur . . . . . . . . . . . . . . . . . . . . . . . . . . . . . . . . . . . . . . . . . . . . 146
FluidColorMap . . . . . . . . . . . . . . . . . . . . . . . . . . . . . . . . . . . . . . . . 147
FluidMorph. . . . . . . . . . . . . . . . . . . . . . . . . . . . . . . . . . . . . . . . . . . 147
Iris . . . . . . . . . . . . . . . . . . . . . . . . . . . . . . . . . . . . . . . . . . . . . . . . . 148
Kaleidoscope. . . . . . . . . . . . . . . . . . . . . . . . . . . . . . . . . . . . . . . . . 149
Lightning . . . . . . . . . . . . . . . . . . . . . . . . . . . . . . . . . . . . . . . . . . . . 150
Melt . . . . . . . . . . . . . . . . . . . . . . . . . . . . . . . . . . . . . . . . . . . . . . . . 151
Motion Blur . . . . . . . . . . . . . . . . . . . . . . . . . . . . . . . . . . . . . . . . . . 152
Page Curl. . . . . . . . . . . . . . . . . . . . . . . . . . . . . . . . . . . . . . . . . . . . 152
Particle Blast . . . . . . . . . . . . . . . . . . . . . . . . . . . . . . . . . . . . . . . . . 153
Particle Orbit . . . . . . . . . . . . . . . . . . . . . . . . . . . . . . . . . . . . . . . . . 154
Particle Wind . . . . . . . . . . . . . . . . . . . . . . . . . . . . . . . . . . . . . . . . . 156
Pattern Generator . . . . . . . . . . . . . . . . . . . . . . . . . . . . . . . . . . . . . 157
Pinch . . . . . . . . . . . . . . . . . . . . . . . . . . . . . . . . . . . . . . . . . . . . . . . 158
Radial Blur . . . . . . . . . . . . . . . . . . . . . . . . . . . . . . . . . . . . . . . . . . . 159
Random Blend. . . . . . . . . . . . . . . . . . . . . . . . . . . . . . . . . . . . . . . . 160
Ripple . . . . . . . . . . . . . . . . . . . . . . . . . . . . . . . . . . . . . . . . . . . . . . 161
Rollup . . . . . . . . . . . . . . . . . . . . . . . . . . . . . . . . . . . . . . . . . . . . . . 162
Shear . . . . . . . . . . . . . . . . . . . . . . . . . . . . . . . . . . . . . . . . . . . . . . . 163
9
Page 10

Sparkler . . . . . . . . . . . . . . . . . . . . . . . . . . . . . . . . . . . . . . . . . . . . 164
Sphere . . . . . . . . . . . . . . . . . . . . . . . . . . . . . . . . . . . . . . . . . . . . . 165
Swirl . . . . . . . . . . . . . . . . . . . . . . . . . . . . . . . . . . . . . . . . . . . . . . . 166
Timecode . . . . . . . . . . . . . . . . . . . . . . . . . . . . . . . . . . . . . . . . . . . 167
Twist . . . . . . . . . . . . . . . . . . . . . . . . . . . . . . . . . . . . . . . . . . . . . . . 168
Wave. . . . . . . . . . . . . . . . . . . . . . . . . . . . . . . . . . . . . . . . . . . . . . . 169
Image Effects. . . . . . . . . . . . . . . . . . . . . . . . . . . . . . . . . . . . . . . . . . . . 170
Avid Pan & Zoom (AVX Plug-In Effect). . . . . . . . . . . . . . . . . . . . . 171
Color Correction . . . . . . . . . . . . . . . . . . . . . . . . . . . . . . . . . . . . . . 172
Color Effect. . . . . . . . . . . . . . . . . . . . . . . . . . . . . . . . . . . . . . . . . . 172
Flip . . . . . . . . . . . . . . . . . . . . . . . . . . . . . . . . . . . . . . . . . . . . . . . . 173
Flip-Flop . . . . . . . . . . . . . . . . . . . . . . . . . . . . . . . . . . . . . . . . . . . . 173
Flop. . . . . . . . . . . . . . . . . . . . . . . . . . . . . . . . . . . . . . . . . . . . . . . . 174
Mask . . . . . . . . . . . . . . . . . . . . . . . . . . . . . . . . . . . . . . . . . . . . . . . 174
Region Stabilize . . . . . . . . . . . . . . . . . . . . . . . . . . . . . . . . . . . . . . 175
Resize. . . . . . . . . . . . . . . . . . . . . . . . . . . . . . . . . . . . . . . . . . . . . . 176
Submaster . . . . . . . . . . . . . . . . . . . . . . . . . . . . . . . . . . . . . . . . . . 177
10
Key Effects . . . . . . . . . . . . . . . . . . . . . . . . . . . . . . . . . . . . . . . . . . . . . 178
Chroma Key . . . . . . . . . . . . . . . . . . . . . . . . . . . . . . . . . . . . . . . . . 179
Luma Key . . . . . . . . . . . . . . . . . . . . . . . . . . . . . . . . . . . . . . . . . . . 180
Matte Key . . . . . . . . . . . . . . . . . . . . . . . . . . . . . . . . . . . . . . . . . . . 181
RGB Keyer (AVX Plug-in Effect). . . . . . . . . . . . . . . . . . . . . . . . . . 182
L-Conceal Effects . . . . . . . . . . . . . . . . . . . . . . . . . . . . . . . . . . . . . . . . 183
Bottom Left . . . . . . . . . . . . . . . . . . . . . . . . . . . . . . . . . . . . . . . . . . 183
Bottom Right. . . . . . . . . . . . . . . . . . . . . . . . . . . . . . . . . . . . . . . . . 184
Top Left. . . . . . . . . . . . . . . . . . . . . . . . . . . . . . . . . . . . . . . . . . . . . 185
Top Right . . . . . . . . . . . . . . . . . . . . . . . . . . . . . . . . . . . . . . . . . . . 186
Matrix Wipe Effects . . . . . . . . . . . . . . . . . . . . . . . . . . . . . . . . . . . . . . . 187
Grid. . . . . . . . . . . . . . . . . . . . . . . . . . . . . . . . . . . . . . . . . . . . . . . . 187
One-Way Row . . . . . . . . . . . . . . . . . . . . . . . . . . . . . . . . . . . . . . . 188
Page 11

Speckle . . . . . . . . . . . . . . . . . . . . . . . . . . . . . . . . . . . . . . . . . . . . . 189
Spiral . . . . . . . . . . . . . . . . . . . . . . . . . . . . . . . . . . . . . . . . . . . . . . . 190
Zig-Zag . . . . . . . . . . . . . . . . . . . . . . . . . . . . . . . . . . . . . . . . . . . . . 191
Motion Effects. . . . . . . . . . . . . . . . . . . . . . . . . . . . . . . . . . . . . . . . . . . . 192
Freeze Frame . . . . . . . . . . . . . . . . . . . . . . . . . . . . . . . . . . . . . . . . 192
Variable Speed and Strobe Motion . . . . . . . . . . . . . . . . . . . . . . . . 192
Peel Effects . . . . . . . . . . . . . . . . . . . . . . . . . . . . . . . . . . . . . . . . . . . . . 193
Bottom Left Corner . . . . . . . . . . . . . . . . . . . . . . . . . . . . . . . . . . . . 194
Bottom Right Corner . . . . . . . . . . . . . . . . . . . . . . . . . . . . . . . . . . . 195
Bottom to Top . . . . . . . . . . . . . . . . . . . . . . . . . . . . . . . . . . . . . . . . 196
Left to Right . . . . . . . . . . . . . . . . . . . . . . . . . . . . . . . . . . . . . . . . . . 197
Right to Left . . . . . . . . . . . . . . . . . . . . . . . . . . . . . . . . . . . . . . . . . . 198
Top Left Corner . . . . . . . . . . . . . . . . . . . . . . . . . . . . . . . . . . . . . . . 199
Top Right Corner . . . . . . . . . . . . . . . . . . . . . . . . . . . . . . . . . . . . . . 200
Top to Bottom . . . . . . . . . . . . . . . . . . . . . . . . . . . . . . . . . . . . . . . . 201
PlasmaWipe Effects . . . . . . . . . . . . . . . . . . . . . . . . . . . . . . . . . . . . . . . 202
Push Effects . . . . . . . . . . . . . . . . . . . . . . . . . . . . . . . . . . . . . . . . . . . . . 203
Bottom Left to Top Right . . . . . . . . . . . . . . . . . . . . . . . . . . . . . . . . 204
Bottom Right to Top Left . . . . . . . . . . . . . . . . . . . . . . . . . . . . . . . . 205
Bottom to Top . . . . . . . . . . . . . . . . . . . . . . . . . . . . . . . . . . . . . . . . 206
Left to Right . . . . . . . . . . . . . . . . . . . . . . . . . . . . . . . . . . . . . . . . . . 207
Right to Left . . . . . . . . . . . . . . . . . . . . . . . . . . . . . . . . . . . . . . . . . . 208
Top Left to Bottom Right . . . . . . . . . . . . . . . . . . . . . . . . . . . . . . . . 209
Top Right to Bottom Left . . . . . . . . . . . . . . . . . . . . . . . . . . . . . . . . 210
Top to Bottom . . . . . . . . . . . . . . . . . . . . . . . . . . . . . . . . . . . . . . . . 211
Sawtooth Wipe Effects . . . . . . . . . . . . . . . . . . . . . . . . . . . . . . . . . . . . . 212
Horizontal Sawtooth . . . . . . . . . . . . . . . . . . . . . . . . . . . . . . . . . . . 212
Horizontal Open Sawtooth. . . . . . . . . . . . . . . . . . . . . . . . . . . . . . . 213
Vertical Open Sawtooth. . . . . . . . . . . . . . . . . . . . . . . . . . . . . . . . . 214
Vertical Sawtooth. . . . . . . . . . . . . . . . . . . . . . . . . . . . . . . . . . . . . . 215
11
Page 12

Shape Wipe Effects. . . . . . . . . . . . . . . . . . . . . . . . . . . . . . . . . . . . . . . 216
4 Corners . . . . . . . . . . . . . . . . . . . . . . . . . . . . . . . . . . . . . . . . . . . 217
Center Box . . . . . . . . . . . . . . . . . . . . . . . . . . . . . . . . . . . . . . . . . . 218
Circle. . . . . . . . . . . . . . . . . . . . . . . . . . . . . . . . . . . . . . . . . . . . . . . 219
Clock. . . . . . . . . . . . . . . . . . . . . . . . . . . . . . . . . . . . . . . . . . . . . . . 220
Diamond . . . . . . . . . . . . . . . . . . . . . . . . . . . . . . . . . . . . . . . . . . . . 221
Ellipse . . . . . . . . . . . . . . . . . . . . . . . . . . . . . . . . . . . . . . . . . . . . . . 222
Horizontal Bands . . . . . . . . . . . . . . . . . . . . . . . . . . . . . . . . . . . . . 223
Horizontal Blinds. . . . . . . . . . . . . . . . . . . . . . . . . . . . . . . . . . . . . . 224
Vertical Blinds. . . . . . . . . . . . . . . . . . . . . . . . . . . . . . . . . . . . . . . . 225
Spin Effects . . . . . . . . . . . . . . . . . . . . . . . . . . . . . . . . . . . . . . . . . . . . . 226
X Spin . . . . . . . . . . . . . . . . . . . . . . . . . . . . . . . . . . . . . . . . . . . . . . 226
Y Spin . . . . . . . . . . . . . . . . . . . . . . . . . . . . . . . . . . . . . . . . . . . . . . 227
Squeeze Effects . . . . . . . . . . . . . . . . . . . . . . . . . . . . . . . . . . . . . . . . . 228
Bottom Centered. . . . . . . . . . . . . . . . . . . . . . . . . . . . . . . . . . . . . . 229
Bottom Left . . . . . . . . . . . . . . . . . . . . . . . . . . . . . . . . . . . . . . . . . . 230
Bottom Right. . . . . . . . . . . . . . . . . . . . . . . . . . . . . . . . . . . . . . . . . 231
12
Bottom to Top . . . . . . . . . . . . . . . . . . . . . . . . . . . . . . . . . . . . . . . . 232
Centered Zoom. . . . . . . . . . . . . . . . . . . . . . . . . . . . . . . . . . . . . . . 233
Horizontal Centered . . . . . . . . . . . . . . . . . . . . . . . . . . . . . . . . . . . 234
Left Centered . . . . . . . . . . . . . . . . . . . . . . . . . . . . . . . . . . . . . . . . 235
Left to Right . . . . . . . . . . . . . . . . . . . . . . . . . . . . . . . . . . . . . . . . . 236
Right Centered . . . . . . . . . . . . . . . . . . . . . . . . . . . . . . . . . . . . . . . 237
Right to Left . . . . . . . . . . . . . . . . . . . . . . . . . . . . . . . . . . . . . . . . . 238
Top Centered . . . . . . . . . . . . . . . . . . . . . . . . . . . . . . . . . . . . . . . . 239
Top Left. . . . . . . . . . . . . . . . . . . . . . . . . . . . . . . . . . . . . . . . . . . . . 240
Top Right . . . . . . . . . . . . . . . . . . . . . . . . . . . . . . . . . . . . . . . . . . . 241
Top to Bottom . . . . . . . . . . . . . . . . . . . . . . . . . . . . . . . . . . . . . . . . 242
Vertical Centered . . . . . . . . . . . . . . . . . . . . . . . . . . . . . . . . . . . . . 243
Page 13

Timewarp . . . . . . . . . . . . . . . . . . . . . . . . . . . . . . . . . . . . . . . . . . . . . . . 244
Timewarp: 0% To 100% . . . . . . . . . . . . . . . . . . . . . . . . . . . . . . . . 245
Timewarp: 100% To 0% . . . . . . . . . . . . . . . . . . . . . . . . . . . . . . . . 246
Timewarp: 50% Speed . . . . . . . . . . . . . . . . . . . . . . . . . . . . . . . . . 247
Timewarp: FluidFilm 2:3 Cadence. . . . . . . . . . . . . . . . . . . . . . . . . 248
Timewarp: FluidFilm Progressive . . . . . . . . . . . . . . . . . . . . . . . . . 248
Timewarp: Trim to Fill . . . . . . . . . . . . . . . . . . . . . . . . . . . . . . . . . . 249
Timewarp: Reverse Motion . . . . . . . . . . . . . . . . . . . . . . . . . . . . . . 250
Timewarp: Speed Boost . . . . . . . . . . . . . . . . . . . . . . . . . . . . . . . . 251
Timewarp: Speed Bump . . . . . . . . . . . . . . . . . . . . . . . . . . . . . . . . 252
Title Effects. . . . . . . . . . . . . . . . . . . . . . . . . . . . . . . . . . . . . . . . . . . . . . 253
Comparison of Similar Effects. . . . . . . . . . . . . . . . . . . . . . . . . . . . . . . . . . . 254
Chapter 2 3D Effects Reference . . . . . . . . . . . . . . . . . . . . . . . . . . . . . . . . . . 255
3D Effects Parameters . . . . . . . . . . . . . . . . . . . . . . . . . . . . . . . . . . . . . . . . 256
Global Versus Keyframeable Parameters . . . . . . . . . . . . . . . . . . . . . . 257
The Hierarchy of Parameters . . . . . . . . . . . . . . . . . . . . . . . . . . . . . . . . 257
Direct Manipulation of 3D Effect Parameters . . . . . . . . . . . . . . . . . . . . 258
Acceleration . . . . . . . . . . . . . . . . . . . . . . . . . . . . . . . . . . . . . . . . . . . . . 259
Axis. . . . . . . . . . . . . . . . . . . . . . . . . . . . . . . . . . . . . . . . . . . . . . . . . . . . 260
Background . . . . . . . . . . . . . . . . . . . . . . . . . . . . . . . . . . . . . . . . . . . . . 261
Border. . . . . . . . . . . . . . . . . . . . . . . . . . . . . . . . . . . . . . . . . . . . . . . . . . 262
Crop . . . . . . . . . . . . . . . . . . . . . . . . . . . . . . . . . . . . . . . . . . . . . . . . . . . 264
Foreground. . . . . . . . . . . . . . . . . . . . . . . . . . . . . . . . . . . . . . . . . . . . . . 265
Position. . . . . . . . . . . . . . . . . . . . . . . . . . . . . . . . . . . . . . . . . . . . . . . . . 266
Rotation . . . . . . . . . . . . . . . . . . . . . . . . . . . . . . . . . . . . . . . . . . . . . . . . 267
Scaling . . . . . . . . . . . . . . . . . . . . . . . . . . . . . . . . . . . . . . . . . . . . . . . . . 268
Shadow . . . . . . . . . . . . . . . . . . . . . . . . . . . . . . . . . . . . . . . . . . . . . . . . 269
Shape . . . . . . . . . . . . . . . . . . . . . . . . . . . . . . . . . . . . . . . . . . . . . . . . . . 270
Spline . . . . . . . . . . . . . . . . . . . . . . . . . . . . . . . . . . . . . . . . . . . . . . . . . . 271
13
Page 14

Target . . . . . . . . . . . . . . . . . . . . . . . . . . . . . . . . . . . . . . . . . . . . . . . . . 272
Trail . . . . . . . . . . . . . . . . . . . . . . . . . . . . . . . . . . . . . . . . . . . . . . . . . . . 273
Xpress 3D Effects. . . . . . . . . . . . . . . . . . . . . . . . . . . . . . . . . . . . . . . . . . . . 274
Page Fold . . . . . . . . . . . . . . . . . . . . . . . . . . . . . . . . . . . . . . . . . . . . . . 275
Tips for Page Fold Creation . . . . . . . . . . . . . . . . . . . . . . . . . . . . . 276
3D Ball. . . . . . . . . . . . . . . . . . . . . . . . . . . . . . . . . . . . . . . . . . . . . . . . . 277
Limitations to 3D Ball Shapes. . . . . . . . . . . . . . . . . . . . . . . . . . . . 278
3D Slats. . . . . . . . . . . . . . . . . . . . . . . . . . . . . . . . . . . . . . . . . . . . . . . . 279
3D PIP Effect. . . . . . . . . . . . . . . . . . . . . . . . . . . . . . . . . . . . . . . . . . . . 280
Index . . . . . . . . . . . . . . . . . . . . . . . . . . . . . . . . . . . . . . . . . . . . . . . . 281
14
Page 15

Using This Guide
Congratulations on your purchase of an Avid editing application. You can use
your application to create broadcast-quality output incorporating every
possible production element from full-speed, high-resolution footage, to
multimedia artwork and animation, to computer-generated effects and titling.
This document is a companion volume to the Avid Xpress Pro HD Effects
Guide, which contains a complete explanation of all the tools and techniques
required to create, apply, and adjust various effects and graphics, including
useful tips, shortcuts, and custom options.
This guide is intended for all users, from beginning to advanced.
The following terms are used in this document:
• “effects guide” refers to the Avid Xpress Pro HD Effects Guide
• “user’s guide” refers to the Avid Xpress Pro HD User’s Guide
• “supplement” refers to the Avid Xpress Pro HD User’s Guide Supplement
n
• “online library CD-ROM” refers to the Avid Xpress Pro HD Online
Library and Tutorial CD-ROM
The effects guide, user’s guide, and supplement are all available on the online
library CD-ROM.
The documentation describes the features and hardware of all models.
Therefore, your system might not contain certain features and hardware that
are covered in the documentation.
Page 16

Using This Guide
Symbols and Conventions
Avid documentation uses the following symbols and conventions:
Symbol or Convention Meaning or Action
n
c
w
> This symbol indicates menu commands (and
t
Margin tips
Italic font Italic font is used to emphasize certain words and to
Courier Bold font
A note provides important related information,
reminders, recommendations, and strong suggestions.
A caution means that a specific action you take could
cause harm to your computer or cause you to lose data.
A warning describes an action that could cause you
physical harm. Follow the guidelines in this document
or on the unit itself when handling electrical
equipment.
subcommands) in the order you select them. For
example, File > Import means to open the File menu
and then select the Import command.
This symbol indicates a single-step procedure.
Multiple arrows in a list indicate that you perform one
of the actions listed.
In the margin, you will find tips that help you perform
tasks more easily and efficiently.
indicate variables.
Courier Bold font identifies text that you type.
16
Ctrl+key or mouse action Press and hold the first key while you press the last
key or perform the mouse action. For example,
Ctrl+drag.
Page 17

If You Need Help
If you are having trouble using your Avid editing application:
1. Retry the action, carefully following the instructions given for that task in
this guide. It is especially important to check each step of your workflow.
2. Check for the latest information that might have become available after
the documentation was published in one of two locations:
- If release notes are available, they ship with your application.
- If ReadMe files are available, they are supplied in your Avid
If You Need Help
application folder. ReadMe files are also available from Help.
n
Release notes and ReadMe files are also available on the Avid Knowledge
Base.
3. Check the documentation that came with your Avid application or your
hardware for maintenance or hardware-related issues.
4. Visit the online Knowledge Base at www.avid.com/onlinesupport. Online
services are available 24 hours per day, 7 days per week. Search this
online Knowledge Base to find answers, to view error messages, to access
troubleshooting tips, to download updates, and to read/join online
message-board discussions.
5. For Technical Support, please call 800-800-AVID (800-800-2843).
For Broadcast On-Air Sites and Call Letter Stations, call
800-NEWSDNG (800-639-7364).
Accessing the Tutorial and Online Library
The Avid Xpress Pro HD Online Library and Tutorial CD-ROM contains a
multimedia tutorial and all the product documentation in PDF format. Avid
recommends the multimedia tutorial as your first resource for learning how to
use your application. You can access the tutorial and the library from the
Online Library and Tutorial CD-ROM or from the Help menu.
The Online Library includes a Master Glossary of all specialized terminology
used in the documentation for Avid products.
17
Page 18

Using This Guide
n
You need Adobe® Reader® installed to view the documentation online. You can
download the latest version of Adobe Reader from the Adobe web site. The
tutorial and the effects reference guide require Apple’s QuickTime
application to view the QuickTime movies. You can download the latest
version of QuickTime from the Apple
To access the tutorial and online library from the Online Library CD-ROM:
1. Insert the Avid Xpress Pro HD Online Library and Tutorial CD-ROM into
the CD-ROM drive.
2. Double-click the Mainmenu file.
To access the online library and tutorial from the Help:
1. Insert the Avid Xpress Pro HD Online Library and Tutorial CD-ROM into
the CD-ROM drive.
2. In your Avid application, select Help > Online Library & Tutorial.
How to Order Documentation
To order additional copies of this documentation from within the
United States, call Avid Sales at 800-949-AVID (800-949-2843). If you are
placing an order from outside the United States, contact your local
Avid representative.
®
Web s ite.
®
Avid Educational Services
For information on courses/schedules, training centers, certifications,
courseware, and books, please visit www.avid.com/training or call Avid Sales
at 800-949-AVID (800-949-2843).
18
Page 19

Chapter 1
2D Effects Reference
This chapter describes all 2D effects parameters and then summarizes all 2D
effects in alphabetical order within each effect category. For information on
effects editing, see the chapter “Basics of Effects Editing” in the effects guide
or the Help.
• 2D Effects Parameters
• 2D Effects
• Comparison of Similar Effects
Page 20

Chapter 1 2D Effects Reference
2D Effects Parameters
This section provides a general description of all 2D parameters, in
alphabetical order. Some parameters apply to a wide range of effects; others
are specific to a small group of effects, such as keys or motion effects.
Effect parameters are grouped in the following categories:
• Acceleration
• Avid Pan & Zoom Parameters
• Background
• Border
• Color Effect Parameters
• Crop
• Foreground
• Illusion FX Parameters
• Key Parameters
20
• Matrix Parameters
• Traditional Motion Effect Parameters
• PlasmaWipe Parameters
• Plug-in Effect Parameters
• Position
• Profile
• Region Stabilize Parameters
• Scaling
• Transition Parameters
For an explanation of how to change a parameter, see “Understanding Effect
Parameters” in the effects guide or the Help.
Page 21
Global and Keyframeable Parameters
The effects parameters are divided into two types:
•Global
Changes apply to all keyframes. When you change a global parameter, the
system automatically sets the value for all keyframes in the effect.
•Keyframeable
Changes can be applied to individual keyframes. You can use keyframe
parameters to alter an effect over time.
This distinction is noted throughout this section for each parameter.
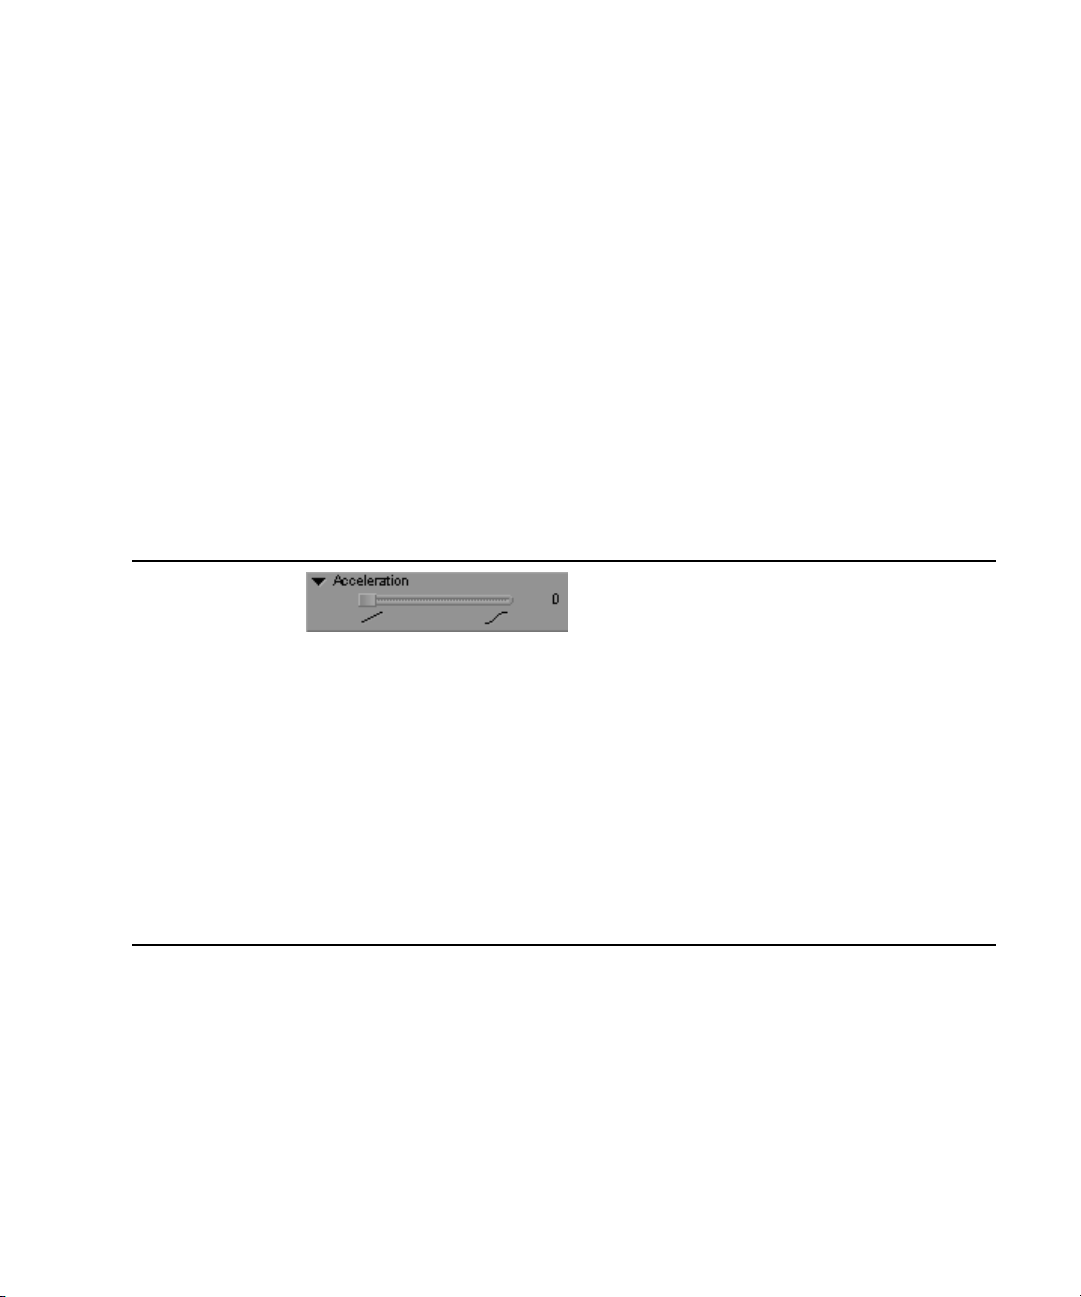
Acceleration
2D Effects Parameters
Parameter Type
Description
Use of Control
Global
Adjusts the effect’s speed over time by having the effect ease in and ease out of every
keyframe. This gives the effect a more natural appearance. The overall speed of an effect
is determined by the duration of the effect, which is determined by the length of the clip in
the sequence. If you want to slow down or speed up the movement of an effect, you will
need to change the length of your effect or use add edits to limit the portion of the clip
affected by the effect.
Drag the slider to control ease in and ease out motion. When the slider is to the left (value
of 0), there is no ease in and ease out motion. The effect maintains a constant speed
throughout its path. As the slider moves to the right (toward a maximum value of 100),
ease in and ease out motion increases.
21
Page 22

Chapter 1 2D Effects Reference
Avid Pan & Zoom Parameters
This section describes the parameter categories available for the
Avid Pan & Zoom AVX plug-in effect.
Other Options button
Other Options button for the Avid Pan & Zoom Effect
Parameter type: Global
The Other Options button opens a file selection dialog box. Use it to specify
the image file for the Avid Pan & Zoom effect.
n
22
If you move the image file after importing it into the Avid Pan & Zoom effect,
the effect will not be able to locate the file and you must reimport the image.
Page 23
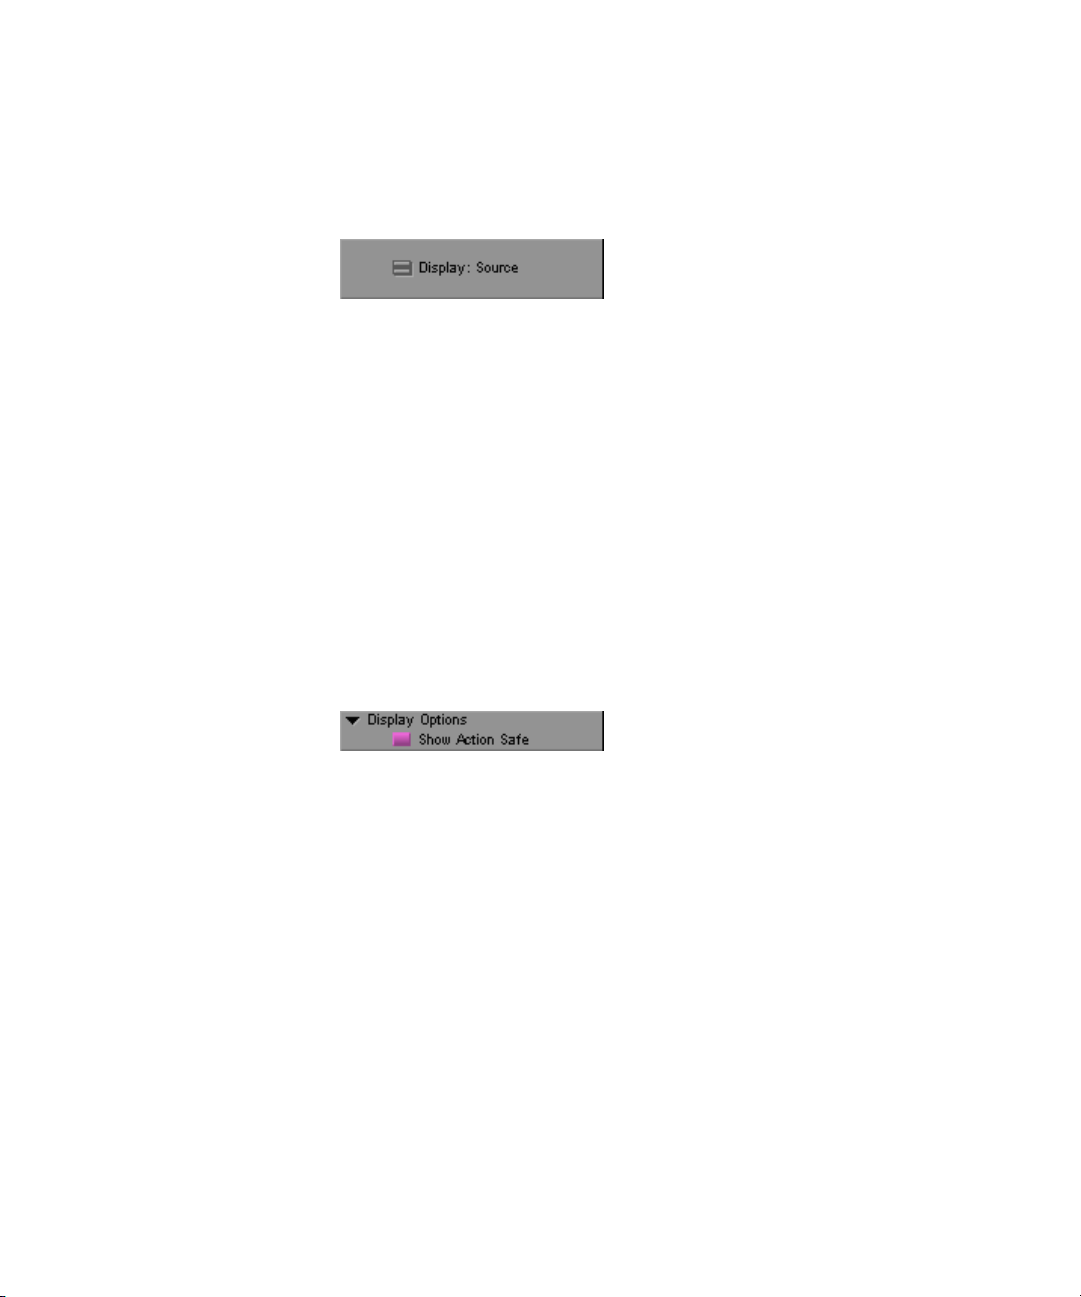
Display
Display Options
2D Effects Parameters
Parameter type: Global
The Display Fast menu lets you choose how you view the image as you work
on it.
• Source shows you the entire image scaled to fit inside the Effect Preview
monitor. Use Source as you draft the effect.
• Ta rg et shows you the results of your pan and zoom settings. Use Target
for previewing your moves.
For more information, see “Viewing the Image While You Work” in the effects
guide or the Help.
Parameter type: Global
Show Action Safe in the Display Options parameter category selects or
deselects the display of the safe action area. When Show Action Safe is
selected, the safe action area appears as a rectangle superimposed on the field
of view.
23
Page 24
Chapter 1 2D Effects Reference
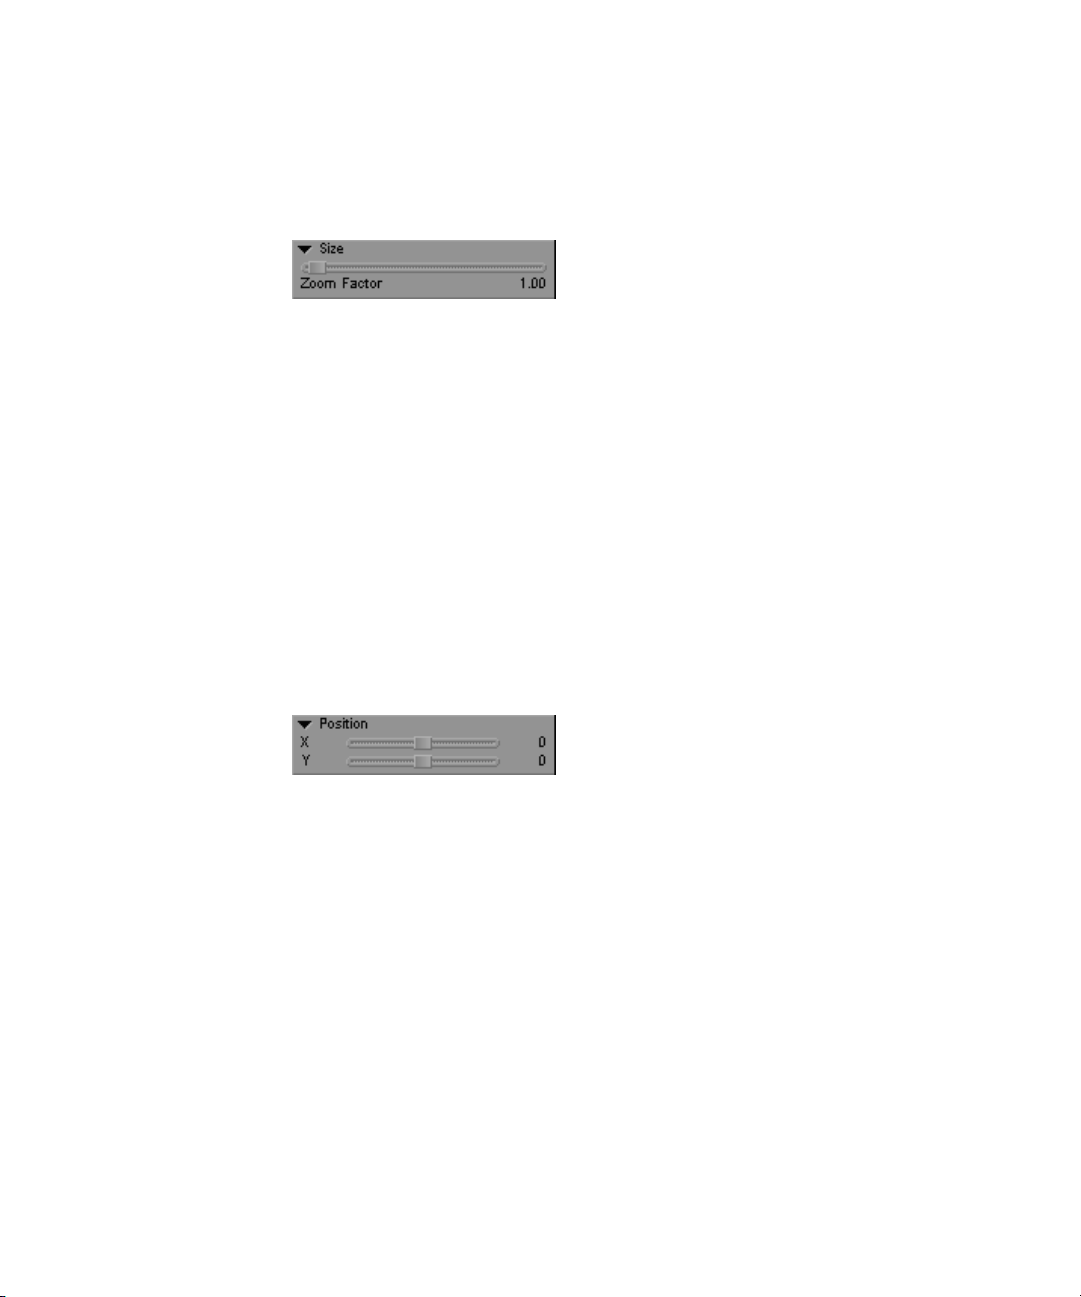
Size
Parameter type: Keyframeable
The Size parameter category contains the Zoom Factor slider. This slider
controls how far you zoom into or out from the source image.
The Zoom Factor ranges from .1 to 20. At .1, the application scales down the
image to one-tenth the original. At 1, the application applies no magnification
to the source image. At 20, the application scales up the image 20 times - that
is, by 2,000%.
The larger the Zoom Factor, the smaller the field of view rectangle appears
when you use Source mode.
Position for the Avid Pan & Zoom Effect
24
Parameter type: Keyframeable
You control pan by either using the X and Y Position parameters or dragging
the field of view across the source image.
The Position parameters refer to the center of the field of view. A Position of
0, 0 centers the field of view over the center of the image.
For more information, see “Panning Over the Source Image” in the effects
guide or the Help.
Page 25
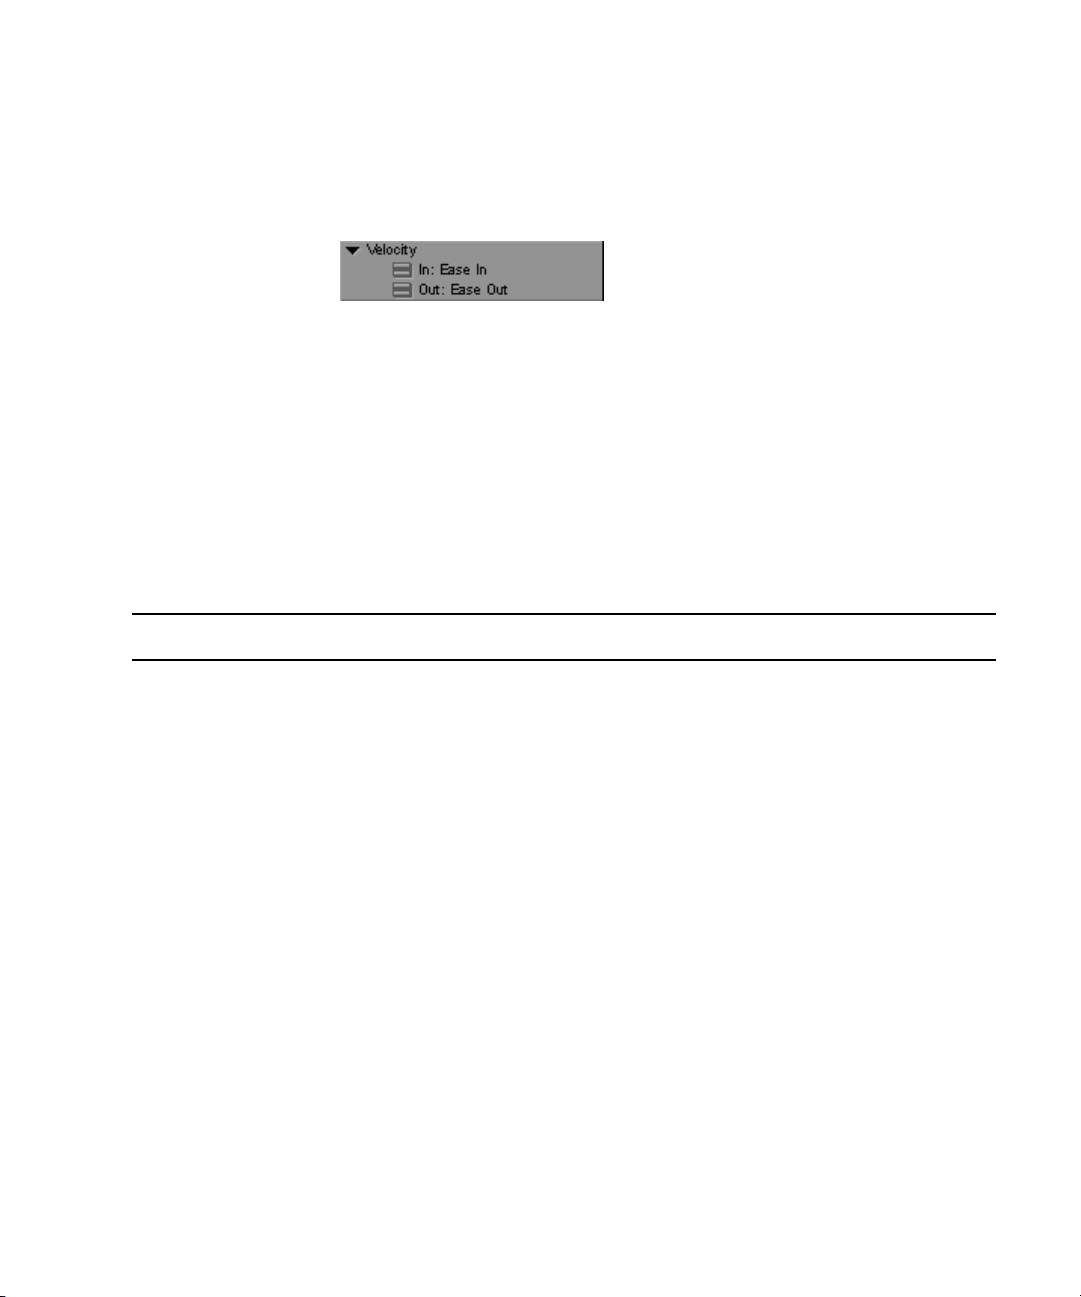
Velocity
Parameter type: Keyframeable
The Avid Pan & Zoom effect uses Velocity In and Velocity Out at each
keyframe to modify apparent camera speed as it pans across the image
between keyframes. It modifies changes in the Zoom Factor setting in the
same way.
The Velocity parameters divide the time between keyframes in half. Velocity
In controls the rate of movement in the first half; Velocity Out controls the rate
of movement in the second half.
Velocity Parameter Options
Parameter Option Description
2D Effects Parameters
Velocity In Linear For the first half of the time between the selected keyframe and the next keyframe
(starting at the selected keyframe and ending at the midpoint between keyframes),
the effect makes no modification to the pan and zoom movement. This results in
apparent camera movement that begins immediately with no ease in.
Constant The effect does not use the keyframe’s Position parameters to calculate the speed
of the effect. However, the effect still uses the keyframe’s Position parameters to
determine the path of the effect (the pan) and the keyframe’s Zoom Factor to
calculate the zoom between the selected keyframe and the next keyframe. For
more information on using the Constant option, see “Creating a Path with
Constant Velocity” in the effects guide or the Help.
When you select Constant for Velocity In, the effect automatically selects
Constant for Velocity Out, and vice versa.
Ease In For the first half of the time between the selected keyframe and the next keyframe
(starting at the selected keyframe and ending at the midpoint between keyframes),
the effect modifies the pan and zoom movement by providing a slight acceleration.
To ease in and ease out of the entire effect, see “Using Ease In and Ease Out” in
the effects guide or the Help.
25
Page 26

Chapter 1 2D Effects Reference
Velocity Parameter Options (Continued)
Parameter Option Description
Velocity Out Linear For the second half of the time between the selected keyframe and the next
keyframe (starting at the midpoint and ending at the next keyframe), the effect
makes no modification to the pan and zoom movement. This results in parameters
that change at a constant rate up to the next keyframe.
Ease Out For the second half of the time between the selected keyframe and the next
keyframe (starting at the midpoint and ending at the next keyframe), the effect
modifies the pan and zoom movement by providing a slight deceleration. To ease
in and ease out of the entire effect, see “Using Ease In and Ease Out” in the effects
guide or the Help.
Constant The effect does not use the keyframe’s Position parameters to calculate the speed
of the effect. However, the effect still uses the keyframe’s Position parameters in
determining the path of the effect (the pan) and the keyframe’s Zoom Factor to
calculate the zoom between the selected keyframe and the next keyframe. For
more information on using the Constant option, see “Creating a Path with
Constant Velocity” in the effects guide or the Help.
When you select Constant for Velocity Out, the effect automatically selects
Constant for Velocity In, and vice versa.
Path
26
Hold At the midpoint between the selected keyframe and the next keyframe, the image
freezes (pan and zoom movement stops). Movement resumes at the next keyframe.
The effect disregards the Velocity In value of the next keyframe.
If you have Background set to Video, the background continues to update.
Parameter type: Global
The Path parameter controls how the Avid Pan & Zoom effect interpolates
Position parameter changes between keyframes.
• Linear interpolation creates straight-line changes from one keyframe to
the next.
• Spline interpolation smooths out changes between keyframes to create a
more natural movement.
Page 27
2D Effects Parameters
The Avid Pan & Zoom effect calculates a Spline path so that it is smooth
through all points. If you move a point the effect recalculates the entire
path.
Filtering
n
Longest Render
Time
Shortest Render
Time
If you combine a Spline path with Constant velocity, when you move a
keyframe the path recalculation might result in a change to the velocity of the
effect.
Parameter type: Global
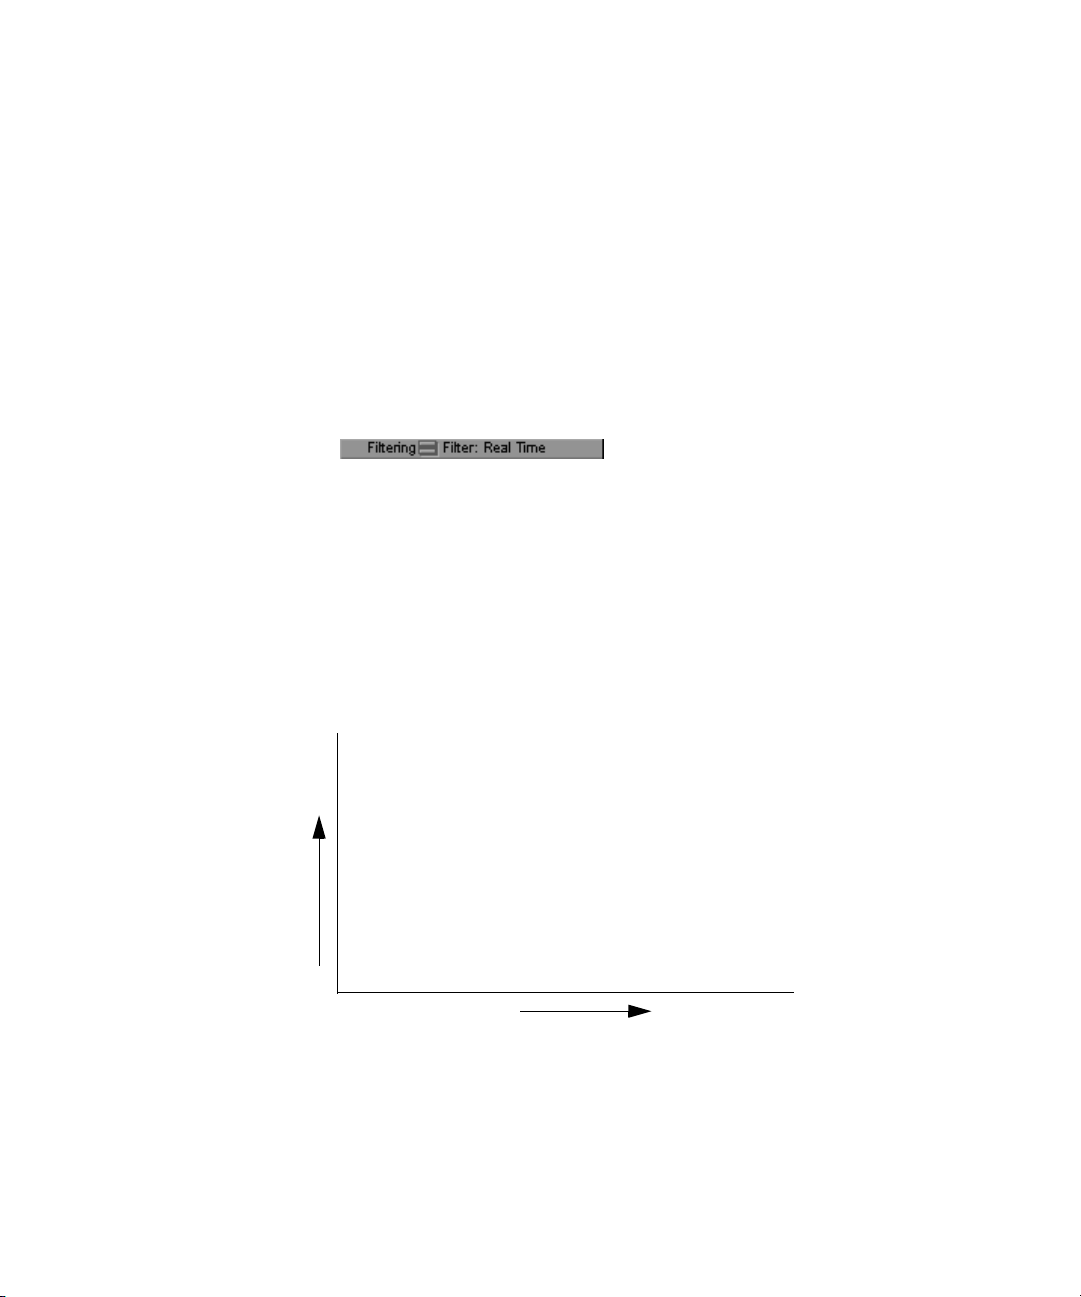
Filtering controls the method by which the Avid Pan & Zoom effect renders
and determines the quality of the rendered result. The various filtering
methods allow you to trade off the clarity or sharpness of the resized image
and the speed at which the effect renders.
The following illustration ranks the Filtering options from fastest render time
and lowest quality image to longest render time and highest quality image. For
more information, see “Filtering” in the effects guide or the Help.
Avid Ultra Qual
Avid Hi Qual
Gaussian
B-Spline Catmull
Cubic
Quadratic
Triangle
Real Time
Lowest Image Quality
Highest Image Quality
27
Page 28
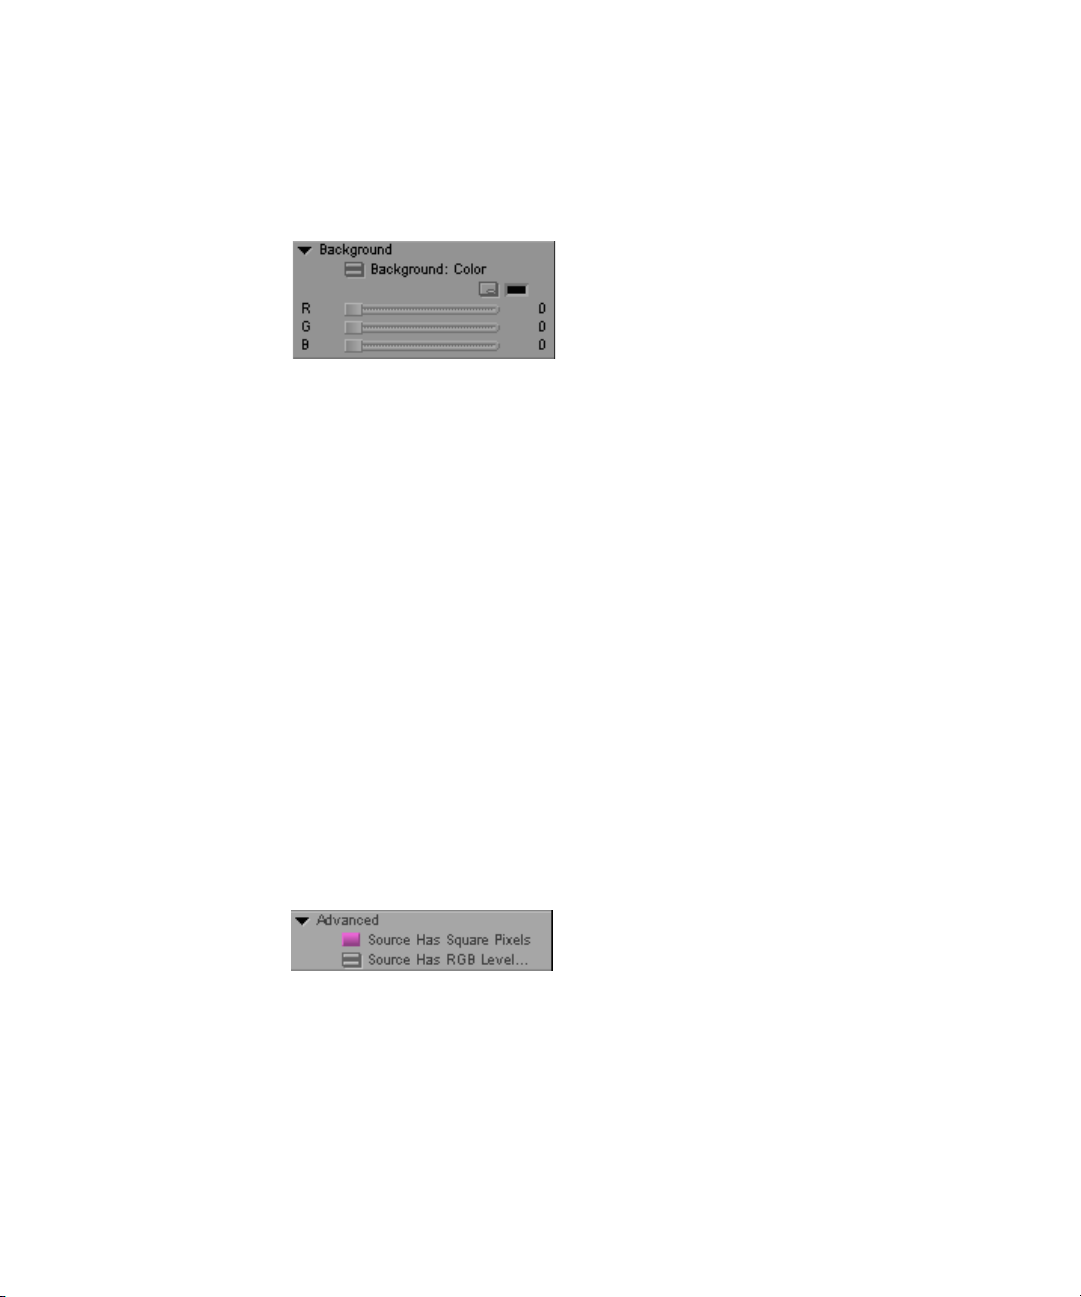
Chapter 1 2D Effects Reference
Background for the Avid Pan & Zoom Effect
Parameter type: Global
With the Avid Pan & Zoom effect you can select a field of view from the
original image that does not fill the entire screen. The Background parameter
determines what appears outside the field of view.
• Color lets you select a background color using one of the following
methods:
t Manipulate the RGB sliders directly, or use the numeric keypad to
enter values.
t Click the Other Options button to use the Windows Color dialog box.
t Click the Color Preview window, and use the eyedropper.
Advanced
28
For more information, see “Adjusting a Color Parameter” in the effects
guide or the Help.
• Video uses the video from the segment upon which you placed the Avid
Pan & Zoom effect.
Parameter type: Global
The Advanced parameter category provides controls to compensate for
differences in pixel shape between source and output, and to select input color
levels.
• Source Has Square Pixels is enabled by default. The Avid Pan & Zoom
effect makes the calculations necessary to produce results compatible with
rectangular pixels.
Page 29

Cache
2D Effects Parameters
When you deselect Source Has Square Pixels, the Avid Pan & Zoom
effect makes no changes to the pixel shape.
•The Level setting tells the effect how to treat the color levels in the image.
- RGB is for images with a black level of 0 and a white level of 255.
Most images you import into the Avid Pan & Zoom effect (except
those from a video source) use RGB values. The effect maps colors to
video black and white levels, which are 16 and 235 respectively. RGB
is the default Level setting.
- 601 refers to the ITU-R-601 standard for video black and white
levels. Select 601 in the rare case when you use images from a video
source. When you select 601 for the Level setting, the effect makes no
adjustment to color levels.
Parameter type: Global
The Cache parameter gives you control over the amount of memory used to
store your images for playback. A full resolution image is always used for
rendering.
• Video Resolution — The effect stores the resized source image at
720 x 480 pixels, using about 1 MB per image. Use Video Resolution if
you have many images in your sequence and you need to limit how much
memory they occupy.
• Image Resolution — The effect stores the resized source image at its
original resolution. The amount of memory used varies with the size of
the image.
• Multi-Resolution — The effect stores several versions of the image:
original image resolution, half resolution, quarter resolution, and so on,
for 8 versions of the image. The result is higher quality real-time preview
and faster rendering. Multi-Resolution uses about twice the memory of
Image Resolution.
• Free Current Cache — The effect frees all memory used for image
storage and then reverts to Image Resolution. Use this setting to free up
memory after you have rendered the clip.
29
Page 30

Chapter 1 2D Effects Reference
• Cache All — The Cache All settings are shortcuts for setting the same
parameter for all instances of the effect in a sequence. The descriptions
are the same as above.
• Free All Caches — Frees the caches for all instances of the plug-in in that
sequence.
Render Mode
Parameter type: Global
If you are working in a progressive project, (23.976p, 24p, 25p), click the
Progressive check box in the Render Mode parameter category. Selecting this
option creates a smoother animation when using progressive frames.
30
Page 31

Background
2D Effects Parameters
Parameter Type
Description
Use of Controls
Global
Sets the color for the background in effects that display a background. For example, the
background parameters determine the color to be used in a Fade to Color, Fade from
Color, or Dip to Color effect.
Other Options
button
Opens the Windows Color dialog box for precise color
selection. For more information, see “Using the Windows
Color Dialog Box” in the effects guide or the Help.
H (hue)
Identifies the background color. The Hue parameter is
measured as values on a color wheel ranging from 0 to 255.
The start (0) and ending (255) values are both red.
S (saturation)
Specifies the amount or intensity of the color. Values range
from 0 to 255, where 0 is no chrominance and 255 is a fully
saturated color.
L (luminance)
Specifies the brightness of the color. Values range from 0 to
255, where 0 is black and 255 is full brightness or white.
31
Page 32

Chapter 1 2D Effects Reference
Border
Parameter Type
Description
Use of Controls
Border without the Blend Color parameters
Other Options button
Border with the Blend Color parameters
Keyframeable
Many effects allow you to place a border on the inner or incoming picture in the effect.
The Border parameters allow you to specify the color, softness, and width of the border.
Some effects also include Blend Color parameters for blending border color.
Other Options
button
Opens the Windows Color dialog box for precise color
selection. For more information, see “Using the Windows
Color Dialog Box” in the effects guide or the Help.
Hue Identifies the border or blend color. The Hue parameter is
measured as values on a color wheel ranging from 0 to 255.
The start (0) and ending (255) values are both red.
32
Sat (saturation) Specifies the intensity of the color. Values range from 0 to 255,
where 0 is no chrominance and 255 is a fully saturated color.
Lum (luminance) Specifies the brightness of the color. Values range from 0 to
255, where 0 is black and 255 is full brightness or white.
Width Specifies the width of the border. Values range from 0 (no
border) to 63 (widest border).
Soft (softness) Blends the border with the background image. Values range
from 0 (no softness) to 63 (maximum softness).
Fixed Border Turns off the Blending options.
Page 33

Color Effect Parameters
The Color Effect parameters, which apply to the Color Effect only, allow you
to perform color correction or to create certain colorization effects such as
posterization or solarization.
Luma Adjust
2D Effects Parameters
Parameter Type
Description
Use of Controls
Global
Allows you to adjust the luminance characteristics of the image.
Bright
(brightness)
Cont (contrast) Controls the contrast of light and dark areas in the image. Values range
Invert Reverses the image’s brightness, such that the brightest parts become
Changes the brightness of the image. The parameter ranges from –100
to +100, where a value of 0 indicates no change. A value of –100
darkens the image; a value of +100 brightens the image.
from –100 to +100, where a value of 0 indicates the image is
unchanged. A negative value is less contrast; a positive value is more
contrast.
the darkest and the darkest parts become the lightest.
Brightness Example
Original – Brightness 0 Brightness –50 Brightness +50
33
Page 34

Chapter 1 2D Effects Reference
Contrast Example
Original – Contrast 0 Contrast –50 Contrast +50
Luma Range
Parameter Type
Description
Use of Controls
34
Global
Allows you to adjust the range of brightness of the image.
Fast menu:
16 to 235
Fast menu:
0to255
The default for video images.
Allows you to map normal video to alpha ranges. This is useful if you
have a high-contrast image that you want to expand to the full dynamic
range. For example, use this value when you want to convert video to
alpha for Matte Key effects.
When you change the Luma Range to 0 to 255, the system
n
attempts to go from 0 to 255 but will be clipped by the Low Clip
and High Clip values in the Luma Clip parameter category. If it
is your intent to “open up” the image to the full dynamic range,
you need to change the Low Clip and High Clip values to 0 and
255, respectively.
Page 35

2D Effects Parameters
W Point
(white point)
B Point
(black point)
Gamma Allows you to adjust the midtones in an image without affecting the
Allows you to set the white point in the image. All pixels with that
value become white, and all pixels with higher values are also clipped
to white. The default is 235 (the broadcast value for white).
Raising the black point and lowering the white point values increase
the contrast by reducing the number of shades of gray in an image. The
number of shades is reduced because you map some to extreme black
and others to extreme white.
Allows you to set the black point in the image. All pixels with that
value become black, and all pixels with lower values are also clipped to
black.
For example, you could use the eyedropper to select a shadow on the
floor and change it from gray to black, clipping everything below that
shade to black. The default is 16 (the broadcast value for black).
Raising the black point and lowering the white point values increase
the contrast by reducing the number of shades of gray in an image. The
number of shades is reduced because you map some to extreme black
and others to extreme white.
Black point control does not change the Black setup level. To
n
adjust the Black setup level, use the Video Output tool. For more
information, see “Output Options” in the Help.
extreme white or black values. Lowering the value darkens midtones
and brings the image closer to black. Raising the value lightens the
midtones and brings the image closer to white.
For example, a person shot in front of a window in daylight may be
very dark, almost in silhouette. You can use gamma correction to
increase the midtones without changing the blacks or whites. Values
range from –100 to +100 with 0 being no change.
The W Point, B Point, and Luma Clip sliders determine the number of
shades of gray. The Gamma point allows you to move the distribution
of the shades closer to black or closer to white. Negative values move
the distribution closer to black. Positive values move the distribution
closer to white.
35
Page 36

Chapter 1 2D Effects Reference
Luma Clip
Parameter Type
Description
Use of Controls
Global
Allows you to determine the levels at which the effect limits the brightness or darkness in
the picture.
High Provides a simple clip function for brightness values. When you
specify a value for High, no pixel in the image can be brighter than that
value. The default is 235 (the broadcast value for white).
Low Provides a simple clip function for darkness values. When you specify
a value for Low, no pixel in the image can be darker than that value.
The default is 16 (the broadcast value for black).
When preparing video for broadcast, normally you do not adjust these
values. They allow you to adjust the brightness and contrast (using
other controls in the Color Effect) while still maintaining legal
broadcast values for black and white.
36
Page 37
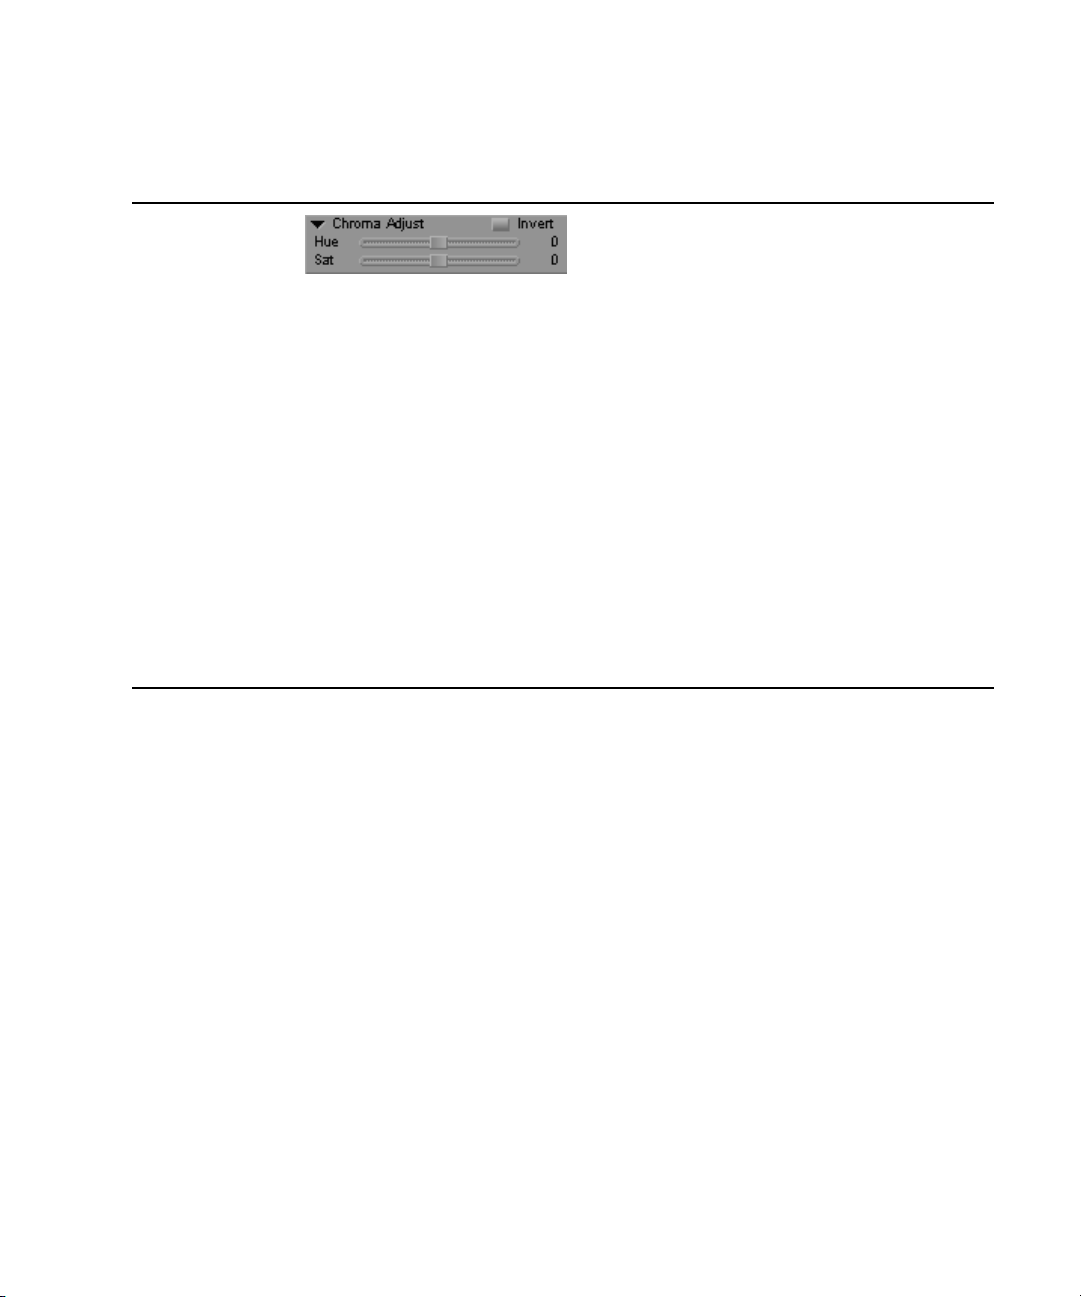
Chroma Adjust
2D Effects Parameters
Parameter Type
Description
Use of Controls
Global
Allows you to adjust the chrominance characteristics of the entire image.
Invert Invert reverses the colors in both Hue and Saturation such that all
colors display as their complement.
Hue Hue varies the tint of all colors in the image. The Hue parameter is
measured as degrees on a color wheel from –180 to +180, where 0
does not change the hue. Changing the value of the Hue causes all
colors in the image to rotate around the color spectrum. For example, a
Hue setting of –20 causes skin tones to look more red, while a Hue
setting of +20 causes skin tones to look more green.
Sat (saturation) Saturation varies the amount of all colors in the image. The Saturation
parameter has a value of –100 to +100. Zero is the default. A value of
–100 displays as gray tones. Positive values display all colors with
more saturation.
37
Page 38

Chapter 1 2D Effects Reference
Color Style
Parameter Type
Description
Use of Controls
Global
Allows you to create effects by limiting or inverting the color values of the image.
Post
(posterization)
Posterization allows you to limit the number of colors in the image by
controlling the number of luminance steps that are displayed. This
gives the image a graphic appearance. The range of values is 0 to 25,
where 0 displays all colors and 25 displays the least number of colors.
Solar
(solarization)
Solarization allows you to make the lightest points in the image dark to
achieve a partial inversion of the luminance. Values above the
threshold set for the parameter will be inverted. Solarization can have a
value of 0 to 255, where 0 is normal luminance and 255 inverts all
luminance values in the picture. Values of 0 to 127 display the lightest
points in the image as dark. Values of 128 to 255 display both the
lightest points as dark and the darkest points as light, which gives the
appearance of a film negative.
Posterization Example
Original image Posterization 10 Posterization 20
38
Page 39

2D Effects Parameters
Solarization Example
Original image Solarization 100 Solarization 200
Color Gain
Parameter Type
Description
Use of Controls
Global
Allows individual control of the Color Gain for each of the three color components: red,
green, and blue.
Red Changes the amount of red in the whole image. The parameter value is
a percentage of the range from 0 to 200, where a value of 100 indicates
that the color is unchanged.
Green Changes the amount of green in the whole image. The parameter value
is a percentage of the range from 0 to 200, where a value of 100
indicates that the color is unchanged.
Blue Changes the amount of blue in the whole image. The parameter value
is a percentage of the range from 0 to 200, where a value of 100
indicates that the color is unchanged.
39
Page 40
Chapter 1 2D Effects Reference
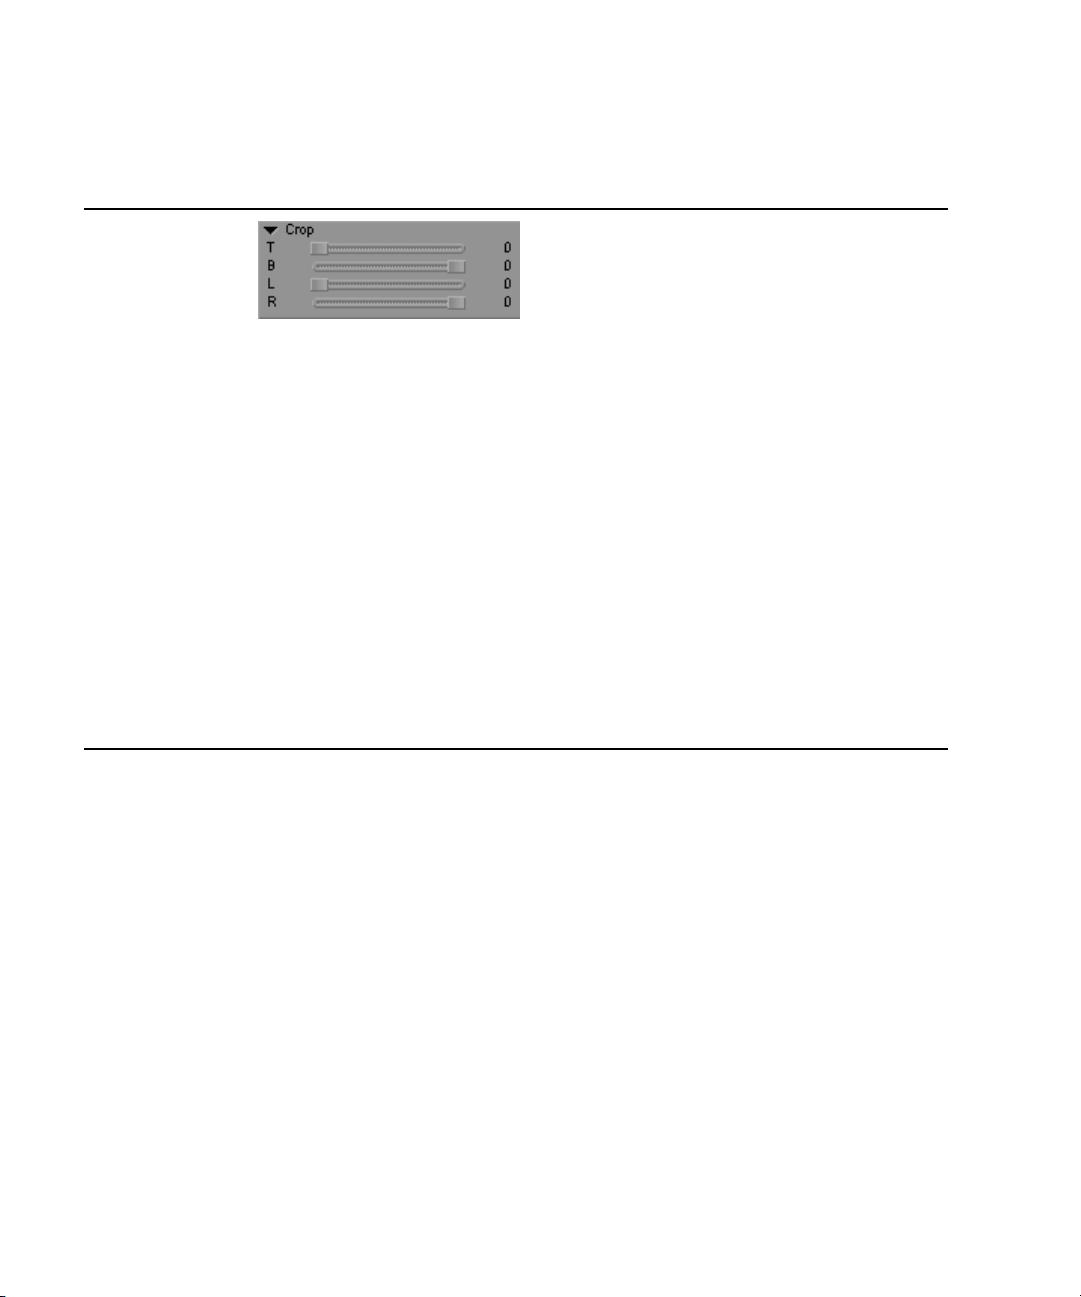
Crop
Parameter Type
Description
Use of Controls
Keyframeable
Removes material from the top, bottom, left, and right edges of the video.
T (top) Removes video from the top of the inner or incoming video. Values
range from 0 to 999; 0 is the top of the screen, 500 is the middle of the
screen, and 999 is the bottom of the screen.
B (bottom) Removes video from the bottom of the inner or incoming video. Values
range from –999 to 0; 0 is the bottom of the screen, –500 is the middle
of the screen, and –999 is the top of the screen.
L (left) Removes video from the left side of the inner or incoming video.
Values range from 0 to 999; 0 is the left side of the screen, 500 is the
middle of the screen, and 999 is the right side of the screen.
R (right) Removes video from the right side of the inner or incoming video.
Values range from –999 to 0; 0 is the right side of the screen, –500 is
the middle of the screen, and –999 is the left side of the screen.
40
Page 41

Foreground
2D Effects Parameters
Parameter Type
Description
Use of Controls
Keyframeable
Used, together with keyframes, to set the relative amount of the effect to be displayed over
time. The additional options included with the Level slider vary, depending on the effect.
Level Controls the opacity of the foreground image. A Level of 0 is 0 percent
opacity (the foreground is transparent), a Level of 50 is 50 percent
opacity, and a Level of 100 is 100 percent opacity (no transparency).
Swap Sources This option applies to key effects (such as Chroma Key or Luma Key)
and the PIP (Picture-in-Picture) effect only.
Click Swap Sources to swap the image source for the foreground and
background layers of the effect.
Reverse
Animation
This option is available for all effects.
Click the Reverse Animation button to cause the entire effect to be
reversed, including the direction of movement as well as the incoming
and outgoing sources.
This maintains the shot continuity while reversing the movement. For
example, instead of the outgoing shot peeling off from the top left
corner, the incoming shot peels on from the bottom right corner. This
option effectively creates a mirror image of the sequence of keyframes
for the effect as they appear in the Effect Preview monitor’s position
bar.
41
Page 42

Chapter 1 2D Effects Reference
Invert Key This option applies to key effects only (such as Chroma Key or Luma
Show Alpha This option applies to key effects only (such as Chroma Key or Luma
Key). Select Invert Key to reverse the key.
In the case of a Chroma Key effect, inverting the key displays the key
color regions while showing the background image source through the
foreground image area.
In the case of a Luma Key effect, inverting the key displays the
background image source through the darker areas rather than the
lighter areas of the foreground image source.
In the case of a Matte Key effect, inverting the key effectively reverses
the black and white areas of the alpha channel so that foreground and
background are reversed.
Key).
Displays the grayscale alpha channel used to apply the key effect to the
foreground and background source. This allows you to examine the
problem areas of the key while making adjustments.
42
Page 43

Illusion FX Parameters
This section describes the parameter categories available for the Illusion FX
AVX plug-in effects.
Background
Pattern Type Fast menu
Axis Fast menu
Base Color
2D Effects Parameters
Parameter Type
Description
Use of Controls
Keyframeable
The Background parameter category is available only for the Pattern Generator effect. For
more information, see “Pattern Generator” on page 157.
Axis Fast menu
•X axis
Selects whether color bars are drawn horizontally (X axis) or vertically
(Y axis).
•Y axis
Pattern Type Fast
menu
• Solid color
• EBU bars
Sets the pattern to be used.
If you select the Grid option, the background color is black if Base
Color has 50% or greater luminance, or white if Base Color has less
than 50% luminance.
(75%)
• Color bars
(75%)
• Color bars
(100%)
•EIA bars
•SMPTE bars
• Color ramps
•Cross ramp
•Grid
43
Page 44

Chapter 1 2D Effects Reference
Border
Parameter Type
Description
R, G, B
(Base Color)
Sets the color of the clip when the Pattern Type is set to Solid Color
Sets the color of the grid lines when the Pattern Type is set to Grid.
Select the color by doing one of the following:
t Directly manipulate the RGB sliders.
t Use the Windows Color dialog box.
t Use the eyedropper.
The background color of the grid is black if Base Color has 50% or
greater luminance, or white if Base Color has less than 50%
luminance.
Keyframeable
Use the Left, Right, Top, and Bottom sliders to prevent black edges of the source clip
from warping into the effect.
Use of Controls
Center
Parameter Type
Description
Use of Controls
44
Left, Right,
Remove between 0 and 20 pixels from the edge of the image.
Top, Bottom
Keyframeable
Sets the center of the Kaleidoscope effect. The Center parameter category is available
only for the Kaleidoscope effect. For more information, see “Kaleidoscope” on page 149.
X, Y The X and Y values range from –999 to +999, where 0, 0 is the center
of the screen. Use the sliders, or click the corresponding marker and
drag within the image, to set the center of the mirrors.
Page 45

Circle
2D Effects Parameters
Color
Parameter Type
Description
Use of Controls
Keyframeable
The Circle parameter category is available only for the Pattern Generator effect. For more
information, see “Pattern Generator” on page 157.
Size Sets the radius of the circle.
Width Sets the width of the circle outline.
Opacity Sets the opacity of the circle.
R, G, B (Color) Sets the color of the circle. Select the color by doing one of the
following:
t Directly manipulate the RGB sliders.
t Use the Windows Color dialog box.
t Use the eyedropper.
45
Page 46

Chapter 1 2D Effects Reference
Core
Lightning Sparkler
Color
Parameter Type
Description
Use of Controls
Color
Keyframeable
The Core parameter category is available for the Lightning effect and the Sparkler effect.
For more information, see “Lightning” on page 150 and “Sparkler” on page 164.
Core Radius,
Sets the radius of the core in pixels.
Width
R, G, B (Color) Sets the color of the core. Select the color by doing one of the
following:
t Directly manipulate the RGB sliders.
t Use the Windows Color dialog box.
t Use the eyedropper.
46
Page 47

Generation
Lightning effect Sparkler effectRipple effect
Render Mode Fast menu
2D Effects Parameters
Parameter Type
Description
Use of Controls Parameter Effect Description
Keyframeable
The Generation parameter category is available for the Lightning, Ripple, and Sparkler
effects. For more information, see “Lightning” on page 150, “Ripple” on page 161, and
“Sparkler” on page 164.
Amount Lightning Sets the proportion of the lightning to be displayed. A
value of 0 is no lightning. 100 is the complete lightning
bolt. Typical keyframing is 0 at the first keyframe to 100
at the last keyframe.
Anti-alias Ripple Sets whether or not transformed areas are smoothed.
This parameter is not keyframeable.
n
Birth Rate Sparkler Sets the number of sparks generated every frame.
Branch
Probability
Length Ripple Sets the distance between the wave peaks.
Length Sparkler Sets the cumulative exposure of the sparks. For example,
Lightning Sets the likelihood that the lightning will have few or
many branches. A value of 0 displays no branches. The
higher the value, the more branches are likely.
a value of 3 produces an image that looks as though you
left a virtual camera shutter open for the last three frames.
Lifetime Sparkler Sets (in frames) how long each spark lives.
47
Page 48

Chapter 1 2D Effects Reference
Link Speed Sparkler If you keyframe the center of the effect, Link Speed
causes the movement of the center to be added to the
movement of the sparks.
Number of
Ripples
Random Seed Lightning,
Render Mode
Fast menu
•Quick
• Standard
• Anti-aliased
Speed Bias X,
Speed Bias Y
Strength Ripple Sets the height of the waves.
X, Y Sparkler Sets the center of the effect. The X and Y values range
Ripple Sets the number of ripples.
Sets the base number upon which all random values are
Ripple
Lightning Sets the quality of the rendered lightning:
Sparkler Sets the bias to the direction of the sparks. The system
calculated. Each value will result in a different random
effect.
This parameter is not keyframeable.
n
• Quick to view just the motion of the lightning.
• Standard to view the full lightning without antialiasing while editing the animation.
• Anti-aliased to ensure that fine branches do not break
up.
adds these values to the initial random directions.
from –999 to +999, where 0, 0 is the center of the screen.
48
Page 49

Glow
2D Effects Parameters
Lightning effect Sparkler effect
Color
Parameter Type
Description
Keyframeable
The Glow parameter category is available for the Lightning effect and the Sparkler effect.
Color
Use it to control the effect’s glow. For more information, see “Lightning” on page 150 and
“Sparkler” on page 164.
Use of Controls Parameter Effect Description
Glow Radius Sparkler Sets the radius of the glow in pixels.
R, G, B (Color) Lightning,
Sparkler
Sets the color of the glow. Select the color by doing one
of the following:
t Directly manipulate the RGB sliders.
t Use the Windows Color dialog box.
t Use the eyedropper.
Width Lightning Sets the radius of the glow in pixels.
49
Page 50

Chapter 1 2D Effects Reference
Illumination
Color
Parameter Type
Description
Use of Controls
Keyframeable
The Illumination parameter category is available only for the Ripple effect. Use it to
highlight the ripples in the effect. For more information, see “Ripple” on page 161.
Angle Sets the source direction of the light. A value of 0 degrees is three
o’clock; positive values move counterclockwise.
R, G, B (Color) Sets the color of the light. Select the color by doing one of the
following:
t Directly manipulate the RGB sliders.
t Use the Windows Color dialog box.
t Use the eyedropper.
50
Page 51

Input
2D Effects Parameters
The set of Input parameters varies between Illusion FX effects. Each set of
parameters is listed in its own section:
• Color Mix Input Parameters
• Crystal Input Parameters
• Film Grain Input Parameters
• Flare Input Parameters
• FluidBlur Input Parameters
• FluidColorMap Input Parameters
• FluidMorph Input Parameters
• Iris Input Parameters
• Kaleidoscope Input Parameters
• Melt Input Parameters
• Motion Blur Input Parameters
• Page Curl Input Parameters
• Particle Blast Input Parameters
• Particle Orbit Input Parameters
• Particle Wind Input Parameters
• Pinch Input Parameters
• Radial Blur Input Parameters
• Random Blend Input Parameters
• Rollup Input Parameters
• Shear Input Parameters
• Sphere Input Parameters
• Swirl Input Parameters
• Timecode Input Parameters
• Twist Input Parameters
• Wave Input Parameters
51
Page 52

Chapter 1 2D Effects Reference
Color Mix Input Parameters
Color
Parameter Type
Description
Use of Controls
Parameter Type
Keyframeable
The Input parameters for the Color Mix effect control the color and the color level. For
more information, see “Color Mix” on page 144.
Color Level Sets the amount of color to add, from 0 (no color) to 100 (maximum
color).
R, G, B (Color) Sets the color. Select the color by doing one of the following:
t Directly manipulate the RGB sliders.
t Use the Windows Color dialog box.
t Use the eyedropper.
Crystal Input Parameters
Keyframeable
Description
Use of Controls
52
The Input parameters for the Crystal effect control the size and randomness of the
polygons. For more information, see “Crystal” on page 145.
Size Sets the radius of the polygons in pixels.
Jitter Sets the randomness of the shape of the polygons. A value of 0 creates
regular hexagons — the higher the value, the more random the shapes.
Page 53

2D Effects Parameters
Random Seed Sets the base number upon which all random values are calculated.
Each value will result in a different random effect. This parameter is
not keyframeable.
Anti-alias Sets whether or not transformed areas are smoothed.
This parameter is not keyframeable.
n
Film Grain Input Parameters
Parameter Type
Description
Use of Controls
Keyframeable
The Input parameters for the Film Grain effect add a grainy texture to a video clip to
simulate the imperfections present in some film footage. For more information, see “Film
Grain” on page 145.
Level Sets the amount of graininess.
Size Sets the size of the individual grain elements.
Color Film footage often contains slight color and luminance imperfections
caused by the chemical processes used to transfer the negative to the
film. You can think of these as very small color smears on the film. The
default setting applies a balanced combination of color and luminance
imperfections. Increase the color value to add more color
imperfections and fewer luminance imperfections. Decrease the value
to increase the luminance imperfections and decrease the color
imperfections.
Field Mode When selected, the grain pattern updates every field.
53
Page 54
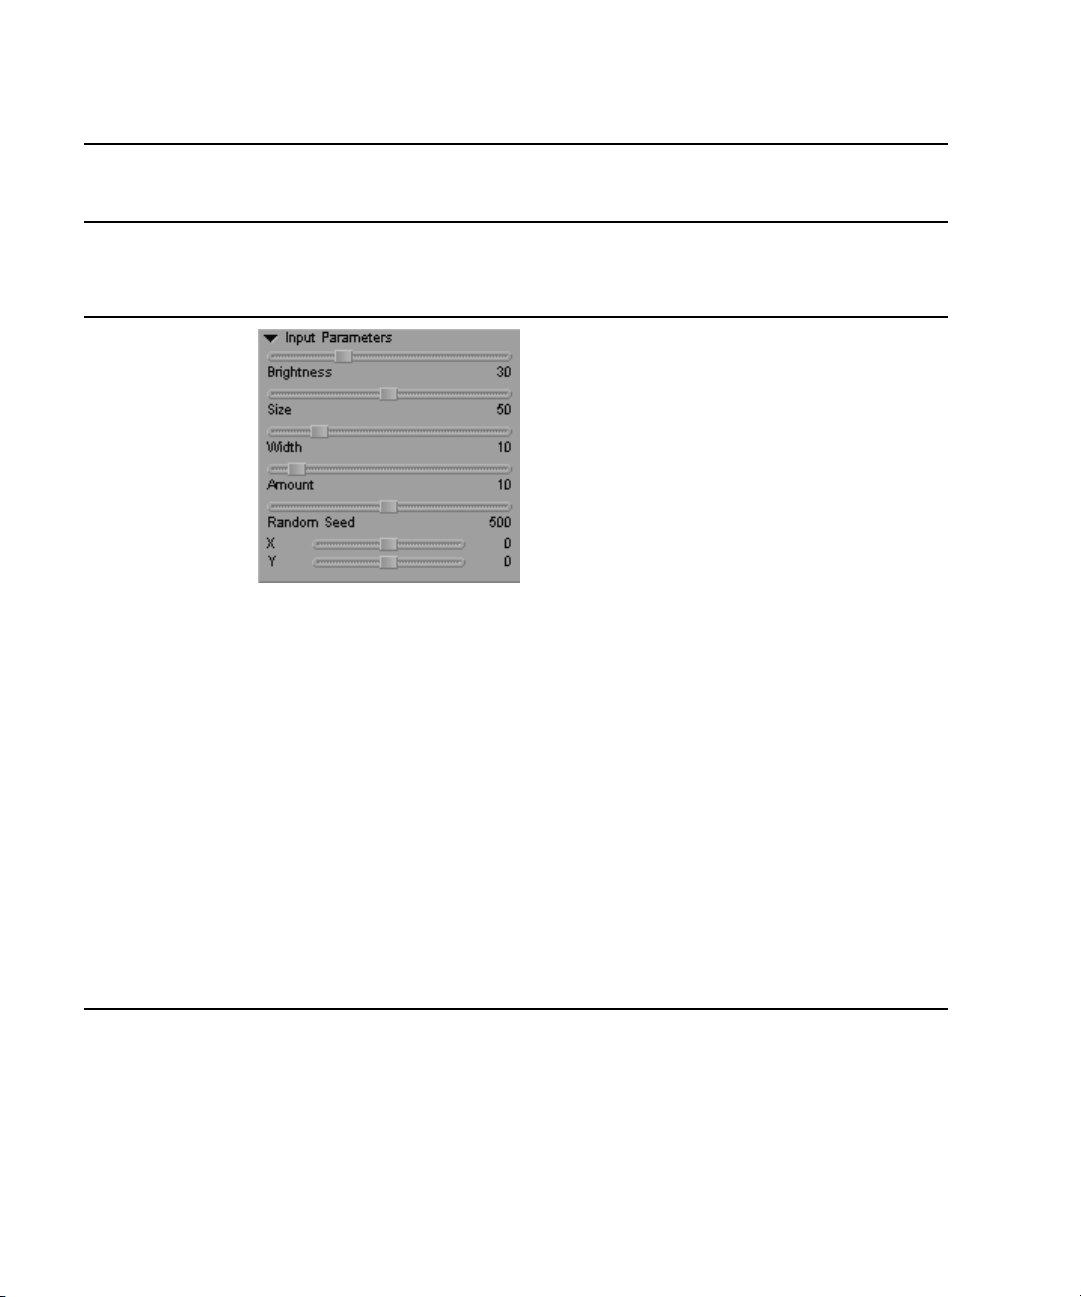
Chapter 1 2D Effects Reference
Hilite Grain Adds grain to the brighter areas of the image.
Shadow Grain Adds grain to the darker areas of the image.
Flare Input Parameters
Parameter Type
Description
Use of Controls
Keyframeable
The Input parameters for the Flare effect create a random flare ring. For more information,
see “Flare” on page 146.
Brightness Sets the brightness of the flare, from 0 (no flare) to 100 (maximum
brightness).
Size Sets the diameter of the flare ring.
Width Sets the distance between the inner and outer edges of the flare ring.
Amount Sets the amount of distortion to the flare ring; 0 is no distortion.
Random Seed Sets the base number upon which all random values are calculated.
Each value will result in a different random effect.
This parameter is not keyframeable.
n
X, Y Sets the center of the flare ring.
54
Page 55

FluidBlur Input Parameters
2D Effects Parameters
Parameter Type
Description
Use of Controls
Keyframeable
The Input parameters for the FluidBlur effect create a motion blur. For more information,
see “FluidBlur” on page 146.
Blur Amount The level of blur for objects that are moving.
The amount of blur ramps linearly from 0 to Blur Amount as the pixel
motion increases from the Lower Motion Threshold value to the Upper
Motion Threshold value. This means that the faster an object moves,
the more it is blurred.
Lower Motion
Threshold,
Upper Motion
Threshold
Objects moving less than the Lower Motion Threshold number of
pixels between frames or fields are not blurred. Objects moving more
than the Upper Motion Threshold number of pixels between frames or
fields are not blurred. Objects whose movement falls between the two
values are blurred by the Blur Amount.
Trail Instructs the system to add an amount from the previous frame’s (or
field’s) blur to the current frame. This produces smooth movement,
especially as objects move along curved paths.
Sharpen Leading
Edge
Progressive
Source
Allows you to keep the front edge of an object crisp and clear while
other portions are blurred.
Use this option if your footage was captured or converted to
progressive footage (i.e., not interlaced). If your sources are
progressive, enabling Progressive Source produces smoother results.
This option has no effect in 24p projects because the system assumes
that you are using progressive footage.
55
Page 56

Chapter 1 2D Effects Reference
FluidColorMap Input Parameters
Parameter Type
Description
Use of Controls
Keyframeable
The Input parameters for the FluidColorMap effect create a color representation of motion
in a scene. For more information, see “FluidColorMap” on page 147.
Min Motion
Threshold, Max
Motion
Threshold
Objects moving less than the Min Motion Threshold number of pixels
between frames (or fields) will have the minimum saturation and
luminance. Objects moving more than the Max Motion Threshold
number of pixels between frames (or fields) receive the maximum
saturation and luminance. The amount of saturation depends on the
Constant Saturation value.
Brightness and color saturation increase as the motion of an object
increases from the minimum threshold value to the maximum
threshold value. The faster an object moves, the brighter and more
color saturated it becomes.
Constant
Saturation
This setting controls how much the Min Motion Threshold and Max
Motion Threshold values affect the color saturation. The minimum and
maximum values always control the luminance (brightness) of the
image. However, for a low Constant Saturation value, the minimum
and maximum values strongly affect saturation as well as luminance.
For a high Constant Saturation value, the minimum and maximum
values affect saturation to a lesser degree. If Constant Saturation is set
to the maximum value, motion will have no effect on color saturation.
Progressive
Source
Use this option if your footage was captured or converted to
progressive footage (i.e., not interlaced). If your sources are
progressive, enabling Progressive Source produces smoother results.
This option has no effect in 24p projects because the system assumes
that you are using progressive footage.
56
Page 57

FluidMorph Input Parameters
2D Effects Parameters
Parameter Type
Description
Use of Controls
Global
The Input parameters for the FluidMorph effect control morphing between two clips. For
more information, see “FluidMorph” on page 147.
Feature Match When selected, the system attempts to match features between the two
clips when it creates the morph for each frame.
When deselected, the system creates the morph based on the brightness
of the two images.
Swap Sources Specifies whether to apply the effect to incoming or outgoing video.
Progressive
Source
Use this option if your footage was captured or converted to
progressive footage (i.e., not interlaced). If your sources are
progressive, enabling Progressive Source produces smoother results.
This option has no effect in 24p projects because the system assumes
that you are using progressive footage.
Iris Input Parameters
Parameter Type
Description
Use of Controls
Keyframeable
The Input parameters for the Iris effect create a wipe transition. For more information, see
“Iris” on page 148.
Amount Sets the proportion of each clip to be displayed. A value of 0 displays
all of the foreground clip; a value of 100 displays all of the background
clip. Typical keyframing would be from 0 at the first keyframe to 100
at the last keyframe.
57
Page 58

Chapter 1 2D Effects Reference
Softness Sets the size of the area over which the pixels are faded from the
X, Y Sets the center of the iris wipe.
Swap Sources Specifies whether to apply the effect to incoming or outgoing video.
Kaleidoscope Input Parameters
foreground clip to the background clip.
This parameter is not keyframeable.
n
Parameter Type
Description
Use of Controls
Keyframeable
The Input parameters for the Kaleidoscope effect create an image resembling a
kaleidoscope using the input video. For more information, see “Kaleidoscope” on
page 149.
Symmetry Sets the number of mirrors.
Angle Sets the angle of the mirrors.
Scale Sets the scale of the image.
58
Page 59

Melt Input Parameters
2D Effects Parameters
Parameter Type
Description
Use of Controls
Keyframeable
The Input parameters for the Melt effect control a transition effect that “melts” the
foreground image away to reveal the background image. For more information, see
“Melt” on page 151.
Bleed Changes the melt image to a more dramatic effect.
Melt Up Reverses the direction of the melt.
Amount Sets the progression of the effect. A value of 0 is no effect; all of the
foreground clip shows. The higher the value, the more of the
foreground clip melts away, and more of the background clip shows.
Typical keyframing would be from 0 at the first keyframe to 100 at the
last keyframe.
Strength Sets the strength of the distortion; the higher the value, the greater the
distortion.
Random Seed Sets the base number upon which all random values are calculated.
Each value results in a different random effect.
This parameter is not keyframeable.
n
Anti-alias Sets whether or not transformed areas are smoothed.
This parameter is not keyframeable.
n
Swap Sources Specifies whether to apply the effect to incoming or outgoing video.
This parameter is not keyframeable.
n
59
Page 60

Chapter 1 2D Effects Reference
Motion Blur Input Parameters
Parameter Type
Description
Use of Controls
Parameter Type
Description
Use of Controls
Keyframeable
The Input parameters for the Motion Blur effect allow you to blur the edges of moving
objects. For more information, see “Motion Blur” on page 152.
Amount Sets the length of the blur.
Direction Sets the direction of the blur. A value of 0 degrees is three o’clock;
positive values move counterclockwise.
Page Curl Input Parameters
Keyframeable
The Input parameters for the Page Curl effect create a transition effect that peels the
foreground video off the background video. For more information, see “Page Curl” on
page 152. For examples of the Page Curl parameter combinations, see the following table.
Turn Left Controls the direction of the page curl.
Reverse When selected, incoming video peels on. When deselected, outgoing
video peels off.
60
Swap Sources Specifies whether to apply the effect to incoming or outgoing video.
This parameter is not keyframeable.
n
Page 61

2D Effects Parameters
The following table describes the possible combinations of the three
parameters and shows an example of the results.
Page Curl Parameter Combinations
Turn Left Reverse Swap Sources Result
Off Off Off
Off Off On
On Off Off
On Off On
Outgoing video
peels off
Incoming video
peels off
Outgoing video
peels off
Incoming video
peels off
61
Page 62

Chapter 1 2D Effects Reference
Page Curl Parameter Combinations (Continued)
Turn Left Reverse Swap Sources Result
Off On Off
Off On On
On On Off
On On On
Incoming video
peels on
Outgoing video
peels on
Incoming video
peels on
Outgoing video
peels on
62
Page 63

Particle Blast Input Parameters
2D Effects Parameters
Parameter Type
Description
Use of Controls
Keyframeable
The Input parameters for the Particle Blast effect create a transition effect that turns the
foreground video into particles that blow off to reveal the background video. For more
information, see “Particle Blast” on page 153.
Amount Sets the progression of the effect. The larger the difference in the
Amount value between keyframes, the faster the effect happens.
Size Sets the radius of the particles.
Spacing Sets the space between the center of the original position of the
particles.
This parameter is not keyframeable.
n
Front Speed Controls whether the particles in the center of the blast start to move
before the particles at the outside edges.
Front
Randomness
Speed Sets the speed at which particles move apart.
Speed
Randomness
Allows particles nearest the center to move at different speeds.
Allows particles to move at different speeds to give a more natural
effect.
63
Page 64

Chapter 1 2D Effects Reference
Acceleration Controls how quickly a particle reaches the full speed of the blast. The
Bumpiness Adds a shadow to the edge of the particles.
Swap Sources Specifies whether to apply the effect to incoming or outgoing video.
Particle Orbit Input Parameters
higher the value, the more quickly the particle reaches full speed.
This parameter is not keyframeable.
n
Parameter Type
Description
Use of Controls
64
Keyframeable
The Input parameters for the Particle Orbit effect create a transition effect that turns the
foreground video into circular particles that orbit around their original position. For more
information, see “Particle Orbit” on page 154.
Amount Sets the progression of the effect. The larger the difference in the
Amount value between keyframes, the faster the effect happens.
Size Sets the radius of the particles.
Spacing Sets the space between the center of the original position of the
particles.
This parameter is not keyframeable.
n
Bumpiness Adds a shadow to the edge of the particles.
Speed Sets the speed at which particles orbit.
Swap Sources Specifies whether to apply the effect to incoming or outgoing video.
This parameter is not keyframeable.
n
Page 65

Particle Wind Input Parameters
2D Effects Parameters
Parameter Type
Description
Use of Controls
Keyframeable
The Input parameters for the Particle Wind effect create a transition effect that turns the
foreground video into circular particles that blow off to reveal the background video. For
more information, see “Particle Wind” on page 156.
Amount Sets the progression of the effect. The larger the difference in the
Amount value between keyframes, the faster the effect happens.
Size Sets the radius of the particles.
Spacing Sets the space between the center of the original position of the
particles.
This parameter is not keyframeable.
n
Front Speed Controls whether the particles near the front edge (where the wind first
hits) start to move before the particles at the outside edge.
Front
Randomness
Speed Sets the wind speed.
Allows particles nearest the front to move at different speeds.
65
Page 66

Chapter 1 2D Effects Reference
Parameter Type
Speed
Randomness
Acceleration Controls how quickly a particle reaches the full speed of the wind. The
Angle Sets the source direction of the wind. A value of 0 degrees is three
Bumpiness Adds a shadow to the edge of the particles.
Swap Sources Specifies whether to apply the effect to incoming or outgoing video.
Pinch Input Parameters
Keyframeable
Allows particles anywhere within the effect to move at different
speeds, giving a more natural effect.
higher the value, the more quickly the particle reaches full speed.
o’clock; positive values move counterclockwise.
This parameter is not keyframeable.
n
Description
Use of Controls
66
The Input parameters for the Pinch effect create an effect that pinches the image in toward
or pushes it out from a user-defined point. For more information, see “Pinch” on
page 158.
Amount Sets the progression of the effect. The larger the difference in the
Amount value between keyframes, the faster the effect happens.
Size Sets the diameter of the affected area.
X, Y Sets the center of the effect.
Anti-alias Sets whether or not transformed areas are smoothed.
This parameter is not keyframeable.
n
Page 67

Render Mode
Fast menu
2D Effects Parameters
Radial Blur Input Parameters
Parameter Type
Description
Use of Controls
Keyframeable
The Input parameters for the Radial Blur effect create an effect that blurs the image
inward or outward from a user-defined point. For more information, see “Radial Blur” on
page 159.
Zoom Sets the scaling of the blur. Smaller values zoom in and larger values
zoom out.
Angle Sets the rotation of the blur.
This effect can take a long time to render. The greater the angle,
n
the more time the rendering takes.
X, Y Sets the center of the effect.
Render Mode
Fast menu
• Locate
• Render Low
Quality
• Render
Medium
Quality
• Render High
Quality
Sets whether only the center marker shows, or how the effect is
rendered.
Select Locate to show the center marker. Use it while setting up the
center.
67
Page 68

Chapter 1 2D Effects Reference
Random Blend Input Parameters
Parameter Type
Description
Use of Controls
Keyframeable
The Input parameters for the Random Blend effect control a random pattern to blend
incoming and outgoing video. For more information, see “Random Blend” on page 160.
Amount Sets the amount of blend.
Random Scale Sets the amount of randomness. This allows the system to blend
different portions of the image at different rates.
Swap Sources Specifies whether to apply the effect to incoming or outgoing video.
This parameter is not keyframeable.
n
Rollup Input Parameters
Parameter Type
Description
Use of Controls
68
Keyframeable
The Input parameters for the Rollup effect control a transition effect that rolls up the
foreground video to reveal the background video. For more information, see “Rollup” on
page 162.
Amount Sets the proportion of each clip to be displayed. A value of 0 displays
all of the foreground clip; 100 displays all of the background clip.
Typical keyframing is from 0 at the first keyframe to 100 at the last
keyframe.
Page 69

2D Effects Parameters
Curl Size Sets the size of the roll.
Direction Sets the direction of the roll. A value of 0 degrees is three o’clock;
positive values move counterclockwise.
Anti-alias Sets whether or not transformed areas are smoothed.
This parameter is not keyframeable.
n
Swap Sources Specifies whether to apply the effect to incoming or outgoing video.
This parameter is not keyframeable.
n
Shear Input Parameters
Parameter Type
Description
Use of Controls
Keyframeable
The Input parameters for the Shear effect control a transition effect that divides the
foreground video into strips and slides them away in opposite directions to reveal the
background video. For more information, see “Shear” on page 163.
Amount Sets the proportion of each clip to be displayed. A value of 0 displays
all of the foreground clip; 100 displays all of the background clip.
Typical keyframing is from 0 at the first keyframe to 100 at the last
keyframe.
Min Width, Max
Width
Sets the minimum and maximum possible width of the slats.
69
Page 70

Chapter 1 2D Effects Reference
Width
Randomness
Spread Sets the randomness of when individual strips start moving. A value of
Angle Sets the direction of the effect. A value of 0 degrees is three o’clock;
Random Seed Sets the base number upon which all random values are calculated.
Anti-alias Sets whether or not transformed areas are smoothed.
Swap Sources Specifies whether to apply the effect to incoming or outgoing video.
Sphere Input Parameters
Controls the variety of sizes of slats. The system creates slats of
various widths in between the minimum and maximum width value.
0 causes all strips to start at the same time.
positive values move counterclockwise.
Each value results in a different random effect.
This parameter is not keyframeable.
n
This parameter is not keyframeable.
n
This parameter is not keyframeable.
n
Parameter Type
Description
Use of Controls
70
Keyframeable
The Input parameters for the Sphere effect control a spherical distortion in the image. For
more information, see “Sphere” on page 165.
Amount Sets the scale of the distortion. Negative values distort the image
inward; positive values distort it outward.
Size Sets the diameter of the circle as a normalized proportion of the
vertical size of the image.
X, Y Sets the center of the effect.
Anti-alias Sets whether or not transformed areas are smoothed.
This parameter is not keyframeable.
n
Page 71

Swirl Input Parameters
2D Effects Parameters
Parameter Type
Description
Use of Controls
Keyframeable
The Input parameters for the Swirl effect control a distortion in the image where pixels
swirl within a circular area. For more information, see “Swirl” on page 166.
Amount Sets the scale of swirl. Negative values swirl the image
counterclockwise; positive values swirl it clockwise.
Size Sets the diameter of the circle as a normalized proportion of the
vertical size of the image.
X, Y Sets the center of the effect.
Anti-alias Sets whether or not transformed areas are smoothed.
This parameter is not keyframeable.
n
Timecode Input Parameters
Timecode Color Fast menu
Timecode Font and Size Fast menu
Timecode Type Fast menu
Parameter Type
Description
Use of Controls
Keyframeable
The Input parameters for the Timecode effect control burn-in timecode. For more
information, see “Timecode” on page 167.
Timecode Color
Fast menu
Select a color and background for the timecode text.
71
Page 72

Chapter 1 2D Effects Reference
• White no background
• Black no background
• White on Black
• Black on White
Timecode Font
and Size Fast
menu
X, Y Sets the position of the lower left corner of the effect.
Timecode Type
Fast menu
Frames per Foot Use the slider to specify the number of frames per foot. This option
Select a font and size for the timecode text.
You can also drag the marker in the Effect Preview monitor.
n
Selects the timecode type:
• Non-drop — Uses a colon (:) as a separator
• Drop frame — Uses a semicolon (;) as a separator (applies only to
NTSC projects)
• Feet and Frames — Uses either a plus sign (+) or an ampersand
(&) symbol as a separator.
The separator changes from + to & between the values 24 and 25. The
+ sign is used for 16mm projects and the & symbol is used for 35mm
projects.
applies when you select Feet and Frames from the Timecode Type Fast
menu.
Twist Input Parameters
Axis Fast menu
Parameter Type
Description
72
Keyframeable
The Input parameters for the Twist effect create an effect that distorts the image by
twisting the two ends in opposite directions. For more information, see “Twist” on
page 168.
Page 73

2D Effects Parameters
Use of Controls
Amount Sets the amount of twist.
X, Y Sets the center of the effect.
Axis Fast menu
•X axis
•Y axis
Anti-alias Sets whether or not transformed areas are smoothed.
Sets whether the twist applies horizontally (X axis) or vertically
(Y axis).
This parameter is not keyframeable.
n
Wave Input Parameters
Parameter Type
Description
Use of Controls
Keyframeable
The Input parameters for the Wave effect create an effect that distorts the image by
applying waves to it. For more information, see “Wave” on page 169.
Amount Sets the scale of swirl. Negative values swirl the image
counterclockwise; positive values swirl it clockwise.
Minimum Size,
Maximum Size
Horizontal
Factor, Vertical
Factor
Sets the minimum wavelength and the maximum wavelength.
The amount of horizontal distortion and vertical distortion, where 0 is
no distortion and 100 is maximum distortion.
73
Page 74

Chapter 1 2D Effects Reference
Motion
Parameter Type
Number of
Wav es
Speed Sets the progress of the effect.
Random Seed Sets the base number upon which all random values are calculated.
Anti-alias Sets whether or not transformed areas are smoothed.
Keyframeable
Sets the number of waves. Wave effects are superimposed upon each
other.
Each value results in a different random effect.
This parameter is not keyframeable.
n
This parameter is not keyframeable.
n
Description
Use of Controls
74
The Motion parameter category is available only for the Ripple effect. Use it to control the
ripples in the effect. For more information, see “Ripple” on page 161.
Amount Sets the progression of the effect. The larger the difference in the time
value between keyframes, the faster the effect will happen.
Wave Speed Sets how fast the waves move.
Ripple Spread Sets the width of the ripple from the inner ring to the outer ring.
Reflections When selected, waves reflect off the edges of the image, as though
hitting a wall.
Page 75

Movement
2D Effects Parameters
Parameter Type
Description
Use of Controls
Keyframeable
The Movement parameter category is available only for the Sparkler effect. Use it to
control the movement of the sparkler in the effect. For more information, see “Sparkler”
on page 164.
Speed Sets the value around which the speed of the sparks is randomized.
Gravity Sets the attraction of the sparks downward or upward. The greater the
value, the more the sparks are attracted downward.
Air Resistance Sets the air resistance. The higher the value, the less the sparks radiate
outward.
Wind X, Wind Y Sets a virtual directional wind, which affects the trajectory of the
sparks.
Air Resistance must be greater than 0 for Wind to have an effect.
n
Turbulence Adds randomness to the movement of the sparks.
75
Page 76

Chapter 1 2D Effects Reference
Number
Text color
Parameter Type
Description
Use of Controls
Keyframeable
The Number parameter category is available only for the Pattern Generator effect. For
more information, see “Pattern Generator” on page 157.
Number Offset Sets the offset of the number from the current frame number.
Opacity Sets the opacity of the number.
Text Size Sets the size of the number.
Stroke Width Sets the width of the number stroke.
R, G, B
(Text color)
Sets the color of the number. Select the color by doing one of the
following:
t Directly manipulate the RGB sliders.
t Use the Windows Color dialog box.
t Use the eyedropper.
76
Page 77

Offset
2D Effects Parameters
Parameter Type
Description
Use of Controls
Source
Parameter Type
Description
Keyframeable
The Offset parameter category is available only for the Kaleidoscope effect. For more
information, see “Kaleidoscope” on page 149.
X, Y Use the X and Y sliders to set the offset from the original source area.
You can also click the corresponding marker, and drag within
n
the image.
Anti-alias Sets whether or not transformed areas will be smoothed.
This parameter is not keyframeable.
n
Keyframeable
The Source parameter category is available only for the FluidMorph effect. Select the
morphing method from the Source Fast menu. For more information, see “FluidMorph”
on page 147.
Use of Controls
Source Fast menu Select the morphing method from the Source Fast menu:
• Still Image — The system takes snapshots of the first frame of outgoing video and the
last frame of incoming video and creates an output that is a morph of the two images.
• Video Stream — The system creates the output by morphing the two clips, frame by
frame.
77
Page 78

Chapter 1 2D Effects Reference
Start Timecode
Parameter Type
Description
Use of Controls
Keyframeable
The Start Timecode parameter category is available only for the Timecode effect. For
more information, see “Timecode” on page 167.
Starting timecode
day
Sets the day for the starting timecode.
When Starting timecode day is 0, the value does not appear. You can
use a non-zero Starting timecode day to identify items such as spool,
reel, and so forth.
Starting timecode
Sets the hour for the starting timecode.
hour
Starting timecode
Sets the minute for the starting timecode.
minute
Starting timecode
Sets the second for the starting timecode.
second
Starting timecode
Sets the frame for the starting timecode.
frame
Starting timecode
feet
When you select Feet and Frames as the Timecode Type, you can
specify the starting feet. See “Timecode Input Parameters” on
page 71.
78
Page 79

Key Parameters
Key
2D Effects Parameters
Key parameters appear only in the Chroma Key, Luma Key, and RGB Keyer
effects. These parameters control the key color and allow you to fine-tune the
edges of key effects and the appearance of the foreground elements.
For information on the workflow for applying key effects, see “Creating Key
Effects” in the effects guide or the Help.
Chroma Key and Luma Key Effects
Parameter Type
Description
Use of Controls
Global
Selects the primary key color to be replaced by video. Available in both Chroma Key and
Luma Key.
Other Options
button
Hue Identifies the key color. The Hue parameter is measured as values
Sat (saturation) Specifies the amount or intensity of the color. Values range from 0
Lum (luminance) Specifies the brightness of the color. Values range from 0 to 255,
Opens the Windows Color dialog box for precise color selection.
For more information, see “Using the Windows Color Dialog Box”
in the effects guide or the Help.
on a color wheel ranging from 0 to 255. The start (0) and ending
(255) values are both red.
to 255, where 0 is no chrominance and 255 is a fully saturated
color.
where 0 is black and 255 is full brightness or white.
79
Page 80

Chapter 1 2D Effects Reference
Gain Specifies how much of the foreground and the background video is
Soft (softness) Determines how the bordering colors along the edge of the key are
Secondary Key
Chroma Key Effect Only
displayed. Values range from 0 to 63. A Gain of 0 shows only the
foreground. A Gain of 63 replaces all the foreground video with
the background video.
processed in the effect. Colors that border the luminance or chroma
specified for the key are displayed as a blend of the foreground and
the background video. Values range from 0 to 63. The higher the
Softness value, the more of the background video is blended in the
border colors. Use the Soft slider to improve the appearance of the
edges of the keyed areas.
Parameter Type
Description
Use of Controls
80
Global
Selects a secondary background color to key out. For example, the floor in a blue screen
or green screen shot might be a slightly different shade from the background. You can
select the floor color as your secondary color and key it out. Available for the Chroma Key
effect only.
See “Key” on page 79.
Page 81

Spill Suppression
2D Effects Parameters
Chroma Key Effect Only
Parameter Type
Description
Use of Controls
Global
Neutralizes the selected color for the Chroma Key effect without affecting the luminance.
The effect changes the spill color to a grayscale, allowing it to blend more easily with the
foreground image.
Use the Spill Suppression key color to fix the following problems:
• Remove background color spill from the foreground image. Color spill occurs when
the background color is present in the foreground image due to backdrop reflection.
• If the foreground object retains an outline of the chroma key color, you can use Spill
Suppression to reduce the color effect in the outline.
See “Key” on page 79.
81
Page 82

Chapter 1 2D Effects Reference
Key Color
RGB Keyer Only
Parameter Type
Description
Global
Use the Key Color parameters in the RGB Keyer effect to select a color for the chroma
key.
Use of Controls H (hue) Specifies the hue or tint measured as values on a color wheel
ranging from 0 to 255. The start (0) and ending (255) values are
both red.
S (saturation) Specifies the amount or intensity of the color. Values range from 0
to 255, where 0 is no chrominance and 255 is a fully saturated
color.
V (value) Specifies the value of the color.
See “RGB Keyer (AVX Plug-in Effect)” on page 182.
82
Page 83

Chroma Key
2D Effects Parameters
RGB Keyer Only
Parameter Type
Description
Global
Use the Chroma Key parameters in the RGB Keyer effect to fine-tune the key effect.
Use of Controls Gain Softens the edge of the key, with a range from 0 to 100.
Soft (softness) Specifies the amount or intensity of the color. Values range from 0
to 255, where 0 is no chrominance and 255 is a fully saturated
color.
Show Alpha Displays the grayscale alpha channel used to apply the key effect to
the foreground and background sources. Viewing the alpha channel
directly allows you to examine problem areas of the key while
making adjustments.
Spill Suppresses the spill from the key color onto foreground objects
that often occurs due to color reflection in the scene. The range is
from 0 to 100.
Level Controls transparency of the foreground elements against the key
background.
Reverse Inverts the key.
See “RGB Keyer (AVX Plug-in Effect)” on page 182.
83
Page 84
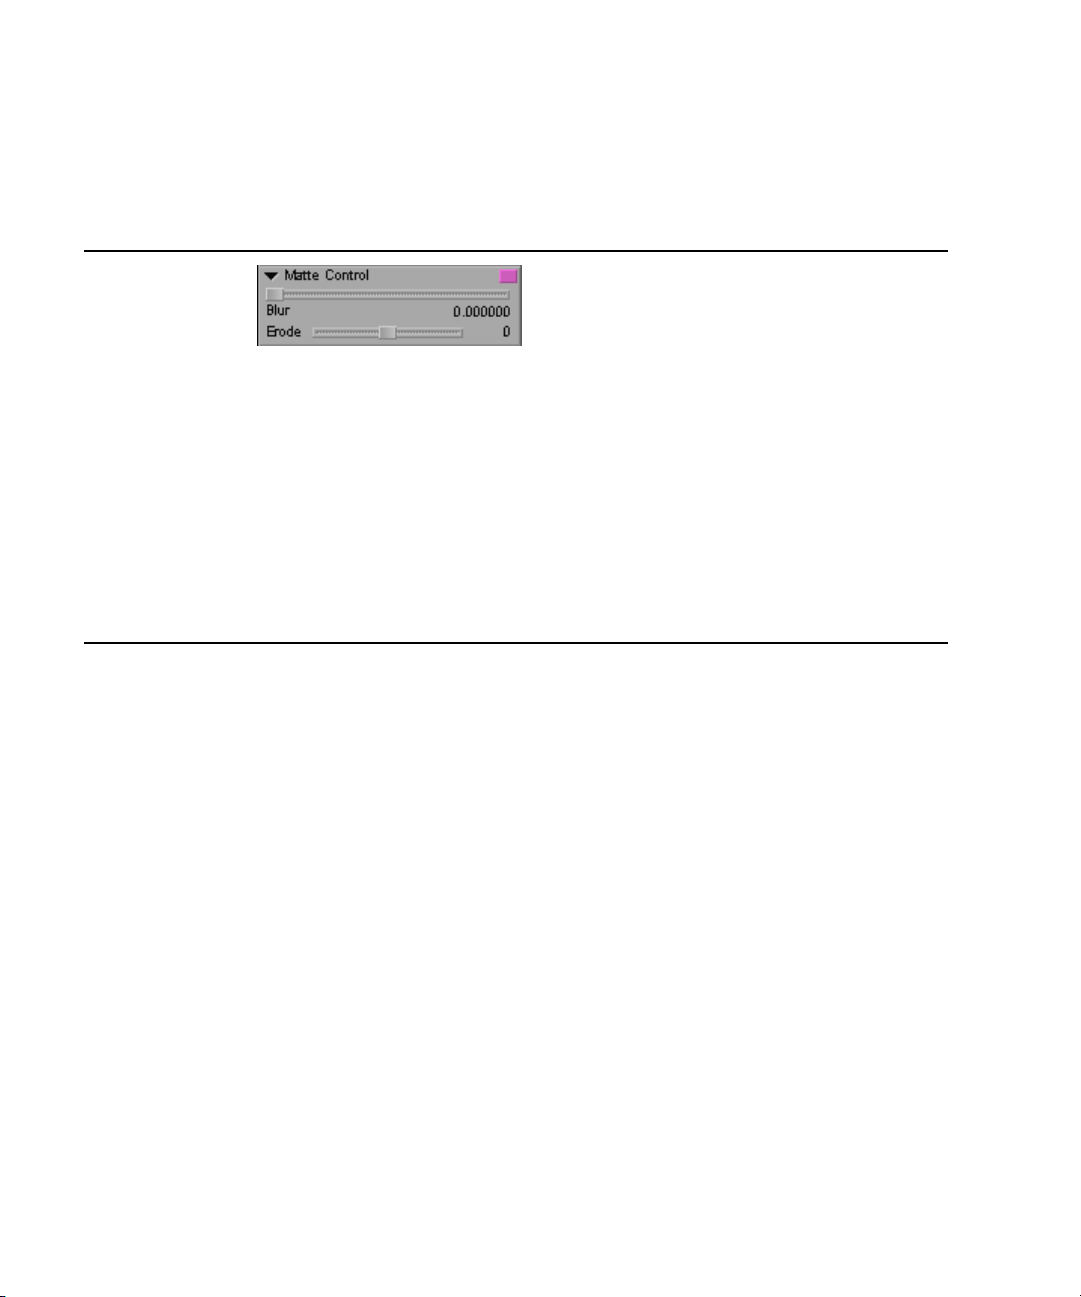
Chapter 1 2D Effects Reference
Matte Control
RGB Keyer Only
Parameter Type
Description
Global
Use Matte Control in the RGB Keyer effect to fine-tune the edges of the matte used in the
chroma key.
Use of Controls Blur Uses a box filter to blur the matte for the key. The range is 0 to 100;
0 indicates a blurring of 0 pixels, and 100 indicates a blurring of 10
pixels.
Erode Used with blur, decreases or “erodes” the outer edges of the
blurred matte key.
See “RGB Keyer (AVX Plug-in Effect)” on page 182.
84
Page 85

Color Correction
2D Effects Parameters
RGB Keyer Only
Parameter Type
Description
Global
Use the Color Correction parameters in the RGB Keyer effect for post-key color
correction of the foreground elements in the Chroma Key effect. Because the foreground
and background elements are often shot at different times and locations, post-key color
correction is especially useful for maintaining the key while matching the visual
characteristics of the foreground to the background.
Use of Controls Sat (saturation) Specifies the amount or intensity of the color. Values range from 0
to 255, where 0 is no chrominance and 255 is a fully saturated
color.
Bright (brightness) Specifies the brightness level. Values range from 0 to 255, where 0
is black and 255 is full brightness or white.
Cont (contrast) Controls the contrast of light and dark areas in the picture. Values
range from –100 to +100, where a value of 0 indicates the image is
unchanged. A negative value is less contrast; a positive value is
more contrast.
See “RGB Keyer (AVX Plug-in Effect)” on page 182.
85
Page 86

Chapter 1 2D Effects Reference
Matrix Parameters
Parameter Type
Description
Use of Controls
Global
Allows you to customize the grid used to define the position or progress of the Matrix
effect over time. For example, the grid defines the number of squares used for the Grid
and Speckle effects, or the number of horizontal bars used for the One-Way Row
effect. Available for Matrix Wipe effects, Sawtooth Wipe effects, and some Shape
Wipe effects.
Other Options
Click to open the Matrix Effect dialog box.
button
Columns Rows
Graphical representation
of the grid
Select a standard grid size or enter a custom number of rows
and columns, and then click OK. The minimum number of
rows and columns is 2 x 2. A graphical representation of the
grid you select appears on the right side of the dialog box.
86
Page 87

Traditional Motion Effect Parameters
Traditional motion effect parameters apply to Freeze Frame, Variable Speed,
and Strobe Motion effects. For information about applying and editing various
motion effects, see “Creating Traditional Motion Effects” in the effects guide
or the Help. See also “Timewarp” on page 244.
Freeze Frame Parameters
2D Effects Parameters
Duration
Custom duration
Parameter Type
Description
Use of Menu
Commands
• Duration commands
(in seconds or
minutes)
• Other Opens a dialog box that allows you to specify a custom duration for the freeze frame
Global
Allows you to create and customize a freeze frame clip based on the image currently
displayed in the Source pop-up monitor.
Freeze frame parameters are menu commands in the Clip menu. To create a freeze
frame and access freeze frame parameters, select Clip > Freeze Frame, and then select
the appropriate submenu commands.
Specifies the length of the freeze frame clip that the Avid editing application creates in
the Source pop-up monitor. You can either select a duration from the Freeze Frame
submenu or select Other to enter a custom duration.
clip.
87
Page 88

Chapter 1 2D Effects Reference
• Two Field Freeze
Frames
• Using Duplicated
Field
Opens a submenu with commands that allow you to determine how the system creates
and displays the effect media when working with two fields.
The system uses a single field to create the effect. This option reduces the vertical
resolution of the image by one-half, resulting in a lower quality image.
• Using Both Fields The system uses both fields to create the effect. This option is especially useful when
there is motion in the footage.
• Using Interpolated
Field
The system creates a second field for the effect by combining scan line pairs from the
first field in the original media. This might result in a slightly softer look to the freeze
frame.
88
Page 89

Variable Speed and Strobe Motion Parameters
Variable Speed
effect
Strobe Motion
effect
2D Effects Parameters
Parameter type
Description
Global
Allows you to create and customize variable speed or strobe motion clips based on all
or part of the clip currently displayed in the Source pop-up monitor.
Use of controls
Variable Speed and Strobe Motion parameters are available in the Motion Effect
dialog box. To open the Motion Effect dialog box, click the Motion Effect button in
the Source pop-up monitor.
Variable Speed
• Duration The duration of the effect in frames. Doubling the number of frames causes the frame
rate to be half the current rate.
• Rate The rate of speed in frames per second (fps) at which the video will be played. Normal
speed is 30 fps for NTSC, 25 fps for PAL.
89
Page 90

Chapter 1 2D Effects Reference
• % Speed The percent of speed at which the video will be played. Normal speed is 100%.
To indicate reverse motion at full play rate, slow or fast, enter a negative play
n
rate or a percent.
• Fit To Fill Sets the Variable Speed parameters, so the duration of the motion effect will match the
IN to OUT duration marked in the sequence.
Strobe Motion
• Update every n
frames
Render 2-field Motion
Effect Using
• Duplicated Field The Avid editing application uses a single field to create the effect.
• Both Fields The Avid editing application uses both fields to create the effect. For example, the first
Specifies the update rate in frames for the Strobe Motion effect. For example, entering
a rate of 5 causes every fifth frame to be displayed in the Strobe Motion effect.
If a Strobe Motion effect becomes unrendered because it has been trimmed to a
n
longer duration, the effect will not play and must be rendered again.
For two-field media, this reduces the information stored by half because it drops one
field of the image, resulting in a lower quality image.
For single-field media, this is usually the best choice because of its speed (the other
options do not improve effect quality for single-field media).
Effects render in the shortest amount of time using this option.
two frames of a half-speed (50%) slow-motion effect repeat the original Frame 1 (both
fields) twice.
This option is good for shots without inter-field motion and still shots.
With footage that includes inter-field motion, this method might result in minor
shifting or bumping of the image because it disturbs the original order of fields: a
Field 1 will appear both before and after the corresponding Field 2.
Effects render relatively quickly. For best results, use evenly divisible frame rates with
this option.
• Interpolated Field The Avid editing application creates a second field for the effect by combining scan
line pairs from the first field in the original media.
This option calculates the motion effect at the field level rather than the frame level.
Because the Avid editing application considers all fields and does not disturb the
original order of fields, the smoothest effect results.
This method is best for video-originated material or film-originated material
transferred at 24 fps. Effects created using this option take the longest amount of time
to render.
90
Page 91

2D Effects Parameters
• VTR-Style The Avid editing application creates a second field for the effect by shifting selected
video fields of the original media by a full scan line. This technique is similar to that
used by high-quality professional video decks when playing footage at less than
normal speed.
This option also creates the motion effect at the field level rather than the frame level;
however, because pixels are not filtered, the final image is sharper than that created by
the Interpolated Field option. The image might display some slight jitter at certain
speeds.
The time needed to render effects created with this option is longer than the time for
effects created using either Duplicated Field or Both Fields but similar to the time
needed for Interpolated Field.
• Ignore Render
Setting
If a specific motion effect type is set in the Motion Effects Render Using option of the
active Render setting, the Avid editing application automatically selects that motion
effect type, makes all other motion effect type options unavailable, and displays the
Ignore Render Setting check box. Click the Ignore Render Setting check box to
temporarily override the active Render setting and make all four motion effect types
available.
91
Page 92

Chapter 1 2D Effects Reference
PlasmaWipe Parameters
All of the PlasmaWipe effects use the same set of parameters. For information
on using PlasmaWipe effects, see “Working with PlasmaWipe Effects” in the
Help.
The following table describes the PlasmaWipe parameters.
PlasmaWipe Parameters
Parameter Description
Border The Border parameters allow you to specify the color, softness, and width of the
border. Blend Color parameters allow you to blend the border color. For more
information, see “Border” on page 32.
Fixed border allows you to specify whether the border can change shape during the
effect. For the Frame and Border PlasmaWipe effects the border is used to create the
effect.
Profile The Profile window in the Effect Editor is a graphical representation of the foreground
level and acceleration applied to effect keyframes. For more information, see “Profile”
on page 96.
92
Page 93

2D Effects Parameters
PlasmaWipe Parameters (Continued)
Parameter Description
Foreground Level The Level value controls the amount of the effect at any given point. As you increase
the value, the effect reveals more incoming video. For more information, see
“Creating PlasmaWipe Effects” in the Help.
Acceleration Acceleration adjusts the effect’s speed over time by having the effect ease in and ease
out of every keyframe. For more information, see “Acceleration” on page 21.
93
Page 94

Chapter 1 2D Effects Reference
Plug-in Effect Parameters
If you install third-party plug-in effects, these effects usually come with their
own documentation. For information on installing and using third-party plugin effects, see “Using Third-Party Plug-in Effects” in the effects guide or the
Help.
Position
Parameter Type
Description
Use of Controls
Keyframeable
Sets the horizontal and vertical position of the effect.
H Pos (horizontal
position)
V Pos (vertical
position)
Moves the video from side to side. Values range from –999 to +999.
Negative values move the image to the left. Positive values move the
image to the right.
Moves the video up and down. Values range from –999 to +999.
Negative values move the image to the top. Positive values move the
image to the bottom.
94
Page 95

Scroll Position
2D Effects Parameters
Parameter Type
Description
Use of Controls
Keyframeable.
Moves a rolling title up or down in the frame (Scroll Position V) or moves a crawling title
left or right in the frame (Scroll Position H). Available for rolling and crawling titles only.
Move the slider to adjust the position of the roll or crawl. The number range refers to the
position of the roll or crawl relative to its overall length, where 0 represents the point at
which the top of the roll is aligned with the top or left of the screen. The highest negative
number (the slider at its leftmost position) places the top or left of the title off the bottom
or right of the screen. The highest positive number (the slider at its rightmost position)
places the bottom or right of the title off the top or left of the screen.
Reverse Click to reverse the direction of the roll or crawl.
c
If you select all keyframes when changing the scroll position on a rolling
or crawling title, all keyframes will be set to that position and the title will
no longer move. Make sure you select the appropriate keyframes.
95
Page 96

Chapter 1 2D Effects Reference
Profile
Parameter type: Keyframeable
The Profile window in the Effect Editor is a graphical representation of the
foreground level and acceleration applied to effect keyframes:
• Foreground level affects the opacity of the effect. The greater the opacity,
the closer to the top of the Profile graph the keyframe appears.
To adjust foreground level within the Profile window:
1. In the effect’s Timeline, select the appropriate keyframe indicator.
100% level (foreground opaque)
Straight lines indicate no acceleration.
0% level (foreground transparent)
96
2. Click the round white keyframe indicator that appears on the Profile
graph, and drag it up or down to increase or decrease the opacity of the
foreground image.
• Acceleration affects the rate of movement into and out of keyframes. The
greater the acceleration, the more rounded the lines appear in the Profile
window. You can adjust Acceleration with the Acceleration slider only.
For more information, see “Acceleration” on page 21.
Page 97

Region Stabilize Parameters
Region Stabilize parameters appear only in the Region Stabilize effect. They
allow you to establish the type of stabilization and the area of the image that is
to remain stationary. For more information, see “Stabilizing an Image” in the
effects guide or the Help.
Model
2D Effects Parameters
Parameter Type
Description
Options
Global
Selects the type of stabilization. Available for the Region Stabilize effect only. For more
information, see “Stabilizing an Image” in the effects guide or the Help.
Translational Keeps the region of interest steady along both the horizontal and the
vertical axis.
Horizontal Constrains horizontal motion in the region of interest. Objects in the
region of interest can move vertically but not horizontally.
Vertical Constrains vertical motion in the region of interest. Objects in the
region of interest can move horizontally but not vertically.
97
Page 98

Chapter 1 2D Effects Reference
Region of Interest
Parameter Type
Description
Use of Controls
Auto Zoom
Parameter Type
Description
Keyframeable
Defines the area of the image that is to remain stationary. Available for the Region
Stabilize effect only. For more information, see “Stabilizing an Image” in the effects guide
or the Help.
T (top)
L(left)
B (bottom)
R (right)
Global
Stabilization exposes black around the edges of the repositioned frames. Auto Zoom
compensates by resizing and, if necessary, repositioning the clip to remove the exposed
edges. Available for the Region Stabilize effect only. For more information, see
“Stabilizing an Image” in the effects guide or the Help.
Sets the corners of the region of interest. Values are relative to the
center of the screen.
You can also change the size and position of the Region of
n
Interest by dragging the wire frame in the Effect Preview
monitor. For more information, see “Manipulating Effects
Directly” in the effects guide or the Help.
98
Page 99

Progressive Source
2D Effects Parameters
Parameter Type
Description
Global
Produces smoother results for the effect when your footage was captured or converted to
progressive footage (not interlaced).
99
Page 100

Chapter 1 2D Effects Reference
Scaling
Parameter Type
Description
Use of Controls
Keyframeable
Resizes the effect by adjusting height and width.
Wid (width) Controls the width of the image when the Fixed Aspect parameter is
disabled. Values range from 0 to 400.
Hgt (height) Controls the height of the image when the Fixed Aspect parameter is
disabled. Values range from 0 to 400.
Fixed Aspect Determines which position and size parameters are displayed. When
the Fixed Aspect parameter is enabled, the aspect ratio of the picture
cannot be changed. The Wid and Hgt sliders are ganged and move
together.
100
 Loading...