

Page 1

Avid Xpress® DV
Getting Started Guide
Release 1.0
for the Windows NT® Operating System
a
tools for storytellers™
Page 2

© 2000 Avid Technology, Inc. All rights reserved.
Avid Xpress DV Getting Started Guide for the Windows NT Operating System • Part 0130-04379-01 Rev. A •
February 2000
2
Page 3

Contents
Chapter 1 Setting Up Your Avid Xpress DV System
Check List for Setting Up Your System . . . . . . . . . . . . . . . . . . . . . . . . 14
Turning On Your Equipment . . . . . . . . . . . . . . . . . . . . . . . . . . . . . . . . . 15
Preparing Your Drives. . . . . . . . . . . . . . . . . . . . . . . . . . . . . . . . . . . . . . . 16
Overview of Partitioning. . . . . . . . . . . . . . . . . . . . . . . . . . . . . . . . . 17
Supported File Systems . . . . . . . . . . . . . . . . . . . . . . . . . . . . . . . . . . 18
Checking Your Internal Drives. . . . . . . . . . . . . . . . . . . . . . . . . . . . 18
Creating Primary Partitions . . . . . . . . . . . . . . . . . . . . . . . . . . . . . . 20
Formatting Partitions . . . . . . . . . . . . . . . . . . . . . . . . . . . . . . . . . . . . 21
Creating a Disk Configuration Floppy Disk . . . . . . . . . . . . . . . . 23
Testing Drives on Windows NT Systems . . . . . . . . . . . . . . . . . . . 24
Installing Avid Xpress DV Software . . . . . . . . . . . . . . . . . . . . . . . . . . 24
Installing Avid Xpress DV Software and All Components . . . 24
Installing Selected Components . . . . . . . . . . . . . . . . . . . . . . . . . . 27
Performing a Custom Installation . . . . . . . . . . . . . . . . . . . . . . . . . 28
Modifying, Repairing, or Removing Avid Xpress DV. . . . . . . . 29
Installing AvidNet Transfer Tool Software . . . . . . . . . . . . . . . . . . . . . 31
Installing EDL Manager . . . . . . . . . . . . . . . . . . . . . . . . . . . . . . . . . . . . . 33
Creating an Emergency Repair Disk . . . . . . . . . . . . . . . . . . . . . . . . . . 34
Installing the Avid Xpress DV Tutorial Files . . . . . . . . . . . . . . . . . . . 35
Turning Off Your Equipment . . . . . . . . . . . . . . . . . . . . . . . . . . . . . . . . . 37
Chapter 2 About Avid Xpress DV
About DV. . . . . . . . . . . . . . . . . . . . . . . . . . . . . . . . . . . . . . . . . . . . . . . . . . 39
Nonlinear Editing with Avid Xpress DV. . . . . . . . . . . . . . . . . . . . . . . 39
3
Page 4

Avid Xpress DV Terms and Concepts. . . . . . . . . . . . . . . . . . . . . . . . . . 40
Media Files . . . . . . . . . . . . . . . . . . . . . . . . . . . . . . . . . . . . . . . . . . . . . 40
Clips. . . . . . . . . . . . . . . . . . . . . . . . . . . . . . . . . . . . . . . . . . . . . . . . . . . 41
Subclips. . . . . . . . . . . . . . . . . . . . . . . . . . . . . . . . . . . . . . . . . . . . . . . . 41
Sequences . . . . . . . . . . . . . . . . . . . . . . . . . . . . . . . . . . . . . . . . . . . . . . 42
Bins . . . . . . . . . . . . . . . . . . . . . . . . . . . . . . . . . . . . . . . . . . . . . . . . . . . 43
Projects . . . . . . . . . . . . . . . . . . . . . . . . . . . . . . . . . . . . . . . . . . . . . . . . 43
The Attic Folder. . . . . . . . . . . . . . . . . . . . . . . . . . . . . . . . . . . . . . . . . 44
Programs . . . . . . . . . . . . . . . . . . . . . . . . . . . . . . . . . . . . . . . . . . . . . . . 44
The Avid Xpress DV File System . . . . . . . . . . . . . . . . . . . . . . . . . . . . . 45
Project Workflow . . . . . . . . . . . . . . . . . . . . . . . . . . . . . . . . . . . . . . . . . . . 46
Starting a Project . . . . . . . . . . . . . . . . . . . . . . . . . . . . . . . . . . . . . . . . 47
Preparing to Edit . . . . . . . . . . . . . . . . . . . . . . . . . . . . . . . . . . . . . . . . 48
Editing a Sequence . . . . . . . . . . . . . . . . . . . . . . . . . . . . . . . . . . . . . . 49
Generating Output . . . . . . . . . . . . . . . . . . . . . . . . . . . . . . . . . . . . . . 50
Chapter 3 Learning How to Use Avid Xpress DV
Using the Tutorial. . . . . . . . . . . . . . . . . . . . . . . . . . . . . . . . . . . . . . . . . . . 52
Using Help. . . . . . . . . . . . . . . . . . . . . . . . . . . . . . . . . . . . . . . . . . . . . . . . . 53
Opening and Closing the Help System . . . . . . . . . . . . . . . . . . . . 53
Getting Help for Windows and Dialog Boxes. . . . . . . . . . . . . . . 53
Getting Help for Screen Objects . . . . . . . . . . . . . . . . . . . . . . . . . . 54
Printing Help Topics. . . . . . . . . . . . . . . . . . . . . . . . . . . . . . . . . . . . . 54
Using Online Documentation . . . . . . . . . . . . . . . . . . . . . . . . . . . . . . . . 55
Tips and Other Resources. . . . . . . . . . . . . . . . . . . . . . . . . . . . . . . . . . . . 56
Chapter 4 Starting a Project and Creating a Simple Sequence
Starting Avid Xpress DV. . . . . . . . . . . . . . . . . . . . . . . . . . . . . . . . . . . . . 59
Using the Open Project Dialog Box . . . . . . . . . . . . . . . . . . . . . . . . . . . 60
Creating a User . . . . . . . . . . . . . . . . . . . . . . . . . . . . . . . . . . . . . . . . . 60
Selecting and Opening a Project . . . . . . . . . . . . . . . . . . . . . . . . . . 61
Creating a Simple Sequence . . . . . . . . . . . . . . . . . . . . . . . . . . . . . . . . . 62
4
Page 5

Next Steps . . . . . . . . . . . . . . . . . . . . . . . . . . . . . . . . . . . . . . . . . . . . . . . . . 68
Closing the Project and Quitting the Application . . . . . . . . . . . . . . . 68
Chapter 5 Playing and Marking Clips
Exploring the Project Window. . . . . . . . . . . . . . . . . . . . . . . . . . . . . . . . 70
The Bins Display. . . . . . . . . . . . . . . . . . . . . . . . . . . . . . . . . . . . . . . . 70
The Settings Display . . . . . . . . . . . . . . . . . . . . . . . . . . . . . . . . . . . . 71
The Info Display . . . . . . . . . . . . . . . . . . . . . . . . . . . . . . . . . . . . . . . . 73
Opening a Bin . . . . . . . . . . . . . . . . . . . . . . . . . . . . . . . . . . . . . . . . . . . . . . 73
Viewing Clips . . . . . . . . . . . . . . . . . . . . . . . . . . . . . . . . . . . . . . . . . . . . . . 74
Using Text View. . . . . . . . . . . . . . . . . . . . . . . . . . . . . . . . . . . . . . . . . 74
Using Frame View. . . . . . . . . . . . . . . . . . . . . . . . . . . . . . . . . . . . . . . 75
Switching Between Views. . . . . . . . . . . . . . . . . . . . . . . . . . . . . . . . 76
Playing Clips in a Source Pop-up Monitor . . . . . . . . . . . . . . . . . . . . . 76
Using the Keyboard to Play Clips . . . . . . . . . . . . . . . . . . . . . . . . . 76
Using Buttons and the Position Indicator to Play Clips . . . . . . 79
Marking IN and OUT Points . . . . . . . . . . . . . . . . . . . . . . . . . . . . . . . . . 80
Marking the First Clip . . . . . . . . . . . . . . . . . . . . . . . . . . . . . . . . . . . 80
Marking Another Clip . . . . . . . . . . . . . . . . . . . . . . . . . . . . . . . . . . . 83
Playing a Sequence in a Source Pop-up Monitor. . . . . . . . . . . . . . . . 84
Using Timecode to Find a Frame. . . . . . . . . . . . . . . . . . . . . . . . . . . . . . 85
About Timecode . . . . . . . . . . . . . . . . . . . . . . . . . . . . . . . . . . . . . . . . 85
Using Timecode to Mark IN and OUT Points. . . . . . . . . . . . . . . 86
Using Frame Offset. . . . . . . . . . . . . . . . . . . . . . . . . . . . . . . . . . . . . . 89
Creating Subclips . . . . . . . . . . . . . . . . . . . . . . . . . . . . . . . . . . . . . . . . . . . 89
Clearing IN Points and OUT Points. . . . . . . . . . . . . . . . . . . . . . . . . . . 90
Saving Your Work. . . . . . . . . . . . . . . . . . . . . . . . . . . . . . . . . . . . . . . . . . . 91
Next Steps . . . . . . . . . . . . . . . . . . . . . . . . . . . . . . . . . . . . . . . . . . . . . . . . . 91
Chapter 6 Creating a Sequence
Working in the Avid Xpress DV Window . . . . . . . . . . . . . . . . . . . . . . 93
Minimizing Avid Xpress DV Windows . . . . . . . . . . . . . . . . . . . . 93
Default Locations for the Avid Xpress DV Windows . . . . . . . . 94
5
Page 6

Making the First Edit. . . . . . . . . . . . . . . . . . . . . . . . . . . . . . . . . . . . . . . . 94
Playing a Video Clip. . . . . . . . . . . . . . . . . . . . . . . . . . . . . . . . . . . . . 94
Dragging a Video Clip and Creating a Sequence . . . . . . . . . . . . 95
Moving and Renaming the Sequence . . . . . . . . . . . . . . . . . . . . . . 97
Opening a Sequence . . . . . . . . . . . . . . . . . . . . . . . . . . . . . . . . . . . . . . . . 98
Opening and Using the Tool Palette. . . . . . . . . . . . . . . . . . . . . . . . . . . 98
Opening and Tearing Off the Tool Palette . . . . . . . . . . . . . . . . . . 99
Displaying Button Names . . . . . . . . . . . . . . . . . . . . . . . . . . . . . . . 100
Splicing in an Audio Clip. . . . . . . . . . . . . . . . . . . . . . . . . . . . . . . . . . . 100
Using Digital Audio Scrub to Locate a Specific Frame of
Audio. . . . . . . . . . . . . . . . . . . . . . . . . . . . . . . . . . . . . . . . . . . . . . . 101
Playing IN to OUT . . . . . . . . . . . . . . . . . . . . . . . . . . . . . . . . . . . . . 102
Splicing in the Clip. . . . . . . . . . . . . . . . . . . . . . . . . . . . . . . . . . . . . 102
Reviewing Your Edits. . . . . . . . . . . . . . . . . . . . . . . . . . . . . . . . . . . 103
Exploring the Timeline . . . . . . . . . . . . . . . . . . . . . . . . . . . . . . . . . . . . . 103
Displaying More or Less Detail in the Timeline . . . . . . . . . . . 104
Navigating in the Timeline . . . . . . . . . . . . . . . . . . . . . . . . . . . . . . 105
Using the Position Indicator . . . . . . . . . . . . . . . . . . . . . . . . . 105
Using the Scroll Bar. . . . . . . . . . . . . . . . . . . . . . . . . . . . . . . . . 105
Using the Track Selector Panel . . . . . . . . . . . . . . . . . . . . . . . . . . . 106
Selecting Tracks . . . . . . . . . . . . . . . . . . . . . . . . . . . . . . . . . . . . . . . . 107
Monitoring Tracks. . . . . . . . . . . . . . . . . . . . . . . . . . . . . . . . . . . . . . 107
Splicing in a Video Clip . . . . . . . . . . . . . . . . . . . . . . . . . . . . . . . . . . . . 108
Adding Additional Frames . . . . . . . . . . . . . . . . . . . . . . . . . . . . . . 108
Splicing in the Clip. . . . . . . . . . . . . . . . . . . . . . . . . . . . . . . . . . . . . 109
Splicing a Clip into the Middle of a Sequence. . . . . . . . . . . . . . . . . 110
Moving to the Head of a Clip . . . . . . . . . . . . . . . . . . . . . . . . . . . . 111
Splicing in the Clip. . . . . . . . . . . . . . . . . . . . . . . . . . . . . . . . . . . . . 111
Undoing an Edit . . . . . . . . . . . . . . . . . . . . . . . . . . . . . . . . . . . . . . . . . . . 112
Splicing in a Music Track . . . . . . . . . . . . . . . . . . . . . . . . . . . . . . . . . . . 112
Opening and Marking the Clip . . . . . . . . . . . . . . . . . . . . . . . . . . 112
Patching Tracks . . . . . . . . . . . . . . . . . . . . . . . . . . . . . . . . . . . . . . . . 112
Selecting the Tracks to Edit . . . . . . . . . . . . . . . . . . . . . . . . . . . . . . 113
6
Page 7

Splicing in the Clip. . . . . . . . . . . . . . . . . . . . . . . . . . . . . . . . . . . . . 113
Reviewing Your Edits. . . . . . . . . . . . . . . . . . . . . . . . . . . . . . . . . . . 114
Confirming the Duration. . . . . . . . . . . . . . . . . . . . . . . . . . . . . . . . 114
Next Steps . . . . . . . . . . . . . . . . . . . . . . . . . . . . . . . . . . . . . . . . . . . . . . . . 115
Chapter 7 Building a Sequence
Storyboard Editing the Clips . . . . . . . . . . . . . . . . . . . . . . . . . . . . . . . . 117
Marking IN and OUT Points . . . . . . . . . . . . . . . . . . . . . . . . . . . . 117
Creating the Storyboard. . . . . . . . . . . . . . . . . . . . . . . . . . . . . . . . . 118
Editing the Clips into the Sequence . . . . . . . . . . . . . . . . . . . . . . 119
Overwriting Clips into a Sequence. . . . . . . . . . . . . . . . . . . . . . . . . . . 120
Backtiming an Edit. . . . . . . . . . . . . . . . . . . . . . . . . . . . . . . . . . . . . . . . . 122
Rearranging Clips . . . . . . . . . . . . . . . . . . . . . . . . . . . . . . . . . . . . . . . . . 122
Overwriting with a Three-Point Edit . . . . . . . . . . . . . . . . . . . . . 123
Using Segment Mode . . . . . . . . . . . . . . . . . . . . . . . . . . . . . . . . . . . 124
Changing the Order of Clips in a Sequence . . . . . . . . . . . . . . . 124
Removing Footage from a Sequence. . . . . . . . . . . . . . . . . . . . . . 125
Removing Footage and Closing the Resulting Gap . . . . . 125
Removing Footage and Retaining the Resulting Gap . . . 126
Replacing a Clip . . . . . . . . . . . . . . . . . . . . . . . . . . . . . . . . . . . . 127
Trimming . . . . . . . . . . . . . . . . . . . . . . . . . . . . . . . . . . . . . . . . . . . . . . . . . 127
Adjusting Both Sides of a Transition (Dual-Roller
Trimming). . . . . . . . . . . . . . . . . . . . . . . . . . . . . . . . . . . . . . . . . . . 128
Single-Roller Trimming . . . . . . . . . . . . . . . . . . . . . . . . . . . . . . . . . 130
Adding the Final Clip . . . . . . . . . . . . . . . . . . . . . . . . . . . . . . . . . . . . . . 132
Working with Audio . . . . . . . . . . . . . . . . . . . . . . . . . . . . . . . . . . . . . . . 133
Adjusting Audio Pan (Balance) . . . . . . . . . . . . . . . . . . . . . . . . . . 133
Adjusting Audio Level. . . . . . . . . . . . . . . . . . . . . . . . . . . . . . . . . . 135
Next Steps . . . . . . . . . . . . . . . . . . . . . . . . . . . . . . . . . . . . . . . . . . . . . . . . 135
Chapter 8 Adding Effects
Effects Editing. . . . . . . . . . . . . . . . . . . . . . . . . . . . . . . . . . . . . . . . . . . . . 137
Transition Effects. . . . . . . . . . . . . . . . . . . . . . . . . . . . . . . . . . . . . . . 137
7
Page 8

Segment Effects . . . . . . . . . . . . . . . . . . . . . . . . . . . . . . . . . . . . . . . . 138
Dissolving Between Clips . . . . . . . . . . . . . . . . . . . . . . . . . . . . . . . . . . 138
Creating a Series of Dissolves . . . . . . . . . . . . . . . . . . . . . . . . . . . 140
Rendering a Series of Effects . . . . . . . . . . . . . . . . . . . . . . . . . . . . 141
Adding Additional Dissolves. . . . . . . . . . . . . . . . . . . . . . . . . . . . 142
Changing the Position of a Dissolve . . . . . . . . . . . . . . . . . . . . . . 142
Adding a Picture-in-Picture Effect . . . . . . . . . . . . . . . . . . . . . . . . . . . 143
Displaying the Effect Palette . . . . . . . . . . . . . . . . . . . . . . . . . . . . 144
Using the Second Video Track . . . . . . . . . . . . . . . . . . . . . . . . . . . 144
Creating the Picture-in-Picture Effect . . . . . . . . . . . . . . . . . . . . . 145
Resizing the Image . . . . . . . . . . . . . . . . . . . . . . . . . . . . . . . . . . . . . 147
Previewing the Effect . . . . . . . . . . . . . . . . . . . . . . . . . . . . . . . . . . . 150
Adjusting the Border . . . . . . . . . . . . . . . . . . . . . . . . . . . . . . . . . . . 150
Fading In and Out. . . . . . . . . . . . . . . . . . . . . . . . . . . . . . . . . . . . . . 151
Rendering the Effect. . . . . . . . . . . . . . . . . . . . . . . . . . . . . . . . . . . . 151
Adding a Flop Effect . . . . . . . . . . . . . . . . . . . . . . . . . . . . . . . . . . . . . . . 152
Next Steps . . . . . . . . . . . . . . . . . . . . . . . . . . . . . . . . . . . . . . . . . . . . . . . . 153
Chapter 9 Creating Titles
Creating a New Title . . . . . . . . . . . . . . . . . . . . . . . . . . . . . . . . . . . . . . . 155
Adding a Shadow . . . . . . . . . . . . . . . . . . . . . . . . . . . . . . . . . . . . . . 156
Positioning and Aligning Text . . . . . . . . . . . . . . . . . . . . . . . . . . . 157
Saving a Title. . . . . . . . . . . . . . . . . . . . . . . . . . . . . . . . . . . . . . . . . . . . . . 158
Editing the Title into the Sequence . . . . . . . . . . . . . . . . . . . . . . . . . . 158
Fading a Title. . . . . . . . . . . . . . . . . . . . . . . . . . . . . . . . . . . . . . . . . . . . . . 159
Editing a Saved Title . . . . . . . . . . . . . . . . . . . . . . . . . . . . . . . . . . . . . . . 160
Changing Color . . . . . . . . . . . . . . . . . . . . . . . . . . . . . . . . . . . . . . . . 160
Saving the Title . . . . . . . . . . . . . . . . . . . . . . . . . . . . . . . . . . . . . . . . 161
Editing the Title. . . . . . . . . . . . . . . . . . . . . . . . . . . . . . . . . . . . . . . . 161
Renaming Your Sequence. . . . . . . . . . . . . . . . . . . . . . . . . . . . . . . . . . . 162
Next Steps . . . . . . . . . . . . . . . . . . . . . . . . . . . . . . . . . . . . . . . . . . . . . . . . 162
8
Page 9

Chapter 10 Generating Output
Creating a Movie for the Internet . . . . . . . . . . . . . . . . . . . . . . . . . . . . 164
About RealMedia . . . . . . . . . . . . . . . . . . . . . . . . . . . . . . . . . . . . . . 164
Preparing the Sequence . . . . . . . . . . . . . . . . . . . . . . . . . . . . . . . . . 165
Creating a RealMedia Movie . . . . . . . . . . . . . . . . . . . . . . . . . . . . 165
Exporting a QuickTime Movie . . . . . . . . . . . . . . . . . . . . . . . . . . . . . . 174
Using the QuickTime DV Codec . . . . . . . . . . . . . . . . . . . . . . . . . 174
Exporting the Sequence . . . . . . . . . . . . . . . . . . . . . . . . . . . . . . . . . 175
Outputting a Digital Cut to Tape . . . . . . . . . . . . . . . . . . . . . . . . . . . . 179
About Remote and Local Deck Control . . . . . . . . . . . . . . . . . . . 179
Changing the Timecode of the Sequence. . . . . . . . . . . . . . . . . . 180
Configuring Your Camera or Video Deck . . . . . . . . . . . . . . . . . 181
Recording a Digital Cut . . . . . . . . . . . . . . . . . . . . . . . . . . . . . . . . . 185
Next Steps . . . . . . . . . . . . . . . . . . . . . . . . . . . . . . . . . . . . . . . . . . . . . . . . 188
Chapter 11 Backing Up and Deleting a Project
Backing Up Project Information . . . . . . . . . . . . . . . . . . . . . . . . . . . . . 190
Backing Up Media Files . . . . . . . . . . . . . . . . . . . . . . . . . . . . . . . . . . . . 191
Deleting a Project Folder and Media Files . . . . . . . . . . . . . . . . . . . . 191
Deleting a Project Folder . . . . . . . . . . . . . . . . . . . . . . . . . . . . . . . . 192
Deleting Media Files . . . . . . . . . . . . . . . . . . . . . . . . . . . . . . . . . . . 192
Next Steps . . . . . . . . . . . . . . . . . . . . . . . . . . . . . . . . . . . . . . . . . . . . . . . . 195
Appendix A Connecting Your Editing Equipment
Connecting the Application Key . . . . . . . . . . . . . . . . . . . . . . . . . . . . . 197
Connecting the External SCSI Drives . . . . . . . . . . . . . . . . . . . . . . . . 198
Installation Overview. . . . . . . . . . . . . . . . . . . . . . . . . . . . . . . . . . . 198
Placing the Drives . . . . . . . . . . . . . . . . . . . . . . . . . . . . . . . . . . . . . . 199
Cabling the Drives . . . . . . . . . . . . . . . . . . . . . . . . . . . . . . . . . . . . . 200
Determining the SCSI IDs . . . . . . . . . . . . . . . . . . . . . . . . . . . . . . 206
Setting the SCSI IDs. . . . . . . . . . . . . . . . . . . . . . . . . . . . . . . . . . . . 207
Connecting the Editing Equipment . . . . . . . . . . . . . . . . . . . . . . . . . . 209
Overview of the Hardware Connections . . . . . . . . . . . . . . . . . . 210
9
Page 10

Cables Needed to Connect the Equipment . . . . . . . . . . . . . . . . 211
Cables Shipped with the Computer. . . . . . . . . . . . . . . . . . . 211
Optional Cables . . . . . . . . . . . . . . . . . . . . . . . . . . . . . . . . . . . . 212
Connecting a Digital Video Deck or Camera to the
Computer. . . . . . . . . . . . . . . . . . . . . . . . . . . . . . . . . . . . . . . . . . . . 213
Connecting an Analog Video Deck to the Computer. . . . . . . . 216
Controlling an Analog Video Deck . . . . . . . . . . . . . . . . . . . . . . . 219
Index
10
Page 11

Figures
Figure 1-1 Example of Local Disks . . . . . . . . . . . . . . . . . . . . . . . . . . 19
Figure A-1 Application Key Connection . . . . . . . . . . . . . . . . . . . . 197
Figure A-2 Placing the External SCSI Drives . . . . . . . . . . . . . . . . . 199
Figure A-3 Example of a Chain of SCSI Drives . . . . . . . . . . . . . . . 200
Figure A-4 Cable and Terminator . . . . . . . . . . . . . . . . . . . . . . . . . . 201
Figure A-5 Connecting the Adapter Cable to the SCSI Board. . . 202
Figure A-6 Connecting the Adapter Cable to the First
SCSI Drive . . . . . . . . . . . . . . . . . . . . . . . . . . . . . . . . . . . . 203
Figure A-7 Connecting the Interconnect Cable Between
SCSI Drives . . . . . . . . . . . . . . . . . . . . . . . . . . . . . . . . . . . 204
Figure A-8 Connecting the LVD Terminator . . . . . . . . . . . . . . . . . 205
Figure A-9 Setting the SCSI IDs . . . . . . . . . . . . . . . . . . . . . . . . . . . . 206
Figure A-10 SCSI ID Switch Location . . . . . . . . . . . . . . . . . . . . . . . . 207
Figure A-11 SCSI ID Switch . . . . . . . . . . . . . . . . . . . . . . . . . . . . . . . . 208
Figure A-12 Computer Cables . . . . . . . . . . . . . . . . . . . . . . . . . . . . . . 212
Figure A-13 Connecting the Digital Video Deck or Camera . . . . . 213
Figure A-14 Connecting an Analog Video Deck . . . . . . . . . . . . . . . 216
Figure A-15 Analog Video Deck Control Cabling. . . . . . . . . . . . . . 220
11
Page 12

Tables
Table 1-1 Check List for Setting Up Your System . . . . . . . . . . . . 14
Table 1-2 Custom Installation Components . . . . . . . . . . . . . . . . . 28
Tab le A -1 Numbers Associated with SCSI Switch Letters. . . . . 208
Tab le A -2 Connecting the Digital Video Deck or Camera . . . . 214
Tab le A -3 Connecting an Analog Video Deck . . . . . . . . . . . . . . 217
12
Page 13

CHAPTER 1
Setting Up Your
Avid Xpress DV System
This chapter describes how to set up your Avid Xpress DV system. It
consists of the following sections:
• Check List for Setting Up Your System
• Turning On Your Equipment
• Preparing Your Drives
• Installing Avid Xpress DV Software
• Installing AvidNet Transfer Tool Software
• Installing EDL Manager
• Creating an Emergency Repair Disk
• Installing the Avid Xpress DV Tutorial Files
• Turning Off Your Equipment
13
Page 14

Check List for Setting Up Your System
The check list in Ta bl e 1 -1 lists the tasks you need to complete before
you can use your Avid Xpress DV system.
Table 1-1 Check List for Setting Up Your System
To See
Set up your computer hardware:
computer, monitor, mouse, keyboard,
and speakers
Connect your optional external drives Appendix A
Install the application key and printer Appendix A
Connect your camera or video deck
(you can connect these after you install
the software if you prefer)
Turn on your equipment “Turning On Your Equipment” on
Prepare your drives “Preparing Your Drives” on page 16
Install Avid Xpress DV software “Installing Avid Xpress DV
Create an emergency repair disk “Creating an Emergency Repair
Install Avid Xpress DV tutorial files
(optional)
Instructions shipped with the
computer
Appendix A
page 15
Software” on page 24
Disk” on page 34
“Installing the Avid Xpress DV
Tutorial Files” on page 35
14
Page 15

Turning On Your Equipment
After you have connected your equipment, turn on the various
components. If you have connected external drives, you need to shut
down and restart your computer before the computer can detect and
use the external drives.
If any part of your system fails to turn on, make sure its electrical cord
is plugged snugly into an appropriate electrical outlet or power strip.
For more information, see the instructions for setting up your
computer hardware.
c
For information on your
Windows NT features,
such as the desktop and
icons, see your
Windows NT
documentation.
If you fail to follow the proper sequence for starting your system,
you could damage your computer or storage drives.
Turn on the components in the following order:
1. External media drives: Your system might include one or more
external media drives. Turn on the drive or drives before starting
the computer. Allow 10 to 15 seconds for the drives to spin up to
speed before starting your computer.
2. Other peripheral hardware: Turn on all other peripheral units,
such as monitor and speakers. If you have connected a camera,
transcoder, or deck, turn them on now.
3. Computer:
a. Turn on your computer.
The computer goes through a self-check routine, and the
Windows NT startup screen appears.
b. Press Ctrl+Alt+Delete and log on.
The Windows NT desktop appears.
15
Page 16
c
To avoid system damage, do not disconnect or turn off the external
media drives while the computer is on.
Preparing Your Drives
To use Avid Xpress DV software on a Windows NT system, you need
to partition and format the drives properly. Partitioning divides a drive
into sections, and formatting places a file system on each partition.
Your computer contains two internal disk drives. One drive is already
partially partitioned and formatted (see “Checking Your Internal
Drives” on page 18). This partition contains the Windows NT
operating system. That’s why the Windows NT operating system
appears automatically when you turn on the computer.
This section includes the following information:
• Overview of Partitioning
• Supported File Systems
• Checking Your Internal Drives
16
Page 17

• Creating Primary Partitions
• Formatting Partitions
• Creating a Disk Configuration Floppy Disk
• Testing Drives on Windows NT Systems
Overview of Partitioning
Windows NT allows you to create multiple partitions on a single
physical drive as a way to manage projects and files. The following are
two ways you can partition your drives.
The letters G through J
used are examples only.
• You can partition your drive as one primary partition, having the
partition represented by a drive letter.
One partition
G
• You can have up to four primary partitions per drive. Each
partition is assigned a drive letter and cannot be further
subdivided.
Four partitions
G
For specific recommendations for partitioning your drives, see
“Creating Primary Partitions” on page 20.
H
IJ
Drive G
Drives G – J
17
Page 18

n
You can also create a partition across more than one drive, which is
called striping drives. You do not need to stripe drives when you use
Avid Xpress DV. See the Windows NT documentation for striping
information.
Supported File Systems
Windows NT supports two file systems: the File Allocation Table
(FAT) and the New Technology File System (NTFS). FAT is primarily
used when backward compatibility is needed on operating systems
such as MS-DOS
be limited to a 2-GB partition size to maintain this backward
compatibility. NTFS affords the user security, compression, and other
file recovery features. Drives employing NTFS support partitions of
any size. Avid recommends that you choose NTFS when you partition
your disk drives.
®
or Windows NT. In general, FAT file systems should
c
One of your internal disk drives has a partition (designated drive C)
that contains the Windows NT operating system stored on a FAT file
system. You should not reformat this partition unless you need to
rebuild your system disk drive.
Checking Your Internal Drives
Your computer contains two internal disk drives. The first drive has a
2-GB partition that is formatted with a FAT file system. This partition
is your system or boot drive, which is designated drive C in the factory
default configuration. The remaining portion of this drive needs to be
partitioned and formatted before you install Avid Xpress DV software.
The second drive is intended to be used as a media drive (see “Media
Files” on page 40). You need to partition and format this drive also.
18
Page 19
To check if you need to partition and format these drives:
1. Start Windows NT 4.0 and log in to an account with
administrative privileges.
2. Click the Start button, point to Programs, point to Administrative
Tools, and select Disk Administrator. The Disk Administrator
window opens.
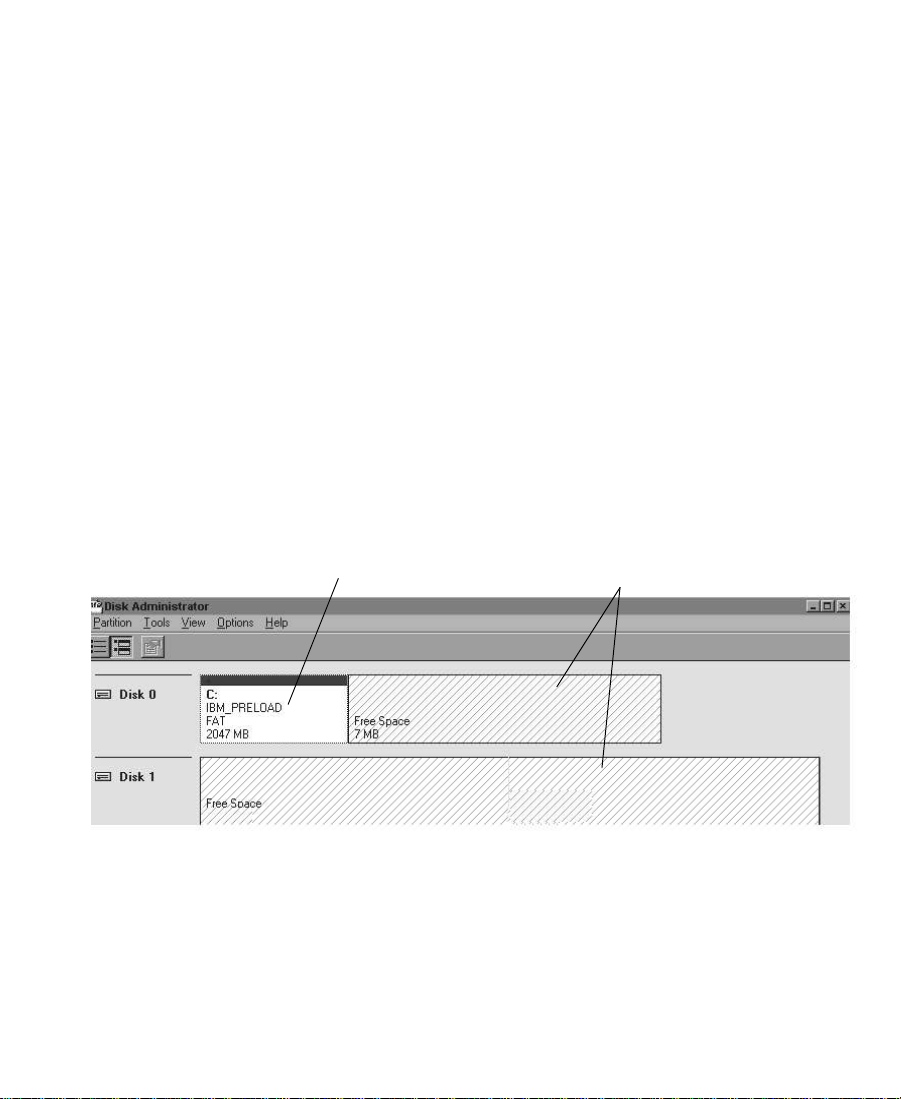
3. Look at Disk 0 and Disk 1.
Your Disk 0 should look similar to Disk 0 in Figure 1-1. The figure
shows Partition C on Disk 0, with a stripe across the top, with
®
Preload and a FAT file system.
IBM
9420 MB
18428 MB
c
You should not partition and format the partition that contains the
Windows NT operating system. In the factory default configuration,
this partition is designated drive C, as shown in Figure 1-1.
Any remaining portion of Disk 0 or Disk 1 that shows Free Space
(as shown in Figure 1-1) needs to be partitioned and formatted.
Already partitioned and formatted
18 MB
Needs partitioning and formatting
Figure 1-1 Example of Local Disks
19
Page 20
Creating Primary Partitions
To create a primary partition:
1. Start Windows NT 4.0 and log in to an account with
administrative privileges. If you do not have administrative
privileges, see your system administrator to get privileges.
2. Click the Start button, point to Programs, point to Administrative
Tools, and select Disk Administrator. The first Disk Administrator
window opens.
3. From the Windows NT Disk Administrator, use the pointer to
select the portion of the disk on which you are going to create one
or more primary partitions.
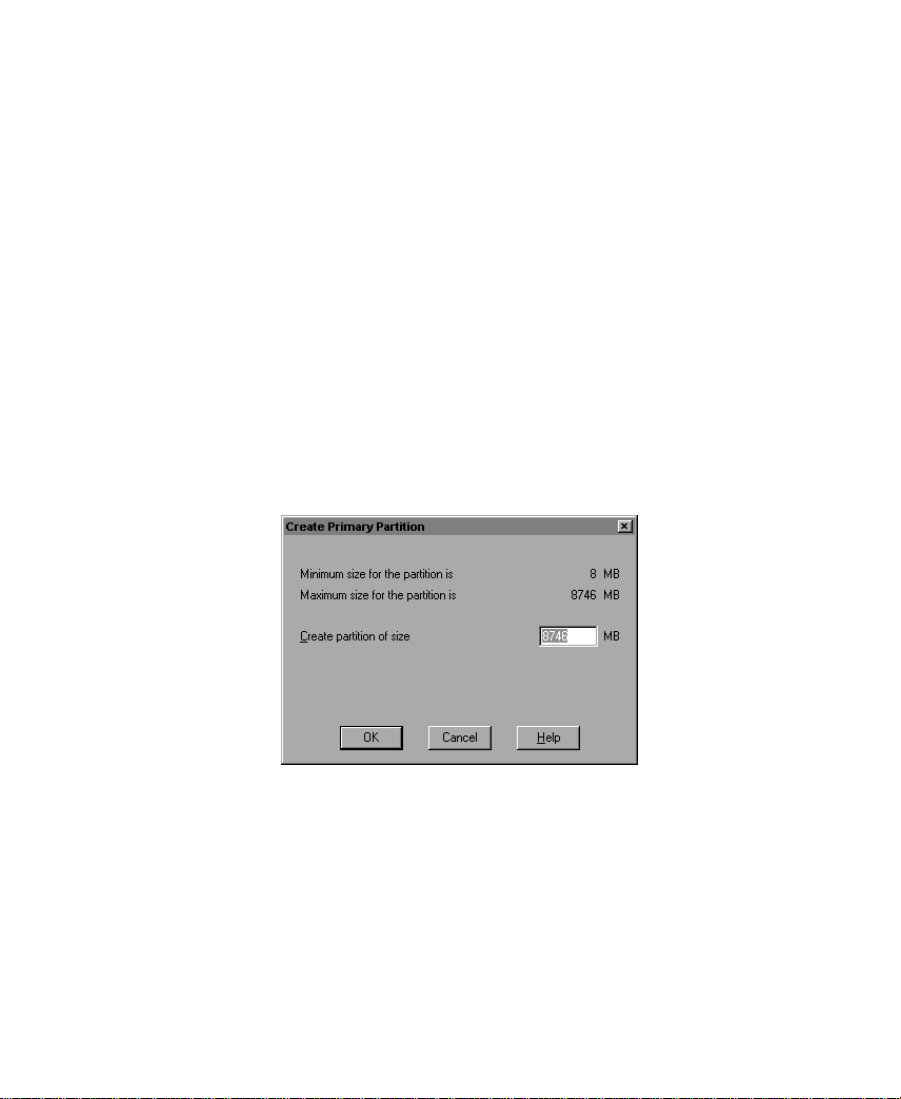
4. From the Partition menu, choose Create.
The Create Primary Partition dialog box appears.
5. Choose the size of the primary partition by typing a number or by
clicking the up or down arrow.
Avid recommends creating a second partition on the first internal
drive (Disk 0), using all the remaining space. Avid also
recommends creating one large partition on the second internal
drive (Disk 1). In both cases, use the maximum size for the
partition.
20
Page 21
If you want to create multiple partitions, you can divide the
maximum size of the partition by the number of partitions (up to
4). Type that number in the Create partition of size text box.
6. Click OK to create the primary partition.
7. If you are formatting multiple partitions, repeat steps 3 through 6
to create up to four primary partitions.
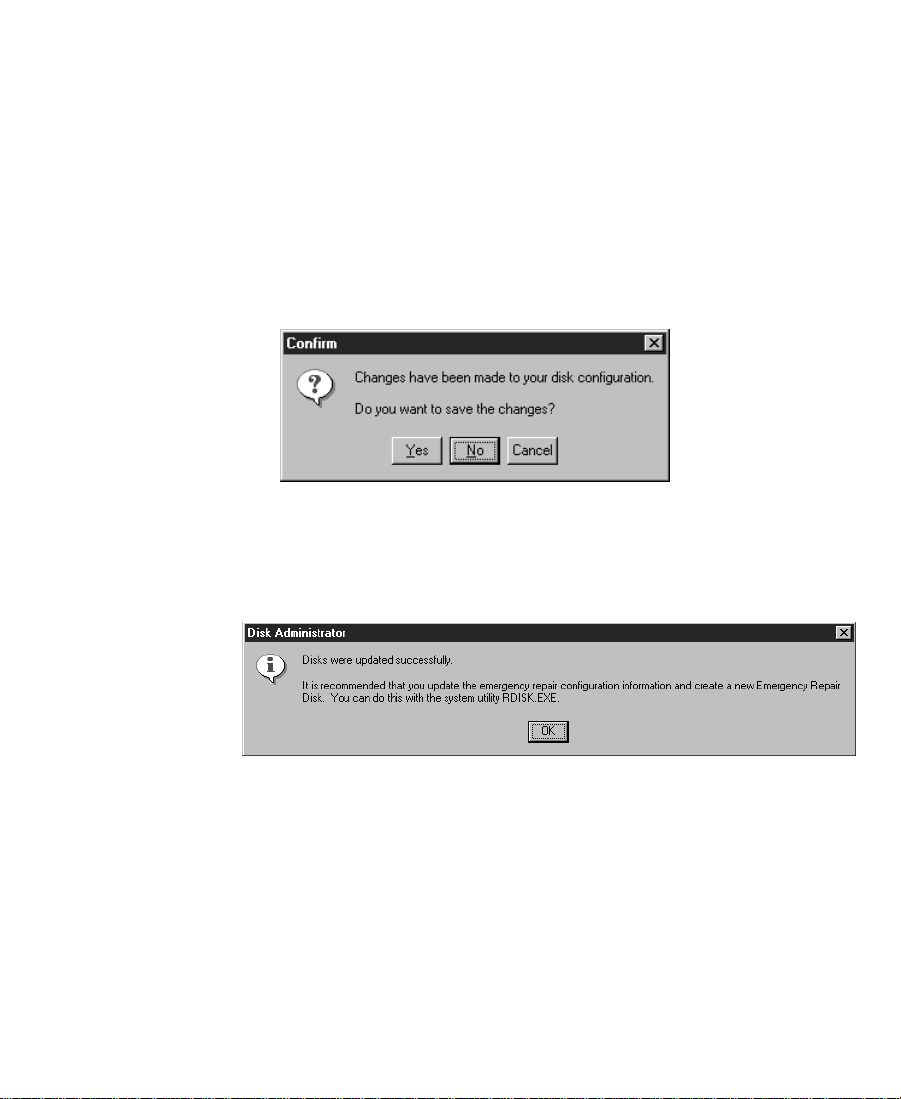
8. From the Partition menu, choose Commit Changes Now.
The first Confirm dialog box appears.
9. Click Yes.
The following Disk Administrator dialog box appears.
10. Click OK.
Formatting Partitions
To format the primary partitions you created:
1. From the Windows NT Disk Administrator, use the pointer to
select the primary partition that you are going to format.
21
Page 22
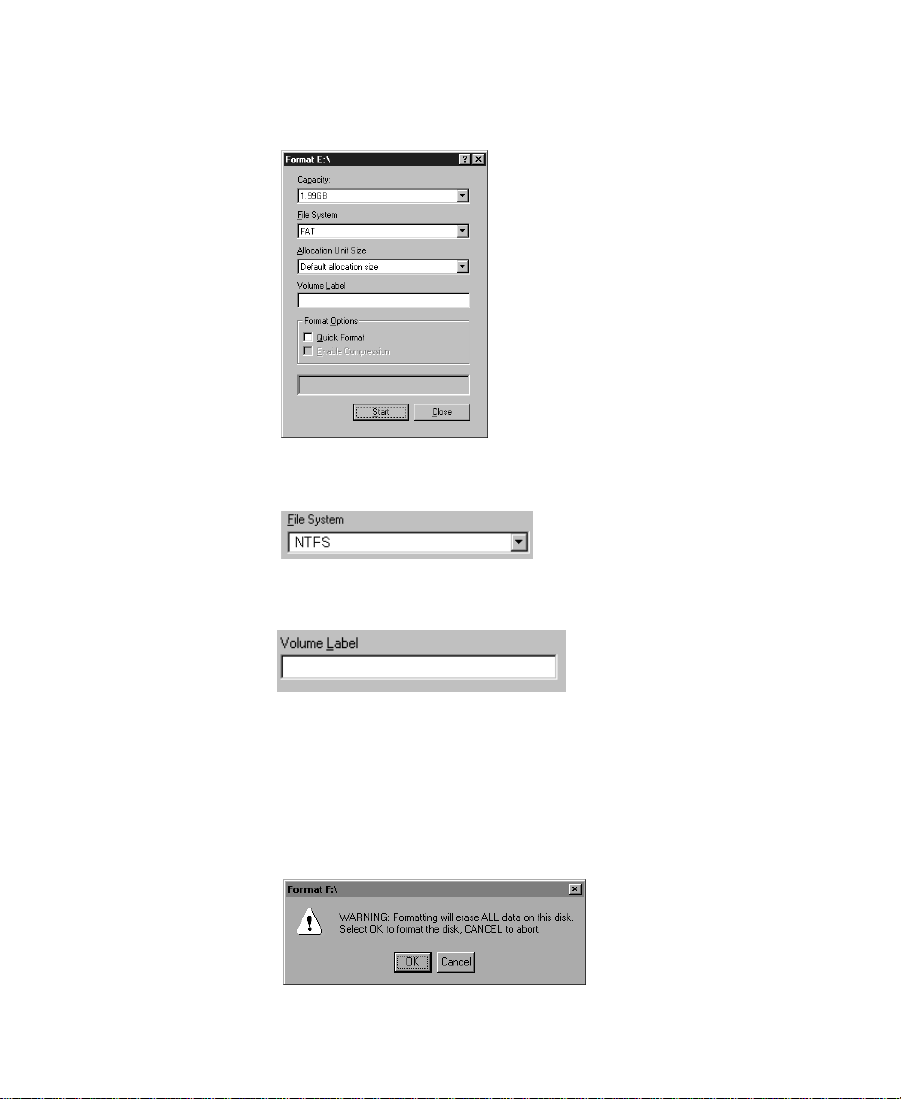
2. From the Tools menu, choose Format.
The Format window opens.
3. Choose NTFS File System.
4. Type a Volume Label Name that helps you define that partition.
You can enter up to 14 characters.
5. Select Quick Format.
6. Click Start to begin formatting.
The Format warning dialog box appears.
22
Page 23

This warning refers only to the new partition, not previously
formatted partitions.
7. Click OK.
The Format Complete dialog box appears after formatting and
tells you the total disk space and the total disk space available on
the volume.
8. Click OK.
9. Repeat steps 1 through 8 until you have formatted all of the
primary partitions you created.
Creating a Disk Configuration Floppy Disk
You should now save the new disk configuration on a floppy disk.
To create a configuration floppy disk:
1. Start Windows NT 4.0 and log in to an account with
administrative privileges. If you do not have administrative
privileges, see your system administrator to get privileges.
2. Click the Start button, point to Programs, point to Administrative
Tools, and select Disk Administrator. The first Disk Administrator
window opens.
n
3. Choose Configuration from the Partition menu and select Save.
4. A dialog box appears asking you to insert a floppy disk into the
floppy drive.
5. Click Yes.
Store the configuration floppy disk in a safe, dry, static-free location.
Whenever you change your disk configuration, create a new configuration
floppy disk.
23
Page 24

Testing Drives on Windows NT Systems
The Windows NT operating system contains a disk-checking feature in
the Properties section of each drive and a program named CHKDSK.
For information about how to use this feature and program, see the
Windows NT documentation.
Installing Avid Xpress DV Software
This section describes how to install the Avid Xpress DV application
and its related components from the installation CD-ROM.
n
c
In order to install or remove the application software, you need to use an
account with administrative privileges.
The following third-party software applications have been modified
to work properly with Avid software: RealProducer G2, LSX-MPEG,
ASF NetShow
these applications before they are supported by Avid might cause
problems. Avid recommends not updating any of these applications
until they are officially supported by Avid. Check the Customer
Service section of the Avid Web site at www.avid.com.
™
, and QuickTime®. Downloading newer versions of
Installing Avid Xpress DV Software and All Components
To install the Avid Xpress DV software and all related components:
1. Quit all Windows NT applications.
2. Insert the Avid Xpress DV application CD-ROM into the CD-ROM
drive.
24
Page 25

If the installation program doesn’t start automatically:
a. Double-click the My Computer icon.
b. Double-click your CD-ROM drive icon.
c. Double-click the Launch icon.
The opening window of the installer opens.
3. In the opening window, click Installers.
4. Click Install Avid Xpress DV.
n
If you have not partitioned and formatted the second internal disk drive (in
addition to drive C) or additional external drives, a message appears. This
message informs you that you need at least two partitions to run
Avid Xpress DV. One partition is the boot drive (drive C), and the other
partition is used to store media. For instructions on partitioning and
formatting drives, see “Preparing Your Drives” on page 16.
If you have previously installed Avid Xpress DV, the Welcome
window for the Setup Maintenance program opens. Follow the
steps in “Modifying, Repairing, or Removing Avid Xpress DV”
on page 29
5. In the Welcome window, click Next.
6. In the License Agreement window, read the agreement, and then
click Yes to accept the terms of the agreement.
7. In the Choose Destination Location window, accept the default
path for the application folder (on drive C) by clicking Next. The
default path is:
C:\Program Files\Avid\Avid Xpress DV
8. In the Setup Type window, select an option:
• Select Typical to install all components. This is the
recommended installation.
• Select Custom to select the components you want to install.
See “Performing a Custom Installation” on page 28.
25
Page 26

9. After you have selected an option, click Next.
The AVX_Plug-In Location window opens and displays the
default destination as:
C:\Program Files\Avid\AVX_Plug-ins
10. Click Next to accept the default path.
11. In the Application Data Location window, indicate a location for
the application files (project folders and user folders).
n
Avid recommends that you install these files on a drive or partition other than
drive C.
To change the default path:
a. Click the Browse button.
b. In the Path text box, type:
drive
:\Avid\Avid Xpress DV
c. Click OK.
A message asks if you want to create the folder.
d. Click Yes.
12. Click Next.
The installation begins. During the installation, you see
installation programs for a series of components. For
RealProducer G2, a Welcome window opens.
a. Click Next
b. In the License Agreement window, click Yes.
c. In the RealProducer G2 Setup Complete window, click Finish.
When the Avid Xpress DV installation is complete, another Setup
Complete window opens and asks if you want to restart the
system.
13. Click Yes, and then click Finish.
26
Page 27

Installing Selected Components
You can install some Avid Xpress DV components separately. These
components, which create movies for Internet distribution, include:
• RealProducer G2
• LSX-MPEG
• ASF NetShow
•QuickTime
To install a selected component:
1. Quit all Windows NT applications.
2. Insert the Avid Xpress DV Installation CD-ROM into the CD-ROM
drive.
If the installation program doesn't start automatically:
a. Double-click the My Computer icon.
b. Double-click your CD-ROM drive icon.
c. Double-click the Launch icon.
The opening window of the installer opens.
3. In the opening window, click Component Installers.
4. Select the component you want to install and follow the on-screen
instructions.
27
Page 28

Performing a Custom Installation
You can perform a custom installation to install particular files from
the installation CD-ROM. Ta bl e 1 - 2 lists the components available
when you use the Custom option of the Avid Application Installer.
Table 1-2 Custom Installation Components
Component Description
Avid Xpress DV Installs the application and all the necessary
supporting files, except the Help files.
Help files Installs the appropriate Help files.
To perform a custom installation:
1. Follow steps 1 through 7 in the procedure “Installing Avid Xpress
DV Software and All Components” on page 24.
2. In the Setup Type window, click Custom and then click Next.
3. In the Select Components window, click the check boxes next to
the components you want to install. A check mark indicates the
component is selected.
n
4. After you have selected the components to install, click Next.
5. In the Application Data Location window, indicate a location for
the application files (project folders and user folders).
Avid recommends that you install these files on a drive or partition other than
drive C.
28
Page 29

To change the default path:
a. Click the Browse button.
b. In the Path text box, type:
drive
:\Avid\Avid Xpress DV
c. Click OK.
A message asks if you want to create the folder.
d. Click Yes.
6. Click Next.
The installation begins. When the installation is complete, a
message asks if you want to restart the system.
7. Click Yes, and then click Finish.
Modifying, Repairing, or Removing Avid Xpress DV
If you have installed Avid Xpress DV and need to reinstall or remove
it, you use the Setup Maintenance program.
To modify, repair, or remove Avid Xpress DV:
1. Quit all Windows NT applications.
2. Insert the Avid Xpress DV application CD-ROM into the CD-ROM
drive.
If the installation program doesn’t start automatically:
a. Double-click the My Computer icon.
b. Double-click your CD-ROM drive icon.
c. Double-click the Launch icon.
The opening window of the installer opens.
3. In the opening window, click Installers.
4. Click Install Avid Xpress DV.
29
Page 30

The Welcome window for the Setup Maintenance program opens.
It presents three options:
• Modify: Select this option to add new program components or
remove currently installed components.
n
n
c
If you choose to remove currently installed components, this option does not
remove registry entries or icons in the Start menu. To fully uninstall
Avid Xpress DV, select the Remove option.
If you want to remove Avid AVI Codec, RealProducer G2, LSX-MPEG
(Ligos), ASF NetShow, or QuickTime, use the Add/Remove Programs dialog
box. To access Add/Remove programs, click the Start menu, point to Settings,
click Control Panel, and double-click the Add/Remove Programs icon.
• Repair: Select this option to reinstall the components that you
previously installed.
• Remove: Select this option to completely uninstall all
components of Avid Xpress DV.
5. Select one of the three options and click Next.
• If you selected Modify, the Select Components window opens.
Components that are already installed are selected. Select the
new components you want to install. The installation
proceeds, as described in steps 12 and 13 in “Installing Avid
Xpress DV Software” on page 24.
If you deselect an installed component, the installation program will
remove the component from the Avid Xpress DV system.
• If you selected Repair, the installation proceeds, as described
in steps 12 and 13 in “Installing Avid Xpress DV Software”
on page 24.
• If you selected Remove, a message box asks you to confirm
that you want to delete the files. Click OK. When the
Maintenance Complete window opens, click Finish. Click Exit
to quit the installation program.
30
Page 31

Installing AvidNet Transfer Tool Software
The AvidNet™ Transfer Tool is an application that allows you to
transfer media and files over a network. For information on using the
AvidNet Transfer Tool, see the AvidNet Transfer Tool User’s Guide,
available on the Avid Xpress DV Online Publications CD-ROM, and the
Avid Xpress DV Release Notes.
n
Before installing the AvidNet Transfer Tool, you should first install
Avid Xpress DV. The installer can find media drives already configured on
the system only if you install the AvidNet Transfer Tool after you install
Avid Xpress DV.
To install the AvidNet Transfer Tool software:
1. Quit all Windows NT applications.
2. Insert the Avid Xpress DV application CD-ROM into the CD-ROM
drive.
3. If the installation program doesn’t start automatically:
a. Double-click the My Computer icon.
b. Double-click your CD-ROM drive icon.
c. Double-click the Launch icon.
The opening window of the installer opens.
4. In the opening window, click Installers.
5. Click Install AvidNet.
6. In the Welcome window, click Next.
7. In the License Agreement window, read the agreement, and then
click Yes to accept the terms of the agreement.
8. In the Choose Destination Location window, accept the default
path for the application folder (on drive C) by clicking Next. The
default path is:
C:\Program Files\Avid\AvidNet
31
Page 32

If you have installed the AvidNet Transfer Tool previously, a
dialog box asks you if you want to uninstall files. Click Yes, and
then follow the on-screen instructions.
9. Select a media drive for Incoming Media Files and click Next.
10. Select a destination location for Incoming Files and click Next.
If you select a location on drive C, a message tells you that you
need to select an NTFS drive for compatibility with Macintosh
files. For compatibility, click No, select a drive other than drive C,
and click Next.
11. Select a destination location for Incoming Compositions and click
Next.
12. Select a directory in which to place the AvidNet log file and click
Next.
13. In the Enter Information window, leave the selection as No BWM
Server and click Next.
14. In the Start Copying Files window, review the current settings. If
you agree with those settings, click Next to copy the files.
15. Click Yes to view the ReadMe file when prompted in the Question
window, or click No to complete the setup.
16. In the Setup Complete window, click Yes to restart the computer,
and then click Finish.
32
Page 33

Installing EDL Manager
EDL Manager is an application that allows you to generate EDLs (edit
decision lists) from sequences exported from any Avid video-based
editing product. For information on using EDL Manager, see the
Avid EDL Manager User’s Guide, available on the Avid Xpress DV Online
Publications CD-ROM.
You can install EDL Manager on another computer. For example, you
might want to install EDL Manager on a portable computer that you
can take with you to an online suite, or on a computer located at the
online suite.
To install EDL Manager:
1. Quit all Windows NT applications.
2. Insert the Avid Xpress DV application CD-ROM into the CD-ROM
drive.
3. If the installation program doesn’t start automatically:
a. Double-click the My Computer icon.
b. Double-click your CD-ROM drive icon.
c. Double-click the Launch icon.
The opening window of the installer opens.
4. In the opening window, click Installers.
5. Click Install EDL Manager.
If you have previously installed EDL Manager, the Setup
Maintenance Program window opens. Follow the steps in
“Modifying, Repairing, or Removing Avid Xpress DV” on
page 29.
6. In the Welcome window, click Next.
33
Page 34

7. In the License Agreement window, read the agreement, and then
click Yes to accept the terms of the agreement.
8. In the Choose Destination Location window, accept the default
path for the application folder (on drive C) by clicking Next. The
default path is:
C:\Program Files\Avid\EDL Manager
9. In the Setup Type window, select Typical and click Next.
The installation proceeds and the Setup Complete window opens.
10. Do one of the following:
• To quit the installation procedure and start EDL Manager,
select Launch EDL Manager Now, and click Finish.
• To quit the installation procedure without starting
EDL Manager, deselect Launch EDL Manager Now,
and click Finish.
Creating an Emergency Repair Disk
Avid recommends that you update the emergency repair disk (ERD)
each time you add or change hardware or software to your system.
The ERD is a floppy disk that contains the latest information about
your system configuration. It is needed in case your system is
damaged and you need to rebuild your system from scratch. If you
have a problem, search for Emergency Repair Disk in the Windows NT
Help.
34
Page 35

To create a repair disk:
1. Start Windows NT 4.0 and log in to an account with
administrative privileges. If you do not have administrative
privileges, see your system administrator to get privileges.
2. Click the Start button and select Run. The Run window opens.
3. Type rdisk /s and press the Enter key.
4. Follow the instructions to create a repair disk.
Store the emergency repair disk in a safe, dry, static-free location.
Installing the Avid Xpress DV Tutorial Files
The Avid Xpress DV Tutorial CD-ROMs contain all the files you need
for the tutorial chapters of this guide, including DV media that is
ready for you to use. The tutorial files are shipped on two CD-ROMs,
in either NTSC or PAL format.
You will need approximately 1 GB of free space available on a media
drive. It takes approximately 10 minutes to complete the installation
program.
To install the tutorial files:
1. Quit all Windows NT applications.
2. Insert Avid Xpress DV Tutorial CD 1 into the CD-ROM drive.
If the installer doesn’t start automatically after you insert the
application CD-ROM, do the following:
a. Double-click the My Computer icon.
b. Double-click the CD-ROM to open it.
c. Double-click the Launch icon to start the installer.
The opening window of the installer opens.
35
Page 36

3. In the opening window, click Installers.
4. Click Install Tutorial.
5. In the Welcome window, click Next.
6. In the Choose Destination Location window, accept the default
path and click Next.
This path should add the Avid Projects folder to the path you
selected for application data when you installed Avid Xpress DV.
See “Installing Avid Xpress DV Software” on page 24.
7. In the Select a Drive window, select a drive for the tutorial media
and click Next.
The installation begins. When the installation is finished for CD 1,
a message asks you to insert Avid Xpress DV Tutorial CD 2 into
the CD-ROM drive.
8. Insert CD 2 into the CD-ROM drive and click OK.
9. When the installation is complete, the Setup Complete window
opens. Click Finish.
10. Click Exit to quit the installation program.
The installation program copies the following folders to your system:
• Introducing Avid folder: This folder contains the project and bins
you need for the tutorial and is copied into the Avid Projects folder
on your hard drive.
• OMFI MediaFiles folder: This folder contains the media files you
need for the tutorial and is copied to a media drive.
36
Page 37

Turning Off Your Equipment
When you are finished using your system and want to turn it off
completely, follow these steps to avoid damaging your computer or
media storage drives. Make sure to quit Avid Xpress DV before
turning off your equipment. See “Closing the Project and Quitting
the Application” on page 68.
To turn off your equipment:
1. Choose Shut Down from the Start menu.The Shut Down Windows
dialog box appears.
2. Select the Shut down the computer option and click Yes.
3. When the system displays a message telling you it is safe to turn
off your computer, press the Power button on the computer.
4. Turn off your speakers and monitors.
5. Turn off each external media drive.
6. Turn off all other hardware.
c
Never remove external media drives from your Avid Xpress DV
system when it is turned on. Shut down the computer before you
move drives.
37
Page 38

CHAPTER 2
About Avid Xpress DV
This chapter explains the basic concepts and terminology that you
need to be familiar with to edit video with Avid Xpress DV. These
concepts include:
• About DV
• Nonlinear Editing with Avid Xpress DV
• Avid Xpress DV Terms and Concepts
• The Avid Xpress DV File System
• Project Workflow
38
Page 39

About DV
The initials DV in the product name Avid Xpress DV stand for digital
video. More specifically, they refer to digital video that is transferred
through equipment conforming to IEEE Standard 1394. This
equipment (cameras, video and audio decks, cables, connectors, and
processing boards) is sometimes referred to as FireWire
DV connections let you transfer digital data (both video and audio)
directly from a DV camera to a digital, nonlinear editing system with
no conversion losses. DV technology simplifies the process of bringing
footage from your camera into your Avid Xpress DV system, and gives
you high-quality video at low cost.
Nonlinear Editing with Avid Xpress DV
In traditional video editing, you electronically copy (dub) video and
audio footage from a source tape to a master tape. This process is
tedious, however, and it is difficult to make changes to your work.
By contrast, when you edit with Avid Xpress DV, you don’t have to
dub footage onto a master tape. Instead, you manipulate Avid Xpress
DV clips, which are segments of the media that contain pointers to
your digital audio and video files. Avid Xpress DV allows you to
experiment with every edit you make. You can trim, move, delete,
duplicate, or modify individual frames or entire segments, and
immediately see the results. This type of editing is called nonlinear
because you are not limited by the traditional video editing need to
dub one shot after another.
®
or I-Link™.
39
Page 40

Avid Xpress DV Terms and Concepts
This section explains the following terms and concepts to help you
understand the Avid Xpress DV editing process:
• Media Files
• Clips
• Subclips
• Sequences
• Bins
• Projects
• The Attic Folder
• Programs
Media Files
Media files store source
material.
n
When you record source material from a camera or deck, or when you
import computer graphic files into your Avid Xpress DV project, the
material is saved in media files on your system’s media drive or drives.
One media file is created for each track of video or audio. For a video
with a stereo sound track, three media files are created: one track of
video and two tracks of audio. Media files are stored in the OMFI
MediaFiles folder; and each media drive has its own OMFI MediaFiles
folder.
Even though your media files contain the actual source material for the
program, you never manipulate the media files directly. Instead, you move,
copy, and edit clips, subclips, and sequences, which are pointers to the media
files.
40
Page 41

Clips
Clips point to media
files.
When you record media, Avid Xpress DV creates another file, called a
master clip, on your system’s internal drive. The master clip is simply a
pointer to its corresponding media file, which is located in the OMFI
MediaFiles folder on a media drive. A media drive can be inside the
computer (an internal media drive) or outside the computer (an external
media drive).
Master clip
OMFI
MediaFiles
Media drive
Video deck
While editing your video, you create other clips, such as graphic clips
and effects clips. You make your edits by modifying clips, and the
corresponding media files remain unchanged. This feature allows you
to easily create and undo edits without destroying your original
material.
Subclips
Subclips are sections
that you mark within
clips.
Because you work with clips instead of media files, you can create
virtually unlimited versions of a program without creating multiple
copies of the source material, which is stored in extremely large files.
Subclips are sections of clips that you want to use in your program. You
create a subclip by marking IN (start) and OUT (end) points in a clip,
41
Page 42

pressing and holding the Alt key, and dragging the clip to the bin. The
subclip is composed of the material between the IN and OUT points.
c
Sequences
A sequence is a
program created from
one or more clips and
subclips.
A subclip points to a media file’s master clip. You must not delete
the master clip from which a subclip was created. If you delete the
master clip, you will lose the information in the subclip.
Master
clip
Subclip
You can join different clips and subclips to create a sequence. A
sequence can include edited material from master clips and subclips,
new clips created when you add effects during the editing process,
and material from other sequences.
IN point OUT point
Subclip
Handle
Handle
Master clip
Sequence
Sequence
42
Page 43

A sequence is composed of marked material from clips, subclips, and
other sequences. The material outside the IN and OUT points remains
in the media file’s master clip. These segments of material are called
handles. Handles are important; you need them to trim cuts and create
transition effects between segments. For more information about
trimming cuts, see “Trimming” on page 127. For more information
about transition effects, see “Effects Editing” on page 137.
Like clips and subclips, a sequence contains pointers to media files,
which are stored in the OMFI MediaFiles folder. If you delete a clip
used to create a sequence, the sequence still displays the media,
because the sequence contains its own pointers to the media files.
Sequence
Bins
You organize your
footage in bins.
Projects
A project consists of one
or more bins.You edit
within a project.
Clip
Subclip
OMFI
MediaFiles
Clips, subclips, and sequences are organized and stored in bins.
Traditionally, a bin is a place where film editors store reels of film. In
Avid Xpress DV, bins represent a database for organizing the material
for a project.
You gather the material you need to create a program in a project. Each
project contains information about bins, clips, subclips, sequences, and
the program in the Timeline. You might have several projects on your
system, but you can work on only one project at a time.
43
Page 44

The Attic Folder
For a complete
description of retriev ing
bins from the Attic
folder, see the Avid
Xpress DV User’s Guide
or Help.
Programs
Avid Xpress DV saves copies of your current project and its bins at
regular intervals and whenever you save or close a project or bin.
These auto-save files are stored in the Attic folder at the top level of the
internal hard drive. If you lose work due to a power outage or system
error, open the Attic folder and look for a project or bin of the same
name with the file name extension.bakxx, where xx is the version
number. For example, the first backup file for the bin Rough Cut
would be named Rough Cut.bak01. Later versions would be named
Rough Cut.bak02, Rough Cut.bak03, and so on.
A program consists of one or more sequences. You can use clips,
subclips, and sequences to build a program. A program is your final
creation; you can output your program to tape, CD-ROM, or the Web
when you are finished.
44
Page 45

The Avid Xpress DV File System
The following illustration shows the different kinds of Avid Xpress DV
files and where they are stored. The Avid Xpress DV application folder
is stored on your computer’s internal hard drive. The Avid Projects
folder is also stored on an internal drive; the location varies,
depending on your installation. An OMFI MediaFiles folder is stored
on each media drive. Media files must be stored on a separate, Avidapproved media drive that is guaranteed to be fast enough to support
video playback.
For complete
information about
folders and files, see the
Avid Xpress DV User’s
Guide or Help.
Media drive
OMFI
MediaFiles
Help
Avid
Xpress DV
Avid Xpress DVSettings
Supporting
Avid
Projects
Project
Project
Bin A Bin B
Files
45
Page 46

Project Workflow
The following sections illustrate the four stages of a typical
Avid Xpress DV project: starting a project, preparing to edit, editing a
sequence, and generating output.
Complete procedures for each stage are included in the printed
manuals, online books, and Help.
46
Page 47

Starting a Project
Starting a project involves the following steps:
1. Turn on your
equipment in the
correct order and start
the software. (Speakers
and external media
drives are optional.)
2. Select or create a new
user and project: the job
that will result in one or
more finished sequences.
1. Turn on and start your Avid system.
2. Select or create a user and project.
3. Create and organize
bins.
4. Back up your project
on a regular basis.
3. Create and organize bins.
4. Back up the project.
47
Page 48

Preparing to Edit
1. (Optional) Import
your log files into the
bins, or log the material
manually.
2. Record your DV
footage, creating media
files and master clips.
3. Work with bins and
clips to organize your
source material for easy
access during editing.
Preparing to edit involves the following steps:
1. (Option) Import shot logs into the bin.
2. Record footage, creating
master clips and media files.
4. (Optional) Build a
storyboard to begin
previsualizing your
final cut before editing.
3. Sort and organize clips in the bins.
4. Previsualize with storyboards.
48
Page 49

Editing a Sequence
Editing a sequence involves the following steps:
1. View your clips in
advance and mark IN
points and OUT points,
or create subclips based
on selected portions of
your master clips.
1. Screen, mark, and subcatalog footage.
5. Screen and
continue editing
as necessary.
2. Build your sequence
using editing controls
with the Timeline,
Source pop-up
monitors, and the
Composer monitor.
3. Fine-tune your edits
and effects by using
functions of the various
edit modes, such as
Segment mode, Trim
mode, and Effect mode.
4. Adjust and mix
multiple audio tracks
and prepare for final
playback or output,
using the Audio tool and
Audio Mix tool.
5. Return to editing if
further adjustments are
required.
Composer
monitor
2. Edit with Timeline and monitors.
3. Fine-tune edits and effects.
Source
pop-up
monitor
Timeline
49
4. Fine-tune audio pan, volume, and EQ.
Page 50

Generating Output
Generating various forms of output based on your sequence involves
selecting among several options:
Export material for
audio sweetening or
graphics enhancement
in a third-party
application, for
incorporating into a
multimedia project, or
for publishing on the
Internet.
Export material for additional processing,
for incorporating into a multimedia project,
or for publishing on the Internet.
Record the final
sequence to tape as a
digital cut.
Generate an EDL for
online videotape
editing.
50
V
D
Record a digital cut directly to tape.
Generate an EDL for online
videotape editing.
Page 51

CHAPTER 3
Learning How to Use
Avid Xpress DV
This chapter explains the different resources that can help you learn
how to use your Avid Xpress DV system. This chapter contains the
following sections:
• Using the Tutorial
• Using Help
• Using Online Documentation
• Tips and Other Resources
51
Page 52

Using the Tutorial
The self-paced tutorial chapters in this guide are designed as guided
Avid editing sessions, using the basic features of the Avid system. In
this tutorial, you’re going to edit a 1-minute sequence about Avid
Technology, Inc. This sequence is typical of a short piece you might
create for your own organization. You can publish the sequence on
tape or CD-ROM, or stream it across the Internet.
The footage for the sequence is supplied on the Avid Xpress DV
Tutorial CD-ROMs that came with your system. This footage is DV
media that has already been recorded and is ready for you to use.
Footage is supplied in either NTSC or PAL format, which is indicated
on the CD-ROMs.
This tutorial does not cover the process of recording video and audio
from a camera or video deck. You can find instructions for recording in
the Avid Xpress DV User’s Guide and Help.
Before you begin, make sure you have installed the tutorial media and
project files (see “Installing the Avid Xpress DV Tutorial Files” on
page 35).
Depending on your level of expertise in editing on Avid systems, you
can choose to work through the tutorial in either of two ways.
• If you have no experience with Avid Xpress DV or other Avid
systems, you should go through the entire tutorial.
• If you have used other Avid systems, you might want to read
certain chapters to understand the specific features of Avid Xpress
DV and complete the tutorial tasks in that chapter. For most
chapters, you can load a sequence that includes the work done up
to that point.
You can create a short sequence in 5 minutes (see “Creating a Simple
Sequence” on page 62). Completing the entire tutorial can take from
3 to 4 hours.
52
Page 53

Using Help
Avid Xpress DV has a comprehensive Help system that includes all
information contained in the Avid Xpress DV User’s Guide, and most of
the information contained in the Avid Xpress DV Effects Guide. In
addition, you can get information on windows, dialog boxes, and
screen objects by pressing the F1 key or clicking the right mouse
button.
Opening and Closing the Help System
The Help system is also
included on the
Avid Xpress DV Online
Publications CD-ROM.
To open the Help system, choose Avid Xpress DV Help from the Help
menu. The Help Topics dialog box appears. Use the Contents, Index,
and Find tabs to access the information you need.
These tabs work the same way as most Windows Help systems. For
more information, see the section “Using Help” in the Help system or
click the Question Mark button in the title bar of the Help Topics
dialog box.
To close the Help system, click the Close button in each Help window.
The Help system automatically closes when you close the last open
Help window.
Getting Help for Windows and Dialog Boxes
The Help system provides you with context-sensitive Help for
windows and dialog boxes, such as tools and settings.
To get Help for windows and dialog boxes:
1. Make sure the Avid application is active.
2. Position the mouse pointer in the window or dialog box for which
you want Help.
3. Press the F1 key on the keyboard.
53
Page 54

n
If there is no information about a window or dialog box, the Help Topics
dialog box appears.
Getting Help for Screen Objects
You can use What’s This? Help to find out about buttons and other
screen objects.
To get Help for screen objects:
1. Using the right mouse button, click on the screen object (for
example, a button).
A pop-up menu appears.
2. Choose What’s This? from the menu.
A pop-up window opens with an explanation of how you use the
item.
n
If you press the F1 key when the mouse pointer is on a button or other screen
object, you get Help for the window or dialog box, not for the button or other
screen object.
Printing Help Topics
You can print a single Help topic or a group of topics listed in the
Contents.
To print a Help topic:
1. Open or click the topic to make it active.
2. Click the Print button in the topic window.
3. Select the print options.
4. Click OK.
54
Page 55

To print a Help topic from the Contents tab:
1. Select the topic you want to print.
2. Click the Print button at the bottom of the tab.
To print a book of related topics from the Contents tab:
1. Select the book you want to print.
2. Click the Print button.
If you select a book, all topics within that book, and all topics in other
books contained in that book, will be printed. The system sends each
topic as a separate print job to the printer; therefore, printing can take
a long time. You can more easily print large sections of user
information from the Avid Xpress DV Online Publications CD-ROM.
You can print a pop-up window by clicking the right mouse button
and selecting Print.
Using Online Documentation
The Avid Xpress DV Online Publications CD-ROM includes:
• Avid Xpress DV User’s Guide
• Avid Xpress DV Effects Guide
• Avid Xpress DV Getting Started Guide (this book)
• Avid Xpress DV Help
The books are PDF files. You can view them with the
Adobe Acrobat
Reader, which you can install from the CD-ROM.
55
Page 56

These online books enable you to:
• Navigate by using bookmarks and hyperlinks.
• Speed up information retrieval by performing keyword searches.
• Annotate the books with your own notes.
• Zoom in on a page, enabling closer review of text and images.
• Print any or all pages.
• View the books with full-color graphics.
• View movies that illustrate Avid Xpress DV effects.
n
Avid gives you permission to print up to three complete copies of each book.
Tips and Other Resources
The following are a few tips for taking full advantage of the
Avid Xpress DV documentation and other resources:
• Complete the tutorial chapters in this guide before starting a
project.
• Begin learning about basic procedures by using the default
settings. As your confidence increases, explore additional
procedures and settings.
• Instead of using the standard menus to find the command you
need in a window, try using shortcut menus. Using the right
mouse button, click on a window to open a shortcut menu that
shows the most frequently used commands for that window.
• Keep the Avid Xpress DV Quick Reference available during editing
sessions.
• Read Avid’s newsletters, mailings, and other trade publications.
56
Page 57

• Make use of additional training resources provided by Avid
whenever possible, such as classes and instructional videotapes.
For more information, contact Avid at 800-867-2843.
• Check the following Avid Web site for listings of courses,
schedules, and locations:
www.avid.com/services/training/training.html
57
Page 58

CHAPTER 4
Starting a Project and Creating a Simple Sequence
This chapter begins the tutorial section of this guide. In this chapter
you’ll practice the following tasks:
• Starting Avid Xpress DV
• Using the Open Project Dialog Box
• Creating a Simple Sequence
• Closing the Project and Quitting the Application
Before starting this chapter, make sure you have installed the tutorial
files (see “Installing the Avid Xpress DV Tutorial Files” on page 35).
58
Page 59

Starting Avid Xpress DV
You can create a
shortcut on the desktop
and start the
application by doubleclicking the icon. See
your Windows NT
documentation.
You start the Avid Xpress DV application the same way you start most
Windows applications.
1. Click the Start button.
2. Point to Programs, point to Avid, and select Avid Xpress DV.
The first few times you start Avid Xpress DV, a window opens that
contains the License Agreement.
3. To accept your Avid Xpress DV product license electronically:
a. Read the License Agreement, and then click the Accept button
or the Decline button at the bottom of the screen.
The agreement appears the first several times you start
Avid Xpress DV. After several starts, a new button appears at
the bottom of the screen labeled Accept and Don’t Show
Again.
b. If you don’t want to see the License Agreement again, click the
Accept and Don’t Show Again button.
A dialog box appears.
c. Enter the name of your organization in the dialog box, and
click OK.
After you accept the License Agreement, the Open Project dialog
box appears. If you are the first user on the system, the Open
Project dialog box appears as shown in the following illustration.
59
Page 60

For this tutorial, you will use the project called either Introducing
Avid (NTSC) or Introducing Avid (PAL).
Using the Open Project Dialog Box
To open a project, you select a user and a project from the Open Project
dialog box. You also use this dialog box to create a new user or a new
project.
Creating a User
For this tutorial, create a new user.
1. Click the New User button in the Open Project dialog box.
The New User dialog box appears.
60
Page 61

By default, the Windows NT login name appears.
2. Delete the default name, type your name, and click OK.
The Open Project dialog box reappears with your name
highlighted in the list of Avid Users.
Selecting and Opening a Project
For this tutorial, we’ve already created a project for you.
1. Select Introducing Avid (NTSC) or Introducing Avid (PAL) from
the Avid Projects list.
2. Click OK.
The Project window opens.
61
Page 62

Look at the title bar of the window. It contains the name of the project
and the name of the user. In this example, the user is named Editor.
Your project window will contain your user name.
Two other windows appear: the Composer window and the Timeline
window. You’ll learn about these windows in Chapter 6.
Creating a Simple Sequence
Before continuing further in the tutorial, you can create a simple
sequence right away. A sequence is a program made up of one or more
clips (see “Sequences” on page 42). These steps will get you started
quickly; you’ll find more thorough instructions and explanations later
in the tutorial.
The sequence uses footage from the Introducing Avid project that you
just opened. The following illustration shows the Project window.
Source Clips bin
62
Page 63

Editor at keyboard clip
Follow these steps to create a sequence:
1. In the Project window, open the Source Clips bin by doubleclicking the bin icon.
The Source Clips Bin window opens and displays a list of clips.
2. From the list of clips, double-click the icon for the Editor at
keyboard clip.
The Editor at keyboard clip opens in a window. This window is
known as a Source pop-up monitor.
63
Page 64

Mark Clip button
3. Click the Mark Clip button, which is located at the bottom of the
Source pop-up monitor.
IN and OUT points appear at the beginning and end of the clip,
which indicate that the entire clip will be edited into the sequence.
IN point
OUT point
64
Page 65

4. Click the image area of the Source pop-up monitor and drag it
anywhere in the Timeline window.
n
If you have more than one bin open, a dialog box appears and asks you to
select a bin in which to store the sequence. Select Source Clips.
Congratulations! You’ve just created your first sequence. The clip
appears in the Timeline and in the Composer monitor.
Position indicator
Notice the vertical blue line at the end of the Timeline.This line is
called the position indicator. The position indicator is parked on the
65
Page 66

last frame of the sequence, so this frame is the one displayed in the
Composer monitor.
5. Now add some music to the sequence.
a. In the Source Clips bin, double-click the icon for the Music
track clip.
The clip opens in a Source pop-up monitor. There is no image
because the clip has only audio.
b. Click the image area and drag the clip to audio track A1 in the
Timeline. Drag the clip so that the A1 track is outlined, as
shown in the following illustration, and then release the
mouse button.
If you make a mistake,
choose Undo from the
Edit menu to undo your
last action.
Drag the position indicator here.
6. In the Timeline, make sure the position indicator is at the
beginning of the sequence. If not, drag the position indicator as far
as you can to the left.
66
Page 67

7. Click the Play button below the Composer monitor to review your
sequence.
Play button
Press the Play button again to stop playing the sequence at any
time.
Now look in the Source Clips bin. The sequence is saved in the bin
with the name Untitled Sequence.01. Delete the sequence. You’ll
create a new one in Chapter 6.
8. In the Source Clips bin, click the Untitled Sequence.01 icon and
press the Delete key on the keyboard.
The Delete dialog box appears.
67
Page 68

9. Click OK.
Close button
You’ve deleted the sequence, but not the source footage.
10. Close the Source Clips bin by clicking the Close button in the
upper right corner of the window.
Next Steps
You’ve finished this chapter of the tutorial. You can either:
• Close the project and application and continue the tutorial at a
later time.
• Continue on to the next chapter.
Closing the Project and Quitting the Application
To close the project and
quit the application
immediately, choose
Exit from the File menu
or click the Close button
in the Avid Xpress DV
title bar.
If you want to close the project and quit the application:
1. Click the Project window to activate it, and then click the Close
button.
The system saves and closes the project. The Open Project dialog
box appears.
2. Click Quit.
A dialog box appears and asks if you want to quit the application.
3. Click Leave.
The application quits and you see the Windows NT desktop.
The next time you open the project, choose your user name and project
name, and resume the tutorial with the next section.
68
Page 69

CHAPTER 5
Playing and Marking Clips
In Chapter 4 you learned how to start a project. In this chapter you’ll
practice the following tasks:
• Exploring the Project Window
• Opening a Bin
• Viewing Clips
• Playing Clips in a Source Pop-up Monitor
• Marking IN and OUT Points
• Playing a Sequence in a Source Pop-up Monitor
• Using Timecode to Find a Frame
• Creating Subclips
• Clearing IN Points and OUT Points
• Saving Your Work
If you have worked on the previous chapters but have quit
Avid Xpress DV — Start the application, choose your user name and
the Introducing Avid project, and then click OK.
If you have not worked on the previous chapters — Start the
application, create a new user, choose the Introducing Avid project,
and then click OK.
69
Page 70

Exploring the Project Window
Click in the Project
window and press the
F1 key to open Help for
the Project window.
n
The Project window must remain open whenever you are working in
Avid Xpress DV. Depending on the button you click, the Project
window displays a list of bins, a list of settings, or information about
your system.
If the Project window becomes hidden by other windows, bring it forward by
choosing Project from the Tools menu.
The Bins Display
The Bins display lists the bins, or storage areas, created to hold your
clips and sequences (you’ll learn more about bins later in this chapter).
For the Introducing Avid project, we’ve supplied you with three bins:
• QuickTime Movies
• Sequences
• Source Clips
70
Page 71

The Settings Display
Click the Settings button at the top of the Project window. A list of
settings appears. This list is called the Settings scroll list. Settings are
groups of options you can select, depending on your needs and
preferences.
The right column
displays the type of
setting. User settings
are associated with the
current user, and Project
settings are associated
with the project. For
more information, see
the Avid Xpress DV
User’s Guide or press F1
for Help.
Especially important for Avid Xpress DV are the Video Display
settings. Check the settings now.
1. Scroll down the list of settings and double-click Video Display.
The Video Display Settings dialog box appears.
71
Page 72

For information on
connecting a camera
and Client monitor, see
Appendix A.
The top part of the dialog box gives you a choice for how to
display video on your desktop.
2. If you have a Client monitor (a separate monitor that displays
NTSC or PAL video) and camera attached to your system, select
the following options:
• DV camera supports digital video input
• External video (client monitor enabled)
• External Video Source (S-Video or Composite, depending on
the connection between your camera and the capture board.
72
Page 73

The Info Display
Fast Menu button
To learn more about these options, see the Avid Xpress DV User’s
Guide or press the F1 key for Help. All Settings dialog boxes have
context-sensitive Help.
3. Click OK to close the Video Display Settings dialog box.
Click the Info button at the top of the Project window. You see the
format of the project (NTSC or PAL). You can get information about
your system by clicking the Fast Menu button in the lower left corner
of the screen, and then choosing Profile, Memory, or Hardware from
the pop-up menu.
Click the Bins button to return to the Bins display.
Opening a Bin
The term bin comes from film editing and refers to a container for
holding film clips (see “Bins” on page 43).
Let’s open a bin now. In the list of bins in the Project window,
double-click the Source Clips icon. The Source Clips bin opens.
Most of the clips you’ll use in your sequence are displayed in this bin.
73
Page 74

Name heading
Frame View
button
Viewing Clips
Using Text View
Text View
button
You can view the information in a bin in two different ways:
• Text view displays columns of information about your clips.
• Frame view displays each clip as a single representative image.
Let’s look at Text view.
1. Click the Text View button (T) in the lower left corner of the bin.
If the button is highlighted, you are already in Text view.
The bin displays columns of information about each clip. For
explanations of these columns, see the Avid Xpress DV User’s Guide
or press the F1 key for Help.
74
Page 75

2. Click the Name heading in the bin.
3. Choose Sort from the Bin menu.
Using Frame View
Now let’s look at Frame view.
1. Click the Frame View button (F) in the lower left corner to see a
You can rearrange the clips in the bin by sorting on a particular
column. Let’s sort alphabetically by clip name.
The clip names are rearranged in alphabetical order.
picture-frame representation of each clip in the bin.
n
The order of clips is different from the order in Text view. You can rearrange
clips in either view independently of the other.
You can change the size of the frames if you want.
2. Choose Reduce Frame or Enlarge Frame from the Edit menu.
75
Page 76

To change frame size at the keyboard, you can also press Ctrl+K
(Reduce Frame) and Ctrl+L (Enlarge Frame).
3. Choose Fill Window from the Bin menu.
The clips are arranged in neat rows and columns in the bin.
4. If some clips are now off the screen, click and drag the window
corner in the lower right corner of the Source Clips bin.
Switching Between Views
It’s easy to switch between views: click the T button for Text view and
the F button for Frame view. For this tutorial, you can use whichever
view you prefer, except when performing a storyboard edit (see
“Storyboard Editing the Clips” on page 117).
Playing Clips in a Source Pop-up Monitor
A Source pop-up monitor is a window in which you play the clips for
your project. You can play clips in three different ways:
• Using the keyboard
• Using the buttons on the screen, below the Source pop-up monitor
• Using the blue position indicator (the “blue bar”)
In this section you’ll try different ways to play clips. As you edit, use
the ones you prefer.
Using the Keyboard to Play Clips
Your system is shipped
with a set of labels that
you can place on the
keys of your keyboard.
The keyboard for your Avid system includes many special control
keys, as shown in the following illustration.
76
Page 77

Stop key
Play/Step/Shuttle keysStep keys
End key
Home key
This illustration shows the U.S. English keyboard. For layouts of other
keyboards, choose Keyboard from the Settings scroll list.
In this section you’ll experiment with different ways to play clips.
1. In the Source Clips bin, open the clip named Editor at keyboard
by double-clicking the icon (in Text view) or anywhere in the
image (in Frame view).
The Editor at keyboard clip appears in a Source pop-up monitor.
77
Page 78

2. Press the Home key (between the main keyboard and the numeric
keypad) to move the position indicator to the start of the clip.
3. Press the End key, just below the Home key, to go to the end of the
clip. The blue position indicator moves to match your directions.
4. Press the Home key again to go to the start of the clip.
5. Press the L key (Play) on the keyboard to play the clip forward at
normal speed.
There is no audio for the Editor at keyboard clip.
n
The small size of the Source pop-up monitor might cause the footage to look
jerky. The footage will look smoother in the Composer monitor and the Client
monitor.
6. Press the space bar on the keyboard to stop playback at any point.
7. Press the L key again to play the clip forward at normal speed.
Press the key repeatedly to play the clip forward at 60, 90, 150, and
240 frames per second (NTSC) or 50, 75, 125, and 200 frames per
second (PAL).
8. Press the J key (Reverse Play) on the keyboard to play the clip
backward at normal speed. Press the key repeatedly to play the
clip backward at 60, 90, 150, and 240 frames per second (NTSC) or
50, 75, 125, and 200 frames per second (PAL).
9. Press the K key (Pause) on the keyboard to pause playback.
10. To move forward or backward at slow speed, press and hold the K
key while you press and hold the L or J keys.
11. Use the 1, 2, 3, and 4 keys to step through the footage forward or
backward in 1-frame or 10-frame increments.
78
Page 79

Step 1
Frame Backward
Step 1
Frame Forward
Step 10
Frames Backward
Step 10
Frames Forward
Using Buttons and the Position Indicator to Play Clips
Two additional ways to play clips are:
• Clicking buttons that appear under a Source pop-up monitor
• Dragging the blue position indicator through the position bar to
scroll through a clip
Position indicator
Position
bar
Step Step
Backward Forward
Now play through the Editor at keyboard clip by using buttons and
the position indicator.
1. Click the Play button under the Source pop-up monitor.
Play
To step forward or
backward 10 frames,
hold the Alt key while
you click the Step
Forward or Step
Backward
button.
2. Click the Play button again to stop playback at any point.
3. Step through the footage forward or backward in 1-frame
increments by using the Step Forward and Step Backward buttons
under the Source pop-up monitor.
4. Locate the blue position indicator in the position bar in the Source
pop-up monitor.
79
Page 80

To step several frames
forward, click just to the
right of the position
indicator.
5. Click to the left of the position indicator to step several frames
back in the clip.
6. Step through the clip by clicking different spots in the position bar.
7. Drag the position indicator to the left, then to the right, to scroll
through the clip.
Marking IN and OUT Points
Before you start to create your sequence, you need to mark the
segments of the clips you want to use. In this section you’ll mark
IN and OUT points for some clips you’ll use later to build your
sequence. You’ll also learn how to use timecode and frame offset to
locate IN and OUT points.
n
The instructions in this section use the keyboard to mark IN and OUT points,
but you can also click the equivalent buttons below the Source pop-up
monitor.
Marking the First Clip
Let’s mark IN and OUT points for the Editor at keyboard clip.
1. Go to the head (start) of the clip by pressing the Home key. Then
use the Step Forward and Step Backward (3 and 4) keys to locate
the frame where the letter A begins to appear on the monitor
screen.
80
Page 81

Your clip might already have IN and OUT points. Your new edit
points will overwrite the old edit points.
2. Mark an IN point by pressing the Mark IN (I) key.
A white sawtooth pattern appears on the left edge of the frame.
3. Drag the position indicator toward the end of the clip, where the
explosion appears on two monitors, and before it fades away.
81
Page 82

4. Mark an OUT point by pressing the Mark OUT (O) key.
A white sawtooth pattern appears on the right edge of the frame.
The system saves your IN and OUT points until you change them.
5. Close the Editor at keyboard clip by clicking the Close button.
The system automatically saves your IN and OUT points.
82
Page 83

Marking Another Clip
Now mark the IN and OUT points for the Eyeball clip. This time,
instead of using the Step keys, use the J-K-L keys to play the clip.
1. Open the Eyeball clip.
n
In this tutorial, “open a clip” means to double-click its icon in a bin, so that it
opens in a Source pop-up monitor.
2. Locate the frame where the letter A of the word Avid appears in
the pupil of the eyeball (after the second blink). Press and hold the
K key and press the L key to go forward or the J key to go
backward in slow motion.
Use the 3 and 4 keys to locate the precise frame.
3. Mark an IN point by pressing the I key.
4. Step forward a few frames after the D appears.
83
Page 84

5. Mark an OUT point by pressing the O key.
6. Close the Eyeball clip.
Playing a Sequence in a Source Pop-up Monitor
So far you have played clips in Source pop-up monitors. You can also
play a sequence (a program made up of one or more clips) in a Source
pop-up monitor.
You might be curious to see what your final sequence will look like.
We have supplied a finished sequence for you. To play it:
1. Click the Project window to display and activate it.
The Project window might be hidden behind the Source Clips bin.
You can choose Project from the Tools menu to bring the window
forward.
2. Open the Sequences bin.
3. Open the Introducing Avid sequence.
84
Page 85

4. Press the Home key to go to the beginning of the sequence. Play
the sequence in the Source pop-up monitor, using the keyboard or
buttons, or a combination of both.
5. Close the Introducing Avid sequence.
6. Close the Sequences bin.
Using Timecode to Find a Frame
Your Avid Xpress DV system uses timecode to identify each frame of a
clip.
About Timecode
Timecode is an electronic indexing method that denotes hours,
minutes, seconds, and frames that have elapsed on a videotape. For
example, a timecode of 01:03:30:10 denotes a frame that is marked at
1 hour, 3 minutes, 30 seconds, and 10 frames.
NTSC video (the video format used mainly in the United States) uses
one of two formats: drop-frame timecode and non-drop-frame timecode.
Drop-frame timecode is designed to match the NTSC scan rate of 29.97
frames per second (fps). Two frames of timecode are dropped every
minute except for the tenth minute. No video frames are actually
dropped. Drop-frame timecode is indicated by semicolons between
the digits; for example, 01;00;00;00. DV cameras that use the NTSC
format use drop-frame timecode.
Non-drop-frame timecode tracks NTSC video at a rate of 30 fps and is
indicated by colons between the digits; for example, 01:00:00:00. Nondrop-frame timecode can be easier to work with, but does not provide
accurate timing for NTSC broadcast.
85
Page 86

PAL video (the video format used in many countries other than the
United States) uses a scan rate of 25 fps. Timecode is indicated by
colons. There is no need for drop-frame timecode in PAL video.
You can change the starting timecode of a sequence or, for NTSC
projects, the type of timecode. See “Changing the Timecode of the
Sequence” on page 180 and the Avid Xpress DV User’s Guide.
Using Timecode to Mark IN and OUT Points
You can mark IN and OUT points by using timecode as your reference
point. If you know the timecode for the frame you want to mark, you
can go to that frame instantly by typing it on the numeric keypad.
In this section, you’ll use timecode to reach a specific location. First,
you need to display the appropriate timecode information in the
Tracking Information display.
1. Open the Hand and keyboard clip.
2. Place the pointer in the gray title bar area over the Tracking
Information display, until the pointer changes to a downward
arrow.
Tracking Information display
3. When the pointer changes to a downward arrow, click to display
the Tracking Information pop-up menu, and then choose TC, V1
(timecode for track Video 1) from the menu. A check mark means
it is selected.
86
Page 87

For information about
the other choices in the
Tracking Information
menu, see the
Avid Xpress DV User’s
Guide or place the
pointer over the
Tracking Information
display, click the right
mouse button, and
choose What’s This?
Timecode shows the following:
Hours
Minutes
Seconds
Frames
The timecode refers to the frame displayed in the Source pop-up
monitor.
n
After you change the display for one Source pop-up monitor, all subsequent
Source pop-up monitors you open use the same display.
4. Use the Play and Step buttons to locate the frame with the
timecode 01:08:14:18 (NTSC) or 00:01:42:23 (PAL). Look for the
number in the Tracking Information display.
5. Click the Mark IN button.
6. Let’s use 2 seconds of this clip. You can determine the OUT point
by adding 2 seconds to the timecode of the IN point, as shown in
the following examples:
01:08:14:18 (NTSC)
+ 2:00
01:08:16:18
or
00:01:42:23 (PAL)
+ 2:00
00:01:44:23
Because Avid Xpress DV counts the frame it is parked on, you will
actually mark one frame more than 2 seconds.
7. Type 01:08:16:18 (NTSC) or 00:01:44:23 (PAL) on the
numeric keypad.
87
Page 88

n
You don’t need to type zeros that start the timecode. In addition, the system
inserts the colons for you. So you only need to type 1081618
14423 (PAL). This guide provides the complete timecode, but you can use
these shortcuts to type the numbers.
As you start typing, a window opens in the middle of the Source
pop-up monitor, showing the numbers you type.
(NTSC) or
Tracking Information
display
Timecode
entered
n
8. Press the Enter key on the numeric keypad. The position indicator
locates the specified frame.
The Timecode window displays the current number.
To locate frames by using timecode and the numeric keypad, you must show
timecode in the Tracking Information display. For example, the display must
show track V1 to go to a specific frame on the V1 track.
9. Click the Mark OUT button.
10. Close the Hand and keyboard clip.
88
Page 89

Using Frame Offset
Whenever you use the
numeric keypad, you
must press the Enter
key on the numeric
keypad after typing the
number.
If you want to move
back a certain number
of frames, type a minus
sign (–) instead of a
plus sign (+) in front of
the number.
You can also use the numeric keypad to move the position indicator
forward or backward a specified number of frames. This technique is
called frame offset. Let’s mark an IN point for the Editor at keyboard 3
clip and then use frame offset to locate the OUT point.
1. Open the Editor at keyboard 3 clip.
2. Use the numeric keypad to type 01:23:24:02 (NTSC) or
00:03:07:15 (PAL), and then press the Enter key.
3. Click the Mark IN button.
4. Advance 29 frames (NTSC) or 24 frames (PAL) by typing +29 or
+24 on the numeric keypad and pressing the Enter key.
Advancing 29 or 24 frames is the equivalent of advancing
1 second, because Avid Xpress DV counts the frame it is
parked on.
5. Advance 2 more seconds by typing +129 (NTSC) or +124 (PAL)
and pressing Enter. The system inserts the colons for you.
6. Mark that frame as the OUT point by clicking the Mark OUT
button.
7. Close the Editor at keyboard 3 clip.
Creating Subclips
Now you’ll copy portions of one clip into shorter clips, called subclips
(see “Subclips” on page 41). Subclipping is a great way to organize
your footage into manageable units.
1. Open the Lab clip.
2. Go to the start of the clip.
89
Page 90

3. Review the clip by clicking the Play button or by dragging the
blue position indicator. There are two parts of the clip that you’ll
copy into separate subclips.
4. Use the numeric keypad to type 01:24:53:19 (NTSC) or
00:04:10:22 (PAL), and then press the Enter key.
5. Mark an IN point.
6. Type 01:24:57:16 (NTSC) or 00:04:14:20 (PAL).
7. Mark an OUT point.
8. Press and hold the Alt key, click the image area of the clip, and
drag it from the Source pop-up monitor to the Source Clips bin.
As you begin dragging, the pointer changes to a hand attached to
a small box.
The subclip has the
name of the original
clip, followed by Sub.n,
where n is the number
of times the master clip
has been cataloged to
that bin.
A new item called Lab.Sub.01 appears in the Source Clips bin.
The name is highlighted.
9. Delete the name Lab.Sub.01 and rename the subclip Lab 1A.
Clearing IN Points and OUT Points
Now you’ll clear previous IN and OUT points, mark new IN and OUT
points, and create a new subclip.
1. Bring the Lab clip forward by choosing Lab from the Windows
menu.
2. Press the Clear IN key (D) and Clear OUT key (F).
You can also click the corresponding buttons beneath the monitor.
3. Mark an IN point at 01:25:00:11 (NTSC) or 00:04:17:03 (PAL).
4. Mark an OUT point at 01:25:07:16 (NTSC) or 00:04:25:12 (PAL).
90
Page 91

5. Press and hold the Alt key, click the image area of the clip, and
drag it from the Source pop-up monitor to the Source Clips bin.
The clip name is highlighted in the Source Clips bin.
6. Delete the name Lab.Sub.02 and rename the subclip Lab 1B.
7. Close the Lab clip.
8. Close the Source Clips bin.
Saving Your Work
By default, Avid Xpress
DV includes an Autosave function set at 15
minutes. You can view
or change this setting in
the Bin settings box,
which you access from
the Settings scroll list in
the Project
window.
Next Steps
You’ve done a lot of work marking clips. Saving your bins and other
project information would be a good idea.
1. Click the Project window to activate it.
2. Choose Save All from the File menu.
You’ve prepared some clips that you’ll use in your sequence. In the
next chapter you’ll start to edit your sequence. You can continue to the
next chapter, or quit this session (see “Closing the Project and
Quitting the Application” on page 68). The next time you open the
project, the windows will be in the same position.
91
Page 92

CHAPTER 6
Creating a Sequence
In this chapter, you begin editing the Introducing Avid sequence by
completing the following tasks:
• Working in the Avid Xpress DV Window
• Making the First Edit
• Opening a Sequence
• Opening and Using the Tool Palette
• Splicing in an Audio Clip
• Exploring the Timeline
• Splicing in a Video Clip
• Splicing a Clip into the Middle of a Sequence
• Undoing an Edit
• Splicing in a Music Track
If you have worked on the previous chapters but have quit
Avid Xpress DV — Start the application, choose your user name and
the Introducing Avid project, and then click OK.
If you have not worked on the previous chapters — Start the
application, create a new user, choose the Introducing Avid project,
and then click OK.
92
Page 93

Working in the Avid Xpress DV Window
Minimize
Maximize
Close
You’ve been working in a single large window, labeled Avid Xpress
DV. Like other Windows NT windows, you can minimize it, maximize
it, and close it by using the buttons on the right side of the title bar.
Within the Avid Xpress DV window, you can manage the Timeline,
bins, and Source pop-up monitors in the same way. The difference is
that, when you reduce or resize these windows, they remain within
the Avid Xpress DV window, rather than appearing on the Windows
desktop.
n
You cannot minimize the Composer window.
Minimizing Avid Xpress DV Windows
To get more space
below the Timeline,
right-click the
Windows toolbar,
choose Properties from
the pop-up menu, and
deselect the Always on
Top check box.
Try minimizing some windows now.
1. Open the Source Clips bin.
2. Click the Minimize button on the Source Clips window and the
Timeline. The windows shrink to small title bars at the bottom of
the Avid Xpress DV window.
Restore button
3. Close the Source Clips bin by clicking the Close button.
4. Return the Timeline to full size by clicking the Restore button.
Managing your Avid Xpress DV windows will become more
important as your projects become larger.
93
Page 94

Default Locations for the Avid Xpress DV Windows
The Composer, Timeline, and Project windows have default sizes and
locations to maximize the available space on your desktop, as shown
in “Dragging a Video Clip and Creating a Sequence” on page 95.
If you want to return these windows to the default locations, click the
window and choose Home from the Windows menu.
Making the First Edit
In this section, you’ll make your first edit and create a sequence by
completing the following tasks:
• Playing a Video Clip
• Dragging a Video Clip and Creating a Sequence
• Moving and Renaming the Sequence
Playing a Video Clip
Let’s start by playing the clip that will begin the sequence.
1. In the Project window, open the QuickTime Movies bin.
2. Double-click the Opening logo.mov clip to display it in a Source
pop-up monitor. Play the clip through.
Notice the .mov file name extension. This indicates that the clip is
a QuickTime
program. You can import a QuickTime movie into Avid Xpress
DV, which changes the QuickTime movie to a DV clip. We’ve
already imported the movie for you.
movie that was created by using a special effects
94
Page 95

Dragging a Video Clip and Creating a Sequence
Now edit the clip to create a sequence.
1. Make sure the Timeline is open and visible. If it is not, choose
Timeline from the Tools menu.
2. Click the Source pop-up monitor that contains the Opening
logo.mov clip. If the monitor is not visible, open it from the
QuickTime Movies bin.
3. Click the Mark Clip button on the Source pop-up monitor.
The Mark Clip button marks IN and OUT points at the beginning
and end of the clip, so that the entire clip is edited into the
sequence.
4. Click the image area of the clip and drag it to the Timeline
window.
You’ve just created a sequence.
n
If you have more than one bin open, a dialog box appears and asks you to
select a bin in which to store the sequence. Select QuickTime Movies.
Look at the Timeline. You should see the Opening logo.mov clip
in track V1. The first frame is the IN point you marked in the clip;
the last frame is the OUT point you marked. The position indicator
rests on the last frame of the clip, as shown in the following
illustration.
95
Page 96

Right angle and
vertical line
Position indicator
The sequence also appears in the Composer monitor. The image is
black because the last frame of the clip is black. Notice the right
angle and vertical line in the lower right corner of the Composer
monitor. The right angle indicates the end of a cut and the vertical
line indicates the end of the sequence.
96
Page 97

When you want to
bring an open bin or
monitor to the
foreground, you can
click anywhere in it or
choose its name from
the Windows menu.
5. Click anywhere in the Composer monitor to activate it.
6. Press the Home key to move to the head of the sequence.
7. Click the Play button at the bottom of the Composer monitor to
play the clip in the sequence.
8. Close the Opening logo.mov clip.
Moving and Renaming the Sequence
You can create a new
sequence by choosing
New Sequence from the
Clip menu.
Because the QuickTime Movies bin was the only bin open, the
sequence appears in that bin. By default, Avid Xpress DV names the
sequence Untitled Sequence.01. Now let’s move the sequence to the
Sequences bin and change its name.
1. In the Project window, click the Bins button.
2. Open the Sequences bin.
3. In the QuickTime Movies bin, click the icon in front of the name
Untitled Sequence.01 and drag it to the Sequences bin.
4. Click the name Untitled Sequence.01 to select it.
The name is highlighted.
97
Page 98

5. Type Rough Cut and press the Enter key.
This is the sequence you’ll be working with for this tutorial. The
sequences Rough Cut 1, Rough Cut 2, and Rough Cut 3 are
supplied for those who prefer not to build their own sequence (see
the notes at the beginning of each chapter).
6. Close the QuickTime Movies bin.
7. Close the Sequences bin.
By closing the Sequences bin, you also close the sequence.
Opening a Sequence
In Chapter 5 you opened a sequence in a Source pop-up monitor (see
“Playing a Sequence in a Source Pop-up Monitor” on page 84). To
open a sequence for editing, you need to drag it into the Composer
monitor or the Timeline.
1. Open the Sequences bin.
2. Drag your Rough Cut sequence to the Composer monitor.
The sequence appears in the Composer monitor and the Timeline.
You need to keep the Sequences bin open to continue working on
your sequence. You can minimize the bin to save workspace on your
desktop.
Opening and Using the Tool Palette
Before you continue with your editing, familiarize yourself with the
Tool palette. So far you have been using buttons that appear below the
Source pop-up monitor or keyboard equivalents. The Tool palette
provides you with additional buttons for navigating and editing.
98
Page 99

Opening and Tearing Off the Tool Palette
You can also open the
Tool palette from the
Fast Menu button on a
Source pop-up monitor.
Open the Tool palette by clicking the Fast Menu button under the
Composer monitor.
Fast Menu button
To use a button on the Tool palette, just click it. You can also “tear off”
the palette and drag it to a different location.
1. If the Tool palette is not open, click the Fast Menu button.
2. Drag the pointer over the buttons and then outside the border of
the Tool palette. You should see a dotted line outline. Drag the
outline to another location. You see the complete Tool palette, with
a title bar and Close button.
All buttons in
Avid Xpress DV have
ToolTips.
You can drag the Tool palette to a different location; just click and hold
anywhere on the Tool palette and drag it wherever you want. You can
also resize it to a square or a single row, to suit the way you want to
work.
To view the name of each button, slowly drag the pointer across each
button. You should see a small yellow window pop up with the name
of each tool. You’ve probably seen these pop-ups in other Windows
applications; they’re called ToolTips.
99
Page 100

Displaying Button Names
You can display a shortened name on the button itself by selecting an
option in the Interface Settings dialog box.
1. In the Project window, click the Settings button.
2. From the Settings scroll list, double-click Interface.
The User Interface Settings dialog box appears.
3. Select the option Show Labels in Tool palette.
4. Click OK.
You see names on the first row of buttons.
5. Click the border of the Tool palette and drag it until you see the
second row of buttons.
You can keep these names or remove them by deselecting the
Show Labels in Tool palette option in the User Interface Settings
dialog box. For this tutorial, you might want to keep the labels
visible.
6. Close the Tool palette by clicking the Close button.
Splicing in an Audio Clip
The next clip, Narration, provides the voice of an off-camera narrator,
or voice-over. This clip includes only audio.
100
 Loading...