

Page 1

Avid Xpress
Getting Started Guide
®
a
tools for storytellers®
Page 2

© 2000 Avid Technology, Inc. All rights reserved. Printed in USA.
Avid Xpress Getting Started Guide • Part 0130-04549-01 Rev. A • August 2000
2
Page 3

Contents
Chapter 1 Introduction
Using the Tutorial Sections. . . . . . . . . . . . . . . . . . . . . . . . . . . . . . . . . . . 14
What You Need . . . . . . . . . . . . . . . . . . . . . . . . . . . . . . . . . . . . . . . . . . . . . 15
Turning on Your Equipment. . . . . . . . . . . . . . . . . . . . . . . . . . . . . . . . . . 16
Installing the Tutorial Files (Windows) . . . . . . . . . . . . . . . . . . . . . . . . 18
Installing the Tutorial Files (Macintosh) . . . . . . . . . . . . . . . . . . . . . . . 22
Starting the Avid System (Windows). . . . . . . . . . . . . . . . . . . . . . . . . . 25
Starting the Avid System (Macintosh) . . . . . . . . . . . . . . . . . . . . . . . . . 25
Electronic Licensing. . . . . . . . . . . . . . . . . . . . . . . . . . . . . . . . . . . . . . . . . 26
How to Proceed. . . . . . . . . . . . . . . . . . . . . . . . . . . . . . . . . . . . . . . . . . . . . 26
Using Help. . . . . . . . . . . . . . . . . . . . . . . . . . . . . . . . . . . . . . . . . . . . . . . . . 27
Setting Up Your Browser . . . . . . . . . . . . . . . . . . . . . . . . . . . . . . . . . 27
Getting Help for Windows and Dialog Boxes. . . . . . . . . . . . . . . 28
Getting Help for Screen Objects . . . . . . . . . . . . . . . . . . . . . . . . . . 28
Keeping Help Available (Windows) . . . . . . . . . . . . . . . . . . . . . . . 29
Restoring Help from the Taskbar (Windows) . . . . . . . . . . . 29
Resizing the Application (Windows). . . . . . . . . . . . . . . . . . . 30
Using Alt+Tab (Windows) . . . . . . . . . . . . . . . . . . . . . . . . . . . . 31
Finding Information Within the Help . . . . . . . . . . . . . . . . . . . . . 31
Using the Contents List . . . . . . . . . . . . . . . . . . . . . . . . . . . . . . 31
Using the Index . . . . . . . . . . . . . . . . . . . . . . . . . . . . . . . . . . . . . 32
Using the Search Feature . . . . . . . . . . . . . . . . . . . . . . . . . . . . . 32
Using the Glossary. . . . . . . . . . . . . . . . . . . . . . . . . . . . . . . . . . . 33
Printing Help Topics. . . . . . . . . . . . . . . . . . . . . . . . . . . . . . . . . . . . . 33
Using Online Documentation . . . . . . . . . . . . . . . . . . . . . . . . . . . . . . . . 34
3
Page 4

Chapter 2 About Avid Xpress
Video Editing with Avid Xpress . . . . . . . . . . . . . . . . . . . . . . . . . . . . . . 36
Avid Xpress Essentials. . . . . . . . . . . . . . . . . . . . . . . . . . . . . . . . . . . . . . . 38
Media Files . . . . . . . . . . . . . . . . . . . . . . . . . . . . . . . . . . . . . . . . . . . . . 38
Clips. . . . . . . . . . . . . . . . . . . . . . . . . . . . . . . . . . . . . . . . . . . . . . . . . . . 39
Subclips. . . . . . . . . . . . . . . . . . . . . . . . . . . . . . . . . . . . . . . . . . . . . . . . 39
Sequences . . . . . . . . . . . . . . . . . . . . . . . . . . . . . . . . . . . . . . . . . . . . . . 40
Your Program . . . . . . . . . . . . . . . . . . . . . . . . . . . . . . . . . . . . . . . . . . . 41
Bins . . . . . . . . . . . . . . . . . . . . . . . . . . . . . . . . . . . . . . . . . . . . . . . . . . . 41
Your Project . . . . . . . . . . . . . . . . . . . . . . . . . . . . . . . . . . . . . . . . . . . . 41
The Attic Folder. . . . . . . . . . . . . . . . . . . . . . . . . . . . . . . . . . . . . . . . . 41
The Avid Xpress File System . . . . . . . . . . . . . . . . . . . . . . . . . . . . . . . . . 42
Chapter 3 Starting a Project
About Avid Projects and Avid Users Folders . . . . . . . . . . . . . . . . . . . 44
Using the Bins Display . . . . . . . . . . . . . . . . . . . . . . . . . . . . . . . . . . . . . . 45
About Trash . . . . . . . . . . . . . . . . . . . . . . . . . . . . . . . . . . . . . . . . . . . . . . . . 46
Using the Settings Display . . . . . . . . . . . . . . . . . . . . . . . . . . . . . . . . . . . 47
Tutorial: Starting a Project . . . . . . . . . . . . . . . . . . . . . . . . . . . . . . . . . . . 49
Starting the Application (Windows). . . . . . . . . . . . . . . . . . . . . . . . . . . 49
Starting the Application (Macintosh). . . . . . . . . . . . . . . . . . . . . . . . . . 50
Opening a Project. . . . . . . . . . . . . . . . . . . . . . . . . . . . . . . . . . . . . . . . . . . 51
Creating a User . . . . . . . . . . . . . . . . . . . . . . . . . . . . . . . . . . . . . . . . . 51
Selecting a Project . . . . . . . . . . . . . . . . . . . . . . . . . . . . . . . . . . . . . . 52
Chapter 4 Digitizing
Selecting Settings . . . . . . . . . . . . . . . . . . . . . . . . . . . . . . . . . . . . . . . . . . . 54
About the Digitize Tool . . . . . . . . . . . . . . . . . . . . . . . . . . . . . . . . . . . . . 55
About the Audio Tool . . . . . . . . . . . . . . . . . . . . . . . . . . . . . . . . . . . . . . . 58
About the Video Input Tool . . . . . . . . . . . . . . . . . . . . . . . . . . . . . . . . . . 60
Digitizing Preparations Check List . . . . . . . . . . . . . . . . . . . . . . . . . . . 61
4
Page 5

About Digitizing . . . . . . . . . . . . . . . . . . . . . . . . . . . . . . . . . . . . . . . . . . . 62
Digitizing and Logging at the Same Time . . . . . . . . . . . . . . . . . . 62
Batch Digitizing. . . . . . . . . . . . . . . . . . . . . . . . . . . . . . . . . . . . . . . . . 63
Redigitizing . . . . . . . . . . . . . . . . . . . . . . . . . . . . . . . . . . . . . . . . . . . . 63
Chapter 5 Getting Ready to Edit
About Bin Views. . . . . . . . . . . . . . . . . . . . . . . . . . . . . . . . . . . . . . . . . . . . 65
Controlling Playback. . . . . . . . . . . . . . . . . . . . . . . . . . . . . . . . . . . . . . . . 68
Using Position Bars and Position Indicators . . . . . . . . . . . . . . . . 68
Using Buttons. . . . . . . . . . . . . . . . . . . . . . . . . . . . . . . . . . . . . . . . . . . 69
Play Button . . . . . . . . . . . . . . . . . . . . . . . . . . . . . . . . . . . . . . . . . 69
Step Buttons . . . . . . . . . . . . . . . . . . . . . . . . . . . . . . . . . . . . . . . . 70
Using the Tool Palette. . . . . . . . . . . . . . . . . . . . . . . . . . . . . . . . . . . . 70
Using the Keyboard . . . . . . . . . . . . . . . . . . . . . . . . . . . . . . . . . . . . . 71
J-K-L Keys (Three-Button Play) . . . . . . . . . . . . . . . . . . . . . . . 71
Home, End, and Arrow Keys . . . . . . . . . . . . . . . . . . . . . . . . . . 72
Using the Mouse . . . . . . . . . . . . . . . . . . . . . . . . . . . . . . . . . . . . . . . . 72
Stepping with the Mouse . . . . . . . . . . . . . . . . . . . . . . . . . . . . . 72
Shuttling with the Mouse . . . . . . . . . . . . . . . . . . . . . . . . . . . . 73
Marking IN and OUT Points . . . . . . . . . . . . . . . . . . . . . . . . . . . . . . . . . 74
Creating Subclips . . . . . . . . . . . . . . . . . . . . . . . . . . . . . . . . . . . . . . . . . . . 74
Tutorial: Getting Ready to Edit . . . . . . . . . . . . . . . . . . . . . . . . . . . . . . . 77
Viewing Clips . . . . . . . . . . . . . . . . . . . . . . . . . . . . . . . . . . . . . . . . . . . . . . 77
Using Text View. . . . . . . . . . . . . . . . . . . . . . . . . . . . . . . . . . . . . . . . . 78
Using Frame View (Windows) . . . . . . . . . . . . . . . . . . . . . . . . . . . . 79
Using Frame View (Macintosh) . . . . . . . . . . . . . . . . . . . . . . . . . . . 79
Playing Clips . . . . . . . . . . . . . . . . . . . . . . . . . . . . . . . . . . . . . . . . . . . . . . . 80
Playing Clips in a Source Pop-up Monitor . . . . . . . . . . . . . . . . . 80
Controlling Playback . . . . . . . . . . . . . . . . . . . . . . . . . . . . . . . . . . . . 82
Marking Edit Points. . . . . . . . . . . . . . . . . . . . . . . . . . . . . . . . . . . . . . . . . 83
Marking the planing ms Clip . . . . . . . . . . . . . . . . . . . . . . . . . . . . . 84
Marking the ducks Clip . . . . . . . . . . . . . . . . . . . . . . . . . . . . . . . . . . 85
Marking the draw knife cu Clip . . . . . . . . . . . . . . . . . . . . . . . . . . . 85
5
Page 6

Using Timecode to Find a Frame . . . . . . . . . . . . . . . . . . . . . . . . . . 86
Using Frame Offset. . . . . . . . . . . . . . . . . . . . . . . . . . . . . . . . . . . . . . 88
Subclipping . . . . . . . . . . . . . . . . . . . . . . . . . . . . . . . . . . . . . . . . . . . . . . . . 89
Clearing IN Points and OUT Points. . . . . . . . . . . . . . . . . . . . . . . . . . . 90
Closing the Project . . . . . . . . . . . . . . . . . . . . . . . . . . . . . . . . . . . . . . . . . . 91
Ending the Session. . . . . . . . . . . . . . . . . . . . . . . . . . . . . . . . . . . . . . . . . . 91
Chapter 6 Editing a Rough Cut
Viewing Methods . . . . . . . . . . . . . . . . . . . . . . . . . . . . . . . . . . . . . . . . . . . 93
Navigating in the Timeline . . . . . . . . . . . . . . . . . . . . . . . . . . . . . . . . . . 93
Using the Position Indicator . . . . . . . . . . . . . . . . . . . . . . . . . . . . . . 93
Using the Scroll Bar . . . . . . . . . . . . . . . . . . . . . . . . . . . . . . . . . . . . . 94
Displaying More or Less Detail . . . . . . . . . . . . . . . . . . . . . . . . . . . 94
Using the Track Selector Panel . . . . . . . . . . . . . . . . . . . . . . . . . . . . . . . 95
Selecting Tracks . . . . . . . . . . . . . . . . . . . . . . . . . . . . . . . . . . . . . . . . . 96
Monitoring Tracks. . . . . . . . . . . . . . . . . . . . . . . . . . . . . . . . . . . . . . . 97
Monitoring Video . . . . . . . . . . . . . . . . . . . . . . . . . . . . . . . . . . . . . . . 98
Tutorial: Rough Cut . . . . . . . . . . . . . . . . . . . . . . . . . . . . . . . . . . . . . . . . . 99
Making the First Edit. . . . . . . . . . . . . . . . . . . . . . . . . . . . . . . . . . . . . . . 100
Using Digital Audio Scrub to Locate a Specific
Frame of Audio . . . . . . . . . . . . . . . . . . . . . . . . . . . . . . . . . . . . . . 100
Splicing an Audio Clip . . . . . . . . . . . . . . . . . . . . . . . . . . . . . . . . . 101
Playing a Sequence . . . . . . . . . . . . . . . . . . . . . . . . . . . . . . . . . . . . . 101
Confirming the Duration. . . . . . . . . . . . . . . . . . . . . . . . . . . . . . . . 102
Splicing Video into the Sequence. . . . . . . . . . . . . . . . . . . . . . . . . . . . 102
Splicing a Clip in a Pop-up Monitor. . . . . . . . . . . . . . . . . . . . . . 103
Playing IN to OUT . . . . . . . . . . . . . . . . . . . . . . . . . . . . . . . . . . . . . 104
Using the Go to OUT Button . . . . . . . . . . . . . . . . . . . . . . . . . . . . 104
Moving to the Head and Tail of a Clip . . . . . . . . . . . . . . . . . . . . 105
Using the Splice-in Button . . . . . . . . . . . . . . . . . . . . . . . . . . . . . . 105
Splicing a Clip into the Middle of a Sequence . . . . . . . . . . . . . 106
Undoing an Edit . . . . . . . . . . . . . . . . . . . . . . . . . . . . . . . . . . . . . . . 106
Using the I/O (IN Point / OUT Point) Tracking Display . . . . . 107
6
Page 7

Chapter 7 Refining the Edit
Using Segment Mode to Edit in the Timeline . . . . . . . . . . . . . . . . . 109
Editing in Segment Mode . . . . . . . . . . . . . . . . . . . . . . . . . . . . . . . 109
Distinguishing Between Two Types of Editing Buttons . . . . . 110
Basic Trim Procedures . . . . . . . . . . . . . . . . . . . . . . . . . . . . . . . . . . . . . . 110
Entering Trim Mode . . . . . . . . . . . . . . . . . . . . . . . . . . . . . . . . . . . . 110
Exiting Trim Mode . . . . . . . . . . . . . . . . . . . . . . . . . . . . . . . . . . . . . 112
Selecting Between Trim Sides . . . . . . . . . . . . . . . . . . . . . . . . . . . 112
Performing a Basic Trim. . . . . . . . . . . . . . . . . . . . . . . . . . . . . . . . . 113
Using the Command Palette. . . . . . . . . . . . . . . . . . . . . . . . . . . . . . . . . 114
Audio Editing . . . . . . . . . . . . . . . . . . . . . . . . . . . . . . . . . . . . . . . . . . . . . 118
Adjusting Volume . . . . . . . . . . . . . . . . . . . . . . . . . . . . . . . . . . . . . . 118
Tutorial: Refining Edits. . . . . . . . . . . . . . . . . . . . . . . . . . . . . . . . . . . . . 119
Overwriting Clips into a Sequence. . . . . . . . . . . . . . . . . . . . . . . . . . . 120
Storyboarding . . . . . . . . . . . . . . . . . . . . . . . . . . . . . . . . . . . . . . . . . . . . . 121
Marking Clips for Storyboarding . . . . . . . . . . . . . . . . . . . . . . . . 122
Storyboard Editing the Clips . . . . . . . . . . . . . . . . . . . . . . . . . . . . 123
Rearranging Clips . . . . . . . . . . . . . . . . . . . . . . . . . . . . . . . . . . . . . . . . . 126
Overwriting with the Three-Point Edit . . . . . . . . . . . . . . . . . . . 126
Changing the Order of Clips in a Sequence . . . . . . . . . . . . . . . 127
Removing Footage from a Sequence . . . . . . . . . . . . . . . . . . . . . . . . . 128
Removing Footage and Closing the Resulting Gap . . . . . . . . . 128
Removing Footage and Retaining the Resulting Gap . . . . . . . 129
Trimming . . . . . . . . . . . . . . . . . . . . . . . . . . . . . . . . . . . . . . . . . . . . . . . . . 130
Adjusting Both Sides of a Transition
(Dual-Roller Trimming) . . . . . . . . . . . . . . . . . . . . . . . . . . . . . . . 130
Using Dual Rollers to Trim the Outgoing Clip. . . . . . . . . . . . . 132
Trimming the pan lumber Clip . . . . . . . . . . . . . . . . . . . . . . . . . . . 133
Single-Roller Trimming . . . . . . . . . . . . . . . . . . . . . . . . . . . . . . . . . 134
Adding Synced Audio . . . . . . . . . . . . . . . . . . . . . . . . . . . . . . . . . . 135
Working with Audio . . . . . . . . . . . . . . . . . . . . . . . . . . . . . . . . . . . . . . . 136
Adjusting Audio Level. . . . . . . . . . . . . . . . . . . . . . . . . . . . . . . . . . 136
Adjusting Audio Pan (Balance) . . . . . . . . . . . . . . . . . . . . . . . . . . 137
7
Page 8

Chapter 8 Adding Effects
Effects Editing. . . . . . . . . . . . . . . . . . . . . . . . . . . . . . . . . . . . . . . . . . . . . 140
Displaying the Effect Palette . . . . . . . . . . . . . . . . . . . . . . . . . . . . . . . . 141
Effect Categories. . . . . . . . . . . . . . . . . . . . . . . . . . . . . . . . . . . . . . . . . . . 141
Effect Types . . . . . . . . . . . . . . . . . . . . . . . . . . . . . . . . . . . . . . . . . . . . . . . 142
Transition Effects. . . . . . . . . . . . . . . . . . . . . . . . . . . . . . . . . . . . . . . 142
Segment Effects . . . . . . . . . . . . . . . . . . . . . . . . . . . . . . . . . . . . . . . . 143
Applying Effects to a Sequence. . . . . . . . . . . . . . . . . . . . . . . . . . . . . . 143
Working in Effect Mode . . . . . . . . . . . . . . . . . . . . . . . . . . . . . . . . . . . . 144
Rendering an Effect . . . . . . . . . . . . . . . . . . . . . . . . . . . . . . . . . . . . . . . . 144
Tutorial: Adding Effects . . . . . . . . . . . . . . . . . . . . . . . . . . . . . . . . . . . . 145
Adding Transition Effects. . . . . . . . . . . . . . . . . . . . . . . . . . . . . . . . . . . 146
Adding a Dissolve Effect (Fade-In) . . . . . . . . . . . . . . . . . . . . . . . 146
Dissolving Between Clips . . . . . . . . . . . . . . . . . . . . . . . . . . . . . . . 148
Creating a Series of Dissolves. . . . . . . . . . . . . . . . . . . . . . . . 149
Creating Audio Dissolves . . . . . . . . . . . . . . . . . . . . . . . . . . . 149
Adding a Fade-to-Black Effect Within the Sequence. . . . . . . . 150
Adding a Picture-in-Picture Effect . . . . . . . . . . . . . . . . . . . . . . . . . . . 151
Using the Second Video Track . . . . . . . . . . . . . . . . . . . . . . . . . . . 151
Creating the Picture-in-Picture Effect . . . . . . . . . . . . . . . . . . . . . 152
Repositioning the Image . . . . . . . . . . . . . . . . . . . . . . . . . . . . . . . . 153
Adjusting a Parameter . . . . . . . . . . . . . . . . . . . . . . . . . . . . . . . . . . 154
Adding Keyframes . . . . . . . . . . . . . . . . . . . . . . . . . . . . . . . . . . . . . 155
Adding Background Images . . . . . . . . . . . . . . . . . . . . . . . . . . . . . 156
Rendering the Effect. . . . . . . . . . . . . . . . . . . . . . . . . . . . . . . . . . . . 156
Screening the Sequence . . . . . . . . . . . . . . . . . . . . . . . . . . . . . . . . . . . . 157
Chapter 9 Creating Titles
Creating New Titles . . . . . . . . . . . . . . . . . . . . . . . . . . . . . . . . . . . . . . . . 159
Understanding the Title Tool . . . . . . . . . . . . . . . . . . . . . . . . . . . . . . . . 160
Working with Text . . . . . . . . . . . . . . . . . . . . . . . . . . . . . . . . . . . . . . . . . 161
Text Formatting Tools . . . . . . . . . . . . . . . . . . . . . . . . . . . . . . . . . . . . . . 161
8
Page 9

Selecting Colors and Setting Transparency. . . . . . . . . . . . . . . . . . . . 163
Adjusting the Color . . . . . . . . . . . . . . . . . . . . . . . . . . . . . . . . . . . . 164
Editing a Title into a Sequence . . . . . . . . . . . . . . . . . . . . . . . . . . . . . . 165
Tutorial: Creating Titles. . . . . . . . . . . . . . . . . . . . . . . . . . . . . . . . . . . . . 166
Adding a Title . . . . . . . . . . . . . . . . . . . . . . . . . . . . . . . . . . . . . . . . . . . . . 167
Creating a New Title. . . . . . . . . . . . . . . . . . . . . . . . . . . . . . . . . . . . 168
Repositioning Text . . . . . . . . . . . . . . . . . . . . . . . . . . . . . . . . . . . . . 169
Changing Color . . . . . . . . . . . . . . . . . . . . . . . . . . . . . . . . . . . . . . . . 170
Adding a Shadow . . . . . . . . . . . . . . . . . . . . . . . . . . . . . . . . . . . . . . 170
Saving a Title. . . . . . . . . . . . . . . . . . . . . . . . . . . . . . . . . . . . . . . . . . . . . . 170
Editing the Title into the Sequence . . . . . . . . . . . . . . . . . . . . . . . . . . 171
Adding Rolling Credits. . . . . . . . . . . . . . . . . . . . . . . . . . . . . . . . . . . . . 171
Editing an Existing Title . . . . . . . . . . . . . . . . . . . . . . . . . . . . . . . . 171
Adding a Video Background. . . . . . . . . . . . . . . . . . . . . . . . . . . . . 172
Viewing the Creation Date . . . . . . . . . . . . . . . . . . . . . . . . . . . . . . 173
Splicing the Title into a Sequence . . . . . . . . . . . . . . . . . . . . . . . . 173
Deleting Excess Footage. . . . . . . . . . . . . . . . . . . . . . . . . . . . . . . . . 174
Closing the Title Tool . . . . . . . . . . . . . . . . . . . . . . . . . . . . . . . . . . . 174
Chapter 10 Generating Output
Output Options . . . . . . . . . . . . . . . . . . . . . . . . . . . . . . . . . . . . . . . . . . . 176
Preparing for Output . . . . . . . . . . . . . . . . . . . . . . . . . . . . . . . . . . . . . . 176
Digital Cut . . . . . . . . . . . . . . . . . . . . . . . . . . . . . . . . . . . . . . . . . . . . . . . . 177
About Exporting Files . . . . . . . . . . . . . . . . . . . . . . . . . . . . . . . . . . . . . . 178
Preparing to Export a Sequence. . . . . . . . . . . . . . . . . . . . . . . . . . . . . . 179
Tutorial: Output . . . . . . . . . . . . . . . . . . . . . . . . . . . . . . . . . . . . . . . . . . . 181
Recording a Digital Cut to Tape . . . . . . . . . . . . . . . . . . . . . . . . . . . . . 182
Chapter 11 Backing Up
About Media Files . . . . . . . . . . . . . . . . . . . . . . . . . . . . . . . . . . . . . . . . . 187
Media Objects and Files . . . . . . . . . . . . . . . . . . . . . . . . . . . . . . . . 188
Media Relationships. . . . . . . . . . . . . . . . . . . . . . . . . . . . . . . . . . . . 189
Basic Media Tool Features . . . . . . . . . . . . . . . . . . . . . . . . . . . . . . . . . . 190
9
Page 10

Freeing Storage Space . . . . . . . . . . . . . . . . . . . . . . . . . . . . . . . . . . . . . . 191
Consolidating Media . . . . . . . . . . . . . . . . . . . . . . . . . . . . . . . . . . . . . . . 191
About the Consolidate Feature. . . . . . . . . . . . . . . . . . . . . . . . . . . 192
Backing Up Media Files . . . . . . . . . . . . . . . . . . . . . . . . . . . . . . . . . . . . 193
Backing Up Project Folders . . . . . . . . . . . . . . . . . . . . . . . . . . . . . . . . . 193
Tutorial: Backing Up . . . . . . . . . . . . . . . . . . . . . . . . . . . . . . . . . . . . . . . 194
Consolidating the Boat Shop Sequence . . . . . . . . . . . . . . . . . . . . . . . 195
Saving Your Work on a Drive or Floppy Disk . . . . . . . . . . . . . . . . . 198
Restoring from a Backup . . . . . . . . . . . . . . . . . . . . . . . . . . . . . . . . . . . 198
Quitting and Shutting Down. . . . . . . . . . . . . . . . . . . . . . . . . . . . . . . . 199
Summary . . . . . . . . . . . . . . . . . . . . . . . . . . . . . . . . . . . . . . . . . . . . . . . . . 199
Index
10
Page 11

Figures
Figure 7-1 Command Palette Tabs . . . . . . . . . . . . . . . . . . . . . . . . . 116
11
Page 12

Tables
Table 6-1 Starting the Tutorial: Rough Cut . . . . . . . . . . . . . . . . . . 99
Table 7-1 Starting the Tutorial: Refining Edits . . . . . . . . . . . . . 119
Table 7-2 Mark Points for Tutorial Clips . . . . . . . . . . . . . . . . . . 122
Table 8-1 Starting the Tutorial: Adding Effects . . . . . . . . . . . . 145
Table 9-1 Starting the Tutorial: Creating Titles . . . . . . . . . . . . . 166
Table 10-1 Starting the Tutorial: Output . . . . . . . . . . . . . . . . . . . 181
Tab l e 11 -1 Media Objects and Files . . . . . . . . . . . . . . . . . . . . . . . . 189
Tab l e 11 -2 Starting the Tutorial: Backing Up . . . . . . . . . . . . . . . 194
12
Page 13

CHAPTER 1
Introduction
This chapter sets you up to use this guide and explains how to work
through the tutorial sections that teach you the basics of your Avid
system. This chapter contains the following sections:
• Using the Tutorial Sections
• What You Need
• Turning on Your Equipment
• Installing the Tutorial Files (Windows)
• Installing the Tutorial Files (Macintosh)
• Starting the Avid System (Windows)
• Starting the Avid System (Macintosh)
• Electronic Licensing
• How to Proceed
• Using Help
• Using Online Documentation
13
Page 14

Using the Tutorial Sections
The self-paced tutorial sections included in this guide are designed as
guided Avid editing sessions, using the basic features of the system. In
the tutorial sections, you’re going to edit a 1-minute sequence about a
company in Amesbury, Massachusetts that makes small fishing boats
called dories.
The footage for the sequence is on the Avid Xpress Tutorial CD-ROMs
that came with your system. The CD-ROMs contain digitized media
that is ready for you to use.
The instructions in the tutorial take you through each step of the
editing process. The steps are:
• Starting a project (in Chapter 3)
• Getting ready to edit (in Chapter 5)
• Editing a rough cut (in Chapter 6)
• Refining the edit (in Chapter 7)
• Adding effects and titles to the sequence (in Chapter 8 and
Chapter 9)
• Preparing output (in Chapter 10)
• Backing up (in Chapter 11)
To complete this tutorial, you need a basic familiarity with the
Windows
never used a Windows or Macintosh system, refer to the Windows or
the Apple
You don’t need any previous experience with the Avid system. The
terms and techniques needed for each tutorial section are in each
chapter. However, it will help to read Chapter 2 of this guide before
starting any of the tutorial sections. You can also use the Avid Xpress
Help (see “Using Help” on page 27) and online books (see “Using
Online Documentation” on page 34) for more information.
®
operating system or Macintosh® computer. If you have
®
Macintosh manuals.
14
Page 15

This tutorial takes approximately 4 hours. Before you begin, you need:
• An installed Avid system
• The Boat Shop media and project files on the Avid Xpress Tutorial
Depending on your level of expertise in editing on Avid systems, you
can choose to work through the tutorial in either of two ways.
• If you have no experience with Avid Xpress or other Avid systems,
• If you have used other Avid systems, you might want to read
What You Need
If you have not yet set up your system, see the Avid Composer
Products Setup Guide. If you need to install the Avid Xpress
software, see the Avid Xpress Release Notes.
CD-ROM
you should go through the entire tutorial.
certain chapters to understand the specific features of Avid Xpress,
and complete the tutorials in those chapters. Each tutorial section
is self-contained.
The Tutorial CD-ROMs packaged with your Avid system include all
files necessary to complete this tutorial. They are:
• OMFI MediaFiles folder — contains the digitized files you need
for the tutorial. You need to copy these files to your external media
drive.
• Avid Projects folder — contains the project and bins you need for
the tutorial. You need to copy these files into \Program
Files\Avid\Avid Xpress on your internal hard drive (Windows) or
to your Avid drive (Macintosh).
15
Page 16

Turning on Your Equipment
Begin your edit session by turning on the components of your Avid
system. If any part of your system fails to turn on, make sure its
electrical cord is plugged snugly into an appropriate electrical outlet
or power strip. For more information on setting up your system, see
the Avid Composer Products Setup Guide.
c
For information on your
Windows features, such
as the desktop and
icons, see your
Windo ws
documentation.
If you fail to follow the proper sequence for starting up your system,
you could damage your computer or storage drives.
Always turn on the devices in the following order:
1. Fixed-storage drives: Turn on fixed-storage drives before starting
the computer. Allow 10 to 15 seconds for the drives to spin up to
speed before starting your PC or Macintosh.
2. Other peripheral hardware: Turn on all other peripheral units
except the PC or Macintosh. These include:
- Monitors and speakers
™
-Meridien
- Tape decks and additional autoassembly configurations
(switcher, time-base corrector, and so on) if you plan to
digitize or conduct an autoassembly
- Black burst generator (to maintain proper sync between audio
and video while digitizing and editing)
3. The PC or Macintosh
Windows:
a. Turn on your PC.
The computer goes through a self-check routine, and the
Windows startup screen appears.
b. Press Ctrl+Alt+Delete and log on.
I/O box
16
Page 17

The Windows desktop appears.
Macintosh:
Press the Power On key located at the upper right corner of the
keyboard.
When you start the Macintosh:
• You hear a tone that means the hardware is operational.
For information on
Macintosh features,
such as the desktop and
icons, see your
Macintosh
documentation.
• The computer goes through a self-check routine. If the
Macintosh passes all of its internal logic tests, the smiling
Macintosh icon appears.
• The Avid startup screen appears and the initialization process
begins.
• The Macintosh desktop appears.
17
Page 18

Avid drive
(internal)
Media
drives
(external)
c
To avoid system damage, do not disconnect or turn off external
drives while the PC or Macintosh is on.
Installing the Tutorial Files (Windows)
The Tutorial CD-ROMs contain all the files you need for the tutorial
sections of this guide. The CD-ROMs contain an NTSC version and a
PAL version of the tutorial media files digitized at a 20:1 resolution.
The tutorial files require two CD-ROMs for NTSC and two for PAL.
The installation procedure is the same for installing either type.
Each CD-ROM has its own installation program and is installed
independently of the other CD-ROM. You will need approximately
1 GB of free space available on your external media drive.
It takes approximately 30 minutes to install the media files from the
CD-ROMs to the external media drive.
18
Page 19
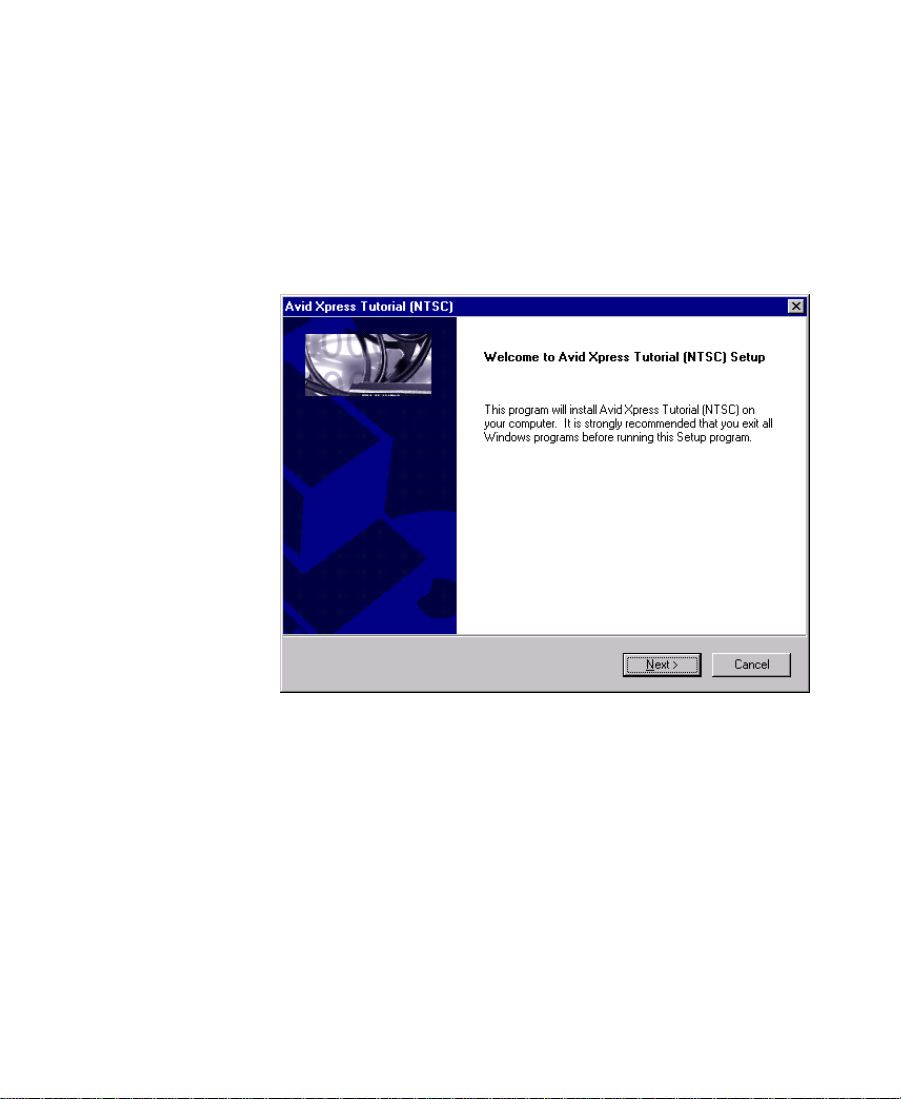
To install the Avid Xpress tutorial on a Windows system:
1. Insert the Avid Xpress NTSC or PAL Tutorial Disc 1 of 2 into the
CD-ROM drive. The Avid Xpress Tutorial screen appears.
2. Click Installers.
3. Click Install Tutorial.
The Welcome to Avid Xpress Tutorial (NTSC or PAL) Setup dialog
box appears.
19
Page 20
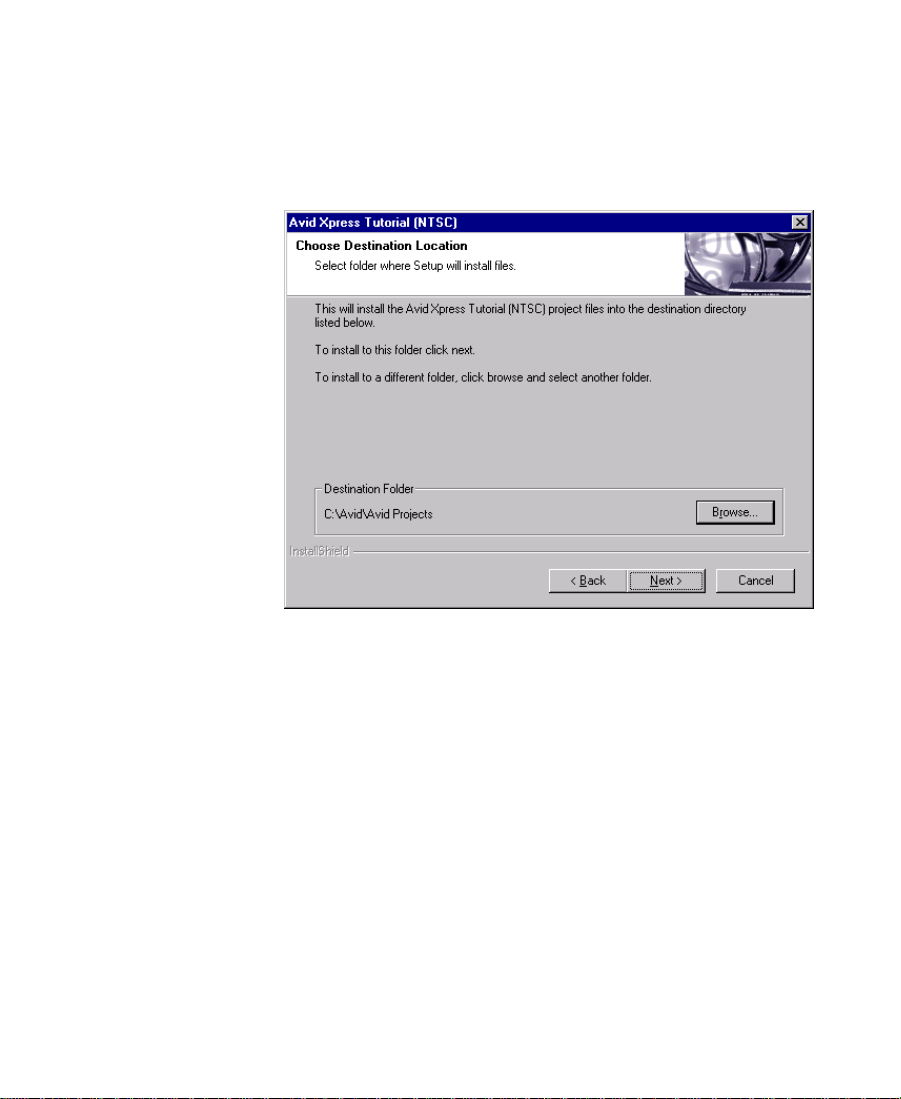
4. Click Next.
The Choose Destination Location dialog box appears. This allows
you to place the Boat Shop project files in the Avid Projects folder.
If an Avid Projects folder is not already created, the installation
will create one for you.
5. Select the destination location for the project files, and then click
Next.
The Select a Drive dialog box appears. This allows you to select
the drive where you want to store the media files. The media files
take up approximately 1 GB. Select a drive with adequate space.
6. Click the appropriate drive, and then click Next.
- If an OMFI MediaFiles folder already exists on the drive, the
media files are copied into that folder.
- If there is no OMFI MediaFiles folder on the drive, a message
appears asking if you want to create an OMFI MediaFiles
folder on the drive. Click Yes. The folder is created and the
media files are copied to the external drive.
20
Page 21
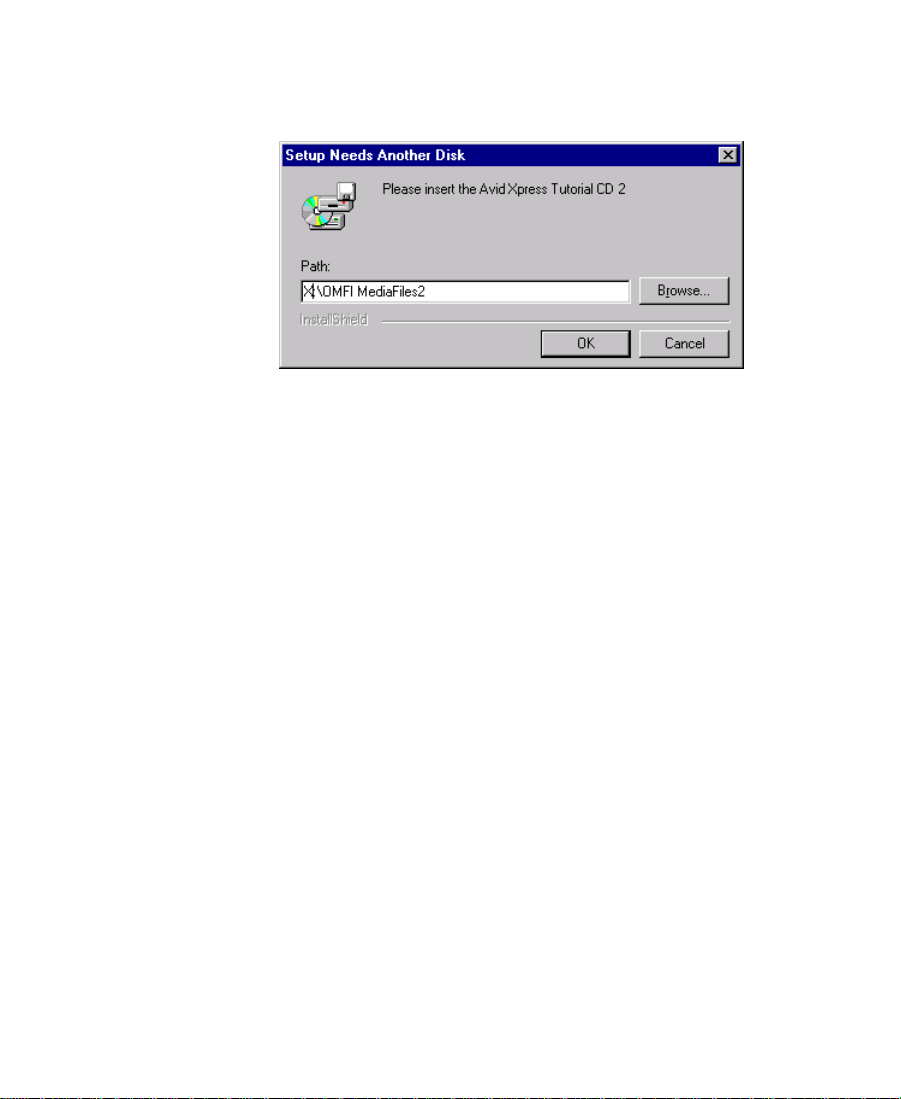
When all the media files on Disc 1 are copied to the drive, the
system prompts you to insert Disc 2. The Setup Needs Another
Disk dialog box appears.
7. Eject the Avid Xpress NTSC or PAL Tutorial Disc 1 of 2 from the
CD-ROM drive.
8. Insert the Avid Xpress NTSC or PAL Tutorial Disc 2 of 2 into the
CD-ROM drive.
9. Click OK.
The system continues to install the rest of the tutorial media files.
10. When the media files on Disc 2 are copied to the drive, a message
appears telling you to reinsert Disc 1.
11. Eject the Avid Xpress NTSC or PAL Tutorial Disc 2 of 2 from the
CD-ROM drive.
12. Reinsert the Avid Xpress NTSC or PAL Tutorial Disc 1 of 2 into the
CD-ROM drive.
13. Click OK.
A final dialog box appears informing you that the installation is
complete.
14. Click Finish, and then click Exit to close the Avid Xpress Tutorial
screen.
15. The installation is complete.
21
Page 22
Installing the Tutorial Files (Macintosh)
The Tutorial CD-ROMs contain all the files you need for the tutorial
sections of this guide. The CD-ROMs contain an NTSC version and a
PAL version of the tutorial media files digitized at a 20:1 resolution.
The tutorial files require two CD-ROMs for NTSC and two for PAL.
The installation procedure is the same for installing either type.
Each CD-ROM has its own installation program and is installed
independently of the other CD-ROM. You will need approximately
1 GB of free space available on your external media drive.
It takes approximately 30 minutes to install the media files from the
CD-ROMs to the external media drive.
To install the Avid Xpress tutorial on a Macintosh system:
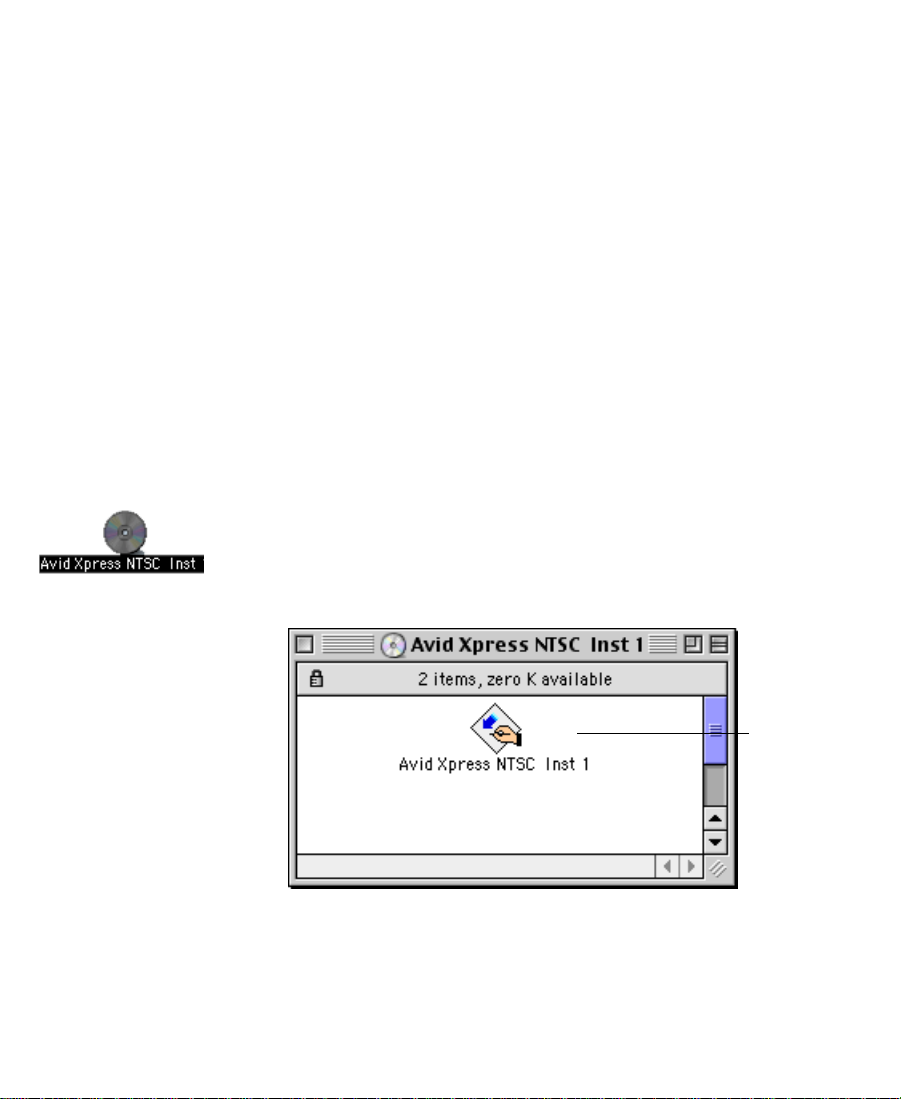
1. Insert Xpress Tutorial Disc 1 of 2 into the CD-ROM drive. The Avid
Xpress NTSC or PAL Tutorial Disc 1 icon appears on your desktop.
2. Double-click the Avid Xpress NTSC or PAL Tutorial Disc 1 icon. A
window opens showing the contents of Disc 1.
22
Avid Xpress
Install icon
Page 23
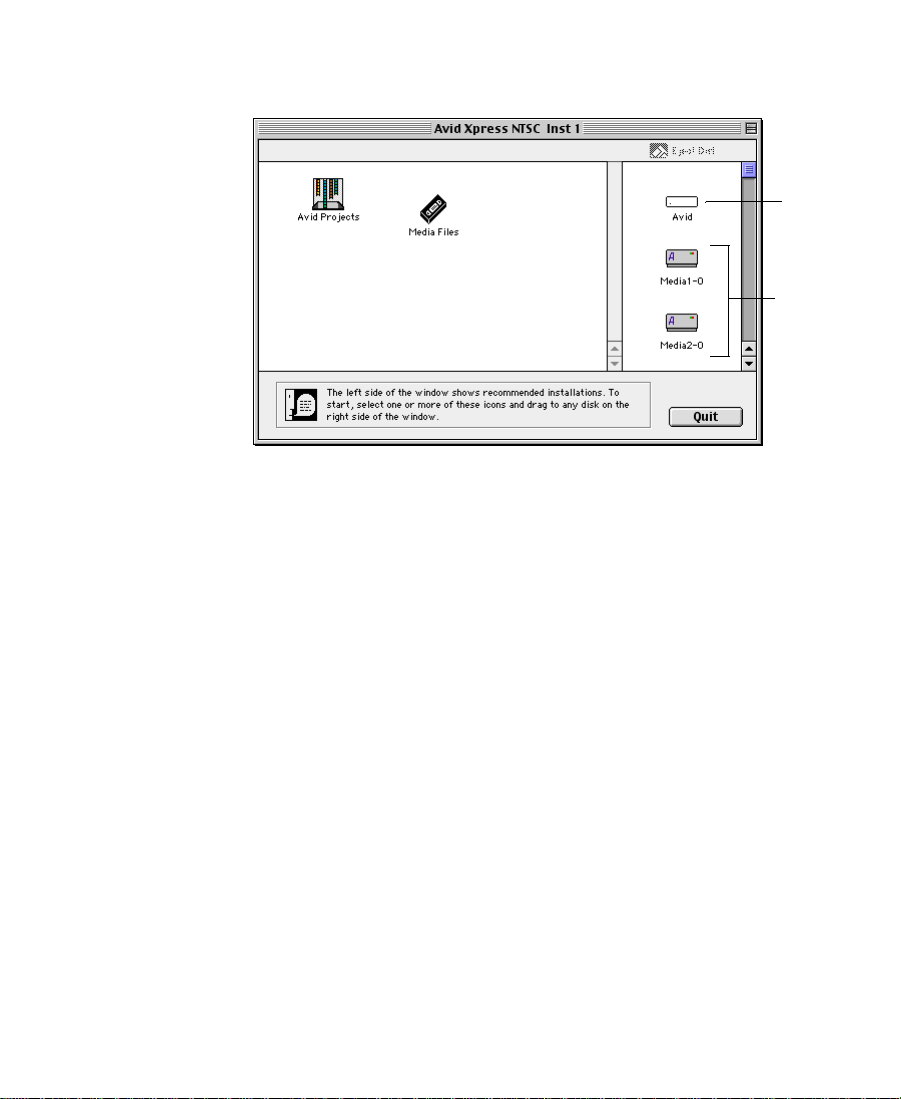
3. Double-click the Xpress NTSC or PAL Install 1 icon. The Xpress
NTSC or PAL Install 1 window opens.
Avid drive
Media
drives
4. Click the Avid Projects icon and drag it to the Avid drive in the
Drive scroll list. The tutorial project installs on your Avid drive
and a message appears asking if you want to continue the
installation.
5. Click Continue.
It takes approximately
20 minutes to copy the
Disc 1 media files to the
external drive.
6. Click the Media Files icon and drag it to any external media drive
in the Drive scroll list. The drive must have approximately 1 GB of
free space.
- If an OMFI MediaFiles folder already exists on the drive, the
media files are copied into the folder.
- If there is no OMFI MediaFiles folder on the drive, a message
appears asking if you want to create an OMFI MediaFiles
folder on the drive. Click Yes. The folder is created and the
media files are copied to the external drive.
When all the media files on Disc 1 are copied to the drive, the
system prompts you to insert Disc 2.
23
Page 24

n
You cannot remove Disc 1 at this time. You must quit the installation
program before you can remove Disc 1 from the CD-ROM drive.
7. Click OK. The system notifies you that the installation of Disc 1 is
complete.
8. Click Quit. The installation program closes.
9. Click the Xpress NTSC or PAL Tutorial Disc 1 icon and drag it to
the Trash. The CD-ROM drive ejects Disc 1.
10. Insert Xpress Tutorial Disc 2 of 2 into the CD-ROM drive. The
Xpress NTSC or PAL Tutorial Disc 2 icon appears on your desktop.
11. Double-click the Xpress NTSC or PAL Tutorial Disc 2 icon. A
window opens showing the contents of Disc 2.
12. Double-click the Xpress NTSC or PAL Install 2 icon. The Xpress
NTSC or PAL Install 2 window opens.
13. Click the Media Files icon and drag it to the same drive where you
installed the Disc 1 media files. The remaining tutorial files are
copied to the drive.
14. When the media files on Disc 2 are copied to the drive, a message
appears telling you that the installation is complete.
15. Click Quit. The installation is complete.
24
Page 25

Starting the Avid System (Windows)
To start Avid Xpress on a Windows system:
1. Click the Start button.
2. Point to Programs.
3. Point to the Xpress folder.
4. Click Xpress.
n
To start the application from the desktop, Avid recommends that you create a
shortcut and place it there. For more information on making a shortcut, see
your Windows documentation.
The application will not start properly if the icon is moved from the Xpress
folder. To start the application from a convenient location, Avid recommends
that you create an alias and place it in a convenient location.
Starting the Avid System (Macintosh)
For more information
on making an alias and
using the Apple menu,
see your Macintosh
documentation.
n
To start Avid Xpress on a Macintosh system:
1. Open the Avid drive by double-clicking the Avid drive icon.
2. Open the Xpress folder.
3. Double-click the application icon or alias. The Avid splash screen
appears.
The Avid Xpress application icon is located in the Xpress folder on the Avid
drive. For most users, the desktop or the Apple menu is a more convenient
location for starting the application.
The application will not start properly if the icon is moved from the Xpress
folder. To start the application from a convenient location, Avid recommends
that you create an alias and place it in a convenient location.
25
Page 26

Electronic Licensing
To accept your Avid Xpress product license electronically:
1. Read the License Agreement, then click the Accept button or the
Decline button at the bottom of the screen.
The agreement appears the first several times you start
Avid Xpress. After several starts, a new button appears at the
bottom of the screen.
2. If you do not want to see the license agreement again, click the
Accept and Don’t Show Again button.
A dialog box appears.
3. Enter the name of your organization in the dialog box, and click
OK.
After Avid Xpress starts, the Open Project dialog box appears, as
described in “Opening a Project” on page 51.
How to Proceed
The following are a few tips for taking full advantage of the
Avid Xpress documentation and other resources:
• Complete the tutorial sections in this guide before starting a
project.
• Begin learning about basic procedures by using the default
settings. As your confidence increases, begin to explore additional
procedures and settings.
• Instead of using the standard menus to find the command you
need in a window, try using shortcut menus. Right-clicking
(Windows) or pressing Ctrl+Shift and clicking (Macintosh) on a
window brings up a context menu that shows the most frequently
used commands for that window.
26
Page 27

Using Help
• Keep the Avid Xpress Quick Reference available during editing
sessions to speed the use of shortcuts and keyboard commands.
• Make a habit of reading Avid’s newsletters, mailings, and other
trade publications.
• Make use of additional training resources provided by Avid
whenever possible, such as classes and instructional videotapes.
For more information, contact Avid at 800-867-2843.
• Check the following Avid Web site for listings of courses,
schedules, and locations:
www.avid.com/services/training/training.html
You can get help and background information for tasks, windows,
dialog boxes, and screen objects through your Avid Help system. Your
Help system is HTML-based and operates in a Web browser. You need
Version 4.5 or higher of Microsoft
system, Avid recommends Internet Explorer Version 5 or higher.
®
Internet Explorer. On a Macintosh
Setting Up Your Browser
You must have cookies enabled in your browser to use several
capabilities of your Avid Help system. Avid does not retain personal
information about you or your system other than your frequently
visited Help topics.
To enable cookies:
1. Choose Internet Options from the Internet Explorer Tools menu.
2. Click the Security tab.
3. Click the Custom Level button.
4. Scroll down to the Cookies section.
27
Page 28

5. Make sure the Enable button is selected.
6. Click OK, and then click OK again.
Getting Help for Windows and Dialog Boxes
The Help system provides you with context-sensitive Help for
windows and dialog boxes, such as tools and settings.
To get Help for windows and dialog boxes:
1. Make sure the Avid application is active.
2. Position the mouse pointer anywhere in the window or dialog box
for which you want help.
3. Press the F1 key (Windows) or the Help key (Macintosh) on the
keyboard.
If there is no information about a window or dialog box, a
Navigation Canceled message appears in the browser. Open the
Help and use the Search or Index functions to look for information
on that window or dialog box.
Getting Help for Screen Objects
You can use What’s This? Help to find out about buttons and other
screen objects.
To get help for screen objects:
1. Do one of the following:
- (Windows) Using the right mouse button, click the screen
object (for example, a button).
- (Macintosh) Ctrl+Shift+click the screen object (for example, a
button).
A pop-up menu appears.
28
Page 29

2. Choose What’s This? from the pop-up menu.
A browser window opens that explains how you use the item.
Many windows include a link (marked by underlined text) to
more information.
n
(Windows only) For some dialog boxes, such as Import and Print, use the
Question Mark button to access What’s This? Help.
Keeping Help Available (Windows)
When you access a Help topic and then return to the Avid application,
the Help browser disappears behind the Avid system.
To keep Help available, you can use one of the methods in the
following topics:
• Restoring Help from the Taskbar (Windows)
• Resizing the Application (Windows)
• Using Alt+Tab (Windows)
• Printing Help Topics
Restoring Help from the Taskbar (Windows)
You can restore the Help from the taskbar at the bottom of the screen.
All your active applications are represented by buttons on the taskbar.
To restore Help, click the browser button on the taskbar, and the Help
reappears.
If you can’t see the taskbar, you might have set a property that hides it.
29
Page 30

To keep the taskbar on top:
1. Right-click in an area of the taskbar where there are no buttons.
2. Choose Properties from the pop-up menu.
The Taskbar Properties dialog box appears.
3. Select Always on top.
4. Deselect Auto hide.
5. Click OK.
The taskbar remains visible at all times.
n
If you want the taskbar to appear only when you pass the pointer over the
bottom of the screen, select Auto hide along with Always on top.
Resizing the Application (Windows)
To resize the application and leave Help available:
1. With Help active, drag the purple Help title bar to the top of the
screen.
2. Click in the Avid application.
The Help browser disappears behind the Avid system.
3. Click the Restore button in the top right corner of the application.
The application shrinks slightly and reveals the Help browser
behind it.
This allows you to click back and forth between the application
and the Help browser without significantly reducing the size of
the Avid application.
30
Page 31

Using Alt+Tab (Windows)
To use Alt+Tab:
1. Press and hold the Alt key.
2. Press and release the Tab key.
A window appears containing icons and names for all the
applications currently started on your system. A box surrounds
the active application.
3. Continue to hold the Alt key and press and release the Tab key
until the box surrounds the Help browser icon, and then release
both keys.
Finding Information Within the Help
You see the Help browser when you open Help from the Help menu.
The left frame of the Help browser includes a Contents list and buttons
for several other methods of finding information.
Using the Contents List
n
The Contents button provides a list of topics covering the entire Help
system.
To view the Contents list by using the Contents button, do one of the
following:
• From the Help menu, choose Avid Xpress Help, and then click the
Contents button.
• From a Help topic, click the Contents button.
To display a topic, double-click the topic title in the Contents list.
The Contents displays only the top-level topics. Many entries link to
subtopics with related information or procedures.
31
Page 32

Using the Index
The Index button provides an alphabetized list of entries, like the
index of a printed book.
To find topics by using the Index button:
1. From the Help menu, choose Avid Xpress Help, and then click the
Index button (or click the Index button from a Help topic).
2. From the alphabet at the top, select the letter that begins the topic
you want to find (for example, click A to jump to index entries
listed under audio).
3. Scroll through the topics beginning with that letter until you find
the topic you want.
4. Click the number to the right of the index entry. The number
indicates how many topics that index entry has associated with it.
The topic opens in the right frame of the browser.
Using the Search Feature
The Search button lets you search the entire Help system for words or
phrases, and then lists topics that include those words or phrases.
To search for topics by using the Search button:
1. From the Help menu, choose Avid Xpress Help, and then click the
Search button (or click the Search button from a Help topic).
2. In the text box, type the word or phrase that you want to find. You
can type up to three words, not including invalid words like “the”
or misspellings.
3. Press Enter (Windows) or Return (Macintosh) or click the Search
button.
A list shows topics that contain the word or words for which you
searched.
32
Page 33

n
Do not type quotation marks or asterisks in the text box.
4. Click a topic in the list.
The topic opens in the right frame of the browser.
Using the Glossary
The Glossary defines and explains many terms common to the
industry. Some entries might not apply to your particular system.
To use the Glossary:
1. Click the Glossary button.
2. Click the letter that begins the term or concept for which you are
searching.
3. Scroll through the section to find your term.
4. Click links to see related information.
Printing Help Topics
You can print a Help topic if you need to refer to it during a
complicated procedure or for reference later.
To print a Help topic:
1. Open or click the topic to make it active.
2. Choose Print from the browser File menu, or click the Print button
in the browser toolbar.
3. Select the print options.
4. Click OK (Windows) or Print (Macintosh).
You can print a topic by clicking the right mouse button and choosing
Print from the pop-up menu (Windows only).
33
Page 34

Using Online Documentation
The Avid Xpress Online Publications CD-ROM includes:
• Avid Xpress User’s Guide
• Avid Xpress Effects Guide
• Avid Xpress Getting Started Guide (this book)
• Avid Xpress Help system
n
The books are PDF files. You can view them with the
Adobe Acrobat
The online version of the books enables you to:
• Navigate through books by using bookmarks and hyperlinks.
• Speed up information retrieval by performing keyword searches.
• Annotate the books with your own notes.
• Zoom in on a page, enabling closer review of text and images.
• Print any or all pages.
• View the books with full-color graphics.
• View movies that illustrate Avid Xpress effects.
Avid gives you permission to print up to three complete copies of each book.
Reader, which you can install from the CD-ROM.
34
Page 35

CHAPTER 2
About Avid Xpress
Welcome to the world of nonlinear digital video editing, in which you
can create professional-quality video programs from your desktop.
The Avid system allows you to change any part of your video program
at any time, until you create your final program on tape. With
Avid Xpress, you can be as flexible and as creative as possible when
editing your video programs.
This chapter explains the basic concepts and terminology that you
need to be familiar with to edit video with Avid Xpress. This chapter
contains the following sections:
• Video Editing with Avid Xpress
• Avid Xpress Essentials
• The Avid Xpress File System
35
Page 36

Video Editing with Avid Xpress
In traditional video editing, you electronically copy video from a
source tape to an edit master tape. The process is tedious, and it is
difficult to make changes to your work.
By contrast, when you edit with Avid Xpress, you don’t have to dub
footage onto a master videotape. Instead, you manipulate Avid Xpress
“clips” that reference your digitized audio and video material. This
allows you to experiment with every edit you make through multiple
generations. You can trim, move, delete, duplicate, or modify
individual frames or entire segments, and immediately see the results.
When you play back your work, the system accesses and plays the
appropriate portions of the digitized video and audio.
The following is a summary of the Avid Xpress editing process:
1. Collect source material for your project.
Collect your source video and audio. You can start with any video
format — Beta SP, 3/4 inch, 8mm, Hi-8, VHS, S-VHS, or any other.
You can also incorporate still images or other computer-generated
files, including computer graphics, still-image files, animations,
sound effects, or AVI movies.
2. Digitize your source material.
Play your source videotapes on a video deck, and digitize them
right onto your hard disk. Import computer-generated files into
your project — graphics, still images, animations, sound effects,
synthesized music, AVI movies, and special effects.
36
Page 37

3. Create a rough cut of your video.
Play your digitized source material in Avid Xpress. Organize your
sources, and lay out a storyboard, using representative clip
frames. Mark sections of your digitized sources, and edit them
together. Reorder your material, cut and paste sections, and trim
the transitions between clips. Immediately view each change you
make. Save the changes that you like; easily undo the changes that
you don’t like.
4. Refine your edits.
Use Avid Xpress to enhance your program with special effects,
such as dissolves, wipes, filters, and video overlays. Add graphics
and animations, CD-quality sound, and a voice-over. Incorporate
titles and credits.
5. Record your finished program.
Record your final program from Avid Xpress onto videotape. Save
a copy of your program in AVI format for CD-ROM or network
distribution. Modify and record a new version of your program at
any time.
37
Page 38

Avid Xpress Essentials
This section explains the terms and concepts that you will need to
know in order to understand the Avid Xpress editing process.
Media Files
Material is stored in
media files.
When you digitize source material from a video or audio deck, or
when you import computer graphic files into your Avid Xpress
project, the material is saved in media files on your system’s external
media drive. One media file is created for each track of video or audio.
Three media files — for one track of video and two tracks of audio —
are created for a video with a stereo sound track.
OMFI
Video deck
Media drive
Master clip
MediaFiles
38
Page 39

Clips
Clips point to media
files.
Subclips
Subclips are sections
that you mark within
clips.
c
You do not manipulate media files directly. Avid Xpress creates
another file, called a master clip, on your system’s internal drive when
you digitize media. The master clip is simply a pointer to its
corresponding media file.
While editing your video, you create other clips, such as graphic clips
and effects clips. You make your edits by modifying clips — the
corresponding media files remain unchanged. This allows you to
easily create and undo edits without destroying your original material.
Because you work with clips instead of media files, you can create
virtually unlimited versions of a program without creating multiple
copies of the extremely large source material.
Subclips are specific sections of clips that you want to use in your
program. You create a subclip by marking IN and OUT points in a clip
and then dragging this material to the bin. The subclip is composed of
the material between the IN and OUT points.
A subclip points to a media file’s master clip. You must not delete
the master clip from which a subclip was created. If you delete the
master clip, you will lose the information in the subclip.
Clip
Subclip
39
Page 40

Sequences
A sequence is a
program created from
one or more clips and
subclips.
You can join different clips and subclips to create a sequence. A
sequence can include edited material from source clips and subclips,
new clips created when you add effects during the editing process,
and material from other sequences. Your final program will be
composed of one or more sequences, depending on how it’s most
convenient for you to work.
A sequence is composed of marked material from clips, subclips, and
other sequences. The material outside the IN and OUT points remains
in the media file’s master clip. This material is very important; you
need it to trim cuts and create transition effects between segments. For
more information about trimming cuts, see “Trimming” on page 130.
For more information about transition effects, see the Avid Xpress
Effects Guide.
Like a clip, a sequence contains pointers to media files. If you delete
one of the clips used to create a sequence, the sequence still works
because the sequence contains its own pointers to the media files.
Sequence
40
Clip
Subclip
OMFI MediaFiles
Page 41

Your Program
The program is your
final video creation.
Bins
You organize your
footage in bins.
Your Project
You edit within a
project. A project
consists of one or more
bins, normally
containing footage for a
specific program.
A program consists of one or more sequences. You use clips, subclips,
and sequences to build a program. Your program is represented by the
Timeline. A program is your final creation; you can output your
program to tape when you are finished.
Even though your media files contain the actual source material for
the program, you never manipulate the media files directly. Instead,
you move, copy, and edit clips, subclips, and sequences.
Clips, subclips, and sequences are organized and stored in bins.
Traditionally, a bin is a place where film editors store reels of film. In
Avid Xpress, bins are tools for organizing the material for a project.
You gather the material you need to create a program in a project. Each
project contains information about bins, clips, subclips, sequences, and
the program in the Timeline. You might have several projects on your
system, but you can only work on one project at a time.
The Attic Folder
For a complete
description of retriev ing
bins from the Attic
folder, see “Attic folder:
retrieving bins from” in
the Help index.
Avid Xpress saves copies of your current project and its bins at regular
intervals and whenever you save or close a project or bin. These
auto-save files are stored in the Attic folder in the Avid Xpress
application folder. If at any time you lose work due to a power outage
or system error, open the Attic folder and look for a project or bin of
the same name with the file name extension .bakxx, where xx is the
version number. For example, the first backup file for the bin Rough
Cut would be named Rough Cut.bak01. Later versions would be
named Rough Cut.bak02, Rough Cut.bak03, and so on.
41
Page 42

The Avid Xpress File System
The following illustration shows the different kinds of Avid Xpress
files and where they are stored. The Avid Xpress application folder is
stored on your internal hard drive (Windows) or Avid drive
(Macintosh). The Avid Projects folder is stored on the same disk as the
Avid Xpress application folder. Media files must be stored on a
separate, Avid-approved media drive, which is guaranteed to be fast
enough to support real-time video playback.
Avid Xpress Avid Projects
(application folder)
Media drive
OMFI MediaFiles
Settings
Attic
Avid Xpress
Supporting
Files
42
Bin A
Project subfolder
Project
Bin B
Page 43

CHAPTER 3
Starting a Project
The Project window provides controls in three different display modes
for structuring and viewing important information about your current
project. These include a display of bins and folders associated with the
project, a list of all settings, and basic information about the format of
the project and use of system memory and hardware.
Starting a project is described in the following sections:
• About Avid Projects and Avid Users Folders
• Using the Bins Display
• About Trash
• Using the Settings Display
Tutorial: Starting a Project contains the following sections:
• Starting the Application (Windows)
• Starting the Application (Macintosh)
• Opening a Project
43
Page 44

About Avid Projects and Avid Users Folders
Avid Projects and Avid Users folders allow you to move whole
projects or selected project and user settings between systems by
copying and moving files on your desktop.
When you create a new project or user, the system creates the
following files and folders:
• When you create a new user, the system creates three items: a user
profile file, a User settings file, and a user folder containing the
two. Each item is given the user name you provide. This new
folder is stored in the Avid Users folder on your internal hard
drive in \Program Files\Avid\Avid Xpress (Windows) or on the
Avid drive (Macintosh).
• When you create a new project, the system creates three items: a
project file, a Project settings file, and a folder containing the two,
each of which is given the project name you provide. This new
folder is stored in the Avid Projects folder on your internal hard
drive in \Program Files\Avid\Avid Xpress (Windows) or on the
Avid drive (Macintosh).
44
Page 45

Your settings are initially set to the default values. As you work, the
files maintain current settings or are adjusted to your use, while the
project folder fills with bin files.
Using the Bins Display
Bins are windows that contain titles, thumbnails (small pictures that
represent clips), and information about the material you digitize.
These editable files are called master clips. They refer to the actual
media files created when you digitize source material. While the
physical media are stored on external hard drives, the master clips that
refer to that media reside in the bin. Bins also store the sequences,
subclips, group clips, and effects clips that you create during a project.
The Project window allows you to make a new bin, close it, reopen it,
and move clips among these bins. You can also open bins created for
different projects.
After you select a user and project in the Open Project dialog box, the
Project window opens. To view a complete list of bins associated with
the project, click the Bins button in the Project window. A list of bins
appears.
Bins button
Open bin
45
Page 46

About Trash
From the Bins list you can examine the number, names, size, and
location of bins, and you can also open bins. Dotted bin icons next to
bin names indicate bins that are currently open; solid icons indicate
closed bins.
Avid stores deleted bins in the Trash. The Trash icon is located in the
Project window and only appears when you delete a bin. You can use
the Trash to retrieve bins you deleted in error, or empty the Trash to
create more disk space.
To empty the contents of the Trash:
1. Click the Trash icon to display its contents.
2. Click the Bin Fast Menu button on the bottom of the Bin window.
3. Choose Empty Trash.
46
Trash icon with file in trash
Page 47

c
Clips, subclips, and effects that are in a bin appear in the Trash after
you delete the bin. However, if you select a clip, subclip, or effect
directly and press the Delete key, the item does not appear in the
Tr as h.
Using the Settings Display
From the Settings display, you can view, select, open, and alter various
User, Project, and Site settings, as described in this section.
To view the Settings display, click the Settings button in the Project
window. The Settings scroll list appears.
Settings button
47
Settings type
Page 48

Three types of settings are displayed in the Settings scroll list:
• User settings are specific to a particular editor. User settings
reflect individual preferences for adjusting the way you view the
Avid Xpress system. Individual User settings are stored in each
user folder within the Avid Users folder on your internal hard
drive in \Program Files\Avid\Avid Xpress (Windows) or on the
Avid drive (Macintosh).
• Project settings are directly related to individual projects. When a
Project setting is changed, it affects all editors working on the
project. Specific Project settings are stored in each project folder
within the Avid Projects folder on your internal hard drive in
\Program Files\Avid\Avid Xpress (Windows) or on the Avid
drive (Macintosh).
For a complete
description of all
settings and their
options, see
“Settings:described” in
the Help index.
• Site settings establish default parameters for all new users and
projects on a particular system. These can apply to particular
configurations of equipment installed at the site, for example,
specifications and node settings for an external switcher. They can
also include other User or Project settings that you copy into the
Site Settings window. Site settings are stored in a separate Settings
folder in the Avid Xpress folder on your internal hard drive in
\Program Files\Avid\Avid Xpress (Windows) or on the Avid
drive (Macintosh).
48
Page 49

Tutorial: Starting a Project
In this tutorial, you start Avid Xpress, create a user, and select a
project. Before starting this procedure, make sure you have installed
the Tutorial files. See “Installing the Tutorial Files (Windows)” on
page 18 or “Installing the Tutorial Files (Macintosh)” on page 22.
Starting the Application (Windows)
To start Avid Xpress on a Windows system:
1. Click the Start button.
2. Point to Programs.
3. Point to the Xpress folder.
4. Click Xpress.
After a few moments, the Open Project dialog box appears.
n
To start the application from the desktop, Avid recommends that you create a
shortcut and place it there.
49
Page 50

n
If the license agreement window opens, click either Accept or Accept and
Don’t Show Again.
For this tutorial, you will use the Boat Shop NTSC or Boat Shop PAL
project (along with its settings file) that you installed into the Avid
Projects folder in “Installing the Tutorial Files (Windows)” on
page 18.
Starting the Application (Macintosh)
To start Avid Xpress on a Macintosh system:
1. Double-click the desktop alias of the Xpress folder icon to open the
folder.
2. Double click the Avid Xpress application icon to start the program.
After a few moments, the Open Project dialog box appears.
n
If the license agreement window opens, click either Accept or Accept and
Don’t Show Again.
50
Page 51

For this tutorial, you will use the Tutorial NTSC or Tutorial PAL
project (along with its settings file) that you installed into the Avid
Projects folder in “Installing the Tutorial Files (Macintosh)” on
page 22.
Opening a Project
To open a project, you create a new user and select an existing project.
Creating a User
To create a new user:
1. Click the New User button in the Open Project dialog box.
The New User dialog box appears.
2. Type your name and click OK.
The Open Project dialog box reappears with your name
highlighted in the list of users.
51
Page 52

Selecting a Project
To select a project:
Click on the Project
window and press the
F1 key (Windows) or
press Ctrl+Shift and
click (Macintosh) to
bring up the contextsensitive Help for the
Project window.
1. Select Boat Shop NTSC (Windows) or Tutorial NTSC (Macintosh),
or Boat Shop PAL (Windows) or Tutorial PAL (Macintosh) from
the Avid Projects list and click OK.
The Project window opens. It lists the bins, or storage areas,
created to hold the clips and sequences you will need for this
tutorial.
2. Double-click the icon to the left of Getting Ready to Edit to open
the bin.
This bin contains the clips of the source footage you will use to
begin to build the Tutorial sequence.
You’ve finished this tutorial. The next tutorial is “Tutorial: Getting
Ready to Edit” on page 77. Be sure to read Chapter 4 and the
introductory material in Chapter 5 before continuing the tutorial.
52
Page 53

CHAPTER 4
Digitizing
This chapter discusses the digitizing process and related tools.
Digitizing is described in the following sections:
• Selecting Settings
• About the Digitize Tool
• About the Audio Tool
• About the Video Input Tool
• Digitizing Preparations Check List
• About Digitizing
53
Page 54

Selecting Settings
For more information
on the selecting
settings, see
“Digitizing:
settings for” in the Help
index.
c
A number of settings have a direct bearing on the digitizing process.
Before digitizing, review the following options for General Settings,
Deck Settings, and Digitize Settings:
• Drive Filtering Based on Resolution causes the system to dim all
drives for which speed capabilities are unknown or untested in a
particular video resolution. This setting is selected by default in
the General Settings dialog box.
The Avid system does not prevent you from using non-Avid drives,
but their reliability cannot be assured.
• Deck Configuration Settings allow you to establish deck control
parameters.
• Deck Preferences include various options for source deck, sync
mode, preroll, drop/non-drop-frame preference, and deck control.
• Digitize Settings include essential options for digitizing and
batch digitizing, including general parameters for capture of the
source material, and special conditions such as digitizing across
timecode breaks or capturing a single video frame.
54
Page 55

About the Digitize Tool
For more information
on the Digitize tool, see
“Digitize tool” in the
Help index.
Record
Channel Selection
Video Input
Message bar
Clip name
and comment
Bin
Target Drive
Single/Dual
Drives
Deck controls
The Digitize tool provides controls for digitizing your footage.
To open the Digitize tool, choose Digitize from the Tools menu. The
Digitize tool opens.
Digitize
indicator
Trash
Digitize/Log Mode
Toggle Source
Video Input Tool
Audio Tool
Enable
Timecode
Audio Input
Resolution
Color/Monochrome
Selection button
Drive time
available
Sets specific
timecode for
digitizing
Deck Selection
Source Tape
display
Custom Preroll
The Digitize tool has the following options:
• Audio Input pop-up menu allows you to choose Analog,
AES/EBU, or S/PDIF.
• Audio Tool button opens the Audio tool.
55
Page 56

• Bin pop-up menu lets you choose a target bin as the destination
for the master clips created when you digitize on-the-fly. You can
also choose a target bin containing the logged clips you will use to
batch digitize your media.
• Channel Selection panel lets you select which video and audio
tracks you want to digitize from the source tape and whether you
want to record timecode.
• Clip name and comment allows you to enter a clip name and any
other information about the clip.
• Color/Monochrome Selection button allows you to filter out all
of the color from each frame of video when digitizing.
• Custom Preroll check box allows you to select a preroll of 1 to 30
seconds.
• Deck controls operate the deck.
• Deck Selection pop-up menu lets you choose the deck you want
to play from. It also lets you check and reset serial port
connections to decks.
• Digitize indicator flashes on and off while you are digitizing.
• Digitize/Log Mode button lets you switch between Digitize mode
and Log mode.
• Drive time available is displayed after you select a video
resolution and target a drive or drives for the digitized media.
• Enable Timecode button allows the system to digitize timecode
from the source tape. If this is deselected, the system digitizes the
time-of-day timecode.
• Message bar displays information on the current status of the tool.
• Record to Timeline allows you to digitize footage directly from
tape into a sequence loaded in the Timeline in one step. Recording
to the Timeline works best when you are digitizing on-the-fly.
• Red Record button begins the digitizing process.
56
Page 57

• Resolution pop-up menu next to the Bin pop-up menu lets you
choose a video resolution.
• Single/Dual Drives button lets you target a single or separate
media drives for digitizing the audio and video for each clip.
• Source Tape display shows the name of the source tape.
• Target Drive pop-up menu lets you choose the target drive.
• Toggle Source button switches the deck online or displays the
External Timecode icon, which allows you to select LTC
(longitudinal or linear timecode).
• Trash button stops the digitizing process and deletes the digitized
media.
• Video Input pop-up menu allows you to choose Composite,
Component, or S-Video.
• Video Input Tool button opens the Video Input tool.
57
Page 58

About the Audio Tool
For more information
on the Audio tool, see
“Audio tool” in the
Help index.
In/Out
Reset Peak
Track
Digital VU scale
The Audio tool controls parameters for audio input and output.
To open the Audio tool, choose Audio Tool from the Tools menu or
click the Audio Tool button in the Digitize tool. The Audio tool opens.
Click the Output and Setup buttons to fully open the Audio tool.
Output
Meters
Setup
Peak/Hold
Analog VU scale
Output
display
Setup
display
Channel
Selectors
The Audio tool has the following options:
• Analog VU scale on the right displays a fixed range of values that
you can conform to the headroom parameters of your source
audio.
• Channel Selector pop-up menus let you map tracks in the
sequence to output channels.
• Digital VU scale on the left displays a fixed range of values from
0 to –90 decibels (dB), according to common digital peak meter
standards.
58
Page 59

• In/Out buttons switch the meter displays for each channel
between input levels from a source device and output levels to the
speakers and record devices. I indicates Input and O indicates
Output.
• Meters dynamically track audio levels for each channel as
follows:
- Meters show green below the target reference level (the
default reference level is –14 dB on the digital scale).
- Meters show yellow for the normal headroom range, above
the reference level to approximately –3 dB.
- Meters show red for peaks approaching overload, between
–3 dB and 0 dB.
- Thin green lines at the bottom indicate signals below the
display range.
• Output button displays the Output display.
• Output display contains a single slider control for raising or
lowering global audio output.
• Peak/Hold button allows you to select options for customizing the
meter displays, and setting and playing back the internal
calibration tone.
• Reset Peak button resets the current maximum peak
measurements. It also stops the playback of the internal
calibration tone.
• Setup button displays the Setup display.
• Setup display contains information and controls for adjusting
various audio hardware parameters.
• Track indicator displays the audio track number.
59
Page 60

About the Video Input Tool
For more information
on the Video Input tool,
see “Calibrating:video
input” in the Help
index.
Input
Waveform
Monitor
button
The Video Input tool controls parameters for incoming video.
To open the Video Input tool, choose Video Input Tool from the Tools
menu or click the Video Input Tool button in the Digitize tool. The
Video Input tool opens. Click the Internal Waveform Monitor and
Vectorscope Monitor buttons to fully open the Video Input tool.
Vectorscope VectorscopeInternal
Monitor
button
Internal
Waveform
monitor
monitor
Settings
Slider
Consumer Source
and 100% Bars
Preset buttons
The Video Input tool has the following options:
• 100% Bars is used if the source displays 100% bars for calibration.
• Consumer Source is selected if you are using a consumer-grade
video deck (VCR), or a deck that has no built-in time-based
corrector.
• Input pop-up menu lets you choose either Composite,
Component, or S-Video input source.
60
Page 61

• Internal Waveform Monitor button lets you adjust luminance
values.
• Preset buttons are lit when the factory preset levels are displayed.
When you click a lit Preset button, it dims and the slider returns to
the most recent manual level setting.
• Settings pop-up menu lets you save the Site settings for an
individual tape each time you calibrate bars.
• Sliders let you change the value for Black, Y Gain, Saturation, and
Hue.
• Vectorscope Monitor button lets you adjust hue and saturation.
Digitizing Preparations Check List
1. Consider striping your drives in advance according to the
Avid Composer Products Setup Guide if you are working on a
complex project with multiple streams of video and highresolution images.
2. Consider labeling each of your external drives. If there are no
labels, you can add a specific name to help identify the
information on the drive, for example, Boat Shop (G:). When
digitizing audio, you must keep the audio files on a separate
external drive from the uncompressed video files. To keep both
the audio and video on separate drives, label your drives, for
example: Audio (F:) and Media (G:).
3. Check your hardware configurations: power switches, cable
connections, and remote switch on the source deck for deck
control (for hardware configurations, see the Avid Composer
Products Setup Guide).
61
Page 62

4. In the Project Settings scroll list, make sure you have selected the
options you want in the General Settings, Deck Settings, Deck
Preferences, Deck Configuration, and Digitize Settings dialog
boxes.
5. Insert a tape into the deck and set up the Digitize tool for track
selection, target bin, target drives, source tape, and source deck.
6. Use the Audio tool to set the audio input levels.
7. Use the Video Input tool to set the video input levels; save your
video settings for future use.
About Digitizing
You can digitize your source material in one of the following ways:
• Digitize and log at the same time
• Batch digitize
• Redigitize
Digitizing and Logging at the Same Time
When you digitize without entering log information in a bin ahead of
time, the system creates clips and associated media files while you
digitize. Digitizing in this manner involves manually cueing source
footage with an Avid-controlled deck, using the deck controls in the
Digitize tool.
For more information
on digitizing, see
“Digitizing” in the Help
index.
There are several ways to digitize and log at the same time. They are:
• Digitizing from a mark IN to a mark OUT. This method lets you
specify the exact timecode location to begin and end digitizing.
You can also specify only a mark IN or mark OUT, and enter the
other mark on-the-fly.
62
Page 63

Batch Digitizing
• Digitizing on-the-fly. This method is easier than setting marks,
but it is less precise. It involves using the deck controls in the
lower left corner of the Digitize tool to cue, play, and stop the
source footage manually while digitizing.
• Autodigitizing. This method requires the least amount of
supervision and effort, but usually calls for more digitizing time
and disk storage space. It involves playing each source tape from a
cue point near the beginning and letting the system digitize the
entire tape, automatically naming and entering each clip into the
bin.
For more information
and procedures, see
“Batch digitizing” in
the Help index.
Redigitizing
For more information
and procedures, see
“Redigitizing” in the
Help index.
Once you have imported a log or manually logged a group of clips
into a bin, you can automate the digitize process by using the
Avid Xpress batch-digitizing capabilities. To batch digitize, source
tapes must have timecode.
Redigitizing is the process of capturing previously digitized source
footage based on existing clips and sequences. Redigitizing uses the
batch-digitize process and does not require extra logging time because
the clip information for such things as source tracks, timecodes, and
resolution settings already exists in the bin.
63
Page 64

CHAPTER 5
Getting Ready to Edit
Before starting an editing session, you need to understand how to
organize and manipulate your clips.
Preparing to edit is described in the following sections:
• About Bin Views
• Controlling Playback
• Marking IN and OUT Points
• Creating Subclips
Tutorial: Getting Ready to Edit contains the following sections:
• Viewing Clips
• Playing Clips
• Marking Edit Points
• Subclipping
• Clearing IN Points and OUT Points
64
Page 65

About Bin Views
You can use three views for working with clips in a bin: Text view,
Frame view, and Script view.
The Bin Fast menu
displays the same menu
as the Bin menu on the
toolbar along the top of
your screen.
Column headings
Object icons
Bin Fast
Menu button
Frame View button
Script View button
•In Tex t v ie w, clips are displayed in a database text format that uses
columns and rows, with icons representing the various objects.
You can save various arrangements of columns, text, and objects
as customized views by using the Bins settings in the Project
window and the Bin Fast menu.
To enter Text view, click the Text View button (T) in the lower left
portion of the bin.
Bin View pop-up menu
Text View button
65
Page 66

•In Frame view, each clip is represented by a single picture frame,
with the name of the clip. You can play back the footage in each
frame, change the size of frames, and rearrange frames in any
order within the bin.
To enter Frame view, click the Frame View button (F) in the lower
left portion of the bin.
66
Page 67

•In Script view, the Avid system combines the features of Text view
with Frame view, and adds space for typing notes or script. The
frames are displayed vertically on the left side of your screen with
a text box to the right of each clip. Clip data is displayed above the
text box.
To enter Script view, click the Script View button (S) in the lower
left portion of the bin.
To the right of the Display View buttons in Text view, is a pop-up
menu of titles for different Bin views. Bins have the following default
views that are automatically loaded:
• Statistics view uses the standard statistical column headings
derived from information established during capture, such as
Start and End timecodes, Duration, Resolution, and so on.
• Custom view allows you to create and save customized views.
The only required heading is the clip name, displayed by default.
You can customize the view by adding, hiding, or rearranging
column headings.
67
Page 68

Controlling Playback
There are several ways to play, view, and cue clips. You can:
• Instantly access frames or move through footage by using the
position indicator within the position bar under the Composer and
Source pop-up monitors
• Play, step (jog), or shuttle through footage by using the buttons
that appear below the Composer and Source pop-up monitors
• Play, step, or shuttle by using keyboard equivalents
Using Position Bars and Position Indicators
You can quickly access frames within a clip that’s been loaded into a
monitor, or move through the footage by using the position indicators
that appear in the position bars under the Composer or Source pop-up
monitors and in the Timeline when you are viewing a sequence.
• You can move the position indicator within the position bar under
the Composer or Source pop-up monitors by clicking anywhere in
the position bar, or by dragging the position indicator to the left or
right. The speed with which you drag the position indicator
determines the speed at which you move through the footage.
Position bar
Position indicator
• In the Timeline, the position indicator shows your position within
the sequence. It is always in the same position as the position
indicator in the Composer monitor’s position bar, and works in
the same way. You can click anywhere in the Timeline to relocate
the position indicator, or you can drag the position indicator
through footage at varying speeds.
68
Page 69

Position indicator in Timeline
Using Buttons
Play Button
• You can go directly to the beginning or end of a clip or sequence
by clicking at the far left or far right of the clip or sequence.
You can use the buttons that appear below the Composer and Source
pop-up monitors to play and step through your footage. You can also
use the keyboard to manipulate footage.
The Play button works much like the Play button on a VCR. With a
clip loaded in a monitor, the Play button plays your footage at a
normal rate. During playback, the Play button acts as a Pause button.
The Play button appears by default in the buttons below the
Composer and Source pop-up monitors.
For more information
on using the Play
button, see “Play
Button:using” in the
Help index.
When viewing sequences in the Composer monitor, you can play only
video and audio tracks that are currently monitored in the Track
Selector panel.
69
Page 70

Step Buttons
You can also use the Step buttons under either monitor to jog or play
the clip backward or forward in 1-frame increments.
If you press the Alt key (Windows) or the Option key (Macintosh)
while clicking either button, you can advance 10 frames forward and
10 frames backward.
Using the Tool Palette
The Tool palette provides additional buttons for editing and
navigating.
Tool palette without text
You can view the Tool palette by clicking the Fast Menu button under
the Composer or Source pop-up monitors. Click the Tool palette and
drag it to any other location on the screen for easy access. If necessary,
resize the Tool palette so that it displays both rows of buttons.
To view the Tool palette with text, make sure the Show Labels in Tool
Palette option is selected in the Interface Settings dialog box.
Tool palette with text
70
Page 71

Using the Keyboar d
The default keyboard contains all of the buttons discussed so far as
well as several additional ones. To access the keyboard, choose
Keyboard from the Project Window Settings scroll list.
Play button
Pause button
J-K-L Keys (Three-Button Play)
The J-K-L keys on the keyboard allow you to play, step, and shuttle
through footage at varying speeds. This feature, also referred to as
three-button or variable-speed play, allows you to use three fingers to
manipulate the speed of playback for greater control.
To shuttle through the footage by using the J-K-L keys on the
keyboard:
1. Load a clip or sequence into the Composer or Source pop-up
monitors.
Play/Step/Shuttle buttonsStep buttons
End key
Home key
2. Use the following keys to shuttle at varying speeds:
- Press the L key to move forward through the footage at
normal speed. Press once to increase the forward speed
2 times, twice to increase it 4 times, and three times to increase
it 8 times normal speed, as desired.
- Press the J key to move backward at the same shuttle speed
increments.
71
Page 72

- Press and hold the K and L keys together for slow forward.
Mouse Jog
button
- Press and hold the K and J keys together for slow backward.
3. To pause the shuttling, press the K key or press the space bar.
Home, End, and Arrow Keys
You can use the Home, End, and arrow keys on the keyboard to move
through footage when a clip is loaded in a monitor.
• The Home key takes you to the beginning of a clip or sequence.
• The End key takes you to the end of a sequence.
• The Left Arrow key moves the footage one frame forward.
• The Right Arrow key moves the footage one frame backward.
Using the Mouse
You can use the mouse for one-handed control of playback. You can
either step or shuttle by using the mouse.
Stepping with the Mouse
To step by using the mouse:
1. Do one of the following:
- Load a clip into the Source monitor or a sequence into the
Record monitor.
- Select a clip in a bin in Frame view.
2. Do one of the following:
- Press the N key to activate mouse control for stepping.
- Activate the buttons on the Command palette by selecting
Active Palette at the bottom of the Command palette. Then
click the Mouse Jog button, which appears on the Play tab of
the Command palette. This button can be mapped to any
72
Page 73

3. Move the mouse to the right to step forward, or to the left to step
Mouse Shuttle
button
backward.
4. To quit stepping with the mouse, press the space bar.
Shuttling with the Mouse
To shuttle by using the mouse:
1. Do one of the following:
- Load a clip or sequence into the Source or Record monitor.
- Select a clip in a bin in Frame view.
2. Do one of the following:
- Press the semicolon (;) key to activate mouse control for
- Activate the buttons on the Command palette by selecting
button under the Record monitor by selecting the Button to
Button Reassignment option (see “Using the Command
Palette” on page 114).
shuttling.
Active Palette at the bottom of the Command palette. Then
click the Mouse Shuttle button, which appears on the Play tab
of the Command palette. This button can be mapped to any
button under the Record monitor by selecting the Button to
Button Reassignment option (see “Using the Command
Palette” on page 114).
3. Move the mouse to the right to increase the shuttle speed, or to the
left to decrease the shuttle speed.
4. To quit shuttling with the mouse, press the space bar or
double-click the mouse button.
You can also use the keyboard in conjunction with the mouse to
control shuttling. For example, if you are shuttling with the mouse and
you press the L key, the playback speeds up to the next normal play
rate (30, 60, 90, 150, or 240 fps for NTSC; 25, 50, 75, 125, or 200 fps for
73
Page 74

PAL). You can continue to change the shuttle speed and direction with
the mouse.
Marking IN and OUT Points
You can mark IN and OUT points for your clips in advance, which
provides several advantages:
• You can quickly build a sequence by splicing the marked clips into
place one after another.
• You can use the process of rough-cut or storyboard editing, which
allows you to instantly splice several prepared clips into a
sequence (see “Storyboarding” on page 121).
• You can play back and mark clips in the bin before loading a single
clip, saving several steps.
Even if your marks are not accurate now, the Avid system allows you
to trim the edit points and fine-tune the sequence later without
reediting the material.
Creating Subclips
When you mark footage with IN and OUT points, you can either save
the entire clip along with the new marks, or you can create subclips
based on the marks you set to break up longer master clips into
smaller segments of selected footage.
Unlike master clips, subclips do not directly reference the original
media. Subclips remain linked to the master clips from which they are
created, and the master clips in turn reference the digitized media files
located on your storage drives. As a result, none of the original footage
is lost.
74
Page 75

Clip icon
You can create subclips directly from the marked section of material in
the monitors by using one of the following methods:
• Alt key (Windows) or the Option key (Macintosh): Press and
hold the Alt key (Windows) or the Option key (Macintosh), then
click the picture and drag it from the monitor to the bin in which
you want to store the subclip.
• Clip icon: Click the icon next to the clip name in the Source
monitor, then drag the icon to the bin in which you want to store
the subclip.
• The pointer changes to an icon of a hand pointing at a frame while
you drag the frame. When you release the frame the subclip
acquires a new name with the file name extension Sub.x, and a
Subclip icon appears in the intended bin.
• Make Subclip button: Click the Make Subclip button located in
the Tool palette to create the subclip and place it into the active bin
by default. If you press and hold the Alt key (Windows) or the
Option key (Macintosh) while you click the Make Subclip button,
the Bin Selection dialog box appears, enabling you to select the
destination bin for the subclip.
75
Page 76

For more information
on trimming, see “Trim
edits” in the Help
index.
A new subclip as
referenced in Bin
Text view
The new subclip is listed in the bin, preceded by a Subclip icon and
identified with a numbered .Sub file name extension, as shown in the
following illustration.
Subclips do not limit your access to the original, digitized master clip
material when trimming. Therefore, if you must trim beyond the
marked IN to OUT boundaries of the subclip to make it longer or
shorter, your system does accommodate the boundary adjustments
during the trim.
76
Page 77

Tutorial: Getting Ready to Edit
The following tutorial steps correspond to the clips and sequence in
the bin titled Getting Ready to Edit:
n
Viewing Clips
Be sure to read Chapter 2 and the preceding overview sections of this chapter
before you start the tutorial.
1. If Avid Xpress is not already running, start it by double-clicking
the Avid Xpress icon.
2. Select your user name and your Boat Shop NTSC (Windows) or
Tutorial NTSC (Macintosh), or Boat Shop PAL (Windows) or
Tutorial PAL (Macintosh) project and click OK.
3. From the Project window, double-click the Getting Ready to Edit
bin.
The clips associated with the lesson are displayed in the bin.
The information in a bin can be viewed in the following ways:
• Text view displays columns of information about your clips.
• Frame view displays each clip as a single representative image.
• Script view displays each clip with an image and an area in which
to enter text as part of a storyboard.
77
Page 78

Name heading
Text view
Frame view
Bin Fast
Menu button
Text View button
Frame View button
Using Text View
The S button is for
Script view.
Let’s look at Text view.
1. Click the Text View button (T) in the lower left corner of the bin to
view information about clips in the Getting Ready to Edit bin.
If the button is highlighted, you are already in Text view.
You can rearrange the clips in the bin by sorting on a particular
column. Let’s sort by clip name so we can easily locate any clip.
2. Click the Name heading in the bin.
3. Choose Sort from the Bin menu along the top of the screen.
The clip names are rearranged in alphabetical order.
78
Page 79

Using Frame View (Windows)
Now let’s look at Frame view.
1. Click the Frame View button (F) to see a picture-frame
representation of each clip in the bin.
n
The sorted order of clips does not carry over to Frame view.
2. Choose Reduce Frame or Enlarge Frame from the Edit menu.
To change frame size at the keyboard, you can also press Ctrl+K
(Reduce Frame) and Ctrl+L (Enlarge Frame).
If some clips are now off screen, do one of the following:
- Choose Fill Window from the Bin menu.
- Drag the window corner in the lower right corner of the bin
window.
The clips are arranged in neat rows and columns in the bin.
Using Frame View (Macintosh)
Now let’s look at Frame view.
1. Click the Frame View button (F) to see a picture-frame
representation of each clip in the bin.
The sorted order of clips does not carry over to Frame view.
n
2. Choose Reduce Frame or Enlarge Frame from the Edit menu.
To change frame size at the keyboard, you can also press
Command (k)+K (Reduce Frame) and k+L (Enlarge Frame).
If some clips are now off screen, do one of the following:
- Click the zoom box in the upper right corner of the bin
window.
79
Page 80

Playing Clips
- Choose Fill Window from the Bin menu.
- Drag the size box in the lower right corner of the bin window.
3. Click the zoom box in the upper right corner of the bin window
labeled Getting Ready to Edit.
The bin zooms out to enclose all the clips. However, they might be
scattered randomly in the bin window. Let’s fix that.
4. Choose Fill Window from the Bin menu.
The clips are arranged in neat rows and columns in the bin.
Now you can adjust frame size so the clips are “readable” but not
so large that they won’t fit in the bin window.
The clips are arranged in neat rows and columns in the bin.
Your Avid system offers a variety of ways to play clips. The more you
practice the various methods, the more control you will have over the
editing process.
Playing Clips in a Source Pop-up Monitor
A Source pop-up monitor is a window in which you can play clips.
1. In the Getting Ready to Edit bin, select the clip named bridge by
double-clicking anywhere in the frame.
80
Page 81

The bridge clip appears in a Source pop-up monitor.
2. Press the Home key on the keyboard (between the main keyboard
and the numeric keypad) to go to the start of the clip.
The End key, just below the Home key, moves the position
indicator to the end of the clip.
3. Press the Play (5) key on the keyboard to play the clip at normal
speed.
4. Press the Play (5) key again (or press the space bar on the
keyboard) to pause playback at any point.
5. Press the L key (Play) on the keyboard to play the clip forward at
normal speed. Press the key repeatedly to play the clip forward at
60, 90, 150, and 240 frames per second (fps).
6. Press the J key (Reverse Play) on the keyboard to play the clip
backward at normal speed. Press the key repeatedly to play the
clip backward at 30, 60, 90, 150, and 240 frames per second (fps).
7. Press the K key (Pause) on the keyboard to pause playback.
81
Page 82

8. To move forward or backward at slow speed, press and hold the
K key while you press and hold the L or J key.
9. Use the 4, 3, 2, and 1 keys to step through the footage forward or
backward in 1-frame or 10-frame increments.
Step 10
Frames Backward
Controlling Playback
In a Source pop-up monitor, you can use:
• Playback control keys
• Equivalent buttons under a Source pop-up monitor
• Blue position indicator to go to a specific position or scroll (move)
through a clip
Position
bar
Step 1
Frame Backward
Step 10
Frames Forward
Step 1
Frame Forward
Position indicator
Step
Backward
Step
Forward
Play
To play through the clip:
1. Double-click the tools clip in the Getting Ready to Edit bin.
The tools clip appears in a Source pop-up monitor.
82
Page 83

You can also press the
Play (5) key on the
keyboard to play.
2. Click the Play button.
3. Click the Play button again (or press the space bar on the
keyboard) to pause playback at any point.
4. Step through the footage forward or backward in 1-frame
increments by using the Step Forward and Step Backward buttons
under the Source pop-up monitor. You can also use the 4, 3, 2, and
1 keys on your keyboard.
5. Locate the vertical blue position indicator in the position bar in the
Source pop-up monitor.
To step several frames
forward, click just to the
right of the position
indicator.
Press the End key to go
to the end of the clip.
6. Click to the left of the position indicator to step several frames
back in the clip.
7. Press the Home key to go to the beginning of the clip.
8. Step through the clip by clicking different spots in the position bar.
9. Drag the position indicator to the left, then to the right, to scroll
through the clip.
Marking Edit Points
Before making your first edit, you can mark the segments of the clips
you want to use in your sequence. You can mark clips in a Source
pop-up monitor.
In this section, you will:
• Mark IN and OUT points in a Source pop-up monitor.
• Locate IN and OUT points by timecode in a Source pop-up
monitor.
83
Page 84

Marking the
planing ms
Let’s first display clips in a Source pop-up monitor, and then mark a
couple of clips you will use when you edit the sequence.
1. Activate the Getting Ready to Edit bin by clicking anywhere in it
or by choosing Getting Ready to Edit from the Windows menu.
The bar above the active window changes to purple.
2. Double-click the planing ms clip to open it.
The clip name is highlighted and the clip appears in the Source
pop-up monitor.
3. Play the clip from the head by pressing the Home key and then the
Play (5) key, and find the approximate place where the boatbuilder
begins to plane. Then use the Step Forward and Step Backward
(3 and 4) keys to locate the frame where he starts the first planing
stroke.
4. Mark an IN point by pressing the Mark IN (I) key.
A white sawtooth pattern appears on the left edge of the Mark IN
frame.
Clip
84
Page 85

5. Step forward two full strokes of the plane.
6. Mark an OUT point by pressing the Mark OUT (O) key.
A white sawtooth pattern appears on the right edge of the Mark
OUT frame.
The system saves your IN and OUT points until you change them.
Marking the
Marking the
ducks
draw knife cu
Clip
Now mark the IN and OUT points for the ducks clip. This time,
instead of using the Play (5) key, use the J-K-L keys to play the clip.
1. Double-click the ducks clip to open it.
2. Locate the frame where the second duck enters the right edge of
the frame behind the duck swimming in the foreground.
Use the 3 and 4 keys to locate the precise frame.
3. Mark an IN point by pressing the I key.
A white sawtooth pattern appears on the left edge of the Mark IN
frame.
4. Step forward to locate the first frame where the same duck flies
beyond the left edge of the screen.
5. Mark an OUT point by pressing the O key.
A white sawtooth pattern appears on the right edge of the Mark
OUT frame.
Clip
Let’s mark another clip we’ll use in the sequence.
1. Open the draw knife cu clip in a Source pop-up monitor by
double-clicking it in the Getting Ready to Edit bin.
85
Page 86

When you edit the sequence, you want to show just three strokes
of the knife.
2. Place the position indicator near the midpoint of the clip, and play
forward until just after the first fairly large wood chip falls off.
Use the Play button (or J-K-L keys) to get close to the frame, and
then use the Step buttons to locate the frame you want to use as
your IN point.
3. Mark an IN point by clicking the Mark IN button under the
monitor.
A white sawtooth pattern appears on the left edge of the Mark IN
frame.
4. Step forward and locate a frame just after three strokes of the
knife.
5. Mark an OUT point by clicking the Mark OUT button under the
monitor.
A white sawtooth pattern appears on the right edge of the Mark
OUT frame.
Using Timecode to Find a Frame
You can mark IN and OUT points by using timecode as your reference
point. If you know the timecode for the frame you want to mark, you
can go to that frame instantly by typing it on the numeric keypad.
In this section, you will use visual cues to mark an IN point, and then
locate a specific timecode. First, you need to display the appropriate
timecode information.
1. Double-click the chiseling clip to open it.
2. Place the pointer in the gray title bar area over the timecode
information displayed above the Source pop-up monitor.
86
Page 87

3. When the pointer changes to a downward arrow, click to display
the pop-up menu, then choose TC, V1 (timecode for track V1)
from the menu. A check mark means it is already selected.
Timecode shows the following:
Hours
Minutes
Seconds
Frames
One second holds 30 frames.
The timecode references the frame displayed in the Source pop-up
monitor.
4. Use the Play and Step buttons to locate the frame where the
boatbuilder begins one of the first strokes of the chisel.
5. Click the Mark IN button.
6. Read the timecode in the Timecode display at the IN point. Add 15
frames (13 frames PAL) to the timecode number. (Remember, there
are 30 frames in a second.)
For example, if the timecode is 04:11:34:15, adding 15 frames gives
you a result of 04:11:35:00.
7. Type the resulting number on the numeric keypad and press the
Enter key on the numeric keypad. The system inserts the colons
for you.
As you start typing, a window opens in the middle of the Source
pop-up monitor, showing the numbers you type. When you press
the Enter key, the position indicator locates the specified frame.
The Timecode window displays the current number.
87
Page 88

n
To locate frames by using the numeric keypad, you must show the appropriate
timecode in the Timecode display. For example, the timecode display must
show track V1 to go to a specific frame on the V1 track.
Timecode
display
Timecode
entered
8. Click the Mark OUT button.
Using Frame Offset
Whenever you use the
numeric keypad, you
must press the Enter
key on the numeric
keypad after typing the
number.
You can also use the numeric keypad to move the position indicator
forward or backward a specified number of frames, with the frame
offset feature. Let’s mark an IN point for the planing cu clip and then
use frame offset to locate the OUT point.
1. Double-click the planing cu clip to open it in a Source pop-up
2. Use the Play and Step buttons to locate the frame where the
3. Click the Mark IN button.
monitor.
boatbuilder begins making the first stroke of the plane.
88
Page 89

4. To advance 2 seconds, type +129 (+124 PAL) on the numeric
keypad and press the Enter key on the numeric keypad. The
system inserts the colons for you.
Since Avid Xpress counts the frame it is parked on, you type one
frame fewer than 2 seconds.
When using frame
offset, type one frame
fewer than the number
of frames you want to
advance.
Subclipping
If you want to move back a certain number of frames, type a
minus sign (–) instead of a plus sign (+) in front of the number.
5. Mark that frame as the OUT point.
Now you will copy portions of one clip into shorter clips, called
subclips. Subclipping is a great way to organize your footage into
manageable units.
1. Double-click the tools clip in the Getting Ready to Edit bin.
2. Press the Home key to go to the start of the clip.
3. Scroll through the clip by clicking the Play button or by dragging
the blue position indicator. There are two separate actions that can
be copied into separate subclips.
4. Mark an IN point when the boatbuilder begins turning the auger
drill.
5. Mark an OUT point 14 seconds later by typing +1400 on the
numeric keypad and pressing the Enter key on the numeric
keypad.
Actually, you have marked an OUT point after 14 seconds and
1 frame, but that’s acceptable because you need not be so precise
here.
6. Press and hold the Alt key (Windows) or the Option key
(Macintosh), click the clip, and drag it from the Source pop-up
monitor to the Getting Ready to Edit bin.
89
Page 90

As you begin dragging, the pointer changes to a hand attached to
a small box.
The subclip has the
name of the original
clip, followed by Sub.n,
where n is the number
of times the master clip
has been cataloged to
that bin.
A new item called tools.Sub.01 appears in the Getting Ready to
Edit bin. The name is highlighted.
7. Type drilling and press the Enter key (Windows) or the Return
key (Macintosh) to name the subclip.
Clearing IN Points and OUT Points
Now you will clear previous IN and OUT points, mark new IN and
OUT points, and create a new clip.
1. With the tools clip in a Source pop-up monitor, click the Clear
Both Marks button in the Tool palette to clear the IN and OUT
points.
2. Mark an IN point in the clip when the boatbuilder begins
hammering, after he takes a few practice swings.
3. Mark an OUT point at the end of the clip.
4. Press and hold the Alt key (Windows) or the Option key
(Macintosh), click the clip, and drag it from the Source pop-up
monitor to the Getting Ready to Edit bin.
The clip name is highlighted in the Getting Ready to Edit bin.
5. Type hammering and press the Enter key (Windows) or the
Return key (Macintosh).
You’ve finished this tutorial. You can go on to “Tutorial: Rough Cut”
on page 99, or quit the session.
90
Page 91

Closing the Project
To close the project:
1. Choose Close Bin from the File menu.
The bin closes.
2. Click the Project window and choose Close from the File menu.
The system saves and closes the project. A dialog box appears.
3. Do one of the following:
- Select an existing project.
- Create a new one.
-Click Quit.
Ending the Session
To end the session:
1. Choose Save Bin or Save All Bins from the File menu.
2. Click the Project window labeled Boat Shop NTSC (Windows) or
Tutorial NTSC (Macintosh), or Boat Shop PAL (Windows) or
Tutorial PAL (Macintosh).
3. Choose Save All from the File menu.
4. Do one of the following:
- Go to the next tutorial.
- (Windows) If you are ready to take a break, choose Exit from
the File menu to quit the Avid system.
(Macintosh) If you are ready to take a break, choose Quit from
the File menu to quit the Avid system.
The system returns to the desktop.
91
Page 92

CHAPTER 6
Editing a Rough Cut
Beginning to edit involves working with various elements of the
Avid Xpress interface.
Editing a rough cut is described in the following sections:
• Viewing Methods
• Navigating in the Timeline
• Using the Track Selector Panel
Tutorial: Rough Cut contains the following sections:
• Making the First Edit
• Splicing Video into the Sequence
92
Page 93

Viewing Methods
You can work with clips and sequences in several different ways,
depending upon your needs and preferences. Each method has its
own uses and advantages, as follows:
• Viewing in bins: Frame view shows you pictorial images of the
clips in your bins; Text view shows you the clips listed by name.
• Viewing in a Source pop-up monitor: You can load clips and
sequences into a Source pop-up monitor to view and mark or
subcatalog clips for use in a sequence that you build in the
Composer monitor.
• Viewing in the Composer monitor: You can load a sequence into
the Composer monitor to view, mark, or modify an existing
sequence.
• Viewing in the Timeline: Use the Timeline to view individual
tracks for either a sequence or a source clip.
Navigating in the Timeline
The Timeline window provides various controls for quickly moving
through a sequence and adjusting your view of details displayed in
the tracks while editing. You can change Timeline views by using the
Timeline Fast menu.
Using the Position Indicator
The position indicator (the vertical blue line) in the Timeline marks
your place in the sequence. It also determines how some of your
commands are interpreted. For example, when you perform an edit,
the system takes the location of the position indicator as the mark IN
in the absence of established marks.
93
Page 94

When you move the position indicator in the Timeline, the smaller
position indicator within the Composer monitor’s position bar also
moves.
Using the Scroll Bar
The scroll bar functions like any standard scroll bar. Click the arrows
or drag the scroll box to scroll left or right.
Scroll bar
Scroll box
Displaying More or Less Detail
The scale box on the scale bar expands and contracts the Timeline area
centered around the blue position bar, allowing you either to zoom in
to focus on a specific area of your sequence, or zoom out to see your
whole sequence. This is especially useful when you have a lengthy
sequence with many edits.
Scale bar
Scale box
The Timeline always expands or contracts proportionally on both
sides of the position indicator.
• To see more detail, click the scale box and drag it to the right.
As the Timeline expands, a second “shadow” position indicator
appears next to the blue position indicator showing the end of a
single frame, and the two continue to move apart as you expand
the Timeline.
94
Page 95

Position indicator Shadow position indicator
The position indicator and its shadow mark the beginning and
end of each frame.
• To contract an expanded Timeline to see less detail but more of the
sequence, click the scale box and drag it to the left.
Using the Track Selector Panel
The Track Selector panel provides numerous controls for working
effectively with multiple tracks. With this one panel, you can select,
delete, monitor, enlarge, reduce, lock, patch, and move any video or
audio track.
The Track Selector panel also provides a quick display of track
information. You can see which tracks (on the source or record side)
are available, active, patched, monitored, or locked. The following
configuration shows one example. The Track Selector panel might look
very different depending on the nature of the source material or the
work under way in the sequence.
95
Page 96

Source Track Monitor buttons
Source Track buttons
Sync Lock and Lock buttons
Record Track buttons
Record Track Monitor buttons
Timecode button
The source side (left side) of the panel displays only those tracks
available for the clip currently loaded and displayed in the Source
pop-up monitor. For instance, a clip that has audio digitized for track
A1 only does not display an A2 track in the Track Selector panel.
The record side of the panel displays only those tracks currently in use
for the sequence and displayed in the Composer monitor. However, if
you edit source material with a track selected that does not yet exist on
the record side (A3 or V2, in the previous example), by default the
track appears on the record side after the edit takes place.
Selecting Tracks
You can select tracks on either the record side or the source side as
follows:
• You can edit selected tracks on the source side directly into the
sequence, assuming you have selected parallel tracks on the
record side.
• You cannot edit deselected tracks on the source side into the
sequence, regardless of record track selections.
• You cannot edit deselected tracks on the record side, regardless of
source track selections.
96
Page 97

There are three methods for selecting tracks:
• Click any deactivated Track Selector button to select it. Click any
activated Track Selector button to deselect it.
• Drag a lasso around multiple Track Selector buttons to select them
all at once.
• With the Timeline window active, choose Select All Tracks from
the Edit menu to select all tracks on the record and source side.
For example, you might select the source and record tracks for V1, A1,
and A2 to edit video and audio from the source clip into the sequence.
Select only V1 source and record tracks to edit the video without the
sound. Or, select only A1 and A2 source and record tracks to edit the
sound without the video.
n
Selected tracks change color.
n
Monitoring Tracks
Audio Track
Monitor
buttons
There are also keyboard equivalents for selecting tracks. Check your keyboard
or the Keyboard settings in the Project window Settings scroll list.
You determine the monitoring of tracks by clicking a Track Monitor
button of either the source-side or record-side tracks to activate or
deactivate the track for monitoring.
Video Track Monitor buttons
Audio Track
Monitor
buttons
97
Page 98

Monitoring Video
The Video Track Monitor button determines whether you see video
during playback. The Video Track Monitor button displays a Monitor
icon when the track is monitored for playback and output. You can
turn it off at any time to monitor only audio during editing. When
there are multiple video tracks, all tracks below the monitored track
are active during playback.
When you edit with multiple tracks, you can activate the Video Track
Monitor button on a lower track to monitor only the video on that
track. This is especially useful when you have multiple layers of video
effects and need to see one track without the additional layers.
n
If you activate the Video Monitor Track button on a lower track, be sure to
activate the topmost track to view, render, or record all the tracks together.
Unmonitored tracks are not included in playback.
98
Page 99

Tutorial: Rough Cut
In this tutorial, you begin editing the Boat Shop sequence. This section
corresponds to the clips and sequence in the bin titled Rough Cut. See
Table 6-1.
n
this tutorial.
Table 6-1 Starting the Tutorial: Rough Cut
If you have worked on the
previous tutorial and the
Avid system is still
running:
1. Double-click the Rough
Cut bin to open it.
Be sure to read the preceding overview sections of this chapter before you start
If you have worked on the
previous tutorial but have
quit the Avid system:
1. Start the Avid system by
double-clicking the Avid Xpress
icon.
2. From the Project window
double-click the Getting Ready
to Edit bin and the Rough Cut
bin to open them.
If you are just starting out
with this tutorial and
haven’t completed the
previous tutorials:
1. Start the Avid system by
double-clicking the Avid Xpress
icon.
2. From the Project window,
click New User and type your
name. Select Boat Shop NTSC
(Windows) or Tutorial NTSC
(Macintosh), or Boat Shop PAL
(Windows) or Tutorial PAL
(Macintosh), and click OK.
3. From the Project window
double-click the Getting Ready
to Edit bin and the Rough Cut
bin to open them.
99
Page 100

Making the First Edit
In this section, you lay down the audio clip, which contains the
sequence’s music and narration. You learn how to mark exactly
1 minute of the clip, which will be the duration of your finished
sequence. First, you play the clip:
1. Double-click the Audio Track clip and play the clip in a Source
pop-up monitor.
The clip appears as black because it’s audio only.
2. Go to the head of the clip by pressing the Home key on your
keyboard.
Using Digital Audio Scrub to Locate a Specific Frame of Audio
Use digital audio scrub to locate a specific frame of audio. Use it now
to locate the first frame of music in the audio clip.
1. Press the Caps Lock key to activate digital audio scrub.
2. Play the clip again and click the Play button to stop at the
approximate place where the music begins.
3. Press the Step (jog) keys (1, 2, 3, 4 on the keyboard) to locate the
first frame of the music and click the Mark IN button.
When you use the Step keys, a frame of music or speech sounds
scratchy or buzzlike. You might want to increase the volume of
your speakers to hear the first frame of music.
4. Press the End key on the keyboard.
5. Press the Step Backward key to find the last frame of music.
6. Mark that frame as the OUT point.
7. Press the Caps Lock key again to close digital audio scrub.
100
 Loading...