

Page 1

Avid® Xpress™ for Macintosh
Effects Guide
Release 2.0
tools for storytellers™
®
Page 2

© Copyright Avid Technology, Inc. 2/98. All rights reserved. Printed in USA.
Avid Xpress for Macintosh Effects Guide • Part 0130-012150-01 Rev. A • 2/98
ii
Page 3

Contents
Chapter 1 Preparing to Work with Effects
Introduction
Effect Palette Overview
List of Effect Categories
Displaying the Effect Palette
Effect Templates Overview
Third-Party Plug-in Effects Overview
Installing Photoshop-Compatible Plug-in Effects
Installing AVX Plug-in Effects
Troubleshooting AVX Plug-ins
Settings for Effects
Effect Settings
Understanding the Color Coding
Render Settings
. . . . . . . . . . . . . . . . . . . . . . . . . . . . . . . . . . . . . . . . . . . . . . . . 16
. . . . . . . . . . . . . . . . . . . . . . . . . . . . . . . . . . . . . . 17
Blank Effect Icons in the Timeline
Missing Effect Categories in the Effect Palette
Avid Xpress Cannot Render the Plug-In
. . . . . . . . . . . . . . . . . . . . . . . . . . . . . . . . . . . . . . . . . . 26
. . . . . . . . . . . . . . . . . . . . . . . . . . . . . . . . . . . . . . . . . . 26
. . . . . . . . . . . . . . . . . . . . . . . . . . . . . . . . . . . . . . . . . 28
Chapter 2 Basics of Effects Editing
Task Overview Ñ Working with Effects
Effect Types
Transition Effects
Segment Effects
Real-Time Effects
Applying Effects to a Sequence
. . . . . . . . . . . . . . . . . . . . . . . . . . . . . . . . . . . . . . . . . . . . . . . . 31
. . . . . . . . . . . . . . . . . . . . . . . . . . . . . . . . . . . . . . . . 31
. . . . . . . . . . . . . . . . . . . . . . . . . . . . . . . . . . . . . . . . . 31
. . . . . . . . . . . . . . . . . . . . . . . . . . . . . . . . . . . . . . . . . . . 32
. . . . . . . . . . . . . . . . . . . . . . . . . . . . . . . . . . 17
. . . . . . . . . . . . . . . . . . . . . . . . . . . . . 18
. . . . . . . . . . . . . . . . . . . . . . . . . . . . . . . . . . . 19
. . . . . . . . . . . . . . . . . . . . . . . . . 20
. . . . . . . . . . . 21
. . . . . . . . . . . . . . . . . . . . . . . . . . . . 22
. . . . . . . . . . . . . . . . . . . . . . . . . . . . 24
. . . . . . . . . . . . . . . . . . . . . 24
. . . . . . . . . . 25
. . . . . . . . . . . . . . . . 25
. . . . . . . . . . . . . . . . . . . . . . . . . . . . . 27
. . . . . . . . . . . . . . . . . . . . . . . 30
. . . . . . . . . . . . . . . . . . . . . . . . . . . . . . . 33
3
Page 4

Applying an Effect to a Single Transition or Segment
Applying an Effect to Multiple Segments
Applying an Effect to Multiple Transitions
Applying a Third-Party Plug-in Effect
Deleting Effects in a Sequence
Deleting a Single Effect
Deleting Multiple Segment Effects
Working with Transition Effects
Applying a Dissolve Effect
Using the Effect Palette
Using the Transition Parameters
Using the Add Dissolve Button
Sizing the Effect to Fit the Media
Trimming and Customizing a Transition Effect
. . . . . . . . . . . . . . . . . . . . . . . . . . . . . . . 40
. . . . . . . . . . . . . . . . . . . . . . . . . . . . . . . . . . 40
. . . . . . . . . . . . . . . . . . . . . . . . . . . . . . 42
. . . . . . . . . . . . . . . . . . . . . . . . . . . . . . . 42
. . . . . . . . . . . . . . . . . . . . . . . . . . . . . . . 42
. . . . . . . . . . . . . . . . . . . . . 38
. . . . . . . . . . . . . . . . . . . . . . . . 41
. . . . . . . . . . . . . . . . . . . . . . . 43
. . . . . . . . . . . . . . . . . . . . . . . 44
. . . . . . . . . . . . . . . . . . . . . . . . . . 46
Chapter 3 Working with the Effect Editor Window
. . . . . . . 33
. . . . . . . . . . . . . . . . . . 35
. . . . . . . . . . . . . . . . . 36
. . . . . . . . . . . . . 47
Opening the Effect Editor Window
Understanding the Effect Preview Monitor
Changing Position in Effect Mode
Understanding the Effect Editor
Effect Editor Buttons
Manipulating the Image
Using Parameter Pane Controls
Manipulating the Image Directly
Moving an Enlarged Image in the Effect Preview Monitor
Changing a Parameter
Adjusting a Color Parameter
Selecting a Color Using the Eyedropper
Selecting a Color Using the Macintosh Color Picker
Adjusting Effect Position
Adjusting Effect Size
Cropping an Effect
Fading an Effect
. . . . . . . . . . . . . . . . . . . . . . . . . . . . . . . . . . . . . 53
. . . . . . . . . . . . . . . . . . . . . . . . . . . . . . . . . . . 58
. . . . . . . . . . . . . . . . . . . . . . . . . . . . . . . . . . . . 61
. . . . . . . . . . . . . . . . . . . . . . . . . . . . . . . . . . . . . . 62
. . . . . . . . . . . . . . . . . . . . . . . . . . . . . . . . . . . . . . . . . 63
4
. . . . . . . . . . . . . . . . . . . . . . . . . . . 49
. . . . . . . . . . . . . . . . . . . . . . . . . 51
. . . . . . . . . . . . . . . . . . . . . . . . . . . . . . 51
. . . . . . . . . . . . . . . . . . . . . . . . . . . . . . . . . 56
. . . . . . . . . . . . . . . . . . . . . . . . 56
. . . . . . . . . . . . . . . . . . . . . . . . . . . . . . 59
. . . . . . . . . . . . . . . . . . . . . . . . . . . . . . . . . 61
. . . . . . . . . . . . . . . . . . . . 50
. . . . . . . . . . . . . . . . . . . . . . 56
57
. . . . . . . . . . . . . . . . 59
. . . . . 60
Page 5

Accessing an EffectÕs Additional Parameters
Safe Title/Action Guidelines Overview
Using Key Frames
Adding a Key Frame
Selecting a Key Frame
. . . . . . . . . . . . . . . . . . . . . . . . . . . . . . . . . . . . . . . . . . . 65
. . . . . . . . . . . . . . . . . . . . . . . . . . . . . . . . . . . . . 67
. . . . . . . . . . . . . . . . . . . . . . . . . . . . . . . . . . . 67
Adjusting the Level Between Key Frames
Adjusting the Acceleration
Moving a Key Frame
. . . . . . . . . . . . . . . . . . . . . . . . . . . . . . . 69
. . . . . . . . . . . . . . . . . . . . . . . . . . . . . . . . . . . . . 69
Changing a Key FrameÕs Parameters
. . . . . . . . . . . . . . . . . . . . . . . . 64
. . . . . . . . . . . . . . . . . . 68
. . . . . . . . . . . . . . . . . . . . . . . 70
Copying and Pasting Key-Frame Parameters
Deleting a Key Frame
DeÞning a Motion Path
Moving the Image Directly
Adjusting Key Frame Parameters
Playing a Motion Path Preview
Rendering an Effect
Selecting the Render Setting for a Project
. . . . . . . . . . . . . . . . . . . . . . . . . . . . . . . . . . . . 71
. . . . . . . . . . . . . . . . . . . . . . . . . . . . . . . . . . . . . . 71
. . . . . . . . . . . . . . . . . . . . . . . . . . . . . . . 72
. . . . . . . . . . . . . . . . . . . . . . . . . 75
. . . . . . . . . . . . . . . . . . . . . . . . . . . . . . . 76
. . . . . . . . . . . . . . . . . . . . . . . . . . . . . . . . . . . . . . . . . 77
. . . . . . . . . . . . . . . . . . 77
Combining Real-Time Effects and Rendered Effects
Overlapping Real-Time Effects
. . . . . . . . . . . . . . . . . . . . . . . . 78
Overlapping Real-Time and Rendered Effects
Speed Considerations
Displaying Effects While You Edit
Rendering a Single Effect
Rendering Multiple Effects
Rendering Third-Party Plug-in Effects
Using an Effect Template
Saving an Effect Template
Applying an Effect Template
Applying Part of an Effect Template
Managing Your Effect Media Files
Locating and Deleting Effect Media Files
. . . . . . . . . . . . . . . . . . . . . . . . . . . . . . . . 78
. . . . . . . . . . . . . . . . . . . . . . . . 79
. . . . . . . . . . . . . . . . . . . . . . . . . . . . . . . . 79
. . . . . . . . . . . . . . . . . . . . . . . . . . . . . . . 81
. . . . . . . . . . . . . . . . . . . . . 82
. . . . . . . . . . . . . . . . . . . . . . . . . . . . . . . . . . . . 82
. . . . . . . . . . . . . . . . . . . . . . . . . . . . . . . . 82
. . . . . . . . . . . . . . . . . . . . . . . . . . . . . 84
. . . . . . . . . . . . . . . . . . . . . . . 84
. . . . . . . . . . . . . . . . . . . . . . . . . . . . 86
. . . . . . . . . . . . . . . . . . 87
. . . . . . . . . . . . . . . . 63
. . . . . . . . . . . . . . . 70
. . . . . . . . . 77
. . . . . . . . . . 78
5
Page 6

Chapter 4 Working with Multilayer and Nested Effects
Using Multilayer Effects
Creating a Key Effect
Creating a YUV Chroma Key Effect
Creating a Luma Key Effect
Creating a Matte Key Effect
Working with Imported Graphics and Animation
Editing with Imported Matte Key Clips
Editing with Imported Master Clips
Nested Effects
Describing Nested Tracks
Nesting a Title Within a Picture-in-Picture
Nesting a Matte Key Effect
Another Nested Effect Technique
Modifying Nested Effects
Submaster Editing
Submaster Editing of Multiple Clips
Submaster Editing of Multiple Effects
Collapsing Layers into One Submaster Effect
Using Video Mixdown
. . . . . . . . . . . . . . . . . . . . . . . . . . . . . . . . . . . . . . . . . . . . . . 96
. . . . . . . . . . . . . . . . . . . . . . . . . . . . . . . . . . . . . 89
. . . . . . . . . . . . . . . . . . . . . . . . . . . . . . . . . . . . 90
. . . . . . . . . . . . . . . . . . . . 90
. . . . . . . . . . . . . . . . . . . . . . . . . . . 91
. . . . . . . . . . . . . . . . . . . . . . . . . . . 91
. . . . . . . . . . . . . . . . . . . . 93
. . . . . . . . . . . . . . . . . . . . . . . 95
. . . . . . . . . . . . . . . . . . . . . . . . . . . . . . . . 96
. . . . . . . . . . . . . . . . . 97
. . . . . . . . . . . . . . . . . . . . . . . . . . . . . . 100
. . . . . . . . . . . . . . . . . . . . . . . . 101
. . . . . . . . . . . . . . . . . . . . . . . . . . . . . . . 101
. . . . . . . . . . . . . . . . . . . . . . . . . . . . . . . . . . . . . . . . . 103
. . . . . . . . . . . . . . . . . . . . . 103
. . . . . . . . . . . . . . . . . . . . 105
. . . . . . . . . . . . . . . . . . . . . . . . . . . . . . . . . . . . . 108
. . . . . . . . . . . . . . 92
. . . . . . . . . . . . . 107
Chapter 5 3D Effects Editing
Using 3D Effects
3D Effects Overview
Accessing the 3D Effects Parameters
Using the Enable Button . . . . . . . . . . . . . . . . . . . . . . . . . . . . . . . . 113
Resetting Default Values . . . . . . . . . . . . . . . . . . . . . . . . . . . . . . . . 113
Real-Time Frame Updating. . . . . . . . . . . . . . . . . . . . . . . . . . . . . . 114
Using the Default Key-Frame Values . . . . . . . . . . . . . . . . . . . . . 114
The 3D Effect Coordinate System . . . . . . . . . . . . . . . . . . . . . . . . 115
Rotation Axes . . . . . . . . . . . . . . . . . . . . . . . . . . . . . . . . . . . . . . . . . . 116
Promoting 2D Effects to 3D Effects. . . . . . . . . . . . . . . . . . . . . . . . . . . 116
Using Matte Keys with 3D Effects . . . . . . . . . . . . . . . . . . . . . . . . . . . 117
. . . . . . . . . . . . . . . . . . . . . . . . . . . . . . . . . . . . . . . . . . . 111
. . . . . . . . . . . . . . . . . . . . . . . . . . . . . . . . . . . . 111
. . . . . . . . . . . . . . . . . . . . . . 112
6
Page 7

3D Picture-in-Picture Effect . . . . . . . . . . . . . . . . . . . . . . . . . . . . . . . . . 118
Shadow Parameters. . . . . . . . . . . . . . . . . . . . . . . . . . . . . . . . . . . . . 119
Trail Parameters. . . . . . . . . . . . . . . . . . . . . . . . . . . . . . . . . . . . . . . . 120
Border Parameters . . . . . . . . . . . . . . . . . . . . . . . . . . . . . . . . . . . . . . 121
Background Parameters . . . . . . . . . . . . . . . . . . . . . . . . . . . . . . . . . 122
Spline Parameter . . . . . . . . . . . . . . . . . . . . . . . . . . . . . . . . . . . . . . . 123
Scaling Parameters . . . . . . . . . . . . . . . . . . . . . . . . . . . . . . . . . . . . . 123
Position Parameters . . . . . . . . . . . . . . . . . . . . . . . . . . . . . . . . . . . . 124
Axis Parameters . . . . . . . . . . . . . . . . . . . . . . . . . . . . . . . . . . . . . . . . 125
Rotation Parameters . . . . . . . . . . . . . . . . . . . . . . . . . . . . . . . . . . . . 126
Page Turn Effects . . . . . . . . . . . . . . . . . . . . . . . . . . . . . . . . . . . . . . . . . . 127
urn Parameters . . . . . . . . . . . . . . . . . . . . . . . . . . . . . . . . . . . 128
Page T
Page Curl Angle Values . . . . . . . . . . . . . . . . . . . . . . . . . . . . . . . . . 129
Radial Shape Effects . . . . . . . . . . . . . . . . . . . . . . . . . . . . . . . . . . . . . . . 130
Multiwave. . . . . . . . . . . . . . . . . . . . . . . . . . . . . . . . . . . . . . . . . . . . . 130
Ball . . . . . . . . . . . . . . . . . . . . . . . . . . . . . . . . . . . . . . . . . . . . . . . . . . . 132
Offset Shape Effects. . . . . . . . . . . . . . . . . . . . . . . . . . . . . . . . . . . . . . . . 134
Turning the 3D Effects Option On and Off. . . . . . . . . . . . . . . . . . . . 136
Turning the 3D Effects Option On and Off at Startup. . . . . . . 136
Turning the 3D Effects Option On and Off from the Console 137
Avid Xpress Effects and Media Composer Effects. . . . . . . . . . . . . . 138
Chapter 6 Creating Titles and Graphic Objects
Task Overview Ñ Creating and Editing Titles . . . . . . . . . . . . . . . . . 140
Creating New Titles . . . . . . . . . . . . . . . . . . . . . . . . . . . . . . . . . . . . . . . . 141
Using the Title Tool . . . . . . . . . . . . . . . . . . . . . . . . . . . . . . . . . . . . . . . . 142
Downstream Keying of Titles and Graphics . . . . . . . . . . . . . . . . . . 143
Understanding the Title Tool Window. . . . . . . . . . . . . . . . . . . . . . . . 143
Understanding the Tool Bar . . . . . . . . . . . . . . . . . . . . . . . . . . . . . 144
Using the Selection Tool . . . . . . . . . . . . . . . . . . . . . . . . . . . . . . . . 146
Setting Up the Drawing Environment . . . . . . . . . . . . . . . . . . . . . . . . 147
Previewing Titles. . . . . . . . . . . . . . . . . . . . . . . . . . . . . . . . . . . . . . . 147
Using Title and Action Guidelines . . . . . . . . . . . . . . . . . . . . . . . 148
7
Page 8

Using Safe Colors . . . . . . . . . . . . . . . . . . . . . . . . . . . . . . . . . . . . . . 148
Selecting a Background . . . . . . . . . . . . . . . . . . . . . . . . . . . . . . . . . 149
Using a Video Background. . . . . . . . . . . . . . . . . . . . . . . . . . . 149
Updating the Video Background . . . . . . . . . . . . . . . . . . . . . 149
Creating a Color Background . . . . . . . . . . . . . . . . . . . . . . . . 150
Displaying a Grid . . . . . . . . . . . . . . . . . . . . . . . . . . . . . . . . . . . . . . 151
Snapping to Grid. . . . . . . . . . . . . . . . . . . . . . . . . . . . . . . . . . . . . . . 151
Bringing the Title Tool Window to the Foreground. . . . . . . . . 151
Working with Text . . . . . . . . . . . . . . . . . . . . . . . . . . . . . . . . . . . . . . . . . 152
Creating Text . . . . . . . . . . . . . . . . . . . . . . . . . . . . . . . . . . . . . . . . . . 152
Repositioning Text . . . . . . . . . . . . . . . . . . . . . . . . . . . . . . . . . . . . . 152
Resizing T
ext Objects . . . . . . . . . . . . . . . . . . . . . . . . . . . . . . . . . . . 153
Editing an Existing Text String . . . . . . . . . . . . . . . . . . . . . . . . . . . 153
Viewing Anti-Aliased Text . . . . . . . . . . . . . . . . . . . . . . . . . . . . . . 154
The Text Formatting Tools. . . . . . . . . . . . . . . . . . . . . . . . . . . . . . . 154
Setting the Default Text Attributes . . . . . . . . . . . . . . . . . . . 155
Selecting Fonts . . . . . . . . . . . . . . . . . . . . . . . . . . . . . . . . . . . . . 156
Justifying Text. . . . . . . . . . . . . . . . . . . . . . . . . . . . . . . . . . . . . . 156
Kerning Text . . . . . . . . . . . . . . . . . . . . . . . . . . . . . . . . . . . . . . . 157
Adjusting Leading . . . . . . . . . . . . . . . . . . . . . . . . . . . . . . . . . . 159
Changing Point Size . . . . . . . . . . . . . . . . . . . . . . . . . . . . . . . . 160
Making Text Bold and Italic. . . . . . . . . . . . . . . . . . . . . . . . . . 160
Using the Drawing Tools . . . . . . . . . . . . . . . . . . . . . . . . . . . . . . . . . . . 161
Selecting Line Attributes. . . . . . . . . . . . . . . . . . . . . . . . . . . . . . . . 162
Rounding Corners . . . . . . . . . . . . . . . . . . . . . . . . . . . . . . . . . . 162
Selecting a Line or Border Width . . . . . . . . . . . . . . . . . . . . . 163
Adding Arrowheads . . . . . . . . . . . . . . . . . . . . . . . . . . . . . . . . 164
Changing Arrowhead Size . . . . . . . . . . . . . . . . . . . . . . . . . . . 164
Creating Rolling or Crawling Titles . . . . . . . . . . . . . . . . . . . . . . . . . . 165
Support for Rolling and Crawling Titles . . . . . . . . . . . . . . . . . . 165
Page Count Limits for Rolling or Crawling Titles . . . . . . . . . . 166
Using Auto Size Mode . . . . . . . . . . . . . . . . . . . . . . . . . . . . . . . . . . 167
Setting Up Text Formatting for Rolling Titles. . . . . . . . . . . . . . 168
8
Page 9

Workßow Options for Creating Crawling Titles . . . . . . . . . . . 168
Typing the Rolling or Crawling Text. . . . . . . . . . . . . . . . . . . . . . 168
Resizing a Rolling or Crawling Title. . . . . . . . . . . . . . . . . . . . . . 169
Scrolling Through a Title. . . . . . . . . . . . . . . . . . . . . . . . . . . . . . . . 170
Going to a Page . . . . . . . . . . . . . . . . . . . . . . . . . . . . . . . . . . . . . . . . 170
Adding Pages . . . . . . . . . . . . . . . . . . . . . . . . . . . . . . . . . . . . . . . . . . 171
Deleting Additional Pages . . . . . . . . . . . . . . . . . . . . . . . . . . . . . . 171
Formatting Rolling or Crawling Titles . . . . . . . . . . . . . . . . . . . . 172
Selecting Colors and Setting Transparency. . . . . . . . . . . . . . . . . . . . 172
Adjusting the Color . . . . . . . . . . . . . . . . . . . . . . . . . . . . . . . . . . . . 173
Blending Two Colors in an Object. . . . . . . . . . . . . . . . . . . . . . . . 175
Adjusting the T
ransparency . . . . . . . . . . . . . . . . . . . . . . . . . . . . . 176
Blending Transparency . . . . . . . . . . . . . . . . . . . . . . . . . . . . . . 177
Working with Shadows. . . . . . . . . . . . . . . . . . . . . . . . . . . . . . . . . . . . . 178
Manipulating Objects . . . . . . . . . . . . . . . . . . . . . . . . . . . . . . . . . . . . . . 179
Viewing Titles Full Frame . . . . . . . . . . . . . . . . . . . . . . . . . . . . . . . 180
Basic Manipulation Operations . . . . . . . . . . . . . . . . . . . . . . . . . . 180
Moving and Resizing Objects . . . . . . . . . . . . . . . . . . . . . . . . 180
Using the Edit Menu . . . . . . . . . . . . . . . . . . . . . . . . . . . . . . . . 181
Grouping, Locking, and Layering Objects. . . . . . . . . . . . . . . . . 182
Grouping Objects. . . . . . . . . . . . . . . . . . . . . . . . . . . . . . . . . . . 182
Locking and Unlocking Objects . . . . . . . . . . . . . . . . . . . . . . 183
Layering Text and Objects . . . . . . . . . . . . . . . . . . . . . . . . . . . 184
Aligning Objects . . . . . . . . . . . . . . . . . . . . . . . . . . . . . . . . . . . . . . . 185
Distributing Objects. . . . . . . . . . . . . . . . . . . . . . . . . . . . . . . . . . . . 186
Distribute Left to Right. . . . . . . . . . . . . . . . . . . . . . . . . . . . . . 186
Distribute Top to Bottom . . . . . . . . . . . . . . . . . . . . . . . . . . . . 186
Distribute First to Last . . . . . . . . . . . . . . . . . . . . . . . . . . . . . . 186
Saving Titles and Title Parameters . . . . . . . . . . . . . . . . . . . . . . . . . . . 187
Matching Resolutions . . . . . . . . . . . . . . . . . . . . . . . . . . . . . . . . . . 187
Using the Fast Save Option. . . . . . . . . . . . . . . . . . . . . . . . . . . . . . 188
Saving a Title and Exiting the Title Tool . . . . . . . . . . . . . . . . . . 189
Saving Multiple Titles in a Session. . . . . . . . . . . . . . . . . . . . . . . 190
9
Page 10

Revising Titles in a Bin . . . . . . . . . . . . . . . . . . . . . . . . . . . . . . . . . 191
Saving a Title Effect Template . . . . . . . . . . . . . . . . . . . . . . . . . . . 192
Saving Title Styles. . . . . . . . . . . . . . . . . . . . . . . . . . . . . . . . . . . . . . 193
Recalling a Title Style . . . . . . . . . . . . . . . . . . . . . . . . . . . . . . . 195
Managing Title Styles . . . . . . . . . . . . . . . . . . . . . . . . . . . . . . . 196
Exporting a Title as a Graphics File . . . . . . . . . . . . . . . . . . . . . . . . . . 197
Titles and Their Related Files . . . . . . . . . . . . . . . . . . . . . . . . . . . . . . . 197
Chapter 7 Editing with Titles
An Overview of Editing with Titles . . . . . . . . . . . . . . . . . . . . . . . . . . 200
Restrictions of Downstream Key Titles . . . . . . . . . . . . . . . . . . . 200
Downstream Key Error Messages
Converting Downstream Key Titles . . . . . . . . . . . . . . . . . . . . . . 202
Restrictions of Non-Downstream Key Titles. . . . . . . . . . . . . . . 203
Playback Capabilities of DSK and Non-DSK Titles . . . . . . . . 204
Adding a Video Track . . . . . . . . . . . . . . . . . . . . . . . . . . . . . . . . . . . . . . 205
Editing a Title into a Sequence . . . . . . . . . . . . . . . . . . . . . . . . . . . . . . 206
Editing a Title over Video . . . . . . . . . . . . . . . . . . . . . . . . . . . . . . . 207
Dragging the Title Effect Icon into the Timeline . . . . . . . . . . . 209
Removing a Title. . . . . . . . . . . . . . . . . . . . . . . . . . . . . . . . . . . . . . . . . . . 211
Replacing Titles . . . . . . . . . . . . . . . . . . . . . . . . . . . . . . . . . . . . . . . . . . . 212
Setting Marks in Rolling and Crawling Titles . . . . . . . . . . . . . . . . . 212
Trimming the Duration of Rolling and Crawling Titles. . . . . . . . . 213
Fading a Title. . . . . . . . . . . . . . . . . . . . . . . . . . . . . . . . . . . . . . . . . . . . . . 214
Adjusting Title Effect Parameters . . . . . . . . . . . . . . . . . . . . . . . . . . . . 215
Using Title Key Frames . . . . . . . . . . . . . . . . . . . . . . . . . . . . . . . . . 216
Adjusting Foreground Transparency. . . . . . . . . . . . . . . . . . . . . . 216
Adjusting Acceleration . . . . . . . . . . . . . . . . . . . . . . . . . . . . . . . . . 216
Adjusting Position . . . . . . . . . . . . . . . . . . . . . . . . . . . . . . . . . . . . . 217
Cropping Titles . . . . . . . . . . . . . . . . . . . . . . . . . . . . . . . . . . . . . . . . 218
Softening Edges on Rolling Titles . . . . . . . . . . . . . . . . . . . . 220
Reducing Title Size . . . . . . . . . . . . . . . . . . . . . . . . . . . . . . . . . . . . . . . . 221
Revising Titles in a Sequence . . . . . . . . . . . . . . . . . . . . . . . . . . . . . . . 221
. . . . . . . . . . . . . . . . . . . . . . . . 201
10
Page 11

Replacing Fill Tracks . . . . . . . . . . . . . . . . . . . . . . . . . . . . . . . . . . . . . . . 224
Rendering Titles . . . . . . . . . . . . . . . . . . . . . . . . . . . . . . . . . . . . . . . . . . . 225
Re-creating Title Media. . . . . . . . . . . . . . . . . . . . . . . . . . . . . . . . . . . . . 225
Promoting a 2D Title to 3D. . . . . . . . . . . . . . . . . . . . . . . . . . . . . . . . . . 227
Chapter 8 2D Effects Reference
Effect Categories. . . . . . . . . . . . . . . . . . . . . . . . . . . . . . . . . . . . . . . . . . . 228
Effect Parameters . . . . . . . . . . . . . . . . . . . . . . . . . . . . . . . . . . . . . . . . . . 230
Border Parameters . . . . . . . . . . . . . . . . . . . . . . . . . . . . . . . . . . . . . . 231
Color Effect Parameters . . . . . . . . . . . . . . . . . . . . . . . . . . . . . . . . . 232
Color Selection Parameters . . . . . . . . . . . . . . . . . . . . . . . . . . . . . . 233
Using the Macintosh Color Picker
Key Control Parameters . . . . . . . . . . . . . . . . . . . . . . . . . . . . . . . . . 236
Secondary Key Color. . . . . . . . . . . . . . . . . . . . . . . . . . . . . . . . 236
Using the Enable Button. . . . . . . . . . . . . . . . . . . . . . . . . . . . . 237
Resetting Default Values . . . . . . . . . . . . . . . . . . . . . . . . . . . . 238
Spill Suppression. . . . . . . . . . . . . . . . . . . . . . . . . . . . . . . . . . . 238
Crop Parameters . . . . . . . . . . . . . . . . . . . . . . . . . . . . . . . . . . . . . . . 239
Matrix Parameters . . . . . . . . . . . . . . . . . . . . . . . . . . . . . . . . . . . . . . 240
Motion Effect Parameters . . . . . . . . . . . . . . . . . . . . . . . . . . . . . . . 241
Position Parameters . . . . . . . . . . . . . . . . . . . . . . . . . . . . . . . . . . . . 241
Scaling Parameters . . . . . . . . . . . . . . . . . . . . . . . . . . . . . . . . . . . . . 242
Rate Control Parameters . . . . . . . . . . . . . . . . . . . . . . . . . . . . . . . . 242
Reverse Parameter. . . . . . . . . . . . . . . . . . . . . . . . . . . . . . . . . . . . . . 244
Transition Parameters . . . . . . . . . . . . . . . . . . . . . . . . . . . . . . . . . . . 244
Blend Effects . . . . . . . . . . . . . . . . . . . . . . . . . . . . . . . . . . . . . . . . . . . . . . 246
Dip to Color . . . . . . . . . . . . . . . . . . . . . . . . . . . . . . . . . . . . . . . . . . . 247
Dissolve. . . . . . . . . . . . . . . . . . . . . . . . . . . . . . . . . . . . . . . . . . . . . . . 248
Fade from Color. . . . . . . . . . . . . . . . . . . . . . . . . . . . . . . . . . . . . . . . 249
Fade to Color . . . . . . . . . . . . . . . . . . . . . . . . . . . . . . . . . . . . . . . . . . 249
Picture-in-Picture. . . . . . . . . . . . . . . . . . . . . . . . . . . . . . . . . . . . . . . 250
Superimpose . . . . . . . . . . . . . . . . . . . . . . . . . . . . . . . . . . . . . . . . . . 252
Conceal Effects . . . . . . . . . . . . . . . . . . . . . . . . . . . . . . . . . . . . . . . . . . . . 253
. . . . . . . . . . . . . . . . . . . . 235
11
Page 12

Bottom Left to Top Right . . . . . . . . . . . . . . . . . . . . . . . . . . . . . . . . 254
Bottom Right to Top Left . . . . . . . . . . . . . . . . . . . . . . . . . . . . . . . . 254
Bottom to Top . . . . . . . . . . . . . . . . . . . . . . . . . . . . . . . . . . . . . . . . . . 255
Left to Right . . . . . . . . . . . . . . . . . . . . . . . . . . . . . . . . . . . . . . . . . . . 255
Right to Left . . . . . . . . . . . . . . . . . . . . . . . . . . . . . . . . . . . . . . . . . . . 256
Top Left to Bottom Right . . . . . . . . . . . . . . . . . . . . . . . . . . . . . . . . 257
Top Right to Bottom Left . . . . . . . . . . . . . . . . . . . . . . . . . . . . . . . . 258
Top to Bottom . . . . . . . . . . . . . . . . . . . . . . . . . . . . . . . . . . . . . . . . . . 258
Image Effects . . . . . . . . . . . . . . . . . . . . . . . . . . . . . . . . . . . . . . . . . . . . . . 259
Color Effect. . . . . . . . . . . . . . . . . . . . . . . . . . . . . . . . . . . . . . . . . . . . 260
Luminance (Luma Adjust) . . . . . . . . . . . . . . . . . . . . . . . . . . . 261
Chrominance (Chroma Adjust)
. . . . . . . . . . . . . . . . . . . . . . . 263
Color Style. . . . . . . . . . . . . . . . . . . . . . . . . . . . . . . . . . . . . . . . . 264
Color Gain . . . . . . . . . . . . . . . . . . . . . . . . . . . . . . . . . . . . . . . . . 265
Flip . . . . . . . . . . . . . . . . . . . . . . . . . . . . . . . . . . . . . . . . . . . . . . . . . . . 266
Flip-Flop . . . . . . . . . . . . . . . . . . . . . . . . . . . . . . . . . . . . . . . . . . . . . . 266
Flop . . . . . . . . . . . . . . . . . . . . . . . . . . . . . . . . . . . . . . . . . . . . . . . . . . 267
Mask . . . . . . . . . . . . . . . . . . . . . . . . . . . . . . . . . . . . . . . . . . . . . . . . . 268
Resize. . . . . . . . . . . . . . . . . . . . . . . . . . . . . . . . . . . . . . . . . . . . . . . . . 269
Key Effects . . . . . . . . . . . . . . . . . . . . . . . . . . . . . . . . . . . . . . . . . . . . . . . . 270
YUV Chroma Key . . . . . . . . . . . . . . . . . . . . . . . . . . . . . . . . . . . . . . 271
Luma Key . . . . . . . . . . . . . . . . . . . . . . . . . . . . . . . . . . . . . . . . . . . . . 272
Matte Key . . . . . . . . . . . . . . . . . . . . . . . . . . . . . . . . . . . . . . . . . . . . . 273
L-Conceal Effects . . . . . . . . . . . . . . . . . . . . . . . . . . . . . . . . . . . . . . . . . . 275
Bottom Left . . . . . . . . . . . . . . . . . . . . . . . . . . . . . . . . . . . . . . . . . . . . 276
Bottom Right . . . . . . . . . . . . . . . . . . . . . . . . . . . . . . . . . . . . . . . . . . 276
Top Left . . . . . . . . . . . . . . . . . . . . . . . . . . . . . . . . . . . . . . . . . . . . . . . 277
Top Right. . . . . . . . . . . . . . . . . . . . . . . . . . . . . . . . . . . . . . . . . . . . . . 277
Motion Effects. . . . . . . . . . . . . . . . . . . . . . . . . . . . . . . . . . . . . . . . . . . . . 278
Freeze Frame. . . . . . . . . . . . . . . . . . . . . . . . . . . . . . . . . . . . . . . . . . . 279
Variable Speed . . . . . . . . . . . . . . . . . . . . . . . . . . . . . . . . . . . . . . . . . 281
Strobe Motion . . . . . . . . . . . . . . . . . . . . . . . . . . . . . . . . . . . . . . . . . 283
Peel Effects. . . . . . . . . . . . . . . . . . . . . . . . . . . . . . . . . . . . . . . . . . . . . . . . 285
12
Page 13

Bottom Left Corner . . . . . . . . . . . . . . . . . . . . . . . . . . . . . . . . . . . . . 286
Bottom Right Corner . . . . . . . . . . . . . . . . . . . . . . . . . . . . . . . . . . . 286
Bottom to Top . . . . . . . . . . . . . . . . . . . . . . . . . . . . . . . . . . . . . . . . . . 287
Left to Right . . . . . . . . . . . . . . . . . . . . . . . . . . . . . . . . . . . . . . . . . . . 287
Right to Left . . . . . . . . . . . . . . . . . . . . . . . . . . . . . . . . . . . . . . . . . . . 288
Top Left Corner . . . . . . . . . . . . . . . . . . . . . . . . . . . . . . . . . . . . . . . . 288
Top Right Corner . . . . . . . . . . . . . . . . . . . . . . . . . . . . . . . . . . . . . . . 289
Top to Bottom . . . . . . . . . . . . . . . . . . . . . . . . . . . . . . . . . . . . . . . . . . 289
Push Effects . . . . . . . . . . . . . . . . . . . . . . . . . . . . . . . . . . . . . . . . . . . . . . . 290
Bottom Left to Top Right . . . . . . . . . . . . . . . . . . . . . . . . . . . . . . . . 291
Bottom Right to Top Left . . . . . . . . . . . . . . . . . . . . . . . . . . . . . . . . 291
Bottom to T
op. . . . . . . . . . . . . . . . . . . . . . . . . . . . . . . . . . . . . . . . . . 292
Left to Right . . . . . . . . . . . . . . . . . . . . . . . . . . . . . . . . . . . . . . . . . . . 292
Right to Left . . . . . . . . . . . . . . . . . . . . . . . . . . . . . . . . . . . . . . . . . . . 293
Top Left to Bottom Right . . . . . . . . . . . . . . . . . . . . . . . . . . . . . . . . 294
Top Right to Bottom Left . . . . . . . . . . . . . . . . . . . . . . . . . . . . . . . . 295
Top to Bottom . . . . . . . . . . . . . . . . . . . . . . . . . . . . . . . . . . . . . . . . . . 295
Spin Effects . . . . . . . . . . . . . . . . . . . . . . . . . . . . . . . . . . . . . . . . . . . . . . . 296
X Spin . . . . . . . . . . . . . . . . . . . . . . . . . . . . . . . . . . . . . . . . . . . . . . . . 297
Y Spin . . . . . . . . . . . . . . . . . . . . . . . . . . . . . . . . . . . . . . . . . . . . . . . . 298
Squeeze Effects . . . . . . . . . . . . . . . . . . . . . . . . . . . . . . . . . . . . . . . . . . . . 299
Bottom Centered . . . . . . . . . . . . . . . . . . . . . . . . . . . . . . . . . . . . . . . 300
Bottom Left . . . . . . . . . . . . . . . . . . . . . . . . . . . . . . . . . . . . . . . . . . . . 300
Bottom Right . . . . . . . . . . . . . . . . . . . . . . . . . . . . . . . . . . . . . . . . . . 301
Bottom to Top . . . . . . . . . . . . . . . . . . . . . . . . . . . . . . . . . . . . . . . . . . 301
Centered Zoom . . . . . . . . . . . . . . . . . . . . . . . . . . . . . . . . . . . . . . . . 302
Horizontal Centered . . . . . . . . . . . . . . . . . . . . . . . . . . . . . . . . . . . . 302
Left Centered . . . . . . . . . . . . . . . . . . . . . . . . . . . . . . . . . . . . . . . . . . 303
Left to Right . . . . . . . . . . . . . . . . . . . . . . . . . . . . . . . . . . . . . . . . . . . 303
Right Centered. . . . . . . . . . . . . . . . . . . . . . . . . . . . . . . . . . . . . . . . . 304
Right to Left . . . . . . . . . . . . . . . . . . . . . . . . . . . . . . . . . . . . . . . . . . . 304
Top Centered . . . . . . . . . . . . . . . . . . . . . . . . . . . . . . . . . . . . . . . . . . 305
Top Left . . . . . . . . . . . . . . . . . . . . . . . . . . . . . . . . . . . . . . . . . . . . . . . 306
13
Page 14

Top Right. . . . . . . . . . . . . . . . . . . . . . . . . . . . . . . . . . . . . . . . . . . . . . 307
Top to Bottom . . . . . . . . . . . . . . . . . . . . . . . . . . . . . . . . . . . . . . . . . . 307
Vertical Centered . . . . . . . . . . . . . . . . . . . . . . . . . . . . . . . . . . . . . . . 308
Box Wipes. . . . . . . . . . . . . . . . . . . . . . . . . . . . . . . . . . . . . . . . . . . . . . . . . 309
Bottom Box . . . . . . . . . . . . . . . . . . . . . . . . . . . . . . . . . . . . . . . . . . . . 310
Left Box . . . . . . . . . . . . . . . . . . . . . . . . . . . . . . . . . . . . . . . . . . . . . . . 310
Lower Left Corner . . . . . . . . . . . . . . . . . . . . . . . . . . . . . . . . . . . . . . 311
Lower Right Corner . . . . . . . . . . . . . . . . . . . . . . . . . . . . . . . . . . . . 311
Right Box. . . . . . . . . . . . . . . . . . . . . . . . . . . . . . . . . . . . . . . . . . . . . . 312
Top Box . . . . . . . . . . . . . . . . . . . . . . . . . . . . . . . . . . . . . . . . . . . . . . . 312
Upper Left Corner . . . . . . . . . . . . . . . . . . . . . . . . . . . . . . . . . . . . . . 313
Upper Right Corner
. . . . . . . . . . . . . . . . . . . . . . . . . . . . . . . . . . . . 314
Edge Wipes . . . . . . . . . . . . . . . . . . . . . . . . . . . . . . . . . . . . . . . . . . . . . . . 315
Horizontal. . . . . . . . . . . . . . . . . . . . . . . . . . . . . . . . . . . . . . . . . . . . . 316
Horizontal Open . . . . . . . . . . . . . . . . . . . . . . . . . . . . . . . . . . . . . . . 316
Lower Left Diagonal. . . . . . . . . . . . . . . . . . . . . . . . . . . . . . . . . . . . 317
Lower Right Diagonal . . . . . . . . . . . . . . . . . . . . . . . . . . . . . . . . . . 318
Upper Left Diagonal. . . . . . . . . . . . . . . . . . . . . . . . . . . . . . . . . . . . 319
Upper Right Diagonal . . . . . . . . . . . . . . . . . . . . . . . . . . . . . . . . . . 320
Vertical. . . . . . . . . . . . . . . . . . . . . . . . . . . . . . . . . . . . . . . . . . . . . . . . 321
Vertical Open . . . . . . . . . . . . . . . . . . . . . . . . . . . . . . . . . . . . . . . . . . 322
Matrix Wipes . . . . . . . . . . . . . . . . . . . . . . . . . . . . . . . . . . . . . . . . . . . . . . 323
Block Spiral . . . . . . . . . . . . . . . . . . . . . . . . . . . . . . . . . . . . . . . . . . . 324
Grid . . . . . . . . . . . . . . . . . . . . . . . . . . . . . . . . . . . . . . . . . . . . . . . . . . 325
One-Way Row . . . . . . . . . . . . . . . . . . . . . . . . . . . . . . . . . . . . . . . . . 326
Speckle . . . . . . . . . . . . . . . . . . . . . . . . . . . . . . . . . . . . . . . . . . . . . . . 327
Zig-Zag . . . . . . . . . . . . . . . . . . . . . . . . . . . . . . . . . . . . . . . . . . . . . . . 328
Saw Tooth Wipes . . . . . . . . . . . . . . . . . . . . . . . . . . . . . . . . . . . . . . . . . . 329
Horizontal Open Saw Tooth . . . . . . . . . . . . . . . . . . . . . . . . . . . . . 330
Horizontal Saw Tooth. . . . . . . . . . . . . . . . . . . . . . . . . . . . . . . . . . . 331
Vertical Open Saw Tooth . . . . . . . . . . . . . . . . . . . . . . . . . . . . . . . . 332
Vertical Saw Tooth. . . . . . . . . . . . . . . . . . . . . . . . . . . . . . . . . . . . . . 333
Shape Wipes . . . . . . . . . . . . . . . . . . . . . . . . . . . . . . . . . . . . . . . . . . . . . . 334
14
Page 15

Center Box. . . . . . . . . . . . . . . . . . . . . . . . . . . . . . . . . . . . . . . . . . . . . 335
Circle . . . . . . . . . . . . . . . . . . . . . . . . . . . . . . . . . . . . . . . . . . . . . . . . . 336
Clock . . . . . . . . . . . . . . . . . . . . . . . . . . . . . . . . . . . . . . . . . . . . . . . . . 337
Diamond . . . . . . . . . . . . . . . . . . . . . . . . . . . . . . . . . . . . . . . . . . . . . . 338
Ellipse . . . . . . . . . . . . . . . . . . . . . . . . . . . . . . . . . . . . . . . . . . . . . . . . 339
Four Corners. . . . . . . . . . . . . . . . . . . . . . . . . . . . . . . . . . . . . . . . . . . 340
Horizontal Bands. . . . . . . . . . . . . . . . . . . . . . . . . . . . . . . . . . . . . . . 341
Horizontal Blind . . . . . . . . . . . . . . . . . . . . . . . . . . . . . . . . . . . . . . . 342
Vertical Blind . . . . . . . . . . . . . . . . . . . . . . . . . . . . . . . . . . . . . . . . . . 343
Comparison of Similar Effects. . . . . . . . . . . . . . . . . . . . . . . . . . . . . . . 344
Box Wipe Ð Upper Left Corner . . . . . . . . . . . . . . . . . . . . . . . . . . . 344
Conceal Ð T
Push Ð Top Left to Bottom Right . . . . . . . . . . . . . . . . . . . . . . . . . 345
Squeeze Ð Top Left . . . . . . . . . . . . . . . . . . . . . . . . . . . . . . . . . . . . . 345
op Left to Bottom Right. . . . . . . . . . . . . . . . . . . . . . . 345
Index
15
Page 16

Introduction
CHAPTER 1
Preparing to Work with Effects
Avid Xpress offers many effects that you can apply to your sequences.
This chapter describes some of the concepts you must become familiar
with before you begin creating and editing effects into sequences.
The Effect Palette is a window that lists all the effects that are available
on your Avid Xpress system. The effects that are available depend on
the model and options that you purchased.
You also can use third-party plug-in effects that are compatible
with the Avid Visual Extension (AVXª) standards and with
Adobe¨ Photoshop¨. After you install these plug-ins, the effects
appear in the Effect Palette. After you create an effect, you can save it
as an effect template and reapply the template to other transitions or
segments in your sequence. Effect templates also appear in a special
section at the bottom of the Effect Palette.
Many effects are real time, which means you do not have to render
them before you play them. You can preview effects that are not real
time before rendering. Rendering an effect creates a media Þle that
plays with the sequence. When you establish Effect settings and Ren-
16
Page 17

der settings, you determine how Avid Xpress plays real-time effects
and non-real-time effects. Additionally, you can conÞgure the Timeline
and Trim settings to make working with effects easier.
Effect Palette Overview
You select most effects from the Effect Palette, accessed from the Tools
menu. The exceptions are motion effects that are accessed from the
buttons below the pop-up monitor, the Freeze Frame effect that is
accessed from the Clip menu, and titles that are created with the Title
Tool. For a description of motion effects, see ÒMotion EffectsÓ on
page 278. Titles are described in Chapter 6 and Chapter 7.
List of Effect Categories
The effects available through the Effect Palette are grouped by effect
category:
¥ Blend
¥ Box Wipe
¥ Conceal
¥ Edge Wipe
¥ Image
¥ Key
¥ L-Conceal
¥ Matrix Wipe
¥ Peel
¥ Push
¥ Saw Tooth Wipe
¥ Shape Wipe
17
Page 18
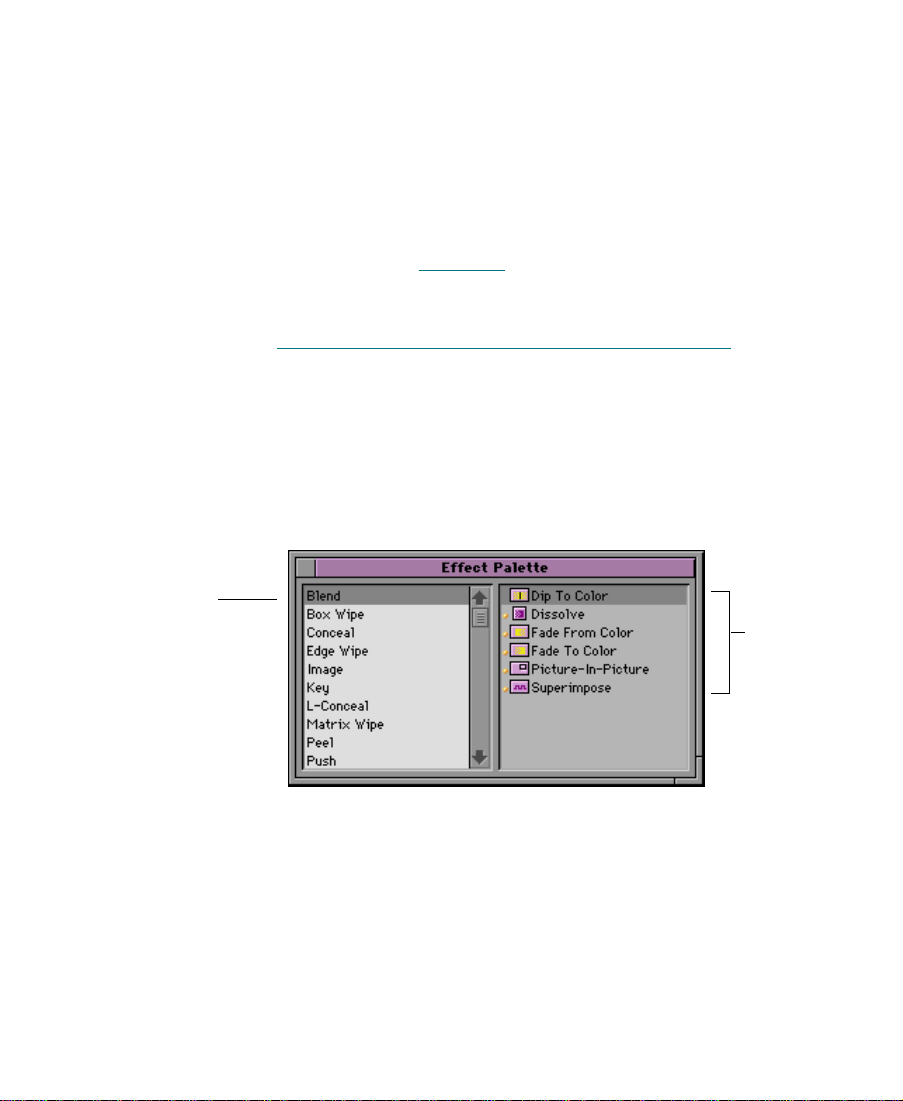
¥ Spin
¥ Squeeze
Each of these effect categories contains multiple effects. Use the procedure in the following section to display the Effect Palette.
n
n
If your Avid Xpress system has the 3D Effects option, the 3D Effect category
appears in the Effect Palette. For an explanation of the 3D effects and the
effect parameters, see Chapter 5.
If you install third-party plug-ins, you will see additional effect categories.
See ÒThird-Party Plug-in Effects OverviewÓ on page 20.
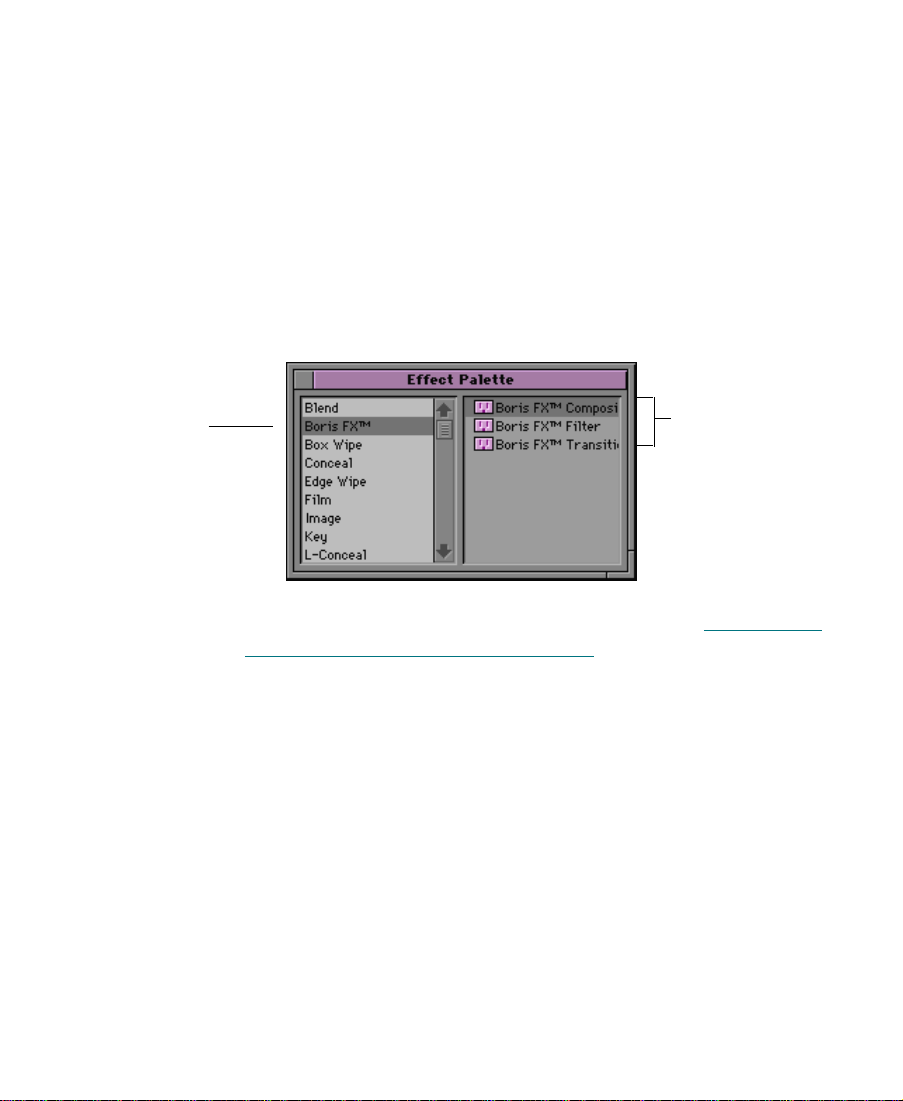
Displaying the Effect Palette
1. Choose Effect Palette from the Tools menu, or press kÐ8.
The Effect Palette appears.
Scrollable list of
effect categories
Blend effect
choices
The left side of the Effect Palette displays a scrollable list of effect
categories. The right side shows the various effects that are available for the currently selected effect category.
2. Click an effect category to select it.
18
Page 19
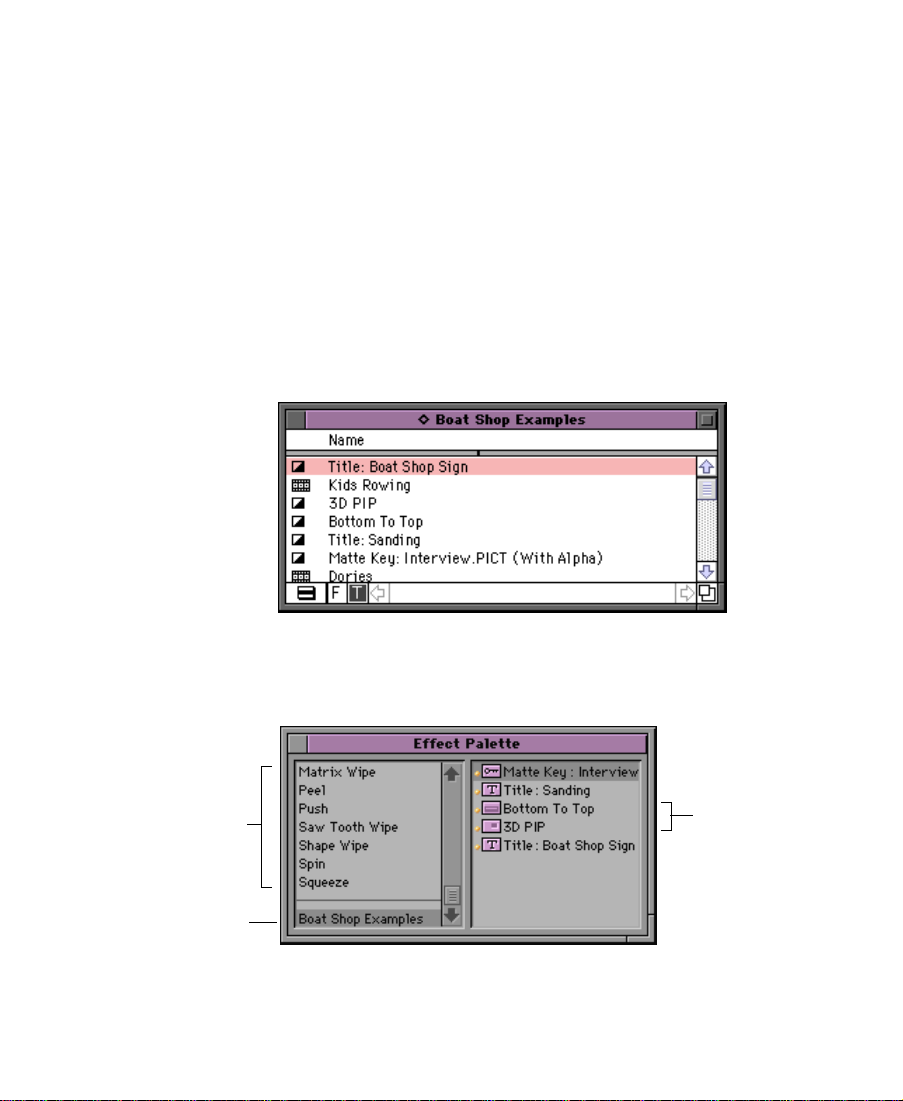
Effect T emplates Overview
Effect templates allow you to save the parameters of an effect and use
them again to create or modify other effects.
In addition to allowing you to view all the standard effects, the Effect
Palette allows you to view and access effect templates that are stored
in open bins. The names of open bins containing effects appear in a list
below the effect categories.
To view the effect template:
1. Open the bins containing the effect templates.
Effect category list
Bin name containing
effect templates
2. Choose Effect Palette from the Tools menu, or press kÐ8.
The Effect Palette appears.
Effect templates
3. Click the bin name below the effect category list to view the effect
templates in the bin.
19
Page 20

For example, in the previous illustration, the bin named Boat Shop
Examples contains two effect templates named Bottom To Top and
3D PIP.
n
In the previous illustration, notice that Avid Xpress also displays other effect
Þles, such as titles and matte key clips.
Whenever you open or close a bin, or whenever you drop an effect
into a bin, both lists are automatically updated.
Once a template appears in the right side of the Effect Palette, you can
apply it like any other effect. For more information, see ÒUsing an
Effect TemplateÓ on page 82.
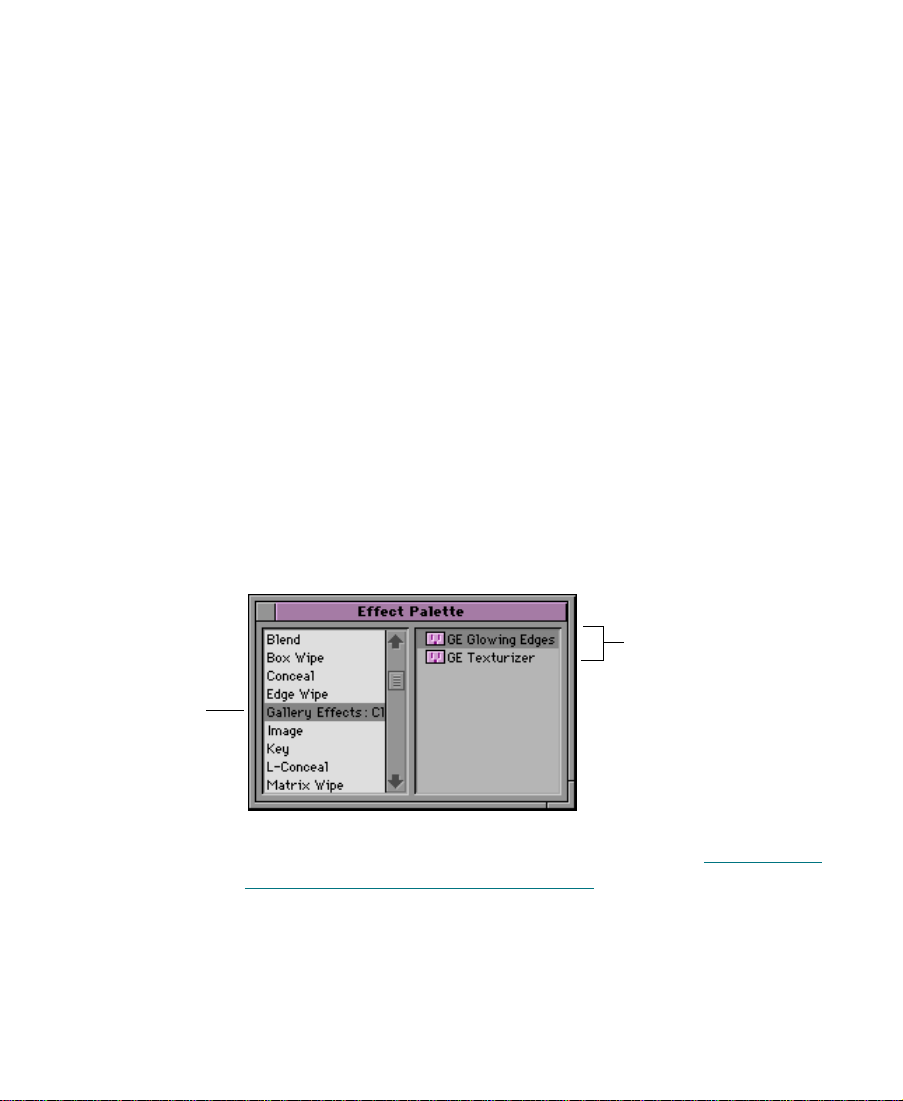
Third-Party Plug-in Effects Overview
You can use third-party plug-in effects that add new effects to Avid
Xpress or update existing effects, with no changes to Avid Xpress.
Third-party plug-in effects include plug-ins that are compatible with
Adobe Photoshop Version 2.5 and AVX (Avid Visual Extension) plugins.
When third-party plug-in effects are installed on your Avid Xpress
system, they appear in the Effect Palette. You can apply them to your
sequence as you would apply an Avid effect. You can set a third-party
plug-in effectÕs parameters in Effect mode. You can view and render
third-party plug-in effects using the same editing procedures as Avid
effects. The following sections describe how to install the Photoshopcompatible plug-ins and the AVX plug-ins.
n
Avid Xpress also supports Digidesign AudioSuite Plug-Ins. These plug-ins
apply only to audio clips and do not appear in the Effect Palette. For more
information, see ÒWorking with AudioÓ under ÒEditing SequencesÓ in the
Contents tab of the online help.
20
Page 21
Installing Photoshop-Compatible Plug-in Effects
Avid Xpress can use many plug-in effects that are compatible with
Adobe Photoshop Version 2.5. You purchase these plug-ins directly
from a third-party vendor.
To install Photoshop-compatible plug-ins:
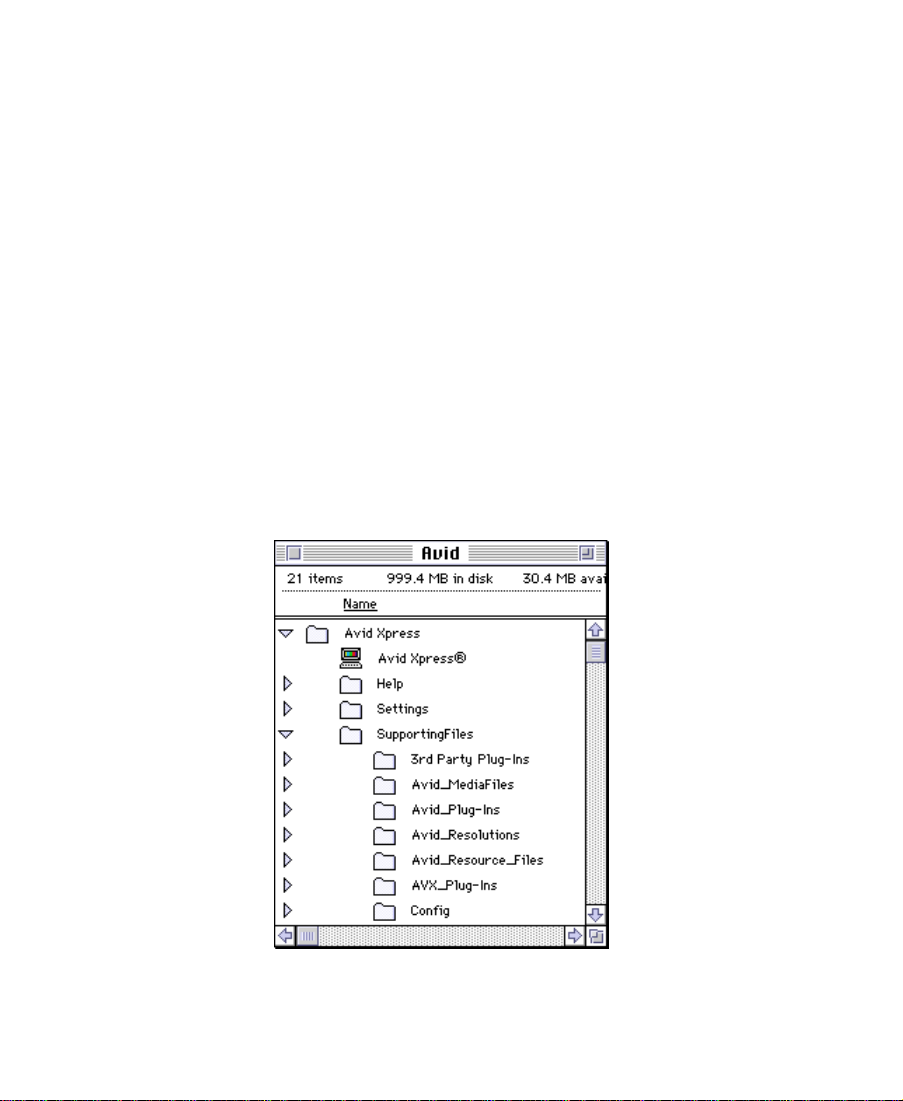
1. Copy the plug-in Þles from the software vendorÕs folder to the
Ò3rd Party Plug-InsÓ folder in the Supporting Files folder in your
Composer folder located on the Avid drive. You must place the
plug-ins directly in this folder. They cannot be inside another
folder within this folder or elsewhere on Avid Xpress. If they are,
the system will not recognize them.
2. If the Avid Xpress application is open, you must quit the application and relaunch it before the third-party plug-in effects will
appear in the Effect Palette.
The following is an example of how third-party plug-in effects appear
in the Effect Palette.
Avid Xpress creates a
new effect category for
the plug-ins.
Third-party
plug-in effects
For information on applying third-party effects, see ÒApplying a
Third-Party Plug-in EffectÓ on page 38.
21
Page 22
Installing AVX Plug-in Effects
AVX is a plug-in standard for integrating various third-party effects
with Avid Xpress. AVX is a cross-platform software architecture
designed to allow software effect modules to be dynamically linked
with a host application such as Avid Xpress.
You can purchase these plug-ins directly from a third-party vendor,
such as Ultimatte¨ Corporation (Ultimatteª) and Artel Software
(Boris FXª). AVX plug-ins usually come complete with any necessary
documentation. This section describes how to install the plug-ins and
how to access them from Avid Xpress.
To install AVX plug-ins:
1. Exit the Avid Xpress application.
2. Copy the plug-in Þles from the software vendorÕs folder to the
AVX_Plug-Ins folder on the Avid drive.
You must place the plug-ins directly in the AVX_Plug-Ins folder.
They cannot be inside another folder within this folder or else-
22
Page 23
where on Avid Xpress. If they are, the system will not recognize
them.
3. Restart Avid Xpress and open the Effect Palette. The AVX plug-in
effects will appear in the Effect Palette under a new effect category.
The category is usually identiÞed by the vendor name.
c
Effect category
n
Do not add or remove plug-ins while the Avid Xpress application is
running.
The following is an example of how AVX plug-in effects appear in
the Effect Palette. This example shows several Boris effects.
Effects
For information on applying third-party effects, see ÒApplying a
Third-Party Plug-in EffectÓ on page 38.
Some plug-in effects come with their own installation program. In that case,
follow the directions supplied with the package.
23
Page 24

Troubleshooting AVX Plug-ins
This section describes solutions to problems that you may encounter
with AVX plug-ins.
Blank Effect Icons in the Timeline
AVX plug-ins have a plug icon in the Effect Palette and in the Timeline.
If the Effect icon in the Timeline is blank, Avid Xpress either could not
Þnd the plug-in or the plug-in version doesn't match the version of
software that you used to create the plug-in.
To determine the cause of the problem, open the Console window
(choose Console from the Tools menu) and look for the message ÒCan't
Þnd effect.Ó The message will identify the plug-in that can't be displayed.
The following are the most common problems:
¥ The plug-in may be missing from the AVX_Plug-Ins folder. Open
the AVX_Plug-Ins folder (located in the SupportingFiles folder)
and look for your plug-in. If it is missing, replace it. This may
involve reinstalling the plug-In.
¥ The plug-In in the AVX_Plug-Ins folder may be incompatible with
the effect in the Timeline. This might happen if you update the
plug-ins on your system. For example, if you create an effect with
Version 1.1 of the plug-in software and then update your plug-ins
to Version 2.5, the new software may not be compatible with the
old effect.
Plug-ins should be compatible with minor releases but not necessarily with major releases of the plug-in software. For example,
Version 1.0 of a plug-in should be compatible with Version 1.1 or
1.2 (minor revision). But Version 1.0 may not be compatible with
Version 2.0 (major revision change).
24
Page 25

If the plug-in is installed correctly, contact the plug-in vendor and ask
if there are any known version compatibility problems with the plugin.
Missing Effect Categories in the Effect Palette
If the plug-in categories are not visible in the Effect Palette, they are
either not installed correctly or you may have an incorrect version of
the AVXLibrary. In this case, check the Console window for a message
that states that AVX was disabled. If it was not disabled, quit the Avid
Xpress application, reinstall the plug-ins, and restart the application.
If the message in the Console window states that AVX software was
disabled, call Avid Customer Support to determine whether you need
a new version of the AVXLibrary.
Avid Xpress Cannot Render the Plug-In
If Avid Xpress cannot render the plug-in, check the Console window.
Some plug-ins write more information about the failure to the Console
window. Also, some plug-ins may report the problem as a message at
the bottom of the Composer monitor. In general, contact the plug-in
vendor if a plug-in doesnÕt work as expected.
25
Page 26
Settings for Effects
There are two User settings that control how effects are used: Effect
and Render. This section explains each of these settings. For information about other settings in the system, see the Avid Xpress online
help.
Effect Settings
There are two effect categories, Wipes and Keys, that contain effects
that are mutually exclusive as real-time effects. If you have both effect
categories in a sequence, only one can be real time. The other must be
rendered. Use the Effect Settings dialog box to specify which effect category should be real time.
n
Because Wipes and Keys are real-time effects on Avid Xpress systems with the
3D Effects option, the Effect settings do not apply to these systems. If you
have the 3D Effects option, continue with ÒUnderstanding the Color Cod-
ingÓ on page 27.
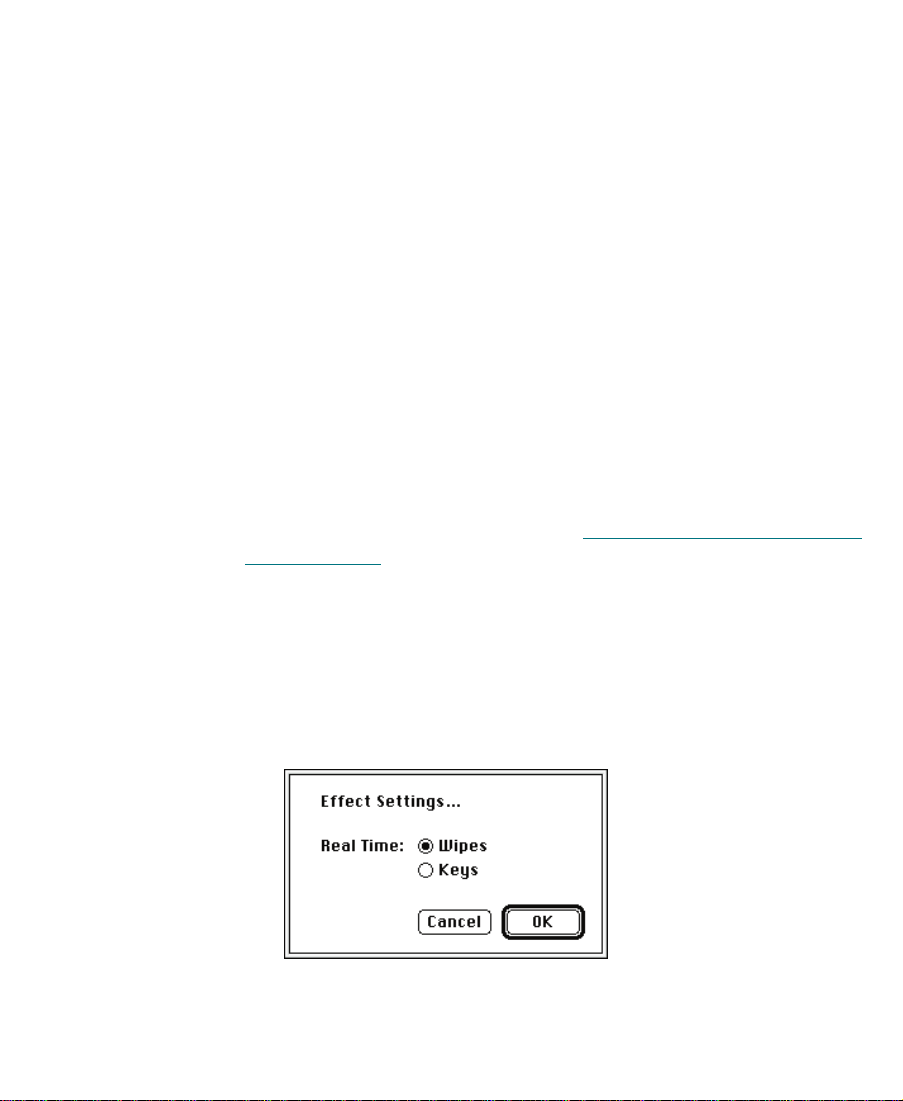
To change the Effect settings:
1. Click the Settings button in the Project window.
2. Double-click the Effect setting.
The Effect Settings dialog box appears.
26
Page 27
3. Select which effect category you want to be real time. The change
takes place immediately in the Effect Palette.
Understanding the Color Coding
The Effect settings also control how effects are displayed in the Effect
Palette. You will notice in the Effect Palette that:
¥ Real-time effects are preceded by an orange dot.
¥ Real-time effects that might not be playable in real time due to
their position in a sequence or the options chosen in the Effect
Settings are preceded by a green dot. These effects take advantage
of fast rendering.
¥ Non-real-time effects have no dot.
Orange dot indicates a
real-time effect.
Green dot indicates a
real-time effect that might
not be playable in real time.
No dot indicates a nonreal-time effect.
In the Timeline, a non-real-time effect icon contains
a blue dot until the effect is rendered.
27
Page 28
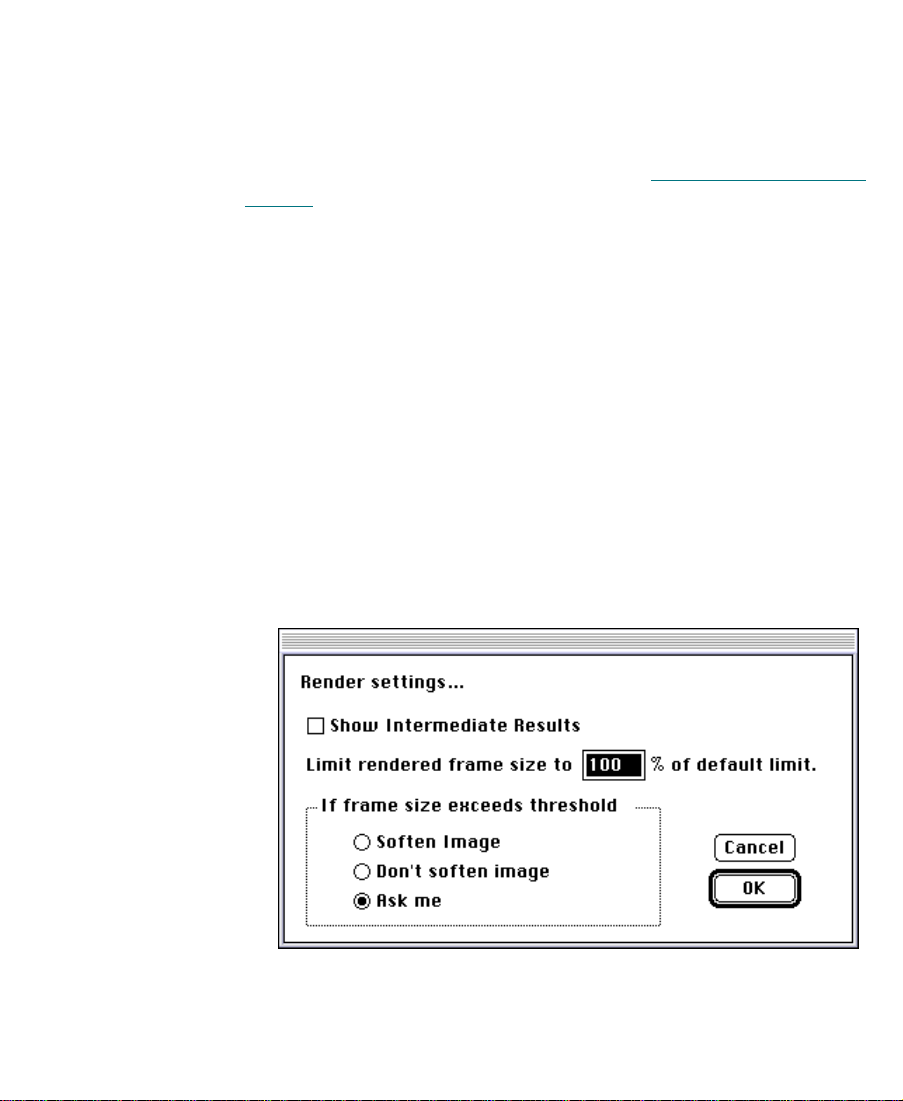
Render Settings
A real-time effect might not be playable in real time because of the
projectÕs Effect Setting, because a real-time transition effect has been
applied on top of another effect, or because there is more than one realtime overlapping effect.
For more information on real-time effects, see ÒReal-Time EffectsÓ on
page 32.
You can control the size of an imported graphic and a rendered effect
by changing the Render settings. This setting is intended to prevent
playback pauses caused by PICT images, QuickTimeª Þles, or rendered composites that are too complex.
To change the Render settings:
1. Click the Settings button in the Project window.
2. Double-click the Render setting.
The Render Settings dialog box appears.
28
Page 29
3. Enter the following parameters:
¥ Click Show Intermediate Results if you want Avid Xpress to
display the rendering of the effect as it processes in the fullscreen monitor. This option is for systems that have a third,
full-screen monitor.
¥ Limit rendered frame size to n% of default limit Ñ This is a
percent of the Avid Video ResolutionÕs (AVRÕs) default limit
for the frame size. The effectÕs AVR is the same as the
sequenceÕs AVR. Enter a percent. The default is 100%. For
more information on Avid Video Resolution, see ÒAvid SpeciÞcationsÓ under ÒQuick ReferenceÓ in the Contents tab of the
online help.
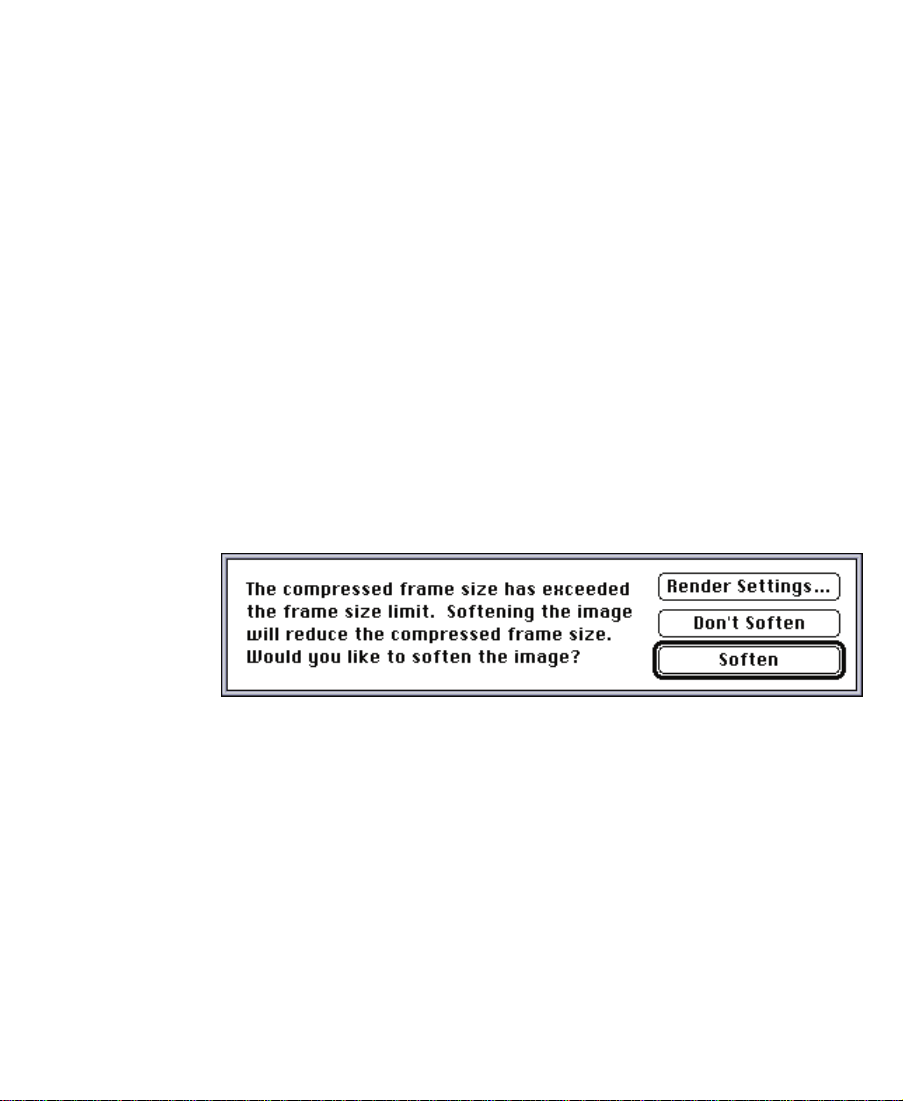
¥ If frame size exceeds threshold Ñ The threshold is established
by the above percent. Select an action. The default is ÒAsk
me.Ó
If you select ÒAsk me,Ó and the threshold is exceeded during
rendering, a dialog box appears.
If you select ÒDonÕt Soften,Ó you may get an error message,
such as a video underrun, when you play the rendered Þle.
If you do not respond within 30 seconds, the system automatically selects Soften.
29
Page 30

CHAPTER 2
Basics of Effects Editing
This chapter explains how to apply effects to transitions or segments
(clips) in your sequence. After you have selected the effect and applied
it to a transition or segment, you can adjust the effect parameters to
meet your requirements.
Task Overview — Working with Effects
The following is an overview of the tasks you will perform to create
and edit an effect:
¥ Load a sequence in the Timeline.
¥ Select a position in the Timeline for the effect.
¥ Apply the effect.
¥ Adjust the effectÕs parameters to create the desired effect.
¥ Render non-real-time effects. If the effect is a real-time effect, you
can play it without having to render the effect.
30
Page 31

Effect T ypes
There are two primary effect types that are deÞned by where you use
them in a sequence:
¥ Transition effects
¥ Segment effects (single-layer and multilayer)
Some effects can be applied only to transitions, other effects can be
applied only to segments, and some effects can be applied to both
transitions and segments. In addition, some effects can be applied to a
single video layer, and others to multiple video layers.
For an explanation of particular effects and the effect parameters, see
Chapter 5 for 3D effects and Chapter 8 for 2D effects.
Transition Effects
A transition effect is applied at the cut point of two video clips that are
on the same video track (that is, the same video layer). Transition
effects are commonly used to show a time lapse or change of scene.
They highlight or smooth the change from one shot to another.
Segment Effects
Examples of transition effects include Dissolve and Wipe effects.
A segment effect is applied to an entire clip or a group of clips. There
are two types of segment effects:
¥ A single-layer segment effect, such as a Mask effect, is applied to a
segment on one video track.
¥ A multilayer segment effect, such as a Picture-in-Picture effect, is
applied to the top layer or a middle layer of segments that contain
two or more video tracks that will be played simultaneously.
31
Page 32

The Timeline, by default, provides two tracks for editing video. You
can add two additional tracks using the New Video Track command
for a total of four video tracks.
¥ The V1 video track is where you edit your sequence.
¥ The other video tracks are where you build layered video effects
and titles. In a multilayer effect, the video clip in the upper track
appears in the foreground, or appears with some degree of transparency over the video in the lower track.
For example, you would use the V2 video track to:
¥ Place titles and credits over background video
¥ Superimpose a logo or other graphic over video
¥ Inset a video clip over background video (a Picture-in-Picture
effect)
¥ Superimpose an animation over video
¥ Layer a semitransparent image over background video
Effects can also be nested within other effects. Instead of one video
layer being physically above another video layer, a nested effect is contained within another effect on the same video layer. For more information about nested effects, see ÒNested Ef
fectsÓ on page 96.
Real-Time Effects
A real-time effect is an effect that you can apply to a sequence and play
without rendering, which takes time and disk space. A real-time effect
has a small orange dot within the effect icon in the Timeline. Effects
that must be rendered have a small green or blue dot within the effect
icon in the Timeline. For more information, see ÒUnderstanding the
Color CodingÓ on page 27.
Although you can create a sequence that has any number of real-time
and non-real-time effects, you can play only one real-time effect at a
32
Page 33

time. If you want to play two overlapping effects, you must render one
of the effects. For an explanation of how the Avid Xpress system handles situations with overlapping real-time effects, see ÒCombining
Real-Time Effects and Rendered EffectsÓ on page 77.
n
If you have a real-time Title and a real-time Dissolve effect, render the
Dissolve effect because it takes less time.
Applying Effects to a Sequence
This section explains how to apply an effect to a sequence in the
Timeline. You can apply an effect to:
¥ One transition or segment on a single video layer
¥ Multiple segments in a sequence
¥ Multiple transitions in a sequence
The effect type (transition or segment) determines where you can
place the effect in the sequence. For an explanation of the effect types,
see ÒEf
After you apply an effect, the next step is to adjust the effectÕs appearance and operation by changing its effect parameters. To understand
how to adjust the effect parameters, see ÒUnderstanding the Effect
EditorÓ on page 51.
fect TypesÓ on page 31.
Applying an Effect to a Single Transition or Segment
Use the following procedure to apply an effect to one transition or segment on a single video layer:
1. Create a sequence in the Timeline using the standard Avid Xpress
editing procedures. For information about editing a sequence, see
ÒEditing BasicsÓ under ÒEditing SequencesÓ in the Contents tab of
the online help.
33
Page 34

Effect icon
2. Choose Effect Palette from the Tools menu, or press k-8.
3. To apply an effect, do one of the following:
¥ Click and drag the desired effect to the segment or transition
in the Timeline, and release the mouse button.
¥ Highlight the transition or segment in the Timeline where you
want to apply the effect and double-click the effectÕs icon in
the Effect Palette.
The effect icon appears in the Timeline as shown in the following
example.
Timeline
n
If the effect is a segment effect, one segment at a time is highlighted as you
drag the effect within the Timeline. If the effect is a transition effect, one transition at a time is highlighted as you drag the effect within the Timeline. Some
effects can be either a transition or a segment effect; when you drag an effect
within the Timeline, both transitions and segments are highlighted.
34
Page 35

Applying an Effect to Multiple Segments
You can apply an effect to multiple segments on the same video layer
or on multiple video layers in a single step. The following procedure
describes selecting multiple segments in the same video layer. You can
also use this procedure to select segments on multiple layers.
1. Create a sequence in the Timeline using the standard Avid Xpress
editing procedures. For information about editing a sequence, see
the Avid Xpress online help.
2. Click one of the Segment Mode buttons in the Timeline.
3. Move the cursor above the segment in the Timeline that you want
to select.
4. Click and drag the cursor to activate a selection box.
Cursor selection box
5. Continue to drag the selection box until you lasso the segment that
you want to select.
Three segments are lassoed.
35
Page 36

6. Release the mouse button when you have lassoed all the desired
segments. The segments that you selected are highlighted.
n
If the desired segments are not contiguous, Shift-click a segment to deselect it.
7. Open the Effect Palette and double-click the icon of the effect that
you want to apply to the segments Ñ in this example, the Dip to
Color effect.
The effect is applied to the highlighted segments in the Timeline.
You can also use Shift-click to select segments in the Timeline.
n
Applying an Effect to Multiple Transitions
You can apply an effect to multiple transitions on the same video layer
or on multiple video layers. After you apply one transition effect in the
36
Page 37

Timeline, you can select other transitions. Then, with a single step, you
can apply an effect to all the selected transitions. The following procedure describes selecting multiple transitions.
1. Create a sequence in the Timeline using the standard Avid Xpress
editing procedures. For information about editing a sequence, see
the Avid Xpress online help.
2. Apply a transition effect to the leftmost transition where you want
an effect.
3. Choose Effect Editor from the Tools menu. The Effect Editor window opens.
4. Make sure the transition effect in the Timeline is selected and its
parameters are displayed in the Effect Editor window.
5. Move the cursor to the left and above the transition effect in the
Timeline.
6. Click and drag the cursor to the right and down to activate a selection box. Make sure you lasso the leftmost transition effect.
7. Continue to drag the selection box to the right until you lasso the
rightmost transition that you want to select.
8. Release the mouse button when you have lassoed all the desired
transitions. The transitions that you selected are highlighted.
n
n
If the desired transitions are not contiguous, Shift-click a transition to deselect it.
9. Open the Effect Palette and double-click the icon of the effect that
you want to apply to all the selected transitions.
The effect is applied to the highlighted transitions in the Timeline.
After selecting one transition effect in the Timeline, you can also use Shiftclick to select additional transitions.
37
Page 38

Applying a Third-Party Plug-in Effect
Third-party plug-in effects are applied to a sequence using procedures
that are similar to those used for an Avid Xpress effect. Third-party
plug-in effects that you can apply to a sequence include plug-ins compatible with Adobe Photoshop Version 2.5 and AVX plug-ins.
n
Effect category
When a segment contains a Photoshop-compatible plug-in effect, the effectÕs
parameters dialog box displays the Þrst time you move the position indicator
to another frame in that segment.
Applying a plug-in effect is similar to applying a standard Avid Xpress
effect.
1. Choose Effect Palette from the Tools menu, or press k-8.
The Effect Palette appears.
2. Choose the effect category that contains the plug-in. For example,
the following illustration shows the Boris plug-ins.
Effects
3. Drag the effect onto your clip or transition in the Timeline.
4. Click the Effect Mode button.
The Effect Editor appears. Plug-in vendors have the following
styles for dialog boxes:
¥ Avid Xpress-style Effect Editor controls only. This means that
all available controls are in the Avid Xpress Effect Editor window.
38
Page 39

Other Options
button
¥ Custom dialog box only. In this case, when you open the Effect
Editor, the window does not display any Avid Xpress-style
controls. Click the Other Options button to open the Plug-in
dialog box.
¥ Combination Avid Xpress-style and custom. In this case, Avid
Xpress-style controls appear, and you also see the Other
Options button. Click the button to see the additional dialog
box.
5. Adjust and preview the effect depending on the controls in the
dialog box. The plug-in vendor usually supplies documentation
on how to adjust the effect.
6. When it is appropriate, render the effect.
w
Applying a third-party plug-in to a clip can cause the clip levels to
be illegal by NTSC standards. Use an external vectorscope to check
if the chroma and luma levels are still appropriate. If they are not,
apply a color effect within Avid Xpress to correct the levels.
39
Page 40
Deleting Effects in a Sequence
You can delete transition effects and segment effects from a sequence
using the Delete key. Use the following procedures either to delete a
single effect from a sequence or to delete effects in multiple segments.
Deleting a Single Effect
1. Place the blue position indicator on the effectÕs icon in the
Timeline.
In this example, the segment effect for the Þrst segment on video
track V1 is being deleted.
Blue position indicator
2. Click one of the Segment Mode buttons from the bottom of the
Timeline window.
3. If there are multiple tracks that contain effects at the same position
in the Timeline, select only the track where the effect to be deleted
resides.
In this example, only video track V1 is selected, because the Title
effect on video track V2 should not be deleted.
40
Page 41

c
If you are deleting a segment effect and the segment contains a transition effect, the transition effect will be deleted also, because the
transition effect resides Òon top ofÓ the segment effect. If necessary,
you will have to reapply the transition effect.
4. Use one of the following methods to delete the effect:
¥ If the Effect Editor is not active, click the Remove Effect button
on the Tear-off palette or press the Delete key.
¥ When the Effect Editor is active, select the effect and press the
Delete key.
¥ In Trim mode (for transition effects only), either press the
Delete key or click the Remove Effect button.
c
When you delete an effect from a sequence, the associated media Þle
is NOT deleted. In order to delete the effectÕs media Þle, you must
manually remove it from the disk drive. The system operates this
way so that you will be able to undo the deletion of an effect or
undo the change you made to an effect. To delete an effectÕs media
Þle, see ÒManaging Your Effect Media FilesÓ on page 86.
Deleting Multiple Segment Effects
Use the following procedure to delete multiple segment effects from
your sequence:
1. Click one of the Segment Mode buttons below the Timeline.
2. Shift-click each segment that contains a segment effect to be
deleted.
3. Press the Delete key or click the Remove Effect button.
41
Page 42

Working with Transition Effects
You apply a transition effect to the cut point between two clips on the
same video track. After you apply a transition effect, you can adjust its
relative position and duration. Depending on the speciÞc effect, other
effect parameters may apply.
Transition effects are included in all effect categories on the Effect Palette. For an explanation of the transition effects in each effect category,
see Chapter 5 for 3D effects and Chapter 8 for 2D effects.
Applying a Dissolve Effect
One of the most common transition effects is a Dissolve. Avid Xpress
has three methods you can use to apply a Dissolve effect.
¥ Drag the Dissolve Effect icon from the Effect Palette to a transition.
¥ In Trim mode, select a transition and enter the DissolveÕs duration
in the Transition Effect Duration text box.
¥ Click the Add Dissolve button on the Composer monitor Tear-off
palette.
This section describes each of these methods.
Using the Effect Palette
Use the following procedure to apply a Dissolve effect to a transition
using the Effect Palette.
1. Create a sequence in the Timeline using the standard Avid Xpress
2. Choose Effect Palette from the Tools menu, or press k-8.
3. Click the Blend category to display its available effects.
editing procedures. For information about editing a sequence, see
ÒEditing BasicsÓ under ÒEditing SequencesÓ in the Contents tab of
the online help.
42
Page 43

4. Drag the Dissolve Effect icon to the transition in the Timeline, and
release the mouse button.
The Dissolve Effect icon appears in the Timeline.
When there is not enough incoming or outgoing media to apply a transition effect, a dialog box appears. See ÒSizing the Effect to Fit the
MediaÓ on page 46.
Using the Transition Parameters
You can create a Dissolve effect using the Transition Effect Alignment
parameters displayed in Trim mode and in the Effect Editor window.
Simply enter the duration for which the effect will play, and the system adds the Dissolve effect to the sequence.
Use the following procedure to create a dissolve using the Transition
Effect Alignment parameters:
1. Click a transition in the Timeline while in Trim mode or with the
Effect Editor window active.
2. Enter the DissolveÕs duration in the Transition Effect Duration text
box and press Enter. The Duration format is timecode.
Transition Effect
Alignment
Transition Effect
Alignment
pop-up menu
Transition Effect Duration text box
This adds the Dissolve effect at the selected transition, and a
Dissolve Effect icon appears in the Timeline.
3. Select the relative position from the pop-up menu. Select the
effectÕs position relative to the cut point.
For an explanation of the Transition Effect Alignment menu selections, see ÒT
ransition ParametersÓ on page 244.
43
Page 44

Using the Add Dissolve Button
Another way to create a transition effect is to go to the transition and
click the Add Dissolve button. This button allows you to apply a Dissolve or a Dip to Color effect without opening the Effect Palette.
1. Move the position indicator to the transition in the Timeline.
2. Click the Add Dissolve button on the Tear-off palette.
A dialog box appears.
3. Choose a transition effect from the Add pop-up menu.
44
Page 45

For an explanation of individual effects, see Chapter 5 for 3D
effects and Chapter 8 for 2D effects.
4. Enter the duration of the transition effect in frames.
5. Click the Position parameter; from the pop-up menu, choose the
effectÕs relative position to the cut point.
6. If you select Custom Start, in the Starts text box you must enter the
number of frames before the cut to start the effect.
7. If you plan to render the effect, click Target Disk; from the pop-up
menu, choose a disk on which to store the effect.
The Effect Source Disk is the disk where the media on the outgoing shot of a transition resides.
8. If the effect you selected is real time on your Avid Xpress system,
select the DonÕt Render Real-time Effects option to prevent realtime effects from being rendered.
9. Do one of the following:
¥ Click the Add button to add the effect without rendering it.
¥ Click the Add and Render button to add the effect and
render it.
45
Page 46

These commands add the selected effect to the transition in the
sequence.
Sizing the Effect to Fit the Media
When you select a transition effect from the Effect Palette, such as a
Dissolve, and there is not enough source media to apply the effect, the
following message appears:
¥ Off Media A Ñ refers to the number of frames by which the outgo-
ing media is short.
¥ Off Media B Ñ refers to the number of frames by which the incom-
ing media is short.
This dialog box lets you select the Size To Fit option, which causes the
system to set the duration of the effect to Þt the available media. If you
have selected a relative position, the system attempts to preserve it. To
select this option, click the Size To Fit button in the dialog box.
To change the relative position or duration of the transition effect, see
ÒUsing the T
ransition ParametersÓ on page 43.
46
Page 47

Trimming and Customizing a Transition Effect
Avid Xpress lets you do the following:
¥ Trim a transition effect using the standard transition trim proce-
dures. For more information, see ÒWorking in Trim ModeÓ under
ÒEditing SequencesÓ in the Contents tab of the online help.
¥ Customize a transition effect, such as changing the fade color. See
Chapter 3 for a description of how to change effect parameters.
47
Page 48

CHAPTER 3
Working with the Effect Editor Window
After you have created an effect and applied it to a transition or segment in your sequence, you can adjust its appearance and operation
by changing its effect parameters using the Effect Editor window. This
section explains how to use the Effect Editor window and how to
adjust the most common effect parameters.
Not all effect parameters apply to all effects. If a parameter is not
applicable, it does not appear in the Effect Editor window for that
effect. To determine which parameters pertain to a 3D effect, refer to
the effectÕs description in Chapter 5; see Chapter 8 for 2D effects.
You can also change the appearance and operation of an effect by adding key frames to the effect. A key frame is a point in the effectÕs Timeline
at which you can set parameters. The Effect Editor window and key
frames allow you to modify an effectÕs parameters at various positions
in the sequence so you can change the effectÕs appearance as it plays.
For more information on using key frames, see ÒUsing Key FramesÓ
on page 65.
48
Page 49

Opening the Effect Editor Window
After you add an effect to a sequence, you must open the Effect Editor
window to change the parameters of the effect. Opening the Effect
Editor window transforms the Composer monitor into the Effect
Preview monitor.
To open the Effect Editor window:
1. Place the blue position indicator on the effectÕs icon in the
Timeline.
2. Click the Effect Mode button in the Tear-off palette.
Avid Xpress opens the Effect Editor window and displays the values for the current effect in the window. At the same time, Avid
Xpress transforms the Composer monitor into the Effect Preview
monitor.
Effect Editor
Effect Preview monitor
49
Page 50

Understanding the Effect Preview Monitor
When an effect is selected and the Effect Editor window is active, the
selected effect displays in the Composer monitor. The Composer monitorÕs position bar no longer represents the complete sequence, but
represents only the selected effect.
Effect’s position
indicator
Effect’s position bar
n
Press and hold the mouse button
for tracking information.
If the effect you expect does not appear in the Effect Preview monitor, make
sure that you have activated the monitor in the monitor column of the effectÕs
track.
Length of effect
Current position
in effect
The two boxes above the Effect Preview monitor display the length of
the effect in seconds and frames and the current position in the effectÕs
Timeline.
50
Page 51

You can press and hold the mouse button to display a menu for viewing and changing the tracking information; this is the same method
you use to change tracking information for clips and sequences. For
information on displaying tracking information, see ÒCustomizing
Your SystemÓ under ÒManaging a ProjectÓ in the Contents tab of the
online help.
Changing Position in Effect Mode
You can change your position in the effect by either dragging the position indicator in the effectÕs position bar or by typing the timecode in
the same way you do when you are editing a sequence. The type of
timecode you enter (master timecode or absolute timecode) depends
on the top row of tracking information you are displaying. The position information boxes above the Effect Preview monitor update as
you change position. For more information on entering timecode to
change the current position, see ÒFinding Frames, Clips, and BinsÓ in
ÒViewing and Marking FootageÓ under ÒManaging a ProjectÓ in the
Contents tab of the online help.
Understanding the Effect Editor
Use the following procedure to display an effectÕs parameters in the
Effect Editor window:
1. Place the blue position indicator on the effectÕs icon in the
Timeline.
2. Click the Effect Mode button in the Tear-off palette.
n
If the Effect Editor window is already open and active, you can just select the
segment or transition effect to display the effectÕs parameters in the Effect
Editor window.
51
Page 52

The Effect Editor window opens.
Effect name
Other Options button
Triangular opener
Parameter pane
Slider used to adjust
parameter
n
Effect icon
Transition parameters
This example shows the Grid effect parameters.
If the position indicator is not on an effectÕs icon in the Timeline and the track
is not selected, then the Effect Editor window is blank.
n
If the position indicator is on an effect and the Effect Editor window is blank,
click the Effect Editor window to activate it.
52
Page 53

Effect Editor Buttons
This section describes the buttons and controls in the Effect Editor
window, starting from the top left button in the window. Not all buttons apply to each effect. Only buttons that apply to the effect appear
in the Effect Editor window. For more information about using each of
the buttons, refer to the associated topic in this chapter.
¥ Other Options Ð Use this button to access additional parameters
for matrix effects and third-party plug-in effects. You also use this
button to access the Title Tool to modify the selected Title effect.
Other Options button
¥ Triangular opener Ð Click this button to display or hide the param-
eter pane. A downward-pointing triangle displays the parameter
pane; a right-pointing triangle displays only the parameter name.
Triangular opener
Parameter pane
¥ Color Selection Ð Click the Other Options button to display the
Macintosh Color Picker when selecting a color. The Color Preview
window displays the selected color and allows you to access the
eyedropper. For more information, see ÒAdjusting a Color Param-
eterÓ on page 59.
Other Options button
Color Preview window
53
Page 54

Add Key Frame
Play Preview
Render Effect
Outline/Path
Grid
The following illustration shows the basic set of Effect Editor buttons. This example shows the Lower Left Corner Wipe effect. The
number of buttons varies with the effect.
Reduce
Enlarge
Play Loop
Play Effect
Transition Effect Duration
Transition Effect
Alignment
¥ Add Key Frame Ñ Click this button to create a key frame at the
frame in the effectÕs Timeline where you place the position indicator. Each effect can have a maximum of four key frames, except for
the Picture-in-Picture effect, which allows for 255 key frames.
¥ Play Preview Ñ Click this button to play a preview of an unren-
dered effect.
¥ Render Effect Ñ Renders the effect.
54
Page 55

¥ Outline/Path Ñ Displays a wire-frame representation to illustrate
the movement of an effect from the Þrst key frame through the last
key frame.
¥ Grid Ñ Displays the safe title and safe action guidelines.
¥ Transition Effect Alignment Ñ Click this button to select the rela-
tive position of the transition effect from the cut point. Note that
the button icon changes depending on the selected option.
¥ Transition Effect Duration Ñ Click this text box to enter the dura-
tion of the transition effect.
¥ Play Effect Ñ Plays the effect from the current position in the
effectÕs Timeline for most 2D and 3D effects.
¥ Play Loop Ñ Plays back a transition or segment effect in a loop.
Click the button again to stop the looped playback.
¥ Enlarge Ñ Click this button to enlarge the image area.
¥ Reduce Ñ Click this button to view an outline of the image area at
a reduced scale to show effects that are outside the normal viewing area. For example, movement of a Picture-in-Picture effect.
For a detailed explanation of the Transition Effect Duration and Duration parameters, see ÒUsing the T
ransition ParametersÓ on page 43.
The 3D Promote button appears in the bottom right corner of the following effects:
¥ Title effects
¥ Picture-in-Picture effects
¥ Imported matte keys
This button allows you to promote these effects to 3D effects on a system with the 3D Effects option installed. You can click the button to
promote the effect to a 3D effect. For example, you can promote a 2D
Picture-in-Picture effect to a 3D effect and make use of 3D effects
parameters such as rotation in three-dimensional space. See ÒPromot-
ing 2D Effects to 3D EffectsÓ on page 116.
55
Page 56

For descriptions of the 3D Effects buttons on the Effect Editor window,
see Ò3D Picture-in-Picture EffectÓ on page 118.
Manipulating the Image
You can change the appearance of an image using the parameter pane
controls in the Effect Editor window, or for multilayer effects such as
Picture-in-Picture, by clicking and dragging the image in the Composer monitor.
Using Parameter Pane Controls
Click the triangular opener to the left of the parameter name to display
the parameter pane. A downward-pointing triangle displays the
parameter pane; a right-pointing triangle displays only the parameter
name.
To manipulate the image, use the sliders or type values in the parameter pane. The image is automatically updated as you change values.
For information on using sliders and the numeric keypad, see ÒChang-
ing a ParameterÓ on page 58.
Manipulating the Image Directly
You can change the size and position of multilayer effects by manipulating the image directly in the Composer monitor. When you apply a
multilayer effect, the Outline/Path button outlines the foreground
image with a wire frame and handles. You can change the size and
position of the foreground image by clicking and dragging the wireframe handles.
To activate the wire frame and handles, click the Outline/Path button.
Click the button a second time to turn off the wire frame.
For more details about using the Wire Frame feature, see ÒDeÞning a
Motion PathÓ on page 71.
56
Page 57

Wire frame
Wire-frame handle
Foreground
image
The parameter pane values automatically change when you move the
wire-frame handles.
Moving an Enlarged Image in the Effect Preview Monitor
When you use the Enlarge button to increase the size of the image in
the Effect Preview monitor, you cannot view the entire frame all at
once. When you are creating an effect that requires great detail, you
can reposition the enlarged frame in the monitor to view the sections
that need your attention.
n
This feature applies only to an enlarged image in the Effect Preview monitor,
not a standard-sized or reduced image.
To move the image within the Effect Preview monitor:
1. Click within the boundaries of the Effect Preview monitor.
2. Press and hold kÐOption.
57
Page 58

The cursor becomes a hand.
Cursor Pixel Size display
3. Drag the hand in any direction to reposition the image within the
Effect Preview monitor.
Changing a Parameter
To change a parameter that has a slider, you must click its slider. When
a slider is activated, it turns pink. Use the Tab key to move from the
current slider to the next slider.
Parameter’s slider
Parameter’s numeric value
58
Page 59

Use any of the following methods to change the value of a parameter
that has a slider:
¥ Move the slider with the cursor.
¥ Type a new value using the numeric keypad. If you type less than
3 digits, press Enter.
¥ Use the Left Arrow and Right Arrow keys to change the value by
Ð1 or +1.
¥ Press the Shift key and use the Left Arrow and Right Arrow keys
to change the value by Ð10 or +10.
Adjusting a Color Parameter
You can use the following methods to change a color parameter:
¥ Use the Hue, Saturation, and Luminance sliders to select a color.
See ÒColor Selection ParametersÓ on page 233 for a description of
these values.
¥ Use the eyedropper to choose any color from the image displayed
in the Composer monitor. Use the Color Preview window to activate the eyedropper.
¥ Use the Macintosh Color Picker to select a color. Click the Other
Options button to open the Macintosh Color Picker.
Other Options button
Selecting a Color Using the Eyedropper
The eyedropper allows you to select a color from the image displayed
in the Composer monitor.
Color Preview window
59
Page 60

1. Move the cursor to the Color Preview window at the right of the
parameter name to activate the eyedropper.
Other Options button
2. Click and drag the eyedropper into the Composer monitor and
release the mouse button on the color you want to select from the
video image.
The parameterÕs numeric values are updated, and the selected
color appears in the Color Preview window.
n
When you use the eyedropper to select a border color, the Border blend color is
also changed to ensure a solid border color. You can select a different color for
the Blend color.
Selecting a Color Using the Macintosh Color Picker
The Macintosh Color Picker is a standard application that ships with
Macintosh systems. Its appearance varies depending on the current
release of the Macintosh operating system.
Color Preview window
and eyedropper
Click the Other Options button to open the Macintosh Color Picker.
See ÒUsing the Macintosh Color PickerÓ on page 235 for a description
of the tool.
60
Page 61

Adjusting Effect Position
The Position parameters represent the position of the effect center
along both the X axis (H Pos) and Y axis (V Pos) at a key frame. If the
effect center is positioned at H Pos = 0 and V Pos = 0, the effect is centered in the frame.
Position parameters
On the X axis, an H Pos value of
side of the frame, and a value of 999 places it beyond the right side of
the frame. Both values Ð999 and 999 place the effect outside the frame.
On the Y axis, a V Pos value of Ð999 places the effect beyond the top of
the frame, and a value of 999 places it beyond the bottom of the frame.
Both values Ð999 and 999 place the effect outside the frame.
If you move the sliders while the wire frame is active, you can see the
frame outline moving in the Composer monitor.
You can also change the effectÕs position by moving the effectÕs image
directly in the Composer monitor. For more information, see ÒMoving
the Image DirectlyÓ on page 72.
Adjusting Effect Size
The Scaling parameters Wid (width) and Hgt (height) represent the
size of the effect.
Ð999 places the effect beyond the left
61
Size parameters
Page 62

The range of values for the Width and Height sliders is 0 to 400. A size
of 100 means you have not scaled the effect (it is 100 percent of its
normal size). A setting of 400 means the effect is 4 times its original
size.
You can adjust the Scaling parameters using the standard procedures
explained in ÒChanging a ParameterÓ on page 58.
You can also change the effectÕs size by moving the image directly in
the Composer monitor. See ÒMoving the Image DirectlyÓ on page 72.
Cropping an Effect
Use Crop parameters to eliminate unwanted picture areas in Picturein-Picture effects.
Cropping allows you to remove video from the top, bottom, left, and
right edge of the inner or incoming video.
T (top) Removes video from the top of the inner or incoming
video. Values range from 0 to 999; 0 is the top of the
screen, 500 is the middle of the screen, and 999 is the
bottom of the screen.
B (bottom) Removes video from the bottom of the inner or incom-
ing video. Values range from Ð999 to 0; 0 is the bottom
of the screen, Ð500 is the middle of the screen, and Ð999
is the top of the screen.
62
Page 63

L (left) Removes video from the left side of the inner or
incoming video. Values range from 0 to 999; 0 is the
left side of the screen, 500 is the middle of the screen,
and 999 is the right side of the screen.
R (right) Removes video from the right side of the inner or
incoming video. Values range from Ð999 to 0; 0 is the
right side of the screen, Ð500 is the middle of the
screen, and Ð999 is the left side of the screen.
Fading an Effect
You can use the Fade Effect button on the Tear-off palette to fade an
effect. See ÒFading a TitleÓ on page 214.
Accessing an Effect’s Additional Parameters
Some effects have additional parameters that control their operation.
For example, the Grid effect has additional parameters in which you
set the number of columns and rows in the grid. When an effect has
additional parameters, the Other Options button appears at the left of
the effect name in the Effect Editor window.
n
Click the Other Options button next to the effect name to access additional parameters.
A dialog box appears in which you set the additional parameters.
You also use the Other Options button to access the parameters for thirdparty plug-in effects and the Title Tool.
63
Page 64

Safe Title/Action Guidelines Overview
Many effects can utilize the outer edges of the viewing screen area. If
you are editing material that will be viewed on screens with more limited viewing areas, such as standard televisions, you can use the Safe
Title/Action guidelines to provide visual guidelines in the Composer
monitor that replicate the actual viewable area on a standard television screen.
For example, you can use the Safe Title/Action guidelines as a template for the area in which you want the effect to operate. In this way,
you can avoid the appearance of the effect ßoating off into a nonviewable area of a standard television screen.
Use the following procedure to display the Safe Title/Action guidelines.
¥ To display the Safe Title/Action guidelines in the Composer mon-
itor select the Grid button in the Tear-off palette or choose Safe
Title/Area Global Grid from the Object menu.
¥ To display the Safe Title/Action guidelines in the Title Tool,
choose Safe Title/Area Global Grid from the Object menu.
Two outlined boxes appear in the Composer monitor. The inner box is
the safe title area. All text and objects should remain within the inner
box. The outer box is the safe action area for video display.
64
Page 65

Safe title area
Safe action area
Fast Menu
button
Using Key Frames
A key frame is a point in the effect at which you can set parameters.
Modifying an effectÕs parameters at various points causes the effectÕs
appearance to vary as it plays. For example, you can add key frames to
a Picture-in-Picture effect, and change the position parameters for each
key frame to add movement to the effect.
Key-frame indicators appear as triangles in the position bar of the
Composer monitor when an effect is selected and the Effect Editor
window is active. You adjust key-frame parameters using the Effect
Editor window.
65
Page 66

Starting key frame
Selected key frame
Ending key frame
By default, the Avid Xpress system always provides the starting and
ending key frames of an effect. You can create two additional key
frames for each effect, except for the Picture-in-Picture effect, which
allows for 255 key frames.
Regardless of the number of key frames in your effect, you can use different parameter settings for each key frame.
66
Page 67

Adding a Key Frame
You can add a key frame at any point in an effect to change the effectÕs
appearance.
Use the following procedure to create a key frame:
1. Click the position in the effectÕs position bar below the Composer
monitor where you want to add the key frame. The position indicator moves to that frame.
2. Do one of the following to add a key frame:
¥ Click the Add Key Frame button in either the Effect Editor
window or on the Tear-off palette.
¥ Press the letter N on the keyboard.
Selecting a Key Frame
You can select a key frame or multiple key frames using the following
procedures. A key frame turns pink when selected.
¥ To select one key frame, click the key-frame indicator in the
effectÕs position bar.
¥ To select multiple key frames, hold down the Shift key and click
the desired key-frame indicators in the effectÕs position bar.
¥ To select all key frames in the effectÕs position bar, press kÐA, or
press k and click on any key frame.
67
Page 68

Adjusting the Level Between Key Frames
Use the Level parameter, together with key frames, to set the relative
amount of the effect to be displayed over time Ñ for example, to fade a
Superimpose effect in or out.
The Level parameter performs differently depending on the effect.
¥ For Blend and Key effects, the Level parameter represents the
effectÕs opacity. A level of 100 is completely opaque, a level of 50 is
50 percent transparent, and a level of 0 is completely transparent.
¥ For Wipes and all other transition effects (except Dissolves) the
Level parameter represents the proportion of incoming frames to
outgoing frames. A Level of 0 is 100 percent of outgoing, a level of
50 is 50 percent of outgoing, and a level of 100 is 0 percent of outgoing.
Dissolve effects are a special case, where the Level parameter represents both the effectÕs opacity and the proportion of incoming to outgoing frames.
Use the following procedure to adjust the Level parameter:
Triangular opener
1. Click a key-frame indicator in the effectÕs position bar to select it.
2. Click the triangular opener to display the Foreground parameter
pane.
3. Adjust the Level parameter using the standard procedures
explained in ÒChanging a ParameterÓ on page
68
58.
Page 69

Adjusting the Acceleration
The Acceleration parameter allows you to adjust the ßow of the effect
by having the effect ease in and ease out of every key frame. The
Acceleration parameter applies to the entire effect, not speciÞc key
frames. The following table shows some sample Acceleration settings.
Settings Results
0 Linear acceleration
50 Slight ease in and ease out
100 Maximum ease in and ease out
n
The overall speed of an effect is determined by the duration of the effect, which
is determined by the length of the clip in the sequence. If you want to slow
down or speed up the movement of an effect, you will need to change the
length of your clip.
To adjust the Acceleration parameter, use the standard procedures
explained in ÒChanging a ParameterÓ on page
Moving a Key Frame
After you have created a key frame, you can move it to another position in the effectÕs position bar.
To move a key frame, hold down the Option key and click and drag
the key frame to its new position.
The starting and ending key frames cannot be moved.
n
58.
69
Page 70

Changing a Key Frame’s Parameters
You can change the parameters for any key frame, including the starting and ending key frames.
Use the following procedure to change a key frameÕs parameters:
1. Select an effect in your sequence.
2. Choose Effect Editor from the Tools menu.
3. Click the key-frame indicator in the effectÕs position bar to select it.
The key-frame indicator turns pink when selected.
Effect’s position bar
n
4. Adjust any of the applicable parameters in the Effect Editor window using the standard procedures explained in ÒChanging a
ParameterÓ on page 58.
The Scaling and Position parameters can also be changed by directly moving
the image in the Composer monitor. See ÒMoving the Image DirectlyÓ on
page 72.
Selected key frame
Copying and Pasting Key-Frame Parameters
You can copy and paste parameters from one key frame and apply
them to another key frame. You can also copy key-frame parameters
from one effect to another effect.
Use the following procedure to copy and paste key-frame parameters:
1. Click one key-frame indicator in the effectÕs position bar whose
parameters you want to copy. The key-frame indicator turns pink
when selected.
70
Page 71

2. Choose Copy from the Edit menu, or press kÐC.
3. Click the key-frame indicator that you want to apply the new
parameters to.
¥ To copy the parameters to multiple frames, Shift-click
¥ To copy the parameters to all key frames, press kÐA.
4. Choose Paste from the Edit menu, or press kÐV.
The parameters that you copied from the key frame are pasted to
the key frame, or frames, you selected.
Deleting a Key Frame
You can delete any key frame you create. You cannot delete the starting and ending key frames that the Avid Xpress system creates.
Use the following procedure to delete a key frame:
1. Click the key-frame indicator in the effectÕs position bar. The keyframe indicator turns pink when selected.
multiple key frames.
2. Press the Delete key.
n
For a quick way to delete a key frame, press the Option key and click the Add
Key Frame button.
Defining a Motion Path
You can deÞne how the foreground image of a multilayer effect will
move across the background video by building a motion path, or string
of key frames. You can deÞne a motion path on multilayer video
effects such as Picture-in-Picture effects. Use the wire-frame preview
feature when you want to see the path an image takes on the screen.
71
Page 72

When you are creating a motion path that moves beyond the viewing
screen, you can use the Enlarge button to view an outline of the image
at a reduced scale. The reduced scale view shows the area outside the
background image and allows you to extend the motion path into that
area. The Reduce button returns the screen to full view.
You can deÞne a motion path for the foreground image using either of
two methods:
¥ Move the image directly and automatically add key frames.
¥ Add key frames and adjust the parameter sliders.
Moving the Image Directly
You can add a motion path to a multilayer effect using the wire-frame
feature and key frames. The Outline/Path button on the Effect Editor
window places a wire frame around the foreground image in the Composer monitor. You can then drag the wire frame to new locations and
add key frames at each location to add movement to the effect.
You can also resize the foreground image using the wire frame by
clicking and dragging the wire-frame handles. The top center handle
adjusts the imageÕs height and the right center handle adjusts the
imageÕs width. You can use the top right corner handle to equally
change the imageÕs height and width.
Use the following procedure to add a motion path to the foreground
image using the wire frame and key frames:
1. Create a sequence with two video layers (foreground video on
track V2, background video on track V1). For information about
creating a sequence, see ÒEditing SequencesÓ in the Contents tab
of the online help.
2. Apply a multilayer effect to the foreground segment on video
track V2.
3. Select the foreground effect segment.
72
Page 73

Wire frame outlining
foreground image
on video track V2
Background image
on video track V1
Effect’s position bar
4. Open the Effect Editor window. By default, the wire frame is
active. The foreground image is outlined, and both the starting
and ending key-frame indicators are highlighted (pink) in the
effectÕs position bar.
Starting key-frame indicator
If the wire frame is not displayed, click the Outline/Path button
on the Effect Editor window to activate the wire frame.
5. Drag the wire frame to the start point of the motion path you are
creating. The starting key-frame indicator represents the start
point.
6. Click the ending key-frame indicator to select it. Make sure the
ending key-frame indicator is the only indicator selected (pink).
7. Drag the wire frame to the end point of the motion path. A path
line from the center of the starting position to the center of the
ending position appears.
Ending key-frame indicator
73
Page 74

Center handle
Wire frame
Path line
8. Drag the position indicator in the effectÕs position bar to a new
location. The wire frame moves with the position indicator; notice
the path line does not change.
9. Click inside the wire frame and drag or stretch the wire frame to
add a key frame at the new location. A handle appears in the center of the wire frame, indicating the path position of the new key
frame.
10. Drag the wire frame to change the effectÕs path.
Effect’s position bar
Selected key frame
11. Repeat the last three steps to add more variation to the path.
74
Page 75

Adjusting Key Frame Parameters
You can adjust the foreground imageÕs motion path by adding a string
of key frames and adjusting their Position parameters.
1. Select the foreground effect segment in the Timeline.
2. Open the Effect Editor window. Both the starting and ending keyframe indicators are highlighted (pink) in the effectÕs position bar.
Effect’s position bar
Triangular opener
Position parameter pane
Starting key-frame indicator
Ending key-frame indicator
3. Click the Position triangular opener to display the Position parameter pane.
75
Page 76

4. Click the starting key-frame indicator to select it. Make sure the
starting key-frame indicator is the only indicator selected (pink).
5. Adjust the Position parameters to set the pathÕs starting position.
6. Click the ending key-frame indicator to select it. Make sure the
ending key-frame indicator is the only indicator selected (pink).
7. Adjust the Position parameters to set the pathÕs ending position. A
path line appears between the starting position and the ending
position.
8. Drag the position indicator in the effectÕs position bar to a new
location.
9. Click the Add Key Frame button to add a key frame at the new
location in the effect.
10. Adjust the Position parameters until the desired path is set. The
path line changes to represent the new motion path.
11. Repeat the last three steps to add additional key frames to vary the
path of the foreground image.
Playing a Motion Path Preview
You may want to play a Picture-in-Picture effect to check the movement of the foreground image. The Play Preview button allows you to
preview the path of the wire frame in a Picture-in-Picture effect. To
play the effect at its full speed, you must Þrst render the effect.
Use the following procedure to play a preview of the wire-frame path:
1. Click the Play Preview button.
Play Preview shows a preview of the path the foreground image
takes from the current position. For non-real-time effects, the outline does not play in real time. For example, if an effect is 3 seconds long, the outline may take 8 seconds to play. However, if an
effect is real time, it is played in real time.
76
Page 77

2. Do one of the following to stop playing the effect preview:
¥ Click the mouse button.
¥ Press the space bar.
¥ Click the Play Preview button a second time.
Rendering an Effect
You must render a non-real-time effect before it can be played at full
speed. When an effect is rendered, the system stores the effect and its
media Þle as a precomputed master clip (often referred to as a precom-
pute). The system uses the precompute the next time to play the effect
at its full speed.
You can identify nonrendered effects by the blue dot located on the
effect icon in the Timeline or in the Effect Editor window. Once an
effect is rendered, the blue dot is removed.
Selecting the Render Setting for a Project
You can control the size of a rendered effect to Þt within a playable
range by changing the Render settings. For an explanation of the Render settings, see ÒRender SettingsÓ on page 28.
Combining Real-Time Effects and Rendered Effects
Avid Xpress can process only two streams of video at one time. Therefore, when two or more real-time effects overlap, Avid Xpress can play
only one of these effects in real time. The other effects will not be
displayed.
77
Page 78

Overlapping Real-Time Effects
The following deÞnes how Avid Xpress handles situations with overlapping real-time effects:
¥ If two or more real-time effects overlap, Avid Xpress plays one of
the effects in real time and substitutes video from track V1 for the
real-time effect that it cannot create. If the video on track V1 is not
readily available because it is also a real-time effect, then Avid
Xpress substitutes black for the real-time effect that it cannot
create.
¥ If real-time effects on different video tracks overlap, Avid Xpress
plays the effect on the highest numbered track in real time.
¥ If you have two real-time effects on the same track (for example, a
dissolve or wipe overlaps video with color effects), Avid Xpress
plays the real-time transition effect using video without the segment effect, or using black, in some cases.
In summary, if you want to view the video with both effects, render
one of the overlapping effects.
Overlapping Real-Time and Rendered Effects
If you are rendering effects that will overlap real-time transition
effects, place the real-time transition effects in the sequence before rendering the non-real-time effects. This ensures that you render enough
extra frames of video to create the real-time effect in real time.
Avid Xpress renders this section of video only if the real-time transition effect is present before you render the segment effect.
Speed Considerations
If you have multiple short clips with multiple real-time effects, you
may exceed the capacity of the hardware to play these in real time,
resulting in Video Underrun error messages. In this case, render some
of the intermediate effects before playing the sequence.
78
Page 79

Displaying Effects While You Edit
You can display the results of effects automatically as soon as you create them. Note that this can slow down your editing of the sequence.
To display effects automatically, choose the Render On-The-Fly command from the Clip menu. It is enabled when there is a check mark
next to it in the menu.
Rendering a Single Effect
After you have adjusted an effectÕs parameters, you can render the
effect.
Use the following procedure to render a single effect:
1. Place the blue position indicator on the effect in the Timeline.
2. Click the Render Effect button in the Tear-off palette.
A dialog box appears.
n
To prevent this dialog box from displaying, press and hold the Option key
when you click the Render Effect button. The system will use the last disk
drive selected.
79
Page 80

3. Select a disk drive from the Target Disk pop-up menu on which to
store the rendered effect.
The Effect Source Disk is the disk drive where the media on the out-
going shot of a transition resides.
The following dialog box appears if the disk drive you selected
does not have enough available disk space for the precompute
media Þle.
You have two choices:
¥ Stop the rendering procedure so you can select another disk
drive with more space available.
n
¥ Continue with the rendering procedure and try to place the
precompute on the selected disk drive.
4. Click OK.
The effect is rendered, and a precompute master clip is stored on
the disk drive you selected.
To display the estimated render time, press the letter T on the keyboard. Press
T again to clear the display.
80
Page 81

Rendering Multiple Effects
When you have more than one effect to render, you can render them as
a group.
c
Save your sequence before you use this feature. Depending on the
number, type, and complexity of the effects, the batch process can
take a long time.
Use the following procedure to render multiple effects:
1. Click the track selector in the Timeline for each track on which you
have effects to be rendered.
2. Mark an IN point before the start of the Þrst effect to be rendered
in your sequence; mark an OUT point after the last effect to be
rendered.
3. Choose Render In/Out from the Clip menu.
The Render Preferences dialog box appears.
4. Select a disk drive from the pop-up menu on which to store the
rendered effect.
The Effect Source Disk is the disk where the media on the outgoing
shot of a transition resides.
5. Click OK.
81
Page 82

The Avid Xpress system renders all effects between the IN and
OUT points.
n
n
To display the estimated render time, press the letter T on the keyboard. Press
T again to clear the display.
Another way to speed up rendering is to use the Submaster effect. See ÒSub-
master EditingÓ on page 103.
Rendering Third-Party Plug-in Effects
Third-party plug-in effects must be rendered. Use the same procedures explained in ÒRendering Multiple EffectsÓ on page 81.
Using an Effect Template
The parameters for an effect are called the effect template. You can
reuse an effect template in multiple places in a sequence by saving the
template in a bin and later applying the template to other effects or
video clips in the sequence.
Saving an Effect Template
You can save the parameters from the effect in the Effect Editor window and reuse them for another effect.
Use the following procedure to save an effect template:
1. Do one of the following:
¥ Drag the effectÕs effect icon from the Effect Editor window to a
bin. This creates a new effect template in the bin, containing
the parameter setting information for the effect.
82
Page 83

Effect icon
¥ To save the source for a segment effect, press and hold the
Option key while dragging the effectÕs icon from the Effect
Editor window to a bin. This also saves the source clips associated with the effect and anything that might be nested inside.
For example, saving the source is useful when you want to
save an imported PICT Þle or matte key clip for future editing
into a sequence.
The new effect template is identiÞed in the bin by its effect icon.
Effect template
n
n
2. Click on the effect template name below the icon and type a new
name to rename the template.
Title effects are saved with source by default. If you hold the Option key while
dragging the icon, you will get a key-frame only template. This template will
retain the movement of the title without the source.
Effect icons for open bins are also displayed in the Effect Palette.
83
Page 84

Applying an Effect Template
You can take an effect template that has been saved in a bin and apply
the template and its parameters to other transitions or segments in
your sequence.
Choose one of the following procedures to apply an effect template to
a transition or segment:
¥ Click the effect template in the bin or in the Effect Palette, and
drag it to the Timeline.
¥ Select a segment or transition in the Timeline, and double-click the
effect template in the bin or in the Effect Palette.
This applies all the parameters from the effect template to the new
video clip that you are creating.
Applying Part of an Effect Template
You can apply part of an effect template to transitions or segments in
your sequence.
Use the following procedure to apply part of an effect template to a
transition or segment:
1. Select an effect transition or segment in the Timeline.
2. Open the Effect Editor window.
3. Open the parameter pane you want to change. For example, the
following illustration shows the Position parameter pane.
84
Page 85

Position
parameter pane
4. Click the effect template icon in the bin or in the Effect Palette, and
drag it to the speciÞc parameter pane in the Effect Editor window.
The effect template is applied only to the effect parameter pane you
selected.
c
Do not drag the effect template through the Timeline window,
because this deselects the effect.
85
Page 86

Managing Your Effect Media Files
When you render an effect, create a title, or import a graphic Þle, Avid
Xpress creates two elements: an effect clip and a precompute master
clip (also known as a rendered effect media Þle).
Avid Xpress overwrites or automatically deletes a media Þle from
your disk drive only if you:
1. Render an effect two or more times with the Render Effect button
2. Close the project before either an Auto Save or a manual save
occurs
In this case, Avid Xpress automatically saves the last-rendered
effect and deletes the earlier, unreferenced versions. This autodeletion applies only to effects rendered since the last save or project
close.
This prevents you from deleting media that may be necessary to play
other versions of the sequence. If you want to remove media Þles from
your disk to save disk space, you will have to manually delete the Þles.
86
Page 87

Locating and Deleting Effect Media Files
Use this procedure to locate and delete unwanted media Þles on your
disk drive for your current project.
1. Choose Media Tool from the Tools menu.
The Display Media Selector dialog box appears.
c
2. Select Current Project and Precompute Master Clips and click OK.
The Media Tool window opens and displays all precompute master clips associated with your current project. To determine which
precomputes your project is using, continue to the next step.
3. Resize the Media Tool window, until you can see all or most of the
precomputes.
4. Open the bin that contains the sequences and highlight the
sequence that you want to keep.
This procedure deletes any precompute media Þles in the project
that are not used by the selected sequences.
5. Choose Select Media Relatives from the Bin menu.
87
Page 88

In the Media Tool window and in other open bins, all the precompute master clips are highlighted. These clips point to the media
Þles that the selected sequences are using.
6. Click the title bar of the Media Tool to make it the active window.
7. Choose Reverse Selection from the Bin menu to highlight all the
precompute master clips you are not using in the selected
sequences.
8. Press Delete.
The Delete Media Files dialog box appears.
9. Click OK to delete the selected precomputes.
88
Page 89

CHAPTER 4
Working with Multilayer and Nested Effects
This chapter describes how to apply multilayer effects to your
sequence. Multilayer effects consist of two or more tracks of video
with effects that play back simultaneously, such as Picture-in-Picture,
Superimpose, and Submaster. The methods and concepts for creating
and applying multilayer effects build on the procedures for creating
single-layer effects described in Chapter 2.
Effects can also be nested within other effects. Instead of one video
layer being physically above another video layer, a nested effect is contained within another effect on the same video layer.
Using Multilayer Effects
Some effects are made up of multiple video layers (tracks). The procedures for applying multilayer effects differ slightly from applying
single-layer effects. This section explains how to create some of the
more common multilayer effects Ñ the Key effects.
89
Page 90

Creating a Key Effect
Avid Xpress supports the following Key effects:
¥ YUV Chroma Key Ñ Replaces one part of the video image with
another video image based on color
¥ Luma Key Ñ Replaces one part of the video image with another
video image based on luminance (brightness)
¥ Matte Key Ñ Replaces one part of the video image with another
video image or graphic based on the location of a high-contrast
image known as a matte
Creating a YUV Chroma Key Effect
The YUV Chroma Key effect is used most frequently with a foreground image shot in front of a highly saturated color screen (for
example, a meteorologist against a weather map). See ÒYUV Chroma
KeyÓ on page 271 for an example.
To create a YUV Chroma Key effect:
1. Create a sequence with two layers. Place the foreground image on
track V2 and place the background image on track V1.
2. Choose Effect Palette from the Tools menu, or press kÐ8.
3. Drag the YUV Chroma Key effect from the Effect Palette to the
segment on track V2.
The Key effect is added. Ultimate Blue is the default key color.
To change the key color, open the Effect Editor window and see
ÒAdjusting a Color ParameterÓ on page 59.
4. Set the Secondary Key color, Spill Suppression, Gain, and Softness
parameters. For an explanation of these parameters, see ÒKey
Control ParametersÓ on page 236.
90
Page 91

Creating a Luma Key Effect
Use a Luma Key effect to replace portions of the foreground video
with the background video based on brightness or luminance.
Use the following procedure to create a Luma Key effect:
1. Create a sequence with two layers. Place the foreground image on
track V2 and place the background image on track V1.
2. Choose Effect Palette from the Tools menu, or press kÐ8.
3. Drag the Luma Key effect from the Effect Palette to the segment on
track V2.
Use the eyedropper or the Luma Key sliders to select a brightness
value in the foreground video. Avid Xpress replaces the corresponding
portions of the foreground video with background video. See ÒLuma
KeyÓ on page 272 for an example.
Creating a Matte Key Effect
The Matte Key effect uses three layers of video to create the effect. The
bottom layer is the background image, the middle layer is the foreground image, and the top layer contains the matte or alpha channel.
Use the following procedure to create a Matte Key effect:
1. Create a Timeline with three video tracks.
2. Edit the background image onto track V1.
3. Edit the foreground image onto track V2.
4. Load a high-contrast image into a pop-up monitor and edit it onto
track V3.
5. Choose Effect Palette from the Tools menu, or press kÐ8.
6. Choose the Key category and drag the Matte Key effect to the clip
on track V3.
91
Page 92

7. Click the Monitor selector for track V3. You should see tracks V2
and V1 through the high-contrast image on track V3.
8. Place the blue position indicator over the Matte Key Effect icon
and render the effect.
For an example of a Matte Key effect, see ÒMatte KeyÓ on page 273.
You can also import a graphic image with an alpha channel and use it
as a Matte Key effect. See ÒEditing with Imported Matte Key ClipsÓ
on page 93.
Working with Imported Graphics and Animation
This section describes two different approaches to editing with
imported graphic images, depending upon whether:
¥ The image was imported as a master clip with no alpha channel
(an opaque graphic element)
¥ The image was imported as a Matte Key Effect clip with an alpha
channel (a keyable graphic element for video overlay)
Graphic master clip
with no alpha channel
Matte Key Effect clip
with alpha channel
These alternatives apply to both single-frame graphic images or animation. In addition, you can edit imported images into sequences
using Avid Xpress editing procedures. These topics are described in
this section.
92
Page 93

n
For more information on importing graphic and animation clips, see ÒFile
Format SpeciÞcationsÓ under ÒImporting, Exporting, and TransferringÓ in
the Contents tab of the online help.
Editing with Imported Matte Key Clips
When an imported clip includes an alpha channel for keying the
graphic over video, it appears in the bin with an effect icon and the
words ÒMatte KeyÓ attached to the front of the clip name and Ò(With
Alpha)Ó attached to the end. You can shorten or change this name at
any time.
Both single-frame graphic images (such as a single PICT Þle) and
multiple-frame animation sequences (such as a PICT sequence Þle)
appear in the bin in the same form after import, and you use the same
editing techniques for both. You can edit this type of clip into a
sequence as a standard matte key overlay.
n
c
Only PICT Þles and PICT sequence Þles can be used as real-time keyed
graphics. QuickTime Þles and PICS animation Þles cannot be used as realtime keyed graphics.
Use the following procedure to edit a matte key clip into the sequence.
1. Edit the main video sequence onto track V1.
2. Play the sequence and mark an IN and OUT point where you
want to overlay the graphic.
3. Load a matte key clip into the pop-up monitor. Mark an IN point
toward the center of the clip if it is a still image.
4. Drag the matte key clip from the pop-up monitor onto track V2.
The graphic is keyed over the video on V1.
You must edit Matte Key Effect clips onto track V2 to achieve the
keyed effect. If you edit a Matte Key Effect clip onto V1, the image is
keyed over black.
93
Page 94

Monitor selector
In the Timeline, the graphic appears on the track above the main
video sequence. A Matte Key Effect icon appears in the Timeline
segment. The blue dot in the icon indicates that the effect must be
rendered before it can be played.
Matte Key graphic
keyed over video
5. Adjust effect parameters with the Effect Editor window, if necessary, using procedures described in ÒUnderstanding the Ef
EditorÓ on page 51.
Matte Key Effect icon
fect
n
n
If the keyed portions of the images are the reverse of the intended effect, then
you must reimport and reverse the effect on import.
6. Use the standard effect editing procedures to preview, render, or
play the matte key clip.
Make sure the Monitor selector is on for track V2 in order to see the complete
effect.
94
Page 95

Editing with Imported Master Clips
When an imported clip does not include an alpha channel for keying
the graphic over video, its icon is the standard Master Clip icon. This is
true for both single-image graphics and animation sequences. You can
edit this type of clip into a sequence as an opaque image or animation
(in other words, as a single layer) using basic editing techniques
described in this section.
Use the following procedure to edit an imported master clip into the
sequence.
1. Double-click the graphic clip icon to open a pop-up monitor.
2. Create a sequence in the Timeline.
3. In the pop-up monitor, mark an IN point at the start of the clip and
mark an OUT point to specify the duration of the graphic.
4. In the Composer monitor, mark an IN point where you want to
edit the graphic clip into the sequence.
5. Click one of the Segment Mode buttons in the Timeline.
6. Drag the clip into the Timeline to add the opaque graphic to the
sequence.
The opaque image appears in the sequence. In the Timeline, the
graphic looks like a standard video clip edited into the sequence.
7. Play the clip. If necessary, use the standard editing procedures to
edit the graphic, the same as you would a video clip.
95
Page 96

Nested Effects
You can use the Avid Xpress system to layer multiple effects in a single
video track to better combine multiple images and digital video
effects. This process is known as nesting, which allows you to layer
multiple effects. You can then render the nested effects as one segment
on the video track.
You can use nesting to constrain one effect by using another effect. For
example, you can use a Circle Wipe effect to constrain an image posterization inside a region.
Avid Xpress allows you to expand the Timeline video tracks so you
can select each nested effect and modify it using the Effect Editor
window.
n
You cannot nest transition effects or audio tracks.
Describing Nested Tracks
You can add nested effects to any of the video tracks in the Timeline.
The video track expands, allowing you to view the nested tracks,
which are numbered 1.1, 1.2, 1.3, and so on. The number of nested
tracks displayed in the Timeline depends on the effect.
For example, a two-layer effect such as Picture-in-Picture creates two
nested tracks. Track 1.1 represents V1 (the background video) and
track 1.2 represents V2 (the foreground video). When nested track 1.1
is empty, the video on V1 contains the background video for the effect.
The following example shows a Timeline with nested tracks for a
Picture-in-Picture effect.
96
Page 97

Nested tracks
In the previous example, nested track 1.2 holds the foreground image
and nested track 1.1 is for the background image. In this case, nested
track 1.1 is empty, which allows the video on track V1 to be used as the
background video. If you want a different background, you can edit
another video onto nested video track 1.1.
Nesting a Title Within a Picture-in-Picture
If you want to create a moving picture-in-picture that includes a title,
you will have to create a nested effect so the title moves with the
picture-in-picture as one unit.
Effect icon
The following picture shows a title within a Picture-in-Picture effect.
97
Page 98

Use the following procedure to nest a title within a Picture-in-Picture
effect:
1. Create a sequence with two video layers. Put your foreground
video on V2 and your background video on V1.
2. Create a Title effect and place it in an open bin. For information on
how to create a title, see Chapter 6.
3. Choose Effect Palette from the Tools menu.
4. Choose the Blend category and apply the Picture-in-Picture effect
to the segment on V2. The following illustration shows an
example.
98
Page 99

Source track selector
Picture-in-Picture Effect icon
5. Click one of the Segment Mode buttons in the Timeline.
6. Double-click the Picture-in-Picture Effect icon in the segment. The
Timeline expands to display the nested tracks 1.1 and 1.2.
7. Deselect the Segment Mode button so you can edit the tracks.
8. Drag the Source track selector to nested track 1.2.
9. Choose New Video Track from the Clip menu. Avid Xpress creates
nested track 1.3.
10. Drag the Source track selector to nested track 1.3.
11. Edit the title into the new nested track 1.3 as shown in the following illustration.
12. Select one of the Segment Mode buttons again, and double-click
the Picture-in-Picture effect on track V2.
Avid Xpress collapses the nested track. Now, if you animate the
Picture-in-Picture effect, the title moves with it.
99
Page 100

Nesting a Matte Key Effect
A Matte Key effect uses three layers of video to create the effect. You
can use nested video tracks for this effect.
A Matte Key effect creates three nested tracks. Track 1.1 represents the
background video (V1), track 1.2 is the Þller track for the foreground
video, and track 1.3 contains the matte or alpha channel (V2).
Nested tracks
Background image
Monitor selector
Matte Key Effect icon
New foreground image
Use the following procedure to create a Matte Key effect:
1. Create a sequence with the background video on track V1.
2. Load a high-contrast image into a pop-up monitor and edit it onto
track V2. For an example of a high-contrast image, see ÒMatte
KeyÓ on page 273.
3. Choose Effect Palette from the Tools menu, or press kÐ8.
4. Open the Key effect category from the Effect Palette, and drag the
Matte Key effect to the segment on track V2.
5. Click one of the Segment Mode buttons in the Timeline.
6. Double-click the Matte Key Effect icon in the segment. The Timeline expands to display three nested tracks (1.1, 1.2, and 1.3).
100
 Loading...