

Page 1

Pro Tools
AVoption & AVoption|XL Guide
Version 5.0.1 for Macintosh
Digidesign Inc.
3401-A Hillview Avenue
Palo Alto, CA 94304 USA
tel: 650·842·7900
fax: 650·842·7999
Technical Support (USA)
650·842·6699
650·856·4275
Product Information (USA)
650·842·6602
800·333·2137
Fax on Demand (USA)
1-888-USE-DIGI (873-3444)
World Wide Web
www.digidesign.com
Digidesign FTP Site
ftp.digidesign.com
Page 2

Copyright
This User’s Guide is copyrighted ©2000 by Digidesign, a
division of Avid Technology, Inc. (hereafter “Digidesign”), with
all rights reserved. Under copyright laws, this manual may not
be duplicated in whole or in part without the written consent of
Digidesign.
DIGIDESIGN, AVID and PRO TOOLS are trademarks or
registered trademarks of Digidesign and/or Avid Technology,
Inc. All other trademarks are the property of their respective
owners.
All features and specifications subject to change without
notice.
PN 932707903-00 REV A 05/00
Page 3

contents
Chapter 1. Introduction to Pro Tools AVoption and AVoption|XL
AVoption Components
AVoption XL Components
AVoption Capabilities
AVoption XL Capabilities
FilmFrame
. . . . . . . . . . . . . . . . . . . . . . . . . . . . . . . . . . . . . . . . . . . . . . . . . . . . . . . . . . . . . 2
Chapter 2. AVoption Hardware Overview
AVoption Hardware Capabilities
Required Hardware
Sync Hardware
Storage Hardware
Chapter 3. AVoption|XL Hardware Overview
AVoption XL Hardware Capabilities
Required Hardware
Sync Hardware
Storage Hardware
Chapter 4. Installing AVoption
Installing a New AVoption System
Installing AVoption as an Upgrade
Installing AVoption Software
Installing AVoption Hardware
Installing the Digidesign SCSI 64 / ATTO EPCI-DC SCSI Accelerator Card
Initializing Hard Drives
AVoption Video Connections
Sample AVoption Setup Diagrams
. . . . . . . . . . . . . . . . . . . . . . . . . . . . . . . . . . . . . . . . . . . . . . . . . . . . . 1
. . . . . . . . . . . . . . . . . . . . . . . . . . . . . . . . . . . . . . . . . . . . . . . . . . . 1
. . . . . . . . . . . . . . . . . . . . . . . . . . . . . . . . . . . . . . . . . . . . . . . . . . . . . . 1
. . . . . . . . . . . . . . . . . . . . . . . . . . . . . . . . . . . . . . . . . . . . . . . . . . . 2
. . . . . . . . . . . . . . . . . . . . . . . . . . . . . . . . . . . . . . . 3
. . . . . . . . . . . . . . . . . . . . . . . . . . . . . . . . . . . . . . . . . . . . . . 3
. . . . . . . . . . . . . . . . . . . . . . . . . . . . . . . . . . . . . . . . . . . . . . . . . . . . . . . 4
. . . . . . . . . . . . . . . . . . . . . . . . . . . . . . . . . . . . . . . . . . . . . . . . . . . . . . . . . . 5
. . . . . . . . . . . . . . . . . . . . . . . . . . . . . . . . . . . . . . . . . . . . . . . . . . . . . . . . 5
. . . . . . . . . . . . . . . . . . . . . . . . . . . . . . . . . . . . 7
. . . . . . . . . . . . . . . . . . . . . . . . . . . . . . . . . . . . . . . . . . . . 7
. . . . . . . . . . . . . . . . . . . . . . . . . . . . . . . . . . . . . . . . . . . . . . . . . . . . . . . 8
. . . . . . . . . . . . . . . . . . . . . . . . . . . . . . . . . . . . . . . . . . . . . . . . . . . . . . . . . . 9
. . . . . . . . . . . . . . . . . . . . . . . . . . . . . . . . . . . . . . . . . . . . . . . . . . . . . . . . 9
. . . . . . . . . . . . . . . . . . . . . . . . . . . . . . . . . . . . . . . . . . . . . . . 11
. . . . . . . . . . . . . . . . . . . . . . . . . . . . . . . . . . . . . . . . . . . . 11
. . . . . . . . . . . . . . . . . . . . . . . . . . . . . . . . . . . . . . . . . . . . 11
. . . . . . . . . . . . . . . . . . . . . . . . . . . . . . . . . . . . . . . . . . . . . . . . 12
. . . . . . . . . . . . . . . . . . . . . . . . . . . . . . . . . . . . . . . . . . . . . . . 12
. . . . . . . . . . . . . . . . . . . . . . . . . . . . . . . . . . . . . . . . . . . . . . . . . . . . 17
. . . . . . . . . . . . . . . . . . . . . . . . . . . . . . . . . . . . . . . . . . . . . . . . 17
. . . . . . . . . . . . . . . . . . . . . . . . . . . . . . . . . . . . . . . . . . . 20
. . . . . . . . . . . . . . . . . . 1
. . . . . . . . . . . . . . . . 16
Contents
iii
Page 4

Chapter 5. Installing AVoption XL
Installing a New AVoption XL System
Installing AVoption XL as an Upgrade
Installing AVoption XL Software
Installing AVoption XL Hardware
Installing the ATTO EPCI-UL2D SCSI Accelerator
AVoption XL Video Connections
Meridien I/O Box
. . . . . . . . . . . . . . . . . . . . . . . . . . . . . . . . . . . . . . . . . . . . . . . . . . . . . . . 28
. . . . . . . . . . . . . . . . . . . . . . . . . . . . . . . . . . . . . . . . . . . . 23
. . . . . . . . . . . . . . . . . . . . . . . . . . . . . . . . . . . . . . . . . 23
. . . . . . . . . . . . . . . . . . . . . . . . . . . . . . . . . . . . . . . . . 23
. . . . . . . . . . . . . . . . . . . . . . . . . . . . . . . . . . . . . . . . . . . . . 24
. . . . . . . . . . . . . . . . . . . . . . . . . . . . . . . . . . . . . . . . . . . . 24
. . . . . . . . . . . . . . . . . . . . . . . . . . . . . . . . . 27
. . . . . . . . . . . . . . . . . . . . . . . . . . . . . . . . . . . . . . . . . . . . . 28
Chapter 6. Recording or Importing the Movie Track
The Movie Track
Setting S-Video or Component Output
Movie Track Options
Recording Video
Exporting Files from Avid Programs
Importing Files into AVoption and AVoption XL
Chapter 7. Playing the Movie Track
Movie Online
Movie Offline
Playback Viewing Options
Spotting the Movie Track
Video Editing With AVoption or AVoption XL
Index
. . . . . . . . . . . . . . . . . . . . . . . . . . . . . . . . . . . . . . . . . . . . . . . . . . . . . . . . . . . . . . . . . . . . . 43
. . . . . . . . . . . . . . . . . . . . . . . . . . . . . . . . . . . . . . . . . . . . . . . . . . . . . . . . 33
. . . . . . . . . . . . . . . . . . . . . . . . . . . . . . . . . . . . . . . . . 34
. . . . . . . . . . . . . . . . . . . . . . . . . . . . . . . . . . . . . . . . . . . . . . . . . . . . . 34
. . . . . . . . . . . . . . . . . . . . . . . . . . . . . . . . . . . . . . . . . . . . . . . . . . . . . . . . 35
. . . . . . . . . . . . . . . . . . . . . . . . . . . . . . . . . . . . . . . . . . 36
. . . . . . . . . . . . . . . . . . . . . . . . . . . . . . . . . . 38
. . . . . . . . . . . . . . . . . . . . . . . . . . . . . . . . . . . . . . . . . . 39
. . . . . . . . . . . . . . . . . . . . . . . . . . . . . . . . . . . . . . . . . . . . . . . . . . . . . . . . . . 39
. . . . . . . . . . . . . . . . . . . . . . . . . . . . . . . . . . . . . . . . . . . . . . . . . . . . . . . . . . 39
. . . . . . . . . . . . . . . . . . . . . . . . . . . . . . . . . . . . . . . . . . . . . . . . . 40
. . . . . . . . . . . . . . . . . . . . . . . . . . . . . . . . . . . . . . . . . . . . . . . . . . 41
. . . . . . . . . . . . . . . . . . . . . . . . . . . . . . . . . . . . 42
. . . . . . . . . . . . . . . . . . . . . . . . . . . 33
AVoption and AVoption XL Guide
iv
Page 5

chapter 1
Introduction to Pro Tools AVoption and
AVoption|XL
AVoption and AVoption XL combine the
powerful audio post-production features of
Pro Tools with integrated support for the
import, capture, and playback of Avid
video media.
AVoption Components
AVoption consists of software and two
Avid video cards that you install in a
Pro Tools audio system. The Digidesign
audio hardware provides digital audio recording, editing, mixing, and processing.
The Avid video hardware provides video
capture and import, full screen video playback on an external PAL or NTSC monitor,
video playback in an on-screen window,
and professional quality video compression.
AVoption XL Components
AVoption XL consists of software, a PCI
card that you install in a Pro Tools audio
system, and an external I/O box that connects to the PCI card. The Digidesign audio
hardware provides digital audio recording,
editing, mixing, and processing. The Avid
video hardware provides video capture and
import, full screen video playback on an
external PAL or NTSC monitor, professional quality video compression, and the
capability to record and play back uncompressed video.
AVoption Capabilities
AVoption lets you do the following:
• Import and capture NTSC and PAL video
• Play the Movie Track with near sampleaccurate precision against audio tracks in
a Pro Tools session
• Spot or Slip the video track to a new time
code location, and spot audio to the
video track
• View video edits and media boundaries
in the Movie Track
• View the Movie Track as frames that represent video data
• Play video on an external NTSC or PAL
monitor
• Play video in a floating window on your
computer monitor
Chapter 1: Introduction to Pro Tools AVoption and AVoption|XL
1
Page 6

You can also do the following:
• Import MFM (Media File Manager format) or MSM (Media Stream Manager
format) video files created on Avid systems, such as Media Composer,
Xpress/Mac, and AudioVision into the
Movie Track of a Pro Tools session
• Capture MSM format video media in the
Movie Track of a Pro Tools session
AVoption XL Capabilities
AVoption XL lets you do the following:
• Import and capture NTSC and PAL video
• Play the Movie Track with near sampleaccurate precision against audio tracks in
a Pro Tools session
• Spot or Slip the video track to a new time
code location, and spot audio to the
video track
• View video edits and media boundaries
in the Movie Track
• View the Movie Track as frames that represent video data
• Play video on an external NTSC or PAL
monitor
FilmFrame
The FilmFrame™ option enables 24 FPS
support in AVoption and AVoption XL.
With FilmFrame installed, you can import
and play back Avid Film Composer media
files. For more information on FilmFrame,
contact your Digidesign dealer or visit the
Digidesign Web site.
You can also do the following:
• Import JFIF video media files from Windows or Macintosh based Avid systems
such as MediaComposer, Symphony, and
Xpress into the Movie Track of a
Pro Tools session
• Capture JFIF format video media in the
Movie Track of a Pro Tools session
AVoption and AVoption XL Guide
2
Page 7

chapter 2
AVoption Hardware Overview
AVoption hardware consists of two cards:
an Avid Broadcast Video Board (ABVB), and
a Janus Advanced JPEG Compression card.
These cards connect with a ribbon cable.
AVoption Hardware Capabilities
AVoption hardware does the following:
• Receives composite or component video
signal
• Digitizes incoming video
• Compresses digitized video using advanced JPEG compression
• Outputs composite and component
video signals
• Connects to a second VGA monitor (optional) for computer screen display
Avid Video Resolutions (AVR)
The ABVB captures and plays back video
media with JPEG compression technology,
expressed as Avid Video Resolution (AVR)
levels, in the MSM media format (Media
Composer 7.x-compatible). AVoption can
import both MSM video and MFM video,
which is generated by AudioVision 4.x and
Media Composer 6.x.
AVR levels dictate the amount of JPEG
compression, which determines image
quality and storage requirements for digitized video.
The following resolutions are available:
• Single-field – AVR 2s, AVR 3s, AVR 4s,
AVR 6s, AVR 8s, AVR 9s
• Two-field – AVR 12, AVR 70, AVR 70B,
AVR 71, AVR 75, AVR 75B, AVR 77
• Multicamera – AVR 2m, AVR 3m,
AVR 4m, AVR 6m
✽
Lower numbered AVR levels require less
hard drive space but provide lower resolution
than higher numbered AVR levels.
The lowest resolution is AVR 2m, and the
maximum resolution, AVR 77, is considered to be broadcast quality.
JPEG Compression and Storage
JPEG compression is not constant, but varies according to the complexity of the footage. For example, a medium shot of a talking head with a simple background would
compress more and use less disk space than
a panning shot of a stadium full of people.
Chapter 2: AVoption Hardware Overview
3
Page 8
The following tables list the approximate
amount of video storage, in minutes per gigabyte, required for each AVR level.
Storage for AVR 2s – AVR 9s
AVR
level
AVR 2s 40-74 50-93
AVR 3s 32-57 40-71
AVR 4s 19-40 24-50
AVR 6s 11-33 14-41
AVR 8s 5-13 6-16
AVR 9s 3-6 4-7
Storage for AVR 2m – AVR 6m
AVR
level
AVR 2m 47-93 58-116
AVR 3m 25-45 35-60
30/25 FPS
Storage
(Minutes/GB)
30/25 FPS
Storage
(Minutes/GB)
24 FPS
Storage
(Minutes/GB)
24 FPS
Storage
(Minutes/GB)
Required Hardware
To install and use AVoption, you must first
install currently supported Pro Tools 24 or
Pro Tools 24 MIX hardware. Other hardware required for AVoption is listed in this
section, along with system requirements
for AVoption.
Supported Computers
• Power Macintosh 9500
• Power Macintosh 9600
• Power Macintosh G3 (Blue & White)
• Power Macintosh G4
If you are using a Blue & White G3 or a G4,
a qualified expansion chassis is required.
Older G3 Macintosh systems (beige) are
not supported.
See the Digidesign Web site for the latest
✽
CPU compatibility information.
AVR 4m 21-36 27-45
AVR 6m 14-30 18-38
Storage for AVR 12 and AVR 70 – AVR 77
AVR
level
AVR 12 18-34
AVR 70
AVR 70B
AVR 71 4-11
AVR 75
AVR 75B
AVR 77 2-6
AVoption and AVoption XL Guide
4
30/25 FPS
Storage
(Minutes/GB)
5-11
3-8
Page 9

Minimum System Requirements
Minimum Pro Tools AVoption System Requirements
Item Minimum Requirement
Computer Power Macintosh 9500
Power Macintosh 9600
Power Macintosh G3 (Blue &
White)
Power Macintosh G4
Pro Tools audio
hardware
Pro Tools 24
Pro Tools 24 MIX
Pro Tools 24 MIXplus
Storage Hardware
SCSI Accelerators
To support the high transfer rates required
by AVoption audio and video, the ATTO
Express PCI Dual-Channel SCSI Accelerator
(or other AVoption qualified SCSI accelerator) is required, with audio drives connected to one channel and video drives
connected to the other channel.
PCI Expansion
Chassis (Blue &
White G3)
SCSI accelerator ATTO ExpressPCI Dual-
SCSI hard drives at least 2 approved SCSI
Sync peripheral Universal Slave Driver (USD)
Magma 13-Slot
Magma 7-slot
Channel
(Other SCSI accelerators
may be approved. Check the
Digidesign web site for the
latest compatibility information.)
hard drives
Sync Hardware
Synchronization Peripheral
AVoption requires a Universal Slave Driver
(USD).
Sync Source
For accurate synchronization during capture and playback, a house sync source or
black burst generator is required.
SCSI Hard Drives
Using Two Hard Drives
For scenarios that do not require a high
audio track count or a very long video segment, use two hard drives.
In this scenario, one drive is used to record,
import, and play back audio data, and one
drive is used to record, import, and play
back the video.
Using More Than Two Hard Drives
To get the highest possible performance
from your AVoption system, you should
use more than two hard drives. In this scenario, you can use one, two, three, or four
hard drives for audio data and one, two, or
three hard drives for video data.
Audio
AVoption can use multiple hard
drives to store audio data. You should allocate audio tracks to different hard drives
manually. “Round robin” disk allocation is
not recommended in a system that includes video drives.
Chapter 2: AVoption Hardware Overview
5
Page 10

Video
AVoption can capture a contiguous
video track to multiple hard drives. This is
useful if the length of your video session
exceeds the 2 GB Mac OS file size limit, or
the storage space available on a single
drive. For example, 50 minutes of video
material, using AVR 77 compression, requires between 9 GB and 25 GB of storage
space. To store this much video, you need
between one and three 9 GB hard drives.
The video is automatically split by AVoption into several files of less than 2 GB on
each disk.
See the Digidesign Web site for the latest
✽
AVoption compatibility information.
AVoption and AVoption XL Guide
6
Page 11

chapter 3
AVoption|XL Hardware Overview
AVoption XL consists of two hardware
components: a Meridien Digital Media
Board that installs in a PCI slot in your
computer, and a Meridien I/O Box that
connects to the card in your computer. A
Video I/O Board, installed in the Meridien
I/O Box, provides video inputs and outputs
from your computer to the rest of your
video equipment.
AVoption XL Hardware
Capabilities
AVoption XL hardware does the following:
• Receives composite, component,
S-video, or (optional) SDI video signal
• Digitizes incoming video
• Compresses digitized video using advanced JFIF compression
• Outputs composite, component,
S-video, and (optional) SDI video signals
• Captures and plays back uncompressed
video
JFIF Video Compression
The Meridien board captures and plays
back video media in JPEG File Interchange
Format (JFIF). JFIF compression levels provide variable levels of compression for your
video project, depending on the recording
input selected, except for 1:1, which is uncompressed. The available JFIF resolutions
are:
• Single field – 15:1s, 4:1s, 2:1s
• Two fields – 20:1, 10:1, 3:1, 2:1, 1:1 (uncompressed)
Higher JFIF compression ratios require less
✽
storage space but provide lower video resolution than lower compression ratios.
The lowest JFIF resolution is 15:1s, and the
maximum resolution, 1:1, is uncompressed.
JFIF Compression and Storage
JFIF compression is variable. This means
that JFIF compression levels vary slightly,
depending on the video input selected.
✽
1:1 (uncompressed) video storage levels
are not approximate. The amount of data required to store 1:1 video is always the same,
regardless of the video input used.
Chapter 3: AVoption|XL Hardware Overview
7
Page 12
The following tables list the approximate
amount of video storage, in megabytes per
second, required for each JFIF compression
level.
Storage for Single-Field JFIF
JFIF
level
15:1s .7 .6
4:1s 2.7 2.2
2:1s 5.5 4.4
30/25 FPS
Storage
(MB/second)
(approximate)
24 FPS
Storage
(MB/second)
(approximate)
Supported CPUs
• Power Macintosh 9600
• Power Macintosh G3 (Blue & White)
• Power Macintosh G4
Older G3 Macintosh systems (beige) are
not supported.
✽
See the Digidesign Web site for the latest
CPU compatibility information.
Minimum System Requirements
Storage Required for Two-Field JFIF
JFIF
level
20:1 1.1 .9
10:1 2.2 1.8
3:1 7.3 5.9
2:1 11 8.8
1:1 22 17.6
30/25 FPS
Storage
(MB/second)
(approximate,
except 1:1)
24 FPS
Storage
(MB/second)
(approximate,
except 1:1)
Required Hardware
To install and use AVoption XL, you must
first install currently supported
Pro Tools 24 or Pro Tools 24 MIX hardware. Other hardware required for
AVoption XL is listed in this section, along
with system requirements for
AVoption XL.
3:1 Video Compression or Higher
Minimum AVoption XL System Requirements
Item Minimum Requirement
CPU Power Macintosh 9600,
Blue & White G3 or G4
PCI Expansion
Chassis
SCSI accelerator Qualified SCSI Accelerator
SCSI hard drives Qualified drives are
Sync peripheral Universal Slave Driver (USD)
Magma 13-Slot
(ATTO EPCI-DC or Digidesign
SCSI 64)
required; see the Digidesign
Web site for more information.
AVoption and AVoption XL Guide
8
Page 13

2:1 Video Compression or 1:1 Uncompressed
Storage Hardware
Minimum AVoption XL System Requirements
Item Minimum Requirement
CPU Power Macintosh 9600,
Blue & White G3 or G4
PCI Expansion
Chassis
SCSI accelerator
(video)
SCSI accelerator
(audio)
SCSI hard drives Qualified drives are
Striped hard
drives
Sync peripheral Universal Slave Driver (USD)
Magma 13-Slot
Qualified SCSI Accelerator
(ATTO EPCI-UL2D LVD Accelerator required for 2:1 or
1:1 video compression)
Qualified SCSI Accelerator
(ATTO EPCI-DC or Digidesign
SCSI 64 required for 2:1 or
1:1 video compression)
required; see the Digidesign
Web site for more information.
A 2-way stripe is required for
2:1 compressed video.
A 4-way stripe is required for
uncompressed (1:1) video.
SCSI Accelerators
To support the high transfer rates required
by AVoption XL video, a qualified SCSI accelerator is required, with audio drives connected to one channel and video drives
connected to the other channel. For 2:1
compression or 1:1 uncompressed video, 2
SCSI accelerators are required.
SCSI Hardware and Drives with Video Compression Level 3:1 or Higher
If you are using 3:1 video compression or
higher at all times, then your system requires only a single dual channel SCSI accelerator, the ATTO EPCI-UL2D or EPCIDC, or the Digidesign SCSI 64, with audio
drives connected to one channel and video
drives connected to another.
Other SCSI accelerators may be qualified.
✽
Refer to the compatibility information on the
Digidesign Web site for more information.
Sync Hardware
Synchronization Peripheral
AVoption XL requires a Universal Slave
Driver (USD).
Sync Source
For accurate synchronization during capture and playback, a house sync source or
black burst generator is required.
Using Two Hard Drives
For scenarios that do not require a high
audio track count or a very long video segment, use two hard drives.
In this scenario, one drive is used to record,
import, and play back audio data, and one
drive is used to record, import, and play
back the video.
Chapter 3: AVoption|XL Hardware Overview
9
Page 14

Using More Than Two Hard Drives
To get the highest possible performance
from your AVoption XL system, you should
use more than two hard drives. In this scenario, you can use one, two, three, or four
hard drives (volumes) for audio data and
one, two, or three hard drives (volumes) for
video data.
✽
Note that striped volumes appear to
AVoption XL as a single volume.
Audio
AVoption XL can store audio data to
multiple hard drives. You should allocate
audio tracks to different hard drives manually. “Round robin” disk allocation is not
recommended in a system that includes
video drives.
Both of these options are covered in detail
in your
Video
ous video track to multiple hard disks. This
is useful if the length of your video session
exceeds the storage space available on a
single drive. For example, 26 minutes of
video material, using 3:1 compression, requires approximately 11.1 GB of storage
space. To store this much video, you need
two 9 GB hard drives.
Pro Tools Reference Guide
AVoption XL can capture a contigu-
.
connected to the EPCI-UL2D, and audio
drives are connected to the EPCI-DC or
SCSI 64.
Striped Drive Requirements
“Striped” drives are configured in such a
way that multiple hard drives behave as if
they are one hard drive. This makes higher
data throughput possible. 4-way striped
drives (4 drives acting as one) are required
when capturing, importing, or playing uncompressed (1:1) video. 2-way striped
drives (2 drives acting as one) are required
when capturing, importing, or playing 2:1
compressed video.
2-way striped drives should be connected
in pairs to the EPCI-UL2D accelerator, with
1 drive connected to each channel.
4-way striped drives should be connected
in pairs to the EPCI-UL2D accelerator, with
2 drives connected to each channel.
SCSI Hardware and Drives with Video Compression Level 2:1 or 1:1
If you are using 2:1 or 1:1 video compression, your system requires two SCSI accelerators: the ATTO EPCI-UL2D LVD accelerator, and the ATTO EPCI-DC or Digidesign
SCSI 64. In this scenario, video drives are
AVoption and AVoption XL Guide
10
Page 15

chapter 4
Installing AVoption
This chapter discusses the installation and
configuration of AVoption software and
hardware.
Installing a New AVoption System
Installing AVoption as an Upgrade
If you have currently supported
Pro Tools TDM hardware installed in your
system, then you can install AVoption as
an upgrade.
If you do not already have currently supported Pro Tools TDM hardware installed,
you must install AVoption as a new system.
To install a new AVoption system:
1 Install Pro Tools software using the
Pro Tools Installer CD-ROM. The first time
you launch Pro Tools, you are prompted to
enter your authorization code, which is included in your TDM Software Installation
Guide.
2 Install AVoption software. See “Installing
AVoption Software” on page 12.
3 Install Pro Tools and AVoption hardware.
• Determine the proper PCI slots for your
installation. See “AVoption PCI Slot Configurations” on page 12.
• Install Pro Tools hardware using the instructions in your TDM Hardware Instal-
lation Guide.
• Install AVoption hardware. See “Installing AVoption Hardware” on page 12.
▲ You must have the latest version of
Pro Tools (included on the Installer CD-ROM)
installed before you install AVoption.
To install AVoption as an upgrade:
1 Install AVoption software. See “Installing
AVoption Software” on page 12.
2 Install AVoption hardware. Determine
the proper PCI slots for your installation
using “AVoption PCI Slot Configurations”
on page 12. You may be required to rearrange Pro Tools hardware that is already installed. See “Installing AVoption
Hardware” on page 12 to install the AVoption hardware.
Chapter 4: Installing AVoption
11
Page 16

Installing AVoption Software
AVoption includes the following software:
• Pro Tools Installer CD-ROM
• AVoption Authorizer diskette
Installing FilmFrame
FilmFrame is optional, and copy protected
with a key disk system. If you purchase this
option, you will receive a FilmFrame Authorizer diskette that permits you to authorize and use this option.
AVoption is copy protected with a key disk
system. After you install the software from
CD-ROM, the Authorizer diskette permits
you to authorize and use a single copy of
AVoption.
AVoption software is installed in a specific
location in your System folder, and should
not be moved or altered. The Authorizer
diskette permits you to reclaim authorization from your hard drive if you wish to install AVoption on a different hard drive, or
if you wish to re-initialize or format your
drive.
To install AVoption software:
1 Insert the Pro Tools Installer CD-ROM in
your CD-ROM drive.
2 Follow the installation instructions to in-
stall AVoption.
To authorize AVoption:
■ When prompted, insert the Authorizer
diskette into your floppy drive.
To authorize FilmFrame:
■ Insert the Authorizer diskette into your
floppy drive, and authorize FilmFrame.
Installing AVoption Hardware
To install your AVoption hardware, first determine the PCI slots where you will install
the hardware, using the following tables.
AVoption PCI Slot
Configurations
The following slot configurations are recommended for video and audio hardware
installations.
AVoption and AVoption XL Guide12
Page 17

Power Macintosh 9500/9600 Power Macintosh G3 (Blue & White)
Power Macintosh 9500 PCI slots with AVoption
Slot Card
1 Macintosh graphics accelerator
2 d24 or MIX Core card
3 MIX Farm or DSP Farm (if any)
4 SCSI accelerator
5 Janus Advanced JPEG card
6 ABVB card
Power Macintosh 9500/9600 PCI slots with
Expansion Chassis (Magma or Bit3)
Slot Card
CPU 1 Empty
CPU 2 Chassis Expander card (con-
nects CPU to chassis)
CPU 3 Macintosh graphics accelerator
CPU 4 SCSI Accelerator
CPU 5 Janus Advanced JPEG card
CPU 6 ABVB card
Chassis
Backplane
Slot
Chassis 1 d24 or MIX Core
Chassis
(remaining)
Chassis Backplane card
Remaining Digidesign cards to
end of chassis (max. 10 including core)
The Blue & White G3 has only three PCI
slots. If you use this CPU, you must use a
Magma 7-Slot or 13-Slot Expansion Chassis.
▲ In the Magma 7-Slot chassis, the Janus Ad-
vanced JPEG card must be placed in the first
slot, and the ABVB card must be placed in the
second slot to avoid potential equipment damage.
Power Macintosh G3 (Blue & White) PCI slots with
AVoption and a Magma 7-Slot Expansion Chassis
Slot Card
CPU 1 PCI Expander card (connects
CPU to chassis)
CPU 2 Empty
CPU 3 SCSI Accelerator
Chassis
Backplane
Slot
Chassis 1 Janus Advanced JPEG card
Chassis 2 ABVB card
Chassis 3 d24 or MIX Core
Chassis 4 Remaining Digidesign cards to
Chassis 5
Chassis 6
Chassis 7
Chassis Backplane card
end of chassis (max. 10 including core)
Chapter 4: Installing AVoption 13
Page 18

Power Macintosh G3 (Blue & White) PCI slots with
AVoption and a Magma 13-Slot Expansion Chassis
Slot Card
CPU 1 PCI Expander card (connects
CPU to chassis)
CPU 2 Empty
CPU 3 SCSI Accelerator
Chassis
Backplane
Slot
Chassis 1 ABVB card
Chassis 2 Janus Advanced JPEG card
Chassis 3 d24 or MIX core
Chassis 4 Remaining Digidesign cards to
Chassis 5
Chassis 6
Chassis 7
Chassis 8
Chassis 9
Chassis 10
Chassis 11
Chassis 12
Chassis 13
Chassis Backplane card
end of chassis (max. 10 including core)
Power Macintosh G4
The G4 has only three PCI slots. If you use
this CPU, you must use a Magma 7-slot or
13-slot expansion chassis.
▲ In the Magma 7-Slot Expansion Chassis,
the Janus Advanced JPEG card must be placed
in the first slot, and the ABVB card must be
placed in the second slot to avoid potential
equipment damage.
Power Macintosh G4 PCI slots with AVoption and a
Magma 7-Slot Expansion Chassis
Slot Card
CPU 1 SCSI Accelerator card
CPU 2 PCI Expander card (connects
CPU to chassis)
CPU 3 Empty
Chassis
Backplane
Slot
Chassis 1 Janus Advanced JPEG card
Chassis 2 ABVB card
Chassis 3 d24 or MIX Core
Chassis 4 Remaining Digidesign cards to
Chassis 5
Chassis 6
Chassis Backplane card
end of chassis (max. 10 including core)
Chassis 7
AVoption and AVoption XL Guide14
Page 19

Power Macintosh G4 PCI slots with AVoption and a
Magma 13-Slot Expansion Chassis
Slot Card
CPU 1 SCSI Accelerator
Audio Hardware
Refer to your TDM Hardware Installation
Guide for audio hardware installation infor-
mation.
CPU 2 PCI Expander card (connects
CPU to chassis)
CPU 3 Empty
Chassis
Backplane
Slot
Chassis 1 ABVB card
Chassis 2 Janus Advanced JPEG card
Chassis 3 d24 or MIX core
Chassis 4 Remaining Digidesign cards to
Chassis 5
Chassis 6
Chassis 7
Chassis 8
Chassis 9
Chassis 10
Chassis 11
Chassis 12
Chassis Backplane card
end of chassis (max. 10 including core)
▲ You may be required to move hardware that
is already installed to new PCI slot locations in
your computer or expansion chassis, based on
the information above.
Installing AVoption Video Hardware
To install AVoption video hardware:
1 Unplug and open your Macintosh com-
puter or your Magma expansion chassis according to the instructions included with
it.
2 Release any static electricity by touching
the power supply of the CPU, or another
grounded item.
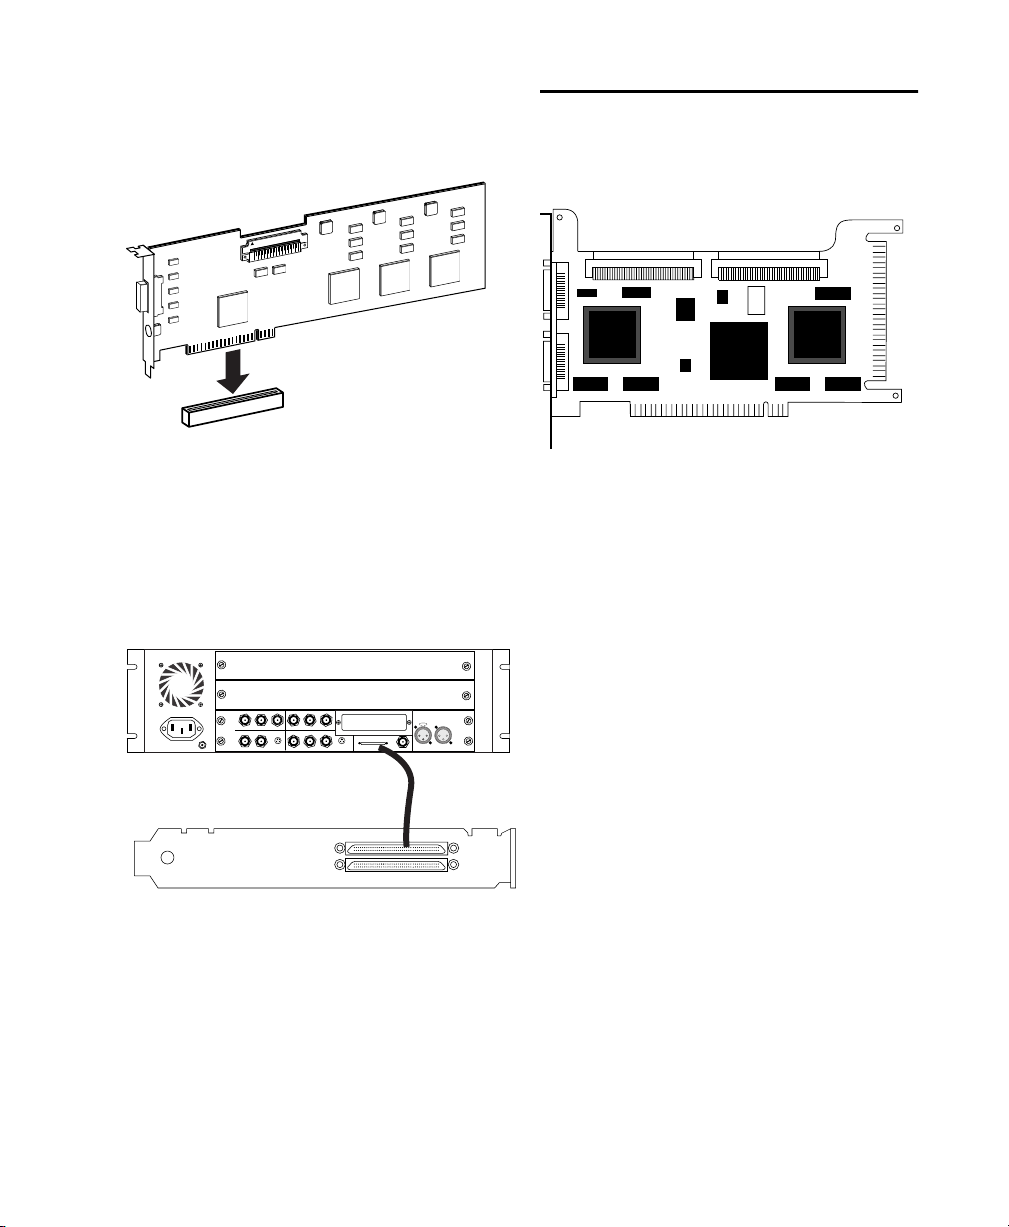
3 Remove the ABVB card from the anti-
static bag, being careful to handle it only
by the edges.
Chassis 13
ABV Card and ribbon cable
4 Line up the ABVB card with the installa-
tion slot, and slide the card into place gently so the PCI connector is lined up with
the PCI slot.
Chapter 4: Installing AVoption 15
Page 20

5 Press down firmly on the card with even
pressure. The connector should click into
place in the PCI slot.
PCI Card alignment and installation
Installing the Digidesign
SCSI 64 / ATTO EPCI-DC
SCSI Accelerator Card
6 Repeat this process for the Janus Ad-
vanced JPEG card, making sure that you
place it in the proper slot.
.
.
.
.
.
.
.
.
.
.
.
.
.
.
.
.
.
.
.
ABVB card
Janus card
Ribbon cable
ABVB card and Janus Advanced JPEG card installed
7 Attach the ribbon cable from the ABVB
board to the connector on top of the Janus
Advanced JPEG card by aligning the cable
end with the connector, and gently pressing it onto the card until it clicks into
place.
8 Close the computer or expansion chassis.
Digidesign SCSI64 / ATTO EPCI-DC SCSI Accelerator
To install the ATTO ExpressPCI Dual-Channel
SCSI Accelerator:
1 Unplug and open your Macintosh com-
puter or expansion chassis according to the
instructions included with it.
2 Release any static electricity by touching
the power supply, or another grounded
item.
3 Remove the ATTO card from the anti-
static bag, being careful to handle it only
by the edges.
4 Line up the ATTO card with the installa-
tion slot, and slide the card into place gently so the PCI connector is aligned with the
PCI slot.
5 Press down firmly on the card with even
pressure. The connector should click into
place in the PCI slot.
6 Fasten the card in place using the in-
cluded screw to attach the card bracket to
the computer mounting bracket.
AVoption and AVoption XL Guide16
Page 21

Initializing Hard Drives
Refer to the information in the AVoption
Release Bulletin and on the Digidesign Web
site for the latest hard drive initialization
information.
AVoption Video Connections
The ABVB Video Cable
AVoption includes a cable that provides
nine coaxial video connections to connect
video and sync components of your system
to the ABVB card.
Video Connectors on the ABVB Cable
GL IN This “Gen Lock” connector is used to
connect the ABVB card to an external reference video (black burst) source.
CV OUT This connector provides Compos-
ite Video out. You can use this output to
connect an NTSC or PAL video monitor for
video viewing. You can also connect this
output to a composite input on your VTR.
✽ Many NTSC video monitors include outputs
that recreate a video input signal. You can connect the CV OUT from the ABVB to an NTSC
monitor, then connect an output from the monitor to your VTR to record from AVoption.
Y OUT, B-Y OUT, R-Y OUT
provide Component (RGB) Video outputs.
You can use these to connect a video reference monitor or VTR that has Component
Video inputs.
CV IN This input is used to get Composite
Video from an external source into AVoption. Connect this to your video source.
These connectors
ABVB video connector cable
To connect the ABVB cable to the ABVB card:
1 Remove the ABVB cable from the protec-
tive plastic bag.
2 Connect the single connector end to the
matching connector on the ABVB card.
3 Tighten the screws to lock the cable in
place.
This connector can also be used in a video
loop with the USD. The output of your VTR
can be connected to the Video In connector on the USD, then the Video Out connector on the USD can be connected to this
CV IN cable. You might use this connection to “window burn” with the USD.
Y IN, B-Y IN, R-Y IN These inputs are used to
get Component Video signals from an external source into AVoption.
Chapter 4: Installing AVoption 17
Page 22

To connect a BNC connector:
■ Slide the end of the BNC connector over
the matching BNC connection, and twist
the BNC connector clockwise until it locks
into place.
To remove a BNC connector:
■ Grip the BNC connector you wish to re-
move and twist it counter-clockwise until it
comes loose.
BNC connector
Connecting House Sync or Black Burst
In most AVoption setups, three black burst
or “house sync” connections are required.
These connections are:
• to VIDEO REF in on the USD
• to a video input on your VTR (a video reference input if available)
• to the GL IN connector from the ABVB
cable
Read the documentation for your black
burst generator for more information.
USD Connections
The following illustrations show USD connections. The Universal Slave Driver User’s
Guide provides more specific information
about this peripheral.
Black burst
VIDEO REF
USD video connections
9-PIN IN / ACC
9-PIN OUT
USD connection to an audio interface
Serial cable
to Macintosh
MAC SERIAL
IN
OUT
SUPER CLOCK (256X)
to Slave Clock In
(audio interface)
VTR out
IN
OUT
VIDEO
CV IN (ABVB)
85-264VAC, 47-63HZ, 115 W
Connecting a VTR
A VTR can be used to provide video input
and to record video output from AVoption.
In most situations, there are three connections you need to make:
• connect a black burst or house sync output to a video input on your VTR (preferably a reference video input)
• connect the ABVB cable’s CV IN and/or
Component IN connectors to the corresponding output or outputs on your VTR
• connect the ABVB cable’s CV OUT
and/or Component OUT connectors to
the corresponding inputs on your VTR
– or –
• connect the ABVB cable’s CV OUT
and/or Component OUT connectors to
the corresponding input on an NTSC or
PAL video monitor, then connect the
outputs from this monitor to corresponding inputs on your VTR.
AVoption and AVoption XL Guide18
Page 23

Connecting an External Video Reference Monitor
Connect an external NTSC or PAL video
reference monitor using the ABVB cable’s
Composite or Component Video outputs.
Centralized Video Switching and Routing
Many professional facilities have centralized video switching and routing systems.
These systems can be used to route AVoption’s inputs and outputs to flexible input
sources and output destinations.
Chapter 4: Installing AVoption 19
Page 24

Sample AVoption Setup Diagrams
Macintosh
monitor
Macintosh
monitor
Video
monitor
Black burst
generator
to a video
ref input
Video deck
Macintosh
video card
ABVB VGA
connector
(optional)
Composite
or
CV OUT
GL IN (ABVB)
Component or CV OUT (ABVB)
Power
Macintosh
computer
MachineControl (serial)
DigiSerial port or other
CV In (ABVB)
Video out
Video In
Video Ref in
ATTO card
Channel 1
ATTO card
Channel 2
Digi card
Super Clock
Audio Interface
Computer 1
(888/24)
Universal
Slave Driver
Video
drives
Audio
drives
Sample ABVB video setup
AVoption and AVoption XL Guide20
Page 25

CV OUT (from ABVB)
External video monitor
Component video outputs (ABVB)
Video deck
CH-1 CH-2
ABVB cable
Blackburst generator
GL IN (ABVB)
to USD / VSD
to Ref Video input
on video deck
Video connections for component video, blackburst, and external monitor
Video in panel
Video out panel
to Component Video
inputs (ABVB)
Chapter 4: Installing AVoption 21
Page 26

AVoption and AVoption XL Guide22
Page 27

chapter 5
Installing AVoption XL
This chapter discusses the installation and
configuration of AVoption XL software and
hardware.
Installing a New
AVoption XL System
If you do not already have currently supported Pro Tools hardware installed, you
must install AVoption XL as a new system.
To install a new AVoption XL system:
1 Install Pro Tools software using the
Pro Tools Installer CD-ROM. The first time
you launch Pro Tools, you are prompted to
enter a serial number, which is included in
your TDM Software Installation Guide.
2 Install AVoption XL software. See “In-
stalling AVoption XL Software” on page 24.
3 Install Pro Tools and AVoption XL hard-
ware.
• Determine the proper PCI slots for your
installation. See “AVoption XL PCI Slot
Configurations” on page 24.
• Install Pro Tools hardware using the instructions in your Pro Tools Hardware In-
stallation Guide.
• Install AVoption XL hardware. See “Installing AVoption XL Hardware” on
page 24.
Installing AVoption XL as
an Upgrade
If you have currently supported
Pro Tools TDM hardware installed in your
system, then you can install AVoption XL
as an upgrade.
▲ You must have the latest version of
Pro Tools (included on the Installer CD-ROM)
installed before you install AVoption XL.
To install AVoption XL as an upgrade:
1 Install AVoption XL software. See “In-
stalling AVoption XL Software” on page 24.
2 Install AVoption XL hardware. Deter-
mine the proper PCI slots for your installation using “AVoption XL PCI Slot
Configurations” on page 24. You may be
required to rearrange Pro Tools or other
cards that are already installed. See “Installing AVoption XL Hardware” on page 24 to
install the AVoption XL hardware.
Chapter 5: Installing AVoption XL 23
Page 28

Installing AVoption XL
Software
AVoption XL includes the following software:
• Pro Tools Installer CD-ROM
• AVoption XL Authorizer floppy disk
AVoption XL is copy protected with a key
disk system. After you install the software
from CD-ROM, the Authorizer diskette permits you to authorize and use a single copy
of AVoption XL.
AVoption XL software is installed in a specific location in your System folder, and
should not be moved or altered. The Authorizer diskette permits you to reclaim authorization from your hard drive if you
wish to install AVoption XL on a different
hard drive, or if you wish to re-initialize or
format your drive.
To install AVoption XL software:
1 Insert the Pro Tools Installer CD-ROM in
your CD-ROM drive.
2 Follow the installation instructions to in-
stall AVoption XL.
To authorize AVoption XL:
■ When prompted, insert the Authorizer
diskette into your floppy drive.
Installing FilmFrame
FilmFrame is optional, and copy protected
with a key diskette system. If you purchase
this option, you will receive a FilmFrame
Authorizer diskette that permits you to authorize and use this option.
To authorize FilmFrame:
■ Insert the Authorizer diskette into your
floppy drive, and authorize FilmFrame.
Installing AVoption XL
Hardware
To install your AVoption XL hardware, first
determine the PCI slots where you will install the hardware, using the following tables.
AVoption XL PCI Slot
Configurations
The following slot configurations are recommended for video and audio hardware
installations.
Power Macintosh G3 (Blue & White)
The Blue & White G3 has only three PCI
slots. If you use this CPU, you must use a
Magma 7-slot 13-slot expansion chassis.
AVoption and AVoption XL Guide24
Page 29
Power Macintosh 9500/9600 PCI Slots with
Expansion Chassis (Magma or Bit3)
Slot Card
CPU 1 Video Accelerator
CPU 2
CPU 3
CPU 4 Audio SCSI Accelerator (ATTO
EPCI-DC or Digidesign SCSI 64)
CPU 5
CPU 6
Chassis
Backplane
Slot
Power Macintosh G3 (Blue & White) PCI slots with
AVoption XL and a Magma 13-Slot Magma Expansion
Chassis
Slot Card
CPU 1 Audio SCSI Accelerator (ATTO
EPCI-DC or Digidesign SCSI 64)
CPU 2 PCI Expander Card (connects
CPU to chassis)
CPU 3
Chassis
Backplane
Slot
Chassis 1 Video SCSI Accelerator (ATTO
Chassis Backplane Card
EPCI-UL2D LVD)
Chassis 1 Video SCSI Accelerator (ATTO
EPCI-UL2D LVD)
Chassis 2
Chassis 3
Chassis 4 Digital Media Board
Chassis 5
Chassis 6
Chassis 7
Chassis 8 d24 or MIX core card
Chassis 9 Remaining Digidesign cards to
Chassis 10
Chassis 11
Chassis 12
Chassis 13
end of chassis (max. 6 including
core)
Chassis 2
Chassis 3
Chassis 4 Digital Media Board
Chassis 5
Chassis 6
Chassis 7
Chassis 8 d24 or MIX core card
Chassis 9 Remaining Digidesign cards to
Chassis 10
Chassis 11
Chassis 12
Chassis 13
end of chassis (max. 6 including
core)
Chapter 5: Installing AVoption XL 25
Page 30

Power Macintosh G4
The G4 has only three PCI slots. If you use
this CPU, you must use a Magma 13-Slot
Expansion Chassis.
Power Macintosh G4 PCI slots with AVoption and a
Magma 13-Slot Expansion Chassis
Slot Card
CPU 1 Audio SCSI Accelerator (ATTO
EPCI-DC or Digidesign SCSI 64)
Audio Hardware
Refer to your Pro Tools Hardware Installation
Guide for audio hardware installation infor-
mation.
✽ You may be required to move hardware that
is already installed to new PCI slot locations in
your computer or expansion chassis, based on
the information above.
CPU 2 PCI Expander card (connects
CPU to chassis)
CPU 3 Empty
Chassis
Backplane
Slot
Chassis 1 Video SCSI Accelerator (ATTO
Chassis 2
Chassis 3
Chassis 4 Digital Media Board
Chassis 5
Chassis 6
Chassis 7
Chassis 8 d24 or MIX core
Chassis 9 Remaining Digidesign Cards to
Chassis 10
Chassis 11
Chassis Backplane card
EPCI-UL2D LVD)
end of chassis
Installing AVoption XL Video
Hardware
To install AVoption XL video hardware:
1 Unplug and open your Magma Expan-
sion Chassis according to the instructions
included with it.
2 Release any static electricity by touching
the power supply of the chassis, or another
grounded item.
3 Remove the Digital Media Board from
the anti-static bag, being careful to handle
it only by the edges.
4 Line up the Digital Media Board with the
installation slot, and slide the card into
place gently so the PCI connector is lined
up with the PCI slot.
Chassis 12
Chassis 13
AVoption and AVoption XL Guide26
Page 31
5 Press down firmly on the card with even
pressure. The connector should click into
place in the PCI slot.
Installing the ATTO EPCIUL2D SCSI Accelerator
PCI Card alignment and installation
6 Close the computer or expansion chassis.
7 Attach the connector cable from the Dig-
ital Media Board (connector labeled M) to
the Computer connector on the Meridien
I/O Box.
IN
COMPONENT
COMPOSITE
ININ
Y
R-Y B-Y
IN
S-VIDEO
COMPOSITE
REF
OUT
B-Y
Y
R-Y
OUT 1
OUT 2
SYSTEM
OUT
IN / OUT
S-VIDEO
OUT 3
MC
Connecting the Digital Media Board to the Breakout
Box
LTC
IN
OUT
OUT
ATTO UL2D LVD SCSI Accelerator
To install the ATTO EPCI-UL2D SCSI
Accelerator:
1 Unplug and open your expansion chassis
according to the instructions included with
it.
2 Release any static electricity by touching
the power supply, or another grounded
item.
3 Remove the ATTO card from the anti-
static bag, being careful to handle it only
by the edges.
4 Line up the ATTO card with the installa-
tion slot, and slide the card into place gently so the PCI connector is aligned with the
PCI slot.
5 Press down firmly on the card with even
pressure. The connector should click into
place in the PCI slot.
6 Fasten the card in place using the in-
cluded screw to attach the card bracket to
the computer mounting bracket.
Chapter 5: Installing AVoption XL 27
Page 32

AVoption XL Video
Connections
The following video I/O capabilities are
available with the Meridien I/O Box:
• Inputs for composite, component (Y, R-Y,
B-Y), S-Video, and (optional) SDI
• Outputs for composite, component (Y, RY, B-Y), S-Video, and (optional) SDI
• Video Ref input to allow the video to be
locked to an external source such as
house sync or a black burst generator.
▲ Only one video input source can be used at
a time. See “Recording Video” on page 35 for
more information.
▲ The Meridien I/O Box can only output from
either S-Video or Component outputs. You
must set this option in your Movie Track. See
“Setting S-Video or Component Output” on
page 34 for instructions.
Meridien I/O Box
The following sections provide figures and
tables that describe the function of the Meridien I/O Box video I/O.
Meridien I/O Box Front Panel Indicators
The front panel of the Meridien I/O box
(see Figure 1) has six indicators and a
power switch. When you turn on the Meridien I/O Box, the indicators turn on and off
as it goes through a power-on self-test
(POST). After the POST, the POWER indicator remains lit.
▲ Some indicators do not light, or do not indi-
cate correctly, when used with AVoption XL
(see illustration). To determine this information, use the indicators on your USD, or your
Session Setup window.
AVoption and AVoption XL Guide28
Page 33

Sample rate
(44.1 or 48
is always lit)
44.1 kHz
48
kHz
Audio sync
(this does
not light)
AUDIO SYNC
VIDEO SYNC
Pull down
(this does not light)
PULL DOWN
POWER
O
l
Video sync
Power indicator
Figure 1. Meridien I/O Box front panel
Video I/O Connectors
1 2 3 4 5 6
IN
ININ
Y
COMPONENT
R-Y B-Y
Y
IN
COMPOSITE
S-VIDEO
REF
COMPOSITE
OUT 1
20 19 18 17 16 1521 13 12
Figure 2. Meridien I/O Box rear panel showing video connectors
OUT
B-Y
R-Y
OUT
S-VIDEO
OUT 3
OUT 2
OUT 1
SERIAL DIGITAL
SYSTEM
IN / OUT
7 8 9 10
OUT 3IN
OUT 2
SLAVE CLOCK
OUT
14
Power switch
LTC
OUT
IN
11
Chapter 5: Installing AVoption XL 29
Page 34

Table 1. Video I/O Board Identifiers
Number Label Function
1 COMPONENT Y IN Video Y component input, BNC connector. Connects to
analog video output of decks.
2 COMPONENT R-Y IN Video R-Y component input, BNC connector. Connects to
analog video output of decks.
3 COMPONENT B-Y IN Video B-Y component input, BNC connector. Connects to
analog video output of decks.
4 COMPONENT Y OUT Video Y component (Betacam) output, BNC connector.
Connects to analog video input of decks.
5 COMPONENT R-Y OUT Video R-Y component (Betacam) output, BNC connector.
Connects to analog video input of decks.
6 COMPONENT B-Y OUT Video B-Y component (Betacam) output, BNC connector.
Connects to analog video input of decks.
7 SDI IN (optional) Serial digital input, BNC connector. Connects to a serial
digital output from a digital video source.
8 SDI OUT1 (optional) Serial digital output number 1, BNC connector. Connects
to VTR input, a video monitor, or other serial digital device.
9 SDI OUT2 (optional) Serial digital output number 2, BNC connector. Connects
to VTR input, a video monitor, or other serial digital device.
10 SDI OUT3 (optional) Serial digital output number 3, BNC connector. Connects
to VTR input, a video monitor, or other serial digital device.
11 SYSTEM Audio and video I/O connector from the system interface
board.
12 LTC OUT Sends LTC time code out (not used with AVoption XL).
13 LTC IN Brings LTC time code in (not used with AVoption XL).
14 SLAVE CLOCK OUT Clock output, BNC connector (not used with AVoption XL)
15 S-VIDEO OUT Super-video output, 4-pin connector. Connects to analog
video input of decks.
16 COMPOSITE OUT3 Composite video output, BNC connector. Connects to ana-
log video input of decks or monitor.
AVoption and AVoption XL Guide30
Page 35

Table 1. Video I/O Board Identifiers(Continued)
Number Label Function
17 COMPOSITE OUT2 Composite video output, BNC connector. Connects to ana-
log video input of decks or monitor.
18 COMPOSITE OUT1 Composite video output, BNC connector. Connects to ana-
log video input of decks or monitor.
19 S-VIDEO IN Super-video input, 4-pin connector. Connects to analog
video output of decks.
20 COMPOSITE IN Composite video input, BNC connector. Connects to
analog video output of decks.
21 Video Reference (REF) Black burst or house sync input, BNC connector. Synchro-
nizes the system with the global clock source provided by
the house sync or black burst generator.
USD Connections
The following illustrations show USD connections. The Universal Slave Driver User’s
Guide provides more specific information
about this peripheral.
Black burst
VIDEO REF
Serial cable
to Macintosh
MAC SERIAL
USD video connections
IN
9-PIN IN / ACC
OUT
9-PIN OUT
SUPER CLOCK (256X)
to Slave Clock In
(audio interface)
USD connection to an audio interface
VTR out
IN
OUT
VIDEO
to COMPOSITE VIDEO input
85-264VAC, 47-63HZ, 115 W
Connecting House Sync or Black Burst
In most AVoption XL setups, three black
burst or “house sync” connections are required. These connections are:
• to VIDEO REF in on the USD
• to a video input on your VTR (a video reference input if available)
• to the VIDEO REF connector on the Meridien I/O Box
Read the documentation for your black
burst generator for more information.
Connecting a VTR
A VTR can be used to provide video input
and to record video output from
AVoption XL. In most situations, there are
three connections you need to make:
• connect a black burst or house sync output to a video input on your VTR (preferably a reference video input)
Chapter 5: Installing AVoption XL 31
Page 36

• connect the Meridien I/O Box COMPOSITE IN, COMPONENT IN, S-VIDEO IN, or
SDI IN connectors to the corresponding
output or outputs on your VTR
• connect the Meridien I/O Box COMPOSITE OUT, COMPONENT OUT, S-VIDEO
OUT, or SDI OUT connectors to the corresponding inputs on your VTR
– or –
• connect the Meridien I/O Box COMPOSITE OUT or COMPONENT OUT connectors to the corresponding input on an
NTSC or PAL video monitor, then connect the outputs from this monitor to
corresponding inputs on your VTR.
▲ The Meridien I/O Box can only output from
either S-Video or Component outputs. You
must set this option in your Movie Track. See
“Setting S-Video or Component Output” on
page 34 for instructions.
Connecting an External Video Reference Monitor
Connect an external NTSC or PAL video
reference monitor to a COMPOSITE,
COMPONENT, S-VIDEO, or SDI output.
Centralized Video Switching and Routing
Many professional facilities have centralized video switching and routing systems.
These systems can be used to route
AVoption XL’s inputs and outputs to flexible input sources and output destinations.
AVoption and AVoption XL Guide32
Page 37

chapter 6
Recording or Importing the Movie Track
You can capture a video file by actually recording the video in through the inputs on
your ABVB connector cable (AVoption) or
the inputs on your Meridien I/O Box
(AVoption XL), or import a file created in a
compatible Avid video editing and composition program.
The Movie Track
The Movie Track holds the movie you capture or import into Pro Tools. A Pro Tools
session with AVoption or AVoption XL can
contain one Movie Track.
Track
options
Track name
Record
View
options
Track height
Figure 3. Movie Track controls (AVoption)
Compression
level
1st video record drive
2nd video record drive
3rd video record drive
Approximate available
record time
Video format
to record
ABVB inputs
to record from
Track
options
Compression
level
1st video record drive
2nd video record drive
3rd video record drive
Approximate available
record time
Video format
to record
Meridien I/O Box
inputs to record
from
Video output
format
Record
View
options
Track name
Track height
Figure 4. Movie Track controls (AVoption XL)
To create a new Movie Track:
■ Choose Movie > New Movie Track.
The new, empty track appears in the Edit
window.
To name the Movie Track:
1 Double-click the Track Name button to
open the Name and Comments dialog.
2 Type a name and click OK. You can also
add comments here.
Chapter 6: Recording or Importing the Movie Track 33
Page 38

To delete the Movie Track:
1 Select the track by clicking on the Track
Name button in the Edit window.
2 Choose File > Delete Selected Tracks.
To clear all video from the Movie Track:
■ Choose Movie > Clear Movie Track.
Movie Track Options
The Movie Track can be viewed in frames or
in blocks. Frames allow you to see an overview of the actual video content in a session. Blocks allow you to see where clips in
the original project begin and end, and the
names of clips.
Setting S-Video or Component Output
(AVoption XL only)
The Meridien I/O Box can only output
from either S-Video or Component outputs. This choice must be made in the software, and echoed in the physical connections you use to output signals.
To select component video outputs in
AVoption XL:
1 On the Movie Track, click the Track Op-
tions pop-up. See Figure 4 on page 33.
2 Use the Video Output pop-up menu to
select the outputs you would like to use:
Component or S-Video.
Frames
In Frames mode, video data is displayed as
pictures in the Movie Track. These pictures
are computed based on the video image,
and scale according to your track zoom settings and track height. They do not provide
a frame-accurate reference, but allow you
to easily find a scene or sequence in the
Movie Track.
Movie Track in Frames mode
Frames do not display properly if you
change zoom settings during playback.
Black frames are drawn until playback is
stopped. You should stop playback before
changing zoom settings if you want to view
frames.
Blocks
Blocks mode displays the Movie Track as
blocks of compositional data. Blocks are
outlined wherever clip boundaries existed
before export from the original program.
Names from the original clips are retained.
For example, two clips edited together
without any transitions or effects, and
AVoption and AVoption XL Guide34
Page 39

named “House Ext” and “House Int,” will
appear as two blocks bordering each other
with those names.
Movie Track in Blocks mode
In Blocks mode, you can place the cursor
on the Movie Track, then press Tab move
to the next video edit in the track.
4 Set the compression level for the video
capture from the Compression Level popup menu.
To set the view for the Movie Track:
■ On the Movie Track, select “frames” or
“blocks” from the View Options pop-up
menu.
Recording Video
To set video recording options:
1 Create a new Movie Track. You can also
use an existing Movie Track if it does not
contain a movie.
2 Select a video format by clicking the
Track options button (see Figure 3 and
Figure 4), then selecting Video Format. You
can select NTSC or PAL format.
3 Select the video input you are using by
clicking the Record options button, then
selecting Video Input. You can select Component or Composite input (AVoption and
AVoption XL), or S-Video or SDI
(AVoption XL only).
Setting the compression level (AVoption)
Setting the compression level (AVoption XL)
5 Select the target hard drive volumes for
the video capture. Target volumes capture
video in order, from the first (top) to the
last (bottom). In the following illustration,
Video-0 captures video first, followed by
Audio-0, then Audio-1.
As you add or remove volumes from the
track, the available record time is updated
to reflect available disk space and compression settings. The time displayed is approximate.
Target volumes for video capture
Chapter 6: Recording or Importing the Movie Track 35
Page 40

To record video:
▲ Note that if there is already a movie on the
Movie Track, the movie will be replaced, regardless of where you start recording.
1 Place your cursor at the point you want
to start recording, or select a range of time
for the recording. You can make this selection on a timeline or on a track. If you
make this selection on a track, make sure
that Edit and Timeline selections are
linked.
2 Record enable the track by clicking the
Record button.
3 Click Record in the Transport window to
enable recording.
4 Start playing the video source.
5 Click Play in the Transport window to be-
gin recording.
6 Click Stop in the Transport window to
stop recording.
MachineControl
For far more accurate video recording, use
MachineControl to remotely control your
video source machine in synchronization
with Pro Tools. MachineControl is optional software. Contact your dealer for
more information.
Blocks mode is recommended when recording to the Movie Track with MachineControl.
Exporting Files from Avid Programs
If you already have a project that was created on an Avid video authoring system,
you can export it to an OMF file so the material can be imported into your AVoption
or AVoption XL system. This exchange of
data between systems is significantly faster
and easier than other methods, such as laying-off to tape and re-digitizing. This section uses a Media Composer project as an
example.
DigiTranslator
DigiTranslator is included with your AVoption or AVoption XL package. Use DigiTranslator to convert OMF files containing
video and audio into Pro Tools session files.
You can also use it to export audio material
from Pro Tools sessions into OMF files for
import into other systems. Refer to your
DigiTranslator documentation for more details.
What AVoption and AVoption XL
Import
AVoption and AVoption XL import only
fully rendered (flattened) compositions,
and will not play video effects or transitions that require special video hardware,
or any areas of a sequence that require multiple, real-time video streams. If you import
such a sequence, you will see black frames
in place of these transitions.
AVoption and AVoption XL Guide36
Page 41

What to Export
When you export from your Avid software,
you have two choices. You can export the
audio and video from a project, or you can
export the video only.
Video and Audio
If your Media Composer project has video
and audio in it, export both the video and
the audio to the OMF file.
Video Only
If you have already started audio post production in Pro Tools and you want to replace the Movie Track with a more recent
version, or your Avid project has no audio
in it, export the video only. Then, if the
video in your project changes, you can export video only, then import that video
into AVoption or AVoption XL to stay current with the project.
Prepare for Export in Media Composer
Exporting from Media Composer
To export a file from Media Composer:
1 Select the material to export by doing
one of the following:
◆ To select specific tracks in a clip or se-
quence, enable those tracks in the Track Selector panel, and disable all others.
◆ To export part of a clip or sequence, mark
IN and OUT points to export the marked
range from a bin or monitor, and select Use
Marks in the Export Settings dialog box. If
you mark an IN and no OUT point, the system exports from the IN mark to the end of
the clip or sequence.
◆ To export the entire clip or sequence, de-
select the options Use Enabled Tracks and
Use Marks in the Export Settings dialog
box, and make sure the topmost track in
the project is monitored.
◆ If using different drives to transport the
project, consolidate the project.
2 Choose File > Export.
To prepare a Media Composer project for
OMF export and use with AVoption or
AVoption XL:
◆ Make sure all media for the project is on-
line.
◆ Render all effects in advance. OMF ex-
port does not automatically render effects
during the process, so if you want to see
them, you must render effects before you
export.
Chapter 6: Recording or Importing the Movie Track 37
Page 42
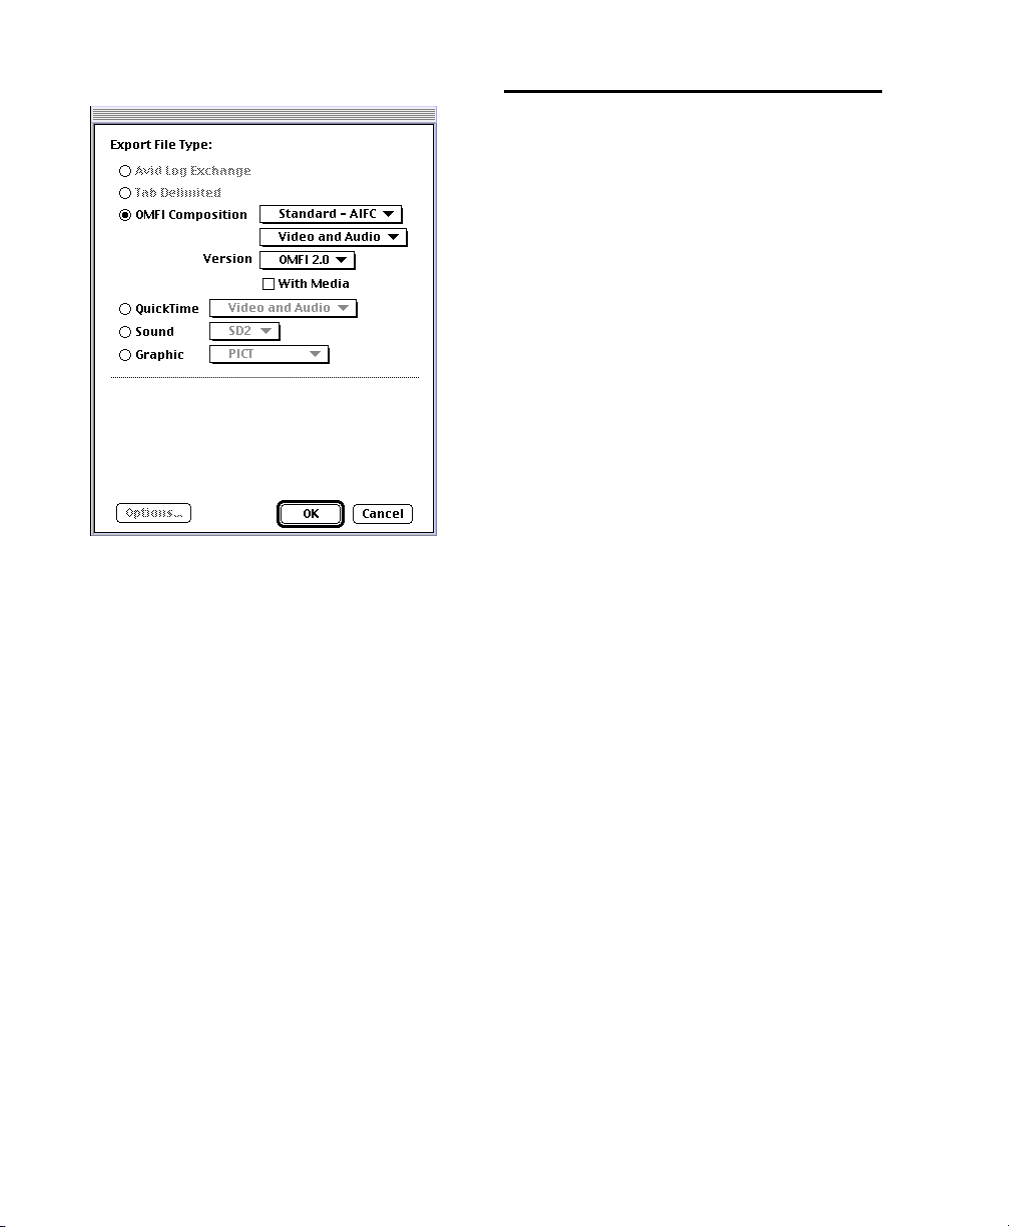
Export File Type dialog in Media Composer
◆ Under Export File type, select OMFI com-
position.
◆ If importing video and audio into an
AVoption session, select Standard-AIFC
and Video and Audio options.
◆ If importing video only into AVoption,
select Video Only.
◆ Usually, you should export an OMF file
that only refers to the audio and video files
that already exist on the hard drives. For
this reason, it is recommended that you do
not export With Media.
3 Set the Version to OMFI 2.0.
4 When you finish setting export options,
click OK.
Importing Files into
AVoption and AVoption XL
Once you have an OMF file for your
project, you are ready to import it. If your
OMF file is Video Only you can simply import it as the Movie Track in AVoption or
AVoption XL. If your OMF file has Video
and Audio, you can use OMF Tool to create
a Pro Tools session from the audio files,
then import the Movie Track separately.
You can use DigiTranslator to translate
video and audio simultaneously. See your
DigiTranslator documentation for details.
To create a Pro Tools session with OMF Tool:
1 Launch OMF Tool, and choose
OMF Tool > Convert OMF to Pro Tools.
2 Select the OMF composition file.
3 Name the Pro Tools session, and choose
Pro Tools 4 as the version to save.
4 Set all other options based on your ses-
sion requirements, and click Save when
you are done. The resulting file is a
Pro Tools session. OMF Tool ignores the
video information.
To open your session with AVoption or
AVoption XL:
1 Choose File > Open Session.
2 Find the Pro Tools session created by
OMF Tool, select it, and click Open.
To import a video into the Movie Track:
1 With a session open, choose Movie > Im-
port Movie.
2 Select the OMF file created by the Video
Only or Video and Audio export, and click
OK.
AVoption and AVoption XL Guide38
Page 43

chapter 7
Playing the Movie Track
Video plays back automatically when you
play a session that includes a Movie Track.
There are several different options for viewing and synchronizing the video and audio
tracks.
Movie Online
When the Movie is online, the Movie Track
plays along with the audio session. The
Movie’s frame location is updated every
time you place your cursor in a new location, and the Movie track is scrubbed along
with the audio tracks. The Movie is also updated whenever you drag or nudge an
audio region or an automation breakpoint.
The Movie is online by default.
Online Edit and Selection Behavior
When Pro Tools is in Grid mode or set for
Loop Playback, and the Movie is online,
Pro Tools will always place your cursor or
Edit selection on legal frame boundaries. If
you make a selection that is outside of
frame boundaries, or you place your cursor
outside a frame boundary, Pro Tools will
warn you with a dialog and move your selection boundaries or cursor to the nearest
frame.
To prevent this, take the Movie offline, go
out of Grid mode, or disable Loop Playback
if you are editing audio that does not require placement at the beginning of a
video frame.
Movie Offline
If you temporarily do not wish to view the
Movie or have the Movie frame location
updated, you can take the movie Offline.
This is useful if you are working with audio
and do not need to see the video.
To put the Movie online:
■ Select Movie > Movie Online.
To take the Movie offline:
■ Deselect Movie > Movie Online.
Chapter 7: Playing the Movie Track 39
Page 44

Playback Viewing Options
Video can be viewed on a separate NTSC or
PAL video monitor. Video can also be
viewed in an on-screen window (AVoption
only).
To connect a playback monitor:
■ Connect a composite output, the com-
ponent outputs, the S-Video output, or and
SDI output from the Meridien I/O Box to
the proper input or inputs on the back of
your video monitor.
Using a Playback Monitor with AVoption
The ABVB video cable includes video outputs to connect an NTSC or PAL video
monitor. You can connect a monitor that
has component or composite video inputs.
The video card will display full-screen
video on the playback monitor.
To connect a playback monitor:
■ Connect the composite output or the
component outputs from the ABVB cable
to the proper input or inputs on the back of
your video monitor.
Using a Playback Monitor with
AVoption XL
The Meridien I/O Box includes video outputs to connect an NTSC or PAL video
monitor. You can connect a monitor that
has component, composite, S-Video, or SDI
video inputs.
Window Playback
(AVoption Only)
Select Windows > Show Movie Window to
view the Movie Track in a window on your
computer screen. This window will display
the video in real time. You can resize or
move this window around your screen
when playback is stopped.
The Movie window will give you the best
performance when it is displayed on a
monitor connected to the ABVB VGA monitor output. With a monitor connected to
your Macintosh graphics accelerator, performance will not be optimal, and may not
work at all.
The video card will display full-screen
video on the playback monitor.
▲ The Meridien I/O Box can only output from
either S-Video or Component outputs. You
must set this option in your Movie Track. See
“Setting S-Video or Component Output” on
page 34 for instructions.
AVoption and AVoption XL Guide40
Movie window (AVoption only)
▲ You cannot view the video input signal in a
window. In order to view video input, you must
connect an external monitor to the Composite
or Component outputs of the ABVB card.
Page 45

If the Movie window is partially blocked by
another window on your screen, playback
will slow or “stutter” as your computer’s
CPU attempts to display the video.
Movie window size and position are saved
with your session.
To show the Movie Window:
■ Select Windows > Show Movie Window.
To resize the Movie Window:
■ When playback is stopped, click the
lower right corner of the Movie window
and drag to shrink or enlarge the window.
Movie Aspect Ratio
(AVoption Only)
You can set the Movie window to automatically snap to one of two window aspect ratios (4x3 or 16x9), or to allow unconstrained resizing.
Spotting the Movie Track
You can spot the entire Movie Track to a
new SMPTE frame location. Although
AVoption and AVoption XL retain the
names and positions of different “clips”
when you import a Movie Track, you cannot spot separate video clips. When you
spot the Movie Track, the whole track or sequence is moved to the new frame location
you specify.
To spot the Movie Track to a new frame
location:
1 Set the Main Timebase display to Time
Code using the pop-up menu.
2 Enable Spot mode by clicking the Spot
button.
By constraining the aspect ratio, you can
see a more accurate on-screen representation of the final video. Use 4:3 for video
destined for television, and use 16:9 for
wide screen film-format viewing.
To set the Movie window aspect ratio:
1 Select Movie > Show Movie Window.
2 Select Movie > Movie Window Aspect Ra-
tio.
3 Choose 4:3, 16:9, or unconstrained as the
aspect ratio.
3 Select the Movie on the Movie Track with
the Grabber tool.
4 In the Spot dialog, specify a new SMPTE
frame number for the start of the Movie
Track. In this dialog, you can press “+” or
“-” on the numeric keypad, enter a number, and press the Enter key to add or subtract that number of frames from the
currently selected time field.
5 Click OK when you are done.
Chapter 7: Playing the Movie Track 41
Page 46

Video Editing With
AVoption or AVoption XL
AVoption and AVoption XL do not support
video editing.
You cannot use the Cut, Copy, and Paste
commands with the Movie Track. You can,
however, Spot the Movie to a new location.
▲ You cannot import or capture multiple video
files to a Movie Track. Once a Movie Track contains video, importing or capturing new video
will replace the entire track, regardless of the
original and new Movie locations.
AVoption and AVoption XL Guide42
Page 47

index
A
ABVB card
cable connectors 17
connecting to video cable 17
install 15
aspect ratio 41
ATTO EPCI-DC card
installing 16
ATTO EPCI-UL2D card
installing 27
authorize
AVoption 12
AVoption XL 24
FilmFrame 12, 24
available record time
approximate 35
Avid Video Resolution
available resolutions 3
overview 3
AVoption
authorize 12
capabilities 1
hardware capabilities 3
installing a new system 11
installing software 12
setup illustration 20
AVoption XL
authorize 24
capabilities 2
hardware capabilities 7
installing a new system 23
installing software 24
striped drive requirements 10
video connectors 29
AVR 3
available resolutions 3
disk space used 4
B
black burst
connecting 18, 31
block mode 34
Blue and White G3
PCI slot configuration
AVoption 13
AVoption XL 24
BNC connector
connecting 18
removing 18
B-Y IN 17
B-Y OUT 17
C
centralized video switching 19, 32
clear video from a Movie Track 34
compression
approximate storage space 4, 8
available levels 3
setting level 35
connect the ABVB video cable 17
connecting a USD 18, 31
connecting a VTR 18, 31
create a new Movie Track 33
CV IN 17
CV OUT 17
D
deleting a Movie Track 34
Digital Media card
install 26
DigiTranslator
description 36
Index 43
Page 48

E
exporting
audio 37
entire clip or sequence 37
file type 38
files
from Media Composer 37
from Media Composer 37
media online 37
OMFI Version 2.0 38
overview 36
part of a sequence 37
render effects in advance 37
selecting specific tracks 37
video 37
video and audio 37
video only 37
With Media 38
external playback monitor
connecting 40
NTSC 40
PAL 40
F
FilmFrame
authorizing 12, 24
installing 12, 24
overview 2
frame boundaries
adjusting to 39
frames
view Movie Track as 34
G
G3 (Blue and White)
PCI slot configuration
AVoption 13
AVoption XL 24
G4
PCI slot configuration
AVoption 14
AVoption XL 26
GL IN 17
H
hard disk
contiguous file capture on multiple 6
don’t use round robin allocation for audio 5, 10
initializing 17
selecting for video capture 35
space required for each AVR level 4
space required for each JFIF level 8
using more than two 5, 10
using two 5, 9
video 6
hardware
AVoption
installing video 15
Avoption
PCI slot configurations 12
AVoption XL
PCI slot configurations 24
installing video
for AVoption XL 26
hardware capabilities 3
house sync
connecting 18, 31
I
illegal frame boundaries 39
Importing
into AVoption 38
importing
Movie Track 38
video 38
Importing files
preparing 36
initializing hard disks 17
install
ABVB card 15
authorize AVoption 12
authorize AVoption XL 24
AVoption
PCI slot configurations 12
AVoption SCSI accelerator 16
AVoption software 12
AVoption upgrade system 11
AVoption video hardware 15
AVoption XL
PCI slot configurations 24
AVoption XL SCSI accelerator 27
AVoption XL software 24
AVoption and AVoption XL Guide44
Page 49

AVoption XL video hardware 26
Digital Media card 26
FilmFrame 12, 24
Janus advanced JPEG card 15
Meridien I/O Box 26
new AVoption system 11
new AVoption XL system 23
upgrade AVoption XL system 23
J
Janus advanced JPEG card
install 15
JFIF
disk space used 8
JPEG
compression varies 3
M
MachineControl 36
Meridien
I/O Box 28
Meridien I/O Box
install 26
Movie Offline
working with 39
Movie Track
clearing all video from 34
creating 33
deleting 34
frames view 34
importing 38
naming 33
overview 33
spotting 41
viewing as blocks 34
Movie Window 40
aspect ratio 41
showing 41
N
name a Movie Track 33
NTSC monitor
connecting 19, 32
O
offline
working with the Movie 39
online
working with the Movie 39
P
PAL monitor
connecting 19, 32
PCI slot configurations
AVoption 12
Power Macintosh G3 (Blue and White) 13
Power Macintosh G4 14
Avoption
Power Macintosh 9500 13
Power Macintosh 9600 13
AVoption XL 24
Power Macintosh G3 (Blue and White) 24
Power Macintosh G4 26
performance with windowed playback 40
Preparing to Import Files 36
R
recording video 36
selecting target volumes 35
selecting video input 35
setting compression level 35
setting options 35
reference video monitor
connecting 19, 32
register
to get DigiTranslator 36
render effects before exporting 37
requirements
for minimum system 5
round robin disk allocation
don’t use 5, 10
R-Y IN 17
R-Y OUT 17
S
sample AVoption setup
illustration 20
Index 45
Page 50

SCSI
hardware with 2-to-1 or 1-to-1 compression
(AVoption XL) 10
hardware with 3-to-1 compression or higher
(AVoption XL) 9
striped drive requirements (AVoption XL) 10
SCSI accelerator
installing for AVoption 16
installing for AVoption XL 27
required 5, 9
supported 5, 9
selecting target volumes for video capture 35
selecting video input 35
setting video recording options 35
show Movie Window 41
slot configurations
AVoption 12
Power Macintosh 9500 13
Power Macintosh 9600 13
Power Macintosh G3 (Blue and White) 13
Power Macintosh G4 14
AVoption XL 24
Power Macintosh G3 (Blue and White) 24
Power Macintosh G4 26
software
installing AVoption 12
installing AVoption XL 24
spotting the Movie Track 41
striped drives 10
synchronization
black burst 5, 9
house sync 5, 9
synchronization peripheral
USD 5, 9
system requirements
minimum 5
U
Universal Slave Driver
connecting 18, 31
required 5, 9
upgrading to AVoption 11
upgrading to AVoption XL 23
USD
connecting 18, 31
required 5, 9
V
variable compression 3
video
captured to multiple hard disks 6
video and audio export 37
video cable
AVoption
connectors 17
connecting to ABVB 17
video compression
available levels 3
AVR overview 3
video connectors
AVoption 17
AVoption XL 29
B-Y IN 17
B-Y OUT 17
CV IN 17
CV OUT 17
GL IN 17
R-Y IN 17
R-Y OUT 17
Y IN 17
Y OUT 17
video hardware
installing
AVoption XL 26
installing AVoption 15
video input
selecting 35
video input signal
view with external monitor 40
video only export 37
video record signal
view with external monitor 40
video signal
centralized routing 19, 32
video storage
disk space used 4, 8
viewing blocks in the Movie Track 34
viewing the Movie in a window 40
VTR
connecting 18, 31
AVoption and AVoption XL Guide46
Page 51

W
window playback
of the Movie 40
performance 40
working with the Movie Online 39
Y
Y IN 17
Y OUT 17
Index 47
 Loading...