

Page 1

Menus Guide
Version 9.0
Page 2

Legal Notices
This guide is copyrighted ©2010 by Avid Technology, Inc.,
(hereafter “Avid”), with all rights reserved. Under copyright
laws, this guide may not be duplicated in whole or in part
without the written consent of Avid.
003, 96 I/O, 96i I/O, 192 Digital I/O, 192 I/O, 888|24 I/O,
882|20 I/O, 1622 I/O, 24-Bit ADAT Bridge I/O, AudioSuite,
Avid, Avid DNA, Avid Mojo, Avid Unity, Avid Unity ISIS,
Avid Xpress, AVoption, Axiom, Beat Detective, Bomb Factory,
Bruno, C|24, Command|8, Control|24, D-Command, D-Control,
D-Fi, D-fx, D-Show, D-Verb, DAE, Digi 002, DigiBase,
DigiDelivery, Digidesign, Digidesign Audio Engine, Digidesign
Intelligent Noise Reduction, Digidesign TDM Bus, DigiDrive,
DigiRack, DigiTest, DigiTranslator, DINR, DV Toolkit, EditPack,
Eleven, EUCON, HD Core, HD Process, Hybrid, Impact,
Interplay, LoFi, M-Audio, MachineControl, Maxim, Mbox,
MediaComposer, MIDI I/O, MIX, MultiShell, Nitris, OMF,
OMF Interchange, PRE, ProControl, Pro Tools M-Powered,
Pro Tools, Pro Tools|HD, Pro Tools LE, QuickPunch, Recti-Fi,
Reel Tape, Reso, Reverb One, ReVibe, RTAS, Sibelius,
Smack!, SoundReplacer, Sound Designer II, Strike, Structure,
SYNC HD, SYNC I/O, Synchronic, TL Aggro, TL AutoPan,
TL Drum Rehab, TL Everyphase, TL Fauxlder, TL In Tune,
TL MasterMeter, TL Metro, TL Space, TL Utilities, Transfuser,
Trillium Lane Labs, Vari-Fi, Velvet, X-Form, and XMON are
trademarks or registered trademarks of Avid Technology, Inc.
Xpand! is Registered in the U.S. Patent and Trademark Office.
All other trademarks are the property of their respective
owners.
Product features, specifications, system requirements, and
availability are subject to change without notice.
Guide Part Number 9329-65054-00 REV A 9/10
Documentation Feedback
At Avid, we are always looking for ways to improve our
documentation. If you have comments, corrections, or
suggestions regarding our documentation, email us at
techpubs@avid.com.
Page 3

contents
Chapter 1. Introduction . . . . . . . . . . . . . . . . . . . . . . . . . . . . . . . . . . . . . . . . . . . . . . . . . . . . . . 1
Chapter 2. Pro Tools Menu (Mac Only) . . . . . . . . . . . . . . . . . . . . . . . . . . . . . . . . . . . . . . . . 3
About Pro Tools . . . . . . . . . . . . . . . . . . . . . . . . . . . . . . . . . . . . . . . . . . . . . . . . . . . . . . . . . 3
Preferences . . . . . . . . . . . . . . . . . . . . . . . . . . . . . . . . . . . . . . . . . . . . . . . . . . . . . . . . . . . . 3
Mac Application Management Commands. . . . . . . . . . . . . . . . . . . . . . . . . . . . . . . . . . . . . . . 3
Quit Pro Tools . . . . . . . . . . . . . . . . . . . . . . . . . . . . . . . . . . . . . . . . . . . . . . . . . . . . . . . . . . . 3
Chapter 3. File Menu. . . . . . . . . . . . . . . . . . . . . . . . . . . . . . . . . . . . . . . . . . . . . . . . . . . . . . . . . 5
New Session . . . . . . . . . . . . . . . . . . . . . . . . . . . . . . . . . . . . . . . . . . . . . . . . . . . . . . . . . . . . 5
Open Session . . . . . . . . . . . . . . . . . . . . . . . . . . . . . . . . . . . . . . . . . . . . . . . . . . . . . . . . . . . 6
Open Recent. . . . . . . . . . . . . . . . . . . . . . . . . . . . . . . . . . . . . . . . . . . . . . . . . . . . . . . . . . . . 6
Close Session . . . . . . . . . . . . . . . . . . . . . . . . . . . . . . . . . . . . . . . . . . . . . . . . . . . . . . . . . . . 6
Save . . . . . . . . . . . . . . . . . . . . . . . . . . . . . . . . . . . . . . . . . . . . . . . . . . . . . . . . . . . . . . . . . 6
Save As . . . . . . . . . . . . . . . . . . . . . . . . . . . . . . . . . . . . . . . . . . . . . . . . . . . . . . . . . . . . . . . 6
Save Copy In. . . . . . . . . . . . . . . . . . . . . . . . . . . . . . . . . . . . . . . . . . . . . . . . . . . . . . . . . . . . 6
Save As Template . . . . . . . . . . . . . . . . . . . . . . . . . . . . . . . . . . . . . . . . . . . . . . . . . . . . . . . . 7
Revert to Saved . . . . . . . . . . . . . . . . . . . . . . . . . . . . . . . . . . . . . . . . . . . . . . . . . . . . . . . . . 8
Send via DigiDelivery . . . . . . . . . . . . . . . . . . . . . . . . . . . . . . . . . . . . . . . . . . . . . . . . . . . . . . 8
Send to Sibelius . . . . . . . . . . . . . . . . . . . . . . . . . . . . . . . . . . . . . . . . . . . . . . . . . . . . . . . . . 8
Bounce to Commands . . . . . . . . . . . . . . . . . . . . . . . . . . . . . . . . . . . . . . . . . . . . . . . . . . . . . 8
Import . . . . . . . . . . . . . . . . . . . . . . . . . . . . . . . . . . . . . . . . . . . . . . . . . . . . . . . . . . . . . . . 10
Export . . . . . . . . . . . . . . . . . . . . . . . . . . . . . . . . . . . . . . . . . . . . . . . . . . . . . . . . . . . . . . . 11
Get Info . . . . . . . . . . . . . . . . . . . . . . . . . . . . . . . . . . . . . . . . . . . . . . . . . . . . . . . . . . . . . . 12
Score Setup . . . . . . . . . . . . . . . . . . . . . . . . . . . . . . . . . . . . . . . . . . . . . . . . . . . . . . . . . . . 13
Print Score . . . . . . . . . . . . . . . . . . . . . . . . . . . . . . . . . . . . . . . . . . . . . . . . . . . . . . . . . . . . 14
Exit . . . . . . . . . . . . . . . . . . . . . . . . . . . . . . . . . . . . . . . . . . . . . . . . . . . . . . . . . . . . . . . . . 14
Contents iii
Page 4

Chapter 4. Edit Menu. . . . . . . . . . . . . . . . . . . . . . . . . . . . . . . . . . . . . . . . . . . . . . . . . . . . . . . 15
Undo . . . . . . . . . . . . . . . . . . . . . . . . . . . . . . . . . . . . . . . . . . . . . . . . . . . . . . . . . . . . . . . . 15
Redo . . . . . . . . . . . . . . . . . . . . . . . . . . . . . . . . . . . . . . . . . . . . . . . . . . . . . . . . . . . . . . . . 15
Restore Last Selection . . . . . . . . . . . . . . . . . . . . . . . . . . . . . . . . . . . . . . . . . . . . . . . . . . . 15
Cut . . . . . . . . . . . . . . . . . . . . . . . . . . . . . . . . . . . . . . . . . . . . . . . . . . . . . . . . . . . . . . . . . 15
Copy . . . . . . . . . . . . . . . . . . . . . . . . . . . . . . . . . . . . . . . . . . . . . . . . . . . . . . . . . . . . . . . . 15
Paste . . . . . . . . . . . . . . . . . . . . . . . . . . . . . . . . . . . . . . . . . . . . . . . . . . . . . . . . . . . . . . . 15
Clear . . . . . . . . . . . . . . . . . . . . . . . . . . . . . . . . . . . . . . . . . . . . . . . . . . . . . . . . . . . . . . . . 16
Cut Special . . . . . . . . . . . . . . . . . . . . . . . . . . . . . . . . . . . . . . . . . . . . . . . . . . . . . . . . . . . 16
Copy Special . . . . . . . . . . . . . . . . . . . . . . . . . . . . . . . . . . . . . . . . . . . . . . . . . . . . . . . . . . 16
Paste Special . . . . . . . . . . . . . . . . . . . . . . . . . . . . . . . . . . . . . . . . . . . . . . . . . . . . . . . . . . 16
Clear Special . . . . . . . . . . . . . . . . . . . . . . . . . . . . . . . . . . . . . . . . . . . . . . . . . . . . . . . . . . 17
Select All . . . . . . . . . . . . . . . . . . . . . . . . . . . . . . . . . . . . . . . . . . . . . . . . . . . . . . . . . . . . . 17
Selection . . . . . . . . . . . . . . . . . . . . . . . . . . . . . . . . . . . . . . . . . . . . . . . . . . . . . . . . . . . . . 17
Duplicate. . . . . . . . . . . . . . . . . . . . . . . . . . . . . . . . . . . . . . . . . . . . . . . . . . . . . . . . . . . . . 17
Repeat . . . . . . . . . . . . . . . . . . . . . . . . . . . . . . . . . . . . . . . . . . . . . . . . . . . . . . . . . . . . . . 17
Shift . . . . . . . . . . . . . . . . . . . . . . . . . . . . . . . . . . . . . . . . . . . . . . . . . . . . . . . . . . . . . . . . 18
Insert Silence . . . . . . . . . . . . . . . . . . . . . . . . . . . . . . . . . . . . . . . . . . . . . . . . . . . . . . . . . . 18
Snap To. . . . . . . . . . . . . . . . . . . . . . . . . . . . . . . . . . . . . . . . . . . . . . . . . . . . . . . . . . . . . . 18
Trim Region . . . . . . . . . . . . . . . . . . . . . . . . . . . . . . . . . . . . . . . . . . . . . . . . . . . . . . . . . . . 18
Separate Region . . . . . . . . . . . . . . . . . . . . . . . . . . . . . . . . . . . . . . . . . . . . . . . . . . . . . . . 19
Heal Separation . . . . . . . . . . . . . . . . . . . . . . . . . . . . . . . . . . . . . . . . . . . . . . . . . . . . . . . . 19
Consolidate . . . . . . . . . . . . . . . . . . . . . . . . . . . . . . . . . . . . . . . . . . . . . . . . . . . . . . . . . . . 19
Mute/Unmute Region . . . . . . . . . . . . . . . . . . . . . . . . . . . . . . . . . . . . . . . . . . . . . . . . . . . . 19
Copy Selection To . . . . . . . . . . . . . . . . . . . . . . . . . . . . . . . . . . . . . . . . . . . . . . . . . . . . . . . 19
Strip Silence . . . . . . . . . . . . . . . . . . . . . . . . . . . . . . . . . . . . . . . . . . . . . . . . . . . . . . . . . . 20
TCE Edit to Timeline Selection . . . . . . . . . . . . . . . . . . . . . . . . . . . . . . . . . . . . . . . . . . . . . . 20
Automation . . . . . . . . . . . . . . . . . . . . . . . . . . . . . . . . . . . . . . . . . . . . . . . . . . . . . . . . . . . 20
Fades . . . . . . . . . . . . . . . . . . . . . . . . . . . . . . . . . . . . . . . . . . . . . . . . . . . . . . . . . . . . . . . 22
Menus Guideiv
Page 5

Chapter 5. View Menu . . . . . . . . . . . . . . . . . . . . . . . . . . . . . . . . . . . . . . . . . . . . . . . . . . . . . . 23
Mix Window . . . . . . . . . . . . . . . . . . . . . . . . . . . . . . . . . . . . . . . . . . . . . . . . . . . . . . . . . . . 23
Narrow Mix . . . . . . . . . . . . . . . . . . . . . . . . . . . . . . . . . . . . . . . . . . . . . . . . . . . . . . . . . . . . 23
Edit Window Views . . . . . . . . . . . . . . . . . . . . . . . . . . . . . . . . . . . . . . . . . . . . . . . . . . . . . . 23
Rulers . . . . . . . . . . . . . . . . . . . . . . . . . . . . . . . . . . . . . . . . . . . . . . . . . . . . . . . . . . . . . . . 24
Other Displays . . . . . . . . . . . . . . . . . . . . . . . . . . . . . . . . . . . . . . . . . . . . . . . . . . . . . . . . . 24
Region . . . . . . . . . . . . . . . . . . . . . . . . . . . . . . . . . . . . . . . . . . . . . . . . . . . . . . . . . . . . . . . 25
Waveforms . . . . . . . . . . . . . . . . . . . . . . . . . . . . . . . . . . . . . . . . . . . . . . . . . . . . . . . . . . . . 26
Automation . . . . . . . . . . . . . . . . . . . . . . . . . . . . . . . . . . . . . . . . . . . . . . . . . . . . . . . . . . . 26
Sends A–E . . . . . . . . . . . . . . . . . . . . . . . . . . . . . . . . . . . . . . . . . . . . . . . . . . . . . . . . . . . . 26
Sends F–J . . . . . . . . . . . . . . . . . . . . . . . . . . . . . . . . . . . . . . . . . . . . . . . . . . . . . . . . . . . . . 26
Track Number . . . . . . . . . . . . . . . . . . . . . . . . . . . . . . . . . . . . . . . . . . . . . . . . . . . . . . . . . . 27
Transport . . . . . . . . . . . . . . . . . . . . . . . . . . . . . . . . . . . . . . . . . . . . . . . . . . . . . . . . . . . . . 27
Main Counter . . . . . . . . . . . . . . . . . . . . . . . . . . . . . . . . . . . . . . . . . . . . . . . . . . . . . . . . . . 27
Chapter 6. Track Menu. . . . . . . . . . . . . . . . . . . . . . . . . . . . . . . . . . . . . . . . . . . . . . . . . . . . . . 29
New . . . . . . . . . . . . . . . . . . . . . . . . . . . . . . . . . . . . . . . . . . . . . . . . . . . . . . . . . . . . . . . . . 29
Group. . . . . . . . . . . . . . . . . . . . . . . . . . . . . . . . . . . . . . . . . . . . . . . . . . . . . . . . . . . . . . . . 29
Duplicate . . . . . . . . . . . . . . . . . . . . . . . . . . . . . . . . . . . . . . . . . . . . . . . . . . . . . . . . . . . . . 30
Split into Mono . . . . . . . . . . . . . . . . . . . . . . . . . . . . . . . . . . . . . . . . . . . . . . . . . . . . . . . . . 30
Make Inactive or Make Active. . . . . . . . . . . . . . . . . . . . . . . . . . . . . . . . . . . . . . . . . . . . . . . 31
Delete . . . . . . . . . . . . . . . . . . . . . . . . . . . . . . . . . . . . . . . . . . . . . . . . . . . . . . . . . . . . . . . 31
Write MIDI Real-Time Properties . . . . . . . . . . . . . . . . . . . . . . . . . . . . . . . . . . . . . . . . . . . . . 31
Set Record Tracks to Input Only or to Auto Input Monitoring . . . . . . . . . . . . . . . . . . . . . . . . . 31
Auto Input Monitoring or Input Only Monitoring . . . . . . . . . . . . . . . . . . . . . . . . . . . . . . . . . . 32
Scroll To Track . . . . . . . . . . . . . . . . . . . . . . . . . . . . . . . . . . . . . . . . . . . . . . . . . . . . . . . . . 32
Clear All Clip Indicators . . . . . . . . . . . . . . . . . . . . . . . . . . . . . . . . . . . . . . . . . . . . . . . . . . . 32
Coalesce VCA Master Automation . . . . . . . . . . . . . . . . . . . . . . . . . . . . . . . . . . . . . . . . . . . . 32
Coalesce Trim Automation . . . . . . . . . . . . . . . . . . . . . . . . . . . . . . . . . . . . . . . . . . . . . . . . . 32
Clear Trim Automation. . . . . . . . . . . . . . . . . . . . . . . . . . . . . . . . . . . . . . . . . . . . . . . . . . . . 32
Create Click Track . . . . . . . . . . . . . . . . . . . . . . . . . . . . . . . . . . . . . . . . . . . . . . . . . . . . . . . 32
Contents v
Page 6

Chapter 7. Region Menu . . . . . . . . . . . . . . . . . . . . . . . . . . . . . . . . . . . . . . . . . . . . . . . . . . . . 33
Edit Lock/Unlock Region . . . . . . . . . . . . . . . . . . . . . . . . . . . . . . . . . . . . . . . . . . . . . . . . . . 33
Time Lock/Unlock . . . . . . . . . . . . . . . . . . . . . . . . . . . . . . . . . . . . . . . . . . . . . . . . . . . . . . 33
Send to Back . . . . . . . . . . . . . . . . . . . . . . . . . . . . . . . . . . . . . . . . . . . . . . . . . . . . . . . . . . 33
Bring To Front . . . . . . . . . . . . . . . . . . . . . . . . . . . . . . . . . . . . . . . . . . . . . . . . . . . . . . . . . 33
Rating . . . . . . . . . . . . . . . . . . . . . . . . . . . . . . . . . . . . . . . . . . . . . . . . . . . . . . . . . . . . . . . 33
Group . . . . . . . . . . . . . . . . . . . . . . . . . . . . . . . . . . . . . . . . . . . . . . . . . . . . . . . . . . . . . . . 34
Ungroup . . . . . . . . . . . . . . . . . . . . . . . . . . . . . . . . . . . . . . . . . . . . . . . . . . . . . . . . . . . . . 34
Ungroup All . . . . . . . . . . . . . . . . . . . . . . . . . . . . . . . . . . . . . . . . . . . . . . . . . . . . . . . . . . . 34
Regroup . . . . . . . . . . . . . . . . . . . . . . . . . . . . . . . . . . . . . . . . . . . . . . . . . . . . . . . . . . . . . 34
Loop . . . . . . . . . . . . . . . . . . . . . . . . . . . . . . . . . . . . . . . . . . . . . . . . . . . . . . . . . . . . . . . . 34
Unloop . . . . . . . . . . . . . . . . . . . . . . . . . . . . . . . . . . . . . . . . . . . . . . . . . . . . . . . . . . . . . . 34
Capture . . . . . . . . . . . . . . . . . . . . . . . . . . . . . . . . . . . . . . . . . . . . . . . . . . . . . . . . . . . . . . 34
Rename . . . . . . . . . . . . . . . . . . . . . . . . . . . . . . . . . . . . . . . . . . . . . . . . . . . . . . . . . . . . . 34
Identify Sync Point and Remove Sync Point . . . . . . . . . . . . . . . . . . . . . . . . . . . . . . . . . . . . 35
Quantize to Grid . . . . . . . . . . . . . . . . . . . . . . . . . . . . . . . . . . . . . . . . . . . . . . . . . . . . . . . . 35
Elastic Properties . . . . . . . . . . . . . . . . . . . . . . . . . . . . . . . . . . . . . . . . . . . . . . . . . . . . . . . 35
Conform to Tempo . . . . . . . . . . . . . . . . . . . . . . . . . . . . . . . . . . . . . . . . . . . . . . . . . . . . . . 35
Remove Warp . . . . . . . . . . . . . . . . . . . . . . . . . . . . . . . . . . . . . . . . . . . . . . . . . . . . . . . . . 35
Remove Pitch Shift. . . . . . . . . . . . . . . . . . . . . . . . . . . . . . . . . . . . . . . . . . . . . . . . . . . . . . 35
Chapter 8. Event Menu . . . . . . . . . . . . . . . . . . . . . . . . . . . . . . . . . . . . . . . . . . . . . . . . . . . . . 37
Time Operations . . . . . . . . . . . . . . . . . . . . . . . . . . . . . . . . . . . . . . . . . . . . . . . . . . . . . . . . 37
Tempo Operations . . . . . . . . . . . . . . . . . . . . . . . . . . . . . . . . . . . . . . . . . . . . . . . . . . . . . . 39
Event Operations . . . . . . . . . . . . . . . . . . . . . . . . . . . . . . . . . . . . . . . . . . . . . . . . . . . . . . . 39
MIDI Track Offsets . . . . . . . . . . . . . . . . . . . . . . . . . . . . . . . . . . . . . . . . . . . . . . . . . . . . . . 44
MIDI Real-Time Properties. . . . . . . . . . . . . . . . . . . . . . . . . . . . . . . . . . . . . . . . . . . . . . . . . 44
Remove Duplicate Notes. . . . . . . . . . . . . . . . . . . . . . . . . . . . . . . . . . . . . . . . . . . . . . . . . . 44
Add Key Change. . . . . . . . . . . . . . . . . . . . . . . . . . . . . . . . . . . . . . . . . . . . . . . . . . . . . . . . 45
Beat Detective . . . . . . . . . . . . . . . . . . . . . . . . . . . . . . . . . . . . . . . . . . . . . . . . . . . . . . . . . 45
Identify Beat . . . . . . . . . . . . . . . . . . . . . . . . . . . . . . . . . . . . . . . . . . . . . . . . . . . . . . . . . . 45
Renumber Bars . . . . . . . . . . . . . . . . . . . . . . . . . . . . . . . . . . . . . . . . . . . . . . . . . . . . . . . . 45
All MIDI Notes Off. . . . . . . . . . . . . . . . . . . . . . . . . . . . . . . . . . . . . . . . . . . . . . . . . . . . . . . 45
Menus Guidevi
Page 7

Chapter 9. AudioSuite Menu . . . . . . . . . . . . . . . . . . . . . . . . . . . . . . . . . . . . . . . . . . . . . . . . . 47
EQ Plug-ins . . . . . . . . . . . . . . . . . . . . . . . . . . . . . . . . . . . . . . . . . . . . . . . . . . . . . . . . . . . . 47
Dynamics Plug-ins . . . . . . . . . . . . . . . . . . . . . . . . . . . . . . . . . . . . . . . . . . . . . . . . . . . . . . . 47
Pitch Shift Plug-ins . . . . . . . . . . . . . . . . . . . . . . . . . . . . . . . . . . . . . . . . . . . . . . . . . . . . . . 48
Reverb Plug-ins . . . . . . . . . . . . . . . . . . . . . . . . . . . . . . . . . . . . . . . . . . . . . . . . . . . . . . . . . 49
Delay Plug-ins . . . . . . . . . . . . . . . . . . . . . . . . . . . . . . . . . . . . . . . . . . . . . . . . . . . . . . . . . . 49
Modulation Plug-ins . . . . . . . . . . . . . . . . . . . . . . . . . . . . . . . . . . . . . . . . . . . . . . . . . . . . . . 49
Harmonic Plug-ins . . . . . . . . . . . . . . . . . . . . . . . . . . . . . . . . . . . . . . . . . . . . . . . . . . . . . . . 50
Noise Reduction Plug-ins . . . . . . . . . . . . . . . . . . . . . . . . . . . . . . . . . . . . . . . . . . . . . . . . . . 50
Instrument Plug-ins . . . . . . . . . . . . . . . . . . . . . . . . . . . . . . . . . . . . . . . . . . . . . . . . . . . . . . 50
Other Plug-ins . . . . . . . . . . . . . . . . . . . . . . . . . . . . . . . . . . . . . . . . . . . . . . . . . . . . . . . . . . 50
Chapter 10. Options Menu. . . . . . . . . . . . . . . . . . . . . . . . . . . . . . . . . . . . . . . . . . . . . . . . . . . 53
Destructive Record . . . . . . . . . . . . . . . . . . . . . . . . . . . . . . . . . . . . . . . . . . . . . . . . . . . . . . 53
Loop Record . . . . . . . . . . . . . . . . . . . . . . . . . . . . . . . . . . . . . . . . . . . . . . . . . . . . . . . . . . . 53
QuickPunch . . . . . . . . . . . . . . . . . . . . . . . . . . . . . . . . . . . . . . . . . . . . . . . . . . . . . . . . . . . 53
TrackPunch . . . . . . . . . . . . . . . . . . . . . . . . . . . . . . . . . . . . . . . . . . . . . . . . . . . . . . . . . . . 53
DestructivePunch . . . . . . . . . . . . . . . . . . . . . . . . . . . . . . . . . . . . . . . . . . . . . . . . . . . . . . . 53
Prepare DPE (DestructivePunch-Enabled) Tracks . . . . . . . . . . . . . . . . . . . . . . . . . . . . . . . . . 54
Transport Online . . . . . . . . . . . . . . . . . . . . . . . . . . . . . . . . . . . . . . . . . . . . . . . . . . . . . . . . 54
Video Track Online . . . . . . . . . . . . . . . . . . . . . . . . . . . . . . . . . . . . . . . . . . . . . . . . . . . . . . 54
Video Out FireWire . . . . . . . . . . . . . . . . . . . . . . . . . . . . . . . . . . . . . . . . . . . . . . . . . . . . . . 54
Scrub in Video Window . . . . . . . . . . . . . . . . . . . . . . . . . . . . . . . . . . . . . . . . . . . . . . . . . . . 54
Pre/Post-Roll . . . . . . . . . . . . . . . . . . . . . . . . . . . . . . . . . . . . . . . . . . . . . . . . . . . . . . . . . . 55
Loop Playback . . . . . . . . . . . . . . . . . . . . . . . . . . . . . . . . . . . . . . . . . . . . . . . . . . . . . . . . . 55
Dynamic Transport . . . . . . . . . . . . . . . . . . . . . . . . . . . . . . . . . . . . . . . . . . . . . . . . . . . . . . 55
Edit Window Scrolling . . . . . . . . . . . . . . . . . . . . . . . . . . . . . . . . . . . . . . . . . . . . . . . . . . . . 55
Link Timeline and Edit Selection . . . . . . . . . . . . . . . . . . . . . . . . . . . . . . . . . . . . . . . . . . . . . 56
Link Track and Edit Selection . . . . . . . . . . . . . . . . . . . . . . . . . . . . . . . . . . . . . . . . . . . . . . . 56
Mirror MIDI Editing . . . . . . . . . . . . . . . . . . . . . . . . . . . . . . . . . . . . . . . . . . . . . . . . . . . . . . 56
Automation Follows Edit . . . . . . . . . . . . . . . . . . . . . . . . . . . . . . . . . . . . . . . . . . . . . . . . . . 56
Click . . . . . . . . . . . . . . . . . . . . . . . . . . . . . . . . . . . . . . . . . . . . . . . . . . . . . . . . . . . . . . . . 56
MIDI Thru . . . . . . . . . . . . . . . . . . . . . . . . . . . . . . . . . . . . . . . . . . . . . . . . . . . . . . . . . . . . . 57
Mute Frees Assigned Voice. . . . . . . . . . . . . . . . . . . . . . . . . . . . . . . . . . . . . . . . . . . . . . . . . 57
Auto-Spot Regions. . . . . . . . . . . . . . . . . . . . . . . . . . . . . . . . . . . . . . . . . . . . . . . . . . . . . . . 57
Pre-Fader Metering . . . . . . . . . . . . . . . . . . . . . . . . . . . . . . . . . . . . . . . . . . . . . . . . . . . . . . 57
Contents vii
Page 8

Solo Mode . . . . . . . . . . . . . . . . . . . . . . . . . . . . . . . . . . . . . . . . . . . . . . . . . . . . . . . . . . . . 57
Edit/Tool Mode Keyboard Lock . . . . . . . . . . . . . . . . . . . . . . . . . . . . . . . . . . . . . . . . . . . . . 58
Calibration Mode . . . . . . . . . . . . . . . . . . . . . . . . . . . . . . . . . . . . . . . . . . . . . . . . . . . . . . . 58
Delay Compensation. . . . . . . . . . . . . . . . . . . . . . . . . . . . . . . . . . . . . . . . . . . . . . . . . . . . . 58
Activate HEAT . . . . . . . . . . . . . . . . . . . . . . . . . . . . . . . . . . . . . . . . . . . . . . . . . . . . . . . . . 58
Low Latency Monitoring . . . . . . . . . . . . . . . . . . . . . . . . . . . . . . . . . . . . . . . . . . . . . . . . . . 58
Chapter 11. Setup Menu . . . . . . . . . . . . . . . . . . . . . . . . . . . . . . . . . . . . . . . . . . . . . . . . . . . . 59
Hardware. . . . . . . . . . . . . . . . . . . . . . . . . . . . . . . . . . . . . . . . . . . . . . . . . . . . . . . . . . . . . 59
Playback Engine. . . . . . . . . . . . . . . . . . . . . . . . . . . . . . . . . . . . . . . . . . . . . . . . . . . . . . . . 59
Disk Allocation . . . . . . . . . . . . . . . . . . . . . . . . . . . . . . . . . . . . . . . . . . . . . . . . . . . . . . . . . 60
Peripherals . . . . . . . . . . . . . . . . . . . . . . . . . . . . . . . . . . . . . . . . . . . . . . . . . . . . . . . . . . . 60
I/O . . . . . . . . . . . . . . . . . . . . . . . . . . . . . . . . . . . . . . . . . . . . . . . . . . . . . . . . . . . . . . . . . 62
Machine Track Arming Profiles . . . . . . . . . . . . . . . . . . . . . . . . . . . . . . . . . . . . . . . . . . . . . 63
Video Sync Offset . . . . . . . . . . . . . . . . . . . . . . . . . . . . . . . . . . . . . . . . . . . . . . . . . . . . . . . 63
Session . . . . . . . . . . . . . . . . . . . . . . . . . . . . . . . . . . . . . . . . . . . . . . . . . . . . . . . . . . . . . . 63
Current Feet+Frames Position . . . . . . . . . . . . . . . . . . . . . . . . . . . . . . . . . . . . . . . . . . . . . . 63
Current Time Code Position . . . . . . . . . . . . . . . . . . . . . . . . . . . . . . . . . . . . . . . . . . . . . . . . 64
External Time Code Offset . . . . . . . . . . . . . . . . . . . . . . . . . . . . . . . . . . . . . . . . . . . . . . . . . 64
MIDI . . . . . . . . . . . . . . . . . . . . . . . . . . . . . . . . . . . . . . . . . . . . . . . . . . . . . . . . . . . . . . . . 64
Click/Countoff . . . . . . . . . . . . . . . . . . . . . . . . . . . . . . . . . . . . . . . . . . . . . . . . . . . . . . . . . 66
Preferences . . . . . . . . . . . . . . . . . . . . . . . . . . . . . . . . . . . . . . . . . . . . . . . . . . . . . . . . . . . 66
Chapter 12. Window Menu . . . . . . . . . . . . . . . . . . . . . . . . . . . . . . . . . . . . . . . . . . . . . . . . . . 85
Configurations . . . . . . . . . . . . . . . . . . . . . . . . . . . . . . . . . . . . . . . . . . . . . . . . . . . . . . . . . 85
Arrange . . . . . . . . . . . . . . . . . . . . . . . . . . . . . . . . . . . . . . . . . . . . . . . . . . . . . . . . . . . . . . 85
Hiding All Floating Windows . . . . . . . . . . . . . . . . . . . . . . . . . . . . . . . . . . . . . . . . . . . . . . . 86
Mix . . . . . . . . . . . . . . . . . . . . . . . . . . . . . . . . . . . . . . . . . . . . . . . . . . . . . . . . . . . . . . . . . 86
Edit. . . . . . . . . . . . . . . . . . . . . . . . . . . . . . . . . . . . . . . . . . . . . . . . . . . . . . . . . . . . . . . . . 86
MIDI Editor . . . . . . . . . . . . . . . . . . . . . . . . . . . . . . . . . . . . . . . . . . . . . . . . . . . . . . . . . . . 86
Score Editor . . . . . . . . . . . . . . . . . . . . . . . . . . . . . . . . . . . . . . . . . . . . . . . . . . . . . . . . . . . 86
MIDI Event List. . . . . . . . . . . . . . . . . . . . . . . . . . . . . . . . . . . . . . . . . . . . . . . . . . . . . . . . . 86
MIDI Editors . . . . . . . . . . . . . . . . . . . . . . . . . . . . . . . . . . . . . . . . . . . . . . . . . . . . . . . . . . . 86
Task Manager . . . . . . . . . . . . . . . . . . . . . . . . . . . . . . . . . . . . . . . . . . . . . . . . . . . . . . . . . 87
Workspace . . . . . . . . . . . . . . . . . . . . . . . . . . . . . . . . . . . . . . . . . . . . . . . . . . . . . . . . . . . 87
Project . . . . . . . . . . . . . . . . . . . . . . . . . . . . . . . . . . . . . . . . . . . . . . . . . . . . . . . . . . . . . . 87
Browsers . . . . . . . . . . . . . . . . . . . . . . . . . . . . . . . . . . . . . . . . . . . . . . . . . . . . . . . . . . . . . 87
Menus Guideviii
Page 9

Transport . . . . . . . . . . . . . . . . . . . . . . . . . . . . . . . . . . . . . . . . . . . . . . . . . . . . . . . . . . . . . 87
Big Counter . . . . . . . . . . . . . . . . . . . . . . . . . . . . . . . . . . . . . . . . . . . . . . . . . . . . . . . . . . . 87
Automation . . . . . . . . . . . . . . . . . . . . . . . . . . . . . . . . . . . . . . . . . . . . . . . . . . . . . . . . . . . 88
Memory Locations. . . . . . . . . . . . . . . . . . . . . . . . . . . . . . . . . . . . . . . . . . . . . . . . . . . . . . . 88
Machine Track Arming . . . . . . . . . . . . . . . . . . . . . . . . . . . . . . . . . . . . . . . . . . . . . . . . . . . . 88
Video Universe . . . . . . . . . . . . . . . . . . . . . . . . . . . . . . . . . . . . . . . . . . . . . . . . . . . . . . . . . 89
Video . . . . . . . . . . . . . . . . . . . . . . . . . . . . . . . . . . . . . . . . . . . . . . . . . . . . . . . . . . . . . . . . 89
Color Palette. . . . . . . . . . . . . . . . . . . . . . . . . . . . . . . . . . . . . . . . . . . . . . . . . . . . . . . . . . . 89
Undo History . . . . . . . . . . . . . . . . . . . . . . . . . . . . . . . . . . . . . . . . . . . . . . . . . . . . . . . . . . . 89
Disk Space . . . . . . . . . . . . . . . . . . . . . . . . . . . . . . . . . . . . . . . . . . . . . . . . . . . . . . . . . . . . 90
System Usage. . . . . . . . . . . . . . . . . . . . . . . . . . . . . . . . . . . . . . . . . . . . . . . . . . . . . . . . . . 90
Eleven Rack . . . . . . . . . . . . . . . . . . . . . . . . . . . . . . . . . . . . . . . . . . . . . . . . . . . . . . . . . . . 91
Chapter 13. Help Menu . . . . . . . . . . . . . . . . . . . . . . . . . . . . . . . . . . . . . . . . . . . . . . . . . . . . . 93
Pro Tools Help . . . . . . . . . . . . . . . . . . . . . . . . . . . . . . . . . . . . . . . . . . . . . . . . . . . . . . . . . 93
Pro Tools Knowledge Base . . . . . . . . . . . . . . . . . . . . . . . . . . . . . . . . . . . . . . . . . . . . . . . . . 93
Pro Tools Guides . . . . . . . . . . . . . . . . . . . . . . . . . . . . . . . . . . . . . . . . . . . . . . . . . . . . . . . . 93
Additional Software Options . . . . . . . . . . . . . . . . . . . . . . . . . . . . . . . . . . . . . . . . . . . . . . . . 93
Check For Updates . . . . . . . . . . . . . . . . . . . . . . . . . . . . . . . . . . . . . . . . . . . . . . . . . . . . . . 93
About Pro Tools . . . . . . . . . . . . . . . . . . . . . . . . . . . . . . . . . . . . . . . . . . . . . . . . . . . . . . . . 93
Chapter 14. Region List . . . . . . . . . . . . . . . . . . . . . . . . . . . . . . . . . . . . . . . . . . . . . . . . . . . . . 95
Region List . . . . . . . . . . . . . . . . . . . . . . . . . . . . . . . . . . . . . . . . . . . . . . . . . . . . . . . . . . . . 95
Index . . . . . . . . . . . . . . . . . . . . . . . . . . . . . . . . . . . . . . . . . . . . . . . . . . . . . . . . . . . . . . . . . . . . 101
Contents ix
Page 10

Menus Guidex
Page 11

chapter 1
Introduction
This guide summarizes Pro Tools® menus and
their commands, and options. The Region List
and its commands and tools are also covered.
For complete information about Pro Tools
software, see the Pro Tools Reference Guide.
Chapter 1: Introduction 1
Page 12

Menus Guide2
Page 13

chapter 2
Pro Tools Menu (Mac Only)
The Pro Tools Menu commands include links to
Pro Tools Preferences, access to Mac OS X application management, and the Quit command.
About Pro Tools
The About Pro Tools command launches the
Pro Tools banner, which includes the version
number of your Pro Tools software.
Preferences
Mac Application Management Commands
(Services, Hide Pro Tools, Hide Others,
Show All)
The Pro Tools menu also provides access to the
following Mac OS X application management
commands: Services, Hide Pro Tools, Hide Others,
and Show All. For more information about these
and other Mac OS X features, refer to the documentation for your Mac computer.
Pro Tools Preferences are available from both
the Pro Tools Menu and the Setup menu. For
more information, see “Preferences” on page 66.
Quit Pro Tools
The Quit Pro Tools command ends your
Pro Tools session and closes the Pro Tools application.
Chapter 2: Pro Tools Menu (Mac Only) 3
Page 14

Menus Guide4
Page 15

chapter 3
File Menu
File menu commands are used to create and
maintain Pro Tools sessions.
New Session
The New Session command creates a new
Pro Tools session. You can choose to either create a session from a template (Create Session
From Template) or create a blank session (Create
Blank Session).
If you choose to create a new session from a template, the available templates appear in the Session Template List.
Before the session is created, you must also
name the session and choose its Audio File Type,
Sample Rate, Bit Depth, and I/O Settings in the
New Session dialog.
New Session dialog
Chapter 3: File Menu 5
Page 16

Open Session
Save Copy In
The Open command opens a session previously
created with Pro Tools. Only one session can be
open at a time.
Open Recent
The Open Recent command lets you open any of
the 10 most recently opened Pro Tools sessions
Close Session
The Close command closes the current session
without quitting Pro Tools. Pro Tools prompts
you to save changes before closing the session.
Save
The Save command saves changes made since
the last time the session was saved. You cannot
undo the Save command.
Save As
The Save As command lets you save a copy of
the current session under a different name, or in
a different location. Because the Save As command closes the current session and allows you
to keep working on the renamed copy, it is useful for saving successive stages of the session.
The Save Copy In command lets you save a copy
of the currently selected session under a different name or in a different location. Session media can be included in the copy that you save,
with options to save the media at a different bit
depth, sample rate, fader gain level, or file format type. Sessions can be saved in a variety of
session formats for compatibility with older systems. This command is useful for archiving sessions.
Save Copy of Session In dialog
Unlike the Save As command, Save Copy In does
not close the original session, so subsequent edits are made to the original session. The saved
copy becomes a backup copy, and gives you the
option of returning to the earlier version.
When you Save Copy In with a lower bit rate,
Pro Tools Dither with Noise Shaping will be applied. The Dither setting used for any conversion is the Digidesign
Noise Shaping enabled.
®
Dither plug-in with
For information on sharing sessions between different platforms, Pro Tools systems, or Pro Tools software versions, see the
Pro Tools Reference Guide.
Menus Guide6
Page 17

The Items To Copy section of this dialog provides several options for copying a session along
with its associated files.
All Audio Files When selected, all audio files are
copied to the new location. Selecting All Non“file type” Audio Files copies all audio files except audio files of the specified audio file type.
This option’s file type will always be the default
audio file type of the session; so if the session’s
default audio file type is WAV, the option will
read All Non-WAV Audio Files. Selecting Don’t Copy
Fade Files omits fade files from the copied data.
Session Plug-in Settings Folder When selected,
the session’s Plug-in Settings Folder is copied to
the new location. The references to these plugin settings in the session are redirected to the
copied files.
Root Plug-in Settings Folder When selected, the
contents of the root-level Plug-in Settings Folder
are copied into a folder named Place in Root Set-
tings Folder, indicating that these files will need
to be moved to the root level plug-in settings
folder on the destination system before you can
use them. The references to these settings files in
the session are not redirected to point to the copied files.
Movie/Video Files When selected, the session’s
video files are copied to the new location, and
the references in the session are redirected to the
copied movie or video file.
Preserve Folder Hierarchy When selected, the
relative arrangement of session audio files located across different drives or folders is maintained. The main folder for the session copy will
include subfolders for each drive or folder in the
original session and the destination subfolders
will use the same names as the source drives and
folders.
When this option is not selected, the Save Copy
In command copies all files of the same type, regardless of their location, into a single destination folder.
Save As Template
The Save As Template command allows you to
save the current session as a Pro Tools Session
Template (a .ptt file).
The Save Session Template provides several options for saving the session as a template.
Save Session Template dialog
Install Template in System When selected, this
option saves the session as a template in the
folder referenced by the Pro Tools Quick Start
dialog (the Session Templates folder). From the
Category pop-up menu, you can select a category
(or create a new one), or you can open the Session Templates folder using the Reveal Session
Templates Folder command. You can also name
the template.
Select Location for Template When selected, the
Save As dialog opens, allowing you to save the
session template in any directory location.
Include Media When selected, audio and video
files are saved along with the template.
Chapter 3: File Menu 7
Page 18

Revert to Saved
Send to Sibelius
The Revert to Saved command restores the most
recently saved version of a session, discarding all
changes made since the last time you saved. Reverting to the last saved version of a session is
like closing the session without saving changes
and reopening it.
Send via DigiDelivery
Aspera DigiDelivery™ is a system for efficient
and reliable transfer of digital media files over
the Internet. Send via DigiDelivery lets you send a
Pro Tools session and all of its related files using
DigiDelivery from within Pro Tools.
Anyone can send and receive files from a
DigiDelivery system, even if they do not own a
DigiDelivery network appliance, as follows:
To send a delivery, senders must have an In-
ternet connection, an account on a DigiDelivery
network appliance, and the DigiDelivery client
application.
To receive a delivery, recipients only need an
Internet connection and the DigiDelivery client
application. An account on the network appliance is not needed.
The Send To Sibelius command exports all MIDI
and Instrument tracks to Sibelius
tion software as a MIDI file. You can then further edit the notation in Sibelius (or G7) and
print the score of your session.
®
or G7 nota-
Bounce to Commands
The Bounce to commands let you mix tracks together into one file.
Bounce to Disk
The Bounce to Disk command allows you to mix
together the outputs of all currently audible
tracks routed to a common output path to create
a new audio file. You can use the Bounce to Disk
command to create a submix or to create a final
mix in any of several audio file formats.
For more information about DigiDelivery,
visit the Aspera website
(http://www.asperasoft.com).
Menus Guide8
Bounce to Disk dialog
Page 19

Bounce Source Selects the audio output path to
bounce. Only audio routed to the selected path
will be included in the bounce.
Import After Bounce Automatically imports the
audio after it is bounced and adds it to the Region List so that it can be used in the session.
Enforce Avid Compatibility Creates frame-accurate edits, wraps the files as OMFI (unless File
Type is MXF), and limits the sample rate options
to 44.1 kHz or 48 kHz. Dithering without noise
shaping will be applied to files being exported
from 24-bit to 16-bit.
File Type Selects the audio file type. Choices on
all systems are WAV (BWF), AIFF, MP3, QuickTime, and MXF. Windows systems also include
Windows Media (Windows). Mac systems also
include SD II.
Certain file types are restricted in regards to format, resolution, and sample rate.
Format Selects the channel format (number of
channels). Choices are mono (summed), multiple mono, or interleaved.
Bit Depth Selects the bit depth. Choices are 24,
16, or 8 bit resolution.
Sample Rate Selects the sample rate (from 8 kHz
to 192 kHz).
Whenever a Bounce to Disk is configured to
a different file type, file format, resolution,
or sample rate, additional options become
available to convert during or after the
bounce. See “Additional Bounce Options”
on page 9 for more information.
The Import After Bounce option is only
available if the target file type and sample
rate for the bounce are the same as the file
type and sample rate of the current session,
and the target resolution (bit rate) is the
same or lower than the resolution of the session. In addition, tracks bounced to a Stereo
Interleaved file cannot be imported after a
bounce.
Additional Bounce Options
The following Bounce options are only available
when bouncing to a different file type, format,
resolution, or sample rate.
Conversion Quality Selects the quality, with option ranging from Low to Tweak Head, when
bouncing to a new sample rate.
Use Squeezer Optimizes the dynamics of the
bounced audio before conversion to 8-bit resolution.
Convert During Bounce Automatically performs
file type, sample rate, and bit resolution conversion as the file is being bounced.
Convert After Bounce Automatically performs
file type, sample rate, and bit resolution conversion after the file has been bounced.
Chapter 3: File Menu 9
Page 20

Bounce to QuickTime Movie
This command lets you bounce the main video
track (QuickTime or Avid
stereo mixdown of your session to a new QuickTime movie. Pro Tools will convert the audio
tracks to the selected sample rate and bit resolution, then create a new flattened movie with the
bounced audio. As a QuickTime file, the new
movie is supported by all software applications
that support QuickTime video.
®
video) and a mono or
Import
Pro Tools provides several menu commands to
import files and regions into an open session.
Import Session Data
This command lets you import selected session
data from an existing session into the current
session. Options are provided for text encoding,
time code mapping, track offset options, sample
rate conversion, and copying, converting, and
referencing audio and video source files. The Import Session Data command also lets you import
the Tempo Meter Map, and any Key Signature
Maps, Markers/Memory Locations, and Window
Configurations.
Pro Tools lets you select specific session data
(such as automation and routing) to import.
You can also import main playlist options—either replacing existing options or overlaying elements onto existing tracks.
Import Session Data dialog
Import Audio
This command lets you import audio files into
the current session. Audio files can be imported
into a new track (and the Region List), or the Region List only.
Menus Guide10
Page 21

Import MIDI
The Import MIDI command imports all tracks
from a Standard MIDI file into Pro Tools. MIDI
files can be imported into a new track (and the
Region List) or the Region List only.
Options are provided for importing the Session
Start or Song Start Marker (if the marker is not
located at the session start), importing tempo
map data contained in the sequence, and removing existing Instrument or MIDI tracks.
Import Video
This command lets you import Avid Video
(Pro Tools|HD
ripheral only) or QuickTime into the main video
track (and the Region List), a new track (and the
Region List), or the Region List only.
The Import Video command can also be used to
extract (import) audio from a Quicktime Movie.
®
systems with an Avid video pe-
Import VENUE Channel Names as Track
Names
This command lets you import VENUE channel
names as track names into the current session.
VENUE system channel names, channel ordering, and all I/O routing is transferred to the
Pro Tools session. This information corresponds
to channel names and bussing configurations
found in the VENUE system Patchbay.
Output routing mirrors input routing in
Pro Tools one-for-one, so that when playing
back Pro Tools tracks through the VENUE system, the Pro Tools tracks appear in the same
channels as the corresponding Stage inputs.
Export
Pro Tools provides several menu commands to
export session tracks or data as files.
Import Region Groups
This command lets you import region groups
into the current session. Region groups can be
imported into a new track (and the Region List)
or the Region List only.
Import Sequence from Avid Interplay
This command opens the Interplay Access
browser for accessing files on Interplay servers
(for more information, see the Pro Tools Avid In-
terplay Guide).
Export Selected Tracks as AAF/OMF
The Export Selected Tracks as AAF/OMF command exports selected tracks in AAF and OMFI
format. Advanced Authoring Format (AAF) and
Open Media Framework Interchange (OMFI) are
industry standard file formats that facilitate the
transfer of digital media between applications
(such as Pro Tools and Avid Video editing software).
Chapter 3: File Menu 11
Page 22
Export MIDI
This command lets you export your Pro Tools
session or individual MIDI or Instruments tracks
as a standard MIDI file. You can export the file
as a Type 1 (multitrack) or Type 0 (merged) Standard MIDI file. The exported MIDI file includes
meter and tempo information, and any key signatures in your Pro Tools session.
Muted MIDI tracks will not be exported.
This can be useful for storing libraries of your favorite MIDI sequences or SysEx data (such as
bulk or individual patch dumps for your external MIDI devices), or for importing MIDI into
notation applications other than Sibelius or G7.
Export Sibelius
This command exports the score from your session as a Sibelius (.sib) file. You can then open
your score in Sibelius as transcribed by
Pro Tools, edit the notation in Sibelius as desired, and print the score and parts from Sibelius.
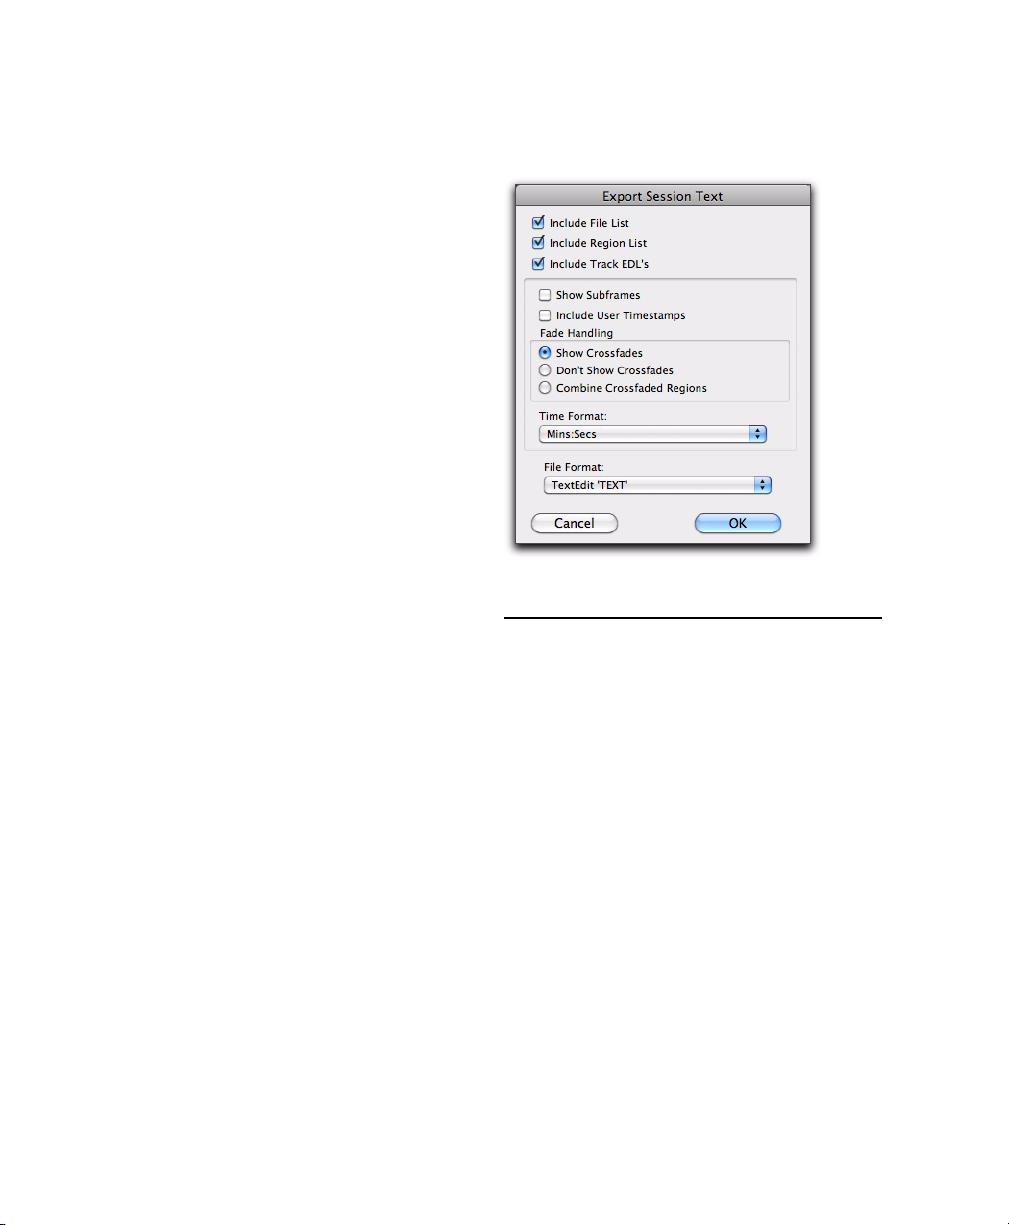
Export Session Info as Text
This command exports the current session as a
tab-delimited text file that can contain region
and file names, extended timestamp information, and information about crossfades.
You can export to any of several different text
file formats (including Microsoft Word and Excel).
Export Session Info as Text dialog (Pro Tools HD shown)
Get Info
This command lets you enter and save information about the session.
Left-column text fields are topic fields. Text entered there is saved with your Pro Tools Preferences and will appear in all sessions, allowing
you to preset the field to topics that you commonly use.
Right-column text fields are information fields
and are session specific and will be saved with
the session.
Menus Guide12
Page 23

Score Setup
Selecting Score Setup opens the Score Setup window. This window lets you set up the page layout and staff spacing of your score, viewable in
the Score Editor window. You can also enter the
Title and Composer for the score and select what
elements of the score to display. Changes to the
Score Setup update dynamically in the Score Editor.
Information
Title Enter the Title for the score. This appears at
the top of the first page.
Composer Enter the Composer for the score.
This appears in the upper right-hand corner of
the first page.
Display
The Display options determine which score elements you want displayed in the score. Deselect
the elements you do not want displayed in the
score.
Title and Composer Select to display the Title
and Composer on the score.
Page Numbers Select to display Page Numbers at
the bottom of each page.
Bar Numbers Select to display Bar Numbers at
the beginning of each system above the top
staff.
Track Nam es Select to display Track Names for
each staff at the beginning of the score.
Score Setup window
The following options are available in the Score
Setup window:
Chord Symbols Select to display chord symbols
in the score.
Chord Diagrams Select to display Chord Diagrams to display guitar tablature in the score
Chapter 3: File Menu 13
Page 24

Spacing
Between Staves Enter the desired amount of
spacing (in staff spaces) between staves.
Between Systems Enter the desired amount of
spacing (in staff spaces) between systems.
Below Title and Composer Enter the desired
amount of spacing (in staff spaces) between the
Title and Composer and the first staff of the
score.
Print Score
The Print Score command lets you print the
score from your Pro Tools session. Pro Tools
provides WYSIWYG (“what you see is what you
get”) printing. Configure the Score Setup as desired and show or hide any MIDI and Instrument tracks as desired. Only those tracks that
are shown in the score will be printed.
Below Chord Symbols and Diagrams Enter the
desired amount of spacing (in Inches or Millimeters) between Chord Symbols and Diagrams,
and the top stave of each system.
Layout
Page Size Select the page size (Letter, Legal, Tab-
loid, or A4).
Portrait Select to set the page orientation to Portrait.
Landscape Select to set the page orientation to
Landscape.
Staff Size Enter the Staff Size (in Inches or Millimeters).
Page Margins Enter the size (in Inches or Millimeters) for the top, bottom, left, and right page
margins.
Inches Select to enter Stave Size, Page, Margins,
and Spacing in inches.
Millimeters Select to enter Stave Size, Page, Margins, and Spacing in millimeters.
Exit
(Windows Only)
The Exit command ends your Pro Tools session
and closes the Pro Tools application.
Menus Guide14
Page 25

chapter 4
Edit Menu
Edit menu commands are used to edit and manipulate the current selection and affect data in
the timeline or the clipboard.
Undo
The Undo command lets you sequentially undo
up to 32 of your previous actions. Certain commands and actions (such as saving) are not undoable. The last command in the undo queue
will appear in the menu (for example, “Undo
Paste”).
If no actions are available to undo, the menu
displays a grayed out Can’t Undo.
Restore Last Selection
If you lose the current Edit (or Timeline) selection and want to restore it, use the Restore Last
Selection command.
If no actions are available to restore, the menu
displays a grayed out Restore Last Selection.
Cut
This command cuts a selection out of its current
location and stores it in memory so that you can
paste it elsewhere.
Redo
After undoing a command or action, you can
redo it by choosing the Redo command. This is a
good way to compare before and after states of
edits.
If no actions are available to redo, the menu displays a grayed out Can’t Redo.
Copy
This command copies a selection (leaving the
original intact) and stores it in memory so that
you can paste it elsewhere.
Paste
This command inserts cut or copied data into a
location specified with an Edit tool (such as the
Selector tool).
Chapter 4: Edit Menu 15
Page 26

Clear
Paste Special
This command removes the contents within a
selection in the Edit window.
Cut Special
The Cut Special commands let you cut just automation data from the current selection (without
associated audio, video, or MIDI notes) and
place it in memory to paste elsewhere. Choices
include:
All Automation Cuts all automation or MIDI controller data whether it is shown or not.
Pan Automation Cuts only pan automation or
MIDI pan data whether it is shown or not.
Plug-in Automation Cuts only plug-in automation that is shown.
Copy Special
The Copy Special commands let you copy just
automation data from the current selection
(without associated audio, vi deo, o r MID I not es)
and place a copy of it in memory to paste elsewhere.
The Paste Special commands let you paste automation data into another region (without affecting associated audio, video, or MIDI notes) in
the following ways:
Merge Pastes MIDI controller data from the clipboard to the selection and merges it with any
current MIDI controller data in the selection.
This can be useful for consolidating MIDI data
from several tracks into a single MIDI track.
Repeat to Fill Selection Pastes multiple iterations of audio, video, or MIDI data from the
Clipboard to fill the selection. If you select an
area that is not an exact multiple of the copied
region size, the remaining selection area is filled
with a trimmed version of the original selection.
This allows you to easily create drum loops and
other repetitive effects. Before the data is pasted,
Pro Tools prompts you to specify a crossfade to
smooth transitions between regions.
To Current Automation Type Pastes the automation or MIDI controller data from the clipboard
to the selection as the current type of automation or continuous MIDI data. This lets you copy
one type of automation data to another, or one
type of continuous MIDI date to another type of
contiguous MIDI data.
All Automation Copies all automation or MIDI
controller data whether it is shown or not.
Pan Automation Copies only pan automation or
MIDI pan data whether it is shown or not.
Plug-in Automation Copies only plug-in automation that is shown.
Menus Guide16
Page 27

Clear Special
Selection
The Clear Special commands let you clear just
automation data from the current region.
Choices are:
All Automation Clears all automation or MIDI
controller data whether it is shown or not.
Pan Automation Clears only pan automation or
MIDI pan data whether it is shown or not.
Plug-in Automation Clears only plug-in automation that is shown.
Select All
This command selects all audio and MIDI data
in one or more tracks.
To select all regions in a single track, select a
portion of the track, or click the Selector anywhere in a track and choose Select All.
To select all regions on multiple tracks, Shift-
click a region on each track with the Selector or
Grabber and choose Select All.
To select all regions on all tracks, Select the
“All” Edit Group in the Groups List, click the Selector anywhere in a track, and choose Select All.
The Selection commands are for copying or
playing Edit or Timeline selections.
Change Timeline to Match Edit When the Edit
and Timeline selections are unlinked, this command copies the current Timeline selection to
the an Edit selection.
Change Edit to Match Timeline When the Edit
and Timeline selections are unlinked, this command copies the current Edit selection to the
Timeline.
Play Edit This command plays an Edit selection
Play Timeline This command plays a Timeline
selection.
Duplicate
This command copies a selection and places it
immediately after the end of that selection in a
track.
Repeat
This command is similar to Duplicate, but allows
you to specify the number of times the selected
material is duplicated. To use this command, select the material you want to repeat, choose Re-
peat, then enter the number of repetitions.
.
Chapter 4: Edit Menu 17
Page 28

Shift
Trim Region
This command moves track material earlier or
later in time by a specified amount. To use this
command, select the material you want to
move, choose Shift, then enter the direction and
time value.
Insert Silence
This command creates regions of silence. Make a
selection on one or more tracks, choose Insert Si-
lence, and precisely that amount of silence will
be inserted. The Insert Silence command also inserts video black into a video track.
Snap To
This command provides two options for “butt
splicing” successive elements on a track.
Next Snaps a region (or Edit selection containing whole regions) to the beginning of the next
region in a track.
This command provides several options for editing region boundaries (including looped regions).
To Selection This command removes data before and after a region or MIDI note selection,
leaving only the selection. This command lets
you quickly remove all data in a region (and in
some instances the entire track) except for the
current selection.
When trimming regions that include fades or
are adjacent to fade boundaries, the fades from
the source region are adjusted to the new region
boundaries.
Start to Insertion This command lets you trim a
region or MIDI note by automatically removing
the material between the Edit insertion point
and the start point.
End to Insertion This command lets you trim a
region or MIDI note by automatically removing
the material between the Edit insertion point
and the end point.
Previous Snaps a region (or Edit selection containing whole regions) to the end of the preceding region
Menus Guide18
Start to Fill Selection This command lets you
automatically reveal underlying material in the
gaps between the region start and selection start
points.
End to Fill Selection This command lets you automatically reveal underlying material in the
gaps between the selection end and region end
points.
To Fill Selection This command lets you automatically reveal underlying material in the gaps
before and after the selection.
Page 29

Separate Region
Consolidate
These commands separate a region from adjacent data in the track where it was created. By
separating a region you will also create by-product regions from data on either side of the separation. The Separate Region commands automatically unloop and flatten looped regions
before separating.
Separate Region includes the following commands:
At Selection This command creates new region
boundaries at the selection start and end points.
When separating regions that include fades, the
status of the fade depends on the Preserve Fades
when Editing preference.
On Grid This command constrains newly created
regions to start and end on grid points.
At Transients This command automatically creates region boundaries on detected transients
within a selection.
Heal Separation
This command consolidates multiple regions
into a single region. When an audio track is consolidated, a new audio file is written that encompasses the selection range, including any
blank space or fades.
Mute/Unmute Region
This command mutes playback of a selected region. Choosing the Unmute command unmutes
the region. This command does not create automation data.
Copy Selection To
In Playlists Track view, these commands copy
the current edit selection and paste it to the Main
Playlist, a New Playlist, or a Duplicate Playlist. at
the same time location.
Copy Selection To Main Playlist Copies and
pastes the selection to the main playlist. Any
material already on the main playlist at the
same location is overwritten.
This command repairs separated regions, provided that the regions are contiguous and their
relative start and end points haven’t changed
since they were originally separated. If you have
trimmed or changed the start and end points of
the two regions, or moved them away from each
other, they cannot be repaired with the Heal
Separation command.
Copy Selection to New Playlist Creates a new,
empty main playlist and copies and pastes the
selection to the new main playlist
Copy Selection to Duplicate Playlist Duplicates
the current main playlist and copies and pastes
the selection to the duplicate of the main playlist. The previous main playlist moves to a new
Playlist lane.
Chapter 4: Edit Menu 19
Page 30

Strip Silence
This command opens the Strip Silence window.
Use this window to remove areas of silence from
a selection. Strip Silence automatically divides a
selection into regions, which can be useful for
quantizing audio to musical values or SMPTE locations.
Copy to Send dialog
Strip Silence window
TCE Edit to Timeline Selection
This command uses the Time Compression/Expansion plug-in to fit an audio selection to a
Timeline selection. This is only possible when
the Edit and Timeline selections are unlinked.
Automation
Copy to Send
(Pro Tools HD and Pro Tools with Complete
Production Toolkit 2 Only)
This command lets you copy either the current
values or automation of a selected track’s volume, pan, mute, or LFE automation to the corresponding playlist for the send. This is useful
when you want a track’s send automation to
mirror automation on the track itself.
To copy a track’s current control settings to a
send on that track, select Current Value. To copy
the entire automation playlist for the track to a
send, select Automation.
Thin
This command lets you selectively thin areas in
a track where automation data is too dense and
adversely affecting CPU performance. The
amount of thinning performed is determined by
the amount you have selected in the Automation page of the Preferences dialog. Avoid overthinning data or it may no longer accurately reflect the original automation.
Thin All
This command lets you thin all automation in a
track. The amount of thinning performed is determined by the amount you have selected in
the Automation page of the Preferences dialog.
Avoid over-thinning data or it may no longer accurately reflect the original automation.
Menus Guide20
Page 31

Write to Current and Write to All
Enabled
(Pro Tools HD and Pro Tools with
Complete Production Toolkit 2 Only)
Trim to All Enabled Parameters
This command trims the current settings for all
automation parameters enabled in the Automation Enable window.
These commands let you write automation
states for one or more parameters to specific session locations in a single step. This saves you the
trouble of performing multiple automation
passes for different parameters in real time, or
having to graphically draw automation state
changes on individual automation playlists.
Write to Current Parameters
This command writes the current value only to
the currently displayed automation parameter.
Write to All Enabled Parameters
This command writes the current settings for all
automation parameters enabled in the Automation Enable window.
Trim to Current and Trim to All Enabled
(Pro Tools HD and Pro Tools with
Complete Production Toolkit 2 Only)
These commands let you use trim values as
snapshots and apply the relative changes (or
delta values) to the selected automation. This is
similar to the Write Automation command, except
that it writes delta values instead of absolute values to automation data. You can use trim values
in writing snapshot automation to any automatable parameter.
Glide to Current and Glide to All
Enabled
(Pro Tools HD and Pro Tools with
Complete Production Toolkit 2 Only)
These commands let you manually create an automation transition (or glide) from an existing
automation value to a new one, over a selected
area.
Glide Automation can also be used for automating the Surround Panner.
Glide to Current Parameter
This command applies Glide Automation only
to the currently displayed automation parameter.
Glide to All Enabled Parameters
This command applies the Glide Automation
for all automation parameters enabled in the
Automation Enable window.
Trim to Current Parameter
This command trims the current value only to
the currently displayed automation parameter.
Chapter 4: Edit Menu 21
Page 32

Fades
These commands let you create (or delete) a
crossfade between two adjacent audio regions,
or a fade-in or fade-out of a single region. Crossfade duration, position, and shape are all selectable. A selection that crosses multiple regions
will create crossfades for each of the region transitions. If a selection includes regions that already contain crossfades, the existing crossfades
will be modified.
Fades dialog
Create The Create command produces a cross-
fade between adjacent regions according to parameters you specify with the Fades editor.
Delete The Delete command removes a cross-
fade between adjacent regions.
Fade to Start The Fade to Start command creates
a fade-in from the current insertion point to a
region’s start point.
Fade to End The Fade to End command creates a
fade-out from the current insertion point to a region’s end point.
Menus Guide22
Page 33

chapter 5
View Menu
View menu options and commands control the
display of Pro Tools windows, tracks, and track
data. Some View menu options toggle the display of various Pro Tools windows or data: selecting the option displays the data, and deselecting the option hides the data.
Mix Window
These options selectively display the following
views in the Mix window:
• Mic Preamps
• Instruments
• HEAT (Pro Tools|HD systems only)
• Inserts A–E
• Inserts F–J
• Sends A–E
• Sends F–J
• Delay Compensation
• Track Color
• Comments
You can also select All of the displays, or None of
them.
Narrow Mix
This option reduces the width of Mix channel
strips on-screen, allowing you to display the
maximum number of tracks on your computer
monitor. In this view, track names, names of
sends, and plug-in names are abbreviated to accommodate the smaller view. To return to normal view width, deselect this option.
Edit Window Views
These options selectively display the following
views in the Edit window:
• Comments
• Mic Preamps
• Instruments
• Inserts A–E
• Inserts F–J
• Sends A–E
• Sends F–J
• I/O
• Real-Time Properties
• Track Color
You can also select All of the displays, or the Min-
imal number of displays (Track Color only).
Chapter 5: View Menu 23
Page 34

Rulers
These options selectively display various Timebase and Conductor rulers in the Edit window.
In addition to providing a timing reference for
track material, Timebase rulers are used to define Edit and Timeline selections.
The Tempo Editor is an expansion of the Tempo
ruler, opening in the rulers section of the Edit
window.
You can show or hide the Key Signature Staff in
the Key Signature ruler.
Besides selecting individual rulers, you can select All of the rulers, or the Minimal number of
rulers (which is the main timebase ruler only).
Timebase Rulers
Any or all of the following Timebase rulers can
be displayed at the top of the Edit window:
• Bars:Beats
• Minutes:Seconds
• Time Code
• Time Code 2
• Feet+Frames
• Samples
In addition to providing a timing reference for
track material, the Timebase rulers are also used
to define Edit selections for track material, and
Timeline selections for record and play ranges.
Conductor Rulers
Any or all of the following Conductor rulers can
be displayed:
• Markers
• Tempo (and Tempo Editor)
• Meter
• Key Signature (and Key Signature Staff)
• Chord Symbols
The Tempo, Meter, Key Signature and Chord
Symbols rulers indicate changes in tempo, meter, key signature, and chords within the session. The Markers ruler displays Markers to important track locations.
Other Displays
These options allow you to show or hide the
Universe view, the Track List, Regions List, or
the MIDI Editor. A check mark indicates an open
display.
Universe The Universe view displays an overview of the entire session, representing audio
and MIDI material on all tracks that are not hidden (including tracks that are inactive, or that
contain offline regions). The order in which material is displayed in the Universe view corresponds to the track order in the Edit window.
In the Universe view, audio, MIDI, and video regions on tracks are represented by horizontal
lines that are the same colors as the regions on
the tracks. Additionally, each channel in a stereo or multichannel audio track is represented
individually.
Track List This option shows or hides the Track
List.
Regions List This option shows or hides the Regions List.
MIDI Editor This option opens a MIDI Editor
docked within the Edit window. This option appears grayed out if no MIDI editor window is
available.
Menus Guide24
Page 35

Region
These options selectively display various data in
regions.
Sync Point This option lets you display or hide
sync points in regions. Regions will align to a
sync point regardless of its display status.
Original Time Stamp This option displays the
Original Time Stamp of all regions in all tracks.
When a region is created, it is time stamped relative to the SMPTE start time specified for the
session. This original time stamp is permanently
stored with the region and cannot be changed.
If a region is ever moved, it can easily be placed
at its original position using the Spot dialog.
Processing State This option lets you display or
hide the Processing State Indicator on Elastic
Audio regions. When selected, any regions on
Elastic Audio–enabled tracks that have been
warped or transposed display the Processing
State Indicator icon.
Name This option lets you display or hide a region’s name in tracks in the Edit window. Hiding a display is useful if you are working at a
zoom level where region names obscure the
view of audio waveforms.
Channel Name This option lets you display or
hide channel names in regions.
Scene and Take This option lets you display or
hide scene and take information in regions.
Rating This option lets you display the ratings
given to regions.
Overlap This option lets you display or hide the
region overlap “dog-ear” corner that indicates
overlapping region boundaries.
Current Time This option displays the time
stamp of all regions placed in all tracks according to their current location in the track.
User Time Stamp This option displays the User
Time Stamp of all regions in all tracks. When a
file is first recorded, its User Time Stamp is identical to its original time stamp. You can change
the User Time Stamp using the Time Stamp Selected command in the Region List. This allows
you to use a custom time stamp for spotting or
re-spotting the region to a time location different from its Original Time Stamp.
No Time This option disables the time stamp display in regions.
Display on All Channels This option displays the
selected Region display option on all channels
of a multi-channel region that was imported
from a field recorder.
Chapter 5: View Menu 25
Page 36

Waveforms
Automation
Waveforms can be displayed normally (as positive and negative shapes around the zero crossing) or rectified. They can also be calculated as
Peak or Power whether displayed normally or
rectified. Any waveform can have an Outline.
Peak When selected, the waveform display is
calculated based on the sample-by-sample peak
level. Peak view is traditionally how Pro Tools
calculates the waveform overview and can be
used for normal or rectified views. Peak view
clearly displays any clipping in the waveform
Power When selected, the wave form display is
calculated according to the Root Mean Square
(RMS). Power view can be used for normal or
rectified views. When zoomed in to the sample
level, Pro Tools always displays Peak view, but
Power view is useful for better seeing the characteristics of the audio in the waveform representation when zoomed out beyond the sample
level. For mastering applications in particular, it
can be more revealing of the sonic characteristics of the audio than Peak view.
Rectified When selected, audio waveforms are
displayed so that their positive and negative
waveform excursions (the portions that fall
above and below the center line) are summed
together and viewed as a single positive-value
signal. This view allows more waveform detail to
be seen in either normal or reduced track height
views. It can be particularly useful when editing
volume automation data, since it depicts waveform levels as starting at the bottom of the track.
Rectified Waveform view is an option that can
be enabled in Peak or Power views.
Outline When selected, audio waveforms are
outlined.
(Pro Tools HD and Pro Tools with Complete
Production Toolkit 2 Only)
In addition to the main automation data displayed in certain automation playlists, you can
simultaneously display other automation data:
Trim Playlist If automation is not set to coalesce
after every automation pass, this command displays Trim automation data along with the
main Volume or Send level automation data in
the same automation view. This Trim automation display cannot be directly edited.
Composite Playlist When a track is a VCA slave,
you can display a composite automation playlist
that shows the contribution of the VCA Master
to the Volume or Mute automation data on the
slave track. This composite playlist reflects the
actual position of the Volume fader on the slave
track. The composite playlist display cannot be
directly edited.
Sends A–E
These options display either send assignments
for all sends, or the controls for individual sends
(Sends A–E). Select Assignment to display all five
of these send assignments.
Sends F–J
These options display either send assignments
for all sends, or the controls for individual sends
(Sends F–J). Select Assignment to display all five
of these send assignments.
Menus Guide26
Page 37

Track Number
This command assigns each track a number corresponding to its position in the Mix and Edit
windows. When tracks are reordered, track
numbers stay in positional sequence.
Transpor t
These options selectively display Counters, MIDI
Controls, Synchronization, and Expanded controls
in the Transport window.
Main Counter
These view options set how the Time Scale is displayed in the Main Counter.
Bars:Beats This option displays the Time Scale
in Bars and Beats. Use this Time Scale if you are
working with musical material that must align
with bars and beats.
Feet+Frames (Pro Tools HD and Pro Tools with
Complete Production Toolkit 2 Only) This option
displays the Time Scale in feet and frames for
referencing audio-for-film projects. The
Feet+Frames time display is based on the 35 millimeter film format.
Samples This option displays the Time Scale in
samples. This format is useful for high-resolution sample editing.
Minutes:Seconds This option displays the Time
Scale in minutes and seconds.
Time Code (Pro Tools HD and Pro Tools with
Complete Production Toolkit 2 Only) This option
displays the Time Scale in SMPTE frames. The
Frame Rate and Session Start time are set from
the Session Setup window. Pro Tools supports
the following frame rates: 24, 25, 29.97 NonDrop, 29.97 Drop, 30 Non-Drop, and 30 Drop
frames per second.
Chapter 5: View Menu 27
Page 38

Menus Guide28
Page 39

chapter 6
Track Menu
Track menu commands are used to create, manage, and edit tracks.
New
The New command lets you add one or more
new audio tracks, Auxiliary Inputs, Master Faders, VCA Masters, MIDI tracks, Instrument
tracks, or Video tracks to a session.
Audio tracks, Auxiliary Inputs, and Master faders can be mono or stereo, or a greater-than-stereo multichannel format (Pro Tools HD and
Pro Tools with Complete Production Toolkit 2
only).
Group
This command opens the Group dialog, which
lets you create, modify, duplicate, delete, and assign attributes to groups.
New Track dialog
Group dialog
Chapter 6: Track Menu 29
Page 40

Mix Groups, Edit Groups, and
Mix/Edit Groups
Mix Groups only affect mixing functions and
Edit Groups only affect editing. Mix/Edit
Groups link the grouping functions of the Mix
Group and the Edit Group.
Mix Groups in Pro Tools HD and Pro Tools with
Complete Production Toolkit 2
Mix Groups in Pro Tools HD and Pro Tools with
Complete Production Toolkit 2 can be set to affect the following items:
• Main Volume
• Main Mute
• Main Pan
• Main LFE Level
• Record Enable
• Input Monitoring (Pro Tools HD only)
•Solo
• Automation Mode
•Send Level
• Send Mute
•Send Pan
•Send LFE Level
• Plug-in Controls
• Plug-in Bypass
Edit Groups
Edit Groups affect the following items in the
Edit window:
•Track View
• Track Height
• Track Timebase
•Audio and MIDI editing functions
• Automation editing functions
Duplicate
This command lets you define how many copies
of a track you want to create, and specifies
whether to copy audio or MIDI data, playlists,
automation, and other attributes.
When duplicating multiple tracks, you can also
choose to have the new tracks follow the last selected track (or have each new track follow its
source track).
Duplicating a VCA slave track without duplicating its group assignments will coalesce any automation the duplicate track. The coalesced duplicate plays back exactly as if it were in the VCA
group.
Mix Groups in Pro Tools
Mix Groups in Pro Tools always affect the following:
• Main volume
• Automation mode
Mix Groups in Pro Tools can also be set to affect
the following:
• Main Mute
•Solo
•Send Level
• Send Mute
Menus Guide30
Split into Mono
This command splits a selected stereo or multichannel track into individual mono tracks that
can be edited and manipulated independently.
The Split into Mono command cannot be undone.
Page 41

Make Inactive or Make Active
This command makes selected tracks inactive,
so that they no longer play back or use any DSP
resources or voices. Inactive tracks can be made
active again by choosing the Make Active command.
Delete
This command removes tracks from a session.
While audio or MIDI region data will remain in
the Region List, the track and its arrangement of
the regions on the deleted track (the track’s
playlist) will be lost.
If the track contains playlists that are not assigned to any track, you will be prompted to delete or retain them.
Deleting a VCA Master track will coalesce automation from the VCA Master to all of its slave
tracks.
Write MIDI Real-Time Properties
Set Record Tracks to Input Only or to Auto Input Monitoring
(Pro Tools HD Only)
Set Record Tracks to Input Only
This command changes all record enabled tracks
to monitor audio input only, regardless of any
punch in or out selection.
Set Record Tracks to Auto Input
(Pro Tools HD Only)
This command changes all record enabled tracks
to automatically switch from monitoring input
signals to monitoring recorded tracks. When set,
record enabled tracks monitor audio input
when the transport is stopped. When playback
is started for a punch-in, Pro Tools monitors existing track material up until the punch point.
While punched in, the input signal is monitored. On punch-out, monitoring switches back
to the existing track material. This is similar to
the auto-switching logic found on digital and
analog multitrack tape machines.
This command applies MIDI quantization, duration, delay, velocity, and transposition parameters during playback, as set in Real-Time Properties View (in the Edit window) or in the MIDI
Real-Time Properties dialog.
Chapter 6: Track Menu 31
Page 42

Auto Input Monitoring or Input Only Monitoring
Coalesce VCA Master Automation
(Pro Tools Only)
Auto Input Monitoring
In this mode, when session playback is stopped,
Pro Tools monitors audio input. When playback
is started for a punch-in, Pro Tools monitors existing track material up until the punch point.
While punched in, the input signal is monitored. On punch-out, monitoring switches back
to the existing track material. This is similar to
the auto-switching logic found on digital and
analog multitrack tape machines.
Input Only Monitoring
In this mode, when a track is record-enabled,
Pro Tools monitors audio input only, regardless
of any punch in or out selection.
Scroll To Track
This command lets you scroll directly to any
track by position number. The Edit window
tracks will scroll to bring the selected track to as
close to the top as possible, and the Mix window
tracks will scroll to bring the selected track as
close to the left as possible.
(Pro Tools HD and Pro Tools with Complete
Production Toolkit 2 Only)
This command lets you commit, or coalesce, the
contribution of a selected VCA Master track’s
Volume and Mute automation to the automation playlists of its slave tracks (or VCA automation across an Edit selection).
Coalesce Trim Automation
(Pro Tools HD and Pro Tools with Complete
Production Toolkit 2 Only)
This command applies, or coalesces Trim automation to the main automation playlist by the
following methods: After Every Pass, On Exiting
Trim Mode, or Manually.
Clear Trim Automation
(Pro Tools HD and Pro Tools with Complete
Production Toolkit 2 Only)
This command lets you clear Trim automation if
it has not been coalesced on a track. When you
clear Trim automation, automation breakpoints
on all Trim playlists are deleted and all Trim faders are reset to zero.
Clear All Clip Indicators
This command clears all clip indication from all
meters.
Menus Guide32
Create Click Track
This command lets you create one or more click
tracks. Click tracks are Auxiliary Input tracks
with the Click plug-in already inserted.
Page 43

chapter 7
Region Menu
Region menu commands are used to manage
and edit regions.
Edit Lock/Unlock Region
If you have a region or group of regions that you
want to protect from being inadvertently edited,
you can Edit-lock them. Regions that are Editlocked cannot be edited (such as cutting, deleting, separating, or trimming) or moved to a different time location. Copied edit-locked regions
can be pasted to any track or time location, but
the copy will also be Edit-locked at the new time
location.
Time Lock/Unlock
Send to Back
This command sends the selected region or regions behind any neighboring overlapping regions. If multiple overlapping regions are selected, Pro Tools will apply the command to
each region as that region relates to the neighboring region on the right.
Bring To Front
This command brings the selected region or regions to the front of any neighboring overlapping regions. If multiple overlapping regions are
selected, Pro Tools will apply the command to
each region as that region relates to the neighboring region on the right.
For regions that you want to lock to a particular
location in a track (a beat, SMPTE frame, or sample location), you can lock it in place so it cannot be moved accidentally. Time-locked regions
cannot be moved or deleted. However, they can
be edited in ways that do not move or delete the
region sync point to a different time location
(such as separating, trimming, AudioSuite
processing, or even moving the region to another track). When separating a Time-locked region, any new regions will also be locked to their
time locations
™
Rating
Using this command, you can rate different regions on a scale of 1 to 5, where 5 is the highest
and 1 is the lowest. Region rating is useful for
identifying which takes (regions) you like the
most when compositing playlists. You can display or hide the region rating in regions to facilitate track compositing or regular editing. You
can also show or hide Playlist lanes based on the
ratings of regions in the playlist.
Chapter 7: Region Menu 33
Page 44

Group
Regroup
The Group command creates a region group
from all elements in the current selection. Selections can include audio, MIDI, or Video regions
on one or more tracks. Multiple region groups
can be selected and included in new region
groups.
Ungroup
The Ungroup command unpacks the currently
selected region group, revealing all underlying
regions and any nested region groups. When
there are multiple nested region groups, the Un-
group command will ungroup the front-most
top-layer region group only, preserving any underlying region groups.
You can also use the Region > Ungroup command on looped regions to unloop and
maintain all loop iterations as individual
regions.
Ungroup All
The Ungroup All command removes all layers of
region groups and nested region groups in the
currently selected region in one step.
v
You can also use the Region > Ungroup All
command on looped regions to flatten the
looped regions into one region.
The Regroup command undoes the last Ungroup
command and regroups the individual regions
back to their former region group state. This lets
you ungroup a grouped region, edit its underlying regions, and regroup it to continue working
on higher-level composition and arranging.
Loop
The Loop command lets you loop audio, video,
and MIDI regions.
Unloop
The Unloop command lets you switch looped regions back to standard (unlooped) regions so
that they can be edited individually.
Capture
This command defines a selection as a new region and adds it to the Region List. From there
the new region can be dragged into a track. You
cannot capture selections across multiple regions unless the data is contiguous material
from the same file.
Rename
This command lets you rename the selected region. When renaming a region that was autocreated during editing, the region becomes a
user-defined region and is displayed in the Region List even when auto-created regions are
hidden.
Menus Guide34
Page 45

Identify Sync Point and Remove Sync Point
This command places a Sync Point at the current cursor location. When you identify a sync
point, a small down arrow appears at the bottom
of the region, with a vertical, light grey line indicating the location of the sync point. This
Sync Point can then be used as the reference
point—nudge, spot, move, and so on—instead
of the region start or end. When you choose this
command, the current SMPTE time is automatically entered as the SMPTE location for the Sync
Point.
To remove a Sync point from a region, select the
region with the Grabber and choose Region > Re-
move Sync Point.
Quantize to Grid
This command adjusts the placement of a selected audio or MIDI region in a track so that its
start point (or Sync Point, if it contains one) precisely aligns to the nearest Grid boundary. Grid
units are chosen from the Grid pop-up menu in
the Edit window.
Conform to Tempo
This command lets you conform regions on
Elastic Audio–enabled tracks (both sample- and
tick-based) to the session tempo. If necessary,
the Conform to Tempo command analyzes the
selected region to determine its tempo and duration (in bars and beats), and then applies Elastic
Audio processing to conform the region to
match the session tempo.
Remove Warp
This command removes warping applied to a region, but leaves underlying Warp markers intact. This feature will only remove warping created by Warp markers (that is, warping caused
by quantization or tempo mapping). This can be
useful if you are not satisfied with the results
and want to revert to the pre-warped region.
Remove Pitch Shift
This command removes pitch shifts applied to
Elastic Audio–enabled regions using the Pitch
Shift option in the Elastic Properties dialog.
Elastic Properties
This command lets you view the Elastic Audio
properties of any region on an Elastic Audio–enabled track. You can also edit Event markers for
Elastic Audio.
Chapter 7: Region Menu 35
Page 46

Menus Guide36
Page 47

chapter 8
Event Menu
The Event menu contains commands for editing
audio and MIDI events.
Time Operations
Pro Tools provides several commands for defining meter and time over a range of time (or measures). The Time Operations options include:
Time Operations Window
This command opens the Time Operations window. This floating window lets you define meter, click, and song start options by choosing
any of the following commands from the popup menu at the top of the window:
• Change Meter
•Insert Time
•Cut Time
• Move Song Start
Time Operations window, Change Meter option
Chapter 8: Event Menu 37
Page 48
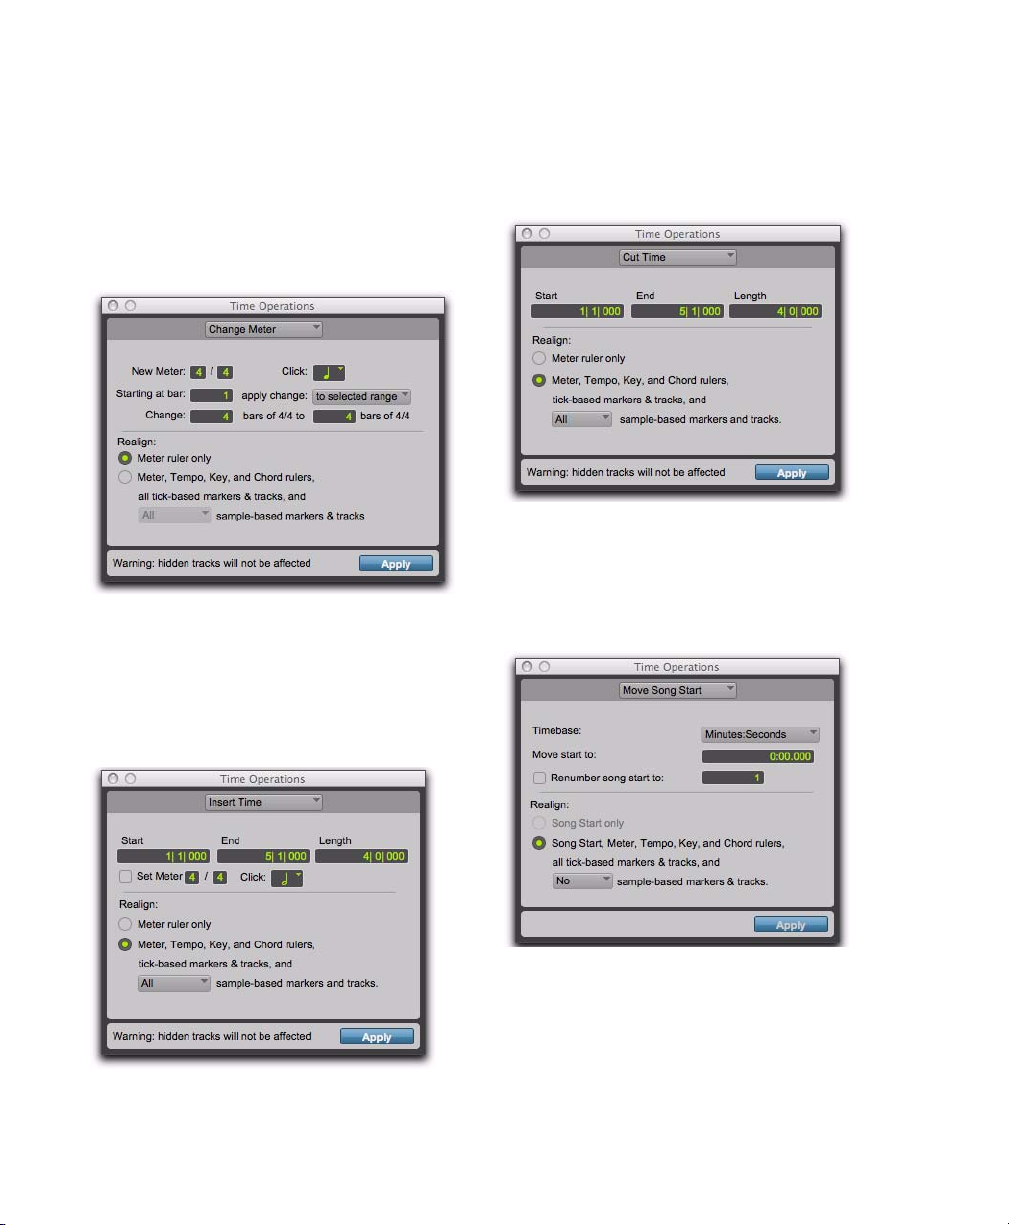
Change Meter
Cut Time
The Change Meter command lets you specify
complex meter changes for Bar|Beat-based material. You can enter meter changes at a particular
bar, make a meter change over a selected area of
time, or add meter changes sequentially one bar
at a time.
Time Operations window, Change Meter option
Insert Time
The Insert Time command lets you insert an
amount of blank time into conductor rulers,
MIDI tracks, and audio tracks.
The Cut Time command lets you cut a specified
amount of time from conductor rulers, MIDI
tracks, and audio tracks.
Time Operations window, Cut Time option
Move Song Start
The Move Song Start command lets you redefine
the location of the Song Start Marker.
Time Operations window, Insert Time option
Menus Guide38
Time Operations window, Move Song Start option
Page 49

Tempo Operations
Pro Tools provides several commands for defining tempo events over a range of time (or measures). The Time Operations commands include:
Parabolic
This command lets you create tempos that accelerate or decelerate following a tempo curve,
which changes the tempo more rapidly or less
rapidly over the selection time.
Tempo Operations Window
This command opens the Tempo Operations
window. This window lets you define tempo
events over a range of time (or measures) by
choosing any of the following commands from
the pop-up menu at the top of the window:
• Constant
•Linear
• Parabolic
•S-Curve
•Scale
•Stretch
S-Curve
This command lets you create tempos that accelerate or decelerate following a tempo curve
with a definable breakpoint that determines
mid-curve times and tempo values.
Scale
This command lets you scale tempos within the
selection by a percentage amount.
Stretch
This command lets you select a region of tempo
events and apply them to a larger or smaller selection area.
Event Operations
Pro Tools provides several commands for changing event data over a range of time (or measures).
Tempo Operations window, Constant page
Constant
This command lets you create a constant tempo
over a selected range of time.
Linear
This command lets you create tempos that
change evenly over a selected range of time.
Chapter 8: Event Menu 39
Page 50

Event Operations Window
Event Operations window, Transpose page
The Event Operations window provides commands to transform groups of MIDI notes to affect pitch, timing, and phrasing. The Quantize
and Restore Performance Event Operations can
also be applied to audio region start times (or
sync points) or Elastic Audio events. The Event
Operations commands include:
• Quantize
• Change Velocity
• Change Duration
• Transpose
• Select/Split notes
• Input Quantize
• Step Input
• Restore Performance
• Flatten Performance
Quantize
This command lets you adjust the placement of
selected MIDI or audio events in a track using
Grid or Groove Quantize.
Event Operations window, Quantize page
Quantize lets you choose from two different
types of quantization.
• Grid Quantize lets you adjust the placement
of selected MIDI events, Elastic Audio events,
or audio regions in a track so that their start or
end points precisely align to the quantization
value chosen.
Menus Guide40
Page 51

• Groove Quantize lets you adjust the placement of selected MIDI events, Elastic Audio
events, or audio regions in a track so that their
timings, durations, and velocities align to the
selected groove template grid. Pro Tools installs several pre-defined groove templates for
use on all Pro Tools systems. With Pro Tools
HD, DigiGroove templates can be created using Beat Detective.
Change Velocity
This command lets you automatically adjust
Note On (attack) and Note Off (release) velocities for selected MIDI notes. Use it to make notes
louder or softer, or to create a crescendo or diminuendo.
Change Duration
This command lets you adjust the duration for
selected MIDI notes. It can be used to make melodies and phrases more staccato or more legato.
Event Operations window, Change Duration page
Transpose
Event Operations window, Change Velocity page
This command transposes selected MIDI notes
in key up or down by scale steps.
Event Operations window, Transpose page
Chapter 8: Event Menu 41
Page 52

Select/Split Notes
Input Quantize
The Select/Split Notes command provides tools
to do the following:
• Select MIDI notes based on pitch, velocity, duration, and position. These controls can be
used to select a single note or note range for
the entire length of a region or track.
• Split selected note and controller to the clipboard, to new tracks, or multiple new tracks
based on pitch (one new track is created for
each different pitch in the selection).
The Select/Split Notes window can be used to
quickly extract a melody line from a keyboard
performance. Or, select a drum kit or similar
multi-voice performance track and automatically create multiple new tracks, one for each
pitch in the selection.
This command lets you quantize MIDI notes as
they are performed and recorded. While this will
improve the strict rhythmic accuracy of a performance, it can also give it a stiff, mechanical feel.
To preserve the original rhythmic nuances of a
performance, experiment with lower Strength
settings, or deselect the Enable input quantize
option.
Event Operations window, Select/Split Notes page
Menus Guide42
Event Operations window, Input Quantize page
Page 53

Step Input
This command lets you use a MIDI controller to
enter notes individually, one step at a time. This
gives you precise control over note placement,
duration, and velocity. With MIDI step input
you can also create musical passages that might
be difficult to play accurately, or at a fast tempo.
For MIDI, one or more of the following note attributes can be restored: Timing (Quantization),
Duration, Velocity, and Pitch. For audio, only
Timing (Quantization) can be restored.
Event Operations window, Restore Performance page
Flatten Performance
This command lets you lock the specified current note parameters as the “restore to” state,
overriding the original performance. One or
more of the following note attributes can be flattened: Timing (Quantization), Duration, Velocity, and Pitch. Flatten Performance can be undone.
Event Operations window, Step Input page
Restore Performance
This command lets you restore the original
MIDI or audio performance regardless of how
many edits you have made or whether or not
the undo queue has been cleared (for example,
by saving the session). Restore Performance can
also be applied to quantized Elastic Audio
Events or quantized audio regions.
Event Operations window, Flatten Performance page
Chapter 8: Event Menu 43
Page 54

MIDI Track Offsets
MIDI Real-Time Properties
This command opens the MIDI Track Offsets
window. This window lets you create timing off sets for MIDI tracks to compensate for MIDI-toaudio latencies in hardware-based or softwarebased MIDI synthesizers.
MIDI Track Offsets window
By configuring a MIDI offset, you can make
MIDI tracks play back slightly earlier (by a specific number of samples), thereby compensating
for any audio monitoring latencies. MIDI offsets
affect playback only and do not alter how MIDI
data is displayed in the Edit window.
This command opens the Real-Time Properties
window. This window lets you adjust and apply
MIDI quantization, duration, delay, velocity,
and transposition parameters during playback.
MIDI Real-Time Properties window
Remove Duplicate Notes
The Remove Duplicate Notes command lets you
quickly identify and remove MIDI notes that
were unintentional “double-hits.”
If a note starts within the first 25% of the duration of a note of the same pitch which is already
sounding (or within an eighth-note, whichever
is shorter), it is considered a duplicate and is
combined with the previous note. If a note starts
later than 25% of the duration, it is considered
to be a new, distinct note, and is shortened so
that it ends at the same tick at which the next
note starts.
Menus Guide44
Page 55

Add Key Change
This command opens the Key Change dialog,
which lets you specify the mode (major or minor), the key (from seven flats to seven sharps),
the range affected (for example, from Bar 1 to
the next key change), and whether existing
notes on pitched MIDI and Instrument tracks
are transposed.
for the calculated tempo are inserted and appear
in the Tempo Ruler at the beginning and end of
the selection. in addition, meter events are inserted into the Meter Ruler.
Beat Detective
This command opens the Beat Detective™ window. Beat Detective automatically detects the
tempo of a session and conforms an audio track
or selection to that tempo by separating it into
regions and aligning it to the beats. Beat Detective is ideal for tailoring a performance to a
groove. For detailed information about Beat Detective, refer to the Pro Tools Reference Guide.
Beat Detective window
Identify Beat
This command lets you establish a tempo/meter
map for audio that was recorded without listening to a click, or for imported audio with unknown tempos.
The Identify Beat command analyzes a selection
range (usually with a distinct number of beats or
measures) and calculates its tempo based on the
specified meter. In doing this, Bar|Beat markers
Identify Beat dialog
Renumber Bars
This command lets you renumber the bars in
the session, effectively changing the bar locations for all regions, meter and tempo events
while leaving their position intact. In doing so,
however, the SMPTE and sample locations of
the session data are not changed.
Renumber Bars dialog
All MIDI Notes Off
This command sends an All Notes Off MIDI
message to all MIDI devices connected to your
system to silence any stuck notes.
Chapter 8: Event Menu 45
Page 56

Menus Guide46
Page 57

chapter 9
AudioSuite Menu
The AudioSuite™ menu allows you to access all
AudioSuite plug-ins currently installed in your
system’s Plug-ins folder. AudioSuite plug-ins are
non-real-time, file-based processing plug-ins for
Pro Tools.
This chapter includes all the AudioSuite plug-in
categories and the DigiRack
included in them, in addition to the free
Bomb Factory
For details on each of these AudioSuite
plug-ins, refer to the
®
plug-ins.
EQ Plug-ins
1 Band, 2–4 Band, and 7 Band EQ III
™ plug-ins that are
Audio Plug-ins Guide.
Dynamics Plug-ins
Bomb Factory BF76
The Bomb Factory BF76 plug-in applies compression to audio material, depending on the ratio of compression used.
Four selectable compression ratios are provided,
along with controls allowing variable attack and
release times.
When using the AudioSuite version of the Bomb
Factory BF76, be sure to select a side-chain input
(normally the track you are processing). The default is “None” and if you leave it set like this,
there’s nothing feeding the detector and you
won’t hear any compression action.
The EQ III plug-ins adjust the frequency spectrum of an audio selection. These plug-ins are
flexible EQ types for maximum CPU and DSP efficiency.
On the 1 Band EQ, the EQ Type selector lets you
choose any one of six available filter types:
High-Pass, Notch, High-Shelf, Low-Shelf, Peak,
and Low-Pass.
On the 7 Band EQ and the 2–4 Band EQ, the
HPF, LPF, LF, and HF sections have EQ Type selectors to toggle between the two available filter
types in each section.
Compressor/Limiter III
The Compressor/Limiter III plug-in applies either compression or limiting to audio material,
depending on the ratio of compression used.
The Compressor reduces the dynamic range of
signals that exceed a selected threshold by a specific amount.
The Limiter is used to prevent signal peaks from
ever exceeding a chosen level so that they do
not overload amplifiers or recording devices.
Chapter 9: AudioSuite Menu 47
Page 58

De-Esser III
The De-Esser reduces sibilants and other high
frequency noises that can occur in vocals, voiceovers, and wind instruments such as flutes.
These sounds can cause peaks in an audio signal
and lead to distortion.
The DeEsser reduces these unwanted sounds using fast-acting compression. A Threshold control sets the level above which compression
starts, and a Frequency control sets the frequency band in which the DeEsser operates.
Expander/Gate III
The Expander/Gate III plug-in applies expansion or gating to audio material, depending on
the ratio setting.
The Expander/Gate plug-in is useful for reducing noise or signal leakage that creeps into recorded material as its level falls, as often occurs
in the case of headphone leakage.
Maxim
The Maxim™ compressor and limiter plug-in
applies either compression or limiting to audio
material, depending on the ratio of compression
used. Maxim is ideal for critical mastering applications, as well as standard peak-limiting tasks.
Pitch Shift Plug-ins
Pitch Shift
The Pitch Shift plug-in changes the pitch of the
currently selected region, with or without
changing its duration. It also allows you to perform Time Compression/Expansion on your selection simultaneously with a pitch change.
Time Shift
The Time Shift plug-in provides high quality
time compression and expansion algorithms
and formant correct pitch shifting. Time Shift is
ideal for music production, sound design, and
post-production applications. Use it to manipulate audio loops for tempo matching or to transpose vocal tracks using formant correct pitch
shifting. You can also use Time Shift in audio
post-production for pull up and pull down conversions as well as for adjusting audio to specific
time or SMPTE durations for synchronization
purposes.
Vari-Fi
Vari-Fi™ is an AudioSuite-only plug-in that provides a pitch-change effect similar to a tape deck
or record turntable speeding up from or slowing
down to a complete stop. Vari-Fi preserves the
original duration of the audio selection.
Menus Guide48
Page 59

Reverb Plug-ins
Modulation Plug-ins
D-Verb
D-Verb is a studio-quality reverb. Reverberation
processing can simulate the complex natural reflections and echoes that occur after a sound has
been produced, imparting a sense of an acoustic
environment. D-Verb artificially creates a sound
space with a specific acoustic character.
Delay Plug-ins
Delay
The Delay plug-in provides time delay-based effects, with up to 10.9 seconds of delay (regardless of the sample rate). In addition to long delays, you can create many delay-based effects
with this plug-in, including slap echo, doubling,
chorusing, and flanging.
Multi-Tap Delay
The Multi-Tap Delay plug-in adds up to four independently-controllable delays or taps to the
original audio signal. By allowing you to individually control the delay time and number of
repetitions of each of the four taps, the MultiTap delay provides greater flexibility than standard single-delay devices.
Chorus
The Chorus plug-in modifies an audio signal by
combining a time-delayed, pitch-shifted copy
with the original signal. It is ideal for thickening
and adding a shimmering quality to guitars,
keyboards, and other instruments.
Flanger
The Flanger plug-in combines a time-delayed,
pitch shifted copy of an audio signal with itself.
The Flanger differs from other digital flangers in
that it uses a thru-zero flanging algorithm that
results in a truer tape-like flange. This technique
delays the original dry signal very slightly (approximately 256 samples), then modulates the
delayed signal back and forth in time in relation
to the dry signal, passing through its zero point
on the way.
Sci-Fi
Sci-Fi™ adds synth-like effects such as ring modulation, resonance, and sample & hold to your
audio region. These effects are typically found
on older, modular analog synthesizers. Sci-Fi is
ideal for adding a synth edge to a track.
Ping-Pong Delay
The Ping-Pong Delay plug-in modifies an audio
signal by adding a controllable delay to the original signal. It is ideal for adding spatialization,
and when used in stereo, adds panned echo to
virtually any instrument. In stereo mode, this
plug-in will feed back delayed signals to their
opposite channels, creating a characteristic
ping-pong echo effect.
Chapter 9: AudioSuite Menu 49
Page 60

Harmonic Plug-ins
Noise Reduction Plug-ins
Harmonic plug-ins include plug-ins that change
the harmonic quality of audio.
Eleven Free
Eleven® Free provides amplifier simulation. You
get two custom guitar amplifiers and two cabinet models, selected from among the “best of
the best” vintage and contemporary gear provided in the full version of Eleven. Ideal for fattening up guitar or bass tracks that have been recorded directly into Pro Tools.
Lo-Fi
Lo-Fi down-processes audio by reducing its sample rate and bit resolution. It is ideal for emulating the grungy quality of 8-bit samplers.
Recti-Fi
Recti-Fi™ provides additive synthesis effects
through waveform rectification. Recti-Fi multiplies the harmonic content of an audio track
and adds subharmonic or superharmonic tones.
Noise Reduction plug-ins, such as DINR™ or
Sonic NoNOISE, are used for removing pops,
clicks, hum, and other unwanted noise that occur in audio (sold separately).
Instrument Plug-ins
Instrument plug-ins include software synthesizers or rhythm machines, such as Synchronic
(sold separately).
Other Plug-ins
The Other Plug-in category includes plug-ins
that do not fit into a standard category, or are
third party plug-ins that have not had a category
designated to them by their manufacturer.
BF Essential Clip Remover
The BF Essential Clip Remover repairs clipped
audio recordings.
SansAmp PSA-1
The SansAmp PSA-1 provides amplifier simulation, harmonic generation, cabinet simulation
and equalization tone shaping. It is ideal for fattening up guitar or bass tracks that have been recorded directly into Pro Tools.
Menus Guide50
DC Offset Removal
The DC Offset Removal plug-in recognizes and
removes spikes caused by DC offset in the currently selected region if any are present.
Duplicate
The Duplicate plug-in duplicates a selected area
or region in place. The Duplicate plug-in is useful for creating a single audio file from a selection encompassing many smaller regions with
areas of silence between them.
Page 61

Gain
The Gain plug-in adjusts the gain (volume) of
the currently selected region in decibels or a percentage value.
Invert
The Invert plug-in inverts the phase (polarity) of
the currently selected region.
Normalize
The Normalize plug-in uniformly adjusts all levels in the currently selected area to a user-definable level, referencing the loudest peak in either
a specific region, or examining the relative peak
level of several regions.
Reverse
The Reverse plug-in rewrites the currently selected region in reverse, producing a backwards
audio effect.
Signal Generator
The Signal Generator plug-in produces audio
test tones in a variety of frequencies, waveforms,
and amplitudes. It is useful for generating reference signals with which to calibrate various elements of your studio.
Time Compression/Expansion
The Time Compression/Expansion plug-in
changes the length (duration) of the currently
selected region, with or without changing its
pitch.
Chapter 9: AudioSuite Menu 51
Page 62

Menus Guide52
Page 63

chapter 10
Options Menu
The Options menu commands lets you select
several editing, recording, monitoring, playback, and display options.
Destructive Record
In Destructive Record mode, recording over existing regions replaces the original audio permanently. This allows you to conserve hard drive
space. However, if you have sufficient drive
space, it is usually best to disable Destructive Record mode, and use Pro Tools in Nondestructive
Record mode to avoid losing any previously recorded material.
Loop Record
Loop Record lets you record take after take while
the same section of audio repeats. This is a convenient technique for quickly recording multiple takes of a part without losing spontaneity.
The time range that is looped and recorded—
which must be at least one second in length—is
defined by selecting a range in the Ruler or in a
track’s playlist, or by specifying start and end
points in the Transport window.
QuickPunch
QuickPunch™ lets you instantaneously punchin (initiate recording) on a record-enabled audio
track during playback, then punch-out (exit recording) by clicking the Transport’s Record button. Recording with QuickPunch is nondestructive.
TrackPunch
(Pro Tools HD Only)
TrackPunch lets you punch individual tracks in,
punch individual tracks out, and take tracks out
of record enable without interrupting online recording and playback. Recording with TrackPunch is nondestructive.
DestructivePunch
(Pro Tools HD Only)
Destructive Punch is a destructive recording
mode that lets you instantaneously punch in
(start recording) and punch out (stop recording)
on individual audio tracks during playback,
while preserving a contiguous audio file on each
punched track. No additional regions are created when recording in DestructivePunch
mode.
Chapter 10: Options Menu 53
Page 64

Prepare DPE (DestructivePunch-Enabled) Tracks
(Pro Tools HD Only)
This command prepares a track for Destructive
Punch recording by consolidating all Destructive-Punch-enabled tracks from the beginning
of the session to the value specified in the Destructive Punch File Length preference.
Video Out FireWire
(QuickTime Movies Only)
This command plays the current QuickTime
movie out the FireWire port. You may want to
do this to have a Digital Video deck, monitor, or
camcorder record or display DV (digital video)
playback from Pro Tools.
For a list or supported DV FireWire transcoders, visit our website (www.avid.com).
Transport Online
This command arms the Pro Tools Transport for
online synchronization. Playback or recording
can then be triggered by an external time code
source. Online recording or playback begins as
soon as Pro Tools receives and locks to time
code or ADAT sync.
Video Track Online
This command enables and disables playback of
the main video track. You may want to give
higher priority to screen updates for other
Pro Tools tasks (such as metering, moving faders). With QuickTime movies, you may want to
disable a video track to freeze the video at a particular point in time relative to Pro Tools playback.
Scrub in Video Window
This command opens a Scrub window, which
displays the Avid video at quarter-resolution,
but accurately scrubs the video. When the Scrub
window is open, video output alternates automatically between the Scrub window and the
video reference monitor depending on whether
or not you are scrubbing.
When scrubbing, the video reference monitor is
black. When leaving Scrub mode, the Scrub window disappears and video is routed to the video
reference monitor.
The Scrub window is only available in
Pro Tools systems with a qualified Avid
DNA™ video peripheral (such as AVoption|V10 or Mojo
video or QuickTime video in the main video
window.
®
), and when there is Avid
Menus Guide54
Page 65

Pre/Post-Roll
Edit Window Scrolling
This option enables pre- and post-roll playback.
Pre- and post-roll amounts can be entered in the
Transport window, set from a track’s playlist or
Timebase Ruler, or by recalling a Memory Location.
Loop Playback
This option continuously loops playback of a selection until you stop playback. Looping playback is a useful way to check the rhythmic continuity of a selection when working with
musical material. Selections must be at least 0.5
seconds in length to use Loop Playback.
Dynamic Transport
This mode lets you decouple the playback start
location from the Timeline selection. This
means that you can start playback from anywhere on the Timeline without losing your
Timeline or Edit selections. For example, you
can use Dynamic Transport mode in conjunction with Loop Playback mode to quickly audition loop transitions.
Pro Tools provides several options for defining
how the contents of the Edit window scroll during playback and recording. These include:
No Scrolling
The No Scrolling option disables scrolling during
and after playback. With this option enabled,
the playback cursor moves across the Edit window, indicating the playback location, up to the
right edge of the Edit window. When the play
point moves beyond the right edge of the Edit
window, the Playback Cursor Locator icons appear at the right edge of the Main Timebase
Ruler.
After Playback
The After Playback option causes the Edit window to scroll to the final playback location after
playback has stopped. With this option enabled,
the playback cursor moves across the Edit window, indicating the playback location.
Page
The Page option causes the Edit window to
scroll during playback. With this option enabled, the playback cursor moves across the Edit
window, indicating the playback location.
When the right edge of the Edit window is
reached, its entire contents are scrolled, and the
playback cursor continues moving from the left
edge of the window.
Chapter 10: Options Menu 55
Page 66

Continuous
(Pro Tools HD and Pro Tools with
Complete Production Toolkit 2 Only)
The Continuous option causes the Edit window’s
contents to scroll continuously past the playback cursor, which remains in the center of the
window. With this option enabled, playback is
always based on the Timeline selection (Playhead).
Center Playhead
(Pro Tools HD Only)
This option causes the Edit window’s contents
to scroll continuously past the Playhead, which
is a blue line in the center of the window (red
when recording).
Regardless of which Scrolling option is selected in the Options menu, Pro Tools does
not scroll when zoomed down to the sample
level.
Link Track and Edit Selection
This option lets you link or unlink any track selection with any Edit selection.
When Link Track and Edit Selection is enabled,
you can make an Edit selection within a track or
across multiple tracks and each associated track
is selected.
When Link Track and Timeline Selection is disabled, making an Edit selection does not automatically select all associated tracks.
Mirror MIDI Editing
This option lets you edit MIDI regions and have
your edits automatically applied to every MIDI
region of the same name. This can be particularly useful when editing looped MIDI regions.
Automation Follows Edit
Link Timeline and Edit Selection
This option lets you link or unlink any Timeline
selection with any Edit selection.
When Link Timeline and Edit Selection is enabled,
making a selection in a track’s playlist (an Edit
selection) also defines the play and record range
(the Timeline selection).
When Link Timeline and Edit Selection is disabled,
you can make a selection within a track for editing purposes that is distinct from the selection
in the Timeline (which determines the playback
and recording range).
Menus Guide56
When this option is disabled, automation
events are not affected by edits to audio or MIDI
notes. When enabled, automation events are affected by edits to audio or MIDI notes.
Click
When the Click command is enabled, a metronome event is generated during playback and
recording. The metronome can trigger an external MIDI device (as specified by the Output setting in the Click/Countoff Options dialog) or
the DigiRack Click TDM or RTAS
the Audio Plug-ins Guide).
®
plug-in (see
Page 67

MIDI Thru
Pre-Fader Metering
Enabling the MIDI Thru command routes MIDI
from your controllers to the devices and channels assigned to the MIDI track currently recordenabled. This allows you to monitor MIDI tracks
while recording.
Mute Frees Assigned Voice
(Pro Tools HD Only)
When this option is enabled, a muted track’s
voice will be allocated to the next highest priority track assigned to the same explicit voice.
Auto-Spot Regions
When enabled, this option simplifies the task of
spotting regions. If you are using VITC with this
option enabled, or MachineControl
you can pause your video at an appropriate
SMPTE frame location, click on a region with
the Grabber, and the region will be automatically spotted to the current time code location.
™ software,
This option toggles track metering between preand post-fader operation. When set to Pre-Fader
Metering, level meters show levels independent
of fader position. With post-fader metering, the
level meters respond to fader position. This option only affects on-screen meters.
Solo Mode
Pro Tools provides several modes and options
for defining how track Solo buttons work.
Solo Modes
(Pro Tools HD Only)
Pro Tools provides several modes for defining
how track Solo buttons work.
SIP (Solo In Place) When this mode is enabled,
the Solo button mutes other tracks so that the
chosen track can be auditioned alone.
AFL (After Fader Listen) When this mode is enabled, the Solo button routes the track’s postfader/post-pan signal to the AFL/PFL Path output, which is set in I/O Setup.
AFL Solo mode requires the Surround Mixer
plug-in (see the Pro Tools Reference Guide
for installation information).
PFL (Pre Fader Listen) When this mode is enabled, the Solo button routes the track’s prefader/pre-pan signal to the AFL/PFL Path output,
which is set in I/O Setup.
PFL Solo mode requires the Surround Mixer
plug-in (see the Pro Tools Reference Guide
for installation information).
Chapter 10: Options Menu 57
Page 68

Solo Latch Options
Pro Tools provides several latch options for defining how track Solo buttons work.
Latch When selected, pressing subsequent Solo
buttons adds them to the soloed mix of tracks.
X-OR (Cancels Previous Solo) When selected,
pressing subsequent Solo buttons cancels previous solos.
Momentary (Pro Tools HD Only) When selected,
Solo buttons are not sticky. A track is soloed
only when its Solo switch is held down.
Edit/Tool Mode Keyboard Lock
Enable this option to lock the ability to change
tool types (for example, to change from the normal Trimmer to the Scrub Trimmer) using keyboard shortcuts. Tool types can still be changed
using the mouse, and you can also still switch
between tools (such as switching from the Grabber to the Trimmer) using keyboard shortcuts.
This option affects the following Edit and Tool
modes: Grid, Zoom, Trim, Grabber, and Pencil.
Delay Compensation
When this option is enabled, Pro Tools captures
reported plug-in delays and signal routing for all
tracks and calculates the correct delay for each
track, compensating all the tracks accordingly.
Activate HEAT
(Pro Tools|HD systems with the HEAT Software
Option only)
This option is only available on Pro Tools|HD
systems when an authorized version of HEAT is
installed. When this option is enabled, HEAT is
applied to all active audio tracks in your session,
emulating the effect of an analog mixing console. Use HEAT to open up your mixes with
warm, analog-modeled soft-saturated distortion.
For more information about HEAT, see the
HEAT Software Option Guide.
Low Latency Monitoring
(Pro Tools|HD Native, 003 Family, Digi 002,
Digi 002 Rack, and Mbox 2 Pro Only)
Calibration Mode
(Pro Tools HD Only)
Use Calibration Mode in Pro Tools to adjust the
input and output levels for your audio interface
(such as HD I/O or 192 I/O
those of your mixing console and other audio
devices in your studio.
Menus Guide58
™) so they match
Pro Tools|HD Native, 003® family, Digi 002®,
Digi 002 Rack, and Mbox
systems can use the Low Latency Monitoring option to record with an extremely small amount
of monitoring latency, to as many tracks as each
system supports.
®
Pro and Mbox 2 Pro
Page 69

chapter 11
Setup Menu
This menu provides commands to open dialogs
and windows for configuring various Pro Tools
hardware and software parameters.
Hardware
The Hardware Setup dialog lets you specify settings for your hardware and sessions. Configure
the settings for any audio interface connected to
your Pro Tools system by selecting it from the
Peripherals list.
The Main page of the Hardware Setup dialog can
be used to define what physical ports are routed
to Pro Tools input and output channels. The
Main page also provides controls for Session
Sample Rate and Clock settings.
Playback Engine
This Playback Engine lets you set a hardware
buffer size, define the RTAS Processors allocation on multi-processor computers, allocate a
percentage of CPU resources for these tasks, and
configure RTAS error reporting for playback and
recording.
On Pro Tools|HD systems, you can select the
number of voices and voiceable tracks for your
system and its sessions. Voice count choices are
based on how much DSP processing you want to
allocate for voicing. If you change the Number
Of Voices setting (Pro Tools HD only) mid-session, the session will be saved, closed, and reopened to enable the new settings.
Hardware Setup dialog, Main page (HD OMNI shown)
With Pro Tools HD, additional pages can be
used to configure other parameters on each audio interface (such as setting operating levels).
Playback Engine dialog
Chapter 11: Setup Menu 59
Page 70

Disk Allocation
Peripherals
If you are using multiple hard drives for recording , us e t he Di sk A ll oc at io n di al og to ass ig n e ac h
track in a session to a specific drive. Audio for
that track will then be recorded to the chosen
drive.
Disk Allocation dialog
The Peripherals dialog provides several tabbed
pages (Synchronization, Machine Control, MIDI
Controller, Ethernet Controller, Microphone
Preamp, Satellites, VENUE) for configuring various peripheral device for use with Pro Tools
(such as SYNC HD
™, Command|8
®
, or PRE™).
Synchronization
This page configures synchronization devices
(such as SYNC HD) to synchronize Pro Tools to
SMPTE Time Code or MIDI Time Code (MTC).
Peripherals dialog, Synchronization page
Menus Guide60
Page 71

Machine Control
Ethernet Controllers
This page configures MIDI Machine Control
(MMC) and 9-pin machine control devices for
use with Pro Tools. Slaving Pro Tools to MIDI
Machine Control is supported on all Pro Tools
systems. 9-pin Machine Control (Deck Control)
and 9-Pin Remote (Deck Emulation) modes require the MachineControl™ software option.
Peripherals dialog, Machine Control page
MIDI Controllers
This page configures MIDI control surfaces such
as Command|8.
This page configures D-Control®, D-Com-
®
mand
, C|24, or EUCON™ for use with
Pro Tools.
Peripherals dialog, Ethernet page
Mic Preamps
This page configures one or more PREs for use
with Pro Tools.
Peripherals dialog, MIDI Controllers page
Peripherals dialog, Mic Preamps page
Chapter 11: Setup Menu 61
Page 72

Satellite (Pro Tools HD Only)
This page configures Pro Tools for the Video Satellite HD option, which synchronizes playback
and capture between Pro Tools and Media Station|PT.
Peripherals dialog, Satellites page
VENUE (Pro Tools HD Only)
This page configures Pro Tools for use with a
VENUE system.
I/O
This I/O Setup dialog provides tools to label and
map Pro Tools input, output, insert, bus signal,
and Mic Preamp (PRE) paths. The I/O Setup dialog also lets you configure delay compensation
for hardware inserts.
I/O Setup dialog, Output page
Peripherals dialog, Satellites page
Menus Guide62
In addition, the I/O Setup dialog, like the Main
page of Hardware Setup, provides controls for
routing the physical ports on your audio interface (such as HD I/O) to Pro Tools Input and
Output channels. The Output page of the
I/O Setup dialog also lets you change the default
path settings for Meter, Audition, and multichannel track layout (as displayed on-screen).
Page 73

Machine Track Arming Profiles
Session
(Pro Tools HD with MachineControl Option
Only)
This dialog provides extensive control over
Pro Tools Track Arming. You can customize
arming, track naming and mapping, and save
configurations for different machines as Track
Arming Profile files. These Profiles can be imported to quickly reconfigure Track Arming as
needed for future projects. You can also test
track mapping, and remap tracks if needed.
Video Sync Offset
The Video Sync Offset dialog lets you offset
video earlier or later in a session so you can accurately spot audio to it.
Avid Video Offset When playing Avid video
through an Avid video peripheral, Pro Tools automatically compensates for the delay introduced by the peripheral. This means you can
leave the setting at 0 frames and the output of
the Avid video peripheral will be in sync with
the audio. If you have a plasma monitor (which
may introduce an additional delay of two
frames), you can compensate for it by entering
the amount of the delay here.
This Session Setup window lets you configure
various session parameters including Pan
Depth, session start frame, SMPTE frame rate,
offset settings, SYNC settings (clock and pullup/pull-down), and several time code parameters.
Session Setup window
Current Feet+Frames Position
QuickTime Video Offset Pro Tools does not automatically compensate for the delay when playing QuickTime video through any FireWire peripheral, including Avid video peripherals. The
amount of delay introduced varies based on
your system and the type of video peripheral
you are using. When using an Avid peripheral
with QuickTime, 18 quarter-frames is a good
starting point, but you will need to verify the
precise setting for your system. (Third-party devices are available to help you measure this delay.)
Current Feet+Frames dialog
This command lets you specify a Feet+Frames
value based on the current Edit cursor time code
location. Typically, this feature lets test tones,
pre-roll, Academy leader, and similar pre-program material to be more easily integrated into
Pro Tools sessions.
Chapter 11: Setup Menu 63
Page 74
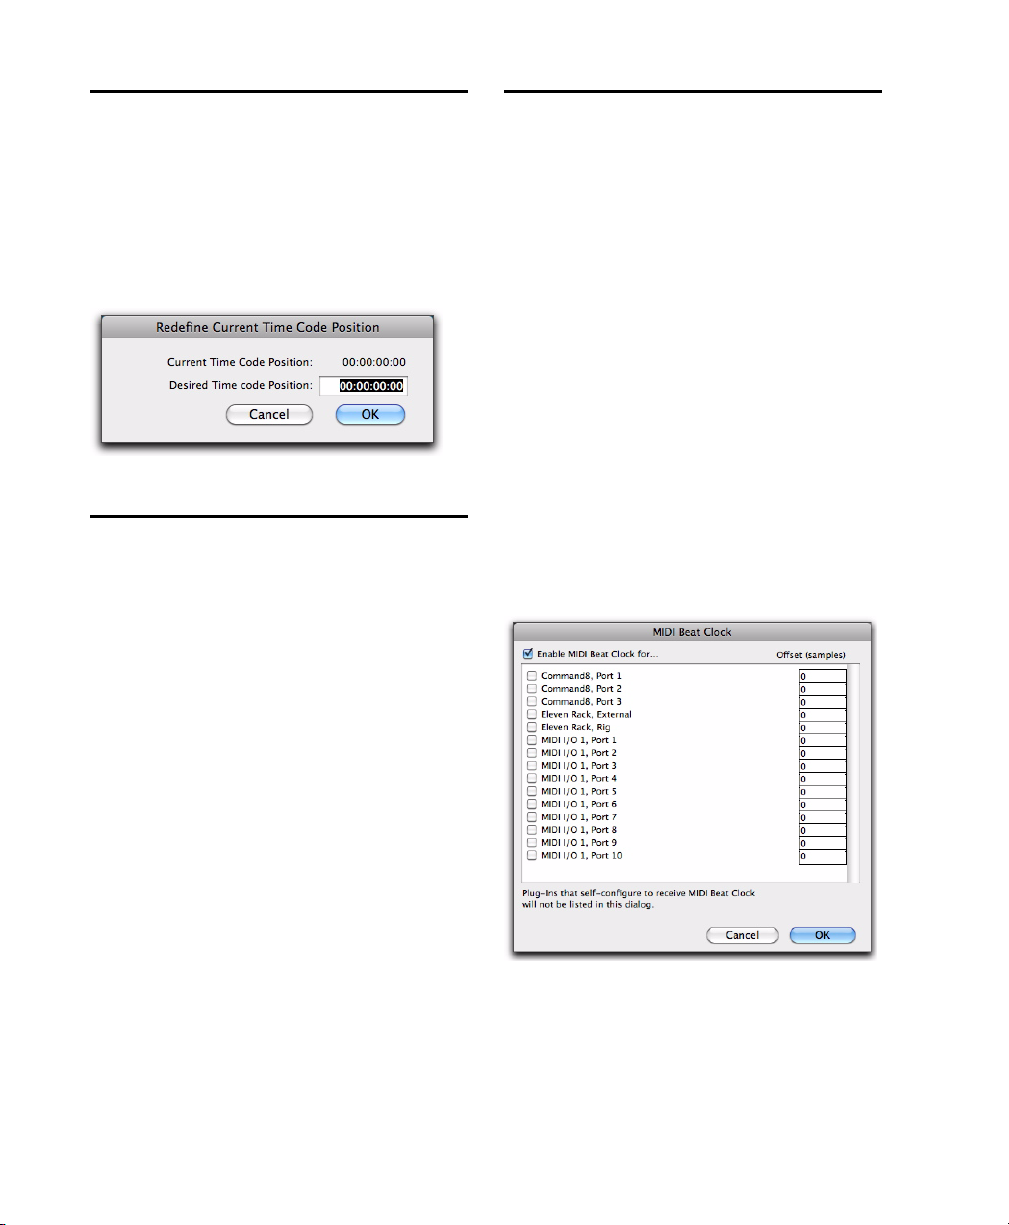
Current Time Code Position
MIDI
This command lets you redefine the session start
time. By creating an insertion point (or selection) and then entering the new time code position for that location, the session start time will
be recalculated based on the new, relative Time
Code location.
Current Time Code Position dialog
External Time Code Offset
This command lets you compensate for devices
that are consistently offset by a fixed number of
frames (such as some color–corrected video masters), or for material that starts at a different
time than the session.
Pro Tools provides three different types of External Time Code Offset settings. These offsets include:
• MMC (MIDI Machine Control)
• 9-Pin (Serial machine control)
• Synchronization peripherals (such as the
SYNC I/O, or a MIDI interface that provide
MIDI Time Code).
MIDI Studio
The MIDI Studio command launches the Apple
Audio MIDI Setup application (Mac) or opens
the MIDI Studio Setup window (Windows).
These let you identify the MIDI devices connected to your MIDI interface.
MIDI Beat Clock
This command lets you enable synchronization
for certain MIDI devices (such as drum machines, software synthesizers, and hardware sequencers) to MIDI Beat Clock. Devices selected
in the MIDI Beat Clock dialog will receive the
MIDI Beat Clock signal. If your MIDI interface
does not support transmitting MIDI Beat Clock
to separate ports, the interface will appear as the
only destination.
Positive and negative offset values can be entered to offset Pro Tools time code display later
or earlier, respectively.
Unique values can be defined for each of these
three types offsets, or you can link all three to
adjust in unison.
Menus Guide64
MIDI Beat Clock dialog
Page 75

Input Filter
Input Devices
This command provides settings for filtering out
selected MIDI messages from your recording.
The Input Filter can be set to record all messages,
only the specified messages, or all except the
specified messages. When using the Only option, only the MIDI messages that are selected
will be recorded. Conversely, when using the All
Except option, the selected messages will not be
recorded.
This command enables selected MIDI controllers and control surfaces so that MIDI data received from them can be recorded. Disabling devices in this dialog will ensure that unwanted
notes (such as those from drum machines or an
arpeggiator) are not recorded.
MIDI Input Enable dialog
MIDI Input Filter dialog
Chapter 11: Setup Menu 65
Page 76

Click/Countoff
Preferences
This command lets you configure metronome
parameters such as MIDI note, velocity, duration, and output. If you are using the Click plugin, set the output to None.
Click/Countoff Options dialog
The Preferences dialog has several tabbed pages
in which you can specify your preferred settings
for various session parameters. Each new session
will use these preferences.
Display Preferences
Basics Section
Track Position Numbers Stay with Hidden Tracks
When selected, tracks keep their track numbers
even when hidden. When not selected, numbers are only assigned to tracks that are shown.
In this case, active tracks are then numbered sequentially, and hidden tracks are not numbered.
Tool Tips Display Options
Function Configures Tool Tips to show the basic
function of the item.
Details Configures Tool Tips to show the complete name of an abbreviated name or item
(such as a track name). Details view can also
show the hidden or abbreviated value of parameters, as well as input and output assignments.
Menus Guide66
Page 77

Edit Window Default Length
This preference sets a default length for the Edit
window in hours, minutes, seconds, and frames.
This is useful if you want to assemble a session of
a particular length or leave extra room to expand the Edit window’s work area in your session. The maximum length is 12 hours and 25
seconds at 48 kHz, and proportionally less at
higher sampling rates. For best scrollbar sensitivity, set the length to slightly longer (a minute
or more) than the total session or song length.
listed in the category submenus. The bottom
menus display plug-ins by manufacturer, with
individual plug-ins listed in the manufacturer
submenus.
Meters Section
Peak Hold Options
These options determine how long the peak indicators on track meters stay lit after a peak is detected.
Organize Plug-In Menus By Options
These option customize how plug-in menus are
organized in the Insert selector or Plug-In selector.
Flat List Organizes plug-ins in a single list, in alphabetical order.
Category Organizes plug-ins by process category
(such as EQ, Dynamics, and Delay), with individual plug-ins listed in the category submenus.
Plug-ins that do not fit into a standard category
(such as the DigiRack Signal Generator), or
third-party plug-ins that have not had a category designated by their developers, appear in
the Other category. Plug-ins can appear in more
than one category.
Manufacturer Organizes plug-ins by their manufacturer, with individual plug-ins listed in the
manufacturer submenus. Plug-Ins that do not
have a Manufacturer defined will appear in the
“Other” manufacturer folder.
Most Avid-distributed third party plug-ins will
be grouped under Digidesign when Manufacturer view is enabled.
Category and Manufacturer Organizes plug-ins
in two levels of menus. The top menus display
plug-ins by process category (such as EQ, Dynamics, and Delay), with individual plug-ins
3 Second Peak Hold When selected, track meters
display the last peak level for three seconds.
Infinite Peak Hold When selected, track meters
display the last peak level until you click them
to clear them.
No Peak Hold When selected, track meters do
not hold the peak level.
Clip Indication Options
These options determine how long the clip indicators on plug-in, send, and track meters stay lit
after a clip is detected.
3 Second Clip Hold When selected, meters display the last clip indication for three seconds.
Infinite Clip Hold When selected, meters display
the last clip indications until you click them to
clear them.
No Clip Hold When selected, meters do not hold
the clip indication.
Show Meters in Sends View
When the Sends View is displaying individual
send controls, you can select this option to show
send level meters. Deselecting this option can
help speed up screen redraws and processing.
Chapter 11: Setup Menu 67
Page 78

Color Coding
Always Display Marker Colors Lets you choose to
view Marker colors in the Markers ruler, regardless of the settings you choose for Default Region Color Coding.
MIDI Note Color Shows Velocity When enabled,
MIDI notes display varying shades of the assigned track color in MIDI notes view in the Edit
window. Notes with high velocities are darker
(more saturated) and notes with lower velocities
are lighter (less saturated)
Default Track Color Coding Options
These color coding options determine the default color coding assignment for tracks in the
Edit and Mix windows. Choices are:
None Turns off color assignment for tracks.
Tracks and MIDI Channels Assigns a color to
each track in the Mix or Edit window according
to its voice assignment or MIDI channel assignment.
Tracks and MIDI Devices Assigns a color to each
track in the Mix or Edit window according to its
voice assignment or MIDI device assignment.
None Turns off color assignment for regions. Regions are drawn with black waveform or MIDI
notes on a light gray background.
Tracks and MIDI Channels Assigns a color to
each region in the Edit window according to its
voice or MIDI channel assignment.
Tracks and MIDI Devices Assigns a color to each
region in the Edit window according to its voice
assignment or MIDI device assignment.
Groups Assigns a color to each region according
to the Group ID of its track. If groups are suspended using the Suspend Groups command, all
regions display black waveforms or MIDI notes
on a light gray background.
Track Color Assigns a region color based on the
color assigned to the track.
Marker Locations Assigns a unique color to each
marker area in the Marker ruler, including the
area preceding the first marker.
Region List Color Assigns a color to each region
based on its color in the Region List.
Operation Preferences
Groups Assigns a color to each track according to
its Group ID. If groups are suspended using the
Suspend Groups command, the tracks color bars
are not shown.
Track Type Assigns a color to each track according to its type (audio, MIDI, Instrument, Auxiliary or Master Fader).
Default Region Color Coding Options
These color coding options determine the default color coding assignment for tracks, Marker
Locations, and regions residing in the track
playlist and Region List. Choices are:
Menus Guide68
Page 79

Transport Section
Timeline Insertion/Play Start Marker Follows
Playback When selected, the Timeline Insertion
and the Play Start Marker both move to the
point in the Timeline where playback stops.
When deselected, the Timeline Insertion and
Play Start Marker do not follow playback, but return to the point in time where playback began.
Press Control+N (Mac) or Start+N (Windows) to toggle the Timeline Insertion/Play
Start Marker Follows Playback preference
on and off.
Edit Insertion Follows Scrub/Shuttle When selected, the edit cursor automatically locates to
the point where scrubbing stops.
Audio During Fast Forward/Rewind When selected, audio is audible during fast forward or rewind.
Latch Forward/Rewind When selected, fast forward and rewind latch and continue until you
start or stop playback. When disabled, the Fast
Forward and Rewind only last as long as you
hold down the mouse after clicking either button on the Transport (or hold down the corresponding switch on a Control Surface).
Play Start Marker Follows Timeline Selection
When enabled, the Play Start Marker snaps to
the Timeline Selection Start Marker when you
move the Timeline Selection, draw a new Timeline Selection, or adjust the Timeline Selection
Start. When disabled, the Play Start Marker
doesn’t move with the Timeline selection.
Reserve Voices for Preview in Context (Pro Tools
HD Only) When enabled, Pro Tools reserves the
appropriate number of voices for preview in
context (previewing audio files in DigiBase
during session playback). The current selected
Audition Paths setting in the Outputs page of the
™
I/O Setup determines the number of voices reserved for preview in context. The number of
available playback voices for tracks is reduced by
that same number. For example, if the number
of playback voices is set to 48 in the Playback
Engine, and you have a stereo audition path selected in the I/O Setup, only 46 voices are available for tracks. If you have a 5.1 audition path,
only 42 voices are available. When this option is
disabled, you will not be able to preview in context if there are not enough available voices.
Custom Shuttle Lock Speed Sets the highest fastforward Shuttle Lock speed (key 9) for Shuttle
Lock modes (Classic or Transport). The range for
this setting is 50–800%.
Back/Forward Amount Sets the default length of
Back, Back and Play, Forward and Forward and
Play. The timebase of the Back/Forward Amount
settings follows the Main Time Scale by default,
or you can deselect Follow Main Time Scale and
select another timebase format: Bars:Beats,
Min:Sec, Time Code, Feet+Frames, or Samples.
Numeric Keypad Mode
Numeric Keypad mode determines how the numeric keypad functions. You can always use the
numeric keypad to select and enter values in the
Event Edit Area, Edit Selection indicators, Main
and Sub Counters, and Transport fields.
Classic Selects a Shuttle Lock mode that emulates the way Pro Tools worked in versions lower
than 5.0. With the Numeric Keypad mode set to
Classic, you can play up to two tracks of audio in
Shuttle Lock mode. Press Control (Mac) or press
the Start key (Windows), followed by 0–9 for different play speeds. Press Plus (+) or Minus (–) to
reverse direction. Recall Memory Locations by
typing the Memory Location number, followed
by Period (.).
Chapter 11: Setup Menu 69
Page 80

Transport Selects a Shuttle Lock mode that lets
you set a number of record and play functions,
and also operate the Transport from the numeric keypad. With the Numeric Keypad mode
set to Transport, you can play up to two tracks of
audio in Shuttle Lock mode. Press Control (Mac)
or press the Start key (Windows), followed by
0–9 for different play speeds. Press Plus (+) or Minus (–) to reverse direction. Recall Memory Locations by typing Period (.), the Memory Location number, and Period (.) again.
Shuttle (Pro Tools HD Pro Tools with Complete
Production Toolkit 2 Only) Selects a type of shut-
tling different from that of Shuttle Lock mode.
With the Numeric Keypad mode set to Shuttle,
playback is triggered by pressing and holding
the keys on the numeric keypad—playback
stops once the keys are released. Various playback speeds are available in both forward and reverse. You can also recall Memory Locations by
typing Period (.), the Memory Location number,
and Period (.) again.
Use Separate Play and Stop Keys When enabled,
this option lets you start playback with the Enter
key and stop playback with the 0 key on the numeric keypad. This is useful for quickly starting
and stopping playback when auditioning loop
transitions. Use Separate Play and Stop Keys is
only available in Transport Numeric Keypad
mode.
When this option is enabled, it overrides using the Enter key to add Memory Location
markers. Instead, press Period (.) and then
Enter on the numeric keypad to add a Memory Location marker.
Video Section
High Quality QuickTime Image (DV25 Only)
When enabled, Pro Tools decompresses both
fields of each interlaced frame of QuickTime
video. When viewing a QuickTime movie in the
Pro Tools Video window, select this option to
display the movie at the highest possible resolution. Deselecting this option can help improve
performance if your system experiences problems playing back a session with QuickTime
video.
Avid Video Errors Stop Playback
(Pro Tools HD with Avid Video Engine Only)
When selected, Pro Tools automatically stops
playback of audio and video if a single frame of
video is dropped.
When not selected, Pro Tools continues playback of audio even if frames are dropped. In
most cases, video playback will recover within a
few frames and continue playing audio and
video in sync.
Avid Video NTSC Has Setup (NTSC-J)
(Pro Tools HD with Avid Video Engine Only)
This preference lets you adjust the level of NTSC
video black output between 7.5 IRE (standard)
or 0 IRE. When this option is selected, output
level is 0 IRE.
Menus Guide70
Page 81

Auto Backup Section
Enable Session File Auto Backup When selected, Pro Tools automatically saves backups of
your Pro Tools session file while you work. Backups are saved to in the Session Files Backup
folder in your session folder.
Keep Specifies the total number of incremental
backups that are kept.
Backup Every Specifies how often the session is
saved.
Record Section
Latch Record Enable Buttons When selected,
multiple audio tracks can be record-enabled.
When not selected, multiple audio tracks cannot be record-enabled. Record-enabling an audio track takes other audio tracks out of recordenabled mode.
Link Record and Play Faders When selected,
Pro Tools does not remember separate fader levels for tracks when they are record-enabled, allowing you to maintain the same monitoring
level for tracks during recording and playback.
Audio Track RecordLock (Pro Tools HD Only) This
option configures Pro Tools tracks to either emulate a digital dubber, or to maintain legacy behavior for track record status.
• When selected, the record-enabled audio
tracks remain record-enabled when playback or recording stops.
• When not selected, record-enabled audio
tracks are taken out of record enable when
Pro Tools is stopped. This prevents tracks
from remaining armed from pass to pass,
emulating track record behavior of a digital
dubber.
Transport RecordLock (Pro Tools HD Only) This
option lets the Transport Record (the Record Enable button in the Transport controls) be configured to either emulate a digital dubber, or to
maintain legacy behavior for the Transport master Record.
• When selected, the Transport Record remains armed when playback or recording
stops. This saves having to re-arm the
Transport between takes, emulating digital
dubber behavior.
• When not selected, the Transport Record
disarms when Pro Tools is manually
stopped or stops due to a loss of time code.
This replicates standard Pro Tools recording behavior.
The Transport RecordLock preference is automatically disabled and greyed out when Destructive record mode is enabled.
Disable “Input” When Disarming Track (In “Stop”)
(Pro Tools HD Only) For flexibility, TrackInput
monitoring can be customized to remain selected regardless of track record status, or to automatically switch to Auto Input monitoring after a recording pass. This lets you optimize
monitoring for a typical dubbing workflow (in
which you might want tracks to remain in Input
Only mode until explicitly switched to Auto Input monitoring) or a typical music tracking
workflow (in which leaving a track in Input
Only monitoring mode after recording can result in accidental double-monitoring).
• When selected, taking an audio track out of
record enable (any mode) takes it out of Input Only mode, regardless of the global
monitor mode, and switches it to monitor
audio from disk only.
• When not selected, audio tracks remain in
Input Only monitoring mode until explicitly switched to Auto Input monitoring.
Chapter 11: Setup Menu 71
Page 82

Mute Record-Armed Tracks While Stopped
(Pro Tools HD Only) This setting determines
monitor status of record-armed tracks.
• When selected, Pro Tools mutes all recordenabled tracks when the transport is
stopped. Input can still be monitored while
stopped using the TrackInput Monitor button.
• When not selected, Pro Tools does not
mute audio input on record-enabled tracks
when the transport is stopped.
PEC/Direct Style Input Monitoring (Pro Tools HD
Only) This option changes the way the TrackIn-
put monitoring mode is indicated on-screen
(and on supported control surfaces) to emulate
“PEC” (playback) and “Direct” (input/bus) indication on some large format consoles.
• When not selected, the TrackInput button
shows the letter “I.” The button remains
gray to indicate Auto Input mode and
lights green to indicate Input Only mode.
•When selected, the TrackInput button remains gray and shows the letter “D” to indicate Input Only mode (“Direct”); it lights
green and shows the letter “P” to indicate
Auto Input mode (“Pec” or playback).
Automatically Create New Playlists When Loop Recording Copies loop recorded alternate takes to
new playlists in the track. This is especially useful to prepare for track compositing in Playlist
View after loop recording multiple alternate
takes.
Online Options
Record Online at Time Code (or ADAT)
Lock When selected, online recording begins as
soon as Pro Tools receives and locks to incoming
time code.
Record Online at Insertion/Selection When selected, online recording begins at the edit cursor
location. Recording continues until Pro Tools
stops receiving time code. If you make a selection, Pro Tools records online for the length of
the selection.
Open Ended Record Allocation
Use All Available Space When selected, the
drive’s entire available space is allocated. Generally, this is a good setting for recording longer
takes, as it provides the maximum amount of
drive space. Additionally, when recording multiple tracks, the files are spread across your drive.
This can sometimes slow down the recording
process for hard drives that use certain file systems, including HFS+ and NTFS.
Limit To Sets the maximum allowable recording
duration for one take. This can help reduce the
time it takes to begin recording by allocating
only a portion of your hard drive. The number
of minutes specified is allocated for each recordenabled track. You may want to experiment
with this number to achieve the recording performance you want.
If you do not regularly record longer takes, set a
smaller length (such as a low multiple of the
song’s total length).
DestructivePunch File Length
(Pro Tools HD Only)
This preference sets the duration of consolidated audio files when preparing tracks for DestructivePunch mode. The default value for this
setting is 25 minutes.
Menus Guide72
Page 83

Misc (Miscellaneous) Section
Show Quick Start Dialog When Pro Tools Starts
When selected, Pro Tools shows the Session
Quick Start dialog on launch.
Auto Region Fade In/Out Length (Pro Tools HD
and Complete Production Toolkit 2 Only) Sets a
default length for fade-ins and fade-outs automatically applied to region boundaries. Using
automatic fade-ins and fade-outs saves you the
trouble of editing to zero-crossings or creating
numerous rendered fades in order to eliminate
clicks or pops in playback. Autofades are not
written to disk. Value range is from 0–10 ms for
the Auto Region Fade In/Out Length. A value of
zero means that no auto-fading will occur. The
Auto Fade value is saved with the session, and is
automatically applied to all free-standing region
boundaries until you change it.
Calibration Reference Level (Pro Tools HD Only)
Editing Preferences
Regions Section
Region List Selection Follows Edit Selection
When selected, selecting a region in a track also
selects it in the Region List.
Sets a default calibration reference level in dB
when Pro Tools is in Calibration mode. For audio interfaces that have trims (such as the
192 I/O), see the interface’s guide for calibration
instructions.
Delay Compensation Time Mode This option lets
you choose whether information in the Delay
Manager is displayed in milliseconds or samples.
This option is only available when Delay Compensation is enabled (Options > Delay Compensa-
tion).
Edit Selection Follows Region List Selection
When selected, selecting a region in the Region
List causes Pro Tools to highlight that region’s
occurrence in a track.
Auto-Name Separated Regions When selected,
Pro Tools automatically names newly separated
regions by appending a number to the region’s
name. Disabling this option can be useful when
importing region groups, REX files, or ACID
files, because these file types can contain so
many separate regions that it becomes difficult
to read the Region List.
Separate Region Operates On All Related Takes
When selected, editing a region with the Separate Region command also affects all other related takes (recording passes) with the same User
Time Stamp. This option helps you compare different sections from a group of related takes.
Chapter 11: Setup Menu 73
Page 84

Tracks Section
Default Fade Settings
New Tracks Default to Tick Timebase When se-
lected, all new tracks default to ticks. When deselected, audio, Auxiliary Input, Master Fader,
and VCA (Pro Tools HD only) tracks default to
samples.
Memory Locations Section
Auto-Name Memory Locations When Playing
When selected, Pro Tools gives new Memory Locations default names based on their time location in the session. The time units currently
chosen in the View menu determine the units
for the names.
Recall Memory Location Selection at Original
Track When selected, Memory Locations that re-
call a selection also recall the track in which the
selection was made.
Fades Section
Crossfade Preview Pre-Roll This option specifies
the amount of pre-roll to be added when you are
auditioning crossfades in the Fades dialog.
Crossfade Preview Post-Roll This option specifies the amount of post-roll to be added when
you are auditioning crossfades in the Fades dialog.
QuickPunch/TrackPunch Crossfade Length Specifies a default length for crossfades created by
QuickPunch or TrackPunch (Pro Tools HD only)
recordings. Crossfades occur before the punch
in and after the punch out.
Preserve Fades when Editing This option preserves fade-ins and fade outs, and converts separated crossfades into corresponding fade-ins and
fade-outs.
Fade In Selects the default envelope shape for
fade-ins.
Fade Out Selects the default envelope shape for
fade-outs.
Crossfade Selects the default envelope shape for
crossfades.
REX Selects the default envelope shape for fades
and crossfades between regions (“slices”) in imported REX files.
Zoom Toggle Section
Vertical Zoom Select Selection or Last Used for
the Zoom Toggle Vertical Zoom.
Horizontal Zoom Select Selection or Last Used for
the Zoom Toggle Horizontal Zoom.
Remove Range Selection After Zooming In When
selected, the current Edit selection collapses into
an insertion point after zoom toggling in. Zoom
toggling back out reverts to the previous selection.
Track Height Select Last Used, Medium, Large,
Extreme, or Fit To Window for the Zoom Toggle
Track Height.
Track View Selects Waveform/Notes, Last Used,
or No Change for the Zoom Toggle Track View.
Separate Grid Settings When Zoomed In When
selected, this option retains the same (current)
grid setting when zoom toggling in or out.
When this option is deselected, the grid setting
stored with Zoom toggle is recalled when zoom
toggling in.
Menus Guide74
Page 85

Zoom Toggle Follows Edit Selection When selected, zoom toggle automatically follows the
current edit selection. When disabled, changing
the edit selection has no affect on the currently
toggled-in track.
Levels of Undo
This preference sets the maximum number of
actions that can be undone with the multiple
undo feature. Setting this to a lower number can
speed up the performance of slower computers.
Pro Tools supports up to 32 Levels of Undo.
Mixing Preferences
Send Pans Default to Follow Main Pan When selected, newly created sends have Follow Main
Pan turned on, so the Send Pan controls follow
the pan controls of the track. When not selected, newly created sends have Follow Main
Pan turned off.
Link Mix and Edit Group Enables When selected,
this option links enabling and disabling of Mix
and Edit Groups. For example, enabling Group
A in the Mix Window automatically enables
Group A in the Edit window.
Use Absolute Pan Linking (Pro Tools HD and Complete Production Toolkit 2 Only) This option af-
fects behavior of grouped pan controls.
• When selected, grouped pan controls do
not maintain relative offsets when any of
the grouped pan controls is adjusted. All
grouped pan controls snap to the absolute
value of the adjusted control.
• When not selected, grouped pan controls
maintain relative offsets when any of the
linked controls is adjusted.
Setup Section
Sends Default to –INF When selected, the initial
fader level of newly-created sends is set to – (no
audible signal level). When not selected, the initial fader level of newly-created sends is set to
0dB.
Default EQ
This preference lets you choose any installed EQ
plug-in as the default, which makes it available
for quick assignment, both on-screen and on
ICON worksurfaces (Pro Tools HD only). Onscreen, the plug-in appears at the top of the Insert selector pop-up menu. On ICON worksurfaces, the plug-in appears first in the list of menu
choices on the rotary encoders.
Chapter 11: Setup Menu 75
Page 86

Default Dynamics
This preference lets you choose any installed
Dynamics plug-in as the default, which makes it
available for quick assignment, both on-screen
and on ICON worksurfaces (Pro Tools HD only).
On-screen, the plug-in appears at the top of the
Insert selector pop-up menu. On ICON worksurfaces, the plug-in appears first in the list of menu
choices on the rotary encoders.
Touch Timeout If you are writing automation in
Touch mode and you stop moving a non-touch
sensitive fader or encoder, Pro Tools continues
to write automation for the Touch Timeout
value.
After the Touch Timeout period, writing of automation stops and the automation data returns
to its previous automation value at the rate specified in the AutoMatch Time setting.
Controllers
Edit Window Follows Bank Selection If you are
using a supported control surface with
Pro Tools, this option scrolls the Edit window to
display the selected bank of tracks when you
switch banks on the control surface, ensuring
that the current bank is viewable on-screen.
Mix Window Follows Bank Selection If you are
using a supported control surface with
Pro Tools, this option scrolls the Mix window to
display the selected bank of tracks when you
switch banks on the control surface, ensuring
that the current bank is viewable on-screen.
Scroll to Track Banks Controllers When using a
control surface (such as D-Control or C|24) you
can select this option to bank control surface
faders to a numbered track when using the Track
> Scroll to Track command.
Always Fill Channel Strips When Banking If you
are using an ICON worksurface (Pro Tools HD
only), you can select this option to maximize
the number of channels displayed when banking. This setting optimizes the Bank commands
to prevent the display of a small number of
channels at the extremes of the surface.
Automation Section
Smooth and Thin Data After Pass When selected,
Pro Tools automatically smooths and then applies the specified amount of thinning to the automation data created in an automation pass.
Degree of Thinning Specifies the amount of thinning performed on automation data when you
using the Thin Automation command, or if you
have selected the Smooth and Thin Data After
Pass option.
Plug-in Controls Default to Auto-Enabled When
selected, all applicable controls of newly added
plug-ins are enabled for automation. When not
selected, the controls of newly added plug-ins
must be manually enabled for automation.
Suppress Automation “Write To” Warnings
(Pro Tools HD and Complete Production Toolkit 2
Only) When selected, Pro Tools suppresses the
warnings that appear after invoking any of the
Write Automation To Start, Selection, End, or
Punch commands and then stopping the transport.
Menus Guide76
Page 87

Latching Behavior for Switched Controls in
Touch This option determines the behavior of
switched controls (such as mute or plug-in bypass) when writing automation in Touch mode.
• When selected, controls in Touch mode
will latch in their current state. If an existing breakpoint is encountered, writing of
automation stops. If the transport is
stopped while writing, the control will AutoMatch to the underlying value.
• When not selected, controls in Touch
mode will not latch.
Allow Latch Prime in Stop (Pro Tools HD and Complete Production Toolkit 2 Only) When selected
and any tracks are in Latch mode, any automation-enabled controls on those tracks can be set
to new values while the transport is stopped by
touching or moving controls, to prepare for the
next automation pass.
Coalesce When Removing Slaves from VCA Group
(Pro Tools HD and Complete Production Toolkit 2
Only) This option determines the behavior when
removing slave tracks from a VCA-controlled
group.
• When selected, any automation on the
VCA Master is automatically coalesced
(without confirmation) to its slave tracks
when the tracks are removed from the
group.
• When not selected, a confirmation dialog
lets you choose whether or not to coalesce
the VCA Master automation to the slave
tracks.
Standard VCA Logic for Group Attributes
(Pro Tools HD and Complete Production Toolkit 2
Only) This option determines which Mix group
attributes may be selected in the Group dialog
when the group is assigned to a VCA Master.
• When selected, Main Volume, Mute, Solo,
Record Enable, and Input Monitoring controls on slave tracks follow the VCA Master
only and are not available to be independently linked. (This emulates the behavior
of analog console VCA masters.)
• When deselected, Main Volume, Mute,
Solo, Record Enable, and Input Monitoring
controls follow the VCA Master, but also remain available for independent linking
with groups.
Include Sends in Trim Mode (Pro Tools HD and
Complete Production Toolkit 2 Only) This option
determines the Trim status of Send faders when
a track is put in Trim mode.
• When selected, Send faders go into Trim
mode along with the Main Volume fader.
• When deselected, the Main Volume fader
goes into Trim mode, but the Send fader
stays in the corresponding standard Automation mode.
Include Control Changes in Undo Queue This option determines whether certain mixer control
changes, such as moving a fader or pan control,
are entered into the Undo queue.
• When selected, mixer control changes appear in the Undo queue, and are undone if
any prior operation is undone.
• When deselected, mixer control changes
will not appear in the undo queue, allowing you to undo other types of operations
without losing the current mixer settings.
Any “set to default” operations that affect mixer
controls will be entered into the Undo queue.
Chapter 11: Setup Menu 77
Page 88

AutoMatch Time If you are writing automation
in Touch mode, when you release a fader or control, writing of automation stops and the automation data returns to its previous value. The
rate of return to the previous value is the AutoMatch Time.
AutoGlide Time (Pro Tools HD and Complete Production Toolkit 2 Only) Specifies how quickly
Pro Tools transitions (glides) from one automation value to another, when AutoGlide mode is
used.
After Write Pass, Switch To Selects the Automation mode that Pro Tools tracks automatically
switch to after an automation pass in Write (or
Write Trim) mode. You can choose to switch to
Touch or Latch mode, or stay in Write mode by
selecting No Change. After an automation pass
in Write Trim mode, tracks automatically switch
to the Trim version of the specified setting.
Coalesce Trim Automation Options
(Pro Tools HD and Pro Tools with Complete
Production Toolkit 2 Only)
These options determine when Trim automation is committed to the main automation playlist on a track.
After Every Pass Sets Trim automation to coalesce when the transport is stopped at the end
of each Trim automation pass. No Composite
Playlist is indicated.
Processing Preferences
AudioSuite Section
Use AudioSuite Dither When selected, certain
AudioSuite plug-ins automatically apply dither
when processing. AudioSuite plug-ins that support automatic dithering include: Gain, Normalize, Smack!, and Sonic NoNOISE.
Plug-in Specifies the plug-in used for dither processing when the Use AudioSuite Dither option
is selected.
Bit Depth Lets you select a bit depth for the dithered audio (24-bit, 20-bit, 18-bit, or 16-bit).
On Exiting Trim Mode Sets Trim Automation to
coalesce on a track when the track is taken out of
Trim mode. A Composite Playlist can be viewed
before committing Trim moves.
Manually Trim Automation can be coalesced
only with the Coalesce Trim Automation command. A Composite Playlist can be viewed before committing Trim moves.
Menus Guide78
Page 89

Import Section
Convert Imported WAV Files To AES31/BroadcastWave When selected, this option applies to
all newly imported WAV files, making them
compliant with the AES31/EBU Broadcast standard.
Automatically Copy Files on Import When selected, all audio files that are imported by dragging and dropping are copied to the current session’s Audio Files folder, regardless of whether
the files need to be converted to the current session’s file type, bit depth or sample rate. Additionally, when selected, the Import Session Data
dialog defaults to “Copy from Source Media.”
The Automatically Copy Files on Import preference does not affect the Import Audio command.
Import REX Files as Region Groups When selected, REX flies are imported as region groups,
all the underlying slices are imported as individual regions contained within the region group.
When this option is not selected, importing REX
files into a session converts them to the session’s
audio file format, the individual slices are consolidated, and the slice information is used for
Elastic Audio analysis. These files remain tickbased after import and conversion.
Automatically Create Fades When selected,
crossfades are applied automatically to the
sliced regions within region groups created by
importing REX files. If the Import REX Files as
Region Groups option is not selected, the Automatically Create Fades option is not available.
To change the default fade settings for REX files,
click the REX button in the Default Fade Settings
section on the Editing Preferences page.
Drag and Drop From Desktop Conforms to
Session Tempo
The Drag and Drop From Desktop Conforms to
Session Tempo options determine whether or
not REX, ACID, and audio files are imported as
tick-based Elastic Audio and conformed to the
session tempo.
None When enabled, REX and ACID files, and
all other audio files are not conformed to the
session tempo when imported by drag and drop
from Windows Explorer or the Mac Finder. They
are imported as sample-based files and converted to the sessions audio file format.
REX and ACID Files Only When enabled, only
REX and ACID files are conformed to the session
tempo when imported by drag and drop from
Windows Explorer or the Mac Finder. REX files
are imported either as tick-based Elastic Audio
or, if the Import REX Files as Region Groups option is enabled, as tick-based region groups.
All Files When enabled, all audio files imported
imported by drag and drop from Windows Explorer or the Mac Finder are imported as tickbased Elastic Audio and conform to the session
tempo.
Sample Rate Conversion Quality
The Sample Rate Conversion Quality preference
lets you select the default sample rate conversion quality for importing audio files by drag
and drop from any DigiBase browser, or Windows Explorer, or Mac Finder. The higher the
quality of sample rate conversion you choose,
the longer Pro Tools will take to process the audio file.
Chapter 11: Setup Menu 79
Page 90

TC/E (Time Compression/Expansion) Section
TC/E Plug-in Lets you choose the plug-in used
for Time Compression and Expansion when you
edit audio with the Time Compression/Expansion Trim tool. This Trim tool works by using
Time Compression/Expansion to match an audio region to the length of another region, a
tempo grid, a video scene, or other reference
point.
Default Settings Specifies the default settings
used by the chosen Time Compression/Expansion plug-in.
Elastic Audio Section
These preferences determine Elastic Audio usage
and settings on new tracks, as well as for previewing and importing tick-based audio.
Default Plug-in Lets you select any Real-Time
Elastic Audio plug-in as the default for previewing and importing Elastic Audio. The selected
Default Elastic Audio plug-in is also used when
new tracks are created with the Enable Elastic
Audio on New Tracks option enabled.
Default Input Gain Lets you attenuate the signal
input to Elastic Audio plug-ins by 0 to –6 dB for
preview and import. If you experience clipping
due to Elastic Audio processing during preview
or after import, you may want to set the Default
Input Gain to slightly attenuate the audio signal
input for Elastic Audio processing. This preference also applies to any audio imported to an
Elastic Audio–enabled track.
Enable Elastic Audio on New Tracks When selected, new tracks are created with Elastic Audio
enabled. The selected Default Plug-in is used.
If the Enable Elastic Audio on New Tracks
option is selected, you may want to also select the New Tracks Default to Tick Timebase option in the Editing Preferences page.
DSP Management Section
(Pro Tools|HD Systems Only)
These preferences determine DSP management
behavior for converting TDM plug-ins to RTAS
and also for the HEAT software option.
Open Unresourced TDM Plug-ins as RTAS When
this option is enabled, any TDM plug-ins that
exceed the available TDM processing are converted to RTAS format plug-ins wherever possible. When this option is disabled, any TDM
plug-ins that exceed the available TDM processing are made inactive.
Enable HEAT in New Sessions When enabled,
new sessions are created with HEAT enabled for
all audio tracks. When disabled, HEAT is disabled in new sessions by default. This option is
only available if the HEAT software option is installed.
The Elastic Properties window inherits the Default Input Gain preference. To apply further region-based Input Gain for Elastic Audio processing, select the region and adjust the Input Gain
setting in the Elastic Properties window.
Menus Guide80
Page 91
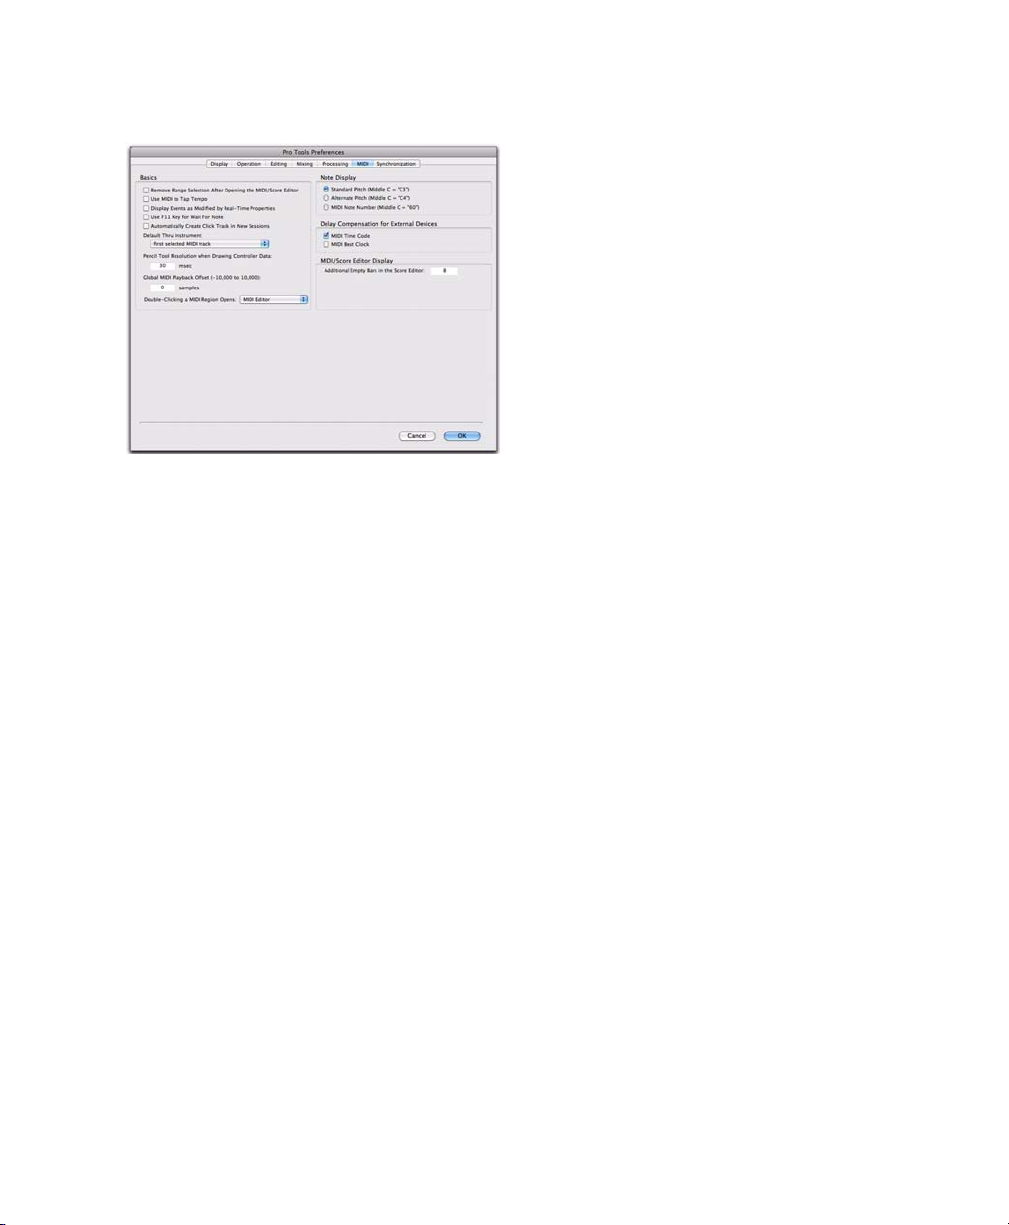
MIDI Preferences
Basics Section
Remove Range Selection After Opening the
MIDI/Score Editor When selected, the current
Edit selection collapses into an insertion point
after opening either a MIDI Editor window or
the Score Editor window.
Use MIDI to Tap Tempo When selected, you can
tap a MIDI keyboard to enter a new tempo value
into a tempo field.
Display Events as Modified by Real-Time Properties When selected, Pro Tools displays the ef-
fects of Real-Time Properties in both the Edit
window and the MIDI Event List.
Default Thru Instrument Sets the default MIDI
Thru instrument. You can select a predefined
de vice from y our ava ilable MIDI instruments, or
select “First Selected MIDI Track” to use the assigned MIDI output of the first selected MIDI or
Instrument track. When multiple MIDI or Instrument tracks are selected, the instrument in
the selected track that is closest to the top of the
Edit window (or closest to the left edge of the
Mix window) will be used.
Pencil Tool Resolution When Drawing Controller
Data Sets the default resolution for MIDI con-
troller data created with the Pencil tool. Setting
this to a lower resolution helps avoid creating
controller data that is unnecessarily dense. The
value range is from 1 to 100 milliseconds.
Global MIDI Playback Offset Sets an offset in
samples to compensate for MIDI latency. Entering a value here has the same effect as setting an
offset with the MIDI Track Offsets command.
Offset values can be positive (later) or negative
(earlier).
Double-clicking a MIDI Region Opens
This option lets you specify what happens when
you double-click MIDI regions on MIDI and Instrument tracks in the Edit window.
MIDI Editor Opens the MIDI region in a MIDI
Editor window.
Use F11 Key for Wait for Note When selected,
pressing the F11 Function key puts MIDI recording in Wait for Note mode.
Automatically Create Click Track in New Sessions
When enabled, Pro Tools automatically creates
a new click track in new sessions.
Score Editor Opens the MIDI region in the Score
Editor window.
MIDI Event List Opens the MIDI region in the
MIDI Event List.
Name Dialog Opens the Name dialog for the
MIDI region.
Chapter 11: Setup Menu 81
Page 92

Note Display Options
These options set the reference for middle C as
C3, C4, or MIDI note number 60.
Delay for External Devices Section
(Pro Tools HD Only)
These options only apply when a Delay Compensation Engine is chosen in the Playback Engine dialog and Delay Compensation is enabled
in Pro Tools These options are distinct from the
hardware offsets available for hardware inserts
in the I/O Setup.
MIDI Time Code When selected, Pro Tools applies Delay Compensation to Pro Tools-generated MIDI Time Code.
MIDI Beat Clock When selected, PRo Tools applies Delay Compensation to Pro Tools-generated MIDI Beat Clock.
MIDI/Score Editor Display
Additional Empty Bars in the Score Editor Lets
you specify the default number of empty bars
that appear in the Score Editor window after the
end of the last MIDI region in the session.
Synchronization Preferences
These preferences determine how a connected
transport responds to Pro Tools.
Machine Control Section
Machine Chases Memory Location When selected, navigating to a specific location in a session with a Memory Location causes a connected transport to chase to that location.
Machine Follows Edit Insertion/Scrub When selected, navigating to a specific location in a session by moving the selection point or by scrubbing a track will cause a connected transport to
chase to that location.
When the connected device is a linear device
(such as a tape deck), choose “Linear Devices
(jog)” to set Pro Tools to send jog commands.
When the connected device is a non-linear device (such as a random-access video recorder or
another Pro Tools system), choose “Non-Linear
Devices (cue)” to set Pro Tools to send cue commands.
Menus Guide82
Page 93

Machine Cues Intelligently (Pro Tools HD Only)
When selected, if you navigate to a cue point
that is more than 10 seconds from the current
location, Pro Tools will command a connected
transport to fast wind to the new location at full
speed to within 10 seconds of the cue point.
Cueing will then slow to normal speed until the
point is reached. This can significantly speed up
tape cueing with certain video transports.
Stop at Shuttle Speed Zero (Pro Tools HD Only)
Causes Pro Tools to send a Stop command
whenever you stop shuttling. This is useful if
you have a machine that requires an explicit
stop command to park correctly.
Non-Linear Transport Error Suppression (Pro Tools
HD Only) When Transport = Pro Tools, keeps
Pro Tools from sending a Stop command when
taken offline. This prevents Pro Tools from stopping any other 9-pin devices connected to the
system.
Delay Before Locking to Time Code (Pro Tools HD
Only) Sets the amount of time (in frames) for
Pro Tools to wait before attempting to lock to
machines that issue servo lock messages. This
setting allows time for the servo mechanisms to
achieve stable lock.
Remote Mode (9-Pin Deck Emulation)
Section
(Pro Tools HD Only)
Ignore Track Arming Sets Pro Tools to ignore in-
coming track arming (record enable) commands. This is useful if you are using a master
controller to arm tracks on other machines, but
you do not want to arm tracks in Pro Tools.
Set Servo Lock Bit at Play Enable this option
when using a synchronizer to control Pro Tools
in Remote mode to minimize lock-up times during recording.
Allow Track Arm Commands in Local Mode Sets
Pro Tools to respond to incoming track arming
(record enable) commands even when the system is not in Remote Mode. This is useful if you
are using a paddle device to control Pro Tools
track arming or punching.
Punch In Frame Offset Sets an offset (in frames)
to compensate for punch in timing advances or
delays.
Punch Out Frame Offset Sets an offset (in frames)
to compensate for punch out timing advances
or delays.
Delay After Play Command Sets the amount of
time (in frames) for Pro Tools to wait after receiving a Play command before starting the audio engine. This can prevent false starts when
locking to synchronizers that are not fully supported by Pro Tools.
Chapter 11: Setup Menu 83
Page 94

Synchronization Section
Minimum Sync Delay Sets the initial amount of
prime time (in frames) your system’s devices
need to achieve synchronization “lock.”
This amount varies for each device. Pro Tools
lock up delay is set by entering a value for Minimum Sync Delay in the Synchronization page
of the Preferences dialog. The lowest value available is 15 frames. Find the shortest possible lockup time that your equipment can operate at
consistently, and set this as the Minimum Sync
Delay. On systems utilizing the MachineControl
software option, enabling the Use Serial Time
Code setting will make machines lock up much
faster. (Serial time code requires both a qualified
synchronization peripheral and external devices
to be locked to house video reference.)
Delay Before Locking to Longitudinal Time Code
(Pro Tools HD Only) Sets the amount of time (in
frames) for Pro Tools to lock to incoming LTC.
Use this option when locking Pro Tools to a stable time code source (such as a non-linear tape
machine or LTC generator) and not a linear tape
machine.
Delay Before Locking to Serial Time Code
(Pro Tools HD Only) Sets the amount of time (in
frames) for Pro Tools to wait before attempting
to lock to machines that issue servo lock messages. This setting allows time for the servo
mechanisms to achieve stable lock.
Satellite Link Section
(Pro Tools HD with Satellite Link Option on
Mac Only)
Transmit Solos Causes a linked Pro Tools system
to send the solo status of its tracks to all other
linked Pro Tools systems. On other linked systems that are set to receive solos, tracks follow
solo behavior as if the solo were on the local system.
Receive Solos Causes a linked Pro Tools system
to receive solos from all other linked Pro Tools
systems that are set to transmit solo status of
their tracks. Tracks on the receiving system follows solo behavior as if the solos were on the local system.
Solo Independent of Linked State Causes a
Pro Tools system to send the solo status of its
tracks to other satellite systems even when it is
unlinked. This allows control of solo status
across systems even when transport control is
not enabled.
DAE Errors Stop All Linked Systems Causes a
DAE error on any linked Pro Tools system to
stop the transport on all linked systems. When
this option is not selected, linked systems will
not stop if a DAE error occurs on one system.
Transmit Play Selections Causes a linked
Pro Tools system to send the Edit window selection to all other linked Pro Tools systems. On
other linked systems that are set to receive play
selections, the selection is mirrored in the Edit
window.
Receive Play Selections Causes a linked
Pro Tools system to receive Edit window selections from all other linked Pro Tools systems
that are set to transmit play selections.
Satellite Link lets you link and unlink networked systems, assign names to systems, and
see the link status of other connected systems.
Menus Guide84
Page 95

chapter 12
Window Menu
The Window menu provides commands to toggle the display of various Pro Tools windows: selecting the command displays the window; selecting the command again hides the window.
For Window menu items, keyboard shortcuts with number keys only work using the
numeric keypad on your computer.
Configurations
The Configurations menu provides commands
and options to manage the configuration of
windows in your session, as well as the internal
window configurations of the Edit, Mix, Transport, MIDI Editor, and Score Editor windows.
Window Configuration List
This command displays the Window Configuration List, which lets you recall and manage
stored Window Configurations, as well as create
new Window Configurations.
New Configuration
This command displays the New Configuration
dialog, which lets you create a new Window
Configuration.
Update Active Configuration
This command updates the selected Window
Configuration with any changes to the layout
and settings of windows depending on the Window Configuration’s properties.
Auto-Update Active Configuration
This command automatically updates the active
Window Configuration as you make changes to
the layout and settings of windows.
Arrange
The Arrange commands tile or cascade all open
windows. Floating windows (such as plug-in,
output, and send windows) and the Transport
window are not affected by these commands.
Tile Arranges all open windows in a tiled pattern
on the screen.
Tile Horizontal Arranges all open windows in a
horizontally-tiled pattern on the screen. This
option is not available if there are too many
windows open.
Tile Vertical Arranges all open windows in a vertically-tiled pattern, side by side, on the screen.
This option is not available if there are too many
windows open.
Chapter 12: Window Menu 85
Page 96

Cascade Arranges all open windows in a cascading pattern on the screen.
Hiding All Floating Windows
The Hide All Floating Windows command hides
or shows all floating windows. This command is
useful for clearing the screen quickly so that you
can work in the Edit or Mix windows.
Score Editor
This command displays a Score Editor window,
which is used to view, edit, arrange, and print
MIDI from your session as music notation. A
check mark indicates that the Score Editor is
foremost window in the display. A diamond indicates that the Score Editor is not in front.You
can have multiple Score Editor windows open
Mix
This command displays the Mix window, used
for recording and mixing tasks.
Edit
This command displays the Edit window, used
for graphical editing and arranging of audio,
MIDI and automation.
MIDI Editor
This command displays a MIDI Editor window,
which is used to display and edit MIDI data for
one or more MIDI or Instrument tracks. A check
mark indicates that the MIDI Editor is the foremost window in the display. A diamond indicates that the MIDI Editor is not in front. You
can have multiple MIDI Editor windows open.
MIDI Event List
This command opens the MIDI Event List window. This floating window shows the contents
of a MIDI track in a single list, so you can
quickly insert, edit, or locate any type of MIDI
data using your computer keyboard. A check
mark indicates that the MIDI Event List is the
foremost window in the display. A diamond indicates that the MIDI Event List is not in front.
MIDI Editors
These commands allow you to choose which
Midi Editor or Score Editor window is foremost
on the screen.
Bring to Front This command brings the MIDI
Editor or Score Editor window to the front.
Send to Back This command sends the MIDI Editor or Score Editor window to the back, behind
the Edit window.
Midi Editor Window List This list shows any open
MIDI Editor or Score Editor windows. Selecting a
window from the list brings the window to the
front.
Menus Guide86
Page 97

Task Manager
Transport
This command displays the Task Window, used
to monitor, pause, or cancel ongoing tasks.
Workspace
This command displays the Workspace browser,
which can be used for searching, sorting, auditioning, and importing data. The Project, Volume, and Catalog browsers can be accessed from
the Workspace browser.
Project
This command displays the Project Browser,
used for Pro Tools file management with the
current session.
For more information on the Task window,
Workspace, Project, and other browsers, see
the DigiBase and DigiBase Pro Guide.
This command opens the Transport window.
This window can display counters, MIDI controls, and basic or expanded transport controls
(configure the Transport window from View >
Transport).
Tra nsport window
Big Counter
This command opens the Big Counter window.
This window provides a large, easy to see reference for the current session time location. Time
is displayed in the currently chosen Main Time
Scale format.
Big Counter window
Browsers
Use the Browsers command to select a currently
open browser and bring it to the front. The
Browsers submenu can also be used to bring all
currently open browsers to the front, or send all
browsers to the back. Choices include Bring to
Front, and Send to Back.
Chapter 12: Window Menu 87
Page 98

Automation
Memory Locations
This command opens the Automation window.
This window lets you enable or suspend the
writing of volume, pan, mute, plug-in, send
level, send pan, and send mute automation for
all tracks.
Automation window (Pro Tools HD shown)
Before you can record automation, an automation type must be enabled. Buttons are highlighted when enabled. To suspend writing of automation, deselect the button for the
automation type.
This command opens the Memory Locations
window. Here you can store up to 200 time location markers, selections, zoom settings, pre- and
post-roll times, track show and hide states, track
height states, and group enables. To recall a
memory location, click the button for the location or, on your computer’s numeric keypad,
press the number of the location followed by a
period (.).
Memory Locations window
Machine Track Arming
(Pro Tools HD with MachineControl Option
Only)
This command opens the Machine Track Arming window on systems that have the MachineControl option installed. When using MachineControl, this window lets you record-arm
external recording devices from within
Pro Tools.
Menus Guide88
Page 99

Video Universe
Color Palette
(Pro Tools HD, and Pro Tools with
Compete Production Toolkit 2 Only)
This command opens the Video Universe window. The Video Universe lets you view, navigate, zoom, and select video regions on the
main video track.
The Video Universe window displays the center
video frame of each video region in the main
video track. Video frames are ordered sequentially according to their order in the Timeline,
and the colored strip under each frame represents the color coding for that region.
Video
This command opens the Video window, which
displays QuickTime movies imported into the
current session using the File > Import > Video
command. This window also displays Avid
Video when it is being scrubbed.
The window provides a sample-accurate, random-access reference for spotting sound effects,
music, Foley, dialog, or other audio to the video.
This command opens the Color Palette window.
Use this window to make color selections for
tracks, regions, groups and markers.
Color Palette window
Undo History
This command opens the Undo History window. Use this window to view a list of undoable
and redoable operations and return to any previous state. The Undo History can show editing
times, enabling you to revert to the state a session held at a particular time.
Video window
Undo History window
Chapter 12: Window Menu 89
Page 100

Disk Space
DSP Cache
pop-up menu
This command opens the Disk Space window.
This window shows the recording capacity of
each hard drive attached to your system, measured in track minutes. This calculation is based
on the bit depth and sample rate of the current
session.
Disk Space window
System Usage
This command opens the System Usage window. This window provide meters that indicate
how much of your system’s processing power is
being used in processing audio, and when writing and playing back automation.
All Pro Tools systems have four common system
activity meters:
•PCI
•CPU (RTAS)
•CPU (Elastic)
•Disk
System Usage window (Pro Tools HD shown)
With Pro Tools|HD systems, there is also the DSP
Cache pop-up menu, that lets you choose Use
DSP Cache (facilitating quicker session loading
times) or Purge Cache (giving you a more accurate display of current DSP usage).
With Pro Tools|HD systems (TDM), there are additional meters:
• TDM Voices Allocated
•TDM Time Slots Used
• DSP Chip Usage (Accel Core, HD Core
HD Accel, and HD Process
Menus Guide90
™ cards)
™,
DSP Cache pop-up menu (Pro Tools HD shown)
 Loading...