

Page 1

Upgrading to Pro Tools 7.3
Version 7.3
Page 2

Copyright
This guide is copyrighted ©2007 by Digidesign, a division of
Avid Technology, Inc. (hereafter “Digidesign”), with all rights
reserved. Under copyright laws, this guide may not be
duplicated in whole or in part without the written consent of
Digidesign.
Avid, Digi 002, Digi 002 Rack, Digidesign, M-Audio, Mbox,
Pro Tools, Pro Tools Academic, Pro Tools|HD, Pro Tools LE,
Pro Tools M-Powered, and RTAS are trademarks or registered
trademarks of Digidesign and/or Avid Technology, Inc. All
other trademarks are the property of their respective owners.
Product features, specifications, system requirements, and
availability are subject to change without notice.
PN 9320-17752-00 REV A 1/07
Page 3

contents
Chapter 1. Introduction
. . . . . . . . . . . . . . . . . . . . . . . . . . . . . . . . . . . . . . . . . . . . . . . . . . . . . . 1
Chapter 2. Installing Pro Tools on Windows
Windows System Optimization
Installing Pro Tools HD Software
Installing Pro Tools LE Software
Installing Pro Tools M-Powered Software
Installing Pro Tools Academic Software
Installing QuickTime
Launching Pro Tools HD Software
Launching Pro Tools LE Software
Launching Pro Tools M-Powered
Launching Pro Tools Academic
Configuring Pro Tools
Additional Software on the Pro Tools Installer Disc
Removing Pro Tools
. . . . . . . . . . . . . . . . . . . . . . . . . . . . . . . . . . . . . . . . . . . . . . . . . . . . . 10
. . . . . . . . . . . . . . . . . . . . . . . . . . . . . . . . . . . . . . . . . . . . . . . . . . . . . 12
. . . . . . . . . . . . . . . . . . . . . . . . . . . . . . . . . . . . . . . . . . . . . . . . . . . . . . 14
Chapter 3. Installing Pro Tools on Mac
Mac System Optimization
Installing and Launching Pro Tools HD Software
Installing and Launching Pro Tools LE Software
Installing and Launching Pro Tools M-Powered Software
Installing and Launching Pro Tools Academic Software
Configuring Pro Tools
Additional Software on the Pro Tools Installer Disc
Removing Pro Tools
. . . . . . . . . . . . . . . . . . . . . . . . . . . . . . . . . . . . . . . . . . . . . . . . . . . . . 21
. . . . . . . . . . . . . . . . . . . . . . . . . . . . . . . . . . . . . . . . . . . . . . . . . . . . . . 23
. . . . . . . . . . . . . . . . . . . . . . . . . . . . . . . . . . . . . . . . . . . . . . . 3
. . . . . . . . . . . . . . . . . . . . . . . . . . . . . . . . . . . . . . . . . . . . . . 6
. . . . . . . . . . . . . . . . . . . . . . . . . . . . . . . . . . . . . . . . . . . . . . 8
. . . . . . . . . . . . . . . . . . . . . . . . . . . . . . . . . . . . . . . . 9
. . . . . . . . . . . . . . . . . . . . . . . . . . . . . . . . . . . . . . . . 10
. . . . . . . . . . . . . . . . . . . . . . . . . . . . . . . . . . . . . . . . . . . . 11
. . . . . . . . . . . . . . . . . . . . . . . . . . . . . . . . . . . . . . . . . . . . 11
. . . . . . . . . . . . . . . . . . . . . . . . . . . . . . . . . . . . . . . . . . . . . 11
. . . . . . . . . . . . . . . . . . . . . . . . . . . . . . . . . . . . . . . . . . . . . . 12
. . . . . . . . . . . . . . . . . . . . . . . . . . . . . . . . . . . . . . . 15
. . . . . . . . . . . . . . . . . . . . . . . . . . . . . . . . . . . . . . . . . . . . . . . . . 15
. . . . . . . . . . . . . . . . . . . . . . . . . . . . . . . . . . . . 3
. . . . . . . . . . . . . . . . . . . . . . . . . . . . . . . . 12
. . . . . . . . . . . . . . . . . . . . . . . . . . . . . . . . . . 16
. . . . . . . . . . . . . . . . . . . . . . . . . . . . . . . . . . 18
. . . . . . . . . . . . . . . . . . . . . . . . . . . . 19
. . . . . . . . . . . . . . . . . . . . . . . . . . . . . 20
. . . . . . . . . . . . . . . . . . . . . . . . . . . . . . . . 21
Contents
iii
Page 4

Appendix A. Configuring MIDI Studio Setup (Windows Only)
MIDI Studio Setup
MIDI Patch Name Support
. . . . . . . . . . . . . . . . . . . . . . . . . . . . . . . . . . . . . . . . . . . . . . . . . . . . . . 25
. . . . . . . . . . . . . . . . . . . . . . . . . . . . . . . . . . . . . . . . . . . . . . . . . 27
. . . . . . . . . . . . . . . . . . . . 25
Appendix B. Configuring AMS (Mac OS X Only)
Audio MIDI Setup
MIDI Patch Name Support
. . . . . . . . . . . . . . . . . . . . . . . . . . . . . . . . . . . . . . . . . . . . . . . . . . . . . . . 29
. . . . . . . . . . . . . . . . . . . . . . . . . . . . . . . . . . . . . . . . . . . . . . . . . 32
. . . . . . . . . . . . . . . . . . . . . . . . . . . . . . . 29
Upgrading to Pro Tools 7.3
iv
Page 5

chapter 1
Introduction
This guide documents how to upgrade to
Pro Tools
Pro Tools LE™, Pro Tools M-Powered™, and
Pro Tools Academic™ systems on a Digidesign
qualified Windows or Mac computer.
®
7.3 for Pro Tools HD®,
Before installing this version of Pro Tools,
refer to the Read Me information included
on the Pro Tools Installer disc.
If you are configuring a new Pro Tools system, follow the complete hardware and software installation steps in the
Started Guide that came with your system.
Getting
System Requirements
Pro Tools software can be used on a
Pro Tools|HD, Pro Tools LE, Pro Tools M-Pow-
®
ered, or Pro Tools Academic system on a Digi-
design-qualified Windows or Mac computer.
For complete system requirements, visit the
Digidesign website (www.digidesign.com).
Compatibility Information
Digidesign can only assure compatibility and
provide support for hardware and software it
has tested and approved.
For a list of Digidesign-qualified computers, operating systems, hard drives, and third-party devices, refer to the latest compatibility information on the Digidesign website
(www.digidesign.com).
Chapter 1: Introduction
1
Page 6

Upgrading to Pro Tools 7.3
2
Page 7

chapter 2
Installing Pro Tools on Windows
This chapter explains how to install and configure Pro Tools for Pro Tools|HD, Pro Tools LE,
Pro Tools M-Powered, and Pro Tools Academic
systems on a Digidesign-qualified Windows
computer.
For complete system requirements and compatibility information, visit the Digidesign website
(www.digidesign.com).
Before installing this version of Pro Tools,
refer to the Read Me information included
on the Pro Tools Installer disc.
Windows System Optimization
Before configuring your computer, make sure
you are logged in as an Administrator for the account where you want to install Pro Tools. For
details on Administrator privileges, refer to your
Windows documentation.
Required Optimizations
To ensure optimum performance with
Pro Tools LE, configure the following settings
before you install Pro Tools hardware and software.
Enabling DMA
Enabling your computer's DMA (Direct Memory
Access) frees up CPU bandwidth so the computer can do other Pro Tools tasks.
In most cases the DMA option will already be set
correctly, as Windows XP detects and activates
DMA mode by default.
To enable DMA for any IDE hard drives:
1
Choose Start > Control Panel.
2
In Classic View, double-click System.
3
Click the Hardware tab.
4
Under Device Manager, choose Device Man-
ager.
5
In the Device Manager window, double-click
IDE ATA/ATAPI controllers, then double-click
the Primary IDE Channel for your IDE hard
drive.
6
Click the Advanced Settings tab.
7
For each device, set the Transfer Mode to
“DMA if available,” and click OK.
8
Repeat steps 5–7 for any additional IDE Channels.
When you are finished changing Windows
system settings, restart your computer.
9
Close the Computer Management window.
Chapter 2: Installing Pro Tools on Windows
3
Page 8

Disabling System Standby and Power Management
When using Pro Tools, the Windows System
Standby power scheme must be set to Always
On. This helps prevent long record or playback
passes from stopping due to system resources
powering down.
To configure Windows Power Management:
1
Choose Start > Control Panel.
2
Double-click Power Options.
3
Click the Power Schemes tab.
4
From the Power Schemes pop-up menu, select
Always On.
5
Click OK.
This sets System Standby, System Hibernate,
and “Turn off hard disks” to Never.
On AMD processors, be sure to check and
disable Cool N’Quiet in the System BIOS (in
the Cool & Quiet Configuration section).
Refer to the manufacturer’s documentation
for instructions on disabling this power option, if necessary.
Disabling ClearType Font Smoothing
When using Pro Tools, the Effects “Clear Type”
setting must be disabled.
To disable ClearType font smoothing:
1
Choose Start > Control Panel.
2
Double-click Display.
3
Click the Appearance tab.
4
Click Effects.
5
Deselect “Use the following method to
smooth edges of screen fonts.”
6
Click OK to save your settings and close the
Effects dialog.
7
Click OK.
8
Restart the computer.
Recommended Optimizations
Pro Tools can also be affected by other software
and hardware drivers installed on your computer. It is recommended (but not required) that
you do the following:
• Avoid running any unneeded programs at
the same time as Pro Tools.
• Turn off any software utilities that run in
the background, such as Windows Messenger, calendars, and disk maintenance programs.
• Turn off any nonessential USB devices
while running Pro Tools.
• If your video display card supports it, enable Bus Mastering in the manufacturer’s
Control Panel. Refer to the manufacturer’s
instructions for details.
Upgrading to Pro Tools 7.3
4
Page 9

Optional Optimizations
The following system optimizations may help
Pro Tools perform better on some systems. It is
recommended that you only try these optimizations if necessary, as they may disable or adversely affect the functionality of other programs on your system.
Disabling Network Cards
If applicable, disable any networking cards
(other than a FireWire card that you might use
to connect an external drive to your system).
To disable a network card:
1
Right-click My Computer and choose Man-
age.
2
Under System Tools, select Device Manager.
3
In the Device Manager window, double-click
Network adapters, then double-click the Network Adapter card you want to disable.
4
Under the General tab, choose “Do not use
this device (disable)” from the Device Usage
pop-up menu, and click OK.
5
Close the Computer Management window.
Adjusting Processor Scheduling
To Adjust Processor Scheduling Performance:
1
Choose Start > Control Panel.
6
Under the Processor scheduling section, select
the Background Services option.
7
Under the Memory Usage section, select the
System cache option.
8
Click OK to close the Performance Options
window.
9
Click OK to close the System Properties win-
dow.
10
Restart the computer for the changes to take
effect.
Disabling Hyper-Threading
Pro Tools LE takes advantage of the added processing power of computers that have multiple
processors, or that feature multi-core processing
or Hyper-Threading, for RTAS processing.
However, if you set the number of processors
available for RTAS processing to 1 (in the
Pro Tools Playback Engine dialog), some computers with hyperthreading capability may experience decreased performance.
If this occurs, you can increase the number of
RTAS processors in the Playback Engine dialog,
or you can disable Hyper-Threading on the computer.
Refer to your computer’s documentation for
steps on how to enter the computer’s BIOS and
disable Hyper-Threading.
2
In Classic View, double-click System.
3
Click the Advanced tab.
4
Under the Performance section, click the Settings button.
5
In the Performance Options window, click the
Advanced tab.
Disabling System Startup Items
The fewer items in use by your computer, the
more resources are available for Pro Tools. Some
startup applications may be consuming unnecessary CPU resources, and should be turned off.
Chapter 2: Installing Pro Tools on Windows
5
Page 10

If you disable any of the following startup items,
do so carefully:
• Portable media serial number (required for
applications that utilize a copy protection
key)
• Plug and play
• Event log
• Cryptographic services
• DHCP Client, TCP/IP Net BIOS, and other
networking-related items (unless the computer has no network or internet connection, in which case these items can be
disabled)
Installing Pro Tools HD Software
(Pro Tools|HD Systems Only)
To install Pro Tools HD software:
1 If you have Media Station|PT or Media Sta-
tion|V10 installed on your system, uninstall it
before proceeding.
For details on uninstalling Media Station|PT or Media Station|V10, see the Avid
Video Peripherals Guide.
To Disable System Startup Items:
1
From the Start menu, choose Run.
2
Type “msconfig” and click OK. The System
Configuration Utility opens.
3
Under the General tab, choose Selective
Startup.
4
Deselect Load Startup Items and click OK.
5
Click Restart to restart the computer.
6
After restarting, the computer displays a System Configuration message. Check to see if
Pro Tools performance has increased before you
deselect the “Don't show this message again”
option. If performance has not changed, run
“msconfig” and return your computer Selective
Startup back to Normal Startup. Alternatively,
try disabling Startup items and non-essential
processes individually.
2 Start Windows, logging in with Administrator
privileges. For details on Administrator privileges, refer to your Windows documentation.
3 Do one of the following:
• Insert the Pro Tools Installer disc for Windows in your CD/DVD drive. Locate and
open the Pro Tools Installer folder, and
double-click the Setup icon.
– or –
• If you downloaded the Pro Tools Update
from our website, follow the instructions
provided with it to expand and launch the
installer.
4 Follow the on-screen instructions to proceed
with installation.
5 Select the install location. For maximum reli-
ability, install Pro Tools on your startup drive.
6 Click Next.
7 Select the Pro Tools application for installa-
tion.
Upgrading to Pro Tools 7.3
6
Page 11

8 You can also select from a list of optional
items to install along with Pro Tools.
Mac HFS+ Disk Support Option This option lets
your Pro Tools system read, write, record, and
play back using Mac-formatted HFS+ disks. HFS+
disks are commonly referred to as Mac OS Extended disks.
Avid Video Engine The Avid Video Engine is required to use Pro Tools with Avid video peripherals such as the Avid Mojo or the Digidesign
AVoption|V10.
DigiTranslator DigiTranslator™ is a software option for Pro Tools that lets you convert and exchange OMF and AAF sequences and MXF files
directly in the Pro Tools application. This option is purchased separately.
MachineControl Digidesign MachineControl™
is a software option that lets you control external audio/video devices from Pro Tools using serial 9-pin protocols. This option is purchased
separately.
Command|8 Controller and Driver The Command|8 Driver is required if you are using the
Digidesign Command|8 control surface.
MP3 Export Option The MP3 Export Option lets
you export MP3 files from Pro Tools. This option is purchased separately.
9 Click Next.
12 Select whether to install the Surround Mixer
plug-in. This plug-in is required for mixing,
mastering, and monitoring in surround.
• Select “Yes – Monitor in Pro Tools Film Format” if your monitoring is configured for
Film Format surround.
• Select “Yes – Monitor in ProControl (DTS
Format)” if you are using a ProControl dedicated controller.
• Select “No – Stereo mixing only” if your
monitoring is configured for Stereo.
AFL/PFL Solo modes require the Surround
Mixer plug-in. See the Pro Tools Reference
Guide for more information.
13 Click Next.
14 Click Install.
Windows will display several messages
during installation that can be ignored, including multiple “Found New Hardware”
dialogs and “A Problem Occurred During
Hardware Installation.”
15 Wait for the installer to finish installing all
software components, drivers, and PACE System
files before proceeding to the next step.
16 When installation is complete, click Finish.
17 Proceed to “Installing QuickTime” on
page 10.
10 Select your work environment. This loads an
initial set of Pro Tools Preferences that include
some of the more popular settings for post production, audio, or audio with MIDI.
Preference settings can be customized at any
time in Pro Tools. See the
ence Guide
11 Click Next.
for more information.
Pro Tools Refer-
Chapter 2: Installing Pro Tools on Windows 7
Page 12

Installing Pro Tools LE Software
(Digi 002, Digi 002 Rack, Mbox 2 Pro,
Mbox 2, Mbox 2 Mini, and Mbox Systems
Only)
To install Pro Tools LE:
1 Start Windows, logging in with Administrator
privileges. For details on Administrator privileges, refer to your Windows documentation.
2 Do one of the following:
• Insert the Pro Tools Installer disc for Windows in your CD/DVD drive. Locate and
open the Pro Tools Installer folder, and
double-click the Setup icon.
– or –
• If you downloaded the Pro Tools Update
from our website, follow the instructions
provided with it to expand and launch the
installer.
3 Follow the on-screen instructions to proceed
with installation.
DigiTranslator DigiTranslator™ is a software option for Pro Tools that lets you convert and exchange OMF and AAF sequences and MXF files
directly in the Pro Tools application. This option is purchased separately.
Command|8 Controller and Driver The Command|8 Driver is required if you are using the
Digidesign Command|8 control surface.
MP3 Export Option The MP3 Export Option lets
you export MP3 files from Pro Tools. This option is purchased separately.
8 Click Next.
9 Click Install.
Windows will display several messages
during installation that can be ignored, including multiple “Found New Hardware”
dialogs and “A Problem Occurred During
Hardware Installation.”
If you get a warning dialog about the driver
not passing Windows Logo testing, click
Continue Anyway.
4 Select the install location. For maximum reli-
ability, install Pro Tools on your startup drive.
5 Click Next.
6 Select the Pro Tools application for installa-
tion.
7 You can also select from a list of optional
items to install along with Pro Tools.
Mac HFS+ Disk Support Option This option lets
your Pro Tools system read, write, record, and
play back using Mac-formatted HFS+ disks. HFS+
disks are commonly referred to as Mac OS Extended disks.
Upgrading to Pro Tools 7.38
10 Wait for the installer to finish installing all
software components, drivers, and PACE System
files before proceeding to the next step.
11 When installation is complete, click Finish.
12 Proceed to “Installing QuickTime” on
page 10.
Page 13

Installing Pro Tools
M-Powered Software
(Pro Tools M-Powered Systems Only)
To install Pro Tools M-Powered:
1 Start Windows, logging in with Administrator
privileges. For details on Administrator privileges, refer to your Windows documentation.
2 Do one of the following:
• Insert the Pro Tools Installer disc for Windows in your CD/DVD drive. Locate and
open the Pro Tools Installer folder, and
double-click the Setup icon.
– or –
• If you downloaded the Pro Tools Update
from our website, follow the instructions
provided with it to expand and launch the
installer.
3 Follow the on-screen instructions to proceed
with installation.
4 Select the install location. For maximum reli-
ability, install Pro Tools on your startup drive.
9 Click Install.
Windows will display several messages
during installation that can be ignored, including multiple “Found New Hardware”
dialogs and “A Problem Occurred During
Hardware Installation.”
If you get a warning dialog about the driver
not passing Windows Logo testing, click
Continue Anyway.
10 Wait for the installer to finish installing all
software components, drivers, and PACE System
files before proceeding to the next step.
11 When installation is complete, click Finish.
12 Proceed to “Installing QuickTime” on
page 10.
5 Click Next.
6 Select the Pro Tools application for installa-
tion.
7 You can also select from a list of optional
items to install along with Pro Tools.
Command|8 Controller and Driver The Command|8 Driver is required if you are using the
Digidesign Command|8 control surface.
MP3 Export Option The MP3 Export Option lets
you export MP3 files from Pro Tools. This option is purchased separately.
8 Click Next.
Chapter 2: Installing Pro Tools on Windows 9
Page 14

Installing Pro Tools Academic Software
(Pro Tools Academic Systems Only)
To install Pro Tools Academic:
1 Start Windows, logging in with Administrator
privileges. For details on Administrator privileges, refer to your Windows documentation.
2 Do one of the following:
• Insert the Pro Tools Installer disc for Windows in your CD/DVD drive. Locate and
open the Pro Tools Installer folder, and
double-click the Setup icon.
– or –
• If you downloaded the Pro Tools Update
from our website, follow the instructions
provided with it to expand and launch the
installer.
9 Click Install.
Windows will display several messages
during installation that can be ignored, including multiple “Found New Hardware”
dialogs and “A Problem Occurred During
Hardware Installation.”
If you get a warning dialog about the driver
not passing Windows Logo testing, click
Continue Anyway.
10 Wait for the installer to finish installing all
software components, drivers, and PACE System
files before proceeding to the next step.
11 When installation is complete, click Finish.
12 Proceed to “Installing QuickTime” on
page 10.
3 Follow the on-screen instructions to proceed
with installation.
4 Select the install location. For maximum reli-
ability, install Pro Tools on your startup drive.
5 Click Next.
6 Select the Pro Tools application for installa-
tion.
7 You can also select from a list of optional
items to install along with Pro Tools.
Command|8 Controller and Driver The Command|8 Driver is required if you are using the
Digidesign Command|8 control surface.
MP3 Export Option The MP3 Export Option lets
you export MP3 files from Pro Tools. This option is purchased separately.
8 Click Next.
Upgrading to Pro Tools 7.310
Installing QuickTime
(All Pro Tools Systems)
QuickTime is required for Pro Tools if you plan
to include movie files, or import MP3 or MP4
(AAC) files in your sessions. QuickTime for Windows XP is available as a free download from the
Apple website (www.apple.com).
For information on which version of QuickTime is compatible with your version of
Pro Tools, visit the compatibility pages of
the Digidesign website
(www.digidesign.com).
To install QuickTime:
1 Visit www.apple.com and go to the Quick-
Time page.
2 Download the QuickTime installer applica-
tion to your computer.
Page 15

3 Double-click the QuickTime installer applica-
tion and follow the on-screen installation instructions.
Launching Pro Tools LE Software
4 Restart your computer.
If the USB LED on the front panel of the
Mbox 2 does not illuminate after installation, try unplugging the USB cable from the
Mbox 2 USB port, and plugging it back in.
If the USB LED still does not illuminate,
shut down the computer, disconnect
Mbox 2 and start the computer. Once the
computer has fully restarted, reconnect
Mbox 2.
Launching Pro Tools HD Software
To use Pro Tools HD, you must always have an
inserted iLok with an authorization for
Pro Tools HD. One pre-authorized iLok is included with your Pro Tools HD system.
To authorize Pro Tools HD software:
1 Insert the pre-authorized iLok into an avail-
able USB port on your computer.
2 Do one of the following:
• Double-click the Pro Tools HD shortcut on
the desktop.
– or –
• Locate and double-click the Pro Tools HD
application on your hard drive.
Do not remove the iLok during Pro Tools
launch or use.
When launching Pro Tools LE the first time, you
are prompted to enter an authorization code.
To authorize Pro Tools LE software:
1 Double-click the Pro Tools LE shortcut on
your desktop (or the application icon in the
Pro Tools folder inside the Digidesign folder).
2 Enter the authorization code in the dialog
(making sure to type it exactly as printed, and
observing any spaces and capitalization), then
click Validate.
Your authorization code is located on the inside
front cover of this guide.
Launching Pro Tools
M-Powered
To use Pro Tools M-Powered with an M-Audio
interface, you must always have an iLok with an
authorization for Pro Tools M-Powered. One
pre-authorized iLok is included with the
Pro Tools M-Powered package.
To authorize Pro Tools M-Powered software:
1 Insert the pre-authorized iLok into an avail-
able USB port on your computer.
2 Double-click the Pro Tools M-Powered short-
cut on your desktop (or the application in
Program Files\Digidesign\Pro Tools).
Do not remove the iLok during Pro Tools
launch or use.
Chapter 2: Installing Pro Tools on Windows 11
Page 16
Launching Pro Tools Academic
To authorize Pro Tools Academic software:
1 For Pro Tools Academic Standalone only, in-
sert the pre-authorized iLok into an available
USB port on your computer.
To use Pro Tools Academic Standalone
software with an M-Audio interface, you
must always have an iLok with an authorization for Pro Tools Academic. One pre-authorized iLok is included with your
Pro Tools Academic Standalone package.
2 Double-click the Pro Tools Academic shortcut
on your desktop (or the application in
Program Files\Digidesign\Pro Tools).
Refer to the electronic PDF version of the Getting
Started Guide that was installed with your software for instructions on configuring Pro Tools
settings.
Additional Software on the Pro Tools Installer Disc
The Pro Tools Installer disc provides additional
software for your system, including audio drivers (for playing other audio applications
through your Digidesign hardware) and a
Pro Tools demo session.
Refer to your Pro Tools Installer disc for additional software and installers.
For Pro Tools Academic Standalone, do not
remove the pre-authorized iLok during
Pro Tools launch or use.
3 For Pro Tools Academic bundled hardware kits
only, enter the authorization code in the dialog
(making sure to type it exactly as printed, and
observing any spaces and capitalization), then
click Validate.
Your authorization code is located on the inside
front cover of this guide.
Configuring Pro Tools
You can adjust the performance of your system
by changing certain Pro Tools system settings
that affect its capacity for processing, playback,
and recording.
In most cases, the default settings for your system provide optimum performance, but you
may want to adjust them to accommodate large
or processing-intensive Pro Tools sessions.
Pro Tools Demo Session
The Pro Tools Installer disc includes a demo session that you can use to verify that your system
is working.
To install the demo session:
1 Insert the Pro Tools Installer disc into your
CD/DVD drive.
2 From your CD/DVD drive, locate and open
the Additional Files/Pro Tools Demo Session Installer folder.
3 Double-click Setup.exe.
4 Select your audio drive as the install location
and click Install.
5 When installation is complete, click OK.
Upgrading to Pro Tools 7.312
Page 17

Windows Audio Drivers for Mbox 2 Pro
The Digidesign® ASIO Driver and DirectSound
Driver let you use your Digidesign Mbox® 2 Pro
hardware interface with third-party applications
that support the ASIO Driver or DirectSound
Driver standard.
The Digidesign ASIO Driver and DirectSound
Driver for Mbox 2 Pro are automatically installed when you install Pro Tools.
For specifications and configuration information specific to each driver, see the Windows Audio Drivers Guide.
Digidesign ASIO Driver
The Digidesign ASIO Driver is a single-client,
multichannel sound driver that allows thirdparty audio programs that support the ASIO
Driver standard to record and play back through
the Mbox 2 Pro audio interfaces.
For detailed information on configuring the
Digidesign ASIO Driver, see the Windows
Audio Drivers Guide.
Digidesign DirectSound Driver
The DirectSound Windows System Audio Driver
is a multi-client, multichannel sound driver that
allows third-party audio programs that support
the DirectSound standard to play back and
record through Mbox 2 Pro.
Standalone Digidesign Windows Audio Drivers
Digidesign Windows Audio Drivers can be installed on Windows systems that do not have
Pro Tools software installed. Use the standalone
version of the Digidesign Windows Audio Drivers installer (Digidesign Audio Drivers
Setup.exe), which is available on the Pro Tools
Installer disc.
Windows Audio Drivers for Most Pro Tools Interfaces
(Pro Tools|HD, Digi 002, Digi 002 Rack,
Mbox 2, Mbox 2 Mini, and Mbox Only)
The Digidesign ASIO Driver and WaveDriver
Windows System Audio Driver let you use your
Digidesign hardware interface with third-party
applications that support the ASIO Driver or
WaveDriver MME (Multimedia Extension).
The following Pro Tools system interfaces are
supported:
• Pro Tools|HD
• Digi 002
• Digi 002 Rack
• Mbox 2
• Mbox 2 Mini
• Mbox
The Digidesign ASIO Driver and WaveDriver for
your Digidesign hardware are automatically installed when you install Pro Tools.
For detailed information on configuring the
Digidesign DirectSound Driver, see the
Windows Audio Drivers Guide.
For specifications and configuration information specific to each driver, see the Windows Audio Drivers Guide.
Chapter 2: Installing Pro Tools on Windows 13
Page 18

Digidesign ASIO Driver
The Digidesign ASIO Driver is a single-client,
multichannel sound driver that allows thirdparty audio programs that support the ASIO
Driver standard to record and play back through
Digidesign-qualified Pro Tools audio interfaces.
For detailed information on configuring the
Digidesign ASIO Driver, see the Windows
Audio Drivers Guide.
Removing Pro Tools
If you need to remove Pro Tools software from
your computer, you can use the Add or Remove
Programs command.
To remove Pro Tools from your computer:
1 Choose Start > Control Panel.
2 Double-click Add or Remove Programs.
Digidesign WaveDriver
The Digidesign WaveDriver Windows System
Audio Driver is a single-client, multichannel
sound driver that allows third-party audio programs that support the WaveDriver MME (Multimedia Extensions) standard to play back
through Digidesign-qualified Pro Tools audio
interfaces.
For detailed information on configuring the
Digidesign WaveDriver, see the Windows
Audio Drivers Guide.
Standalone Digidesign Windows Audio Drivers
Digidesign Windows Audio Drivers can be installed on Windows systems that do not have
Pro Tools software installed. Use the standalone
version of the Digidesign Windows Audio Drivers installer (Digidesign Audio Drivers
Setup.exe), which is available on the Pro Tools
Installer disc.
3 From the Currently Installed Programs list, se-
lect Digidesign Pro Tools.
4 Click the Change/Remove button.
5 Follow the on-screen instructions to remove
Pro Tools.
Upgrading to Pro Tools 7.314
Page 19

chapter 3
Installing Pro Tools on Mac
This chapter explains how to install and configure Pro Tools for Pro Tools|HD, Pro Tools LE,
Pro Tools M-Powered, and Pro Tools Academic
systems on a Digidesign-qualified Mac computer.
For complete system requirements and compatibility information, visit the Digidesign website
(www.digidesign.com).
Before installing this version of Pro Tools,
refer to the Read Me information included
on the Pro Tools Installer disc.
Mac System Optimization
To ensure optimum performance with
Pro Tools, configure your computer before installing Pro Tools hardware and software.
Before configuring your computer, make sure
you are logged in as an Administrator for the account where you want to install Pro Tools. For
details on Administrator privileges in Mac OS X,
refer to your Apple OS X documentation.
Do not use the Mac OS X automatic Software Update feature, as it may upgrade your
system to a version of Mac OS that has not
yet been qualified for Pro Tools. For details
on qualified versions of Mac OS, visit the
Digidesign website (www.digidesign.com).
Turning Off Software Update
To turn off the Software Update feature:
1 Choose System Preferences from the Apple
menu and click Software Update.
2 Click Update Software and deselect Check for
Updates.
Turning Off Energy Saver
To turn off the Energy Saver feature:
1 Choose System Preferences from the Apple
menu and click Energy Saver.
2 Click Sleep and do the following:
• Set the computer sleep setting to Never.
• Set the display sleep setting to Never.
• Deselect “Put the hard disk(s) to sleep
when possible” option.
Setting Processor Performance
(Mac G5 Computers Only)
To set the Processor Performance:
1 Choose System Preferences from the Apple
menu and click Energy Saver.
2 Click Options and set Processor Performance
to Highest.
Chapter 3: Installing Pro Tools on Mac 15
Page 20

Disabling Spotlight Indexing
Enabling Journaling for Audio Drives
The Mac OS X Spotlight feature indexes files and
folders in the background, affecting system performance. It is recommended that you disable
Spotlight indexing before using Pro Tools.
To disable Spotlight indexing:
1 Choose System Preferences from the Apple
menu and click Spotlight.
2 In the Spotlight window, click Privacy.
3 To prevent indexing of a drive, drag its icon
from the desktop into the list.
Disabling the Spotlight Shortcuts
The Mac OS X Spotlight feature uses the same
key commands Pro Tools uses to start recording
(Command+Spacebar), and to record online
(Command+Option+Spacebar). To retain use of
these key commands in Pro Tools, these shortcuts must be disabled.
To disable the Spotlight keyboard shortcut:
1 Choose System Preferences from the Apple
menu and click Spotlight.
2 Deselect “Spotlight menu keyboard shortcut”
and “Spotlight window keyboard shortcut.”
Disabling Dashboard and Exposé
The Mac OS X Dashboard and Exposé features
use function keys that are also used by Pro Tools
(F9–F12). To retain use of these keys in
Pro Tools, these features must be disabled.
To disable Dashboard and Exposé:
1 Choose System Preferences from the Apple
menu and click Dashboard and Exposé.
2 In the pop-up menus for each keyboard short-
cut, set the shortcut to “–” to disable it.
If you plan to use an audio drive that you used
with a previous version of Pro Tools on the Mac,
enable journaling.
To enable journaling:
1 Launch the Disk Utility application, located in
Applications/Utilities.
2 Select the volume in the left column of the
Disk Utility window.
3 Click Enable Journaling in the toolbar.
Installing and Launching Pro Tools HD Software
(Pro Tools|HD Systems Only)
Installing Pro Tools HD
To install Pro Tools HD software:
1 Make sure you are logged in as an Administra-
tor for the account where you want to install
Pro Tools. For details on Administrator privileges in Mac OS X, refer to your Apple OS X documentation.
2 Do one of the following:
• Insert the Pro Tools Installer disc in your
CD/DVD drive. Double-click “Install
Pro Tools.”
– or –
• If you downloaded the Pro Tools Update
from our website, follow the instructions
provided with it to expand and launch the
installer.
3 Select the install location. For maximum reli-
ability, install Pro Tools on your startup drive.
4 Click Continue.
Upgrading to Pro Tools 7.316
Page 21

5 Select the Pro Tools application for installa-
tion.
6 You can also select from a list of optional
items to install along with Pro Tools:
Avid Video Engine The Avid Video Engine is required to use Pro Tools with Avid video peripherals such as the Avid Mojo or the Digidesign
AVoption|V10.
DigiTranslator DigiTranslator™ is a software option for Pro Tools that lets you convert and exchange OMF and AAF sequences and MXF files
directly in the Pro Tools application. This option is purchased separately.
MachineControl Digidesign MachineControl™
is a software option that lets you control external audio/video devices from Pro Tools using serial 9-pin protocols. This option is purchased
separately.
MIDI I/O Driver The MIDI I/O Driver is required
if you are using the Digidesign MIDI I/O.
10 Select whether to install the Surround Mixer
plug-in. This plug-in is required for mixing,
mastering, and monitoring in surround:
• Select “Yes – Monitoring in Standard
Pro Tools (Film Format)” if your monitoring is configured for Film Format surround.
• Select “Yes – Monitoring in ProControl
(DTS Format)” if you are using a ProControl dedicated controller.
• Select “No – Stereo mixing only” if your
monitoring is configured for Stereo.
AFL/PFL Solo modes require the Surround
Mixer plug-in. See the Pro Tools Reference
Guide for more information.
11 Click Continue.
12 When installation is complete, click Restart.
The Pro Tools Installer disc includes additional software for your system. For more
information, see “Additional Software on
the Pro Tools Installer Disc” on page 21.
MP3 Export Option The MP3 Export Option lets
you export MP3 files from Pro Tools. This option is purchased separately.
7 Click Install.
8 If prompted, enter your Administrator pass-
word and click OK to accept the installation.
9 Select your work environment. This loads an
initial set of Pro Tools Preferences that include
some of the more popular settings for post production, audio, or audio with MIDI.
Preference settings can be customized at any
time in Pro Tools. See the Pro Tools Reference Guide for more information.
Launching Pro Tools HD
(Pro Tools|HD Systems Only)
To use Pro Tools HD, you must always have an
inserted iLok with an authorization for
Pro Tools HD. One pre-authorized iLok is included with your Pro Tools HD system.
Chapter 3: Installing Pro Tools on Mac 17
Page 22

To authorize Pro Tools HD software:
1 Insert the pre-authorized iLok into an avail-
able USB port on your computer.
2 Do one of the following:
• Click the Pro Tools HD icon in the Dock.
– or –
• Locate and double-click the Pro Tools HD
application on your hard drive.
Do not remove the iLok during Pro Tools
launch or use.
Installing and Launching Pro Tools LE Software
(Digi 002, Digi 002 Rack, Mbox 2 Pro,
Mbox 2, Mbox 2 Mini, and Mbox Systems
Only)
4 Select the install location. For maximum reli-
ability, install Pro Tools on your startup drive.
5 Click Continue.
6 Select the Pro Tools application for installa-
tion.
7 You can also select from a list of optional
items to install along with Pro Tools:
DigiTranslator DigiTranslator™ is a software option for Pro Tools that lets you convert and exchange OMF and AAF sequences and MXF files
directly in the Pro Tools application. This option is purchased separately.
MIDI I/O Driver The MIDI I/O Driver is required
if you are using the Digidesign MIDI I/O.
MP3 Export Option The MP3 Export Option lets
you export MP3 files from Pro Tools. This option is purchased separately.
Installing Pro Tools LE
To install Pro Tools LE on Mac OS X:
1 Make sure you are logged in as an Administra-
tor for the account where you want to install
Pro Tools. For details on Administrator privileges in Mac OS X, refer to your Apple Mac OS X
documentation.
2 Do one of the following:
• Insert the Pro Tools Installer disc in your
CD/DVD drive. Double-click “Install
Pro Tools.”
– or –
• If you downloaded the Pro Tools Update
from our website, follow the instructions
provided with it to expand and launch the
installer.
3 Follow the on-screen instructions to continue
and accept installation.
Upgrading to Pro Tools 7.318
8 Click Install.
9 If prompted, enter your Administrator pass-
word and click OK to authenticate the installation.
10 Follow the remaining on-screen instructions.
11 When installation is complete, click Restart.
The Pro Tools Installer disc includes additional software for your system. For more
information, see “Additional Software on
the Pro Tools Installer Disc” on page 21.
Page 23

Launching Pro Tools LE
When launching Pro Tools LE the first time, you
are prompted to enter an authorization code to
validate your software.
To authorize Pro Tools LE software:
1 Click the Pro Tools LE icon in the Dock (or
double-click the application icon in the
Pro Tools folder inside the Digidesign folder).
2 Enter the authorization code in the dialog
when prompted (making sure to type it exactly
as printed, and observing any spaces and capitalization), then click Validate.
2 Do one of the following:
• Insert the Pro Tools Installer disc in your
CD/DVD drive. Double-click “Install
Pro Tools.”
– or –
• If you downloaded the Pro Tools Update
from our website, follow the instructions
provided with it to expand and launch the
installer.
3 Follow the on-screen instructions to proceed
with installation.
4 Select the install location. For maximum reli-
ability, install Pro Tools on your startup drive.
Your authorization code is located on the inside
front cover of this guide.
Installing and Launching
Pro Tools M-Powered
Software
(Pro Tools M-Powered Systems Only)
Installing Pro Tools M-Powered
To install Pro Tools M-Powered:
1 Make sure you are logged in as an Administra-
tor for the account where you want to install
Pro Tools. For details on Administrator privileges in Mac OS X, refer to your Apple Mac OS X
documentation.
5 Click Continue.
6 Select the Pro Tools application for installa-
tion.
7 You can also select from a list of optional
items to install along with Pro Tools:
MIDI I/O Driver The MIDI I/O Driver is required
if you are using the Digidesign MIDI I/O.
MP3 Export Option The MP3 Export Option lets
you export MP3 files from Pro Tools. This option is purchased separately.
8 Click Install.
9 If prompted, enter your Administrator pass-
word and click OK to authenticate the installation.
10 Follow the remaining on-screen instructions.
11 When installation is complete, click Restart.
The Pro Tools Installer disc includes additional software for your system. For more
information, see “Additional Software on
the Pro Tools Installer Disc” on page 21.
Chapter 3: Installing Pro Tools on Mac 19
Page 24

Launching Pro Tools M-Powered
To use Pro Tools M-Powered with an M-Audio
interface, you must always have an iLok with an
authorization for Pro Tools M-Powered. One
pre-authorized iLok is included with the M-Powered package.
To authorize Pro Tools M-Powered software:
1 Insert the pre-authorized iLok into an avail-
able USB port on your computer.
3 Follow the on-screen instructions to proceed
with installation.
4 Select the install location. For maximum reli-
ability, install Pro Tools on your startup drive.
5 Click Continue.
6 Select the Pro Tools application for installa-
tion.
7 You can also select from a list of optional
items to install along with Pro Tools:
2 Click the Pro Tools M-Powered shortcut in
your Dock, (or the application in Applications\
Digidesign\Pro Tools).
Do not remove the iLok during Pro Tools
launch or use.
Installing and Launching Pro Tools Academic Software
(Pro Tools Academic Systems Only)
Installing Pro Tools Academic
To install Pro Tools Academic:
1 Make sure you are logged in as an Administra-
tor for the account where you want to install
Pro Tools. For details on Administrator privileges in Mac OS X, refer to your Apple Mac OS X
documentation.
2 Do one of the following:
• Insert the Pro Tools Installer disc in your
CD/DVD drive. Double-click “Install
Pro Tools.”
– or –
• If you downloaded the Pro Tools Update
from our website, follow the instructions
provided with it to expand and launch the
installer.
MP3 Export Option The MP3 Export Option lets
you export MP3 files from Pro Tools. This option is purchased separately.
8 Click Install.
9 If prompted, enter your Administrator pass-
word and click OK to authenticate the installation.
10 Follow the remaining on-screen instructions.
11 When installation is complete, click Restart.
The Pro Tools Installer disc includes additional software for your system. For more
information, see “Additional Software on
the Pro Tools Installer Disc” on page 21.
Launching Pro Tools Academic
To authorize Pro Tools Academic software:
1 For Pro Tools Academic Standalone only, in-
sert the pre-authorized iLok into an available
USB port on your computer.
To use Pro Tools Academic Standalone
software with an M-Audio interface, you
must always have an iLok with an authorization for Pro Tools Academic. One pre-authorized iLok is included with your
Pro Tools Academic Standalone package.
Upgrading to Pro Tools 7.320
Page 25

2 Click the Pro Tools Academic shortcut in your
Dock, (or double-click the application in
Applications\Digidesign\Pro Tools).
Additional Software on the Pro Tools Installer Disc
For Pro Tools Academic Standalone, do not
remove the pre-authorized iLok during
Pro Tools launch or use.
3 For Pro Tools Academic bundled hardware kits
only (including Mbox 2 Academic), enter the
authorization code in the dialog (making sure to
type it exactly as printed, and observing any
spaces and capitalization), then click Validate.
Your authorization code is located on the inside
front cover of this guide.
The Pro Tools Installer disc includes additional software for your system. For more
information, see “Additional Software on
the Pro Tools Installer Disc” on page 21.
Configuring Pro Tools
You can adjust the performance of your system
by changing certain Pro Tools system settings
that affect its capacity for processing, playback,
and recording.
The Pro Tools Installer disc provides additional
software for your system, including audio drivers (for playing other audio applications
through your Digidesign hardware) and a
Pro Tools demo session.
Check your Pro Tools Installer disc for additional software and installers.
Pro Tools Demo Session
The Pro Tools Installer disc includes a separate
demo session installer. You can use this session
to verify that your system is working.
To install the demo session:
1 Insert the Pro Tools Installer disc in your
CD/DVD drive. Locate and double-click the
demo session installer icon.
2 Select your audio drive as the install location
and click Install.
3 When installation is complete, click Quit.
In most cases, the default settings for your system provide optimum performance, but you
may want to adjust them to accommodate large
or processing-intensive Pro Tools sessions.
Refer to the electronic PDF version of the Getting
Started Guide that was installed with your software for instructions on configuring Pro Tools
settings.
Chapter 3: Installing Pro Tools on Mac 21
Page 26

Digidesign CoreAudio Driver
(Pro Tools|HD, Digi 002, Digi 002 Rack, and
Mbox Systems Only)
Mbox 2-Series CoreAudio Drivers
(Mbox 2 Pro, Mbox 2, Mbox 2 Academic, and
Mbox 2 Mini Systems Only)
The Digidesign® CoreAudio Driver lets you use
your Digidesign-qualified audio interfaces with
third-party applications that support the CoreAudio Driver standard.
The following Pro Tools system interfaces are
supported:
• Pro Tools|HD
• Digi 002
• Digi 002 Rack
• Mbox
The Digidesign CoreAudio Driver for your Digidesign hardware is automatically installed when
you install Pro Tools.
®
®
®
For information on configuring the Digidesign CoreAudio Driver, see the CoreAudio
Drivers Guide
.
Standalone Digidesign CoreAudio Drivers
Digidesign CoreAudio Drivers can be installed
on Mac systems that do not have Pro Tools software installed. Use the standalone version of the
Digidesign CoreAudio Drivers installer (Install
CoreAudio.mpkg), which is available on the
Pro Tools Installer disc.
For information on installing and configuring the standalone version of the Digidesign
CoreAudio Driver, see the CoreAudio Drivers Guide.
Digidesign® Mbox 2-series CoreAudio Drivers
let you use your Digidesign-qualified Mbox 2-series audio interfaces with third-party applications that support the CoreAudio Driver standard.
The following Pro Tools Mbox 2-series system
interfaces are supported:
• Mbox 2™ Pro
• Mbox 2
• Mbox 2 Academic
• Mbox 2 Mini
The Mbox 2 CoreAudio Driver is a multi-client,
multichannel sound driver that allows CoreAudio compatible applications to record and
play back through Digidesign hardware.
The Mbox 2 CoreAudio Driver is installed by default when you install Pro Tools.
For information on configuring the Mbox 2
CoreAudio Driver, see the CoreAudio Drivers Guide
.
Standalone Digidesign CoreAudio Drivers
Digidesign CoreAudio Drivers can be installed
on Mac systems that do not have Pro Tools software installed. Use the standalone version of the
Digidesign CoreAudio Drivers installer (Install
CoreAudio.mpkg), which is available on the
Pro Tools Installer disc.
For information on installing and configuring the standalone version of the Digidesign
CoreAudio Driver, see the CoreAudio Drivers Guide.
Upgrading to Pro Tools 7.322
Page 27

Removing Pro Tools
If you need to remove Pro Tools software from
your computer, use the Uninstaller application.
To remove Pro Tools from your computer:
1 Make sure you are logged in as an Administra-
tor for the account where Pro Tools is installed.
For details on Administrator privileges in
Mac OS X, refer to your Apple OS X documentation.
2 Go to Applications/Digidesign/Pro Tools/
Pro Tools Utilities and double-click the
“Uninstall Pro Tools” file.
3 Click Continue to proceed with the uninstall.
4 Choose the type of uninstall you want to per-
form:
Safe Uninstall Leaves certain plug-ins and system files needed for compatibility with some
Avid products.
Clean Uninstall Removes all Pro Tools files, including system files, Digidesign plug-ins, and
MIDI patch names.
5 Click Uninstall.
6 Enter your Administrator password and click
OK.
7 Click Finish to close the Installer window.
Chapter 3: Installing Pro Tools on Mac 23
Page 28

Upgrading to Pro Tools 7.324
Page 29
appendix a
Configuring MIDI Studio Setup
(Windows Only)
MIDI Studio Setup
MIDI Studio Setup (MSS) lets you configure the
MIDI controllers and sound modules that are
connected to your system, and control the routing of MIDI data between your MIDI equipment
and Pro Tools.
MSS automatically finds MIDI interfaces, and
lets you specify a custom name for each of the
MIDI ports within the MIDI Studio Setup document.
MSS also supports XML-based patch file names
for storing and importing patch names for your
external MIDI devices.
Entire MIDI Studio Setup configurations created
within MSS can be imported and exported.
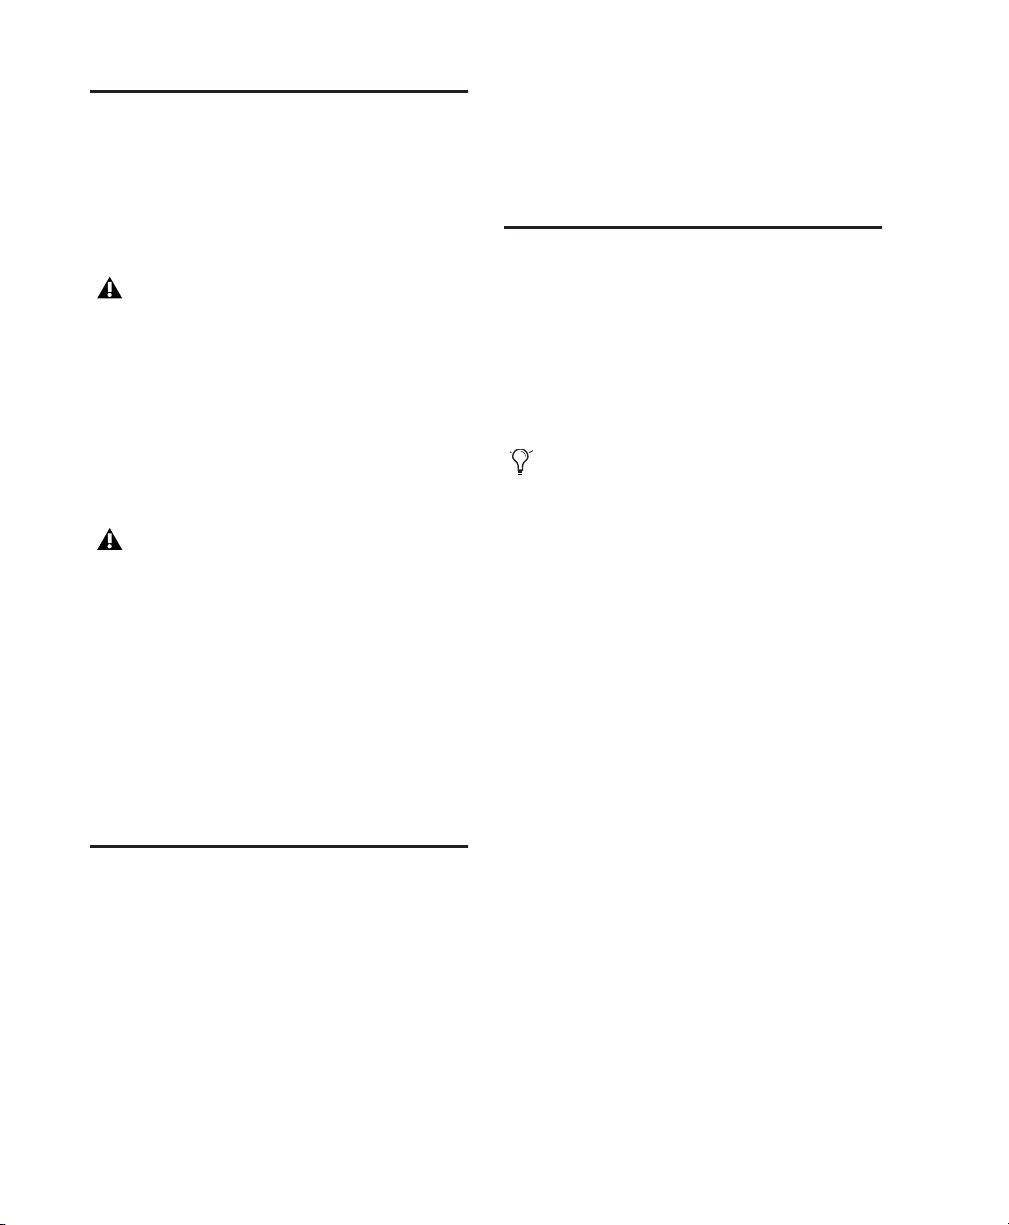
MIDI Studio Setup Window
The MIDI Studio Setup window is organized
into three sections. Interface controls are at the
top of the window. All the currently defined instruments are displayed in the Instrument
Name list on the left side of the window. A detailed view of MIDI parameters is shown in the
Properties section on the right.
MIDI Studio Setup window
Interface Controls
Create This button adds a new instrument to
the Instrument Name list.
Delete This button deletes the instrument or instruments selected in the Instrument Name list.
Import This button lets you import an existing
MIDI Studio Setup file.
Export This button lets you export the current
MIDI Studio Setup file.
Appendix A: Configuring MIDI Studio Setup (Windows Only) 25
Page 30

Show Duplicate Emulated Ports When this option is selected and you are using a MIDI interface that supports timestamping (such as MIDI
I/O), in addition to the MIDI ports on your Digidesign interface (if applicable), the MIDI Studio
setup window shows both the DirectMusic timestamped output ports, and non-stamped duplicate emulated output ports.
Some MIDI Interfaces will not properly load
or unload their drivers unless you quit and
re-launch Pro Tools. Check the documentation that came with your MIDI interface for
more information.
Instrument List
The Instrument list contains all the currently
defined instruments. Selecting an instrument in
the list displays that instrument’s properties in
the Properties section of the window.
To define an instrument with MIDI Studio Setup:
1 Choose Setup > MIDI > MIDI Studio.
2 Click Create.
3 In the Instrument Name field, type the name
of your instrument, and press Enter.
If you do not enter an instrument name, the
Instrument Name field will automatically
inherit information from the Manufacturer
and Model pop-up menu.
4 Set a manufacturer and model for the new de-
vice from the corresponding pop-up menus. If
the Manufacturer and Model pop-up menus do
not provide a name for your particular device,
choose None.
5 From the Input pop-up menu, choose the in-
put port on your MIDI interface that is connected to the MIDI Out of your instrument.
Properties Section
The Properties section lets you edit information
for new instruments, or instrument currently selected in the Instrument list.
MIDI Studio Setup Properties section
When a previously defined instrument is selected in the Instrument list, the Properties section changes to reflect the properties of the selected instrument.
Upgrading to Pro Tools 7.326
6 From the Output pop-up menu, choose the
output port on your MIDI interface that is connected to the MIDI In of your instrument.
7 Enable the appropriate MIDI channels (1–16)
for the Send Channels and Receive Channels
options (These determine which channels send
and receive MIDI.)
Instrument Name
The Instrument Name field shows the user-definable instrument name for the currently selected instrument.
Manufacturer
The Manufacturer pop-up menu provides a list
of MIDI equipment manufacturers. This list is
derived from the XML-based MIDI device files.
For more information, see “MIDI Patch
Name Support” on page 27.
Page 31

Model
Receive Channels
The Model pop-up menu provides a list of MIDI
devices, filtered by the manufacturer name. This
list is derived from the XML-based MIDI device
files provided with your Pro Tools installation.
For more information, see “MIDI Patch
Name Support” on page 27.
Input Port
The Input Port pop-up menu displays a list of
available MIDI interface input ports. Inputs will
include your Digidesign interface (if applicable)
and any additional MIDI interfaces enabled on
your system. The MIDI interface port that is set
and displayed here is the port through which
MIDI data is sent from the external MIDI device
specified in the Instrument Name field into your
MIDI interface.
If you set the input port to None, the defined
instrument will not appear as a choice in a
MIDI Input selector.
Output Port
The Output Port pop-up menu displays a list of
available MIDI interface output ports. The port
set and displayed here is the port through which
MIDI data is sent from your MIDI interface to
the MIDI device specified in the Instrument
Name field.
The Receive Channels grid sets the receive channels for the MIDI device specified in the Instrument Name field.
MIDI Patch Name Support
Pro Tools supports XML (Extensible Markup
Language) for storing and importing patch
names for your external MIDI devices. Pro Tools
installs MIDI patch name files (.midnam) for the
factory default patch names of many common
MIDI devices. These files reside in directories,
sorted by manufacturer, in Program Files\
Common Files\Digidesign\MIDI Patch Names\
Digidesign.
To import MIDI patch names into Pro Tools:
1 Verify the MIDI Device name in the MIDI Stu-
dio Setup window (see “MIDI Studio Setup” on
page 25).
2 Verify the MIDI track’s output is correctly as-
signed to the MIDI device.
If you set the output port to None, the defined instrument will not appear as a choice
in a MIDI Output selector.
Send Channels
The Send Channels grid sets the send channels
for the MIDI device specified in the Instrument
Name field.
Appendix A: Configuring MIDI Studio Setup (Windows Only) 27
Page 32
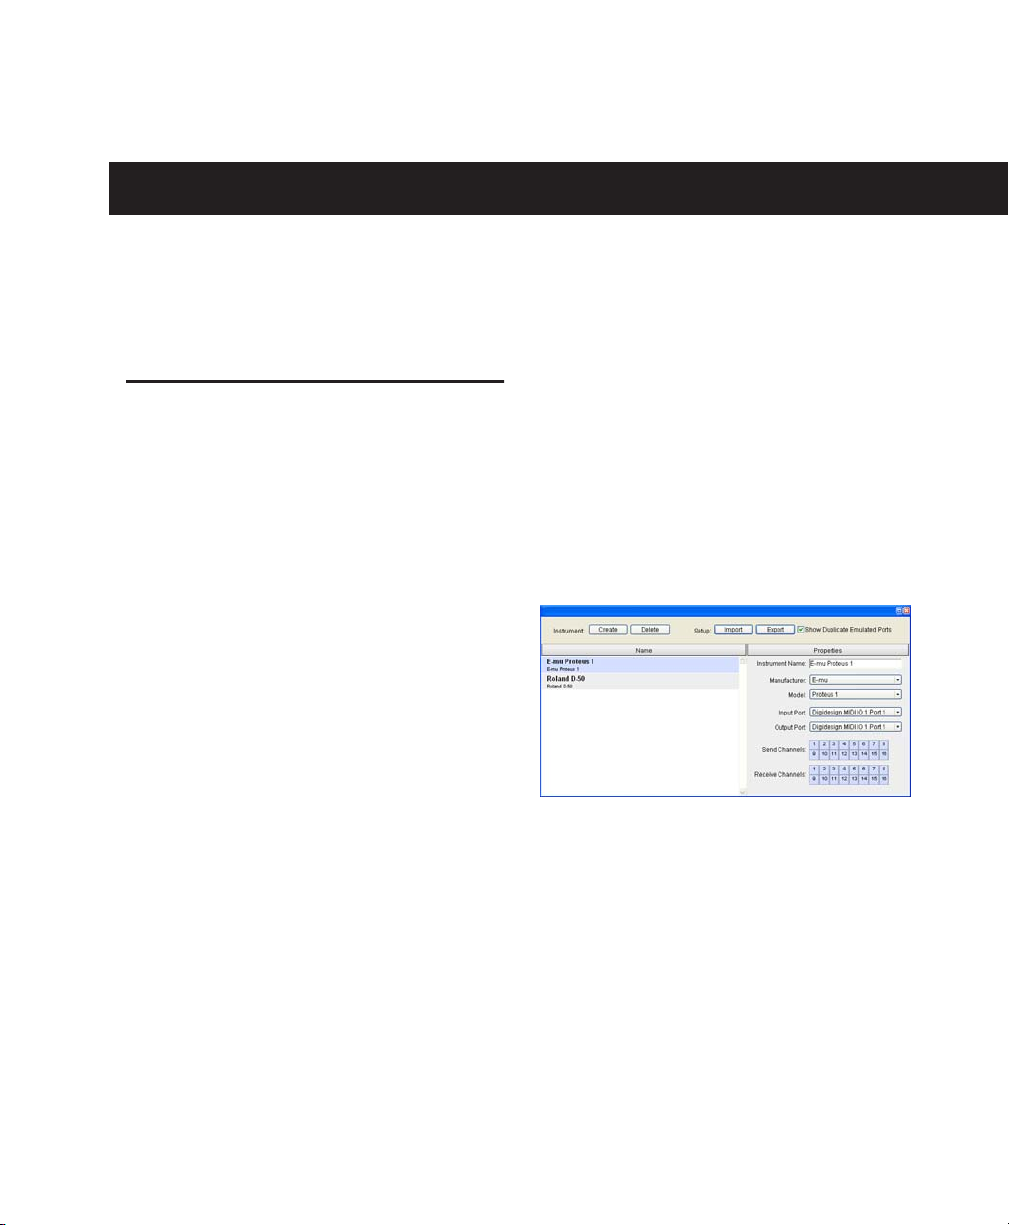
3 Click the MIDI track’s Patch Select button.
Patch Select button
Patch Select button, Edit window
Patch Select button
The Patch Select dialog is populated with patch
names and the Patch Name Bank pop-up menu
appears in the upper left hand corner of the window.
Patch Select dialog with patch names
Patch Select button, Mix window
4 In the Patch Select dialog, click the Change
button.
Change button
Patch Select dialog
5 In the Open dialog, navigate to Program
Files\Common Files\Digidesign\MIDI Patch
Names\Digidesign\<name of manufacturer>,
and select the MIDI Patch Name file (.midnam)
for the MIDI device.
6 Click Open.
Once patch names have been imported into
Pro Tools, they are available for that MIDI device in all sessions.
To clear patch names:
■ In the Patch Select dialog, click the Clear but-
ton, and click Done.
MIDI patch name files (.midnam) can be
edited in any text editor, or you can use
third party patch librarian and editor software to create your own custom patch
names.
Upgrading to Pro Tools 7.328
Page 33
appendix b
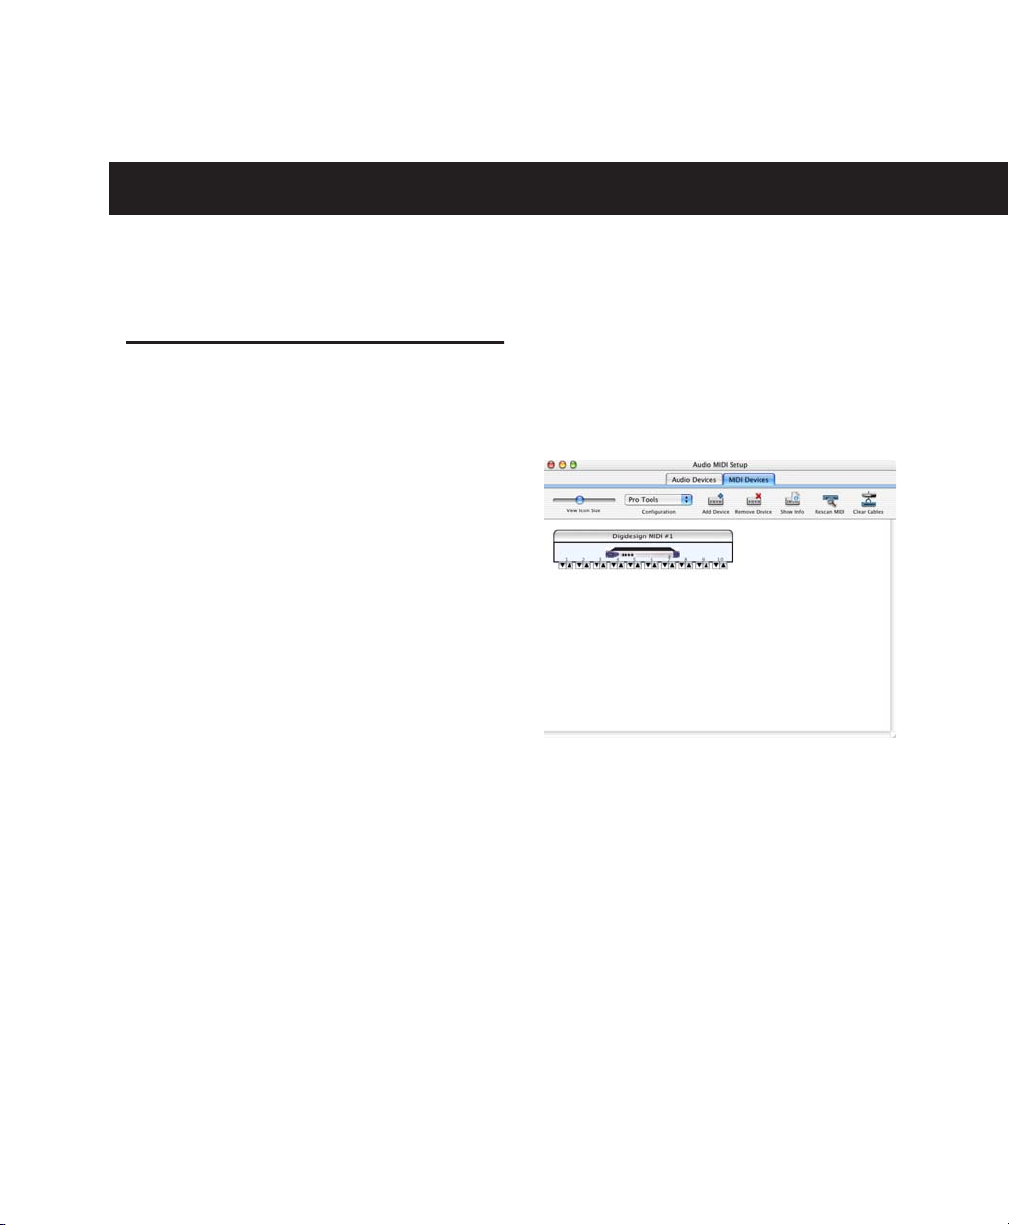
Configuring AMS (Mac OS X Only)
2 Click MIDI Devices. AMS scans your system
Audio MIDI Setup
Pro Tools recognizes the ports on your MIDI interface as generic ports. With Mac OS X, you use
Apple’s Audio MIDI Setup (AMS) utility to identify external MIDI devices connected to your
MIDI interface and configure your MIDI studio
for use with Pro Tools.
To configure your MIDI studio in AMS:
1 Do one of the following:
• Launch Audio MIDI Setup (located in Applications/Utilities).
– or –
• In Pro Tools, choose Setup > MIDI > MIDI
Studio.
for connected MIDI interfaces. If your MIDI interface is properly connected, it appears in the
window with each of its ports numbered.
Audio MIDI Setup (MIDI Devices tab)
3 For any MIDI devices connected to the MIDI
interface, click Add Device. A new external device icon with the default MIDI keyboard image
will appear.
4 Drag the new device icon to a convenient lo-
cation within the window.
Appendix B: Configuring AMS (Mac OS X Only) 29
Page 34

5 Connect the MIDI device to the MIDI inter-
face by clicking the arrow for the appropriate
output port of the device and dragging a connection or “cable” to the input arrow of the corresponding port of the MIDI interface.
Making MIDI input and output connections
6 Click the arrow for the appropriate input port
of the device and drag a cable to the output arrow of the corresponding port of the MIDI interface.
To configure an external MIDI device:
1 Select the external device icon and click Show
Info (or double-click the new device icon).
External Device Icon
2 Select a manufacturer and model for the new
device from the corresponding pop-up menus.
(If the Manufacturer and Model pop-up menus
do not provide a name for your particular device, you can type a name.)
To remove a connection, select the cable and
press Delete. To delete all connections, click
Clear Cables.
7 Repeat steps 3–6 for each MIDI device in your
MIDI setup.
Upgrading to Pro Tools 7.330
Naming a new MIDI device
For Manufacturer and Model names, AMS
refers to one or more files with the suffix
“.middev” in the directory Root/Library/
Audio/MIDI Devices. Pro Tools installs a
file that contains information for many
commercially available MIDI devices,
named “Digidesign Device List.middev.” If
the Manufacturer or Model names for any of
your external MIDI devices is not available
in the AMS Manufacturer and Model popup menus, you can add them by editing the
.middev file in any text editor (such as
TextEdit).
Page 35

3 Click the More Properties arrow to expand the
dialog, then enable the appropriate MIDI channels (1–16) for the Transmits and Receives options. (These determine which channels the
device will use to send and receive MIDI.)
Enabling MIDI channels
4 Click the device image. The window expands
to show images for various MIDI devices (such
as keyboards, modules, interfaces, and mixers).
Select an icon for your device.
Selecting a device icon
To use your own custom icons, you can
place TIFF image files in /Library/
Audio/MIDI Devices/Generic/Images, and
they will appear as choices in the AMS device window.
5 Click OK.
The device names you enter appear as MIDI input and output choices in Pro Tools.
Appendix B: Configuring AMS (Mac OS X Only) 31
Page 36

MIDI Patch Name Support
Pro Tools supports XML (Extensible Markup
Language) for storing and importing patch
names for you external MIDI devices. Pro Tools
installs MIDI patch name files (.midnam) for the
factory default patch names of many common
MIDI devices. These files reside in directories,
sorted by manufacturer, in /Library/Audio/MIDI
Patch Names/Digidesign.
To import MIDI patch names into Pro Tools:
1 Verify the MIDI Device name in the Audio
MIDI Setup window (see “Audio MIDI Setup” on
page 29).
2 Verify the MIDI track’s output is correctly as-
signed to the MIDI device.
3 Click the MIDI track’s Patch Select button.
Patch Select button
4 In the Patch Select dialog, click the Change
button.
Change button
Patch Select dialog
5 In the Open dialog, navigate to /Library/Au-
dio/MIDI Patch Names/Digidesign/<name of
manufacturer>, and select the MIDI Patch Name
file (.midnam) for the MIDI device.
6 Click Open.
The Patch Select dialog is populated with patch
names and the Patch Name Bank pop-up menu
appears in the upper left hand corner of the window.
Once patch names have been imported into
Pro Tools, they are available for that MIDI device in all sessions.
Patch Select button, Edit window
Patch Select button
Patch Select button, Mix window
Upgrading to Pro Tools 7.332
To clear patch names:
■ In the Patch Select dialog, click the Clear but-
ton, and click Done.
MIDI patch name files (.midnam) can be
edited in any text editor, or you can use
third party patch librarian and editor software to create your own custom patch
names.
Page 37

Page 38

www.digidesign.com
DIGIDESIGN
2001 Junipero Serra Boulevard
Daly City, CA 94014-3886 USA
Tel: 650.731.6300
Fax: 650.731.6399
TECHNICAL SUPPORT (USA)
Tel: 650.731.6100
Fax: 650.731.6384
PRODUCT INFORMATION (USA)
Tel: 800.333.2137
INTERNATIONAL OFFICES
Visit the Digidesign website
for contact information
 Loading...