

Page 1

Pro Tools
Reference Guide
Version 5.0.1 for Macintosh and Windows
Digidesign Inc.
3401-A Hillview Avenue
Palo Alto, CA 94304 USA
tel: 650·842·7900
fax: 650·842·7999
Technical Support (USA)
650·842·6699
650·856·4275
Product Information (USA)
650·842·6602
800·333·2137
Fax on Demand (USA)
1-888-USE-DIGI (873-3444)
World Wide Web
www.digidesign.com
Digidesign FTP Site
ftp.digidesign.com
Page 2

Copyright
This User’s Guide is copyrighted ©1999 by Digidesign, a
division of Avid Technology, Inc. (hereafter “Digidesign”), with
all rights reserved. Under copyright laws, this manual may not
be duplicated in whole or in part without the written consent of
Digidesign.
DIGIDESIGN, AVID and PRO TOOLS are trademarks or
registered trademarks of Digidesign and/or Avid Technology,
Inc. All other trademarks are the property of their respective
owners.
All features and specifications subject to change without
notice.
PN 932708002-00 REV A 05/00
Page 3

contents
Part I Introduction
Chapter 1. Welcome to Pro Tools
The Pro Tools Guides
Compatibility Information
Digidesign Registration
. . . . . . . . . . . . . . . . . . . . . . . . . . . . . . . . . . . . . . . . . . . . . . . . . . . . . . 3
. . . . . . . . . . . . . . . . . . . . . . . . . . . . . . . . . . . . . . . . . . . . . . . . . . . . 4
. . . . . . . . . . . . . . . . . . . . . . . . . . . . . . . . . . . . . . . . . . . . . 3
. . . . . . . . . . . . . . . . . . . . . . . . . . . . . . . . . . . . . . . . . . . . . . . . . . . 4
Chapter 2. Pro Tools System Configurations
TDM-equipped systems
TDM System Playback, Recording and Voice Limits
Audio Interfaces for TDM Systems
Pro Tools LE Systems
Pro Tools LE System Capabilities
Chapter 3. Pro Tools Concepts
Hard Disk Recording
The Digidesign Audio Engine
Elements of a Session
MIDI Concepts
Virtual Tracks
. . . . . . . . . . . . . . . . . . . . . . . . . . . . . . . . . . . . . . . . . . . . . . . . . . . . . . . . . 12
. . . . . . . . . . . . . . . . . . . . . . . . . . . . . . . . . . . . . . . . . . . . . . . . . . . . . . . . . . 14
Chapter 4. Pro Tools Windows
The Mix Window
The Edit Window
The Transport Window
Keyboard Focus
. . . . . . . . . . . . . . . . . . . . . . . . . . . . . . . . . . . . . . . . . . . . . . . . . . . . 5
. . . . . . . . . . . . . . . . . . . . . . . . . . . . . . . . . . . . . . . . . . . . 6
. . . . . . . . . . . . . . . . . . . . . . . . . . . . . . . . . . . . . . . . . . . . . . . . . . . . . 7
. . . . . . . . . . . . . . . . . . . . . . . . . . . . . . . . . . . . . . . . . . . . . 7
. . . . . . . . . . . . . . . . . . . . . . . . . . . . . . . . . . . . . . . . . . . . . . . . 9
. . . . . . . . . . . . . . . . . . . . . . . . . . . . . . . . . . . . . . . . . . . . . . . . . . . . . . 9
. . . . . . . . . . . . . . . . . . . . . . . . . . . . . . . . . . . . . . . . . . . . . . . . 9
. . . . . . . . . . . . . . . . . . . . . . . . . . . . . . . . . . . . . . . . . . . . . . . . . . . . 10
. . . . . . . . . . . . . . . . . . . . . . . . . . . . . . . . . . . . . . . . . . . . . . . 15
. . . . . . . . . . . . . . . . . . . . . . . . . . . . . . . . . . . . . . . . . . . . . . . . . . . . . . . . 15
. . . . . . . . . . . . . . . . . . . . . . . . . . . . . . . . . . . . . . . . . . . . . . . . . . . . . . . . 23
. . . . . . . . . . . . . . . . . . . . . . . . . . . . . . . . . . . . . . . . . . . . . . . . . . . . 33
. . . . . . . . . . . . . . . . . . . . . . . . . . . . . . . . . . . . . . . . . . . . . . . . . . . . . . . . 36
. . . . . . . . . . . . . . . . . . . . . . . . . . . . . . . . . . . 5
. . . . . . . . . . . . . . . . . . . . . . . . . . . . . . . . 6
Contents
iii
Page 4

Part II Pro Tools Sessions
Chapter 5. Creating Sessions
Starting Up Your System
Configuring Your System
Changing the Pro Tools Playback Engine
Changing DAE Playback Buffer Size
Creating a New Session
Opening a Session
Saving a Session
Creating Custom Session Templates
Closing a Session
Quitting a Session
Sharing Sessions between Pro Tools TDM Systems and Pro Tools LE Systems
. . . . . . . . . . . . . . . . . . . . . . . . . . . . . . . . . . . . . . . . . . . . . . . . . . . . . . 45
. . . . . . . . . . . . . . . . . . . . . . . . . . . . . . . . . . . . . . . . . . . . . . . . . . . . . . . 46
. . . . . . . . . . . . . . . . . . . . . . . . . . . . . . . . . . . . . . . . . . . . . . . . . . . . . . . 50
. . . . . . . . . . . . . . . . . . . . . . . . . . . . . . . . . . . . . . . . . . . . . . . . . . . . . . 50
. . . . . . . . . . . . . . . . . . . . . . . . . . . . . . . . . . . . . . . . . . . . . . . 39
. . . . . . . . . . . . . . . . . . . . . . . . . . . . . . . . . . . . . . . . . . . . . . . . . . 39
. . . . . . . . . . . . . . . . . . . . . . . . . . . . . . . . . . . . . . . . . . . . . . . . . . 39
. . . . . . . . . . . . . . . . . . . . . . . . . . . . . . . . . . . . . . . . . . . . . . . . . . 42
Chapter 6. Working with Tracks
Creating Tracks
Hiding Tracks
Assigning Track Inputs
Assigning Track Outputs
Virtual Tracks, Voices, and Track Priority
Automatic Assignment of Ascending Voices
Assigning Voices and Track Priority
Setting MIDI Channels
Adjusting Track Volume and Pan
Soloing and Muting Tracks
Adjusting Track Width
Color Coding Tracks
Grouping Tracks
Using the Groups List
Enabling Grouping
Creating a Group
. . . . . . . . . . . . . . . . . . . . . . . . . . . . . . . . . . . . . . . . . . . . . . . . . . . . . . . . 51
. . . . . . . . . . . . . . . . . . . . . . . . . . . . . . . . . . . . . . . . . . . . . . . . . . . . . . . . . . 52
. . . . . . . . . . . . . . . . . . . . . . . . . . . . . . . . . . . . . . . . . . . . . . . . . . . 53
. . . . . . . . . . . . . . . . . . . . . . . . . . . . . . . . . . . . . . . . . . . . . . . . . . 54
. . . . . . . . . . . . . . . . . . . . . . . . . . . . . . . . . . . . . . . . . . . . . . . . . . . 59
. . . . . . . . . . . . . . . . . . . . . . . . . . . . . . . . . . . . . . . . . . . . . . . . 60
. . . . . . . . . . . . . . . . . . . . . . . . . . . . . . . . . . . . . . . . . . . . . . . . . . . . 61
. . . . . . . . . . . . . . . . . . . . . . . . . . . . . . . . . . . . . . . . . . . . . . . . . . . . . 62
. . . . . . . . . . . . . . . . . . . . . . . . . . . . . . . . . . . . . . . . . . . . . . . . . . . . . . . . 62
. . . . . . . . . . . . . . . . . . . . . . . . . . . . . . . . . . . . . . . . . . . . . . . . . . . . 63
. . . . . . . . . . . . . . . . . . . . . . . . . . . . . . . . . . . . . . . . . . . . . . . . . . . . . . 64
. . . . . . . . . . . . . . . . . . . . . . . . . . . . . . . . . . . . . . . . . . . . . . . . . . . . . . . 65
. . . . . . . . . . . . . . . . . . . . . . . . . . . . . . . . . . . . . . 41
. . . . . . . . . . . . . . . . . . . . . . . . . . . . . . . . . . . . . . . . . . 41
. . . . . . . . . . . . . . . . . . . . . . . . . . . . . . . . . . . . . . . . . 48
. . . . . . . . . . . . 50
. . . . . . . . . . . . . . . . . . . . . . . . . . . . . . . . . . . . . . . . . . . . . 51
. . . . . . . . . . . . . . . . . . . . . . . . . . . . . . . . . . . . . . . 54
. . . . . . . . . . . . . . . . . . . . . . . . . . . . . . . . . . . . 55
. . . . . . . . . . . . . . . . . . . . . . . . . . . . . . . . . . . . . . . . . . 56
. . . . . . . . . . . . . . . . . . . . . . . . . . . . . . . . . . . . . . . . . . . . 59
Pro Tools Reference Guide
iv
Page 5

Chapter 7. File Management and Compatibility
Locating Audio Files
WAV File Compatibility
Naming Files, Playlists and Regions
. . . . . . . . . . . . . . . . . . . . . . . . . . . . . . . . . . . . . . . . . . . . . . . . . . . . . 67
. . . . . . . . . . . . . . . . . . . . . . . . . . . . . . . . . . . . . . . . . . . . . . . . . . . . 68
. . . . . . . . . . . . . . . . . . . . . . . . . . . . . . . . . . . . . . . . . . 69
Part III Recording
. . . . . . . . . . . . . . . . . . . . . . . . . . . . . . . . 67
Chapter 8. Record Setup
Input Connections and Audio Levels
Record Enabling Tracks
Monitoring Modes
Monitoring Latency
Low Latency Monitoring
Track Names
Recording to Multiple Hard Drives
Allocating Hard Drive Space for Recording
Record Modes
Recording with the Click
. . . . . . . . . . . . . . . . . . . . . . . . . . . . . . . . . . . . . . . . . . . . . . . . . . . . . . . . . . 78
. . . . . . . . . . . . . . . . . . . . . . . . . . . . . . . . . . . . . . . . . . . . . . . . . . . . 73
. . . . . . . . . . . . . . . . . . . . . . . . . . . . . . . . . . . . . . . . . . . . . . . . . . . 74
. . . . . . . . . . . . . . . . . . . . . . . . . . . . . . . . . . . . . . . . . . . . . . . . . . . . . . . 75
. . . . . . . . . . . . . . . . . . . . . . . . . . . . . . . . . . . . . . . . . . . . . . . . . . . . . . 76
. . . . . . . . . . . . . . . . . . . . . . . . . . . . . . . . . . . . . . . . . . . . . . . . . . . 77
. . . . . . . . . . . . . . . . . . . . . . . . . . . . . . . . . . . . . . . . . . . . . . . . . . . . . . . . . . 81
. . . . . . . . . . . . . . . . . . . . . . . . . . . . . . . . . . . . . . . . . . . . . . . . . . 83
Chapter 9. Basic Audio Recording
Recording a Single Audio Track
Stereo and Multiple-Track Recording
Recording Additional Takes
Punch Recording Audio
Loop Recording Audio
Auditioning Record Takes
Setting Punch/Loop Points
. . . . . . . . . . . . . . . . . . . . . . . . . . . . . . . . . . . . . . . . . . . . . . . . 90
. . . . . . . . . . . . . . . . . . . . . . . . . . . . . . . . . . . . . . . . . . . . . . . . . . . 92
. . . . . . . . . . . . . . . . . . . . . . . . . . . . . . . . . . . . . . . . . . . . . . . . . . . . 93
. . . . . . . . . . . . . . . . . . . . . . . . . . . . . . . . . . . . . . . . . . . . . . . . . 94
. . . . . . . . . . . . . . . . . . . . . . . . . . . . . . . . . . . . . . . . . . . . . . . . . 96
. . . . . . . . . . . . . . . . . . . . . . . . . . . . . . . . . . . . . . . . . . 73
. . . . . . . . . . . . . . . . . . . . . . . . . . . . . . . . . . . . . . . . . . . . 79
. . . . . . . . . . . . . . . . . . . . . . . . . . . . . . . . . . . . . . 80
. . . . . . . . . . . . . . . . . . . . . . . . . . . . . . . . . . . . . . . . . . . . 87
. . . . . . . . . . . . . . . . . . . . . . . . . . . . . . . . . . . . . . . . . . . . . 87
. . . . . . . . . . . . . . . . . . . . . . . . . . . . . . . . . . . . . . . . . . 89
Contents
v
Page 6

Chapter 10. MIDI Recording
MIDI Controller Devices
Enabling Input Devices
MIDI Thru
MIDI Input Filter
Input Quantize
Wait for Note
MIDI Merge/Replace
Recording a MIDI Track
Punch Recording MIDI
Loop Recording MIDI
Recording System Exclusive Data
. . . . . . . . . . . . . . . . . . . . . . . . . . . . . . . . . . . . . . . . . . . . . . . . . . . . . . . . . . . 103
. . . . . . . . . . . . . . . . . . . . . . . . . . . . . . . . . . . . . . . . . . . . . . . . . . . . . . . . 104
. . . . . . . . . . . . . . . . . . . . . . . . . . . . . . . . . . . . . . . . . . . . . . . . . . . . . . . . . 104
. . . . . . . . . . . . . . . . . . . . . . . . . . . . . . . . . . . . . . . . . . . . . . . . . . 101
. . . . . . . . . . . . . . . . . . . . . . . . . . . . . . . . . . . . . . . . . . . . . . . . . . 102
. . . . . . . . . . . . . . . . . . . . . . . . . . . . . . . . . . . . . . . . . . . . . . . . . . . . . . . 103
. . . . . . . . . . . . . . . . . . . . . . . . . . . . . . . . . . . . . . . . . . . . . . . . . . . . 105
. . . . . . . . . . . . . . . . . . . . . . . . . . . . . . . . . . . . . . . . . . . . . . . . . . 105
. . . . . . . . . . . . . . . . . . . . . . . . . . . . . . . . . . . . . . . . . . . . . . . . . . 107
. . . . . . . . . . . . . . . . . . . . . . . . . . . . . . . . . . . . . . . . . . . . . . . . . . . 109
. . . . . . . . . . . . . . . . . . . . . . . . . . . . . . . . . . . . . . . . . . . . . . . . 101
. . . . . . . . . . . . . . . . . . . . . . . . . . . . . . . . . . . . . . . . . . . 112
Chapter 11. Advanced Recording
Using QuickPunch
Recording from a Digital Source
Half-Speed Recording and Playback
. . . . . . . . . . . . . . . . . . . . . . . . . . . . . . . . . . . . . . . . . . . . . . . . . . . . . 113
. . . . . . . . . . . . . . . . . . . . . . . . . . . . . . . . . . . . . . . . . . . 113
. . . . . . . . . . . . . . . . . . . . . . . . . . . . . . . . . . . . . . . . . . . 116
. . . . . . . . . . . . . . . . . . . . . . . . . . . . . . . . . . . . . . . . . 118
Chapter 12. Importing/Exporting Audio and MIDI
Importing Audio
Importing Audio into a Session (Macintosh)
Importing Audio into a Session (Windows)
Recalculating Waveform Overviews
Loading Audio Files with Drag & Drop
Transferring Audio from CD
Conversion Quality
Exporting Audio
Importing MIDI Files
Exporting MIDI Files
. . . . . . . . . . . . . . . . . . . . . . . . . . . . . . . . . . . . . . . . . . . . . . . . . . . . . . . 119
. . . . . . . . . . . . . . . . . . . . . . . . . . . . . . . . . . . 119
. . . . . . . . . . . . . . . . . . . . . . . . . . . . . . . . . . . . 122
. . . . . . . . . . . . . . . . . . . . . . . . . . . . . . . . . . . . . . . . . 125
. . . . . . . . . . . . . . . . . . . . . . . . . . . . . . . . . . . . . . . 125
. . . . . . . . . . . . . . . . . . . . . . . . . . . . . . . . . . . . . . . . . . . . . . . 125
. . . . . . . . . . . . . . . . . . . . . . . . . . . . . . . . . . . . . . . . . . . . . . . . . . . . . 126
. . . . . . . . . . . . . . . . . . . . . . . . . . . . . . . . . . . . . . . . . . . . . . . . . . . . . . . 127
. . . . . . . . . . . . . . . . . . . . . . . . . . . . . . . . . . . . . . . . . . . . . . . . . . . . 128
. . . . . . . . . . . . . . . . . . . . . . . . . . . . . . . . . . . . . . . . . . . . . . . . . . . . 129
. . . . . . . . . . . . . . . . . . . . . . . . . . . . 119
Pro Tools Reference Guide
vi
Page 7

Part IV Editing
Chapter 13. Editing Basics
Pro Tools Editing
Track Material
Displaying Region Names and Times
Audio Regions and Waveforms
MIDI Regions and MIDI Data
Playlists
The Audio and MIDI Regions Lists
Edit Modes
Zooming
Rulers
Time Scale
Tick-Based Timing
. . . . . . . . . . . . . . . . . . . . . . . . . . . . . . . . . . . . . . . . . . . . . . . . . . . . . . . . . 134
. . . . . . . . . . . . . . . . . . . . . . . . . . . . . . . . . . . . . . . . . . . . . . . . . . . . . . . . . . . . . 141
. . . . . . . . . . . . . . . . . . . . . . . . . . . . . . . . . . . . . . . . . . . . . . . . . . . . . . . . . . . 145
. . . . . . . . . . . . . . . . . . . . . . . . . . . . . . . . . . . . . . . . . . . . . . . . . . . . . . . . . . . . . 147
. . . . . . . . . . . . . . . . . . . . . . . . . . . . . . . . . . . . . . . . . . . . . . . . . . . . . . . . . . . . . . 149
. . . . . . . . . . . . . . . . . . . . . . . . . . . . . . . . . . . . . . . . . . . . . . . . . . . . . . . . . . . 150
. . . . . . . . . . . . . . . . . . . . . . . . . . . . . . . . . . . . . . . . . . . . . . . . . 133
. . . . . . . . . . . . . . . . . . . . . . . . . . . . . . . . . . . . . . . . . . . . . . . . . . . . . . . 133
. . . . . . . . . . . . . . . . . . . . . . . . . . . . . . . . . . . . . . . . 137
. . . . . . . . . . . . . . . . . . . . . . . . . . . . . . . . . . . . . . . . . . . . . 137
. . . . . . . . . . . . . . . . . . . . . . . . . . . . . . . . . . . . . . . . . . . . . . 139
. . . . . . . . . . . . . . . . . . . . . . . . . . . . . . . . . . . . . . . . . . . 143
. . . . . . . . . . . . . . . . . . . . . . . . . . . . . . . . . . . . . . . . . . . . . . . . . . . . . . 152
Chapter 14. Playing/Selecting Track Material
Playing Tracks
Scrolling Options
The Scrubber
Separate Edit and Timeline Selections
Selecting Track Material
Playing Selections
Timeline Selections
Playing Edit and Timeline Selections with the Playhead
. . . . . . . . . . . . . . . . . . . . . . . . . . . . . . . . . . . . . . . . . . . . . . . . . . . . . . . . 155
. . . . . . . . . . . . . . . . . . . . . . . . . . . . . . . . . . . . . . . . . . . . . . . . . . . . . . . 157
. . . . . . . . . . . . . . . . . . . . . . . . . . . . . . . . . . . . . . . . . . . . . . . . . . . . . . . . . 158
. . . . . . . . . . . . . . . . . . . . . . . . . . . . . . . . . . . . . . . 161
. . . . . . . . . . . . . . . . . . . . . . . . . . . . . . . . . . . . . . . . . . . . . . . . . 162
. . . . . . . . . . . . . . . . . . . . . . . . . . . . . . . . . . . . . . . . . . . . . . . . . . . . . . 170
. . . . . . . . . . . . . . . . . . . . . . . . . . . . . . . . . . . . . . . . . . . . . . . . . . . . . 171
. . . . . . . . . . . . . . . . . . . . . . . . . . . . . . . . 155
. . . . . . . . . . . . . . . . . . . . . . . . . . . 173
Contents
vii
Page 8

Chapter 15. Working with Regions and Selections
Creating New Regions
Healing a Separation
Placing Regions in Tracks
The Trimmer Tool
Moving Regions
Nudging
Shift Command
Quantizing Regions
Locking Regions
Muting/Unmuting Regions
Edit Commands
Duplicate Command
Repeat Command
Merge Paste Command
Consolidate Selection Command
Managing Regions
Compacting an Audio File
. . . . . . . . . . . . . . . . . . . . . . . . . . . . . . . . . . . . . . . . . . . . . . . . . . . . . . . . . . . . 186
. . . . . . . . . . . . . . . . . . . . . . . . . . . . . . . . . . . . . . . . . . . . . . . . . . . 175
. . . . . . . . . . . . . . . . . . . . . . . . . . . . . . . . . . . . . . . . . . . . . . . . . . . 177
. . . . . . . . . . . . . . . . . . . . . . . . . . . . . . . . . . . . . . . . . . . . . . . . 178
. . . . . . . . . . . . . . . . . . . . . . . . . . . . . . . . . . . . . . . . . . . . . . . . . . . . . . 180
. . . . . . . . . . . . . . . . . . . . . . . . . . . . . . . . . . . . . . . . . . . . . . . . . . . . . . . 182
. . . . . . . . . . . . . . . . . . . . . . . . . . . . . . . . . . . . . . . . . . . . . . . . . . . . . . . 188
. . . . . . . . . . . . . . . . . . . . . . . . . . . . . . . . . . . . . . . . . . . . . . . . . . . . . 189
. . . . . . . . . . . . . . . . . . . . . . . . . . . . . . . . . . . . . . . . . . . . . . . . . . . . . . . 189
. . . . . . . . . . . . . . . . . . . . . . . . . . . . . . . . . . . . . . . . . . . . . . . 190
. . . . . . . . . . . . . . . . . . . . . . . . . . . . . . . . . . . . . . . . . . . . . . . . . . . . . . . 190
. . . . . . . . . . . . . . . . . . . . . . . . . . . . . . . . . . . . . . . . . . . . . . . . . . . . 194
. . . . . . . . . . . . . . . . . . . . . . . . . . . . . . . . . . . . . . . . . . . . . . . . . . . . . 194
. . . . . . . . . . . . . . . . . . . . . . . . . . . . . . . . . . . . . . . . . . . . . . . . . 195
. . . . . . . . . . . . . . . . . . . . . . . . . . . . . . . . . . . . . . . . . . . 196
. . . . . . . . . . . . . . . . . . . . . . . . . . . . . . . . . . . . . . . . . . . . . . . . . . . . . 196
. . . . . . . . . . . . . . . . . . . . . . . . . . . . . . . . . . . . . . . . . . . . . . . . 199
. . . . . . . . . . . . . . . . . . . . . . . . . . . 175
Chapter 16. MIDI Editing
Inserting MIDI Notes with the Pencil Tool
Manually Editing MIDI Notes
Continuous Controller Events. . . . . . . . . . . . . . . . . . . . . . . . . . . . . . . . . . . . . . . . . . . . . . 207
Program Changes. . . . . . . . . . . . . . . . . . . . . . . . . . . . . . . . . . . . . . . . . . . . . . . . . . . . . . 208
System Exclusive Events . . . . . . . . . . . . . . . . . . . . . . . . . . . . . . . . . . . . . . . . . . . . . . . . . 211
MIDI Operations Window. . . . . . . . . . . . . . . . . . . . . . . . . . . . . . . . . . . . . . . . . . . . . . . . . 212
Select Notes . . . . . . . . . . . . . . . . . . . . . . . . . . . . . . . . . . . . . . . . . . . . . . . . . . . . . . . . . 213
Quantize . . . . . . . . . . . . . . . . . . . . . . . . . . . . . . . . . . . . . . . . . . . . . . . . . . . . . . . . . . . . 214
Change Velocity . . . . . . . . . . . . . . . . . . . . . . . . . . . . . . . . . . . . . . . . . . . . . . . . . . . . . . . 219
Change Duration . . . . . . . . . . . . . . . . . . . . . . . . . . . . . . . . . . . . . . . . . . . . . . . . . . . . . . 221
Transpose . . . . . . . . . . . . . . . . . . . . . . . . . . . . . . . . . . . . . . . . . . . . . . . . . . . . . . . . . . . 222
Note/Controller Chasing . . . . . . . . . . . . . . . . . . . . . . . . . . . . . . . . . . . . . . . . . . . . . . . . . 223
MIDI Offset . . . . . . . . . . . . . . . . . . . . . . . . . . . . . . . . . . . . . . . . . . . . . . . . . . . . . . . . . . 224
Stuck Notes . . . . . . . . . . . . . . . . . . . . . . . . . . . . . . . . . . . . . . . . . . . . . . . . . . . . . . . . . . 225
Pro Tools Reference Guide
viii
. . . . . . . . . . . . . . . . . . . . . . . . . . . . . . . . . . . . . . . . . . . . . . . . . . 201
. . . . . . . . . . . . . . . . . . . . . . . . . . . . . . . . . . . . . 201
. . . . . . . . . . . . . . . . . . . . . . . . . . . . . . . . . . . . . . . . . . . . . . 202
Page 9

Chapter 17. Conductor Tracks and Memory Locations . . . . . . . . . . . . . . . . . . . . . . . . 227
Tempo Events. . . . . . . . . . . . . . . . . . . . . . . . . . . . . . . . . . . . . . . . . . . . . . . . . . . . . . . . . 227
Default Tempo . . . . . . . . . . . . . . . . . . . . . . . . . . . . . . . . . . . . . . . . . . . . . . . . . . . . . . . . 230
Identify Beat Command . . . . . . . . . . . . . . . . . . . . . . . . . . . . . . . . . . . . . . . . . . . . . . . . . . 230
Meter Events . . . . . . . . . . . . . . . . . . . . . . . . . . . . . . . . . . . . . . . . . . . . . . . . . . . . . . . . . 233
Memory Locations and Markers . . . . . . . . . . . . . . . . . . . . . . . . . . . . . . . . . . . . . . . . . . . . 235
Memory Locations Window . . . . . . . . . . . . . . . . . . . . . . . . . . . . . . . . . . . . . . . . . . . . . . . 242
Chapter 18. Advanced Editing . . . . . . . . . . . . . . . . . . . . . . . . . . . . . . . . . . . . . . . . . . . . . . 245
Using Crossfades. . . . . . . . . . . . . . . . . . . . . . . . . . . . . . . . . . . . . . . . . . . . . . . . . . . . . . . 245
Creating Fades at the Beginnings and Ends of Regions. . . . . . . . . . . . . . . . . . . . . . . . . . . . 253
Creating Fades and Crossfades in Batches. . . . . . . . . . . . . . . . . . . . . . . . . . . . . . . . . . . . . 255
Stripping Silence From Regions . . . . . . . . . . . . . . . . . . . . . . . . . . . . . . . . . . . . . . . . . . . . 256
Inserting Silence . . . . . . . . . . . . . . . . . . . . . . . . . . . . . . . . . . . . . . . . . . . . . . . . . . . . . . . 258
The Time Trimmer. . . . . . . . . . . . . . . . . . . . . . . . . . . . . . . . . . . . . . . . . . . . . . . . . . . . . . 258
Compress/Expand Edit To Play . . . . . . . . . . . . . . . . . . . . . . . . . . . . . . . . . . . . . . . . . . . . . 260
Repeat Paste To Fill Selection . . . . . . . . . . . . . . . . . . . . . . . . . . . . . . . . . . . . . . . . . . . . . 260
Replacing Regions . . . . . . . . . . . . . . . . . . . . . . . . . . . . . . . . . . . . . . . . . . . . . . . . . . . . . 261
Processing Audio with AudioSuite Plug-Ins. . . . . . . . . . . . . . . . . . . . . . . . . . . . . . . . . . . . . 263
Waveform Repair with the Pencil Tool. . . . . . . . . . . . . . . . . . . . . . . . . . . . . . . . . . . . . . . . 263
Part V Mixing
Chapter 19. Basic Mixing . . . . . . . . . . . . . . . . . . . . . . . . . . . . . . . . . . . . . . . . . . . . . . . . . . 267
Creating Inserts and Sends . . . . . . . . . . . . . . . . . . . . . . . . . . . . . . . . . . . . . . . . . . . . . . . 267
Inserts . . . . . . . . . . . . . . . . . . . . . . . . . . . . . . . . . . . . . . . . . . . . . . . . . . . . . . . . . . . . . . 268
Sends . . . . . . . . . . . . . . . . . . . . . . . . . . . . . . . . . . . . . . . . . . . . . . . . . . . . . . . . . . . . . . 271
Auxiliary Inputs . . . . . . . . . . . . . . . . . . . . . . . . . . . . . . . . . . . . . . . . . . . . . . . . . . . . . . . . 273
Master Faders. . . . . . . . . . . . . . . . . . . . . . . . . . . . . . . . . . . . . . . . . . . . . . . . . . . . . . . . . 275
Contents ix
Page 10

Chapter 20. Advanced Mixing . . . . . . . . . . . . . . . . . . . . . . . . . . . . . . . . . . . . . . . . . . . . . . 277
Hardware I/O Inserts and Sends . . . . . . . . . . . . . . . . . . . . . . . . . . . . . . . . . . . . . . . . . . . 277
Creating a Submix . . . . . . . . . . . . . . . . . . . . . . . . . . . . . . . . . . . . . . . . . . . . . . . . . . . . . 280
Using an Auxiliary Input to Mix an External Source. . . . . . . . . . . . . . . . . . . . . . . . . . . . . . . 281
Creating a Master Send Level Control. . . . . . . . . . . . . . . . . . . . . . . . . . . . . . . . . . . . . . . . 281
Printing Effects to Disk . . . . . . . . . . . . . . . . . . . . . . . . . . . . . . . . . . . . . . . . . . . . . . . . . . 282
Recording a Submix to Disk . . . . . . . . . . . . . . . . . . . . . . . . . . . . . . . . . . . . . . . . . . . . . . 282
TDM Mixer Plug-Ins. . . . . . . . . . . . . . . . . . . . . . . . . . . . . . . . . . . . . . . . . . . . . . . . . . . . . 283
Chapter 21. Automation . . . . . . . . . . . . . . . . . . . . . . . . . . . . . . . . . . . . . . . . . . . . . . . . . . . 287
Automation Modes . . . . . . . . . . . . . . . . . . . . . . . . . . . . . . . . . . . . . . . . . . . . . . . . . . . . . 288
Automation Preferences . . . . . . . . . . . . . . . . . . . . . . . . . . . . . . . . . . . . . . . . . . . . . . . . . 291
Viewing Automation . . . . . . . . . . . . . . . . . . . . . . . . . . . . . . . . . . . . . . . . . . . . . . . . . . . . 293
Writing Automation . . . . . . . . . . . . . . . . . . . . . . . . . . . . . . . . . . . . . . . . . . . . . . . . . . . . 294
Enabling or Suspending Automation. . . . . . . . . . . . . . . . . . . . . . . . . . . . . . . . . . . . . . . . . 297
Deleting Automation. . . . . . . . . . . . . . . . . . . . . . . . . . . . . . . . . . . . . . . . . . . . . . . . . . . . 298
Thinning Automation . . . . . . . . . . . . . . . . . . . . . . . . . . . . . . . . . . . . . . . . . . . . . . . . . . . 299
Drawing Automation. . . . . . . . . . . . . . . . . . . . . . . . . . . . . . . . . . . . . . . . . . . . . . . . . . . . 300
Editing Automation. . . . . . . . . . . . . . . . . . . . . . . . . . . . . . . . . . . . . . . . . . . . . . . . . . . . . 301
Writing Automation to the Start, End or All of a Selection. . . . . . . . . . . . . . . . . . . . . . . . . . 306
Trimming Automation. . . . . . . . . . . . . . . . . . . . . . . . . . . . . . . . . . . . . . . . . . . . . . . . . . . 307
Creating Snapshot Automation . . . . . . . . . . . . . . . . . . . . . . . . . . . . . . . . . . . . . . . . . . . . 308
Setting the Automation Buffer Size . . . . . . . . . . . . . . . . . . . . . . . . . . . . . . . . . . . . . . . . . 311
Chapter 22. Mixdown and Mastering. . . . . . . . . . . . . . . . . . . . . . . . . . . . . . . . . . . . . . . . 313
Bouncing Tracks to Disk . . . . . . . . . . . . . . . . . . . . . . . . . . . . . . . . . . . . . . . . . . . . . . . . . 313
Bounce Parameters . . . . . . . . . . . . . . . . . . . . . . . . . . . . . . . . . . . . . . . . . . . . . . . . . . . . 314
Output Options. . . . . . . . . . . . . . . . . . . . . . . . . . . . . . . . . . . . . . . . . . . . . . . . . . . . . . . . 315
Using Dither on an Output Mix . . . . . . . . . . . . . . . . . . . . . . . . . . . . . . . . . . . . . . . . . . . . . 321
Creating a Submix . . . . . . . . . . . . . . . . . . . . . . . . . . . . . . . . . . . . . . . . . . . . . . . . . . . . . 322
Final Mixdown . . . . . . . . . . . . . . . . . . . . . . . . . . . . . . . . . . . . . . . . . . . . . . . . . . . . . . . . 323
Mastering . . . . . . . . . . . . . . . . . . . . . . . . . . . . . . . . . . . . . . . . . . . . . . . . . . . . . . . . . . . 323
Pro Tools Reference Guidex
Page 11

Part VI Synchronization
Chapter 23. Synchronization Concepts . . . . . . . . . . . . . . . . . . . . . . . . . . . . . . . . . . . . . . 329
Your Sync Requirements . . . . . . . . . . . . . . . . . . . . . . . . . . . . . . . . . . . . . . . . . . . . . . . . . 329
Aspects of Sync . . . . . . . . . . . . . . . . . . . . . . . . . . . . . . . . . . . . . . . . . . . . . . . . . . . . . . . 329
Syncing Pro Tools . . . . . . . . . . . . . . . . . . . . . . . . . . . . . . . . . . . . . . . . . . . . . . . . . . . . . . 330
SMPTE Frame Formats . . . . . . . . . . . . . . . . . . . . . . . . . . . . . . . . . . . . . . . . . . . . . . . . . . 332
Working with Film-Originated Material. . . . . . . . . . . . . . . . . . . . . . . . . . . . . . . . . . . . . . . . 333
Chapter 24. Time Code Synchronization . . . . . . . . . . . . . . . . . . . . . . . . . . . . . . . . . . . . . 339
Pro Tools Sync Options . . . . . . . . . . . . . . . . . . . . . . . . . . . . . . . . . . . . . . . . . . . . . . . . . . 339
The Session Setup Window . . . . . . . . . . . . . . . . . . . . . . . . . . . . . . . . . . . . . . . . . . . . . . . 340
Preparing to Work with SMPTE. . . . . . . . . . . . . . . . . . . . . . . . . . . . . . . . . . . . . . . . . . . . . 343
Configuring Pro Tools for SMPTE. . . . . . . . . . . . . . . . . . . . . . . . . . . . . . . . . . . . . . . . . . . . 343
Putting Pro Tools Online. . . . . . . . . . . . . . . . . . . . . . . . . . . . . . . . . . . . . . . . . . . . . . . . . . 346
Generating Time Code . . . . . . . . . . . . . . . . . . . . . . . . . . . . . . . . . . . . . . . . . . . . . . . . . . . 347
Syncing a Sequencer to Pro Tools on the Macintosh . . . . . . . . . . . . . . . . . . . . . . . . . . . . . . 349
Syncing a Sequencer to Pro Tools in Windows . . . . . . . . . . . . . . . . . . . . . . . . . . . . . . . . . . 351
Using MIDI Machine Control . . . . . . . . . . . . . . . . . . . . . . . . . . . . . . . . . . . . . . . . . . . . . . . 351
Remote Track Arming . . . . . . . . . . . . . . . . . . . . . . . . . . . . . . . . . . . . . . . . . . . . . . . . . . . 353
Syncing Pro Tools to an OMS-Compatible Sequencer using MMC . . . . . . . . . . . . . . . . . . . . . 355
MIDI Beat Clock . . . . . . . . . . . . . . . . . . . . . . . . . . . . . . . . . . . . . . . . . . . . . . . . . . . . . . . 358
Spotting Regions to SMPTE Frame Locations . . . . . . . . . . . . . . . . . . . . . . . . . . . . . . . . . . . 358
Time Stamping . . . . . . . . . . . . . . . . . . . . . . . . . . . . . . . . . . . . . . . . . . . . . . . . . . . . . . . . 361
Identifying a Sync Point . . . . . . . . . . . . . . . . . . . . . . . . . . . . . . . . . . . . . . . . . . . . . . . . . . 362
Troubleshooting Sync. . . . . . . . . . . . . . . . . . . . . . . . . . . . . . . . . . . . . . . . . . . . . . . . . . . . 363
Contents xi
Page 12

Chapter 25. Working with QuickTime Movies . . . . . . . . . . . . . . . . . . . . . . . . . . . . . . . . 367
About QuickTime . . . . . . . . . . . . . . . . . . . . . . . . . . . . . . . . . . . . . . . . . . . . . . . . . . . . . . 367
QuickTime Requirements . . . . . . . . . . . . . . . . . . . . . . . . . . . . . . . . . . . . . . . . . . . . . . . . 369
Movie Playback Quality Options . . . . . . . . . . . . . . . . . . . . . . . . . . . . . . . . . . . . . . . . . . . . 369
Importing a QuickTime Movie . . . . . . . . . . . . . . . . . . . . . . . . . . . . . . . . . . . . . . . . . . . . . 370
Setting the Movie Start Time: Movie Offset . . . . . . . . . . . . . . . . . . . . . . . . . . . . . . . . . . . . 372
Spotting Audio to a QuickTime Movie . . . . . . . . . . . . . . . . . . . . . . . . . . . . . . . . . . . . . . . . 373
Importing QuickTime Audio . . . . . . . . . . . . . . . . . . . . . . . . . . . . . . . . . . . . . . . . . . . . . . . 374
Bouncing to a new Movie . . . . . . . . . . . . . . . . . . . . . . . . . . . . . . . . . . . . . . . . . . . . . . . . 376
Appendix A. DSP-Induced Delays in Mixing . . . . . . . . . . . . . . . . . . . . . . . . . . . . . . . . . . 379
Delay Factors. . . . . . . . . . . . . . . . . . . . . . . . . . . . . . . . . . . . . . . . . . . . . . . . . . . . . . . . . 379
Compensating for Delays . . . . . . . . . . . . . . . . . . . . . . . . . . . . . . . . . . . . . . . . . . . . . . . . 380
Typical Delay Scenarios. . . . . . . . . . . . . . . . . . . . . . . . . . . . . . . . . . . . . . . . . . . . . . . . . . 382
Appendix B. TDM Mixing and DSP Usage. . . . . . . . . . . . . . . . . . . . . . . . . . . . . . . . . . . . 383
Pro Tools TDM Technology. . . . . . . . . . . . . . . . . . . . . . . . . . . . . . . . . . . . . . . . . . . . . . . . 383
DSP Allocation . . . . . . . . . . . . . . . . . . . . . . . . . . . . . . . . . . . . . . . . . . . . . . . . . . . . . . . . 383
DSP Usage with TDM Mixers . . . . . . . . . . . . . . . . . . . . . . . . . . . . . . . . . . . . . . . . . . . . . . 386
DSP Usage with TDM Plug-Ins . . . . . . . . . . . . . . . . . . . . . . . . . . . . . . . . . . . . . . . . . . . . . 388
DSP Usage and I/O Allocation . . . . . . . . . . . . . . . . . . . . . . . . . . . . . . . . . . . . . . . . . . . . . 388
Appendix C. Keyboard Shortcuts. . . . . . . . . . . . . . . . . . . . . . . . . . . . . . . . . . . . . . . . . . . . 389
Global Key Commands . . . . . . . . . . . . . . . . . . . . . . . . . . . . . . . . . . . . . . . . . . . . . . . . . . 389
Commands Key Focus . . . . . . . . . . . . . . . . . . . . . . . . . . . . . . . . . . . . . . . . . . . . . . . . . . 390
Numeric Keypad Modes . . . . . . . . . . . . . . . . . . . . . . . . . . . . . . . . . . . . . . . . . . . . . . . . . 390
Appendix D. Troubleshooting . . . . . . . . . . . . . . . . . . . . . . . . . . . . . . . . . . . . . . . . . . . . . . . 393
Backing up your work . . . . . . . . . . . . . . . . . . . . . . . . . . . . . . . . . . . . . . . . . . . . . . . . . . . 393
Common Issues . . . . . . . . . . . . . . . . . . . . . . . . . . . . . . . . . . . . . . . . . . . . . . . . . . . . . . . 393
Using DigiTest As a Diagnostic Tool . . . . . . . . . . . . . . . . . . . . . . . . . . . . . . . . . . . . . . . . . 396
Performance Factors . . . . . . . . . . . . . . . . . . . . . . . . . . . . . . . . . . . . . . . . . . . . . . . . . . . 396
Before You Call Digidesign Technical Support . . . . . . . . . . . . . . . . . . . . . . . . . . . . . . . . . . 397
Pro Tools Reference Guidexii
Page 13

Part I
Introduction
Page 14

Page 15

chapter 1
Welcome to Pro Tools
Welcome to Pro Tools®. Pro Tools integrates powerful multitrack digital audio
and MIDI sequencing features, giving you
everything you need to record, arrange,
edit, mix, and master professional-quality
audio.
The Pro Tools Guides
Your Pro Tools System includes the following guides:
Pro Tools Installation Guides Instructions
for installing Pro Tools software and hardware, and connecting your studio.
Pro Tools Reference Guide Instructions for
creating sessions, recording, editing, and
mixing with Pro Tools.
DigiRack™ Plug-Ins Guide Instructions for
using the DigiRack Plug-Ins for both realtime and file-based audio processing in
Pro Tools.
Pro Tools MIDI Controllers Guide Instruc-
tions for operating Pro Tools with various
MIDI control surfaces.
Quick Reference Cards (TDM Systems only)
Separate cards for Macintosh and Windows
that list the many keyboard shortcuts not
shown in the Pro Tools menus.
✽ Online PDF versions of the Quick Reference
cards are included for Pro Tools LE systems.
Conventions Used in These Guides
The Pro Tools guides use the following
conventions to indicate menu choices and
key commands:
:
Convention Action
File > Save Session Choose Save Session
from the File menu
Control+N Hold down the Control
key and press the
Option-click Hold down the Option
key and click the mouse
button
Right-click (Windows) Click with the right
mouse button
N key
Chapter 1: Welcome to Pro Tools 3
Page 16
The following symbols are used to highlight important information:
Compatibility Information
✽ User Tips are helpful hints for getting the
most from your Pro Tools system.
▲ Important Notices include information that
could affect your Pro Tools session data or the
performance of your Pro Tools system.
☞ Cross References point to related sections
in the Pro Tools Guides.
Choose and Select
The words “choose” and “select” are often
interchangeable in conversational english.
In this guide, however, there is a distinction between the two terms.
Select When the guide instructs you to se-
lect something, it stays selected. This is the
case with dialog box options and menu
items that enable or disable an option.
Choose When the guide instructs you to
choose something, a one-time action is performed. This is the case with most menu
commands; they perform their chosen action only once.
Digidesign can only assure compatibility
and provide support for devices it has
tested and approved. For a list of Digidesign-qualified computers, SCSI accelerator
cards, hard drives, diskette drives, and serial port adapters, refer to the latest compatibility information on the Digidesign
Web site (www.digidesign.com).
Digidesign Registration
Make sure to complete and return the registration card included with Product Name.
Registered users are entitled to one year of
free technical support, and will receive periodic software updates and upgrade notices.
Pro Tools Reference Guide4
Page 17

chapter 2
Pro Tools System Configurations
TDM-equipped systems
Pro Tools TDM-equipped systems are available in the following configurations:
Pro Tools 24 MIXplus
A core system includes:
• MIX Core card
• MIX Farm card
• Pro Tools software
• Digidesign Audio Interface
(sold separately)
Pro Tools 24 MIX
A core system includes:
• a MIX Core card
• Pro Tools software
• Digidesign Audio Interface
(sold separately)
Pro Tools 24
Pro Tools III PCI (Macintosh only)
A core system includes:
• a Disk I/O Audio Card
• a DSP Farm Card
• Pro Tools software
• Digidesign Audio Interface
(sold separately)
Supported Audio Interfaces
You can use the following Audio Interfaces
with Pro Tools TDM systems:
◆ The 888/24 I/O and 882/20 I/O (as well
as 888 I/O and 882 I/O) Audio Interfaces
work with Pro Tools 24 MIX/MIXplus,
Pro Tools 24, or Pro Tools III PCI systems.
◆ The 1622 I/O Audio Interface works with
Pro Tools 24 MIX/MIXplus and
Pro Tools 24 systems only.
◆ The ADAT Bridge I/O Interface works
with Pro Tools 24 MIX/MIXplus,
Pro Tools 24, or Pro Tools III PCI systems.
A core system includes:
• d24 Audio card
• DSP Farm card
• Pro Tools software
• Digidesign Audio Interface
(sold separately)
▲ Pro Tools system performance depends on
factors such as computer processor speed,
amount of system memory, and hard drive performance. Contact your Digidesign dealer or
visit Digidesign’s Web site for the latest system requirements and compatibility information.
Chapter 2: Pro Tools System Configurations 5
Page 18

TDM System Playback, Recording and Voice Limits
The following table lists the audio playback, recording, and voice limits of each type of
Pro Tools TDM system. The term virtual voice refers to the maximum number of audio
tracks that can share the available voices on your system. TDM-equipped Pro Tools systems
can open sessions with up to 128 audio tracks, but any audio tracks beyond that system’s
virtual voice limit will be automatically set to Voice Off.
All TDM-equipped Pro Tools systems provide a total of 32 internal mix busses. TDM systems also provide 5 Inserts and 5 Sends per track, up to the DSP capacity of your system.
Table 1. Pro Tools TDM System Audio Playback, Recording and Virtual Voice Limits
Voices
Core System Type
Pro Tools 24 MIX/MIXplus 32 or 64 32 or 64 86
Pro Tools 24 32 32 43
Pro Tools III (PCI) 16 16 53
(Tracks of
Simultaneous
Playback)
Tracks of
Simultaneous
Recording
Virtual Voices
Audio Interfaces for TDM Systems
The following table lists the input and output capabilities of the various Audio Interfaces
for TDM-equipped Pro Tools systems. In expanded TDM systems, Audio Interfaces can be
combined for up to 72 audio inputs and outputs.
Table 2. Pro Tools Audio Interface Channel Capabilities
Interface Type
888/24 I/O 8 in/8 out 24-bit 24-bit 24-bit
882/20 I/O 8 in/8 out 20-bit 20-bit 24-bit
Number of I/O
Channels
A/D
Conversion
D/A
Conversion
Digital I/O
888 I/O 8 in/8 out 18-bit 18-bit 24-bit
882 I/O 8 in/8 out 18-bit 18-bit 24-bit
1622 I/O 16 in/2 out 20-bit 20-bit 24-bit
ADAT Bridge I/O 16 in/16 out 20-bit 20-bit 24-bit
Pro Tools Reference Guide6
Page 19
Pro Tools LE Systems
Pro Tools LE-based systems are available in
the following configurations.
Pro Tools with Audiomedia III
An Audiomedia III system includes:
• Audiomedia III card
• Pro Tools LE software
Digi 001
A Digi 001 system includes:
• Digi 001 PCI card
• Digi 001 I/O box
• Pro Tools LE software
▲ The total track count and processing capac-
ity of Pro Tools LE-based systems depend on
the processing power of your computer. Contact your Digidesign dealer or visit Digidesign’s
Web site for the latest system requirements
and compatibility information.
Pro Tools LE System Capabilities
The following table lists the playback, recording, and input/output capabilities of each
Pro Tools LE-based system. All Pro Tools LE systems are limited to 24 audio tracks. If you
open a Pro Tools session containing more than 24 audio tracks on an LE-based system,
only the first 24 audio tracks will open; if you save the session using Pro Tools LE, any
audio tracks beyond the first 24 will be lost.
All Pro Tools LE systems provide a total of 16 internal mix busses. Pro Tools LE also provides up to 5 Inserts and 5 Sends per track, depending on your computer’s processing capacity.
Table 3. Pro Tools LE System Audio Playback, Recording, and Channel Capabilities
System Type
Tracks of
Simultaneous
Playback
Number of
Recording/Playback
Channels
A/D
Conversion
D/A
Conversion
Digital
I/O
Digi 001 24 up to 18 in/18 out 24-bit 24-bit 24-bit
Audiomedia III 24 up to 4 in/4 out 18-bit 18-bit 24-bit
For details on transferring session material between Pro Tools LE and Pro Tools TDM systems, see “Sharing Sessions between Pro Tools TDM Systems and Pro Tools LE Systems” on
page 50.
Chapter 2: Pro Tools System Configurations 7
Page 20

Pro Tools Reference Guide8
Page 21

chapter 3
Pro Tools Concepts
This chapter is an overview of some essential concepts related to digital audio, MIDI,
and digital signal processing as they apply
to Pro Tools.
Hard Disk Recording
Tape-based recording is a linear medium—
you need to rewind or fast forward a tape to
hear a particular spot in a recording. To rearrange or repeat material in a linear system, you need to re-record it.
Hard disk recording is a non-linear (or random access) medium—you can go immediately to any spot in a recording without
having to rewind or fast forward.
Non-linear systems have several advantages. You can easily rearrange or repeat
parts of a recording by making the hard
disk read parts of the recording in a different order. In addition, this re-arrangement
is non-destructive, meaning that the original
recorded material is not altered.
The Digidesign Audio Engine
When you start Pro Tools, an application
called DAE automatically launches in the
background. DAE, or the Digidesign Audio
Engine, is Digidesign’s real-time operating
system for digital recording systems. When
you install Pro Tools, DAE is automatically
installed on your system.
In the same way that a computer’s operating system provides the foundation for
programs that run on the computer, DAE
provides much of the hard disk recording,
digital signal processing, mix automation,
and MIDI functionality required by
Pro Tools and other products from Digidesign and its Development Partners.
Pro Tools is a non-linear recording system
that allows you to rearrange and mix recorded material non-destructively.
Chapter 3: Pro Tools Concepts 9
Page 22

Elements of a Session
When you start a project in Pro Tools, you
create a session. Some basic elements of sessions are explained in this section.
Region
Session File
Pro Tools session file icon
A session file is the document that Pro Tools
creates when you start a new project. The
session file contains maps of all elements
associated with a project, including audio
files, MIDI data, and all your edit and mix
information. You can make changes to a
session and save those changes in a new
session file. This allows you to create multiple versions of a project or back up your
editing and mixing work.
Audio File
Audio region
A region is a piece of audio, MIDI, or automation data. An audio region could be a
guitar riff, a verse of a song, a sound effect,
a piece of dialog, or an entire sound file. In
Pro Tools, regions are created from audio
or MIDI files, and can be arranged in tracks.
Playlist
Playlist selector pop-up menu
A playlist is a group of regions arranged on
an Audio or MIDI track. You can place multiple edit playlists on a single track. This allows you to assemble different versions of a
track and choose among them with a popup menu on the track.
Audio file icon
When you record audio into a Pro Tools
session, audio files are created and stored in
a folder named “Audio Files.” Audio files
can appear in a session as regions, in a track
or in the Audio Regions List.
Pro Tools Reference Guide10
On Audio tracks, a playlist tells the hard
disk which audio files to read in what order. By using several copies of an audio region in a playlist, you can repeat a section
of a recording without using any additional disk space.
Page 23

Track
Audio track in the Edit Window
A track is where audio or MIDI regions are
strung together in a playlist. A playlist can
be made up of a single region or many separate regions. It can be made up of similar
elements, such as regions from several different takes of a solo, or dissimilar elements, such as several sound effects.
Voice
(TDM Systems Only)
Channel
Computer 1
78563412785634125/6
ANALOG OUTPUT ANALOG INPUT AES/EBU OUTPUT AES/EBU INPUT
7/8
Rear view of 888/24 I/O Interface
The term channel is used to describe several
related components of a Pro Tools system.
The first refers to a physical input or output
of your Pro Tools system. For example, an
888/24 I/O Audio Interface provides 8
channels of analog input and output to a
TDM-equipped system, and a Digi 001 system provides up to 18 channels of input
and output to a Pro Tools LE system.
Computer 2
1/2
5/6
1/2
3/4
7/8
3/4
8 CH Mode
2 x 4 CH Mode
S/PDIFINS/PDIF
SLAVE CLOCKINSLAVE CLOCK
OUT
OUT
Choosing a voice for an Audio track
On TDM-equipped Pro Tools systems, voice
refers to the number of digital audio events
that Pro Tools can play back simultaneously. For example, a Pro Tools 24 core
system is a 32-voice system and can therefore playback 32 different audio events at
one time.
On TDM systems, you can have more
tracks in a session than your system has
voices; they just cannot all play back at the
same time. These tracks are referred to as
virtual tracks.
Channel strip from the Mix window
The second use of the term channel refers to
a mixer strip in the Pro Tools Mix window.
The term channel strip refers to the mixer
strip of any Audio track, MIDI track, Auxiliary Input track or Master Fader track in a
session.
Chapter 3: Pro Tools Concepts 11
Page 24
Audio and MIDI channel strips have similar controls, but those controls have
slightly different effects. For example, Audio and Auxiliary Input channel strip faders control the Pro Tools mixer, while MIDI
channel strip faders send MIDI volume
data (MIDI controller 7).
The term channel also describes an aspect of
MIDI operation. See “MIDI Concepts” on
page 12.
MIDI Concepts
MIDI (Musical Instrument Digital Interface) is a communication protocol for musical instruments. This industry standard
enables connections between a variety of
devices from different manufacturers. Examples of MIDI-compatible equipment include synthesizers, sound modules, drum
machines, patch bays, effects processors,
MIDI interfaces, and sequencers.
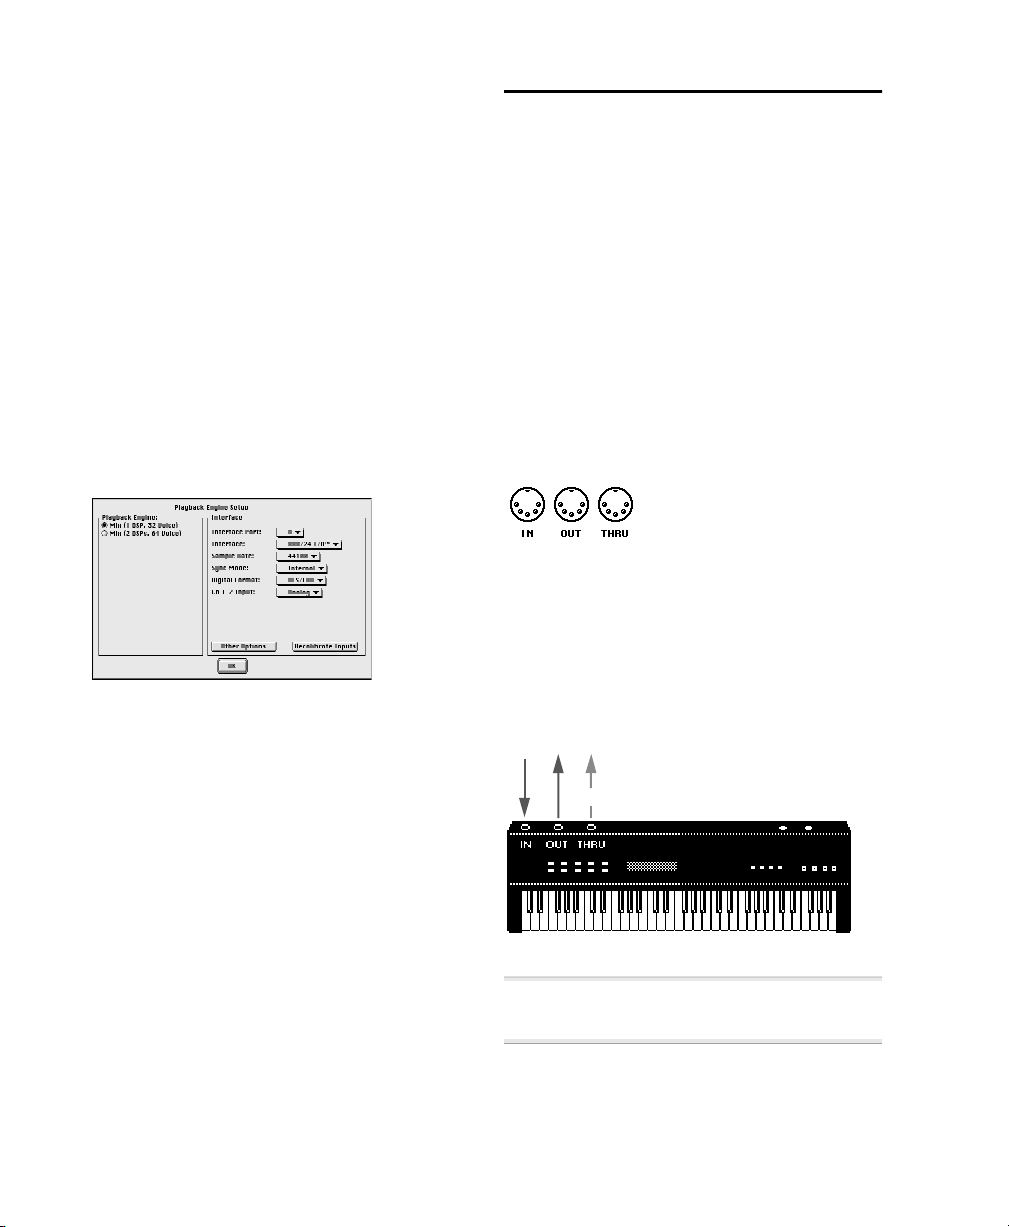
Playback Engine
All Pro Tools systems allow you choose the
Playback Engine for a session at any time.
Playback Engine dialog for Pro Tools TDM system
The Playback Engine allows you to reconfigure Pro Tools to use different Digidesign
hardware.
For details on choosing a Playback Engine,
see “Configuring Your System” on page 39.
MIDI devices are equipped with 5-pin DIN
connectors, labeled as either IN, OUT, or
THRU.
MIDI Connectors
The MIDI OUT port transmits messages;
the MIDI IN port receives messages; and,
MIDI THRU echoes whatever is received
from the IN port. MIDI devices are connected with MIDI cables that are available
at most music stores.
echoed from IN
MIDI signal flow
▲ Not all devices will have all three MIDI ports
(IN, OUT and THRU).
Pro Tools Reference Guide12
Page 25

A single MIDI cable can transmit a separate
set of messages for each of 16 channels.
These 16 channels correspond to separate
MIDI devices or to multiple channels
within a single device (if the device is multi-
timbral). Each channel represents a discreet
instrument sound; for instance, bass on
channel 1, piano on channel 2 and drums
on channel 10. Similar to a multitrack tape
recorder, a MIDI sequencer can record
complex arrangements—even using a single multi-timbral keyboard.
separate channels. This makes it possible
for a single MIDI sound source to play back
entire arrangements.
MIDI Channel Up to 16 channels of MIDI
performance data can be transmitted on a
single MIDI cable. The channel number
separates the different messages so your
sound sources can receive the right ones.
Program Change Event A MIDI command
that tells a sound source which sound
patch to use. The MIDI protocol lets you
choose from a range of 128 patches.
MIDI Terms
The following are some basic MIDI terms:
MIDI Interface Hardware that allows com-
puters to connect to and communicate
with MIDI devices.
MIDI Device Any keyboard, sound module,
effects device or other equipment that can
send or receive MIDI information.
MIDI Controller Any MIDI device that trans-
mits MIDI performance data. These include
keyboards, MIDI guitar controllers, MIDI
wind instruments, and others. Controllers
transmit MIDI from their MIDI OUT ports.
MIDI Control Surface Any device, such as
the Mackie HUI, that uses a MIDI connection to send control messages to a software
program, but is not generally used to
record MIDI information.
MIDI Sound Source Any MIDI instrument
that plays back in your arrangements.
Sound sources receive MIDI from their
MIDI IN ports.
Multi-timbral The capability of playing sev-
eral different instrument sounds (such as
piano, bass, and drums) simultaneously on
Bank Select Message A MIDI command
that specifies the bank of patches from
which to choose. Many devices have more
than 128 patches and Bank Select messages
provide a means of accessing them.
Local Control A controller setting found on
most MIDI keyboards that allows them to
play their own sound source. Disabling “local control” ensures that a device’s internal
sound source is only played by external
MIDI messages.
When using Pro Tools, “local control”
should usually be disabled. When “local
control” is off, your keyboard still transmits data to its MIDI OUT port.
Continuous Controller Events MIDI instruc-
tions that allow real-time changes to notes
that are currently sounding. These include
pitch bend, modulation, volume, pan, and
many others.
System Exclusive Data MIDI data com-
monly used for sending and retrieving
patch parameter information for storage
purposes.
Chapter 3: Pro Tools Concepts 13
Page 26
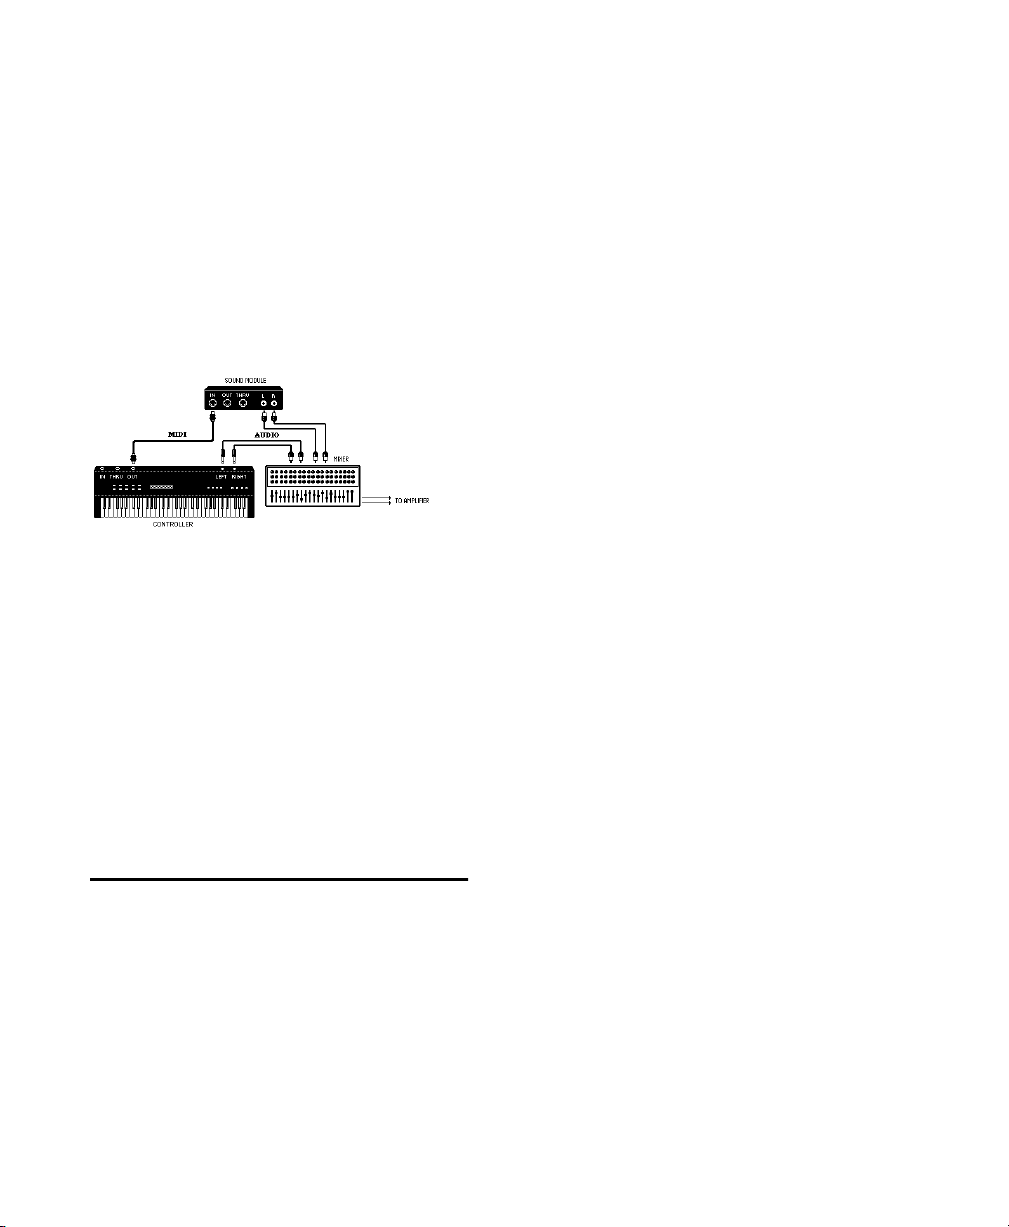
Common Misconceptions about MIDI
MIDI is not audio. The messages that travel
down a MIDI cable are only numbers that
translate to specific instructions. For instance, when you strike a key on your MIDI
keyboard it sends a message to its MIDI
OUT port telling another device (if connected and set to the same MIDI channel)
to play that particular note.
Signal paths for MIDI instruments
However, to actually hear that second device (sound source) you’ll need to connect
its audio outputs to a sound system. Your
MIDI instruments have two signal paths,
one for audio and another for MIDI.
MIDI does not allow you to use your devices beyond their capabilities. Particular
instruments have their own sound generation, polyphony, and multi-timbral limitations.
Pro Tools TDM systems are not limited by
the number of physical inputs and outputs.
Pro Tools TDM systems provide up to 128
virtual audio tracks that can be recorded
upon and cued up for playback, but cannot
all be played back simultaneously.
Virtual tracks provide significant advantages: on Pro Tools TDM systems, you can
have many more tracks than voices in a session. You can then choose which of these
tracks you want to play, up to the total
number of available voices. You never need
to erase tracks to make room for other
tracks—provided that you have enough
space available on your hard disk to store
all of them. In addition, virtual tracks allow
you to create separate tracks for each audio
component of your mix, each with its own
volume, pan, EQ, effects sends, and automation.
Pro Tools voices are dynamically allocated.
When a hole opens up in one track, its
voice becomes temporarily available and
another track can pop through and begin
to play. If the first track reaches a point
where audio occurs again, the voice reverts
to the original track. You can determine
the order in which your tracks use available
voices. See “Assigning Voices and Track Priority” on page 56.
Virtual Tracks
(TDM Systems Only)
Tape decks record only physical tracks: they
are limited by the number of tracks on the
deck and on the tape itself. For example, a
16-track recorder can record and play back
a maximum of 16 tracks at a time.
Pro Tools Reference Guide14
Virtual tracks use the Digital Signal Processing (DSP) capacity of your system. (See
“DSP Allocation” on page 383 for more information.) Another powerful Pro Tools
feature, multiple edit playlists, allows you to
create comps and alternate arrangements
of material, but does not use additional
DSP capacity. For details about multiple
edit playlists, see “Playlists” on page 141.
Page 27
chapter 4
Pro Tools Windows
Pro Tools provides two complementary
ways of viewing a project: the Mix window
and the Edit window. Pro Tools also allows
you to control many functions from the
Transport window. The main elements of
these windows are explained in the following sections.
The Mix Window
In the Mix window, tracks appear as mixer
modules, with controls for inserts, sends,
input/output assignments, volume, panning (in Stereo Mix mode), record-enable,
automation mode, and solo/mute. The following section explains each of these track
controls.
To display the Pro Tools input/output controls, inserts, sends, and comments, select
Display > Mix Window Shows > All.
✽ To toggle between the Mix and Edit win-
dows, press Command + = (Macintosh) or
Control + = (Windows).
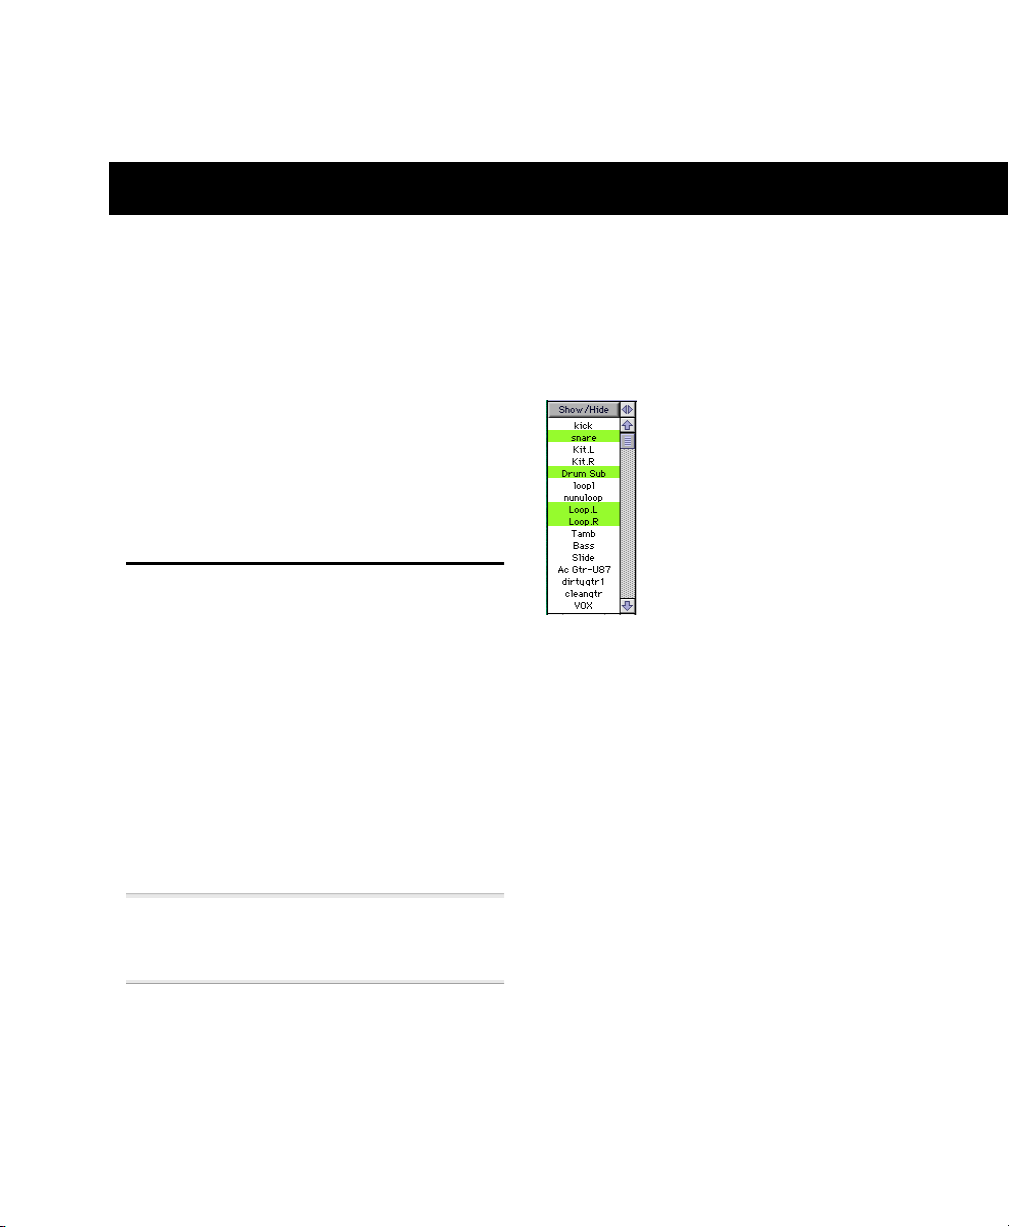
The Show/Hide Tracks List
Show/Hide Tracks List
This scrolling window lists all tracks in the
current session. It allows you to show or
hide a track by selecting or deselecting its
name in its list. You can also use this list to
reorder tracks on screen by dragging a track
name to a new position within the list. The
pop-up menu at the top of this list provides
commands that allow you to show or hide
all tracks, or only tracks currently selected
on screen.
About Groups and Show/Hide Tracks
Even if a track is hidden, if it is a member of
an enabled group, all Mix window operations performed on other members of the
group will also affect the hidden track—with
the exception of audio or MIDI record-enabling. If you solo, mute, or automation
Chapter 4: Pro Tools Windows 15
Page 28

write-enable a grouped track, any group
members that are hidden will be soloed,
muted, or automation write-enabled as
well. The only exception to this rule is
record enabling of Audio or MIDI tracks.
These functions are not applied to hidden
tracks in the Mix window.
name. The pop-up menu at the top of this
list provides commands to create, delete or
suspend groups. You can link groups in the
Mix Groups and Edit Groups lists. For more
information on grouping, see “Grouping
Tracks” on page 62.
In the Edit window, however, editing operations performed on members of an enabled group will not affect hidden tracks
that are also members of the enabled
group.
On TDM systems, even if a track is hidden
from view, its position relative to other
tracks still affects its virtual track playback
priority (see “Virtual Tracks, Voices, and
Track Priority” on page 54 for details).
The Mix Groups List
Mix Groups List
An Audio Track/Channel Strip
Inserts
Sends
Input/Output
Automation Mode
Record Enable/Solo/Mute/Voice
Pan Slider
Group ID
Volume Fader
Level Meter
The Mix Groups list shows all groups in the
session. It allows you to activate a group by
selecting its name in the list. A group is
only enabled (meaning that its members are
linked for mixing purposes), when its
name is highlighted in this list.
You can also use this list to select grouped
tracks on-screen by clicking to the left of
the dotted vertical line next to a group
Pro Tools Reference Guide16
Track Name
Audio Channel Strip
Each Audio track has its own set of controls
for volume, pan, record-enable, automation mode, solo, mute, and on TDM systems, voice assignment.
Page 29

Stereo Send
Real-Time Plug-In
Show/Hide
Tracks List
Send Pan
Send
Volume
Send
Level Meter
Automation
Mode
Selector
Channel Pan
Group ID
Indicator
Channel
Volume
Mix Groups
List
Track Name
Track
Comments
View
Inserts
View
Sends
View
I/O View
Record Enable,
Solo, Mute
buttons
Track Level
Meter
Audio
Channel Strip
Figure 1. Pro Tools Mix Window
AutoMatch
Indicator
Auxiliary Input
Channel Strip
Master Fader
Channel Strip
MIDI
Channel Strip
Chapter 4: Pro Tools Windows 17
Page 30

A MIDI Track/Channel Strip
MIDI Channel
Automation Mode
Record Enable/Solo/Mute/Patch
MIDI Pan
MIDI Volume
MIDI Velocity Meter
Track Name
MIDI Channel Strip
Each MIDI track has its own set of controls
for volume, pan, record enable, automation mode, solo, mute, MIDI patch assignment, and MIDI channel assignment. MIDI
tracks can be added to a session with the
New Track command. Tracks can be added
to a session with the New Track command.
You can display tracks in Narrow or Normal width by selecting Display > Narrow
Mix Window.
Mix Window Track Controls
Record Enable button
Automation Mode Selector
Voice Selector
Mute button
Solo button
Mix window track controls in channel strip
Record Enable Button
The Record Enable button puts the track
into record-ready mode. Once a track is
record-enabled, click the Record and Play
buttons in the Transport window to start
audio or MIDI recording.
When the Latch Record Enable Buttons option is selected, you can record enable
more than one track at the same time by
clicking the record enable button on each
track. If the Latch Record Enable Buttons
option is deselected, Shift-click to record
enable multiple tracks.
Record Safe Mode
Pro Tools provides a record safe mode
which allows you to disable recording capability on any track in a session. This prevents you from inadvertently record-enabling a track and then recording over
valuable material. To toggle Record Safe
mode, Command-click (Macintosh) or
Control-Click (Windows) the Record button on the track.
Solo Button
The Solo button mutes all other tracks so a
track can be auditioned alone.
Pro Tools Reference Guide18
Page 31

When the Latch Solo Buttons option is selected, you can solo more than one track at
the same time simply by clicking the solo
button on each of the desired tracks. If the
Latch Solo Buttons option is deselected,
Shift-click to solo multiple tracks.
Solo Safe Mode
Pro Tools also allows you to solo safe a
track. This prevents the track from being
muted even if you solo other tracks. This
feature is useful for tracks such as Auxiliary
Inputs that are being used as effects returns, allowing the effects track to remain
in a mix even when other tracks are soloed.
It is also useful to solo-safe MIDI tracks so
that their playback is not affected when
you solo audio tracks. To toggle Solo Safe
mode, Command-click (Macintosh) or
Control-Click (Windows) the Solo button
on the track.
Mute Button
The Mute button silences a track. More
than one track can be muted at one time.
On TDM systems, if the Mute Frees Voice
option is selected, muting a track will allocate its voice to the next highest priority
virtual track allocated to that voice in your
session.
Automation Mode Selector
The Automation Mode selector allows you
to choose a track’s automation mode. Once
a track is automation write-enabled, starting playback will start writing automation
(depending on the mode you have chosen). Any automation moves that you
make on the track can then be played back
exactly as you performed them.
Voice Selector
(TDM Systems Only)
Audio Track Voice Selector
On TDM systems, the Voice Selector is used
to assign a voice to an audio track for playback. Boldface type in this pop-up menu
indicates that the voice is currently in use
by one or more tracks.
More than one track can be assigned to the
same voice, but only one of the tracks can
be played back at the same time. Track priority is determined by a track’s position in
the Mix or Edit window. If multiple tracks
are assigned to the same voice, the one farthest to the left in the Mix window (or topmost in the Edit window) will be heard.
If there is an empty spot in a track that
shares a voice with another track, audio on
the track with the next-highest priority assigned to the same voice will “pop
through” during that time. You can also
disable playback of any muted track and
free its spot for the next virtual track assigned to that voice by selecting the Mute
Frees Voice option. For more information
on voices and track priority, see “Assigning
Voices and Track Priority” on page 56.
Chapter 4: Pro Tools Windows 19
Page 32

Input/Output View
Input Selector
Output Selector
Level/Peak/Delay Indicator
Pan Indicator
Output Selector
(Audio Tracks, Aux Inputs, Master Faders)
Inputs/Outputs view in channel strip
The I/O (Inputs/Output) view shows Input
and Output Selectors on Audio tracks, and
the Channel Selector on MIDI tracks. Both
types of tracks show volume and pan values in this view. To show the I/O View, select Display > Mix Window Shows (or Edit
Window Shows) > I/O View.
Input Selector
(Audio and Auxiliary Input Tracks)
‘
Audio Track Input Selector
The Input Selector allows you to route any
audio input or any of the Pro Tools internal
busses to an Audio track or an Auxiliary Input track.
Audio Track Output Selector
The Output Selector allows you to route a
track to any audio output or any of the
Pro Tools internal busses. In Stereo Mix
Outputs mode, the pop-up menu allows
you to route the track to a pair of outputs or
busses. In Direct Outputs mode, the popup menu allows you to route the track to a
single output.
In Stereo Mix Outputs mode, to send output to the odd-numbered channel, pan
left; to send output to the even-numbered
channel, pan right.
MIDI Device/Channel Selector
MIDI Device/Channel Selector
The MIDI Device/Channel Selector allows
you to route the MIDI track to a device and
channel.
Pro Tools Reference Guide20
Page 33

Default Program Button
Pan Indicator
The Pan Indicator displays the current pan
setting of a track. Pan values range from
<100 (full left) to 100> (full right). Panning
controls are only available if you are using
Pro Tools in Stereo Mix mode.
Default Program button in channel strip
The Default Program button opens the Program Change window, where you can specify a default program for the track. The
track’s default program is transmitted each
time the track plays.
Level/Peak/Channel Delay Indicator
The Level Indicator on an Audio track has
three modes: Level Indicator, Peak Indicator, and Channel Delay Indicator. Command-click (Macintosh) or Control-Click
(Windows) this button to toggle between
these modes.
Level Indicator Shows the current vol-
ume/input level of a track as set by the
track level fader.
Peak Indicator Functions as a headroom in-
dicator based on the last peak playback
level. To reset the peak counter, click the
indicator. Values range from +6 dB (highest
level signal), to ∞ (no signal).
Channel Delay Indicator Shows the delay, in
samples, incurred by any TDM Plug-Ins on
that channel.
Pan Slider
The Pan slider controls the balance of a
track between the assigned output pair. It
only appears if you are using Pro Tools in
Stereo Mix Outputs mode. The outputs
used as the stereo pair for the track’s image
are set with the Output Selector. The Pan
slider on a MIDI track is only effective if
you are controlling a sound module that
supports MIDI panning.
Track Level Fader
The track level fader controls the volume of
a track when it is in playback, and the
monitor level of the track when it is in
record.
The level fader on a MIDI track is only effective if you are controlling a sound module that supports MIDI volume.
Track Level Meter
On Audio tracks, level meters indicate the
level of the signal being recorded or played
back from the hard drive. Green indicates
nominal levels; Yellow indicates pre-clipping (–6 dB below full scale); and Red indicates clipping. When a track is record-enabled, these meters indicate record levels.
Chapter 4: Pro Tools Windows 21
Page 34

You can globally set level meters to indicate pre-or post-fader levels by choosing
Operations > Pre-Fader Metering. When set
to pre-fader, the level meters show levels
independent of fader position. With postfader metering, the level meters respond to
fader position.
If clipping occurs, the topmost LED will
stay lit (red). In addition, Pro Tools meters
provide a peak hold feature with three options:
To choose a peak hold setting, choose Setups > Preferences and click Display, and select one of the Peak Hold options: 3 Second
Peak Hold, Infinite Peak Hold, or No Peak
Hold.
Insert Controls
Click to assign an insert
Click to open the
Inserts/Sends editor
Inserts view in channel strip
Pro Tools provides up to five pre-fader inserts per Audio track or Auxiliary Input.
The inserts can be either hardware inserts
or software Plug-Ins included with your
system. To assign an insert, click the Inserts
button on the inserts section of a track.
You can clear a meter’s clipping or peak
hold indicator by clicking anywhere on the
meter. To clear all meters, Option-click
(Macintosh) or Alt-Click (Windows) on any
meter.
On MIDI tracks, the level meter shows the
MIDI velocity of the most recent MIDI
event.
Track Name
When new tracks are created with the New
Track command, they are given a default
name which can be changed at any time by
double-clicking the track name or choosing
File > Rename Selected Tracks.
Send Controls
Click to assign a send
Click to open the
Inserts/Sends editor
Sends view in channel strip
Pro Tools provides up to 5 mono or stereo
sends per Audio track or Auxiliary Input,
for sending signals to external signal processors or any of the Pro Tools internal busses. Sends can be either pre- or post-fader.
To assign a send to a track, click the Sends
button on the sends section of the track.
Pro Tools Reference Guide22
Page 35

Send level, pan and mute controls can be
adjusted from the Inserts and Sends Editor,
or directly from the sends area of a track by
showing individual send controls.
When you display the controls for an individual Send, you also have the option of
displaying Send level meters.
Send Level
Send Level Meter
Sends view showing individual send controls
Send Pan
Pre/Post button
Send Mute
Edit Window Track Controls
Record Enable button
Track Name
Playlist Selector
Automation Mode Selector
Mute button
Voice Selector
Track Height Selector
Track Display Format Selector
Solo button
Track Comments View
The Comments View shows any comments
entered in the Track Name/Comments dialog. You can also type directly in the Comments area for each track when it is displayed. To display the Comments View,
select Display > Mix Window Shows (or
Edit Window Shows) > Comments.
The Edit Window
The Edit window provides a time-line display of audio and MIDI for editing and arranging tracks. As in the Mix window, each
track has controls for record enable, solo,
mute and automation mode.
To display the Pro Tools input/output controls, inserts, sends, and comments, select
Display > Edit Window Shows > All.
Edit window track controls (medium track height)
Record Enable Button
See “Record Enable Button” on page 18.
Solo Button
See “Solo Button” on page 18.
Mute Button
See “Mute Button” on page 19.
Automation Mode Selector
See “Automation Mode Selector” on
page 19.
Voice Selector
(TDM Systems Only)
See “Voice Selector” on page 19.
Chapter 4: Pro Tools Windows 23
Page 36

Link Selection,
Commands Focus
Buttons
Rulers
Zoom Buttons
Edit Mode
Buttons
Editing Tools
Event Edit Area
Grid/Nudge
Selector
Location Indicators
Audio Regions
List
Audio Track
Show/Hide
Tracks List
MIDI Track
Edit Groups
List
MIDI Velocity View
Audio Waveform
View
Volume
Automation View
MIDI Regions
List
Selected Region
MIDI Notes View
Figure 2. Pro Tools Edit Window
Pro Tools Reference Guide24
Page 37

Playlist Selector
Playlist Selector
Track Display Format Selector
Tracks have edit playlists and automation
playlists. You can create any number of edit
playlists for a track, and assign them by
clicking the Playlist Selector in the track
and choosing from the pop-up menu. Each
track has a single set of automation playlists, according to the type of track and any
Send or Plug-In assignments. You choose
the automation playlist to display with the
Track Display Format Selector.
Track Height Selector
Track Height Selector
Tracks can be viewed in the Edit window at
any of six heights: Mini, Small, Medium,
Large, Jumbo, and Extreme. The appearance
of track controls varies with track height.
You can adjust track height by clicking either the Track Height Selector or in the area
just to the right of the track controls.
Track Display Format Selector
The Display Format for each track determines which data is displayed and edited
in the track’s playlist area.
Audio tracks can be set to Blocks, Waveform,
Volume, Pan, Mute, Send Level, Send Mute,
Send Pan, or any Plug-In parameters that
have been automated. Except when editing
automation data, audio tracks are usually
set to Waveform view.
Auxiliary input tracks can be set to Volume,
Pan, Mute, or any Plug-In parameter that
has been automated. Master Fader tracks
can be set to Volume, or any Plug-In param-
eter that has been automated.
MIDI tracks can be set to Blocks, Regions,
Notes, Volume, Pan, Mute, Velocity, Pitch
Bend, After Touch, Program, Sys Ex, and any
continuous controller type. Except when
editing controller data, program changes,
or sysex events, MIDI tracks are usually set
to Notes or Regions.
Track Name
See “Track Name” on page 22.
Chapter 4: Pro Tools Windows 25
Page 38

Edit Modes, Commands Key Focus, and Linked Selections
✽ You can also press F4 to set the Edit mode
to Grid.
Edit Mode
Commands Key Focus
Edit mode buttons in Edit window
Linked Selections
Shuffle Sets the Edit mode to Shuffle, which
restricts the placement of regions so that
they snap to each other and are placed end
to end.
✽ You can also press F1 to set the Edit mode
to Shuffle.
Spot
Sets the Edit mode to Spot, which
causes the Spot dialog to open when moving or trimming regions and notes. The
Spot dialog lets you enter a precise start,
end, or length (in any time format) for the
event.
✽ You can also press F2 to set the Edit mode
to Spot.
Slip
Sets the Edit mode to Slip, which allows regions and notes to be moved and
trimmed freely. Regions can placed so that
there is space between them, or so that
they overlap.
✽ You can also press F3 to set the Edit mode
to Slip.
Grid
Sets the Edit mode to Grid, which constrains edits and selections to the current
Grid value.
Commands Key Focus
(TDM Systems only)
Enables the Commands Key Focus, which
provides a wide range of shortcuts from the
alpha keyboard for editing and playing.
✽ You can also press Command+Option+1
(Macintosh) or Control+Alt+1 to enable the
Commands Key Focus.
Linked Selections
Links the Edit and Timeline selections, allowing you to set play and
record ranges by selecting in a track’s playlist. When unlinked, you can make Edit selections without disturbing the Timeline
selection.
✽ You can also press Shift+slash to enable
and disable Linked Selections.
Zoom Buttons
Vertical Zoom
In/Out (MIDI)
Vertical Zoom
In/Out (Audio)
Horizontal
Zoom Out
Zoom Preset Buttons
Zoom buttons in Edit window
Horizontal Zoom In/Out Zooms in and out
horizontally for all tracks. Option-click
(Macintosh) or Alt-click (Windows) either
of the Horizontal Zoom buttons to return
to the previous zoom level.
Horizontal
Zoom In
Pro Tools Reference Guide26
Page 39

✽ While pressing Command (Macintosh) or
Control (Windows), you can also use the
bracket keys to zoom in and out horizontally.
Edit Tools
Trimmer
Selector
Grabber
Scrubber
Vertical Zoom In/Out (Audio)
Zooms in and
out vertically for audio tracks. Option-click
(Macintosh) or Alt-click (Windows) either
of the Vertical Zoom buttons to return to
the previous zoom level.
✽ While pressing Command+Option (Mac-
intosh) or Control+Alt (Windows), you can also
use the bracket keys to zoom in and out vertically for all audio tracks.
Vertical Zoom In/Out (MIDI)
Zooms in and
out vertically for MIDI tracks. Option-click
(Macintosh) or Alt-click (Windows) either
of the Vertical Zoom buttons to return to
the previous zoom level.
✽ While pressing Command+Shift (Mac-
intosh) or Control+Shift (Windows), you can
also use the bracket keys to zoom in and out
vertically for all MIDI tracks.
Zoom Presets
Recalls horizontal zoom values for audio and MIDI tracks. Commandclick (Macintosh) or Control-click (Windows) a Zoom Preset button to store the
current horizontal zoom values.
✽ While pressing Control (Macintosh) or the
Start key (Windows), you can also recall a
Zoom Preset by typing its number on the alpha
keyboard.
✽ On TDM systems, when the Commands Key
Focus is enabled, you can also recall a Zoom
Preset by typing its number on the alpha keyboard.
Zoomer
Edit tools in Edit window
Smart Tool
Pencil
Zoomer Click or drag with the Zoomer tool
to zoom in horizontally for a track or Ruler.
Press Command (Macintosh) or Control
(Windows) while dragging to zoom horizontally and vertically.
To go back to the previous zoom level, Option-click (Macintosh) or Alt-click (Windows) with the Zoomer.
To zoom a selection, Option-click (Macintosh) or Alt-click (WIndows) the Zoomer
tool. To fill the Edit window with all regions, double-click the Zoomer tool.
✽ You can also press F5 to select the Zoomer
tool.
Standard Trimmer
To resize regions or MIDI
notes, drag or click near their start/end
points with the Trimmer tool. To reverse
the direction of the Trim cursor, which determines whether the start or end point is
edited, press Option (Macintosh) or Alt
(Windows).
The Trimmer can also be used to scale the
values for note velocities, controller events,
and automation breakpoints.
Chapter 4: Pro Tools Windows 27
Page 40

For TDM systems, choose from the Trimmer pop-up these other Trimmer tools:
Choose from the Grabber pop-up these
other Grabber tools:
Trimmer pop-up menu
• Scrub Trimmer, scrubs audio material to
find the trim point before performing
the trim.
• TCE Trimmer, expands or compresses
audio material to fit within a time range.
✽ You can also press F6 to select and toggle
through the three Trimmer tools: Standard,
Scrub, and TCE.
Selector
Drag with the Selector in a track’s
playlist for an Edit selection, or in a Timebase Ruler for a Timeline selection.
To adjust the length of a selection, Shiftclick or Shift-drag with the Selector. To extend an Edit selection to other tracks, Shiftclick with the Selector in the desired tracks.
To temporarily switch the Selector to the
Scrubber, press Control (Macintosh) or the
Start key (Windows).
✽ You can also press F7 to select the Selector
tool.
Grabber pop-up menu
• Separation Grabber, separates selections
into new regions.
• Object Grabber (TDM systems only), allows selection of discontiguous regions,
which can even be on different tracks.
✽ You can also press F8 to select and toggle
through the three Grabber tools: Time, Separation, and Object.
Scrubber
Drag with the Scrubber to scrub
up to two audio tracks—right for forward,
left for reverse. The resolution for the
Scrubber is determined by the zoom level,
and the distance and speed dragged determine the speed and length for the scrubbed
audio.
For finer resolutions without zooming,
press Command (Macintosh) or Control
(Windows) while scrubbing.
✽ You can also press F9 to select the Scrub-
ber tool.
Time Grabber
Use the Grabber to select or
move regions, MIDI events, and Conductor
events. The Grabber can also be used to edit
and insert automation breakpoints.
Option-click (Macintosh) or Alt-click (Windows) with the Grabber to delete tempo
and meter events, Markers, and automation breakpoints.
Pro Tools Reference Guide28
Pencil
Use the Pencil tool to insert MIDI
notes, edit velocities for a range of MIDI
notes, draw automation and controller
events, and repair audio waveforms (when
zoomed down to the sample level).
Page 41

Press Option (Macintosh) or Alt (Windows)
and the Pencil changes to an Eraser, which
can be used to delete notes, program
changes, and sysex events.
Choose from the Pencil pop-up any of the
five shapes, which can be used to affect a
range of note velocities, controller events,
or automation breakpoints.
Pencil pop-up menu
Using the Smart Tool
With the Smart Tool you can instantly access the Selector, Grabber, and Trimmer,
and you can also perform fades and crossfades. The position of the cursor in relation
to a region or note, or within an automation playlist, determines how the Smart
Tool functions.
Smart Tool in Edit window
To select the Smart Tool, click its icon in
the upper left of the Edit window, or press
F6+F7 (or F7+F8).
✽ You can also press F10 to select and toggle
through the five Pencil shapes: Freehand, Line,
Triangle, Square, and Random.
Smart Tool
The Smart Tool lets you use the
Selector, Grabber, and Trimmer, as well as
create fades, without switching tools. Depending on where the cursor is placed in
relation to a region or note, the Smart Tool
automatically switches to the appropriate
tool. For details, see “Using the Smart Tool”
on page 29.
To temporarily switch the Smart Tool to
the Scrubber, press Control (Macintosh) or
the Start key (Windows).
✽ You can also press F6+F7 (or F7+F8) to se-
lect the Smart tool.
The Smart Tool in Waveform View
Fade-In
Trim
Start
Smart Tool in Waveform view
Selector
Grabber
The following capabilities are available
with the Smart Tool when working with
Audio tracks in Waveform or Blocks view,
or MIDI tracks in Regions view:
◆ For the Selector, position the cursor over
the middle of the region, in the upper half.
◆ For the Grabber, position the cursor over
the middle of a region, in the lower half.
◆ For the Trimmer, position the cursor near
the region’s start or end point.
Fade-Out
Trim
End
Crossfade
Chapter 4: Pro Tools Windows 29
Page 42

◆ For a fade-in or fade-out, position the
cursor near an audio region’s start or end
point, near the top. Drag into the region to
set the fade length. The fade is created automatically with the settings last used in
the Fades dialog.
◆ For a crossfade, position the cursor be-
tween two adjacent audio regions, near the
bottom. Drag left or right to set the crossfade length. The fade is created automatically with the settings last used in the Fades
dialog.
To get the Marquee so you can select a
group of notes, press Command (Macintosh) or Control (Windows).
◆ For the Trimmer, position the cursor near
the note’s start or end point.
✽ To temporarily switch the Smart Tool to the
Pencil, press Control (Macintosh) or the Start
key (Windows), for the Eraser, press Control+Option (Macintosh) or Start+Alt (Windows).
✽ To temporarily switch the Smart Tool to the
Scrubber, press Control (Macintosh) or the
Start key (Windows).
The Smart Tool in Notes View
Selector
Trim
End
Trim
Start
Smart tool in Notes view
The following capabilities are available
with the Smart Tool when working with
MIDI tracks in Notes view:
◆ For the Selector, position the cursor so it
doesn’t cover any notes.
To get the Selector while positioning the
cursor over notes, press Command (Macintosh) or Control (Windows).
◆ For the Grabber, position the cursor over
the note, near its middle.
Grabber
The Smart Tool in Automation and Controller Views
The following capabilities are available
with the Smart Tool when working in automation and controller views:
◆ For the Selector, move the cursor so it is
positioned anywhere in the bottom 75% of
the playlist.
◆ For the Grabber, press Command (Mac-
intosh) or Control (Windows) to insert or
edit breakpoints. Continue pressing Command (Macintosh) or Control (Windows)
after you begin editing for fine control,
otherwise release for coarse control.
Press Command+Shift (Macintosh) or Control+Shift (Windows) to vertically constrain movement.
◆ For the Trimmer, position the cursor in
the top 25% of the playlist to trim breakpoints. Press Command (Macintosh) or
Control (Windows) after you begin trimming for fine control.
Pro Tools Reference Guide30
Page 43

Event Edit Area
Selection
Indicators
Attributes
Note
Location Indicators, Grid/Nudge Values, Current Cursor Display
Pitch
Attack Velocity
Release Velocity
Event Edit Area showing MIDI track information
Start Displays the start point for a selected
region or note, or for an Edit selection. To
move the start point, enter a new value in
this field.
End Displays the end point for a selected re-
gion or note, or for an Edit selection. To
move the end point, enter a new value in
this field.
Length Displays the length for a selected re-
gion or note, or for an Edit selection. To
change the length of the region, note, or
Edit selection, enter a new value in this
field.
Pitch Displays the pitch (including octave
number) for a selected note. To change the
pitch, enter a new value in this field, or select the field and play a note on your MIDI
controller.
Attack Displays the attack velocity for a se-
lected note. To change the velocity, enter a
new value in this field, or select the field
and play a note on your MIDI controller.
Release Displays the release velocity for a
selected note. To change the velocity, enter
a new value in this field, or select the field
and play a note on your MIDI controller.
✽ Press slash (/) to automatically select the
Start field, and to navigate from one field to
the next. Press Enter to accept a value.
Location Indicators
Edit window display showing MIDI track information
Grid/Nudge Values
Cursor Value
Cursor Location
Location Indicators Displays the current
play position in the Main and Sub Time
Scales. To move the Timeline insertion
point to a different location, click in either
field, type in the new location and press
Enter.
To change the time format for the Main or
Sub Time Scale, choose from the pop-up
menu to the right of the fields.
✽ To highlight the Main Location Indicator,
press Equal (=) on the numeric keypad. Press
period (.) to navigate the different time fields in
an indicator, press Enter to go to the new location.
Grid Value
Defines the Grid boundaries
used in Grid mode, and when quantizing
regions. The Grid value, selected from the
pop-up menu to the right of this field, can
be based on the Main Time Scale or any of
the other time formats.
Nudge Value Defines the time value, which
can be based on the Main Time Scale or any
other time format, used when nudging. Se-
Chapter 4: Pro Tools Windows 31
Page 44

lect the Nudge value from the pop-up
menu to the right of this field, or type in
any value you want.
In addition to nudging regions and notes,
you can also nudge start/end points for regions and notes, start/end points for selections, and region contents.
Cursor Location Provides feedback on the
current cursor location. This location is displayed in the time format for the Main
Time Scale.
Cursor Value Provides feedback on the cur-
rent cursor value. The type of value displayed depends on the Track’s Display Format: for instance, note number for Notes
view, velocity value for Velocity view, and
dB value for Volume view.
The Edit Groups List
You can also use this list to select grouped
tracks on-screen by clicking to the left of
the dotted vertical line next to a group
name. The pop-up menu at the top of this
list provides commands to create, delete or
suspend groups. You can link groups in the
Edit Groups and Mix Groups lists. For more
information on grouping, see “Grouping
Tracks” on page 62.
Audio Regions List and Pop-up Menu
All audio regions that are recorded, imported, or created by editing appear in the
Audio Regions List. Regions can be dragged
from the list to tracks and arranged in any
order.
Edit Groups List
The Edit Groups list shows all groups in the
session. It allows you to activate or deactivate a group by selecting or deselecting its
name in the list. A group is only enabled
(meaning that its members are linked for
editing purposes), when its name is highlighted in this list.
Pro Tools Reference Guide32
Using the Audio Regions List pop-up menu
(at the top of this list) you can sort this list
by a variety of attributes. You can also select, rename and clear regions from the session, as well as import and export audio
from this menu.
Page 45

MIDI Regions List and Pop-up Menu
All MIDI regions that are recorded, imported, or created by editing appear in the
MIDI Regions List. Regions can be dragged
from the list to tracks and arranged in any
order.
Online Puts Pro Tools online so that play-
back and recording is triggered by an external SMPTE source.
Return to Zero Locates to the beginning of
the session.
✽ You can also press Return (Macintosh) or
Enter on the alpha keyboard (Windows) to locate to the beginning of the session.
Rewind
Rewinds from the current play location. You can also click repeatedly to rewind incrementally (by an amount based
on the Main Time Scale).
Using the MIDI Regions List pop-up menu
(at the top of this list), you can sort this list
by a variety of attributes. You can also rename and clear regions from the session, as
well as import MIDI from this menu.
The Transport Window
The Transport window can be set to show
basic transport controls, counters, and
MIDI controls. The counters in the Transport window mirror the Location Indicators at the top of the Edit window.
Return to Zero
Rewind
Online
Pre-Roll
Post-Roll
Transport Master
Transport window showing basic transport controls
Fast Forward
Play
Stop
Start, End, and Length
for Timeline Selection
Go to End
Record
✽ With the Numeric Keypad Mode set to Trans-
port, you can also rewind by pressing 1.
Stop
Stops playback or recording.
You can also stop the Transport with the
following shortcuts:
• Press the Spacebar.
• With the Numeric Keypad Mode set to
Transport, press 0.
Play Starts playback or (if the Record but-
ton was clicked first) recording from the
Timeline insertion point.
With the Transport stopped, Control-click
(Macintosh) or Right-click (Windows) Play
to toggle Loop Playback mode. When enabled, a loop symbol appears in the Play
button.
You can also initiate playback with the following shortcuts:
• Press the Spacebar.
• With the Numeric Keypad Mode set to
Transport, press 0.
Chapter 4: Pro Tools Windows 33
Page 46

✽ To play or record at half-speed, Command-
click (Macintosh) or Control-click (Windows)
the Play button.
Fast Forward
Fast forwards from the Timeline insertion point. You can also click repeatedly to fast forward incrementally (by
an amount based on the Main Time Scale).
✽ With the Numeric Keypad Mode set to Trans-
port, you can also fast forward by pressing 2.
Go to End
✽ You can also press Option+Return (Mac-
intosh) or Control+Enter on the alpha keyboard
(Windows) to locate to the end of the session.
Record
Locates to the end of the session.
Arms Pro Tools for recording (the
button flashes). Clicking Play then initiates
recording.
With the Transport stopped, Control-click
(Macintosh) or Right-click (Windows)
Record to cycle through the four record
modes. The Record button changes to indicate the currently selected mode: blank for
Nondestructive, “D” for Destructive, a loop
symbol for Loop Record, and “Q” for
QuickPunch.
You can also begin recording with the following shortcuts:
• Press F12.
• Press Command+Spacebar (Macintosh)
or Control+Spacebar (Windows).
• With the Numeric Keypad Mode set to
Transport, press 3.
Pre-Roll Specifies the amount that plays be-
fore the beginning of a play or record
range. Pre-roll is particularly useful in
punch recording since it provides you with
time to “catch the beat” before reaching
the punch-in point. To set the pre-roll
amount, enter a new value in this field, or
drag the Pre-Roll flag in the Main Timebase
Ruler.
To enable pre-roll, click the Pre-Roll button
to the left of the pre-roll field so it becomes
highlighted.
Post-Roll Specifies the amount that plays
after the end of a play or record range. Postroll is useful in punch recording since playback continues after the punch-out point
so you can check for a smooth transition to
previously recorded material. To set the
post-roll amount, enter a new value in this
field, or drag the Post-Roll flag in the Main
Timebase Ruler.
To enable post-roll, click the Post-Roll button to the left of the post-roll field so it becomes highlighted.
Start Specifies the beginning of the play or
record range. You can set the start point by
entering a location in this field, by dragging the corresponding Playback Marker in
the Main Timebase Ruler, or by selecting
End Specifies the end of the play or record
range. You can set the end point by entering a location in this field, or by dragging
the corresponding Playback Marker in the
Main Timebase Ruler.
Length Specifies the length for the play or
record range. You can set the length by entering a location in this field, or by selecting a range in any Timebase Ruler.
Pro Tools Reference Guide34
Page 47

Transport Master
Specifies the “master” for
transport functions. Click this button and
choose from the pop-up menu to select the
Transport Master, which can be set to
Pro Tools, Machine, ADAT, or MMC.
MIDI Controls
Wait for Note
Countoff
Click
MIDI Merge
Tempo
Countoff
When selected, Pro Tools counts
off a specified number of measures (indicated in the button) before playback or recording begins.
Double-click the Countoff button, to open
the Click/Countoff Options dialog.
✽ With the Numeric Keypad Mode set to Trans-
port, you can also press 8 to enable the Countoff.
MIDI Merge
When selected (Merge mode),
recorded MIDI data is merged with exiting
track material. When deselected (Replace
mode), recorded MIDI data replaces existing track material.
Meter
Conductor
Transport window showing MIDI controls
Wait for Note When selected, recording
does not begin until a MIDI even is received. This ensures that you begin recording when you’re ready to play, and that the
first note, or other MIDI data, is recorded
precisely at the beginning of the record
range.
✽ You can also press F11 to turn on Wait for
Note, unless the Operation Preference for
“Disable F11 for Wait for Note” is selected.
Click
When selected, a metronome sounds
during playback and recording (as specified
by the settings in the Click/Countoff Options dialog).
Double-click the Click button to open the
Click/Count Options dialog.
✽ With the Numeric Keypad Mode set to Trans-
port, you can also press 7 to enable the Click.
✽ You can also press Option+A (Macintosh) or
Alt+A (Windows) to enable MIDI Merge, or with
the Numeric Keypad Mode set to Transport,
press 9.
Conductor
When selected, Pro Tools uses
the tempo map defined in the Tempo
Ruler. When deselected, Pro Tools switches
to Manual Tempo mode and ignores the
Tempo Track.
In Manual Tempo mode, you can enter a
BPM value in the tempo field, or tap in the
tempo by clicking the Tap button.
Meter Displays the session’s current meter
based on the play location. Double-click
the Meter button to open the Change
Meter window.
Tempo Display’s the session’s current
tempo based on the play location. In Manual Tempo mode, you can enter a BPM
value into this field. In addition, when the
tempo field is selected, you can tap in a
tempo from a MIDI controller.
Chapter 4: Pro Tools Windows 35
Page 48

Keyboard Focus
The Keyboard Focus in Pro Tools determines how the alpha keys function. Depending on which Keyboard Focus is enabled, you can use the keys on your alpha
keyboard to select regions in the Audio or
MIDI Regions List, enable or disable
groups, or perform an edit or play command (TDM systems only).
Audio Regions List
Key focus
Commands
Key focus
Groups List
Key focus
MIDI Regions List
Key focus
Keyboard Focus buttons
Commands Key Focus (TDM Systems only)
When selected, provides a wide range of
shortcuts from the alpha keyboard for editing and playing.
With the Commands Key focus disabled,
you can still access any of its key shortcuts
by pressing Control (Macintosh) or the
Start key (Windows) along with the key.
Audio Regions List Key Focus When se-
lected, audio regions can be located and selected in the Audio Regions List by typing
the first few letters of the region’s name.
MIDI Regions List Key Focus When se-
lected, MIDI regions can be located and selected in the MIDI Regions List by typing
the first few letters of the region’s name.
Groups List Key Focus When selected, Edit
and Mix Groups can be enabled or disabled
by typing the Group ID letter.
☞ Refer to the Quick Reference Card that
came with your Pro Tools package (TDM systems only) for a complete list of keyboard
shortcuts. This card is also available in PDF
format in the Release Notes and Documentation folder.
To set the Keyboard Focus:
■ Click the a-z button for the focus you
want to enable.
– or –
While pressing Command+Option (Macintosh) or Control+Alt (Windows), press
1 (Commands), 2 (Audio Regions List),
3 (MIDI Regions List), or 4 (Groups List).
You can only enable one Keyboard Focus at
a time. Enabling a Keyboard Focus will disable the one previously selected.
Pro Tools Reference Guide36
Page 49

Part II
Pro Tools Sessions
Page 50

Page 51

chapter 5
Creating Sessions
This chapter covers some of the basics of
starting a project in Pro Tools, including
how to set up and save a Pro Tools session.
Starting Up Your System
In order for the components of your
Pro Tools system to communicate properly
with each other, you need to start them up
in a specific order.
Start your Pro Tools System in this order:
1 Turn on your external hard drives. Wait
approximately ten seconds for them to
come up to speed.
2 If you plan to work with MIDI equip-
ment, turn on your MIDI interface and
other MIDI devices.
3 Turn on your Pro Tools Audio Interfaces.
Wait at least ten seconds for them to initialize.
4 Turn on your computer.
Shut down your Pro Tools System in this
order:
1 Turn off your Audio Interfaces.
2 Turn off your computer.
3 If you’re using MIDI equipment, turn off
your MIDI interface and controllers.
4 Turn off your external hard drives.
▲ If you launch Pro Tools without turning on
your Audio Interface, it will prompt you to turn
it on. Allow about ten seconds for your Audio
Interface to complete its power-up cycle before
clicking OK.
Configuring Your System
When you first use Pro Tools, or when you
change the input/output scheme for your
system, you need to choose Pro Tools
Hardware settings.
Pro Tools TDM Systems
To change the Hardware Setup:
1 Choose Setups > Hardware.
2 From the Card pop-up, select the Digide-
sign card type.
3 From the Interface port pop-up, choose
the port to which your Audio Interface is
connected (port A or port B).
Choose port A if only one Audio Interface
is connected to the card. If two Audio Interfaces are connected to your card, follow the
steps below for each port/interface.
Chapter 5: Creating Sessions 39
Page 52

✽ The Interface port pop-up does not appear
for Pro Tools III systems.
4 From the Sample Rate pop-up, select a
sample rate.
5 From the Sync Mode pop-up, select the
appropriate sync mode on the currently selected interface (Internal or Digital). In
most cases you will use Internal. Digital is
used primarily for inputting data from DAT
or other digital sources.
6 From the Ch 1–2 Input pop-up, select the
input format of Channels 1–2 of the currently selected interface.
7 Click Other Options for additional con-
figuration options specific to the Audio Interface. These include:
◆ Setting the input format (analog or digi-
tal) of each pair of input channels on a
888/24 I/O
◆ Configuring the level sensitivity and
peak hold settings for the output level
meters on the front panel of the 888/24 I/O
◆ Enabling DAC Muting (mutes the
888/24 I/O digital-to-analog convertors
when its output level falls below a certain
threshold, to reduce noise)
◆ Setting the input and output levels on an
882/20 I/O or a 1622 I/O
◆ Selecting S/PDIF compatibility with Tas-
cam DA30 DAT recorders
8 Configure the Other Options parameters
and click Done.
9 Click OK to close the Hardware Setup di-
alog.
Pro Tools LE Systems
To change the Hardware Setup:
1 Choose Setups > Hardware.
2 From the Sample Rate pop-up, select a
sample rate.
3 From the Sync Mode pop-up, select the
appropriate sync mode on the currently selected interface. In most cases you will use
Internal. S/PDIF (RCA) is used primarily for
inputting material from a DAT or other digital sources. Optical (on Digi 001 systems
only) is used primarily for inputting material from an ADAT.
4 Select a Hardware Buffer Size.
5 Click Other Options for additional con-
figuration options specific to your system.
These include:
◆ Setting the input gain for a Digi 001 or
Audiomedia III
◆ Boosting the output gain for an
Audiomedia III
◆ Enabling the Mic/Line High-Pass Filter
for a Digi 001
◆ Selecting S/PDIF compatibility with Tas-
cam DA30 DAT recorders
6 Configure the Other Options parameters
and click Done.
7 Click OK to close the Hardware Setup di-
alog.
Pro Tools Reference Guide40
Page 53

Changing the Pro Tools
Playback Engine
Pro Tools allows you to select different
Playback Engines depending on your system configuration. The Playback Engine
determines which Pro Tools card is used to
for Pro Tools recording and playback features. Supported Digidesign cards include
the Pro Tools MIX card, d24 card, Disk I/O
card, Digi 001, or Audiomedia III card.
On TDM systems, the Playback Engine is
also used to change the Audio Interface assignments for each card.
Playback Engine dialog for Pro Tools 24 system
7 Click Other Options to configure addi-
tional options for the Audio Interface.
A Pro Tools session created on one
Pro Tools system configuration can be
opened and used on a different Pro Tools
system configuration. When you change
the Playback Engine while a session is
open, the session will be saved, closed and
reopened to enable your new Playback Engine choice.
If you change your Playback from a TDMbased engine (MIX 64 Voice, MIX 32 Voice,
d24, or Disk I/O) to a Pro Tools LE -based
engine (Digi 001 or Audiomedia III) you
will lose any tracks, busses, or I/O Assignments that exceed the limits of the
Pro Tools LE system. Any TDM Plug-Ins
that do not have Real-Time AudioSuite
(RTAS) equivalents will also be lost.
Changing DAE Playback Buffer Size
To change an Audio Interface assignment:
1 Choose Setups > Playback Engine.
2 Select from the available Playback En-
gines.
3 Choose the card you want to configure
from the Card pop-up menu.
4 If available, choose the port to which
your Audio Interface is connected from the
Interface port pop-up.
5 Choose the Audio Interface connected to
the currently displayed card or port.
6 Set the Sample Rate, Sync Mode, and
Channel 1–2 format for the Audio Interface.
The DAE Playback Buffer size determines
the amount of memory allocated within
DAE to manage disk buffers, which affects
system performance.
Though DAE automatically selects the optimal Playback Buffer for your system, you
may want to adjust this parameter to modify your system’s performance:
◆ Allocating a larger buffer can sometimes
allow for a higher density of edits. This can
be useful if you experience system performance problems in sessions with a large
number of edits in rapid succession.
Chapter 5: Creating Sessions 41
Page 54

◆ Allocating a smaller buffer can some-
times improve playback/recording initiation speed. This can be useful if you are
experiencing a time lag when you initiate
playback/recording.
You should also note the following:
◆ Choosing a smaller buffer can make it
difficult for slower hard disks to play or
record tracks reliably.
◆ Choosing larger buffer can cause a time
lag to occur before playback or recording
begins. It can also cause a time lag to occur
when you are editing during playback.
DAE Playback Buffer Size dialog
Windows NT
In Windows NT, you can change the DAE
Buffer size from the Pro Tools application.
To change the DAE Buffer Size:
■ Choose Setups > DAE Buffer Size and ad-
just the Buffer Size. Restart your computer
for this change to take effect.
Creating a New Session
The first step in beginning a Pro Tools
project is creating a new session. When you
do this, Pro Tools automatically creates a
new folder named after your session.
Within this folder is the session file and
two other folders, an Audio Files folder,
and a Fade Files folder.
The Audio Files folder contains all audio recorded during the session. The Fade Files
folder contains any crossfaded audio data
generated by the session.
Macintosh
To change DAE’s Playback Buffer size:
1 If you are running Pro Tools, quit
Pro Tools.
2 Locate and open DAE by double-clicking
it. (It is inside the DAE folder within your
System Folder.)
3 From the DAE File menu, choose Set
Playback Buffer Size.
4 Adjust the buffer size and Click OK.
5 Quit DAE. The next time you open
Pro Tools, it will use the playback buffer
size you have selected.
Pro Tools Reference Guide42
Typical session folder
When you record a new audio track, the
track is saved as a new audio file and automatically placed in the Audio Files folder.
You can also import other audio files into
the session, and work with them as well.
Page 55

To create a new session:
1 Choose File > New Session.
New Session dialog
2 Choose the drive where you want to save
the session. On Pro Tools III systems, sessions can only be created on drives that are
connected to your Pro Tools Disk I/O SCSI
chain. All other systems allow you to create
your sessions on any SCSI drive attached
your computer.
3 On Pro Tools 24 MIX and Pro Tools 24
systems, choose the file type (on Windows
computers) and bit depth of your session
by doing one of the following:
◆ On Macintosh, select the bit depth
(24-bit or 16-bit) and click OK.
◆ In Windows, choose a file type from the
Save as Type pop-up menu.
Pro Tools 5 Session (PC) (.pt5)
Stores session file in Pro Tools 5.0 format,
and stores audio as WAV files, which are
readable by Pro Tools 24 and Pro Tools 24
MIX systems on the Windows platform.
You set the bit depth for Pro Tools 5.0 sessions by selecting 16-bit or 24-bit in the
area under the Save as Type pop-up menu.
Pro Tools 4 24-bit Session (PC) (.p24)
Stores session file in Pro Tools 4 format,
and stores audio as 24-bit WAV files, which
are readable by Pro Tools 24 and
Pro Tools 24 MIX systems on the Windows
platform.
Pro Tools 4 16-bit Session (PC) (.pt4)
Stores session file in Pro Tools 4 format,
and stores audio as 16-bit WAV files, which
are readable by Pro Tools 24 and
Pro Tools 24 MIX systems on the Windows
platform.
Pro Tools 5 Session (Mac) (*.*)
Stores session file in Pro Tools 5.0 format,
and stores audio as SoundDesigner II files,
which are readable by Pro Tools 24 and
Pro Tools 24 MIX systems on both Macintosh and Window platforms. You set the
bit depth for Pro Tools 5.0 sessions by selecting 16-bit or 24-bit in the area under
the Save as Type pop-up menu.
Selecting a File Type in Windows
Pro Tools 4 24-bit session (Mac) (*.*)
Stores session file in Pro Tools 4 format,
and stores audio as 24-bit SoundDesigner II
files, which are readable by Pro Tools 24
and Pro Tools 24 MIX systems on both
Macintosh and Window platforms.
Pro Tools 4 16-bit session (Mac) (*.*)
Stores session file in Pro Tools 4 format,
and stores audio as 16-bit SoundDesigner II
files, which are readable by Pro Tools III,
Chapter 5: Creating Sessions 43
Page 56

Pro Tools 24 and Pro Tools 24 MIX systems
on both Macintosh and Window platforms.
4 Enter a name for the session and click OK
(Macintosh) or Save (Windows).
Choosing a Bit Depth
(Pro Tools 24 MIX and Pro Tools 24 only)
When choosing a bit depth for your session, consider the disk space and DSP mixing power your selection will require. 24bit sessions occupy about 50% more disk
space and power fewer mixer channels per
DSP chip. It is not possible to combine different bit depths within a single session.
Adding Tracks
To create new tracks:
1 Choose File > New Track.
2 In the New Track dialog, choose the type
of track to create from the pop-up menu.
3 Enter the number of new tracks you want
to create, and click Create. Pro Tools automatically names new tracks.
To rename a track:
1 In the Edit or Mix window, double-click
the Track Name.
2 In the Track Name/Comments dialog,
type a new track name.
3 Type comments for the track in the Com-
ments text box. Click Previous or Next to
rename another track.
Track Name/Comments dialog
✽ To switch tracks in the Track Name/Com-
ments dialog, you can also press Command
(Macintosh) or Control (Windows) and use the
Up/Down Arrows.
4 When you are finished, click OK.
Displaying track controls
To conserve space on-screen, Pro Tools allows you to show or hide the controls for
input/outputs, inserts, sends, and comments on your tracks, in either the Mix or
Edit window.
Creating a new track
✽ To auto-scroll the Track Type pop-up in the
New Track dialog, press Command (Macintosh) or Control (Windows) and use the
Up/Down Arrow keys.
Pro Tools Reference Guide44
Displaying Inserts or Sends
Page 57

To display track controls:
■ Choose Display > Mix Window Shows, or
Edit Window Shows, and select the controls you want to display from the submenu.
Comments View This view shows the com-
ments you enter when creating the track,
or type directly into the comment area.
I/O View Shows the standard input and
output controls for tracks.
Inserts View Shows the Inserts on a track.
Audio, Auxiliary Input and Master Fader
tracks can have up to five unity-gain, prefader, in-line Inserts. (Master Fader channels are post-fader only.)
Sends View Audio and Auxiliary Input
tracks can have up to five sends that allow
you to send that track’s signal to an external signal processor or any internal busses.
Sends can be wither mono or stereo and
can be either pre- or post-fade. You can
choose to show all the send assignments
for your tracks, or you can show the level,
mute, pre/post and (in the case of stereo
sends) pan controls for individual sends.
Opening a Session
When you open a session, Pro Tools looks
in the same directory for its associated
audio and fade files.
To open an existing session:
1 Choose File > Open Session.
Open Session dialog
2 Locate the session you want to open and
click Open.
Recent Folders and Files
(Windows NT Only)
To show the controls for individual sends:
■ Choose Display > Sends View Shows and
choose the send you wish to display from
the submenu. To show all send assignments for your tracks, choose Assignments.
Displaying controls for a send
See Chapter 19: Basic Mixing for more information on Inserts and Sends.
Open Session dialog (Windows)
In Windows, the Open Session Dialog has
two menus that allow you to navigate directly to recent directories (by choosing a
location from the Folders menu) or directly
open recent session files (by choosing a
filename from the Files menu).
Chapter 5: Creating Sessions 45
Page 58

Saving a Session
Save regularly while working on your session to ensure that your work is preserved
on your hard disk.
Speeding up Saves by Reducing the Disk Cache Size
(Macintosh Only)
To speed up session saves and disk
bounces, it is recommended that you reduce the Cache Size (in the Memory Control panel) for your Macintosh to 512k.
Saving the Session File
The Save Session command saves the
changes you have made to your session
and writes them over the previously saved
version of the file. The Save Session command cannot be undone.
To save a session:
■ Choose File > Save Session.
If you have made changes to a session since
you last saved it, you can discard the
changes and revert to its previously saved
state.
To revert to the last saved version of a
session:
■ Choose File > Revert to Saved.
Saving the Session File with a New Filename
The Pro Tools Save Session As command is
useful for saving a copy of the current session under a different name, or in a different hard disk location. Because the Save
Session As command closes the current session and lets you keep working on the renamed copy, it is particularly useful if you
are experimenting and want to save successive stages of the session.
By working this way, you can quickly retrace your steps should you want to go back
to an earlier version of your session. By using the Save Session As command you are
saving a new version of the session file
only—not duplicate versions of the audio
or Fade files.
To save a session under another name:
1 Choose File > Save Session As.
2 Choose the destination and type a new
name for your session. On Pro Tools III systems, sessions and their associated audio
files must be saved to a drive connected to
the Disk I/O.
3 Click Save to save the session.
The renamed session document is saved in
the session folder along with the original
session. Any new audio files that you
record in your renamed session will be
placed into the same Audio Files folder that
was created for your original session.
To keep audio files for different sessions in
separate folders, choose File > New to create a new session.
Pro Tools Reference Guide46
Page 59

To copy the track layout, signal routing
and Plug-In choices in your session, you
can create a Session Template of your original session. For details, see “Creating Custom Session Templates” on page 48.
tings Folder, indicating that these files will
need to be moved to the root level Plug-In
settings folder on the destination system
before you can use them. The references to
these settings files in the session are not redirected to point to the copied files.
Saving the Session File and its Associated Files
The Pro Tools Save Session Copy In command is used to save a copy of the currently
selected session document under a different name, in a different hard disk location,
in a different session file format, or at a different bit-depth (such as saving a 16-bit
version of a 24-bit session).
Unlike the Save Session As command, Save
Session Copy In does not close the original
session, so subsequent edits are made to
the original session. The saved session
serves as a backup copy, and gives you the
option of reverting to the earlier version of
the session.
This command also gives you several options for copying a session along with its
associated files.
Copy Audio Files & Session Plug-In Settings Folder
When this option is selected, all audio files
and the session’s Plug-In Settings Folder are
copied to the new location. The references
to these Plug-In settings in the session are
redirected to point to the copied files.
Copy Root Plug-In Settings Folder
Copy Movie/Video Files
When this option is selected, a session
movie files are copied to the new location,
and the references in the session to the
movies are redirected to point to the copied
movie files.
Format
Macintosh Provides the option of saving
the current session in 24-bit or 16-bit format, as well as in Pro Tools 4.3 format for
Pro Tools 3.2 format for compatibility with
older systems. By saving down to Pro Tools
4.3 format, you will lose any MIDI data,
marker information, and other data unique
to the Pro Tools 5. 0 session format.
By saving down to Pro Tools 3.2 format,
you will lose any Plug-In automation, as
well as mix and edit groups, and other data
(such as memory location attributes)
unique to the Pro Tools 5.0 or Pro Tools 4.3
session format.
Windows NT Provides the option of saving
the current session in Pro Tools 5.0 format
for Macintosh or Windows, Pro Tools 4 24bit (.p24) or Pro Tools 4 16-bit format (.pt4)
for Windows, and Pro Tools 4 24-bit or
Pro Tools 4 16-bit format for Macintosh.
When this option is selected, the contents
of the root-level Plug-In Settings Folder are
copied into a folder named Place in Root Set-
Chapter 5: Creating Sessions 47
Page 60

To save a session in a different location or in
a different format:
1 Choose File > Save Session Copy In.
Save Session Copy In dialog (Macintosh)
2 Choose a destination and type a name
for the new session file.
3 Choose the format for the session copy
by selecting it from the Format pop-up.
4 Select the bit depth for the session copy.
5 To copy the session along with all of its
associated files, select from the available
options.
6 Click Save to save the session in the new
location.
Creating Macintosh Templates
You can create a session template on the
Macintosh by saving a session file as a Sta-
tionery pad document. Once a session is
saved as stationery, it acts as a template
that you can open and then resave as a normal session.
To create a custom session template:
1 Create a session and arrange the Mix,
Edit, and Transport windows as you like.
You can choose which windows are open
and where they appear on the screen. You
can also define the parameters within these
windows, such as signal routings, inserts
and sends configurations, track views, ruler
settings, and Preference settings.
2 Choose File > Save Session.
3 Name the session and click Save.
4 Close the session.
5 Locate the session file that you just saved.
6 Click once on the file to select it.
7 Choose File > Get Info. A file information
window appears.
Creating Custom Session Templates
You can create custom session documents
that are pre-configured to the track setups,
mixer setups, window arrangements, and
zoom level memory locations that you use
most frequently. Doing this will save you
the trouble of having to create your studio
setup from scratch every time you start a
new session.
Pro Tools Reference Guide48
Saving a session as a Stationery pad (Macintosh)
8 Click the Stationery Pad check box to
save the file as a template, then close the
information window.
Page 61

To use this template, double-click it or
open it with the Open Session command if
you are already running Pro Tools. You can
create several custom templates for studio
setups that you frequently use.
When you open a session saved as a Stationery pad, Pro Tools gives you the option of
editing the template or starting a new session using the template settings. If you
choose New Session, Pro Tools will create a
new folder containing a copy of your session template and Audio and Fades folders.
Creating Windows Templates
7 Click the General tab and select the Read
Only option.
In Windows, you can create a session template by making a session file a Read Only
document.
To create a custom session template in
Windows:
1 Create a session and arrange the Mix,
Edit, and Transport windows as you like.
You can choose which windows are open
and where they appear on the screen. You
can also define the parameters within these
windows, such as signal routings, inserts
and sends configurations, track views, ruler
settings, and Preference settings.
2 Choose File > Save Session.
3 Name the session and click Save.
4 Close the session.
5 Locate the session file that you just saved.
6 Right-click the file and choose Properties.
Making a session a Read Only file (Windows)
8 Click OK.
To use this template, double-click it or
open it with the Open Session command.
When you first save the session, Pro Tools
will ask you to give the session a new name.
Your original session template will remain
unchanged.
To modify the session template, you will
need to reopen its Properties and deselect
the Read Only option, make your modifications, then change it back to a Read Only
file.
Chapter 5: Creating Sessions 49
Page 62

Closing a Session
Because Pro Tools allows you to work on
just one session at a time, you must close
the current session if you want to work on
another. The Close Session command
closes your current Pro Tools session but
leaves the Pro Tools application open. You
can save your work using the Save Session
or Save Session As command before closing
the current session.
To close a session:
■ Choose File > Close Session.
If you transfer a session from a TDMequipped Pro Tools system to a
Pro Tools LE-based system, any tracks, busses, or I/O Assignments that exceed the
limits of the Pro Tools LE system will be
lost. Any TDM Plug-Ins that do not have
Real-Time AudioSuite (RTAS) equivalents
will also be lost.
Differences between TDM and LE systems
Feature TDM Systems LE Systems
Number of
Tracks
Number of
mix busses
up to 128 limited to 24
32 busses 16 busses
Quitting a Session
Although Pro Tools will warn you before
allowing you to quit without saving
changes, you should generally save your
work before quitting.
To Quit a Session:
■ Choose File > Quit (Macintosh) or File >
Exit (Windows).
Sharing Sessions between
Pro Tools TDM Systems and
Pro Tools LE Systems
Pro Tools makes it easy to share sessions
between Pro Tools LE and TDM-equipped
systems. There are some important differences between the two types of systems
that can affect how session material is
transferred.
Inserts per
Track
Sends per
Track
up to 5 inserts up to 5 inserts
up to 5 sends up to 5 sends
Pro Tools Reference Guide50
Page 63

chapter 6
Working with Tracks
This chapter covers basic track management tasks such as creating and deleting
tracks, assigning voices and output channels, and grouping tracks.
Creating Tracks
You can add tracks to your session at any
time by using the New Track command.
New tracks appear in both the Edit and Mix
windows.
Adding New Tracks
You can choose where to insert new tracks
by selecting an existing track’s name.
Before you create new tracks:
◆ For new tracks to appear next to a spe-
cific track in a session, select that track by
clicking its name. The new tracks are added
immediately after the selected track.
◆ For new tracks to appear as the last tracks
in a session, make sure that no track names
are selected on-screen.
To create a new audio or MIDI track:
1 Choose File > New Track.
2 Choose the type of track to create from
the pop-up menu.
3 Enter the number of new tracks and click
Create.
Creating a new track
4 To name a track, double-click the Track
Name button at the bottom of the Mix
window. Enter a name and any comments
for the track, and click OK.
The track name will be given to any audio
files that you record on the track.
Chapter 6: Working with Tracks 51
Page 64

5 Choose which controls appear on the
track by choosing Display > Mix Window
Shows or Display > Edit Window Shows
and selecting the controls from the submenu.
Displaying track controls
To rename existing tracks in your session:
1 Select the track to rename by clicking the
track name (Shift-click to select multiple
tracks).
2 Choose File > Rename Selected Tracks.
3 Type a new name and click OK for each
track you are renaming.
Hiding Tracks
The Show/Hide Tracks List (at the left of
both the Mix and Edit windows) shows all
tracks in the session. It allows you to show
or hide a track by selecting or deselecting
its name. Even though a track is hidden,
the material on the track will still play as
part of the session.
To show a track, click to highlight its name.
To hide a track, deselect its name.
The Show/Hide Tracks List
Deleting Tracks
When you delete tracks, your audio or
MIDI region data will remain in the Regions List, but your arrangement of the regions on the deleted track (the track’s playlist) will be lost. The Delete Selected Tracks
command cannot be undone.
To delete a track:
1 Click the name of the desired track to se-
lect it. If you wish to select multiple tracks,
hold down the Shift key and click additional track names to select them as well.
2 Choose File > Delete Selected Tracks.
3 Click OK to remove the selected tracks
from the session.
Pro Tools Reference Guide52
The pop-up menu at the top of Show/Hide
Tracks List provides commands that allow
you to show or hide all tracks, or only
tracks currently selected on screen.
When a track that is a member of an active
group is hidden from view, editing operations performed on other members of the
group in the Edit window will not affect
the hidden track. In the Mix window however, all operations other than record-enable will affect a hidden track that is a
member of an active group.
▲ On TDM systems, even if a track is hidden
from view, its position relative to other tracks
still affects virtual track playback priority.
Page 65

To hide a track:
■ Click the highlighted name of a track in
the Show/Hide Tracks List.
To show a track that is currently hidden:
■ Click the unhighlighted name of a track
in the Show/Hide Tracks List.
To show all tracks:
1 Click the Show/Hide button at the top of
the Show/Hide Tracks List.
2 From the pop-up menu, choose Show All
Tracks.
To hide all tracks:
1 Click the Show/Hide button at the top of
the Show/Hide Tracks List.
2 From the pop-up menu, choose Hide All
Tracks.
✽ To reorder tracks on screen, drag the track
names to new positions within the Show/Hide
Tracks List.
Assigning Track Inputs
Your Pro Tools system has a certain number of hardware inputs, in the form of the
physical inputs on your Pro Tools Audio
Interface, your Digi 001, or your
Audiomedia III card. Pro Tools also provides internal mix busses that can be the
source of track inputs.
With Pro Tools 24 MIX, Pro Tools 24 and
Pro Tools III systems, if you have multiple
Audio Interfaces, their default I/O Labels
appear in order as input #1/1-8,
input #2/1-8, and so on.
To assign a track input:
1 If I/O controls are not currently visible
on your tracks, choose Display > Mix Window Shows (or Edit Windows Shows) > I/O
View.
2 Click the input selector button on the
track, and choose an available input source
from the pop-up menu.
Input selector
Chapter 6: Working with Tracks 53
Page 66

Assigning Track Outputs
Your Pro Tools system has a certain number of hardware outputs, in the form of the
physical outputs on your Pro Tools Audio
Interface, your Digi 001, or your
Audiomedia III card. Pro Tools also provides internal mix busses that can be the
destination of track outputs.
To assign a track to an output:
1 If I/O controls are not currently visible
on your tracks, choose Display > Mix Window Shows (or Edit Windows Shows) > I/O
View.
2 Click the output selector button on the
track and choose an available output destination from the pop-up menu.
Virtual Tracks, Voices, and Track Priority
Output selector (Stereo Mix Outputs mode)
Pro Tools has two different operating
modes, Direct Outputs mode and Stereo
Mix Outputs mode. These modes allow you
to configure Pro Tools to match your particular studio setup.
Direct Outputs mode In this mode, each
track output is routed to a single Audio Interface output. Track panning controls are
not available in Direct Outputs mode. With
Pro Tools 24 MIX, Pro Tools 24 and
Pro Tools III systems, if you have multiple
Audio Interfaces, their default I/O Labels
appear in order as output #1/1-8, output
#2/1-8, and so on.
Stereo Mix Outputs mode In this mode,
track outputs are routed to a pair of Audio
Interface outputs or bus pairs, such as
output #1 1-2, output #1 3-4, and so on.
Each track contains controls for panning
between the two selected output pairs.
(TDM Systems Only)
Voices and Virtual Tracks
Pro Tools 24 MIX core system hardware
provides up to 64 simultaneous voices of
audio playback. Pro Tools 24 core systems
provide up to 32 voices of audio playback.
A Pro Tools III system provides 16 voices.
While your Pro Tools hardware allows a
fixed number of voices, Pro Tools software
provides for up to 128 virtual tracks—tracks
which can be recorded upon and cued up
for playback but cannot all be played back
simultaneously.
In such an environment where there are
potentially more tracks than can play back
at one time, Pro Tools assigns priorities for
tracks that compete for the available
voices. Pro Tools provides two ways of assigning playback priority to audio tracks:
Pro Tools Reference Guide54
Page 67

Voice Selector
voice selector, a pop-up menu appears offering a choice of voice numbers, which refer to voice assignments.
Audio Track Voice selector
On-screen track placement The left-most
track in the Mix window (or the topmost
track in the Edit window) has priority over
other tracks with the same voice assignment.
It is possible to assign more than one track
to the same voice, but only one of the
tracks—the one with highest priority—will
play.
Choosing Options > Mute Frees Voice and
muting a track disables playback of that
track, and surrenders control of its voice to
the next highest priority track with the
same voice assignment.
Pro Tools features dynamic voice allocation,
so that when a hole opens up in a higherpriority track, its voice is temporarily available, and the track with the next highest
priority “pops through” and begins to play.
When the original track returns, the track
that had popped through relinquishes the
voice to the higher priority track.
When you click a track’s
The following example demonstrates the
concept of dynamic voice allocation:
The “Lead Guitar” region will pop through
In the above illustration, the two visible
tracks are assigned to the same voice. There
is an open area in the top track where no
region appears. At this point, the voice is
free since it is not being used, and the next
highest priority track on that voice (the
bottom track) will pop through the open
area and play. In order for a lower priority
region to pop through, it must be placed so
that its beginning occurs after a higher priority track’s region has ended.
Automatic Assignment of Ascending Voices
(TDM Systems Only)
You can automatically assign all tracks or
all selected tracks to successive voices. For
example, you may want to select eight
audio tracks and reassign them to voices
9–16.
To assign all audio tracks to successive
voices:
■ While pressing Command+Option (Mac-
intosh) or Control+Alt (Windows), click on
the Voice Selector for any track and choose
the starting voice number.
Chapter 6: Working with Tracks 55
Page 68

The track with the highest priority is assigned to the chosen voice, with all other
tracks assigned to successive voices.
To assign all selected audio tracks to
successive voices:
1 Select the desired audio tracks by Shift-
clicking their names.
2 While pressing Command+Shift (Mac-
intosh) or Control+Shift (Windows), click
on the Voice Selector for any of the selected
tracks and choose the starting voice number.
Changing a Track’s Playback Priority
When more than one track is assigned to
the same voice, the track that occurs earliest (left-most in the Mix window or topmost in the Edit window) has priority over
others assigned to that voice. Moving another track of the same voice to a higher
position will then give that track priority.
You can drag a track to a new position in either the Mix or Edit windows to change its
playback priority.
Of the tracks that are selected, the one with
the highest priority is assigned to the specified voice, with all other selected tracks assigned to successive voices.
Assigning Voices and Track Priority
You can use track priority settings, voice assignment, and output assignments to get
the most out your system configuration.
To assign an audio track to a voice:
1 Click the track’s voice selector.
Assigning a voice
2 Select a voice from the pop-up menu.
Voices listed in boldface type are already in
use by other tracks in the session.
To increase a track’s priority in the Edit
window:
■ Click the track’s Track Name button and
drag it above another track assigned to the
same voice.
– or –
■ In the Show/Hide Tracks List, drag the
track to a higher position in the list of
tracks. Tracks nearer the top of this list
have higher priority.
To increase a track’s priority in the Mix
window:
■ Click the track’s Track Name button and
drag it to the left of another track assigned
to the same voice.
– or –
■ In the Show/Hide Tracks List, drag the
track to a higher position in the list of
tracks. Tracks nearer the top of this list
have higher priority.
By experimenting with track priority, voice
assignment, and arranging regions so that
they are positioned to “pop through” holes
Pro Tools Reference Guide56
Page 69

in higher priority tracks, you will find
many useful ways to apply virtual tracks
and dynamic voice allocation.
Voice Management In Expanded Systems
(Macintosh Pro Tools III systems only)
• If you have a multiple Disk I/O system
and you assign a track to a voice which
does not correspond to the hard drive
that the track’s regions belong to.
• If you have a multiple Disk I/O system
and you’ve moved a drive which was
originally connected to a different Disk
I/O.
Voice Numbering
In expanded Pro Tools III systems, the first
16 voices of your system are numbered A-1
through A-16. The next Disk I/O’s voices
would be numbered B-1 through B-16, and
so on.
Managing Voices in Expanded Systems
In expanded Pro Tools III systems each
Disk I/O card requires that a separate SCSI
hard drive be attached to it, with specific
audio files residing on specific drives. An
audio file or region that resides on one Disk
I/O’s hard drive cannot be moved to a track
routed to a different Disk I/O drive. If you
try to do this, Pro Tools will alert you and
allow you to automatically copy the sound
file to the destination voice’s drive.
The following scenarios will cause voice assignment conflicts which you will have to
resolve by either reassigning voices, copying sound files, or managing “Ghost regions”:
• If you attempt to put regions from Disk
I/O “A” voice track onto a Disk I/O “B”
voice track.
• If you attempt to drag a region that resides on Disk I/O “A” from the Audio Regions List onto a track which is assigned
to a Disk I/O “B” voice track.
Pro Tools will copy the entire sound file
(not just the single region) to the appropriate Audio Files folder on the destination
drive.
The audio file will be copied to whatever
drive is specified in the Disk Allocation dialog box for that track. Before you begin
copying files, be sure the destination drive
has sufficient space. If the destination drive
doesn’t have enough space, the copy procedure will be cancelled and any material
that hasn’t been fully copied will be discarded.
Disk Allocation dialog
Chapter 6: Working with Tracks 57
Page 70

Ghost Regions
If you decide not to copy the file, Pro Tools
will display what are called Ghost regions.
Ghost regions occur in cases where Disk
I/O SCSI chain/voice combinations make
them invalid for playback. A Ghost region
appears “grayed out” (much like a muted
region does) and signifies that the audio is
not present on the drive to which the voice
refers, and is not available for audio playback as currently assigned.
If you have Ghost regions in a session, each
time you open the session it will ask you if
you wish to copy the Ghost regions onto
the appropriate drive so that you will be
able to use the regions as voiced.
Ghost regions can still be selected with the
Grabber tool and moved or deleted, or auditioned from the Regions List. They will
not play as currently assigned. They can become regular “active” regions again if you
place them on a track/voice that is valid for
the Disk I/O associated with the region.
If you open a session which has a region/voice/hard drive assignment conflict,
a warning dialog will appear, alerting you
of this condition and offering several solutions. The options in the dialog are as follows:
Look for Duplicated Files If this option is
enabled, before it begins copying files to
the necessary drive, Pro Tools will check if
the needed “parent” audio files or regions
have already been copied to the drive. This
helps prevent unnecessary duplication of
audio data.
Look for Compatible Voices If this option is
enabled, Pro Tools will try to resolve the
problem by assigning conflicting voices
from the “swapped” drive to available valid
voices.
Copy Files to New Drives. If this option is
enabled, Pro Tools will copy the files to the
necessary drive (if there is enough space). If
the Look for Duplicated Files option is also
enabled, Pro Tools will check if the needed
“parent” audio files or regions already reside on the drive before it begins copying.
If the Look for Duplicated Files option is
not enabled, Pro Tools will copy the required files without checking first.
Alternatives to Copying an Entire Audio File
If you wish to move a region without copying the entire sound file, you can place the
region on a track which is routed to a drive
where the audio actually resides. Alternatively, you can use the Duplicate Plug-In in
the AudioSuite menu, or you can bounce
the region to disk, thereby creating a new
audio file that consists of just the region.
Refer to the DigiRack Plug-Ins Guide to learn
how to use the Duplicate Plug-In. For information on bouncing, refer to the Mixing
chapter in the Pro Tools Reference Guide.
Pro Tools Reference Guide58
Page 71

Setting MIDI Channels
MIDI tracks can be assigned to one or more
MIDI channels with the Device/Channel
selector. When assigned to multiple channels, all material in the track is sent to all
assigned channels.
MIDI Tracks in Pro Tools can not contain
multiple channels of MIDI data.
To assign all regions on a MIDI track to a
specific MIDI channel:
1 Click on the track’s MIDI Device/Chan-
nel Selector and assign a device and channel from the pop-up menu. Channels
already assigned to another track appear
bold in this menu.
Adjusting Track Volume and Pan
In the Mix window, each track has its own
Volume fader and Pan slider for adjusting
the track’s playback volume and stereo
placement. (Panning controls for audio
tracks are only available if your session is
set to Stereo Mix Outputs mode.) On audio
tracks, the volume selector controls the
output level of the track on your system’s
Audio Interface or system output jacks.
On MIDI tracks, it controls MIDI volume
(controller 7) on MIDI instruments that
support this feature. If a track has regions
with MIDI volume controller data (created
in the original sequence), its volume will be
controlled by that data.
MIDI Device/Channel selector
To assign multiple destinations to a single
MIDI track, Shift-click the MIDI Device/Channel Selector and select additional
channels from any device.
For details on recording and importing
MIDI data, see Chapter 10: MIDI Recording.
Track Level fader
To adjust the volume of a track:
■ Drag the slider to the desired level. It has
a range of ∞ (no output) to +6dB of gain.
The Pan Slider
To adjust the pan value of a track:
■ Drag the slider to the desired level. It has
a range of <100 (full left) to 100> (full
right).
Panning a track full right or full left sends it
to a single output channel.
Chapter 6: Working with Tracks 59
Page 72

Soloing and Muting Tracks
The Solo and Mute buttons can be engaged
at any time during playback.
The Solo and Mute buttons affect MIDI as
well as audio tracks. It is possible to have
more than one track soloed or muted at the
same time in a session.
Grouping affects mute and solo behavior as
well. Normally, muting or soloing a track
that is a member of an active mix group
will mute or solo all other tracks that are a
member of that active mix group as well.
However, by changing the Mute and Solo
settings in the Pro Tools Preferences dialog,
you can disable this behavior.
To disable group muting of tracks:
1 Choose Setups > Preferences, and click
Automation.
2 Deselect the Mutes Follow Mix Groups
option, and click OK.
With this option deselected, muting a track
that is a member of an active group does
not affect other members of the group.
To disable group soloing of tracks:
1 Choose Setups > Preferences, and click
Automation.
2 Deselect the Solos Follow Mix Groups op-
tion, and click OK.
Mute Frees Voice and Mute Lag Time
If you select Operations > Mute Frees Voice,
a muted track’s voice will be allocated to
the next highest priority track assigned to
the same voice. With this option enabled,
there may be a delay (ranging in length
from one to several seconds depending on
the processing power of your system) between the time you mute or unmute a track
and when you hear the effect on playback.
To avoid this delay, make sure that the
Mute Frees Voice option is disabled. Another factor than can cause delays is your
DAE Playback Buffer Size setting. Playback
Buffer Size is set from DAE’s File menu
(Macintosh), or by choosing Setups > DAE
Buffer Size (Windows). The larger the playback buffer you choose, the longer the potential lag time between the time you click
the Mute button and the onset of muting.
Solo Button
The solo button mutes other tracks so that
the chosen track can be auditioned alone.
Normally solos are “latched,” that is, pressing subsequent solo buttons adds them to
the soloed mix of tracks. Pro Tools allows
you to “unlatch” solos, so that pressing a
solo will mute all tracks except the track
you have just soloed.
With this option deselected, soloing a track
that is a member of an active group does
not affect other members of the group.
Pro Tools Reference Guide60
Page 73

To solo a track:
1 Click the Solo button on the track. The
button is highlighted and all other tracks
are muted.
2 Click the Solo button again to turn off
the solo function.
To unlatch solo buttons:
1 Choose Setups > Preferences and click
Operation.
2 Deselect the Latch Solo Buttons option
and click Done. With this option disabled,
pressing a Solo button mutes all tracks except the track you have just soloed.
Mute Button
The mute button silences a chosen track.
More than one track can be muted at one
time. If Operations > Mute Frees Voice is
enabled, muting a track will allocate its
voice to the next highest priority virtual
track in your session.
To mute a track:
■ Click the Mute button on the track. The
track will appear grayed-out and be muted.
To unmute a track:
■ Click the Mute button again.
Solo Safe Mode
Pro Tools also allows you to solo safe a
track. This prevents the track from being
muted even if you solo other tracks. This
feature is useful for tracks such as Auxiliary
Inputs that are being used as effects returns, allowing the effects track to remain
in a mix even when other tracks are soloed.
It is also useful to solo-safe MIDI tracks so
that their playback is not affected when
you solo audio tracks.
To solo safe a track:
■ Command-click (Macintosh) or Control-
click (Windows) the Solo button on the desired track. This prevents the track from being muted even if you solo other tracks.
To return a solo safe track to normal:
■ Command-click (Macintosh) or Control-
click (Windows) the Solo button on the
track again.
For information on the relationship between muting and voice assignments, see
“Virtual Tracks, Voices, and Track Priority”
on page 54.
Adjusting Track Width
The Pro Tools Narrow Mix Window command allows you to view all tracks/channels in the Mix window at a reduced width
to conserve screen space in a large session.
To reduce the width of tracks in the Mix
window:
■ Select Display > Narrow Mix Window.
To display tracks at normal width:
■ Deselect Display > Narrow Mix Window.
Chapter 6: Working with Tracks 61
Page 74

Color Coding Tracks
Grouping Tracks
The Pro Tools Color Code options in the
Preferences dialog allow you to quickly
identify tracks which are assigned to the
same voice or group. Color coding of voices
is particularly useful in sessions where you
wish to make efficient use of virtual tracks.
Since tracks assigned to the same voice
share the same color, you can easily identify and arrange regions so that they do not
overlap or conflict with other regions on
tracks assigned to the same voice.
To color code tracks by voice assignment:
1 Choose Setups > Preferences and click
Display.
2 Select “Color Code Voices and MIDI
Channels in Edit Window,” and click
Done. This color codes tracks according to
voice assignment, giving each voice a different color.
To color code tracks by group:
1 Choose Setups > Preferences and click
Display.
2 Select “Color Code Groups in Edit Win-
dow,” and click Done. This color codes
tracks according to their group assignment.
To be color coded, the track must be part of
an active group.
To turn off color coding:
1 Choose Setups > Preferences and click
Display.
2 Select No Color Code in Edit Window,
and click Done.
Pro Tools provides a relative grouping
function for linking channels and their
controls. Groups can be applied to either
the Mix or Edit window, or both.
Groups are useful for editing several tracks
in exactly the same way, or for mixing several tracks (such as a pair of stereo tracks or
a submix) while keeping them at the same
relative volume level.
Pro Tools provides the following grouping
features:
• Up to 26 different groups
• Nested groups (subgroups within groups)
• Grouped faders/controllers preserve
their levels relative to each other
Grouping can affect the following track parameters:
• Volume levels
• Solos
• Mutes
• Automation modes
• Track display format
• Track height
• Editing functions
Grouping does not affect these parameters:
• Record enables
• Panning
• Send levels, panning and mutes
• Voice assignment
• Output assignment
• Creating Plug-In instances
Pro Tools Reference Guide62
Page 75

Using the Groups List
The Pro Tools grouping functions are located at the left side of your screen in the
Groups List. This scrolling window contains the names of all the groups in your
session, as well as a pop-up menu for accessing grouping commands. From this
menu, you can select and enable groups.
By default, every session has a group
named All, which includes every track and
channel in the session. The All group cannot be edited or deleted.
Group pop-up menu
Click to
select
group
members
on-screen
Click to hide
Groups List
The Groups List
Click to
select a
group by
typing its
letter
Click to
activate a
group
To the left of each name in the Groups List
is a letter denoting its Group ID (“a”
through “z”), and to the left of that, a symbol indicating whether that group is selected in the currently active window (either the Edit or Mix window). These
symbols indicate the following:
The hollow circle symbol indicates that
only some members of the group are currently selected.
The circle with a dot symbol indicates that
all members of the group are currently selected, plus additional members outside the
group.
The Groups Pop-up Menu
The Groups pop-up menu contains commands that allow you to create, delete and
suspend groups. These commands are as
follows:
The Group pop-up menu
New Group This command allows you to
create a new group. You must first select
two or more tracks/channel strips on
screen to do this.
Display This command allows you to toggle
the Groups List display to either Mix
Groups or Edit Groups. If all of your groups
apply to both Editing and Mixing, the
Groups List will be the same for both.
Suspend All Groups This command allows
you to temporarily toggle all active groups
off.
The filled-in circle symbol indicates that all
members of the group are currently selected.
Chapter 6: Working with Tracks 63
Page 76

Delete Selected Groups
This command allows you to permanently remove a group
from the Groups List. You must first select
a Group Name in the Groups List to do
this.
Moving a fader of a group member will
cause all other group members to move relative to it. If a fader belongs to multiple
groups, and the groups conflict when faders are moved, the fader will follow the topmost or “parent” group that it belongs to.
Enabling Grouping
Editing operations are not applied to members of a group that are hidden with the
Show/Hide Tracks List. Mix operations
(with the exception of Record-enable) are
applied to hidden tracks.
Pro Tools allows you to create separate
groups for editing and mixing. You set this
option when you use the New Group command. Groups that apply to both editing
and mixing can be decoupled.
Displaying a track’s group membership
To enable a group:
■ In the Groups List, click the name of the
group you want to enable. The group name
is highlighted to indicate that it is enabled.
To disable a group:
■ In the Groups List, click the name of the
group you want to disable. The group name
is unhighlighted to indicate that it is not
enabled.
Keyboard Selection of Groups
If the Groups List Key focus is enabled, you
can type a Group ID letter and Pro Tools
will automatically enable that group.
To enable and use the Groups List Key focus:
1 Click the a-z button in upper right of the
Groups List.
Groups List Key focus enabled
2 Type Group ID letter (a-z) of the region to
automatically enable it.
To enable additional groups, click their
names in the Groups List. It is not necessary to Shift-click to enable or disable multiple groups.
Pro Tools Reference Guide64
Page 77

Creating a Group
Changing the Members of a Group
To create a group:
1 Hold down the Shift key and select the
tracks you wish to include in the group.
Selecting tracks to be grouped
2 Choose File > Group Selected Tracks.
3 Enter a name for the group and choose a
Group ID (“a” - “z”).
The New Group dialog
4 Choose the type of group to create: Edit
Group, Mix Group, or Edit and Mix Group.
5 Click OK to add the new group to the
Groups List.
You can add or remove members from a
group at any time.
To change the members of a group:
1 Hold down the Shift key and select the
tracks to include in the group.
2 Choose New Group from the Group pop-
up menu.
3 In the dialog that appears, select the
Group ID that you want to update.
4 Click OK. The new group definition over-
writes the original definition.
Renaming a Group
You can rename a group at any time.
To rename a group:
1 In the Groups List, double-click to the
left of the group’s name (in the area with
the circular symbols).
2 In the dialog that appears, enter a new
name for the group. (If you wish to change
the group’s type, you can also do so here.)
3 Click OK. The group is renamed in the
Groups List.
Deleting a Group
You can delete a group at any time.
To delete a group:
1 In the Groups List, select the name of the
group (or groups) you wish to delete.
2 Click the Group pop-up menu and
choose Delete Selected Groups. You cannot
undo this action.
Chapter 6: Working with Tracks 65
Page 78

Linking Mix and Edit Groupings
The “Link Mix and Edit Group Enables” option links group enabling between the Mix
and Edit windows.
Pro Tools allows you to create groups that
are both Mix and Edit groups. but in some
cases you may prefer not to link enabling
of Mix and Edit groups. For example, when
you are using the Mix window for mixing,
you may prefer to work with large, nested
groups. However, in the Edit window, you
may want to perform editing tasks within a
smaller group. You could disable the Link
Mix and Edit Group Enables preference.
This would allow you to work with different groups in the two windows.
To unlink mix and edit groups:
1 Choose Setups > Preferences and click
Operation.
2 Deselect the “Link Mix and Edit Group
Enables” option and click Done.
Pro Tools Reference Guide66
Page 79

chapter 7
File Management and Compatibility
The various Pro Tools systems require that
you keep certain files on specific hard
drives in order for these systems to function properly. Observe the following file
management rules:
Macintosh
◆ On all Macintosh Pro Tools Systems, the
Pro Tools software should reside on your
Start-up drive (the drive that contains your
System folder and other System-related
files).
◆ On Pro Tools 24 MIX and Pro Tools 24
systems, data files (such as session files,
audio files and fade files) can be located on
any compatible drive connected to the internal SCSI bus or the external SCSI bus of
your computer, or to a SCSI accelerator
card in your computer.
◆ On Pro Tools III systems, data files (such
as session files, audio files and fade files)
must be located on a compatible drive
which is connected to your Disk I/O SCSI
chain.
◆ On Pro Tools LE systems, data files can be
located on any compatible hard drive connected to your computer’s internal or external SCSI bus.
Windows NT
◆ On all Windows NT Pro Tools Systems,
the Pro Tools software should reside on
your system boot drive (the drive that contains your System files).
◆ On all Windows NT Pro Tools Systems,
data files should be located on a compatible SCSI drive connected to the SCSI bus of
your computer, or to a SCSI accelerator
card in your computer.
Locating Audio Files
(Windows NT Systems Only)
When you open a session, if Pro Tools is
unable to locate audio files contained in
the session, it will post a Find File dialog.
Pro Tools for Windows NT tags each audio
file in a session with a unique identifier
that allows it to distinguish a particular file
even if its name or location have changed.
Chapter 7: File Management and Compatibility 67
Page 80

In cases where the unique identifier is not
present (for example, with files imported
from a Macintosh session), Pro Tools can
identify an audio file using other file attributes, such as sample rate, bit depth, file
length, and creation or modification date.
Pro Tools will search for files with similar
attributes, and list potential matches in the
Candidate Files list.
To locate an audio file:
1 In most cases, you can find files created
or modified by Pro Tools for Windows NT
by clicking Look in Current Folder or Look
on All Mounted Volumes. To search in all
subfolders of the current folder, select Include Subfolders.
2 If Pro Tools is unable to find the target
file, use the Folder or Files menus or the
Navigation Toolbar in the upper left of the
Find File dialog to look in directories on
your audio drives. You can limit the search
to files of a certain type by selecting from
the Files of Type menu. Potential matches
will appear in the Candidate Files list on
the right.
3 Select a candidate file to view its at-
tributes in the File Info area. To audition a
selected audio file, click Play and adjust the
Play Position slider to choose the playback
location in the file.
4 If you determine that a file in the Candi-
date Files list is not the target file, click
Skip. To eliminate all files in the list, click
Skip All.
5 Click Down to move to the next file in
the list.
6 When you have located the target file,
click Open.
Find File dialog
WAV File Compatibility
Convert all imported WAV files to
AES31/BroadcastWave
Pro Tools always creates AES31/Broadcast
compliant WAV files when the file originates in Pro Tools. This option, accessed by
choosing Setups > Preferences > Compatibility, applies to all imported WAV files,
making them compliant with the
AES31/EBU Broadcast standard.
AES31/BroadcastWave is a variant of the
standard audio WAV file type. The AES31
format contains additional information beyond the raw PCM audio data such as
SMPTE time stamps.
Pro Tools Reference Guide68
Page 81

This variant complies with the new standards set down by the EBU (European
Broadcasters Union), and the AES (Audio
Engineering Society). Choose this option
to ensure compatibility with other workstations that recognize this new standard
file type.
Compatibility Preference Setting
Naming Files, Playlists and Regions
To ensure portability of your Pro Tools sessions between Windows and Macintosh
platforms, you will want to name your session files, bounced audio files, regions and
playlists carefully.
“ (quotation marks)
< (less-than symbol)
> (greater-than symbol)
| (vertical line or pipe)
Filenames with non-ASCII characters, such
as those created on the Macintosh by typing combinations with the Option or Control keys (for example, letters with diacritical marks, like é, ü, or ç), are also illegal in
Windows.
If you open a Macintosh session which
contains playlists or regions with these
characters, any illegal characters will be
changed to “_” (underscore) when you perform an operation that uses that filename
(such as exporting a region or AudioSuite
processing).
The “:” (colon) is also an illegal character
on the Macintosh, since it is used as a separator in Mac OS pathnames.
While it is probably best to avoid using any
special characters or punctuation marks in
your filenames, the ones that can cause
problems are listed below.
Avoid using the following characters since
they cannot be used in Windows filenames:
/ (slash)
\ (backslash)
: (colon)
* (asterisk)
? (question mark)
Chapter 7: File Management and Compatibility 69
Page 82

Pro Tools Reference Guide70
Page 83

Part III
Recording
Page 84

Page 85

chapter 8
Record Setup
Before you start recording, make sure your
your Pro Tools system is connected and
configured properly. For details on connecting Pro Tools to your studio, refer to
the Pro Tools Hardware Installation Guide
that came with your system.
While some of the information in this
chapter is relevant to recording MIDI, there
are more specific setup details for MIDI recording in Chapter 10: MIDI Recording.
Input Connections and Audio Levels
Most Digidesign audio interfaces operate as
line-level devices and offer no pre-amplification. You must therefore adjust the level
of an input signal to line level before it
reaches Pro Tools. Low-level sources like
microphones and electric guitars need to
be pre-amplified. You can do this with a
quality mixing board or dedicated preamp.
✽ The Digi 001 is an exception to this rule. Its
I/O Box has two inputs with preamps, to which
you can connect low-level signals, and six additional inputs with “input gain.”
Volume and pan controls for tracks in
Pro Tools only affect monitoring levels—
not the recording input gain. The LED indicators on audio interfaces indicate both
full-code (highest level before clipping)
and true clipping of Pro Tools output signals. The on-screen meters in the Pro Tools
application indicate only true clipping.
Digital Clipping
Clipping occurs when you feed a signal to a
recorder or mixer that is louder or “hotter”
than the device allows. On many analog
tape decks, a little clipping adds a perceived
warmth to the sound due to tape compression. In digital recording, however, clipping causes digital distortion, which is undesirable and should always be avoided.
Set Input Levels High But Don’t Clip
When you feed a signal into any audio recording system, including Pro Tools, you
need to adjust the input level to optimize
the dynamic range. Adjust the input signal
to register as high as possible on your input
meter without triggering the clipping indicator. If the input level is too low, you will
not take full advantage of the dynamic
Chapter 8: Record Setup 73
Page 86

range of your Pro Tools system. If the input
level is too high, however, it will be
clipped.
Calibration Mode
You can use the Calibration Mode in
Pro Tools to adjust the input and output
levels for your audio interface so they
match those of your mixing console and
other audio devices in your studio.
For more information on Calibration
Mode, see the TDM Hardware Installation
Guide.
To record enable all audio tracks:
■ Option-click (Macintosh) or Alt-click
(Windows) the Record button on any audio
track.
Option-click (Macintosh) or Alt-click (Windows) again to take all audio tracks out of
record-enabled mode.
To record enable all selected audio tracks:
■ Shift-Option-click (Macintosh) or Shift-
Alt-click (Windows) the Record button on
any audio track.
Shift-Option-click (Macintosh) or Shift-Altclick (Windows) again to take all selected
audio tracks out of record-enabled mode.
Record Enabling Tracks
To record to a track you must first recordenable it. While you can have multiple
audio tracks record-enabled (for simultaneously recording more than one track),
there can only be one MIDI track recordenabled at a time. The record-enabled MIDI
track can, however, be switched on the fly
while recording.
Record-enabled audio track
To record enable an audio or MIDI track:
■ From either the Edit or Mix window,
click the track’s Record button.
Click again to take the track out of recordenabled mode.
✽ Multiple tracks are selected by Shift-clicking
their track names.
✽ While record enabling does not affect audio
tracks that are grouped, you
can select all
tracks in a group by clicking directly to the left
of the group’s name in the Groups List. Then
you can Shift-Option-click (Macintosh) or ShiftAlt-click (Windows) to record enable all selected tracks.
To record enable a different MIDI track on the
fly:
■ While pressing Option (Macintosh) or
Alt (Windows), press the Up/Down arrows
to record-enable the previous or next MIDI
track.
– or –
Click the Record button of the MIDI track
you want to record enable. The previous
record track is taken out of record-enabled
mode.
Pro Tools Reference Guide74
Page 87

Latch Record Mode
When the option for Latch Record Enable
Buttons is selected (in the Operations Preferences), you can record enable (latch) additional audio tracks by clicking their
Record buttons. Previously record-enabled
tracks remain record-enabled.
When Latch Record Enable Buttons is deselected, record-enabling a subsequent audio
track takes the previously record-enabled
track out of record-enabled mode.
✽ When the option for Latch Record Enable
Buttons is deselected, you can still Shift-click
the Record buttons on multiple audio tracks to
record enable them.
Record Safe Mode
When tracks are in Record Safe mode, it is
not possible to record enable them, and
therefore not possible to record to them.
Use Record Safe mode to protect important
track recordings.
To put an audio or MIDI track in Record Safe
mode:
■ Command-click (Macintosh) or Control-
click (Windows) the track’s Record button.
Command-click (Macintosh) or Controlclick (Windows) again to take the track out
of Record Safe mode.
To put all tracks in Record Safe mode:
■ Command-Option-click (Macintosh) or
Control-Alt-click (Windows) the Record
button on any track.
Command-Option-click (Macintosh) or
Control-Alt-click (Windows) again to take
all tracks out of Record Safe mode.
To put all currently selected tracks into
Record Safe mode:
■ Command-Option-Shift-click (Mac-
intosh) or Control-Alt-Shift-click (Windows) the Record button on any of the
selected tracks to toggle them in and out of
Record Safe mode.
Monitoring Modes
Pro Tools offers two modes of input monitoring, Auto Input Monitoring or Input Only
Monitoring (chosen from the Operations
menu), which determine how input signals
are monitored while recording audio.
Auto Input Monitoring
In this mode, when session playback is
stopped, Pro Tools monitors audio input.
When playback is started for a punch-in,
Pro Tools monitors existing track material
up until the punch point. While punched
in, the input signal is monitored. On
punch-out, monitoring switches back to
the existing track material. This is similar
to the auto-switching logic found on digital and analog multitrack tape machines.
▲ When using Auto Input Monitoring, the
switch back to monitoring track material on
punch-out is not instantaneous. To get instantaneous monitor switching on punch-out, use
QuickPunch (see “Using QuickPunch” on
page 113).
Chapter 8: Record Setup 75
Page 88

Input Only Monitoring
In this mode, when a track is record-enabled, Pro Tools monitors audio input
only, regardless of any punch in/out selection.
Monitor Levels for Record and Playback
Pro Tools allows you to set two different
fader levels for each audio track: one for
when the track is record-enabled, and one
for when it is not record-enabled. This lets
you adjust levels for playback and configure a different set of levels for monitoring
while recording.
Pro Tools remembers these two states for
fader levels automatically. If you adjust a
fader when a track is record-enabled and
then take the track out of record-enabled
mode, the fader updates accordingly.
When audio tracks are record-enabled,
their volume faders in the Mix window
turn red, indicating that the record monitor level is active.
Monitoring Latency
(Pro Tools LE Only)
Because Pro Tools LE uses the host processor in your computer for audio processing,
playback, and recording, there is a small
amount of audio delay, or latency, in the
system. This latency amount is related to
the Hardware Buffer Size—the larger the
buffer size, the larger the latency.
While there may be times when you want a
larger Buffer Size, for the sake of higher
track counts with more Plug-Ins, you’ll
generally want a smaller Buffer Size when
recording audio that is monitored through
your Digi 001 or Audiomedia III.
If you are monitoring the audio material
you’re recording with an external mixer,
you will not hear any latency.
To set the Hardware Buffer Size:
1 Choose Setups > Hardware.
2 Choose the number of samples from the
Hardware Buffer Size pop-up.
Hardware Buffer Size
3 Click OK.
▲ Computers with slower CPUs may not be
able to use the 128 Buffer Size without encountering performance errors.
Pro Tools Reference Guide76
Page 89

▲ If have a SampleCell II Plus card, a buffer
size of 128 should not be used when running
the SampleCell Editor at the same time as
Pro Tools LE. Use a larger buffer setting to
avoid performance errors.
The following table lists the amount of
monitoring latency (in ms) you can expect
from the four Buffer Sizes.
Sample
rate
(kHz)
44.1
48
How Hardware Buffer settings affect latency
Buffer
Size
(samples)
128 2.9 recording drums and
256 5.8 recording vocals and
512 11.6 mixing with 24
1024 23.2 final mixdown or
128 2.7 recording drums and
256 5.3 recording vocals and
512 10.7 mixing with 24
1024 21.3 final mixdown or
Latency
Amount
(ms)
Use for:
other timing-critical
instruments
instruments with
slower attacks
(bass, guitar, etc.)
tracks
many plug-ins
other timing-critical
instruments
instruments with
slower attacks
(bass, guitar, etc.)
tracks
many plug-ins
Low Latency Monitoring
(Pro Tools LE Only)
You can reduce the amount of monitoring
latency for Pro Tools LE systems by reducing the Hardware Buffer Size. However,
even at the smallest Buffer Size, there is still
some latency. In addition, reducing the
Buffer Size limits the number of simultaneous audio tracks you can record without
encountering performance errors.
Digi 001 and Audiomedia III systems can
use the Low Latency Monitoring option to
record with an extremely small amount of
monitoring latency, to as many tracks as
each system supports.
To use Low Latency Monitoring:
1 Record enable the desired audio tracks
(or Auxiliary Inputs) by clicking their
Record buttons. Only tracks with inputs set
to an audio interface (not a bus) use Low
Latency Monitoring.
2 From the Output Selector, assign each
track to either Output 1 or Output 2. Only
tracks assigned to these outputs use Low
Latency Monitoring.
3 Select Operations > Low Latency Moni-
toring.
When Low Latency Monitoring is enabled,
any plug-ins and sends assigned to recordenabled tracks (routed to Outputs 1–2) are
automatically bypassed, and must remain
bypassed. Also, these tracks will not register
on meters for Master Faders.
Chapter 8: Record Setup 77
Page 90

Low Latency Monitoring and Bounce To Disk
With Low Latency Monitoring Enabled,
only audio tracks are included with the
Bounce To Disk command—Auxiliary Input tracks are ignored.
✽ To switch tracks in the Track Name/Com-
ments dialog, you can also press Command
(Macintosh) or Control (Windows) and use the
Up/Down Arrows.
4 When you are finished, click OK.
To record Auxiliary Inputs with Low Latency Monitoring enabled, you must
record the material in real time.
Track Names
When creating new audio and MIDI tracks,
Pro Tools names them as either “Audio” or
“MIDI” and numbers them consecutively.
For instance, when you create 2 new audio
tracks, their default names are “Audio 1”
and “Audio 2.” You can rename tracks and
also log comments for each track.
To rename a track:
1 In the Edit or Mix window, double-click
the Track Name.
2 In the Track Name/Comments dialog,
type a new track name.
Default Names for Audio Files and Regions
When recording to an audio track, the resulting file and region names are based on
the name of the track. For instance, after recording for the first time on a track called
“Electric Gtr,” an audio file is written to
your hard drive with the name “Electric
Gtr-01.” In addition, a region appears in
the Audio Regions List with the name
“Electric Gtr-01-00.”
Subsequent record takes on the same track
are named identically but with the first set
of digits (indicating the take number) incremented. The second set of digits is only
used for region naming and indicate a region auto-created from an edit.
☞ The QuickPunch record mode uses a slightly
different method for numbering regions. For
details, see “Region and Take Numbering with
QuickPunch” on page 116.
Track Name/Comments dialog
3 If desired, type comments for the track in
the Comments text box. Click Previous or
Next to rename another displayed track.
Pro Tools Reference Guide78
When recording MIDI tracks, a similar
naming scheme is used, though with only
one set of digits. For instance, after recording to a track called “Synth 1,” a region is
created called “Synth 1-01.” Subsequent regions for that track, generating either from
additional record takes or region edits, are
numbered sequentially.
Page 91

Recording to Multiple Hard Drives
To increase system performance, Pro Tools
lets you record each track to different hard
drive.
Since Pro Tools III systems use a Disk I/O
card for SCSI connections, it may not be
necessary to allocate tracks to multiple
drives. However, using Round Robin Allocation can minimize the performance burden on a single drive.
To record to multiple hard drives:
1 Choose Setups > Disk Allocation.
2 In the Disk Allocation dialog, assign a
hard drive for each track by clicking in the
Record Drive column.
3 To automatically distribute any newly
created tracks among the drives connected
to your system, select “Use Round Robin
Allocation for New Tracks.”
If you are using Round Robin Allocation
and want audio to be recorded to your system’s startup drive, select Include System
Volume (see “Recording to the System Volume” on page 80 for details).
4 When you are finished, Click OK.
When recording, each track is routed to the
selected drive. If Round Robin Allocation is
enabled, new tracks are automatically allocated to subsequent hard drives. A folder
with the session name is created on each
hard drive, containing folders for “Audio
Files” and “Fade Files.”
To save Disk Allocation settings for use
with future sessions, save the session as a
template. For details, see “Creating Custom
Session Templates” on page 48.
Disk Allocation dialog
To assign all tracks to the same hard drive,
press Option (Macintosh) or Alt (Windows)
while selecting a drive name.
Disk Allocation and Cross-Platform Sessions
Pro Tools for Windows supports recording
and playback of audio from multiple hard
drives, but to ensure cross-platform operation, it also requires that Macintosh
Pro Tools sessions and their associated
audio files be on Macintosh-formatted
(HFS) drives.
Similarly, Windows sessions and their associated audio files must reside on Windowsformatted (FAT16) drives. If you want to
share sessions between Windows and Macintosh platforms, consider these restrictions when allocating tracks to drives.
Chapter 8: Record Setup 79
Page 92

Reallocating Tracks
When opening a session where some of the
previously assigned hard drives are no
longer available (or don’t match the current session platform), Pro Tools automatically reassigns tracks to the volume where
the session file is stored. In such cases,
Pro Tools gives you the option of reallocating tracks to other drives.
When this preference is set to Use All Available Space, the drive’s entire available
space is allocated. This can slow down the
recording process for hard drives that use
certain file systems, including HFS+ and
NTFS.
In such cases, you can reduce the time it
takes to begin recording by allocating only
a portion of your hard drive.
Recording to the System Volume
Though Pro Tools will let you record to
your system hard drive, this is generally
not recommended. Performance for audio
recording and playback on system drives is
worse than on non-system hard drives.
You should record to system drives only
when absolutely necessary—if your computer system has just the one hard drive, or
if your other hard drives are completely out
of space.
Allocating Hard Drive Space for Recording
The Operation Preference for Open Ended
Record Allocation determines how much
of your available hard drive space is allocated for recording.
To allocate a portion of your hard drive for
recording:
1 Choose Setups > Preferences and click
Operation.
2 Under the Open Ended Record Alloca-
tion option, select Limit To and enter a
number of minutes to be allocated.
Open Ended Record Allocation, Operation Preference
The number of minutes specified is allocated for each record-enabled track. You
may find it necessary to experiment with
this number to achieve the desired performance for recording.
3 When you are finished, click Done.
Pro Tools Reference Guide80
Page 93

Record Modes
For recording audio, Pro Tools has four
record modes:
• Normal Nondestructive Record
• Destructive Record
• Loop Record
• QuickPunch
ing start and end points in the Transport
window. If there is no selection, recording
begins from the current cursor location
and continues until the Transport’s Stop
button is clicked.
▲ To set a record range by selecting within a
track’s playlist, the Edit and Timeline selections must be linked.
To enable Destructive Record, Loop
Record, or QuickPunch, select them from
the Operations menu. If none of these
record modes are selected, Pro Tools is in
normal Nondestructive Record mode.
The record mode can also be switched by
Control-clicking (Macintosh) or Rightclicking (Windows) the Record button in
the Transport window. This cycles through
the four modes with the Record button
changing to indicate the currently selected
mode: blank for Nondestructive, “D” for
Destructive, a loop symbol for Loop
Record, and “Q” for QuickPunch.
Destructive Record mode enabled
Nondestructive Record Mode
In normal Nondestructive Record mode,
Pro Tools records audio non-destructively,
which means that if you record over a
track’s existing regions, the audio is not
erased from your hard drive. Both the new
and old audio remain on your hard drive,
available as regions from the Audio Regions
List.
In Nondestructive Record mode, the record
range is defined by selecting a range in the
Ruler or in a track’s playlist, or by specify-
The pre/post-roll settings allow material to
be heard up to and after the start and end
points, which is useful when punch recording (see “Punch Recording Audio” on
page 92 for details).
Destructive Record Mode
In Destructive Record mode, recording
over existing regions replaces the original
audio permanently, which allows you to
preserve hard drive space. However, if you
have sufficient drive space, it is usually best
to use Pro Tools in Nondestructive Record
mode, to avoid losing any previously recorded material.
☞ When working in normal Nondestructive
Record mode, you can preserve disk space by
removing unwanted record takes (see “Removing Unwanted Regions” on page 198) and
compacting audio files (see “Compacting an
Audio File” on page 199).
When defining the record range and setting pre- and post-roll, Destructive Record
mode works the same as Nondestructive
mode.
Unlike the other record modes, it is not
possible to cancel record takes when using
Destructive Record mode (see “Canceling a
Record Take” on page 88).
Chapter 8: Record Setup 81
Page 94

Loop Record Mode
Loop Record mode allows you to record
take after take (non-destructively) while
the same section of audio repeats. This is a
convenient technique for quickly recording multiple takes of a part without losing
spontaneity.
The time range that is looped and recorded—which must be at least one second
in length—is defined by selecting a range
in the Ruler or in a track’s playlist, or by
specifying start and end points in the
Transport window. The pre-roll setting, if
enabled, is used during the first record pass,
but on each successive loop the pre/postroll times are ignored.
▲ To set a record range by selecting within a
track’s playlist, the Edit and Timeline selections must be linked.
When using Loop Record mode, each successive take appears as a region in the Audio Regions List and each is numbered sequentially. The various takes, which are
identical in length and start time, are easily
auditioned and placed in the track at the
correct location with the Takes List pop-up
menu (see “Auditioning Record Takes” on
page 94).
QuickPunch
QuickPunch gives you the ability to instantaneously punch in (initiate recording) and
punch out (stop recording) on record-enabled audio tracks during playback by
clicking the Transport’s Record button. Recording with QuickPunch is nondestructive.
When using QuickPunch, Pro Tools begins
recording a new file when playback begins,
automatically generating regions in that
file at each punch in/out point. Up to 100
of these “running punches” can be performed in a single pass.
Though you can punch record in the other
record modes by manually specifying the
record range, only QuickPunch provides
instantaneous monitor switching on
punch-out.
The Record Modes and MIDI
In addition to the four record modes, there
is also a MIDI Merge button in the Transport window that determines how MIDI is
recorded. When enabled (Merge mode), recording over existing MIDI regions results
in the new data being merged with the old.
When the MIDI Merge button is disabled
(Replace mode), the new material replaces
the old.
MIDI Merge button
MIDI Merge enabled
MIDI recording works the same whether
using Nondestructive or Destructive
Record mode. In addition, QuickPunch
does not need to be enabled to punch on
the fly with MIDI—this capability is available in Nondestructive and Destructive
Record modes.
Unlike audio, MIDI can be loop recorded
when Operations > Loop Playback is enabled. In this mode, the state of the MIDI
Merge toggle determines whether existing
material is replaced or merged.
Pro Tools Reference Guide82
Page 95

In almost all instances, recording MIDI is
destructive (though you can undo a MIDI
record pass), either overwriting or adding
to region material. One exception to this
rule is when Loop Record mode is enabled;
in this mode, existing track regions are replaced with new regions when new material is recorded. The old regions remain intact and available from the MIDI Regions
List, and from the Takes List pop-up. In
Loop Record mode, MIDI Merge has no effect, so its button is dimmed.
To enable the click in the Transport:
1 To view the MIDI controls in the Trans-
port window, select Display > Transport
Window Shows > MIDI Controls.
Transport Window with MIDI Controls
2 In the Transport window, click the Click
button so it becomes highlighted.
Click button
Recording with the Click
If you intend to work with MIDI tracks in
your session, or if the audio you’re working
with is bar- and beat-oriented, you may
record your tracks while listening to the
click. This ensures that recorded material,
both MIDI and audio, will align with the
session’s bar and beat boundaries.
When your track material lines up with the
beats, you can take advantage of some useful editing functions in Pro Tools, such as
quantizing MIDI and audio regions, quantizing individual MIDI notes, and copying
and pasting measures and song sections in
Grid mode.
☞ Material that is recorded without listening to
the click can still be aligned to bar and beat
boundaries in Pro Tools with the Identify Beat
command. For details, see “Identify Beat Command” on page 230.
Click enabled
3 To use a countoff when recording or play-
ing, click the Countoff button in the Transport window so it too becomes
highlighted.
Countoff button
Countoff enabled
Hearing the countoff before recording is
helpful in getting the feel for the tempo before you begin playing. The Countoff button in the Transport window displays the
number of bars to be counted off.
▲ The countoff is ignored when Pro Tools is
Online and syncing to SMPTE time code.
Chapter 8: Record Setup 83
Page 96

To configure the click options:
1 Choose MIDI > Click Options.
– or –
Double-click the Click or Countoff button
in the Transport window.
2 In the Click/Countoff Options dialog,
choose from the Output pop-up the port
number (device) and channel that will play
the click.
Click/Countoff Options dialog
3 For the accented and unaccented notes,
specify the note, velocity, and duration.
When listening to the click in your
Pro Tools sessions, the accented note
sounds on the first beat of each measure
and the unaccented note sounds on the remaining beats. Make sure the sound assigned to these notes has a sharp, percussive attack.
4 Select whether the click is heard “During
play and record” or “Only during record.”
5 If using a countoff, specify the number of
Bars to be counted off. To hear the countoff
only when recording, select that option.
6 Click OK.
Setting the Default Meter
When opening a new session in Pro Tools,
the meter defaults to 4/4. If you intend to
record with the click and are working with
a different meter, make sure to set the default meter accordingly.
If a session’s meter does not match the music you’re recording, the accented clicks
will not line up with what you’re playing,
and, as a result, the recorded material may
not align with the bars and beats in the Edit
window.
Meter events, which can occur anywhere
within a Pro Tools session, are stored in the
Meter Track and appear in the Meter Ruler.
Inserting and editing for meter events is
discussed in “Meter Events” on page 233.
To set the default meter for a session:
1 Choose Windows > Show Tempo/Meter.
– or –
Double-click the Meter button in the
Transport window.
Meter button
Pro Tools Reference Guide84
Page 97

2 Enter the Meter you will use for the ses-
sion and set the Location to 1|1|000 (so the
inserted meter event replaces the default
one).
Tempo/Meter Change window
3 Choose a note value for the number of
clicks to sound in each measure.
4 Click Apply to insert the new meter
event.
Setting the Default Tempo
When opening a new session in Pro Tools,
the tempo defaults to 120 BPM. If you intend to record with the click and are working with a different tempo, make sure to set
the default tempo accordingly. If you know
the tempo you will use for the session, you
can insert a tempo event at the beginning
of the Tempo Track.
Tempo events, which can occur anywhere
within a Pro Tools session, are stored in the
Tempo Track and appear in the Tempo
Ruler. Inserting and editing for tempo
events is discussed in greater detail in
“Tempo Events” on page 227.
To insert a default tempo event:
1 Choose Windows > Show Tempo/Meter.
2 At the top of the Tempo/Meter Change
window, choose Tempo Change from the
pop-up menu.
Tempo/Meter Change window
3 Enter the BPM value you will use for the
session and set the Location to 1|1|000 (so
the inserted tempo event replaces the default tempo).
4 To base the BPM value on something
other than the default quarter-note, select
the desired note value.
5 Click Apply to insert the new tempo
event.
See “Default Tempo” on page 230 for more
information on the default tempo.
Using Manual Tempo Mode
In Manual Tempo mode, Pro Tools ignores
the tempo events in the Tempo Track and
instead plays back at the tempo displayed
in the Transport window. The manual
tempo can be set with the Tempo slider, or,
if you’re not sure of the actual tempo, by
tapping in the tempo.
Chapter 8: Record Setup 85
Page 98

▲ While you can adjust the Manual Tempo dur-
ing playback, doing so will momentarily interrupt playback.
To set the manual tempo with the Tempo
slider:
1 To view the MIDI controls in the Trans-
port window, select Display > Transport
Window Shows > MIDI Controls.
2 In the Transport window, click the Con-
ductor button so it becomes unhighlighted.
To set the manual tempo with the Tap button:
1 To view the MIDI controls in the Trans-
port window, select Display > Transport
Window Shows > MIDI Controls.
2 In the Transport window, click the Con-
ductor button so it becomes unhighlighted. Pro Tools switches to Manual
Tempo mode. In this mode, any tempo
events in the Tempo Track are ignored.
3 Click the Tap button repeatedly at the de-
sired tempo.
Conductor button
Manual Tempo mode enabled
Pro Tools switches to Manual Tempo
mode. In this mode, any tempo events in
the Tempo Track are ignored.
3 To enter a new tempo, drag the horizon-
tal Tempo slider in the Transport window.
Tempo slider
For finer resolution with the Tempo slider,
press Command (Macintosh) or Control
(Windows) while dragging.
4 To base the BPM value on something
other than the default quarter-note, make
the change in the Beat Value pop-up menu
(just to the left of the Tap button).
5 To exit Manual Tempo mode and enable
the Tempo Track, click the Conductor button in the Transport window so it becomes
highlighted.
Tap button
– or –
Click in the Tempo field so it becomes
highlighted and tap in the tempo by playing a note on your MIDI keyboard controller.
To compute the new tempo, Pro Tools requires at least four taps (each of which is
displayed in the Tap area when received).
The computed BPM value appears in the
Transport’s Tempo field.
Tempo Taps as reflected in Transport
To lock in the new tempo, take Pro Tools
out of Manual Tempo mode by clicking the
Conductor button, then insert a tempo
event (with the new tempo) at the beginning of the Tempo Track.
Pro Tools Reference Guide86
Page 99

chapter 9
Basic Audio Recording
Recording a Single Audio Track
When recording from a mono source,
record to a single audio track in Pro Tools.
To configure a new audio track for recording:
1 Connect a mono sound source to the ap-
propriate input of your audio hardware.
2 From the Session Setup window, select
the sample rate for your session.
If using inputs 1 or 2 of an audio interface,
make sure to specify the format (analog or
digital) in the pop-up menu for Ch 1–2.
3 Choose File > New Track and specify 1
Audio Track, then click Create.
4 Rename the new track as desired. Track
names are used to auto-name recorded
audio files and regions. For more information, see “Track Names” on page 78.
5 In the Mix Window, click the audio
track’s Record button to record enable the
track.
Volume faders for record-enabled audio
tracks turn red to indicate they are functioning as record monitor levels.
6 In the Mix window, click on the track’s
Input Selector and assign a hardware input.
New Track dialog
✽ To auto-scroll the Track Type pop-up in the
New Track dialog, press Command (Macintosh) or Control (Windows) and use the
Up/Down Arrow keys.
Input Selector
7 Adjust the output level of your sound
source (instrument, mixer, or preamp).
Monitor the track’s meter levels in
Pro Tools to ensure that you get the highest
possible signal without clipping.
8 In the Mix window, adjust the track’s vol-
ume and pan faders as desired. These settings are for monitoring purposes only and
do not affect the recorded material.
Chapter 9: Basic Audio Recording 87
Page 100

To record to the new audio track:
1 Put Pro Tools in normal Nondestructive
Record mode. In the Operations menu, deselect Destructive Record, Loop Record,
and QuickPunch.
2 If desired, enable the click and countoff
in the Transport window. Also, make sure
to specify the session’s default meter and
tempo. For details, see “Recording with the
Click” on page 83.
3 In the Transport window, click Return to
Zero so the start/end times are cleared. This
ensures that you’ll start recording from the
beginning of the track.
4 Click Record in the Transport window.
The Record button flashes.
3 Click Play in the Transport window to be-
gin playback. Adjust the track’s volume
and pan faders as necessary.
Record Shortcuts
You can also begin recording with the following keyboard shortcuts:
• Press F12
• Press Command+Spacebar
• Press 3 on the Numeric Keypad (when
the Numeric Keypad Mode is set to
Transport)
✽ To initiate recording at half-speed, press
Command+Shift+Spacebar (Macintosh) or
Control+Shift+Spacebar (Windows). For details, see “Half-Speed Recording and Playback” on page 118.
Record button
5 When you are ready to begin recording,
click Play. If using a countoff, Pro Tools
counts off the specified number of measures and then begins recording.
6 When you have finished recording, click
Stop in the Transport window.
The newly recorded audio is written to disk
and appears as an audio region in the
track’s playlist. The new audio region also
appears in the Audio Regions List.
To play back the new audio track:
1 Click the Record button for the audio
track to take it out of record-enabled mode.
The track’s volume fader now functions as
a playback level control.
2 In the Transport window, click Return to
Zero.
Pro Tools Reference Guide88
Canceling a Record Take
While recording it is possible to discard the
current record take. This removes the audio
(recorded up to that point) from your hard
drive and deletes the region from the
track’s playlist. This capability is not available in Destructive Record mode.
To cancel a record take while recording:
■ Press Command+period (Macintosh) or
Control+period (Windows) before the
Transport is stopped.
If using Loop Record mode, all takes from
each record pass are discarded.
☞ Unlike audio recording, MIDI recordings can
be undone after stopping the Transport. For details, see “Undo and MIDI Recording” on
page 107.
 Loading...