

Page 1

Chapter A
Essential Concepts
Page 2

Pro Tools User’s Guide2
Page 3

Essential Concepts
Introduction
Welcome to Digidesign Pro Tools™. Pro Tools is the leading integrated digital studio
that uses the power of personal computers to record multitrack digital audio direct to
hard disk, while allowing you to integrate other elements of your studio such as MIDI
instruments and MIDI sequencers. This powerful combination of technologies provides
you with the means to compose, record, mix, and master professional-quality recordings in your own digital studio.
Along with this new generation of digital tools come a number of concepts that may be
new to you if you are just getting started with direct-to-disk recording. This chapter
explains some of the fundamental concepts behind digital audio and direct-to-disk
recording. Before diving into the specifics of using Pro Tools, you may wish to first
familiarize yourself with a few basic audio principles and terms. The first sections of
your Software User’s Guide provide an overview of the principles of sound, digital
audio, and basic audio production.
Before you go any further in this User’s Guide, you should have already installed your
Pro Tools Software and connected your studio according to the instructions given in
your Installation Guide. If you haven’t already done this, please take a few moments to
do so now. You can then return to this User’s Guide and begin learning how to use Pro
Tools’s many powerful tools for creative audio production.
A
About Your Pro Tools Software User’s Guide
This User’s Guide explains how to use the Pro Tools software to perform digital recording, editing, and mixing. If you have not yet gotten Pro Tools installed and operating
on your computer, put this book down and open your Pro Tools Installation Guide, and
follow the instructions there.
Even if you’re the type of person who simply hates to read User’s Guides (and most of
us are), make an exception with Pro Tools. Your Pro Tools system can do some truly
amazing things with sound. Your User’s Guide is the key to unlocking its power.
3Chapter A: Essential Concepts
Page 4

Your Pro Tools User’s Guide is designed to teach you how to use Pro Tools, not how to
use the Macintosh. It assumes that you have a working knowledge of standard
Macintosh users techniques, including Macintosh basics such as using the Finder,
double-click, select, Shift-select, using menus, etc. If you don’t know how to do all of
these tasks, spend some time learning your Macintosh before going any further.
How to use this manual
How you approach this User’s Guide will depend on how familiar you already are with
Pro Tools and/or digital audio. There are some conventions used in this manual that all
readers should be aware of, and these are listed below:
System Names
This User’s Guide contains operating instructions for the following Pro Tools systems:
Pro Tools Project. Pro Tools Project is comprised of the Pro Tools software and
the following hardware; the Pro Tools Project Audio Card (formerly called the
Session 8 Audio Card), and your choice of the 888 I/O, 882 I/O or 882 Studio
Audio Interface.
Pro Tools 442. Pro Tools 442 is comprised of the Pro Tools software and a Pro
Tools 442 Audio Card and 442 I/O Audio Interface. This system is also known
as Pro Tools I-series hardware.
Pro Tools with Audiomedia. Pro Tools with Audiomedia is comprised of the Pro
Tools software and an Audiomedia card.
Note: In this User’s Guide, “Audiomedia” refers to Audiomedia III cards.
Pro Tools with DAE PowerMix. This configuration consists of Pro Tools and the
DAE PowerMix software. DAE PowerMix is a DAE Extension that allows you to
run Pro Tools on your Power Macintosh without any additional audio hardware.
If you’re upgrading from a previous version of Pro Tools:
If you’re upgrading (or receiving an update) you should go straight to the
following section What’s New In Pro Tools 3.4. There you’ll find a quick rundown of all that has changed since the previous Pro Tools version was released.
If you find any subject that you need to know more about, look up that word
or feature or on-screen item in the Index at the back of this User’s Guide. The
index will show you where to find additional information on a topic.
If you’re new to Pro Tools or new to digital audio:
If you’ve never used Pro Tools before, we recommend you read through as
much of your User’s Guide as you can regardless of how much audio experience you may possess. The first few chapters (Essential Concepts, Pro Tools
Pro Tools User’s Guide4
Page 5

Basics, Working with Tracks) cover the basics of Pro Tools and digital audio
(terminology, concepts, etc.), and describe Pro Tools’ windows and on-screen
features in detail. Later chapters get into specific tasks — Recording, Editing,
Mixing, Working with MIDI, etc.
What’s New in Pro Tools 3.4
Version 3.4 of the Pro Tools software has several new features and enhancements,
including:
• Stereo recording and up to 16-track playback on a Power Macintosh without
Digidesign hardware when used with the DAE PowerMix extension. (The number of tracks available depends on the processor speed of the Power Macintosh.)
• Sample-accurate Nudge/Grid via the Nudge/Grid pop-up menu in
Minutes:Seconds, Feet & Frames, and Time Code modes
• Batch importing of mono and stereo audio files into an open Session via “drag
and drop” in the Finder
• Batch deletion of unused files from within a Session
• A Get Info command which allows you to create and store notes about a Session
within the Session
• Support for other Digidesign hardware, allowing Pro Tools to be run on
Session 8 (Pro Tools Project) and Audiomedia systems (functionality will vary).
A
• Numerous performance improvements
The Physics of Sound
Analog Audio
Sound is composed of sound waves. A sound wave behaves like a ripple in a pond—it
travels outward from its source in all directions. If you were to drop a pebble into a
pond once every second, there would be a new wave created with each pebble dropped,
and the resulting waves would have a frequency of 1 wave per second.
5Chapter A: Essential Concepts
Page 6

Sound waves are actually variances of pressure in the air. In the audio world, the
number of sound waves (cycles) per second are measured in Hertz, which is abbreviated
“Hz.” One Hertz = 1 cycle per second. Higher numbers of Hz are perceived by humans
as having a higher pitch. The human ear can perceive sound in the frequency range of
20 to 20,000 Hz, though for many adults this range is probably 20 to 16,000 Hz as an
individual’s audible frequency range decreases with age.
Microphones take these pressure waves and convert them into electrical signals. Audio
represented by these actual electrical voltages is called analog audio. When the pressure
increases towards the microphone a positive electrical signal is generated. Conversely,
when the pressure is away from the microphone a negative electrical signal is generated.
Speakers reverse this conversion process by generating pressure waves from an electrical
signal.
Digital Audio
Your Pro Tools-equipped Macintosh computer stores audio digitally. This means that
analog electrical signals from microphones or other sources are converted into numbers, which are then stored in a digital medium (hard disk, CD-ROM, compact disc, etc.).
Conversion from analog electrical signals into numbers is accomplished using a technique called digital sampling. Digital sampling takes a numeric “snapshot” of the voltage
over and over again in precise intervals, similar to the way individual frames of film
capture action in a movie camera. The number of snap shots or samples taken of the
audio in a second is called the sample rate. The more samples taken, the better the
quality of the audio. The audio on compact discs, for example, is recorded at 44,100
samples each second (or 44.1 kHz). A 44.1 kHz sample rate produces very high quality
audio.
Another factor that affects the quality of the audio is the accuracy of each particular
sample. Digital audio uses a number to represent or describe the content of each
sample—the higher the number, the more detailed the sample. The following analogy
explains why this is so. Imagine if you had to measure the distance between two points
using a ruler, but were forced to only use numbers matching the marks on the ruler. If
you had a ruler with marks only at inch intervals, your measurement would be accurate
only to the closest inch. But what if the marks were 1/4 inch, or 1/8 inch, or even a
thousandth of an inch? Then you could measure much more accurately. With digital
audio, the accuracy of the sample is determined by the bit resolution of each sample. 8bit resolution provides 256 different numbers to represent the signal level at the
moment the sample is taken. 16-bit resolution provides 65,535 different numbers. Now
you can see why bit resolution makes a big difference in digital audio quality.
Pro Tools User’s Guide6
Page 7

About the Digidesign Audio Engine (DAE)
When you start the Pro Tools software you will notice that an application called DAE
automatically launches in the background. DAE stands for the Digidesign Audio Engine.
It is Digidesign’s real-time operating system for digital recording systems. When you
install Pro Tools, DAE is automatically installed inside your System folder.
In the same way that the Macintosh System software provides the foundation for
programs that run on the Macintosh, DAE provides the hard disk recording, digital
signal processing, mix automation, and MIDI functionality required by Pro Tools and
other products from Digidesign and its Development Partners. Because DAE is an
application itself, it supplies these capabilities to any products (such as StudioVision
Logic Audio
to record and play digital audio.
DAE allows such programs to run on virtually any Digidesign DSP card. Thus, a
Macintosh digital audio sequencing program can run on a Pro Tools III, Pro Tools
Project, or Audiomedia III card installed in your computer.
Another benefit of DAE is that such programs need not be updated when future
Digidesign DSP hardware cards appear: Digidesign will simply update DAE and the
necessary resources will be available to them.
The only thing that you really need to remember about DAE is this: You never need to
run or quit DAE by itself. When you start Pro Tools, DAE will automatically start. When
you quit Pro Tools, DAE will automatically quit.
™
, Digital Performer™ or Cubase Audio™) which utilize Digidesign DSP cards
™
A
,
What is DAE PowerMix?
DAE PowerMix is a DAE™ (Digidesign Audio Engine) Extension which enables the PPC
processor in Power Macintosh computers to perform as a playback engine and provide
the required DSP power to run Pro Tools software. With DAE PowerMix in a PPCequipped Macintosh or clone, Pro Tools can operate without any additional Digidesign
hardware being present in the system. Users who have both capabilities can take advantage of both the Audiomedia’s 16-bit RCA input/output jacks for system i/o, and then
switch the Playback Engine to DAE PowerMix to obtain up to 16 tracks of simultaneous
playback.
DAE PowerMix is installed in a folder “DAE Extensions” which is created by the Pro
Tools Installer within your DAE folder in your System folder.
7Chapter A: Essential Concepts
Page 8

Some New Recording Terms and Concepts
Pro Tools has a lot in common with traditional multitrack recording. However, Pro
Tools also provides some distinctly new and exciting concepts and creative tools that
may be new to you. Before you jump straight into recording, take a moment to look
over a few of these concepts. They are essential to understanding Pro Tools.
How Hard Disk Recording Differs From Tape-based Recording
Hard disk recording systems and tape-based recording systems are two very different
things. Tape recorders use a linear recording medium. This simply means that recording
is done “in a line”—the line being the tape itself as it moves from beginning to end. To
record or play the magnetic signals that make up sound on tape, a tape recorder
physically moves the tape across its tape heads. In order to hear a portion of a song recorded on tape, you have to rewind or fast forward the tape to a particular point and play it.
Hard disk recording is quite different. It’s not a linear medium, but a random-access
medium. This means that you can go to any spot in a song at random, and do it
immediately—without having to rewind or fast forward to get there. This is because
sound is not recorded upon a fixed piece of tape, but stored in digital format as a series
of ones and zeros on a hard disk. This design allows the audio to be randomly accessed
as follows:
A hard disk works something like a CD recorder/player. It has a platter similar to a CD
where the data is recorded, and a read/write head like a CD player’s laser head that does
the actual recording and playback of data. To read the digital audio information stored
on the hard disk, your computer simply “drops the laser head” (the read/write head) in
a specific location. Among the many benefits of hard disk technology, two are immediately relevant to recording: First, you can access any part of a recording almost immediately. And second, you can rearrange the parts of a recording even after you’ve recorded
them.
Rearranging a recording is achieved by simply making the hard disk read parts of the
recording in a different order (similar to telling your CD player to skip from track 1 to
track 7). You can digitally “cut and splice” pieces of sound to rearrange or repeat any
and all parts of your recording—without ever actually changing or copying the source
material. This ability is referred to as non-destructive editing.
Your Hard Disk is Your “Workspace”
Another difference between recording on a hard disk and recording on tape is how you
approach your recording projects. In general, you can think of your hard disk as a
Pro Tools User’s Guide8
Page 9

“workspace” for your current project. When you begin composing and recording, you
do it on disk. When you finish the project, you move it or archive it on DAT tape or
another long-term storage medium. That way, your hard disk is free for a new project.
After archiving, an occasional bit of hard drive maintenance (optimizing, reformatting,
etc.) contributes significantly to the overall performance of your system. Just as open
reel decks need to be cleaned and calibrated occasionally, hard disks require their own
type of regular maintenance.
How much recording time does a hard disk provide? It depends on the size of the hard
disk. Each of your tracks will take five megabytes of hard disk space per minute of
recording (at a sample rate of 44.1 kHz). That means that if you are recording simultaneously to 4 tracks you will use about 20 megabytes of disk space per minute. Recording
8 simultaneous tracks for one minute would consume 40 megabytes, 80 megabytes for 2
minutes, and so on. Recording 16 tracks simultaneously will consume in the neighborhood of 80 megabytes per minute.
Though this new approach to recording and editing sound may seem strange to you at
first, it will soon become second nature, and you will find that it is far more powerful
and flexible that any kind of recording that you’ve experienced before.
Essential Concepts Defined:
Sessions, Regions, Playlists, Tracks, Voices, and Channels
Because Pro Tools is a new technology, certain recording terms such as tracks and
channels take on new meanings which you should understand before you start using
your system. Before you proceed any further, here are some essential terms you should
know.
A
Session
A Session is the document which Pro Tools creates when you start a new project. In fact,
you could say that it is your project. It contains “maps” of all of the elements (audio,
MIDI, and automation) associated with your project. Pro Tools will store each new
Session in its own folder. Inside the Session folder will be the Session document, plus an
Audio Files folder and a Fade Files folder.
Sound files
Each time you record and save a take, it is stored on your computer’s hard disk as a file,
much like a word processor creates a text file when you type a letter on a computer. We
refer to the digital audio files which Pro Tools creates as sound files. Pro Tools saves
sound files in the Session’s Audio Files folder.
9Chapter A: Essential Concepts
Page 10

Regions
Once you have recorded a sound file you can divide it up into pieces, or regions, and
rearrange them as you like in a track. A region can consist of a musical riff, a verse, or
even a single note from a take. You define regions to suit your specific needs. For
instance, you could perform several takes of a solo, select the best portions of each take
and, by defining each fragment as a region, assemble them into a single composite solo
comprised of the best parts from the various takes.
Playlist
A Playlist is a term used to describe a list of regions strung together in a specific order.
Because audio is recorded to hard disk in Pro Tools, this list merely tells the hard disk
which sections of which audio files to read and in what order. By reusing regions, sections
of a recording can be repeated without using any additional disk space.
Tracks
A track is where audio or MIDI regions are strung together for playback. A track can be
made up of a single file, a single region or many regions. It can be made up of similar
elements, as in the case of a guitar solo track made up of regions from several different
“takes” of the solo, or it can be made up of dissimilar elements, as in the case of a track
made up of several sound effects. Each Pro Tools Session typically consists of multiple
tracks.
The maximum number of allowable tracks is defined by the Pro Tools system being
used. (See the table which follows.)
Voices
Voices refers to the number of digital audio events that Pro Tools can play back at one time.
Each Pro Tools system (Project, Audiomedia III, DAE PowerMix) has its own limit as
to how many digital audio “voices” can play at one time. (See the table which follows.)
Pro Tools User’s Guide10
Page 11
Table of Track and Voice Limits of all Systems
The following table lists the Track, Voice and simultaneous recording limits of each
system.
System Tracks Voices Simultaneous Record
Pro Tools Project up to 55 8 8
Pro Tools Audiomedia III 32 8 2
Pro Tools w/DAE PowerMix - 16* 64 16 16
Pro Tools w/DAE PowerMix - 12* 48 12 12
Pro Tools w/DAE PowerMix - 8* 32 8 8
*About Pro Tools with DAE PowerMix
Track and Voice performance of Pro Tools with DAE PowerMix is dependent upon CPU
and hard disk speed. The following table shows you what each Power Macintosh CPU
provides (NOTE - Power Macintosh models 7200/90 and 7500/100 are limited to 8 tracks):
100 MHz or faster 16
80-100 MHz 12
<80MHz 8
Channels
A Channel refers to a physical input or output. The number of inputs and outputs
available is determined by the Pro Tools system you are using. The following table lists
the channel capabilities of all audio interface options for Pro Tools Project.
A
Pro Tools System Channel Capabilities
The 888 I/O, 882 I/O and 882 Studio provide 8 channels of input and output.
For use with Pro Tools III and Pro Tools Project.
Pro Tools Audiomedia III provides 2 channels of input and output.
Pro Tools with DAE PowerMix, using the Power Macintosh’s built-in audio
convertors, provides 2 channels of input and output.
11Chapter A: Essential Concepts
Page 12

These terms will become even clearer to you as you begin to actually use your Pro Tools system. In the next section you are going to learn another key concept which is closely related to tracks and voices—virtual tracks.
The Difference Between Virtual Tracks and Physical Tracks
Pro Tools features an architecture that is unique to the digital audio workstation: the
virtual track system. A tape deck records only physical tracks: there are a fixed number of
physical tracks on the record and play heads, and the same number of physical tracks
on the tape itself. A 4-track analog recorder can record a maximum of 4 tracks, and can
play back all of those tracks simultaneously.
A virtual track system operates on a different principle. For example, the Pro Tools
Project system provides for up to 55 virtual tracks—tracks which can be recorded upon
and cued up for playback but cannot all be played back simultaneously. Such tracks are
called “virtual” tracks because they provide virtually all of the functionality of physical
tracks except for this limitation.
The number of virtual tracks supported by each system varies, as described below:
Pro Tools Project 55*
Pro Tools Audiomedia III 32*
Pro Tools with DAE PowerMix 16 64
Pro Tools with DAE PowerMix 12 48
Pro Tools with DAE PowerMix 8 32
*Power Macintosh users can switch the Playback Engine to DAE PowerMix and use as
many as 64 virtual tracks on playback. See also the explanation of Virtual Voices in
Chapter B for more information
The benefit of a virtual track system becomes clear when you think about the nature of
a recorded track. Although some audio tracks in a Session (a drum or bass track, for
example) often contain audio from beginning to end, most tracks actually only occupy
a small portion of the entire tape. If you were to look at the placement of audio on a
typical multi-track tape, it would probably look something like a checkerboard, with
“patches” of audio interspersed with blank areas. For example, you might have a track
called “Guitar Solo.” Although the solo lasted only 10 seconds, it would probably
occupy an entire track in a typical studio session. This is because engineers and producers tend not to place other material on the same track (a vocal overdub, for example),
because it would require its own EQ, pan, effects, and level.
Pro Tools User’s Guide12
Page 13

A virtual track system addresses this situation by allowing you to create separate tracks
for each audio element, each with its own volume, pan, EQ, effects sends, and automation. They act like individual tracks, and as far as the engineer/producer is concerned
they are individual tracks.
This provides two significant advantages: First, you can have up to 55 tracks in a given
Session (the maximum number is determined by your system configuration). You can
then simply choose which of these tracks you wish to play (depending on the total
number of available voices), and hit the play button to play them. You never need to
erase tracks to make room for other tracks—provided that you have enough space
available on your hard disk to store all of them. You can keep dozens of alternate takes
of vocals, solos, etc. and always have the freedom to go back and pick and choose the
optimum one.
Second, because Pro Tools’ virtual track’s are dynamically allocated, when a “hole” opens
up in one track, its voice is temporarily available and another track, assigned to the
same voice, can “pop through” the hole and begin to play. If the original track reaches
a point where audio occurs again, the track that had popped through relinquishes the
voice to the original track.
You have the power to determine which tracks are allowed to “pop through” holes in
other tracks. The way that you actually assign priority to tracks is described in greater
detail in Chapter C: Working with Tracks . The most important thing for you to remember is that by arranging tracks so that lower priority tracks can pop through gaps in
higher priority tracks, you can get much more performance out of say, a “4-channel”
system than just 4 tracks. Learning to use virtual tracks well is an essential part getting
the most out of Pro Tools.
A
The Cycle of a Typical Pro Tools Project
When you begin a project with Pro Tools, you create a Session. A Session is a Macintosh
file that contains information about all of the elements associated with a particular
project. When you create and save a Session, Pro Tools remembers all aspects of the
Session setup: what sound files were associated with the Session, your mixer settings
and voice assignments, signal routing setup, EQ configurations, and other aspects of the
Session. (This information is saved within the Session document itself. Pro Tools saves
your system configurations — i.e., Preference settings, Hardware settings, etc.— in a Pro
Tools Preferences file which gets stored in the Preferences folder inside your System Folder.)
When you open a Session created earlier, the Session appears exactly as it was saved, and
the associated sound files and settings are loaded automatically (as long as you have not
altered your system configuration).
13Chapter A: Essential Concepts
Page 14
Many Pro Tools music projects will typically progress something like this:
• Import some basic MIDI tracks into Pro Tools and record digital audio tracks in
sync with them. Punch in any new audio you need and set basic levels for
playback. When you have a rough layout of your Session with audio and MIDI,
open the Edit window.
• In the Edit window, try out various arrangements of your audio and MIDI
tracks—repeat verses, swap choruses, fix mistakes, etc. Continue until the
structure of your Session is complete.
• Next, record any additional MIDI tracks to accompany your digital audio
tracks. Finally, add any EQ or effects processing, automate a full digital
mixdown (with EQ and effects), and mix the Session to a digital stereo master
(on disk or DAT). The digital stereo mixdown is then ready for mastering to CD
using Digidesign’s optional MasterList CD software.
1. Import MIDI and
Record audio in the
MIX or EDIT Window.
3. Add EQ, FX and mix down
in the MIX or EDIT Window.
2. Edit and arrange
audio in the EDIT
Window.
4. Bounce stereo master to disk and
record it to compact disk (using
Digidesign’s MasterList CD™, not
included), or record your stereo
master to DAT.
A typical Pro Tools music session
If you are using Pro Tools for audio post or broadcast production, your exact project
flow may be somewhat different, but the principles are generally the same. Pro Tools
3.4 adds greater flexibility in how projects are completed, because of the ability to open
any Pro Tools 3.2 or later Session on any Pro Tools Project, Pro Tools with Audiomedia, Pro
Tools with DAE PowerMix, or Pro Tools 442 core system, regardless of the hardware
used to record or create it. This allows corporations and large facilities to run multiple
smaller editing suites to complement a full Pro Tools III system.
Pro Tools User’s Guide14
Page 15

Keeping Your Hard Disk Tuned Up
Because Pro Tools is a disk-based audio production system, keeping your hard drives in
good operating condition is essential. Like most other recording devices, hard drives
require regular maintenance in order to operate at their optimum level. In this section,
you’ll learn about formatting, optimizing and initializing hard drives and when you
should perform each of these functions to keep your system running smoothly.
Avoiding Fragmentation
For maximum efficiency, digital audio files should be written to your hard drive in a
“contiguous” fashion—that is, in an unbroken stream on the disk, similar to a vinyl
record, where sound is recorded in one continuous groove from beginning to end. This
helps keep the drive from having to search very far to find the data it needs for playback. Unfortunately, your computer can’t always store the sound files in this way
because there are other files taking up space on the disk. Thus, when your computer
writes a new file, it has to write it where it can find space.
When there are very few files on your hard disk, there is plenty of open space where
files can be written contiguously. But as the disk fills up, the areas of open space
become fewer and smaller. The end result is that the drive has to break file data into
smaller and smaller sections and scatter them around the disk, writing them wherever
there is space. This slows down the drive because when it comes time to read the data,
it has to do a lot of searching to find the different pieces that make up the file. This
phenomenon is referred to as fragmentation.
To keep your drive’s performance at a maximum, it’s best to keep file fragmentation to
a minimum. As fragmentation increases, it’s harder for the drive to retrieve and send
file information to the computer quickly. What happens if the computer doesn’t get the
information fast enough? Disk errors, which can interfere with playback of audio. Even
minor fragmentation can result in stuttering playback of sound files.
A
Optimizing Your Drive
What can you do to prevent this from happening? You can optimize your drive. This
means rearranging your files into a contiguous form. There are many software programs
that do this for you. When you optimize a drive, each file is regrouped and arranged on
the drive in a linear format, making it much easier for the drive to access the data when
it’s needed. Most optimizing software lets you run a check on a drive to find out the
percentage of fragmentation. The amount of fragmentation found will determine if
your drive needs to be optimized. In most cases, if your drive shows over 5% or 10%
fragmentation, you should consider optimizing it.
15Chapter A: Essential Concepts
Page 16

How often should you optimize? If you use your system several hours a day, five days a
week, you may want to check your drives on a daily basis, since it doesn’t take long for
even a large hard disk to become fragmented. This recommendation applies to less
frequent usage as well. The more often you check your drives, the fewer problems you’ll
have. However, optimizing a hard disk can take time. You should probably allow up to
30 minutes for a 600 Mbyte drive and one hour for a one gigabyte drive. This may take
substantially less time if the drives are not completely full. Also, different brands of
optimizing software may be faster or slower than others. Since your files will be rewritten
by the optimization process, always remember to make a backup copy of the data on your
hard drive before you optimize it! This also applies when formatting and initializing your hard
drive too, which are discussed below.
Formatting Your Drive
In order for a hard drive to locate and rearrange its files, its directory must also be in
good shape. The drive’s directory is like a map that the drive refers to in order to locate
files when the computer asks for them. Hard drives are a magnetic medium, and over
long periods of time, typically months, magnetic data can start to lose its coercive
properties. When this happens, it may become difficult for the hard drive to locate files
as efficiently.
To prevent directory problems from occurring on your system, it is important that you
format your hard drive on a regular basis. Formatting a hard drive replaces the drive’s
directory and will also erase any data that is currently on the disk. That is why it is
important that you back up (make a safety copy of) all the sound files and other information on your drive before you reformat it. Formatting can take up to an hour for
larger drives (such as 1-2 gigabyte drives): Smaller drives may take less time.
How Often Should You Format Your Drive?
Most computer specialists recommend formatting every three to four months. It’s
important to remember though that recording, processing, and playing digital audio is
more demanding on a hard drive than an application such as word processing. Thus, it
may be wise to “tune-up” your hard drive more frequently. If you find yourself using
your system on a very frequent basis, such as many hours a day, you should consider
reformatting on a monthly or even bi-monthly basis.
Initializing a Drive
The final procedure that you should know about is initializing a drive. What’s the
difference between formatting and initializing? As explained previously, formatting
means completely erasing the hard drive. Initializing a drive is similar to formatting in
that the drive’s directory, volume partition map and drivers are replaced, but in this case,
the drive is not erased, nor is a process called verification performed, where each sector
on the drive is read/write tested. In most cases, initializing a drive is not as thorough as
reformatting one, but it is much faster. If you’re trying to get rid of a problem with your
hard drive, you should reformat it rather than simply initialize it.
Pro Tools User’s Guide16
Page 17

Software Products that Can Help You Tune Up Your Hard Drive
There are many software products available to assist you with drive maintenance. When
the time to format your drive comes around, it is generally best to use the formatting
software supplied with the drive. Most hard drives come with a floppy disk containing
all the software you need to keep your drive running smoothly. If your drive didn’t
come with maintenance software, some commonly used applications that you may
wish to look into are Norton Utilities™ and Norton Speed Disk™. Most computer stores
carry these products.
In the end, the time you spend keeping your drive in good shape will be well worth the
effort. Take good care of your drive and your drive will take good care of your Pro Tools
projects.
About Rebuilding your Desktop
One of the best maintenance operations you can perform yourself with very little effort
is to rebuild your desktop frequently. This helps your Macintosh keep track of data on
your startup disk. You can “rebuild” the desktop with a simple startup keystroke, or
with a utility that has this function. This should be done on a regular basis (weekly,
monthly, etc.). Consult the documentation that came with your computer for more
information.
To rebuild your Desktop:
• Restart your computer while holding down the Command+Option keys. Keep
holding them down until a dialog appears asking you to confirm that you want
to rebuild the desktop on the drive named.
A
• Click OK to rebuild the desktop. If you have multiple drives attached to your
machine, the Macintosh will give you the option of rebuilding the desktop on
each one. Repeat these steps for each drive necessary.
Conclusion
In the next chapter you will learn some fundamental aspects of using Pro Tools,
including how to start up and shut down your system, and how to create, open, and
save Sessions. Read on!
17Chapter A: Essential Concepts
Page 18

Pro Tools User’s Guide18
Page 19

Chapter B
Pro Tools Basics
Page 20

Pro Tools User’s Guide20
Page 21

Pro Tools Basics
Introduction
In this chapter you’ll learn how to start up and shut down your system, how to create,
open, close, and save your projects, and other basic skills involved in using Pro Tools.
Starting Up and Shutting Down Your System
Your Pro Tools system consists of several components that have to be turned on and off
individually: your Audio Interface(s), your Macintosh computer, and your external hard
drive(s). In order for all of these devices to communicate properly it’s important that
you start up and shut down your system in a specific order.
Start your Pro Tools System in this order:
• Turn on your external hard drives first. Wait 10-15 seconds for them to come
up to speed.
• If you plan to work with MIDI equipment, turn on your MIDI interface and
other MIDI devices.
• Expansion Chassis (if used).
• Turn on your Pro Tools Audio Interface.
• Turn on your Macintosh.
B
Shut down your Pro Tools System in this order:
• Turn off your Macintosh. (Use the Shut Down command in the Finder’s Special menu.)
• Turn off your Audio Interface (Pro Tools Project only).
• Expansion Chassis (if used).
• If you’re using MIDI equipment, turn off your MIDI interface and controllers.
• Turn off your external hard drives.
21Chapter B: Pro Tools Basics
Page 22

Preparing Your System
The first time you use Pro Tools, you must set several parameters of your system so that
they match your studio setup. At this point, if you followed the instructions in your
Installation Guide, you should have installed your Pro Tools hardware and software, and
configured your system by using the Hardware and/or Playback Engine command in
ProTools’ Setups menu. You should also have installed the demo files included with your
Pro Tools system and confirmed that your system was working properly.
Once Pro Tools is configured, you won’t need to reset anything unless you remove and
reinstall Pro Tools (to reformat your hard drive, for example). You will also need to
configure everything whenever you wish to change settings such as the number of
tracks in your session (if you are using Pro Tools with DAE PowerMix) or to change the
settings of your Audio Interface (or Audiomedia III card) such as the input format
(analog or digital), sample rate, synchronization source, sync mode, and other parameters.
You have two options for configuring Pro Tools Software:
• If you have a Power Macintosh and the DAE PowerMix extension: You can
run Pro Tools without any additional Digidesign hardware. Pro Tools will
provide stereo recording and from 8-16 tracks of audio playback depending on
your Power Mac’s processor speed and the speed of your hard drive. This
scenario provides the greatest number of tracks, but relies on the Power
Macintosh’s built-in 16-bit audio converters for input and output. These builtin converters provide lower fidelity than those found on Digidesign audio cards
and audio interfaces.
• If you have a Power Macintosh AND a Digidesign audio card/audio
interface: This arrangement gives you the best of both worlds: the highfidelity input/output of the Digidesign hardware and the Power Macintosh’s 816 track capability. For example, you can use Audiomedia III’s high-fidelity
input and output to record your tracks; switch to the Power Macintosh hardware to edit, mix, and bounce (with more tracks); and finally, switch back to
Audiomedia if you wish to record your master stereo mixdown to an external
mastering recorder such as a DAT deck.
Pro Tools User’s Guide22
Page 23
To configure your Pro Tools Project, or Audiomedia III system:
• Make sure that you have powered on your equipment in the order outlined in the
previous section Starting Up and Shutting Down Your System.
• Double-click the Pro Tools icon to start the software.
• Next, if this is the first time you’ve launched Pro Tools, the following dialog
appears, prompting you to use the Hardware Setup dialog to configure your
system:
• Click OK. The Hardware Setup dialog appears.
B
The Hardware Setup dialog (Pro Tools Project shown, configured with an 882 I/O)
Configuring Hardware Setup for Pro Tools Project or Audiomedia III:
• In the Hardware Setup dialog you must configure the parameters for your audio
card and/or audio interface.
• Click the Select Card Type button to choose the Digidesign Card that you want
to configure (“Project” for Pro Tools Project or “Audiomedia” for Pro Tools with
Audiomedia III systems). Once you have selected an audio card, the remaining
options in the Hardware setup dialog control that audio card.
23Chapter B: Pro Tools Basics
Page 24

• To configure a Pro Tools Project system, click the Interface pop-up menu to
select the correct peripheral device (i.e., the audio interface attached to your
Pro Tools Project card). Select 888 I/O, 882 I/O, or 882 Studio.
• Click the Sample Rate pop-up to select the appropriate sample rate for the
currently selected card and any audio Interface, if applicable (44100 or 48000
Hz). 44.1 kHz is the Compact Disc standard. This will become the default
setting for all subsequent sessions until you change it again here.
• Click the Sync Mode pop-up to select the appropriate sync mode on the currently selected Interface (Internal or Digital).
• Click the Digital Format pop-up to select the appropriate digital format of the
currently selected interface (AES/EBU or S/PDIF).
• Click the Ch 1-2 Input pop-up to select the input format of Channels 1-2 of the
currently selected Interface (Analog or Digital). If you are recording from an
analog source such as an analog mixer, choose analog. If you are recording from
a digital source such as a DAT deck, choose digital.
• To continue configuring Pro Tools Project or Pro Tools Audiomedia systems,
refer to the following sections for specific information about the Other Options
button that appears in Hardware Setup. This button provides additional
configuration options for the 888 I/O and 882 Studio interfaces, as well as Pro
Tools with Audiomedia systems.
• When you have finished setting all Hardware Setup parameters appropriately,
click OK. Your Pro Tools system is now ready to use.
Configuring the 888 I/O Audio Interface
(Pro Tools Project only)
If you selected 888 I/O, click the Other Options button to configure the input
format for each of the 888’s input pairs (analog vs. digital).
Setting the analog/digital format for 888 I/O outputs (888 I/O Audio Interface only)
If you selected 882 Studio, click the Other Options button to configure the
routing of your 882 Studio Audio Interface. The window that appears should be
familiar to a few 882 Studio Interface owners. If you are unsure of how to route
the 882 Studio, refer to the following section Configuring the 882 Studio.
Pro Tools User’s Guide24
Page 25
Configuring the 882 Studio Audio Interface
(Pro Tools Project only)
Using the 882 Studio Audio Interface with Pro Tools requires you to “route”
interface inputs to specific Pro Tools inputs. When used with Pro Tools, the
882 Studio can be used in Direct Outputs mode or Stereo Mix Outputs mode,
described in the following section.
The 882 Studio provides 8 discrete 1/4” inputs, and 8 discrete 1/4” outputs. You
can still use the four front-panel inputs on the 882 Studio. To use these inputs,
or to set up effect send/return routings, you must first use the Hardware Setup
dialog’s Other Options window to route interface inputs to Pro Tools inputs.
The following dialog appears when you click Other Options with the 882
Studio selected:
Routing 882 Studio input jacks to Pro Tools inputs via the Other Options dialog (HW Setup)
B
This dialog is used to “route” the input jacks on your 882 Studio Audio Inter-
face to Pro Tools’ software inputs. The vertical items listed down the left-hand
side of the dialog represent the input jacks on the back and front panels of the
882 Studio Audio Interface. The top-most 8 are the back-panel input jacks, and
the bottom 4 (“Front 1, Front 2,” etc.) are the four front-panel Mic/Line inputs.
Along the bottom of this “grid” are numbers representing each Pro Tools
Project input channel, 1-8. What this design allows you to do is internally send
the signal arriving at any 882 Studio Audio Interface input connector to any
Pro Tools input channel.
• To route an interface input to a Pro Tools input, click in the box at the intersection of the interface input (the left-hand column of inputs) and Pro Tools
inputs (along the bottom of the grid). The example above shows a typical effect
send/return routing, using outputs 7 and 8 as Sends, and inputs 7 and 8 as
returns. In addition, a single input is shown routed from front-panel Line input
1 to Pro Tools Project input 1.
25Chapter B: Pro Tools Basics
Page 26

You should now proceed to the section Choosing Your Operating Mode to con-
tinue configuring Pro Tools Project.
Configuring Audiomedia
To configure Pro Tools with Audiomedia, click the Other Options button. The following
dialog appears:
The Input Gain slider (Pro Tools with Audiomedia only)
This fader controls the level of the analog input signal coming into the
Audiomedia card’s analog inputs. Adjust the input gain as necessary and click
OK to return to the Hardware Setup dialog.
IMPORTANT
If you ever wish to switch your system from DAE with PowerMix using a Power Macintosh’s
built-in audio capabilities to an Audiomedia card or other Audio Card, or vice-versa, use the
Playback Engine command in the Setups menu. This command will prompt you to save the
current session and close it before it you change your Playback Engine from DAE with
PowerMix to an audio card or vice-versa.
Selecting Your Operating Mode
(Pro Tools Project only)
Pro Tools Project has two different operating modes, Direct Outputs mode and Stereo Mix
Outputs mode. These modes allow you to configure Pro Tools to match your particular
studio setup.
Systems with no audio interface, such as Pro Tools with Audiomedia and Pro Tools with
DAE/PowerMix, should always be used in Stereo Mix mode as they lack discrete hardware outputs.
Pro Tools User’s Guide26
Page 27
These modes were explained in greater detail in your Installation Guide in Chapter C:
Connecting Your Studio. Here is a brief explanation of these two modes again and how
they differ:
Direct Output Mode
In Direct Outputs mode, track outputs are routed to a single Audio Interface output: 1, 2,
3, 4, 5, 6, 7, 8. Panning controls are not available in Direct Outputs mode.
Stereo Mix Output Mode
In Stereo Mix Outputs mode, track outputs are routed to a pair of Audio Interface outputs:
1-2 or 3-4, 5-6, 7-8. Each track contains controls for panning between the selected
output pair.
To choose an operating mode:
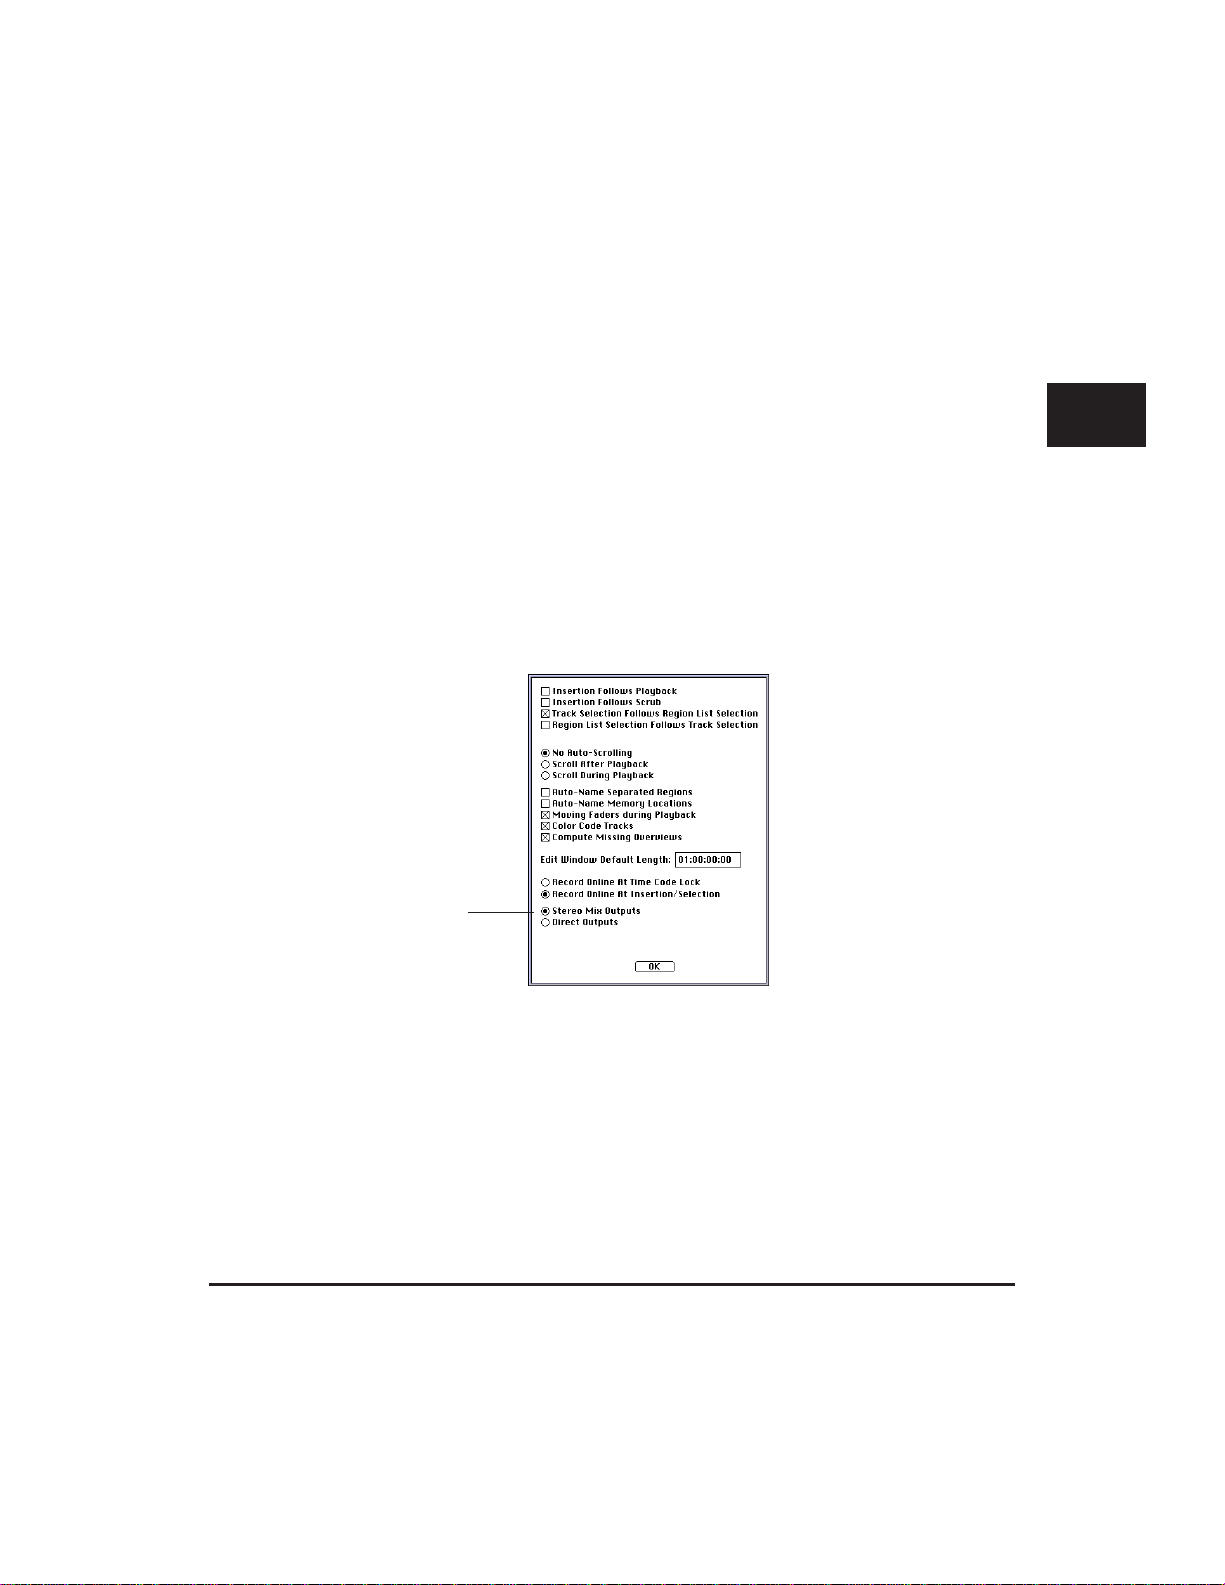
• From the Options menu, choose Preferences. This dialog appears:
Choose Pro Tools’
operating mode
from here
B
The Preferences dialog
• Choose the desired operating mode, Stereo Mix Outputs or Direct Outputs.
If you choose Stereo Mix Outputs mode, track outputs are routed to pairs of
Audio Interface outputs: 1-2, 3-4, 5-6, 7-8. If you choose Direct Outputs mode,
track outputs are routed to a single Audio Interface output: 1, 2, 3, 4, 5, 6, 7, 8.
Panning controls are not available in Direct Outputs mode.
• After choosing your operating mode, click OK. To learn about the other options
in the Preferences dialog, please see the discussion of Preferences in the Refer-
ence chapter.
27Chapter B: Pro Tools Basics
Page 28
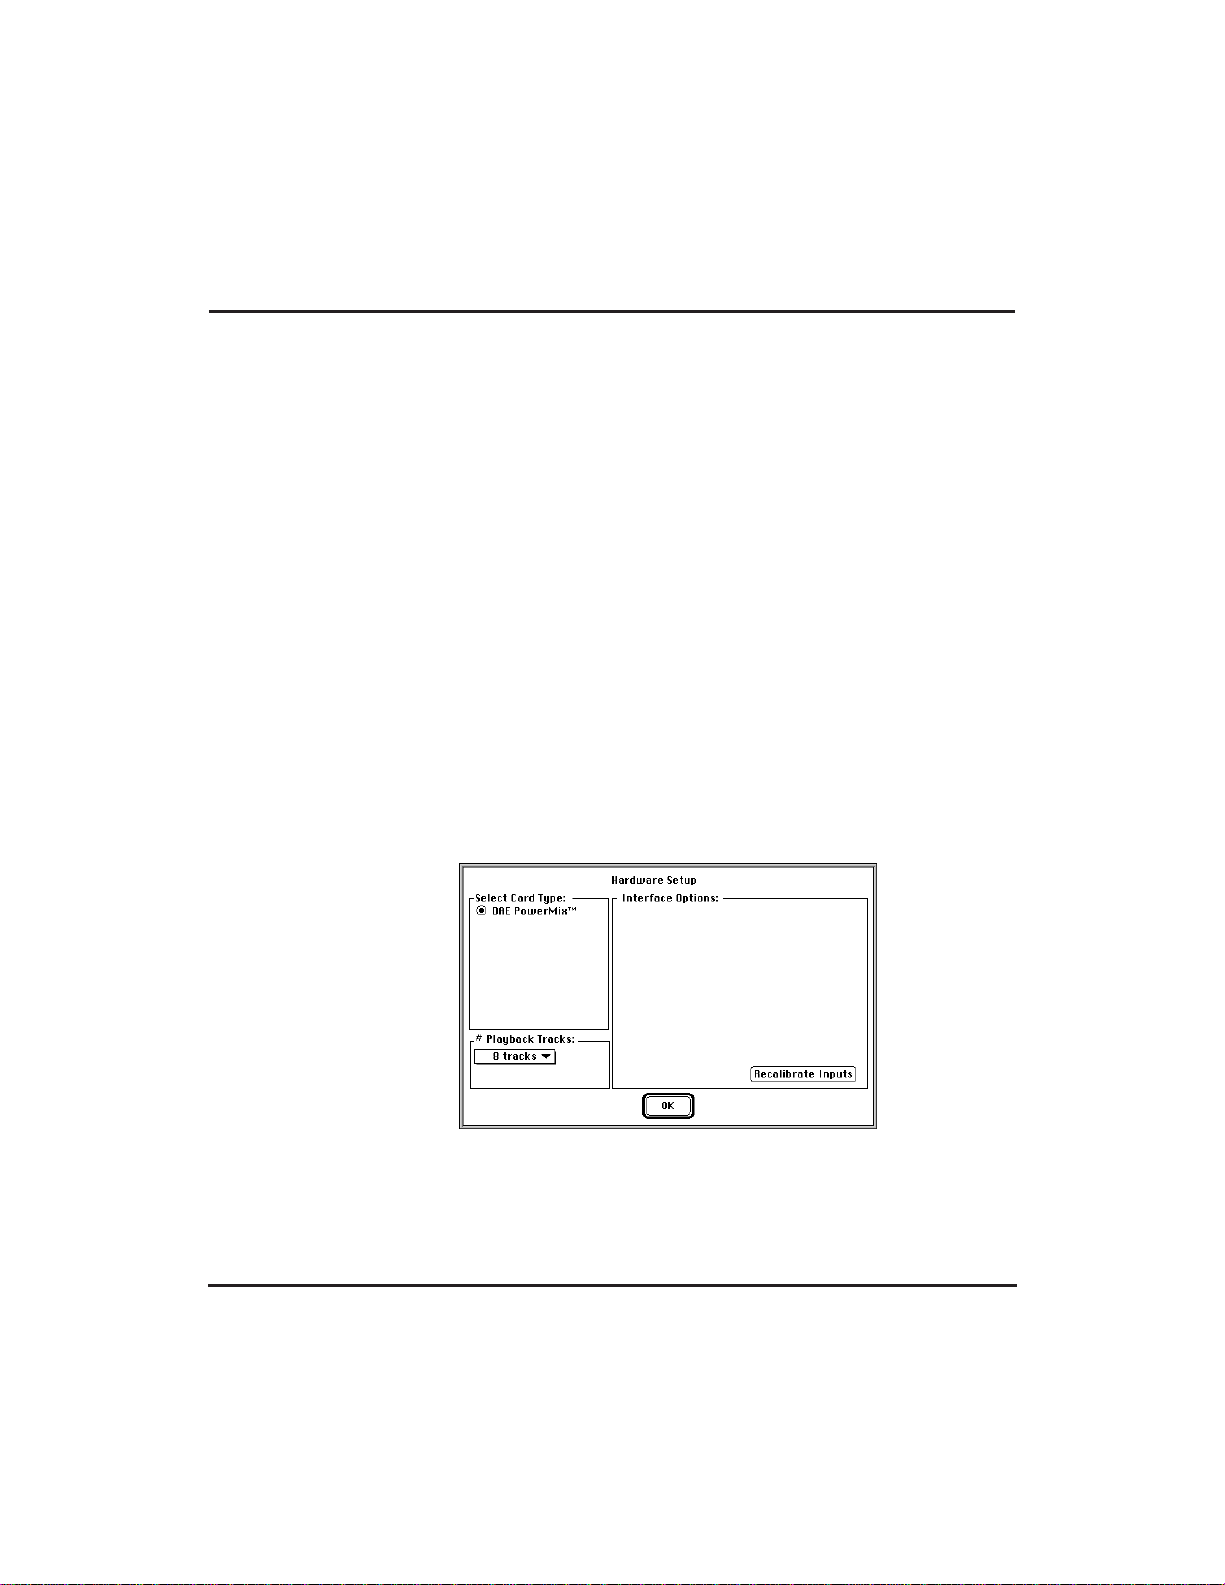
Configuring Pro Tools for a Power Macintosh:
If you have a Power Macintosh and plan on using Pro Tools with DAE PowerMix, you
must first configure Pro Tools Hardware Setup dialog box for your system. If you plan on
using Pro Tools with DAE PowerMix and Pro Tools Project or Pro Tools with Audiomedia, be sure to also read the following section Using Pro Tools without Digidesign Hardware.
• Double-click the Pro Tools icon to start the software if it is not already running.
• Choose Hardware Setup from the Setup menu.
• Click the PowerMix button at the top of the Hardware Setup dialog. If you have
no Digidesign hardware, PowerMix will already be selected.
• Next, click the # Playback Tracks pop-up at the bottom left of this dialog to
select the default number of tracks you wish to have in your sessions. (This will
become the default setting for all subsequent sessions you open on the current
system until you change it again here.) The greater the number of tracks you
choose, the greater the demand on your computer’s performance. To maximize
performance, set the track count no larger than you absolutely need. You can
always increase the number of tracks later in the Session with the # Playback
Tracks pop-up.
• Click OK to close this dialog.
The Hardware Setup dialog
(configured for a Power Macintosh)
• To configure the Power Macintosh’s built-in 16-bit input and output capabilities, go to the Apple menu and open the Sound Control Panel.
Pro Tools User’s Guide28
Page 29
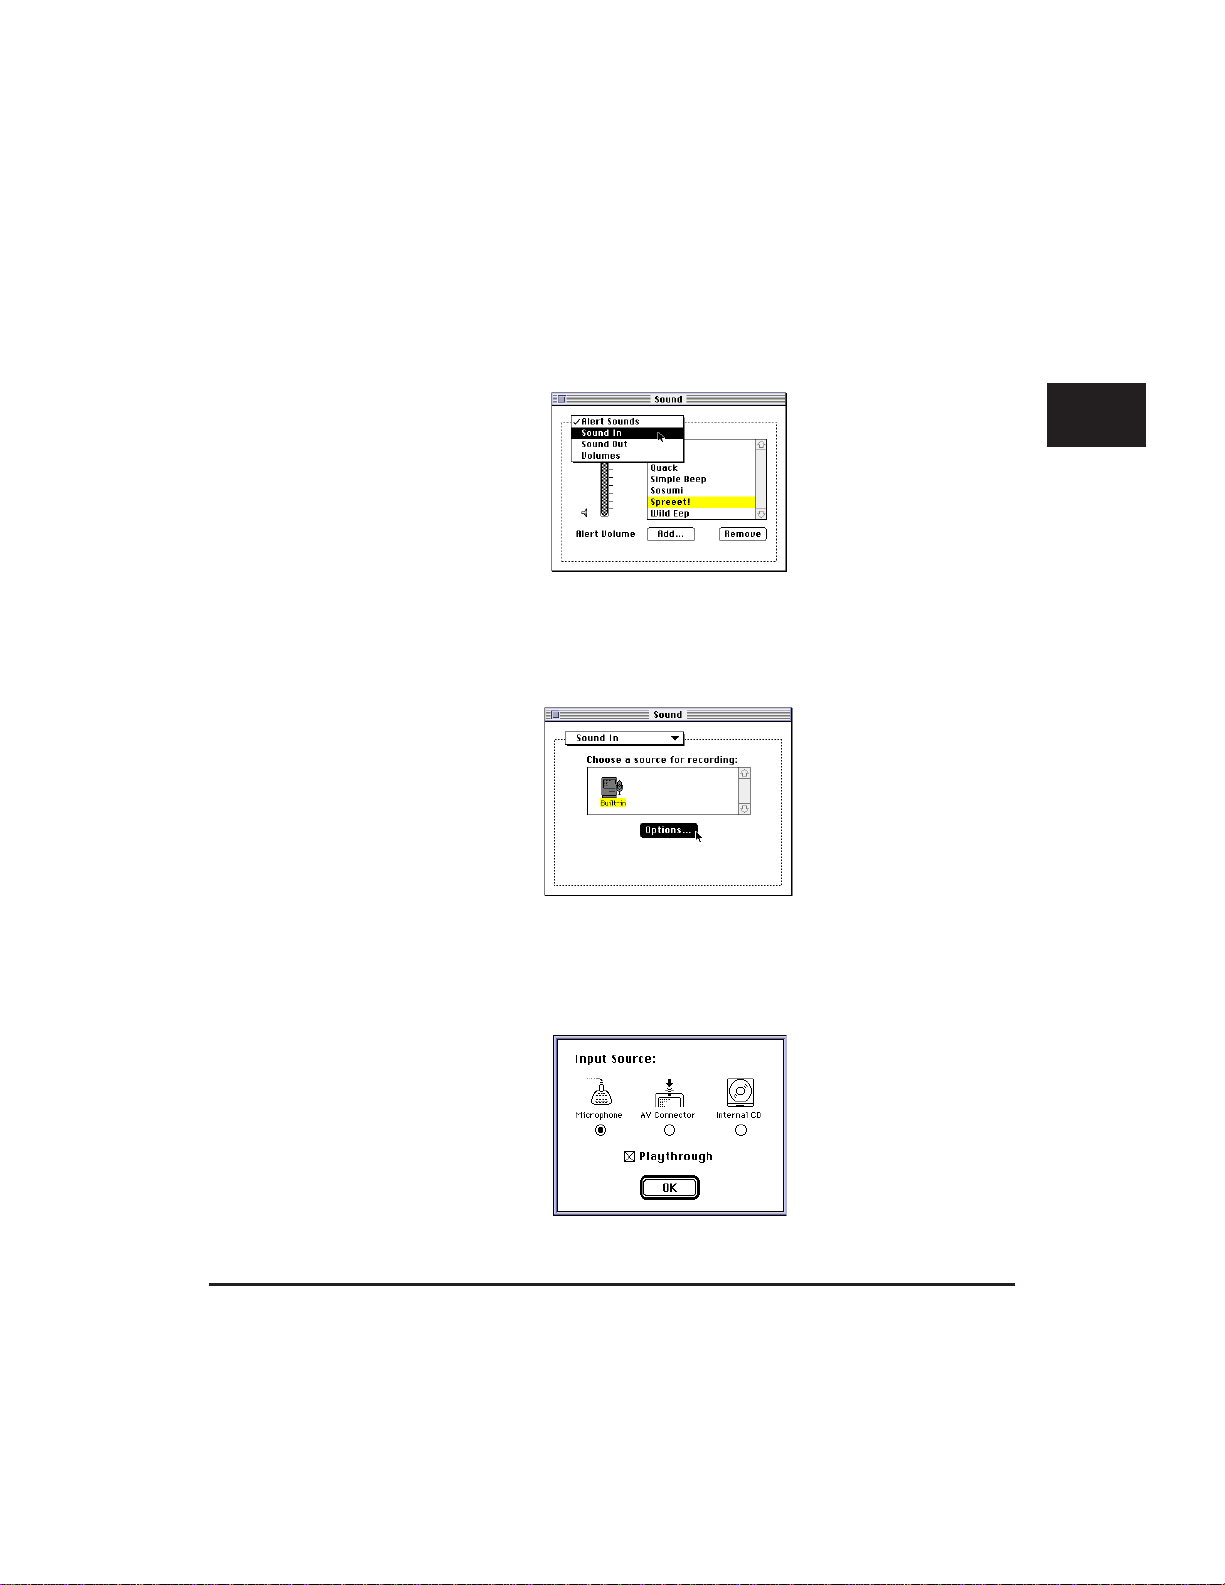
• When the Sound Manager appears, choose Sound In from the pop-up menu at
the top of this window.
The “Sound” Control Panel lets you configure
Sound Manager Input and Outputs
• In the Sound In window, click the Options button.
B
Click the Options button to choose a sound input source
• Select Microphone and then select Playthrough. This selects the sound input jack
on the rear of the Power Macintosh. Click OK when you are finished.
Choosing a sound input source
29Chapter B: Pro Tools Basics
Page 30
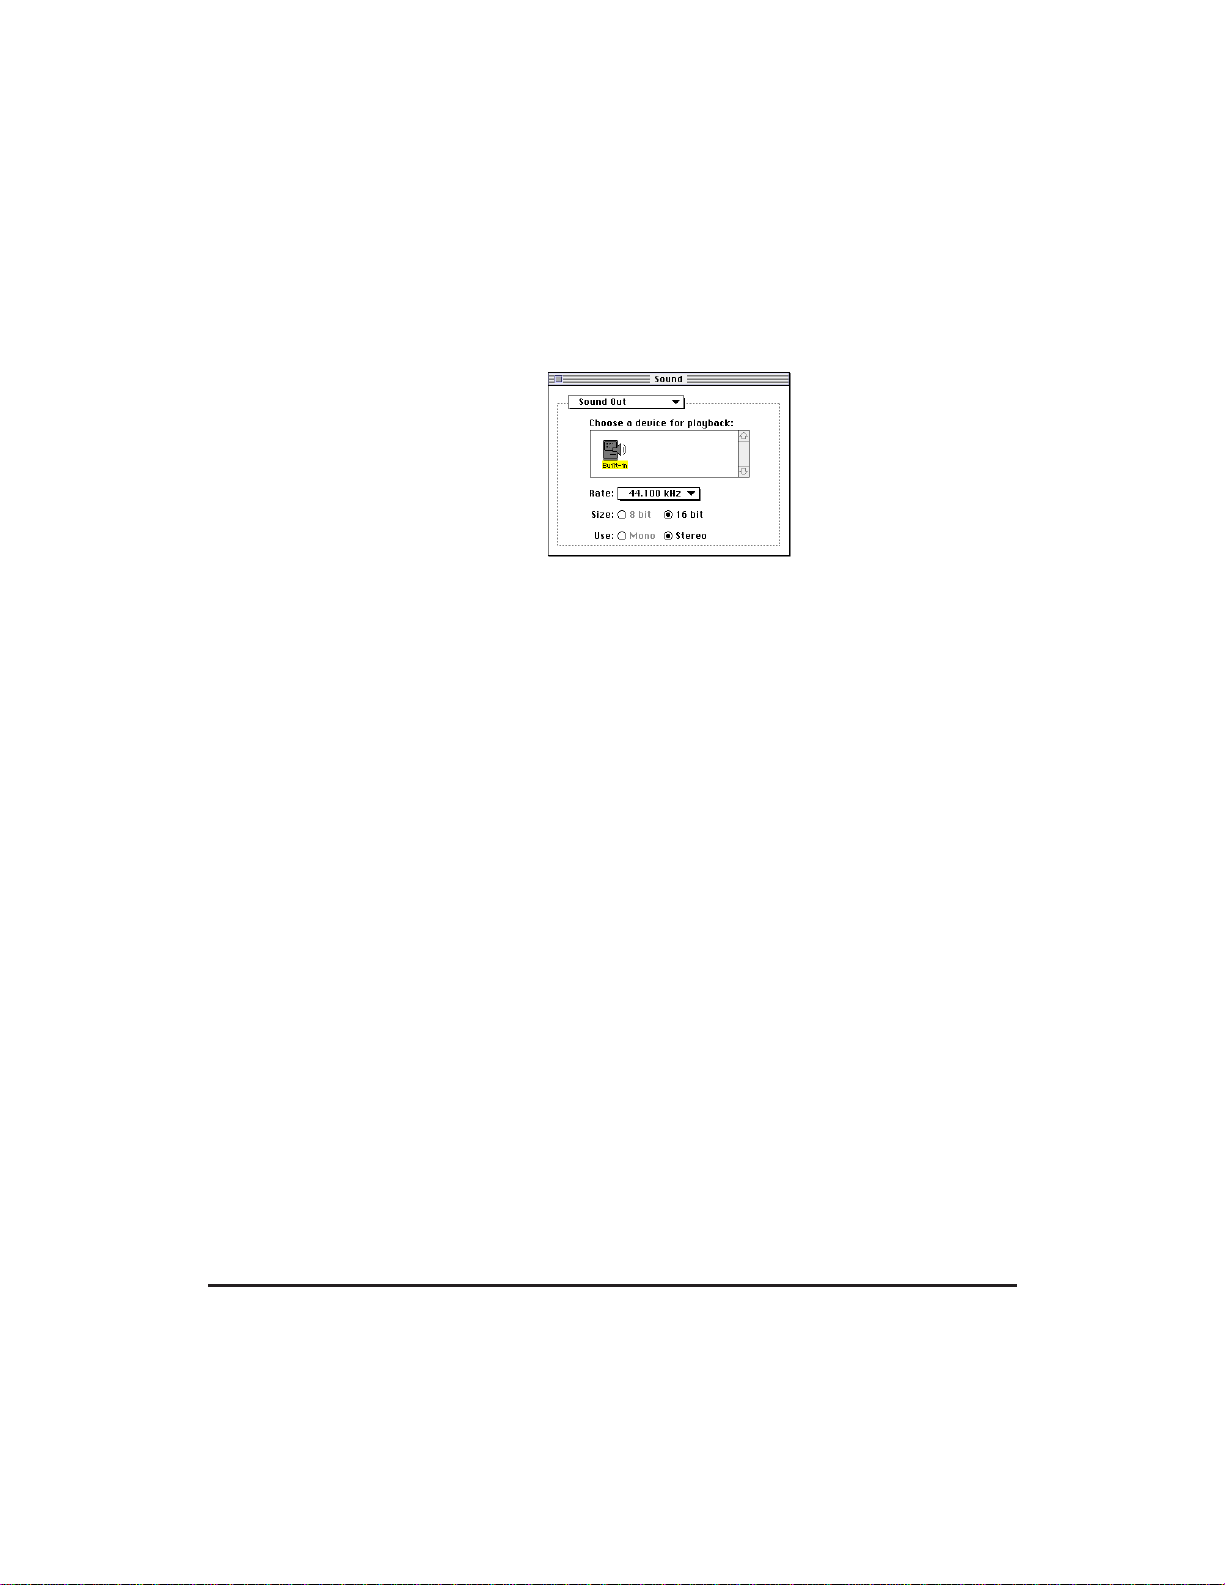
• Next, choose Sound Out from the pop-up menu at the top of the Sound Manager window.
Choosing sound output options
• In the Sound Out window, select the sample rate that you desire (“Rate”). 44.1
kHz is the Compact Disc standard. (This doesn’t affect Pro Tools, just audio
playback through the Sound Output jack on the Power Macintosh.)
• Select the bit resolution (“Size”). 16-bit is the Compact Disc standard. (This
doesn’t affect Pro Tools, just audio playback through the Sound Output jack on
the Power Macintosh.)
• Select mono or stereo format (“Use”). We recommend stereo.
• Close the Sound window when you have finished and go back to the Pro Tools
application.
Using Pro Tools Without Digidesign Hardware
If you own a Power Macintosh, you can run Pro Tools without Digidesign cards or an
Audio Interface by using the DAE PowerMix™ extension included on your Installer disks.
While you use this option you are limited to the built-in audio input and output
capabilities of your Power Macintosh. However this capability will allow you to create a
“hardware-less setup” at need, which can be convenient for applications such as
editing. On systems where only DAE PowerMix is installed (i.e., no hardware), only the
system configuration settings described in the previous section need to be set. The
following information explains how to work with both hardware-based and hardwareless Pro Tools systems.
In order to use DAE PowerMix with System 7.5.2 or higher, your Power Macintosh must have
at least 24 megabytes of RAM.
Pro Tools User’s Guide30
Page 31
On systems where Digidesign audio hardware and DAE PowerMix are installed, Pro
Tools automatically defaults to using your installed DSP cards (i.e., Pro Tools Project
and Pro Tools with Audiomedia) as its playback engine each time you launch Pro Tools
software or open a Session.
If you wish to use DAE PowerMix instead, you must specifically choose to do so by
using the Playback Engine command. You can either do this as you launch Pro Tools, or
after Pro Tools is already open. Each method is explained below.
To select DAE PowerMix as your playback engine as you open Pro Tools:
• Hold down the “N” key on your computer keyboard.
• Double-click the Pro Tools application icon (keep the “N” key held down). As
Pro Tools opens, the Playback Engine dialog appears.
• Click the DAE PowerMix button to select this option.
• Click the # Playback Tracks pop-up at the button of this dialog and choose the
number of tracks you would like in your Session. (The number of tracks
allowed depends on the processor speed of your Power Macintosh. Refer to the
system capabilities listings in Chapter A: Essential Concepts for details. In
general, you will need a 100 MHz or faster Power Macintosh for a 16-track
Session.)
• Click OK to close this dialog. Pro Tools will now use the DAE PowerMix engine
to power your Session.
To switch to DAE PowerMix if Pro Tools is already open:
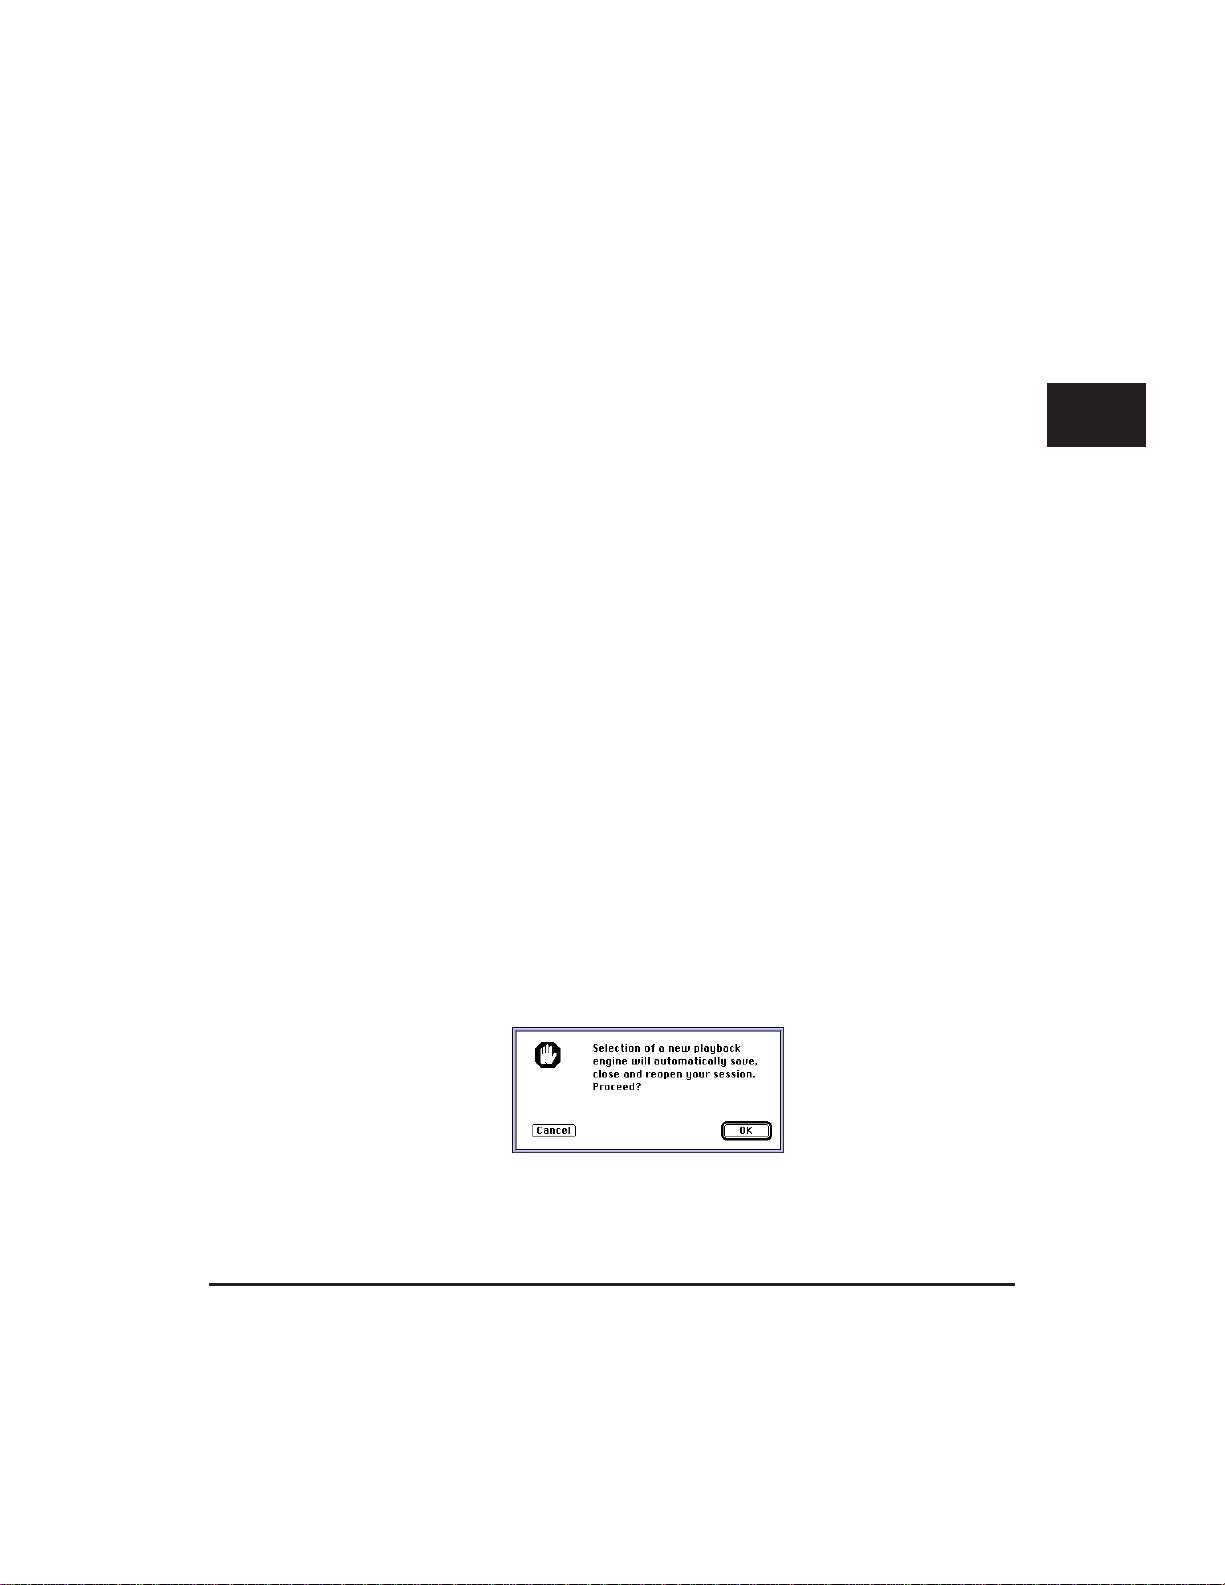
• From the Setups menu, choose Playback Engine. If a Session is currently open,
Pro Tools will prompt you to save it before it closes it.
B
This dialog appears whenever you select Playback Engine from the Setup menu
31Chapter B: Pro Tools Basics
Page 32

• Click OK to proceed. Click Cancel to return to the Mix or Edit window without
saving and closing the current Session. After you click OK, the Playback Engine
dialog appears.
• Click the DAE PowerMix button to select this option.
• Click the # Playback Tracks pop-up at the button of this dialog and choose the
number of tracks you would like in your Session.
• Click OK to close this dialog. Pro Tools will now use the DAE PowerMix engine
to power your Session.
The Playback Engine dialog, configured for an 8-voice Pro Tools with DAE PowerMix system
If You Plan to W ork With MIDI
If you wish to use Pro Tools’ MIDI integration capabilities you will need the following
hardware and software:
• A Macintosh-compatible MIDI interface
You may also need:
• Digidesign SampleCell II™ or other MIDI sound modules
• Macintosh MIDI sequencing software
Pro Tools User’s Guide32
Page 33

• Opcode Systems’ OMS software (version 1.2.3 or higher is needed to use the
IAC Driver).
If you plan to synchronize Pro Tools to an external tape deck or other SMPTE-generating device, you will also need:
• a SMPTE-to-MIDI Time Code converter or:
• Digidesign’s SMPTE Slave Driver
™
Are You Using OMS?
Pro Tools supports OMS (the Open Music System, from Opcode). This software
facilitates communication between MIDI sources and destinations and the
Macintosh. If you want to use a dedicated sequencer with Pro Tools you may need
to use OMS. Vision
be aware that some sequencers do not support OMS. To find out if your sequencer is
compatible with OMS, consult its User’s Guide.
If you do plan to use a MIDI sequencer with Pro Tools, this will use a significant
amount of your computer’s RAM (random-access memory). If you currently have only
16 megabytes of memory in your computer and plan to run Pro Tools and MIDI
sequencing software together, you will need to install whatever additional RAM your
sequencer requires.
Note: If you are using System 7.5.2 or higher and are using Pro Tools with DAE PowerMix, at least
24 megabytes of RAM is strongly recommended.
™
, Cubase™ and Logic™ sequencing software support OMS. Please
B
Preparing Your Pro Tools MIDI Setup
Because your MIDI setup will differ depending on whether or not you are using OMS, the
following section provides instructions for configuring your setup with and without it.
To prepare Pro Tools to work with MIDI (non-OMS):
• Make sure that your MIDI interface and controllers are powered on. Choose
Serial Ports from the Setups menu. In the dialog that appears, select the
Macintosh serial port that your MIDI interface is connected to, and click OK.
The Serial Ports dialog
33Chapter B: Pro Tools Basics
Page 34

To prepare Pro Tools to work with MIDI (using OMS):
• Make sure that your MIDI interface and controllers are powered on. Choose
Serial Ports from the Setups menu. If you are using OMS, a dialog will appear
allowing you to select the appropriate serial port. After you have chosen the
appropriate port, click OK.
The OMS MIDI Setup dialog (OMS version 1.2.3)
If You are Using a MIDI Keyboard Controller
• If you are using a MIDI controller, enable MIDI Thru in the Options menu. By
doing so you will be able to play your controller and have your MIDI sound
modules respond even when Pro Tools playback is not engaged. When a MIDI
track is Record-enabled, your MIDI controller will be Thru’d to the port and
channel specified by the MIDI track.
If You Are Using a Digidesign SMPTE Slave Driver or JL Cooper CS-10
• If you are using Digidesign’s SMPTE Slave Driver to synchronize Pro Tools
Project to SMPTE Time Code, or have an ADAT
Digidesign ADAT Interface, or if you are using JL Cooper’s CS-10 Controller for
hands-on control of Pro Tools faders, select the Peripherals command from the
Setups menu and click in the appropriate checkbox for these devices. Then,
from the pop-up menu next to each of these items in this dialog, select the
MIDI port that you wish to send and receive MIDI data over.
®
connected for use with the
The Peripherals dialog (without OMS), before configuring Pro Tools for a CS-10 or SMPTE Slave Driver
Pro Tools User’s Guide34
Page 35

B
The Peripherals dialog configured for a CS-10 attached to the modem port
and a SMPTE Slave Driver attached to the printer port
If You Are Using a Digidesign SMPTE Slave Driver with OMS
• If you are using Digidesign’s SMPTE Slave Driver with OMS, you must define
your SMPTE Slave Driver as an OMS device in the OMS Setup. In OMS select
New Device in the Studio menu. In the MIDI Device Info window, leave blank
the Manufacturer and Model names, name the device SSD, uncheck Is Controller
and Is Multitimbral, leave MIDI Machine Control unchecked under Options,
uncheck Receive Channels 1-16, check both Receives and Sends MIDI Time Code,
and uncheck Receives and Sends MIDI Beat Clock. Click OK to close the MIDI
Device Info window, and save the changes to the OMS setup.
Defining the SMPTE Slave Driver as an OMS Device
• Connect the SMPTE Slave Driver to the correct port or MIDI interface in your
current OMS Setup window. Click with the mouse and drag the SSD icon over
the icon for the desired port or MIDI interface, and release the mouse. Arrows
connecting the SSD to and from the desired port or MIDI interface signifies a
connection has been made. (Your screen may differ in appearance from the
following example, depending on your setup)
35Chapter B: Pro Tools Basics
Page 36

Connecting the SMPTE Slave Driver to the correct port or MIDI interface
in the OMS Setup window
• Launch Pro Tools. Select the Peripherals command from the Setups menu and
click in the appropriate checkbox for the SMPTE Slave Driver. Then, from the
pop-up menu next to the SMPTE Slave Driver in this dialog, select the MIDI
port that you wish to use.
Selecting the SMPTE Slave Driver port in the Peripherals Setup dialog (with OMS installed)
If You Are Using a MIDI Fader Box or other Control Surface
• If you are using a MIDI fader box for hands-on control of Pro Tools, connect
the device to your MIDI interface. Then, if you haven’t already done so, choose
Serial Ports from the Setups menu and in the dialog that appears, select the
Macintosh serial port that your MIDI interface is connected to. Click OK when
you have finished.
If You Are Using a Digidesign ADAT Interface
• If you are using Pro Tools Project with a Digidesign ADAT Interface for sampleaccurate transfer and editing of ADAT digital audio tracks, please refer to your
Digidesign ADAT Interface User’s Guide (included in your ADAT Interface for Pro
Tools Cable Kit) for instructions on how to install and configure your system
with this device.
Pro Tools User’s Guide36
Page 37

Creating a New Session
The first step in beginning a Pro Tools project is creating a new Session. When you do
so, Pro Tools automatically creates a new folder named after your Session. Within this
folder is the Session file itself, and two other folders: an Audio Files folder, and a Fade
Files folder. The Audio Files folder contains all audio recorded during the Session. The
Fade Files folder contains any crossfaded audio data generated by the Session (you’ll
learn how to create crossfades in Chapter E, Editing).
A typical Session folder
When you record a new audio track, the track is saved as a new audio file and automatically placed in the Audio Files folder. At any time in a Session, you also have the ability
to import existing Sound Designer II or AIFF audio files into the Session, and work with
them as well.
To create a new Session:
• Choose New Session from the File menu. A dialog appears asking you to name
the Session.
B
The New Session dialog
37Chapter B: Pro Tools Basics
Page 38

• In this dialog, choose the drive you wish to create your Session on. If you have
a Pro Tools Project system , only drives connected to the Project card can be
used.
• Enter a name for the Session and click OK. The Pro Tools Transport appears,
followed by empty Edit and Mix windows.
To create tracks for your Session:
• Choose New Audio Tracks (or if you wish to create MIDI tracks, New MIDI
Tracks) from the File menu. A dialog appears prompting you to specify how
many new tracks you wish to create. You can add as many new audio tracks at
once up to your system’s Virtual Track limit. The maximum number of MIDI
tracks you can use is 64.
• Enter a number and click OK. Your new tracks appear.
The New Audio Track dialog
• If you wish to give names to your tracks, double-click the Track Name button at
the bottom of each track. In the dialog that appears, enter a name and click OK.
This name will also be given to any new audio files that you record on the track.
The Name Track dialog
Pro Tools User’s Guide38
Page 39

To show Inserts, Sends, and I/O controls on your tracks:
• To conserve space on screen, Pro Tools allows you to either to show or hide the
controls for Inserts, Sends, and Input/Output controls on your tracks. If you
choose to show these, you can do so in either the Mix or Edit window. To show
these controls in the Mix window, choose Show Extra Views in Mix Window
from the Display menu. To show them in the Edit window, choose Show Extra
Views in Edit Window from the Display menu.
You can choose to display Inserts, Sends, and I/Os in either the Mix or Edit windows
Any input can be routed to any track, and any track can be routed to any output via Pro
Tools Input/Output pop-up controls.
• To show Pro Tools’ Input/Output controls, choose Show I/O View from the
Display menu.
Non-TDM Pro Tools systems have various EQ configurations available dependent upon
which system you are using. EQs are available via the pop-up menu in the Inserts section of
a track. EQs are covered in greater detail in Chapter G, Mixing.
• To show Pro Tools’ Inserts controls, choose Show Inserts View from the Display
menu.
B
Pro Tools Project systems also have two post-fader Sends. Pro Tools Sends are signal busses
that allow you to send a track’s signal to an external signal processor. Sends and Returns are
covered in greater detail in Chapter G, Mixing.
• To show Pro Tools’ Sends controls, choose Show Sends View from the Display menu.
The Show I/O View, Show Inserts View, and Show Sends View commands
39Chapter B: Pro Tools Basics
Page 40

Opening an Existing Session
If you wish to work on a Session that you created previously, you can open it with the
Open Session command. The Session will open in exactly the same state that you saved
it, with all settings and audio files intact. If the Session was last saved on a different
system, Pro Tools will reset its Hardware and Playback Engine setup so that the Session
will be playable on the current platform.
To open an existing Session:
• Choose Open Session from the File menu.
The Open Session dialog
• Locate the Session you want to open and click Open. All audio, MIDI tracks and
regions saved with the Session appear. If Pro Tools is unable to locate any of
the files which the Session needs, the “Where is...” dialog will appear. Use this
dialog to “point” Pro Tools to the file being asked for, or to “Skip” the missing
file or all missing files. The two buttons “Look in Current Directory” and “Look
in Selected Directory” can be used to have Pro Tools search for the missing
audio. When Pro Tools locates all the needed files and computes waveform
overviews (if you have that Preference turned on), the Session will open and
you can resume work.
Virtual Voices
All Sessions are compatible with all available Playback Engines. When switching back
and forth between Playback Engines, if the number of allocated voices in the Session
exceeds the voice capability for the newly selected Playback Engine, all tracks with
voice allocations over the maximum allowable will be set to “voice off.” These tracks
will still be displayed and may be edited, but will not playback audio. If you switch
Playback Engines mid-Session, your Session will be saved, closed and reopened.
Pro Tools User’s Guide40
Page 41

When you switch back to a Playback Engine with increased voice capability, the Pro
Tools Session will remember the previous voice allocation scheme for each track. If the
voice allocation for a specific track has been edited while using a different Playback
Engine, however, the original allocation prior to switching engines will not be retained.
Loading Previously Recorded Audio Files into a Session
You can import previously recorded Pro Tools audio files into a Session and work with
them in addition to the tracks currently in your Session. The Import Audio command in
either the File or Region List menus allows you to do this one file at a time, or you can
drag-drop multiple sound files onto an open Pro Tools Session icon to batch import.
Note: When using Pro Tools Project, all audio files must be on the hard drive connected to your
Pro Tools Project Audio Card.
If you choose the Import Audio command from the File menu, Pro Tools will automatically create a new track for each file that you select and place the file(s) into the new
track(s) for you. If you choose this command from the Region List menu, Pro Tools will
import the audio file into the Region List only. From there, you can drag it into a track
yourself. If you drag-drop, the file(s) will appear in the Region List only.
Because Pro Tools doesn’t currently support the interleaved stereo file format, importing stereo sound files requires both additional time and hard disk space because an
interleaved stereo file must be converted into two mono audio files (split-stereo files) and
saved to disk.
B
On the following page is a picture of the Import Audio dialog:
41Chapter B: Pro Tools Basics
Page 42

The Import Audio dialog
The Import Audio dialog box lets you select both audio files (the whole recording) and
audio regions (a portion of the recording) and load them into the current Session. In the
center and right scroll boxes you’ll notice two types of icons which appear next to an
item’s name. These icons indicate whether the item is an audio file or an audio region.
The icon that looks like a page with two small waveforms on it identifies an audio file.
The icon that looks like a highlighted waveform identifies an audio region. When you
click on an audio file’s name in this dialog, information appears about the sample rate
of the file. The Play button allows you to audition a region to make sure it’s exactly
what you want before you load it into a Session.
The left scroll box is a standard Macintosh file directory that lists the audio files on the
selected hard drive. (Pro Tools Project users: sound files must be located on the Pro
Tools hard disk in order to be imported. In the example above, the directory shows that
the folder Audio Files on the hard drive “Pro Tools Drive” contains seven files, and the
file Drums is currently selected.
The center scroll box lists all the regions associated with the currently selected Audio
File (in other words, the regions which have been created from the original source file,
Drums). In the above example, the regions Drums crash, Drums dbl kick, Drums kick,
Drums loop, and Drums snare are shown because they are regions associated with the file
Drums. The item at the top of the list which bears the name of the original audio file
represents the “Whole Soundfile”—the entire source file. Loading this will load the
entire source file into the Session.
The right scroll box lists the regions that you have selected to load into the Session.
Pro Tools User’s Guide42
Page 43

Auditioning Files in the Import Audio Dialog
The Play and Stop buttons at the lower right of the Import Audio dialog let you audition
the selected region/sound file. Simply click the Play button to audition the currently
selected file. The counter immediately above Play/Stop serves two purposes: it provides a
time display for the file being auditioned, and it also lets you fast forward/rewind the file.
To use the counter to fast forward to at or near the beginning of the file, click on the
counter close to the hours value (i.e., the left-most numbers) as shown below:
Using the Import Audio dialog’s counter to fast forward a little ways in to the selected file
To fast forward to the middle of the file, click on the counter close to the
minutes:seconds values (i.e., the middle of the display).
Using the Import Audio dialog’s counter to fast forward to the middle of the selected file
To fast forward to at or near the end of the file, click the right-most values of the
counter.
B
There are several keyboard shortcuts that simplify commonly used functions in this
dialog.
Import Audio Dialog Keyboard Shortcuts:
• Enter or Return key = adds currently selected audio file/region to the list of
chosen items from either the left or center box.
• Command-P = auditions currently selected audio file/region.
• Command-S = stops audition (playback) of currently selected audio file/region.
• Tab key = tabs between file windows.
• Command-Period = Cancels and closes dialog.
43Chapter B: Pro Tools Basics
Page 44

To load audio files/regions into a Session:
• Select Import Audio from either the File or Region List menu. As explained
earlier, this command functions slightly differently depending on which menu
you choose it from. The Import Audio dialog appears.
• Locate the desired audio file and click on its name in the list on the left.
• Select the file you want to import and click Add. (Double-clicking a file or
region’s name from the left or center scroll box will achieve the same result.) If
you want to audition the file or region before you load it, click the Play button
at the bottom of the screen (the other button is a Stop button — see the
previous section Auditioning Files in the Import Audio Dialog for complete
instructions). To add additional regions from the same audio file, double-click
on their names to load them as well. To remove an item from the list of items
currently chosen, select it and click the Remove button.
• When you have finished, click Done. The regions that you have chosen will
appear in the Audio Region List (and in new tracks if you choose the Import
Audio command from the File menu).
Batch Importing with Drag-drop
By dragging and dropping any number of files onto the Pro Tools icon in the Finder,
you can easily load large numbers of SD II or AIFF files into an open Pro Tools Session
without having to go through the Import File dialog and choose each file, one at a
time. A Session must be open for this to work, but after you’ve dragged and dropped, all
the files will be in the Region List ready for use.
To batch import using drag-drop:
• Launch Pro Tools and open a Session.
• Return to the Finder (do not quit out of Pro Tools or close the Session).
• Using standard Macintosh techniques, drag and drop as many sound files as
you want on to the Pro Tools icon on your desktop (the Pro Tools icon should
be grayed out while Pro Tools is running).
Pro Tools will add all the sound files to the Session’s Region List, and compute any
missing overviews (if you have Preferences configured to do so).
The key things to remember about using drag-drop batch import is that Pro Tools must
be running, and you must have a Session open.
Pro Tools User’s Guide44
Page 45

IMPORTANT
If this technique for batch importing does not seem to be functioning, it is likely that
you need to rebuild your desktop. To do this, press and hold down the Option and
Command keys while you restart your computer.
Note: You can launch Pro Tools by dragging-dropping a Session file on the Pro Tools icon to
open that Session. Dragging-dropping audio files on to the Pro Tools icon while Pro Tools is not
running will launch Pro Tools but no audio files will be batch imported.
If You Want to Re-use Sound files/Regions in Other Sessions
Pro Tools keeps a sound file’s region definitions inside the Session file itself. This means
that if you want to use a sound file—complete with its regions—in other Sessions, you
have to use Pro Tools’ Export Selected command (in the Region List menu) to make the
region definitions readable by other Sessions. The Export Selected command is explained
in more detail in Chapter E, Editing.
Track Transfer™ utility software
Track Transfer utility software (included with your Pro Tools system) greatly simplifies
the process of exporting regions. This convenient program lets you import, export, or
merge entire track entities (including region definitions) into other Sessions.
Saving a Session
Saving isn’t something that you should do just at the end of your Session. Saving
regularly throughout your Session ensures that your work is preserved safely on your
hard disk. There are few things more infuriating (or unpredictable) than for a power
failure or other unforeseen act to cause you to lose valuable work. To avoid this, get in
the habit of saving your work throughout your Session—and of course, at the end of it—
with one of the methods below.
B
Save Session
The Save Session command saves the changes you have made to your Session and writes
them over the old Session file. The Save Session command cannot be undone.
45Chapter B: Pro Tools Basics
Page 46

To Save a Session:
• Choose Save Session from the File menu. Because you’ve already named your
Session, you won’t be prompted to name it again when you use the Save Session
command.
Save Session As...
The Save Session As... command is useful for saving a copy of the current Session under a
different name, or in a different hard disk location. Because the Save Session As...
command closes the current Session and lets you keep working on the renamed copy, it
is particularly useful if you are experimenting and want to save successive stages of the
Session. This way, you can save each major step under a different name such as “FX
Session 1.0,” “FX Session 1.1,” etc. By working this way, you’ll always have the option
of retracing your steps should you want to go back to an earlier version. Keep in mind
that by using the Save Session As command you are saving a new version of the Session
file only—not duplicate versions of the Audio or Fade files.
To Save a Session under another name:
• Choose Save Session As... from the File menu. This dialog appears:
The Save Session As dialog
• Choose the destination and type in a new name for your Session.
• Click Save to save the Session or Cancel to cancel.
Save Session Copy In...
Pro Tools’ Save Session Copy In... command is used to save a copy of the currently
selected Session document under a different name or to a different hard disk location.
But unlike the Save Session As... command, Save Session Copy in... does not close the
Pro Tools User’s Guide46
Page 47

original Session, so subsequent edits are made to the original Session. Having a backup
copy gives you the option of reverting to the earlier version if you’ve gone too far down
the wrong road.
To Save a Session in a different location:
• Choose Save Session Copy In... from the File menu. This dialog appears:
The Save Session Copy in dialog
• Choose the destination disk and folder and type in the name of the Session.
• Click Save to save or Cancel to cancel.
B
Creating a Custom Session Template
Pro Tools allows you to create custom Session documents that are pre-configured to the
track setups, mixer setups and window arrangements that you use most frequently.
Doing this will save you the trouble of having to create your studio setup from scratch
every time you start a new Session. You can accomplish this by saving a Session as a
Stationery Pad. Once a Session is saved as Stationery, its settings act as a template that
you can open and then resave as a normal Session. Before saving a Session Template,
you may want to set up your own defaults in your Pro Tools Session’s Get Info dialog so
that they will be reflected in your new template.
To create a custom Session template:
• Create a Session and arrange the Mix, Edit, and Transport windows as you like.
This includes the actual positions of the windows themselves, as well as the
47Chapter B: Pro Tools Basics
Page 48

parameters within these windows, such as signal routings, Inserts and Sends
configurations, audio tracks, MIDI tracks, track views, and Preferences settings.
• Choose Save Session from the File menu.
• In the dialog that appears, name the Session and click Save.
• Close the Session.
• Go to the Finder and locate the Session file that you just saved.
• Click once on the file to select it.
• From the Finder’s Edit menu (not Pro Tools’ File menu), choose Get Info (or press
Command-I). The Macintosh Get Info window appears.
• Click on the Stationery pad check box to save the file as a template.
• Click on the window’s close box.
Click on the “Stationery pad” check box to save
a Session as a template that you can reuse.
This document will now act as a template that you can open, with your settings just as
you configured them. To use this template, simply double-click it in the Finder, or open
it with the Open Session command if you are already running Pro Tools. When you save
the Session, Pro Tools will save it as a normal Session. You can create several custom
setups like this for studio setups that you frequently use.
Opening a Session Template (i.e., a Stationery pad)
Pro Tools User’s Guide48
Page 49

When you open a Session saved as a Stationery pad, this dialog appears. It offers you
the choice of editing the Template or starting a new Session using the Template settings. If you choose New Session, Pro Tools will create a new folder containing the
customary Audio and Fades folders.
Pro Tools’ Get Info Feature
This command in Pro Tools’ File menu allows you to save text information about a
specific Session with the Session file itself. The Get Info dialog provides five topic fields
and five data fields.
The Get Info command, shown with custom topics defined and data entered
The left text field in each of the five rows is the “topic” field. The text that you enter
here is saved with your Pro Tools Preferences and will appear in all Sessions. You can
define the topic fields to describe each of the five information/data fields. The right text
field in each of the five rows is the “information” field. The text that you enter here is
Session-specific.
B
To set up your Get Info topics:
• Choose Get Info from Pro Tools’ File Menu. The Get Info dialog appears.
• Enter your topic into the topic fields (the left text field in each of the five
rows). Continue until you have defined as many topics as necessary.
• Click OK to close the Get Info dialog. Click Cancel to close Get Info without
saving your changes.
To enter descriptive information about a Session:
• Choose Get Info from the File menu.
• Click the cursor in the desired text field and type the information that you
wish.
49Chapter B: Pro Tools Basics
Page 50

• Click OK to save your Session info, or click Cancel to close the Get Info dialog
without saving any changes. The text you enter in the information fields will
be stored in the Session file itself.
Closing a Session
Because Pro Tools can only open one Session at a time, you must close the current
Session if you want to work on another. The Close Session command closes your current
Pro Tools Session but leaves the Pro Tools application open. Although Pro Tools will
warn you before allowing you to close without saving changes, you will probably want
to save your work using the Save Session or Save Session As... command before closing
the current Session.
To close a Session:
• Choose Close Session from the File menu (or click the close box at the upper left
corner of the Pro Tools window).
If you have made any changes to your Session since the last time you saved, Pro Tools
will ask you if you want to save them. If you do, choose Yes; if you don’t, choose No. If
you change your mind and wish to continue your Session, choose Cancel.
Quitting a Session
When you are ready to end your Pro Tools Session, the Quit command will quit
Pro Tools and return you to the Finder where you can shut down your computer.
Although Pro Tools will warn you before allowing you to quit without saving changes,
you’ll probably want save your work before quitting.
To Quit a Session:
• Choose Quit from the File menu.
If you have made any changes to your Session since the last time you saved, Pro Tools
will ask you if you want to save them. If you do, choose Yes; if you don’t, choose No. If
you change your mind and wish to continue your Session, choose Cancel.
Pro Tools User’s Guide50
Page 51

The Save Changes Before Quitting dialog
Understanding the Mix and Edit Windows
Pro Tools is designed to provide virtually all of the recording, editing, and mixing
capabilities that you would find in a professional recording facility. Pro Tools does this
by presenting you with two “windows” into your recording Session, each with a
different view of your project. The Mix window provides a mixer-like environment with
recording, mixing, and automation capabilities. The Edit window features a graphical
editing environment which also provides recording, mixing, and automation capabilities. The two views are complementary and interdependent. Together they make up
your Pro Tools audio production environment.
The Mix Window
The Mix window provides a mixer-like environment for recording and mixing audio
and MIDI. Here, tracks appear as mixer modules, each with controls for Inserts, effects
sends, input/output assignments, volume panning (in Stereo Mix mode), record-enable,
automation-enable and solo/mute. The following several pages explain the use of each
of these track controls. Take a moment to familiarize yourself with this window and the
tools contained here.
B
NOTE: Pressing “Command and =” allows you to quickly toggle between the Mix and Edit
windows.
Before you begin, if you haven’t already done so, choose the Show Extra Views in Mix
Window command from the Display menu. Then, choose the Show I/O View, Show
Inserts View and Show Sends View commands from the Display menu to display
ProTools Input/Output controls, Inserts, and Sends.
51Chapter B: Pro Tools Basics
Page 52

inserts (EQs)
input selector
output selector
volume indicator
pan indicator
voice selector
record & automation
enable buttons
solo & mute
track meter
track volume slider
track name
sends
MIDI port selector
MIDI channel selector
MIDI volume indicator
MIDI pan indicator
MIDI record enable
solo & mute
pan slider
The Mix Window with Inserts, Sends, and I/O controls displayed (Pro Tools Project shown)
Pro Tools User’s Guide52
Page 53

An Audio Track
Audio tracks, shown with all extra views displayed (left), I/O views (center) and no extra views (right)
Each audio track has its own set of controls for Record-enable, Automation recordenable, Solo/Mute, Volume, Panning (if you are in Stereo Mix mode), Output assignment, and Voice assignment. EQ is available depending on which system you are using,
and these are displayed via the Show Inserts View command in the Display menu. With
Pro Tools Project two sends are available as well, via the Show Sends View command.
B
Tracks can be added to a session with the New Audio Tracks command, removed with
the Delete Tracks command, or even hidden from view with the Show/Hide Tracks
command, should you need to streamline your on-screen track display.
The meters on audio tracks show input levels when they are record-enabled. They show
disk “playback” levels during playback. Pro Tools’ volume faders only adjust the
monitoring level of a track—not the recording input gain. In order to increase the input
signal level, you need to adjust the level of the actual signal before it reaches the Audio
Interface. You can do this by recording it through a quality mixing board or dedicated
preamp.
53Chapter B: Pro Tools Basics
Page 54

A MIDI Track
Each MIDI track has its own set of controls for Record-enable, Solo/Mute, Volume,
Panning, MIDI port assignment, and MIDI channel assignment. MIDI tracks can be
added to a session with the New MIDI Track command, removed with the Delete Track
command, or even hidden from view with the Show/Hide Tracks command. A maximum
of 64 MIDI tracks can be created in a Session. The meters on MIDI tracks indicate MIDI
Velocity levels.
Auxiliary Inputs
Auxiliary Input tracks, mono (left) and stereo (right)
Auxiliary inputs can be used as effects returns or as additional on-screen inputs for live
mixing of instruments connected to your Audio Interface. You can add mono and
stereo Auxiliary inputs to your Sessions by using the New Auxiliary Inputs command in
Pro Tools’s File menu.
Pro Tools User’s Guide54
Page 55

Record Enable Button
Clicking this button puts the selected track into record-ready mode. On audio tracks,
there is an Input Selector button that allows you to route one of the Audio Interface’s
inputs to the track. Once a track is record-enabled, clicking the Transport’s Record and
Play buttons will initiate audio or MIDI recording. To record-enable more than one
track at the same time (as in the case of stereo recording), hold down the Shift key and
click the record-enable button on each of the desired tracks. You can only record on
one MIDI track at a time, but one MIDI track can record all 16 channels (i.e., multiple
instruments).
NOTE: Option-clicking on the record-enable button enables all tracks for recording.
Automation Record Enable
Clicking the mouse on this button puts the selected track into automation recordenable. Once a track is automation record-enabled, clicking the Transport’s Record and
Play buttons will initiate automation recording. Any fader or pan moves that you make
on the selected track will then be recorded and played back exactly as you performed
them. Be aware that automation recording is always “destructive,” regardless of the
status of the Destructive Record option in the Options menu, since it will record over any
previous automation data on the track. Like audio and MIDI data, automation can be
edited within the Pro Tools’ Edit window.
B
Solo and Mute Buttons
These buttons apply to both audio and MIDI tracks. Clicking on the Solo button mutes
other tracks so that the selected track can be auditioned alone. When a track is Solo’d,
the Mute buttons of other tracks in the session are highlighted. More than one track can
be solo’d at the same time.
Clicking on the Mute button silences the selected track. More than one track can be
muted at one time. If the Mute Frees Voice command is enabled in the Options menu,
muting a track will allocate its voice to the next highest priority virtual track in your
session. In this mode, there may a delay (ranging in length from one to several seconds
depending on the “voice size” of your system) between the time you mute or unmute a
track and the time you hear the effect on playback. This is normal.
55Chapter B: Pro Tools Basics
Page 56

Audio Input Selector
or
Audio Input Selector, Pro Tools Project (left), and Pro Tools with Audiomedia (right)
This button allows you to select an audio input and route the input to the track.
Note: You can use the I/O Labels command (Setups menu) to change the names of inputs that
appear in the Input Selector. Refer to the Reference chapter for details on using the I/O Labels
command.
Audio Output Selector
or
Audio Output Selector, Pro Tools Project (left) and Pro Tools with Audiomedia (right)
This button allows you to route a track to an output channel. If you are using Pro Tools
Project in Direct Outputs mode, the pop-up menu allows you to route the track to a
single output (1, 2, 3, 4, 5, 6, 7 or 8). In Stereo Mix mode, this pop-up lets you select
pairs of outputs (1-2, 3-4, 5-6, or 7-8). Pro Tools with Audiomedia and Pro Tools with
DAE PowerMix only support Stereo Mix mode, so this pop-up will only list a single pair
of outputs on those systems. When in Stereo Mix mode on all systems, selecting output
pair 1-2 (for example) and dragging the Pan slider towards the left will weight the
track’s output towards output 1. Dragging to the right will weight the sound towards
output 2 (in other words, panning left routes audio to the odd-numbered output of the
selected pair, panning right routes to the even-numbered output of the selected pair).
Note: You can use the I/O Labels command (Setups menu) to change the names of outputs that
appear in the Output Selector. Refer to the Reference chapter for details on using the I/O Labels
command.
Pro Tools User’s Guide56
Page 57

Voice Selector
The Voice Selector pop-up, 16-voice Pro Tools with DAE PowerMix (left),
Pro Tools Project (right), and Pro Tools with Audiomedia
Clicking and holding the mouse button on this box brings up a pop-up menu in which the
selected track can be assigned a “Voice” for audio playback. An 8-channel Pro Tools Project
system provides eight voices of audio playback, hence the settings Voice 1, Voice 2, Voice 3, Voice
4, Voice 5, and so on.
Pro Tools with Audiomedia: Voices 1-4
Pro Tools with DAE PowerMix: Voices 1-16 (depending on your system — refer
to the system descriptions in the Installation Guide).
B
More than one track can be assigned to the same Voice, but only one of the tracks can
be played back at the same time. Track priority, or “which track gets the Voice,” is
determined by a track’s position in the Mix or Edit window. If six tracks are assigned to
the same Voice, for example, the one farthest to the left in the Mix window (or topmost
in the Edit window) will be heard. If there’s an empty spot in that track (you’ll have to
look at the Edit window to determine this), audio on the track with the next highest
priority will “pop through” during that time. Selecting the Mute Frees Voice command
and muting a track will disable playback of that track and allocate its voice to the next
highest priority virtual track. Voices and track priority are covered in greater detail in
Chapter C.
57Chapter B: Pro Tools Basics
Page 58

MIDI Port Selector
The MIDI Port selector, as it appears without OMS (left) with OMS (center)
and with a MIDI Time Piece™ MIDI Interface without OMS (right)
Clicking and holding the mouse button on this box brings up a pop-up MIDI Port
menu. This menu allows you to route the MIDI track to a desired destination, including
the Macintosh’s serial ports (modem or printer), OMS port destinations, MIDI Time
Piece’s Interface ports, or directly to a Digidesign SampleCell™ sample playback card
installed in your Macintosh. The appearance of this pop-up will vary depending on
whether you are using OMS, a MIDI Time Piece, or neither. (Refer to your OMS Installation and Setup Guides to properly configure your OMS setup.) In order for the Pro Tools
software to “see” a MIDI interface attached to the Macintosh’s modem or printer serial
port, you must turn on the interface before you launch Pro Tools.
MIDI Channel Selector
Clicking and holding the mouse button on this selector brings up a pop-up menu in
which a MIDI track’s MIDI Channel can be assigned. The default setting of this selector
is “Channel -” in which all regions placed on a track automatically retain the original
MIDI Channel assignments from an imported MIDI file. In other words, they play back
on whatever MIDI Channel they were assigned to in the original MIDI file.
Pro Tools User’s Guide58
Page 59

Track Volume/Input Level Indicator
This indicator shows the current volume/input level of a track as set by the Volume/
∞
Input Level fader. Values range from +6 dB (highest level signal), to When recording, please remember that Pro Tools offers no built-in pre-amplification, so
you will need to increase the source signal’s amplitude to increase the input record
level. The Track Volume slider will not boost a signal’s input level.
(no signal).
Pan Indicator
This indicator displays the current pan setting of a track. Pan values range from <100 (full
left) to 100> (full right). It only appears if you are using Pro Tools in Stereo Mix mode.
Pan Slider
The Pan slider controls the balance of a track within a given output pair. It only appears
if you are using Pro Tools in Stereo Mix mode. The outputs used as the stereo pair for
the track’s image are set with the Output Selector. The Pan slider on a MIDI track is
only effective if you are controlling a sound module that supports MIDI panning. In
addition, if your original sequence contains MIDI panning changes, that data will
override whatever value you set here.
B
Track Volume/Monitor Level Fader
Moving this fader controls the volume of a track when it is in playback, and the monitor
level of the track when it is in record.
The Volume slider on a MIDI track is only effective if you are controlling a sound
module that supports MIDI volume. In addition, if your original sequence contains
MIDI Volume changes, that data will override whatever value you set here.
59Chapter B: Pro Tools Basics
Page 60

Level Meter
These meters are LED-style meters that show you the level of the signal that is being
recorded to or played back from the hard drive. When a track is record-enabled, these
meters are very important as they are Pro Tools’ record-level indicators. Remember that
the Pro Tools system retains a clean, quiet signal path by offering no pre-amplification
of the input signal. If your input signal is too low, you must increase it before it reaches
the A/D convertors of your particular system (i.e., the audio interface, Audiomedia III
card, built-in Power Macintosh inputs, etc.) Digital recording produces the best results
when the recorded signal is as high as possible without clipping. Pro Tools’ level meters
have a convenient “clip hold” feature so that if you overload your input at any time
during recording, the top-most LED will stay lit (red) indicating that clipping may have
occurred somewhere in the recording process. You can clear the clip indicator by
clicking on it. If the top-most LED is lit an even darker red, it indicates that clipping has
occurred repeatedly.
Note: Option-click on an LED to clear all clip indicators.
In Playback mode, these LEDs show you the pre-fader audio level of a track as it plays
from hard disk. This means that the meter of a track with audio on it will light up
during playback regardless of the setting of the track’s volume fader. On a MIDI track,
the meter will show MIDI velocity of the most recent MIDI event.
Track Name
The name of a track appears here. Double-clicking this box brings up a dialog in which
you can change the track’s name. When new tracks are created with the New Audio
Tracks (or New MIDI Tracks) command, they are given a default name which can be
changed at any time. When new audio files are recorded, they will take their default name
from the Track name.
Pro Tools User’s Guide60
Page 61

Bypass button
click here
Track selector
Insert Selector
EQ selector
Track Inserts Button/Inserts & Sends Editor
Pro Tools provides pre-fader digital equalizers, but the total number of EQ’s
available varies from system to system. The EQs are located on the Inserts
section of a track. You can display them with the Show Inserts View command in the
Display menu. Five types of EQ are available: high pass, high shelf, peak/notch, low shelf,
and low pass. Each EQ can be adjusted or bypassed independent of the other. The
parameters of these EQ’s are covered in Chapter G, Mixing. Inserts such as Pro Tools’
EQs can be adjusted via the Inserts & Sends Editor. This floating window provides
instant access to any Insert or Send on any Pro Tools track. EQ and The Inserts & Sends
Editor is covered in greater detail in Chapter G, Mixing.
B
Mute button
click here
Send gain
Track selector
Send Selector
Output indicator
Track Sends/Inserts & Sends Editor
In Pro Tools Project systems, each track has two effects sends. These can be displayed
with the Show Sends View command in the Display menu. They can be used as two
mono effects sends or a single stereo effect send. Send levels are set by clicking the Send
button, and in the Inserts & Sends Editor that appears, dragging the level slider to the
desired level. The floating Inserts & Sends Editor provides instant access to any Insert or
Send on any Pro Tools track. The Inserts & Sends Editor is covered in greater detail in
Chapter G, Mixing.
Pro Tools Project uses outputs 7 & 8 as Effect Sends. Effect Returns are set up by first
creating a new Auxiliary Inputs or a new Audio Track. You then need to use the Input
Selector pop-up to assign the appropriate input for that Aux Input or Audio Track. Sends
and Returns are covered in greater detail in Chapter G, Mixing.
61Chapter B: Pro Tools Basics
Page 62

The Edit Window
This window provides a time line-type display of audio and MIDI for editing and
arranging tracks. Here, the tracks appear as graphic waveforms and MIDI data. As in the
Mix window, each track has controls for record-enable, automation record-enable, and
mute/solo. Inserts and effects send can also be displayed in the Edit window by choosing these options in the Display menu. Take a moment to familiarize yourself with this
window and the tools contained here.
Time Scale
Track Name
Audio Track
Voice
Selector
Display
Format
Selector
Editable
Automation
Data
MIDI Track
Mode buttons
Display Scale arrows
Zoomer
Scrubber
Trimmer
Selector
Start/End/Length
Buttons
Grabber
Current
Position
Indicators
Current
Time Display
Nudge/Grid
Units Selector
Audio
Regions List
MIDI
Regions List
The Edit Window
Pro Tools User’s Guide62
Page 63

The Slip/Shuffle/Spot/Grid Buttons
These four buttons control how regions can be moved with the Grabber tool (explained
later in this section) and also how edit commands such as Cut, Paste, Clear, and Dupli-
cate affect the movement of regions. For this reason, you should always be aware of
which mode is currently active before performing any type of edit.
NOTE: Pressing the tilde key (~) allows you to switch between the various edit modes.
Shuffle Mode
Clicking the Shuffle button puts Pro Tools into Shuffle mode. In this mode regions line
up end-to-end like magnets. They “snap” to other regions or the beginning of a track.
Adding a new region to a track simply “shuffles aside” any regions occurring after it by
that region’s length. This mode is most useful for arranging regions together so that
they occur one after another in a track without overlapping or gaps between them.
Slip Mode
Clicking the Slip button puts Pro Tools into Slip mode. In this mode, regions can be
moved freely, without snapping to other regions as they do in Shuffle mode. Regions
can have space preceding or following them. They can be placed so that they overlap
portions of other regions or entire regions. Unlike Shuffle mode, regions placed into
tracks in Slip mode don’t “shuffle aside” subsequent regions. Compared to Shuffle
mode, Slip mode gives you the most freedom for placing regions.
B
Spot Mode
Clicking the Spot button puts Pro Tools into Spot mode. This mode is useful for Sessions
in which you wish to “spot” regions to specific SMPTE frame locations. In this mode, a
region in a track can be quickly spotted by simply clicking it with the Grabber. A dialog
will then appear prompting you to enter an appropriate SMPTE frame location. If you
drag a region from the Region List into a track while in Spot mode, a dialog prompting
you to specify a SMPTE time location for the region will appear automatically when you
release the region. Regions are spotted by their start times unless you have identified a
Sync Point (covered in Chapter F, Working with SMPTE) within the region. If the region
contains a Sync Point, spotting is performed in reference to the Sync Point.
63Chapter B: Pro Tools Basics
Page 64

Grid Mode
Clicking the Grid button puts Pro Tools into Grid mode. In this mode, the movement of
regions is quantized to a user-selectable time value on an invisible time “grid.” This
mode is especially useful for lining up regions at precise intervals (as in a music Session
based around bars & beats or a post Session using SMPTE frames). For example, if you
have set the Grid to quarter note increments, dragging or nudging a region to a new
location in a track will cause it to snap to the nearest quarter note location on the Grid.
This provides you with a handy way of “quantizing” audio. You will also find that if
you drag a region from the Region List into a track while in Grid mode, the region will
automatically snap to the grid when you let go of it.
Grid values are selected by choosing the appropriate time format from the Display
menu (Bars & Beats, Minutes:Seconds, Time Code, or Feet and Frames) and selecting the
desired increments from the Nudge/Grid units pop-up menu at the top right of the screen.
The Nudge/Grid units selector
Note: Nudge to Samples is not available when the Time Scale Indicator is displaying
Bars&Beats.
The Display Scale Arrows
Clicking on the Display Scale arrows allows you to adjust the track view. The Display
Scale arrows adjust the display around its center point, keeping it centered as it
changes. The four arrows work like this:
The up arrow expands the waveform view vertically, expanding the amplitude and making
the waveform appear taller. This adjustment is useful in distinguishing amplitude values of
audio data, because amplitude differences are more easily viewed at a higher resolution.
The down arrow performs the opposite function. It compresses the track view downward.
Use it to squeeze the height of the track view so you can see its entire amplitude range.
Pro Tools User’s Guide64
Page 65

The right arrow expands the track view to the right, performing the same function for
duration as the up arrow performed for amplitude. This arrow stretches out the track
view, and makes it possible to magnify it until you are looking at only a few audio
samples or MIDI events.
The left arrow functions as the zoom out arrow. It compresses the track view to show
you more of the duration.
The Zoomer
Clicking here activates Pro Tools’ Zoomer. The cursor turns into a miniature magnifying
glass. To use the Zoomer, click and drag this magnifying glass over a portion of a track
that you wish to view. As you drag, a dashed box appears indicating the range that you
will be zooming in on. When you release the mouse, the display zooms in on that portion.
To zoom back out to view the entire Session, double click on the Zoomer. Hold down
the Option key and drag the Zoomer over a selection to increase duration while keeping
the amplitude magnification the same. Option-click on the Zoomer to zoom so that the
current selection fills the window.
NOTE: Pressing the Esc key allows you to “tab” between Pro Tools’ various tools.
B
The Scrubber
Clicking here activates Pro Tools’ Scrubber. “Scrubbing” is a term that refers to a
method of locating an exact spot on analog tape by rocking the tape reels back and
forth with the playback head engaged. By doing this, the exact beginning or end of a
specific sound on the tape can be pinpointed. In a hard disk recording system like
Pro Tools, scrubbing works a little differently, but the principle is basically the same.
With the Scrubber, you can click anywhere on a track and drag the mouse to the right
or left to begin playback at that point instantly. Playback speed and direction varies
with mouse movement. Scrubbing is more useful at medium levels of magnification.
NOTE: Pressing the Esc key allows you to “tab” between Pro Tools’ various tools.
65Chapter B: Pro Tools Basics
Page 66

The Trimmer
Clicking here activates Pro Tools’ Trimmer. With this tool, regions can be quickly
shortened or expanded to a desired length.
To trim a region, simply click the cursor at the right or left side of a region and drag
towards the center. As you drag, the edge of the region is “trimmed off” until you
release the mouse button. Note that the cursor changes into the appropriate “right
trim” or “left trim” shape as it is placed over the right or left side of the region.
To extend a region or expand it beyond its current definition, click the cursor on the
appropriate edge of the region and drag outwards. The more you drag, the more data is
“uncovered” until the region is restored to its original length, a portion thereof, or all
the way out to the entire length of the original audio or MIDI file.
If you click a region with the Trimmer while you are in Spot mode, a dialog will appear
allowing you to enter a value in SMPTE frames to specify exactly where you wish the
region’s beginning or end to be trimmed to. This is a convenient way to edit the length
of a region to a particular “hit point” if you are doing audio post production work.
NOTE: Holding down the Option key before trimming a region allows you to reverse the direction of
the Trim tool so that you can trim in either direction from any point in a region. Holding down the
Control key after you beginning trimming will allow you to extend a region up to but not
beyond the border of a neighboring region.
NOTE: Pressing the Esc key allows you to “tab” between Pro Tools’ various tools.
The Selector
Clicking here activates Pro Tools’ Selector. The mouse cursor changes to an I-beam.
Clicking and dragging the cursor across any audio waveform or MIDI data range in a
track will select that range for editing. The cursor position is always indicated in the
Selection and Position Indicator boxes at the top right of the screen.
Note: Holding down the Command key while using the Selector temporarily switches to the
Scrubber.
Pro Tools User’s Guide66
Page 67

Selecting the same range on multiple tracks is also accomplished with the Shift key, but
with a slightly different technique. To do this, make your selection on any of the tracks.
After you have released the mouse button, hold down the Shift key and click in another
track. The same range will then be selected in that track. Continue clicking in tracks.
Once a waveform range is selected, it can be captured as a region, “separated” as a
region, or modified by any of the other operations listed in the Edit menu. (Capturing
regions, separating/healing regions and other editing techniques are explained in
Chapter E: Editing.)
NOTE: Pressing the Esc key allows you to “tab” between Pro Tools’ various tools.
The Grabber
Clicking here activates Pro Tools’ Grabber. With this tool, tracks and regions can be
moved or rearranged simply by clicking and dragging them to a new location. Pro
Tools’ four modes of editing operation, Slip, Shuffle, Spot and Grid, affect how regions
can be moved with the Grabber.
NOTE: Pressing the Esc key allows you to “tab” between Pro Tools’ various tools.
B
The Selection and Position Indicator Boxes
The Data Indicator boxes provide information about the current selection’s start point,
end point, duration, and the current playback position.
The Start box gives the start point of the current selection. The End box gives the end
point of the current selection. The Length box gives the duration of the current selection. Double-clicking on any of these indicators will present you with a dialog in which
you can enter a new time value.
Information in the Data Indicator boxes can be displayed in Bars & Beats, Minutes:Seconds,
SMPTE, or Feet and Frames depending on which Time Scale format is selected in the
Display menu.
If you are using Pro Tools to “spot” audio to SMPTE Time Code, clicking on the Start,
End, or Length buttons will present you with a dialog in which you can edit the current
selection’s start, end, or length in SMPTE frames.
67Chapter B: Pro Tools Basics
Page 68

Clicking the Start, End or Length buttons brings up this dialog
Time Indicator Box
This box displays the current point in time at the cursor’s insertion point in a track.
Time can be displayed in Bars & Beats, Minutes:Seconds, SMPTE, or Feet and Frames, as
chosen in the Display menu. Time values shown here are slightly rounded off.
Position the mouse pointer over any of the time fields in this box and click to increase
or decrease the time shown in that field and move the insertion point to that time
location. Move the mouse up and click to increase the time; move it down and click to
decrease the time.
The Nudge/Grid Units Selector
Nudge/Grid Selector, showing Minutes:Seconds (left), Time Code (center) ,and Feet & Frames (right)
Clicking on this pop-up menu allows you to select the value used in Pro Tools Grid
Mode. It also defines the amount that regions can be “nudged” by pressing the plus (+)
and minus (-) keys on your Macintosh keyboard. In addition, the value chosen here
Pro Tools User’s Guide68
Page 69

serves as the quantization value for Pro Tools’ MIDI Quantize and Quantize Region
commands if you are using Bars & Beats as your time format. The units that appear here
are controlled by the time format currently selected from the Display menu (Bars &
Beats, Minutes:Seconds, Time Code, or Feet and Frames).
The Time Scale Indicator (a.k.a. the Timeline)
This indicates the time scale currently in use. Options are Bars & Beats, Minutes:Seconds,
Time Code (SMPTE frames) or Feet and Frames as chosen in the Display menu. If you
double-click the Time Format button at the far left of the scale, a dialog will appear
allowing you to quickly change time formats. If you wish to display data in Bars & Beats
you must have MIDI Regions in the current Session or you must use the Identify Beat
command in the Edit menu to provide Pro Tools with Bar/Beat information. SMPTE
formats can be chosen with the Time Code command in the Setups menu.
You can grab the Time Scale Indicator and move it so that is between any two tracks in
the Edit Window.
To move the Timeline:
• Use the Grabber tool to grab the left-most end of the time scale.
B
• Continue to hold the mouse button down and drag the time line between any
two tracks. You can’t see the time scale while it’s being moved but you can see
the borders of the Track Name fields flash where the time scale is about to be
moved.
69Chapter B: Pro Tools Basics
Page 70

An Audio Track
This is where audio regions are strung together to form a “Playlist” for audio playback.
Audio regions can be arranged in any order in a track and can even be dragged onto
other audio tracks. Each audio track has its own Name, Record-enable, Automation Record-
enable, Solo, Mute, Volume, Voice, and Track Display Format selector. Data on each track
can be individually viewed in waveform, block, volume graph, or pan graph format by
selecting any of these options in the pop-up Track Display Format pop-up menu. All
tracks can also be viewed at reduced height by choosing Reduce Track Size from the
Display menu. They can even be hidden from view with the Show/Hide Tracks command,
should you need to streamline your on-screen track display.
A MIDI Track
This is where MIDI regions are strung together to form a Playlist for MIDI playback.
MIDI regions can be arranged in any order in a track and even be dragged onto other
MIDI tracks. Each MIDI track has its own Name, Record-enable, Solo, Mute, Channel/MIDI
Port selector, and Display Format selector. Data on MIDI tracks can be displayed in Region
Block or Note format by choosing one of these options from the pop-up Track Display
Format selector. All tracks can also be viewed at reduced height by choosing Reduce
Track Size from the Display menu. They can even be hidden from view with the Show/
Hide Tracks command, should you need to streamline your on-screen track display.
Track Name
The name of a track appears here. Double-clicking this box brings up a dialog in which
you can change the track’s name. Audio and/or MIDI recorded on a track will get their
name from the Track Name field.
Pro Tools User’s Guide70
Page 71

Record Enable Button
Clicking this button puts the selected track into record-ready mode.
Automation Record Enable
Clicking this button puts the selected track into Automation record-ready mode.
Solo and Mute Buttons
Clicking on the Solo button mutes other tracks so that the selected track can be auditioned alone. Clicking on the Mute button silences the selected track. See the explanation of these functions in the Mix Window section of this chapter for more information.
Voice Selector
The Voice Selector in the Edit window (Pro Tools with Audiomedia shown)
B
Clicking and holding the mouse button on this box brings up a pop-up menu in which
the selected track can be assigned a “Voice” for audio playback. This function is explained in greater detail in the Mix Window section of this chapter.
71Chapter B: Pro Tools Basics
Page 72

MIDI Channel
Clicking and holding the mouse button on this selector brings up a pop-up menu in
which a MIDI track’s MIDI Channel can be assigned. The default setting of this selector
is “Channel - ” in which all regions placed on a track automatically retain their original
MIDI Channel assignments. In other words, they play back on whatever MIDI Channel
they were assigned to in the original MIDI file.
MIDI Port Selector
The MIDI Port selector, as it appears: 1) with OMS
2) with a MIDI Time Piece (no OMS)
3) without OMS or a MIDI Time Piece
Clicking on this button brings up a pop-up MIDI Port menu. This menu allows you to route
the MIDI track to a desired destination including the Macintosh’s serial ports and
SampleCells installed in your Macintosh. Depending on whether you are using OMS, a
MIDI Time Piece MIDI Interface, or neither, the appearance of this pop-up menu will differ.
In order for the Pro Tools software to “see” a MIDI interface attached to the Macintosh’s
modem or printer serial port, you must turn on the interface before you start Pro Tools.
Pro Tools User’s Guide72
Page 73

Track Display Format Selector
Clicking and holding the mouse on this button brings up a pop-up menu in which a
track’s data display format can be chosen. Choices include Region Blocks, Waveform,
Volume Graph, or Pan Graph. When a track is displayed as a volume or pan graph, the
automation data for that track appears in the form of a line graph with a series of
editable breakpoints. The breakpoints can be dragged to modify the automation data.
When a track is displayed as region blocks, regions are displayed as simple blocks with
the region name inside. Displaying a track as region blocks helps speed up screen
redraws since there is much less data to be shown.
Note: Holding down the Option key while you choose a display format will display all tracks in
the format that you choose.
Audio Region List
B
This is where audio regions appear after being recorded, loaded into Pro Tools with the
Import Audio command, or created with one of the Edit commands. From here, they can
be dragged into tracks and arranged in whatever order you choose. Regions that bear
only the name of the original sound file represent the entire sound file. Regions appear
in alphabetical order in this list and can be selected by typing the first letters of the
region’s name.
73Chapter B: Pro Tools Basics
Page 74

Holding down the Option key and clicking and holding the mouse button on a region’s
name in this list will allow you to audition that region.
A region’s name consists of two parts: the File name, which represents the audio file
from which the region originated, and the unique Region name that you gave it when
you created it. Pro Tools defaults to displaying just the region portion of a region’s
name. If you wish to display the full name of a region (both the File and region portion), simply choose Show File Names in Region List from the Display menu. This will
affect all regions in the Region List.
If you have a Pro Tools Project system with multiple hard drives and wish to know
which drive a particular region resides on, choose the Show Volume Names in Region List
option from the Display menu. Enabling this display option adds the hard drive
(volume) name to region names in the Audio Region List. This too will affect all regions
in the Region List.
Because region names can become lengthy (up to 31 characters in length for each half
of the name), the Audio Region List can be scrolled in order to view full names. Clicking the name of an audio region in the Region List will highlight it in a track (and viceversa — refer to the discussion of the two Preference options Region Selection follows
Track Selection and Track Selection follows Region Selection in the Reference chapter.) Also,
the window “split” can be moved to increase or decrease the width or length of the
Region List.
MIDI Region List
This is where MIDI regions appear after being loaded into Pro Tools with the Import
MIDI command in the File menu or after recording on a MIDI track. From here, they
can be dragged into tracks and arranged in whatever order you choose. Regions appear
in alphabetical order in this list and can be selected by typing the first letters of the
region’s name.
Pro Tools User’s Guide74
Page 75

MIDI Region names reflect both the name that you have given them and the name of
the MIDI track in the original sequence from which they came. If you choose to display
both names with Show File Names in Region List command, the original MIDI track’s
name appears first, followed by a slash (/) and the name that you’ve given the region.
The MIDI Region List can be scrolled in order to view full names. Clicking the name of
a MIDI region in the MIDI Region List will highlight it in a track.
Note: Pro Tools’ MIDI playback supports Type 0 (merged) and Type 1 (multitrack) Standard
MIDI files.
The Transport
The Transport functions much like a conventional tape transport and provides controls
for (from left to right) on-line, return to zero, rewind, stop, play, fast forward, go to end, and
record. In addition the Transport contains Pro Tools’ 100 autolocate buttons and Punch
In/Punch Out Time indicators.
B
On-line
This button puts Pro Tools On-line, just as if you had selected Online from the Options
menu. In this mode, recording or playback can be triggered by an external SMPTE-driven
source.
Return to Zero
This button sets the playback cursor to the beginning of the Session.
Rewind
This button rewinds through the Session starting from the current cursor position.
75Chapter B: Pro Tools Basics
Page 76

Stop
This button stops playback.
Play
This button begins playback from the current cursor position.
Fast-Forward
This button fast-forwards through the Session starting from the current cursor position.
Go To End
This button sets the playback cursor to the end of the Session (more precisely, to the
end of the last sound file/region in the Session).
Record
This button arms Pro Tools for recording. Clicking the Play button then initiates recording.
Autolocate buttons
Option-clicking one of these buttons (there are a total of 100) captures the current
cursor location (or selection) in the track as an autolocate point and allows you to give
the location a name. Autolocation points can also be dropped "on the fly" during
playback or recording by pressing the Enter key on your computer keyboard. After you
have defined one of these points, you can quickly navigate to it by clicking on the
numbered autolocate button once. Pressing a number on your Macintosh keyboard
(1-100) followed by a period will also take you to the corresponding autolocation
Pro Tools User’s Guide76
Page 77

point. You can rename an autolocation by double-clicking it. The scroll bars at the
bottom of the transport allow you to scroll through the lists of all 100 buttons, ten
at a time. Use of the Autolocate buttons is covered in greater detail in Chapter E,
Editing.
Double-clicking an autolocate button brings up this dialog in
which you can rename or set preferences for the selected autolocation button.
Punch In/Out Time Indicators/Buttons
These boxes display the values currently set for punch in/punch out recording. As you
will learn later in this manual, Punch Ins are accomplished by selecting a waveform (or
MIDI data) range on a track with the Selector Tool and then recording normally. The
selected area becomes the section that is punched in. The Pre/Post-Roll command in the
Setups menu allows you to leave a time before and/or after the punch occurs.
B
The Play Start box indicates the point at which Pre-roll begins, as specified in the Pre/
Post-Roll dialog in the Setups menu.
The Record Start box indicates the point at which recording begins, as specified by the
selected range on the track.
The Record Length box indicates the length of the punch, as specified by the selected
range on the track.
77Chapter B: Pro Tools Basics
Page 78

The Record End box indicates the point at which recording ends, as specified by the
selected range on the track.
The Play End box indicates the point at which post-roll ends, as specified in the Pre/Post-
Roll dialog in the Setups menu.
You can edit these values by clicking and holding the mouse on the appropriate time
field. A small up or down arrow will appear depending on whether you are closer to the
top or bottom of the display. To increase the value, hold down the mouse with the up
arrow displayed. To decrease the value, hold down the mouse with the down arrow
displayed. If you are in Grid mode, time increments are determined by the Nudge/Grid
Units Selector.
If you are using Pro Tools to “spot” audio to SMPTE Time Code, clicking on the Play
Start, Record Start, Record Length, Record End, or Play End buttons (to the right of the time
fields) will present you with a dialog in which you can edit the current selection’s start,
end, length, and pre- or post-roll values in SMPTE frames. This dialog also allows you to
capture incoming time code.
Clicking the Play Start, Record Start, Record Length,
Record End, or Play End buttons brings up this dialog
Pro Tools User’s Guide78
Page 79

Conclusion
You should now be familiar with the tools and function of the Mix, Edit and Transport
windows. You should also have the knowledge you need to open, close, create, and save
Pro Tools Sessions. In the following chapters you’ll learn how to put these skills to use
in your recording projects. When you have become sufficiently familiar with the Pro
Tools interface, move on to Chapter C, Working with Tracks. There you will learn how to
perform basic track management tasks including how to play, hide, display, and delete
them, as well as how to assign voices, track priority, and track size.
B
79Chapter B: Pro Tools Basics
Page 80

Pro Tools User’s Guide80
Page 81

Chapter C
W orking with Tracks
Page 82

Pro Tools User’s Guide82
Page 83

W orking with Tracks
Introduction
Before you begin recording to disk, it is first necessary that you have a fundamental
understanding of Pro Tools tracks and how to manage them. Tracks are built from
regions. Here we are going to deal with tracks at the simplest level—a track consisting of
a single region. You will learn how to open a Pro Tools Session and perform basic track
management tasks such as creating a new track, assigning voices and output channels,
soloing and muting, adjusting volume and panning, and deleting a track. Some of this
information has been introduced in previous chapters, but this chapter goes into greater
detail about each topic.
How Pro Tools Manages Tracks
Though you may think of audio and MIDI data as very different entities, Pro Tools
treats them much the same. The result is that the recording and editing techniques you
will learn are identical for both. This approach is one of the most powerful aspects of
Pro Tools.
When you are editing audio or MIDI with Pro Tools, you are basically dealing with two
things: Tracks and Regions. For simplicity’s sake we’ll deal with audio tracks and audio
regions in the following explanation.
C
As you’ve already learned, a Region is a “piece” of audio data (or MIDI, or automation
data) of arbitrary length. An audio Region could be a guitar riff, a verse of a song, a
sound effect, a piece of dialog, or even an entire sound file. Regions are strung together
to create tracks.
Pro Tools’ definition of a track is somewhat broader than the conventional multitrack
tape analogy. A track can be made up of a single region or many regions. It can be made
up of similar elements, as in the case of a composite guitar solo track made up of
83Chapter C: Working with Tracks
Page 84

regions from several different “takes” of the solo. It can also be made up of dissimilar
elements, as in the case of a track made up of several sound effects regions.
Though Pro Tools’ Mix and Edit windows differ in the way that they display tracks (a
mixer module in the Mix window, versus graphic waveforms in the Edit window), the
way that they manage them is the same. However unusual this new way of dealing with
sound may seem to you at first, you will soon find that recording and editing sound
this way is far more powerful and flexible than anything you have experienced before.
To summarize: Tracks are made of regions. Regions are the building blocks you will use to
create tracks.
Creating New Tracks
You can add audio and MIDI tracks to your Session at any time by using the New Audio
Tracks or New MIDI Tracks command (in the File Menu). New tracks created with this
command will then appear in your Session in both the Edit and Mix windows.
Here’s a quick reminder of the number of tracks that are possible with each of the Pro
Tools systems covered in this User’s Guide. These numbers represent the total number
“virtual” tracks which each system supports — do not confuse these numbers with the
specific voice capabilities of your particular Pro Tools system. Refer to the section Table of
Track and Voice Limits for All Systems in Chapter A: Essential Concepts for more information:
System Virtual Track Limit
Project 55 tracks
Audiomedia 12 tracks
Pro Tools DAE PowerMix systems provide the following virtual track limits:
16 voice system* 64 tracks
12 voice system* 48 tracks
8 voice system* 32 tracks
*Note: Remember, the number of voices available on DAE PowerMix systems is dependent on
CPU speed. Refer to the section “Table of Track and Voice Limits for All Systems” in Chapter
A: Essential Concepts for details.
Pro Tools User’s Guide84
Page 85

To create a new Audio or MIDI track:
• Choose New Audio Tracks (or New MIDI Tracks) from the File menu. The
following dialog appears prompting you to enter the number of tracks you wish
to create (the default value is 1).
The New Audio Tracks dialog
• Enter a number and click OK. The selected number of tracks appear. The new
track is empty until you record on it or place a region into it from the Audio
Region List or MIDI Region List.
• From the Mix or Edit window, double-click the new track’s Track Name button.
In the dialog that appears, enter a name for your new Track and click OK. This
name will also be given to any new audio files that you record on the track.
C
The Name Track dialog
• If you wish to display track Inputs/Outputs, Inserts, or Sends on your track,
choose Show I/O View, Show Inserts View, or Show Sends View command from the
Display menu, as you desire. (Note: Sends are available in Pro Tools Project
only. On Audiomedia or DAE PowerMix systems the Show Sends View command
will be grayed out.)
• Next, choose either the Show Extra Views in Mix Window or Show Extra Views in
Edit Window command, depending on which window you want to display the
selected controls in. The selected controls then appear on the new track (and
all other tracks in the window).
85Chapter C: Working with Tracks
Page 86
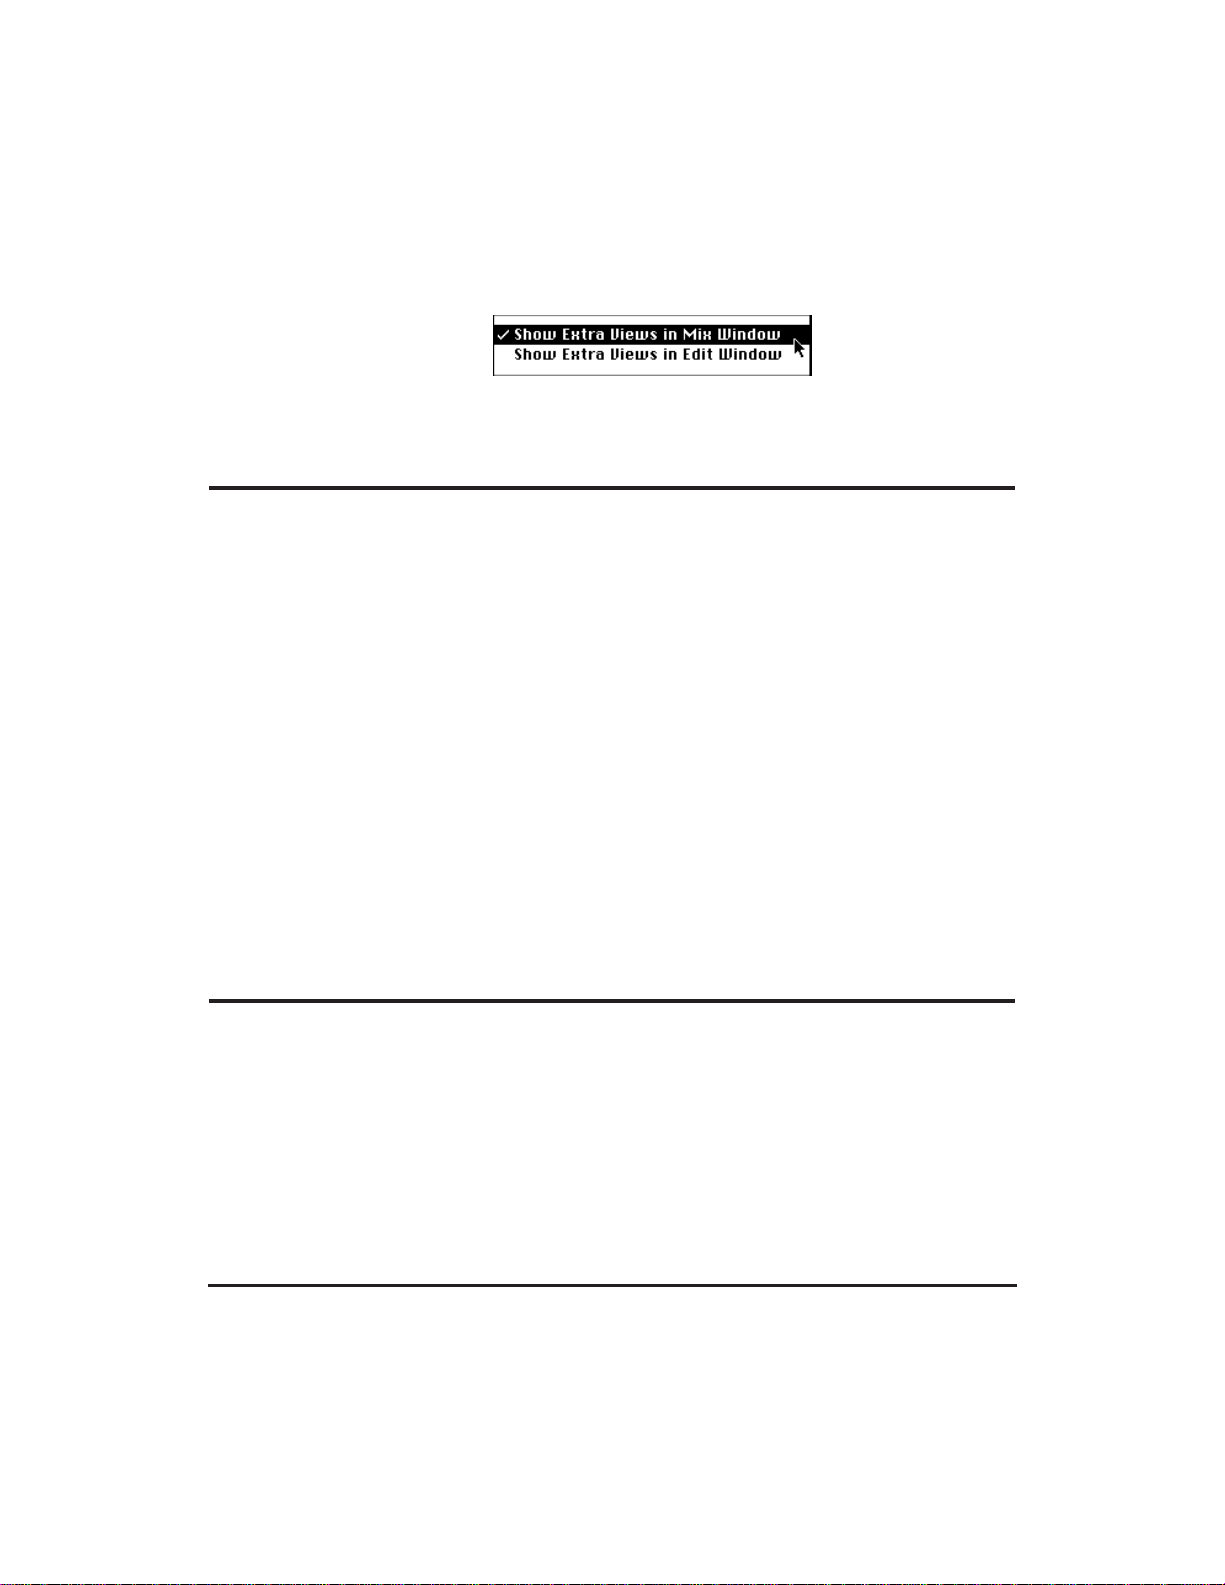
The Show Views commands in the Display menu allow you to display the controls for
Inserts, Inputs/Outputs, and Sends for all tracks.
Deleting a Track
At some point in a Session you may decide that you don’t need a track you have
created. In that case, you can remove it from the Session with the Delete Track command in the File menu.
To Delete a track:
• Click on the name of the track to select it.
• Choose Delete Track from the File menu. A dialog appears asking you if you
wish to delete the track from the Session.
Don’t be alarmed by this warning. Your audio or MIDI Region data will remain in the
Region List, untouched. Your arrangement of the Regions on the track (the track’s
“playlist”) will be lost, however.
• Click OK and the track will disappear from the Session.
Playing an Audio Track
Pro Tools gives you three ways to start a Session playing back: with the Transport’s Play
button, with the Space bar, or via a MIDI controller. Each of these three methods will
be explained in his section.
Before proceeding, take a moment to make sure all your audio and computer equipment is on and connected to an amplifier and speakers.
Pro Tools User’s Guide86
Page 87

The Transport
One way to play back a track is with the Play button on the transport. Pro Tools’
transport will begin playback from the current playback point. To start playback from a
different point in a track, you have several options: you can use the fast-forward or
rewind buttons, you can click one of the autolocate buttons (if you have defined any),
or you can jump to the Edit window to place the playback cursor at a new playback
point. For now, simply use the Play button to start playback from the current location.
The Transport
To play back a track with the Transport:
• If it’s not currently visible, choose Show Transport Window from the Display
menu to make the Transport appear.
• Press the Play button. Playback begins.
• To stop playback, press the Stop button.
C
The Space bar
Another way to play back a track or region is with the Space bar.
To play back a track with the Space bar:
• Press the Space bar on the Macintosh’s keyboard. Playback will begin at the
current playback point and continue through the end of the track, or until you
press the Space bar again.
MIDI Controller
Pro Tools allows you to map a MIDI controller to any of Pro Tools’ Transport controls.
You can also map MIDI controllers to Pro Tools faders and sliders (see the Mixing
chapter for more information on controlling faders and sliders) using the same technique.
87Chapter C: Working with Tracks
Page 88

Because the Transport buttons are “on/off” controls, we recommend that you map a
“switched” (on/off-type) controller, or a single MIDI key/pad, rather than a continuous
controller (such as a pitch/mod wheel, slider-type control, etc.).
To map a MIDI controller to a Transport control:
• Hold down the Control key and click once on the Pro Tools Transport button
you wish to remotely control. It turns green.
• On your MIDI device, move the controller that you wish to “map” to the Pro
Tools Transport (again, use an on/off type controller such as an individual key
or pad from a MIDI controller). When you move/press the MIDI controller, the
on-screen Pro Tools Transport will toggle in tandem with it.
• You can now engage the desired Transport function from the MIDI controller.
• If you want to “unmap” the Transport control, hold down the Control key and
click twice on the button, fader or slider you want to unmap. It is now unmapped.
You’ll learn about other playback options such as loop playback and track scrubbing in
Chapter E, Editing.
Virtual Tracks, Voices, and Track Priority
As we begin to explore playback of tracks in more detail, it is probably a good time to
say a few words about voices, track priority and “virtual tracks.”
The hardware which makes up your Pro Tools system provides a specific number of
voices of audio playback. This number is the maximum number of different sounds that
can play back at one time. With Pro Tools Project (an 8-voice system) a maximum of 8
sounds can be played back simultaneously. On a 4 voice system such as Pro Tools
Audiomedia, 4 sounds can be played simultaneously. Pro Tools DAE PowerMix systems
provide 8, 12, or 16 voices depending on CPU speed (for more information, refer to the
table at the end of this section for a complete listing of Pro Tools’ voice, track and
virtual track limits).
The Pro Tools software, however, lets you create and use more tracks than the number
of available voices (the exact number of available tracks depends on the hardware used)
in a Session — tracks which can be recorded upon and cued up for playback but cannot
all be played back simultaneously. Such tracks are called “virtual tracks” because they
Pro Tools User’s Guide88
Page 89

provide virtually all of the functionality of real tracks except for this limitation. Note
that track limits for each Pro Tools system vary — refer to the table at the end of this
section for a complete listing of Pro Tools’ voice, track and virtual track limits.
In an environment such as this, where there are potentially many more tracks available
than could ever play back at one time, Pro Tools must have a way of deciding which
tracks get priority when more than four compete for just four voices. For instance, if
you have one drum track and four guitar tracks in a 4-voice system, you may want to
ensure that the drums have priority and always play back, and that Guitar 1 should
always take precedence over Guitar 2; Guitar 2 over Guitar 3, etc. For this reason,
Pro Tools provides two ways of assigning playback priority to audio tracks:
1) The Voice Selector pop-up menu (in each Track in the Edit and Mix window).
2) Track placement: The left-most track in the Mix window (or the topmost track in
the Edit window) has priority over other tracks with the same Voice assignment.
When you click and hold the mouse on a track’s Voice selector, a pop-up menu appears
offering a choice of Voices 1-4 (or 1-8, 1-12, 1-16 depending on your system). The
numbers refer to voice assignments. Selecting Voice 1 for a given track signifies that the
track will be played by Voice 1, selecting Voice 2 assigns the track to Voice 2, and so on.
Enabling the Mute Frees Voice command (in the Options menu) and muting a track
disables playback of that track, and surrenders control of its voice to the next highest
priority track.
C
An Audio Track’s Voice selector on a 4-voice Pro Tools with Audiomedia system (left)
and an 8-voice Pro Tools with DAE PowerMix or Pro Tools Project system (right)
It is possible to assign more than one track to the same Voice, but only one of the
tracks—the one with highest priority—will play back at one time. The following
illustration shows the Edit window with the two rhythm guitar tracks in the Demo
Session assigned to the same voice (Voice 2). In this case, the topmost track (“Guitar”)
has priority and will be heard. The lower track (“Guitar Echo”) will not be heard.
89Chapter C: Working with Tracks
Page 90

These two
tracks are
both
assigned to
the same
Voice
Two guitar tracks assigned to the same Voice
Another important point to understand about Pro Tools is that it has dynamic voice
allocation. This means that it is smart about allocating voices when and where they are
needed. So, when a “hole” opens up in a high priority track, its voice is temporarily
available, and the track with the next highest priority “pops through” and begins to
play. When the original track returns, the track that had popped through relinquishes
the voice to the higher priority track again.
The following example demonstrates this concept:
Pro Tools User’s Guide90
Page 91

This region will
“pop through”
the hole
Note the
“hole” here
in this track
C
The “Guitar Echo” track will “pop through”
If you look closely at the above illustration, you will see that there is an open area in
the Guitar track where no region appears. At this point, Voice 2 is free since it is not
being used, and the next highest priority track, Guitar Echo, will pop through the open
area and play. This type of intelligent dynamic voice allocation is one of Pro Tools’
most powerful features and one of the key reasons why Pro Tools is so much more
flexible than conventional multitrack tape systems.
There is one important trick to remember when using this feature: in order for a lower
priority region to pop through, it must be placed so that its beginning occurs after a
higher priority track’s region has ended. By arranging tracks so that lower priority tracks
can pop through these open areas, you can get much more performance out of a system
than just 4, 8, 12 or 16 tracks playback (or “voices” in Pro Tools parlance). Learning to
use virtual tracks well is one key to unlocking the power of the Pro Tools system.
91Chapter C: Working with Tracks
Page 92

NOTE: Do not confuse the Voice Selector with the Output Channel Selector (covered later in
this chapter). The Output Channel Selector routes Pro Tool’s digital audio to the physical
output channels of your system.
Summary of Voice and Virtual Track Limits of Pro Tools systems
Voices
Voices refers to the number of digital audio events that Pro Tools can play back at
one time. Here are the Voice limits of non-DAE/PowerMix Pro Tools systems:
System Voices
Project 8
Pro Tools with Audiomedia 4
Pro Tools with DAE/PowerMix systems CPU Speed/Voice limit
100 MHz or faster 16
80-100 MHz 12
<80 MHz 8
Virtual Tracks
The number of virtual tracks supported by each system varies, as described
below:
Pro Tools Project 55
Pro Tools with Audiomedia 12
Pro Tools with DAE PowerMix 64 (16 track configurations)
48 (12 track configurations)
32 (8 track configurations)
For Power Macintosh users who have multiple Pro Tools systems in the same or different CPUs, another important concept is Virtual Voices. This is explained in the following section.
Virtual Voices
Users who have a Digidesign audio card and a Power Macintosh w/DAE PowerMix can
take advantage of both systems’ capabilities by switching the Playback Engine. The
ability to switch Playback Engine lets you run Pro Tools on your Digidesign audio card
while recording (using the high-fidelity analog-to-digital convertors on the card/audio
interface), then switch to run Pro Tools with DAE PowerMix mode for up to 16-track
playback using the built-in audio outputs of the Power Macintosh. Edit and mix using
virtual tracks to get even more performance out of your system. When you’ve mixed
your Session and bounced it down to a master audio file(s), switch the Playback Engine
Pro Tools User’s Guide92
Page 93

back to your audio card/audio interface for maximum fidelity (using direct digital
output) when you record the master files out to DAT or other digital medium.
All Sessions are compatible with all available Playback Engines. If you switch Playback
Engines mid-Session, your Session will be saved, closed and reopened. When switching
back and forth between Playback Engines, if the number of allocated voices in the
Session exceeds the voice capability for the newly selected Playback Engine, all tracks
with voice allocations over the maximum allowable will be set to “voice off” and these
tracks are known as “virtual voices.” These tracks will still be displayed and may be
edited, but will not playback audio.
When you switch back to a Playback Engine with increased voice capability, the Pro
Tools Session will remember the previous voice allocation scheme for each track. If the
voice allocation for a specific track has been edited while using a different Playback
Engine, the original allocation prior to switching engines will not be retained.
Note: To switch Playback Engines before opening a Pro Tools Session, hold down the letter “N”
when you double-click/launch the Pro Tools application. This will cause the Playback Engine
dialog to appear, which will allow you to configure it prior to opening a Session.
Assigning Voices, Output Channels and Track Priority
In the next section you will learn how to apply what you have just learned about track
priority, voice assignment, output channel assignment, and output channels. In the
next several examples, you can be in either the Mix or Edit windows, since they share
most of the same basic track management functions.
C
To assign an audio track to a Voice:
• Click and hold the mouse button on the track’s Voice selector. A pop-up menu
appears.
Assigning a Voice via the Voice Selector on a Pro Tools with Audiomedia system (left)
and Pro Tools Project (right)
93Chapter C: Working with Tracks
Page 94

• Select the desired Voice and release the mouse button. The track is now
assigned to the Voice you have chosen.
Choosing an Output Mode and Assigning Outputs
As you know, Pro Tools has two different operating modes, Direct Outputs mode and
Stereo Mix Outputs mode. These modes allow you to configure Pro Tools to match your
particular studio setup. If you are using Pro Tools Project or Pro Tools 442, you can
utilize either mode.
In Direct Outputs mode, track outputs are routed to a single Audio Interface output: 1-8
(Pro Tools Project), 1-4 (Pro Tools 442). Panning controls are not available in Direct
Outputs mode.
In Stereo Mix Outputs mode, track outputs are routed to pairs of Audio Interface
outputs, either outputs 1-2 or 3-4, 5-6, or 7-8. Stereo Mix mode lets you set all your Pro
Tools tracks to the same output pair and work entirely in Pro Tools virtual mix environment. In addition, each track contains controls for panning between the selected
output pairs. You are not limited to a single pair of outputs. All output pairs remain
available, which becomes useful when creating “stem” and “M&E” (music and effects)
mixes, where it’s convenient to have audio elements in stereo pairs.
When using Pro Tools with DAE PowerMix as your Playback Engine, only Stereo Mix
Output mode is available.
To choose an output operating mode:
• From the Options menu, choose Preferences. A dialog appears allowing you to
choose and set several Session parameters.
• Choose the desired operating mode, Stereo Mix Outputs or Direct Outputs.
• If you choose Stereo Mix Outputs mode, track outputs are routed to a pair of
Audio Interface outputs, either outputs 1-2 or 3-4 (and so on with 8-voice
systems. In addition, each track contains controls for panning between the two
selected output pairs.
• If you choose Direct Outputs mode, track outputs are routed to a single Audio
Interface output: 1, 2, 3, etc. Panning controls are not available in Direct
Outputs mode.
To assign a track to an output channel:
• If I/O controls are not currently visible on your tracks, choose the Show I/O
View command from the Display menu.
Pro Tools User’s Guide94
Page 95

• Next, choose either the Show Extra Views in Mix Window or Show Extra Views in
Edit Window command, depending on which window you want to display
these controls in. The selected controls then appear on the new track (and all
other tracks in the window).
• Click and hold the mouse on the Output Selector button. A pop-up menu
appears.
• If you are in Stereo Mix Outputs mode, select the desired output pair, 1-2 or 34,etc., and release the mouse button. The track’s Voice will now be routed to
the chosen output channels.
• If you are in Direct Outputs mode (if available), select the desired output, 1, 2,
3, or 4, etc., and release the mouse button. The track’s Voice will now be routed
to the chosen output channel.
Setting the output of a Pro Tools Project audio track in Stereo Mix Outputs mode
C
Setting the output of a Pro Tools Project audio track in Direct Outputs mode
Changing a Track’s Playback Priority
As explained earlier, when more than one track is assigned to the same Voice, the leftmost (or top-most if you are in the Edit window) track has priority over the others
assigned to that Voice. Moving another track of the same Voice to a higher position will
then give that track priority.
95Chapter C: Working with Tracks
Page 96

You can change a track’s playback priority in either the Mix or Edit windows. In the
Mix window, you will be dragging the track to the left to raise its priority. In the Edit
window you will be dragging a track upwards to raise its priority.
To move a track’s position to change its playback priority (in the Edit window):
• Click and hold the mouse on the track’s Track Name button.
• Drag it above another track assigned to the same Voice. Though you can’t
actually see a track as you drag it, you’ll notice that as you approach a border of
another track, its edge begins to blink, indicating its position.
• Release the mouse button and the track will appear in the new location.
To move a track’s position to change its playback priority (in the Mix window):
• Click and hold the mouse on the track’s Track Name button.
• Drag it to the left of another track assigned to the same Voice. Though you
can’t actually see a track as you drag it, you’ll notice that as you approach a
border of another track, its edge begins to blink, indicating its position.
• Release the mouse button and the track will appear in the new location.
By experimenting with track priority, Voice assignment, and arranging Regions so that
they are positioned to “pop through” holes in higher priority tracks, you will find many
useful ways to apply virtual tracks and dynamic voice allocation to maximize the
capabilities of your Pro Tools system.
Setting MIDI Channels
When you load a MIDI file into a Pro Tools Session, the Regions all retain the MIDI
channel assignments that they had in the original sequence. Setting a MIDI track’s
Channel Selector to “Channel -” will allow the Region to play back on its original
channel. If however, you wish to “rechannelize” the Regions on a particular MIDI track,
you can do so with the MIDI Channel selector.
To assign all Regions on a track to a specific MIDI channel:
• Click and hold the mouse button on the track’s MIDI Channel selector. A popup menu appears:
Pro Tools User’s Guide96
Page 97

The MIDI Channel selector
• Select the desired MIDI Channel and release the mouse.
Soloing and Muting Tracks
Though a Pro Tools system can play back multiple Voices of audio simultaneously, you
may not always want to hear all of them playing at once. It is useful to be able to isolate
playback of one or more of the tracks at any given time for arranging purposes. To do
this, you will use the Solo and Mute buttons. These functions can be engaged at any
time during playback.
The Solo and Mute buttons affect MIDI as well as audio. In other words, if an audio track
is solo’d, all other tracks in the Session—audio and MIDI—will be muted. It is possible
to have more than one track soloed or muted at the same time in a Session.
As you learned previously, if you choose the Mute Frees Voice command in the Options
menu, a muted track’s voice will be allocated to the next highest priority track assigned
to the same voice. You should be aware that if you enable the Mute Frees Voice option,
there may a delay (ranging in length from one to several seconds depending on the
“size” of your system) between the time you mute or unmute a track and when you
hear the effect on playback.
C
The Solo and Mute buttons
97Chapter C: Working with Tracks
Page 98

To Solo a track:
• Click the Solo button on the track that you wish to solo. The button will be
highlighted and all other tracks will be muted (unless they, too, are soloed) and
the data on them will appear grayed-out.
• Click the Solo button again to turn off the Solo function.
Note: If you wish to unsolo all tracks, hold down the Option key when you click the Solo
button.
To Mute a track:
• Click the Mute button on the track that you wish to mute. The track will appear
grayed-out and be muted.
• Click the Mute button again to turn off the Mute function.
Note: If you wish to unmute all tracks, hold down the Option key when you click the Mute
button.
Note: Though you can’t automate Solo and Mute buttons, you can achieve the same results
using Pro Tools volume and pan automation. Volume and Pan automation are explained in
the Mixing chapter.
Adjusting the Volume and Panning of a Track
In the Mix window, each track has its own Volume and Pan slider for adjusting the
track’s playback volume and stereo placement. (Panning control for audio tracks is only
available if your Session is set to Stereo Mix Outputs mode.)
On audio tracks, the Volume selector controls the track’s output volume. On MIDI
tracks it controls MIDI volume on MIDI instruments that support this feature. If a track
has Regions with MIDI Volume Controller data (created in the original sequence), its
volume will be controlled by that data.
Pro Tools User’s Guide98
Page 99

The Volume slider
To Adjust the volume of a track:
• Click and drag the slider to the desired level. It has a range of -∞ (no output) to
+6dB (full scale output).
NOTE: Holding down the Option key and clicking a Volume slider will automatically set its
level to a default value of 0. In fact, holding down the Option while adjusting almost any of
Pro Tools’ on-screen controls will set the control to its default position.
The Pan Slider
To adjust the panning of a track:
• Click and drag the slider to the desired level. It has a range of <100 (full left) to
100> (full right).
Panning a track full right or full left sends it to a single output channel.
Note: You can automate volume and pan using Pro Tools automation capabilities. You can
also map MIDI Controllers to Pro Tools’ volume and pan sliders to control them remotely. Both
of these features are explained in the Mixing chapter.
C
99Chapter C: Working with Tracks
Page 100

Configuring the Display
An important part of managing tracks is deciding how you want to display information
on screen. Pro Tools gives you several options for configuring your recording and
editing environment. These options include hiding tracks, reducing the on-screen size
of tracks, selecting a Time Scale format, and more. Which options you choose depends
largely on the nature of your Session and your needs at the time. Listed below are your
options and how to implement them.
Show Mix Window
Choosing this command displays Pro Tools’ Mix window.
To show the Mix Window:
• Select Show Mix Window from the Display menu. Pro Tools’ Mix window
appears.
Note: (To quickly switch between the Mix Window and the Edit Window, press “Command
=”.)
You can choose to show Pro Tools’ Inputs/Outputs, Inserts (which contain Pro Tools’
two digital EQs), and/or Pro Tools’ two effects sends (when available) in either the Mix
window or Edit window.
To show Track Inputs/Outputs in the Mix window:
• From the Display menu, enable Show I/O View.
• From the Display menu, enable Show Extra Views in Mix Window.
To show Inserts (EQs) in the Mix window:
• From the Display menu, enable Show Inserts View.
• From the Display menu, enable Show Extra Views in Mix Window.
To show Sends in the Mix window (Pro Tools Project only):
• From the Display menu, enable Show Sends View.
• Then, again from the Display menu, choose Show Extra Views in Mix Window.
Pro Tools User’s Guide100
 Loading...