

Page 1

Pro Tools® Reference Guide
Version 12.5
Page 2

Legal Notices
© 2016 Avid Technology, Inc., (“Avid”), all rights reserved.
This guide may not be duplicated in whole or in part without
the written consent of Avid.
003, 192 Digital I/O, 192 I/O, 96 I/O, 96i I/O, Adrenaline,
AirSpeed, ALEX, Alienbrain, AME, AniMatte, Archive,
Archive II, Assistant Station, AudioPages, AudioStation,
AutoLoop, AutoSync, Avid, Avid Active, Avid Advanced
Response, Avid DNA, Avid DNxcel, Avid DNxHD, Avid DS
Assist Station, Avid Ignite, Avid Liquid, Avid Media Engine,
Avid Media Processor, Avid MEDIArray, Avid Mojo,
Avid Remote Response, Avid Unity, Avid Unity ISIS,
Avid VideoRAID, AvidRAID, AvidShare, AVIDstripe, AVX,
Beat Detective, Beauty Without The Bandwidth,
Beyond Reality, BF Essentials, Bomb Factory, Bruno, C|24,
CaptureManager, ChromaCurve, ChromaWheel,
Cineractive Engine, Cineractive Player, Cineractive Viewer,
Color Conductor, Command|8, Control|24, Cosmonaut Voice,
CountDown, d2, d3, AAE, D-Command, D-Control, Deko,
DekoCast, D-Fi, D-fx, Digi 002, Digi 003, DigiBase,
Digidesign, Digidesign Audio Engine, Digidesign
Development Partners, Digidesign Intelligent Noise
Reduction, Digidesign TDM Bus, DigiLink, DigiMeter,
DigiPanner, DigiProNet, DigiRack, DigiSerial, DigiSnake,
DigiSystem, Digital Choreography, Digital Nonlinear
Accelerator, DigiTest, DigiTranslator, DigiWear, DINR,
DNxchange, Do More, DPP-1, D-Show, DSP Manager,
DS-StorageCalc, DV Toolkit, DVD Complete, D-Verb, Eleven,
EM, Euphonix, EUCON, EveryPhase, Expander,
ExpertRender, Fairchild, FastBreak, FastTrack, FilmCutter,
FilmScribe, Flexevent, FluidMotion, Frame Chase, FXDeko,
HD Core, HD Process, HDpack, Home-to-Hollywood,
HyperSPACE, HyperSPACE HDCAM, iKnowledge, Impact,
Improv, iNEWS, iNEWS Assign, iNEWS ControlAir, InGame,
Instantwrite, Instinct, Intelligent Content Management,
Intelligent Digital Actor Technology, IntelliRender, Intelli-Sat,
Intelli-Sat Broadcasting Recording Manager, InterFX,
Interplay, inTONE, Intraframe, iS Expander, iS9, iS18, iS23,
iS36, ISIS, IsoSync, LaunchPad, LeaderPlus, LFX, Lightning,
Link & Sync, ListSync, LKT-200, Lo-Fi, MachineControl,
Magic Mask, Make Anything Hollywood,
make manage move|media, Marquee, MassivePack,
MassivePack Pro, Maxim, Mbox, Media Composer,
MediaFlow, MediaLog, MediaMix, MediaReader,
Media Recorder, MEDIArray, MediaServer, MediaShare,
MetaFuze, MetaSync, MIDI I/O, Mix Rack, Moviestar,
MultiShell, NaturalMatch, NewsCutter, NewsView,
NewsVision, Nitris, NL3D, NLP, NSDOS, NSWIN, OMF,
OMF Interchange, OMM, OnDVD, Open Media Framework,
Open Media Management, Painterly Effects, Palladiium,
Personal Q, PET, Podcast Factory, PowerSwap, PRE,
ProControl, ProEncode, Profiler, Pro Tools, Pro Tools|HD,
Pro Tools LE, Pro Tools M-Powered , P ro Transfer,
QuickPunch, QuietDrive, Realtime Motion Synthesis,
Recti-Fi, Reel Tape Delay, Reel Tape Flanger,
Reel Tape Saturation, Reprise, Res Rocket Surfer, Reso,
RetroLoop, Reverb One, ReVibe, Revolution, rS9, rS18,
RTAS, Salesview, Sci-Fi, Scorch, ScriptSync,
SecureProductionEnvironment, Shape-to-Shape,
ShuttleCase, Sibelius, SimulPlay, SimulRecord,
Slightly Rude Compressor, Smack!, Soft SampleCell,
Soft-Clip Limiter, SoundReplacer, SPACE, SPACEShift,
SpectraGraph, SpectraMatte, SteadyGlide, Streamf actory,
Streamgenie, StreamRAID, SubCap, Sundance,
Sundance Digital, SurroundScope, Symphony, SYNCHD,
SYNC I/O, Synchronic, SynchroScope, Syntax,
TDM FlexCable, TechFlix, Tel-Ray, Thunder, TimeLiner,
Titansync, Titan, TL Aggro, TL AutoPan, TL Drum Rehab,
TL Everyphase, TL Fauxlder, TL In Tune, TL MasterMeter,
TL Metro, TL Space, TL Utilities, tools for storytellers, Transit,
TransJammer, Trillium Lane Labs, TruTouch, UnityRAID,
Vari-Fi, Video the Web Way, VideoRAID, VideoSPACE,
VTEM, Work-N-Play, Xdeck, X-Form, and XMON are either
registered trademarks or trademarks of Avid Technology, Inc.
in the United States and/or other countries.
Bonjour, the Bonjour logo, and the Bonjour symbol are
trademarks of Apple Computer, Inc.
Thunderbolt and the Thunderbolt logo are trademarks of Intel
Corporation in the U.S. and/or other countries.
This product may be protected by one or more U.S. and nonU.S. patents. Details are available at www.avid.com/patents.
Product features, specifications, system requirements, and
availability are subject to change without notice.
Guide Part Number 9329-65691-00 REV A 3/16
Page 3

Contents
Part I Introduction to Pro Tools
Chapter 1. Welcome to Pro Tools. . . . . . . . . . . . . . . . . . . . . . . . . . . . . . . . . . . . . . . . . . . . . . . . . 3
System Requirements and Compatibility Information . . . . . . . . . . . . . . . . . . . . . . . . . . . . . . . 3
About www.avid.com . . . . . . . . . . . . . . . . . . . . . . . . . . . . . . . . . . . . . . . . . . . . . . . . . . . . . . 3
Conventions Used in Pro Tools Documentation. . . . . . . . . . . . . . . . . . . . . . . . . . . . . . . . . . . 4
Chapter 2. Pro Tools Concepts. . . . . . . . . . . . . . . . . . . . . . . . . . . . . . . . . . . . . . . . . . . . . . . . . . . 5
Hard Disk Audio Recording . . . . . . . . . . . . . . . . . . . . . . . . . . . . . . . . . . . . . . . . . . . . . . . . . 5
Nonlinear Editing . . . . . . . . . . . . . . . . . . . . . . . . . . . . . . . . . . . . . . . . . . . . . . . . . . . . . . . . . 5
Audio Engines. . . . . . . . . . . . . . . . . . . . . . . . . . . . . . . . . . . . . . . . . . . . . . . . . . . . . . . . . . . 5
Avid Video Engine . . . . . . . . . . . . . . . . . . . . . . . . . . . . . . . . . . . . . . . . . . . . . . . . . . . . . . . . 6
MIDI . . . . . . . . . . . . . . . . . . . . . . . . . . . . . . . . . . . . . . . . . . . . . . . . . . . . . . . . . . . . . . . . . . 6
Synchronization. . . . . . . . . . . . . . . . . . . . . . . . . . . . . . . . . . . . . . . . . . . . . . . . . . . . . . . . . . 7
Surround Sound . . . . . . . . . . . . . . . . . . . . . . . . . . . . . . . . . . . . . . . . . . . . . . . . . . . . . . . . . 7
Pro Tools Sessions . . . . . . . . . . . . . . . . . . . . . . . . . . . . . . . . . . . . . . . . . . . . . . . . . . . . . . . 7
Pro Tools Projects . . . . . . . . . . . . . . . . . . . . . . . . . . . . . . . . . . . . . . . . . . . . . . . . . . . . . . . 13
Tick-Based and Sample-Based Time . . . . . . . . . . . . . . . . . . . . . . . . . . . . . . . . . . . . . . . . . 14
System Resources. . . . . . . . . . . . . . . . . . . . . . . . . . . . . . . . . . . . . . . . . . . . . . . . . . . . . . . 15
Workspace Browsers. . . . . . . . . . . . . . . . . . . . . . . . . . . . . . . . . . . . . . . . . . . . . . . . . . . . . 17
AAF, MXF, and OMF . . . . . . . . . . . . . . . . . . . . . . . . . . . . . . . . . . . . . . . . . . . . . . . . . . . . . 17
Pro Tools and Media Composer Terminology . . . . . . . . . . . . . . . . . . . . . . . . . . . . . . . . . . . 19
Embedded Media and Linked Media. . . . . . . . . . . . . . . . . . . . . . . . . . . . . . . . . . . . . . . . . . 20
Chapter 3. Keyboard and Mouse Sho rtcuts. . . . . . . . . . . . . . . . . . . . . . . . . . . . . . . . . . . . . . . . 23
Mouse Shortcuts . . . . . . . . . . . . . . . . . . . . . . . . . . . . . . . . . . . . . . . . . . . . . . . . . . . . . . . . 23
Global Key Commands . . . . . . . . . . . . . . . . . . . . . . . . . . . . . . . . . . . . . . . . . . . . . . . . . . . 23
Keyboard Focus . . . . . . . . . . . . . . . . . . . . . . . . . . . . . . . . . . . . . . . . . . . . . . . . . . . . . . . . 24
Toolbar Focus . . . . . . . . . . . . . . . . . . . . . . . . . . . . . . . . . . . . . . . . . . . . . . . . . . . . . . . . . . 25
Numeric Keypad Modes. . . . . . . . . . . . . . . . . . . . . . . . . . . . . . . . . . . . . . . . . . . . . . . . . . . 26
Contents iii
Page 4

Chapter 4. Using Help. . . . . . . . . . . . . . . . . . . . . . . . . . . . . . . . . . . . . . . . . . . . . . . . . . . . . . . . . 29
Accessing Guides in Pro Tools Software . . . . . . . . . . . . . . . . . . . . . . . . . . . . . . . . . . . . . . 29
Accessing the Help System. . . . . . . . . . . . . . . . . . . . . . . . . . . . . . . . . . . . . . . . . . . . . . . . 29
Help Display. . . . . . . . . . . . . . . . . . . . . . . . . . . . . . . . . . . . . . . . . . . . . . . . . . . . . . . . . . . 30
Using the Contents and Index Tabs . . . . . . . . . . . . . . . . . . . . . . . . . . . . . . . . . . . . . . . . . . 30
Using the Search Tab . . . . . . . . . . . . . . . . . . . . . . . . . . . . . . . . . . . . . . . . . . . . . . . . . . . . 31
Search Guidelines. . . . . . . . . . . . . . . . . . . . . . . . . . . . . . . . . . . . . . . . . . . . . . . . . . . . . . . 32
Copying from a Help Topic . . . . . . . . . . . . . . . . . . . . . . . . . . . . . . . . . . . . . . . . . . . . . . . . 32
Printing Help Topics . . . . . . . . . . . . . . . . . . . . . . . . . . . . . . . . . . . . . . . . . . . . . . . . . . . . . 32
Part II System Configuration
Chapter 5. Pro Tools Systems . . . . . . . . . . . . . . . . . . . . . . . . . . . . . . . . . . . . . . . . . . . . . . . . . . 35
Pro Tools Software . . . . . . . . . . . . . . . . . . . . . . . . . . . . . . . . . . . . . . . . . . . . . . . . . . . . . . 35
Pro Tools | HD Software with Pro Tools | HDX Hardware . . . . . . . . . . . . . . . . . . . . . . . . . . 36
Pro Tools | HD Software with Pro Tools | HD Native Hardware . . . . . . . . . . . . . . . . . . . . . . 37
Supported Pro Tools HD Audio Interfaces . . . . . . . . . . . . . . . . . . . . . . . . . . . . . . . . . . . . . 38
Playback, Recording, and Voice Limits with Pro Tools | HD Software. . . . . . . . . . . . . . . . . . 39
Pro Tools HD Audio Interface Features . . . . . . . . . . . . . . . . . . . . . . . . . . . . . . . . . . . . . . . 40
Additional Pro Tools Hardware Options . . . . . . . . . . . . . . . . . . . . . . . . . . . . . . . . . . . . . . . 43
Additional Pro Tools HD Hardware Options . . . . . . . . . . . . . . . . . . . . . . . . . . . . . . . . . . . . 43
Pro Tools Software Options. . . . . . . . . . . . . . . . . . . . . . . . . . . . . . . . . . . . . . . . . . . . . . . . 44
Avid Application Manager . . . . . . . . . . . . . . . . . . . . . . . . . . . . . . . . . . . . . . . . . . . . . . . . . 44
Chapter 6. System Setup . . . . . . . . . . . . . . . . . . . . . . . . . . . . . . . . . . . . . . . . . . . . . . . . . . . . . . 45
Starting Up or Shutting Down Your System . . . . . . . . . . . . . . . . . . . . . . . . . . . . . . . . . . . . 45
Checking a Pro Tools | HDX or Pro Tools | HD Native System with DigiTest. . . . . . . . . . . . . 46
Configuring Pro Tools Software System Settings . . . . . . . . . . . . . . . . . . . . . . . . . . . . . . . . 46
Configuring MIDI Setup. . . . . . . . . . . . . . . . . . . . . . . . . . . . . . . . . . . . . . . . . . . . . . . . . . . 50
Configuring Hardware Settings in Pro Tools . . . . . . . . . . . . . . . . . . . . . . . . . . . . . . . . . . . . 51
Configuring Pro Tools | HDX and Pro Tools | HD Native Hardware Settings . . . . . . . . . . . . . 54
System Usage . . . . . . . . . . . . . . . . . . . . . . . . . . . . . . . . . . . . . . . . . . . . . . . . . . . . . . . . . 58
Pro Tools Reference Guideiv
Page 5

Chapter 7. I/O Setup. . . . . . . . . . . . . . . . . . . . . . . . . . . . . . . . . . . . . . . . . . . . . . . . . . . . . . . . . . . 61
Pro Tools Software Signal Paths. . . . . . . . . . . . . . . . . . . . . . . . . . . . . . . . . . . . . . . . . . . . . 62
I/O Setup Pages . . . . . . . . . . . . . . . . . . . . . . . . . . . . . . . . . . . . . . . . . . . . . . . . . . . . . . . . 64
I/O Setup Signal Path Controls. . . . . . . . . . . . . . . . . . . . . . . . . . . . . . . . . . . . . . . . . . . . . . 67
I/O Setup Buttons . . . . . . . . . . . . . . . . . . . . . . . . . . . . . . . . . . . . . . . . . . . . . . . . . . . . . . . 68
I/O Setup Options . . . . . . . . . . . . . . . . . . . . . . . . . . . . . . . . . . . . . . . . . . . . . . . . . . . . . . . 68
Customizing I/O Settings . . . . . . . . . . . . . . . . . . . . . . . . . . . . . . . . . . . . . . . . . . . . . . . . . . 73
Configuring Hardware in I/O Setup . . . . . . . . . . . . . . . . . . . . . . . . . . . . . . . . . . . . . . . . . . . 74
Signal Path Routing for Audio Input . . . . . . . . . . . . . . . . . . . . . . . . . . . . . . . . . . . . . . . . . . 76
Signal Path Routing for Audio Output . . . . . . . . . . . . . . . . . . . . . . . . . . . . . . . . . . . . . . . . . 77
Creating New Paths. . . . . . . . . . . . . . . . . . . . . . . . . . . . . . . . . . . . . . . . . . . . . . . . . . . . . . 78
Creating New Sub-Paths . . . . . . . . . . . . . . . . . . . . . . . . . . . . . . . . . . . . . . . . . . . . . . . . . . 80
Editing Paths. . . . . . . . . . . . . . . . . . . . . . . . . . . . . . . . . . . . . . . . . . . . . . . . . . . . . . . . . . . 82
Assigning Paths to Hardware I/O . . . . . . . . . . . . . . . . . . . . . . . . . . . . . . . . . . . . . . . . . . . . 86
Valid Paths and Requirements . . . . . . . . . . . . . . . . . . . . . . . . . . . . . . . . . . . . . . . . . . . . . . 87
Configuring Busses . . . . . . . . . . . . . . . . . . . . . . . . . . . . . . . . . . . . . . . . . . . . . . . . . . . . . . 87
Downmix and Upmix Output Busses to Outputs. . . . . . . . . . . . . . . . . . . . . . . . . . . . . . . . . . 92
I/O Settings Files . . . . . . . . . . . . . . . . . . . . . . . . . . . . . . . . . . . . . . . . . . . . . . . . . . . . . . . . 93
Session or Project Interchange and I/O Mapping. . . . . . . . . . . . . . . . . . . . . . . . . . . . . . . . . 95
I/O Settings and the Playback Engine. . . . . . . . . . . . . . . . . . . . . . . . . . . . . . . . . . . . . . . . . 97
Organize Track I/O Menus By Preference. . . . . . . . . . . . . . . . . . . . . . . . . . . . . . . . . . . . . . 97
I/O Setup in Session Notes. . . . . . . . . . . . . . . . . . . . . . . . . . . . . . . . . . . . . . . . . . . . . . . . . 98
Pro Tools Session Templates and I/O Settings . . . . . . . . . . . . . . . . . . . . . . . . . . . . . . . . . . 98
Chapter 8. Preferences . . . . . . . . . . . . . . . . . . . . . . . . . . . . . . . . . . . . . . . . . . . . . . . . . . . . . . . . 99
Display Preferences. . . . . . . . . . . . . . . . . . . . . . . . . . . . . . . . . . . . . . . . . . . . . . . . . . . . . . 99
Operation Preferences. . . . . . . . . . . . . . . . . . . . . . . . . . . . . . . . . . . . . . . . . . . . . . . . . . . 102
Editing Preferences . . . . . . . . . . . . . . . . . . . . . . . . . . . . . . . . . . . . . . . . . . . . . . . . . . . . . 107
Mixing Preferences . . . . . . . . . . . . . . . . . . . . . . . . . . . . . . . . . . . . . . . . . . . . . . . . . . . . . 109
Metering Preferences. . . . . . . . . . . . . . . . . . . . . . . . . . . . . . . . . . . . . . . . . . . . . . . . . . . . 112
Processing Preferences. . . . . . . . . . . . . . . . . . . . . . . . . . . . . . . . . . . . . . . . . . . . . . . . . . 116
MIDI Preferences. . . . . . . . . . . . . . . . . . . . . . . . . . . . . . . . . . . . . . . . . . . . . . . . . . . . . . . 119
Collaboration Preferences . . . . . . . . . . . . . . . . . . . . . . . . . . . . . . . . . . . . . . . . . . . . . . . . 121
Synchronization Preferences . . . . . . . . . . . . . . . . . . . . . . . . . . . . . . . . . . . . . . . . . . . . . . 121
Global and Local Preferences. . . . . . . . . . . . . . . . . . . . . . . . . . . . . . . . . . . . . . . . . . . . . . 123
Contents v
Page 6

Chapter 9. Peripherals . . . . . . . . . . . . . . . . . . . . . . . . . . . . . . . . . . . . . . . . . . . . . . . . . . . . . . . 125
Synchronization . . . . . . . . . . . . . . . . . . . . . . . . . . . . . . . . . . . . . . . . . . . . . . . . . . . . . . . 125
Machine Control . . . . . . . . . . . . . . . . . . . . . . . . . . . . . . . . . . . . . . . . . . . . . . . . . . . . . . . 127
MIDI Controllers . . . . . . . . . . . . . . . . . . . . . . . . . . . . . . . . . . . . . . . . . . . . . . . . . . . . . . . 129
Ethernet Controllers . . . . . . . . . . . . . . . . . . . . . . . . . . . . . . . . . . . . . . . . . . . . . . . . . . . . 130
Mic Preamps . . . . . . . . . . . . . . . . . . . . . . . . . . . . . . . . . . . . . . . . . . . . . . . . . . . . . . . . . 131
Satellites . . . . . . . . . . . . . . . . . . . . . . . . . . . . . . . . . . . . . . . . . . . . . . . . . . . . . . . . . . . . 132
VENUE. . . . . . . . . . . . . . . . . . . . . . . . . . . . . . . . . . . . . . . . . . . . . . . . . . . . . . . . . . . . . . 133
Chapter 10. Configuring MIDI. . . . . . . . . . . . . . . . . . . . . . . . . . . . . . . . . . . . . . . . . . . . . . . . . . 135
MIDI Studio Setup (Mac). . . . . . . . . . . . . . . . . . . . . . . . . . . . . . . . . . . . . . . . . . . . . . . . . 135
MIDI Studio Setup (Windows) . . . . . . . . . . . . . . . . . . . . . . . . . . . . . . . . . . . . . . . . . . . . . 138
Part III Sessions, Projects & Tracks
Chapter 11. Sessions and Projects . . . . . . . . . . . . . . . . . . . . . . . . . . . . . . . . . . . . . . . . . . . . . 143
Sessions and Projects. . . . . . . . . . . . . . . . . . . . . . . . . . . . . . . . . . . . . . . . . . . . . . . . . . . 143
Dashboard Window. . . . . . . . . . . . . . . . . . . . . . . . . . . . . . . . . . . . . . . . . . . . . . . . . . . . . 144
Bit Depths and Sample Rates . . . . . . . . . . . . . . . . . . . . . . . . . . . . . . . . . . . . . . . . . . . . . 146
Mixed Audio File Formats . . . . . . . . . . . . . . . . . . . . . . . . . . . . . . . . . . . . . . . . . . . . . . . . 147
Interleaved Multichannel and Multi-Mono Audio Files . . . . . . . . . . . . . . . . . . . . . . . . . . . . 148
Session Files and Folders . . . . . . . . . . . . . . . . . . . . . . . . . . . . . . . . . . . . . . . . . . . . . . . . 148
Pro Tools Projects. . . . . . . . . . . . . . . . . . . . . . . . . . . . . . . . . . . . . . . . . . . . . . . . . . . . . . 149
Creating a New Session or Project from a Template. . . . . . . . . . . . . . . . . . . . . . . . . . . . . 150
Creating a New Blank Session or Project . . . . . . . . . . . . . . . . . . . . . . . . . . . . . . . . . . . . . 151
Opening a Recent Session or Project. . . . . . . . . . . . . . . . . . . . . . . . . . . . . . . . . . . . . . . . 152
Opening Any Session . . . . . . . . . . . . . . . . . . . . . . . . . . . . . . . . . . . . . . . . . . . . . . . . . . . 153
Opening a Session . . . . . . . . . . . . . . . . . . . . . . . . . . . . . . . . . . . . . . . . . . . . . . . . . . . . . 153
Opening a Session or Project with Plug-Ins Deactivated . . . . . . . . . . . . . . . . . . . . . . . . . . 155
Saving Sessions and Projects . . . . . . . . . . . . . . . . . . . . . . . . . . . . . . . . . . . . . . . . . . . . . 155
Save Copy In . . . . . . . . . . . . . . . . . . . . . . . . . . . . . . . . . . . . . . . . . . . . . . . . . . . . . . . . . 157
Saving a Session as a Project . . . . . . . . . . . . . . . . . . . . . . . . . . . . . . . . . . . . . . . . . . . . . 161
Saving a Project as a Session . . . . . . . . . . . . . . . . . . . . . . . . . . . . . . . . . . . . . . . . . . . . . 162
Session Templates . . . . . . . . . . . . . . . . . . . . . . . . . . . . . . . . . . . . . . . . . . . . . . . . . . . . . 163
Project and Session Metadata. . . . . . . . . . . . . . . . . . . . . . . . . . . . . . . . . . . . . . . . . . . . . 164
Closing a Session or Project . . . . . . . . . . . . . . . . . . . . . . . . . . . . . . . . . . . . . . . . . . . . . . 165
Renaming Projects . . . . . . . . . . . . . . . . . . . . . . . . . . . . . . . . . . . . . . . . . . . . . . . . . . . . . 165
Pro Tools Reference Guidevi
Page 7

Remove Local Cache. . . . . . . . . . . . . . . . . . . . . . . . . . . . . . . . . . . . . . . . . . . . . . . . . . . . 166
Deleting Projects . . . . . . . . . . . . . . . . . . . . . . . . . . . . . . . . . . . . . . . . . . . . . . . . . . . . . . . 166
Restore Project from Cloud . . . . . . . . . . . . . . . . . . . . . . . . . . . . . . . . . . . . . . . . . . . . . . . 167
Open Latest Auto-Backup . . . . . . . . . . . . . . . . . . . . . . . . . . . . . . . . . . . . . . . . . . . . . . . . 167
Quitting or Exiting Pro Tools . . . . . . . . . . . . . . . . . . . . . . . . . . . . . . . . . . . . . . . . . . . . . . . 167
Chapter 12. Pro Tools Main Windows . . . . . . . . . . . . . . . . . . . . . . . . . . . . . . . . . . . . . . . . . . . 169
Mix Window. . . . . . . . . . . . . . . . . . . . . . . . . . . . . . . . . . . . . . . . . . . . . . . . . . . . . . . . . . . 170
Edit Window . . . . . . . . . . . . . . . . . . . . . . . . . . . . . . . . . . . . . . . . . . . . . . . . . . . . . . . . . . 172
Transport Window . . . . . . . . . . . . . . . . . . . . . . . . . . . . . . . . . . . . . . . . . . . . . . . . . . . . . . 177
MIDI Editor Windows . . . . . . . . . . . . . . . . . . . . . . . . . . . . . . . . . . . . . . . . . . . . . . . . . . . . 182
Score Editor Window . . . . . . . . . . . . . . . . . . . . . . . . . . . . . . . . . . . . . . . . . . . . . . . . . . . . 182
Workspace Browsers. . . . . . . . . . . . . . . . . . . . . . . . . . . . . . . . . . . . . . . . . . . . . . . . . . . . 182
Task Manager Window. . . . . . . . . . . . . . . . . . . . . . . . . . . . . . . . . . . . . . . . . . . . . . . . . . . 183
Artist Chat Window . . . . . . . . . . . . . . . . . . . . . . . . . . . . . . . . . . . . . . . . . . . . . . . . . . . . . 183
In-Application Web Browser . . . . . . . . . . . . . . . . . . . . . . . . . . . . . . . . . . . . . . . . . . . . . . . 184
Managing Windows . . . . . . . . . . . . . . . . . . . . . . . . . . . . . . . . . . . . . . . . . . . . . . . . . . . . . 186
How Window Configurations Work . . . . . . . . . . . . . . . . . . . . . . . . . . . . . . . . . . . . . . . . . . 190
Window Configuration Commands and Options. . . . . . . . . . . . . . . . . . . . . . . . . . . . . . . . . 193
Menus . . . . . . . . . . . . . . . . . . . . . . . . . . . . . . . . . . . . . . . . . . . . . . . . . . . . . . . . . . . . . . . 194
Tool Tips. . . . . . . . . . . . . . . . . . . . . . . . . . . . . . . . . . . . . . . . . . . . . . . . . . . . . . . . . . . . . 196
Chapter 13. Tracks. . . . . . . . . . . . . . . . . . . . . . . . . . . . . . . . . . . . . . . . . . . . . . . . . . . . . . . . . . . 197
Track Types . . . . . . . . . . . . . . . . . . . . . . . . . . . . . . . . . . . . . . . . . . . . . . . . . . . . . . . . . . 197
Track Channel Strips in the Mix Window . . . . . . . . . . . . . . . . . . . . . . . . . . . . . . . . . . . . . . 199
Track Controls and Indicators in the Edit Window . . . . . . . . . . . . . . . . . . . . . . . . . . . . . . . 203
Edit Window Views . . . . . . . . . . . . . . . . . . . . . . . . . . . . . . . . . . . . . . . . . . . . . . . . . . . . . 206
Track Level Meters . . . . . . . . . . . . . . . . . . . . . . . . . . . . . . . . . . . . . . . . . . . . . . . . . . . . . 209
Adjusting Track Width . . . . . . . . . . . . . . . . . . . . . . . . . . . . . . . . . . . . . . . . . . . . . . . . . . . 214
Creating Tracks. . . . . . . . . . . . . . . . . . . . . . . . . . . . . . . . . . . . . . . . . . . . . . . . . . . . . . . . 215
Track Views. . . . . . . . . . . . . . . . . . . . . . . . . . . . . . . . . . . . . . . . . . . . . . . . . . . . . . . . . . . 221
Setting Track Views in the Edit Window . . . . . . . . . . . . . . . . . . . . . . . . . . . . . . . . . . . . . . 223
Track Height . . . . . . . . . . . . . . . . . . . . . . . . . . . . . . . . . . . . . . . . . . . . . . . . . . . . . . . . . . 225
Track List . . . . . . . . . . . . . . . . . . . . . . . . . . . . . . . . . . . . . . . . . . . . . . . . . . . . . . . . . . . . 226
Track Name Right-Click Menu . . . . . . . . . . . . . . . . . . . . . . . . . . . . . . . . . . . . . . . . . . . . . 229
Assigning Audio Inputs and Outputs to Tracks. . . . . . . . . . . . . . . . . . . . . . . . . . . . . . . . . . 230
Track Priority and Voice Assignment. . . . . . . . . . . . . . . . . . . . . . . . . . . . . . . . . . . . . . . . . 235
Contents vii
Page 8

Assigning MIDI Inputs and Outputs to Tracks . . . . . . . . . . . . . . . . . . . . . . . . . . . . . . . . . . 237
Soloing and Muting Tracks . . . . . . . . . . . . . . . . . . . . . . . . . . . . . . . . . . . . . . . . . . . . . . . 239
Making Tracks Inactive . . . . . . . . . . . . . . . . . . . . . . . . . . . . . . . . . . . . . . . . . . . . . . . . . . 243
Color Coding for Tracks, Clips, Markers, and Groups . . . . . . . . . . . . . . . . . . . . . . . . . . . . 243
Chapter 14. Grouping Tracks. . . . . . . . . . . . . . . . . . . . . . . . . . . . . . . . . . . . . . . . . . . . . . . . . . 247
Grouping Tracks. . . . . . . . . . . . . . . . . . . . . . . . . . . . . . . . . . . . . . . . . . . . . . . . . . . . . . . 247
Group Controls . . . . . . . . . . . . . . . . . . . . . . . . . . . . . . . . . . . . . . . . . . . . . . . . . . . . . . . . 249
Working with Groups. . . . . . . . . . . . . . . . . . . . . . . . . . . . . . . . . . . . . . . . . . . . . . . . . . . . 252
Setting Group Attributes . . . . . . . . . . . . . . . . . . . . . . . . . . . . . . . . . . . . . . . . . . . . . . . . . 254
Enabling Groups. . . . . . . . . . . . . . . . . . . . . . . . . . . . . . . . . . . . . . . . . . . . . . . . . . . . . . . 256
Grouped Control Offsets . . . . . . . . . . . . . . . . . . . . . . . . . . . . . . . . . . . . . . . . . . . . . . . . . 258
Chapter 15. The Clip List . . . . . . . . . . . . . . . . . . . . . . . . . . . . . . . . . . . . . . . . . . . . . . . . . . . . . 259
Clip List Menu. . . . . . . . . . . . . . . . . . . . . . . . . . . . . . . . . . . . . . . . . . . . . . . . . . . . . . . . . 259
Sorting and Searching in the Clip List. . . . . . . . . . . . . . . . . . . . . . . . . . . . . . . . . . . . . . . . 261
Selecting Clips in the Clip List . . . . . . . . . . . . . . . . . . . . . . . . . . . . . . . . . . . . . . . . . . . . . 263
Previewing Clips in the Clip List. . . . . . . . . . . . . . . . . . . . . . . . . . . . . . . . . . . . . . . . . . . . 265
Stereo and Multichannel Clips in the Clip List . . . . . . . . . . . . . . . . . . . . . . . . . . . . . . . . . . 266
Naming and Displaying Clips in the Clip List. . . . . . . . . . . . . . . . . . . . . . . . . . . . . . . . . . . 267
Managing Clips in the Clip List. . . . . . . . . . . . . . . . . . . . . . . . . . . . . . . . . . . . . . . . . . . . . 269
Clip Name Right-Click Commands. . . . . . . . . . . . . . . . . . . . . . . . . . . . . . . . . . . . . . . . . . 270
Chapter 16. Workspace Browsers . . . . . . . . . . . . . . . . . . . . . . . . . . . . . . . . . . . . . . . . . . . . . . 271
Performance and Transfer Volumes. . . . . . . . . . . . . . . . . . . . . . . . . . . . . . . . . . . . . . . . . 273
Databases . . . . . . . . . . . . . . . . . . . . . . . . . . . . . . . . . . . . . . . . . . . . . . . . . . . . . . . . . . . 273
Workspace Browser Layout and Tools. . . . . . . . . . . . . . . . . . . . . . . . . . . . . . . . . . . . . . . 274
Working with Items in Workspace Browsers . . . . . . . . . . . . . . . . . . . . . . . . . . . . . . . . . . . 277
Indexing Workspace Databases. . . . . . . . . . . . . . . . . . . . . . . . . . . . . . . . . . . . . . . . . . . . 278
Workspace Browser Menu. . . . . . . . . . . . . . . . . . . . . . . . . . . . . . . . . . . . . . . . . . . . . . . . 279
Workspace Right-Click Menu. . . . . . . . . . . . . . . . . . . . . . . . . . . . . . . . . . . . . . . . . . . . . . 280
Workspace Browser Panes and Display. . . . . . . . . . . . . . . . . . . . . . . . . . . . . . . . . . . . . . 282
Column Data . . . . . . . . . . . . . . . . . . . . . . . . . . . . . . . . . . . . . . . . . . . . . . . . . . . . . . . . . 283
Selecting Items. . . . . . . . . . . . . . . . . . . . . . . . . . . . . . . . . . . . . . . . . . . . . . . . . . . . . . . . 286
Moving, Copying, Duplicating, and Removing Items . . . . . . . . . . . . . . . . . . . . . . . . . . . . . 286
Searching Items . . . . . . . . . . . . . . . . . . . . . . . . . . . . . . . . . . . . . . . . . . . . . . . . . . . . . . . 287
Waveforms. . . . . . . . . . . . . . . . . . . . . . . . . . . . . . . . . . . . . . . . . . . . . . . . . . . . . . . . . . . 292
Elastic Audio Files in the Workspace . . . . . . . . . . . . . . . . . . . . . . . . . . . . . . . . . . . . . . . . 293
Pro Tools Reference Guideviii
Page 9

Previewing Audio in Workspace Browsers. . . . . . . . . . . . . . . . . . . . . . . . . . . . . . . . . . . . . 294
Preview Controls and Indicators . . . . . . . . . . . . . . . . . . . . . . . . . . . . . . . . . . . . . . . . . . . . 295
Preview Modes . . . . . . . . . . . . . . . . . . . . . . . . . . . . . . . . . . . . . . . . . . . . . . . . . . . . . . . . 297
Linking and Relinking Files. . . . . . . . . . . . . . . . . . . . . . . . . . . . . . . . . . . . . . . . . . . . . . . . 299
Transfer Files . . . . . . . . . . . . . . . . . . . . . . . . . . . . . . . . . . . . . . . . . . . . . . . . . . . . . . . . . 300
Missing Files . . . . . . . . . . . . . . . . . . . . . . . . . . . . . . . . . . . . . . . . . . . . . . . . . . . . . . . . . . 301
Relink Window. . . . . . . . . . . . . . . . . . . . . . . . . . . . . . . . . . . . . . . . . . . . . . . . . . . . . . . . . 302
Catalogs . . . . . . . . . . . . . . . . . . . . . . . . . . . . . . . . . . . . . . . . . . . . . . . . . . . . . . . . . . . . . 306
Task Manager Window. . . . . . . . . . . . . . . . . . . . . . . . . . . . . . . . . . . . . . . . . . . . . . . . . . . 309
Chapter 17. Artist Chat Window . . . . . . . . . . . . . . . . . . . . . . . . . . . . . . . . . . . . . . . . . . . . . . . . 313
Profile Setup . . . . . . . . . . . . . . . . . . . . . . . . . . . . . . . . . . . . . . . . . . . . . . . . . . . . . . . . . . 314
Contacts . . . . . . . . . . . . . . . . . . . . . . . . . . . . . . . . . . . . . . . . . . . . . . . . . . . . . . . . . . . . . 315
Notifications. . . . . . . . . . . . . . . . . . . . . . . . . . . . . . . . . . . . . . . . . . . . . . . . . . . . . . . . . . . 316
Projects. . . . . . . . . . . . . . . . . . . . . . . . . . . . . . . . . . . . . . . . . . . . . . . . . . . . . . . . . . . . . . 317
Chat . . . . . . . . . . . . . . . . . . . . . . . . . . . . . . . . . . . . . . . . . . . . . . . . . . . . . . . . . . . . . . . . 320
Filtering Chat and Project Messages. . . . . . . . . . . . . . . . . . . . . . . . . . . . . . . . . . . . . . . . . 323
Editing Chat or Project Messages. . . . . . . . . . . . . . . . . . . . . . . . . . . . . . . . . . . . . . . . . . . 324
Emoticon and Notations Panel . . . . . . . . . . . . . . . . . . . . . . . . . . . . . . . . . . . . . . . . . . . . . 324
Pinning or Unpinning Items in the Projects and Chat Lists . . . . . . . . . . . . . . . . . . . . . . . . . 325
Taking Artist Chat Offline or Back Online. . . . . . . . . . . . . . . . . . . . . . . . . . . . . . . . . . . . . . 326
Chapter 18. Track Collabora t io n. . . . . . . . . . . . . . . . . . . . . . . . . . . . . . . . . . . . . . . . . . . . . . . . 327
Sharing Projects and Collaborating. . . . . . . . . . . . . . . . . . . . . . . . . . . . . . . . . . . . . . . . . . 327
What is Shared? . . . . . . . . . . . . . . . . . . . . . . . . . . . . . . . . . . . . . . . . . . . . . . . . . . . . . . . 327
What is Not Shared? . . . . . . . . . . . . . . . . . . . . . . . . . . . . . . . . . . . . . . . . . . . . . . . . . . . . 329
Project Ownership . . . . . . . . . . . . . . . . . . . . . . . . . . . . . . . . . . . . . . . . . . . . . . . . . . . . . . 329
Track Ownership and Conflicting Changes . . . . . . . . . . . . . . . . . . . . . . . . . . . . . . . . . . . . 329
Track Collaboration Tools in the Edit Window . . . . . . . . . . . . . . . . . . . . . . . . . . . . . . . . . . 329
Track Collaboration Tools in the Transport Window. . . . . . . . . . . . . . . . . . . . . . . . . . . . . . 330
Global Track Collaboration Tools . . . . . . . . . . . . . . . . . . . . . . . . . . . . . . . . . . . . . . . . . . . 330
Track Collaboration Track View in the Edit and Mix Windows. . . . . . . . . . . . . . . . . . . . . . . 333
Track Collaboration Controls . . . . . . . . . . . . . . . . . . . . . . . . . . . . . . . . . . . . . . . . . . . . . . 334
Ruler Collaboration Controls. . . . . . . . . . . . . . . . . . . . . . . . . . . . . . . . . . . . . . . . . . . . . . . 339
Contents ix
Page 10

Chapter 19. Importing and Exporting Session Data. . . . . . . . . . . . . . . . . . . . . . . . . . . . . . . . 343
Importing and Exporting Data to and from a Session or Project . . . . . . . . . . . . . . . . . . . . . 343
Audio Conversion on Import . . . . . . . . . . . . . . . . . . . . . . . . . . . . . . . . . . . . . . . . . . . . . . 344
Importing Files with Drag and Drop . . . . . . . . . . . . . . . . . . . . . . . . . . . . . . . . . . . . . . . . . 346
Importing Audio Files and Clips Using the Import Audio Command . . . . . . . . . . . . . . . . . . 349
Importing Audio from Audio CDs . . . . . . . . . . . . . . . . . . . . . . . . . . . . . . . . . . . . . . . . . . . 351
Importing ACID and REX Files. . . . . . . . . . . . . . . . . . . . . . . . . . . . . . . . . . . . . . . . . . . . . 352
Importing Multichannel Audio Files from a Field Recorder. . . . . . . . . . . . . . . . . . . . . . . . . 353
Import Options and Preferences . . . . . . . . . . . . . . . . . . . . . . . . . . . . . . . . . . . . . . . . . . . 354
Exporting Audio . . . . . . . . . . . . . . . . . . . . . . . . . . . . . . . . . . . . . . . . . . . . . . . . . . . . . . . 356
Importing MIDI Files . . . . . . . . . . . . . . . . . . . . . . . . . . . . . . . . . . . . . . . . . . . . . . . . . . . . 358
Exporting MIDI Files . . . . . . . . . . . . . . . . . . . . . . . . . . . . . . . . . . . . . . . . . . . . . . . . . . . . 360
Exporting Sibelius Files. . . . . . . . . . . . . . . . . . . . . . . . . . . . . . . . . . . . . . . . . . . . . . . . . . 362
Importing Session Data. . . . . . . . . . . . . . . . . . . . . . . . . . . . . . . . . . . . . . . . . . . . . . . . . . 362
Import Session Data Dialog. . . . . . . . . . . . . . . . . . . . . . . . . . . . . . . . . . . . . . . . . . . . . . . 364
Importing AAF and OMF Sequences . . . . . . . . . . . . . . . . . . . . . . . . . . . . . . . . . . . . . . . . 371
Import Options when Importing AAF or OMF Sequences. . . . . . . . . . . . . . . . . . . . . . . . . . 375
Media Composer | Software Export Options for Audio and Video Mixdowns. . . . . . . . . . . . 380
Audio File Format Compatibility Issues. . . . . . . . . . . . . . . . . . . . . . . . . . . . . . . . . . . . . . . 381
Exporting Pro Tools Tracks as AAF or OMF Sequences . . . . . . . . . . . . . . . . . . . . . . . . . . 382
Exporting Pro Tools Tracks as MXF Audio Files . . . . . . . . . . . . . . . . . . . . . . . . . . . . . . . . 385
Export Options when Exporting to AAF or OMF Sequences. . . . . . . . . . . . . . . . . . . . . . . . 388
Export Selected Tracks as New Session or Project. . . . . . . . . . . . . . . . . . . . . . . . . . . . . . 393
Exporting Session Information as Text. . . . . . . . . . . . . . . . . . . . . . . . . . . . . . . . . . . . . . . 394
Export Session Information as Text Options. . . . . . . . . . . . . . . . . . . . . . . . . . . . . . . . . . . 395
Importing and Exporting Clip Group Files . . . . . . . . . . . . . . . . . . . . . . . . . . . . . . . . . . . . . 396
Chapter 20. File and Session Management and Compatibility. . . . . . . . . . . . . . . . . . . . . . . 399
Audio File Management. . . . . . . . . . . . . . . . . . . . . . . . . . . . . . . . . . . . . . . . . . . . . . . . . . 399
WAV File Compatibility . . . . . . . . . . . . . . . . . . . . . . . . . . . . . . . . . . . . . . . . . . . . . . . . . . 402
Sharing Projects Offline. . . . . . . . . . . . . . . . . . . . . . . . . . . . . . . . . . . . . . . . . . . . . . . . . . 402
Sharing Sessions Created on Different Computer Platforms . . . . . . . . . . . . . . . . . . . . . . . 403
Sharing Sessions Created on Different Pro Tools Systems . . . . . . . . . . . . . . . . . . . . . . . . 406
Opening Pro Tools HD Sessions in Pro Tools. . . . . . . . . . . . . . . . . . . . . . . . . . . . . . . . . . 406
Sharing Sessions Created on Different Pro Tools Software Versions . . . . . . . . . . . . . . . . . 407
Language Compatibility. . . . . . . . . . . . . . . . . . . . . . . . . . . . . . . . . . . . . . . . . . . . . . . . . . 413
Pro Tools Reference Guidex
Page 11

Part IV Playback and Recording
Chapter 21. Playing Back Track Material . . . . . . . . . . . . . . . . . . . . . . . . . . . . . . . . . . . . . . . . . 417
Playback Location . . . . . . . . . . . . . . . . . . . . . . . . . . . . . . . . . . . . . . . . . . . . . . . . . . . . . . 418
Setting the Playback Location. . . . . . . . . . . . . . . . . . . . . . . . . . . . . . . . . . . . . . . . . . . . . . 420
Scrolling Options . . . . . . . . . . . . . . . . . . . . . . . . . . . . . . . . . . . . . . . . . . . . . . . . . . . . . . . 424
Playing Selections . . . . . . . . . . . . . . . . . . . . . . . . . . . . . . . . . . . . . . . . . . . . . . . . . . . . . . 425
Transport Fade-in . . . . . . . . . . . . . . . . . . . . . . . . . . . . . . . . . . . . . . . . . . . . . . . . . . . . . . 427
Playing Timeline and Edit Selections with the Playhead. . . . . . . . . . . . . . . . . . . . . . . . . . . 427
Playback Modes . . . . . . . . . . . . . . . . . . . . . . . . . . . . . . . . . . . . . . . . . . . . . . . . . . . . . . . 428
MIDI Beat Clock. . . . . . . . . . . . . . . . . . . . . . . . . . . . . . . . . . . . . . . . . . . . . . . . . . . . . . . . 433
MIDI Beat Clock Offsets. . . . . . . . . . . . . . . . . . . . . . . . . . . . . . . . . . . . . . . . . . . . . . . . . . 435
Chapter 22. Record Setup. . . . . . . . . . . . . . . . . . . . . . . . . . . . . . . . . . . . . . . . . . . . . . . . . . . . . 437
Record Setup Overview . . . . . . . . . . . . . . . . . . . . . . . . . . . . . . . . . . . . . . . . . . . . . . . . . . 437
Configuring Pro Tools Hardware I/O for Recording . . . . . . . . . . . . . . . . . . . . . . . . . . . . . . 438
Connecting a Sound Source. . . . . . . . . . . . . . . . . . . . . . . . . . . . . . . . . . . . . . . . . . . . . . . 440
Recording with a Click . . . . . . . . . . . . . . . . . . . . . . . . . . . . . . . . . . . . . . . . . . . . . . . . . . . 440
Setting the Session Meter and Tempo . . . . . . . . . . . . . . . . . . . . . . . . . . . . . . . . . . . . . . . 442
Record Modes. . . . . . . . . . . . . . . . . . . . . . . . . . . . . . . . . . . . . . . . . . . . . . . . . . . . . . . . . 445
Configuring Default Names for Audio Files and Clips. . . . . . . . . . . . . . . . . . . . . . . . . . . . . 448
Assigning Hardware I/O on a Track. . . . . . . . . . . . . . . . . . . . . . . . . . . . . . . . . . . . . . . . . . 449
Record Enabling Tracks. . . . . . . . . . . . . . . . . . . . . . . . . . . . . . . . . . . . . . . . . . . . . . . . . . 450
Working with Hard Drives for Recording . . . . . . . . . . . . . . . . . . . . . . . . . . . . . . . . . . . . . . 453
Selecting a Record Input Monitoring Mode . . . . . . . . . . . . . . . . . . . . . . . . . . . . . . . . . . . . 456
Setting Monitor Levels for Record and Playback . . . . . . . . . . . . . . . . . . . . . . . . . . . . . . . . 458
Reducing Monitoring Latency . . . . . . . . . . . . . . . . . . . . . . . . . . . . . . . . . . . . . . . . . . . . . . 458
Chapter 23. Audio Recording . . . . . . . . . . . . . . . . . . . . . . . . . . . . . . . . . . . . . . . . . . . . . . . . . . 461
Recording Shortcuts . . . . . . . . . . . . . . . . . . . . . . . . . . . . . . . . . . . . . . . . . . . . . . . . . . . . 463
Prime for Record Mode . . . . . . . . . . . . . . . . . . . . . . . . . . . . . . . . . . . . . . . . . . . . . . . . . . 464
Setting Punch and Loop Points. . . . . . . . . . . . . . . . . . . . . . . . . . . . . . . . . . . . . . . . . . . . . 464
Setting Pre- and Post-Roll . . . . . . . . . . . . . . . . . . . . . . . . . . . . . . . . . . . . . . . . . . . . . . . . 467
Audio Punch Recording Over a Specified Range. . . . . . . . . . . . . . . . . . . . . . . . . . . . . . . . 469
Recording Additional Takes . . . . . . . . . . . . . . . . . . . . . . . . . . . . . . . . . . . . . . . . . . . . . . . 470
Contents xi
Page 12

Loop Recording Audio. . . . . . . . . . . . . . . . . . . . . . . . . . . . . . . . . . . . . . . . . . . . . . . . . . . 473
Alternate Takes. . . . . . . . . . . . . . . . . . . . . . . . . . . . . . . . . . . . . . . . . . . . . . . . . . . . . . . . 474
Recording from a Digital Source . . . . . . . . . . . . . . . . . . . . . . . . . . . . . . . . . . . . . . . . . . . 478
Half-Speed Recording. . . . . . . . . . . . . . . . . . . . . . . . . . . . . . . . . . . . . . . . . . . . . . . . . . . 480
Chapter 24. MIDI Recording . . . . . . . . . . . . . . . . . . . . . . . . . . . . . . . . . . . . . . . . . . . . . . . . . . . 481
Recording from MIDI Devices . . . . . . . . . . . . . . . . . . . . . . . . . . . . . . . . . . . . . . . . . . . . . 481
Enabling Input Devices . . . . . . . . . . . . . . . . . . . . . . . . . . . . . . . . . . . . . . . . . . . . . . . . . . 482
MIDI Thru . . . . . . . . . . . . . . . . . . . . . . . . . . . . . . . . . . . . . . . . . . . . . . . . . . . . . . . . . . . . 483
MIDI Input Filter . . . . . . . . . . . . . . . . . . . . . . . . . . . . . . . . . . . . . . . . . . . . . . . . . . . . . . . 484
Input Quantize . . . . . . . . . . . . . . . . . . . . . . . . . . . . . . . . . . . . . . . . . . . . . . . . . . . . . . . . 484
Wait for Note . . . . . . . . . . . . . . . . . . . . . . . . . . . . . . . . . . . . . . . . . . . . . . . . . . . . . . . . . 484
MIDI Merge/Replace . . . . . . . . . . . . . . . . . . . . . . . . . . . . . . . . . . . . . . . . . . . . . . . . . . . . 485
Configuring MIDI or Instrument Tracks for Recording . . . . . . . . . . . . . . . . . . . . . . . . . . . . 486
Recording MIDI and Instrument Tracks . . . . . . . . . . . . . . . . . . . . . . . . . . . . . . . . . . . . . . 487
MIDI Punch Recording Over a Specified Range . . . . . . . . . . . . . . . . . . . . . . . . . . . . . . . . 489
Loop Recording MIDI . . . . . . . . . . . . . . . . . . . . . . . . . . . . . . . . . . . . . . . . . . . . . . . . . . . 491
MIDI Step Input. . . . . . . . . . . . . . . . . . . . . . . . . . . . . . . . . . . . . . . . . . . . . . . . . . . . . . . . 494
Recording System Exclusive Data . . . . . . . . . . . . . . . . . . . . . . . . . . . . . . . . . . . . . . . . . . 494
Recording Audio from a MIDI Instrument . . . . . . . . . . . . . . . . . . . . . . . . . . . . . . . . . . . . . 495
Chapter 25. Punch Recording Modes . . . . . . . . . . . . . . . . . . . . . . . . . . . . . . . . . . . . . . . . . . . 497
Introduction to Punch Recording Modes. . . . . . . . . . . . . . . . . . . . . . . . . . . . . . . . . . . . . . 497
Guidelines for Punch Recording. . . . . . . . . . . . . . . . . . . . . . . . . . . . . . . . . . . . . . . . . . . . 498
QuickPunch Audio Recording . . . . . . . . . . . . . . . . . . . . . . . . . . . . . . . . . . . . . . . . . . . . . 502
TrackPunch Audio Recording . . . . . . . . . . . . . . . . . . . . . . . . . . . . . . . . . . . . . . . . . . . . . 504
Using TrackPunch. . . . . . . . . . . . . . . . . . . . . . . . . . . . . . . . . . . . . . . . . . . . . . . . . . . . . . 506
DestructivePunch Audio Recording . . . . . . . . . . . . . . . . . . . . . . . . . . . . . . . . . . . . . . . . . 507
Using DestructivePunch . . . . . . . . . . . . . . . . . . . . . . . . . . . . . . . . . . . . . . . . . . . . . . . . . 511
Example TrackPunch and DestructivePunch Workflows . . . . . . . . . . . . . . . . . . . . . . . . . . 512
Pro Tools Reference Guidexii
Page 13

Part V Editing
Chapter 26. Editing Basics . . . . . . . . . . . . . . . . . . . . . . . . . . . . . . . . . . . . . . . . . . . . . . . . . . . . 517
Track Material . . . . . . . . . . . . . . . . . . . . . . . . . . . . . . . . . . . . . . . . . . . . . . . . . . . . . . . . . 518
Audio Clips and Waveforms . . . . . . . . . . . . . . . . . . . . . . . . . . . . . . . . . . . . . . . . . . . . . . . 519
MIDI Clips and MIDI Data. . . . . . . . . . . . . . . . . . . . . . . . . . . . . . . . . . . . . . . . . . . . . . . . . 523
Naming Clips. . . . . . . . . . . . . . . . . . . . . . . . . . . . . . . . . . . . . . . . . . . . . . . . . . . . . . . . . . 526
Displaying Clip Names, Clip Times, and Other Data. . . . . . . . . . . . . . . . . . . . . . . . . . . . . . 527
Multiple Undo . . . . . . . . . . . . . . . . . . . . . . . . . . . . . . . . . . . . . . . . . . . . . . . . . . . . . . . . . 528
Basic Editing Commands . . . . . . . . . . . . . . . . . . . . . . . . . . . . . . . . . . . . . . . . . . . . . . . . . 530
Editing Across Multiple Tracks . . . . . . . . . . . . . . . . . . . . . . . . . . . . . . . . . . . . . . . . . . . . . 533
Chapter 27. Edit Modes and Tools . . . . . . . . . . . . . . . . . . . . . . . . . . . . . . . . . . . . . . . . . . . . . . 535
Edit Modes . . . . . . . . . . . . . . . . . . . . . . . . . . . . . . . . . . . . . . . . . . . . . . . . . . . . . . . . . . . 535
Shuffle Mode. . . . . . . . . . . . . . . . . . . . . . . . . . . . . . . . . . . . . . . . . . . . . . . . . . . . . . . . . . 535
Slip Mode . . . . . . . . . . . . . . . . . . . . . . . . . . . . . . . . . . . . . . . . . . . . . . . . . . . . . . . . . . . . 536
Spot Mode. . . . . . . . . . . . . . . . . . . . . . . . . . . . . . . . . . . . . . . . . . . . . . . . . . . . . . . . . . . . 536
Grid Mode. . . . . . . . . . . . . . . . . . . . . . . . . . . . . . . . . . . . . . . . . . . . . . . . . . . . . . . . . . . . 537
Edit Tools . . . . . . . . . . . . . . . . . . . . . . . . . . . . . . . . . . . . . . . . . . . . . . . . . . . . . . . . . . . . 539
Zooming Options . . . . . . . . . . . . . . . . . . . . . . . . . . . . . . . . . . . . . . . . . . . . . . . . . . . . . . . 540
Zoom Buttons . . . . . . . . . . . . . . . . . . . . . . . . . . . . . . . . . . . . . . . . . . . . . . . . . . . . . . . . . 540
Zoomer Tool . . . . . . . . . . . . . . . . . . . . . . . . . . . . . . . . . . . . . . . . . . . . . . . . . . . . . . . . . . 542
Zoom Preset Buttons. . . . . . . . . . . . . . . . . . . . . . . . . . . . . . . . . . . . . . . . . . . . . . . . . . . . 544
Zoom Toggle. . . . . . . . . . . . . . . . . . . . . . . . . . . . . . . . . . . . . . . . . . . . . . . . . . . . . . . . . . 545
Zooming with a Scroll Wheel . . . . . . . . . . . . . . . . . . . . . . . . . . . . . . . . . . . . . . . . . . . . . . 548
Using the Trim Tools . . . . . . . . . . . . . . . . . . . . . . . . . . . . . . . . . . . . . . . . . . . . . . . . . . . . 549
Trim Tool. . . . . . . . . . . . . . . . . . . . . . . . . . . . . . . . . . . . . . . . . . . . . . . . . . . . . . . . . . . . . 549
Time Compression/ Expansion Trim Tool . . . . . . . . . . . . . . . . . . . . . . . . . . . . . . . . . . . . . 550
Scrub Trim Tool. . . . . . . . . . . . . . . . . . . . . . . . . . . . . . . . . . . . . . . . . . . . . . . . . . . . . . . . 551
Loop Trim Tool . . . . . . . . . . . . . . . . . . . . . . . . . . . . . . . . . . . . . . . . . . . . . . . . . . . . . . . . 552
Using the Selector Tool . . . . . . . . . . . . . . . . . . . . . . . . . . . . . . . . . . . . . . . . . . . . . . . . . . 554
Using the Grabber Tools . . . . . . . . . . . . . . . . . . . . . . . . . . . . . . . . . . . . . . . . . . . . . . . . . 555
Using the Smart Tool . . . . . . . . . . . . . . . . . . . . . . . . . . . . . . . . . . . . . . . . . . . . . . . . . . . . 556
Using the Scrubber Tool. . . . . . . . . . . . . . . . . . . . . . . . . . . . . . . . . . . . . . . . . . . . . . . . . . 559
Numeric Keypad Set to Shuttle. . . . . . . . . . . . . . . . . . . . . . . . . . . . . . . . . . . . . . . . . . . . . 561
Using the Pencil Tool. . . . . . . . . . . . . . . . . . . . . . . . . . . . . . . . . . . . . . . . . . . . . . . . . . . . 561
Edit/Tool Mode Keyboard Lock. . . . . . . . . . . . . . . . . . . . . . . . . . . . . . . . . . . . . . . . . . . . . 562
Contents xiii
Page 14

Chapter 28. Making Selections. . . . . . . . . . . . . . . . . . . . . . . . . . . . . . . . . . . . . . . . . . . . . . . . . 563
Linking or Unlinking Timeline and Edit Selections . . . . . . . . . . . . . . . . . . . . . . . . . . . . . . . 563
Linking or Unlinking Track and Edit Selections . . . . . . . . . . . . . . . . . . . . . . . . . . . . . . . . . 565
Selecting Track Material . . . . . . . . . . . . . . . . . . . . . . . . . . . . . . . . . . . . . . . . . . . . . . . . . 565
Timeline Selections. . . . . . . . . . . . . . . . . . . . . . . . . . . . . . . . . . . . . . . . . . . . . . . . . . . . . 575
Auto-Scrolling Tracks in the Mix and Edit Windows. . . . . . . . . . . . . . . . . . . . . . . . . . . . . . 578
Universe View. . . . . . . . . . . . . . . . . . . . . . . . . . . . . . . . . . . . . . . . . . . . . . . . . . . . . . . . . 579
Navigating a Pro Tools Session . . . . . . . . . . . . . . . . . . . . . . . . . . . . . . . . . . . . . . . . . . . . 581
Chapter 29. Editing Clips and Selec tions . . . . . . . . . . . . . . . . . . . . . . . . . . . . . . . . . . . . . . . . 585
Creating New Clips . . . . . . . . . . . . . . . . . . . . . . . . . . . . . . . . . . . . . . . . . . . . . . . . . . . . . 585
Healing Separated Clips . . . . . . . . . . . . . . . . . . . . . . . . . . . . . . . . . . . . . . . . . . . . . . . . . 588
Trimming Clips . . . . . . . . . . . . . . . . . . . . . . . . . . . . . . . . . . . . . . . . . . . . . . . . . . . . . . . . 589
Nudging Clips. . . . . . . . . . . . . . . . . . . . . . . . . . . . . . . . . . . . . . . . . . . . . . . . . . . . . . . . . 591
Quantizing Clips to Grid. . . . . . . . . . . . . . . . . . . . . . . . . . . . . . . . . . . . . . . . . . . . . . . . . . 594
Editing Stereo and Multichannel Tracks . . . . . . . . . . . . . . . . . . . . . . . . . . . . . . . . . . . . . . 594
Clip Gain . . . . . . . . . . . . . . . . . . . . . . . . . . . . . . . . . . . . . . . . . . . . . . . . . . . . . . . . . . . . 596
Consolidating Clips . . . . . . . . . . . . . . . . . . . . . . . . . . . . . . . . . . . . . . . . . . . . . . . . . . . . . 604
Compacting an Audio File . . . . . . . . . . . . . . . . . . . . . . . . . . . . . . . . . . . . . . . . . . . . . . . . 605
Processing Audio with AudioSuite Plug-Ins. . . . . . . . . . . . . . . . . . . . . . . . . . . . . . . . . . . . 605
TCE (Time Compression and Expansion) Edit To Timeline Selection. . . . . . . . . . . . . . . . . 606
Rating Clips . . . . . . . . . . . . . . . . . . . . . . . . . . . . . . . . . . . . . . . . . . . . . . . . . . . . . . . . . . 607
Chapter 30. Fades and Crossfades . . . . . . . . . . . . . . . . . . . . . . . . . . . . . . . . . . . . . . . . . . . . . 609
About Crossfades and Curves. . . . . . . . . . . . . . . . . . . . . . . . . . . . . . . . . . . . . . . . . . . . . 609
Fades Dialog . . . . . . . . . . . . . . . . . . . . . . . . . . . . . . . . . . . . . . . . . . . . . . . . . . . . . . . . . 611
Fade and Crossfade Preferences. . . . . . . . . . . . . . . . . . . . . . . . . . . . . . . . . . . . . . . . . . . 616
Fade Presets . . . . . . . . . . . . . . . . . . . . . . . . . . . . . . . . . . . . . . . . . . . . . . . . . . . . . . . . . 616
Creating Fades at the Beginnings and Ends of Clips. . . . . . . . . . . . . . . . . . . . . . . . . . . . . 617
Creating a Crossfade . . . . . . . . . . . . . . . . . . . . . . . . . . . . . . . . . . . . . . . . . . . . . . . . . . . 619
Using AutoFades . . . . . . . . . . . . . . . . . . . . . . . . . . . . . . . . . . . . . . . . . . . . . . . . . . . . . . 620
Creating Fades and Crossfades in Batches . . . . . . . . . . . . . . . . . . . . . . . . . . . . . . . . . . . 621
Moving and Nudging Fades and Crossfades. . . . . . . . . . . . . . . . . . . . . . . . . . . . . . . . . . . 622
Separating Clips that Include Fades or Crossfades. . . . . . . . . . . . . . . . . . . . . . . . . . . . . . 625
Trimming Clips that Include Fades or Crossfades. . . . . . . . . . . . . . . . . . . . . . . . . . . . . . . 626
Fade Boundaries and Shapes Displayed in Automation View . . . . . . . . . . . . . . . . . . . . . . 626
Pro Tools Reference Guidexiv
Page 15

Chapter 31. Playlists . . . . . . . . . . . . . . . . . . . . . . . . . . . . . . . . . . . . . . . . . . . . . . . . . . . . . . . . . 627
Working with Playlists . . . . . . . . . . . . . . . . . . . . . . . . . . . . . . . . . . . . . . . . . . . . . . . . . . . 627
Track Compositing. . . . . . . . . . . . . . . . . . . . . . . . . . . . . . . . . . . . . . . . . . . . . . . . . . . . . . 630
Playlists View . . . . . . . . . . . . . . . . . . . . . . . . . . . . . . . . . . . . . . . . . . . . . . . . . . . . . . . . . 632
Matching Alternate Clips . . . . . . . . . . . . . . . . . . . . . . . . . . . . . . . . . . . . . . . . . . . . . . . . . 638
Matching Criteria Options. . . . . . . . . . . . . . . . . . . . . . . . . . . . . . . . . . . . . . . . . . . . . . . . . 639
Selecting Alternate Takes on Tracks. . . . . . . . . . . . . . . . . . . . . . . . . . . . . . . . . . . . . . . . . 639
Automatically Create New Playlists when Loop Recording . . . . . . . . . . . . . . . . . . . . . . . . . 641
Expanding Alternate Takes to New Playlists or Tracks. . . . . . . . . . . . . . . . . . . . . . . . . . . . 641
Expanding Alternate Channels to New Playlists or Tracks . . . . . . . . . . . . . . . . . . . . . . . . . 642
Chapter 32. Beat Detective . . . . . . . . . . . . . . . . . . . . . . . . . . . . . . . . . . . . . . . . . . . . . . . . . . . . 645
Beat Detective and Source Material . . . . . . . . . . . . . . . . . . . . . . . . . . . . . . . . . . . . . . . . . 645
Uses for Beat Detective . . . . . . . . . . . . . . . . . . . . . . . . . . . . . . . . . . . . . . . . . . . . . . . . . . 645
Beat Detective Requirements. . . . . . . . . . . . . . . . . . . . . . . . . . . . . . . . . . . . . . . . . . . . . . 646
The Beat Detective Window . . . . . . . . . . . . . . . . . . . . . . . . . . . . . . . . . . . . . . . . . . . . . . . 647
Beat Detective Modes . . . . . . . . . . . . . . . . . . . . . . . . . . . . . . . . . . . . . . . . . . . . . . . . . . . 647
Defining a Beat Detective Selection . . . . . . . . . . . . . . . . . . . . . . . . . . . . . . . . . . . . . . . . . 648
Beat Detective Analysis . . . . . . . . . . . . . . . . . . . . . . . . . . . . . . . . . . . . . . . . . . . . . . . . . . 649
Calculating Tempo with Beat Detective. . . . . . . . . . . . . . . . . . . . . . . . . . . . . . . . . . . . . . . 650
Generating Beat Triggers. . . . . . . . . . . . . . . . . . . . . . . . . . . . . . . . . . . . . . . . . . . . . . . . . 650
Editing Beat Triggers . . . . . . . . . . . . . . . . . . . . . . . . . . . . . . . . . . . . . . . . . . . . . . . . . . . . 654
Generating Bar|Beat Markers with Beat Detective . . . . . . . . . . . . . . . . . . . . . . . . . . . . . . . 656
DigiGroove Templates . . . . . . . . . . . . . . . . . . . . . . . . . . . . . . . . . . . . . . . . . . . . . . . . . . . 657
Separating Clips with Beat Detective. . . . . . . . . . . . . . . . . . . . . . . . . . . . . . . . . . . . . . . . . 659
Conforming Clips with Beat Detective . . . . . . . . . . . . . . . . . . . . . . . . . . . . . . . . . . . . . . . . 660
Edit Smoothing . . . . . . . . . . . . . . . . . . . . . . . . . . . . . . . . . . . . . . . . . . . . . . . . . . . . . . . . 663
Detection (Normal) and Collection Mode. . . . . . . . . . . . . . . . . . . . . . . . . . . . . . . . . . . . . . 665
Contents xv
Page 16

Part VI MIDI
Chapter 33. MIDI Editing. . . . . . . . . . . . . . . . . . . . . . . . . . . . . . . . . . . . . . . . . . . . . . . . . . . . . . 671
MIDI Editing Options . . . . . . . . . . . . . . . . . . . . . . . . . . . . . . . . . . . . . . . . . . . . . . . . . . . . 671
Setting the Grid Value. . . . . . . . . . . . . . . . . . . . . . . . . . . . . . . . . . . . . . . . . . . . . . . . . . . 673
Using the Pencil Tool . . . . . . . . . . . . . . . . . . . . . . . . . . . . . . . . . . . . . . . . . . . . . . . . . . . 674
Inserting MIDI Notes . . . . . . . . . . . . . . . . . . . . . . . . . . . . . . . . . . . . . . . . . . . . . . . . . . . . 676
Inserting a Series of Notes. . . . . . . . . . . . . . . . . . . . . . . . . . . . . . . . . . . . . . . . . . . . . . . . 677
Manually Editing MIDI Notes . . . . . . . . . . . . . . . . . . . . . . . . . . . . . . . . . . . . . . . . . . . . . . 678
Using the Grabber Tools . . . . . . . . . . . . . . . . . . . . . . . . . . . . . . . . . . . . . . . . . . . . . . . . . 680
Time Compression/Expansion Trim Tool Functionality on MIDI Clips. . . . . . . . . . . . . . . . . 687
Continuous Controller Events . . . . . . . . . . . . . . . . . . . . . . . . . . . . . . . . . . . . . . . . . . . . . 689
Patch Select (Program and Bank Changes) . . . . . . . . . . . . . . . . . . . . . . . . . . . . . . . . . . . 692
System Exclusive Events. . . . . . . . . . . . . . . . . . . . . . . . . . . . . . . . . . . . . . . . . . . . . . . . . 696
Note and Controller Chasing . . . . . . . . . . . . . . . . . . . . . . . . . . . . . . . . . . . . . . . . . . . . . . 697
Offsetting MIDI Tracks. . . . . . . . . . . . . . . . . . . . . . . . . . . . . . . . . . . . . . . . . . . . . . . . . . . 698
Stuck Notes . . . . . . . . . . . . . . . . . . . . . . . . . . . . . . . . . . . . . . . . . . . . . . . . . . . . . . . . . . 700
Remove Duplicate Notes. . . . . . . . . . . . . . . . . . . . . . . . . . . . . . . . . . . . . . . . . . . . . . . . . 700
MIDI Real-Time Properties . . . . . . . . . . . . . . . . . . . . . . . . . . . . . . . . . . . . . . . . . . . . . . . 700
Real-Time Properties Settings. . . . . . . . . . . . . . . . . . . . . . . . . . . . . . . . . . . . . . . . . . . . . 702
Real-Time Properties on Tracks and Clips . . . . . . . . . . . . . . . . . . . . . . . . . . . . . . . . . . . . 704
Writing Real-Time Properties to Tracks or Clips . . . . . . . . . . . . . . . . . . . . . . . . . . . . . . . . 705
Real-Time Properties In the MIDI Event List. . . . . . . . . . . . . . . . . . . . . . . . . . . . . . . . . . . 706
Display of Real-Time Properties Effects . . . . . . . . . . . . . . . . . . . . . . . . . . . . . . . . . . . . . . 706
Chapter 34. MIDI Editors. . . . . . . . . . . . . . . . . . . . . . . . . . . . . . . . . . . . . . . . . . . . . . . . . . . . . . 707
Opening a MIDI Editor Window . . . . . . . . . . . . . . . . . . . . . . . . . . . . . . . . . . . . . . . . . . . . 708
MIDI Editor Window Toolbar . . . . . . . . . . . . . . . . . . . . . . . . . . . . . . . . . . . . . . . . . . . . . . 709
MIDI Editor Zoom Controls . . . . . . . . . . . . . . . . . . . . . . . . . . . . . . . . . . . . . . . . . . . . . . . 714
Track List . . . . . . . . . . . . . . . . . . . . . . . . . . . . . . . . . . . . . . . . . . . . . . . . . . . . . . . . . . . . 714
Group List. . . . . . . . . . . . . . . . . . . . . . . . . . . . . . . . . . . . . . . . . . . . . . . . . . . . . . . . . . . . 716
Timebase and Conductor Rulers . . . . . . . . . . . . . . . . . . . . . . . . . . . . . . . . . . . . . . . . . . . 717
Superimposed Notes View. . . . . . . . . . . . . . . . . . . . . . . . . . . . . . . . . . . . . . . . . . . . . . . . 717
Notes Pane Right-Click Menu . . . . . . . . . . . . . . . . . . . . . . . . . . . . . . . . . . . . . . . . . . . . . 720
Notation View . . . . . . . . . . . . . . . . . . . . . . . . . . . . . . . . . . . . . . . . . . . . . . . . . . . . . . . . . 722
Velocity, Controller, and Automation Lanes . . . . . . . . . . . . . . . . . . . . . . . . . . . . . . . . . . . 724
Pro Tools Reference Guidexvi
Page 17

Chapter 35. Score Editor. . . . . . . . . . . . . . . . . . . . . . . . . . . . . . . . . . . . . . . . . . . . . . . . . . . . . . 725
Opening the Score Editor Window . . . . . . . . . . . . . . . . . . . . . . . . . . . . . . . . . . . . . . . . . . 726
Edit Tools . . . . . . . . . . . . . . . . . . . . . . . . . . . . . . . . . . . . . . . . . . . . . . . . . . . . . . . . . . . . 726
Default Note Duration. . . . . . . . . . . . . . . . . . . . . . . . . . . . . . . . . . . . . . . . . . . . . . . . . . . . 729
Default Note On Velocity . . . . . . . . . . . . . . . . . . . . . . . . . . . . . . . . . . . . . . . . . . . . . . . . . 729
Play MIDI Notes When Editing . . . . . . . . . . . . . . . . . . . . . . . . . . . . . . . . . . . . . . . . . . . . . 729
Link Timeline and Edit Selection. . . . . . . . . . . . . . . . . . . . . . . . . . . . . . . . . . . . . . . . . . . . 729
Mirrored MIDI Editing. . . . . . . . . . . . . . . . . . . . . . . . . . . . . . . . . . . . . . . . . . . . . . . . . . . . 730
Double Bar . . . . . . . . . . . . . . . . . . . . . . . . . . . . . . . . . . . . . . . . . . . . . . . . . . . . . . . . . . . 730
Cursor Location. . . . . . . . . . . . . . . . . . . . . . . . . . . . . . . . . . . . . . . . . . . . . . . . . . . . . . . . 730
Grid. . . . . . . . . . . . . . . . . . . . . . . . . . . . . . . . . . . . . . . . . . . . . . . . . . . . . . . . . . . . . . . . . 731
Score Editor Window Target. . . . . . . . . . . . . . . . . . . . . . . . . . . . . . . . . . . . . . . . . . . . . . . 731
Score Editor Window Menu . . . . . . . . . . . . . . . . . . . . . . . . . . . . . . . . . . . . . . . . . . . . . . . 732
Customizable Toolbar . . . . . . . . . . . . . . . . . . . . . . . . . . . . . . . . . . . . . . . . . . . . . . . . . . . 733
Track List . . . . . . . . . . . . . . . . . . . . . . . . . . . . . . . . . . . . . . . . . . . . . . . . . . . . . . . . . . . . 733
Page Controls . . . . . . . . . . . . . . . . . . . . . . . . . . . . . . . . . . . . . . . . . . . . . . . . . . . . . . . . . 734
Score Editor Zoom Controls . . . . . . . . . . . . . . . . . . . . . . . . . . . . . . . . . . . . . . . . . . . . . . . 735
Notation Display Track Settings . . . . . . . . . . . . . . . . . . . . . . . . . . . . . . . . . . . . . . . . . . . . 736
Score Setup . . . . . . . . . . . . . . . . . . . . . . . . . . . . . . . . . . . . . . . . . . . . . . . . . . . . . . . . . . 737
Editing Notes. . . . . . . . . . . . . . . . . . . . . . . . . . . . . . . . . . . . . . . . . . . . . . . . . . . . . . . . . . 739
Score Editor Right-Click Menu . . . . . . . . . . . . . . . . . . . . . . . . . . . . . . . . . . . . . . . . . . . . . 742
Key Changes. . . . . . . . . . . . . . . . . . . . . . . . . . . . . . . . . . . . . . . . . . . . . . . . . . . . . . . . . . 743
Meter Changes . . . . . . . . . . . . . . . . . . . . . . . . . . . . . . . . . . . . . . . . . . . . . . . . . . . . . . . . 744
Chord Symbols and Diagrams . . . . . . . . . . . . . . . . . . . . . . . . . . . . . . . . . . . . . . . . . . . . . 744
Exporting Scores . . . . . . . . . . . . . . . . . . . . . . . . . . . . . . . . . . . . . . . . . . . . . . . . . . . . . . . 746
Printing Scores . . . . . . . . . . . . . . . . . . . . . . . . . . . . . . . . . . . . . . . . . . . . . . . . . . . . . . . . 746
Chapter 36. MIDI Event List. . . . . . . . . . . . . . . . . . . . . . . . . . . . . . . . . . . . . . . . . . . . . . . . . . . . 747
Opening the MIDI Event List. . . . . . . . . . . . . . . . . . . . . . . . . . . . . . . . . . . . . . . . . . . . . . . 747
Inserting Events in the MIDI Event List . . . . . . . . . . . . . . . . . . . . . . . . . . . . . . . . . . . . . . . 750
Editing Events in the MIDI Event List. . . . . . . . . . . . . . . . . . . . . . . . . . . . . . . . . . . . . . . . . 752
MIDI Event List Options . . . . . . . . . . . . . . . . . . . . . . . . . . . . . . . . . . . . . . . . . . . . . . . . . . 754
Contents xvii
Page 18

Part VII Arranging
Chapter 37. Time, Tempo, Meter , Key, and Chords . . . . . . . . . . . . . . . . . . . . . . . . . . . . . . . . 757
Timebase Rulers and Conductor Rulers. . . . . . . . . . . . . . . . . . . . . . . . . . . . . . . . . . . . . . 757
Main Time Scale. . . . . . . . . . . . . . . . . . . . . . . . . . . . . . . . . . . . . . . . . . . . . . . . . . . . . . . 759
The Sub Counter. . . . . . . . . . . . . . . . . . . . . . . . . . . . . . . . . . . . . . . . . . . . . . . . . . . . . . . 760
Tick-Based Timing . . . . . . . . . . . . . . . . . . . . . . . . . . . . . . . . . . . . . . . . . . . . . . . . . . . . . 761
Tick- and Sample-Based Timebases . . . . . . . . . . . . . . . . . . . . . . . . . . . . . . . . . . . . . . . . 762
Song Start Marker. . . . . . . . . . . . . . . . . . . . . . . . . . . . . . . . . . . . . . . . . . . . . . . . . . . . . . 764
Tempo . . . . . . . . . . . . . . . . . . . . . . . . . . . . . . . . . . . . . . . . . . . . . . . . . . . . . . . . . . . . . . 765
Graphic Tempo Editor. . . . . . . . . . . . . . . . . . . . . . . . . . . . . . . . . . . . . . . . . . . . . . . . . . . 771
Editing Tempo Events in the Tempo Editor. . . . . . . . . . . . . . . . . . . . . . . . . . . . . . . . . . . . 771
Changing the Linearity Display Mode. . . . . . . . . . . . . . . . . . . . . . . . . . . . . . . . . . . . . . . . 777
Tempo Operations Window . . . . . . . . . . . . . . . . . . . . . . . . . . . . . . . . . . . . . . . . . . . . . . . 778
Identify Beat Command. . . . . . . . . . . . . . . . . . . . . . . . . . . . . . . . . . . . . . . . . . . . . . . . . . 784
Meter Events . . . . . . . . . . . . . . . . . . . . . . . . . . . . . . . . . . . . . . . . . . . . . . . . . . . . . . . . . 787
Time Operations . . . . . . . . . . . . . . . . . . . . . . . . . . . . . . . . . . . . . . . . . . . . . . . . . . . . . . . 789
Change Meter. . . . . . . . . . . . . . . . . . . . . . . . . . . . . . . . . . . . . . . . . . . . . . . . . . . . . . . . . 789
Insert Time . . . . . . . . . . . . . . . . . . . . . . . . . . . . . . . . . . . . . . . . . . . . . . . . . . . . . . . . . . . 791
Cut Time . . . . . . . . . . . . . . . . . . . . . . . . . . . . . . . . . . . . . . . . . . . . . . . . . . . . . . . . . . . . 792
Move Song Start. . . . . . . . . . . . . . . . . . . . . . . . . . . . . . . . . . . . . . . . . . . . . . . . . . . . . . . 793
Renumbering Bars . . . . . . . . . . . . . . . . . . . . . . . . . . . . . . . . . . . . . . . . . . . . . . . . . . . . . 794
Key Signatures . . . . . . . . . . . . . . . . . . . . . . . . . . . . . . . . . . . . . . . . . . . . . . . . . . . . . . . . 794
Chord Symbols. . . . . . . . . . . . . . . . . . . . . . . . . . . . . . . . . . . . . . . . . . . . . . . . . . . . . . . . 798
Chapter 38. Memory Locations . . . . . . . . . . . . . . . . . . . . . . . . . . . . . . . . . . . . . . . . . . . . . . . . 801
Creating Memory Locations. . . . . . . . . . . . . . . . . . . . . . . . . . . . . . . . . . . . . . . . . . . . . . . 801
Creating Memory Locations During Playback . . . . . . . . . . . . . . . . . . . . . . . . . . . . . . . . . . 802
Properties of Memory Locations. . . . . . . . . . . . . . . . . . . . . . . . . . . . . . . . . . . . . . . . . . . . 803
Recalling Memory Locations . . . . . . . . . . . . . . . . . . . . . . . . . . . . . . . . . . . . . . . . . . . . . . 805
Editing Memory Locations . . . . . . . . . . . . . . . . . . . . . . . . . . . . . . . . . . . . . . . . . . . . . . . . 806
Deleting Memory Locations . . . . . . . . . . . . . . . . . . . . . . . . . . . . . . . . . . . . . . . . . . . . . . . 807
Copying Marker Memory Locations . . . . . . . . . . . . . . . . . . . . . . . . . . . . . . . . . . . . . . . . . 807
Memory Locations Window . . . . . . . . . . . . . . . . . . . . . . . . . . . . . . . . . . . . . . . . . . . . . . . 808
Memory Locations Commands and Options . . . . . . . . . . . . . . . . . . . . . . . . . . . . . . . . . . . 808
Pro Tools Reference Guidexviii
Page 19

Chapter 39. Arranging Clips . . . . . . . . . . . . . . . . . . . . . . . . . . . . . . . . . . . . . . . . . . . . . . . . . . . 811
Placing Clips from the Clip List on to Track Playlists . . . . . . . . . . . . . . . . . . . . . . . . . . . . . 811
Working with Multiple Items from the Clip List . . . . . . . . . . . . . . . . . . . . . . . . . . . . . . . . . . 812
Placing Clips at the Edit Insertion Point. . . . . . . . . . . . . . . . . . . . . . . . . . . . . . . . . . . . . . . 813
Aligning Clip Start Points . . . . . . . . . . . . . . . . . . . . . . . . . . . . . . . . . . . . . . . . . . . . . . . . . 814
Arranging with Transparent Clip Overlays . . . . . . . . . . . . . . . . . . . . . . . . . . . . . . . . . . . . . 815
Moving Clips with the Grabber Tools. . . . . . . . . . . . . . . . . . . . . . . . . . . . . . . . . . . . . . . . . 815
Snapping to the Preceding or Next Clip on a Track . . . . . . . . . . . . . . . . . . . . . . . . . . . . . . 816
Arranging Clips in Shuffle Mode . . . . . . . . . . . . . . . . . . . . . . . . . . . . . . . . . . . . . . . . . . . . 816
Arranging Clips in Slip Mode. . . . . . . . . . . . . . . . . . . . . . . . . . . . . . . . . . . . . . . . . . . . . . . 817
Spotting Clips . . . . . . . . . . . . . . . . . . . . . . . . . . . . . . . . . . . . . . . . . . . . . . . . . . . . . . . . . 818
Arranging Clips in Grid Mode . . . . . . . . . . . . . . . . . . . . . . . . . . . . . . . . . . . . . . . . . . . . . . 819
Replacing Audio Clips . . . . . . . . . . . . . . . . . . . . . . . . . . . . . . . . . . . . . . . . . . . . . . . . . . . 821
Sync Points. . . . . . . . . . . . . . . . . . . . . . . . . . . . . . . . . . . . . . . . . . . . . . . . . . . . . . . . . . . 823
Shift Command . . . . . . . . . . . . . . . . . . . . . . . . . . . . . . . . . . . . . . . . . . . . . . . . . . . . . . . . 824
Locking Clips. . . . . . . . . . . . . . . . . . . . . . . . . . . . . . . . . . . . . . . . . . . . . . . . . . . . . . . . . . 825
Muting/Unmuting Clips. . . . . . . . . . . . . . . . . . . . . . . . . . . . . . . . . . . . . . . . . . . . . . . . . . . 826
Stripping Silence from Clips . . . . . . . . . . . . . . . . . . . . . . . . . . . . . . . . . . . . . . . . . . . . . . . 826
Inserting Silence . . . . . . . . . . . . . . . . . . . . . . . . . . . . . . . . . . . . . . . . . . . . . . . . . . . . . . . 829
Duplicating Clips . . . . . . . . . . . . . . . . . . . . . . . . . . . . . . . . . . . . . . . . . . . . . . . . . . . . . . . 830
Repeating Clips. . . . . . . . . . . . . . . . . . . . . . . . . . . . . . . . . . . . . . . . . . . . . . . . . . . . . . . . 831
Chapter 40. Clip Loops and Groups. . . . . . . . . . . . . . . . . . . . . . . . . . . . . . . . . . . . . . . . . . . . . 833
Clip Looping . . . . . . . . . . . . . . . . . . . . . . . . . . . . . . . . . . . . . . . . . . . . . . . . . . . . . . . . . . 833
Creating Looped Clips . . . . . . . . . . . . . . . . . . . . . . . . . . . . . . . . . . . . . . . . . . . . . . . . . . . 834
Unlooping Clips . . . . . . . . . . . . . . . . . . . . . . . . . . . . . . . . . . . . . . . . . . . . . . . . . . . . . . . . 835
Editing Looped Clips . . . . . . . . . . . . . . . . . . . . . . . . . . . . . . . . . . . . . . . . . . . . . . . . . . . . 835
Clip Groups. . . . . . . . . . . . . . . . . . . . . . . . . . . . . . . . . . . . . . . . . . . . . . . . . . . . . . . . . . . 837
Creating Clip Groups . . . . . . . . . . . . . . . . . . . . . . . . . . . . . . . . . . . . . . . . . . . . . . . . . . . . 838
Ungrouping Clips. . . . . . . . . . . . . . . . . . . . . . . . . . . . . . . . . . . . . . . . . . . . . . . . . . . . . . . 839
Regrouping Clips. . . . . . . . . . . . . . . . . . . . . . . . . . . . . . . . . . . . . . . . . . . . . . . . . . . . . . . 839
Multitrack Clip Groups . . . . . . . . . . . . . . . . . . . . . . . . . . . . . . . . . . . . . . . . . . . . . . . . . . . 839
Clip Groups on Tick-Based Tracks . . . . . . . . . . . . . . . . . . . . . . . . . . . . . . . . . . . . . . . . . . 841
Editing Clip Groups . . . . . . . . . . . . . . . . . . . . . . . . . . . . . . . . . . . . . . . . . . . . . . . . . . . . . 842
Fades and Crossfades on Clip Groups . . . . . . . . . . . . . . . . . . . . . . . . . . . . . . . . . . . . . . . 843
Clip Groups and Clip Gain . . . . . . . . . . . . . . . . . . . . . . . . . . . . . . . . . . . . . . . . . . . . . . . . 844
Importing and Exporting Clip Group Files . . . . . . . . . . . . . . . . . . . . . . . . . . . . . . . . . . . . . 844
Contents xix
Page 20

Part VIII Processing
Chapter 41. AudioSuite Processing. . . . . . . . . . . . . . . . . . . . . . . . . . . . . . . . . . . . . . . . . . . . . 847
AudioSuite Menu. . . . . . . . . . . . . . . . . . . . . . . . . . . . . . . . . . . . . . . . . . . . . . . . . . . . . . . 847
AudioSuite Window. . . . . . . . . . . . . . . . . . . . . . . . . . . . . . . . . . . . . . . . . . . . . . . . . . . . . 847
AudioSuite Window Header. . . . . . . . . . . . . . . . . . . . . . . . . . . . . . . . . . . . . . . . . . . . . . . 848
AudioSuite Window Footer . . . . . . . . . . . . . . . . . . . . . . . . . . . . . . . . . . . . . . . . . . . . . . . 852
Using AudioSuite Plug-Ins. . . . . . . . . . . . . . . . . . . . . . . . . . . . . . . . . . . . . . . . . . . . . . . . 854
Conditions for AudioSuite Rendering with Handles, Fades, Clip Gain, and Metadata . . . . . 857
Chapter 42. Elastic Audio. . . . . . . . . . . . . . . . . . . . . . . . . . . . . . . . . . . . . . . . . . . . . . . . . . . . . 859
Example Elastic Audio Workflow . . . . . . . . . . . . . . . . . . . . . . . . . . . . . . . . . . . . . . . . . . . 860
Elastic Audio Tracks . . . . . . . . . . . . . . . . . . . . . . . . . . . . . . . . . . . . . . . . . . . . . . . . . . . . 864
Disabling Elastic Audio Tracks. . . . . . . . . . . . . . . . . . . . . . . . . . . . . . . . . . . . . . . . . . . . . 865
Elastic Audio Track Co ntrols . . . . . . . . . . . . . . . . . . . . . . . . . . . . . . . . . . . . . . . . . . . . . . 866
Elastic Audio Track Views . . . . . . . . . . . . . . . . . . . . . . . . . . . . . . . . . . . . . . . . . . . . . . . . 866
Elastic Audio Analysis. . . . . . . . . . . . . . . . . . . . . . . . . . . . . . . . . . . . . . . . . . . . . . . . . . . 867
Real-Time and Rendered Elastic Audio Processing . . . . . . . . . . . . . . . . . . . . . . . . . . . . . 868
Elastic Audio Plug-Ins . . . . . . . . . . . . . . . . . . . . . . . . . . . . . . . . . . . . . . . . . . . . . . . . . . . 869
Editing in Warp View. . . . . . . . . . . . . . . . . . . . . . . . . . . . . . . . . . . . . . . . . . . . . . . . . . . . 873
Warping Audio . . . . . . . . . . . . . . . . . . . . . . . . . . . . . . . . . . . . . . . . . . . . . . . . . . . . . . . . 875
Editing in Analysis View. . . . . . . . . . . . . . . . . . . . . . . . . . . . . . . . . . . . . . . . . . . . . . . . . . 880
Elastic Properties . . . . . . . . . . . . . . . . . . . . . . . . . . . . . . . . . . . . . . . . . . . . . . . . . . . . . . 882
Elastic Properties Window. . . . . . . . . . . . . . . . . . . . . . . . . . . . . . . . . . . . . . . . . . . . . . . . 882
Elastic Audio Clip-Based Pitch Shifting. . . . . . . . . . . . . . . . . . . . . . . . . . . . . . . . . . . . . . . 885
AudioSuite Processing and Elastic Audio Clips. . . . . . . . . . . . . . . . . . . . . . . . . . . . . . . . . 886
Moving Elastic Audio Between Tracks . . . . . . . . . . . . . . . . . . . . . . . . . . . . . . . . . . . . . . . 887
Approximate Waveforms . . . . . . . . . . . . . . . . . . . . . . . . . . . . . . . . . . . . . . . . . . . . . . . . . 888
Elastic Audio Preferences . . . . . . . . . . . . . . . . . . . . . . . . . . . . . . . . . . . . . . . . . . . . . . . . 888
Chapter 43. Commiting, Freezing, and Bouncing Tracks . . . . . . . . . . . . . . . . . . . . . . . . . . . 889
Commit Tracks . . . . . . . . . . . . . . . . . . . . . . . . . . . . . . . . . . . . . . . . . . . . . . . . . . . . . . . . 889
Track Freeze . . . . . . . . . . . . . . . . . . . . . . . . . . . . . . . . . . . . . . . . . . . . . . . . . . . . . . . . . 894
Bounce Track . . . . . . . . . . . . . . . . . . . . . . . . . . . . . . . . . . . . . . . . . . . . . . . . . . . . . . . . . 897
Pro Tools Reference Guidexx
Page 21

Chapter 44. Event Operations. . . . . . . . . . . . . . . . . . . . . . . . . . . . . . . . . . . . . . . . . . . . . . . . . . 898
Event Operations Window . . . . . . . . . . . . . . . . . . . . . . . . . . . . . . . . . . . . . . . . . . . . . . . . 898
Quantize Command. . . . . . . . . . . . . . . . . . . . . . . . . . . . . . . . . . . . . . . . . . . . . . . . . . . . . 899
Grid Quantize . . . . . . . . . . . . . . . . . . . . . . . . . . . . . . . . . . . . . . . . . . . . . . . . . . . . . . . . . 901
Grid Quantize Examples . . . . . . . . . . . . . . . . . . . . . . . . . . . . . . . . . . . . . . . . . . . . . . . . . 903
Groove Quantize . . . . . . . . . . . . . . . . . . . . . . . . . . . . . . . . . . . . . . . . . . . . . . . . . . . . . . . 905
Quantizing Elastic Audio . . . . . . . . . . . . . . . . . . . . . . . . . . . . . . . . . . . . . . . . . . . . . . . . . 909
Quantizing Audio Clips. . . . . . . . . . . . . . . . . . . . . . . . . . . . . . . . . . . . . . . . . . . . . . . . . . . 910
Quantizing Mixed Selections . . . . . . . . . . . . . . . . . . . . . . . . . . . . . . . . . . . . . . . . . . . . . . 910
Restore Performance Command. . . . . . . . . . . . . . . . . . . . . . . . . . . . . . . . . . . . . . . . . . . . 911
Flatten Performance . . . . . . . . . . . . . . . . . . . . . . . . . . . . . . . . . . . . . . . . . . . . . . . . . . . . 912
Change Duration . . . . . . . . . . . . . . . . . . . . . . . . . . . . . . . . . . . . . . . . . . . . . . . . . . . . . . . 914
Transpose. . . . . . . . . . . . . . . . . . . . . . . . . . . . . . . . . . . . . . . . . . . . . . . . . . . . . . . . . . . . 916
Select/Split Notes Command . . . . . . . . . . . . . . . . . . . . . . . . . . . . . . . . . . . . . . . . . . . . . . 918
Input Quantize Command. . . . . . . . . . . . . . . . . . . . . . . . . . . . . . . . . . . . . . . . . . . . . . . . . 920
Step Input Command. . . . . . . . . . . . . . . . . . . . . . . . . . . . . . . . . . . . . . . . . . . . . . . . . . . . 921
Chapter 45. HEAT. . . . . . . . . . . . . . . . . . . . . . . . . . . . . . . . . . . . . . . . . . . . . . . . . . . . . . . . . . . . 924
Enabling HEAT . . . . . . . . . . . . . . . . . . . . . . . . . . . . . . . . . . . . . . . . . . . . . . . . . . . . . . . . 924
About HEAT Processing. . . . . . . . . . . . . . . . . . . . . . . . . . . . . . . . . . . . . . . . . . . . . . . . . . 924
HEAT Controls . . . . . . . . . . . . . . . . . . . . . . . . . . . . . . . . . . . . . . . . . . . . . . . . . . . . . . . . 926
Master Bypass and Track Bypass Indicators . . . . . . . . . . . . . . . . . . . . . . . . . . . . . . . . . . . 927
A Note About Other Track Types . . . . . . . . . . . . . . . . . . . . . . . . . . . . . . . . . . . . . . . . . . . 928
DSP and Voice Requirements . . . . . . . . . . . . . . . . . . . . . . . . . . . . . . . . . . . . . . . . . . . . . 928
Using HEAT with a Control Surface . . . . . . . . . . . . . . . . . . . . . . . . . . . . . . . . . . . . . . . . . 929
Contents xxi
Page 22

Part IX Mixing
Chapter 46. Basic Mixing . . . . . . . . . . . . . . . . . . . . . . . . . . . . . . . . . . . . . . . . . . . . . . . . . . . . . 934
Mixing Concepts. . . . . . . . . . . . . . . . . . . . . . . . . . . . . . . . . . . . . . . . . . . . . . . . . . . . . . . 934
Metering and Calibration . . . . . . . . . . . . . . . . . . . . . . . . . . . . . . . . . . . . . . . . . . . . . . . . . 934
Signal Flow by Track Type. . . . . . . . . . . . . . . . . . . . . . . . . . . . . . . . . . . . . . . . . . . . . . . . 935
Audio Tracks and Signal Flow . . . . . . . . . . . . . . . . . . . . . . . . . . . . . . . . . . . . . . . . . . . . . 935
Auxiliary Input Tracks and Signal Flow. . . . . . . . . . . . . . . . . . . . . . . . . . . . . . . . . . . . . . . 936
Master Fader Tracks and Signal Flow . . . . . . . . . . . . . . . . . . . . . . . . . . . . . . . . . . . . . . . 937
Instrument Tracks and Signal Flow . . . . . . . . . . . . . . . . . . . . . . . . . . . . . . . . . . . . . . . . . 938
VCA Master Tracks. . . . . . . . . . . . . . . . . . . . . . . . . . . . . . . . . . . . . . . . . . . . . . . . . . . . . 939
Inserts . . . . . . . . . . . . . . . . . . . . . . . . . . . . . . . . . . . . . . . . . . . . . . . . . . . . . . . . . . . . . . 943
Configuring Inserts View in the Mix and Edit Windows. . . . . . . . . . . . . . . . . . . . . . . . . . . . 943
HEAT. . . . . . . . . . . . . . . . . . . . . . . . . . . . . . . . . . . . . . . . . . . . . . . . . . . . . . . . . . . . . . . 943
Stereo Pan Depth . . . . . . . . . . . . . . . . . . . . . . . . . . . . . . . . . . . . . . . . . . . . . . . . . . . . . . 944
Views in the Mix and Edit Windows . . . . . . . . . . . . . . . . . . . . . . . . . . . . . . . . . . . . . . . . . 944
Audio Input and Output Paths . . . . . . . . . . . . . . . . . . . . . . . . . . . . . . . . . . . . . . . . . . . . . 948
Sends. . . . . . . . . . . . . . . . . . . . . . . . . . . . . . . . . . . . . . . . . . . . . . . . . . . . . . . . . . . . . . . 950
Configuring Sends View in the Mix and Edit Windows. . . . . . . . . . . . . . . . . . . . . . . . . . . . 954
Sends View Options . . . . . . . . . . . . . . . . . . . . . . . . . . . . . . . . . . . . . . . . . . . . . . . . . . . . 954
Editing Sends in the Mix and Edit Windows (Individual Send Views) . . . . . . . . . . . . . . . . . 956
Bus Interrogation Options . . . . . . . . . . . . . . . . . . . . . . . . . . . . . . . . . . . . . . . . . . . . . . . . 959
Output Windows for Tracks and Sends. . . . . . . . . . . . . . . . . . . . . . . . . . . . . . . . . . . . . . . 960
Output Meters. . . . . . . . . . . . . . . . . . . . . . . . . . . . . . . . . . . . . . . . . . . . . . . . . . . . . . . . . 964
Signal Routing for Monitoring and Submixing . . . . . . . . . . . . . . . . . . . . . . . . . . . . . . . . . . 965
Delay Compensation. . . . . . . . . . . . . . . . . . . . . . . . . . . . . . . . . . . . . . . . . . . . . . . . . . . . 972
Dither. . . . . . . . . . . . . . . . . . . . . . . . . . . . . . . . . . . . . . . . . . . . . . . . . . . . . . . . . . . . . . . 979
Using an Ethernet Control Surface with Pro Tools. . . . . . . . . . . . . . . . . . . . . . . . . . . . . . . 980
Using a MIDI Control Surface with Pro Tools . . . . . . . . . . . . . . . . . . . . . . . . . . . . . . . . . . 981
Pro Tools Reference Guidexxii
Page 23

Chapter 47. Plug-In and Hardware Inserts. . . . . . . . . . . . . . . . . . . . . . . . . . . . . . . . . . . . . . . . 984
Types of Inserts. . . . . . . . . . . . . . . . . . . . . . . . . . . . . . . . . . . . . . . . . . . . . . . . . . . . . . . . 984
Viewing Inserts . . . . . . . . . . . . . . . . . . . . . . . . . . . . . . . . . . . . . . . . . . . . . . . . . . . . . . . . 986
Making Inserts Inactive. . . . . . . . . . . . . . . . . . . . . . . . . . . . . . . . . . . . . . . . . . . . . . . . . . . 987
Inserting Plug-Ins on Tracks. . . . . . . . . . . . . . . . . . . . . . . . . . . . . . . . . . . . . . . . . . . . . . . 988
Plug-In Menu Organization. . . . . . . . . . . . . . . . . . . . . . . . . . . . . . . . . . . . . . . . . . . . . . . . 990
Moving and Duplicating Plug-In and Hardware Inserts. . . . . . . . . . . . . . . . . . . . . . . . . . . . 992
Plug-In Windows . . . . . . . . . . . . . . . . . . . . . . . . . . . . . . . . . . . . . . . . . . . . . . . . . . . . . . . 992
Opening Plug-In Windows . . . . . . . . . . . . . . . . . . . . . . . . . . . . . . . . . . . . . . . . . . . . . . . . 995
Using Plug-In Window Controls . . . . . . . . . . . . . . . . . . . . . . . . . . . . . . . . . . . . . . . . . . . . 995
Editing Plug-In Controls . . . . . . . . . . . . . . . . . . . . . . . . . . . . . . . . . . . . . . . . . . . . . . . . . . 996
Plug-In Automation and Safe Modes. . . . . . . . . . . . . . . . . . . . . . . . . . . . . . . . . . . . . . . . . 997
Side-Chain Input . . . . . . . . . . . . . . . . . . . . . . . . . . . . . . . . . . . . . . . . . . . . . . . . . . . . . . . 997
Plug-In Presets . . . . . . . . . . . . . . . . . . . . . . . . . . . . . . . . . . . . . . . . . . . . . . . . . . . . . . . . 998
Plug-In Settings Dialog. . . . . . . . . . . . . . . . . . . . . . . . . . . . . . . . . . . . . . . . . . . . . . . . . . 1001
Plug-In Mapping . . . . . . . . . . . . . . . . . . . . . . . . . . . . . . . . . . . . . . . . . . . . . . . . . . . . . . 1003
Bypassing Plug-Ins . . . . . . . . . . . . . . . . . . . . . . . . . . . . . . . . . . . . . . . . . . . . . . . . . . . . 1008
Linking and Unlinking Controls on Multi-Mono Plug-Ins . . . . . . . . . . . . . . . . . . . . . . . . . . 1010
Using Hardware Inserts . . . . . . . . . . . . . . . . . . . . . . . . . . . . . . . . . . . . . . . . . . . . . . . . . 1010
Chapter 48. Automation. . . . . . . . . . . . . . . . . . . . . . . . . . . . . . . . . . . . . . . . . . . . . . . . . . . . . . 1014
Automation Overview. . . . . . . . . . . . . . . . . . . . . . . . . . . . . . . . . . . . . . . . . . . . . . . . . . . 1014
Automation Playlists. . . . . . . . . . . . . . . . . . . . . . . . . . . . . . . . . . . . . . . . . . . . . . . . . . . . 1015
Automation Modes. . . . . . . . . . . . . . . . . . . . . . . . . . . . . . . . . . . . . . . . . . . . . . . . . . . . . 1017
Automation Preferences. . . . . . . . . . . . . . . . . . . . . . . . . . . . . . . . . . . . . . . . . . . . . . . . . 1021
Viewing Automation. . . . . . . . . . . . . . . . . . . . . . . . . . . . . . . . . . . . . . . . . . . . . . . . . . . . 1023
Writing Automation. . . . . . . . . . . . . . . . . . . . . . . . . . . . . . . . . . . . . . . . . . . . . . . . . . . . . 1026
Automating Sends . . . . . . . . . . . . . . . . . . . . . . . . . . . . . . . . . . . . . . . . . . . . . . . . . . . . . 1028
Automating Plug-Ins. . . . . . . . . . . . . . . . . . . . . . . . . . . . . . . . . . . . . . . . . . . . . . . . . . . . 1029
AutoMatching Controls. . . . . . . . . . . . . . . . . . . . . . . . . . . . . . . . . . . . . . . . . . . . . . . . . . 1032
Priming Controls for Writing Automation in Latch Mode . . . . . . . . . . . . . . . . . . . . . . . . . . 1033
Enabling and Suspending Automation. . . . . . . . . . . . . . . . . . . . . . . . . . . . . . . . . . . . . . . 1035
Deleting Automation. . . . . . . . . . . . . . . . . . . . . . . . . . . . . . . . . . . . . . . . . . . . . . . . . . . . 1037
Thinning Automation . . . . . . . . . . . . . . . . . . . . . . . . . . . . . . . . . . . . . . . . . . . . . . . . . . . 1038
Drawing Automation. . . . . . . . . . . . . . . . . . . . . . . . . . . . . . . . . . . . . . . . . . . . . . . . . . . . 1039
Editing Automation. . . . . . . . . . . . . . . . . . . . . . . . . . . . . . . . . . . . . . . . . . . . . . . . . . . . . 1040
Cutting, Copying, and Pasting Automation. . . . . . . . . . . . . . . . . . . . . . . . . . . . . . . . . . . . 1045
Contents xxiii
Page 24

Glide Automation . . . . . . . . . . . . . . . . . . . . . . . . . . . . . . . . . . . . . . . . . . . . . . . . . . . . . 1049
Trimming Automation . . . . . . . . . . . . . . . . . . . . . . . . . . . . . . . . . . . . . . . . . . . . . . . . . . 1050
Writing Automation to the Start, End, or All of a Track or Selection . . . . . . . . . . . . . . . . . 1052
Writing Automation to the Next Breakpoint or to the Punch Point. . . . . . . . . . . . . . . . . . . 1054
Guidelines for “Write To” Commands . . . . . . . . . . . . . . . . . . . . . . . . . . . . . . . . . . . . . . . 1056
Overwriting or Extending Mute Automation. . . . . . . . . . . . . . . . . . . . . . . . . . . . . . . . . . . 1057
Creating Snapshot Automation . . . . . . . . . . . . . . . . . . . . . . . . . . . . . . . . . . . . . . . . . . . 1060
Previewing Automation . . . . . . . . . . . . . . . . . . . . . . . . . . . . . . . . . . . . . . . . . . . . . . . . . 1062
Capturing Automation . . . . . . . . . . . . . . . . . . . . . . . . . . . . . . . . . . . . . . . . . . . . . . . . . . 1064
VCA Master Track Automation. . . . . . . . . . . . . . . . . . . . . . . . . . . . . . . . . . . . . . . . . . . . 1067
Coalescing VCA Automation . . . . . . . . . . . . . . . . . . . . . . . . . . . . . . . . . . . . . . . . . . . . . 1068
Chapter 49. Mixdown. . . . . . . . . . . . . . . . . . . . . . . . . . . . . . . . . . . . . . . . . . . . . . . . . . . . . . . . 1070
Selecting Audio for Loops, Submixes, and Effects. . . . . . . . . . . . . . . . . . . . . . . . . . . . . . 1070
Using Dither . . . . . . . . . . . . . . . . . . . . . . . . . . . . . . . . . . . . . . . . . . . . . . . . . . . . . . . . . 1071
Bus Recording to Tracks . . . . . . . . . . . . . . . . . . . . . . . . . . . . . . . . . . . . . . . . . . . . . . . . 1072
Bounce to Disk . . . . . . . . . . . . . . . . . . . . . . . . . . . . . . . . . . . . . . . . . . . . . . . . . . . . . . . 1073
Bounce From Sends or Track Outputs . . . . . . . . . . . . . . . . . . . . . . . . . . . . . . . . . . . . . . 1074
Bounce Options . . . . . . . . . . . . . . . . . . . . . . . . . . . . . . . . . . . . . . . . . . . . . . . . . . . . . . 1075
Recording a Submix (with Bounce to Disk). . . . . . . . . . . . . . . . . . . . . . . . . . . . . . . . . . . 1082
Final Mixdown (with Bounce to Disk) . . . . . . . . . . . . . . . . . . . . . . . . . . . . . . . . . . . . . . . 1082
Mastering . . . . . . . . . . . . . . . . . . . . . . . . . . . . . . . . . . . . . . . . . . . . . . . . . . . . . . . . . . . 1083
Part X Surround
Chapter 50. Pro Tools Setup for Surround . . . . . . . . . . . . . . . . . . . . . . . . . . . . . . . . . . . . . . 1086
Surround Mixing in Pro Tools. . . . . . . . . . . . . . . . . . . . . . . . . . . . . . . . . . . . . . . . . . . . . 1086
Pro Tools Audio Connections for 5.1 Mixing . . . . . . . . . . . . . . . . . . . . . . . . . . . . . . . . . . 1086
7.1 and 7.0 Formats . . . . . . . . . . . . . . . . . . . . . . . . . . . . . . . . . . . . . . . . . . . . . . . . . . . 1087
Configuring Pro Tools for Multichannel Sessions . . . . . . . . . . . . . . . . . . . . . . . . . . . . . . 1087
Default I/O Selectors in I/O Setup . . . . . . . . . . . . . . . . . . . . . . . . . . . . . . . . . . . . . . . . . 1092
5.1 Track Layouts, Routing, and Metering . . . . . . . . . . . . . . . . . . . . . . . . . . . . . . . . . . . 1093
Pro Tools Reference Guidexxiv
Page 25

Chapter 51. Multichannel Tracks and Signal Routing . . . . . . . . . . . . . . . . . . . . . . . . . . . . . 1094
Multichannel Audio Tracks . . . . . . . . . . . . . . . . . . . . . . . . . . . . . . . . . . . . . . . . . . . . . . . 1094
Multichannel Signal Routing. . . . . . . . . . . . . . . . . . . . . . . . . . . . . . . . . . . . . . . . . . . . . . 1097
Paths in Surround Mixes . . . . . . . . . . . . . . . . . . . . . . . . . . . . . . . . . . . . . . . . . . . . . . . . 1100
Example Paths and Signal Routing for a Surround Mix . . . . . . . . . . . . . . . . . . . . . . . . . . 1102
Chapter 52. Surround Panning and Mixing . . . . . . . . . . . . . . . . . . . . . . . . . . . . . . . . . . . . . . 1108
Introduction to Pro Tools Surround Panning . . . . . . . . . . . . . . . . . . . . . . . . . . . . . . . . . . 1108
Output Windows . . . . . . . . . . . . . . . . . . . . . . . . . . . . . . . . . . . . . . . . . . . . . . . . . . . . . . 1109
Standard Controls . . . . . . . . . . . . . . . . . . . . . . . . . . . . . . . . . . . . . . . . . . . . . . . . . . . . . 1110
Surround Panner Controls . . . . . . . . . . . . . . . . . . . . . . . . . . . . . . . . . . . . . . . . . . . . . . . 1111
Panning Modes . . . . . . . . . . . . . . . . . . . . . . . . . . . . . . . . . . . . . . . . . . . . . . . . . . . . . . . 1113
Divergence and Center Percentage . . . . . . . . . . . . . . . . . . . . . . . . . . . . . . . . . . . . . . . . 1116
LFE Faders in Multichannel Panners. . . . . . . . . . . . . . . . . . . . . . . . . . . . . . . . . . . . . . . . 1119
Pan Playlists . . . . . . . . . . . . . . . . . . . . . . . . . . . . . . . . . . . . . . . . . . . . . . . . . . . . . . . . . 1119
Part XI Sync and Video
Chapter 53. Working with Synchroniza tio n. . . . . . . . . . . . . . . . . . . . . . . . . . . . . . . . . . . . . . 1122
Pro Tools Synchronization Options . . . . . . . . . . . . . . . . . . . . . . . . . . . . . . . . . . . . . . . . . 1122
Session Setup Window . . . . . . . . . . . . . . . . . . . . . . . . . . . . . . . . . . . . . . . . . . . . . . . . . 1124
Format Displays and Controls in the Session Setup Window . . . . . . . . . . . . . . . . . . . . . . 1125
SYNC Setup and Timecode Offsets in the Session Setup Window . . . . . . . . . . . . . . . . . . 1127
Timecode Settings in the Session Setup Window . . . . . . . . . . . . . . . . . . . . . . . . . . . . . . 1129
Preparing to Work with SMPTE . . . . . . . . . . . . . . . . . . . . . . . . . . . . . . . . . . . . . . . . . . . 1130
Configuring Pro Tools for SMPTE. . . . . . . . . . . . . . . . . . . . . . . . . . . . . . . . . . . . . . . . . . 1130
Pull Up and Pull Down . . . . . . . . . . . . . . . . . . . . . . . . . . . . . . . . . . . . . . . . . . . . . . . . . . 1132
Effect of Using Pull Up or Pull Down . . . . . . . . . . . . . . . . . . . . . . . . . . . . . . . . . . . . . . . . 1136
Generating Timecode. . . . . . . . . . . . . . . . . . . . . . . . . . . . . . . . . . . . . . . . . . . . . . . . . . . 1137
Using MIDI Machine Control. . . . . . . . . . . . . . . . . . . . . . . . . . . . . . . . . . . . . . . . . . . . . . 1138
Enabling MIDI Machine Control in Pro Tools . . . . . . . . . . . . . . . . . . . . . . . . . . . . . . . . . . 1139
MMC Transport Settings . . . . . . . . . . . . . . . . . . . . . . . . . . . . . . . . . . . . . . . . . . . . . . . . 1141
Setting Minimum Sync Delay . . . . . . . . . . . . . . . . . . . . . . . . . . . . . . . . . . . . . . . . . . . . . 1141
Remote Track Arming . . . . . . . . . . . . . . . . . . . . . . . . . . . . . . . . . . . . . . . . . . . . . . . . . . 1142
Spotting Clips to SMPTE Frame Locations . . . . . . . . . . . . . . . . . . . . . . . . . . . . . . . . . . . 1142
The Spot Dialog. . . . . . . . . . . . . . . . . . . . . . . . . . . . . . . . . . . . . . . . . . . . . . . . . . . . . . . 1143
Capturing Timecode. . . . . . . . . . . . . . . . . . . . . . . . . . . . . . . . . . . . . . . . . . . . . . . . . . . . 1144
Contents xxv
Page 26

Auto-Spotting Clips . . . . . . . . . . . . . . . . . . . . . . . . . . . . . . . . . . . . . . . . . . . . . . . . . . . . 1145
Using the Trim Tools in Spot Mode . . . . . . . . . . . . . . . . . . . . . . . . . . . . . . . . . . . . . . . . 1145
Time Stamping . . . . . . . . . . . . . . . . . . . . . . . . . . . . . . . . . . . . . . . . . . . . . . . . . . . . . . . 1145
Identifying a Synchronization Point. . . . . . . . . . . . . . . . . . . . . . . . . . . . . . . . . . . . . . . . . 1147
Troubleshooting SMPTE Synchronization. . . . . . . . . . . . . . . . . . . . . . . . . . . . . . . . . . . . 1147
Speed Correction for Film, NTSC Video, and PAL Video. . . . . . . . . . . . . . . . . . . . . . . . . 1149
Chapter 54. Working with Field Recorders in Pro Tools . . . . . . . . . . . . . . . . . . . . . . . . . . . 1152
Field Recorder and Production Workflow Terminology . . . . . . . . . . . . . . . . . . . . . . . . . . 1152
Supported Field Recorder Audio Files and Metadata. . . . . . . . . . . . . . . . . . . . . . . . . . . . 1154
Displaying Field Recorder Metadata in Pro Tools . . . . . . . . . . . . . . . . . . . . . . . . . . . . . . 1155
Workspace Support for Field Recorder Metadata . . . . . . . . . . . . . . . . . . . . . . . . . . . . . . 1155
Field Recorder Workflows . . . . . . . . . . . . . . . . . . . . . . . . . . . . . . . . . . . . . . . . . . . . . . . 1156
Ensuring Metadata of Source Files Have Been Preserved. . . . . . . . . . . . . . . . . . . . . . . . 1156
Receiving Source Files . . . . . . . . . . . . . . . . . . . . . . . . . . . . . . . . . . . . . . . . . . . . . . . . . 1157
Importing Source Files into Pro Tools. . . . . . . . . . . . . . . . . . . . . . . . . . . . . . . . . . . . . . . 1158
Designating Field Recorder Tracks . . . . . . . . . . . . . . . . . . . . . . . . . . . . . . . . . . . . . . . . 1160
Displaying Multichannel Files from a Field Recorder in the Clip List . . . . . . . . . . . . . . . . . 1160
Selecting a Matching Field Recorder Channel to Replace a Clip . . . . . . . . . . . . . . . . . . . 1161
Expanding Matching Field Recorder Channels to New Tracks. . . . . . . . . . . . . . . . . . . . . 1165
Determining the Method of Expanding Matching Field Recorder Channels to New Tracks. 1166
Film Workflow. . . . . . . . . . . . . . . . . . . . . . . . . . . . . . . . . . . . . . . . . . . . . . . . . . . . . . . . 1169
Video and Fully Non-Linear Workflows. . . . . . . . . . . . . . . . . . . . . . . . . . . . . . . . . . . . . . 1171
Chapter 55. Working with Video in Pro Tools. . . . . . . . . . . . . . . . . . . . . . . . . . . . . . . . . . . . 1174
Avid Video Engine (AVE). . . . . . . . . . . . . . . . . . . . . . . . . . . . . . . . . . . . . . . . . . . . . . . . 1174
QuickTime Movie Support in Pro Tools. . . . . . . . . . . . . . . . . . . . . . . . . . . . . . . . . . . . . . 1175
Before Starting Your Project . . . . . . . . . . . . . . . . . . . . . . . . . . . . . . . . . . . . . . . . . . . . . 1175
Pro Tools Video Preferences . . . . . . . . . . . . . . . . . . . . . . . . . . . . . . . . . . . . . . . . . . . . . 1176
Video Tracks . . . . . . . . . . . . . . . . . . . . . . . . . . . . . . . . . . . . . . . . . . . . . . . . . . . . . . . . 1176
Main Video Track . . . . . . . . . . . . . . . . . . . . . . . . . . . . . . . . . . . . . . . . . . . . . . . . . . . . . 1177
Video Track Controls and Indicators. . . . . . . . . . . . . . . . . . . . . . . . . . . . . . . . . . . . . . . . 1178
Video Track Settings. . . . . . . . . . . . . . . . . . . . . . . . . . . . . . . . . . . . . . . . . . . . . . . . . . . 1179
Locking Video Tracks . . . . . . . . . . . . . . . . . . . . . . . . . . . . . . . . . . . . . . . . . . . . . . . . . . 1185
Video Engine Rate . . . . . . . . . . . . . . . . . . . . . . . . . . . . . . . . . . . . . . . . . . . . . . . . . . . . 1185
Importing Video into Pro Tools. . . . . . . . . . . . . . . . . . . . . . . . . . . . . . . . . . . . . . . . . . . . 1186
Configuring Video Import Options . . . . . . . . . . . . . . . . . . . . . . . . . . . . . . . . . . . . . . . . . 1188
Pro Tools Reference Guidexxvi
Page 27

Importing Audio from a QuickTime Video Clip . . . . . . . . . . . . . . . . . . . . . . . . . . . . . . . . . 1189
Video Clips . . . . . . . . . . . . . . . . . . . . . . . . . . . . . . . . . . . . . . . . . . . . . . . . . . . . . . . . . . 1190
Showing or Hiding Video Clips in the Clip List . . . . . . . . . . . . . . . . . . . . . . . . . . . . . . . . . 1191
General Video Editing . . . . . . . . . . . . . . . . . . . . . . . . . . . . . . . . . . . . . . . . . . . . . . . . . . 1191
Renaming Video Disk Files. . . . . . . . . . . . . . . . . . . . . . . . . . . . . . . . . . . . . . . . . . . . . . . 1193
Video Clip Groups . . . . . . . . . . . . . . . . . . . . . . . . . . . . . . . . . . . . . . . . . . . . . . . . . . . . . 1193
Using the Video Window . . . . . . . . . . . . . . . . . . . . . . . . . . . . . . . . . . . . . . . . . . . . . . . . 1194
Browsing Video in the Video Universe Window . . . . . . . . . . . . . . . . . . . . . . . . . . . . . . . . 1196
Playback of High-Definition Video. . . . . . . . . . . . . . . . . . . . . . . . . . . . . . . . . . . . . . . . . . 1198
Optimized Video Playback . . . . . . . . . . . . . . . . . . . . . . . . . . . . . . . . . . . . . . . . . . . . . . . 1198
Tips for Optimizing Video Playback. . . . . . . . . . . . . . . . . . . . . . . . . . . . . . . . . . . . . . . . . 1199
Compensating for Video Monitoring Delays. . . . . . . . . . . . . . . . . . . . . . . . . . . . . . . . . . . 1199
Playing Video to an External Monitor Using a Video Peripheral . . . . . . . . . . . . . . . . . . . . 1200
Bouncing the Video Track to a QuickTime Movie. . . . . . . . . . . . . . . . . . . . . . . . . . . . . . . 1200
Part XII Satellite Systems
Chapter 56. Satellite Link. . . . . . . . . . . . . . . . . . . . . . . . . . . . . . . . . . . . . . . . . . . . . . . . . . . . . 1206
Satellite Link Requirements and Compatibility. . . . . . . . . . . . . . . . . . . . . . . . . . . . . . . . . 1206
Configuring Satellite Link . . . . . . . . . . . . . . . . . . . . . . . . . . . . . . . . . . . . . . . . . . . . . . . . 1207
Linking Satellite Systems . . . . . . . . . . . . . . . . . . . . . . . . . . . . . . . . . . . . . . . . . . . . . . . . 1209
Using Satellite Link with MachineControl. . . . . . . . . . . . . . . . . . . . . . . . . . . . . . . . . . . . . 1213
Control Surface Support for Satellite Link . . . . . . . . . . . . . . . . . . . . . . . . . . . . . . . . . . . . 1214
Chapter 57. Pro Tools Video Satellite. . . . . . . . . . . . . . . . . . . . . . . . . . . . . . . . . . . . . . . . . . . 1216
Video Output Options. . . . . . . . . . . . . . . . . . . . . . . . . . . . . . . . . . . . . . . . . . . . . . . . . . . 1216
Connecting a Pro Tools Video Satellite System . . . . . . . . . . . . . . . . . . . . . . . . . . . . . . . . 1216
Linking the Pro Tools Video Satellite System. . . . . . . . . . . . . . . . . . . . . . . . . . . . . . . . . . 1217
Contents xxvii
Page 28

Chapter 58. Avid Video Satellite. . . . . . . . . . . . . . . . . . . . . . . . . . . . . . . . . . . . . . . . . . . . . . . 1220
Video Output Options . . . . . . . . . . . . . . . . . . . . . . . . . . . . . . . . . . . . . . . . . . . . . . . . . . 1221
Supported Video Resolutions. . . . . . . . . . . . . . . . . . . . . . . . . . . . . . . . . . . . . . . . . . . . . 1222
Avid Video Satellite Workflows. . . . . . . . . . . . . . . . . . . . . . . . . . . . . . . . . . . . . . . . . . . . 1222
Using a Video Satellite in an Avid Interplay Environment. . . . . . . . . . . . . . . . . . . . . . . . . 1222
Connecting Pro Tools and a Video Satellite . . . . . . . . . . . . . . . . . . . . . . . . . . . . . . . . . . 1222
Matching Media Composer and Pro Tools Settings in a Video Satellite System . . . . . . . . 1224
Linking or Unlinking Pro Tools and a Video Satellite . . . . . . . . . . . . . . . . . . . . . . . . . . . . 1230
Capturing Audio and Video with a Video Satellite System . . . . . . . . . . . . . . . . . . . . . . . . 1232
Re-Digitizing an Existing Sequence . . . . . . . . . . . . . . . . . . . . . . . . . . . . . . . . . . . . . . . . 1233
Digitizing from an EDL. . . . . . . . . . . . . . . . . . . . . . . . . . . . . . . . . . . . . . . . . . . . . . . . . . 1233
Laying Back Audio and Video to Tape . . . . . . . . . . . . . . . . . . . . . . . . . . . . . . . . . . . . . . 1233
Index . . . . . . . . . . . . . . . . . . . . . . . . . . . . . . . . . . . . . . . . . . . . . . . . . . . . . . . . . . . . . . . . . . . . 1236
Pro Tools Reference Guidexxviii
Page 29

Part I: Introduction to
Pro Tools
Page 30

Page 31

Chapter 1: Welcome to Pro Tools
Welcome to Pro Tools®, brought to you by Avid®
Technology. Pro Tools Software integrates powerful multitrack digital audio and MIDI sequencing
features, giving you everything you need to record,
arrange, compose, edit, mix, and master professional quality audio and MIDI for music, video,
film, and multimedia.
System Requirements and Compatibility Information
Avid can only assure compatibility and provide
support for hardware and software it has tested and
approved.
For complete system requirements and a list of
qualified computers, operating systems, hard
drives, and third-party devices, visit:
www.avid.com/compatibility
About www.avid.com
The Avid website (www.avid.com) is your best
online source for information to help you get the
most out of your Pro Tools system. The following
are just a few of the services and features available.
Product Registration
online.
Support and Downloads
Success (technical support); download software
updates and the latest online manuals; browse the
Compatibility documents for system requirements;
search the online Knowledge Base or join the
worldwide Pro Tools community on the User
Conference.
Training and Education
courses available online or find out how you can
learn in a classroom setting at a certified Pro Tools
training center.
Products and Developers
ucts; download demo software or learn about our
Development Partners and their plug-ins, applications, and hardware.
Register your purchase
Contact Avid Customer
Study on your own using
Learn about Avid prod-
News and Events
sign up for a Pro Tools demo.
Get the latest news from Avid or
Chapter 1: Welcome to Pro Tools 3
Page 32

Conventions Used in Pro Tools Documentation
Pro Tools documentation uses the following
conventions to indicate menu choices, keyboard
commands, and mouse commands:
:
Convention Action
File > Save Choose Save from the
Control+N Hold down the Control
Control-click Hold down the Control
Right-click Click with the right
File menu
key and press the N key
key and click the mouse
button
mouse button
The names of Commands, Options, and Settings
that appear on-screen are in a different font.
The following symbols are used to highlight
important information:
User Tips are helpful hints for getting the
most from your Pro Tools system.
Important Notices include information that
could affect your Pro Tools session data or
the performance of your Pro Tools system.
Shortcuts show you useful keyboard or mouse
shortcuts.
Cross References point to related sections in
this guide and other Avid documentation.
Pro Tools Reference Guide4
Page 33

Chapter 2: Pro Tools Concepts
Before you begin to use Pro Tools, you may find it
helpful to review Pro Tools concepts. These concepts are the foundation of Pro Tools operation
and functionality.
Hard Disk Audio Recording
Hard disk recording is a nonlinear (or random access) medium—you can go immediately to any
spot in a recording without having to rewind or fast
forward.
This differs from tape-based recording, which is a
linear medium—where you need to rewind or fast
forward to hear a particular spot in a recording. To
rearrange or repeat material in a linear system, you
need to re-record it, or cut and splice it.
Nonlinear systems have several advantages. You
can easily rearrange or repeat parts of a recording
by making the hard disk read parts of the recording
in a different order or multiple times. In addition,
this re-arrangement is nondestructive, meaning
that the original recorded material is not altered.
Nonlinear Editing
Pro Tools is a nonlinear editing system that lets
you rearrange and mix recorded material nondestructively. Nonlinear editing simply means that
you can cut, copy, paste, move, delete, trim, and
otherwise rearrange any audio, MIDI, or video in
the Pro Tools Edit window.
Nonlinear editing provides significant advantages
over dubbing (re-recording), and cutting and splicing magnetic tape. It gives you the greatest possible flexibility for editing and arranging, and it is all
nondestructive and “undoable.” Additionally, with
nonlinear editing in Pro Tools, you will never introduce any degradation of audio fidelity as you
would with tape.
Audio Engines
Pro Tools can stream audio between the application and your audio hardware using the Avid Audio Engine (Avid audio hardware only), Core Audio (Mac only with third-party audio hardware), or
ASIO (Windows only with third-party audio hardware).
Avid Audio Engine
The Avid audio engine (AAE) is a real-time operating system for digital audio recording, playback,
and processing with Pro Tools and Avid audio
hardware. When you install Pro Tools, AAE is automatically installed on your system. AAE provides the foundation for much of the hard disk recording, digital signal processing, and mix
automation required by Pro Tools and other products from Avid and its Development Partners.
Chapter 2: Pro Tools Concepts 5
Page 34

Core Audio
Apple’s Core Audio provides audio connectivity
between software applications and audio hardware
on Mac OS X. Pro Tools software can use audio
interfaces with supported Core Audio drivers for
playback and recording with up to 32 channels of
I/O.
ASIO
Steinberg’s Audio Stream Input/Output (ASIO)
provides audio connectivity between software applications and audio hardware on Windows.
Pro Tools software can use audio interfaces with
supported ASIO drivers for playback and recording with up to 32 channels of I/O.
Avid Video Engine
Pro Tools uses the Avid Video Engine (AVE) for
real-time digital video playback. AVE is installed
automatically with Pro Tools. AVE provides compatibility and interoperability across the full product line of Avid audio and video editing solutions,
and provides support for a wide range of Avid HD
and SD MXF video formats on Pro Tools video
tracks without transcoding (including Avid
DNxHD
and SD MXF, and QuickTime media using Avid
Media Composer
Media Composer
qualified third-party video interfaces.
®
). AVE also lets you monitor Avid HD
®
|Nitris®DX,
®
| Mojo® DX, and other Avid
MIDI
MIDI (Musical Instrument Digital Interface) is a
communication protocol for musical instruments.
This industry standard enables connections between a variety of devices from different manufacturers. Examples of MIDI-compatible equipment
include synthesizers, drum machines, MIDI patch
bays, effects processors, MIDI interfaces, MIDI
control surfaces, and MIDI sequencers.
MIDI devices are equipped with 5-pin DIN connectors, labeled as either IN, OUT, or THRU. The
MIDI OUT port transmits messages. The MIDI IN
port receives messages. The MIDI THRU outputs
whatever is received from the IN port. MIDI devices are connected with MIDI cables that are
available at most music stores.
USB and FireWire-compatible MIDI devices send
and receive MIDI messages to and from the computer over USB or FireWire.
The MIDI protocol provides 16 channels of MIDI
per port. A single MIDI cable can transmit a separate set of messages for each of the 16 channels.
These 16 channels can correspond to separate
MIDI devices or to multiple channels within a single device (if the device is multitimbral). Each
channel can control a different instrument sound.
Pro Tools provides powerful MIDI sequencing capabilities. You can record, enter, edit, and play
back MIDI data on Pro Tools Instrument and
MIDI tracks. These actions can be done in the Edit
window, the MIDI Editor window, the Score Editor window, and the MIDI Event List.
MIDI data in Pro Tools can be anything from
MIDI note data (note number, on/off, velocity) to
System Exclusive (Sysex) messages. MIDI data
can be recorded or played back from both external
MIDI devices with a MIDI interface and other
MIDI software (such as instrument plug-ins and
ReWire client applications).
Pro Tools Reference Guide6
Page 35

Synchronization
Pro Tools Sessions
When you are working with multiple time-based
systems, such as Pro Tools and an external deck,
you want the systems to be synchronized. Synchronization is where one system outputs clock
source (such as timecode or MIDI Beat Clock) and
another device synchronizes to or follows that
clock source so that they work together. Pro Tools
can be synchronized to other devices (or other devices can be synchronized to Pro Tools) using
SMPTE/EBU timecode or MIDI Timecode.
Surround Sound
(Pro Tools | HD Software Only)
Surround sound simply means having one or more
speakers with discrete audio signals (channels)
placed behind the listener in addition to the typical
stereo pair.
There are multiple types of surround formats in use
(from three-channel LCR to 7.1, which has eight
channels).
The most common surround format is 5.1, which
refers to having 5 speakers and a sub-woofer (the
“.1”). 5.1 is used in movie theaters and home entertainment systems. Additionally, most DVDs are
mixed to 5.1. The standard speaker placement for
5.1 for surround monitoring is stereo left and right
speakers, and an additional center speaker in front,
two more stereo left and right speakers in the rear,
and the sub-woofer on the side.
Pro Tools | HD Software supports mixing in surround formats. In Pro Tools, each surround format
is considered to be a greater-than-stereo multi-
channel format.
When you start a project in Pro Tools, you create a
session.
Session Files
A session file is the document that Pro Tools creates when you choose
figure a new session. Pro Tools can open only one
session file at a time. The session file is named
with a .ptx (Pro Tools file) extension. Session files
contain maps of all elements associated with a
project, including audio files, MIDI data, and all
your edit and mix information. It is important to realize that a Pro Tools session file does not contain
any media files (audio or video). Instead, it references audio, video, MIDI, and other files. You can
make changes to a session and save those changes
in a new session file. This lets you create multiple
versions of a session or back up your editing and
mixing work.
Session file icon
File > New Session and con-
Tracks
Pro Tools tracks are where audio, MIDI, video,
and automation data are recorded and edited.
Pro Tools tracks also provide audio channels for
routing internal busses, and physical inputs and
outputs for audio and MIDI.
Chapter 2: Pro Tools Concepts 7
Page 36

Pro Tools provides multiple types of tracks:
Audio, Auxiliary Input, Master Fader, VCA
Master, MIDI, Instrument, and Video.
Video tracks support QuickTime movies (all
Pro Tools systems) and VC-1 video files (Windows only). Additionally, Pro Tools supports Avid
video using a the Avid Video Engine (AVE) either
natively or with a supported Avid video peripheral.
An individual video track can play back only one
type of video at a time.
Audio track in the Edit window (stereo track shown)
MIDI track in the Edit window
Video track in Frames view
Audio, MIDI, Instrument, and video track data can
be edited into clips or repeated in different locations to create loops, re-arrange sections or entire
songs, or to assemble tracks using material from
multiple takes.
Auxiliary Input tracks can route internal audio busses or physical inputs to internal busses or physical
outputs. Auxiliary Inputs are typically used for audio effects busses, audio throughput (monitoring),
and submixing.
Master Fader tracks provide controls for physical
audio output channels, including the volume level
of your mix, panning, and plug-in inserts.
VCA Master tracks provide control of tracks in a
Mix Group that has been assigned to the VCA
Master.
Audio, Auxiliary Input, Master Fader, and Instrument tracks can be mono, stereo, or multichannel
(Pro Tools HD only). When creating a new track,
select from the list of channel formats supported
by your system.
Voices
In Pro Tools, voices are unique, discrete audio
streams that can be routed to and from Pro Tools
audio tracks, and physical audio outputs and inputs
on your Pro Tools audio interfaces. The audio
paths to and from Pro Tools software routed to
Pro Tools hardware use voices. If you exceed the
number of available voices in your system, you
have effectively exceeded the available number of
audio paths. Voices are allocated dynamically.
Typically, each audio channel for each track in
your Pro Tools session uses a single voice. So, for
a mono audio track, a single voice is used; for a stereo audio track, two voices are used. When using
Punch Recording, two voices are needed for every
single audio channel (one for playback and one for
recording on punch in and out). In some situations,
with Pro Tools | HDX systems, more than one
voice may be necessary for a single channel (such
as when using host processing on a DSP bus).
On HDX systems, the number of available voices
is dependent on the amount of dedicated DSP processing in your system (see “Playback, Recording,
and Voice Limits with Pro Tools | HD Software”
on page 39).
Pro Tools Reference Guide8
Page 37
On all other Pro Tools systems, the full number of
available voices for your system may be limited by
the host processing power of your computer (see
“Pro Tools Capabilities with Different Hardware
Configurations” on page 36).
For more information about voicing in
Pro Tools, see “Track Priority and Voice
Assignment” on page 235.
Media Files
Pro Tools sessions create, import, export, and reference media files. Media files are audio, MIDI,
and video files. Audio and video media files are
stored separately from the Pro Tools session file.
MIDI data is stored in the session file.
MIDI Files
When you record or enter MIDI into a Pro Tools
session, all MIDI data is stored in the Pro Tools
session file. You can import and export MIDI files
to and from Pro Tools sessions, but MIDI
recorded or otherwise created in a Pro Tools
session does not automatically create new MIDI
files.
MIDI file icon
Video Files
Audio Files
When you record audio into a Pro Tools session,
audio files are created.
Audio file icon
Audio files for each session are stored in a folder
named “Audio Files.” Audio files are listed in the
Pro Tools Clip List and can appear in an audio
track. A section of an audio file can be defined as a
clip. See “Clips” on page 9.
When you record or import video into a Pro Tools
session, all video data is stored as the corresponding video file type (such as QuickTime). Video
files can be created in (or copied to) the Video
Files folder in the session folder. However, in most
cases, Pro Tools references video files that have
been captured by another application, such as Avid
®
Media Composer
|Software.
Clips
A clip is a segment of audio, MIDI, or video data.
A clip could be a drum loop, a guitar riff, a verse of
a song, a recording take, a sound effect, some dialog, or an entire sound file. Clips are especially
useful for arranging audio and MIDI. A clip can
also have associated automation data. In
Pro Tools, clips are created from audio files or
MIDI data, and can be arranged in audio and MIDI
track playlists. Clips can also be grouped (a “clip
of clips”) and looped (repeated).
Chapter 2: Pro Tools Concepts 9
Page 38

Audio clip
MIDI clip
Video clip (Frames view)
Playlists
A playlist is a sequence of clips arranged on an audio, MIDI, or video track. Tracks have edit play-
lists and automation playlists.
Playlist selector pop-up menu
On audio tracks, an edit playlist tells the hard disk
which audio clips to play in what order. For example, you can have separate audio clips for a song
introduction, the first verse, the first chorus, and so
on. You can also use the same audio clip to access
the same piece of audio multiple times at different
locations and not use additional disk space. Different versions of the same original audio can be used
in different places and have different effects applied. On MIDI and Instrument tracks, edit playlists can store multiple MIDI sequences (or performances) on a track.
Clip group (Mixed audio and MIDI multitrack clip
group)
Pro Tools Reference Guide10
A playlist can be made up of a single clip or many
separate clips. It can be made up of similar elements (such as clips from several different takes of
a solo), or dissimilar elements (such as several
sound effects).
You can create any number of alternate edit playlists for a track. This lets you assemble different
versions of performances or edits on a single track
and choose between them from the Playlists menu
on the track.
Page 39

Each audio, Auxiliary Input, Instrument, Master
Fader, and VCA track also has a single set of automation playlists. Automation playlists can include
volume, pan, mute, and each automation-enabled
control for the insert and send assignments on that
track.
MIDI controller data on Instrument and MIDI
tracks is always included as part of the track playlist.
Channels
The term channel is used to describe several related components of a Pro Tools system.
The first example of channel refers to a physical
input or output of your Pro Tools system. For example, Pro Tools | HD I/O provides up to 16 channels of audio input and output to a HDX or
Pro Tools | HD Native system, while the
Pro Tools | Mbox
to eight inputs and eight outputs.
The second use of the term channel refers to a
channel strip in the Pro Tools Mix window. Each
track in a Pro Tools session has a corresponding
channel strip in the Mix window.
®
Pro audio interface provides up
Audio and MIDI channel strips have similar controls, but those controls have slightly different effects. For example, audio, Auxiliary Input, and Instrument track channel strip faders control the
output gain to the mix bus for that channel, while
MIDI channel strip faders send MIDI volume data
(MIDI controller 7) to the selected MIDI instrument.
The term “MIDI channel” also describes a
separate aspect of MIDI operation. See
“MIDI” on page 6.
Channel strip in the Mix window (audio track)
Chapter 2: Pro Tools Concepts 11
Page 40

Signal Routing
Input from
stereo
bus path
Outputs to
stereo bus
path
Audio tracks
Inserts
Sends
Auxiliary Input
track
Signal Routing Options
Pro Tools provides software-based mixing and
signal routing controls for audio and MIDI. These
controls are located in the Mix window. Some of
these controls can also be accessed from the Edit
window.
A common audio signal routing task is to submix
multiple tracks to a single channel strip (such as an
Auxiliary Input) for shared processing and level
control. The following example shows two audio
tracks submixed to a stereo Auxiliary Input.
Signal routing options include the following:
Track Input and Output (I/O) Controls
The most
basic type of signal routing is track input and output. A track needs to have an assigned input path to
record audio, and an assigned mapped output path
in order to be audible through a hardware output.
Signals can also be routed to or from other tracks in
Pro Tools (or hardware inputs and outputs) using
internal busses.
Auxiliary Input and Master Fader Tracks
Auxiliary Inputs can be used as returns, submixers, and
bus masters. Master Fader tracks are used as bus
and output master level controls. Both Auxiliary
Input and Master Fader tracks can have plug-in and
hardware inserts.
MIDI Tracks
MIDI tracks are generally used for
routing MIDI from internal or external sources to
external MIDI devices. MIDI data can also be
routed to plug-ins on Auxiliary Inputs or Instrument tracks.
Instrument Tracks
Instrument tracks are the primary way to route MIDI to an instrument plug-in
and then route the plug-in’s sound to outputs,
sends and busses, or other inserts. Instrument
tracks can also be used to send MIDI to and monitor audio from external MIDI devices.
Submixing to an Auxiliary Input
Pro Tools Reference Guide12
Sends
Sends route audio from tracks to hardware
outputs, or to internal busses that are in turn routed
to other tracks within Pro Tools. MIDI, Master
Fader, and VCA Master tracks do not have sends.
Plug-In and Hardware Inserts
Plug-In processing
occurs completely within the Pro Tools system.
Hardware inserts use audio interface inputs and
outputs for traditional insert routing to and from
external effects and other devices. MIDI and VCA
Master tracks do not have inserts.
Page 41

Instrument Plug-Ins
Instrument plug-ins are different from processing plug-ins in that they generate audio rather than process the audio signal from
a track’s audio input or from hard disk. Instrument
plug-ins are typically played by MIDI.
Paths
Paths are any routing option in Pro Tools,
including internal or external inputs, outputs, busses, and inserts. Pro Tools lets you name these
paths, and these path names appear in the Audio
Input and Output Path selectors and other menus.
For more information, see Chapter 7, “I/O Setup.”
You can only collaborate with projects, never with
sessions. Otherwise, projects work just like sessions. Projects have all of the same recording, editing, mixing, and processing capabilities as do
sessions.
Project data and media are bundled and cached on
local storage, but you cannot open a project by
navigating through the file system. You can only
access projects through the Pro Tools Dashboard.
Projects are differentiated from sessions by their
file icon.
Mixing Formats
Sessions can include combinations of mono, stereo, and greater-than-stereo multichannel format tracks, busses, inputs, outputs,
and inserts. Greater-than-stereo multichannel formats are supported with Pro Tools HD only.
Grouping and VCA Tracks
Tracks can be grouped
together for mixing so that their relative mix settings are maintained when changing a mix setting
for any track in the group. For example, changing
the volume of one track affects the volume of all
the other tracks in the group. VCA Master tracks
control the relative mix settings for all tracks
within the selected group.
Pro Tools Projects
Projects are similar to sessions, but projects are
cloud enabled. Projects are stored in a similar format to that of a session, but all media and project
data is automatically backed up to your Avid
Cloud account.
Projects also let you collaborate on a track-bytrack basis with anyone in the Avid Artist Community anywhere in the world; or, if you prefer, you
can choose your collaborators privately and invite
them to join a project by email.
Project icon
You must be online and logged in to your Avid
Master Account the first time you create a project,
but after that you can work offline. Pro Tools and
the Avid Application Manager will synchronize
your local project with your account the next time
you online. This process runs in the background
and can be monitored in Pro Tools by checking the
Task Manager (
Window > Task Manager).
If a project is downloaded on another system when
you log in to your Avid Master Account, all associated media is downloaded inside of the project
bundle. This does not affect the location of the media on the originating system. Each system maintains its own unique placement of media without
duplication.
You can save a copy of a session as a project or a
project as a session using the
Save Copy In com-
mand.
Chapter 2: Pro Tools Concepts 13
Page 42

Tick-Based and Sample-Based Time
Pro Tools lets you set any track timebase to
either sample-based or tick-based. You can also set
the Timeline to be viewed as tick-based or samplebased.
Audio in Pro Tools is sample-based by default.
This means that if an audio clip is located at a particular sample location, it will not move from that
location if the tempo changes in the session—
though its Bar|Beat location will change.
MIDI data in Pro Tools is tick-based by default.
This means that if a MIDI clip is located at a particular Bar|Beat location, it will not move from that
Bar|Beat location if the tempo changes in the session—though its sample location will change.
justed, while audio clips do not (unless Elastic Audio is enabled). When Elastic Audio is not enabled
on an audio track, meter and tempo changes affect
only the start point (or sync point) for each audio
clip in a tick-based track. If Elastic Audio is enabled on an audio track, tempo changes apply Elastic Audio processing, which changes the duration
of the audio clip.
Elastic Audio
Elastic Audio provides real-time and non-real-time
(rendered) Time Compression and Expansion
(TCE) of audio. Tick-based Elastic Audio tracks
actually change the location of samples according
to changes in tempo. The audio stretches or compresses to match changes in tempo. Elastic Audio
also provides high-quality non-real-time clipbased pitch shifting.
You can select whether a track is sample-based or
tick-based when it is created, or change timebases
later.
Sample-Based Audio and MIDI
With a sample-based audio track, all clips in the
track have an absolute location on the Timeline.
Clips stay fixed to the sample time, regardless of
where tempo or meter changes occur in a session.
If you make a MIDI track sample-based, all MIDI
events in the track have an absolute location on the
Timeline. MIDI events stay fixed to sample time,
regardless of any tempo or meter changes in a
session.
Tick-Based Audio and MIDI
Tick-based audio is fixed to a Bars|Beat location,
and moves relative to the sample Timeline when
tempo and meter changes occur. However, MIDI
events and tick-based audio respond differently to
tempo changes with respect to duration. MIDI note
events change length when tempo or meter is ad-
Pro Tools Elastic Audio uses exceptionally highquality transient detection algorithms, beat and
tempo analysis, and real-time or rendered TCE
processing algorithms. Elastic Audio lets you
quickly and easily tempo conform and beat match
audio to the session’s Tempo ruler. It also provides
an unprecedented degree of control over transient
detection and TCE processing on an event-byevent basis.
With Elastic Audio, Pro Tools analyzes entire audio files for transient “events.” For example, an
event can be a drum hit, a sung note, or chord
played by a guitar. These detected events can then
serve as control points for “warping” the audio.
Pro Tools can warp (TCE) audio events automatically, such as when automatically conforming audio to the session tempo or quantizing audio
events, or you can warp audio manually using the
standard editing tools with the audio track set to
Warp view.
Pro Tools Reference Guide14
Page 43

Elastic Audio is useful in several common workflows: working with loops, correcting performances, remixing, beat and pitch matching, and
sound design and special effects.
System Resources
Track count, plug-in processing, signal path and
routing options, and voice availability are ultimately limited by the combined resources available from the host computer and from your
Pro Tools hardware.
Pro Tools provides several ways to manage and
conserve resources to maximize the performance
of your system. As you begin working with
Pro Tools sessions and tracks, you can take advantage of the following features to extend the effectiveness of your available DSP and other resources:
Pro Tools lets you adjust the performance of
your system by changing system settings that affect its capacity for processing, playback, and recording. See “Configuring Pro Tools Software
System Settings” on page 46.
In order to free up needed DSP resources,
Pro Tools allows for certain items (such as tracks
and inserts) to be manually made inactive. Inactive
elements are viewable, editable, and retained
within the session. See “Active and Inactive
Items” on page 15.
All Pro Tools systems provide flexible voice
options for audio tracks, to help maximize use of
available voices in your system. For more information on voice management and options, see “Track
Priority and Voice Assignment” on page 235.
Active and Inactive Items
Pro Tools lets you make certain items (such as
tracks and inserts) inactive, in order to free up DSP
resources and mixer connections.
Items in Pro Tools that can be made inactive
include the following:
• Audio, Auxiliary Input, Master Fader,
VCA Master, and Instrument tracks
• Track Inputs and Outputs
• Sends
• Side-chain inputs
• Plug-Ins
• Hardware inserts
• Paths (session-wide)
MIDI tracks cannot be made inactive.
Side-chain inputs support direct active and
inactive switching, but do not follow switching all or all selected side-chain inputs.
In addition to manually setting Active and
Inactive modes, Pro Tools automatically makes
items inactive if there are insufficient or
unavailable resources.
When active, items are fully engaged and operational.
When inactive, items are silent and off, although
most associated controls can still be adjusted. Different inactive items affect available system resources in specific ways, as follows:
Plug-Ins
DSP is made available for other plug-ins and processing. Plug-In assignments can be made inactive
manually or automatically.
When a plug-in is inactive on a track, its
Chapter 2: Pro Tools Concepts 15
Page 44

Paths and Path Assignments
Active plug-in Inactive plug-in
Inactive
track
assignment is inactive, its mixer resources are
made available for other signal routing purposes in
the session. Paths and assignments can be made inactive manually or automatically.
Tracks
When a track is made inactive, its voices
become available for another track. Inactive mono
tracks free up one voice; inactive stereo and multichannel tracks free up one voice per channel. Additionally, when an audio, Auxiliary Input, Instrument, or Master Fader track is made inactive, its
plug-ins, inserts, sends, and I/O assignments become inactive, and the associated DSP used is
freed up for use elsewhere in the session.
When a path or path
Display of Inactive Items
When items are inactive, their names appear in
italics, and their background becomes dark gray.
When a track is inactive, the entire channel strip is
grayed out.
Active and inactive plug-ins, sends, and tracks
Pro Tools Reference Guide16
Page 45

Workspace Browsers
AA F, MXF, and OMF
The Workspace is a database management tool for
Pro Tools. Workspace browsers expand upon basic Pro Tools search and import capabilities by
providing powerful tools to manage your data both
inside and outside of your sessions, on any hard
drive connected to the system.
A database is a way of organizing data such that it
can easily be searched, sorted, managed, and utilized. Your checkbook is an example of a database
file. For every check you write, you enter a new record. That record contains information about the
check, such as when you wrote it, to whom you
wrote it, and for what amount. This information is
written in specific columns, or fields. Everything
you need to know (the check’s metadata) is there,
even though the check itself is not.
Workspace browsers let you search, sort, and
mange these databases by volume or catalog. You
can use Workspace browsers not only to organize
your Pro Tools sessions and media files (audio,
MIDI, and video), but also to audition and import
by drag and drop.
For more information, see Chapter 16,
“Workspace Browsers.”
Pro Tools lets you exchange audio, video, and sequences with other AAF-, MXF-, and OMF-compatible applications (such as Avid editors).
Media Data (Media Files)
Media data represents raw audio or video material
and is stored in individual media files. Every time
you record a piece of video or audio material into
an application, you are creating a media file. Audio
media files hold samples (such as 44,100 or 48,000
samples per second of recording) while video media files use frames (24, 25, or 30 frames per second of recording).
The size of each media file depends on how much
audio or video material it contains. For example, a
file containing ten minutes of high resolution video
might be approximately 2 GB in size, whereas a
ten-minute audio recording at the might result in a
100 MB file. Media files tend to be large, since
high quality audio and video signals are data intensive. Video data generally requires considerably
more storage than audio data.
Chapter 2: Pro Tools Concepts 17
Page 46

Metadata
Metadata is used to describe the following:
• Information embedded in a media file. This may
include scene, take, sample rate, bit depth, external clip names, the name of the videotape from
which the media file was captured, and even
timecode values.
• Information embedded in Pro Tools sessions or
other sequences, including what files are used,
where they appear in a timeline, and automation.
• For AAF or OMF sequences, metadata also in-
cludes information embedded in unrendered AudioSuite™ effects (such as real-time EQ) on
Avid workstations. Pro Tools skips unrendered
effects on import. Rendered effects are media
files that can be imported into Pro Tools.
• For AAF or OMF sequences, information about
automation (clip-based gain or keyframe gain).
AAF, OMF, and MXF Basics
AAF and OMF files are mechanisms for storing
and retrieving media files and metadata so that
projects can be freely exchanged between different
applications and platforms. MXF is a media file
format that can be used with AAF (but not OMF)
files.
Media data and metadata enable an application that
receives AAF and OMF sequence files (such as
Pro Tools) to automatically and quickly reassemble the composition. A simple metaphor for this
approach is that media data files are the pieces of a
puzzle and metadata is the set of instructions for
assembling the puzzle.
In the simplest case, only an AAF or OMF sequence is exchanged. If this sequence points to existing media files, the size of the sequence file is
relatively small and the export/import process is
relatively fast.
AAF and OMF sequences can also have media
data embedded in them. This creates a single,
larger file that is slower to export and import, but
which may be easier to manage than thousands of
files stored on different volumes.
AAF
AAF is a sequence file format. AAF sequences are
the best way to exchange projects and maintain
valuable metadata. An AAF sequence can refer to
OMF or MXF media files, or have OMF and MXF
media files embedded within them. There is no
such thing as an AAF audio or video media file.
Pro Tools will import, play back, and export an
AAF sequence that either links to media files or
has audio embedded within it.
When you import an AAF sequence with embedded audio into Pro Tools, the audio will be
extracted into mono tracks using the current session’s audio file format.
MXF
MXF is a media file format. There are MXF video
files and MXF audio files, but there are no MXF
sequences. An AAF sequence may refer to or
include MXF media files, but OMF sequences cannot refer to or include MXF files.
MXF file icon
Pro Tools Reference Guide18
Page 47
Pro Tools can import and play back MXF audio
and video files created in Media Composer or
other Avid applications.
OMF
OMF is both a media file and sequence format.
OMF media files can be audio or video, and
Pro Tools can import and play back OMF audio,
but not OMF video. Pro Tools can also export
OMF audio, but not OMF video.
Pro Tools can import and play back OMF audio
files created in Media Composer or other applications.
Pro Tools and Media Composer Terminology
Pro Tools and Avid Media Composer use different
terms to describe the same items. For example, a
Pro Tools session is equivalent to an Avid se-
quence. The following table lists common
Pro Tools elements and their Avid equivalents.
Pro Tools Avid (AAF or OMF)
session sequence
whole file clip master clip
An OMF sequence cannot reference or have MXF
media embedded within it.
Pro Tools can import an OMF sequence with embedded audio, but not embedded video.
clip subclip
plug-ins real-time audio effects
volume automation gain Avid keyframe volume
Whole audio files in the Clip List normally
appear in bold type. However, master clip audio files imported from AAF or OMF into
Pro Tools will not appear in bold type (indicating clips) in the Pro Tools Clip List even
though they are audio files.
Chapter 2: Pro Tools Concepts 19
Page 48

Embedded Media and Linked Media
Avid Workstation Edited Sequence
Embedded AAF/OMF File (metadata and media)
Export AAF/OMF with Embedded Media
Refers to:
Original Source Media Files
Sequence (metadata)
Consolidated Media Files
(with Handle)
creates...
There are two types of AAF and OMF files: ones with embedded media, and ones with linked media.
Embedded Media
Exporting to AAF or OMF with embedded media results in one large AAF or OMF file containing both the
metadata and all associated media files.
AAF/OMF Interchange Workflow with Embedded Media
Pro Tools Reference Guide20
Page 49

Linked Media
Lin
ke
d
to
:
Linked to:
L
in
ke
d
t
o
:
Avid Workstation Edited Sequence
AAF/OMF File (metadata only)
Original Source Media Files
Translated Pro Tools Session File
Pro Tools Imports
Session File
Avid Workstation exports
sequence edits and
file information as AAF
or OMF sequence
Exporting AAF or OMF with linked media results in a single metadata file (.AAF or .OMF) and all
associated media stored as separate files.
The main benefit to this approach is that fewer copies of media files may need to be made, so the
export and import process can be much faster. Using this approach, it is less likely that you will
encounter any file size limitations since the data is broken up into many smaller files.
The main disadvantage to this approach is that there are potentially many files (for example, one AAF or
OMF file and hundreds of media files) that must be transported between systems.
AAF and OMF Interchange Workflow with Linked Media
Chapter 2: Pro Tools Concepts 21
Page 50

Pro Tools Reference Guide22
Page 51

Chapter 3: Keyboard and Mouse Shortcuts
For increased operational speed and ease of use,
there are many Pro Tools keyboard and
Right-click shortcuts.
A full list of Pro Tools shortcuts is available in
online Help and in a PDF guide.
To access the full list of Pro Tools shortcuts in
online Help:
1 Choose Help > Pro Tools Help.
2 Click Pro Tools Shortcuts on the Contents page
(in the left pane of Help).
To access the full list of Pro Tools shortcuts in the
Pro Tools Shortcuts Guide:
Choose Help > Shortcuts.
Mouse Shortcuts
Right-Click Shortcuts
Pro Tools provides Right-Click shortcuts for
choosing various Pro Tools commands and menus
with any Right-Click capable mouse.
For a complete list of Right-Click shortcuts,
see the Shortcuts Guide.
Scroll-wheel Functions
Pro Tools lets you increment or decrement values
in numerical fields by selecting the value and moving the mouse scroll wheel up or down.
Global Key Commands
Some keyboard shortcuts apply to many functions
in Pro Tools.
For a complete list of keyboard shortcuts, see
the Shortcuts Guide.
Track Functions
Pro Tools provides keyboard shortcuts for the following track functions:
• Changing Automation mode
• Enabling playlists
• Adding plug-ins
• Record enabling, soloing, and muting tracks
• Record safing and solo safing tracks
• Assigning inputs, outputs, and sends
• Toggling volume/peak/delay display
• Clearing meters
• Changing track heights
Command Windows Mac
Apply action to all
channel strips/tracks
Apply action to
selected channel
strips/tracks
Alt+
action
Alt+
Shift+
action
Option+
action
Option+
Shift+
action
Chapter 3: Keyboard and Mouse Shortcuts 23
Page 52

List and Parameter Selection
Pro Tools provides keyboard shortcuts for the following items:
• Selection of tracks in Track List
• Enabling of groups in Group List
• Automation Enable window parameters
• Setting Memory Location parameters
Command Windows Mac
Toggle item and set
all others to same
new state
Toggle item and set
all others to opposite
state
Controls and Editing Tools
Alt-click item Option-click
item
Control-click
item
Commandclick item
Pro Tools provides keyboard shortcuts for
moving plug-in controls, faders and sliders, the
Scrubber, and automation data.
Command Windows Mac
Fine adjustment
of sliders,
knobs, and
breakpoints
For extra-fine
adjustment of
breakpoints in
Grid mode
Hold Control
while clicking
the item
Hold Control
+Shift while
adjusting
automation
breakpoints
Hold Command
while clicking
the item
Hold Command
+Shift while
adjusting automation breakpoints
Keyboard Focus
The Keyboard Focus in Pro Tools determines how
the alpha keys function. Depending on which Keyboard Focus is enabled, you can use the keys on
your computer (alpha) keyboard to select clips in
the Clip List, enable or disable groups, or perform
an edit or play command.
You can only enable one of the three Keyboard Focus modes at a time. Enabling a Keyboard Focus
will disable the one previously enabled.
There are three types of Keyboard Focus:
Commands Keyboard Focus
the Tracks pane in the Edit window or in the Notes
pane of any MIDI Editor window, this provides a
wide range of single key shortcuts from the computer keyboard for editing and playing. The frontmost Edit or MIDI Editor window always receives
Commands Keyboard Focus when it is enabled.
With Commands Keyboard Focus disabled, you
can still access any of its key shortcuts by pressing
the Start key Control (Mac) or (Windows) along
with the key. See the Shortcuts Guide for a com-
plete list of Commands Keyboard Focus shortcuts.
Clip List Keyboard Focus
clips, MIDI clips, and clip groups can be located
and selected in the Clip List by typing the first few
letters of the clip’s name.
Group List Keyboard Focus
and Edit Groups can be enabled or disabled by typing the Group ID letter (in either the Mix or Edit
window).
When selected in
When selected, audio
When selected, Mix
Pro Tools Reference Guide24
Page 53

Toolbar Focus
Clip List
Keyboard Focus
Group List
Keyboard Focus
Commands Keyboard Focus
(Edit window)
In the Edit window, the MIDI Editor pane can be
displayed in addition to the Tracks pane (
Other Displays > MIDI Editor
). When the MIDI Editor pane is displayed, there are two separate Toolbars and Timelines in the Edit window: one for the
Tracks pane and one for the MIDI Editor pane.
Only one Toolbar and Timeline can be focused for
Menu and Toolbar commands (including the corresponding keyboard shortcuts) at a time. The focused Toolbar displays a yellow outline.
If Keyboard Focus for the Edit window is enabled,
it follows the selected Toolbar focus.
View >
Keyboard Focus buttons
To set the Keyboard Focus, do one of the
following:
Click the a–z button for the focus you want to
enable.
While pressing Command+Option (Mac) or
Control+Alt (Windows), press one of the following keys: 1 (Commands), 2 (Clip List), or 3
(Group List).
Although multiple plug-in windows can have a
keyboard focus enabled, only the front-most
window receives any keyboard input.
To enable Toolbar focus for the Tracks pane, do
one of the following:
Click the Toolbar at the top of the Edit window.
Press Command+Option+4 (Mac) or
Control+Alt+4 (Windows).
To enable Toolbar focus for the MIDI Editor pane,
do one of the following:
Click the Toolbar right above the MIDI Editor
pane.
Press Command+Option+5 (Mac) or
Control+Alt+5 (Windows).
Chapter 3: Keyboard and Mouse Shortcuts 25
Page 54

Numeric Keypad Modes
The Operation preference for Numeric Keypad
mode determines how the numeric keypad functions for Transport.
There are two Shuttle Lock modes (Classic and
Transport), and one Shuttle mode.
No matter which Numeric Keypad mode is selected, you can always use the numeric keypad to
select and enter values in the Event Edit Area, Edit
Selection indicators, Main and Sub Counters, and
Transport fields.
To set the Numeric Keypad Mode:
1 Choose Setup > Preferences and click the
Operation tab.
2 In the Transport section, select a Numeric Key-
pad mode (Classic, Transport, or Shuttle).
3 Click OK.
Shuttle Lock Modes
There are two Shuttle Lock modes (Classic and
Transport). Both modes let you use the numeric
keypad to shuttle forward or backwards at specific
speeds.
• 5 is normal speed.
• 6–9 provide increasingly greater fast-forward
speeds.
• 1–4 provide progressively greater rewind speeds
(4 is the slowest, 1 is the fastest).
• Press 0 to stop Shuttle Lock, then press the number to resume Shuttle Lock speed.
• Press Escape or Spacebar to exit Shuttle Lock
mode.
Custom Shuttle Lock Speed
(Pro Tools HD Only)
The highest fast-forward Shuttle Lock speed
(key 9) can be customized.
For more information, see “Custom Shuttle
Lock Speed” on page 560.
Classic Mode
This mode emulates the way Pro Tools worked in
versions lower than 5.0. With the Numeric Keypad
mode set to
Classic, you can:
• Play up to two tracks of audio in Shuttle Lock
mode. Press the Control key (Mac) or the Start
key (Windows), followed by 1–9 for different
play speeds.
• Press Plus or Minus to reverse direction.
• Press 0 to stop Shuttle Lock, then press the number to resume Shuttle Lock speed.
• Press Escape or Spacebar to exit Shuttle Lock
mode.
• Recall Memory Locations by typing the Memory Location, followed by a Period (.).
Pro Tools Reference Guide26
Page 55

Transport Mode
This mode lets you set a number of record and play
functions, and also operate the Transport from the
numeric keypad.
Function Key
Click on/off 7
Countoff on/off 8
MIDI Merge/Replace mode 9
Loop Playback mode on/off 4
Loop Record mode on/off 5
QuickPunch mode on/off 6
Rewind 1
Fast Forward 2
Record enable 3
Play/Stop 0
With the Numeric Keypad mode set to
Transport,
you can also:
• Play up to two tracks of audio in Shuttle Lock
mode. Press the Control key (Mac) or the Start
key (Windows), followed by 1–9 for different
play speeds.
• Press Plus or Minus to reverse direction.
• Press 0 to stop Shuttle Lock, then press the number to resume Shuttle Lock speed.
• Press Escape or Spacebar to exit Shuttle Lock
mode.
• Recall Memory Locations by typing Period (.),
the Memory Location number, and Period (.)
again.
Shuttle Mode
(Pro Tools HD Only)
Pro Tools offers another form of shuttling, different from that of the two Shuttle Lock modes. With
the Numeric Keypad mode set to
of the current Edit selection is triggered by pressing and holding the keys on the numeric keypad—
playback stops once the keys are released. Various
playback speeds are available in both forward and
reverse. In this mode, pre- and post-roll are ignored.
Playback Speeds Key
1x Forward 6
1x Rewind 4
4x Forward 9
4x Rewind 7
1/4x Forward 3
1/4x Rewind 1
1/2x Forward 5+6
1/2x Rewind 5+4
2x Forward 8+9
2x Rewind 8+7
1/16x Forward 2+3
1/16x Rewind 2+1
Loop Selection (1x) 0
With the Numeric Keypad mode set to
can also recall Memory Locations by typing Period
(.), the Memory Location number, and Period (.)
again.
Shuttle, playback
Shuttle, you
Shuttle Lock modes are not available when
the Numeric Keypad mode is set to Shuttle.
Chapter 3: Keyboard and Mouse Shortcuts 27
Page 56

Pro Tools Reference Guide28
Page 57

Chapter 4: Using Help
The Pro Tools Help menu provides quick access to
installed PDF documentation and online Help. The
Help system is HTML-based and launches in the
Pro Tools in-application browser. It also runs on
most common web browsers.
The Pro Tools Help menu also provides direct access to the online Pro Tools Knowledge Base,
Avid Audio Forums, and the Avid Support Center
using the in-application browser (an internet connection is required).
The Pro Tools in-application Web browser
is not available outside Pro Tools. To use
Pro Tools Help while Pro Tools is not
running, use the default Web browser for
your operating system.
Accessing Guides in Pro Tools Software
PDF (Portable Document Format) versions of the
main Pro Tools guides are accessible from the
Pro Tools
mended for PDF documentation.
To access guides in Pro Tools:
Choose Help, then a guide name.
Help menu. Adobe Reader is recom-
Guides Accessible in Pro Tools
The following guides are available from the
Pro Tools
Audio Plug-Ins Guide
Help menu:
Describes the plug-ins included free with Pro Tools, as well as additional
plug-ins available for purchase separately.
Pro Tools Reference Guide
Explains Pro Tools
systems and software in detail.
Pro Tools Shortcuts
Lists keyboard and
Right-click shortcuts for Pro Tools, including
those shown in Pro Tools menus.
Accessing the Help System
There are several ways to access the Help system.
• Open Help at its Welcome page from the Help
menu in Pro Tools
• Open Help at its Welcome page from within a
Help browser in Pro Tools
• Open Help at its Welcome page outside of
Pro Tools
• Open a different version or language of
Pro Tools Help
Chapter 4: Using Help 29
Page 58

To open Help within Pro Tools, do one of the
following:
Choose Help > Pro Tools Help.
From the Pro Tools Online browser window,
Help.
choose
To open Help outside of Pro Tools (or to select a
different version or language of Help):
1 Open your favorite online browser (such as
Safari or Explorer).
2 Visit the Pro Tools Help launch page
(http://apps.avid.com/ProToolsHelp/).
Using the Contents and Index Tabs
The left pane of the Help browser is the display
area for most of the Help system’s main navigation
tools, including the Contents and Index tabs.
Contents Tab
The Contents tab displays a complete hierarchical
list of all topics in the Help system. This lets you
quickly see the overall organization of the Help
system.
3 Follow the on-screen instructions to open a
version of Help.
To close the Help system:
Click the Help viewer’s Close button.
Help Display
The Help system includes the following display elements:
Topics
Help viewer.
Navigation Tools
open in the left pane of the Help viewer.
Hierarchy Links
location of the currently displayed topic within its
chapter and to jump to relevant higher-level topics,
including the Main Topic.
Show in Contents Button
locate the current topic in the Contents.
Previous Topic and Next Topic Buttons
these buttons to browse through the topics in the
order in which they appear in the Contents.
Help topics open in the right pane of the
Contents, Index, and Search tabs
Use these links to verify the
Use this button to
Use
You can expand and collapse the contents to view
the logical organization of the Help system, and
you can move to any topic by clicking its entry in
the Contents.
When you move to a new topic, the contents expands to the level of that topic and highlights the
topic. This feature, like the hierarchy links at the
top of each topic, lets you see exactly where the
current topic is positioned within the logical organization of the Help system.
To display a topic from the contents:
Click the Contents tab, and then click a topic’s
entry in the contents.
To expand or close a section in the contents:
Click the Contents tab, and then click a book
icon to the left of a link.
Print
Click this button to print one or more topics.
Pro Tools Reference Guide30
Page 59

Index Tab
The Index provides an alphabetized list of entries
similar to the index of a printed book.
If Java is enabled in your browser, the Index displays as a dynamic index where the listing scrolls
as you type a word in the text box. If you do not
have Java enabled in your browser, or if your
browser does not support Java implementations, a
JavaScript version of the index displays, which lets
you scroll manually through the entries.
To find topics by using the Index tab:
1 Click the Index tab.
2 Click the first character of the topic in the
Numerics, Letters, Symbols list.
To view the topic associated with an index entry:
Click the index entry.
Using the Search Tab
The Search tab lets you search the entire text of the
Help system for one or more words and then lists
the topics that include those words. The list of results is ranked, placing the topics that the Search
feature considers most likely to be relevant at the
top of the list.
When you search for text, the text string automatically highlights by default. You can turn these
highlights off. You can also stop displaying highlights after a search by using the Back and Forward
buttons to go to a different topic. When you come
back to your searched topic, the highlights no longer display.
For more guidelines on using the Search feature effectively, see “Search Guidelines” on page 32.
To perform a basic search:
1 Click the Search tab.
2 In the Search pop-up menu (located below the
Search text box), click whether you want to
search in “All Available Books” or a specific
book (such as Pro Tools Shortcuts).
3 In the Search text box, type the word or words
that you want to find.
4 Click Go.
A list of topics and ranking numbers appears.
Additional Search Information
The Search feature provides the best combination
of usefulness and speed:
• The Search feature uses a database of valid
words. This database includes all words that are
significant for identifying topics and excludes
all other words. When you type words in the
search text box, the system ignores any invalid
words that you have typed and searches for valid
words.
• The Search feature cannot search for words in a
certain order. For example, if you type “TIFF
graphics import” as a search entry, Search displays all topics that contains these three words
regardless of their location in the topic. The results include topics where the three words appear together as a phrase, and also topics where
the three words are scattered throughout the
topic.
• The Search feature cannot distinguish between
words that are similar but not identical. For example, if you type “capture” as a search entry,
Search displays topics that include that word,
but it does not find topics that include related
words such as “captures” or “capturing.” If a
search for a word fails to produce useful results,
you might be more successful if you search
again using one of the related words.
Chapter 4: Using Help 31
Page 60

Search Guidelines
Printing Help Topics
Use the following rules for formulating search
queries:
• Searches are not case-sensitive, so you can type
your search in uppercase or lowercase characters.
• You can search for any combination of letters
(a–z) and numbers (0–9).
• Punctuation marks (such as the period, colon,
semicolon, comma, and hyphen) are ignored
during a search, unless they are part of the topic
(such as .WAV).
• You can search for a literal phrase by using quotation marks. You cannot search for quotation
marks.
Copying from a Help Topic
You can copy information from a Help topic for
use in another document (such a text file).
To copy information from a Help topic to another
document:
1 Open or click the topic to make it active.
You can print Help topics if you need to refer to
them during a complicated procedure or to use for
reference later.
See your browser documentation for more information on print options.
To print a Help topic:
1 Click the topic pane within the browser window
that you want to print.
2 Do one of the following:
• Click the Print button in the Topic pane.
• Right-click in the Topic pane and select Print.
• Select
3 Select the print options.
4 Click Print.
File > Print.
Topics that you print from Help have limited
page layout and formatting features. If you
want to print a higher quality version of Help
information, Avid recommends that you print
all or part of the PDF version of the appropriate guide.
2 Select the text that you want to copy.
3 Choose Edit > Copy.
4 Place the mouse pointer in another application,
such as a word processing application.
5 Choose Edit > Paste to paste the copied text into
a document. (You can also paste the text into the
Search text box.)
Pro Tools Reference Guide32
Page 61

Part II: System Configuration
Page 62

Page 63

Chapter 5: Pro Tools Systems
There are three types of Pro Tools systems:
Pro Tools Software with Avid or Third-Party
Hardware
These systems include Pro Tools software with
Avid audio hardware (such as Pro Tools | Quartet,
Pro Tools | Duet, Pro Tools | Fast Track family,
®
Pro Tools | Mbox
Pro Tools | Eleven
family (third generation),
®
Rack, or Avid 003™ family
audio interfaces). These systems also include
Pro Tools software using third-party audio interfaces with supported Core Audio (Mac, including
the built-in audio on Mac computers), ASIO (Windows), or WASAPI (Windows).
For a list of qualified audio interfaces and
computers for all Pro Tools systems, visit
www.avid.com/compatibility.
Pro Tools HD Software with HDX or HD Native
Hardware
Hardware accelerated Pro Tools HD systems include Pro Tools HD software with HDX or
HD Native (PCIe or Thunderbolt) hardware. Hardware accelerated systems provide expanded I/O
capabilities and low latency monitoring. HDX systems also provide dedicated DSP for plug-in processing and for large mixer configurations.
Pro Tools HD Software with Avid or Third-Party
Hardware
These systems include Pro Tools HD software
with any compatible non-HDX or non-HD Native
Avid audio interfaces (such as Mbox Pro), or Core
Audio (Mac) or ASIO (Windows) hardware.
Pro Tools Software
Pro Tools software provides the following
capabilities, depending on your hardware
configuration:
• Up to 32 channels of I/O depending on your system and audio hardware
• Up to a total of 128 mono or stereo audio tracks
per session:
• Playback of up to 128 tracks, or a combina-
tion of playing back and recording up to 128
tracks, mono or stereo, at 44.1 kHz and
48 kHz
• Playback of up to 64 tracks, or a combination
of playing back and recording up to 64 tracks,
mono tracks or stereo, at 88.2 kHz and
96 kHz
• Playback of up to 32 tracks, or a combination
of playing back and recording up to 32 tracks,
mono or stereo, at 176.4 kHz and 192 kHz
• Up to 128 Auxiliary Input tracks
• Up to 64 Master Fader tracks
• Up to 512 MIDI tracks
• Up to 512 Instrument tracks
Chapter 5: Pro Tools Systems 35
Page 64

• A single QuickTime video track
• 16-bit, 24-bit, or 32-bit floating point audio
resolution, at sample rates up to 192 kHz
• Automatic Delay Compensation (up to 16,383
samples at 48 kHz)
• Fixed RAM Disk Cache allocation options
• Non-destructive, random-access editing and mix
automation
• Audio processing with up to 10 real-time
plug-ins per track, depending on your
computer’s capabilities
• Up to 10 hardware inserts per track
• Up to 10 sends per track
Pro Tools Capabilities with Different
Hardware Configurations
Pro Tools supports up to 32 channels of audio input and output, but the available input and output
capabilities with Pro Tools varies depending on
your audio interface. For information about the input and output capabilities of your audio interface,
refer to the documentation that came with your
hardware.
If you open a Pro Tools session created on a
Pro Tools HD system that contains more than the
number of tracks supported on your Pro Tools system, audio tracks beyond the system’s voiceable
track limit will be automatically set to inactive.
For more information about the I/O
capabilities of your audio interface with
Pro Tools, see the documentation that came
with your audio interface.
Supported Hardware
Configurations with Pro Tools
Software
Pro Tools Software works seamlessly with
non-HD Avid audio hardware (such as
Pro Tools | Quartet). For the latest information on
supported hardware configurations with Pro Tools
Software, visit:
http://www.avid.com/compatibility
Processing Capacity
The total processing capacity of a Pro Tools system depends on the processing power of your computer. Contact your dealer or visit www.avid.com
for the latest system requirements and compatibility information.
For details on transferring session material
between Pro Tools HD and Pro Tools systems, see “Sharing Sessions Created on
Different Pro Tools Systems” on page 406.
Pro Tools | HD Software with Pro Tools | HDX Hardware
Each system requires at least one Avid HD audio
interface (sold separately). HDX systems can be
expanded by adding HDX cards to increase track
count and the amount of plug-in and mixer
processing, and by adding additional audio
interfaces.
Pro Tools HD Capabilities with
HDX Hardware
Pro Tools HD with HDX hardware provides the
following capabilities:
• Up to 256 channels of I/O depending on your
system
• Up to a total of 768 voiced audio tracks
• Up to 512 Auxiliary Input tracks
• Up to 64 Master Fader tracks
Pro Tools Reference Guide36
Page 65

• Up to 128 VCA Master tracks
• Up to 512 MIDI tracks
• Up to 256 Instrument tracks
• Up to 64 video tracks per session
• 16-bit, 24-bit, or 32-bit floating point audio
resolution, at sample rates up to 192 kHz
• Up to 7.1 surround mixing capability
• Automatic Delay Compensation (up to 16,348
samples at 48 kHz)
• Fixed RAM Disk Cache allocation options
• No-latency monitoring
• Non-destructive, random-access editing and mix
automation
• Audio processing with up to 10 inserts per track
(any combination of real-time plug-in and hardware inserts), depending on your computer’s capabilities
• Up to 10 sends per track
Audio Recording and Playback Capabilities
The number of simultaneous tracks of audio
recording or playback depends on your system
configuration. A Pro Tools HD system with a single HDX card provides recording and playback of
24-bit or 16-bit audio files with the following
voiced track counts:
• Up to 256 tracks at 44.1 kHz or 48 kHz
• Up to 128 tracks at 88.2 kHz or 96 kHz
• Up to 64 tracks at 176.4 kHz or 192 kHz
Pro Tools | HD Software with Pro Tools | HD Native Hardware
Each system requires at least one Pro Tools HD
audio interface (sold separately). HD Native systems can be expanded by adding additional HD audio interfaces.
Pro Tools HD systems with HD Native hardware
consist of the following:
• One of the following:
• HD Native PCIe card
• HD Native Thunderbolt interface
• Pro Tools HD
• An authorized iLok for running Pro Tools HD
software
• One or more Avid HD audio interfaces (sold
separately)
• DigiLink Mini cable for connecting HD Native
hardware to an audio interface
• A MIDI interface (optional)
For detailed information about installing
HD Native PCIe hardware, see the HD Native
Installation Guide.
For information about installing HD Native
Thunderbolt hardware, see the HD Native
Thunderbolt Guide.
Each additional HDX card increases the possible
track count by the same amount. For example, at
44.1 kHz, two HDX cards provide up to 512 audio
tracks, and three HDX cards provide up to 768
audio tracks.
Chapter 5: Pro Tools Systems 37
Page 66

Pro Tools HD Capabilities with
HD Native Hardware
Pro Tools HD with HD Native hardware provides
the following capabilities:
• Up to 64 channels of I/O depending on your system, and the number and type of installed audio
interfaces
• Up to a total of 256 voiced audio tracks (up to
768 voiceable audio tracks):
• Up to 256 voices at 44.1 kHz or 48 kHz
• Up to 128 voices at 88.2 kHz or 96 kHz
• Up to 64 voices at 176.4 kHz or 192 kHz
• Up to 512 Auxiliary Input tracks
• Up to 64 Master Fader tracks
• Up to 128 VCA Master tracks
• Up to 512 MIDI tracks
• Up to 256 Instrument tracks
• Up to 64 video tracks per session
• 16-bit, 24-bit, or 32-bit floating point audio resolution, at sample rates up to 192 kHz
• Non-destructive, random-access editing and mix
automation
• Up to 7.1 surround mixing capability
• Automatic Delay Compensation (up to 16,348
samples at 48 kHz)
• Fixed RAM Disk Cache allocation options
• FPGA-based low latency monitoring (LLM)
• Audio processing with up to 10 inserts per track
(in any combination of real-time, host-based
plug-in and hardware inserts), depending on
your computer’s capabilities, and the number
and type of installed audio interfaces
• Up to 10 sends per track
Supported Pro Tools HD Audio Interfaces
The following Pro Tools HD audio interfaces are
compatible with HDX and HD Native hardware:
• Pro Tools | HD I/O
• Pro Tools | HD OMNI
• Pro Tools | HD MADI
HDX and HD Native systems require at least
one HD I/O, HD OMNI, or HD MADI.
Maximum I/O Configuration with
HDX
HDX supports up to a maximum combination of
12 total of the following audio interfaces:
• HD OMNI (only 1 HD OMNI interface is supported in a single system)
• HD I/O (up to 12 HD I/O interfaces can be used
simultaneously—requires 3 HDX cards)
• HD MADI (up to 3 HD MADI interfaces can be
used simultaneously—requires 3 HDX cards)
Maximum I/O Configuration with
HD Native
HD Native supports up to a maximum combination of up to 4 total of the following audio interfaces:
• HD OMNI (only 1 HD OMNI interface is supported in a single HD Native system)
• HD I/O (up to 4 HD I/O interfaces can be used
simultaneously)
• HD MADI (full connectivity with 1 HD MADI
interface is possible when both DigiLink ports
of the HD MADI are connected to both DigiLink ports on the HD Native PCIe card or
Thunderbolt interface)
Pro Tools Reference Guide38
Page 67

Playback, Recording, and Voice Limits with Pro Tools | HD Software
The table below lists the audio playback, recording, and voiceable track limits with Pro Tools HD software
with HDX, HD Native, Core Audio, and ASIO hardware. Playback and recording voices refers to the number of unique simultaneous playback and record tracks on your system. Total voiceable tracks refers to the
maximum number of audio tracks that can share the available voices on your system. (Mono tracks take up
one voice. Stereo and multichannel tracks take up one voice per channel.)
With HDX hardware accelerated systems, voice limits are dependent on the session sample rate and the
number of DSP chips dedicated to the system’s Playback Engine. Pro Tools HD can open sessions with up
to 768 audio tracks, but any audio tracks beyond that system’s voiceable track limit will be automatically
set to Voice Off.
s
Pro Tools HD audio playback, recording and voice limits by hardware configuration
Playback and
Recording
Core System Type Maximum I/O
HDX, 1 card 64 channels 44.1/48 256 768
Sample
Rate (kHz)
88.2/96 128 768
Voices
(Mono Tracks of
Simultaneous
Playback and
Recording)
Total
Voiceable
Tracks
176.4/192 64 768
HDX, 2 cards 128 channels 44.1/48 512 768
88.2/96 256 768
176.4/192 128 768
HDX, 3 cards 192 channels 44.1/48 1024 768
88.2/96 512 768
176.4/192 128 768
HD Native 64 channels 44.1/48 256 768
88.2/96 128 768
176.4/192 64 768
Chapter 5: Pro Tools Systems 39
Page 68

Pro Tools HD audio playback, recording and voice limits by hardware configuration
Playback and
Recording
Voices
(Mono Tracks of
Simultaneous
Playback and
Recording)
Core System Type Maximum I/O
Sample
Rate (kHz)
Total
Voiceable
Tracks
Core Audio and ASIO
(Pro Tools HD)
32 channels 44.1/48 256 768
88.2/96 128 768
176.4/192 64 768
Pro Tools HD Audio Interface Features
The following table lists the input and output capabilities of the various Pro Tools HD audio interfaces for
HDX and HD Native systems. Each HDX card in your system supports a maximum of 64 channels of I/O.
HD Native hardware supports a maximum of 64 channels of I/O. To record and play audio with
Pro Tools HD with any of these hardware configurations, you must have at least one Pro Tools HD audio
interface connected to the first port of the first card (or Thunderbolt interface) in the system.
Avid HD audio interface channel capabilities
Interface Type
HD I/O 16 in/16 out 44.1, 48,
HD OMNI 8 in/8 out 44.1, 48,
Number of I/O
Channels
Sample
Rates (kHz)
88.2, 96,
176.4, 192
88.2, 96,
176.4, 192
A/D
Conversion
24-bit 24-bit 24-bit
24-bit 24-bit 24-bit
D/A
Conversion
Digital I/O
HD MADI 64 in/64 out 44.1, 48,
88.2, 96,
176.4, 192
Pro Tools Reference Guide40
None None 24-bit
Page 69

HD OMNI Audio Interface
HD OMNI is a professional digital audio interface
designed for use with Pro Tools HD systems.
HD OMNI provides a compact preamp, monitoring, and I/O solution for music production and recording, and post production studios.
HD OMNI Features
HD OMNI provides up to 8 discrete channels of
Pro Tools input and output, with 4-segment LED
meters for input or output (selectable).
Analog I/O
• 24-bit analog-to-digital (A/D) and digital-to-analog (D/A) converters, with support for sample
rates up to 192 kHz
• 2 high-quality Mic/DI preamps (Channels 1–2)
• 2 combined XLR and 1/4-inch TRS front panel
inputs for microphone and instrument level input
• 2 XLR back panel microphone inputs
• 2 1/4-inch TRS Send and 2 1/4-inch TRS Return
back panel jacks for hardware inserts on channels 1 and 2
• 4 analog TRS line level back panel inputs
(Channels 1–4)
HD OMNI provides multiple analog input connections, but only provides up to four channels
of simultaneous analog input for Pro Tools.
• Soft Clip and Curv limiting circuits to protect
against clipping on analog input
• 8 channels of analog back panel output using a
DB-25 breakout cable (sold separately) with
variable output gain
• 2 channels of analog back panel output using
TRS (Mirrors channels 1–2 or 7–8 on DB-25
connector)
• Front panel stereo 1/4-inch headphone jack
Digital I/O
• 8 channels of AES/EBU output (up to 192 kHz
Single Wire) using a DB-25 breakout cable (sold
separately)
• 2 channels of AES/EBU XLR input (up to
192 kHz Single Wire)
• 2 channels of S/PDIF RCA input and output (up
to 192 kHz)
• 8 channels of ADAT TOSLINK input and output
• Support for ADAT S/MUX Optical for sample
rates of 88.2 kHz, 96 kHz, 176.4 kHz, and
192 kHz
• Support for two channels of S/PDIF Optical
with sample rates of up to 96 kHz
• Real-time sample rate conversion (SRC) on Digital Inputs 1–2 of either AES/EBU, S/PDIF, or
Optical (S/PDIF)
SRC is not supported with ADAT S/MUX.
Monitoring
• An additional stereo “CUE” output path in
Pro Tools for headphone monitoring from the
front panel headphone jack
• Front panel Control Room (MAIN/ALT) and
Headphone monitoring volume control
• Flexible monitoring with fold-down from all stereo and surround formats (up to 7.1 surround)
• Input mixer for low latency direct monitoring of
a variety of incoming signals (configured in the
Pro Tools Hardware Setup)
Synchronization
• Loop Sync input and output for connecting
additional HD peripherals
• External Clock input and output for synchronizing HD OMNI with external Word Clock devices
For more information, see the HD OMNI Guide.
Chapter 5: Pro Tools Systems 41
Page 70

HD I/O Audio Interface
HD I/O is a multichannel digital audio interface
designed for use with Pro Tools HD systems.
HD I/O features extremely high quality 24-bit analog-to-digital (A/D) and digital-to-analog (D/A)
converters, and supports sample rates of up to
192 kHz.
HD I/O comes in three standard configurations:
• 8 x 8 x 8 (8 analog in, 8 analog out, and 8 digital
in and out)
• 16 x 16 analog in and out
• 16 x 16 digital in and out
You can also add or remove HD I/O Analog Expansion cards (ADC and DAC) and HD I/O Digital Expansion cards for custom configurations.
HD I/O Features
HD I/O provides up to 16 discrete channels of
Pro Tools input and output, with 4-segment LED
meters for input and output.
Analog I/O
• Up to sixteen channels of 24-bit D/A and A/D
converters for superior analog input and output
at sample rates of 44.1 kHz, 48 kHz, 88.2 kHz,
96 kHz, 176.4 kHz, and 192 kHz with Analog In
and Analog Out HD I/O cards
• Soft Clip and Curv limiting circuits to protect
against clipping on analog input
Digital I/O
• Up to sixteen channels of 24-bit digital I/O, using AES/EBU, TDIF DB-25, or Optical at sample rates of 44.1, 48, 88.2, 96, 176.4, and
192 kHz with a Digital HD I/O card
• Real-time sample rate conversion on digital inputs with a Digital I/O card (up to sixteen channels of AES/EBU, Optical, or TDIF)
• Support for S/MUX Optical for sample rates of
88.2 kHz and higher
• Support for 2 channels of S/PDIF Optical
(enclosed) with sample rates of up to 96 kHz
• 2 channels of AES/EBU I/O (enclosed) with
support for sample rates up to 192 kHz
• 2 channels of 24-bit-capable S/PDIF I/O
(enclosed) with support for sample rates up to
192 kHz
Synchronization
• Loop Sync input and output for connecting additional Avid HD audio interfaces and peripherals
• External Clock input and output for synchronizing HD I/O with external Word Clock devices
Expandability
• Optional addition of I/O cards to expand analog
or digital I/O
• Simultaneous use of multiple Avid HD audio interfaces to further expand system input and output
For more information, see the HD I/O Guide.
Pro Tools Reference Guide42
Page 71

HD MADI Digital Audio Interface
HD MADI is a 64-channel, digital audio interface
designed for use with Avid HD systems.
HD MADI supports the Multichannel Audio Digital Interface (MADI) format and sample rates of up
to 192 kHz. HD MADI provides simplified connectivity between your Avid HD system and
MADI-compatible audio equipment.
HD MADI Features
• 2 MADI Optical and Coaxial inputs and 2
MADI Optical and Coaxial outputs for up to 64
discrete channels of digital input and output (32
channels per DigiLink Mini port)
• Supports sample rates of 44.1, 48, 88.2, 96,
176.4, and 192 kHz
• 24- or 16-bit resolution
• Sample Rate Conversion (SRC) on input or output
• Front panel clock and SRC indicators
• Front panel signal present LEDs for input and
output
• BNC Word Clock I/O for synchronizing
HD MADI with external 1x Word Clock
• BNC Loop Sync I/O for synchronizing
HD MADI with additional Avid HD audio
interfaces and peripherals (such as HD I/O,
HD OMNI, or SYNC HD)
• Dedicated BNC Word Clock input and XLR
AES/EBU input (clock input only) for external
MADI synchronization (when using SRC on
output)
• Clock support for the following formats: Internal, Loop Sync, Word Clock, AES/EBU, and
MADI
• Varispeed modes (supports both 64- and 56channel standards)
Additional Pro Tools Hardware Options
Pro Tools software systems also supports the following Pro Tools hardware options.
• Pro Tools | PRE (Eight-channel microphone
preamp)
• Eleven Rack (guitar processor)
• Control surfaces (such as Avid Artist Series controllers)
Additional Pro Tools HD Hardware Options
Pro Tools HD also supports the following Avid
HD hardware options.
• SYNC HD synchronization peripheral (HDX
and HD Native systems only):
• PRE (Eight-channel microphone preamp)
• Eleven Rack (guitar processor)
• Control surfaces (such as D-Command or
D-Control)
For more information, see the HD MADI Guide.
Chapter 5: Pro Tools Systems 43
Page 72

Pro Tools Software Options
Avid Application Manager
Pro Tools HD
HEAT (Harmonically Enhanced Algorithm Technology) is a paid software option that adds “analog
color” to Pro Tools HD systems. For more information, see Chapter 45, “HEAT.”
HDX and HD Native Systems with
MachineControl
The MachineControl™ software option for
Pro Tools HD is supported with HDX and
HD Native systems. MachineControl is a paid
software option for Pro Tools HD that enables se-
®
rial communication with Sony
9-pin compatible
synchronizers, and video or audio machines. For
more information, see the MachineControl Guide.
Pro Tools with VENUE Link
For Pro Tools systems that are connected to
VENUE systems using Ethernet, VENUE Link
provides Pro Tools and VENUE system integration and interoperability.
The Avid Application Manager is installed with
Pro Tools. The Avid Application Manager is used
to manage your software and entitlements related
to your MyAvid account. The Avid Application
Manager helps you maintain the most current
Pro Tools software and audio plug-in updates that
you are entitled to when new versions become
available. For more information about the Avid
Application Manager, see the Avid Application
Manager Guide (available online through the Avid
Knowledgebase).
Pro Tools Reference Guide44
Page 73

Chapter 6: System Setup
You can review and update the setup of your system to ensure it is configured for your needs.
Starting Up or Shutting Down Your System
To ensure that the components of your Pro Tools
system communicate properly with each other, you
need to start them in a particular order.
Start up your Pro Tools system in this order:
1 Make sure all your equipment (including your
computer) is off.
2 Lower the volume of all output devices in your
system.
3 For systems with an expansion chassis, turn on
the chassis.
4 Turn on any external hard drives. Wait approxi-
mately ten seconds for them to spin up to speed.
5 Turn on any control surfaces (such as
D-Command
6 Turn on any MIDI interfaces, MIDI devices, or
synchronization peripherals.
®
or Avid Artist Control).
7 Do one of the following, depending on your
Pro Tools system:
• For HDX and HD Native systems, with the volume of all output devices lowered, turn on your
audio interfaces (such as HD OMNI). Wait at
least fifteen seconds for your system hardware
to initialize.
• For Pro Tools systems that use hardware requiring external power (such as 003), with the volume of all output devices lowered, turn on the
hardware.
8 Turn on your computer.
9 Launch Pro Tools or any third-party audio or
MIDI applications.
Shut down your Pro Tools system in this order:
1 Quit Pro Tools and any other running applica-
tions.
To quit Pro Tools, choose Pro Tools >
Quit (Mac) or File > Exit (Windows).
2 Turn off or lower the volume of all output
devices in your system.
3 Turn off your computer.
Chapter 6: System Setup 45
Page 74
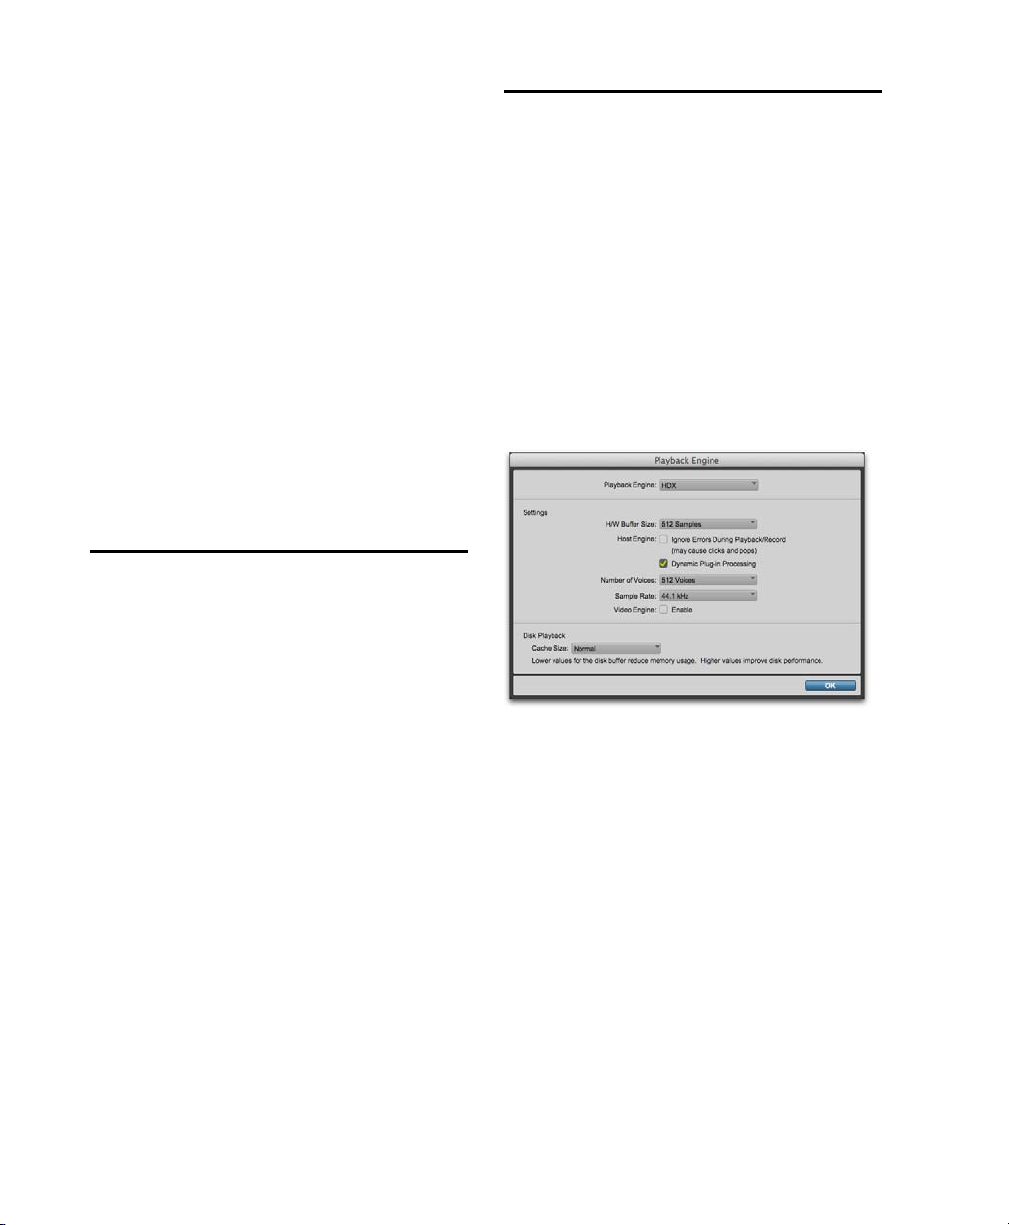
4 Do one of the following depending on your
Pro Tools system:
• For HDX and HD Native systems, turn off your
Pro Tools audio interfaces.
• For Pro Tools systems that use hardware requiring external power (such as 003), turn off the
hardware.
5 For systems with an expansion chassis, turn off
the chassis.
6 Turn off any MIDI interfaces, MIDI devices, or
synchronization peripherals.
7 Turn off any worksurfaces (such as
D-Command) or control surfaces (such as
Command|8).
8 Turn off any external hard drives.
Checking a Pro Tools | HDX or Pro Tools | HD Native System with DigiTest
Before you use Pro Tools, you may want to run the
DigiTest diagnostic application to ensure that all
HDX cards in the system are recognized, installed
in the proper order, and have valid connections.
You can also use DigiTest to validate your
HD Native PCIe card or Thunderbolt interface.
See the Avid DigiTest Guide for more information.
Configuring Pro Tools Software System Settings
Pro Tools lets you adjust the performance of your
system by changing system settings that affect its
capacity for processing, playback, and recording.
These system settings are available in the Playback
Engine (
In most cases, the default settings for your
system provide optimum performance, but you
may want to adjust them to accommodate large or
processing-intensive Pro Tools sessions.
Playback Engine for a HDX system
Setup > Playback Engine).
Pro Tools Reference Guide46
Page 75

Playback Engine
In the Playback Engine dialog, Pro Tools lets you
select the audio engine for use with your audio interfaces. The available options are determined by
which audio interfaces are connected and have
compatible drivers installed.
Changing the
ful if you have multiple audio interfaces connected
to your computer with different routing configurations in your studio, or if you want to prepare a session for use with a specific interface on a different
system (for example, you might want to prepare a
session created on your HDX system for use with
the built-in audio on your Mac laptop).
To select which audio engine Pro Tools uses:
1 Choose Setup > Playback Engine.
2 From the Playback Engine selector, select your
audio interface:
• For HDX and HD Native systems, use the default setting of
• For supported Avid audio interfaces (such as the
Mbox Pro), selecting the name of the corresponding interface uses the Avid Audio Engine
for Pro Tools.
• For third-party audio interfaces with compatible
Core Audio (Mac) or ASIO (Windows), select
the name of the corresponding Core Audio
(Mac) or ASIO (Windows) compatible audio interface.
• On Mac systems, if you are using built-in audio,
select any of the available built-in options for
playback or select
simultaneous input and output with the built-in
I/O hardware options.
3 Click OK.
Playback Engine setting can be use-
HDX or HD Native.
Pro Tools Aggregate I/O for
On HDX systems, changing engines requires that
you quit and relaunch Pro Tools for the new setting
to take effect.
When changing engines on any Pro Tools
system, you may need to reset the default
I/O settings to match the selected audio
interface.
Pro Tools Aggregate I/O
(Mac Only)
On Mac systems using Core Audio, you can use
Pro Tools with the built-in audio inputs and outputs on your Mac by selecting any of the available
built-in inputs and outputs, or by selecting the
Pro Tools Aggregate I/O option for using a combi-
nation of built-in inputs and outputs simultaneously (for recording and monitoring).
Selecting Pro Tools Aggregate I/O in the Playback
Engine (Mac only)
You can configure the Input and Output options
for Pro Tools Aggregate I/O in the Mac Audio
Setup, which can be accessed from the Pro Tools
Hardware Setup.
If you need simultaneous input (recording)
and output (playback and monitoring) with
Pro Tools using the built-in audio options on
Mac, use the Pro Tools Aggregate I/O option.
If you only need to play back audio for editing
and mixing, select the appropriate built-in
audio output option.
When changing engines with a Pro Tools session
open, Pro Tools closes and reopens the session to
initialize the new engine.
Chapter 6: System Setup 47
Page 76

Hardware Buf fer Size
Host Engine
The Hardware Buffer Size (H/W Buffer Size) in the
Playback Engine controls the size of the buffer
used to handle host processing tasks such as processing with host-based, or “Native” plug-ins.
• Lower Hardware Buffer Size settings are useful
for improving latency issues in certain recording
situations or for improving certain system performance problems:
• On all Pro Tools systems, lower settings reduce MIDI-to-audio latency (such as when
playing a virtual instrument live and monitoring the instrument’s output). Lower settings
can also improve screen response or the accuracy of plug-in and mute automation data.
• On host-based Pro Tools systems, lower settings reduce all input-to-output monitoring
latency on any record-armed tracks or Auxiliary Input tracks with live inputs.
• On HDX systems, lower settings reduce monitoring latency that occurs on tracks that have
one or more Native plug-ins. Lower settings
can also improve the accuracy of MIDI track
timing on systems without a MIDI interface
that supports time stamping. Lower settings
also improve MIDI track timing on tracks using MIDI virtual instruments that do not support time stamping.
• Higher Hardware Buffer Size settings are useful
for sessions that are using more Native plug-ins
for playback. These settings allow for more audio processing. They can also be useful to reduce errors on machines that require a higher
buffer size.
The Host Engine settings provide options for error
suppression during playback and recording, and
the option to use dynamic plug-in processing.
Ignore Errors During
Playback/Recording
The Ignore Errors During Playback/Record option
determines how Pro Tools responds to error reporting from the Avid Audio Engine (AAE) during
playback and recording. This can be useful when
working with instrument plug-ins where you care
less about clicks and pops in the audio signal while
you work on composing and arranging. Once you
are ready to work on the final mix you should disable this option. Observe the following guidelines
as to whether or not to enable or disable error suppression:
• Enable error suppression only if you are experiencing frequent errors that are interrupting your
creative workflow. When error suppression is
enabled, you can experience a degradation of audio quality. However, this may be acceptable in
order to avoid interrupting playback and recording when working with instrument plug-ins.
• Disable error suppression when you need to ensure the highest possible audio quality, such as
for a final mix.
To enable error suppression:
1 Choose Setup > Playback Engine.
2 Select Ignore Errors During Playback/Record.
3 Click OK.
To change the Hardware Buffer Size:
1 Choose Setup > Playback Engine.
2 From the H/W Buffer Size pop-up menu, select
the audio buffer size, in samples.
3 Click OK.
Pro Tools Reference Guide48
Page 77

If the Ignore Errors Dur ing Playback/Record option
is enabled and too many CPU intensive Native
plug-ins are active in the session (such as Eleven
Free or various virtual instrument plug-ins), you
may experience badly distorted audio. If you encounter this problem, remove or make inactive any
unnecessary Native plug-ins. You can also isolate
and bus record any tracks that use virtual instruments, and then make those source tracks inactive
to free up processing resources.
Minimize Additional I/O Latency
(Host-based Pro Tools Systems Only)
Dynamic Plug-In Processing
When enabled, the Dynamic Plug-In Processing
option maximizes plug-in counts by dynamically
reallocating host-based processing resources as
needed. This means that plug-ins only use CPU
cycles when they are actually processing audio.
To enable dynamic plug-in processing:
1 Choose Setup > Playback Engine.
2 Select Dynamic Plug-In Processing.
3 Click OK.
When the Minimize Additional I/O Latency option is
enabled, any additional latency due to ignoring errors during playback and recording is minimized to
128 samples. Ignoring errors requires at least 128
samples of additional buffering on some systems.
If this option is disabled, the buffer is half the
Buffer Size
, or at least 128 samples (whichever is
H/W
greater). If you are using a slower computer, you
may want to disable this option to avoid adverse
performance.
This option is only available if the
During Playback/Record
option is enabled and the
Ignore Errors
Pro Tools system you are using requires additional
buffering for error suppression, as follows:
•Windows:
• Mbox Pro and Mbox 2 Pro
•Mac:
• 003 family devices
• Eleven Rack
• Mbox family devices
• Pro Tools Aggregate I/O
Number of Voices
(HDX Systems Only)
On HDX systems, the Number of Voices setting in
the Playback Engine lets you control the number of
available voices.
Changing the number of voices affects the total
number of voiceable tracks.
Depending on the session sample rate and the
number of HDX cards in your system, there are
different choices for voice count. For voice limits
on different HDX systems, see “Playback, Recording, and Voice Limits with
Pro Tools | HD Software” on page 39.
To change the Number of Voices:
1 Choose Setup > Playback Engine.
2 Select a value from the Number of Voices pop-
up menu.
3 Click OK.
Chapter 6: System Setup 49
Page 78

Sample Rate
(HDX Systems Only)
The Sample Rate setting in the Playback Engine
shows the default sample rate used when you create a new session. If a session is open, the current
session sample rate is displayed, but cannot be
changed. If no session is open, you can set the default sample rate for new sessions.
back, those files are already cached for playback.
This is especially useful when working with shared
media storage (such as with Avid Unity ISIS
shared storage systems).
To determine the maximum amount of RAM available for the Disk Cache, Pro Tools polls the computer for the amount of RAM installed and subtracts 4 GB of RAM.
Video Engine
Enable the Video Engine option to import, edit, and
playback a wide range of Avid HD and SD MXF
video formats on Pro Tools video tracks without
transcoding (including Avid DNxHD) as well as
QuickTime video. With the Video Engine enabled
you can simultaneously view desktop video and
video monitored using a video peripheral
(Media Composer | Nitris DX,
Media Composer | Mojo DX, and other Avid qualified third-party video interfaces).
To enable the Avid Video Engine for Pro Tools:
1 Choose Setup > Playback Engine.
2 Select the Video Engine option.
3 Click OK.
Cache Size
The Cache Size setting in the Playback Engine determines the amount of memory AAE allocates to
pre-buffer audio for playback and recording. In
most cases, the default setting of
timum Cache Size for most sessions.
Normal is the op-
For example, if your computer has 12 GB of RAM
installed, the total amount of RAM available for
the Disk Cache will be 8 GB.
You can use the Disk Cache and Memory
meters in the System Usage window to determine whether to assign more or less RAM to
the Disk Cache for the current session. See
“System Usage” on page 58.
To set the amount of RAM for use by the Disk
Cache:
1 Choose Setup > Playback Engine.
2 From the Disk Cache selector, select the amount
of RAM you want to allocate for Disk Cache.
3 Click OK.
Configuring MIDI Setup
If you plan to use any external MIDI devices with
Pro Tools (such as controllers, keyboards, synthesizers, drum machines, samplers, sequencers, or
sound modules), you may want to configure your
MIDI setup using Audio MIDI Setup (Mac) or
MIDI Studio Setup (Windows).
Pro Tools can also load audio files used in
Pro Tools sessions into RAM for cached playback.
Pro Tools prioritizes files closest to the current
play head location. This way, when you start play-
Pro Tools Reference Guide50
For more information, see Chapter 10,
“Configuring MIDI.”
Page 79

Configuring Hardware Settings in Pro Tools
Pro Tools lets you configure the signal routing,
digital I/O format, default sample rate, clock
source, and other hardware-based settings depending on your system configuration. These system
settings are available in the Hardware Setup
Setup > Hardware).
(
Selecting an Audio Interface to
Configure
The Peripherals list in the Hardware Setup lets you
select any audio interface connected to your
Pro Tools system associated with the selected
rent Engine
To change the
setting in the Playback Engine dialog.
Playback Engine setting to use a
specific audio interface or AAE (such as HDX,
003, a third-party Core Audio or ASIO interface,
or Pro Tools Aggregate I/O), see “Playback Engine” on page 47).
For Avid HD audio interfaces (such as HD OMNI
or HD I/O) you can configure the signal routing,
digital I/O format, default sample rate, clock
source, and other hardware-based settings for each
HD peripheral connected to your system.
Cur-
Hardware Setup for HD OMNI, Main page
Hardware Setup for Mbox (third generation)
For some Avid audio interfaces (such as 003), you
can configure the signal routing, digital I/O format,
default sample rate, clock source, and other hardware-based settings, depending on your system
configuration.
For third-generation Mbox family audio interfaces, and third-party Core Audio (Mac) and ASIO
(Windows) compatible audio interfaces, use the
Launch Control Panel button to launch the control
panel for configuring your specific audio interface.
Chapter 6: System Setup 51
Page 80

Launch Control Panel or Setup
App
(Pro Tools with Avid Hardware or Third-Party
Audio Interfaces with Control Panel Software)
Using the control panel or setup application for
your audio interface, you can change settings in the
following areas, depending on your audio interface:
• Mixer Settings
• Output Settings
• Hardware Settings (including sample rate,
hardware buffer size, and sync source).
Configuring Pro Tools
Aggregate I/O
(Mac Only)
On Mac systems using Core Audio, you can select
Pro Tools Aggregate I/O as the Current Engine to
use the built-in audio inputs and outputs on your
Mac computer. You can configure the Pro Tools
Aggregate I/O setting in the Mac Audio Setup,
which can be accessed from the Pro Tools Hardware Setup.
To configure Pro Tools Aggregate I/O settings:
1 Choose Setup > Hardware.
You can set the sample rate when creating a
new Pro Tools session by selecting a different
sample rate in the New Session dialog.
To change control panel settings:
1 In the Hardware Setup dialog, click the Launch
Control Panel
button or Launch Setup App but-
ton (depending on your audio interface).
2 To change settings in the control panel or setup
application, see the documentation that came
with your audio interface.
3 When finished, close the control panel or setup
application.
2 In the Peripherals list, select Pro Tools Aggre-
gate I/O
option is selected as the
, or whichever Built-in input or output
Current Engine in the
Playback Engine.
Hardware Setup for Pro Tools Aggregate I/O
(Mac only)
3 Click the Launch Setup App button.
4 In the Audio Devices window of the Mac Audio
Setup, configure the Pro Tools Aggregate I/O
settings.
The Pro Tools Aggregate I/O device is
intended for use only with the built-in
audio on your Mac computer. For best
performance, use the default settings.
Pro Tools Reference Guide52
Page 81

Configuring Default Sample Rate
Setting in Hardware Setup
The Sample Rat e setting in the Hardware Setup dialog determines the default sample rate when you
create a new session. This setting is available only
when there is no session open. Otherwise, the current session sample rate is displayed, but cannot be
changed.
With HDX and HD Native hardware, you can
change the default Sample Rate in the Hardware
Setup, or in the Playback Engine.
With HDX and HD Native hardware, the
Sample Rate setting can affect the number
of available voices.
On other Pro Tools systems, you can only change
the default sample rate in the Hardware Setup or
using the control panel for third-party audio interfaces.
You can set the sample rate when creating a
new Pro Tools session by selecting a different
sample rate in the New Session dialog.
To change the default Sample Rate in the
Hardware Setup:
1 Choose Setup > Hardware Setup.
2 Select the sample rate from the Sample Rate
pop-up menu.
3 Click OK.
Configuring Clock Source
The Pro Tools Hardware Setup lets you select the
Clock Source for the system.
Changes made to Clock Source in the Session
Setup window are reflected in the Hardware
Setup window.
Internal
directly into Pro Tools, you will usually use the
Pro Tools
External
Pro Tools from an external digital device, or if you
utilize a common house clock signal, you will synchronize Pro Tools to that digital device or common signal.
Depending on your audio interface, external
options can include
Optical [Encl], AES/EBU 1–8, TDIF, ADAT, and
Word Clock. For details, see the guide for your au-
dio interface.
To select the Clock Source:
1 Choose Setup > Hardware.
2 Choose the clock source from the Clock Source
3 Click OK.
If you are recording an analog signal
Internal clock source.
If you are transferring material into
AES/EBU [Encl], S/PDIF,
pop-up menu.
Your digital input device must be
connected and powered on for Pro Tools to
synchronize to it. If your input device is not
powered on, leave the Clock Source set to
Internal.
Chapter 6: System Setup 53
Page 82

Configuring Digital Format and
Hardware Routing
The Hardware Setup includes additional settings
for configuring the digital format and hardware
routing for your system’s audio interfaces.
For an outline of the configuration of an HDX or
HD Native system with one or more Pro Tools HD
interfaces, see “Configuring Pro Tools | HDX and
Pro Tools | HD Native Hardware Settings” on
page 54.
To configure specific hardware settings for
other Pro Tools or third-party audio interfaces, see the documentation that came with
your audio interface.
Selecting Footswitch Control
(003 Only)
The footswitch connector on your 003 family interface lets you use a footswitch pedal to control
either playback start/stop or recording
punch in/out. Both QuickPunch audio punch-in
and punch-out and MIDI punch-in and punch-out
recording are supported.
Record Punch In/Out
footswitch connected to your 003 family interface
to punch in and punch out during recording.
Playback Start/Stop
footswitch connected to your 003 family interface
to start and stop playback.
Select this option to use a
Select this option to use a
Configuring Pro Tools | HDX and Pro Tools | HD Native Hardware Settings
On HDX and HD Native systems, you configure
Hardware settings for each audio interface connected to your system (see Chapter 5, “Pro Tools
Systems.”)
HDX and HD Native systems can have HD I/O,
HD OMNI, or HD MADI audio interfaces connected to HDX cards or HD Native hardware. The
HD I/O and HD OMNI can also have additional
interfaces attached using the Expansion port on
each interface.
Identifying Audio Interfaces
If you have multiple audio interfaces of the same
type connected to your system, before you make
audio connections to them, you should confirm the
identity of each interface. This ensures that you
choose the appropriate interface in the Peripherals
list when you define its inputs and outputs in the
Hardware Setup.
To identify audio interfaces in your system:
1 Choose Setup > Hardware.
2 From the Peripherals list, select an audio inter-
face connected to your system.
Use the Up and Down Arrow keys to scroll
though the Peripherals list in the Hardware
Setup.
3 Make sure the Main page is shown.
Pro Tools Reference Guide54
Page 83

4 Select the Identify option, located in the lower
left corner of the Hardware Setup. This illuminates all the LEDs on the front panel of the selected audio interface.
5 Make a note of which interface in your studio
setup corresponds to the identified interface.
6 Repeat the above steps for each additional audio
interface in your setup.
Configuring Avid HD Audio
Interfaces
Additional pages are available to configure other
controls for each audio interface (such as setting
operating levels).
To configure Avid HD audio interfaces:
1 Choose Setup > Hardware.
2 From the Peripherals list, select the audio
interface connected to the first card in your
system. This will be the interface at the top of
the list.
3 Click the Main tab.
HD OMNI supports up to eight channels of simultaneous I/O and multiple I/O formats (such as analog, AES/EBU, ADAT Optical, and S/PDIF).
HD I/O audio interfaces support sixteen channels
of simultaneous I/O and multiple I/O formats (such
as analog, AES/EBU, ADAT Optical, S/PDIF, and
TDIF). HD MADI supports up to 64 channels of
MADI I/O.
The Main page of the Hardware Setup is where
you define which physical inputs and outputs on
your audio interface are routed to available inputs
and outputs in Pro Tools. You can think of this
window as a patchbay that allows you to route any
of the inputs or outputs on your audio interfaces to
channel assignments in the Pro Tools mixer.
Hardware Setup for HD I/O, Main page
Press Command+Left or Right Arrow keys
(Mac) or Control+Left or Right Arrow keys
(Windows) to move though the different
pages of the Hardware Setup.
4 From the Clock Source pop-up menu, select the
appropriate clock source for the interface.
In many cases, you will use
Internal. The other
choices are for resolving Pro Tools to external
clock sources. Depending on your audio interface,
Clock Source options can include:
[Encl], S/PDIF, Optical [Encl], AES/EBU 1–8, TDIF,
ADAT,
and Word Clock (optional Word Clock rates
AES/EBU
are available when operating at higher sample
rates).
5 If you want to send clock output to other de-
vices attached to the audio interface, select the
appropriate output from the
Ext. Clock Output
pop-up menu.
6 Select which digital I/O port on your audio in-
terface enclosure is active by selecting the corresponding option under
Digital Format.
Depending on the type of interfaces in your
system, choices include
Optical (S/PDIF)
AES/EBU, S/PDIF, and
. Selecting Optical (S/PDIF) re-
sets the Optical I/O port (which is, by default,
eight channels of ADAT Optical I/O) to two
channels of S/PDIF Optical I/O.
Chapter 6: System Setup 55
Page 84

7 For S/PDIF compatibility with Tascam DA-30
DAT recorders, select the
Tascam option under
S/PDIF Format.
8 From the Input and Output channel pop-up
menus, select the physical ports (such as
1–2
or Optical 1–2), that will be routed to the
Analog
corresponding Pro Tools input and output channels (such as Ch 1–2, Ch 3–4), listed on the left
side of the Main page.
Configuring HD OMNI Controls
For detailed information about configuring
HD OMNI, see the HD OMNI Guide.
To configure HD OMNI in Pro Tools:
1 Choose Setup > Hardware.
2 From the Peripherals list, select the HD OMNI
audio interface.
Inputs and outputs of similar format are differentiated in the input and output channel pop-up menus.
For example, the AES/EBU inputs and outputs in
the HD I/O enclosure are listed as
AES/EBU [Encl],
while the AES/EBU inputs and outputs on the factory-installed Digital I/O card are listed (in pairs)
AES/EBU 1–2, AES/EBU 3–4, AES/EBU 5–6,
as
and AES/EBU 7–8. For HD I/Os equipped with a
second Digital I/O Card, the additional AES/EBU
I/O ports on the optional card are listed as
AES/EBU 9–10, AES/EBU 11–12, AES/EBU
13–14,
and AES/EBU 15–16.
9 Configure any specific controls for your audio
interface:
• “Configuring HD OMNI Controls” on page 56.
• “Configuring HD I/O Controls” on page 57.
• “Configuring HD MADI Controls” on page 58.
10 For additional audio interfaces, select them in
the Peripherals list, and repeat the above steps.
See your audio interface guide for additional
configuration details and restrictions.
3 Click the Monitor tab and configure the options.
When working with HD OMNI, you should always configure the Monitor page first.
HD OMNI Hardware Setup, Monitor page
4 Click the Main tab and configure the options.
HD OMNI Hardware Setup, Main page
Pro Tools Reference Guide56
Page 85

5 Click the Analog In tab and configure the
options.
HD OMNI Hardware Setup, Analog In page
6 Click the Analog Out tab and configure the
options.
HD OMNI Hardware Setup, Analog Out page
Configuring HD I/O Controls
For detailed information about configuring
HD I/O, see the HD I/O Guide.
To configure controls for HD I/O:
1 Choose Setup > Hardware.
2 From the Peripherals list, select the HD I/O
audio interface.
3 Click the Main tab and configure the options.
HD I/O Hardware Setup, Main page
4 If you have at least one HD I/O AD card, click
Analog In tab and configure the options. If
the
you have two HD I/O AD cards, this tab is la-
Analog In 1–8.
beled
7 Click the Mixer tab and configure the options.
HD OMNI Hardware Setup, Mixer page
8 When you are finished, click OK.
HD I/O Hardware Setup, Analog In page
5 If you have two HD I/O AD cards, click the
Analog In 9–16 tab and configure the options.
6 If you have at least one HD I/O Digital card,
click the
Digital tab and configure the options.
Chapter 6: System Setup 57
Page 86

7 If you have two HD I/O Digital cards, click the
Digital tab and configure the options.
second
8 When you are finished, click OK.
Configuring HD MADI Controls
For detailed information about configuring
HD MADI, see the HD MADI Guide.
To configure controls for HD MADI:
1 Choose Setup > Hardware.
2 From the Peripherals list, select either
HD MADI Port 1 or HD MADI Port 2 and configure the options.
System Usage
Meters in the System Usage window indicate how
much of your system’s processing power is being
used when processing audio, and when writing and
playing back automation.
As these meters approach their limits, host processing and recording or playback of automation
data can be affected. If CPU or PCI Activity are
high, a system error may occur. If Disk Activity is
high, Pro Tools may miss playback of some automation data during particularly dense periods of
activity, such as while using the Bounce to Disk
command.
HD MADI Hardware Setup
The settings for HD MADI Port 1 and
HD MADI Port 2 are linked. Any changes are
global regardless of which is selected in the
Peripherals list.
3 When you are finished, click OK.
Pro Tools Reference Guide58
System Usage window
CPU Meters
The CPU Total meter displays session performance
for Elastic Audio processing, Clip Gain processing, and Native plug-in and mixer processing.
The individual
cation of how much Pro Tools is using each of the
processors in your computer.
CPU meters provide a general indi-
Page 87

Activity Meters
Memory Meter
The Activity section of the System Usage window
display meters for disk usage and memory usage.
Disk Meter
As in previous versions of Pro Tools, the Disk meter displays the amount of hard disk processing activity.
Disk Cache Meter
(Pro Tools HD Only)
Pro Tools HD provides a meter in the System Usage window for monitoring the Disk Cache. This
meter is only present if a fixed
Cache Size is se-
lected in the Playback Engine dialog.
The Memory meter displays how much of the installed physical RAM in the system is being used
by Pro Tools. This includes RAM used by the audio engine, the video engine (if enabled), plug-ins,
and the disk cache. Other than Pro Tools, it does
not show any other RAM usage by the system. If
the Memory meter approached 100%, install more
physical RAM or lower the Disk Cache setting in
the Playback Engine dialog.
DSP Usage Meters
(HDX Systems Only)
HDX systems provide additional meters below the
Activity meter:
Voices
The Voices meter displays the total number of
voices that can be allocated and the number of
voices currently allocated. This includes all voices
whether they are allocated explicitly or dynamically, as well as any voices used for routing hostbased processing.
System Usage window showing Disk Cache meter
The Disk Cache meter
located
memory being used to cache audio in the
indicates the amount of al-
timeline (up to the amount of RAM selected for the
Disk Cache setting in the Playback Engine). An
additional peak-meter style indicator
show how
for caching
much of the allocated RAM is needed
the session.
is included to
Time Slots
The Time Slots meter displays the total number of
DSP Time Slots available and the number of DSP
Time Slots currently used.
Chapter 6: System Setup 59
Page 88

DSP
Voices
Time Slots
DSP Usage
Managing System Resources
The DSP meters display how much of each DSP
chip on each HDX card is currently being used for
mixer configurations and DSP-based plug-ins.
System Usage window (HDX 2 shown)
To monitor the usage of resources during a
Pro Tools session:
Choose Window > System Usage.
To reduce processing load, do one of the
following:
Reduce the density of automation in places
where it shows the most activity. For details, see
“Thinning Automation” on page 1038.
Make unnecessary track inputs and outputs in-
active. For details, see “Making Track Inputs
and Outputs Inactive from the Edit or Mix Window” on page 234.
Make unnecessary tracks inactive. For details,
see “Making Tracks Inactive” on page 243.
Make unnecessary DSP plug-ins inactive. For
details, see “Making Inserts Inactive” on
page 987.
Pro Tools Reference Guide60
Page 89

Chapter 7: I/O Setup
Channel Grid
Path Type tabs
Active/Inactive
Status
Path Format selector
Path Name column
Path tools
Input and Output
selectors
Interface Name label
Import/Export Settings
Options
The I/O Setup provides tools to label, format, and assign Pro Tools input, output, insert, and bus audio signal paths both for individual sessions as well as for your specific Pro Tools system. I/O Setup also provides
controls for PRE (Mic Preamp) signal paths, and Delay Compensation settings for hardware inserts.
The I/O Setup displays a graphical representation (cross-point matrix) of the signal routing for physical in-
put and output paths for each connected audio interface. Like a virtual patchbay, I/O Setup controls let you
route physical inputs and outputs on audio interfaces to Pro Tools input and output channels. For HDX and
HD Native systems, some of these controls mirror the routing controls found in the Hardware Setup—
changes made to physical routing in one is always reflected in the other. The I/O Setup also includes controls for creating internal mix busses and for creating and mapping output busses.
I/O Setup on an HDX system with HD OMNI and HD I/O
Chapter 7: I/O Setup 61
Page 90

Opening the I/O Setup
The I/O Setup can be opened from the application
window (with a session closed), or from within a
session (when a session is open).
To open the I/O Setup:
1 Make sure your audio interfaces are enabled
and configured properly in the Hardware Setup.
See “Configuring Hardware Settings in
Pro Tools” on page 51.
Pro Tools Software Signal Paths
A signal path is a logical grouping of multiple inputs, outputs, or busses that has a single name and
(channel) format. The I/O Setup lets you create,
define and name paths according to the configuration of your studio and the needs of each project.
24 busses are created by default, but you can create
as many as you need.
2 Choose Setup > I/O.
Closing the I/O Setup
To close the I/O Setup and save changes:
Click OK.
Pro Tools checks several settings for routing validity (to prevent feedback loops). If there are any
overlapping or invalid settings, you will be required to correct them (see “Valid Paths and Requirements” on page 87).
To close the I/O Setup without saving changes:
Click Cancel.
Navigating in the I/O Se tup
To scroll left or right in the I/O Setup:
Press Option+Page Up/Down (Mac) or
Alt+Page Up/Down (Windows).
Main Paths and Sub-Paths
Paths in Pro Tools tracks and I/O Setup include
main paths and sub-paths.
Main Paths
Main paths are logical groupings of inputs, inserts,
busses, or outputs. For example, a master stereo
output path will include both its left and right channels.
Sub-Paths
A sub-path represents a signal path within a main
path. For example, a default stereo output bus path
consists of two mono sub-paths, left and right.
Mono tracks and sends can be routed to either
mono sub-path of the stereo output bus path.
Main and sub-paths in I/O Setup (Input page)
Pro Tools Reference Guide62
Page 91

Sub-paths for Output Paths
Pro Tools lets you create sub-paths for physical
output paths in the Output page. Using output bus
sub-paths rather than physical output sub-paths is
sufficient for most workflows. Use physical output
sub-paths only when you need alternate mix formats for the same physical output (including explicit downmix paths).
Default Bus Sub-paths
Pro Tools lets you create the default sub-paths for
busses in the New Sub-Path dialog when accessed
from the Bus page. Enable the
Paths
option to have Pro Tools automatically cre-
Create Default Sub-
ate the default set of sub-paths for the path format
(channel width) of the selected main bus path, as
follows:
Default Sub-Paths
Main
Path
Mono N/A N/A
Stereo 2 mono <
LCR 1 Stereo (LR),
Sub-Paths Sub-Path Name
main path
name
> followed by
channel designation
.L and .R
3 Mono (one for
each channel)
Stereo: <
name
Mono: <
name
main path
>.LR
main path
>.L, .C, .R
Default Sub-Paths
Main
Path
LCRS 1 Stereo (LR),
Quad 1 Stereo (LR),
5.0 –
6.0 –
7.0
5.1 –
6.1 –
7.1
When the
Sub-Paths Sub-Path Name
Stereo: <
4 Mono (one for
each channel)
4 Mono (one for
each channel)
1 Stereo (LR),
5–7 Mono
(one for each
channel)
1 Stereo (LR),
6–8 Mono
(one for each
channel)
Create Default Sub-Paths option is en-
name
Mono: <main path
name>.L, .C, .R, .S
Stereo: <
name
Mono: <main path
name>.L, .R, .Ls, .Rs
Stereo: <
name
Mono: <
name
.Ls, .Rs, and so on
Stereo: <
name
Mono: <
name
.Ls, .Rs, and so on,
and LFE
main path
> .LR
main path
> .LR
main path
>.LR
main path
>.L, .C, .R,
main path
>.LR
main path
>.L, .C, .R,
abled, all other custom options in the New SubPaths dialog are grayed-out and unavailable.
It is especially useful to define and name
sub-paths for complex mixing setups, such
as a 5.1 surround mix.
Paths in Session s
In sessions, signals are routed to and from tracks,
sends, and inserts using track Input, Output, Insert,
and Send selectors.
When you click a track Input, Output, Insert, or
Send selector, the paths created and defined in the
IO Setup appear in the list of available paths (see
“Assigning Audio Inputs and Outputs to Tracks”
on page 230).
Chapter 7: I/O Setup 63
Page 92

Path Configurations and
I/O Settings
Each Pro Tools system can have a different path
configuration, determined by:
• On Pro Tools systems, the type of audio interface or other physical I/O (including built-in
hardware)
• On HDX and HD Native systems, the number
and types of audio interfaces
Path configurations in Pro Tools are saved as
I/O settings.
I/O Settings are saved with both the session and
with the system. You can choose to overwrite the
I/O settings saved with the system with those
saved with the session (see “Restore from Session”
on page 95).
Unavailable items (including hardware, paths, or
required resources) remain in the session as inactive items (see “Making Paths Active or Inactive”
on page 85).
When you create a new session, you can specify
which I/O Settings to use. For example, you can
use the factory installed default settings, the “Last
Used” setting, or one of any available custom I/O
settings files.
See “Factory I/O Settings” on page 92 and
“I/O Settings Files” on page 93 for more
information.
Default I/O Settings
Pro Tools comes with default I/O Setup settings to
get you started (see “Factory I/O Settings” on
page 92). You should only need to open the I/O
Setup if you want to customize I/O paths or if you
change your system hardware (for example, adding an expansion card to HD I/O, or adding or removing an audio interface).
You can always return to the default settings for an
I/O Settings page by clicking the Default button.
These paths are available in session tracks and are
reflected in the I/O Setup.
You can customize your I/O Setup configuration at
any time, according to the needs of each project
(see “Customizing I/O Settings” on page 73).
I/O Setup Pages
The I/O Setup provides tabs to open pages for configuring specific I/O Settings.
Opening an I/O Setup Page
To open an I/O Setup page:
Click the corresponding tab at the top of the I/O
Setup.
Hold the Command key (Mac) or the
Control key (Windows) and use the Left or
Right Arrow keys to cycle through the
different pages of the I/O Setup.
It is recommended that if you choose to customize your I/O Setup, configure the systemspecific options first: Input, Output, Insert,
Mic Preamps, and H/W Insert Delay. Then
configure the Bus page. Once you have configured your system, you should not need to
change it unless you add or remove hardware
(such as audio interfaces) from your system.
See “Customizing I/O Settings” on page 73.
Pro Tools Reference Guide64
Page 93

Input Page
Output Page
The Input page of the I/O Setup lets you create and
assign Pro Tools Input channels to receive audio
from the physical inputs of your audio hardware.
Configure input signal path names, formats, and
source channel (analog or digital) on the Input
page. Multichannel input paths (stereo or greater)
can have any number of sub-paths. Input channels
can have overlapping input paths. Input names,
channel widths, and physical input mappings are
saved with the system and the session, and can be
recalled from either.
The Output page of the I/O Setup lets you create
and assign Pro Tools Output channels to send audio to the physical outputs of your audio hardware.
Configure output signal path names and formats on
the Output page. Output channels can have overlapping output paths. Multichannel Output paths
(stereo or greater) can have any number of subpaths. Output names, channel widths, and physical
output assignments are saved with the system and
the session, and can be recalled from either.
I/O Setup, Input page
I/O Setup, Output page
Chapter 7: I/O Setup 65
Page 94

Bus Page
Insert Page
The Bus page of the I/O Setup lets you create and
edit internal mix busses and output busses. The
Bus page also lets you map output busses to output
paths (as configured in the Output page of the I/O
Setup).
Configure bus path names and formats, and map
any main bus path to any available output of the
same width or greater. Multichannel bus paths
(stereo or greater) can have any number of subpaths. Output bus and internal mix bus names and
channel widths are saved with and recalled from
the session.
The Insert page of the I/O Setup lets you create and
edit hardware insert signal paths for the Pro Tools
mixer. Hardware inserts can route audio through
an external device connected to parallel inputs and
outputs of a Pro Tools audio interface. This lets
you process audio on a track with a hardware insert
in real time.
Insert paths require audio interface inputs and outputs, and are determined by the configuration of
the Insert page in the I/O Setup for your system.
I/O Setup, Bus page
For more information, see “Configuring
Busses” on page 87.
Pro Tools Reference Guide66
I/O Setup, Insert page
For more information, see “Using Hardware Inserts” on page 1010.
Page 95

Mic Preamps Page
Input selector
Expand/Collapse
Path Format selector
Channel Grid
triangle
Active/Inactive
Status box
Path Name
column
On the Mic Preamps page of the I/O Setup,
signal paths for one or more PRE multi-purpose
microphone preamplifiers can be mapped to
audio interfaces. For more information, see the
PRE Guide.
Mic Preamps page
H/W Insert Delay
(Compensation) Page
To compensate for the delay (latency) of any external hardware devices (such as an effects unit) used
in your session, you can set the amount of Hardware Insert Delay Compensation (in milliseconds)
for each external device. These times will be used
by the Delay Compensation Engine to time-align
input paths when the hardware insert is in use and
Delay Compensation is enabled.
I/O Setup Signal Path Controls
Depending on the I/O Setup page, the I/O Setup
provides the following controls in its graphical
section for configuring signal routing paths.
I/O Setup, Signal Path controls (Input page shown)
Input and Output Selectors
physical ports on your audio interface to route to
Pro Tools inputs and outputs. Ports are selectable
in channel pairs. Available ports for each displayed interface are based on Hardware Setup settings; for example, if the AES/EBU inputs and outputs of an interface are enabled in Hardware Setup,
they are available for routing in I/O Setup. The
functionality provided with the Input and Output
selector is the same as that provided on the Main
page of the Hardware Setup.
Let you select the
Insert offset delay field
For more information, see “Setting a
Hardware Insert Delay Offset” on
page 978.
Path Name Column
Shows paths that are available
for selection, including the name of each defined
path. Path names can be renamed.
Expand/Collapse Triangle
Shows or hides the subpaths associated with a main path (Input and Bus
paths only).
Active/Inactive Status Box
Shows and changes
the active/inactive status of each path.
Chapter 7: I/O Setup 67
Page 96

Path Format Selector
Shows and selects the
type/format (such as Mono, Stereo, Quad, or 5.1)
of each defined path (greater-than-stereo multichannel formats are supported with Pro Tools HD
only).
Import Settings Button
settings file to reconfigure I/O Setup.
tings
only imports the settings for the currently
Lets you import an I/O
Import Set-
viewed page of the I/O Setup (such as the Input
page).
Channel Grid
Assigns paths to specific interfaces
and channels.
I/O Setup Buttons
Depending on the I/O Setup page, the I/O Setup
can provide the following buttons for configuring
signal routing.
I/O Setup, Signal Path buttons (Output page shown)
New Path Button
signal path pages for Input, Output, Insert, Bus, or
Mic Preamp.
New Sub-Path Button
path on signal path pages for Input, Output, Insert,
or Bus.
Delete Path Button
path or sub-path on signal path pages for Input,
Output, Insert, or Bus.
Default Button
path configuration, depending on the physical
hardware I/O you are using and how your hardware is configured.
Lets you create a new path on
Lets you create a new sub-
Lets you delete any selected
Resets a path type to its default
Apply to All Tabs
Applies imported I/O settings to
all pages of the I/O Setup.
Option-click (Mac) or Alt-click (Windows) the
Import Settings button to import settings to all
pages of the I/O Setup.
Export Settings Button
Lets you save I/O settings
as a file that can be imported into other sessions or
used on other Pro Tools systems.
Export Settings
exports the settings for all pages of the I/O Setup.
Show Last Saved Setup
Appears in the I/O Setup
in certain session transfer situations. For details on
this feature, see “Show Last Saved or Current
Setup” on page 96.
Cancel Button
Closes the I/O Setup without
saving changes.
OK Button
Closes the I/O Setup and saves any
changes.
I/O Setup Options
Pro Tools systems have several additional
I/O Setup options depending on which page of the
I/O Setup you are viewing. These include default
signal routing for metering and auditioning, and
default track layout for multichannel mix formats.
Option-click (Mac) or Alt-click (Windows)
the Default button to restore defaults to paths
in all pages of the I/O Setup.
Pro Tools Reference Guide68
I/O Setup, Signal Path options (Output page shown)
Page 97

Compensate for Delays After
Record Pass
(HDX and HD Native Systems Only)
Pro Tools provides two options for compensating
for input and output latency (due to any inherent
latency in the analog to digital and digital to analog
converters of the audio interface) after recording.
Monitor Path
Pro Tools provides a Monitor Path setting in the
Output page of the I/O Setup. Using the selected
Monitor path for the main mix output of your
Pro Tools sessions ensures that a session created
on another Pro Tools system will always have at
least one audible output.
Compensation for Input Delays After
Record Pass
When enabled, this option provides automatic
compensation for any analog or digital input delay
with Avid HD interfaces. Enable this option for all
recording situations. When recording from a digital source, both the
After Record Pass
put Delays After Record Pass
Compensation for Input Delays
and the Compensation for Out-
options must be en-
abled.
Compensation for Input Delays After Record
The
Pass
option is only available in the Input page of
the I/O Setup.
Compensation for Output Delays After
Record Pass
When enabled, this option provides automatic
compensation for any analog or digital output delay with Avid HD audio interfaces. Enable this option when you are synchronized to an external
clock source. When recording from a digital
source, both the
After Record Pass
Output Delays After Record Pass
Compensation for Input Delays
and the Compensation for
options must be
enabled.
Compensation for Output Delays After Record
The
Pass
option is only available in the Output page of
the I/O Setup.
Pro Tools automatically downmixes or upmixes
the session Monitor path to the system Monitor
path so that you always hear session playback regardless of name and width of the Output path on
either system.
The Monitor path is graphically indicated by a
speaker icon in track and send Output selectors,
Output paths, and in the Output and Bus pages of
the I/O Setup.
Selecting the Monitor Path
Audition Path
You can specify the output path through which
files and clips are previewed (auditioned) from the
Clip List or Workspace browsers, as well as when
previewing AudioSuite processing. Pro Tools lets
you assign the Audition path to any available Output path regardless of its channel width. For mismatched channel widths, the Audition path is automatically downmixed or upmixed to the selected
Output path.
Chapter 7: I/O Setup 69
Page 98

The Audition Path selector is available in the Output page of the I/O Setup.
For information on previewing audio, see
“Previewing Clips in the Clip List” on
page 265 or “Previewing Audio in Workspace Browsers” on page 294.
Using the Default Audition Path
When you preview a file or clip in the Clip List or
in a Workspace browser, or when previewing AudioSuite processing, Pro Tools routes the audio
output through the specified Audition Path.
Pro Tools assigns a default Audition Path to the
first available main Output path of the corresponding format. You can also select a different Audition Path in the I/O Setup.
Configuring Audition Paths
You can specify the monitoring outputs for auditioning audio in the Clip List and Workspace
browsers, or for previewing AudioSuite processing, using the
Audition Paths Main Menu
Audition Paths pop-up menu.
The main menu consists of all path format choices available on the current system (Mono and Stereo on all systems, and
LCR and greater with Pro Tools HD only).
Output Meter Path
The Output Meter Path selector determines the
which output or bus paths are monitored by the
Output Meters in the transport (see “Output Meters” on page 964). It also determines the path displayed across the Output meters of D-Control or
D-Command worksurfaces as well as in the
Pro Tools transport. For more details, see your
control surface documentation.
Output Meter Path selector is available in the
The
Output and Bus pages of the I/O Setup.
To set the Output Meter Paths:
1 Choose Setup > I/O Setup.
2 Select the Output tab.
3 From the Output Meter Path selector, select the
desired output path for metering.
Default Output Bus
You can specify the default output bus path
assignment for new tracks, in each available
format.
Default Output Bus selector is available in the
The
Bus page of the I/O Setup.
Audition Paths Submenus
Each path format
choice has a submenu listing Output paths of that
given format. (The mono submenu lists Output
paths of any format.)
To configure an Audition Path:
Select a path from the Audition Paths pop-up
menu or submenus.
Pro Tools Reference Guide70
The Default Output Bus can be set for
internal mix bus paths, as well as for
output bus paths.
To specify a default output for new tracks in the
I/O Setup:
Click the Default Output Bus pop-up menu and
select a format and output bus path.
Page 99

AFL/PFL Path
Setting AFL or PFL Path Levels
Tracks soloed in AFL (After Fader Listen) or PFL
(Pre Fader Listen) Solo mode are routed to the current AFL/PFL Path, as set with the
AFL/PFL Path
selector.
Pro Tools provides a combined
AFL/PFL Path set-
ting that can use any available Output path, regardless of channel width. For mismatched channel
widths, the AFL/PFL path is automatically downmixed or upmixed to the selected Output path.
Note that if you assign the
AFL/PFL Path to a phys-
ical output used for monitoring, that signal is
muted when soloed and the solo path is used for
monitoring instead. However, if the
AFL/PFL Path
is assigned to a different output, the main output
continues to pass signal even when the AFL/PFL
path is soloed. This lets you use XMON “Broadcast Mode” without XMON (ICON) hardware.
AFL/PFL Path selector is available in the Out-
The
put page of the I/O Setup.
See “Solo Modes” on page 240 for more information on using AFL or PFL Solo modes.
To select the AFL/PFL Path output:
Select a path from the AFL/PFL Path pop-up
menu.
Selecting None as the AFL/PFL Path disables
AFL and PFL Solo modes. When None is
selected, AFL and PFL cannot be used.
You can set a separate master AFL/PFL Path level
for all AFL solos and all PFL solos.
Tracks do not need to be soloed to have the
master AFL/PFL Path level adjusted.
To set the AFL/PFL Path level for AFL or PFL
solos:
1 Choose Options > Solo Mode, and select a Solo
mode:
• To set the level for AFL solos, select
• To set the level for PFL solos, select
2 In the Mix or Edit window, Control-click Com-
AFL.
PFL.
mand-click (Mac) or (Windows) a Solo button
on any track.
3 Adjust the AFL/PFL Path fader.
4 Click on the new fader position (or press Esc) to
close the fader display.
To set the AFL/PFL Path level to 0 dB,
Command-Control-click (Mac) or
Control-Start-click (Windows) any Solo
button.
AFL/PFL Mutes (Output Path)
(Systems without a D-Control or D-Command
Control Surface)
If you are not using a D-Control™ or D-Command
console, your regular Pro Tools output path can be
muted when you send a signal to the AFL/PFL
Path. The muted path is set with the AFL/PFL
Mutes (Output Path) selector.
AFL/PFL Mutes selector is available in the
The
Output and Bus pages of the I/O Setup.
See “Solo Modes” on page 240 for more
information on selecting and using AFL or
PFL Solo modes.
Chapter 7: I/O Setup 71
Page 100

To set which output path is muted when tracks are
soloed in AFL or PFL Solo mode:
1 Choose Setup > I/O.
2 Click the Output tab to display the Output page.
3 Select a path from the AFL/PFL Mutes (Output
Path) pop-up menu.
4 Click OK to save your changes to the I/O Setup
and close the I/O Setup.
Low Latency Monitoring
(HD Native Systems Only)
With HD Native systems, the Output page of the
I/O Setup lets you enable (or disable) Low Latency
Monitoring. It also lets you specify any available
Output path for Low Latency Monitoring. The
Output path for Low Latency Monitoring can be of
any channel width (from Mono to 7.1). Low Latency Monitoring uses Outputs 1–2 by default.
To configure Low Latency Monitoring in the I/O
Setup:
1 Open the I/O Setup dialog (Setup > I/O).
2 Click the Output tab.
3 Enable the Low Latency Monitoring option.
4 From the Low Latency Monitoring pop-up menu,
select the Output path you want to use for Low
Latency Monitoring.
5 Click OK to save your changes and close the I/O
Setup.
Default Format
(Pro Tools HD Only)
The Default Format pop-up menu lets you select
the default format (Mono, Stereo, and all multichannel formats) for new paths and for when you
click the
Default button.
The
Default Format selector is available in the
Input, Output, and Insert pages of I/O Setup. The
Default Format settings on each page are set inde-
pendently of one another. The Input and Insert
pages only provide Mono and Stereo options. The
Output page provides all available formats.
Depending on the I/O Setup page, the
mat
setting determines the width of the first output
(or input or insert) when clicking the
Default For-
Default but-
ton. If mono or stereo is selected, all outputs (or inputs or inserts) are created accordingly.
To choose a Default Format:
Select the channel mapping from the Default
Format
pop-up menu.
For more information about multichannel
mixing, see Chapter 50, “Pro Tools Setup for
Surround.”
Path Order
(Pro Tools HD Only)
The Path Order pop-up menu lets you specify the
default channel order for all new paths created.
The selected
channel order for the following:
• Channels added to newly created path (first
paths) when hitting the
• Channels added to empty paths when penciling
in channel assignments.
• Channels added when creating a new path and
selecting the
option.
Path Order selector is available in the Input,
The
Output, and Insert pages of I/O Setup. Setting the
Path Order on any page of I/O Setup affects the
other pages.
Path Order setting determines the
Default button.
Add default channel assignments
Pro Tools Reference Guide72
 Loading...