

Page 1

Intro to Pro Tools
Version 10.0
®
Page 2

Legal Notices
This guide is copyrighted ©2011 by Avid Technology, Inc.,
(hereafter “Avid”), with all rights reserved. Under copyright
laws, this guide may not be duplicated in whole or in part
without the written consent of Avid.
003, 96 I/O, 96i I/O, 192 Digital I/O, 192 I/O, 888|24 I/O,
882|20 I/O, 1622 I/O, 24-Bit ADAT Bridge I/O, AudioSuite,
Avid, Avid DNA, Avid Mojo, Avid Unity, Avid Unity ISIS, Avid
Xpress, AVoption, Axiom, Beat Detective, Bomb Factory,
Bruno, C|24, Command|8, Control|24, D-Command,
D-Control, D-Fi, D-fx, D-Show, D-Verb, DAE, Digi 002,
DigiBase, DigiDelivery, Avid, DigidesignAudio Engine,
Digidesign Intelligent Noise Reduction, DigidesignTDM Bus,
DigiDrive, DigiRack, DigiTest, DigiTranslator, DINR,
DV Toolkit, EditPack, Eleven, EUCON, HD Core,
HD Process, Hybrid, Impact, Interplay, LoFi, M-Audio,
MachineControl, Maxim, Mbox, MediaComposer, MIDI I/O,
MIX, MultiShell, Nitris, OMF, O MF In t er c h a ng e, PRE,
ProControl, Pro Tools M-Powered, Pro Tools, Pro Tools|HD,
Pro Tools|HD Native, QuickPunch, Recti-Fi, Reel Tape,
Reso, Reverb One, ReVibe, RTAS, Sibelius, Smack!,
SoundReplacer, Sound Designer II, Strike, Structure,
SYNC HD, SYNC I /O, Synchronic, TL Aggro, TL AutoPan,
TL Drum Rehab, TL Everyphase, TL Fauxlder, TL In Tune,
TL MasterMeter, TL Metro, TL Space, TL Utilities,
Transfuser, Trillium Lane Labs, Vari-Fi, Velvet, X-Form, and
XMON are trademarks or registered trademarks of Avid
Technology, Inc. Xpand! is Registered in the U.S. Patent and
Trademark Office. All other trademarks are the property of
their respective owners.
Product features, specifications, system requirements, and
availability are subject to change without notice.
Guide Part Number 9320-65050-00 REV A 10/11
Documentation Feedback
At Avid, we are always looking for ways to improve our
documentation. If you have comments, corrections, or
suggestions regarding our documentation, email us at
techpubs@avid.com.
Page 3

Contents
Chapter 1. Welcome to Pro Tools . . . . . . . . . . . . . . . . . . . . . . . . . . . . . . . . . . . . . . . . . . . . 1
Connect Headphones or Speakers. . . . . . . . . . . . . . . . . . . . . . . . . . . . . . . . . . . . . . 1
Listen to the Demo Session . . . . . . . . . . . . . . . . . . . . . . . . . . . . . . . . . . . . . . . . . . . 2
Import a Track from a CD . . . . . . . . . . . . . . . . . . . . . . . . . . . . . . . . . . . . . . . . . . . . . 7
Record Yourself . . . . . . . . . . . . . . . . . . . . . . . . . . . . . . . . . . . . . . . . . . . . . . . . . . . 13
Make a Beat . . . . . . . . . . . . . . . . . . . . . . . . . . . . . . . . . . . . . . . . . . . . . . . . . . . . . . 20
Composing without a MIDI Controller. . . . . . . . . . . . . . . . . . . . . . . . . . . . . . . . . . . 23
Using a Click (Metronome) . . . . . . . . . . . . . . . . . . . . . . . . . . . . . . . . . . . . . . . . . . . 26
Composing with a MIDI Controller/Keyboard . . . . . . . . . . . . . . . . . . . . . . . . . . . . . 29
Mix and Change Your Sounds . . . . . . . . . . . . . . . . . . . . . . . . . . . . . . . . . . . . . . . . 30
Get Your Music Out to the World . . . . . . . . . . . . . . . . . . . . . . . . . . . . . . . . . . . . . . 37
Learn More . . . . . . . . . . . . . . . . . . . . . . . . . . . . . . . . . . . . . . . . . . . . . . . . . . . . . . . 40
Chapter 2.
Pro Tools
ヘッドフォンまたはスピーカーを接続する . . . . . . . . . . . . . . . . . . . . . . . . . . . . . . 41
デモ・セッションを聴く. . . . . . . . . . . . . . . . . . . . . . . . . . . . . . . . . . . . . . . . . . . . . 42
トラックを
レコーディングする . . . . . . . . . . . . . . . . . . . . . . . . . . . . . . . . . . . . . . . . . . . . . . . . 53
ビートを作成する . . . . . . . . . . . . . . . . . . . . . . . . . . . . . . . . . . . . . . . . . . . . . . . . . . 60
MIDI
クリック(メトロノーム)を使用する. . . . . . . . . . . . . . . . . . . . . . . . . . . . . . . . . . 66
MIDI
サウンドをミックス、変更する . . . . . . . . . . . . . . . . . . . . . . . . . . . . . . . . . . . . . . . 70
あなたの音楽を世界へ . . . . . . . . . . . . . . . . . . . . . . . . . . . . . . . . . . . . . . . . . . . . . . 78
さらに学ぶ . . . . . . . . . . . . . . . . . . . . . . . . . . . . . . . . . . . . . . . . . . . . . . . . . . . . . . . 81
へようこそ. . . . . . . . . . . . . . . . . . . . . . . . . . . . . . . . . . . . . . . . . . 41
からインポートする . . . . . . . . . . . . . . . . . . . . . . . . . . . . . . . . . . . 47
CD
コントローラーを使わずに作曲する. . . . . . . . . . . . . . . . . . . . . . . . . . . . . . 63
コントローラー/キーボードを使って作曲する . . . . . . . . . . . . . . . . . . . . . 69
Contents
iii
Page 4

iv
Intro to Pro Tools
Page 5
Welcome to Pro Tools
Read this guide if you are new to Pro Tools®. This guide provides examples of how to use
Pro Tools to record, edit, and mix audio or MIDI (Musical Instrument Digital Interface)
information.
If you have not yet installed Pro Tools, install Pro Tools according to the instructions in the
Pro Tools Installation Guide. For information on connecting your audio hardware and installing
drivers for your hardware, consult the documentation that came with your hardware.
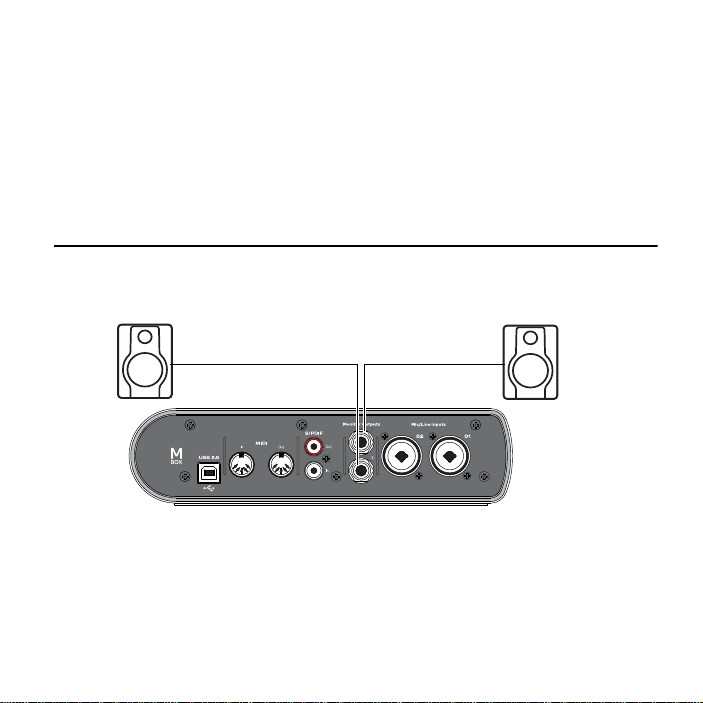
Connect Headphones or Speakers
To hear the audio from Pro Tools, connect headphones or speakers to your audio interface.
Example: Connecting a pair of speakers to Mbox
Welcome to Pro Tools 1
Page 6
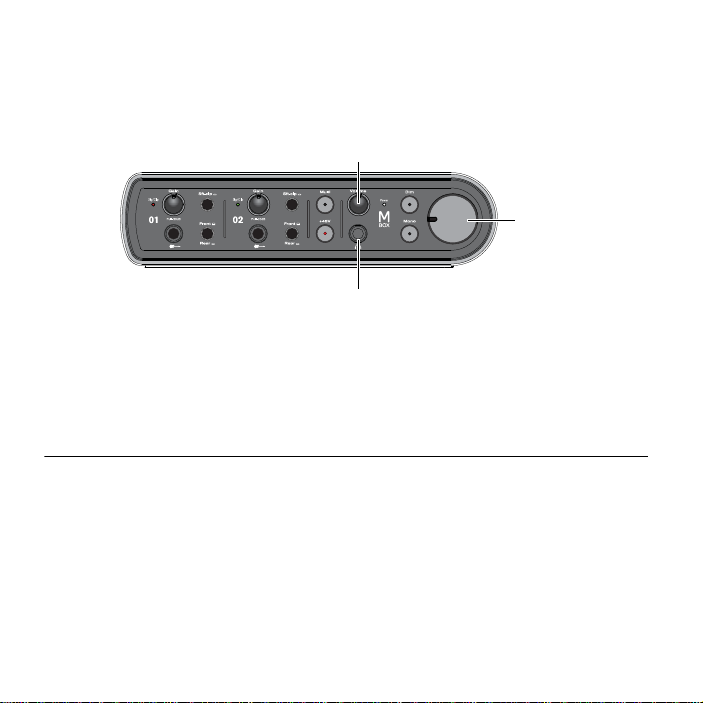
To adjust volume:
Volume knob
1/4-inch headphone jack
Master volume
1 Adjust your headphone level on your audio interface. For example, on an Mbox, turn the
Volume knob left (counterclockwise) to lower the volume or right (clockwise) to raise the
volume.
Example: Mbox front panel connectors and controls
2 Adjust the main monitor level, which sets level for your speakers. For example, on an Mbox,
turn the Master volume left (counterclockwise) to lower the volume or right (clockwise) to
raise the volume.
3 Start with a lower level for both your headphone and speaker levels.
Listen to the Demo Session
The Demo Session is a great example of a complete, finished project that has been arranged,
edited, and mixed. To get started, you can use the Demo Session included on the Pro Tools
Installer disc to see and hear many of the things you’ll soon be doing in Pro Tools. Use the
Demo Session to test your headphones and speakers.
To install the demo session:
1 Insert the Pro Tools Installer disc into your DVD drive.
Intro to Pro Tools
2
Page 7
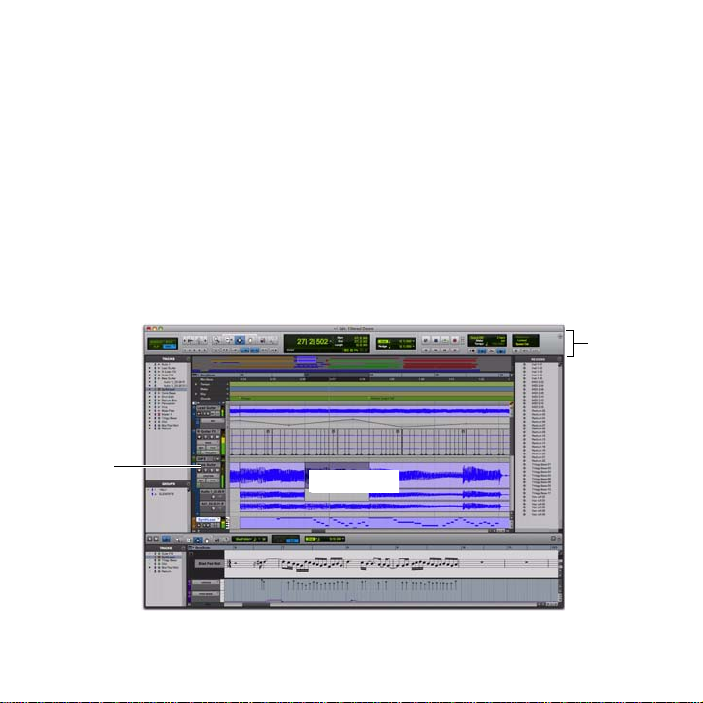
2 On the Pro Tools Installer disc, locate and open the Additional Files folder.
Toolbar
Track
Ed it wi ndo w
3 Drag and drop the Pro Tools Demo Session folder to your hard drive.
4 Launch Pro Tools by clicking its icon in the Dock (Mac) or double-clicking its icon on your
desktop (Windows).
5 Next, do one of the following depending on what you see on-screen:
• If the Quick Start dialog appears, click
Session file, select it, and click
Open Session, then click OK. Navigate to the Demo
Open.
– or –
• If the Quick Start dialog does not appear, choose
Demo Session file, select it, and click
Open.
File > Open Session, then navigate to the
Pro Tools opens the session.
Welcome to Pro Tools 3
Page 8
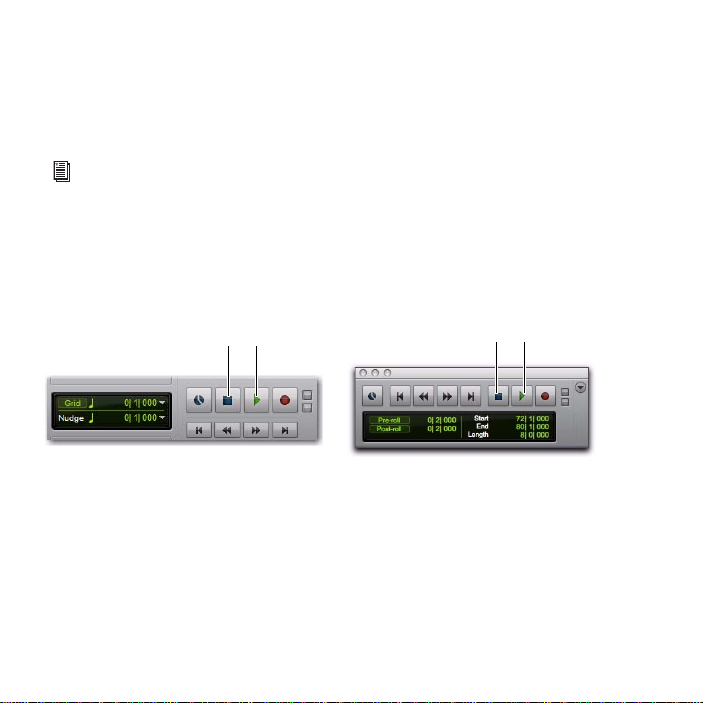
Play and Listen
Stop Play
Stop Play
To play the Demo Session:
1 If your audio interface has a main monitor level control (such as the Master volume on
Mbox), turn the volume down so that you don’t play back audio at an uncomfortably high
level. Otherwise, turn the volume down on your monitoring system.
For more information about headphone and monitor connections and volume control on
your specific interface, refer to the guide that came with your system.
2 Start playback of the demo session in Pro Tools.
You can start and stop Pro Tools by pressing the Spacebar, or clicking the Play and Stop
buttons on-screen. (These buttons are located at the top of the Edit window; you can also
have them appear in their own Transport window by choosing
Stop and Play buttons in Edit window (left) and Transport window (right)
3 While the session plays, increase the monitor level to a comfortable listening level.
Window > Transport.)
On Mbox, turn the Master volume clockwise gradually.
Intro to Pro Tools
4
Page 9

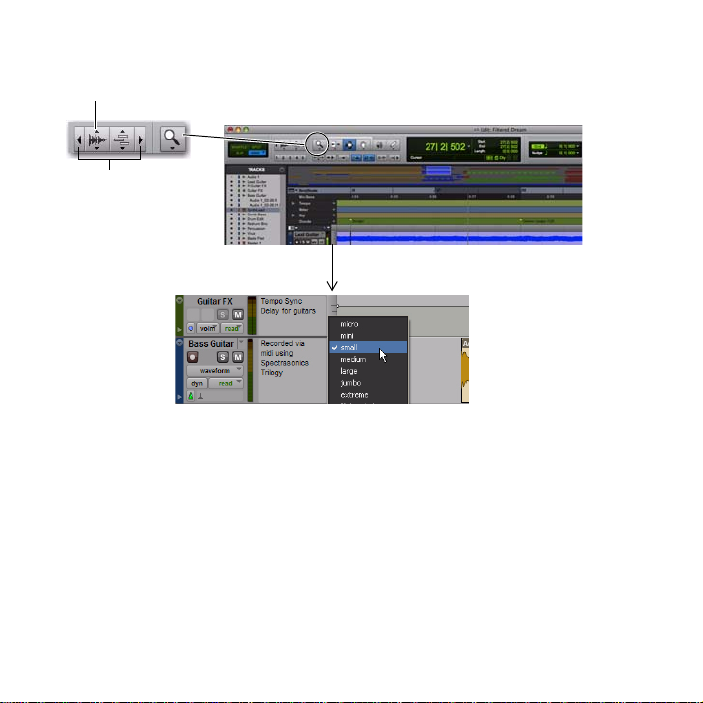
4 Use the zoom and Track view controls to zero in on different tracks.
Vertical
Horizontal
Click to select the Zoomer tool and then drag-select to zoom in.
(Double-click the Zoomer tool to zoom back out again)
Click the Track Height selector and choose
a display height
Click the Horizontal an d
Vertical Zoom buttons
to adjust size and length
of what is shown in
tracks
Welcome to Pro Tools 5
Page 10

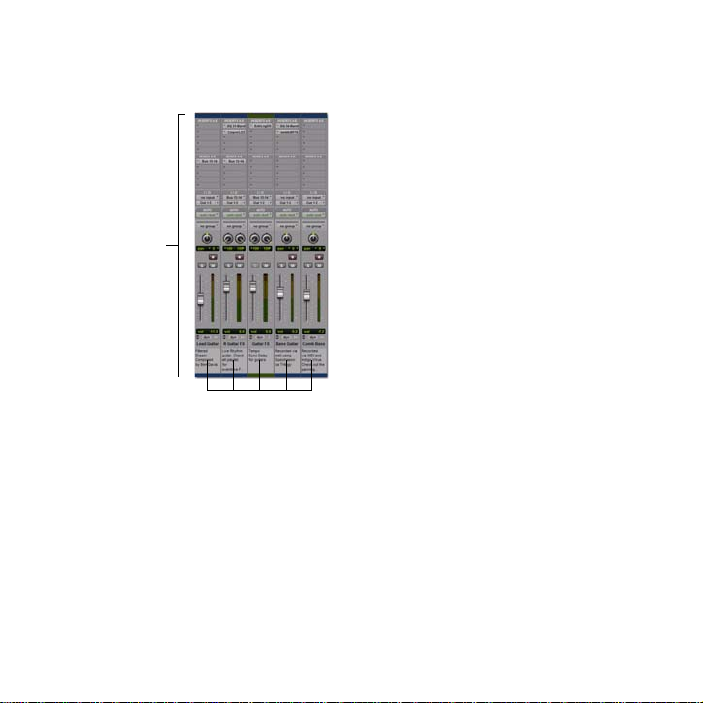
5 Next, click the Window menu and choose Mix (Window > Mix). The Mix window shows tracks
Mix window
Tracks
in vertical channel strips (similar to an analog mixer).
The Edit window and the Mix window are the two main work areas in Pro Tools. Throughout
the rest of this guide, you’ll see examples of both windows being used for different types of
production work.
6 Press the Spacebar or click the Stop button to stop playback.
7 When you’re through checking out the Demo Session, choose File > Close Session.
Intro to Pro Tools
6
Page 11
Import a Track from a CD
This section shows your how to create a new Pro Tools session and then import a track from a
CD. You can create a new session when you first launch Pro Tools or even after you launch
Pro Tools.
To create a new session:
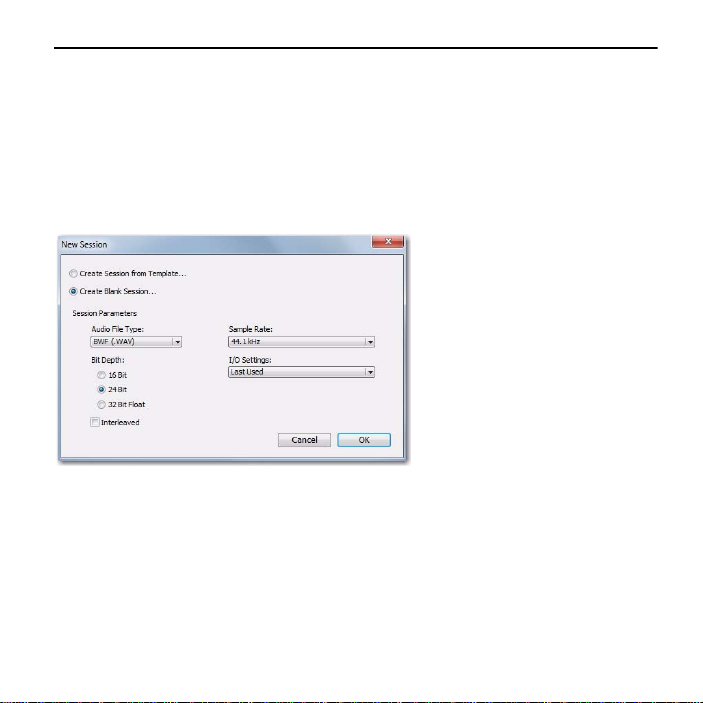
1 Choose File > New Session. If you currently have a session open, you will be prompted to save
any changes.
New Session dialog
2 In the New Session dialog, choose Create Blank Session, then click OK.
3 In the Name the Session dialog, choose where you want to save the session, and then name
it and click
Save.
Welcome to Pro Tools 7
Page 12

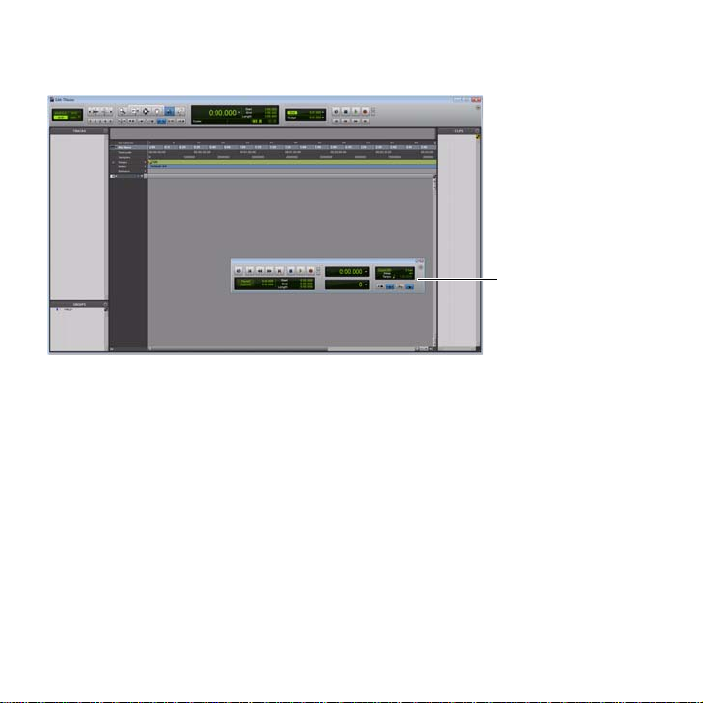
4 After Pro Tools opens the new session, choose Window > Edit to display the Edit Window.
Transport window
The Edit window, with the Transport window showing in the foreground
To import a track from CD:
1 Put the source CD into your computer’s CD/DVD drive.
Intro to Pro Tools
8
Page 13

2 In Pro Tools, choose Window > Workspace to open the Workspace browser.
Workspace browser
Click the speaker icon to
audition a selected song;
press the Spacebar to
stop.
3 In the Workspace browser, click the Audio CD Expand/Collapse icon to show the tracks on
the CD.
4 Click an item (track) to select a song on the CD.
Welcome to Pro Tools 9
Page 14

5 Drag the item from the Workspace to the open area in the middle of the Edit window;
Audio Track
Clip list
Pro Tools creates a new audio track containing the song. The song appears in its new track
where you let go of the mouse. The song also appears as a clip in the Clip list.
You can also drag items from the Workspace to the Clip List and then later drag them into the
track area. This lets you assemble a collection of audio clips and loops to use later in different
tracks or even the same track.
6 Close the Workspace browser, then press the Spacebar to begin playing back the song in
Pro Tools (see “Play and Listen” on page 4).
The Mbox and Mbox Pro interfaces both have a “Multi” button (located on the front panel
of the interface) that can be assigned to easily execute several functions in Pro Tools by
pressing it two different ways (Press and Release, Press and Hold). For example, you could
easily start and stop Pro Tools (as in our example) with the Multi button. For detailed
instructions on how to use this feature, see the guide that came with your interface.
Intro to Pro Tools
10
Page 15
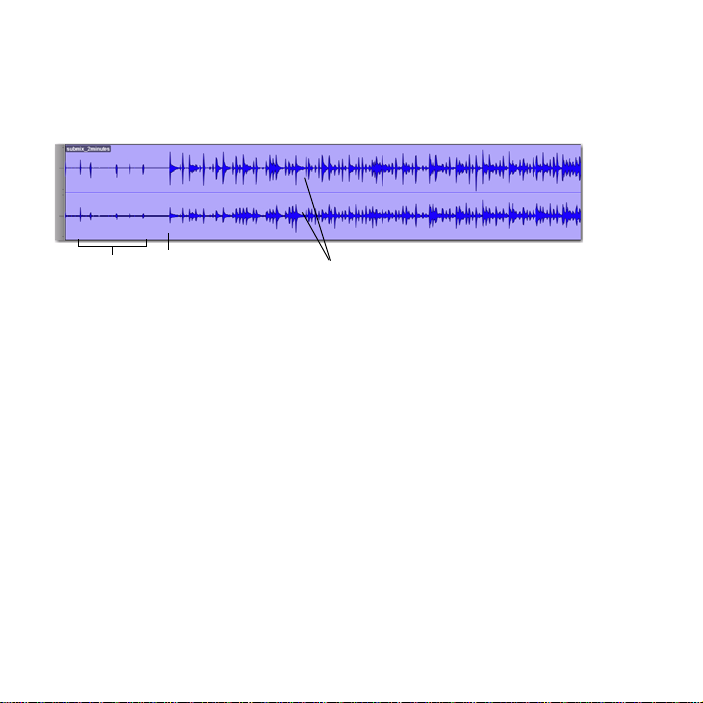
Make an Audio Edit
countoff
song start waveforms
In this example, we’ll do a simple edit to change where a song starts. To show this, let’s begin
with a song where the drummer is heard “counting off” the tempo (“1...2...1.2.3...”) before
the song starts. Here’s what this song looks like in Pro Tools.
In the picture, the stereo waveforms let you visualize the different sections of the song. We can
take advantage of this “what you see is what you hear” aspect of Pro Tools to be able to
quickly silence the countoff by “trimming” the beginning of the song.
Welcome to Pro Tools 11
Page 16
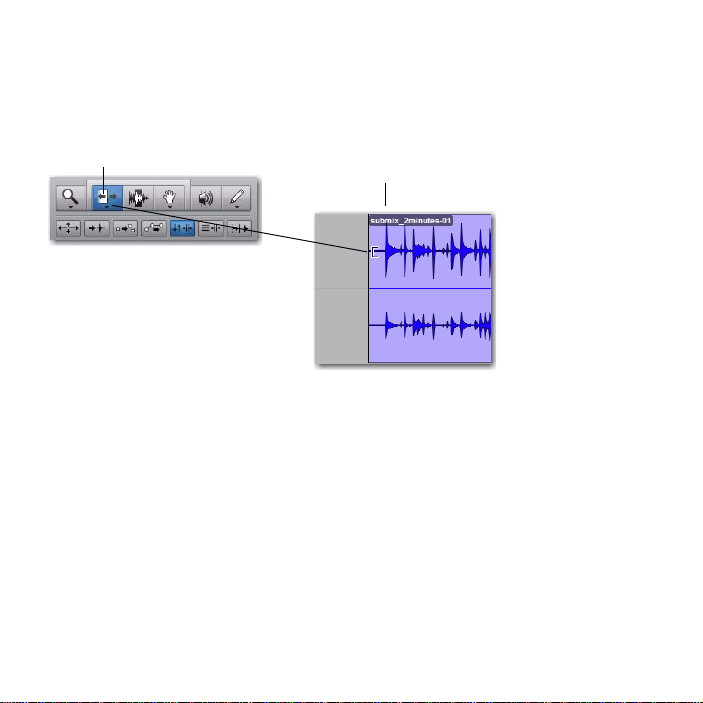
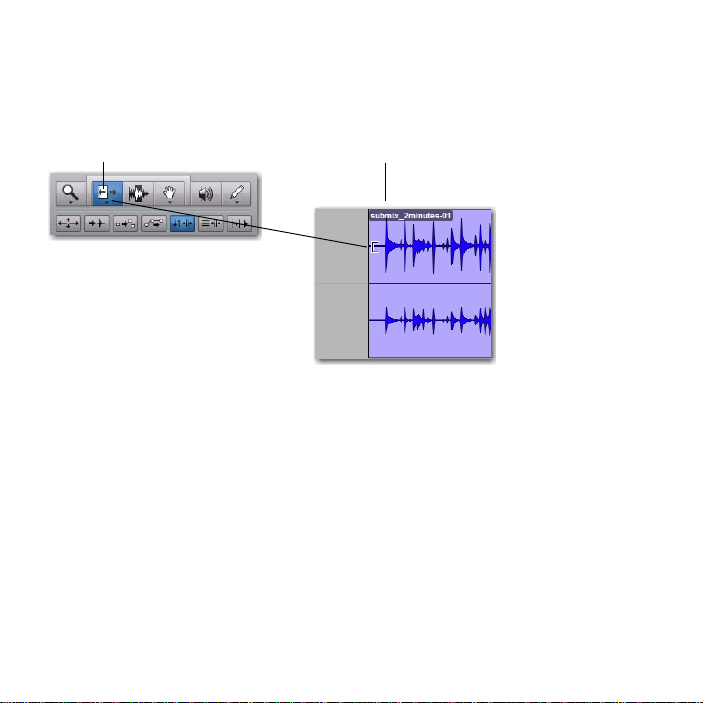
To trim:
song start
Trim tool
1 Click to select the Trim tool (located in the toolbar across the top of the Edit window).
2 Click in the track after the countoff and before the start of the song; you’ll see the cursor
display the Trim icon. Drag left or right to fine tune the location.
For future reference, you can also “untrim” the song by dragging the song start back to the
left with the Trim tool. You’ll see that the previous audio (the countoff) is still there. This is
a small example of how Pro Tools lets you edit non-destructively.
Intro to Pro Tools
12
Page 17
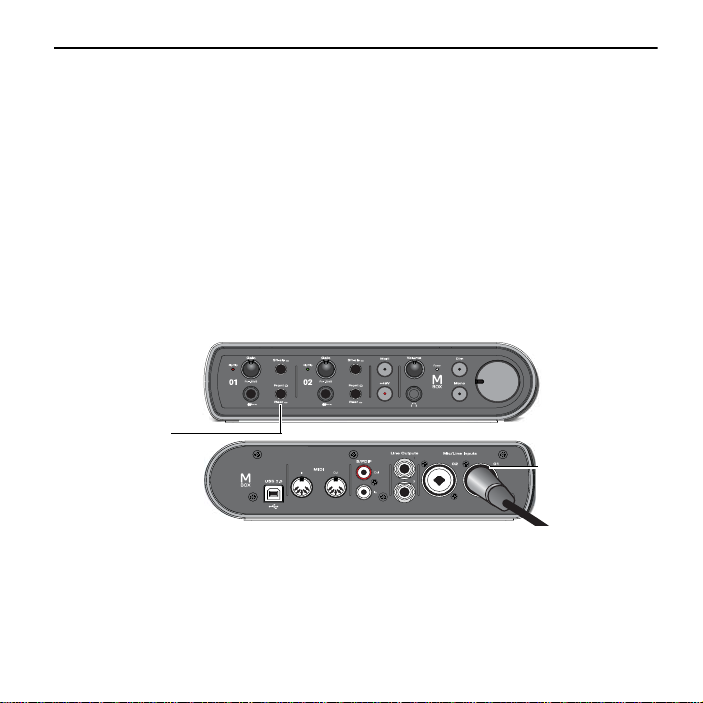
Record Yourself
Input 1
source selector
Input 1
Mic/Line input
(Front/Rear button)
This section shows how to connect a microphone and record yourself. Once you get
comfortable recording with a mic, you can go ahead and record yourself over the track you
imported in the last section. In this section, we’ll use an Mbox as the interface.
Connecting a Mic to an Interface
To hook up a microphone:
1 Depending on your Pro Tools audio interface, plug a mic into one of the Mic/Line inputs (or
DI inputs) of your Pro Tools audio interface.
• If your mic has an XLR cable, plug into a Mic/Line input.
– or –
• If your mic has a 1/4-inch cable, plug into a DI input.
Connecting a mic to Mbox with an XLR cable
Welcome to Pro Tools 13
Page 18

2 Depending on your interface, you may need to select its physical input. For an Mbox, if
you're using the XLR connector on the back, press the Front/Rear button until it’s in the “in”
position. If your mic has a 1/4-inch cable and you’re using the 1/4-inch connector on the
front (one of the two instrument inputs), press the Front/Rear button until it’s in the “out”
position. See the guide that came with your system for more information.
Create a Track
Pro Tools tracks are where audio, MIDI and other elements get recorded and edited within a
session. Before you can record, you need to create one or more tracks.
To create an audio track and prepare it for recording:
1 Create a new session, or open an existing session. (See “Import a Track from a CD” on
page 7).
2 Choose Track > New.
3 To record from a single mic (as in our example), set the New Tracks dialog for 1 Mono
Audio Track
Creating a new mono audio track
, in Samples, and click Create.
If you want to record both inputs at once, create one or two new tracks depending on what
you’ve got plugged in and what you plan to record:
• To record two different sources (such as one vocal mic and one electric guitar), create 2
Mono audio tracks. This lets the two input signals be recorded simultaneously, and be
edited, processed, and balanced independently.
– or –
Intro to Pro Tools
14
Page 19

• To record a two-channel stereo source (such as a stereo keyboard, or the left and right
Audio Input Path selector
outputs from a DJ mixer), create 1 Stereo audio track.
4 Make sure the Mix window is open by choosing Window> Mix.
5 In the middle of the new track’s channel strip, notice where it says “Analog 1 (Mono).” This
shows which Input channel (Input 1 or Input 2) is assigned to this track. (To specify a
different Input channel, click the Audio Input Path selector and choose the other channel.)
Welcome to Pro Tools 15
Page 20
Record Your Performance to a Track
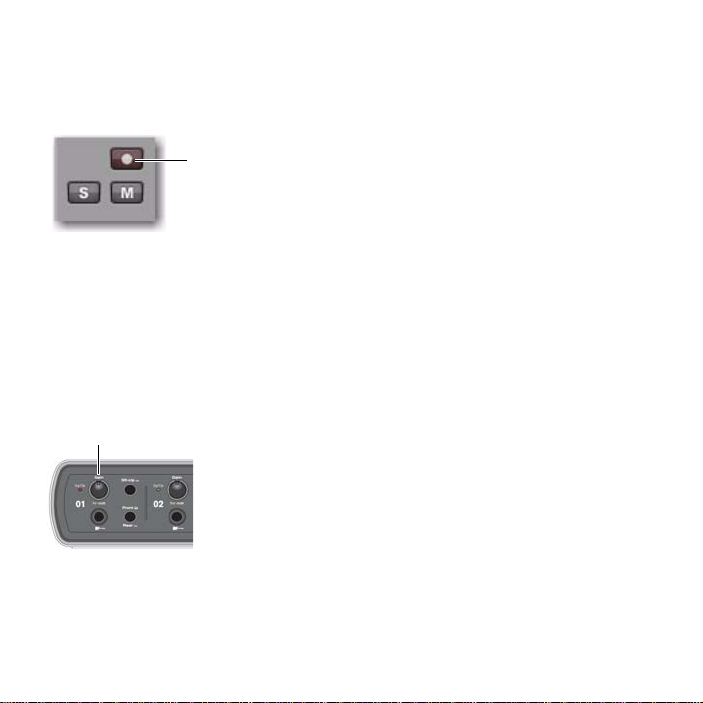
Record Enable button
Input 1 Gain (Mbox)
To record an audio track:
1 Click the track’s Record Enable button.
Record enabling a track in the Mix window
2 Choose Track > Input Only Monitoring. This lets you listen to your incoming signal so you can
“set your levels.”
3 Sing or play into the mic. Watch the meter level in the Pro Tools track while you raise the
input gain on your Pro Tools audio interface. (Don’t move the on-screen fader to try and
adjust your input level because it isn’t going to have any affect; It’s only for adjusting your
listening level.) Turn the gain up until you see the on-screen track meter show green most of
the time, or yellow for louder passages.
If the track meter shows red, gain is too high; lower the gain.
Intro to Pro Tools
16
Page 21
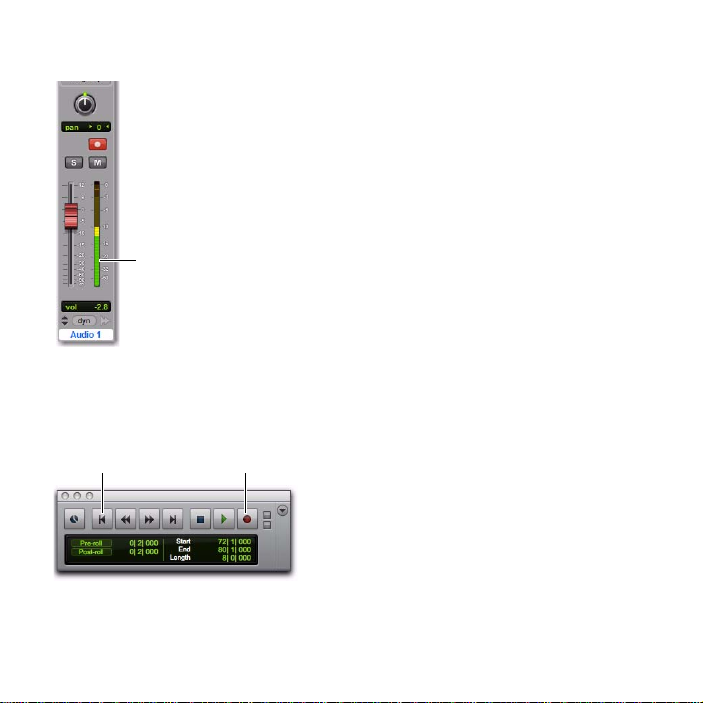
If you barely see green in the track meter, gain is too low; raise the gain.
Track meter
RecordReturn to Zero
4 In the toolbar (or in the Transport window) click the Return to Zero button to jump back
to the start of th e session, then click the Rec ord b utto n. This tell s Pro Tool s th at you’re happy
with your levels and are ready to record. Think of this as a “master” record enable button.
5 Choose Window > Edit so you can watch what happens when you record.
Welcome to Pro Tools 17
Page 22
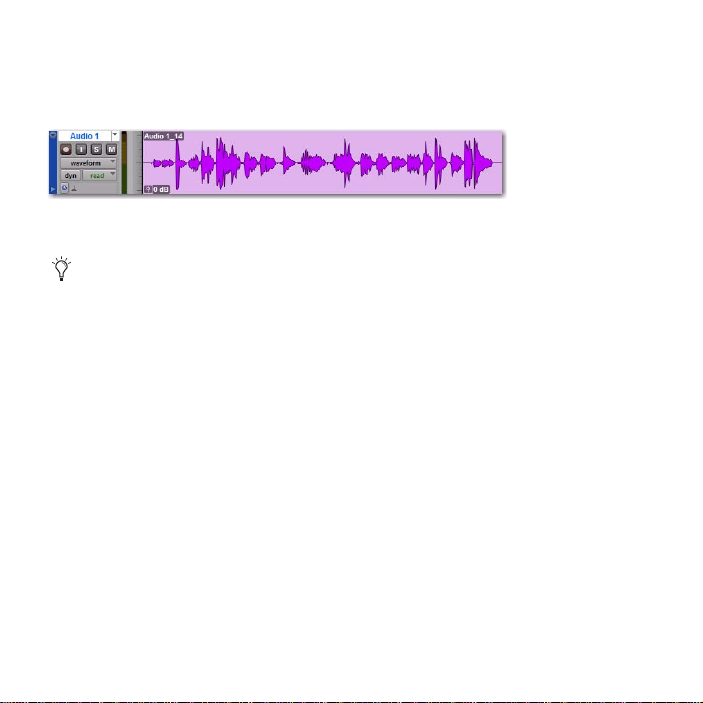
6 When you are ready to start recording, click Play or press the Spacebar. To stop, press the
Spacebar or click Stop. Here’s what Pro Tools looks like after a track has been recorded and
the transport has been stopped.
Recording a vocal track
If you want to use a click track/metronome, see “Using a Click (Metronome)” on page 26.
Listen to Y ou r Recording
To play back a recorded track:
1 Click the track’s Record Enable button again to take it out of Record mode.
2 Click Play in the Transport window or press the Spacebar to start playback.
3 When you want to stop, press the Spacebar or click Stop.
Intro to Pro Tools
18
Page 23

Record More Tracks
To record another track:
1 Choose Track > New and create 1 Mono audio track.
2 Choose Track > Auto Input Monitoring.
3 In the new audio track, click its Input path selector and choose the same input (In 1) you
used before.
4 Next, click the track’s Record Enable button, just like you did on the first track.
5 In the Transport window, click the Return to Zero button to jump back to the start of the
session, then click the Record button (the button flashes) to arm Pro Tools for recording.
When you are ready to start recording, click Play or press the Spacebar.
6 Press the Spacebar again to stop playback.
Hard drives are one of the most important components of your Pro Tools system. For best
performance, Avid recommends using an external hard drive for Pro Tools recording.
Welcome to Pro Tools 19
Page 24
Make a Beat
This section shows you how to work with Xpand!2, a plug-in you can use to make beats and
compose music.
The Xpand!2 Virtual Instrument Plug-In
Xpand!2 is a virtual instrument plug-in, which means it makes sound. Xpand!2 is part of the Avid
Virtual Instruments plug-ins that comes free with Pro Tools. Xpand!
Avid Virtual Instruments installer. This installer is available on the Pro Tools Installer disc
and online from www.avid.com. For more information, see the Audio Plug-ins Guide.
Here’s how to start utilizing its many drum kits, basses, strings, keyboards, horns, sound
effects and other sounds.
You can add all sorts of plug-ins to your system. Instrument plug-ins (like Xpand!2) make
sound. Processing plug-ins (such as those for reverb, EQ and compression) change your
sound.For more information on your plug-ins, see the Audio Plug-Ins Guide. This guide is
installed automatically during Pro Tools installation. A PDF only copy is available from
within Pro Tools: Help > Audio Plug-Ins Guide.
Set Up a Track
You add Xpand!2 to your sessions by inserting it on a specific type of track called an
Instrument track.
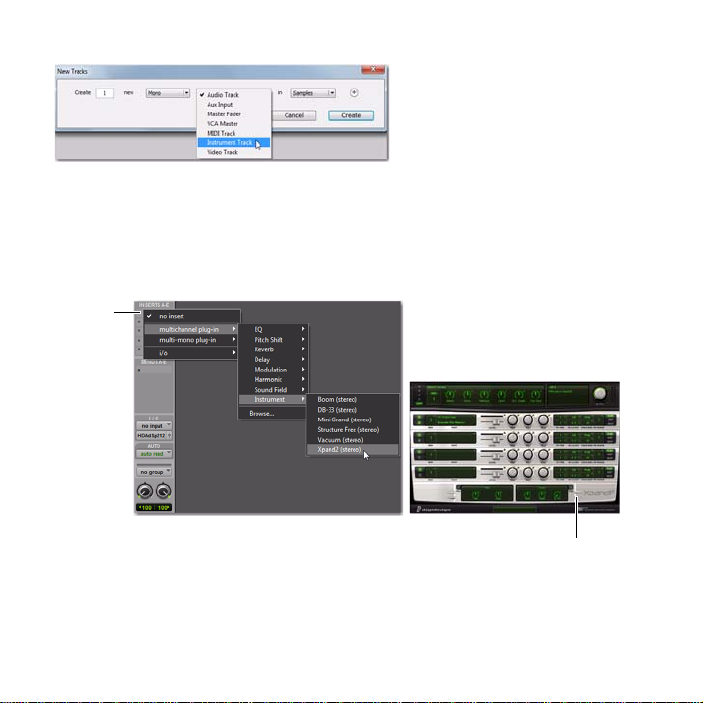
To create a Instrument track for beats and composition:
1 Choose Track > New.
2 In the New Track dialog, click the pop-up menu that says Mono and choose Stereo, then click
the pop-up menu that shows
as they are and click
Audio Track and choose Instrument Track. Leave the other settings
Create.
2
is installed with the
Intro to Pro Tools
20
Page 25
Creating a stereo Instrument track
Xpand!
2
Insert
selector
3 Choose Window > Mix to display the Mix window.
4 Click the track Insert selector near the top of the Instrument track and choose Xpand!
from the Instrument sub-menu.
Welcome to Pro Tools 21
2
Page 26

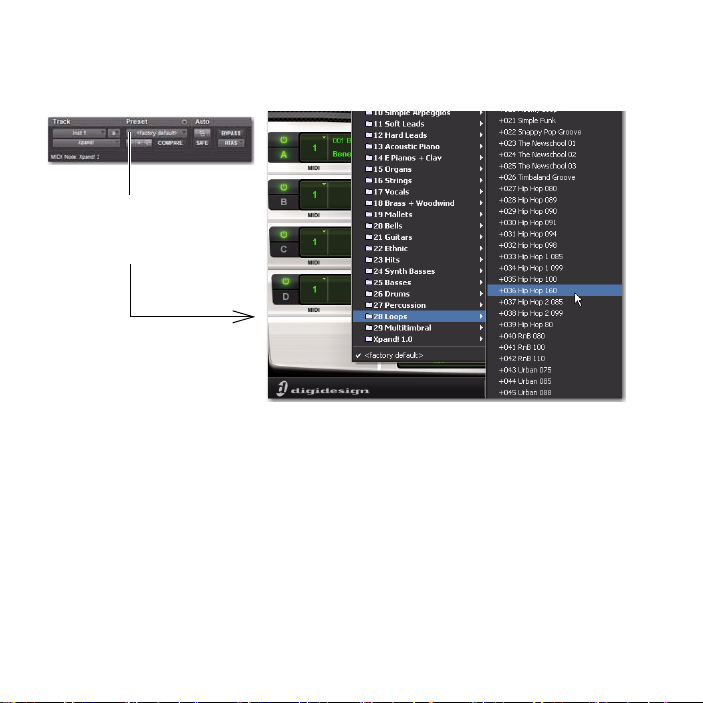
5 Now let’s load a sound. Click the Librarian menu (<factory default>) and choose a preset from
Click the Librarian menu
to see the list of presets,
then choose an item from
a sub-menu.
the Loops sub-menu. Presets are pre-configured settings files, and they’re a great way to see
examples of what a plug-in can do.
6 Make music by doing one of the following:
• If you have a MIDI controller connected, you can record yourself playing Xpand!
For more information see “Composing with a MIDI Controller/Keyboard” on page 29.
– or –
• Create MIDI notes using the mouse. To see an example of how you can compose without
a MIDI controller, “Composing without a MIDI Controller” on page 23.
Intro to Pro Tools
22
2
.
Page 27
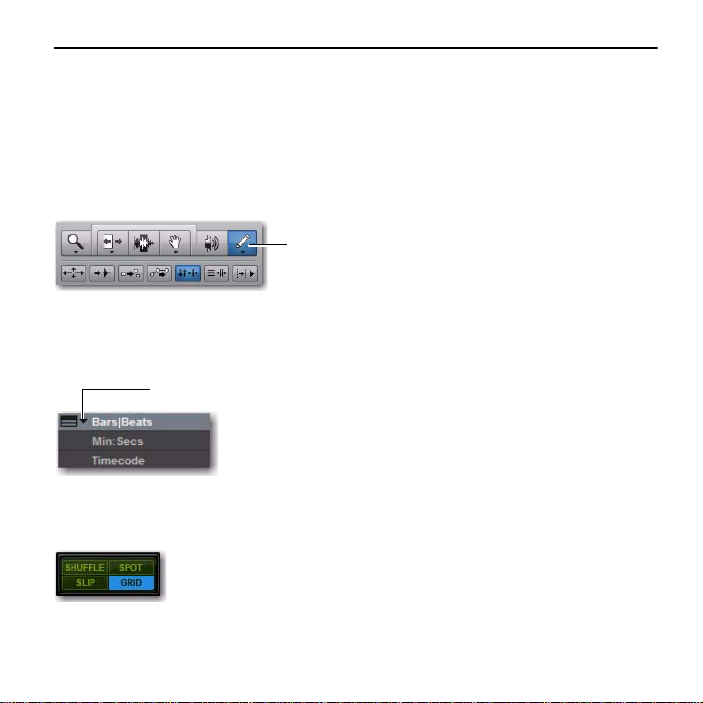
Composing without a MIDI Controller
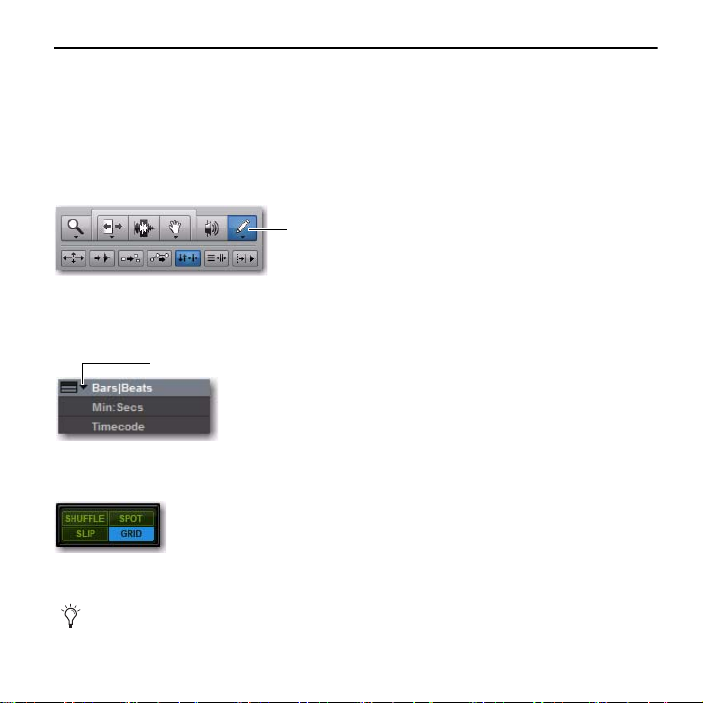
Pencil tool
Selecting Bars|Beats
You can make beats and compose in Pro Tools using just the mouse.
To create a note:
1 Close or move the Xpand!
Instrument track in the Edit window.
2 Click to select the Pencil tool (located in the toolbar across the top of the Edit window).
3 Select View > Rulers > Bars:Beats to add the Bars|Beats ruler.
4 Click the Ruler View selector to select Bars|Beats.
Ruler View selector in the Edit window
5 In the Edit window, select Grid from the Edit mode buttons.
Grid mode enabled
2
plug-in window, then choose Window > Edit so you can see the
Welcome to Pro Tools 23
Page 28

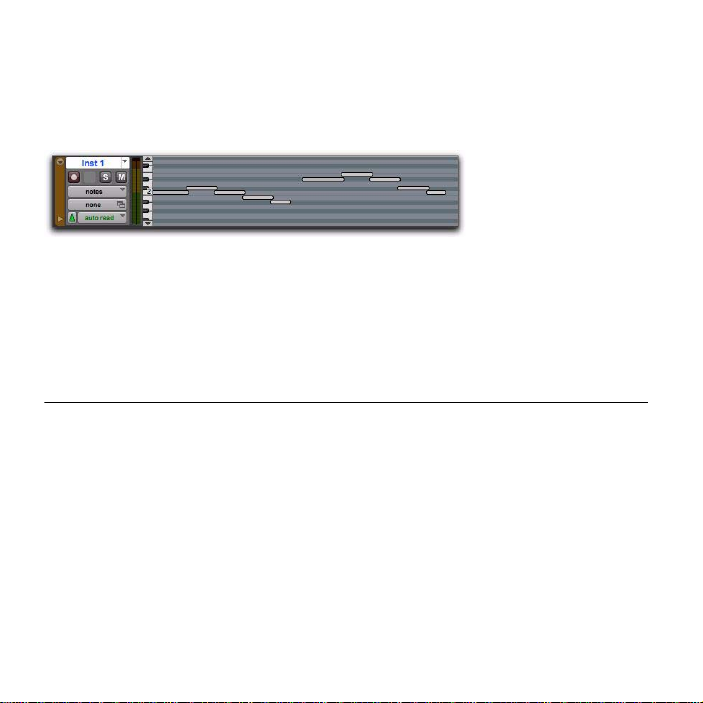
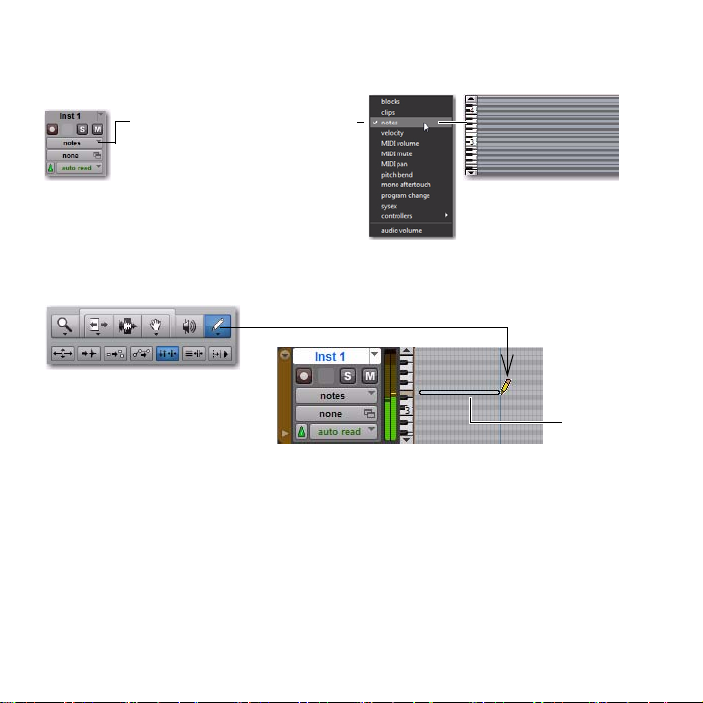
Make sure you have Grid mode enabled. When you draw in your drum (and other) notes
Click for Track View pop-up menu
Instrument track
in Notes
note
in Grid mode, they are in time with the session Tempo and Bar|Beat map.
6 Click the Track View selector for the track and select the Notes format from the menu.
7 Now click in the main Instrument track to “pencil in” a note.
The small horizontal bar created with each mouse click is a MIDI note. The location and length
of each note determines when, and for how long, you’ll hear the sound. Since we’re using a
Loop preset in this example, we need to edit this note so we can hear the complete loop of the
Xpand!
2
preset.
Intro to Pro Tools
24
Page 29

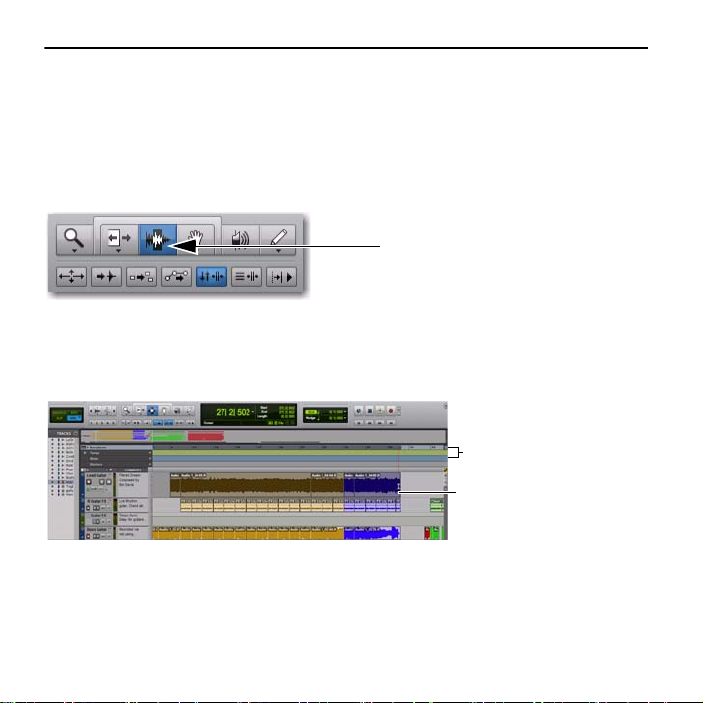
Editing MIDI Notes
Trim tool being used in a track
To edit a MIDI note:
1 Click to select the Trim tool (located in the toolbar across the top of the Edit window), and
then use it in your Instrument track to drag the right edge of the MIDI note out to the right
to make it longer. This leaves the note selected (highlighted).
2 Press the Spacebar to start playback, which will start from the current selection (in this
case, the MIDI note we lengthened). You should hear the drum loop play for the duration of
the MIDI note.
Using a loop is one fast way to get a beat going, and you can use the same basic techniques to
quickly build a beat piece-by-piece too.
To compose a beat from scratch:
1 Repeat the previous steps to create a stereo Instrument track and insert Xpand!
2 Instead of choosing a Loop preset, choose something from the Drums sub-menu.
2
on it.
Welcome to Pro Tools 25
Page 30

3 Now, pencil some notes in on the new drums track. Here’s what our example session looks
One long note (for a loop)
Five different notes (kick , snares, and other)
like after we add another Xpand!
2
track to the loop track we set up previously.
4 To add a bass line, create another track, insert Xpand!
2
, then load up a bass tone.
One more thing: This example showed how to manually enter and edit notes. For a more
musical way to compose, lots of people use an external MIDI controller (such as a MIDI
keyboard) to let them play and perform instead of only writing and editing with the mouse.
If you want to learn how to do this, see “Composing with a MIDI Controller/Keyboard” on
page 29
Using a Click (Metronome)
A click track (also known as a metronome) gives you a steady time reference while recording
tracks. Pro Tools lets you create a specialized click track that comes with a the Click plug-in
already inserted on it.
To quickly create a Click track in a new session:
Choose Track > Create Click Track.
To use a click track:
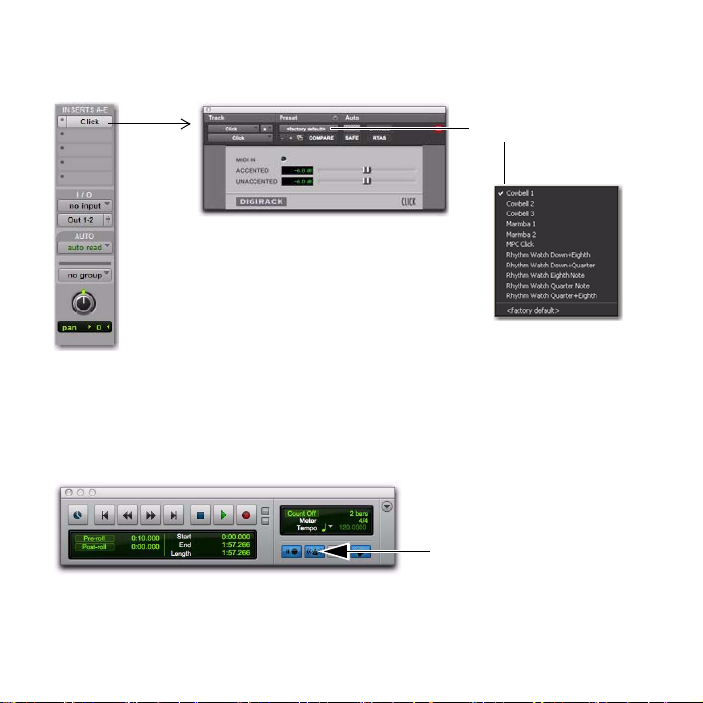
1 Choose View > Mix Window to display the Mix window.
2 At the top of the track, select the Click plug-in.
Intro to Pro Tools
26
Page 31

3 In the Click plug-in window, click the Librarian menu and pick a sound. You can pick a
Librarian menu
cowbell, sidestick, or other common click sounds.
Selecting a Click Sound
4 Select View > Transport > MIDI Controls to view the MIDI controls in the Transport Window.
5 Click the Metronome Click button so it’s highlighted blue.
6 Now click Play in the Transport window or press the Spacebar to listen to the click.
Welcome to Pro Tools 27
Page 32

To silence the click track:
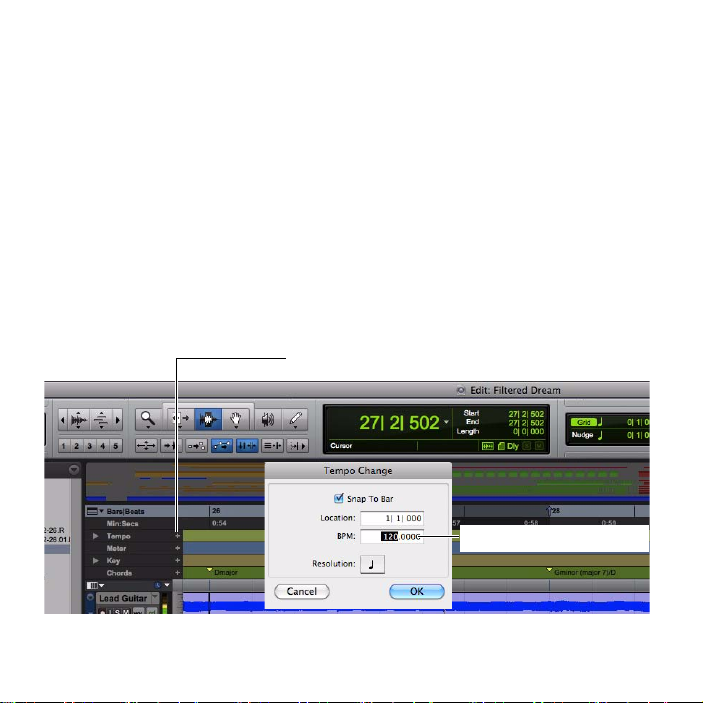
Add Tempo Change symbol (+)
Default tempo is 120 BPM
Do one of the following:
• Mute the Click track by clicking the
M (Mute) button on the Click track.
– or –
• In the Transport window, deselect the Metronome Click button (so it is not highlighted
blue) to silence the track during playback. Also deselect the Count Off button (so it's not
highlighted) to turn off the Count Off.
Setting the Tempo
You can specify the session tempo to speed up or slow down your song.
To adjust the tempo, do the following:
1 Choose View > Rulers > Tempo. See where it says “Tempo” in the Edit window? Click on the
plus symbol (+) that appears next to it. Then type the tempo you want in the Tempo Change
window and click
OK.
Intro to Pro Tools
28
Page 33

2 Press the Spacebar or click the Play button to listen to your click play back at a different
speed. Repeat the previous steps if you need to enter a different tempo.
3 Press the Spacebar again or click Stop when you’re done.
Composing with a MIDI Controller/Keyboard
What is MIDI?
MIDI (Musical Instrument Digital Interface) data isn’t aud io, and it has no sound of its own.
MIDI is just a way for musical devices like virtual instrument plug-ins, MIDI controllers, and
MIDI sequencers to talk to one another.
Hardware MIDI instruments are connected using MIDI cables to the MIDI inputs and outputs
on your audio interface or MIDI interface. Virtual instruments are inserted as plug-ins on
Instrument tracks in Pro Tools and accessed directly from within Pro Tools.
Make Beats and Compose with a MIDI Controller
Here we’ll show you how to compose with a MIDI controller/keyboard instead of a mouse.
To record MIDI on an Instrument Track:
1 Make sure your MIDI controller/keyboard is connected either to a MIDI interface with
MIDI cables or directly to your computer with a USB cable.
2 Repeat the steps to create a stereo Instrument track and insert Xpand!
Beat” on page 20).
3 Select a bass preset (also known as a “patch”).
4 Select Options > MIDI Thru. (Verify that MIDI Thru is checked; if not, select it.)
5 Click the Record Enable button to enable the Instrument track for MIDI recording.
6 In the Transport window, click Return to Zero to start recording from the beginning of the
session. You can also record to a selection in a track or from the cursor location in the Edit
window.
2
on it (see “Make a
Welcome to Pro Tools 29
Page 34
7 Click the Record button.
8 Now play your MIDI controller/keyboard and hear the bass sound.
9 When you are ready to start recording, click Play or press the Spacebar. To stop, click Stop
or press the Spacebar.
MIDI data in the Instrument track
10 Click the track Record button again to take it out of record enable and play back what you
just recorded.
See the Pro Tools Reference Guide (
Help > Pro Tools Reference Guide) to learn more about Loop
Playback, and how you can apply all sorts of other musical treatments to your rhythms,
sounds, and patterns.
Mix and Change Your Sounds
Your Pro Tools system comes supplied with a wealth of plug-ins that you can use to change
the sounds you’ve recorded. This section shows two examples of how to use plug-ins to
process your sound. The first example shows you how to apply compression to audio on one
track. The second example shows how to apply reverb across multiple tracks. The plug-ins
used here are part of the Avid Effects suite of plug-ins, which are installed with Pro Tools.
Intro to Pro Tools
30
Page 35
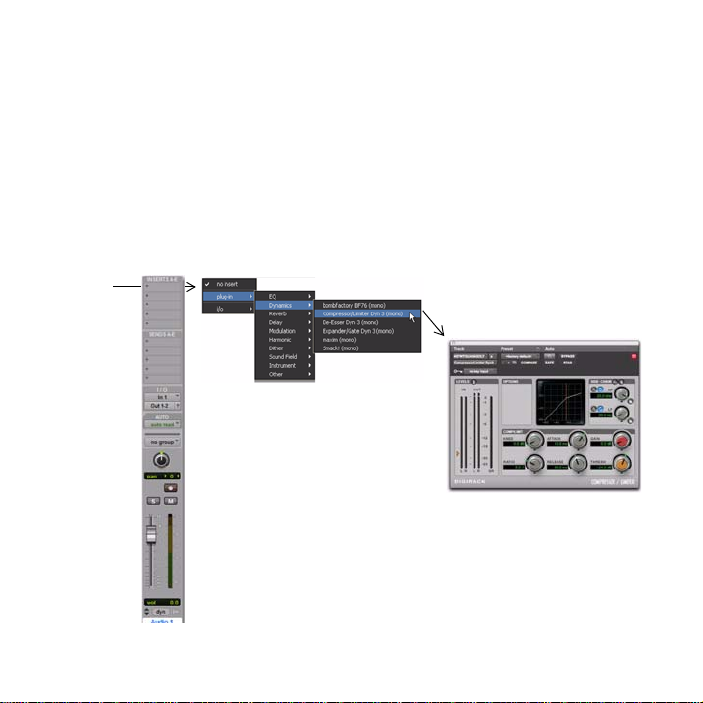
Compression
Insert
selector
Compression can help smooth the dynamics of a track (making your soft and loud parts
sound less uneven). It can also make a vocal performance sound more intimate.
To apply compression to a track:
1 Choose Window > Mix.
2 In the top of a track that has audio (or MIDI), click the first Track Insert selector and
choose plug-in, Dynamics, and then
Compressor/Limiter Dyn 3 (mono) from the Dynamics sub-
menu. Pro Tools inserts the Dynamics 3 Compressor/Limiter plug-in on your plug-in
Dynamics sub-menu and opens its plug-in window.
Welcome to Pro Tools 31
Page 36
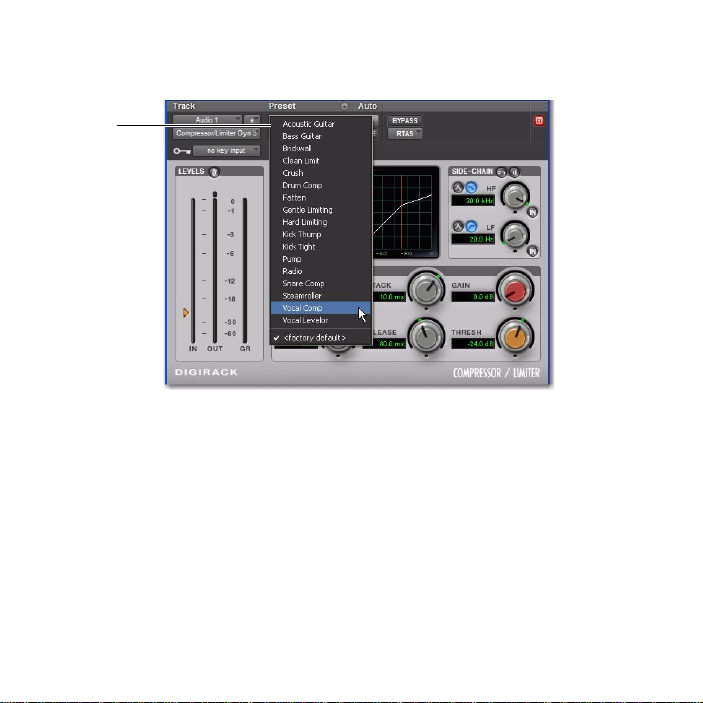
3 In the plug-in window, click the Librarian menu (shown below) and choose an available
Librarian
menu
Settings File (preset) from the list.
4 Press the Spacebar to start playback. Listen to how the sound has changed.
5 Choose other presets and you can hear what their settings do to sound. Try out different
plug-ins to start learning about the different colors of sound you have at your disposal. (The
Audio P lug-ins Gui de is a great place to learn more about compressors, limiters, EQs, and other
types of processing.)
6 Press the Spacebar again to stop playback.
Intro to Pro Tools
32
Page 37

Reverb
Send A
selector
Reverb is a great effect for vocals. It can make you sound like you're in a big concert hall or
small recording booth.One of the best ways to incorporate reverb in your mix is in a “sendand-return” configuration. Send/return makes it easy to send multiple vocal tracks or
instruments to and through the same single reverb effect.
To apply reverb on one or more tracks:
1 Choose Window > Mix.
2 Click the Send selector on your vocal track as shown below and choose Bus 1-2.
Welcome to Pro Tools 33
Page 38
3 Choose Track > New, and set it to create 1 stereo Auxiliary Input track, then click Create.
Insert
selector
Audio Input
Track Selector
An Auxiliary Input track is a type of track you can use to collect sound from other tracks,
then apply an effect (such as reverb).
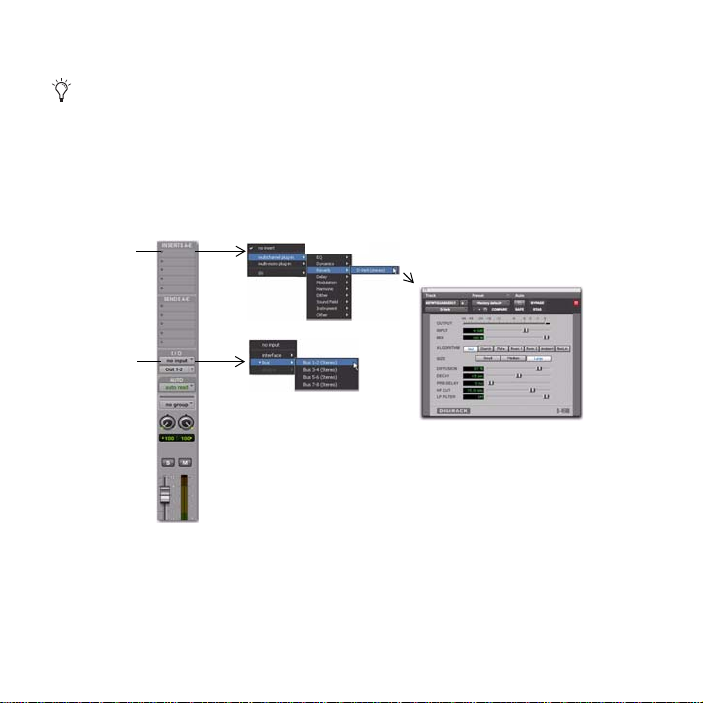
4 On the new Auxiliary Input track you just added, do the following:
• Click the Track Insert selector and choose
• Click the Audio Input Track selector and choose
D-Verb from the Reverb sub-menu.
Bus 1–2. This sets the Auxiliary Input
track to receive audio from other tracks (such as your vocal tracks).
Intro to Pro Tools
34
Page 39

5 Click the Send assignment on your vocal track to open the Send Output window.
Send
Raise the Send fader
6 Press the Spacebar and slowly raise the small fader in the Send Output window. This adjusts
how much of the vocal track you are sending to D-Verb (on the Auxiliary Input track).
7 Keep playing and listening, and check out different D-Verb settings. Repeat this section’s
basic instructions to try out a delay (echo), chorus, flanger, or other type of effects plug-ins.
Welcome to Pro Tools 35
Page 40

Fade Out the End of the Song
First breakpoint
To put the finishing touch on a song, it’s sometimes nice to go with the classic fade out. Here’s
an example of how to use mix automation to fade out a track. (There are many other ways to
create fades. See the Pro Tools Reference Guide.)
To do a fade out (using Pro Tools automation):
1 In order to do a fade out, add a Master Fader track.
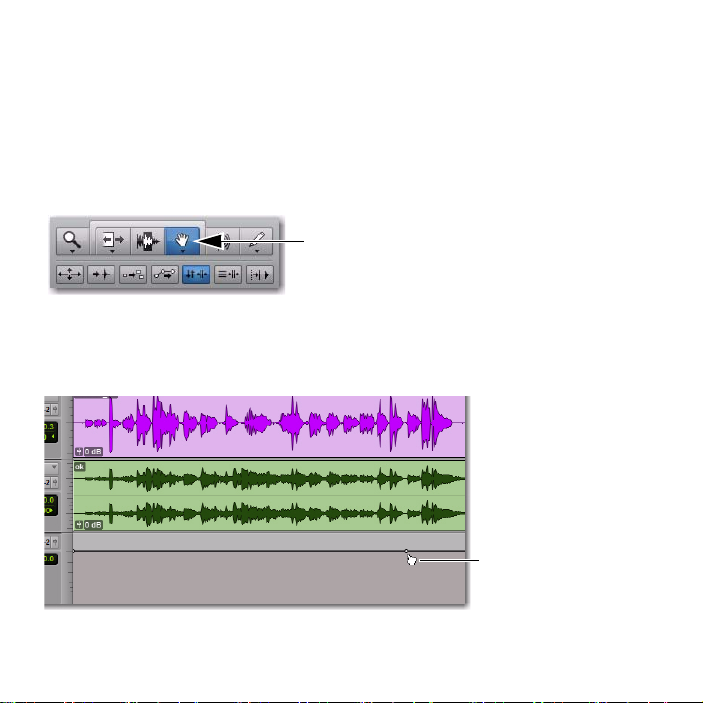
2 Click to select the Grabber tool (located in the toolbar across the top of the Edit window).
Grabber tool
3 In the Master Fader track, click with the Grabber tool at the place that you'd like the fade
to start. This creates a white dot or “breakpoint.”
Intro to Pro Tools
36
Page 41
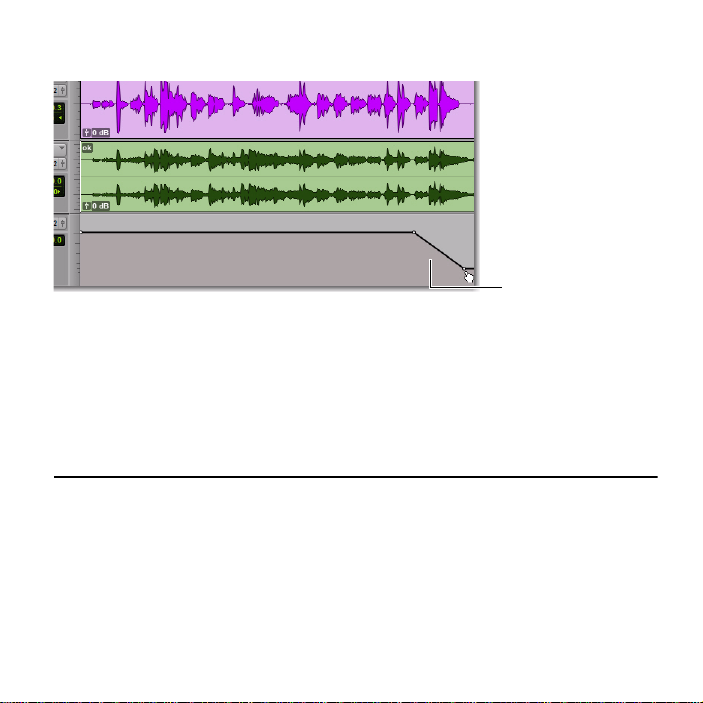
4 Drag down with the Grabber at some point later in time (after the first breakpoint).
Creating a fade
5 Now click in the Master Fader track to place the cursor where you want to audition your
fade.
6 Press the Spacebar to hear the section and the results of your fade.
You can also edit breakpoint automation with many of the same tools we use to edit audio
(such as the Pencil, the Grabber, and the Trim). You can learn more about how to record and
edit your control moves in the Pro Tools Reference Guide.
Get Your Music Out to the World
After you’ve finished recording and editing tracks in a Pro Tools session, you’re ready to mix
down. You can use the Bounce to Disk feature to combine all the tracks that make up a session
into a single “master” audio file to share with the world.
Welcome to Pro Tools 37
Page 42

To create a stereo master from a session:
Timeline
Session audio selected
and ready to
Bounce to Disk
1 Click to select the Selector tool (located in the toolbar across the top of the Edit window).
Selector tool
2 Use the Selector to select the length of the session in the Timeline (or on a track).
If you don’t make a selection, your entire session will bounce from start to finish.
3 Choose File > Bounce to > Disk.
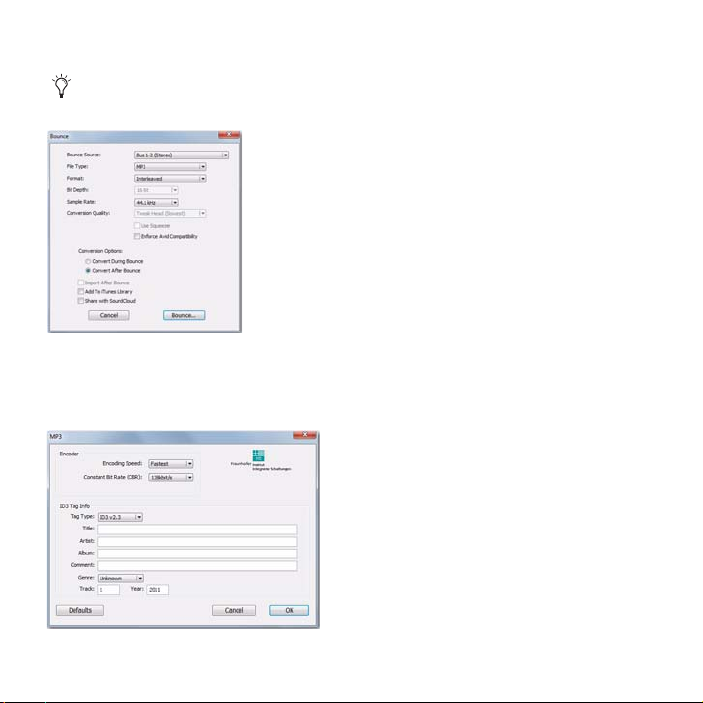
4 In the Bounce dialog, do the following to create an MP3:
•For the Bounce Source select the main output path for you mix. This is the path shown in
Audio Output Path Selector in your tracks.
the
•Select
MP3 for the File Type. This gives you a stereo file.
•Select Interleaved for the Format. This is the same sample rate as audio on CDs.
•Select
44.1 kHz for the Sample Rate.
Intro to Pro Tools
38
Page 43

•Enable Add to iTunes Library if you want your mix to appear in your iTunes library, where
it can be burned to CD, or loaded onto a personal audio player.
•Enable
Share with SoundCloud if you want to share your mix with SoundCloud, a social
audio sharing site that lets you feature your tracks or playlists on social networks (such
as Twitter, Facebook, and Google+).
Convert after Bounce
•Select
5 Click Bounce.
For more information about Bounce to Disk, see the Pro Tools Reference Guide.
Bounce dialog (shown set to creat e an MP3)
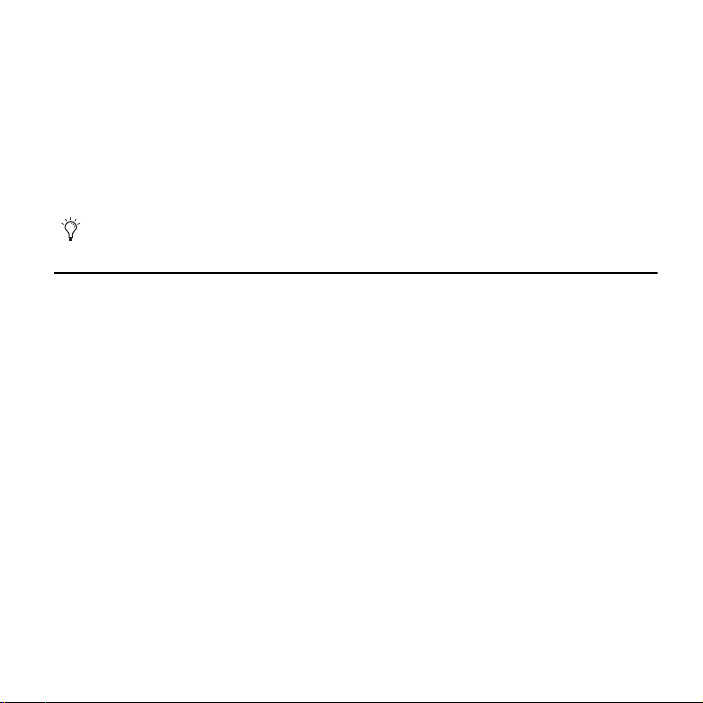
6 When you export or bounce to MP3 format, the MP3 dialog appears and you can set several
options. To learn more about these options, see the Pro Tools Reference Guide.
Welcome to Pro Tools 39
Page 44

MP3 dialog
7 When you have set your options, click OK.
8 In the Save dialog, name your bounce and pick where it should be saved, then click Save.
Pro Tools begins bouncing to disk. Pro Tools bounces are done in real time, so you hear
playback of your mix during the bounce process. You cannot adjust any Pro Tools controls
during a bounce).
After Mixdown, Mastering
After the bounce is completed, your audio will be available for use in the format you've
chosen. Depending on the options you've set, your audio may also be sent to your iTunes
library or SoundCloud account.
Listening to a reference mix in an environment other than your studio is a time-tested way
to hear how your mix translates to other systems and listening environments.
Learn More
We hope this quick introduction has inspired you to make music with Pro Tools. To learn
more about any of the topics presented, check out Online Help in Pro Tools (
Help
). Search for any terms you’re curious about and read all about it.
Intro to Pro Tools
40
Help > Pro Tools
Page 45

Pro Tools
®
Pro Tools
MIDI(Musical Instrument Digital Interface
の
ProTools
て
ドライバーのインストールに関しては、お使いのハードウェアに同梱されているマニュアルをご参
照ください。
を初めてお使いになる方は、このガイドをご覧ください。このガイドでは、オーディオや
ProTools
をまだインストールしていない場合は、『
ProTools
へようこそ
の使い方を説明します。
をインストールしてください。オーディオ・ハードウェアの接続と、ハードウェア用の
)情報のレコーディング、編集、ミックスを行うため
ProTools
インストール・ガイド』の指示に従っ
ヘッドフォンまたはスピーカーを接続する
Pro Tools
たスピーカーが必要です。
例:
からオーディオを聴くには、ヘッドフォンまたはオーディオ・インターフェースに接続し
にスピーカーを接続する
Mbox
Pro Tools
へようこそ
41
Page 46

ボリュームを調整するには:
ボリュームつまみ
1/4
インチ・ヘッドフォン・ジャック
マスター・ボリュー
オーディオ・インターフェースのヘッドフォンのレベルを調整します。例えば
1
ムつまみを左(反時計回り)へ回すとボリュームが下がり、右(時計回り)へ回すとボリュームが
上がります。
例:
のフロント・パネルのコネクターとコントロール
Mbox
スピーカーのレベルを設定するメイン・モニター・レベルを調整します。例えば
2
ター・ボリュームを左(反時計回り)へ回すとボリュームが下がり、右(時計回り)へ回すとボ
リュームが上がります。
ヘッドフォンとスピーカー共に低いレベルから調整を始めてください。
3
では、ボリュー
Mbox
Mbox
では、マス
デモ・セッションを聴く
デモ・セッションは、アレンジ、編集、ミックスされて完成したプロジェクトの優れた一例です。
まず始めに、
ProTools
ピーカーのテストを行うこともできます。
デモ・セッションをインストールするには:
ProTools
1
ProTools
2
ProTools Demo Session
3
42
Pro Tools
ProTools
でできる、さまざまな機能を学習しましょう。デモ・セッションでヘッドフォンおよびス
インストーラー・ディスクを
インストーラー・ディスクの
の紹介
のインストーラー・ディスクに含まれているデモ・セッションを使って、
ドライブに挿入します。
DVD
Additional Files
フォルダをハードドライブにドラッグ&ドロップします。
フォルダを開きます。
Page 47

内のアイコンをクリックするか(
ツールバー
トラック
編集ウィンドウ
Dock
4
クして(
次に、画面上の表示によって、以下のいずれかの操作を行います。
5
クイック・スタートのダイアログが表示されたら、[セッションを開く](
•
クし、次に
リックします。
または
[クイックスタート](
•
ションを開く]
をクリックします。
Pro Tools
の場合)、
Windows
[OK] をクリックします。
(
がセッションを開きます。
Pro Tools
Quick Start
Open Session
)を選択して
の場合)、デスクトップ上のアイコンをダブルクリッ
Mac
を起動します。
Demo Session
)ダイアログが表示されない場合は、
Demo Session
ファイルを選択し、[開く](
Open Session
[ファイル](
ファイルを指定し、
Open
File)>
[開く](
)をクリッ
) をク
[セッ
Open
)
Pro Tools
へようこそ
43
Page 48

再生して聴く
停止 再生 停止 再生
デモ・セッションを再生するには:
ご使用のオーディオ・インターフェースにメイン・モニター・レベル・コントロール(
1
スター・ボリュームなど)がある場合は、不快な高いレベルでオーディオが再生されないようにボ
リュームを下げます。または、モニタリング・システムのボリュームを下げます。
ヘッドフォンとモニターの接続、特定のインターフェースのボリュームの操作について詳
しくは、システムに付属のガイドをご参照ください。
でデモ・セッションの再生を開始します。
ProTools
2
を再生、停止させるには、スペースバーを押すか、画面上の[再生]ボタンと[停止]ボタ
Pro Tools
ンをクリックします。(これらのボタンは
(
ドウ]
Window)>
示させることもできます。)
[編集]ウィンドウ(左)と[トランスポート]ウィンドウ(右)の[停止]ボタンと[再生]ボタン
セッションを再生しながら、快適なリスニング・レベルへモニターのレベルを上げます。
3
は、マスター・ボリュームを時計回りにゆっくり回します。
[トランスポート](
[編集](
)を選択して固有のトランスポート・ウィンドウに表
Transport
)ウィンドウの上部にありますが、[ウィン
Edit
Mbox
Mbox
のマ
で
44
Pro Tools
の紹介
Page 49
ズームやトラック・ビュー・コントロールを使えば、各トラックに照準を合わせられます。
垂直
水平
ズーマー・ツールをクリックして選択してから、ドラッグしてズームインします。
(ズーマー・ツールをダブルクリックすると、元のサイズに戻ります)
[トラックの高さ]セレクターをクリックし、
表示の高さを選択します。
[水平ズーム]ボタンと
[垂直ズーム]ボタンをク
リックしてトラック内に表
示されているデータのサイ
ズと長さを調整します。
4
Pro Tools
へようこそ
45
Page 50
次に、ウィンドウ・メニューをクリックして[ミックス](
ミックス・ウィンドウ
トラック
5
(
Window)>
プでトラックが表示されます(アナログ・ミキサーに類似)。
[ミックス](
))。[ミックス](
Mix
)ウィンドウには縦方向のチャンネル・ストリッ
Mix
)を選択します([ウィンドウ]
Mix
[編集](
です。このガイドでは、これらのウィンドウがさまざまなタイプの制作作業に使われている例を紹介し
ます。
スペースバーを押すか、[停止]ボタンをクリックして再生を止めます。
6
デモ・セッションのチェックが終わったら、[ファイル](
7
を選択します。
46
)ウィンドウと[ミックス](
Edit
の紹介
Pro Tools
)ウィンドウが、
Mix
Pro Toolsの2
[セッションを閉じる](
File) >
つの主要な作業エリア
Close Session
)
Page 51

トラックをCDからインポートする
このセクションでは、新規の
する方法について説明します。
規セッションを作成することができます。
Pro Tools
新規セッションを作成するには:
[ファイル](
1
いる場合には、変更を保存するようメッセージが表示されます。
[新規セッション]ダイアログ
[新規セッション](
2
を選択し、[
3
択し、次に名前を入力して
OK
[セッションに名前をつける](
[新規セッション](
File)>
New Session
]をクリックします。
[保存](
セッションを作成する方法と、音楽CDから曲をインポート
ProTools
を起動した後、または最初に起動した時のどちらでも、新
New Session
)ダイアログで[空のセッションを作成する](
Name the Session
) をクリックします。
Save
)を選択します。すでにセッションを開いて
)ダイアログでセッションを保存する場所を選
Create a Blank Session
)
Pro Tools
へようこそ
47
Page 52
新規セッションが開いたら、[ウィンドウ](
トランスポート・
ウィンドウ
4
表示します。
[編集]ウィンドウ、[トランスポート]ウィン ドウが前面に表示されている状態
Pro Tools
の紹介
48
Window)>
[編集](
)を選択して編集ウィンドウを
Edit
Page 53

から曲をインポートするには:
ワークスペース・ブラウザ
CD
コンピューターの
1
ProTools
2
ス・ブラウザを開きます。
ワークスペース・ブラウザでオーディオCDの開閉アイコンをクリックし、CD内のファイルを表示します。
3
で[ウィンドウ](
ドライブにCDを挿入します。
CD/DVD
Window)>
[ワークスペース](
Workspace
)を選択して、ワークスペー
Pro Tools
へようこそ
49
Page 54

アイテム(トラック)をクリックしてCDの曲を選択します。
スピーカー・アイコンをク
リックすると、選択した曲
が試聴できます。スペース
バーを押すと停止します。
オーディオ・トラック
クリップ・リスト
4
ワークスペースから編集ウィンドウの中央の空きスペースにアイテムをドラッグすると、
5
ProTools
規トラック内に曲が表示されます。曲はクリップ・リストにクリップとしても表示されます。
でその曲を含んだ新規オーディオ・トラックが作成されます。マウスボタンを放すと、新
50
Pro Tools
の紹介
Page 55

また、ワークスペースからクリップ・リストへアイテムをドラッグし、後でトラック・エリアにド
カウントオフ 曲の開始 波形
ラッグすることもできます。これにより、別のトラックや同じトラックで使用するオーディオ・リー
ジョンやループを、事前に集めることができます。
ワークスペース・ブラウザを閉じ、次にスペースバーを押して
6
(
ページの「再生して聴く」をご参照ください)。
44
ProTools
で曲の再生を開始します
MboxとMbox Pro
Pro Tools
できます。たとえば、[
様に)。この機能の使い方について詳しくは、ご使用のインターフェースに付属のガイドを
ご参照ください。
には、[
のさまざまな機能を2通りの押し方(押して放す、または長押し)で簡単に実行
]ボタン(インターフェースのフロント・パネル)があり、
Multi
Multi
]ボ タ ン で
Pro Tools
を簡単に再生、停止できます(この例の
オーディオを編集する
ここでは、簡単な編集の例として、曲の始まる位置を変更してみましょう。この曲では、曲が始ま
る前にドラマーがテンポをカウントオフ(「
以下のように表示されます。
この画面のステレオ波形を見ると、異なる楽節を識別することができます。
うに「音を目で確認」することができるため、曲の頭をトリムしてカウントオフを取り除くことな
どが簡単に行えます。
1...2...1.2.3...
」)しています。
Pro Tools
Pro Tools
Pro Tools
では、この曲は
では、このよ
へようこそ
51
Page 56
トリミングするには:
曲の開始トリム・ツール
トリム・ツール(編集ウィンドウの一番上のツールバーにある)をクリックして選択します。
1
トラックのカウントオフと曲の始まりの間をクリックします(カーソルがトリマー・アイコンにな
2
ります)。左右にドラッグして、位置を微調整します。
今後の参考として、トリム・ツールで曲の始めを左にドラッグすると、曲のトリムを解除できます。
元のオーディオ(カウントオフ)が表示されます。これは、
クティブであることを示す一例です。
Pro Tools
の紹介
52
Pro Tools
での編集がノン・ディストラ
Page 57

レコーディングする
インプット
1
マイク/ライン入
インプット
1
ソース・
セレクター[フロント
/
リア]ボタン
このセクションでは、マイクを接続して自分の声を録音する方法について説明します。マイクを使っ
たレコーディングに慣れたら、前回のセッションでインポートしたトラックに自分の声を被せてレ
コーディングできます。このセクションでは、インターフェースとして
を使用します。
Mbox
インターフェースへマイクを接続する
マイクを接続するには:
使用する
1
入力)にマイクを接続します。
ケーブルの付いたマイクの場合は、
•XLR
または
インチ・ケーブルの付いたマイクの場合は、DI入力に接続します。
•1/4
オーディオ・インターフェースにより異なりますが、
ProTools
Mic/Line
入力に接続します。
Mic/Line
入力(または
DI
ケーブルでマイクを
XLR
インターフェースによっては、物理入力を選択する必要があります。
2
ターを使用する場合は、[
インチ・ケーブルが付属し、前面の
を使用する場合は、[
テムに付属のガイドをご参照ください。
Mbox
Front/Rear
に接続する
の背面の
Front/Rear
]ボタンを押して「イン」ポジションにします。マイクに
インチ・コネクター(2つのインストゥルメント用入力の1つ)
1/4
]ボタンを押して「アウト」ポジションにします。詳しくは、シス
Mbox
Pro Tools
コネク
XLR
1/4
へようこそ
53
Page 58

トラックを作成する
のトラックは、オーディオ、
Pro Tools
レコーディングする前に、
オーディオ・トラックを作成しレコーディングの準備をするには:
新規セッションを作成するか、既存のセッションを開きます。(47ページの「トラックをCDから
1
インポートする」をご参照ください。)
[トラック](
2
つのマイクをレコーディングするには(この例のように)、[新規トラック](
1
3
ログを[
(
Create
新規モノ・オーディオ・トラックを作成する
つの入力を同時にレコーディングしたい場合は、レコーディングする対象によって1つまたは2つ
2
の新規トラックを作成します。
•2
のモノ・オーディオ・トラックを作成します。この設定により、
ディングでき、その後の編集、処理、調整は別々に行うことができます。
または
•2
をレコーディングするには、[
[ウィンドウ](
4
を確認します。
Track) >
オーディオ・トラック サンプル](
1 モノ
)をクリックします。
つの別々のソース(ボーカル・マイクとエレキ・ギターなど)をレコーディングするには、2つ
チャンネルのステレオ ソース(ステレオのキーボードまたはDJミキサーからの
Window) >
つまたは複数のトラックを作成する必要があります。
1
[新規](
New
[ミックス](
、その他をレコーディングして編集するための場所です。
MIDI
)を選択します。
New Tracks
1 Mono Audio Track Samples
]のオーディオ・トラックを作成します。
1][Stereo
)を選択し、ミックス・ウィンドウが開いていること
Mix
2
)に設定し、[作成]
つの入力信号を同時にレコー
出力など)
L/R
)ダイア
54
Pro Tools
の紹介
Page 59

新規トラックのチャンネル・ストリップの中央に、「アナログ1(
オーディオ・インプット・パス・セレクター
5
れは、どのインプット・チャンネル(インプット
られているかを示しています。(別のインプット・チャンネルを指定するには、オーディオ・イン
プット・パス・セレクターをクリックし、そのチャンネルを選択します。)
またはインプット2)がこのトラックに割り当て
1
)」と表示されています。こ
Mono
Pro Tools
へようこそ
55
Page 60

演奏をトラックにレコーディングする
レコード・ボタン
インプット1ゲイン(
Mbox
)
オーディオ・トラックにレコーディングするには:
トラックの[レコード]ボタンをクリックします。
1
ミックス・ウィンドウでトラックをレコーディング可能にする
[トラック](
2
号を聴くことができ、レベル設定が可能になります。
マイクに向かって歌う、または演奏します。
3
げながら
Pro Tools
は変化しません。再生レベルのみが調整されます。)画面上のトラック・メーターがほとんどの部分
で緑色になり、少しレベルが高い部分で黄色になるまでゲイン・コントロールつまみを上げてみま
しょう。
トラック・メーターが赤色になるとゲインが高すぎるので、ゲインを下げます。
56
Pro Tools
の紹介
[入力のみモニター](
Track) >
トラックのメーターを確認します。(画面上のフェーダーを調整しても入力レベル
Input OnlyMonitoring
オーディオ・インターフェースのゲインを上
ProTools
)を選択します。これで入力信
Page 61

トラック・メーターがほとんど緑色を表示していない場合は、ゲインが低すぎるので、ゲインを上
トラック・メーター
レコード最初まで巻き戻し
げます。
ツールバー(またはトランスポート・ウィンドウ)の[最初まで巻戻し]ボタンをクリックして
4
セッションの最初へ戻り、[レコード]ボタンをクリックします。これで適切なレベルが設定され、
レコーディングの準備ができました。これが「マスター」のレコード・ボタンだと思ってください。
[ウィンドウ](
5
しておきます。
Window)>
[編集](
)を選択し、レコーディング状態をモニターできるように
Edit
Pro Tools
へようこそ
57
Page 62

レコーディング開始の準備ができたら、[再生]をクリックするか、スペースバーを押します。停止
6
するには、スペースバーを押すか、
トランスポートが停止すると、
[停止]をクリックします。トラックのレコーディングが完了し、
ProTools
に次のように表示されます。
ボーカル・トラックをレコーディングする
クリック・トラック/メトロノームを使用する場合は、66ページの「クリック(メトロ
ノーム)を使用する」をご参照ください。
自分の演奏を聴いてみる
レコーディングしたトラックを再生するには:
トラックの[レコード]ボタンをもう一度クリックし、レコーディング・モードを終了します。
1
トランスポート・ウィンドウで[再生]ボタンをクリックするか、スペースバーを押して再生を始
2
めます。
再生を止めるには、スペースバーを押すか、[停止]ボタンをクリックします。
3
Pro Tools
の紹介
58
Page 63

別のトラックにレコーディングする
別のトラックにレコーディングするには:
[トラック](Track) >[新規](New) を選択し、[1][
1
す。(この機能をソフト・ボタンに割り当てることもできます。)
[トラック](Track) > [入力のみモニター](Input Only Monitoring)を選択します。
2
新規オーディオ・トラックで入力パス・セレクターをクリックし、前と同じ入力(入力1)を選択
3
します。
次に、最初のトラックで行ったように、トラックの[レコード・イネーブル](
4
タンをクリックします。
転送ウィンドウで[最初まで巻戻し](
5
に戻り、次に[レコード](
ング・アームします。レコーディング開始の準備ができたら、[再生](
ペースバーを押します。
再生を停止するには、再度スペースバーを押します。
6
ハード・ドライブは
ルに発揮させるためには、
を推奨します。
Record
ProTools
]のオーディオ トラックを作成しま
Mono
Record Enable
Return to Zero
)ボタン(点滅ボタン)をクリックして
システムの最も重要なコンポーネントの1つです。性能をフ
Pro Tools
での録音に外付けハードドライブをご使用になること
)ボタンをクリックしてセッションの最初
Pro Tools
)をクリックするか、ス
Play
をレコーディ
)ボ
Pro Tools
へようこそ
59
Page 64

ビートを作成する
このセクションでは、
ラグインです。
2
Xpand!
Xpand !
Xpand !
Xpand !
は
ともできます。詳しくは、『オーディオ・プラグイン・ガイド』をご 覧ください。
ここでは、さまざまなドラムキット、ベース、ストリングス、キーボード、ホーン、サウンド・エフェ
クトなどのサウンドの活用方法を説明します。
バーチャル・インストゥルメント・プラグイン
2
は、バーチャル・インストゥルメント・プラグインで、サウンドを作成する際に使用します。
2
は
Avid Vir tual Instrum ent s
2
は
Avid Vir tual Instrum ent s
ProTools
のインストーラー・ディスクに含まれており、
2
の使い方を説明します。
Xpand!
プラグインの一部で、
のインストーラーでインストールします。このインストーラー
2
はビートの作成や作曲に使用するプ
Xpand !
ProTools
www.avid.com
に無料で付属しています。
からダウンロードするこ
ご使用のシステムへは、あらゆる種類のプラグインを追加できます。インストゥルメント・
プラグイン(
(リバーブ、
2
など)はサウンドをつくりだします。プロセッシング・プラグイン
Xpand!
、コンプレッションなど)はサウンドを変化させます。ご使用のプラグインに
EQ
ついて詳しくは、『オーディオ・プラグイン・ガイド』をご覧ください。このガイドは
のインストール中に自動でインストールされます。
プラグイン ガイド]を選択して
オ
トラックを設定する
2
をセッションに追加するには、インストゥルメント・トラックと呼ばれる特別なトラックに
Xpand !
挿入します。
版が参照できます。
PDF
Pro Tools
ビートと作曲用のインストゥルメント・トラックを作成するには:
[トラック](
1
[新規トラック](
2
リックして
をクリックして
はそのままにして、
60
Pro Tools
[
Stereo
の紹介
[新規](
Track)>
New Track
]を選択し、次に[オーディオ・トラック](
[インストゥルメント・トラック](
[作成](
)を選択します。
New
)ダイアログで、[
) をクリックします。
Create
Mono
]と表示されているポップアップメニューをク
Instrument Track
内からは[ヘルプ]
Audio Track
)のポップアップメニュー
) を選択します。その他の設定
Pro Tools
[オーディ
>
Page 65

ステレオのインストゥルメント・トラックを作成する
Xpand!
2
[ウィンドウ](
3
インストゥルメント・トラックの上の方にあるトラック・インサート・セレクターをクリックし、
4
インストゥルメント・サブメニューから[
Window)>
[ミックス](
)を選択して[ミックス](
Mix
2
]を選択します。
Xpand!
)ウィンドウを表示します。
Mix
へようこそ
Pro Tools
61
Page 66
ここでサウンドをロードします。ライブラリ・メニュー(<出荷時の初期設定(
ライブラリアン・メニューをク
リックしてプリセットのリスト
を表示し、サブメニューから項
目を
1
つ選択します。
5
をクリック し、ループのサブメニューからプリセットを選択します。プリセットは予め設定されてい
るファイルで、それぞれのプラグインの機能を知るために非常に役立ちます。
以下の1つを行って音楽を制作します。
6
コントローラーが接続されていれば、
•MIDI
できます。詳しくは、
ご覧ください。
または
マウスを使って
•
ては、
ページの「
63
MIDI
ページの「
69
ノートを作成します。
コントローラーを使わずに作曲する」をご覧ください。
MIDI
MIDI
2
を演奏をしているご自身をレコーディング
Xpand !
コントローラー/キーボードを使って作曲する」を
コントローラーを使わずに作曲する例につい
MIDI
factory default)>
)
62
Pro Tools
の紹介
Page 67
コントローラーを使わずに作曲する
ペンシル・ツール
小節|拍の選択
MIDI
マウスだけを使って、
ノートを作成するには:
2
のプラグイン・ウィンドウを閉じるか移動してから、[ウィン ドウ](
Xpand !
1
(
)を選択し、編集ウィンドウにインストゥルメント・トラックを表示させます。
Edit
ペンシル・ツール(編集ウィンドウの一番上のツールバーにある)をクリックして選択します。
2
ProTools
でビートを作成したり作曲したりすることもできます。
Window)>
[編集]
[ビュー](
3
ルーラーを追加します。
ルーラー・ビュー・セレクターをクリックして[小節
4
[編集]ウィンドウのルーラー・ビュー・セレクター
[編集]ウィンドウの編集モード・ボタンから[グリッド](
5
グリッド・モード有効
グリッド・モードが有効になっていることを確認します。グリッド・モードでドラムやその
他のノートを描くと、ノートはセッションのテンポと小節|拍マップに合わせられます。
View)>
[ルーラー](
Rulers)>
[小節:ビート](
ビート](
|
Bars:Beats
Bars:Beats
)を選択します。
Grid
) を選択し、[小節
)を選択します。
Pro Tools
ビート]
|
へようこそ
63
Page 68
該当するトラックのトラックビュー・セレクターをクリックし、メニューから[ノート](
クリックしてトラックビューの
ポップアップメニューを表示
[ノート]形式で表示
されているインストゥ
ルメント・トラック
ノート
6
のフォーマットを選択します。
ここでメインのインストゥルメント・トラックをクリックしてノートを「書き入れ」ます。
7
Notes
)
マウスをクリックするたびに作られる小さな水平のバーが
置と長さによって、いつ、どれくらいの間サウンドが聴こえるのかが決まります。この例ではループ
のプリセットを使用しているので、
トを編集する必要があります。
Pro Tools
の紹介
64
2
のプリセットの完全なループが聴こえるように、このノー
Xpand!
ノートです。それぞれのノートの位
MIDI
Page 69

ノートを編集する
トラックで使われ
ているトリム・ツール
MIDI
ノートを編集するには:
MIDI
[編集](
1
インストゥルメント・トラックでトリム・ツールを使って
して音を伸ばします。この操作により、ハイライト表示されたノートは選択されたままとなります。
)ウィンドウ上部のツールバーにあるトリム・ツールをクリックして選択してから、
Edit
のノートの右端を右方向にドラッグ
MIDI
スペースバーを押して再生を開始すると、現在選択範囲(この例では、伸ばした
2
ら再生が始まります。
ループを使うと簡単にビートを続けることができますが、同じ基本テクニックを使って
ビートを素早く作成することもできます。
ノートの長さだけ、ドラム・ループの演奏が聴こえます。
MIDI
MIDI
Pro Tools
ノート)か
つずつの
1
へようこそ
65
Page 70

最初からビートを作成するには:
1
つの長音(ループ用)
5
つの異なる音色(キック、スネア、その他)
前述の手順に従って、ステレオのインストゥルメント・トラックを作成し、
1
ループのプリセットを選択する代わりに、ドラムのサブメニューからツールを選択します。
2
新規のドラム・トラックにペンシルでノートを描きます。以前に設定したループ・トラックに、
3
別の
2
トラックを加えると、以下のようになります。
Xpand!
2
を挿入します。
Xpand!
ベース・ラインを加えるには、新たなトラックを作成して
4
ロードします。
ワンポイント:この例では、マニュアルでノートを入力して編集する方法を説明します。より音楽
的な作曲手法を求めて、多くのユーザーがマウスを使った作曲・編集作業の代わりに
ドなどの演奏ができる外付け
しくは、
ページの「
69
MIDI
コントローラーを使用しています。この方法についてについて詳
MIDI
コントローラー/キーボードを使って作曲する」をご参照ください。
2
を挿入してから、ベース音を
Xpand !
MIDI
キーボー
クリック(メトロノーム)を使用する
クリック・トラック(「メトロノーム」とも呼ばれます)は、トラックの録音中に正確な参照時間
(テンポ)を表示します。
用のクリック・トラックを作成することができます。
新規セッションで簡単にクリック・トラックを作成するには:
[トラック](
クリック・トラックを使用するには:
[表示](
1
トラックの一番上のクリック・プラグインを選択します。
2
66
Pro Tools
Track)>
View)>
の紹介
ProTools
[クリックトラックを作成](
[ミックス](
には、予め挿入されたクリック・プラグインが付属しており、専
Create Click Track
)ウィンドウを選択してミックス・ウィンドウを表示します。
Mix
)を選択します。
Page 71
クリック・プラグイン・ウィンドウでライブラリ・メニューをクリックし、サウンドを選択します。
ライブラリー・メニュー
3
カウベル、サイドスティック、その他一般的なクリック・サウンドが選択できます。
クリック音を選択する
[表示](
4
トランスポート・ウィンドウに
[メトロノーム・クリック](
5
ライト表示されます。
ここでトランスポート・ウィンドウの[再生]ボタンをクリックするか、スペースバーを押して、
6
クリックを聴いてみましょう。
[トランスポート](
View)>
Transport)>
コントロールを表示します。
MIDI
Metronome Click
[
)ボタンをクリックすると、ボタンが青色でハイ
コントロール](
MIDI
MIDI Controls
) を選択し、
Pro Tools
へようこそ
67
Page 72
クリック・トラックを消音するには:
テンポ変更の記号(+)を追加
デフォルトのテンポは
120BPM
以下のいずれかの操作を行います:
クリック・トラックのM(ミュート)ボタンをクリックし、クリック・トラックをミュートします。
•
または
[トランスポート]ウィンドウで、プレイバック中に[メトロノーム クリック]ボタンを選択解
•
除(青くハイライトされていない状態に)します。[カウントオフ]ボタンを選択解除(ハイラ
イトされていない状態に)して、カウントオフをオフにします。
テンポを設定する
セッションのテンポを指定して、曲の速さを変えることができます。
テンポを調整するには以下を行います:
[表示](
1
ドウの「
します。次に、テンポ変更ウィンドウで希望のテンポを入力し、
[ルーラー](
View)>
」と表示された位置が分かりますか。その横にあるプラス(+)マークをクリック
Temp o
[テンポ](
Rulers)>
Tem po
)を選択します。[編集](
[OK]をクリックします。
Edit
)ウィン
68
Pro Tools
の紹介
Page 73

スペースバーを押すか、[再生]ボタンをクリックして、異なる速度のクリック音を聴いてみま
2
しょう。別のテンポを入力する場合は、上記の手順を繰り返します。
操作が完了したら、再度スペースバーを押すか、[停止]をクリックします。
3
コントローラー/キーボードを使って作曲する
MIDI
とは
MIDI
MIDI(Musical Instrument Digital Interface
ドがあるわけではありません。
ントローラー、
ハードウェアの
スまたは
トはプラグインとして
操作されます。
MIDI
ここでは、マウスの代わりに
します。
インストゥルメント・トラックに
MIDI
1
ケーブルで)直接コンピューターに接続されていることを確認します。
前述の手順に従って、ステレオのインストゥルメント・トラックを作成し、
2
ページの「ビートを作成する」を参照)。
(
60
「パッチ」と呼ばれているベース・プリセットを選択します。
3
[オプション](
4
がチェックされていることを確認します。チェックされていなければ選択します。)
[レコード]ボタンをクリックして、インストゥルメント・トラックで
5
能にします。
トランスポート・ウィンドウで[最初まで巻戻し]をクリックして、セッションの最初からレコー
6
ディングを開始します。編集ウィンドウのトラックの、選択した範囲内にレコーディングしたり、
カーソル位置からレコーディングを開始することもできます。
MIDI
MIDI
インターフェースの
MIDI
コントローラーで作曲する
コントローラー/キーボードが(
Options)>[MIDI
MIDI
シーケンサーなどの音楽用装置で互いに情報を交換するための手段です。
インストゥルメントは、
MIDI
Pro Tools
のインストゥルメント・トラックに挿入され、
コントローラー/キーボードを使って作曲する方法について説明
MIDI
MIDI
スルー](
)データはオーディオではなく、
は、バーチャル・インストゥルメント・プラグイン、
ケーブルを使ってオーディオ・インターフェー
MIDI
入出力端子に接続します。バーチャル・インストゥルメン
をレコーディングするには:
MIDI
MIDI Thru
ケーブルで)
)を選択します。([
インターフェースにまたは(
MIDI
MIDI
MIDI
自体にサウン
MIDI
MIDI
ProTools
Xpand!
スルー](
レコーディングを可
Pro Tools
内で直接
2
を挿入します
MIDI Thru
へようこそ
USB
コ
)
69
Page 74

[レコード]ボタンをクリックします。
7
ここで
8
レコーディング開始の準備ができたら、[再生]をクリックするか、スペースバーを押します。停止
9
するには、[停止]をクリックするか、スペースバーを押します。
コントローラー/キーボードを操作して、ベース・サウンドを聴いてみましょう。
MIDI
インストゥルメント・トラックの
もう一度トラックの[レコード]ボタンをクリックしてレコード・モードを解除し、先ほどレ
10
コーディングした内容を再生します。
ループ・プレイバックやリズム、サウンド、パターンの作成方法について詳しくは、『
レンスガイド』
([ヘルプ]
データ
MIDI
>[Pro Tools
リファレンスガイド]) をご参照ください。
ProTools
サウンドをミックス、変更する
ProTools
属しています。このセクションでは、サウンドを加工するためのプラグインの使い方を
明します。最初の例は
2
インは、
70
システムには、レコーディングしたサウンドを変更するための便利なプラグインが多数付
つのトラック上のオーディオへコンプレッションを適用する方法を示します。
番目の例は複数のトラックにわたってリバーブを適用する方法を示します。ここで使用するプラグ
Pro Tools
の紹介
Pro Tools
1
と共にインストールされる
Avid Ef fects
プラグインの一部です。
つの例で説
2
リファ
Page 75

コンプレッション
インサート・
セレクター
コンプレッションは、トラックのダイナミクスをスムーズにします(音の大きいところと小さいと
ころをより均一にします)。ボーカルのサウンドを整える方法の
トラックにコンプレッションを適用するには:
[ウィンドウ](
1
オーディオ(または
2
をクリックし、プラグインの[
[
Compressor/Limiter Dyn 3 (mono)
[
Dynamics 3 Compressor/Limiter
Window)>
MIDI
[ミックス](
)があるトラックの一番上の最初のトラック・インサート・セレクター
) を選択します。
Mix
Dynamics
] を選択します。プラグインの[
]プラグインが挿入され、プラグイン・ウィンドウが開きます。
]を選択し、[
つです。
1
Dynamics
]サブメニューから
Dynamics
]サブメニューの
Pro Tools
へようこそ
71
Page 76

プラグイン・ウィンドウでライブラリ・メニュー(下図)をクリックし、リストから有効な設定
ライブラリアン・
メニュー
3
ファイル(プリセット)の
スペースバーを押して再生を開始します。どの様にサウンドが変わったか聴いてみてください。
4
他のプリセットも選択し、それぞれの設定でサウンドがどのように変化するか聴いてみましょう。
5
他のさまざまなプラグインを試して、選択したプラグインの音色の違いを聴き比べてください。
(『オーディオ・プラグイン・ガイド』で は、コンプレッサー、リミッター、
ロセッシングについての詳細を説明しています。)
再生を停止するには、再度スペースバーを押します。
6
つを選択します。
1
、その他さまざまなプ
EQ
72
Pro Tools
の紹介
Page 77

リバーブ
センド・
セレクター
リバーブはボーカルに対して大きな効果があります。リバーブは、リスナーが大きなコンサート・
ホールや小さなレコーディング・ブースの中にいるように感じさせます。ミックスにリバーブを適
用するには「センド&リターン」構成が適しています。センド
やインストゥルメントを同じ単一のリバーブ・エフェクトへ簡単に送ることができます。
つまたは複数のトラック上でリバーブを適用するには:
1
[ウィンドウ](
1
以下に示すように、ボーカル・トラックのセンド・セレクターをクリックし、[
2
ます。
Window)>
[ミックス](
)を選択します。
Mix
リターンを使うと、複数のボーカル
/
Bus 1-2
]を選択し
Pro Tools
へようこそ
73
Page 78

[トラック](
インサート・
セレクター
オーディオ・
インプット・
パス・セレク
ター
3
れるよう設定し、
インプット・トラックは、他の複数のトラックからサウンドを集めてエフェクト(リバー
AUX
Track)>
[作成](
[新規](
New
)をクリックします。
Create
)を選択し、[
ステレオ
1
AUX
ブなど)を適用するために使うトラックです。
追加した新規
4
トラック・インサート・セレクターをクリックし、リバーブのサブメニューから[
•
択します。
オーディオ・インプット・トラック・セレクターをクリックし、[
•
で他のトラック(ボーカル・トラックなど)からオーディオを受信するよう
トラックが設定されます。
インプット・トラックで、以下を行います。
AUX
インプット トラック]が作成さ
] を選
D-Verb
]を選択します。これ
Bus 1-2
インプット・
AUX
74
Pro Tools
の紹介
Page 79

ボーカル・トラック上の[センド]アサインメントをクリックし、[センド アウトプット]ウィン
センド
センド・フェーダーを上げる
5
ドウを開きます。
スペースバーを押し、[センド アウトプット]ウィンドウの小さなフェーダーをゆっくり上げます。
6
これでボーカル・トラックをどれくらい
ます。
再生を聴きながら、
7
返し、ディレー(エコー)、コーラス、フランジャー、その他のタイプのエフェクト・プラグインを
試してみましょう。
の別の設定を確認してみましょう。このセクションの基本手順を繰り
D-Verb
D-Verb(AUX
インプット・トラック上)へ送るかを調整し
Pro Tools
へようこそ
75
Page 80
曲の最後のフェードアウト
最初のブレークポイント
時には昔ながらのフェードアウトで曲が終わる のも良 いでし ょう。 ここで は、ミックス・オートメー
ションを使って、トラックをフェードアウトさせる方法を説明します。(フェードを作成する方法は
他にもいろいろとあります。『
フェードアウトするには(
フェードアウトするには、マスター・フェーダー・トラックを追加します。
1
グラバー・ツール(編集ウィンドウの一番上のツールバーにある)をクリックして選択します。
2
グラバー・ツール
マスター・フェーダー・トラックで、フェードを開始したい場所をグラバー・ツールでクリック
3
します。これで「ブレークポイント」(白い点)が作成されます。
Pro Tools
リファレンス・ガイド』をご参照ください。)
ProTools
のオートメーションを使って):
76
Pro Tools
の紹介
Page 81

後ろの方(最初のブレークポイントの後)をグラバーでドラッグして下げます。
フェードを作成する
4
マスター・フェーダー・トラックをクリックし、フェードを試聴する位置にカーソルをおきます。
5
スペースバーを押して、フェードの結果を試聴します。
6
ペンシル、グラバー、トリマーなどオーディオを編集するために使うさまざまなツールで、ブレー
クポイント・オートメーションも編集することができます。コントロールの動きのレコーディング
と編集方法についてについて詳しくは、『
リファレンスガイド』をご覧ください。
Pro Tools
Pro Tools
へようこそ
77
Page 82
あなたの音楽を世界へ
タイムライン
選択されて[ディスクにバ
ウンス]の準備ができた
セッションのオーディオ
ProTools
です。[ディスクにバウンス]機能を使うと、すべてのトラックを組み合わせて、誰とでも共有でき
る
セッションからステレオのマスターを作成するには:
1
セレクター・ツール
2
なかった場合は、セッション全体が初めから終わりまでバウンスされます。
セッションのトラックのレコーディングと編集が終了したら、いよいよミックス・ダウン
つの「マスター」オーディオ・ファイルが作成できます。
1
セレクター・ツール(編集ウィンドウの一番上のツールバーにある)をクリックして選択します。
セレクターを使ってタイムライン(またはトラック)のセッションの長さだけ選択します。選択し
78
Pro Tools
の紹介
Page 83

[ファイル](
3
[バウンス](
4
[バウンス ソース](
•
これはトラックの
[バウンス](
File)>
)ダイアログで、以下を行って
Bounce
Bounce to)>
Bounce Source
[オーディオ・アウトプット・パス・セレクター ](
[ディスク](
)にはミックスのメイン・アウトプット・パスを選択します。
Disk
を作成します。
MP3
)を選択します。
Audio Output Path Selector
に表示されているパスです。
[ファイル タイプ](
•
File Type
)として[
]を選択します。これでステレオ・ファイルが作成
MP3
されます。
[フォーマット](
•
)として[インターリーブ](
Format
Interleaved
)を選択します。これは
オーディオと同じサンプルレートです。
[サンプルレート](
•
ミックスを、CDへ焼いたりパーソナル・オーディオ・プレーヤー上にロードできる
•
Sample Rate
ラリーに表示したい場合は
ミックスを、ソーシャル・ネットワーク(
•
レイリストを公開できる
SoundCloud
[バウンス後に変換](
•
) をオンにします。
Convert after Bounce
)として[
[
ライブラリーへ追加](
iTunes
SoundCloud
]を選択します。
44.1kHz
Add to iTunes Library
Twi t te r、Facebook、Google+
で共有したい場合は[
)を選択します。
SoundCloud
上の
CD
ライブ
Tun e s
)をオンにします。
など)上にトラックやプ
で共有](
Share with
)
Pro Tools
へようこそ
79
Page 84
[バウンス](
5
)をクリックします。
Bounce
[ディスクにバウンス]について詳しくは、『
ださい。
ProTools
リファレンス・ガイド』をご参照く
[バウンス]ダイアログ(
フォーマットへエクスポートまたはバウンスするときは、[
MP3
6
くつかのオプションが設定できます。これらのオプションについて詳しくは、『
を作成するときの例)
MP3
]ダイアログが表示され、い
MP3
ンス ・ガイド』をご 参照ください。
[
]ダイアログ
MP3
Pro Tools
の紹介
80
Pro Tools
リファレ
Page 85
オプションを選択したら、[
7
[保存](
8
します。
われ、バウンス処理中にミックスのプレイバックが聴こえます。バウンス中は
ルは調整できません。
)ダイアログで名前を入力し、保存場所を指定してから、[保存](
Save
がディスクへのバウンスを開始します。
Pro Tools
]をクリックします。
OK
ProTools
)をクリック
のバウンスはリアルタイムで行
Save
ProTools
のコントロー
ミックスダウン後のマスタリング
バウンスが完了したら、選択したフォーマットでオーディオが使用できます。設定したオプション
によって、オーディオを
ライブラリーや
iTunes
SoundCloud
のアカウントへ送ることもできます。
スタジオ以外の環境でリファレンス
ミックスがどのように変わるかを確認することができます。
を聴いてみると、他のシステムやリスニング環境で
CD
さらに学ぶ
このガイドが
クをさらに学びたい方は、
ください。関心のある用語を検索して、詳細をお読みください。
ProTools
で音楽を制作する皆様の一助になれば幸いです。ここで取り上げたトピッ
のオンライン・ヘルプ([ヘルプ]
Pro Tools
>[Pro Tools
ヘルプ])をご参照
へようこそ
Pro Tools
81
Page 86

82
Pro Tools
の紹介
Page 87

Page 88
Avid
2001 Junipero Serra Boulevard
Daly City, CA 94104-3886 USA
Technical Support (USA)
Visit the Online Support Center at
www.avid.com/support
Product Information
For company and product information,
visit us on the web at www.avid.com
 Loading...