

Page 1
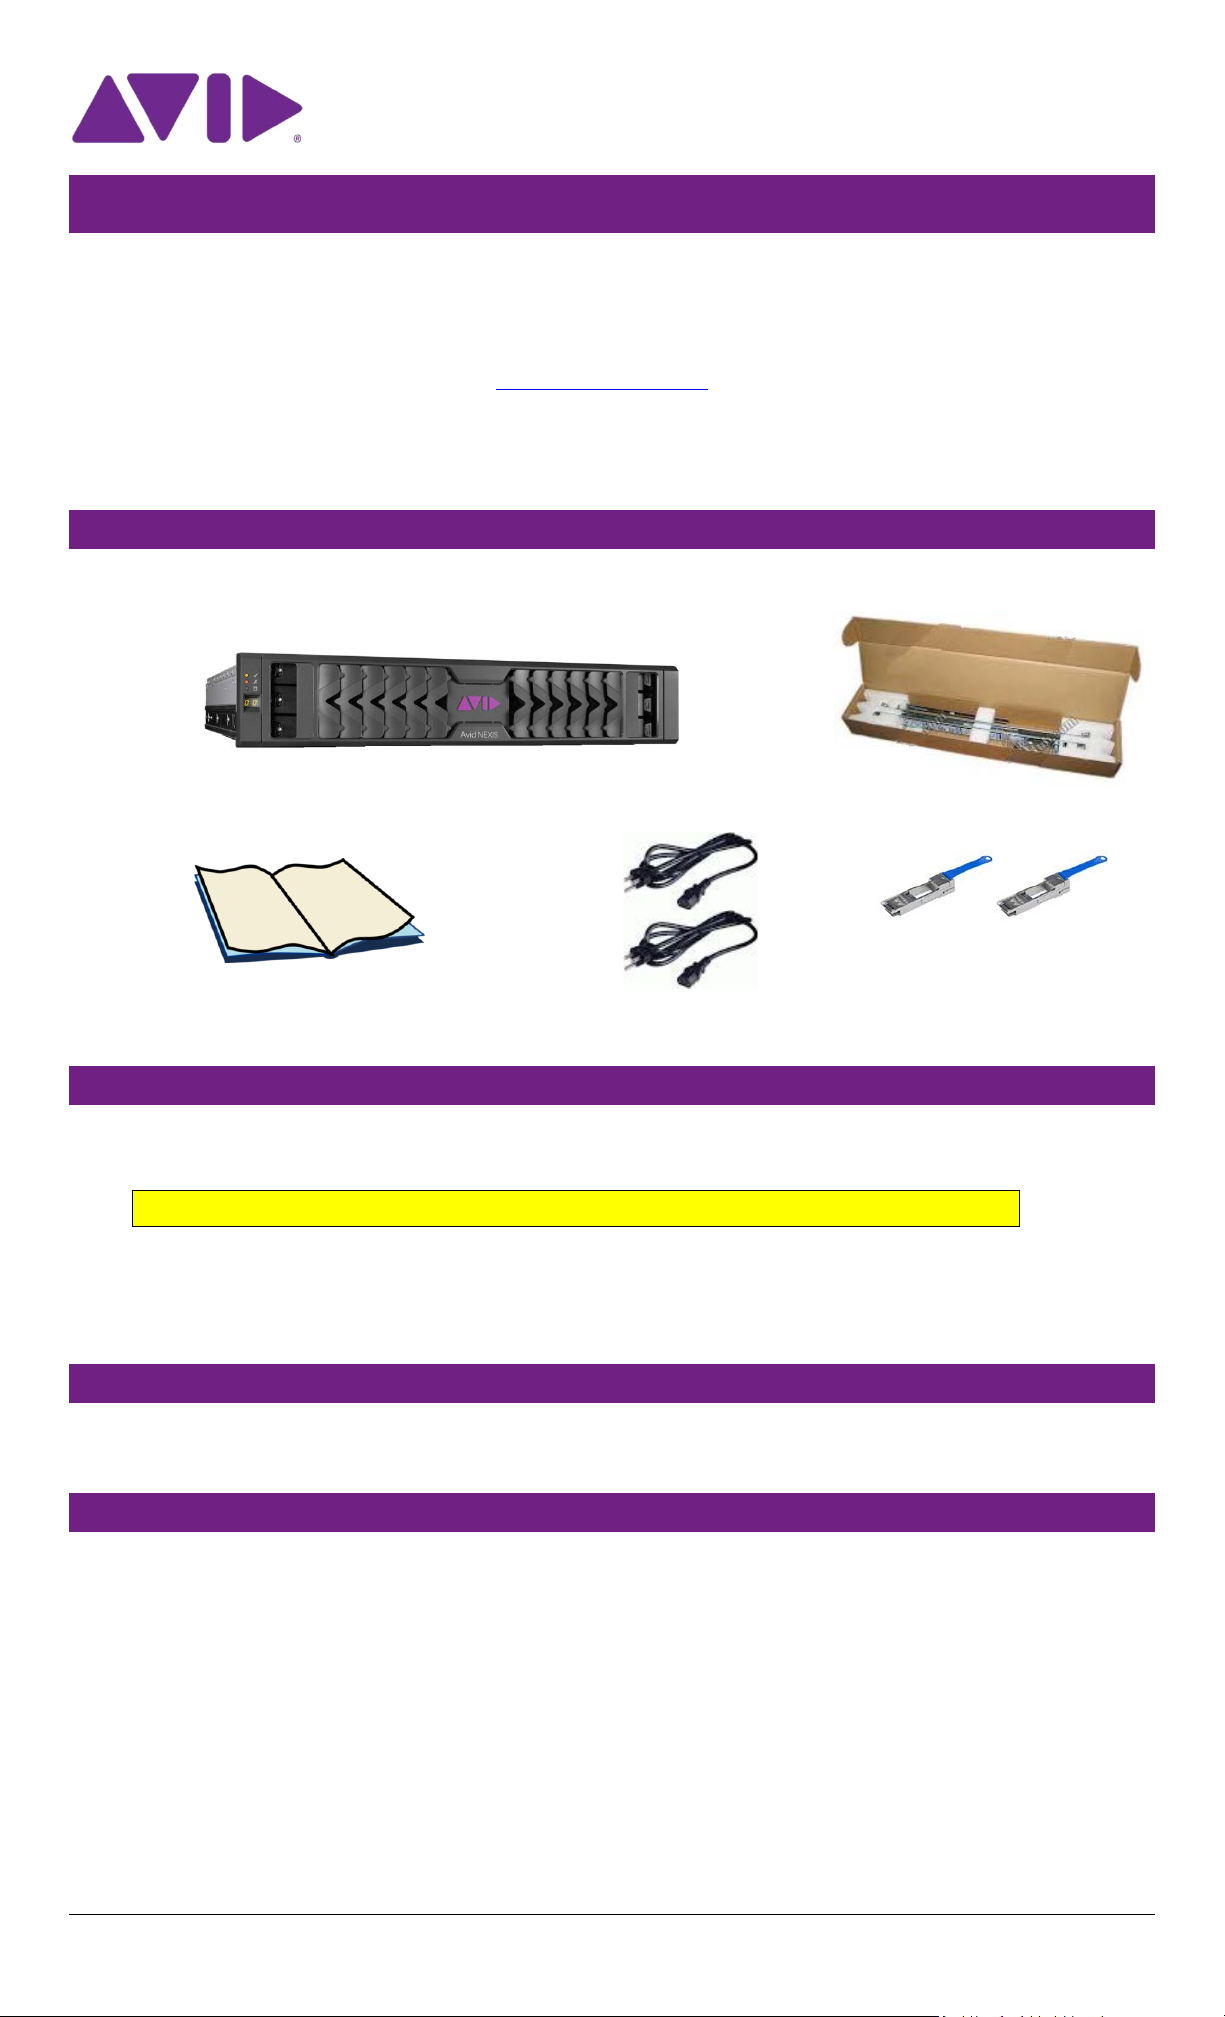
Avid NEXIS | PRO Engine including Storage Controller,
2 power supplies, Media Pack (10 HDDs), 2 system drives (SSDs), and Bezel
Rack Mounting Kit (may include
other hardware and tools)
Health and Safety information, EULA
2 Power cables
2 QSFP adapters
TM
Avid® NEXIS
Thank you for purchasing an Avid NEXIS | PRO. This Quick Start guide provides an overview of the steps required to get
your system up and running as quickly as possible.
For detailed instructions or clarifications on the steps outlined in this document, see the Avid NEXIS | PRO Setup Guide,
available in the software kit or via download at www.avid.com/support
for Avid NEXIS | PRO Setup Guide.
This Quick Start describes creating a configuration with a single Avid NEXIS | PRO Engine. To create a multi-Engine
system, see the Setup Guide.
1 Unpack the Shipping Box and Verify Contents
What’s included with your Avid NEXIS | PRO:
| PRO Quick Start
. Click the link titled Knowledge Base and search
2 Register Your Avid NEXIS
Before you can start using your new Avid NEXIS | PRO, you must register your system and upgrade the pre-loaded
software at www.avid.com/activationcard.
You must register your product before you can download and install the software.
You can use an existing support login or create a new account if you do not have one.
Each Avid NEXIS | PRO must be registered separately using the unique serial number printed on the labels on the Engine
chassis and the shipping box.
3 Download the Software
After you register each Avid NEXIS | PRO, the software will be accessible through www.avid.com/account. Download the
software to a computer that can be connected to the Avid NEXIS | PRO in a later step.
4 Rack-Mount the Equipment, Connect Network Switch and Cables
1 Follow the instructions on the label attached to the rail kit to install the rails in a rack. If you do not plan to mount
your equipment in a rack, make sure it is on a stable, level surface.
Note: The screws in the rail kit are metric. You might need to use your own screws for your rack type.
2 Connect the system to power and turn on the power supply switches.
A Power-On-Self-Test (POST) cycle begins, which lasts about 6-7 minutes; LEDs on the power supplies light up and the fans start after about 2
minutes and run at full speed for several more minutes. After they slow down, wait another 2-3 minutes before the Engine is ready for
configuration and software installation.
Copyright 2016 Avid Technology, Inc. 1
Page 2
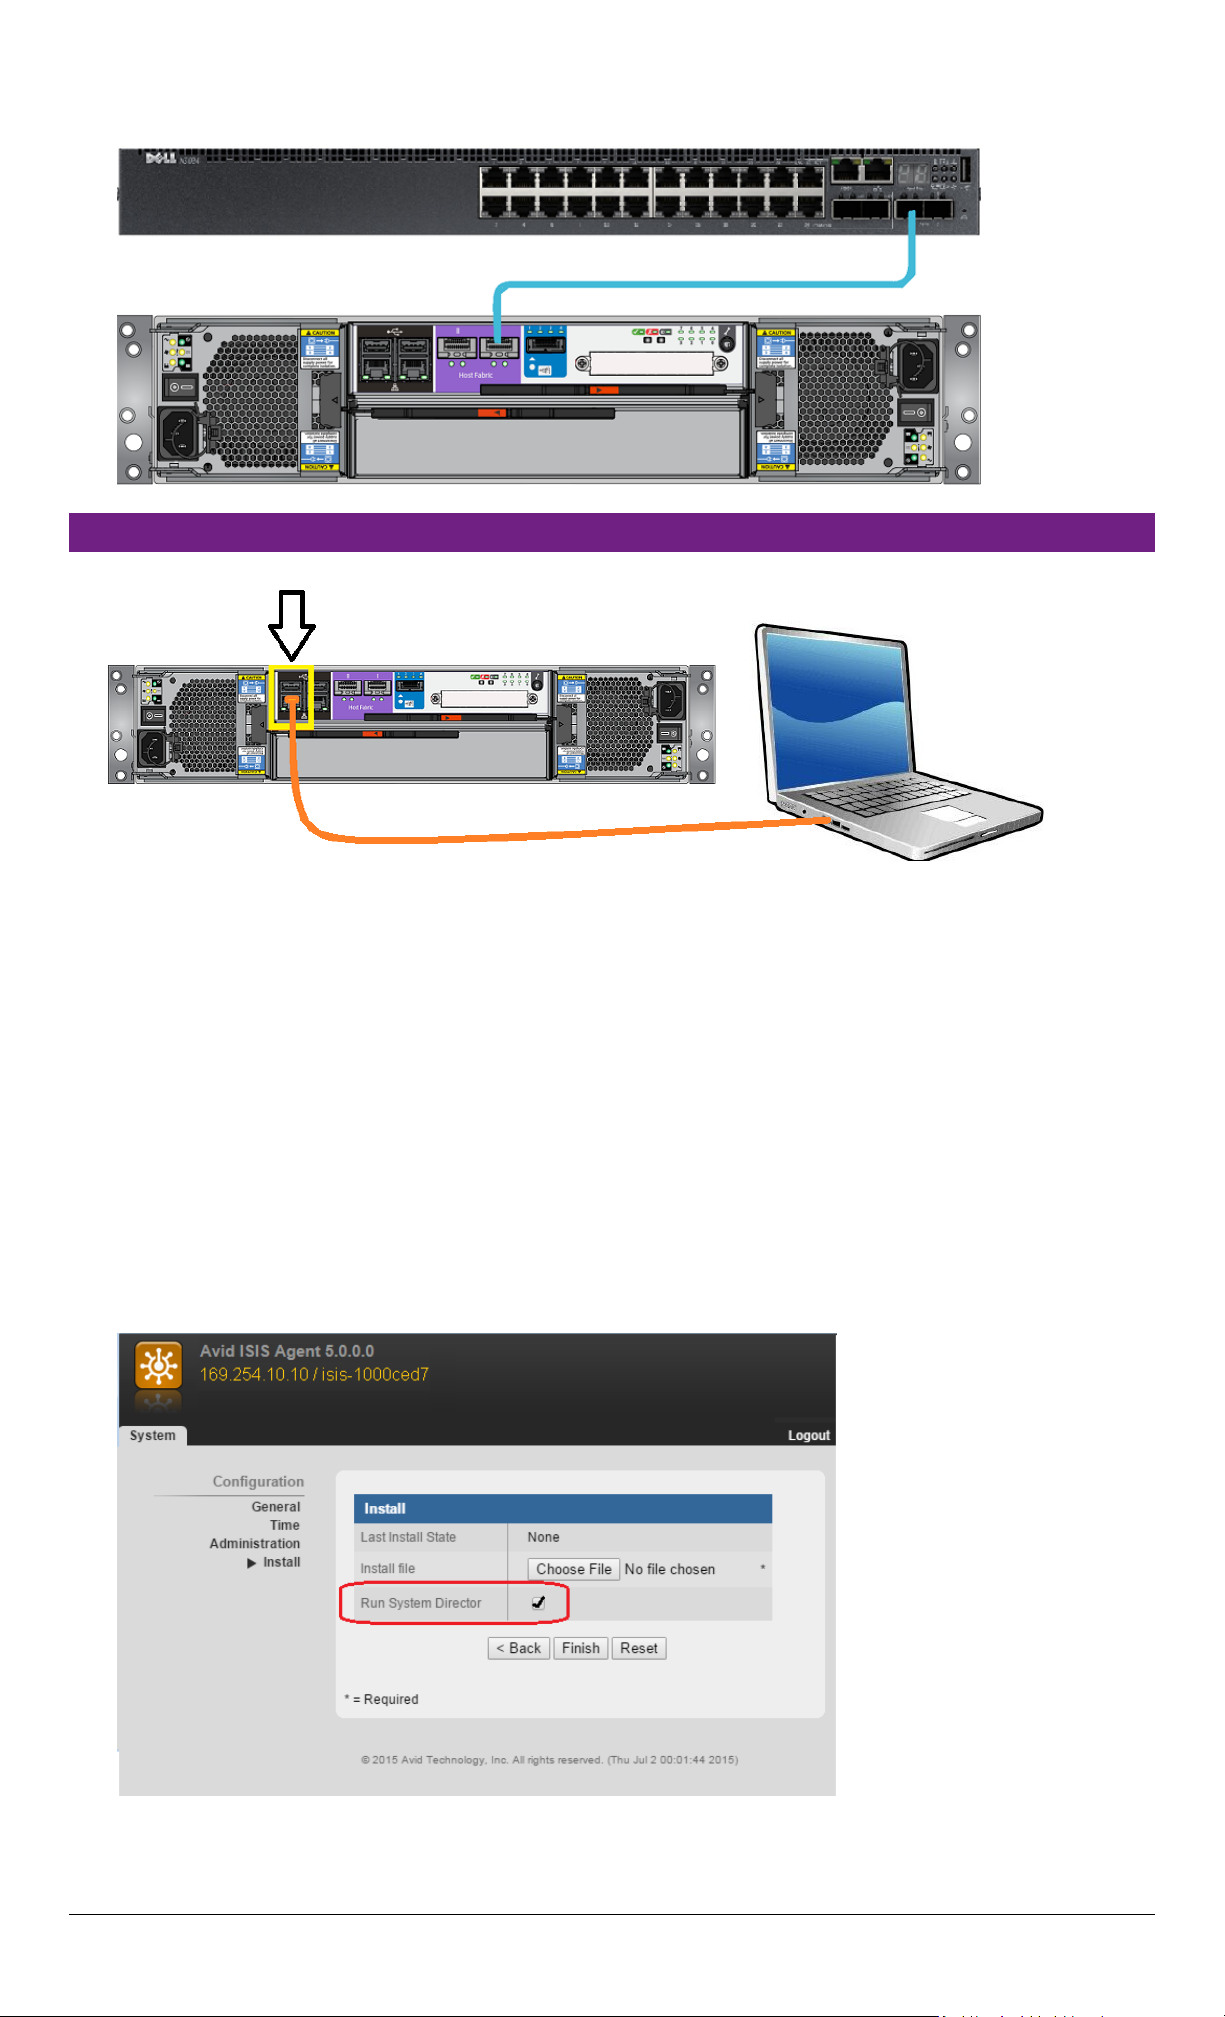
3 Connect the 10 Gb port on the Avid NEXIS | PRO to a qualified network switch. See Supported Switches in the Avid
NEXIS | PRO Setup Guide for details.
5 Install the Software on the Avid NEXIS | PRO, Configure the System
1 Connect an Ethernet cable between the computer and the management port on the back of the Avid NEXIS | PRO.
2 Set the computer Ethernet interface to the following IP address and netmask:
IP address: 169.254.10.20
Netmask: 255.255.255.0
For more detail, see page 27, Configuring the Computer’s IP Address, in the Avid NEXIS | PRO Setup Guide.
3 Open a browser and enter the following URL: https://169.254.10.10:5015
4 Enter the password: se-admin.
5 Enter the following required information:
o Storage System Name (name for the whole Avid NEXIS system comprising from one to four Engines)
o A unique host name (name of the System Director)
o IP address for the 10 Gb switch interface, netmask, and gateway
6 Set the system time (or optionally add NTP servers), and optionally change the administrator password.
7 Install the software. On the first system you are configuring, make sure to check the box next to Run System
Director. For more information, see page 29, Installing the Software and Setting up the ISIS System, in the Avid
NEXIS | PRO Setup Guide.
8 The Avid NEXIS | PRO reboots and performs the software upgrade. For more details, see the Avid NEXIS | PRO
Setup Guide.
Copyright 2016 Avid Technology, Inc. 2
Page 3

6 Create the File System and Bind the Media Packs
1 Disconnect the computer from the Management Port, and connect it to your network.
2 Open a browser and enter the IP address you configured in the previous step. This opens the Management Console.
The default user account is Administrator; if you changed the password during setup, enter it now. Otherwise press
Enter.
3 Under the Advanced heading, click System Settings.
4 Click Create File System.
5 Click Home, then Media Packs.
Copyright 2016 Avid Technology, Inc. 3
Page 4

6 Select all the Media Packs, then click Bind.
7 Create Storage Groups and Workspaces
1 Click Home, then Storage Groups.
2 Enter a name for the Storage Group, then select one or more Media Packs and click Add, then click Apply.
Copyright 2016 Avid Technology, Inc. 4
Page 5

3 Click Home, then Workspaces.
4 Enter a name and size for the Workspace, and select the Storage Group in which to create it, and then click Apply.
8 Finish System Configuration and Install Client Software
See the Avid NEXIS | PRO Setup Guide and the Avid NEXIS Administration Guide (available in the Help link in the
Management Console) for detailed instructions on configuring the storage for users.
See the Client Guide (also available in the Help link) to install the Avid NEXIS Client software and connect users to the
Avid NEXIS.
Congratulations: Your Avid NEXIS is ready to use!
Copyright 2016 Avid Technology, Inc. 5
 Loading...