

Page 1

Avid® NewsCutter® XP
Setup Guide
Page 2

Copyright and Disclaimer
Product specifications are subject to change without notice and do not represent a commitment on
the part of Avid Technology, Inc. The software described in this document is furnished under a
license agreement. You can obtain a copy of that license by visiting Avid's Web site at
www.avid.com. The terms of that license are also available in the product in the same directory as
the software. The software may not be reverse assembled and may be used or copied only in
accordance with the terms of the license agreement. It is against the law to copy the software on any
medium except as specifically allowed in the license agreement. Avid products or portions thereof
are protected by one or more of the following United States patents: 4,746,994; 4,970,663;
5,045,940; 5,063,448; 5,077,604; 5,245,432; 5,267,351; 5,309,528; 5,325,200; 5,355,450;
5,396,594; 5,440,348; 5,452,378; 5,467,288; 5,513,375; 5,528,310; 5,557,423; 5,568,275;
5,577,190; 5,583,496; 5,584,006; 5,627,765; 5,634,020; 5,640,601; 5,644,364; 5,654,737;
5,701,404; 5,715,018; 5,719,570; 5,724,605; 5,726,717; 5,729,673; 5,731,819; 5,745,637;
5,752,029; 5,754,180; 5,754,851; 5,781,188; 5,799,150; 5,812,216; 5,828,678; 5,842,014;
5,852,435; 5,883,670; 5,889,532; 5,892,507; 5,905,841; 5,912,675; 5,929,836; 5,929,942;
5,930,445; 5,930,797; 5,946,445; 5,966,134; 5,977,982; 5,986,584; 5,987,501; 5,995,079;
5,995,115; 5,999,190; 5,999,406; 6,009,507; 6,011,562; 6,014,150; 6,016,152; 6,016,380;
6,018,337; 6,023,531; 6,023,703; 6,031,529; 6,035,367; 6,038,573; 6,052,508; 6,058,236;
6,061,758; 6,072,796; 6,084,569; 6,091,422; 6,091,778; 6,105,083; 6,118,444; 6,128,001;
6,128,681; 6,130,676; 6,134,379; 6,134,607; 6,137,919; 6,141,007; 6,141,691; 6,154,221;
6,157,929; 6,160,548; 6,161,115; 6,167,404; 6,174,206; 6,192,388; 6,198,477; 6,208,357;
6,211,869; 6,212,197; 6,215,485; 6,223,211; 6,226,005; 6,226,038; 6,229,576; 6,239,815;
6,249,280; 6,269,195; 6,271,829; 6,301,105; 6,310,621; 6,314,403; 6,317,142; 6,317,153;
6,317,515; D352,278; D372,478; D373,778; D392,267; D392,268; D392,269; D395,291;
D396,853; D398,912. Additional U.S. and foreign patents pending. No part of this document may
be reproduced or transmitted in any form or by any means, electronic or mechanical, including
photocopying and recording, for any purpose without the express written permission of Avid
Technology, Inc.
Copyright © 2001 – 2002 Avid Technology, Inc. and its licensors. All rights reserved. Printed in USA.
The following disclaimer is required by Sam Leffler and Silicon Graphics, Inc. for the
use of their TIFF library:
Copyright © 1988-1997 Sam Leffler
Copyright © 1991-1997 Silicon Graphics, Inc.
Permission to use, copy, modify, distribute, and sell this software [i.e., the TIFF library] and its
documentation for any purpose is hereby granted without fee, provided that (i) the above copyright
notices and this permission notice appear in all copies of the software and related documentation,
and (ii) the names of Sam Leffler and Silicon Graphics may not be used in any advertising or
publicity relating to the software without the specific, prior written permission of Sam Leffler and
Silicon Graphics.
THE SOFTWARE IS PROVIDED “AS-IS” AND WITHOUT WARRANTY OF ANY KIND, EXPRESS,
IMPLIED OR OTHERWISE, INCLUDING WITHOUT LIMITATION, ANY WARRANTY OF
MERCHANTABILITY OR FITNESS FOR A PARTICULAR PURPOSE.
IN NO EVENT SHALL SAM LEFFLER OR SILICON GRAPHICS BE LIABLE FOR ANY SPECIAL,
INCIDENTAL, INDIRECT OR CONSEQUENTIAL DAMAGES OF ANY KIND, OR ANY DAMAGES
WHATSOEVER RESULTING FROM LOSS OF USE, DATA OR PROFITS, WHETHER OR NOT
ADVISED OF THE POSSIBILITY OF DAMAGE, AND ON ANY THEORY OF LIABILITY, ARISING OUT
OF OR IN CONNECTION WITH THE USE OR PERFORMANCE OF THIS SOFTWARE.
The following disclaimer is required by the Independent JPEG Group:
Portions of this software are based on work of the Independent JPEG Group.
The following disclaimer is required by Paradigm Matrix:
Portions of this software licensed from Paradigm Matrix.
Page 3

The following disclaimer is required by Ray Sauers Associates, Inc.:
“Install-It” is licensed from Ray Sauers Associates, Inc. End-User is prohibited from taking any
action to derive a source code equivalent of “Install-It,” including by reverse assembly or reverse
compilation, Ray Sauers Associates, Inc. shall in no event be liable for any damages resulting from
reseller’s failure to perform reseller’s obligation; or any damages arising from use or operation of
reseller’s products or the software; or any other damages, including but not limited to, incidental,
direct, indirect, special or consequential Damages including lost profits, or damages resulting from
loss of use or inability to use reseller’s products or the software for any reason including copyright or
patent infringement, or lost data, even if Ray Sauers Associates has been advised, knew or should
have known of the possibility of such damages.
The following disclaimer is required by Videomedia, Inc.:
“Videomedia, Inc. makes no warranties whatsoever, either express or implied, regarding this
product, including warranties with respect to its merchantability or its fitness for any particular
purpose.”
“This software contains V-LAN ver. 3.0 Command Protocols which communicate with V-LAN ver. 3.0
products developed by Videomedia, Inc. and V-LAN ver. 3.0 compatible products developed by
third parties under license from Videomedia, Inc. Use of this software will allow “frame accurate”
editing control of applicable videotape recorder decks, videodisc recorders/players and the like.”
The following notice is required by Altura Software, Inc. for the use of its Mac2Win software and Sample Source Code:
©1993–1998 Altura Software, Inc.
The following notice is required by Ultimatte Corporation:
Certain real-time compositing capabilities are provided under a license of such technology from
Ultimatte Corporation and are subject to copyright protection.
Attn. Government User(s). Restricted Rights Legend
U.S. GOVERNMENT RESTRICTED RIGHTS. This Software and its documentation are “commercial
computer software” or “commercial computer software documentation.” In the event that such
Software or documentation is acquired by or on behalf of a unit or agency of the U.S. Government,
all rights with respect to this Software and documentation are subject to the terms of the License
Agreement, pursuant to FAR §12.212(a) and/or DFARS §227.7202-1(a), as applicable.
Trademarks
AirPlay, AudioVision, Avid, Avid Xpress, CamCutter, Digidesign, FieldPak, Film Composer, HIIP,
Image Independence, Marquee, Media Composer, Media Recorder, NewsCutter, OMF,
OMF Interchange, Open Media Framework, Pro Tools, and Softimage are registered trademarks and
888 I/O, AirSPACE, AirSPACE HD, AniMatte, AudioSuite, AutoSync, AVIDdrive, AVIDdrive Towers,
AvidNet, Avid Production Network, AvidProNet, AvidProNet.com, AVIDstripe, Avid Unity,
AVX, DAE, D-Fi, D-fx, Digidesign Audio Engine, DINR, D-Verb, ExpertRender, FilmScribe,
HyperSPACE, HyperSPACE HDCAM, Intraframe, iS9, iS18, iS23, iS36, Lo-Fi, Magic Mask,
make manage move | media, Matador, Maxim, MCXpress, MEDIArray, MediaDock,
MediaDock Shuttle, Media Fusion, Media Illusion, MediaLog, Media Reader, MediaShare, Meridien,
NaturalMatch, NetReview, OMM, Open Media Management, ProEncode, QuietDrive, R&A, Recti-Fi,
Review & Approval, rS9, rS18, Sci-Fi, Sound Designer II, SPACE, SPACEShift, Symphony, Trilligent,
UnityRAID, Vari-Fi, Video Slave Driver, and VideoSPACE are trademarks of Avid Technology, Inc.
iNEWS and Media Browse are trademarks of iNews, LLC.
Page 4

Adobe and Acrobat Reader are either registered trademarks or trademarks of Adobe Systems
Incorporated in the United States and/or other countries. Compaq is a registered trademark of
Compaq Computer Corporation. FireWire is a trademark of Apple Computer, Inc., registered in the
U.S. and other countries. IEEE is a registered trademark of the Institute of Electrical and Electronics
Engineers, Inc. LSX-MPEG is a trademark of Ligos Corporation. Microsoft, MS-DOS, NetShow,
Windows, and Windows NT are either registered trademarks or trademarks of Microsoft Corporation
in the United States and/or other countries. RealProducer is a registered trademark of RealNetworks,
Inc. Sony, DVCAM, and i.LINK are trademarks of Sony Corporation. TI is a trademark of Texas
Instruments. Videomedia, V-LAN, and VLXi are registered trademarks of Videomedia, Inc. All other
trademarks contained herein are the property of their respective owners.
Avid NewsCutter XP Setup Guide • Part 0130-05168-01 Rev. A • April 2002
Page 5

Contents
Using This Guide
Who Should Use This Guide . . . . . . . . . . . . . . . . . . . . . . . . . . . . . . . . . . 11
About This Guide . . . . . . . . . . . . . . . . . . . . . . . . . . . . . . . . . . . . . . . . . . . 12
Symbols and Conventions . . . . . . . . . . . . . . . . . . . . . . . . . . . . . . . . . . . . 12
If You Need Help . . . . . . . . . . . . . . . . . . . . . . . . . . . . . . . . . . . . . . . . . . . . 14
Related Information. . . . . . . . . . . . . . . . . . . . . . . . . . . . . . . . . . . . . . . . . . 14
If You Have Documentation Comments . . . . . . . . . . . . . . . . . . . . . . . . 16
How to Order Documentation. . . . . . . . . . . . . . . . . . . . . . . . . . . . . . . . . 16
Chapter 1 Setting Up Your System
Preparing to Set Up Your System . . . . . . . . . . . . . . . . . . . . . . . . . . . . . . 18
Determining Supported Equipment . . . . . . . . . . . . . . . . . . . . . . . . 18
Purchasing the Equipment . . . . . . . . . . . . . . . . . . . . . . . . . . . . . . . . 19
System Setup Check List . . . . . . . . . . . . . . . . . . . . . . . . . . . . . . . . . . 19
Turning On Your Equipment. . . . . . . . . . . . . . . . . . . . . . . . . . . . . . . . . . 20
Hardware Configurations . . . . . . . . . . . . . . . . . . . . . . . . . . . . . . . . . . . . 21
Slot Assignments . . . . . . . . . . . . . . . . . . . . . . . . . . . . . . . . . . . . . . . . 22
OHCI Support. . . . . . . . . . . . . . . . . . . . . . . . . . . . . . . . . . . . . . . . . . . 22
USB-to-MIDI Converter Installation . . . . . . . . . . . . . . . . . . . . . . . . 23
Installing Boards Purchased Separately. . . . . . . . . . . . . . . . . . . . . . . . . 25
Installing the 1394 Board. . . . . . . . . . . . . . . . . . . . . . . . . . . . . . . . . . 25
Installing the PCI SCSI Board. . . . . . . . . . . . . . . . . . . . . . . . . . . . . . 25
Installing the Application Key. . . . . . . . . . . . . . . . . . . . . . . . . . . . . . . . . 26
Setting Your Screen Resolution . . . . . . . . . . . . . . . . . . . . . . . . . . . . . . . . 27
Connecting External Drives . . . . . . . . . . . . . . . . . . . . . . . . . . . . . . . . . . . 28
Page 6

6
Connecting the SCSI Drives . . . . . . . . . . . . . . . . . . . . . . . . . . . . . . . 29
Preparing the External SCSI Drives . . . . . . . . . . . . . . . . . . . . . . . . 29
Cabling the SCSI Drives . . . . . . . . . . . . . . . . . . . . . . . . . . . . . . . . . . 30
Determining the SCSI IDs. . . . . . . . . . . . . . . . . . . . . . . . . . . . . . . . . 31
Connecting the FireWire Drives . . . . . . . . . . . . . . . . . . . . . . . . . . . 32
Preparing the FireWire Drives. . . . . . . . . . . . . . . . . . . . . . . . . . . . . 33
Cabling the FireWire Drives. . . . . . . . . . . . . . . . . . . . . . . . . . . . . . . 34
Preparing Your Drives . . . . . . . . . . . . . . . . . . . . . . . . . . . . . . . . . . . . . . . 35
Supported File Systems. . . . . . . . . . . . . . . . . . . . . . . . . . . . . . . . . . . 35
Creating Primary Partitions and Formatting Drives . . . . . . . . . . 36
Testing Drives . . . . . . . . . . . . . . . . . . . . . . . . . . . . . . . . . . . . . . . . . . . . . . 39
Chapter 2 Installing the Software
Installing the NewsCutter XP Software. . . . . . . . . . . . . . . . . . . . . . . . . 41
Removing Earlier Releases of NewsCutter XP . . . . . . . . . . . . . . . 42
Installing NewsCutter XP Software . . . . . . . . . . . . . . . . . . . . . . . . 43
Performing a Custom Installation. . . . . . . . . . . . . . . . . . . . . . . . . . 45
Modifying, Repairing, or Removing Avid Applications . . . . . . . 46
Installing the Companion Applications. . . . . . . . . . . . . . . . . . . . . . . . . 48
Creating an Emergency Repair Disk . . . . . . . . . . . . . . . . . . . . . . . . . . . 50
Saving the Disk Configuration . . . . . . . . . . . . . . . . . . . . . . . . . . . . . . . . 50
Setting the Proper Paging File. . . . . . . . . . . . . . . . . . . . . . . . . . . . . . . . . 52
Chapter 3 Connecting the Editing Equipment
Connecting a 1394 Cable . . . . . . . . . . . . . . . . . . . . . . . . . . . . . . . . . . . . . 54
Connecting a Computer Without a Client Monitor. . . . . . . . . . . . . . . 55
Connecting a Computer with a Client Monitor . . . . . . . . . . . . . . . . . . 56
Audio and Video Sync Issues . . . . . . . . . . . . . . . . . . . . . . . . . . . . . . . . . 58
Connecting an Analog Video Deck to the Computer . . . . . . . . . . . . . 60
Connecting a Video Deck or Edit Controller . . . . . . . . . . . . . . . . . . . . 62
Connecting a V-LAN VLXi Controller and GPI Devices. . . . . . . 64
Linking OHCI Drivers . . . . . . . . . . . . . . . . . . . . . . . . . . . . . . . . . . . 65
Linking the Driver to a New DV Device. . . . . . . . . . . . . . . . . 66
Page 7

Linking the Driver to a DV Device Previously Linked
to a Different Driver . . . . . . . . . . . . . . . . . . . . . . . . . . . . . . . . 67
Linking DV Devices to a Particular Driver . . . . . . . . . . . . . . . 67
File Structure . . . . . . . . . . . . . . . . . . . . . . . . . . . . . . . . . . . . . . . . . . . . . . . 68
Project Workflow . . . . . . . . . . . . . . . . . . . . . . . . . . . . . . . . . . . . . . . . . . . . 69
Starting a Project. . . . . . . . . . . . . . . . . . . . . . . . . . . . . . . . . . . . . . . . . 70
Preparing to Edit. . . . . . . . . . . . . . . . . . . . . . . . . . . . . . . . . . . . . . . . . 71
Editing a Sequence . . . . . . . . . . . . . . . . . . . . . . . . . . . . . . . . . . . . . . . 72
Generating Output . . . . . . . . . . . . . . . . . . . . . . . . . . . . . . . . . . . . . . . 73
Chapter 4 Setting Up Workgroups
NewsCutter XP Workgroups. . . . . . . . . . . . . . . . . . . . . . . . . . . . . . . . . . 75
Avid Unity for News Workgroup Configuration. . . . . . . . . . . . . . . . . 76
PortServer Pro Support. . . . . . . . . . . . . . . . . . . . . . . . . . . . . . . . . . . . . . . 78
LANshare Configuration . . . . . . . . . . . . . . . . . . . . . . . . . . . . . . . . . . . . . 79
Media File Transfers to Playback Devices . . . . . . . . . . . . . . . . . . . . . . . 80
Connecting NewsCutter XP and the Playback
Device for Ingest . . . . . . . . . . . . . . . . . . . . . . . . . . . . . . . . . . . . . . . 81
Setting Up the Playback Device for Ingest . . . . . . . . . . . . . . . . . . . 82
Setting Up NewsCutter XP for Ingest . . . . . . . . . . . . . . . . . . . . . . . 83
Fibre Channel Workgroup Configuration . . . . . . . . . . . . . . . . . . . 84
Transferring Files from NewsCutter XP to the
Playback Device . . . . . . . . . . . . . . . . . . . . . . . . . . . . . . . . . . . . . . . 84
Transferring from the Playback Device to NewsCutter XP . . . . . 86
7
Appendix A Avid Setup and Product Recovery CD-ROM
Process Summary. . . . . . . . . . . . . . . . . . . . . . . . . . . . . . . . . . . . . . . . . . . . 90
Using the Avid Setup and Product Recovery CD-ROM . . . . . . . . . . . 90
Page 8

8
Appendix A Regulatory and Safety Notices
FCC Notice. . . . . . . . . . . . . . . . . . . . . . . . . . . . . . . . . . . . . . . . . . . . . . . . . 93
Canadian ICES-003 . . . . . . . . . . . . . . . . . . . . . . . . . . . . . . . . . . . . . . . . . . 94
European Union Notice . . . . . . . . . . . . . . . . . . . . . . . . . . . . . . . . . . . . . . 94
Australia and New Zealand EMC Regulations . . . . . . . . . . . . . . . . . . 96
Taiwan EMC Regulations . . . . . . . . . . . . . . . . . . . . . . . . . . . . . . . . . . . . 96
Index
Page 9

Figures
Figure 1-1 Connecting the USB-to-MIDI Converter. . . . . . . . . . . . 23
Figure 1-2 USB ports . . . . . . . . . . . . . . . . . . . . . . . . . . . . . . . . . . . . . . 24
Figure 1-3 USB-to-MIDI Converter Front Panel . . . . . . . . . . . . . . . 24
Figure 1-4 Application Key Connection. . . . . . . . . . . . . . . . . . . . . . 26
Figure 1-5 Cable and LVD Terminator. . . . . . . . . . . . . . . . . . . . . . . 30
Figure 1-6 Chain of SCSI Drives . . . . . . . . . . . . . . . . . . . . . . . . . . . . 31
Figure 1-7 Assigning the SCSI IDs . . . . . . . . . . . . . . . . . . . . . . . . . . 32
Figure 1-8 Configuration Using Four MediaDrive rS
Enclosures . . . . . . . . . . . . . . . . . . . . . . . . . . . . . . . . . . . 33
Figure 1-9 Connecting the IEEE 1394 Cables. . . . . . . . . . . . . . . . . . 34
Figure 1-10 Partitioning in the Computer Management
Window . . . . . . . . . . . . . . . . . . . . . . . . . . . . . . . . . . . . . 37
Figure 1-11 Formatting the Partition . . . . . . . . . . . . . . . . . . . . . . . . . 38
9
Figure 3-1 Connecting a 1394 Cable . . . . . . . . . . . . . . . . . . . . . . . . . 55
Figure 3-2 Connecting a Computer Without a Client
Monitor. . . . . . . . . . . . . . . . . . . . . . . . . . . . . . . . . . . . . . 56
Figure 3-3 Connecting a Computer with a Client Monitor. . . . . . 57
Figure 3-4 NewsCutter XP System with Client Monitor . . . . . . . . 58
Figure 3-5 Connecting an Analog Video Deck . . . . . . . . . . . . . . . . 60
Figure 3-6 Analog Video Deck Control Cabling. . . . . . . . . . . . . . . 63
Figure 3-7 V-LAN VLXi Deck Control . . . . . . . . . . . . . . . . . . . . . . . 65
Figure 3-8 File Structure . . . . . . . . . . . . . . . . . . . . . . . . . . . . . . . . . . . 69
Figure 4-1 Avid Workgroup Flow Diagram . . . . . . . . . . . . . . . . . . 78
Figure 4-2 LANshare Workgroup Configuration. . . . . . . . . . . . . . 80
Figure 4-3 Audio, Video, and Serial Connections . . . . . . . . . . . . . 82
Figure 4-4 Digital Cut Tool . . . . . . . . . . . . . . . . . . . . . . . . . . . . . . . . 85
Page 10

10
Tables
Table 1-1 System Setup Check List. . . . . . . . . . . . . . . . . . . . . . . . . .19
Table 1-2 Compaq W8000 Slot Assignments . . . . . . . . . . . . . . . . .22
Table 1-3 Monitor Resolutions . . . . . . . . . . . . . . . . . . . . . . . . . . . . .27
Table 2-1 Custom Installation Components . . . . . . . . . . . . . . . . . .45
Page 11

Using This Guide
This guide explains how to set up the Avid® NewsCutter® XP system.
This release of NewsCutter XP uses the Windows
system and Service Pack 2. For the most current information, see the
Avid
NewsCutter XP Release Notes.
n
The documentation describes the features and hardware of all models and
configurations. Therefore, your system might not contain certain features and
hardware that are covered in the documentation.
Who Should Use This Guide
You should have some prior knowledge of computers before
attempting to install this product. If you are not familiar with
computers, you should obtain qualified help before installing any
hardware or software for this product.
®
2000 operating
Page 12

12
About This Guide
Use this guide when you are connecting the peripherals and cables to
a NewsCutter XP system. After you complete the installation, you
might want to consult this guide if you need to add external drives
and video decks.
This guide has the following overall structure:
• Chapter 1, “Setting Up Your System,” describes how to set up
your NewsCutter XP system and prepare drives.
• Chapter 2, “Installing the Software,” describes how to install the
product software and create an emergency repair disk (ERD).
• Chapter 3, “Connecting the Editing Equipment,” describes how to
connect video equipment and shows a typical workflow.
• Chapter 4, “Setting Up Workgroups,” describes how NewsCutter
XP functions in a workgroup environment.
• Appendix A, “Avid Setup and Product Recovery CD-ROM,”
provides you with instructions for using the Avid Setup and
Product Recovery CD-ROM.
• Appendix B, “Regulatory and Safety Notices,” provides
regulatory and safety notices.
•A detailed Index helps you quickly locate specific topics.
The Avid NewsCutter XP Online Publications CD-ROM and the Avid
NewsCutter XP Help contain a comprehensive Glossary of
cross-industry terms and definitions.
Symbols and Conventions
Unless noted otherwise, the material in this document applies to the
Windows 2000 operating system.
Using This Guide
Page 13

13
The term IEEE® 1394 refers to a communications standard that
features a high-speed serial bus used for attaching digital cameras and
other video devices to the NewsCutter XP PC platform.
Open Host Controller Interface (OHCI) refers to a particular IEEE 1394
specification that supports data transfer rates of up to 400 megabits
per second (Mb/s).
The NewsCutter XP documentation uses the following special
symbols and conventions:
1. Numbered lists, when the order of the items is important.
a. Alphabetical lists, when the order of secondary items is
important.
• Bulleted lists, when the order of the items is unimportant.
- Indented dashed lists, when the order of secondary items is
unimportant.
t One arrow indicates a single-step procedure. Multiple arrows in a
list indicate that you perform one of the actions listed.
Look here in the margin
for tips.
n
c
w
Courier Bold font identifies text that you type.
In the margin, you will find tips that help you perform tasks more
easily and efficiently.
A note provides important related information, reminders, recommendations,
and strong suggestions.
A caution means that a specific action you take could cause harm to
your computer or cause you to lose data.
A warning describes an action that could cause you physical harm.
Follow the guidelines in this guide or on the unit itself when
handling electrical equipment.
Symbols and Conventions
Page 14

14
If You Need Help
If you are having trouble using NewsCutter XP, you should:
1. Retry the action, carefully following the instructions given for that
task in this guide.
2. Check the documentation that came with your hardware for
maintenance or hardware-related issues.
3. Check the release notes supplied with your Avid application for
information on accessing the Avid Web site and the Avid
Knowledge Center.
4. For customer support, contact your local Avid Reseller, or contact
Avid Customer Support directly:
- Broadcast customers — call 800-NEWS-DNG (639-7364).
- Postproduction customers — call 800-800-AVID (2843).
Related Information
After learning the basics about NewsCutter XP in this guide, consult
the following for information about all product features:
• Avid NewsCutter XP Release Notes
The release notes include important information you should read
before installing and using NewsCutter XP.
• Avid NewsCutter XP User’s Guide
This guide provides complete information on all editing tasks,
such as recording footage, viewing and marking footage, editing,
trimming, importing, exporting, and generating final output.
• Avid NewsCutter XP Effects Guide
This guide describes techniques for using digital video effects,
titles, third-party effect filters, mattes, keys, paint effects, and
layering options.
Using This Guide
Page 15

•Avid NewsCutter XP Help
The Help system includes online, hypertext information for using
all product features. It provides all the information included in the
Avid NewsCutter XP User’s Guide and the Avid NewsCutter XP
Effects Guide supplied with your system.
• Avid NewsCutter XP Quick Reference
This folded card lists convenient keyboard shortcuts.
• Avid NewsCutter XP Online Publications CD-ROM
This online collection provides electronic versions of this guide
and other guides listed in this section. You can view these
documents with Adobe
®
Acrobat® Reader®, which you can install
from the CD-ROM. The collection also includes the
Avid NewsCutter XP Help and the Avid EDL Manager User’s
Guide.
• Avid Products Collaboration Guide
This guide provides step-by-step instructions for transferring
project files, audio files, and graphics and effects files between
various Avid products.
15
The most recent update of the Avid Products Collaboration Guide is
provided online. Check the release notes supplied with your Avid
application for information on accessing online documentation.
Related Information
Page 16

16
If You Have Documentation Comments
Avid Technology continuously seeks to improve its documentation.
We value your comments about this guide, the Help, the Online
Publications CD-ROM, and other Avid-supplied documentation.
Simply e-mail your documentation comments to Avid Technology at
TechPubs@avid.com
Please include the title of the document, its part number, revision, and
the specific section you are commenting on in all correspondence.
How to Order Documentation
To order additional copies of this documentation from within the
United States, call Avid Telesales at 800-949-AVID (2843). If you are
placing an order from outside the United States, contact your local
Avid representative.
Using This Guide
Page 17

CHAPTER 1
Setting Up Your System
This chapter describes how to set up your NewsCutter XP system. It
contains the following sections:
• Preparing to Set Up Your System
• Turning On Your Equipment
• Hardware Configurations
• Installing Boards Purchased Separately
• Installing the Application Key
• Setting Your Screen Resolution
• Connecting External Drives
• Preparing Your Drives
• Testing Drives
Page 18

18
Preparing to Set Up Your System
NewsCutter XP is a digital video (DV) system. The equipment used to
transfer the digital video conforms to IEEE Standard 1394. This
equipment (cameras, video and audio decks, cables, connectors, and
processing boards) is sometimes referred to as FireWire
OHCI-compliant. NewsCutter XP connections let you transfer digital
data (both video and audio) directly from a DV camera to a digital,
nonlinear editing (NLE) system with no conversion degradation. The
process of bringing footage from your camera into your system not
only is easy but also gives you high-quality video at low cost.
Your NewsCutter XP hardware consists of:
• A supported desktop or laptop system running the Windows 2000
operating system and Windows 2000 Service Pack 2
®
, i.LINK™, or
• An OHCI-compliant 1394 capture board (1394 board) using the
Texas Instruments (TI
™
Determining Supported Equipment
Avid ships NewsCutter XP as a desktop system. You can also purchase
NewsCutter XP software and install it on supported laptop systems.
To find out which laptop systems and 1394 boards are supported,
consult your Avid sales representative and the Avid NewsCutter XP
Release Notes.
n
The list of supported equipment changes as more systems and boards are
tested.
) chip
Setting Up Your System
Page 19

Purchasing the Equipment
You can purchase a NewsCutter XP system in one of two ways:
• Through an Avid Reseller. This includes the hardware and
supporting software drivers preinstalled.
• From a system vendor other than an Avid Reseller. Purchase a
“software only” kit from Avid that contains the software,
documentation, and application key (dongle). In this case, you are
responsible for setting up the hardware and installing the software
according to the documentation provided by the system vendor
and Avid respectively.
System Setup Check List
Table 1 -1 lists the tasks you need to complete before you can use your
NewsCutter XP system.
19
Table 1-1 System Setup Check List
Ta sk Setup Procedures
Set up your computer hardware (computer, monitor,
mouse, keyboard, and speakers)
Turn on your equipment “Turning On Your Equipment” on page 20
Install boards purchased separately (1394 and PCI
SCSI)
Connect the application key (dongle) “Installing the Application Key” on page 26
Connect your optional external SCSI drives “Connecting External Drives” on page 28
Prepare your drives “Preparing Your Drives” on page 35
Instructions shipped with the computer
“Installing Boards Purchased Separately” on
page 25
Preparing to Set Up Your System
Page 20

20
Table 1-1 System Setup Check List (Continued)
Ta sk Setup Procedures
Install NewsCutter XP software “Installing the NewsCutter XP Software” on
page 41
Create an emergency repair disk (ERD) “Creating an Emergency Repair Disk” on
page 50
Connect your camera, digital video deck, or
transcoder (you can connect these after you install the
software if you prefer)
Turning On Your Equipment
After you have connected the monitor, mouse, keyboard, and speakers
(if required) according to the documentation provided by the vendor,
turn on the various components. This allows you to check that your
system works properly before you install any new hardware or Avid
software and helps you to isolate problems for troubleshooting.
If any part of your system fails to turn on, make sure its electrical cord
is plugged into an appropriate electrical outlet or power strip. For
more information, see the instructions for setting up your computer
hardware.
To check the system before you install the hardware:
1. Turn on all peripheral units, such as the monitor and speakers.
“Connecting the Editing Equipment” on
page 53
n
Setting Up Your System
If you have external SCSI drives attached to the system, turn them on also.
Page 21

2. Turn on your computer.
21
n
answer questions related to the licensing and setup of the operating system.
The computer goes through a self-check routine, and the startup
screen appears.
If this is the first time the computer has been turned on, you might have to
For information on your
operating system
features, such as the
desktop and icons, see
your Windows
documentation.
3. When you see the login screen, do not type a password; just press
Enter, and the desktop appears.
4. Do any type of Windows task, such as checking the disks or
running any program, to see if the system is working properly.
Look in the Event Viewer for error messages.
To shut down the system:
1. Press Ctrl+Alt+Delete.
2. Click Shut Down.
Hardware Configurations
NewsCutter XP ships from Avid on the Compaq
Detailed information on this platform includes:
®
W8000 system.
• Slot Assignments
• OHCI Support
• USB-to-MIDI Converter Installation
Hardware Configurations
Page 22

22
Slot Assignments
Table 1 -2 lists the supported slot configuration for NewsCutter XP on
the Compaq
W8000 system.
Table 1-2 Compaq W8000 Slot Assignments
Slot Description
1AGP slot Accelerated Graphics Port (AGP) board
2 PCI slot (32-bit bus) Fibre Channel board to Avid Unity
3 PCI slot (32-bit bus) OHCI-compliant 1394 board
4 PCI slot (32-bit bus) Interphase Fibre Channel (Push to Playback)
5 PCI slot (32-bit bus) (Optional) Dual-channel SCSI controller
6 PCI slot (64-bit bus) Avail able slo t
7 PCI slot (64-bit bus) Avail able slo t
™
If you install a 1394 board, you need to link the board to a custom
OHCI driver before using a DV device. See “Linking OHCI Drivers”
on page 65.
OHCI Support
Setting Up Your System
NewsCutter XP supports OHCI-compliant IEEE 1394 chip DV boards
with Texas Instruments-based technology and OHCI chipset.
Page 23
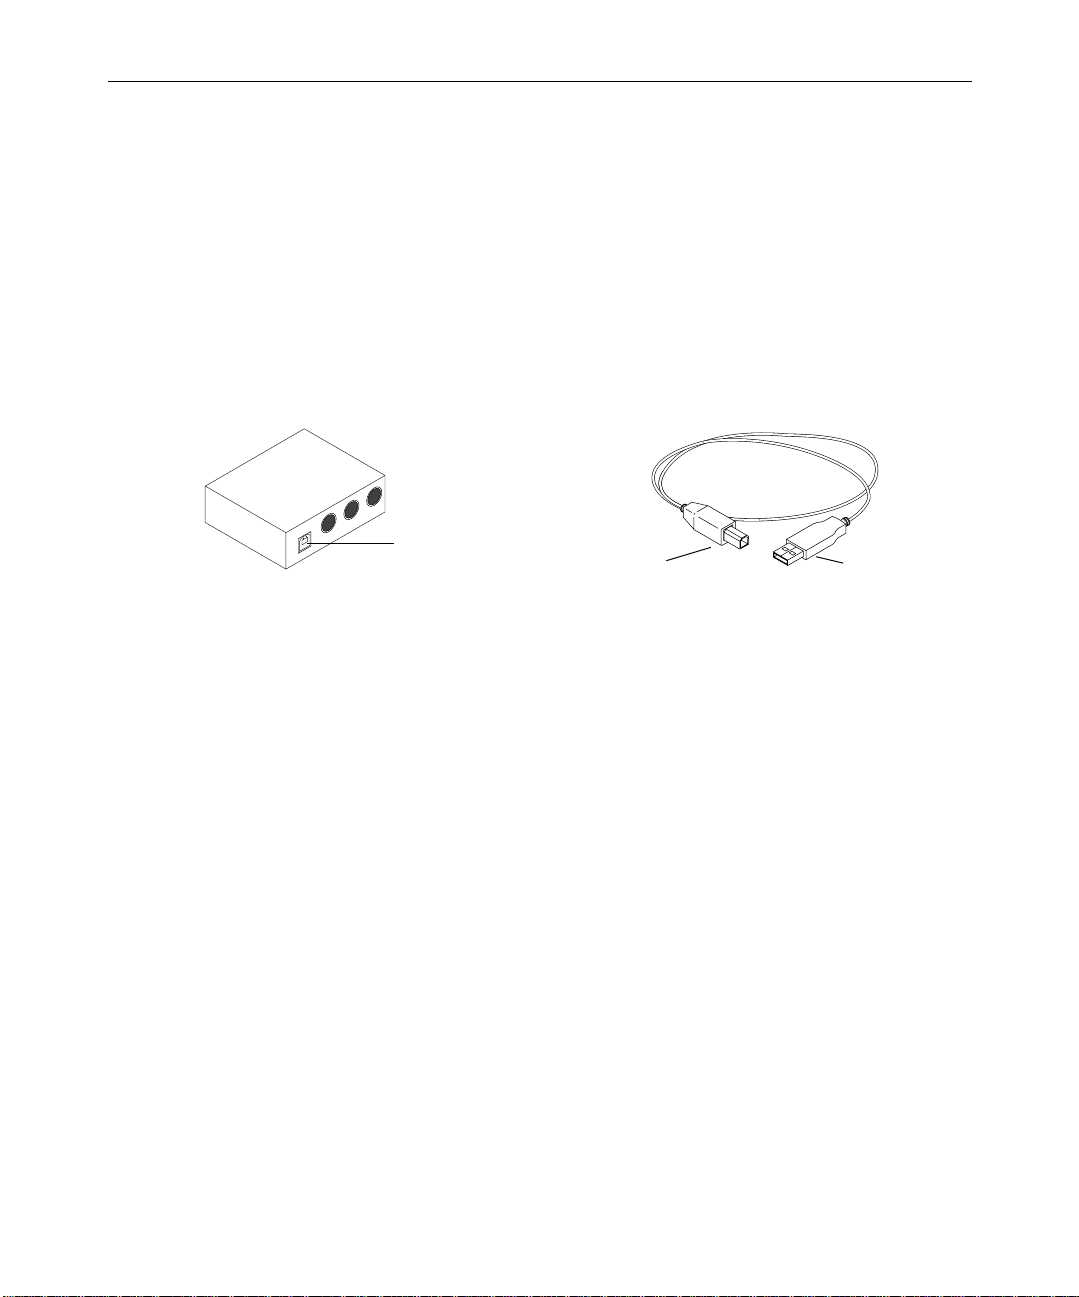
USB-to-MIDI Converter Installation
Avid supplies a USB-to-MIDI converter and a USB cable that connects
to a USB port on the Avid system (see Figure 1-1). Connect the
USB-to-MIDI converter only if you are going to use it.
23
n
To use the USB-to-MIDI converter, install the proper revision driver prior to
use. Go to www.midiman.net, and install revision 1.5 or 1.8.
MIDI
USB-to-MIDI converter
Converter
connector
Figure 1-1 Connecting the USB-to-MIDI Converter
To connect the USB-to-MIDI converter to a port on the system:
1. Locate the MIDI converter USB cable.
2. Connect the device connector to the converter connector at the
rear of the USB-to-MIDI converter.
Device connector
converter
USB cable
USB connector
Hardware Configurations
Page 24
24
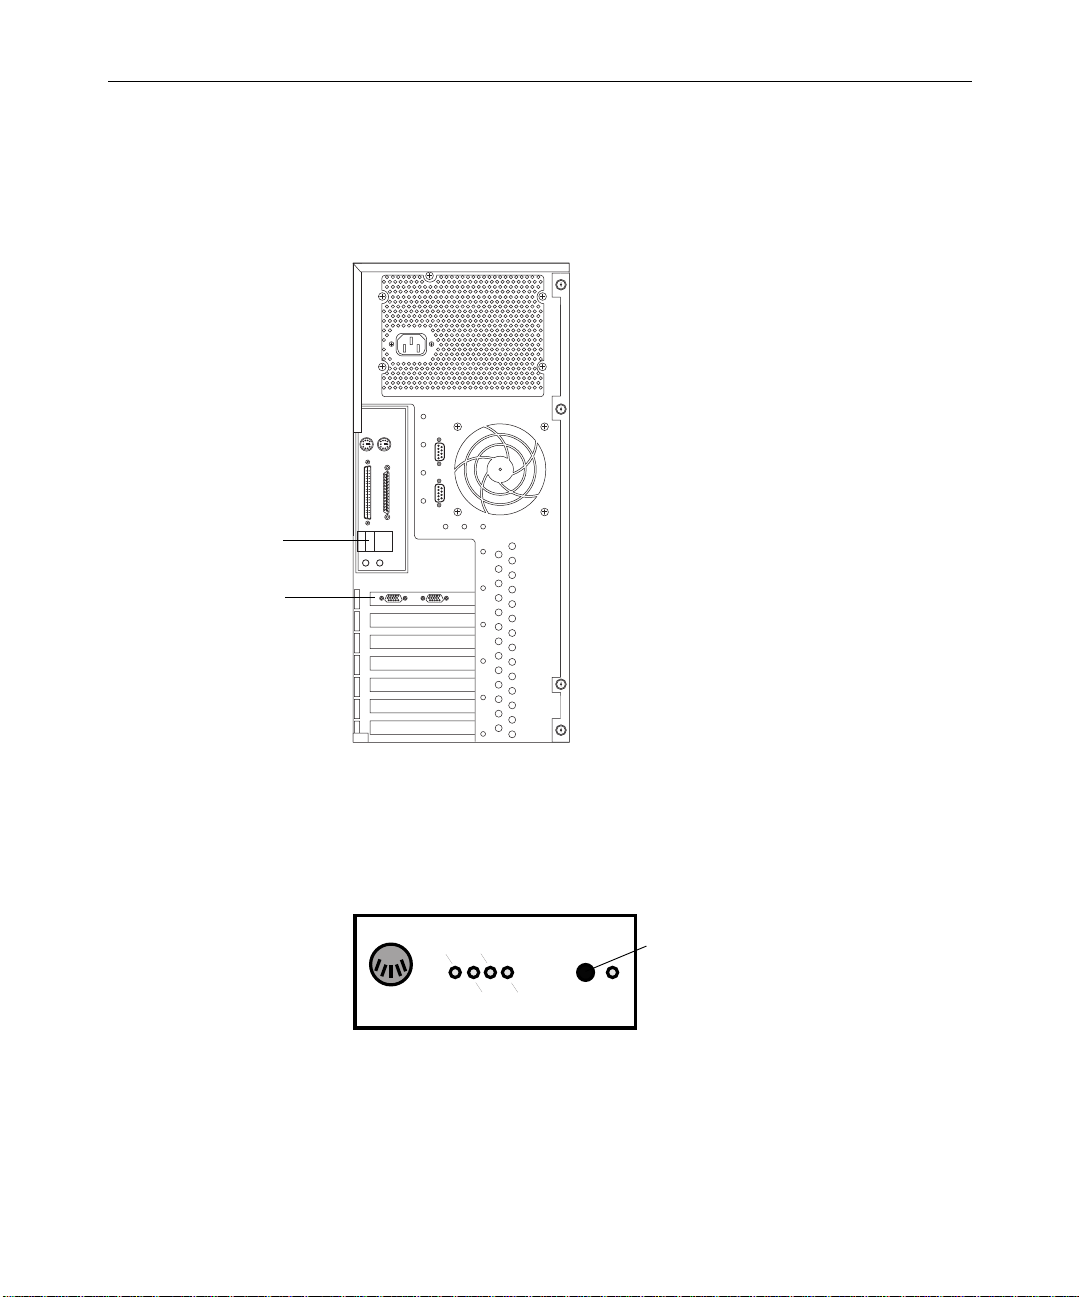
3. Connect the USB connector to a USB port at the rear of your
NewsCutter XP system (see Figure 1-2).
USB ports
AGP board
USB-to-MIDI converter
Setting Up Your System
Figure 1-2 USB ports
4. Push the USB MIDI Thru button in to allow the device to act as a
USB-to-MIDI converter (see Figure 1-3).
IN A
IN A IN B
OUT A OUT B
USB
MIDI
Thru
USB MIDI Thru button (In position)
USB
Figure 1-3 USB-to-MIDI Converter Front Panel
Page 25

Installing Boards Purchased Separately
The following sections explain where to find installation instructions if
you have purchased supported versions of a separate 1394 board and
a separate PCI SCSI board.
25
n
The operating system will use its plug-and-play capability to install the
software for the boards the first time you turn on the system after the boards
are installed. If the software is not available on the system drive and is
installed automatically, a software installation wizard appears. You should
follow the instructions provided by the wizard to install the software for the
boards from the CD-ROM or floppy disk provided with the board.
Installing the 1394 Board
If you purchased the 1394 board separately and you tested your
system, as explained in “Turning On Your Equipment” on page 20,
turn off your system and install the supported 1394 board. The 1394
board can be either a PCI or PCMCIA version that is OHCI-compliant
and uses the TI chip.
n
If your system does not have a built-in 1394 connection, you need to install a
1394 board in your system.
To install the 1394 board in the computer, follow the instructions in the
documentation that ships with your computer. There is no specific PCI
slot assignment for the 1394 board in desktop computers.
Installing the PCI SCSI Board
If you purchased a supported PCI version of a SCSI board and you
tested your system, as explained in “Turning On Your Equipment” on
page 20, turn off your system and install the supported PCI SCSI
Installing Boards Purchased Separately
Page 26
26
board. To find out which SCSI boards Avid supports, consult your
Avid representative and the Avid NewsCutter XP Release Notes.
To install the PCI SCSI board in the computer, follow the instructions
in the documentation that ships with your computer. There is no
specific PCI slot assignment for the PCI SCSI board in desktop
computers.
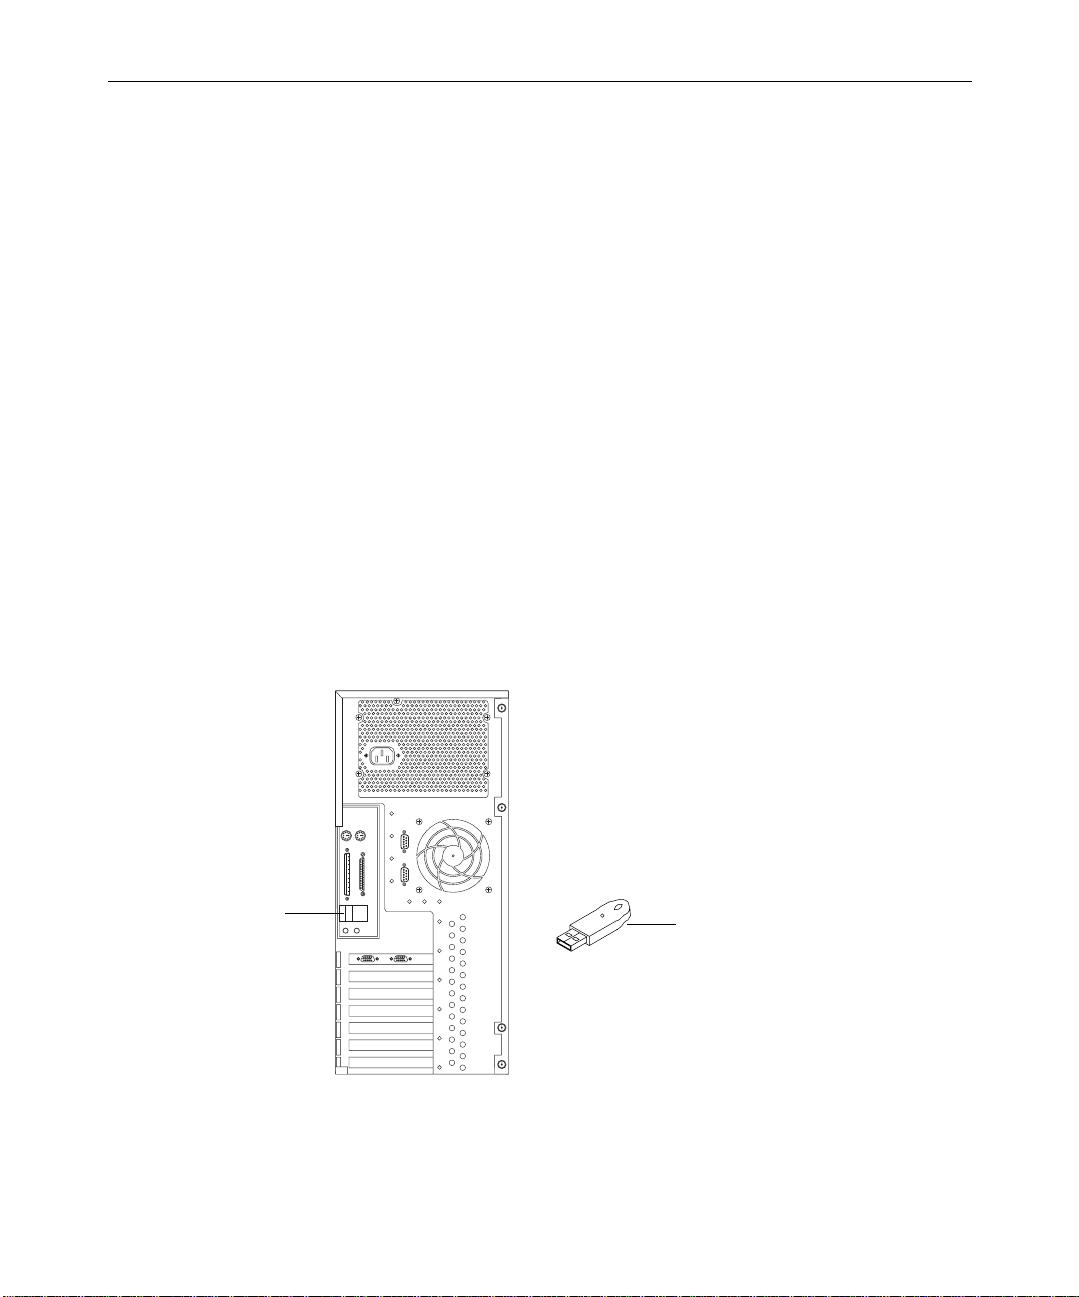
Installing the Application Key
The application key (also called a dongle) is a copy-protection device.
Without the application key, NewsCutter XP will not run.
To install the application key:
t Connect the application key to one of the USB ports at the rear of
your NewsCutter XP system (see Figure 1-4).
USB ports
Setting Up Your System
USB application key
Figure 1-4 Application Key Connection
Page 27

27
c
Do not lose the application key. Your Avid software does not
function without it. If you lose your application key, you must
purchase another key from Avid.
Setting Your Screen Resolution
NewsCutter XP has the following screen resolution requirements:
• Minimum Screen area of 1024 by 768 pixels
• Colors palette set to True Color (32 bit)
• Refresh Frequency of 75 Hertz (Refresh Frequency does not apply
to laptops.)
The video playback on your monitor might not display properly,
depending on the type of graphics board you have and the selected
resolution in the monitor display properties. Use Table 1-3 as a starting
point for setting your screen resolutions.
Table 1-3 Monitor Resolutions
n
One Monitor Two Monitors
1024 x 768 pixels 2048 x 768 pixels
1152 x 864 pixels 2304 x 864 pixels
1280 x 1024 pixels 2560 x 1024 pixels
If you use a single video board to drive two monitors, the maximum
resolution at which video will play correctly might be limited. If video does
not play correctly, try reducing the resolution to 2048 x 768.
Setting Your Screen Resolution
Page 28

28
To change the monitor resolution:
1. Right-click the desktop, and choose Properties.
The Display Properties dialog box appears.
2. Click the Settings tab.
3. Under the Screen area, drag the slider to the resolution you want.
4. Under Colors, choose True Color (32 bit).
5. Click OK.
Repeat this procedure until you find the best resolution for your
graphics board.
Connecting External Drives
Avid supports the connection of Low Voltage Differential (LVD) style
SCSI drives to the desktop version of NewsCutter XP. No external
SCSI drives are supported on the laptop version of NewsCutter XP.
Setting Up Your System
Avid also supports the Avid MediaDrive rS IEEE 1394-compliant
enclosure family. Avid MediaDrive rS IEEE 1394 consists of
industry-standard hard drives and a special bridge circuit supporting
the IEEE 1394 high-speed serial bus specification (commonly known
as FireWire) for data storage and retrieval. These hard drives are
optimized for use with Avid application software.
Page 29

Connecting the SCSI Drives
Avid recommends the use of an Ultra3 LVD/SE SCSI controller board
(SCSI board) with your external SCSI drives. You will need the
following items to connect external SCSI drives:
•A SCSI board
• An LVD SCSI cable from the SCSI board to the first drive (a
30-inch [76.2-centimeter] or longer cable)
• One or more SCSI LVD drives
• Cables that interconnect the external drives
• An LVD terminator to terminate the end of the SCSI bus
• A driver for the SCSI board (must be installed before you use the
SCSI drives)
29
n
If the drives you purchased have instructions different from the procedures
described in this section, use the instructions that come with your drives.
Preparing the External SCSI Drives
Avid recommends the following process when you connect external
SCSI drives:
1. Always read the documentation that comes with the drive.
2. Before you connect or install any equipment, turn off power to the
system and drives.
3. Cable the drives from your computer to the last drive in the chain,
and terminate the last drive.
4. Determine the SCSI IDs before you physically set them on the
drive.
Connecting External Drives
Page 30
30
Cabling the SCSI Drives
You will need the following components to cable a chain of SCSI
drives to the SCSI board:
• Controller cable — This cable is used to connect the SCSI board to
the first SCSI drive. The distance between the computer and the
first SCSI drive determines the length of the controller cable.
• Interconnect cable — Use shorter cables to connect each SCSI
drive in the SCSI chain. This cable is the same type of cable as the
controller cable but is usually 15 inches (38.1 centimeters) long.
n
If you are connecting the top drive in a stack of four drives to the bottom drive
in another stack of four drives, you might need a longer interconnect cable.
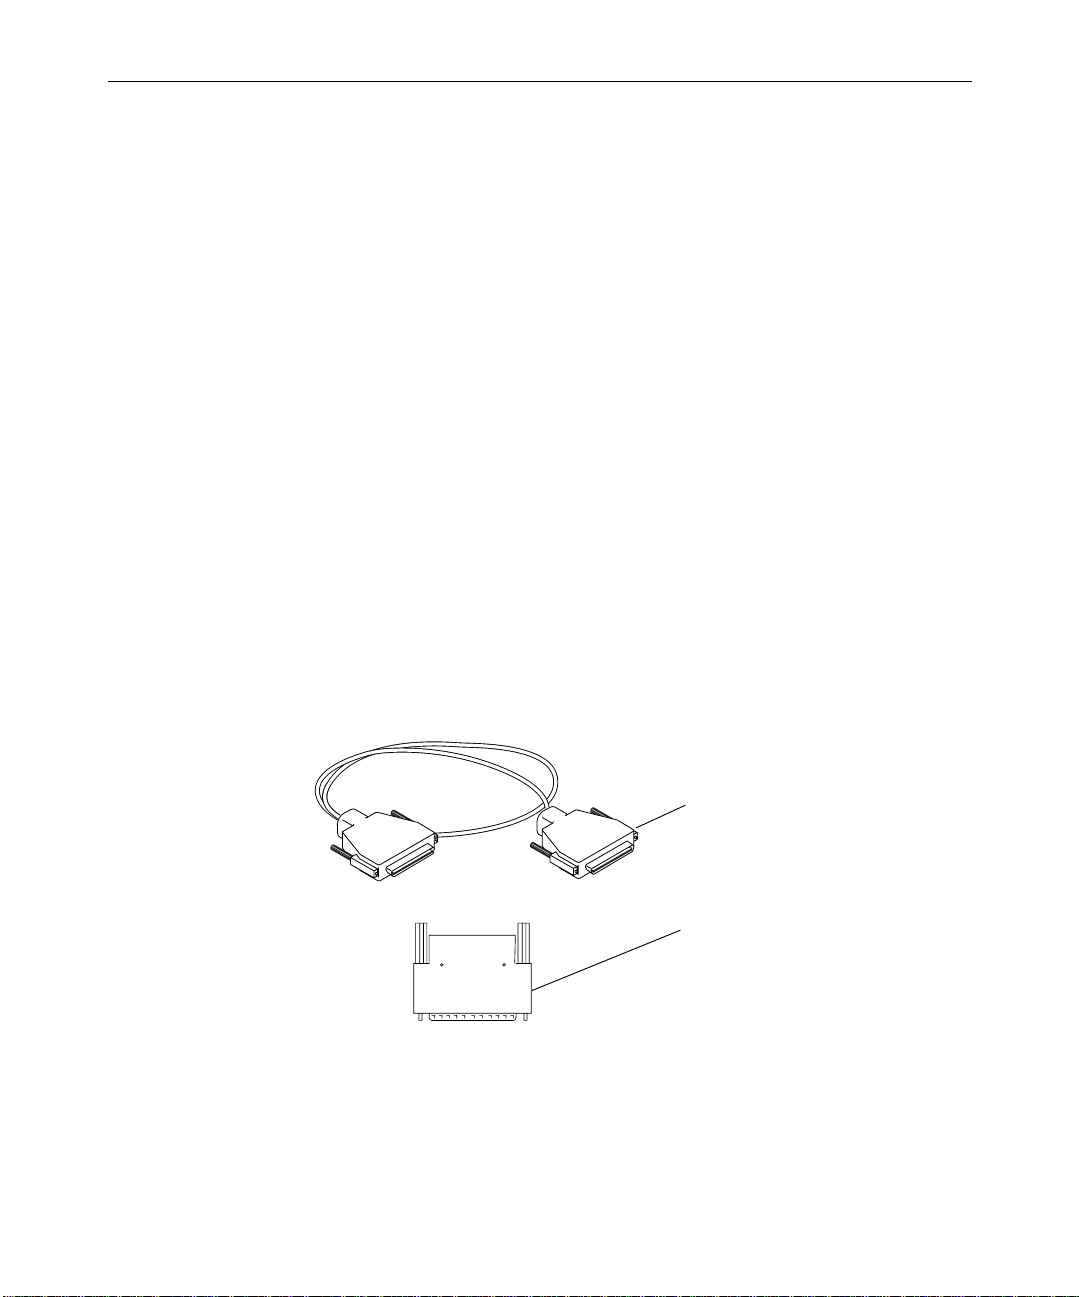
• LVD terminator — Always place on the last SCSI drive in the
chain to ensure reliable communication on the SCSI bus.
Figure 1-5 shows a controller cable and an LVD terminator. The cables
that ship with the SCSI drives you purchased should look similar.
Controller cable
LVD terminator
Figure 1-5 Cable and LVD Terminator
Setting Up Your System
Page 31

Figure 1-6 shows a chain of four SCSI drives.
31
LVD terminator
Last SCSI drive
Interconnect
cables
First SCSI drive
Controller cable
to SCSI board
Figure 1-6 Chain of SCSI Drives
Determining the SCSI IDs
For each SCSI drive you connect to the computer, you must assign a
SCSI ID so the NewsCutter XP software can find and access the drive.
When you set the SCSI IDs, remember the following:
4
4
4
4
• Each PCI-based SCSI bus has its own set of unique SCSI IDs from
0 through 6 and from 8 through 15.
• SCSI ID 7 cannot be used by external drives. SCSI ID 7 is used by
the SCSI board.
• You cannot have two SCSI drives with the same SCSI ID on the
same SCSI bus.
Connecting External Drives
Page 32

32
Internal
IDE drives
Avid recommends that you set the SCSI IDs for the devices on the SCSI
bus in sequential order; that is, start with the device attached closest to
the computer and assign it ID 0 (see Figure 1-7).
Computer
External SCSI drives
ID 0
ID 1
ID 3
ID 2
LVD terminator
ID 1
ID 0
SCSI board
ID 7
Figure 1-7 Assigning the SCSI IDs
Connecting the FireWire Drives
You will need the following items to connect external FireWire drives
to the NewsCutter XP system:
• A 1394 OHCI-compliant board
• An IEEE 1394 host bus connector cable from the 1394 board to the
first drive
• One or more MediaDrive rS IEEE 1394 enclosures
• Daisy-chain cables that interconnect the external drives
SCSI cables
Setting Up Your System
Page 33

Preparing the FireWire Drives
Keep in mind the following when connecting your MediaDrive rS
enclosures:
• The IEEE 1394 FireWire cable between the system and the first
drive (or between any two ports) cannot exceed 14.76 feet (4.5
meters).
• The total IEEE 1394 FireWire cable from the system to the last
drive cannot exceed 236 feet (72 meters).
• Either MediaDrive rS IEEE 1394 enclosure port on the enclosure
can be used to connect to the system and other drives.
• Maximum compatibility is achieved when your system has dual
IEEE 1394 ports. Daisy chain MediaDrive rS enclosures to one
port, and use the other port for cameras and video decks.
• MediaDrive rS IEEE 1394 enclosures do not require a terminator.
33
Figure 1-8 illustrates a typical daisy chain using four MediaDrive rS
IEEE 1394 enclosures.
Daisy-chained connections shown using
12-in (30.5-cm) IEEE 1394 cables
IEEE 1394 cable
from connector on system
Figure 1-8 Configuration Using Four MediaDrive rS Enclosures
Connecting External Drives
Page 34

34
IEEE 1394 dai
Cabling the FireWire Drives
When adding a MediaDrive rS enclosure, connect the IEEE 1394
interface cable between the IEEE 1394 bus connectors on the rear of the
drive enclosure and the NewsCutter XP system. Figure 1-9 shows the
1394 connections.
n
sy chain
cable
Second MediaDrive rS
enclosure
First MediaDrive rS
enclosure
For the location of the 1394 connector on your NewsCutter XP system, see
the documentation supplied by your computer manufacturer.
Power input
connectors
Power cables to
grounded power
source
IEEE 1394 interface
cable to NewsCutter XP
Figure 1-9 Connecting the IEEE 1394 Cables
The IEEE 1394 standard supports hot-pluggable installation of
FireWire devices; you do not have to turn off the hardware
components in your system before connecting the IEEE 1394 cables.
c
Setting Up Your System
To avoid corrupting your work, Avid strongly recommends you quit
your Avid application software (and any other applications you
might have running) before connecting or disconnecting the 1394
cables.
Page 35

Preparing Your Drives
The Windows 2000 operating system allows you to create multiple
partitions or logical drive assignments to manage projects and files.
You can partition your hard disk as one large partition or as multiple
partitions varying in size. Each partition is assigned a drive letter.
The Windows 2000 operating system defines two types of disks:
• Basic disks contain primary partitions, extended partitions, or
logical drives. Basic disks also can contain spanned volumes (such
as stripe sets). Basic disks normally are used for standalone disks
in the Windows 2000 operating system.
35
n
Use Basic disks for MediaDrive rS IEEE 1394 enclosures.
• Dynamic disks contain an unlimited number of volumes. Dynamic
disks cannot contain partitions or logical drives. Use dynamic
disks if you want to stripe, mirror, or use fault-tolerant drives,
such as RAID-5 volumes. Avid supports the use of dynamic drives
when you need to create a striped volume on your Windows 2000
system.
Dynamic disks are not supported on portable computers.
n
n
Supported File Systems
MediaDrive rS IEEE 1394 enclosures cannot be striped, either to each other
or to other external hard disks attached to the system.
The Windows 2000 operating system supports three types of file
systems:
• Two types of File Allocation Table (FAT): FAT 16 and FAT 32. FAT
is used primarily when backward compatibility is needed on
operating systems such as MS-DOS
®
or other Windows versions.
Preparing Your Drives
Page 36

36
The new FAT 32 file system is no longer limited to a 2-GB partition
size. Avid does not support the FAT 16 file system for media.
• New Technology File System (NTFS). NTFS affords the user
security, compression, and other file-recovery features. Drives
employing NTFS support partitions of any size.
n
Avid recommends NTFS when you partition your disk drives.
c
Creating Primary Partitions and Formatting Drives
c
One of your internal disk drives (normally designated drive C) has a
partition that contains the operating system. This drive might be
labeled System or Boot. Do not reformat this partition unless you
need to rebuild your system disk drive.
This section explains how to partition and format a basic disk, labeled
Disk 1 in this example. The procedure can be used to partition and
format any unallocated sections of disks in your system.
Do not partition and format the partition that contains the operating
system (labeled Boot or System). In the factory default
configuration, this partition might be designated as drive C, as
shown in Figure 1-10.
To create a primary partition and format a basic disk:
1. Start your system, and log in to an account with administrative
privileges.
Setting Up Your System
2. Right-click the My Computer icon, and choose Manage from the
shortcut menu.
Page 37

Disk
Management
folder
37
The Computer Management window opens.
n
Physical disk section
Figure 1-10 Partitioning in the Computer Management Window
For more information on the Computer Management window, click the Help
icon in the toolbar of the window.
3. Click the Disk Management folder.
4. Make sure the disk is designated as a Basic disk before you
partition it. To designate a disk as Basic:
t Right-click the disk in the physical disk section, and choose
Basic Disk.
5. Right-click Disk 1, and choose “Create partition.”
The Create Partition Wizard opens and explains the function of the
wizard.
6. Click Next.
The wizard leads you through partitioning and formatting of the
selected unallocated section of your disk.
a. In the Select Partition Type window, select Primary, and click
Next.
Disk 1
Preparing Your Drives
Page 38

38
b. In the Partition Size window, select Maximum to make the
complete unallocated space a partition, and click Next. To
make a smaller partition, divide the maximum number by the
number of partitions you want to make, for a maximum of
four partitions per disk. You need to run the wizard for each
partition.
c. In the Assign Drive Letter window, assign the partition an
unused drive letter or use the letter automatically selected by
the wizard.
d. In the Format Partition window, select “Format this partition
with the following settings” (see Figure 1-11).
Setting Up Your System
Figure 1-11 Formatting the Partition
Page 39

7. Click Next.
8. Verify your selections, and click Finish (this might take a minute to
9. Repeat this procedure to partition and format any unallocated
Testing Drives
39
e. Select NTFS from the “File system to use” list.
f. Select Default from the “Allocation unit size” list.
g. Type a label you want for the volume that easily identifies the
volume in the “Volume label” text box.
h. Select Perform a Quick Format.
The Completing the Create Partition Wizard window opens and
provides a list of your selections.
complete).
sections.
The Windows 2000 operating system contains a disk error-checking
program available for each drive.
To run the error-checking program:
1. Start your system, and log in to an account with administrative
privileges.
2. Right-click the My Computer icon, and choose Manage from the
shortcut menu.
The Computer Management window opens.
3. Click the Disk Management folder.
4. Right-click the disk where you want to perform the error check,
and choose Properties.
The Properties window for that device opens.
5. Click the Tools tab.
Testing Drives
Page 40

40
6. Click “Check now” in the error-checking frame.
The Check Disk dialog box appears.
7. Click Start.
The error-checking program returns the status of the disk.
8. Click OK when the Disk Check Complete dialog box appears, and
close all open windows.
If errors are detected, see your Windows documentation.
Setting Up Your System
Page 41

CHAPTER 2
Installing the Software
This chapter explains how to install the NewsCutter XP software and
connect the editing equipment to the system. It contains the following
sections:
• Installing the NewsCutter XP Software
• Installing the Companion Applications
• Creating an Emergency Repair Disk
• Saving the Disk Configuration
• Setting the Proper Paging File
Installing the NewsCutter XP Software
n
This section describes how to install the NewsCutter XP application
and its related components from the installation CD-ROM.
To install or remove the application software, use an account with
administrative privileges.
Page 42

42
Removing Earlier Releases of NewsCutter XP
Ignore this section if:
• You have just purchased your NewsCutter XP system.
• You do not have an earlier release of NewsCutter XP installed on
your system.
• You have just installed the Windows 2000 operating system.
Installing the new operating system removes all applications
previously installed on your system.
n
If you are upgrading from Release 1.5, see the Avid NewsCutter XP
Release 2.x Upgrade Instructions for information on replacing the DV
1394 board and installing the Windows 2000 operating system.
You need to follow the procedure if:
• You are reinstalling this release.
• You have the Windows 2000 operating system with
NewsCutter XP installed. Remove older releases before installing
the new releases.
You can use the Avid NewsCutter XP application CD-ROM for the
earlier or new release to uninstall the application. See “Modifying,
Repairing, or Removing Avid Applications” on page 46 for
instructions. Be aware of the following concerns when removing the
application.
• Avid Projects, Avid Users, Settings, and AVX_Plug-ins folders will
not be deleted when you remove the earlier NewsCutter XP
release. However, as a precaution, you might consider making a
copy of these folders.
• To completely remove all the folders and files associated with the
NewsCutter XP application, browse to the location that previously
held the application and remove all files and folders from the
application folder. For example:
Installing the Software
drive:\Program Files\Avid\Avid NewsCutter XP
Page 43

•Some AVX™ plug-ins include files that might be deleted when you
remove the NewsCutter XP application. If a plug-in does not
appear in the Effect Palette, reinstall the plug-in. For more
information, see the Avid NewsCutter XP Effects Guide.
• If a dialog box appears asking if you want to delete a shared file,
do not delete it. Other applications might be using that file.
• You might see dialog boxes asking if you want to replace existing
files with the new version. Always accept the newer files.
• Delete the msmMMOB.mdb and msmFMID.pmr files from the
Avid NewsCutter XP\SupportingFiles\Avid_MediaFiles folder.
• Delete any shortcuts you might have created on your desktop.
Installing NewsCutter XP Software
You must uninstall any earlier release of the application before
installing a newer NewsCutter XP release (see “Removing Earlier
Releases of NewsCutter XP” on page 42).
43
To install the NewsCutter XP software:
1. Quit all active applications.
2. Insert the Avid NewsCutter XP application CD-ROM into the
CD-ROM drive.
If the installation program does not start automatically:
a. Double-click the My Computer icon.
b. Double-click the CD-ROM drive icon.
c. Double-click Launch.exe to start the installer.
The Main Menu window opens.
3. Click Install Products.
The Install Products window opens.
4. Click Install Avid NewsCutter XP.
Installing the NewsCutter XP Software
Page 44

44
The Welcome window for the Avid NewsCutter XP Setup
Maintenance program opens.
If NewsCutter XP is already installed, follow the steps in
“Modifying, Repairing, or Removing Avid Applications” on
page 46.
5. Click Next.
The Country Selection for License Agreement window opens.
6. Select the country in which you purchased this product, and click
Next.
The License Agreement window opens.
7. Read the agreement, and then click Yes to accept the terms of the
agreement.
The Choose Destination Location window opens.
c
Do not install the NewsCutter XP application on a drive that will be
used to store media.
8. Click Next to accept the default path for the application folder and
proceed to the next window. The default path is:
C:\Program Files\Avid\Avid NewsCutter XP
The AVX Plug-in Location window opens.
9. Click Next to accept the default path for the AVX_Plug-ins folder
and proceed to the next window. The default path is:
C:\Program Files\Avid\AVX_Plug-ins
The Application Data Location window opens.
10. Click Next to accept the default path for the location for the
application files (project folders and user folders). The default
path is:
C:\Program Files\Avid\Avid NewsCutter XP
Installing the Software
Page 45

11. Select the type of installation:
t Select Typical to install all components. This is the
recommended installation.
t Select Custom to select the components you want to install.
See “Performing a Custom Installation” on page 45.
12. Click Next.
The installation begins.
When the installation is complete, the Setup Complete window
opens and asks if you want to restart the system.
13. Select when to restart the computer:
t To restart the computer now, click Yes, and then click Finish.
t To restart the computer later, click No, and then click Finish.
45
c
You must restart the NewsCutter XP system for the NewsCutter XP
software to work properly.
Performing a Custom Installation
You can perform a custom installation to install particular files from
the installation CD-ROM. Tab le 2- 1 lists the components available
when you use the Custom option of the Avid Application Installer.
Table 2-1 Custom Installation Components
Component Description
NewsCutter XP Installs the application and all the necessary supporting
files, except Help files
Utilities Installs files and programs used to support the application
Help files Installs the appropriate Help files
Installing the NewsCutter XP Software
Page 46

46
To perform a custom installation:
1. Follow steps 1 through 10 in “Installing NewsCutter XP Software”
on page 43.
2. In the Setup Type window, select Custom, and then click Next.
The Select Components window opens.
3. Select the components you want to install. A check mark indicates
the component is selected.
4. Click Next.
The installation begins.
5. When the installation is complete, a message asks if you want to
restart the system.
t If you do not want to install any other Avid applications, click
Yes.
The system restarts.
t If you want to install other Avid applications, click No.
The Install Products window opens. Select the next
application for installation.
Modifying, Repairing, or Removing Avid Applications
If you installed NewsCutter XP (or any other Avid application) and
need to modify, repair, or remove it, use the Avid NewsCutter XP
Setup Maintenance program.
To modify, repair, or remove NewsCutter XP (or any other Avid
application):
1. Quit all active applications.
2. Insert the Avid NewsCutter XP application CD-ROM into the
CD-ROM drive.
Installing the Software
Page 47

If the installation program does not start automatically:
a. Double-click the My Computer icon.
b. Double-click the CD-ROM drive icon.
c. Double-click Launch.exe to start the installer.
The Main Menu window opens.
3. Click Install Products.
The Install Products window opens.
4. Click Install Avid NewsCutter XP.
The Welcome window for the Avid NewsCutter XP Setup
Maintenance program opens and presents three options:
- Modify: Select this option to add new program components
or to remove currently installed components.
47
n
n
If you select Modify to remove currently installed components, this option
does not remove registry entries or Start menu icons. To uninstall
NewsCutter XP completely, select Remove.
If you want to remove the Avid Codec for AVI, RealProducer® G2,
LSX-MPEG
Programs dialog box. To access Add/Remove Programs, click the Start button,
point to Settings, click Control Panel, and then double-click the Add/Remove
Programs icon.
- Repair: Select this option to reinstall the components that you
- Remove: Select this option to completely uninstall all
™
(Ligos), ASF NetShow®, or QuickTime®, use the Add/Remove
previously installed.
components of NewsCutter XP.
Installing the NewsCutter XP Software
Page 48

48
5. Select one of the three options, and click Next.
- If you selected Modify, the Select Components window opens.
Components that are already installed are selected. Select the
new components you want to install. The installation
proceeds, as described in steps 12 and 13 in
“Installing NewsCutter XP Software” on page 43.
c
If you deselect an installed component, the installation program will
remove the component.
- If you selected Repair, the installation proceeds, as described
in steps 12 and 13 in “Installing NewsCutter XP Software” on
page 43.
- If you selected Remove, a message box asks you to confirm
that you want to delete the files. Click OK. When the
Maintenance Complete window opens, click Finish. Click Exit
to quit the installation program.
If you receive a message about removing shared files, click No.
Installing the Companion Applications
The Avid NewsCutter XP application CD-ROM contains installers for
the following Avid products:
• Avid Log Exchange
• Avid MediaLog
•EDL Manager
™
Installing the Software
The Avid Log Exchange (ALE) utility allows you to quickly convert
shot logs created by other sources. You can then import the files
directly into a bin. For information on using the ALE utility, see the
Avid NewsCutter XP User’s Guide.
Page 49

MediaLog allows you to create a log of your media and then use the
log to import the media to NewsCutter XP or another Avid
video-based editing product. The log is used to record media
automatically using your IN and OUT points. For information on
using MediaLog, see the Avid MediaLog User’s Guide.
EDL Manager allows you to generate edit decision lists (EDLs) from
sequences exported from any Avid video-based editing product. For
information on using EDL Manager, see the Avid EDL Manager User’s
Guide.
To install additional Avid products:
1. Quit all active applications.
2. Insert the Avid NewsCutter XP application CD-ROM into the
CD-ROM drive.
If the installation program does not start automatically:
a. Double-click the My Computer icon.
49
b. Double-click the CD-ROM drive icon.
c. Double-click Launch.exe to start the installer.
The Main Menu window opens.
3. Click Install Products.
The Install Products window opens.
4. Click the name of the product you want to install.
5. Follow the instructions on the screen.
6. When the installation is complete, a message asks if you want to
restart the system.
t If you do not want to install any other Avid applications, click
Yes, and then click Finish.
The system restarts.
t If you want to install other Avid applications, click No, and
then click Finish. Then repeat steps 4 and 5.
Installing the Companion Applications
Page 50

50
Creating an Emergency Repair Disk
Whenever you make any hardware or software changes to the system,
create a new emergency repair disk (ERD).
To create an emergency repair disk:
1. Start your system, and log in to an account with administrative
privileges.
2. Click the Start button, point to Programs, point to Accessories,
point to System Tools, and then click Backup.
The Backup window opens.
3. Click the Emergency Repair Disk icon.
A dialog box appears.
4. Select “Also backup the registry to the repair directory.”
5. Insert a blank, formatted floppy disk into the floppy drive.
6. Click OK.
7. When the process is complete, click OK.
8. Remove the floppy disk, label it, date it, and store it in a safe, dry,
static-free location.
Saving the Disk Configuration
Whenever you make changes to the disk configuration on a system,
such as creating striped drives or changing drive letter assignments,
the disk configuration should be saved to a floppy disk. This enables a
successful restoration of the disk configuration if a hardware failure or
other problems occur. This information is also saved as part of the
repair disk process.
Installing the Software
Page 51

51
c
n
If you plan to move your stripe set from a Windows NT® system to a
Windows 2000 system, you will need a disk configuration floppy
disk.
Save the disk configuration floppy disk after you install all the software.
To create a disk configuration floppy disk on a Windows NT system:
1. Click the Start button, point to Programs, point to Administrative
Tools (Common), and then click Disk Administrator.
The Disk Administrator dialog box appears.
2. From the Partition menu, point to Configuration, and then click
Save.
3. Insert a formatted high-density floppy disk into the floppy drive,
and then click OK.
The disk configuration information is copied to the floppy disk.
4. Remove the floppy disk, label it, and store it in a safe location.
To restore the disk configuration:
1. Click the Start button, point to Programs, point to Administrative
Tools (Common), and then click Disk Administrator.
The Disk Administrator dialog box appears.
2. From the Partition menu, choose Configuration, and then click
Restore.
3. Insert the saved disk configuration floppy disk into the floppy
drive, and then click Yes.
This action will copy the disk configuration information into the
registry.
Saving the Disk Configuration
Page 52

52
Setting the Proper Paging File
When you first install the Windows 2000 operating system, the paging
file is automatically generated for the amount of memory in the
system. If you add more memory, you need to change the paging file.
The paging file should be at least 1.5 times the memory size.
To change the paging file size according to the memory size:
1. Log in as System Administrator to your local computer.
2. Click the Start button, point to Settings, and then click Control
Panel.
The Control Panel opens.
3. Double-click the System icon.
4. Click the Advanced tab.
5. Click Performance Options.
n
Installing the Software
The Performance Options dialog box appears.
6. Click Change in the Virtual memory area.
The Virtual Memory dialog box appears.
7. Select the appropriate partition in the Drive list.
8. Change the initial paging file size and maximum paging file size
under the selected disk partition.
The minimum and maximum paging file should be the same size.
9. Click Set.
10. Click OK to close all open dialog boxes and windows.
11. Restart the system to allow the paging file to take effect.
Page 53

CHAPTER 3
Connecting the Editing Equipment
Before you connect the editing equipment, review the setup
information provided with your computer. This information provides
instructions for setting up your computer and for attaching the
monitor, keyboard, and mouse.
Your editing equipment might be a digital camera, a digital video
deck, or an analog video deck connected to a transcoder. This chapter
explains the connections between the editing equipment and the
computer in general terms. The documentation that comes with your
equipment explains the locations of cable connections and how to
connect the cables.
c
n
Do not connect the editing equipment to the system before you
install the NewsCutter XP software. When you connect a 1394 device
to the Windows 2000 operating system for the first time, an Add
Device Wizard appears. This Wizard assigns a device driver to the
1394 device you connect. You must assign the driver installed by
Avid for the device to work properly. See “Linking OHCI Drivers”
on page 65.
The cameras, video decks, and transcoders in the illustrations represent the
type of equipment explained in the text. The actual equipment you have might
be different.
Page 54

54
You need cables to connect the computer to the camera, digital video
deck, or transcoder used with an analog video deck. You receive some
or all of these cables when you purchase most digital devices.
This chapter contains the following topics:
• Connecting a 1394 Cable
• Connecting a Computer Without a Client Monitor
• Connecting a Computer with a Client Monitor
• Audio and Video Sync Issues
• Connecting an Analog Video Deck to the Computer
• Connecting a Video Deck or Edit Controller
• File Structure
• Project Workflow
Connecting a 1394 Cable
You use a 1394 cable to connect a digital video deck, a digital camera,
or a transcoder (connected to an analog video deck) to a PCI or
PCMCIA 1394 board in your computer (see Figure 3-1). The 1394
board can be either an OHCI-compliant PCI board in a desktop
computer or an OHCI-compliant PCMCIA board in a laptop
computer.
n
Connecting the Editing Equipment
Avid might qualify laptop computers that have built-in 1394 connections in
the future.
When you purchase a PCI board or PCMCIA board, you might receive
a 1394 cable. Depending on your equipment, you might need to
purchase a different 1394 cable. The following 1394 cables are
available:
•4-pin to 4-pin
•4-pin to 6-pin
•6-pin to 6-pin
Page 55

The documentation that comes with your equipment explains the
cable connections.
55
Digital camera
PCI
board
Digital video
deck
Transcoder
IN
OUT
L
R
DV IN / OUTDC IN 6V
AUDIO
VIDEO
S-VIDEO
1394 cable
PCMCIA
board
Figure 3-1 Connecting a 1394 Cable
Connecting a Computer Without a Client Monitor
To connect equipment to your computer without a Client monitor:
1. Connect the monitor, speakers, keyboard, and mouse to the rear of
your computer according to the documents that come with your
desktop computer. If you have a laptop, connect only needed
components.
2. Connect the 1394 cable from a digital video deck, a digital camera,
or a transcoder to either a PCI or PCMCIA 1394 board in the
computer (as explained in the documentation that comes with
your equipment). Figure 3-2 shows a digital video deck connected
to a PCI 1394 board.
The computer uses the same 1394 cable to input and output data
to and from a digital video deck, a digital camera, or a transcoder.
The output data can be recorded or used to control a digital video
deck or digital camera.
Connecting a Computer Without a Client Monitor
Page 56

56
3. Turn on power to all peripheral equipment and then the system.
n
The output data can be sent through a transcoder to be recorded on an analog
video deck, but control of the analog video deck must be done remotely using
the serial port (see “Connecting a Video Deck or Edit Controller” on page 62).
Monitor
Keyboard
and mouse
1394 cable
Figure 3-2 Connecting a Computer Without a Client Monitor
PCI 1394 board
Input data and output data
System speakers
Digital video deck
Connecting a Computer with a Client Monitor
To connect equipment to your computer with a Client monitor:
1. Connect the system as you did in “Connecting a Computer
2. Connect a Client monitor to a digital video deck, a digital camera,
3. Connect powered external speakers (or built-in speakers) to a
Connecting the Editing Equipment
Without a Client Monitor” on page 55, but do not turn on power.
or a transcoder using the necessary analog cable. Figure 3-3 shows
a digital video deck connected to a Client monitor.
digital video deck, a digital camera, or a transcoder using the
necessary cables.
Page 57

4. Turn on power to all peripheral equipment and then the system.
57
n
Monitor
Keyboard
and mouse
The output data (video and audio) are synchronized as Client audio and video
and do not match the video displayed on the desktop monitor and audio sent
to the system speakers. For more synchronization information, see “Audio
and Video Sync Issues” on page 58.
System speakers
Client monitor
Input data and output data
1394 cable
Digital video deck
Powered speakers
To power
Figure 3-3 Connecting a Computer with a Client Monitor
Connecting a Computer with a Client Monitor
Page 58

58
Audio and Video Sync Issues
With the NewsCutter XP system set up as shown in Figure 3-4, the
video and audio might appear to be out of sync in the following
situations:
• You are recording from a digital device to NewsCutter XP.
• A Client monitor is attached to a digital video deck.
The system, however, is functioning normally, as explained in the
following instances:
• Sync Issue: When you record from a digital device (a camera,
digital video deck, or transcoder), what you see on the desktop
monitor and hear from the system speakers is not in sync with the
incoming video and audio coming from the digital device.
Explanation: The incoming video and audio from the digital
device must be buffered and then fed to the desktop monitor and
system speakers. Although they might look and sound out of sync
from the digital device output, the video and audio are being
recorded properly. For example, if you are marking IN and OUT
points while previewing video, the points will be placed in the
correct location for editing.
Monitor
Figure 3-4 NewsCutter XP System with Client Monitor
Connecting the Editing Equipment
1394 cable
System speakers
Client monitor
External speakers
Digital video deck
Page 59

• Sync Issue: With a Client monitor attached, the audio you hear
from the system speakers is not in sync with the video on the
Client monitor.
Explanation: NewsCutter XP processes the video and audio and
sends them to the desktop monitor and system speakers. The
desktop video and audio will always be in sync.
However, NewsCutter XP also provides the same video and audio
in 1394 format to a digital device (camera, digital video deck, or
transcoder) connected by a 1394 cable (see Figure 3-4).
Because the Client monitor is attached to the digital device, the
delay between the time the video and audio are processed
internally and are sent to the digital device causes the video on the
Client monitor to be out of sync with the audio from the system
speakers.
If you need to use a Client monitor for video and hear
synchronized audio:
- Attach a separate pair of speakers to the same digital device to
which the Client monitor is attached.
59
- Turn off or disconnect the system speakers.
Client monitor video and audio from external speakers are always
in sync when they are sent to the digital device.
Audio and Video Sync Issues
Page 60

60
Connecting an Analog Video Deck to the Computer
An analog video deck connects to the NewsCutter XP system through
a transcoder. Cables supplied with the camera and the 1394 board are
used for this connection (see Figure 3-5).
From analog video deck
RCA cable connections
left audio, right audio, and video
DV IN / OUTDC IN 6V
L
R
AUDIO
VIDEO
RCA and S-Video output connections can also
be used for a Client monitor and speakers.
S-Video cable connection
IN
OUT
S-VIDEO
Transcoder
1394 cable
1394 board
Figure 3-5 Connecting an Analog Video Deck
Connecting the Editing Equipment
NewsCutter XP
Audio Out
Speakers connected
during system setup
DV
4-pin6-pin
Page 61

To connect an analog video deck to the NewsCutter XP system:
1. Connect the video and audio cables from an analog video deck to
the input of the transcoder. For more information on transcoder
connections, see your transcoder documentation.
Typical connections use one of the following methods:
t Connect the left audio, right audio, and video RCA-to-RCA
cable from the analog video deck to the In ports on the
transcoder.
t Connect an S-Video cable from the analog video deck to the In
port on the transcoder.
2. (Option) Connect the Client monitor to the transcoder RCA video
Out connector.
61
n
n
n
The Client monitor and its cables do not ship with the NewsCutter XP
system and must be purchased separately.
3. (Option) Connect the audio Out of your transcoder to audio In at
the rear of NewsCutter XP. Some transcoders provide the
appropriate cable.
You should have already connected the speakers during the initial setup of
your system.
4. Connect the 1394 cable (also known as your FireWire cable) from
the transcoder to the 1394 board.
The 1394 board in NewsCutter XP accepts a 6-pin and a 4-pin cable.
Connecting an Analog Video Deck to the Computer
Page 62

62
Connecting a Video Deck or Edit Controller
You can control up to two video decks remotely by using serial
connections between NewsCutter XP and the video deck. This serial
connection requires an RS-232 to RS-422 cable adapter for each video
deck connected to NewsCutter XP.
To control the decks, you need a RS-232 to RS-422 serial cable or an
adapter kit. The following procedure explains how to connect a
sample adapter kit between your system and an analog video deck
using the following:
• An RS-232 to RS-422 serial adapter
• Two serial cables; male 9-pin connectors at both ends
You also use the serial adapter when connecting NewsCutter XP to an
edit controller. This allows you to enable VTR emulation, using
NewsCutter XP like a videotape recorder (VTR). For more information
on using VTR emulation, see the Avid NewsCutter XP User’s Guide.
n
n
Connecting the Editing Equipment
VTR emulation cabling requires a special Avid 9-pin VTR emulation cable
(male-to-female 9-pin connector). For more details, see your Avid Reseller.
If you need to connect and control more than two video decks, see
“Connecting a V-LAN VLXi Controller and GPI Devices” on page 64.
To connect a single deck to your computer:
1. Locate the serial adapter kit.
2. Attach one end of the first 9-pin cable to the end of the serial
adapter labeled RS-232 (see Figure 3-6).
Page 63

63
3. Attach the other end of the first 9-pin cable to the NewsCutter XP
COM1 serial port.
To video deck
or VTR
emulation cable
n
RS-422 connection
Serial adapter
RS-232 connection
To NewsCutter XP
Figure 3-6 Analog Video Deck Control Cabling
4. Do one of the following:
t For a video deck, attach one end of the second 9-pin cable to
the end of the serial adapter labeled RS-422.
t For an edit controller, attach one end of the VTR emulation
cable to the end of the serial adapter labeled RS-422.
5. Attach the other end of the second cable to the remote serial port
of the video deck or to the edit controller.
6. If you are connecting to a video deck, set the deck’s Remote mode
switch to Remote.
If the LEDs on the serial adapter do not light when the connections are
completed with the equipment turned on, the serial adapter is connected
backward. Before the remote control becomes functional, you must also choose
the COM port in the Deck Configuration dialog box of the NewsCutter XP
application (for more information on using the Deck Configuration dialog
box, see the Avid NewsCutter XP User’s Guide or the Help).
Connecting a Video Deck or Edit Controller
Page 64

64
Connecting a V-LAN VLXi Controller and GPI Devices
NewsCutter XP can control multiple video decks through a video local
area network (V-LAN
®
) VLXi® deck controller. Use a general-purpose
interface (GPI) connected to the V-LAN to trigger functions in the
NewsCutter XP application.
Video Local Area Network
The V-LAN VLXi shown in Figure 3-7 consists of one V-LAN
transmitter and a dual V-LAN VLXi receiver. The receiver contains
two deck controllers. Both the transmitter and receiver are internally
linked. The V-LAN VLXi connects to NewsCutter XP through a direct
serial connection.
Each V-LAN VLXi supports two video decks. If you need to add more
video decks, daisy chain multiple V-LAN VLXi units.
General-Purpose Interface
The VLXi-GT contains six programmable GPI input and output
terminals. The GPI input terminal can be configured to trigger
NewsCutter XP to play, record, cue, and stop. You can configure the
GPI output terminal to provide stop, record, and play status.
Assign the VLXi-GT to V-LAN node addresses 16 through 19. LAN
connections of more than 50 feet (190.5 meters) must have a
terminator. For more information, see the Video media VLXi User’s
Guide.
The V-LAN VLXi deck controller and VLXi-GT connect to
NewsCutter XP as shown in Figure 3-7.
Connecting the Editing Equipment
Page 65

Six GPI input and output terminals
IN OUT1IN OUT2IN OUT3IN OUT4IN OUT5IN OUT
SERIAL LAN CF
6
V-LAN connection
All cables are customer supplied.
VLXi-GT (GPI)
AC
Terminator
(required when cable length is
more than 50 feet [190.5 meters])
65
SERIAL PARALLEL REF LAN CF
VLX TRANSMITTER VLX 2R DUAL RECEIVER
VLXi transmitter
serial input
Figure 3-7 V-LAN VLXi Deck Control
Linking OHCI Drivers
NewsCutter XP uses a custom OHCI driver developed by Texas
Instruments rather than the default Microsoft
Whenever you use a camera or deck (DV device) with the
NewsCutter XP system via an OHCI-compliant 1394 board, you have
to link the device with Avid’s custom OHCI driver rather than the
default driver.
TIMECODE A
SERIAL A SERIAL B
IN INOUT OUT
TIMECODE B
Serial connection
to deck remote
Serial cable to RS-232 COM1 port
on NewsCutter XP
V-LAN VLXi
AC
Video deck
®
OHCI/1394 driver.
Connecting a Video Deck or Edit Controller
Page 66

66
There are two scenarios under which you should follow this
procedure:
• You have not previously connected a DV device.
• You have previously connected a DV device and used the
Microsoft OHCI 1394 driver.
You can also link a DV device to a particular driver if you want to use
a driver other than the custom OHCI driver.
Linking the Driver to a New DV Device
To link with the correct driver if you have not previously connected
a DV device:
1. Start the NewsCutter XP application before connecting the camera
or deck via the OHCI 1394 cable and turning on the DV device.
2. Connect the DV device, and then turn it on.
The Found New Hardware Wizard and the DV Driver Installed
dialog box appear. The dialog box instructs you to turn the DV
device off and then back on so the proper driver can be installed.
3. Click OK, and then turn the DV device off and then on.
If you turn on the DV device before you start the NewsCutter XP
application, the Found New Hardware Wizard appears. Click Cancel
to close the wizard, turn off the DV device, and do one of the
following:
t Follow the procedure for connecting a new DV device described in
t Follow the procedure described in “Linking the Driver to a DV
Connecting the Editing Equipment
The Found New Hardware Wizard and the dialog box close. This
establishes communication with the DV device via the custom
OHCI driver.
this section.
Device Previously Linked to a Different Driver” on page 67.
Page 67

67
n
Avid recommends that you let the NewsCutter XP application link to the
correct driver for you.
Linking the Driver to a DV Device Previously Linked to a Different Driver
To link with the correct driver if you have previously connected a
DV device that was linked to a different driver:
1. Start the Avid NewsCutter XP application.
2. Turn on the DV device.
The Wrong DV Driver Active dialog box appears, instructing you
to turn off the DV device.
3. Turn off the DV device, and then click Yes.
The DV Driver Replaced dialog box appears, instructing you to
turn on the DV device back.
4. Turn on the DV device, and then click OK.
This establishes communication with the DV device via the
custom OHCI driver.
n
If NewsCutter XP stops communication with the camera or deck, try turning
the DV device off and then on.
Linking DV Devices to a Particular Driver
Use the DVSelect utility to link to a driver other than the custom OHCI
driver. For example, you might need to use the Microsoft driver with a
third-party application.
To connect DV devices with a particular driver:
1. Connect and turn on the DV devices you want to link to a selected
driver.
2. Click the Start button, point to Programs, point to Avid, point to
Utilities, and then click DVSelect.
The DV Driver Select dialog box appears.
Connecting a Video Deck or Edit Controller
Page 68

68
3. Select one of the following:
t Microsoft DV Camera and VCR Driver
t Texas Instruments 1394 DV Camcorder Driver
4. Select “Switch drivers for only those devices that are currently
turned on.”
n
File Structure
If you do not select this option, DVSelect links the driver to all devices you
have ever connected to your system.
5. Click OK.
The selected driver is linked to the currently connected devices
that are turned on.
Figure 3-8 shows the different kinds of NewsCutter XP files and where
they are stored. The NewsCutter XP application folder is stored on
your computer’s internal hard drive. The Avid Projects folder is also
stored on an internal drive; the location varies, depending on your
installation. For complete information about folders and files, see the
Avid NewsCutter XP User’s Guide or the Help. Media is stored in a
folder called OMFI MediaFiles, which is created by the application.
Avid recommends that you store media files on a separate disk or
partition.
Connecting the Editing Equipment
Page 69

Avid
NewsCutter XP
69
Media drive
OMFI
MediaFiles
Settings
NewsCutter XP
Bin A
Figure 3-8 File Structure
Project Workflow
The following sections illustrate the four stages of a typical
NewsCutter XP project:
• Starting a Project
• Preparing to Edit
• Editing a Sequence
Help
Supporting
Files
Avid
Projects
Project
Bin B
• Generating Output
Complete procedures for each stage are included in the Avid
NewsCutter XP User’s Guide and the Help.
Project Workflow
Page 70

70
Starting a Project
Starting a project involves the following steps:
1. T urn on your equipment in the
correct order, and start the
software. (Speakers and
external media drives are
optional.)
2. Select or create a new user
and project: the job that will
result in one or more finished
sequences.
1. Turn on and start your Avid system.
3. Create and organize bins.
4. Back up your project on a
regular basis.
Connecting the Editing Equipment
2. Select or create a user and project.
3. Create and organize bins.
4. Back up the project.
Page 71

Preparing to Edit
Preparing to edit involves the following steps:
1. (Option) Import your log files
into the bins, or log the
material manually.
2. Record your DV footage,
creating media files and
master clips.
71
1. (Option) Import shot logs into the bin.
3. Work with bins and
clips to organize your
source material for
easy access during
editing.
4. (Option) Build a
storyboard to begin
visualizing your final
cut before editing.
3. Sort and organize clips in the bins.
4. Use a storyboard.
2. Record footage, creating
master clips and media files.
Project Workflow
Page 72

72
Editing a Sequence
Editing a sequence involves the following steps:
1. View your clips in advance
and mark IN points and OUT
points, or create subclips
based on selected portions of
your master clips.
2. Build your sequence using
editing controls with the
Timeline, Source pop-up
monitors, and the
Source/Record monitor.
3. Fine-tune your edits and
effects by using functions of
the various edit modes, such
as Segment mode, T rim mode,
and Effect mode.
4. Adjust and mix multiple
audio tracks and prepare for
final playback or output, using
the Audio tool and the Audio
Mix tool.
1. Screen, mark, and subcatalog footage.
2. Edit with Timeline and monitors.
5. Screen and
continue editing
as necessary.
Source/Record
monitor
Timeline
5. Return to editing if further
adjustments are required.
Connecting the Editing Equipment
3. Fine-tune edits and effects.
4. Fine-tune audio pan, volume, and EQ.
Page 73

Generating Output
Generating various forms of output based on your sequence involves
selecting among several options:
73
Export material for additional processing,
for incorporating into a multimedia project,
or for publishing on the Internet.
V
D
Record a digital cut directly to tape.
Generate an EDL for online
videotape editing.
Project Workflow
Page 74

74
Connecting the Editing Equipment
Page 75

CHAPTER 4
Setting Up Workgroups
This chapter describes the different NewsCutter XP workgroup
configurations, as well as how to connect NewsCutter XP to a
playback device. The following sections provide more detail:
• NewsCutter XP Workgroups
• Avid Unity for News Workgroup Configuration
• PortServer Pro Support
• LANshare Configuration
• Media File Transfers to Playback Devices
NewsCutter XP Workgroups
NewsCutter XP can work in four basic network configurations:
• As a client in an Avid Unity for News workgroup
• As a client in an Avid Unity for News workgroup with
PortServer Pro
• As part of a LANshare workgroup
• As a standalone system connected to a playback device
Page 76

76
The Avid Unity for News workgroup is a shared-storage, client- and
server-based network operating in an Avid Unity MediaNet
environment. NewsCutter XP can share media files and other project
data with clients in the workgroup or with other workgroups.
The PortServer Pro network allows NewsCutter XP to connect to a
MediaNet environment through an Ethernet connection. Each
PortServer Pro system allows you to connect multiple NewsCutter XP
workspaces, increasing the number of systems editing and sharing
media files.
NewsCutter XP can be used as a client in an Avid Unity LANshare
workgroup system. LANshare allows you to share media files with
other clients connected to a high-performance server through an
Ethernet network.
NewsCutter XP also can connect to a playback device using serial,
Ethernet, and Fibre Channel connections. NewsCutter XP can then
send edited news sequences to a remote play-to-air device.
Avid Unity for News Workgroup Configuration
When NewsCutter XP works in an Avid Unity for News workgroup, it
becomes a client in a MediaNet environment. An Avid Unity for News
workgroup consists of the following functional components:
• Supported Avid editing systems (such as NewsCutter XP).
• Avid Unity MediaManager server to track and manage Avid Unity
media files. When connected to a Fibre Channel network, a
workgroup client uses the MediaManager server to share
Avid Unity files with clients within the workgroup.
Setting Up Workgroups
Page 77

• Avid Unity TransferManager server to manage the transfer of
media files to and from another workgroup’s TransferManager
server (typically, over an Ethernet network). The TransferManager
server also allows you to transfer media files from a feed (ingest)
device or send finished sequences to a playback device.
77
n
n
The TransferManager server is not required in a MediaNet environment.
However, you must connect a TransferManager server in your workgroup if
you want to share media files with other workgroups in the MediaNet
environment.
• Avid Unity MediaNet file server and storage subsystem.
• A Fibre Channel network that connects the NewsCutter XP
systems, MediaManager server, and TransferManager server to
the file server and storage subsystem.
An optional Fibre Channel connection kit is available for connecting
NewsCutter XP to the Avid Unity MediaNet environment.
• An Ethernet network that is used as a general-purpose
communications network connecting all the system components.
An Ethernet network can also be used by the TransferManager
server to transfer media files between workgroups.
Avid Unity for News Workgroup Configuration
Page 78

78
Figure 4-1 shows a flow diagram of a typical shared-storage
Avid Unity for News workgroup configuration.
MediaNet File
server
Avid Unity
shared
storage
Fibre Channel
n
NewsCutter XP
systems
To another
workgroup’s
TransferManager
server
Workgroup
MediaManager
server
TransferManager
server
Ethernet
Figure 4-1 Avid Workgroup Flow Diagram
The purpose of the workgroup is to enable collaborative workflows by
allowing multiple NewsCutter XP editors to share media files.
For information on connecting NewsCutter XP in an Avid Unity for News
workgroup, see the Avid Unity MediaNet Setup Guide.
PortServer Pro Support
NewsCutter XP is also supported as a client on a PortServer Pro
system. The PortServer Pro system allows NewsCutter XP to access
MediaNet workspaces using an Ethernet 100BASE-T connection.
NewsCutter XP connects to a gigabit-uplink Ethernet switch, which in
turn connects to the PortServer Pro system. The PortServer Pro is
connected as a client to an Avid Unity MediaNet system using a Fibre
Channel connection.
Setting Up Workgroups
Page 79

This functionality allows up to 10 NewsCutter XP editing systems to
be connected to each PortServer Pro. This solution enables many
NewsCutter XP editors to share media in real time at a low cost.
79
n
Multiple users can edit on a NewsCutter XP system, but all users must have
administrative privileges. Without administrative privileges, certain
functions such as accessing projects and recording might not work correctly.
You cannot change users’ permissions in the operating system while the
NewsCutter XP application is running. Quit the NewsCutter XP
application, make permission changes, and restart the application after
making the permission changes.
LANshare Configuration
LANshare is a low-cost alternative to Avid Unity for News that allows
you to connect Ethernet clients to a LANserver and its storage. It is
designed to provide real-time media editing over an Ethernet network
using MediaNet software.
In a LANshare workgroup, NewsCutter XP systems become Ethernet
clients of a LANserver. You can access media files stored on the
LANserver in the same manner as files stored on local drives.
NewsCutter XP clients can then play, record, and edit media using a
high-performance networking protocol optimized by Avid for
real-time media transfer.
To set up a LANshare workgroup, you need the following
components:
• Supported Avid systems, such as NewsCutter XP, with
100BASE-T capable Ethernet connectivity
• A LANserver that stores media files
• MediaNet software that manages the MediaNet workspaces
(shared folders)
LANshare Configuration
Page 80

80
• A fast Ethernet switch (a nonblocking GigabitEthernet-to-10/100BASE-T Ethernet switch) that connects the
LANshare to the Ethernet clients
Figure 4-2 illustrates the components of a LANshare workgroup.
Ethernet switch
Gigabit Ethernet
LANserver
Storage and
MediaNet file system
100BASE-T Ethernet
Figure 4-2 LANshare Workgroup Configuration
The LANshare workgroup provides NewsCutter XP clients access to
MediaNet workspaces over a fast Ethernet network. You can have
several LANshare workgroups at your site, each accommodating
multiple NewsCutter XP clients.
Media File Transfers to Playback Devices
Depending on the playback device connected to the NewsCutter XP
system, you can transfer edited news sequences to a play-to-air
playback device using the Ethernet or Fibre Channel connection.
When the playback device functions as a video server, ingest of raw
audio and video files into NewsCutter XP takes place through a
baseband serial connection between NewsCutter XP and the playback
device.
NewsCutter XP
clients
Setting Up Workgroups
Page 81

81
NewsCutter XP controls the media transfers to and from the playback
device using audio, video, and serial RS-422 connections (in much the
same way as it controls a video deck).
n
The playback device is an optional component used with NewsCutter XP.
Avid provides specific connection kits for different playback devices. For
details, see the release notes provided with the specific playback device
connection kit.
Connecting NewsCutter XP and the Playback Device f or Ingest
n
For information on connecting NewsCutter XP to a playback device in an
Avid Unity for News workgroup, see the Avid Unity Workgroup Setup
Guide and the Avid Unity TransferManager Setup and User's Guide.
In a standalone, peer-to-peer workgroup environment, ingest of
material from the remote playback device to NewsCutter XP requires
audio and serial (baseband) connections between NewsCutter XP and
the playback device via audio and serial connector panels. The video
connection between NewsCutter XP and the playback device is direct.
NewsCutter XP controls the ingest media in much the same way as it
controls a video deck. Figure 4-3 shows the connections.
To ingest material from the remote playback device to NewsCutter XP,
see “Setting Up the Playback Device for Ingest” on page 82 and
“Setting Up NewsCutter XP for Ingest” on page 83.
Media File Transfers to Playback Devices
Page 82

82
Remote playback device
UI monitor
Speakers
Transcoder
NewsCutter XP
R
Media
L
IN
OUT
L
R
DV IN / OUTDC IN 6V
AUDIO
VIDEO
S-VIDEO
External MediaDrive
Figure 4-3 Audio, Video, and Serial Connections
Setting Up the Playback Device for Ingest
Ingest
data
UI monitor
Serial connection with
serial adapter
Setting Up Workgroups
To enable the remote playback device for ingest using the baseband
connection, select these general settings from the playback device’s
user interface:
• Select BVW as the deck protocol.
• Select the playback device COM port used for the serial
connection.
Page 83

• Select the video I/O settings to match your hardware connections.
• Select the audio I/O settings to match your hardware connections.
Setting Up NewsCutter XP for Ingest
Before attempting to transfer material from the remote playback
device to NewsCutter XP using the baseband connection, configure
the playback device as a deck on the NewsCutter XP system.
To configure a deck:
1. Click the Settings tab in the Project window.
The Settings scroll list appears.
2. Double-click Deck Configuration.
The Deck Configuration dialog box appears.
3. Click Add Channel.
83
n
The Channel dialog box appears.
4. Choose Direct from the Channel Type menu, and choose a port
from the Ports menu.
5. Click OK.
A message appears, asking if you want to Autoconfigure the
channel.
6. Click No.
NewsCutter XP does not currently support the Autoconfigure function for
the playback device. If you choose Yes for Autoconfigure, NewsCutter XP will
configure the playback device as a deck.
7. In the Deck Configuration dialog box, click Add Deck.
The Deck Settings dialog box appears.
Media File Transfers to Playback Devices
Page 84

84
8. Choose the appropriate playback device from the menu, and then
click OK.
The dialog box closes and returns you to the Deck Configuration
dialog box.
9. Click Apply.
Fibre Channel Workgroup Configuration
An optional Fibre Channel connection kit is available for using an
Ethernet connection to link NewsCutter XP to a playback device in a
Fibre Channel workgroup configuration. If you are installing a Fibre
Channel connection kit in NewsCutter XP, follow the instructions
provided by the computer manufacturer for removing the cover and
installing an expansion board.
n
This information might change in accordance with feature and performance
enhancements. Depending on your specific playback device, your
configuration might differ.
Transferring Files from NewsCutter XP to the Playback Device
To transfer a sequence from NewsCutter XP to the remote playback
device using the serial (baseband) connection:
1. Add the TapeID heading to the Project bin window:
a. Click the Fast Menu button, and choose Headings.
The Bin Column Selection dialog box appears.
b. Select TapeID, and click OK.
NewsCutter XP adds the TapeID column to the bin columns.
n
For information on saving the TapeID column as a default setting or as a Site
setting, see the Help.
Setting Up Workgroups
Page 85

Play Digital
Cut button
Record to Tape
pop-up menu
Mark IN text box
85
2. In the TapeID column, type the name of the sequence on which
you want to perform a digital cut to the playback device. The
name on the playback device is restricted to 15 characters when
using the BVW controller setup. The playback device will truncate
any names longer than 15 characters. For seamless integration,
you should not use special characters or spaces when naming the
sequence.
3. Choose Digital Cut from the Clip menu.
The Digital Cut tool opens (see Figure 4-4).
Tape Name
display
Figure 4-4 Digital Cut Tool
4. Select Entire Sequence.
5. Select Remote.
6. Choose Mark In Time from the Record to Tape pop-up menu.
Media File Transfers to Playback Devices
Page 86

86
7. Choose a tape name as follows:
a. Click the Tape Name display.
The Select Tape dialog box appears.
b. Click New.
c. Type a new name, press Enter, and click OK.
8. Establish a time for the IN point in the Mark IN text box. The time
for the IN point must be equal to the preroll time. The default
preroll time for the playback device is 1 second. For a preroll time
of 1 second, type 01:00.
9. Click the Play Digital Cut button.
n
For more information on using the Digital Cut tool, see the Help or the Av id
NewsCutter XP User’s Guide.
Transferring from the Playback Device to NewsCu tter XP
n
n
For information on transferring files between NewsCutter XP and a playback
device in an Avid Unity for News workgroup, see the Avid Unity
TransferManager Setup and User’s Guide.
After you connect the remote playback device in a standalone,
peer-to-peer workgroup and select the appropriate settings, you can
record media from the playback device to NewsCutter XP through the
serial (baseband) connection. Some playback devices allow you to
drag clips from the playback device’s user interface into the Record
tool in the NewsCutter XP application.
Not all functionality is the same in each playback device’s user interface. For
details on how to transfer media, see the documentation provided with the
playback device.
Setting Up Workgroups
Page 87

To record media from the playback device to NewsCutter XP:
1. Choose Record from the Tools menu.
The Record tool opens.
2. When the playback device is playing media, click the Record
button in the Record tool to record from the playback device to
NewsCutter XP.
87
Media File Transfers to Playback Devices
Page 88

88
Setting Up Workgroups
Page 89

APPENDIX A
Avid Setup and Product Recovery CD-ROM
This appendix explains how to use the Avid Setup and Product
Recovery CD-ROM in case your NewsCutter XP system ever gets
corrupted to the point where it is easier to start over. The Avid Setup
and Product Recovery CD-ROM restores the system drive to its
original condition when the system was shipped from Avid.
n
If you purchased the NewsCutter XP software only kit, an Avid Setup and
Product Recovery CD-ROM is not included.
This chapter contains the following sections:
• Process Summary
• Using the Avid Setup and Product Recovery CD-ROM
Page 90

90
Process Summary
The Avid Setup and Product Recovery CD-ROM reloads an image of
the NewsCutter XP system drive as it was shipped from Avid. To do
this, the system must boot from the CD-ROM. Compaq sets the system
to boot from the CD-ROM by default, but if your BIOS settings have
been changed, you might need to use the Setup utility to allow the
system to boot from the CD-ROM. For more information on using the
Setup utility to modify the boot order, see your Compaq
documentation.
When the system boots from the Avid Setup and Product Recovery
CD-ROM, you must install the Windows image on the system disk.
The Avid Setup and Product Recovery CD-ROM performs this
installation.
c
Before continuing with this procedure, disconnect all external drives
from the system so you do not lose data. You should have only the
original internal drive connected.
Using the Avid Setup and Product Recovery CD-ROM
With the Avid Setup and Product Recovery CD-ROM in the CD-ROM
drive, restart your system. The system boots from the Avid Setup and
Product Recovery CD-ROM.
An MS-DOS screen appears with the following choices when installing
the Windows image:
• 1 — Perform a full recovery of the complete disk.
• 2 — Exit from the process without doing any recovery.
Avid Setup and Product Recovery CD-ROM
Page 91

91
Depending upon the recovery method selected, consider the
following:
• You must reinstall the Avid software application after you perform
any recovery.
• If you select 1, all data on the C partition, including applications
installed after the system was built, will be destroyed.
• You should attempt to back up all data on drive C before
performing a full recovery.
c
The system warns you two times during this procedure that you are
about to destroy data on all, or parts, of hard drive 0.
To perform a complete recovery (install an image of the complete
disk):
1. Press the arrow keys to highlight choice 1 (full recovery), and
press Enter.
You will be asked if you really want to continue; continuing
destroys data on hard drive 0.
2. Press the Y key. Do not press Enter.
You will be asked again if you really want to continue; continuing
destroys data on hard drive 0.
3. Press the Y key again. Do not press Enter.
At this time, the program will place the Windows image on hard
drive 0. The image takes approximately 5 or 6 minutes to install.
Once the image has been completely written, you will see a setup
complete message.
4. Remove the CD-ROM from the CD-ROM drive.
5. Press Ctrl+Alt+Delete. This continues the boot sequence.
6. Use the arrow keys to select Avid Configuration, and then press
Enter.
Using the Avid Setup and Product Recovery CD-ROM
Page 92

92
n
Select the Original Configuration only if you want to boot the system in a
standard Windows configuration.
7. As the Windows 2000 operating system is installed, you will be
asked to supply the following information. Follow the on-screen
instructions, and see your Windows documentation.
- Regional settings
- Name and organization
- Product key (25-digit code on the Microsoft Product Key)
- Computer name (do not enter a password for the
administrator account)
- Date and time
- Networking setup for your site
You need network administrative privileges when you
perform specific network functions.
8. If you are connected to a network, complete the Network
Identification Wizard.
The setup is complete.
c
n
Avid Setup and Product Recovery CD-ROM
If the Windows 2000 operating system finds stripe sets, a message
might state that the stripe set does not have the correct signature.
Avid recommends that you do not reformat.
If you added memory to the 256K MB of memory that shipped with your
NewsCutter XP system, you need to manually adjust the paging file size to
match the current memory size. For more information on configuring the
paging file, see “Setting the Proper Paging File” on page 52.
Page 93

FCC Notice
APPENDIX B
Regulatory and Safety Notices
This device complies with Part 15 of the FCC Rules. Operation is
subject to the following two conditions:
1. This device may not cause harmful interference.
2. This device must accept any interference received, including
interference that may cause undesired operation.
This equipment has been tested and found to comply with the limits
for a Class A digital device, pursuant to Part 15 of the FCC Rules.
These limits are designed to provide reasonable protection against
harmful interference when the equipment is operated in a commercial
environment. This equipment generates, uses, and can radiate radio
frequency energy and, if not installed in accordance with the
instruction manual, may cause harmful interference to radio
communications. Operation of this equipment in a residential area is
likely to cause harmful interference in which case the user will be
required to correct the interference at his own expense.
Page 94

94
Canadian ICES-003
This Class A digital apparatus meets all requirements of the Canadian
Interference Causing Equipment Regulations.
Cet appareil numérique de la classe A respecte toutes les exigences du
Règlement sur le matériel brouilleur du Canada.
European Union Notice
Declaration of Conf ormity
(According to ISO/IEC Guide 22 and EN 45014)
Regulatory and Safety Notices
Application of Council
Directives:
Standards to which
Conformity is Declared:
Manufacturer’s Name: Avid Technology, Inc.
European Contact: Nearest Avid Sales and Service Office or
Type of Equipment: Information Technology Equipment
73/23/EEC, 89/336/EEC.
EN60950:1992 + A1 + A2 + A3 + A4 + A11
CISPR 22:1985 / EN55022:1988 Class A
EN55024:1998/EN61000 — 3-2, 4-2, 4-3, 4-4, 4-5, 4-6,
4-8, 4-11
1925 Andover Street
Tewksbury, MA 01876, USA
Avid Technology International B.V.
Sandyford Business Center
Unit 3,
Dublin 18, Ireland
Page 95

95
Product Name: Products for the Windows NT or Windows 2000
Operating System: Media Composer,
Film Composer, Avid Xpress, Avid Xpress DV,
Avid Unity, Avid|DS, NewsCutter, NewsCutter XP,
NewsCutter DV, Symphony
Products for the Macintosh Operating System:
Media Composer, Film Composer, Avid Xpress,
Av id U ni ty
Products for the UNIX Operating System: AirPlay,
VideoSPACE
Base Model Numbers: None
Product Options: All
Year of Manufacture: 2002
(1) Products for the Windows NT or Windows 2000 Operating System:
products were tested in a typical Media Composer, Film Composer,
Avid Xpress, Avid Xpres s D V, Avid Unity, Avid|DS, NewsCutte r,
NewsCutter XP, NewsCutter DV, or Symphony configuration.
(2) Products for the Macintosh Operating System: products were
tested in a typical Media Composer, Film Composer, Avid Xpress, or
Avid Unity configuration.
(3) Products for the UNIX Operating System: products were tested in
an AirPlay or VideoSPACE configuration.
I, the undersigned, hereby declare that the equipment specified above
conforms to the above Directives and Standards.
George R. Smith, Director of Hardware Engineering.
European Union Notice
Page 96

96
Australia and New Zealand EMC Regulations
John Kells, Australian Operations Manager
N1709
Avid Technology (Australia)
Unit B
5 Skyline Place
French Forest NSW 2086
Australia
Phone: 61-2-8977-4800
Taiwan EMC Regulations
Taiwan EMC Regulations BSMI Class A EMC Warning
Regulatory and Safety Notices
Page 97

Index
A C D E F G I L M N O P R S T U V W
Numerics
1394 Standard 13, 18
A
ALE (Avid Log Exchange)
installing 48
Analog video deck
connecting, to the NewsCutter XP system 60
Application key 26
Avid Projects folder location 68
Avid Setup and Product Recovery CD-ROM 89
Avid Unity for News 76
C
Cable
connecting 34
length 33
Cables
FireWire 54
for editing equipment 54
IEEE 1394 54
RS-422 converter 62
CD-ROM
Avid Setup and Product Recovery 89
NewsCutter XP application 46
Check list
for setting up system 19
Companion applications 48
Computer Management window 37, 39
Configuration disk
creating 50
Connecting
deck control 64
editing equipment 53
external SCSI drives 28, 31
multiple drives 33
USB-to-MIDI converter 23
Connector
IEEE 1394 34
power supply 34
Converter, RS-422 62
Copy-protection device 26
Creating
disk configuration disk 50
primary partitions 36
Custom installation
for NewsCutter XP 45
Page 98

98
D
Decks
connecting analog video, to the NewsCutter
XP system
Device numbering 32
Digital audio and video data cable 54
Digital video (DV)
described 18
Disk configuration disk
creating 50
Dongle 26
Drives
connecting external SCSI 28, 31
formatting 36
preparing 40
striping 35
testing 39
60
E
Editing
overview 72
preparing for 71
Editing equipment
cables for 54
connecting 53
connecting analog video deck to 60
overview 54
EDL Manager
installing 49
Effect mode
in workflow 72
Equipment
turning on 20
ERD (emergency repair disk) 50
Ethernet
network 77, 78, 79
switch 78, 80
External SCSI drives
connecting 28, 31
turning on 21
F
FAT file system 35
Fibre Channel 76, 77, 84
File system 68
FireWire
cables 54
described 13, 18
Formatting drives 36
Full recovery 90
G
GPI (general-purpose interface)
triggers 64
I
i.LINK
described 18
IEEE 1394
connectors 34
IEEE Standard 1394
cables 54
described 13, 18
Installing
ALE 48
EDL Manager 49
external SCSI drives 28, 31
NewsCutter XP software 43
Installing MediaDrives
cabling 34
power cord 34
Page 99

99
Installing software
custom option for 45
removing earlier releases 42
L
LANserver 79
LANshare 75, 79
LVD (Low Voltage Differential)
external SCSI drives 28
terminator 30
M
Media files
transfers 80
MediaDrive
configure 33
installing 34
MediaManager 76
MediaNet 76, 79
MIDI converter
connecting 23
Modifying the NewsCutter XP software 46
Multiple drives
cabling 33
Open Host Controller Interface (OHCI) 18
Operating system
Windows 2000 35
Optional
equipment 81
playback device 81
Output 73
P
Partitioning
creating primary partitions during 36
Windows 2000 35
PCI SCSI board
described 29
Playback
deck protocol 82
devices 81
Playback device
transfer 84, 86
PortServer Pro 75, 78
Power connection 34
Preparing to edit
overview 71
Product recovery CD-ROM 89, 90
Projects
workflow 69
N
NewsCutter
deck control 62
NTFS file system 35
O
OHCI (Open Host Controller Interface) 18
OMFI MediaFiles folders 68
R
Recovery CD-ROM 89, 90
Remote control 62
Removing the NewsCutter XP software 46
Repairing the NewsCutter XP software 46
RS-232 to RS-422 serial adapter 62
RS-422 converter 62
Page 100

100
S
SCSI drives
cabling 30
connecting 28
controller 29
determining IDs for 31
testing 39
SCSI IDs
determining 31
numbering 32
Segment mode
in workflow 72
Sequences
editing (overview) 72
Serial adapter 62
Settings
playback device 82
Setup
CD-ROM 89
check list 19
equipment 17
Software
ALE 48
companion applications 48
custom installation of NewsCutter XP 45
EDL Manager 49
modifying, repairing, or removing 46
NewsCutter XP application 43
uninstalling 42
upgrading 42
Starting a project (overview) 70
Striping drives 35
Subclips
in workflow 72
T
Terminators
for PCI SCSI boards 30
Testing drives 39
Transcoder
connecting 60
TransferManager 76
Transferring media files
option 80
Transferring video
to NewsCutter 86
to playback device 84
Trim mode
in workflow 72
Turning on
equipment 20
U
Uninstalling NewsCutter XP software 46
USB-to-MIDI converter 23
V
Video deck
connections 64
control 64
playback device 80, 81
Video decks
connecting analog 60
Video local area network See V-LAN VLXi
V-LAN VLXi
control 64
deck connections 64
VTR emulation 62
 Loading...