

Page 1

Avid® Media Composer® and NewsCutter
Effects and Color Correction Guide
®
Page 2

Legal Notices
Product specifications are subject to change without notice and do not represent a commitment on the part of Avid Technology,
Inc.
This product is subject to the terms and conditions of a software license agreement provided with the software. The product
may only be used in accordance with the license agreement.
Avid products or portions thereof are protected by one or more of the following United States Patents: 5,077,604; 5,267,351;
5,309,528; 5,355,450; 5,396,594; 5,440,348; 5,467,288; 5,513,375; 5,528,310; 5,557,423; 5,568,275; 5,577,190; 5,584,006;
5,634,020; 5,640,601; 5,644,364; 5,654,737; 5,724,605; 5,726,717; 5,745,637; 5,752,029; 5,754,180; 5,754,851; 5,799,150;
5,812,216; 5,828,678; 5,842,014; 5,852,435; 5,905,841; 5,929,836; 5,930,445; 5,946,445; 5,986,584; 5,987,501; 5,999,406;
6,016,152; 6,018,337; 6,023,531; 6,038,573; 6,058,236; 6,061,758; 6,069,668; 6,091,778; 6,105,083; 6,118,444; 6,130,676;
6,134,607; 6,141,007; 6,141,691; 6,198,477; 6,201,531; 6,211,869; 6,223,211; 6,249,280; 6,269,195; 6,330,369; 6,353,862;
6,404,435; 6,407,775; 6,426,778; 6,477,271; 6,489,969; 6,512,522; 6,532,043; 6,546,190; 6,552,731; 6,553,142; 6,570,624;
6,571,255; 6,583,824; 6,596,031; 6,618,547; 6,636,869; 6,665,450; 6,678,461; 6,687,407; 6,704,445; 6,747,705; 6,763,134;
6,763,523; 6,766,063; 6,766,357; 6,791,556; 6,810,157; 6,813,622; 6,847,373; 6,871,003; 6,871,161; 6,901,211; 6,907,191;
6,928,187; 7,043,058; 7,081,900; 7,103,231; 7,266,241; 7,280,117; RE40,107; 7,403,561; 7,433,519; 7,512,885; 7,545,957;
7,671,871; 7,684,096; D352,278; D372,478; D373,778; D392,267; D392,268; D392,269; D395,291; D396,853; D398,912.
Other patents are pending.
Avid products or portions thereof are protected by one or more of the following European Patents: 0506870; 0635188;
0674414; 0752174; 0857293; 0976108; 0988756; 1068723; 1068734; 1111910; 1173850; 1629675.
Other patents are pending.
This document is protected under copyright law. An authorized licensee of Avid Media Composer, NewsCutter, or Symphony
may reproduce this publication for the licensee’s own use in learning how to use the software. This document may not be
reproduced or distributed, in whole or in part, for commercial purposes, such as selling copies of this document or providing
support or educational services to others. This document is supplied as a guide for Avid Media Composer, NewsCutter, or
Symphony. Reasonable care has been taken in preparing the information it contains. However, this document may contain
omissions, technical inaccuracies, or typographical errors. Avid Technology, Inc. does not accept responsibility of any kind for
customers’ losses due to the use of this document. Product specifications are subject to change without notice.
Copyright © 2010 Avid Technology, Inc. and its licensors. All rights reserved.
The following disclaimer is required by Apple Computer, Inc.:
APPLE COMPUTER, INC. MAKES NO WARRANTIES WHATSOEVER, EITHER EXPRESS OR IMPLIED, REGARDING
THIS PRODUCT, INCLUDING WARRANTIES WITH RESPECT TO ITS MERCHANTABILITY OR ITS FITNESS FOR ANY
PARTICULAR PURPOSE. THE EXCLUSION OF IMPLIED WARRANTIES IS NOT PERMITTED BY SOME STATES. THE
ABOVE EXCLUSION MAY NOT APPLY TO YOU. THIS WARRANTY PROVIDES YOU WITH SPECIFIC LEGAL RIGHTS.
THERE MAY BE OTHER RIGHTS THAT YOU MAY HAVE WHICH VARY FROM STATE TO STATE.
The following disclaimer is required by Sam Leffler and Silicon Graphics, Inc. for the use of their TIFF library:
Copyright © 1988–1997 Sam Leffler
Copyright © 1991–1997 Silicon Graphics, Inc.
Permission to use, copy, modify, distribute, and sell this software [i.e., the TIFF library] and its documentation for any purpose
is hereby granted without fee, provided that (i) the above copyright notices and this permission notice appear in all copies of
the software and related documentation, and (ii) the names of Sam Leffler and Silicon Graphics may not be used in any
advertising or publicity relating to the software without the specific, prior written permission of Sam Leffler and Silicon
Graphics.
THE SOFTWARE IS PROVIDED “AS-IS” AND WITHOUT WARRANTY OF ANY KIND, EXPRESS, IMPLIED OR
OTHERWISE, INCLUDING WITHOUT LIMITATION, ANY WARRANTY OF MERCHANTABILITY OR FITNESS FOR A
PARTICULAR PURPOSE.
IN NO EVENT SHALL SAM LEFFLER OR SILICON GRAPHICS BE LIABLE FOR ANY SPECIAL, INCIDENTAL, INDIRECT
OR CONSEQUENTIAL DAMAGES OF ANY KIND, OR ANY DAMAGES WHATSOEVER RESULTING FROM LOSS OF USE,
DATA OR PROFITS, WHETHER OR NOT ADVISED OF THE POSSIBILITY OF DAMAGE, AND ON ANY THEORY OF
LIABILITY, ARISING OUT OF OR IN CONNECTION WITH THE USE OR PERFORMANCE OF THIS SOFTWARE.
The following disclaimer is required by the Independent JPEG Group:
This software is based in part on the work of the Independent JPEG Group.
2
Page 3

This Software may contain components licensed under the following conditions:
Copyright (c) 1989 The Regents of the University of California. All rights reserved.
Redistribution and use in source and binary forms are permitted provided that the above copyright notice and this paragraph
are duplicated in all such forms and that any documentation, advertising materials, and other materials related to such
distribution and use acknowledge that the software was developed by the University of California, Berkeley. The name of the
University may not be used to endorse or promote products derived from this software without specific prior written
permission. THIS SOFTWARE IS PROVIDED ``AS IS'' AND WITHOUT ANY EXPRESS OR IMPLIED WARRANTIES,
INCLUDING, WITHOUT LIMITATION, THE IMPLIED WARRANTIES OF MERCHANTABILITY AND FITNESS FOR A
PARTICULAR PURPOSE.
Copyright (C) 1989, 1991 by Jef Poskanzer.
Permission to use, copy, modify, and distribute this software and its documentation for any purpose and without fee is hereby
granted, provided that the above copyright notice appear in all copies and that both that copyright notice and this permission
notice appear in supporting documentation. This software is provided "as is" without express or implied warranty.
Copyright 1995, Trinity College Computing Center. Written by David Chappell.
Permission to use, copy, modify, and distribute this software and its documentation for any purpose and without fee is hereby
granted, provided that the above copyright notice appear in all copies and that both that copyright notice and this permission
notice appear in supporting documentation. This software is provided "as is" without express or implied warranty.
Copyright 1996 Daniel Dardailler.
Permission to use, copy, modify, distribute, and sell this software for any purpose is hereby granted without fee, provided that
the above copyright notice appear in all copies and that both that copyright notice and this permission notice appear in
supporting documentation, and that the name of Daniel Dardailler not be used in advertising or publicity pertaining to
distribution of the software without specific, written prior permission. Daniel Dardailler makes no representations about the
suitability of this software for any purpose. It is provided "as is" without express or implied warranty.
Modifications Copyright 1999 Matt Koss, under the same license as above.
Copyright (c) 1991 by AT&T.
Permission to use, copy, modify, and distribute this software for any purpose without fee is hereby granted, provided that this
entire notice is included in all copies of any software which is or includes a copy or modification of this software and in all
copies of the supporting documentation for such software.
THIS SOFTWARE IS BEING PROVIDED "AS IS", WITHOUT ANY EXPRESS OR IMPLIED WARRANTY. IN PARTICULAR,
NEITHER THE AUTHOR NOR AT&T MAKES ANY REPRESENTATION OR WARRANTY OF ANY KIND CONCERNING THE
MERCHANTABILITY OF THIS SOFTWARE OR ITS FITNESS FOR ANY PARTICULAR PURPOSE.
This product includes software developed by the University of California, Berkeley and its contributors.
The following disclaimer is required by Nexidia Inc.:
© 2006 Nexidia. All rights reserved.
Manufactured under license from the Georgia Tech Research Corporation, U.S.A. Patent Pending.
The following disclaimer is required by Paradigm Matrix:
Portions of this software licensed from Paradigm Matrix.
The following disclaimer is required by Ray Sauers Associates, Inc.:
“Install-It” is licensed from Ray Sauers Associates, Inc. End-User is prohibited from taking any action to derive a source code
equivalent of “Install-It,” including by reverse assembly or reverse compilation, Ray Sauers Associates, Inc. shall in no event be
liable for any damages resulting from reseller’s failure to perform reseller’s obligation; or any damages arising from use or
operation of reseller’s products or the software; or any other damages, including but not limited to, incidental, direct, indirect,
special or consequential Damages including lost profits, or damages resulting from loss of use or inability to use reseller’s
products or the software for any reason including copyright or patent infringement, or lost data, even if Ray Sauers Associates
has been advised, knew or should have known of the possibility of such damages.
3
Page 4

The following disclaimer is required by Videomedia, Inc.:
“Videomedia, Inc. makes no warranties whatsoever, either express or implied, regarding this product, including warranties with
respect to its merchantability or its fitness for any particular purpose.”
“This software contains V-LAN ver. 3.0 Command Protocols which communicate with V-LAN ver. 3.0 products developed by
Videomedia, Inc. and V-LAN ver. 3.0 compatible products developed by third parties under license from Videomedia, Inc. Use
of this software will allow “frame accurate” editing control of applicable videotape recorder decks, videodisc recorders/players
and the like.”
The following disclaimer is required by Altura Software, Inc. for the use of its Mac2Win software and Sample
Source Code:
©1993–1998 Altura Software, Inc.
The following disclaimer is required by Ultimatte Corporation:
Certain real-time compositing capabilities are provided under a license of such technology from Ultimatte Corporation and are
subject to copyright protection.
The following disclaimer is required by 3Prong.com Inc.:
Certain waveform and vector monitoring capabilities are provided under a license from 3Prong.com Inc.
The following disclaimer is required by Interplay Entertainment Corp.:
The “Interplay” name is used with the permission of Interplay Entertainment Corp., which bears no responsibility for Avid
products.
This product includes portions of the Alloy Look & Feel software from Incors GmbH.
This product includes software developed by the Apache Software Foundation (http://www.apache.org/).
© DevelopMentor
This product may include the JCifs library, for which the following notice applies:
JCifs © Copyright 2004, The JCIFS Project, is licensed under LGPL (http://jcifs.samba.org/). See the LGPL.txt file in the Third
Party Software directory on the installation CD.
Avid Interplay contains components licensed from LavanTech. These components may only be used as part of and in
connection with Avid Interplay.
Attn. Government User(s). Restricted Rights Legend
U.S. GOVERNMENT RESTRICTED RIGHTS. This Software and its documentation are “commercial computer software” or
“commercial computer software documentation.” In the event that such Software or documentation is acquired by or on behalf
of a unit or agency of the U.S. Government, all rights with respect to this Software and documentation are subject to the terms
of the License Agreement, pursuant to FAR §12.212(a) and/or DFARS §227.7202-1(a), as applicable.
Trademarks
003, 192 Digital I/O, 192 I/O, 96 I/O, 96i I/O, Adrenaline, AirSpeed, ALEX, Alienbrain, AME, AniMatte, Archive, Archive II,
Assistant Station, AudioPages, AudioStation, AutoLoop, AutoSync, Avid, Avid Active, Avid Advanced Response, Avid DNA,
Avid DNxcel, Avid DNxHD, Avid DS Assist Station, Avid Liquid, Avid Media Engine, Avid Media Processor, Avid MEDIArray,
Avid Mojo, Avid Remote Response, Avid Unity, Avid Unity ISIS, Avid VideoRAID, AvidRAID, AvidShare, AVIDstripe, AVX,
Axiom, Beat Detective, Beauty Without The Bandwidth, Beyond Reality, BF Essentials, Bomb Factory, Boom, Bruno, C|24,
CaptureManager, ChromaCurve, ChromaWheel, Cineractive Engine, Cineractive Player, Cineractive Viewer, Color Conductor,
Command|24, Command|8, Conectiv, Control|24, Cosmonaut Voice, CountDown, d2, d3, DAE, Dazzle,
Dazzle Digital Video Creator, D-Command, D-Control, Deko, DekoCast, D-Fi, D-fx, Digi 003, DigiBase, DigiDelivery,
Digidesign, Digidesign Audio Engine, Digidesign Development Partners, Digidesign Intelligent Noise Reduction,
Digidesign TDM Bus, DigiLink, DigiMeter, DigiPanner, DigiProNet, DigiRack, DigiSerial, DigiSnake, DigiSystem,
Digital Choreography, Digital Nonlinear Accelerator, DigiTest, DigiTranslator, DigiWear, DINR, DNxchange, DPP-1, D-Show,
DSP Manager, DS-StorageCalc, DV Toolkit, DVD Complete, D-Verb, Eleven, EM, EveryPhase, Expander, ExpertRender,
Fader Pack, Fairchild, Fastbreak, Fast Track, Film Cutter, FilmScribe, Flexevent, FluidMotion, Frame Chase, FXDeko,
HD Core, HD Process, HDPack, Home-to-Hollywood, HYBRID, HyperControl, HyperSPACE, HyperSPACE HDCAM,
iKnowledge, Image Independence, Impact, Improv, iNEWS, iNEWS Assign, iNEWS ControlAir, Instantwrite, Instinct,
Intelligent Content Management, Intelligent Digital Actor Technology, IntelliRender, Intelli-Sat,
Intelli-sat Broadcasting Recording Manager, InterFX, Interplay, inTONE, Intraframe, iS Expander, ISIS, IsoSync, iS9, iS18,
iS23, iS36, ISIS, IsoSync, KeyRig, KeyStudio, LaunchPad, LeaderPlus, LFX, Lightning, Link & Sync, ListSync, LKT-200, Lo-Fi,
Luna, MachineControl, Magic Mask, Make Anything Hollywood, make manage move | media, Marquee, MassivePack,
Massive Pack Pro, M-Audio, M-Audio Micro, Maxim, Mbox, Media Composer, MediaDock, MediaDock Shuttle, MediaFlow,
4
Page 5

MediaLog, MediaMatch, MediaMix, Media Reader, Media Recorder, MEDIArray, MediaServer, MediaShare, MetaFuze,
MetaSync, MicroTrack, MIDI I/O, Midiman, Mix Rack, MixLab, Moviebox, Moviestar, MultiShell, NaturalMatch, NewsCutter,
NewsView, Nitris, NL3D, NLP, Nova, NRV-10 interFX, NSDOS, NSWIN, Octane, OMF, OMF Interchange, OMM, OnDVD,
Open Media Framework, Open Media Management, Ozone, Ozonic, Painterly Effects, Palladium, Personal Q, PET, Pinnacle,
Pinnacle DistanTV, Pinnacle GenieBox, Pinnacle HomeMusic, Pinnacle MediaSuite, Pinnacle Mobile Media,
Pinnacle Scorefitter, Pinnacle Studio, Pinnacle Studio MovieBoard, Pinnacle Systems, Pinnacle VideoSpin, Podcast Factory,
PowerSwap, PRE, ProControl, ProEncode, Profiler, Pro Tools|HD, Pro Tools LE, Pro Tools M-Powered, Pro Transfer, Pro Tools,
QuickPunch, QuietDrive, Realtime Motion Synthesis, Recti-Fi, Reel Tape Delay, Reel Tape Flanger, Reel Tape Saturation,
Reprise, Res Rocket Surfer, Reso, RetroLoop, Reverb One, ReVibe, Revolution, rS9, rS18, RTAS, Salesview, Sci-Fi, Scorch,
Scorefitter, ScriptSync, SecureProductionEnvironment, Serv|LT, Serv|GT, Session, Shape-to-Shape, ShuttleCase, Sibelius,
SIDON, SimulPlay, SimulRecord, Slightly Rude Compressor, Smack!, Soft SampleCell, Soft-Clip Limiter, Solaris,
SoundReplacer, SPACE, SPACEShift, SpectraGraph, SpectraMatte, SteadyGlide, Streamfactory, Streamgenie, StreamRAID,
Strike, Structure, Studiophile, SubCap, Sundance Digital, Sundance, SurroundScope, Symphony, SYNC HD, Synchronic,
SynchroScope, SYNC I/O, Syntax, TDM FlexCable, TechFlix, Tel-Ray, Thunder, Titansync, Titan, TL Aggro, TL AutoPan,
TL Drum Rehab, TL Everyphase, TL Fauxlder, TL In Tune, TL MasterMeter, TL Metro, TL Space, TL Utilities,
tools for storytellers, Torq, Torq Xponent, Transfuser, Transit, TransJammer, Trigger Finger, Trillium Lane Labs, TruTouch,
UnityRAID, Vari-Fi, Velvet, Video the Web Way, VideoRAID, VideoSPACE, VideoSpin, VTEM, Work-N-Play, Xdeck, X-Form,
Xmon, XPAND!, Xponent, X-Session, and X-Session Pro are either registered trademarks or trademarks of Avid Technology,
Inc. in the United States and/or other countries.
Adobe and Photoshop are either registered trademarks or trademarks of Adobe Systems Incorporated in the United States
and/or other countries. Apple and Macintosh are trademarks of Apple Computer, Inc., registered in the U.S. and other
countries. Windows is either a registered trademark or trademark of Microsoft Corporation in the United States and/or other
countries. All other trademarks contained herein are the property of their respective owners.
Footage
Arri — Courtesy of Arri/Fauer — John Fauer, Inc.
Bell South “Anticipation” — Courtesy of Two Headed Monster — Tucker/Wayne Atlanta/GMS.
Canyonlands — Courtesy of the National Park Service/Department of the Interior.
Eco Challenge British Columbia — Courtesy of Eco Challenge Lifestyles, Inc., All Rights Reserved.
Eco Challenge Morocco — Courtesy of Discovery Communications, Inc.
It’s Shuttletime — Courtesy of BCP & Canadian Airlines.
Nestlé Coffee Crisp — Courtesy of MacLaren McCann Canada.
Saturn “Calvin Egg” — Courtesy of Cossette Communications.
“Tigers: Tracking a Legend” — Courtesy of www.wildlifeworlds.com, Carol Amore, Executive Producer.
"The Big Swell" — Courtesy of Swell Pictures, Inc.
Windhorse — Courtesy of Paul Wagner Productions.
Arizona Images — KNTV Production — Courtesy of Granite Broadcasting, Inc.,
Editor/Producer Bryan Foote.
Canyonlands — Courtesy of the National Park Service/Department of the Interior.
Ice Island — Courtesy of Kurtis Productions, Ltd.
Tornados + Belle Isle footage — Courtesy of KWTV News 9.
WCAU Fire Story — Courtesy of NBC-10, Philadelphia, PA.
Women in Sports – Paragliding — Courtesy of Legendary Entertainment, Inc.
Avid Media Composer and NewsCutter Effects and Color Correction Guide • 0130-30394-01 Rev A •
June 2010
5
Page 6

6
Page 7

Contents
Using This Guide . . . . . . . . . . . . . . . . . . . . . . . . . . . . . . . . . . . . . . . . . . . . 17
Symbols and Conventions . . . . . . . . . . . . . . . . . . . . . . . . . . . . . . . . . . . . . . . . . . . . 17
If You Need Help. . . . . . . . . . . . . . . . . . . . . . . . . . . . . . . . . . . . . . . . . . . . . . . . . . . . 18
Accessing the Goodies Folder . . . . . . . . . . . . . . . . . . . . . . . . . . . . . . . . . . . . . . . . . 19
Avid Training Services . . . . . . . . . . . . . . . . . . . . . . . . . . . . . . . . . . . . . . . . . . . . . . . 19
Chapter 1 Effects Concepts and Settings . . . . . . . . . . . . . . . . . . . . . . . . . . . . . . . . . 21
Types of Effects . . . . . . . . . . . . . . . . . . . . . . . . . . . . . . . . . . . . . . . . . . . . . . . . . . . . 21
Real-Time Effects and Non-Real-Time Effects . . . . . . . . . . . . . . . . . . . . . . . . . . . . . 24
Color Coding on Effect Icons . . . . . . . . . . . . . . . . . . . . . . . . . . . . . . . . . . . . . . . . . . 25
Understanding the Effect Palette . . . . . . . . . . . . . . . . . . . . . . . . . . . . . . . . . . . . . . . 26
Displaying and Adjusting the Effect Palette . . . . . . . . . . . . . . . . . . . . . . . . . . . . . . . 26
Working with Effects in HD and in Progressive Frame Projects . . . . . . . . . . . . . . . . 27
Changing Timeline View Settings for Effects . . . . . . . . . . . . . . . . . . . . . . . . . . . . . . 29
Adjusting Trim Settings for Effects . . . . . . . . . . . . . . . . . . . . . . . . . . . . . . . . . . . . . . 30
Setting Effect Grid Options . . . . . . . . . . . . . . . . . . . . . . . . . . . . . . . . . . . . . . . . . . . . 31
Setting Effect Aperture Options. . . . . . . . . . . . . . . . . . . . . . . . . . . . . . . . . . . . . . . . . 31
Chapter 2 Basics of Effects Editing . . . . . . . . . . . . . . . . . . . . . . . . . . . . . . . . . . . . . . 35
Applying Effects . . . . . . . . . . . . . . . . . . . . . . . . . . . . . . . . . . . . . . . . . . . . . . . . . . . . 35
Deleting Effects in a Sequence. . . . . . . . . . . . . . . . . . . . . . . . . . . . . . . . . . . . . . . . . 39
Sizing Effects to Fit the Media. . . . . . . . . . . . . . . . . . . . . . . . . . . . . . . . . . . . . . . . . . 41
Adjusting Effects . . . . . . . . . . . . . . . . . . . . . . . . . . . . . . . . . . . . . . . . . . . . . . . . . . . . 41
Updating and Reverting Existing Effects in Sequences . . . . . . . . . . . . . . . . . . . . . . 44
Working with Effect Templates . . . . . . . . . . . . . . . . . . . . . . . . . . . . . . . . . . . . . . . . . 47
Promoting Existing Effect Templates . . . . . . . . . . . . . . . . . . . . . . . . . . . . . . . . . . . . 49
Playing Effects . . . . . . . . . . . . . . . . . . . . . . . . . . . . . . . . . . . . . . . . . . . . . . . . . . . . . 50
Basics of Effects Rendering . . . . . . . . . . . . . . . . . . . . . . . . . . . . . . . . . . . . . . . . . . . 53
7
Page 8

Chapter 3 Applying and Customizing Effects . . . . . . . . . . . . . . . . . . . . . . . . . . . . . . 63
Applying Dissolve Effects . . . . . . . . . . . . . . . . . . . . . . . . . . . . . . . . . . . . . . . . . . . . . 63
Working with the Quick Transition Dialog Box . . . . . . . . . . . . . . . . . . . . . . . . . . . . . 66
Adjusting Transitions in the Timeline . . . . . . . . . . . . . . . . . . . . . . . . . . . . . . . . . . . . 74
Preserving Effect Transitions in the Timeline. . . . . . . . . . . . . . . . . . . . . . . . . . . . . . 75
Replacing an Effect in Effect Mode . . . . . . . . . . . . . . . . . . . . . . . . . . . . . . . . . . . . . 76
Using the Effect Preview Monitor . . . . . . . . . . . . . . . . . . . . . . . . . . . . . . . . . . . . . . . 76
Stepping Through Field-Based Media . . . . . . . . . . . . . . . . . . . . . . . . . . . . . . . . . . . 86
Using the Effect Editor . . . . . . . . . . . . . . . . . . . . . . . . . . . . . . . . . . . . . . . . . . . . . . . 87
Manipulating Effects Directly in the Effect Preview Monitor . . . . . . . . . . . . . . . . . . . 97
Chapter 4 Working with Keyframes . . . . . . . . . . . . . . . . . . . . . . . . . . . . . . . . . . . . . . 99
Understanding Keyframes . . . . . . . . . . . . . . . . . . . . . . . . . . . . . . . . . . . . . . . . . . . . 99
Track Types for Advanced Keyframes . . . . . . . . . . . . . . . . . . . . . . . . . . . . . . . . . . 101
Viewing Advanced Keyframe Graphs. . . . . . . . . . . . . . . . . . . . . . . . . . . . . . . . . . . 102
Manipulating Advanced Keyframes . . . . . . . . . . . . . . . . . . . . . . . . . . . . . . . . . . . . 109
Controls and Settings for Advanced Keyframes. . . . . . . . . . . . . . . . . . . . . . . . . . . 140
Working with Standard Keyframes. . . . . . . . . . . . . . . . . . . . . . . . . . . . . . . . . . . . . 147
Chapter 5 Playing Effects, Rendering Effects, and Managing Effect Media Files 151
Real-Time Playback of Video Effects. . . . . . . . . . . . . . . . . . . . . . . . . . . . . . . . . . . 151
ExpertRender . . . . . . . . . . . . . . . . . . . . . . . . . . . . . . . . . . . . . . . . . . . . . . . . . . . . . 158
Creating and Using Render Settings . . . . . . . . . . . . . . . . . . . . . . . . . . . . . . . . . . . 167
Render Settings Options . . . . . . . . . . . . . . . . . . . . . . . . . . . . . . . . . . . . . . . . . . . . 169
Using Partial Render . . . . . . . . . . . . . . . . . . . . . . . . . . . . . . . . . . . . . . . . . . . . . . . 171
Using 16-Bit Processing Support for Rendered Effects . . . . . . . . . . . . . . . . . . . . . 173
Ensuring the Quality Level of Precomputed Clips . . . . . . . . . . . . . . . . . . . . . . . . . 175
Rendering 3D Effects Using the HQ (Highest Quality) Option . . . . . . . . . . . . . . . . 176
Rendering Effects for the Media Station XL . . . . . . . . . . . . . . . . . . . . . . . . . . . . . . 178
Managing Effect Media Files . . . . . . . . . . . . . . . . . . . . . . . . . . . . . . . . . . . . . . . . . 181
Chapter 6 Working with Plug-In Effects. . . . . . . . . . . . . . . . . . . . . . . . . . . . . . . . . . 185
Understanding AVX Plug-Ins . . . . . . . . . . . . . . . . . . . . . . . . . . . . . . . . . . . . . . . . . 185
Freeing Memory Used by AVX 1.x Plug-ins. . . . . . . . . . . . . . . . . . . . . . . . . . . . . . 186
Installing AVX Plug-ins. . . . . . . . . . . . . . . . . . . . . . . . . . . . . . . . . . . . . . . . . . . . . . 187
Locating the AVX 1.x Plug-Ins Folder (Windows Only) . . . . . . . . . . . . . . . . . . . . . 188
8
Page 9

Updating and Promoting AVX Plug-ins . . . . . . . . . . . . . . . . . . . . . . . . . . . . . . . . . . 189
Assigning Multiple Tracks in Plug-in Effects . . . . . . . . . . . . . . . . . . . . . . . . . . . . . . 191
Using AVX Plug-In Controls . . . . . . . . . . . . . . . . . . . . . . . . . . . . . . . . . . . . . . . . . . 191
Using the Client Monitor to Preview a Plug-In Effect . . . . . . . . . . . . . . . . . . . . . . . 192
Troubleshooting AVX Plug-Ins . . . . . . . . . . . . . . . . . . . . . . . . . . . . . . . . . . . . . . . . 192
Working with the Avid After Effects EMP Plug-In (Windows Only) . . . . . . . . . . . . . 194
Considerations for Using the Avid After Effects EMP Plug-in (Windows Only). . . . 196
Chapter 7 Creating and Customizing Motion Effects. . . . . . . . . . . . . . . . . . . . . . . 197
Understanding Motion Effects . . . . . . . . . . . . . . . . . . . . . . . . . . . . . . . . . . . . . . . . . 198
Creating Traditional Motion Effects . . . . . . . . . . . . . . . . . . . . . . . . . . . . . . . . . . . . . 199
Playing and Rendering Motion Effects . . . . . . . . . . . . . . . . . . . . . . . . . . . . . . . . . . 207
Understanding Timewarp Effects . . . . . . . . . . . . . . . . . . . . . . . . . . . . . . . . . . . . . . 210
Creating Timewarp Effects . . . . . . . . . . . . . . . . . . . . . . . . . . . . . . . . . . . . . . . . . . . 213
Promoting a Traditional Motion Effect to Timewarp . . . . . . . . . . . . . . . . . . . . . . . . 213
Using the Motion Effect Editor. . . . . . . . . . . . . . . . . . . . . . . . . . . . . . . . . . . . . . . . . 215
Scaling a Graph Display in the Motion Effect Editor . . . . . . . . . . . . . . . . . . . . . . . . 217
Using the Source Anchor Frame. . . . . . . . . . . . . . . . . . . . . . . . . . . . . . . . . . . . . . . 218
Using Adaptive Deinterlacing . . . . . . . . . . . . . . . . . . . . . . . . . . . . . . . . . . . . . . . . . 219
Motion Effect Editor Reference . . . . . . . . . . . . . . . . . . . . . . . . . . . . . . . . . . . . . . . . 220
Rendering Options for Timewarp Effects . . . . . . . . . . . . . . . . . . . . . . . . . . . . . . . . 224
Timewarp Speed Graph Reference . . . . . . . . . . . . . . . . . . . . . . . . . . . . . . . . . . . . 226
Timewarp Position Graph Reference . . . . . . . . . . . . . . . . . . . . . . . . . . . . . . . . . . . 228
Timewarp Effect Examples . . . . . . . . . . . . . . . . . . . . . . . . . . . . . . . . . . . . . . . . . . . 229
Understanding FluidMotion Timewarp Effects . . . . . . . . . . . . . . . . . . . . . . . . . . . . 238
FluidMotion Workflow . . . . . . . . . . . . . . . . . . . . . . . . . . . . . . . . . . . . . . . . . . . . . . . 239
Using FluidMotion Edit . . . . . . . . . . . . . . . . . . . . . . . . . . . . . . . . . . . . . . . . . . . . . . 240
Example of Correcting FluidMotion Artifacts . . . . . . . . . . . . . . . . . . . . . . . . . . . . . . 243
Timewarp Preset Effects . . . . . . . . . . . . . . . . . . . . . . . . . . . . . . . . . . . . . . . . . . . . . 247
FluidFilm Preset Effects . . . . . . . . . . . . . . . . . . . . . . . . . . . . . . . . . . . . . . . . . . . . . 247
Setting Source and Output Options for Format Conversion with
Timewarp Effects . . . . . . . . . . . . . . . . . . . . . . . . . . . . . . . . . . . . . . . . . . . . . . . . . 249
9
Page 10

Chapter 8 Layered and Nested Effects . . . . . . . . . . . . . . . . . . . . . . . . . . . . . . . . . . 251
Key Effects . . . . . . . . . . . . . . . . . . . . . . . . . . . . . . . . . . . . . . . . . . . . . . . . . . . . . . . 251
Working with Imported Graphics and Animation . . . . . . . . . . . . . . . . . . . . . . . . . . 265
Nesting Effects . . . . . . . . . . . . . . . . . . . . . . . . . . . . . . . . . . . . . . . . . . . . . . . . . . . . 268
Submaster Editing . . . . . . . . . . . . . . . . . . . . . . . . . . . . . . . . . . . . . . . . . . . . . . . . . 276
Collapsing Layers into a Submaster Effect . . . . . . . . . . . . . . . . . . . . . . . . . . . . . . 278
Performing a Video Mixdown . . . . . . . . . . . . . . . . . . . . . . . . . . . . . . . . . . . . . . . . . 280
Chapter 9 Working with Camera Effects . . . . . . . . . . . . . . . . . . . . . . . . . . . . . . . . . 283
Using the Reformat Effects . . . . . . . . . . . . . . . . . . . . . . . . . . . . . . . . . . . . . . . . . . 283
Working with the Pan and Scan Effect. . . . . . . . . . . . . . . . . . . . . . . . . . . . . . . . . . 284
Using Avid Pan & Zoom . . . . . . . . . . . . . . . . . . . . . . . . . . . . . . . . . . . . . . . . . . . . . 296
Chapter 10 Motion Tracking and Stabilization . . . . . . . . . . . . . . . . . . . . . . . . . . . . . 309
Understanding Motion Tracking . . . . . . . . . . . . . . . . . . . . . . . . . . . . . . . . . . . . . . . 310
Workflow for Motion Tracking. . . . . . . . . . . . . . . . . . . . . . . . . . . . . . . . . . . . . . . . . 312
Effects and Effect Parameters That Use Tracking Data. . . . . . . . . . . . . . . . . . . . . 313
Understanding the Tracking Interface . . . . . . . . . . . . . . . . . . . . . . . . . . . . . . . . . . 314
Opening The Tracking Window . . . . . . . . . . . . . . . . . . . . . . . . . . . . . . . . . . . . . . . 316
Tracking Window Components . . . . . . . . . . . . . . . . . . . . . . . . . . . . . . . . . . . . . . . 317
Setting Up an Effect for Tracking . . . . . . . . . . . . . . . . . . . . . . . . . . . . . . . . . . . . . . 319
Preparing to Generate Tracking Data . . . . . . . . . . . . . . . . . . . . . . . . . . . . . . . . . . 320
Generating Tracking Data . . . . . . . . . . . . . . . . . . . . . . . . . . . . . . . . . . . . . . . . . . . 331
Offset Tracking. . . . . . . . . . . . . . . . . . . . . . . . . . . . . . . . . . . . . . . . . . . . . . . . . . . . 332
Understanding Tracking Data. . . . . . . . . . . . . . . . . . . . . . . . . . . . . . . . . . . . . . . . . 335
Customizing the Display of Tracking Data . . . . . . . . . . . . . . . . . . . . . . . . . . . . . . . 337
Setting the Reference Frame for a Tracker . . . . . . . . . . . . . . . . . . . . . . . . . . . . . . 338
Understanding the SteadyGlide and Smoothing Options for Tracking. . . . . . . . . . 339
Using SteadyGlide or Smoothing to Process Tracking Data . . . . . . . . . . . . . . . . . 340
Selecting, Deleting, and Moving Tracking Data Points . . . . . . . . . . . . . . . . . . . . . 341
Moving Tracker Data Points Outside the Frame Boundary . . . . . . . . . . . . . . . . . . 344
Stretching a Range of Tracker Data Points . . . . . . . . . . . . . . . . . . . . . . . . . . . . . . 344
Limiting the Effect of Position Tracking Data to a Single Axis . . . . . . . . . . . . . . . . 346
Playing Effects That Use Tracking Data. . . . . . . . . . . . . . . . . . . . . . . . . . . . . . . . . 347
Understanding Stabilizing. . . . . . . . . . . . . . . . . . . . . . . . . . . . . . . . . . . . . . . . . . . . 348
10
Page 11

Stabilizing an Image . . . . . . . . . . . . . . . . . . . . . . . . . . . . . . . . . . . . . . . . . . . . . . . . 349
Reviewing and Adjusting a Stabilized Image . . . . . . . . . . . . . . . . . . . . . . . . . . . . . 351
Guidelines for Using Multiple Trackers When Stabilizing . . . . . . . . . . . . . . . . . . . . 353
Using the Region Stabilize Effect . . . . . . . . . . . . . . . . . . . . . . . . . . . . . . . . . . . . . . 353
Making Adjustments to the Region Stabilize Region of Interest . . . . . . . . . . . . . . . 355
Editing Segments That Use Tracking Data . . . . . . . . . . . . . . . . . . . . . . . . . . . . . . . 356
Reusing Existing Tracking Data . . . . . . . . . . . . . . . . . . . . . . . . . . . . . . . . . . . . . . . 357
Copying and Pasting Tracking Data . . . . . . . . . . . . . . . . . . . . . . . . . . . . . . . . . . . . 358
Conforming Symphony Meridien Sequences with Tracking Data . . . . . . . . . . . . . . 359
Examples of Effects Using Motion Tracking . . . . . . . . . . . . . . . . . . . . . . . . . . . . . . 359
Chapter 11 Working with 3D Effects . . . . . . . . . . . . . . . . . . . . . . . . . . . . . . . . . . . . . 363
Understanding 3D Effects . . . . . . . . . . . . . . . . . . . . . . . . . . . . . . . . . . . . . . . . . . . . 363
Applying the 3D Warp Effect . . . . . . . . . . . . . . . . . . . . . . . . . . . . . . . . . . . . . . . . . . 364
Using Xpress 3D Effects . . . . . . . . . . . . . . . . . . . . . . . . . . . . . . . . . . . . . . . . . . . . . 365
Promoting 2D Effects to 3D Effects. . . . . . . . . . . . . . . . . . . . . . . . . . . . . . . . . . . . . 366
Using Matte Keys with 3D Effects . . . . . . . . . . . . . . . . . . . . . . . . . . . . . . . . . . . . . . 367
Real-Time Playback of 3D Effects . . . . . . . . . . . . . . . . . . . . . . . . . . . . . . . . . . . . . 368
Understanding 3D Geometry and Degrees of Rotation . . . . . . . . . . . . . . . . . . . . . 368
Working with 3D Effects Parameters . . . . . . . . . . . . . . . . . . . . . . . . . . . . . . . . . . . 370
Manipulating 3D Effects Directly . . . . . . . . . . . . . . . . . . . . . . . . . . . . . . . . . . . . . . . 371
Applying 3D Effects: Examples . . . . . . . . . . . . . . . . . . . . . . . . . . . . . . . . . . . . . . . . 372
Chapter 12 Creating Titles . . . . . . . . . . . . . . . . . . . . . . . . . . . . . . . . . . . . . . . . . . . . . 383
Opening the Title Tools . . . . . . . . . . . . . . . . . . . . . . . . . . . . . . . . . . . . . . . . . . . . . . 384
Using Marquee . . . . . . . . . . . . . . . . . . . . . . . . . . . . . . . . . . . . . . . . . . . . . . . . . . . . 385
Overview of Title Creation in the Title Tool . . . . . . . . . . . . . . . . . . . . . . . . . . . . . . . 386
Installing Fonts for Use in the Title Tool . . . . . . . . . . . . . . . . . . . . . . . . . . . . . . . . . 386
Understanding the Title Tool . . . . . . . . . . . . . . . . . . . . . . . . . . . . . . . . . . . . . . . . . . 387
Toolbar Reference for the Title Tool . . . . . . . . . . . . . . . . . . . . . . . . . . . . . . . . . . . . 388
Using the Selection and Text Tools . . . . . . . . . . . . . . . . . . . . . . . . . . . . . . . . . . . . 390
Understanding the Drawing Environment . . . . . . . . . . . . . . . . . . . . . . . . . . . . . . . . 392
Setting Up the Drawing Environment . . . . . . . . . . . . . . . . . . . . . . . . . . . . . . . . . . . 394
Creating Text. . . . . . . . . . . . . . . . . . . . . . . . . . . . . . . . . . . . . . . . . . . . . . . . . . . . . . 395
Sizing and Positioning Text Objects . . . . . . . . . . . . . . . . . . . . . . . . . . . . . . . . . . . . 396
11
Page 12

Editing a Text String. . . . . . . . . . . . . . . . . . . . . . . . . . . . . . . . . . . . . . . . . . . . . . . . 397
Formatting Text . . . . . . . . . . . . . . . . . . . . . . . . . . . . . . . . . . . . . . . . . . . . . . . . . . . 397
Creating Graphic Objects. . . . . . . . . . . . . . . . . . . . . . . . . . . . . . . . . . . . . . . . . . . . 402
Creating Rolling and Crawling Titles . . . . . . . . . . . . . . . . . . . . . . . . . . . . . . . . . . . 404
Modifying and Manipulating Title Objects. . . . . . . . . . . . . . . . . . . . . . . . . . . . . . . . 411
Modifying Box Corners, Lines, and Borders on Title Objects. . . . . . . . . . . . . . . . . 412
Understanding Color and Transparency Controls in the Title Tool . . . . . . . . . . . . 415
Selecting Colors and Setting Transparency. . . . . . . . . . . . . . . . . . . . . . . . . . . . . . 417
Adding Shadows to Title Objects . . . . . . . . . . . . . . . . . . . . . . . . . . . . . . . . . . . . . . 420
Adjusting Shadows on Title Objects. . . . . . . . . . . . . . . . . . . . . . . . . . . . . . . . . . . . 421
Manipulating Title Objects . . . . . . . . . . . . . . . . . . . . . . . . . . . . . . . . . . . . . . . . . . . 423
Saving Titles. . . . . . . . . . . . . . . . . . . . . . . . . . . . . . . . . . . . . . . . . . . . . . . . . . . . . . 426
Revising a Title in a Bin . . . . . . . . . . . . . . . . . . . . . . . . . . . . . . . . . . . . . . . . . . . . . 428
Creating and Using Title Templates. . . . . . . . . . . . . . . . . . . . . . . . . . . . . . . . . . . . 429
Working with Multiple Title Formats . . . . . . . . . . . . . . . . . . . . . . . . . . . . . . . . . . . . 430
Saving and Recalling Title Styles. . . . . . . . . . . . . . . . . . . . . . . . . . . . . . . . . . . . . . 432
Exporting a Title as a Graphics File . . . . . . . . . . . . . . . . . . . . . . . . . . . . . . . . . . . . 438
Chapter 13 Editing with Titles. . . . . . . . . . . . . . . . . . . . . . . . . . . . . . . . . . . . . . . . . . . 439
Displaying Title Clips and Frames in Bins . . . . . . . . . . . . . . . . . . . . . . . . . . . . . . . 440
Editing a Title into a Sequence. . . . . . . . . . . . . . . . . . . . . . . . . . . . . . . . . . . . . . . . 441
Removing a Title . . . . . . . . . . . . . . . . . . . . . . . . . . . . . . . . . . . . . . . . . . . . . . . . . . 445
Replacing a Title. . . . . . . . . . . . . . . . . . . . . . . . . . . . . . . . . . . . . . . . . . . . . . . . . . . 445
Fading a Title . . . . . . . . . . . . . . . . . . . . . . . . . . . . . . . . . . . . . . . . . . . . . . . . . . . . . 446
Setting Marks in a Rolling or Crawling Title . . . . . . . . . . . . . . . . . . . . . . . . . . . . . . 446
Trimming the Duration of Rolling and Crawling Titles . . . . . . . . . . . . . . . . . . . . . . 446
Adjusting Title Effect Parameters. . . . . . . . . . . . . . . . . . . . . . . . . . . . . . . . . . . . . . 447
Revising a Title in a Sequence. . . . . . . . . . . . . . . . . . . . . . . . . . . . . . . . . . . . . . . . 449
Working with Existing Multiple Format Titles . . . . . . . . . . . . . . . . . . . . . . . . . . . . . 450
Replacing Fill Tracks in a Title . . . . . . . . . . . . . . . . . . . . . . . . . . . . . . . . . . . . . . . . 451
Rendering Titles . . . . . . . . . . . . . . . . . . . . . . . . . . . . . . . . . . . . . . . . . . . . . . . . . . . 451
Re-creating Title Media . . . . . . . . . . . . . . . . . . . . . . . . . . . . . . . . . . . . . . . . . . . . . 451
Troubleshooting Titles . . . . . . . . . . . . . . . . . . . . . . . . . . . . . . . . . . . . . . . . . . . . . . 455
12
Page 13

Chapter 14 Working with the SubCap Effect. . . . . . . . . . . . . . . . . . . . . . . . . . . . . . . 459
Understanding the SubCap Effect. . . . . . . . . . . . . . . . . . . . . . . . . . . . . . . . . . . . . . 460
How the SubCap Effect Handles Caption Files. . . . . . . . . . . . . . . . . . . . . . . . . . . . 461
Applying the SubCap Effect . . . . . . . . . . . . . . . . . . . . . . . . . . . . . . . . . . . . . . . . . . 463
Entering Caption Text Directly in the Effect Editor . . . . . . . . . . . . . . . . . . . . . . . . . 465
Importing a Caption File . . . . . . . . . . . . . . . . . . . . . . . . . . . . . . . . . . . . . . . . . . . . . 465
Adding Information to a SubCap Effect. . . . . . . . . . . . . . . . . . . . . . . . . . . . . . . . . . 467
Editing Text in the Master Caption List . . . . . . . . . . . . . . . . . . . . . . . . . . . . . . . . . . 468
Adjusting SubCap Effect Parameters . . . . . . . . . . . . . . . . . . . . . . . . . . . . . . . . . . . 468
Synchronizing SubCap Effect Parameters and Information . . . . . . . . . . . . . . . . . . 469
Exporting SubCap Effect Data to Caption Files . . . . . . . . . . . . . . . . . . . . . . . . . . . 470
Working with Unicode Text in the SubCap Effect . . . . . . . . . . . . . . . . . . . . . . . . . . 472
Working with SubCap Effect Stylesheets . . . . . . . . . . . . . . . . . . . . . . . . . . . . . . . . 473
Examples of SubCap Effect Parameter Adjustments . . . . . . . . . . . . . . . . . . . . . . . 476
Chapter 15 Intraframe Editing . . . . . . . . . . . . . . . . . . . . . . . . . . . . . . . . . . . . . . . . . . 479
Understanding the Intraframe Effects . . . . . . . . . . . . . . . . . . . . . . . . . . . . . . . . . . . 479
Rendering Intraframe Effects . . . . . . . . . . . . . . . . . . . . . . . . . . . . . . . . . . . . . . . . . 481
Applying the Paint or AniMatte Effect to a Sequence . . . . . . . . . . . . . . . . . . . . . . . 482
Effect Editor Reference for the Paint and AniMatte Effects . . . . . . . . . . . . . . . . . . 483
Using the Intraframe Drawing Tools . . . . . . . . . . . . . . . . . . . . . . . . . . . . . . . . . . . . 485
Working with Vector-Based Objects . . . . . . . . . . . . . . . . . . . . . . . . . . . . . . . . . . . . 497
Using the Previsualization Marker Tool for Film Projects . . . . . . . . . . . . . . . . . . . . 507
Manipulating Intraframe Objects . . . . . . . . . . . . . . . . . . . . . . . . . . . . . . . . . . . . . . . 509
Layering, Grouping, and Locking Intraframe Objects . . . . . . . . . . . . . . . . . . . . . . . 514
Exporting a Matte Key Created With the AniMatte Effect . . . . . . . . . . . . . . . . . . . . 516
Scratch Removal. . . . . . . . . . . . . . . . . . . . . . . . . . . . . . . . . . . . . . . . . . . . . . . . . . . 519
Intraframe Editing Examples . . . . . . . . . . . . . . . . . . . . . . . . . . . . . . . . . . . . . . . . . . 533
Working with the Blur Effect and Mosaic Effect . . . . . . . . . . . . . . . . . . . . . . . . . . . 546
Chapter 16 PlasmaWipe Effects . . . . . . . . . . . . . . . . . . . . . . . . . . . . . . . . . . . . . . . . . 551
Understanding PlasmaWipe Effects . . . . . . . . . . . . . . . . . . . . . . . . . . . . . . . . . . . . 551
Folder Structure for PlasmaWipe Effects . . . . . . . . . . . . . . . . . . . . . . . . . . . . . . . . 553
Using PlasmaWipe Effects . . . . . . . . . . . . . . . . . . . . . . . . . . . . . . . . . . . . . . . . . . . 554
Creating Gradient Images for PlasmaWipe Effects. . . . . . . . . . . . . . . . . . . . . . . . . 554
13
Page 14

Understanding PlasmaWipe Frame and Border Effects. . . . . . . . . . . . . . . . . . . . . 564
Applying and Adjusting PlasmaWipe Frame and Border Effects . . . . . . . . . . . . . . 566
Creating Custom PlasmaWipe Border and Frame Effects. . . . . . . . . . . . . . . . . . . 567
Using PlasmaWipes with HD Projects . . . . . . . . . . . . . . . . . . . . . . . . . . . . . . . . . . 569
Chapter 17 Effects Reference . . . . . . . . . . . . . . . . . . . . . . . . . . . . . . . . . . . . . . . . . . . 573
Blend Effects . . . . . . . . . . . . . . . . . . . . . . . . . . . . . . . . . . . . . . . . . . . . . . . . . . . . . 575
Box Wipes . . . . . . . . . . . . . . . . . . . . . . . . . . . . . . . . . . . . . . . . . . . . . . . . . . . . . . . 578
Conceal Effects . . . . . . . . . . . . . . . . . . . . . . . . . . . . . . . . . . . . . . . . . . . . . . . . . . . 579
Edge Wipes . . . . . . . . . . . . . . . . . . . . . . . . . . . . . . . . . . . . . . . . . . . . . . . . . . . . . . 580
Film Effects. . . . . . . . . . . . . . . . . . . . . . . . . . . . . . . . . . . . . . . . . . . . . . . . . . . . . . . 581
Generator Effects . . . . . . . . . . . . . . . . . . . . . . . . . . . . . . . . . . . . . . . . . . . . . . . . . . 583
Illusion FX Effects. . . . . . . . . . . . . . . . . . . . . . . . . . . . . . . . . . . . . . . . . . . . . . . . . . 584
Image Effects . . . . . . . . . . . . . . . . . . . . . . . . . . . . . . . . . . . . . . . . . . . . . . . . . . . . . 589
Key Effects . . . . . . . . . . . . . . . . . . . . . . . . . . . . . . . . . . . . . . . . . . . . . . . . . . . . . . . 595
L-Conceal Effects. . . . . . . . . . . . . . . . . . . . . . . . . . . . . . . . . . . . . . . . . . . . . . . . . . 598
Matrix Wipes. . . . . . . . . . . . . . . . . . . . . . . . . . . . . . . . . . . . . . . . . . . . . . . . . . . . . . 599
Motion Effects. . . . . . . . . . . . . . . . . . . . . . . . . . . . . . . . . . . . . . . . . . . . . . . . . . . . . 600
Peel Effects . . . . . . . . . . . . . . . . . . . . . . . . . . . . . . . . . . . . . . . . . . . . . . . . . . . . . . 601
PlasmaWipe Effects . . . . . . . . . . . . . . . . . . . . . . . . . . . . . . . . . . . . . . . . . . . . . . . . 603
Push Effects . . . . . . . . . . . . . . . . . . . . . . . . . . . . . . . . . . . . . . . . . . . . . . . . . . . . . . 604
Reformat Effects. . . . . . . . . . . . . . . . . . . . . . . . . . . . . . . . . . . . . . . . . . . . . . . . . . . 605
Sawtooth Wipes . . . . . . . . . . . . . . . . . . . . . . . . . . . . . . . . . . . . . . . . . . . . . . . . . . . 606
Shape Wipes . . . . . . . . . . . . . . . . . . . . . . . . . . . . . . . . . . . . . . . . . . . . . . . . . . . . . 607
Spin Effects . . . . . . . . . . . . . . . . . . . . . . . . . . . . . . . . . . . . . . . . . . . . . . . . . . . . . . 609
Squeeze Effects . . . . . . . . . . . . . . . . . . . . . . . . . . . . . . . . . . . . . . . . . . . . . . . . . . . 610
Timewarp Effects . . . . . . . . . . . . . . . . . . . . . . . . . . . . . . . . . . . . . . . . . . . . . . . . . . 611
Title Effects. . . . . . . . . . . . . . . . . . . . . . . . . . . . . . . . . . . . . . . . . . . . . . . . . . . . . . . 617
Xpress 3D Effects. . . . . . . . . . . . . . . . . . . . . . . . . . . . . . . . . . . . . . . . . . . . . . . . . . 619
Comparison of Similar Effects . . . . . . . . . . . . . . . . . . . . . . . . . . . . . . . . . . . . . . . . 620
14
Page 15

Chapter 18 Effects Parameter Reference . . . . . . . . . . . . . . . . . . . . . . . . . . . . . . . . . 621
Color Parameter Controls . . . . . . . . . . . . . . . . . . . . . . . . . . . . . . . . . . . . . . . . . . . . 622
Common 2D Effect Parameters . . . . . . . . . . . . . . . . . . . . . . . . . . . . . . . . . . . . . . . 623
Film Effects Blowup Parameter. . . . . . . . . . . . . . . . . . . . . . . . . . . . . . . . . . . . . . . . 634
Generator Effect Parameters . . . . . . . . . . . . . . . . . . . . . . . . . . . . . . . . . . . . . . . . . 634
Illusion FX Effect Parameters . . . . . . . . . . . . . . . . . . . . . . . . . . . . . . . . . . . . . . . . . 644
Image Effect Parameters . . . . . . . . . . . . . . . . . . . . . . . . . . . . . . . . . . . . . . . . . . . . 672
Key Effect Parameters . . . . . . . . . . . . . . . . . . . . . . . . . . . . . . . . . . . . . . . . . . . . . . 697
Motion Effect Parameters . . . . . . . . . . . . . . . . . . . . . . . . . . . . . . . . . . . . . . . . . . . . 715
Reformat Effect Parameters . . . . . . . . . . . . . . . . . . . . . . . . . . . . . . . . . . . . . . . . . . 718
FluidMotion Edit Parameters for Timewarp Effects. . . . . . . . . . . . . . . . . . . . . . . . . 720
Rolling Title and Crawling Title Effect Parameters . . . . . . . . . . . . . . . . . . . . . . . . . 723
3D Effect Parameters . . . . . . . . . . . . . . . . . . . . . . . . . . . . . . . . . . . . . . . . . . . . . . . 724
Chapter 19 Understanding Color Correction Mode . . . . . . . . . . . . . . . . . . . . . . . . . 751
Overview of Color Correction . . . . . . . . . . . . . . . . . . . . . . . . . . . . . . . . . . . . . . . . . 751
Reasons for Making Color Corrections . . . . . . . . . . . . . . . . . . . . . . . . . . . . . . . . . . 753
Entering and Exiting Color Correction Mode. . . . . . . . . . . . . . . . . . . . . . . . . . . . . . 754
The Color Correction Monitors . . . . . . . . . . . . . . . . . . . . . . . . . . . . . . . . . . . . . . . . 754
The Color Correction Tool. . . . . . . . . . . . . . . . . . . . . . . . . . . . . . . . . . . . . . . . . . . . 759
Working with Color Correction Effect Templates . . . . . . . . . . . . . . . . . . . . . . . . . . 767
Chapter 20 Performing Color Corrections . . . . . . . . . . . . . . . . . . . . . . . . . . . . . . . . 773
General Workflow for Making Color Corrections. . . . . . . . . . . . . . . . . . . . . . . . . . . 773
Using Automatic Color Corrections . . . . . . . . . . . . . . . . . . . . . . . . . . . . . . . . . . . . . 775
Using the Color Match Control . . . . . . . . . . . . . . . . . . . . . . . . . . . . . . . . . . . . . . . . 782
The HSL (Hue, Saturation, Luminance) Group . . . . . . . . . . . . . . . . . . . . . . . . . . . . 789
The Curves Group. . . . . . . . . . . . . . . . . . . . . . . . . . . . . . . . . . . . . . . . . . . . . . . . . . 797
Keyframing Color Corrections . . . . . . . . . . . . . . . . . . . . . . . . . . . . . . . . . . . . . . . . . 811
Working with the Waveform Monitors and Vectorscope Monitor . . . . . . . . . . . . . . 815
Applying Color Corrections to an Entire Sequence. . . . . . . . . . . . . . . . . . . . . . . . . 824
Using the Color Correction Effect . . . . . . . . . . . . . . . . . . . . . . . . . . . . . . . . . . . . . . 825
Chapter 21 Color Correction Techniques . . . . . . . . . . . . . . . . . . . . . . . . . . . . . . . . . 829
Guiding Principles for Color Correction. . . . . . . . . . . . . . . . . . . . . . . . . . . . . . . . . . 829
Examples of Color Correction Problems . . . . . . . . . . . . . . . . . . . . . . . . . . . . . . . . . 835
15
Page 16

Chapter 22 Safe Colors . . . . . . . . . . . . . . . . . . . . . . . . . . . . . . . . . . . . . . . . . . . . . . . . 843
Overview of Safe Color Limits . . . . . . . . . . . . . . . . . . . . . . . . . . . . . . . . . . . . . . . . 843
Safe Color Settings Options. . . . . . . . . . . . . . . . . . . . . . . . . . . . . . . . . . . . . . . . . . 844
Understanding the Graphical View of Safe Color Settings. . . . . . . . . . . . . . . . . . . 846
Understanding Safe Color Warnings . . . . . . . . . . . . . . . . . . . . . . . . . . . . . . . . . . . 847
Managing Safe Color Warnings . . . . . . . . . . . . . . . . . . . . . . . . . . . . . . . . . . . . . . . 849
Making Adjustments to Achieve Safe Color Values . . . . . . . . . . . . . . . . . . . . . . . . 850
Safe Color Limits with Waveform and Vectorscope Information . . . . . . . . . . . . . . 852
Working with the Safe Color Limiter Effect. . . . . . . . . . . . . . . . . . . . . . . . . . . . . . . 853
Index . . . . . . . . . . . . . . . . . . . . . . . . . . . . . . . . . . . . . . . . . . . . . . . . . . . . . 859
16
Page 17

Using This Guide
This guide provides conceptual information and step-by-step instructions for the effects and
color correction features of your Avid
information for every effect and effect parameter available in your application.
Unless noted otherwise, the material in this document applies to the Windows
Mac OS
on a Windows system, but the information applies to both Windows and Mac OS X systems.
Where differences exist, both Windows and Mac OS X screen shots are shown.
The documentation describes the features and hardware of all models and applies to both
n
the Windows and Mac OS X operating systems. Your system might not contain certain
features and hardware that are covered in the documentation, and might not be available on
both Windows and Mac OS X.
®
X operating systems. The majority of screen shots in this document were captured
®
editing application. It also provides reference
Symbols and Conventions
Avid documentation uses the following symbols and conventions:
Symbol or Convention Meaning or Action
n
c
A note provides important related information, reminders,
recommendations, and strong suggestions.
A caution means that a specific action you take could cause harm to
your computer or cause you to lose data.
®
and
w
> This symbol indicates menu commands (and subcommands) in the
A warning describes an action that could cause you physical harm.
Follow the guidelines in this document or on the unit itself when
handling electrical equipment.
order you select them. For example, File > Import means to open the
File menu and then select the Import command.
This symbol indicates a single-step procedure. Multiple arrows in a list
indicate that you perform one of the actions listed.
Page 18

Symbol or Convention Meaning or Action
(Windows), (Windows
only), (Macintosh), or
(Macintosh only)
Bold font Bold font is primarily used in task instructions to identify user interface
Italic font Italic font is used to emphasize certain words and to indicate variables.
Courier Bold font
Ctrl+key or mouse action Press and hold the first key while you press the last key or perform the
If You Need Help
If you are having trouble using your Avid product:
1. Retry the action, carefully following the instructions given for that task in this guide. It
is especially important to check each step of your workflow.
2. Check the latest information that might have become available after the documentation
was published:
- If the latest information for your Avid product is provided as printed release notes,
they are shipped with your application and are also available online.
This text indicates that the information applies only to the specified
operating system, either Windows or Macintosh OS X.
items and keyboard sequences.
Courier Bold font identifies text that you type.
mouse action. For example, Command+Option+C or Ctrl+drag.
18
- If the latest information for your Avid product is provided as a ReadMe file, it is
supplied on your Avid installation CD or DVD as a PDF document
(README_product.pdf) and is also available online.
You should always check online for the most up-to-date release notes or ReadMe
because the online version is updated whenever new information becomes
available. To view these online versions, select ReadMe from the Help menu, or visit
the Knowledge Base at www.avid.com/readme.
3. Check the documentation that came with your Avid application or your hardware for
maintenance or hardware-related issues.
4. Visit the online Knowledge Base at www.avid.com/onlinesupport. Online services are
available 24 hours per day, 7 days per week. Search this online Knowledge Base to find
answers, to view error messages, to access troubleshooting tips, to download updates,
and to read or join online message-board discussions.
Page 19

Accessing the Goodies Folder
Avid supplies a Goodies folder located on the editing application DVD. Access the Goodies
folder by browsing the DVD. This folder contains programs and files you might find useful
when trying to perform functions beyond the scope of your Avid editing application.
The information in the Goodies folder is provided solely for your reference and as
suggestions for you to decide if any of these products fit into your process. Avid is not
responsible for the manufacture, support, or sales of these products. Avid is also not
responsible for any loss of data or time, or any other adverse results related to the use of
these products. All risks of using such products or accessing such Web sites are entirely your
own. The Web sites listed in the Goodies folder are not under the control of Avid, and Avid
is not responsible for their content, any changes or updates to them, or the collection of any
personal data or information by the operators of such Web sites. All information and product
availability is subject to change without notice.
Avid Training Services
Avid makes lifelong learning, career advancement, and personal development easy and
convenient. Avid understands that the knowledge you need to differentiate yourself is always
changing, and Avid continually updates course content and offers new training delivery
methods that accommodate your pressured and competitive work environment.
Accessing the Goodies Folder
For information on courses/schedules, training centers, certifications, courseware, and
books, please visit www.avid.com/support and follow the Training links, or call Avid Sales
at 800-949-AVID (800-949-2843).
19
Page 20

20
Page 21

1 Effects Concepts and Settings
This chapter describes concepts you should understand before you begin creating effects and
common settings adjustments that affect how you work with effects:
• Types of Effects
• Real-Time Effects and Non-Real-Time Effects
• Color Coding on Effect Icons
• Understanding the Effect Palette
• Displaying and Adjusting the Effect Palette
• Working with Effects in HD and in Progressive Frame Projects
• Changing Timeline View Settings for Effects
• Adjusting Trim Settings for Effects
• Setting Effect Grid Options
• Setting Effect Aperture Options
Types of Effects
You can divide the effects in Avid editing applications into a number of groupings, which are
described in the remainder of this topic.
There is considerable overlap within these groupings. For example, Timewarp effects are
one of the main types of motion effects in Avid editing applications, but they are also
examples of segment effects. The following descriptions give you a basic understanding of
the range of effects available, and an introduction to some of the terminology Avid uses in its
effects documentation.
Transition Effects
You apply transition effects at the cut point between two video clips that are on the same
track (the same video layer) in a sequence. Examples of transition effects are dissolves,
fades, and wipes.
Page 22

1 Effects Concepts and Settings
Segment Effects
You apply segment effects to an entire clip or group of clips in a sequence. For example, you
might apply a Color Effect to several segments in a sequence to tint those segments,
suggesting that the action they contain is taking place in the past.
Segment effects fall into two subgroups:
•Single-layer
You apply a single-layer segment effect to a segment on one video track. A single-layer
segment effect only needs one stream of video to create its effect. For example, the
Mask effect lets you mask out some parts of the video in a segment, replacing it with a
solid color.
• Multilayer
You apply a multilayer segment effect to the top layer or a middle layer of segments that
contain two or more video tracks that will play simultaneously. A multilayer segment
effect requires more than one video stream to create its effect. For example, a
Picture-in-Picture effect displays video from an upper video track inside video from a
lower track.
Motion Effects
22
Motion effects manipulate the motion characteristics in a clip, for example, by freezing
action or by varying the speed at which a clip plays. You create motion effects either by
generating new clips with fixed motion characteristics, or by using the Timewarp effects to
change the motion characteristics of clips already in a sequence. For information on motion
effects, see “Creating and Customizing Motion Effects” on page 197.
Title Effects
Title effects contain text and graphic objects that you create with one of the title tools in your
Avid editing application. You save title effects into bins as a special clip type, and edit them
onto their own layers in a sequence, usually above all other video layers. For information on
title effects, see “Creating Titles” on page 383.
2D Effects and 3D Effects
Effects in Avid editing applications are either 2D or 3D. 2D effects appear to be acting in the
two dimensions of the screen the viewer is watching and do not give an impression of depth.
3D effects give an impression of depth, for example, by wrapping a video image around a
sphere. Some Avid effects are 2D only or 3D only, while others have both 2D and 3D
versions, or can be promoted from 2D to 3D. For specific information on working with 3D
effects, see “Working with 3D Effects” on page 363.
Page 23

Types of Effects
Nested Effects
You apply nested effects inside other effects on the same video layer. Effect nesting allows
you great flexibility to apply multiple effects to the same segment in a sequence. For
example, you might want to apply a color effect within an existing Picture-in-Picture effect.
To do this, you can nest the color effect inside the Picture-in-Picture. For more information,
see “Layered and Nested Effects” on page 251.
Key Effects
Key effects use specific rules to define how parts of one image show through another image.
The best-known example of a key effect is a chroma key, for example, where an actor shot in
front of a blue or green screen appears to be standing in front of another background. The
key effect replaces the blue or green color in the foreground shot with parts of the
background shot. For more information, see “Layered and Nested Effects” on page 251.
Camera Effects
Camera effects control aspect ratio, format, or the apparent motion of the camera. For
example, Avid editing applications can reformat video media to different aspect ratios,
allowing you to select the area of video that is preserved in the new aspect ratio. For more
information, see “Working with Camera Effects” on page 283.
Motion Tracking and Stabilization Effects
Motion tracking lets you track the motion of an area in an image and then use the tracking
data to control the motion of another effect. You can also use tracking to stabilize an image
to compensate for camera motion. For more information, see “Motion Tracking and
Stabilization” on page 309.
Intraframe Effects
Intraframe effects let you perform paint or animated matte effect operations within one or
more individual frames in a clip. For example, you can identify part of an image with
drawing tools and apply a blur to only that part of the image. You can also use this technique
to repair scratches and other flaws on individual frames. For more information, see
“Intraframe Editing” on page 479.
PlasmaWipe Effects
PlasmaWipe effects use gradient image bitmaps to create highly-customizable wipes and
segment effects. You can use one of the many preset effects or create your own using new
gradient images. For more information, see “PlasmaWipe Effects” on page 551.
23
Page 24

1 Effects Concepts and Settings
AVX Plug-In Effects
Avid editing applications support the Avid Visual Extensions (AVX™) standard. AVX is a
cross-platform technology that allows software effect modules (plug-ins) to be dynamically
linked to an Avid editing application. Some effects that Avid supplies with your Avid editing
application use the AVX technology, while others do not. In general, you work in exactly the
same way with both types.
Third-party developers use AVX to create effect plug-ins that you can purchase, install, and
use to extend the effects functionality of your Avid editing application. Third-party AVX
plug-in effects might have controls that look very similar to standard Avid effect controls, or
they might have custom user interfaces.
For more information on working with third-party plug-ins, see “Working with Plug-In
Effects” on page 185.
Real-Time Effects and Non-Real-Time Effects
Effects in Avid editing applications can be either real-time or non-real-time. A real-time
effect is one that you can apply to a sequence and play without having to render it first.
Rendering is a processing operation that your Avid editing application performs to merge
effect layers, creating one stream of digital video for playback in real time. (Rendering takes
time and creates a new media file that occupies drive space.) You must render non-real-time
effects before you can play them back. You can preview non-real-time effects, or play them
as an outline, without rendering them.
24
A real-time effect has a small green dot in the Effect Palette and within the effect icon in the
Timeline. Effects that you must render have a small blue dot within the effect icon in the
Timeline. For more information, see “Color Coding on Effect Icons” on page 25.
You can create a sequence that has any number of real-time and non-real-time effects.
However, there are limits on how many real-time effects your Avid editing application can
play at once without rendering or otherwise reducing the amount of processing necessary
during playback. For more information, see “Real-Time Playback of Video Effects” on
page 151.
When you want to play a sequence that includes effects at full quality, you might have to
render some of the effects. You will have to render any effect that is non-real-time, and you
might need to render some of the effects that are normally real-time.
Page 25

Color Coding on Effect Icons
The exact number of effects that you must render for output depends on the following
factors:
• Whether or not you have Avid input/output hardware attached to your system. If you do
not have Avid input/output hardware attached, you must render all effects before you
perform a digital cut.
• How complex your sequence is, and especially how your effects are layered on multiple
video tracks. If you have Avid input/output hardware attached to your system, real-time
effects might cause dropped frames during a digital cut. You can have your Avid editing
application select and render real-time effects that might cause dropped frames. For
more information, see “Recording a Digital Cut to Tape (Remote Mode)” and
“Recording a Digital Cut to Tape (Local Mode)” in the Help.
If you attempt to play or output a sequence that your Avid editing application cannot play in
real-time, you can display information in the Timeline that shows where the demands of the
sequence are preventing successful real-time play. For more information, see
“Understanding Real-Time Playback Information in the Timeline” on page 153. You have
several options for how to proceed in these circumstances:
• For playing alone, you can use the Video Quality menu or Video Display settings to ease
the playback demands by reducing the display quality of the video. For more
information, see “Options for Controlling Real-Time Effects Playback” on page 154.
• For output, where anything less than the best quality is not an option, you can use the
ExpertRender feature to identify the minimum number of effects that you must render in
order for the sequence to play in real time. For more information, see “ExpertRender”
on page 158.
Color Coding on Effect Icons
Effect icons in the Effect Palette and in the Timeline display colored dots to help you
determine whether an effect is real-time or non-real-time.
Real-time effects show a green dot. Real-time effects play in real time in a sequence, subject
to the playback capabilities and constraints of your Avid editing system. For more
information, see “Real-Time Playback of Video Effects” on page 151.
Non-real-time effects have no dot in the Effect Palette. In the Timeline, the effect icon shows
a blue dot until you render the effect.
25
Page 26
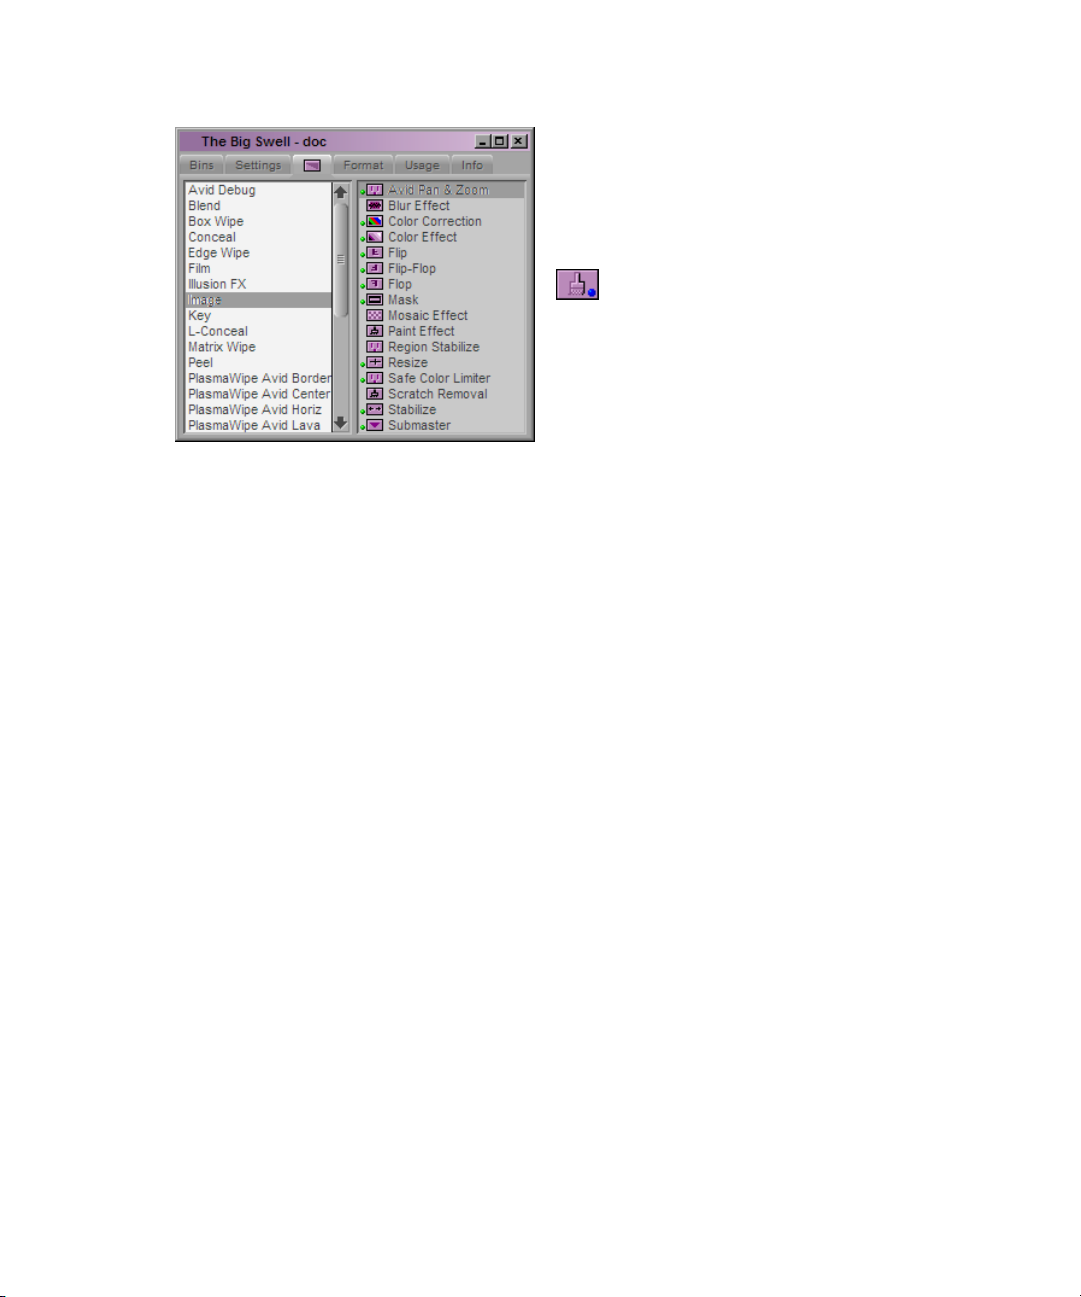
1 Effects Concepts and Settings
In the Effect Palette (left), green dots indicate real-time effects. (Real-time effects might not be playable in real
time depending on system resources and the complexity of your sequence.) Non-real-time effects have no dot
in the Effect Palette. Non-real-time effects have a blue dot in the Timeline (right) until they are rendered.
All colored dots disappear in the Timeline when you render effects.
Understanding the Effect Palette
The Effect Palette lists all transition and segment effects, and some motion effects, that are
available for your Avid editing application. The Effect Palette is the primary tool that you
use to apply effects to your sequences. For information on accessing the Effect Palette, see
“Displaying and Adjusting the Effect Palette” on page 26.
The left side of the Effect Palette displays a list of effect categories. The right side shows the
various effects that are available for the currently selected effect category.
The Effect Palette displays all of the effect categories available for your Avid editing
application, including any third-party AVX plug-in effects you have installed. If you save
any effect templates to a bin, and have that bin open, those templates also display in the
Effect Palette. For reference information on all Avid effects, see “Effects Reference” on
page 573.
Displaying and Adjusting the Effect Palette
This topic provides basic information on displaying and adjusting the Effect Palette. For
information on the organization and purpose of the Effect Palette, see “Understanding the
Effect Palette” on page 26.
26
Page 27

Working with Effects in HD and in Progressive Frame Projects
To display the Effect Palette:
t In the Project window, click the Effects tab.
To resize the Effect Palette:
t Click the lower right corner of the palette, drag the palette to the size you want, and
release the mouse button.
To display effect templates saved to a bin in the Effect Palette:
1. Open the bin containing the effect templates.
2. If the Effect Palette is not already open, in the Project window, click the Effects tab.
3. Click the bin name below the effect category list to view the effect templates in the bin.
In the following illustration, the bin named “Effect Templates” is selected below the
effect category list and the templates in that bin appear on the right.
Working with Effects in HD and in Progressive
Frame Projects
Many video effects work the same way regardless of the project type or video format. This
topic describes several situations where effect behavior varies depending on whether a
project is SD or HD, or is interlaced or progressive.
27
Page 28

1 Effects Concepts and Settings
Effects Considerations for HD Projects
Effects that use square geometry automatically use the correct pixel aspect ratios. These
effects include Titles, Box Wipes, and certain paint modes like Mosaic. Effects such as
Color Correction, Color Effect, and Luma keys automatically use the correct color space
(ITU-709 for HD).
The Safe Color Limiter effect converts from 709 to 601 color space before limiting unsafe
n
colors, and then converts back to 709 color space. For more information, see
“Understanding the Safe Color Limiter Effect” on page 854.
Note the following:
• You do not need to generate 4:3 media for titles.
• Timewarp effects use a 60p input and output format in 720p/59.94 projects.
Effects Considerations for Progressive Frame Projects
Effects in progressive frame projects are frame based rather than field based, so their normal
behavior is slightly different from effects in interlaced projects. In particular, temporal
artifacts might appear in some effects under certain circumstances. This topic explains when
temporal artifacts might appear and suggests ways to create effects that do not show
perceptible temporal artifacts.
28
Effects that do not involve any movement across the screen — for example, masks, Color
Effects, and dissolves — always look the same in progressive projects as they do in
interlaced projects.
Effects that involve movement across the screen — for example, wipes, 3D shapes, or
moving titles — might look different in 24p or 25p projects from their equivalents in
interlaced projects for the following reasons:
• Because the effect uses 24 or 25 progressive frames per second (24p or 25p), motion
across the screen is interpolated in 24 or 25 increments per second. (Contrast the 50
increments per second for a PAL interlaced project or the 60 increments per second for
an NTSC interlaced project.) For example, the edge of a 1-second Horizontal Edge
Wipe effect appears in 24 or 25 different positions across the screen. For effects of short
duration in particular, this difference might be perceptible to the viewer.
• When the 24p or 25p media is output (to the interlaced Client monitor or as a digital
cut), it is interlaced again and pulldown is inserted to achieve 60 fields per second
(NTSC). Your Avid editing application inserts pulldown by duplicating some of the
existing frames to create the correct number of fields per second. Viewers might notice
temporal artifacts created by this duplication process. This behavior is a normal result of
the pulldown insertion process and is often perceptible in conventional transfers of films
to video formats.
Page 29

Changing Timeline View Settings for Effects
PAL output with pulldown also duplicates certain frames but is less likely to exhibit
n
perceptible temporal artifacts since fewer frames require duplication.
Motion effects that you create in 24p or 25p projects, such as Variable Speed effects, might
also look different from motion effects that you create in interlaced projects. For more
information on 24p or 25p motion effects, see “Considerations for Motion Effects in
Progressive Projects” on page 209.
For more information on how your Avid editing application handles 24p or 25p material, see
n
“Displaying 24p and 25p Media” in the Help.
If an effect in a 24p or 25p project does not look completely smooth, do one or more of the
following:
• Slow down the effect.
For example, a 2-second Horizontal Edge Wipe effect, while it is still performing at the
same rate (24 increments per second), moves across the screen in 48 steps. These
smaller movements make the wipe appear smoother to the viewer.
• Soften the edges of the effect.
The more the edges of the effect are blurred, the less noticeable are the movements
between the increments of the effect.
• When working with moving titles, avoid small font sizes and sharp edges.
In a moving title such as a roll, lines of small text might move less smoothly than lines
of larger text.
In a 24p or 25p project, if you select Output to DV Device from the Video Quality menu in
n
the Timeline, the Realtime Encoding option is automatically turned off. For more
information, see “Playing Back to a DV Device” in the Help.
Changing Timeline View Settings for Effects
All effect icons display in the Timeline by default. You can change the Timeline settings to
display all effect icons, all effect icons except Dissolve Effect icons, or no effect icons. If
you change the setting to display no effect icons, you must reset it before you begin applying
effects. The fewer effect icons you display, the faster your Avid editing application refreshes
the screen.
29
Page 30

1 Effects Concepts and Settings
To change the Timeline settings:
1. In the Timeline window, click the Fast Menu button, and then do one of the following:
t To display all effect icons in the Timeline, select Effect Icons.
t To display all effect icons except Dissolve icons, select Effect Icons and deselect
Dissolve Icons.
t To display no effect icons, deselect Effect Icons. Dissolve Icons appears dimmed
and is now unavailable.
2. (Option) To save your Timeline settings, click the Timeline View Name button, select
Save As, and type a view name.
Timeline View Name button and menu below Timeline
Adjusting Trim Settings for Effects
30
In Trim mode in some Avid editing applications, you can control whether or not the effects
you apply are computed immediately on the screen (that is, on-the-fly) or appear later when
you render them. For example, viewing transitions as cuts (without rendering on-the-fly) can
make trimming easier.
For more information on changing Trim settings, see “Trim Settings Basics” in the Help.
n
To change the Trim settings for Render On-the-Fly:
1. In the Project window, click the Settings tab.
The Settings list appears.
2. Double-click Trim.
The Trim Settings dialog box opens.
3. Click the Features tab, and then select or deselect Render On-The-Fly.
4. Click OK.
Page 31

Setting Effect Grid Options
You can display a grid in the Effect Preview monitor in Effect mode to guide you as you
create and adjust effects. For information on using the grid, see “Understanding the Effect
Grid” on page 81.
The Grid Settings dialog box lets you customize the grid.
To set the default grid values, do one of the following:
t In the Settings list of the Project window, double-click Grid.
t If the effect you are working with has a Grid parameter group, click the Other Options
button for the Grid parameter group in the Effect Editor.
The Grid Settings dialog box opens.
For information on the Grid Settings options, see “Grid Settings” in the Help.
Setting Effect Aperture Options
In some Avid editing applications, the Effect Aperture setting lets you control the number of
horizontal lines of an image that are used to create an effect. For example, if you are working
with DV media and notice black lines above and below Picture-in-Picture effects, you can
instruct the system to ignore the lines by changing the effect aperture.
Setting Effect Grid Options
The Effect Aperture feature applies only to NTSC projects.
n
For uncompressed and non-DV resolutions, your Avid editing application uses all 243
horizontal lines per field to display the image. For DV media, your Avid editing application
uses 240 lines for the image and adds two black lines above the image and one black line
below the image. The effect aperture lets you decide whether or not to use the three black
lines when you create effects.
In a DV project the black lines can become visible when you create effects such as
Picture-in-Picture or Squeeze effects.
The following illustrations show four PIP effects. In the first illustration, which uses the
default ITU 601 aperture, you can clearly see the black lines between the effects. The second
illustration displays the same media with the DV25 effect aperture — the black lines do not
appear between the effects.
31
Page 32

1 Effects Concepts and Settings
32
In a project that uses only DV media, it is useful to switch to the DV 25 aperture setting. In a
project using uncompressed or mixed resolution media, use the ITU 601 aperture.
Page 33

Setting Effect Aperture Options
To change the effect aperture:
1. In the Settings list in the Project window, double-click General.
The General Settings dialog box opens.
2. Select one of the following Effect Aperture options:
Option Description
ITU 601 (720x 486) Select this setting when you are using uncompressed media or
mixed resolutions. This is the default setting.
DV25 (720 x 480) Select this setting when you are using DV media exclusively.
3. Click OK.
33
Page 34

1 Effects Concepts and Settings
34
Page 35

2 Basics of Effects Editing
This chapter provides basic procedures for creating, adjusting, playing, and rendering
effects:
• Applying Effects
• Deleting Effects in a Sequence
• Sizing Effects to Fit the Media
• Adjusting Effects
• Updating and Reverting Existing Effects in Sequences
• Working with Effect Templates
• Promoting Existing Effect Templates
• Playing Effects
• Basics of Effects Rendering
Applying Effects
You apply most effects to video material after you edit it into a sequence. This section
describes basic methods for applying effects using the Effect Palette and the Fade Effect
button.
You can also apply and adjust basic transition effects using the Quick Transition button and
the Quick Transition dialog box. For more information, see “Working with the
Quick Transition Dialog Box” on page 66
You can also create titles and some types of motion effects as new clips that you then edit
into a sequence. For more information, see “Creating Titles” on page 383 and “Creating and
Customizing Motion Effects” on page 197.
You cannot apply effects to clips on a data (D1) track.
n
Page 36

2 Basics of Effects Editing
Applying Effects From the Effect Palette
You can apply effects either to transitions or to segments. Most effects are only suitable for
one of these applications. For example, you cannot apply every effect in the Effect Palette to
a transition. For more information on the use of an individual effect, see the reference
information for the effect in “Effects Reference” on page 573.
To apply an effect to a single transition or to a single segment in the Timeline, do one
of the following:
t Click the effect’s icon in the Effect Palette, drag the icon over the transition or segment
in the Timeline, and release the mouse button.
t In Effect Mode, click the transition, and then double-click the effect’s icon in the Effect
Palette.
t Select the segment in the Timeline, and then double-click the effect’s icon in the Effect
Palette.
For more information on selecting segments, see “Selecting and Deselecting Segments”
in the Help.
If there is not enough incoming or outgoing media to apply a transition effect at its
default length, the Insufficient Source dialog box opens. For more information, see
“Sizing Effects to Fit the Media” on page 41.
36
To apply an effect to multiple transitions in the Timeline:
1. Enter Effect mode, for example, by selecting Toolset > Effects Editing.
For more information, see “Entering Effect Mode” on page 42.
2. Click the first or last transition to which you want to apply the effect.
3. Click above the Timeline and begin dragging to activate a selection box. Continue to
drag down and either to the left or right to include additional transitions in the selection.
Page 37

Applying Effects
4. Release the mouse button when the selection box includes all the transitions you want.
Your Avid editing application highlights the transitions that you select, and the position
indicator moves to the first transition.
5. (Option) Shift+click any transition to deselect it.
6. In the Effect Palette, double-click the icon for the effect that you want to apply to the
transitions.
your Avid editing application applies the effect to the selected transitions in the
Timeline.
If there is not enough incoming or outgoing media to apply the transition effect at its
default length to one or more of the transitions, the Insufficient Source dialog box opens.
For more information, see “Sizing Effects to Fit the Media” on page 41.
To apply an effect to multiple segments in the Timeline:
1. Enter Effect mode, for example, by selecting Toolset > Effects Editing.
For more information, see “Entering Effect Mode” on page 42.
2. Click above the Timeline and to the left of the leftmost segment that you want to select
and begin dragging to the right and down to activate a selection box.
3. Continue to drag to the right until the selection box includes the rightmost segment that
you want to select.
37
Page 38

2 Basics of Effects Editing
4. Release the mouse button.
Your Avid editing application highlights the segments that you select.
5. (Option) Shift+click a segment to deselect it.
6. In the Effect Palette, double-click the icon for the effect that you want to apply to the
segments.
Your Avid editing application applies the effect to the selected segments in the Timeline.
Using the Fade Effect Button
You can use the Fade Effect button to create basic fades for segment effects.
The Fade Effect feature creates keyframes for the effect automatically. You can access the
keyframes in the Effect Editor.
The Fade Effect button appears in the FX tab of the Command palette and, for some Avid
n
editing applications, in the Tool Palette. You can map the Fade Effect button to another
location. For more information, see “Mapping User-Selectable Buttons” in the Help.
To fade one or more segment effects in a sequence:
1. Select the segment effects in the Timeline:
t To fade a single segment effect, move the position indicator to the segment.
t To fade multiple segment effects, click one of the segment tools on the Timeline
Palette, and then Shift+click the segments.
38
Page 39

Segment tools in the Timeline palette
2. Click the Fade Effect button.
The Fade Effect dialog box opens.
3. Type the number of frames to fade up and fade down, and click OK.
You can view the Fade effect by playing the segment or segments.
Deleting Effects in a Sequence
You can delete transition effects from a sequence in Source/Record mode (editing mode on
NewsCutter systems), Trim mode, or Effect mode.
Deleting Effects in a Sequence
To delete a single effect:
1. Move the position indicator to the Timeline segment containing the effect’s icon.
2. If there are multiple tracks that contain effects at the same position in the Timeline,
select only the track that contains the effect you want to delete.
In this example, only track V3 is selected.
3. Do one of the following:
t In Source/Record mode (editing mode on NewsCutter systems), click the Remove
Effect button.
t In Effect mode, select the effect and press Delete.
t When trimming (for transition effects only), either press Delete or click the Remove
Effect button.
39
Page 40

2 Basics of Effects Editing
Your Avid editing application removes the effect.
When you delete a rendered effect from a sequence, your do not delete the associated media
n
file (precompute). To delete the effect’s media file, you must manually remove it from the
drive. Your Avid editing application operates this way so that you can undo the deletion of
an effect or undo the change you made to an effect. For more information, see “Managing
Effect Media Files” on page 181.
To delete multiple transition effects:
t In Effect mode, Shift+click each transition effect you want to delete, and then press
Delete.
To delete multiple segment effects:
1. If you are not in Effect mode, click one of the segment tools on the Timeline palette.
40
Segment tools in the Timeline palette
2. Shift+click each segment that contains a segment effect you want to delete.
3. Do one of the following:
t Click the Remove Effect button.
t Press Delete.
Page 41

Sizing Effects to Fit the Media
Transition effects usually require additional frames of source media beyond those you edit
into the sequence. For example, if a dissolve begins 15 frames before the cut point between
clips, your Avid editing application needs 15 frames of video from before the cut point on
the incoming clip to create the beginning of the dissolve.
When you edit and apply effects, be aware that you might need these extra frames. Editors
usually allow for these extra frames by marking IN and OUT points on source clips far
enough away from the beginning and end of the clip that extra frames are available for
transition effects. These extra frames are commonly known as “handles.”
When you apply a transition effect from the Effect Palette and there are not enough extra
source frames available for the effect to use, the Insufficient Source dialog box opens and
indicates whether the source that has insufficient material is Media A (outgoing) or Media B
(incoming).
You can choose to cancel the effect or have your Avid editing application resize the effect to
fit the available media. The result might be a shorter transition effect, or an effect with a
changed alignment. For example, if no extra frames are available before the cut to an
incoming clip, a transition effect cannot start before the cut point, so its alignment must be
“Starting at Cut.”
Sizing Effects to Fit the Media
To automatically size an effect to fit the media:
t Click Size To Fit in the Insufficient Source dialog box.
Your Avid editing application sets the duration of the effect to fit the available media. If
you have selected an alignment, your Avid editing application attempts to preserve it.
To change the alignment or duration of the transition effect, see “Applying a Dissolve
Effect Using the Transition Parameters” on page 64.
Adjusting Effects
After you apply an effect to a transition or segment in your sequence, you can adjust its
appearance and operation. To make most effect adjustments, you enter Effect mode and
work with the Effect Editor and the Effect Preview monitor.
This section explains how to enter Effect mode and provides basic information on how to
use the Effect Editor and the Effect Preview monitor.
For more advanced information, see “Applying and Customizing Effects” on page 63.
41
Page 42

2 Basics of Effects Editing
Entering Effect Mode
After you add an effect to a sequence, you must enter Effect mode to change the parameters
of the effect.
To enter Effect mode, do one of the following:
t Click the Effect Mode button.
t Select Toolset > Effects Editing.
Your Avid editing application opens the Effect Editor and the Record monitor becomes
the Effect Preview monitor. If the position indicator in the Timeline is on an effect, the
controls for adjusting that effect display in the Effect Editor.
Understanding Effect Mode
The following illustration shows the main components of Effect mode, the Effect Editor
(left) and the Effect Preview monitor (right).
42
Each property of an effect that you can control is known as an effect parameter. For
example, a Picture-in-Picture effect has a Position parameter that controls where the
picture-in-picture is located on the screen. The Effect Editor displays controls that let you
adjust each of an effect’s parameters, as well as other buttons that help you adjust effects. As
different effects have different sets of parameters, the Effect Editor display changes
depending on the effect you select.
For more detailed information on the Effect Editor, see “Using the Effect Editor” on
page 87.
Page 43

The Effect Preview monitor displays the selected effect in the sequence where the position
indicator is located in the Timeline. The position bar below the Effect Preview monitor
represents the length of the selected effect, not of the entire sequence.
For some effects, the Effect Preview monitor displays tools that let you adjust the effect
directly in the monitor. For example, a Picture-in-Picture effect normally displays with a
wireframe outline and adjustment handles that you can use to reposition or resize the
picture-in-picture. A direct adjustment like this is equivalent to adjusting the effect with
parameter controls in the Effect Editor, but it is often easier and more intuitive to make the
adjustment directly in the monitor.
For more detailed information on the Effect Preview monitor, see “Using the Effect Preview
Monitor” on page 76.
Making Basic Effect Adjustments
This topic describes a general procedure for selecting and adjusting effects, including some
simple examples of types of adjustments.
You can find more detailed information elsewhere in this guide. For example, for full details
of how to use effect adjustment controls, see “Applying and Customizing Effects” on
page 63. For details of the parameters available for a specific effect, see the reference
information for that effect in “Effects Reference” on page 573.
Adjusting Effects
To make basic effects adjustments:
1. Enter Effect mode, for example, by selecting Toolset > Effects Editing.
For more information, see “Entering Effect Mode” on page 42.
2. In the Timeline, click the effect you want to adjust.
3. In the Effect Editor or the Effect Preview monitor, adjust the effect’s parameters until
you achieve the look you want.
For example, depending on the effect, you might want to do one or more of the
following:
t Adjust a parameter by dragging its slider control in the Effect Editor.
t Reposition an effect such as a Picture-in-Picture by dragging the effect in the
Effect Preview monitor.
t Resize an effect such as a Picture-in-Picture by dragging one of the adjustment
handles that display around the edge of the picture-in-picture in the
Effect Preview monitor.
t Select an option for a parameter by clicking its Fast menu in the Effect Editor and
selecting an item from the menu.
43
Page 44

2 Basics of Effects Editing
t Select a color for a parameter that uses color by clicking the parameter’s Color
Preview window, dragging the eyedropper to the Effect Preview monitor, and
releasing the mouse button over the color you want to use.
t Select a color for a parameter that uses color by clicking the Other Options button
for the parameter and selecting the color from the Windows Color dialog box or the
Macintosh Colors panel.
t Select an alignment option for a transition effect by clicking the Transition Effect
Alignment button in the Effect Editor and selecting an option from the menu.
t Define a custom duration for a transition effect by clicking in the Transition Effect
Duration box in the Effect Editor, typing a duration, and pressing Enter.
Moving Through an Effect
The position bar in the Effect Preview monitor represents only the length of the currently
selected effect. You can use the Effect Preview monitor’s position bar to move through an
effect in the same way that you use the position bars in Source/Record mode (editing mode
on NewsCutter systems) to move through a clip or a sequence.
To move to a different point in an effect, do one of the following:
t Click a location in the position bar to move the position indicator to that location.
t Drag the position indicator to a location in the position bar.
Updating and Reverting Existing Effects in Sequences
If you are working with a sequence that already contains effects, you might need to update
some of those effects.
If you apply color corrections to a sequence in the current version of your Avid editing
application, you might need to save a duplicate version of the sequence with a reverted color
corrections format that you can open in older versions of Avid editing applications.
44
Page 45

Updating and Reverting Existing Effects in Sequences
The following table summarizes the types of effects that you can update or revert to their
original format:
Effect Type Description
Standard
keyframe effects
Color Correction You must update color corrections in sequences created in older versions of
In the current version of your Avid editing application, many effects use
advanced keyframes only. You can no longer apply or use standard keyframe
versions of those effects.
If an existing sequence contains standard keyframe versions of any effects that
now use advanced keyframes, you must update those effects to their advanced
keyframe versions.
This also applies to Title Effect clips in a sequence that still use
n
standard keyframes. When you update these, you change the clip in the
bin as well as the Title Effect segment in the sequence itself.
You can update the standard keyframe effects in a sequence by loading the
sequence or by using the Update Effects command.
Avid editing applications that did not support keyframeable color correction
before you can work with them in the current version. Color corrections in
recent versions store parameter information differently to support keyframing.
If you apply color corrections to a sequence in the current version of your
Avid editing application and want to open that sequence in a version of an
Avid editing application that does not support keyframeable color correction,
you must revert the color corrections to the earlier format. This creates a
duplicate sequence that stores color correction parameter information in an
appropriate format for use in the older version.
You can update color corrections in a sequence by loading the sequence or by
using the Update Effects command.
Traditional
motion effects
Promotable,
missing AVX1
plug-ins
You can update traditional motion effects in a sequence to Timewarp effects
by using the Update Effects command. This provides you with superior tools
for adjusting the effects.
You can update these effects to AVX2 effects by using the Update Effects
command. For more information on AVX effects, including other options for
promoting AVX1 effects, see “Working with Plug-In Effects” on page 185.
45
Page 46

2 Basics of Effects Editing
To update standard keyframe effects or color corrections by loading a sequence:
1. Load the sequence, for example, by dragging it to a monitor.
The Update Sequence dialog box opens.
If the sequence contains standard keyframe versions of effects that are now available in
advanced keyframe versions, a message informs you that you must update the effects.
If the sequence contains incompatible color corrections from an older version of your
Avid editing application, a message informs you that you must update the color
corrections.
2. (Option) If you want your Avid editing application to update sequences that you open in
the future without displaying the Update Sequence dialog box, select “Do not ask again
when loading a sequence.”
3. Click OK.
Your Avid editing application creates a copy of the sequence, updates the effects and
color corrections in the copy that require updating, and opens the copy.
The name of the new sequence uses a suffix indicating that it is an updated sequence. If
the original sequence is named MySequence, the updated copy is named, for example,
MySequence.updated.01. Both the original sequence and the updated copy are available
in the bin.
46
To update effects and color corrections in a sequence using the Update Effects
command:
1. Select the sequence in a bin.
2. Right-click the sequence, and select Update Effects.
The Update Sequence dialog box opens.
Messages inform you if the sequence contains standard keyframe effects or color
corrections that require updating.
If the sequence contains motion effects or AVX effects that you can choose to update,
check boxes appear for those effect types.
3. (Option) Select the optional effect types that you want to update.
4. Click OK to update the effects, or Cancel to take no action.
If you click OK, your Avid editing application creates a copy of the sequence and
updates the effects and color corrections in the copy that require updating or that you
chose to update.
The name of the new sequence uses a suffix indicating that it is an updated sequence. If
the original sequence is named MySequence, the updated copy is named, for example,
MySequence.updated.01. Both the original sequence and the updated copy are available
in the bin.
Page 47

To save a sequence with reverted color corrections that you can open in older
versions of Avid editing applications:
1. Select the sequence in a bin.
2. Right-click the sequence, and select Revert Effects.
A message box appears.
3. Do one of the following:
t If the message box indicates that the sequence includes color corrections that you
must modify for use in versions of Avid editing applications that do not support
keyframeable color correction, click OK to save a new version of the sequence, or
Cancel to take no action.
If you click OK, your Avid editing application saves a new version of the sequence.
The name of the new sequence uses a suffix indicating that it is a compatible copy,
for example, MySequence.reverted.01.
t If the message box indicates that you do not need to revert any effects, click OK.
Working with Effect Templates
Working with Effect Templates
If you apply an effect and make a set of adjustments to it, you might want to be able to
quickly recreate the same look elsewhere in your sequence or project. Your Avid editing
application lets you save an effect with its parameter settings as a template. You can then
apply the template to other effects or video clips at any time.
You can save any effect to a bin as an effect template. You can also save a segment effect
with its source media. This is useful when you want to save an imported PICT file or Matte
Key clip for future editing into a sequence.
When you save a title effect template, your Avid editing application includes the source
media by default. You can also save a keyframe-only template, which retains the movement
of the title without the source media.
You can apply an effect template with all its parameters directly to segments or transitions as
you would any other effect. You can also apply specific parameters from the template.
47
Page 48

2 Basics of Effects Editing
In this example, a 3D Picture-in-Picture effect template is applied repeatedly to a series of segments to
achieve the same cropping and positioning of foreground footage
To save an effect template:
t Drag the effect icon from the Effect Editor to a bin.
A new effect template appears in the bin, containing the parameter setting information
for the effect. The new effect template is identified in the bin by its effect icon.
Effect icons for open bins also display in the Effect Palette.
n
48
To save a segment effect with its source media, or save a title effect as a
keyframe-only template:
t Press and hold the Alt key (Windows) or Option key (Macintosh) while you drag the
effect icon from the Effect Editor to a bin.
To rename an effect template:
t In the bin, click the template name below the icon and type a new name.
To apply a specific parameter from an effect template:
1. In the Timeline, select an effect transition or segment.
2. Select Tools > Effect Editor.
Page 49

Promoting Existing Effect Templates
3. Open the parameter group you want to change.
For example, the following illustration shows the Position parameter group.
4. Click the effect template icon in the bin or in the Effect Palette, and drag it to the
specific parameter group in the Effect Editor.
c
Do not drag the effect template through the Timeline because this deselects the effect.
Your Avid editing application applies the effect template only to the effect parameter
group you selected.
Promoting Existing Effect Templates
In the current version of your Avid editing application, many effects use advanced
keyframes only. You can no longer apply or use standard keyframe versions of those effects.
You might have effect templates that you created in an older version of an Avid editing
application. If you created these templates from standard keyframe versions of effects that
now use advanced keyframes only, you can still apply them in the standard ways described
in “Working with Effect Templates” on page 47. You can apply the template to create a new
effect in the Timeline, in which case the new effect uses advanced keyframes, or you can
apply the template to a specific parameter in an effect. You can also choose to promote the
template itself to advanced keyframes.
To promote a standard keyframe effect template:
t Right-click the template in the bin, select Promote Effects, and then click OK in the
Promote Effects dialog box.
Your Avid editing application creates a copy of the template in the bin and promotes the
effect information in the copy to advanced keyframes.
49
Page 50

2 Basics of Effects Editing
The name of the new template uses a suffix indicating that it is a promoted template. If
the original template is named MyColorEffect, the promoted copy is named, for
example, MyColorEffect.Promoted.01. Both the original template and the promoted
copy are available in the bin.
Playing Effects
There are several situations where you need to play effects:
• While you are adjusting effects in Effect mode, you might want to play an individual
effect to check its look. Depending on your needs, you might want to see the effect
playing in real time and at high quality, or you might be able to accept playback at lower
quality or in less than real time. Alternatively, you might only need to play an outline
preview of the effect’s movement.
• At any point in your project workflow, you might want effects in a sequence to play
when you play all or part of the sequence. Depending on your needs, you might want to
see the effects playing in real time and at high quality, or you might be able to accept
playback at lower quality or in less than real time.
• When you are ready to output your project, you need all the effects in the sequence to
play in real time and at full quality.
Depending on the capabilities of your Avid editing application and the complexity of your
sequences, you might need to render some effects before you can play them back in real
time.
For more information, see “Real-Time Playback of Video Effects” on page 151 and “Basics
of Effects Rendering” on page 53.
Playing an Effect in Effect Mode
While you are in Effect mode, you can:
• Play all or part of an individual effect once.
• Play an individual effect in a continuous loop.
• Play an outline preview of an effect (a wire-frame representation of the effect’s position,
scale, and path of motion).
To play an effect in Effect mode:
1. In the Timeline, select the effect.
2. In the position bar of the Effect Preview monitor, move the position indicator to the
location where you want play to begin.
50
Page 51

Playing Effects
3. Click the Play button or press the space bar.
Play continues until the end of the effect, or until you click the Play button or press the
space bar again.
To play an effect in a continuous loop in Effect mode:
1. Move the position indicator in the Timeline to the effect you want to play.
2. Click the Play Loop button.
Play begins at the start of the effect and continues until you press the space bar.
To play an outline preview of an effect in Effect mode:
1. In the Timeline, select the effect.
2. In the position bar of the Effect Preview monitor, move the position indicator to the
location where you want play to begin.
3. Click the Play Preview button.
Play continues until the end of the effect, or until you click the Play Preview button
again or press the space bar.
Playing Real-Time Effects
A real-time effect is an effect that you can typically apply to a sequence and play without
having to render it first (rendering takes time and disk space).
Real-time effects have a small green dot within the effect icon in the Timeline. Effects that
you must render have a small blue dot within the effect icon in the Timeline. For more
information, see “Color Coding on Effect Icons” on page 25.
You can create a sequence that has any number of real-time and non-real-time effects. While
any individual real-time effect plays in real time without rendering, multiple real-time
effects in complex sequences might not all play in real time. The maximum real-time
playback capabilities of your Avid editing application vary depending on system capabilities
and the complexity of the sequence.
If your sequence contains a combination of effects that exceeds the real-time playback
capabilities of your Avid editing application, you can still achieve successful playback in
many cases. See “Options for Controlling Real-Time Effects Playback” on page 154.
Real-time effects might cause dropped frames during a digital cut. You can have your Avid
editing application select and render real-time effects that might cause dropped frames. For
more information, see “ExpertRender” on page 158.
51
Page 52

2 Basics of Effects Editing
If you do not have Avid input/output hardware connected to your system, you must render all
n
effects before performing a digital cut. Software-only systems ignore unrendered effects
during a digital cut. For example, unrendered transition effects play as cuts.
Using Render On-the-Fly for Effect Preview
When you preview effects in a sequence, you can use Render On-the-Fly to control how
your Avid editing application displays frames with effects.
When Render On-the-Fly is selected, you can step through your sequence and preview any
frame to check the look of the effects that apply to it, regardless of the type or number of
those effects. Whenever you change the frame you are monitoring, your Avid editing
application updates to show the image that results from any effects applied to that frame.
Depending on the number and complexity of effects, there might be a perceptible delay
before the image updates in the Composer monitor.
When Render On-the-Fly is deselected, your Avid editing application shows the monitored
frame as if no effects are applied to it. You can deselect Render On-the-Fly to avoid delays in
image updating when you are not concerned about the look of effects.
Using Render On-the-Fly can slow down your editing of a sequence. If you are compositing
in a very complex, effects-intensive sequence, you might need to wait a noticeable period of
time for a single frame to render when you change the frame you are monitoring. Instead of
waiting for rendering to finish, you can interrupt Render On-the-Fly. Interrupting Render
On-the-Fly interrupts only the rendering of non-real-time effects.
52
Render On-the-Fly only controls how your Avid editing application displays a frame when
the position indicator is stationary at that frame. During playback (that is, while the position
indicator is in motion), your Avid editing application’s ability to display effects depends on
whether real-time effects are enabled and on other associated factors. For more information,
see “Real-Time Playback of Video Effects” on page 151.
To display effects immediately during effects editing:
t Select Special > Render On-the-Fly (Clip > Render On-the-Fly on NewsCutter
systems).
To interrupt Render On-the-Fly, do one of the following:
t Drag the position indicator in the Timeline.
While you are dragging, the sequence appears in the Composer monitor as it would if
Render On-the-Fly were not selected from the Special menu.
t If you click in the Timeline and rendering begins, quickly move to another location in
the Timeline.
This interrupts the rendering process until you release the mouse button.
Page 53

Basics of Effects Rendering
The topics in this section provide basic information about rendering effects in Avid editing
applications, along with instructions for rendering effects manually.
You can also render effects with the help of the ExpertRender feature. ExpertRender
determines which effects you need to render for successful playback of a sequence. For more
information, see “ExpertRender” on page 158.
Understanding Effects Rendering
In Avid editing applications, rendering is the process of calculating and storing video
information for the finished look of an effect so that the effect always plays in real time at
full quality. Avid editing applications store a rendered effect and its media file as a
precomputed master clip (often referred to as a precompute).
There are two main situations in which you render effects:
• Before you output a sequence, you must render any effects in the sequence that cannot
play in real time during output. Avid editing applications can use the ExpertRender
feature to identify and render these effects for you, so that you do not spend time and
storage rendering effects that do not need rendering.
Basics of Effects Rendering
• At any time in your workflow, you must render any effects in a sequence that cannot
play in real time if you need to view those effects in real time and at full quality. (If you
can accept effects playback that is less than real time or less than full quality for preview
purposes, you do not need to render.) Information in the Timeline can help you to see
which parts of a sequence cannot play in real time, and you can use the ExpertRender
feature to identify and render those effects that cannot play in real time. The
ExpertRender feature can operate across a whole sequence, a marked part of a sequence,
or a single location in a sequence.
You can render a single effect after you create it, or you can render multiple effects at the
same time.
You can also interrupt a render in progress and choose to save or discard the completed
portion. You can finish the render later by resubmitting the effect for rendering.
The key to rendering quickly is to render only those effects that require it. With vertical and
nested effects, for example, you do not have to render every layer to play the effect in real
time. If the top track covers the entire duration of the tracks below, your Avid editing
application renders the composite result of all tracks into the top track.
53
Page 54

2 Basics of Effects Editing
One useful way to minimize rendering time is to use the Submaster effect by applying it to a
track above layered effects and rendering only the Submaster effect. For more information,
see “Submaster Editing” on page 276.
When you render an audio effect on an AMA media clip, all audio media files are written as
n
PCM (MXF), regardless of what you set for the audio file format.
Rendering Effects
You have the following options for rendering effects:
• Render a single effect.
• Render multiple effects at a particular point in the Timeline (for example, effects on
several stacked video tracks).
• Render multiple effects for a whole sequence or a portion of a sequence, by marking IN
and OUT points.
You can configure your Avid editing application to send an email notification when a render
operation completes. This lets you leave your Avid editing application unattended when a
long render operation is taking place, yet still know when the render completes.
For more information, see “Email Settings” in the Help.
Save your sequence before you render by marking IN and OUT points. Depending on the
n
number, type, and complexity of the effects, the rendering process can take a long time.
For information on preparing a RED clip for rendering, see “Preparing your Red Clip for
n
Transcode, Mixdown or Render” in the Help.
To render a single effect:
1. Move the position indicator to the effect in the Timeline.
Make sure the track containing the effect is selected.
2. Do one of the following:
t Click the Render Effect button.
t Select Clip > Render at Position.
54
Page 55

Basics of Effects Rendering
The Render Effect dialog box opens.
To prevent the Render Effects dialog box from opening, press and hold the Alt key (Windows)
n
or Option key (Macintosh) when you click the Render Effect button. Your Avid editing
application uses the last drive selected and you do not need to follow the remaining steps in
this procedure.
3. Click the Drive button, and select a drive for the rendered media.
The Effect Source Drive selection refers to the drive where the media on the outgoing
shot of a transition resides.
4. Click OK.
For information on displaying the estimated time required for the render, see
“Displaying Estimated Render Time” on page 57.
If there is not enough room on the drive, your Avid editing application displays a
message box that gives you the following choices:
Option Description
Stop Stop the rendering process and return to the Render Effect
dialog box, and then select another drive before continuing.
Continue Attempt to render the effect anyway, in case there might be
enough room on the drive.
Your Avid editing application renders the effect and stores a precompute master clip on
the drive you select.
To render multiple effects at position:
1. Move the position indicator to the effects in the Timeline.
2. Select all tracks that contain effects you want to render.
3. Select Clip > Render at Position.
55
Page 56

2 Basics of Effects Editing
The Render Effects dialog box opens.
4. Click the Drive button, and select a drive on which to store the rendered effects.
The Effect Source Drive selection refers to the drive where the media on the outgoing
shot of a transition resides.
5. Click OK.
For information on displaying the estimated time required for the render, see
“Displaying Estimated Render Time” on page 57.
If there is not enough room on the drive, your Avid editing application displays a
message box that gives you the following choices:
56
Option Description
Stop Stop the rendering process and return to the Render Effect
dialog box, and then select another drive before continuing.
Continue Attempt to render the effect anyway, in case there might be
enough room on the drive.
Your Avid editing application renders the effect and stores a precompute master clip on
the drive you select.
To render multiple effects using IN and OUT points:
1. Select all tracks that contain effects you want to render.
2. Mark an IN point before the start of the first effect you want to render, and then mark an
OUT point after the last effect you want to render.
3. Select Clip > Render In/Out.
Page 57

Basics of Effects Rendering
The Render Effects dialog box opens.
4. Click the Drive button, and select a drive on which to store the rendered effect.
The Effect Source Drive selection refers to the drive where the media on the outgoing
shot of a transition resides.
5. Click OK.
For information on displaying the estimated time required for the render, see
“Displaying Estimated Render Time” on page 57.
If there is not enough room on the drive, your Avid editing application displays a
message box that gives you the following choices:
Option Description
Stop Stop the rendering process and return to the Render Effect
dialog box, and then select another drive before continuing.
Continue Attempt to render the effect anyway, in case there might be
enough room on the drive.
Your Avid editing application renders the effect and stores a precompute master clip on
the drive you select.
Displaying Estimated Render Time
To display estimated render time during render:
t Press the T key.
Press the T key again to clear the display.
To display how much of the render is completed as a percentage:
t Press the P key.
57
Page 58

2 Basics of Effects Editing
Clearing Rendered Effects
When you have one or more effects in a sequence that you want to return to unrendered
status, you can clear the rendered effects within a range marked by IN and OUT points.
Clearing rendered effects does not delete the effects or their precomputes, but it
disassociates the precomputes from the sequence so that the effects appear unrendered. If
you want to restore the renders after clearing them, you can use the Undo feature.
If you want to clear one or more effects at a particular point in the Timeline (for example,
effects on several stacked video tracks), you can clear just the rendered effects at that
position.
You can also choose to clear all rendered effects except motion effects and any effects that
your Avid editing application does not recognize (third-party plug-in effects that are not
installed on your system).
If you clear an unknown effect — that is, one marked by a blank effect icon — you cannot
n
rerender it on your system because the necessary AVX plug-in is not installed. For more
information on blank effect icons, see “Troubleshooting AVX Plug-Ins” on page 192.
You can store effect precomputes on a drive separate from your media. If this drive is offline,
rendered effects in the Timeline appear to be unrendered. Clearing these rendered effects
does not change their appearance in the Timeline, but you cannot restore the rendered effect
by bringing the effect drive online as the sequence has lost the information stored in the
precompute. For more information on setting the effects drive, see “Media Creation
Settings” in the Help.
58
To clear rendered effects using IN and OUT points:
1. Select all tracks that contain rendered effects you want to clear.
2. Mark an IN point before the start of the first effect you want to clear, and then mark an
OUT point after the last effect you want to clear.
3. Select Clip > Clear Renders In/Out.
Page 59

The Clear Renders dialog box opens.
4. Select the appropriate options:
Option Description
Skip Motion Effects Retains all motion effects in the marked range.
Skip Unknown Effects Retains all effects with blank effect icons in the
marked range.
Basics of Effects Rendering
5. Click OK.
Your Avid editing application clears all rendered effects between the IN and OUT
points. The effect icons in the Timeline change from rendered to unrendered (the render
dot appears in all cleared renders).
To clear rendered effects at position:
1. Move the position indicator to the effects in the Timeline.
2. Select all tracks that contain effects you want to clear.
3. Select Clip > Clear Renders at Position.
The Clear Renders dialog box opens.
4. Select the appropriate options:
Option Description
Skip Motion Effects Retains all motion effects at the position indicator.
Skip Unknown Effects Retains all effects with blank effect icons at the
position indicator.
59
Page 60

2 Basics of Effects Editing
5. Click OK.
Your Avid editing application clears all rendered effects at the position indicator. The
effect icons in the Timeline change from rendered to unrendered (the render dot appears
in all cleared renders).
To restore cleared effects, do one of the following:
t Select Edit > Undo.
The cleared effects are restored only if Clear Renders was the previous action.
t Select Edit > Undo/Redo List, and then select Clear Renders.
All the previous commands, including the Clear Renders command selected from the
submenu, are undone or redone as appropriate.
Rerendering Effects
In some situations you need to rerender an effect that you have already rendered. For
example, you might have rendered a series of effects at a low resolution, and now need to
rerender them at a higher resolution. This situation might occur if you are working with
multiple resolutions. For more information, see “Using MultiRez and Dynamic Relink” in
the Help.
60
You cannot use ExpertRender to rerender effects.
n
To rerender a single effect:
1. Move the position indicator to a single effect in the Timeline.
2. Shift-click the Render Effect button.
3. Click OK.
For more information, see “Rendering Effects” on page 54.
To rerender multiple effects at one position:
1. Move the position indicator to the effects in the Timeline.
2. Select all tracks that contain effects you want to render.
3. Hold down the Shift key and select Clip > Render at Position.
For more information, see “Rendering Effects” on page 54.
Page 61

Basics of Effects Rendering
To rerender multiple effects using IN and OUT points:
1. Select all tracks that contain effects you want to render.
2. Mark an IN point before the start of the first effect you want to render in your sequence,
and then mark an OUT point after the last effect you want to render.
3. Hold down the Shift key and select Clip > Render In/Out.
For more information, see “Rendering Effects” on page 54.
You can also rerender effects using the shortcut menu Render commands. On the Macintosh,
n
Shift+Ctrl-click in the Timeline to display the shortcut menu, and then press and hold the
Shift key while you select Render at Position or Render In/Out. On Windows,
Shift+right-click in the Timeline, and then select Render at Position or Render In/Out.
61
Page 62

2 Basics of Effects Editing
62
Page 63

3 Applying and Customizing Effects
This chapter contains further information on applying and customizing effects that builds on
the information presented in “Basics of Effects Editing” on page 35.
• Applying Dissolve Effects
• Working with the Quick Transition Dialog Box
• Adjusting Transitions in the Timeline
• Preserving Effect Transitions in the Timeline
• Replacing an Effect in Effect Mode
• Using the Effect Preview Monitor
• Stepping Through Field-Based Media
• Using the Effect Editor
• Manipulating Effects Directly in the Effect Preview Monitor
Applying Dissolve Effects
You can apply a Dissolve effect using any of the following methods:
• Select the Dissolve effect from the Effect Palette.
For more information, see “Applying Effects From the Effect Palette” on page 36.
• Click the Quick Transition button.
For more information, see “Using the Quick Transition Button” on page 69.
• Type a duration in the Transition parameters in Trim mode or in the Effect Editor.
For more information, see “Applying a Dissolve Effect Using the Transition
Parameters” on page 64.
• Use the Head Fade button or the Tail Fade button.
For more information, see “Adding Dissolves with the Head Fade and Tail Fade
Buttons” on page 64.
Page 64

3 Applying and Customizing Effects
Applying a Dissolve Effect Using the Transition Parameters
You can create a Dissolve effect by using the Transition parameters that display in Trim
mode and in the Effect Editor. Enter the duration for the effect, and your Avid editing
application adds the Dissolve effect to the sequence.
Transition Effect Alignment button (left, with menu below) and Transition Effect Duration text box (right) in the
Effect Editor
To create a Dissolve effect by using the Transition parameters:
1. Click a transition in the Timeline while in Trim mode or Effect mode.
2. In the Transition Effect Duration text box in the Effect Editor, type the
dissolve’s duration.
The Duration setting above the Record monitor determines the duration format — for
n
example, seconds:frames.
Your Avid editing application adds the Dissolve effect at the transition, and the Dissolve
Effect icon appears in the Timeline.
3. Click the Transition Effect Alignment button, and select the effect’s position relative to
the cut point.
For an explanation of the Transition Effect Alignment menu selections, see “Transition
Parameters” on page 633.
Adding Dissolves with the Head Fade and Tail Fade Buttons
You can use the Head Fade button and Tail Fade button to add a dissolve for selected audio
and video tracks.
When you use the Head Fade button and Tail Fade button, all selected tracks, including
layered tracks, receive the effect.
When you use the Head Fade button and Tail Fade button with filler, your Avid editing
n
application treats the filler like another video clip. You can use the Tail Fade button, for
example, to fade from filler at the beginning of a sequence into the opening video clip.
64
Page 65

Applying Dissolve Effects
To add a fade (dissolve):
1. Move the position indicator to a clip where you want the dissolve to end or begin.
Your Avid editing application uses the location of the position indicator to begin or end
the dissolve. For example, if you move the position indicator ten frames after the
beginning of the clip and then use the Head Fade button, your Avid editing application
creates a ten-frame dissolve that lasts from the beginning of the clip to the location of
the position indicator.
2. Select the tracks on which you want to create dissolves.
If you select more than one track, your Avid editing application creates dissolves of
appropriate lengths for each track, as shown in the following illustration.
Tail Fade example — your Avid editing application creates two dissolves of different lengths on the two
tracks
3. Select Tools > Command Palette.
4. Click the FX tab, and then click Active Palette.
5. Click the Head Fade button or the Tail Fade button.
Head Fade button (left) and Tail Fade button (right)
The dissolves appear in the Timeline. If a dissolve begins or ends at the edit point
between two clips, the dissolve crosses between the two clips. Otherwise the dissolve is
a fade from or to black.
6. (Option) If, for any selected track, there is insufficient source media to create a dissolve
of the length you specified with the position indicator, the Insufficient Source dialog box
opens. Do one of the following:
t Click Size to Fit.
Your Avid editing application creates the longest dissolve possible. For more
information on sizing effects to fit available media, see “Sizing Effects to Fit the
Media” on page 41.
t Click Skip Track.
Your Avid editing application does not create a dissolve on the track with
insufficient source material but does create dissolves on any other selected tracks
with sufficient source material.
65
Page 66

3 Applying and Customizing Effects
t Click Cancel.
Your Avid editing application does not create any dissolves.
Working with the Quick Transition Dialog Box
The following topics provide instructions and information for using the Quick Transition
button and the Quick Transition dialog box to apply basic transition effects without using the
Effect Palette or entering Effect mode.
• Detailed information about the graphical controls in the Quick Transition dialog box.
• Procedures for applying a single transition effect.
• Procedures for applying effects to multiple transitions at one time.
The Quick Transition Dialog Box
The graphical display of the transition effect in the Quick Transition dialog box lets you
control the length and position of the effect with frame accuracy simply by dragging. You
can select specific tracks to apply the effect to, and you can quickly reset the position of the
effect by using the three alignment buttons.
66
12 3 4
56789
Page 67

Element Description
Working with the Quick Transition Dialog Box
1 Track Selection
buttons
Add effect menu Lets you select a specific transition effect:
Position menu Lets you specify where to position the effect:
Let you specify the tracks to which you apply the effect. When you open
the Quick Dissolve dialog box, all tracks selected in the Timeline are also
selected in the dialog box by default. However, selecting tracks in the
Quick Dissolve dialog box does not affect track selection in the Timeline
itself.
• Dissolve
• Film Dissolve
• Film Fade
• Fade to Color
• Fade from Color
• Dip to Color
When you select a color transition with Quick Transition, the default
n
color is black. You must enter Effect mode to select another color.
For more information, see “Using the Effect Editor” on page 87.
• Ending at Cut
• Centered on Cut
• Starting at Cut
• Custom
Duration Lets you set the duration of the transition effect (in frames). The duration
depends on the amount of available footage.
Start n frames
before cut
2 Outgoing media Provides a graphical representation of the outgoing (A) media for the
3 Transition effect
icon
Lets you specify how far before the cut (in frames) the transition effect
begins. The number of frames depends on the amount of available footage.
transition to which you apply the effect.
Shows the effect icon and indicates the length and position of the effect in
relation to the media. You can adjust the effect by dragging this part of the
display. For more information, see “Adjusting a Transition Effect by
Dragging in the Quick Transition Dialog Box” on page 72.
67
Page 68

3 Applying and Customizing Effects
Element Description
4 Handle on
outgoing media
The amount of handle available for each piece of media is indicated as a
darker area on the graphic. If you have multiple transitions between an In
point and an Out point, the handle refers to the transition closest to the
position indicator (see “Using the Quick Transition Button to Apply Effects
to Multiple Transitions” on page 72).
5 Frames of
outgoing media
6 Handle on
incoming media
Lists the amount of handle available for each piece of media as a number of
frames.
The amount of handle available for each piece of media is indicated as a
darker area on the graphic. If you have multiple transitions between an In
point and an Out points, the handle refers to the transition closest to the
position indicator (see “Using the Quick Transition Button to Apply Effects
to Multiple Transitions” on page 72).
7 Alignment buttons Allow you to quickly reposition the effect so that it either ends at the cut
point, is centered on the cut point, or starts at the cut point. These buttons
appear when you select Custom from the Position menu or click in the
graphical display. For more information, see “Repositioning the Dissolve
Effect with the Quick Transition Alignment Buttons” on page 74.
8 Incoming media Provides a graphical representation of the incoming (B) media for the
transition to which you apply the effect.
9 Frames of
incoming media
Lists the amount of handle available for each piece of media as a number of
frames.
Target drive Lets you select the drive where you store the effect if you choose to render
it. The default Effect Source Drive is the drive where the media on the
outgoing shot of a transition resides.
68
Apply to All
Transitions
Skip Existing
Transition Effect
Applies the transition effect to all transitions between the In point and the
Out point.
Applies the transition effect only to transitions that do not have an effect
already applied.
Add button Adds the effect to the sequence without rendering it.
Add and Render
Adds the effect to the sequence and renders all applied transition effects.
button
Cancel Closes the Quick Transition dialog box without applying any transition
effects.
Page 69

Using the Quick Transition Button
You can use the Quick Transition button to apply the following transition effects without
using the Effect Palette and to adjust them for position and duration without entering Effect
mode:
• Dissolve and Film Dissolve
• Fade to Color, Fade from Color, and Film Fade
• Dip to Color
The Quick Transition button appears on the Tool palette, in the Timeline top toolbar, and in
the FX tab of the Command palette. For more information, see “Using the Tool Palette,”
“Displaying the Timeline Top Toolbar,” and “The Command Palette” in the Help.
You can add the same transition effect to multiple transitions by marking In and Out points
in your sequence that select all the transitions to which you want to apply the effect. When
you click the Quick Transition button, the Quick Transition dialog box contains a check box
for Apply to All Transitions (In -> Out). For more information, see “Applying Effects From
the Effect Palette” on page 36.
You can select which tracks to apply the effect to from within the Quick Transition dialog
box. The Track Selection buttons in the Quick Transition dialog box match the Track
Selection panel in the Timeline. However, selecting tracks in the dialog box only determines
which tracks the effect applies to, not which Timeline tracks are active. You can apply the
effect to active or inactive tracks, depending on your selection. Timeline shortcuts for
selecting tracks — for example, lassoing a track selector to reverse the current track
selection — also work in the Quick Transition dialog box, with the exception of Ctrl+A and
Shift+Ctrl+A to select and deselect all tracks.
Working with the Quick Transition Dialog Box
Creating a Transition with the Quick Transition Dialog Box
To create an effect by using the Quick Transition button:
1. Move the position indicator to the transition in the Timeline.
2. Click the Quick Transition button.
69
Page 70

3 Applying and Customizing Effects
The Quick Transition dialog box opens.
The dialog box shows a graphical display of the outgoing media (A) and incoming
media (B), with the Dissolve Effect icon applied to the transition. Your Avid editing
application scales the graphical display to show the relative size of the Dissolve effect
and the media available for the effect. For more information on Quick Transition
options, see “The Quick Transition Dialog Box” on page 66.
70
3. Click the Track Selection buttons to select the tracks to which you want to apply the
effect.
4. Click the Add menu and select a transition effect.
For reference information on individual effects shown in the menu, see “Blend Effects”
on page 575.
When you save a Dissolve effect template into a bin named Quick Transitions, the effect
n
template appears in the Add menu. For more information, see “Working with Effect
Templates” on page 47.
5. Set the transition duration by doing one of the following:
t Type the duration in frames in the Duration text box. You cannot type a number
greater than the number of frames available for the effect.
t Click either the left or right edge of the Dissolve Effect icon and drag it to change
the duration.
The graphical display changes to reflect the new duration. The size of the effect icon
increases or decreases, and the numbers in the Duration and Start text boxes change.
Page 71

Working with the Quick Transition Dialog Box
6. Adjust the position of the effect relative to the cut point by doing one of the following:
t Click the Position menu, and select a command to have the effect end at the cut
point, center on the cut point, or start at the cut point.
t Click the Position menu, select Custom, and then type a number in the Start text box
to specify how many frames before the cut point you want the effect to begin. You
cannot type a number greater than the number of frames available for the effect.
t Click the effect icon and drag it to position the effect with respect to the cut point.
t Click one of the alignment buttons below the graphical display.
These buttons appear when you select Custom from the Position menu or click in
the graphical display.
Your Avid editing application positions the effect, and updates both the graphical
display and the value in the Start text box.
If you select an alignment for which there is not enough media, your Avid editing
application comes as close as possible to the alignment you request.
7. If you click the Dissolve Effect icon and drag it, the Position menu changes to Custom.
Indicate where you want the effect to start — that is, how many frames before the cut
you want to include in the effect — by doing one of the following:
t Click near the middle of the effect icon and drag it to change the number of frames
dynamically.
t Click one of the alignment buttons below the graphical display to specify the effect
as ending at cut, centered on cut, or starting at cut.
t Type the number of frames in the Start text box. You cannot type a number greater
than the number of frames available for the effect.
The graphical display changes to show the relative amount of media available and the
relative position of the effect, and the new value appears in the Start text box.
8. Click the Target Drive menu, and select a drive on which to store the effect if you choose
to render it.
The Effect Source Drive is the default drive where the media on the outgoing shot of a
transition resides.
9. (Option) If you have In and Out points marked in your sequence, do one of the
following:
t Select Apply to All Transitions (In -> Out) to overwrite all existing transition
effects between the In and Out points.
t Select both options to avoid overwriting any existing transition effects.
The Skip Existing Transition Effects option is useful when you want to add a number of
n
dissolves to a sequence that already has transition effects.
71
Page 72

3 Applying and Customizing Effects
10. Do one of the following:
t To add the effect without rendering it, click Add.
t To add the effect and render it, click Add and Render.
Your Avid editing application adds the effect to the selected transition and the selected
tracks in the sequence, or, if you select Apply to All Transitions (In -> Out), to all
transitions between the In and Out points on the selected tracks.
If there is not enough incoming or outgoing media material to apply the effect to a
n
transition, a dialog box opens. For more information, see “Sizing Effects to Fit the Media”
on page 41.
Using the Quick Transition Button to Apply Effects to Multiple Transitions
You can select multiple transitions by marking In and Out points. Then you can apply an
effect from the Quick Transition dialog box in one of the following ways:
• Apply the effect to all transitions between the In and Out points.
• Apply the effect to only those transitions that do not already have an effect applied.
The graphical display in the Quick Transition dialog box always shows the transition closest
to the position indicator. When you define an effect to apply to multiple transitions, the
positioning details of any one transition might not be useful since you need to create an
effect that will fit all the transitions. However, you might want to select one transition as a
model. For example, you might use the transition with the least amount of handle as a
model. If your effect fits that transition, it should fit all the others you have selected.
To apply an effect to multiple transitions by using the Quick Transition button:
1. Mark In and Out points around the transitions to which you want to add the effect.
2. (Option) If you want to see a particular transition in the graphical display of the Quick
Transition dialog box, move the position indicator to that transition.
3. Follow the procedure for applying an effect with the Quick Transition button described
in “Creating a Transition with the Quick Transition Dialog Box” on page 69.
Adjusting a Transition Effect by Dragging in the Quick Transition Dialog Box
You can control the length or position of the transition effect by dragging in the
graphical display.
72
Page 73

Working with the Quick Transition Dialog Box
To adjust the length of the effect:
1. Do one of the following:
t To adjust the length of the effect without changing its start point, move the pointer
over the right edge of the effect.
t To adjust the length of the effect without changing its end point, move the pointer
over the left edge of the effect.
The pointer changes to a resizing arrow.
2. Do one of the following:
t To lengthen the effect, drag away from the effect icon in the center.
t To shorten the effect, drag toward the effect icon in the center.
The graphical display and the Duration text box update to reflect your adjustment. If
you are dragging the left edge of the effect, the Start text box also updates to reflect the
changed start point.
To adjust the position of the effect:
1. Move the pointer inside the effect.
The pointer changes to a hand.
2. Drag the effect to adjust its position with respect to the cut point.
The graphical display updates to show the new effect position, and the Start text box
updates to show the new number of frames before the cut point.
You cannot drag an effect beyond the ends of the handles on the media because you cannot
n
create a transition unless both incoming and outgoing media are available for every frame
of the transition. You also cannot drag an effect beyond the cut point.
For information about preserving transition effects, see “Preserving Effect Transitions in
the Timeline” on page 75.
73
Page 74

3 Applying and Customizing Effects
Repositioning the Dissolve Effect with the Quick Transition Alignment Buttons
You can use the alignment buttons below the graphical display in the Quick Transition
dialog box to quickly reposition an effect so that it either ends at the cut, is centered on the
cut, or starts at the cut. The buttons have the same effect as the Ending at Cut, Centered on
Cut, and Starting at Cut commands in the Position menu.
To reposition the effect with an alignment button:
t Click one of the following buttons:
Button Description
Ending at Cut Aligns the effect so it ends at the cut point.
Centered on Cut Aligns the effect so it is centered on the cut point.
Starting at Cut Aligns the effect so it starts at the cut point.
Adjusting Transitions in the Timeline
You can adjust transitions directly in the Timeline while you are performing Trim edits.
You can trim a transition effect by using the standard transition trim procedures. For more
information, see “Working with Trim Edits” in the Help.
In some Avid editing applications, you can also change the duration of transition effects just
by dragging them in the Timeline. To use this feature, you open the Transition Corner
Display. For more information, see “Using the Transition Corner Display” in the Help.
The Transition Corner Display feature is only available in some Avid editing applications,
n
and only when you are in Big Trim mode. To ensure that you enter Big Trim mode, select
“Never use Small Trim mode” in the Features tab of the Trim Settings dialog box. For more
information, see “Trim Settings: Features Tab” in the Help.
To customize transition effect parameters, see the procedures in “Transition Parameters” on
page 633.
74
Page 75

Preserving Effect Transitions in the Timeline
Preserving Effect Transitions in the Timeline
This topic describes the behavior of clips with transition effects when you trim and move
them in the Timeline.
Segment Editing
When you move a segment with a transition effect into filler, the effect remains with the
segment. Your Avid editing application does not remove the effect.
When you move a segment with a transition effect into another segment, the effect remains
with the stationary segment.
For information about Segment editing, see “Editing Segments” in the Help.
Splicing and Overwriting
When you splice or overwrite a sequence onto another sequence, your Avid editing
application preserves the transition effects at the marks in the source, depending on the
position of the mark. For example:
If you: The result is:
Place the Mark In at the cut Your Avid editing application leaves the transition effect as
is.
Place a Mark In before the cut Your Avid editing application leaves the transition effect,
but shortens the transition.
Place a Mark In after the cut Your Avid editing application removes the transition effect.
Trim Mode
You can trim past the edge of the transition effect up to the cut.
For information about Trim mode, see “Working with Trim Edits” in the Help.
Cutting or Extracting
When you cut or extract a clip with a transition effect, the effect remains in the Timeline.
Your Avid editing application does not remove the effect.
For information about extracting, see “Lifting, Extracting, and Copying Material” in the
Help.
75
Page 76

3 Applying and Customizing Effects
Replacing an Effect in Effect Mode
You can replace an existing effect in Effect mode. However, some effects cannot replace
other effects. For example, some segment effects, such as the Mask effect, cannot replace
transition effects. In addition, two-track effects, such as wipes, cannot replace three-track
effects, such as matte keys.
To replace an effect:
1. If your Avid editing application is not in Effect mode, enter Effect mode, for example,
by selecting Toolset > Effects Editing.
For more information, see “Entering Effect Mode” on page 42.
2. In the Effect Palette, select an effect category.
3. Do one of the following to replace the effect:
t Drag the new effect’s icon to the Timeline. To replace an existing effect, move the
new effect’s icon on top of the existing effect’s icon.
t Drag the new effect’s icon to the Effect Preview monitor.
t Select the effect in the Timeline, and double-click the new effect’s icon in the Effect
Palette.
4. Set the applicable effect parameters in the Effect Editor.
Using the Effect Preview Monitor
The Effect Preview monitor displays the selected effect in the sequence where the position
indicator is located in the Timeline. The effect’s position bar, located directly below the
Effect Preview monitor, represents only the selected effect, not the entire sequence.
For information on entering Effect mode and displaying the Effect Preview monitor, see
“Entering Effect Mode” on page 42.
76
Page 77

Using the Effect Preview Monitor
The Effect Preview monitor. Top, left to right: tracking information, length of effect, and current position in
effect. Bottom, left to right: scale bar (for expanding position bar), and position bar with position indicator (blue
bar) and keyframe indicators (pink triangle).
If the effect you expect does not appear in the Effect Preview monitor, make sure that you
n
have selected the Record Track Monitor button in the Track Selector panel. If a black frame
appears in the Effect Preview monitor, the position indicator might be at a location in the
Timeline where an effect has not been applied to the sequence. The following illustration
shows the Record Track Monitor buttons.
Toolbar Buttons in the Effect Preview Monitor
You can use toolbar buttons in the Effect Preview Monitor to control effect position and
adjustment. The following table describes these buttons.
The Effect Editor also contains controls that you use to adjust and preview effects. For more
information, see “Effect Editor Controls” on page 88.
77
Page 78

3 Applying and Customizing Effects
Button Description
Rewind Places the position indicator at the first frame or field of the sequence.
Fast Forward Places the position indicator at the last frame or field of the sequence.
Add Keyframe Creates a keyframe at the current position of the position indicator in the effect’s
position bar. Alt+click (Windows) or Option+click (Macintosh) to delete the
selected keyframe.
Step Backward
One Frame
Step Forward
One Frame
Play Plays the effect from the current position in the effect’s position bar. Click again
Play Preview Plays back a wire-frame preview of an unrendered effect.
Play Loop Plays back the current effect repeatedly in a loop. Click again or press the space
Dual Split Click to divide the Effect Preview monitor in half, showing the image with and
Reduce Reduces the size of the image in the Effect Preview monitor.
Enlarge Enlarges the size of the image in the Effect Preview monitor.
Moves the position indicator one frame backward.
Moves the position indicator one frame forward.
or press the space bar to stop play.
Rendered effects play at full speed, and real-time unrendered effects play at full
speed in most circumstances. For information on effect playback, see
“Real-Time Playback of Video Effects” on page 151.
bar to stop play.
Rendered effects play at full speed, and real-time unrendered effects play at full
speed in most circumstances. For information on effect playback, see
“Real-Time Playback of Video Effects” on page 151.
without the effect applied. Click again to remove.
You can also Ctrl+click (Windows) or Command+click (Macintosh) in
n
the Effect Preview monitor to enlarge the image.
Using Big Effect Mode
Some Avid editing applications let you use Big Effect mode to work in an enlarged Effect
Preview monitor. The Source monitor disappears, and the Effect Preview monitor becomes a
larger working space that makes it easier to create effects and make changes to them.
78
Page 79

To enter or leave Big Effect mode:
1. If your Avid editing application is not in Effect mode, enter Effect mode, for example,
by selecting Toolset > Effects Editing.
For more information, see “Entering Effect Mode” on page 42.
2. Alt+click (Windows) or Option+click (Macintosh) the Effect Mode button.
If your Avid editing application is in the default Effect mode, it enters Big Effect mode.
You can click the Effect Editor and drag it to the left of the enlarged Effect Preview
monitor.
If your Avid editing application is in Big Effect mode, it returns to the default Effect
mode.
Once you enter Big Effect mode, it remains enabled until you Alt+click (Windows) or
n
Option+click (Macintosh) the Effect Mode button again.
Mapping User-Selectable Buttons in Effect Mode
You can customize the buttons that are available in Effect mode by mapping user-selectable
buttons directly from the Command palette to the Tool palette or to the area below the Effect
Preview monitor.
Using the Effect Preview Monitor
To remap user-selectable buttons, enter Effect mode and use the procedure in “Mapping
User-Selectable Buttons” in the Help.
When you customize the display of buttons in Effect mode, the new configuration appears in
n
Effect mode only. The default editing mode buttons reappear when you exit Effect mode.
Understanding Tracking Information in the Effect Preview Monitor
The two boxes above the Effect Preview monitor display the length of the effect in seconds
and frames and the current position in the effect’s position bar.
If you are working with two-field media, the current position display indicates the field that
appears in the monitor. The current position display ends with .1 for the first field of a frame
and with .2 for the second field. These boxes replace the name of the sequence that normally
appears in this position.
If the position information boxes do not appear above the Effect Preview monitor, increase
n
the size of the window.
79
Page 80

3 Applying and Customizing Effects
Displaying Safe Title and Safe Action Guidelines in Monitors
Many effects can utilize the outer edges of the viewing screen area. If you are editing
material that will be viewed on screens with more limited viewing areas, such as standard
televisions, you can use the Safe Title and Safe Action options to provide visual guidelines
in the Effect Preview monitor that replicate the actual viewable area on a standard television
screen.
For example, you can use the Safe Title option as a template for the area in which you want
the effect to operate. In this way, you can avoid the appearance of the effect floating off into
a nonviewable area of a standard television screen.
You can also display safe title and safe action guidelines in other monitor types and in the
Title tool. For information on displaying guidelines in the Title tool, see “Setting Up the
Drawing Environment” on page 394.
To display the Safe Title and Safe Action guidelines in the Effect Preview monitor:
t Click the Grid button in the Effect Editor.
You can customize the type of grid displayed by the Grid button. For more information, see
n
“Understanding the Effect Grid” on page 81.
80
Two outlined boxes appear in the Effect Preview monitor. The inner box is the safe title
area. All text and objects should remain within the inner box. The outer box is the safe
action area for video display
Page 81

Understanding the Effect Grid
The Effect Grid helps you to position effects with accuracy and previsualize them in the
Effect Preview monitor. The grid coordinates can be expressed in traditional fields or X–Y
pixels in any resolution.
The following illustration shows a 12-field grid displayed in a video project.
Using the Effect Preview Monitor
You can use the Effect Grid to:
• Display the aspect ratios for film categories such as standard film, Academy, Super
35 mm, and Anamorphic, as well as the 4:3 safety area for the 16:9 aspect ratio.
• Show coordinate information to track the exact location of an effect in the frame.
• Use the snap-to-grid feature to easily position effects.
In film projects, you can also use the Effect Grid to:
™
• Create position information for the following effects: Paint, AniMatte
You can include this information in an optical list created using Avid FilmScribe
, Blowup.
™
.
• Create position information for an effect you previsualize using the Previsualization
Marker tool.
You can include this information in an optical list created using Avid FilmScribe. For
more information, see “Using the Previsualization Marker Tool for Film Projects” on
page 507.
81
Page 82

3 Applying and Customizing Effects
The Grid parameter category in the Effect Editor lets you customize the grid display for an
individual effect. Grid parameters set in the Effect Editor apply only to that effect and
temporarily override the current settings in the Grid Settings dialog box. For more
information on the parameters available with the Grid parameter category, see “Grid” on
page 629.
Displaying the Effect Grid in Effect Mode
To display the Effect Grid rather than the Safe Title/Safe Action guidelines:
t Press the Alt key (Windows) or Option key (Macintosh), and click the Grid button.
To switch between the Effect Grid and the Safe Title/Safe Action guidelines:
t Press the Alt key (Windows) or Option key (Macintosh), and click the Grid button until
the appropriate grid is displayed.
To remove the display of either the Effect Grid or the Safe Title/Safe Action guidelines:
t Click the Grid button without pressing the Alt key (Windows) or Option key
(Macintosh).
Displaying Position Coordinates for Effects
82
Your Avid editing application uses compass coordinates and X, Y coordinates to describe
the position of an effect.
For compass coordinates, the point (0, 0) is the center of the axes. For X, Y coordinates, the
point (0, 0) is the upper left corner of the monitor. X values increase to the right, and Y
values increase as you move down.
The compass coordinates describe the effect’s position in terms of film optical house
standards. Each compass coordinate begins with a direction (N, S, E, or W, the abbreviations
for North, South, East, or West) followed by a numerical value. This numerical component
reflects the Fields and Sub Fields parameters you select in the Grid Settings dialog box or
the Grid parameter group.
The X, Y coordinates describe position in terms of the Source Scan Size parameters you
select in the Grid Settings dialog box or the Grid parameter group.
Page 83

Using the Effect Preview Monitor
To enable display of position coordinates:
1. In the Settings tab of the Project window, double-click Grid.
The Grid Settings dialog box opens.
2. Select Show Position Info, and then click OK.
3. Enable the Effect Grid as described in “Displaying the Effect Grid in Effect Mode” on
page 82.
To display position coordinates in Effect mode:
1. Deselect all tools in the Effect Editor (including the Outline/Path button and the
Selection tool for Intraframe effects).
Outline/Path button (left) and Selection Tool button (right)
2. Press and hold the mouse button, and drag the pointer in the Effect Preview monitor.
To display position coordinates in Source/Record mode (editing mode on NewsCutter
systems):
t Move the pointer to the Record monitor, press and hold the mouse button, and move the
mouse.
Obtaining Position Information in a Film Project
Some Avid editing applications let you use the Effect Grid to include position information in
a cut list for the Paint and AniMatte effects on a keyframe-by-keyframe basis. You can
include both compass coordinate and X, Y coordinate information in a cut list for each
corner of a Paint or AniMatte effect. For example, a rectangle you create with the Paint
Effect shows four compass and four X, Y coordinates for each keyframe.
83
Page 84

3 Applying and Customizing Effects
The following illustration shows the presentation of Paint Effect information for a
rectangular object in a cut list.
Example of Paint Effect information in a cut list. Top to bottom: Grid information, keyframe number and
reference numbers, Shape type and color information, Compass and (X,Y) coordinate information for each
corner of the rectangle.
You can also display the position information for the first keyframe of a Blowup effect in a
cut list. The event section of the cut list displays the compass coordinates of the effect at the
first keyframe in the segment and the Fields parameter you have selected for the effect. You
must enable the Effect Grid before you generate the cut list to display this information in the
list.
84
The following illustration shows sample Blowup effect information in a cut list.
Example of Blowup Effect information in a cut list. Top: Grid information. Bottom, left to right: Keyframe
number, Field parameter value, and Compass coordinates.
Page 85

Using the Effect Preview Monitor
You generate film cut lists and change lists with Avid FilmScribe. For general information on
n
using Avid FilmScribe, see the Avid FilmScribe Help.
You can also generate effect information in a cut list by using the Previsualization Marker
Tool in the Paint Effect. For more information, see “Using the Previsualization Marker Tool
for Film Projects” on page 507.
To include coordinate information in a cut list:
1. Enable the Effect Grid before you generate the list.
For more information, see “Displaying the Effect Grid in Effect Mode” on page 82.
2. In the Cut List tool within Avid FilmScribe, select the Key Frames check box in the
Options pane for the optical list.
Moving an Enlarged Image in the Effect Preview Monitor
You can use the Enlarge and Reduce buttons in the Effect Editor or the Effect Preview
Monitor toolbar to zoom in or out on an image in the Effect Preview monitor.
This lets you view parts of an image in detail or to view parts of effects and effect controls
that extend beyond the limits of the standard-size image. For more information, see “Effect
Editor Controls” on page 88 and “Toolbar Buttons in the Effect Preview Monitor” on
page 77.
When you use the Enlarge button to increase the size of the image in the Effect Preview
monitor, you cannot view the entire frame all at once. When you are creating an effect that
requires great detail, you can reposition the enlarged frame in the monitor to view the areas
that need your attention.
This feature applies only to an enlarged image in the Effect Preview monitor, not to a
n
standard-size or reduced image.
85
Page 86

3 Applying and Customizing Effects
To move an enlarged image within the Effect Preview monitor:
1. Click within the boundaries of the Effect Preview monitor.
2. Press and hold Ctrl+Alt (Windows) or Command+Option (Macintosh).
The pointer changes to a hand.
3. Drag the hand in any direction to reposition the image within the Effect Preview
monitor.
You can also enlarge the frame in the Source monitor and move the frame around by
n
pressing and holding Ctrl+Alt (Windows) or Command+Option (Macintosh). To access the
Enlarge and Reduce buttons when you are not in Effect mode, use the Command palette, or
map the buttons to your keyboard or to the user-selectable palettes. You can also use Ctrl+L
(Windows) or Command+L (Macintosh) to enlarge the frame and Ctrl+K (Windows) or
Command+K (Macintosh) to reduce the frame.
Stepping Through Field-Based Media
Your Avid editing application behaves differently when stepping through two-field media
depending on the mode you are in.
In Effect mode, your Avid editing application displays each field in the media as you step
forward or back using the standard controls, for example, the Step Forward and Step
Backward buttons below the Effect Preview monitor.
86
Page 87

In Source/Record and Color Correction modes (editing and Color Correction modes on
NewsCutter systems), your Avid editing application displays only field 1 of each frame by
default. If you need to view both field 1 and field 2 of each frame of video while in these
modes, you can use the Step Forward One Field and Step Backward One Field buttons.
To step through footage one field at a time in Source/Record or Color Correction
mode:
t Click the Step Forward One Field button or the Step Backward One Field button.
Step Forward One Field button (left) and Step Backward One Field button (right)
As you step, the number “2” appears in the upper right corner of the image display in the
Record monitor whenever field 2 of the media is displayed. The number disappears
during the display of field 1 (the default display).
Using the Effect Editor
You use the Effect Editor to adjust the parameters for an effect and to control other aspects
of effects such as how they display and how you preview them.
Using the Effect Editor
Parameter controls are grouped in parameter categories in the main area of the Effect Editor.
For example, the Border parameter category includes all the controls that you can use to
define the color and appearance of an effect border.
Other controls and buttons are grouped on the right and at the bottom of the Effect Editor.
Displaying an Effect’s Parameters in the Effect Editor
You display the Effect Editor by entering Effect Mode. The Effect Editor shows effect
parameters for the effect currently selected in the Timeline.
To display an effect’s parameters in the Effect Editor:
1. Move the position indicator to the effect’s icon in the Timeline.
2. Make sure that the Record Track button for the track that contains the effect is selected
in the Track Selector panel.
3. Enter Effect mode, for example, by selecting Toolset > Effects Editing.
For more information, see “Entering Effect Mode” on page 42.
The Effect Editor opens. The name of the effect and its icon appear at the top of the
Effect Editor and the parameters that pertain to the effect appear in the Effect Editor.
87
Page 88

3 Applying and Customizing Effects
If the Effect Editor is already open and active, select the segment or transition effect to
n
display the effect’s parameters in the Effect Editor.
Understanding Parameters in the Effect Editor
Effect parameters are values that define the appearance of an effect. For example, you can
set parameters that control the size and position of a Picture-in-Picture effect.
A number of parameters are common to many effects, such as parameters affecting size,
position, or foreground level (transparency). You can adjust these parameters once for the
entire effect, or you can use the Effect Editor along with keyframes to change the effect
parameter over time. Other parameters can be adjusted only once for the entire effect,
regardless of keyframe selection.
Not all effect parameters apply to all effects. Parameters that do not apply to an effect do not
appear in the Effect Editor for that effect.
If the position indicator is not on an effect’s icon in the Timeline, or if the track that contains
n
the effect is not selected, the Effect Editor is blank.
For reference information on all of the available effect parameters (including which effect
parameters apply to each effect), see “Effects Reference” on page 573 and “Effects
Parameter Reference” on page 621.
Effect Editor Controls
This topic describes the controls in the Effect Editor. Not all controls apply to each effect. If
a control is not applicable, it does not appear in the Effect Editor for that effect.
The following illustration is an example of the location of controls and buttons within a
typical Effect Editor display. The exact number of controls and their appearance might vary
for your Avid editing application.
88
Page 89

12
3
4
5
6 7 8 9 10 11
12
Using the Effect Editor
1 Triangular opener 5 Parameter name 9 Transition Effect Duration box
2 Effect name and icon 6 Render Effect button 10 3D Promote button
3 Parameter group (parameter
category)
4 Parameter adjustment slider 8 Transition Effect
7 Outline/Path button 11 Show/Hide Keyframe Graph
button
12 Additional buttons (exact set
Alignment button
depends on the effect
89
Page 90

3 Applying and Customizing Effects
The following table describes the buttons that all effects have in common. Additional
buttons appear in the Effect Editor, depending on the effect used. For example, if you are
working with a 3D effect, a set of 3D-specific buttons appears along the right side of the
Effect Editor. For more information on 3D-specific Effect Editor buttons, see “Working with
3D Effects” on page 363.
When you are working with advanced keyframes, additional buttons appear in the bottom
toolbar of the Effect Editor. For more information, see “Effect Editor Controls for Advanced
Keyframes” on page 140.
The Effect Preview Monitor toolbar also contains buttons that you use to adjust and preview
effects. For more information, see “Using the Effect Preview Monitor” on page 76.
Location in
Button or Control
Effect Editor Description
Triangular
opener
Other Options Inside some
Reduce Right side Reduces the image in the Effect Preview monitor.
Enlarge Right side Enlarges the image in the Effect Preview monitor.
Dual Split Right side Splits the Effect Preview monitor in half to show the image
Play Loop Right side Plays back a transition or segment effect in a loop.
Play Right side Plays the effect from the current position in the effect’s
Left side Opens or closes the parameter group. A downward-pointing
triangle displays the parameter group; a right-pointing
triangle displays the parameter name.
Triangular openers also appear to the left of keyframe
n
graphs when you use advanced keyframes. For more
information, see “Opening Keyframe Graphs” on
page 102.
Opens additional parameters for some effects, including the
parameter
categories
Macintosh Colors panel or the Windows Color dialog box for
color selection. For more information, see “Accessing
Additional Parameters for an Effect” on page 94.
with and without effects applied to it.
position bar for most 2D and 3D effects.
90
Page 91

Using the Effect Editor
Location in
Button or Control
HQ Right side Appears when a 3D effect has the HQ (Highest Quality)
Tracking Tool Right side Appears when the effect can use motion tracking data. Click
Grid Right side Displays Safe Action/Safe Title guidelines or the Effect Grid.
Render Effect Bottom Renders the current effect.
Outline/Path Bottom Displays a wire-frame path to illustrate the movement of an
Effect Editor Description
rendering option. Click to select the HQ implementation or
the standard implementation with which to render the effect.
The button is green when the HQ implementation is selected.
For more information, see “Rendering 3D Effects Using the
HQ (Highest Quality) Option” on page 176.
to open the Tracking window. For more information, see
“Motion Tracking and Stabilization” on page 309.
For more information, see “Displaying the Effect Grid in
Effect Mode” on page 82.
effect from the first keyframe through the last keyframe.
Transition
Effect
Alignment
The Transition Effect Alignment button shows the alignment of the transition effect applied at the cut
n
point. If the cut point does not have a transition effect, the Transition Effect Alignment button appears as
a vertical bar. If the cut point has an existing transition effect, the button indicates the alignment of the
transition effect.
Transition
Effect
Duration box
Promote to
Advanced
Keyframes
3D Promote Bottom right
Bottom Opens a menu from which you select the alignment of a
transition effect relative to the cut point. The appearance of
the button changes depending on which alignment option you
have selected from the menu. For a detailed explanation of the
Transition Effect Alignment menu and the Transition Effect
Duration box, see “Applying a Dissolve Effect Using the
Transition Parameters” on page 64.
Bottom Sets a duration for the transition effect other than the duration
displayed.
Bottom Promotes an AVX 1.x effect to an AVX 2 effect. This button
only appears for an AVX 1.x plug-in that is promotable to
AVX 2. For more information, see “Updating and Promoting
AVX Plug-ins” on page 189.
Promotes the effect to a 3D effect. Available for some effects,
corner
including titles, Picture-in-Picture, and imported matte keys.
91
Page 92

3 Applying and Customizing Effects
Selecting a Parameter from a Menu in the Effect Editor
Some effects have parameters that you select from a menu (advanced keyframes) or from a
Fast menu (standard keyframes). For example, border types for 3D effects are in the same
menu.
To select a parameter from a menu:
t Click the menu or the Fast Menu button, and then select a parameter.
Example of a menu in an advanced keyframe effect (left), and of a Fast Menu button and its menu in a
standard keyframe effect (right)
Changing a Parameter with a Slider in the Effect Editor
Many parameters have sliders for controlling parameters with a range of possible values.
Some parameters have a thumbwheel, a specialized slider that provides a window on a wide
range of values and allows precise control over increments.
When you edit an effect that uses advanced keyframes, you can choose to display parameters
n
with either sliders or thumbwheels. See “Effect Editor Controls for Advanced Keyframes”
on page 140.
The parameter’s numeric value appears to the right of the slider or thumbwheel.
Examples of a parameter slider (left) and a thumbwheel (right)
Some parameters display a blank slider track until you click an Effect Editor tool that
activates the control.
92
Page 93

Using the Effect Editor
To activate a parameter that has a slider:
t Click the slider.
The slider changes to pink.
To change the value of a parameter that has a slider, use any of the following methods:
t Move the slider with the mouse.
t Use the Left Arrow or Right Arrow key to change the value by –1 or +1.
t Press the Ctrl key and use the mouse scroll wheel to change the value by increments of
–1 or +1.
t Press the Shift key, and use the Left Arrow key or Right Arrow key to change the value
by –10 or +10.
t Press the Ctrl and Shift keys, or the Ctrl and Alt keys, and use the mouse scroll wheel to
change the value by increments of -10 or +10.
t Use the numeric keypad to type a new value, and, if you entered fewer than three digits,
press Enter (Windows) or Return (Macintosh).
The parameter’s numeric value (to the right of the slider) changes as you move the
slider.
To move from one slider to the next slider:
t Press the Tab key.
To move from one slider to the previous slider:
t Press Shift+Tab.
Using Parameter Enable Buttons in the Effect Editor
You control some parameters using parameter Enable buttons. These parameters can either
be active or inactive but cannot be adjusted over a range of values. For example, the Fixed
Aspect parameter Enable button controls whether the aspect ratio of an image is maintained
when you adjust one of its dimensions.
To turn a parameter on or off using a parameter Enable button:
t Click the Enable button.
Parameter Enable buttons, when the parameter is active (left) and when the parameter is inactive (right)
93
Page 94

3 Applying and Customizing Effects
Accessing Additional Parameters for an Effect
Some effects have additional parameters that control their operation. For example, the Grid
effect has additional parameters in which you set the number of columns and rows in the
wipe.
When an effect has additional parameters, the Other Options button appears next to the
effect name or in a parameter group.
To access an effect’s additional parameters:
t Next to the effect name or in a parameter group, click the Other Options button.
A dialog box opens in which you set the additional parameters.
You also use the Other Options button to access the parameters for third-party plug-in
n
effects and for the Windows Color dialog box or Macintosh Colors panel in effects that lets
you change color parameters.
Adjusting a Color Parameter for an Effect
In addition to using the Hue, Sat (saturation), and Lum (luminance) sliders, you can change
a color parameter or select a key color with the following methods:
94
• Select a color with the eyedropper.
• Specify a color in the Windows Color dialog box or Macintosh Colors panel.
The Windows Color dialog box is part of the Windows operating system and the
Macintosh Colors panel is part of the Macintosh operating system.
To select a color using the eyedropper:
1. Position the pointer over the Color Preview window to activate the eyedropper.
Example of Color Preview window with eyedropper active
Page 95
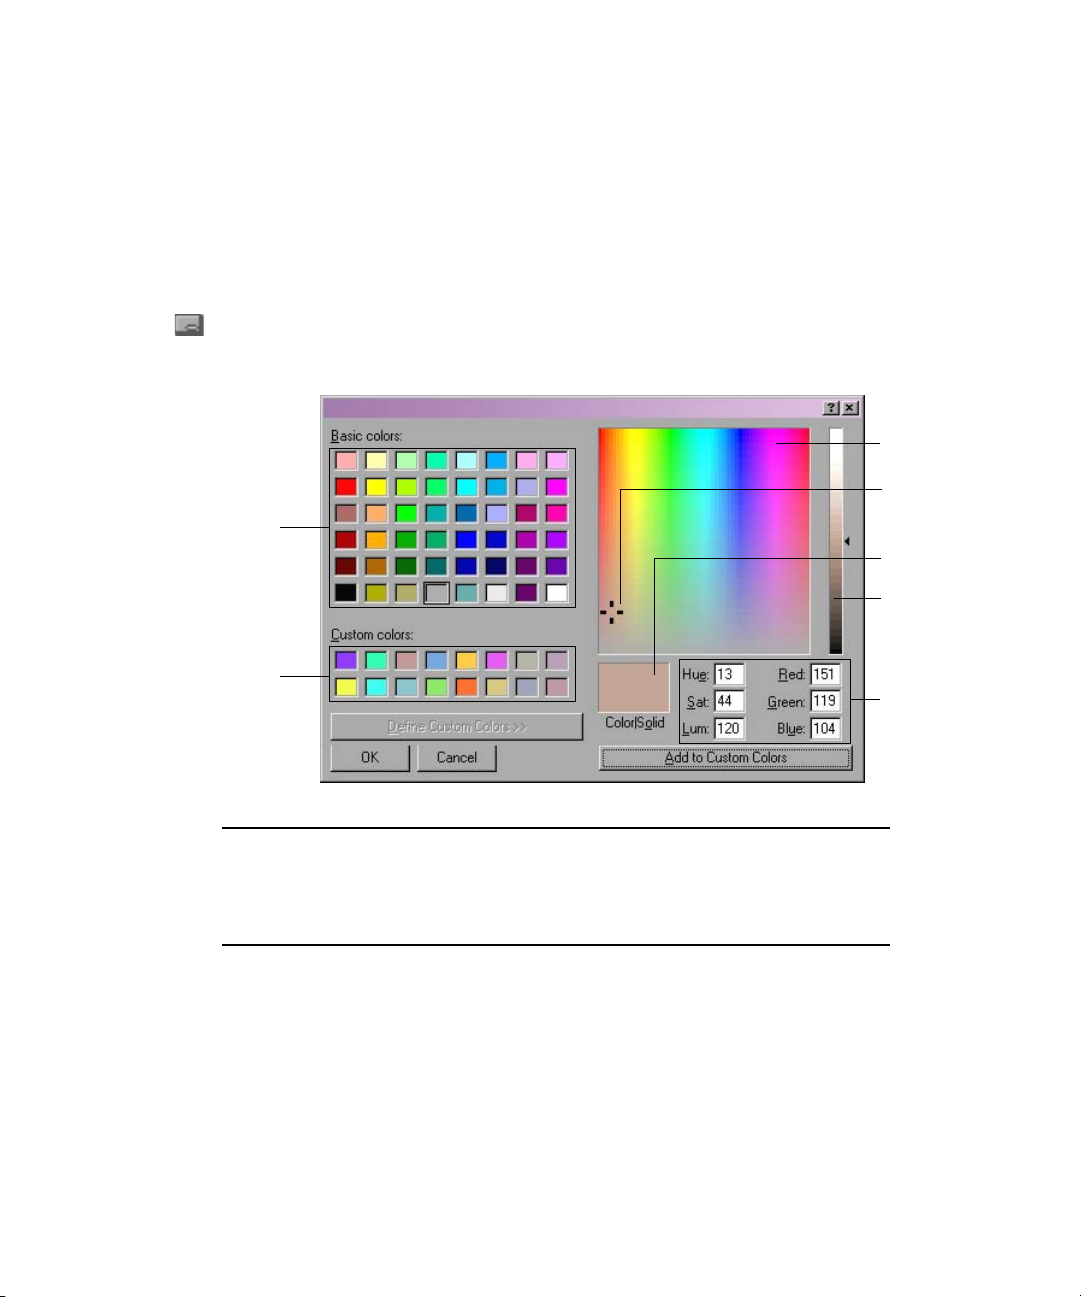
Using the Effect Editor
1
2
3
4
5
6
7
2. Press and hold the mouse button, then drag the eyedropper to the Effect Preview
monitor, and release the mouse button on the color you want to select from the video
image.
Your Avid editing application updates the parameter’s numeric values, and the selected
color appears in the Color Preview window.
To open the Windows Color dialog box:
t Click the Other Options button next to a color parameter.
The Windows Color dialog box opens.
1 Default color choices 4 Current color 7 Color Selection text boxes
2 Custom colors palette 5 Color|Solid box
3 Color matrix 6 Color slider
95
Page 96

3 Applying and Customizing Effects
To use the Windows Color dialog box:
1. To select a color from the Basic colors palette, click the color you want.
2. To specify a custom color, do one of the following:
t Click in the color matrix to select a color, and then drag the color slider to adjust the
amount of white and black in the color.
t Type numeric values for each color component in the color selection text boxes.
The new color appears in the left side of the Color|Solid box.
3. When you are satisfied with the color, click Add to Custom Colors to add it to the
Custom Colors palette.
4. To select a custom color from the Windows Color dialog box, click the color you want.
5. Click OK.
The Windows Color dialog box closes, and your Avid editing application applies the
color to the parameter in the Effect Editor.
To open the Macintosh Colors panel:
t Click the Other Options button next to a color parameter.
The Macintosh Colors panel opens.
96
Select the appropriate icon at the top of the Colors panel to display the method you want
to use for selecting the color. Options include RGB sliders, a crayon box, an HSV (hue,
saturation, luminance) color wheel, a Web-safe color picker (Name), and CMYK (cyan,
magenta, yellow, and black) sliders. For a complete description of how to use the
Macintosh Colors panel, see the documentation that ships with your Macintosh.
Page 97

Manipulating Effects Directly in the Effect Preview Monitor
Manipulating Effects Directly in the
Effect Preview Monitor
You can make some adjustments to effects by manipulating them directly in the Effect
Preview monitor. These adjustments use handles and wire-frame outlines that you can
display in the monitor.
You can create a motion path that defines how the foreground image moves across the
background video. You can also resize a foreground image, as in a picture-in-picture effect.
You can define how the foreground image of a multilayer effect moves across the
background video by building a motion path, or string of keyframes. You can define a
motion path on multilayer video effects such as Picture-in-Picture effects. Use the
wire-frame preview feature when you want to see the path an image takes on the screen. You
can also use the resize handles to set the size of the effect image at each keyframe location.
Create keyframes where you need them, make sure that the appropriate keyframe is selected,
and then manipulate the wire frame and handles in the Effect Preview monitor. Drag the wire
frame to reposition the effect. Drag the resize handles to resize the image — the top handle
adjusts the height of the effect image, the side handle adjusts the width, and the corner
handle adjusts width and height together, maintaining the aspect ratio. For more information
on keyframing, see “Working with Keyframes” on page 99.
When you are creating a motion path that moves beyond the viewing screen, you can use the
Reduce button to view an outline of the image at a reduced scale. The reduced scale view
shows the area outside the background image and lets you extend the motion path into that
area. The Enlarge button returns the screen to full view.
97
Page 98

3 Applying and Customizing Effects
Example of wireframe display in the Effect Preview monitor. The image area shows a background image on
track V1 and a wire frame outlining the foreground image on track V2.
98
Example of a motion path in the Effect Preview monitor. Each dot on the path represents the location of the
center of the PIP at a keyframe. The center handle and the resize handles are highlighted.
Page 99

4 Working with Keyframes
This chapter describes how to use keyframes to change the behavior of an effect over time.
• Understanding Keyframes
• Track Types for Advanced Keyframes
• Viewing Advanced Keyframe Graphs
• Manipulating Advanced Keyframes
• Controls and Settings for Advanced Keyframes
• Working with Standard Keyframes
Understanding Keyframes
A keyframe is a point in an effect at which you can set parameters.
When you set parameters to different values in different keyframes, your Avid editing
application animates your effect by calculating intermediate values for parameters between
the keyframes. For example, if a Picture-in-Picture is set to be on the left of the screen at one
keyframe and on the right of the screen at the next keyframe, the Picture-in-Picture moves
from left to right across the screen over the period of time between the two keyframes.
Avid editing applications use two different kinds of keyframes, advanced and standard. In
the current version of your Avid editing application, most effects use advanced keyframes
only, while a small number of effects use standard keyframes only.
In previous versions of Avid editing applications, you could apply some effects as standard
n
keyframe effects and subsequently choose to promote them to advanced keyframes. This
workflow is no longer necessary or available. Effects either use advanced keyframes only or
use standard keyframes only. For information on promoting existing effects in sequences, or
existing effect templates, see “Updating and Reverting Existing Effects in Sequences” on
page 44 and “Promoting Existing Effect Templates” on page 49.
Page 100

4 Working with Keyframes
Advanced Keyframes
Advanced keyframes let you establish independent keyframes for each keyframeable
parameter in an effect, which provides flexibility and control for sophisticated effects
adjustments. Most effects use advanced keyframes.
When an effect uses advanced keyframes, each keyframeable effect parameter has a separate
keyframe track that opens to display a keyframe graph where you can set and customize
keyframes. Keyframe tracks are also available for each parameter group, and for the entire
effect. For more information on the three keyframe track types, see “Track Types for
Advanced Keyframes” on page 101.
You can modify the keyframes for any single parameter independently from the keyframes
for any other parameters. You can also modify the keyframes for various groups or
combinations of parameters independently from the keyframes for any other parameters.
Alternatively, you can create and modify keyframes that affect all parameters at once, in
which case you are using advanced keyframes as if they were standard keyframes. This
approach limits your flexibility, but it might provide all the control you need for simple
effect adjustments. You might also prefer this approach if you have done most of your
keyframing work in the past using standard keyframes, at least until you become more
familiar with the capabilities of advanced keyframes.
100
The following illustration shows part of the Effect Editor display for a Center Box effect,
one of the many effects that uses advanced keyframes. The illustration shows the three types
of keyframe tracks and an open keyframe graph.
Top to bottom: effect track (gray), parameter group tracks (darker blue), parameter tracks (lighter blue), and an
open keyframe graph
 Loading...