

Page 1

Avid® Nearchive
™
Administrator’s and User’s Guide
make manage move | media
™
Avid
®
Page 2

Copyright and Disclaimer
Product specifications are subject to change without notice and do not represent a commitment on the part
of Avid Technology, Inc. The software described in this document is furnished under a license agreement.
You can obtain a copy of that license by visiting Avid's Web site at www.avid.com. The terms of that license
are also available in the product in the same directory as the software. The software may not be reverse
assembled and may be used or copied only in accordance with the terms of the license agreement. It is
against the law to copy the software on any medium except as specifically allowed in the license
agreement. Avid products or portions thereof are protected by one or more of the following United States
patents: 4,746,994; 4,970,663; 5,045,940; 5,267,351; 5,309,528; 5,355,450; 5,396,594; 5,440,348;
5,452,378; 5,467,288; 5,513,375; 5,528,310; 5,557,423; 5,568,275; 5,577,190; 5,584,006; 5,640,601;
5,644,364; 5,654,737; 5,715,018; 5,724,605; 5,726,717; 5,729,673; 5,745,637; 5,752,029; 5,754,851;
5,799,150; 5,812,216; 5,852,435; 5,883,670; 5,905,841; 5,929,836; 5,929,942; 5,930,445; 5,946,445;
5,987,501; 5,995,115; 6,016,152; 6,018,337; 6,023,531; 6,035,367; 6,038,573; 6,058,236; 6,061,758;
6,091,778; 6,105,083; 6,118,444; 6,128,001; 6,130,676; 6,134,607; 6,137,919; 6,141,007; 6,141,691;
6,157,929; 6,198,477; 6,201,531; 6,211,869; 6,223,211; 6,239,815; 6,249,280; 6,269,195; 6,301,105;
6,317,158; 6,317,515; 6,327,253; 6,330,369; 6,351,557; 6,353,862; 6,357,047; 6,392,710; 6,404,435;
6,407,775; 6,417,891; 6,426,778; D396,853; D398,912. Additional U.S. and foreign patents pending. No
part of this document may be reproduced or transmitted in any form or by any means, electronic or
mechanical, including photocopying and recording, for any purpose without the express written permission
of Avid Technology, Inc.
Copyright © 2003 Avid Technology, Inc. and its licensors. All rights reserved. Printed in USA.
The following disclaimer is required by Apple Computer, Inc.
APPLE COMPUTER, INC. MAKES NO WARRANTIES WHATSOEVER, EITHER EXPRESS OR IMPLIED,
REGARDING THIS PRODUCT, INCLUDING WARRANTIES WITH RESPECT TO ITS
MERCHANTABILITY OR ITS FITNESS FOR ANY PARTICULAR PURPOSE. THE EXCLUSION OF
IMPLIED WARRANTIES IS NOT PERMITTED BY SOME STATES. THE ABOVE EXCLUSION MAY NOT
APPLY TO YOU. THIS WARRANTY PROVIDES YOU WITH SPECIFIC LEGAL RIGHTS. THERE MAY BE
OTHER RIGHTS THAT YOU MAY HAVE WHICH VARY FROM STATE TO STATE.
The following disclaimer is required by Sam Leffler and Silicon Graphics, Inc. for the use of
their TIFF library:
Copyright © 1988–1997 Sam Leffler
Copyright © 1991–1997 Silicon Graphics, Inc.
Permission to use, copy, modify, distribute, and sell this software [i.e., the TIFF library] and its
documentation for any purpose is hereby granted without fee, provided that (i) the above copyright notices
and this permission notice appear in all copies of the software and related documentation, and (ii) the
names of Sam Leffler and Silicon Graphics may not be used in any advertising or publicity relating to the
software without the specific, prior written permission of Sam Leffler and Silicon Graphics.
THE SOFTWARE IS PROVIDED “AS-IS” AND WITHOUT WARRANTY OF ANY KIND, EXPRESS,
IMPLIED OR OTHERWISE, INCLUDING WITHOUT LIMITATION, ANY WARRANTY OF
MERCHANTABILITY OR FITNESS FOR A PARTICULAR PURPOSE.
IN NO EVENT SHALL SAM LEFFLER OR SILICON GRAPHICS BE LIABLE FOR ANY SPECIAL,
INCIDENTAL, INDIRECT OR CONSEQUENTIAL DAMAGES OF ANY KIND, OR ANY DAMAGES
WHATSOEVER RESULTING FROM LOSS OF USE, DATA OR PROFITS, WHETHER OR NOT ADVISED
OF THE POSSIBILITY OF DAMAGE, AND ON ANY THEORY OF LIABILITY, ARISING OUT OF OR IN
CONNECTION WITH THE USE OR PERFORMANCE OF THIS SOFTWARE.
The following disclaimer is required by the Independent JPEG Group:
Portions of this software are based on work of the Independent JPEG Group.
The following disclaimer is required by Paradigm Matrix:
Portions of this software licensed from Paradigm Matrix.
Page 3

The following disclaimer is required by Ray Sauers Associates, Inc.:
“Install-It” is licensed from Ray Sauers Associates, Inc. End-User is prohibited from taking any action to
derive a source code equivalent of “Install-It,” including by reverse assembly or reverse compilation, Ray
Sauers Associates, Inc. shall in no event be liable for any damages resulting from reseller’s failure to
perform reseller’s obligation; or any damages arising from use or operation of reseller’s products or the
software; or any other damages, including but not limited to, incidental, direct, indirect, special or
consequential Damages including lost profits, or damages resulting from loss of use or inability to use
reseller’s products or the software for any reason including copyright or patent infringement, or lost data,
even if Ray Sauers Associates has been advised, knew or should have known of the possibility of such
damages.
The following disclaimer is required by Videomedia, Inc.:
“Videomedia, Inc. makes no warranties whatsoever, either express or implied, regarding this product,
including warranties with respect to its merchantability or its fitness for any particular purpose.”
“This software contains V-LAN ver. 3.0 Command Protocols which communicate with V-LAN ver. 3.0
products developed by Videomedia, Inc. and V-LAN ver. 3.0 compatible products developed by third
parties under license from Videomedia, Inc. Use of this software will allow “frame accurate” editing control
of applicable videotape recorder decks, videodisc recorders/players and the like.”
The following disclaimer is required by Altura Software, Inc. for the use of its Mac2Win
software and Sample Source Code:
©1993–1998 Altura Software, Inc.
The following disclaimer is required by Ultimatte Corporation:
Certain real-time compositing capabilities are provided under a license of such technology from Ultimatte
Corporation and are subject to copyright protection.
The following disclaimer is required by 3Prong.com Inc.:
Certain waveform and vector monitoring capabilities are provided under a license from 3Prong.com Inc.
Attn. Government User(s). Restricted Rights Legend
U.S. GOVERNMENT RESTRICTED RIGHTS. This Software and its documentation are “commercial
computer software” or “commercial computer software documentation.” In the event that such Software or
documentation is acquired by or on behalf of a unit or agency of the U.S. Government, all rights with
respect to this Software and documentation are subject to the terms of the License Agreement, pursuant to
FAR §12.212(a) and/or DFARS §227.7202-1(a), as applicable.
Trademarks
888 I/O, AirPlay, AirSPACE, AirSPACE HD, AniMatte, AudioSuite, AudioVision, AutoSync, Avid,
AVIDdrive, AVIDdrive Towers, AvidNet, AvidNetwork, AVIDstripe, Avid Unity, Avid Xpress, AVoption, AVX,
CamCutter, ChromaCurve, ChromaWheel, DAE, D-Fi, D-fx, Digidesign, Digidesign Audio Engine,
Digidesign Intelligent Noise Reduction, DigiDrive, DINR, D-Verb, Equinox, ExpertRender, FieldPak,
Film Composer, FilmScribe, FluidMotion, HIIP, HyperSPACE, HyperSPACE HDCAM, IllusionFX,
Image Independence, Intraframe, iS9, iS18, iS23, iS36, Lo-Fi, Magic Mask, make manage move | media,
Marquee, Matador, Maxim, MCXpress, Media Composer, MediaDock, MediaDock Shuttle, Media Fusion,
Media Illusion, MediaLog, Media Reader, Media Recorder, MEDIArray, MediaShare, Meridien, MetaSync,
NaturalMatch, NetReview, NewsCutter, OMF, OMF Interchange, OMM, Open Media Framework,
Open Media Management, ProEncode, Pro Tools, QuietDrive, Recti-Fi, rS9, rS18, Sci-Fi, Softimage,
Sound Designer II, SPACE, SPACEShift, Symphony, Trilligent, UnityRAID, Vari-Fi, Video Slave Driver,
VideoSPACE, and Xdeck are either registered trademarks or trademarks of Avid Technology, Inc. in the
United States and/or other countries.
iNEWS, iNEWS ControlAir, and Media Browse are trademarks of iNews, LLC.
Macintosh is a trademark of Apple Computer, Inc., registered in the U.S. and other countries. Microsoft and
Windows are either registered trademarks or trademarks of Microsoft Corporation in the United States
and/or other countries. All other trademarks contained herein are the property of their respective owners.
Page 4

GOT FOOTAGE?
Editors — Filmmakers — Special Effects Artists — Game Developers — Animators — Educators —
Broadcasters — Content creators of every genre — Just finished an incredible project and want to
share it with the world?
Send us your reels and we may use your footage in our show reel or demo!*
For a copy of our release and Avid’s mailing address, go to www.avid.com/footage.
*Note: Avid cannot guarantee the use of materials submitted.
Avid Nearchive Administrator’s and User’s Guide • Part 0130-05702-01 • April 2003
Page 5

Contents
Using This Guide . . . . . . . . . . . . . . . . . . . . . . . . . . . . . . . . . . . . . 9
Who Should Use This Guide . . . . . . . . . . . . . . . . . . . . . . . . . . . . . . . . . . 9
About This Guide . . . . . . . . . . . . . . . . . . . . . . . . . . . . . . . . . . . . . . . . . . . 9
Symbols and Conventions . . . . . . . . . . . . . . . . . . . . . . . . . . . . . . . . . . . 10
If You Need Help . . . . . . . . . . . . . . . . . . . . . . . . . . . . . . . . . . . . . . . . . . 11
Related Information . . . . . . . . . . . . . . . . . . . . . . . . . . . . . . . . . . . . . . . . 12
If You Have Documentation Comments . . . . . . . . . . . . . . . . . . . . . . . . . 12
How to Order Documentation. . . . . . . . . . . . . . . . . . . . . . . . . . . . . . . . . 12
Avid Educational Services . . . . . . . . . . . . . . . . . . . . . . . . . . . . . . . . . . . 12
Chapter 1 Getting Started. . . . . . . . . . . . . . . . . . . . . . . . . . . . . . . . . . . . . . 13
The Nearchive System Overview . . . . . . . . . . . . . . . . . . . . . . . . . . . . . . 13
Nearchive MediaManager . . . . . . . . . . . . . . . . . . . . . . . . . . . . . . . . 14
Nearchive TransferManager . . . . . . . . . . . . . . . . . . . . . . . . . . . . . . 14
Supported Media Types . . . . . . . . . . . . . . . . . . . . . . . . . . . . . . . . . . 14
About Adding Media Objects to the Nearchive System . . . . . . . . . . 15
About Finding Media Objects — Searching and Browsing . . . . . . . 15
About Retrieving Media Objects from the Nearchive System . . . . . 15
Accessing and Logging In to the Nearchive System . . . . . . . . . . . . . . . 16
Opening the Nearchive System . . . . . . . . . . . . . . . . . . . . . . . . . . . . 16
Logging In as Administrator . . . . . . . . . . . . . . . . . . . . . . . . . . . . . . . 17
User Interface Overview . . . . . . . . . . . . . . . . . . . . . . . . . . . . . . . . . . . . . 18
Mode Selector . . . . . . . . . . . . . . . . . . . . . . . . . . . . . . . . . . . . . . . . . 19
Control Frame . . . . . . . . . . . . . . . . . . . . . . . . . . . . . . . . . . . . . . . . . 20
Results Frame . . . . . . . . . . . . . . . . . . . . . . . . . . . . . . . . . . . . . . . . . 21
Getting Help . . . . . . . . . . . . . . . . . . . . . . . . . . . . . . . . . . . . . . . . . . . . . . 22
Logging Out . . . . . . . . . . . . . . . . . . . . . . . . . . . . . . . . . . . . . . . . . . . . . . 22
Page 6

Chapter 2 Administrative Tasks. . . . . . . . . . . . . . . . . . . . . . . . . . . . . . . . . 23
User Accounts. . . . . . . . . . . . . . . . . . . . . . . . . . . . . . . . . . . . . . . . . . . . . 24
Accessing Shortcut Menus. . . . . . . . . . . . . . . . . . . . . . . . . . . . . 24
Privilege Levels . . . . . . . . . . . . . . . . . . . . . . . . . . . . . . . . . . . . . 24
The Users List . . . . . . . . . . . . . . . . . . . . . . . . . . . . . . . . . . . . . . 25
Creating User Accounts . . . . . . . . . . . . . . . . . . . . . . . . . . . . . . . . . . 25
Editing User Accounts . . . . . . . . . . . . . . . . . . . . . . . . . . . . . . . . . . . 27
Deleting User Accounts . . . . . . . . . . . . . . . . . . . . . . . . . . . . . . . . . . 29
Maintenance Tasks . . . . . . . . . . . . . . . . . . . . . . . . . . . . . . . . . . . . . . . . . 30
Performing Database Maintenance Tasks . . . . . . . . . . . . . . . . . . . . 30
Managing Database Size . . . . . . . . . . . . . . . . . . . . . . . . . . . . . . . . . . . . 31
Deleting Media Pending . . . . . . . . . . . . . . . . . . . . . . . . . . . . . . . . . . . . . 32
Hiding the Delete Media Pending Catalog . . . . . . . . . . . . . . . . . . . . 32
Deleting Disassociated Media. . . . . . . . . . . . . . . . . . . . . . . . . . . . . . . . . 33
Checking Consistency. . . . . . . . . . . . . . . . . . . . . . . . . . . . . . . . . . . . . . . 34
Database Backup and Restore . . . . . . . . . . . . . . . . . . . . . . . . . . . . . . . . 35
Specifying the Location for the Nearchive System
Backup Files . . . . . . . . . . . . . . . . . . . . . . . . . . . . . . . . . . . . . . . . . 35
Backing Up the Nearchive System Database. . . . . . . . . . . . . . . . . . 37
Restoring the Nearchive System Database . . . . . . . . . . . . . . . . . . . 38
Setting the Session Timeout . . . . . . . . . . . . . . . . . . . . . . . . . . . . . . . . . . 40
Setting the Default Access . . . . . . . . . . . . . . . . . . . . . . . . . . . . . . . . . . . 41
Creating Volumes . . . . . . . . . . . . . . . . . . . . . . . . . . . . . . . . . . . . . . . . . . 42
Sharing Volumes. . . . . . . . . . . . . . . . . . . . . . . . . . . . . . . . . . . . . . . . . . . 46
Setting the Desktop Check-in Limit. . . . . . . . . . . . . . . . . . . . . . . . . . . . . 48
Syncing with Shared Drives . . . . . . . . . . . . . . . . . . . . . . . . . . . . . . . . . . 49
Resyncing to the Shared Drives . . . . . . . . . . . . . . . . . . . . . . . . . . . . . . . 50
Recovering from a Server Crash. . . . . . . . . . . . . . . . . . . . . . . . . . . . . . . 51
Restarting the Nearchive System . . . . . . . . . . . . . . . . . . . . . . . . . . . . . . 51
Chapter 3 Moving Media Objects into and out of
Nearchive MediaManager. . . . . . . . . . . . . . . . . . . . . . . . . . . . 53
Configuring TransferManager on Standalone Editing Applications. . . . . 54
Transferring Media Objects from an Avid Unity MediaNetwork
Workgroup to the Nearchive System . . . . . . . . . . . . . . . . . . . . . . . . . . 55
6
Page 7

Transferring Media Objects from an Avid Editing Application to the
Nearchive System . . . . . . . . . . . . . . . . . . . . . . . . . . . . . . . . . . . . . . . . 57
Checking In a File from Your Desktop . . . . . . . . . . . . . . . . . . . . . . . . . . 58
Retrieving Media Objects from the Nearchive System and
Restoring Them to an Avid Unity MediaNetwork Workgroup . . . . . . . 60
Retrieving Media Objects from the Nearchive System and
Restoring Them to Your Avid Editing Application . . . . . . . . . . . . . . . . 60
Organizing Media Objects with Catalogs . . . . . . . . . . . . . . . . . . . . . . . . 62
Moving Media Objects to Catalogs . . . . . . . . . . . . . . . . . . . . . . . . . 63
Adding Media Objects to Catalogs. . . . . . . . . . . . . . . . . . . . . . . . . . 64
Using Catalogs to Organize Media . . . . . . . . . . . . . . . . . . . . . . . . . 64
Chapter 4 Finding Media Objects. . . . . . . . . . . . . . . . . . . . . . . . . . . . . . . . 65
Simple Searches . . . . . . . . . . . . . . . . . . . . . . . . . . . . . . . . . . . . . . . . . . 66
Saving Your Simple Search. . . . . . . . . . . . . . . . . . . . . . . . . . . . . . . 68
Extended Searches . . . . . . . . . . . . . . . . . . . . . . . . . . . . . . . . . . . . . . . . 69
Specifying Attribute Names, Operators, and Values . . . . . . . . . . . . 70
Performing an Extended Search . . . . . . . . . . . . . . . . . . . . . . . . . . . 73
Refining a Search You Just Performed . . . . . . . . . . . . . . . . . . . . . . 75
Saving Your Extended Search. . . . . . . . . . . . . . . . . . . . . . . . . . . . . 75
Managing Saved Searches . . . . . . . . . . . . . . . . . . . . . . . . . . . . . . . . . . 76
Viewing a Saved Search . . . . . . . . . . . . . . . . . . . . . . . . . . . . . . . . . 76
Editing the Name and Description of a Saved Search . . . . . . . . . . . 77
Deleting a Saved Search . . . . . . . . . . . . . . . . . . . . . . . . . . . . . . . . . 78
Browsing a Catalog . . . . . . . . . . . . . . . . . . . . . . . . . . . . . . . . . . . . . . . . 78
Displaying Catalogs on a Macintosh Client . . . . . . . . . . . . . . . . . . . 79
Creating a New Catalog . . . . . . . . . . . . . . . . . . . . . . . . . . . . . . . . . . 80
Changing a Catalog Name. . . . . . . . . . . . . . . . . . . . . . . . . . . . . . . . 80
Changing Access Control. . . . . . . . . . . . . . . . . . . . . . . . . . . . . . . . . . . . 81
Adding Users to a Catalog. . . . . . . . . . . . . . . . . . . . . . . . . . . . . . . . 81
Setting an Existing Catalog to Public Access . . . . . . . . . . . . . . . . . 83
Creating an Access List . . . . . . . . . . . . . . . . . . . . . . . . . . . . . . . . . . . . . 83
Changing the Access List of a Catalog . . . . . . . . . . . . . . . . . . . . . . 85
Editing an Existing Access List. . . . . . . . . . . . . . . . . . . . . . . . . . . . . . . . 87
Deleting an Access List . . . . . . . . . . . . . . . . . . . . . . . . . . . . . . . . . . . . . 89
7
Page 8

Chapter 5 Viewing and Using Your Search Results. . . . . . . . . . . . . . . . . 91
Viewing Your Search Results . . . . . . . . . . . . . . . . . . . . . . . . . . . . . . . . . 91
Display Views . . . . . . . . . . . . . . . . . . . . . . . . . . . . . . . . . . . . . . . . . . 93
Media Status. . . . . . . . . . . . . . . . . . . . . . . . . . . . . . . . . . . . . . . . . . . 94
Sorting Media Objects in the Results Frame . . . . . . . . . . . . . . . . . . 94
Selecting Media Objects. . . . . . . . . . . . . . . . . . . . . . . . . . . . . . . . . . 95
Viewing Head Frames . . . . . . . . . . . . . . . . . . . . . . . . . . . . . . . . . . . 97
Obtaining Media Size Information . . . . . . . . . . . . . . . . . . . . . . . . . . 97
Obtaining Detailed Object Information . . . . . . . . . . . . . . . . . . . . . . . 98
Viewing Media Relatives . . . . . . . . . . . . . . . . . . . . . . . . . . . . . . . . 100
Finding Other Clips from the Same Source Tape. . . . . . . . . . . . . . 101
Moving Your Search Results. . . . . . . . . . . . . . . . . . . . . . . . . . . . . . . . . 102
Adding Media Objects to Catalogs . . . . . . . . . . . . . . . . . . . . . . . . . . . . 102
Deleting Media Objects from Nearchive MediaManager. . . . . . . . . . . . 103
Deleting a Catalog . . . . . . . . . . . . . . . . . . . . . . . . . . . . . . . . . . . . . 103
Deleting Selected Media Objects . . . . . . . . . . . . . . . . . . . . . . . . . . 104
Deleting Audio and Video Separately. . . . . . . . . . . . . . . . . . . . . . . 105
Chapter 6 Using Nearchive TransferManager. . . . . . . . . . . . . . . . . . . . . 107
Nearchive TransferManager Overview . . . . . . . . . . . . . . . . . . . . . . . . . 107
Transfer Options . . . . . . . . . . . . . . . . . . . . . . . . . . . . . . . . . . . . . . . . . . 108
Setting Up the Avid Editing Application for Transfers . . . . . . . . . . . . . . 109
Monitoring Transfers . . . . . . . . . . . . . . . . . . . . . . . . . . . . . . . . . . . . . . . 111
Monitoring the Transfer from Within the Avid Editing
Application. . . . . . . . . . . . . . . . . . . . . . . . . . . . . . . . . . . . . . . . . . 111
Status Window . . . . . . . . . . . . . . . . . . . . . . . . . . . . . . . . . . . . . 112
Sorting the Transfer Status Columns . . . . . . . . . . . . . . . . . . . . 113
Clearing the Transfer Status Window . . . . . . . . . . . . . . . . . . . 114
Monitoring Transfers from Your Browser . . . . . . . . . . . . . . . . . . . . 114
Detail Window . . . . . . . . . . . . . . . . . . . . . . . . . . . . . . . . . . . . . 117
History Window . . . . . . . . . . . . . . . . . . . . . . . . . . . . . . . . . . . . 119
Index . . . . . . . . . . . . . . . . . . . . . . . . . . . . . . . . . . . . . . . . . . . . . 121
8
Page 9

Using This Guide
Congratulations on your purchase of Avid® Nearchive™, a powerful
storage solution. The Nearchive system allows Avid’s customers to store
media files on local shared drives instead of on Avid Unity
Who Should Use This Guide
This guide is intended for the Nearchive system administrators and users.
About This Guide
The Contents lists all topics included in the book. They are presented with
the following overall structure:
• Chapter 1 helps you set up your work environment and get oriented
with beginning concepts and general workflow.
™
file systems.
• Chapter 2 describes Administrative tasks.
• Chapter 3 to Chapter 5 describe how to set up your work environment
and how to use Nearchive MediaManager, with clear and
comprehensive step-by-step procedures.
• Chapter 6 describes how to use Nearchive TransferManager to monitor
your media file transfers.
Page 10

Using This Guide
Symbols and Conventions
Avid documentation uses the following symbols and conventions:
Symbol or Convention Meaning or Action
n
c
w
> This symbol indicates menu commands (and
t
k This symbol represents the Apple or Command key.
A note provides important related information,
reminders, recommendations, and strong
suggestions.
A caution means that a specific action you take could
cause harm to your computer or cause you to lose
data.
A warning describes an action that could cause you
physical harm. Follow the guidelines in this
document or on the unit itself when handling
electrical equipment.
subcommands) in the order you select them. For
example, File > Import means to open the File menu
and then select the Import command.
This symbol indicates a single-step procedure.
Multiple arrows in a list indicate that you perform
one of the actions listed.
Press and hold the Command key and another key to
perform a keyboard shortcut.
10
Margin tips In the margin, you will find tips that help you
perform tasks more easily and efficiently.
Italic font Italic font is used to emphasize certain words and to
indicate variables.
Courier Bold font
Click Quickly press and release the left mouse button
Courier Bold font identifies text that you type.
(Windows) or the mouse button (Macintosh).
Page 11

If You Need Help
Symbol or Convention Meaning or Action
Double-click Click the left mouse button (Windows) or the mouse
button (Macintosh) twice rapidly.
Right-click Quickly press and release the right mouse button
(Windows only).
Drag Press and hold the left mouse button (Windows) or
the mouse button (Macintosh) while you move the
mouse.
Ctrl+key
k+key
If You Need Help
If you are having trouble using the Nearchive system:
1. Retry the action, carefully following the instructions given for that task
in this guide. It is especially important to check each step of your
workflow.
2. Check the release notes supplied with your Avid application for the
latest information that might have become available after the hardcopy
documentation was printed.
3. Check the documentation that came with your Avid application or your
hardware for maintenance or hardware-related issues.
4. Visit the online Knowledge Center at www.avid.com/support. Online
services are available 24 hours per day, 7 days per week. Search this
online Knowledge Center to find answers, to view error messages, to
access troubleshooting tips, to download updates, and to read/join
online message-board discussions.
Press and hold the first key while you press the
second key.
5. For Technical Support, please call 800-800-AVID (800-800-2843).
For Broadcast On-Air Sites and Call Letter Stations, call
800-NEWSDNG (800-639-7364).
11
Page 12

Using This Guide
Related Information
The following documents provide more information about the Nearchive
system:
• Avid Nearchive Version 1.0 Release Notes
• Avid Nearchive Hardware Setup Guide
If You Have Documentation Comments
Avid Technology continuously seeks to improve its documentation. We
value your comments about this guide, the Help, and other Avid-supplied
documentation.
Simply e-mail your documentation comments to Avid Technology at
TechPubs@avid.com
Please include the title of the document, its part number, and the specific
section you are commenting on in all correspondence.
How to Order Documentation
To order additional copies of this documentation from within the
United States, call Avid Sales at 800-949-AVID (800-949-2843). If you are
placing an order from outside the United States, contact your local
Avid representative.
Avid Educational Services
For information on courses/schedules, training centers, certifications,
courseware, and books, please visit www.avid.com/training or call
Avid Sales at 800-949-AVID (800-949-2843).
12
Page 13

Chapter 1
Getting Started
The Nearchive system is a storage management tool that allows you to
store large numbers of media objects (master clips, sequences, effects, and
any other type of object that references digital media) in network-attached
storage and retrieve them later.
This chapter discusses the following topics:
• The Nearchive System Overview
• Accessing and Logging In to the Nearchive System
• User Interface Overview
• Getting Help
• Logging Out
The Nearchive System Overview
The Nearchive system has both MediaManager and TransferManager
components. You use Nearchive MediaManager to manage files and
initiate file transfers and Nearchive TransferManager to monitor file
transfers.
Page 14

Chapter 1 Getting Started
Nearchive MediaManager
Nearchive MediaManager provides sophisticated search capabilities for
finding media objects stored in the Nearchive local storage. Nearchive
MediaManager is easy to access and use. Its user interface (UI) opens in a
standard Web browser and allows you to quickly search or browse its
contents for objects of interest. Drag-and-drop support allows you to add
Avid media objects to and retrieve Avid media objects from its database.
Nearchive TransferManager
You initiate file transfers through the Nearchive MediaManager UI, and
Nearchive TransferManager works in the background to move media
objects into and out of the Nearchive storage system. You use the
Nearchive TransferManager primarily to monitor transfer status through a
Web-based UI. You can also monitor your own transfers from within your
Avid application.
Supported Media Types
You can add the following media objects to Nearchive MediaManager:
• Master clip
•Subclip
•Files
• Sequence
• Effect (for example, titles, matte keys)
• Motion effect
• Rendered effect
• Group clips
14
Page 15

The Nearchive System Overview
About Adding Media Objects to the Nearchive System
In a workgroup environment, you can send to the Nearchive system by
using an Avid editing application’s Transfer menu, or you can drag objects
from a workgroup MediaManager UI and drop them into the Nearchive
MediaManager UI.
In a standalone environment, you can send to the Nearchive system by
selecting Transfer > Send to Workgroup in the Avid editing application.
n
You must load the TransferManager client software on an editor to select
Transfer > Send to Workgroup.
For more information on adding media objects to the Nearchive system,
see Chapter 3.
About Finding Media Objects — Searching and Browsing
You can use Nearchive MediaManager to perform simple text-based or
extended searches. You typically base searches for media objects on their
associated attributes. For example, you can search for all media objects
that have the word “promo” in their names, all media objects from a
particular source tape, or all media objects from a particular tape that have
the word “promo” in their names.
You can also browse a catalog to find media objects. For more information
on searching, see Chapter 4.
About Retrieving Media Objects from the Nearchive System
Once you have found media objects that meet your search or browsing
criteria, Nearchive MediaManager offers multiple views of your results
and allows you to obtain detailed information about their attributes,
including media relatives. For more information, see Chapter 5.
When you are sure that you have found the media objects you want, you
can retrieve it from the Nearchive system.
15
Page 16

Chapter 1 Getting Started
• In a workgroup environment, you can drag objects from Nearchive
MediaManager and drop them into a workgroup MediaManager or
into a bin in an Avid editing application.
• In a standalone environment, you can drag objects from Nearchive
MediaManager and drop them into a bin in an Avid editing
application.
For more information, see see Chapter 3.
Accessing and Logging In to the Nearchive System
The Nearchive UI is implemented as a dynamic Web page. You can open
the Nearchive UI with Internet Explorer 5.0 or later. This section describes
how to open the Nearchive Web page and then log in.
Opening the Nearchive System
16
n
You can access the Nearchive UI from the Nearchive Base Server or any
system running Internet Explorer that has a TCP/IP network connection to
the Nearchive Base Server by opening the appropriate dynamic Web page.
To open the Nearchive system, first obtain its Uniform Resource Locator
(URL) from your site administrator.
To open the page in Internet Explorer:
1. Start your Internet Explorer application.
2. Select File > Open (or press Ctrl+O).
3. Type the URL supplied to you by your administrator in the Open
dialog box, and then click OK.
Alternatively, if the Address toolbar is open, you can simply type the
URL there and press Enter (Windows) or Return (Macintosh).
After you open the Nearchive page for the first time by specifying its
address manually, create a shortcut or bookmark it for easy access.
Page 17
Logging In as Administrator
Each time you open the Nearchive system, a login screen appears,
prompting you to enter a user name and password. To gain access to the
administrative functions of the Nearchive system, you must supply a user
name with administrative privileges. Once you have logged in as
administrator, you can access all the standard Nearchive system
functionality as well as its administrative functions.
Accessing and Logging In to the Nearchive System
n
The Nearchive system comes preconfigured with a default administrative
account (Administrator) with no associated password to allow you to log
in for the first time. Once you have logged in, Avid recommends that you
immediately specify a password for this account to prevent unauthorized
users from gaining administrative access to the Nearchive system.
Type any user name and password with administrative privileges in the
text boxes, and then click Login. The first time you need to log in (prior to
setting up user accounts), specify user name Administrator with no
password.
17
Page 18
Chapter 1 Getting Started
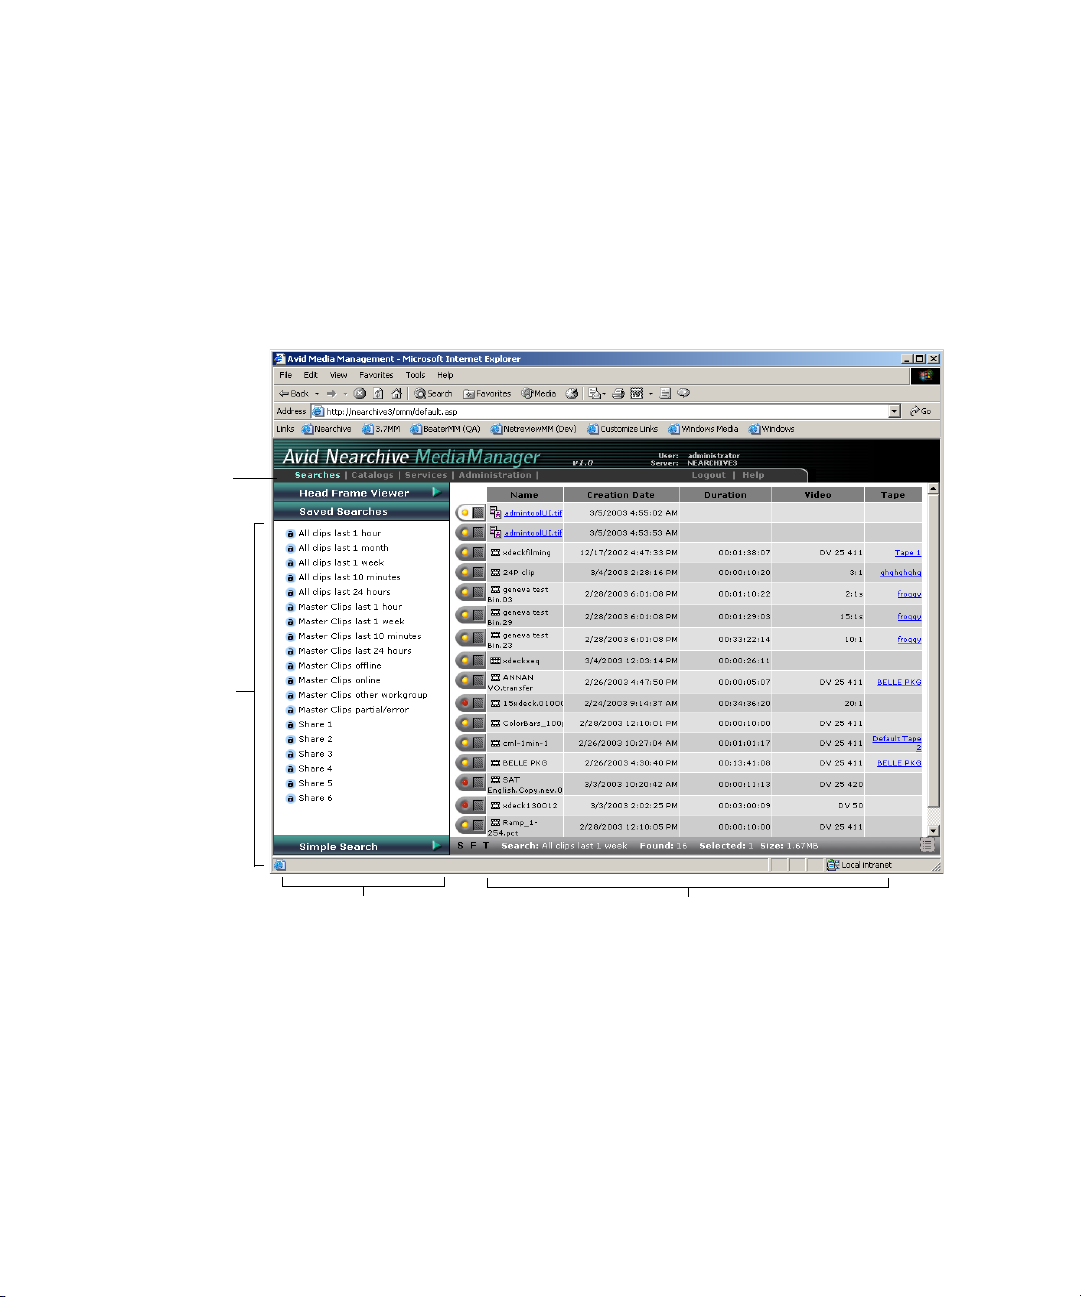
User Interface Overview
Although the Nearchive MediaManager database actually runs on a
dedicated server system, you can easily access and use the database from
any Avid Unity MediaNetwork editor client by simply opening the
appropriate dynamic Web page in Internet Explorer.
Mode
selector
Moderelated
controls
18
Control frame
Results frame
The user interface is designed to provide access to the most commonly
used functions without using complex menus or multiple dialog boxes.
Whether you are accessing saved searches or browsing catalogs
(determined by the mode selector), the user interface displays controls to
perform searches and view head frames in the control frame. All results of
searching or browsing are displayed in the results frame.
Page 19

Mode Selector
User Interface Overview
The following sections describe the parts of the Nearchive MediaManager
user interface:
• Mode Selector
• Control Frame
•Results Frame
The mode selector determines Nearchive MediaManager’s functional
mode and thus which mode-related controls are displayed in the user
interface. Table 1 describes the four available modes.
Table 1 Nearchive MediaManager Modes
Mode Description
Searches Edit, delete, and run saved searches.
For more information, see “Managing Saved Searches” on
page 76.
Catalogs Create, edit, delete, and browse Avid Nearchive
MediaManager catalogs.
For more information, see “Browsing a Catalog” on
page 78.
Services Check in files from your desktop. For more information,
see “Checking In a File from Your Desktop” on page 58.
For information on using the Transfer Status window for
monitoring the transferring of files from one workgroup to
another workgroup, see “Monitoring Transfers” on
page 111.
You can also browse incoming catalogs to get the status of
transfers.
Administration Perform administration tasks. See “User Accounts” on
page 24.
19
Page 20
Chapter 1 Getting Started
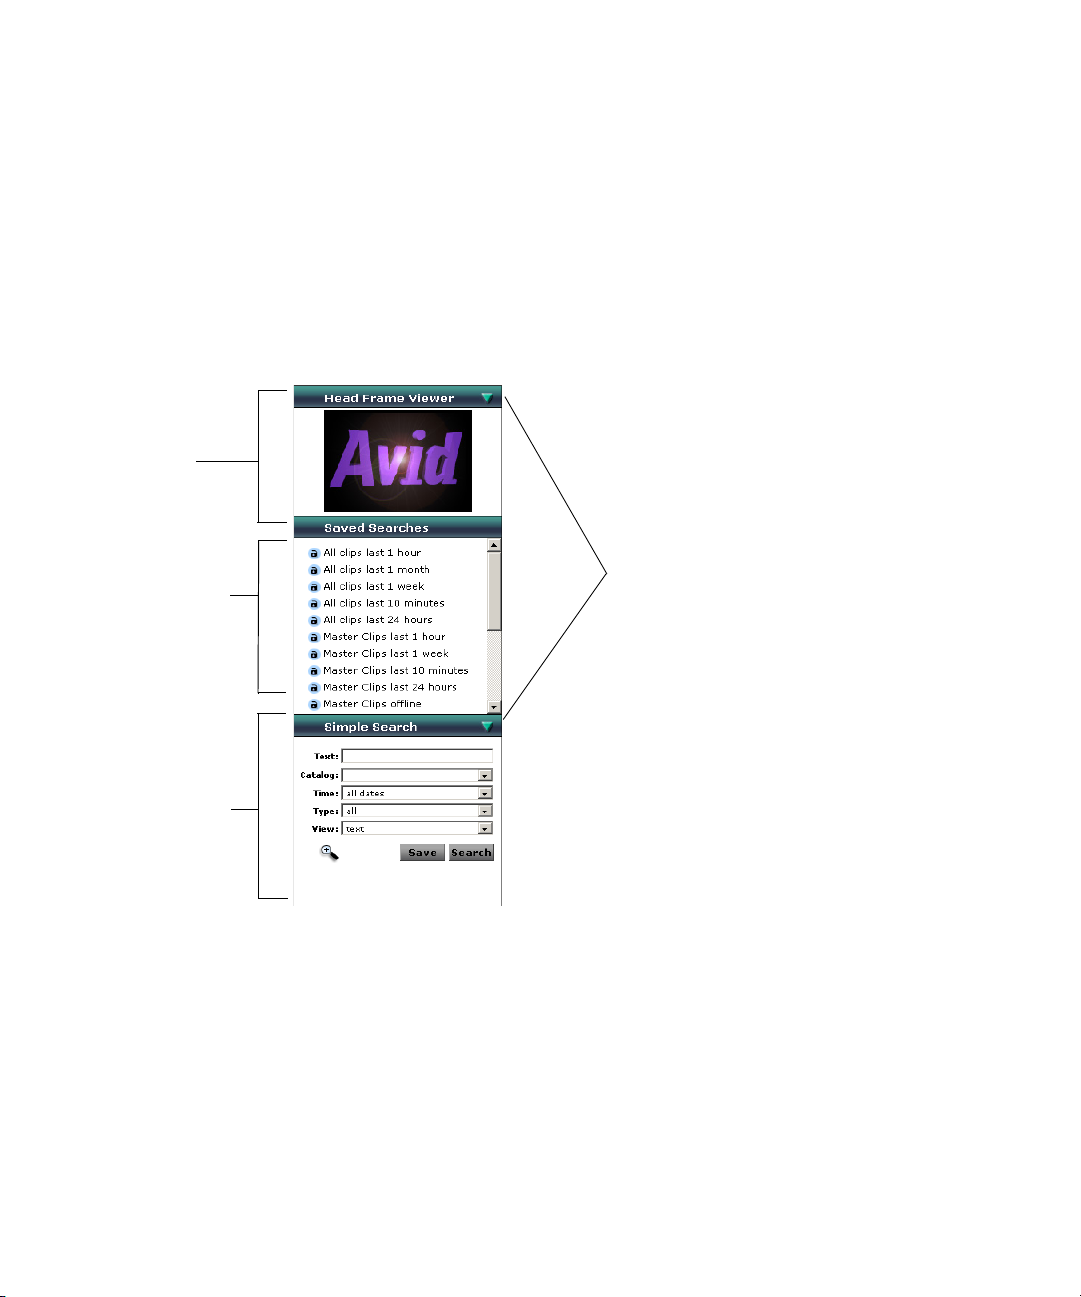
Control Frame
The control frame is the focus of all operations that you can perform using
Nearchive MediaManager. Except in Administration mode, it provides
access to the Head Frame Viewer, Simple Search controls, and Desktop
Check-In. Additionally, the control frame provides a central area whose
contents are determined by the selected mode.
Head
Frame
Viewer
Mode-related
view
Simple Search
controls
n
Triangle icons
If the Head Frame Viewer and Simple Search controls are closed, you can
open them by clicking the Triangle icons in their headers. Click either or
both Triangle icons again to close the Head Frame Viewer or Simple
Search controls to make space available for the selected mode-related
view.
20
Page 21
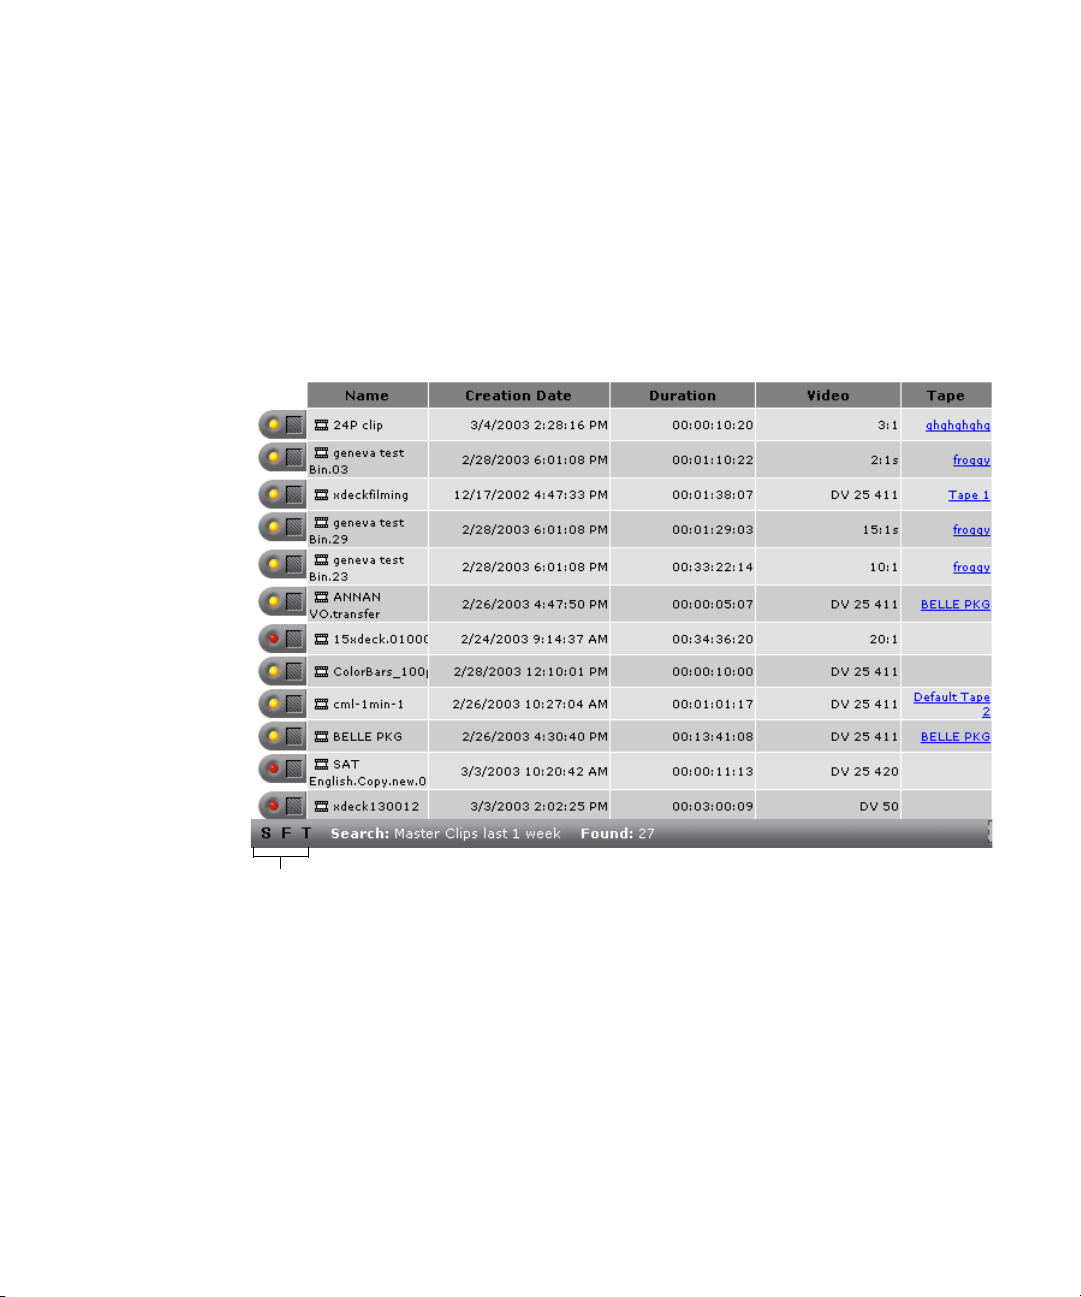
Results Frame
User Interface Overview
The results frame displays the media objects returned by your search and
browse operations. The results frame offers three views and access to other
information such as media relatives. The three views are Storyboard,
Frame, and Text view. For more information, see “Display Views” on
page 93.
View options
21
Page 22

Chapter 1 Getting Started
Getting Help
Online Help is provided with the Nearchive system.
To access Help:
t Click Help in the Nearchive system banner.
Logging Out
When you are finished using the Nearchive system, you should log out
rather than leave it open or access another page in Internet Explorer.
To log out:
t Click Logout in the Nearchive system banner.
The Nearchive system logs you out, and the login screen opens.
22
Page 23

Chapter 2
Administrative Tasks
As the Nearchive system administrator, you will create accounts, set up
your system, and maintain the database. Additionally, you might need to
perform some procedures if problems do occur.
This chapter discusses the following topics:
• User Accounts
• Maintenance Tasks
• Managing Database Size
• Deleting Media Pending
• Deleting Disassociated Media
• Checking Consistency
• Database Backup and Restore
• Setting the Session Timeout
• Setting the Default Access
• Creating Volumes
• Sharing Volumes
• Setting the Desktop Check-in Limit
• Resyncing to the Shared Drives
• Recovering from a Server Crash
• Restarting the Nearchive System
Page 24

Chapter 2 Administrative Tasks
User Accounts
You must create a user account for anyone who needs to access the
Nearchive system.
Accessing Shortcut Menus
When using the Nearchive system, you need to access a shortcut menu for
certain procedures. For example, if you want to delete a user, you must
access the shortcut menu. To access shortcut menus, follow the appropriate
procedure.
To access a shortcut menu while in Text view:
• (Windows) Right-click the name or icon of the object for which you
want to perform the procedure.
• (Macintosh) Move the mouse pointer over the object for which you
want to perform the procedure, and then click the shortcut menu arrow.
To access a shortcut menu while in Script or Frame view:
Privilege Levels
n
24
• (Windows) Right-click the frame of the object for which you want to
perform the procedure.
• (Macintosh) Move the mouse pointer over the frame of the object for
which you want to perform the procedure, and then click the shortcut
menu arrow.
The following topics describe how to manage the Nearchive system user
accounts with the Users list.
Each user account has an associated privilege level that determines
whether the user logging in to that account has regular or administrative
privileges in the Nearchive system.
Avid recommends that you restrict administrative privileges to designated
administrators who absolutely need to perform the administrative tasks
described in this guide.
Page 25

The Users List
New User icon
User Accounts
You access the Users list when the Nearchive system is in Administration
mode to view, create, edit, and delete user accounts.
The following topics describe how to manage your Nearchive system user
accounts with the Users list.
Creating User Accounts
To create a user account:
1. Click Administration in the mode selector.
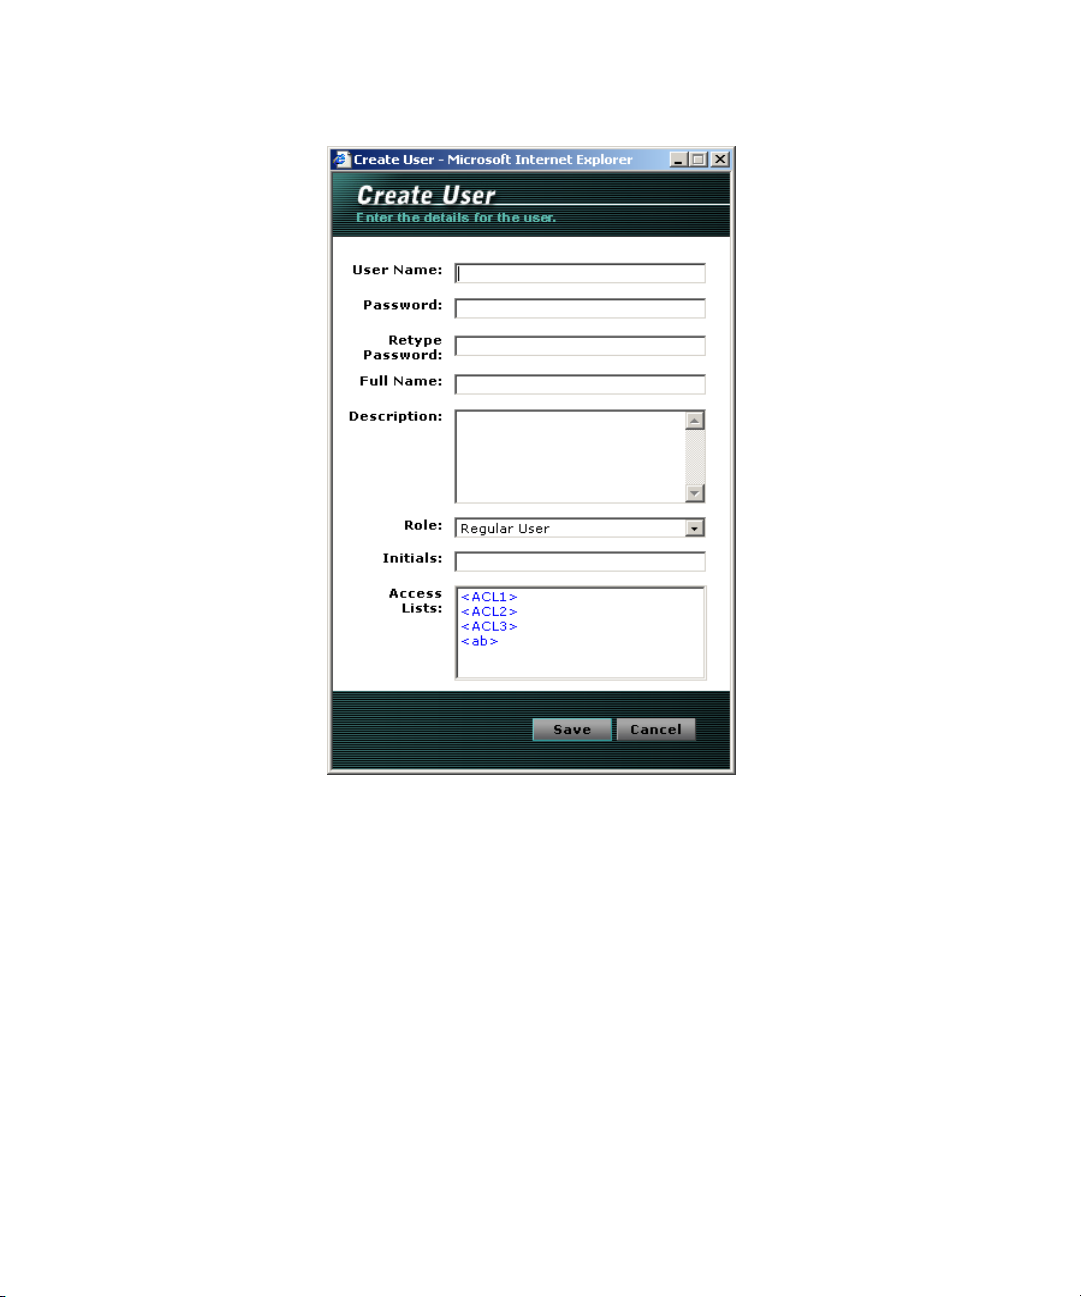
2. Click the New User icon in the Functions list.
The Create User window opens.
25
Page 26
Chapter 2 Administrative Tasks
26
3. Specify the standard user account attributes by typing in the
appropriate text boxes.
- User Name — The account name (login name).
- Password — The login password. Type the required password
identically in both the Password and Retype Password text boxes.
- Full Name (Option) — The user’s name.
- Description (Option) — A brief description of the user or notes
about the account’s purpose (for example, the user’s title, role,
client type, and so on).
Page 27

User Accounts
4. Select the user account privilege level (Administrator, Regular User,
Regular User with Delete Role, or System User) from the Role list.
- Administrator — Can perform functions as a regular user and can
also perform administrative tasks such as backup and restore.
- Regular User — Can do everything except administrative tasks
and delete media. Can also change the account password.
- Regular User with Delete Role — Can perform functions as a
regular user and can delete files. Can also change the account
password.
- System User — Cannot log in to the Nearchive system through
the user interface. Can be used as a valid account to log in from a
service such as Avid Unity TransferManager.
5. (Option) Add the new user to existing access lists by selecting the
name of the access list.
6. Click Save.
The new user account is created and added to the Users list.
Editing User Accounts
To edit a user account:
1. Click Administration in the mode selector.
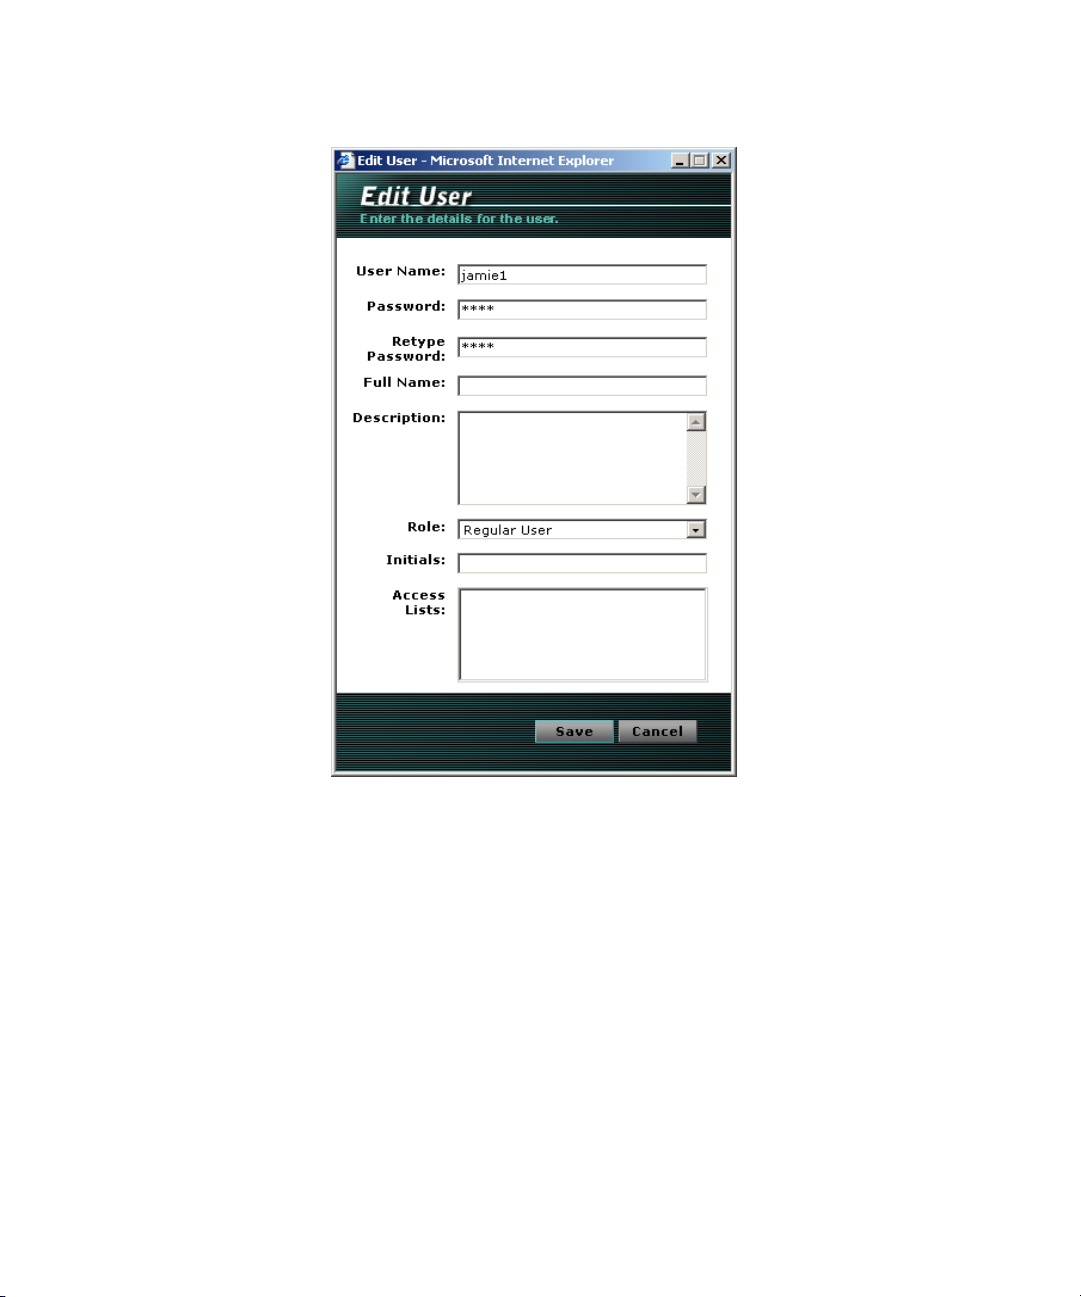
2. Access the user account you want to edit, and select Edit User from the
shortcut menu. See “Accessing Shortcut Menus” on page 24.
The Edit User window opens.
27
Page 28
Chapter 2 Administrative Tasks
28
n
3. Edit the standard user account attributes that you want to change by
typing in the appropriate text boxes.
You cannot edit the user name. To change the user name, you must create
a new user account with the required name and attributes.
- Password — The login password. Type the required password
identically in both the Password and Retype Password text boxes.
- Full Name (Option) — The user’s name.
- Description (Option) — A brief description of the user or notes
about the account’s purpose (for example, the user’s title, role,
client type, and so on).
Page 29

User Accounts
4. If necessary, modify the user account privilege level (Administrator,
Regular User, Regular User with Delete Role, or System User) by
selecting an item from the Role list.
- Administrator — Can perform functions as a regular user and can
also perform administrative tasks such as backup, restore, and
system setup.
- Regular User — Can do everything except administrative tasks
and delete media. Can also change the account password.
- Regular User with Delete Role — Can perform functions as a
regular user and can delete files. Can also change the account
password.
- System User — Cannot log in to the Nearchive system through
the user interface. Can be used as a valid account to log in from a
service such as Avid Unity TransferManager.
If the user is a member of an access list, the name of the access list or
lists will appear.
5. Click Save.
The user account is modified.
Deleting User Accounts
To delete a user account:
1. Click Administration in the mode selector.
The Users list appears in the results frame.
2. Select the user you want to delete, and select Delete from the shortcut
menu. See “Accessing Shortcut Menus” on page 24.
A dialog box opens, prompting you to confirm that you want to
proceed with deleting the user account.
3. Click OK.
The user account is deleted.
c
Never delete or modify the Resync user account. Resync will not work
properly if you delete the Resync user account.
29
Page 30

Chapter 2 Administrative Tasks
Maintenance Tasks
c
c
The Nearchive system contains a Microsoft® SQL Server database running
on a Windows
Do not run any other applications on the database server. They might
interfere with operation of the database and slow its response time.
You should not use any SQL Server tools other than those described in
this chapter to administer the Nearchive system — you might corrupt
your data.
®
2000 system.
Performing Database Maintenance Tasks
You perform most database maintenance tasks by using functions
available from the Functions list, which appears when
Nearchive MediaManager is in Administration mode.
30
Functions
list
Page 31

Managing Database Size
The Nearchive database currently scales from 3.5 terabytes to
10.5 terabytes of disk space.
You should regularly check that sufficient drive space is available by
looking at the Nearchive data drive properties.
To check disk space:
1. Click Administration in the mode selector.
2. Click the Server Statistics icon in the Functions list.
The Server Statistics window opens, indicating the available disk
space.
Managing Database Size
Free disk space
31
Page 32

Chapter 2 Administrative Tasks
Deleting Media Pending
When the Nearchive system users delete media objects from the database,
the media is not deleted if the media is used in another catalog. The media
objects are moved to the Delete Media Pending catalog. To physically
remove these objects and free up the disk space, you must delete them
from the Delete Media Pending catalog.
n
Avid recommends you hide the Delete Media Pending catalog. This
prevents users from unintentionally deleting media. See “Hiding the Delete
Media Pending Catalog” on page 32.
To delete media objects from the Delete Media Pending catalog:
1. Click Catalogs in the mode selector.
2. Click the Delete Media Pending folder.
3. Select the items in the catalog that you want to delete.
4. Press the Delete key.
5. A delete confirmation message box opens.
6. Click OK.
The media files are deleted from the Nearchive system shared storage.
Hiding the Delete Media Pending Catalog
Avid recommends that you select the option to hide the Delete Media
Pending catalog. This eliminates a situation where you unintentionally
delete media that is still referenced by another catalog. You must be an
administrator to hide the Delete Media Pending catalog.
32
To hide the Delete Media Pending catalog:
1. Click Administration in the mode selector.
2. Click the System Setup icon in the Functions list.
Page 33

Select
“Don’t Show”
Deleting Disassociated Media
The System Setup window opens.
3. Select “Don’t Show (recommended)” in the Delete Media Pending
Catalog list.
Deleting Disassociated Media
When the Nearchive system media objects are not associated with any
catalogs, the media objects are moved to the Disassociated Media catalog.
This can happen when a user deletes clips but does not delete the
associated media files. The clips are removed from the bin, and, if they are
not in any other bins or catalogs, they are moved to the Disassociated
Media catalog. To physically remove these objects and free up the disk
space, you must delete them from the Disassociated Media catalog.
33
Page 34

Chapter 2 Administrative Tasks
To delete media objects from the Disassociated Media catalog:
1. Click Catalogs in the mode selector.
2. Click the Disassociated Media folder.
3. Select the items in the catalog that you want to delete.
4. Press the Delete key.
5. A delete confirmation message box opens.
6. Click OK.
The selected media objects are permanently deleted from the
Nearchive system database.
Checking Consistency
Hardware problems (drive failures) and operating system problems might
cause consistency problems in the database. You should periodically verify
that your database is consistent by using the SQL Server Query Analyzer
installed with SQL Server (see “Performing Database Maintenance Tasks”
on page 30).
34
To check the consistency of the database:
1. Start the SQL Server Query Analyzer by clicking the Start button and
selecting Programs > Microsoft SQL Server > Query Analyzer.
A Login dialog box opens.
2. Log in to the database as user sa, with the appropriate password.
The SQL Server Query Analyzer starts and displays a new query
window.
3. Type the following in the query window:
use Nearchive_Database_Name ; dbcc checkdb
4. Press F5 to run the query.
The results appear in the lower panel of the window.
Page 35

SQL Server should be able to fix and recover from most errors that it finds.
If the search returns any data corruption from which it cannot recover, you
should search for warning messages that might provide additional
information about the problem and might be useful to Avid Customer
Support; then contact them for help. You will probably need to restore
your database from a recent backup (see “Restoring the Nearchive System
Database” on page 38).
Database Backup and Restore
Avid recommends that you back up the entire the Nearchive system
database daily. You use Nearchive MediaManager to back up and restore
your files.
Database Backup and Restore
n
An optional method of backup is to point standard corporate backup
software to the drive location of the local backup. This creates a second
automated backup across the network.
Specifying the Location for the Nearchive System Backup Files
To specify the location in which to store the Nearchive system
backup files:
1. Click Administration in the mode selector.
2. Click the System Setup icon in the Functions list.
35
Page 36

Chapter 2 Administrative Tasks
The System Setup window opens.
36
3. Select a drive from the Backup Location list. The default location is
drive C. This location can be a tape drive or other removable media
device but not a network drive remote from the Nearchive system
server.
4. In the Directory text box, accept the default name (backup), or type
another name.
5. Click Submit.
The new location for the Nearchive system backup files is stored.
Page 37

Backing Up the Nearchive System Database
You should perform a complete backup of the Nearchive system database
daily.
To back up the Nearchive system database:
1. Click Administration in the mode selector.
2. Click the Backup icon in the Functions list.
The Create Backup window opens.
Database Backup and Restore
3. Create a new backup file name, or select an existing one:
- To create a new backup, select New and then type the name of the
file in the text box.
- To overwrite an existing backup file, select Existing and then
select an existing file from the list that appears.
4. (Option) Type a description to be associated with the backup in the
Description text box.
5. Click Start.
The backup procedure begins. It can take a long time, depending on
the number of media objects.
37
Page 38

Chapter 2 Administrative Tasks
Restoring the Nearchive System Database
If the database loses its data or becomes corrupted for any reason, you will
need to copy the data from your most recent database backup files back to
the database. (This is known as restoring the database.)
To restore the Nearchive database:
1. Check that the specified backup location (see “Specifying the Location
for the Nearchive System Backup Files” on page 35) contains the
backup file that you want to restore.
2. Click Administration in the mode selector.
3. Click the Restore icon in the Functions list. The Restore From Backup
window opens.
38
4. Select the backup file to be restored from the Backup File list. Any
description associated with the chosen backup file appears in the
Description text box.
Page 39

Database Backup and Restore
5. Specify the directory in which the existing the Nearchive system
database is installed by typing the name in the Database Directory text
box (for example, E:\SQLData\MSSQL\data).
6. Specify a temporary database name to create from the backup file by
typing the name in the Database Name text box. The name must be
unique (different from the current database name).
7. Specify the SQL Server database access password (the password
associated with the sa account for the SQL Server database) by typing
the name in the DBA Password text box.
8. Click Restore.
A progress indicator appears, and then a dialog box opens, displaying
the numbers of different types of media objects in the database being
restored.
9. If the database being restored is correct, click Accept to override the
current database. Otherwise, click Cancel to stop the restore operation.
c
Proceeding with the restore operation will overwrite your existing
database. If you want to preserve it, back up your database before
completing the restore.
If you clicked Accept, the database restore operation proceeds,
copying the data from the backup file to the appropriate directories.
This can take a long time, depending on the number of objects in the
database being restored. When the operation is complete, a message
box opens, informing you of this.
10. Restart the Base Server on the Nearchive system.
39
Page 40

Chapter 2 Administrative Tasks
Setting the Session Timeout
The Nearchive system defaults to automatically time-out and log you out
after it has been idle for more than 30 minutes. You can reset the session
timeout to between 10 minutes and 24 hours.
To specify the session timeout:
1. Click Administration in the mode selector.
2. Click the System Setup icon in the Functions list.
The System Setup window opens.
40
3. Select another value from the Session Timeout list.
4. Click Submit.
The updated timeout value will take effect for any new session.
Page 41

Setting the Default Access
The Nearchive system allows you to specify the default access for your
catalogs: Public or Private.
To specify the default access:
1. Click Administration in the mode selector.
2. Click the System Setup icon in the Functions list.
The System Setup window opens.
Setting the Default Access
3. Select either Private or Public from the Default Access list. When set
to Private, the default for accessing catalogs is Private, indicating that
only the owner of the catalog and an administrator can access the
catalogs. When set to Public, all the Nearchive system users can access
the catalogs.
41
Page 42

Chapter 2 Administrative Tasks
Creating Volumes
c
Create volumes only from the Nearchive Base Server. Never use disk
management tools from the Nearchive Storage System to manipulate
the RAID volumes.
Before You Begin
Before you create volumes, consider the following:
• Once you create a volume, you cannot change it without losing data.
• You don’t have to create all your volumes initially. Begin with a
minimal setup, and build out as you understand the needs of your work
environment.
• All users with access to a shared drive will be able to see all media on
the shared drive, so consider security.
- When security is not a concern, provide wide-open access, in
which all shared drives are public.
- When security is a concern, provide limited access, where
relatively few people (administrators) can move media to or from
the Nearchive system.
• If you have multiple shared drives per drive letter, there is no
guaranteed space allocation — they all use the same disk space, and
one shared drive could use all the physical space.
42
n
You use the Disk Management tool to create partitions, but the Nearchive
system uses the term “volumes” thereafter.
Page 43

Creating Volumes
To create volumes:
1. Right-click the My Computer icon, and select Manage.
2. Select Disk Management.
3. Right-click an unallocated disk, and select Create Partition.
4. The Create Partition Wizard opens.
5. Click Next.
43
Page 44

Chapter 2 Administrative Tasks
The Select Partition Type dialog box opens.
6. Select “Primary partition,” and click Next.
44
The Specify Partition Size dialog box opens.
The partition size you select will be determined by your site
requirements. See “Before You Begin” on page 42.
Page 45

Creating Volumes
7. Type a partition size in the “Amount of disk space to use” text box,
and click Next.
The Format Partition dialog box opens.
8. Make the following selections, and click Next:
- Select “Format this partition with the following settings.”
- Select NTFS as the “File system to use.”
- Select Default as the “Allocation unit size.”
- Type a name for the “Volume label.”
- Select Perform a Quick Format.
45
Page 46

Chapter 2 Administrative Tasks
Sharing Volumes
c
Share volumes only from the Nearchive Base Server. Never use disk
management tools from the Nearchive Storage System to manipulate
the RAID volumes.
To share volumes:
1. From the Base Server, double-click the My Computer icon.
2. Right-click Volume, and select Sharing.
The Share Properties window opens.
46
Click
New Share.
3. Click New Share.
Page 47

Sharing Volumes
The New Share dialog box opens.
4. Type a share name (for example, Volume1), and select a user limit.
5. Click Permissions.
The “Permissions for” dialog box opens.
6. Apply permissions to meet the needs for your environment.
The minimum set of permissions needed to share volumes is:
t Administration and MS receive full permissions, full control.
“MS” is the user name created for Services Setup during the
Nearchive system installation.
t “Everyone” receives read-only.
47
Page 48

Chapter 2 Administrative Tasks
7. From the Share Properties dialog box, remove the default share
already attached to the volumes you shared.
For example, “F$” shows up by default if you have an F drive. If you
added another name to it, select “F$” and click Remove Share.
Otherwise, Nearchive MediaManager and Nearchive TransferManager
will see duplicate F drives.
Select
default
share
name.
Click
Remove
Share.
Setting the Desktop Check-in Limit
The Nearchive system allows you to specify a limit to the file size for a
desktop check-in. Desktop check-in enables users to store non-Avid format
media files in the Nearchive system. Once stored, files can be cataloged
with any relevant Avid media to preserve the 1:1 association between the
two files.
48
Page 49

To specify the desktop check-in size:
1. Click Administration in the mode selector.
2. Click the System Setup icon in the Functions list.
The System Setup window opens.
Syncing with Shared Drives
3. Select a desktop limit from the Desktop Limit list. The range is
100M bytes to 2Gb.
4. Click Submit.
When you perform a desktop check-in, the size of the file will be
limited to the chosen size.
Syncing with Shared Drives
The Nearchive system allows you to synchronize with shared drive. Any
changes that have occurred with shared drive, such as privilege changes or
new users being added, can be synchronized with the Nearchive system.
49
Page 50

Chapter 2 Administrative Tasks
If you make changes to users on shared drives, use the Sync With Shared
Drives feature to make sure these users appear in the Users list with the
proper privileges.
To sync with shared drive users:
1. Click Administration in the mode selector.
2. Click the Sync With Shared Drives icon in the Functions list.
Any users that have been added or changed on the Nearchive system
now appear in the Users list.
Resyncing to the Shared Drives
The Nearchive system allows you to resync to the shared drives. Resyncing
ensures that all the media on the shared drives has been checked in to the
Nearchive system.
When media files are copied into a shared storage environment manually,
resyncing is necessary to make the compositional metadata (the clips
associated with those media files) appear in the Nearchive system.
50
n
n
To resync to the shared drives:
1. Click Administration in the mode selector.
2. Click the Resync icon in the Functions list.
The Resync window opens.
3. Select the shared drives to which you want to resync.
4. Click Resync.
A progress indicator displays that the resync process is taking place.
Not all attributes are restored. The Name, Tape name, Creation date,
Audio, Audio format, Tracks, Drive, End, and Start attributes are restored.
All other attributes are left blank.
Only media clips such as master clips and rendered effects are checked in
by Resync. Sequences and subclips must be checked in again from the
editing application.
Page 51

Recovering from a Server Crash
If the Nearchive Base Server crashes, perform the following procedure.
To recover from a server crash:
1. Reboot the Nearchive Base Server.
2. Check the database consistency. See “Checking Consistency” on
page 34.
3. Restore from backup if necessary. See “Restoring the Nearchive
System Database” on page 38.
4. Make sure the server is functional by simply logging in to the
Nearchive system from the browser. If the server is not running,
contact Avid Customer Support.
5. If the server is running, click Resync to ensure the media on
Avid Unity is in sync with the data in the Nearchive system. See
“Resyncing to the Shared Drives” on page 50.
Recovering from a Server Crash
Restarting the Nearchive System
If the Nearchive system fails, reboot the Nearchive Base Server.
To reboot the Nearchive Base Server:
1. Restart the Nearchive Base Server computer.
2. Log in as a valid Nearchive user. This should be the same Nearchive
user name that you used during the Nearchive installation.
3. Map to a Nearchive drive:
a. Double-click the My Network Places icon.
The My Network Places window opens.
b. Select Tools > Map Network Drive.
n
Do not unmap the Nearchive system drive from the Nearchive Base Server.
51
Page 52

Chapter 2 Administrative Tasks
52
Page 53

Chapter 3
Moving Media Objects into and out of Nearchive MediaManager
This chapter describes how to move media objects into and out of
Nearchive MediaManager.
n
Avid strongly recommends that you use only the methods described in this
chapter to add media objects to the Nearchive system storage.
This chapter discusses the following topics:
• Configuring TransferManager on Standalone Editing Applications
• Transferring Media Objects from an Avid Unity MediaNetwork
Workgroup to the Nearchive System
• Transferring Media Objects from an Avid Editing Application to the
Nearchive System
• Checking In a File from Your Desktop
• Retrieving Media Objects from the Nearchive System and Restoring
Them to an Avid Unity MediaNetwork Workgroup
• Retrieving Media Objects from the Nearchive System and Restoring
Them to Your Avid Editing Application
• Organizing Media Objects with Catalogs
Page 54

Chapter 3 Moving Media Objects into and out of Nearchive MediaManager
Configuring TransferManager on Standalone Editing Applications
After installing the TransferManager server software on a standalone
editing application, you have to configure TransferManager to work with
the Nearchive system.
n
This configuration is for editing applications connected to only a
Nearchive system. If your editing application is part of a workgroup, omit
this procedure.
To configure TransferManager on an Avid editing application:
1. Click the Start button, and select Programs > Avid >
TransferManager Server Configuration.
The TransferManager Server Configuration window opens.
54
Page 55

Transferring Media Objects from an Avid Unity MediaNetwork Workgroup to the Nearchive System
2. Select the following options:
a. In Standalone Settings, select “Accept incoming transfer after
timeout.”
b. In Timeout, type 0.
c. In Directory for incoming transfers, type
E:\OMFI MediaFiles
n
The directory name OMFI MediaFiles is case sensitive.
d. Select “Enable auto-cleanup of transfer queues,” and enter values
for minutes and seconds.
e. Select “Standard logging on.”
f. Select all three Workgroups options (“WG transfers enabled,”
“Incoming transfers enabled,” and “Delete temporary comp.
files”).
g. In Workgroups, click Add.
- Type a workgroup name (for example, Nearchive).
- Type the Nearchive system hostname (for example,
NEARCHIVE2).
h. In Total Transfers (All Types), type 4 in the Max. simultaneous
transfers text box.
3. Click Save.
Transferring Media Objects from an Avid Unity
MediaNetwork Workgroup to the Nearchive System
You can transfer Avid media objects from MediaManager in an existing
workgroup to Nearchive MediaManager.
55
Page 56

Chapter 3 Moving Media Objects into and out of Nearchive MediaManager
To transfer media objects from a workgroup to the Nearchive system:
1. Open the MediaManager application in an existing workgroup, and
then open Nearchive MediaManager.
2. Open the bin containing the objects you want to transfer to the
Nearchive system.
3. In the bin, select the object you want to transport, or Ctrl+click
(Windows) or Shift+click (Macintosh) multiple objects.
4. Drag the selected files to the Nearchive MediaManager. You can drop
them anywhere on the Nearchive MediaManager Web page.
A dialog box opens.
56
n
5. Select the Shared Drive where you want to transfer the media.
6. Select the Shared Drive Incoming Folder catalog or another
appropriate catalog. This is the Nearchive MediaManager catalog
where you want to access the metadata.
7. Click OK.
For information on monitoring the transfer of files, see “Monitoring
Transfers from Your Browser” on page 114.
You can view the status of the media in the Nearchive MediaManager
results window. The status icon is red before the transfer and yellow after
the transfer.
Page 57

Transferring Media Objects from an Avid Editing Application to the Nearchive System
Transferring Media Objects from an Avid Editing
Application to the Nearchive System
You can transfer Avid media objects to Nearchive MediaManager from
your Avid editing application.
To transfer media objects from your Avid editing application:
1. Click the Start button, and select Programs > Avid > TransferManager.
2. Open the bin in your Avid editing application that contains the media
object you want to send to the Nearchive system.
3. In the bin, select the object you want to transfer, or Ctrl+click
(Windows) or Shift+click (Macintosh) multiple objects.
4. Select Transfer > Send To Workgroup, and then select the Nearchive
workgroup to which you want to send the files.
If any of the items chosen to be transferred are sequences, a dialog box
opens, asking if you want to enable check-in of the sequences and their
referenced clips.
- If you select No, only the clips you selected will be checked in.
- If you select Yes, the clips you selected, along with the selected
sequences, and all referenced media objects will be checked in.
- If you select Cancel, the transfer will not occur.
The files are sent to the TransferManager server, where they are then
sent to the selected Nearchive workgroup. You can continue working
while the transfer is taking place.
For information on monitoring the transfer of files, see “Monitoring
the Transfer from Within the Avid Editing Application” on page 111.
57
Page 58

Chapter 3 Moving Media Objects into and out of Nearchive MediaManager
Checking In a File from Your Desktop
Nearchive MediaManager allows you to take a non-Avid format file from
your desktop and store the file in the Nearchive system. For example, you
might have a TIFF file, a JPEG file, or a WAV file that you want others to
access. Simply check in the file from your desktop.
To check in a file from your desktop:
1. If you have not already done so, start Internet Explorer and open your
local Nearchive MediaManager.
Mode selector
2. Click Services in the mode selector.
The Services control frame appears.
58
Desktop
Check-In
icon
3. Click the Desktop Check-In icon.
The Desktop Check-In window opens.
Page 59

Checking In a File from Your Desktop
4. Click Browse to locate the file on your desktop.
Catalog icon
n
5. Accept the default name or type a file name in the Check-In Name text
box.
6. Select the shared drive on Nearchive MediaManager where you want
the file to be located.
7. Select the catalog where you want the file to appear. Click the catalog
icon if you want to create a new catalog.
8. (Option) Add any comments about the file.
There is a 255-character limit to the comments field.
9. Click Check-In.
The objects are checked in to your local Nearchive MediaManager in
the selected catalog.
If you chose the default Shared Drive Incoming Folder, you can access
the file by clicking Services in the mode selector and selecting the
drive under Shared Drive Incoming Folders.
59
Page 60

Chapter 3 Moving Media Objects into and out of Nearchive MediaManager
Retrieving Media Objects from the Nearchive System and Restoring Them to an Avid Unity MediaNetwork Workgroup
You can transfer media objects from Nearchive MediaManager to a
workgroup MediaManager.
To transfer media objects from Nearchive MediaManager into a
workgroup MediaManager:
1. Open Nearchive MediaManager, and then open your MediaManager in
an existing workgroup.
2. In Nearchive MediaManager, open the catalog containing the objects
you want to retrieve.
3. In the catalog, select the object you want to retrieve, or Ctrl+click
(Windows) or Shift+click (Macintosh) multiple objects.
4. Continue to press and hold the mouse button, and drag the files from
the catalog:
- (Windows) Drag anywhere on the workgroup MediaManager Web
Drag tool
(Macintosh)
page.
- (Macintosh) Drag to the drag tool.
The objects are checked in to the workgroup MediaManager.
Retrieving Media Objects from the Nearchive System and Restoring Them to Your Avid Editing Application
You can transfer files from the Nearchive system to an Avid editing
application bin. You can use the drag-and-drop method for both standalone
editing applications and workgroup editing applications.
60
Page 61

Retrieving Media Objects from the Nearchive System and Restoring Them to Your Avid Editing Application
To transfer media objects from Nearchive MediaManager into an Avid
editing application:
1. Open the Avid application bin in which you want to store the media
objects that you want to retrieve.
2. If you have not already done so, open Nearchive MediaManager.
3. Perform a search or browse operation that returns the object or objects
that you want to retrieve.
4. In the results frame, click the objects you want to transfer and drag
them to the Avid system bin:
t Ctrl+click (Windows) or Shift+click (Macintosh) the objects to
select multiple objects, or click Select All to select all the objects.
If you selected one item to transfer, a message box opens, asking if you
want to initiate the transfer.
5. Click Now or Later:
- If you select Now, the object is transferred.
- If you select Later, the object is not transferred until you retrieve
it. To retrieve it, select Transfer > Retrieve.
61
Page 62

Chapter 3 Moving Media Objects into and out of Nearchive MediaManager
If you selected multiple items to transfer, a message box opens, asking
if you want to initiate the transfer.
6. Click Transfer, Transfer All, Defer, or Defer All:
- If you select Transfer, a message box opens for each clip. You
must click OK in each message box to initiate the transfers.
- If you select Transfer All, all the items selected are transferred.
- If you select Defer, the objects are not transferred, and you receive
a message box to defer each object. You must click OK in each
message box to defer the transfers.
- If you select Defer All, the objects are not transferred until you
retrieve them. To retrieve them, select Transfer > Retrieve.
The imported objects appear in the bin. To monitor the transfer, see
“Monitoring Transfers” on page 111.
Organizing Media Objects with Catalogs
Catalogs are useful for organizing your media objects. When you use the
drag-and-drop method to transfer media into the Nearchive system, the
media moves by default into top-level Incoming Folders. You can take the
media in the Incoming Folders and associate it with catalogs, which makes
searches faster by limiting the number of records through which the
database has to search.
62
Page 63

Organizing Media Objects with Catalogs
Move media from
Incoming Folders
into catalogs
From an Incoming Folder, you can right-click media and select Move to
Catalog or Add to Catalog.
n
To keep the Incoming Folders clean, select Move to Catalog.
Moving Media Objects to Catalogs
Selecting Move to Catalog results in a single copy of the media residing on
the Nearchive system. One copy is moved to the appropriate catalog, and
the original copy is removed from the Incoming Folder.
To move media objects to a catalog:
1. Perform a search or browse operation that returns the objects you want
to move to a catalog.
2. (Option) Click Catalogs in the mode selector to open the Catalogs
browser in the control frame.
3. Select the object or objects you want to move to the catalog, and select
Move to Catalog from the shortcut menu. See “Accessing Shortcut
Menus” on page 24.
4. Select the appropriate catalog.
The objects are added to the catalog.
63
Page 64

Chapter 3 Moving Media Objects into and out of Nearchive MediaManager
Adding Media Objects to Catalogs
The Add to Catalog operation results in two copies of the media residing
on the Nearchive system. One copy is added to the catalog, and the original
copy remains in the Incoming Folder.
To add media objects to a catalog:
1. Perform a search or browse operation that returns the objects that you
want to add to a catalog.
2. (Option) Click Catalogs in the mode selector to open the Catalogs
browser in the control frame.
3. Select the object or objects you want to add to the catalog, and select
Add to Catalog from the shortcut menu. See “Accessing Shortcut
Menus” on page 24.
A dialog box opens.
4. Select the appropriate catalog.
The objects are added to the catalog.
n
(Windows) You can drag the selected items directly to a catalog.
Using Catalogs to Organize Media
To help you find and retrieve stored media items efficiently:
• Use catalogs as a substitute for projects. Create a catalog with the
name of a project and associate all media from the originating project
with the similarly named catalog.
• Use Desktop Check-In for non-Avid files, and associate them with a
catalog. This allows you to organize things like scripts and graphics
with the appropriate catalog.
64
Page 65

Chapter 4
Finding Media Objects
You find media objects in Nearchive MediaManager by performing simple
or extended searches or by browsing catalogs.
This chapter discusses the following topics:
• Simple Searches
• Extended Searches
• Managing Saved Searches
• Browsing a Catalog
• Changing Access Control
• Creating an Access List
• Editing an Existing Access List
• Deleting an Access List
Page 66

Chapter 4 Finding Media Objects
Simple Searches
The most common method of finding objects in Nearchive MediaManager
is to perform a search based on attributes.
The database returns the results of any search in the results frame, which
offers access to more detailed information about displayed media objects.
For more information about the results frame and what you can do with the
media objects displayed in it, see Chapter 5.
Nearchive MediaManager stores information about media objects in
records. Each record contains information about the media object it
represents, known as its attributes. Attributes may define fundamental
statistical information (clip duration, creation date, and so on) or
descriptive information (comments, object name, and so on).
Typically, you conduct database searches for media objects on their
associated attributes. For example, you could find all media objects that
have the word “feature” in their names, all media objects in a particular
catalog, or all media objects in a particular catalog that have the word
“feature” in their names.
66
Nearchive MediaManager offers constant access to simple searches of
limited attributes and also allows you to perform complex extended
searches in which you can specify any combination of attributes and values
that you need.
Nearchive MediaManager provides easy access to the Simple Search
controls in Searches and Catalogs modes (although the controls can be
opened and closed by clicking the Triangle icon in the header). Simple
searches allow you to quickly specify one or several of the most frequently
used attributes. For each search, you can also select the view in which to
display the results.
Page 67

Simple Searches
Triangle icon
Search attributes
Display view for results
Extended Search button
To perform a simple search:
1. Ensure that the Simple Search controls are visible by selecting
Searches or Catalogs in the mode selector and, if necessary, clicking
the Triangle icon in the header.
2. Specify the attribute values that match the media objects you want to
find by typing in the text boxes or selecting the appropriate entries
from the lists. You can specify as few or as many of the available
attributes (Text, Time, Type) as you want. (If you specify none, the
search will return all records in the database.)
n
For more information, see “Specifying Attribute Names, Operators,
and Values” on page 70.
3. Select the view (Storyboard, Frame, or Text) in which to display the
results of your search.
4. Click Search.
To get the best response times for your searches, make them as specific as
possible. If a search is returning too many results, you can stop it by using
your browser Stop button in the toolbar.
Nearchive MediaManager performs the specified search and returns all
matching records in the results frame. For more information, see
Chapter 5.
67
Page 68

Chapter 4 Finding Media Objects
Saving Your Simple Search
To save your simple search so that you can run it without
respecifying its criteria:
1. Specify all the criteria for the search by using the Simple Search
controls.
2. Click Search.
Matching results appear in the results frame.
3. Click Save. The Save Search window opens.
68
4. Type the name under which you want to save the search and,
optionally, a description of the search.
5. (Option) If you want to make this saved search available to all
Nearchive MediaManager users, select Public Resource. If you want to
keep the saved search private, make sure this option is not selected.
6. Click Save.
The search is saved and added to the list of saved searches displayed in
Searches mode, from where it subsequently can be edited and run (see
“Managing Saved Searches” on page 76).
Page 69

Extended Searches
Extended searches allow you to specify complex search criteria to find
exactly the objects you need. You can also specify how to sort your results
and the view in which to display them.
The elements of an extended Nearchive MediaManager search are:
•The attribute names in which you are interested
•The operator that specifies how the values you specify match the
values of the media objects for which you are looking
• The attribute values you are looking to match
To refine a search, you can specify multiple lines of More search criteria
(and, if required, create additional groups of OR criteria) that match
objects for which you are searching.
The search interface makes the relationship among the three elements
clear. Select the combination that makes a “sentence” that is true for the
media object you wish to find. See the following example.
Extended Searches
In this case, you are asking Nearchive MediaManager to “Show objects
whose Name contains Harbor, and that has a Check-In Date after
2/14/03, and whose Created By attribute is not Bob.”
69
Page 70

Chapter 4 Finding Media Objects
Specifying Attribute Names, Operators, and Values
Table 2 shows the range of valid operators and values for the Nearchive
MediaManager extended search attributes.
Table 2 Attribute Names, Operators, and Values
Field Possible Value
Attribute
Name
Operator Varies depending on the attribute selected. Operators
Value Varies depending on the attribute selected. Values include:
Any attribute (standard or custom) defined in Nearchive
MediaManager, for example, Catalog Name or Tape ID.
For a full list of standard attributes, see Table 3.
include:
Is
Is Not
Contains
Starts with
After
Before
Within
Not Within
Less than
Greater than
Tex t
Numeric value
Time
Duration
Date
Yes or No
70
Page 71

Extended Searches
Table 3 lists the standard Nearchive MediaManager attribute names, their
meanings, and the values you can enter for them when specifying a search.
Table 3 Extended Search Attribute Names
and Values
Attribute
Name
Description Search Values
Catalog Name A catalog with which the media
Enter text (not case sensitive).
object is associated
Check-In Date When the media object was
checked in to Nearchive
MediaManager
Comments Additional information about the
media object
Created By The login name of the user who
A particular date (for example, 12/4/02
or 12/4/2002) or a period chosen from a
pop-up menu.
Enter text (not case sensitive; spaces
permitted).
Enter text (not case sensitive).
checked in the media object
Creation Date When the media object was created A particular date (for example, 12/4/02
or 12/4/2002) or a period chosen from a
pop-up menu.
Data Format Advanced Authoring Format
AAF
(AAF) is a cross-platform file
format that allows the interchange
of data between multimedia
authoring tools. This is useful for
Avid|DS products.
Duration The length of the object in hours,
minutes, seconds, and frames
Enter numbers only in the four colon-
separated entry fields displayed.
IN-OUT The length of the marked segment
of a clip, if any
In-Use If Yes, object is referenced by a
sequence also in the database.
Enter numbers only in the four colon-
separated entry fields displayed.
Yes or No.
71
Page 72

Chapter 4 Finding Media Objects
Table 3 Extended Search Attribute Names
Attribute
Name
Description Search Values
and Values (Continued)
Incoming
Folder
Modified Date When the media object was last
Name of an shared drive incoming
folder
modified
Enter the name of the shared drive
incoming folder.
A particular date (for example, 12/4/02
or 12/4/2002) or a period chosen from a
pop-up menu.
Name The name of the media object Enter text (not case sensitive; spaces
permitted).
Scene The scene number of the clip
Enter text.
(from the bin)
Shoot Date The date the footage was shot
Enter text.
(from the bin)
Size (KB) Searches by media file size Enter a number.
Status Online, offline, or partially offline
status, or exists on another
Enter online, offline, partial/error, other
workgroup.
workgroup
Take The take number of the scene
Enter a number.
(from the bin)
Tape Source tape name (from the bin) Enter text (not case sensitive; spaces
permitted).
72
Tape ID Assigned Tape ID (from the bin) Enter text (not case sensitive; spaces
permitted).
Text Combination of Name, Tape, User
Attributes, and Comments
Enter text (not case sensitive; spaces
permitted).
attributes. Allows you to search for
text in all attributes at once.
Tracks All tracks used by the media object
(from the bin)
Enter text (value can be Video, Audio, or
Both).
Page 73

Extended Searches
Table 3 Extended Search Attribute Names
and Values (Continued)
Attribute
Name
Type Type of media object Select an option from the list, or enter
Description Search Values
master clip, sequence, subclip, effect,
motion effect, rendered effect, group, or
file.
Video Video compression ratio
(from the bin)
User Attributes User-specified column information
(from the bin)
Shared Drive
Name
Name of an Avid Nearchive shared
drive
Performing an Extended Search
You perform an extended search by specifying your search criteria in the
Extended Search window, which you can open from the Simple Search
controls.
To perform an extended search:
1. Click the Extended Search button in the Simple Search controls.
The Extended Search window opens.
Enter ratio (for example, 2:1).
Enter text.
Enter the name of the shared drive.
73
Page 74

Chapter 4 Finding Media Objects
2. Specify the attribute names, operators, and values that make up your
search criteria. See “Specifying Attribute Names, Operators, and
Values” on page 70. To refine the search by specifying more than one
criterion, click More to open up to ten additional More entry lines. If
you want to specify additional sets of search criteria that match the
media objects you want, click OR to open up to three groups of OR
entry criteria.
3. (Option) Specify the attribute by which you want your results sorted
and whether they should be presented in ascending or descending
order. If you specify no attribute to sort on, the results are presented in
the order in which they are found.
4. Specify the view (Storyboard, Frame, or Text) in which the search
results are to be displayed.
Find objects that
meet these criteria.
Plus objects that
meet these criteria
74
n
5. Click Search.
If a search does not seem to be specific enough (that is, it is returning too
many results and is taking a long time), you can stop it by using your
browser Stop button in the toolbar.
Nearchive MediaManager performs the specified search and returns all
matching records in the results frame. For more information about how to
view and manipulate the results, see Chapter 5.
Page 75

Refining a Search You Just Performed
By default, the Extended Search window closes after you start your search.
However, if you want to refine or modify your search by redefining its
criteria after you perform the search, keep the Extended Search window
open after the search is performed by deselecting Close Window on
‘Search’.
You can also reopen the Extended Search window with the previous
criteria still displayed by clicking the “EX” link that appears in the
Nearchive MediaManager status bar when the results of an extended
search are shown in the results frame.
Saving Your Extended Search
To save your extended search so that you can run it without
respecifying its criteria:
1. Specify all the search criteria for the search in the Extended Search
window.
Extended Searches
2. Click Save. The Save Search window opens.
3. Type the name under which you want to save the search and,
optionally, a description of the search.
75
Page 76

Chapter 4 Finding Media Objects
4. (Option) If you want to make this saved search available to all
Nearchive MediaManager users, select Public Resource. If you want to
keep the saved search private, make sure this option is not selected.
5. Click Save.
The search is saved and added to the list of saved searches displayed in
Searches mode, from where it subsequently can be edited and run (see
“Managing Saved Searches” on page 76).
Managing Saved Searches
You might need to routinely use the same search criteria to find particular
media objects. Manually setting up a search each time is repetitive and can
be time consuming. To avoid this situation, Nearchive MediaManager
allows criteria from both simple and extended searches to be saved so that
they can later be recalled and performed whenever you or anyone else
needs them. To find out how to save a search, see “Saving Your Simple
Search” on page 68 and “Saving Your Extended Search” on page 75.
When Nearchive MediaManager is in Searches mode, use the Saved
Searches browser displayed in the control frame to view, edit, and delete
searches currently saved in Nearchive MediaManager.
Viewing a Saved Search
After you have specified and saved the search criteria, you can easily
access the media objects that match the saved criteria.
To view a saved search:
t Click the saved search name in the browser. The media objects found
are displayed in the results frame.
76
Page 77

Managing Saved Searches
Saved search
n
You can view and open only the saved searches that you created or that
are public resources. If a search is not public, you can see it only if your
name is in its access list.
Editing the Name and Description of a Saved Search
To edit the name or description of a saved search:
1. Ensure that the Saved Searches are visible by clicking Searches in the
mode selector.
(Macintosh)
Place mouse
pointer over
the shortcut
menu arrow.
2. Select Edit from the shortcut menu. See “Accessing Shortcut Menus”
on page 24.
The Edit Search window opens.
3. Make your changes.
n
If you add to the description field, the description appears when you place
the cursor over the saved search name.
4. Click Save.
77
Page 78

Chapter 4 Finding Media Objects
Deleting a Saved Search
To delete a saved search:
1. Ensure that the Saved Searches are visible by clicking Searches in the
mode selector.
2. Select Delete from the shortcut menu. See “Accessing Shortcut
Menus” on page 24.
The Confirm Delete window opens.
3. Click OK to delete the saved search.
Browsing a Catalog
You can place any media object in the database into one or more
appropriately named catalogs. Catalogs can be freely browsed in Catalogs
mode and can also make searches faster by limiting the number of records
through which the database has to search.
78
For example, Nearchive MediaManager could contain catalogs called
Features, Promos, File, Out Takes, and 24p. At this site, a clip from a
feature that might also be useful in a trailer could be placed in both the
Features and Promos catalogs. To find out how to add media objects to
catalogs, see “Adding Media Objects to Catalogs” on page 102.
When Nearchive MediaManager is in Catalogs mode, use the Catalogs
browser displayed in the control frame to create, edit, and delete catalogs.
Folder icon
Catalog name
Page 79

To browse the media objects associated with a particular catalog:
t Click the catalog name.
Media objects found are displayed in the results frame.
Displaying Catalogs on a Macintosh Client
The following feature applies when viewing the Nearchive MediaManager
browser on a Macintosh client. Catalogs are now displayed in banks of 50.
This makes it faster to display the catalogs if you have a large number of
catalogs.
If you have more than 50 catalogs, Page mode will be displayed. Page
mode includes the following:
• An input text box to enter the first few characters (8 characters
maximum) of a catalog name
• A Go button to display the catalogs starting with the input characters
• A First button to display the first 50 catalogs
Browsing a Catalog
• A Previous button to display the previous 50 catalogs
• A Next button to display the next 50 catalogs
79
Page 80

Chapter 4 Finding Media Objects
Creating a New Catalog
To create a new catalog:
1. Click Catalogs in the mode selector.
2. Click the Folder icon in the Catalogs browser header.
The Create Catalog window opens.
3. Type the name and, optionally, a description of the catalog.
4. (Option) If you want to make this catalog available to all Nearchive
MediaManager users, select Public Resource. If you want to keep the
catalog private, make sure this option is not selected.
5. Click Save.
The catalog is saved.
Changing a Catalog Name
To change the name or description of a catalog:
1. Click Catalogs in the mode selector.
2. Select Edit from the shortcut menu. See “Accessing Shortcut Menus”
on page 24.
The Edit Catalog window opens.
80
Page 81

3. Make any changes to the name or description of the catalog.
4. (Option) If you want to make this catalog available to all Nearchive
MediaManager users, select Public Resource. If you want to keep the
catalog private, make sure this option is not selected.
5. Click Save.
The catalog is saved.
Changing Access Control
Access control is based on catalogs and shared volumes. As a user, you can
change the access control of the catalogs or Saved Searches that you
created. An administrator can make changes to any catalogs, shared
volumes, or Saved Searches. For information on sharing volumes, see
“Sharing Volumes” on page 46.
If you are the creator of a catalog, or an administrator, you can select the
catalog and change the access control by adding more users to the access
list or changing the catalog to a public resource.
Changing Access Control
Adding Users to a Catalog
To add users to a catalog:
1. Click Catalogs in the mode selector.
2. Select Modify Access Control from the shortcut menu. See “Accessing
Shortcut Menus” on page 24.
81
Page 82

Chapter 4 Finding Media Objects
The Modify Access Control window opens.
82
3. Click Add. The Add User window opens.
Page 83

4. Click the name of the user or users you want to add.
5. Select the Access Mode for the user, either Full or No Access.
Full means that users can see, modify, and delete metadata and media
data.
6. Click Save.
7. If you need to change the access after setting the Access Mode, click
the user name in the list, click Modify, and change the Access Mode to
either Full or No Access.
Setting an Existing Catalog to Public Access
You may have a catalog that you want to share with all users. You can set
the catalog to public access. You can change a catalog’s access only if you
are the owner of that catalog or an administrator. The Modify Access
Control option is not available if you do not have access privileges.
To set the catalog to public access:
Creating an Access List
1. Click Catalogs in the mode selector.
2. Select Modify Access Control from the shortcut menu. See “Accessing
Shortcut Menus” on page 24.
The Modify Access Control window opens.
3. Select Public Resource.
4. Click Save.
The catalog’s icon now appears as an open lock, indicating it is a
public resource.
Creating an Access List
You can create user access lists to allow certain users access to your
catalogs. As a user, you can allow access only to your own catalogs.
An administrator can allow users access to any catalog. For information on
setting up access lists as an administrator, see “User Accounts” on page 24.
83
Page 84

Chapter 4 Finding Media Objects
To create an access list:
1. Click Administration in the mode selector.
The Administration Functions list appears along with a list of users
and any created access lists.
New
Access
List icon
2. Click the New Access List icon in the Functions list.
84
The Create Access List window opens.
Page 85

Creating an Access List
3. In the Name text box, type a name for your access list. The access list
name cannot include a space.
4. In the Users list, click the name of the user you want to add to your
access list.
5. Select the Access Mode for the user, either Full or No Access.
6. Click the right arrow button to add the user to your access list.
7. Continue selecting users, setting their Access Mode, and adding them
to your access list.
n
n
If you add a user to the access list and then decide you do not want that
user in the access list, click the name in the access list, and click the left
arrow button to move the user back to the Users list.
8. (Option) Select “Available to public” only if you want the access list
available to every Nearchive MediaManager user. If you leave
“Available to public” deselected, the access list is available to only
those users on the list. By default, the check box is deselected.
9. Once you have the correct users in the access list, click Save.
You can now select one of your catalogs and select an access list to
allow those users access to your catalog. See “Changing the Access
List of a Catalog” on page 85.
If you want to create an access list based on an existing access list, simply
select the access list and select Edit and Save List As from the shortcut
menu. See “Accessing Shortcut Menus” on page 24.
Changing the Access List of a Catalog
The access list allows you to select a list that has been created by you or an
administrator and that contains a restricted set of users. Choosing a specific
list will make access to a catalog restricted to that list of users. You can
apply an access list to a catalog only if you are the owner of the catalog or
an administrator.
85
Page 86

Chapter 4 Finding Media Objects
To change an access list:
1. Click Catalogs in the mode selector.
2. Select Modify Access Control from the shortcut menu. See “Accessing
Shortcut Menus” on page 24.
The Modify Access Control window opens.
86
n
3. Select a new access list from the Access List menu.
The new access list is added to the Users list. The added access list
users inherit the privileges given to them when the access list was
created. If you need to modify the privilege of the users of the access
list, click the access list name, click Modify, and change the privileges.
Modifying an access list changes all users within the access list.
4. Click Save.
The catalog will be limited to the users in the selected list.
You will have access only to the access lists to which you belong.
Page 87

Editing an Existing Access List
The following example provides just one reason to edit an existing access
list.
Imagine you have an “All Editors” access list, which is used for private
catalogs. When two new editors join your group, you decide to add them to
the “All Editors” access list. Now your new editors have access to all the
private catalogs available through the “All Editors” access list.
To edit an access list:
1. Click Administration in the mode selector.
The Functions list appears along with the Users list and any access
lists. You might need to scroll down the list to see the access lists.
Editing an Existing Access List
2. Select Edit Access List from the shortcut menu of the access list you
want to edit. See “Accessing Shortcut Menus” on page 24.
87
Page 88

Chapter 4 Finding Media Objects
The Edit Access List window opens.
3. Make the changes you want to the access list.
88
n
4. Click Save.
To edit and change the name of an access list:
1. Click Administration in the mode selector.
The Functions list appears along with the Users list and any access
lists. You might need to scroll down the list to see the access lists.
2. Select Edit and Save List As from the shortcut menu of the access list
you want to edit. See “Accessing Shortcut Menus” on page 24.
The Edit Access List window opens.
3. Make the changes you want to the access list.
You can change the name of the access list in this dialog box.
4. Click Save.
Page 89

Deleting an Access List
You can delete an access list if you no longer need that access list. As a
user, you can delete only access lists that you created. An administrator
can delete any access list.
To delete an access list:
1. Click Administration in the mode selector.
The Functions list appears along with the Users list and any access
lists.
Deleting an Access List
n
You will see only the access lists to which you belong.
2. Select the access list you want to delete, and select Delete List from
the shortcut menu. See “Accessing Shortcut Menus” on page 24.
A message box opens.
3. Click OK.
The access list is deleted.
89
Page 90

Chapter 4 Finding Media Objects
90
Page 91

Chapter 5
Viewing and Using Your Search Results
The results frame displays the media objects found by all Nearchive
MediaManager searches and catalog browsing operations. It allows you to
view results, obtain additional information about them (including media
relatives), and check them out by dragging them into the bin of an Avid
editing application.
This chapter discusses the following topics:
• Viewing Your Search Results
• Moving Your Search Results
• Adding Media Objects to Catalogs
• Deleting Media Objects from Nearchive MediaManager
Viewing Your Search Results
All media objects returned by operations in Searches and Catalogs modes
are displayed in the results frame.
Page 92

Chapter 5 Viewing and Using Your Search Results
92
View selector
Status bar
The results frame is a flexible, interactive results viewer — it does not
present a static view of your search results. The results frame offers three
display views for your results, provides access to detailed information and
head frames for selected objects, and allows you to perform searches for
objects related to those displayed (media relatives and other objects from
the same source tape).
Page 93

Display Views
Viewing Your Search Results
The results frame also allows you to use or manage media objects
displayed there by dragging them to appropriate locations. In this manner,
you can:
• Check out media objects from MediaManager (see “Moving Your
Search Results” on page 102).
• Add media objects to catalogs (see “Adding Media Objects to
Catalogs” on page 102).
• Mark media objects for deletion (see “Deleting Media Objects from
Nearchive MediaManager” on page 103).
The results frame provides three views. You can preselect the view in
which to display the results of a simple or extended search, and then you
can switch among them by using the view selector.
View Information Displayed
[S]toryboard Head frame, object name, object type, creation date,
duration, video, and tape name
[F]rame Head frame and object name
[T]ext Object name, object type (represented by an icon), creation
date, duration, video, tape name
93
Page 94

Chapter 5 Viewing and Using Your Search Results
Media Status
Each media object in Text, Storyboard, and Frame view has an associated
Media Status indicator. The color of the indicator shows the status of the
media.
Media Status
indicator
(Frame view)
Media Status
Indicator Color
Yellow Media is online.
Red Media is offline, or media is on a
Blue Some of the related media files are
Indicates
remote workgroup.
offline.
Media Status indicator (Text
view)
Sorting Media Objects in the Results Frame
Once the media objects you want are displayed in the results frame, you
can sort the objects. For example, you can list the media objects by
creation date starting with the most current or click the Creation Date
heading and view them from the earliest date.
94
Page 95

To sort media objects displayed in the results frame according to a
specific attribute:
1. Switch to Text view.
2. Click the appropriate column heading (for example, Name, Creation
Date, or Duration). The results are re-sorted in ascending order.
3. Click the heading again to sort the results in descending order.
Selecting Media Objects
To select media objects in Text view:
t Click the check box next to the Text List icon. Ctrl+click (Windows) or
Shift+click (Macintosh) to select multiple objects.
Click here.
Viewing Your Search Results
Click the
head frame.
To select media objects in Storyboard or Frame view:
t Click the head frame to select an object. Ctrl+click (Windows) or
Shift+click (Macintosh) to select multiple objects.
The head frame is outlined in green when selected.
95
Page 96

Chapter 5 Viewing and Using Your Search Results
To select all media objects:
t Click Select All in the status bar at the bottom of the
Nearchive MediaManager page.
If the number of items returned on a search is greater than one page can
display, the status bar displays Select Page instead of Select All.
The Page Size option at the top of the results frame allows you to select to
show more or fewer media objects per display page. For example, if you
set the Page Size to Small, fewer objects are displayed per page and you
have more pages of media objects. If you set the Page Size to Large, more
objects are displayed per page and you have fewer pages of media objects.
To view the next page of results, click Next.
Page Size option
96
Page 97

Viewing Head Frames
If associated media was online when a media object was checked in to
MediaManager, that object’s record will include a head frame stored in
low-resolution JPEG format. Storyboard and Frame view entries include
small inline head-frame images where available.
To view a larger head-frame image for a media object:
1. Click to select the object you want to view.
2. Open the Head Frame Viewer by clicking the Triangle icon.
Viewing Your Search Results
Triangle icon
The head-frame image appears in the Head Frame Viewer.
Obtaining Media Size Information
To obtain the media size information for a media file:
t In the results frame, click the file for which you want to obtain size
information.
The status bar at the bottom of the results frame displays the media
size of the selected file.
97
Page 98

Chapter 5 Viewing and Using Your Search Results
Media size status display
To obtain the media size information for multiple media files:
t In the results frame, Ctrl+click (Windows) or Shift+click (Macintosh)
the files for which you want to obtain size information.
The status bar at the bottom of the results frame displays the total
media size of the selected files.
n
The total media size is a rounded-off estimate and should be used as such.
Obtaining Detailed Object Information
To obtain detailed information about a media object:
1. In the results frame, select the object for which you want to find
detailed information.
2. Select About This Item from the shortcut menu. See “Accessing
Shortcut Menus” on page 24.
98
Page 99

Unique identifier
number for each
clip
Click to expand.
Viewing Your Search Results
The Clip Information window opens.
The Clip Information window shows:
• A title bar with a unique identifier number. For example,
“Clip 42.1228598735.2511840 (66).”
• The head frame and all the attributes that can be seen in all results
frame views
• Associated comments (that you can also edit)
• Expandable view areas that contain:
- System attributes
- User attributes
- Catalog information
- Any associated catalogs
To obtain the path information of the location of the media on the
Nearchive system drives:
t Click Locator in the Clip Information window. A window opens,
showing the path of the media to the Nearchive system shared drives.
99
Page 100

Chapter 5 Viewing and Using Your Search Results
To add comments:
t Type them in the Comments text box, and click Update. (Update saves
the comments and closes the dialog box.)
n
This is a good place to add keywords. There is a 255-character limit to the
comments field.
Viewing Media Relatives
Finding a media object’s media relatives (clips that are referenced by a
sequence or sequences that reference a clip) is often useful. The Show
Relatives command allows you to find relatives for a single object or
multiple media objects.
To view the media relatives of a single media object:
t (Windows) Right-click the sequence or clip, and select Show
Relatives.
t (Macintosh) Click the sequence or clip, click the shortcut menu arrow,
and select Show Relatives.
To view the media relatives for multiple objects:
t (Windows) Ctrl+click the files, right-click, and select Show Relatives.
t (Macintosh) In the results frame, Shift+click the files, click the
shortcut menu arrow, and select Show Relatives.
100
(Macintosh only) The results are returned in a hierarchy format (not treestyle collapsible).
(Windows only) The results are returned in a tree-style collapsible view, as
in the following Text view example.
 Loading...