

Pinnacle Systems MovieBox Deluxe Quick Start Manual

Pinnacle MovieBox Deluxe
Professional Quality Movie Making
UICK START GUIDE
Q
G
UIDE DE DEMARRAGE RAPIDE
MANUAL BREVE DE INSTRUCCIONES
GUIA DE INÍCIO RÁPIDO
41003890

© Pinnacle Systems GmbH 2004
All rights reserved.
No part of this manual may be reproduced or transferred to other media without explicit written
permission from Pinnacle Sysrems., Braunschweig, Germany.
All brand or product names are trademarks or registered trademarks of their respective holders.
© Pinnacle Systems GmbH 2004
Tous droits réservés.
Toute reproduction ou représentation intégrale ou partielle, par quelque procédé que ce soit, du présent
manuel est interdite sans l'autorisation expresse par écrit de Pinnacle Systems GmbH, Brunswick.
Tous les noms de marques et de produits sont des marques ou des marques déposées des constructeurs
respectifs.
© Pinnacle Systems GmbH 2004
Todos los derechos reservados
No se permite reproducir o transferir parte alguna de este manual a otro tipo de soporte sin la
autorización por escrito de Pinnacle Systems, Braunschweig, Alemania.
El resto de denominaciones de marca y de producto son marcas de fábrica o marcas registradas de los
fabricantes correspondientes.
© Pinnacle Systems GmbH 2004
Todos os direitos reservados.
Nenhuma parte deste guia poderá ser copiada ou transferida para outro meio sem a autorização escrita
da Pinnacle Systems GmbH, Braunschweig.
Todos os nomes de marcas e produtos são marcas ou marcas registradas de seus respectivos
fabricantes.

Pinnacle MovieBox Deluxe
Professional Quality Movie Making
QUICK START GUIDE
English
BEFORE YOU BEGIN 1
SYSTEM REQUIREMENTS 1
PACKAGE CONTENTS 2
INSTALLING THE SOFTWARE 3
CONNECTING THE MOVIEBOX DELUXE AND THE
VIDEO DEVICES 4
HOW TO CONNECT THE DEVICES 4
TECHNICAL DATA 6
KEY PARTS 6
KEY FEATURES 6
WARRANTY I
Contents
This Quick Start Guide explains how to install the Pinnacle hardware and
software.
Important text passages are marked with the “notepad” and this format.
Numbers mark step by step instructions:
1. Start Windows.
All keyboard commands appear in this font:
Setup
Menus, commands, options, or buttons which the user can select are written
in italics.
About this Quick Start Guide
This chapter tells you which computer system components are required for
the operation of MovieBox Deluxe and what is included in the MovieBox
Deluxe package contents.
SYSTEM REQUIREMENTS
Please make sure your system meets the following requirements before
installing MovieBox Deluxe:
Computer
Pentium IV 1.6 GHz (or higher) or equivalent AMD CPU (2 GHz
recommended)
USB 2.0 port
Windows XP (Home and Professional Edition, Service Pack 1 or higher)
DirectX 9 or higher compatible graphics card
DirectX 9 or higher compatible sound card
256 MB of RAM (512 MB recommended)
CD-ROM drive (optional: CD or DVD burner required to create
Video CD, S-Video CD or DVD)
300 MB of free hard disk space to install software
Before you begin
English
Video equipment
MovieBox Deluxe can capture from and output video to:
Any analog (8mm, Hi8, VHS, SVHS, VHS-C or SVHS-C) camcorder or
VCR
Any DV, Digital8 or MicroMV camcorder with analog outputs (capture
only)
Any DV or Digital8 camcorder or VCR (to output to the camcorder, it
must be enabled to record from DV Input)
Quick Start Guide
1
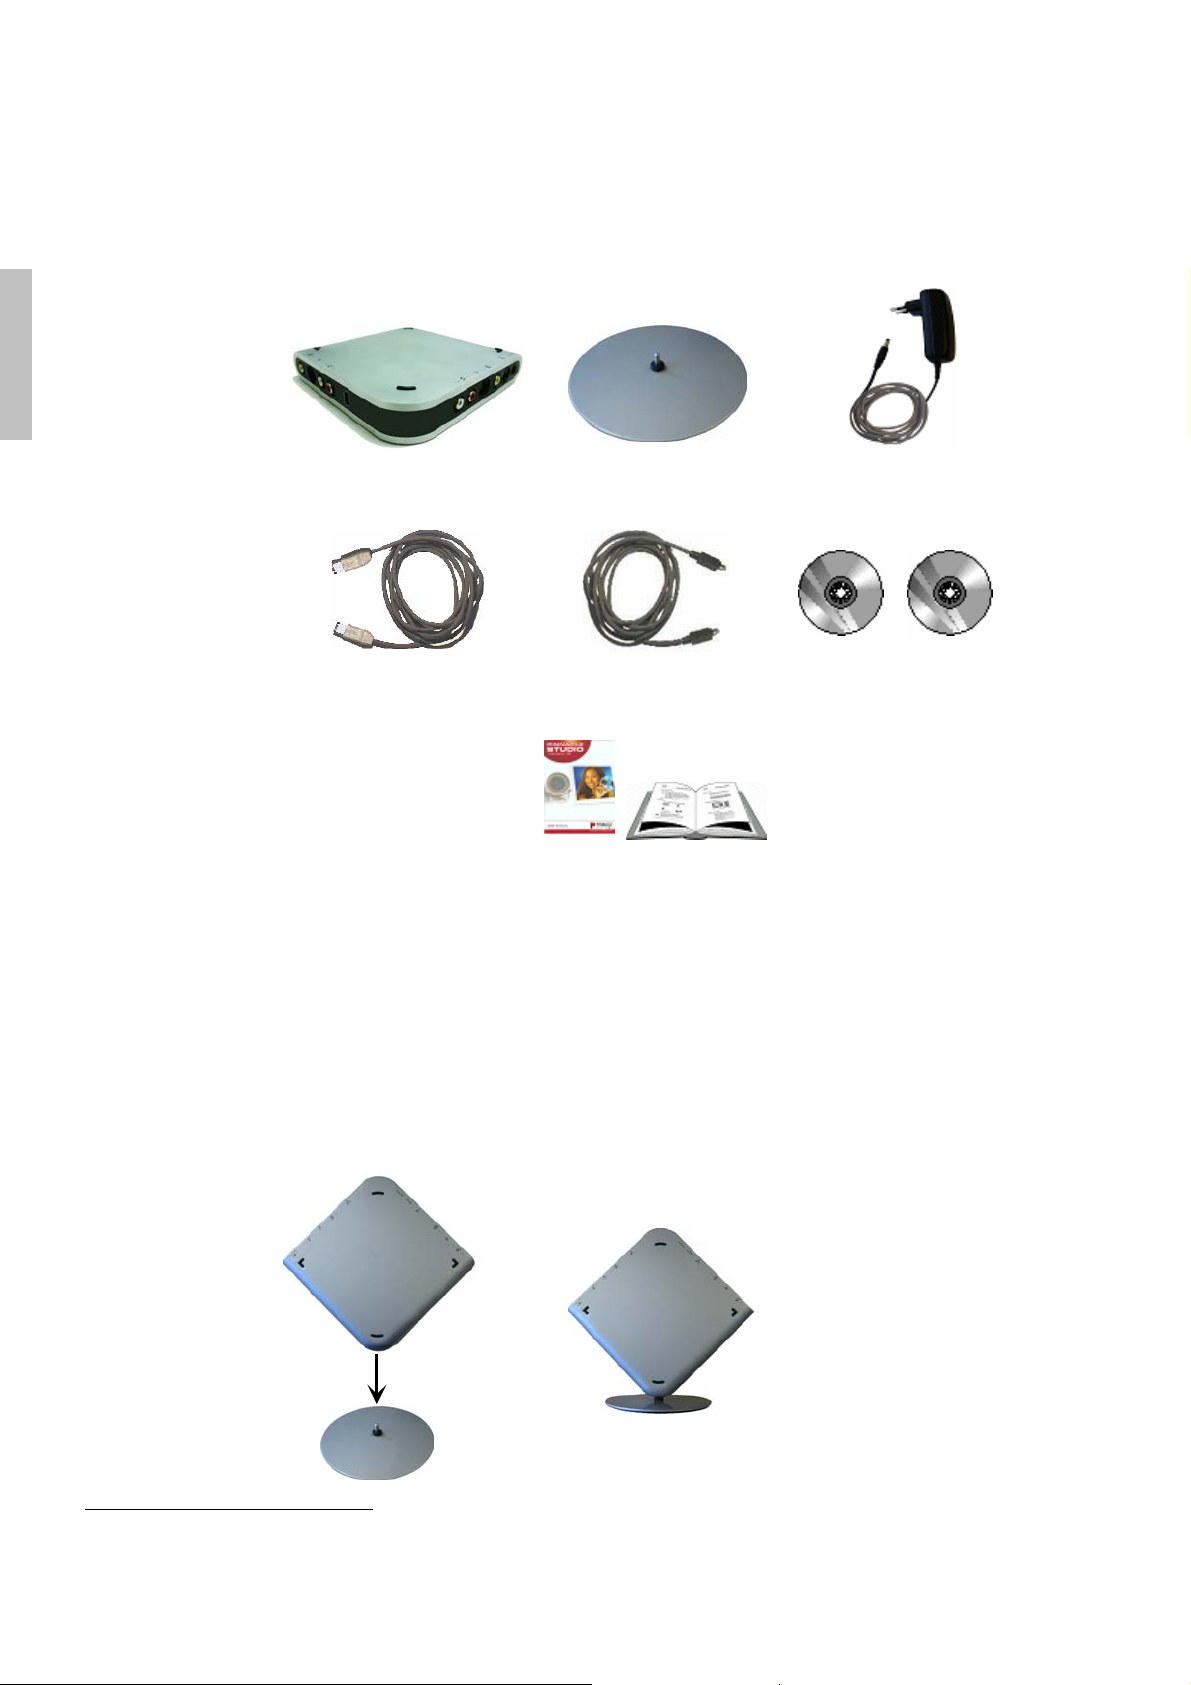
PACKAGE CONTENTS
Please make sure your MovieBox Deluxe system is complete before you
begin the installation. The system includes1:
English
MovieBox Deluxe Stand Power Supply
USB-cable IEEE-1394 cable 6x4 Pinnacle Studio “Programs”
and “Content” disks
Studio Manual and this
Quick Start Guide
If any parts are missing, please contact your retailer.
Optionally you can place the MovieBox Deluxe-Box onto the stand, as
shown below:
1
Depending on the delivery scope, the actual package contents may be different from the package contents listed in
the manual. Specifications are subject to change without notice or obligation.
2 Pinnacle MovieBox Deluxe

Installing the Software
1. Insert the Studio CD-ROM into your CD-ROM drive.
If you have Autorun enabled for your CD-ROM, Setup will run
automatically. If you do not have Autorun enabled, navigate to your CD-
ROM drive, and double-click on Setup.exe.
2. Select the language of your choice.
3. Check for previous version.
If a previous version of Studio is not found on your system you will be
asked to insert the CD-ROM of your previous version into your CDROM drive.
4. Personalise your Studio installation by entering your name, country,
e-mail address (optional) and serial number.
5. Registration.
Next you will be given the opportunity to register your copy of Studio.
You can quickly and easily register using your Internet connection.
Registration is important for four reasons:
You will receive a free bonus effect pack upon registration.
Registration is required to receive technical support.
Registration allows Pinnacle Systems to inform you of free updates to
the Studio software.
Registration makes you eligible for special offers and promotions
from Pinnacle Systems.
6. Agree to the Studio software license terms (click I Agree).
If you do not accept or understand the terms, you should promptly return
this product to your dealer.
7. Choose Typical installation (recommended).
Only advanced computer users should choose Custom.
8. Click Next until the installation is completed.
9. Restart. In some cases, you may be instructed to restart your PC.
10. Drive r i nstall a t i on.
Follow the prompts on the screen to complete the driver installation.
11. When a reminder pops up, insert the Studio Content DVD into your
DVD drive.
If you have Autorun enabled for your DVD drive, Setup will run
automatically. If you do not have Autorun enabled, navigate to your
DVD drive, and double-click on Setup.exe. If you do not have a DVD
drive you may order the tutorial, electronic manual and bonus content
separately on CD ROMs at http://www.pinnaclesys.com/studio9cd.
12. Install additional software.
If you received any additional effects or content with your Studio
upgrade, install it now by inserting the CD-ROM(s) or DVD into your
CD-ROM or DVD drive. If you have Autorun enabled for your CD-ROM
or DVD drive, Setup will run automatically. If you do not have Autorun
enabled, navigate to your CD-ROM or DVD drive, and double-click on
Setup.exe.
English
Quick Start Guide
3
Connecting the MovieBox
Deluxe and the Video Devices
The following chapter tells you how to connect your video devices to the
MovieBox Deluxe. To do so you will need the appropriate cables.
English
Important: Be sure your PC, MovieBox Deluxe and video equipment are
HOW TO CONNECT THE DEVICES
all turned OFF before making any connections.
If the Windows Add New Hardware dialog box appears, follow the
on-screen prompts.
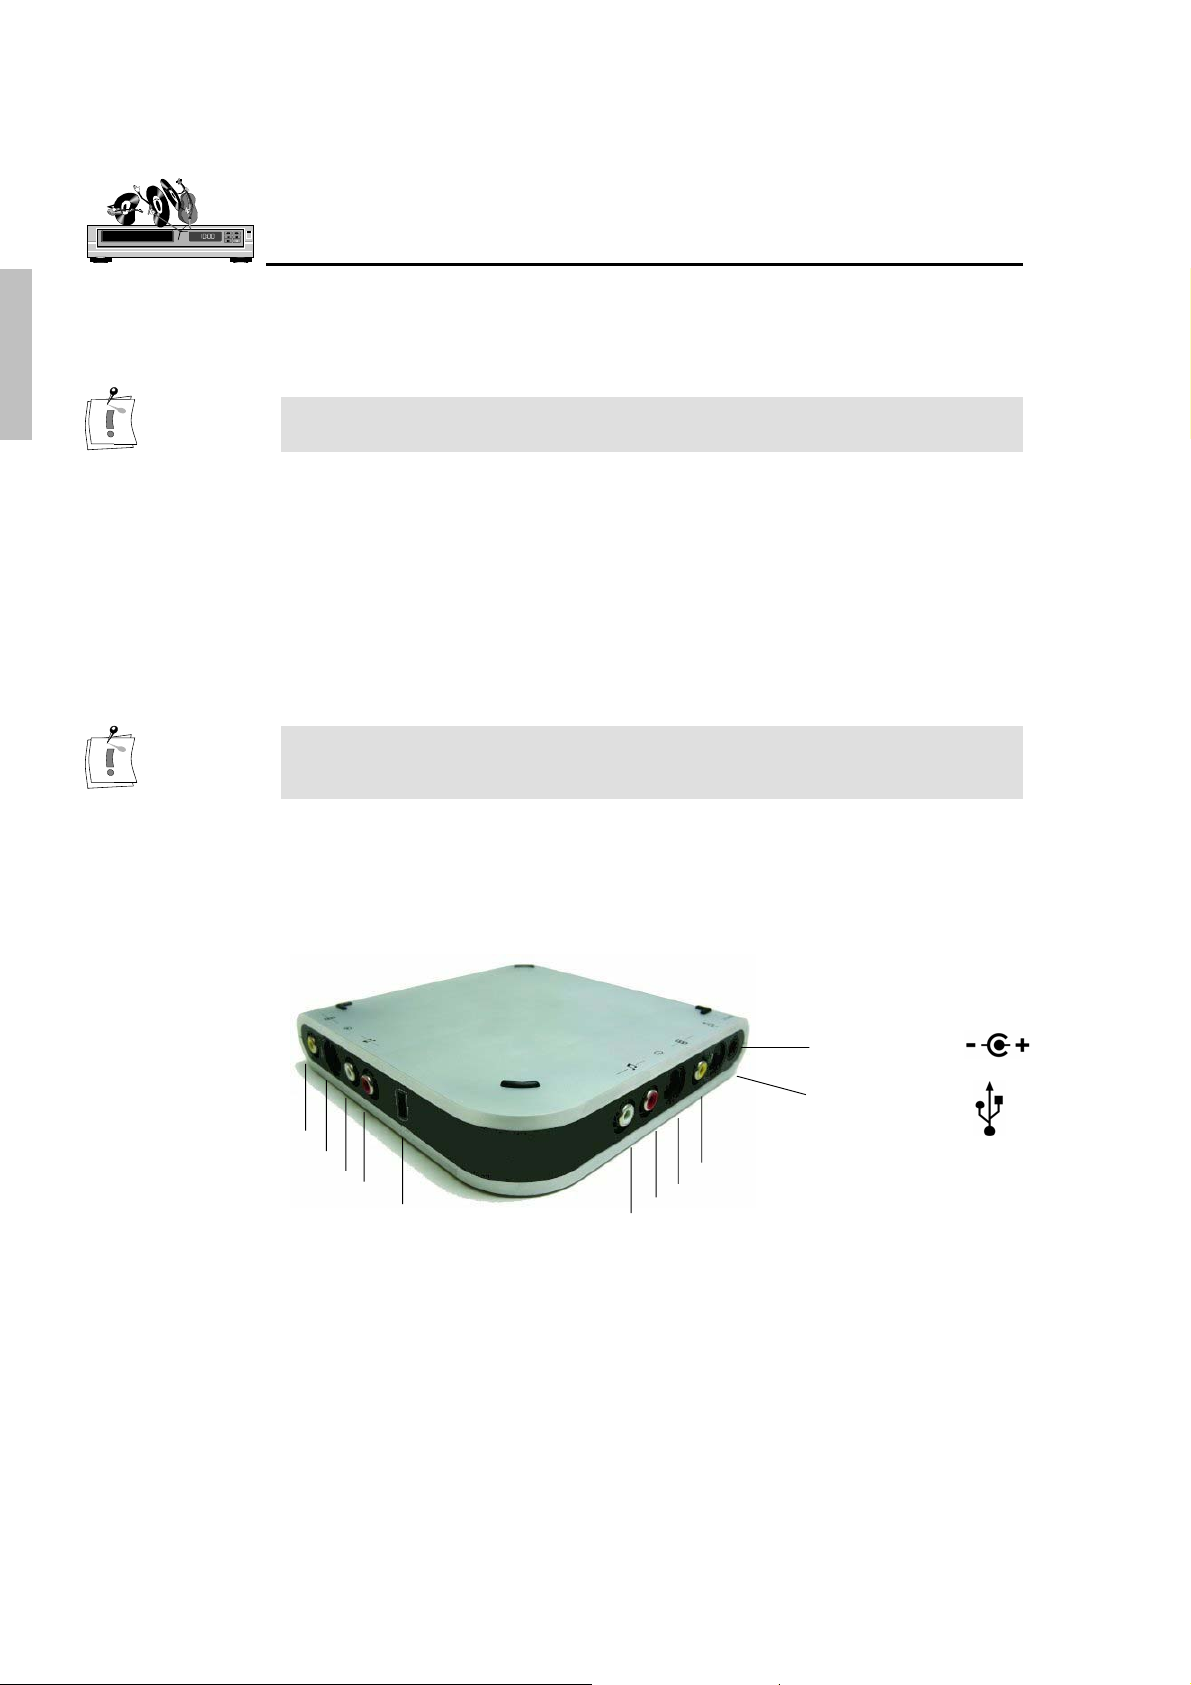
The following illustrations show how to connect MovieBox Deluxe to your
PC and video equipment.
Power supply
USB connector
1
2
3
4
5
9
6
7
8
Composite Video In
1
S-Video In
2
Composite Video Out
6
S-Video Out
7
Audio Left In
3
Audio Right In
4
DV Port In/Out
5
4 Pinnacle MovieBox Deluxe
Audio Right Out
8
Audio Left Out
9
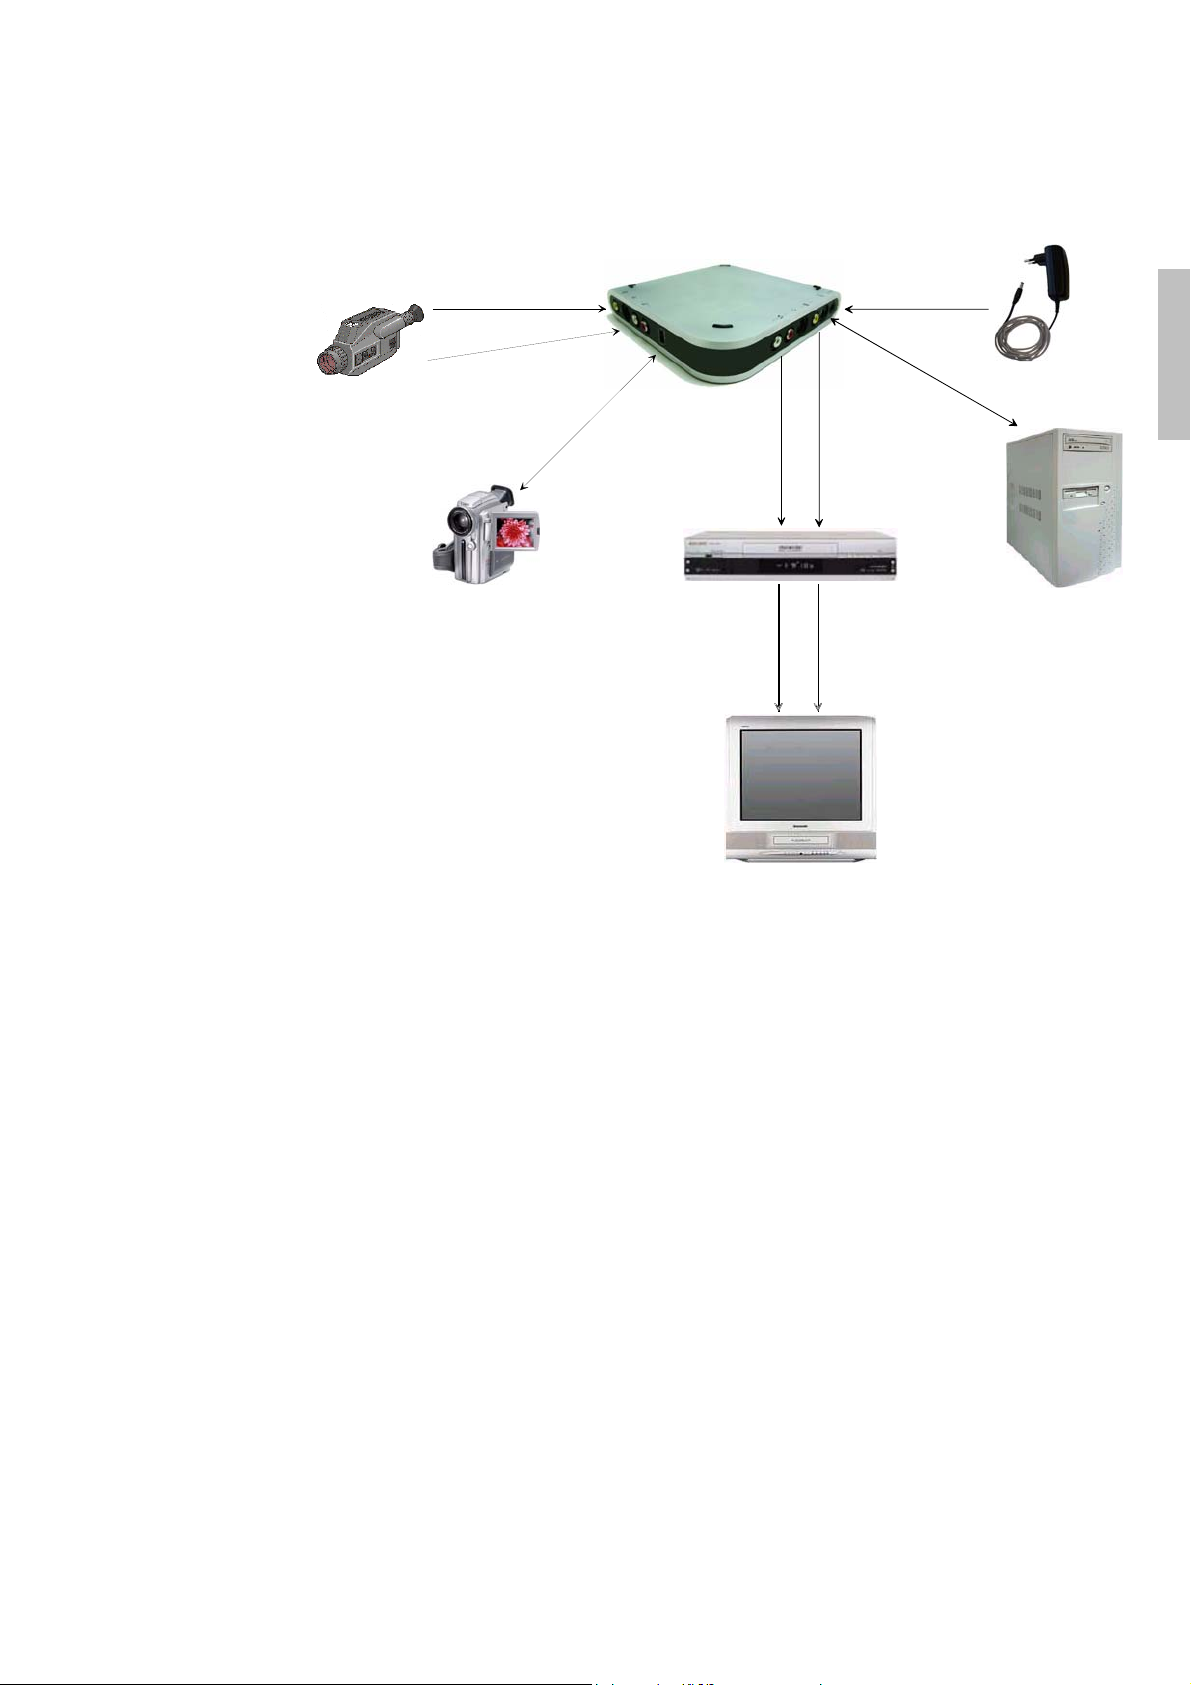
Composite or
S-Video Out
Analog
Video Source
Digital Video Source
Audio
Out
Composite or
S-Video In
Audio
In
DV Port
VCR
Audio
Out
Audio
In
Audio
Out
Audio
In
Composite
or S-Video Out
Composite
or S-Video In
Composite
or S-Video Out
Composite
or S-Video In
Power Supply
USB
PC
English
Video Monitor
Now, have some fun…
Now that you have installed the MovieBox Deluxe, you can use it
immediately. We strongly recommend you take this opportunity to
experience Studio digital video editing.
Quick Start Guide
5

Technical Data
KEY PARTS
English
Hardware
External USB box
External power supply
USB 2.0 hi-speed cable
1394 cable
Software
Drivers for Windows XP
Studio Application
KEY FEATURES
Connectors:
S-video and composite video I/O
Stereo audio I/O
One 1394 6pin port to connect DV device
One USB 2.0 port for connection to host PC
Power supply
Power LED
Operating modes:
Capture analog video and audio
Playback analog video and audio
Capture DV data from IEEE1394 port
Playback DV data on IEEE1394 port
Preview analog A/V source on PC while capturing
Preview DV source on PC while capturing
Compression formats:
DV
MPEG2
MPEG1
Uncompressed YUV
Other:
Supports Device Control on IEEE1394 port
6 Pinnacle MovieBox Deluxe

Pinnacle MovieBox Deluxe
Création de Film de Qualité Professionnelle
GUIDE DE DEMARRAGE RAPIDE

Français
AVANT DE COMMENCER 1
CONFIGURATION NECESSAIRE 1
VERIFICATION DES ELEMENTS REÇUS 2
INSTALLER LE LOGICIEL 3
CONNEXION DU MOVIEBOX DELUXE ET DES
PERIPHERIQUES VIDEO 4
COMMENT CONNECTER LES PERIPHERIQUES VIDEO 4
DONNEES TECHNIQUES 6
PRINCIPAUX COMPOSANTS 6
FONCTIONS CLES 6
GARANTIE II
A propos de ce
Table des matières
Guide de Démarrage Rapide
Ce résumé vous explique l’installation du matériel et du logiciel Pinnacle.
Les passages de texte particulièrement importants sont caractérisés par la
« fiche de notes » et le format suivant.
Les instructions qui vous précisent pas à pas les opérations à effectuer dans
certaines situations sont identifiables à la numérotation:
1. Démarrez Windows.
Toutes les commandes à entrer par l’utilisateur sont indiquées dans un certain
style d’écriture
Setup
Les menus, commandes, options, onglets, etc. à sélectionner par l’utilisateur
sont mentionnés en italiques.
 Loading...