

Page 1

Avid® Motion Graphics
User’s Guide
Page 2

Legal Notices
Product specifications are subject to change without notice and do not represent a commitment on the part of Avid Technology, Inc.
This product is subject to the terms and conditions of a software license agreement provided with the software. The product may
only be used in accordance with the license agreement.
This document is protected under copyright law. An authorized licensee of Avid Motion Graphics may reproduce this publication for
the licensee’s own use in learning how to use the software. This document may not be reproduced or distributed, in whole or in part,
for commercial purposes, such as selling copies of this document or providing support or educational services to others. This
document is supplied as a guide for Avid Motion Graphics. Reasonable care has been taken in preparing the information it contains.
However, this document may contain omissions, technical inaccuracies, or typographical errors. Avid Technology, Inc. does not
accept responsibility of any kind for customers’ losses due to the use of this document. Product specifications are subject to change
without notice.
This product may be protected by one or more U.S. and non-U.S patents. Details are available at www.avid.com/patents.
Copyright © 2013 Avid Technology, Inc. and its licensors. All rights reserved.
The following disclaimer is required by Apple Computer, Inc.:
APPLE COMPUTER, INC. MAKES NO WARRANTIES WHATSOEVER, EITHER EXPRESS OR IMPLIED, REGARDING THIS
PRODUCT, INCLUDING WARRANTIES WITH RESPECT TO ITS MERCHANTABILITY OR ITS FITNESS FOR ANY PARTICULAR
PURPOSE. THE EXCLUSION OF IMPLIED WARRANTIES IS NOT PERMITTED BY SOME STATES. THE ABOVE EXCLUSION
MAY NOT APPLY TO YOU. THIS WARRANTY PROVIDES YOU WITH SPECIFIC LEGAL RIGHTS. THERE MAY BE OTHER
RIGHTS THAT YOU MAY HAVE WHICH VARY FROM STATE TO STATE.
The following disclaimer is required by Sam Leffler and Silicon Graphics, Inc. for the use of their TIFF library:
Copyright © 1988–1997 Sam Leffler
Copyright © 1991–1997 Silicon Graphics, Inc.
Permission to use, copy, modify, distribute, and sell this software [i.e., the TIFF library] and its documentation for any purpose is
hereby granted without fee, provided that (i) the above copyright notices and this permission notice appear in all copies of the
software and related documentation, and (ii) the names of Sam Leffler and Silicon Graphics may not be used in any adver tising or
publicity relating to the software without the specific, prior written permission of Sam Leffler and Silicon Graphics.
THE SOFTWARE IS PROVIDED “AS-IS” AND WITHOUT WARRANTY OF ANY KIND, EXPRESS, IMPLIED OR OTHERWISE,
INCLUDING WITHOUT LIMITATION, ANY WARRANTY OF MERCHANTABILITY OR FITNESS FOR A PARTICULAR PURPOSE.
IN NO EVENT SHALL SAM LEFFLER OR SILICON GRAPHICS BE LIABLE FOR ANY SPECIAL, INCIDENTAL, INDIRECT OR
CONSEQUENTIAL DAMAGES OF ANY KIND, OR ANY DAMAGES WHATSOEVER RESULTING FROM LOSS OF USE, DATA OR
PROFITS, WHETHER OR NOT ADVISED OF THE POSSIBILITY OF DAMAGE, AND ON ANY THEORY OF LIABILITY, ARISING
OUT OF OR IN CONNECTION WITH THE USE OR PERFORMANCE OF THIS SOFTWARE.
The following disclaimer is required by the Independent JPEG Group:
This software is based in part on the work of the Independent JPEG Group.
This Software may contain components licensed under the following conditions:
Copyright (c) 1989 The Regents of the University of California. All rights reserved.
Redistribution and use in source and binary forms are permitted provided that the above copyright notice and this paragraph are
duplicated in all such forms and that any documentation, advertising materials, and other materials related to such distribution and
use acknowledge that the software was developed by the University of California, Berkeley. The name of the University may not be
used to endorse or promote products derived from this software without specific prior written permission. THIS SOFTWARE IS
PROVIDED ``AS IS'' AND WITHOUT ANY EXPRESS OR IMPLIED WARRANTIES, INCLUDING, WITHOUT LIMITATION, THE
IMPLIED WARRANTIES OF MERCHANTABILITY AND FITNESS FOR A PARTICULAR PURPOSE.
Copyright (C) 1989, 1991 by Jef Poskanzer.
Permission to use, copy, modify, and distribute this software and its documentation for any purpose and without fee is hereby
granted, provided that the above copyright notice appear in all copies and that both that copyright notice and this permission notice
appear in supporting documentation. This software is provided "as is" without express or implied warranty.
Copyright 1995, Trinity College Computing Center. Written by David Chappell.
Permission to use, copy, modify, and distribute this software and its documentation for any purpose and without fee is hereby
granted, provided that the above copyright notice appear in all copies and that both that copyright notice and this permission notice
appear in supporting documentation. This software is provided "as is" without express or implied warranty.
2
Page 3

Copyright 1996 Daniel Dardailler.
Permission to use, copy, modify, distribute, and sell this software for any purpose is hereby granted without fee, provided that the
above copyright notice appear in all copies and that both that copyright notice and this permission notice appear in supporting
documentation, and that the name of Daniel Dardailler not be used in advertising or publicity pertaining to distribution of the software
without specific, written prior permission. Daniel Dardailler makes no representations about the suitability of this software for any
purpose. It is provided "as is" without express or implied warranty.
Modifications Copyright 1999 Matt Koss, under the same license as above.
Copyright (c) 1991 by AT&T.
Permission to use, copy, modify, and distribute this software for any purpose without fee is hereby granted, provided that this entire
notice is included in all copies of any software which is or includes a copy or modification of this software and in all copies of the
supporting documentation for such software.
THIS SOFTWARE IS BEING PROVIDED "AS IS", WITHOUT ANY EXPRESS OR IMPLIED WARRANTY. IN PARTICULAR,
NEITHER THE AUTHOR NOR AT&T MAKES ANY REPRESENTATION OR WARRANTY OF ANY KIND CONCERNING THE
MERCHANTABILITY OF THIS SOFTWARE OR ITS FITNESS FOR ANY PARTICULAR PURPOSE.
This product includes software developed by the University of California, Berkeley and its contributors.
The following disclaimer is required by Nexidia Inc.:
© 2010 Nexidia Inc. All rights reserved, worldwide. Nexidia and the Nexidia logo are trademarks of Nexidia Inc. All other
trademarks are the property of their respective owners. All Nexidia materials regardless of form, including without limitation,
software applications, documentation and any other information relating to Nexidia Inc., and its products and services are the
exclusive property of Nexidia Inc. or its licensors. The Nexidia products and services described in these materials may be covered
by Nexidia's United States patents: 7,231,351; 7,263,484; 7,313,521; 7,324,939; 7,406,415, 7,475,065; 7,487,086 and/or other
patents pending and may be manufactured under license from the Georgia Tech Research Corporation USA.
The following disclaimer is required by Paradigm Matrix:
Portions of this software licensed from Paradigm Matrix.
The following disclaimer is required by Ray Sauers Associates, Inc.:
“Install-It” is licensed from Ray Sauers Associates, Inc. End-User is prohibited from taking any action to derive a source code
equivalent of “Install-It,” including by reverse assembly or reverse compilation, Ray Sauers Associates, Inc. shall in no event be liable
for any damages resulting from reseller’s failure to perform reseller’s obligation; or any damages arising from use or operation of
reseller’s products or the software; or any other damages, including but not limited to, incidental, direct, indirect, special or
consequential Damages including lost profits, or damages resulting from loss of use or inability to use reseller’s products or the
software for any reason including copyright or patent infringement, or lost data, even if Ray Sauers Associates has been advised,
knew or should have known of the possibility of such damages.
The following disclaimer is required by Videomedia, Inc.:
“Videomedia, Inc. makes no warranties whatsoever, either express or implied, regarding this product, including warranties with
respect to its merchantability or its fitness for any particular purpose.”
“This software contains V-LAN ver. 3.0 Command Protocols which communicate with V-LAN ver. 3.0 products developed by
Videomedia, Inc. and V-LAN ver. 3.0 compatible products developed by third parties under license from Videomedia, Inc. Use of this
software will allow “frame accurate” editing control of applicable videotape recorder decks, videodisc recorders/players and the like.”
The following disclaimer is required by Altura Software, Inc. for the use of its Mac2Win software and Sample Source
Code:
©1993–1998 Altura Software, Inc.
The following disclaimer is required by Ultimatte Corporation:
Certain real-time compositing capabilities are provided under a license of such technology from Ultimatte Corporation and are
subject to copyright protection.
The following disclaimer is required by 3Prong.com Inc.:
Certain waveform and vector monitoring capabilities are provided under a license from 3Prong.com Inc.
The following disclaimer is required by Interplay Entertainment Corp.:
The “Interplay” name is used with the permission of Interplay Entertainment Corp., which bears no responsibility for Avid products.
This product includes portions of the Alloy Look & Feel software from Incors GmbH.
3
Page 4

This product includes software developed by the Apache Software Foundation (http://www.apache.org/).
© DevelopMentor
This product may include the JCifs library, for which the following notice applies:
JCifs © Copyright 2004, The JCIFS Project, is licensed under LGPL (http://jcifs.samba.org/). See the LGPL.txt file in the Third Par ty
Software directory on the installation CD.
Avid Interplay contains components licensed from LavanTech. These components may only be used as part of and in connection
with Avid Interplay.
Attn. Government User(s). Restricted Rights Legend
U.S. GOVERNMENT RESTRICTED RIGHTS. This Software and its documentation are “commercial computer software” or
“commercial computer software documentation.” In the event that such Software or documentation is acquired by or on behalf of a
unit or agency of the U.S. Government, all rights with respect to this Software and documentation are subject to the terms of the
License Agreement, pursuant to FAR §12.212(a) and/or DFARS §227.7202-1(a), as applicable.
Trademarks
003, 192 Digital I/O, 192 I/O, 96 I/O, 96i I/O, Adrenaline, AirSpeed, ALEX, Alienbrain, AME, AniMatte, Archive, Archive II, Assistant
Station, AudioPages, AudioStation, AutoLoop, AutoSync, Avid, Avid Active, Avid Advanced Response, Avid DNA, Avid DNxcel, Avid
DNxHD, Avid DS Assist Station, Avid Ignite, Avid Liquid, Avid Media Engine, Avid Media Processor, Avid MEDIArray, Avid Mojo, Avid
Remote Response, Avid Unity, Avid Unity ISIS, Avid VideoRAID, AvidRAID, AvidShare, AVIDstripe, AVX, Beat Detective, Beauty
Without The Bandwidth, Beyond Reality, BF Essentials, Bomb Factory, Bruno, C|24, CaptureManager, ChromaCurve,
ChromaWheel, Cineractive Engine, Cineractive Player, Cineractive Viewer, Color Conductor, Command|24, Command|8,
Control|24, Cosmonaut Voice, CountDown, d2, d3, DAE, D-Command, D-Control, Deko, DekoCast, D-Fi, D-fx, Digi 002, Digi 003,
DigiBase, Digidesign, Digidesign Audio Engine, Digidesign Development Partners, Digidesign Intelligent Noise Reduction,
Digidesign TDM Bus, DigiLink, DigiMeter, DigiPanner, DigiProNet, DigiRack, DigiSerial, DigiSnake, DigiSystem, Digital
Choreography, Digital Nonlinear Accelerator, DigiTest, DigiTranslator, DigiWear, DINR, DNxchange, Do More, DPP-1, D-Show, DSP
Manager, DS-StorageCalc, DV Toolkit, DVD Complete, D-Verb, Eleven, EM, Euphonix, EUCON, EveryPhase, Expander,
ExpertRender, Fader Pack, Fairchild, FastBreak, Fast Track, Film Cutter, FilmScribe, Flexevent, FluidMotion, Frame Chase, FXDeko,
HD Core, HD Process, HDpack, Home-to-Hollywood, HYBRID, HyperSPACE, HyperSPACE HDCAM, iKnowledge, Image
Independence, Impact, Improv, iNEWS, iNEWS Assign, iNEWS ControlAir, InGame, Instantwrite, Instinct, Intelligent Content
Management, Intelligent Digital Actor Technology, IntelliRender, Intelli-Sat, Intelli-sat Broadcasting Recording Manager, InterFX,
Interplay, inTONE, Intraframe, iS Expander, iS9, iS18, iS23, iS36, ISIS, IsoSync, LaunchPad, LeaderPlus, LFX, Lightning, Link &
Sync, ListSync, LKT-200, Lo-Fi, MachineControl, Magic Mask, Make Anything Hollywood, make manage move | media, Marquee,
MassivePack, Massive Pack Pro, Maxim, Mbox, Media Composer, MediaFlow, MediaLog, MediaMix, Media Reader, Media
Recorder, MEDIArray, MediaServer, MediaShare, MetaFuze, MetaSync, MIDI I/O, Mix Rack, Moviestar, MultiShell, NaturalMatch,
NewsCutter, NewsView, NewsVision, Nitris, NL3D, NLP, NSDOS, NSWIN, OMF, OMF Interchange, OMM, OnDVD, Open Media
Framework, Open Media Management, Painterly Effects, Palladium, Personal Q, PET, Podcast Factory, PowerSwap, PRE,
ProControl, ProEncode, Profiler, Pro Tools, Pro Tools|HD, Pro Tools LE, Pro Tools M-Powered, Pro Transfer, QuickPunch,
QuietDrive, Realtime Motion Synthesis, Recti-Fi, Reel Tape Delay, Reel Tape Flanger, Reel Tape Saturation, Reprise, Res Rocket
Surfer, Reso, RetroLoop, Reverb One, ReVibe, Revolution, rS9, rS18, RTAS, Salesview, Sci-Fi, Scorch, ScriptSync,
SecureProductionEnvironment, Serv|GT, Serv|LT, Shape-to-Shape, ShuttleCase, Sibelius, SimulPlay, SimulRecord, Slightly Rude
Compressor, Smack!, Soft SampleCell, Soft-Clip Limiter, SoundReplacer, SPACE, SPACEShift, SpectraGraph, SpectraMatte,
SteadyGlide, Streamfactory, Streamgenie, StreamRAID, SubCap, Sundance, Sundance Digital, SurroundScope, Symphony, SYNC
HD, SYNC I/O, Synchronic, SynchroScope, Syntax, TDM FlexCable, TechFlix, Tel-Ray, Thunder, TimeLiner, Titansync, Titan, TL
Aggro, TL AutoPan, TL Drum Rehab, TL Everyphase, TL Fauxlder, TL In Tune, TL MasterMeter, TL Metro, TL Space, TL Utilities,
tools for storytellers, Transit, TransJammer, Trillium Lane Labs, TruTouch, UnityRAID, Vari-Fi, Video the Web Way, VideoRAID,
VideoSPACE, VTEM, Work-N-Play, Xdeck, X-Form, Xmon and XPAND! are either registered trademarks or trademarks of Avid
Technology, Inc. in the United States and/or other countries.
Avid Motion Graphics User’s Guide v2.5 • 9329-65242-00 Rev B • March 2013 • 3/27/13
4
Page 5

Contents
Symbols and Conventions . . . . . . . . . . . . . . . . . . . . . . . . . . . . . . . . . . . . . . . . . . . . . . . . 9
If You Need Help. . . . . . . . . . . . . . . . . . . . . . . . . . . . . . . . . . . . . . . . . . . . . . . . . . . . . . . 10
Accessing the Online Documentation . . . . . . . . . . . . . . . . . . . . . . . . . . . . . . . . . . . . . . . 11
Avid Training Services . . . . . . . . . . . . . . . . . . . . . . . . . . . . . . . . . . . . . . . . . . . . . . . . . . 11
Chapter 1 Avid Motion Graphics Overview . . . . . . . . . . . . . . . . . . . . . . . . . . . . . . . . . . 12
Product Suite. . . . . . . . . . . . . . . . . . . . . . . . . . . . . . . . . . . . . . . . . . . . . . . . . . . . . . . . . . 13
Key Features. . . . . . . . . . . . . . . . . . . . . . . . . . . . . . . . . . . . . . . . . . . . . . . . . . . . . . . . . . 16
Chapter 2 Graphics Design Products . . . . . . . . . . . . . . . . . . . . . . . . . . . . . . . . . . . . . . 18
Design Products . . . . . . . . . . . . . . . . . . . . . . . . . . . . . . . . . . . . . . . . . . . . . . . . . . . . . . . 18
Understanding the Design User Interface. . . . . . . . . . . . . . . . . . . . . . . . . . . . . . . . . . . . 20
Assets Area . . . . . . . . . . . . . . . . . . . . . . . . . . . . . . . . . . . . . . . . . . . . . . . . . . . . . . . 21
Viewports Area . . . . . . . . . . . . . . . . . . . . . . . . . . . . . . . . . . . . . . . . . . . . . . . . . . . . . 31
Animation Area. . . . . . . . . . . . . . . . . . . . . . . . . . . . . . . . . . . . . . . . . . . . . . . . . . . . . 35
Model Area. . . . . . . . . . . . . . . . . . . . . . . . . . . . . . . . . . . . . . . . . . . . . . . . . . . . . . . . 37
Saving Presets . . . . . . . . . . . . . . . . . . . . . . . . . . . . . . . . . . . . . . . . . . . . . . . . . . . . . 55
Working with Layouts . . . . . . . . . . . . . . . . . . . . . . . . . . . . . . . . . . . . . . . . . . . . . . . . 55
Panes and Areas. . . . . . . . . . . . . . . . . . . . . . . . . . . . . . . . . . . . . . . . . . . . . . . . 57
Menus . . . . . . . . . . . . . . . . . . . . . . . . . . . . . . . . . . . . . . . . . . . . . . . . . . . . . . . . . . . . . . . 57
Creating a Composition. . . . . . . . . . . . . . . . . . . . . . . . . . . . . . . . . . . . . . . . . . . . . . . . . . 58
Saving Projects and Compositions . . . . . . . . . . . . . . . . . . . . . . . . . . . . . . . . . . . . . . . . . 59
Chapter 3 Avid Motion Graphics Journalist . . . . . . . . . . . . . . . . . . . . . . . . . . . . . . . . . . 60
Avid Motion Graphics Journalist Client Overview . . . . . . . . . . . . . . . . . . . . . . . . . . . . . . 60
Starting the Journalist Plug-in . . . . . . . . . . . . . . . . . . . . . . . . . . . . . . . . . . . . . . . . . 61
Avid Motion Graphics Journalist User Interface . . . . . . . . . . . . . . . . . . . . . . . . . . . . 62
Template Area. . . . . . . . . . . . . . . . . . . . . . . . . . . . . . . . . . . . . . . . . . . . . . . . . . 63
Graphics Database Area . . . . . . . . . . . . . . . . . . . . . . . . . . . . . . . . . . . . . . . . . . 63
Creating Graphics from Templates . . . . . . . . . . . . . . . . . . . . . . . . . . . . . . . . . . . . . . . . . 64
Working with Database Graphics . . . . . . . . . . . . . . . . . . . . . . . . . . . . . . . . . . . . . . . . . . 69
Filter Dialog Box . . . . . . . . . . . . . . . . . . . . . . . . . . . . . . . . . . . . . . . . . . . . . . . . . . . . 71
5
Page 6

Setting the Ready/Not Ready Indicators . . . . . . . . . . . . . . . . . . . . . . . . . . . . . . . . . 73
Locking Graphics . . . . . . . . . . . . . . . . . . . . . . . . . . . . . . . . . . . . . . . . . . . . . . . . . . . 74
Library Graphics. . . . . . . . . . . . . . . . . . . . . . . . . . . . . . . . . . . . . . . . . . . . . . . . . . . . 75
Setting the Library Graphic Option . . . . . . . . . . . . . . . . . . . . . . . . . . . . . . . . . . 75
Changing the Name of a Library Graphic . . . . . . . . . . . . . . . . . . . . . . . . . . . . . 76
Using Avid Motion Graphics Journalist with iNEWS . . . . . . . . . . . . . . . . . . . . . . . . . . . . 77
Graphics Organization in Journalist for iNEWS . . . . . . . . . . . . . . . . . . . . . . . . . . . . 77
General Library Graphics . . . . . . . . . . . . . . . . . . . . . . . . . . . . . . . . . . . . . . . . . 77
Library Graphics with a Specific User Name . . . . . . . . . . . . . . . . . . . . . . . . . . . 78
Personal Library Graphics. . . . . . . . . . . . . . . . . . . . . . . . . . . . . . . . . . . . . . . . . 78
Page Numbers for Graphics . . . . . . . . . . . . . . . . . . . . . . . . . . . . . . . . . . . . . . . 78
Using Avid Motion Graphics Journalist with ENPS . . . . . . . . . . . . . . . . . . . . . . . . . . . . . 79
Chapter 4 Avid Motion Graphics Control . . . . . . . . . . . . . . . . . . . . . . . . . . . . . . . . . . . . 81
Playout Control . . . . . . . . . . . . . . . . . . . . . . . . . . . . . . . . . . . . . . . . . . . . . . . . . . . . . . . . 81
Template Control. . . . . . . . . . . . . . . . . . . . . . . . . . . . . . . . . . . . . . . . . . . . . . . . . . . . . . . 81
Motion Graphics Control User Interface . . . . . . . . . . . . . . . . . . . . . . . . . . . . . . . . . . . . . 82
Creating Keyboard Layouts . . . . . . . . . . . . . . . . . . . . . . . . . . . . . . . . . . . . . . . . . . . 86
Configuring Settings . . . . . . . . . . . . . . . . . . . . . . . . . . . . . . . . . . . . . . . . . . . . . . . . . 89
Chapter 5 Avid Motion Graphics News Control . . . . . . . . . . . . . . . . . . . . . . . . . . . . . . . 96
News Control User Interface . . . . . . . . . . . . . . . . . . . . . . . . . . . . . . . . . . . . . . . . . . . . . . 97
Control Area . . . . . . . . . . . . . . . . . . . . . . . . . . . . . . . . . . . . . . . . . . . . . . . . . . . . . . . 98
Rundown Area . . . . . . . . . . . . . . . . . . . . . . . . . . . . . . . . . . . . . . . . . . . . . . . . . . . . . 99
Message Area . . . . . . . . . . . . . . . . . . . . . . . . . . . . . . . . . . . . . . . . . . . . . . . . . . . . 100
Basic News Control Operations . . . . . . . . . . . . . . . . . . . . . . . . . . . . . . . . . . . . . . . . . . 100
Changing a Cued Graphic . . . . . . . . . . . . . . . . . . . . . . . . . . . . . . . . . . . . . . . . . . . 101
Modifying the Position of a Graphic in a Story . . . . . . . . . . . . . . . . . . . . . . . . . . . . 101
Template Editor . . . . . . . . . . . . . . . . . . . . . . . . . . . . . . . . . . . . . . . . . . . . . . . . . . . 101
Editing Graphics Content . . . . . . . . . . . . . . . . . . . . . . . . . . . . . . . . . . . . . . . . . . . . 102
Adding a New Graphic to a Rundown . . . . . . . . . . . . . . . . . . . . . . . . . . . . . . . . . . 103
Special News Control Operations . . . . . . . . . . . . . . . . . . . . . . . . . . . . . . . . . . . . . . . . 104
Checking Status . . . . . . . . . . . . . . . . . . . . . . . . . . . . . . . . . . . . . . . . . . . . . . . . . . . 105
Ready and Not Ready Status. . . . . . . . . . . . . . . . . . . . . . . . . . . . . . . . . . . . . . . . . 105
Clearing Renders . . . . . . . . . . . . . . . . . . . . . . . . . . . . . . . . . . . . . . . . . . . . . . . . . . 106
6
Page 7

Advanced News Control Operations . . . . . . . . . . . . . . . . . . . . . . . . . . . . . . . . . . . . . . 106
Pauses . . . . . . . . . . . . . . . . . . . . . . . . . . . . . . . . . . . . . . . . . . . . . . . . . . . . . . . . . . 106
Searching for Rundown Graphics . . . . . . . . . . . . . . . . . . . . . . . . . . . . . . . . . . . . . 107
Using Page Numbers . . . . . . . . . . . . . . . . . . . . . . . . . . . . . . . . . . . . . . . . . . . . . . . 107
Transitions . . . . . . . . . . . . . . . . . . . . . . . . . . . . . . . . . . . . . . . . . . . . . . . . . . . . . . . 107
Playing Locked Graphics . . . . . . . . . . . . . . . . . . . . . . . . . . . . . . . . . . . . . . . . . . . . 108
Channels . . . . . . . . . . . . . . . . . . . . . . . . . . . . . . . . . . . . . . . . . . . . . . . . . . . . . . . . . . . . 108
Channel Auto-Activation. . . . . . . . . . . . . . . . . . . . . . . . . . . . . . . . . . . . . . . . . . . . . 109
Channel Assignment . . . . . . . . . . . . . . . . . . . . . . . . . . . . . . . . . . . . . . . . . . . . . . . 109
Chapter 6 Avid Motion Graphics Tools. . . . . . . . . . . . . . . . . . . . . . . . . . . . . . . . . . . . . 110
Avid License Control . . . . . . . . . . . . . . . . . . . . . . . . . . . . . . . . . . . . . . . . . . . . . . . . . . . 110
AMG Advanced Device Manager . . . . . . . . . . . . . . . . . . . . . . . . . . . . . . . . . . . . . . . . . 110
AMG Control . . . . . . . . . . . . . . . . . . . . . . . . . . . . . . . . . . . . . . . . . . . . . . . . . . . . . . . . . 110
Avid Motion Graphics Font Package. . . . . . . . . . . . . . . . . . . . . . . . . . . . . . . . . . . . . . . 111
AMG Transcode . . . . . . . . . . . . . . . . . . . . . . . . . . . . . . . . . . . . . . . . . . . . . . . . . . . . . . 111
Using AMG Transcode . . . . . . . . . . . . . . . . . . . . . . . . . . . . . . . . . . . . . . . . . . . . . . 112
Deko Translator. . . . . . . . . . . . . . . . . . . . . . . . . . . . . . . . . . . . . . . . . . . . . . . . . . . . . . . 115
Before You Begin... . . . . . . . . . . . . . . . . . . . . . . . . . . . . . . . . . . . . . . . . . . . . . . . . 115
Creating an AMG Project with Deko Translator . . . . . . . . . . . . . . . . . . . . . . . . . . . 116
Deko Chart Designer. . . . . . . . . . . . . . . . . . . . . . . . . . . . . . . . . . . . . . . . . . . . . . . . . . . 119
Deko Player. . . . . . . . . . . . . . . . . . . . . . . . . . . . . . . . . . . . . . . . . . . . . . . . . . . . . . . . . . 119
Before You Begin... . . . . . . . . . . . . . . . . . . . . . . . . . . . . . . . . . . . . . . . . . . . . . . . . 119
Playing Deko Graphics in AMG Compositions . . . . . . . . . . . . . . . . . . . . . . . . . . . . 120
Playing Deko Graphics in AMG Control or AMG News Control . . . . . . . . . . . . . . . 122
Motions with Pauses . . . . . . . . . . . . . . . . . . . . . . . . . . . . . . . . . . . . . . . . . . . . 123
Cancelling a Previewed Graphic . . . . . . . . . . . . . . . . . . . . . . . . . . . . . . . . . . . 123
Defining Replaceable Data Using AMG Control or AMG News Control. . . . . . . . . 124
Avid Motion Graphics Design UI Shortcuts . . . . . . . . . . . . . . . . . . . . . . . . . . . . . . . . . . 125
Avid Motion Graphics Control Shortcuts . . . . . . . . . . . . . . . . . . . . . . . . . . . . . . . . . . . . 128
Chapter 8 Avid Motion Graphics Glossary. . . . . . . . . . . . . . . . . . . . . . . . . . . . . . . . . . 132
A . . . . . . . . . . . . . . . . . . . . . . . . . . . . . . . . . . . . . . . . . . . . . . . . . . . . . . . . . . . . . . . . . . 132
B . . . . . . . . . . . . . . . . . . . . . . . . . . . . . . . . . . . . . . . . . . . . . . . . . . . . . . . . . . . . . . . . . . 132
C . . . . . . . . . . . . . . . . . . . . . . . . . . . . . . . . . . . . . . . . . . . . . . . . . . . . . . . . . . . . . . . . . . 133
7
Page 8

E . . . . . . . . . . . . . . . . . . . . . . . . . . . . . . . . . . . . . . . . . . . . . . . . . . . . . . . . . . . . . . . . . . 133
F . . . . . . . . . . . . . . . . . . . . . . . . . . . . . . . . . . . . . . . . . . . . . . . . . . . . . . . . . . . . . . . . . . 133
G . . . . . . . . . . . . . . . . . . . . . . . . . . . . . . . . . . . . . . . . . . . . . . . . . . . . . . . . . . . . . . . . . . 134
I . . . . . . . . . . . . . . . . . . . . . . . . . . . . . . . . . . . . . . . . . . . . . . . . . . . . . . . . . . . . . . . . . . . 134
L . . . . . . . . . . . . . . . . . . . . . . . . . . . . . . . . . . . . . . . . . . . . . . . . . . . . . . . . . . . . . . . . . . 134
M . . . . . . . . . . . . . . . . . . . . . . . . . . . . . . . . . . . . . . . . . . . . . . . . . . . . . . . . . . . . . . . . . . 135
O . . . . . . . . . . . . . . . . . . . . . . . . . . . . . . . . . . . . . . . . . . . . . . . . . . . . . . . . . . . . . . . . . . 135
P . . . . . . . . . . . . . . . . . . . . . . . . . . . . . . . . . . . . . . . . . . . . . . . . . . . . . . . . . . . . . . . . . . 135
S . . . . . . . . . . . . . . . . . . . . . . . . . . . . . . . . . . . . . . . . . . . . . . . . . . . . . . . . . . . . . . . . . . 136
T . . . . . . . . . . . . . . . . . . . . . . . . . . . . . . . . . . . . . . . . . . . . . . . . . . . . . . . . . . . . . . . . . . 137
V . . . . . . . . . . . . . . . . . . . . . . . . . . . . . . . . . . . . . . . . . . . . . . . . . . . . . . . . . . . . . . . . . . 137
8
Page 9

Symbols and Conventions
Using This Guide
Congratulations on your purchase of Avid Motion Graphics. Avid Motion Graphics is the
foundation for reliable, high-productivity media production. It is designed for media facilities
and broadcasters using the industry's most proven real-time storage software technology,
delivering stable operation, high performance media access, and class-leading value. From
character generation to full 3D animations, customers can create stunning imagery with a
complete next-generation creative toolset, featuring an advanced 2D/3D real-time rendering
engine accelerated by the latest GPU technology.
This guide contains all the task-oriented instructions, conceptual information, and reference
material you need to get started using your new graphics system. It is intended for use by those
responsible for using Avid Motion Graphics in your facility.
Unless noted otherwise, the material in this document applies to the Windows 7 operating
system.The screen shots in this document were captured on a Windows 7 system.
This document describes all the features available for the Avid Motion Graphics Server.
n
Depending on your particular configuration, your system might not contain certain features that
are covered in this documentation.
Symbols and Conventions
Avid documentation uses the following symbols and conventions:
Symbol or Convention Meaning or Action
n
c
w
> This symbol indicates menu commands (and subcommands) in the
A note provides important related information, reminders,
recommendations, and strong suggestions.
A caution means that a specific action you take could cause harm to
your computer or cause you to lose data.
A warning describes an action that could cause you physical harm.
Follow the guidelines in this document or on the unit itself when
handling electrical equipment.
order you select them. For example, File > Import means to open the
File menu and then select the Import command.
9
Page 10

Symbol or Convention Meaning or Action
This symbol indicates a single-step procedure. Multiple arrows in a list
indicate that you perform one of the actions listed.
If You Need Help
(Windows), (Windows
only), (Macintosh), or
(Macintosh only)
Bold font Bold font is primarily used in task instructions to identify user interface
Italic font Italic font is used to emphasize certain words and to indicate variables.
Courier Bold font
Ctrl+key or mouse action Press and hold the first key while you press the last key or perform the
If You Need Help
If you are having trouble using your Avid product:
1. Retry the action, carefully following the instructions given for that task in this guide. It is
especially important to check each step of your workflow.
2. Check the latest information that might have become available after the documentation was
published.
New information would be found in the ReadMe file available online.
You should always check online for the most up-to-date release notes or ReadMe
because the online version is updated whenever new information becomes available. To
view the online versions, visit the Knowledge Base at www.avid.com/US/support.
This text indicates that the information applies only to the specified
operating system, either Windows or Macintosh OS X.
items and keyboard sequences.
Courier Bold font identifies text that you type.
mouse action. For example, Command+Option+C or Ctrl+drag.
3. Check the documentation that came with your Avid application or your hardware for
maintenance or hardware-related issues.
4. Visit the online Knowledge Base at www.avid.com/US/support. Online services are
available 24 hours per day, 7 days per week. Search this online Knowledge Base to find
answers, to view error messages, to access troubleshooting tips, to download updates, and to
read or join online message-board discussions.
10
Page 11

Accessing the Online Documentation
Accessing the Online Documentation
The Avid Motion Graphics online documentation contains all the product documentation in PDF
format. You can access the documentation in the Avid Motion Graphics Documentation folder
on the Avid Motion Graphics installer device.
You need to download and install Acrobat Reader on your Avid Motion Graphics Server before
n
you can access the PDF documentation.
To access the online documentation from the installer device:
1. Insert your Avid Motion Graphics USB flash drive (UFD) with the Avid Motion Graphics
software into the USB port.
2. Navigate to the Avid Motion Graphics Documentation folder, and double-click the PDF file
for the document you want to view.
Avid Training Services
Avid makes lifelong learning, career advancement, and personal development easy and
convenient. Avid understands that the knowledge you need to differentiate yourself is always
changing, and Avid continually updates course content and offers new training delivery methods
that accommodate your pressured and competitive work environment.
For information on courses/schedules, training centers, certifications, courseware, and books,
please visit www.avid.com/support and follow the Training links, or call Avid Sales at
800-949-AVID (800-949-2843).
11
Page 12

1 Avid Motion Graphics Overview
Avid Motion Graphics is a product suite geared for media producers in the media enterprise,
professional video, and education market segments who produce graphics for several
applications including news, sports, live events (concerts, houses of worship), post production,
channel branding, game shows, reality TV, corporate video, and educational purposes.
Avid Motion Graphics solutions can integrate industry-leading broadcast graphics systems and
live production servers with both the newsroom and broadcast production. The result is
facility-wide access to branded visual templates and elements—from traffic to the promotions
department to the journalists—and a more consistent and competitive channel identity in all
news, sports and entertainment programming.
This document describes the key features, product suite applications and their descriptions.
Depending on your configuration, your Avid Motion Graphics system might not contain certain
applications or features covered in this document. Information that applies to a specific
application is covered in that particular section.
The following main topics describe:
• Product Suite
• Key Features
Page 13

Product Suite
The Avid Motion Graphics platform is built on a powerful rendering engine that lets everyone
involved in graphics development make the most of their media. The product suite provides a
foundation for a variety of applications, including news, sports, live events, post production, and
channel branding. The following table describes the different Avid Motion Graphics
applications.
Application Description
Avid Motion Graphics Avid Motion Graphics is one of three Avid Motion
Graphics design applications. It is geared towards
the high-end broadcast graphics designer who needs
to produce differentiated broadcast graphics with
the highest production value. This application has a
state-of-the-art feature set allowing for advanced,
real-time 2D/3D graphics creation and playout,
integrations with common workflows and
infrastructure, turn-key or distributed hardware and
control architecture. It also has support for Deko
graphics.
Product Suite
Avid Motion Graphics Production Avid Motion Graphics Production is one of three
Avid Motion Graphics design applications. It is for
broadcast graphics designers who need a
cost-effective, easy to use, graphics solution with a
w/ 2D/3D production capabilities. This application
allows simplified real-time 2D/3D creation, and
playout with basic effects, turn-key or distributed
hardware and control architecture, and including
support for Deko graphics.
Avid Motion Graphics Creation Avid Motion Graphics Creation is one of three Avid
Motion Graphics design applications. It is for
graphics departments where graphics designers
need separate graphics creation for later playout.
They can import and edit third-party graphics
objects using the full Avid Motion Graphics feature
set for creation in a software only package, which
can be installed on a laptop with a powerful
graphics card and plenty of memory. This
application includes the Clips and Stereoscopic
options and has support for Deko graphics.
13
Page 14

Application Description
Avid License Control Must be installed on any computer with a licensed
component. For instance, the servers pass licenses
to Journalist clients and News Control Clients.
Installed on the Avid Motion Graphics computer,
Avid Motion Graphics Journalist Server, Avid
Motion Graphics Preview Renderer, and any
Computers running 3DS, Photoshop, MAP or Avid
Motion Graphics Control.
AMG Advanced Device Manager Used for the iNEWS Command workflow or
Automation and is installed on the Avid Motion
Graphics Server.
Avid Motion Graphics Control Avid Motion Graphics Control is for non-newsroom
graphics and control room operators. For those who
need to control sequenced or non-sequenced
graphics, and need the ability to adjust graphics
on-the-fly. This application provides full graphics
control for playout flexibility. It is installed with
Avid Motion Graphics or on a separate 3rd party
system.
Product Suite
Avid Motion Graphics Font Package Allows use of graphics previously created in Deko
and users can create new graphics using fonts from
this package in Avid Motion Graphics too.Installed
on the Avid Motion Graphics Server.
AMG Transcode AMG Transcode is an application that allows you to
convert from multiple types of clips into a known
usable format, which allows playback in real-time
and has aligned audio.
Deko Translator The DekoTranslator is an application that allows
you to utilize your existing Deko Graphics assets
and convert them into native AMG Compositions.
DekoTranslator is a standalone application not
requiring AMG or Deko to be installed to work
correctly. However, to confirm that the all the assets
required to process the Deko Graphics are available,
you need some version of the Deko application. It is
recommended that you use a single computer that
has a version of both Deko and AMG installed.
14
Page 15

Application Description
Deko Chart Designer Allows use of Deko graphics previously created
with Deko Chart Designer. Installed on the
computer running Avid Motion Graphics with Deko
Player or Deko Translator.
Deko Player Deko Player is a component of Avid Motion
Graphics that allows you to easily play your
existing Deko graphics to air.
Avid Motion Graphics Journalist Avid Motion Graphics Journalist is for the
journalists who need template graphics for easy
fulfillment of data.This application allows for use of
the NRCS Integrated MOS plug-in along with
flexibility in determining the level of functionality
that journalists are exposed to for fulfillment of
graphics data and adjustment of templates. Avid
Motion Graphics News Control is also part of this
installer.
Avid Motion Graphics News Control Avid Motion Graphics News Control is designed for
the news graphics operators who need graphics
rundown automation with manual control. This
application allows for automated graphics playout
connected to the NRCS rundown, on-the-fly
graphics adjustment, and third-party production
automation integration. This application is part of
the Avid Motion Graphics Journalist installer.
Product Suite
15
Page 16

Key Features
The following table describes some of the key features of Avid Motion Graphics.
Feature Description
Real-time 2D/3D graphics processing and rendering Graphics creation from basic CG functions up to
Deko asset preservation Saves resources, time, and money by letting you use
Workflow integration Enables you to integrate graphics into the newsroom
Object-based environment Allows each object to contain its own parameters
Key Features
highly advanced real-time compositions using
effects and shaders. Switch between 2D and 3D
without complexity.
all the same raw file assets. Includes a translator to
bring the basic components of your Deko files onto
the new platform.
and edit suite while transitioning to the new
platform. Empowers you to create powerful
newsroom graphics from advanced templates.
and animation properties, and to be combined in an
infinite variety of ways.
Local or distributed controller Enables you to bring graphics to air with all
products within the Avid Motion Graphics platform.
Includes full override capabilities and the fastest to
air workflows.
Text editing and effects Gets you to air quickly with all the standard text
entry and editing functionality, as well as dozens of
preset text effects and animations.
Primitives modeling and animation, environment
lighting and atmosphere tools
Intuitive user interface with traditional 2D and
multiple 3D views on demand
Enhanced materials with soft clipping planes,
specular effects, bumpmapping, advanced materials,
shaders and shadows
Available plug-ins provide export from industry
standard tools, such as Photoshop and 3D Studio
Max, letting you create 3D objects and animations
natively or from imported geometry with open
integrations.
Enables you to work more efficiently to create many
types of graphic assets, from character generation to
full 3D animations.
Provides a wide range of creative options to develop
a differentiated look and feel for any application.
16
Page 17

Key Features
Feature Description
Group effects Lets you animate entire groups of objects, such as
multi-line scoreboards with a variety of preset
animations.
Clips and/or video input mapped to any object
including text
Enables you to map graphics clips or input video to
any object and play in combination with timeline
animations.
Control via automation, external machines, or
applications
Interfaces with automated graphics playout control
systems to automatically trigger playout in a variety
of workflows.
Data-driven graphics Lets you dynamically update graphics, such as
financial charts, sports scores, and election results
via integration with ODBC sources, RSS feeds,
XML files, and/or third-party data sources and
applications.
Advanced GPU technology support Supports the latest advances in GPU and I/O
technology, as well as formats from NTSC up to 2K,
including film resolutions and custom formats.
17
Page 18

2 Graphics Design Products
The following describes the Avid Motion Graphics design products user interface created for
those users who produce graphics and compositions, which are used for news, sports, live events
(concerts, houses of worship), post production, channel branding, game shows, reality TV,
corporate video, and educational purposes.
The following main topics describe:
• Design Products
• Understanding the Design User Interface
Design Products
You can use the Avid Motion Graphics design products to create graphics you want to present
on-air, such as lower thirds, frames for text, clocks, leaderboards, full-screen bulleted lists,
templates for interfaced data, and pops, for quickly popping partial graphics onto a master
graphic. The graphics are saved as a composition. The composition contains all the objects and
all the properties of those objects, including the animation.
All graphics are built in 3-dimensional space, even if they are 2-dimensional objects. multiple
n
objects can be grouped together to create a new object.
In the Avid Motion Graphics product suite, there are three main design applications with which
graphics and compositions are created. With some feature differences, the user interface for each
of these design products is the same.
For this topic, starting your Avid Motion Graphics application means whichever Avid Motion
n
Graphics design application you are using.
Page 19

Design Products
The following table describes the different Avid Motion Graphics design applications.
Design Application Description
Avid Motion Graphics Avid Motion Graphics is one of three graphics
design applications. It is geared towards the
high-end broadcast graphics designer who needs to
produce differentiated broadcast graphics with the
highest production value. This application has a
state-of-the-art feature set allowing for advanced,
real-time 2D/3D graphics creation and playout,
integrations with common workflows and
infrastructure, turn-key or distributed hardware and
control architecture. It also has support for Deko
graphics.
Avid Motion Graphics Production Avid Motion Graphics Production is one of three
graphics design applications. It is for broadcast
graphics designers who need a cost-effective, easy
to use, graphics solution with a w/ 2D/3D
production capabilities. This application allows
simplified real-time 2D/3D creation, and playout
with basic effects, turn-key or distributed hardware
and control architecture, and including support for
Deko graphics.
Avid Motion Graphics Creation Avid Motion Graphics Creation is one of three
graphics design applications. It is for graphics
departments where graphics designers need separate
graphics creation for later playout. They can import
and edit third-party graphics objects using the full
Avid Motion Graphics feature set for creation in a
software only package, which can be installed on a
laptop with a powerful graphics card and plenty of
memory. This application includes the Clips and
Stereoscopic options and has support for Deko
graphics.
No matter which of the design applications you are using to create your graphics, many aspects
of the workflow are the same. You can import or create assets or movies in a project. Those
assets are then used to create layers and assembled in a composition. The properties of those
layers can be modified by adding effects, textures, fonts or even animation. You can preview the
rendered composition and export it for playout.
19
Page 20

Understanding the Design User Interface
Understanding the Design User Interface
The Avid Motion Graphics design user interface consists of a layout, which is a set of areas
containing panes and tools that are installed with the product. The size and location of the areas
and panes are set by default in each of the different basic layouts. Not all of the available panes
are displayed in each layout, but users can customize which panes are displayed, their sizes, and
where they are located in the window. You can name and save a customized layout so that it
appears in the layout menu, and can be selected for use again. The following illustration shows
the default layout for the graphics design user interface.
Your user interface may look slightly different from that in the following illustration based upon
n
your options and configuration. You are able to rearrange your personal user interface by
dragging a tab, with a left-mouse click, to a different area, and releasing the tab when the area in
which you want to place the tab is highlighted in white. You are also able to tear tabs off
completely and have those individual tabs open in separate windows. A placeholder with the tab
name will be held in the user interface, but no information will be held there until the external
window is closed.
In addition to the areas and panes, the application layouts feature menu bars and tools in the
panes that offer additional information and functionality. The following table describes the areas
and panes displayed when using the default layout.
20
Page 21

Understanding the Design User Interface
Area Description
1 - Assets The Assets area displays different types of asset panes. The asset
panes are tabbed libraries of graphic objects, materials, and effects,
which can all be used in composition creation. This area also
contains the Browser and StormLogic panes to help locate and
navigate different assets used in compositions, and the In Use
panes, which contains all of the assets that are in use in the current
composition. For more information, see “Assets Area” on page 21.
2 - Viewports The Viewport area contains the Tools, Playout, and Preview panes
and can contain more than one Viewport. This is the area where
you layout your design and create your compositions. For more
information, see “Viewports Area” on page 31.
3 - Animation The Animation area allows you to add timing or motion to a
composition. For more information, see “Animation Area” on
page 35.
4 - Model The Model area displays panes for used for modifying a selected
object. It allows you to change object and effect values for the
assets used in a composition. The object values are the sizes and
shapes of assets used in compositions. The effect values are the
colors, textures, reflectiveness, and so forth, on the surfaces of the
assets in compositions. For more information, see “Model Area” on
page 37.
By default, panes are grouped into different areas in the user interface for basic ease of access.
All panes can be moved to different areas, thereby creating custom layouts, depending on the
user’s preferences.
Assets Area
The Assets area contains the following panes by default:
• Library Pane
• Effects Pane
• Browser Pane
• StormLogic Pane
• In Use Pane
21
Page 22
Understanding the Design User Interface
Library Pane
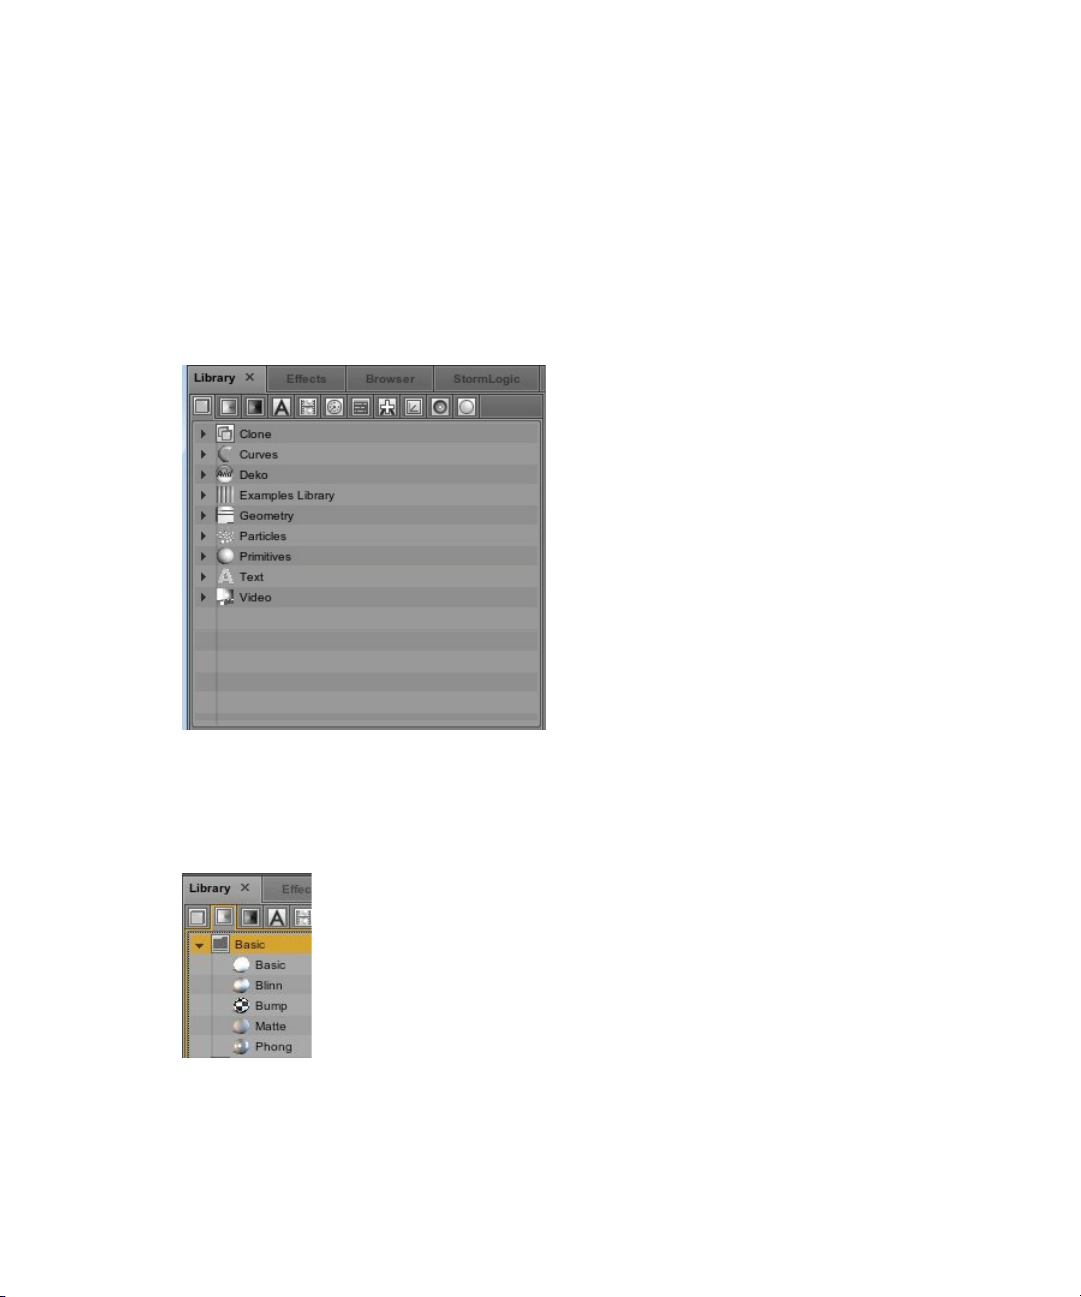
The Library pane is comprised of preset library categories that contain different objects, shapes,
graphic images, materials, textures, and so on, which are the fundamental building blocks of
your compositions. You can also create custom images and add them to these different libraries.
Each library category is represented by a different icon displayed at the top of the Library pane.
You can select an icon to display objects in that particular library. For instance, in the following
illustration the Object library icon is selected and a list of object categories is displayed.
To view the contents of a library category, click the disclosure arrow to the left of the category
name in the list. In the following illustration, the clicking the disclosure arrow next to the Basic
category in the Materials library displays the available basic materials.
22
Page 23

Understanding the Design User Interface
You can make these Icons larger by placing the pointer over the divider line between the
disclosure arrow and the name of the category. This works for any divider line in the user
interface.
The pointer becomes a cross hair, which allows you to drag the divider line to the right, enlarging
the items, and making them easier to identify.
23
Page 24
Understanding the Design User Interface
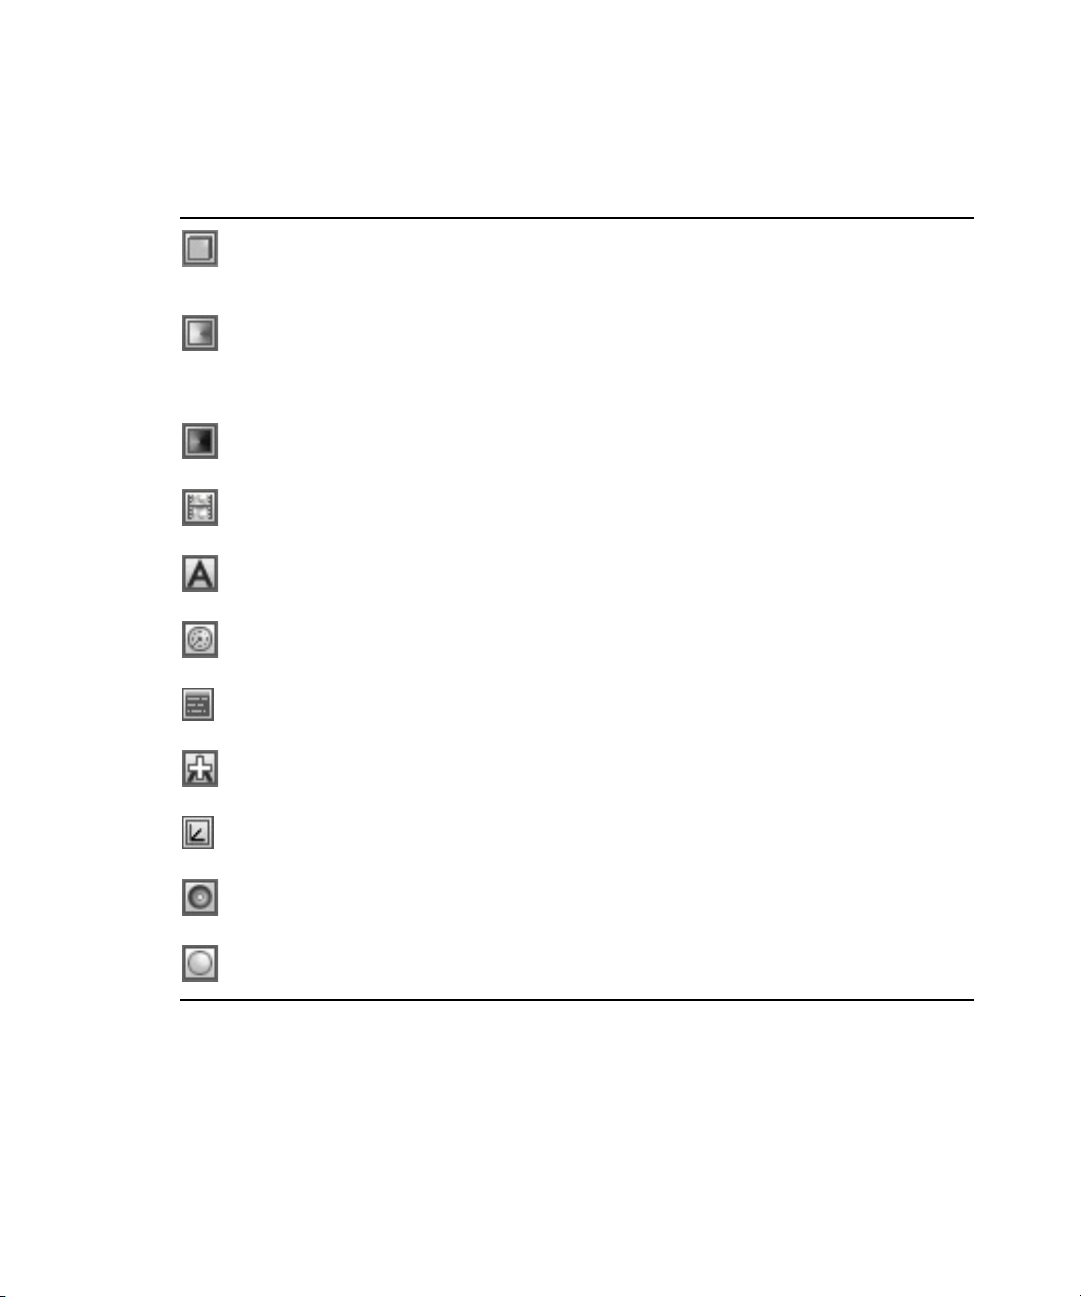
The following table lists the icons for the different libraries and their descriptions.
Library Icon Description
Object library - this is a library of different predefined objects that can be used in
compositions. The objects categories, such as Curves, Primitives, Text and others are
listed here.
Material library - this is a library contains shader presets used to define the basic
surface properties, such as glass, metal, plastic They determine how the light in a
composition reacts on an object’s surface.Materials that can be applied to objects or
text, which are used in compositions.
Texture library - this is a library of different predefined textures that can be applied
to objects, fonts, and materials, which are used in compositions
MediaIn library - This is a library of different predefined media-type file objects
.wav, . mov
(
Font library - this is a library of different predefined fonts objects that can be used in
compositions.
Timer library - this library contains different predefined timers that can be used with
objects in compositions.
, and clips) that can be used in compositions.
Map library - this is a library of different predefined map objects that can be used in
compositions.
Font Fix library - this is a library of different predefined font fix objects that can be
used in compositions.
Pivot library - this is a library of different predefined pivot objects that can be used in
compositions.
Sound library - this is a library of different predefined sound objects to which a
particular sound can be assigned in compositions.
Light library - this is a library of different predefined light effect objects, such as that
can be applied to compositions.
24
Page 25
Understanding the Design User Interface
Effects Pane
The Effects pane is a collection of different preset effects that can be used in compositions. You
can also create custom effects and add them to these different collections. The different effects
are represented by a different icon displayed at the top of the Effects pane.
You can display the contents of each of the different effects collections by clicking on its icon.
The following table lists the icons for the different preset effects and their descriptions.
Effects Icon Description
Object Effects - this is a library of different predefined object effects, which can be
applied to objects and can be used in compositions.
Material Effects - this is a library of different predefined material effects, which can
be applied to objects and can be used in compositions.
Texture Effects - this is a library of different predefined texture effects, which can be
applied to objects and can be used in compositions.
Font Effects - this is a library of different predefined font effects, which can be
applied to fonts and can be used in compositions.
MediaIn Effects - this is a library of different predefined media effects, which can be
applied to objects and can be used in compositions.
25
Page 26

Understanding the Design User Interface
Effects Icon Description
Timer Effects - this is a library of different predefined timer effects, which can be
applied to objects and can be used in compositions
Bind Effects - this is a library of different predefined bind effects, which can be
applied to objects and can be used in compositions
Pipe Effects - this is a library of different predefined pipe effects, which can be
applied to objects and can be used in compositions
Modes Effects - this is a Library of the system modes.
Light Effects - this is a library of different predefined light effects, which can be
applied to objects and can be used in compositions
Browser Pane
The Browser pane displays a collection of different preset file locations and their respective
folder lists, containing assets, which can be used in compositions. You can navigate to different
locations using the convenient navigation tools at the top of the pane.
Navigation Tool Icon Description
Move up one drive
Select a Disk Drive
Select a Drive path
26
Page 27

Understanding the Design User Interface
You can also use the quick navigational presets to display the list of folders in each predefined
location. Each predefined location is represented by a different icon, displayed at the top of the
Browser pane just under the navigation tools.
The following table lists the icons for the different default locations and their descriptions.
Currently all paths are
C:\Windows\Fonts
Browser Pane Icon Description
C:\users\<username>\Documents
.
\dbs - database path
\obs - object path
\imas - imas path
sounds path
except for the fonts path which is
27
Page 28

Browser Pane Icon Description
\plg - plug-in path
fonts path
\python path
\sets path
\ipf path
\desktop path
Open Operative System Browser
Understanding the Design User Interface
28
Page 29
Understanding the Design User Interface
StormLogic Pane
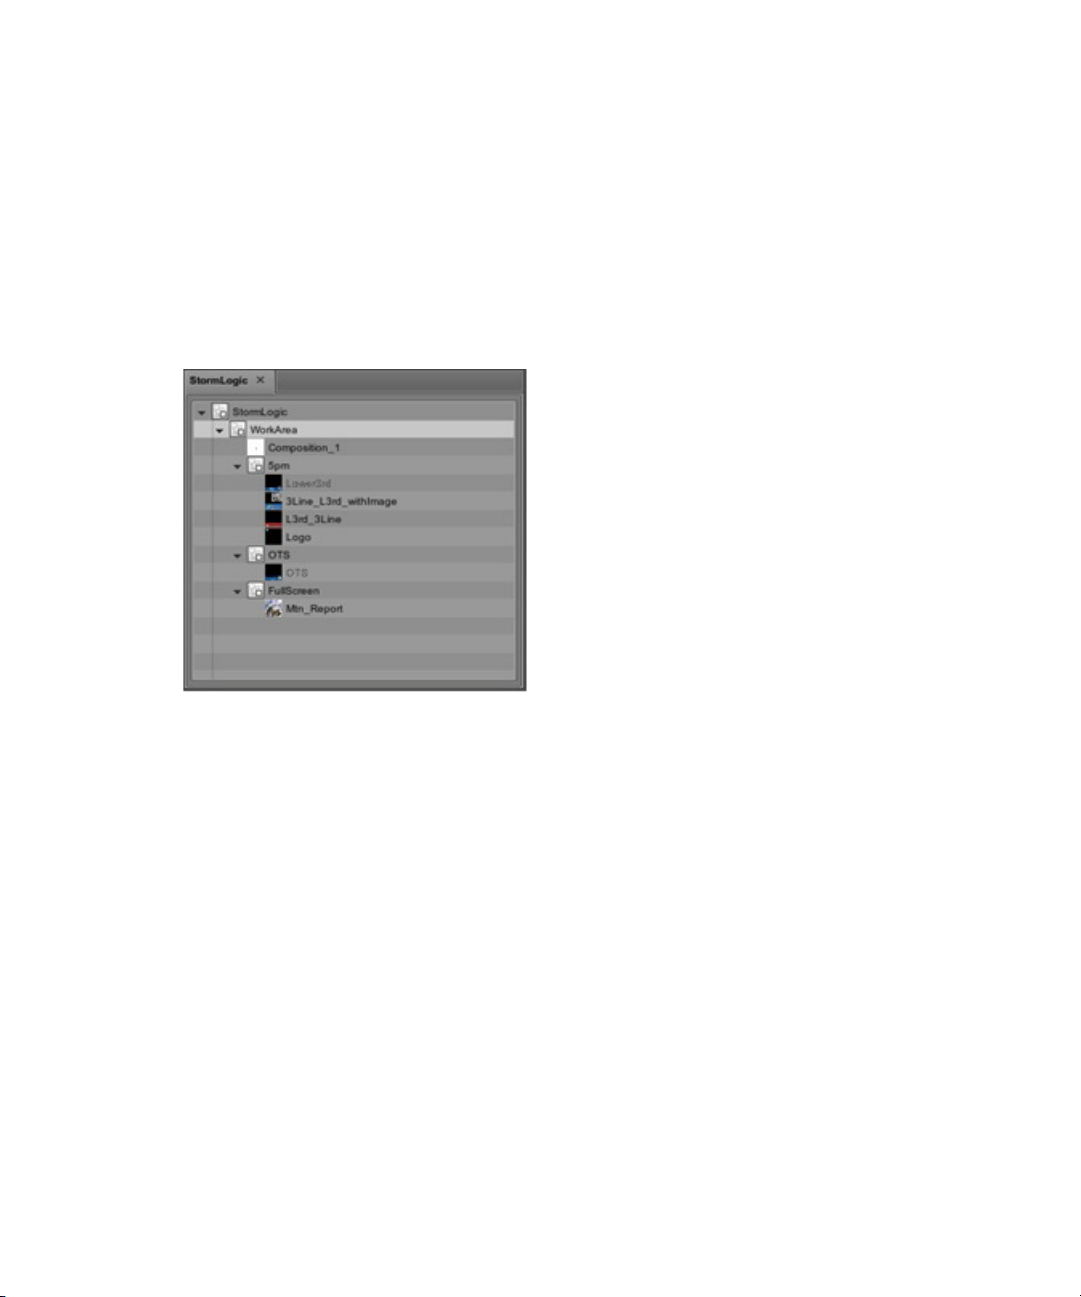
The StormLogic pane displays all of the compositions in a project. A project can contain any
number of different compositions, which you might want to keep in the same locations for
convenience. For instance, It might be a good practice to keep all of the graphics used for a
particular program in the same project location.The StormLogic pane displays, in a tree-like
structure, the way a composition interacts with other compositions. It shows how objects act as
part of a composition. The logic is built as you create a composition. The StormLogic pane
allows you to quickly navigate to and open a composition so you can review it or make a change.
When you select a composition in the StormLogic pane, it opens and displays in the Viewport
area.
You can change the default name assigned to a composition on the StormLogic pane.
n
Double-click the name of the composition, type the new, more meaningful name, and press the
enter key on the keyboard. When naming projects, objects or compositions use only
alphanumeric characters and underscores (_). Do not use any special characters, such as
asterisks (*), at sign (@), dollar sign ($), percent (%) back slash (\)or forward slash (/) marks.
29
Page 30

Understanding the Design User Interface
In Use Pane
The In Use area contains the In Use pane, which ia a tree-like structure that displays the assets
that are being used in a particular composition.
In the previous example, the Materials in use icon is selected and displayed are all of the material
assets in use in this particular composition. Depending on the assets used in a composition,
different icons appear on this tab. Clicking on the icon displays a list of those particular types of
assets in use in your composition.
30
Page 31

Viewports Area
The Viewports area of the user interface is where you layout and design your compositions. The
default layout includes the Tools, Playout and Edit panes with the viewport appearing on the Edit
pane, as shown in the following illustration.
Understanding the Design User Interface
31
Page 32

Understanding the Design User Interface
Depending the layout you select, there may be more than one viewport available. For instance,
you may opt to work with the Playout layout when you are controlling playout remotely using
Avid Motion Graphics Control or Avid Motion Graphics News Control. This layout affords you
different simultaneous views of your composition including the Program and Preview panes, as
shown in the following illustration.
32
Page 33

Understanding the Design User Interface
Generally, when creating graphics, you select your asset object from one of the categories in the
Library pane, and drag and drop it onto the Viewport area.
As shown in the previous illustration, when you drag an object from the Library pane to the
viewport on the Edit pane, a connection line clarifies which object you selected and where it will
be placed in the viewport. The horizontal and vertical pixel coordinates appear next to the mouse
pointer, providing the exact viewport location.
The Tool icons located at the top of the viewport on the Tools pane provide quick access to tools
referred to as gizmos. The gizmos are used to directly transform the objects in the viewport. As
you use the tools to transform an object in the viewport, the coordinates for the object are
displayed in the Transformation section of the Object pane.
Tools Pane Icon Gizmo Type
Deselect (q)
Move (w)
Rotate (e)
Scale (r)
33
Page 34

Tools Pane Icon Gizmo Type
Box (t)
Object Pivot (y)
Path <u>
Display Statistics <Alt+s>
Display Global Axis <Alt+e>
Display Camera Data <Alt+i>
Understanding the Design User Interface
Display Alpha Channel
Display Wireframe <Alt+u>
Freezes Interface <Alt+f> Snowflake
Reset Camera <Alt+r>
View camera point of interest <Alt+m>
Display Safety Frame
Grid <alt+g>
34
Page 35

Tools Pane Icon Gizmo Type
Animation Area
Keyframe animation is one way to add motion to the objects in your compositions. This is the
process of setting at least two values for a parameter on an object at two or more points in time.
For instance, when at least two keyframes are assigned to an object for any given parameter,
Avid Motion Graphics creates a transition between the keyframes, generating a smooth change
between the two points in time.
The Animation area of the design user interface is used to add motion to your compositions. This
Area contains the In and Out tabbed panes along with a timeline, controls, and tools.
Objects can be dragged and dropped into the timeline using the center wheel on the mouse.
Understanding the Design User Interface
GridSnap
Enable Video Input 1
The timeline has two modes, the default Lists mode, which displays as a locked hierarchy of
actions and is automatically organized as Lists > Items > Editors; or the Actions mode which
allows for line by line editing of actions due to the delineation of the hierarchy.
35
Page 36

Understanding the Design User Interface
The following table describes the Animation area control icons.
Animation Controls Description
Go to Start
Go to previous Keyframe
Play Production
Pause/Resume
Go to next keyframe
Go to end
Loop mode
The following table describes the Animation area tool icons.
Animation Timeline Tool Icons Description
Frame window
Autokeyframe
Spline keyframing
36
Page 37

Animation Timeline Tool Icons Description
Model Area
The Model Area contains various tabbed panes, which contain tools that appear as objects are
added to the composition. The tools that are used to modify the size and shape of a selected
object in your composition as well as the colors, materials, fonts, and textures used with that
object. There are also tools that allow you to add timers and lighting. The following panes appear
in the Model Area.
• Object Pane
• Light Pane
• Material Pane
• Texture Pane
• MediaIn Pane
Understanding the Design User Interface
Autofit
• Font Pane
• Data Pane
• Bind Pane
• Viewport Pane
• Timer Pane
• Form Pane
• Pivot Pane
• Sound Pane
37
Page 38

Understanding the Design User Interface
Object Pane
As soon as you begin to create a composition and place an object in the viewport, you will notice
a Transformation section open in the Object pane, located in the Model area. The Transformation
section allows you to move an object around in the viewport. This section contains tools and
controls, which enable you to modify coordinates of an object, to change its size, shape or
position in your composition.
38
Page 39

Understanding the Design User Interface
Within the Transformation section, coordinates of an object can be scaled with a left-mouse click
and dragging the mouse left-to-right. If you click on the hundreds-digit, the coordinate will move
to the order of one hundred, if you click on the ones, it will move in increments of one
accordingly. You can also enter numeric values by double-clicking in a field, typing a precise
digit and pressing the enter key. Lastly, you can copy a field value in the same manner as you
would bind two fields--in order to copy a field value, click on it with the center mouse wheel and
drag it into the field box which you want it copied into.
The four buttons at the top of the Transformation section affect the way an object appears in a
composition. Even though you might change many of the coordinates of an object in your
composition, you can simultaneously reset the values of your coordinates by right-clicking over
the word Transformation and selecting Reset value from the menu. The following table describes
the buttons found in the Transformation section.
Transformation Buttons Description
Cull button - allows you to remove a selected object within a
composition without deleting it.
Visible button - displays a bounding box around the selected object in a
composition.
Reset button - resets all of the matrix settings to the original
coordinates.
Matrix button - you can click this button and drag the current set of
matrix coordinates to the timeline creating in and out points for adding
animation to a composition.
39
Page 40

Understanding the Design User Interface
You can select the type of preset coordinates that are available by using the Type selector down
arrow.
The Basic type displays the Scale, Rotate, and Displace preset coordinates. The Eccentric type
displays an additional set of preset coordinates for the Center presets of an object. The following
table lists the icons for the preset coordinates.
Preset Coordinate Icons Description
Center coordinates
Scale coordinates
Rotate coordinates (H = Heading, P = Pitch, and R = Roll)
Displace coordinates
Located to the right of the Scale coordinates is a Uniform Scale button, as shown in the following
table.
Uniform Scale Button Description
Pressing this button collapses the scale coordinate values so that you can
uniformly scale the entire object at one time rather than scaling each axis
coordinate individually.
40
Page 41

Understanding the Design User Interface
As you enhance and refine the graphics in your composition, more controls and tools become
available with which you can work. In the following illustration, the object selected is a cylinder
to which a color was added.
Notice that now there are tools and controls available on the Material pane with which you can
make adjustments to the color. All of the adjustments you make to your graphics can be saved as
presets so they can be reused in other graphics and compositions.
41
Page 42

Understanding the Design User Interface
Light Pane
The Light pane contains the tools and controls that allow you to add different types of lighting to
objects and compositions. You can add lighting from the library pane when you select the Light
library icon and double-click or drag-and-drop on a type of lighting in the list.
There are three global lights listed by default but you can also add a spotlight, local, and infinite
type-light by selecting them using the Type button, as shown in the following illustration.
The Influence button, shown in the previous illustration, is used to select whether light influences
all of the scenes, the scene to which the light belongs, or only to those objects which select the
light.
42
Page 43

Understanding the Design User Interface
You can move the lights on the X (horizontal), Y (depth), and Z (vertical) axis, and when you are
using a spotlight, you can also adjust the euler coordinates with the tools located on the
Coordinates tab.You can adjust the intensity of the light on the Mode tab.
Color is added to the light from the Color tab.
43
Page 44

Understanding the Design User Interface
Material Pane
The Material pane contains the tools and controls that allow you to add color to, and modify
other surface attributes of the objects in your compositions. In the following illustration, the
Cylinderfront object is the focus of material work. A blue color has been applied to the object.
From this pane you can adjust the shade properties specular, shininess, and emission of the
material as well as the texture.
44
Page 45

Understanding the Design User Interface
Texture Pane
Textures are usually bitmap images. You can use the bundled textures included with AMG, find
them from various Web sites or create them using a digital camera. Adding textures to the
material of your object gives them the most realistic look.The Texture pane displays the textures
applied to the material used on objects in a composition.
You can add a texture to material from the library pane. In the following illustration the Texture
category is selected in the Library pane of the Assets area, a list of texture objects are displayed,
and the mcsphere texture is selected.
45
Page 46

Understanding the Design User Interface
From the Texture library, drag the Texture file to the Main Texture selector at the bottom of the
Material pane. The word Texture is displayed in the selector where you can select the actual
image you want the map to use. After you have selected the texture, the Texture pane displays the
coordinates and controls with which you can adjust the look of the texture.
46
Page 47

Understanding the Design User Interface
MediaIn Pane
The MediaIn pane displays a list of Media objects (clips or audio) coming into a composition.
This pane contains controls you can use do direct the behavior of the media used in a
composition.
The control buttons allow you to; Start, Step Backward, Play Backwards, Play Forward, Step
Forward, To End, Pause, Resume, and Stop the media object’s action in the project. You can
click these controls and drag the values to the timeline to animate them when the composition is
played.
Font Pane
The Font Pane allows you to set a typeface for your text elements. After a text object has been
assigned a 2 or 3 dimensional shader, a typeface can be selected from your computers available
fonts.
47
Page 48

Understanding the Design User Interface
Data Pane
The Data pane contains the tools and controls that allow you to add different types of data
objects to compositions. You can add a data object from the library pane when you select the
Map library icon and double-click or drag-and-drop a type of data object from the list. Data
objects in the Maps library can include those in the following illustration.
48
Page 49

Understanding the Design User Interface
After adding a data map object to your composition, the object appears in the Data pane, where
you can adjust the values for the object so that it displays the data correctly in the composition.
The following illustration shows the focus on the ODBC data that was added to the composition.
49
Page 50

Understanding the Design User Interface
You can customize the name by which a data object appears in the list by double-clicking the
name and typing in a new, more meaningful name or description in the Text box, as shown in the
following illustration.
After typing in the new name for the data object and pressing the Enter key on your keyboard,
the name is changed, as shown in the following illustration.
50
Page 51

Understanding the Design User Interface
Another example of data selected for use may be an Excel spreadsheet.
In the previous example, Excel was chosen as the source for data. To import an entire worksheet
named NYSE, the Range format is
[NYSE$]
.
51
Page 52

Understanding the Design User Interface
There are two formats that can be used to import a data range within a worksheet.
• Name the range in Excel. For instance, StockData. In Avid Motion Graphics the format used
to reference that range is
[StockData]
the same as the worksheet format except the
. In the following illustration, the format is the same
$
has been removed.)
• Another format that can be used is
[Sheet1$A1:D17]
, as shown in the following
illustration.
Bind Pane
The Bind pane allows you to bind two fields, such as x-displacement and pitch, or
y-displacement and time. This is a highly useful and very powerful tool. The bound parameters
will change directly with each other. In order to bind two fields, hold ALT, select the first field
with the center control wheel, and drag to the second field.
Viewport Pane
The Viewport pane of the Model area contains parameters that can set the x, y, z grids, visible
panels, fog and pipe colors of the Viewport area. The pipe color determines the background color
of your Viewport, and thus your animation; the default color is black. A fog color can be set as a
three dimensional layer (remember, all things in AMG are three dimensional!) that depending
upon its near/far location and the locations of the other objects in your viewport, may appear in
front of or behind your objects. A fog color will appear as a blurry natural emulation of fog.
Timer Pane
The Timer function allows you to create a timer on a single cycle, a loop, or an oscillating “loop
swing” that when bound to an object functions as an automated animation. Without being bound
to an object, the timer will simply count and not be a useful part of your animation.
52
Page 53

Understanding the Design User Interface
Form Pane
In the Motion Graphics design applications, the text you add here is a placeholder. It defines the
placement and style but the actual text is entered from a playout system just before this graphic
goes to air. This pane gives you a way to identify which text objects can be changed from the
Newsroom or playout system.
As shown in the following illustration, you select the text object from the Object hierarchy, press
the Alt key on the keyboard, drag using the middle mouse button from the text entry section to
the Form pane, and drop it in place.
The object name and the placeholder text appear in the Form pane. When this template is opened
in Avid Motion Graphics Control, the playout operator can modify the text for this text object.
53
Page 54

Understanding the Design User Interface
Pivot Pane
The Pivot pane is located in the Model area of the user interface. The following illustration
shows the Pivot pane before a pivot is added to an object or composition.
You can apply a pivot to an object from the Library pane by clicking the Pivot icon, dragging and
dropping the pivot on to your object. After a Pivot is added to an object, the Pivot pane provides
the tools for controlling the pivot’s values, as shown in the following illustration.
Pivots are another control point for an object or a composition. For instance, if you want to move
an object when another object moves or reaches a certain point. You add a pivot, from the Pivot
library, to the second object and then animate that pivot from the first object's timeline. This way
you don't run the risk of inadvertently changing the original values for the second object.
54
Page 55

Sound Pane
The Sound Pane allows you to control the sound and delays of .WAV files from the Model area
of the AMG User Interface.
Saving Presets
From the Materials pane you can name any material object that you have used in order to make it
distinct. After you have made an object distinct from an original preset, you can then drag and
drop it to the Material library to save it. You can also do this with shaders, texts, and most other
objects that appear in the Model pane.
Working with Layouts
The application is installed with some preset layouts. When you open the application the default
layout is displayed. You can select a layout from the Layout menu, located near the top left side
of the window.
The following table lists the preset layouts and their descriptions.
Layout Type Description
Understanding the Design User Interface
Animation The Animation layout provides a larger viewport in the Edit pane providing a most
efficient workspace for those users working with motion and animated graphics.
Default The Default layout exposes the most panes, for the most functionality, for immediate
use.
Design The Design layout is similar to the default view with an extended timeline intended for
the most common design workflows. This layout puts the Logic pane at the top of the
Assets area so that a user can see the list of compositions they created, and can easily
navigate between them as they work.
Playout The Playout layout provides the user with the Preview pane to allow the user
confidence in the graphic being sent to air. Playout mode is reserved for external
control only.
Snap Renderer The Snap Renderer layout only lists the Program viewport. It is intended to run only on
the Snap Renderer computers in Avid Motion Graphics News workflow systems.
When you use a preset layout, the next time you open the application, the last preset layout that
was used is the layout that opens. You can start with a preset layout and customize it. You can
add other functionality by opening other panes and then save the layout that you have created.
55
Page 56

Understanding the Design User Interface
When you save a new layout, the name of the layout is added to the list of preset layouts from
which you can select the next time you open your application. Only the custom layouts that you
create can be deleted from the list of preset layouts.
To change to a different predefined layout:
t Select a layout from the Layout > Select drop-down menu.
To close a pane:
t Click the X on the pane’s tab.
To open additional panes:
1. Select the View menu.
2. Select the menu option corresponding to the pane you want to open.
The pane you select opens in the active area.
To reset a layout to its original configuration:
t Select Default from the Layout > Select drop-down menu.
To reset all layouts to their original default configurations:
t Select Reset All Layouts from the Layout drop-down menu.
To save a custom layout:
1. Select the Save Now option from the Layout menu.
a dialog box opens.
2. Type the name for your custom layout.
3. Click the Ok button.
The new custom layout now appears in the Layout drop-down list of preset layouts from
which to choose.
56
Page 57

Panes and Areas
The user interface is customizable because of the multiple areas in to which panes may be
moved. Any single area can contain one or more panes, and when multiple panes are positioned
into a single area, the panes appear in a tabular format with one pane on top of the others.
If the number of tabbed panes within an area exceeds the area’s space within the window, a scroll
bar appears, enabling you to scroll through all of the panes.
You can move panes around to save screen space and reconfigure panes in a way that best suits
your particular workflow. You can save your favorite layout and select it the next time you sign
into the application. For more information about layouts, see “Working with Layouts” on
page 55.
Each pane has its own unique tools, controls and shortcuts available to the user. For instance, if
you are working in the Edit pane, the keyboard stroke,
shortcuts that can be used.
Menus
The Avid Motion Graphics user interface has a menu bar located near the top of the window that
includes the following:
Alt+h
presents a list of keyboard
Menus
• File — this menu contains all of the actions you can perform with respect to projects and
compositions within the window. You also have a Preferences option that allows you to
configure properties for Viewports, text, paths, desktop shortcuts, and other miscellaneous
settings for the Avid Motion Graphics design products. For more information about
preferences, see the Avid Motion Graphics Setup and Configuration Guide.
• View — this menu has options to open or close the various panes in the window.
• Skin — this menu allows you to change the appearance of the user interface from the default
to a lighter or darker color scheme.
• Layout — this menu allows you to select your preferred work layout or create your own
custom layouts and save them to use over again. When you create a custom layout, it appears
as a selection in the Layout menu.
• Help — this menu displays product version information.
57
Page 58

Creating a Composition
The graphics you create are saved as compositions and listed in the projects folder in your C:
drive. Each composition contains all the objects and all the properties of those objects. You can
create and save your composition before you actually add graphic objects to it.
To start the Avid Motion Graphics program:
1. Do one of the following:
t Double click the Avid Motion Graphics desktop icon.
In this documentation, starting your Avid Motion Graphics application means whichever Avid
n
Motion Graphics application you are using.
t Select the Avid Motion Graphics application from the Windows Start menu.
The Avid Motion Graphics workspace opens and displays an empty composition. A
composition is a template which contains graphic elements and object animations.
To create a composition:
1. In the Assets area, select the Library pane.
Twelve icons for the various asset libraries further divide the Library pane: (Objects,
Materials, Textures, Fonts, Media In, Timer Data Source, Font Fix, Pivot, Sound, and
Lights). You can click an icon to view its contents.
Creating a Composition
2. Select an asset from one of the Library categories, click and drag the object to the Viewport
area and drop it in the viewport on the Edit pane.
At any time you can save the composition. For more information, see “Saving Projects and
Compositions” on page 59. After the composition is saved you can continue to build your
graphic.
Now that you have an object to work with in your composition, you can move or modify it
changing the size and shape or by adding a material, texture, text or color to the object. You
can add, clone, duplicate and group objects in a composition.
58
Page 59

Saving Projects and Compositions
It is important to develope a naming convention that is unique to your workflow so that recalling
projects and compositions can be done efficiently.
To save all the current compositions that are open in the StormLogic pane:
Saving Projects and Compositions
1. From the File menu select
The FileLoader dialog box opens allowing you to name the project and select a directory for
the project containing the compositions.
2. Type a name for the project in the Name Text box.
The default directory for saving projects and compositions is the same location entered as
the User Projects path in File > Preferences > Paths:
C:\Users\<usrname>\Documents\Avid\AMG\Projects.
3. Do one of the following:
t Accept the default drive location.
t At the top of the FileLoader dialog box, you can change the drive location.
4. Click the OK button at the bottom of the dialog to save the project and compositions.
File > Project
> Save.
59
Page 60

3 Avid Motion Graphics Journalist
Avid Motion Graphics Journalist a solution for journalists and producers to add graphics to the
rundowns that they create. This application allows for use of the NRCS Integrated ActiveX
plug-in along with flexibility in determining the level of functionality that journalists are exposed
to for fulfillment of graphics data and adjustment of templates.
The following main topics describe:
• Avid Motion Graphics Journalist Client Overview
• Creating Graphics from Templates
• Working with Database Graphics
• Using Avid Motion Graphics Journalist with iNEWS
• Using Avid Motion Graphics Journalist with ENPS
Avid Motion Graphics Journalist Client Overview
Depending upon your newsroom computer system, the Avid Motion Graphics Journalist client
user interface (UI) my look slightly different from the UI described in this documentation. For
information about Avid Motion Graphics Journalist with ENPS, see “Using Avid Motion
Graphics Journalist with ENPS” on page 79.
The following describes starting the Avid Motion Graphics Journalist plug-in used with the Avid
iNEWS newsroom computer system, and basics of the user interface (UI).
Page 61

Starting the Journalist Plug-in
After you log in to an Avid iNEWS newsroom computer system, you can open the Avid Motion
Graphics Journalist plug-in.
To open the Avid Motion Graphics Journalist Plug-in from iNEWS:
1. Click the Tools menu and navigate to the Plug-ins option.
2. Select Plug-ins > AMG Journalist.
Avid Motion Graphics Journalist Client Overview
The Avid Motion Graphics Journalist plug-in opens in the iNEWS window.
61
Page 62

Avid Motion Graphics Journalist Client Overview
Avid Motion Graphics Journalist User Interface
The Avid Motion Graphics Journalist user interface (UI) is a window consisting of two main
areas, the Template and Graphic Database, along with controls that are installed as part of the
plug-in. The following illustration shows the Avid Motion Graphics Journalist plug-in opened in
the iNEWS user interface.
The following table lists descriptions for the areas of the Journalist plug-in.
Number Description
1 Template Area
2 Graphic Database Area
(Available for iNEWS only,
not used with an ENPS
system.)
62
Page 63

Template Area
The Template area is where project templates are displayed. This is where you can open a
template and fulfill any replaceable text or graphics. For more information about templates, see
“Creating Graphics from Templates” on page 64.
The Template area contains the Info button. The Info button displays the version number for the
plug-in, as shown in the following illustration.
The Template area also has a Search field, as shown in the following illustration, where you can
type in the name or part of the name, of a graphic, and quickly locate the template containing that
specific text.
Avid Motion Graphics Journalist Client Overview
Graphics Database Area
The Graphic Database area displays all graphics available in the database.The Graphics Database
area is shown in the following illustration.
In the Graphics Database area, graphics can be sorted by their column headings by clicking on
n
the column heading.
63
Page 64

The Avid Motion Graphics Journalist displays a collection of templates that may be used to
create a desired graphic. When a new graphic is created, it is shown in the list. From this list, you
drag and drop the new graphic on to the iNEWS Story panel, where the appropriate production
line is then created.
Creating Graphics from Templates
A journalist uses templates to create graphics that are then stored in the Avid Motion Graphics
Journalist database. From the database, graphics can be dragged and dropped into the playlist for
use.Templates and graphics though visibly similar are different in their creation and purpose.
• Templates are unfulfilled graphics, meaning the values (replaceable data) have not yet been
entered and saved.
• A graphic is defined as a fulfilled template, meaning that the values (replaceable data) have
been entered and saved with a unique ID for the graphic, in a database.
After values are entered into a template, it can be saved, creating a new graphic. The template
can then be used again to create other graphics.
Templates are originally created in one of the three Avid Motion Graphics Design applications,
Avid Motion Graphics, Avid Motion Graphics Production, or Avid Motion Graphics Creation.
After creating a composition in one of the Design applications, and saving it to a project on the
X:\ drive on the Avid Motion Graphics Journalist Server, an Avid Motion Graphics Journalist
user can access the composition and use it as a template for creating unique graphics in the Avid
Motion Graphics Journalist database.
Creating Graphics from Templates
To create a graphic from a template with Journalist:
1. Open the Journalist plug-in.
2. In the Template area, navigate through the folders to find the template to use for the new
graphic.
64
Page 65

Creating Graphics from Templates
3. Double-click to select the template and open the template editor for this particular template.
The template editor opens, as shown in the following illustration.
The Template Editor is used to fill and preview the contents of a graphic template. It allows
you to enter certain information into the template. Each template has different fields
depending on how the template was designed. Text fields, Option selectors, Toggles, Tab,
File selectors, and other controls can appear as a part of a template dialog.
The Template Editor contains the areas described in the following table.
65
Page 66

Creating Graphics from Templates
Area Number Description
1 - Preview area The Preview area displays a preview image of the selected template
allowing you to see the graphic appearance of the image.
2 - Values area The Values area displays a series of editable fields, which the user fills,
to create the graphic.
3 - Title area The Title area displays the name of the selected graphic. .
4 - Page area The Page area is an optional field that allows the user to set a page
number for this graphic.
Graphic templates are designed using one of the Avid Motion Graphics Design applications.
When the graphic template is created, some fields are selected to be filled later by a
Journalist. Graphics, sometimes referred to as objects, can be defined as a template plus
some values introduced by the Journalist.
The Template Editor dialog box contains the buttons described in the following table.
Button Description
The Save & New button creates a new graphic with the current values
and template but doesn't close the Template Editor dialog box. This
allows the user to continue creating more graphics using the current
template.
The Save button saves the graphic with the current values and closes
the Template Editor dialog box.
The Close button closes the Template Editor dialog box without saving
the graphic.
The Detach button Floats the template editor so that it can be moved to
another part of the UI or desktop. In the floating state the template
editor displays the name of the template in the title bar.
While the template editor is in the floating state, the Detach button
changes to an Attach button. Pressing the Attach button docks the
template editor to the Journalist UI.
If the Journalist application is closed, while the template editor is in
the floating state, the next time the Journalist plug-in is opened, the
template editor displays the previous template in a floating template
editor.
66
Page 67
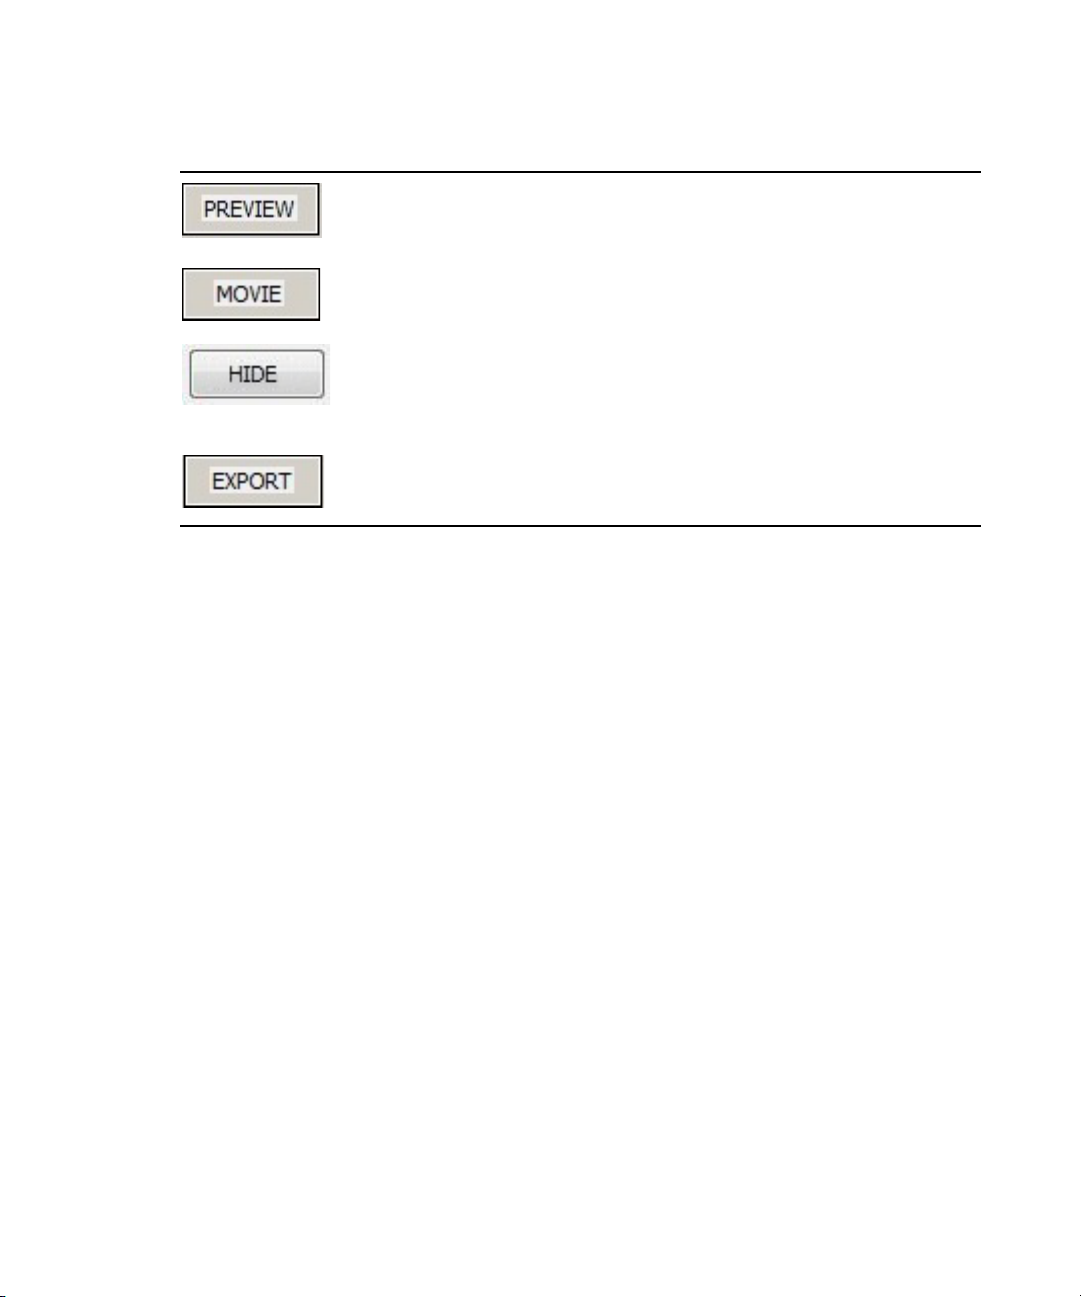
Creating Graphics from Templates
Button Description
The Preview button updates the Template Editor dialog box to show
the graphic appearance with the current values.
The Movie button expands s the Preview area of the Template Editor
dialog box to show the Destination, Preset format, PAD IN, Duration,
and PAD OUT values for the graphic. There is also a Record button
available.
Values are displayed and the Movie button changes to a Hide button.
Pressing the Hide button allows you to hide the values displayed for
the movie.
The Export button exports the graphic as a movie file, which can be
used in post-production programs.
4. In the Values area, fulfill the replaceable fields to create the new graphic. Depending on how
the template was designed, the Values area displays a series of editable fields, which the user
fills, to create the graphic. Right-clicking on these fields displays a list of options from
which to select and fill values for the graphic.
5. (Optional) you can give the graphic a custom title by editing the Title field. By default, the
Title field value is set to AUTO TITLE, which cause a name to be assigned automatically by
the system. To change the AUTO TITLE, double-click the Title field, and enter the name of
your choice. The custom name you entered is displayed in the Graphics Name column in the
Graphics Database area. This field is non-editable if the system is configured to create auto
names. If the system is configured as MIXED, it will appear non-editable by default but the
user can override this by double-clicking in the Title area text box.
6. (Optional) you can assign a page number to the graphic so it is easier to find later. When a
page number is set, the number can be used by the Avid Motion Graphics Control
application when searching for this graphic.
Page numbers are helpful when searching for graphics or objects using the Avid Motion
Graphics News Control application. In Control, you can type a page number using the
numeric keypad and press the Preview key or Take key to put the graphic in the preview or
program output quickly, without having to locate the graphic by moving through the entire
rundown.
This search functionality only works in Avid Motion Graphics News Control when the focus is
n
not set in the Search text box area. If the focus is in the Search text box, the search is performed
on the graphics titles only.
67
Page 68

Creating Graphics from Templates
7. Do one of the following:
t Click the save button to save the new graphic and close the template editor.
t Click the Save & New button to save the new graphic and leave the template editor open
so that you can create another new graphic.
When you are finished, the new graphic appears in the Graphics Database area, as shown in
the following illustration.
The new graphic appears in the Graphics Database area only when using the iNEWS newsroom
n
computer system. The Graphics Database area is not available when using an ENPS system.
You can also edit existing graphics in Journalist.
To open an existing graphic to edit:
t Double-click the graphic in the Graphic Database area list.
The template editor opens displaying the graphic, as shown in the following illustration.
68
Page 69

Working with Database Graphics
When using an iNEWS newsroom computer system, all graphics available in the database are
displayed in the Graphics Database area.
The Graphics Database area is not available when using an ENPS system.
n
The following table shows the names and description of each field heading in the Graphics
Database area.
Field Heading Description
Graphic ID The Graphic ID is a unique ID assigned to each
graphic by the system. This ID is used in the
creation of the iNEWS production line and may not
be edited by the user.
Ready/Not Ready The Ready/Not Ready indicator displays following
the Graphic ID. It is a visual signal in the form of a
colored block. A green block might mean that the
journalist has finished creating the graphic and it is
ready for broadcasting or maybe that an editor has
reviewed and approved this graphic. A red block is
displayed if the Graphic is not ready. For more
information, see “Setting the Ready/Not Ready
Indicators” on page 73.
Working with Database Graphics
The Ready/Not Ready indicator status is cosmetic only, for the journalist, and
n
does not affect the playout.
User/Library Graphic The User/Library Graphic indicator displays next to
the Ready/Not Ready indicator. It is a visual signal
in the form of a user icon
or a set of books icon.
Users should create library graphics for graphics
that will be reused frequently. These types of
graphics can be specific to the user or graphics
commonly used by all journalists.
69
Page 70

Working with Database Graphics
Field Heading Description
Graphic Name The graphic name is the name by which the graphic
can be identified. This name can be created by the
system or by the user, depending on the system
configuration.
Page The Page field is used to display any page number
assigned to this graphic. Page numbers are optional,
so this field might be left empty. Page numbers are
assigned by the user to a graphic. When a page
number is assigned, it can be used later to perform a
search.
First Value The first field value displays the characters or
information entered, using the template editor, in
the first replaceable field of the graphic.
Last Change The Last Change field displays the year, month,
date, and time when this graphic was last changed.
Changed By The Changed By field is the name of the last user
who made changes to this graphic.
Lock The Lock field tells you whether or not this graphic
is locked. Locking a graphic helps protect a graphic
from having changes made by mistake.
The Graphics Database area contains the following tools:
Tool Name Description
Recent button The Recent button allows you to retrieve all of the
graphics created by this user at any time during that
day. The graphics are viewed in the Graphics
Database area.
Lib button The Lib or Library button, retrieves the current
user’s library graphics from the database.
Find button The Find button allows you to search the graphics
database. Pressing this button opens a Filter dialog
box with various search parameters. The search is
case-sensitive. For more information, see “Filter
Dialog Box” on page 71.
70
Page 71

Tool Name Description
Clear button The Clear button removes all current graphics from
Playout Device ID list The Playout Device ID list, located to the far right
When you right-click on a graphic in the Graphic Database area, a menu displays options that
can be applied to the graphic.
Filter Dialog Box
When you press the Find button in the Journalist plug-in, a Filter dialog box opens, as shown in
the following illustration.
Working with Database Graphics
the list but does not delete the graphics from the
system.
of the buttons above the Graphic Database area,
displays a list of configured playout device IDs.
When using Avid Motion Graphics News Control
for playout, there is just one MOS playout device
selection that appears in the list. When using other
playout scenarios, such as with iNEWS Command,
there may be multiple playout devices appearing in
the list, depending on the configuration.
71
Page 72

Working with Database Graphics
The Filter dialog box allows you to refine your search for graphics by entering words, page
numbers, Library objects, Objects Created by me, Objects created by others and objects that
have been changed. The following table describes the filters.
All entries in the Filter dialog box are case-sensitive.
n
Filter Description
Words The Word filter allows you to enter a word that is
present in the graphic title to be retrieved. This field
is case sensitive. The percent (%) symbol can be
used as a wildcard, but in most of the cases it is not
needed. For instance, the string F or F% will
retrieve, in both cases all the graphics whose titles
contain the character F.
Page The Page filter allows you to search for a graphic by
page number, providing a page number is assigned.
Library Objects When the Library Objects box is checked, the
search is only performed in this group of objects.
Objects Created by me When the Objects Created by me box is checked,
the search retrieves all of the objects created by this
user.
Objects Created by When the Objects Created by box is checked and a
name is entered in the text field, the search retrieves
all of the objects created by the user specified in the
text field.
Objects Changed The objects changed filter allows the user to specify
a time and date-type of criteria by which the results
produced by all the other options are filtered.
72
Page 73

Setting the Ready/Not Ready Indicators
Setting the visual indicator for a new graphic allows the user to see whether or not the graphic is
ready to go on air.
To set the Ready/Not Ready indicator
1. Right-click on the Graphic in the Graphic Database area.
A menu opens.
Working with Database Graphics
2. Do one of the following:
t Select Ready for OnAir if the graphic is ready to playout on air. When this selection is
made, a green colored box appears next to the Graphic ID in the Database Graphic area
to let the user know that this graphic is ready to playout on air.
t Select Not Ready for OnAir if the Graphic is not ready to playout on-air. When this
selection is made, a red colored box appears next to the Graphic ID in the Database
Graphic area to let the user know that this graphic is not ready to playout on air.
73
Page 74

Locking Graphics
After creating and saving a new graphic from an existing template, you can lock the graphic so
that only the user who created the graphic can change the graphic’s values, thus making it a
Library Graphic.
To lock a graphic:
1. Right-click on the Graphic in the Graphic Database area.
A menu opens.
Working with Database Graphics
2. Select the Lock Graphic option from the menu.
3. Right-click on the Graphic in the Graphic Database area and when the Menu opens, select
Set as Library Graphic.
To unlock a graphic:
1. Right-click on the Graphic in the Graphic Database area.
A menu opens.
2. Select the Unlock Graphic option from the menu.
To override a lock:
1. Right-click on the Graphic in the Graphic Database area.
A menu opens.
2. Select the Override Lock option from the menu.
The override lock option is designed to be used when a graphic must be modified and it is not
n
possible to login with the appropriate user credentials and unlock the graphic. The override lock
automatically locks the graphic by the current user.
74
Page 75

Library Graphics
Frequently used graphics can be marked as Library graphics. It is a good practice for users to
name their library graphics with a unique name so they may be easily identified.
Setting the Library Graphic Option
Marking a graphic as a Library graphic adds a library book icon to the graphic in the Graphic
Database area. This marker identifies this graphic as a Library Graphic and locks the graphic by
the user enabling the option. The Remove From Library option may only be selected if the user
is the one who initially marked this graphic as a Library Graphic.
To set the Library graphic option:
1. Right-click on the Graphic in the Graphic Database area.
A menu opens.
Working with Database Graphics
2. Select the Set as Library Graphic option.
The library book icon is added to the graphic in the Graphic Database area, as shown in the
following illustration.
When an item is set as a Library graphic it also gets a locked status assigned to it.
n
75
Page 76

To remove the graphic from the library:
1. Right-click on the Graphic in the Graphic Database area.
A menu opens.
2. Select the Remove From Library Option.
The library book icon is replaced with a user icon in the Graphic Database area, as shown in
the following illustration.
When a graphic is removed from the library, the locked status is also remove from that graphic.
n
Changing the Name of a Library Graphic
Users can change the title of their library graphic, so that it is user friendly and easily identified.
Working with Database Graphics
To change the name of a library graphic:
1. Open the item in the template editor.
2. In the template editor, double-click the Tile field.
3. Enter a name for the graphic.
4. Click the Save button.
You can do this when you first create the graphic or if the graphic has already been created,
by double-clicking the graphic, which opens the template editor allowing you to make the
change.
76
Page 77

Using Avid Motion Graphics Journalist with iNEWS
Using Avid Motion Graphics Journalist with iNEWS
The following information serves as a “how to” guide for using Avid Motion Graphics Journalist
with iNEWS. It is important to understand how graphics are created, how Journalist can be used
to create and use graphics, and how to avoid any pitfalls.
To add a graphic to a rundown:
t Drag and drop the graphic into the script area in iNEWS.
When you drop the graphic into the script area, iNEWS creates a production cue.
Because the production cue points to a unique item in the database, the cues need to be
treated differently than other products, such as with Deko Select. Remember the following:
- If you drag the same graphic into several rundowns, remember that those production
cues all point to the same graphic.
- When you update an item in the Template Editor (which updates it in the database), it
does not update the production cue – so the production cue will have out-of-date text.
You can avoid this problem by dragging the updated graphic into the production cue,
which will replace the cue with the up-to-date text.
Because of this link between the production cue and the graphic, Avid strongly recommends
n
against reusing graphics for any purpose.
- To alleviate any potential confusion, it would be a good idea to add any graphics that are
going to be used more than once to the Library, so that they are locked by the database.
Though iNEWS does not have up-to-date production cues, Command always displays the
n
up-to-date information in the production cue.
Graphics Organization in Journalist for iNEWS
Because of the added functionality of the Lib and Find buttons, there is flexibility in how you can
build and use graphics. The following are some suggestions for organizing graphics in Avid
Motion Graphics Journalist.
General Library Graphics
Create library graphics that are to be used generally, such as the standard reporter-anchor lower
thirds. Journalists can easily find these commonly used graphics using the Find filter.
77
Page 78

Library Graphics with a Specific User Name
Create a specific user in iNEWS, and then use that account to create graphics for a specific use.
Doing this allows Journalists to use the Find filter to search for that set of graphics. For instance,
you can create a ‘5p’ user in iNEWS, and then create all the standard reporter-anchor lower
thirds for the evening shows with the 5p user. Journalists would then be able to search for all of
commonly used Library graphics for the evening shows by adding ‘5p’ to the Find filter. You can
also make a set of morning show graphics with a ‘6a’ user, and another for sports. The
possibilities are endless.
Personal Library Graphics
The Lib or Library button searches for library graphics created by the current user. Individual
journalists can assign any item that may be used repeatedly as a Library graphic, so that they can
be easily found using the Lib button. This allows the journalist to use the Lib button as like they
would a favorites option in their browser. This includes graphics that may only be used often for
a short period of time, but would be used repeatedly. They can be designated as Library graphics,
and when no longer being used, can be removed from the Library.
Page Numbers for Graphics
Graphics can also get assigned page numbers, so that the user can specifically search for a
particular page number. The Find filter does a partial word search, so a search for 100 displays
anything that begins with 100, so it also finds 1000, 105, and 10023.
Using Avid Motion Graphics Journalist with iNEWS
These page numbers only for the Find filter, and cannot be used in a hand-entered production
n
cue.
78
Page 79
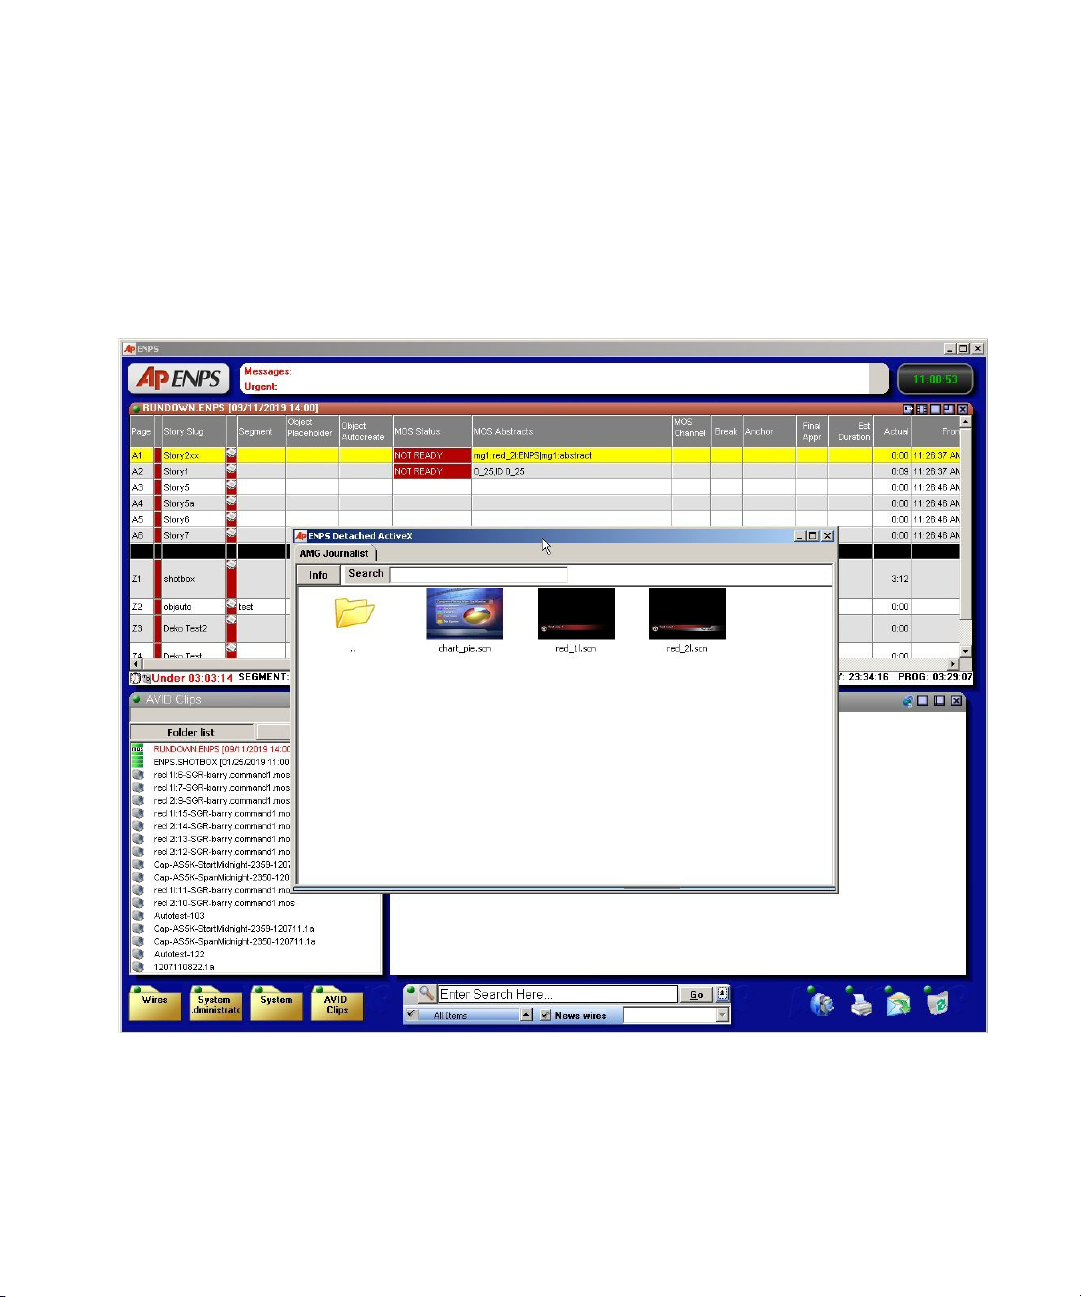
Using Avid Motion Graphics Journalist with ENPS
Using Avid Motion Graphics Journalist with ENPS
The Avid Motion Graphics Journalist client in iNEWS consists of the Template area and a
Template Editor, but unlike iNEWS, graphic items are not displayed in the plug-in, but rather
displayed in the ENPS item list. The following illustration shows the Avid Motion Graphics
Journalist client running in detached mode, with the ENPS item list displayed behind Avid
Motion Graphics Journalist.
79
Page 80

Using Avid Motion Graphics Journalist with ENPS
To open the Avid Motion Graphics Journalist in ENPS:
1. In ENPS, click the following button:
An option menu displays, as shown in the following illustration.
2. Select the AMG Journalist option.
To create an item in ENPS:
1. Drag an item from the list to the Rundown.
2. Add information to the replaceable fields.
3. Click Save.
This returns you to the Template area view and the item appears in the ENPS item list.
4. To add the item to a rundown, drag and drop it from the list to the story script.
To add an item to an ENPS Rundown:
t Drag and drop an item from the list to the story script.
80
Page 81

4 Avid Motion Graphics Control
Avid Motion Graphics Control is for non-newsroom graphics and control room operators. For
those who need to control sequenced or non-sequenced graphics, and need the ability to adjust
graphics on-the-fly. This application provides full graphics control for playout flexibility. Its
different modes of operation keep playout simple in any situation, live sports, channel branding,
game shows, news, tickers, or election graphics.
The following main topics describe:
• Playout Control
• Templ a te Contro l
• Motion Graphics Control User Interface
• Creating Keyboard Layouts
• Configuring Settings
Playout Control
There are many tools that can help the operator to control the playout of graphics in a manner
that best suits the needs of each individual type of production. Avid Motion Graphics Control is
able to playout graphics simultaneously, sequentially, in random order, and combine them as
needed.
Template Control
The Avid Motion Graphics Control playout application can automatically manage complex
interacting graphics without additional programming or the creation of complex tables or sheets.
A template can be called up by a name or a number. A numerical keyboard can be used for
operators who prefer calling up page numbers, or you can control templates by using a mouse.
Operators can search for a template or the content in a template, allowing you to quickly find the
graphic required and play it to air. Avid Motion Graphics Control has support for intelligent
templates. With each TAKE, the system knows which pages are live, which should be
maintained, and which new pages should be broadcast The system also knows how all the
graphical objects on the screen need to interact.
Page 82

Motion Graphics Control User Interface
Motion Graphics Control User Interface
The Avid Motion Graphics Control user interface consists of different areas and controls that are
installed as part of the software.
82
Page 83

Motion Graphics Control User Interface
The following table describes the areas of the Avid Motion Graphics Control user interface.
Area Number Description
1 - Section area This area can contain different types of rundowns.
2 - Program Bar area This area contains a list of compositions.
3 - Settings area This area contains a clock feature, a Render Engine connection indicator,
a Settings button, and a numerical indicator in which page numbers
belonging to specific templates can be entered. For more information,
see“Settings Area” on page 83.
4 - Rundown area This area contains a list of compositions to be played out.
5 - Quick Template area Displays templates in use.
6 - Project Browser area This area allows you to navigate to a particular project containing
templates that can be displayed in the Template List area.
7 - Template List area This area displays the templates available in a selected project.
Settings Area
The settings area of the user interface is located in the upper right-hand corner of the Avid
Motion Graphics Control user interface. This area contains a clock feature, a Render Engine
connection indicator, a Settings button, and a numerical indicator in which page numbers
belonging to specific templates can be entered.
Settings Features Description
The clock feature is a convenient time-of-day display in hours, minutes,
and seconds.
83
Page 84

Motion Graphics Control User Interface
Settings Features Description
The Render Engine connection indicator is a visual point of reference to
the connection status of the Render Engines available to the Avid Motion
Graphics Control system. A glance at the colored display informs you of
the connection status of the Render Engines configured for your system.
For more information about Render Engine connection status,
see“Render Engine Connection Status” on page 84.
The Settings button opens the Settings dialog box which allows for
configuration of the Avid Motion Graphics Control application. For more
information about configuring settings, see “Configuring Settings” on
page 89.
The Numerical Page Buffer is the area that displays the page number
assigned to a template, if one is assigned. You use the number pad on the
keyboard to enter the page number, which is displayed here. After you
enter the number, you can pres the Enter key on the keyboard and the
template is displayed, and ready for use.
Render Engine Connection Status
The following table describes the colors displayed by the Render Engine connection status
indicator.
Render Engine
Connection Status Icon Description
A green icon means there is a Render Engine configured to connect to
this Avid Motion Graphics Control system.
A red icon means there is no Render Engine configured to connect to this
Avid Motion Graphics Control system.
A blue icon means there is Render Engine configured to connect to this
Avid Motion Graphics Control system but there is a problem with the
connection. For instance, you might be connected to a different project
than the one specified on the computer on which the Render Engine is
running.
In the event that you have more than one Render Engine configured for your Avid Motion
Graphics Control system, multiple icons are displayed depicting the connection status for each
one.
84
Page 85

Motion Graphics Control User Interface
After configuring Avid Motion Graphics Control to detect a Render Engine, it may be necessary
n
to click on the icon to refresh the status. For more information About configuring the Render
Engine connection, see “Configuring Settings” on page 89.
Virtual Keyboard
At the bottom of the Avid Motion Graphics Control user interface there ia a resize button.
Clicking this resize button opens a virtual keyboard, as shown in the following illustration.
The virtual keyboard allows a user to map certain actions, in the form of macros, to specific keys
on the virtual keyboard or to the keys on the Avid Motion Graphics Keyboard. The virtual
keyboard is also used with a mouse or a touch screen monitor.
The virtual keyboard uses colors (red, green, and blue), to group keys, as a customizable visual
reference point.
85
Page 86

Motion Graphics Control User Interface
The virtual keyboard contains keys, grouped by colors, and four buttons that enable the user to
record macros, assigning them to a key on the keyboard, and then saving and naming that
particular group of macros as a keyboard layout. This saved keyboard layout can later be loaded,
for use or cleared completely. The buttons used to perform these actions are shown in the
following table.
Button Icon Description
Load Keyboard Layout
Save Keyboard Layout
Clear Keyboard layout
Record Macro
Creating Keyboard Layouts
The virtual keyboard allows a user to map certain actions, in the form of macros, to specific keys
on the virtual keyboard. Macros are combinations of keystrokes that perform a defined action or
set of actions and assign that action to just one key. This saves time making the action more
efficient. Combinations of different macros can be saved and named as a specific keyboard
layout. Later, these keyboard layouts can be loaded and used again.
To create a macro:
1. Open the virtual keyboard by clicking the resize button at the bottom of the Avid Motion
Graphics Control user interface.
The virtual keyboard opens.
86
Page 87

Motion Graphics Control User Interface
2. On the virtual keyboard, click the Record Macro button.
3. Hover the mouse pointer over the key (in this example, the A11 key on the bottom grouping
of keys was hovered over) on the virtual keyboard to which this macro will be assigned.
4. Perform the keystroke or combination of keystrokes that result in the desired action. For
instance, load the layout on air.
5. Click the key (the A11 key) on the virtual keyboard that you hovered over previously.
The Edit Macro Etq dialog box opens.
6. Type in the short label to replace A11 label on the key.
7. Click the OK button.
The Edit Macro Eqt Short Label changes allowing you to enter a Long Tip.
8. Enter a longer description of what action results from pressing this button.
This text displays as a descriptive tool tip when you hover over the key on the virtual
keyboard, as shown in the following illustration.
87
Page 88

Motion Graphics Control User Interface
To save this macro as a keyboard layout:
1. Click the Save Keyboard Layout button.
The Keyboard Layout File dialog box opens.
2. Type a name for this keyboard layout. In the previous example, Load On-Air is the name.
3. Click the OK button.
To clear this macro:
t Click the Clear Keyboard Layout button.
88
Page 89

Configuring Settings
The Settings dialog box is used to configure the Avid Motion Graphics Control application.
To open the Settings dialog box:
t Click the Settings button.
The Settings dialog box opens and displays the information on the About tab.
Motion Graphics Control User Interface
To configure General settings:
1. Click the General tab.
The General tab opens.
2. Select your language using the Language drop-down arrow.
3. Set your spell check to the desired dictionary if not leaving at the default.
4. Leave all other options on their default.
89
Page 90

Motion Graphics Control User Interface
To configure Render settings:
1. Click the Renders tab.
The Render tab opens.
2. Set encoding.
3. Select the number of render units to which this Avid Motion Graphics Control system can
connect.
As you increase the number of render units, additional numbered tabs appear for each render
unit, which you must configure.
4. Set the StormLogic listen port.
90
Page 91

Motion Graphics Control User Interface
Each render unit setup consists of the main unit, and if you have them, a backup, and
preview units. Neither a backup or preview unit is required as part of a render unit setup. The
Renders tab is used to configure the setup of the IP address, Storm port, language and
section for each render unit.
To configure settings for a main render unit:
1. In the Settings dialog box on the Renders tab, click the tab number that corresponds to the
render unit.
2. Click the Main Unit button.
3. Enter the IP address, Storm Port, Language, and section for the main unit.
4. Click the Ok button.
A backup render unit is an option but not required as part of the render unit setup.
n
(Optional) To configure settings for a backup render unit:
1. In the Settings dialog box on the Renders tab, click the tab number that corresponds to the
render unit.
2. Click the BackUp Unit button.
3. Enter the IP address, Storm Port, Language, and section for the backup unit.
4. Click the Ok button.
A preview render unit is an option but not required as part of the render unit setup.
n
(Optional) To configure settings for a preview render unit:
1. In the Settings dialog box on the Renders tab, click the tab number that corresponds to the
render unit.
2. Click the Pwd Unit button.
3. Enter the IP address, Storm Port, Language, and section for the preview unit.
4. Click the Ok button.
91
Page 92

Motion Graphics Control User Interface
To configure Paths settings:
1. Click the Paths tab.
The Paths tab opens.
2. Click the ellipsis button in the Projects section to browse to the projects folder.
3. Click the ellipsis button in the Templates section to browse to the templates folder.
4. Click the ellipsis button in the Resources section to browse to the resources folder.
5. In the Plug-ins section, mark the check box to use plug-ins.
6. Click the ellipsis button in the Plug-ins section to browse to the plug-ins folder
7. Click the OK button.
To configure Sections settings:
1. Click the Sections tab.
The Sections tab opens.
92
Page 93

Motion Graphics Control User Interface
2. In the Default section type area of this tab, click the radio button that corresponds to the type
of sections you want to create each time you use Avid Motion Graphics Control. The default
is the RunDown type.
Later, when you create your sections, in the Section area of the user interface, an icon is
displayed so you can tell at a glance the type of section in which you are working.
Section Icon Description
Folder default section type
RunDown default section type
Fixed RD default section type
When the Folder section type is defined as the default section type, and you place a template
in that section’s Rundown area of the user interface, two dialog boxes open.
93
Page 94

Motion Graphics Control User Interface
The Quick Info dialog box, shown in the following illustration, displays a thumbnail image
of the template and information about the template. It also lets you rename and change some
of the template’s attributes.
The Playout Control dialog box, shown in the following illustration, reflects the name of the
template in its title bar and may show other replaceable text fields, as defined in the
template’s original composition. It lets you duplicate a template or change certain text, as
defined within the template’s original composition. This is ideal for a workflow requiring
frequent, quick changes.
94
Page 95

Motion Graphics Control User Interface
The Playout Control dialog box contains the buttons described in the following table.
Button Description
Duplicate - pressing this button
creates another instance of the
template, which can be edited,
played out, and saved.
Toggle - pressing this button
toggles between a thumbnail view
of the template and the edit view of
the Playout Control dialog box.
Play - pressing this button plays the
template on air. It changes the color
of the Playout Control dialog box
title bar to red, signifying the item is
on-air.
Stop - pressing this button while the
template is on air stops the playout.
To configure Miscellaneous settings:
1. Click the Miscellaneous tab.
Within the Miscellaneous tab, you can choose to log the commands performed by Avid
Motion Graphics Control, such as play and eject, and set the log path. You can also set the
number of maximum log files and maximum log file size, as well as direct the keyboard
layout to a different path.
95
Page 96

5 Avid Motion Graphics News Control
Avid Motion Graphics News Control is designed for the news graphics operators who need
graphics rundown automation with manual control. This application allows for automated
graphics playout connected to the NRCS rundown, on-the-fly graphics adjustment, and
third-party production automation integration.
The following main topics describe:
• News Control User Interface
• Basic News Control Operations
• Special News Control Operations
• Advanced News Control Operations
• Channels
Page 97

News Control User Interface
The Avid Motion Graphics News Control application is allows operators to broadcast graphics in
a MOS environment. Producers and journalists can mark rundowns as on air, and the operators
can load those rundowns and play out the graphics.
News Control User Interface
The user interface is divided into the following areas:
• Control Area
• Rundown Area
• Message Area
97
Page 98

Control Area
The Control area is located across the top portion of the window.
This area contains all of the controls, which an operator can use to load rundowns, start playout,
add new graphics, edit graphics, and so forth. To use some of these controls, you must have a
rundown loaded or a graphic selected; otherwise, the controls are not enabled.
The most frequently used controls, their hot-key shortcuts (if any), and their descriptions are
listed in the following table:
Control Keyboard Shortcut Description
News Control User Interface
Rundown selector tool This tool allows you to select a
rundown to control from a list of
available rundowns.
ADD NEW button Numeric Keypad + The ADD NEW button allows you to
create a new graphic.
EDIT button Enter The EDIT button allows you to edit
the selected graphic.
UP button Page Up The UP button allows you to move the
selected graphic up.
DOWN button Page Down The DOWN button allows you to
move the selected graphic down.
RESTART button Backspace The RESTART button allows you to
restart the show and selected in cue is
the first graphic.
TAKE button space bar If there is a graphic on air, pressing the
TAKE button stops it. If there is no
graphic on air, pressing this button
plays the cued graphic.
98
Page 99

News Control User Interface
Control Keyboard Shortcut Description
ADVANCE button Ctrl Pressing this button replaces the
current played graphic by the next
cued graphic.
Hot-key assignments can be modified in the
n
Rundown Area
When a rundown is loaded, all of its stories and graphics compositions are shown in the
Rundown area. The Rundown area lets you view what is currently on air and also what goes to
air next.
controller.ini
configuration file.
99
Page 100

In the Rundown area, an on air graphic row is highlighted in red, a cued graphic is highlighted in
yellow, while a selected graphic is highlighted in blue. Stories appearing in the Rundown area
are gray and depicted by a story icon, as shown in the following illustration.
Message Area
The message area is located below the Rundown area and remains blank unless a message is
generated by the application. Any messages for the operator are displayed in this area.
In Python scripts, when the command is activated, the CODE IN script is sent to the player and
when it is deactivated, the CODE OUT script is sent to the player. If a Python Script command
has no CODE OUT, it won't have two states. When the command is run, it sends the CODE IN
script, but remains deactivated. That means, every time this command hot-key is pressed, it sends
the same code.
Basic News Control Operations
Basic News Control Operations
The Avid Motion Graphics News Control application provides the following basic operations:
• Rundown selector—allows you to select a rundown.
• RESTART button —allows you to restart the show. When you do this, the first available
graphic is automatically cued.
• TAKE button —plays the cued graphic and automatically cues the next graphic.
If you continue to press the TAKE button, you can sequentially play and stop each graphic in the
n
rundown
• RESTART button—pressing this button restarts from the beginning.
100
 Loading...