

Page 1

miroVIDEO DC30 Series
SER’S GUIDE
U
Page 2

miroVIDEO DC30 series
User’s Guide
Version 1.0 /GB August 1999
Part No. 51006044 Rev. B
© Pinnacle Systems Inc. 1999
All rights reserved.
No part of this manual may be reproduced or transferred to other media without
explicit written permission from Pinnacle Systems GmbH, Braunschweig,
Germany.
Adobe™ is a trademark of Adobe Systems Inc.
IBM AT® is a registered trademark of International Business Machines Corp.
miroVIDEO™ is a trademark of Pinnacle Systems Inc.
Pentium™ is a trademark of Intel Corp.
DirectX™ is a trademark of Microsoft Corp.
Vision986™, Trio64V+™, ViRGE™ and ViRGE VX™ are trademarks of S3 Incorporated.
VGA™ is a trademark of International Business Machines Corp.
Windows® is a registered trademark of Microsoft Corp.
All other brand or product names are trademarks or registered trademarks of their respective holders.
This manual is printed on chlorine-free paper using environmentally safe ink.
Pinnacle Systems Inc. has written this manual to the best of its knowledge, but
does not guarantee that the programs/systems will fulfill the desires of the user.
No warranty is made as to the specifications of features.
Pinnacle Systems Inc. retains the right to make alterations to the content of the
manual without the obligation to inform third parties.
All tenders, sales, supply and manufacturing contracts from Pinnacle Systems
Inc., including consultancy, installation and other contractual performance are
subject exclusively to the General Sales and Delivery Terms of Pinnacle
Systems, Inc.
Page 3

Contents
OVERVIEW 1
HAT IS THE
W
HAT DOES THE
W
BEFORE YOU BEGIN 5
YSTEM REQUIREMENTS
S
ACKAGE CONTENTS
P
XISTING VIDEO CAPTURE BOARD
E
EFRAGMENTING THE HARD DISK
D
QUICK START 10
UICK INSTALLATION
Q
IDEO RECORDING—QUICK START
V
LAYBACK WITH MEDIAPLAYER—QUICK START
P
INGLE FRAMES—QUICK START (WINDOWS
S
INSTALLING ADOBE PREMIERE 13
INSTALLING THE HARDWARE 15
miroVIDEO DC30 series?........................................................................ 1
miroVIDEO DC30 series
OFFER
? ....................................................... 3
................................................................................................... 5
......................................................................................................... 8
................................................................................... 9
.................................................................................... 9
..................................................................................................... 10
............................................................................... 11
......................................................... 12
ONLY
95/98
) ...........................................12
CONNECTING THE VIDEO AND AUDIO DEVICES 17
ONNECTING VIDEO DEVICES
C
ONNECTING AUDIO DEVICES
C
......................................................................................... 18
......................................................................................... 19
INSTALLING THE SOFTWARE FOR WINDOWS 95/98 20
NSTALLING THE DRIVERS FOR WINDOWS
I
NSTALLING THE DRIVERS FOR WINDOWS
I
NSTALLING THE SOFTWARE FOR WINDOWS
I
95 ................................................................21
98 ................................................................25
INDOWS
95 / W
98 ...................................26
INSTALLING THE SOFTWARE FOR WINDOWS NT 4.0 33
HE INSTALLATION PROGRAM
T
........................................................................................ 34
QUICK START GUIDE FOR DC30 PRO 37
UDIO LOOPTHROUGH TEST
A
IDEO LOOPTHROUGH TEST
V
IDEO CAPTURE TEST
V
IDEO EDIT TEST
V
IDEO OUTPUT TEST
V
............................................................................................................ 44
...................................................................................................... 46
.......................................................................................... 37
.......................................................................................... 39
.................................................................................................... 41
USING THE DC30 BOARD UNDER WINDOWS 95 / WINDOWS 98 48
HE
T
DC30 series
IVE OVERLAY
L
OUND SETTINGS
S
CONTROL
............................................................................................ 49
................................................................................................................ 53
............................................................................................................. 55
Contents
i
Page 4

ECORDING VIDEO
R
.......................................................................................................... 59
USING THE DC30 BOARD UNDER WINDOWS NT 65
DC30 series Control....................................................................................................... 65
MIRO
VIDEO CAPTURE 68
TARTING
S
ODE
M
ROJECTS—STANDARD
P
ROJECTS—ADVANCED
P
ETTINGS—STANDARD
S
ETTINGS—ADVANCED
S
ECORD—STANDARD
R
ECORD—ADVANCED
R
ATCH CAPTURE—ADVANCED (WINDOWS
B
LIPS
C
miroVIDEO C
............................................................................................................................... 68
............................................................................................................................... 87
APTURE
.................................................................................. 68
.................................................................................................. 69
.................................................................................................. 71
................................................................................................... 76
.................................................................................................. 78
..................................................................................................... 81
.................................................................................................... 82
AND PRODUCTIVITY PACK ONLY
95/98
)..84
MIROINSTANT VIDEO 5 AND ADOBE PREMIERE 5.1 90
HAT IS
W
W
YSTEM REQUIREMENTS
S
OW TO MAKE IT WORK
H
OW DOES IT WORK
H
miroINSTANT V
M
IMITATIONS
L
miroINSTANT V
HAT IS IT GOOD FOR
IDEO
ODES OF OPERATION
................................................................................................................... 98
miroVIDEO DC30 series
HANGES FROM PREVIOUS VERSIONS
C
IDEO
5?................................................................................ 90
?................................................................................................... 90
................................................................................................ 91
? ............................................................................................... 91
?...................................................................................................... 92
INDOW
5 W
................................................................................. 92
................................................................................................... 95
AND
miroINSTANT V
IDEO
5 .............................................. 98
........................................................................... 99
TITLEDEKO 100
ELCOME TO TITLEDEKO
W
NSTALLING TITLEDEKO
I
AUNCHING TITLEDEKO
L
HE TITLEDEKO USER INTERFACE
T
ELECTING TEXT AND OBJECTS
S
ORMATTING TEXT AND OBJECTS
F
OOLS AND SELECTION HANDLES
T
RANSFORMING TEXT AND OBJECTS
T
SING AND MODIFYING LOOKS AND STYLES
U
HE BACKGROUND
T
ET’S MAKE A TITLE
L
........................................................................................................ 115
........................................................................................... 100
.............................................................................................. 101
.............................................................................................. 101
............................................................................. 102
................................................................................... 106
............................................................................... 107
................................................................................ 109
........................................................................... 111
............................................................... 112
.................................................................................................... 117
TIPS & TRICKS 126
ENERAL INFORMATION
G
ARDWARE
H
OFTWARE
S
IGITIZING
D
IDEO EDITING
V
.................................................................................................................... 126
..................................................................................................................... 128
.................................................................................................................... 129
.............................................................................................................. 130
miroVIDEO DC30 series
miroVIDEO DC30 series
JPEG
ISSUES
................................................................................................................. 135
............................................................................................... 126
AND ADOBE PREMIERE
AND COMPUTER ANIMATION
4.2 / 4.2LE ................................... 131
.............................................. 135
TROUBLESHOOTING 136
ii
miroVIDEO DC30 series User´s Guide
Page 5

NSTALLATION
I
PERATION
O
ERFORMANCE PROBLEMS DURING DIGITIZING
P
ROBLEMS PLAYING BACK AND EDITING VIDEOS
P
IDCAP
V
UDIO PROBLEMS
A
DOBE PREMIERE
A
INDOWS
W
INDOWS
W
miroINSTANT V
............................................................................................................... 136
.................................................................................................................... 138
.......................................................... 138
........................................................ 139
.......................................................................................................................... 140
.......................................................................................................... 140
......................................................................................................... 144
INDOWS
95 / W
98......................................................................................... 145
NT ................................................................................................................ 146
IDEO
.................................................................................................. 149
TECHNICAL DATA 151
ENERAL
G
ONNECTORS
C
....................................................................................................................... 151
................................................................................................................. 152
APPENDIX A: HARDWARE CONFIGURATIONS 154
IGITIZING WITH THE
D
IGITIZING AND RECORDING WITH THE
D
IGITIZING WITH THE
D
IGITIZING AND RECORDING WITH THE
D
AND A SOUND BOARD
miroVIDEO DC30 series........................................................ 154
miroVIDEO DC30 series........................... 156
miroVIDEO DC30 series
AND A SOUND BOARD
.................... 158
miroVIDEO DC30 series
..................................................................................................... 159
APPENDIX B: GLOSSARY 161
APPENDIX C: SUPPORT QUESTIONNAIRE 168
APPENDIX D: FCC COMPLIANCE STATEMENT 172
INDEX 174
Contents
iii
Page 6

For your own safety
In the interest of your own safety and the flawless functioning of your new
product and computer system please note the following:
• Computer components are sensitive to static charge. Divert any electrostatic
charge from your person before touching the components with your hands or
any tools.
• Before opening the computer make sure that the power plug is disconnected
from the main socket.
For changes that have occurred after the manual has been printed, refer to the
ReadMe file/s on the CD-ROM supplied with your system!
About the User’s Guide
Subheadings
This manual explains how to install and use the hardware and software of your
miroVIDEO DC30 series product. It also contains many tips and tricks to make
optimal use of it.
In the margins are subheadings to help you quickly find your way through this
manual.
Important text passages are marked with the “notepad” and this format.
Numbers mark step by step instructions:
1. Start Windows.
Bullets mark instructions for optional steps the order of which is not important.
• Connect the board to the camcorder.
All keyboard commands appear in this font:
install <↵>
<↵> represents the enter key.
Menus, commands, options, or buttons which the user can select are written in
italics.
iv
miroVIDEO DC30 series User´s Guide
Page 7

Overview
The following chapter gives you an overview of the fields of application and
the features of the miroVIDEO DC30 series hardware and software.
W
HAT IS THE
Differences
miroVIDEO DC30 series?
The miroVIDEO DC30 series contains the following Pinnacle boards:
miroVIDEO DC30
miroVIDEO DC30 with miroVIDEO Productivity Pack
miroVIDEO DC30 SPEED (Germany only)
miroVIDEO DC30 plus
miroVIDEO DC30 pro (USA only).
This manual covers all of these products, and “miroVIDEO DC30 series”
stands for “miroVIDEO DC30 or miroVIDEO DC30 plus or...” and so on. The
main differences between these products are different bundled additional
software packages.
Differences to note:
miroVIDEO DC30 has a data rate limit of 6 MB/sec, the others can do up to
7 MB/sec. All miroVIDEO DC30 series products except miroVIDEO DC30
support miroINSTANT Video. Only the Productivity Pack allows for device
control and batch capture with the Pinnacle capture application and Windows
95/98.
*
The miroVIDEO DC30 series is a system of hardware and software, for IBM
compatible PCs with a PCI bus, used to digitize, compress, process, and play
back video sequences in Motion-JPEG format. The sound is digitized, as well.
You can also add the sound to your video clips after they have been recorded.
The miroVIDEO DC30 series also lets you digitize, compress, process, and
reproduce individual images as TrueColor bitmaps.
*
Windows 95 / 98 only.
Overview
1
Page 8

Where to use it?
Boards of the miroVIDEO DC30 series convert video into a computerunderstandable format by digitizing video sequences to uncompressed or
Motion-JPEG compressed data files. The video sequences can then be edited
on the computer and output in good to very good S-VHS quality to a VCR,
television, or computer monitor. The higher the quality of the video input and
the higher the computer’s data transfer rate, the better the output quality of the
video image.
The miroVIDEO DC30 series’ video post-production recording capabilities
combined with video editing software, Adobe Premiere, provide a complete
video studio plus cutting table on your desktop.
The miroVIDEO DC30 series’ capabilities result from optimally integrated
hardware and software.
System components
Hardware
The miroVIDEO DC30 series hardware is a state-of-the-art PCI video digitizer.
The miroVIDEO DC30 series includes a JPEG processor to compress video as
well as a video encoder and an audio codec to digitize and decode audio
signals. For capturing and playing back the PCI bus mastering mode is used.
Software
The miroVIDEO DC30 series software includes the miroVIDEO DC30 series
drivers to control the video capture, compression, decompression, and
playback. miroINSTANT Video, miroVIDEO Capture, and
miroVIDEO EXPERT, a hard disk test utility are also part of the miroVIDEO
DC30 series’ software. Adobe Premiere and the presets for Adobe Premiere
offer you a wide range of options for video and audio editing.
2
miroVIDEO DC30 Series User´s Guide
Page 9
W
HAT DOES THE
miroVIDEO DC30 series
OFFER
?
The miroVIDEO DC30 series system stands out for its quality (Hi8),
compression capabilities, performance, and digital video editing capabilities.
Combined with a suitable graphics board, the miroVIDEO DC30 series offers
digital real-time overlay. Please also see our website
(http://www.pinnaclesys.com) for hardware compatibility.
The following diagram illustrates the possible connections:
Combined audio
input/output
VCR
VCR
TV
VCR
Inputs:
Audio output of the video source,
microphone, tape recorder, CD player, ...
VCR
Camcorder, VCR, TV tuner, ...
Composite video input
S-Video input
Composite video output
S-Video output
Outputs:
Audio input of the VCR,
TV, loudspeakers, ...
VCR
VCR
TV
TV for image preview (optional)
• Video inputs
The miroVIDEO DC30 series connects to any video source (VCR, video
camera, TV tuner, laserdisk, still-video camera) that generates a composite
video signal or an S-Video signal (such as VHS, S-VHS, Hi8, Video 8).
• Video outputs
To record video sequences back to tape, connect a composite or S-Video
VCR to the miroVIDEO DC30 series. Video sequences can also be
displayed on a TV or computer monitor.
• Audio codec
The audio codec integrated on the miroVIDEO DC30 series board digitizes
the sound during video digitization, providing synchronous playback of
video and audio.
Overview
3
Page 10

• Video formats
The NTSC and PAL and SECAM (video input only) TV standards are
supported.
• Video compression
The integrated JPEG processor on the miroVIDEO DC30 series compresses
video sequences in real-time in Motion-JPEG format.
• Optimized bus interface
The miroVIDEO DC30 series supports the PCI bus mastering mode and is
therefore capable of transferring the uncompressed video data for the video
overlay to suitable PCI graphics boards simultaneously to the compressed
audio and video data.
• Digital video editing
The miroVIDEO DC30 series offers all the possibilities of a digital video
studio: cuts, filters, transparency effects, integration of computer graphics
and computer animation, and much more.
• Best color quality
The video image is scanned at a high color bandwidth at a 4:2:2 ratio
(brightness by color information in accordance with the YUV model).
• Full Screen—Full Motion Video
The performance of a video digitizer is defined on the frame size, frame rate,
and color depth. miroVIDEO DC30 series can digitize full size, full motion
video with 16.7 million colors (24 bits color depth) in real-time.
• Adobe Premiere
The miroVIDEO DC30 series package includes Adobe Premiere. Adobe
Premiere is a software for capturing, editing, and playing back digital video
under Windows.
• Hardware-independent playback
Software, such Adobe Premiere, can generate AVI files using suitable
compressors such as Cinepak. These files can be played back without
specialized hardware.
miroINSTANT Video
miroINSTANT Video is a playback plug-in for Adobe Premiere.
miroINSTANT Video 5 integrates itself into the Adobe Premiere interface.
The plug-in handles the video clips and effects in the timeline and controls
playback and scrubbing directly from the timeline.
Important: miroINSTANT Video does not run on a single miroVIDEO DC30.
Please refer to the chapters describing miroINSTANT Video on Page 90.
4
miroVIDEO DC30 Series User´s Guide
Page 11

This chapter tells you which computer system components are required for the
operation of the miroVIDEO DC30 series, which devices you can connect to
the board, and what is included in the miroVIDEO DC30 series package
contents.
S
YSTEM REQUIREMENTS
Please make sure your system meets the following requirements before
installing the miroVIDEO DC30 series:
Hardware
Computer:
Pentium computer (recommended: Pentium 200 MHz or higher) with an empty
master bus PCI slot.
Memory
Windows 95/98
At least 32 MB, recommended 64 MB.
Windows NT / Windows 2000
64 MB or more.
Before you begin
Hard disk
Hard disk with a sufficiently high data transfer rate and enough capacity. For
more details, read the following:
• Data transfer rate
The higher the desired video quality, the higher the required data transfer
rate of the hard disk. For S-Video quality 2 MB/sec of data has to be
transferred, for high S-Video quality approximately 3-4 MB/sec. The
miroVIDEO DC30 is capable of digitizing a maximum data rate of 6
MB/sec, the miroVIDEO DC30 SPEED / plus is capable of digitizing a
maximum data rate of 7 MB/sec. The data transfer rate of your hard disk has
to be approximately 50% higher than the data rate for video capturing.
• Hard disk capacity:
For capturing video, you need a hard disk with sufficient capacity. When
capturing, for example, S-Video approximately 120-200 MB per minute
have to be saved.
Before You Begin
5
Page 12

To accelerate capturing and playing back a large amount of data, we
recommend that you defragment your hard disk before capturing/playing back
video. Under Windows 95 / 98 you will find a defragmentation utility under
Start, Programs, Accessories, System Tools, Disk Defragmenter. If you use
miroVIDEO DC30 series under Windows NT, use a tool you can obtain from
your computer store to defragment your hard disk.
Graphics board and monitor
A graphics system with at least 8 bits color depth (256 colors) is required. If
you want to display an overlay using the miroVIDEO DC30 series board, your
graphics board has to support DirectDraw at the selected Windows resolution.
The following graphics cards have been tested by Pinnacle for Microsoft Direct
X Surface Overlay:
Windows 98 Windows NT
3DFX Voodoo 3 /3000
ATI Expert @ Play ATI Expert @ Play (AGP & PCI )
ATI Expert @ Work ATI Expert @ Work (AGP & PCI)
ATI Expert XLATI XL
ATI Expert 98, 99
ATI Rage (chip set) ATI Rage (chip set)
ATI Rage 128 Fury ATI Rage 128 Fury
ATI Rage Pro (chip set) ATI Rage Pro (chip set)
ATI Rage II, III (chip sets) ATI Rage II, III (chip sets)
Diamond Viper V-550 (AGP & PCI) Diamond V550 (TNT)
Diamond Viper V-770 (AGP & PCI)
Diamond Stealth 3D 2000 & 4000
Diamond Stealth GII460
Elsa Victory 2 (Banshee) Elsa Victory 2 (Banshee)
Elsa Victory Erazor 4 MB Elsa Erazor III (TNT 2)
Intel 1740 (chip set)
Matrox Millenium
Matrox Millenium G200 Matrox Millenium G200
miroMagic Premium (Riva 128) miroMagic Premium (Riva 128)
Riva TnT (chip set)
Riva 128 (chip set)
S3 Savage 3D S3 Savage 3D
S3 Virge (chip set)
6
miroVIDEO DC30 Series User´s Guide
Page 13

Sound board
If you use the miroVIDEO DC30 series board under Windows NT, an
additional sound board has to be installed in your system.
Software
Windows 95 (OSR2), Windows 98 or Windows NT 4.0 (SP3 or higher).
Support for Windows 2000 is planned.
Video/audio devices
Video input
The miroVIDEO DC30 series connects to any video source (VCR, video
camera, TV tuner, laserdisk) generating a composite video or S-Video signal in
PAL, NTSC, or SECAM quality.
Video output
The miroVIDEO DC30 series video output connects to any video device
(television set, VCR, camcorder) that supports a composite video or an S-Video
signal in NTSC, or PAL.
Audio input/output
The miroVIDEO DC30 series package contents includes a Y adapter you can
use to connect the audio inputs/outputs of your audio devices (such as a
microphone, CD player or powered speakers.
Cables
To connect video/audio devices to the miroVIDEO DC30 series board, you
need suitable cables (Cinch or S-Video cables).
Before You Begin
7
Page 14
P
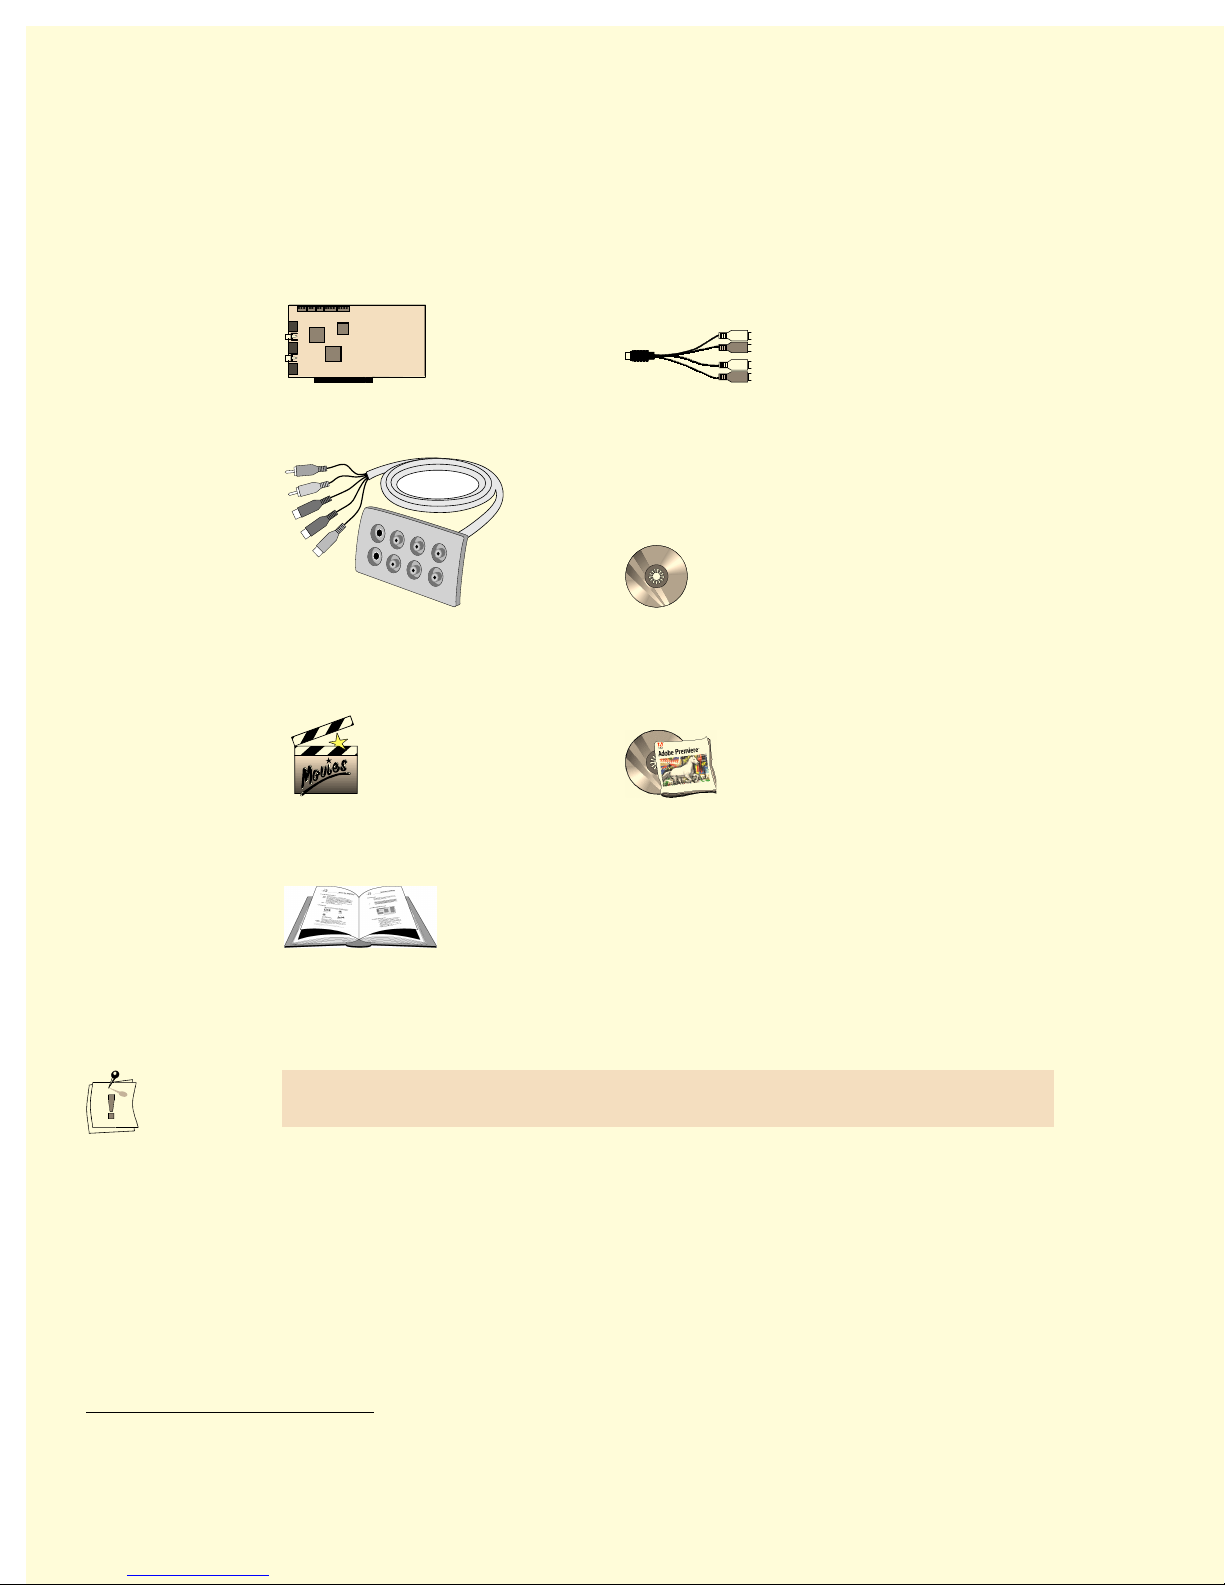
ACKAGE CONTENTS
Please make sure your miroVIDEO DC30 series system is complete before you
begin the installation. The system includes*:
miroVIDEO DC30 board**Y audio cable
Breakout Box CD with drivers, extended
Comes with DC30pro Adobe Premiere Presets and
Available for other DC30s documentation
miroINSTANT Video (on CD) Adobe Premiere
miroVIDEO Capture (on CD)
Documentation
If any parts are missing, please contact your retailer. Additional peripherals,
such as the Breakout Box, are available from your retailer.
Computer components are sensitive to electrostatic charge. Do not take the
miroVIDEO DC30 series board out of its antistatic package until you install it.
*
Depending on the delivery scope, the package contents may vary from the contents listed in this manual.
**
For model and serial number of your board, refer to thelabel on the board.
8
miroVIDEO DC30 Series User´s Guide
Page 15

E
XISTING VIDEO CAPTURE BOARD
If you have already installed a video capture board in your computer, you must
de-install and remove this board before installing the miroVIDEO DC30 series
board. To do so, you must also remove the corresponding software, while the
board is still installed. To do so, select Settings in the Start menu, select
Control Panel and System, Device Manager and Sound, video and game
controller. Click on your video board and on Remove.
D
EFRAGMENTING THE HARD DISK
Before installing and configuring the miroVIDEO DC30 series, defragment
your hard disk/s. You find the Windows 95 / Windows 98 defragmentation
utility under Start > Programs > Accessories > System Tools > Disk
Defragmenter. If you use miroVIDEO DC30 series under Windows NT, use a
utility, which you can obtain from your computer store, to defragment your
hard disk. Or go to Start > Run and type in “defrag.”
Before You Begin
9
Page 16

The following chapter is designed so that you can start using your miroVIDEO
DC30 series board immediately.
For more detailed installation instructions, please refer to the subsequent
chapters in the manual. Detailed configuration options are listed in the
appendix, beginning on page I.
Q
UICK INSTALLATION
Proceed as follows to install the miroVIDEO DC30 series hardware and
software:
Install Adobe Premiere.
; Place the Adobe Premiere-CD-ROM in your CD-ROM drive.
; If the installation program is not started automatically, select Run…
; Depending on your drive, enter, for example:
; Follow the installation instructions on the screen.
Quick start
from the Start menu.
e:\premiere\setup,
then click OK.
Install the miroVIDEO DC30 series board.
; Turn your computer and all peripherals off.
; Remove the necessary cables.
; Open the computer’s housing.
; Remove the slot cover.
; Insert the board into bus master PCI slot.
; Reassemble your computer.
; Reconnect all cables.
Connect video source(s) to the video input(s)*.
; Connect video sources with composite outputs to the composite input
and/or connect video sources with S-VHS outputs to the
S-VHS input.
Connect a VCR/television to the video output
; Connect the VCR/television to the appropriate video output (composite
or S-VHS).
*
For help with this, refer to the board layout on page 17.
*
.
10
miroVIDEO DC30 Series User´s Guide
Page 17

Establish the audio link
Connect a Y adapter to the audio input/output.
;
Connect the audio source to the Line In connection on the adapter.
;
Connect a VCR or active boxes to the Line Out connection on the
;
*
.
adapter.
Switch your computer on.
;
Install the miroVIDEO DC30 series software.
Turn on the PC and start Windows.
;
Place the CD-ROM in the CD-ROM drive.
;
Follow the installation program instructions on the screen.
;
Run the hardware test (Windows 95/98 only).
Test your hardware to make sure it is operating correctly.
;
miroVIDEO EXPERT starts up automatically to check your system’s
;
performance level.
Quit hardware test by clicking OK.
;
V
IDEO RECORDING
—Q
UICK START
Start miroVIDEO Capture.
Start miroVIDEO Capture from the miroVIDEO DC30 series program
group, or directly from the Desktop if you have selected this option during
the installation.
Specify the user type.
Select the
Standard
user type.
Make the necessary adjustments for your video.
Select the
Projects
tab. Specify the
Video standard
and the
Quality
.
Check audio settings.
Check if you want to capture the clip with or without
audio
.
Select the video and audio inputs and outputs.
In the
Settings
Note that
the CD-ROM or sound card to the DC30 card.
tap adjust the necessary options.
internal
audio refers to a connection inside the computer from
External
audio refers to a
connection outside the computer, from a tape deck or camcorder to the
Breakout Box.
*
For help with this, refer to the board layout on page 17.
Specify the capture drive.
In the
Settings
tab specify the capture drive and directory.
Quick Start
11
Page 18

Record the clip.
Click the Record button to start recording. Click the Stop button to stop
recording.
P
LAYBACK WITH MEDIAPLAYER
Proceed as follows to play the edited video sequence on a television or to
record it on videotape:
Start media playback.
Start MediaPlayer from the miroVIDEO DC30 series program group.
Select the video output.
Use the DC30 series Control to select the video output (Window, S-VHS,
Composite video) and define the output standard if required.
Play the file back.
Select Device and miroAVI Cache and then select the AVI file to play
back.
S
INGLE FRAMES
—Q
Proceed as follows to capture single frames rather than a video sequence:
Start miroVIDEO Capture.
Start the miroVIDEO Capture application from the miroVIDEO DC30
series program group, or directly from the Desktop.
UICK START
—Q
(W
UICK START
INDOWS
95/98
ONLY
)
Select Record tab.
Select the Record tab and click on the Start Record button. The video
sequence is display in the overlay window.
Click left
Click the left mouse button into the overlay window to capture a single
frame. The frame is copied into the Windows Clipboard and can be pasted
into any picture editing application.
What’s next?
For more detailed instructions concerning any of the above functions, please
refer to the appropriate section below.
You can also find information concerning the installation of a PCI expansion
board in the documentation supplied with your computer.
12
miroVIDEO DC30 Series User´s Guide
Page 19
Installing Adobe Premiere
The following chapter describes the procedure to install Adobe Premiere
You must install Adobe Premiere before installing the miroVIDEO DC30
series board in your computer, because the miroVIDEO DC30 series presets
must be copied to the appropriate Adobe Premiere folder during the installation
of the miroVIDEO DC30 series software, and software installation starts
immediately after the hardware installation.
Proceed as follows to install Adobe Premiere:
1. Place the Adobe Premiere CD-ROM in your CD-ROM drive.
2. If the installation program is not started automatically, select Run… from the
Start menu.
.
3. Depending on your drive, enter, for example: e:\Autoplay.
If your CD-ROM drive has a different drive designation, change the path
accordingly.
— or —
Installing Adobe Premiere
13
Page 20
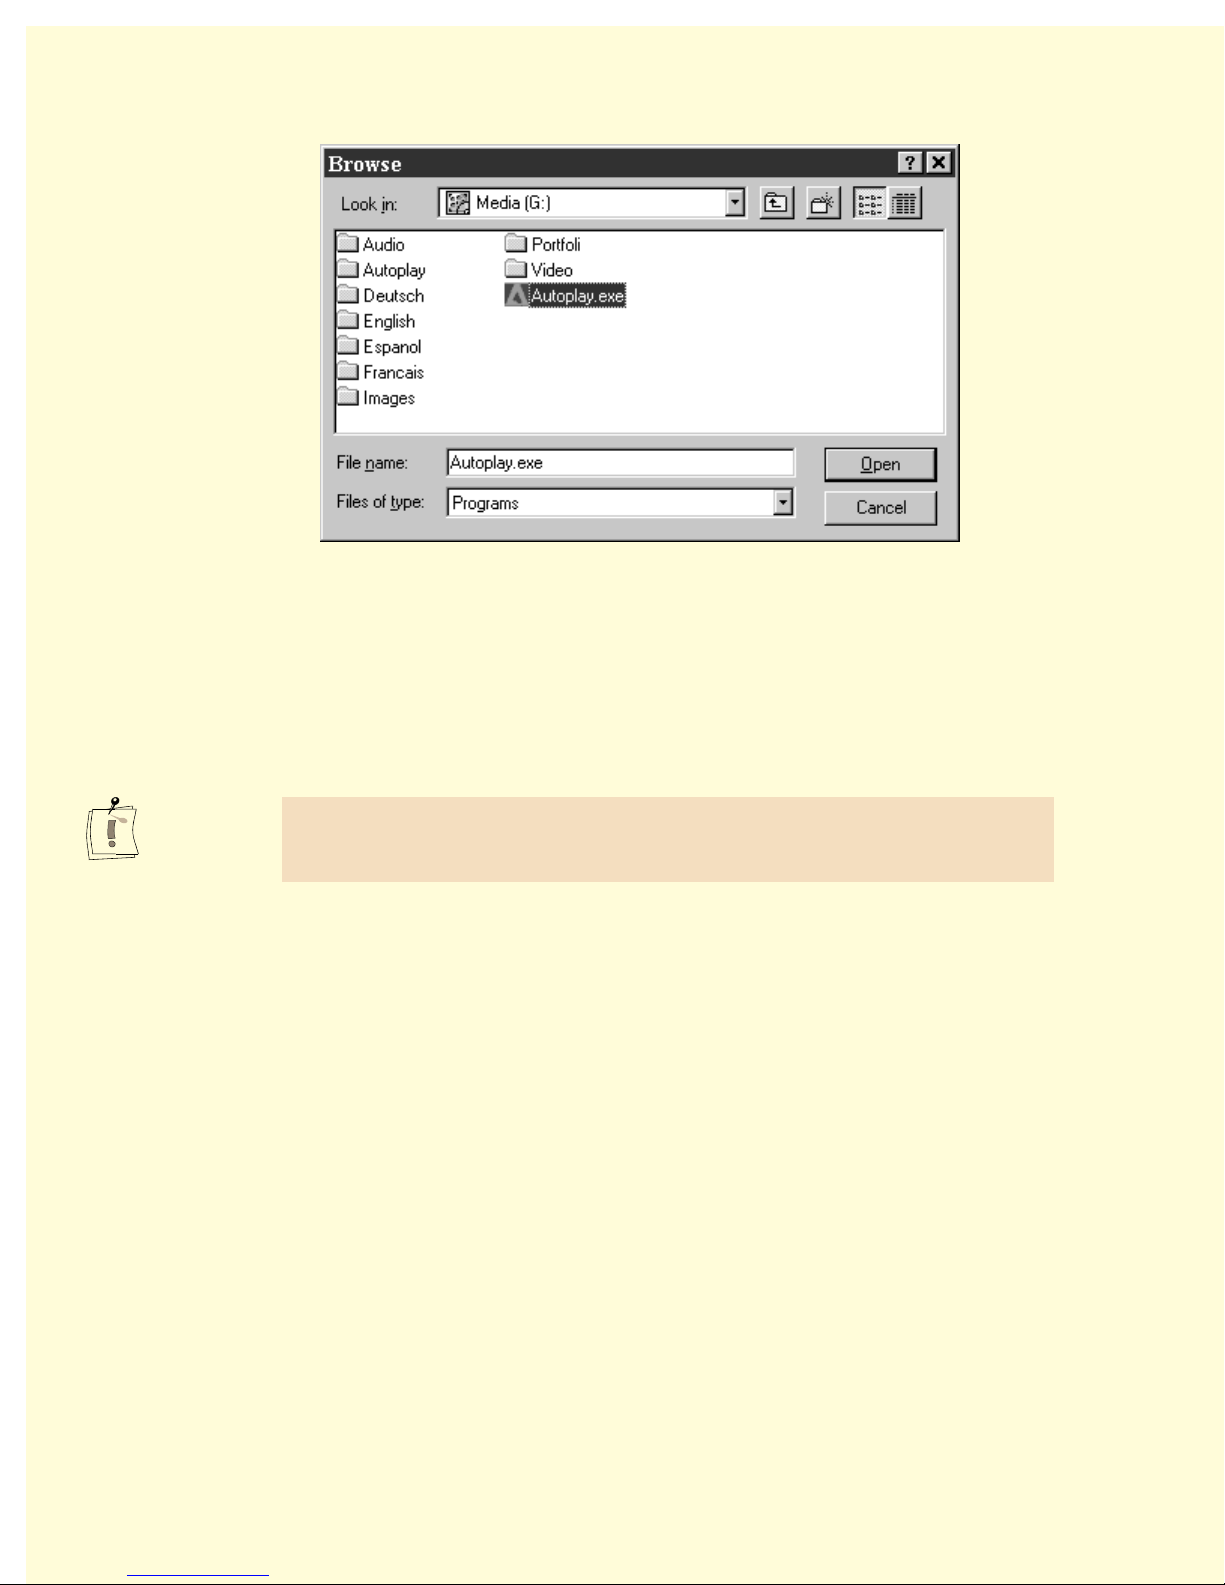
Click on Browse..., switch to your CD-ROM drive and to the directory
mentioned above and double-click the Autoplay.exe file.
4. Click OK.
5. Follow the program installation instructions on the screen.
After you have installed Adobe Premiere on your computer, you can install the
miroVIDEO DC30 series board.
If you ever need to reinstall Adobe Premiere, please remember to run the DC30
series installation again, selecting at a minimum the Presets and Plug-ins. DC30
series will not work correctly if these components are missing.
14
miroVIDEO DC30 Series User´s Guide
Page 21

Installing the Hardware
The following chapter explains how to install the miroVIDEO DC30 series into
your computer.
If you have already installed a video capture board in your computer, you must
un-install and remove this board before installing the miroVIDEO DC30 series
board. And you must also remove the corresponding software, while the board
is still installed. To do so, select Control Panel in the Start menu, select
System, Device Manager and Sound, video and game controller. Click on your
video board and click on Remove.
To insert the miroVIDEO DC30 series into your computer, proceed as follows:
1. Discharge yourself.
Discharge yourself charge by touching the metal case of your computer.
2. Switch off the computer, disconnect the cables.
Switch off the computer and all peripheral devices. Pull out the power cord
and disconnect all necessary cables.
3. Remove the cover.
Loosen the screws of the computer’s cover and remove the cover.
4. Select a PCI slot.
Select a free, bus mastering PCI slot.
Slot shields
Slots
Power
supply
unit
PCI slots
Installing the Hardware
15
Page 22
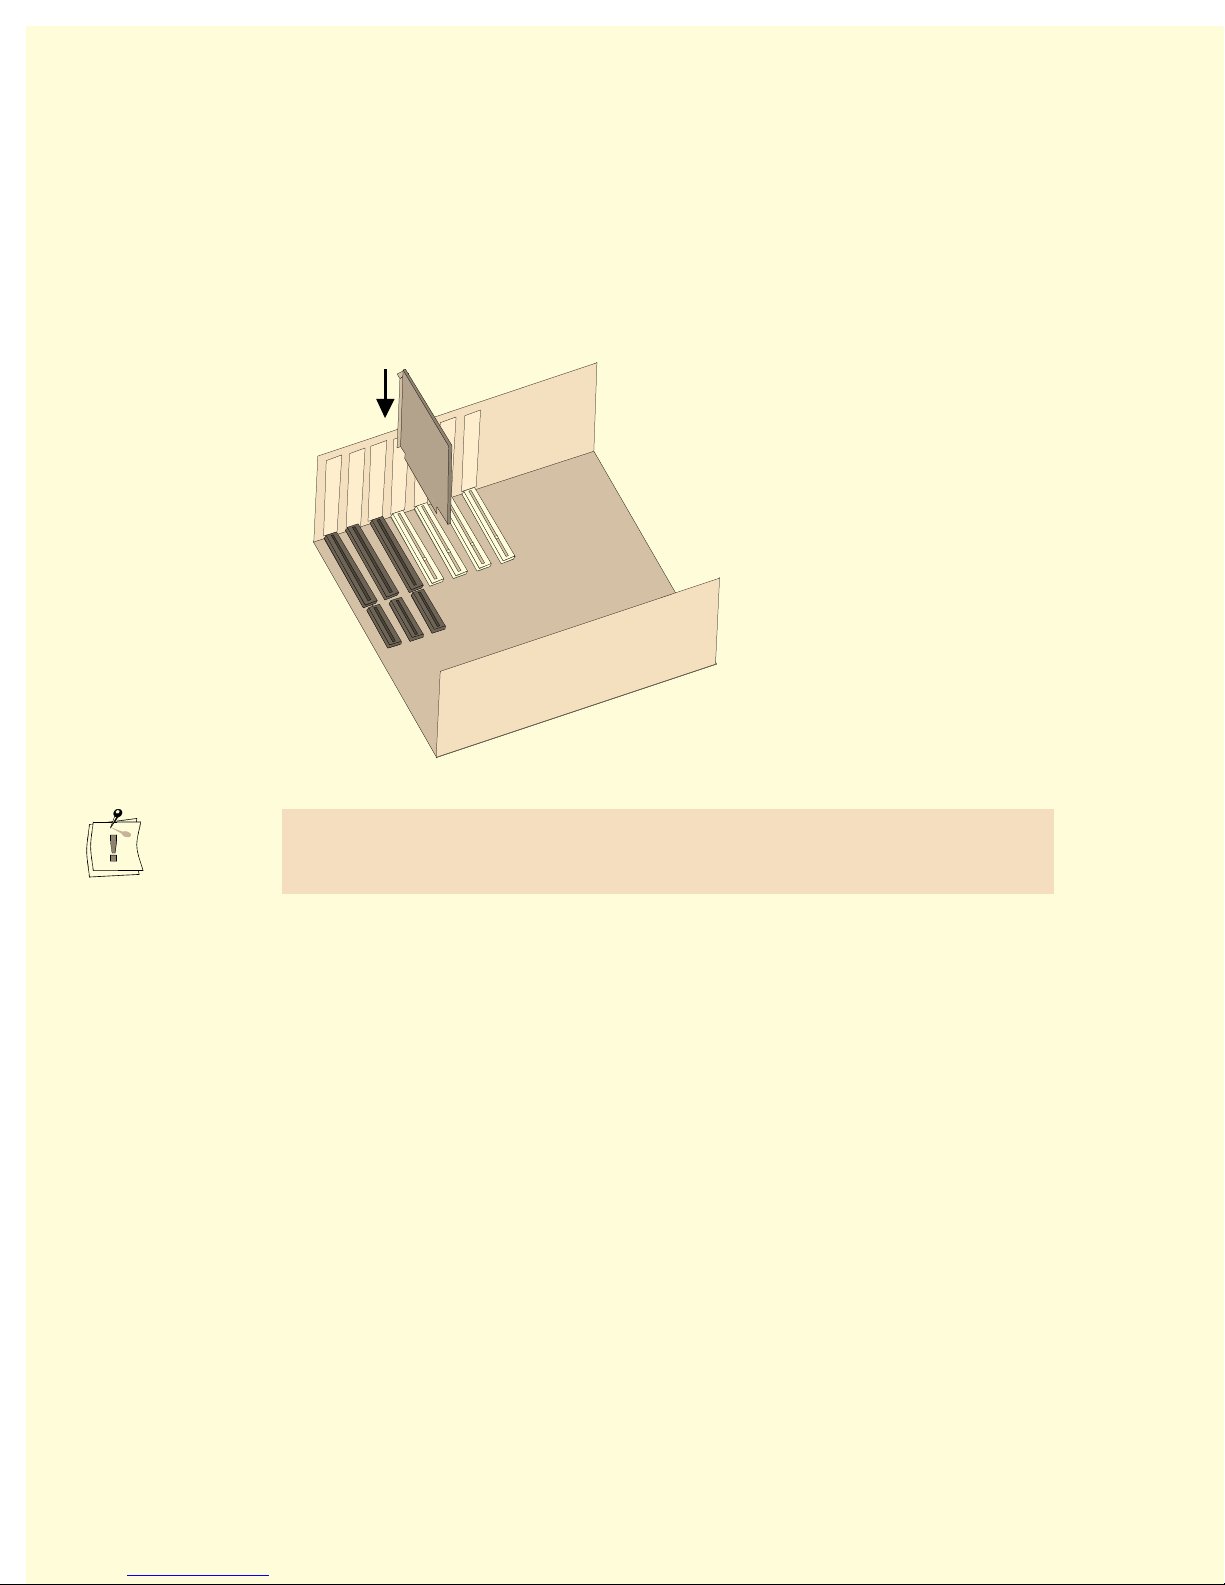
1. Remove the slot shield.
Remove the slot shield at the back of the computer. If necessary, remove the
screw at the cover.
2. Insert the board.
Insert the board carefully in the selected slot. Hold the board at the top edge
and push both ends simultaneously into the slot. Press the board’s top edge
to make sure that the board is firmly seated in the slot.
If the board cannot be inserted without problems, do not force the board into
place. The contacts at the connector could bend. Instead, pull the board out
carefully and try again.
7. Reconnect the cables.
Tighten the screws and reassemble the computer’s casing. Reconnect the
cables.
The miroVIDEO DC30 series hardware installation is completed. Connect the
video/audio devices as described in the next chapter, and install and configure
the software as described in the “Installing the software” chapter (see page 20).
16
miroVIDEO DC30 Series User´s Guide
Page 23
Connecting the
Video and Audio Devices
The following section shows you how to connect your video and audio devices
(which have to be powered off) to the miroVIDEO DC30 series board. To do
so, you need suitable cables.
For detailed sample configurations, refer to the Appendix A beginning on
page 154.
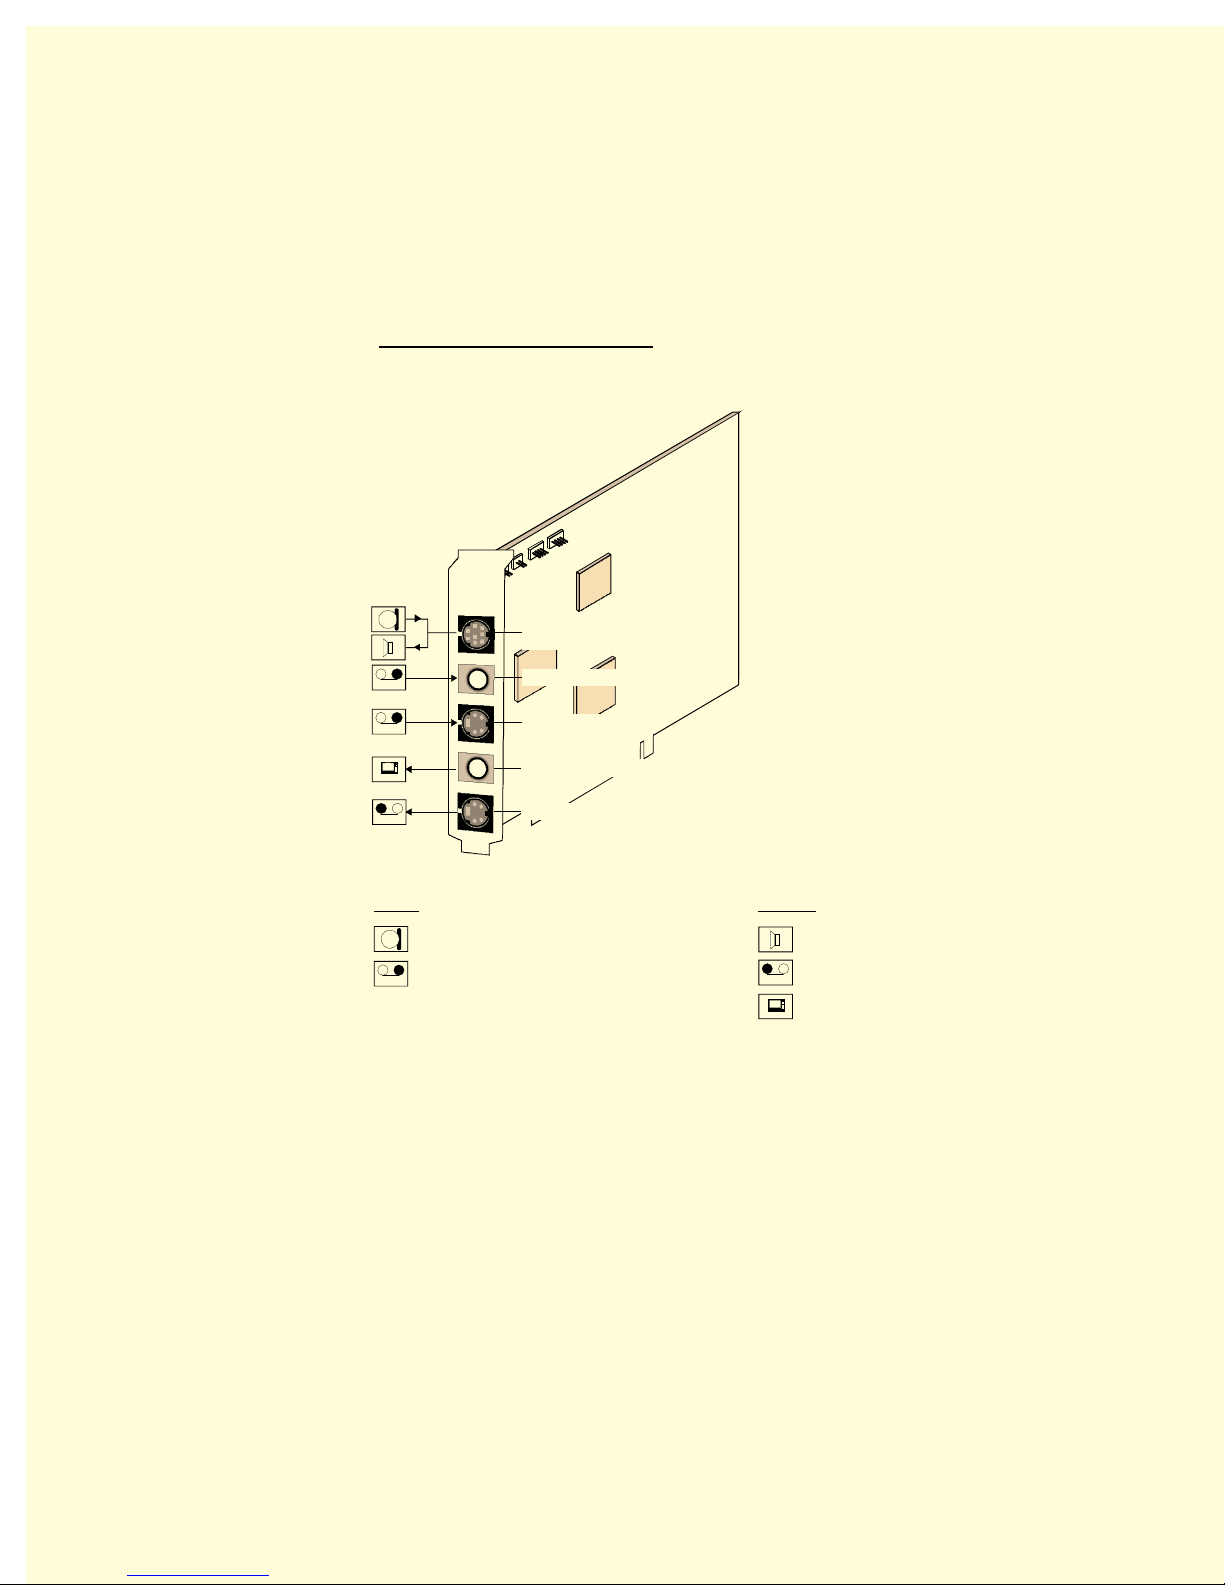
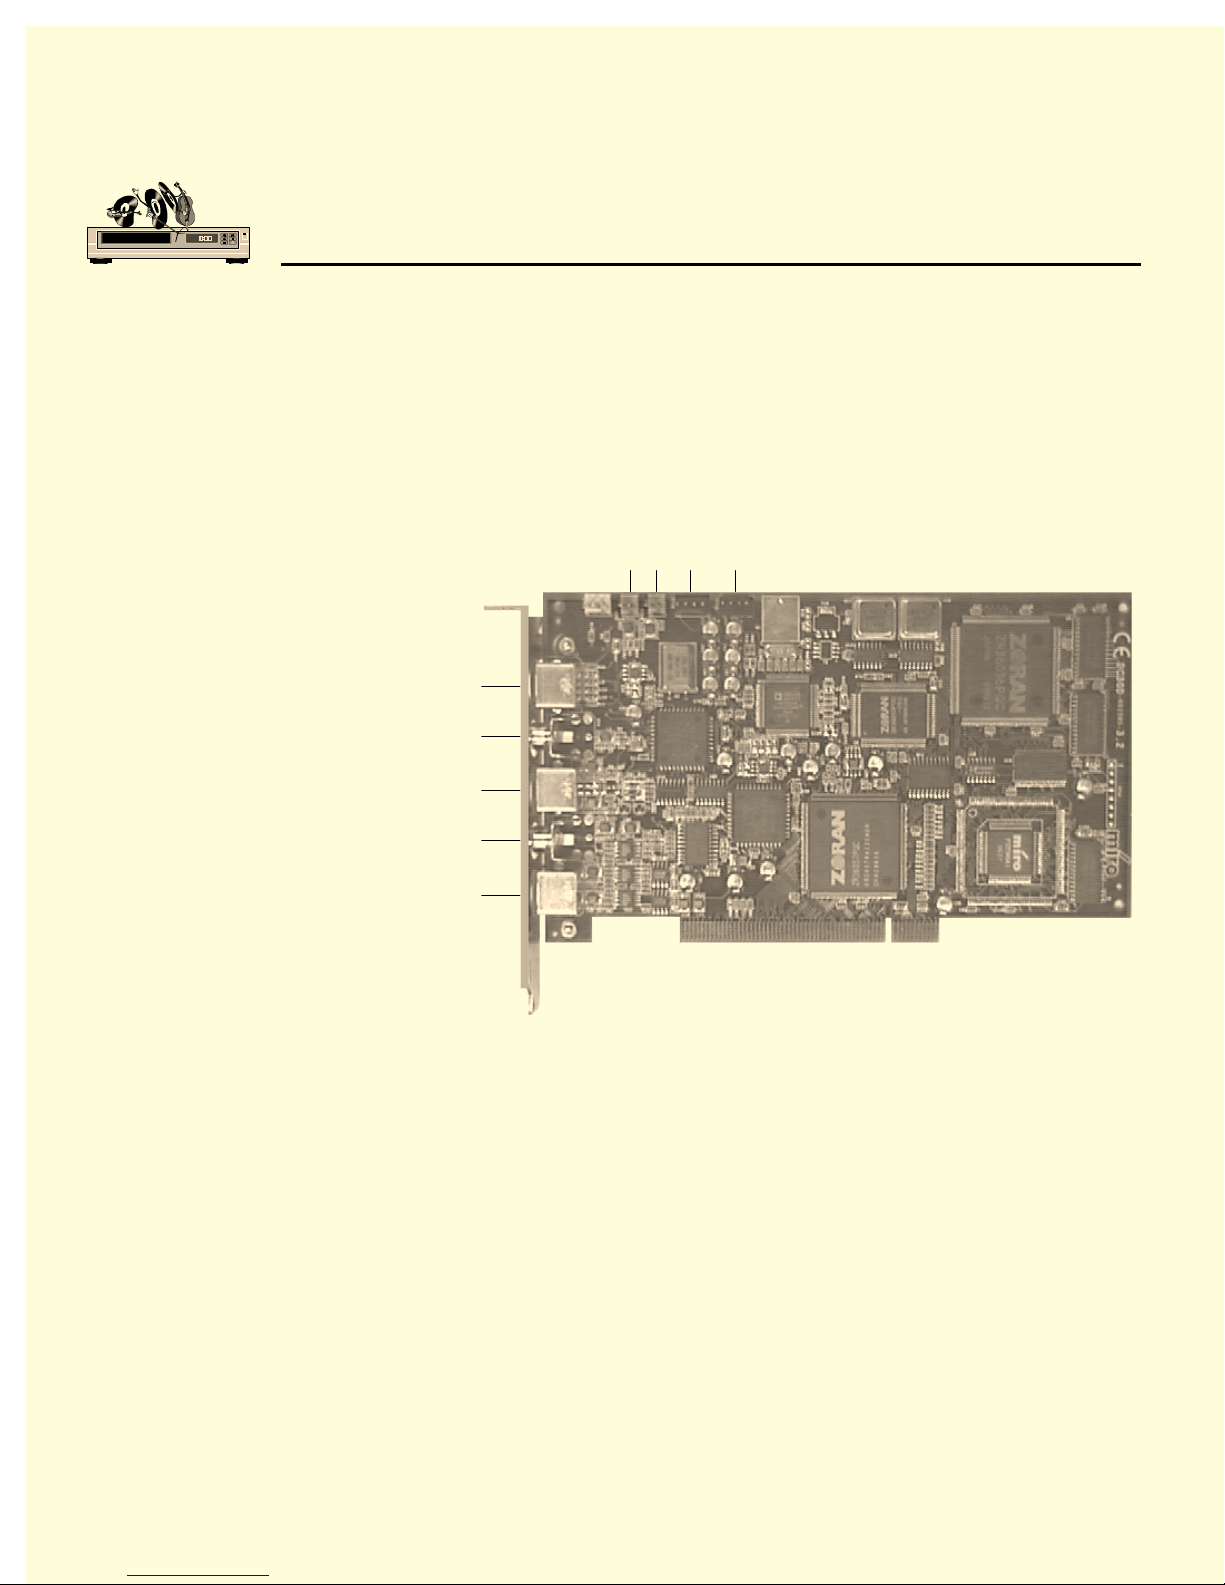
The following diagram shows the miroVIDEO DC30 series board and its
connectors. Your board may look different, but the connectors are the same.
Side view
ST8 ST9 ST10 ST12
Combined audio
input/output
Composite
video input
S-Video input
Composite
video output
S-Video output
Internal connectors:
ST8 = Composite video input
ST9 = Composite video output
ST10 = Audio in
ST12 = Audio out
Connecting Video and Audio Devices
17
Page 24

Back view
Combined audio input/output
Composite video input
S-Video input
Composite video output
S-Video output
Inputs
The miroVIDEO DC30 series has one composite input and one S-Video input,
enabling parallel connections of two video sources. The software switches
between the video inputs. The composite input is an RCA female connector,
the S-Video input is a 4-pin Mini DIN female connector.
Outputs
The miroVIDEO DC30 series also has a composite (RCA female connector)
and an S-Video output (4-pin Mini DIN female connector) to connect a VCR
and/or TV or monitor.
C
ONNECTING VIDEO DEVICES
Video input/s
• If you have a video source with S-Video output, connect it to the
miroVIDEO DC30 series’ S-Video input with a suitable cable.
• If you have a video source with Composite video output, connect it to the
miroVIDEO DC30 series’ Composite video input with a suitable cable.
Video output/s
• Connect a video recorder and/or television set to the S-Video output with a
suitable cable.
• Connect a video recorder and/or television set to the Composite video output
with a suitable cable.
18
miroVIDEO DC30 Series User´s Guide
Page 25
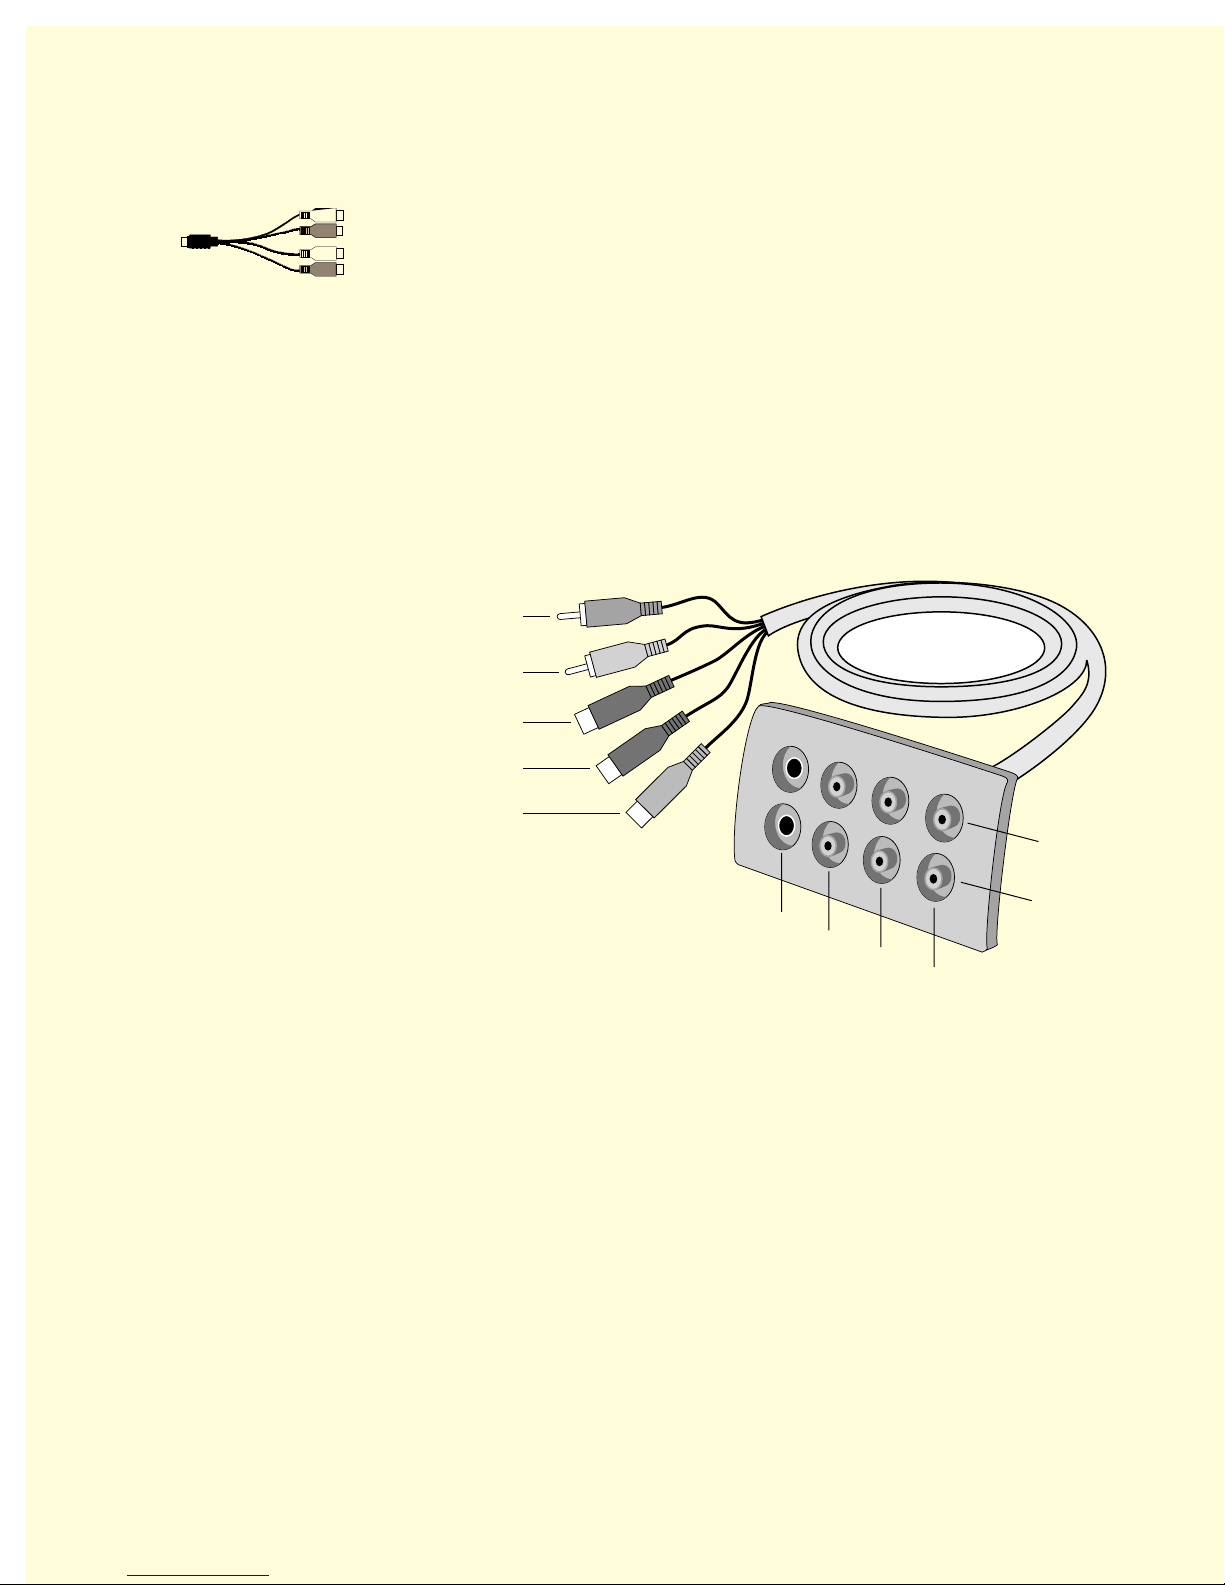
C
ONNECTING AUDIO DEVICES
• Connect the supplied Y adapter to the combined audio input/output.
• Connect the audio output of your video source, a microphone, or any other
audio source (CD player, tape recorder etc.) to the In connectors of the
adapter.
• Connect the audio input of your VCR, TV set or powered speakers to the
Out connectors of your adapter.
• Connect the Breakout Box cable ends to the corresponding sockets on the
miroVIDEO DC30 series board.
• Place the Breakout Box in a convenient location. Connect your external
video and audio source devices to the panel.
.
Composite video input (red)
Composite video output (yellow)
Combined audio input/output
S-video input (black, 4-pin)
(black, 8-pin)
S-video output (gray)
S-video
Composite
video
Left
audio
Right
audio
Outputs
For more details on the different connections, refer to the Appendix. In
addition, you will find a specification of the Y adapter in the “Technical Data”
on page 151.
Inputs
Connecting Video and Audio Devices
19
Page 26

Installing the
Software for Windows 95/98
Once you have installed the miroVIDEO DC30 series into your computer, you
can install the miroVIDEO DC30 series drivers and software. The installation
steps for the Windows 95 (OSR2), Windows 98 and Windows NT are slightly
different.
Windows 95
If you have Windows 95 installed on your computer, please proceed with the
section “Installing the drivers for Windows 95 on page 21.
The complete installation consists of the following steps:
Installing drivers for Windows 95 on page 21.
Installing the software for Windows 95 / Windows 98 on page 26.
Windows 98
If you use Windows 98, please proceed with the “Installing the drivers for
Windows 98” section on page 25.
The complete installation consists of the following steps:
Installing drivers for Windows 98 on page 25.
Installing the software for Windows 95 / Windows 98 on page 26.
Windows NT
If you use Windows NT, please read the “Installing the software for
Windows NT 4.0” chapter on page 33.
Among other things, installing the miroVIDEO DC30 series software copies
the miroVIDEO DC30 series drivers to your hard disk. The miroVIDEO DC30
series program group is created, and the expanded Adobe Premiere project
defaults (Presets) are copied to your hard disk.
20
miroVIDEO DC30 Series User´s Guide
Page 27
I
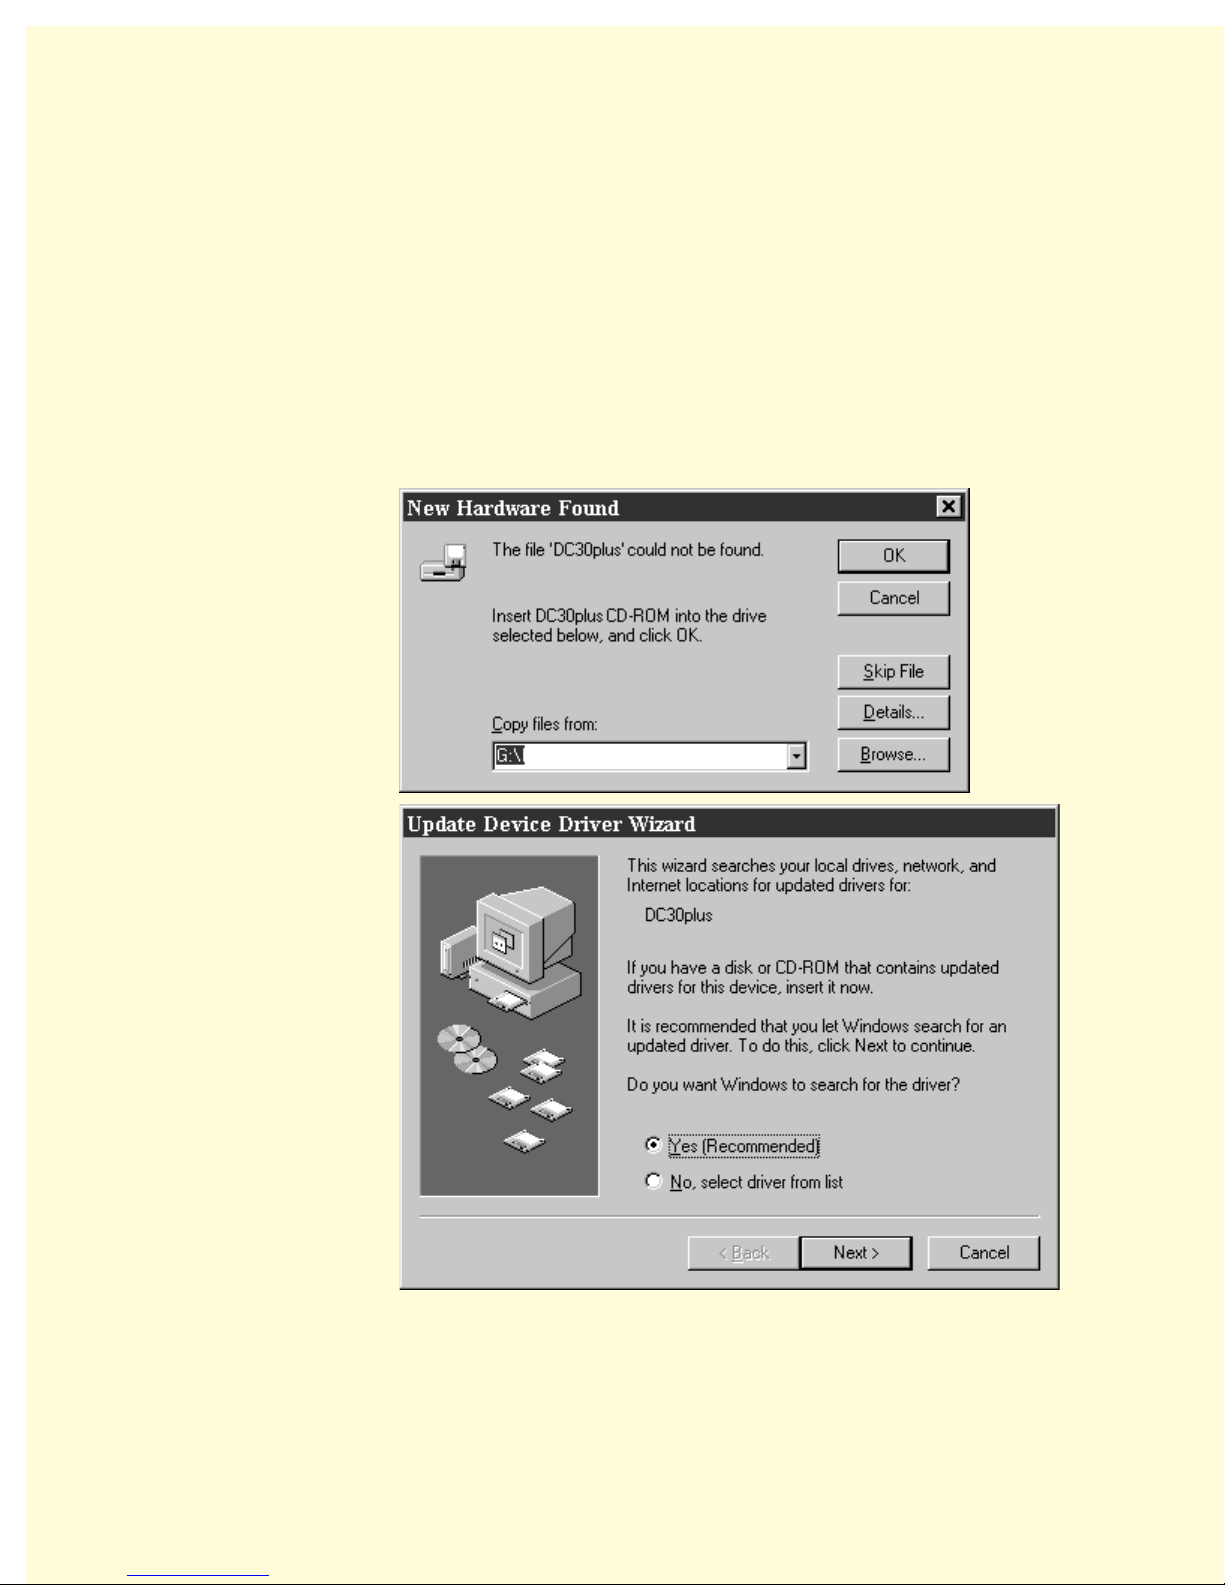
NSTALLING THE DRIVERS FOR WINDOWS
At this point, the miroVIDEO DC30plus board should already be installed in
your computer. To install the drivers for Windows 95, proceed as follows:
1. Switch on computer.
Switch on your computer. Windows 95 is started automatically.
If your computer is configured in such a way, that Windows 95 is not started
automatically, please start Windows 95 now.
After Windows 95 starts, the New hardware component found dialog box
appears followed by the Update Device Driver Wizard dialog box.
95
2. Click Next.
Click on the Next button.
3. Insert the CD-ROM.
Insert the miroVIDEO DC30plus CD-ROM into the CD-ROM drive.
Installing the Software for Windows 95/98
21
Page 28
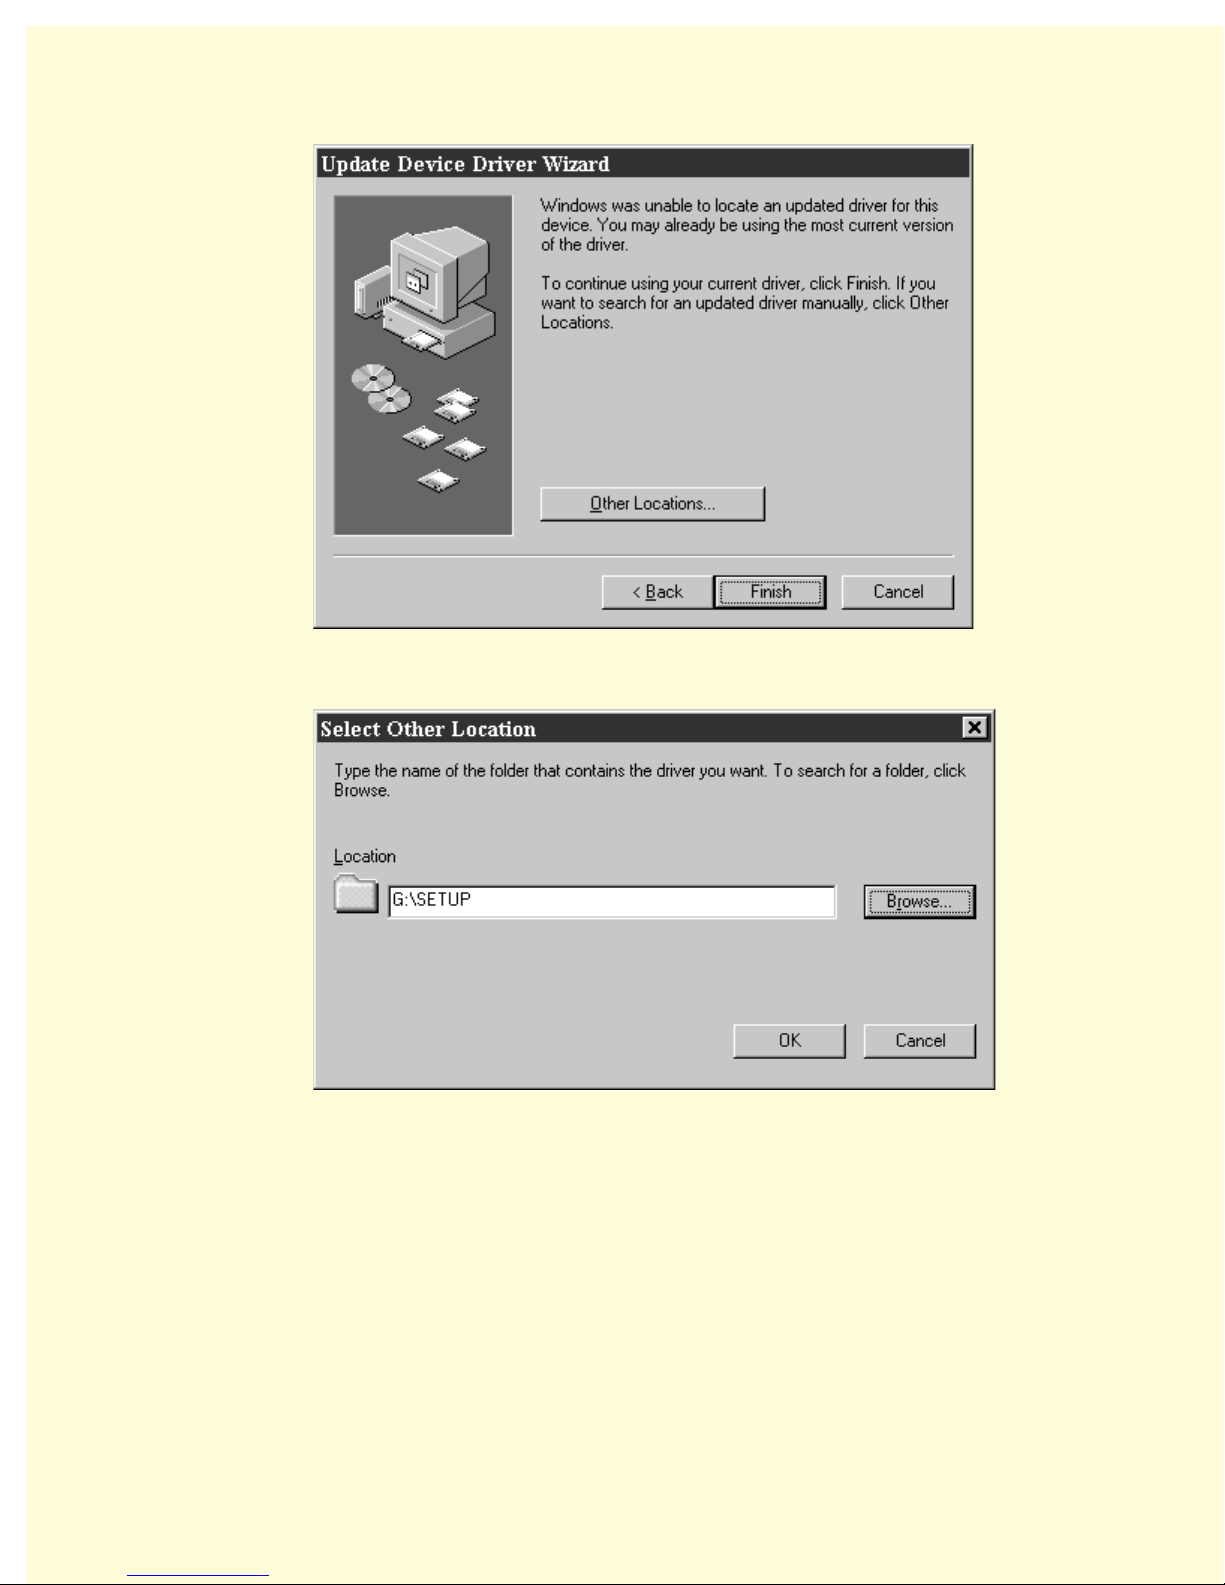
4. Click Other Locations... .
Click on the Other Locations... button.
5. Click Browse... .
Click on the Browse... button.
6. Switch into the :\SETUP directory, click OK.
Switch to your CD-ROM drive and go into the \SETUP directory. Click
OK.
7. Click Next.
Click on the Next button.
8. Click OK and Browse... again.
When your system requests you to insert the CD-ROM again, click on OK
and once again on Browse... .
22
miroVIDEO DC30 Series User´s Guide
Page 29
9. Switch into the \SETUP directory, click OK.
Switch to your CD-ROM drive and go into the :\SETUP directory. Click
OK.
10. Clic k OK.
Click the OK button again.
After the drivers have been copied, the installation program starts
automatically. Proceed with the “Installing the software for Windows 95 /
Windows 98” section on page 26.
Be sure you have the latest driver!
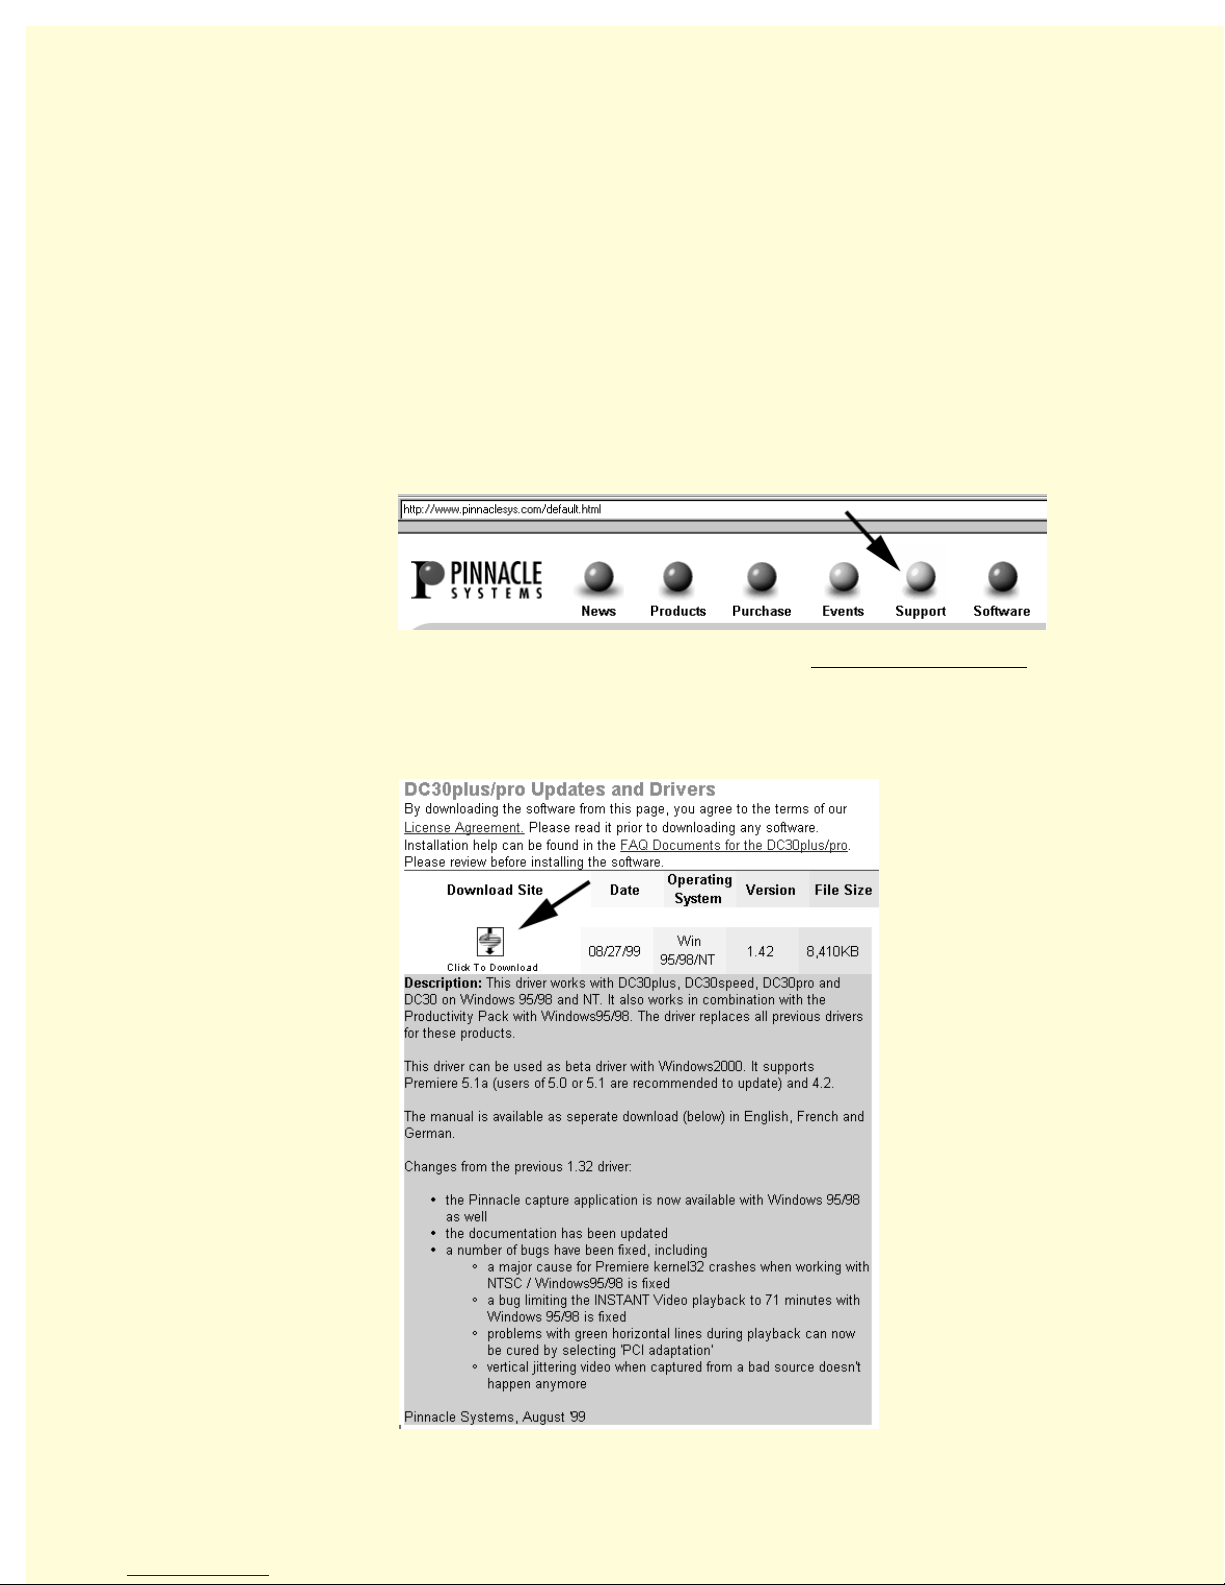
1. Go to the Pinnacle Systems Website at www.pinnaclesys.com and click
on Support. Click on the
download site.
DC30plus
or
DC30pro
links to navigate to the
2. Click on the download icon to download the new driver to your computer.
Installing the Software for Windows 95/98
23
Page 30

3. Double-click on the driver updater icon on your desktop to launch the
installation program.
24
miroVIDEO DC30 Series User´s Guide
Page 31

I
NSTALLING THE DRIVERS FOR WINDOWS
1. Switch on computer.
Switch on your computer. Windows 98 is started automatically.
If your computer is configured in such a way, that Windows 98 is not started
automatically, start Windows 98 now.
After Windows 98 starts, the new hardware is found, and the Add New
Hardware Wizard dialog box appears.
2. Click Next.
Click on the Next button.
98
3. Select Search for the best driver for your device (Recommended), click
Next.
Chose the Select Search for the best driver for your device (Recommended)
option , and click on the Next button.
4. Enter Specify a location, click Browse... .
Activate the check box Specify a location, and click on Browse... .
5. Change on the CD-ROM drive and into the :\SETUP directory, click
Next.
Change on the CD-ROM drive and into the \setup directory, and click the
Next button.
6. Click OK.
To finish the installation, click on the OK button.
Installing the Software for Windows 95/98
25
Page 32

The drivers are being installed. After the drivers have been copied, the
installation program starts automatically. Proceed with the “Installing the
software for Windows 95 / 98” section on page 26.
See the note about installing the latest driver on page 23.
I
NSTALLING THE SOFTWARE FOR WINDOWS
After installing the driver, you can install the remaining miroVIDEO DC30
series software (miroINSTANT Video, Adobe Presets etc.) using the
installation program.
The installation program
The installation program is started automatically in the language specified via
the Regional Settings (Start Menu, Settings, Control Panel, Regional Settings)
of the installed Windows version.
If you use other regional settings than English, German or French, you will
have to select the language in which you wish the installation carried out.
1. If necessary, change the language, click Next.
If necessary, select the language in which you wish the installation carried
out.
If you have activated the German, English, or French Regional Settings and
nevertheless want to change the language of the installation program, click
the button Back first and then select the language.
95 / W
INDOWS
98
Click on the Next button.
This installation step is not required, if you have activated the German, English,
or French Regional Settings.
2. Select a setup type.
In the Setup Type window, select whether you prefer a typical, a compact, or
a user-defined installation.
Typical: Installs all components and uses the default settings. Choose this
option for virtually all installations.
Compact: Skips some components, such as the online manual, and uses
the default settings. We do not recommend this option.
Custom: Lets you select the components and allows to adjust the settings
individually. Choose this option only if several versions of Premiere are
installed on your computer or your system hard disk is very slow.
26
miroVIDEO DC30 Series User´s Guide
Page 33

3. If necessary, change the hard disk / directory.
If you wish to copy the files to another hard disk / another directory, click on
the Browse... button and define the hard disk / the directory. Install the
driver software on the system hard disk, not on the video hard disk!
4. Click Next.
Click on Next to proceed with the installation.
5. If necessary, select the components.
If you have chosen Custom as setup type, you can directly choose those
components in the dialog box Select Components, which you want to install.
By clicking on Details... you open the window Select Sub-components. Here
you can determine the components even more precisely.
− System Software
−
− Adobe Premiere AddOns
− Extended presets for Adobe Premiere 4.2
Drivers for Windows 95 / Windows 98.
miroVIDEO series utilities
The capture application miroVIDEO Capture for capturing clips, tools,
helps and ReadMe file.
Including miroINSTANT Video. miroINSTANT Video allows to save
valuable computing time when creating projects with Adobe Premiere.
The Change... button lets you choose between three intro movies for PAL
and NTSC. The intro movies help you switch on the VCR just in time
when recording video.
Presets for Adobe Premiere which have been developed especially for the
miroVIDEO DC30 series board and the PAL and NTSC standard.
Installing the Software for Windows 95/98
27
Page 34

−
Documentation
The User’s guide is also available in PDF format and can be opened with
the Acrobat Reader. If Acrobat Reader has not already been installed on
your computer, use the Documentation option to install it.
After having determined the components, click Next.
This installation step is not required, if you have chosen Typical or Compact as
setup type.
6. Select video standard, click Next.
Select the video standard you use and click on Next.
7. Click Next.
In the Start copying files window, all components you chose are listed. If
you wish to change the settings you chose, click on Back. Click Next to start
copying.
8. Click Finish.
In the Complete Setup window you are asked to restart Windows. Please
carry out this prompt and click on Finish to complete the installation of the
miroVIDEO DC30 series.
Hardware Test (Windows 95 / 98 Only)
After the restart, the miroVIDEO DC30 series Hardware Test program starts.
The hardware test program is used to test your miroVIDEO DC30 series
hardware and to analyze your computer system.
Click on the More>> button to expand the dialog box window to include the
Extended Settings area. For further information, click on the Help button.
28
miroVIDEO DC30 Series User´s Guide
Page 35

9. Click Test.
To test the hardware, click on Test.
You will be shown the following information:
Version info
PCI video
overlay with
graphics board
All the drivers and programs used by the miroVIDEO DC30 series, together
with their version numbers, are listed under this heading.
DirectDraw found
If during the hardware test, a current version of DirectDraw together with
the corresponding graphics board’s driver will be found on your computer, a
green symbol will automatically appear in front of the option DirectDraw
found.
If no current version of DirectDraw is found, a red symbol will appear
instead, and no overlay will be possible.
DDraw primary surface supported
If your computer supports the Primary Surface in the current graphic mode,
a green symbol automatically appears in front of the option DDraw primary
Surface supported.
If, currently, the primary surface is not supported, there will be no overlay
representation with the function primary surface at the moment.
DDraw overlay surface supported
If your computer supports Overlay Surface in the current graphic mode, the
DDraw overlay surface supported check box will be activated
automatically.
Tests
Notes
Here, the results of the hardware test (Test button) are displayed. This indicates
whether all the miroVIDEO DC30 series components are operating correctly. If a
faulty function is detected, a corresponding message appears. In this case, insert the
miroVIDEO DC30 series board in a different slot and test it there.
This section displays notes regarding the current hardware of miroVIDEO DC30
series.
If the miroVIDEO DC30 series is not working properly, install the video board in a
different slot.
Installing the Software for Windows 95/98
29
Page 36

miroVIDEO Expert
If you are installing the miroVIDEO DC30 series for the first time, the hard
disk transfer test program will automatically start once the hardware test has
been successfully completed. miroVIDEO EXPERT determines your hard
disk’s performance capabilities. If you have linked more than one hard disk to
your system, test them all and use the hard disk with the fastest data rate for
video work.
The online help function contains detailed information about all miroVIDEO
EXPERT’s options.
10.Select hard disk, click Start test.
Select the hard disk whose performance you wish to test, then click Start
test. In order to provide realistic values, be sure you have defragmented the
disk before testing it.
The program indicates that you have installed a miroVIDEO DC30 series
board. miroVIDEO Expert also works together with other miroVIDEO
boards, this is for example the reason for the audio setting of lower quality.
The main purpose of miroVIDEO Expert is to detect the reachable data rates
of the hard disks—for this purpose you can ignore the settings on top of the
Save button.
30
miroVIDEO DC30 Series User´s Guide
Page 37

The hard disk test first examines the speed with which data can be written
to, or read from, the hard disk. After this, the test determines the optimum
frame format with its corresponding compression factor .
Using the PCI storage link data together with your hard drive’s write speed,
the program calculates the data rate at which an M-JPEG video sequence
with sound can be recorded with no image loss (dropped frames). For more
detailed information, refer to the chapter, “Tips & tricks”, beginning on page
126.
The optimum frame formats and compression factor together with the
attainable data rate are displayed.
Please keep in mind that your hard disk will exhibit a lower data rate on its
inner tracks. When recording, hard disk tracks are written to starting at the
outer edge and working inwards.
11. Enabl e Audio recording check box.
To determine the attainable video data rate in conjunction with audio data,
activate the Audio recording check box. Specify the quality with which you
want sound to be recorded.
12.Test additional hard disks.
If necessary, test additional hard disks.
13.Select hard disk for recording, click Store.
Select the hard disk (if more than one is available) that you wish to use for
recording. Click Store to save the settings. The last measured value will be
taken into consideration when later setting the data rate in the Video Format
dialog box.
14. Clic k Close.
Click Close to return to the configuration dialog box.
15. Clic k OK.
To complete the installation procedure, click OK to exit the DC30
series Hardware Test dialog box.
Installing the Software for Windows 95/98
31
Page 38

Starting the miroVIDEO DC30 series hardware test at a
later time
There are two methods of starting the miroVIDEO DC30 series hardware test at
a later time, to select another language version, receive information about the
driver version, or to test the hardware):
1. By using the Start menu and the commands Programs, miroVIDEO DC30
series, Tools, and miroVIDEO DC30 series Hardware Test.
By using the Start menu and the commands Settings, Control Panel,
2.
Multimedia, Advanced (Windows 98: Devices), Video Recording Device,
miroVIDEO DC30 series, Properties, Settings.
32
miroVIDEO DC30 Series User´s Guide
Page 39

Installing the
Software for Windows NT 4.0
Once you have installed the miroVIDEO DC30 series into your computer, you
can install the miroVIDEO DC30 series drivers and software. The installation
steps for the Windows 95 (OSR2), Windows 98 and Windows NT are slightly
different.
Windows NT
If you use Windows NT, please read the “The Installation program” section on
page 34.
Windows 98
If you use Windows 98, please proceed with the “Installing the drivers for
Windows 98” section on page 25.
The complete installation consists of the following steps:
Installing drivers for Windows 98 on page 25.
Installing the software for Windows 95 / Windows 98 on page 26.
Windows 95
If you have Windows 95 installed on your computer, please proceed with the
section “Installing the drivers for Windows 95 on page 21.
The complete installation consists of the following steps:
Installing drivers for Windows 95 on page 21.
Installing the software for Windows 95 / Windows 98 on page 26.
Among other things, installing the miroVIDEO DC30 series software copies
the miroVIDEO DC30 series drivers to your hard disk. The miroVIDEO DC30
series program group is created, and the expanded Adobe Premiere project
defaults (Presets) are copied to your hard disk.
Installing the Software for Windows NT 4.0
33
Page 40

T
HE INSTALLATION PROGRAM
To install the drivers for Windows NT, proceed as follows:
1. Switch on the computer.
If you have not done so already, switch on the computer.
2. Insert CD-ROM.
If have not done so already, insert the installation CD in your CD-ROM
drive.
Under Windows NT the installation program should start automatically. If this
is not the case, the Autostart function of your CD-ROM drive has probably
been disabled. In this case, you have to start the installation program manually.
To do so, elect the
letter]
The installation program is started automatically in the language specified via
the Regional Settings of the installed Windows version. To change the settings,
go to
If you use other regional settings than English, German or French, select the
language in which you wish the installation carried out.
:\SETUP\SETUP.EXE
>
Start
Settings
... command in the
Run
>
menu and enter [your drive
Start
. Click on
Control Panel > Regional Settings.
to start the installation program.
OK
3. If necessary, change the language, click Next.
If necessary, select the language in which you wish the installation carried
out.
If you have activated the German, English, or French Regional Settings and
nevertheless want to change the language of the installation program, click
the button
Click on the
This installation step is not required, if you have activated the German, English,
or French Regional Settings.
4. Select a setup type.
In the
a user-defined installation.
Typical
Compact
Custom
Setup Type
option for virtually all installations.
the default settings. We do not recommend this option.
individually. Choose this option only if several versions of Premiere are
installed on your computer or your system hard disk is very slow.
first and then select the language.
Back
button.
Next
window, select whether you prefer a typical, a compact, or
: Installs all components and uses the default settings. Choose this
: Skips some components, such as the online manual and uses
: Lets you select the components and allows to adjust the settings
34
miroVIDEO DC30 Series User´s Guide
Page 41

5. If necessary, change the hard disk / directory.
If you wish to copy the files to another hard disk / another directory, click on
the Browse... button and define the hard disk / the directory. Install the
driver software on the system hard disk, not on the video hard disk!
6. Click Next.
Click on Next to proceed with the installation.
7. If necessary, select the components.
If you have chosen Custom as setup type, you can directly choose those
components in the dialog box Select Components, which you want to install.
By clicking on Details... you open the window Select Sub-components. Here
you can determine the components even more precisely.
− System Software
−
− Adobe Premiere AddOns
Drivers for Windows NT.
miroVIDEO DC30 series utilities
The capture application miroVIDEO Capture for capturing clips, tools,
helps and ReadMe file.
Including miroINSTANT Video. miroINSTANT Video allows to save
valuable computing time when creating projects with Adobe Premiere.
The Change... button lets you choose between three intro movies for PAL
and NTSC. The intro movies help you switch on the VCR just in time
when recording video.
Installing the Software for Windows NT 4.0
35
Page 42

− Extended presets for Adobe Premiere 4.2
Presets for Adobe Premiere which have been developed especially for the
miroVIDEO DC30 series board and the PAL and NTSC standard.
−
Documentation
The User’s guide is also available in PDF format and can be opened with
the Acrobat Reader. If Acrobat Reader has not already been installed on
your computer, use the Documentation option to install it.
6. Select video standard, click Next.
Select the video standard you use and click on Next.
7. Click Next.
In the Start copying files window, all components you chose are listed. If
you wish to change the settings you chose, click on Back. Click Next to start
copying.
8. Click Finish.
In the Complete Setup window you are asked to restart Windows. Please
carry out this prompt and click on Finish to complete the installation of
miroVIDEO DC30 series.
36
miroVIDEO DC30 Series User´s Guide
Page 43

Quick Start Guide for DC30 Pro
The following chapter is designed to verify correct operation of your
miroVIDEO DC30 Pro installation. Before beginning, be sure you have
installed Premiere, the DC30 board, the Breakout Box, the drivers and
software.
A
UDIO LOOPTHROUGH TEST
1. Open miro VIDEO Capture. Go to Start > Programs > DC30 Series > miro
VIDEO Capture.
2. Start a new project. Press the New Project Button on the Projects tab.
NEW PROJECT BUTTON
Using the DC30 Board Under Windows 95/98
37
Page 44

2. Click on the Settings tab. Check the settings for correct input selection and
audio level.
3. Click on the Record tab. Start your VCR or video source.
4. Do you hear audio from your TV monitor speakers?
YES Go on to the Video Loopthrough Test.
NO Go to the Breakout Box setup section and check your connections.
38
miroVIDEO DC30 Series User´s Guide
Page 45

V
IDEO LOOPTHROUGH TEST
1. Open miro VIDEO Capture. Go to Start > Programs > DC30 Series > miro
VIDEO Capture.
NEW PROJECT BUTTON
2. Start a new project. Press the New Project Button on the Projects tab.
3. Click on the Settings tab. Check the settings for correct input selection and
audio level.
Using the DC30 Board Under Windows 95/98
39
Page 46

4. Click on the Record tab. Start your VCR or video source.
5. Do you see video on your TV monitor?
YES Go on to the Video Capture Test.
NO Go back to the Breakout Box setup section and check your
connections.
40
miroVIDEO DC30 Series User´s Guide
Page 47

V
IDEO CAPTURE TEST
1. Open miro VIDEO Capture. Go to Start > Programs > DC30 Series > miro
VIDEO Capture.
NEW PROJECT BUTTON
2. Start a new project. Press the New Project Button on the Projects tab.
3. Click on the Settings tab. Check the settings for correct input selection and
audio level.
Using the DC30 Board Under Windows 95/98
41
Page 48

4. Select the capture drive.
RECORD BUTTON
5. Click on the Record tab.
6. Start your VCR or video source.
7. Click on the Record Button.
8. Are dropped frames are reported on the Record tab (below the Preview
window)?
YES Go on to Step 9.
NO This test is done. Go on to the Video Edit Test.
42
miroVIDEO DC30 Series User´s Guide
Page 49

DATA RATE SLIDER
9. Click on the Settings tab.
10. Move the slider left to reduce the data rate.
11. Repeat the Video Capture Test (Steps 1 thru 7).
12. Are dropped frames are reported on the Record tab?
YES Go on to Step 13.
NO This test is done. Go on to the Video Edit Test.
13. Click on the Settings tab.
14. Move the slider more left to further reduce the data rate.
15. Repeat the Video Capture Test (Steps 1 thru 7).
16. Are dropped frames are reported on the Record tab?
YES Call Pinnacle Tech Support.
NO This test is done. Go on to the Video Edit Test.
Using the DC30 Board Under Windows 95/98
43
Page 50

V
IDEO EDIT TEST
This test uses the clips you captured in the previous Video Capture Test
1. Launch Adobe Premiere.
2. From the pulldown menu, select Project > Settings > General.
In the New Project Settings dialog box, click the Load button.
3. Choose the NTSC DC30 640x480 4MB setting and click the OK button.
44
miroVIDEO DC30 Series User´s Guide
Page 51

The frame size in Project Settings must match the frame size (Resolution)
in the miroVIDEO Project tab.
4. Click the OK button on the New Project Settings dialog box.
5. From the pulldown menu, select File > Import > File to import a clip.
6. Drag the clip from the Project Window to the beginning of the Video 1A
track in the timeline.
7. Hold the Alt key and click on the work area bar to lengthen it.
8. Save this project in the same folder as the original clip (as shown in the
miroVIDEO Settings tab).
9. Press the Enter key on your keyboard to play the clip from Premiere.
10. Are dropped frames are reported on the Record tab?
YES This test is done. Go on to the Video Output Test.
NO Go back to Step 2 and reload the Project Settings.
Using the DC30 Board Under Windows 95/98
45
Page 52

V
IDEO OUTPUT TEST
This test uses the clips you captured in the previous Video Capture Test.
1. Launch Adobe Premiere.
2. From the pulldown menu, select Project > Settings > General.
In the New Project Settings dialog box, click the Load button.
3. Choose the NTSC DC30 640x480 4MB setting and click the OK button.
46
miroVIDEO DC30 Series User´s Guide
Page 53

The frame size in Project Settings must match the frame size (Resolution)
in the miroVIDEO Project tab.
4. Click the OK button on the New Project Settings dialog box.
5. From the pulldown menu, select File > Import > File to import a clip.
6. Drag the clip from the Project Window to the beginning of the Video 1A
track in the timeline.
7. Hold the Alt key and click on the work area bar to lengthen it.
8. Press the Record button on your VCR.
9. Press the Enter key on your keyboard to play the clip from Premiere.
10. When the clip is done playing, stop and rewind your VCR. Press the Play
button on your VCR.
11. Do the video and audio from your clip play back from the VCR?
YES The Quick Test is completed and your DC30 Pro is ready.
NO Go back to Step 2 and reload the Project Settings.
Using the DC30 Board Under Windows 95/98
47
Page 54

Using the DC30 Board Under
Windows 95 / Windows 98
This chapter provides an introduction into working with the miroVIDEO DC30
series. You can find additional information about working with the
miroVIDEO DC30 series in the “Tips & tricks” section (page 126).
Important: If you use Windows NT, skip this chapter and see “Using the DC30
Board Under Windows NT” on page 65.
Recording
quality
Overlay
You can adjust the recording quality to your hard disk’s speed by changing the
data rate or the compression factor.
If the hard disk is too slow to write all the images, some will of them will be
dropped (not recorded), and the video playback will look jerky and stuttering.
Solution: Select a lower data rate.
If your system contains a graphics board that supports DirectDraw, the
miroVIDEO DC30 series board can add a real-time overlay. Check whether
displaying an overlay while simultaneously recording weakens the recording.
This may be due to a lower transfer rate on the part of the graphics board. In
this case, either reduce the overlay resolution or simply turn off the overlay
function while recording.
You should always use your television to control the video colors. Because of
gamma values, phosphors, etc., that differ from those of a TV, the computer
monitor may not show the correct colors.
48
miroVIDEO DC30 Series User´s Guide
Page 55

T
DC30 series
HE
CONTROL
The DC30 series Control tool offers several settings for the miroVIDEO DC30
series output. The DC30 series Control is automatically started, and is filed in
the System tray as a .
You cannot see changes you make with the DC30 series Control while a movie
is running. Any changes only take effect after you restart the playback
procedure.
1. Click the icon in the System tray to open the DC30 series Control.
Make the desired changes.
2.
Standard
Allows you to manually determine the video standard for the outputs of the
miroVIDEO DC30 series:
PAL
NTSC
PAL M (Brazil)
PAL N (Argentina)
NTSC 4.43 MHz.
With miroVIDEO DC30 series no standard conversion is possible. That is
clips digitized and edited PAL video only be output in PAL format. The
same applies to NTSC.
The default selection for the pixel ratio “Automatic adaptation” enables an
automatic detection and setting of the playback standard as well. So, there
will be no need to set the standard manually.
Using the DC30 Board Under Windows 95/98
49
Page 56

Exception: If you want to playback NTSC material in NTSC 4.43 format, a
variant of the NTSC formats with PAL color burst, you need to determine
the settings manually.
Output device
Use this option to optimize the video output signal quality for one of the
analog outputs. If your recording VCR is connected to the composite output,
then select Composite Video here, and vice versa.
Pixel ratio
Allows you to choose between the following options:
Automatic adaptation
Square pixels
ITU-R.601.
Automatic adaptation is the default setting. When working with miroVIDEO
DC30 series there is no need to change this setting, as the video standard as
well as the resolution will be detected automatically by the miroVIDEO
DC30 series driver.
If you have chosen the option Automatic Adaptation, also the setting
Standard will be set correctly.
So, why using this setting at all? If you have not captured or created AVIs at
very unusual resolutions, the automatic detection might not function and you
might not be satisfied with the image. In that case you can improve the result
by choosing Square pixels or ITU-R.601 (studio standard).
Video output & preview (Default setting)
Using this setting, any video played by your DC30 series board will be
output via the analog video outputs and—if you use an overlay-capable
graphics board—also as overlay. Editing video with certain applications may
be more difficult in this mode, especially when you need to use overlay via a
primary surface.
Only preview
If you activate the option Only preview, an *.avi sequence will only be
played back on the computer monitor and not on the analog video outputs.
This gives advantages when working with certain applications, for example,
when scrubbing with Premiere 4.2.
More
The More >> button enlarges the DC30 series Control by the Overlay
Settings and AVI Cache Settings sections.
50
miroVIDEO DC30 Series User´s Guide
Page 57

Overlay settings
Activate overlay
The overlay enables the playback of video sequences not only as analog
signals at the outputs of the miroVIDEO DC30 series board, but
simultaneously in the window on the computer monitor. This function is
usually activated.
If the Activate overlay check box is deactivated, no image will be displayed
on the computer monitor while playing back a video sequence.
Pinnacle logo
If you activate the Pinnacle logo check box, the Pinnacle logo will be
displayed in the upper right corner of the video window while playing back
the video sequence. This indicates that the video is played back
simultaneously at the outputs of the miroVIDEO DC30 series, but here, of
course, without logo.
The setting of the overlay resolution as well as the logo setting only refer to the
Overlay Surface function. When using Primary or when the overlay function is
deactivated, these options appear in light gray.
High resolution
This is the default setting. If the option High resolution has been chosen, the
video will be played back on the computer monitor in high image quality.
Therefore, also the option Activate overlay must be activated. As playback
mode, overlay surface must be chosen, and your graphics board together
with the installed drivers must be able to produce an overlay surface in the
current resolution and color depth.
For playback in overlay mode, several MBs of image data must be
transmitted per second by miroVIDEO DC30 series to your graphics board
via the PCI bus. If your system does not offer the necessary performance,
image interference might occur in the video window: Only a section of
varying size at the upper window edge will be played back fluently, in the
lower window section the video will get stuck again and again.
In this case, install a graphics board of higher performance or with a faster
mother board in your PC. For the moment, it might be helpful to choose a
lower overlay resolution.
Medium resolution
If the image interference, described above, occurs when the High resolution
option has been chosen, select the option Medium resolution instead. Then,
the video will be transferred from the miroVIDEO DC30 series to the
graphics board in limited quality and a limited amount of data. In this case,
the bus will be less charged and the image interference should be avoided.
Using the DC30 Board Under Windows 95/98
51
Page 58

Limiting the image quality and the amount of data only refers to the playback in
the window: the high quality of miroVIDEO DC30 series during video editing
and playback will not be affected.
Low resolution
If the described image interference still occur when the option Medium
resolution has been chosen, try the option Low resolution. Obviously, your
computer system is overcharged, probably it does not meet the requirements
of miroVIDEO DC30 series.
AVI Cache settings
miroAVI Cache is a software developed for playing back videos with
miroVIDEO DC30 series without jerkiness but with a synchronous lip
movement. In order to playback videos and to output them via the
miroVIDEO DC30 series, the videos must be in MJPG format.
miroAVI Cache is always activated, when miroINSTANT Video is used or
when it has been chosen in the MediaPlayer explicitly under Device.
Use always
This is the default setting.
In some Video for Windows applications the option Use always may cause
problems during playback. In this case, deactivate the check box.
Synchronized start
If the Synchronized start check box is activated and you start playing back a
video sequence with miroAVI Cache, a dialog box will appear as soon as the
cache is filled and prepared for immediate playback.
Click OK, and the playback will be started immediately and without any
jerks. This mode is especially appropriate for recording accurate video
material with a VCR. For that, first start the playback of the video with
miroVIDEO DC30 series, then, after the dialog box of the miroAVI Cache
has appeared, start recording with the VCR and click OK in the dialog box
at the same time.
The synchronized start can be deactivated, if you do not want to record the
played back video onto a tape. This might cause some jerks at the beginning
of the playback, but it avoids the dialog box each time you use the playback.
Default
The Default button restores all default settings.
52
miroVIDEO DC30 Series User´s Guide
Page 59

L
IVE OVERLAY
If you have installed the miroVIDEO DC30 series together with a graphics
board that supports DirectDraw a digital overlay function is, in principle,
possible.
Please refer to the information given on our Website at:
http://www.pinnaclesys.com.
You can access the Live Overlay via VidCap, the Options Menu and the Live
Overlay command.
If the overlay display in a window does not work, go to the Windows 95 /
Windows 98 Control Panel (Control Panel, Display, Settings) and change the
resolution, color depth, and refresh rate, or ask your reseller for a new driver for
your graphics board.
Overlay quality
High resolution
This is the default setting. The option High resolution displays the video in
high quality in the PC window.
For this purpose Overlay Surface must be selected as representation mode, and
your graphics board together with the installed drivers must be able to produce
an Overlay Surface in the current resolution and color depth.
For displaying in overlay mode several MBs of image data must be transmitted
per second to your graphics board by miroVIDEO DC30 series via the PCI bus.
This is no problem for state-of-the-art PCs and graphics boards. If your system
does not offer the necessary performance, image interference might occur in the
video window. Only a section of changing size at the upper edge of the window
will be displayed fluently, in the lower window section the video will get stuck
again and again.
In this case, install a graphics board of higher performance or a faster mother
board in your PC. For the moment, choosing a lower overlay resolution might
help.
Using the DC30 Board Under Windows 95/98
53
Page 60

Medium resolution
If the selection of High resolution causes the image interference, described
above, choose the option Medium resolution. Via this option the video is
transferred from the miroVIDEO DC30 series to the graphics board with a
reduced quality and a reduced amount of data. This reduces the strain on the
bus, so that image interference should be avoided.
The reduction of image quality and data amount only refers to the representation
inside the window. This does not effect the high quality of miroVIDEO DC30
series during video editing and playback.
Low resolution
If the described image interference continue to appear at Medium resolution,
choose the option Low resolution instead. Obviously, your computer system is
immensely overcharged. Probably, it does not meet the requirements of
miroVIDEO DC30 series.
Pinnacle logo
If you activate the Pinnacle logo check box, the logo will appear during
recording. But only if the function Overlay Surface is used for displaying the
video in the window.
Overlay while recording
If the Overlay while recording check box is activated, the video will be
displayed as overlay on the computer monitor during recording.
Squeezing
By activating the Squeezing check box, the content of the overlay window will
be adapted to each size and position of the window.
54
miroVIDEO DC30 Series User´s Guide
Page 61

S
OUND SETTINGS
Use the Microsoft Mixer application to define the settings for sound playback
and recording*.
Audio playback
This application is identified by a speaker icon on the taskbar. Simply doubleclick the icon to start Playback Control. The application starts in the Playback
Control mode. In this mode, you can make the settings required for audio
playback.
Playback
Use the controllers in the Playback column to regulate the sound output of all
devices connected to the miroVIDEO DC30 series board.
Internal
Lets you adjust the input level and the balance for the device you connected to
the internal miroVIDEO DC30 series audio input (such as the audio cable of a
CD-ROM drive or a sound board).
External
Lets you adjust the input level and the balance of the connected device (a VCR,
for example) with the miroVIDEO DC30 series board.
Wave
Use the Wave controller to define the volume and balance of sound output from
Wave and AVI files.
*
Some settings and options may vary depending on the board you use.
Using the DC30 Board Under Windows 95/98
55
Page 62

Mute
The Mute control box turns the volume from the corresponding audio source
(internal, external, wave) off. The Mute settings of the internal and the external
input depend on each other: If you switch one input on, the other input is
automatically muted (Mute). The control of the Wave is not affected by these
settings.
Mute all
The Mute all control box mutes all inputs.
Advanced (Playback)
The Advanced buttons let you make further settings. If these buttons are not
visible, select Advanced Controls from the Options menu.
Set Default Values
The Set Default Values option sets all sliders to default settings. The default
settings are the ones that were enabled after you first installed the
miroVIDEO DC30 series software.
Audio Loopthrough
If you activate the check box Audio loopthrough, the audio signal that is
present at the audio input of the miroVIDEO DC30 series will also be
looped through to the audio output of the miroVIDEO DC30 series.
Advanced (Balance)
The Advanced buttons let you make further settings. If these buttons are not
visible, select Advanced Controls from the Options menu.
Mic. Boost On
The Mic. Boost On button lets you enable an additional amplification of 20
dB for the external input, if you want to connect a microphone.
56
miroVIDEO DC30 Series User´s Guide
Page 63

Audio recording
The settings for recording audio are made in the Recording Control mode. To
start the Recording Control application, select the Settings menu from the
Playback Control window, then select the Properties and Record commands.
You can only select one device (internal or external) at any one time for
recording.
Record Control
The Record Control is the master control for adjusting the levels of both inputs.
Controlling the balance is not possible. To adjust the balance, use the balance
sliders of these inputs.
The level slider have an adjustment range from 0dB to +22 dB. Normally, place
the controller on its lowest setting (see figure above). However, you can
increase the setting to amplify particularly quiet sounds.
Internal
Lets you adjust the input level and the balance for the device you connected to
the internal miroVIDEO DC30 series audio input (such as the audio cable of a
CD-ROM drive or a sound board).
External
Lets you adjust the input level and the balance of the connected device (a VCR,
for example) with the miroVIDEO DC30 series board.
Mute
The Mute control box turns off the volume from the corresponding audio
sources (internal, external). Only one Mute control box can be activated at any
given time.
Using the DC30 Board Under Windows 95/98
57
Page 64

Mute all
The Mute all control box mutes all inputs.
Advanced (Record)
The Advanced buttons let you make further settings. If these buttons are not
visible, select Advanced Controls from the Options menu.
Set Default Values
The Set Default Values option sets all sliders to default settings. The default
settings are the ones that were enabled after you first installed the
miroVIDEO DC30 series software.
Advanced (External)
The Advanced buttons let you make further settings. If these buttons are not
visible, select Advanced Controls from the Options menu.
Mic. Boost On
The Mic. Boost On button lets you enable an additional amplification of 20
dB for the external input, if you want to connect a microphone.
58
miroVIDEO DC30 Series User´s Guide
Page 65

R
ECORDING VIDEO
Video capture: source settings
Depending on the application you use for capturing video, there are several
ways to access the DC30 series Video Input settings dialog box.
Adobe
Premiere 5.1
Adobe
Premiere 4.2LE
VidCap
Under Premiere 5.1 select the File menu and the commands Capture and Movie
Capture. The Movie Capture menu appears. Select the Recording Options...
command and in the following window click the VfW Settings button. Click on
the Video Input button.
Opening the File menu and using the Capture and Movie capture commands in
the File menu, you can put Adobe Premiere in the capture mode. The Movie
capture menu item and Video Source command allow you to select the video
source, and contain options for setting the video quality.
In VidCap you open the Video source dialog box via the Options menu and the
Video Source command.
Input
Here you can select the miroVIDEO DC 30 / plus Video input to which the
video source connects: composite or S-Video. This setting is stored. If you
connect a video source to another video input, you have to select the other
input. If not, no live video image appears on your monitor.
If you connect a video source supporting another video standard than the one
selected, choose the correct Standard.
Using the DC30 Board Under Windows 95/98
59
Page 66

Standard
Here you select the video standard of a video source:
PAL
NTSC
SECAM.
miroVIDEO DC30 series does not convert between standards. That means if
you digitize PAL video, you must choose a PAL-Premiere preset and the result
will be output in PAL format by miroVIDEO DC30 series.
Pixel ratio
Lets you choose between Square and ITU-R.R601. For most projects, use
Square.
Video loopthrough
If you activate the Video loopthrough check box, the input video signal will be
directly transmitted to the output connectors of the miroVIDEO DC30 series
and will be output on a connected control monitor.
If your player is also your recording device, connected to the video input as
well as to the video output of the miroVIDEO DC30 series, deactivate the
Video loopthrough check box in order to avoid video feedback.
VCR stability
Please activate the VCR stability check box, when using as a player a VCR
instead of a camera.
Display
Allows you to modify the Brightness, the Contrast, the Saturation and the
Sharpness.
This will have an impact on the video signal during digitalization. If you want
to edit the unchanged video material, you need to set the sliders on the default
settings.
NTSC options
If you selected NTSC, you can select special NTSC options: Comb Filter is a
filter especially designed for NTSC which improves the composite signal
quality. You can only enable Comb Filter if you selected a composite input.
Enable the 4.43 MHz color carrier option, if your source offers this color
carrier. If there is no color in the preview or in the overlay, change the setting
for this option.
You can additionally change the NTSC Hue.
Default
60
miroVIDEO DC30 Series User´s Guide
Page 67

The Defaults button restores all default settings. The default settings have the
value 0.
Video capture: format settings
Depending on the application you use for capturing video, there are several
ways to access the DC30 series video format settings dialog box.
Adobe
Premiere 5.1
Adobe
Premiere 4.2
VidCap
Under Premiere 5.1 select the File menu and the commands Capture and Movie
Capture. The Movie Capture menu appears. Select the Recording Options...
command and in the following window click the VfW Settings button. Click on
the Video Format button.
To open the Video Format window, use the Capture setup and Video format
commands in the Movie Capture menu item.
In VidCap you open the Video source dialog box via the Options menu and the
Video Source command.
Using the DC30 Board Under Windows 95/98
61
Page 68

Frame adjust
Here you can select the image size of the video clip:
Horizontal
When selecting Full resolution (default), all pixels of a video clips will be
digitized, when selecting Half resolution, every second pixel is digitized: pixels
which have not been digitized are interpolated from the digitized pixels.
Vertical
If you enabled Both fields, Both fields are recorded, when enabling One field,
only one field is digitized.
Frame ratio
You can select between the 4:3 and the 16:9 (kinescope) aspect ratio.
Cropping
When clicking Cropping >> the Cropping field is added to the window.
Here you can view the compression factor (with reference to the data rate). If
you change the image settings, the compression factor changes automatically.
62
miroVIDEO DC30 Series User´s Guide
Page 69

Quality adjustments
Here, you determine the amount of data of the compressed video and thus the
quality. The entries for compression, data rate, frame size, and capture time
depend on each other.
Compression
The slider Compression helps you to determine the compression factor. This
factor reduces the amount of data of the digitized video sequence compared to
the uncompressed data during capture. A low compression factor stands for
high quality, a high compression factor stands for lower quality. If you change
the position of the compression slider, you automatically change the position of
the Data rate slider as well.
Data rate
The data rate slider allows you to determine the data rate for capturing the
video sequence. Changing the position of the Data rate slider, changes
automatically the position of the Compression slider. The set data rate will be
displayed.
High data rate means high quality. If a certain, material dependent data rate is
reached, the maximum quality is reached as well (no visible difference
compared to the input signal), a further increasing of the quality is impossible.
If the determined data rate is getting too high for your computer system, a
warning message will appear. To find a suitable data rate, measure the
performance of your hard disk with miroVIDEO EXPERT. Then try the quality
procedure again.
Pixel ratio
Lets you choose between Square and ITU-R.R601.
Choosing ITU-R.601 either reduces the data rate or, if the data rate remains the
same, increases the quality.
Cropping
None
When enabling None, you capture the complete TV image including the
image margin which normally is not visible on the TV screen.
TV
When enabling TV, you choose the normal TV image size. The complete
captured video is shown on the TV monitor. Image data from the image
margin which are not important will be omitted and the quality increases.
Special
Under Special you can determine the image section yourself using the slider.
The current image size is displayed.
The current size (width and height in pixels) is displayed.
Clicking on the Cropping << button minimizes the dialog box window by the
cropping section.
Using the DC30 Board Under Windows 95/98
63
Page 70

Data rate
Displays in dependence on the set compression and data rate the image volume
(the amount of compressed data per image) as well as the capture size (the
recordable video duration per GB hard disk space).
Default
The Default button restores all default settings.
Expert...
The Expert... button opens miroVIDEO EXPERT, the test program for the hard
disk transfer. This program measures the attainable data rate of your PC system
and your hard disk(s).
CAUTION: there is only one board and only one driver. In other words, any
settings you specify in a program that accesses the miroVIDEO DC30 series,
will automatically apply to all other programs that operate with the miroVIDEO
DC30 series and the associated driver.
64
miroVIDEO DC30 Series User´s Guide
Page 71

Important: If you use Windows95 or 98, skip this chapter and see “Using the
DC30 Board Under Windows 95/98” on page 48.
DC30 series Control
The DC30 series Control regulates the miroVIDEO DC30 series output.
You cannot change the video standard with the miroVIDEO DC30 SPEED plus
Control while a movie is running. This change only takes effect after you restart
the playback procedure.
Select the Start menu, the miroVIDEO DC30 series program group and the
DC30 series Control command to start the control application.
Using the DC30 Board
Under Windows NT
Make the desired settings:
Video format
Select the desired video standard.
PAL
Video standard in Germany, many other European countries and Australia
NTSC
Video standard in the USA, many other American countries and Japan
PAL M
Video standard in Brazil
PAL N
Video standard in Argentina
Using the DC30 Board Under Windows NT
65
Page 72

NTSC 4.43
NTSC signal, PAL color carrier, standard for some devices.
NTSC with CombFilter
With Composite signals the CombFilter reduces possible color distortions.
NTSC 4.43 with CombFilter
Movies in NTSC resolution cannot be shown in PAL without “jerkiness”, nor
will they fill the entire screen area. PAL movies cannot be played back in
NTSC.
Further Settings
Square pixel
A square pixel ratio refers to a 4:3 relationship between horizontal and vertical
resolution and is commonly used in a computer environment. Select Square
pixel if you want to use the 4:3 pixel format.
ITU-R.601 Studio standard
ITU-R.601 pixel ratio refers to a format compatible with many types of studio
equipment resolution. Select ITU-R.601 if your video device supports this
studio standard.
Automatic adaptation
If you enabled the Automatic adaptation check box, the video standard and
pixel format (PAL or NTSC) will be detected automatically. Select this option
if you frequently want to playback PAL clips as well as NTSC clips from your
computer.
Video output
Select the video output via which you want to output the clip in maximum
quality: S-Video or Composite Video.
Switching from S-Video to Composite-Video and vice versa activates
corresponding filters of the miroVIDEO DC30 SPEED plus board, which
optimize the selected video output.
Overlay
Determine if you want to view an overlay during recording and playback or not.
The miroVIDEO DC30 series board supports the PCI overlay using the Overlay
Surface.
When using Primary Overlay, clipping is not possible. When you move another
window over the overlay window, the overlapping section will remain in the
overlay window. The Primary Overlay is limited to a size of 384 x 288 pixels.
Because the Overlay Surface requires fewer system resources and is not
restricted to a certain resolution, always use this option—if your board supports
this function.
66
miroVIDEO DC30 Series User´s Guide
Page 73

If no overlay is possible, this can have the following reasons:
• Your graphics board does not support overlay surface.
• The overlay surface does not work at the current resolution you selected for
your graphics board (Select a smaller graphics board resolution with less
colors, reduce the refresh rate.).
• The graphics board driver does not support the overlay surface. (Install the
current driver for your graphics board.).
Depending on the graphics board, horizontal resolution may be limited during
overlay, resulting in the overlay having a grid-like appearance. This grid will
only appear on the overlay, and this limitation has no influence on the quality
of the recorded video sequences! A reduction in the resolution and/or color
depth can improve the quality of the overlay.
Resolution
Here you can select the overlay resolution: high resolution, medium resolution, low
resolution (for overlay surface only).
Logo
When you enable the “Logo” check box, the logo appears during recording (for
overlay surface only).
Audio output
Using the slider you control the audio volume during playback. If you enable
the Mute check box, you will have no audio during playing back a clip.
PCI bus adaptation
With some PC configurations, picture interference, horizontal green or black
lines, may occur during video recording or playback. This is caused by
overloading of the PCI-Bus. In this case, activate the check box PCI bus
adaptation. If this option is activated, the miroVIDEO DC30 series board uses
a different operating mode for data transmission on the PCI bus, which may
eliminate picture interference under some circumstances.
All settings (except for the video format settings) will take effect immediately.
The Abort button rejects all changes and restores the original settings after
restarting the DC30 series Control.
Clicking the Close button saves the current settings.
Using the DC30 Board Under Windows NT
67
Page 74

miro
miroVIDEO Capture is designed to benefit both inexperienced users and video
editing professionals. miroVIDEO Capture may be used under Windows 95,
Windows 98 and Windows NT 4.0
values for video and audio quality, frame rate and size can be set just once and
will be applied to all captured clips of this project. Switching to another project
is possible at all times and miroVIDEO Capture will organize the clips into
separate folders for you.
If you use Windows NT, you must use miroVIDEO Capture in order to capture
video with a miroVIDEO DC30 series product, as other capture applications
are not supported.
*
. Using a project-oriented approach, the
VIDEO Capture
S
TARTING
miroVIDEO C
To start miroVIDEO Capture, select the Start menu, the Programs command,
the miroVIDEO DC30 series program group and the miroVIDEO Capture: The
miroVIDEO Capture has five tabs:
Mode
Projects
Settings
Record
Clips.
APTURE
Right mouse button
Some tab areas provide context-sensitive menus: click the right mouse button
to access additional functions.
M
ODE
Under User type you can select Standard or Advanced.
• Select Standard if you are not or only a little familiar with video editing.
*
For Windows NT you have to use the miroVIDEO Capture application to capture video clips.
68
miroVIDEO DC30 Series User´s Guide
Page 75

• Select Advanced if you are experienced in video editing and if the concepts
“data rate”, “compression” and “cropping” are not new to you.
P
ROJECTS
—S
TANDARD
A project consists of a compilation of video clips which have the same settings
(video quality, video standard, resolution). Project data is saved under a
filename with the .mfp extension, the individual video clips are saved with the
.avi extension.
Create new project
To create a new project, click the Create new project button or use the right
mouse button. The project list will show the new project.
Rename project
To rename a project, select the project and click on the Rename project button
or use the right mouse button. Enter a new name.
Delete project
To delete a project, select the project and click on the Delete project button or
use the right mouse button. The project will be removed from the project list.
miroVIDEO Capture
69
Page 76

All settings you select in the Projects tab are saved automatically and cannot be
changed after you have captured the first clip. The settings apply to all clips of
this project.
Changing the
settings
After you have captured a video clip, do not change the settings for subsequent
clips. This will help you avoid problems when editing the clips later. You have
two possibilities to select new settings:
Delete the project and create a new project with the desired settings.
Delete all files in the Clips tabs and make the desired settings.
Video
Under Video you can select the settings for your captured video clips:
Video standard
Here you can select the video standard: PAL, NTSC, SECAM, NTSC 4.43
(NTSC video signal, PAL color carrier), PAL M (Brazil) or PAL N (Argentina).
Depending on the installed Windows version, one video standard has been preselected.
Quality
Here you can select the quality of your video by selecting the target format for
your production: S-VHS or Hi8, VHS, CD-ROM (16x) or CD-ROM (2x). S-VHS
delivers the best and CD-ROM (2x) the lowest quality.
Frames/Sec
The video standard you selected determines the frames per second:
PAL / PAL N / SECAM: 25 frames/sec
NTSC / NTSC 4.43 / PAL M: 29,97 frames/sec.
70
miroVIDEO DC30 Series User´s Guide
Page 77

Resolution
The quality setting determines the resolution:
PAL / PAL N / Secam NTSC / NTSC 4.43 / PAL M
Quality Format Format
S-VHS, Hi8 720 x 540 608 x 456
VHS 720 x 540 608 x 456
CD-ROM (16x) 384 x 288 320 x 240
CD-ROM (2x) 384 x 288 320 x 240
Audio
Capture audio
If the Capture audio check box is enabled, you can record audio.
•
If necessary, enable the check box.
The audio settings depend on the quality you chose.
Right mouse button
P
ROJECTS
If you click on the project list with the right mouse button, the commands
Create new project, Rename project, Delete project are available. The Rename
project and Delete project commands are only if a project name is selected in
the project list.
—A
DVANCED
A project consists of a compilation of video clips which have the same settings
(video quality, video standard, resolution). Project data is saved under a
filename with the .mfp extension, the individual video clips are saved with the
.avi extension.
miroVIDEO Capture
71
Page 78

Create new project
To create a new project, click the Create new project button or use the right
mouse button. The project list will show the new project.
Rename project
To rename a project, select the project and click on the Rename project button
or use the right mouse button. Enter a new name.
Delete project
To delete a project, select the project and click on the Delete project button or
use the right mouse button. The project will be removed from the project list.
All settings you select in the Projects tab are saved automatically and cannot be
changed after you have captured the first clip. The settings apply to all clips of
this project.
Changing the
settings
After you have captured a video clip, do not change the settings for subsequent
clips. This will help you avoid problems when editing the clips later. You have
two possibilities to select new settings:
Delete the project and create a new project with the desired settings.
Delete all files in the Clips tabs and make the desired settings.
72
miroVIDEO DC30 Series User´s Guide
Page 79

Video
Under Video you can select the settings for your captured video clips:
Video standard
Here you can select the video standard: PAL, NTSC, SECAM, NTSC 4.43
(NTSC video signal, PAL color carrier), PAL M (Brazil) or PAL N (Argentina).
Depending on the installed Windows version, one video standard has been preselected.
Frame resolution
Here you can select the output quality you want your final video to have: Full,
Half, Quarter.
− Full
Select Full, if your computer is capable to handle the amount of data which
is being produced when capturing the full-screen image. Full means a
resolution of 768 x 576 (PAL / PAL N / SECAM) or 640 x 480 (NTSC /
NTSC 4.43 / PAL M).
− Half
Select Half, if you want to reduce the amount of data when capturing video.
As the Half option skips every second horizontal line, the capture quality is
lower. Half results in a 384 x 576 (PAL / PAL N / SECAM) or a
320 x 480 (NTSC / NTSC 4.43 / PAL M) resolution.
− Quarter
Select Quarter, if you want to reduce the amount of data considerably when
capturing video. As the Quarter option skips every second horizontal and
vertical line, the capture quality is considerably lower. Quarter results in a
384 x 288 (PAL / PAL N / SECAM) or 320 x 240 (NTSC / NTSC 4.43 /
PAL M) resolution.
− TV cropping
If the TV cropping check box has been enabled, pixels will be cut off the
image edges (top, bottom, left, right). For many applications, these areas are
not visible and removing them will save some amount of data with no
degradation in quality.
miroVIDEO Capture
73
Page 80

TV cropping: Pixel ratio Square (see below)
PAL - PAL N Secam
Full 768 x 576 48 x 36 720 x 540
Half 384 x 576 24 x 36 360 x 540
Quarter 384 x 288 24 x 18 360 x 270
NTSC - NTSC 4.43 PAL M
Full 640 x 480 32 x 24 608 x 456
Half 320 x 480 16 x 24 304 x 456
Quarter 320 x 240 16 x 12 304 x 228
Format TV cropping Visible image
Format TV cropping Visible image
TV cropping: Pixel ratio ITU-R.601 (see below)
PAL - PAL N Secam
Full 704 x 576 32 x 24 672 x 552
Half 352 x 576 16 x 24 336 x 552
Quarter 352 x 288 16 x 12 336 x 276
NTSC - NTSC 4.43 PAL M
Format TV cropping Visible image
Format TV cropping Visible image
Full 704 x 480 32 x 24 672 x 456
Half 352 x 480 16 x 24 336 x 456
Quarter 352 x 240 16 x 12 336 x 228
Resolution
Shows the selected resolution.
Pixel ratio
A square pixel ratio refers to a 4:3 relationship between horizontal and vertical
resolution and is commonly used in a computer environment. ITU-R.601 pixel
ratio refers to a format compatible with many types of studio equipment, it
corresponds to 704 x 576 (PAL / PAL N /SECAM) or 704 x 480 (NTSC /
NTSC 4.43 / PAL M) resolution.
• Select Square if you want to use the 4:3 pixel format.
• Select ITU-R.601 if your video device supports this studio standard.
74
miroVIDEO DC30 Series User´s Guide
Page 81

If you selected the ITU-R.601 pixel ratio, the captured video clip looks a bit
squashed on the computer display. Please keep this in mind when editing the
clip with a video editing program. When the clip is played back on a TV or
recorded with a VCR, the original image proportions will be restored.
Frames/Sec
The video standard you selected determines the frames per second: PAL / PAL
N / SECAM: 25 frames/sec., NTSC / NTSC 4.43 / PAL M: 29,97 frames/sec.
This setting can be changed in the Frames/Sec. list box.
When reducing the number of images per second, the resulting amount of data
is smaller but there will be a loss in quality with moving pictures (“jerkiness”).
Rule of thumb: the human eye compensates for the missing images up to a
frame rate of 15 images per second, if the frame rate is lower, the clip appears
to be jerky. As every person perceives missing images in a different way, you
have to decide for yourself when selecting the number of frames.
Audio
Capture audio
If the Capture audio check box is enabled, you can record audio.
• If necessary, enable the check box.
• Audio is capture in Stereo quality.
• Specify the quality for recording audio: the higher the sampling rate (kHz),
the better the quality. We recommend to select 44 kHz
• Choose between 16 bits and 8 bits: The recording quality is better with 16
bits than with 8 bits. Therefore, always choose 16 bits.
The higher the recording quality the more disk space is required for digitizing
audio: CD quality (44 kHz, 16 bits stereo), stereo quality (22 kHz, 16 Bits
stereo).
Right mouse button
If you click on the project list with the right mouse button, the commands
Create new project, Rename project, Delete project are available. The Rename
project and Delete project commands are only if a project name is selected in
the project list.
miroVIDEO Capture
75
Page 82

S
ETTINGS
—S
TANDARD
The Settings tab lets you select the audio and video inputs and outputs.
When the Settings tab is selected, the video from your source will be displayed
in overlay mode.
Inputs/outputs
Under Inputs/outputs there are three buttons. Clicking the buttons repeatedly,
allows you to toggle between the possible connections.
Audio
Click on the Audio button to specify whether you connected your video capture
board to your sound board within the computer (Intern) or you connected your
video capture board directly to the speakers (Extern). The button icon changes
with the option you chose.
Video input
Click the Video input button repeatedly to specify whether an S-Video device, a
composite device, or an internal video source is connected to your video
capture board. The button icon changes to reflect the selected option.
76
miroVIDEO DC30 Series User´s Guide
Page 83

Video output
Click the Video output button repeatedly to specify whether an S-Video device
or a composite device is connected to your video capture board. The button
icon changes to reflect the selected option.
Data rate
This tab displays the quality of the final video clip you selected under Project.
It also displays the data rate (KB) and the compression factor.
Compression
factor
Maximum
Maximum data
duration
rate
The compression factor is the relation between the data rate of the original
image and the data rate after compression.
Drive list
The drive list includes all project data: drive/directory/project name, size, free
hard disk space, the maximum duration and the maximum data rate.
The displayed time results from the free space on the hard drive and the quality.
When choosing a hard drive to be your capture drive for the first time,
miroVIDEO-Expert automatically informs you about the maximum data rate
for this drive, that is miroVIDEO-Expert determines the maximum speed at
which data can be written to your hard drive. The result will be shown in the
file list under Data rate. In front of the list entry a camera icon is displayed.
Right mouse button
When clicking with the right mouse button in the drive section (file list), five
commands are available:
Set new capture directory
Specifies the selected directory as capture directory. The camera icon
appears in front of the directory.
Measure speed
Measures the speed of the specified hard disk.
Update
Determines the free hard disk space and changes all resulting data
accordingly.
Do not use for capturing
Excludes the selected directory as capturing directory.
miroVIDEO Capture
77
Page 84

S
ETTINGS
—A
DVANCED
The Settings tab lets you select the audio and video inputs and outputs. In
addition, you can adjust the sound and the image and select the data rate.
When the Settings tab is selected, the video from your source will be displayed
in overlay mode.
Inputs/outputs
Under Inputs/outputs there are three buttons. Clicking the buttons repeatedly,
allows you to toggle between the possible connections.
Audio
Click on the Audio button to specify whether you connected your video capture
board to your sound board within the computer (Intern) or you connected your
video capture board directly to the speakers (Extern). The button icon changes
with the option you chose.
Video input
Click the Video input button repeatedly to specify whether an S-Video device, a
composite device, or an internal video source is connected to your video
capture board. The button icon changes to reflect the selected option.
78
miroVIDEO DC30 Series User´s Guide
Page 85

Video output
Click the Video output button repeatedly to specify whether an S-Video device
or a composite device is connected to your video capture board. The button
icon changes to reflect the selected option.
Image settings
Here you can select the Brightness, the Contrast, the Saturation, the Sharpness
and the Hue (the latter for NTSC only).
Use this slider to adjust the brightness.
Use this slider to adjust the contrast.
Use this slider to adjust the saturation.
Use this slider to adjust the sharpness.
Use this slider to adjust the hue*.
Audio level
Stereo
Mono
Here you can select the audio input level.
• Move the left slider to adjust the left channel.
• Move the right slider to adjust the right channel.
• Enable the Linked together check box if you want to adjust both channel at
the same time.
• Move one slider, the second one moves automatically.
• 20 dB input gain
If the + 20 dB input gain check box has been enabled, the audio input signal
will be amplified by 20 dB.
Data rate
Use the slider to determine the data rate.
• Specify the data rate.
It displays the data rate (KB) and the compression factor.
Compression
factor
*
For NTSC only.
The compression factor is the relation between the data rate of the original
image and the data rate after compression.
miroVIDEO Capture
79
Page 86

Test capture
Lets you record a test clip of 4 seconds duration to preview the quality you will
get with the current settings:
• Click on the Test capture button to record a test clip. After the clip has been
recorded, miroVIDEO Capture switches automatically to the playback
mode: the video clip will be played back continuously to give you a chance
to observe the image quality. Click the Stop button to terminate playback.
Default
The Default button resets all values to the default setting.
Drive list
The drive list includes all project data: drive/directory/project name, size, free
hard disk space, the maximum duration and the maximum data rate.
Duration
Maximum data
rate
The displayed time results from the free space on the hard drive and the quality.
When choosing a hard drive to be your capture drive for the first time,
miroVIDEO-Expert automatically informs you about the maximum data rate
for this drive, that is miroVIDEO-Expert determines the maximum speed at
which data can be written to your hard drive. The result will be shown in the
file list under Data rate. In front of the list entry a camera icon is displayed.
Right mouse button
When clicking with the right mouse button in the drive section (file list), five
commands are available:
Set new capture directory
Specifies the selected directory as capture directory. The camera icon
appears in front of the directory.
Measure speed
Measures the speed of the specified hard disk.
Update
Determines the free hard disk space and changes all resulting data
accordingly.
Do not use for capturing
Excludes the selected directory as capturing directory.
80
miroVIDEO DC30 Series User´s Guide
Page 87

R
ECORD
—S
TANDARD
The Record tab lets you record and playback video clips.
The current settings are displayed in the top right corner.
Recording clips
• Click the Start recording ( ) button to start recording: The Start
recording button then changes to a Stop recording (
During capture you are able to view the video clip as overlay* in the video
window, the current position on the tape is displayed in hours, minutes,
seconds, and number of frames.
• Click the Stop recording ( ) button to stop recording.
The recorded clips will be listed under the project name and will be
numbered sequentially. The file names of the clip which was recorded last
and the current clip will be displayed.
*
A video overlay is a window in which incoming video clips “cover” the actual computer image, such as the Windows
desktop.
) button.
miroVIDEO Capture
81
Page 88

Playing back video clips
• Click the Play ( ) button to playback the video clip recorded last: the
clip appears in the video window. The Play button turns into the Stop
button.
• Click Stop ( ) to stop the playback.
• Use the Delete ( ) button to delete the clip you recorded last.
Capturing single frames (Windows 95/98 only)
• Start your video source.
During capture, you are able to view the video clip in the video window.
• Click left into the video windows to capture a single frame.
The frame is copied into the Windows Clipboard and can be pasted into any
picture editing application.
ECORD
R
—A
DVANCED
The Record tab lets you record and playback video clips.
The current settings are displayed in the top right corner.
82
miroVIDEO DC30 Series User´s Guide
Page 89

Recording video clips
• If you want to limit the recording duration, enable the Capture time check
box and specify the desired duration. If the resulting clip size exceeds the
hard disk capacity, the duration will be reduced automatically to the
maximum recording time available.
• Click the Start recording (
recording button then changes to a Stop recording (
) button to start recording: The Start
) button.
During capture, you are able to view the video clip as overlay* in the video
window, the current position on the tape is displayed in hours, minutes,
seconds, and number of frames.
• Click the Stop recording (
) button, to stop recording.
The recorded clips will be listed under the project name and will be
numbered sequentially. The file names of the last clip recorded last and the
current clip will be displayed.
Playing back video clips
• Click the Play ( ) button to playback the last recorded video clip. It
appears in the video window. The Play button turns into the Stop button.
• Click Stop ( ) to stop the playback.
• Use the Delete ( ) button to delete the last recorded clip.
Capturing single frames (Windows 95/98 only)
• Start your video source.
During capture, you are able to view the video clip in the video window.
• Click left into the video windows to capture a single frame.
The frame is copied into the Windows Clipboard and can be pasted into any
picture editing application.
*
A video overlay is a window in which incoming video clips “cover” the actual computer image, such as the Windows
desktop.
miroVIDEO Capture
83
Page 90

B
ATCH CAPTURE
—A
DVANCED
(W
INDOWS
95/98
AND
P
RODUCTIVITY PACK ONLY
With the Batch capture tab, miroVIDEO Capture provides a convenient and time-saving method
for browsing through the contents of a tape and marking the areas you want to digitize. During
the actual batch capture, miroVIDEO Capture will automatically process the list in a way that
minimizes fast forward/rewind operations.
This feature is only available if you own and have installed the miroVIDEO
Productivity Pack together with your DC30 series board and drivers, and if you
use Windows 95 or 98.
)
Player control
The VCR control buttons and the jog shuttle slider allow you to search for
individual video clips on the tape inserted in your VCR / camcorder.
The button
Starts the playback.
Stops the playback.
Rewinds to the beginning of the tape.
Fast forwards to the end of the tape.
Winds the tape to its beginning displaying the clip. If the VCR is in pause
mode, you can step backward by single frames.
84
miroVIDEO DC30 Series User´s Guide
Page 91

Winds the tape to its end displaying the clip. If the VCR is in pause
mode, you can step forward by single frames.
The Jog Shuttle
Use the Jog Shuttle slider to search the video tape in both directions at four
velocities. The more you drag the slider to the left or to the right, the higher the
speed becomes when rewinding/forwarding the tape–if this function is
supported by your video source. If you let go of the slider, it will return slowly
to its center position.
Beginning/End
Use either the VCR buttons or the jog shuttle slider to position the tape to the
beginning of the clip you want to capture.
• Click IN (
• Use either the VCR buttons or the jog shuttle slider to position the tape to
the end of the clip.
• Click OUT (
the batch list.
• Repeat the above steps for all sequences you want to digitize for your movie.
It makes no difference if you first select the beginning and then the end of a clip
or vice versa. A video clip is defined by setting an in point and an out point.
Only then will the video clip be included in the batch list.
): this marks the starting point.
): this marks the end point and the video clip is added to
Batch list
If you specified an in and an out point for a clip, the clip will be automatically
included in the batch list and marked for capturing . The batch list includes
all selected video clips in the order you defined them.
During the actual batch capture, miroVIDEO Capture will automatically
process the list in a way that minimizes fast forward/rewind operations.
The batch list also informs you about the in and the out points of the clip and
about the duration. If you like to determine the beginning and the end of the
clip more precisely, double-click the in and/or the out points and enter the
desired time.
If you want to exclude individual clips from capturing, double-click the clip to
deselect it .
miroVIDEO Capture
85
Page 92

After capturing a clip, it will be marked as captured . If you like to digitize a
clip which you have already captured again, double-click the clip to mark it for
capturing.
If you want to view a clip on the tape, select it in the batch list and
click on Play. miroVIDEO Capture will position your video source to
the beginning of the clip and it will be played back in the video
window. The position on the will be displayed in hours, minutes,
seconds, and number of frames.
If you want to delete the in and out points, select it in the batch list and
click Delete: the in and out points will be removed.
Once you checked the clips in the batch list, click the Start batch
capture button to start digitizing.
Right mouse button
Use the right mouse button to click on the list. The following commands will
be available:
− Play capture list
Plays back all selected clips from the capture list in the best order possible
avoiding rewinding and forwarding the tape.
− Record capture list
Records all selected clips from the capture list in the best order possible
avoiding rewinding and forwarding the tape.
− Select for capturing
Creates a capture list from all selected clips.
− Add to capture list
The selected clip/s will be added to the capture list.
− Remove from capture list
The selected clip/s will be removed from the capture list.
− Play from < 0:30:14.02> to < 0:30:14.15>
Plays back a single clip from the capture list. It makes no difference whether
the clip has or has not been selected for capturing, or it has already been
captured.
− Record from < 0:30:14.02> to < 0:30:14.15>
Records a single clip from the capture list. It makes no difference whether
the clip has or has not been selected for capturing, or it has already been
captured.
− Select all
Selects all clips you want to be captured. The symbol appears in front of the
clip names.
86
miroVIDEO DC30 Series User´s Guide
Page 93

C
− Deselect all
Deselects all clips. The symbol disappears.
− Select all unrecorded
Selects all clips which have not been recorded so far: the symbol appears in
front of the clip names.
− Select all recorded
Selects all recorded clips: the symbol appears in front of the clip names.
− Rename item
Renames the selected clip. When entering a new name, this will appear in
the list.
− Delete item
Deletes the selected clip/s from the list.
LIPS
The Clips tab lets you play back, rename, or delete digitized clips.
miroVIDEO Capture
87
Page 94

Playback
• If you want to play back a video clip, select the desired one and click the
playback button:
Starts the playback.
Stops the playback and jumps to the beginning.
Jumps to the beginning of the current clip. If you are at the beginning
of a clip, you will jump to the beginning of the preceding clip.
Jumps to the beginning of the following clip.
Jumps back step by step.
Jumps forward step by step.
File list
All data about the clips already digitized for the selected project is displayed in
the file list: the name, duration, number of clips and file size.
Rename clip
To rename a clip, select it and click Rename clip or use the right mouse button.
Enter a new file name.
Delete clip
To delete a clip, select it and click on the Delete clip button or use the right
mouse button. The clip will be removed from the list.
Right mouse button
When you click on the list using the right mouse button, nine commands will
be available:
Play marked clips
Plays back selected clips.
Mark as playlist
Creates a list from selected video clips you want to play back.
Add to playlist
Adds the currently selected files to a list.
Remove from playlist
Removes all selected
files from a list.
88
miroVIDEO DC30 Series User´s Guide
Page 95

Select all
Selects all files in the list.
Deselect all
Deselects the files.
Select invalid
Deletes all files from the list which have been removed or which are empty.
Rename
Renames the selected
file.
Delete
Deletes the selected files
from the hard disk.
miroVIDEO Capture
89
Page 96

miroINSTANT Video 5
and Adobe Premiere 5.1
This chapter only refers to miroINSTANT Video 5 under Adobe Premiere 5.1!
How to use miroINSTANT Video 2.0 with Adobe Premiere 4.2LE is described
in previous versions of this manual.
W
HAT IS
W
HAT IS IT GOOD FOR
miroINSTANT V
miroINSTANT Video 5 is a playback module for Adobe Premiere 5.1 that
works with miroVIDEO editing boards. It requires Premiere 5.1 compatible
software drivers for the editing board as well.
There are some slight differences in the miroINSTANT Video 5 operation
depending on the miroVIDEO editing board you use, please see the board
specific sections at the bottom of this document. If you are used to work with
miroINSTANT Video 2.0 and Premiere 4.2, see the “Changes From Previous
Versions” section on page 99.
Important: miroINSTANT Video 5 does not run on a miroVIDEO DC30
without the miroVIDEO Productivity Pack. This does not apply to other DC30
versions: plus, SPEED, or pro.
When editing video tape with Premiere 5.1, using miroINSTANT Video 5
gives you three major advantages:
The duration of the rendering process, that happens after you have done the
editing and before you can watch your production or print it to tape, is
substantially reduced. This, in turn, increases productivity.
?
IDEO
5?
The amount of hard disk space required to do a production is being reduced
as well. In case of a simple cuts-only project miroINSTANT Video 5 saves
50% hard drive space. This saves money spend on larger hard drives.
The maximum duration of your productions is being increased. Without
miroINSTANT Video 5, the whole production must fit into a single AVI
file, which is limited to a maximum size of 2GB.
This results in a maximum project duration of less than 7 minutes when
working at a data rate of 5 MB/sec, for example.
Using miroINSTANT Video 5, the maximum project duration is 3 hours.
This makes long format work on a PC possible.
90
miroVIDEO DC30 Series User´s Guide
Page 97

S
YSTEM REQUIREMENTS
To make use of miroINSTANT Video 5 you need a PC system that fulfills both
the system requirements for running Adobe Premiere 5.1 (see Adobe
documentation) and the requirements for running your miroVIDEO DC30
series board.
The following boards are supported:
miroVIDEO DC30 with connected SmartCable*, included in the delivery
scope of the miroVIDEO Productivity Pack
miroVIDEO DC30 SPEED (Germany only)
miroVIDEO DC30 plus
miroVIDEO DC30 pro (USA only).
You also need a graphics board that is capable of showing video overlay in
combination with your miroVIDEO editing board.
H
OW TO MAKE IT WORK
In order to use miroINSTANT Video 5, you must have installed three things in
your PC:
A Pinnacle video editing board that supports INSTANT Video 5, like the
miroVIDEO DC30 series.
Adobe Premiere 5.1.
Driver software for the video editing board that supports and includes
INSTANT Video 5.
Please see the detailed install information that comes with your video editing
board and drivers in the release notes and this User’s Guide.
There you will learn about the requirement to remove other editing boards and
old drivers, the correct installation sequence, which driver version is required,
and more.
Once the installation is done, launch miroINSTANT Video 5:
Start Premiere 5.1, click the load button in the settings dialog box and select
one of the miroVIDEO presets.
Important: If you do not use one of the presets supplied for your miroVIDEO
DC30 or change the Premiere 5 settings manually, then miroINSTANT Video 5
may not work properly!
?
*
Windows 95 / 98 only.
miroINSTANT Video 5 and Adobe Premiere 5.1
91
Page 98

To work, miroINSTANT Video 5 must be selected as Editing Mode in the
Project/Settings/General dialog box, This is done automatically when you
choose the miroVIDEO preset.
• Now open a new Premiere project, and the miroINSTANT Video 5 window
will appear. From now on miroINSTANT Video 5 will be active and will
handle the smooth video playback using the miroVIDEO editing board.
Note that Premiere 5.1 projects must fulfill some conditions to be
compatible with miroINSTANT Video 5 and the miroVIDEO editing
boards. See the ‘Limitations’ section later in this document. With
miroINSTANT Video 5, some things in Premiere work not exactly as
described in the Premiere manual. So please make sure to read all the
miroINSTANT Video 5 documentation.
H
OW DOES IT WORK
Whenever you play video clips or parts of the timeline in the Premiere 5.1
monitor window, miroINSTANT Video 5 does two things:
It plays back the video using the miroVIDEO editing board, so that it can be
watched on a TV in addition to the usual display on your computer screen
It makes sure that all source clips and rendered effects play back smoothly,
without interruptions between the single AVI files. This way, the playback
from the timeline can directly be recorded to tape.
Without miroINSTANT Video 5, there would be stuttering and dropped
frames during the timeline playback, so you would have to render the whole
project before you’re able to print it to tape.
miroINSTANT V
When miroINSTANT Video 5 is installed and selected as Editing Mode, the
miroINSTANT Video 5 window displays in front of other Premiere 5.1
windows. However, it may be hidden by Premiere’s floating tool palettes.
Move the palettes to see and access the INSTANT Video 5 window.
?
IDEO
5 W
INDOW
The window indicates by it’s existence that miroINSTANT Video 5 is active.
92
miroVIDEO DC30 Series User´s Guide
Page 99

Speaker symbol
Whenever miroINSTANT Video 5 is playing back video, it will show a little
speaker icon in the INSTANT Video 5 window to indicate the current play
mode.
There are two possible audio modes:
INSTANT audio output, indicated by a speaker
In this mode, the audio is being handled by INSTANT Video 5 and is being
output through your Pinnacle video board.
Premiere audio output, indicated by a crossed out speaker
In this mode, the audio is being played through your standard Windows
sound device. This means that there is probably no audio output to tape.
When you record your project to tape, the speaker symbol should not be
crossed out.
To correct a crossed out speaker and determine the audio play mode, go to the
section “Modes of Operation / Audio Output” (page 96) of this Guide.
Film strip
Below the Pinnacle Systems logo there is a horizontal film strip. This acts as an
indicator for the INSTANT Video 5-playability of the whole project.
If all images in the strip are black, then the whole project from the beginning to
the end of the timeline can currently be played by miroINSTANT Video 5.
If some of the images in the film strip are red, then some parts of the timeline
can currently not be played by miroINSTANT Video 5. This indicates that
either:
Some video effects placed in the project have not yet been rendered,
Some clips have a format that does not match with the project settings, and
have not yet been converted to the correct format, or
There are gaps in the timeline without any clips.
If you scrub or play, these non-playable parts will not show on the video output
of your miroVIDEO editing board.
miroINSTANT Video 5 and Adobe Premiere 5.1
93
Page 100

To make the whole project playable, activate the Premiere 5.1 Render Preview
function by hitting the <Enter> key.
Important: If your work area does not include the complete timeline, the film
strip in the INSTANT Video 5 window may still show red frames after you
called Render Preview. This is not a problem, because the non-playable parts of
the timeline are outside the work area, so the work area will play to tape
without problems.
Status line
Normally there is a status line at the bottom of the INSTANT Video 5 window
that shows different information, depending on the current mode of operation
of miroINSTANT Video 5.
The status line is not visible if the window has been minimized (see
miroINSTANT Video 5 menu below).
Dropped frames Indicator
If you are currently playing parts of the timeline, meaning that video plays in
the right video window within the Premiere 5.1 monitor window, the status line
shows the number of video frames that have been dropped during the current
playback. For smooth playback this number must be zero. If the number of
dropped frames is not zero, see the troubleshooting section below. This
message remains in the status line until you do another action.
Audio
scrubbing
miroINSTANT Video 5 menu
By moving the mouse pointer to any part of the miroINSTANT Video 5
window and clicking the right mouse button, you can activate the
miroINSTANT Video 5 menu. There are three menu items:
By default, audio scrubbing is switched on. This means, if your project contains
audio, you will hear the audio playback when playing clips or the whole
project, as well as when scrubbing within the project. See the Premiere 5.1
manual for details on scrubbing and playing.
94
miroVIDEO DC30 Series User´s Guide
 Loading...