

Page 1

Installation Manual
for the
Metal Box Controller Module
Page 2

Rev 9-6
Page 3

Metal Box Controller Module
Installation Manual
Pinnacle Systems, Inc.
3715 Swenson Avenue
St. Charles, IL 60174
P/N: 28-006r9-6
Customer Service: 630-443-8542 (CST)
(Please have Model #, Serial #, and Software Rev # Available)
Sales and Marketing: 800-569-7697 (EST)
www.pinnaclesystems.com • sales@pinnaclesystems.com • service@pinnaclesystems.com
Page 4

Proper Usage and Limitations
The information disclosed herein includes proprietary
rights of the manufacturer. Neither this document nor
the information disclosed herein shall be reproduced
or transferred to other documents, used or disclosed
to others for manufacturing purposes, or for any other
purposes, except as specically authorized in writing by
the manufacturer. If this manual is supplied in connection
with the sale or delivery of manufacturer’s equipment, it is
to be used solely for maintenance, repair, or installation
of such equipment.
The MicroGuard was manufactured in the United States.
The Installation Manual was printed in the United States.
You must read and fully understand the following
information pertaining to the proper use and limitations of
your Microguard:
• The MicroGuard must be installed by qualified
personnel only.
• The MicroGuard must NOT be used on full revolution
presses or any machine that cannot be commanded
to stop at any time.
• You must NOT wire the Safety Output contacts of
the MicroGuard to an external relay unless you use
the External Relay Checking feature.
• Th e me chanical powe r p ress o n w hic h t he
MicroGuard is installed must meet ANSI B11.1-
1988 and OSHA 1910.217 regulations. These
include inspection and maintenance procedures
that must be followed to comply with the regulations.
The manufacturer will NOT take responsibility for
improperly maintained machinery.
• Point of operation safeguarding is dened in ANSI
B11.19-2003. This regulation is used to determine
a safe distance to place your MicroGuard. The
manufacturer takes no responsibility for injury as
a result of improper safeguarding or improper safe
distances.
• The MicroGuard may not be able to safely stop
a press which has a faulty stopping mechanism.
The manufacturer cannot be held responsible
for an improperly maintained or faulty stopping
mechanism.
• The MicroGuard must be checked before put into
operation. Follow instructions provided in this
manual for procedures on how to do this.
• The MicroGuard should never be modified or
repaired except by qualied personnel and upon
authorization of the manufacturer. Never operate
machinery that is not in full working order.
• Make sure that all maintenance people, machine
operators, die-setters, foreman, and supervisors
have read and understood this manual and all
procedures have been and will be followed.
• All procedures in this manual must be followed. The
manufacturer cannot take responsibility for operation
if all procedures and warnings in this manual are not
followed.
Warranty
Manufacturer warrants that this product will be free
from defects in material and workmanship for a period
of two years from the date of shipment thereof. Within
the warranty period, the manufacturer will repair or
replace (at our discretion) any product that is disclosed
as defective upon examination by the manufacturer and
is returned with shipping charges prepaid. This warranty
will not apply to any product that has been subjected to
misuse, negligence, accident, restriction, and use not in
accordance with manufacturer’s instructions or which will
have been altered or repaired by persons other than the
authorized agent or employees of the manufacturer.
Disclaimer
The provisions of the warranty are the sole obligations
of the manufacturer and exclude all other warranties of
merchantability, expressed or implied. Further, there are
no warranties that extend beyond the above warranty.
Limitation of Liability
In the event of any claim for breach of any obligations of
the manufacturer under any order, whether expressed
or implied, and particularly in the event of any claim
of a breach of the warranty or warranties contained in
the paragraph “Warranty” or of any other warranties,
expressed or implied which might despite the paragraph
entitled “Disclaimer,” be determined to be incorporated in
any order, the company shall under no circumstances be
liable for any consequential or special damages, either in
law or in equity, or for losses or expenses or claims for
the same arising from the use of, or inability to use, the
products of the manufacturer for any purpose whatsoever.
We have designed our equipment to the very highest
performance and safety standards known to the current
technological state of the art. However, the installation,
usage, suitability, and tness of our equipment for any
purpose, known or unknown, is interdependent upon
the performance of other equipment not manufactured,
installed, or secured or maintained by the manufacturer.
We cannot and do not accept responsibility for any overall
system performance when factors, such as these, are
beyond our control.
WARNING: The entire machine safety system must
be tested at the start of every shift. Machine testing
should include: (1) proper machine operation and
stopping capability; and (2) verification of proper
installation and settings of all point of operation
guards and devices before the operation is released
for production.
Page 5

We will not supply individual component parts of any
circuit board but will supply the individual circuit board
complete. Individual detectors or emitters are available
as a complete tested unit.
Fill this Information out Immediately
(It will be needed in the event you need assistance)
Purchase Date: _______________________________
Purchased From: ______________________________
Model No.: ___________________________________
Serial No.: ___________________________________
Options: _____________________________________
Microprocessor Revision No.: ____________________
Page 6

Table of Contents
Introduction ...........................................................................................................................................................iv
Theory of Operation ...............................................................................................................................................iv
The System ............................................................................................................................................................iv
System Safety ........................................................................................................................................................iv
Immunity to EMI/RFI ...............................................................................................................................................v
CE Approved ...........................................................................................................................................................v
Specications .......................................................................................................................................................1
Standard Features
Auxillary Output Contact ........................................................................................................................................2
Cincinnati Interface .................................................................................................................................................2
External Relay Check .............................................................................................................................................2
Standard Output Contacts .....................................................................................................................................3
Fault Relay Output .................................................................................................................................................3
Optional Features
Auto Blank ...............................................................................................................................................................4
Emergency Stop Input ............................................................................................................................................5
DeviceNet ...............................................................................................................................................................5
Floating Blank .........................................................................................................................................................5
Depth Penetration Factor ........................................................................................................................................5
Guarding Mute-Out .................................................................................................................................................6
Latching Relays ......................................................................................................................................................6
Installation Procedures .....................................................................................................................................7
Resetting the MicroGuard .......................................................................................................................................8
Alignment Procedure ..............................................................................................................................................9
Operations ............................................................................................................................................................10
ANSI Standard B11.19.2003 .................................................................................................................................11
Safeguarding with Mechanical Guards .................................................................................................................12
Light Curtain Testing Procedure ............................................................................................................................12
Controller Module Setup .......................................................................................................................................13
Single Pylon Set Controller Module Jumper Settings ...........................................................................................14
Multiple Pylon Set Controller Module Jumper Settings .........................................................................................15
Wiring ....................................................................................................................................................................16
Swivel Bracket Dimensions ...................................................................................................................................17
Pylon Dimensions (by model) (Swivel) .................................................................................................................18
Additional cable information (Swivel) ....................................................................................................................18
Fixed Bracket Dimensions ....................................................................................................................................19
Pylon Dimensions (by model) (Fixed) ...................................................................................................................19
Additional cable information (Fixed) ......................................................................................................................19
Dimensions
Physical Dimensions of Swivel Bracket ................................................................................................................17
Physical Dimensions of Swivel Bracket ................................................................................................................18
Physical Dimensions of Fixed Bracket ..................................................................................................................19
Controller Module ..................................................................................................................................................20
- i -
Page 7

Table of Contents
Accessories
Cornering Mirrors ..................................................................................................................................................21
Pedestal ................................................................................................................................................................22
Swing-Arm Mounting Bracket ...............................................................................................................................22
Appendix A: Diagnostics & Troubleshooting
Diagnostic Indicator Lights ................................................................................................................................. A-1
Obstruction or Misalignment ............................................................................................................................... A-1
Error Conditions ..................................................................................................................................................A-1
Status Display Messages ....................................................................................................................................A-2
Fault Display Messages ......................................................................................................................................A-2
Appendix B: Regulations and Guidelines
OSHA Regulations ..............................................................................................................................................B-1
Machine Control Reliability .................................................................................................................................B-1
Safety Guidelines and Management
Operational Safety .......................................................................................................................................... B-2
Power Press Guarding .................................................................................................................................... B-2
Power Press Care through Inspection and Maintenance ................................................................................ B-3
Safety Enforcement ........................................................................................................................................B-3
Supervisor Training ......................................................................................................................................... B-3
Operator Training ............................................................................................................................................ B-3
Appendix C: Replacement Parts
Controller Module Replacement Parts ................................................................................................................C-1
Pylon Replacement Parts ...................................................................................................................................C-2
Appendix D: USB Diagnostic Codes
Model MG or DR USB Diagnostic Codes ................................................................................................D-1 to D-2
- ii -
Page 8

Table of Contents
Figures
Figure 1: Wiring External Relays ........................................................................................................................2
Figure 2: Bottom Board Inside Control Box .........................................................................................................6
Figure 3: 4 Sided Guarding with Dual Stud Guard Brackets, TRM Mirrors and Model #8000 Pedestals ...........9
Figure 4: Minimum Object Sensitivity and D(pf) ................................................................................................ 11
Figure 5: Controller Module (Lower Board) .......................................................................................................13
Figure 6: Controller Module Jumper (Upper Board) ..........................................................................................14
Figure 7: Multi-pylon Controller Module Connector/Jumper Detail ...................................................................15
Figure 8: Controller Module Wiring Diagram .....................................................................................................16
Figure 9a: Swivel Bracket Dimensions ................................................................................................................17
Figure 9b: Swivel Bracket Dimensions, pylon dimensions (by model), and additional cable information ...........18
Figure 10: Fixed Bracket Dimensions, pylon dimensions (by model), and additional cable information .............19
Figure 11: Controller Module Dimensions ...........................................................................................................20
Figure 12: Cornering Mirror Dimensions .............................................................................................................21
Figure 13: Pedestal Dimensions .........................................................................................................................22
Figure 14: Swing-Arm Mounting Bracket Dimensions .........................................................................................22
Figure 15: Controller Module Replacement Parts .............................................................................................C-1
Figure 16: Pylon Replacement Parts ................................................................................................................C-2
Tables
Table 1a: .5” Beam Spacing Pylons .....................................................................................................................5
Table 1b: 1” Beam Spacing Pylons ......................................................................................................................5
Table 2: Mechanical Guards ............................................................................................................................12
Table 3: Controller Module Connection Chart (Lower Board) ..........................................................................13
Table 4: Single Pylon Set Controller Module Jumper Chart ............................................................................14
Table 5: Multiple Pylon Set Controller (DUAL - SC) Module Length Jumper Chart .........................................15
Table 6: Controller Module Dimensions ...........................................................................................................20
Table 7: Cornering Mirror Dimensions (MGM & TRM) .....................................................................................21
- iii -
Page 9

Introduction
The Microguard is the latest in infrared safety curtain
technology. Contained in the main housing (Controller
Module) is a diverse redundant architecture that is
designed to detect internal failures in the Emitter
pylon(s), Receiver pylon(s), and the Controller Module
which will immediately send a “STOP” command to
the machine, thus being “FAIL-SAFE.” Failures are
immediately reported on the diagnostic message display
for immediate evaluation.
Diverse redundancy means that there are at least two
ways to detect a system failure, two ways to shut it down,
and that the two methods of detection and shut down
use different techniques. This eliminates the chance
an inherent fault in one circuit will effect the other. For
example: The stop circuit output contacts run through
two relays and both are monitored for correct position
through a second set of contacts on each relay. A special
circuit monitors those contacts, but a different circuit (a
test circuit) monitors the rst circuit to make sure that it
is functioning correctly. Two different microprocessors
isolated from one another each monitor the same signals
and monitor each other. Either microprocessor can turn
off the output relays, but it requires both to turn them on.
Special watchdog circuits on the microprocessors and
on the output relay circuits prevent an unsafe condition
by turning off both outputs relays should either or both
microprocessors become erratic.
With the aid of advanced microprocessor technology, the
MicroGuard can not only detect a fault in the light curtain
but spell out the exact problem. This advancement is
a great help during alignment, use, and servicing of the
light curtain. It not only can detect shorted and open
infrared emitters, but indicate which emitters have failed,
allowing the faulty board to be replaced.
Built into the MicroGuard is an optically coupled external
relay check which can detect open or short circuits,
a Cincinnati Interface, provision for auxiliary output
contacts, and external voltage check input. The power
supply is designed to accommodate most voltage
requirements, from DC to AC (see Specications).
is placed between them, the beam is broken and the
absence of a beam is observed by the Controller Module
which de-energizes the output relays and opens the
circuit it is connected to.
The System. The MicroGuard employs infrared
technology in a small sealed NEMA 4 aluminum housing
which provides harmless invisible protection and an
unobstructed view of the guarded area. The Microguard
consists of three parts: an Emitter pylon(s), Receiver
pylon(s), and Controller Module. The Emitter pylon(s)
contains infrared light emitting diodes spaced .5” or 1”
apart down the entire length of the pylon. The Receiver
pylon(s) contains an equal number of infrared detector’s
and transistor receivers also spaced .5” or 1” apart.
The Controller Module contains diverse redundant
technology that includes two different microprocessors,
self-checking circuitry, power supply, safety output
contacts, and a diagnostics display.
System Safety. The MicroGuard employs diverse
redundant technology that provides a backup for every
system that could cause an unsafe condition. Upon
power up, all systems are checked before activating
the output relays. Once the unit passes the initial
tests and activates the system it is then tested by both
microprocessors and other circuits once per scan of
the light curtain. All signals are presented to both
microprocessors, but are isolated from one another
to prevent a failure of one microprocessor should the
other crash. Other circuits detect short circuits, open
circuits, proper voltage, proper oscillation, etc. The
use of special dual force guided safety relays assure
that if one fails, the other can safely shut down the unit.
Additionally, watchdog circuits on the relays prevent an
unsafe condition even if both microprocessors failed.
All the standard and optional features that run on the
MicroGuard are designed with safety in mind:
The Floating Blank option allows only one object to be
placed into the light curtains eld of view. Even if the
object is smaller than the allowed size, a second object
will cause the unit to go RED.
As the MicroGuard is a single function device, that of
sensing an unauthorized intrusion into a guarded area
while simultaneously determining that it is capable of
sensing such an intrusion, any internal malfunction will
manifest itself with a RED condition shut down.
Theory of Operation. The MicroGuard guards an area
by projecting a curtain of infrared light across it. It forms
a curtain by utilizing infrared emitters in line very close
together on .5” or 1” centers. This close spacing makes
it impossible to place a body part through the curtain
without detection. For every infrared emitter there is an
infrared detector directly opposite. When an obstruction
The Auto Blank option programs in the exact size and
location of an object automatically and thus can detect
any movement in the object and shut down the light
curtain, which must be reset with a key.
The External Relay Check can detect both an open or
a short in the external relay or its wiring. The standard
Cincinnati Interface provides a means to assure that
the light curtain can open up i t s o u t p u t r e l a ys
between press cycles.
- iv -
Page 10

Introduction
Immunity to EMI/RFI. The entire system is shielded,
including the pylon cables. The use of MOV’s, lters,
and chokes make it immune to the noise found in the
industrial environment. Even the software embedded
into the dual microprocessors is written to cope with a
noisy environment.
CE Approved. CE approval was third party certied by
UL / DEMKO to IEC61496-1,-2. CE approved units offer
+/-2deg beam angle, which is tighter than the standard
Microguard.
- v -
Page 11

Specications
Metal Box Controller Module
Input Power
18 to 33 VDC @ 10 W (optional)
90 to 140 VAC @ 12 W (standard)
128 to 240 VAC @ 12 W (optional)
All AC voltages work with 50 or 60 Hz
Fuses
AC power: 1 AMP Slow Blow (250VAC)
DC power: 1 AMP Fast Blow
Output Circuits (all isolated)
Terminals #12-13: N.O. (held closed when Green)
control reliable dry STOP circuit, wired through K1 &
K2 relays. 4A @ 120vac recommended max
Terminals #14-15: N.O. (held closed when Green)
control reliable dry STOP circuit, wired through K1 & K2
relays. 4A @ 120vac recommended max
Term inal s #9- 1 0-11: N.O. (hel d clo s ed wh en
Green) – common – N.C. (held open when Green)
dry auxi liar y cir cuit , wir ed th roug h K3 rela y.
4A @ 120vac recommended max
Alarm + - : N.O. (held closed when powered and NO
FAULTS) dry auxiliary circuit, wired through K4 relay.
4A @ 120vac recommended max
NOTE: For Older Control boxes prior to October 2007:
Both terminals #12-13 and #14-15 must be used to
achieve a control reliable STOP circuit. Newer control
boxes can use either or both sets of terminals.
Indicators
External:
Construction:
Control Unit: All 18 Gauge painted steel
NEMA 12 lockable box with sealed front
panel and sealed cable entry ttings (8 lbs.).
Pylons: Heavy-duty aluminum extrusion
NEMA 4. Replaceable IR lens.
Sealed bulkhead positive locking circular
connectors. (Optional polycarbonate
protective tube guards).
Cables: Emitter 20’/ Receiver 8’ (supplied
standard). Shielded PVC 22 AWG cable
(optional cable lengths available).
Temperature Range 32° to 120° F
Dimensions
Controller Module: (see Dimensions)
Pylons: 1.45” (36.83mm) square (see
Dimensions)
Beam Spacing
.5” (12.7mm) standard
1” (25.4mm) (optional). The Floating Blank
option changes the effective beam spacing.
Minimum Object Sensitivity:
.5” (12.7mm) beam spacing is .55” (14mm)
1” (25.4mm) beam spacing is 1.18” (30mm)
Response Time < 30 mSec total
Scanning Frequency 5.9 KHz
Shock Tested to withstand high vibration applications.
OK/CLEAR Green
BLOCK/FAULT Red
AUTO/FLOAT ACTIVE Yellow
SLAVE DISAGREEMENT Red
The Diagnostics Display is a four-digit
alphanumeric with scroll
Internal:
+12V (RED) D2 CINN INT. (GRN) D10
+5V (YEL) D4 EXT RELAY (GRN) D11
+5V (YEL) D3 -5V (GRN) D17
FAULT RELAY (GRN) D21
Self-Checking every 20 milliseconds
Scanning Distance All units are supplied standard
with a 20’ (6.1m) scanning capability. Extended
range units are available and must be specied -- 50’
maximum (15.2m).
Maximum Operating Distance Stated as last two
digits in model number.
1
Page 12
Standard Features
Metal Box Controller Module
Auxiliary Output Contact (K3)
Description: K3 relay uses the same driver circuitry
as the K1 relay, but has its own relay checking circuitry.
This means that you should never use the K3 relay in
series with the K1 relay unless you use K2 in another
stop circuit.
Usage: K3 has both N.O. and N.C. outputs off the
same common. This can be used in conjunction with
the standard output contacts. Never just use K3 by
itself or with K1.
N.O. contact is closed when the curtain is GREEN.
N.C. contact is open when the curtain is GREEN.
Cincinnati Interface
Description: Provided to allow an external device to
determine if the light curtain is still capable of shutting
down the safety control circuit. The Cincinnati Interface
allows an external device to override the light curtain,
initiate a RED condition, and open up the standard
output relay contacts.
Application: Cincinnati Press, PLC
Usage:
Type1: The press interface provides 24VDC when it
wants the guard to de-energize (go RED). Connect this
press signal to Terminal #5 and Ground to Terminal #6.
Type 2: The press interface provides Ground when it
wants the guard t de-energize (go RED). Connect this
signal to Terminal #6 and attach nothing to Terminal #5.
You must install the jumper J8 (bottom board).
(see Installation Procedures, “Controller Module Setup”)
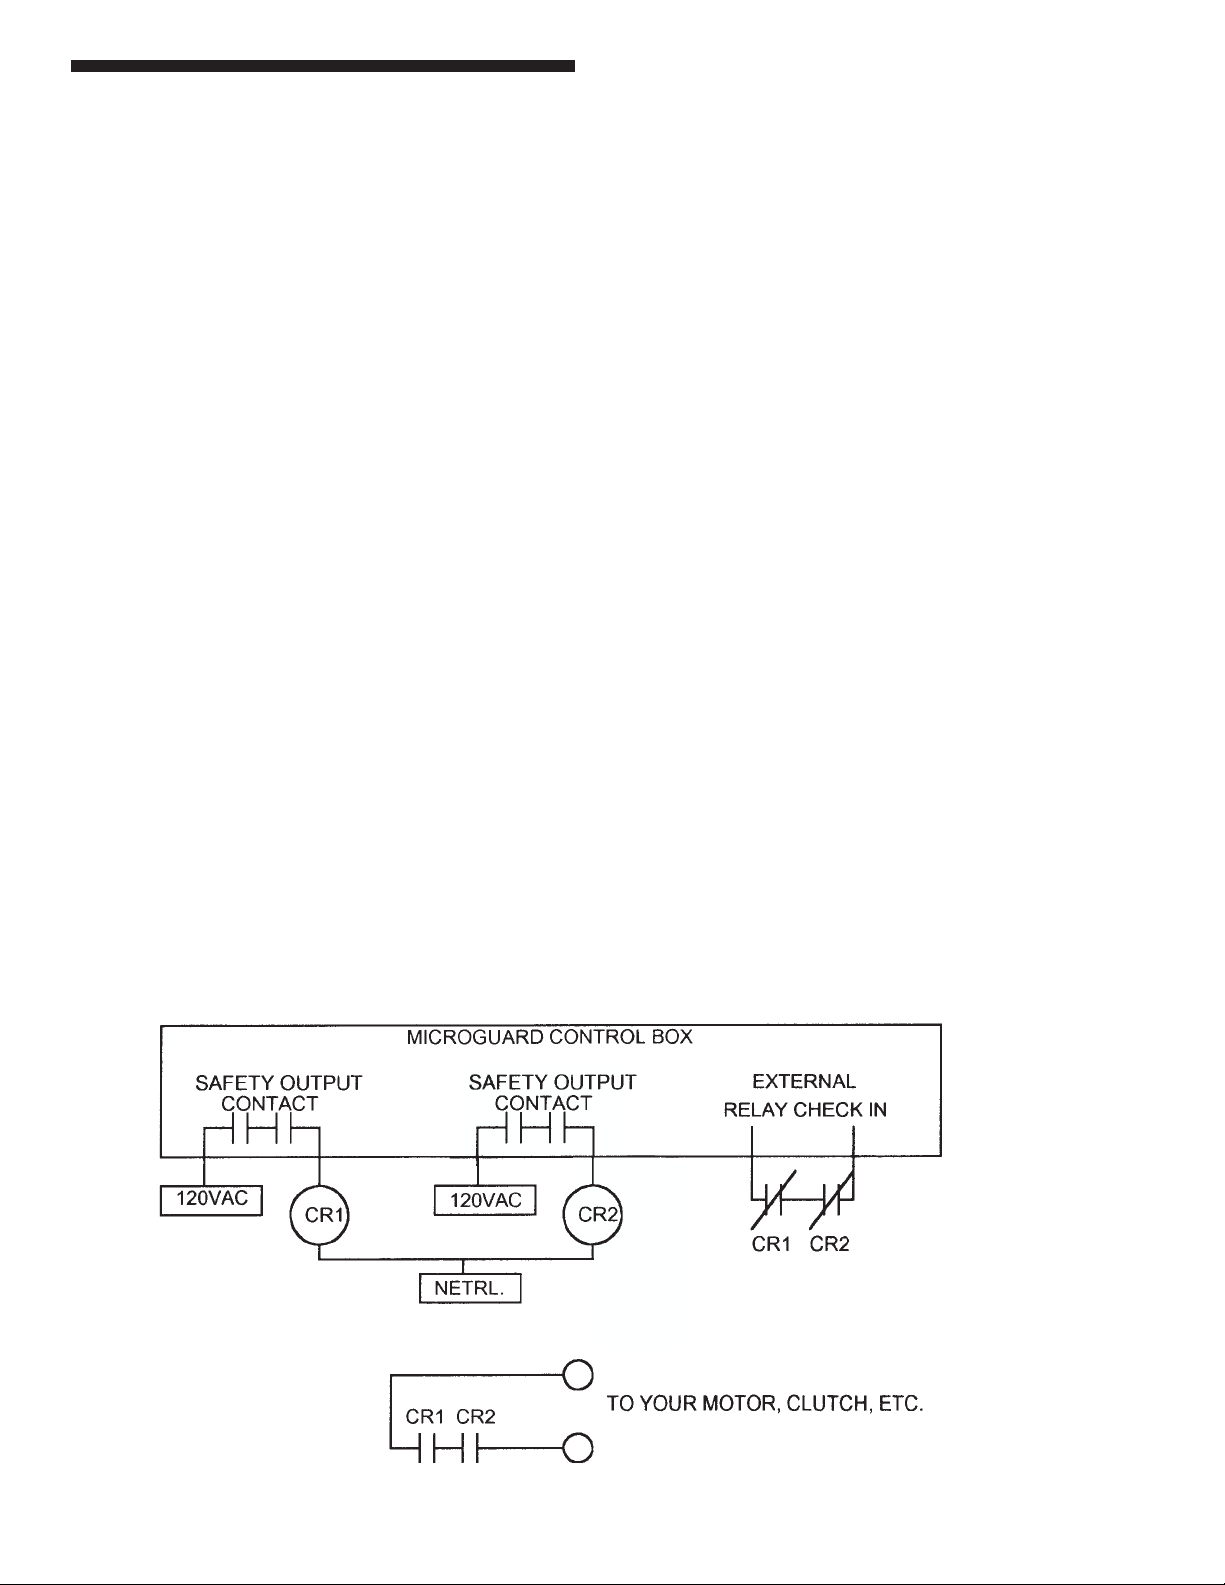
External Relay Check
Description: Allows the MicroGuard to monitor a pair
of external relays in series using the external relays
secondary set of DRY contacts, provided that they are
N.C. and captive contacts. This captive or force-guided
contact will maintain the identical position as the primary
set of contacts on the external relays, except that the
secondary set of contacts are wired up to signal the
reverse of the primary. (i.e., primary are N.O., secondary
are N.C.) The circuit looks for both closure and opening
of the external relay contacts. This system is the only
safe External Relay Check.
Application: Monitoring external relay contacts for
shorts or opens.
Usage: Follow Figure 1 for wiring your external relays.
You must rst activate this feature by using the spare
jumper and placing it across J19 labeled EXT (door
board). This system requires that both N.C. relay
contacts be wired in series then back to the terminals
inside the Controller Module. Relay contacts must be
DRY contacts. Both external relay contacts must be
closed when the light curtain is RED within .25 sec or an
Figure 1: Wiring External Relays
12 13 14 15
2
Page 13

error will occur (this detects an open or a contact weld).
When the light curtain goes GREEN it will record the
opening of the external relay. If the light curtain goes
RED again without ever sensing the opening of the
external relays, an error will occur (this detects a short
or failed relay) and cause the light curtain to lock up and
must be powered down to clear the error. A Red LED
(D14) will light up when external contact is closed (see
Installation Procedures, “Controller Module Setup.” )
Captive Contact Denition: one pole inside the relay
always maintains the identical position to the other pole.
(i.e., if one pole contact welds closed, the other pole
remains closed even when the relay coil is de-energized.
NOTE: Use shielded cable for relay check inputs.
Standard Output Contacts (K1 & K2)
Description: Both K1 and K2 relays each have there
own relay driving circuitry and relay checking circuitry
and are fully independent of each other having there
own output terminals. The MicroGuard checks the
position of all the relays and shuts them all down if any
are found in the wrong position. In order for the system
to remain safe during a single failure of one relay, you
must be using the relays such that the second relay can
still shut the system down if the rst one ever fails. This
can either be by wiring both relays in series or using both
relays separately in two control circuits.
Usage: K1 and K2 have separate outputs and both
must be used either together in series with your stop
circuit or separately in two stop circuits. K1 and K2
outputs are N.O. and close when the curtain is GREEN
only.
Standard Features
Metal Box Controller Module
Fault Relay Output
Description: It will not change states due to curtain
blockage.
Application: Can be used to signal a remote station
of an unexpected machine shut down.
Usage: The fault relay provides a dry contact that is
open when good and closed when a fault or loss of
power occurs. Use the alarm contacts on the power
supply board. The dry contact is isolated up to 120VAC.
To Actviate: Install jumper on J17 (bottom board)
top 2 pins. Install jumper on J9 (door board) between
Latch and Close pins (left side). This feature will disable
remote latching. D21 will light up to show the relay is
active.
3
Page 14

Optional Features
Metal Box Controller Module
Auto Blank [patent # 5,243,183]
Description: Allows user to program the exact size and
location of an object (i.e., a conveyor, table, work piece,
etc.) automatically and can detect any movement in the
object causing the light curtain to shut down.
Application: With the obstruction in place, turn the
key swith from “OFF” to any mode of operation. If the
object(s) do not exceed the total allowable size, the unit
will energize the safety outputs.
Standard Operation: If the obstruction is moved or
removed, the unit will issue a “MOVE” fault, but will
re-energize the safety outputs when the obstruction
is returned to the original position. Standard operation
allows for a total of eight beams to be blocked anywhere
in the curtain (they do not have to be next to each other).
Optional Operation: If the obstruction is moved or
removed, the unit will issue a “MOVE” fault and lockup,
requiring you to re-program the obstruction.
Troubleshooting: If you get a “MOVE” fault when
the obstruction did not move, it is possible that you
are just barely covering a beam and either vibration or
reections are causing the beam to become uncovered.
The uncovered beam then causes a fault.
To Activate Feature: This feature must be ordered and
requires exchanging the computer chips (see Installation
Procedures, “Controller Module Setup”).
WARNING: Leave key switch in OFF/RESET
position while installing, setting up, and testing the
light curtain. Use Auto Blank only after you are
able to get a clear signal from the curtain with no
obstruction.
The term “Auto Blank” is an abbreviation which stands
for Automatic Programmable Beam Blanking. Auto
Blanking is controlled by a multi-position keyswitch and
has three distinct modes of operation:
1) Must be reset if auto blank obstruction moves
or g uard penetrated. The AUTO BLANK
obstruction must remain in its exact location
permanently. Any movement in the AUTO BLANK
obstruction and/or additional guard penetration
will latch the light curtain in a RED condition and
must be reset via the keyswitch.
NOTE: If no obstructions were programmed in, the
guard will still latch in a RED condition should the
guard be penetrated.
2) Must be reset if auto blank obstruction moves.
The Auto Blank obstruction must remain in its
exact location permanently. This works like Mode
1 except guard penetrations will not latch in a RED
condition.
3) Mode 2 with oating blank. This mode works
like Mode 2 with the addition of a Floating Blank
which is set to allow a one beam float (see
Optional Features, Floating Blank”).
NOTE: If no obstructions were programmed in, the
guard will still allow a one beam oat.
Programming: To program, turn the keyswitch into the
OFF/RESET position and place the obstruction(s) in the
guarded area. Now, turn the keyswitch into the desired
mode of operation. The exact size and location of the
object(s) are now in memory. The Depth Penetration
Factor D(pf) must be set to account for the one beam
oat (see Optional Features, “Floating Blank”).
Diagnostics Display
AB Auto Blank detected an object (the number
indicates the size of the object).
RDY No objects programmed in, keyswitch in
Mode 1 or 2.
FB No objects programmed in, keyswitch in
Mode 3
SIZE Obstruction size exceeded a total of eight
beams.
PENT Penetration of the light curtain occurred
while keyswitch was in Mode 1.
MOVE Auto Blank obstruction moved.
IMPORTANT: Place Auto Blank keyswitch into
OFF/RESET position and remove any obstructions
while aligning light curtain. Do not use Auto Blank
until light curtain is correctly aligned (see Installation
Procedures, “Alignment Procedure”).
The keyed selector switch is designated to be supervisory
controlled. After installation, the safety key should be
removed and controlled only by the safety supervisor or
authorized plant personnel.
4
Page 15

Optional Features
Metal Box Controller Module
Emergency Stop Input(s)
Description: This option utilizes two normally-closed
emergency stop contacts to achieve a Catagory 4
safety level, per EN 954-1. If either or both emergency
stop contacts open, power to the safety output relays is
removed, causing the relays to de-energize and send
a stop signal to the guarded machine.
Application: This protects against a safety switch
contact failure or wiring fault. A contact failure or wiring
short will inhibit the system reset, causing the system’s
Diagnostic Message Display to indicate an Emergency
Stop Input Failure.
Usage: Wire one N.C. contact between Terminal #1 and
#4. Wire the second N.C. contact between Terminal #3
and #4 (located on power supply board). This option
cannot be used with Mute-Out. Alterative option: Wire
rst N.C. contact between Terminal #6 and #4. Wire
second N.C. contact between Terminal #7 and #8. This
option cannot be used with Cincinnati or External relay
checking features. To reset ESTOP: Close both ESTOP
inputs, then use the latching relay reset input to clear
ESTOP fault (cycle closure between Terminal #2 and 4).
DeviceNet
Description: Optional external board that is mounted
to the door board inside the Metal Box Controller
Module. External board comes with its own directions.
™
Depth Penetration Factor is the number used to
compute the distance the light curtain should be placed
from the point of operation (see Installation Procedures,
“ANSI Standard B11.19-2003”).
Diagnostics Display:
RDY Keyswitch is in the lowest position (Floating
Blank is off).
FB Indicates Floating Blank active and the
number of blocked beams.
OBST A second object found in the curtain (only
one obstruction is allowed to oat).
Table 1a: .5” Beam Spacing Pylons
Display
Minimum
Object
Sensitivity, S
D(pf) Depth
Penetration
Factor
Max. Floating
object size
less than
Inches/Millimeters Inches/Millimeters Inches/Millimeters
RDY (oat off) 0.55” / 14mm 0.935” / 23.8mm 0.00” / 0.0mm
FB1 (1 beam oat) 1.18” / 30mm 3.077” / 78.2mm 0.45” / 11.4mm
FB2 (2 beam oat) 1.75” / 45mm 5.015”/129.2mm 0.95” / 24.1mm
FB3 (3 beam oat) 2.36” / 60mm 7.089”/180.2mm 1.45” / 36.8mm
FB4 (4 beam oat) 2.95” / 75mm 9.095”/231.2mm 1.95” / 49.5mm
FB5 (5 beam oat) 3.54” / 90mm 11.101”/282.2mm 2.45” / 62.2mm
FB6 (6 beam oat) 4.13” /105mm 13.107”/333.2mm 2.95” / 74.9mm
Floating Blank
Description: On a press brake, the Floating Blank permits
the work piece to be placed in the guarded area and can
be moved around as long as it does not exceed the object
sensitivity selected. A keyswitch by default allows for
zero, one, two, or three beams to be blocked anywhere
in the curtain as long as all the blocked beams are next
to each other. The customer may request different
blanking sizes for different applications. The Minimum
Object Sensitivity (MOS) and the Depth Penetration
Factor (DPF) change when the key switch position
is changed. The DPF is used to compute the safety
distance.
Location of the light curtain from the point of operation
must include the depth penetration factor D(pf)
equivalent to the beam spacing.
Minimum Object Sensitivity indicates the minimum
size required to cause the light curtain to detect an
object even if it is moving (oating). If the obstruction is
slightly smaller (less than .25”) than the stated number,
the light curtain may blink RED/GREEN when the
object is moving in the eld of view. If the obstruction
is smaller than the stated number by at least .25”, then
the light curtain will stay GREEN as long as there are
no additional obstructions.
Table 1b: 1” Beam Spacing Pylons
Minimum
Display
Inches/Millimeters Inches/Millimeters Inches/Millimeters
Rdy (oat off) 1.18” / 30mm 3.077” / 78.2mm 0.00” / 0.0mm
FB1 (1 beam oat) 2.36” / 60mm 7.089” /180.2mm 0.95” / 24.1mm
FB2 (2 beam oat) 3.54” / 90mm 11.101” /282.2mm 1.95” / 49.5mm
FB3 (3 beam oat) 4.72” / 120mm 15.113” /384.2mm 2.95” / 74.9mm
Object
Sensitivity, S
D(pf) Depth
Penetration
Factor
Max. Floating
IMPORTANT: Place Floating Blank keyswitch
in lowest position and remove any obstructions
while aligning light curtain. Do not use Floating
Blank until light curtain is correctly aligned (see
Installation Procedure, “Alignment Procedures”).
The keyed selector switch is designated to be
supervisory controlled. After installation, the safety
key should be removed and controlled only by the
safety supervisor or authorized plant personnel.
5
object size
less than
Page 16

Optional Features
Figure 2: Bottom board inside Control Box
Metal Box Controller Module
Guarding Mute-Out
Description: The Guarding Mute-Out option is the
only fault-tolerant method of by-passing the light curtain
during the nonhazardous portion of your machine cycle
(i.e., up stroke of press).
Application: Allows any object to pass through the light
curtain without opening the stop circuit and interrupting
the machine cycle (i.e., the curtain stays GREEN).
Usage: The Guarding Mute-Out portion of the cycle
occurs between the pinch point and top stop (about
180° to 300°) or any non-hazardous portion of your
machine cycle.
You must power up the MicroGuard out of the Guarding
Mute-Out condition, any other condition will cause an
error to occur and you will have to power down the guard
to reset it. When in Guarding Mute-Out, the MicroGuard
will display “MUTE.” If LS4 or LS5 limit switches are ever
caught out of sequence, the guard will fault and issue
an error message of “MUTE-OUT SWITCH FAULT” or
“SLV MUTE-OUT SWITCH FAULT.”
Use only the shielded cable provided! Do not route
cable along with high voltage lines.
1) Connect one side of LS4 and LS5 to Terminal
4 inside MicroGuard.
2) Connect other side of LS4 to Terminal 1 inside
MicroGuard.
4) Connect other side of LS5 to Terminal 3 inside
MicroGuard.
If both signals remain in the same state (i.e., both
closed or both open) for more than 100mSec a fault
will be issued.
NOTE: To by-pass this feature, jumper LS5 (terminal
3) to terminal 4.
To Activate Feature: This feature must be ordered and
requires exchanging the computer chips (see Controller
Module Setup section for a diagram).
Latching Relays
Description: Light curtain wil stay in a RED condition
when blocked, even when the blockage is removed and
the guard is clear, until signalled to try and reset back
to GREEN (unblocked).
If you have Auto-Blank, this option allows you to reset
penetration without reprogramming the Auto-Blank.
Application: This is used for guarding an area against
intrusion. Without this option the light curtain would only
stay RED (safe) as long as the intrusion was detected
(i.e., nger, hand, etc.).
Usage: Wire a N.O. button between Terminals 2 and 4. You
can remote this button if you want. This feature must be
ordered and requires exchanging the computer chips.
Also, install jumpers on J15 and J17 on bottom 2 pins
of each (bottom board).
Figure 2: Bottom Board Inside Control Box
1 2 3 4 - +
LS4 LS5 CONDITION DISPLAY
OPEN CLOSED GUARDED RdyM
CLOSED OPEN MUTE-OUT MUTE
OPEN OPEN FAULT Mute out switch fault
CLOSED CLOSED FAULT Mute out switch fault
N.O.
MUTE-LS4
Latching
Reset
Button
NOTE: To turn off this option (for alignment purposes)
short the 3 left pins of J4 together. Remove the shorted
pins when done with the guard alignment.
ALARM
Dry contact
MUTE-LS5
6
Page 17

Installation Procedures
Metal Box Controller Module
WARNING: The entire machine safety system
must be tested at the start of every shift. Machine
testing should include: (1) proper machine
operation and stopping capability; and (2)
verication of proper installation and settings of
all point of operation guards and devices before
the operation is released for production.
CAUTION: The MicroGuard should be mounted
in a manner so that only authorized personnel can
change the mounting or location.
CAUTION: Additional guards may be required to
prevent the operator from standing between the
light curtain and the point of operation.
1) Test the unit before you mount it on your equipment
by running the light curtain with the pylons butted
up to and facing each other. Each cable and pylon
is labeled “EMITTER” or “RECEIVER”. You will
feel a snap when the plug is fully seated and
locked onto the connector. Attach a line cord to
the power terminals for testing. If the light curtain
goes GREEN, you are ready to proceed with the
next step. If the light curtain stays RED, call your
dealer for help in determining the problem.
2) Determine the Safety Distance of the light curtain
from the point of operation (see Installation
Procedure, “ANSI Standard B11.19-2003”).
3) Determine if any part of the Microguard is to be
directly subjected to either excessive shock and/
or vibration. If so, mount the subjected parts to
your equipment using shock-mounted devices
(such as Part# 21-019). Shock and/or Vibration
damage is not covered under warranty.
4) Place the Controller Module in an accessible
location where the cables can reach the pylons.
Dress the cables to avoid crushing, kinking, or
cutting (see Dimensions, “Controller Module“).
5) Wire power to the proper terminals and check that
the voltage is correct (see Installation Procedures,
“Controller Module Setup”).
Power for the MicroGuard should not be down
stream of noisy inductive devices (i.e., motors,
solenoids, etc.), it should be in front of them.
6) Interface the light curtain standard relay output
contacts to the safety stop circuit(s). You must use
both K1 and K2 output contacts. Do not use an
external relay(s) unless you use the external
relay checking feature.
7) Interface any remaining optional input or output
lines to their proper terminals (see Optional
Features).
8) Align the light curtain (see Installation Procedures,
“Alignment Procedure”).
9) Use a round test piece (i.e., dowel rod) that has a
diameter equal to the minimum object sensitivity.
Check and assure stop of machine when signal of
penetration is made. Minimum object sensitivity
goes up if you use Auto or Floating Blank options.
10) Mechanical guarding may also be required
from reaching around the light curtain to the
point of operation (see Installation Procedures,
“Safeguarding with Mechanical Guards”).
11) For installation assistance, please call your
dealer.
NOTE: For location of pylons in relation to the hazard
area, see Appendix B: Regulations and Guidelines,
“Federal Register 1910.217 (c) (3) (iii) (e)” and Installation
Procedures, “Safeguarding with Mechanical Guards”.
4) Mount both pylons with the connector side in the
same direction mechanically aligned with one
another. Locate pylons so the working zone
is guarded from reaching around, over, and
under the light curtain system to the point
of operation or hazard zone (see Installation
Procedures, “Safeguarding with Mechanical
Guards”).
NOTE: For location of pylons in relation to the
hazard area, refer to Appendix B: Regulations
and Guidelines, “Federal Register 1910.217
(c) (3) (iii) (e).”
7
Page 18

Installation Procedures
Metal Box Controller Module
Resetting the MicroGuard
Error messages are stored in a nonvolatile memory
(EEPROM). To clear error messages, press the RESET
button. DO NOT hold in the button or hit it twice,
just one hit. The unit will not reset until it is nished
displaying the entire error message.
If you remove power from the unit without clearing the
error message, the message will reappear when you
power back up. Hit the RESET button to clear this error
from memory.
The RESET button is located inside the MicroGuard
Controller Module on the door circuit board, left hand
side, or the lower circuit board underneath the gray
ribbon cable to start up the light curtain.
You can review all previous error messages recorded
by holding down the RESET button while turning on the
power to the unit, for two seconds. Each error message
will scroll by, last error rst. When you see the message
“NO MORE CODES,” hit the RESET button to start up
the curtain. Up to 45 previous error messages can be
displayed. You can shut down the curtain during normal
operation by pressing the RESET button.
8
Page 19
Installation Procedures
Metal Box Controller Module
Alignment Procedure
1) Both pylons should be placed so that they are
mechanically aligned to one another. Make sure
that both ends of each pylon line up with each
other.
2) Slightly loosen the mounting bracket screws to
allow for slight rotational movement of Receiver
pylon.
3) Move the Receiver pylon to nd its midpoint (or
sweet spot) where the unit goes from RED to
GREEN to RED.
4) Tighten the screws once you nd the midpoint
and repeat the operation for the Emitter pylon.
If you still cannot get the unit to go GREEN
5) Recheck mechanical alignment.
6) The diagnostics display will indicate the distance
(in inches) of the rst missing beam from the
connector end of the guard and the total number
of missing beams (i.e., 12 4 = rst missing beam
is 12” from connector and a total of 4 beams are
missing or 015A = rst missing beam is 1.5” from
connector and 10 beams are missing)
7) Loosen the mounting bracket corresponding to
the end of the pylon closest to the missing beam
and adjust it to get the unit to go GREEN.
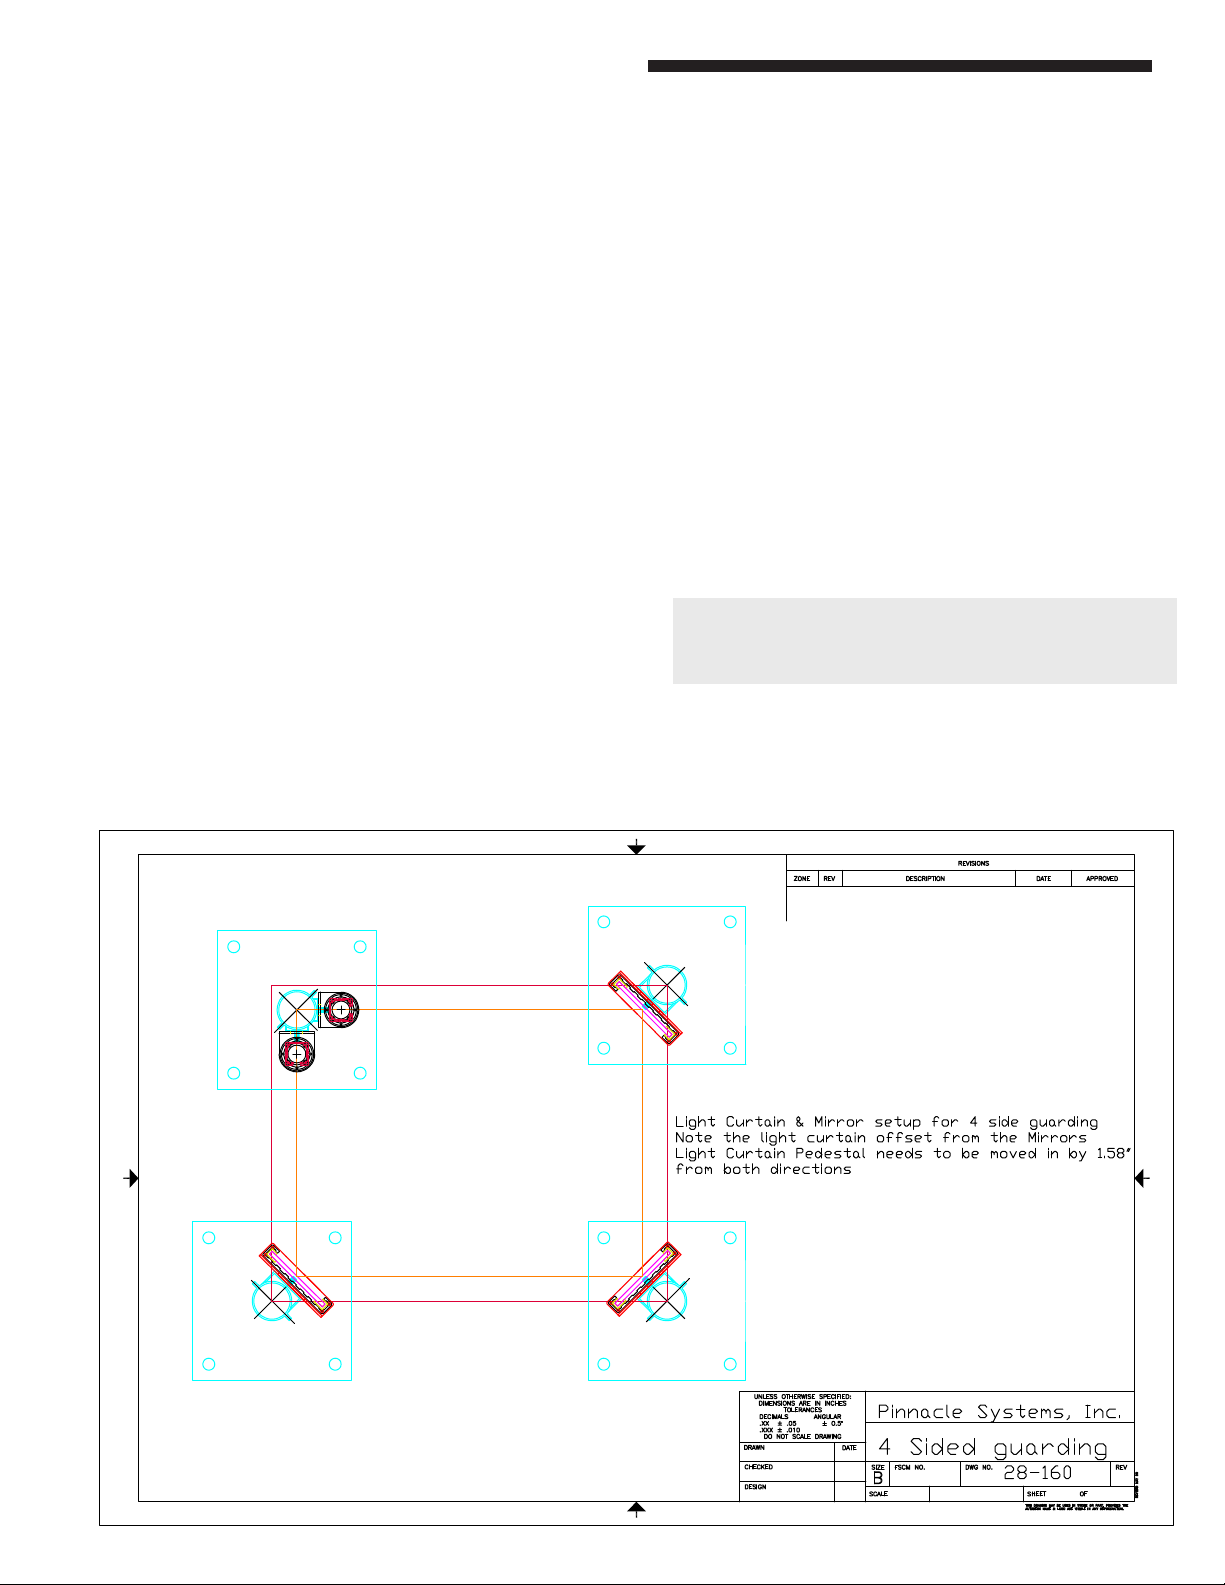
If you are using mirrors, refer to Figure 3
8) Every mirror you use will increase the difculty of
alignment and will reduce the overall maximum
optical distance you can achieve. A loss of 5%
per mirror should be used to determine the total
optical distance (i.e., 15’ through two mirrors =
16.5’ with losses).
9) You may have to rotate all mirrors in turn (starting
from the Emitter end) to nd the true optical path
of infrared light. Also, you may have to toe in one
end of the mirror due to irregularities in the mirror
brackets.
NOTE: Make sure you do not exceed the total
optical path distance of 20’ or the curtain distance
that was specied.
Figure 3: 4 Sided Guarding with Dual Stud Guard Brackets, TRM Mirrors and Model #8000 Pedestals
9
Page 20

Installation Procedures
Metal Box Controller Module
Operations
NOTE: Examine the MicroGuard on a daily basis to
make sure that no one has moved the light curtain pylons
closer to the pinch point or removed any mechanical
guards from around the curtain.
NOTE: If it is possible for someone to go through the
light curtain and remain in a dangerous area without
having to block the light curtain, you must order the
Resettable Latching Relays option which keeps the
curtain RED even after you are no longer blocking the
curtain. The Latchout reset button is mounted away
from the dangerous area and must be cycled to reset
the curtain.
1) Power up the light curtain. If a fault occurred the
last time the unit was powered and was never
RESET, it will appear as a “SLAVE FOUND” error
message and you will have to push the RESET
button to clear the fault message and start the
curtain.
2) When GREEN the curtain will display “RDY” or
“rdy “ depending on any options that were set (see
Appendix A: Diagnostics and Troubleshooting for
Descriptions).
3) When RED due to blockage, the display will
indicate the location of the rst obstruction(s) and
the total size of the obstruction(s) (see Appendix
A: Diagnostics and Troubleshooting). If you have
Floating Blank, then this is indicating that your
object is too large for the oating size you have
selected. If you increase the Floating Blank size,
you must recalculate the safety distance formula
since the object sensitivity will be larger. If you
have the Resettable Latchout option, the display
will show “PENT” to indicate penetration. You
must cycle the Latchout RESET button to clear
the curtain (see Optional Features, “Resettable
Latching Relays”).
6) Auto Blank. The display will show “AB” to indicate
that an object is programmed in and its size (in
beams) is shown as the next digit. If you keep
getting a “MOVE” message and your object is
not moving, try repositioning the object slightly
(+/- 1/4”) and reprogram it back into memory. If
you get a “SIZE” message, you must either get
new software to allow a larger object or reduce
your object size.
7) Floating Blank. The display will show “FB” to
indicate the allowed blanking size in beams. Once
an object penetrates the curtain, any second
object will cause the curtain to display “OBST” to
indicate that a second obstruction is in the curtain.
This is done in case you select a Floating Blank
size much larger than the actual object size.
4) When RED due to a fault, the display will scroll
the error message that caused the fault and the
board and beam number (if it can be pin pointed).
You must rst correct the fault and then push the
RESET button to clear the fault from memory,
even powering down the unit will not clear the
fault from memory (see Appendix A: Diagnostics
and Troubleshooting).
5) If you have the Guarding Mute-Out option, the
display will show “MUTE” during the up stroke.
If you have the Cincinnati Interface hooked up,
the display will show “CINN” during the up stroke
(see Optional Features, “Guarding Mute-Out”).
10
Page 21

Installation Procedures
Installation Procedures
Metal Box Controller Module
The following formula should be used when calculating
the safety distance:
Ds = K x (Ts + Tc + Tr + Tbm) + D(pf)
Ds = Minimum safety distance between the
device and the nearest point of operation
hazard (in inches).
K = Hand speed constant. This value has been
determined by various studies and, although
these studies indicate speeds of 63 in/sec to
over 100 in/sec, they are not conclusive
de termination s. Th e emplo yer sho uld
determine this value by considering all factors,
including physical ability of the operator.
Ts = Stop time of the machine tool measured by a
stop time measurement device.
Tc = Response time of the control system (usually
is taken care of by the measurement device).
Tr = Response time of the presence-sending
device and it’s interface, if any, as stated by
the ma nufactu rer or measur ed by th e
employer.
Tbm = Additional time allowed for the brake monitor
to compensate for variations in normal
stopping time.
D(pf) = Depth Penetration Factor. Added distance as
indicated by Figure 2. The minimum object
sensitivity is stated by the manufacturer. If a
Floating Blank is used, use the Dpf numbers
found on Tables 2 and 3.
Penetration factor, Dpf, for presence-sensing
devices used in a vertical application with object
sensitivity less than 64 mm (2.5 inches)
Dpf, the distance added to the safety distance due to
the penetration factor compensates for varying object
sensitivities of electro-optical presence-sensing
devices.
When blanking features are used and when the
blanked area is not completely filled by the workpiece
or part, or by mechanical guarding, the minimum
d B11.19-2003d B11.19-2003
d B11.19-2003d B11.19-2003
d B11.19-2003
or calculaor calcula
or calculaor calcula
or calcula
ting safting saf
ting safting saf
ting saf
ety distanceety distance
ety distanceety distance
ety distance
tains frtains fr
tains frtains fr
tains fr
om hazarom hazar
om hazarom hazar
om hazar
dous pointdous point
dous pointdous point
dous point
aa
aa
a
tion.tion.
tion.tion.
tion.
Metal Box Controller Module
ANSI Standard B11.19-2003
Formula for calculating safety distance
of light curtains from hazardous point
of operation.
The effective sensing eld of the device shall be located
at a distance from the nearest recognized hazards such
that the operator or others cannot reach the hazard with
a hand or other body part before cessation of motion
during the hazardous portion of the machine cycle.
The point at which a device responds to an intrusion may
vary. The devices should be located or adjusted such
that the device always responds to the intrusion at or
prior to the safety distance. Care should be exercised
when installing the device to ensure that it does not
detect false signals from other devices in the area.
Usually the electro-optical presence-sensing device is
used in a manner that provides a protected zone in front
of the primary work area with auxiliary devices or guards
used to protect secondary access areas. In some cases,
however, mirrors may be used in conjunction with the
device to provide 2-, 3-, or 4-sided protection.
The machine stop time should be measured with the
machine running at its fastest speed with its heaviest
die or tooling and the stop time being measured at the
90° position in the downstroke.
Figure 4: Minimum Object Sensitivity and D(pf)
Minimum
Object
Dpf = 3.4 (S-7) mm
(Dpf = 3.4 (S-0.275) in)
The following formula should be used when calculating
the safety distance:
Ds = K x (Ts + Tc + Tr + Tbm) + D(pf)
Ds = Minimum safety distance between the
device and the nearest point of operation
hazard (in inches).
K = Hand speed constant. This value has
been determined by various studies and,
although these studies indicate speeds of
Ts = Stop time of the machine tool measured by
Tc = Response time of the control system (usually
Tr = Response time of the presence-sending
Tbm = Additional time allowed for the brake
D(pf) = Depth Penetration Factor. Added distance
Penetration factor, Dpf, for presence-sensing
devices used in a vertical application with object
sensitivity less than 64 mm (2.5 inches)
Dpf, the distance added to the safety distance due
to the penetration factor compensates for varying
object sensitivities of electro-optical presence-sensing
devices.
When blanking features are used and when the
blanked area is not completely lled by the workpiece
or part, or by mechanical guarding, the minimum
object sensitivity can be calculated as:
Object sensitivity = size of the blanked area plus
minimum object sensitivity without blanking.
Once this value is found, then determine Dpf.
If the entre blanked area is lled with mechanical
11
guarding or other xed material or guards, use the
device’s object sensitivity to determine Dpf.
63 in/sec to over 100 in/sec, they are not
conclusive determinations. The employer
should determine this value by considering
all factors, including physical ability of the
operator.
a stop time measurement device.
is taken care of by the measurement
device).
device and it’s interface, if any, as stated
by the manufacturer or measured by the
employer.
monitor to compensate for variations in
normal stopping time.
as indicated by Figure 4 on this page. The
minimum object sensitivity is stated by the
manufacturer. If a Floating Blank is used,
use the Dpf numbers found in the Floating
Blank section of this manual.
Page 22

Installation Procedures
Metal Box Controller Module
Safeguarding with Mechanical Guards
When a light system is used to protect the operator or
passerby from penetration, it must be mounted and
properly sized (grid length) so it is impossible to reach
under, around, or over into the hazardous point of
operation zone. Infrared light systems normally guard
the front or feed area of a machine. The sides or the
areas where the light screen does not guard must be
guarded by some other means.
If the position of the safety light curtain will allow the
operator or others to place themselves between the
sensing eld and the hazardous area, auxiliary guards or
devices such as safety mats, barrier guards, or devices
should be used in conjunction with the safety light
curtain to prevent the operator or others from exposure
to the hazardous area. If mechanical guards such as
polyurethane, expanded or perforated metal, hairpins,
etc. are used to guard these areas, the opening must
comply with the OSHA safety distance in relationship
to the openings.
After installation of point of operation guards and before
a job is released for operation, a check should be made
to verify that the guard will prevent the operators hands
from reaching into the point of operation or any hazard
zone.
Table 2 outlines the distances that guards should be
positioned from the nearest point-of-operation hazards.
The various openings are such that for average-sized
hands, an operator’s ngers will not reach the point of
operation.
After installation of point-of-operation guards and before
a job is released for operation, a check should be made
to verify that the guard will prevent the operator’s hands
or other body parts from reaching the point of operation.
Light Curtain Test Procedure
Use a dowel rod (or similar object) with a diameter
equal to the M.O.S. (Minimum Object Sensitivity) of
the guard you are testing. Move the rod through the
eld of the curtain (i.e. top to bottom for vertically
mounted curtains). Repeat this test close to the Emitter pylon, close to the Receiver pylon, in the middle
between the pylons, and most importantly in front of
the operator position.
Make sure the curtain indicates a “Blocked” condition
(RED light) when the rod is in the eld of the curtain.
Check and make sure the machine cannot move
when the curtain shows “Blocked”. If the machine can
operate while the curtain shows a “Blocked” condition,
then re-examine your wiring.
NOTE: Always use both safety relays in your STOP
circuit(s).
If the curtain does not show “Blocked” when the rod
is in the eld: Check to make sure the rod is truly in
the curtain’s eld, and re-check the curtain’s Minimum
Object Sensitity (including AutoBlank and Floating
blank options that change the M.O.S.).
Infrared light from the curtain may be reecting
around the rod due to reective material too close
to the curtain’s eld. In this case, you will have to
move the curtain pylons back away from the reective
material and repeat the test over again. The curtain’s
power level can also be reduced by the factory.
Table 2: Mechanical Guards
Distance of opening Maximum width
from point of operation of opening
hazard (inches) (inches)
1/2 to 1-1/2 1/4
1-1/2 to 2-1/2 3/8
2-1/2 to 3-1/2 1/2
3-1/2 to 5-1/2 5/8
5-1/2 to 6-1/2 3/4
6-1/2 to 7-1/2 7/8
7-1/2 to 12-1/2 1-1/4
12-1/2 to 15-1/2 1-1/2
15-1/2 to 17-1/2 1-7/8
17-1/2 to 31-1/2 2-1/8
12
Page 23

Controller Module Setup
Table 3: Controller Module Connection Chart (Lower Board)
Installation Procedures
Metal Box Controller Module
1 Mute-Out Input LS4 (optional)
2 Remote Latch reset input
3 Mute-Out LS5 (optional)
4 Ground for Terminals
5 Cincinnati Interface + Input
6 Cincinnati Interface – Input
7 External relay monitor input
8 External relay monitor input
9 Aux relay K3 (N.O.) close when Green
Figure 5: Controller Module (Lower Board)
NOTE:
If K1 & K2 Safety Relays
are clear, blue or white,
you m u s t use b o th
Safety Outputs 12-13
& 14-15 together. If K1
& K2 Safety Relays are
Green, you can use one
or both Safety Outputs.
10 Aux relay K3 (common)
11 Aux relay K3 (N.C.) close when Red
12-13 Safety Output #1 N.O. close when Green
14-15 Safety Output #2 N.O. close when Green
16 Case Ground (Earth)
17-18 Neutral (-) and Line (+)
alarm Dry relay opens on fault or loss of power
13
Page 24

Installation Procedures
Metal Box Controller Module
Table 4: Single Pylon Set Controller Module Jumper Chart
Auto Blank / Floating Blank Keyswitch.................................................................................................................. J4
Pylon Length Selector ...........................................................................................................................................S3
1 = Jumper
4" 8" 12" 16" 20" 24" 28" 32" 36" 40" 44" 48" 52" 56" 60" 64"
D0 1 1 1 1 1 1 1 1
D1 1 1 1 1 1 1 1 1
D2 1 1 1 1 1 1 1 1
D3 1 1 1 1 1 1 1 1
D4 1 1 1 1 1 1 1 1 1 1 1 1 1 1 1 1
68" 72" 76" 80" 84" 88" 92" 96" 100" 104" 108" 112" 116" 120"
D0 1 1 1 1 1 1 1
D1 1 1 1 1 1 1 1 1
D2 1 1 1 1 1 1 1 1
D3 1 1 1 1 1 1 1 1
D4
For pylons with 1” beam spacing, install the Jumper plug (just below D4)
For pylons with 1/2” beam spacing, remove the Jumper plug (just below D4)
EXT (Activates External Relay Check, see Standard Features) .......................................................................... J9
FLASH (Doubles response time of light curtain allow for Arc Weld Flash near light curtain ................................ J9
LATCH (Activates remote latch resetting (see Resettable Latching Relays) ....................................................... J9
FAULT RESET BUTTON (Push button to reset faults, do not hold button in) .......................................................S2
Figure 6: Controller Module Jumper — Upper Board
14
Page 25

Installation Procedures
Metal Box Controller Module
Table 5: Multiple Pylon Set Controller (DUAL - SC) Module Length Jumper Chart
Auto Blank / Floating Blank Keyswitch................................................................................................................ J40
Pylon Length Selector ..................................................................................................................................S3 & S4
1 = Jumper
4" 8" 12" 16" 20" 24" 28" 32" 36" 40" 44" 48" 52" 56" 60" 64"
D0/L0 1 1 1 1 1 1 1 1
D1/L1 1 1 1 1 1 1 1 1
D2/L2 1 1 1 1 1 1 1 1
D3/L3 1 1 1 1 1 1 1 1
D4/L4 1 1 1 1 1 1 1 1 1 1 1 1 1 1 1 1
68" 72" 76" 80" 84" 88" 92" 96" 100" 104" 108" 112" 116" 120"
D0/L0 1 1 1 1 1 1 1
D1/L1 1 1 1 1 1 1 1 1
D2/L2 1 1 1 1 1 1 1 1
D3/L3 1 1 1 1 1 1 1 1
D4/L4
For pylons with 1” beam spacing, install the Jumper plug (just Left of D4/L4)
For pylons with 1/2” beam spacing, remove the Jumper plug (just Left of D4/L4)
EXT (Activates External Relay Check, see Standard Features) .......................................................................... J9
FLASH (Doubles response time of light curtain allow for Arc Weld Flash near light curtain ................................ J9
LATCH (Activates remote latch resetting (see Resettable Latching Relays) ....................................................... J9
FAULT RESET BUTTON (Push button to reset faults, do not hold button in) .......................................................S2
Figure 7: Multiple Pylon Controller Module Connector/Jumper Detail
15
Page 26

Installation Procedures
Figure 8: Controller Module Wiring Diagram
Metal Box Controller Module
Wiring
Figure 8: Controller Module Wiring Diagram
16
Page 27

Pylon Dimensions
Dimensions
Metal Box Controller Module
Figure 9a: Swivel Bracket Dimensions
Dimensions
Metal Box Controller Module
17
Page 28

Dimensions
Metal Box Controller Module
Pylon Dimensions
Figure 9b: Swivel Bracket Dimensions, pylon dimensions (by model), and additional cable information
18
Page 29

Dimensions
Metal Box Controller Module
Pylon Dimensions
Figure 10: Fixed Bracket Dimensions, pylon dimensions (by model), and additional cable information
19
Page 30

Dimensions
Metal Box Controller Module
Controller Module
The Emitter cable plugs into a bulkhead connector on
the bottom right of the controller. The Receiver cable
plugs into a bulkhead connector on the bottom middle of
the controller. All other signals, including power, enter
through the knockout provided on the bottom left of the
controller. The bulkhead connectors are water/dust/oil
tight. Cables lock onto the bulkhead connectors with
a ¼ turn.
Tol. +/- 0.10” / 2.54mm
Table 6: Controller Module Dimensions
Dim Single Multiple
(in/mm) (in/mm)
A 7” / 177.8 8” / 203.2
B 4” / 101.6 7” / 177.8
C 8” / 203.2 9” / 228.6
D 4” / 101.6 4” / 101.6
E 8.65” / 215.9 9.85” / 248.9
Figure 11: Controller Module Dimensions
20
Page 31

Cornering Mirrors
Accessories
Metal Box Controller Module
Through the use of cornering mirrors, multiple sides or
work envelopes can be guarded which enhance safety
and down-time related to mechanical and electrical
interlock systems. Be sure to include a reectivity
loss per mirror (15% for MGM, 10% for TRM) when
calculating total scanning distance of light curtain.
WARNING: If you are using Auto Blank or Floating
Blank options, you may unknowingly create a hole
around your machine. Do not use mirrors with
blanking unless you need blanking on all guarded
sides.
Table 7: Cornering Mirror Dimensions
MODEL DIM A (in/mm) DIM B (in/mm) DIM C (in/mm)
(hole to hole (mirror length) (total length)
distance)
TRM-04 / MGM-04 7.45 / 189 6.25 / 159 8.50 / 216
TRM-08 / MGM-08 11.45 / 240 10.25 / 260 12.50 / 318
TRM-12 / MGM-12 15.45 / 392 14.25 / 362 16.50 / 419
TRM-16 / MGM-16 19.45 / 494 18.25 / 464 20.50 / 521
TRM-20 / MGM-20 23.45 / 595 22.25 / 565 24.50 / 622
TRM-24 / MGM-24 27.45 / 697 26.25 / 667 28.50 / 724
TRM-28 / MGM-28 31.45 / 799 30.25 / 768 32.50 / 826
TRM-32 / MGM-32 35.45 / 900 34.25 / 870 36.60 / 927
TRM-36 / MGM-36 39.45 / 1002 38.25 / 971 40.50 / 1029
TRM-40 / MGM-40 43.45 / 1104 42.24 / 1073 44.50 / 1130
TRM-44 / MGM-44 47.45 / 1208 46.25 / 1175 48.50 / 1232
TRM-48 / MGM-48 51.45 / 1307 50.25 / 1276 52.50 / 1334
TRM-52 / MGM-52 55.45 / 1408 54.25 / 1378 56.50 / 1435
TRM-56 / MGM-56 59.45 / 1510 58.25 / 1480 60.50 / 1537
TRM-60 / MGM-60 63.45 / 1612 62.25 / 1581 64.50 / 1638
TRM-64 / MGM-64 67.45 / 1713 66.25 / 1683 68.50 / 1740
NOTE: Mirrors are surface coated. Wipe surface
using only a damp, clean, soft 100% cotton cloth.
To replace broken or scratched glass, remove end
bracket and slide mirror out with gasket.
Tolerance: +/- 0.10 inches / .025cm
Figure 12: Cornering Mirror Dimensions
TRM DimensionsMGM Dimensions
21
Page 32

Accessories
Metal Box Controller Module
Pedestal
The heavy duty, all-welded steel pedestal oor mounts
can be used for mounting either the MicroGuard Metal
Box or DIN-rail Controller Module light curtain or
cornering mirrors. Sliding mounts on the pedestal are
universal in design and are supplied standard. Unique
oating base on pedestal is designed to compensate
for uneven oors. Pedestal is fabricated from 12 gauge
steel, the base is ¼” steel plate, and the entire unit is
painted OSHA yellow.
Standard height = 72” (model 8000)
Optional height = 96” (model 8096)
NOTE: Do not mount pedestal to oor until you have
fully installed your guarding system and know it is
operating properly in its current position on the oor.
WARNING: Pedestals must be bolted to the oor
after installation; they must not be movable.
11-183 Standard Single mounting bracket
(shown)
Figure 13: Pedestal Dimensions
Stud is 3/8”-16 x 10/16” long
11-184 Special Dual pedestal mounting
bracket. Has two mounting studs 90
deg apart. Allows both Emitter and
Receiver pylon on one pedestal.
Requires SMB option on pylons.
Model 9000 and 9500
Excellent method of mounting the light guard for press brakes or when the light guard is to be moved for die setups
or machine maintenance. Model 9000 consists of three 180-pivot points along with light guard diagonal movement
capability for virtually unlimited light guard positioning. Two-inch square tubing 3/16” thick painted OSHA yellow
which mounts directly onto the machine housing and makes for a heavy duty yet versatile mounting bracket. Model
9500 consists of two 180-pivot points and one adjustable length arm.
Model 9000 Swing Arm Brackets Model 9500 Swing Arm Brackets
Figure 14: Swing-Arm Mounting Bracket Dimensions
22
Page 33

Appendix “A”
Appendix “A”
Diagnostics & Troubleshooting
Er Er
Er Errrrr
r
or Conditionsor Conditions
or Conditionsor Conditions
or Conditions
Appendix “A”
Diagnostics & Troubleshooting
Er Er
Er Er
Er
rr
rr
r
or Conditionsor Conditions
or Conditionsor Conditions
or Conditions
When an ERROR message is displayed, the end of the
message will display a set of numbers to indicate where
along the pylon the problem resides.
ObstrObstr
ObstrObstr
Obstr
uction or Misalignmentuction or Misalignment
uction or Misalignmentuction or Misalignment
uction or Misalignment
When the curtain is obstructed or misaligned, the display
will present four numbers to indicate location of
obstruction or misalignment.
Diagnostics and Troubleshooting
Obstruction or Misalignment
When the curtain is obstructed or misaligned, the
display will present four numbers to indicate location of
obstruction or misalignment.
Distance
The rst three numbers displayed represent (in inches)
the rst obstructed or misaligned beam on the guard
starting from the cable end of the pylon. The third digit
is blank for whole inches and “5” for half inches.
Total #
The last digit indicates the total number of beams
blocked or misaligned. The digit counts in Hexadecimal
(0 to F = 0 to 15 beams). A “>” sign indicates more than
15 beams missing.
“A”=10 beams, “B”=11 beams, “C”=12 beams, “D”=13
beams, “E”=14 beams, “F”=15 beams
Computing Object Size
To compute an object’s size, use the following formula:
size(inches) = TOTAL# x 0.5”
This can be used to evaluate an object’s size up to 7.5”
in diameter.
(i.e., TOTAL# = 3 so SIZE = 1.5”)
Error Conditions
When an ERROR message is displayed, the end of the
message will display a set of numbers to indicate where
along the pylon the problem resides.
The rst two numbers displayed represent the rst
problem beam on the guard starting from the cable
end of the pylon. The third number represents the total
number of beams blocked on the guard. Boards inside
each pylon are exactly four inches long. Using this you
can determine which board in the pylon is bad.
Denitions
BOARD #: Indicates rst board on which a problem
was detected (01 to 17).
(i.e., 01 = board nearest cable connection)
BEAM #: Indicates rst problem beam on the board
indicated above (1 to 8).
(i.e., 1 = rst beam on board, 8 = last beam
on board)
TOTAL #: Indicates total number of blocked beams
on the curtain.
(i.e., 1 to 9 beams then A to F = 10 to 15
beams)
(i.e., TOTAL# = D so SIZE = 6.5”)
Examples
1255 = First ob structio n l oca ted 12.5” from
05 A = First obstruction located 5.0” from connector,
connector, size of object is 2.5”
size of object is 5.0”
A-1
Page 34

Appendix “A”
Diagnostics and Troubleshooting
The Diagnostics Display has two modes of operation:
Status and Fault. If a fault occurs, the display will scroll
the fault message until the “FN1” fault reset button is
pushed, even if the cause of the fault is corrected and/
or you reset the power.
Status Display Messages
Normal Operation
TEST Testing internal systems
RST Unit waiting for Push of RESET button
(located on control module power supply
board middle left hand side). If you push
the Reset button during normal operation,
the unit will go RED and display RST, push
again and the unit will start up.
RDY Normal operation, no operations selected.
RdyE External relay checking feature active
RdyM Mute-Out option enabled
RdyL Normal, Latching Relay option software
selected. Used to reset guard penetration.
RdyF Weld ash enabled
Obstruction
03 > This is an example of 15 or more beams
blocked starting at 3” up from connector
pylon.
153 This is an example of 3 beams out starting
1.5” up from connector end of pylon.
SBLK Slave miroprocessor detected blockage
when the Master did not. Some of the
receiver signals are so weak that the
leading edge of the pulse is missed by the
Slave, but the trailing edge is not missed
by the Master. Realign the pylons.
FLIP Master microprocessor is getting intermittent
blockage of the curtain, due to weak signals
and is ip-opping between trying to go
GREEN and to RED. Re-align the pylons.
Floating Blank
FBxy Floating Blank, x indicates # of beams
oating and y indicates option selected or
number of beams broken. Yellow LED on
the control unit will also light up.
OBST Floating Blank Obstruction; more than
one object was detected in the curtain.
Optional conguration allows two objects
for applications where the piece part is bent
twice.
Auto Blank
ABxy Auto Blank, x indicates number of beams
blanked by object, y indicates option
selected or number of beams broken in
Mode 3. If no object found during program,
the display will read RDY.
In future software versions, the blocked
pattern will be stored in permanent memory
to allow you to power down without having
to reprogram in the object.
PENT Auto Blank in Mode 1 and/or Resettable
Latching Relay option in which the curtain
was p enetrat ed. By moving th e AB
keyswitch into OFF/RESET, you can clear
this but by moving the keyswitch into MODE
2 or 3 you can clear the PENT without
reprogramming in the AB object.
If using the Resettable Latching Relay
option, you can reset the cycling the
CLOSE contacts S5 located on the door of
the control unit. This is where you would
connect your remote reset push button.
SIZE Auto Blank programmed object exceeded
eight beams total. Optional conguration
can increase or decrease this number.
MOVE Auto Blank object moved during normal
operations, exposing beams that were
previously blocked. This can occur if the
object is not fully blocking one of the beams
its covering. Optional conguration can
ignore movements of the object.
Mute-Out
MUTE Guard has gone into by-pass mode
Cincinnati Interface
CINN When your Cincinnati interface applies
+24VDC to terminals 5 & 6, the curtain wil
go RED.
A-2
Page 35

Appendix “A”
Diagnostics and Troubleshooting
Fault Display Messages
Resetting Faults: To reset a fault message, push the
FN1 button located on the top of the Controller Module
and wait for the message to nish scrolling. Powering
down will not clear out faults
All faults appear as scrolling messages. Numbers may
appear at the end of the message to indicate where the
fault occurred in the pylon itself.
42-002/3 R28
Software Revision numbers needed during
service (42-002 MASTER chip; 42-003 SLAVE
AutoBlank data corrupted
The number of beams found blocked during
programming is no longer equal to the number
found in memory. This may indicate that the
object moved just as it was being programmed
in memory.
CPU clock failure
MASTER has a bad on-board clock circuit in the
CPU.
Emitter ring at wrong time xxy
An LED in the Emitter pylon was ring even
though it was not told to do so. Could be a short
circuit in the emitter pylon or a faulty circuit on the
computer board.
Emitter length fault xxy
The length of the Emitter pylon was detected as
different from the jumpers S3 set on the door
of the Controller Module. xx indicates board
number in 4” increments from circular connector;
y indicates beam number of that board (1 to 8).
Check for a disconnected cable, missing jumper in
the pylon, or a faulty circuit on the computer board.
External contact short
External relay checking option has detected that
the external contact did not close during a cycling
of the curtain from GREEN to RED. Second relay
is able to shut down the system.
External contact welded or wire cut
External relay checking option has detected that
the external contact did not open within .25sec of
the curtain going RED. Second relay is able to
shut down the system.
External infrared source detected xxy
Whenever the curtain is RED (at power up) the
unit checks for external sources of infrared that
might interfer with normal operation of the curtain.
xx indicates board number in 4” increments from
circular connector; y indicates beam number of
that board (1 to 8). This could also indicate that
the detector circuit is faulty.
FLIP
MASTER microprocessor is getting intermittent
blockage of the curtain due to weak signals and
is ip-opping between GREEN and RED. Re-
align the pylons.
Illegal code
MASTER has come across an illegal machine
language code inside the ROM of the CPU (this
could indicate a bad CPU chip).
Improper operation
MASTER has determined that there has been
an improper operation in the CPU and has reset
for safety.
Initializing memory
The SLAVE has determined that the EEPROM
memory chip does not contain the proper setup
values and will attempt to initialize it. This
message should only occur during the rst time
power up. If you get this any other time, it could
mean a faulty memory chip or a glitch in the power.
Internal relay bad/missing
One of the Internal relays has a contact that is not
open or closed and is determined to be missing.
Check for faulty relay contacts or relay position
circuitry.
Internal relay is not energizing
Internal relay was told to turn but the contact
never closed. Check for a faulty relay or a faulty
driver circuit.
Internal relay is stuck on
Internal relay contact has not opened up when
requested to do so. Check for a faulty relay,
welded contact, or a faulty driver circuit. Second
relay is able to shut down the system.
MBLK
MASTER has detected that the pulse width
coming from all the receivers is too wide and has
determined that the pylons are too close together
( < 1’ ). Turn the pylons away from each other
slightly.
A-3
Page 36

Appendix “A”
Diagnostics and Troubleshooting
Mute-out switch fault
The proper sequence of limit switch closures was
not correct and so the unit shut down. This could
also be due to excessive noise getting into the
PLC lines causing misinformation.
No ACK from memory
The SLAVE is requesting error messages from
the EEPROM memory chip but has not received
an acknowledge from it within the time allotted.
No clock line detected
SLAVE microprocessor could not detect this
signal line from the MASTER during a normal
scan of the curtain. Check for a faulty circuit in
the computer board.
No data line detected
SLAVE microprocessor could not detect this
signal line from the MASTER during a normal
scan of the curtain. Check for a faulty circuit in
the computer board.
No emitter line detected
SLAVE microprocessor could not detect this signal
line from the MASTER during a normal scan of
the curtain. Faulty circuit in the computer board.
No more error codes
This message appears after the control unit is
nished displaying all previously recorded error
messages stored in memory. You can start up the
curtain by pushing the RESET button when you
see this message.
Open LED in emitter pylon xxy
An LED in Emitter pylon was found not ring. xx
indicates board number in 4” increments from
circular connector; y indicates beam number
of that particular board (1 to 8). Could also be
a faulty cable, computer board, or R27 on the
computer board has burned open.
Power failure reset
SLAVE has reset due to either a power loss or
some condition that caused the SLAVE to lockup,
in which case the watchdog reset it.
RAM failure
MASTER OR SLAVE has determined that their
internal RAM cannot hold data correctly. Glitch
in power can cause this.
Receiver length fault xxy
The length of the Receiver pylon was detected
as different from the jumpers S3 set on the door
of the Controller Module. xx indicates board
number in 4” increments from circular connector;
y indicates beam number of that board (1 to 8).
This could be a cable pulled out, missing jumper
in the pylon, faulty circuit on the computer board.
Receiver Oscillating xxy
More than one pulse was detected during
reception of the proper Infrared signal. x x
indicates board number in 4” increments from
circular connector; y indicates beam number of
that board (1 to 8). This may indicate that the
detector circuit has a problem or a severe external
infrared problem was detected.
Reset held down
You have held the reset button down too long.
The SLAVE is trying to communicate with the
EEPROM memory chip.
SBLK
SLAVE microprocessor detected blockage when
the MASTER did not. Some of the receiver signals
are so weak that the leading edge of the pulse is
missed by the SLAVE but the trailing edge is not
missed by the MASTER. Re-align the pylons.
Serial data corrupted
The MASTER has requested data from the SLAVE
but the check-sum value received does not match
the value calculated from the data received.
1) Check for electrical noise. Add MOV’s from
each leg of safety relay output to earth ground.
2) Receiver pylon may be seeing an Emitter pylon
of a different light curtain. 3) Possibly a faulty
computer board or connection.
Serial data transfer incomplete
The MASTER has requested data from the SLAVE
and the SLAVE has not responded within the
allotted time. This can happen if you hold the
RESET button down at the wrong time.
Short LED in emitter pylon xxy
An LED in Emitter pylon was found not ring. xx
indicates board number in 4” increments from
circular connector; y indicates beam number of
that board (1 to 8). Could also be a faulty cable,
computer board, or R44 (R27 below Rev 5) on
the computer board has burned short.
A-4
Page 37

Slave Found
SLAVE microprocessor has sent an error code
to the MASTER and the MASTER is displaying
it. Any one the following error messages can
also be sent by the SLAVE. Also, you see this
message when the SLAVE is sending back error
codes from the memory chip during the power up
reset sequence.
UNKNOWN CODE
The MASTER has received an error code from
the SLAVE for which it has no match. It is possible
that the software versions don’t match.
Waiting for reset button
Master is waiting for user to push the RESET
button to start scanning. This indicates that you
pushed the RESET button too soon after getting
an error message and prevented the SLAVE from
saving the error code in permanent memory. You
should wait until the message displays one time
before pushing the RESET button.
Appendix “A”
Diagnostics and Troubleshooting
Watchdog failure reset
MASTER has reset due to either a power loss or
some condition that caused the SLAVE to lockup,
in which case the watchdog reset it.
A-5
Page 38

Appendix “B”
Regulations and Guidelines
OSHA Regulations
1910.217 (C) (3) (iii)
Safeguarding the Point of Operation
(iii) A presence sensing point of operation device shall
protect the operator as provided in paragraph (c) (3)
(i) (a) of this section, and shall be interlocked into the
control circuit to prevent or stop slide motion if the
operator’s hand or other part of his body is within the
sensing eld of the device during the downstroke of the
press slide.
(a) The device may not be used on machines
using full revolution clutches.
(b) The device may not be used as a tripping
means to initiate slide motion.
(c) The device shall not be constructed so that a
failure within the system does not prevent the
normal stopping action from being applied to
the press when required, but does prevent the
initiation of a successive stroke until the failure
is corrected. The failure shall be indicated by
the system.
(d) Muting (bypassing of the protective function)
of such device, during the upstroke of the press
slide, is permitted for the purpose of parts
ejection, circuit checking, and feeding.
auxiliary equipment, and safeguards are in
a safe operating condition and adjustment.
The employer shall maintain records of
these inspections and maintenance work
performed.
1910.212
General requirements for all machines (covers
press brakes, hydraulic and pneumatic machines
not covered by mechanical power press standards).
(a) Machine guarding - (1) Types of guarding.
One or more methods or machine guarding shall
be provided to protect the operator and other
employees in the machine area from hazards
such as those created by point of operation
ingoing nip points, rotation parts, ying chips,
and sparks. Examples of guarding methods are:
barrier guards, two-handed tripping devices,
electronic safety devices, etc.
NOTE: These are only partial reprints, refer to your
Federal Register for total construction, control reliability,
and machine guarding requirements for the subject
machine being guarded for all applicable OSHA
Standards.
(e) Refer to ANSI B11.19-2003 for calculating
safety light curtain distance from the point of
operation.
(f) Guards shall be used to protect all areas of
entry to the point of operation not protected by
the presence-sensing device.
1910.217 (C) (3) (iii)
Additional requirements for safeguarding
Where the operator feeds or removes parts by placing
one or both hands in the point of operation, and a two
hand control, presence sensing device or Type B gate
or movable barrier (on a part revolution clutch) is used
for safeguarding:
(i) The employer shall use a control system and
a brake monitor which comply with paragraphs
(b) (13) and (14) of this section.
(e) Inspection, maintenance, and modication of
presses-
(i) It shall be the responsibility of the employer
to establish and follow a program of
periodic and regular inspections of his
power presses to insure that all their parts,
Machine Control Reliability
Requirements
Control Reliability
“...control circuits shall be designed and constructed so
that a single failure or fault within the system does not
prevent the normal stopping action from being applied
to the press when required, or does not create an
unintended stroking action, but does prevent initiation of
a successive stroke until the failure is corrected” (ANSI
B11.1-1988).
“...control shall be designed to prevent initiation of a
stroke signal in the event that a failure occurs within the
press control” (ANSI B11.2-1982).
“Robots shall be designed and constructed so that any
single, reasonably foreseeable failure will not cause
hazardous motion of the robot” (ANSI/RIA R15.06-
1991).
“...control circuits shall incorporate features to minimize
the possibility of an unintended stroke in the event of
the failure of the control component to function properly,
including relays, limit switches, and static output circuits”
(ANSI B11.1-1982).
B-1
Page 39

Appendix “B”
Regulations and Guidelines
“...control system shall be constructed so that a failure
within the system does not prevent the normal stopping
action from being applied to the press when required,
but does prevent initiation of a successive stroke until
the failure is corrected” (ANSI B11.1-1982).
“...the control system shall be constructed so that a
failure within the system does not prevent the normal
stopping action from being applied to the press when
required, but does prevent initiation of a successive
stroke until the failure is corrected” (OSHA CFR
1910.217, 1988).
Safety Guidelines for Management
Operational Safety
1. Appoint a Safety Coordinator to be responsible for
safety regulations, requirements, and suggestions.
He must review and investigate all accidents and
“close calls.”
2. Establish and issue safety rules. Inform each
employee of his responsibilities. Make sure he
understands them and knows what is expected
of him.
3. A thorough review and an early inspection must
be made of existing presses, dies, and point
of operation guarding to attain the degree of
responsibility required by ANSI B11.1-1988 Safety
Standards and Federal State laws. Review what
mandatory modications are necessary.
4. Equipment that is no longer safe and that cannot
be economically upgraded should be destroyed.
5. Never allow persons legally under age to operate
or assist in the operation of machinery.
6. All personnel must be properly trained to eliminate
accidents and injuries.
7. Regardless of the operator’s experience, education,
or language barrier, it is the responsibility of the
supervisor to give him a thorough explanation with
each new job assignment.
8. No employee should be given a work assignment
that he does not fully understand. Only properly
instructed and thoroughly trained personnel
should be assigned to work on or with any
machine.
9. It shall be the responsibility of the employer to
provide an adequate, clean, safe, and uncluttered
work area around each machine.
10. If a malfunction is reported, stop the machine
immediately, correct the problem, then resume
production.
11. Investigate all accidents and close calls.
Analyze the reason for occurrence. Take action
to prevent recurrence. Keep records of the
investigation and preventative steps that were
taken.
12. Only employees who understand the machines,
operation and safety requirements, and who are
able to communicate this knowledge should be
given the responsibility of instructing and training
others to perform as operators.
13. Management must decide that personnel
protective safety equipment is requi red to
perform each job safely. Items such as safety
glasses, shoes, gloves, helmets, hand pads,
spats, protective sleeves and material handling
equipment are common in the metal working
industry. If noise levels are excessive, protective
headsets and earmuffs are recommended.
14. When designing point of operation guarding,
the manufacturing process should be weighed
heavily in favor of operational safety.
15. Establish safe and convenient material handling
methods and procedures.
16. Post in convenient areas the names, addresses,
and phone numbers of physicians and hospitals,
and members of the organization who are to be
called in case of emergency.
17. All equipment must be electrically connected
according to the National Electric Code and be
consistent with other accepted practices.
18. Provide adequate and proper re protection
equipment.
Power Press Guarding
1. Press manufacturers do not know and cannot
foresee the magnitude of potential
applications of power presses. Therefore, only the
press user can determine the type of guards that
have to be used in order to perform the job safely.
It is the responsibility of the user management to
make certain that point of operation guarding and
other necessary safety devices are installed. The
press should be guarded in such a manner that it
is impossible for the operators to place their hands
or any other part of the body in the die area.
B-2
Page 40

Appendix “B”
Regulations and Guidelines
2. The press user should become thoroughly
acquainted with the safety devices commonly
employed in power press operations.
3. Feeding devices are strongly recommended,
since they remove the operator from the die area,
and therefore allow more effective utilization of
guards and safety devices.
4. Do not release a press for production before
installing and testing all guards and covers.
5. Make frequent evaluation checks of all guarding
and devices while the press is running. Correct
all unsafe ndings immediately.
Power Press Care through Inspection and
Maintenance
1. All maintenance and inspection personnel should
be specically instructed, and must understand
proper maintenance and inspection procedures
contained in this manual.
2. Set up a daily, weekly, and monthly press
inspection program. Use a checklist and verify
that the job is done correctly.
analyzed in order to take corrective action.
Supervisor Training
It should be the responsibility of management to instruct
their supervisors on safety, giving job instructions,
supervising operators, determining accident causes, and
building safety attitudes among the machine operators.
Accidents can occur due to inadequate training of
supervisors.
Operator Training
It shall be the responsibility of management to insure
proper training of operators. A specic training program
should be instituted to instruct the operator in safety,
proper usage of the equipment, and correct operational
procedure in performing each and every job. In addition
to the supervisor, the operator should be familiar with the
proper guarding of the point of operation. Never permit
an operator to start a job without complete instructions
from his immediate supervisor.
3. Establish a preventative maintenance program.
Records of all maintenance work performed must
be kept.
4. Since all equipment has a limited life, quality
maintenance personnel are required to obtain
maximum usage of your equipment.
5. Releasing a power press for production following
maintenance should be the responsibility of a
qualied individual assigned by management.
6. To maintain the original level of press reliability,
careful inspection of mechanical, electrical, and
pneumatic areas must be made. This may give
an advance warning of a hazard which then can
be corrected to prevent possible injuries and
damage.
Safety Enforcement
In or der to have a n effec tiv e sa fet y pr ogr am,
management at all levels must enforce every safety
rule and regulation. Strong disciplinary measures are
sometimes required. They should consist of a warning,
written reprimand, work suspension, transfer, demotion,
or possibly a dismissal. All infractions must be reported
and recorded. Once an infraction in noted, it shows
that an unsafe practice or condition has existed. This
may be the result of poor planning or improper training
and instructing. The reason for the infraction should be
B-3
Page 41

Figure 14: Controller Module Replacement Parts
Appendix “C”
Replacement Parts
Figure 14: Controller Module Replacement Parts
Appendix “C”
Replacement Parts
32-001 or 32-098 (green) Safety Relay
20-001 Glass, 20-022 SMT 1A slo-blo
NOTE:
42-002 & 42-003 computer chips, must specify square or rectangle shape.
32-001 White,Clear, or Blue are 2 pole Safety Relays.
32-098 Green is a 3 pole Safety Relay.
11-183 Standard Single pedestal mounting bracket
11-184 Special Dual pedestal mounting bracket.
Has 2 mounting studs 90deg apart. Allows both
Emitter & Receiver pylon on 1 pedestal. Requires
SMB option on pylons
21-019 Rubber Shock-Mount (Male-Female) 1” dia x 1” tall
5/16-18 thread
C-1
Page 42
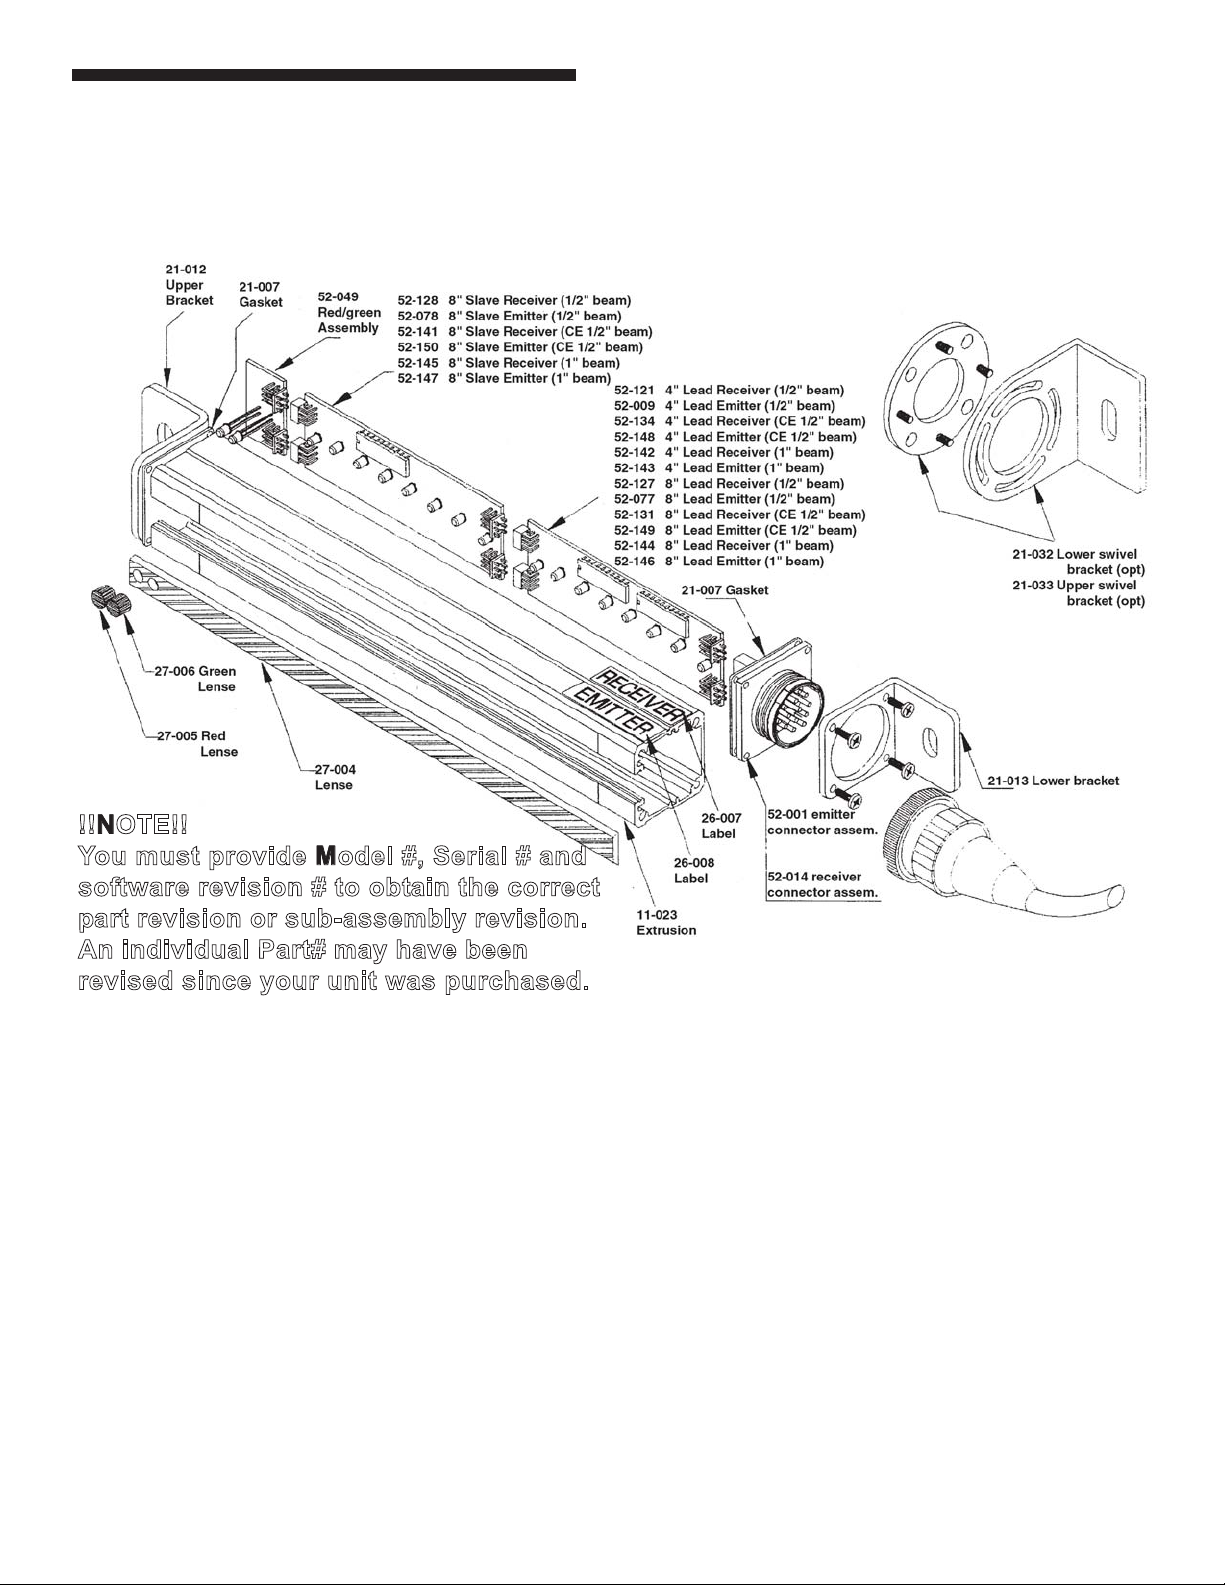
Appendix “C”
Replacement Parts
Figure 15: Pylon Replacement Parts
Appendix “C”
Replacement Parts
Figure 15: Pylon Replacement Parts
!!NOTE!!
You must provide Model #, Serial # and
software revision # to obtain the correct
part revision or sub-assembly revision.
An individual Part# may have been
revised since your unit was purchased.
Part Numbers for Units made prior to 1998
52-013 4” Slave receiver
52-080 8” Slave receiver
52-012 4” Lead receiver
52-079 8” Lead receiver
C-2
Page 43

Model MG or DR USB Diagnostic Codes: Master Controls USB port
Microguard MG or DR USB Diagnostics Codes:
Master controls USB port
B or b
First or Second Pylon set Blocked
repeats when # of blocked beams changes
C or c
First or Second Pylon set Cleared after a Block
k
Light Curtain no longer in MUTE-OUT
Ee
Start & Stop ReWriting EEPROM
Should only happen 1st time programmed
“RST”
String on LED display
Then jmp to FAULT routine
V<cr>
Clearing Active Fault
Someone Hit RESET button while in a Fault
z
Return from Fault() routine
Not first time returning
v
Hold RESET button down at power-up
LED displays 9 fault codes
G
First Time return from FAULT()
xxxx m
Pylon length , performing SHORT LED test
1 SCAN of pylon
Note: You must install the Silabs CP210x USB driver on your windows PC. Check your Device
Manager for Silabs COM port#. You read the port at 230400 Baud 8N1
Char Description
M or m First or Second Pylon set Blocked during MUTE-OUT condition Guard stays GREEN
E or e First or Second Pylon set no Blocked beams during MUTE-OUT condition
K Light Curtain in MUTE-OUT (Guard was GREEN before going into MUTE-OUT)
S Check EEPROM
Q Fault found active in EEPROM at Startup Previously powered down with an
E AutoBlank load Should always see this
“Soft Ver= R34r.1012.MG” Scroll this string on LED display
M Version Display scroll finished
Appendix “D”
USB Diagnostic Codes
uncleared Fault
Only RST F1 push can interrupt this
Fx Enter Fault() routine
x: 0=Slave in Fault() routine, 1=Slave not in Fault() routine
W Writing to EEPROM new Fault code
x y x & y: upper and lower bytes of Fault Code just cleared. Displayed in HEX
P<cr> Return from Fault() routine First time returning
0
1
.
9
p End of Fault
A Run Initial pylon TEST One time after power-up only
“Wait” Done with initial SHORT LED SCAN
x* If numbers appear without an F, then problems communicating with Slave
g Bad Auto Blank memory
9 lines of 2 byte HEX showing the last 9 Fault Codes First to Last
Should be F0
D-1
Page 44

Appendix “D”
External contact welded or wire cut ", 06
External contact short ", 07
Internal relay is stuck on ", 08
Internal relay is not energizing ", 09
No data line detected ", 0A
No clock line detected ", 0B
No emitter line detected ", 0C
External infrared source detected ", 0D
Internal relay bad/missing ", 0E
NO MORE FAULT CODES ", 17
Initialize memory ", 18
IIC bad ", 19
AB data corrupted ", 1A
Reset held down ", 1B
No Ack from memory ", 1C
" ------------------ " 27
USB Diagnostic Codes
Model MG or DR USB Diagnostic Codes: Master Controls USB port Cont.
Note: You must install the Silabs CP210x USB driver on your windows PC. Check your Device
Manager for Silabs COM port#. You read the port at 230400 Baud 8N1
Fault Codes: in HEX code
Mute-out switch fault ", 01
Open LED in emitter pylon ", 02 Short LED in emitter pylon ", 03
Emitter length fault ", 04 Receiver length fault ", 05
Ram failure ", 0F Power failure ", 10
Watchdog failure ", 11 Serial data corrupted ", 12
Serial data transfer incomplete ", 13 Receiver bad ", 14
Emitter on at wrong time ", 15 Receiver oscillating ", 16
Short det. bad ", 1D ESTOP OPENED ", 1E
Not Synced up with Slave ", 1F 51 ", 20
Slave Found: ", 21 Improper operation ", 22
NO Message FOUND ", 23 Clock did not drop ", 24
Old FAULTS from Memory: ", 25 End of Memory ", 26
Proper power up example: SEMF0P <CR> 10 lines of EEPROM memory <CR> GA0024m (for a 24 beam length guard)
Blocked Beam pattern display:
If you transmit the ASCII character ‘B’ via the USB port, the Microguard will return a string of ASCII character 1’s and 0’s based on the beam blockage.
The start of the string represents the beam closest to the cable end, and the end of the string is represented
by the ASCII character ‘@’
0 = clear beam
1 = blocked beam
Example for an MG-04-0F-20 model (which has a total of 8 beams):
Send ‘B’, then you Receive 01100000@
This indicates 2 blocked beams (2nd and 3rd beams from the cable end)
D-2
Page 45

NOTES
Page 46

NOTES
Page 47

WARRANTY
Manufacturer warrants that this product will be free from defects in
material and workmanship for a period of two years from the date of
shipment thereof. Within the warranty period, manufacturer will repair
or replace such products which are returned to it with shipping charges
prepaid and which will be disclosed as defective upon examination by
the manufacturer. This warranty will not apply to any product which will
have been subject to misuse, negligence, accident, restriction, and use
not in accordance with manufacturer’s instructions or which will have
been altered or repaired by persons other than the authorized agent or
employees of the manufacturer.
DISCLAIMER
The provisions of the paragraph “Warranty” are the sole obligations of
the manufacturer and exclude all other warranties of merchantability,
expressed or implied.
Further, there are no warranties which extend beyond the above warranty.
LIMITATION OF LIABILITY
In the event of any claim or breach of any obligations of manufacturer
under any order, whether expressed or implied, and particularly in the
event of any claim or a breach of the warranty or warranties contained
in the paragraph “Warranty” or of any other warranties, expressed or
implied which might, despite the paragraph entitled “Disclaimer,” be
determined to be incorporated in any order, the company shall under no
circumstances be liable for any consequential or special damages, either
in law or in equity, or for losses or expenses or claims for the same arising
from the use of, or inability to use, the products of the manufacturer for
any purpose whatsoever.
WARNING: The entire machine safety system must be tested
at the start of every shift. Machine testing should include: (1)
proper machine operation and stopping capability; and (2)
verication of proper installation and settings of all point of
operation guards and devices before the operation is released
for production.
Page 48

Sales and Marketing Ofces
United States
Pinnacle Systems, Inc.
P.O. Box 100088
Pittsburgh, PA 15233
Toll Free Number: 800-569-7697
Direct Number: 412-262-3950
Fax: 412-262-4055
Canada
Pinnacle Systems, Inc.
8-1734 Orangebrook Court
Pickering, Ontario L1W 3G8
Toll Free Number: 888-285-8885
Direct Number: 905-831-1111
Fax: 905-831-4064
Customer Service: (630) 443-8542
We have designed our equipment to the very highest
performance and safety standards known to the
current technological state of the art, as evidenced by
our U.S.A. and foreign patents issued and pending.
However, the installation, usage, suitability, and tness
of our equipment for any purpose, known or unknown,
is interdependent upon the performance of other
equipment not manufactured, installed, secured or
maintained by Pinnacle Systems, Inc.
We cannot and do not accept responsibility for any
overall system performance when factors, such as
these, are beyond our control.
www.pinnaclesystems.com
sales@pinnaclesystems.com
service@pinnaclesystems.com
 Loading...