

Page 1

Avid® MediaLog
User’s Guide
™
make manage move | media
™
Avid
®
Page 2

Copyright and Disclaimer
Product specifications are subject to change without notice and do not represent a commitment on the part
of Avid Technology, Inc.
The software described in this document is furnished under a license agreement. You can obtain a copy of
that license by visiting Avid's Web site at www.avid.com. The terms of that license are also available in the
product in the same directory as the software. The software may not be reverse assembled and may be
used or copied only in accordance with the terms of the license agreement. It is against the law to copy the
software on any medium except as specifically allowed in the license agreement.
Avid products or portions thereof are protected by one or more of the following United States Patents:
4,746,994; 4,970,663; 5,045,940; 5,267,351; 5,309,528; 5,355,450; 5,396,594; 5,440,348; 5,452,378;
5,467,288; 5,513,375; 5,528,310; 5,557,423; 5,568,275; 5,577,190; 5,584,006; 5,640,601; 5,644,364;
5,654,737; 5,715,018; 5,724,605; 5,726,717; 5,729,673; 5,745,637; 5,752,029; 5,754,851; 5,799,150;
5,812,216; 5,852,435; 5,905,841; 5,929,836; 5,930,445; 5,946,445; 5,987,501; 6,016,152; 6,018,337;
6,023,531; 6,058,236; 6,061,758; 6,091,778; 6,105,083; 6,118,444; 6,128,001; 6,134,607; 6,137,919;
6,141,691; 6,198,477; 6,201,531; 6,223,211; 6,249,280; 6,269,195; 6,317,158; 6,317,515; 6,330,369;
6,351,557; 6,353,862; 6,357,047; 6,392,710; 6,404,435; 6,407,775; 6,417,891; 6,426,778; 6,477,271;
6,489,969; 6,512,522; 6,532,043; 6,546,190; 6,552,731; 6,553,142; 6,570,624; 6,571,255; 6,583,824;
6,618,547; 6,636,869; 6,665,450; 6,678,461; D392,269; D396,853; D398,912. Other patents are pending.
No part of this document may be reproduced or transmitted in any form or by any means, electronic or
mechanical, including photocopying and recording, for any purpose without the express written permission
of Avid Technology, Inc.
Copyright © 2004 Avid Technology, Inc. and its licensors. All rights reserved.
The following disclaimer is required by Apple Computer, Inc.
APPLE COMPUTER, INC. MAKES NO WARRANTIES WHATSOEVER, EITHER EXPRESS OR IMPLIED,
REGARDING THIS PRODUCT, INCLUDING WARRANTIES WITH RESPECT TO ITS
MERCHANTABILITY OR ITS FITNESS FOR ANY PARTICULAR PURPOSE. THE EXCLUSION OF
IMPLIED WARRANTIES IS NOT PERMITTED BY SOME STATES. THE ABOVE EXCLUSION MAY NOT
APPLY TO YOU. THIS WARRANTY PROVIDES YOU WITH SPECIFIC LEGAL RIGHTS. THERE MAY BE
OTHER RIGHTS THAT YOU MAY HAVE WHICH VARY FROM STATE TO STATE.
The following disclaimer is required by Sam Leffler and Silicon Graphics, Inc. for the use of
their TIFF library:
Copyright © 1988–1997 Sam Leffler
Copyright © 1991–1997 Silicon Graphics, Inc.
Permission to use, copy, modify, distribute, and sell this software [i.e., the TIFF library] and its
documentation for any purpose is hereby granted without fee, provided that (i) the above copyright notices
and this permission notice appear in all copies of the software and related documentation, and (ii) the
names of Sam Leffler and Silicon Graphics may not be used in any advertising or publicity relating to the
software without the specific, prior written permission of Sam Leffler and Silicon Graphics.
THE SOFTWARE IS PROVIDED “AS-IS” AND WITHOUT WARRANTY OF ANY KIND, EXPRESS,
IMPLIED OR OTHERWISE, INCLUDING WITHOUT LIMITATION, ANY WARRANTY OF
MERCHANTABILITY OR FITNESS FOR A PARTICULAR PURPOSE.
IN NO EVENT SHALL SAM LEFFLER OR SILICON GRAPHICS BE LIABLE FOR ANY SPECIAL,
INCIDENTAL, INDIRECT OR CONSEQUENTIAL DAMAGES OF ANY KIND, OR ANY DAMAGES
WHATSOEVER RESULTING FROM LOSS OF USE, DATA OR PROFITS, WHETHER OR NOT ADVISED
OF THE POSSIBILITY OF DAMAGE, AND ON ANY THEORY OF LIABILITY, ARISING OUT OF OR IN
CONNECTION WITH THE USE OR PERFORMANCE OF THIS SOFTWARE.
The following disclaimer is required by the Independent JPEG Group:
Portions of this software are based on work of the Independent JPEG Group.
The following disclaimer is required by Paradigm Matrix:
Portions of this software licensed from Paradigm Matrix.
2
Page 3

The following disclaimer is required by Ray Sauers Associates, Inc.:
“Install-It” is licensed from Ray Sauers Associates, Inc. End-User is prohibited from taking any action to
derive a source code equivalent of “Install-It,” including by reverse assembly or reverse compilation, Ray
Sauers Associates, Inc. shall in no event be liable for any damages resulting from reseller’s failure to
perform reseller’s obligation; or any damages arising from use or operation of reseller’s products or the
software; or any other damages, including but not limited to, incidental, direct, indirect, special or
consequential Damages including lost profits, or damages resulting from loss of use or inability to use
reseller’s products or the software for any reason including copyright or patent infringement, or lost data,
even if Ray Sauers Associates has been advised, knew or should have known of the possibility of such
damages.
The following disclaimer is required by Videomedia, Inc.:
“Videomedia, Inc. makes no warranties whatsoever, either express or implied, regarding this product,
including warranties with respect to its merchantability or its fitness for any particular purpose.”
“This software contains V-LAN ver. 3.0 Command Protocols which communicate with V-LAN ver. 3.0
products developed by Videomedia, Inc. and V-LAN ver. 3.0 compatible products developed by third
parties under license from Videomedia, Inc. Use of this software will allow “frame accurate” editing control
of applicable videotape recorder decks, videodisc recorders/players and the like.”
The following disclaimer is required by Altura Software, Inc. for the use of its Mac2Win
software and Sample Source Code:
©1993–1998 Altura Software, Inc.
The following disclaimer is required by Ultimatte Corporation:
Certain real-time compositing capabilities are provided under a license of such technology from Ultimatte
Corporation and are subject to copyright protection.
The following disclaimer is required by 3Prong.com Inc.:
Certain waveform and vector monitoring capabilities are provided under a license from 3Prong.com Inc.
Attn. Government User(s). Restricted Rights Legend
U.S. GOVERNMENT RESTRICTED RIGHTS. This Software and its documentation are “commercial
computer software” or “commercial computer software documentation.” In the event that such Software or
documentation is acquired by or on behalf of a unit or agency of the U.S. Government, all rights with
respect to this Software and documentation are subject to the terms of the License Agreement, pursuant to
FAR §12.212(a) and/or DFARS §227.7202-1(a), as applicable.
Trademarks
888 I/O, Adrenaline, AirPlay, AirSPACE, AirSPACE HD, AniMatte, AudioSuite, AudioVision, AutoSync,
Avid, Avid DNA, AVIDdrive, AVIDdrive Towers, Avid Mojo, AvidNet, AvidNetwork, AVIDstripe, Avid Unity,
Avid Xpress, AVoption, AVX, CamCutter, ChromaCurve, ChromaWheel, DAE, D-Fi, D-fx, Digidesign,
Digidesign Audio Engine, Digidesign Intelligent Noise Reduction, DigiDrive, Digital Nonlinear Accelerator,
DigiTranslator, DINR, D-Verb, Equinox, ExpertRender, FieldPak, Film Composer, FilmScribe, FluidMotion,
HIIP, HyperSPACE, HyperSPACE HDCAM, IllusionFX, Image Independence, Intraframe, iS9, iS18, iS23,
iS36, Lo-Fi, Magic Mask, make manage move | media, Marquee, Matador, Maxim, MCXpress,
Media Composer, MediaDock, MediaDock Shuttle, Media Fusion, Media Illusion, MediaLog,
Media Reader, Media Recorder, MEDIArray, MediaShare, Meridien, MetaSync, NaturalMatch, Nearchive,
NetReview, NewsCutter, Nitris, OMF, OMF Interchange, OMM, Open Media Framework,
Open Media Management, ProEncode, Pro Tools, QuietDrive, Recti-Fi, RetroLoop, rS9, rS18, Sci-Fi,
Softimage, Sound Designer II, SPACE, SPACEShift, Symphony, the Avid|DS logo, Trilligent, UnityRAID,
Vari-Fi, Video Slave Driver, VideoSPACE, and Xdeck are either registered trademarks or trademarks of
Avid Technology, Inc. in the United States and/or other countries.
iNEWS, iNEWS ControlAir, and Media Browse are trademarks of iNews, LLC.
Aaton is a registered trademark of Aaton S.A. Arri is a registered trademark of Arri Group. Claris is a
trademark of Claris Corporation, registered in the U.S. and other countries. FileMaker is a trademark of
FileMaker, Inc., registered in the U.S. and other countries. FLEx is a trademark of Pioneer-Standard
Electronics, Inc. IBM is a registered trademark of International Business Machines Corporation. KeyKode is
a trademark of Eastman Kodak Company. Final Cut Pro, Macintosh and Mac OS are trademarks of Apple
Computer, Inc., registered in the U.S. and other countries. Microsoft, Windows, Windows NT, and Windows
XP are either registered trademarks or trademarks of Microsoft Corporation in the United States and/or
3
Page 4

other countries. Sony is a registered trademark of Sony. V-LAN and VLXi are registered trademarks of
Videomedia, Inc.
All other trademarks contained herein are the property of their respective owners.
Footage
Arri — Courtesy of Arri/Fauer — John Fauer, Inc.
Bell South “Anticipation” — Courtesy of Two Headed Monster — Tucker/Wayne Atlanta/GMS.
Canyonlands — Courtesy of the National Park Service/Department of the Interior.
Eco Challenge British Columbia — Courtesy of Eco Challenge Lifestyles, Inc., All Rights Reserved.
Eco Challenge Morocco — Courtesy of Discovery Communications, Inc.
It’s Shuttletime — Courtesy of BCP & Canadian Airlines.
Nestlé Coffee Crisp — Courtesy of MacLaren McCann Canada.
Saturn “Calvin Egg” — Courtesy of Cossette Communications.
“Tigers: Tracking a Legend” — Courtesy of www.wildlifeworlds.com, Carol Amore, Executive Producer.
Windhorse — Courtesy of Paul Wagner Productions.
GOT FOOTAGE?
Editors — Filmmakers — Special Effects Artists — Game Developers — Animators — Educators —
Broadcasters — Content creators of every genre — Just finished an incredible project and want to
share it with the world?
Send us your reels and we may use your footage in our show reel or demo!*
For a copy of our release and Avid’s mailing address, go to www.avid.com/footage.
*Note: Avid cannot guarantee the use of materials submitted.
Avid MediaLog User’s Guide • 0130-07990-01 • June 2008
4
Page 5

Contents
Using This Guide. . . . . . . . . . . . . . . . . . . . . . . . . . . . . . . . . . . . . . . 13
Symbols and Conventions . . . . . . . . . . . . . . . . . . . . . . . . . . . . . . . . . . . . . . 13
If You Need Help. . . . . . . . . . . . . . . . . . . . . . . . . . . . . . . . . . . . . . . . . . . . . . 15
How to Order Documentation . . . . . . . . . . . . . . . . . . . . . . . . . . . . . . . . . . . . 15
Avid Educational Services. . . . . . . . . . . . . . . . . . . . . . . . . . . . . . . . . . . . . . . 16
Chapter 1 Understanding MediaLog . . . . . . . . . . . . . . . . . . . . . . . . . . . . . . . . 17
What Is MediaLog? . . . . . . . . . . . . . . . . . . . . . . . . . . . . . . . . . . . . . . . . . . . . 17
How Does MediaLog Work? . . . . . . . . . . . . . . . . . . . . . . . . . . . . . . . . . . . . . 18
What Are the Basic Logging Steps? . . . . . . . . . . . . . . . . . . . . . . . . . . . . . . . 20
Chapter 2 Getting Started . . . . . . . . . . . . . . . . . . . . . . . . . . . . . . . . . . . . . . . . 21
Setting Up the Hardware (Windows). . . . . . . . . . . . . . . . . . . . . . . . . . . . . . . 21
Setting Up the Hardware (Macintosh) . . . . . . . . . . . . . . . . . . . . . . . . . . . . . . 23
Supported Decks. . . . . . . . . . . . . . . . . . . . . . . . . . . . . . . . . . . . . . . . . . . . . . 24
Turning On the Hardware . . . . . . . . . . . . . . . . . . . . . . . . . . . . . . . . . . . . . . . 24
Installing MediaLog . . . . . . . . . . . . . . . . . . . . . . . . . . . . . . . . . . . . . . . . . . . . 25
Installing MediaLog on a Windows System . . . . . . . . . . . . . . . . . . . . . . 25
Installing MediaLog on a Mac OS X System . . . . . . . . . . . . . . . . . . . . . 26
Starting MediaLog . . . . . . . . . . . . . . . . . . . . . . . . . . . . . . . . . . . . . . . . . . . . . 26
Changing Users . . . . . . . . . . . . . . . . . . . . . . . . . . . . . . . . . . . . . . . . . . . 27
Selecting a Project . . . . . . . . . . . . . . . . . . . . . . . . . . . . . . . . . . . . . . . . . 28
Creating a New Project . . . . . . . . . . . . . . . . . . . . . . . . . . . . . . . . . . 29
Selecting a Private Project . . . . . . . . . . . . . . . . . . . . . . . . . . . . . . . 32
Selecting a Shared Project . . . . . . . . . . . . . . . . . . . . . . . . . . . . . . . 33
Selecting an External Project . . . . . . . . . . . . . . . . . . . . . . . . . . . . . 34
Browsing for a Project . . . . . . . . . . . . . . . . . . . . . . . . . . . . . . . . . . . 35
5
Page 6

Using User Profiles . . . . . . . . . . . . . . . . . . . . . . . . . . . . . . . . . . . . . . . . 36
Creating a User Profile . . . . . . . . . . . . . . . . . . . . . . . . . . . . . . . . . . 36
Importing a User Profile . . . . . . . . . . . . . . . . . . . . . . . . . . . . . . . . . 37
Changing User Profiles. . . . . . . . . . . . . . . . . . . . . . . . . . . . . . . . . . 37
Exporting a User Profile . . . . . . . . . . . . . . . . . . . . . . . . . . . . . . . . . 38
Closing a Project . . . . . . . . . . . . . . . . . . . . . . . . . . . . . . . . . . . . . . . . . . . . . 38
Backing Up Your Project Information . . . . . . . . . . . . . . . . . . . . . . . . . . . . . . 39
Saving Your Project Information on a Drive or Floppy Disk . . . . . . . . . 39
Restoring from a Backup. . . . . . . . . . . . . . . . . . . . . . . . . . . . . . . . . . . . 40
Ending a Work Session . . . . . . . . . . . . . . . . . . . . . . . . . . . . . . . . . . . . . . . . 40
Quitting the MediaLog Application. . . . . . . . . . . . . . . . . . . . . . . . . . . . . 40
Turning Off Your Equipment (Windows) . . . . . . . . . . . . . . . . . . . . . . . . 41
Turning Off Your Equipment (Macintosh) . . . . . . . . . . . . . . . . . . . . . . . 41
Using Help . . . . . . . . . . . . . . . . . . . . . . . . . . . . . . . . . . . . . . . . . . . . . . . . . . 42
Chapter 3 Working with the Project Window . . . . . . . . . . . . . . . . . . . . . . . . . 43
Exploring the Project Window . . . . . . . . . . . . . . . . . . . . . . . . . . . . . . . . . . . 43
Opening and Closing the Project Window. . . . . . . . . . . . . . . . . . . . . . . 44
Changing Font and Point Size. . . . . . . . . . . . . . . . . . . . . . . . . . . . . . . . 45
Working with Bins. . . . . . . . . . . . . . . . . . . . . . . . . . . . . . . . . . . . . . . . . . . . . 46
Viewing a List of Bins . . . . . . . . . . . . . . . . . . . . . . . . . . . . . . . . . . . . . . 46
Displaying Folders of Bins in the Bins List. . . . . . . . . . . . . . . . . . . . . . . 47
Creating a Folder in a Project . . . . . . . . . . . . . . . . . . . . . . . . . . . . . . . . 48
Creating a New Bin . . . . . . . . . . . . . . . . . . . . . . . . . . . . . . . . . . . . . . . . 48
Renaming a Bin. . . . . . . . . . . . . . . . . . . . . . . . . . . . . . . . . . . . . . . . . . . 48
Opening and Closing a Bin . . . . . . . . . . . . . . . . . . . . . . . . . . . . . . . . . . 49
Opening Selected Bins . . . . . . . . . . . . . . . . . . . . . . . . . . . . . . . . . . 49
Opening Bins from Other Projects . . . . . . . . . . . . . . . . . . . . . . . . . 49
Closing a Bin. . . . . . . . . . . . . . . . . . . . . . . . . . . . . . . . . . . . . . . . . . 50
Deleting a Bin or Folder. . . . . . . . . . . . . . . . . . . . . . . . . . . . . . . . . . . . . 50
Viewing Contents in the Trash. . . . . . . . . . . . . . . . . . . . . . . . . . . . . . . . 51
6
Page 7

Emptying the Trash in the Bins List . . . . . . . . . . . . . . . . . . . . . . . . . . . . 51
Managing Folders and Bins . . . . . . . . . . . . . . . . . . . . . . . . . . . . . . . . . . 52
Saving Bins Automatically . . . . . . . . . . . . . . . . . . . . . . . . . . . . . . . . . . . 52
Saving Bins Manually. . . . . . . . . . . . . . . . . . . . . . . . . . . . . . . . . . . . . . . 53
Describing Project Settings . . . . . . . . . . . . . . . . . . . . . . . . . . . . . . . . . . . . . . 54
Understanding Settings . . . . . . . . . . . . . . . . . . . . . . . . . . . . . . . . . . . . . 54
Defining Settings . . . . . . . . . . . . . . . . . . . . . . . . . . . . . . . . . . . . . . . . . . 56
Reviewing Basic Settings . . . . . . . . . . . . . . . . . . . . . . . . . . . . . . . . . . . . 57
Film Settings . . . . . . . . . . . . . . . . . . . . . . . . . . . . . . . . . . . . . . . . . . 57
Bin Settings . . . . . . . . . . . . . . . . . . . . . . . . . . . . . . . . . . . . . . . . . . . 57
Logging Settings . . . . . . . . . . . . . . . . . . . . . . . . . . . . . . . . . . . . . . . 58
Displaying Project Settings. . . . . . . . . . . . . . . . . . . . . . . . . . . . . . . . . . . 58
Working with Settings. . . . . . . . . . . . . . . . . . . . . . . . . . . . . . . . . . . . . . . 59
Selecting Another User . . . . . . . . . . . . . . . . . . . . . . . . . . . . . . . . . . 59
Modifying Settings . . . . . . . . . . . . . . . . . . . . . . . . . . . . . . . . . . . . . . 60
Restoring Default Settings. . . . . . . . . . . . . . . . . . . . . . . . . . . . . . . . 60
Using Site Settings . . . . . . . . . . . . . . . . . . . . . . . . . . . . . . . . . . . . . 61
Viewing Keyboard Settings . . . . . . . . . . . . . . . . . . . . . . . . . . . . . . . 62
Customizing Your Workspace . . . . . . . . . . . . . . . . . . . . . . . . . . . . . 62
Using the Format, Info and Usage Displays . . . . . . . . . . . . . . . . . . . . . . . . . 63
Using Other Tools . . . . . . . . . . . . . . . . . . . . . . . . . . . . . . . . . . . . . . . . . . . . . 64
About the Avid Calculator. . . . . . . . . . . . . . . . . . . . . . . . . . . . . . . . . . . . 64
Using the Communications (Serial) Ports Tool . . . . . . . . . . . . . . . . . . . 65
Using the Console Window . . . . . . . . . . . . . . . . . . . . . . . . . . . . . . . . . . 65
Chapter 4 Logging Source Material . . . . . . . . . . . . . . . . . . . . . . . . . . . . . . . . 67
Understanding Logging . . . . . . . . . . . . . . . . . . . . . . . . . . . . . . . . . . . . . . . . . 68
Configuring Decks and Setting Preferences . . . . . . . . . . . . . . . . . . . . . . . . . 68
Configuring Decks . . . . . . . . . . . . . . . . . . . . . . . . . . . . . . . . . . . . . . . . . 68
Automatic Deck Configuration . . . . . . . . . . . . . . . . . . . . . . . . . . . . . 69
Manual Deck Configuration . . . . . . . . . . . . . . . . . . . . . . . . . . . . . . . 69
7
Page 8

Deck Settings Options . . . . . . . . . . . . . . . . . . . . . . . . . . . . . . . . . . 73
Deleting Deck Configuration Elements. . . . . . . . . . . . . . . . . . . . . . 75
Setting Deck Preferences . . . . . . . . . . . . . . . . . . . . . . . . . . . . . . . . . . . 75
Understanding Timecode . . . . . . . . . . . . . . . . . . . . . . . . . . . . . . . . . . . . . . . 77
Preparing to Log Material. . . . . . . . . . . . . . . . . . . . . . . . . . . . . . . . . . . . . . . 78
Accessing and Setting Up the Logging Tool . . . . . . . . . . . . . . . . . . . . . 78
Accessing the Logging Tool . . . . . . . . . . . . . . . . . . . . . . . . . . . . . . 79
Setting Up the Logging Tool . . . . . . . . . . . . . . . . . . . . . . . . . . . . . . 79
Guidelines for Naming Tapes . . . . . . . . . . . . . . . . . . . . . . . . . . . . . 79
Inserting Source Tapes. . . . . . . . . . . . . . . . . . . . . . . . . . . . . . . . . . 80
Selecting Active Tracks . . . . . . . . . . . . . . . . . . . . . . . . . . . . . . . . . 81
Selecting the Target Bin . . . . . . . . . . . . . . . . . . . . . . . . . . . . . . . . . 81
Selecting the Source Deck . . . . . . . . . . . . . . . . . . . . . . . . . . . . . . . 81
Identifying the Source Tape . . . . . . . . . . . . . . . . . . . . . . . . . . . . . . 82
Setting the Audio Sample Rate . . . . . . . . . . . . . . . . . . . . . . . . . . . . . . . 83
Logging. . . . . . . . . . . . . . . . . . . . . . . . . . . . . . . . . . . . . . . . . . . . . . . . . . . . . 83
Logging from a Source Tape. . . . . . . . . . . . . . . . . . . . . . . . . . . . . . . . . 84
Marking and Logging . . . . . . . . . . . . . . . . . . . . . . . . . . . . . . . . . . . 84
Adding a Memory Mark. . . . . . . . . . . . . . . . . . . . . . . . . . . . . . . . . . 86
Logging On-the-Fly . . . . . . . . . . . . . . . . . . . . . . . . . . . . . . . . . . . . . . . . 87
Pausing a Deck While Logging . . . . . . . . . . . . . . . . . . . . . . . . . . . . . . . 88
Logging with the Deck Offline . . . . . . . . . . . . . . . . . . . . . . . . . . . . . . . . 88
Adding Clip Names and Comments On-the-Fly . . . . . . . . . . . . . . . . . . 90
Controlling Decks from the Keyboard . . . . . . . . . . . . . . . . . . . . . . . . . . 91
Logging Film Information . . . . . . . . . . . . . . . . . . . . . . . . . . . . . . . . . . . . . . . 92
Modifying Clip Information After Logging . . . . . . . . . . . . . . . . . . . . . . . . . . . 92
Creating Avid Logs. . . . . . . . . . . . . . . . . . . . . . . . . . . . . . . . . . . . . . . . . . . . 92
Importing Logs . . . . . . . . . . . . . . . . . . . . . . . . . . . . . . . . . . . . . . . . . . . . . . . 93
Importing Standard Log Files . . . . . . . . . . . . . . . . . . . . . . . . . . . . . . . . 93
Compatible Logs . . . . . . . . . . . . . . . . . . . . . . . . . . . . . . . . . . . . . . . . . . 93
8
Page 9

Importing Log Files into MediaLog Bins . . . . . . . . . . . . . . . . . . . . . . . . . 94
Transferring Bins from Another MediaLog System . . . . . . . . . . . . . . . . 97
Chapter 5 Organizing with Bins. . . . . . . . . . . . . . . . . . . . . . . . . . . . . . . . . . . . 99
Preparing to Work with Bins . . . . . . . . . . . . . . . . . . . . . . . . . . . . . . . . . . . . . 99
Film Scene Workflow . . . . . . . . . . . . . . . . . . . . . . . . . . . . . . . . . . . . . . 100
Setting the Bin Display . . . . . . . . . . . . . . . . . . . . . . . . . . . . . . . . . . . . . 100
Understanding Bin Display Views . . . . . . . . . . . . . . . . . . . . . . . . . . . . . . . . 102
Brief View . . . . . . . . . . . . . . . . . . . . . . . . . . . . . . . . . . . . . . . . . . . . . . . 102
Text View . . . . . . . . . . . . . . . . . . . . . . . . . . . . . . . . . . . . . . . . . . . . . . . 103
Bin View Menu . . . . . . . . . . . . . . . . . . . . . . . . . . . . . . . . . . . . . . . . . . . 104
Customizing Bin Views in Text View . . . . . . . . . . . . . . . . . . . . . . . 104
Saving a Custom Bin View . . . . . . . . . . . . . . . . . . . . . . . . . . . . . . 105
Bin Fast Menu . . . . . . . . . . . . . . . . . . . . . . . . . . . . . . . . . . . . . . . . . . . 105
Basic Bin Procedures . . . . . . . . . . . . . . . . . . . . . . . . . . . . . . . . . . . . . . . . . 106
Selecting Clips . . . . . . . . . . . . . . . . . . . . . . . . . . . . . . . . . . . . . . . . . . . 106
Duplicating Clips. . . . . . . . . . . . . . . . . . . . . . . . . . . . . . . . . . . . . . . . . . 107
Moving Clips. . . . . . . . . . . . . . . . . . . . . . . . . . . . . . . . . . . . . . . . . . . . . 107
Copying Clips . . . . . . . . . . . . . . . . . . . . . . . . . . . . . . . . . . . . . . . . . . . . 107
Deleting Clips and Subclips . . . . . . . . . . . . . . . . . . . . . . . . . . . . . . . . . 108
Assigning Colors to Bin Objects . . . . . . . . . . . . . . . . . . . . . . . . . . . . . . 109
Adding a Color Column to a Bin . . . . . . . . . . . . . . . . . . . . . . . . . . 109
Assigning a Source Color . . . . . . . . . . . . . . . . . . . . . . . . . . . . . . . 109
Assigning a Custom Source Color. . . . . . . . . . . . . . . . . . . . . . . . . 109
Limiting Color Choices. . . . . . . . . . . . . . . . . . . . . . . . . . . . . . . . . . 110
Sifting Clips . . . . . . . . . . . . . . . . . . . . . . . . . . . . . . . . . . . . . . . . . . . . . 111
Sifting Timecodes or Keycode Ranges . . . . . . . . . . . . . . . . . . . . . 112
Sifting Within a Range. . . . . . . . . . . . . . . . . . . . . . . . . . . . . . . . . . 115
Locking and Unlocking Items in a Bin . . . . . . . . . . . . . . . . . . . . . . . . . 116
9
Page 10

Using Text View . . . . . . . . . . . . . . . . . . . . . . . . . . . . . . . . . . . . . . . . . . . . . 117
Arranging Bin Columns . . . . . . . . . . . . . . . . . . . . . . . . . . . . . . . . . . . . 117
Moving and Rearranging Columns . . . . . . . . . . . . . . . . . . . . . . . . 117
Aligning Bin Columns . . . . . . . . . . . . . . . . . . . . . . . . . . . . . . . . . . 117
Showing and Hiding Columns. . . . . . . . . . . . . . . . . . . . . . . . . . . . 118
Deleting a Column . . . . . . . . . . . . . . . . . . . . . . . . . . . . . . . . . . . . 119
Duplicating a Column . . . . . . . . . . . . . . . . . . . . . . . . . . . . . . . . . . 119
Adding Customized Columns to a Bin . . . . . . . . . . . . . . . . . . . . . 120
Changing a Custom Column Heading . . . . . . . . . . . . . . . . . . . . . 121
Managing Clip Information in Text View . . . . . . . . . . . . . . . . . . . . . . . 121
Moving Within Column Cells. . . . . . . . . . . . . . . . . . . . . . . . . . . . . 121
Copying Information Between Columns . . . . . . . . . . . . . . . . . . . . 125
Sorting Clips in Text View . . . . . . . . . . . . . . . . . . . . . . . . . . . . . . . . . . 125
Sorting Clips in Ascending Order . . . . . . . . . . . . . . . . . . . . . . . . . 125
Sorting Clips in Descending Order . . . . . . . . . . . . . . . . . . . . . . . . 126
Multilevel Sorting with Columns . . . . . . . . . . . . . . . . . . . . . . . . . . 126
Sorting Clips by Color. . . . . . . . . . . . . . . . . . . . . . . . . . . . . . . . . . 127
10
Displaying Timecodes in a 23.976p, 24p or 25p Project . . . . . . . . . . . 127
Frame Counting for Timecodes . . . . . . . . . . . . . . . . . . . . . . . . . . 128
Adding Timecode Columns to a Bin . . . . . . . . . . . . . . . . . . . . . . . 129
Adding Timecode Values to the Timecode Columns . . . . . . . . . . 129
Bin Column Headings . . . . . . . . . . . . . . . . . . . . . . . . . . . . . . . . . . . . . 130
Chapter 6 Creating MediaLog Output . . . . . . . . . . . . . . . . . . . . . . . . . . . . . . 135
Printing Bins . . . . . . . . . . . . . . . . . . . . . . . . . . . . . . . . . . . . . . . . . . . . . . . . 135
Exporting Bins . . . . . . . . . . . . . . . . . . . . . . . . . . . . . . . . . . . . . . . . . . . . . . 136
Transferring Bins to an Avid Editing System . . . . . . . . . . . . . . . . . . . . . . . 137
Transferring Projects and Bins Using AFE Files . . . . . . . . . . . . . . . . . . . . 139
Appendix A Avid Log Specifications . . . . . . . . . . . . . . . . . . . . . . . . . . . . . . . . 143
Understanding Avid Log Specifications . . . . . . . . . . . . . . . . . . . . . . . . . . . 143
Page 11

Avid Log Specifications . . . . . . . . . . . . . . . . . . . . . . . . . . . . . . . . . . . . . . . . 144
Global Headings. . . . . . . . . . . . . . . . . . . . . . . . . . . . . . . . . . . . . . . . . . 144
Column Headings. . . . . . . . . . . . . . . . . . . . . . . . . . . . . . . . . . . . . . . . . 146
Data Entries . . . . . . . . . . . . . . . . . . . . . . . . . . . . . . . . . . . . . . . . . . . . . 149
Sample Avid Log . . . . . . . . . . . . . . . . . . . . . . . . . . . . . . . . . . . . . . . . . . . . . 152
Appendix B Working with a Film Project . . . . . . . . . . . . . . . . . . . . . . . . . . . . . 155
Film and 24P Settings . . . . . . . . . . . . . . . . . . . . . . . . . . . . . . . . . . . . . . . . . 156
Setting the Film and Edge Type Ink Numbers . . . . . . . . . . . . . . . . . . . 157
Transfer Settings for Film Projects . . . . . . . . . . . . . . . . . . . . . . . . . . . . 158
Setting the Pulldown Phase . . . . . . . . . . . . . . . . . . . . . . . . . . . . . . . . . 159
Logging Film Information. . . . . . . . . . . . . . . . . . . . . . . . . . . . . . . . . . . . . . . 162
Displaying Film Columns . . . . . . . . . . . . . . . . . . . . . . . . . . . . . . . . . . . 162
Entering Pulldown Information . . . . . . . . . . . . . . . . . . . . . . . . . . . . . . . 163
Determining the Pulldown Phase . . . . . . . . . . . . . . . . . . . . . . . . . 165
Modifying the Pulldown Phase Before Logging. . . . . . . . . . . . . . . 166
Entering Frames-per-Second Rates for PAL Transfers . . . . . . . . . . . . 168
Entering Key Numbers . . . . . . . . . . . . . . . . . . . . . . . . . . . . . . . . . . . . . 168
Tracking 3-Perf Counts . . . . . . . . . . . . . . . . . . . . . . . . . . . . . . . . . . . . 169
Entering Additional Timecodes (Optional) . . . . . . . . . . . . . . . . . . . . . . 169
Entering the Ink Number (Optional) . . . . . . . . . . . . . . . . . . . . . . . . . . . 170
Entering Additional Film Data. . . . . . . . . . . . . . . . . . . . . . . . . . . . . . . . 170
Index . . . . . . . . . . . . . . . . . . . . . . . . . . . . . . . . . . . . . . . . . . . . . . . . 171
11
Page 12

12
Page 13

Using This Guide
This guide provides information about the configuration and operation of
®
MediaLog™.
Avid
This guide is for video and film editors who wish to log clips before bringing
them to an Avid editing system for batch capture and editing.
Unless noted otherwise, the material in this document applies to the
Windows XP and Mac OS X operating systems.The majority of screen shots
in this document were captured on a Windows XP system, but the information
applies to both Windows XP and Mac OS X systems. Where differences exist,
both Windows XP and Mac OS X screen shots are shown.
n
The documentation describes the features and hardware of all models.
Therefore, your system might not contain certain features and hardware that
are covered in the documentation.
Symbols and Conventions
Avid documentation uses the following symbols and conventions:
Symbol or Convention Meaning or Action
n
c
w
A note provides important related information,
reminders, recommendations, and strong suggestions.
A caution means that a specific action you take could
cause harm to your computer or cause you to lose data.
A warning describes an action that could cause you
physical harm. Follow the guidelines in this document
or on the unit itself when handling electrical
equipment.
Page 14

Using This Guide
Symbol or Convention Meaning or Action
> This symbol indicates menu commands (and
subcommands) in the order you select them. For
example, File > Import means to open the File menu
and then select the Import command.
n
t
k This symbol represents the Apple or Command key.
Margin tips
(Windows), (Windows
only), (Macintosh), or
(Macintosh only)
Italic font Italic font is used to emphasize certain words and to
Courier Bold font
Ctrl+key or mouse action
k+key or mouse action
This symbol indicates a single-step procedure.
Multiple arrows in a list indicate that you perform one
of the actions listed.
Press and hold the Command key and another key to
perform a keyboard shortcut.
In the margin, you will find tips that help you perform
tasks more easily and efficiently.
This text indicates that the information applies only to
the specified operating system, either Windows XP or
Macintosh OS X.
indicate variables.
Courier Bold font identifies text that you type.
Press and hold the first key while you press the last
key or perform the mouse action. For example,
k+Option+C or Ctrl+drag.
In this guide, the term Avid system is a generic term that refers to any Avid
application, including MediaLog. The term Avid editing system refers to one of
the Avid video editing applications such as Avid Symphony, Avid
Media Composer, Avid Film Composer, Avid Xpress, or Avid NewsCutter.
14
Page 15

If You Need Help
If you are having trouble using Avid MediaLog:
1. Retry the action, carefully following the instructions given for that task in
this guide. It is especially important to check each step of your workflow.
2. Check for the latest information that might have become available after
the documentation was published in one of two locations:
- If release notes are available, they ship with your application.
- If ReadMe files are available, they are supplied in your Avid
If You Need Help
application folder. ReadMe files are also available from Help.
n
The most up-to-date ReadMe files are available on the Avid Knowledge Base.
3. Check the documentation that came with your Avid application or your
hardware for maintenance or hardware-related issues.
4. Visit the online Knowledge Base at www.avid.com/onlinesupport. Online
services are available 24 hours per day, 7 days per week. Search this
online Knowledge Base to find answers, to view error messages, to access
troubleshooting tips, to download updates, and to read/join online
message-board discussions.
5. For Technical Support, please call 800-800-AVID (800-800-2843).
For Broadcast On-Air Sites and Call Letter Stations, call
800-NEWSDNG (800-639-7364).
How to Order Documentation
To order additional copies of this documentation from within the
United States, call Avid Sales at 800-949-AVID (800-949-2843). If you are
placing an order from outside the United States, contact your local
Avid representative.
15
Page 16

Using This Guide
Avid Educational Services
For information on courses/schedules, training centers, certifications,
courseware, and books, please visit www.avid.com/training or call Avid Sales
at 800-949-AVID (800-949-2843).
16
Page 17

Chapter 1
Understanding Avid MediaLog
Avid MediaLog is a tool to select and log footage before your edit session.
Although you can log footage with Avid editing system products, using Avid
MediaLog frees up your Avid editing system for editing rather than for
logging footage. After logging shots (for example, on a laptop), use your Avid
editing system to capture and edit the footage. In addition, you can transfer
film to National Television Standards Committee (NTSC) or Phase
Alternating Line (PAL) video. Use Avid MediaLog to log the material and
then transfer the logged shots (also known as clips) to an Avid editing system
for capturing and editing.
This chapter answers the following questions:
• How to Use Avid MediaLog?
• How Does MediaLog Work?
• What Are the Basic Logging Steps?
How to Use Avid MediaLog?
Avid MediaLog is portable; you can install it on a laptop or on desktop
computers running the Windows
®
X operating system. To log shots from a source tape, connect your
OS
computer to a deck that uses Sony
MediaLog, you control the deck while viewing your source tapes and selecting
the shots for your log. You can also log without a deck and manually enter
logging information.
For each shot that you log, Avid MediaLog saves the start and end timecodes,
duration, tracks selected, and tape name.
®
2000, Windows XP Professional, or Mac
®
serial deck protocol. With Avid
Page 18

Chapter 1 Understanding Avid MediaLog
Avid MediaLog also lets you add new categories of information to your log, so
you can record the scene, take, location, or any other comments that can help
you identify the footage.
Once you have created a log, the Avid MediaLog Sort command orders your
shots according to criteria you specify. The Sift command uses your criteria to
pick out specific footage, such as all the product shots or all shots from a
certain location.
You can also use Avid MediaLog to output an AFE file. AFE files are designed
to transfer project information between Avid editing systems.
How Does Avid MediaLog Work?
The Avid MediaLog system uses clips, bins, and projects to organize your
work.
Avid MediaLog clips and bins are a lot like their film counterparts. Just as film
editors pull clips from their raw footage and store the clips in bins for the
editing session, Avid MediaLog lets you select shots from your tapes and store
information about the shots in electronic bins.
18
A clip corresponds to a shot you select from a tape. Clips contain information
about your footage such as the start and end timecodes and the number of
video and audio tracks. Clips are stored in electronic bins that have built-in
database capabilities to help you easily find a specific shot.
Page 19

Sample Bin
How Does Avid MediaLog Work?
Each time you log clips, you open a bin and use Logging Tool controls to play
your tapes, mark the shots, and add the clips to the open bin.
A bin is open while you log clips to it.
Deck and log controls are in the Logging tool.
Deck controls
Log controls
If you have a log sheet, you can log clips without using a deck. You type the
start and end timecodes for each clip, and then add them to the bin.
Avid MediaLog uses a project file to organize all the work you do on a single
job. You must always create a new project or open an existing project before
you can open a bin and log your shots.
19
Page 20
Chapter 1 Understanding Avid MediaLog
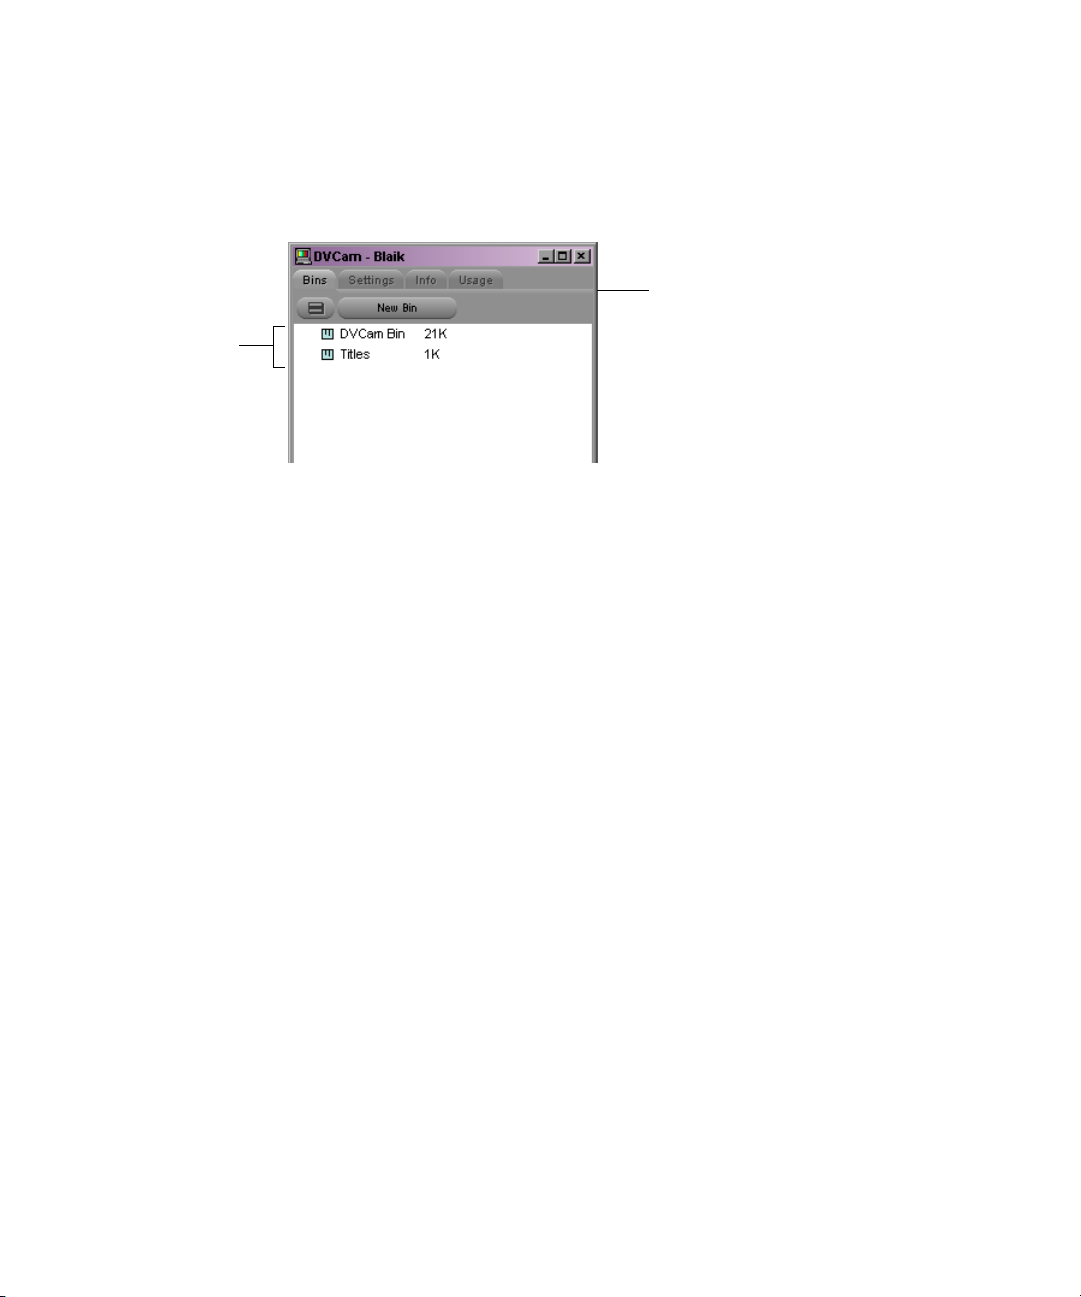
As you work on a project, Avid MediaLog remembers the name of each bin
you open and displays a list of bin names in the Project window. The list is
useful for helping you to quickly access bins.
Sample Project
window
Bin names
What Are the Basic Logging Steps?
To perform a logging session:
1. Start your computer and the Avid MediaLog program.
20
2. Create a new or open an existing project.
3. Create a new or open an existing bin.
4. Prepare to log:
a. Select a video format.
b. Enter Logging mode.
c. Select a source name.
5. Select the tracks you want to log from the tape.
6. Log the clips.
7. Save and organize the bin.
8. Quit the Avid MediaLog application, and (optionally) shut down the
computer.
Page 21

Chapter 2
Getting Started
This chapter describes how to set up the hardware and run Avid MediaLog
sessions. It includes the following topics:
• Setting Up the Hardware (Windows)
• Setting Up the Hardware (Macintosh)
• Supported Decks
• Turning On the Hardware
• Installing Avid MediaLog
• Starting Avid MediaLog
• Backing Up Your Project Information
• Ending a Work Session
• Using Help
Setting Up the Hardware (Windows)
Make sure your computer meets the following requirements:
• The computer must be running the Windows 2000 or Windows XP
operating system.
• The computer includes at least 32 megabytes (MB) of random-access
memory (RAM).
Avid MediaLog can control a deck that uses Sony serial deck protocol and a
timecode reader. Manually control a single deck by connecting an RS-232 to
RS-422 serial adapter kit to the serial port of your computer. Avid MediaLog
can also control a deck through V-LAN
®
VLXi® connections.
Page 22
Chapter 2 Getting Started
n
c
n
If you need to connect and control more than one video deck, see the setup
guide for your Avid editing system.
A direct serial video deck connection requires a serial adapter kit that contains
these items (see the following figure):
• An RS-232 to RS-422 serial adapter
• Two serial cables; male 9-pin connectors at both ends
Turn off the computer and the deck when you are connecting the serial
cable.
To connect a single deck to your PC:
1. Shut down the computer and the deck.
2. Attach one end of the first 9-pin cable to the end of the serial adapter
labeled RS-232.
3. Attach the other end of the first 9-pin cable to the serial port of your
computer.
When you attach the cable to the serial port on the computer, note if it is
port 1 or port 2. You have to select the port in the Avid software.
Serial adapter
22
n
RS-422 connection
To your
deck
4. Attach one end of the second 9-pin cable to the end of the serial adapter
labeled RS-422.
5. Attach the other end of the second 9-pin cable to the remote serial port of
the deck.
Set the deck to Remote mode before you attempt to control the deck using the
software.
For more information about connecting decks, see the setup guide for your
Avid editing system.
RS-232 connection
To your
computer
Page 23
Setting Up the Hardware (Macintosh)
Setting Up the Hardware (Macintosh)
Make sure your computer meets the following requirements:
• The computer is running the Mac OS X operating system. See the release
notes for the supported version.
• At least 12 MB of RAM is available to run Avid MediaLog (20 MB or
more is preferred when working with large bins).
Avid MediaLog can control a deck that uses Sony serial deck protocol and a
timecode reader.
c
Turn off the computer and the deck when you are connecting the serial
cable.
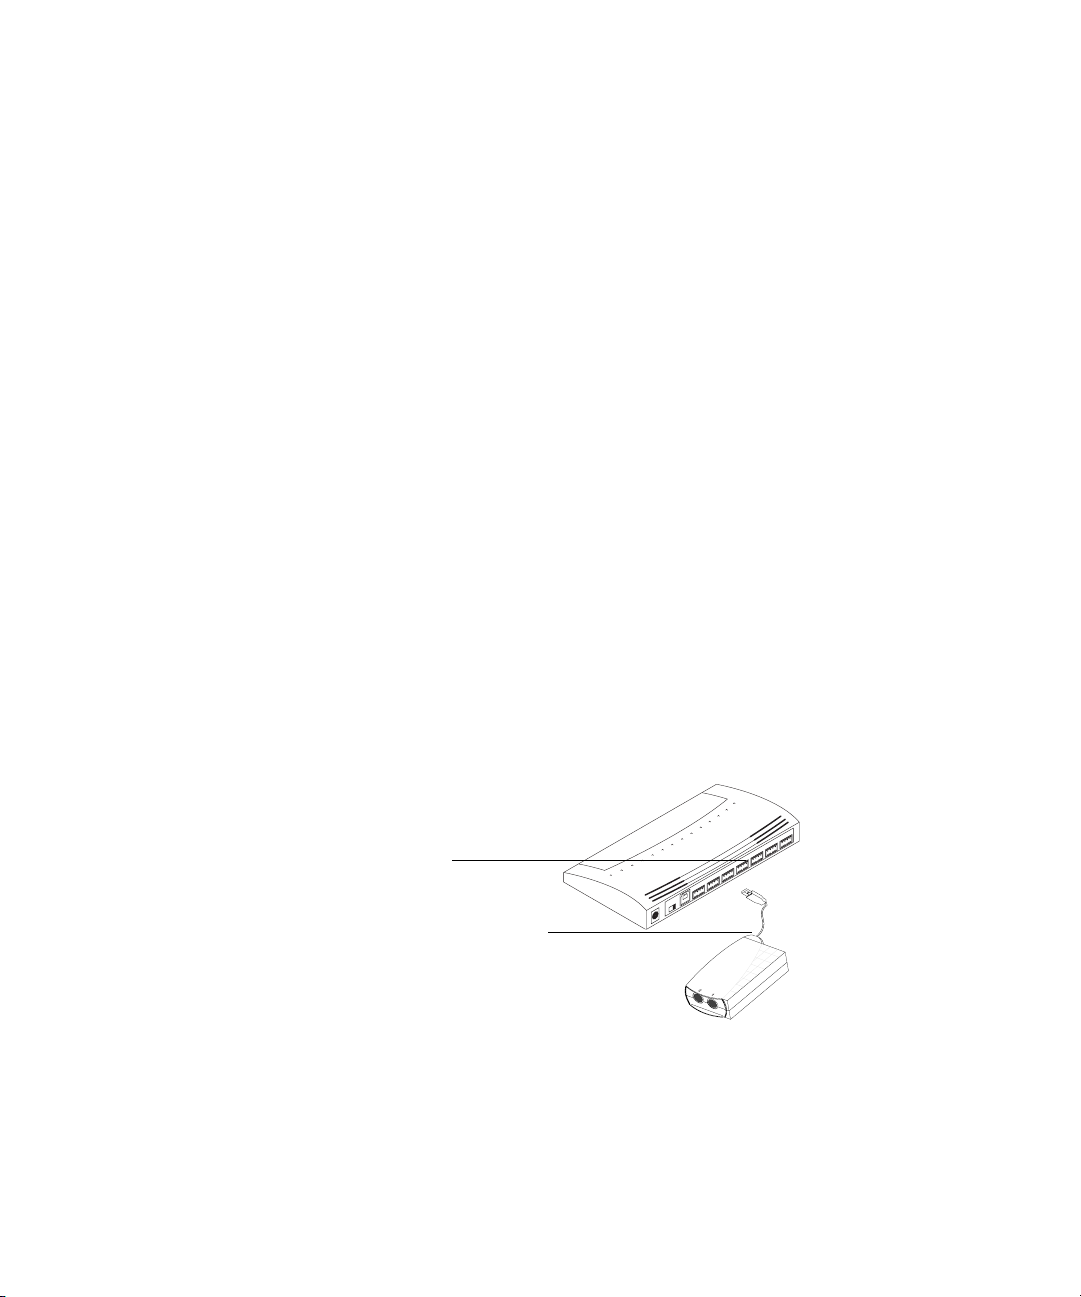
To connect a single deck to your system:
1. Locate a serial cable.
2. Attach the round 8-pin DIN connector to a USB-to-serial adapter.
3. Connect the USB-to-serial adapter to one of the following:
t A USB connector on the rear of your Macintosh G4 system
t A USB hub (See the following figure.)
USB hub
USB-to-serial adapter
4. Attach the 9-pin D connector to the remote serial connector on the back of
the deck.
23
Page 24

Chapter 2 Getting Started
n
Adjust the switch on the video deck to Remote mode before using the software
to control the video deck.
For more information about connecting decks, see the setup guide for your
Avid editing system.
Supported Decks
For a list of supported decks, search for “Supported Decks” in the Avid
Customer Support Knowledge Center on www.avid.com. For instructions on
how to access the Knowledge Center, see the Avid editing application release
notes.
Turning On the Hardware
To assure that the computer detects all the attached hardware and to
avoid damage to any component, turn on the hardware in the following
order:
1. If your computer has media drives, turn on each drive.
Wait 15 to 30 seconds for the drives to spin up before you turn on the
computer system; otherwise, the computer will not communicate with the
storage devices successfully.
24
c
2. If you are logging clips using a deck, turn on the deck.
Set the REMOTE/LOCAL switch on the deck to REMOTE.
3. Start the computer.
Do not disconnect or turn off individual drives while the
computer is on.
You can now install the Avid MediaLog software.
Page 25

Installing Avid MediaLog
This section describes how to install the Avid MediaLog software.
Installing Avid MediaLog
c
c
Do not install the Avid MediaLog application on disks where you store
media.
If you install Avid MediaLog on an Avid editing system, make sure the
Avid MediaLog application is in a folder separate from the Avid editing
application. Each application has its own preferences.
Installing Avid MediaLog on a Windows System
You can install Avid MediaLog on the following Windows operating systems:
• Windows 2000
• Windows XP Professional
Avid MediaLog software is shipped on the Avid MediaLog CD-ROM and the
Avid editing application CD-ROM.
n
For information on installing Avid MediaLog from the Avid editing application
CD-ROM, see the release notes for your Avid editing system.
To install Avid MediaLog software on a Windows system:
1. Quit all Windows applications.
2. Insert the Avid MediaLog CD-ROM into your computer’s CD-ROM
drive.
If the installer does not run automatically after you insert the application
CD-ROM, do the following:
a. Double-click the My Computer icon.
b. Double-click the CD-ROM icon.
c. Double-click Launch.exe to run the installer.
The Avid MediaLog Installer CD-ROM window opens.
25
Page 26

Chapter 2 Getting Started
3. Click Install Avid MediaLog.
Follow the online instructions to install the software.
When the installation is complete, a message asks if you want to restart
the system.
4. Restart the computer now or later (before you start the Avid MediaLog
application).
Installing Avid MediaLog on a Mac OS X System
For Macintosh systems, Avid MediaLog software is shipped only on the Avid
MediaLog CD-ROM.
n
The Macintosh version of Avid MediaLog v11.7 and later runs only on the
Mac OS X operating system. See the Avid MediaLog ReadMe file for more
information.
To install Avid MediaLog software on a Mac OS X system:
1. Restart your Macintosh system.
2. Quit any applications that run automatically at startup.
3. Insert the Avid MediaLog CD-ROM into your computer’s CD-ROM
drive.
4. Double-click the Avid MediaLog Installer icon.
Follow the online instructions to install the software.
Starting Avid MediaLog
After you install Avid MediaLog, you are ready to start the application.
To start Avid MediaLog:
1. Turn on the video deck.
2. If you are using a deck, set the REMOTE/LOCAL switch on the deck to
REMOTE.
26
3. Turn on the computer.
Page 27

Starting Avid MediaLog
c
Do not run any other Avid editing application on the computer at the
same time as the Avid MediaLog application. The two applications
conflict with each other.
4. Do one of the following:
t (Windows) Click the Start button and select Programs > Avid >
MediaLog.
t (Macintosh) Double-click the Avid MediaLog folder to open it and
then double-click the Avid MediaLog application icon to start Avid
MediaLog.
The Select Project dialog box appears.
Changing Users
Your login name is selected as the user. You can change users by logging
in through a different name. You can also establish user profiles.
To change users:
1. Quit the Avid application.
2. Do one of the following:
t (Windows) Select Start > Log Off, and then log in as a different user.
t (Macintosh) Select Apple P menu > Log Out, click Log Out, and
then click a new user.
27
Page 28

Chapter 2 Getting Started
n
(Macintosh only) You have to create a new user before you can change to that
user. See your Macintosh documentation or the Macintosh Help.
Selecting a Project
You can select a project from a private folder, a shared folder, or a folder
anywhere on your system. You can also create a project in any of these folders.
The path of the folder appears in the Folder text box in the Select Project
dialog box.
3. Start the Avid application.
Your current login name appears as the User in the Select Project dialog
box.
Folder path
Folder
options
28
Page 29

The following table lists the default folder locations for each folder option:
Folder Option Folder Path
Private (Windows) C:\Program Files\Avid\Avid MediaLog\Avid
Shared (Windows) C:\Program Files\Avid\Avid MediaLog\Avid Projects
External Last folder opened through Browse button.
Creating a New Project
To create a new project:
Starting Avid MediaLog
Projects\login name
(Macintosh) Macintosh HD/Users/Shared/MediaLog/Avid
Projects/login name
(Macintosh) Macintosh HD/Users/Shared/MediaLog/Avid
Projects
1. In the Select Project dialog box, select the folder in which you want to
create the project: private, shared, or external.
n
n
2. Click New Project.
The New Project dialog box opens.
3. Type the name of your new project in the text box.
If you plan to move bins and projects from one platform to another, do not use
the characters / \ : * ? “ < > | or leading spaces, trailing spaces, or trailing
periods, when naming projects, bins, and users. Bin and project names are
limited to 27 characters, not including the period and 3-character extension
that the system automatically adds to a file name.
(Macintosh only) You can set the Use Windows compatible File Names option
in the Avid application’s General Settings dialog box to prevent the system
from accepting these restricted characters in a bin, project, or user name. If
you are using your Avid application as a standalone editor (and do not plan to
move your bins or projects to another platform), you have the option of
extending bin and project names to 31 characters using the Allow filenames to
exceed 27 characters option in the General Settings dialog box.
29
Page 30

Chapter 2 Getting Started
4. Click the Format pop-up menu and select a project type based on your
source footage.
The following table lists the available format options.
n
References to 24p projects include 23.976p projects unless otherwise noted.
Project Type Source Footage Transfer
23.976p NTSC For film-originated or video-originated footage that
has been shot at 23.976 fps or film-originated footage
transferred on digital videotape (such as Digital
Betacam
24p NTSC For film-originated or other 24-fps footage
transferred to NTSC videotape
30i NTSC For NTSC video-originated or other 30-fps footage
transferred to NTSC videotape
24p PAL For film-originated or other 24-fps footage
transferred to PAL videotape at 25 fps
25p PAL For 25-fps film footage transferred to PAL videotape
25i PAL For PAL video-originated footage (25 fps)
720p/59.94 HD broadcast. For video-originated footage
transferred to this format
1080p/23.976 HD online. For film-originated footage transferred to
this format
®
)
30
1080p/25 HD online. For film-originated footage transferred to
this format
1080i/50 HD broadcast. For video-originated footage
transferred to this format
1080i/59.94 HD broadcast. For video-originated footage
transferred to this format
Page 31

Starting Avid MediaLog
5. Select the following additional options:
- For 23.976p, 24p, 25p, and 1080p film projects, click the Film button
and select a film gauge tracking format from the Film Type pop-up
menu.
- For 24p PAL projects, select an audio transfer rate. For information
on audio transfer rates, see “Transfer Settings for Film Projects” on
page 158.
- For 25i PAL, 30i NTSC, and 1080i Matchback projects, select
Matchback, click the Film Type pop-up menu, and select a film
format.
For more information about matchback, see “Using the Matchback
Option” in the input and output guide or user’s guide for your Avid
editing system.
6. Click OK.
The system creates the new project files and folder, and then returns to the
Select Project dialog box. The project name is highlighted in the Projects
scroll list.
7. Select a user profile. (See “Using User Profiles” on page 36.)
8. Do one of the following:
t Select a project and click OK.
t Double-click a project name.
The Project window, the Composer monitor, and the Timeline open with
the selected User settings loaded.
Setting Film Preferences
If you are logging 24p or 25p footage for a film project, set film preferences in
the Film Settings dialog box immediately after you create a project. These
settings provide the system with important information about the type of film
and audio transfer you used for your job. For more information, see “Working
with a Film Project” on page 155.
31
Page 32

Chapter 2 Getting Started
Selecting a Private Project
The default location for the private projects folder is
• (Windows) C:\Program Files\Avid\Avid MediaLog\Avid Projects\login
name
• (Macintosh) Macintosh HD/Users/Shared/MediaLog/Avid Projects/login
name
Creating or storing a project in a private folder does not prevent other users
from navigating to or opening the folder.
To select a private project:
1. Start the Avid application.
The Select Project dialog box opens.
Login name
32
n
Private folder
location
Private option
selected
2. Click Private in the Select a Project area.
Your private projects appear.
You cannot type into the User or Folder text boxes.
3. Do one of the following:
t Select a project and click OK.
t Double-click a project name.
The Project window, the Composer monitor, and the Timeline open with
the selected User settings loaded.
Page 33

Selecting a Shared Project
The default path for the shared projects folder is
• (Windows) C:\Program Files\Avid\Avid MediaLog\Avid Projects
• (Macintosh) Macintosh HD/Users/Shared/MediaLog/Avid Projects
To select a shared project:
1. Start the Avid application.
The Select Project dialog box opens.
Starting Avid MediaLog
Shared folder
Location
Shared
option
selected
n
2. Click Shared in the Select a Project area.
You cannot type into the User or Folder text boxes.
33
Page 34

Chapter 2 Getting Started
3. Do one of the following:
t Select a project and click OK.
t Double-click a project name.
The Project window, the Composer monitor, and the Timeline open with
the selected User settings loaded.
Selecting an External Project
You can select a project that is located outside of the Avid Projects folder.
To select an external project:
1. Start the Avid application.
The Select Project dialog box opens.
Browse
button
34
2. In the Select Project dialog box, click External.
The projects displayed are those you most recently navigated to by using
the browse button.
Page 35

Browsing for a Project
Starting Avid MediaLog
3. Do one of the following:
t Select a project and click OK.
t Double-click a project name.
The Project window, the Composer monitor, and the Timeline open with
the selected User settings loaded.
To browse for a project in a location other than the default folders:
1. Start the Avid application.
The Select Project dialog box opens.
2. Click the Browse button.
Browse
button
3. The Browse for Folder (Windows) or Project Directory (Macintosh)
dialog box opens.
4. Navigate to the folder that contains the project you want.
5. Click OK (Windows) or Choose (Macintosh).
6. Do one of the following:
t Select a project and click OK.
t Double-click a project name.
The Project window, the Composer monitor, and the Timeline open with
the selected User settings loaded.
35
Page 36

Chapter 2 Getting Started
Using User Profiles
You can establish different profiles for a single user without having to log out
of your system and log back in under a different name (see “Changing Users”
on page 27). Separate editing functions to have separate settings. User
“Editor,” for example, can have separate profiles for “Audio editor,” “Film
editor,” or for “Assistant 1,” “Assistant 2,” and so on. These profiles have
separate folders and settings that are kept in the following folders:
• (Windows) C:\Program Files\Avid\Avid MediaLog\Avid Users\login
• (Macintosh) Macintosh HD/Users/Shared/MediaLog/Avid Users/login
You can also import a user or user profile from another location.
Creating a User Profile
To create a user profile:
1. Click the Settings tab in the Project window.
name
name
36
2. Click the User Profile Selection pop-up menu, and select Create User
Profile.
User Profile Selection pop-up menu
Page 37

3. Type a name in the Profile Name text box and then click OK.
Importing a User Profile
To import user settings from another user or user profile:
1. Click the Settings tab in the Project window.
2. Click the User Profile Selection pop-up menu and select Import User or
3. Navigate to the user or user profile you want to import.
Starting Avid MediaLog
The Create User Profile dialog box opens.
The new user profile appears selected in the pop-up menu and the user
profile name appears in the Project window title bar.
User Profile.
Changing User Profiles
To change user profiles:
To return to the original user profile:
n
When you select the original user profile, your login name appears in the
Project window title bar. When you select another user profile, the user profile
name appears in the Project window title bar.
1. Click the Settings tab in the Project window.
2. Click the User Profile Selection pop-up menu and select another user
profile.
1. Click the Settings tab in the Project window.
2. Click the User Profile Selection pop-up menu and select the original user
profile.
37
Page 38

Chapter 2 Getting Started
n
Exporting a User Profile
If you are using a user profile other than the default and you change to
another project, the default user settings are loaded, even though the Project
window still displays your non-default user profile name. You must reselect the
user profile you want to have active.
You can create a user profile on one system, export it to a server and then
import the same user profile from another system to the new system. Export
the user profile as a Personal profile or a Group profile.
When you choose Personal, the user profile performs an autoload and auto
save every time you open a project. Every time you update the user profile, it
saves the new profile information. For example, you can create the user profile
Jennie on one system, export it to another location (server) and then import it
to a different system. Every time you make any changes to the Jennie user
profile, it updates to the server and when you open the Jennie user profile on
either system, it uses the most recent Jennie user profile.
When you choose Group, the user profile autoloads but does not auto save.
Changes made to the user profile only affects the system the changes were
made on, the changes do not update to the server.
To export user settings to another user or user profile:
1. Click the Settings tab in the Project window.
2. Click the User Profile Selection pop-up menu and select Export User or
User Profile.
3. Choose Personal or Group.
4. Navigate to the location where you want to place the user or user profile.
Closing a Project
When you close the current project, you return to the Select Project dialog
box.
To close the current project, do one of the following:
t With the Project window active, select File > Close.
t Click the Close button in the Project window.
38
Page 39

Backing Up Your Project Information
Backing Up Your Project Information
Although Avid MediaLog automatically saves your bins, projects, and
settings, you should back up these items frequently to avoid losing any of your
work if your hard drive fails. Because the storage requirements are minimal,
you can back up these files to a variety of storage devices, such as:
• Floppy disk or equivalent drive
• Removable storage device
• Network storage device (such as a file server)
n
To back up the larger media files created when you capture footage, use a
high-capacity storage device. For information on backing up media files, see
the editing guide or user’s guide for your Avid editing system.
Saving Your Project Information on a Drive or Floppy Disk
To save your work on a floppy disk or equivalent device:
1. Close Avid MediaLog.
2. Mount the drive or insert a floppy disk as appropriate.
3. (Windows only) From the Windows desktop, double-click the My
Computer icon.
4. Double-click the icon for the destination storage drive or floppy drive to
open it. Double-click any additional folders to target the appropriate
storage location.
5. Double-click the internal hard drive to open it.
6. Navigate to the project folder and drag the folder to the targeted storage
location. For the default locations of project folders, see “Selecting a
Project” on page 28.
7. When the system finishes copying the files, unmount the drive or eject the
floppy disk and store it where appropriate.
39
Page 40

Chapter 2 Getting Started
Restoring from a Backup
To restore a project, user profile, or settings from a backup storage
device:
1. Make sure Avid MediaLog is closed.
2. Mount the drive or insert a floppy disk as appropriate that contains the
backup copies you want to restore.
3. From the desktop, double-click the drive or floppy disk and the internal
hard drive.
4. Drag the project folders from the storage device to the appropriate folder
on the internal hard drive. For the default locations of project folders, see
“Selecting a Project” on page 28.
When you start Avid MediaLog, the restored project is displayed in the Select
Project dialog box.
Ending a Work Session
To end the work session, first you must quit the application, and then turn off
your equipment in the order described in these sections:
• Quitting the Avid MediaLog Application
• Turning Off Your Equipment (Windows)
• Turning Off Your Equipment (Macintosh)
Quitting the Avid MediaLog Application
There are two ways to quit the Avid MediaLog application, depending upon
whether you have a project open or you are between projects:
t If you are working on an open project and want to quit Avid MediaLog
quickly, select File > Exit (Windows) or File > Quit MediaLog
(Macintosh).
The project closes and the application quits.
t If you are between projects, from the Select Project dialog box:
a. Click the Quit button.
A message box opens, asking if you want to leave the application.
40
Page 41

b. Click Leave to quit the application. Click Cancel to return to the
Select Project dialog box, and select another project.
Turning Off Your Equipment (Windows)
When you finish using your system and want to turn it off completely, follow
these steps to avoid damaging your system or media storage drives. Quit the
Avid application before turning off your equipment.
To turn off your equipment:
1. Select Start > Shut Down.
The Shut Down Windows dialog box opens.
2. Select Shut down from the pop-up menu, and click OK.
3. When a message states that you can safely turn off your computer, press
the computer’s Power button.
4. Turn off your speakers and monitors.
5. Turn off each external drive in the chassis, and then turn off the chassis
itself.
Ending a Work Session
6. Turn off all other hardware.
c
Never remove media drives from your Avid system when it is turned on.
Shut down the computer and then remove the drives.
Turning Off Your Equipment (Macintosh)
When you finish using your system and want to turn it off completely, follow
these steps to avoid damaging your system or media storage drives. Quit the
Avid application before turning off your equipment.
To turn off your equipment:
1. Select Apple P menu > Shut Down.
This turns off your Macintosh system. The screens on the Bin and Edit
monitors become dimmed.
2. Turn off your speakers and monitors.
41
Page 42

Chapter 2 Getting Started
3. Turn off each external drive in the chassis and then turn off the
chassis itself.
4. Turn off all other hardware.
c
Using Help
Never remove media drives from your Avid system when it is turned on.
Shut down the computer and then remove the drives.
You can get help and background information for tasks, windows, dialog
boxes, and screen objects through your Avid Help system. The Help system is
HTML based and operates in the Microsoft
Avid recommends using Internet Explorer Version 5 or later.
To open the Help system:
t Select Help > Media Log Help.
The Help system appears in a browser window.
To close the Help system, do one of the following:
t Click the Close button in the browser.
t (Windows) Select File > Close.
t (Macintosh) In Internet Explorer, select Explorer > Quit. In Netscape
Navigator, select Netscape > Quit.
t Navigate to another Web site.
®
Internet Explorer Web browser.
42
Page 43

Chapter 3
Working with the Project Window
The Project window provides controls for structuring and viewing important
information about your current project.
This chapter covers the following topics:
• Exploring the Project Window
• Working with Bins
• Describing Project Settings
• Using the Format, Info and Usage Displays
• Using Other Tools
n
This chapter refers to the installation default directory path for the various
Avid folders. If you selected a different directory path during the installation,
you must substitute that path when using this chapter.
Exploring the Project Window
The Project window provides controls (Bins, Settings, Format, Info, and
Usage) for structuring and viewing information about your current project.
The Project window also provides access to the Settings scroll list for altering
various User, Project, and Site settings.
Page 44

Chapter 3 Working with the Project Window
You can use the Project window to:
• Create and open bins.
• View and modify settings.
• View information about the format of the project and system memory
usage.
• View information about the work session usage.
• Add folders to organize project components.
Opening and Closing the Project Window
The Project window opens automatically when you select a project in the
Select Project dialog box.
44
To close the Project window and return to the Select Project dialog box,
do one of the following:
t Click the Close button in the Project window.
t With the Project window active, select File > Close Project.
The Project window remains open the entire time you are working in a project;
however, it might be hidden from view by several open bins or tools.
Page 45

To locate and redisplay the Project window, do one of the following:
t Select Tools > Project.
t Click in an unobstructed area of the Project window to bring it forward.
Changing Font and Point Size
You can change the default font and point sizes of the Project and Bin
windows. You can vary the fonts and point sizes across these windows. For
example, you can set the Project window to Helvetica, 13 pt; set one Bin
window to Times Roman, 11 pt; and set another Bin window to Arial, 12 pt.
The following table describes the windows you can change and where these
changes are saved.
Window Location of Changes
Project Changes the font and point size of the text in the Bins and Settings
tabs; saved as a Project setting.
Bin Changes the font and point size of the text in the Bin window;
saved as a Bin setting (not the Bin View setting).
Exploring the Project Window
n
To change the font displayed in the Project or Bin window:
1. Click the Project or Bin window to make it active.
2. Select Edit > Set Font.
The Set Font dialog box opens.
3. Select a font from the Font pop-up menu.
Any font installed on the Avid system appears in the list. For information on
adding fonts to your system, see your Windows or Macintosh documentation.
4. Type another point size for the font in the Size text box.
5. Click OK.
The new font and point size appear in the active window.
When you close the window, the last font and point size applied is saved with
the window.
45
Page 46

Chapter 3 Working with the Project Window
Working with Bins
Bins contain the master clips that are created when you log source material.
From the Project window, you can view a list of bins associated with the
project, and open, close, and create bins. You can also open bins created for
another project.
Viewing a List of Bins
To view a list of bins associated with the project:
t Click the Bins tab in the Project window.
Bins tab
Fast Menu
button
Bin icon
Bins list
46
From the Bins list you can examine the number, names, sizes, and location of
the bins.
Page 47

Displaying Folders of Bins in the Bins List
You can add folders to the Bins list in the Project window to help organize
your project. You can click bins and drag them into folders, or click folders
and drag them into other folders. See “Managing Folders and Bins” on
page 52.
Fast Menu button
New folders
Trash icon
Working with Bins
n
To display the folder’s contents in the Bins list of the Project window:
t Click the triangular opener next to a folder icon.
To close the display:
t Click the triangular opener again.
To view a list of only the folder contents and not the folders:
t Select Fast > Flat View.
The Trash icon and its contents disappear until Flat View is deselected.
The Trash icon does not appear until you select and delete a bin.
47
Page 48

Chapter 3 Working with the Project Window
Creating a Folder in a Project
To create a folder in a project:
1. Click the Bins tab in the Project window.
2. Select Fast > New Folder.
A new untitled folder opens.
3. Click the untitled folder name in the Bins list and rename it.
Creating a New Bin
To create a new bin from the Project window, do one of the following:
t Select File > New Bin.
t Click the New Bin button in the Project window.
A new (empty) bin opens and is given the name of the project as displayed in
the title bar of the Project window. The new bin opens in the Bins list of the
Project window with the default name highlighted. A corresponding file is
placed in the project folder in the Avid Projects folder and a backup copy is
placed in the Avid Attic folder.
Renaming a Bin
48
You can keep the default name of the bin or rename the bin immediately. For
more information, see “Renaming a Bin” on page 48.
Each new bin you create takes the name of the project that appears in the title
bar of the Project window, and is numbered incrementally.
Page 49

To change the name of a bin:
1. Click the bin name in the Bins list of the Project window.
2. Type a new name.
Project name
Default bin name
Opening and Closing a Bin
To open a bin:
1. Click the Bins tab in the Project window.
Working with Bins
2. Double-click the Bin icon next to the bin name.
The bin opens in a separate window. The Bin icon in the Project window
becomes dimmed, indicating the bin is open.
Opening Selected Bins
To open several bins at once from the Project window:
1. Click a Bin icon in the Bins list.
2. Ctrl+click (Windows) or Shift+click (Macintosh) each additional bin you
want to open.
3. Select File > Open Selected Bins.
Opening Bins from Other Projects
To open a bin from another project:
1. Select File > Open Bin.
(Make sure that no bins are selected in your current project view.)
The Open dialog box opens.
49
Page 50

Chapter 3 Working with the Project Window
2. Find and select the bin you want.
(Windows only) Bins have the file name extension .avb.
c
n
Closing a Bin
Never open a bin that is stored on a floppy disk or equivalent device, since
the system cannot save your work. Always copy the bin to a project folder
on the system drive before you open it. For more information, see the
input and output guide or user’s guide for your Avid editing system.
3. Click Open.
The bin appears in the Bins list of the Project window in a folder called Other
Bins. The name Other Bins appears in italics. You can rename this folder. This
option is useful when you want to open a bin not currently displayed in the
Project window.
The Other Bins folder disappears from the Bins list when you delete all the
bins in the Other Bins folder. Deleting bins from the Other Bins folder does not
remove the bins from the drive; only the pointers to the bins are removed.
To close a bin, do one of the following:
t Click the Close button.
t Select File > Close Bin.
Deleting a Bin or Folder
50
c
You can delete bins and folders along with their contents from the Bins list in
the Project window. Deleted bins and folders are moved to a Trash folder in
the Bins list until you empty the Trash. If you need a deleted bin or folder, you
can retrieve it from the Trash. For more information, see “Viewing Contents in
the Trash” on page 51.
Only bins and folders appear in the Trash. If you select any other item
within a bin and press Delete, the item is permanently deleted and does
not appear in the Trash.
To delete a bin or folder from the Project window:
1. Select the bin or folder you want to delete in the Bins list.
2. Press the Delete key.
Page 51

A Trash icon appears in the Bins list in the Project window. The Trash
contains the deleted item (bin or folder). The deleted item is stored in the
Trash until you empty it.
Viewing Contents in the Trash
If you need to view the contents in the Trash or decide you do not want to
delete those items in the Trash, you must first move the bins or folders from
the Trash.
To view items in the Trash:
1. Click the triangular opener next to the Trash icon in the Bins list to list the
contents of the Trash.
2. Click the bins or folders you want to keep (or view) and drag them from
the Trash to the Bins list in the Project window.
3. Double-click the bin or folder to view it.
Emptying the Trash in the Bins List
Working with Bins
c
n
You can empty the contents of the Trash that is located in the Bins list.
Emptying the Trash permanently removes the bins or folders from the
drive.
If you change the name of the Trash icon, you cannot empty the Trash.
To empty the Trash in the Bins list:
1. Select Fast > Empty Trash.
A message box is displayed.
51
Page 52

Chapter 3 Working with the Project Window
2. Click Empty Trash to delete the bins or folders from the Trash and from
your system drive.
Managing Folders and Bins
You can use the Project window to create hierarchies of folders and bins that
reflect the specific workflow of the current project. This structure provides
both simplicity and backup security.
Creating a hierarchy allows you to have one set of bins available in the Project
window during the digitizing and organizing phase, and another set of bins
available during editing to reduce clutter. For more information, see the
editing guide or user’s guide for your Avid editing system.
Saving Bins Automatically
Avid MediaLog automatically saves changes to your work on a regular basis
during each session. You can modify the frequency of the automatic backups
using the Bin settings in the Settings scroll list in the Project window.
52
When you are working with bins, an asterisk (Windows) or a diamond
(Macintosh) appears before the bin name in the bin’s title bar. The asterisk
(Windows) or diamond (Macintosh) indicates that the changes to the bin have
not been saved. Once you save the bin, the asterisk (Windows) or diamond
(Macintosh) is removed.
When auto-save occurs:
• Any open bins are updated with changes made since the last auto-save.
• Copies of these bins are placed in the following folders as backup:
(Windows) drive:\Program Files\Avid\Avid MediaLog\Avid Attic folder
(Macintosh) Macintosh HD:/Users/Shared/MediaLog/Avid Attic folder
The system automatically places copies of all bins into the Avid Attic folder at
regular intervals for backup. The procedure for recovering bin files from the
Avid Attic folder is described in the editing guide or user’s guide for your Avid
editing system.
Page 53

You can manually save bins for added security — for example, immediately
after an important edit. When your work is lost, or when you want to recover
an earlier version of a bin, you can retrieve files from the Avid Attic folder.
To adjust the frequency of automatic saves:
1. Click the Settings tab in the Project window.
The Settings scroll list appears.
2. Double-click Bin in the Settings scroll list.
The Bin Settings dialog box opens.
3. Type a number in the minutes text box for the Auto-save interval option.
4. Click OK.
Saving Bins Manually
You can manually save a specific bin, selected bins, or all bins.
To save a specific bin:
1. Click the bin window to activate it.
Working with Bins
n
2. Select File > Save Bin.
The Save Bin command appears dimmed if there have been no changes since
the last time the active bin was saved.
To save all the bins:
1. Click the Project window to activate it but do not select any bins in the
Bins list.
2. Select File > Save All.
The system saves all the bins for the project.
53
Page 54

Chapter 3 Working with the Project Window
Describing Project Settings
From the Settings scroll list in the Project window, you can view, select, open,
and alter various User, Project, and Site settings.
To view the Settings scroll list:
t Click the Settings tab in the Project window.
Settings tab
Settings scroll list
Settings type
Understanding Settings
The three types of settings appear in the Settings scroll list as User, Project,
and Site.
The function of these settings is as follows:
• User settings are specific to a particular editor. User settings reflect
individual preferences for adjusting the user interface in the Avid
MediaLog application. Individual User settings are stored in each user
folder.
• Project settings are directly related to individual projects. When you
change a Project setting, it affects all editors working on the project.
Specific Project settings are stored in each project folder.
54
Page 55

Describing Project Settings
• Site settings establish default parameters for all new users and projects on
a particular system. They can apply to particular configurations of
equipment installed at the site (for example, specification and node
settings for an external switcher). They can also include other User or
Project settings that you copy into the Site Settings window. Site settings
are stored in a separate Settings folder.
n
For information about the location of the settings files, see the editing guide or
user’s guide for your Avid editing system.
The following table briefly describes each item in the Settings scroll list. The
table also lists where you can find additional information on a particular item,
and indicates whether the item has an associated dialog box (or window) that
you can access from the Settings scroll list.
Settings Scroll List
For More
Setting Name Description
Audio Project Sets the rate for audio input. See the input and
Bin Sets the auto-save interval; double-click
preferences for bins and other binrelated parameters.
Bin View Selects and formats the information
displayed in bins.
Communication
(Serial) Ports
Configures the serial ports on your
system for deck control.
Information
output guide or user’s
guide for your Avid
editing system.
See “Bin Settings” on
page 57.
See “Bin View Menu”
on page 104.
See “Using the
Communications
(Serial) Ports Tool” on
page 65.
Deck
Configuration
Deck Preferences Sets preferences that affect all decks
Configures channels and decks into the
system.
configured into the system.
See “Configuring
Decks and Setting
Preferences” on
page 68.
See “Setting Deck
Preferences” on
page 75.
55
Page 56

Chapter 3 Working with the Project Window
Settings Scroll List (Continued)
Setting Name Description
For More
Information
Defining Settings
Film Sets parameters for edit play rate, ink
number format, and transfer rate.
Import Sets parameters for file import. See “Importing Logs”
Keyboard Maps commands from the Command
palette to the keyboard.
Logging Allows you to enable the Pause Deck
While Logging feature, map function
keys, and specify a preset duration for
subclips.
Workspace Enables you to associate settings and
windows with a workspace.
See “Film and 24P
Settings” on page 156.
on page 93.
See “Viewing
Keyboard Settings” on
page 62.
See “Pausing a Deck
While Logging” on
page 88.
See “Working with
Bins” on page 46.
You can use the Settings scroll list to establish a hierarchy of settings that
address the specific needs of each production phase.
For example, you can establish:
• User settings for the assistant editor — Facilitate logging, digitizing,
and organizing projects
56
c
• Project settings — Reflect the specific needs of the project
• Bin View settings — Display useful columns of information for each bin
Never use a User settings file that was opened in an Avid editing
application such as Avid Symphony, Media Composer, Film Composer,
Avid Xpres s , or Avid New sCutter.
By establishing these settings once, and selecting the appropriate setting or bin
view in context, you can save time and effort that would be spent searching for
information or adjusting bin headings on-the-fly. You can also save these
settings along with your template for use on similar projects.
Page 57

Reviewing Basic Settings
The following are basic system settings to review at the start of your project:
• Film SettingsBin Settings
• Logging Settings
To view the settings:
t Double-click each setting in the Settings scroll list of the Project window.
Film Settings
Film settings determine essential parameters for accurately capturing,
tracking, and editing source material for 23.976p, 24p, 25p, and 1080p
projects. For a description of film settings, see “Film and 24P Settings” on
page 156.
Bin Settings
The Bin Settings dialog box controls the Avid MediaLog’s automatic save
features, including the number of backups saved in the Avid Attic folder. The
following table describes the Automatic Save and Backup options, and the
results of double-clicking an object in a bin.
Describing Project Settings
Bin Settings Dialog Box Options
Option Description
Auto-Save interval Specifies the length of time between attempts to auto-save project
files. The default is 15 minutes.
To avoid interrupting a logging operation, the Avid system waits
until the system is inactive before auto-saving. Use the “Force autosave at” option to specify an interval at which the system will
interrupt an operation to auto-save.
Inactivity period Specifies the length of time the Avid system waits while the system
is inactive before automatically saving the project files. The default
is 0 seconds.
Force Auto-Save at Specifies the maximum length of time between auto-saves. When
the system reaches this time, it will auto-save the project files even
if it must interrupt an operation to do so. The default is 15 minutes.
57
Page 58

Chapter 3 Working with the Project Window
Bin Settings Dialog Box Options (Continued)
Option Description
Maximum files in a project’s attic Specifies the total number of files stored in the Avid Attic folder.
When a bin is saved, the Avid system copies the previous version of
the bin to a special folder called the Avid Attic. The default is 30
files.
Keep more files if there are many users working on the system. This
ensures that all the bins are backed up.
When there are multiple users working on one system, store Bin
settings as Site or Project settings. This will ensure that another user
does not override your settings and delete your backups.
Max versions of a file in the attic Specifies the total number of single-bin copies stored in the Avid
Attic folder. This setting prevents filling the Avid Attic with too
many copies of one bin, at the risk of losing the others. The default
is 5 copies.
Logging Settings
The logging settings let you define whether the deck will pause during a
logging operation. See “Pausing a Deck While Logging” on page 88.
Displaying Project Settings
You can display the Settings scroll list of the Project window in different
groups, depending on what you need to view.
To change the Settings scroll list display of the Project window:
1. Click the Settings tab in the Project window.
The Settings scroll list appears.
2. Click the Fast Menu button and select a settings display group from the
Settings menu.
The Settings menu displays the selected settings group and the Settings
scroll list displays only the settings in that group.
58
Page 59

The following table describes the different settings display groups.
Settings Display Groups
Option Description
Active Settings Displays currently active settings in your Avid system.
All Settings Displays all settings available in the Avid system.
Base Settings Displays Project, User, and Site settings only; no views are displayed.
Bin Views Displays all the Bin View settings you created.
Import Settings Displays all the Import settings.
Workspaces Displays all the Workspace settings you created.
Workspace Linked Displays only the linked workspaces.
Working with Settings
Describing Project Settings
You can view and modify most of your current settings by double-clicking
them in the Settings scroll list of the Project window and by selecting new
options. You can duplicate, rename, copy, and move settings among files or
systems.
Selecting Another User
Because User settings are not project or site specific, you can display another
set of User settings in the Project window.
To select another user:
1. Click the Settings tab in the Project window.
The Settings scroll list appears.
59
Page 60

Chapter 3 Working with the Project Window
2. Select another name from the User pop-up menu.
User pop-up menu
The previous user’s settings are saved, and the new user’s settings are loaded
into the Avid system and the Project window.
Modifying Settings
You can alter the default options for various settings to reflect the specific
needs of a project or to customize the system based on personal preferences.
For details, open a settings window and press F1 (Windows) or the Help key
(Macintosh).
Restoring Default Settings
To restore settings to their default values:
1. Click the Settings tab in the Project window.
The Settings scroll list appears.
2. Click a setting to select it. Ctrl+click (Windows) or Shift+click
(Macintosh) each additional setting you want to select.
3. Select Special > Restore to Default.
A message box opens and asks whether you want to save the settings.
4. Click the Copy & Restore button to copy the current settings before
restoring the default settings, or click the Restore button to discard the
current settings.
The system restores the default values for the selected settings.
60
Page 61

Using Site Settings
Describing Project Settings
When the system opens a new project, it searches for the Site_Settings file in
the following path:
•(Windows) drive:\Program Files\Avid\Avid MediaLog\ML Settings
• (Macintosh) Macintosh HD:/Applications/MediaLog/ML Settings
The system loads Site settings and any settings placed in the file and then
loads any Project and User settings not included in the Site_Settings file.
Adding settings to the Site_Settings files is useful if you need to establish
global settings for all new users and projects, such as deck settings, a specific
start timecode for all clips, or various customized features of the interface.
To load settings into the Site_Settings file:
1. Open a project with the settings you want to establish as Site settings. If a
project does not already exist with the settings you want, create a project
and make adjustments to the default settings as needed.
2. Select Special > Site Settings.
The Site_Settings window opens.
3. Click a Project or User setting in the Settings scroll list of the Project
window, or Ctrl+click (Windows) or Shift+click (Macintosh) multiple
settings and drag them into the Site_Settings window.
Copies appear in the Site_Settings window.
4. Close the Site_Settings window.
All new users and projects opened from the Select Project dialog box use these
settings as the default settings.
61
Page 62

Chapter 3 Working with the Project Window
Viewing Keyboard Settings
Common editing commands are mapped to the MediaLog keyboard. Use the
Keyboard settings to view the commands mapped to your keyboard. You
cannot change the mappings in Avid MediaLog.
To view keyboard settings:
t Double-click Keyboard in the Settings scroll list of the Project window.
n
Customizing Your Workspace
The Keyboard palette varies, depending on the type of keyboard attached to
your Avid system. If an Avid-supported European keyboard is attached to your
Avid system, then the Keyboard palette matches that keyboard.
Your workspace defines how you arrange and size the windows on the desktop
of the Avid editing application. If you like to work with a particular group of
windows arranged and sized in a particular setup, you can assign them to a
workspace setting that you can then recall with a Workspace button. For
example, during logging you might want to display the Logging tool and bins
in specific locations.
While in a workspace, you can move tool windows or open and close tool
windows. The next time you select that workspace, the tool windows appear
with either:
• The arrangement from the last time you left the workspace
• The arrangement you set for the workspace, regardless of any changes you
made
For information on setting up workspaces, see the editing guide or user’s guide
for your Avid editing system.
62
Page 63

Using the Format, Info and Usage Displays
The Keyboard settings window opens and displays command buttons that are
mapped to the keyboard. To view the name of a command button, let the
mouse pointer rest on the button for 1 or 2 seconds.
Using the Format, Info and Usage Displays
The following types of information are also available on the Project window:
•The Format display allows you to view the video format selected in the
New Project dialog box.
•The Info display allows you to view basic project information. The
displayed information lists the options you selected in the New Project
dialog box when you created the project. You can also view system
memory information from the Info display.
•The Usage display shows information on system usage. You can use this
information to support business functions such as resource management.
For more information, see the editing guide or user’s guide for your Avid
editing system.
To open the Format, Info, or Usage display:
t Click the Format, Info, or Usage tab in the Project window.
The items listed in this view are for information only and cannot be changed.
63
Page 64

Chapter 3 Working with the Project Window
Using Other Tools
The Avid MediaLog application provides access to the following tools for use
while logging clips:
• Avid Calculator
• Communications (Serial) Ports tool
•Console window
About the Avid Calculator
The Avid Calculator helps you calculate video and film durations, and convert
timecode and film key numbers to different formats.
For example, you can:
• Convert drop-frame to non-drop-frame timecode values.
• Convert timecode durations between 30-fps and 25-fps projects.
• Convert a duration in video to the corresponding length in footage and
frames for measuring 35mm film.
64
To use the Avid Calculator:
1. Select Tools > Calculator.
The Avid Calculator opens.
Format pop-up menu
Page 65

2. Select a format from the Format pop-up menu.
3. Make calculations in one of the following ways:
t Click numbers and functions in the Avid Calculator.
t Enter numbers and functions using the numeric keypad.
t Enter numbers and functions using the top row of numbers on the
keyboard.
You do not need to enter leading zeros, colons, or semicolons for
timecode.
4. To convert your totals at any time to another format, select a different
frame code or key number format from the Format pop-up menu.
Using the Communications (Serial) Ports Tool
The Communications (Serial) Ports tool allows you to view the current
configuration of the serial interface at any time during editing. You can also
use it to reconfigure the ports without quitting Avid MediaLog or shutting
down the computer.
Using Other Tools
To access the Communications (Serial) Ports tool:
1. Double-click Communications (Serial) Ports in the Settings scroll list of
the Project window.
The Communications (Serial) Ports tool opens.
n
If you have not yet configured a deck, the window is empty.
2. View or change the port for one or more decks.
You configure the deck and port in the Deck Configuration dialog box
(see “Configuring Decks and Setting Preferences” on page 68). You can
change the port in the Communications (Serial) Ports tool, but whenever
Avid MediaLog starts it uses the port selected in the Deck Configuration
dialog box.
Using the Console Window
The Console window provides a number of features, including:
• Current system information, including your system ID number
• A log of error messages
65
Page 66

Chapter 3 Working with the Project Window
c
Do not use the programming features of the Console window without
guidance from Avid professionals. Contact your local Avid Reseller (in
North America, you can contact Avid Customer Support).
To display current system information:
1. Select Tools > Console to open the Console window.
2. Scroll to the top of the Console window to view your system information
and ID. This feature is especially useful for finding the system ID before
you contact your Avid Reseller or Avid Customer Support.
66
Page 67

Chapter 4
Logging Source Material
You use Avid MediaLog to log your clips in preparation for capturing later
when using Avid editing applications.
This chapter covers the following topics:
• Understanding Logging
• Configuring Decks and Setting Preferences
• Understanding Timecode
• Preparing to Log Material
• Logging
• Logging Film Information
• Modifying Clip Information After Logging
• Creating Avid Logs
• Importing Logs
Page 68

Chapter 4 Logging Source Material
Understanding Logging
Avid MediaLog requires that you name the clips that you log, the tapes they
came from, and their start and end timecodes. Many editors prefer to log all
their clips (shots) first and then batch capture their material later in the Avid
editing application.
There are three basic methods for producing a bin or log that you can use later
for batch capturing:
• Logging directly to a bin
• Importing standard log files to a bin
• Creating Avid logs
The Avid MediaLog tools automate the process of recording each clip’s start
and end timecodes, track selection, and other important data. You do not need
to enter information manually. However, if a source deck is unavailable, or if
you already logged the data on paper, you can manually record clip data in a
bin.
The logging tools provided in Avid MediaLog are also available in the Avid
editing system products. Bins that you create with Avid MediaLog are
completely compatible with your Avid editing system product — you can
copy Avid MediaLog bins to the Avid editing system to begin working with
the logged footage.
Configuring Decks and Setting Preferences
Attach and configure your deck, and then set deck preferences within the Avid
MediaLog application.
See the next section to configure a deck and then go to “Setting Deck
Preferences” on page 75.
68
Page 69

Configuring Decks
The Avid MediaLog application provides a feature that automatically
configures your attached deck. Each time you quit the Avid MediaLog
application, the deck configuration settings are saved. If you reconnect the
deck to a different port, or attach a new deck, run the automatic deck
configuration feature again.
If Avid MediaLog does not automatically sense your attached deck, you must
manually configure the deck.
Configuring Decks and Setting Preferences
n
Automatic Deck Configuration
Manual Deck Configuration
Avid MediaLog does not override the manually specified configurations.
Use the automatic configuration feature before manually trying to configure
any attached deck. If the automatic feature does not sense your attached deck,
see “Manual Deck Configuration” on page 69.
To automatically sense the attached deck:
t Select Special > Autoconfigure All Ports.
Avid MediaLog searches the system ports and configures the attached decks.
Avid MediaLog offers an alternative method of configuring your deck if it
cannot be automatically configured. You can manually configure single or
multiple decks even if the decks are not currently attached to the system. You
can also delete stored deck configurations.
69
Page 70

Chapter 4 Logging Source Material
The Deck Configuration and Deck Preferences settings appear as separate
items in the Settings scroll list of the Project window.
Deck settings
Deck Configuration settings allow you to establish deck control parameters for
a single deck or for multiple decks. As with all settings, you can create
multiple versions, allowing you to select among them for frequent changes in
hardware configurations.
70
c
Deck Configuration settings and global deck control preferences appear as
separate items in the Settings scroll list of the Project window.
For information on setting Deck Preferences, see “Setting Deck Preferences”
on page 75.
You must manually configure the appropriate hardware connections
before Deck Configuration settings can take effect. For more information,
see the setup guide for your Avid editing system.
Page 71

Configuring Decks and Setting Preferences
To configure a deck or multiple decks:
1. Double-click Deck Configuration in the Settings scroll list of the Project
window.
The Deck Configuration dialog box opens.
2. If you are configuring your system for the first time, click the Add
Channel button to add a new channel box on the left side of the Deck
Configuration dialog box and to automatically open a Channel dialog box.
n
For more information
on V-LAN equipment,
contact your Avid sales
representative.
Channel refers to the signal path for deck control, whether directly through a
serial port or through a V-LAN VLXi system connected to a serial port. Direct
serial port connection allows one deck for each channel, while a
V-LAN VLXi system provides multiple decks.
3. Select one of the following from the Channel Type pop-up menu,
depending upon your system configuration.
t Direct if you are controlling a deck through an RS-422 connection to
the serial port.
t VLAN VLX if you are controlling a deck through a V-LAN/VLXi
connection.
4. Select the port to which you are connecting the deck from the Port pop-up
menu.
71
Page 72

Chapter 4 Logging Source Material
n
Channel
boxes appear
on the left
side.
If you are not sure which port to choose, check the 9-pin serial port connectors
on the back of the system. If the ports are not labeled, see the hardware
documentation supplied with your system.
5. Click OK to close the Channel dialog box.
A message box opens and asks if you want to automatically configure the
channel now.
6. Click Yes if you want to automatically configure the channel.
A new channel appears in the display area of the Deck Configuration
dialog box, along with the autoconfigured deck.
Decks appear on the right side
72
n
You can reopen the Channel dialog box to change the options at any time by
double-clicking the channel box in the Deck Configuration dialog box.
7. If you did not autoconfigure the deck, click the channel box to select it.
8. Click the Add Deck button to open the Deck Settings dialog box.
Page 73

Configuring Decks and Setting Preferences
n
With a deck already connected to the system, you can click the Auto-configure
button to bypass the Deck Settings dialog box and automatically configure a
deck with the default settings.
9. Select settings based on your deck. For information on Deck settings, see
“Deck Settings Options” on page 73.
10. Click OK to close the Deck Settings dialog box and return to the Deck
Configuration dialog box.
n
You can reopen the Deck Settings dialog box to change the options at any time
by double-clicking the deck box in the Deck Configuration dialog box.
11. Repeat steps 2 to 10 for each additional channel or deck you want to
configure.
12. (Option) Select the “Verify configuration against actual decks” option (at
the bottom of the Deck Configuration dialog box) if you want the system
to check the deck configuration against the decks physically connected to
the system.
The system checks the deck configuration after you click Apply in the
Deck Configuration dialog box and when you start Avid MediaLog. A
message box warns you if the configuration does not match the deck.
13. Type a name in the Configuration name text box to name the deck
configuration. The new deck configuration appears in the Settings scroll
list of the Project window.
73
Page 74

Chapter 4 Logging Source Material
14. Click Apply to complete the configurations and close the Deck
Configuration dialog box.
15. If necessary, double-click Deck Preferences in the Settings scroll list of
the Project window to adjust global deck control options. For more
information, see “Setting Deck Preferences” on page 75.
Deck Settings Options
To access the Deck Settings dialog box, do one of the following:
t Click the Add Deck button in the Deck Configuration dialog box.
t Select Deck Selection > Adjust Deck in the deck controller section of the
capture tool.
t Double-click the deck name in the Deck Settings dialog box.
74
Page 75

Configuring Decks and Setting Preferences
The following table describes the Deck Settings options.
Deck Settings Options
Option Suboption Description
Name Type your custom name for the tape deck. The default name
matches the deck type.
Description Enter notes about the deck.
Notes Displays configuration information, supplied by Avid, about the
deck you have selected. Not all decks include this information.
Device Select your manufacturer and model from the menus. These decks
have been qualified to work with your Avid system.
Address For V-LAN VLXi use only (see your V-LAN VLXi
documentation). If you are using direct serial port deck control,
this option is unavailable.
Preroll Specifies how many seconds the tape rolls before a capture or
digital cut starts. The default is based on the type of deck.
The Preroll option has no effect in Avid MediaLog.
n
FAST CUE Speeds up long searches; if your decks can read timecode in Fast
Forward or Rewind mode. Otherwise, this option is not useful.
Switch to ff/rew
(seconds)
Switch to Search
(seconds)
When this option is selected, the system switches to fast forward
or rewind if the target timecode is beyond the specified number of
seconds from your current location on the tape.
By default, the deck switches to fast forward or rewind to reach a
target timecode that is more than 60 seconds away.
If your deck shuttles very quickly, you can increase this number
so the system uses fast cue only for long searches.
When this option is selected, the system switches out of fast
forward or rewind when it is within the specified number of
seconds of the target timecode. By default, the system switches to
Search mode when it is 25 seconds from the target timecode.
75
Page 76

Chapter 4 Logging Source Material
Deleting Deck Configuration Elements
You can delete deck configuration elements to remove or replace them.
To delete deck configuration elements in the Avid system:
1. Double-click Deck Configuration in the Settings scroll list of the Project
window.
The Deck Configuration dialog box opens.
2. Click a channel box, a deck box, or the entire configuration to select it.
3. Click the Delete button.
4. Click Apply to complete the changes and close the dialog box.
Setting Deck Preferences
Deck preferences are global settings for basic deck control. These settings
apply to all decks connected to your system, regardless of your deck
configuration. You can open the Deck Preferences dialog box from the
Settings scroll list of the Project window.
76
Page 77

The following table describes the Deck Preferences options.
Deck Preferences Options
Option Description
Configuring Decks and Setting Preferences
When the deck contains
no tape, Log As
Allow assemble edit for
digital cut
Stop key pauses deck This option defines the function of the Stop key (space bar) on the keyboard.
Shuttle holds speed The Shuttle button continues shuttling at a constant speed instead of stopping
Stop any paused decks
when quitting
Poll deck during digital
cut
You select the timecode format (Drop Frame or Non-drop Frame) for logging
clips when no tape is in the deck. When a tape is in the deck, the system
automatically uses the existing timecode format on the tape (See
“Understanding Timecode” on page 77).
Not Applicable.
Select this option to map the space bar to the Pause button on the deck.
Deselect this option to map the space bar to the Stop button.
If the videotape heads are down in “Stop key pauses deck” mode, pressing the
space bar brings up the heads and pauses the deck.
The Stop button in the capture tool and Deck Controller tool always stops the
decks. (Select Tools > New Deck Controller to access the Deck Controller
tool.)
when you release it.
Any paused decks are stopped when you quit the Avid application. Selecting
this option saves wear on the deck heads.
Not Applicable.
77
Page 78

Chapter 4 Logging Source Material
Understanding Timecode
Timecode is an electronic indexing method that denotes hours, minutes,
seconds, and frames that have elapsed on a videotape. For example, a
timecode of 01:03:30:10 denotes a frame that is marked at 1 hour,
3 minutes, 30 seconds, and 10 frames.
NTSC video (the video format used mainly in the United States) uses one of
two formats: drop-frame timecode and non-drop-frame timecode. Drop-frame
(DF) timecode is designed to match the NTSC scan rate of 29.97 frames per
second (fps). Two frames of timecode are dropped every minute except for the
tenth minute. No video frames are dropped. Drop-frame timecode is indicated
by semicolons between the digits; for example, 01;00;00;00.
Non-drop-frame (NDF) timecode tracks NTSC video at a rate of 30 fps and is
indicated by colons between the digits; for example, 01:00:00:00. Non-dropframe timecode can be easier to work with, but does not provide accurate
timing for NTSC broadcast.
For example, a typical 1-hour show uses 52 minutes of video. If your program
ends at 01:52:00:00 (non-drop-frame), and it is broadcast at 29.97 fps, it will
last 94 frames too long (approximately 3 seconds). The final credits could be
cut off.
78
The following illustration compares the two types of timecode at the
1-minute mark. No frames are actually dropped.
Non-dropframe
timecode
01:00:59:28 01:00:59:29 01:01:00:00 01:01:00:01 01:01:00:02
Drop-frame
timecode
01:00:59:28 01:00:59:29 01:01:00:02 01;01;00;0401:01:00:03
Page 79

PAL video (the video format used in many countries other than the United
States) uses a scan rate of 25 fps. Timecode is indicated by colons. There is no
need for drop-frame timecode in PAL video.
You set the default timecode format for logging clips in the Deck Preferences
dialog box (see “Setting Deck Preferences” on page 75). You can select Drop
Frame or Non-drop Frame.
You can change the starting timecode of a clip or, for NTSC projects, the type
of timecode. See the editing guide or user’s guide for your Avid editing
system.
Preparing to Log Material
Avid MediaLog provides two special tools for logging source material:
• The Logging tool, which contains:
- Source deck controls
- Marking and logging controls
Preparing to Log Material
- Active track controls
- Timecode information
- Deck, bin, and tape name information
- Comment section
- Message area
• The Audio Project settings, which enables you to set the audio rate
Accessing and Setting Up the Logging Tool
Once you have opened or created a bin, use the Logging tool to enter the name
of the tape you are logging and to access deck and logging controls.
Use the Logging tool to plan a naming scheme; to work with source tapes; and
to select tracks, bins, and sources.
79
Page 80

Chapter 4 Logging Source Material
Accessing the Logging Tool
To access the Logging tool, do one of the following:
t Click in a Bin window to activate it, and then select Bin > Go To Logging
Mode.
t Select Tools > Logging.
Setting Up the Logging Tool
To select the appropriate source deck, source tape, and active track
settings for your logged material:
1. Open or create your project and the bin in which you want to store your
master clips. For information about opening projects and bins, see
“Getting Started” on page 21.
2. Select Bin > Go To Logging Mode.
The Logging tool opens.
Mark IN button
Channel Selection
area
Enable timecode
button
Triangular opener
Deck controller
Guidelines for Naming Tapes
Consider the following naming guidelines when you provide a name for your
tape:
• Devise a naming scheme. You may prefer tapes of similar names because
they are easy to sort and view together in a bin but distinguishing among
them is difficult when you try to quickly locate a specific tape. Name the
tapes based on the amount and complexity of your source material.
80
Page 81

Preparing to Log Material
• Use unique names. The system cannot distinguish between two tapes with
the same name and between two bins or clips with the same name. For
example, if two tapes are named 001, you might encounter problems
correctly associating their clips with the correct physical tapes.
• Use alphanumeric characters (A–Z, 0–9), with no spaces before the name.
Characters can be uppercase and lowercase. The maximum length of a
name is 31 characters.
n
Although the maximum length of a name is 31 characters, most online houses
accept tape names of no more than 6 characters.
• Select a case convention and maintain it throughout a project. A single
• Be cautious when changing the tape name. After you provide a name for a
Inserting Source Tapes
To insert a source tape in a deck to prepare for logging source material
with Avid MediaLog:
tape is listed as several different tapes if you alter the case of the letters.
For example, if you type a single name as SUNSET, Sunset, and sunset on
three different occasions, all three names appear. This can cause problems
when keeping track of clips during the logging process.
tape source, any change to the name automatically changes that tape name
everywhere it occurs. If you decide later to change the name of one of the
tapes from 001 to 999, every reference to tape 001 changes to a reference
to tape 999.
1. Set the REMOTE/LOCAL switch on the deck to REMOTE.
2. Insert a tape into the deck.
3. Select Bin > Go To Logging Mode.
The Deck Controller tool opens as part of the Logging tool.
Fast Forward button
Rewind button
Stop button
Pause button
Deck Name
pop-up menu
Source tape timecode Shuttle button
Valid timecode indicator
Single-Frame Backward button
Single-Frame Forward button
Eject button
Play button
Source Tape Display button
81
Page 82

Chapter 4 Logging Source Material
Selecting Active Tracks
The Logging tool captures information about the active tracks. Avid
MediaLog automatically activates the tracks that were active in the previous
session.
To change these settings:
t Click tracks in the Channel Selection area of the Logging tool to activate
or deactivate them.
Selecting the Target Bin
You select a target bin in which you want to organize your logged material.
To select a target bin:
t Click the Bin pop-up menu in the Logging tool and make a selection.
n
For more information
on working with bins,
see “Organizing with
Bins” on page 99.
Only opened bins appear in the Bin pop-up menu.
To open a bin, do one of the following:
t For a bin created in the current project, double-click the bin in the Project
window.
t For a bin created in a different project, select File > Open Bin, and then
locate and open the bin in the Open dialog box (Windows) or Open a Bin
dialog box (Macintosh).
t Create a new bin by clicking the New Bin button in the Project window.
Selecting the Source Deck
In some cases, your source material might not reside on a video deck. You can
also select other source devices, such as a digital audiotape (DAT). Be sure the
source material has readable timecode.
To select the deck where the source material is found:
1. Click the Deck Name pop-up menu to display the available online decks.
2. Select the name of your source deck from the pop-up menu.
82
Page 83

Identifying the Source Tape
To select a source tape:
1. Insert a tape into the deck.
The Select Tape dialog box opens.
Preparing to Log Material
n
For information about
deck preferences, see
“Setting Deck
Preferences” on
page 75.
n
If a tape is already inserted into the deck, click the Source Tape Display button
in the capture tool.
2. In an NTSC project, play the tape for a few seconds so the system can
detect the timecode format of the tape (drop-frame or non-drop-frame).
Otherwise, the system maintains the timecode format set in the Deck
Preferences dialog box, regardless of the format on the tape and you might
receive a message indicating a wrong tape.
Drop-frame timecode appears in the Timecode indicator with semicolons
between hours, minutes, seconds, and frames. Non-drop-frame timecode
appears with colons. For more information, see “Understanding Timecode”
on page 77.
For information on tape
naming conventions,
see “Guidelines for
Naming Tapes” on
page 79.
3. Provide the system with a tape name in one of the following ways:
t Select the name of the tape from the list in the Select Tape dialog box
and click OK.
t Click the New button in the Select Tape dialog box if the tape is not in
the list. A new tape name line appears in the dialog box. Type the new
name and click OK.
83
Page 84

Chapter 4 Logging Source Material
Setting the Audio Sample Rate
Before you begin logging, you must select an audio sample rate.
To set the audio sample rate:
1. Double-click Audio Project in the Settings scroll list of the Project
window.
The Audio Project Settings dialog box opens.
2. Click the Sample Rate pop-up menu and select either 44.1 kHz or 48 kHz.
3. Close the dialog box.
If you select Batch Capture in your Avid editing system and then select the
“Use the audio compression rate logged for each clip” option, you must
capture at the same rate as the audio rate at which you logged the clips.
Logging
84
The following methods are available for logging:
• Logging from a Source Tape
• Logging On-the-Fly
• Pausing a Deck While Logging
• Logging with the Deck Offline
• Adding Clip Names and Comments On-the-Fly
• Controlling Decks from the Keyboard
Page 85

Logging from a Source Tape
One method of logging is to use Avid MediaLog tools to control a source
deck, to select shots from your source tapes, and to record clip data directly to
a bin.
Make sure you have set up all the required information for logging, as
described in “Configuring Decks and Setting Preferences” on page 68 and
“Preparing to Log Material” on page 78. After you establish your settings and
specify your bin, deck, and tape, the Logging tool is the only tool you need to
log from a tape to a bin.
The Logging tool provides flexibility in the way you mark your clips for
logging as the following illustration shows.
Logging
Mark IN
button
Clip name and
Comment heading
Bin name
Mark IN button
Mark OUT button
Source tape
display button
Marking and Logging
Channel Selection
area
Logging Messages
bar
Go To IN button
Clear IN button
Go To OUT button
Clear OUT button
Timecode entry
text boxes
Mark Memory buttonDuration Mark button
Clear Memory button
Go To Memory button
The basic logging procedure involves marking IN and OUT points. You mark
IN and OUT points using the Mark buttons or by typing IN and OUT
timecodes.
The button in the top left corner of the Logging tool changes according to the
stage of logging you are in. When the button appears as a pencil, Avid
MediaLog is ready to log the clip.
85
Page 86

Chapter 4 Logging Source Material
To log clips directly from a source tape to a bin:
1. Insert your tape into the deck.
The Logging Messages bar displays the message “Mark IN,” indicating
the system is waiting for you to mark an IN point. The Mark IN button
appears in the top left corner of the Logging tool.
2. Set an IN point or an OUT point for the clip you want to log, using one of
the following methods:
Mark IN
t Use the deck controls in the Logging tool to cue your source tape to
the start or end point, and click the Mark IN or the Mark OUT button.
Mark OUT
t Click the Mark IN button in the upper left corner of the Logging tool
or press the F4 key.
Go To IN
t If the footage starts at a known IN point or ends at a known OUT
point, type the timecode in the text box next to the Mark IN or the
Go To OUT
Mark OUT button, press the Go To IN or the Go To OUT button to
scan the tape forward to the mark, or press Enter (Windows) or
Return (Macintosh) to enter the mark.
Mark OUT
and Log
Mark IN
and Log
After you set the mark, the Mark IN button changes to the Mark OUT and
Log button or the Mark IN and Log button.
86
n
c
The Mark OUT and Log and Mark IN and Log buttons only appear when the
Pause Deck While Logging feature is not in effect. If you want to pause the
deck while you enter a clip name and comments, see “Pausing a Deck While
Logging” on page 88.
For an NTSC film-to-tape transfer or footage downconverted from
1080p/24, you must log the correct pulldown phase. See “Setting the
Pulldown Phase” on page 159 and “Entering Pulldown Information” on
page 163.
3. To finish logging the clip, do one of the following:
t Set the remaining IN or OUT points on-the-fly using the Mark IN or
Mark OUT buttons or by pressing the F4 key.
t Click the Mark OUT and Log or Mark IN and Log button.
t Type a timecode for the clip IN point, OUT point, or duration in the
timecode text boxes next to the corresponding icon and press Enter
(Windows) or Return (Macintosh).
Page 87

Logging
The system automatically calculates the appropriate timecode for the
remaining IN point, OUT point, or duration, and enters the clip into the
bin. The clip name, which is automatically numbered by the system, is
highlighted and ready to change.
c
n
n
Adding a Memory Mark
You must enter two of the three timecode marks (IN point, OUT point, or
duration) to complete the log entry.
Consider changing the clip name immediately, because it is easy to forget the
contents of each clip if you are logging many clips. You can accept the clip
name and proceed with the logging process and change the clip names in the
bin at a later time.
While viewing the footage, you can continuously update your marks on-the-fly
by clicking the Mark IN or the Mark OUT button repeatedly before entering
the second mark. See “Logging On-the-Fly” on page 87.
You can add a memory mark to a particular location on a tape.
You can add one mark per tape. The memory mark is not stored on the tape.
When you remove the tape from the deck and insert another tape into the
decks, the mark is cleared.
4. Name the clip by typing a new name before clicking any of the buttons in
the Capture tool.
5. Repeat these steps until all your clips are logged.
To mark the location:
t Click the Mark Memory button.
Clear Memory button
Go To Memory buttonMark Memory button
87
Page 88

Chapter 4 Logging Source Material
To move through the tape to the marked location:
t Click the Go To Memory button.
To clear the memory mark:
t Click the Clear Memory button.
Logging On-the-Fly
You can log clips while the tape is playing. This is called logging on-the-fly.
Logging on-the-fly requires the preparation described in the following
sections:
• “Selecting the Source Deck” on page 81
• “Identifying the Source Tape” on page 82
• “Setting the Audio Sample Rate” on page 83
You can log on-the-fly whether or not you already know where you want to
mark the IN and OUT points in your clips.
To log on-the-fly:
88
1. Insert your tape into the deck.
2. Open the bin where you want to store the clips, or create a new bin.
3. Select Bin > Go To Capture Mode.
4. Select the audio and video tracks you want to log and their tape name.
5. Play the tape.
6. Mark an IN point by pressing the E key or I key.
The timecode appears and the Logging Messages bar displays the
following message: “Mark OUT and Log.”
7. Mark the OUT point by pressing the R key or O key.
8. Log the clip by pressing the F4 key.
The clip is logged into the bin.
The clip name, which the system selects and numbers, is highlighted in
the bin and ready to change. The default clip name is the bin name plus a
number.
Page 89

9. (Option) Type a new name for the logged clip in the bin, and press Enter
(Windows) or Return (Macintosh).
10. Repeat these steps until you have logged all your clips.
Pausing a Deck While Logging
If the deck is playing while you log clips, you can direct Avid MediaLog to
automatically pause the deck after you select an IN point and an OUT point.
While the deck is paused, you can enter the name and comment for the clip
you want to log.
To pause the deck while logging:
1. Click the Settings tab in the Project window.
The Settings scroll list appears.
2. Double-click the Logging setting and select the Pause Deck While
Logging option in the Logging Settings dialog box.
3. Start the deck playing.
4. When you reach the point where you want to start the clip, click the Mark
IN button (or press the F4 key). The Mark IN button changes to the Mark
OUT button, and the deck continues to play.
5. When you reach the point where you want to end the clip, click the Mark
OUT button (or press the F4 key again). The Mark OUT button changes to
the Log Clip button, and the deck pauses.
Logging
6. (Option) Enter a clip name and comment.
7. Click the Log Clip button (or press the F4 key again).
The system logs the clip in a bin, and the deck starts playing again.
Logging with the Deck Offline
You can also log material without controlling a source tape deck. If the deck is
not connected or not working, or if the tape is not available, you can still log
material as long as you know the timecodes.
To log without a deck or tape:
1. Click the Settings tab in the Project window.
The Settings scroll list appears.
2. Double-click Deck Preferences.
89
Page 90

Chapter 4 Logging Source Material
The Deck Preferences dialog box opens.
3. For NTSC projects, select either Non-drop Frame or Drop Frame from the
pop-up menu. This selects the timecode format for logging.
4. Click OK to close the Deck Preferences dialog box.
5. Make sure a bin is selected.
6. Select Bin > Go To Logging Mode.
The Logging tool opens.
90
7. Click the Source Tape Display button.
A message box opens and asks if you want to associate a tape with the
deck.
Page 91

List of tapes
Logging
8. Click Yes to open the Select Tape dialog box.
9. Do one of the following:
t Double-click the name of the tape.
t Click the New button, type the name of the tape you want to log, and
then click OK.
t Select the name from the list, and then click OK.
10. In the Channel Selection area in the Logging tool, click the tracks you
want to log. For example, click V, A1, and A2.
11. Select the destination bin from the Bin pop-up menu.
12. Type the start timecode in the timecode entry text box for mark IN, and
press Enter (Windows) or Return (Macintosh).
13. Type the end timecode in the timecode entry text box for mark OUT, and
press Enter (Windows) or Return (Macintosh).
14. Click the Log Clip button.
15. (Option) Rename the clip that appears in the destination bin.
Adding Clip Names and Comments On-the-Fly
The Avid system’s Annotate feature allows you to type clip names and
comments during logging. This information is saved in the clip Name and
Comments columns in the bin. You can add comments about such things as
color correction or directions for editing.
91
Page 92

Chapter 4 Logging Source Material
n
To carry your comments over to the sequence so that they will appear in the
Timeline, in cut lists, or in EDLs, you must add the comments again when
creating the sequence by using the Add Comments command in the Clip Name
menu.
To add clip names and comments on-the-fly:
1. Start typing the clip name at any time during logging of a clip.
The Annotate window opens on screen, allowing you to see the text as you
type.
2. After typing the clip name, press the Tab key and begin typing comments.
You cannot edit the text until after the capture is complete, but you can
backspace to retype the comments.
Controlling Decks from the Keyboard
You can use the J-K-L keys to control a deck while logging.
J-K-L Functions for Deck Control
Press To
K Stop the deck.
92
L Shuttle the deck at 1x, 2x, 3x, 5x, 8x, 16x, or 24x normal speed.
J Shuttle the deck at –1x, –2x, –3x, –5x, –8x, –16x, or –24x normal
speed.
K+L Shuttle the deck at 0.25x normal speed.
J+K Shuttle the deck at –0.25x normal speed.
The following restrictions apply:
• The Logging tool window must be selected for keys to be active.
• Single-field stepping is not supported.
Page 93

Logging Film Information
Logging Film Information
After entering or importing the basic log information into a bin, you can then
add film-related log information before capturing. For information, see
“Working with a Film Project” on page 155.
Modifying Clip Information After Logging
You can change or modify the information logged into the bin. This is
especially useful if you find that some of the data is incorrect, or if you need to
update the information based on technical needs such as varying timecode
formats or film specifications.
There are two ways to modify clip information prior to capturing:
• You can modify the information directly by clicking in a column and by
entering the new information one field at a time.
• You can use the Modify command to change selected groups of clips all at
once.
For information on modifying the pulldown phase, see “Setting the Pulldown
Phase” on page 159.
c
Modifying tape names and timecodes will affect any key numbers entered
for the selected clips.
Creating Avid Logs
You can use a text editor to log your source footage manually. An Avid log
lists video clips you want to capture for editing. You can create the logs in
Avid format, entering data about your source tapes and clips according to Avid
specifications.
You can also modify an incompatible log to make it conform to Avid
specifications. To prepare an Avid log on any type of computer, use any text
editor. After you create logs, you can import them directly into Avid
MediaLog bins.
93
Page 94

Chapter 4 Logging Source Material
“Avid Log Specifications” on page 143 describes the format specifications for
an Avid log and includes a sample Avid log.
Make a separate log for each videotape, or log clips from several different
videotapes into one log. After you manually create an Avid log, you can
import it into Avid MediaLog as described in “Importing Log Files into
MediaLog Bins” on page 94.
Importing Logs
Many logging programs and film-to-tape transfer systems create logs you can
import into your Avid MediaLog project. You can open some logs directly in
Avid MediaLog bins; others require converting to Avid format first.
Importing Standard Log Files
If you are transferring film to video for logging in Avid MediaLog, ask the
transfer house to log the source footage during the film-to-tape transfer. You
can import some standard film-to-tape logs directly into Avid MediaLog bins
or use Avid Log Exchange to convert other film-to-tape logs to Avid format
and then import them into Avid MediaLog. A number of video logging
systems also produce files you can import into a Avid MediaLog bin.
Compatible Logs
94
Use the File > Import command to import these files to a Avid MediaLog bin:
• Avid Log Exchange (ALE)
• Log Right (file names that have the .ale file name extension)
• Excalibur (file names that have the .ale file name extension)
• Shotlister
• Avid logs you create yourself, using a text editor (see “Creating Avid
Logs” on page 92)
• Logs converted into Avid format using Avid Log Exchange (file names
that have the .ale file name extension)
Page 95

Importing Logs
n
Avid recommends that you convert any files not created on an Avid system into
Avid format using Avid Log Exchange. Avid Log Exchange is included with
most Avid video editing applications.
The following table lists the log formats that can be imported directly or
converted for import using Avid Log Exchange (ALE).
Compatible Log Formats
Log Format Requirements File Name Extension
AatonBase Conversion required .atn or .atl
Avid Log Import directly .ale
Cinema Tools Conversion required .txt
CMX EDL Conversion required .cmx
Evertz Conversion required .ftl
Excalibur Conversion required .ale or .flx
Final Cut Pro
FLEx Conversion required .flx
™
Conversion required .txt
Keyscope Conversion required .ksl
Log Producer Conversion required .llp
Log right Import directly .ale
OSC/R (Macintosh only) Conversion required .asc
OLE (Windows only) Conversion required .odb
For information about using Avid Log Exchange, see the input and output
guide or user’s guide for your Avid editing system.
Importing Log Files into Avid MediaLog Bins
To import log files into a Avid MediaLog bin:
1. Open a bin and click its window to select it.
2. Select File > Import.
95
Page 96

Chapter 4 Logging Source Material
The Select files to Import dialog box opens. For Windows, select Files of
type > Shot Log Files (*.ale). For Macintosh, Shot Log Documents is
already selected as the file type.
3. Navigate to the drive and then to the folder that contains the log file you
want to import.
If the log is on a floppy disk, insert the floppy disk into the floppy drive.
4. (Option) If you want to adjust import parameters for the shot log, click the
Options button.
The Import Settings dialog box opens.
5. Select one of the options from the following table and click OK.
Import Settings Options
Option Description
Maintain events as logged. Select this option to maintain events as originally logged.
Combine events based on scene and
automatically create subclips.
Combine events based on camera roll and
automatically create subclips.
96
Select this option to combine all the events for a scene into
a single master clip. Then, link the master clip to subclips
that represent the original events for that scene. To use this
option, you must have scene numbers logged into a scene
column in the bin.
Select this option to combine all the events from a camera
roll into a single master clip. Then, link the master clip to
subclips that represent the original events for that camera
roll. To use this option, you must have camera roll
numbers logged into a camera roll column in the bin for a
film project.
Page 97

Import Settings Options (Continued)
Option Description
Importing Logs
Merge events with known sources and
automatically create subclips.
Merge events with known master clips. Select this option to merge information in the shot log onto
Select this option to create subclips for events that are
merged or relinked to their source clips upon import. Use
this option if you have already entered master clips in a bin
for each camera roll or master scene and have
subsequently logged all the events related to those clips for
import.
You must select the clips that you want to merge
n
before selecting this option.
selected master clips based on the matching tape name.
Use this option if you have already logged (or captured)
master clips in a bin for each take.
You must select the clips that you want to merge
n
before selecting this option.
6. Select files or deselect files from the source file list by doing one of the
following:
t (Windows only) To add a group of files, click the first file in a group,
and then Shift+click the last file in a group.
t To deselect a single file from the file browser section (Windows) or
import section, Ctrl+click a highlighted file name (Windows) or select
a file name and click Remove (Macintosh).
7. Click Open (Windows) or Done (Macintosh) to import the selected logs to
the bin, or click Cancel to cancel the operation.
The bin fills with master clips derived from the information in the
imported shot log. Any additional information logged with each clip is
also imported.
8. To save the new master clips that came from importing the log, save the
bin.
97
Page 98

Chapter 4 Logging Source Material
Transferring Bins from Another Avid MediaLog System
Avid MediaLog bins are interchangeable with those of other releases. In
general, later releases of the Avid MediaLog application accept bins from
earlier releases.
To transfer a bin from one Avid MediaLog system to another Avid
MediaLog system:
1. Save Avid MediaLog project bins from the first Avid MediaLog system on
a floppy disk.
2. Go to your second Avid MediaLog system and quit the Avid MediaLog
application.
3. Locate the project folder where you want to store the Avid MediaLog bins
and double-click it to open it.
For information about the default paths for project folders, see “Selecting
a Project” on page 28.
4. Insert the transfer floppy disk into the floppy drive on the second Avid
MediaLog system.
98
5. Navigate to the floppy drive.
6. Position the floppy drive window and your Avid MediaLog project folder
window so you can see both.
7. Select (click) the Avid MediaLog bins in the floppy drive window and
drag them to your Avid MediaLog project folder.
When you start your Avid MediaLog program, open the imported bins in the
same way you open standard Avid MediaLog bins.
Page 99

Chapter 5
Organizing with Bins
The Avid system provides powerful database tools for organizing and
managing your captured material. You can view bins in two different display
views. You can rename, print, sort, sift, duplicate, and delete clips.
This chapter covers the following topics:
• Preparing to Work with Bins
• Understanding Bin Display Views
• Basic Bin Procedures
• Using Text View
Preparing to Work with Bins
Before organizing a project, you may want to follow these procedures since it
affects the display of information in bins or the way the clips play back during
screening:
• When working with film projects, organize captured clips according to the
scene. This practice keeps crowded bins to a minimum. See “Film Scene
Workflow” on page 100.
• If you want to customize the types of objects displayed in a bin, see
“Setting the Bin Display” on page 100.
• If you need to group or multigroup material, see the editing guide or user’s
guide for your Avid editing system.
Page 100

Chapter 5 Organizing with Bins
Film Scene Workflow
During the organizing phase, common practice on film productions is to
organize the captured clips according to a scene. This helps to simplify the
work environment for the editor and keeps crowded bins to a minimum.
Organize scene bins according to the following basic workflow:
1. Create one bin for each scene using the procedures described in “Creating
a New Bin” on page 48.
2. Gather clips according to scene using one of the following optional
procedures:
t Copy clips for each scene from the dailies bins into the appropriate
t Duplicate the clips and then move the duplicates into the appropriate
3. Proceed to sort, sift, and organize the clips within each scene bin,
according to the editor’s preferences.
scene bin, using procedures described in “Copying Clips” on
page 107.
scene bin, using procedures described in “Duplicating Clips” on
page 107.
It is good practice to copy or duplicate clips as you reorganize them in bins. As
a result, the original source clips remain in the appropriate dailies bin if you
ever need to recapture according to source tape.
Setting the Bin Display
By default, your bins display all existing media objects except source clips and
rendered effects. To reduce crowding in the bin and to display only those
objects required to organize your project, you can display selected media
objects.
You can use the Set Bin Display option to display clips referenced by a
sequence, even if the clips were not previously in the bin. Place a sequence in
a new bin and follow this procedure.
To set the bin display:
1. Click the window of the bin that you want to display.
2. Select Bin > Set Bin Display.
100
 Loading...