

Page 1

Avid® MediaLog
User’s Guide
Release 8.0
for the Macintosh® Operating System
a
tools for storytellers™
™
Page 2

© 1994-1996, 1998-1999 Avid Technology, Inc. All rights reserved. Printed in USA.
Avid MediaLog User’s Guide • Part 0130-04038-01 Rev. A • May 1999
2
Page 3

Contents
Chapter 1 Understanding MediaLog
What Is MediaLog? . . . . . . . . . . . . . . . . . . . . . . . . . . . . . . . . . . . . . . . . . . 9
How Does MediaLog Work?
What Are the Basic Logging Steps?
Chapter 2 Getting Started
Setting Up the Hardware . . . . . . . . . . . . . . . . . . . . . . . . . . . . . . . . . . . . 14
Turning On the Hardware
Installing MediaLog Software
Starting the System
About Project Files and Folders
Working with Project Files and Folder s
Creating a New User
Creating a New Project
Choosing Matchback Options
Selecting an Existing Project
Using the Project Window
Displaying Project Bins
Displaying Project Settings
Displaying Project Information
Closing a Project
Working with Bins
Creating a Bin
Closing a Bin
Reopening a Bin
. . . . . . . . . . . . . . . . . . . . . . . . . . . . . . . . . . . . . . . . . . 30
. . . . . . . . . . . . . . . . . . . . . . . . . . . . . . . . . . . . . . . . . . . 31
. . . . . . . . . . . . . . . . . . . . . . . . . . . . . . . . . . . . 15
. . . . . . . . . . . . . . . . . . . . . . . . . . . . . . . . . . . . . . . . . 17
. . . . . . . . . . . . . . . . . . . . . . . . . . . . . . . . . . . . . 20
. . . . . . . . . . . . . . . . . . . . . . . . . . . . . . . . . . . 21
. . . . . . . . . . . . . . . . . . . . . . . . . . . . . . . . . . . . . 29
. . . . . . . . . . . . . . . . . . . . . . . . . . . . . . . . . . . . . . . . . . 29
. . . . . . . . . . . . . . . . . . . . . . . . . . . . . . . . . . . . . . . . 31
. . . . . . . . . . . . . . . . . . . . . . . . . . . . . . . . . 10
. . . . . . . . . . . . . . . . . . . . . . . . . . . 12
. . . . . . . . . . . . . . . . . . . . . . . . . . . . . . . . 16
. . . . . . . . . . . . . . . . . . . . . . . . . . . . . . . 18
. . . . . . . . . . . . . . . . . . . . 18
. . . . . . . . . . . . . . . . . . . . . . . . . . . . 22
. . . . . . . . . . . . . . . . . . . . . . . . . . . . . . 24
. . . . . . . . . . . . . . . . . . . . . . . . . . . . . . . . 24
. . . . . . . . . . . . . . . . . . . . . . . . . . . . . . 25
. . . . . . . . . . . . . . . . . . . . . . . . . . . 26
. . . . . . . . . . . . . . . . . . . . . . . 28
3
Page 4

Removing Bin Names from the Current Project. . . . . . . . . . . . . 32
Opening Bins from Other Projects
Retrieving Bin Files from the Attic Folder
Saving Your Work
Saving a Bin
Saving All Bins
Saving a Copy of a Bin
Setting Auto-Save Bin Preferences
Shutting Down
Quitting the MediaLog Application
Backing Up Files
Turning Off the Hardware
. . . . . . . . . . . . . . . . . . . . . . . . . . . . . . . . . . . . . . . . . . . 35
. . . . . . . . . . . . . . . . . . . . . . . . . . . . . . . . . . . . . . . . . . . . 36
. . . . . . . . . . . . . . . . . . . . . . . . . . . . . . . . . . . . . . . . . 36
. . . . . . . . . . . . . . . . . . . . . . . . . . . . . . . . . . . . . . . . . . . . . 38
. . . . . . . . . . . . . . . . . . . . . . . . . . . . . . . . . . . . . . . . 39
Chapter 3 Logging Source Material
Understanding Logging . . . . . . . . . . . . . . . . . . . . . . . . . . . . . . . . . . . . . 42
Configuring Decks
Automatic Deck Configuration
Manual Deck Configuration
Deck Configuration Settings
Deleting Deck Configurations
Deck Preferences
Preparing to Log Material
Using the Logging Tool
Naming Your Tapes
Inserting Source Tapes
Selecting Active Tracks
Selecting the Target Bin
Selecting the Source Deck
Identifying the Source Tape
Using the Compression Tool
Logging
. . . . . . . . . . . . . . . . . . . . . . . . . . . . . . . . . . . . . . . . . . . . . . . . . . . . 56
Logging from a Source Tape
Marking and Logging
. . . . . . . . . . . . . . . . . . . . . . . . . . . . . . . . . . . . . . . . . . 42
. . . . . . . . . . . . . . . . . . . . . . . . . . . . . . . . . . . . 49
. . . . . . . . . . . . . . . . . . . . . . . . . . . . . . . . . . . . 51
. . . . . . . . . . . . . . . . . . . . . . . . 33
. . . . . . . . . . . . . . . . . . 34
. . . . . . . . . . . . . . . . . . . . . . . . . . . . . . . . . . . 36
. . . . . . . . . . . . . . . . . . . . . . . . 37
. . . . . . . . . . . . . . . . . . . . . . . 39
. . . . . . . . . . . . . . . . . . . . . . . . . . . . . . . . 39
. . . . . . . . . . . . . . . . . . . . . . . . . . . 43
. . . . . . . . . . . . . . . . . . . . . . . . . . . . . . 43
. . . . . . . . . . . . . . . . . . . . . . . . . . 44
. . . . . . . . . . . . . . . . . . . . . . . . 49
. . . . . . . . . . . . . . . . . . . . . . . . . . . . . . . . . . 51
. . . . . . . . . . . . . . . . . . . . . . . . . . . . . . . . . . 52
. . . . . . . . . . . . . . . . . . . . . . . . . . . . . . . 53
. . . . . . . . . . . . . . . . . . . . . . . . . . . . . . . 54
. . . . . . . . . . . . . . . . . . . . . . . . . . . . . . 54
. . . . . . . . . . . . . . . . . . . . . . . . . . . . 54
. . . . . . . . . . . . . . . . . . . . . . . . . . . 55
. . . . . . . . . . . . . . . . . . . . . . . . . . . . . . 55
. . . . . . . . . . . . . . . . . . . . . . . . . . . . . . 57
. . . . . . . . . . . . . . . . . . . . . . . . . . . . . . . . 57
4
Page 5

Logging While Marking OUT or Marking IN . . . . . . . . . . . 59
Using Go To Buttons
Logging On-the-Fly
Logging with the Deck Offline
Creating Avid Logs
Importing Logs
Importing Standard Log Files
Compatible Logs
Importing Logs to MediaLog Bins
Transferring Bins from Another MediaLog System
. . . . . . . . . . . . . . . . . . . . . . . . . . . . . . . . . . . . . . . . . . 63
. . . . . . . . . . . . . . . . . . . . . . . . . . . . . . . . . . . . . . . . . . . . . 64
. . . . . . . . . . . . . . . . . . . . . . . . . . . . . . . . . . . . . . . . 64
. . . . . . . . . . . . . . . . . . . . . . . . . . . . . . . . . 60
. . . . . . . . . . . . . . . . . . . . . . . . . . . . . . . . . . . . . . 60
Chapter 4 Working with Clips and Bins
Organizing Clips and Sequences . . . . . . . . . . . . . . . . . . . . . . . . . . . . . 70
Viewing Clips in a Bin
Customizing Bin Views
Moving and Rearranging Columns
Aligning Bin Columns
Showing and Hiding Columns
Deleting a Column
Duplicating a Column
Adding Customized Columns to a Bin
Changing a Custom Column Heading
Saving a Custom View
Setting the Bin Font
Renaming Clips
Selecting Clips
Deleting Clips and Sequences
Duplicating Clips
Copying Timecode Information
Displaying Specific Clip Types
Sorting and Sifting Clips and Sequences
Sorting Clips
Sorting a Column
. . . . . . . . . . . . . . . . . . . . . . . . . . . . . . . . . . . . . . . . . . . . . 82
. . . . . . . . . . . . . . . . . . . . . . . . . . . . . . . . . . . . . . 70
. . . . . . . . . . . . . . . . . . . . . . . . . . . . . . . . . . . . . . 75
. . . . . . . . . . . . . . . . . . . . . . . . . . . . . . . . . . . 76
. . . . . . . . . . . . . . . . . . . . . . . . . . . . . . . . . . . . . . 77
. . . . . . . . . . . . . . . . . . . . . . . . . . . . . . . . . . . 77
. . . . . . . . . . . . . . . . . . . . . . . . . . . . . . . . . . . 80
. . . . . . . . . . . . . . . . . . . . . . . . . . . . . . . . . . . . . 81
. . . . . . . . . . . . . . . . . . . . . . . . . . . . . . . . . . . . . . . . . . . . 81
. . . . . . . . . . . . . . . . . . . . . . . . . . . . . . . . 82
. . . . . . . . . . . . . . . . . . . . . . . . . . . . . . . . . . . . . . . . . . . 83
. . . . . . . . . . . . . . . . . . . . . . . . . . . . . . . . . . . . . . . . . . . 86
. . . . . . . . . . . . . . . . . . . . . . . . . . . . . . . . . . . . 87
. . . . . . . . . . . . . . . . . . . . . . . . . . . 61
. . . . . . . . . . . . . . . . . . . . . . . . . . . . . 64
. . . . . . . . . . . . . . . . . . . . . . . . . 65
. . . . . . . . . . 68
. . . . . . . . . . . . . . . . . . . . . . . . 75
. . . . . . . . . . . . . . . . . . . . . . . . . . . . 76
. . . . . . . . . . . . . . . . . . . . . 78
. . . . . . . . . . . . . . . . . . . . . 79
. . . . . . . . . . . . . . . . . . . . . . . . . . . . . . 84
. . . . . . . . . . . . . . . . . . . . . . . . . . . . . . . 85
. . . . . . . . . . . . . . . . . . . . . . 86
5
Page 6

Reversing the Sort Order . . . . . . . . . . . . . . . . . . . . . . . . . . . . . 88
Sorting on Multiple Levels
Sifting Clips
Using Sift Criteria
Showing Sifted and Unsifted Views
Moving or Copying Clips to Other Bins
Modifying Clip Data
Understanding Procedures for Modifying Clips
Using the Modify Command
Modifying Data Directly
. . . . . . . . . . . . . . . . . . . . . . . . . . . . . . . . . . . . . . . . . . . . 89
. . . . . . . . . . . . . . . . . . . . . . . . . . . . . . . . . . . 89
. . . . . . . . . . . . . . . . . . . . . . . . . . . . . . . . . . . . . . . . 92
Chapter 5 Creating MediaLog Output
Printing Bins . . . . . . . . . . . . . . . . . . . . . . . . . . . . . . . . . . . . . . . . . . . . . . . 98
Exporting Bins
Transferring Bins to an Avid Editing System
. . . . . . . . . . . . . . . . . . . . . . . . . . . . . . . . . . . . . . . . . . . . . . 98
Appendix A Avid Log Specifications
Global Headings. . . . . . . . . . . . . . . . . . . . . . . . . . . . . . . . . . . . . . . . . . . 102
Column Headings
Clip Data
Sample Avid Log
. . . . . . . . . . . . . . . . . . . . . . . . . . . . . . . . . . . . . . . . . . . . . . . . . 106
. . . . . . . . . . . . . . . . . . . . . . . . . . . . . . . . . . . . . . . . . 103
. . . . . . . . . . . . . . . . . . . . . . . . . . . . . . . . . . . . . . . . . . 109
. . . . . . . . . . . . . . . . . . . . . . . . . . . 88
. . . . . . . . . . . . . . . . . . . 91
. . . . . . . . . . . . . . . . . . . . . . . 91
. . . . . . . . . . . . 92
. . . . . . . . . . . . . . . . . . . . . . . . . . . . . 94
. . . . . . . . . . . . . . . . . . . . . . . . . . . . . . . . . 96
. . . . . . . . . . . . . . . . . . 100
Appendix B Regulatory and Safety Notices
FCC Notice. . . . . . . . . . . . . . . . . . . . . . . . . . . . . . . . . . . . . . . . . . . . . . . . 110
Canadian ICES-003
European Union Notice
Australia and New Zealand EMC Regulations
. . . . . . . . . . . . . . . . . . . . . . . . . . . . . . . . . . . . . . . . . 111
. . . . . . . . . . . . . . . . . . . . . . . . . . . . . . . . . . . . . 111
Index
6
. . . . . . . . . . . . . . . . 112
Page 7

Tables
Table 2-1 Project Files and Folders . . . . . . . . . . . . . . . . . . . . . . . . 19
Table 2-2
Table 2-3
Table 3-1
Table 3-2
Table 4-1
Table 4-2
Table 4-3
Table 4-4
Table A-1
Table A-2
Table A-3
Project Settings Options . . . . . . . . . . . . . . . . . . . . . . . . . 27
Project Info Options . . . . . . . . . . . . . . . . . . . . . . . . . . . . 28
Deck Settings . . . . . . . . . . . . . . . . . . . . . . . . . . . . . . . . . . 47
Deck Preferences . . . . . . . . . . . . . . . . . . . . . . . . . . . . . . . 50
Bin Column Headings . . . . . . . . . . . . . . . . . . . . . . . . . . 72
Sample of Sifted Bin . . . . . . . . . . . . . . . . . . . . . . . . . . . . 90
Bin Columns That Can Be Modified . . . . . . . . . . . . . . . 93
Modify Command Options . . . . . . . . . . . . . . . . . . . . . . 95
Global Headings . . . . . . . . . . . . . . . . . . . . . . . . . . . . . . 102
Column Headings . . . . . . . . . . . . . . . . . . . . . . . . . . . . . 103
Clip Data . . . . . . . . . . . . . . . . . . . . . . . . . . . . . . . . . . . . . 106
7
Page 8

CHAPTER 1
Understanding MediaLog
This chapter explains the MediaLog application and covers the following topics:
• What Is MediaLog?
• How Does MediaLog Work?
• What Are the Basic Logging Steps?
8
Page 9

What Is MediaLog?
MediaLog is a tool that helps you select a nd log footage before your
edit session. Although you can log footage with Avid editing system
products, using MediaLog can free up your Avid editing system for
editing rather than for logging footage. After logging shots, you can
use your Avid editing system to digitize and edit the footage. In addition, you can transfer film to National Television Standards Committee
(NTSC) or Phase Alternating Line (PAL) video, use MediaLog to log
the material, and then transfer the logged shots to an Avid videobased editing system for digitizing and editing at 24 frames per second
(fps).
MediaLog is portable; you can install it on a laptop and on most desktop computers that are running the Macintosh
log clips from a source tape, your computer must be connected to a
deck that uses Sony
control the deck while viewing your source tapes and selecting the
shots for your log. You can also log without a deck and enter the logging information by hand.
For each shot that you log, MediaLog saves the start and end timecodes, duration, tracks selected, and tape name.
MediaLog also lets you add new categories of information to your log,
so you can record the sce ne, take, location, o r any other comments that
can help you to identify the footage.
Once you have created a log, the MediaLog Sort command or ders your
shots according to criteria you specify. The Sif t command uses your
criteria to pick out specific footage, such as all the product shots or all
shots from a certain location.
®
serial deck protocol. MediaLog allows you to
®
operating system. To
9
Page 10
How Does MediaLog Work?
The MediaLog system uses clips, bins, and projects to organize your
work.
MediaLog clips and bins are a lot like their film counterparts. Just as
film editors pull clips from their raw footage and store the clips in bins
for the editing session, MediaLog lets you select shots from your tapes
and store information about the shots in electronic bins.
A clip corresponds to a shot you select from a tape. Clips contain information about your footage such as the start and end timecodes and the
number of video and audio tracks. Clips are stored in electronic bins,
which have built-in database capabilities to help yo u easily find a specific shot.
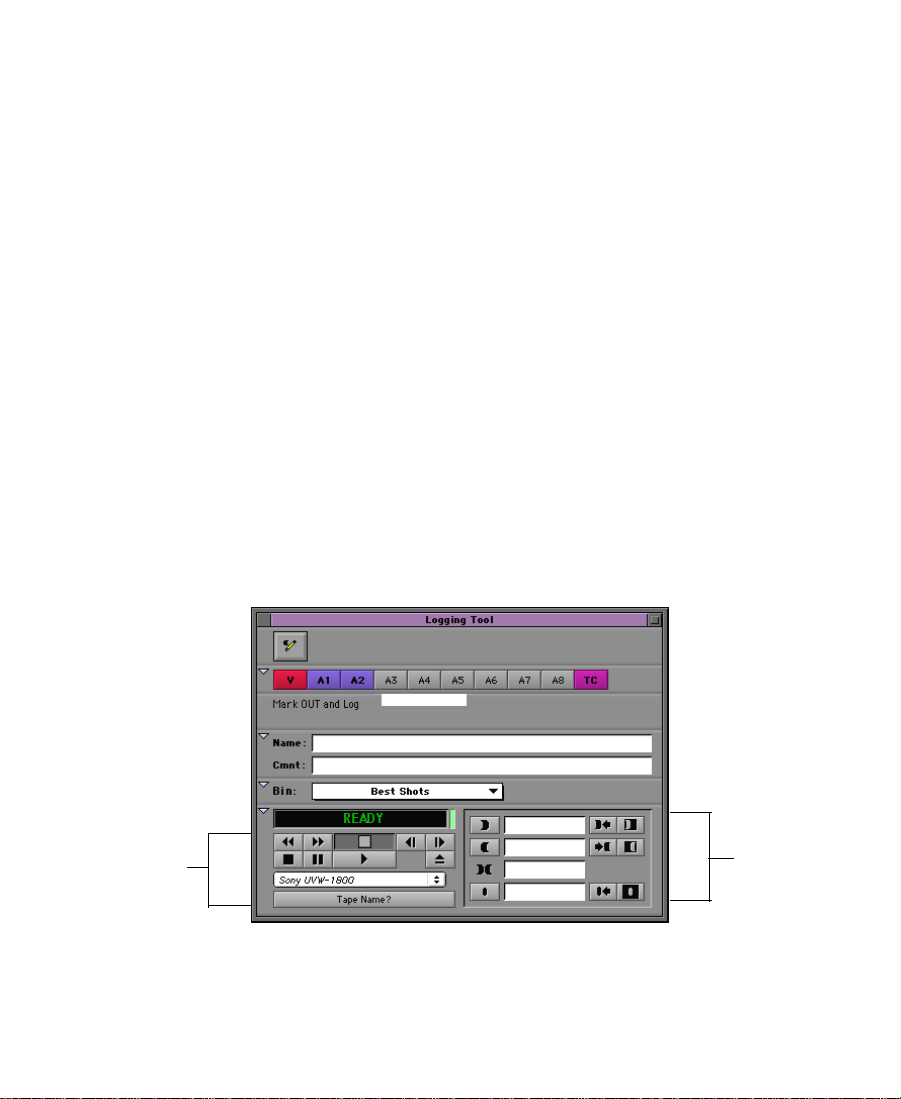
Each time you log clips, you open a bin and use Logging tool controls
to play your tapes, mark the shots, and add the clips to the open bin.
Deck and log controls are in the Logging Tool window.
Deck controls
Log controls
10
Page 11
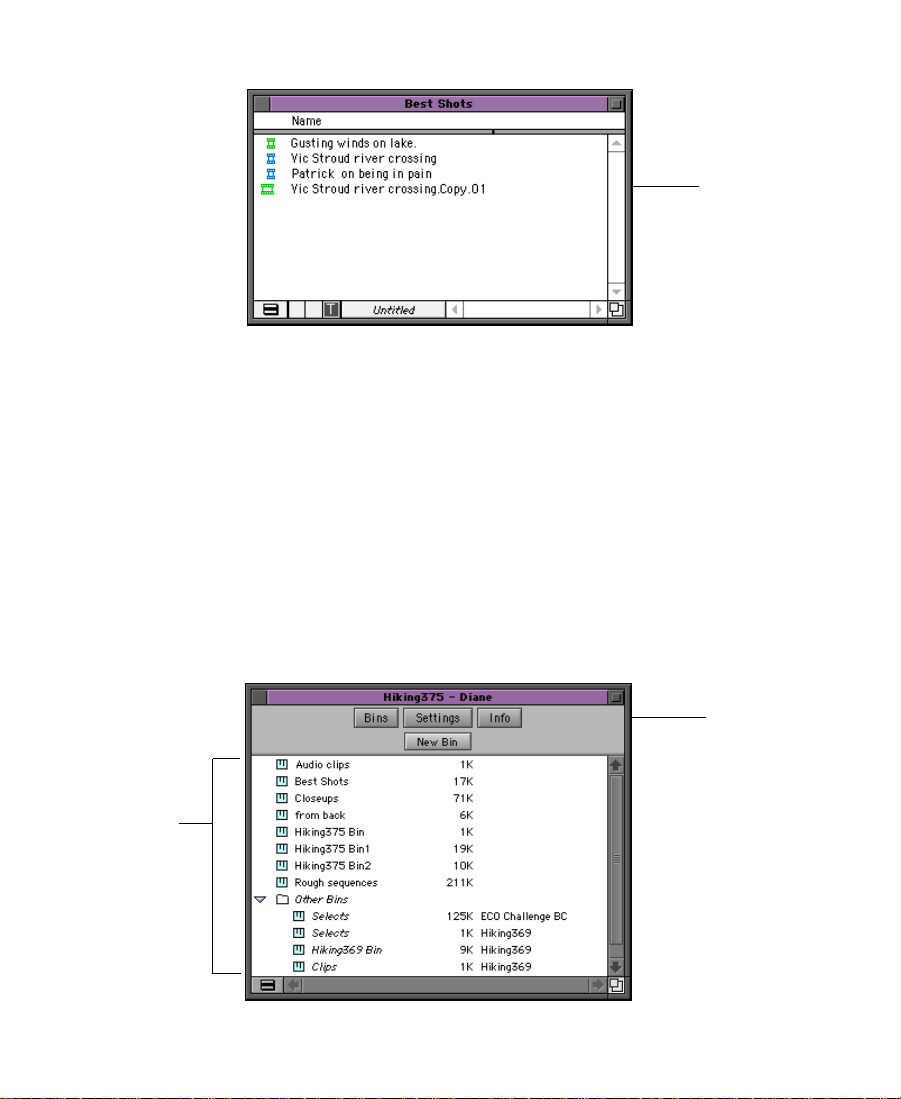
A bin is open while you log clips to it.
Sample bin
If you have a log sheet, you can log clips with out using a deck. You
type the start and end timecodes for each clip, and then add them to
the bin.
MediaLog uses a project file to organize all the work you do on a single job. You must always create a new project or open an existing
project before you can open a bin and log your shots.
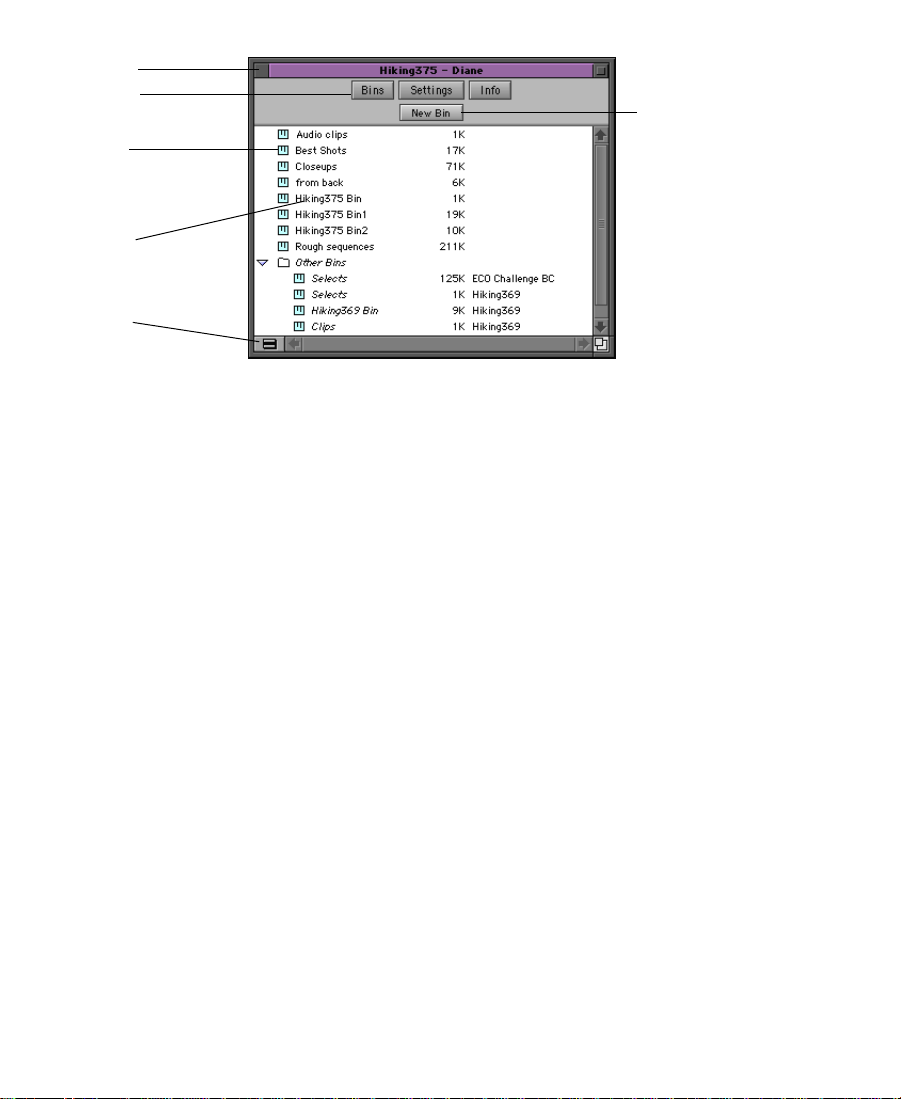
As you work on a project, MediaLog remembers the name of each bin
you open and displays a list of bin nam es in the Project window. The
list is useful for helping you quickly access bins.
Bin names
Sample Project
window
11
Page 12

What Are the Basic Logging Steps?
In each logging session, you should:
1. Start your computer and the MediaLog program.
2. Create a new project or open an existing project.
3. Create a new bin or open an existing bin.
4. Prepare to log:
a. Select video format.
b. Enter Logging mode.
c. Select a source name.
5. Select the tracks you want to log from the tape.
6. Log the clips .
7. Save and organize the bin.
8. Qu it from the MediaLog application and shut down the computer.
12
Page 13

CHAPTER 2
Getting Started
This chapter describes how to set up the hardware and run MediaLog
sessions. This chapter covers the following topics:
• Setting Up the Hardware
• Turning On the Hardware
• Installing MediaLog Software
• Starting the System
• About Project Files and Folders
• Working with Bins
• Saving Your Work
• Shutting Down
n
For information on installing the MediaLog software, see the current
MediaLog release notes.
13
Page 14

Setting Up the Hardware
This section assumes that your computer is already set up and that it
meets the following requirements:
• Macintosh computer with a monitor and running System 7.0 (or
later) version of the operating system
• At least 4 megabytes (MB) of random access memory (RAM) must
be available to run the application (8 MB or more is preferred
when working with large bins)
n
w
Most Macintosh laptop computers contain significantly less built-in RAM
than Macintosh desktop computers. In addition to the RAM you have allocated to the MediaLog application, make sure you have enough RAM to run
the Macintosh operatin g system. For example, if your system contains 8 MB
of RAM, allocating 6 MB to the MediaLog application might not allow the
operating system to function properly.
MediaLog can control a deck with Sony serial deck protocol and a
timecode reader. For the most recent list of compatible videotape
recorders (VTRs), see the Open Me Firs t box supplied with MediaLog
or the Avid Web site, http://www.avid.com. MediaLog controls the
deck through a direct RS-422 serial connection to the modem or printer
port. MediaLog can also control a deck via V-LAN
tions.
Y ou might need a 1/8 -inch flathead scr ewdriver to co nnect the cable to
the deck.
The computer and the deck must be turned off when you are connecting the serial cable.
To connect the computer and the deck with an RS-422 serial cable:
®
VLXi® connec-
1. Turn off the computer and t he deck.
2. Plug end A of the direct deck control cable into the modem or
serial port at the back of the Macintosh computer.
14
Page 15
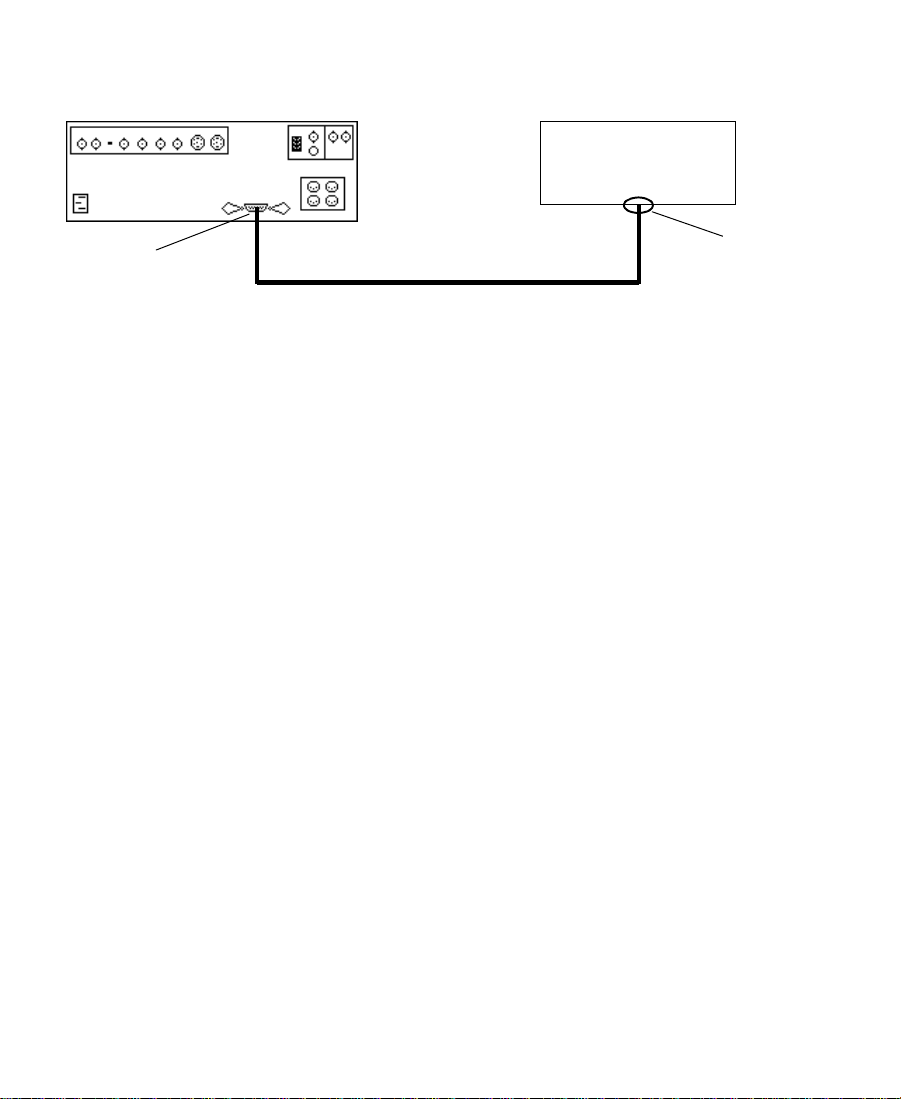
3. Plug end B of the direct deck control cable into the deck’s serial
remote connector; then tighten the connector screws.
Deck
End B to serial
remote connector
Direct deck control cable
Turning On the Hardware
Begin your logging session by turning on the hardware. To avoid damage and so that all the attached hardware is detected, turn on the hardware in the following order:
1. If you are running MediaLog on a Macintosh with media drives,
turn on each drive.
The green drive lights flicker on, followed by the amber drive
lights. Wait 1 5 to 30 seconds for the drives to spin up before you
turn on the Macintosh system; otherwise, the co mputer will not
communicate with the storage devices successfully.
Macintosh computer
End A to modem
or serial port
connector
w
2. If you will be logging clips by using a deck, turn on th e deck.
Set the REMOTE/LOCAL switch on the deck to REMOTE.
3. Turn on the computer.
Do not disconnect or turn off individual drives while the
computer is on.
You can now install the MediaLog software.
15
Page 16

Installing MediaLog Software
To install the software:
1. Insert the MediaLog CD-ROM into your computer’s CD-ROM
drive.
The MediaLog Installer CD-ROM window opens.
2. Do uble-click the MediaLog Installer icon.
A splash screen introduces the installer.
3. Select “Click here to continue” or press Return to exit the splash
screen.
The MediaLog Install window opens.
c
c
When you install the MediaLog application on an Avid editing system, you must install the a pplication on the Avid disk. Do not install
the MediaLog application on any disks where you sto re media.
4. Drag the MediaLog icon to the Avi d drive icon or system disk.
The system creates a MediaLog folder on the top level of the
selected disk, and then copies the MediaLog application and its
supporting files into the folder.
If you install MediaLog on an Avid editing system, keep the
MediaLog application in a folder separate from the Avid editing
application. Each application will have its own preference settings.
16
Page 17
Starting the System
After you install the MediaLog software according to the instructions
in the MediaLog release notes, you are ready to start the MediaLog
application. To start MediaLog:
1. Turn on the video deck.
2. Set the deck’s REMOTE/LOCAL switch to REMOTE.
3. Turn on the computer.
c
Do not start any other Avid editing application on the computer at
the same time as the MediaLog application. The two applications
will conflict with each other.
4. Double-click the MediaLog folder to open it.
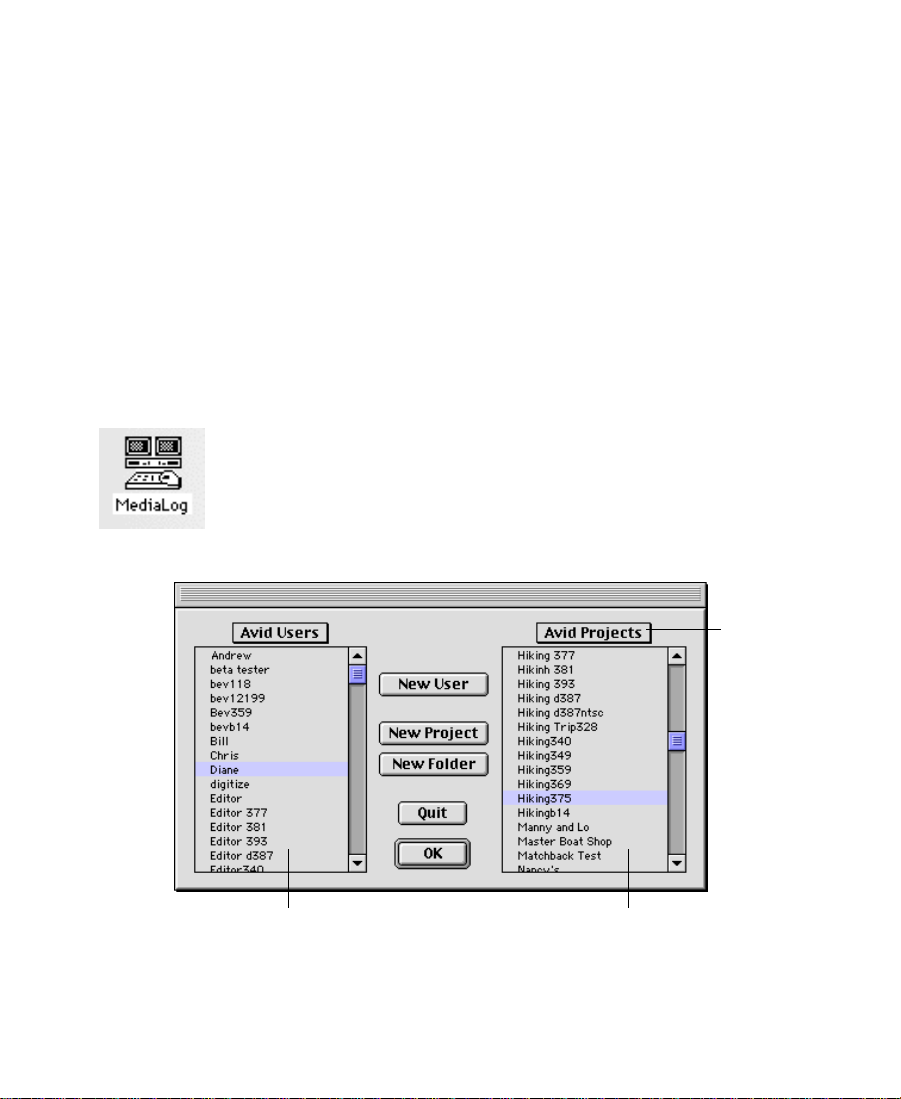
5. Double-click the MediaLog application icon to start MediaLog.
The Open Project dialog box appears.
MediaLog project
folders are stored
in the Avid Projects
folder.
Project foldersUser folders
6. Select a new or existing project, and a new or existing user.
17
Page 18

About Project Files and Folders
Each time you start the MediaLog application or close your current
project, the Open Project dialog box appears. The first thing you do in
the dialog box is select an existing user and project or create new ones.
When you start a new project, the system creates a folder for the
project on the Avid disk. The system stores this project folder inside
the main Avid Projects folder. Your project folder holds the bins that
contain all the material you use in the project.
You choose the project’s video format when you create the project.
Use the project ma nagement tools to organize your bins, which contain the material you are editing, and to adjust the project settings such
as auto-save preferences or keyboard command layout.
Only one project can be open at a time. To switch projects, you must
close the current project before opening another project.
MediaLog saves the video format, settings, and bin selection with the
project, so you can stop working on a project and return to it at any
time.
Working with Project Files and Folders
A project file, for storing information related to the project, is saved in
a project folder. The project folder has the same name as the project
(for example, Epic Fil m is stored in the Epic Film folder).
The project folder is saved in the Avid Projects folder on the Avid disk.
Backups of the project folder bins are created and stored in the Attic
folder. The project folder contains bins, project files, settings file, and
Statistics and Trash folders.
18
Page 19
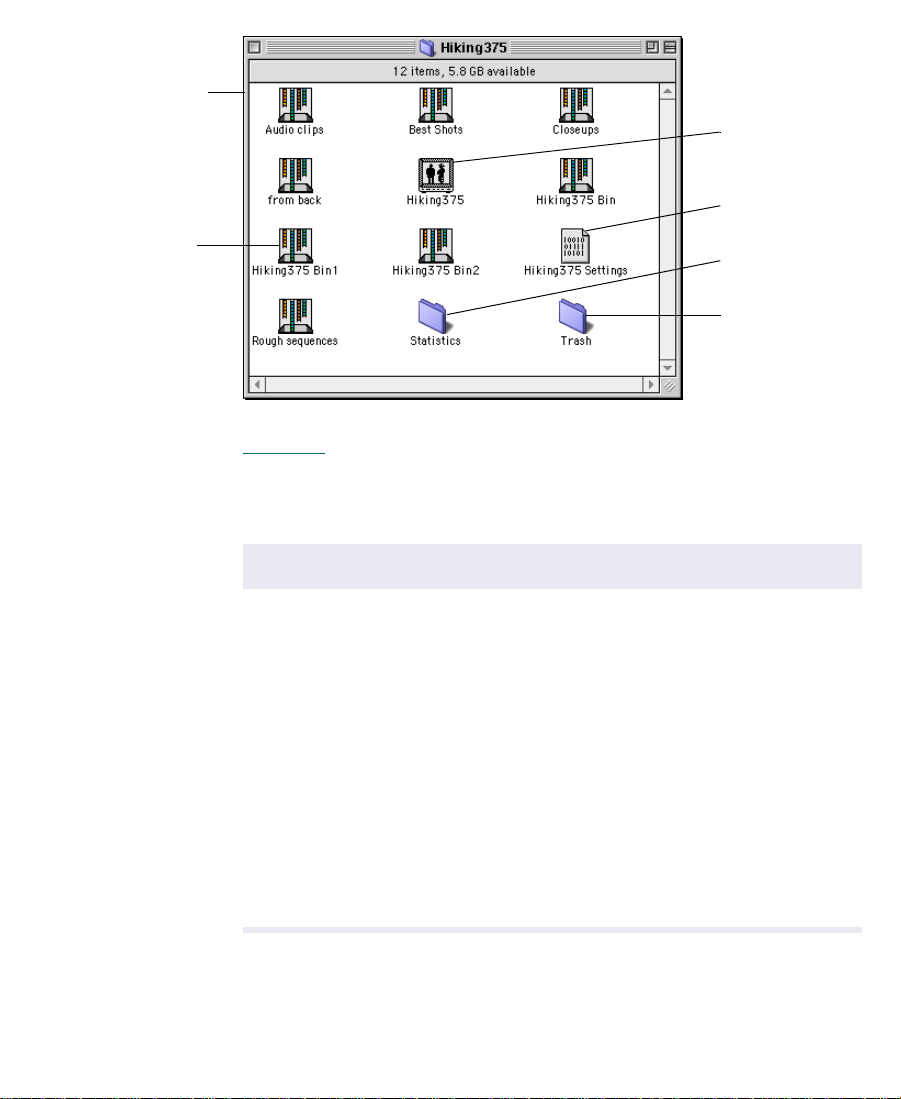
Open project folder
on desktop
Project file
Project Settings file
Project bin
Statistics folder
Trash folder
Table 2-1 describes the files and folders in the project.
Table 2-1 Project Files and Folders
File or Fold er Description
Project file Stores the information used by the MediaLog
application that makes up the project.
Project Settings file Stores the settings for the project, including any
custom views you create.
Project bins Bins you create in the Project window are stor ed in
the project folder .
Trash folder Stores files and folders you delete in the Project
window.
Statistics folder For internal MediaLog application use only; this
folder is normally empty.
19
Page 20
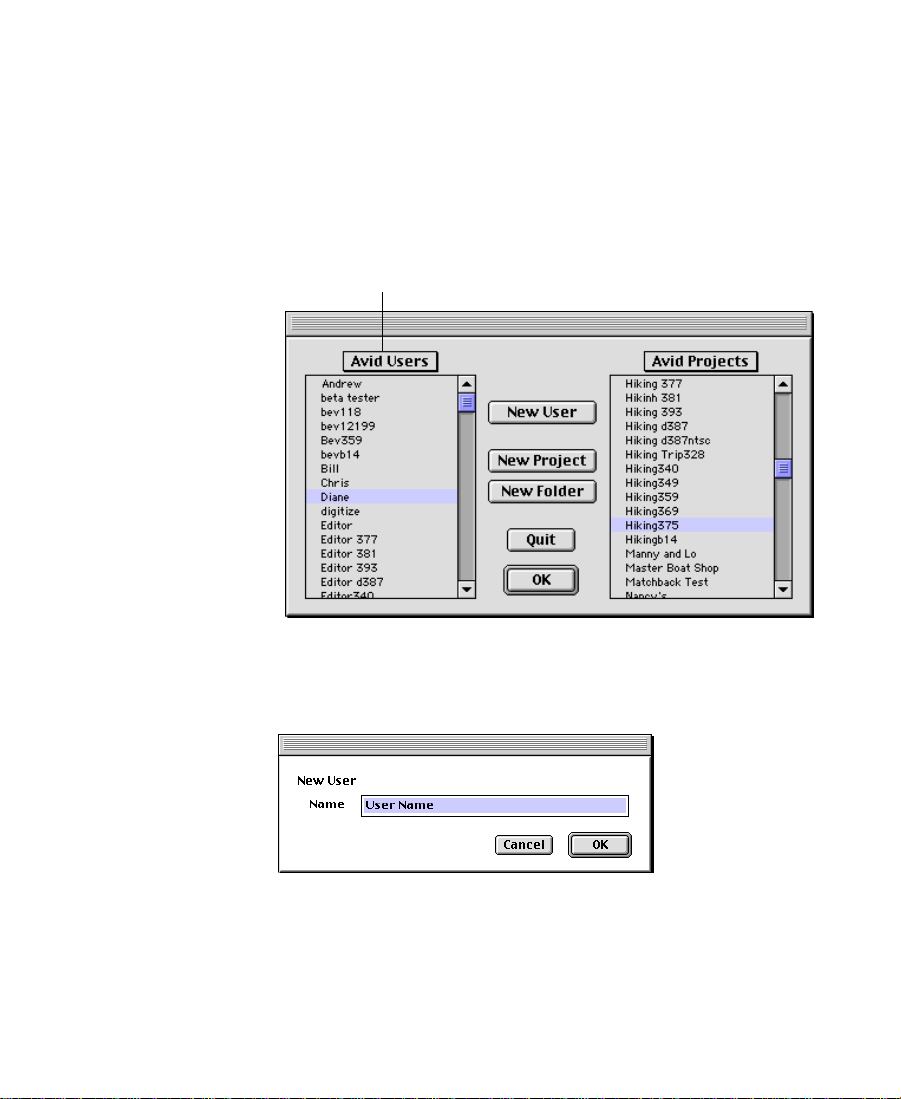
Creating a New User
To create a new user:
1. From the pop-up menu, select the folder where you want the new
user folder to be created.
The default folder is Avid Users.
Current user folder
(pop-up menu)
2. Click New User in the Open Project dialog box.
The New User dialog box appears.
3. Ent er your name in the Name text box.
4. Click OK.
The Open Project dialog box reappears with the new us er name.
20
Page 21
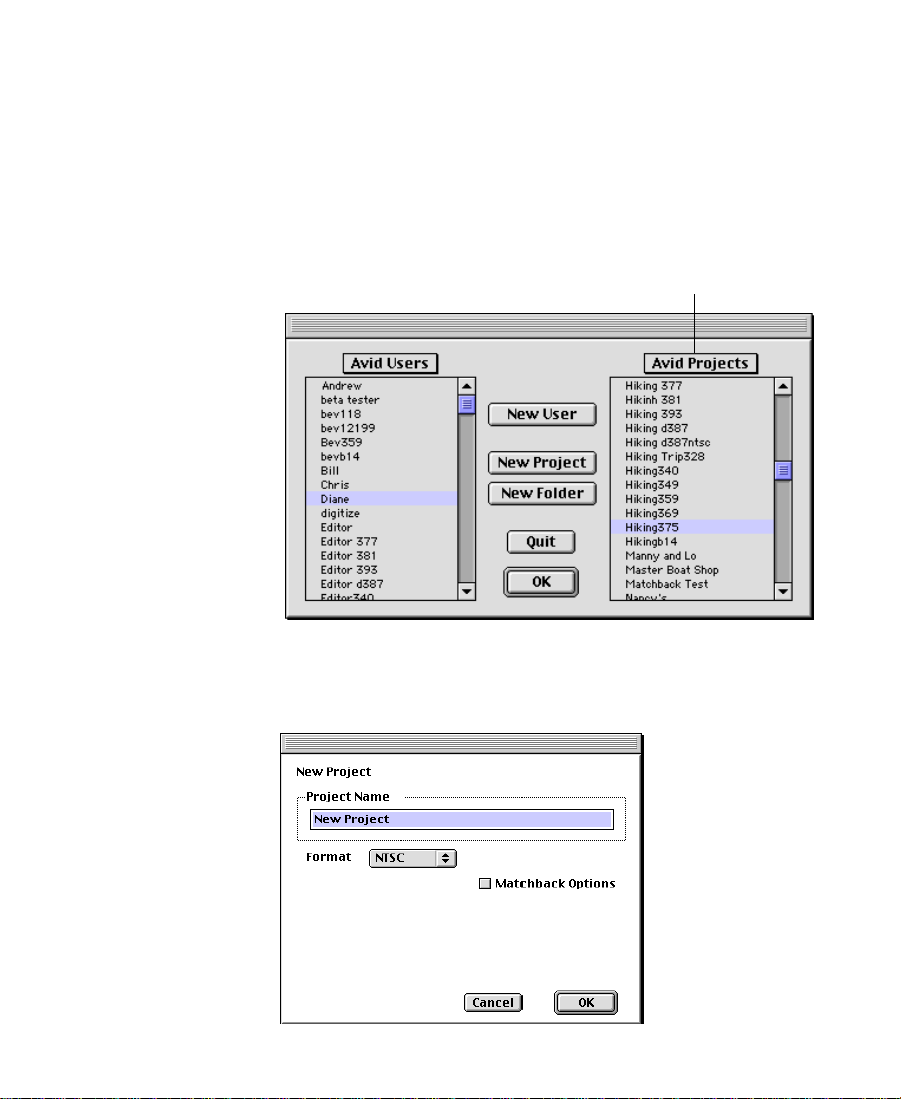
Creating a New Project
To create a new project:
1. From the pop-up menu, select the folder where you want the new
project folder to be created.
The default is Avid Projects.
Current project folder
(pop-up menu)
2. Click New Project in the Open Project dialog box.
The New Project dialog box appears.
21
Page 22

3. Enter a name for the project in the Project Name text box.
If you plan to transfer your work to an Avid Composer system,
assign the same name to MediaLog projects and Avid Composer
projects.
c
Make sure you do not already have a project by that name on your
Avid Composer system, or the MediaLog project will overwrite the
one on the Avid Composer system.
If you transfer your MediaLog bins to a project with a different
name, the name of the source project is included in the tape
names. For example, if you use MediaLog to log cli ps from Tape1
in Project X, the Avid Composer system lists the source of the clips
as Project X:Tape1.
4. Choose NTSC or PAL from the Format pop-up menu.
Choosing Matchback Options
If you are working with film material in a video project, but need to
generate film pull lists or cut lists in addition to EDLs, you must
establish the film format for matching back from your video EDL to a
film list.
To establish matchback settings:
1. Select Matchback Options in the New Project dialog box.
A pop-up menu for key number tracking appears.
22
Page 23
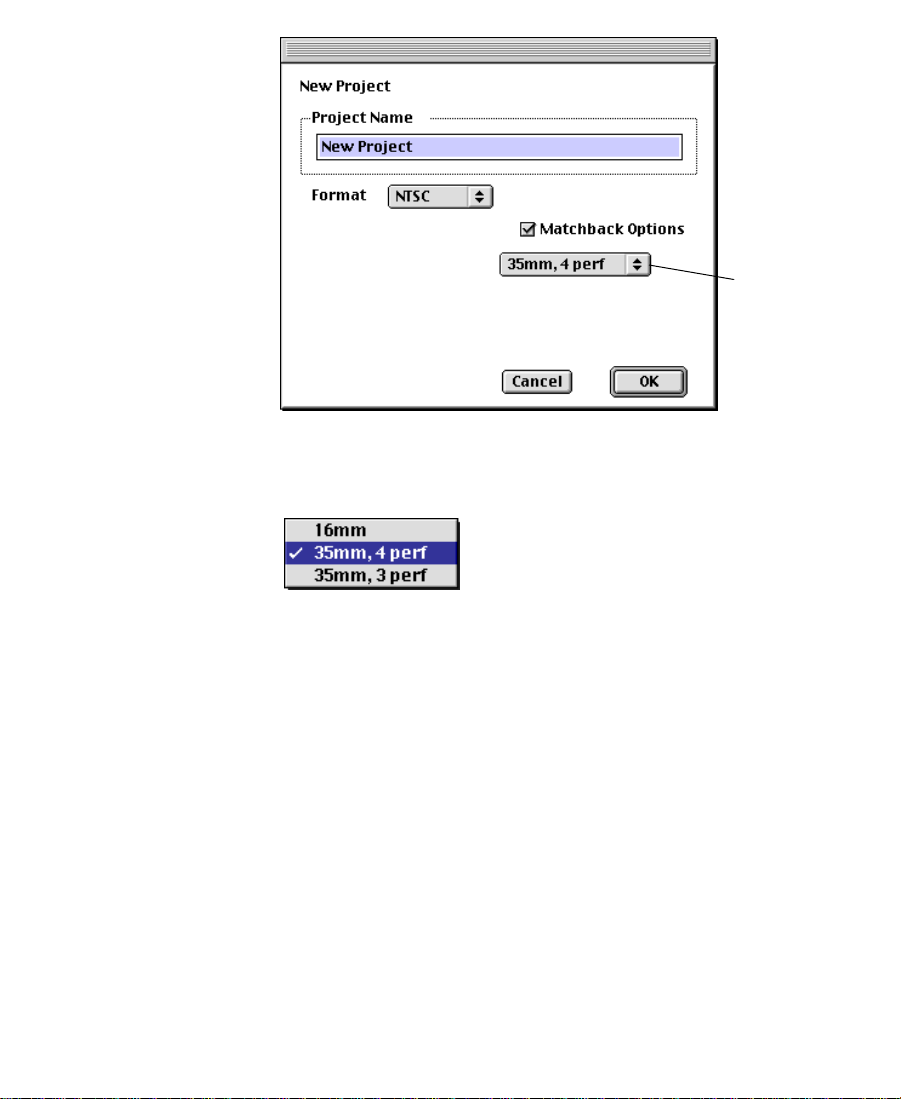
Pop-up menu
2. Select the film tracking format to be used in the matchback
process.
3. Click OK.
The system creates the new project files and fol der and returns you to
the Open Project dialog box, where the project name is highlighted in
the Avid Projects list.
23
Page 24

Selecting an Existing Project
To open an existing project when you start MediaLog:
1. In the Open Project dialog box, select an Avid user and project you
want to open.
2. Double-click the project folder name.
Using the Project Windo w
When you select a project, the Project window opens on the monitor.
The Bins button displays a list of bins that are in the project. Click the
Settings button to see the settings for the project; click the Info butto n
to see information about the format of the project (for example, film,
PAL, or NTSC).
Project folders
Default folder for
MediaLog projects
The New Bin button creates a new bin in the project. See “Creating a
Bin” on page 30 for instructions.
24
Page 25
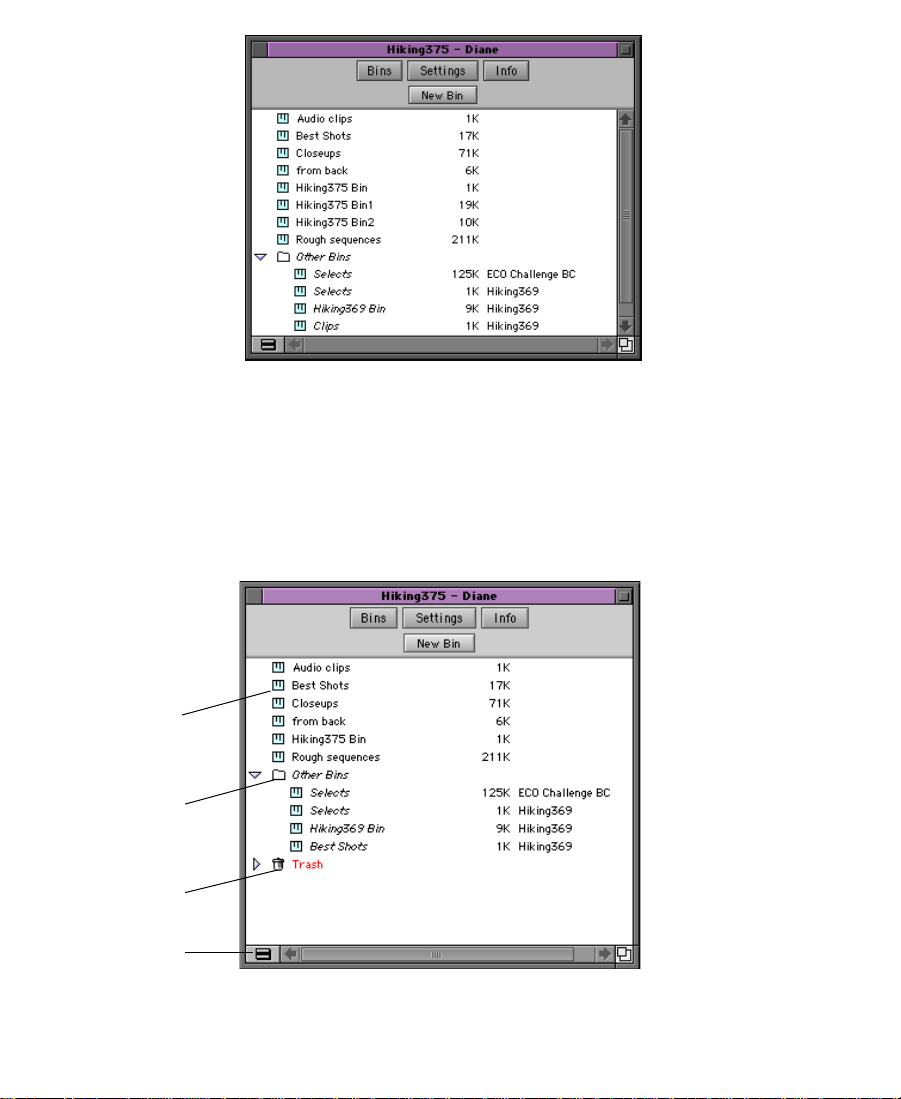
Displaying Project Bins
Folders in the Project window help to organize the projects. You can
create folders in the Project window by using the Fast Menu button at
the bottom of the window. Bins in the project can then be dragged into
your custom folder.
Bin
Other Bins folder
Trash icon
Fast Menu button
25
Page 26
When you open bins from other projects, the Project window creates
an Other Bins folder . Use the Other Bins fo lder for quick access links to
other bins you have opened outside the current project. Bins in the
Other Bins folder appear in italics and cannot be moved out of the
Other Bins folder.
The Trash icon in the Project window holds your deleted bins and
folders in case you change your mind. These bins stay in the folder
until you choose Empty Trash from the Fast menu. You can drag bins
from the Trash back into the project.
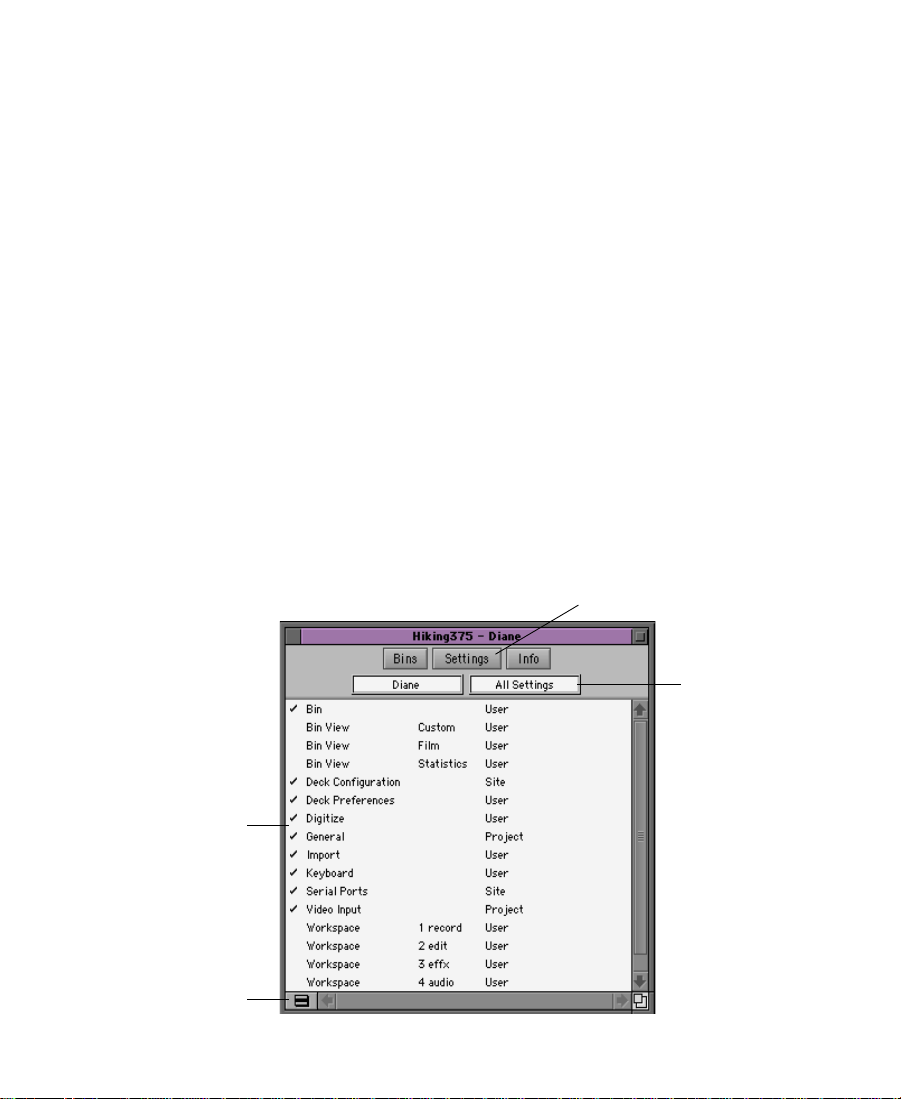
Displaying Project Settings
The Settings scroll list can be displayed in different ways, depending
on what you need to view.
To change a Project Settings display:
1. Click the Settings button in the Project window.
The Settings scroll list appears.
Settings button
Settings scroll list
Fast Menu button
Settings menu
26
Page 27
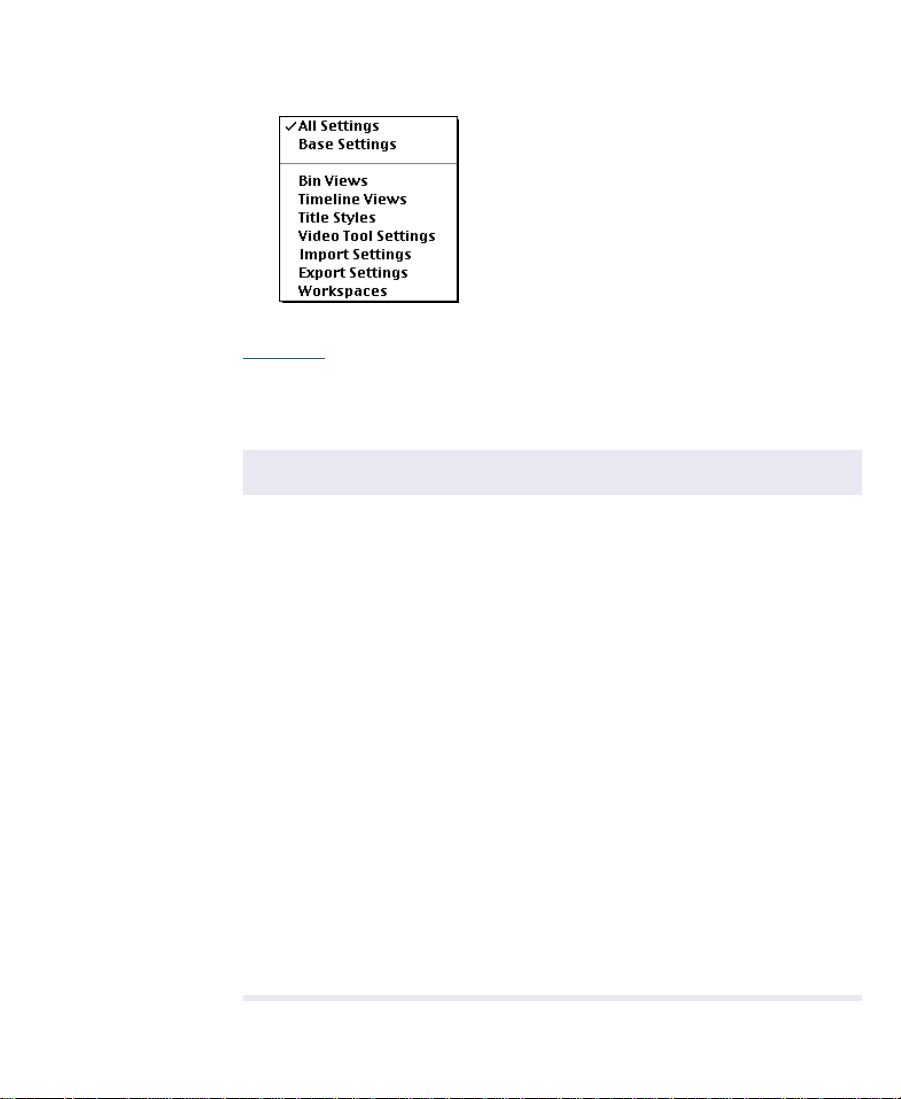
2. Choose a settings display from the Settings menu, or click the Fast
Menu button.
Table 2-2
describes the Project Settings options.
Table 2-2 Project Settings Options
Option Description
All Settings Displays all settings available in the
Avid Composer system.
Base Settings Displays Project settings only; no views are
displayed.
Bin Views Displays all the Bin View settings you created.
Timeline Views Displays all the Timeline View settings you
created.
Title Styles Displays all the templates you created for the Title
tool.
Video Tool Settings Displays all the Video Tool settings.
Import Settings Displays all the import settings.
Export Settings Displays all the export settings.
Workspaces Displays all the Workspace settings you created.
27
Page 28
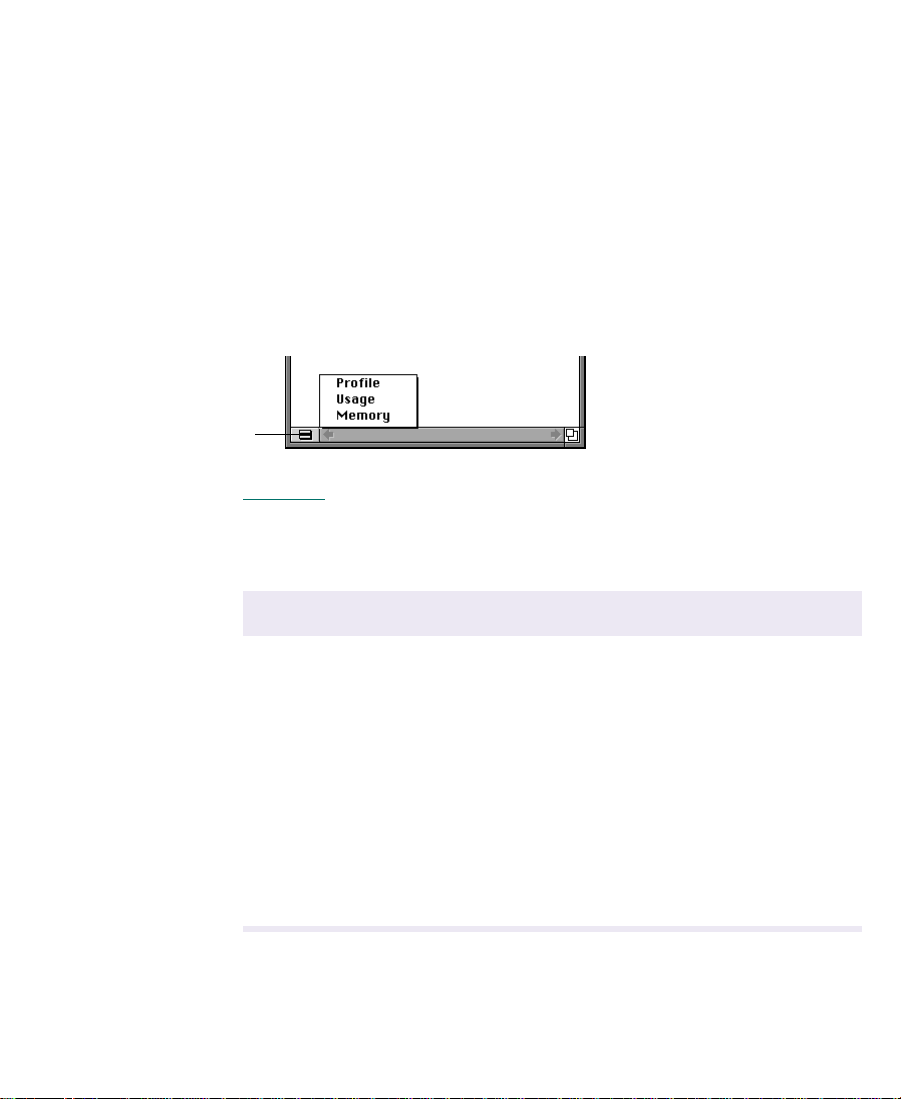
Displaying Project Information
The Project window includes an Info button that opens the Info window. Click the Fast Menu button at the bottom of the Info window to
display the menu items: Profile, Usage, and Memory.
To change a Project Info display:
1. Click the Info button in the Project window.
The Info window opens.
2. Choose Profile, Usage, or Memory from the Fast menu.
Fast Menu button
Table 2-3
describes the Project Info options.
Table 2-3 Project Info Options
Option Description
Profile Displays the basic project information, such as the
video format (NTSC or PAL) or frame rate (24 fps
for film projects).
Usage Gathers and reports information on the system
usage by project. The file information is formatted
so you can use it as input to software programs
such as analysis applications, spreadsheets, or
report generators.
Memory Displays the Memory window, which shows the
amount of system memory used by the project.
28
Page 29
Closing a Project
close box
To close a project:
1. Click the Project window to activate it.
2. Do one of the following steps to close the Project window:
• Choose Close from the File menu, or press
• Click the close box in the upper left corner of the window.
The application automatically saves and closes the project. The
Open Project dialog box appears.
3. Create a new project or select an existing project, or click Quit to
quit the MediaLog application.
Working with Bins
The Project window displays a list of bins. Bins store your clips and
the sequences you create. Anytime after you select a project, you can
make a new bin. You can also open bins created for other projects.
To view the bins in the project, click the Bins button in the Project window. After closing a bin, you can reopen it by double-clicking its icon
beside the name in the Project window. You can rename the bin by
double-clicking the bin name and typing the new name.
k+W.
29
Page 30
close box
Bins button
Bin icon.
Double-click
to open.
Bin name.
Double-click
to rename.
Fast menu
button
Creating a Bin
New Bin button.
Avid bins function most efficiently when they contain no more than
100 clips. If you work with a lot of source material, you can create a
number of bins, each named according to the type of shots it will contain. Then you can log an optimal number of clips into each bin.
If multiple windows are open on your desktop, you must make the
Project window active before you can create a bin.
To create a new bin:
1. Do one of the following steps to activate the Project window.
• Click the Project window.
• Choose Project from the Tools menu, or press
k+9.
2. Click the Bins button.
3. Do one of the following steps to create the bin:
• Choose New Bin from the File menu, or press
k+N.
• Choose New Bin from the Fast menu.
• Click the New Bin button in the Project window.
30
Page 31

Closing a Bin
close box
A new bin appears and uses the same name as that of the Avid
Project folder but appends a number to it. This name also appears
in the list of bins in the Project window
4. To change the default name of the bin, select the name in the
Project window and type the new name.
5. Press the Return key.
To close a bin, do one of the following:
• Click the close box to save and close the bin.
• Activate the Bin window and choose Close Bin from the File menu
to save and close the bin, or press
k+W.
Reopening a Bin
To reopen a bin already in the project:
1. Click the Bins button in the Project window to see a list of bins.
2. Double-click the icon beside the name in the Project window you
want to reopen.
31
Page 32

To reopen several bins:
1. Click the icon of one of the bins.
2. Shift+click each additional bin you want to reopen.
3. Do one of the following steps to open the bins:
• Choose Open Selected Bins from the File menu, or press
• Choose Open Selected Bins from the Fast menu.
• Double-click the icon beside the name of any selected bins.
Removing Bin Names fro m the Current Project
In the Project window, you can delete the name of a bin you no longer
need to use for the current project without destroying the bin itself. If
necessary, you can reopen the bin later by using the Open Bin command. See “Opening Bins from Other Projects” on page 33
To remove a bin name from the current project:
1. Click the Bins button in the Project window to see a list of bins.
2. Select the bin you want to delete from the list.
3. Do one of the following steps to remove the bin:
• Press the Delete key.
• Choose Delete Selected Bins from the Edit menu.
• Choose Delete Selected Bins from the Fast menu.
k+O.
.
A Trash icon appears in the Project window with the deleted bins
inside.
32
Page 33

Opening Bins from Other Projects
You can open bins created for other projects.
To open a bin from a different project in your current project:
1. Do one of the following steps to activate the Project window:
• Click the Project window.
Project folder
Bin to be opened
• Choose Project from the Tools menu, or press
k+9.
2. Click the Bins button.
3. Do one of the following steps to open a bin:
• Choose Open Bin from the File menu, or press
k+O.
• Choose Open Bin from the Fast menu.
The Select a Bin dialog b ox appears.
4. Select the project folder that contains the bin you want to open.
5. Do one of the following steps to select the bin:
• Double-click the icon beside the name of the bin.
• Select the bin and click the Open button.
• Select the bin and press the Return key.
33
Page 34

The bin name is added to an Other Bins folder in the Project
window.
c
Never open a bin that is stored on a disk. Always copy the bin to
your Avid disk before you open it. If you open a bin while it is on a
disk, the system might not be able to save y our work.
Retrieving Bin Files from the Attic Folder
You retrieve files from the Attic folder in the following circu mst ances:
• When you want to replace current changes to a sequence or clip
with a previous version
• When the current bin file becomes corrupt
When a copy of a bin file is stored in the Atti c folder, the system adds
the file extension .bak plus a version number to the bin name. W hen
you view the Attic folder in the List view, you can identify the most
recent backup file based on the name and timestamp of creation displayed in the Date Modified column.
To retrieve a file from the Attic folder:
1. Close all your bins in the Project window.
2. On your desktop, double-click the Avid disk to open it.
3. Open the Attic folder.
4. Choose “as List” from the View menu if the Folder window is not
already in the Name view.
5. In the Attic folder, open the project you want to retrieve, and then
lasso or Shift+select the desired bin files.
6. Press and hold the Option key , and drag the backup bin files to the
desktop. This makes a copy of the files, leaving the original files in
the Attic folder.
7. Click the Project window to reactivate it.
34
Page 35

8. Choose Open Bin from the File menu or press k+O. Select on e of
the backup bins on the desktop and click Open.
When you open the backup bin, a link to that backup bin is created
in the Other Bins folder.
n
The MediaLog application does not allow a bin and copy of a bin to be opened
at the same time. You must keep all other bins closed and open the backup bins
one at a time. The creation date might need to be changed to avoid conflicts.
9. Create a new bin from the Project window.
10. S elect the material you want to keep from the backup bin, press
and hold the Option key, and drag the duplicates to the new bin.
Repeat steps 8 to 10 for any other backup bins you copied to your
desktop.
11. Select and delete the backup bins in the Other Bins folder.
12. Click on the desktop and drag the backup copies of the bins to the
Trash on the desktop.
Saving Your Work
Save your work frequently to avoid losing what you have done.
Your most recent work is stored only in the volatile, random-access
memory (RAM) of the Macintosh system until you save the information on a hard disk, either explicitly or by automatically saving.
Should the power fail or the system shut down unexpectedly, the
project and bins stored in RAM are lost. You can restart the editing
session by opening the project and bins saved on disk.
35
Page 36

Saving a Bin
To save a single bin:
1. Click the bin to open it.
2. Choose Save Bin from the File menu, or press
The Save Bin command dims if the current bin has already been
saved.
Saving All Bins
To save all bins:
1. Click the Project window to activate it.
2. Choose Save All from the File menu, or press
The system saves all the bins that are currently open. At the same
time, it saves your Project settings.
Saving a Copy of a Bin
To save a copy of a bin:
1. Click the bin to activate it.
2. Choose Save Bin Copy As from the File menu.
k+S.
k+S.
The Save Bins dialog box appears.
3. Select the disk and folder where you want to save the copy.
4. Type a new name for the copy and click Save.
36
Page 37

Setting Auto-Save Bin Preferences
Remember to save your project and bins while you work. For added
safety, MediaLog automatically saves a backup copy of your files
every few minutes. It also saves a backup copy each time you explicitly save a file yourself and when you close a bin or a project.
Backup files are labeled with the name of the bin and a .bak file name
extension. They are stored in the Attic folder. An Attic folder is automatically created for each project and stored in the project folder.
The system adds backups to the Attic folder until a maximum number
is reached. By default, the system automatically saves every 15 minutes and keeps a maximum of 30 backup files in the folder.
You can specify how many backup copies of each file can be saved.
Once this maximum is reached for a bin, every new version of a
backup file replaces an older version of the same file. If, when the Attic
folder is full, you want to add a new version of a file that has not met
the maximum, the new version replaces the oldest file in the folder.
To change the default auto-save settings for a project:
Bin setting
1. Click the Settings button in the Project window.
The Settings scroll list appears.
Settings button
Settings scroll list
37
Page 38

Shutting Down
2. Double-click the Bin setting.
The Bin Settings dialog box appears.
3. Ent er the auto-save values you want.
4. Click OK.
At the end of a logging session, you can either close the project and
open another, or you can quit the MediaLog application and shut
down the system.
When you quit MediaLog, the ap plication automatically saves the current project folder, project file, and bin inside the Avid Projects folder
on the Avid disk. However, if the Avid disk fails or if the files are
destroyed or lost, your work will be lost. Remember to back up your
project and bins. See “Backing Up Files” on page39
38
.
Page 39

Quitting the MediaLog Application
To close a project before shutting down the computer:
• If a project is open, choose Quit from the File menu, or press
• If no project is open, click the Quit button in the Open Project
Backing Up Files
To back up your files:
k+Q.
dialog box.
The application saves your project and bins before it quits.
1. Insert a backup floppy disk into the floppy drive. Format the
floppy disk if necessary.
2. Double-click the Avid disk, and then double-click the project
folder that contains your projects and bins.
Project folders are usually stored within the Avid Projects folder
on the Avid disk.
3. Drag the Bin icon, Project icon, or entire project folder with bins
and projects enclosed to the Disk icon.
4. When the system finishes copying the files, eject the floppy disk
by dragging it to the Trash.
Turning Off the Hardware
You must shut down the hardware at the end of each editing session.
c
Failure to shut down the Macintosh computer first bef ore shutting
down the remaining hardware could damage the Macintosh or the
storage disks for the system.
39
Page 40

To shut down the hardware at the end of each session:
1. Quit the MediaLog application.
2. Choose Shut Down from the Finder Special menu to turn off the
Macintosh.
Older Macintosh computers are powered off with a switch on the
back of the computer.
3. Turn off the external drives and all other hardware connected to
the system (for example, decks and monitors).
40
Page 41

CHAPTER 3
Logging Source Material
You use MediaLog to log your clips in preparation for digitizing later
in Avid Compos er products.
This chapter describes the following tasks:
• Understanding Logging
• Configuring Decks
• Preparing to Log Material
• Logging
• Creating Avid Logs
• Importing Logs
41
Page 42

Understanding Logging
MediaLog requires that you name the clips that you log, the tapes they
came from, and their start and end timecodes. Many editors prefer to
log all their clips (shots) first, and then batch digitize their material
later in the Avid Composer application.
The three basic methods for producing a bin or log that can be used
later for batch digitizing are:
• Logging directly to a bin
• Importing standard log files to a bin
• Creating Avid logs
The MediaLog tools automate the process of recording each clip’s start
and end timecodes, track selection, and other important data. You do
not need to enter information manually. However, if a source deck is
unavailable, or if you have already logged the data on paper, you can
manually record clip data in a bin.
The logging tools provided in MediaLog are also available in the
Media Composer products. Bins that you create with MediaLog on a
Macintosh computer are completely compatible with your Media
Composer product. You can copy MediaLog Macintosh bins to the
Avid Composer system to begin working with the logged footage.
Configuring Decks
The MediaLog application provides a feature that will automatically
configure your attached deck. Each time you exit the MediaLog application, the deck configuration settings are saved. If you reconnect the
deck to a different port, or attach a new deck, you must run the automatic deck configuration feature again.
42
Page 43

If MediaLog does not automatically s ense yo ur attached deck, you
must manually configure the deck.
n
MediaLog will not override the configurations that were manually s pe c ified.
Automatic Deck Configuration
Use the automatic configuration feature before manually trying to configure any attached deck. If the automatic feature does not sense your
attached deck, see “Manual Deck Configuration” on page 43
To automatically sense the attached deck, choose Autoconfigure All
Ports from the Special menu.
MediaLog searches the system ports and configures the attached
decks.
.
Manual Deck Configuration
MediaLog offers an alternative method of configuring your deck if it
cannot be automatically configu red. You can manually configure single or multiple decks even if the decks are not currently attached to the
system. Stored deck configurations can also be deleted.
The Deck Configuration and Deck Preferences settings appear as separate items in the Settings scroll list of the Project window.
43
Page 44

Deck settings
Deck Configuration Settings
Deck Configuration settings allo w you to establish deck control
parameters for a single deck or for multiple decks. You can create multiple versions, allowing you to select them for frequent changes
in hardware configurations.
c
Y ou must manually configure the appropriate hardware connecti ons
before Deck Configuration settings can take effect. For more information, see the Avid Media Composer Products Setup Guide.
44
Page 45

To configure a deck or multiple decks:
1. Double-click Deck Configuration in the Se ttings scroll list of the
Project window.
The Deck Configuration dialog box appears.
2. Click the Add Channel button to add a new channel box and automatically open a Channel dialo g box.
n
Channel refers to the signal path for deck cont rol, whether through a serial
port or a V-LAN VLXi system. The Maci nto sh pr o vid es two dir ec t seri al po rt
connections (modem port and printer port). While a V-LAN VLXi connects
directly to the Macintosh serial port, it can provide multiple channels via network or other hardware connections.
3. Choose either Direct (serial port) or VLAN/VLX from the Channel
Type pop-up menu, depending on your system configuration.
4. If you chose Direct for the channel type, choose either Printer Port
or Modem Port from the Port pop-up menu.
45
Page 46

5. Click OK to close the Channel dialog box.
A new channel appears in the display area of the Deck
Configuration dialog box.
Channel boxes appear
on the left.
n
You can reopen the Channel dialog box to change the options at any time by
double-clicking the channel box.
6. Click the channel box to select it.
7. Click the Add Deck button to add a new deck box on the left side
of the Deck Configuration dialog box and to automatically open a
Deck Settings dialog box.
8. Configure Deck settings based on the information in Table 3-1
46
.
Page 47

n
Option Description
Name Includes a text box for typing your own custom name for the video deck.
Description Includes a text box for entering notes about the deck.
Deck Type Provides a list of supported decks. For accurate deck control, choose your
Address For V-LAN VLXi use only (see your V-LAN VLXi documentation). If you
Preroll Determines how many seconds you want the tape to roll before a digitize
Fast Cue Fast cue is useful only for decks that can read timecode in fast forward or
If you already have a deck connected to the system, you can also click
the Auto-configure button to bypass the Deck Settings dialog box and automatically configure a deck with the default settings.
Table 3-1 Deck Settings
The default name matches the deck type.
manufacturer and model from the menu.
are using direct serial port deck control, this option remains dimmed.
or digital cut starts. The default is based on the type of VTR.
rewind mode. If your decks can do this, fast cue can speed up long
searches.
47
Page 48

Table 3-1 Deck Settings (Continued)
Option Description
Fast Cue
(Continued)
Switch to ff/rew This option instructs the system to switch to fast
forward or rewind if the target timecode is farther
than the specified number of seconds from your
current location on the tape.
By default, the deck switches to fast forward or
rewind to reach a target timecode that is more than
60 seconds away.
If your deck shuttles very quickly, you can increase
this number so that the system uses fast cue only
for long searches.
Switch to search This option instructs the system to switch out of
fast forward or rewind when it is within the specified number of seconds of the target timecode. By
default, the system switches to search mode when it
is 14 seconds from the target timecode.
9. Click OK to close the Deck Settings dialog box an d return to the
Deck Configuration dialog box.
Channel boxes appear on the left.
Decks appear on the right.
48
Page 49

n
You can reopen the Deck Settings dialog box to change the options at any time
by double-clicking the box that displays the selected deck.
10. Repeat steps 2 to 9 for each additional channel or deck you want to
configure.
11. Click the Apply button to complete the configurations and close
the Deck Configuration dialog box.
n
Deleting Deck Configurations
Deck Preferences
See “Deck Preferences” on page 49 to adjust global deck control options for
default timecode format, assemble editing, stop key, and shuttle operation.
You can remove or replace deck configuration elements from the Deck
Configuration dialog box.
To delete deck configuration elements:
1. Double-click Deck Configuration in the Se ttings scroll list of the
Project window.
The Deck Configuration dialog box appears.
2. Click a channel box, a deck box, or the entire configuration to
select it.
3. Click the Delete button, or press the Delete key to delete the
element.
Deck preferences are gl obal settings for basic deck control. These settings apply to all decks connected to your system, regardless of your
deck configuration. You can open the Deck Preferences dialog box
from the Settings scroll list of the Project window.
49
Page 50

Table 3-2 lists the Deck Preferences window options.
Table 3-2 Dec k Preferences
Option Description
When no tape in deck
log as
Allow assemble edit for
digital cut (this option is
not used in MediaLog)
Stop key pauses deck Defines how the Stop key (space bar) on the keyboard functions. If you
Shuttle holds speed Determines whether the Shuttle button will continue shuttling at a con-
Stop any paused decks
when quitting
Displays a pop-up menu that lets you choose the default timecode format (Drop Frame or Non-drop Frame) to use when logging clips without a tape in the deck. If a tape is in the deck, the MediaLog application
automatically use s the existing timecode format on the tape.
Allows you to use assemble-edit features in the Digital Cut tool along
with assemble-editing capabilities of your record deck, to quickly
record frame-accurate digital cuts withou t striping entire tapes in
advance.
select this option, the space bar maps to the Pause button on the deck. If
you deselect this option, the space bar maps to the Stop button.
If the videotape heads are down in “Stop key pauses deck” mode,
pressing the space bar brings up the heads and pauses the deck.
The Stop button on the Digitize tool and Deck Controller tool always
stops the decks. (Choose New Deck Controller from the Tools menu to
access the Deck Controller tool.)
stant speed or stop when you release it.
Stops any running decks when you quit MediaLog.
50
Page 51

Preparing to Log Material
MediaLog provides two special tools for logging source material:
• The Logging tool, which provides information about:
- The source deck
- The active video and audio tracks
- The bin name
- Clip duration and the clip’s IN and OUT points
Once you have opened or created a bin, use the Logging tool to
enter the name of the tape you are l ogg ing and to access deck and
logging controls.
• The Compression tool, which provides information a b out the
audio rate.
Using the Logging Tool
Use the Logging tool to plan a naming scheme; work with source
tapes; and select tracks, bins, and sources.
To access the Logging tool, do one of the following steps:
• Click in a Bin window to activate it, and then choose Go To
Logging Mode from either the Bin menu or Fast menu, or press
k+B.
• Choose Logging from the Tools menu, or press k+7.
To select the appropriate source deck, source tape, target disk, and
active track settings for your captured material:
1. Open or create your project and the bin in which you want to store
your master clips. For information about opening projects and
bins, see Chapter 2.
2. Choose Go To Logging Mode from the Bin menu, or press
51
k+B.
Page 52

Logging button
The Logging Tool window opens.
Track panel
Open/Close triangle
Deck name
Tape name
Naming Your Tapes
Enable timecode
button
Consider the following naming guidelines when you enter tape na mes
in the Logging tool:
• Devise a naming scheme for your tapes. For example, tapes with
similar names can be easily sorted and viewed together in a bin.
However, distinguishing among numerous tapes with similar
names might be difficult when you try to locate a speci fi c tape
quickly. Name the tapes based on the amount and complexity of
your source material.
• A single tape can be listed as several different tapes if you alter the
case of the letters. For example, if you type a single name as TAPE,
Tape, and tape on three different occasions, all three names appear.
This can cause significant problems in keeping track of clips when
logging. Select a case convention and maintain it throughout a
project.
• Tape names must be all alphanumeric characters (A–Z, 0–9), with
no spaces before the name. They can include uppercase and lowercase characters. The maximum length of a name is 31 characters.
52
Page 53

• The system cannot distinguish between two tapes with the same
• After you provide a name for tape source, any change to the tape’s
Inserting Source Tapes
To insert a source tape in a deck to prepare for logging source material
with MediaLog:
1. Set the deck to REMOTE.
2. Insert a source tape in the deck.
name, or between two bins or clips with the same name. For example, if you name a tape 001, and then later you name another tape
001, you will have problems correctly associating their clips with
the correct physical tapes.
name automatically changes that tape name everywhere it occurs.
If you decide later to change the name of one of the tapes fr om 001
to 999, every reference to tape 001 changes to a reference to tape
999.
Fast Forward button
Rewind button
Stop button
Pause button
Deck Name
pop-up menu
3. Choose Go To Logging Mode from the Bin menu, or press
The Deck Controller appears as part of the Logging Tool window.
Source tape timecode
53
Shuttle button
Valid timecode indicator
Single-Frame Backward button
Single-Frame Forward b ut ton
Eject button
Play button
Source tape name
k+B.
Page 54

Selecting Active Tracks
The Logging tool captures information about the active tracks.
MediaLog automatically activates the tracks that were active in the
previous session. Change these settings by clic king tracks in the Tra c k
Panel Selection area of the Logging Tool window to activate or deactivate them.
Selecting the Target Bin
To select the target bin in which you want to organize your logged
material:
1. Click the Bins pop-up menu in the Logging Tool window.
2. Select the target bin you want to use.
If the pop-up menu does not list the target bin you want, either open an
old one or create a new bin from the Project window as follows:
• Open a previously created bin by choosing Open Bin from the File
The pop-up menu lists all open bins.
menu, or by pressing
k+O.
• Create a new bin by choosing New Bin from the File menu, or by
pressing
Selecting the Source Deck
In some cases, your source material might not reside on a video deck.
You can also select other source devices, such as a digital audiotape
(DAT). Be sure the source material has readable timecode.
To identify the deck where the source material is found:
1. Click the Deck Name pop-up menu to display the available online
decks.
2. Choose the name of your source deck from the pop-up menu.
k+N.
54
Page 55

Identifying the Source Tape
To specify the source tape’s name:
1. Insert a tape in the deck.
The Select Tape dialog box appears.
2. Double-click the name of a tape listed in the dialog box.
3. If the name of the tape is not shown in the list, clic k the
New button.
A new tape name line appears at the bottom of the dialog box.
4. Type the tape name and press the Return key. T ape names must be
all alphanumeric characters (A–Z, 0–9), with no spaces before the
name.
n
Remember to use a unique tape name for each tape. Although the maximum
length of a name is 31 characters, most online houses will accept tape names
of no more than 6 characters.
Using the Compression Tool
Before you begin logging, you must choose an audio compression rate.
The Compression tool lets you digitize your audio at either 44.1 kHz
or 48 kHz.
55
Page 56

To access the Compression tool, choose Compression from the Tools
menu, or press
k+5.
The Compression Tool dialog box appears.
Audio settings
Video compression settings
Make sure the correct audio sample rate is indicated under Audio
Rate. The audio sample rate is not adjustable within the Compression
tool. To change the audio rate, choose either 44.1 kHz or 48 kHz from
the Sample Rate pop-up menu on the Audio Settings dialog box. If you
select Batch Digitize in Media Composer or Film Composer and then
select “Use the audio compression rate logged for each clip,” you must
digitize at the same rate as the audio rate you logged at.
Logging
The following methods are available for logging:
• From a source tape
• On-the-fly
• With the deck offline
56
Page 57

Logging from a Source Tape
One method of logging is to use MediaLog tools to control a source
deck, to select shots or clips from your source tapes, and to record clip
data directly to a bin.
Make sure you have set up all the required information for logging, as
described earlier in this chapter. After you establish your settings and
specify your bin, deck, and tape, the Logging tool is the only tool you
need to log from a tape to a bi n.
The Logging tool provides flexibility in the way you mark your clips
for logging, as the following illustration shows.
Logging
button
Track panel selector
Name of clip and
information for
adding to the
Comment heading.
Bin name
Marking and Logging
Logging Messages
bar
Go To IN button
Clear IN button
Go To OUT button
Clear OUT button
Timecode entry text
boxes
Mark IN button
Mark OUT button
Mark MEMORY button
Duration Mark button
Clear ME MO RY button
Go To MEMOR Y button
The basic logging procedure involves marking IN and OUT points.
You mark IN and OUT points either by using the Mark buttons or by
typing IN and OUT timecodes.
57
Page 58

The icon in the Logging button changes according to the stage of logging you are in. When the Logging button appears as a pencil,
MediaLog is ready to log the clip.
To log clips directly from a source tape to a bin :
1. Load your tape in the deck.
The Logging Messages bar displays the message “Mark IN,” indicating the system is waiting for you to mark an IN point. The
Logging button displays a Mark IN button.
2. Using the Play or Shuttle buttons in the deck controller area, move
to the point where you want to mark IN or OUT points for a cl ip.
3. Mark an IN or OUT point by doing one of the following:
• Click the Logging button to mark the IN po int.
• Mark the IN or OUT point.
• Enter the timecode for the IN or OUT point.
The timecode appears and the Logging Messages bar displays the
following messag e: “Mark OUT and Log” or “Mark IN and Log.”
4. Mark the remaining IN or OUT points by doing one of the
following:
c
• Move to the point where you want the other mark (IN or
OUT) and mark IN or mark OUT, using the Mark buttons.
• Enter the timecode for the IN or OUT point.
• Enter the timecode for the duration.
The system calculates the appropriate timecode for the remaining
mark IN, mark OUT, or duration.
You must enter at least two of the three timecode marks (mark IN,
mark OUT, or duration) to complete the log entry.
If you want to change either the IN point, the OUT point, or the
duration before you log the clip, you can do one of the following:
58
Page 59

• Move to the new IN or OUT point and click the Mark IN or
Mark OUT button.
• Highlight the IN or OUT timecode and enter the new one, or
click the Clear IN or Clear OUT button and enter the new
timecode.
5. Log the clip by clicking the Logging button.
The clip is logged to the bin.
The clip name, which the system chooses and numbers, is high-
lighted in the bin and is ready to be changed. The default
clip name is the bin name plus a number.
6. Type a new name for the logged clip in the bin, and press Enter.
n
You should change the clip name immediately. Forgetting the contents of each
clip among the dozens you log is easy to do. Therefore, consider accepting the
default clip na me, pr oceeding wit h the lo gging pr oces s, and the n changi ng the
clip names in the bin at a later time.
7. Repeat these steps until you have logged all your clips.
Logging While Marking OUT or Marking IN
If you have already marked an IN point, the timecode for the IN point
is displayed and the icon in the Logging button changes to a mark
OUT and a pencil. To mark OUT and log at the same time:
1. Move to where you want to mark OUT.
2. Click the Logging button.
The clip is logged to the bin.
If you have already marked an OUT point, but have not marked an IN
point, the timecode for the OUT point is displayed and the icon in the
Logging button changes to a mark IN and a pencil.
59
Page 60

Using Go To Buttons
You can use the Go To buttons to the right of the timecode entry text
boxes to cue the tape to that point.
To use the Go To buttons:
1. Type in the approximate timecode of the IN or OUT point for the
2. Click the Go To IN or Go To OUT button to the right of the time-
3. Use the deck controls to move to the point where you want to
4. Click the Logging button.
Logging On-the-Fly
You can log clips while the tape is playing. This is called logging onthe-fly. Logging on-the-fly requires the preparation described in the
following sections:
clip.
code entry text box.
The Logging tool automatically cues the tape to that point.
mark IN or mark OUT.
The clip appears in the bin.
• “Selecting the Source Deck” on page 54
• “Identifying the Source Tape” on page 55
• “Using the Compression Tool” on page 55
• “Importing Logs to MediaLog Bins” on page 65
You can log on-the-fly whether or not you already know where you
want to mark the IN and OUT points in your clips.
60
Page 61

To log on-the-fly:
1. Load your tape into the deck.
2. Open the bin where you want to store the clips , or create a new
bin.
3. Choose Go To Logging Mode from the Bin menu, or press
4. Select the audio and video tracks you want to digitize and their
tape name.
5. Step (jog), shuttle, or play the tape to the point where you want to
begin logging material; then follow the steps in “Marking and
Logging” on page 57.
Logging with the Deck Offline
You can also log material without controlling a source tape deck. If the
deck is not connected or not working, or if the tape is not available,
you can still log material as lon g as you know the timecodes.
To log without a deck or tape:
1. Choose Deck Preferences from your project’s Settings menu.
The Deck Preferences dialog box appears.
k+B.
2. Choose either Non-drop Frame or Drop Frame from the pop-up
menu. This selects the timecode format for logging.
61
Page 62

3. Make sure a bin is selected and choose Go To Logging Mode from
the Bin menu, or press
k+B.
4. Click the tape name display.
A dialog box appears.
5. Click Yes to open the tape name dialog box.
The Select Tape dialog box appears.
6. Double-click the name of the tape in the dialog box, or click the
New button and type the name of the tape to log.
7. Click OK.
8. In the Track Selection area in the Logging Tool window, click the
tracks you want to log. For example click V, A1, and A2.
9. Type the start timecode into the Mark IN display and press the
Return key.
10. Type the end timecode into the Mark OUT display and press the
Return key.
62
Page 63

11. Click the Pencil icon in the Logging button.
The clip is logged to the bin.
12. Rename the clip.
Creating Avid Logs
You can use a text editor to log your source footage manually. An Avid
log lists video clips you want to capture for editing. You can create the
logs in Avid format, entering data about your source tapes and clips
according to Avid specifications .
You can also modify an incompatible log to make it conform to Avi d
specifications. To prepare an Avid log on any type of Macintosh
computer, use any text editor. When finished creating Avid logs,
you can import them directly into MediaLog bins. Appendix A lists
the log specifications, including the following parts of a log:
• Global headings
• Column headings
•Clip date
Appendix A also includes a sample Avid log.
Make a separate log for each videotape, or log clips from several different videotapes in one log. After you manually create an Avid log,
you can import it into MediaLog as described in “Importing Logs to
MediaLog Bins” on page 65.
63
Page 64

Importing Logs
Many logging programs and film-to-tape transfer systems create logs
you can import into your MediaLog project. You can open some logs
directly in MediaLog bins; others must be converted to Avid format
first.
Importing Standard Log Files
If you are transferring film to video for logging in MediaLog, you
should ask the transfer house to log the source footage during the filmto-tape transfer. You can import some standard film-to-tape logs
directly into MediaLog bins. Many other film-to-tape logs can be converted to Avid format using Avid Log Exchange and then imported
into MediaLog. A number of video logging systems also produce files
you can import to a MediaLog bin.
Compatible Logs
Use the Import command, in the File menu, to import these files to a
MediaLog bin:
• Avid Log Exchange (ALE)
• Log Right (file names that have the .ale file name extension)
• Excalibur (file names that have the .ale file nam e extension)
• Shot Lister
• MediaLog/PC
• Avid logs you create yourself, using a text editor (see “Creating
Avid Logs” on page 63 for Avid log specifications.)
• Logs converted into Avid format using Avid Log Exchange
(file names that have the .ale file name extension)
64
Page 65

n
Avid recommends that you convert any files not created on an Avid system
into Avid format by using Avid Log Exchange.
Use the Avid Log Exchange utility to convert these logs to Avid format
before importing to a MediaLog bin:
•Log Producer
• AatonBase (file names that have the .flx file name extension)
• FLEx (file names that have the .flx file name extension)
• Evertz
For more information about converting a log to the Avid format,
see the section on Avid Log Exchange in the Avid Media Composer
User’s Guide.
Importing Logs to MediaLog Bins
Use the following procedure to import logs to MediaLog bins:
1. Open a bin and click to select it.
2. Choose Import from the File menu.
A dialog box appears with Shot Log already selected as the file
type.
65
Page 66

3. Select the disk and folder that contain the log to be imported.
If the log is on a floppy disk, insert the disk into the floppy drive.
4. (Optional) Click the Options button if you want to combine events
on the import list.
A dialog box appears.
• Combine events based on scene and automatically create
subclips. Combines all events for a scene into a single master
clip and then links the master clip to subclips that represent
the original events for that scene. T o use this option, you must
have scene numbers logged in a scene column in the bin.
• Combine events based on camera roll and automatically cre-
ate subclips. Combines all the events from a camera roll into a
66
Page 67

single master clip and then links the master clip to subclips
that represent the original events for that camera roll. To use
this option, you must have camera roll numbers logged in a
camera roll column in the bin for a film project.
• Merge events with known sources and automatically create
subclips. Automatically creates subclips for those events that
are merged or reli nked to their source clips upon import. Use
this option if you have already entered master clips in a bin for
each camera roll or master scene, and subsequently logged all
the events related to those clips for import.
• Merge events with known master clips. Automatically cre-
ates subclips for those events that are merged, or relinked to a
selected master clip based upon matching tape name. Use this
option if you have already logged (or digitized) master clips in
a bin for each tape.
5. Select the files you want to import, and click one of the following
options:
• Add — Imports one file
• Add All — Imports all the files in the folder
The screen displays the files to be imported in the window on the
right side of the screen.
6. Click Done to import the selected logs to the bin, or click Cancel to
cancel the operation.
The bin fills with master clips derived from the information in the
imported shot log. Any additional information lo gged with each
clip is also imported.
7. To save the new master clips that came from importing the log,
save the bin.
67
Page 68

Transferring Bins from Another MediaLog System
MediaLog bins are interchangeable with those of other releases. In
general, later releases of the MediaLog application accept bins from
earlier releases.
Use the following procedure to transfer a bin from one MediaLog
system to another MediaLog system.
1. Save MediaLog project bins from the first MediaLog system on a
floppy disk.
2. Go to your second MediaLog system and quit or hide the
MediaLog application.
3. Do uble-click the Avid Projects folder on the Avid disk. Then
double-click the project folder where you want to store MediaLog
bins.
Project folders are generally stored inside the Avid Projects folder.
4. Insert the transfer floppy disk into the floppy drive on the second
MediaLog system.
5. Double-click the Disk icon. A Disk window opens.
Position the Disk window and your MediaLog project folder
window so you can see both.
6. Select MediaLog bins in the Disk window and drag them to your
MediaLog project folder.
When you start your MediaLog program, open the imported bins
in the same way you open standard MediaLog bins.
68
Page 69

CHAPTER 4
Working with Clips and Bins
This chapter provides information on how to organiz e your clips and
bins. After creating clips, you can rename them, subcatalog them, sort
or sift them, select, duplicate, and delete them. You can also analyze
the clips in a Bin view.
This chapter describes the following tasks:
• Organizing Clips and Sequences
• Viewing Clips in a Bin
• Customizing Bin Views
• Renaming Clips
• Selecting Clips
• Deleting Clips and Sequences
• Duplicating Clips
• Copying Timecode Information
• Displaying Specific Clip Types
• Sorting and Sifting Clips and Sequences
• Moving or Copying Clips to Other Bins
• Modifying Clip Data
69
Page 70

Organizing Clips and Sequences
MediaLog provides powerful database tools for organizing and managing source material. You can use these tools as much, or as little, as
you need to do the following:
• Rename each clip, using a descriptive phrase or a line from the
script.
• Add information about each clip in bin columns you create and
define. For example, you can label the clip to indicate the type of
shot or location.
• Subcatalog long clips by breaking them up into shorter subclips.
• Keep all clips that meet specific criteria in a single bin created for
that purpose. For example, all the close-ups can go in the Closeup
Clips bin.
• Print the bin with all the information you have added and the data
automatically captured by MediaLog.
• Export the bin information to an ASCII file that can be imported
into a database or spreadsheet file.
Viewing Clips in a Bin
Clips are listed in a text format. The setting you choose or create
defines the placement of the column headings for that bin.
70
Page 71

List of clips
Fast Menu button
Sample bin
Text View button
Anytime you modify a bin’s Text view, the view’s name changes to
italics with .1 appended to it because it no longer matches the original
Text view. You can then choose the Save As item in the Bin View popup menu to permanently save this new Bin view under a unique view
name.
If you try to select a new Bin View setting while the current setting is
Untitled, an alert box appears and queries if you want to discard the
current setting.
MediaLog bins have three default Text views:
• Custom — The only required heading in this view is the clip
name. You can customize the view by adding or hiding statistical
column headings. Statistical information is created when you digitize the footage; it cannot be changed later.
• Film — This Bin view has film-related column headings. If you
work on a project that is not film-related, and you select the Film
Bin view, an alert box informs you that only the non-film-related
columns will be displayed.
• Statistics — The standard statistical column headings are derived
from information established during logging.
Table 4-1
shows the bin column headings available in Text view (in
addition to any column headings you m ight want to create for your
bins).
71
Page 72

Table 4-1 Bin Column Headings
Heading Description
Name This heading does not appear in the Headings list, but it always appears in the
clip. This heading contains the name of the clip or sequence (you can rename a
clip or sequence after it has been digitized).
Audio The audio resolution (sample rate).
Auxiliary Ink Auxiliary ink format settings allow you to display two types of ink numbers
at the same time. This lets you track additional types of film information for different film gauges.
Auxiliary TC1
through TC5
CFPS The captured frames per second.
Camera The camera that captured this clip. This feature is used in multicamera shoots.
Camroll The camera roll containing this clip (film projects only).
Color Framing The color framing for th e ta pe. F or NTSC, the choice is Even or Odd. For PAL, the
Creation Date The date and time the clip was logged/digitized.
Disk The last known disk on which the media for that master clip existed.
Duration The length of the clip.
End The timecode of the clip’s tailframe.
Film TC 24 fps timecode or ARRI timecode (film projects only).
FPS The play rate: the number of frames to be displayed each second. The default is
You can enter an auxiliary timecode, for example, Aaton, ARRI, or some other
timecode for editing film or audio timecode for film.
choice is A Standard, A Non-Standard, B Standard, or B Non-Standard.
30 for NTSC, 25 for PAL, and 24 or 25 for film.
72
Page 73

Table 4-1 Bin Column Headings (Continued)
Heading Description
Frame
The same frame that is displayed when you select Frame view for the bin. You can
perform the same operations on the fr ame that you can perform in Fra me view, as
described in the user’s guide for your Avid editing system.
The screen takes longer to display frames than text; using frames can slow the
n
work you do with bins.
IN-OUT The length of the marked segment, if any.
Ink Number The ink number for the clip (film projects only).
KN Duration The length of the clip, expressed in feet and frames.
KN End The ending key number for the clip.
KN Start The starting key number for the clip.
KN Mark IN The key number of the IN point, if you set one for the clip (film projects only).
KN Mark OUT The key number of the OUT point, if you set one for the clip (film projects only).
KN IN-OUT The duration between the IN and OUT points, expressed in feet and frames (film
projects only).
Labroll The labroll containing this clip.
Lock Specifies whether the clip is locked against deletion.
Mark IN The timecode for the IN, if you set one for the clip.
Mark OUT The timecode for the OUT, if you set one for the clip.
Offline The track names for any media files that are offline.
Perf The film edge perforation format; 3-perf is used in television productions.
Project The project under which the media was originally digitized.
73
Page 74

Table 4-1 Bin Column Headings (Continued)
Heading Description
Pullin The telecine pulldown of the first frame of the clip. Pullin can have the values A,
B, C, or D.
Pullout The telecine pulldown of the las t fra me of th e cl ip. P ullout can ha v e the va lues A,
B, C, or D.
Reel # Reel number (usually in a sequence) assigned by an assistant editor; used for
creating a change list (film projects only).
Scene The scene number of the clip.
Shoot Date The date the footage was shot.
Slip The information regarding how much quarter-frame slip is on this clip for sub-
frame-syncing (film projects only).
Sound TC The timecode for audio.
Sound Roll The sound roll this clip came from.
Start The timecode of the clip’s head frame.
Take The take number of the scene.
Tape The source tape name.
Tracks All tracks used by this media object.
VITC The vertical interval timecode.
Video The video resolution un der which the media for that clip was digitized.
74
Page 75

Customizing Bin Views
The following methods are available for customizing bin views:
• Alter the arrangement of existing columns in the standard
Statistics view or Film view to suit your needs, without adding or
hiding columns. These arrangements are recal led each time you
choose Statistics view or Film view.
• Add or hide columns of information to create customized
Statistics or Film views. These are saved as additional view
settings in numerical order (for example, Statistics.1, Statistics.2),
unless you select another name.
• Add, hide, copy, or rearrange standard or customized columns in
any combination to create your own custom views. You can name
and save these to suit your needs.
When you create a new Bin View, the system saves the settings for
this view so you can later access and alter, copy, or delete these settings.
Moving and Rearranging Columns
To move a text column in a bin:
1. Click the heading of the column you want to move.
The entire column is highlighted.
2. Drag the column to the desired position and release the mouse
button.
The column appears in the new position, and columns to the right
are moved down to make room.
75
Page 76

Aligning Bin Columns
When you align bin columns, the system ma intains the same order of
columns from left to right but spaces them according to the width of
the contents. This is especially useful for removing spaces that remain
after moving or rearranging columns.
To align bin columns, choose Align To Grid from the Bin menu.
Showing and Hiding Columns
You can select individual or multiple bin headings to display or hide.
n
Neither the Name column nor the Icon column can be hidden.
To select column head ings using the Headings dialog box:
1. With a bin in Text view, choose Headings from the Bin menu. You
can also double-click a Bin View setting in the Settings scroll list of
the Project window.
A dialog box appears.
76
Page 77

You can also display a
frame for each clip
along with statistical
information in Text
view by displaying the
Frame column.
2. Select the headings you want to add to the bin as follows:
3. Click OK.
Deleting a Column
Deleting a st atis tica l colum n is th e same as hidin g the column; in othe r
words, you can restore the column at any time using the Headings
dialog box as described in “Showing and Hiding Columns” on
page 76. When you delete a Custom column, however, you must re-
create the column.
To delete a column:
• Click the name of a heading to select it.
• Click a highlighted heading to deselect it.
• Click Select All to highlight all the headings in the bin.
• Click Deselect All to deselect all the headings in the bin.
Only the headings highlighted in the Headings dialog box appear
in the bin.
1. Click the column heading.
2. Choose Clear from the Edit menu, or press the Delete key.
The column disappears from the view, and surrounding columns
close to fill the space.
Duplicating a Column
You can duplicate existing columns containing timecode information
in other compatible columns that you target in a dialog box.
To duplicate a timecode column:
1. Select the column you wish to duplicate by clicking its header. For
example, click the Duration column heading.
77
Page 78

2. Choose Duplicate from the Edit menu, or press k+D.
A dialog box appears.
In the example, the user has selected the Duration column to
duplicate; thus “Copy Duration to” appears at the top of the
dialog box. Select a column name from the list. The column must
be of the same type of data for the copy to occur. For example, you
can copy start timecodes to the Auxiliary TC1 column, but you
cannot copy timecodes to the Pullin column.
The column of information appears in the column you designated.
Adding Customized Columns to a Bin
In addition to the standard statistical or film headings, you can add
your own column headings to describe information about clips and
sequences. For example, you might want to add a column heading to
describe what kind of shot (close-up, wide shot, master shot, extreme
close-up, and so on) is used in a clip.
To add a new column:
1. Move any existing column headings to the right, which creates an
empty area.
2. Click in the empty area.
78
Page 79

3. Type your column heading name. Column headings must contain
fewer than 30 characters, including spaces.
4. Press the Return key.
This puts the cursor in the data box, beside the first clip in the bin.
You can click in an y row to customize the information for your
column.
5. Use the Align to Grid command after you have entered the new
column heading.
6. Type the information and press the Return key to move to the next
line.
Changing a Custom Column Heading
Y ou can change the heading name of custom columns only. You cannot
change any of the standard sta tistical or film column headings.
To change the name of a custom column:
1. Press and hold the Option key, and click the heading to highlight
it.
2. Type the new text for the heading and press the Return key.
79
Page 80

Saving a Custom View
Anytime you add, hide, or delete a column, the Bin View name
changes to an italicized name to indicate that it no longer matches the
original view. If you try to select a new Bin View setting while the
current setting is Untitled or italicized, an alert box appears and queries
if you want to discard the current setting.
To save a Bin view:
1. Add or hide columns according to preference. The Bin View name
becomes italicized.
2. Choose Save As from the Bin View pop-up menu.
The View Name dialog box appears.
3. Name the custom view by doing one of the following:
• To keep the default view name, click OK or press the Return
key.
• To create a new name for the custom view, type the name and
click OK or press the Return key.
80
Page 81

Setting the Bin Font
When you are in Text view, you can change the bin font, as follows:
1. Choose Set Font from the Edit menu.
A dialog box appears.
2. Choose a font from the Font pop-up menu.
Any Macintosh font loaded in the System folder can be used
in the bin.
3. If you want to use a larger or smaller point size, click the h ighlighted number next to the word Size, and type the size
you want to use.
4. Click OK.
Renaming Clips
In Text view, you can add an identifying name to each clip or
sequence, as follows:
n
1. Move the cursor to the beginning of the clip name.
2. Drag the cursor across the clip name to highlight it.
3. Type the new clip name and press the Return k ey.
A clip name can have up to 256 characters, including spaces.
To modify information in other Te xt view columns of a bin, see “Modifying
Clip Data” on page92.
81
Page 82

Selecting Clips
To select clips in a bin, do one of the following steps:
• Click the Clip icon.
• Select multiple clips by pressing the Shift key and clicking a d ditional icons.
• Move your mouse pointer inside the bin window. Click and hold
the mouse button while dragging the selection rectangle around
the clips. When you release the mouse button, the clips are highlighted.
To reverse your selection:
With one or more clips selected, choose Reverse Selection from the
Bin menu. The selection is inverted; that is, the clips you previously selected are deselected and those clips you previously deselected are selected.
Deleting Clips and Sequences
To delete clips from a bin:
1. Select the clips you want to delete.
2. Choose Clear from the Edit menu, or press the Delete key.
A dialog box appears showing information about the selected
items (for example, one master clip).
82
Page 83

To protect you from accidentally deleting important information,
the master clips, by default, are not marked for deletion.
3. To mark a master clip for deletion, select the check box next to the
item. To exempt the master clip from deletion, select the check box
again.
4. Click OK; a dialog box appears.
5. Click Delete to confirm.
Duplicating Clips
To duplicate clips:
1. Select the clip you want to duplicate by clicking its icon.
2. Choose Duplicate from the Edit menu, or press
A copy of the clip appears in the bin, with the original clip fol-
lowed by Copyn, where n is the number of duplicates created
from the original clip.
For related topics, refer to “Moving or Copying Clips to Other Bins”
on page 91.
83
k+D.
Page 84

Copying Timecode Information
You can copy timecode data to an auxiliary timecode column. To copy
timecode information:
1. Select the timecode column you want to copy by clicking the
column heading. For example, click the Mark IN column heading.
2. Choose Duplicate from the Edit menu, or press
A dialog box appears.
3. Select the column to which you want to copy the data.
4. Click OK.
The timecode is copied to the column you selected.
k+D.
84
Page 85

Displaying Specific Clip Types
You can decide to display on ly certain types of media objects in a bin.
To specify what kinds of media objects to display in a bin:
1. Choose Set Bin Display from the Bin menu.
n
Effect type clips cannot be displayed in the bins.
The Display Bin Selector dialog box appears.
2. Select the ch eck boxes n ext to the object types y ou want to see —
master clips, subclips, sequences, and so on.
• Select “Show clips created by user” if you want the bin to dis-
play the object types you specifically created. These are listed
in the top section of the dialog box.
• Select “Show reference clips” if you want the bin to display
the object types that are related to the sequences in the bin.
These are objects you did not specifically create. They are
listed in the top section of the dialog box.
85
Page 86

For example, the bin displays only the sequence if you do one of
the following:
• Store a sequence in the bin.
• Set the bin display to show either just the clips created by the
user or all the object types listed in the top of the dialog box.
If you also set the bin display to “Show reference clips,” th e bin
displays all the objects related to that sequence. These related
objects might include master clips, motion effects, sources, and so
on.
3. Click OK.
Sorting and Sifting Clips and Sequences
You can either sort or sift clips to find a specific clip or to see clips that
meet specific criteria.
• Sorting clips arranges clips in either numerical or alphabetical
order, based on the sorting criterion you choose.
• Sifting clips shows only clips that meet specific criteria.
Sorting Clips
The following sections describe both methods.
Clips within a bin can be sorted in alphabetical or numerical order.
The Sort command sorts multiple columns if more than one column is
selected. You can also reverse the order of the sort. When the selected
column is an alpha column, the Sort command sorts in alphabetical
order. If the selected column is a list of numbers, the Sort command
sorts in numerical order.
86
Page 87

Sorting a Column
To sort clips in a column:
1. Click the heading of the column you want to sort.
The column is highlighted.
n
2. Choose Sort from the Bin menu, or press
MediaLog alphabetically sorts the objects in the bin.
If the Sort command is dimmed in the Bin menu, you have not selected
a column.
To reapply the last sort, choose Sort Again from the Bin menu. T he
same column will be resorted. This is especially useful after new clips
are added to the bin.
k+E.
87
Page 88

Reversing the Sort Order
To reverse the order of the clips:
1. Click the heading of the column you want to sort.
The column is highlighted.
2. Press and hold the Option key while you choose Sort Reversed
from the Bin menu, or while you press
objects in the reverse order.
k+E. MediaLog sorts
n
If the Sort command is dimmed in the Bin menu, you have not selected a
column.
To reapply the last sort, choose Sort Again from the Bin menu. The
same column will be resorted in descending order.
Sorting on Multiple Levels
You can select multiple columns in a bin and perform a multilevel sort
using the information in the colu mns. The column that appears farthest to the left in the Text view of the bin becomes the primary object
for the sorting operation. You can rearrange the columns in the bin to
establish which column is primary.
88
Page 89

Sifting Clips
Using Sift Criteria
Choose a method for
matching from the
pop-up menu.
Sifting clips allows you to list only those clips that meet certain criteria. For example, you might want to list only the clips that contain the
word “water” in one or more of their heading columns.
To sift clips:
1. Choose Custom Sift from the Bin menu.
The Sift dialog box appears.
Enter the text to sift in this text box.
Choose a column
heading from the
pop-up menu.
2. Choose a method for matching from the pop-up menu on the left:
•Contain
• Begin with
• Match exac tly
3. In the text box, type the text you want the system to find.
4. Choose a column heading from the pop-up menu on the right.
The menu lists column headings in the current Bin view . To search
all the columns, select Any.
5. Follow steps 1 to 4 to enter additional sift criteria, if necessary.
89
Page 90

6. Click OK.
The clips that meet your criteria appear in the bin, with the word
Partial added to the bin name.
You can use the sift function to show only clips that meet up to six different sets of criteria. Each sifting set can have up to three criteria. For
example, you might want:
• A first sift for clips that contain the words Sc1, Sc2, and Sc3 in the
Name column
• A second sift for clips that contain:
- 4/29/99 in the Creation Date column
- 001 in the Tape column
- V1 in the Tra c ks column
MediaLog shows the clips that meet the specifications in both sets of
criteria.
Table 4-2
shows the resulting sift, which appears a t the start of the
bin’s Text view listing.
Table 4-2 Sample of Sifted Bin
Name Creation Date Tape Tracks
Sc1 - close-up 4/29/99 001 V1 A1-2
erosion - Sc1 4/29/99 001 V1-2 A1-2
Sc2 - bird 4/29/99 001 V1 A1
close-up - feathers- Sc2 4/29/99 001 V1
Sc3 - long shot - nest 4/29/99 001 V1-2 A1-2
interior - cave - Sc3 4/29/99 001 V1-2 A1-2
90
Page 91

Showing Sifted and Unsifted Views
After sifting the clips, you can display the bin in a sif ted or unsifted
state.
• To view the entire bin, choose Show Unsifted from the Bin menu.
• To view the sifted bin, choose Show Sifted from the Bin menu.
n
The check mark in the submenu indicates the current state of the bin. Unsifted
and sifted are dimmed in the submenu if sifting was not set up.
Moving or Copying Clips to Other Bins
To move or copy clips from one bin to another bin:
1. Create a new bin or open an existing bin.
If you create a new bin, give the bin a name that represents the
types of cl ip s it wi ll c ont a in. F or ex ample , if yo u are putting all th e
close-ups in the new bin, call the bin Closeup Clips.
2. Position the bins so you can see both of them at the same time. You
might need to resize the bins to do this.
n
3. In the original bin, click the icon of the clip you want to move.
4. Shift+click the icons of any other clips you wa nt to move.
You can also lasso multiple clips to select them.
91
Page 92

5. Do one of the following:
• To move the clips, drag the clips to the destination bin.
The clips are now listed in the destination bin.
• To copy the clips , press and hold the Option key while you
drag them to the destination bin. Be sure to continue holding
the Option key as you release the mouse button to drop the
clips in the destination bin.
The clips appear in the new bin.
When you copy clips from one bin to another, the custom columns
you created in the first bin are also copied to the second bin. The
custom columns appear in the order in which you created them.
The copied clip is displayed in the destination bin’s current format
(Frame view or Text view).
n
If you set the destination bin’s display to show reference clips, the referenced
object types do not appear until you save the bin.
Modifying Clip Data
Y ou can m odify data for master clips, subclips, tapes, and other objects
stored in a bin to correct data input errors or to add additional information required for editing your project later.
Understanding Procedures for Modifying Clips
Two methods are available for modifying data in a bin.
• Direct modification
You can change one item at a time by highlighting the data and
typing updated information. For example, you can type a new
name for a tape, or correct the start and end timecodes for a clip.
92
Page 93

• Modify command
Alternatively, you can use the Modify command to change some
types of data for a number of objects at the same time. For example, you can increment the start and end timecodes for several
master clips.
MediaLog automatically updates relat e d ob jects to reflect any new
information you enter. For example, if you change the timecodes and
names for a group of clips, the updated timecodes and names appear
in sequences created from the clips.
Some data can be modified anytime. Other data cannot be modified
after digitizing because changes would prevent you from playing back
and editing the material successfully.
Table 4-3
lists the data you can modify, the methods you can use to
make the modifications, and the times when you can make the modifications. You cannot modify data not included in the list.
Table 4-3 Bin Columns That Can Be Modified
Column Heading Modifying Method When to Modify
Name Directly Anytime
Start Directly or by using Modify command After logging, but before digitizing
End Directly or by using Modify command After logging, but before digitizing
Auxiliary TC1
through TC5
Directly Anytime
93
Page 94

Using the Modify Command
To modify data in bins by using the Modify command:
1. Open a bin and click the icon for a clip, sequence, or other object
you want to modify . Shift+click each additional object you want to
modify.
Select any object in the bin: master clips, subclips, sequences ,
tapes, audiotapes, film reels, and so on.
2. Choose Modify from the Special menu.
The Modify dialog box appears.
Modification
pop-up menu
n
3. Click the current modification.
A pop-up menu appears, listing the changes you can make.
4. Select a modification; then adjust the options, as described in
Table 4-4
You cannot modify columns of data. Always select maste r clip s, subclips, or
other objects in the bin for modification, not columns.
, and click OK.
94
Page 95

Table 4-4 Modify Command Options
Modification Options Allows you to...
Set Timecode Drop/
Nondrop
Set Timecode By Field Start or End buttons Change either the Start or End timecode.
Increment Timecode Start or End buttons Change either the Start or End timecode.
Decrement Timecode Start or End buttons Change either the Start or End timecode.
Set Key Number Generic
(Prefix)
Set Pullin Punch frame timecode text
Set Tracks V, A1 to A8 track
Drop, Nondrop buttons Change the timecode format between drop-
frame and non- drop-frame.
Fields for Hour, Minutes,
Second, Frame
Timecode text box Enter custom incremental timecode.
Field for Key Number Enter custom generic key number.
box
A, B, C, or D buttons Select the pulldown frame to match to the
selector buttons
Enter custom timecode.
Set the timecode location of the punch
frame for pullin.
timecode entry.
Change the clip’s configuration of tracks.
Set Source Opens the Select Tape
dialog box
Select another source tape name for the clip.
95
Page 96

Modifying Data Directly
To directly modify data in bins:
1. Click the data you want to modify.
The selected data is highlighted. Select only one item at a time. For
example, select a clip’s Auxiliary TC1 timecode. For a list of the
data you can modify directly, see Table 4-3
2. Modify the data by doing one of the following:
• To replace the selected data with new information, type the
new data and press the Return key.
• T o permanently r emove the selected data, press the Delete key,
or press
.
Selected data
for modification
k+X.
• To copy the selected data, press
to replace with the data you copied, and then press
k+C. Select an item you want
k+V.
If you import a log file from your telecine transfer, much of this information will be placed in the bin when you import the log. If you do
not have a film log, then you can ente r this information manually by
highlighting the file in the bin and typing the information.
96
Page 97

CHAPTER 5
Creating MediaLog Output
Once you have finished logging your tapes, you can prin t the bin s
to create a paper record of your log, export the bin files for use in a
different application, or tran sfer the bins to an Avid editing system for
digitizing and editing the footage.
This chapter includes the following topics:
• Printing Bins
• Exporting Bins
• Transferring Bins to an Avid Editing System
97
Page 98

Printing Bins
Before you print MediaLog bins, make sure a printer driver has
been installed in the System folder on the Avid disk, and that your
Macintosh computer recognizes the driver. If the driver is installed
properly, then simply restarting your Macintosh computer will cause
the system to recognize the driver.
Directions for installing the printer driver and selecting the
printer are included in your printer’s documentation and in
the Macintosh system documentation.
To print a bin:
1. Open the Chooser and select the printer.
2. Select the Bin view you want to print.
3. Choose Page Setup from the File menu. The Page Setup dialog box
appears.
4. Select the appropriate options from the Page Setup dialog box.
Available options depend on the printer.
5. Click OK.
Exporting Bins
You can save the bin information in a text file for use with other
applications.
The information is saved in an ASCII file and is organized in the following way:
• Line 1 is a list of the headings in the current Bin view. This line is
6. Choose Print Bin from the File menu, or press
7. Set the print options and then click Print.
optional.
98
k+P.
Page 99

• Each remaining line is data for an individual clip, with tabs delimiting each category of information. These lines are separated by
carriage returns.
The file can be opened in any word pr ocessing or text editing package,
or it can be imported into a database file created by applications like
®
Microsoft
Excel™ and Claris® FileMaker®.
The information can also be saved as a shot log in Avid format for
importing to a Media Composer product bin. This is generally unnecessary, because MediaLog bins can also be opened directly in Media
Composer products.
To export a MediaLog bin:
1. Open the bin that contains the clips you want to export.
2. Select the clips.
3. Choose Export from the File menu.
The Export Format dialog box appears.
4. Select the format you want to use for the exported bin.
5. Click OK.
6. Navigate to the disk and folder where you want to save the
exported file.
7. Click Save to accept the default file name or enter a new file name
and then click Save.
99
Page 100

Transferring Bins to an Avid Editing System
Bins you have created on a MediaLog system can be transferred
to an Avid editing system and then opened directly from within an
Avid Composer project.
The clips logged in the transferred bins are ready for batch digitizing;
no additional preparation is required.
It is best to transfer only bins, without projects, to the Avid editing
system. Then if you want, you can digitize the bins using a different
video resolution.
To transfer MediaLog bins to an Avid Composer system:
1. Save MediaLog bins on a formatted floppy disk.
2. Move to the Avid Composer system and qu it the
Avid Composer application.
3. Do uble-click the Avid Projects folder on the Avid disk. Then
double-click the project folder where you want to store MediaLog
bins.
Project folders are generally stored inside the Avid Projects folder.
4. Insert the transfer disk into the Avid editing system disk drive.
5. Double-click the Disk icon. The Disk window o pens.
Position the Disk window and the Avid Projects window so that
you can see both.
6. Select the MediaLog bins and drag them into the Avid Projects
folder.
When you start the Avid Composer system, use your standard
process to open the bins.
100
 Loading...