

Page 1

Avid Media | Index
Configuration Guide
Version 2.9
Page 2

Legal Notices
Product specifications are subject to change without notice and do not represent a commitment on the part of Avid Technology, Inc.
This product is subject to the terms and conditions of a software license agreement provided with the software. The product may only be
used in accordance with the license agreement.
This product may be protected by one or more U.S. and non-U.S patents. Details are available at www.avid.com/patents.
This guide is protected by copyright. This guide is for your personal use and may not be reproduced or distributed, in whole or in part,
without permission of Avid. Reasonable care has been taken in preparing this guide; however, it may contain omissions, technical
inaccuracies, or typographical errors. Avid Technology, Inc. disclaims liability for all losses incurred through the use of this document.
Product specifications are subject to change without notice.
Copyright © 2017 Avid Technology, Inc. and its licensors. All rights reserved.
The following disclaimer is required by Apple Computer, Inc.:
APPLE COMPUTER, INC. MAKES NO WARRANTIES WHATSOEVER, EITHER EXPRESS OR IMPLIED, REGARDING THIS
PRODUCT, INCLUDING WARRANTIES WITH RESPECT TO ITS MERCHANTABILITY OR ITS FITNESS FOR ANY PARTICULAR
PURPOSE. THE EXCLUSION OF IMPLIED WARRANTIES IS NOT PERMITTED BY SOME STATES. THE ABOVE EXCLUSION MAY
NOT APPLY TO YOU. THIS WARRANTY PROVIDES YOU WITH SPECIFIC LEGAL RIGHTS. THERE MAY BE OTHER RIGHTS THAT
YOU MAY HAVE WHICH VARY FROM STATE TO STATE.
The following disclaimer is required by Sam Leffler and Silicon Graphics, Inc. for the use of their TIFF library:
Copyright © 1988–1997 Sam Leffler
Copyright © 1991–1997 Silicon Graphics, Inc.
Permission to use, copy, modify, distribute, and sell this software [i.e., the TIFF library] and its documentation for any purpose is hereby
granted without fee, provided that (i) the above copyright notices and this permission notice appear in all copies of the software and
related documentation, and (ii) the names of Sam Leffler and Silicon Graphics may not be used in any advertising or publicity relating to
the software without the specific, prior written permission of Sam Leffler and Silicon Graphics.
THE SOFTWARE IS PROVIDED “AS-IS” AND WITHOUT WARRANTY OF ANY KIND, EXPRESS, IMPLIED OR OTHERWISE,
INCLUDING WITHOUT LIMITATION, ANY WARRANTY OF MERCHANTABILITY OR FITNESS FOR A PARTICULAR PURPOSE.
IN NO EVENT SHALL SAM LEFFLER OR SILICON GRAPHICS BE LIABLE FOR ANY SPECIAL, INCIDENTAL, INDIRECT OR
CONSEQUENTIAL DAMAGES OF ANY KIND, OR ANY DAMAGES WHATSOEVER RESULTING FROM LOSS OF USE, DATA OR
PROFITS, WHETHER OR NOT ADVISED OF THE POSSIBILITY OF DAMAGE, AND ON ANY THEORY OF LIABILITY, ARISING OUT
OF OR IN CONNECTION WITH THE USE OR PERFORMANCE OF THIS SOFTWARE.
The following disclaimer is required by the Independent JPEG Group:
This software is based in part on the work of the Independent JPEG Group.
This Software may contain components licensed under the following conditions:
Copyright (c) 1989 The Regents of the University of California. All rights reserved.
Redistribution and use in source and binary forms are permitted provided that the above copyright notice and this paragraph are
duplicated in all such forms and that any documentation, advertising materials, and other materials related to such distribution and use
acknowledge that the software was developed by the University of California, Berkeley. The name of the University may not be used to
endorse or promote products derived from this software without specific prior written permission. THIS SOFTWARE IS PROVIDED ``AS
IS'' AND WITHOUT ANY EXPRESS OR IMPLIED WARRANTIES, INCLUDING, WITHOUT LIMITATION, THE IMPLIED WARRANTIES
OF MERCHANTABILITY AND FITNESS FOR A PARTICULAR PURPOSE.
Copyright (C) 1989, 1991 by Jef Poskanzer.
Permission to use, copy, modify, and distribute this software and its documentation for any purpose and without fee is hereby granted,
provided that the above copyright notice appear in all copies and that both that copyright notice and this permission notice appear in
supporting documentation. This software is provided "as is" without express or implied warranty.
Copyright 1995, Trinity College Computing Center. Written by David Chappell.
Permission to use, copy, modify, and distribute this software and its documentation for any purpose and without fee is hereby granted,
provided that the above copyright notice appear in all copies and that both that copyright notice and this permission notice appear in
supporting documentation. This software is provided "as is" without express or implied warranty.
Copyright 1996 Daniel Dardailler.
Permission to use, copy, modify, distribute, and sell this software for any purpose is hereby granted without fee, provided that the above
copyright notice appear in all copies and that both that copyright notice and this permission notice appear in supporting documentation,
and that the name of Daniel Dardailler not be used in advertising or publicity pertaining to distribution of the software without specific,
written prior permission. Daniel Dardailler makes no representations about the suitability of this software for any purpose. It is provided "as
is" without express or implied warranty.
Modifications Copyright 1999 Matt Koss, under the same license as above.
Copyright (c) 1991 by AT&T.
Permission to use, copy, modify, and distribute this software for any purpose without fee is hereby granted, provided that this entire notice
is included in all copies of any software which is or includes a copy or modification of this software and in all copies of the supporting
documentation for such software.
2
Page 3

THIS SOFTWARE IS BEING PROVIDED "AS IS", WITHOUT ANY EXPRESS OR IMPLIED WARRANTY. IN PARTICULAR, NEITHER
THE AUTHOR NOR AT&T MAKES ANY REPRESENTATION OR WARRANTY OF ANY KIND CONCERNING THE MERCHANTABILITY
OF THIS SOFTWARE OR ITS FITNESS FOR ANY PARTICULAR PURPOSE.
This product includes software developed by the University of California, Berkeley and its contributors.
The following disclaimer is required by Paradigm Matrix:
Portions of this software licensed from Paradigm Matrix.
The following disclaimer is required by Ray Sauers Associates, Inc.:
“Install-It” is licensed from Ray Sauers Associates, Inc. End-User is prohibited from taking any action to derive a source code equivalent of
“Install-It,” including by reverse assembly or reverse compilation, Ray Sauers Associates, Inc. shall in no event be liable for any damages
resulting from reseller’s failure to perform reseller’s obligation; or any damages arising from use or operation of reseller’s products or the
software; or any other damages, including but not limited to, incidental, direct, indirect, special or consequential Damages including lost
profits, or damages resulting from loss of use or inability to use reseller’s products or the software for any reason including copyright or
patent infringement, or lost data, even if Ray Sauers Associates has been advised, knew or should have known of the possibility of such
damages.
The following disclaimer is required by Videomedia, Inc.:
“Videomedia, Inc. makes no warranties whatsoever, either express or implied, regarding this product, including warranties with respect to
its merchantability or its fitness for any particular purpose.”
“This software contains V-LAN ver. 3.0 Command Protocols which communicate with V-LAN ver. 3.0 products developed by Videomedia,
Inc. and V-LAN ver. 3.0 compatible products developed by third parties under license from Videomedia, Inc. Use of this software will allow
“frame accurate” editing control of applicable videotape recorder decks, videodisc recorders/players and the like.”
The following disclaimer is required by Altura Software, Inc. for the use of its Mac2Win software and Sample Source
Code:
©1993–1998 Altura Software, Inc.
The following disclaimer is required by 3Prong.com Inc.:
Certain waveform and vector monitoring capabilities are provided under a license from 3Prong.com Inc.
The following disclaimer is required by Interplay Entertainment Corp.:
The “Interplay” name is used with the permission of Interplay Entertainment Corp., which bears no responsibility for Avid products.
This product includes portions of the Alloy Look & Feel software from Incors GmbH.
This product includes software developed by the Apache Software Foundation (http://www.apache.org/).
© DevelopMentor
This product may include the JCifs library, for which the following notice applies:
JCifs © Copyright 2004, The JCIFS Project, is licensed under LGPL (http://jcifs.samba.org/). See the LGPL.txt file in the Third Party
Software directory on the installation CD.
Avid Interplay contains components licensed from LavanTech. These components may only be used as part of and in connection with Avid
Interplay.
Portions © Copyright 2003-2007 of MOG Solutions.
Attn. Government User(s). Restricted Rights Legend
U.S. GOVERNMENT RESTRICTED RIGHTS. This Software and its documentation are “commercial computer software” or “commercial
computer software documentation.” In the event that such Software or documentation is acquired by or on behalf of a unit or agency of the
U.S. Government, all rights with respect to this Software and documentation are subject to the terms of the License Agreement, pursuant
to FAR §12.212(a) and/or DFARS §227.7202-1(a), as applicable.
Trademarks
Avid, the Avid Logo, Avid Everywhere, Avid DNXHD, Avid DNXHR, Avid Nexis, AirSpeed, Eleven, EUCON, Interplay, iNEWS, ISIS, Mbox,
MediaCentral, Media Composer, NewsCutter, Pro Tools, ProSet and RealSet, Maestro, PlayMaker, Sibelius, Symphony, and all related
product names and logos, are registered or unregistered trademarks of Avid Technology, Inc. in the United States and/or other countries.
The Interplay name is used with the permission of the Interplay Entertainment Corp. which bears no responsibility for Avid products. All
other trademarks are the property of their respective owners. For a full list of Avid trademarks, see:
http://www.avid.com/US/about-avid/legal-notices/trademarks.
Footage
WCAU Fire Story — Courtesy of NBC-10, Philadelphia, PA.
News material provided by WFTV Television Inc.
Avid Media | Index Configuration Guide • Created January 10, 2017 • This document is distributed by Avid in online
(electronic) form only, and is not available for purchase in printed form.
3
Page 4

Contents
Using This Guide . . . . . . . . . . . . . . . . . . . . . . . . . . . . . . . . . . . . . . . . . . . . . . . . . . . 7
Symbols and Conventions . . . . . . . . . . . . . . . . . . . . . . . . . . . . . . . . . . . . . . . . . . . . . . . . . . . . 7
If You Need Help. . . . . . . . . . . . . . . . . . . . . . . . . . . . . . . . . . . . . . . . . . . . . . . . . . . . . . . . . . . . 8
Avid Training Services . . . . . . . . . . . . . . . . . . . . . . . . . . . . . . . . . . . . . . . . . . . . . . . . . . . . . . . 8
Chapter 1 Media | Index Configuration Overview . . . . . . . . . . . . . . . . . . . . . . . . . . . . . . . . . . 9
Prerequisites for Media | Index Configuration. . . . . . . . . . . . . . . . . . . . . . . . . . . . . . . . . . . . . . 9
Checklist for Configuring Media | Index . . . . . . . . . . . . . . . . . . . . . . . . . . . . . . . . . . . . . . . . . 10
Chapter 2 Configuring Media | Index for a Single Server . . . . . . . . . . . . . . . . . . . . . . . . . . 12
Preparing for the Media | Index Configuration . . . . . . . . . . . . . . . . . . . . . . . . . . . . . . . . . . . . 12
Configuring Media | Index . . . . . . . . . . . . . . . . . . . . . . . . . . . . . . . . . . . . . . . . . . . . . . . . . . . . 13
Validating the Media | Index Configuration . . . . . . . . . . . . . . . . . . . . . . . . . . . . . . . . . . . . . . . 15
Continuing the Installation. . . . . . . . . . . . . . . . . . . . . . . . . . . . . . . . . . . . . . . . . . . . . . . . . . . . 16
Chapter 3 Configuring Media | Index for a Cluster . . . . . . . . . . . . . . . . . . . . . . . . . . . . . . . . 17
Shard Count and Usage . . . . . . . . . . . . . . . . . . . . . . . . . . . . . . . . . . . . . . . . . . . . . . . . . . . . . 17
Preparing for the Media | Index Configuration . . . . . . . . . . . . . . . . . . . . . . . . . . . . . . . . . . . . 20
Adding Resources to the Cluster . . . . . . . . . . . . . . . . . . . . . . . . . . . . . . . . . . . . . . . . . . . . . . 21
Configuring Media | Index . . . . . . . . . . . . . . . . . . . . . . . . . . . . . . . . . . . . . . . . . . . . . . . . . . . . 21
Validating the Media | Index Configuration . . . . . . . . . . . . . . . . . . . . . . . . . . . . . . . . . . . . . . . 24
Continuing the Installation. . . . . . . . . . . . . . . . . . . . . . . . . . . . . . . . . . . . . . . . . . . . . . . . . . . . 26
Chapter 4 Setting Up Multi-Zone Search . . . . . . . . . . . . . . . . . . . . . . . . . . . . . . . . . . . . . . . . 27
Setting the Zone Bindings. . . . . . . . . . . . . . . . . . . . . . . . . . . . . . . . . . . . . . . . . . . . . . . . . . . . 27
Validating the Elasticsearch Configuration . . . . . . . . . . . . . . . . . . . . . . . . . . . . . . . . . . . . . . . 31
Chapter 5 Installing the Production Engine Bus Connector . . . . . . . . . . . . . . . . . . . . . . . . 34
Enabling Sync Events in the Interplay Administrator . . . . . . . . . . . . . . . . . . . . . . . . . . . . . . . 34
Creating a PEBCo Instance on a Single MCS Server . . . . . . . . . . . . . . . . . . . . . . . . . . . . . . 36
Creating a PEBCo Instance on an MCS Cluster. . . . . . . . . . . . . . . . . . . . . . . . . . . . . . . . . . . 36
Configuring the ACS Bus Service in Interplay Administrator . . . . . . . . . . . . . . . . . . . . . . . . . 38
Configuring and Using the PEBco Service . . . . . . . . . . . . . . . . . . . . . . . . . . . . . . . . . . . . . . . 39
Chapter 6 Installing and Configuring Production Services for MediaCentral Delivery . . 43
Understanding Production Services for MediaCentral Delivery . . . . . . . . . . . . . . . . . . . . . . . 43
Check List for Installing and Configuring Automation and Consolidate Services . . . . . . . . . . 44
Prerequisites for Installing and Configuring Automation and Consolidate Services . . . . . . . . 45
Installing the Automation and Consolidate Services. . . . . . . . . . . . . . . . . . . . . . . . . . . . . . . . 46
Page 5

Registering the Automation and Consolidate Services. . . . . . . . . . . . . . . . . . . . . . . . . . . . . . 46
Registering a Provider with the Production Services Engine . . . . . . . . . . . . . . . . . . . . . . . . . 48
Creating a Consolidate Profile . . . . . . . . . . . . . . . . . . . . . . . . . . . . . . . . . . . . . . . . . . . . . . . . 52
Chapter 7 Configuring iNEWS for Media | Index. . . . . . . . . . . . . . . . . . . . . . . . . . . . . . . . . . 55
Editing iNEWS Site Files. . . . . . . . . . . . . . . . . . . . . . . . . . . . . . . . . . . . . . . . . . . . . . . . . . . . . 57
Manually Installing the log4cpp File . . . . . . . . . . . . . . . . . . . . . . . . . . . . . . . . . . . . . . . . . . . . 59
(Optional) Enabling Logging . . . . . . . . . . . . . . . . . . . . . . . . . . . . . . . . . . . . . . . . . . . . . . . . . . 59
Assigning the Media | Index Attribute . . . . . . . . . . . . . . . . . . . . . . . . . . . . . . . . . . . . . . . . . . . 60
Activating the Mediaindex Program . . . . . . . . . . . . . . . . . . . . . . . . . . . . . . . . . . . . . . . . . . . . 60
Chapter 8 Setting Up Interplay | MAM Sync Service . . . . . . . . . . . . . . . . . . . . . . . . . . . . . . 61
About Interplay | MAM Sync Service Administrator . . . . . . . . . . . . . . . . . . . . . . . . . . . . . . . . 61
Opening Sync Service Administrator . . . . . . . . . . . . . . . . . . . . . . . . . . . . . . . . . . . . . . . . . . . 64
Understanding the Sync Service Administrator Layout. . . . . . . . . . . . . . . . . . . . . . . . . . . . . . 65
Quitting Sync Service Administrator . . . . . . . . . . . . . . . . . . . . . . . . . . . . . . . . . . . . . . . . . . . . 70
Appendix A Upgrading Media | Index . . . . . . . . . . . . . . . . . . . . . . . . . . . . . . . . . . . . . . . . . . . . 71
Upgrading Media Index from v2.2 or Higher. . . . . . . . . . . . . . . . . . . . . . . . . . . . . . . . . . . . . . 71
Upgrading Media Index from v2.0.x or v2.1.x . . . . . . . . . . . . . . . . . . . . . . . . . . . . . . . . . . . . . 71
Media | Index Backup Locations . . . . . . . . . . . . . . . . . . . . . . . . . . . . . . . . . . . . . . . . . . . . . . . 75
Appendix B Working with Media Index . . . . . . . . . . . . . . . . . . . . . . . . . . . . . . . . . . . . . . . . . . . 76
Media Index Log Locations. . . . . . . . . . . . . . . . . . . . . . . . . . . . . . . . . . . . . . . . . . . . . . . . . . . 76
Updating Localization Strings . . . . . . . . . . . . . . . . . . . . . . . . . . . . . . . . . . . . . . . . . . . . . . . . . 76
Displaying Information about Initialized Systems . . . . . . . . . . . . . . . . . . . . . . . . . . . . . . . . . . 77
Checking the Current Index Status. . . . . . . . . . . . . . . . . . . . . . . . . . . . . . . . . . . . . . . . . . . . . 78
Using the Media | Index Restart Command Line Tool . . . . . . . . . . . . . . . . . . . . . . . . . . . . . . 79
Restarting the Search and PEBCo Services. . . . . . . . . . . . . . . . . . . . . . . . . . . . . . . . . . . . . . 81
Re-Sharding a Media Index Database . . . . . . . . . . . . . . . . . . . . . . . . . . . . . . . . . . . . . . . . . . 82
Taking Nodes Offline in a MediaCentral Cluster. . . . . . . . . . . . . . . . . . . . . . . . . . . . . . . . . . . 83
Removing Zones from a Multi-Zone Configuration . . . . . . . . . . . . . . . . . . . . . . . . . . . . . . . . . 84
Disabling Media Index. . . . . . . . . . . . . . . . . . . . . . . . . . . . . . . . . . . . . . . . . . . . . . . . . . . . . . . 85
Appendix C Media | Index Custom Configuration . . . . . . . . . . . . . . . . . . . . . . . . . . . . . . . . . . 87
Configuring Media Index Fields . . . . . . . . . . . . . . . . . . . . . . . . . . . . . . . . . . . . . . . . . . . . . . . 87
Modifying the Media | Index System Settings . . . . . . . . . . . . . . . . . . . . . . . . . . . . . . . . . . . . . 89
Adjusting Settings Through the ACS Monitor . . . . . . . . . . . . . . . . . . . . . . . . . . . . . . . . . . . . . 93
Setting Elasticsearch Memory Usage . . . . . . . . . . . . . . . . . . . . . . . . . . . . . . . . . . . . . . . . . . 103
Configuring the PEBCo for Custom Configurations . . . . . . . . . . . . . . . . . . . . . . . . . . . . . . . 104
Changing the Default Search Type. . . . . . . . . . . . . . . . . . . . . . . . . . . . . . . . . . . . . . . . . . . . 104
Changing Replica Counts . . . . . . . . . . . . . . . . . . . . . . . . . . . . . . . . . . . . . . . . . . . . . . . . . . . 105
Changing the Index Refresh Interval . . . . . . . . . . . . . . . . . . . . . . . . . . . . . . . . . . . . . . . . . . 107
Appendix D Updating Media | Index Property Schemas . . . . . . . . . . . . . . . . . . . . . . . . . . . . 108
Property Changes in Production and Schema Updates . . . . . . . . . . . . . . . . . . . . . . . . . . . . 108
5
Page 6

Monitor the Re-index Process. . . . . . . . . . . . . . . . . . . . . . . . . . . . . . . . . . . . . . . . . . . . . . . . 111
6
Page 7

Using This Guide
This guide is intended for users of Avid MediaCentral Platform Services (MCS) with the
Media | Index feature. This guide describes the configuration procedures for Media Index, such as
configuring Media Index for single-server and cluster installations.
For information on installing MCS, see the MediaCentral Platform Services Installation and
Configuration Guide. For administrative information for MediaCentral | UX, see the Avid
MediaCentral | UX Administration Guide.
Important: See the following link on the Avid Knowledge Base for the latest updates to this guide
and all related documentation:
http://avid.force.com/pkb/articles/en_US/user_guide/Avid-MediaCentral-Documentation
c
If copying / pasting commands from this document into a command line interface such as
Putty, be sure to verify the command after pasting. It is possible that some characters might be
replaced during the paste process which can lead to a failed or problematic installation.
Revision History
Date Revised Changes Made
January 10, 2017 Additional detail added to the note on page 42 regarding Interplay Production
database permissions.
December 22, 2016 A progress bar has been added to the PEBCo configuration window in the Interplay
Administrator.
For details, see “Configuring and Using the PEBco Service” on page 39.
Symbols and Conventions
Avid documentation uses the following symbols and conventions:
Symbol or Convention Meaning or Action
A note provides important related information, reminders,
n
recommendations, and strong suggestions.
A caution means that a specific action you take could cause harm to
c
w
> This symbol indicates menu commands (and subcommands) in the
your computer or cause you to lose data.
A warning describes an action that could cause you physical harm.
Follow the guidelines in this document or on the unit itself when
handling electrical equipment.
order you select them. For example, File > Import means to open the
File menu and then select the Import command.
Page 8

Symbol or Convention Meaning or Action
This symbol indicates a single-step procedure. Multiple arrows in a list
indicate that you perform one of the actions listed.
If You Need Help
(Windows), (Windows
only), (Macintosh), or
(Macintosh only)
Bold font Bold font is primarily used in task instructions to identify user interface
Italic font Italic font is used to emphasize certain words and to indicate variables.
Courier Bold font
Ctrl+key or mouse action Press and hold the first key while you press the last key or perform the
If You Need Help
If you are having trouble using your Avid product:
1. Retry the action, carefully following the instructions given for that task in this guide. It is
especially important to check each step of your workflow.
2. Check the latest information that might have become available after the documentation was
published. You should always check online for the most up-to-date release notes or ReadMe
because the online version is updated whenever new information becomes available. To view
these online versions, select ReadMe from the Help menu, or visit the MediaCentral
Documentation page at
http://avid.force.com/pkb/articles/en_US/user_guide/Avid-MediaCentral-Documentation.
This text indicates that the information applies only to the specified
operating system, either Windows or Macintosh OS X.
items and keyboard sequences.
Courier Bold font identifies text that you type.
mouse action. For example, Command+Option+C or Ctrl+drag.
3. Check the documentation that came with your Avid application or your hardware for
maintenance or hardware-related issues.
4. Visit the online Avid Knowledge Base. Online services are available 24 hours per day, 7 days per
week. Search this online Knowledge Base to find answers, to view error messages, to access
troubleshooting tips, to download updates, and to read or join online message-board discussions.
Avid Training Services
Avid makes lifelong learning, career advancement, and personal development easy and convenient.
Avid understands that the knowledge you need to differentiate yourself is always changing, and Avid
continually updates course content and offers new training delivery methods that accommodate your
pressured and competitive work environment.
For information on courses/schedules, training centers, certifications, courseware, and books, please
visit www.avid.com/support and follow the Training links, or call Avid Sales at 800-949-AVID
(800-949-2843).
8
Page 9

1 Media | Index Configuration Overview
This document describes the tasks required to configure a Media Index system.
Media Index comprises the following components:
®
• Elasticsearch
• Elasticsearch tribe service, the federated client that enables multi-zone search functionality.
• Data Import API, a bus-based service for metadata indexing, search, configuration, status,
permissions, and updates for Media Index.
• Search API, a bus-based service that provides the search API
• Media Index Configuration API, a bus-based service that provides the API for the Media Index
configuration
• Media Index Status API, a bus-based service that provides the API for the Media Index
• Media Index Permissions API, a bus-based service that provides per asset permissions for the
search service
• Media Index Feed API, a bus-based service that provides an updated assets feed for external
services
• Media Index Thesaurus API, a bus-based service that provides API for importing structured
metadata (dictionaries)
service, which manages data storage and runs the search engine.
Elasticsearch is an open source, distributed, real-time search and analytics engine. Elasticsearch
stores information about assets and makes it accessible across multiple sites.
For more information on Elasticsearch operation and term definitions, visit the Elasticsearch website:
https://www.elastic.co/guide/en/elasticsearch/guide/master/distributed-cluster.html
Prerequisites for Media | Index Configuration
Before you configure Media Index, you need to install and configure the following MediaCentral
components:
• MediaCentral Platform Services (MCS) — Media Index is configured after you have installed
and set up your MCS system, either for a single server or for a cluster configuration. For more
information about installing and configuring MCS, see the MediaCentral Platform Services
Installation and Configuration Guide.
• Multi-zone components — If you use MCS in a multi-zone environment, you must first
configure the multi-zone components. For information on configuring a multi-zone environment,
see the MediaCentral Platform Services Installation and Configuration Guide.
MediaCentral servers configured with Media Index require a minimum of 128 GB of RAM in each
server. Prior to configuring Media Index, verify that your server meets these requirements.
Page 10

Checklist for Configuring Media | Index
For more information on hardware requirements, see the MediaCentral Platform Services Hardware
Guide.
Media Index is installed with MediaCentral Platform Services by default, but the Media Index
services are not started by default. Once configured, Media Index services start automatically when
the server is powered-on.
Media Index can be configured in both standalone and multi-zone environments. Multi-zone
configurations federate separate MCS installations, which can be co-located in a single facility or
geographically separated — for example, one zone could be located in Toronto and another in
Munich.
If configuring Media Index with an Interplay Production system, review the following:
• The Production Engine Bus Connector (PEBCo) service requires Interplay Engine v3.1 or later.
• If you are installing or updating your configuration with Media Index v2.3.x, you must install
Interplay Access v3.3. You do not need to update your Interplay Production Engine to v3.3, but
you must have the Interplay Administration tool that installs with Interplay Access v3.3 to
enable sync events for Media Index.
• If you are installing or updating your configuration with Media Index v2.4 or later, you must
install Interplay Access v3.5 or later. You do not need to update your Interplay Production
Engine to v3.5, but you must have the Interplay Administration tool that installs with Interplay
Access v3.5 or later to enable sync events for Media Index.
• If you are indexing an Interplay Archive Engine, you must use Interplay Access v3.6 or later.
Checklist for Configuring Media | Index
The following table provides a checklist for configuring Media Index components. The checklist also
includes chapter and page references to complete each step.
Task Section Reference
Review the prerequisites. “Prerequisites for Media | Index Configuration”
b
on page 9.
Configure the Media Index and Elasticsearch
b
services on the MediaCentral server or servers.
Validate your configuration. “Validating the Media | Index Configuration” on
b
If you have a multi-zone setup, configure
b
Media Index for multiple zones.
If you are integrating with an Interplay Production
b
system, configure the Production Engine Bus
Connector.
“Configuring Media | Index for a Single Server”
on page 12 or “Configuring Media | Index for a
Cluster” on page 17.
page 15 or “Validating the Media | Index
Configuration” on page 24.
“Setting Up Multi-Zone Search” on page 27.
“Installing the Production Engine Bus Connector”
on page 34.
If you are integrating with an Interplay Production
b
system that includes Production Services such as
Interplay Delivery, configure additional provider
services used with Media Index workflows.
“Installing and Configuring Production Services
for MediaCentral Delivery” on page 43.
10
Page 11

Checklist for Configuring Media | Index
Task Section Reference
If you are integrating with an Avid iNEWS system,
b
configure the iNEWS servers for Media Index.
If you are integrating with an Interplay MAM
b
system, configure the MAM servers for Media
Index.
“Configuring iNEWS for Media | Index” on
page 55.
“Setting Up Interplay | MAM Sync Service” on
page 61.
For information on installing and configuring
Interplay MAM, see the Interplay | MAM
Installation Manual and the Interplay | MAM Sync
Service Administrator User’s Guide.
11
Page 12

2 Configuring Media | Index for a Single
Server
When you set up Media Index, you enable Elasticsearch and several other services related to Media
Index. Elasticsearch and Elasticsearch Tribe are used to index, store and search assets while the
Media Index services add specific Avid logic to Elasticsearch.
Elasticsearch indexes are split into “shards” and “replicas”. Each shard contains indexed data and
each replica contains a copy of that data. Replicas are used to spread the search load and provide
redundancy. Single server installations default to one shard and zero replicas. This is the appropriate
number of shards and replicas for single server configuration and in most cases the numbers should
not be altered.
The configuration of shards and replicas on a single server is fairly simple, but the deployment
becomes more complex in clustered systems. If you are interested in learning more about
Elasticsearch shards and replicas, see “Shard Count and Usage” on page 17 of this guide.
Preparing for the Media | Index Configuration
When you install MediaCentral Platform Services, Media Indexes services are stopped, except for
avid-acs-media-index-configuration. Before you begin configuring Media Index, you must start this
configuration service if it has stopped.
You can also change the default method of naming Elasticsearch nodes. The Media Index API uses
the hostname of the Elasticsearch node as the display name of the node. If you disable this default
behavior, Elasticsearch automatically generates node names. You can also supply a different value to
use for assigning node names.
To check the status of the Media Index configuration service:
1. Open a Linux terminal window on your MCS server and type the following command:
service avid-acs-media-index-configuration status
The result must report that the service has started:
avid-acs-media-index-configuration is running
2. If the configuration service is not running, type the following command:
service avid-acs-media-index-configuration start
To change the default Elasticsearch node name method:
1. Open the configuration file for editing by typing the following command:
vi /etc/sysconfig/avid-acs-media-index-configuration
2. Using the text editor, locate the following line:
export ELASTICSEARCH_NODE_NAME=hostname
Page 13

Configuring Media | Index
3. Delete the
If the node name variable is not set, Elasticsearch automatically generates node names when your
n
node starts. If it is set to
running.
4. Press the Escape key to return to command mode, then type
quit the text editor.
5. Restart the configuration service to enable the configuration changes:
service avid-acs-media-index-configuration restart
hostname
value and type the value you want to use to assign to node.
hostname
, Elasticsearch uses the hostname of the node where the service is
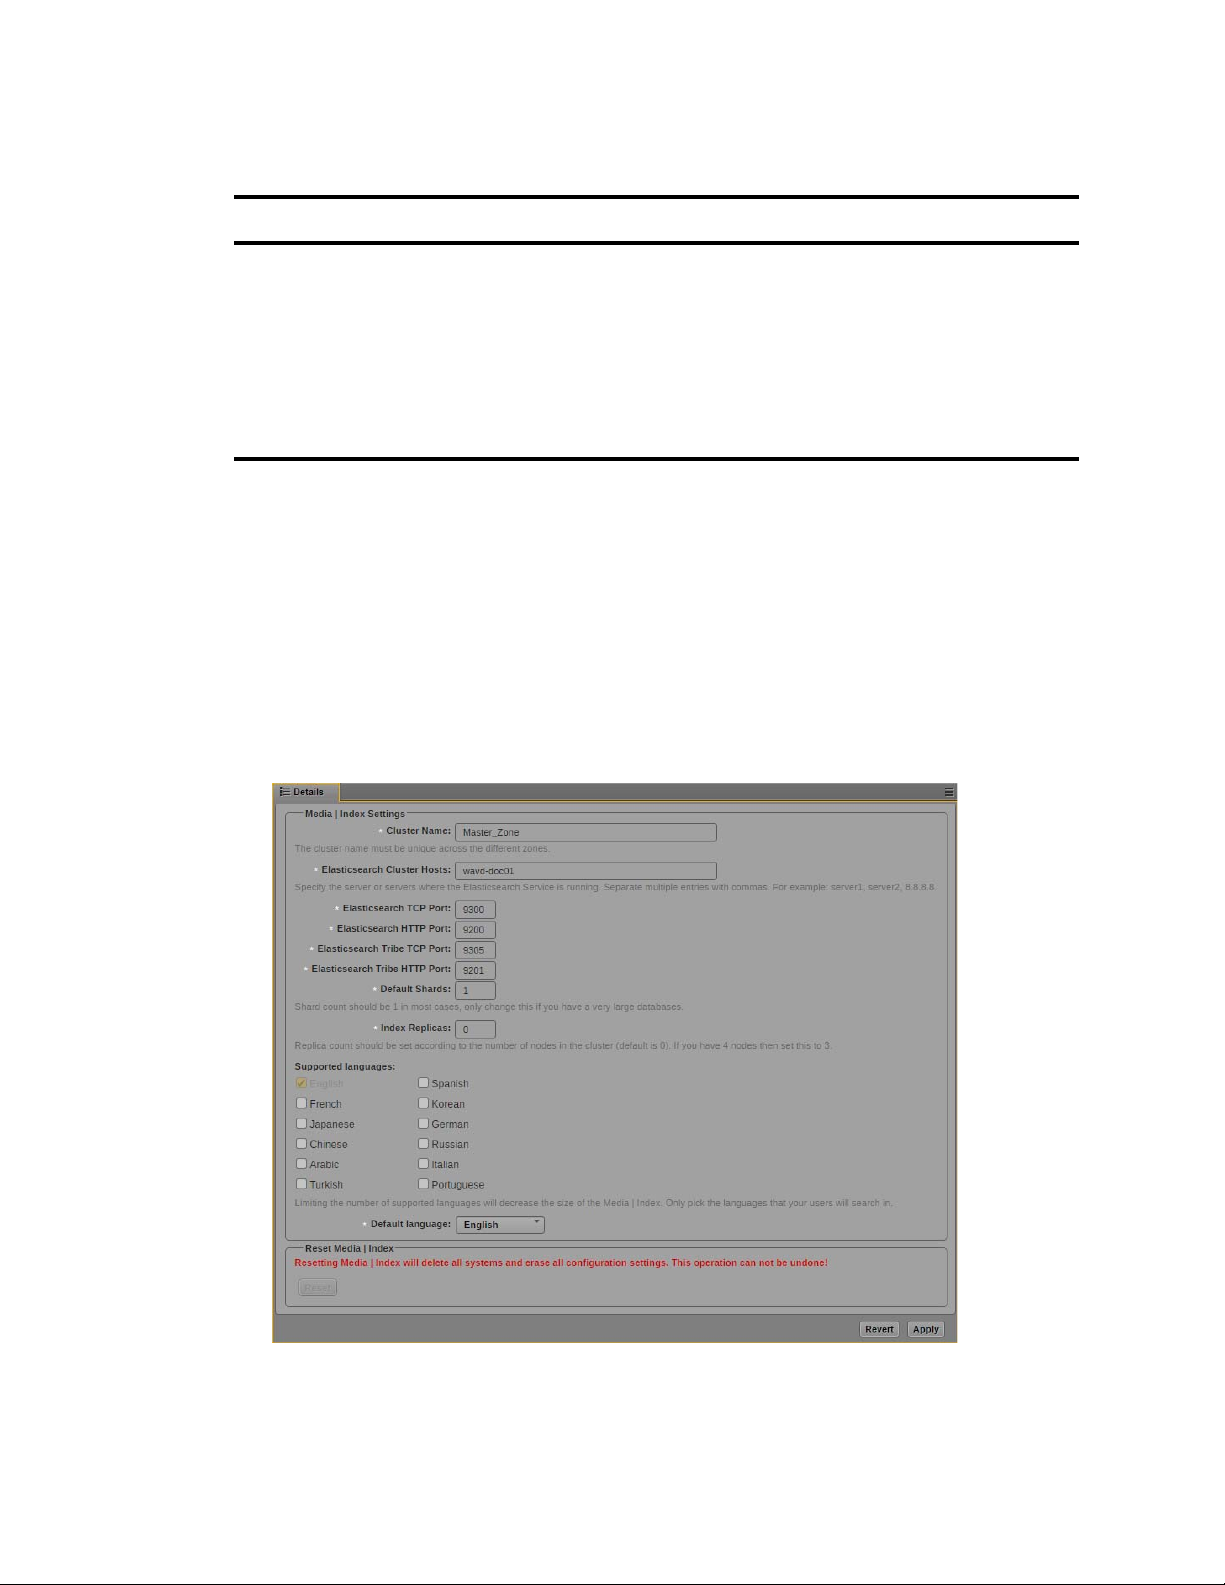
Configuring Media | Index
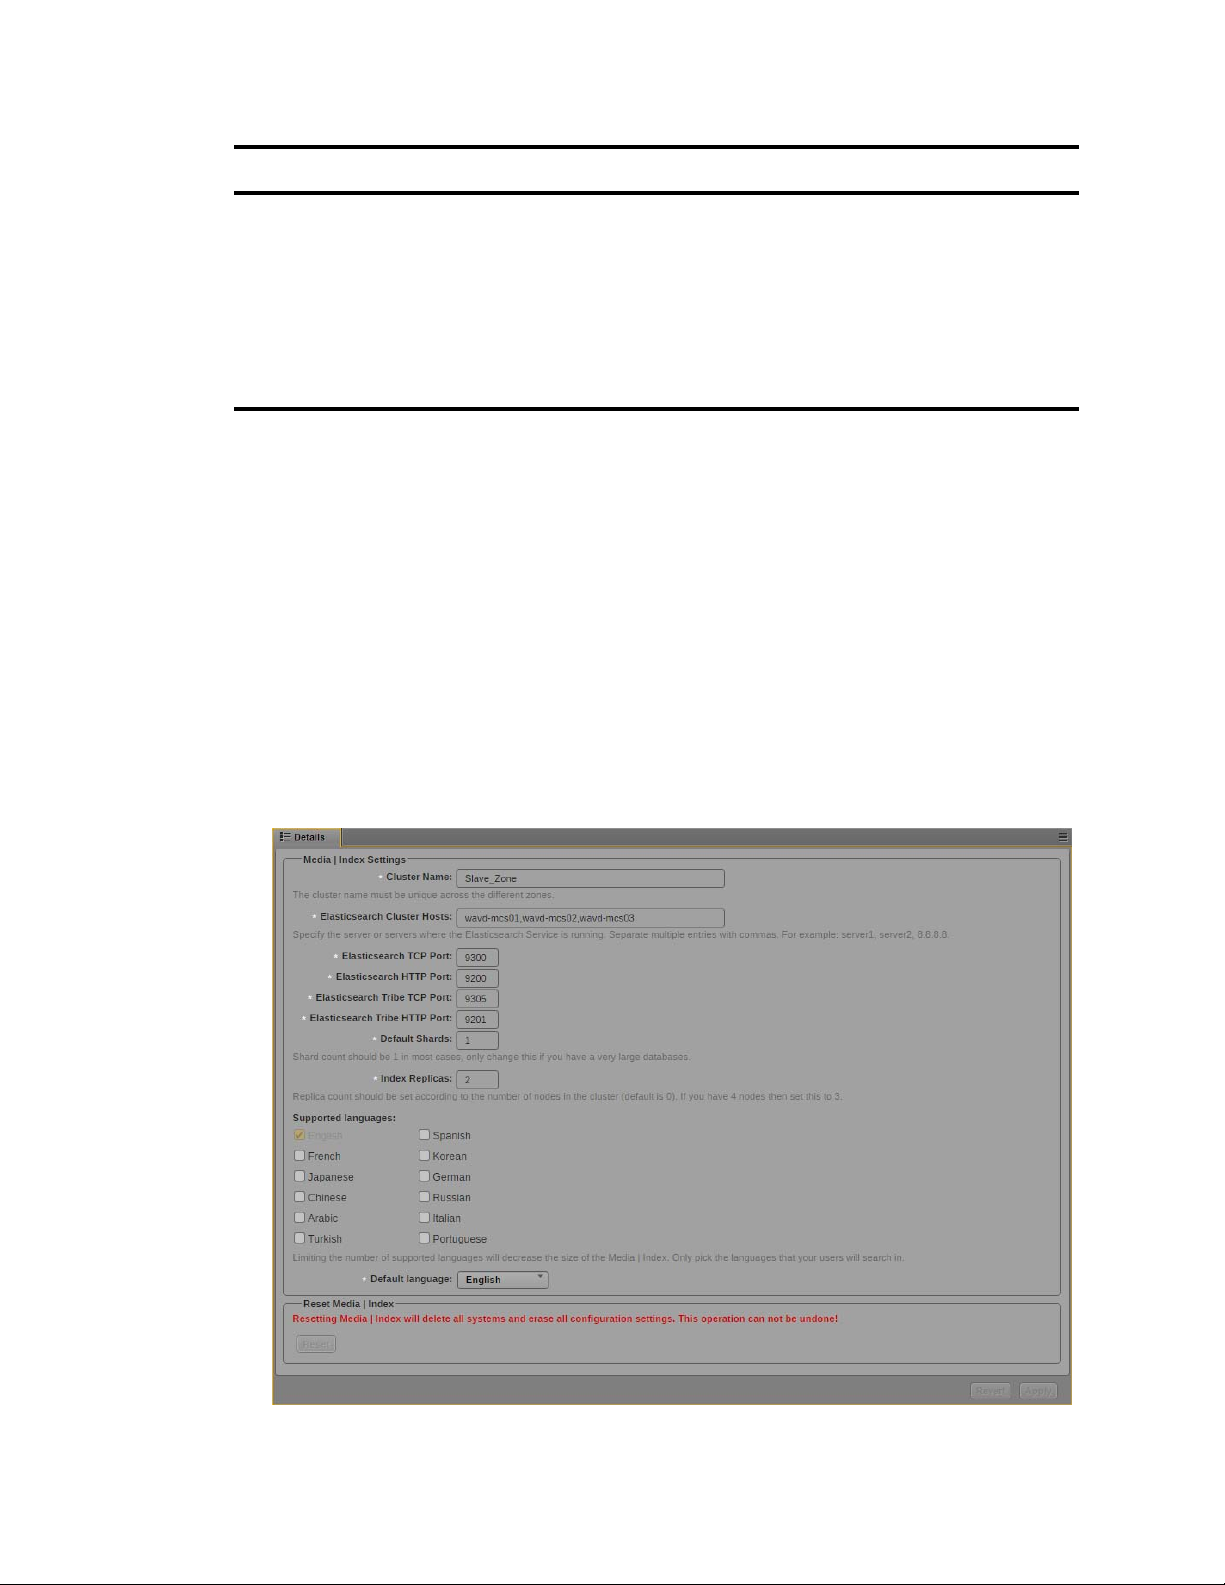
You configure Media Index in the MediaCentral | UX System Settings. You must provide the
following properties in your settings:
• Cluster Name — The “Cluster Name” is simply an identifier for the Media Index configuration
on this system. In a standalone configuration (non-multi-zone), Avid recommends using the local
hostname or site location (e.g. NewYork). In a multi-zone configuration, Avid recommends using
the same value that you used for “Zone Name” during the multi-zone configuration process.
Each zone in a multi-zone configuration requires a unique Media Index Cluster Name.
• Elasticsearch Cluster Hosts — Specify the host name or IP address of the MediaCentral server
running the Elasticsearch service.
:wq
and press Return to write and
• Elasticsearch TCP Port — Specify the TCP port of the Elasticsearch data node, used for binary
connection protocol and for inter-node communications. The default value is 9300. In most cases
you, you do not need to modify this property.
• Elasticsearch HTTP Port — Specify the port of the Elasticsearch data node HTTP API. The
default value is 9200. In most cases you, you do not need to modify this property.
• Elasticsearch Tribe TCP Port — Specify the TCP port of the Elasticsearch tribe node, used for
inter-node communications. The default value is 9305. In most cases you, you do not need to
modify this property.
• Elasticsearch Tribe HTTP Port — Specify the port of the Elasticsearch tribe node HTTP API.
The default value is 9201. In most cases you, you do not need to modify this property
• Default Shards — Specify default shards count. Avid recommends using a default value of 1
shard.
• Default Replicas — Specify default replica count. The default number of replicas is 0, which is
the required replica count for a single-server configuration.
• Supported languages — Lists the languages supported by Media Index.
Media Index supports multiple languages for your search. However, enabling all languages can slow
down searches. You should enable only those languages your users require. If you work with a
multi-zone configuration, you can enable different languages for each zone, and these languages are
then available for all indexes within the specified zone. If possible, your language selection should be
the same across all zones, because a search using one language returns results only from indexes that
you have configured for this language.
13
Page 14
Configuring Media | Index
The following table provides an example of which languages are used in searches within a
multi-zone configuration with different languages enabled for different zones.
Enabled Languages Language Selected for Search Languages in Results
c
Zone 1: English, French
Zone 2: English, Korean
Zone 1: English, French
Zone 2: English, Korean
Zone 1: English, French, Korean
Zone 2: English, French, Korean
English Zone 1: English
Zone 2: English
French Zone 1: French
Zone 2: [no results]
French Zone 1: French
Zone 2: French
If you change your language settings after you have configured Media Index, you must reset
Media Index. This deletes all indexes, which you then need to re-index.
To configure Media Index:
1. Sign in to MediaCentral UX as an administrator.
2. Select System Settings from the Layout selector.
The System Settings layout opens.
3. In the Settings pane select Media Index > Settings.
The Media Index Settings display in the Details pane.
4. Specify the required settings for the following properties:
- Cluster Name (custom name for this zone)
14
Page 15

Validating the Media | Index Configuration
The Cluster Name field must include only letters, numbers, dashes, and underscore symbols.
n
- Elasticsearch Cluster Hosts (hostname or IP address of the local MediaCentral node)
- Elasticsearch TCP Port
- Elasticsearch HTTP Port
- Elasticsearch Tribe TCP Port
- Elasticsearch Tribe HTTP Port
- Default Shards
- Default Replicas
5. Click Apply. The system will display a message on the screen indicating “Update in progress...”.
After a few moments, a second message should appear indicating that Index has been configured
successfully:
6. Click Close.
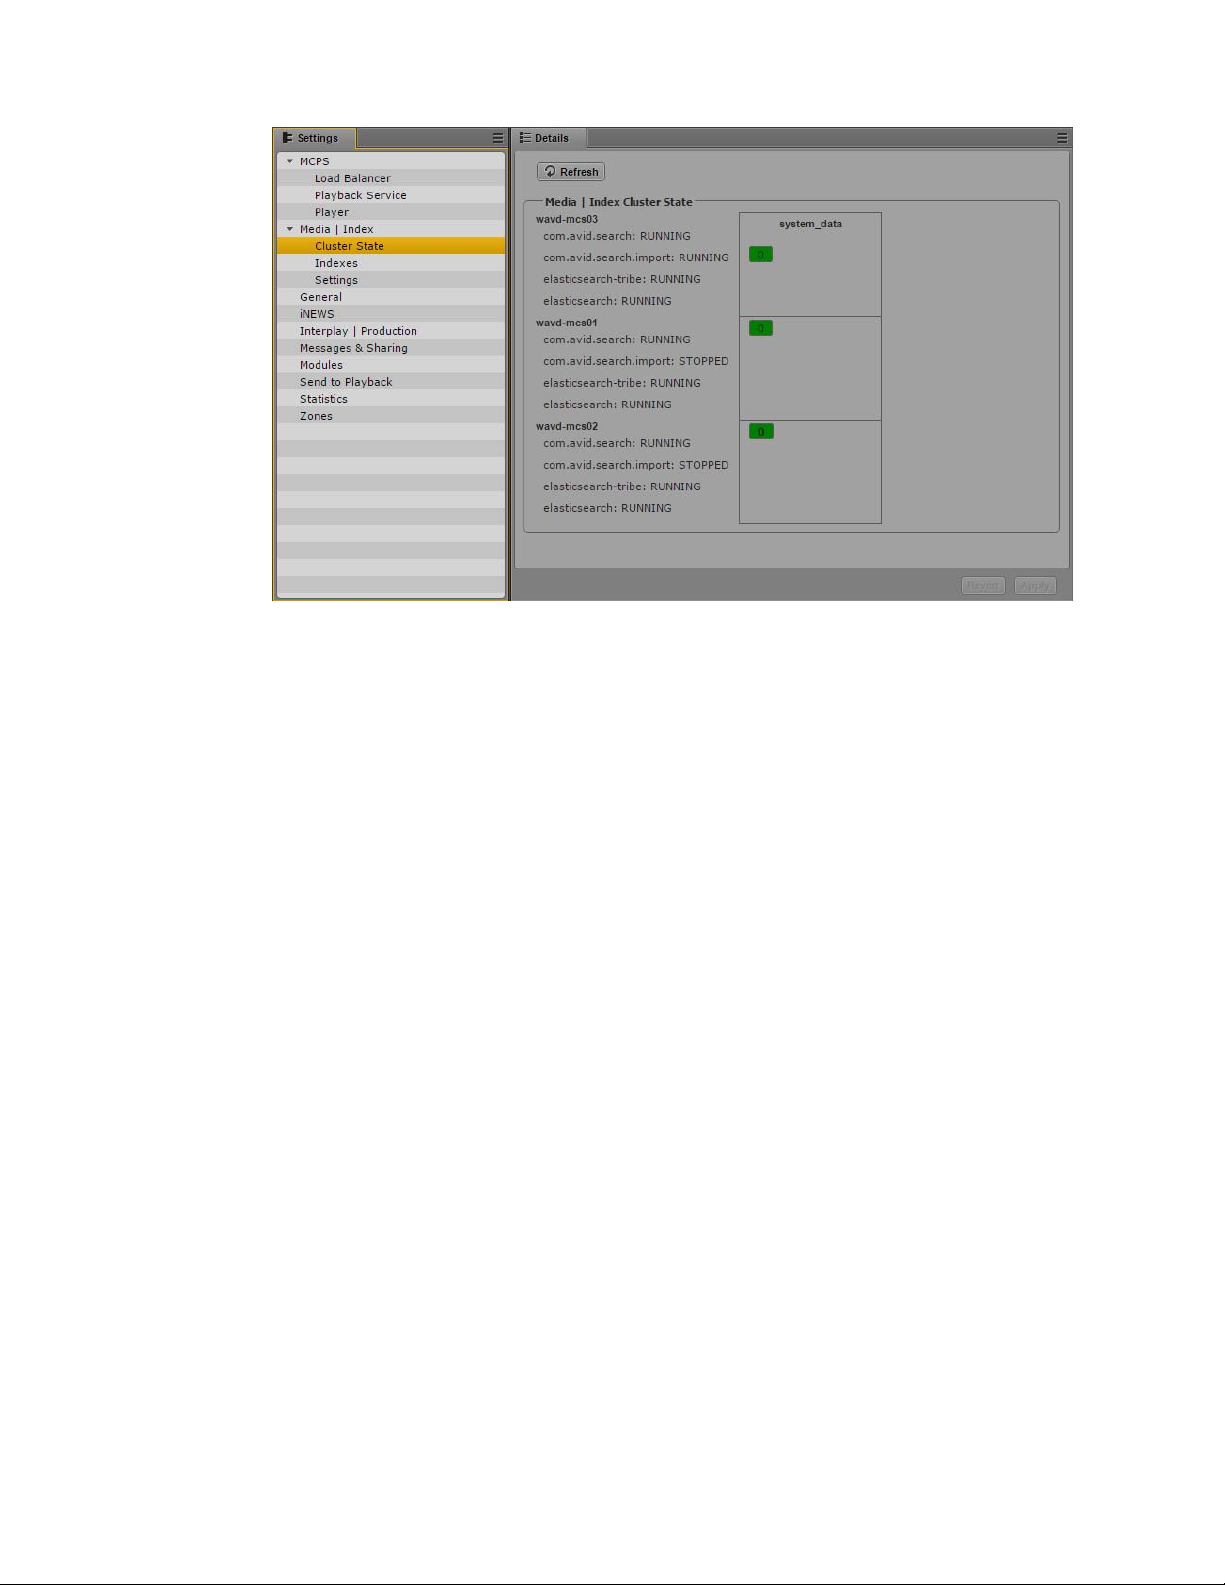
Validating the Media | Index Configuration
You can validate your setup by checking the status of the Media Index services and ensuring that they
are running. Using the Cluster State pane in MediaCentral UX, you can view your node with core
services running and see that the system data index is available.
To check the current status of Media Index:
1. Sign in to MediaCentral UX as an administrator.
2. Select System Settings from the Layout selector.
The System Settings layout opens.
3. In the Settings pane select Media Index > Cluster State.
The Media Index Cluster State display in the Details pane.
Media Index Cluster State pane, with the system_data index and one index available
15
Page 16
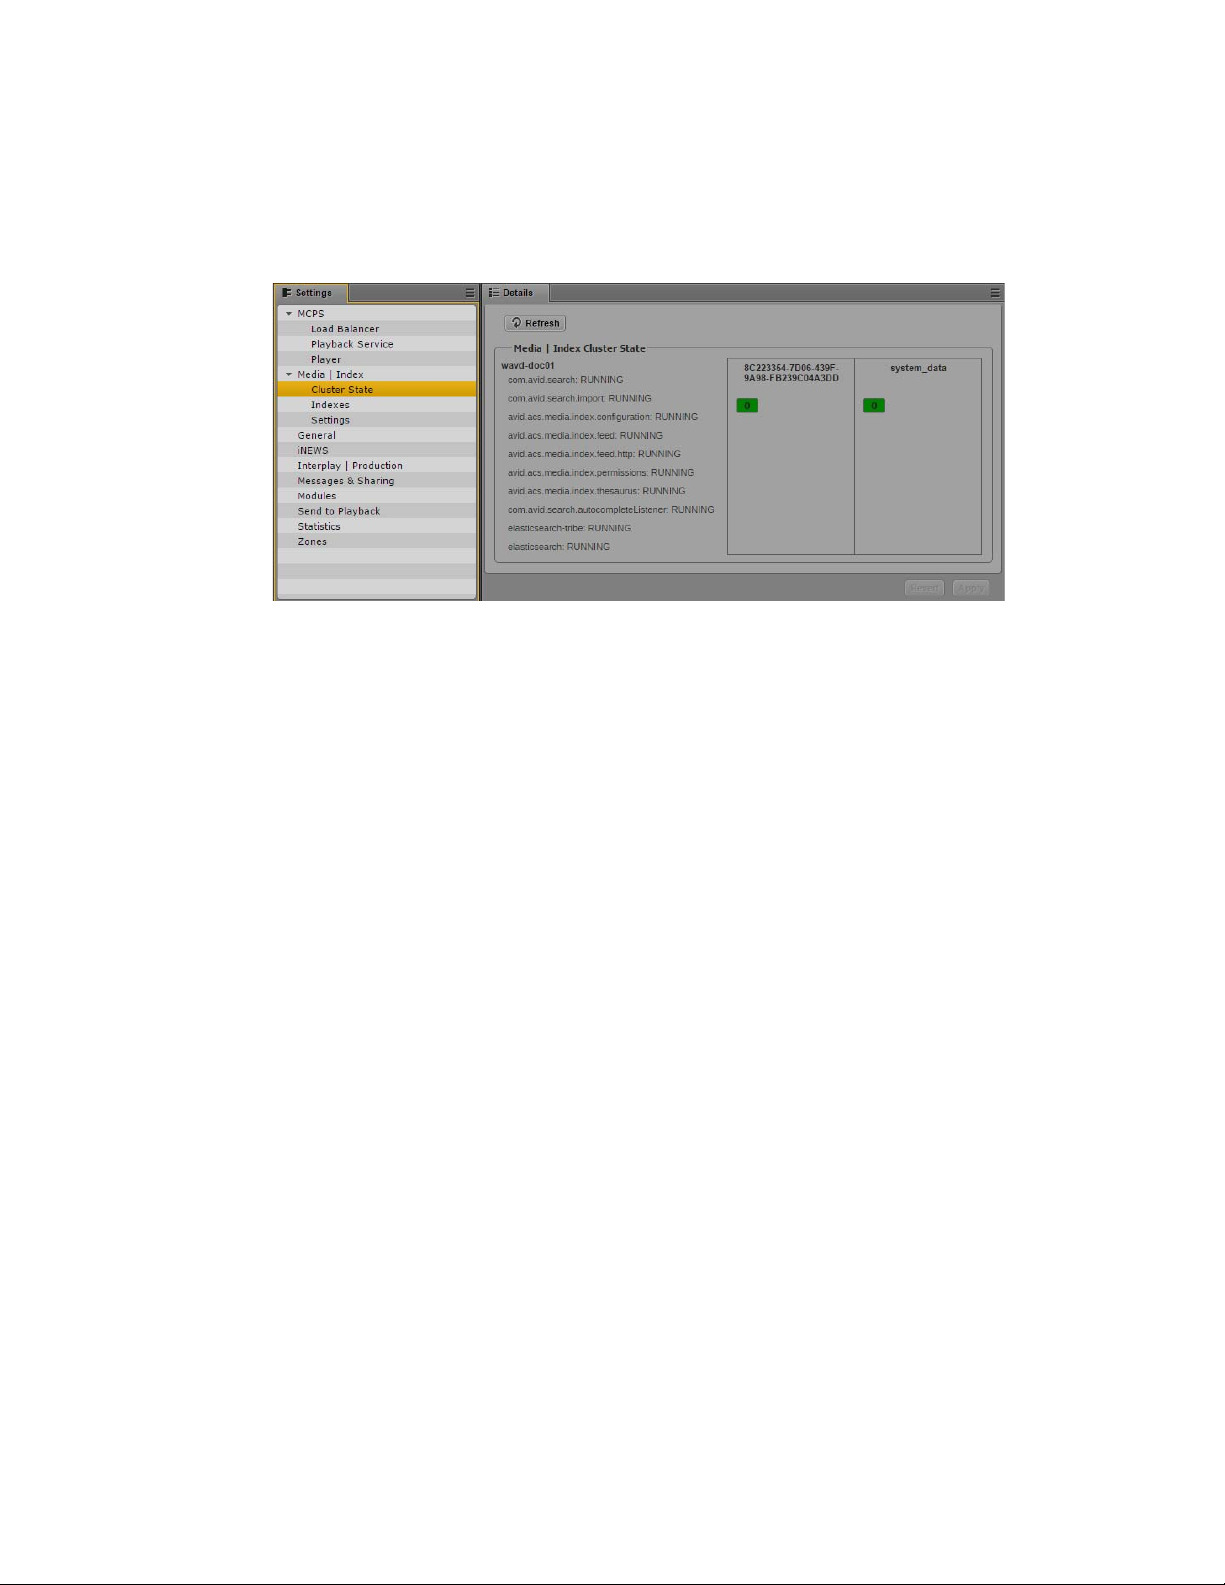
Continuing the Installation
The core services for your configuration must display a status of “Running,” and the system_data
must display the shard count in green.
Later, once you have configured an Interplay Production, MAM or iNEWS system, additional
information on the indexes will appear in this window. The following image shows an index for
an Interplay Production system:
Once configured, the string of characters listed in the index will match the System ID that
appears in the System Settings > Media Index > Indexes pane.
Continuing the Installation
Depending upon your workflow, proceed to one or more of the following sections as applicable:
• If you are installing Media Index in a multi-zone configuration, see “Setting Up Multi-Zone
Search” on page 27.
• If you are integrating with and Interplay Production or Interplay Archive system, you need to
configure and start the Production Engine Bus Connector (PEBCo) service. For information on
PEBCo, see “Installing the Production Engine Bus Connector” on page 34.
• If you are integrating with an Avid iNEWS system, you must configure the iNEWS servers to
synchronize data with the Media Index services. For information, see “Configuring iNEWS for
Media | Index” on page 55.
• If you are integrating with an Interplay MAM system, you must configure the MAM servers to
communicate with Media Index. For more information, see “Setting Up Interplay | MAM Sync
Service” on page 61.
• For additional customization of the Media Index configuration, see “Media | Index Custom
Configuration” on page 87.
16
Page 17

3 Configuring Media | Index for a Cluster
When you set up Media Index, you enable Elasticsearch and several other services related to Media
Index. Every node in an MCS cluster runs an Elasticsearch instance as well as an Elasticsearch-tribe
instance. Elasticsearch and Elasticsearch Tribe are used to index, store and search assets while the
Media Index services add specific Avid logic to Elasticsearch. Tribe instances allow you to perform
read operations against the nodes in multiple zones.
Although the MediaCentral Corosync cluster includes resources that relate to Media Index, the
Corosync cluster and the Elasticsearch cluster do not share configuration details and use different
mechanisms for the clustering.
You can configure Elasticsearch in a federated way so that a tribe instance of one Elasticsearch zone
can be connected to other zones (one or more Elasticsearch data instances). For MediaCentral
multi-zone configurations, this functionality is required The tribe node configuration process
connects multiple systems to each other so that searches from each zone can find assets from all other
remotely connected Elasticsearch zones.
When you create an index, Elasticsearch creates a number of “primary shards” and “replicas,” each
shard contains indexed data and each replica contains a copy of that data. You use shards and replicas
to spread the search load and provide redundancy.
Shard Count and Usage
Elasticsearch shards are available in two varieties: primaries and replicas. The key difference is that
primary shards allow for both read and write while replica shards are read-only.
During the configuration of Media Index, you configure the number of (primary) shards and replicas
through the MediaCentral UX System Settings. In a single-server configuration, a single shard is
configured with zero replicas. Since there is only one server, there is little benefit to having a replica
of the shard on the same system.
In cluster configurations, Avid recommends setting the shard count to one and the replica count to
one fewer than the number of cluster nodes to accommodate fail-over safety and load balancing. For
example, if your configuration includes a cluster with five nodes, set the replica count to four. This
allows for one node to maintain the primary shard with a replica of all your indexed data on the
remaining nodes. This horizontal scaling allows the load to be distributed among the nodes which
increases efficiency and enables redundancy.
Page 18
Shard Count and Usage
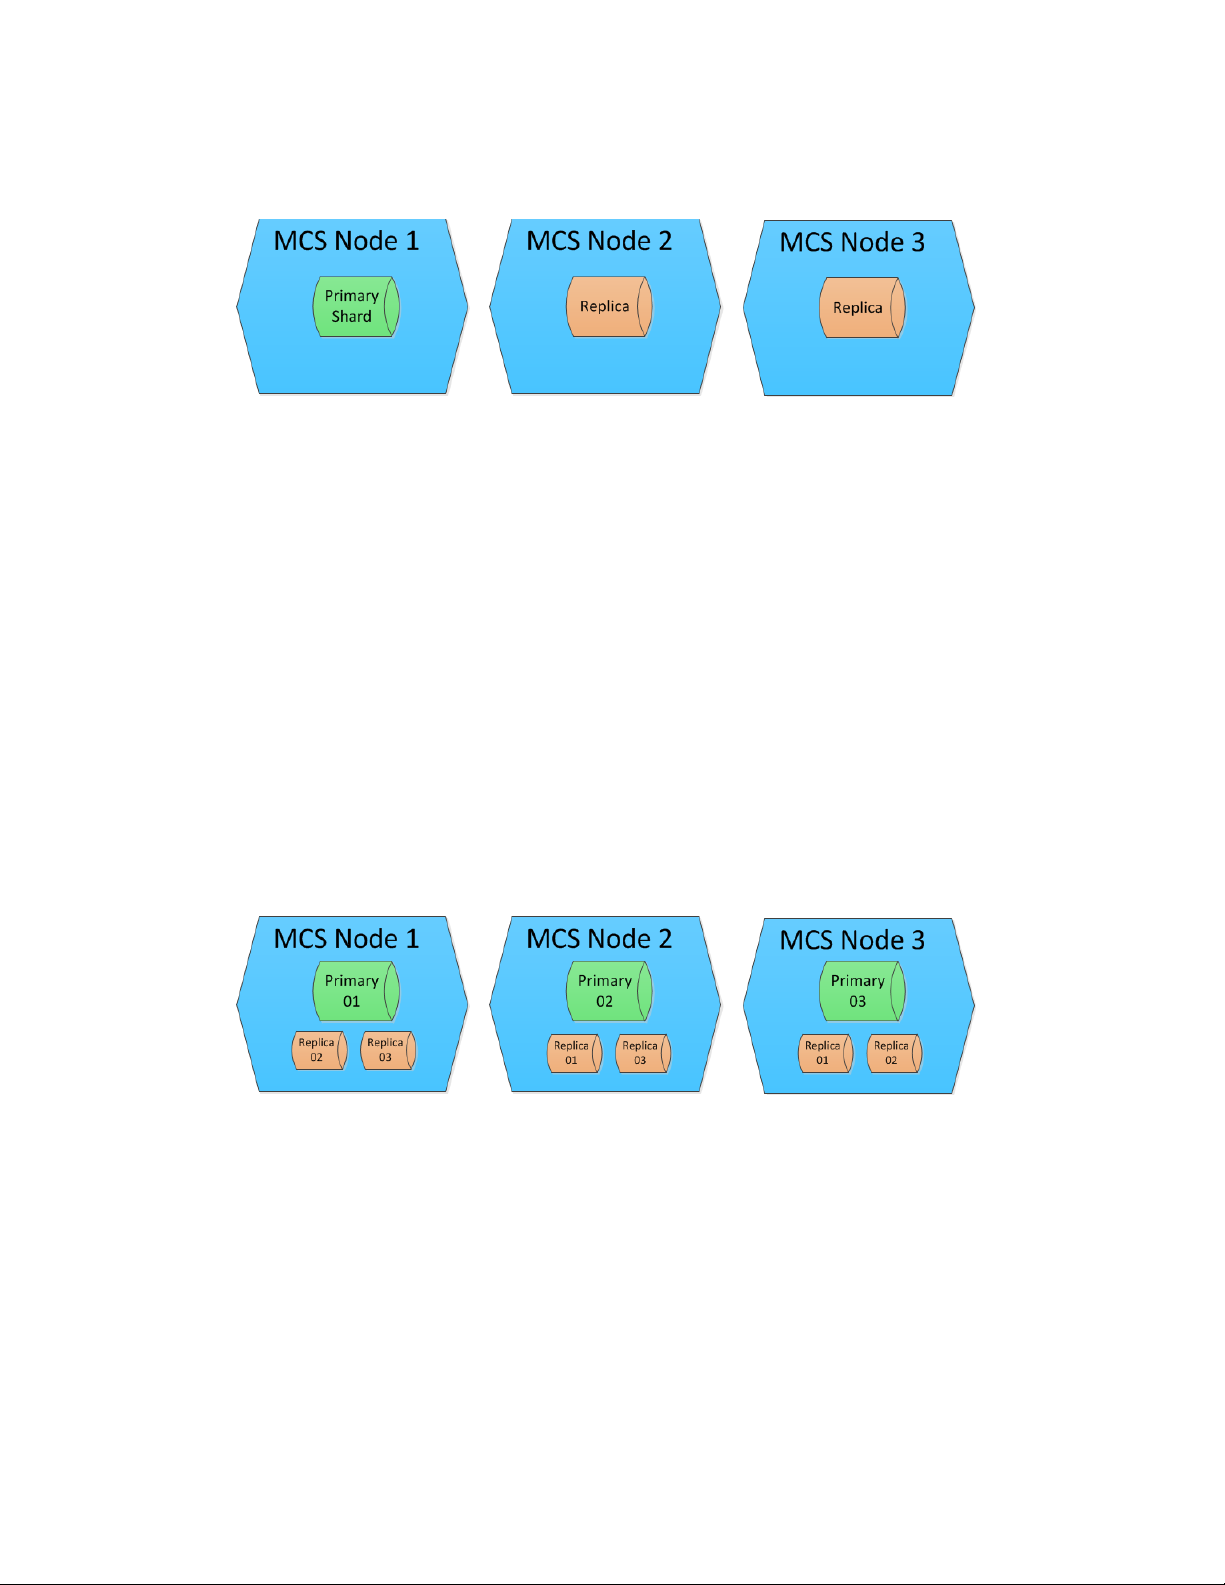
Configuring a Single Primary Shard
Consider a MediaCentral cluster consisting of three nodes, as shown below:
In this configuration, the MediaCentral UX System Settings were configured for:
• 1 Default (primary) Shard
• 2 Index Replicas
Elasticsearch intelligently locates the shards across the three nodes. In this example the primary
shard happens to be located on Node 1, but that might not always the case. A single primary shard,
coupled with replicas, provides redundancy and flexibility for your index.
In most situations, a single primary shard provides enough resources to host your entire index.
MediaCentral systems that are indexing very large databases, such as large Interplay MAM
deployments, can increase the shard count to decrease the amount of data per shard. In such
configurations, an MCS cluster is used to spread the increased load of multiple primary shards across
the cluster nodes.
Configuring Multiple Primary Shards
In the following example, the System Settings in the same MediaCentral cluster have been
configured for 3 primary shards and 2replica shards:
As previously stated, this configuration spreads the load across multiple systems which increases
database efficiency and enables additional redundancy. Notice that the primary shard and its replica
are never co-located on the same server. The number of primary shards in your configuration affects
the amount of data that can be stored in your index, although the type of data and metadata affects the
size of the index as well.
It is important to plan your configuration early in the process. Once configured, users can add
replicas to the configuration, but primary shards cannot be added without reconfiguring and
resynchronizing the indexes which can be a time consuming process. For example, if you start with
two server nodes but know that at some point you will scale your configuration up to six nodes, you
18
Page 19
Shard Count and Usage
might want to configure Media Index initially for six shards. As the additional nodes are added to the
configuration, Elasticsearch relocates the primary shards to the new nodes so that the shards are
evenly distributed across the six servers (one shard on each node).
Increasing the amount of shards without increasing the number of nodes on the system adds load to
n
the system resources. For systems with spinning disks, there should ideally be nor more than two
shards per node. Only increase the number of primary shards if you know that additional nodes will
be added in the near future or if directed to do so by Avid.
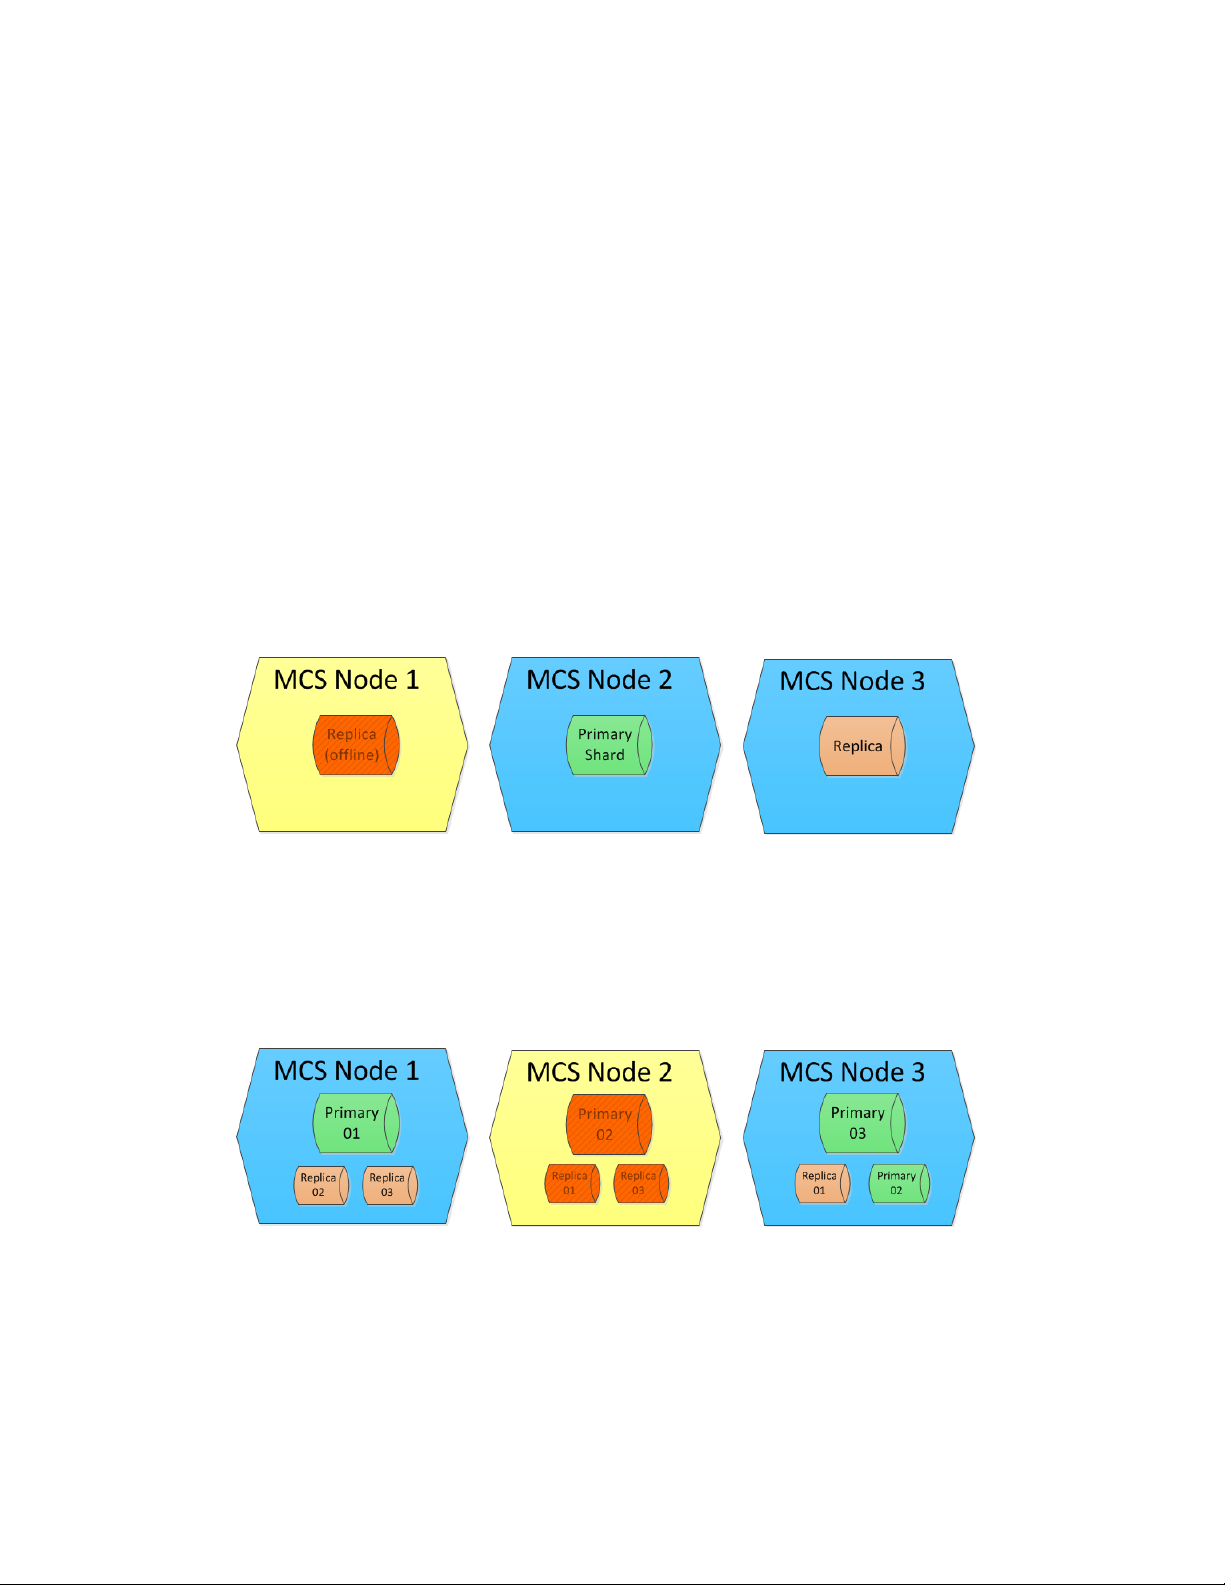
Explaining Failover
If a primary node is lost, it must have a replica for the system to continue to operate normally. If
available the former read-only replica shard is automatically promoted to primary, providing
uninterrupted read/write access to the Elasticsearch database. If a replica is not available, Indexed
searches will fail until the node containing the missing sharded is repaired. Configuring multiple
shards and replicas gives your index more stability in case of a failure or if you need to take one or
more nodes offline for maintenance.
Example 1: In this illustration, Node 1 has failed. Elasticsearch dynamically promoted the replica of
the shard on Node 2 to primary. Since Node 2 and Node 3 both contain a replica of Node 1,
Elasticsearch decides which replica becomes the primary based on an internal algorithm.
Note that in this configuration, the system is still fully redundant. The primary shard has a replica on
Node 3. Since replicas load-balance read requests, it is possible that users might see a small reduction
in search performance.
Example 2: Similar to the previous illustration, Node 2 was taken offline which resulted in
Elasticsearch dynamically promoting the replica shard on Node 3 to primary.
Note that in this configuration, the system is still fully redundant. Each primary shard has a replica on
another node. Node 3 now hosts two primary shards.
19
Page 20
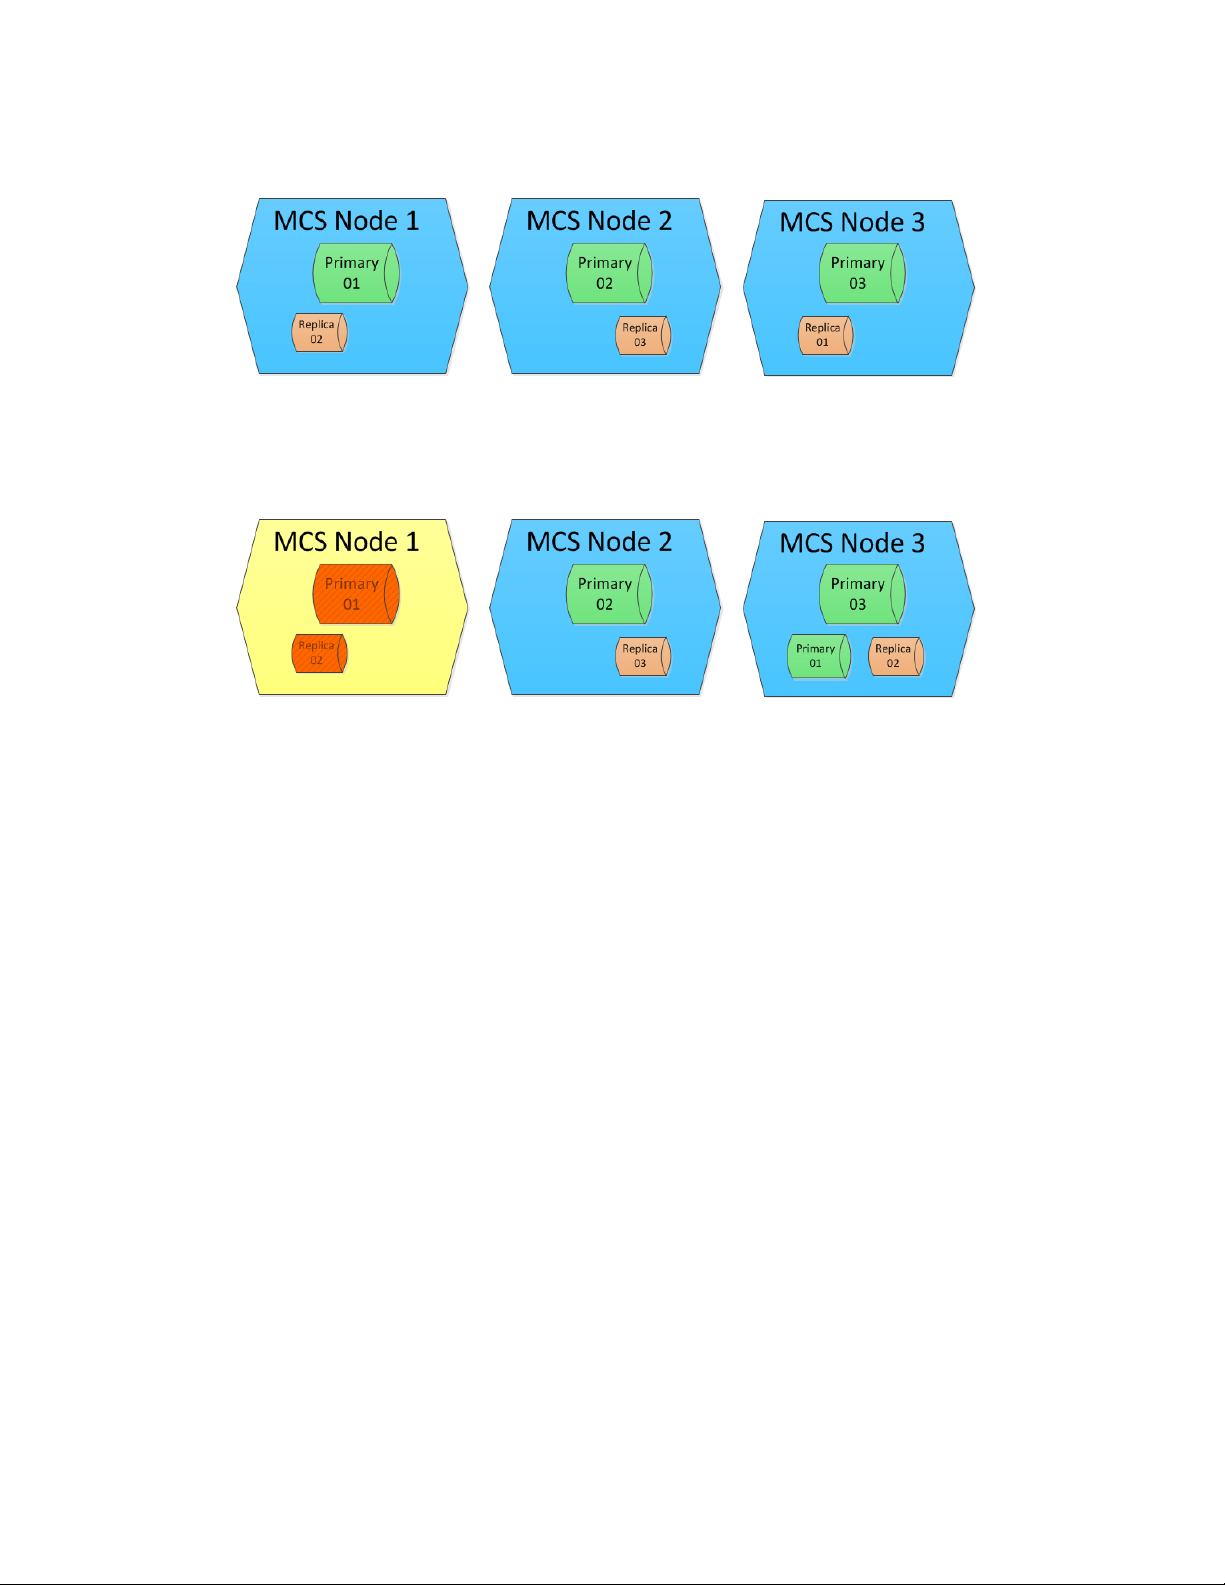
Preparing for the Media | Index Configuration
Example 3: In this final example, MediaCentral has been configured for 3 primary shards and 1
replica:
If Node 1 goes offline, Replica 1 on Node 3 becomes a primary shard and the index remains fully
functional. However, since Node 1 also hosted the replica for Node 2, Elasticsearch then re-creates
the missing replica, as shown in the following illustration:
If Node 2 goes offline, the index remains functional because Node 3 contains Shards 1 and 3, as well
as a replica of Shard 2. However, if Node 2 goes offline before Elasticsearch re-creates the replica on
Node 3, then the index is incomplete and cannot function.
Preparing for the Media | Index Configuration
Prior to configuring Media Index on a MediaCentral cluster, it is good practice to check that the
cluster is healthy. The Cluster Resource Monitor,
To monitor the cluster:
1. Log in to any node in the cluster and open the Cluster Resource Monitor:
crm_mon -f
2. If any failure are listed, use the cleanup command to reset the fail-counts:
crm resource cleanup <resource>
Where <resource> is the name of the Pacemaker resource you want to clean — for example,
avid-acs-search.
3. The Cluster Resource Monitor is needed again in the following process. If desired, you can leave
the monitor tool running or close it and reopen it again later.
To close the Cluster Resource Monitor, press CTRL-C on a Windows keyboard or CMD-C on a
Mac keyboard.
crm_mon
, is used to verify this information.
For more information on using the cluster resource monitor utility, see “Cluster Resource Monitor”
n
in the MediaCentral Platform Services Concepts and Clustering Guide.
20
Page 21

Adding Resources to the Cluster
When you install a new MediaCentral system, all Media Index services are stopped except for the
“avid-acs-media-index-configuration” service. After issuing the setup command, as detailed in the
following process, additional services are started and resources are added to the cluster.
To add resources to the cluster:
1. Log in to any node in the cluster as root and type the following command:
/opt/avid/cluster/bin/search-cluster setup
The necessary resources are added to the cluster configuration, and the related services are
started. The following example shows the new cluster resources:
pgpool (lsb:pgpool): Started wavd-mcs01
pgpoolchecker (lsb:pgpoolchecker): Started wavd-mcs01
Clone Set: elasticsearchEverywhere [elasticsearch]
Started: [ wavd-mcs01 wavd-mcs02 wavd-mcs03 ]
Clone Set: elasticsearchTribeEverywhere [elasticsearchTribe]
Started: [ wavd-mcs01 wavd-mcs02 wavd-mcs03 ]
Clone Set: AvidSearchConfigEverywhere [AvidSearchConfig]
Started: [ wavd-mcs01 wavd-mcs02 wavd-mcs03 ]
If the cluster is not detected, the following message is displayed:
The cluster services are either down or the cluster is not yet configured.
Please make sure that the corosync and pacemaker services are running
correctly and that the cluster is properly configured before rerunning the
search-cluster script.
Adding Resources to the Cluster
2. If not already running, open the Cluster Resource Monitor to verify that the resources have been
added successfully:
crm_mon -f
When configuring a cluster for Media Index a number of new resources are added to Pacemaker,
making it difficult to see the fail-counts at the end of the output. If this is the case, you can
modify the command with a “1” which tells the Cluster Resource Monitor to print the output to
the screen once and exit:
crm_mon -f1
3. If any failure are listed, use the cleanup command to reset the fail-counts:
crm resource cleanup <resource>
Where <resource> is the name of the Pacemaker resource you want to clean — for example,
avid-acs-search.
4. Press CTRL-C on a Windows keyboard or CMD-C on a Mac keyboard to exit the crm_mon
utility.
Configuring Media | Index
You configure Media Index in the MediaCentral | UX System Settings. You must provide the
following properties in your settings:
• Cluster Name — This name has no direct relation to the virtual host name given to the Corosync
cluster. The “Cluster Name” is simply an identifier for the Media Index configuration on this
system. In a standalone configuration (non-multi-zone), Avid recommends using the Corosync
21
Page 22

Configuring Media | Index
cluster hostname or site location (e.g. NewYork). In a multi-zone configuration, Avid
recommends using the same value that you used for “Zone Name” during the multi-zone
configuration process. Each zone in a multi-zone configuration requires a unique Media Index
Cluster Name.
c
Avid recommends that you not change the Cluster Name after your initial configuration. If you
change the cluster name, Elasticsearch creates a new data folder on the next restart. While the
index data is not lost, any indexes that existed before changing the cluster name fail to appear
in your configuration and the information in them is not accessible. When you work in a
multi-zone set-up, you should consider which cluster names you plan to use in all zones and not
change them after the indexing process has started.
• Elasticsearch Cluster Hosts — Specify the hostname or IP address of each MediaCentral server
running the Elasticsearch service. Each must be separated by a comma.
• Elasticsearch TCP Port — Specify the TCP port of the Elasticsearch data node, used for binary
connection protocol and for inter-node communications. The default value is 9300. In most cases
you, you do not need to modify this property.
• Elasticsearch HTTP Port — Specify the port of the Elasticsearch data node HTTP API. The
default value is 9200. In most cases you, you do not need to modify this property.
• Elasticsearch Tribe TCP Port — Specify the TCP port of the Elasticsearch tribe node, used for
inter-node communications. The default value is 9305. In most cases you, you do not need to
modify this property.
• Elasticsearch Tribe HTTP Port — Specify the port of the Elasticsearch tribe node HTTP API.
The default value is 9201. In most cases you, you do not need to modify this property
• Default Shards — Specify the number of default shards. Avid recommends using a default value
of 1 shard. This only changes if indexing a very large database such as an Interplay MAM
system. If you are considering altering the number of default shards, consult your Avid
representative before making this change.
c
• Default Replicas — Specify default replica count. The default number of replicas is 0, which is
the required replica count for a single-server configuration. In an MCS cluster installation, you
must set the default number of replicas to a number greater than zero.
A replica count greater than zero is necessary in a cluster configuration in order to ensure that
your data gets distributed properly and remains safe. For maximum security, you should set
the replica count to a value of <number of MCS cluster nodes> minus 1. Do not set the replica
count to a value greater than this. For example, if your configuration consists of two nodes,
then set the replica count to 1.
• Supported languages — Lists the languages supported by Media Index.
Media Index supports multiple languages for your search. However, enabling all languages can slow
down searches. You should enable only those languages your users require. If you work with a
multi-zone configuration, you can enable different languages for each zone, and these languages are
then available for all indexes within the specified zone. If possible, your language selection should be
the same across all zones, because a search using one language returns results only from indexes that
you have configured for this language. The following table provides an example of which languages
are used in searches within a multi-zone configuration with different languages enabled for different
zones.
22
Page 23
Configuring Media | Index
Enabled Languages Language Selected for Search Languages in Results
c
Zone 1: English, French
Zone 2: English, Korean
Zone 1: English, French
Zone 2: English, Korean
Zone 1: English, French, Korean
Zone 2: English, French, Korean
English Zone 1: English
Zone 2: English
French Zone 1: French
Zone 2: [no results]
French Zone 1: French
Zone 2: French
If you change your language settings after you have configured Media Index, you must reset
Media Index. This deletes all indexes, which you then need to re-index.
When you set these values and apply your changes, Media Index writes to several configuration files
and restarts cluster services and resources. It also creates the system_data index. This process might
take some time, depending on your cluster configuration.
To configure Media Index:
1. Sign in to MediaCentral UX as an administrator.
2. Select System Settings from the Layout selector.
The System Settings layout opens.
3. In the Settings pane select Media Index > Settings.
The Media Index Settings display in the Details pane.
23
Page 24

Validating the Media | Index Configuration
4. In the Supported Languages section, select the languages you want to make available for
searching. You can select as many languages as needed, but Avid recommends you select only
those languages your users are likely to use in a search.
5. Click the Default Language menu, and select the default language for indexed searches.
6. Specify the required settings for the following properties:
- Cluster Name (custom name for this zone)
The Cluster Name field must include only letters, numbers, dashes, and underscore symbols.
n
- Elasticsearch Cluster Hosts
- Elasticsearch TCP Port
- Elasticsearch HTTP Port
- Elasticsearch Tribe TCP Port
- Elasticsearch Tribe HTTP Port
- Default Shards
- Default Replicas
7. Click Apply. The system will display a message on the screen indicating “Update in progress...”.
After a few moments, a second message should appear indicating that Index has been configured
successfully:
8. Click Close.
Validating the Media | Index Configuration
You can validate your setup by checking the status of the Media Index services and ensuring that they
are running. Using the Cluster State pane in MediaCentral UX, you can view all nodes with core
services running and see that the system data index is available. You should also use the Cluster
Resource Monitor utility, crm_mon, to verify the status and failure counts of the MediaCentral
services. Any failures should be reset or investigated.
For information on using the cluster resource manager, see “Monitoring Services and Resources” in
n
the MediaCentral Platform Services Installation and Configuration Guide.
To check the current status of Media Index:
1. Sign in to MediaCentral UX as an administrator.
2. Select System Settings from the Layout selector.
The System Settings layout opens.
3. In the Settings pane select Media Index > Cluster State.
The Media Index Cluster State displays in the Details pane.
24
Page 25
Validating the Media | Index Configuration
The core services for your configuration must display a status of “Running,” and the indexes
must display the shard count in green. Note that the avid-acs-search-import service is installed
on all cluster nodes, but is only ever active on one node.
To monitor the fail count within the cluster:
1. Log in to any node in the cluster as root and verify the cluster fail counts by typing the following
command:
crm_mon -f
When configuring a cluster for Media Index a number of new resources are added to Pacemaker,
making it difficult to see the fail-counts at the end of the output. If this is the case, you can
modify the command with a “1” which tells the command to print the output to the screen once
and exit:
crm_mon -f1
Additional “AvidSearch” resources will have been added to the cluster.
2. Use the cleanup command to reset any observed failure counts:
crm resource cleanup <resource>
<resource> is the name of the resource you want to monitor — for example, avid-acs-search.
For more information on using the cluster resource monitor utility, see “Cluster Resource Monitor”
n
in the MediaCentral Platform Services Concepts and Clustering Guide.
25
Page 26

Continuing the Installation
Depending upon your workflow, proceed to one or more of the following sections as applicable:
• If you are installing Media Index in a multi-zone configuration, see “Setting Up Multi-Zone
Search” on page 27.
• If you are integrating with and Interplay Production or Interplay Archive system, you need to
configure and start the Production Engine Bus Connector (PEBCo) service. For information on
PEBCo, see “Installing the Production Engine Bus Connector” on page 34.
• If you are integrating with an Avid iNEWS system, you must configure the iNEWS servers to
synchronize data with the Media Index services. For information, see “Configuring iNEWS for
Media | Index” on page 55.
• If you are integrating with an Interplay MAM system, you must configure the MAM servers to
communicate with Media Index. For more information, see “Setting Up Interplay | MAM Sync
Service” on page 61.
• For additional customization of the Media Index configuration, see “Media | Index Custom
Configuration” on page 87.
Once configured, taking a cluster node configured for Media Index offline requires special
procedures. for more information, see “Taking Nodes Offline in a MediaCentral Cluster” on page 83.
Continuing the Installation
26
Page 27

4 Setting Up Multi-Zone Search
In a multi-zone MCS configuration, each zone runs its own Elasticsearch cluster with its own
Elasticsearch Cluster Name. This is true for MCS single-servers as well as MCS servers in a
Corosync cluster configuration. Single servers run a Elasticsearch cluster consisting of one node.
These different Elasticsearch clusters are then connected to each other using the Elasticsearch tribe
service. For example, in a two zone configuration, if you call one cluster “Zone1” and another cluster
“Zone2,” you configure the Media Index Cluster Name to Zone1 on all nodes in one MCS cluster and
to Zone2 on all nodes in the second MCS cluster.
Avid recommends that you name each cluster using the same value that you used for “Zone Name”
n
during the multi-zone configuration process.
You can configure the MCS multi-zones before or after starting the Media Index multi-zone
configuration. However, if you complete your Media Index multi-zone configuration without having
previously configured your MCS multi-zones, you cannot play back remote assets until the
multi-zone configuration process is complete. Avid recommends configuring and testing the
multi-zone configuration before configuring Media Index.
If you need to change the Media Index Cluster Name, you must make the change before proceeding
with the Media Index multi-zone configuration process detailed in this chapter. For information on
changing the Cluster Name, see “Modifying the Media | Index System Settings” on page 89.
c
Avid recommends that you not change the Cluster Name after your initial configuration. If you
change the cluster name, Elasticsearch creates a new data folder on the next restart. While the
index data is not lost, any indexes that existed before changing the cluster name fail to appear
in your configuration and the information in them is not accessible. When you work in a
multi-zone set-up, you should consider which cluster names you plan to use in all zones and not
change them after the indexing process has started.
For information for configuring MCS for multi-zones, see the MediaCentral Platform Services
Installation and Configuration Guide. For information on user management and multi-zones in
MediaCentral UX, see “Managing Multi-Zone Environments” in the Avid MediaCentral | UX
Administration Guide.
Setting the Zone Bindings
To join two or more individual zones in a multi-zone setup, you must update the Elasticsearch tribe
configuration on all of your tribe nodes and set bindings for all Elasticsearch clusters. If one or more
zones share the same Cluster Name, you also have to reconfigure the Cluster Name so that each zone
has a unique name. This requires changes in the Elasticsearch and the Elasticsearch tribe.
You must update the Elasticsearch configuration file — /etc/elasticsearch-tribe/elasticsearch.yml —
n
on all cluster nodes in each of the zones.
Page 28

Setting the Zone Bindings
To update the Elasticsearch tribe configuration:
1. Using the Linux text editor, vi, open the Elasticsearch tribe configuration file for editing:
vi /etc/elasticsearch-tribe/elasticsearch.yml
2. Add the following lines in the configuration file to add the binding information that allows the
tribe to connect to another Media Index cluster:
tribe.<RemoteClusterName>.cluster.name: <RemoteClusterName>
tribe.<RemoteClusterName>.transport.tcp.port: <port>
Where the following variables are used:
<RemoteClusterName>
-
the MediaCentral UX System Settings of the remote zone.
<port>
-
Avid recommends using port number 9313 as the starting port. If additional zones are added
to your configuration, increment the port number by one for each zone (9314, 9315, and so
on). Avid recommends using sequential port numbers for clarity, but this is not required.
You must use a space between the colon (:) and your custom variable for each of these lines.
n
3. Add the following line to configure Unicast for tribe node binding:
tribe.<RemoteClusterName>.discovery.zen.ping.unicast.hosts:
- "<remoteMCSNode1>:9300"
- "<remoteMCSNode2>:9300"
...
- "<remoteMCSNodeN>:9300"
Where the following variables are used:
<RemoteClusterName>
-
the MediaCentral UX System Settings of the remote zone.
-<
name or IP address of an MCS server in the remote zone. If the remote zone is a single
server, only one line is added. If the remote zone is a cluster, a line is added for each node.
- The
transport.tcp.port
remoteMCSNode1
- This value represents the Media Index Cluster Name specified in
number must be unique for each Media Index cluster.
- This value represents the Media Index Cluster Name specified in
> through <
remoteMCSNodeN
> - Each value represents the short host
When adding this information to the configuration file, strict adherence to formatting is important.
n
You must add two spaces before the dash “-” and one space after the dash. Do not add a space
between the node name, the colon and the port number.
4. Save and exit the vi session:
Press <ESC> and type:
5. If you have a cluster configuration, repeat these steps for each node within the cluster.
6. Once complete, restart all Elasticsearch tribe nodes affected by your configuration changes:
t For single-server configurations, type the following command:
service elasticsearch-tribe restart
t For cluster configurations, type the following command on one of the nodes in your cluster:
crm resource restart elasticsearchTribeEverywhere
The following examples show an environment with three zones, where the first zone is a single
server, the second zone is a three node cluster and the third zone is another single server.
:wq
28
Page 29

Setting the Zone Bindings
Example from the master zone of the multi-zone configuration:
[root@wavd-doc01 ~]# cat /etc/elasticsearch-tribe/elasticsearch.yml
discovery.zen.ping.multicast.enabled: false
tribe.local.cluster.name: Master_Zone
tribe.local.transport.tcp.port: 9312
tribe.local.discovery.zen.ping.unicast.hosts:
- "wavd-doc01:9300"
http.port: 9201
transport.tcp.port: 9305
node.name: wavd-doc01-tribe
tribe.Slave_Zone.cluster.name: Slave_Zone
tribe.Slave_Zone.transport.tcp.port: 9313
tribe.Slave_Zone.discovery.zen.ping.unicast.hosts:
- "wavd-mcs01:9300"
- "wavd-mcs02:9300"
- "wavd-mcs03:9300"
tribe.3rd_Zone.cluster.name: 3rd_Zone
tribe.3rd_Zone.transport.tcp.port: 9314
tribe.3rd_Zone.discovery.zen.ping.unicast.hosts:
- "wavd-news:9300"
Example from the first slave zone of the multi-zone configuration:
[root@wavd-mcs01 ~]# cat /etc/elasticsearch-tribe/elasticsearch.yml
discovery.zen.ping.multicast.enabled: false
tribe.local.cluster.name: Slave_Zone
tribe.local.transport.tcp.port: 9312
tribe.local.discovery.zen.ping.unicast.hosts:
- "wavd-mcs01:9300"
- "wavd-mcs02:9300"
- "wavd-mcs03:9300"
http.port: 9201
transport.tcp.port: 9305
node.name: wavd-mcs01-tribe
tribe.Master_Zone.cluster.name: Master_Zone
tribe.Master_Zone.transport.tcp.port: 9313
tribe.Master_Zone.discovery.zen.ping.unicast.hosts:
- "wavd-doc01:9300"
tribe.3rd_Zone.cluster.name: 3rd_Zone
tribe.3rd_Zone.transport.tcp.port: 9314
tribe.3rd_Zone.discovery.zen.ping.unicast.hosts:
- "wavd-news:9300"
Example from the second slave zone of the multi-zone configuration:
[root@wavd-news ~]# cat /etc/elasticsearch-tribe/elasticsearch.yml
discovery.zen.ping.multicast.enabled: false
tribe.local.cluster.name: 3rd_Zone
tribe.local.transport.tcp.port: 9312
tribe.local.discovery.zen.ping.unicast.hosts:
- "wavd-news:9300"
29
Page 30

http.port: 9201
transport.tcp.port: 9305
node.name: wavd-news-tribe
tribe.Master_Zone.cluster.name: Master_Zone
tribe.Master_Zone.transport.tcp.port: 9313
tribe.Master_Zone.discovery.zen.ping.unicast.hosts:
- "wavd-doc01:9300"
tribe.Slave_Zone.cluster.name: Slave_Zone
tribe.Slave_Zone.transport.tcp.port: 9314
tribe.Slave_Zone.discovery.zen.ping.unicast.hosts:
- "wavd-mcs01:9300"
- "wavd-mcs02:9300"
- "wavd-mcs03:9300"
Setting the Zone Bindings
30
Page 31
Validating the Elasticsearch Configuration
Validating the Elasticsearch Configuration
When you finish updating the Elasticsearch configuration file, you can validate your setup by
checking the Elasticsearch information for each server.
The example in this section is a multi-zone system consisting of the following:
• wavd-doc01: Multi-zone / master zone, single server
• wavd-news: Multi-zone / slave zone, single server
• wavd-mcs01 - wavd-mcs03: Multi-zone / slave zone, 3-node cluster
To validate the Elasticsearch configuration:
1. Open a browser and navigate to http://<server_name>:9200/_plugin/head, where sever_name is
the host name or IP address of the server in one zone in your configuration — for example, the
local zone.
The Elasticsearch head plug-in Web page opens in your browser.
2. Verify that the local zone and the bindings between zones are listed.
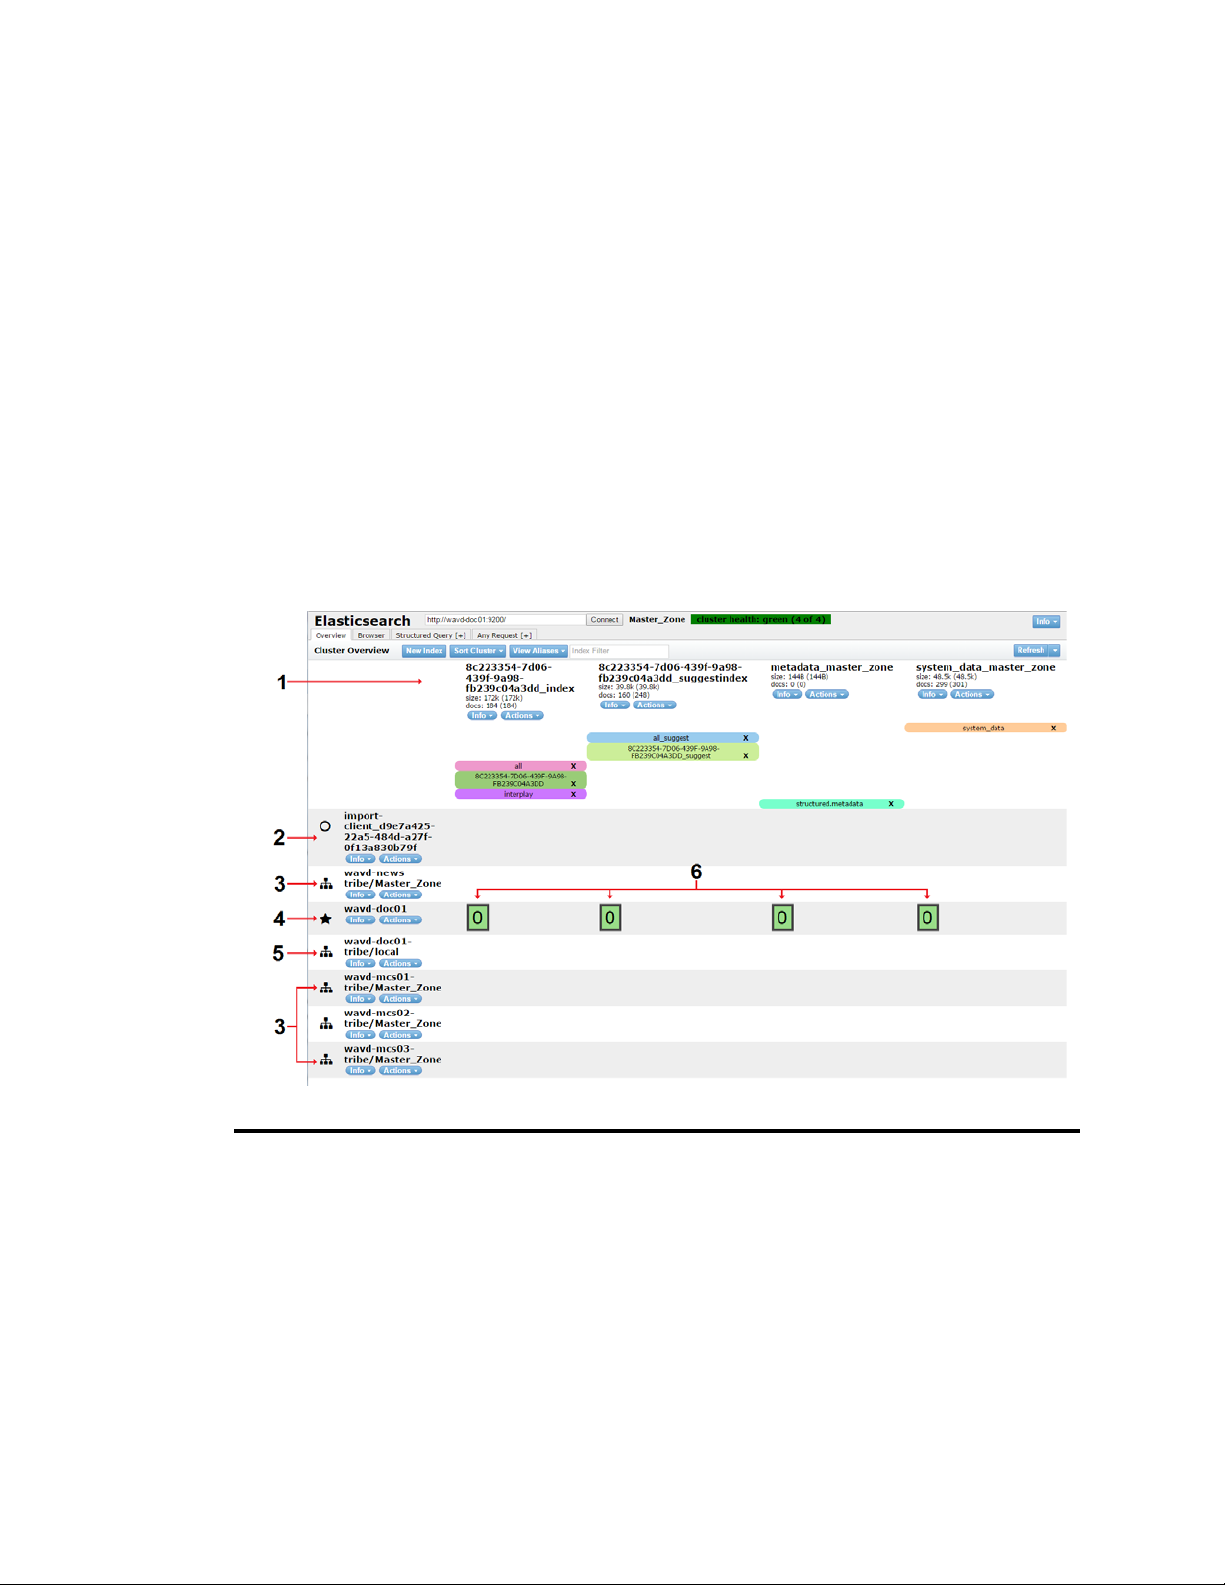
1 Elasticsearch Indexes:
•<System_ID>_index - Index that stores assets. The type of index is identified below in the same
column. In the example above, this is an index for an Interplay Production system.
•<System_ID>_suggestindex - Index that stores “suggest” data. Search suggestions appear below
the Search text field when users begin typing.
• metadata_<zone_name> - This index stores thesaurus data. This index is also identified by its alias,
“structured.metadata”.
• system_data_<zone_name> - This is a system index that stores information about the indexes
registered with Media Index. Permission information and other data is also stored in this index.
This index is also identified by its alias, “system_data”.
31
Page 32

Validating the Elasticsearch Configuration
2 The import client listens for updates from the PEBco service. There is one instance of this service in
each zone. In cluster configurations, the import client may or may not reside on the same server as the
master.
3 Each remote zone tribe is bound to the local cluster. This this example, two remote zones are shown.
Note that the tribe name reflects the local zone.
4 The local zone’s data node is listed.
5 The local zone tribe is bound to the local cluster.
6 The numbered green boxes represent Elasticsearch shards. The local node in this example
(wavd-doc01) has been configured for one primary shard and no replicas. If the system had been
configured for two primary shards, the image would show two green boxes (numbered 0 and 1). Shard
numbering begins with zero and increments for each additional shard. This remains true for replica
shards as well. Configurations that include primary and replica shards show the primary shard outlined
in bold.
3. Open a browser and navigate to http://<server_name>:9200/_plugin/head, where sever_name is
the host name or IP address of the server in another zone in your configuration — for example,
the remote zone.
The Elasticsearch head plug-in Web page opens in your browser.
4. Verify that this local zone (the remote zone in your multi-zone configuration) and the bindings
between zones are listed.
1 The import client listens for updates from the PEBco service. There is one instance of this service in
each zone. In cluster configurations, the import client may or may not reside on the same server as the
master.
2 The local zone data node is listed.
3 The local zone tribe is bound to the local cluster.
4 Each remote zone tribe is bound to the local cluster. This this example, two remote zones are shown.
Note that the tribe name reflects the local zone.
32
Page 33

Validating the Elasticsearch Configuration
5. Open a browser and navigate to http://<server_name>:9201/_plugin/head, where sever_name is
the host name or IP address of a server in a zone in your configuration — for example, the local
zone — and the port number is configured for the tribe node of the zone.
The Elasticsearch head plug-in Web page for the tribe node opens in your browser.
6. Verify that the tribe node lists the all indexes in your configuration as well as the local and
remote data nodes.
Some data not present do to sizing limitations within this document.
1 Shows the connected tribe node.
2 Indexes from all nodes are listed.
3 The local zone data node is listed.
4 The local zone tribe node is listed.
5 The remote zone data node is listed.
6 In zones with multiple shards, the primary shard is outlined in bold.
33
Page 34

5 Installing the Production Engine Bus
Connector
The Production Engine Bus Connector (PEBCo) queries the change table of the Interplay Production
Engine and delivers that data to the Avid Common Services (ACS) bus where the import service
takes these messages and sends the data to the Elasticsearch index. A timestamp is saved on the
Interplay Production Engine, and the PEBCo service queries the Interplay Production Engine
regularly and uses the timestamp to determine which assets have been already indexed. After each
indexing operation, the timestamp is updated.
If you have a cluster configuration, you can use the search-cluster script to set up the necessary
search services on a node and configure the PEBCo services (see “Creating a PEBCo Instance on an
MCS Cluster” on page 36).
Media Index v2.5 and later supports searching Interplay Archive databases. If you want to use Media
Index with Interplay Archive, create a PEBCo instance and configure the bus service for Interplay
Production, and then repeat the procedure for Interplay Archive. You must have a separate PEBCo
instance for each database.
For more information on configuring the ACS bus service for Interplay Archive, see the Interplay |
n
Engine and Interplay | Archive Engine Administration Guide and the Avid MediaCentral Platform
Services ReadMe.
Configuring PEBco involves the following steps:
• Enabling Sync Events in the Interplay Administrator
• Creating a PEBCo Instance on a Single MCS Server
• Creating a PEBCo Instance on an MCS Cluster
• Configuring the ACS Bus Service in Interplay Administrator
• Configuring and Using the PEBco Service
Enabling Sync Events in the Interplay Administrator
Before you set up your PEBCo instance, you need to enable sync events. Syncing events allows
changes in the search properties specified in Interplay Production and Interplay Archive to be pushed
to Media Index.
• If your configuration includes Interplay Production v3.3 or later, the Interplay Administrator tool
is used to enable sync events.
• If your configuration includes Media Index v2.2.x and Interplay Production v3.2 or earlier, the
InterplayEngineUpdateActivation utility on the MCS installation USB key is used to update your
registry setting to allow sync events.
Page 35

Enabling Sync Events in the Interplay Administrator
To enable the sync events (Media Index v2.3 or later):
1. Start Interplay Administrator and log on to the Interplay Production or Interplay Archive
database that you want to be indexed.
2. In the Server section of the Interplay Administrator, click the Server Settings icon.
The Server Settings view opens.
3. In the Update Tracking section, select Enabled to enable sync events.
You do not need to restart the Interplay Production or Archive Engine.
n
4. Click Apply Changes to save the settings change.
5. If you have additional Interplay Production or Interplay Archive Engines, repeat steps 1 through
4 to enable syncing on those systems.
To enable the sync events (Media Index v2.2.x):
1. On the server running the Interplay Production Engine, insert the MCS installation USB key.
2. Navigate to the root directory of the USB key, and then double-click the following utility:
InterplayEngineUpdateActivation.exe.
3. Restart the Interplay Production Engine by doing one of the following:
t For single-server configurations: in the Interplay Administrator tool, click the Restart Server
view, and then click Restart.
t For cluster configurations: in the Cluster Administrator tool, open the Avid Workgroup
Server resource group, select Avid Workgroup Engine Monitor, and then change the state to
“Offline.” Once the engine is offline, you can then right-click the Avid Workgroup Server
group (not the resource) and select Bring Online.
35
Page 36

Creating a PEBCo Instance on a Single MCS Server
Creating a PEBCo Instance on a Single MCS Server
The Production Engine Bus Connector (PEBco) is automatically installed during the MCS
installation. Although before the service can be used, it must first be configured.
To create a PEBCo instance:
1. Type the following command to create a PEBCo instance on the MCS server:
pam-agent-ctrl add <instance_name>
<instance_name> can be any meaningful name. Avid recommends that you use the MCS host
name or Corosync cluster virtual host name so the PEBCo instance can be easily identified.
A single server will return no information after issuing this command.
2. Verify that the PEBCo instance has been created through the
pam-agent-ctrl list
pam-agent-ctrl
script:
The screen displays a list of all available PEBCo (pam-agent) instances on this machine. The
following is a sample output from a single server:
[root@wavd-doc01 ~]# pam-agent-ctrl list
wavd-doc01
3. Type the following command to start the PEBCo instance:
pam-agent-ctrl start <instance_name>
The screen displays the status of all available PEBCo instances on this machine. The following is
a sample output:
[root@wavd-doc01 ~]# pam-agent-ctrl start wavd-doc01
Starting pam-agent-service.wavd-doc01: [ OK ]
4. To verify that the PEBCo instance is running, type the following command:
pam-agent-ctrl status
The command should return a confirmation that the service is running, similar to the following:
[root@wavd-doc01 ~]# pam-agent-ctrl status
Instance 'wavd-doc01' (pid 85540) is running...
5. If your configuration includes an Interplay Archive Engine, a separate PEBco instance must be
created. Repeat steps 1-4 to create an additional instance.
Creating a PEBCo Instance on an MCS Cluster
The Production Engine Bus Connector (PEBco) is automatically installed during the MCS
installation. Although before the service can be used, it must first be configured.
To create a PEBCo instance:
1. Type the following command on any cluster node to create a PEBCo instance on the MCS
cluster.
pam-agent-ctrl cluster add <instance_name>
<instance_name> can be any meaningful name. Avid recommends that you use the MCS host
name or Corosync cluster virtual host name so the PEBCo instance can be easily identified.
36
Page 37

Creating a PEBCo Instance on an MCS Cluster
In a cluster, the addition of the
n
nodes simultaneously.
A cluster configuration should return a response similar to the following:
[root@wavd-mcs01 ~]# pam-agent-ctrl cluster add wavd-mcs
Add resource: AvidPamAgent-wavd-mcs, Broker Host: 192.168.10.50
2. Verify that the PEBCo instance has been created through the
pam-agent-ctrl cluster list
The screen displays a list of all available PEBCo (pam-agent) instances on this machine. The
following is a sample output from a cluster configuration:
[root@wavd-mcs01 ~]# pam-agent-ctrl cluster list
Cluster resources:
------------------------------------
AvidPamAgent-wavd-mcs (ocf::avid:pam-agent): Started
-----------------------------------Note: 'AvidPamAgent-' is the common prefix for pam agent cluster resources.
3. Use the Cluster Resource Monitor to verify that a new resource has been added to Pacemaker:
crm_mon -f1
A new resource similar to the following should be found near the end of the output:
AvidPamAgent-wavd-mcs (ocf::avid:pam-agent): Started wavd-mcs01
cluster
switch to this command adds the PEBco instance to all
pam-agent-ctrl
script:
4. Type the following command to start the PEBCo instance:
crm resource start AvidPamAgent-<instance_name>
5. To verify that the PEBCo instance is running, type the following command:
pam-agent-ctrl status
The screen displays the status of all available PEBCo instances on this machine. The following is
a sample output:
[root@wavd-mcs01 ~]# pam-agent-ctrl status
Instance 'wavd-mcs' (pid 117058) is running...
6. If your configuration includes an Interplay Archive Engine, a separate PEBco instance must be
created. Repeat steps 1-5 to create an additional instance.
37
Page 38

Configuring the ACS Bus Service in Interplay Administrator
Configuring the ACS Bus Service in Interplay
Administrator
The PEBCo configuration requires a series of bus calls to the MCS server. For the configuration to be
successful, the Interplay Production and /or Interplay Archive Engines must have the proper bus
URL so that the Interplay Administrator can configure the service correctly.
To configure the ICS bus service:
1. Start Interplay Administrator and log on to the Interplay Production database that you want to
have indexed.
2. In the Site Settings section of the Interplay Administrator, click the MediaCentral Platform
Services Settings icon.
In versions of Interplay Production prior to v3.6, the setting is located in the Server Hostname
n
Settings section of the tool.
3. In the ACS Bus Service Settings section, type the name of the Bus AMQP (Advanced Message
Queuing Protocol) URL.
The bus URL can take the following form:
- For single-server configurations:
- For cluster configurations:
If you do not configure this setting correctly, Interplay Administrator cannot communicate with
the bus on the MCS server and no data displays in the Production Engine Bus Connector settings
since the needed services cannot be queried. Instead, an error message appears:
error: Error connecting to the bus (Make sure ACS Bus URL is correctly
configured).
4. Click the Apply Changes button.
5. (Optional) If your configuration includes Interplay Archive, log out of the Interplay Production
database and repeat the procedure to configure the bus service for the Archive system.
amqp://<MCS-server-IP-or-hostname>/acs
amqp://<virtual-cluster-IP-or-hostname>/acs
ACS Bus
38
Page 39

Configuring and Using the PEBco Service
Configuring and Using the PEBco Service
Every PEBCo instance is bound to no more than one Interplay Production or Interplay Archive
database.
You configure the PEBCo service in the Production Engine Bus Connector view in the Interplay
Administrator. This view has two tabs:
• The Manage/Status tab provides the following:
- Fields that let you assign an instance of the PEBCo service to your Interplay Production or
Interplay Archive database.
- Buttons that let you start, stop, and resync the PEBCo service.
- Information about the status of the instance which is assigned to the selected database.
Before you can configure the PEBCo service, you must configure the ACS Bus URL in the Interplay
n
Administrator.
Interplay Production v3.7 introduced a progress bar for the Resync process. Note the following
about this feature:
- The bar is only visible when a Resync is in progress.
- When selecting the Stop button, the Resync process is essentially paused. When a user clicks
the Start button to re-initiate the Resync, the process picks up from where it left off. When
this happens, the percentage number in the progress bar resets to 0%. This new percentage
does not include the previously indexed assets in its calculation.
- The progress bar might not provide an accurate “time remaining”. It is possible that the last
3% (for example) could take as long as the first 97%.
- Clicking “Resync” will always start Resync from the beginning (not from the last stop).
• The Canonical Data tab lets you select the Properties used in the indexing process. These
properties can be selected by users when performing an indexed search in MediaCentral UX.
Some properties are part of the standard data model. These properties are enabled by default and
cannot be deselected.
39
Page 40

Configuring and Using the PEBco Service
Before you can start the first indexing operation, you must specify the Canonical Data set in the
n
Canonical Data tab.
Notice in the image above that one of the properties in the Canonical Data tab are highlighted in
yellow. The Interplay Administrator v3.2 and later highlights any fields that contain special
characters (mostly unicode characters in the ranges of U+0000 to U+001F and U+007F U+009F). Make sure not to enable any highlighted fields when selecting data to be indexed.
These special characters cannot be indexed properly and cause PEBCo to fail when attempting to
start the service.
c
When you change the database properties, a re-index operation occurs to adapt the index
structure to your change. This runs in the background but does not add data from these new
properties to the existing data within the index. Only newly indexed assets contain the data
from this property. To have this property available for all assets, you need to use the Resync
button on the Manage/Status tab. This resync might take a lot of time for bigger databases, so
make changes to your database properties carefully.
Indexed search maps Interplay Production properties to Media Index criterion fields. The following
table describes how Media Index categorizes some common Interplay Production properties:
Interplay Production Property Media Index Field
Name Name
Created By Creator
Creation Date Created
Modified Date Modified
Changed By Modifier
Start Start
End End
Duration Duration
Comments Description
Mime Type Type
40
Page 41

Configuring and Using the PEBco Service
Due to differences in the properties and fields used by Interplay Production and Media Index, some
duplication appears in the criteria available for indexed searches with both Interplay Production and
Media Index fields appearing. If you add the wrong fields as criteria, your search might not return
any usable results.
If your configuration includes multiple systems that use the same custom field ID, once you mark a
field ID as hidden in one system, the field will be not searchable on any of the systems. This might be
an issue when fields are removed in a multi-zone setup with multiple Interplay Production systems. If
you add a field and then remove it for one Interplay Production system, then it is hidden for all other
systems as well. Also, if the field IDs (keys) are the same in different systems, this could cause an
issue. Avid recommends that you keep the selected fields consistent across all systems of the same
type (Interplay Production, Interplay Archive, iNEWS, MAM). If this is not possible, then you need
to re-index the index of the affected systems.
To select database properties that can be used in an indexed search:
1. Start Interplay Administrator and log on to the Interplay Production database that you want to
have indexed.
2. In the Site Settings section of the Interplay Administrator, click the “Production Engine Bus
Connector” icon.
3. Click the Canonical Data tab.
4. Select the properties that you want to be available when using the MediaCentral UX Search
pane.
You must select at property set before you can start the indexing process
n
t Use individual checkboxes, the Select All button, or the Clear All button. You should select
just the set of data that users will search for and not rely on the Select All button.
t Click the Sync with Property Layout button to match these selections with those in the
Interplay Administrator Property Layout view.
Media Index base properties and common properties are selected by default, and you cannot deselect
n
these properties.
5. Click Apply to save your selections and to make them available in MediaCentral UX.
To configure an instance of the PEBCo service:
1. Start Interplay Administrator and log on to the Interplay database that you want to be indexed.
2. In the Site Settings section of the Interplay Administrator, click the Production Engine Bus
Connector icon.
The Production Engine Bus Connector view is not available on Macintosh clients.
n
3. Click the Manage Status tab.
4. In the Assign PEBCo Service section, do the following:
a. Click the Instance menu and select the PEBCo instance name you want to use.
b. Enter a user name and password for access to the Interplay Production or Archive Engine.
As a best practice, create a separate user and password for this purpose (in the User
Management settings) that you can easily identify in case troubleshooting is necessary. Avid
recommends creating an Interplay user called “pebco” with administrative privileges. This
can make it easier to track down issues in log files for debugging issues.
41
Page 42

Configuring and Using the PEBco Service
The PEBCo settings respect the privileges set for the user configured in this section. If the user is not
n
an administrator, database access can be limited to certain directories, and only those directories are
indexed. Since indexed searches respect the permissions of this account and not that of individuals
logging into MediaCentral UX, users with permissions different from the PEBCo user might be
exposed to assets that they could not otherwise view in Interplay Access. Although MediaCentral UX
users can view names and metadata for assets they do not have permission to view, they are blocked
from playing the assets.
5. Click Assign.
The Interplay Administrator should reply with the following message:
Service instance assigned successfully
If you need to remove the service from the selected Interplay Production or Archive Engine,
click UnAssign.
To manage an instance of the PEBCo service:
t In the Manage section of the Manage/Status tab, click one of the following:
- Start to start the service.
- Stop to stop the service.
- Resync to update the whole database content independent from any existing saved
timestamp. Resyncing the database might take a long time to complete and invalidates the
existing content of your index. During this process, the search only returns assets that are
already processed within this run.
To update the status and statistics for the PEBCo service:
t In the Status section, click the Refresh button.
The information includes requests sent from the PEBCo to the import service for indexing the
data.
42
Page 43

6 Installing and Configuring Production
Services for MediaCentral Delivery
The Production Automation service and the Interplay Consolidate service are used for the
MediaCentral Delivery feature. The following topics describe installation and configuration of these
services:
• Understanding Production Services for MediaCentral Delivery
• Check List for Installing and Configuring Automation and Consolidate Services
• Prerequisites for Installing and Configuring Automation and Consolidate Services
• Installing the Automation and Consolidate Services
• Registering the Automation and Consolidate Services
• Registering a Provider with the Production Services Engine
• Creating a Consolidate Profile
MediaCentral Delivery requires an Interplay Delivery provider. For information about MediaCentral
Delivery, see the Avid MediaCentral | UX User’s Guide. For information about Interplay Delivery,
see the Interplay | Production Services Setup and User’s Guide.
Understanding Production Services for MediaCentral Delivery
A Production Services Engine and three Interplay Production Services are needed for delivering
media and assets between Interplay Production workgroups or MediaCentral zones:
• Interplay Production Services Automation: This service handles the logic of chaining a
consolidate job and a delivery job. It triggers a consolidate job and monitors its status. If the
consolidate job is successful, it triggers a delivery job.
• Interplay Consolidate: This service uses the In and Out marks specified for a loaded clip or
subclip to create a new media and asset. This service is used if a user selects “Deliver from Mark
In to Mark Out” in either the Deliver To dialog box or the Deliver To Me dialog box.
• Interplay Delivery: This service executes the delivery job.
Page 44

Check List for Installing and Configuring Automation and Consolidate Services
MediaCentral
Client (Browser)
we
qq ew
Interplay
Consolidate
Production
Services
Engine
Media Services
Automation
wr
Interplay
Delivery
The following illustration shows the Production Services components and a Delivery workflow.
1. The user initiates a Delivery request.
2. The Production Services Engine forwards the request to the Production Services Automation
service, which determines the next step.
3. If the request includes In to Out marks, the Automation service tells the Production Services
Engine to send the request to the Consolidate service. The Consolidate service creates a new
asset and new media.
4. The Automation Service tells the Production Services Engine to initiate a Delivery job.
Check List for Installing and Configuring Automation
and Consolidate Services
The following table provides a check list of steps for installing and configuring the Interplay
Production Services that support MediaCentral UX Delivery. The check list also provides references
where to find more information about each step.
Production Services Check List
Task Section Reference
Check the prerequisites “Prerequisites for Installing and Configuring
b
Automation and Consolidate Services” on
page 45.
Install the Production Services Automation service,
b
the Interplay Consolidate service, and Interplay
Access.
Verify that each service is running. “Installing the Automation and Consolidate
b
Register each service. “Registering the Automation and Consolidate
b
“Installing the Automation and Consolidate
Services” on page 46.
Services” on page 46.
Services” on page 46.
Configure each service to communicate with the
b
Production Services Engine.
b
Verify that each service is connected. “Registering a Provider with the Production
“Registering a Provider with the Production
Services Engine” on page 48
Services Engine” on page 48
44
Page 45

Prerequisites for Installing and Configuring Automation and Consolidate Services
Production Services Check List(Continued)
Task Section Reference
Connect the Avid shared storage client to the
b
System Director and mount the required
workspaces.
Create at least one Interplay Consolidate profile.
b
No profile is needed for Production Services
Automation.
Avid shared storage client documentation.
“Creating a Consolidate Profile” on page 52
Prerequisites for Installing and Configuring
Automation and Consolidate Services
Where to install: Production Services Automation and Interplay Consolidate can be installed on any
server currently configured in an Interplay Production workgroup except for the servers hosting the
following components:
• Interplay Engine
• Interplay Archive Engine
Avid recommends installing Production Services Automation on the same server as the Production
Services Engine. In a high-workload facility, Avid recommends installing Interplay Consolidate on a
separate server. Do not install Interplay Consolidate on the same server as Interplay Transcode.
Hardware requirements: Production Services Automation and Interplay Consolidate share the
same hardware requirements:
• Minimum 512 MB RAM
• Approximately 380 MB of hard drive space.
• Port 1099 for communication with the Production Services Engine.
A license is not required for these services.
n
Software requirements: Production Services Automation and Interplay Consolidate share the same
hardware requirements:
• Windows 7 or Windows Server 2012 Standard R2
• Avid Service Framework (ASF)
• Avid shared storage client software
Production Services Engine: Production Services Automation and Interplay Consolidate require
network access to an installed and configured Production Services Engine. For more information
about installing and configuring a Production Services Engine, see the Interplay | Production
Services Setup and Installation Guide.
Interplay Delivery Service: The Delivery service is configured to work with the Production
Services Engine and provides the profile for transferring the assets. For more information about
Interplay Delivery, see the Interplay | Production Services Setup and Installation Guide.
45
Page 46

Installing the Automation and Consolidate Services
c
When you create a Delivery profile for MediaCentral, use a network path to an Avid shared
storage share for the Temporary Workspace on Sender parameter. For example, use
\\avidstorage_server\Delivery_temp. This storage space is used for temporary media files
created by the Interplay Consolidate service. If you use a local folder, the large amount of
media created can cause system problems for the Delivery server. The files will automatically
be deleted when the Delivery job is completed.
Installing the Automation and Consolidate Services
You install both services from the Interplay Production Servers installer.
Starting with Interplay Consolidate v3.6, separate installation of Interplay Access is not required.
n
To install the Production Services Automation service:
1. Select the following from the Interplay Server Installer Main Menu:
Servers > Production Services > Install Media | Index Support
The Install Media | Index support window opens.
2. Click Production Services Automation.
The Production Services Automation installer window opens.
3. Click Next.
4. Accept the license agreement and click Next.
5. Follow the prompts to install the service.
The service is started automatically by the installer after the installation is complete.
To install the Interplay Consolidate service:
1. Select the following from the Interplay Server Installer Main Menu:
Servers > Production Services > Install Media | Index Support
The Install Media | Index support window opens.
2. Click Consolidate.
The Interplay Consolidate installer window opens.
3. Install the Sentinel USB Driver (if prompted).
4. Install the PACE Interlok Driver (if prompted)
5. Accept the license agreement and click Next.
6. Follow the prompts to install the service.
The service is started automatically by the installer after the installation is complete.
Registering the Automation and Consolidate Services
To register the Automation and Consolidate services, you need to open the Production Services and
Transfer Status tool and install the service description. You only need to install a service description
once, even if you configure multiple providers.
Registration of other Production Services is automatic.
n
46
Page 47

Registering the Automation and Consolidate Services
To install service descriptions:
1. Start the Production Services Engine and log in as administrator.
2. Click the Admin Tool button.
The Interplay Production Services and Transfer Status tool opens.
3. Click the Services tab.
The Services page displays the currently configured services.
4. Click Install/Upgrade.
The Install/Upgrade Service dialog box opens.
5. Click the Browse button and navigate to the folder containing the service package (.zip file).
Make sure you have access to the folder.
The following are the default locations of the service packages:
- C:\Program Files\Avid\Interplay Consolidate\TranscodeService\ConsolidateService.zip
- C:\Program Files\Avid\Interplay Production Services
Automation\MediaServicesAutomation.zip
6. In the folder, select the service.zip file.
7. Click Save.
The path to the file appears in the Install/Upgrade Service dialog box.
47
Page 48

Registering a Provider with the Production Services Engine
8. Click Install/Upgrade.
The service and its description appear on the Services page. The following illustration shows
both services after they are registered.
Registering a Provider with the Production Services
Engine
A service that is installed and registered is referred to as a provider. Starting with Interplay
Production Services v3.1, some service providers operate as Windows services, and others operate as
Windows applications.
• Interplay Production Services Automation operates as a Windows service. See “Registering a
Production Services Automation Provider” on page 48
• Interplay Consolidate operates as a Windows application. See “Registering and Connecting a
Consolidate Provider” on page 50
Registering a Production Services Automation Provider
Production Services Automation runs as a Windows service. Information about the service is
included in an .ini file.
• If you are performing a new installation, the installed .ini file uses “localhost” as the name of the
associated Production Services Engine. This is appropriate if you are installing the service on the
same system as the Production Services Engine. If you are installing the service on a different
system, you need to change the default hostname by editing the .ini file.
• If you are upgrading from a previous version, the existing .ini file is copied to the appropriate
new folder. If the associated Production Services Engine remains the same, no further
configuration is needed.
To register a Production Services Automation provider with the Production Services Engine:
1. Locate the .ini file and open it in a text editor, such as Windows Notepad.
The following table lists the services with the folder that holds the .ini file and the log files.
Service Name Folder for .ini File and Log Files
Interplay | Production Services
Automation
C:\ProgramData\Avid\Production Services
Automation\DMSCMService.ini
48
Page 49

Registering a Provider with the Production Services Engine
2. Substitute the hostname of the Production Services Engine.
Following is an example of an Automation service .ini file with the default hostname
“localhost”:
#Mon May 05 11:34:54 EDT 2014
@5%?MaxJobs=1
@2%tMedia_Services_Engine_Hostname=localhost
@1%tProvider_Name=a51-WG6_Consolidate_0123
Following is the same .ini file, edited to use the hostname “a51-MSE.”
#Mon May 05 11:34:54 EDT 2014
@5%?MaxJobs=1
@2%tMedia_Services_Engine_Hostname=a51-MSE
@1%tProvider_Name=a51-WG6_Consolidate_0123
The provider name is automatically created by adding a number string to the local hostname.
You can change this name if you want.
3. A default name for the provider is automatically created by the provider software using the
following syntax:
<hostname>_<servicename>_<unique#>
The provider name in the previous example is a51-WG6_Consolidate_0123
Accept the default name or type a new name. This name appears in the Production Services and
Transfer Status tool.
4. Save and close the .ini file.
The service automatically reads the .ini file and tries to connect to the Production Services
Engine. If the service fails to connect, it continues to try to connect every thirty seconds.
To verify that the Production Services Automation service provider is running and connected:
1. Start the Production Services Engine.
2. Click the Admin Tool button.
The Interplay Production Services and Transfer Status tool opens.
3. Click the Providers tab.
The system displays the status of the Production Services providers. In the following illustration,
all services are connected, indicated by a check mark in the Status column. Production Services
Automation is circled.
You can also view the services in the Services tab of the Computer Management window.
49
Page 50

Registering a Provider with the Production Services Engine
Registering and Connecting a Consolidate Provider
Interplay Consolidate runs as a Windows application. You need to register the provider by connecting
to the Production Services Engine.
If you try to connect to the Production Services Engine before the latest service is registered, the
n
Status line in the Transcode Service dialog box reads:
Error From Broker! UNKNOWN_SERVICE.
To connect the Consolidate provider to the Production Services Engine:
1. Click Start and select Programs > Avid > Avid Interplay Consolidate.
The Consolidate Service dialog box opens.
2. Click Settings.
The Provider Settings dialog box opens.
50
Page 51

Registering a Provider with the Production Services Engine
3. Do the following:
a. Provider Name — A default name for the provider is automatically supplied. Accept the
default name or type a new name. In this example, the name is Consolidate_01.
b. Production Services Engine Host Name — Type the name of the system running the
Production Services Engine application.
c. Automatically Connect — Select Yes to automatically connect the provider to the
Production Services Engine when the application starts. To prevent automatic connection,
select No.
4. Click OK.
5. Click Connect in the Service window.
The Consolidate Service dialog box now shows that the service is connected and shows the name
of the provider you connected.
The Provider page in the Production Services and Transfer Status tool now shows that the
Consolidate service is connected, indicated by a check mark in the Status column.
51
Page 52

Creating a Consolidate Profile
If users in your MediaCentral zone are going to perform MediaCentral Delivery operations that use
“Deliver from Mark In to Mark Out,” an administrator must create at least one Consolidate profile.
This default profile must be named “default_for_delivery.” The target video quality for this profile is
displayed in the Deliver or Deliver To dialog box, and is used if the user selects “Deliver from Mark
In to Mark Out.” and the Delivery profile does not include a specific Target Video Quality.
The following illustration shows a profile with DV 25 420 as the TargetVideoQuality.
Creating a Consolidate Profile
The following illustration shows the Deliver To dialog box, with Deliver from Mark In to Mark Out
selected, and the Target Video Quality as DV 25 420. The Target Video Quality is taken from the
Consolidate profile. This resolution will be used for the new media, because the Target Video Quality
specified in the Delivery profile is “highest” rather than a specific resolution.
52
Page 53

Creating a Consolidate Profile
Other options in the Consolidate profile, such as Handle and Interplay Checkin Folder, are also used
for Deliver from Mark In to Mark Out operations. However, they are not shown in the Deliver To or
Deliver to Me dialog box.
To create a Consolidate profile:
1. Start the Production Services Engine.
2. Click the Admin Tool button.
The Interplay Production Services and Transfer Status tool opens.
3. Click the Profiles tab.
4. In the Service menu, select Avid Interplay Consolidate Service.
5. Click Add in the Profiles area.
The Add Profile dialog box opens.
6. Type “default_for_delivery” in the Add Profile dialog box.
7. Click OK.
The name appears in the Profiles list and an empty template appears in the Parameters area.
8. In the Parameters area, define the values you want in the profile.
The following table describes the parameters for a Consolidate profile.
Consolidate Profile Settings
Parameter Description
Handle The number of additional frames you want to include on both ends
of a subclip or a cut within a sequence. If the handle length exceeds
either end of the master clip, then the handle is truncated to the
amount of source media available.
Interplay Checkin Folder The folder in the database that will contain the consolidated asset
(metadata). For example, Catalogs/Consolidated.
Priority A value allows you to assign job priorities to different profiles.
Priority numbers range from 1 (highest priority) through 100
(lowest priority). The default priority number assigned to each job is
50.
53
Page 54

Creating a Consolidate Profile
Consolidate Profile Settings(Continued)
Parameter Description
TargetAudioQuality Select an audio resolution for the consolidate operation:
• None
• MPEG1 Layer 2: Digital audio compressed to the MPEG1
Layer 2 specification at 96 Kb/s.
• Uncompressed PCM: 16-bit 48-kHz digital audio
• Uncompressed PCM 24-bit: 24-bit 48-kHz digital audio
TargetVideoQuality Select a video resolution for the consolidate operation. Select None
if you do not want the transcoded clip to include a video track.
WorkspaceAudio The name of the Avid shared-storage workspace that will hold the
new audio media files. Use the following syntax:
\\hostname\workspace_name
WorkspaceVideo The name of the Avid shared-storage workspace that will hold the
new video media files.
9. Click Save in the Parameters area.
The Save Profile dialog box opens.
10. Click Yes to save your changes.
For information about using MediaCentral Delivery, see the Avid MediaCentral | UX User’s Guide.
54
Page 55

7 Configuring iNEWS for Media | Index
When integrating iNEWS with Media Index, the iNEWS system relies on the sync agent in the
Mediaindex utility program to push stories to Media Index. It must be configured to control what
data gets indexed. To specify which Media Index the iNEWS system should use also requires
configuration within iNEWS.
This integration first appeared with the release of iNEWS v5.2, for which the ftsindex utility program
was used to drive indexing for both Media Index and Fast Text Search (FTS), a feature of iNEWS.
Beginning with iNEWS v5.3, however, indexing for Media Index was decoupled from that of FTS.
This chapter has been updated to provide set up for iNEWS v5.3 and later. For information on how to
set up integration to work with the earlier 5.2 version of iNEWS, refer to the iNEWS & Media | Index
Integration Guide appended to the iNEWS v5.2 ReadMe.
The following table summarizes the differences between the Media Index configuration for iNEWS
v5.2 and iNEWS v5.3:
iNEWS v5.2.x iNEWS v5.3 and later
The ftsindex utility program pushes to both FTS server
and the BUS (for Media Index).
Indexes remain separate, as defined by separate tokens in /
site/dict/words: W_BINDFTSI for the FTS server port
and W_BINDBUS for the MediaCentral system's bus
server port.
Queue for index requests is shared, as defined by token in
/site/dict/queues: SYSTEM.INDEX is the queue as
defined by the Q_INDEX token.
The server's device number, notify value, and mailbox
number are the same for both FTS Index and Media
Index — in this case 120 — and must match the mailbox
assigned to the SYSTEM.INDEX queue.
Logging was enabled for both indexes by creating a file in
/site/env/ftsindex
lines:
with the following on separate
The ftsindex utility program pushes to FTS server only;
The Mediaindex utility program pushes to the BUS (for
Media Index).
Indexes remain separate, as defined by separate tokens in /
site/dict/words: W_BINDFTS for the FTS server port and
W_BINDBUS for the MediaCentral system's bus server
port.
Queue for index requests are separate, as defined by
tokens in /site/dict/queues: SYSTEM.INDEX is still the
queue for handling FTS index requests, as defined by
Q_INDEX, but now SYSTEM.MEDIA-INDEX is the
queue for handling index requests for Media Index, as
defined by the Q_MEDIA_INDEX token.
The server's device number, notify value, and mailbox
number are the same — in this case 120 — and must
match the mailbox assigned to the SYSTEM.MEDIAINDEX queue. But for Media Index, the server's device
number, notify value, and mailbox are changed — in this
case 122 — and must match the mailbox assigned to the
SYSTEM.MEDIA-INDEX queue.
Logging for Media Index is enabled by creating a file in /
site/env/mediaindex
lines:
with the following on separate
DEBUG=7
DEBUGFILE=/tmp/ftsindex
DEBUG=7
DEBUGFILE=/tmp/mediaindex
Page 56

iNEWS v5.2.x iNEWS v5.3 and later
Config file (/site/config) needed a line in the host section
and a line in the SEEK & FTS SERVERS section for
ftsindex:
host abc b <section>
servers 105 ; keyword = 2
servers 113:115 ; seek = 5
servers 120:121 ; fts = 2
servers 200:207 ; action, distribution = 20
; SEEK & FTS SERVERS
;
server 113 seek 110 - ; seek server
server 114 seek 110 - ; seek server
server 115 seek 110 - ; seek server
server 120 ftsindex 120 - ; Fast Text Index ing
server 121 ftsseek 121 - ; Fast Text Search
Config file (/site/config) needs a separate line in both
sections for Media Index:
host abc b <section>
servers 105 ; keyword = 2
servers 113:115 ; seek = 5
servers 120:121 ; fts = 2
servers 122 ; media-index = 1
servers 200:207 ; action, distribution = 20
; SEEK & FTS SERVERS
;
server 113 seek 110 - ; seek server
server 114 seek 110 - ; seek server
server 115 seek 110 - ; seek server
server 120 ftsindex 120 - ; Fast Text Indexi ng
server 121 ftsseek 121 - ; Fast Text Search
server 122 mediaindex 122 - ; Media-Index
c
n
n
In a multi-zone configuration, all iNEWS servers must belong to the same iNEWS Community.
The following steps are required to configure Media Index on the iNEWS Server:
• Manually Installing the log4cpp File
• Editing iNEWS Site Files
• (Optional) Enabling Logging
• Assigning the Media | Index Attribute
• Activating the Mediaindex Program
These procedures should only be performed by qualified Avid personnel.
This chapter only includes the steps related to Media Index integration. Procedures for configuring
Fast Text Search are not represented. For more information about FTS, see the “Fast Text Search
Servers” section in the Avid iNEWS Setup and Configuration Guide.
When you finish configuring iNEWS for Media Index, you must restart the Mediaindex program. For
more information, see “Activating the Mediaindex Program” on page 60.
56
Page 57

Editing iNEWS Site Files
The following site files must be edited on the iNEWS servers to enable Media Index functionality:
• /site/dict/words
• /site/dict/queues
•/site/config
The Mediaindex program must be pointed to the message broker by adding a definition in the /site/
dict/words file:
Editing iNEWS Site Files
W_BINDBUS
•
which is necessary for central indexing as part of iNEWS integration with Media Index.
If it does not already exist, you might also need to create the queue that holds indexing requests, and
to point the Mediaindex program to it by adding a definition in the /site/dict/queues file:
Q_MEDIA_INDEX
•
necessary for central indexing as part of iNEWS integration with Media Index.
Before editing any system file, Avid recommends you make a backup copy of the file.
To edit the Words dictionary file:
1. From the PuTTYCS application, select the PuTTY Filter created for sending server commands
to all servers, such as iNEWS Consoles.
2. Use the line editor, ed, to modify the /site/dict/words file:
ed /site/dict/words
If you do not know how to use ed to modify lines in the file, please see “The Line Editor, ed” in the
n
Avid iNEWS Setup and Configuration Guide.
3. Set the binding address for the MediaCentral system’s bus server port by adding the definition
for W_BINDBUS. The format is: <server>:<tcp port number>. The <server> is the hostname
of the Avid Common Services (ACS) bus, and <port> is its dedicated bus server port number.
The default is busserver:5672. You can use a hostname or IP address in place of <server>. The
port number should be set to 5672.
– Identifies the binding address for the MediaCentral platform’s bus server port,
– Identifies the SYSTEM.MEDIA-INDEX queue to hold indexing requests
For example:
To edit the Queues dictionary file:
1. From the PuTTYCS application, select the PuTTY Filter created for sending server commands
to all servers, such as iNEWS Consoles.
2. Use the line editor, ed, to modify the /site/dict/queues file:
ed /site/dict/queues
If you do not know how to use ed to modify lines in the file, please see “The Line Editor, ed” in the
n
Avid iNEWS Setup and Configuration Guide.
3. Name the queue for index requests by adding the definition for Q_MEDIA_INDEX — for
example,
If the queue SYSTEM.MEDIA-INDEX does not exist, create it. For information on how to create a
n
queue, see the “Creating a New Queue” section in the Avid iNEWS Setup and Configuration Guide.
W_BINDBUS /busserver:5672
Q_MEDIA_INDEX /system.media-index
or
W_BINDBUS /10.105.242.34:5672
57
Page 58

Editing iNEWS Site Files
To edit the iNEWS configuration file:
1. From the PuTTYCS application, select the PuTTY Filter created for sending server commands
to all servers, such as iNEWS Consoles.
c
n
Always back up the /site/config file before making any changes.
2. Use the line editor, ed, to modify the configuration file:
ed /site/config
After you press Enter, the editor responds by displaying a numerical value indicating the file size
expressed as the number of characters, including spaces and returns.
You can check the iNEWS configuration file (/site/config) for Media Index servers, their assigned
device numbers, and whether they are configured or not by using the list c command at the console,
in the following format:
a. Ensure there is a line for the Mediaindex program and its device number in the host section
of the /site/config file.
b. Also ensure there is a line for the Mediaindex program and its device number in the SEEK &
FTS SERVERS section of the /site/config file.
For instance, add lines as shown in the following example in bold:
host abc b <section>
servers 105 ; keyword = 2
servers 113:115 ; seek = 5
servers 120:121 ; fts = 2
servers 122 ; media-index = 1
servers 200:207 ; action, distribution = 20
list c mediaindex
.
; SEEK & FTS SERVERS
;
server 113 seek 110 - ; seek server
server 114 seek 110 - ; seek server
server 115 seek 110 - ; seek server
server 120 ftsindex 120 - ; Fast Text Indexing
server 121 ftsseek 121 - ; Fast Text Search
server 122 mediaindex 122 - ; Media-Index
Typically a server’s device number, notify value, and mailbox number are the same. Make sure
the notify value for Mediaindex that appears in the configuration file matches the mailbox
assigned to SYSTEM.MEDIA-INDEX. If not, change it.
SYSTEM.MEDIA-INDEX is the queue used to hold indexing requests for Media Index, as defined in
n
the token Q_MEDIA_INDEX in /site/dict/queues. If this queue does not exist, create it.
For more information about mailbox numbers, see “Assigning a Mailbox to a Queue” in the Avid
iNEWS Setup and Configuration Guide. For more information on editing the configuration file,
see “Configuration File” in the Avid iNEWS Setup and Configuration Guide.
58
Page 59

For more information on the Q_MEDIA_INDEX token in /site/dict/queues, see Appendix C
“Standard Dictionaries,” in the Avid iNEWS Setup and Configuration Guide.
3. Reconfigure the system.
Manually Installing the log4cpp File
The log4cpp library package for RHEL 6.5 is required for iNEWS to work with Media Index. It is
necessary for the sync agent in the Mediaindex program to function with the Avid Common Services
(ACS) bus.
Prior to completing this process, your iNEWS servers must already be running RHEL v6.5.
n
To install the log4cpp library package:
1. Copy the RHEL v6.5 ISO to a DVD as an image.
For more information, see the RHEL website.
2. Insert the DVD into the optical drive on the iNEWS server, and mount it:
mount /dev/cdrom /mnt
3. Navigate to the Packages folder:
Manually Installing the log4cpp File
cd /mnt/Packages
4. Install the log4cpp package on the server:
rpm -ivh log4cpp-1.0-13.e16.x86_64.rpm
The system reports the installation progress:
warning: log4cpp-1.0-13.e16.x86_64.rpm: Header V3 RSA/SHA256 Signature, key
ID fd431d51: NOKEY
Preparing... ##################################################
[100%]
1:log4cpp ##################################################
[100%]
5. Change directory to / and unmount the DVD drive:
cd /
umount /mnt
(Optional) Enabling Logging
Should you need to troubleshoot search integration, before restarting Media Index, enable logging.
To enable logging:
1. Create the file
2. In the file, on separate lines, type the following:
DEBUG=7
DEBUGFILE=/tmp/mediaindex
3. Save and close the file.
/site/env/mediaindex
.
59
Page 60

Assigning the Media | Index Attribute
Define the queues or folders in the iNEWS directory that will be monitored by Media Index by
applying the Media Index attribute (+mi).
To apply the Media Index attribute to a queue or folder:
t From the console, type the dbtraits command in the following format:
dbtraits <queue or directory> +mi
Assigning the Media | Index Attribute
For example:
Database traits may also be assigned to queues or directories via the Directory/Queue Properties
n
dialog box at an iNEWS Workstation. For more information, see “Viewing Database Traits” and
“Changing Database Traits” in the Avid iNEWS Setup and Configuration Guide.
To find out which directories or queues have the Media Index attribute:
t From the console, type the list command in the following format:
list flags=m d
The system will display a line that shows the database traits flags (SRPlo-LIsUGQSXWFiTMm)
and some column headers. Each line underneath the header line represents either a queue or
directory, as indicated by the Q or D to start each line of text. A dash appears when the attribute
is not assigned to the queue or directory. The lowercase “m” is the last flag, coming before the
sortfield column, and indicates the directories or queues with the Media Index attribute assigned
to them.
SRPlo-LIsUGQSXWFiTMm sortfield purge dis mbox directory
D-------Is----X-Fi--m TITLE P1 D7 - SHOWS
Q-R-----I-----XW-iT-m TITLE P3.0 D1 - WIRES.ALL
dbtraits SHOW.RUNDOWN +mi
Activating the Mediaindex Program
After completing all other steps in this chapter, you need to activate the Mediaindex program, which
acts as the sync agent for Media Index. To do this, you need to know the device number for the
program, which will vary by site.
To get the device number for Mediaindex, use the following command:
t Type:
To activate Mediaindex:
t Use the restart console command in the following format:
(Optional) Use the stop command to stop the program, such as
n
list c mediaindex
The system will display information similar to this example, in which case the device number is
122, located in the NOTIFY column:
DEV DEVICE_TYPE COMPUTER NOTIFY OPTIONS DEVNAME
S122 mediaindex B 122
restart <device number>
For example: select the appropriate server at the console, and type:
.
restart 122
stop 122
60
.
Page 61

8 Setting Up Interplay | MAM Sync Service
The following topics provide basic information to help you get started using Avid Interplay | MAM
Sync Service Administrator:
• About Interplay | MAM Sync Service Administrator
• Opening Sync Service Administrator
• Understanding the Sync Service Administrator Layout
• Quitting Sync Service Administrator
For more information on using the Interplay MAM Sync Service Administrator, see the
Interplay | MAM Sync Service Administrator User’s Guide.
About Interplay | MAM Sync Service Administrator
This quick start guide is designed to familiarize you with the most important functions of Avid
Interplay Media Asset Manager Sync Service Administrator, an Interplay MAM tool that provides
features to monitor metadata synchronization between Interplay MAM Data Manager and Media |
Index.
Basic Features
Starting with MAM v5.0, Interplay MAM systems can be accessed through MediaCentral | UX.
MediaCentral UX provides the capability to search in the databases of different connected systems
by using the “Central Index”. This requires data synchronization between MediaCentral and
Interplay MAM.
On MediaCentral’s side, Media Index allows users of MediaCentral UX to search using the Central
Index, which provides both data storage and a query engine. The index receives its data from the
original data sources — generally, the databases of multiple asset management systems like Interplay
MAM — and then pushes the data to the service that performs the index. This allows the index to
continuously sync to the database. Indexed search in MediaCentral UX queries a central index
synced with multiple databases and finds anything stored in the index.
On Interplay MAM’s side, the synchronization of data between the MAM system database and
Central Index is done by the SyncCentralIndex Service. It gets data from the MAM Data Manager’s
DM_SYNC table and pushes it to Central Index. The SyncCentralIndex Service detects data changes
for media and EDL objects, reads information from the Data Manager database (for metadata, all
attributes; for strata, changed segments), and sends update and delete requests to Central Index.
Before SyncCentralIndex Service can synchronize the data, it passes all Interplay MAM attribute
names and types to Central Index and converts MAM attributes to Central Index custom attributes.
This is called the initialization of the data schema.
Page 62

About Interplay | MAM Sync Service Administrator
Note the following limitations:
• All Attributes marked as “searchable” in the MAM data model are always sent to Central Index
during synchronization; attributes marked as “not searchable” are not sent to Central Index and
are not available for searching or in search-result lists.
• Multi-value (MV) attributes and multi-value compound (MVC) attributes cannot be used for
searching in Central Index and cannot be displayed in search-result lists.
• For timecoded metadata (MAM stratum segments) only searching of text fields is currently
supported; non-text metadata fields in segments are not sent to Central Index and are not
available for searching or in search-result lists.
• When using legal list attributes in Interplay MAM CBA rules, MAM allows building rules using
“>=”, “<” for legal list values, since these values are integer values in MAM. On the Central
Index side, legal list values are treated as “ID-string,” and only comparisons like “=” or “!=” are
supported.
The SyncCentralIndex Service has a GUI called “Sync Service Administrator” that can be used by
administrators to monitor the metadata synchronization between Interplay MAM and Media Index.
The following illustration shows the services that are involved in data synchronization for Central
Index on Interplay MAM’s and MediaCentral’s side.
Prerequisites for Using Sync Service Administrator
To use Sync Service Administrator you must be a member of an administrator group that has the
following group rights:
• Administration/Platform_Administration
As an administrator you can review and assign these group rights in the User Manager of the
Interplay MAM Administrator. For additional information, see the “Interplay | MAM User Manager
User’s Guide” that is shipped with the software.
62
Page 63

About Interplay | MAM Sync Service Administrator
Sync Service Administrator Configuration Options
Some Sync Service Administrator features are subject to configuration. The default MAM
installation comes with a full set of default configuration settings for Sync Service Administrator. As
an administrator you can review and adapt these configuration settings in the following MAM
System Administrator profiles:
Profile Section Affected Sync Service Administrator Views
SyncCentralIndex Settings Monitor, Traffic, Errors
For additional information, see the “Interplay | MAM Configuration Settings Reference” that is
shipped with the software.
Basic Checks
To use Central Index for Interplay MAM in MediaCentral UX, check and adjust the following
settings. These settings are configured during the installation of the
MAM.Core.MediaCentralConnection package and should already display correct values.
To check the configuration:
1. Sign in to Interplay MAM Control Center as an administrator.
2. Start Interplay MAM Administrator from within MAM Control Center.
3. Open the System Administrator from within Interplay MAM Administrator.
4. In the Configuration tab, select Global > Bus and ensure that the value refers to the correct host
where the Bus is running.
If you change the setting, you need to restart the pool MAM_2000_Backend2 in MAM Control
n
Center’s Service Controller.
5. Select DataManagerWS > CentralIndex and ensure that the value of the key
MarkForSynchronization is set to “true”.
If you change the setting, you need to refresh the configuration of the DataMangerWS or restart the
n
pool MAM_1000_Backend1 in MAM Control Center’s Service Controller.
6. Select SyncCentralIndex > Settings and ensure that the value of the following keys are set to
“true”.
- EnableDataPropagation
- EnableCBAAssignmentsPropagationOnStart (if needed)
- SendLegalListsOnStartup (if needed)
- SendThesauriOnStartup (if needed)
If you change a setting, you need to refresh the configuration of the SyncCentralIndex or restart the
n
pool MAM_2000_Backend2 in MAM Control Center’s Service Controller.
63
Page 64

Opening Sync Service Administrator
7. Select SyncCentralIndex > Toggles and check if the value of the key EnableNewThesauriIds has
the required value:
- True: Enables the new ID format for thesauri and legal lists. Recommended for new
installations of Interplay MAM v5.4/MediaCental v2.5 or higher, or updating an installation
with a small amount of data. Setting the value to “true” requires rebuilding the index for all
assets.
- False: This is the default value; allows the use of MAM v5.4/MediaCentral v2.5 without the
re-indexing requirement.
If you change the setting, you need to refresh the configuration of the SyncCentralIndex or restart the
n
pool MAM_2000_Backend2 in MAM Control Center’s Service Controller.
To check required services:
1. Sign in to Interplay MAM Control Center as an administrator.
2. Open the Service Controller from within MAM Control Center.
3. Ensure that the following pools and services are running:
- Pool MAM_1000_Backend1
- Pool MAM_2000_Backend2
- Service DataManagerWS
- Service SyncCentralIndex
Opening Sync Service Administrator
Sync Service Administrator is started from within Interplay MAM Control Center.
To start Interplay MAM Sync Service Administrator:
1. Open an Internet browser and enter the URL https://<hostname>:9911/ControlCenter/web/
The Interplay MAM Control Center login dialog opens.
2. Type your user name and password, and click Login.
Interplay MAM Control Center opens.
3. Click MAM Administrator on the Links pane.
The Interplay MAM Administrator login dialog opens.
4. Type your user name and password, and click Login.
Interplay MAM Administrator opens.
5. Click the Sync Service Administrator link on the Overview page of Interplay MAM
Administrator.
Sync Service Administrator opens in a new tab.
64
Page 65

Understanding the Sync Service Administrator Layout
Understanding the Sync Service Administrator Layout
Once you have logged in, Sync Service Administrator opens and displays the Monitor view. Sync
Service Administrator includes the following areas and views:
Area Function
Title bar The Show mapping info link provides information on attribute mapping between
Interplay MAM and Central Index.
Monitor Monitors recent synchronization activities, displays details for each activity, and
provides controls to manually trigger synchronization on different levels. For
additional information, see “The Monitor View” on page 66.
Traffic Monitors recently synchronized objects and displays details for each object. For
additional information, see “The Traffic View” on page 67
Statistics Provides statistics on how many MAM objects of different classes were synchronized
in Central Index. For additional information, see “The Statistics View” on page 68.
MAM/CI Compare Provides statistics on the number of objects and EDLs per object class in MAM and
Central Index, and shows the difference between these numbers. For additional
information, see “The MAM / CI Compare View” on page 69.
Sync Queue Provides statistics on the create, update, and delete entries in the DM_SYNC table. For
additional information, see “The Sync Queue View” on page 69.
Errors Displays information on unsynchronized entries and provides controls to reset or purge
erroneous synchronization entries. For additional information, see “The Errors View”
on page 70.
Send JSON Allows the sending of JSON statements to and receives responses from Interplay
Central services for debugging and troubleshooting purposes. For security reasons, the
Send JSON tab is hidden by default. As an administrator you can show the tab by
setting the value of the key EnableMessagingDiagnostics in the Settings section of the
SyncCentralIndex configuration profile to “true.”
65
Page 66

The Monitor View
rr
qq
tt
ww ee
In most cases, your first experience with Sync Service Administrator will be in Monitor view, where
the basic Sync Service Administrator features are close at hand. The Monitor view is arranged in six
sections that provide information and controls to set up basic Sync Service Administrator functions.
The following illustration and table describe the layout of the Monitor view.
Understanding the Sync Service Administrator Layout
Item Function
1 Refresh controls Sync Service Administrator updates the display of recent synchronization
activities every five seconds if the Auto refresh check box is checked. If you
uncheck the Auto refresh check box you can update the display manually by
clicking the Refresh button.
2 Recent events list Displays a configurable number of synchronization activities (default is 3,000).
For each entry the following information is shown: Time stamp (data and time
of synchronization), consecutive number, and message.
The following colors indicate the synchronization status:
• Red: indicates synchronization errors
• Orange: indicates warnings
• Black: indicates schema, CBA, legal list, and thesaurus synchronization
activities; bold style indicates index rebuild activities
66
Page 67
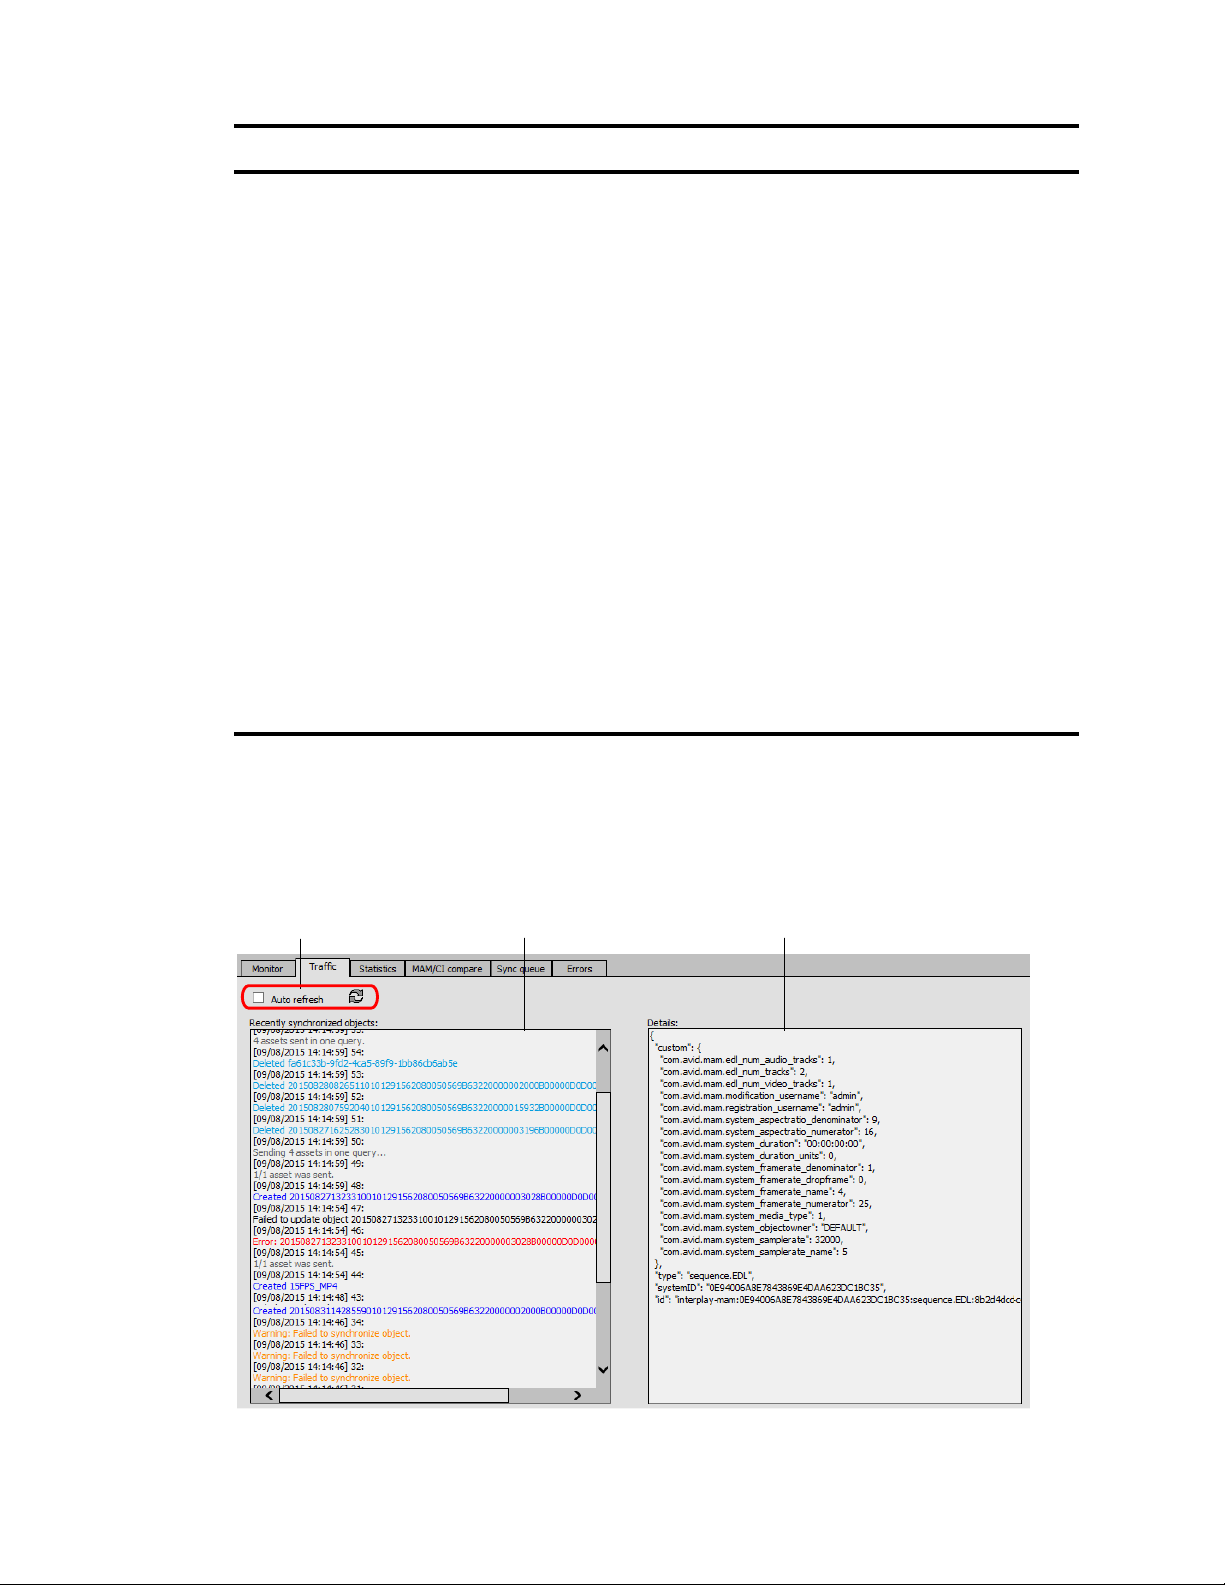
Understanding the Sync Service Administrator Layout
qq
ww
ee
Item Function
3 Details Displays detailed information about the entry selected in the Recent events list.
4 Water mark indicator Indicates the load of the synchronization queue as a traffic light. Sync Index
Administrator checks the number of high-priority entries in the DM_Sync table
and shows a traffic light depending on water mark settings. You can update the
water mark indicator manually by clicking the Refresh button.
5 Synchronization controls Provides controls to manually trigger synchronization on different levels:
• Synchronization of an individual object using its DMGUID
• Synchronization of all objects of a selected object class
• Synchronization of all objects
• Synchronization of all objects (with lower priority)
• Synchronization of CBA rules to user assignment
• Synchronization of CBA rules
• Synchronization of thesauri
• Synchronization of legal lists
• Rebuild of the entire index
All synchronization options — except for synchronizing an individual object
by DMGUID — require that you type a reason in the Synchronization reason
text box to activate the Synchronize button.
The Traffic View
The Traffic view displays information about recently synchronized objects; it provides information
about recent asset create, asset update, and asset delete activities, and error, warning, and group
messages.
67
Page 68

Understanding the Sync Service Administrator Layout
Item Function
1 Refresh controls Sync Service Administrator updates the display of recently synchronized
objects every five seconds if the Auto refresh check box is checked. If you
uncheck the Auto refresh check box you can update the display manually by
clicking the Refresh button.
2 Synchronized objects list Displays a configurable number of recently synchronized objects (default is
3,000). For each object the following information is shown: Time stamp (data
and time of synchronization), consecutive number, and a title consisting of an
operation type (Created, Updated, or Deleted) and the DMGUID of the object.
The following colors indicate the synchronization status:
• Red: indicates synchronization errors
• Orange: indicates failed synchronizations
• Blue: indicates successfully created or updated objects
• Light blue: indicates deleted objects
• Gray: indicates bulk synchronization activities
3 Details Displays detailed information about the object selected in the Recently
synchronized objects list.
The Statistics View
The Statistics view provides statistics on how many MAM objects of different classes were
synchronized in Central Index. The information is displayed in an overview table, as shown in the
following illustration. For each object class the number of successful and failed synchronizations is
shown for the current hour, current day, and current week. Additionally, the total number of
synchronization activities is given.
The Statistics view is for information purposes only, and does not provide controls to apply actions
on the statistics.
68
Page 69

The MAM / CI Compare View
The MAM / CI Compare view provides statistics on the number of objects in MAM and Central
Index per object class, and differences between them. Information is provided for object (asset) and
EDL (sequence) classes.
The information is displayed in an overview table, as shown in the following illustration. It shows the
number of objects for each object and EDL class in MAM and Central Index. Additionally, the
number of differing entries is given.
The MAM / CI Compare view is for information purposes only, and does not refresh automatically. It
provides a control to update the statistics.
Understanding the Sync Service Administrator Layout
The Sync Queue View
The Sync Queue view provides statistics on the number of entries in the synchronization queue. The
information is displayed in an overview table, as shown in the following illustration. For each object
class, it shows the number and priority of synchronization requests, and the create, update, and delete
entries in the DM_SYNC table. Additionally, the total number of entries in the synchronization table
is given.
The Sync Queue view is for information purposes only, and does not refresh automatically. It
provides a control to update the statistics.
69
Page 70

The Errors View
The Errors view provides statistics on synchronization errors, and controls to reset or purge
erroneous synchronization entries in Central Index.The following illustration and table describe the
layout of the Errors view.
Function
Quitting Sync Service Administrator
1 Refreshes the entries in the Object class table.
2 Displays the number of synchronization errors for each affected object class. Provides check boxes to
select individual or all object classes to trigger a retry or purge operation.
3 Provides controls to handle synchronization errors:
• Clear error flag (retry): The ERROR_COUNT column value of the selected object class(es) will be
reset to 0 and the synchronization can be triggered anew.
• Remove Synchronization entries with errors (purge): All rows with an ERROR_COUNT value greater
or equal than the configured error count threshold (profile SyncCentralIndex > section Settings > key
EntryErrorLimit) will be deleted from the DM_SYNC table. These entries will not be synchronized
again.
4 Triggers the selected synchronization operation (retry or purge) for the selected object class(es).
Quitting Sync Service Administrator
When you are finished using Sync Service Administrator quit the application.
To quit the application:
t Click the X in the Sync Service Administrator tab.
Sync Service Administrator quits, but both Interplay MAM Control Center and Interplay MAM
Administrator remain open. You can resume working in both applications or quit.
70
Page 71

A Upgrading Media | Index
The procedures for upgrading your MediaCentral system configured with Media Index depend on
which version of MediaCentral Platform Services (MCS) you are upgrading from. For example, if
you upgrade from v2.0 to v2.3, you must reset the Media Index indexes before the upgrade begins. If
you upgrade from v2.2 to v2.3, you only need to migrate the Media Index schema data.
Upgrading Media Index from v2.2 or Higher
See the Avid MediaCentral Platform Services Upgrade Guide for complete upgrade details.
Upgrading Media Index from v2.0.x or v2.1.x
See the Avid MediaCentral Platform Services Upgrade Guide for upgrade details. At the appropriate
point in the upgrade process, the Upgrade Guide will direct you to this section of the Media Index
Guide.
Media Index v2.0 installations only support indexing Interplay Production databases. Media Index
v2.1 introduced support for Avid iNEWS systems and Media Index v2.2 introduced support for
MAM. As this chapter relates to v2.0 and v2.1 Media Index installations, it does not apply to
configurations that include Interplay MAM.
If you are upgrading a multi-zone configuration, upgrade slave zones first. If you cannot bring all
zones offline at once, upgrade the slave zone(s) before the master zone. An upgraded slave zone no
longer has access to the centralized user management service (UMS), which is owned by the master
zone. Users in the upgraded slave zone can continue to log in using the local, read-only copy of the
UMS database. However, new users cannot be added through the slave zone.
This process consists of three steps:
• Resetting Media Index
• Editing the Elasticsearch-tribe Configuration File (if applicable)
• Validating the Media Index Changes
Resetting Media Index
Before upgrading your Media Index deployment, you must reset Media Index. In a multi-zone
environment, you must reset the Media Index in each zone. During the Media Index reset procedure,
all indexed data is deleted. If you are indexing an Interplay Production database, you must use the
Production Engine Bus Connector (PEBCo) service to resync and restore the Media Index database
after the upgrade is complete. For information on using PEBCo, see “Installing the Production
Engine Bus Connector” on page 34.
Page 72

Upgrading Media Index from v2.0.x or v2.1.x
To reset Media Index to prepare for an upgrade:
1. If you are indexing an Interplay Production database, you must first determine the name of the
PEBCo instance running on the MediaCentral server. Enter the following command on either a
single MediaCentral server or any node in a cluster configuration:
/opt/avid/bin/pam-agent-ctrl list
The server returns the name of your PEBCo instance.
2. If you are indexing an Interplay Production database, stop the PEBCo service by typing the
following command:
t For single-server configurations:
/opt/avid/bin/pam-agent-ctrl stop <instance>
t For cluster configurations, type the following command on one of the nodes in your cluster:
crm resource stop AvidPamAgent-<instance>
3. From the MediaCentral server, or any node in a cluster configuration, enter the following
command to list the systems (Interplay Production or Avid iNEWS) indexed by Elasticsearch:
/opt/avid/bin/avid-acs-elastic-index-setup -m info
The terminal window displays the system information for your Media Index configuration.
The following is a sample output:
Systems found: 1
*************************
System id : BC2F27F5-DBC5-4611-869A-F7A43690EE57
System type : interplay
System display name : WAVD-IE01
Number of assets : 18880
*************************
Take note of the “System id” for all listed systems as this information is required in the next step.
4. Type the following command for each system indexed by Elasticsearch:
/opt/avid/bin/avid-acs-elastic-index-setup -m deleteSystem --systemId
<id_of_the_system>
If you have multiple indexed systems repeat this command for each system.
5. Type the following command to remove the System Data index:
/opt/avid/bin/avid-acs-elastic-index-setup -m removeSystemData
6. Use the
avid-acs-media-index-restart.sh
t For single-server installations:
avid-acs-media-index-restart.sh stop
t For cluster installations:
avid-acs-media-index-restart.sh crm stop
For more information on the
n
Index Restart Command Line Tool” on page 79.
avid-acs-media-index-restart.sh
script to stop all Media Index services:
script, see “Using the Media |
72
Page 73

Upgrading Media Index from v2.0.x or v2.1.x
Editing the Elasticsearch-tribe Configuration File
In multi-zone configurations, you also must edit the Elasticsearch-tribe configuration file in all zones
to remove information about the zone or zones that you are upgrading. For example, in a three-zone
configuration where you start by upgrading Zone_1, you must remove Zone_1’s information from
the elasticsearch-tribe configuration file on Zone_2 and Zone_3. You must also remove the
information regarding Zone_2 and Zone_3 from Zone_1’s configuration file.
If there are other zones that you are not upgrading, you must still edit the configuration file. However,
any zones remaining at the older version can continue to have configuration information that exposes
the zone to other old zones.
To remove the zone information from the configuration file:
1. Starting with the zone you wish to upgrade, use the Linux text editor, vi, to edit the
elasticsearch.yml
vi /etc/elasticsearch-tribe/elasticsearch.yml
2. Delete the zone binding information of the non-local zones (as highlighted in the example
below):
[root@wavd-doc01 ~]# cat /etc/elasticsearch-tribe/elasticsearch.yml
discovery.zen.ping.multicast.enabled: false
tribe.local.cluster.name: Zone_1
tribe.local.transport.tcp.port: 9312
tribe.local.discovery.zen.ping.unicast.hosts:
- "zone1-mcs:9300"
http.port: 9201
transport.tcp.port: 9305
node.name: zone1-tribe
tribe.Zone_2.cluster.name: Zone_2
tribe.Zone_2.transport.tcp.port: 9313
tribe.Zone_2.discovery.zen.ping.unicast.hosts:
- "zone2-mcs01:9300"
- "zone2-mcs02:9300"
- "zone2-mcs03:9300"
tribe.Zone_3.cluster.name: Zone_3
tribe.Zone_3.transport.tcp.port: 9314
tribe.Zone_3.discovery.zen.ping.unicast.hosts:
- "zone3-mcs:9300"
configuration file:
3. Press the Escape key to return to command mode, then type
:wq
and press Return to write and
quit the text editor.
4. If you have a cluster configuration, repeat these steps for each node within the cluster.
5. Restart the Elasticsearch tribe service on this zone by typing one of the following commands:
t For single-server configurations:
service elasticsearch-tribe restart
t For cluster configurations:
crm resource restart elasticsearchTribeEverywhere
73
Page 74

Upgrading Media Index from v2.0.x or v2.1.x
6. In one of the remaining zones, use the Linux text editor, vi, to edit the
elasticsearch.yml
configuration file:
vi /etc/elasticsearch-tribe/elasticsearch.yml
7. Delete the binding information for the zone that is being upgraded.
The example below highlights the information for Zone_1 which is the zone being upgraded:
[root@wavd-news ~]# vi /etc/elasticsearch-tribe/elasticsearch.yml
discovery.zen.ping.multicast.enabled: false
tribe.local.cluster.name: Zone_3
tribe.local.transport.tcp.port: 9312
tribe.local.discovery.zen.ping.unicast.hosts:
- "zone3-mcs:9300"
http.port: 9201
transport.tcp.port: 9305
node.name: zone3-tribe
tribe.Zone_1.cluster.name: Zone_1
tribe.Zone_1.transport.tcp.port: 9313
tribe.Zone_1.discovery.zen.ping.unicast.hosts:
- "zone1-mcs:9300"
tribe.Zone_2.cluster.name: Zone_2
tribe.Zone_2.transport.tcp.port: 9314
tribe.Zone_2.discovery.zen.ping.unicast.hosts:
- "zone2-mcs01:9300"
- "zone2-mcs02:9300"
- "zone2-mcs03:9300"
8. Press the Escape key to return to command mode, then type
changes and quit the text editor.
9. If you have a cluster configuration, repeat these steps for each node within the cluster.
10. Restart the Elasticsearch tribe service on this zone by typing one of the following commands:
t For single-server configurations:
service elasticsearch-tribe restart
t For cluster configurations:
crm resource restart elasticsearchTribeEverywhere
11. Repeat steps 6 - 10 on all remaining zones.
Validating the Media Index Changes
Once the steps in the previous two processes have been completed, use the Elasticsearch plugin page
to verify that the indexes are not listed.
To validate your changes:
1. Open a browser and navigate to http://<server_name>:9200/_plugin/head, where sever_name is
the host name or virtual cluster name of the system that is being upgraded.
The Elasticsearch head plug-in Web page opens in your browser.
:wq
and press Return to write
74
Page 75

Media | Index Backup Locations
2. Check to make sure the system_data index and index information are not listed.
When Media Index is reset for your upgrade process, you can install the latest version of
MediaCentral Platform Services. For more information, see one of the following topics:
Once the MediaCentral upgrade is complete, you must reconfigure your Media Index
configuration. See the following sections for more information:
- For installing Media Index in a single-server configuration, see “Configuring Media | Index
for a Single Server” on page 12.
- For installing Media Index in a cluster configuration, see “Configuring Media | Index for a
Cluster” on page 17.
- For configuring Media Index in a multi-zone environment, see “Setting Up Multi-Zone
Search” on page 27.
Media | Index Backup Locations
When upgrading the MediaCentral Platform Services software, users are required to create a backup
of all data using the USB key. However, indexes are not backed up by the system backup script. This
typically does not cause an issue since users generally do not need to back up their indexes. For
cluster configurations, the following notes also apply:
• In a cluster, the index should be configured with data redundancy to avoid data loss.
• In the case of a complete rebuild or of complete data loss within a cluster, Avid recommends that
you do not use a backup but re-index the data instead. This is because the backup will no longer
be in sync with what the index agents are expecting.
With the release of Elasticsearch v1.6, backups are only allowed on shared file locations, the backup
in Media Index v2.4 and higher requires manual configuration of the backup locations. Setting this
up correctly requires a file server to be mounted on all machines. Customers should contact Avid
Customer Care or Avid Professional Services for instructions and support from Avid Engineering in
setting this up.
75
Page 76

B Working with Media Index
This section covers the additional commands and utilities that are used with systems configured for
Media Index. The following topics are covered:
• Media Index Log Locations
• Updating Localization Strings
• Displaying Information about Initialized Systems
• Checking the Current Index Status
• Using the Media | Index Restart Command Line Tool
• Restarting the Search and PEBCo Services
• Re-Sharding a Media Index Database
• Taking Nodes Offline in a MediaCentral Cluster
Additionally, a process for removing a system configured with Media Index in a MediaCentral
multi-zone environment is included in this chapter:
• Removing Zones from a Multi-Zone Configuration
• Disabling Media Index
Media Index Log Locations
Logs for Elasticsearch are located in the Linux
Avid Media Index services are located at
For detailed information on each of the logs, see the “Best Practices, Troubleshooting and System
Logs” chapter of the MediaCentral Platform Services Concepts and Clustering Guide.
/var/log/ directory
/var/log/avid/
Updating Localization Strings
Localizations for base, common, and time-based fields are stored in a directory located at
/opt/avid/etc/avid-search-import/resources/
data index when it is created.
To reload localization strings, do the following:
t Type the following command:
/opt/avid/bin/avid-acs-elastic-index-setup -m updateLocalization
. Additional logs related to
.
and are automatically loaded into the system
Page 77

Displaying Information about Initialized Systems
Displaying Information about Initialized Systems
You can use the
info
command to display the following data for all available systems within all
configured Elasticsearch clusters:
•System id
• System type
• System display name
• Number of assets
To display system information, do the following:
t Type the following command:
/opt/avid/bin/avid-acs-elastic-index-setup -m info
The following is an example of Media Index configured for an Avid Interplay Production system
on a single zone:
[root@wavd-doc01 ~]# avid-acs-elastic-index-setup -m info
Fetching system information...
Systems found: 1
***************************************
System id : 8C213466-7A16-424F-9B72-EB239C04A3BB
System type : interplay
System display name : WAVD-IE01
Number of assets : 138
***************************************
77
Page 78
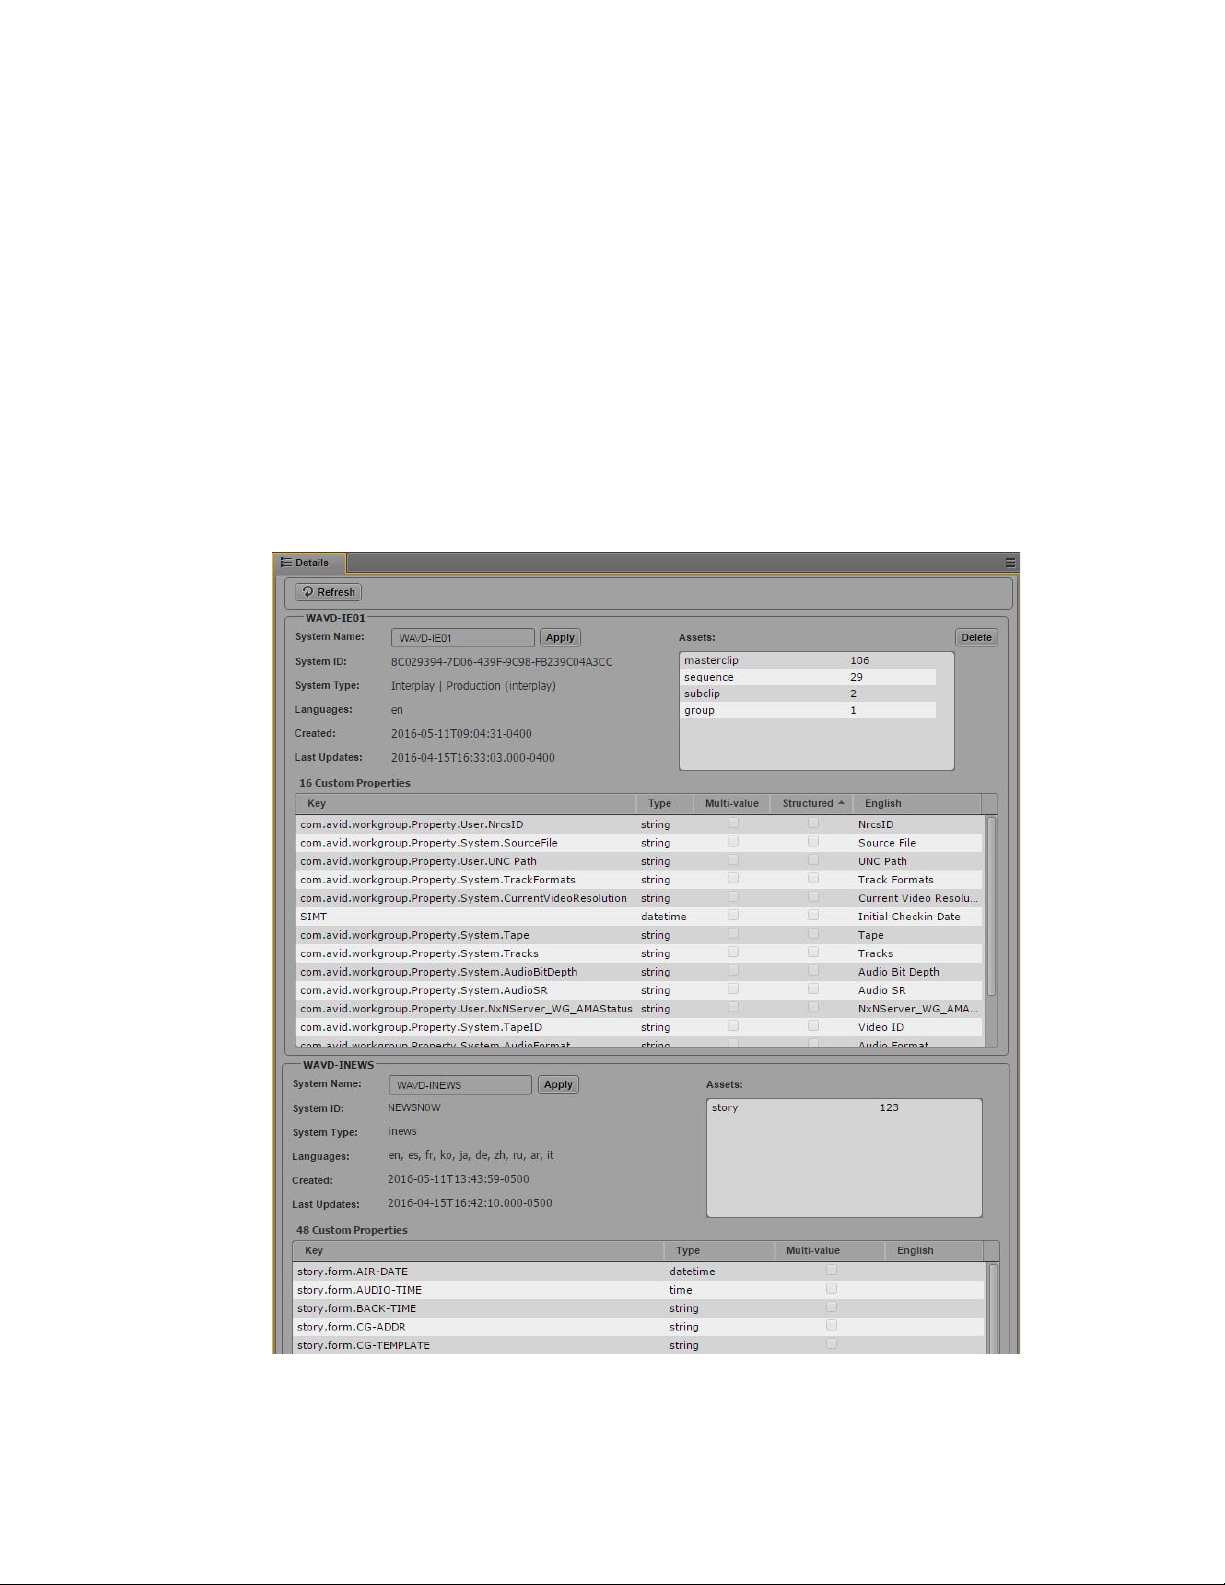
Checking the Current Index Status
The Indexes pane in the MediaCentral UX System Settings can be used to view the status of the
indexes in your configuration.
The Indexes pane displays only the indexes in the local zone. To display indexes of other zones,
n
connect directly to the MediaCentral UX of that zone.
To check the current status of your indexes:
1. Sign in to MediaCentral UX as an administrator.
2. Select System Settings from the Layout selector.
The System Settings layout opens.
3. In the Settings pane select Media Index > Indexes.
The Media Index Indexes status displays in the Details pane.
Checking the Current Index Status
All indexes for your configuration display with their status and details listed in the pane. Use the
Refresh button at the top of the pane to refresh the information.
78
Page 79

Using the Media | Index Restart Command Line Tool
Using the Media | Index Restart Command Line Tool
When Media Index is configured on a MediaCentral system, multiple new services are enabled. In
the case of a cluster, many of these resources are added as resources to the Corosync / Pacemaker
cluster. In an effort to simplify working with Media Index, Avid includes a utility that allows you to
start, stop, or restart many of the services (or resources) in a single command. Additionally, a “status”
option is available to provide the user with information on the affected services.
There is however one Media Index service that is not included in the utility. The
avid-acs-media-index-configuration
restarted manually.
Type one of the following commands to interact with the Media Index services:
For single-server configurations:
/opt/avid/bin/avid-acs-media-index-restart.sh <service> <command>
For cluster configurations:
/opt/avid/bin/avid-acs-media-index-restart.sh <service> crm <command>
service is excluded and must be stopped, started, or
Although the word “restart” is included in the utility name, functionality is not limited to only
n
restarting the services.
The command line tool takes the following parameters:
[service name]
•
specifying the service name. Each service must be separated by a space. If you do not specify a
service, all Media Index services except for avid-acs-media-index-configuration are affected.
The following services or resources can be specified:
Single Server Service Name Cluster Resource Name
avid-acs-autocomplete AvidSearchAutocomplete (AvidSearchAutocompleteEverywhere)
avid-acs-media-index-status-provider AvidSearchIndexStatus (AvidSearchIndexStatusEverywhere)
avid-acs-media-index-feed AvidSearchIndexFeed (AvidSearchIndexFeedEverywhere)
avid-acs-media-index-permission AvidSearchPermission (AvidSearchPermissionEverywhere)
avid-acs-media-index-thesaurus AvidSearchThesaurus (AvidSearchThesaurusEverywhere)
avid-acs-search AvidSearch (AvidSearchEverywhere)
avid-acs-search-import AvidSearchImport
elasticsearch elasticsearch (elasticsearchEverywhere)
— (optional) If desired, you can interact with one or more services by
elasticsearch-tribe elasticsearchTribe (elasticsearchTribeEverywhere)
crm
•
— If working in a cluster configuration, the crm flag is required. For single-server
configurations, this option is not required.
79
Page 80

•
[command]
-
-
— Specify one of the following commands to interact with the services:
start
— start services
stop
— stop services
Using the Media | Index Restart Command Line Tool
restart
-
status
-
To get command line tool help information, run the command tool without parameters.
n
— restart services
— get the status
The following table includes examples of using the command line tool:
Description Command
Restart one or more specific services in a
single-server configuration
Alternatively, you can interact with a single
service with the standard Linux commands such
service elasticsearch-tribe restart
as:
Stop all services in a single-server configuration
Start specific services in a cluster configuration
Restart all services in a cluster configuration
The following example restarts only the elasticsearch and
elasticsearch-tribe services:
/opt/avid/bin/avid-acs-media-index-restart.sh
elasticsearch elasticsearch-tribe restart
/opt/avid/bin/avid-acs-media-index-restart.sh
stop
/opt/avid/bin/avid-acs-media-index-restart.sh
start
/opt/avid/bin/avid-acs-media-index-restart.sh
crm restart
Since the avid-acs-media-index-configuration service is not included in the restart script, the service
must be started, stopped or restarted separately from the other services.
Type one of the following commands to interact with the avid-acs-media-index-configuration
service:
• To interact with the service in a single-server configuration:
service avid-acs-media-index-configuration <command>
• To interact with the service on a single node in a cluster configuration:
crm resource <command> AvidSearchConfig
• To interact with the service on all nodes in a cluster configuration simultaneously:
crm resource <command> AvidSearchConfigEverywhere
Command options are
start, stop
, and
restart.
80
Page 81
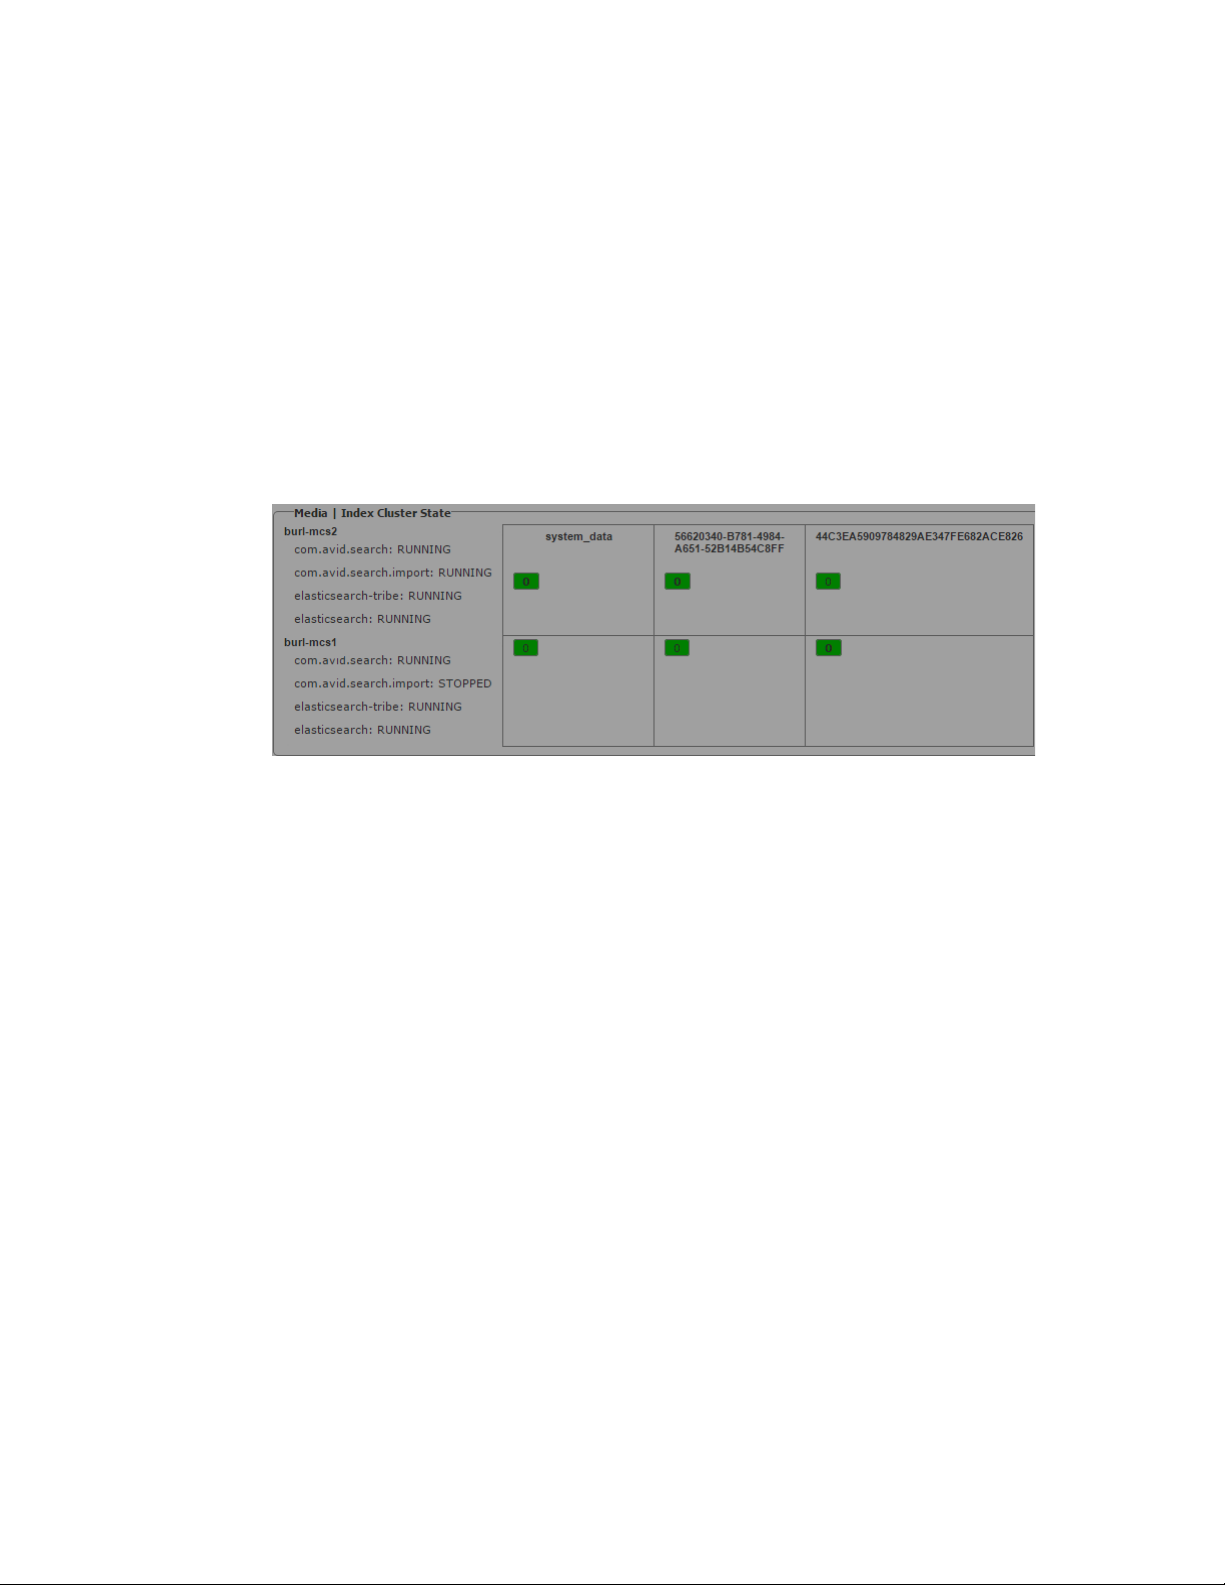
Restarting the Search and PEBCo Services
Restarting the Search and PEBCo Services
If you find that the indexed search has stopped working in your MediaCentral environment, you can
restart the search service on any node that has a problem and then resync your index.
To check the status of the search service:
1. Sign in to MediaCentral UX as an administrator.
2. Select System Settings from the Layout selector.
The System Settings layout opens.
3. In the Settings pane select Media Index > Cluster State.
The Media Index Cluster State displays in the Details pane. You can identify the node displaying
problems by checking the status of the search services.
To restart the search service and to resync the PEBCo service:
1. Log in to the MCS node as the Linux root user.
2. Restart the indexed search service by typing one of the following commands:
t For single-server systems:
t For clustered configurations:
3. Identify the PEBCo instance name by typing the following command:
pam-agent-ctrl list
4. Restart the PAM agent resource by typing one of the following commands:
t For single-server systems:
t For clustered configurations:
5. Start Interplay Administrator and log on to the Interplay Production database that you want to
have indexed.
6. In the Site Settings section of the Interplay Administrator, click the Production Engine Bus
Connector icon.
The Production Engine Bus Connector view is not available on Macintosh clients.
n
service elasticsearch restart
crm resource restart elasticsearchEverywhere
service <PEBCo_instance_name> restart
crm resource restart <PEBCo_instance_name>
81
Page 82

Re-Sharding a Media Index Database
7. Click the Manage Status tab.
8. In the Manage section, click Resync to update the whole database content. Resyncing the
database might take a long time to complete and invalidates the existing content of your index.
During this process, the search only returns assets that are already processed within this run.
Re-Sharding a Media Index Database
Elasticsearch indexes are split into “shards” and “replicas”. Each shard contains indexed data and
each replica contains a copy of that data. Replicas are used to spread the search load and provide
redundancy. Single server installations default to one shard and zero replicas. In cluster
configurations, Avid recommends setting the shard count to one and the replica count to one fewer
than the number of cluster nodes to accommodate fail-over safety and load balancing.
If the amount of data indexed by your system grows to a point where it becomes necessary to alter the
original configuration, this can be accomplished through the
When run, the tool completes the following:
• Creates a new index with the specified number of shards.
• Migrates all data from the original index to the new index.
• Re-assigns aliases so that all links point to the new index.
• Deletes the original index once the process is complete.
To re-shard the Media Index configuration:
1. Log in to the MCS server as the Linux ‘root’ user. If you have a clustered configuration, log into
the master node.
2. Enter the following command to run the “reshard” script:
media-index-reshard
command.
/opt/avid/bin/media-index-reshard --systemID=<index-id> --shards=<number>
Where the following values are used:
<index-id>
-
the MediaCentral UX System Settings > Media Index > Indexes pane.
is the System ID associated with the index. This information can be found in
82
Page 83

Taking Nodes Offline in a MediaCentral Cluster
Alternatively, the
command can also be used to determine the System ID.
-
<number>
The following command is provided as an example:
/opt/avid/bin/media-index-reshard
--systemID=BC2F27F5-DBC5-4611-869A-F7A43690EE57 --shards=5
For more information on shard and replica configurations, see “Shard Count and Usage” on page 17.
is the number of total shards that you want the index to be split into.
/opt/avid/bin/avid-acs-elastic-index-setup -m info
Taking Nodes Offline in a MediaCentral Cluster
Depending on the number of primary shards and replicas configured on your system, taking a node
offline without following the recommended procedures might temporarily disable Indexed search
functionality. If you need to take a node offline, review the following and complete the process that is
appropriate for your situation:
• Manually stop Media Index services before taking the node offline using the
avid-acs-media-index-restart.sh
without introducing fail-counts to the Corosync cluster. This is the best solution when you need
to temporarily remove a node from the Media Index cluster.
If you need to take the node completely offline, use the
to stop the remaining cluster resources.
script. This script is cluster-aware and can stop services
crm node standby <node>
command
If you only need to take the Media Index cluster offline, use the
avid-acs-media-index-restart.sh
For more information on the
Media | Index Restart Command Line Tool” on page 79.
For more information on the
Services Concepts and Clustering Guide.
• Increase the replica count before removing a node to allow for more nodes to be taken offline.
This causes Elasticsearch to copy data on startup, which can consume processor resources. This
can be a good solution if you remove multiple nodes. However, increasing the number of replicas
puts more load on the existing nodes, both in terms of memory needed for the index and for
storage space.
• Decrease number of shards. This option is only appropriate if a node will be taken offline
permanently. You can change the replica count at any time, but changing the primary shard count
requires you to reset the index, reconfigure it with the new shards count, and then re-index the
data. This can be a time consuming process, especially for configurations with large indexes.
As a reminder, the Media Index clustering functionality and the Corosync Clustering functionality
n
are independent from each other.
avid-acs-media-index-restart.sh
crm node standby
script to restart the index services when ready.
script, see “Using the
command, see the MediaCentral Platform
83
Page 84

Removing Zones from a Multi-Zone Configuration
Removing Zones from a Multi-Zone Configuration
If you want to remove a zone from your MediaCentral multi-zone configuration, you must remove
the bindings for that zone in the Elasticsearch tribe configuration file on all other zones.
This process only removes the affected zone from the Media Index multi-zone configuration, it does
not disable Media Index on any zone.
The example configuration used in this section consists of three zones: Master_Zone, Slave_Zone,
n
and 3rd_Zone. This process will assume the removal of the zone named “3rd_Zone”
To remove the zone information from the configuration file:
1. Starting with the zone you wish to remove, use the Linux text editor, vi, to edit the
elasticsearch.yml
vi /etc/elasticsearch-tribe/elasticsearch.yml
2. Delete the zone binding information of the non-local zones (as highlighted in the example
below):
[root@wavd-news ~]# vi /etc/elasticsearch-tribe/elasticsearch.yml
discovery.zen.ping.multicast.enabled: false
tribe.local.cluster.name: 3rd_Zone
tribe.local.transport.tcp.port: 9312
tribe.local.discovery.zen.ping.unicast.hosts:
- "wavd-news:9300"
http.port: 9201
transport.tcp.port: 9305
node.name: wavd-news-tribe
tribe.Master_Zone.cluster.name: Master_Zone
tribe.Master_Zone.transport.tcp.port: 9313
tribe.Master_Zone.discovery.zen.ping.unicast.hosts:
- "wavd-doc01:9300"
tribe.Slave_Zone.cluster.name: Slave_Zone
tribe.Slave_Zone.transport.tcp.port: 9314
tribe.Slave_Zone.discovery.zen.ping.unicast.hosts:
- "wavd-mcs01:9300"
- "wavd-mcs02:9300"
- "wavd-mcs03:9300"
configuration file:
3. Press the Escape key to return to command mode, then type
:wq
and press Return to write and
quit the text editor.
4. If you have a cluster configuration, repeat these steps for each node within the cluster.
5. Restart the Elasticsearch tribe service on this zone by typing one of the following commands:
t For single-server configurations:
service elasticsearch-tribe restart
t For cluster configurations:
crm resource restart elasticsearchTribeEverywhere
6. In one of the remaining zones, use the Linux text editor, vi, to edit the
elasticsearch.yml
configuration file:
vi /etc/elasticsearch-tribe/elasticsearch.yml
84
Page 85

Disabling Media Index
7. Delete the binding information for the zone that is being removed from the configuration.
The example below highlights the information to be removed from zone name “Master_Zone”:
[root@wavd-doc01 ~]# cat /etc/elasticsearch-tribe/elasticsearch.yml
discovery.zen.ping.multicast.enabled: false
tribe.local.cluster.name: Master_Zone
tribe.local.transport.tcp.port: 9312
tribe.local.discovery.zen.ping.unicast.hosts:
- "wavd-doc01:9300"
http.port: 9201
transport.tcp.port: 9305
node.name: wavd-doc01-tribe
tribe.Slave_Zone.cluster.name: Slave_Zone
tribe.Slave_Zone.transport.tcp.port: 9313
tribe.Slave_Zone.discovery.zen.ping.unicast.hosts:
- "wavd-mcs01:9300"
- "wavd-mcs02:9300"
- "wavd-mcs03:9300"
tribe.3rd_Zone.cluster.name: 3rd_Zone
tribe.3rd_Zone.transport.tcp.port: 9314
tribe.3rd_Zone.discovery.zen.ping.unicast.hosts:
- "wavd-news:9300"
8. Press the Escape key to return to command mode, then type
changes and quit the text editor.
9. If you have a cluster configuration, repeat these steps for each node within the cluster.
10. Restart the Elasticsearch tribe service on this zone by typing one of the following commands:
t For single-server configurations:
service elasticsearch-tribe restart
t For cluster configurations:
crm resource restart elasticsearchTribeEverywhere
11. Repeat steps 6 - 10 on all remaining zones.
12. If you intend to remove this zone from the MediaCentral multi-zone configuration, review the
steps for “Dismantling a Multi-Zone Environment” in the MediaCentral Platform Services
Installation and Configuration Guide.
13. If you are running MediaCentral Platform Services v2.6 or higher, you must also remove the
zone from the sharded Mongo configuration.
Disabling Media Index
Media Index components are automatically installed with the MediaCentral Platform Services
software installation and cannot be removed. However, if you have configured Media Index on a
MediaCentral single server or cluster and need to remove Media Index from the environment, the
following processes details the required steps to delete the indexes and remove the Media Index
configuration.
:wq
and press Return to write
This process is destructive as it deletes the indexes from the server! Indexes can only be recovered
n
through a reindex which can take a long time for large databases.
85
Page 86

Disabling Media Index
To completely disable Media Index:
1. Delete all Indexes from MCUX System Settings > Media Index > Indexes.
2. Click Reset in MCUX System Settings > Media Index > Settings.
3. If the Media Index is configured with Interplay Production, complete the following in the
Interplay Administrator:
a. Under Server > Server Settings, disable “Update Tracking”
b. Under Site Settings > Production Engine Bus Connector, Stop the PEBco service and
Unassign the PEBCo service
4. If the Media Index is configured with Interplay Production, use Interplay Access to remove the
Bus AMQP URL The Interplay Administrator tool allows you to enter a new URL or alter the
existing URL, but you cannot delete the URL. The deletion process must be completed using
Interplay Access.
a. If you are logged into the Interplay Administrator, log out at this time.
b. Launch Interplay Access and log into the application as a user with administrator-level
access.
c. Right-click on the Interplay Production database (AvidWG) at the top of the tree and select
Advanced > Get / Set Property...
d. Type ACS_BUS_URL in the Name field and click the Get button.
e. Delete the URL in the Value text box and click the Apply button.
f. Click OK to close the Get / Set Property window and Close Interplay Access.
g. Launch the Interplay Administrator tool and verify that the Bus AMQP URL has been
removed from the MediaCentral and Platform Services Settings.
5. If changes were made to Interplay Production Services, disable the Configuring Automation and
Consolidate Services.
6. If Media Index has been integrated with Avid iNEWS, revert changes on the iNEWS servers.
7. If Media Index has been integrated with Interplay MAM, revert changes on the MAM servers.
86
Page 87

C Media | Index Custom Configuration
The Configuring Media | Index for a Single Server and Configuring Media | Index for a Cluster
chapters in this document detail the most common Media Index deployments. In some instances, you
might want to customize or need to modify the installation.
This section covers the following custom configuration procedures:
• Configuring Media Index Fields
• Modifying the Media | Index System Settings
• Adjusting Settings Through the ACS Monitor
• Setting Elasticsearch Memory Usage
• Configuring the PEBCo for Custom Configurations
• Changing the Default Search Type
• Changing Replica Counts
• Changing the Index Refresh Interval
Configuring Media Index Fields
Introduced with Avid MediaCentral Platform Services v2.8.0, the “Fields” menu in the MediaCentral
UX System Settings enables system administrators to select or deselect search options to limit the
number of fields available to the user. This allows sites to customize the search to show only those
values that apply to the local workflow.
Page 88

Configuring Media Index Fields
The search criteria at the top of the pane show Media Index and TBMD (time-based metadata) values
that are common to all Indexed searches.
The sections below TBMD list the databases that have been indexed by the system. The image above
shows a single indexed Interplay Production database. The System ID of that index is shown in the
header of the section. By individually listing each system, administrators can customize the available
search values on a per-database level. This is exceptionally valuable if two databases of the same type
(such as Interplay Production) are dedicated to different workflows.
To customize the Media Index search values:
1. Sign in to MediaCentral UX as an administrator.
2. Select System Settings from the Layout selector.
The System Settings layout opens.
3. In the Settings pane select Media Index > Fields.
Enable or disable the check boxes as needed for each value. The following lists explains the
meaning of each option:
- Key — This is the name of the search value as identified in the database.
- Type — Indicates how the search field is structured. For example, “string” refers to a text
-based value whereas “datetime” is a numerical value.
- Visible — When the check box is deselected, the field can be used in a search, but it can not
be selected in the “Add or Remove Columns” selector in the Search pane’s context menu.
- Full Text — When the check box is deselected and a user performs a full text search, the
field is not used in the query by default.
- Criterion — When the check box is deselected, the field is not available in the “Add
Criteria” menu in the Search pane.
- Multi-Value — Indicates whether or not field is declared and indexed as a multi-value, i.e.
single value or array of values. This value is set by the indexing agent and cannot be changed
by Administrator.
- Structured — Indicates whether or not the field is declared as “structured”. Structured values
are associated with an assigned legal list or thesaurus. Criteria selection for structured fields
appear as a drop-down menu instead of text-box. This value is set by the indexing agent and
cannot be changed by Administrator.
- (languages) — These columns show how the key is displayed to the users in the search
menus.
4. Once complete, click Apply to save the changes.
88
Page 89

Modifying the Media | Index System Settings
Modifying the Media | Index System Settings
The Media Index section of the MediaCentral UX System Settings allows you to monitor and modify
some settings used by Media Index. You use some of these settings to configure Media Index and
others to monitor the systems and the indexes used by Media Index.
Modifying the Indexes Pane
You can use the Indexes pane in the System Settings to add or change the system name that is used to
filter some indexed searches, to delete a system from the central index, and to view details about the
indexes configured for Media Index.
To use the Media Index settings in the MediaCentral UX Indexes pane:
1. Sign in to MediaCentral UX as an administrator.
2. Select System Settings from the Layout selector.
The System Settings layout opens.
3. In the Settings pane select Media Index > Indexes.
The Media Index Indexes display in the Details pane.
If you have indexed more than one system, such as an Interplay Production system and an
iNEWS system, each system will be listed separately in the Details pane.
89
Page 90

Modifying the Media | Index System Settings
Area or Component Description
System Name (optional) The system name is set by the indexing agent. For Interplay Production, the system
name is set by the Production Engine Bus Connector (PEBCo) and uses the
Interplay Production Engine’s host name or virtual cluster host name. Other
indexing agents — for example, the iNEWS sync agent — might not assign a
system name by default. You can add or modify the system name so that users can
easily identify the index used during an indexed search. The System Name appears
as the System filter in indexed searches.
Apply button Click this button to apply changes made to the System Name field.
Delete button You can use the Delete button to remove the system and all of its data from the
central index.
Removing a system removes all data from the index. Users cannot search
c
the system using the indexed search functionality of Media Index.
Index summary This area lists some of the details of the index, including the system ID, system type
(for example, Interplay Production or iNEWS), and when the index was created.
System ID The System ID is a unique identifier for an index that is generated by the indexing
agent (PEBCO, MAM agent). It uniquely identifies the system in Media Index.
Interplay Production systems are identified by a unique string of characters which
cannot be altered. iNEWS systems use the system name as the System ID.
c
Assets summary This area provides a brief summary of the assets indexed by Media Index.
Custom Properties list This list includes all properties set for the system that can appear in an indexed
search. Search properties are set by administrators for the appropriate system — for
example, Interplay Production properties are specified in the Canonical Data tab in
the Production Engine Bus Connector view in the Interplay Administrator tool.
You cannot modify the properties in this pane. For more information, see
“Configuring and Using the PEBco Service” on page 39.
4. If you want to modify the name that appears in the System search criterion in indexed searches,
enter a new name in the System Name field, and then click Apply.
For more information on using search criteria to filter searches, see “Advanced Search Filters” in
the Avid MediaCentral | UX User’s Guide.
5. If you want to remove the system from the central index, click Delete.
Deleting a system removes the system and all data from the index. You cannot undo this action.
The Delete System dialog box opens.
6. Type
DELETE
to delete the system, and then click OK. You can cancel the action by clicking
Cancel.
The system and its data are removed from the central index.
90
Page 91
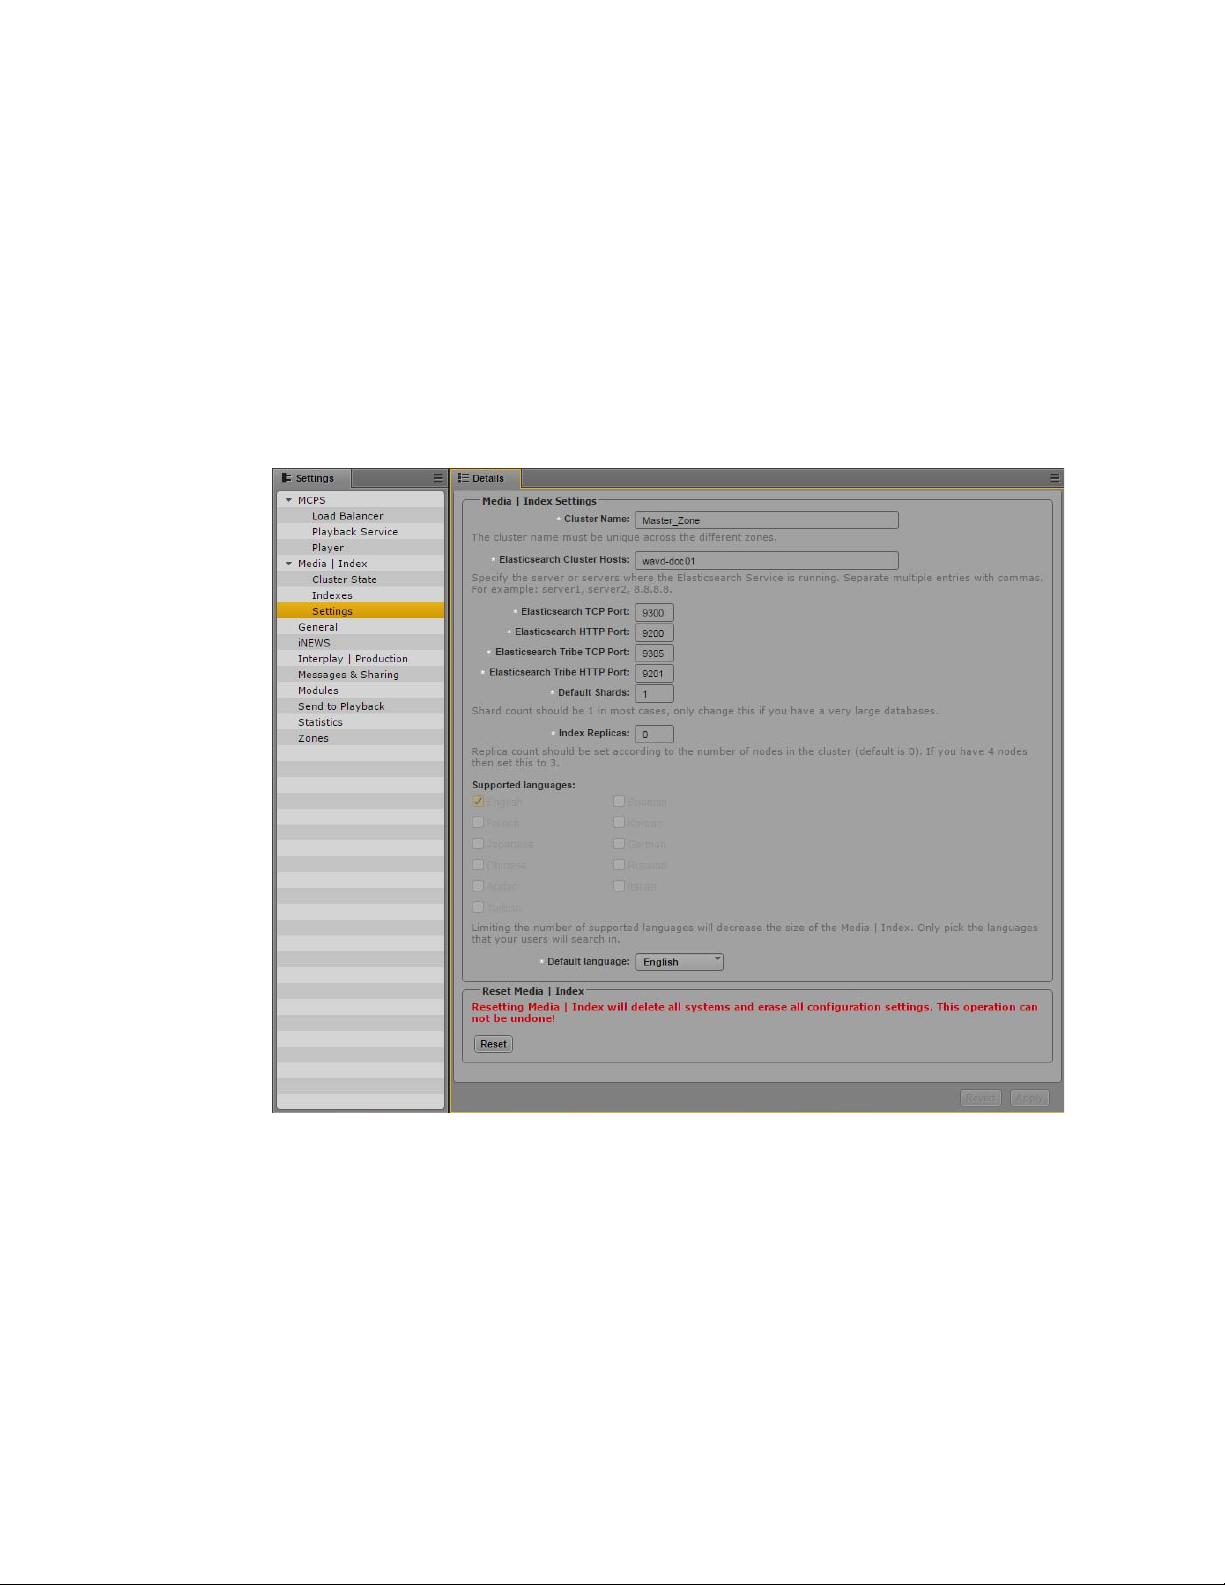
Modifying the Settings Pane
You can use the Settings pane in the System Settings to change the cluster name and to delete all
systems and restore Media Index into the initial state.
To change the cluster name:
1. Sign in to MediaCentral UX as an administrator.
2. Select System Settings from the Layout selector.
The System Settings layout opens.
3. In the Settings pane select Media Index > Settings.
The Media Index Settings display in the Details pane.
Modifying the Media | Index System Settings
c
4. If you want to modify the name of the cluster, type the name in the Cluster Name field, and then
click Apply.
If you change the cluster name, during a restart Elasticsearch creates a new data folder. If you
had any indexes before you changed the cluster name, the indexes fail to appear in your
configuration and the information in them is not accessible. While the index data is not lost,
Avid recommends that you not change the cluster name after your initial configuration. When
you work in a multi-zone set-up, you should consider which cluster names you plan to use in all
zones and not change them after the indexing process has started.
91
Page 92

Modifying the Media | Index System Settings
To delete all systems and restore Media Index into the initial state:
1. Sign in to MediaCentral UX as an administrator.
2. Select System Settings from the Layout selector.
The System Settings layout opens.
3. In the Settings pane select Media Index > Settings.
The Media Index Settings display in the Details pane.
4. In the Reset Media | Index section, click Reset.
c
c
Deleting all systems and resetting Media Index removes the systems and all data from the
index. A reset also removes the Elasticsearch tribe configuration. The old configuration is saved
in a backup file next to the new one so that the tribe configuration can be copied and restored.
You cannot undo this action.
The Reset Media Index dialog box opens.
RESET
5. Type
The Media Index system is reset.
6. To restore the Elasticsearch tribe configuration, do the following:
a. On each node in your configuration, use the Linux vi text editor to edit the backup copy of
the Elasticsearch tribe configuration file:
vi /etc/elasticsearch-tribe/elasticsearch.yml_backup<n>
b. Copy the configuration information, and then press the Escape key to return to command
mode.
to reset the system, and then click OK. You can cancel the action by clicking Cancel.
c. Open the elasticsearch.yml configuration file for editing:
vi elasticsearch.yml
d. Paste the information from the backup file into the configuration file.
:wq
e. Press the Escape key to return to command mode, then type
and quit the text editor.
f. Restart Elasticsearch tribe service:
t For single server configurations, type the following command:
service elasticsearch-tribe restart
t For cluster configurations, type the following command on one of the nodes in your
cluster:
crm resource restart elasticsearchTribeEverywhere
92
and press Return to write
Page 93
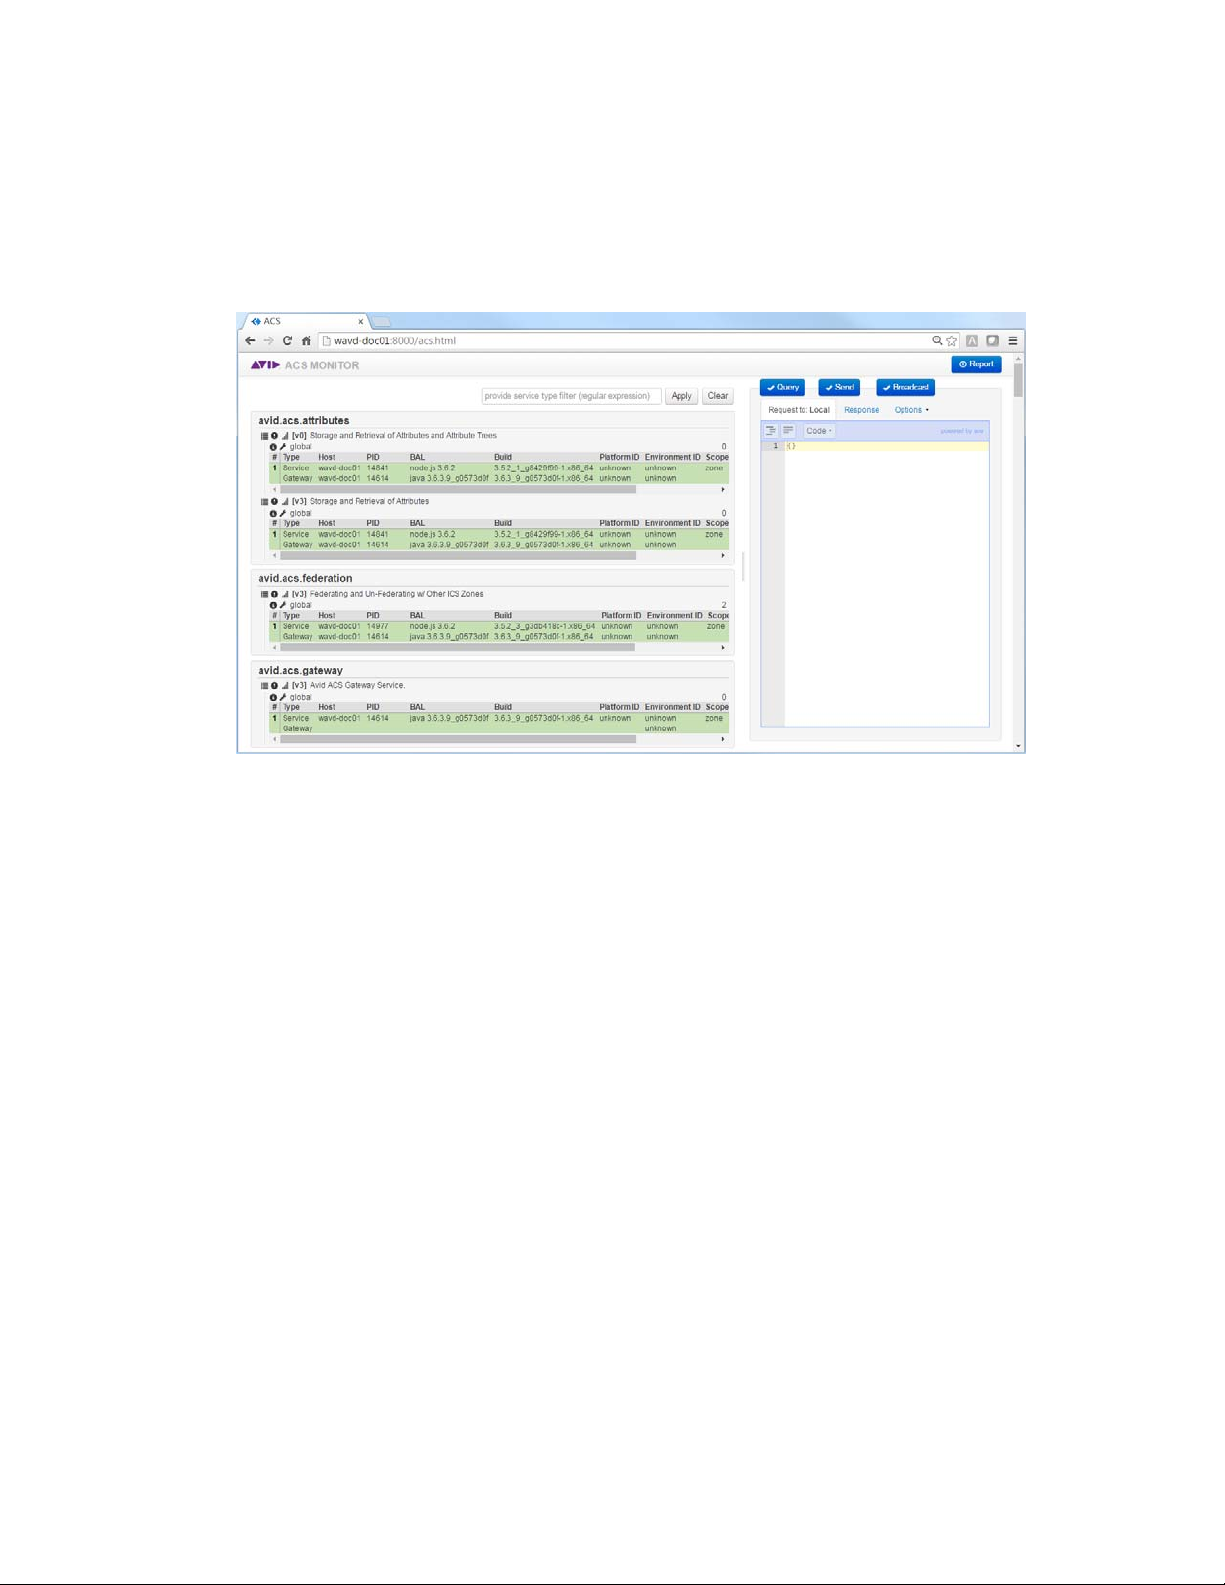
Adjusting Settings Through the ACS Monitor
Adjusting Settings Through the ACS Monitor
Many of the services used to create Media Index are governed by configuration files that contain
parameters which can be adjusted to enhance or limit the operation of the system. While these files
can be edited manually through Linux, Avid provides a user interface called the Avid ACS Monitor
which can be used to adjust many of the same settings more easily.
Adjusting settings through the Avid ACS Monitor provides the following advantages:
• Fewer manual adjustments to system files makes the process less prone to error.
• Changes made through direct manipulation of configuration files are often not saved during
system upgrades. Changes made through the ACS Monitor are saved through the
avid-acs-attributes service and are maintained through all system upgrades.
• In cluster configurations, changes made through the ACS Monitor are pushed to all nodes.
This section includes instructions to complete the following tasks:
• Accessing the Avid ACS Monitor Tool
• Changing the Maximum Number of Markers Returned in a Search
• Disabling Highlighted Markers
• Adjusting Media Index Scalability
• Adjusting Relevance for Search Results
• Disabling Search Suggestions
• Configuring Search Criteria Behavior
93
Page 94

Accessing the Avid ACS Monitor Tool
The ACS Monitor is not enabled by default and must be manually started to interact with the tool and
adjust system settings.
To adjust the Media Index configuration through the ACS Monitor:
1. Log in to the MCS server as the Linux ‘root’ user. If you have a clustered configuration, log into
the master node.
2. Start the avid-acs-monitor service:
service avid-acs-monitor start
3. Open a web browser and enter the following address to access the Avid ACS Monitor:
http://<hostname>:8000
Where <hostname> is the host name or IP address of your MediaCentral server or cluster master
node.
The Avid ACS Monitor page appears, allowing you to alter the system configuration.
If you do not see the list of attributes on the left side of the page, refresh the browser page.
n
4. Refer to the processes in this section to alter the system configuration.
Adjusting Settings Through the ACS Monitor
5. Once you have completed all system configuration changes, stop the avid-acs-monitor service:
service avid-acs-monitor stop
Changing the Maximum Number of Markers Returned in a Search
When initiating an indexed search to locate text contained in markers, Media Index returns a
maximum of five markers in the search results by default. This number can be adjusted through the
ACS Monitor.
To change the default number of markers:
1. Follow the instructions for “Accessing the Avid ACS Monitor Tool” on page 94.
2. Enter “avid.acs.media.index.configuration” (without the quotes) in the search field at the top of
the page to find the configuration service.
3. Expand the configuration service options by clicking the Service Operations List icon in the
upper-left corner of the configuration service field.
4. Locate the setConfigurationByField item in the list of service options. This section includes a
number of examples for changes than can be made to the configuration. Click on the link for
enableSearchQueryLogger
The following text appears in the right pane:
.
94
Page 95
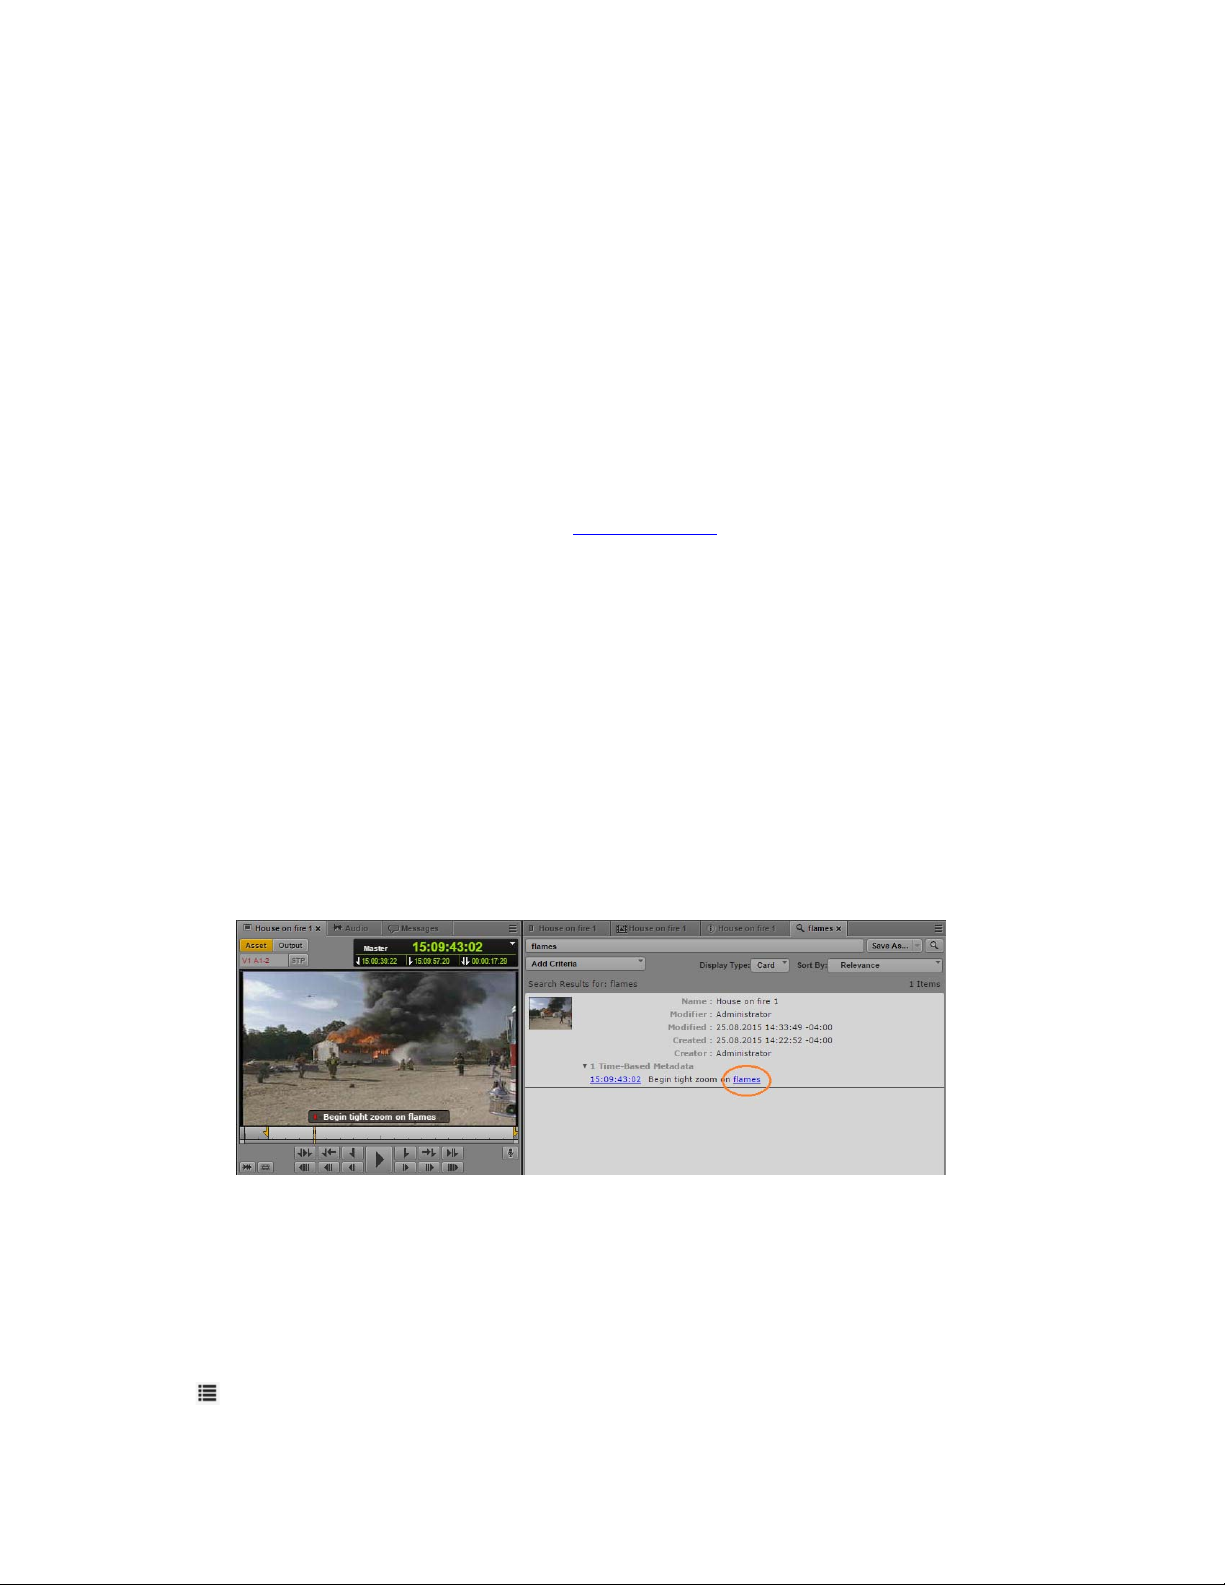
Adjusting Settings Through the ACS Monitor
If you click on any of the examples in the “setConfigurationByField” section, you will notice
that they all share the same basic structure. Line 7 is the only line that is different between them.
Rather than entering all the text manually, you can alter the contents of this example to update
the maximum number of markers.
5. In the “Request to: Local” pane on the right, replace the text on line 7 with the following:
"highlight_number_of_fragments": "#"
Where “#” represents the maximum number of markers to be returned in a search. The default
number is 5.
When entering text, make sure to include the two leading spaces and the quotes as shown in the
example above.
6. Click the Query button in the right pane to save the change.
If the query is accepted, a Response value (in milliseconds) will be returned. If you receive any
errors, verify that the information you entered does not contain any incorrect characters.
7. Verify your change by selecting the getConfiguration
the Query button on the right to poll the service. The updated value appears under the "resultSet"
list.
8. Restart the avid-acs-search service to activate the change:
t For a single server, type the following from the Linux command prompt:
service avid-acs-search restart
t For a clustered system, type the following from the Linux command prompt:
crm resource restart AvidSearchEverywhere
Disabling Highlighted Markers
Text that has been entered in markers through the Logging pane can be found through Indexed
searches. When displayed, the text is highlighted in the search results, as indicated below:
item in the list of service options and click
If desired, system administrators can disable this feature for under-performing servers. Disabling the
feature reduces load on system resources such as RAM and CPU cycles.
To disable highlighted markers:
1. Enter “avid.acs.media.index.configuration” (without the quotes) in the search field at the top of
the page to find the configuration service.
2. Expand the configuration service options by clicking the Service Operations List icon in the
upper-left corner of the configuration service field.
95
Page 96

Adjusting Settings Through the ACS Monitor
3. Locate the setConfigurationByField section and click the link for disableHighlighting.
The following text appears in the right pane:
{
"serviceType": "avid.acs.media.index.configuration",
"serviceRealm": "global",
"serviceVersion": 0,
"op": "setConfigurationByField",
"paramSet": {
"acs_disable_highlight": true
}
}
4. No adjustments are required, simply click the Query button in the right pane to save the change.
5. Restart the avid-acs-search service to activate the change:
t For a single server, type the following from the Linux command prompt:
service avid-acs-search restart
t For a clustered system, type the following from the Linux command prompt:
crm resource restart AvidSearchEverywhere
Once disabled, highlighted markers can be re-enabled by completing the above process, substituting
n
“enableHighlighting” option in step 3.
Adjusting Media Index Scalability
You can configure the scalability of the Media Index search service — for example, you can run
more than one instance of the search service at the same time.
Altering the default values of the variables described in this section can negatively affect system
n
performance. Only adjust these values if directed to do so by an Avid representative.
To adjust Media Index scalability options:
1. Follow the instructions for “Accessing the Avid ACS Monitor Tool” on page 94.
2. Enter “avid.acs.media.index.configuration” (without the quotes) in the search field at the top of
the page to find the configuration service.
3. Expand the configuration service options by clicking the Service Operations List icon in the
upper-left corner of the configuration service field.
4. Locate the setConfigurationByField item in the list of service options. This section includes a
number of examples for changes than can be made to the configuration. Click on the link for
enableSearchQueryLogger
The following text appears in the right pane:
.
96
Page 97

Adjusting Settings Through the ACS Monitor
If you click on any of the examples in the “setConfigurationByField” section, you will notice
that they all share the same basic structure. Line 7 is the only line that is different between them.
Rather than entering all the text manually, you can alter the contents of this example to alter the
Media Index scalability options.
5. In the “Request to: Local” pane on the right, replace the text on line 7 with one of the following
values:
Variable Description
"search_cluster_threads_minimum": "<value>" Sets the minimal number of search service instances. If
not set, the variable defaults to the number of CPUs.
"search_cluster_threads_maximum": "<value>" Sets the maximum number of instances. If not set, the
variable defaults to the value of the
SEARCH_CLUSTER_THREADS_MINIMUM
variable multiplied by 2.
When entering text, make sure to include the two leading spaces and the quotes as shown in the
example above.
6. Click the Query button in the right pane to save the changes.
If the query is accepted, a Response value (in milliseconds) will be returned. If you receive any
errors, verify that the information you entered does not contain any incorrect characters.
7. If you need to adjust both variables, repeat the above steps the configure the second value.
8. Verify your changes by selecting the getConfiguration
the Query button on the right to poll the service. The updated values appear under the "resultSet"
list.
9. Restart the avid-acs-search service to activate the changes:
t For a single server, type the following from the Linux command prompt:
service avid-acs-search restart
t For a clustered system, type the following from the Linux command prompt:
crm resource restart AvidSearchEverywhere
Adjusting Relevance for Search Results
You can use the indexed search to search by key terms. Adjusting the relevance of certain fields for
searches allows you to boost the priority of those terms so that the appropriate assets have a higher
relevance in the search results. To adjust the relevance of certain fields, you can modify the index
boosting settings in the search attribute service by using the setBoostConfiguration command in the
ACS Monitor tool.
To adjust the index boosting settings:
1. Follow the instructions for “Accessing the Avid ACS Monitor Tool” on page 94.
2. Enter “avid.acs.media.index.configuration” (without the quotes) in the search field at the top of
the page to find the configuration service.
item in the list of service options and click
3. Expand the configuration service options by clicking the Service Operations List icon in the
upper-left corner of the configuration service field.
97
Page 98

Adjusting Settings Through the ACS Monitor
4. Locate the setBoostConfiguration item in the list of service options and click the link for
setBoostConfiguration
.
The following text appears in the right pane:
The paramSet lists three different categories or “entities”: asset (base), common, and tbmd (time
based metadata). Each category is associated with various fields and boost values. For example,
the “tbmd” category includes the following default values:
"tbmd": {
"id": 3,
"category": 1,
"creator": 2,
"modifier": 4
The default boost value for most categories (displayed or not) is 1. Fields with higher boost
values have increased priority when returning search results. For example, the “creator” field has
a boost value of 2 which means that it is twice as important than the “category” field. The “id”
field has a boost value of 3 indicating that it is three times more important than the “category”
field. “modifier” has the highest value and is the most important for time based searches.
Refer to the following tables for lists of fields that can be added to each of the three categories:
asset (base)
id systemID type
common
categories created creator description
durationTC endTC globalAssetID location
modified modifier name startTC
thumbnailURL
98
Page 99

Adjusting Settings Through the ACS Monitor
tbmd
category created creator duration
id modified modifier startTC
text thumbnailURL type
Avid supports making changes to the asset, common, and tbmd categories. Creating additional
n
categories is not supported.
5. Add or adjust the boost values as desired. In the following example, the “created” parameter has
been added and assigned a boost values of 3; giving it a higher value than “category” and
“creator”.
"tbmd": {
"id": 3,
"category": 1,
"creator": 2,
"created": 3,
"modifier": 4
If you wish to add or adjust multiple fields or boost values, make all adjustments now.
When manually entering text, spacing and formatting is important. Notice that a comma is
present after each value except for the final value. If a mistake is made, a red X appears in the
configuration indicating an error has been made. In the following example, line 18 is missing the
comma at the end of the line:
6. Once you are done editing, click the Query button in the right pane to save the changes.
If the query is accepted, a Response value (in milliseconds) will be returned. If you receive any
errors, verify that the information you entered does not contain any incorrect characters.
7. Verify your changes by selecting the getBoostConfiguration
and click the Query button on the right to poll the service. The updated values appear under the
"resultSet" list.
8. Restart the avid-acs-search service to activate the changes:
t For a single server, type the following from the Linux command prompt:
service avid-acs-search restart
t For a clustered system, type the following from the Linux command prompt:
crm resource restart AvidSearchEverywhere
item in the list of service options
If needed, you can restore the original configuration by selecting the eraseBoostConfiguration item
n
in the list of service options and clicking the Query button in the “Request to: Local” pane on the
right.
99
Page 100
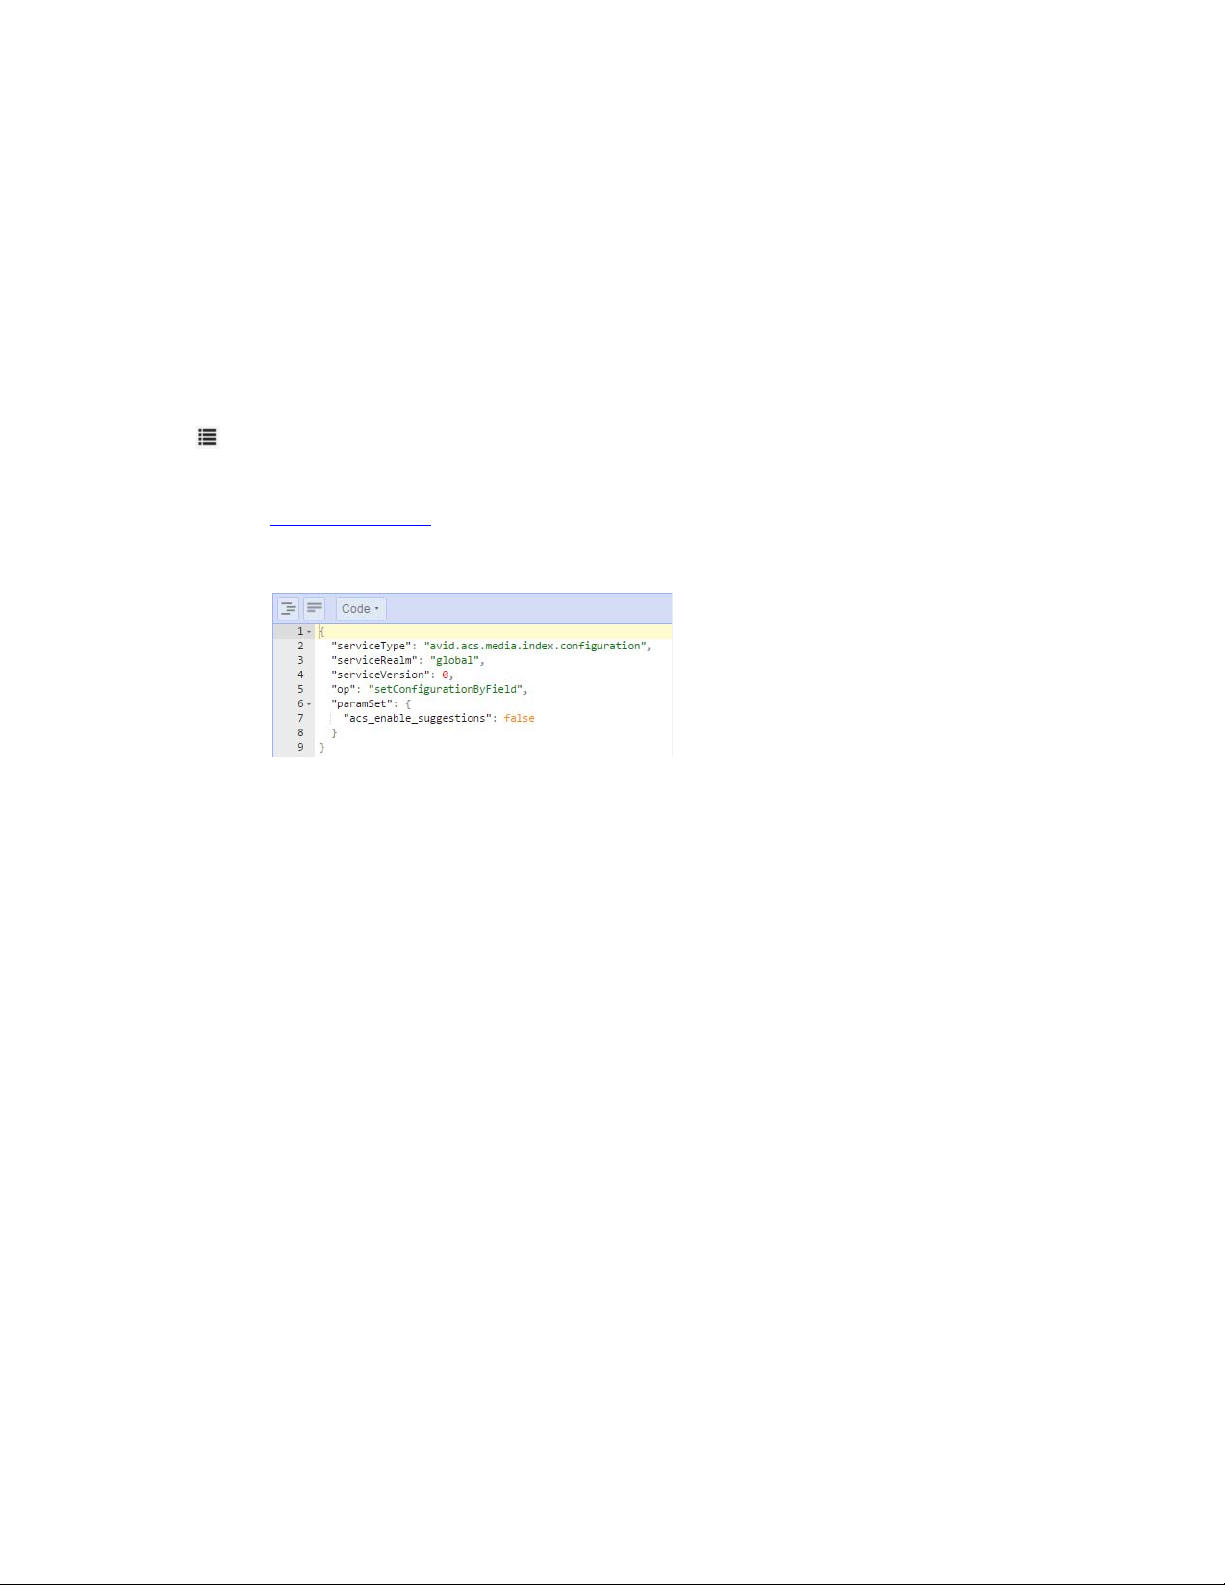
Disabling Search Suggestions
When entering text in indexed search fields, search suggestions are displayed below the text box to
assist users in finding the data they are looking for faster. While this is a useful feature, Media Index
configurations that use large indexes might see a slow down in search performance when search
suggestions are enabled. If desired, this feature can be disabled through the ACS Monitor tool.
To disable the search suggestion data:
1. Follow the instructions for “Accessing the Avid ACS Monitor Tool” on page 94.
2. Enter “avid.acs.media.index.configuration” (without the quotes) in the search field at the top of
the page to find the configuration service.
3. Expand the configuration service options by clicking the Service Operations List icon in the
upper-left corner of the configuration service field.
4. Locate the setConfigurationByField item in the list of service options and click the link for
disableSuggestions
The following text appears in the right pane:
.
Adjusting Settings Through the ACS Monitor
5. No adjustments are required, simply click the Query button in the right pane to save the change.
6. Restart the avid-acs-search service to activate the change:
t For a single server, type the following from the Linux command prompt:
service avid-acs-search restart
t For a clustered system, type the following from the Linux command prompt:
crm resource restart AvidSearchEverywhere
Configuring Search Criteria Behavior
When you specify search criteria for your search, Media Index returns results that are an exact match
for the text field for the criteria used in the search. For example, if you specify “elections” as the text
for the Name criterion, your search returns results only with that exact string. By contrast, when you
use the search text field in the Search pane, by default Media Index uses text analysis and
normalization which allows your search to return results for terms in different forms of the terms,
such as conjugated verbs or plural words. For example, if you type “elections” in the Search text
field, the natural language search returns results for “elect,” “electing,” or “election” in addition to the
original term.
If desired, you can alter the default configuration for Media Index to return only exact matches in the
search results.
100
 Loading...