

Page 1

Media | Distribute
Installation and Configuration Guide
Version 2.10
Page 2

Legal Notices
Product specifications are subject to change without notice and do not represent a commitment on the part of Avid Technology, Inc.
This product is subject to the terms and conditions of a software license agreement provided with the software. The product may only be
used in accordance with the license agreement.
This product may be protected by one or more U.S. and non-U.S patents. Details are available at www.avid.com/patents.
The content of this guide is copyright protected guide and is made available for personal use. It may not be reproduced or distributed, in
whole or in part, without permission of Avid. Reasonable care has been taken in preparing this guide, however, it may contain omissions,
technical inaccuracies, or typographical errors. Avid Technology, Inc. disclaims liability for all losses incurred through the use of this
document. Product specifications are subject to change without notice.
Copyright © 2017 Avid Technology, Inc. and its licensors. All rights reserved.
This product includes FFmpeg, which is covered by the GNU Lesser General Public License.
This product includes software that is based in part of the work of the FreeType Team.
This software is based in part on the work of the Independent JPEG Group.
This product includes libjpeg-turbo, which is covered by the wxWindows Library License, Version 3.1.
Portions copyright 1994, 1995, 1996, 1997, 1998, 1999, 2000, 2001, 2002 by Cold Spring Harbor Laboratory. Funded under Grant
P41-RR02188 by the National Institutes of Health.
Portions copyright 1996, 1997, 1998, 1999, 2000, 2001, 2002 by Boutell.Com, Inc.
Portions relating to GD2 format copyright 1999, 2000, 2001, 2002 Philip Warner.
Portions relating to PNG copyright 1999, 2000, 2001, 2002 Greg Roelofs.
Portions relating to gdttf.c copyright 1999, 2000, 2001, 2002 John Ellson (ellson@lucent.com).
Portions relating to gdft.c copyright 2001, 2002 John Ellson (ellson@lucent.com).
Portions relating to JPEG and to color quantization copyright 2000, 2001, 2002, Doug Becker and copyright (C) 1994, 1995, 1996, 1997,
1998, 1999, 2000, 2001, 2002, Thomas G. Lane. This software is based in part on the work of the Independent JPEG Group. See the file
README-JPEG.TXT for more information. Portions relating to WBMP copyright 2000, 2001, 2002 Maurice Szmurlo and Johan Van den
Brande.
Permission has been granted to copy, distribute and modify gd in any context without fee, including a commercial application, provided that
this notice is present in user-accessible supporting documentation.
This does not affect your ownership of the derived work itself, and the intent is to assure proper credit for the authors of gd, not to interfere
with your productive use of gd. If you have questions, ask. "Derived works" includes all programs that utilize the library. Credit must be
given in user-accessible documentation.
This software is provided "AS IS." The copyright holders disclaim all warranties, either express or implied, including but not limited to
implied warranties of merchantability and fitness for a particular purpose, with respect to this code and accompanying documentation.
Although their code does not appear in gd, the authors wish to thank David Koblas, David Rowley, and Hutchison Avenue Software
Corporation for their prior contributions.
This product includes software developed by the OpenSSL Project for use in the OpenSSL Toolkit (http://www.openssl.org/)
MediaCentral may use OpenLDAP. Copyright 1999-2003 The OpenLDAP Foundation, Redwood City, California, USA. All Rights
Reserved. OpenLDAP is a registered trademark of the OpenLDAP Foundation.
Media | Distribute enables its users to access certain YouTube functionality, as a result of Avid's licensed use of YouTube's API. The
charges levied by Avid for use of Media | Distribute are imposed by Avid, not YouTube. YouTube does not charge users for accessing
YouTube site functionality through the YouTube APIs.
Media | Distribute uses the bitly API, but is neither developed nor endorsed by bitly.
Android is a trademark of Google Inc.
The following disclaimer is required by Apple Computer, Inc.:
APPLE COMPUTER, INC. MAKES NO WARRANTIES WHATSOEVER, EITHER EXPRESS OR IMPLIED, REGARDING THIS
PRODUCT, INCLUDING WARRANTIES WITH RESPECT TO ITS MERCHANTABILITY OR ITS FITNESS FOR ANY PARTICULAR
PURPOSE. THE EXCLUSION OF IMPLIED WARRANTIES IS NOT PERMITTED BY SOME STATES. THE ABOVE EXCLUSION MAY
NOT APPLY TO YOU. THIS WARRANTY PROVIDES YOU WITH SPECIFIC LEGAL RIGHTS. THERE MAY BE OTHER RIGHTS THAT
YOU MAY HAVE WHICH VARY FROM STATE TO STATE.
The following disclaimer is required by Sam Leffler and Silicon Graphics, Inc. for the use of their TIFF library:
Copyright © 1988–1997 Sam Leffler
Copyright © 1991–1997 Silicon Graphics, Inc.
Permission to use, copy, modify, distribute, and sell this software [i.e., the TIFF library] and its documentation for any purpose is hereby
granted without fee, provided that (i) the above copyright notices and this permission notice appear in all copies of the software and
related documentation, and (ii) the names of Sam Leffler and Silicon Graphics may not be used in any advertising or publicity relating to
the software without the specific, prior written permission of Sam Leffler and Silicon Graphics.
2
Page 3

THE SOFTWARE IS PROVIDED “AS-IS” AND WITHOUT WARRANTY OF ANY KIND, EXPRESS, IMPLIED OR OTHERWISE,
INCLUDING WITHOUT LIMITATION, ANY WARRANTY OF MERCHANTABILITY OR FITNESS FOR A PARTICULAR PURPOSE.
IN NO EVENT SHALL SAM LEFFLER OR SILICON GRAPHICS BE LIABLE FOR ANY SPECIAL, INCIDENTAL, INDIRECT OR
CONSEQUENTIAL DAMAGES OF ANY KIND, OR ANY DAMAGES WHATSOEVER RESULTING FROM LOSS OF USE, DATA OR
PROFITS, WHETHER OR NOT ADVISED OF THE POSSIBILITY OF DAMAGE, AND ON ANY THEORY OF LIABILITY, ARISING OUT
OF OR IN CONNECTION WITH THE USE OR PERFORMANCE OF THIS SOFTWARE.
The following disclaimer is required by the Independent JPEG Group:
This software is based in part on the work of the Independent JPEG Group.
This Software may contain components licensed under the following conditions:
Copyright (c) 1989 The Regents of the University of California. All rights reserved.
Redistribution and use in source and binary forms are permitted provided that the above copyright notice and this paragraph are
duplicated in all such forms and that any documentation, advertising materials, and other materials related to such distribution and use
acknowledge that the software was developed by the University of California, Berkeley. The name of the University may not be used to
endorse or promote products derived from this software without specific prior written permission. THIS SOFTWARE IS PROVIDED ``AS
IS'' AND WITHOUT ANY EXPRESS OR IMPLIED WARRANTIES, INCLUDING, WITHOUT LIMITATION, THE IMPLIED WARRANTIES
OF MERCHANTABILITY AND FITNESS FOR A PARTICULAR PURPOSE.
Copyright (C) 1989, 1991 by Jef Poskanzer.
Permission to use, copy, modify, and distribute this software and its documentation for any purpose and without fee is hereby granted,
provided that the above copyright notice appear in all copies and that both that copyright notice and this permission notice appear in
supporting documentation. This software is provided "as is" without express or implied warranty.
Copyright 1995, Trinity College Computing Center. Written by David Chappell.
Permission to use, copy, modify, and distribute this software and its documentation for any purpose and without fee is hereby granted,
provided that the above copyright notice appear in all copies and that both that copyright notice and this permission notice appear in
supporting documentation. This software is provided "as is" without express or implied warranty.
Copyright 1996 Daniel Dardailler.
Permission to use, copy, modify, distribute, and sell this software for any purpose is hereby granted without fee, provided that the above
copyright notice appear in all copies and that both that copyright notice and this permission notice appear in supporting documentation,
and that the name of Daniel Dardailler not be used in advertising or publicity pertaining to distribution of the software without specific,
written prior permission. Daniel Dardailler makes no representations about the suitability of this software for any purpose. It is provided "as
is" without express or implied warranty.
Modifications Copyright 1999 Matt Koss, under the same license as above.
Copyright (c) 1991 by AT&T.
Permission to use, copy, modify, and distribute this software for any purpose without fee is hereby granted, provided that this entire notice
is included in all copies of any software which is or includes a copy or modification of this software and in all copies of the supporting
documentation for such software.
THIS SOFTWARE IS BEING PROVIDED "AS IS", WITHOUT ANY EXPRESS OR IMPLIED WARRANTY. IN PARTICULAR, NEITHER
THE AUTHOR NOR AT&T MAKES ANY REPRESENTATION OR WARRANTY OF ANY KIND CONCERNING THE MERCHANTABILITY
OF THIS SOFTWARE OR ITS FITNESS FOR ANY PARTICULAR PURPOSE.
This product includes software developed by the University of California, Berkeley and its contributors.
The following disclaimer is required by Nexidia Inc.:
© 2010 Nexidia Inc. All rights reserved, worldwide. Nexidia and the Nexidia logo are trademarks of Nexidia Inc. All other trademarks are
the property of their respective owners. All Nexidia materials regardless of form, including without limitation, software applications,
documentation and any other information relating to Nexidia Inc., and its products and services are the exclusive property of Nexidia Inc.
or its licensors. The Nexidia products and services described in these materials may be covered by Nexidia's United States patents:
7,231,351; 7,263,484; 7,313,521; 7,324,939; 7,406,415, 7,475,065; 7,487,086 and/or other patents pending and may be manufactured
under license from the Georgia Tech Research Corporation USA.
The following disclaimer is required by Paradigm Matrix:
Portions of this software licensed from Paradigm Matrix.
The following disclaimer is required by Ray Sauers Associates, Inc.:
“Install-It” is licensed from Ray Sauers Associates, Inc. End-User is prohibited from taking any action to derive a source code equivalent of
“Install-It,” including by reverse assembly or reverse compilation, Ray Sauers Associates, Inc. shall in no event be liable for any damages
resulting from reseller’s failure to perform reseller’s obligation; or any damages arising from use or operation of reseller’s products or the
software; or any other damages, including but not limited to, incidental, direct, indirect, special or consequential Damages including lost
profits, or damages resulting from loss of use or inability to use reseller’s products or the software for any reason including copyright or
patent infringement, or lost data, even if Ray Sauers Associates has been advised, knew or should have known of the possibility of such
damages.
The following disclaimer is required by Videomedia, Inc.:
“Videomedia, Inc. makes no warranties whatsoever, either express or implied, regarding this product, including warranties with respect to
its merchantability or its fitness for any particular purpose.”
3
Page 4

“This software contains V-LAN ver. 3.0 Command Protocols which communicate with V-LAN ver. 3.0 products developed by Videomedia,
Inc. and V-LAN ver. 3.0 compatible products developed by third parties under license from Videomedia, Inc. Use of this software will allow
“frame accurate” editing control of applicable videotape recorder decks, videodisc recorders/players and the like.”
The following disclaimer is required by Altura Software, Inc. for the use of its Mac2Win software and Sample Source
Code:
©1993–1998 Altura Software, Inc.
The following disclaimer is required by Ultimatte Corporation:
Certain real-time compositing capabilities are provided under a license of such technology from Ultimatte Corporation and are subject to
copyright protection.
The following disclaimer is required by 3Prong.com Inc.:
Certain waveform and vector monitoring capabilities are provided under a license from 3Prong.com Inc.
The following disclaimer is required by Interplay Entertainment Corp.:
The “Interplay” name is used with the permission of Interplay Entertainment Corp., which bears no responsibility for Avid products.
This product includes portions of the Alloy Look & Feel software from Incors GmbH.
This product includes software developed by the Apache Software Foundation (http://www.apache.org/).
© DevelopMentor
This product may include the JCifs library, for which the following notice applies:
JCifs © Copyright 2004, The JCIFS Project, is licensed under LGPL (http://jcifs.samba.org/). See the LGPL.txt file in the Third Party
Software directory on the installation CD.
Avid Interplay contains components licensed from LavanTech. These components may only be used as part of and in connection with Avid
Interplay.
Attn. Government User(s). Restricted Rights Legend
U.S. GOVERNMENT RESTRICTED RIGHTS. This Software and its documentation are “commercial computer software” or “commercial
computer software documentation.” In the event that such Software or documentation is acquired by or on behalf of a unit or agency of the
U.S. Government, all rights with respect to this Software and documentation are subject to the terms of the License Agreement, pursuant
to FAR §12.212(a) and/or DFARS §227.7202-1(a), as applicable.
Trademarks
Avid, the Avid Logo, Avid Everywhere, Avid DNXHD, Avid DNXHR, Avid Nexis, AirSpeed, Eleven, EUCON, Interplay, iNEWS, ISIS, Mbox,
MediaCentral, Media Composer, NewsCutter, Pro Tools, ProSet and RealSet, Maestro, PlayMaker, Sibelius, Symphony, and all related
product names and logos, are registered or unregistered trademarks of Avid Technology, Inc. in the United States and/or other countries.
The Interplay name is used with the permission of the Interplay Entertainment Corp. which bears no responsibility for Avid products. All
other trademarks are the property of their respective owners. For a full list of Avid trademarks, see:
http://www.avid.com/US/about-avid/legal-notices/trademarks.
Media | Distribute Installation and Configuration Guide • Created 5/15/17 • This document is distributed by Avid in online
(electronic) form only, and is not available for purchase in printed form.
4
Page 5

Contents
Using This Guide . . . . . . . . . . . . . . . . . . . . . . . . . . . . . . . . . . . . . . . . . . . . . . . . . . . 7
Chapter 1 Installation for Media | Distribute . . . . . . . . . . . . . . . . . . . . . . . . . . . . . . . . . . . . . . 8
Preparing the Installation Package . . . . . . . . . . . . . . . . . . . . . . . . . . . . . . . . . . . . . . . . . . . . . . 9
Creating the USB Installation Drive . . . . . . . . . . . . . . . . . . . . . . . . . . . . . . . . . . . . . . . . . . 9
Mounting the USB Installation Drive on the MCS Server. . . . . . . . . . . . . . . . . . . . . . . . . . 9
Installing or Upgrading Media | Distribute on a Single Server . . . . . . . . . . . . . . . . . . . . . . . . 10
Installing or Upgrading Media | Distribute in a Cluster Environment. . . . . . . . . . . . . . . . . . . . 13
Identifying the Master and Non-Master Nodes. . . . . . . . . . . . . . . . . . . . . . . . . . . . . . . . . 14
Identifying the Virtual Cluster IP. . . . . . . . . . . . . . . . . . . . . . . . . . . . . . . . . . . . . . . . . . . . 14
Installing or Upgrading Media | Distribute . . . . . . . . . . . . . . . . . . . . . . . . . . . . . . . . . . . . 15
Configuring Media | Distribute on the Master Node . . . . . . . . . . . . . . . . . . . . . . . . . . . . . 16
Configuring Media | Distribute on Non-Master Nodes . . . . . . . . . . . . . . . . . . . . . . . . . . . 18
Restarting PostgreSQL Service and Verifying the Cluster Installation. . . . . . . . . . . . . . . 19
Verifying the Connection to ServiceMix . . . . . . . . . . . . . . . . . . . . . . . . . . . . . . . . . . . . . . 20
Modifying Media Distribute to Work with a Proxy Server . . . . . . . . . . . . . . . . . . . . . . . . . . . . 21
Using the Social Messages and Web Story Panes . . . . . . . . . . . . . . . . . . . . . . . . . . . . . 21
Using the Distribution Pane . . . . . . . . . . . . . . . . . . . . . . . . . . . . . . . . . . . . . . . . . . . . . . . 23
Removing Media Distribute. . . . . . . . . . . . . . . . . . . . . . . . . . . . . . . . . . . . . . . . . . . . . . . . . . . 24
Chapter 2 Configuration for Media | Distribute. . . . . . . . . . . . . . . . . . . . . . . . . . . . . . . . . . . 25
Verifying Your Media | Distribute Installation . . . . . . . . . . . . . . . . . . . . . . . . . . . . . . . . . . . . . 25
Assigning Media | Distribute Roles . . . . . . . . . . . . . . . . . . . . . . . . . . . . . . . . . . . . . . . . . . . . . 25
MediaCentral | UX Security for Media | Distribute . . . . . . . . . . . . . . . . . . . . . . . . . . . . . . . . . 30
Configuring the Transcode Route. . . . . . . . . . . . . . . . . . . . . . . . . . . . . . . . . . . . . . . . . . . . . . 30
Configuring the Video Transcoding Host . . . . . . . . . . . . . . . . . . . . . . . . . . . . . . . . . . . . . 32
Send to Playback Configuration for Media | Distribute. . . . . . . . . . . . . . . . . . . . . . . . . . . 35
Configuring a Telestream Vantage Profile . . . . . . . . . . . . . . . . . . . . . . . . . . . . . . . . . . . . 38
Validating the Vantage Transcode Route Configuration . . . . . . . . . . . . . . . . . . . . . . . . . 40
Configuring the Harmonic ProMedia Carbon Transcoder . . . . . . . . . . . . . . . . . . . . . . . . 44
Configuring a RadiantGrid Profile . . . . . . . . . . . . . . . . . . . . . . . . . . . . . . . . . . . . . . . . . . 46
Configuring a MAM Profile . . . . . . . . . . . . . . . . . . . . . . . . . . . . . . . . . . . . . . . . . . . . . . . . 49
Configuring an E-mail Profile . . . . . . . . . . . . . . . . . . . . . . . . . . . . . . . . . . . . . . . . . . . . . . 52
Chapter 3 Configuring System Accounts for Media | Distribute. . . . . . . . . . . . . . . . . . . . . 54
Configuring the Bitly Link-Shortening Service. . . . . . . . . . . . . . . . . . . . . . . . . . . . . . . . . . . . . 55
Configuring a Twitter Publication Account . . . . . . . . . . . . . . . . . . . . . . . . . . . . . . . . . . . . . . . 56
Configuring a Facebook Publication Account . . . . . . . . . . . . . . . . . . . . . . . . . . . . . . . . . . . . . 60
Configuring a Facebook Page Publication Account . . . . . . . . . . . . . . . . . . . . . . . . . . . . . . . . 68
5
Page 6

Configuring a Vimeo Publication Account. . . . . . . . . . . . . . . . . . . . . . . . . . . . . . . . . . . . . . . . 73
Configuring a Vimeo V3 Publication Account . . . . . . . . . . . . . . . . . . . . . . . . . . . . . . . . . . . . . 77
Configuring a YouTube v3 Publication Account . . . . . . . . . . . . . . . . . . . . . . . . . . . . . . . . . . . 80
Configuring a Brightcove Account. . . . . . . . . . . . . . . . . . . . . . . . . . . . . . . . . . . . . . . . . . . . . . 83
Configuring a Kaltura Account . . . . . . . . . . . . . . . . . . . . . . . . . . . . . . . . . . . . . . . . . . . . . . . . 85
Configuring an Ooyala Account . . . . . . . . . . . . . . . . . . . . . . . . . . . . . . . . . . . . . . . . . . . . . . . 87
Configuring a Flickr Account . . . . . . . . . . . . . . . . . . . . . . . . . . . . . . . . . . . . . . . . . . . . . . . . . . 89
Configuring an Atex Polopoly Web CMS Account . . . . . . . . . . . . . . . . . . . . . . . . . . . . . . . . . 92
Configuring a WorldNow Web CMS Profile . . . . . . . . . . . . . . . . . . . . . . . . . . . . . . . . . . . . . . 94
Configuring thePlatform Profile. . . . . . . . . . . . . . . . . . . . . . . . . . . . . . . . . . . . . . . . . . . . . . . . 98
Configuring a WordPress CMS Profile . . . . . . . . . . . . . . . . . . . . . . . . . . . . . . . . . . . . . . . . . 100
Configuring an Amazon S3 Profile . . . . . . . . . . . . . . . . . . . . . . . . . . . . . . . . . . . . . . . . . . . . 102
Configuring a Generic CMS Profile. . . . . . . . . . . . . . . . . . . . . . . . . . . . . . . . . . . . . . . . . . . . 103
Configuring a Generic CMS Extended Profile. . . . . . . . . . . . . . . . . . . . . . . . . . . . . . . . . . . . 107
Configuring a NoOpTranscoder Profile. . . . . . . . . . . . . . . . . . . . . . . . . . . . . . . . . . . . . . . . . 111
Configuring a Generic OVP Profile . . . . . . . . . . . . . . . . . . . . . . . . . . . . . . . . . . . . . . . . . . . . 112
Chapter 4 Configuring User Profiles for Media | Distribute. . . . . . . . . . . . . . . . . . . . . . . . 114
Configuring a User Profile for an Amazon S3 Account. . . . . . . . . . . . . . . . . . . . . . . . . . . . . 114
Configuring a User Profile for an E-Mail Account . . . . . . . . . . . . . . . . . . . . . . . . . . . . . . . . . 116
Configuring a User Profile for a Personal Facebook Account. . . . . . . . . . . . . . . . . . . . . . . . 118
Configuring a User Profile for a Personal Facebook Page Account . . . . . . . . . . . . . . . . . . . 120
Configuring a User Profile for a Personal Flickr Account . . . . . . . . . . . . . . . . . . . . . . . . . . . 121
Configuring a User Profile for a Personal Twitter Account . . . . . . . . . . . . . . . . . . . . . . . . . . 125
Configuring a User Profile for a Personal Vimeo V3 Account. . . . . . . . . . . . . . . . . . . . . . . . 126
Configuring a User Profile for a Personal YouTube v3 Account. . . . . . . . . . . . . . . . . . . . . . 128
Delegated Publishing . . . . . . . . . . . . . . . . . . . . . . . . . . . . . . . . . . . . . . . . . . . . . . . . . . . . . . 131
Appendix A Media | Distribute Checklist . . . . . . . . . . . . . . . . . . . . . . . . . . . . . . . . . . . . . . . . 132
Appendix B Working with Media | Distribute Logs . . . . . . . . . . . . . . . . . . . . . . . . . . . . . . . . 140
Appendix C Modifying the Transcoder Monitoring Interval . . . . . . . . . . . . . . . . . . . . . . . . . 142
Appendix D Modifying the Settings for Interlaced Graphics . . . . . . . . . . . . . . . . . . . . . . . . 144
Appendix E Sample XSL for the Generic CMS Extended Profile . . . . . . . . . . . . . . . . . . . . . 145
Appendix F Custom Configuration for Avid Publish Services. . . . . . . . . . . . . . . . . . . . . . . 148
Installing Avid Publish Services Manually. . . . . . . . . . . . . . . . . . . . . . . . . . . . . . . . . . . . . . . 148
Configuring the Avid Publish Services . . . . . . . . . . . . . . . . . . . . . . . . . . . . . . . . . . . . . . . . . 148
Appendix G Deleting Packages from Packages Pane . . . . . . . . . . . . . . . . . . . . . . . . . . . . . . 151
Index . . . . . . . . . . . . . . . . . . . . . . . . . . . . . . . . . . . . . . . . . . . . . . . . . . . . . . . . . . . 153
6
Page 7

Using This Guide
This guide is intended for users of MediaCentral | UX with the Media | Distribute feature. This guide
describes the installation and configuration procedures for Media Distribute, such as installing the
Media Distribute software and configuring system accounts.
For information on using the publishing features of Media Distribute, see the Media | Distribute
User’s Guide or the MediaCentral | UX Help. For administrative information for MediaCentral | UX,
see the Avid MediaCentral | UX Administration Guide.
Page 8

1 Installation for Media | Distribute
Media Distribute is installed on the MediaCentral Platform Services (MCS) server as a plug-in that
offers additional functionality within MediaCentral UX. The Media Distribute installation procedure
assumes that you have a fully configured and functional MediaCentral Platform Services
environment. If your MCS server or servers have not been installed and configured, see the Avid
MediaCentral Platform Services Installation and Configuration Guide for detailed instructions.
The Media Distribute installation package is delivered as “Media_Distribute_<version>_Linux.zip”.
You run the installation file itself from a shell script called
needed for MediaCentral UX to access the Media Distribute functionality, as well as the avid-mpd
service which provides the functionality for Media Distribute workflows.
Because Media Distribute requires access to the Internet to publish packages to public websites,
direct Internet access is often granted to the MediaCentral server. However, Media Distribute can also
be configured to communicate with the Internet through a proxy server for additional security. For
more information, see “Using the Social Messages and Web Story Panes” on page 21.
Depending on your workflow, the following components might be required by Media Distribute:
• iNEWS (for MCS configurations with iNEWS)
• Interplay Production Engine (for MCS configurations with Interplay Production)
install.sh
. This installs the plug-in
• Interplay MAM (for MCS configurations with Avid Interplay Media Asset Manager)
• Avid Shared Storage Client
MediaCentral Platform Services includes a copy of both the Avid ISIS Client and the Avid NEXIS
n
Client software. Verify the version of the Avid NEXIS or Avid ISIS client required for your
environment and upgrade the client software if necessary. For more information, see the Avid
MediaCentral Platform Services Installation and Configuration Guide.
• MediaCentral Distribution Service
• Interplay Transfer Engine
• Interplay Production Services Engine
• Interplay Production Transcode provider (for creating video or audio mixdowns of Avid assets)
• Interplay Production STP Encode (only required if working with LongGOP media assets)
• An FTP server (for transferring assets between systems)
• A video transcoding host server such as Telestream Vantage or Harmonic ProMedia Carbon
(depending on the workflow)
• Internet connection for publishing to social media sites
For specific information on software version compatibility, see the Avid Knowledge Base:
n
http://avid.force.com/pkb/articles/en_US/compatibility/Avid-Video-Compatibility-Charts
If you ever need to remove Media Distribute, see “Removing Media Distribute” on page 24.
Page 9

Preparing the Installation Package
Preparing the Installation Package
The Media Distribute software installation package (Media_Distribute_<version>_Linux.zip) is
available to Avid Support representatives only and can be downloaded from the Avid Gold Build
repository.
Creating the USB Installation Drive
Media Distribute is installed on the MediaCentral Platform Services server through a USB drive. The
following process provides instructions to prepare the USB drive for use with the MCS server.
To prepare and mount a USB drive for Media Distribute installation:
1. On a Windows system, format a USB drive of at least 1GB in size as a FAT32 volume.
2. Obtain the Media Distribute installation package file (Media_Distribute_<version>_Linux.zip)
from your Avid representative.
3. Copy the compressed installation file to the USB drive.
4. Remove the USB device from the Windows system.
Mounting the USB Installation Drive on the MCS Server
After the Media Distribute installer has been copied to a USB drive, the drive must be connected and
mounted on the MCS server. The package must also be uncompressed to extract the installer script.
To mount the USB drive on the MCS server:
1. Connect the Media Distribute installation USB drive to the MCS server. If you are running a
clustered configuration, connect the device to the cluster master node. Once the installation is
complete on the master node, you must repeat this procedure for all non-master nodes.
root
2. Log into the MCS server (at the Linux prompt) as the
user.
3. Use the display message command to verify the name of the USB device:
dmesg
Information relating to the hardware appears on the screen.
Information for the USB drive appears at the end of the output, in the list of SCSI devices. The
name of the USB drive is found inside square brackets (for example, sdc). This is the name you
use to mount the drive.
The
dmesg
command displays a great deal of information which can be difficult to review in the
Linux console. You can reduce the amount of information that dmesg returns by using the Linux
grep
command to show only items that contain certain text (such as “sd”). The following
command can be used as an alternative:
dmesg | grep sd
4. Create a mount point for the USB device by typing the following:
mkdir /media/usb
If this directory already exists, the following message is displayed:
mkdir: cannot create directory `/media/usb': File exists
5. Mount the USB key at the mount point you just created:
mount -t vfat /dev/<volume><partition> /media/usb
9
Page 10

Installing or Upgrading Media | Distribute on a Single Server
The mount command requires you to specify the volume and a partition on the volume that needs
to be mounted. The process of formatting the USB device in Windows creates this partition.
In the following example,
mount -t vfat /dev/sdc1 /media/usb
The USB device is now mounted and available for use.
6. Verify the USB key has been mounted:
Information is displayed about all mounted file systems and devices, and should include
information about the USB drive, similar to the following (some output omitted for clarity):
Filesystem Size Used Avail Use% Mounted on
/dev/sdc1 7.5G 5.3G 2.2G 71% /media/usb
7. Navigate to the mount point for the USB drive:
cd /media/usb
8. Unzip the Media Distribute installer package by typing the following command:
unzip Media_Distribute_<version>_Linux.zip
The installer is compressed within a .tar.gz container which must be unpacked to reveal the
Media Distribute installer script.
9. Unpack the Media Distribute installation file by typing the following command:
tar -xzf Media_Distribute_<version>_<build>_Linux.tar.gz
The compressed file extracts to a subfolder within the target directory called
Media_Distribute_<version>_<build>_Linux.
sdc
is the volume and 1 (one) is the partition number:
df -h
The process for installing Media Distribute is different for single-server and clustered environments.
• If you are running MCS on a single-server, see “Installing or Upgrading Media | Distribute on a
Single Server” on page 10 to continue the installation process.
• If your configuration consists of a set of clustered MediaCentral servers, see “Installing or
Upgrading Media | Distribute in a Cluster Environment” on page 13 to continue the installation
process.
Installing or Upgrading Media | Distribute on a Single
Server
The following process details the steps required to install or upgrade Media Distribute on a single
MediaCentral Platform Services server. During the installation, the PostgreSQL database is updated
for use with the Media Distribute service.
The procedure for upgrading Media Distribute follows the same process as that of a new installation.
The existing packages are simply overwritten with new versions during the upgrade process.
When you upgrade your version of Media Distribute, all system and user settings are saved. You do
n
not need to create new settings. However if the software update includes new features, you might
need to modify your settings to activate the features. For a list of new features, see the ReadMe
documentation that came with your version of MediaCentral UX. For information on setting up
account profiles, see “Configuring System Accounts for Media | Distribute” on page 59.
10
Page 11
Installing or Upgrading Media | Distribute on a Single Server
c
n
The process of installing Media Distribute includes a restart of some core services. This process
disconnects all users logged in to MediaCentral UX. Ensure that all users save their sessions
and log off during the installation or upgrade procedures.
To install or upgrade Media Distribute:
1. Complete the process for “Mounting the USB Installation Drive on the MCS Server” on page 9.
2. Navigate to the installation directory on the USB drive:
cd Media_Distribute_<version>_<build>_Linux
3. Run the installation script:
./install.sh
The period-slash “./” in this command tells Linux to look for the script in the current directory.
The PostgreSQL database is updated with a custom user name of
resudpm
4. Once the installation process is complete, verify that the packages have been installed by typing
. The necessary database tables and schema in PostgreSQL database are also created.
the following command:
/usr/share/apache-servicemix/bin/mpd_version
The command returns the installed versions of ServiceMix and Media Distribute. For example:
ServiceMix Version: 4.5.1
MPD Version: 2.9.0.20161221_164247
MPD UI Version: 2.9.0.20161221_164247
mpduser
and a password of
c
Additional service packages might also be listed when using this command.
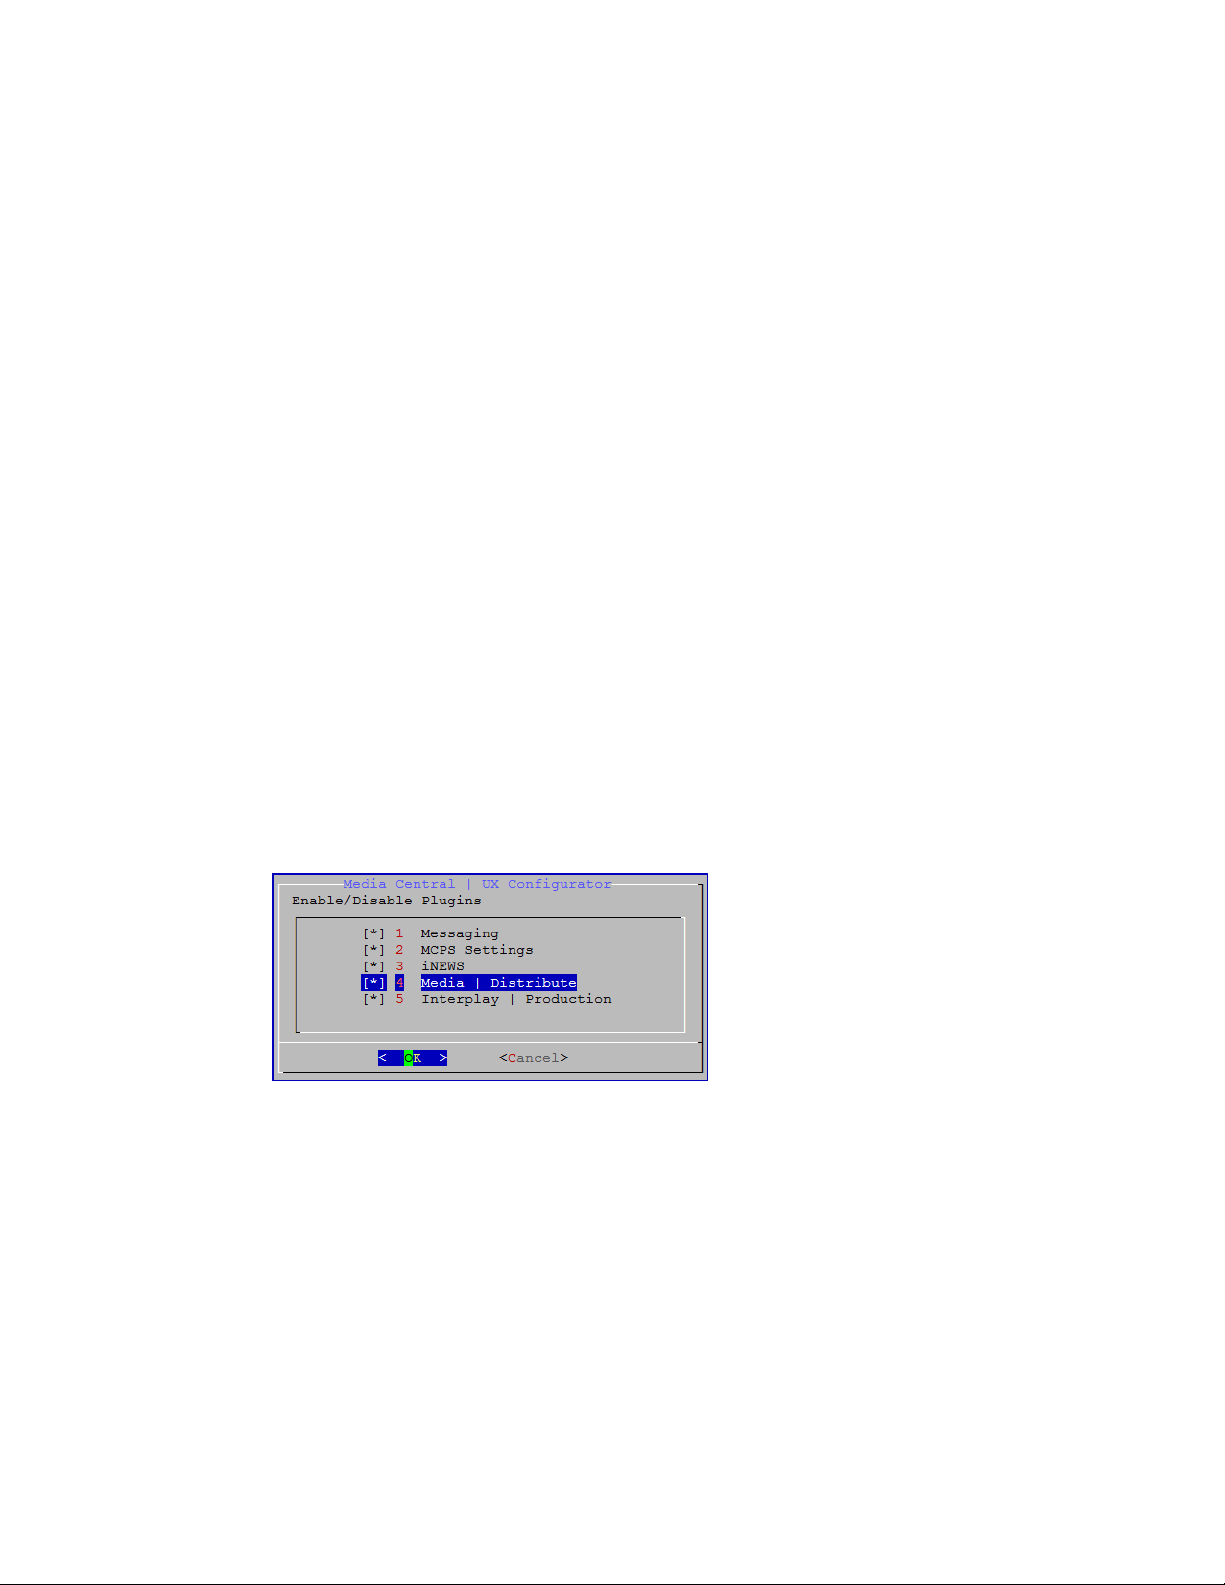
5. Type the following to open the MediaCentral UX Configurator:
/opt/avid/avid-interplay-central/configurator
An asterisk symbol indicates that a particular option is enabled. Verify that the Media Distribute
plug-in is enabled within the Configurator as shown above.
6. Select OK to exit the MediaCentral UX Configurator.
A dialog box opens and asks if you want to restart the MediaCentral services. Use the Tab key to
select Yes and press Enter.
When you restart the services, all users currently logged on to MediaCentral UX are logged
out. Restarting the services is a required step in this process. Do not simply select Cancel and
exit the tool.
11
Page 12
Installing or Upgrading Media | Distribute on a Single Server
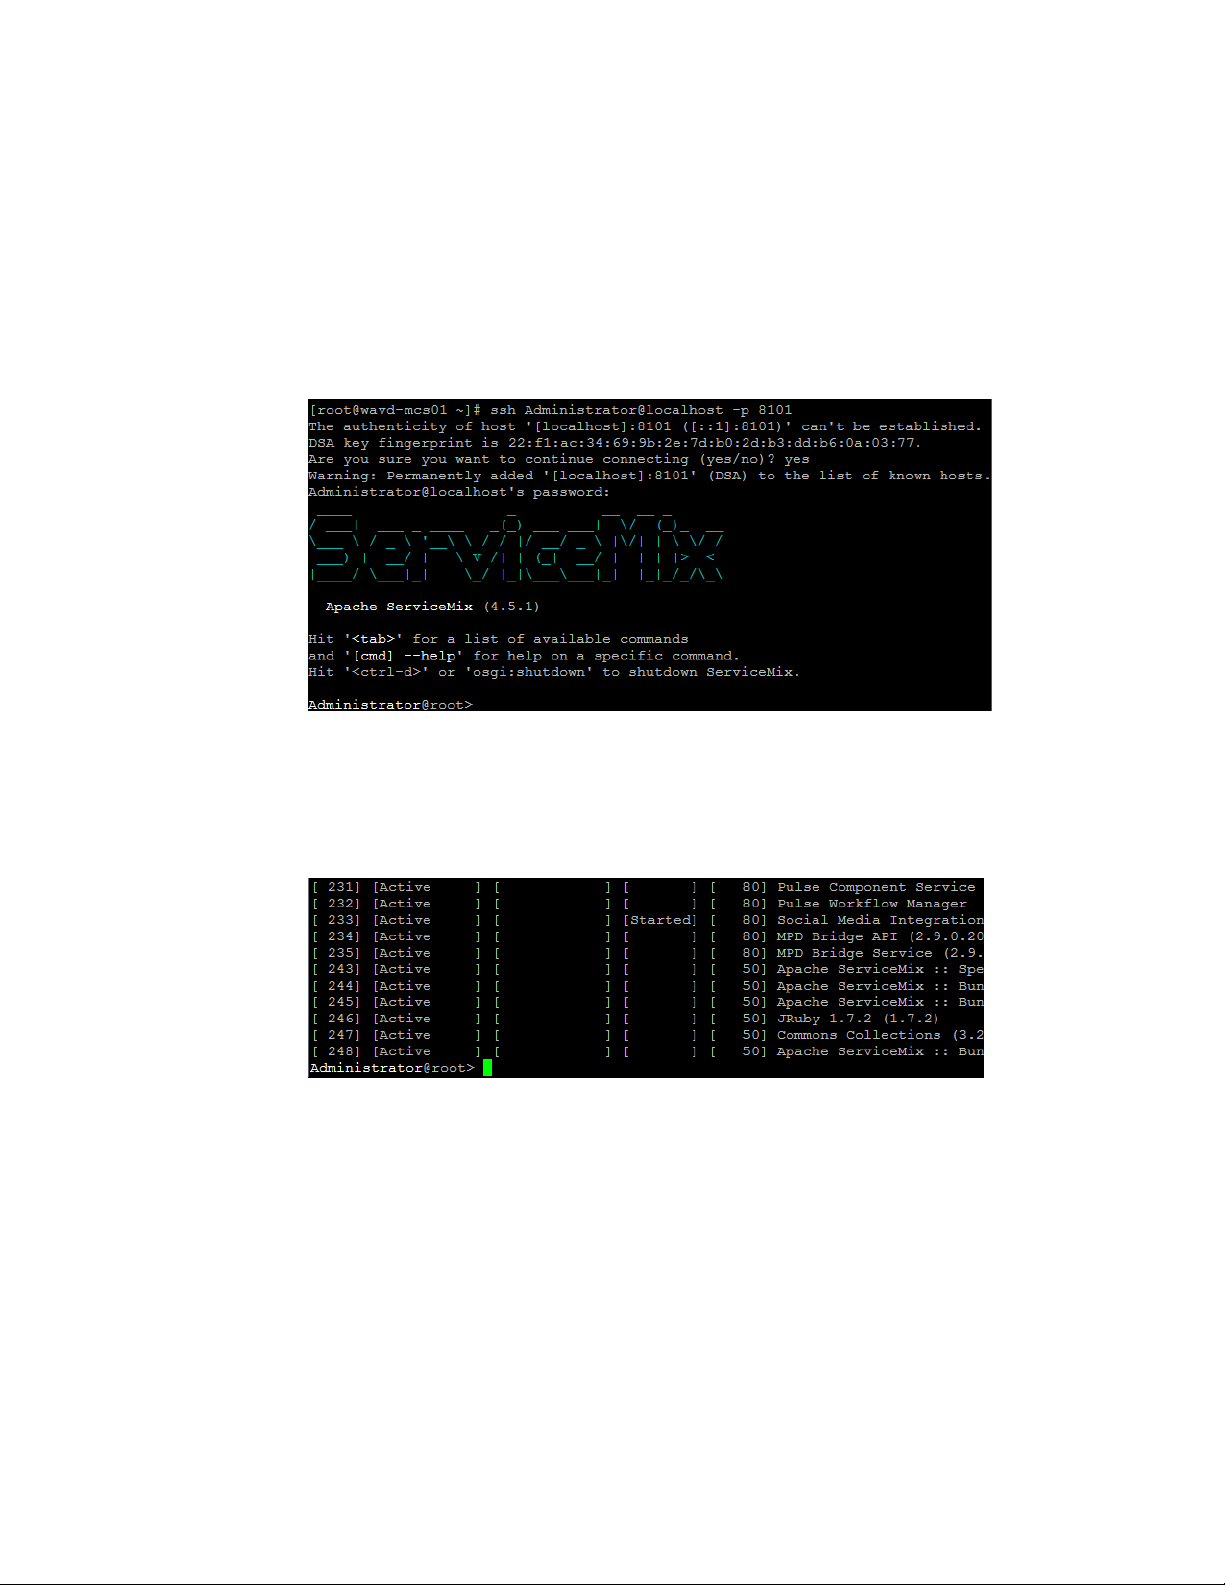
7. With the Media Distribute installation complete, it is important to verify the connection to the
ServiceMix tool. To verify the connection, complete the following steps:
a. Type the following:
ssh Administrator@localhost -p 8101
If prompted to verify the DSA key fingerprint, type
ServiceMix interface.
b. Enter the Administrator password:
A successful connection to the ServiceMix tool should look similar to the following:
c. Verify that the services are running properly by entering the
Enter.
If the ServiceMix installation is successful, all account endpoints should be listed as
“Active” and the “Social Media Integration Routes” endpoint should be listed as “Started.”
avid
yes
to continue to connect to the
list
command, and pressing
If all endpoints are not active or if the “Social Media Integration Routes” endpoint is not started,
n
ServiceMix might not have completed restarting. Wait a moment and then retry these steps.
d. Type
8. Unmount the USB drive from the MediaCentral server by completing the following steps:
a. Type
b. Type the following to unmount the volume:
c. Physically remove the USB drive from the server.
logout
cd
mount.
umount /media/usb
to quit the ServiceMix tool.
to change to the Linux root directory and navigate away from the USB drive
12
Page 13

Installing or Upgrading Media | Distribute in a Cluster Environment
Installing or Upgrading Media | Distribute in a Cluster
Environment
The procedures in this section assume you have already configured your MediaCentral Platform
Services servers in a clustered environment and that you have verified failover functionality. For
more information on configuring the MediaCentral servers in a cluster, see the Avid MediaCentral
Platform Services Installation and Configuration Guide.
The procedure for upgrading Media Distribute follows the same process as that of a new installation.
The existing packages are simply overwritten with new versions during the upgrade process. If
necessary, you can restore some of the original files by using the backup configuration files already
in your configuration once the upgrade completes. For other files — for example, the Avid Publish
Service configuration files — you must edit the new versions if you made any customizations to the
original configuration.
When you upgrade your version of Media Distribute, all system and user settings are saved. You do
n
not need to create new settings. However if the software update includes new features, you might
need to modify your settings to activate the features. For a list of new features, see the ReadMe
documentation that came with your version of MediaCentral UX. For information on setting up
account profiles, see “Configuring System Accounts for Media | Distribute” on page 59.
Installing Media Distribute in a cluster entails the following steps:
• “Identifying the Master and Non-Master Nodes” on page 14
Media Distribute is installed on all cluster nodes, but some installation steps are completed on
the Master node only, so it is important to know the role of each node before beginning the
process.
• “Identifying the Virtual Cluster IP” on page 14
The virtual cluster IP address must be clearly identified as you are required to manually add this
information to multiple configuration files after the installation is complete.
• “Installing or Upgrading Media | Distribute” on page 15
This process installs the software on each of the cluster nodes.
• “Configuring Media | Distribute on the Master Node” on page 16
After the installation, multiple configuration files need to be updated with custom information.
• “Configuring Media | Distribute on Non-Master Nodes” on page 18
This process updates the configuration files on the non-master nodes.
• “Restarting PostgreSQL Service and Verifying the Cluster Installation” on page 19
This process validates changes to the PostgreSQL database and tests cluster failover.
• “Verifying the Connection to ServiceMix” on page 20
Checks the connection to the ServiceMix tool from each cluster node.
c
The process of installing Media Distribute includes a restart of some core services. This process
disconnects all users logged in to MediaCentral UX. Ensure that all users save their sessions
and log off during the installation or upgrade procedures.
13
Page 14

Installing or Upgrading Media | Distribute in a Cluster Environment
Identifying the Master and Non-Master Nodes
There are three types of nodes in a cluster: master, slave, and load-balancing. The master “owns” the
cluster IP address. The slave assumes the role of master in the event of a failover. Any additional
nodes play a load-balancing role, but can never take on the role of master.
Prior to beginning the installation, identify the current role of each cluster node.
To identify the master, slave, and load-balancing nodes:
1. Identify the master node of the cluster through the Cluster Resource Monitor. Log in to any
machine in the cluster as root and type:
crm_mon
2. To identify the master and slave, look for the line containing “Master/Slave Set.”
For example:
Master/Slave Set: ms_drbd_postgres [drbd_postgres]
Masters: [ wavd-mcs01 ]
Slaves: [ wavd-mcs02 ]
In this example, the master node is wavd-mcs01 and the slave node is wavd-mcs02.
3. To identify the load-balancing nodes, look for the line containing “Clone Set.”
For example:
Clone Set: AvidAllEverywhere [AvidAll]
Started: [ wavd-mcs01 wavd-mcs02 wavd-mcs03 wavd-mcs04 ]
In this example, the load-balancing nodes are wavd-mcs03 and wavd-mcs04.
4. Exit crm_mon by pressing CTRL-C on the keyboard.
Identifying the Virtual Cluster IP
Some files used in the configuration of Media Distribute require the virtual cluster IP. Prior to
beginning the installation, identify the IP address assigned to the cluster.
To identify the virtual cluster IP:
t Log in to the master node of the cluster and type the following command:
The following is an example of the output of a typical network interface configuration. The
virtual cluster IP is the IP assigned to the 'eth0:c10' network adapter.
In this example, the virtual cluster IP is 192.168.10.50:
eth0 Link encap:Ethernet HWaddr 00:26:55:E6:83:E1
inet addr:192.168.10.51 Bcast:192.168.10.255 Mask:255.255.255.0
inet6 addr: fe80::226:55ff:fee6:83e1/64 Scope:Link
UP BROADCAST RUNNING MULTICAST MTU:1500 Metric:1
RX packets:4321802 errors:0 dropped:0 overruns:0 frame:0
TX packets:3628475 errors:0 dropped:0 overruns:0 carrier:0
collisions:0 txqueuelen:1000
RX bytes:1374391088 (1.2 GiB) TX bytes:1086706641 (1.0 GiB)
eth0:cl0 Link encap:Ethernet HWaddr 00:26:44:E6:83:E1
inet addr:192.168.10.50 Bcast:192.168.10.255 Mask:255.255.255.0
UP BROADCAST RUNNING MULTICAST MTU:1500 Metric:1
Interrupt:38 Memory:fbde0000-fbe00000
ifconfig
14
Page 15

Installing or Upgrading Media | Distribute in a Cluster Environment
lo Link encap:Local Loopback
inet addr:127.0.0.1 Mask:255.0.0.0
inet6 addr: ::1/128 Scope:Host
UP LOOPBACK RUNNING MTU:16436 Metric:1
RX packets:7331022 errors:0 dropped:0 overruns:0 frame:0
TX packets:7331022 errors:0 dropped:0 overruns:0 carrier:0
collisions:0 txqueuelen:0
RX bytes:8040287442 (7.4 GiB) TX bytes:8040287442 (7.4 GiB)
Installing or Upgrading Media | Distribute
If you install Media Distribute in a cluster environment, you must install it first on the master node of
the cluster since the database service runs on this node. The installation process updates the
PostgreSQL database for the Media Distribute service. These updates can only be completed on the
node running PostgreSQL service. After completing the installation of Media Distribute on the
master node, you must repeat the process to install the software on all non-master nodes.
c
n
Prior to installing Media Distribute in a cluster, make sure that all cluster nodes are online.
During the installation, changes are made to the PostgreSQL database. If the cluster is in
standby mode, this does not occur and the installation fails.
To install or upgrade Media Distribute:
1. Complete the process for “Mounting the USB Installation Drive on the MCS Server” on page 9.
2. Navigate to the installation directory on the USB drive:
cd Media_Distribute_<version>_<build>_Linux
3. Run the installation script:
./install.sh
The period-slash “./” in this command tells Linux to look for the script in the current directory.
For master node installations, a default user in the PostgreSQL database is created with a user name
mpduser
of
database are also created.
4. Once the installation process is complete, verify that the packages have been installed by typing
the following command:
/usr/share/apache-servicemix/bin/mpd_version
The command returns the installed versions of ServiceMix and Media Distribute. For example:
ServiceMix Version: 4.5.1
MPD Version: 2.9.0.20161221_164247
MPD UI Version: 2.9.0.20161221_164247
and a password of
resudpm
. The necessary database tables and schema in PostgreSQL
Additional service packages might also be listed when using this command.
15
Page 16
Installing or Upgrading Media | Distribute in a Cluster Environment
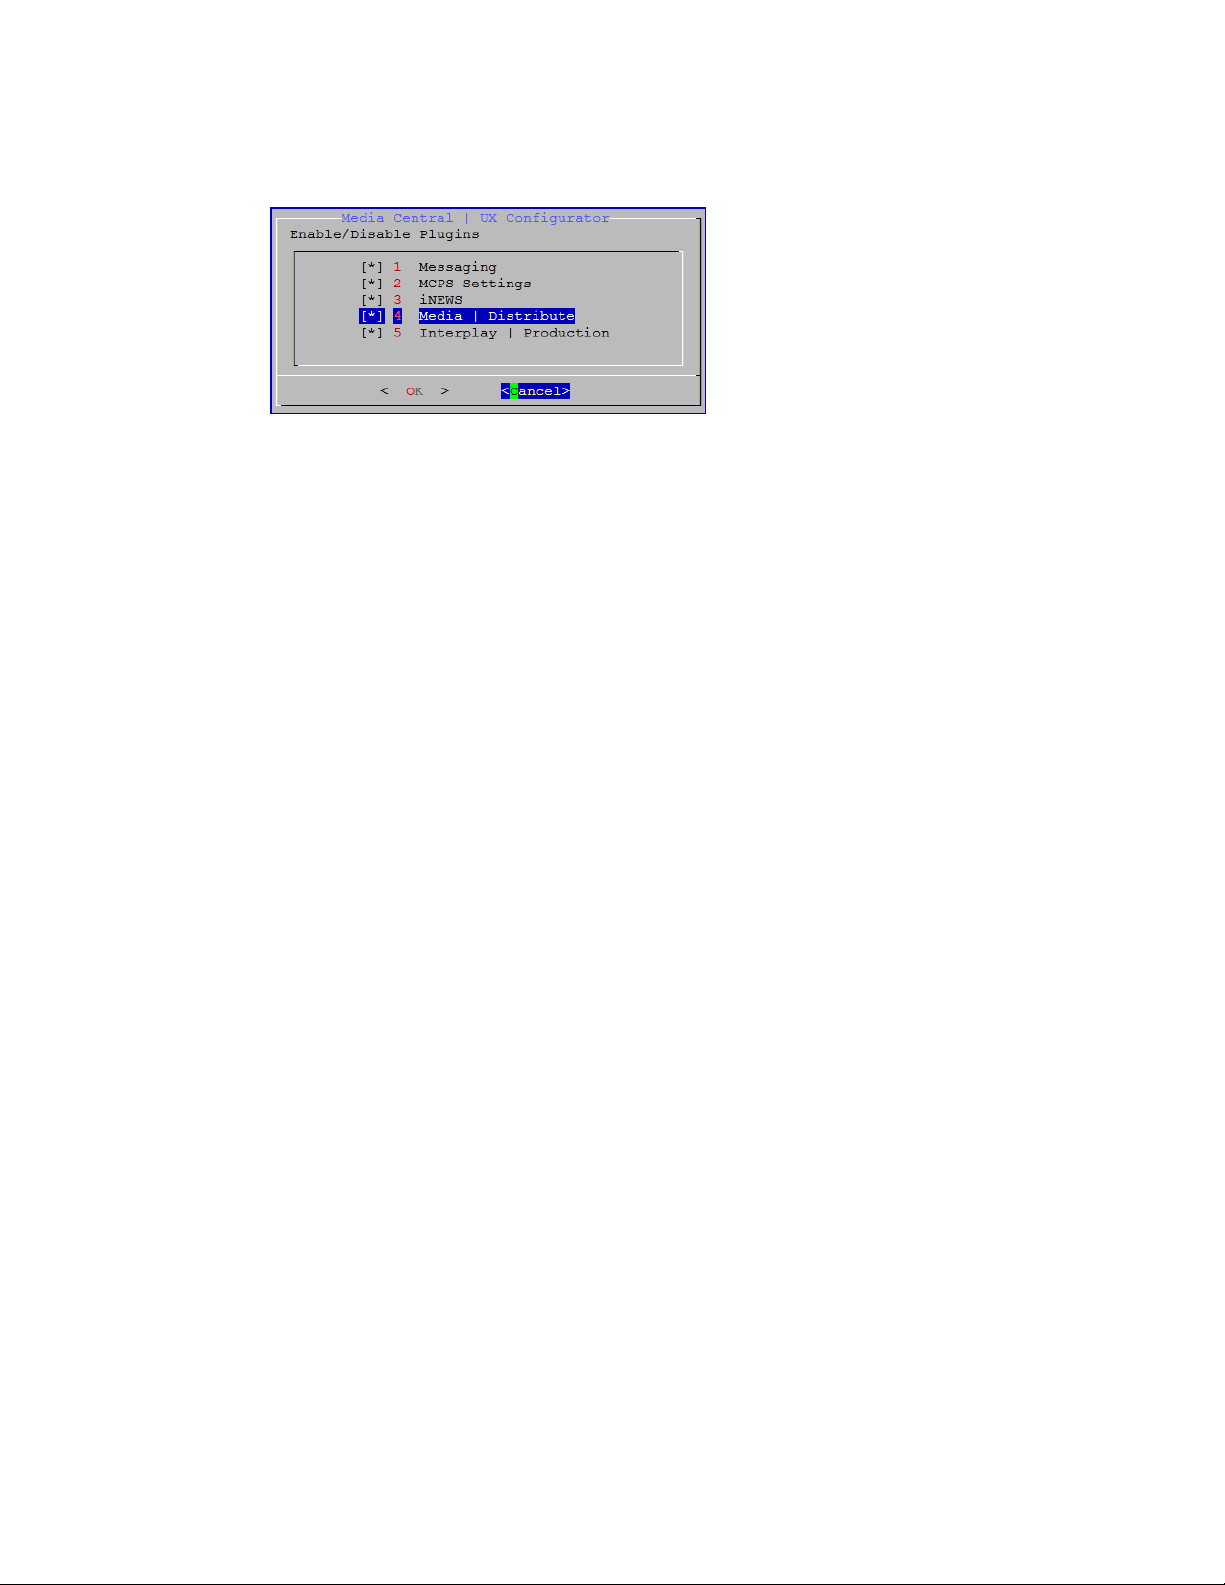
5. Type the following to open the MediaCentral UX Configurator:
/opt/avid/avid-interplay-central/configurator
An asterisk symbol indicates that a particular option is enabled. Verify that the Media Distribute
plug-in is enabled within the Configurator as shown above.
Use the Tab key to select
6. Unmount the USB drive from the MediaCentral server by completing the following steps:
cd
a. Type
mount.
b. Type the following to unmount the volume:
umount /media/usb
c. Physically remove the USB drive from the server.
7. Repeat steps 1 - 6 of this procedure on all non-master nodes.
When installing Media Distribute on the non-master nodes, you might see the following message:
n
“Not running a database PG on localhost. Please enter IP of database server.” If you see this
message, press Enter. You do not need to provide an IP address for your database server when
installing Media Distribute on a non-master node.
8. After Media Distribute has been installed on all cluster nodes, restart the AvidIPC cluster
resource from any node to restart the avid-interplay-central service and enable Media Distribute:
crm resource restart AvidIPC
When you restart the resource, all users currently logged on to MediaCentral UX are logged out.
n
Restarting the services controlled by the cluster resource might take up to a minute.
to change to the Linux root directory and navigate away from the USB drive
Cancel
and press Enter to exit the Configurator.
Configuring Media | Distribute on the Master Node
After you install Media Distribute, you must edit several configuration and property files and restart
services on the master cluster node.
Although multiple text editors exist, the tool used throughout this document is “vi”. If needed, a short
introduction to vi is included in the MediaCentral Platform Services Concepts and Clustering Guide.
To configure PostgreSQL to allow remote hosts access to the Media Distribute database:
1. Using the Linux vi editor, open the PostgreSQL configuration file for editing:
vi /mnt/drbd/postgres_data/pg_hba.conf
16
Page 17

Installing or Upgrading Media | Distribute in a Cluster Environment
2. Add the following information on a new line at the end of the file:
host mpd mpduser 0.0.0.0/0 trust
3. Save and exit the vi session. Press
To configure the User Management Service (UMS) properties file (new installation only):
<ESC>
and type:
:wq
1. Using the Linux vi editor, open the UMS properties file for editing:
vi /usr/share/apache-servicemix/config/application.properties
2. Remove the “#” character from the beginning of the following line:
#com.avid.mpd.uls.host.retriever=application.properties
3. Using the arrow keys, navigate to the line containing the parameter for:
com.avid.osgi.uls.host=
4. Replace the default UMS REST address of
https://localhost:10443/ws/rest
with the
cluster’s virtual IP address. For example:
com.avid.osgi.uls.host=https://192.168.10.50:10443/ws/rest
5. Save and exit the vi session. Press
To configure PostgreSQL to allow remote hosts access to the Media Distribute database (new
installation only):
<ESC>
and type:
:wq
1. Using the Linux vi editor, open the Media Distribute database configuration file for editing:
vi /etc/apache-servicemix/avid-mpd-wrapper.conf
2. Locate the following line in the configuration file:
#set.default.DB_HOST=hostname or IP
3. Remove the “#” character from the beginning of this line:
set.default.DB_HOST=hostname or IP
4. Replace the
set.default.DB_HOST=192.168.10.50
5. Save and exit the vi session. Press
To modify the bus configuration file (new installation only):
hostname or IP
value with the cluster’s virtual IP address. For example:
<ESC>
and type:
:wq
1. Navigate to the directory containing the MediaCentral configuration file:
cd /etc/apache-servicemix
2. Using the Linux vi editor, open the following configuration file for editing:
vi com.avid.acs.bus.broker.rabbitmq.RabbitMqBusAccessFactory.cfg
3. Using the arrow keys, navigate to the line containing the parameter for:
brokerConnectURL=
4. Replace the default URL of
amqp://localhost/acs
with the cluster’s virtual IP address. For
example:
brokerConnectURL=amqp://192.168.10.50/acs
5. Save and exit the vi session. Press
<ESC>
and type:
:wq
6. After this file has been saved, restart the Media Distribute service:
service avid-mpd clean-restart
17
Page 18

Installing or Upgrading Media | Distribute in a Cluster Environment
To restore and move the Servicemix configuration files (upgraded systems only):
t For Media Distribute upgrades, restore the Servicemix configuration files by doing the
following:
a. Type the following to navigate to the Servicemix directory:
cd /etc/apache-servicemix/
b. Type the following commands to restore the backup configuration files:
mv avid-mpd-wrapper.conf.rpmsave avid-mpd-wrapper.conf
mv com.avid.acs.bus.broker.rabbitmq.RabbitMqBusAccessFactory.cfg.rpmsave
com.avid.acs.bus.broker.rabbitmq.RabbitMqBusAccessFactory.cfg
Configuring Media | Distribute on Non-Master Nodes
The configuration files that you just edited on the master node also be edited on the non-master
nodes. Since the configuration and property files need to be identical on all nodes, you can simply
copy the edited files from the master to the non-master nodes.
To copy the edited Media Distribute files from the master to the non-master nodes:
1. From the cluster master node, enter the following commands to copy the configuration files to
the non-master nodes:
scp /etc/apache-servicemix/avid-mpd-wrapper.conf
root@<hostname>:/etc/apache-servicemix/
Where <hostname> is the host name of your non-master node.
2. After issuing the above command, Linux might display the following message:
The authenticity of host '<hostname (IP address)>' can't be established.
RSA key fingerprint is <fingerprint alphanumerical id>.
Are you sure you want to continue connecting (yes/no)?
If this occurs, type:
yes
The terminal window displays the following message:
Warning: Permanently added '<hostname, IP address>' (RSA) to the list of
known hosts.
If prompted for a password, type the password for your
root
user account.
The edited files are copied to the non-master node.
3. From the cluster master node, enter the following commands to copy the remaining
configuration files to the non-master nodes:
scp /etc/apache-servicemix/com.avid.acs.bus.broker.rabbitmq.RabbitMqBusAcc
essFactory.cfg root@<hostname>:/etc/apache-servicemix/
scp /usr/share/apache-servicemix/config/application.properties
root@<hostname>:/usr/share/apache-servicemix/config/
Where <hostname> is the host name of your non-master node.
4. Once the three configuration files have been copied, restart the Media Distribute service on the
non-master node:
service avid-mpd clean-restart
5. Repeat steps 1 - 4 for each non-master node.
18
Page 19

Installing or Upgrading Media | Distribute in a Cluster Environment
Restarting PostgreSQL Service and Verifying the Cluster Installation
Before you verify your Media Distribute installation on the master and non-master nodes, you need
to perform a failover of the servers. This restarts the PostgreSQL service and validates the mpduser. It
also tests your new installation and verifies that both Media Distribute and MediaCentral Platform
Services are running properly.
For more information about cluster failover procedures, see the Avid MediaCentral Platform
n
Services Concepts and Clustering Guide.
To perform a failover and verify your installation:
1. Open a terminal window and log in to any non-master node in the cluster as the
2. Open the Cluster Resource Monitor to view the status of the cluster resources:
crm_mon -f
In addition to the resource status information, the Migration Summary and Failed Actions (if
applicable) sections displayed at the bottom of the screen shows errors and fail counts per node.
3. Place the master node in standby by typing the following command and pressing Enter:
crm node standby <hostname>
Replace
4. Monitor the Cluster Resource Monitor on the non-master node.
As the master node enters standby, the former slave node becomes the new master. It takes
ownership of the cluster IP address, the PostgreSQL database, and other resources.
Be patient as this process takes several moments to complete
5. When the updated cluster is stable, take former master node out of standby mode by typing the
following command and pressing Enter:
crm node online <hostname>
Replace
The node is brought back up and takes the role of the cluster slave node.
6. Monitor the Cluster Resource Monitor on the non-master node.
<hostname>
<hostname>
with the hostname of the master node — for example, wavd-mcs01.
with the name of the standby node (e.g. wavd-mcs01).
root
user.
When the standby node comes back online, verify that its status is that of the slave node.
7. Repeat the process to test failover in the opposite direction.
As the master node goes into standby node, the status of the slave node returns to that of the
master node. When the standby node comes back online, its status is that of the slave node.
19
Page 20

Installing or Upgrading Media | Distribute in a Cluster Environment
Verifying the Connection to ServiceMix
With the Media Distribute installation complete, it is important to verify the connection to the
ServiceMix tool. This process must be completed locally on each cluster node.
To verify the ServiceMix installation:
1. Type the following to access the ServiceMix tool:
ssh Administrator@localhost -p 8101
If prompted to verify the DSA key fingerprint, type
ServiceMix interface.
2. Enter the Administrator password:
A successful connection to the ServiceMix tool should look similar to the following:
3. Verify that the services are running properly by entering the
avid
yes
to continue to connect to the
list
command, and pressing Enter.
If the ServiceMix installation is successful, all account endpoints should be listed as “Active”
and the “Social Media Integration Routes” endpoint should be listed as “Started.”
If all endpoints are not active or if the “Social Media Integration Routes” endpoint is not started,
n
ServiceMix might not have completed restarting. Wait a moment and then retry these steps.
4. Type
logout
to quit the ServiceMix tool.
20
Page 21

Modifying Media Distribute to Work with a Proxy Server
Modifying Media Distribute to Work with a Proxy Server
Media Distribute requires a connection to the public Internet to post packages to sites such as
Facebook or Twitter. This connectivity requirement might create potential security issues for certain
customers. For secure deployment considerations, you can configure Media Distribute to
communicate with the Internet through a proxy server.
Using a proxy server — such as a Squid server or any other proxy server running on another machine
in the network — allows you to restrict the ports that Media Distribute and it’s dependent systems use
to communicate with the Internet. This solution involves configuration changes only and does not
affect the existing Media Distribute installation process. After installing Media Distribute, you need
to modify certain configuration file to include the proxy settings to ensure that all requests and
responses go through the proxy server. After restarting the appropriate Media Distribute services,
external traffic is forwarded to the proxy server.
You can also specify some systems in your configuration to bypass the proxy server. This can be
useful in some configurations where you need to access the intranet — for example, when using a
Vantage transcoder — where direct access works better.
Depending on how you use Media Distribute, you might need to alter one or more files to configure
the system to operate through a proxy server. The following two sections include information on
configuring Media Distribute to use a proxy server:
• Using the Social Messages and Web Story Panes
• Using the Distribution Pane
See the documentation that came with your proxy server for information on how to configure it for
proxy operation. The following processes assume that the proxy server is available and fully
configured.
If your MediaCentral servers are configured in a cluster, complete the following processes on the
master node first. Once complete, repeat the processes on all non-master nodes.
Using the Social Messages and Web Story Panes
When using either the Social Messages or Web Story panes, you must configure the proxy server
with the following information:
• IP addresses of all ServiceMix instances, so that only data originating from Media Distribute are
allowed to the proxy server
• Social media targets for the destination domains — for example, api.twitter.com
To modify the configuration file for using ServiceMix with a proxy server:
1. Navigate to the directory containing the Media Distribute database configuration file:
cd /etc/apache-servicemix
2. Using the Linux text editor, vi, open the avid-mpd-wrapper.conf file for editing:
vi avid-mpd-wrapper.conf
3. Locate the section called Proxy configuration, and then type i (lower case “i”) to enter insert
mode.
21
Page 22

Modifying Media Distribute to Work with a Proxy Server
4. Locate the following lines, type i (lower case “i”) to enter insert mode, and then use the arrow
#
keys and backspace to erase the
(comment indicator) on all lines except those for setting the
proxy user name and proxy password (these are optional parameters):
#wrapper.java.additional.n=-Dhttp.proxySet=true
#wrapper.java.additional.n=-Dhttp.proxyHost=<the proxy host>
#wrapper.java.additional.n=-Dhttp.proxyPort=<the proxy port>
#wrapper.java.additional.n=-Dhttp.proxyUser=<the proxy username>
#wrapper.java.additional.n=-Dhttp.proxyPassword=<the proxy password>
#wrapper.java.additional.n=-Dhttps.proxySet=true
#wrapper.java.additional.n=-Dhttps.proxyHost=<the proxy host>
#wrapper.java.additional.n=-Dhttps.proxyPort=<the proxy port>
#wrapper.java.additional.n=-Dhttps.proxyUser=<the proxy username>
#wrapper.java.additional.n=-Dhttps.proxyPassword=<the proxy password>
5. (Optional) If you want to specify systems to bypass the proxy server, add the following line:
#wrapper.java.additional.n=-Dhttp.nonProxyHosts=<the proxy hosts>
For example, you might be connecting to a transcode server that is in your network and you do
not want or need that traffic passing through the proxy server. In this case, you could add the IP
address, short hostname, or FQDN to this line. The server hosting the MediaCentral Distribution
Service (MCDS) is another possible example of a machine that might be added to this field.
If you add this line to the file, Avid recommends matching the information that is added to the
profile in the MediaCentral UX System Settings. For example, if you enter the transcode server’s
IP address in the system settings, add the IP address to this line. If you plan to enter the FQDN,
enter the FQDN here.
You can add systems to this exclusion by separating them with a pipe symbol (|).
n
6. Delete the numeral variable (.n) and number the lines for which you have removed the comment
indicator.
7. Delete the <proxy host> or <proxy port> variable and then replace it by typing the IP address of
your proxy server or by typing the port configured by your proxy server for both the HTTP and
HTTPS settings.
Typically the proxy port is 3128.
n
The modified configuration should look like the following example:
wrapper.java.additional.1=-Dhttp.proxySet=true
wrapper.java.additional.2=-Dhttp.proxyHost=12.345.67.89
wrapper.java.additional.3=-Dhttp.proxyPort=3128
#wrapper.java.additional.n=-Dhttp.proxyUser=<the proxy username>
#wrapper.java.additional.n=-Dhttp.proxyPassword=<the proxy password>
wrapper.java.additional.4=-Dhttps.proxySet=true
wrapper.java.additional.5=-Dhttps.proxyHost=12.345.67.89
wrapper.java.additional.6=-Dhttps.proxyPort=3128
22
Page 23

Modifying Media Distribute to Work with a Proxy Server
#wrapper.java.additional.n=-Dhttps.proxyUser=<the proxy username>
#wrapper.java.additional.n=-Dhttps.proxyPassword=<the proxy password>
8. Press the Escape key to return to command mode, then type
quit the text editor.
9. To restart the MediaCentral service, type the following command:
service avid-mpd restart
Using the Distribution Pane
Introduced in Media Distribute v2.7.0, the Distribution pane uses avid-publish-* services rather than
the original ServiceMix connectors. If using this pane, you must configure the individual services to
communicate with the proxy server.
You only need to configure the services that you plan to use. If you only plan to use the YouTube
n
service and not the Twitter service for instance, only the YouTube service needs to be adjusted.
To modify configuration files for using the Distribution pane with a proxy server:
1. Navigate to the directory containing the Media Distribute service files:
cd /opt/avid/sbin/
2. Use the Linux
directory:
ls avid-publish*
Output similar to the following is displayed:
avid-publish-amazon-s3 avid-publish-flickr avid-publish-vimeo
avid-publish-brightcove avid-publish-kaltura avid-publish-youtube
avid-publish-facebook avid-publish-twitter
list
command to show the Media Distribute “publish” packages included in this
:wq
and press Return to write and
These are the files that must be altered to enable a proxy server workflow with the Distribution
pane.
3. Open the desired configuration file for editing. For example:
vi avid-publish-youtube
4. Locate the following lines in the file (located near the beginning of the file):
# Add default JVM options here. You can also use JAVA_OPTS and
AVID_PUBLISH_<connector>_OPTS to pass JVM options to this script.
DEFAULT_JVM_OPTS=""
5. Add the proxy server’s http and https connection information within the quotes:
DEFAULT_JVM_OPTS="-Dhttp.proxyHost=<http_IP> -Dhttp.proxyPort=<http_port>
-Dhttps.proxyHost=<https_IP> -Dhttps.proxyPort=<https_port>"
Where the following variables are used:
<http_IP>
-
<http_port>
-
<https_IP>
-
<https_port>
-
— The IP address of the proxy server used for HTTP communication.
— The port on the proxy server used for HTTP communication.
— The IP address of the proxy server used for HTTPS communication.
— The port on the proxy server used for HTTPS communication.
23
Page 24

Removing Media Distribute
The following example shows a completed configuration change:
DEFAULT_JVM_OPTS="-Dhttp.proxyHost=192.168.10.220 -Dhttp.proxyPort=3128
-Dhttps.proxyHost=192.168.10.220 -Dhttps.proxyPort=3129"
6. Save and exit the vi session. Press
7. To activate the change, restart the service associated with the file you just updated. For example:
service avid-publish-youtube restart
8. Repeat the process above to update additional services as required by your workflow.
<ESC>
Removing Media Distribute
If you need to uninstall the software, Media Distribute v2.10 includes a script that quickly and easily
removes the Distribute components for you. If you are uninstalling the software in a cluster
configuration, begin the following process from the master node.
When you remove Media Distribute, the Media Distribute Producer role remains in
n
MediaCentral UX.
To remove Media Distribute:
1. Refer to the process for “Preparing the Installation Package” on page 9 to create a USB drive
loaded with the Media Distribute software.
2. Once the software package is unpacked, run the uninstall script from the USB drive:
./uninstall.sh
Be sure to use the dot-slash (“./”) notation, which tells Linux to look for the script in the current
n
directory. Otherwise you will receive the following error message:
and type:
:wq
-bash: uninstall.sh: command not found
3. If in a cluster configuration, repeat the above two steps on all cluster nodes in any order.
4. To complete the uninstall process, type one of the following commands to restart the
MediaCentral services:
t For single-server systems:
t For cluster configurations:
If you need to reinstall Media Distribute, see “Installing or Upgrading Media | Distribute on a Single
Server” on page 10 or “Installing or Upgrading Media | Distribute in a Cluster Environment” on
page 13.
service avid-interplay-central restart
crm resource restart AvidIPC
24
Page 25

2 Configuration for Media | Distribute
Before you use Avid Media Distribute to publish your content to multiple channels and devices, you
need to configure MediaCentral | UX for each platform or service you want to use for publishing.
This allows you to link your media packages and iNEWS stories with distribution to the Web and to
social media outlets and assists you with automating file preparation and transcoding.
Before you configure your system accounts, you need to need to configure MediaCentral UX for
Media Distribute. For more information, see the following topics:
• “Assigning Media | Distribute Roles” on page 25
• “Configuring the Transcode Route” on page 30
You can then configure your system and user accounts for Media Distribute:
• “Configuring System Accounts for Media | Distribute” on page 54
• “Configuring User Profiles for Media | Distribute” on page 114
Once you have configured your platforms and services, users can log in to MediaCentral UX and
start working with the application. For more information on using MediaCentral UX, see the Avid
MediaCentral UX User’s Guide.
Verifying Your Media | Distribute Installation
Before you start to configure Media Distribute, you can test your installation to verify that all Media
Distribute components are functioning correctly.
To verify your Media Distribute installation:
1. Sign in to MediaCentral UX as an administrator.
2. Click the Layout selector and select Media Distribute.
If Media Distribute has installed correctly, the following panes display in the Media Distribute
layout:
- Social Message
-Web Story
- Packages
Assigning Media | Distribute Roles
Media Distribute provides two basic roles for publishing to multiple platforms and managing the
layouts and permissions associated with them. Before you assign roles, you need to set up an
administrative account for Media Distribute. Once this administrative account appears in the System
Settings, the necessary roles are available for Media Distribute.
Page 26
Assigning Media | Distribute Roles
If your MediaCentral configuration includes iNEWS, you need to assign an Advance License to the
two Media Distribute roles before you assign these roles to users. For Interplay Production
configurations, you can use the default Basic License type for these roles.
For more information about licenses and roles, see the Avid MediaCentral | UX Administration
Guide.
When you have set up an administrative account and assigned the appropriate license type, you can
then assign either the Advance Journalist or the Media Distribute Producer role to Media Distribute
users. Only Media Distribute Producers have access to the review and approval features in the
Packages pane.
You can assign roles in two ways:
• In the Role Details pane
• In the User or Group Details pane.
If you are upgrading from Media Distribute v1.8 to v2.x, you need to add the Media Distribute layout
to the Advance Journalist role and to modify the legacy Interplay Pulse Producer role.
To set up an administrative account for Media Distribute:
1. Sign in to MediaCentral UX as an administrator.
2. Select System Settings from the Layout selector.
The System Settings layout opens.
3. In the Settings pane select Media Distribute > Profiles.
The Settings pane displays the settings in that group.
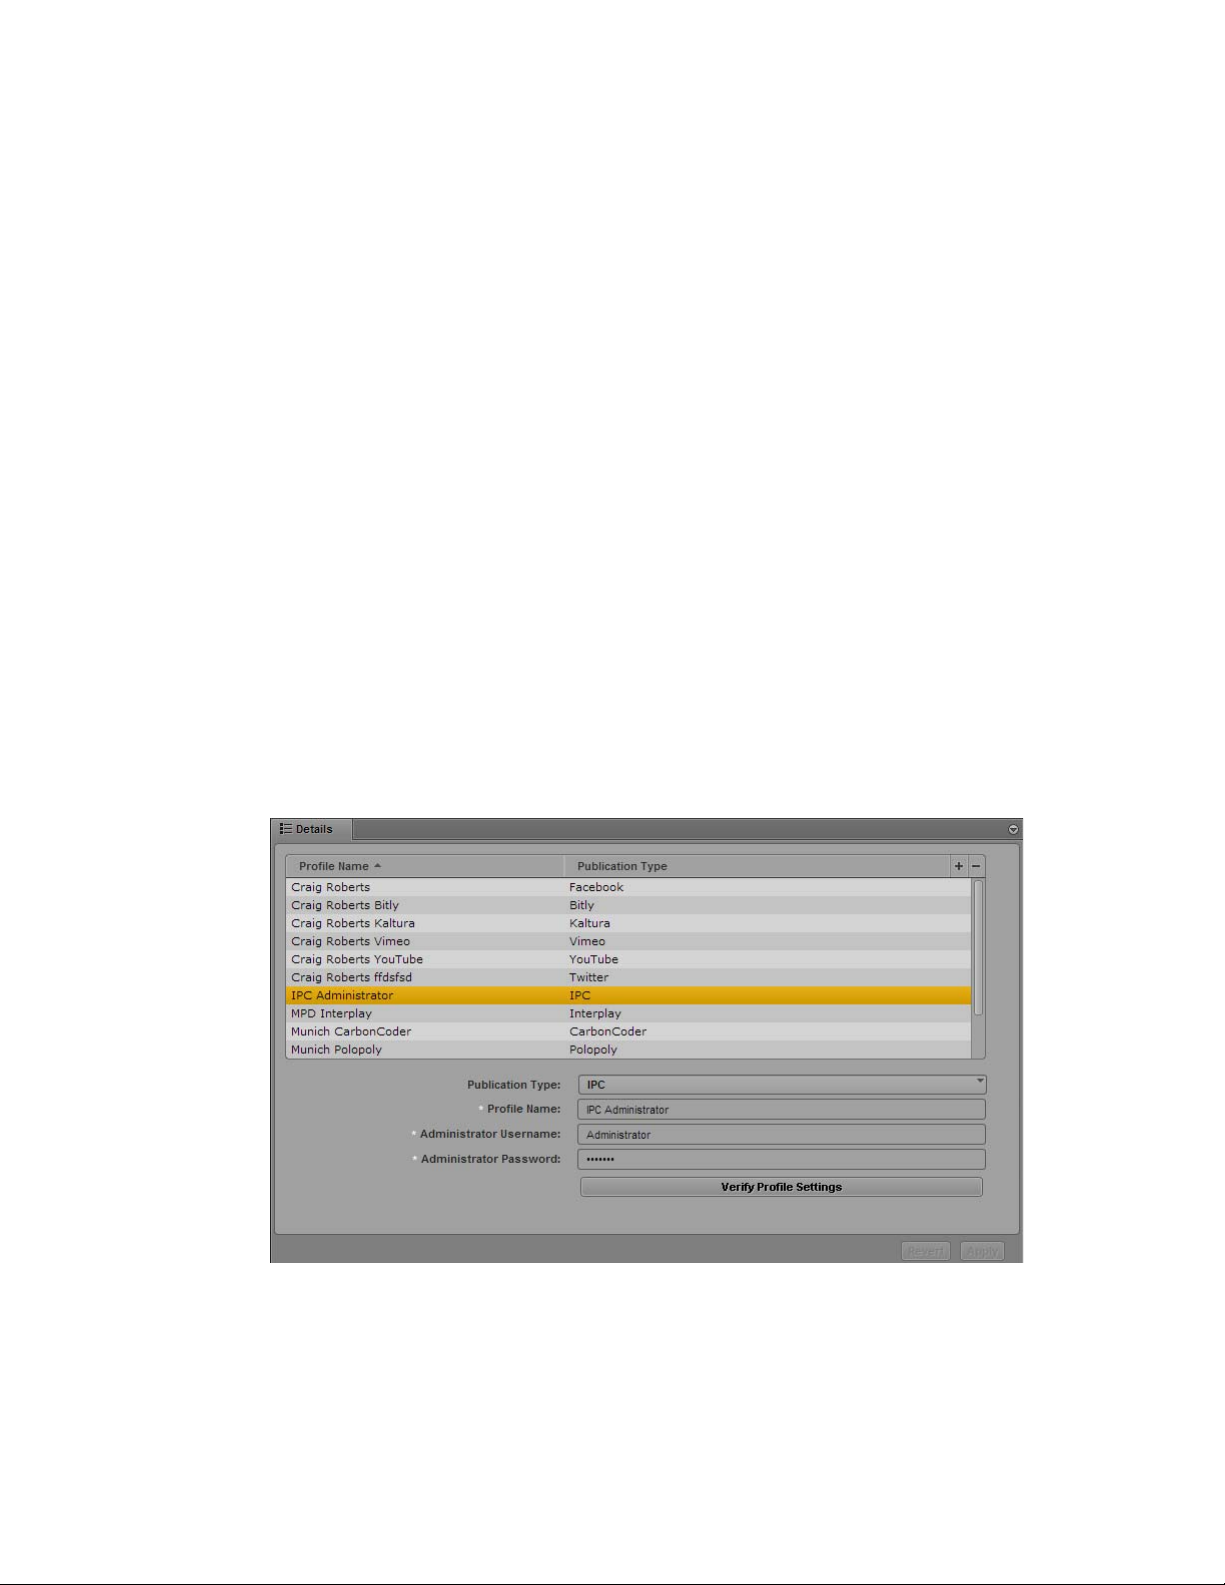
4. Click the Publication Type menu below the list of Profile Names and Publication Types and
select IPC.
5. Click the + (plus) button to the right of the Publication Type list in the Details section.
Clicking the + (plus) button creates the profile. If you do not click the + button, the profile
options are displayed, but the Apply button in the bottom-right corner cannot be selected.
26
Page 27
Assigning Media | Distribute Roles
6. Specify the required settings:
- Profile Name (type a descriptive name for your administrative profile)
- Administrator Username
- Administrator Password
7. Click Verify Profile Settings to validate the profile settings.
If your profile is valid, a message displays: “Profile configurations is valid.” If any settings are
incorrect, a message displays and indicates which fields are incorrect. All invalid settings names
change to red.
The setting, “Transform iNEWS stories to lower case,” applies only to Media Distribute accounts
n
that publish packages containing iNEWS stories. The option does not affect this setting.
8. Click Apply to save the profile.
The profile displays in the Details section with the new information.
If you are editing a profile, click Revert to return to the original settings. If you want to delete a
profile, select the profile and click the minus (-) button in the Details section.
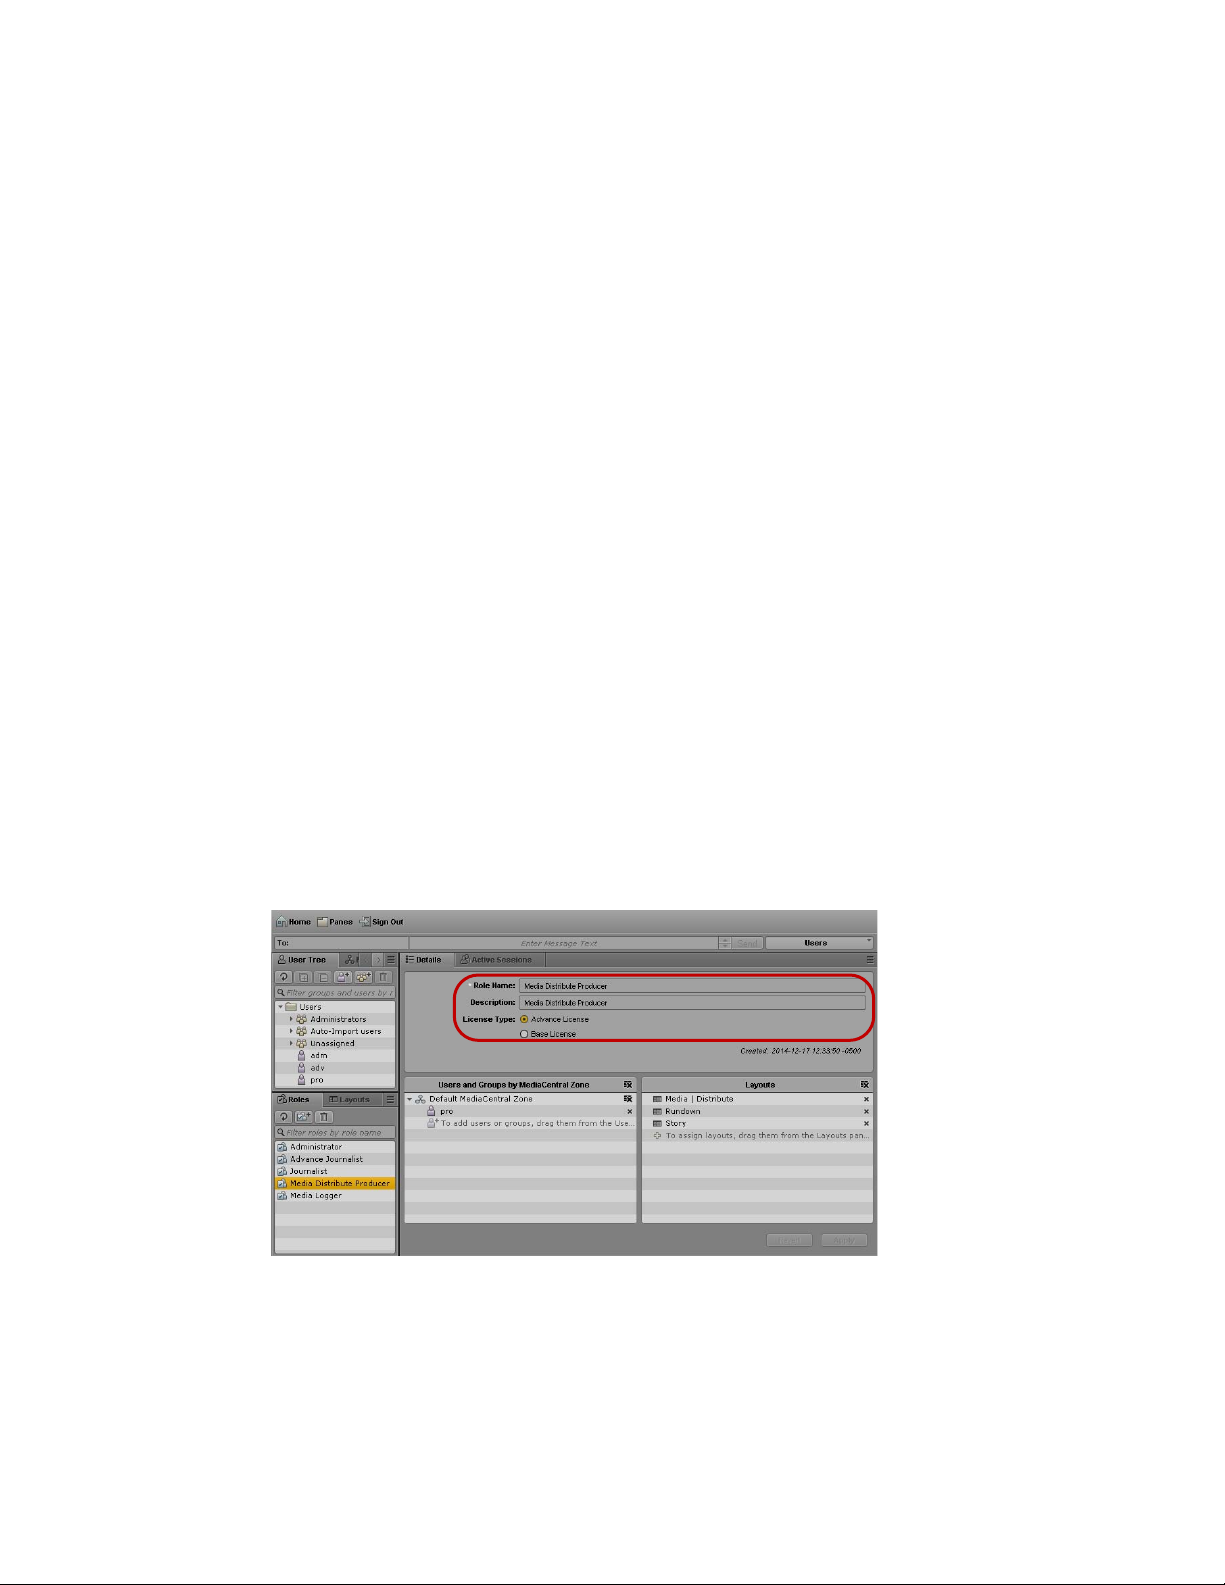
To assign an Advance License to the Media Distribute roles in the Role Details pane (iNEWS
configurations only):
1. Select Users from the Layout selector.
2. In the Roles pane, double-click either Advance Journalist or Media Distribute Producer to assign
to a user or group.
Information about the role is displayed in the Details pane.
3. In the Details pane, select Advance License as the License Type for the following roles:
- Advance Journalist
- Media Distribute Producer
4. Click Apply to save your changes or click Revert to cancel your changes.
27
Page 28
Assigning Media | Distribute Roles
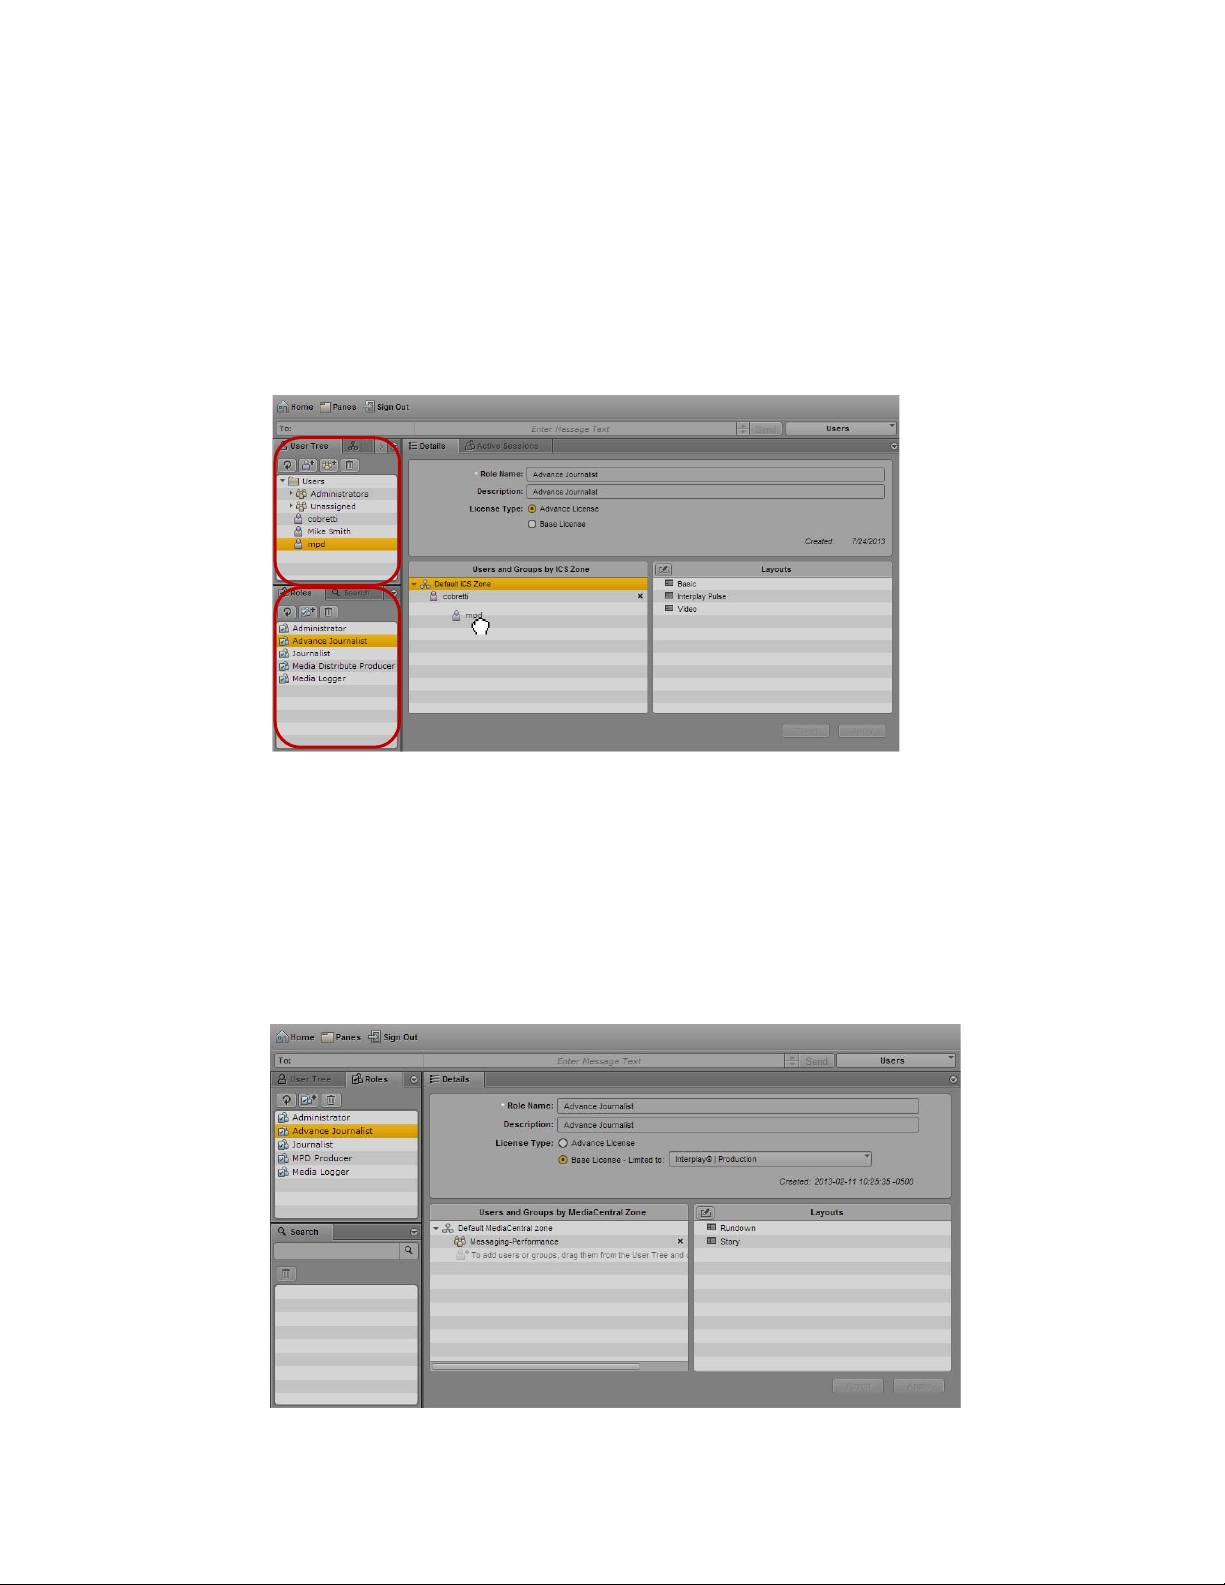
To assign a Media Distribute role to a user in the Role Details pane:
1. Select Users from the Layout selector.
2. In the Roles pane, double-click either Advance Journalist or Media Distribute Producer to assign
to a user or group.
Information about the role is displayed in the Details pane.
3. Click the User Tree pane.
4. Select the user or group to which you which you want to assign the role and drag it to the Users
and Groups by MediaCentral Zone section of the Details pane.
MediaCentral UX User Settings, with the User Tree and Roles panes.
5. Click Apply to save your changes or click Revert to cancel your changes.
To assign the Media Distribute layout and create the Media Distribute Producer role (for
MediaCentral UX upgrade installations only):
1. Select Users from the Layout selector.
2. In the Roles pane, double-click Advance Journalist.
Information about the role is displayed in the Details pane.
28
Page 29

Assigning Media | Distribute Roles
3. Click the Layouts pane, select the Media Distribute layout, and drag it to the Layouts section.
The Media Distribute layout is added to the Layouts list.
4. In the Roles pane, double-click Media Distribute Producer.
Information about the role is displayed in the Details pane.
5. Click the Layouts pane, select the Media Distribute layout, and drag it to the Layouts section.
The Media Distribute layout is added to the Layouts list.
6. Click Apply to save your changes or click Revert to cancel your changes.
To assign a role in the User or Group Details pane (iNEWS configuration only):
1. Select Users from the Layout selector.
2. In the Roles pane, double-click either Advance Journalist or Media Distribute Producer to assign
to a user or group.
Information about the role is displayed in the Details pane.
3. Click the User Tree pane.
4. Select the user or group to which you which you want to assign the role and drag it to the Users
and Groups by MediaCentral Zone section of the Details pane.
MediaCentral UX User Settings, with the User Tree and Roles panes.
5. Click Apply to save your changes or click Revert to cancel your changes.
29
Page 30

MediaCentral | UX Security for Media | Distribute
MediaCentral | UX Security for Media | Distribute
A MediaCentral client requires user login credentials in order to gain access to the underlying
functionality. All data transfered to and from the MediaCentral client (user credentials, session
information, user configuration settings, media images and files, text, and machine instructions) are
transported in a secure manner to the MediaCentral server using HTTPS protocol.
MediaCentral clients that connect through the public Internet require a virtual private network (VPN)
access to the server network. All connections pass through the VPN router/firewall through identified
ports. Once the data has passed into the “house network” it is secured using the customer’s existing
network security infrastructure.
For Media Distribute, ports are used for outgoing HTTP traffic and pass through a network firewall.
In some cases, a platform or a system account might require a separate port for outgoing FTP data.
Media Distribute does not require any ports for incoming data.
c
Do not enable a firewall on the MediaCentral servers in your Media Distribute configuration.
For more information on specific ports used with MediaCentral Platform Services and Media
Distribute, see the Avid Networking Port Usage Guide on the Avid Knowledge Base.
For more information on MediaCentral security, see the Avid MediaCentral | UX Security
Architecture and Analysis.
Configuring the Transcode Route
Media Distribute delivers video to the configured online video platforms using the following
workflow. An understanding of this workflow might help to complete the Send to Playback settings.
• The user publishes a bundle to endpoints that include video assets — for example, YouTube and
Vimeo. The source videos are stored in Interplay Production.
• To start the publishing process, Media Distribute sends the source video to the MediaCentral
Distribution server in a send-to-playback operation.
• The Interplay Production media files are mixed down to MXF-wrapped OP1a media. In the
Packages pane, Media Distribute monitors the process as the status displays as “mixing down.”
You can send only sequences for mixdown and transfer to an FTP location.
n
• The Transfer Manager moves the MXF file to the FTP location specified in the Mixing Down
FTP Path in the Send to Playback system settings — see “Send to Playback Configuration for
Media | Distribute” on page 35.
This location is independent of the transcoder. The system supports multiple transcode
n
configurations which you can assign to various endpoints. By not delivering the video directly to a
transcode watch folder, the transcode route is built in a manner that allows for support of multiple
transcode endpoints.
• The Media Distribute orchestration engine monitors the FTP location. Once the MXF media
arrives at the FTP location, Media Distribute delivers it to the appropriate transcoder /in folder,
based on the configuration for your transcoder service (ftp://<transcoder>/transcoding/in).
30
Page 31

Configuring the Transcode Route
6
7
ftp://[transcoder]/transcoding/out
ftp://[transcoder]/transcoding/in
File Share in Path (mixing down) folder
Third-Party Transcoder Service
Online Video
Provider
(For example:
Vimeo, YouTube
(mapped folders)
1
2
3
4
5
• Media Distribute submits the transcoding job to the transcoder:
- The File Share in Path value (\\<transcoder_hostname>\avid\transcoding\in) should be
configured and mapped to the FTP “in” path (ftp://<transcoder>/transcoding/in). The file
share folder must have the appropriate read/write permissions set. For more information, see
“Configuring the Video Transcoding Host” on page 32.
- The transcoder workflow should be configured to provide output to the
ftp://<transcoder>/transcoding/out folder.
• After transcoding, the Media Distribute orchestration engine obtains the transcoded video file
from the transcoder “out” folder and delivers it to the designed online video provider (OVP)
endpoint for publication.
In order to enable this workflow, you must configure the Send to Playback system settings to provide
the necessary information.
The following illustration outlines the overall workflow for publishing video using Media Distribute.
Note that some details depend on the specific configuration of your transcoder service — for
example, Telestream Vantage or Harmonic ProMedia Carbon transcoder.
1 A user creates a media package with video and clicks Post to send it for review and approval. When a
producer approves the package, it is sent for publication.
2 The sequence, with the source files stored in the Interplay Production database, is mixed down to
MXF-wrapped OP1a media. In the Packages pane, the status displays as “mixing down.”
3 Media Distribute uses the MediaCentral Distribution Service to monitor the send-to-playback status.
When the sequence is mixed down, the Transfer Manager profile, configured in Interplay Transfer,
allows Interplay Transfer to move the MXF file to the Mixing Down FTP Host location.
4 Interplay Transfer moves the media to the Mixing Down FTP Path folder. This folder, specified in the
STP profile, matches the configuration the Transfer Manager profile. The folder is configured as a shared
folder.
31
Page 32

Configuring the Transcode Route
5 Media Distribute monitors the shared folder, and when the media has been transferred, Media Distribute
copies the MXF file from the Mixing Down FTP folder to the transcoding/in FTP folder on the
transcoder service system. The shared folder is mapped to the transcoding/in FTP folder on the
transcoder server. It is transcoded and moved to the transcoding/out folder.
6 Media Distribute downloads the transcoded media from the transcoder service.
7 Media Distribute publishes the video package to the specified online video provider.
To transcode and publish video with Media Distribute, you need to provide the following
configuration:
• Configuration requires that the following servers are available: Avid MediaCentral Distribution
Service, Interplay Production Services, Interplay Transfer, and MediaCentral Platform Services.
• You must configure the Send to Playback settings to provide mixdown output to an FTP server.
For more information, see “Configuring for Send to Playback” in the Avid MediaCentral | UX
Administration Guide.
• You must configure each transcoding host — for example, Vantage and Carbon Coder. See
“Configuring the Video Transcoding Host” on page 32.
• You also need to configure an STP profile in the System Settings > Media Distribute section. See
“Send to Playback Configuration for Media | Distribute” on page 35.
• You must configure the Media Distribute system accounts as described in “Configuring System
Accounts for Media | Distribute” on page 54.
If your iNEWS stories use uppercase characters, you can select the option to transform iNEWS
n
stories to lowercase. This changes all text to lowercase characters when you load an iNEWS story in
the Media Distribute layout.
Configuring the Video Transcoding Host
You must configure Windows network share folder structure and folders before using a third-party
transcoder such as Telestream Vantage
File Transfer Protocol (FTP) service running on your transcode server. For the FTP process to work,
each media file function must be mapped to specified folders. The following table describes the
required structure of the Windows network share folder and FTP folders on a Vantage host server:
Windows Network Share FTP Folder
avid ftp://<Vantage_hostname>/transcoding/in
The Windows network folder for incoming media must be accessible and mapped to the FTP folder
(for the transcoded media). This FTP structure is required for retrieving MXF files from Send to
Playback and for providing the transcoded output for Media Distribute workflows.
®
to transcode video for your media package. You also need a
ftp://<Vantage_hostname>/transcoding/out
ftp://<Vantage-hostname>/transcoding/mixdown
You also need to set the Interplay Transfer Manager options in the Send to Playback configuration for
Media Distribute. For information on configuring Send to Playback, see “Send to Playback
Configuration for Media | Distribute” on page 35.
32
Page 33

Configuring the Transcode Route
To configure your FTP service, you need to install an FTP server application. The procedure in this
section uses the open source FTP server application called FileZilla Server. You can download the
software from the following Web site: https://filezilla-project.org/.
To set up Windows network share:
1. On your transcoding server, create the following folder if it does not exist already:
<transcoder_hostname>\<drive:>\avid\transcoding\in
2. Right-click the <transcoder_hostname>\<drive:>\avid folder and select Sharing and Security.
The avid Properties dialog box opens.
3. Click the Sharing tab, and then select the Share this folder option.
4. Click Permissions.
The Permissions dialog box opens.
5. Select Everyone, and then select Allow for all permissions in the Permissions for Everyone list.
33
Page 34

Configuring the Transcode Route
6. Click OK to return to the avid Properties dialog box, and then click OK.
7. Open FileZilla Server, and log in to your server.
8. Select Edit > Users.
The Users dialog box opens.
9. Click Add.
The Add User Account dialog box opens.
avid
10. In the text box, type
, and then click OK.
11. In the Users dialog box, select the following options:
- Enable account
- Password, and type a password for the user account
- Bypass userlimit of server
12. In the Page list, select Shared folders.
34
Page 35

Configuring the Transcode Route
13. In the Shared folders area, click Add, and then navigate to the <drive:>\avid folder, and then
click OK.
The folder is added to the Shared folders list.
14. Select the following options for Files and Directories:
-Read
- Write
-Delete
-Append
-Create
-Delete
-List
-+Subdirs
15. Click OK.
Send to Playback Configuration for Media | Distribute
The MediaCentral UX administrator needs to specify Send to Playback configuration information
before you can use publish using Media Distribute. The Transfer Manager Destination Profile must
be the same as the profile name specified in the Interplay Transfer settings. The FTP host name, user
name, and password also reflect the same settings in Interplay Transfer.
The send-to-playback operation uses the credentials of the MediaCentral UX workgroup user
specified in the Interplay profile and not the currently logged in user, so the user must have read/write
privileges for the Interplay database used for sending media assets to the FTP host. For information
on setting up MediaCentral UX users and roles, see “Managing Users and Groups” in the Avid
MediaCentral | UX Administration Guide.
You can create only one Send to Playback configuration for each Media Distribute installation.
n
35
Page 36

To configure Send to Playback publish settings:
1. Sign in to MediaCentral UX as an administrator.
2. Select System Settings from the Layout selector.
The System Settings layout opens.
3. In the Settings pane select Media Distribute > Profiles.
The Settings pane displays the settings in that group.
Configuring the Transcode Route
4. Click the Publication Type menu and select STP.
5. Click the + (plus) button in the Details section.
An STP profile named “New Profile” is created in the Details section.
6. Specify the required settings:
- Profile Name: use the same name used for the FTP server profile configured in the Interplay
Transfer Configuration tool. For more information, see “Configuring an FTP Server Profile”
in the Interplay | Transfer Setup and User’s Guide.
- Target VCID: Select a VCID from the list of supported resolutions.
AVC Long GOP formats are not supported with Media Distribute.
n
- Audio: Options are Direct, Stereo, or Mono. When you use Direct to send a export a clip for
Send to Playback, the channel order reflects the channel order used when you captured the
audio. For example, if your source audio is 5:1 multichannel audio, you should select Direct
to preserve the channel mappings.
36
Page 37

Configuring the Transcode Route
- Audio Bit Depth: Options are 16 and 24.
- Audio Target Sample Rate: Options are 32000, 44100, 48000, and 96000.
- Shared ISIS Workspace — The STP service requires this Avid shared storage workspace to
store video prior to delivery to the transcode service. Select a valid shared workspace from
the menu to be used as a temporary location for storing media.
The user specified in this profile must have read/write privileges for the shared storage workspace.
n
- Transfer Manager Host — select a Transfer Manager host from the menu. You can use the
values from your Transfer Manager configuration. For more information, see the
Interplay | Transfer Setup and User's Guide.
- Transfer Manager Destination Profile — Select an existing destination profile from the
menu.
- TransferManager Profile Type — Select a profile from the following options:
Profile Type Description
IFrame For send-to-playback operations using I-frame media. The source media clips must
match the target VCID format. The output file uses an OP1a format.
IFrameAMS For send-to-playback operations using I-frame media and sent to an Avid AirSpeed
server. The source media clips must match the target VCID format. The output file
uses an OP Atom format.
LongGoP For send-to-playback operations using Long GOP media. Since the
send-top-playback encoding creates a new media clip, the source media clips do
not need to match the target VCID format. The output file uses an OP1a format.
LongGoPAMS For send-to-playback operations using Long GOP media and sent to an Avid
AirSpeed server. Since the send-top-playback encoding creates a new media clip,
the source media clips do not need to match the target VCID format. The output
file uses an OP Atom format.
- Mixing Down FTP Host — Type the FTP host name. The FTP host name must be the same
as the FTP server name associated with the destination profile and specified in the FTP
configuration in Interplay Transfer. For more information on FTP configuration in Interplay
Transfer, see Interplay | Transfer Setup and User's Guide.
In the sample profile setting above, the Transfer Manager Destination Profile is listed as
xdcamhd1080i50
and the Mixing Down FTP Host is
xxx-srmonia
. This corresponds to the
following components of the Interplay Transfer FTP configuration:
37
Page 38

Configuring the Transcode Route
- Mixing Down FTP Path — Type the path to the FTP destination where MXF output is
staged for transcode. This should be the same as the destination directory specified in the
FTP configuration in Interplay Transfer. In the example here, the Mixing Down FTP Path is
/transcoding/mixdown
.
c
Do not set the Mixing Down FTP Path to the same delivery folders used by your third-party
transcoding application — for example, the FTP Transcode/in Path in your Vantage profile.
The FTP location must be independent of the transcoder path.
- Mixing Down FTP Username — Type the user name for your FTP service credentials.
- Mixing Down FTP Password — Type the password for your FTP service credentials.
You cannot use either an at sign (@) or a colon (:) in your password. You can substitute %40 (@) or
n
%3a (:) instead.
7. Click Verify Profile Settings to validate the profile settings.
If your profile is valid, a message displays: “Profile configurations is valid.” If any settings are
incorrect, a message displays and indicates which fields are incorrect. All invalid settings names
change to red.
8. Click Apply to save the profile.
The profile displays in the Details section with the new information.
If you are editing a profile, click Revert to return to the original settings. If you want to delete a
profile, select the profile and click the minus (-) button in the Details section.
Configuring a Telestream Vantage Profile
Before you can use the Telestream Vantage video transcoding service with Media Distribute, you
must install Telestream Vantage on your system and then configure the Vantage settings in
MediaCentral UX.
Before you set up your Vantage workflow, you must configure your video host transcoding. For more
information, see “Configuring the Video Transcoding Host” on page 32.
The following procedures assume you have created a Vantage account. For more information, see
http://www.telestream.net/vantage/.
You must select your Telestream Vantage video transcoding service profile when you set up your
n
system accounts — for example, your YouTube or Vimeo account — for publishing your media
packages. Depending on your configuration, you might need to configure your system accounts
before configuring MediaCentral UX for your Vantage account. For more information, see
“Configuring System Accounts for Media | Distribute” on page 54.
To install and configure Telestream Vantage:
1. Install Vantage on your Windows system.
2. Use the Vantage Management Console to configure your Vantage license.
3. Configure your Vantage workflow, and then edit your Flip tasks to set the output folder to the
\\<hostname>\avid\transcoding\out folder you created when you set up your video host
transcoding. A typical Vantage workflow usually includes at least a Receive and a Flip task. See
your Vantage documentation for more information on creating and configuring workflows.
4. Make sure that you select H.264 as the Encoder and .mp4 as the Extension in your Flip tasks.
38
Page 39

Configuring the Transcode Route
You cannot change the output file name by adding file name prefixes or suffixes. This causes the
n
publish job to fail.
5. Type the following URL in a browser address bar to obtain your Vantage workflow ID:
http://<hostname>:8676/DomainRest/GetWorkflows.
A Web page displays your Vantage workflow ID.
6. Save your workflow ID.
To configure MediaCentral UX for your Vantage account:
1. Sign in to MediaCentral UX as an administrator.
2. Select System Settings from the Layout selector.
The System Settings layout opens.
3. In the Settings pane select Media Distribute > Profiles.
The Settings pane displays the settings in that group.
4. Click the Publication Type menu and select Vantage.
5. Click the + (plus) button in the Details section.
A Vantage profile named “New Profile” is created in the Details section.
6. Specify the required settings, using the configuration on your Vantage system:
- Profile Name (type a descriptive name for your profile)
- Workflow ID (from your Vantage workflow configuration)
- Host Name (your Vantage hostname — for example, vantage-host)
39
Page 40

Configuring the Transcode Route
- FTP Hostname (optional — if you use different servers for your FTP transcode in/out
location and for your File Share path, you can specify a different FTP server. If the transcode
in/out and File Share are on the same server, you can leave this setting blank.)
- FTP User Name (from your video host transcoding configuration)
- FTP Password (from your video host transcoding configuration)
- FTP Transcode/In Path (for incoming files, from your video host transcoding configuration.
You can use a subpath expression — for example,
- FTP Transcode/Out Path (for outgoing files, from your video host transcoding configuration.
You can use a subpath expression — for example,
- File Share In Path (from your video host transcoding configuration — see “Configuring the
Video Transcoding Host” on page 32. You must use the path to the Network Share path for
this setting — for example,
7. Click Verify Profile Settings to validate the profile settings.
If your profile is valid, a message displays: “Profile configurations is valid.” If any settings are
incorrect, a message displays and indicates which fields are incorrect. All invalid settings names
change to red.
8. (Optional) If your iNEWS stories use uppercase characters, you can select the option to
transform iNEWS stories to lowercase. This changes all text to lowercase characters when you
load an iNEWS story in the Media Distribute layout.
\\my_vantage\avid
transcoding/in.
transcoding/out
.)
)
.)
9. Click Apply to save the profile.
The profile displays in the Details section with the new information.
If you are editing a profile, click Revert to return to the original settings. If you want to delete a
profile, select the profile and click the minus (-) button in the Details section.
Validating the Vantage Transcode Route Configuration
When you have configured video transcoding for your Vantage video host system as well as the
Telestream Vantage profile, you can validate the configuration by publishing a test media package to
make sure all components work successfully. For information on configuring video transcoding and
the Vantage profile, see “Configuring the Video Transcoding Host” on page 32 and “Configuring a
Telestream Vantage Profile” on page 38.
To publish a media package, you first need to set up and configure at least one system account. For
n
more information, see “Configuring System Accounts for Media | Distribute” on page 54.
The validation procedure includes monitoring the progress of the transcode procedure in the
following applications:
• the ServiceMix log in your MediaCentral server
• the Job Status tab of the Vantage Workflow Designer
• the Vantage server Avid transcode folders
• the Media Distribute layout in MediaCentral UX
40
Page 41

Configuring the Transcode Route
To validate the Vantage transcode configuration:
1. Log in to the MediaCentral server, either locally or using a terminal emulator application such as
PuTTY, and type the following in a terminal window:
a. To open the ServiceMix application, type the following command:
ssh Administrator@localhost -p 8101
b. Type
yes
to continue connecting to the host, and then type the default password
avid
The ServiceMix interface displays in the terminal window.
c. To move to the end of the log, type
log:tail
, and press Enter.
2. On your Vantage server, do the following:
a. Open Vantage Workflow Designer, and then select File > Job Status.
b. In a file browser, navigate to <drive>:/avid/transcoding so you can see the following folders:
- <drive>:/avid/transcoding/in
- <drive>:/avid/transcoding/out
.
3. Sign in to MediaCentral UX, and then click the Layout selector and select Media Distribute.
The Media Distribute layout opens.
4. Click the Social Message pane.
The Social Message pane opens.
5. Add some text in the Message text box.
Changes you make in the Message text box apply globally to all social media targets you select.
You can also modify the story text for individual targets in the text boxes for those targets.
6. Select a social media target — for example, YouTube.
7. Click the Profiles menu, and select the Vantage transcoding service profile.
8. Double-click a video asset in the Asset pane or drag the video asset to the Media viewer.
The video asset displays in the Media pane. You can select a master clip, a subclip, or a
sequence.
41
Page 42

9. Click Attach Video.
The video displays in the Video area of the Social Media pane.
Configuring the Transcode Route
10. Click Post, and then click Yes.
11. Click the Packages pane, and then click the Refresh button.
The Packages pane displays the media package status as Pending.
42
Page 43

Configuring the Transcode Route
12. Click Publish.
The Packages pane displays the media package status as Mixing Down. When the mixdown
process completes, the status displays as Mixing Down Finished.
13. In the ServiceMix console displaying in the MediaCentral server terminal window, check the log
for the following entries:
- Transcoded MediaItem is found transcodedMediaItemID=<ID number>
- Starting to copy MXF <media object ID> to transcoder machine FTP <Vantage_hostname>
When the media package is published, the ServiceMix log displays the transcoded media item as
n
released.
14. In the file browser on the Vantage server, check the <drive>:/avid/transcoding/in folder for the
MXF media file to be transcoded.
When the media package is published, the transcoded media item is deleted from the transcoding/in
n
and transcoding/out folders.
43
Page 44

Configuring the Transcode Route
15. In the Job Status tab of the Vantage Workflow Designer, check the status of the transcode job.
16. When the Job Status tab reports the transcode process as completed, check the
<drive>:/avid/transcoding/out folder in the file browser for the transcoded MXF media file.
17. In the MediaCentral UX Packages pane, check the status of the media package.
When the publish procedure completes, the status displays as Published and the link to video
included in the package appears in blue. Clicking the link opens a browser and displays the video
on the Web page for the selected online platform.
Configuring the Harmonic ProMedia Carbon Transcoder
Before you can use the Harmonic ProMedia™ Carbon transcoder with Media Distribute, you must
install ProMedia Carbon on your system and then configure the CarbonCoder settings in
MediaCentral UX.
Before you set up your Carbon system, you must configure your video host transcoding. For more
information, see “Configuring the Video Transcoding Host” on page 32.
The following procedures assume you have created a ProMedia Carbon account. For more
information, see http://www.harmonicinc.com/product/promedia-carbon.
To install and configure ProMedia Carbon:
1. Install Harmonic ProMedia Carbon on your Windows system.
2. Start ProMedia Carbon.
44
Page 45

Configuring the Transcode Route
3. In Carbon, create a new profile by doing the following:
a. In the Target tab, add a new target and select a target preset.
b. In the Target Parameters window, modify the Destination Base Name to
Destination Path to \\hostname\avid\transcoding\out.
%s
and the
c. Click Save Profile, and name the new profile
Avid MPD
.
4. Locate the profile ID by using one of the following:
t The Preset Editor in Carbon Admin
t ListProfiles.exe in the Carbon SDK
To configure MediaCentral UX for your ProMedia Carbon account:
1. Sign in to MediaCentral UX as an administrator.
2. Select System Settings from the Layout selector.
The System Settings layout opens.
3. In the Settings pane select Media Distribute > Profiles.
The Settings pane displays the settings in that group.
4. Click the Publication Type menu and select CarbonCoder.
5. Click the + (plus) button in the Details section.
A CarbonCoder profile named “New Profile” is created in the Details section.
45
Page 46

Configuring the Transcode Route
6. Specify the required settings, using the using the parameter fields from ProMedia Carbon:
- Profile Name (type a descriptive name for your profile)
- Workflow ID (from your CarbonCoder profile)
- Host Name (your CarbonCoder hostname — for example, carboncoder-host)
- FTP Hostname (optional — if you use different servers for your FTP transcode in/out
location and for your File Share path, you can specify a different FTP server. If the transcode
in/out and File Share are on the same server, you can leave this setting blank.)
- FTP User Name (from your video host transcoding configuration)
- FTP Password (from your video host transcoding configuration)
- FTP Transcode/In Path (for incoming files, from your video host transcoding configuration)
- FTP Transcode/Out Path (for outgoing files, from your video host transcoding
configuration)
- File Share In Path (from your video host transcoding configuration — see “Configuring the
Video Transcoding Host” on page 32)
7. Click Verify Profile Settings to validate the profile settings.
If your profile is valid, a message displays: “Profile configurations is valid.” If any settings are
incorrect, a message displays and indicates which fields are incorrect. All invalid settings names
change to red.
8. (Optional) If your iNEWS stories use uppercase characters, you can select the option to
transform iNEWS stories to lowercase. This changes all text to lowercase characters when you
load an iNEWS story in the Media Distribute layout.
9. Click Apply to save the profile.
The profile displays in the Details section with the new information.
If you are editing a profile, click Revert to return to the original settings. If you want to delete a
profile, select the profile and click the minus (-) button in the Details section.
Configuring a RadiantGrid Profile
In order to use the RadiantGrid™ transcoding engine with Media Distribute, you need to install and
configure the RadiantGrid software on a supported server. See your RadiantGrid representative for
more information.
The following procedures assume you have created a RadiantGrid account and password. For more
information, see http://www.wohler.com/RgProduct.aspx.
Once you have your RadiantGrid profile credentials, you need to create new transcode profile. This
profile must transcode media from the MXF format to the H.264 (.mp4) format. The following
procedure does not describe all of the options required for creating the profile using the RadiantGrid
application.
46
Page 47

Configuring the Transcode Route
To set up a RadiantGrid profile for use with Media Distribute:
1. Open your browser and log in to your RadiantGrid account.
2. Create a new Transcode profile. For details on creating a RadiantGrid transcoding profile, see
your RadiantGrid documentation.
3. (Optional) Configure a workflow template.
If you create a new transcode profile, you might be able to skip this step. However, if you use an
n
existing transcode profile, you might need to reconfigure your workflow template.
4. Configure an FTP service. For information on configuring the FTP service, see “Configuring the
Video Transcoding Host” on page 32.
47
Page 48

To configure MediaCentral UX for your RadiantGrid account:
1. Sign in to MediaCentral UX as an administrator.
2. Select System Settings from the Layout selector.
The System Settings layout opens.
3. In the Settings pane select Media Distribute > Profiles.
The Settings pane displays the settings in that group.
Configuring the Transcode Route
4. Click the Publication Type menu and select RadiantGrid.
5. Click the + (plus) button in the Details section.
A RadiantGrid profile named “New Profile” is created in the Details section.
6. Specify the required settings, using the configuration on your RadiantGrid system and your FTP
configuration:
- Profile Name (type a descriptive name for your profile)
- RadiantGrid User Name (from your RadiantGrid configuration)
- RadiantGrid Password (from your RadiantGrid configuration)
- Transcoding Profile Name (the profile name is listed on the Workflow > Transcode Web
page of your RadiantGrid configuration)
- Host Name (your RadiantGrid server hostname — for example, radiant-host)
48
Page 49

Configuring the Transcode Route
- FTP Hostname (optional — if you use different servers for your FTP transcode in/out
location and for your File Share path, you can specify a different FTP server. If the transcode
in/out and File Share are on the same server, you can leave this setting blank.)
- FTP User Name (from your video host transcoding configuration)
- FTP Password (from your video host transcoding configuration)
- FTP Transcode/In Path (for incoming files, from your video host transcoding configuration)
- FTP Transcode/Out Path (for outgoing files, from your video host transcoding
configuration)
- File Share In Path (from your video host transcoding configuration)
- File Share Out Path (from your video host transcoding configuration)
7. Click Verify Profile Settings to validate the profile settings.
If your profile is valid, a message displays: “Profile configurations is valid.” If any settings are
incorrect, a message displays and indicates which fields are incorrect. All invalid settings names
change to red.
8. (Optional) If your iNEWS stories use uppercase characters, you can select the option to
transform iNEWS stories to lowercase. This changes all text to lowercase characters when you
load an iNEWS story in the Media Distribute layout.
9. Click Apply to save the profile.
The profile displays in the Details section with the new information.
If you are editing a profile, click Revert to return to the original settings. If you want to delete a
profile, select the profile and click the minus (-) button in the Details section.
Configuring a MAM Profile
Starting with Media Distribute v2.7, you can publish media packages using assets stored in Interplay
Media Asset Management (MAM) databases. If your configuration includes a MAM system, you can
create a MAM profile for Media Distribute to the following platforms:
• Amazon S3
• Facebook
•Flickr
•Twitter
•Vimeo
•YouTube
Your MAM configuration provides you with the following information needed to complete your
MediaCentral UX configuration:
• MAM Process Name (defined by your MAM workflow; the default is MEDIA_DISTRIBUTE)
• Service Realm (listed in the MediaCentral UX System Settings for Interplay MAM)
• Output FTP Hostname (the name of the FTP server accessible from MAM and from MCS
systems)
• Output FTP Path (the path to the FTP server accessible from MAM and from MCS and Media
Distribute systems)
49
Page 50

Configuring the Transcode Route
• Output FTP User Name (the user name associated with the FTP server)
• Output FTP Password (the user password associated with the FTP user)
Configuring the FTP site allows Media Distribute to acquire assets from Interplay MAM and publish
them to the selected platform. For information on configuring Interplay MAM for Media Distribute,
see the Interplay | MAM Media Distribution Process Reference, part of the Interplay MAM
documentation that comes with Interplay MAM.
To configure MediaCentral UX for your MAM database:
1. Sign in to MediaCentral UX as an administrator.
2. Select System Settings from the Layout selector.
The System Settings layout opens.
3. In the Settings pane select Media Distribute > Profiles.
The Settings pane displays the settings in that group.
4. Click the Publication Type menu and select MAM.
5. Click the + (plus) button in the Details section.
A MAM profile named “New Profile” is created in the Details section.
6. Specify the required settings, using the configuration on your AAF system and your FTP
configuration:
- Profile Name: Type a descriptive name for your profile.
- MAM Process Name: Type the process name specified by your MAM configuration; the
default is MEDIA_DISTRIBUTIOIN.
The MAM Process Name is case-sensitive.
n
50
Page 51

Configuring the Transcode Route
- Service Realm: Type the name of the service realm associated with your MAM
configuration. The MAM service realm is listed as the Bus Realm in the MediaCentral UX
System Settings for Interplay MAM.
- MAM Video Output Format: Use a format from the list. The options are MOV, MP4, MXF.
- MAM Image Output Format: Use a format from the list. The options are JPEG and PNG.
- Output FTP Hostname: Type the name of the FTP server accessible from MAM and from
MCS systems. This can be the same server listed as the Server Name in the System
Connection section of the MediaCentral UX System Settings for Interplay MAM.
- Output FTP Path (the path to the FTP server accessible from MAM and from MCS and
Media Distribute systems)
- Output FTP User Name (the user name associated with the FTP server)
- Output FTP Password (the user password associated with the FTP user)
7. Click Apply to save the profile.
The profile displays in the Details section with the new information.
If you are editing a profile, click Revert to return to the original settings. If you want to delete a
profile, select the profile and click the minus (-) button in the Details section.
51
Page 52

Configuring an E-mail Profile
If you use the Distribution pane to publish media packages, you can configure an e-mail profile to
send e-mail notifications to one or more users when a package is published. The e-mail profile uses
the e-mail information configured for MediaCentral UX in the Messages & Sharing panel of the
System Settings to send the e-mail.
For information on using the Distribution pane, see “Publishing MediaCentral Assets with the
Distribution Pane” in the Media | Distribute User’s Guide. For information about configuring e-mail
settings in MediaCentral UX, see “Configuring E-Mail Forwarding” in the Avid MediaCentral | UX
Administration Guide.
To configure e-mail notifications:
1. Sign in to MediaCentral UX as an administrator.
2. Select System Settings from the Layout selector.
The System Settings layout opens.
3. In the Settings pane select Messages & Sharing.
The Settings pane displays the settings in that group.
Configuring the Transcode Route
4. Make sure E-mail Forwarding has been configured for your MediaCentral environment. If it has
not been configured, see the Avid MediaCentral | UX Administration Guide for information on
configuring e-mail settings.
52
Page 53

5. In the Settings pane select Media Distribute > Profiles.
The Settings pane displays the settings in that group.
Configuring the Transcode Route
6. Click the Publication Type menu and select E-mail.
7. Click the + (plus) button in the Details section.
An E-mail profile named “New Profile” is created in the Details section.
8. Specify the required settings:
- Profile Name: Type a descriptive name for your profile)
- Recipients: Type the e-mail address of any user you want to receive notifications. Multiple
e-mail addresses must be separated by a semicolon (;).
9. Select Send If Publication Fails if you want to receive e-mail notifications when publication fails
to complete.
10. Click Verify Profile Settings to validate the profile settings.
If your profile is valid, a message displays: “Profile configurations is valid.” If any settings are
incorrect, a message displays and indicates which fields are incorrect. All invalid settings names
change to red.
11. Click Apply to save the profile.
The profile displays in the Details section with the new information.
If you are editing a profile, click Revert to return to the original settings. If you want to delete a
profile, select the profile and click the minus (-) button in the Details section.
53
Page 54

3 Configuring System Accounts for
Media | Distribute
You can set up multiple accounts in the System Settings layout for the services you want to use for
publishing to multiple platforms. For information on the supported system accounts, see the
following topics:
• “Configuring the Bitly Link-Shortening Service” on page 55
• “Configuring a Twitter Publication Account” on page 56
• “Configuring a Facebook Publication Account” on page 60
• “Configuring a Facebook Page Publication Account” on page 68
• “Configuring a Vimeo Publication Account” on page 73
• “Configuring a Vimeo V3 Publication Account” on page 77
• “Configuring a YouTube v3 Publication Account” on page 80
• “Configuring a Brightcove Account” on page 83
• “Configuring a Kaltura Account” on page 85
• “Configuring an Ooyala Account” on page 87
• “Configuring a Flickr Account” on page 89
• “Configuring an Atex Polopoly Web CMS Account” on page 92
• “Configuring a WorldNow Web CMS Profile” on page 94
• “Configuring thePlatform Profile” on page 98
• “Configuring a WordPress CMS Profile” on page 100
• “Configuring an Amazon S3 Profile” on page 102
• “Configuring a Generic CMS Profile” on page 103
• “Configuring a Generic CMS Extended Profile” on page 107
• “Configuring a NoOpTranscoder Profile” on page 111
• “Configuring a Generic OVP Profile” on page 112
If your iNEWS stories use uppercase characters, you can select the option in the Media Distribute >
n
General section of the System Settings to transform iNEWS stories to lowercase. This changes all text
to lowercase characters when you load an iNEWS story in the Media Distribute layout.
Page 55

Configuring the Bitly Link-Shortening Service
Configuring the Bitly Link-Shortening Service
You can configure the Bitly™ URL shortening service using MediaCentral UX settings. Using a link
shortening service is optional, but it can aid in ensuring that URLs do not exceed character limits on
some social media postings.
The following procedures assume you have created a Bitly account at https://bitly.com/ and you have
generated a Bitly API key at http://dev.bitly.com/.
To configure Bitly for Media Distribute:
1. Sign in to MediaCentral UX as an administrator.
2. Select System Settings from the Layout selector.
The System Settings layout opens.
3. In the Settings pane select Media Distribute > Profiles.
The Settings pane displays the settings in that group.
4. Click the Publication Type menu and select Bitly.
5. Click the + (plus) button in the Details section.
A Bitly profile named “New Profile” is created in the Details section.
6. Specify the required settings:
- Profile Name (type a descriptive name for your profile)
-Login
-API Key
7. Click Verify Profile Settings to validate the profile settings.
If your profile is valid, a message displays: “Profile configurations is valid.” If any settings are
incorrect, a message displays and indicates which fields are incorrect. All invalid settings names
change to red.
55
Page 56

Configuring a Twitter Publication Account
The setting, “Transform iNEWS stories to lower case,” applies only to Media Distribute accounts
n
that publish packages containing iNEWS stories. The option does not affect this setting.
8. Click Apply to save the profile.
The profile displays in the Details section with the new information.
If you are editing a profile, click Revert to return to the original settings. If you want to delete a
profile, select the profile and click the minus (-) button in the Details section.
Configuring a Twitter Publication Account
Before you can publish a package to Twitter from MediaCentral UX using Media Distribute, you
must first set up a Twitter account to which you want to publish, and you must configure a Twitter
publication account.
This section describes configuring corporate or group house accounts. When you publish to these
accounts, your packages require review and approval For information on configuring a personal
account, see “Configuring a User Profile for a Personal Twitter Account” on page 125.
The following procedures assume you have created a Twitter account at https://twitter.com.
The user interface for Twitter might change without notice. The procedure below outlines the general
n
steps to create the elements needed to configure Media Distribute. For more information on creating
a Twitter application, see your Twitter account documentation.
To set up a Twitter application account for MediaCentral UX multi-platform delivery:
1. Log on to your Twitter account and navigate to the My Applications Web page at
https://dev.twitter.com/apps.
2. Click Create New App.
The Create an application Web page opens.
56
Page 57

Configuring a Twitter Publication Account
3. Type your information for the required fields, which might include the following:
-Name
- Description
- Website (the public URL for your Twitter application, where users can download your
application or get more information about it; use a placeholder URL if you do not have an
application URL yet)
4. In the Developer Agreement section, read the rules agreement and select Yes, I agree.
5. If required, type the security text.
6. Click Create your Twitter application.
Your Twitter application opens in the Application Management page.
7. Click the Permissions tab.
The Permissions tab opens.
8. In the Access area, select Read, Write and Access direct messages, and then click Update this
Twitter application’s settings.
Your settings are saved.
57
Page 58

9. Click the Keys and Access Tokens tab.
The Keys and Access Tokens tab opens.
Configuring a Twitter Publication Account
10. In the Application Settings area, click Create Consumer Key and Secret.
If you already created an access token, the button in this area is labeled “Recreate Consumer Key
n
and Secret.”
11. In the Your Access Token area, click Create My Access Token and Token Secret.
If you already created an access token, the button in this area is labeled “Recreate My Access Token
n
and Token Secret.”
58
Page 59

Configuring a Twitter Publication Account
12. Save the following parameter fields so you can enter them in the appropriate location in the
MediaCentral UX settings:
- Consumer key
- Consumer secret
- Access token
- Access token secret
To configure MediaCentral UX for your Twitter application:
1. Sign in to MediaCentral UX as an administrator.
2. Select System Settings from the Layout selector.
The System Settings layout opens.
3. In the Settings pane select Media Distribute > Profiles.
The Settings pane displays the settings in that group.
4. Click the Publication Type menu and select Twitter.
5. Click the + (plus) button in the Details section.
A Twitter profile named “New Profile” is created in the Details section.
6. Specify the required settings, using the parameter fields you copied from your Twitter
application Web page:
- Profile Name (type a descriptive name for your profile)
- Access Token
- Access Secret
59
Page 60

Configuring a Facebook Publication Account
-Consumer Key
- Consumer Secret
7. Click Verify Profile Settings to validate the profile settings.
If your profile is valid, a message displays: “Profile configurations is valid.” If any settings are
incorrect, a message displays and indicates which fields are incorrect. All invalid settings names
change to red.
8. Click Apply to save the profile.
The profile displays in the Details section with the new information.
If you are editing a profile, click Revert to return to the original settings. If you want to delete a
profile, select the profile and click the minus (-) button in the Details section.
You can add multiple Twitter profiles.
n
Configuring a Facebook Publication Account
Before you can publish a package to Facebook from MediaCentral UX using Media Distribute, you
must first set up a Facebook profile account to which you want to publish, and you must configure a
Facebook publication account in MediaCentral UX. You also need to set permissions for your
Facebook application so it can post to your Facebook account.
This section describes configuring corporate or group house accounts. When you publish to these
accounts, your packages require review and approval For information on configuring a personal
account, see “Configuring a User Profile for a Personal Facebook Account” on page 118.
Before you attempt to publish your package to Facebook, Avid recommends that you test your
n
account privileges.
The following procedures assume you have created a Facebook account at
https://www.facebook.com.
The user interface for Facebook developers might change without notice. The procedure below
n
provides general guidelines to create the elements needed to configure Media Distribute. For more
information on creating a Facebook application, downloading and installing any necessary SDK
applications, see Facebook support documentation.
To set up a Facebook developer account:
1. Log on to your Facebook account, and then go to the Facebook developers Web page at
https://developers.facebook.com.
2. If you have not registered as a Facebook developer, do the following:
a. Click Apps and select Register as a Developer.
The Register as a Facebook Developer dialog box opens.
b. Follow the prompts to register as a Facebook developer.
60
Page 61

Configuring a Facebook Publication Account
To set up a Facebook application account for MediaCentral UX multi-platform delivery:
1. Log on to your Facebook account, and then go to the Facebook developers Web page at
https://developers.facebook.com.
2. Click Apps, and select Create New App.
If you previously created an app for Facebook, select My Apps > Add a New App.
n
The Create New App ID dialog box opens.
3. Type a display name for your app. The display name appears in a Facebook posting when media
is published.
4. Type a contact e-mail address for your app.
5. Click the Choose a Category menu and select a category for your app — for example, Apps for
Pages.
6. Click Create App ID.
The Security Check dialog box opens.
7. Type the required security text, and then click Submit.
The Product Setup dialog box opens.
8. In the navigation panel, click Dashboard.
61
Page 62

The Dashboard for your app opens.
9. Click Show to display the app secret.
The Please Re-enter Your Password dialog box opens.
10. Type your Facebook password, and then click Submit.
Configuring a Facebook Publication Account
11. Save the following parameter fields so you can enter them in the appropriate location in the
MediaCentral UX settings:
-App ID
- App Secret
You can save these parameters to a text file. This makes it easier to add the information to the Media
n
Distribute profile for your Facebook account.
12. In the navigation panel, click Settings.
The Basic Settings page opens.
62
Page 63

Configuring a Facebook Publication Account
13. Click Add Platform, and select a platform for your app — for example, Website.
A section for your platform opens in the Basic Settings page.
14. Supply the appropriate information for the platform for your app.
If you type a URL, it is embedded in the App Name in Facebook postings. When visitors click the
n
credit for posting, a new browser tab opens at the URL entered here
15. Click Save Changes.
To set Facebook permissions for your Media Distribute application:
1. In the navigation panel, click Dashboard.
The dashboard for your app opens.
2. Click Tools and Support at the top of the dashboard.
The Tools and Support Web page opens.
3. Click Graph API Explorer.
The Graph API Explorer Web Page opens.
4. Click the Application menu, and select your Facebook application.
The Graph API Explorer Web page opens.
5. Click the Get Token menu, and then select Get User Access Token.
The Select Permissions dialog box opens.
6. Select the following permissions:
- publish_actions
- user_friends
- user_photos
- user_videos
- manage_pages
- publish_pages
63
Page 64

Configuring a Facebook Publication Account
7. Click Get Access Token.
A confirmation dialog box opens.
8. Click Continue as Name, where Name is the first name of your Facebook profile account.
A dialog box opens to allow you to select who can view your Facebook posts.
64
Page 65

Configuring a Facebook Publication Account
9. Click the Friends menu and select the appropriate access, and then click OK, and then click OK
in the confirmation dialog box.
The Graph API Explorer page for your app opens and displays the new access token.
This token remains valid for only one or two hours. If you plan on completing your Media Distribute
n
Facebook account profile in this time, you can extend the expiration date within Media Distribute. If
you cannot complete your configuration before then, you can extend the expiration of your user
access token from the Facebook developer Web site.
10. Click Submit.
11. Save the following parameters so you can enter it in the appropriate location in the
MediaCentral UX setting.
- Access token
- User ID (for the FB Profile ID option in your Media Distribute Facebook profile account)
To verify permissions and extend the access token expiration from the Facebook developer
Web site:
1. In the Tools and Support Web page, click Access Token Tool.
The Access Token Tool page opens and displays the token information for all of your apps.
2. Click Debug for the user token for your app.
The Access Token Debugger for your app opens, showing the permissions you selected in the
Scopes field.
65
Page 66

Configuring a Facebook Publication Account
3. Click Extend Access Token, and then re-enter the account password in the validation dialog.
The new access token displays.
Facebook automatically extends the long-term access token prior to the expiration date, except for
n
apps that are unused.
4. Save the new access token so you can enter it in the appropriate location in the MediaCentral UX
settings.
To make your app available to be viewed by the public:
1. Log on to your Facebook developers account, click My Apps, and select your app.
The Dashboard page for your app opens.
2. Click App Review.
3. In the Status tab, click the Yes button to activate your app.
A confirmation dialog box opens.
4. Click Confirm.
66
Page 67

Configuring a Facebook Publication Account
To configure MediaCentral UX for your Facebook application:
1. Sign in to MediaCentral UX as an administrator.
2. Select System Settings from the Layout selector.
The System Settings layout opens.
3. In the Settings pane select Media Distribute > Profiles.
The Settings pane displays the settings in that group.
4. Click the Publication Type menu and select Facebook.
5. Click the + (plus) button in the Details section.
A Facebook profile named “New Profile” is created in the Details section.
6. Specify the required settings, using the parameter fields you copied from your Facebook Apps
Web page:
- Profile Name (type a descriptive name for your profile — for example, [MyCompany]
Facebook News)
-FB Profile ID
- Application ID
- Application Secret
- Access Token
- (Optional) Album ID
67
Page 68

Configuring a Facebook Page Publication Account
You can specify the name of a Facebook album if you want to publish images directly to an album that
n
you have created for your Facebook account. By default, images are published to an album named
after the App you created.
7. (Optional) Click Transcoding Profile and select one of the available profiles.
You cannot publish video directly to Facebook unless you specify a transcoding profile.
n
8. (Optional) Click Get Expiration Date.
Media Distribute checks the expiration date of your access token and updates the entry in the
Expiration Date field. This shows you how much time is left on your Facebook access token.
9. (Optional) Click Get Long-Term Token.
Media Distribute converts your access token, which often remains valid for a couple of hours, to
a long-lived token. For more information on short-lived and long-lived tokens and their
expiration periods, see your Facebook developer documentation.
10. Click Verify Profile Settings to validate the profile settings.
If your profile is valid, a message displays: “Profile configurations is valid.” If any settings are
incorrect, a message displays and indicates which fields are incorrect. All invalid settings names
change to red.
11. Click Apply to save the profile.
The profile displays in the Details section with the new information.
If you are editing a profile, click Revert to return to the original settings. If you want to delete a
profile, select the profile and click the minus (-) button in the Details section.
You can add multiple Facebook profiles.
n
Configuring a Facebook Page Publication Account
You can publish packages to a corporate Facebook Page account from MediaCentral UX using Media
Distribute. Once you set up a Page account on Facebook, you then can configure a Facebook Page
publication account.
Facebook Pages allow businesses to connect with customers and users. Facebook Page accounts
allow official representatives of a business or organization to create and contribute to Pages. For more
information on Facebook Pages, see Facebook Pages support information at
www.facebook.com/help.
You do not need to configure a Facebook publication account in Media Distribute in order to publish
to your Facebook Page, but you do need to have a Facebook account to set up a Facebook Page. For
information on configuring a Facebook publication account, see “Configuring a Facebook
Publication Account” on page 60.
Before you attempt to publish your package to a Facebook Page, Avid recommends that you test your
n
account privileges.
The following procedures assume you have created a Facebook account and created a Facebook Page
at https://www.facebook.com/pages/create.
68
Page 69

Configuring a Facebook Page Publication Account
The user interface for Facebook developers might change without notice. The procedure below
n
provides general guidelines to create the elements needed to configure Media Distribute. For more
information on creating a Facebook application, see Facebook support documentation.
To set up a Facebook Page for MediaCentral UX multi-platform delivery:
1. Log on to your Facebook account, click the Edit Account button, and select Manage Pages.
The Pages page opens.
2. Click your Page in the Pages list.
Your Facebook Page opens.
3. Click About, and then select Page Info.
Your Facebook Page displays the page information.
4. Save your Facebook Page ID so you can enter it in the appropriate location in the MediaCentral
UX setting.
To set Facebook Page permissions for your Media Distribute application:
1. Log on to your Facebook developers account, and click Tools & Support > Graph API Explorer.
2. Click the Application menu and select the Facebook application associated with your Facebook
Page.
The Graph API Explorer Web page displays.
69
Page 70

Configuring a Facebook Page Publication Account
3. Click the Get Token menu, and then select Get Access Token.
The Select Permissions dialog box opens.
4. Click the User Data Permissions tab, and then select the user_friends, the user_photos, and
user_videos options.
5. Click the Extended Permissions tab, and then select the manage_pages, publish_actions, and
publish_pages options.
6. Click Get Access Token.
70
Page 71

The Web page generates a new access token and sets the necessary permissions for your
application.
This token remains valid for only one hour.
n
7. Save your access token so you can enter it in the appropriate location in the MediaCentral UX
setting.
8. Click Debug.
The Access Token Debugger page opens and displays information about your access token.
9. Save your App ID and User ID so you can enter them in the appropriate locations in the
MediaCentral UX setting.
10. Select Apps > [your Facebook app].
Configuring a Facebook Page Publication Account
The Dashboard for your app opens.
11. Click Show to display your App Secret.
12. Save your App Secret so you can enter it in the appropriate locations in the MediaCentral UX
setting.
To configure MediaCentral UX for your Facebook Page:
1. Sign in to MediaCentral UX as an administrator.
2. Select System Settings from the Layout selector.
The System Settings layout opens.
71
Page 72

Configuring a Facebook Page Publication Account
3. In the Settings pane select Media Distribute > Profiles.
The Settings pane displays the settings in that group.
4. Click the Publication Type menu and select FacebookPage.
5. Click the + (plus) button in the Details section.
A FacebookPage profile named “New Profile” is created in the Details section.
6. Specify the required settings, using the parameter fields you copied from your Facebook Page
Web page:
- Profile Name (type a descriptive name for your profile — for example, [MyCompany] Page)
- FB Profile ID — the Facebook Profile ID of the user who administers your Facebook Page
- FB Page ID — from your Facebook app settings
- Application ID — from your Facebook app settings
- Application Secret — from your Facebook app settings
- Access Token — from your Facebook app settings
- (Optional) Album ID
You can specify the name of a Facebook album if you want to publish images directly to an album that
n
you have created for your Facebook account.
72
Page 73

Configuring a Vimeo Publication Account
7. (Optional) Click Transcoding Profile and select one of the available profiles.
You cannot publish video directly to Facebook unless you specify a transcoding profile.
n
8. (Optional) Click Get Expiration Date.
Media Distribute checks the expiration date of your access token and updates the entry in the
Expiration Date field. This shows you how much time is left on your Facebook access token.
9. (Optional) Click Get Long-Term Token.
Media Distribute converts your access token, which often remains valid for a couple of hours, to
a long-lived token. For more information on short-lived and long-lived tokens and their
expiration periods, see your Facebook developer documentation.
10. Click Verify Profile Settings to validate the profile settings.
If your profile is valid, a message displays: “Profile configurations is valid.” If any settings are
incorrect, a message displays and indicates which fields are incorrect. All invalid settings names
change to red.
11. Click Apply to save the profile.
The profile displays in the Details section with the new information.
If you are editing a profile, click Revert to return to the original settings. If you want to delete a
profile, select the profile and click the minus (-) button in the Details section.
You can add multiple Facebook page profiles.
n
Configuring a Vimeo Publication Account
Before you can publish a package to Vimeo from MediaCentral UX using Media Distribute, you
must first set up a Vimeo account to which you want to publish, and you must configure a Vimeo
publication account. The configuration requires that you request and receive upload access for you
app from Vimeo.
Media Distribute works with both the Advanced API and the standard API used by Vimeo
n
applications. For both, you need to check the OAuth tab in the My Apps Web page for the required
parameters used in configuring your Vimeo account. To use OAuth2 authentication, see “Configuring
a YouTube v3 Publication Account” on page 80.
The following procedures assume you have created a Vimeo account at https://vimeo.com/.
The user interface for Vimeo might change without notice. The procedure below outlines the general
n
steps to create the elements needed to configure Media Distribute. For more information on creating
a Vimeo application, see your Vimeo account documentation.
73
Page 74

Configuring a Vimeo Publication Account
To set up a Vimeo application account for MediaCentral UX multi-platform delivery:
1. Log on to your Vimeo account, and then go to the Vimeo My Apps Web page at
https://developer.vimeo.com/apps.
2. Click “Create a new app.”
The Create an new App Web page opens.
3. Type your information in the required text fields:
-App Name
-App Description
- App URL (the public URL for your Vimeo application, where users can download your
application or get more information about it; use a placeholder URL if you do not have an
application URL yet)
4. Accept the Vimeo API License Agreement (https://developer.vimeo.com/guidelines/terms) and
the Vimeo Terms of Service (https://vimeo.com/terms), and then click Create app.
The My API Apps Web page opens.
5. To request upload access, do the following:
a. Click the Basic tab, and in the Upload Access section click Request Upload Access.
The Request Upload Permissions Web page opens.
b. On the Request Upload Permissions page, answer the three questions and then click Request
Upload Access.
The message, “Requested - Pending decision,” displays. If Vimeo approves the request, the
My API Apps page for your app displays the approval in the Upload Access section.
Approval from Vimeo might take up to five business days from the time of the request.
74
Page 75

Configuring a Vimeo Publication Account
6. Click the OAuth tab, and save the following parameter fields so you can enter them in the
appropriate location in the MediaCentral UX settings:
- Client ID (Also known as Consumer Key or API Key)
- Client Secret (Also known as Consumer Secret or API Secret)
- Access token
- Access token secret
By default, Vimeo assigns Read, Write, and Delete permissions for your application.
n
To configure MediaCentral UX for your Vimeo application:
1. Sign in to MediaCentral UX as an administrator.
2. Select System Settings from the Layout selector.
The System Settings layout opens.
75
Page 76

3. In the Settings pane select Media Distribute > Profiles.
The Settings pane displays the settings in that group.
Configuring a Vimeo Publication Account
4. Click the Publication Type menu and select Vimeo.
5. Click the + (plus) button in the Details section.
A Vimeo profile named “New Profile” is created in the Details section.
6. Specify the required settings, using the parameter fields you copied from your Vimeo My
Advanced API Apps Web page:
- Profile Name (type a descriptive name for your profile)
- Access Token
- Access Secret
-Consumer Key
- Consumer Secret
7. Click Transcoding Profile and select one of the available profiles.
8. Click Verify Profile Settings to validate the profile settings.
If your profile is valid, a message displays: “Profile configurations is valid.” If any settings are
incorrect, a message displays and indicates which fields are incorrect. All invalid settings names
change to red.
9. Click Apply to save the profile.
The profile displays in the Details section with the new information.
If you are editing a profile, click Revert to return to the original settings. If you want to delete a
profile, select the profile and click the minus (-) button in the Details section.
76
Page 77

Configuring a Vimeo V3 Publication Account
Configuring a Vimeo V3 Publication Account
Before you can publish a package to Vimeo from MediaCentral UX using Media Distribute, you
must first set up a Vimeo account to which you want to publish, and you must configure a Vimeo
publication account. The configuration requires that you request and receive upload access for you
app from Vimeo.
The Vimeo V3 publication profile uses the V3 API for your Vimeo application. This allows you to
employ the OAuth2 authentication protocol for your app.
The following procedures assume you have created a Vimeo account at https://vimeo.com/.
The user interface for Vimeo might change without notice. The procedure below outlines the general
n
steps to create the elements needed to configure Media Distribute. For more information on creating
a Vimeo application, see your Vimeo account documentation.
To set up a Vimeo application account for MediaCentral UX multi-platform delivery:
1. Log on to your Vimeo account, and then go to the Vimeo My Apps Web page at
https://developer.vimeo.com/apps.
2. Click “Create a new app.”
The Create an new App Web page opens.
3. Type your information in the required text fields:
-App Name
-App Description
- App URL (the public URL for your Vimeo application, where users can download your
application or get more information about it; use a placeholder URL if you do not have an
application URL yet)
77
Page 78

Configuring a Vimeo V3 Publication Account
4. Accept the Vimeo API License Agreement (https://developer.vimeo.com/guidelines/terms) and
the Vimeo Terms of Service (https://vimeo.com/terms), and then click Create app.
The My API Apps Web page opens.
5. Click the OAuth2 tab.
6. To request upload access, do the following:
a. Click the Basic tab, and in the Upload Access section click Request Upload Access.
The Request Upload Permissions Web page opens.
b. On the Request Upload Permissions page, answer the three questions and then click Request
Upload Access.
The message, “Requested - Pending decision,” displays. If Vimeo approves the request, the
My API Apps page for your app displays the approval in the Upload Access section.
Approval from Vimeo might take up to five business days from the time of the request.
7. Click Generate Token, and save the access token value displayed in the Your new Access token
field so you can enter it in the appropriate location in the MediaCentral UX settings:
By default, Vimeo assigns Read, Write, and Delete permissions for your application.
n
To configure MediaCentral UX for your Vimeo V3 application:
1. Sign in to MediaCentral UX as an administrator.
2. Select System Settings from the Layout selector.
The System Settings layout opens.
78
Page 79

3. In the Settings pane select Media Distribute > Profiles.
The Settings pane displays the settings in that group.
Configuring a Vimeo V3 Publication Account
4. Click the Publication Type menu and select Vimeo V3.
5. Click the + (plus) button in the Details section.
A Vimeo V3 profile named “New Profile” is created in the Details section.
6. Specify the required settings, using the access token you copied from your Vimeo My Advanced
API Apps Web page:
- Profile Name (type a descriptive name for your profile)
- Access Token
7. Click Transcoding Profile and select one of the available profiles.
8. Click Verify Profile Settings to validate the profile settings.
If your profile is valid, a message displays: “Profile configurations is valid.” If any settings are
incorrect, a message displays and indicates which fields are incorrect. All invalid settings names
change to red.
9. Click Apply to save the profile.
The profile displays in the Details section with the new information.
If you are editing a profile, click Revert to return to the original settings. If you want to delete a
profile, select the profile and click the minus (-) button in the Details section.
79
Page 80

Configuring a YouTube v3 Publication Account
Configuring a YouTube v3 Publication Account
Before you can publish a package to YouTube from MediaCentral UX using Media Distribute, you
must first set up a Google account to manage the publication of your media package to YouTube, and
you must configure a YouTube v3 publication account in MediaCentral UX.
The following procedures assume you have created a Google account at
https://accounts.google.com/.
The user interface for Google accounts might change without notice. The procedure below outlines
n
the general steps to create the elements needed to configure Media Distribute. For more information
on creating and managing a Google or YouTube application, see your Google developer account
documentation.
You can use the Avid Media Distribute Integration application to generate the necessary access token
and refresh token. MediaCentral UX also supplies the following default parameter values when it
creates a new YouTube v3 profile so it can use the Avid application:
•Client Id
• Client Secret
•Scopes
• Redirect URI
To use the Avid Media Distribute Integration application to generate default values for your YouTube
n
v3 account, you must be logged in to the Google account you use for publishing videos from Media
Distribute.
If you want to create your own YouTube application, you can replace the profile parameter values
with those copied from your YouTube application. You need to generate the Client ID and Client
Secret from the OAuth 2.0 credentials in the Credentials Web page in the APIs and auth section of
your application in the Google Developers Console. You also need to supply the values for the
Scopes and Redirect URI parameters. For more information, see the Google Developers
documentation.
To configure MediaCentral UX for your YouTube v3 account:
1. Log on to your Google account at https://accounts.google.com/.
2. If you have never used this account to upload a video, do the following to create a YouTube
channel:
a. In your browser, navigate to https://www.youtube.com/my_videos.
b. Create a new channel. For information creating a new YouTube channel, see the YouTube
online help.
3. Sign in to MediaCentral UX as an administrator.
4. Select System Settings from the Layout selector.
The System Settings layout opens.
5. In the Settings pane select Media Distribute > Profiles.
The Settings pane displays the settings in that group.
80
Page 81

Configuring a YouTube v3 Publication Account
6. Click the Publication Type menu and select YouTube v3.
7. Click the + (plus) button in the Details section.
A YouTube v3 profile named “New Profile” is created in the Details section, and the following
parameter fields are automatically filled by default:
-Client ID
- Client Secret
-Scopes
- Redirect URI
8. Specify a Profile Name by typing a descriptive name for your profile.
9. Click the Privacy Settings menu and select one of the following options:
t Public — Everyone can view your published videos.
t Unlisted — Only those with whom you share a URL link can view your published video.
t Private — Videos cannot be viewed by the public.
81
Page 82

Configuring a YouTube v3 Publication Account
10. Click Get Tokens.
The Avid Media Distribute Integration application opens a Web page asking permission to
manage your YouTube account. This allows the application to generate the necessary access
tokens so you can publish videos to your YouTube account.
If you already received the access and refresh tokens, clicking Get Tokens does not supply you with
n
new tokens. You need to click Revoke Tokens, and then click Get Tokens.
11. Click Allow.
The Avid Media Distribute Integration application generates the access tokens and displays them
on the application Web page.
12. Copy the Access Token value to the parameter field for Access Token in your MediaCentral
YouTube v3 profile.
13. Copy the Refresh Token value to the parameter field for Refresh Token in your MediaCentral
YouTube v3 profile.
14. Click Transcoding Profile and select one of the available profiles.
15. Click Verify Profile Settings to validate the profile settings.
If your profile is valid, a message displays: “Profile configurations is valid.” If any settings are
incorrect, a message displays and indicates which fields are incorrect. All invalid settings names
change to red.
16. Click Apply to save the profile.
The profile displays in the Details section with the new information.
If you are editing a profile, click Revert to return to the original settings. If you want to delete a
profile, select the profile and click the minus (-) button in the Details section.
82
Page 83

Configuring a Brightcove Account
Before you can publish a package to Brightcove from MediaCentral UX using Media Distribute, you
must first set up a Brightcove account to which you want to publish, and you must configure the
Brightcove Media API settings for your account.
The following procedures assume you have created a Brightcove account at
http://www.brightcove.com/en/.
You must have a paid Brightcove account to use the Brightcove Video Cloud Media API to publish
n
packages from MediaCentral UX to the Brightcove service.
The Media Distribute settings for Brightcove allow you to select some rendition options when you
publish to your Brightcove account. A rendition is a copy of your video transcoded to a specific bit
rate and resolution. If your video is supported for transcoding, you can use Media Distribute to create
multiple renditions as specified in your transcoding profile. If you use a video with the H.264 format,
you can also retain this format as a rendition when you create multiple renditions.
To set up a Brightcove account for MediaCentral UX multi-platform delivery:
1. Log on to your Brightcove account, and click the Account Settings tab.
The Account Settings Web page opens.
Configuring a Brightcove Account
2. In the navigation panel on the left, click API Management.
The API Management Web page opens.
3. To create tokens, do the following:
a. Click the Add a: menu and select Read Token with URL Access, and then click Add.
b. Click the Add a: menu and select Write Token, and then click Add.
The tokens appear in the Token list.
4. Save the following parameter fields from the API Management Web page so you can enter them
in the appropriate location in the MediaCentral UX settings:
- Read Token with URL Access
- Write Token
83
Page 84

To configure MediaCentral UX for your Brightcove account:
1. Sign in to MediaCentral UX as an administrator.
2. Select System Settings from the Layout selector.
The System Settings layout opens.
3. In the Settings pane select Media Distribute > Profiles.
The Settings pane displays the settings in that group.
Configuring a Brightcove Account
4. Click the Publication Type menu and select Brightcove.
5. Click the + (plus) button in the Details section.
A Brightcove profile named “New Profile” is created in the Details section.
6. Specify the required settings, using the parameter fields you copied from your Brightcove API
Management Web page:
- Profile Name (type a descriptive name for your profile)
- Read Token
- Write Token
7. Click Transcoding Profile and select one of the available profiles.
8. (Optional) If you want to create multiple transcoded versions of your media as specified in your
transcoding profile, select Create multiple renditions.
9. (Optional) If you want to keep a copy of your video at the source H.264 rendition in addition to
any other renditions created, select Preserve source rendition. This option is selected by default.
10. Click Verify Profile Settings to validate the profile settings.
If your profile is valid, a message displays: “Profile configurations is valid.” If any settings are
incorrect, a message displays and indicates which fields are incorrect. All invalid settings names
change to red.
84
Page 85

11. Click Apply to save the profile.
The profile displays in the Details section with the new information.
If you are editing a profile, click Revert to return to the original settings. If you want to delete a
profile, select the profile and click the minus (-) button in the Details section.
Configuring a Kaltura Account
Before you can publish a package to Kaltura from MediaCentral UX using Media Distribute, you
must first set up a Kaltura account to which you want to publish, and you must configure the Kaltura
Media API settings for your account.
The following procedures assume you have created a Kaltura account at http://corp.kaltura.com/.
To set up a Kaltura account for MediaCentral UX multi-platform delivery:
1. Log on to your Kaltura account at http://corp.kaltura.com/, and click the Settings tab.
The Account Settings Web page opens.
2. Click Integration Settings tab.
The Integration Settings Web page opens.
Configuring a Kaltura Account
3. Save the following parameter fields from the Integration Settings Web page so you can enter
them in the appropriate location in the MediaCentral UX settings:
- Partner ID
- Administration Secret
To configure MediaCentral UX for your Kaltura account:
1. Sign in to MediaCentral UX as an administrator.
2. Select System Settings from the Layout selector.
The System Settings layout opens.
85
Page 86

3. In the Settings pane select Media Distribute > Profiles.
The Settings pane displays the settings in that group.
Configuring a Kaltura Account
4. Click the Publication Type menu and select Kaltura.
5. Click the + (plus) button in the Details section.
A Kaltura profile named “New Profile” is created in the Details section.
6. Specify the required settings, using the parameter fields you copied from your Kaltura API
Management Web page:
- Profile Name (type a descriptive name for your profile)
- Partner ID
- User ID (your login credential)
- Admin Secret
7. Click Transcoding Profile and select one of the available profiles.
8. Click Verify Profile Settings to validate the profile settings.
If your profile is valid, a message displays: “Profile configurations is valid.” If any settings are
incorrect, a message displays and indicates which fields are incorrect. All invalid settings names
change to red.
9. Click Apply to save the profile.
The profile displays in the Details section with the new information.
If you are editing a profile, click Revert to return to the original settings. If you want to delete a
profile, select the profile and click the minus (-) button in the Details section.
86
Page 87

Configuring an Ooyala Account
Before you can publish a package to Ooyala from MediaCentral UX using Media Distribute, you
must first set up an Ooyala account to which you want to publish, and you must check the Backlot
API settings for your account.
The following procedures assume you have created an Ooyala account at
https://backlot.ooyala.com/backlot/web.
To set up an Ooyala account for MediaCentral UX multi-platform delivery:
1. Log on to your Ooyala Backlot account.
The Ooyala Backlot Web page opens.
2. Click the Account tab, and then click the Developers tab.
The Backlot API Web page opens.
Configuring an Ooyala Account
3. Save the following parameter fields from the Backlot API Web page so you can enter them in the
appropriate location in the MediaCentral UX settings:
-API Key
- API Secret
To configure MediaCentral UX for your Ooyala account:
1. Sign in to MediaCentral UX as an administrator.
2. Select System Settings from the Layout selector.
The System Settings layout opens.
87
Page 88

3. In the Settings pane select Media Distribute > Profiles.
The Settings pane displays the settings in that group.
Configuring an Ooyala Account
4. Click the Publication Type menu and select Ooyala.
5. Click the + (plus) button in the Details section.
An Ooyala profile named “New Profile” is created in the Details section.
6. Specify the required settings, using the parameter fields you copied from your Ooyala Backlot
API Web page:
- Profile Name (type a descriptive name for your profile)
-API Key
- API Secret
7. Click Transcoding Profile and select one of the available profiles.
8. Click Verify Profile Settings to validate the profile settings.
If your profile is valid, a message displays: “Profile configurations is valid.” If any settings are
incorrect, a message displays and indicates which fields are incorrect. All invalid settings names
change to red.
9. Click Apply to save the profile.
The profile displays in the Details section with the new information.
If you are editing a profile, click Revert to return to the original settings. If you want to delete a
profile, select the profile and click the minus (-) button in the Details section.
88
Page 89

Configuring a Flickr Account
Before you can publish a package to Flickr from MediaCentral UX using Media Distribute, you must
first set up an Flickr account to which you want to publish, and you must check the Flickr App
Garden settings for your account.
The following procedures assume you have created an Flickr account at https://www.flickr.com, and
that you have created your Flickr app. For information on creating apps for Flickr, see the Flickr
documentation at https://www.flickr.com/services/api/.
To set up an Flickr account for MediaCentral UX multi-platform delivery:
1. Log in to your Flickr account.
2. Select Explore > App Garden.
3. In the Your Apps section, click Apps By You.
The App Garden page displays your apps.
4. Click the name of your app and save the following parameter fields so you can enter them in the
appropriate location in the MediaCentral UX settings:
-API Key
- API Secret
Configuring a Flickr Account
To configure MediaCentral UX for your Flickr account:
1. Sign in to MediaCentral UX as an administrator.
2. Select System Settings from the Layout selector.
The System Settings layout opens.
3. In the Settings pane select Media Distribute > Profiles.
The Settings pane displays the settings in that group.
89
Page 90

Configuring a Flickr Account
4. Click the Publication Type menu and select Flickr.
5. Click the + (plus) button in the Details section.
An Flickr profile named “New Profile” is created in the Details section.
6. Specify the required settings, using the parameter fields you copied from your Flickr app in the
App Garden.
- Profile Name (type a descriptive name for your profile)
- API Key (from your app settings in the Flickr App Garden)
- API Secret (from your app settings in the Flickr App Garden)
7. To get your Access Token and Access Secret, do the following:
a. Click Get Access Token.
The Get Access Token dialog box opens.
b. Click Request Token.
The Get Access Token dialog box updates and provides a URL link for the access token.
90
Page 91

c. Click the URL link in the Get Access Token dialog box.
The authorization Web page for your Flickr app opens.
d. Click OK, I’ll Authorize It.
Configuring a Flickr Account
The Flickr authorization Web page displays your authorization code.
e. Type your authorization code in the Verifier text box in the Get Access Token dialog box,
and then click Exchange token.
The Get Access Token displays your Flickr app account data.
f. Click Save Token and Close.
The Get Access Token dialog box closes, and the following fields are automatically filled in
the Flickr Profile:
- Access Token
- Access Secret
8. Click Transcoding Profile and select one of the available profiles.
91
Page 92

Configuring an Atex Polopoly Web CMS Account
9. Click Verify Profile Settings to validate the profile settings.
If your profile is valid, a message displays: “Profile configurations is valid.” If any settings are
incorrect, a message displays and indicates which fields are incorrect. All invalid settings names
change to red.
10. Click Apply to save the profile.
The profile displays in the Details section with the new information.
If you are editing a profile, click Revert to return to the original settings. If you want to delete a
profile, select the profile and click the minus (-) button in the Details section.
Configuring an Atex Polopoly Web CMS Account
Before you can publish a package to Polopoly from MediaCentral UX using Media Distribute, you
must first have a Polopoly account with Atex and set up a Polopoly environment.
You can create multiple Polopoly profiles in the System Settings layout, but you can only configure
one Web CMS account at a time — for example, you can configure MediaCentral UX either for
Polopoly or for WorldNow, but not for both.
The following procedures assume you have already created the necessary Polopoly environment. See
your Polopoly documentation for more information.
To configure your Polopoly server for MediaCentral UX multi-platform delivery:
1. Log on to your Polopoly server using one of the following set of credentials.
root
-Log in as
-Log in as
with the your root password.
centos
with your centos password.
SSH is turned off by default.
2. To make the Polopoly user interface accessible through the server firewall, type to following to
open a port:
iptables -I INPUT 1 -i eth0 -p tcp --dport 8080 -j ACCEPT
3. If the Polopoly services are not running, do the following:
su
a. Type
and press Return.
b. At the prompt, type the password you used to log in to the server.
c. Start the MySQL database by typing the following:
/usr/local/mysql/support-files./mysql.server start
d. Navigate to the Jboss directory by typing
following:
bin/run.sh -b 0.0.0.0 &
e. Navigate to the Tomcat directory by typing
typing the following:
To configure MediaCentral UX for your Polopoly account:
bin/startup.sh
cd /opt/jboss
cd /opt/tomcat
cd
and then start Jboss by typing the
and then start Tomcat by
1. Sign in to MediaCentral UX as an administrator.
2. Select System Settings from the Layout selector.
The System Settings layout opens.
92
Page 93

Configuring an Atex Polopoly Web CMS Account
3. In the Settings pane select Media Distribute > Profiles.
The Settings pane displays the settings in that group.
4. Click the Publication Type menu and select Polopoly.
5. Click the + (plus) button in the Details section.
A Polopoly profile named “New Profile” is created in the Details section.
6. Specify the required settings for the following parameter fields:
- Profile Name (type a descriptive name for your profile)
- Server (the name of your Polopoly host — for example, http://localhost :80080)
- User Name (your Polopoly login name)
- Password (your Polopoly login password)
- Service Address (the address of the Polopoly REST service — for example, polopoly)
- External ID (from your Polypoly account settings)
7. Click OVP Profile and select one of the available profiles. OVP profiles are created when you
configure your online video provider settings — for example, when you set up MediaCentral UX
for your Vimeo or YouTube account. For more information, see “Configuring a Vimeo
Publication Account” on page 73 or “Configuring a YouTube v3 Publication Account” on
page 80.
8. Click Verify Profile Settings to validate the profile settings.
If your profile is valid, a message displays: “Profile configurations is valid.” If any settings are
incorrect, a message displays and indicates which fields are incorrect. All invalid settings names
change to red.
93
Page 94

Configuring a WorldNow Web CMS Profile
9. Click Apply to save the profile.
The profile displays in the Details section with the new information.
If you are editing a profile, click Revert to return to the original settings. If you want to delete a
profile, select the profile and click the minus (-) button in the Details section.
Configuring a WorldNow Web CMS Profile
Before you can publish a package to the WorldNow platform from MediaCentral UX using Media
Distribute, you must first have a WorldNow account and set up a WorldNow environment.
The following procedures assume you have already created the necessary WorldNow environment.
Your WorldNow account provides you with the following information needed to complete your
MediaCentral UX configuration:
• Account user name
• Account password
• Affiliate number
•Producer host
• Ingest FTP host
• Ingest FTP path
• Ingest FTP user name
• Ingest FTP password
The following notes apply to using WorldNow with MediaCentral UX:
• Once you have configured MediaCentral UX for your WorldNow CMS, the fields available to
you in the Web Story pane change to reflect the options and metadata provided by WorldNow.
• You can create multiple WorldNow profiles in the System Settings layout, but you can only
configure one Web CMS account at a time — for example, you can configure MediaCentral UX
either for WorldNow or for Atex Polopoly, but not for both.
• You can set the default values for some options used when you publish to a WorldNow account
so you do not have to set them in the Web Story pane each time you create a story. Some values
display as automatically selected options and some control the size and placement of graphics
when you attach images to your story. These options correspond to those available in your
WorldNow CMS.
See your WorldNow documentation for more information, or see the WorldNow Web site at
www.worldnow.com.
A limitation in the current version of Media Distribute might cause an SSLHandshakeException
n
error to occur and prevent posting video to WorldNow. This is caused by a problem where the client
and server cannot negotiate the desired level of security. To work around this problem, you can
disable SSL validation for HTTPS connections.
94
Page 95

Configuring a WorldNow Web CMS Profile
To configure MediaCentral UX for your WorldNow account:
1. Sign in to MediaCentral UX as an administrator.
2. Select System Settings from the Layout selector.
The System Settings layout opens.
3. In the Settings pane select Media Distribute > Profiles.
The Settings pane displays the settings in that group.
4. Click the Publication Type menu and select WorldNow.
5. Click the + (plus) button in the Details section.
A WorldNow profile named “New Profile” is created in the Details section.
6. Specify the required settings for the following parameter fields:
- Profile Name (type a descriptive name for your profile)
- Username (your WorldNow login name)
- Password (your WorldNow login password)
- Affiliate Number (from your WorldNow account information)
- Producer Host (from your WorldNow account information)
- FTP Ingest Hostname (from your WorldNow account information)
- FTP Path (optional) — if your ingest FTP location is configured to use a directory other than
the root folder, you can specify a different FTP directory or subdirectory. If the transcode
in/out has not changed, you can leave this setting blank.
95
Page 96

Configuring a WorldNow Web CMS Profile
- FTP Username (from your WorldNow account information)
- FTP Password (from your WorldNow account information)
7. Click Transcoding Profile and select one of the available profiles.
8. Click Verify Profile Settings to validate the profile settings.
If your profile is valid, a message displays: “Profile configurations is valid.” If any settings are
incorrect, a message displays and indicates which fields are incorrect. All invalid settings names
change to red.
9. Click Apply to save the profile.
The profile displays in the Details section with the new information.
If you are editing a profile, click Revert to return to the original settings. If you want to delete a
profile, select the profile and click the minus (-) button in the Details section.
To set default values in MediaCentral UX for your WorldNow account:
1. Sign in to MediaCentral UX as an administrator.
2. Select System Settings from the Layout selector.
The System Settings layout opens.
3. In the Settings pane select Media Distribute > WorldNow.
The Settings pane displays the WorldNow settings.
96
Page 97

Configuring a WorldNow Web CMS Profile
4. Select the WorldNow options that you want to use as default values in the Web Story pane.
- Story options can be set to use your Story Headline in some additional areas for your Web
story. You can also select a default classification for your story from the Content
Classification menu.
- Use Headline as Abridged Title
- Use Headline as Browser Title
- Use Headline as Page URL
- Content Classification
- Graphics options control the default size (in pixels) and alignment of images in your Web
story.
- Story Body Image Size
- Summary Image Size
- Summary Image Alignment
- Abstract Image Size
- Abstract Image Alignment
- Video options can be set to use your Headline in some additional areas for your Web story.
You can also enable closed captions for your story and select a default classification from the
Content Classification menu.
- Use Headline as Abridged Title
- Use Headline as Browser Title
- Use Headline as Page URL
- Enable Closed Captioning
- Content Classification
5. Click Apply to save the settings.
The WorldNow options display in the Details section with the new information.
If you are editing your WorldNow settings, click Revert to return to the original settings.
To disable SSL validation:
1. In a terminal window on the master cluster node, type the following to stop ServiceMix:
service avid-mpd stop
2. Navigate to the directory containing the Media Distribute database configuration file:
cd /etc/apache-servicemix
3. Using the Linux text editor, vi, open the avid-mpd-wrapper.conf file for editing:
vi avid-mpd-wrapper.conf
4. Locate the following line in the JVM Parameters section, and then edit the SSL validation to
true:
# wrapper.java.additional.<NUMBER>=-Dmpd.ssl.trust.all=true
97
Page 98

Configuring thePlatform Profile
5. Press the Escape key to return to command mode, then type
quit the text editor.
6. To restart the Media Distribute service, type the following command:
service avid-mpd restart
Configuring thePlatform Profile
Before you can publish a package to thePlatform® video CMS from MediaCentral UX using Media
Distribute, you must first have an account for thePlatform and set up an administrative role.
The following procedures assume you have already created the necessary thePlatform environment.
Your thePlatform account provides you with the following information needed to complete your
MediaCentral UX configuration:
• Account user name
• Account password
Once you have configured MediaCentral UX for your thePlatform account, you can use the fields
available to you in a separate thePlatform pane that reflect the options and metadata provided by
thePlatform. You can also specify upload servers for your media package if these servers are part of
your thePlatform configuration. Media Distribute uploads media directly to these servers when you
publish your media package. If you configure an FTP ingest server instead, Media Distribute uploads
your media to this server. If you do not configure either upload servers or an FTP server, Media
Distribute automatically selects an appropriate upload server.
:wq
and press Return to write and
See your thePlatform documentation for more information, or see thePlatform Technical Resource
Center at help.theplatform.com.
To configure MediaCentral UX for your thePlatform account:
1. Sign in to MediaCentral UX as an administrator.
2. Select System Settings from the Layout selector.
The System Settings layout opens.
98
Page 99

3. In the Settings pane select Media Distribute > Profiles.
The Settings pane displays the settings in that group.
Configuring thePlatform Profile
4. Click the Publication Type menu and select thePlatform.
5. Click the + (plus) button in the Details section.
A new thePlatform profile named “New Profile” is created in the Details section.
6. Specify the required settings for the following parameter fields:
- Profile Name (type a descriptive name for your profile)
- Username (your thePlatform login name)
- Password (your thePlatform login password)
7. Click Transcoding Profile and select one of the available profiles.
8. (Optional) If your thePlatform configuration specifies upload servers, do the following:
a. Click Get Upload Servers by Username and Password.
The upload servers for your thePlatform account are retrieved.
b. Click the Upload Server options used in your thePlatform profile and select the appropriate
server for the following options:
- Metadata Upload Server
- Video Upload Server
99
Page 100

- Image Upload Server
- CC [Closed Captioning] Upload Server
If you use an FTP ingest server, do not specify upload servers.
n
9. If you use an FTP ingest server for publishing to thePlatform, type the hostname of the FTP
ingest server and the path to the FTP server.
10. If applicable, type the FTP user name and the FTP password.
11. Click Verify Profile Settings to validate the profile settings.
If your profile is valid, a message displays: “Profile configurations is valid.” If any settings are
incorrect, a message displays and indicates which fields are incorrect. All invalid settings names
change to red.
12. Click Apply to save the profile.
The profile displays in the Details section with the new information.
If you are editing a profile, click Revert to return to the original settings. If you want to delete a
profile, select the profile and click the minus (-) button in the Details section.
Configuring a WordPress CMS Profile
Configuring a WordPress CMS Profile
Before you can publish a package to the WordPress® platform from MediaCentral UX using Media
Distribute, you must first set up your WordPress CMS and have a WordPress administrative account.
The following procedures assume you have already created the necessary WordPress CMS
environment. Your WordPress installation provides you with the following information needed to
complete your MediaCentral UX configuration:
• Blog ID — Media Distribute uses a default blog ID of “1.” If your WordPress configuration uses
multiple blog sites, you might need to assign a different blog ID.
• Administrator account user name
• Administrator account password
• Your WordPress host’s API URL — The default XML-RPC API is
“http://[your_WordPress_IP]/xmlrpc.php. You can disable or reconfigure this URL if needed.
WordPress allows you to configure your site in many ways and the default Media Distribute settings
might not be appropriate for your corporate needs. See your WordPress administrator or the
WordPress documentation for more information on customizing your account details, or see the
WordPress Web site at wordpress.org.
To configure MediaCentral UX for your WordPress account:
1. Sign in to MediaCentral UX as an administrator.
2. Select System Settings from the Layout selector.
The System Settings layout opens.
100
 Loading...