

Page 1

1 Media Composer | First Quick Start
The following topics provide a quick start for installing and using Media Composer | First. This
document is meant to get you running quickly with Media Composer | First. This document is not
meant to provide descriptions of all the features in the editing application. For more detailed
information, see the Media Composer | First User’s Guide.
• Downloading and Installing Media Composer | First
• Launching Media Composer | First
• Creating a Project
• Accessing Your Footage
• Creating a Sequence
• Publishing Your Story
Downloading and Installing Media Composer | First
Use the following procedure to access and install Media Composer | First.
To access the download for Media Composer | First:
1. Go to http://www.avid.com/media-composer-first
2. You must have an Avid Master Account. Follow the on screen instructions to either Login in (if
you already have an account) or create an Avid Master Account. The on screen instructions will
step you through creating an Avid Master Account, verifying your email address, and
downloading Media Composer | First. Once the download is complete, continue with installing
the application.
(Windows) To install the Avid software:
1. Access the file you downloaded.
2. Click to launch the Media Composer | First installer. A window will open with instructions as
well as options for choosing file locations and other custom settings.
3. Follow the on screen instructions.
4. When prompted, choose to restart the computer.
The installation process adds a Media Composer | First icon to the Desktop icon and a pointer to
your Avid editing application in the Start menu. The installation process also adds an
Application Manager icon to the Toolbar menu. The Application Manager allows you to view the
installed Avid applications and try new offerings.
5. Once you restart your system, the Application Manager launches.
Page 2

Downloading and Installing Media Composer | First
6. Sign In to your Avid Master Account. NOTE: You cannot launch Media Composer | First if you
are not signed into your Avid Master Account. Continue with Launching Media
Composer | First.
(Macintosh) To install Media Composer | First:
1. Access the file you downloaded.
2. Double-click the .pkg file with the editing application name.
3. Follow the on screen instructions.
4. When prompted, choose to restart the computer.
The installation process adds a Media Composer First icon to the Dock. The installation process
also adds an Application Manager icon to the Dock. The Application Manager allows you to
view the installed Avid applications and try new offerings.
5. Once you restart, the Application Manager launches.
2
Page 3
6. Sign In to your Avid Master Account. NOTE: You cannot launch Media Composer | First if you
are not signed into your Avid Master Account. Continue with Launching Media
Composer | First.
Launching Media Composer | First
Perform the following to launch Media Composer | First:
(Windows) To start your Avid editing application, do one of the following:
t Click Start > All Programs > Avid > Media Composer | First.
t Double-click the Media Composer | First desktop icon.
The Media Composer | First application opens.
(Macintosh) To start your Avid editing application, do one of the following:
t Click the alias icon for your Avid editing application on the Dock.
t Select Go > Applications, and double-click the Avid editing application folder. Then double-
click the Media Composer | First application file.
The Media Composer | First application opens.
Launching Media Composer | First
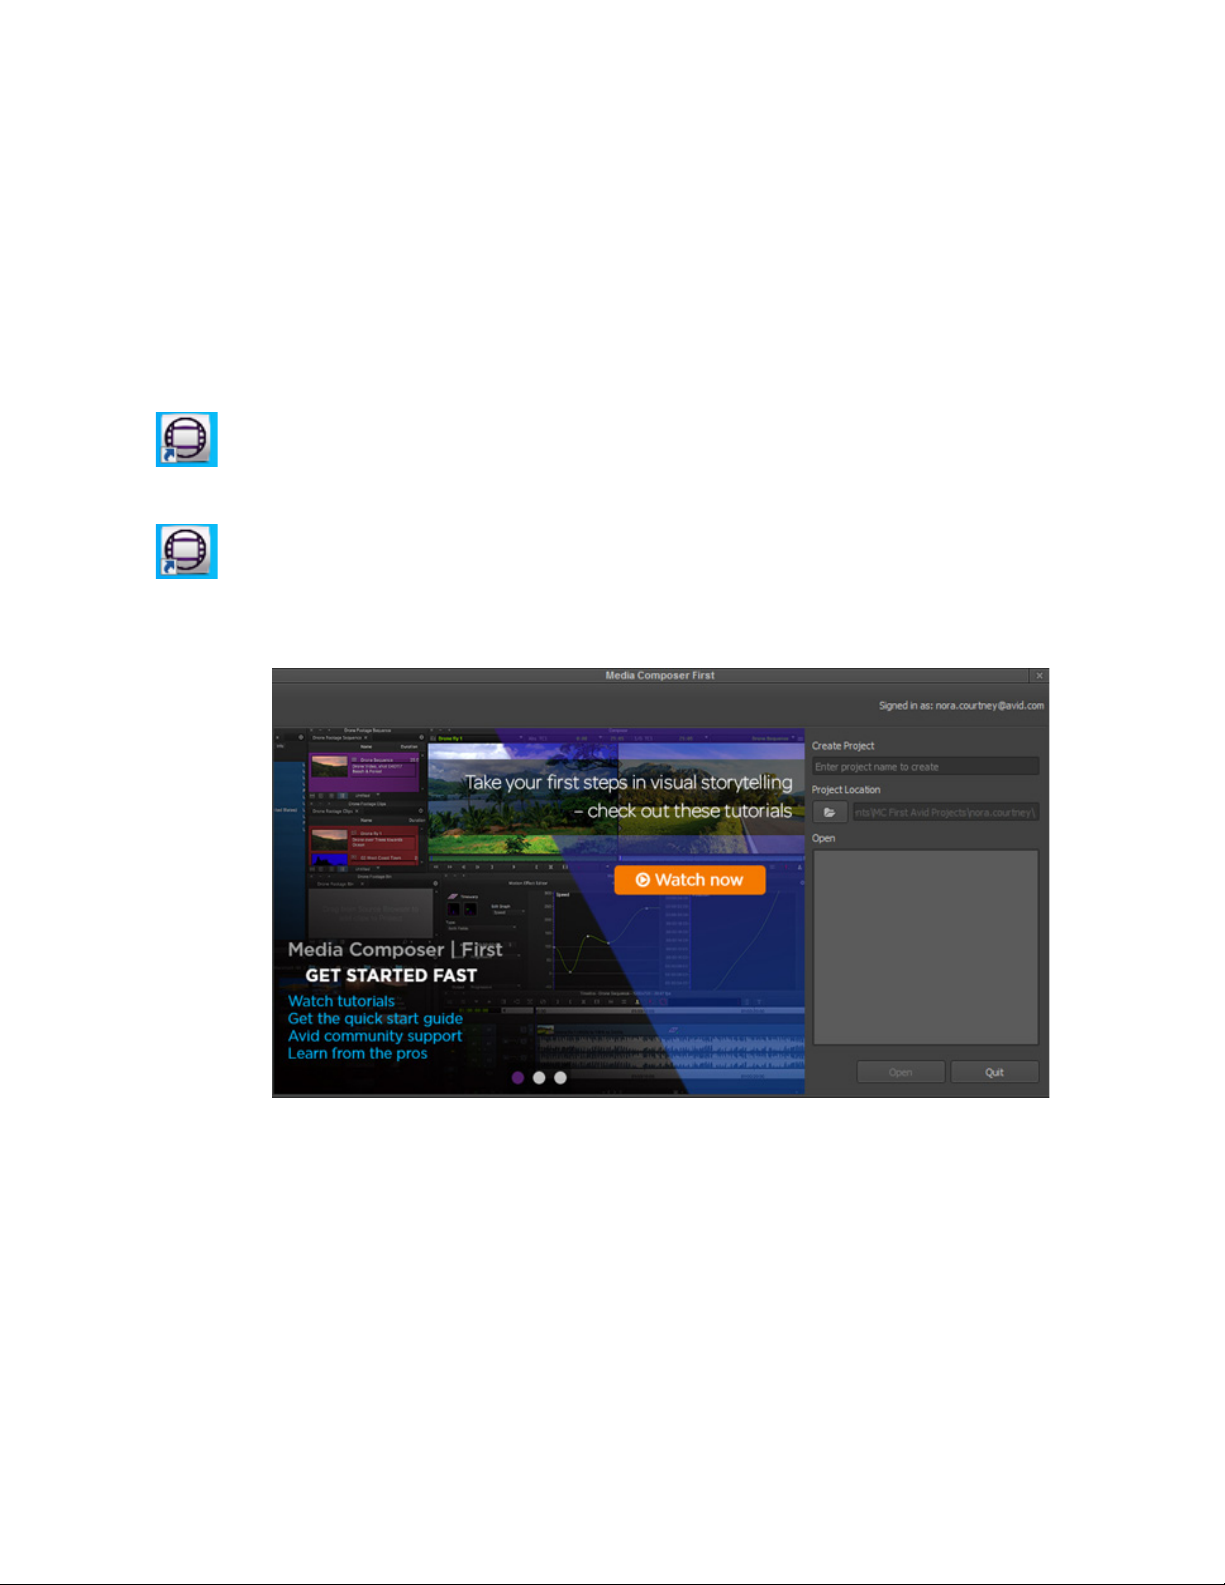
Creating a Project
When you first open Media Composer | First, a window opens where you can create a project or open
an existing project.
To create a project:
1. Enter a name for your project in the Create Project text box.
2. Click Create.
The application opens with a default workspace.
3
Page 4
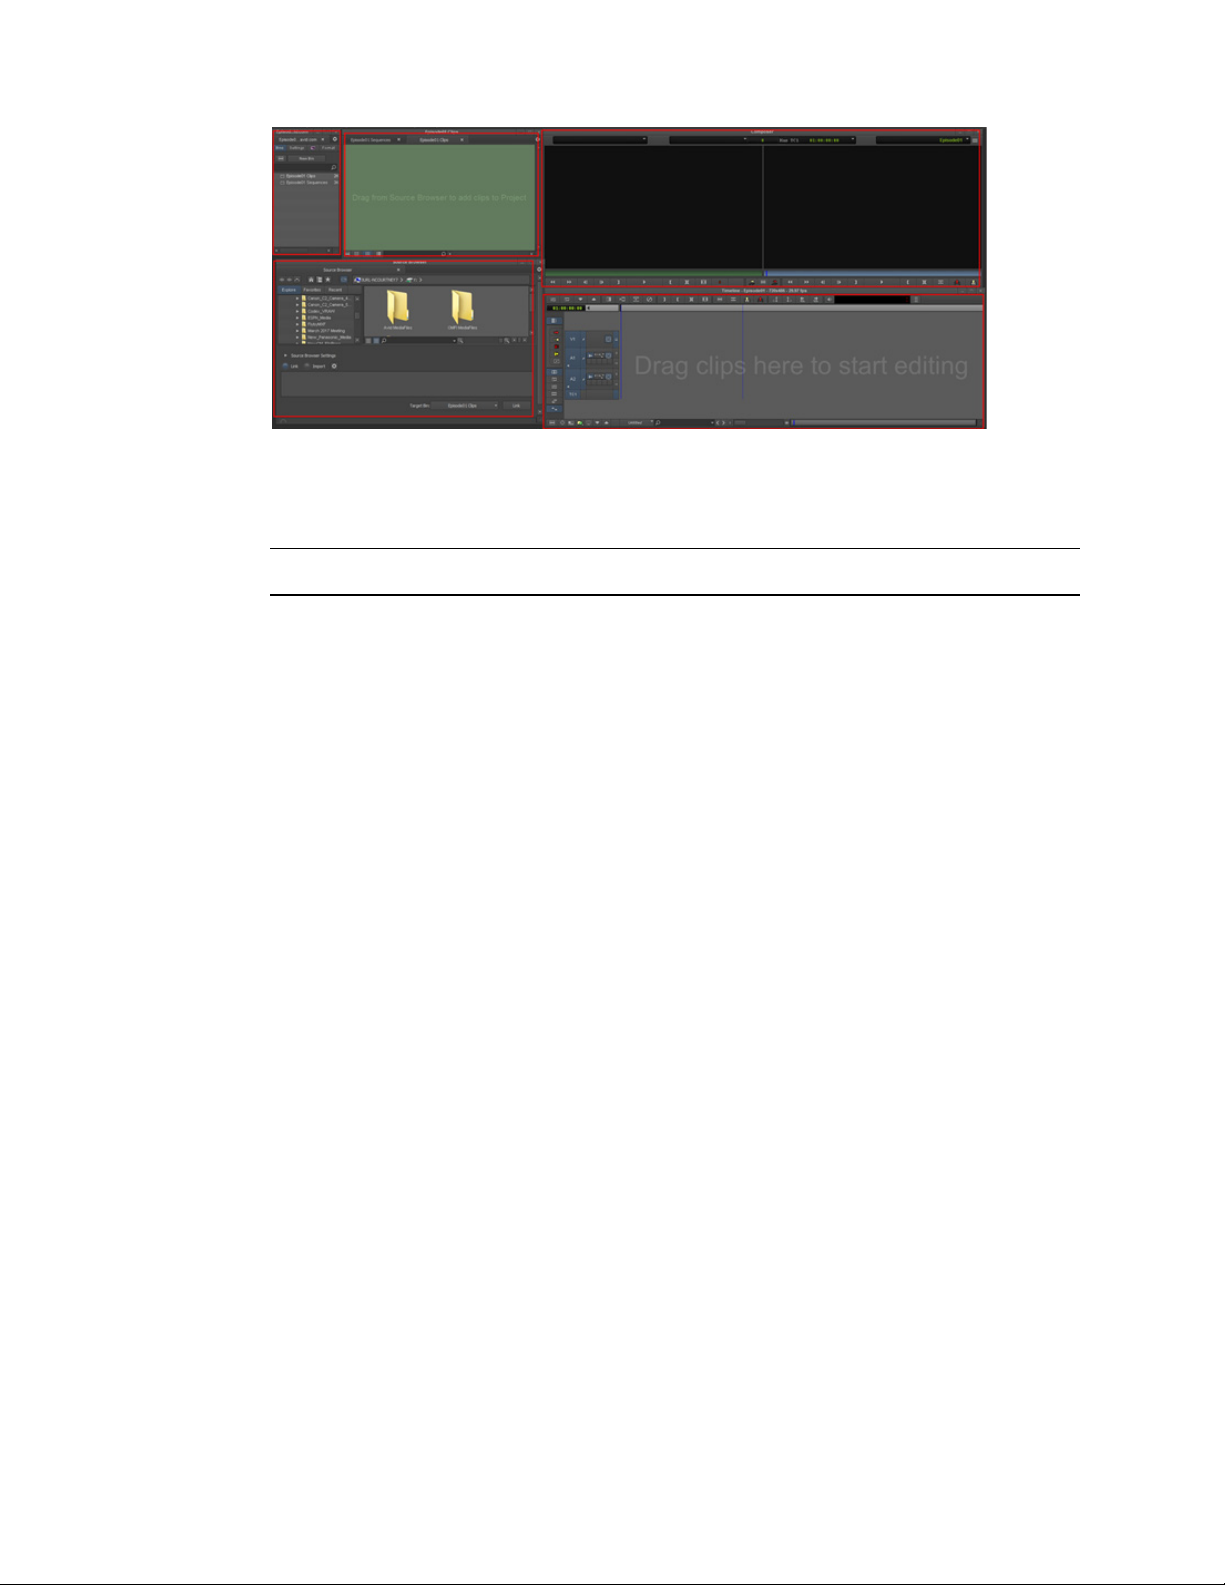
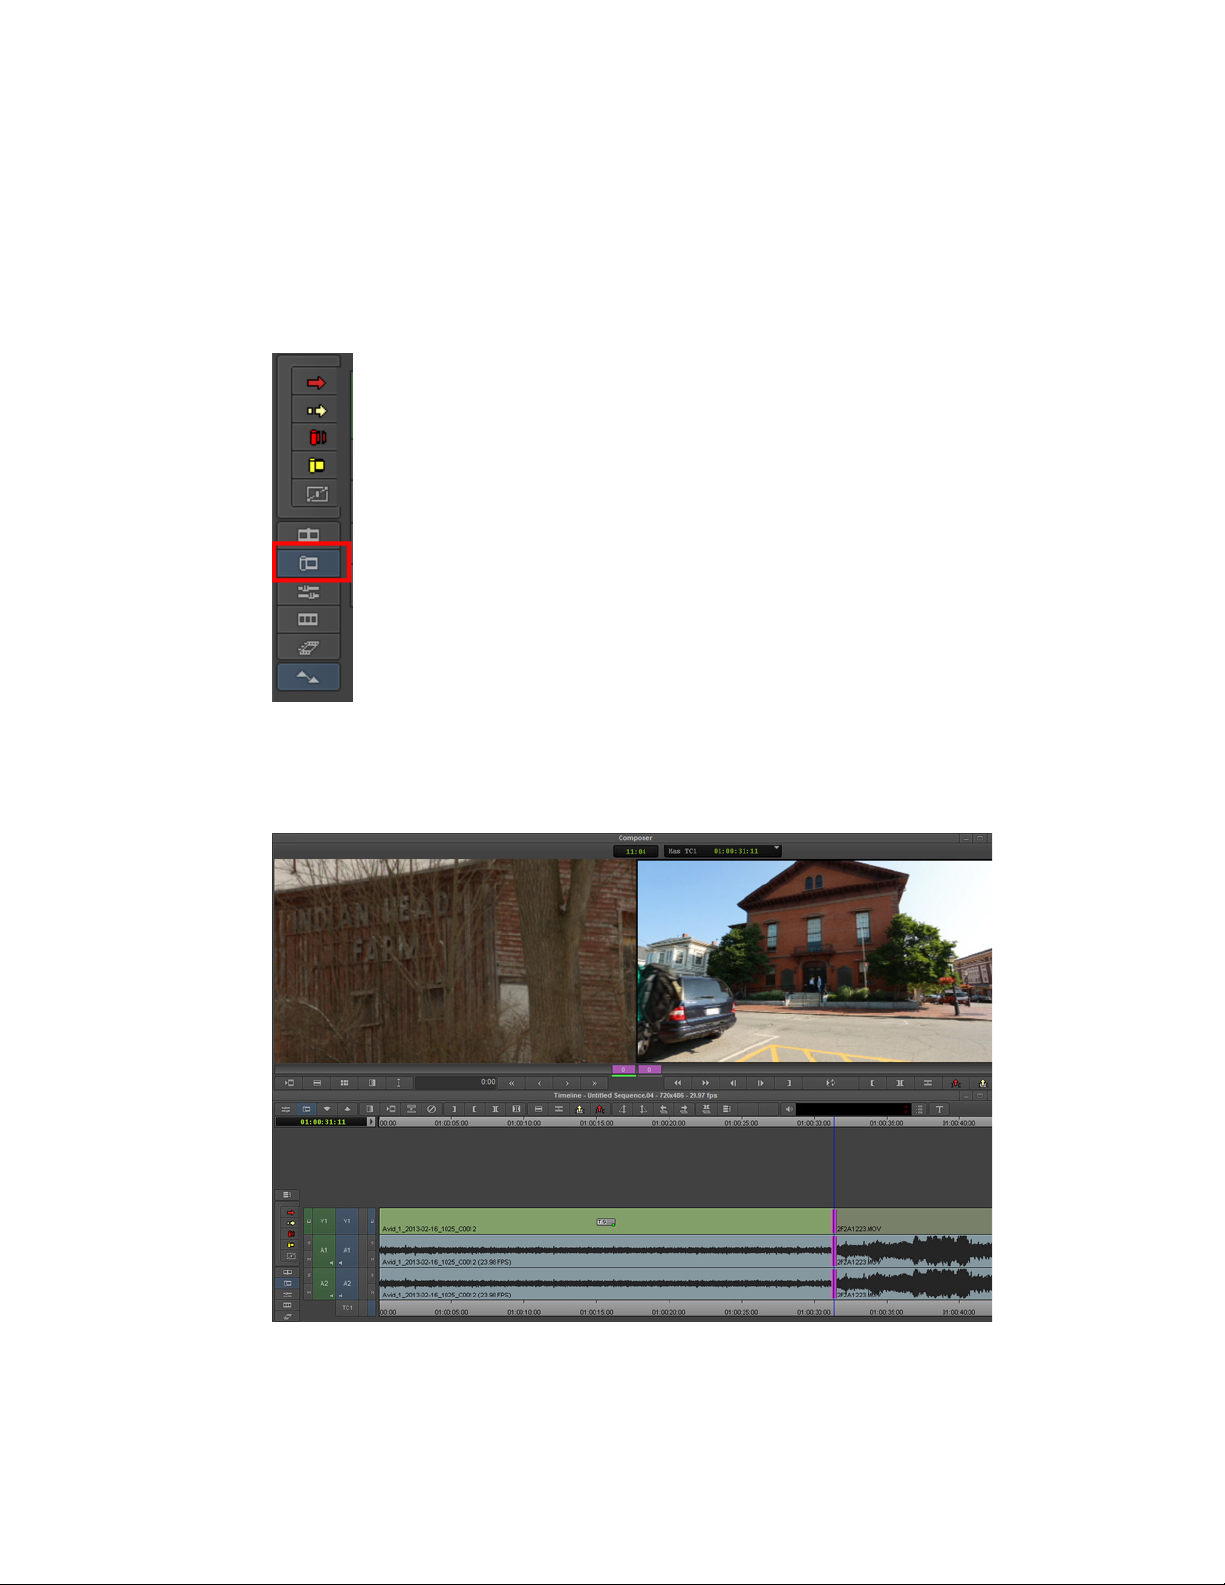
Creating a Project
Top row: Project Window, Sequence Bin and Clip Bin, Source and Record monitors
Bottom row: Source Browser, Timeline
The following describes the windows that initially open when you create a project:
Window Description
Project Window The Project window is a central location for
important information and tools that you need as
you work on your project. The Project window has
tabs that allow you to choose from the following:
• Bins - lets you create and open bins.
• Settings - lets you view and modify settings.
• Effects icon - lets you access a library of effects.
• Format - displays the Raster Dimension and
Frame Rate.
• Usage - lets you view information about the
work session usage.
• Info - lets you view information about system
memory usage and system hardware
configuration.
Sequence Bin and Clips Bin Bins are locations for organizing and managing
your media. You can create up to 5 bins.
Source and Record Monitors The Source Monitor (left monitor) displays the
currently loaded clip. The Record Monitor (right
monitor) displays the frame at the current position
of a loaded sequence in the Timeline.
Source Browser The Source Browser window allows you to import
or link your media. You can also preview your
footage before you commit the clip(s) into a bin.
4
Page 5

Window Description
Timeline Media Composer | First represents each edit and
Accessing Your Footage
Once you have created a project, use the Source Browser to access and preview your footage. Once
you decide on the footage you want for your sequence, use the Source Browser to import or link to
your media.
Accessing Your Footage
effect on the Timeline to help you track and
manipulate the elements of your sequence. The
Timeline continuously updates as you work,
displaying icons and information that you can
customize in various ways. The Timeline also has
its own set of editing tools for creating and revising
edits and transitions across multiple tracks.
The audio and video tracks in the Timeline play in
the Record monitor. You can continually edit your
sequence and review your changes until you are
pleased with the result.
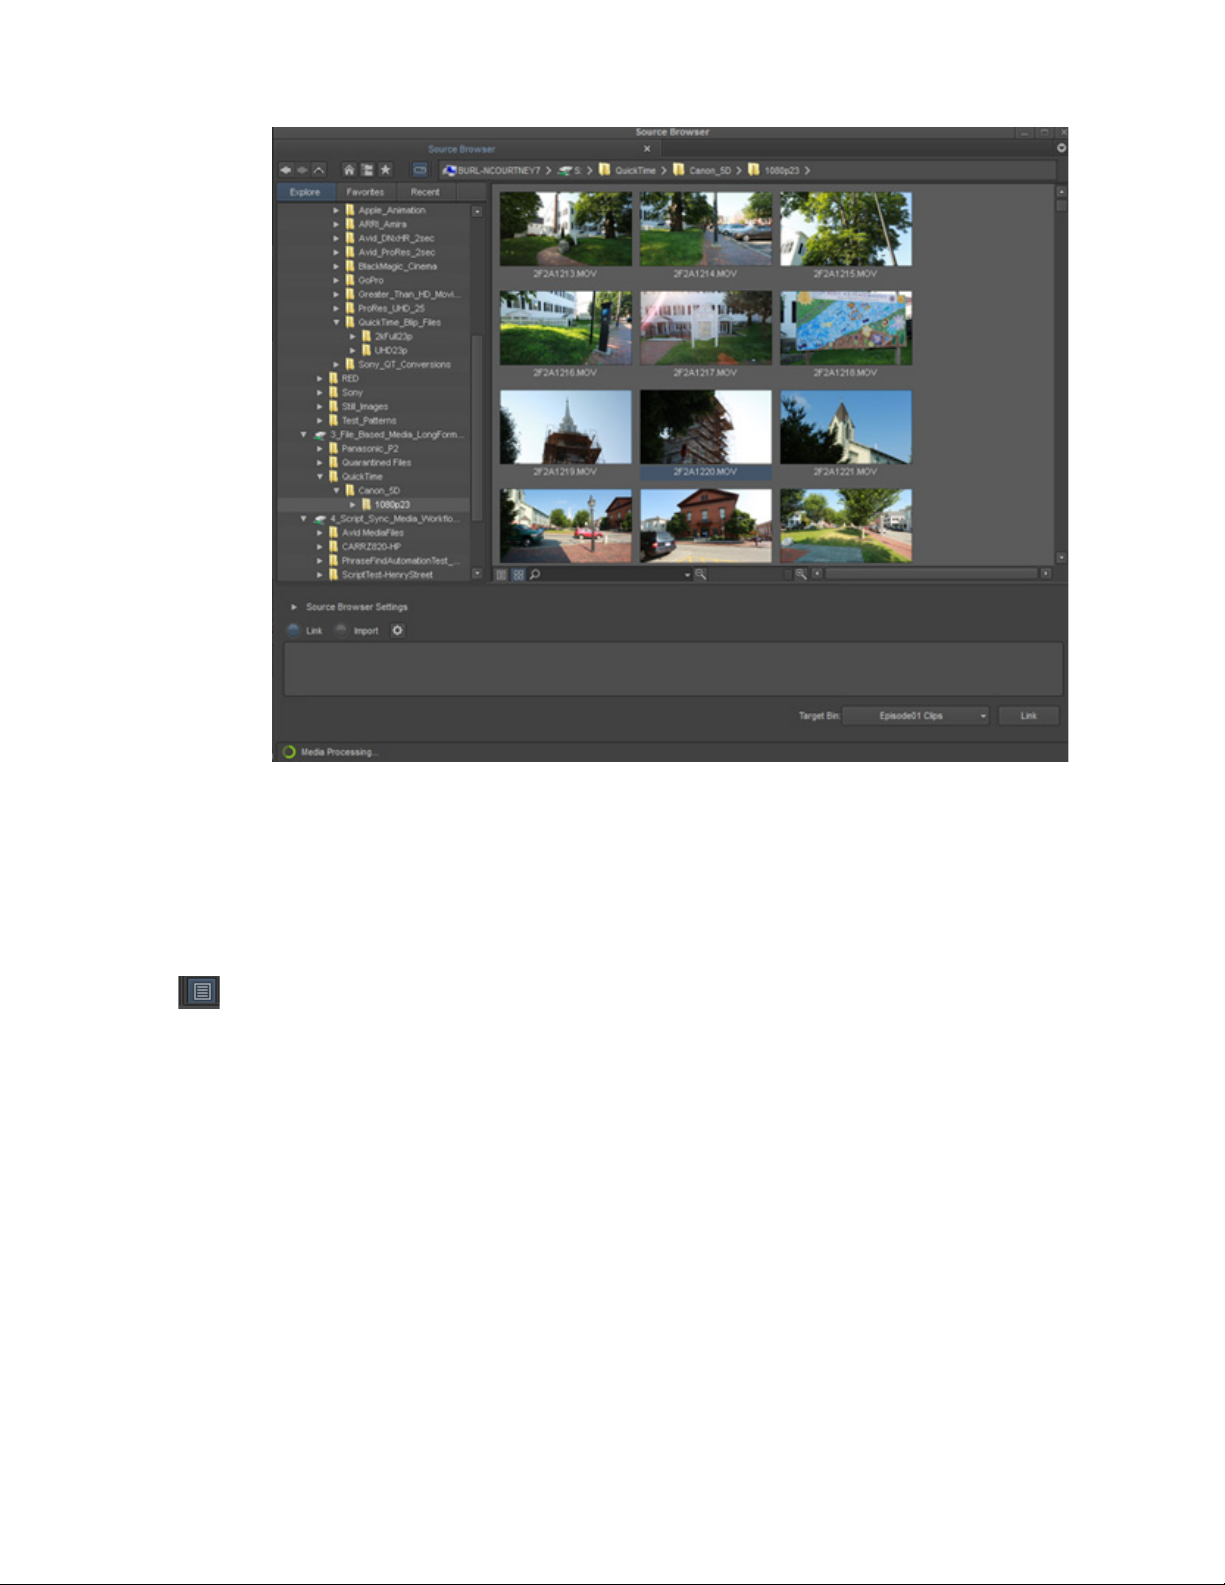
Accessing and Previewing Your Media
You can preview your media in the Source Browser before you commit the clip(s) into a bin.
To access and preview your media:
1. In the Explore area of the Source Browser window, browse to the location of the media you want
to preview.
The clips will populate the right pane of the Source Browser with the frame clip representation
(thumbnails).
5
Page 6
Accessing Your Footage
2. Press Ctrl + L (Windows) or Command + L (Mac) to enlarge the thumbnails.
3. Place your cursor so it hovers over the thumbnail of the clip. While hovering, move the cursor to
the edges of the thumbnail to preview the footage. You can also use the JKL keys to shuttle
through the thumbnail. (Use L to move forward, K to pause, and J to move backward.)
4. (Optional) You can drag a clip from the Source Browser to the Source monitor to review the clip.
Dragging to the Source monitor does not commit the clip to the bin.
5. (Optional) You can also choose to view the clips in text view, rather than in thumbnail view by
clicking the Text View button at the bottom of the display pane.
6. Continue with Importing or Linking Your Media.
For additional details on the Source Browser, see “Source Browser Overview” in the Help.
Importing or Linking Your Media
In the Source Browser Window, you can choose to either import or link your media. Linking allows
you to quickly link to the files without importing, transcoding, or copying them. Once you link to the
files, you can immediately drag them to your Timeline and start editing. Importing will actually
import the media files to the bin. (The import process can take longer than linking.)
To link or import the media files:
1. Once you have previewed the clips you want in the Source Browser window, select the Link
button if you want to link to them or select the Import button if you want to import the files.
2. Select the clips you want and drag and drop them to the bin. (Ctrl+click or Shift+click to select
multiple files.)
6
Page 7
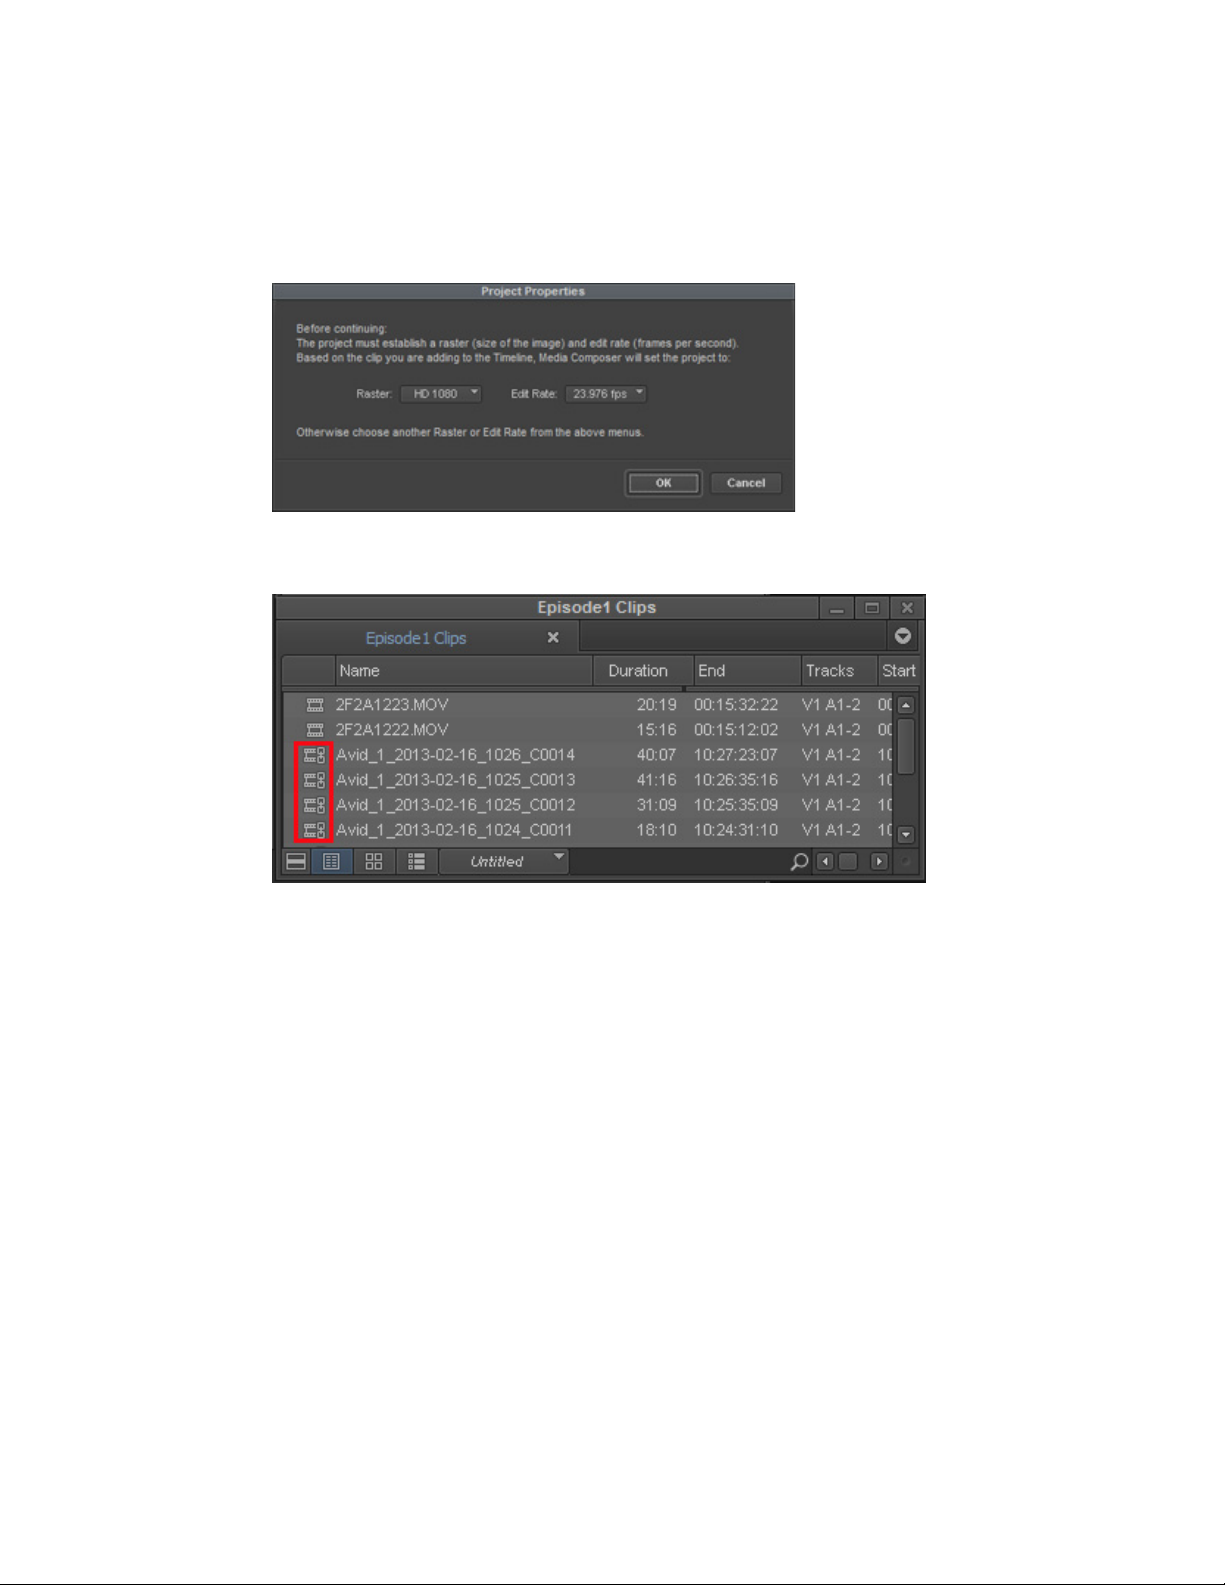
Creating a Sequence
If you chose to Import, a Project Properties dialog box appears showing the image size and edit
rate of the first clip you are importing to the bin. You can click OK to accept the selected clip size
and edit rate, or select another raster size and edit rate from the menus.
If you chose to Link rather than import, the Project Properties dialog box will appear when you
drag the first linked clip to the Timeline.
The clips appear in the bin. Linked clips appear with a link on the clip icon.
You can also import or link clips by selecting them, right clicking and selecting Add to Bin.
n
Creating a Sequence
Once you have your media in the bin, you can begin to assemble the clips into the Timeline to create
your sequence. The following topics cover a basic workflow to edit your sequence.
• Marking IN and OUT Points
• Adding Clips to the Timeline
• Trimming
• Adding Effects to Your Sequence
• Adjusting Audio with “Ducking”
• Publishing Your Story
7
Page 8

Marking IN and OUT Points
You can mark IN and OUT points in your footage to indicate selected material, for example, the
portion of a clip that you want to edit into a sequence. You can also easily clear or move these marks.
Even if your marks are not accurate now, your Avid editing application lets you trim the edit points
and fine-tune the sequence later without reediting the material.
To mark IN and OUT points:
1. Double click a clip in the bin to load it into the Source monitor.
2. Play, step, or shuttle through the material by using the blue bar, J-K-L, or the Play, Rewind, and
Fast forward buttons.
Creating a Sequence
Blue bar, Rewind - Fast Forward- Step Backward - Step Forward buttons, Play button
3. Mark an IN point by doing the following:
t Click the Mark IN button under the monitor to mark an IN point and stop playback.
In the monitor, a Sawtooth icon appears on the left to indicate the mark IN frame.
8
Page 9

Sawtooth icon in the frame, and marked IN point, in the monitor
4. Continue moving through the material.
Creating a Sequence
5. Mark an OUT point by doing the following:
t Click the Mark OUT button under the monitor to mark an OUT point and stop playback.
In the monitor, a Sawtooth icon appears on the right to indicate the mark OUT frame.
If you need to move a mark icon, simply press Alt (Windows) or Option (Mac) while dragging
the icon to a new location.
6. Continue loading your clips in the Source Monitor and marking the material you want to add to
your sequence with IN and OUT points. Once you have finished marking IN and OUT marks for
your source material, continue with Adding Clips to the Timeline.
For more details on marking your footage, see “Viewing and Marking Footage” in the Help.
Adding Clips to the Timeline
You can create a sequence by loading the clips directly into the Timeline.
To create a sequence:
1. In the bin, select the first clip you want to add to the sequence and double-click to load the clip in
the Source Monitor.
2. Drag the selected clip to the Timeline.
If the first clip you are dragging to the Timeline is a linked clip, the Project Properties dialog box
opens.
9
Page 10

Editing the Sequence
3. The dialog box shows the image size and edit rate of the first clip you are dragging to the
Timeline. You can click OK to accept the selected clip size and edit rate, or select another raster
size and edit rate from the menus.
The selected clip appears in the Record Monitor and a graphical representation appears in the
Timeline.
4. In the bin, double click to load the next clip you want to add to the sequence to the Source
Monitor and click the Splice-In button below the Source Monitor.
5. Continue loading the clips in the Source Monitor and then click the Splice-In button to add the
clip to the sequence.
6. Once you have finished adding clips to the sequence, you can edit the sequence by trimming,
adding effects, and adjusting audio. See Editing the Sequence.
For more details on working in the Timeline, see “Using the Timeline” in the Help.
Editing the Sequence
Once you have added the clips you want to the sequence, you can continue to fine tune the sequence
by trimming, adding effects, and adjusting audio.
10
Page 11
Trimming
Basic editing of a sequence initially produces a rough cut, which is loosely defined as a series of
straight-cut edits with many rough edges and few effects. After creating a rough cut, you can use trim
edits to fine-tune the transitions between each clip or between whole segments.
To perform a trim:
1. Click the Trim mode button to enter Trim mode.
Editing the Sequence
2. Once you enter Trim mode, the Composer monitor changes to display Trim mode for trimming
transitions. Outgoing frames appear on the left monitor and incoming frames appear on the right.
Trim rollers appear at the nearest transition in the Timeline.
3. If you want to trim frames from the outgoing clip, click in the left monitor and then drag the trim
roller at the transition in the Timeline to the left to trim the frames. If you want to trim frames
from the incoming clip, click the right monitor and then drag the roller to trim the frames.
11
Page 12

4. Continue trimming transitions if necessary. Once you are finished cleaning transitions, you can
add effects to your sequence.
5. Exit Trim mode. There are multiple ways to exit Trim mode: click on another mode button, for
example, the Source/Record mode button directly above the Trim mode button, or simply click
in the TC 1 ruler at the bottom of the Timeline.
For more details on using Trim mode, see “Working with Trim Edits” in the Help.
Adding Effects to Your Sequence
Media Composer | First provides a number of effects that you can add to your sequence. In this
example, we’ll add a simple fade to a transition.
To add a fade to a transition:
1. Place your cursor at a transition in your sequence.
2. Click the Quick Transition button in the Timeline Tool bar.
Editing the Sequence
3. The Quick Transition dialog opens.
4. Type the number of frames to fade up and fade down, and click Add.
5. You can view the Fade effect by playing the segment in the Timeline.
You can also add a number of effects from the Effect Palette. You can access the Effect Palette
from the Tools menu.
Adjusting Audio with “Ducking”
Audio Ducking is a feature that allows you to reduce the audio level of one or more audio tracks
when you want to hear the level of another audio track(s). For example, this is useful when you want
to lower the music on one track in order to hear the dialog on another audio track.
To set Audio Ducking:
1. Load the sequence that contains audio tracks to which you want to apply Audio Ducking.
2. Right click in the Timeline and select Audio Ducking.
The Audio Ducking dialog opens.
12
Page 13

Editing the Sequence
3. Select the Dialog and Music track(s) that you want to adjust.
4. (Optional) Select Use Marks if you want to set IN and OUT points to determine the starting and
ending frames for applying audio ducking.
5. Click Duck.
Keyframes are applied to the respective target tracks and you will visually see the ducking in the
track(s).
6. Play the sequence. The audio will playback with Audio Ducking applied.
7. (Optional) If you want to make adjustments to the Audio Ducking, click the Advanced opener in
the Audio Ducking dialog and make adjustments by choosing from the following options:
Option Meaning
Dialog track parameters Threshold: Enter a value to set how aggressive key frames will be
applied when analyzing the Dialog tracks.
Hold time: Enter a value in frames to set how long a track will
remain ducked after the last known peak above the threshold value
in the Dialog tracks.
13
Page 14

Option Meaning
Music track parameters Attenuation: Sets how much the volume will be reduced in the
Music track(s).
Ramp time: Sets how many frames it takes to ramp the Music
track(s) down from or back to full volume.
Media Composer | First also provides several unique features that facilitate audio editing, such as
audio scrub, waveform displays, and tools for adjusting and mixing audio levels and pan between
speakers as well as the frequency ranges of segments.
For details on using these audio tools, see “Working with Audio” in the Help.
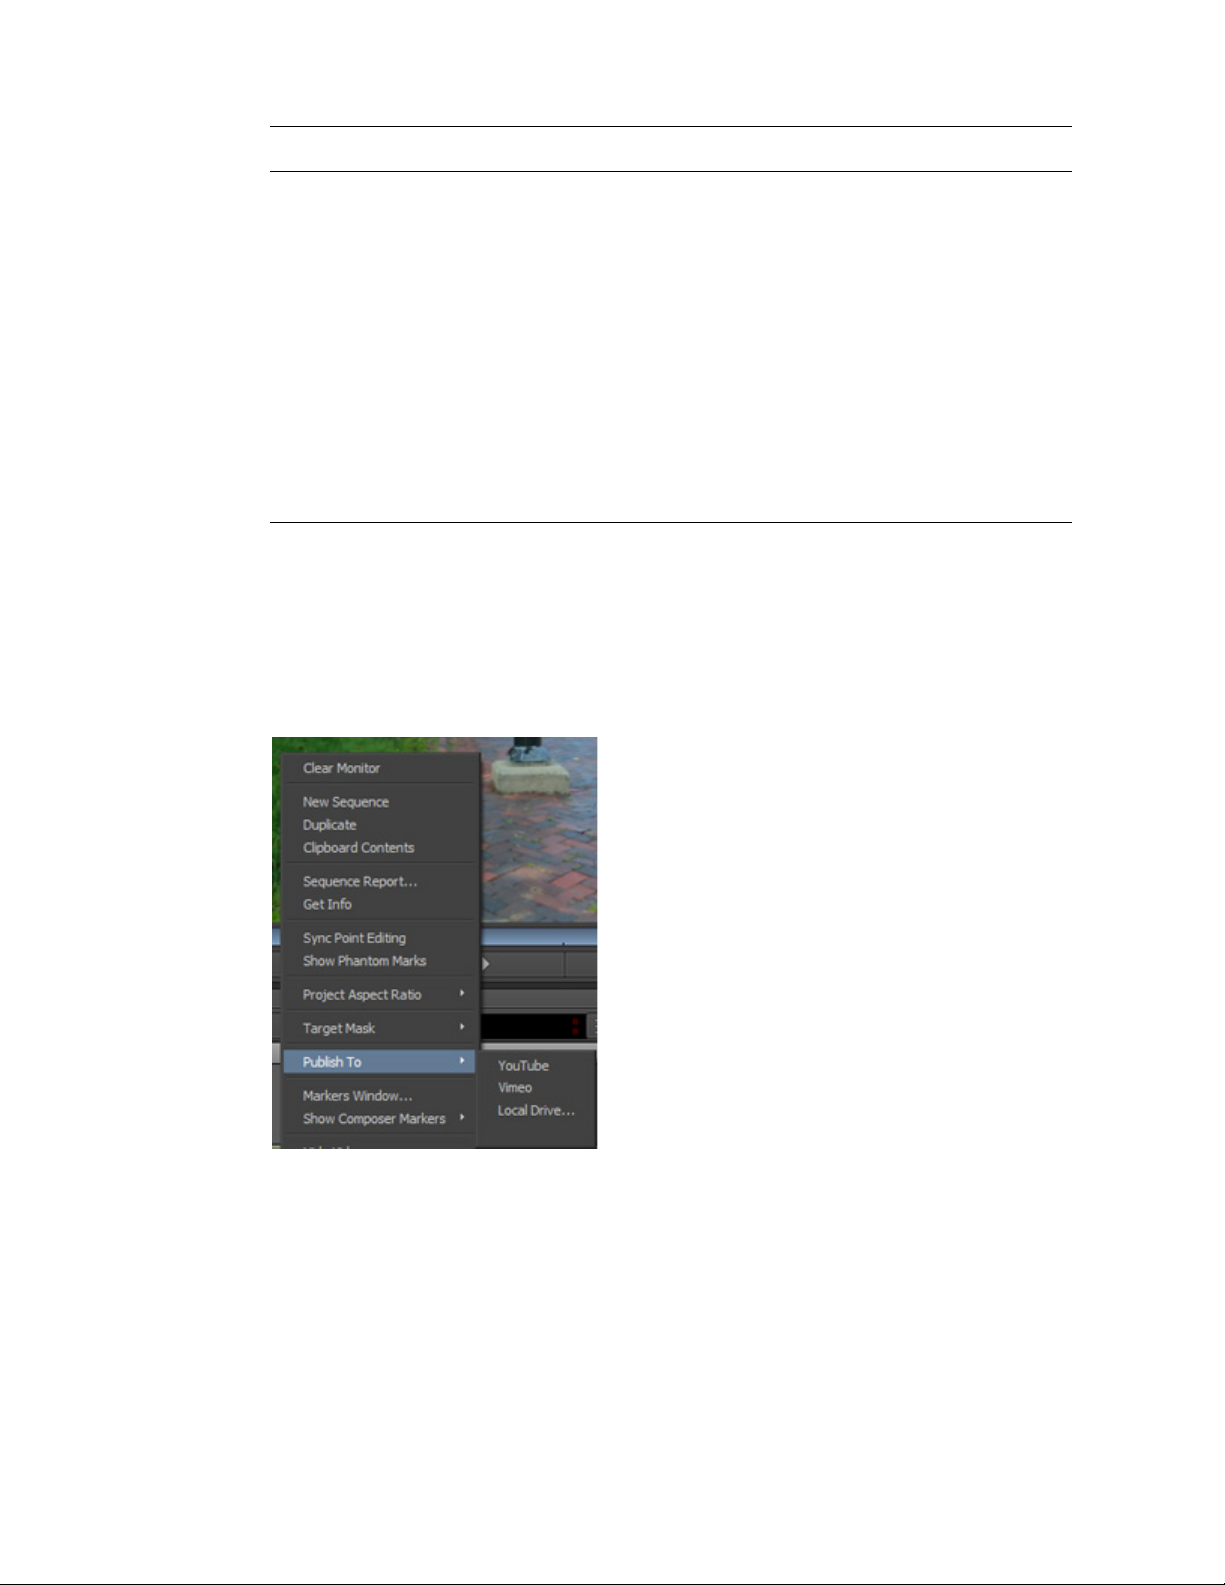
Publishing Your Story
When your sequence is finished, you can choose to save it to your local drive, or publish it to social
media such as YouTube and Vimeo.
To publish your story to a local drive:
1. In the Sequences Bin, select the sequence you want to publish, right click, select Publish To >
local drive.
Publishing Your Story
2. Choose from the following options to publish your story.
Option Description
Publish to.. Choose to publish to your local drive.
Set Choose the Set button to select the location where you want to place
the finished movie.
Type Choose what type of output you want to publish. Select either Video
and Audio, Video only, Still image, or Audio only
Format Choose the kind of file to be created. The options for Format change
according to the Type you selected:
• Video and Audio: Choose QuickTime
• Video only: Choose QuickTime
• Still Image: Choose either PNG or JPEG.
• Audio only: Choose Wave format, either Mono or Stereo
Codec Choose a compression type. The options for Codec change depending
upon the output Type you selected.
• Video and Audio: Choose h264 (a common format for
distribution of video content) or DNxHD.
• Video only: Choose h264 (a common format for distribution of
video content) or DNxHD.
14
Page 15
Publishing Your Story
Option Description
Qualtiy Set the quality for the compression. The options for Quality change
depending upon the output Type you selected.
• Video and Audio: Choose from Faster, Best, and Better
• Video only: Choose from Faster, Best, and Better
• Still Image: Choose from Best, Media, Least
Size Set the image dimension for the Video and Audio or Video Only
movie.
Audio Format Choose the Audio Format. The options for Audio Format change
depending upon the output Type you selected.
• Video and Audio: Linear PCM
• Audio only: Choose Wave format, either Mono or Stereo
3. Click OK.
A .mov will be saved to the local drive.
To publish your story to social media:
1. Select the sequence you want to publish, right click and select Publish To > social media. For
example, YouTube or Vimeo.
The Publish dialog opens.
2. Click the Login button.
Your social media login window opens.
3. Login to your account.
The first time you Login, you will receive a dialog asking you to allow Avid to access your
account to upload your movies. The following is a sample of the Youtube permission dialog.
15
Page 16
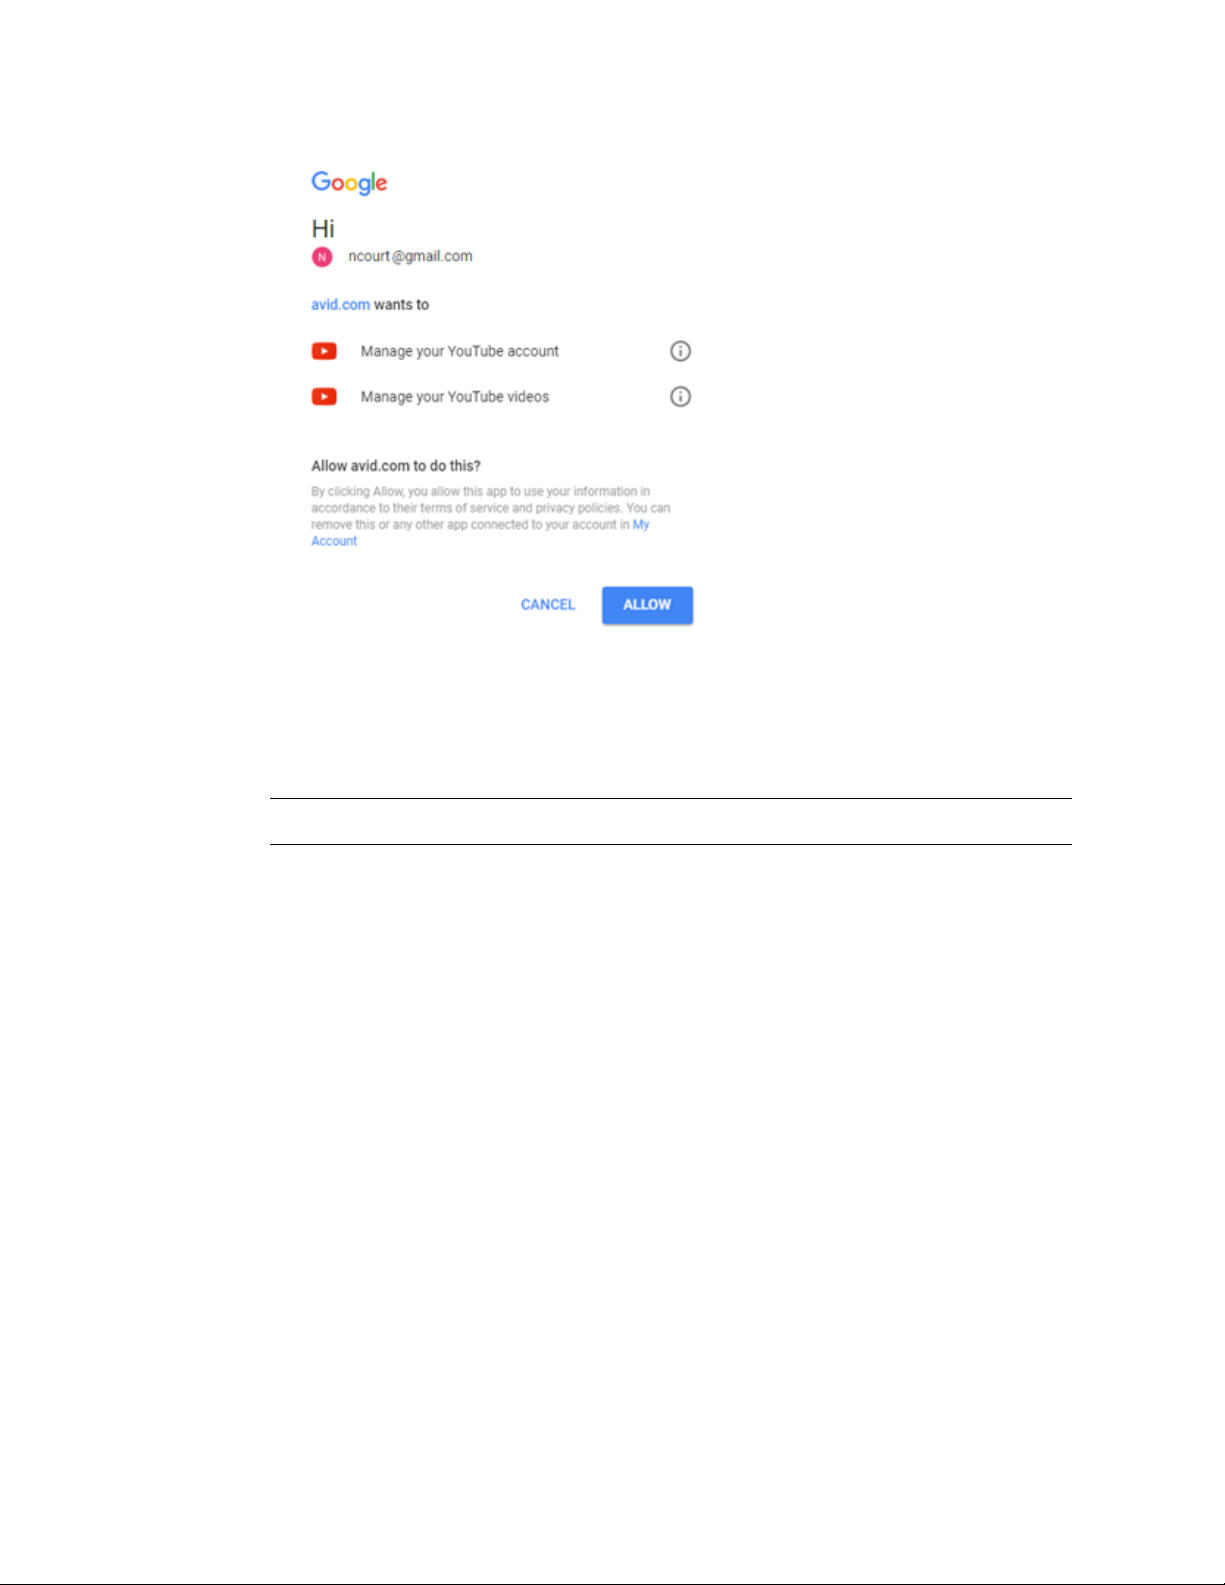
Publishing Your Story
4. Choose to allow access to post your movie.
You will be returned to the Publish dialog.
5. Choose from the following options to publish your story.
Option Description
Publish to.. Choose to either publish to social media.
Set Choose the Set button to select the location where you want to place
the finished movie.
Type Choose what type of output you want to publish. Select either Video
and Audio, Video only, Still image, or Audio only
Format Choose the kind of file to be created. The options for Format change
according to the Type you selected:
• Video and Audio: Choose QuickTime
• Video only: Choose QuickTime
• Still Image: Choose either PNG or JPEG.
• Audio only: Choose Wave format, either Mono or Stereo
Codec Choose a compression type. The options for Codec change depending
upon the output Type you selected.
• Video and Audio: Choose h264 (a common format for
distribution of video content) or DNxHD.
• Video only: Choose h264 (a common format for distribution of
video content) or DNxHD.
16
Page 17
Publishing Your Story
Option Description
Quality Set the quality for the compression. The options for Quality change
depending upon the output Type you selected.
• Video and Audio: Choose from Faster, Best, and Better
• Video only: Choose from Faster, Best, and Better
• Still Image: Choose from Best, Media, Least
Size Set the image dimension for the Video and Audio or Video Only
movie.
Audio Format Choose the Audio Format. The options for Audio Format change
depending upon the output Type you selected.
• Video and Audio: Linear PCM
• Audio only: Choose Wave format, either Mono or Stereo
6. Click OK.
A Publish to social media dialog box opens.
7. Enter the information you want to associate with your movie.
8. Click Publish.
A publish progress dialog opens. Once the progress bar completes, your movie is uploaded to the
selected social media site.
If you choose to upload to Vimeo and receive an error that the video is too long, click OK. The video
n
should upload successfully.
In some instances, upload times might be slower on Windows 7 systems.
n
It might be useful to save profiles for publishing your movies. See Create a Publishing Profile.
n
Create a Publishing Profile
When you create movies for publishing, you can save the settings in the Publish dialog box as a
profile so you can recall those settings when publishing a movie where you want to apply the same
settings.
17
Page 18

To create a Profile:
1. Right click a sequence and select Publish To > local drive or YouTube.
2. Select the desired settings for the Type of movie you want to Publish.
3. In the Profile name text field, enter a name for your profile.
Publishing Your Story
4. Click Save profile.
The saved profile appears in the Profile pull down menu. You can create multiple profiles to fit
the different kinds of movies or audio files you create.
To rename a Profile:
1. In the Publish dialog, select the profile you want to rename from the Profile pull down menu.
2. Click Rename profile.
3. Type a new name for the profile.
The new profile name appears in the Profile pull down menu.
To delete a Profile:
1. In the Publish dialog, select the profile you want to delete from the Profile pull down menu.
2. Click Delete profile.
A message box opens.
3. Click Yes.
The selected profile is deleted.
18
 Loading...