

Page 1

Avid® Media Composer
User’s Guide
Release 8.0
for the Macintosh® Operating System
a
tools for storytellers™
®
Page 2

© 1990-1996, 1998-1999 Avid Technology, Inc. All rights reserved.
Avid Media Composer User’s Guide • Part 0130-04015-01 Rev. A • May 1999
2
Page 3

Contents
Chapter 1 Desktop Basics
About the Media Composer Folder . . . . . . . . . . . . . . . . . . . . . . . . . . . 32
Managing Avid Project and Avid User Folders
About Avid Projects and Avid Users Folders
Changing Project and User Names
Deleting Projects and User Profiles
Retrieving Bin Files from the Attic Folder
Starting the
Chapter 2 Starting a Work Session
Opening a Project. . . . . . . . . . . . . . . . . . . . . . . . . . . . . . . . . . . . . . . . . . . 40
Identifying a User
Selecting a Project
Opening the Project
Closing a Project
Backing Up Your Project Information
Saving Yo ur Project Information
Restoring from a Backup
Ending a Work Session
Quitting the Avid Application
Media Composer Application . . . . . . . . . . . . . . . . . . . . . 37
. . . . . . . . . . . . . . . . . . . . . . . . . . . . . . . . . . . . . . . 40
Setting Up a New User
Selecting an Existing User
. . . . . . . . . . . . . . . . . . . . . . . . . . . . . . . . . . . . . . . 43
Creating a New Project
Selecting an Existing Project
Nesting Projects in Folders
. . . . . . . . . . . . . . . . . . . . . . . . . . . . . . . . . . . . . 47
. . . . . . . . . . . . . . . . . . . . . . . . . . . . . . . . . . . . . . . . 48
. . . . . . . . . . . . . . . . . . . . . . . . . . . . . . . . . . . . . . 50
. . . . . . . . . . . . . . . . . 32
. . . . . . . . . . . . . . . 33
. . . . . . . . . . . . . . . . . . . . . . . . 34
. . . . . . . . . . . . . . . . . . . . . . . . 35
. . . . . . . . . . . . . . . . . . . . . 35
. . . . . . . . . . . . . . . . . . . . . . . . . . . . . . . 41
. . . . . . . . . . . . . . . . . . . . . . . . . . . . 42
. . . . . . . . . . . . . . . . . . . . . . . . . . . . . . . 43
. . . . . . . . . . . . . . . . . . . . . . . . . . 45
. . . . . . . . . . . . . . . . . . . . . . . . . . . 46
. . . . . . . . . . . . . . . . . . . . . . . . . 48
. . . . . . . . . . . . . . . . . . . . . . . . . . 48
. . . . . . . . . . . . . . . . . . . . . . . . . . . . . . . . . 49
. . . . . . . . . . . . . . . . . . . . . . . . . . . . 50
3
Page 4

Turning Off Your Equipment . . . . . . . . . . . . . . . . . . . . . . . . . . . . . 51
Mounting and Ejecting Media Drives
Ejecting Drives
Mounting All Drives
Using Context Menus
Using Help
Opening and Closing the Help System
Getting Help for Windows and Dialog Boxes
Getting Help for Screen Objects
Finding Information with the Help Topics Dialog Box
How Help Windows Work
Using Buttons in a Help Topic
Printing Help Topics
Copying from a Help Topic
Changing the Font Size of Help Topics
Transferring Help to Another Macintosh System
Session Check List
. . . . . . . . . . . . . . . . . . . . . . . . . . . . . . . . . . . . . . . . . . . . . . . . . 54
Using the Contents Tab
Using the Index Tab
Using the Find Tab
. . . . . . . . . . . . . . . . . . . . . . . . . . . . . . . . . . . . . . . . . . 52
. . . . . . . . . . . . . . . . . . . . . . . . . . . . . . . . . . . . 53
. . . . . . . . . . . . . . . . . . . . . . . . . . . . . . . . . . . . . . . 54
. . . . . . . . . . . . . . . . . . . . . . . . . . . . . . . . . . 56
. . . . . . . . . . . . . . . . . . . . . . . . . . . . . . . . . . . 57
. . . . . . . . . . . . . . . . . . . . . . . . . . . . . . . . . . . . . 60
. . . . . . . . . . . . . . . . . . . . . . . . . . . . . . . . . . . . . . . . . . 63
. . . . . . . . . . . . . . . . . . . . . . . . . 52
. . . . . . . . . . . . . . . . . . . . 54
. . . . . . . . . . . . . . . 54
. . . . . . . . . . . . . . . . . . . . . . . . . . 55
. . . . . . . 56
. . . . . . . . . . . . . . . . . . . . . . . . . . . . . . . 56
. . . . . . . . . . . . . . . . . . . . . . . . . . . . . . . 58
. . . . . . . . . . . . . . . . . . . . . . . . . . . . 59
. . . . . . . . . . . . . . . . . . . . . . . . . . . . . . . 61
. . . . . . . . . . . . . . . . . . . . 61
. . . . . . . . . . . . 61
Chapter 3 Working with the Project Window
Opening and Closing the Project Window . . . . . . . . . . . . . . . . . . . . . 65
Using the Bins Display
Displaying Bins
Creating a Folder in a Project
Creating a New Bin
Renaming a Bin
Opening and Closing a Bin
Opening Selected Bins
Opening Bins from Other Projects
Closing a Bin
Deleting a Bin or Folder
. . . . . . . . . . . . . . . . . . . . . . . . . . . . . . . . . . . . . . 66
. . . . . . . . . . . . . . . . . . . . . . . . . . . . . . . . . . . . . . . . . 67
. . . . . . . . . . . . . . . . . . . . . . . . . . . . . 67
. . . . . . . . . . . . . . . . . . . . . . . . . . . . . . . . . . . . . . 68
. . . . . . . . . . . . . . . . . . . . . . . . . . . . . . . . . . . . . . . . . 68
. . . . . . . . . . . . . . . . . . . . . . . . . . . . . . . 69
. . . . . . . . . . . . . . . . . . . . . . . . . . . . . . . 69
. . . . . . . . . . . . . . . . . . . . . . . . . . . . . . . . . . . . . . . . 70
. . . . . . . . . . . . . . . . . . . . . . . . . . . . . . . . . . 70
4
. . . . . . . . . . . . . . . . . . . . . 69
Page 5

Viewing Contents in the Trash. . . . . . . . . . . . . . . . . . . . . . . . . . . . 71
Emptying the Trash in the Bins List
Managing Folders and Bins
Saving Bins Automatically
Saving Bins Manually
Using the Settings Display
About Settings
. . . . . . . . . . . . . . . . . . . . . . . . . . . . . . . . . . . . . . . . . . 76
Defining Settings
. . . . . . . . . . . . . . . . . . . . . . . . . . . . . . . . . . . 74
. . . . . . . . . . . . . . . . . . . . . . . . . . . . . . . . . . . 75
. . . . . . . . . . . . . . . . . . . . . . . . . . . . . . . . . . . . . . . 79
Reviewing Basic Settings
Bin Settings
General Settings
Interface Settings
. . . . . . . . . . . . . . . . . . . . . . . . . . . . . . . . . . . . . . . . . 80
. . . . . . . . . . . . . . . . . . . . . . . . . . . . . . . . . . . . . 82
. . . . . . . . . . . . . . . . . . . . . . . . . . . . . . . . . . . . 83
Displaying Project Settings
Working with Settings
. . . . . . . . . . . . . . . . . . . . . . . . . . . . . . . . . . . 85
Selecting Another User
Modifying Settings
. . . . . . . . . . . . . . . . . . . . . . . . . . . . . . . . . . 86
W orking with Multiple Settings
Duplicating Settings
Naming Settings
. . . . . . . . . . . . . . . . . . . . . . . . . . . . . . . . . 88
. . . . . . . . . . . . . . . . . . . . . . . . . . . . . . . . . . . . . 88
Selecting Among Multiple Settings
Deleting Settings
. . . . . . . . . . . . . . . . . . . . . . . . . . . . . . . . . . . . 89
Restoring Default Settings
Copying Settings Between Settings Files
Using Site Settings
Using the Info Display
. . . . . . . . . . . . . . . . . . . . . . . . . . . . . . . . . . . 92
. . . . . . . . . . . . . . . . . . . . . . . . . . . . . . . . . . . . . . 93
Displaying a Project Profile
Displaying Usage Information
File Structure and Layout
Importing the Statistics File into a Spreadsheet
Displaying Disk Space Statistics
Viewing Memory
. . . . . . . . . . . . . . . . . . . . . . . . . . . . . . . . . . . . . . . 100
Accessing the Hardware Tool
Customizing Your Workspace
. . . . . . . . . . . . . . . . . . . . . . . . . . . . . . 72
. . . . . . . . . . . . . . . . . . . . . . . . . . . . . . . 73
. . . . . . . . . . . . . . . . . . . . . . . . . . . . . . . . 80
. . . . . . . . . . . . . . . . . . . . . . . . . . . . . . . 84
. . . . . . . . . . . . . . . . . . . . . . . . . . . . . . . 85
. . . . . . . . . . . . . . . . . . . . . . . . . . . . . . 94
. . . . . . . . . . . . . . . . . . . . . . . . . . . . . . . 102
. . . . . . . . . . . . . . . . . . . . . . . 71
. . . . . . . . . . . . . . . . . . . . . . . 87
. . . . . . . . . . . . . . . . . . . . 89
. . . . . . . . . . . . . . . . . . . . . . . . . . . . 90
. . . . . . . . . . . . . . . 90
. . . . . . . . . . . . . . . . . . . . . . . . . . . . 95
. . . . . . . . . . . . . . . . . . . . . . . . . . . . . 96
. . . . . . . . . 98
. . . . . . . . . . . . . . . . . . . . . . . . . 100
. . . . . . . . . . . . . . . . . . . . . . . . . . . . 101
5
Page 6

Creating a New Workspace Setting . . . . . . . . . . . . . . . . . . . . . . . 103
Linking User Settings and Workspaces
Switching Between Workspaces
Deleting a Workspace
Assigning a Workspace Button
Chapter 4 Using Basic Tools
Using the Tools Menu . . . . . . . . . . . . . . . . . . . . . . . . . . . . . . . . . . . . . . 109
Using the Deck Controller
Using the Command Palette
About Button Mapping
Mapping User-Selectable Buttons
Using the Blank Button
Mapping Menu Commands
Activating Commands from the Command Palette
Using the Avid Calculator
Using the Console
Displaying System Information
Reviewing a Log of Errors
Getting Information with the Console
Using the Hardware Tool
Using the Serial Ports Tool
. . . . . . . . . . . . . . . . . . . . . . . . . . . . . . . . . . . . . . . . . 120
. . . . . . . . . . . . . . . . . . . 105
. . . . . . . . . . . . . . . . . . . . . . . . . . 107
. . . . . . . . . . . . . . . . . . . . . . . . . . . . . . . . . . . 107
. . . . . . . . . . . . . . . . . . . . . . . . . . . 108
. . . . . . . . . . . . . . . . . . . . . . . . . . . . . . . . . . 111
. . . . . . . . . . . . . . . . . . . . . . . . . . . . . . . . . 113
. . . . . . . . . . . . . . . . . . . . . . . . . . . . . . . . . 114
. . . . . . . . . . . . . . . . . . . . . . . . 115
. . . . . . . . . . . . . . . . . . . . . . . . . . . . . . . . . 116
. . . . . . . . . . . . . . . . . . . . . . . . . . . . . 116
. . . . . . . . . 118
. . . . . . . . . . . . . . . . . . . . . . . . . . . . . . . . . . . 118
. . . . . . . . . . . . . . . . . . . . . . . . . . 120
. . . . . . . . . . . . . . . . . . . . . . . . . . . . . . . 120
. . . . . . . . . . . . . . . . . . . . 121
. . . . . . . . . . . . . . . . . . . . . . . . . . . . . . . . . . . 122
. . . . . . . . . . . . . . . . . . . . . . . . . . . . . . . . . . 123
Chapter 5 Logging
Logging Tips . . . . . . . . . . . . . . . . . . . . . . . . . . . . . . . . . . . . . . . . . . . . . . 125
Logging Preroll
Logging Timecode
Naming Tapes
Double-Checking the Logs
Adding a Memory Mark
Preparing Logs for Import
Transferring Bins from MediaLog for Macintosh
Converting Logs with Avid Log Exchange
. . . . . . . . . . . . . . . . . . . . . . . . . . . . . . . . . . . . . . . . 126
. . . . . . . . . . . . . . . . . . . . . . . . . . . . . . . . . . . . . . 126
. . . . . . . . . . . . . . . . . . . . . . . . . . . . . . . . . . . . . . . . . 126
. . . . . . . . . . . . . . . . . . . . . . . . . . . . . . 127
. . . . . . . . . . . . . . . . . . . . . . . . . . . . . . . . 128
. . . . . . . . . . . . . . . . . . . . . . . . . . . . . . . . . . 128
. . . . . . . . . . . 129
. . . . . . . . . . . . . . . . . 130
6
Page 7

Drag-and-Drop Conversion. . . . . . . . . . . . . . . . . . . . . . . . . . 133
Creating Avid Logs
Importing Shot Log Files
Logging Directly into a Bin
Logging with an Avid-Controlled Deck
Logging with Non-Avid-Controlled Decks
Modifying Clip Information Before Digitizing
Using the Modify Command
Modify Command Options
Exporting Shot Log Files
Chapter 6 Preparing to Digitize
Preparing the Hardware . . . . . . . . . . . . . . . . . . . . . . . . . . . . . . . . . . . . 149
Selecting Settings
Deck Configuration Settings
Deck Settings Options
Deleting Deck Configurations
Setting Deck Preferences
Entering Capture Mode
Setting Up the Compression Tool
About the Color Rate Option
Setting Up the Digitize Tool
Selecting a Deck
Selecting a Tape
Selecting Source Tracks
Choosing a Resolution in the Digitize Tool
Choosing a Target Bin
Selecting the Target Drives
Targeting a Single Drive
Targeting Separate Drives for Audio and Video
Interpreting the Time-Remaining Display
Selecting a Custom Preroll
Digitizing to Multiple Media Files
. . . . . . . . . . . . . . . . . . . . . . . . . . . . . . . . . . . . . . . . . . 151
. . . . . . . . . . . . . . . . . . . . . . . . . . . . . . . . . . . . . . . 165
. . . . . . . . . . . . . . . . . . . . . . . . . . . . . . . . . . . . . . . . 166
. . . . . . . . . . . . . . . . . . . . . . . . . . . . . . . . . . . . . 133
. . . . . . . . . . . . . . . . . . . . . . . . . . . . . . . . . . . 134
. . . . . . . . . . . . . . . . . . . . . . . . . . . . . . . . . 136
. . . . . . . . . . . . . . . . . . . 136
. . . . . . . . . . . . . . . . 140
. . . . . . . . . . . . . . . . 142
. . . . . . . . . . . . . . . . . . . . . . . . . . . . 142
. . . . . . . . . . . . . . . . . . . . . . . . . . 144
. . . . . . . . . . . . . . . . . . . . . . . . . . . . . . . . . . . . 146
. . . . . . . . . . . . . . . . . . . . . . . . . . . . 152
. . . . . . . . . . . . . . . . . . . . . . . . . . . . . . . . . . 157
. . . . . . . . . . . . . . . . . . . . . . . . . . . 158
. . . . . . . . . . . . . . . . . . . . . . . . . . . . . . . . 159
. . . . . . . . . . . . . . . . . . . . . . . . . . . . . . . . . . . . . 160
. . . . . . . . . . . . . . . . . . . . . . . . . . . . 162
. . . . . . . . . . . . . . . . . . . . . . . . . . . . 163
. . . . . . . . . . . . . . . . . . . . . . . . . . . . . . . . . 163
. . . . . . . . . . . . . . . . . . . . . . . . . . . . . . . . . 167
. . . . . . . . . . . . . . . . 168
. . . . . . . . . . . . . . . . . . . . . . . . . . . . . . . . . . 168
. . . . . . . . . . . . . . . . . . . . . . . . . . . . . . 169
. . . . . . . . . . . . . . . . . . . . . . . . . . . . . 169
. . . . . . . . 170
. . . . . . . . . . . . . . . . 170
. . . . . . . . . . . . . . . . . . . . . . . . . . . . . . 171
. . . . . . . . . . . . . . . . . . . . . . . 171
7
Page 8

Digitizing Across Timecode Breaks . . . . . . . . . . . . . . . . . . . . . . 175
General Digitize Settings Options
Preparing for Audio Input
Choosing the Audio File Format
Establishing Sync for Audio-Only Input
Checking for a Valid Digital Sync Signal
Adjusting Audio Settings
Using the Audio Tool
Resizing the Audio Tool
Adjusting the Reference Level
Choosing a Peak Hold Option
Adjusting Audio Input Levels
Creating Tone Media
Using the Console to Check Audio Levels
Preparing for Video Input
Using the Factory Presets
About Video Input Calibration
Before You Begin
Calibrating Video Input
Saving Settings
Saving a Custom Default Setting for the Video Input Tool
Adjusting Video Levels by Eye
Digitize Preparations Check List
. . . . . . . . . . . . . . . . . . . . . . . . . . . . . . . . . . 177
. . . . . . . . . . . . . . . . . . . . . . . . . . . . . . . 181
. . . . . . . . . . . . . . . . . . . . . . . . . . . . . . . . . . . 184
. . . . . . . . . . . . . . . . . . . . . . . . . . . . . . . . 192
. . . . . . . . . . . . . . . . . . . . . . . . . . . . . . . . . . 194
. . . . . . . . . . . . . . . . . . . . . . . . . . . . . . . . 196
. . . . . . . . . . . . . . . . . . . . . . . . . . . . . . . . . . . 197
. . . . . . . . . . . . . . . . . . . . . . . . . . . . . . . . . . . . . . . . 204
. . . . . . . . . . . . . . . . . . . . . . . 176
. . . . . . . . . . . . . . . . . . . . . . . . . 178
. . . . . . . . . . . . . . . . . . 180
. . . . . . . . . . . . . . 181
. . . . . . . . . . . . . . . . . . . . . . . . . . . . . 186
. . . . . . . . . . . . . . . . . . . . . . . 186
. . . . . . . . . . . . . . . . . . . . . . . . 188
. . . . . . . . . . . . . . . . . . . . . . . 189
. . . . . . . . . . . . . . . . . 193
. . . . . . . . . . . . . . . . . . . . . . . . . . 197
. . . . . . . . . . . . . . . . . . . . . . . . . . . . . 198
. . . . . . . . . . . . . . . . . . . . . . . . . . 206
. . . . . . . . . . . . . . . . . . . . . . . . . . . . 207
. . 205
Chapter 7 Digitizing
Before You Begin . . . . . . . . . . . . . . . . . . . . . . . . . . . . . . . . . . . . . . . . . . 209
Special Digitizing Procedures
Logging Errors to the Console
Creating Subclips On-the-Fly
Adding Locators On-the-Fly
Adding Clip Names and Comments On-the-Fly
Digitizing and Logging at the Same Time
Digitizing from a Mark IN to a Mark OUT
. . . . . . . . . . . . . . . . . . . . . . . . . . . . . . . 210
. . . . . . . . . . . . . . . . . . . . . . . . . . . 210
. . . . . . . . . . . . . . . . . . . . . . . . . . . . 211
. . . . . . . . . . . . . . . . . . . . . . . . . . . . . 212
. . . . . . . . . . . 213
. . . . . . . . . . . . . . . . . . . . . 214
. . . . . . . . . . . . . . . . 215
8
Page 9

Setting Both Marks . . . . . . . . . . . . . . . . . . . . . . . . . . . . . . . . . 215
Setting Only One Mark
Digitizing On-the-Fly
Autodigitizing
Digitizing from a Non-Avid-Controlled Deck
Digitizing with Time-of-Day Timecode
Digitizing to the Timeline
Batch Digitizing from Logged Clips
Preparing to Batch Digitize
Resizing the Digitize Tool
Preparing Settings for Unattended Batch Digitizing
Batch Digitizing Clips
Batch Digitize Settings Options
Redigitizing Your Material
Redigitizing Master Clips and Subclips
Redigitizing Sequences
Saving Two Versions of a Sequence When
Redigitizing. . . . . . . . . . . . . . . . . . . . . . . . . . . . . . . . . . . . . . . . 233
Using Decompose When Redigitizing
Redigitizing the Sequence Without Using Decompose
. . . . . . . . . . . . . . . . . . . . . . . . . . . . . . . . . . . . . . . . . 220
. . . . . . . . . . . . . . . . . . . . . . . . . . . . . 216
. . . . . . . . . . . . . . . . . . . . . . . . . . . . . . . . . . . 217
. . . . . . . . . . . . . . . . . . . . . . . . . . . . . . . . . . 224
. . . . . . . . . . . . . . . . . . . . . . . . . . 225
. . . . . . . . . . . . . . . . . . . . . . . . . . . . . . 226
. . . . . . . . . . . . . . . . . . . . . . . . . . . 226
. . . . . . . . . . . . . . . . . . . . . . . . . . . . . . . . . . 227
. . . . . . . . . . . . . . . . . . . . . . . . . . 230
. . . . . . . . . . . . . . . . . . . . . . . . . . . . . . . . . . 231
. . . . . . . . . . . . . . . . . . . . . . . . . . . . . . . . . 232
. . . . . . . . . . . . . 221
. . . . . . . . . . . . . . . . . . . 223
. . . . 227
. . . . . . . . . . . . . . . . . . 232
. . . . . . . . . . . . . . . . 233
. . 235
Chapter 8 Importing Files
Preparing to Import Files . . . . . . . . . . . . . . . . . . . . . . . . . . . . . . . . . . . 238
Working with Mixed-Resolution Projects
Creating and Using Import Settings
Import Settings Options
Importing Files
Using Drag-and-Drop Method to Import Files
Reimporting Files
About Reimporting Matte-Key Effects
Batch Import Dialog Box
Using Decompose When Reimporting
Starting the Reimport Process
. . . . . . . . . . . . . . . . . . . . . 239
. . . . . . . . . . . . . . . . . . . . . . . . . . 240
. . . . . . . . . . . . . . . . . . . . . . . . . . . . . . . . 242
. . . . . . . . . . . . . . . . . . . . . . . . . . . . . . . . . . . . . . . . . . . . 247
. . . . . . . . . . . . . . . . 251
. . . . . . . . . . . . . . . . . . . . . . . . . . . . . . . . . . . . . . . . . . 252
. . . . . . . . . . . . . . . . . . . . 253
. . . . . . . . . . . . . . . . . . . . . . . . . . . . . . . . 254
. . . . . . . . . . . . . . . . . . . . 256
. . . . . . . . . . . . . . . . . . . . . . . . . . . 258
9
Page 10

Chapter 9 Organizing with Bins
Before You Begin . . . . . . . . . . . . . . . . . . . . . . . . . . . . . . . . . . . . . . . . . . 262
Using Audio T imecod e
Adjusting Pan Defaults
Adjusting Default Pan Settings
Using the Center Pan Command
Setting the Bin Display
About Bin Display Views
Bin Fast Menu
Basic Bin Procedures
Setting the Bin Font
Selecting Clips and Sequences
Duplicating Clips and Sequences
Moving Clips and Sequences
Copying Clips and Sequences
Deleting Clips and Sequences
Assigning Colors to Bin Objects
Adding a Color Column to a Bin
Assigning a Source Color
Assigning a Custom Source Color
Limiting Color Choices
Sifting Clips and Sequences
Sifting Timecodes or Keycode Ranges
Sifting Within a Rang e
Locking Items in the Bin
Selecting Offline Items in a Bin
Selecting Media Relatives for an Object
Selecting Sources Used by an Object
Selecting Unreferenced Clips
Using Text View
About Bin Views
Customizing Bin Views in Text View
Arranging Bin Columns
. . . . . . . . . . . . . . . . . . . . . . . . . . . . . . . . . . . . . . . . . 271
. . . . . . . . . . . . . . . . . . . . . . . . . . . . . . . . . . . . . . . 271
. . . . . . . . . . . . . . . . . . . . . . . . . . . . . . . . . . . . . . . . . . . 287
. . . . . . . . . . . . . . . . . . . . . . . . . . . . . . . . . . . . . . . 288
. . . . . . . . . . . . . . . . . . . . . . . . . . . . . . . . . 262
. . . . . . . . . . . . . . . . . . . . . . . . . . . . . . . . . 264
. . . . . . . . . . . . . . . . . . . . . . 264
. . . . . . . . . . . . . . . . . . . . . . 265
. . . . . . . . . . . . . . . . . . . . . . . . . . . . . . . . . 266
. . . . . . . . . . . . . . . . . . . . . . . . . . . . . . . . . . . 269
. . . . . . . . . . . . . . . . . . . . . . . . . . . . . . . . . . . . 272
. . . . . . . . . . . . . . . . . . . . . . . . . . . 272
. . . . . . . . . . . . . . . . . . . . . . . . 273
. . . . . . . . . . . . . . . . . . . . . . . . . . . . 273
. . . . . . . . . . . . . . . . . . . . . . . . . . . 274
. . . . . . . . . . . . . . . . . . . . . . . . . . . 275
. . . . . . . . . . . . . . . . . . . . . . . . . 276
. . . . . . . . . . . . . . . . . . . . . 276
. . . . . . . . . . . . . . . . . . . . . . . . . . . . 277
. . . . . . . . . . . . . . . . . . . . 278
. . . . . . . . . . . . . . . . . . . . . . . . . . . . . . 279
. . . . . . . . . . . . . . . . . . . . . . . . . . . . . 279
. . . . . . . . . . . . . . . . 281
. . . . . . . . . . . . . . . . . . . . . . . . . . . . . . 283
. . . . . . . . . . . . . . . . . . . . . . . . . . . . . . . . 284
. . . . . . . . . . . . . . . . . . . . . . . . . . 285
. . . . . . . . . . . . . . . . . . 286
. . . . . . . . . . . . . . . . . . . . . 286
. . . . . . . . . . . . . . . . . . . . . . . . . . . . 287
. . . . . . . . . . . . . . . . . 289
. . . . . . . . . . . . . . . . . . . . . . . . . . . . . 289
10
Page 11

Saving a Custom Bin View. . . . . . . . . . . . . . . . . . . . . . . . . . . 294
Managing Clip Information in Text View
Moving Within Column Cells
Modifying Clip Information
Copying Information Between Columns
Copying Information from Another Cell in a
Custom Column . . . . . . . . . . . . . . . . . . . . . . . . . . . . . . . . . . . . 301
Sorting Clips
Bin Column Headings
Using Frame View
Changing the Bin Background Color
Enlarging or Reducing Frame Size
Rearranging Frames
Changing the Frame Identifying the Clip
Arranging Frames in a Bin
Using Script View
Adding Text in Script View
Rearranging Clips in Script View
Printing Bins
Gathering Format Elements
Preparing Digital Bars and Tone
Importing Color Bars and Other Test Patterns
Creating Leader
Storyboard Worksheet
. . . . . . . . . . . . . . . . . . . . . . . . . . . . . . . . . . . . . . . . . . . . . . 312
Creating Video Leader
Creating Audio Leader
. . . . . . . . . . . . . . . . . . . . . . . . . . . . . . . . . . . . . . . 301
. . . . . . . . . . . . . . . . . . . . . . . . . . . . . . . . . . 303
. . . . . . . . . . . . . . . . . . . . . . . . . . . . . . . . . . . . . . . . . 306
. . . . . . . . . . . . . . . . . . . . . . . . . . . . . . . . . . . . 309
. . . . . . . . . . . . . . . . . . . . . . . . . . . . . . 310
. . . . . . . . . . . . . . . . . . . . . . . . . . . . . . . . . . . . . . . . . . 310
. . . . . . . . . . . . . . . . . . . . . . . . . . . . . . . . . 313
. . . . . . . . . . . . . . . . . . . . . . . . . . . . . . . . . . . . . . . . 317
. . . . . . . . . . . . . . . . . . . . . . . . . . . . . . 317
. . . . . . . . . . . . . . . . . . . . . . . . . . . . . . 318
. . . . . . . . . . . . . . . . . . . . . . . . . . . . . . . . . . . . . . 319
. . . . . . . . . . . . . . . . . . . . . . . . 295
. . . . . . . . . . . . . . . . . . . . . . . . . 295
. . . . . . . . . . . . . . . . . . . . . . . 308
. . . . . . . . . . . . . . . . . . . . . . . . . . . . . . 311
. . . . . . . . . . . . . . . . . . . . . . . . 312
. . . . . . . . . . . . . . . . . . . . . . . . . 314
. . . . . . . . . . . . . . . . . 295
. . . . . . . . . . . . . . 301
. . . . . . . . . . . . . . . . . . . . . 307
. . . . . . . . . . . . . . . . . 309
. . . . . . . . . . . . . 315
Chapter 10 Managing Media Files
Using the Media Tool . . . . . . . . . . . . . . . . . . . . . . . . . . . . . . . . . . . . . . 321
Basic Media Tool Features
Opening the Media Tool
Deleting Media Files with the Media Tool
Freeing Storage Space
. . . . . . . . . . . . . . . . . . . . . . . . . . . . . . . . . . . . . . 326
11
. . . . . . . . . . . . . . . . . . . . . . . . . . . . . . . 321
. . . . . . . . . . . . . . . . . . . . . . . . . . . . . . . . 322
. . . . . . . . . . . . . . . . 324
Page 12

Consolidating Media. . . . . . . . . . . . . . . . . . . . . . . . . . . . . . . . . . . . . . . 327
About the Consolidate Feature
Using the Consolidate Command
Loading the Media Database
Backing Up Media Files
Finding a Related Media File
Relinking Media Files
Relinking to Selected Clips
Relinking Consolidated Clips
Relinking Moved Projects
Unlinking Media Files
. . . . . . . . . . . . . . . . . . . . . . . . . . . . . . . . . . . . 334
. . . . . . . . . . . . . . . . . . . . . . . . . . . . . . . . . . . . . . 336
. . . . . . . . . . . . . . . . . . . . . . . . . . . . . . . . . . . . . 340
Chapter 11 Using Script Integration
Line Script Basics . . . . . . . . . . . . . . . . . . . . . . . . . . . . . . . . . . . . . . . . . . 342
Explanation of Symbols
Lining in the Digital Realm
Script Integration Workflow
Using Script Integration in Video Projects
Script Window Basics
Script Settings Options
Importing a Script
Opening, Closing, and Saving the Script Window
Displaying Clip Information in a Script Window
Navigating in the Script Window
Adjusting the Script Margins
Manipulating Script Text
Changing the Font of the Script
Selecting Text
Cutting, Copying, and Pasting Script
Removing Script Text
Searching Through Script
Using Page and Scene Numbers
Adding a Page or Scene Number
. . . . . . . . . . . . . . . . . . . . . . . . . . . . . . . . . . . . . . 347
. . . . . . . . . . . . . . . . . . . . . . . . . . . . . . . . . . . . . . 348
. . . . . . . . . . . . . . . . . . . . . . . . . . . . . . . . . . . 351
. . . . . . . . . . . . . . . . . . . . . . . . . . . . . . . . . . . . . . . . . . 353
. . . . . . . . . . . . . . . . . . . . . . . . . . . 328
. . . . . . . . . . . . . . . . . . . . . . . . 331
. . . . . . . . . . . . . . . . . . . . . . . . . . . . 333
. . . . . . . . . . . . . . . . . . . . . . . . . . . . . . . . 335
. . . . . . . . . . . . . . . . . . . . . . . . . . . . . . 338
. . . . . . . . . . . . . . . . . . . . . . . . . . . 338
. . . . . . . . . . . . . . . . . . . . . . . . . . . . . . . 339
. . . . . . . . . . . . . . . . . . . . . . . . . . . . . . . . . 343
. . . . . . . . . . . . . . . . . . . . . . . . . . . . . 344
. . . . . . . . . . . . . . . . . . . . . . . . . . . . . 345
. . . . . . . . . . . . . . . . 346
. . . . . . . . . . . . . . . . . . . . . . . . . . . . . . . . . 347
. . . . . . . . . 349
. . . . . . . . . . 350
. . . . . . . . . . . . . . . . . . . . . . . . 350
. . . . . . . . . . . . . . . . . . . . . . . . . . . . 351
. . . . . . . . . . . . . . . . . . . . . . . . . . 352
. . . . . . . . . . . . . . . . . . . . . 354
. . . . . . . . . . . . . . . . . . . . . . . . . . . . . . . . . . . 355
. . . . . . . . . . . . . . . . . . . . . . . . . . . . . . . . . . . 356
. . . . . . . . . . . . . . . . . . . . . . . . . 356
. . . . . . . . . . . . . . . . . . . . . 356
12
Page 13

Changing a Page or Scene Number . . . . . . . . . . . . . . . . . . . 357
Deleting a Page or Scene Number
. . . . . . . . . . . . . . . . . . . . 358
Searching for a Page or Scene Number
Conducting a Text Search
Linking Clips to the Script
. . . . . . . . . . . . . . . . . . . . . . . . . . . . . . . 359
. . . . . . . . . . . . . . . . . . . . . . . . . . . . . . . . . . 360
Interpolating Position for Script Integration
Manipulating Slates
Selecting Slates
Resizing a Slate
Hiding Slate Frames
Showing One Take Per Slate
Moving a Slate
Deleting a Slate
Manipulating Takes
Selecting Takes
Adding Takes
Deleting Takes
Displaying Take Numbers
. . . . . . . . . . . . . . . . . . . . . . . . . . . . . . . . . . . . . . . . 362
. . . . . . . . . . . . . . . . . . . . . . . . . . . . . . . . . . . . . . . . 362
. . . . . . . . . . . . . . . . . . . . . . . . . . . . . . . . . . . . . . . . 363
. . . . . . . . . . . . . . . . . . . . . . . . . . . . . . . . . . . . 363
. . . . . . . . . . . . . . . . . . . . . . . . . . . . . 364
. . . . . . . . . . . . . . . . . . . . . . . . . . . . . . . . . . . . . . . . . 365
. . . . . . . . . . . . . . . . . . . . . . . . . . . . . . . . . . . . . . . . 366
. . . . . . . . . . . . . . . . . . . . . . . . . . . . . . . . . . . . . . . . 367
. . . . . . . . . . . . . . . . . . . . . . . . . . . . . . . . . . . . . . . . 367
. . . . . . . . . . . . . . . . . . . . . . . . . . . . . . . . . . . . . . . . . . 367
. . . . . . . . . . . . . . . . . . . . . . . . . . . . . . . . . . . . . . . . . 368
. . . . . . . . . . . . . . . . . . . . . . . . . . . . . . 368
Changing the Representative Frame for a Take
Loading Takes
Playing Takes
Adjusting Take Lines
Indicating Off-Screen Dialog
Using Color Indicators
Using Script Marks
Placing Script Marks Manually
Automating Screening and Marking
. . . . . . . . . . . . . . . . . . . . . . . . . . . . . . . . . . . . . . . . . 369
. . . . . . . . . . . . . . . . . . . . . . . . . . . . . . . . . . . . . . . . . . 370
. . . . . . . . . . . . . . . . . . . . . . . . . . . . . . . . . . . 370
. . . . . . . . . . . . . . . . . . . . . . . . . . . . 371
. . . . . . . . . . . . . . . . . . . . . . . . . . . . . . . . . . 371
. . . . . . . . . . . . . . . . . . . . . . . . . . . . . . . . . . . . . . . . 372
. . . . . . . . . . . . . . . . . . . . . . . . . . 373
. . . . . . . . . . . . . . . . . . . . . . 374
Loading and Playing Marked Segments
Moving a Script Mark
Deleting a Script Mark
Finding Clips and Script
Finding Script
. . . . . . . . . . . . . . . . . . . . . . . . . . . . . . . . . . . . . . . . . 377
. . . . . . . . . . . . . . . . . . . . . . . . . . . . . . . . . . 376
. . . . . . . . . . . . . . . . . . . . . . . . . . . . . . . . . . 376
. . . . . . . . . . . . . . . . . . . . . . . . . . . . . . . . . . . . 377
Finding Clips and Bins from the Script Window
. . . . . . . . . . . . . . . . 358
. . . . . . . . . . . . . . . . . . 361
. . . . . . . . . . . . 369
. . . . . . . . . . . . . . . . . . 375
. . . . . . . . . . . 378
13
Page 14

Editing with the Script Window . . . . . . . . . . . . . . . . . . . . . . . . . . . . . 378
Assembling a Rough Cut
Splicing a Script Range
Revising the Script
Interactive Screenings
. . . . . . . . . . . . . . . . . . . . . . . . . . . . . . . . 379
. . . . . . . . . . . . . . . . . . . . . . . . . . . . . . . . . 380
. . . . . . . . . . . . . . . . . . . . . . . . . . . . . . . . . . . . . 380
. . . . . . . . . . . . . . . . . . . . . . . . . . . . . . . . . . 380
Chapter 12 Viewing and Marking Footage
Customizing the Composer Window . . . . . . . . . . . . . . . . . . . . . . . . . 383
Changing the Composer Window Background Color
Using the 16 x 9 Display Format
Displaying Tracking Information
Tracking Format Options
Setting the Font and Point Size for Monitor Displays
Displaying the Clip Information Window
Copying Text from the Clip Information Window
Displaying Timecode
Setting Multiple Timecode Displays
Composer Window Settings Options
Color Framing Options
Miscellaneous Composer Options
Fast Forward and Rewind
Viewing Methods
Loading and Clearing Footage
Loading into Source, Record, and Pop-up Monitors
Loading Multiple Clips or Sequences
Using the Clip Name Menus
Switching Between Loaded Clips
Clearing Clips from Monitors
Resizing Monitors
Hiding the Video in a Monitor
Resizing a Monitor
Controlling Playback
Using Position Bars and Position Indicators
. . . . . . . . . . . . . . . . . . . . . . . . . . . . . . . . . . . . . . . . . . 399
. . . . . . . . . . . . . . . . . . . . . . . . . . . . . . . . . . . . . . . . . 406
. . . . . . . . . . . . . . . . . . . . . . . . . . . . . . . . . . . . . . . 407
. . . . . . . . . . . . . . . . . . . . . . . . . . . . . . . . 388
. . . . . . . . . . . . . . . . . . . . . . . . . . . . . . . . . . . 393
. . . . . . . . . . . . . . . . . . . . . . . . . . . . . . 396
. . . . . . . . . . . . . . . . . . . . . . . . . . . . . . . 402
. . . . . . . . . . . . . . . . . . . . . . . . . . . . . . . . . . . . . 407
. . . . . . . 385
. . . . . . . . . . . . . . . . . . . . . . . . . . 386
. . . . . . . . . . . . . . . . . . . . . . . . 387
. . . . . . 390
. . . . . . . . . . . . . . . . . 390
. . . . . . 392
. . . . . . . . . . . . . . . . . . . . . 395
. . . . . . . . . . . . . . . . . . . . . 395
. . . . . . . . . . . . . . . . . . . . . . . . 397
. . . . . . . . . . . . . . . . . . . . . . . . . . . 398
. . . . . . . . 402
. . . . . . . . . . . . . . . . . . . . 403
. . . . . . . . . . . . . . . . . . . . . . . . . . . . 404
. . . . . . . . . . . . . . . . . . . . . 404
. . . . . . . . . . . . . . . . . . . . . . . . 405
. . . . . . . . . . . . . . . . . . . . . . . . . . . 406
. . . . . . . . . . . . . . . 407
14
Page 15

Using Buttons. . . . . . . . . . . . . . . . . . . . . . . . . . . . . . . . . . . . . . . . . . 409
Play Reverse, Play, Pause, Stop, Rewind, and
Fast Forward Buttons. . . . . . . . . . . . . . . . . . . . . . . . . . . . . . . . 409
Play Standby Button
Step Buttons
. . . . . . . . . . . . . . . . . . . . . . . . . . . . . . . . . . . . . . . 410
Using Single-Field Step
Using the Keyboard
J-K-L Keys (Three-Button Play)
Home, End, and Arrow Keys
Using the Mouse
. . . . . . . . . . . . . . . . . . . . . . . . . . . . . . . . . . . . . . . 415
Jogging with the Mouse
Shuttling with the Mouse
Marking and Subcataloging Footage
Marking IN and OUT Points
Moving IN and OUT Points
Marking an Entire Clip or Segment
Creating Subclips
Marking Audio Clips
Using Locators
. . . . . . . . . . . . . . . . . . . . . . . . . . . . . . . . . . . . . . . . . 422
Ways to Use Locators
Adding Locators While Editing
Copying Locators from Source Clips
Marking Locators
Using the Locators Window
Features of the Locators Window
Locators Window Fast Menu
Finding Frames, Clips, and Bins
Using Timecode to Fi nd a Frame
Searching a Clip
. . . . . . . . . . . . . . . . . . . . . . . . . . . . . . . . . . . . . . . 429
Using Match Frame
Performing a Reverse Match Frame
Finding a Bin
. . . . . . . . . . . . . . . . . . . . . . . . . . . . . . . . . . . . . . . . . . 432
Locating a Master Clip from a Subclip in a Sequence
. . . . . . . . . . . . . . . . . . . . . . . . . . . . . . . . 410
. . . . . . . . . . . . . . . . . . . . . . . . . . . . . . . . . 411
. . . . . . . . . . . . . . . . . . . . . . . . . . . . . . . . . . . . 412
. . . . . . . . . . . . . . . . . . . . . . 413
. . . . . . . . . . . . . . . . . . . . . . . . . 414
. . . . . . . . . . . . . . . . . . . . . . . . . . . . . 415
. . . . . . . . . . . . . . . . . . . . . . . . . . . 415
. . . . . . . . . . . . . . . . . . . . . . . . . 416
. . . . . . . . . . . . . . . . . . . . . . . . . . . . 416
. . . . . . . . . . . . . . . . . . . . . . . . . . . . . 418
. . . . . . . . . . . . . . . . . . . . . . 419
. . . . . . . . . . . . . . . . . . . . . . . . . . . . . . . . . . . . . . 419
. . . . . . . . . . . . . . . . . . . . . . . . . . . . . . . . . . . 421
. . . . . . . . . . . . . . . . . . . . . . . . . . . . . . . . 422
. . . . . . . . . . . . . . . . . . . . . . 423
. . . . . . . . . . . . . . . . . . 424
. . . . . . . . . . . . . . . . . . . . . . . . . . . . . . . . . . . 425
. . . . . . . . . . . . . . . . . . . . . . . . . . . . . 425
. . . . . . . . . . . . . . . . . . . . . 426
. . . . . . . . . . . . . . . . . . . . . . . . . 426
. . . . . . . . . . . . . . . . . . . . . . . . . . . . . 427
. . . . . . . . . . . . . . . . . . . . . . . . . 427
. . . . . . . . . . . . . . . . . . . . . . . . . . . . . . . . . . . . . 431
. . . . . . . . . . . . . . . . . . . . . . 431
. . . . . . . 433
15
Page 16

Finding a Frame. . . . . . . . . . . . . . . . . . . . . . . . . . . . . . . . . . . . . . . . 433
Chapter 13 Editing in Source/Record Mode
Entering Source/Record Mode. . . . . . . . . . . . . . . . . . . . . . . . . . . . . . . 436
Setting Up a New Sequence
Changing the Sequence Name and Timecode
Setting Up Tracks for the New Sequence
User Preferences for Creating Tracks
Adding Filler
Making an Edit
Creating an Instant Rough Cut
Undoing or Redoing Edits
Editing Additional Shots into the Sequence
Performing a Splice-in Edit
Performing an Overwrite Edit
Performing a Replace Edit
Using Single-Mark Editing
Using Phantom Marks
Setting One Mark
Adding a Second Mark
Lifting, Extracting, and Copying Material
Lifting Material
Extracting Material
Copying Material
Using the Clipboard
Preserving Clipboard Contents
Recovering Material from the Clipboard
Adding Comments to Sequence Clips
Playing the New Sequence
Starting a Playback Loop
Playback Performance Tips
Using the Play Length Toggle Feature
Changing the Value for the Play Length Toggle Button
. . . . . . . . . . . . . . . . . . . . . . . . . . . . . . . . . . . . . . . . . . 442
. . . . . . . . . . . . . . . . . . . . . . . . . . . . . . . . . . . . . . . . . . . . 443
. . . . . . . . . . . . . . . . . . . . . . . . . . . . . . . . . . . . . . . . 452
. . . . . . . . . . . . . . . . . . . . . . . . . . . . . . . . . 437
. . . . . . . . . . . . . . . . . . . . . . . . . . . . . . . . . . 446
. . . . . . . . . . . . . . . . . . . . . . . . . . . . . . 447
. . . . . . . . . . . . . . . . . . . . . . . . . . . . . . . 449
. . . . . . . . . . . . . . . . . . . . . . . . . . . . . . 450
. . . . . . . . . . . . . . . . . . . . . . . . . . . . . . . . . . . . . . 450
. . . . . . . . . . . . . . . . . . . . . . . . . . . . . . . . . . . . . . 451
. . . . . . . . . . . . . . . . . . . . . . . . . . . . . . . . . 451
. . . . . . . . . . . . . . . . . . . . . . . . . . . . . . . . . . . . . 453
. . . . . . . . . . . . . . . . . . . . . . . . . . . . . . . . . . . . . . 453
. . . . . . . . . . . . . . . . . . . . . . . . . . . . . . . . . . . . 454
. . . . . . . . . . . . . . . . . . . . . . . . . . . . . . . . . . 457
. . . . . . . . . . . . . . . . . . . . . . . . . . . . . . . . 458
. . . . . . . . . . . . . . . . . . . . . . . . . . . . . . 458
. . . . . . . . . . . . . . 439
. . . . . . . . . . . . . . . . . . 440
. . . . . . . . . . . . . . . . . . 441
. . . . . . . . . . . . . . . . . . . . . . . . . . . 444
. . . . . . . . . . . . . . . . . . 447
. . . . . . . . . . . . . . . . . . . . . . . . . . . 448
. . . . . . . . . . . . . . . . . . . . . 452
. . . . . . . . . . . . . . . . . . . . . . . 454
. . . . . . . . . . . . . . 455
. . . . . . . . . . . . . . . . . . . . . . . . 456
. . . . . . . . . . . . . . . . . . . . 459
. . 459
16
Page 17

Playing a Sequence Using the Play Length
Toggle Button . . . . . . . . . . . . . . . . . . . . . . . . . . . . . . . . . . . . . . 460
How to Fine-Tune the Sequence
Chapter 14 Using the Timeline
Customizing Timeline Views. . . . . . . . . . . . . . . . . . . . . . . . . . . . . . . . 463
Using the Timeline Fast Menu
Additional Procedures for Customizing the Timeline
Enlarging and Reducing Tracks
Moving a Track
Changing the Timeline Background Color
Changing the Timeline Track Color
Assigning Local Colors to Clips in the Timeline
Displaying Local and Source Colors in the Timeline
Displaying Source Colors
Displaying Local Colors
Highlighting Offline Media Cl ips
Saving a Customized Timeline View
Replacing a Timeline View
Setting the Scroll Option for the Timeline
Timeline Settings Options
Restoring the Default Timeline View
Navigating in the Timeline
Using the Position Indicator
Using the Timeline Scroll Bar/Position Bar
Displaying Detail in the Timeline
Zooming In and Out
Focusing the Timeline
Using Full-Screen Timeline
Displaying Source Material in the Timeline
Controlling Movement in the Timeline
IN to OUT Highlighting in the Timeline
Using Segment Mode
. . . . . . . . . . . . . . . . . . . . . . . . . . . . . 461
. . . . . . . . . . . . . . . . . . . . . . . . . . . 465
. . . . . . 466
. . . . . . . . . . . . . . . . . . . . . . 466
. . . . . . . . . . . . . . . . . . . . . . . . . . . . . . . . . . . . . 467
. . . . . . . . . . . . . . . . 468
. . . . . . . . . . . . . . . . . . . . . . 468
. . . . . . . . . . . 468
. . . . . . . 469
. . . . . . . . . . . . . . . . . . . . . . . . . . . . 470
. . . . . . . . . . . . . . . . . . . . . . . . . . . . . 470
. . . . . . . . . . . . . . . . . . . . . . . . 470
. . . . . . . . . . . . . . . . . . . . . 471
. . . . . . . . . . . . . . . . . . . . . . . . . . . . . . 472
. . . . . . . . . . . . . . . . 472
. . . . . . . . . . . . . . . . . . . . . . . . . . . . . . 473
. . . . . . . . . . . . . . . . . . . . . . . . 475
. . . . . . . . . . . . . . . . . . . . . . . . . . . . . . . . . 475
. . . . . . . . . . . . . . . . . . . . . . . . . . . . . 476
. . . . . . . . . . . . . . . . 476
. . . . . . . . . . . . . . . . . . . . . . . . 479
. . . . . . . . . . . . . . . . . . . . . . . . . . . . . . . . . . . . 480
. . . . . . . . . . . . . . . . . . . . . . . . . . . . . . . . . . 481
. . . . . . . . . . . . . . . . . . . . . . . . . . . . . 481
. . . . . . . . . . . . . . . 483
. . . . . . . . . . . . . . . . . . . 484
. . . . . . . . . . . . . . . . . . 485
. . . . . . . . . . . . . . . . . . . . . . . . . . . . . . . . . . . . . . 485
17
Page 18

Segment Mode Workflow . . . . . . . . . . . . . . . . . . . . . . . . . . . . . . . 486
Selecting and Deselecting Segments
. . . . . . . . . . . . . . . . . . . . . . 486
Selecting Segments with the Segment Mode Pointer
Lassoing One or More Segments
Deselecting Segments
. . . . . . . . . . . . . . . . . . . . . . . . . . . . . . . 488
Performing Segment Mode Edits
About Four-Frame Display
Maintaining Sync in Segment Mode
Extracting/Splicing Segments
Lifting/Overwriting Segments
Deleting Segments with Segment Mode
. . . . . . . . . . . . . . . . . . . . . 487
. . . . . . . . . . . . . . . . . . . . . . . . . 489
. . . . . . . . . . . . . . . . . . . . . . . . . . 489
. . . . . . . . . . . . . . . . . . 492
. . . . . . . . . . . . . . . . . . . . . . . . 493
. . . . . . . . . . . . . . . . . . . . . . . 494
. . . . . . . . . . . . . . . 495
Marking Clips and Sequences with Segment Mode
Using Advanced Timeline Techniques
Bin Editing into the Timeline
Cutting, Copying, and Pasting in the Timeline
Editing with the Film Track
Editing in Heads and Tails View
Working with Multiple Tracks
About Effects Editing
About Nesting
. . . . . . . . . . . . . . . . . . . . . . . . . . . . . . . . . . . . . . . . . 504
. . . . . . . . . . . . . . . . . . . . . . . . . . . . . . . 503
. . . . . . . . . . . . . . . . . . . . . . . . . . . . . . . . . . . 503
Using the Track Selector Panel
Selecting Tracks
Monitoring Tracks
Monitoring Video
Monitoring Audio
. . . . . . . . . . . . . . . . . . . . . . . . . . . . . . . . . . . . . . . . 506
. . . . . . . . . . . . . . . . . . . . . . . . . . . . . . . . . . . . . . 507
. . . . . . . . . . . . . . . . . . . . . . . . . . . . . . . . . . 507
. . . . . . . . . . . . . . . . . . . . . . . . . . . . . . . . . . 508
Monitoring a Solo Track
Patching Tracks
. . . . . . . . . . . . . . . . . . . . . . . . . . . . . . . . . . . . . . . . 509
Locking and Sync Locking Tracks
Locking Tracks
Sync Locking Tracks
Adding a Track
Deleting Tracks
. . . . . . . . . . . . . . . . . . . . . . . . . . . . . . . . . . . . . 511
. . . . . . . . . . . . . . . . . . . . . . . . . . . . . . . . 512
. . . . . . . . . . . . . . . . . . . . . . . . . . . . . . . . . . . . . . . . . 512
. . . . . . . . . . . . . . . . . . . . . . . . . . . . . . . . . . . . . . . . 513
Adding an Edit (Match Framing)
. . . . . . . . . . . . . . . . . . . . . . . 497
. . . . . . . . . . . . . . . . . . . . . . . . . . . . 497
. . . . . . . . . . . . 498
. . . . . . . . . . . . . . . . . . . . . . . . . . . . . 499
. . . . . . . . . . . . . . . . . . . . . . . . . 501
. . . . . . . . . . . . . . . . . . . . . . . . . . . 504
. . . . . . . . . . . . . . . . . . . . . . . . . . . . . 509
. . . . . . . . . . . . . . . . . . . . . . . . 511
. . . . . . . . . . . . . . . . . . . . . . . . . 514
. . . . 487
. . . . 496
18
Page 19

Removing Match-Frame Edits. . . . . . . . . . . . . . . . . . . . . . . . 515
Backtiming Edits
Additional Offline Aids
Detecting Duplicate Frames
Tracking Color-Frame Shifts
Printing the Timeline
. . . . . . . . . . . . . . . . . . . . . . . . . . . . . . . . . . . . . . . 516
. . . . . . . . . . . . . . . . . . . . . . . . . . . . . . . . . . . . . . . 521
Chapter 15 Working in Trim Mode
Customizing Trim Mode. . . . . . . . . . . . . . . . . . . . . . . . . . . . . . . . . . . . 522
Trim Settings Options
Using Basic Trim Procedures
Entering Trim Mode
Exiting Trim Mode
Switching Between Big and Small Trim Modes
Selecting Between Trim Sides
Selecting Additional Transitions
Performing a Basic Trim
Audio Solo in Trim Mode
Reviewing the Trim Edit
Trimming On-the-Fly
Dual-Image Playback During Trims
Trimming During a Playback Loop
Creating Overlap Edits
Extending an Edit
Slipping or Sliding Shots
Selecting Segments for Slip or Slide Trimming
The Slip/Slide Display
Performing the Slip or Slide Trim
Slipping Shots in Source/Record Mode
Maintaining
Adding Black When Trimming
Trimming with Sync-Locked Tracks
Using the Transition Corner Display
Sync While Trimming . . . . . . . . . . . . . . . . . . . . . . . . . . 545
. . . . . . . . . . . . . . . . . . . . . . . . . . . . . . . . . . . . . 529
. . . . . . . . . . . . . . . . . . . . . . . . . . . . . . . . . . . . . 537
. . . . . . . . . . . . . . . . . . . . . . . . . . . . . . . . . . . . . . . . . . 538
. . . . . . . . . . . . . . . . . . . . . . . . . . . . . . . . . . . . 517
. . . . . . . . . . . . . . . . . . . . . . . . . . . . . 517
. . . . . . . . . . . . . . . . . . . . . . . . . . . . . 518
. . . . . . . . . . . . . . . . . . . . . . . . . . . . . . . . . . 525
. . . . . . . . . . . . . . . . . . . . . . . . . . . . . . . . 526
. . . . . . . . . . . . . . . . . . . . . . . . . . . . . . . . . . . . 527
. . . . . . . . . . . . 530
. . . . . . . . . . . . . . . . . . . . . . . . . . . 531
. . . . . . . . . . . . . . . . . . . . . . . . . 531
. . . . . . . . . . . . . . . . . . . . . . . . . . . . . . . . . 533
. . . . . . . . . . . . . . . . . . . . . . . . . . . . . . . 533
. . . . . . . . . . . . . . . . . . . . . . . . . . . . . . . . 534
. . . . . . . . . . . . . . . . . . . . . . . . . . . . . . . . . . . 535
. . . . . . . . . . . . . . . . . . . . . . 536
. . . . . . . . . . . . . . . . . . . . . . . 536
. . . . . . . . . . . . . . . . . . . . . . . . . . . . . . . . . . . 540
. . . . . . . . . . . . 540
. . . . . . . . . . . . . . . . . . . . . . . . . . . . . . . . . . 541
. . . . . . . . . . . . . . . . . . . . . . . . 543
. . . . . . . . . . . . . . . . . . . 544
. . . . . . . . . . . . . . . . . . . . . . . . . . 545
. . . . . . . . . . . . . . . . . . . . . . 546
. . . . . . . . . . . . . . . . . . . . . . . . . 549
19
Page 20

Chapter 16 Working with Audio
About Audio Tools. . . . . . . . . . . . . . . . . . . . . . . . . . . . . . . . . . . . . . . . . 553
Accessing Audio Effect Tools
Audio Editing Aids
Using Audio Scrub
Smooth Scrub Versus Digital Scrub
Selecting Tracks for Scrubbing
Performing Smooth Audio Scrub
Using the J-K-L Keys to Perform Smooth Scrub
Using the Mouse to Perform Smooth Scrub
Using Digital Audio Scrub
Adjusting Digital Scrub Parameters
Performing the Digital Scrub Procedure
Using Waveform Plots
Displaying Audio Waveforms
Muting the Audio
Using the Audio Mix Tool
Resizing the Audio Mix Tool
Adjusting One Audio Track at a Time
Ganging and Adjusting Multiple Tracks
Ignoring Existing Volume and Pan Settings
Adjusting Volume While Playing an Audio Effect
Using Audio Gain Automation
Automation Gain Values and System Clip Gain Values
Adjusting Volume in the Timeline
Deleting Audio Gain Keyframes
Moving Audio Gain Keyframes on the Timeline
Using an External Fader Box to Adjust Volume
Using an External Fader to Adjust the Volume of
Individual Keyframes. . . . . . . . . . . . . . . . . . . . . . . . . . . . . . . 578
About the Automation Gain Tool Window
Hardware Toggle Button
Track Solo Button
. . . . . . . . . . . . . . . . . . . . . . . . . . . . . . . . . . . . . . . . 555
. . . . . . . . . . . . . . . . . . . . . . . . . . . . . . . . 554
. . . . . . . . . . . . . . . . . . . . . . . . . . . . . . . . . . . . . 555
. . . . . . . . . . . . . . . . . . . 555
. . . . . . . . . . . . . . . . . . . . . . . 556
. . . . . . . . . . . . . . . . . . . . . . . . 556
. . . . . . . . 556
. . . . . . . . . . . . 557
. . . . . . . . . . . . . . . . . . . . . . . . . . . . . . 557
. . . . . . . . . . . . . . . . . . 558
. . . . . . . . . . . . . . . 560
. . . . . . . . . . . . . . . . . . . . . . . . . . . . . . . . . . 561
. . . . . . . . . . . . . . . . . . . . . . . . 561
. . . . . . . . . . . . . . . . . . . . . . . . . . . . . . . . . . . . . . 563
. . . . . . . . . . . . . . . . . . . . . . . . . . . . . . . . . . 563
. . . . . . . . . . . . . . . . . . . . . . . . . . . . 565
. . . . . . . . . . . . . . . . . . . . 565
. . . . . . . . . . . . . . . . . . 570
. . . . . . . . . . . . . . . 571
. . . . . . . . . 572
. . . . . . . . . . . . . . . . . . . . . . . . . . . . . . 573
. . . . . 574
. . . . . . . . . . . . . . . . . . . . . . . 574
. . . . . . . . . . . . . . . . . . . . . 576
. . . . . . . 576
. . . . . . . . . . . . 578
. . . . . . . . . . . . . . . . 579
. . . . . . . . . . . . . . . . . . . . . . . . . . . . . 581
. . . . . . . . . . . . . . . . . . . . . . . . . . . . . . . . . . . 582
20
Page 21

Position Indicator Lights . . . . . . . . . . . . . . . . . . . . . . . . . . . . 583
Automation Gain Tool Fast Menu
Recording Audio Gain Information
. . . . . . . . . . . . . . . . . . . . 584
. . . . . . . . . . . . . . . . . . . . . . 585
Using the Automation Gain Tool Window Sliders to
Record Gain Information. . . . . . . . . . . . . . . . . . . . . . . . . . . . 585
Using a Keyboard Shortcut
. . . . . . . . . . . . . . . . . . . . . . . . . . 587
Using an External Fader Box to Record Audio Gain
Information. . . . . . . . . . . . . . . . . . . . . . . . . . . . . . . . . . . . . . . . 587
Using the Snap Mode Feature on the MCS-3000X Fader
Connecting an External Fader to Your Avid System
The MCS-3000X Buttons
. . . . . . . . . . . . . . . . . . . . . . . . . . . . . 590
Ganging Sliders on the FaderMaster Pro Fader
. . . . . . . . 589
. . . . . . . . . 591
Using the Automation Gain Tool and Audio Mix Tool
Windows. . . . . . . . . . . . . . . . . . . . . . . . . . . . . . . . . . . . . . . . . . . . . . 592
Using the Audio EQ Tool
Audio EQ Tool Features
Applying Audio EQ Effects
Saving Audio EQ Effects
Removing Audio EQ Effects
Audio EQ Examples
Low Shelf Example
Small Octave Range Example
Using Audio EQ Templates
Applying an EQ Template
Creating Your Own Templates
Adjusting EQ While Playing an Audio Effect
Using Digidesign AudioSuite Plug-Ins
Installing AudioSuite Plug-Ins
Starting and Quitting the DAE Application
Setting Playback Buffer Size
Using Digidesign AudioSuite Plug-Ins
. . . . . . . . . . . . . . . . . . . . . . . . . . . . . . . . . . . 594
. . . . . . . . . . . . . . . . . . . . . . . . . . . . . . . . . 595
. . . . . . . . . . . . . . . . . . . . . . . . . . . . . 597
. . . . . . . . . . . . . . . . . . . . . . . . . . . . . . . . 601
. . . . . . . . . . . . . . . . . . . . . . . . . . . . . 602
. . . . . . . . . . . . . . . . . . . . . . . . . . . . . . . . . . . . 602
. . . . . . . . . . . . . . . . . . . . . . . . . . . . . . . . . 602
. . . . . . . . . . . . . . . . . . . . . . . . 603
. . . . . . . . . . . . . . . . . . . . . . . . . . . . . . 605
. . . . . . . . . . . . . . . . . . . . . . . . . . . 606
. . . . . . . . . . . . . . . . . . . . . . . 607
. . . . . . . . . . . . . . 607
. . . . . . . . . . . . . . . . . . . . . . . 608
. . . . . . . . . . . . . . . . . . . . . . . . . . 609
. . . . . . . . . . . . . . . 609
. . . . . . . . . . . . . . . . . . . . . . . . . . . . 610
. . . . . . . . . . . . . . . . . . . 610
Applying an AudioSuite Plug-In to a Clip in the Timeline
Using a Plug-In Dialog Box
. . . . . . . . . . . . . . . . . . . . . . . . . . . . . . 613
. 588
. . 612
21
Page 22

AudioSuite Plug-In Fast Menu. . . . . . . . . . . . . . . . . . . . . . . 614
Rendering Plug-In Effects
Creating New Master Clips
Serial Versus Parallel Processing
AudioSuite Controls for Creating New Master Clips
Using the AudioSuite Plug-Ins to Create New
Master Clips . . . . . . . . . . . . . . . . . . . . . . . . . . . . . . . . . . . . . . . 619
Using an AudioSuite Effect Template
Plug-In Limitations
Troubleshooting AudioSuite Plug-Ins
Addressing Memory Allocation Problems
Canceling a Render Operation
Addressing Error Messages When Rendering a
Plug-in Effect . . . . . . . . . . . . . . . . . . . . . . . . . . . . . . . . . . . . . . 623
Recording Voice-Over Narration
Using the Audio Punch In Tool
Connecting the Hardware
Creating the Voice-Over
Voice-Over Media Files
Fine-Tuning Audio Transitions
Fading and Dipping Audio
Fading Audio
Dipping Audio
Mixing Down Audio Tracks
. . . . . . . . . . . . . . . . . . . . . . . . . . . . . . . . . . . . . . 629
. . . . . . . . . . . . . . . . . . . . . . . . . . . . . . . 615
. . . . . . . . . . . . . . . . . . . . . . . . . . . . . . 615
. . . . . . . . . . . . . . . . . . . . . . . . . . . . . . . . . . . . . 620
. . . . . . . . . . . . . . . . . . . . . . . . . . . . . . . 625
. . . . . . . . . . . . . . . . . . . . . . . . . . . . . . . . . 626
. . . . . . . . . . . . . . . . . . . . . . . . . . . . . . . . . 628
. . . . . . . . . . . . . . . . . . . . . . . . . . . . . . 628
. . . . . . . . . . . . . . . . . . . . . . . . . . . . . . 629
. . . . . . . . . . . . . . . . . . . . . . . . . . . . . . . . . . . . . 631
. . . . . . . . . . . . . . . . . . . . . . . . . . . . . . . . . 632
. . . . . . . . . . . . . . . . . . . . . 616
. . . 616
. . . . . . . . . . . . . . . . . 620
. . . . . . . . . . . . . . . . . . . . 621
. . . . . . . . . . . . . 621
. . . . . . . . . . . . . . . . . . . . . . . 622
. . . . . . . . . . . . . . . . . . . . . . . . . . . . . 623
. . . . . . . . . . . . . . . . . . . . . . . . . . 625
Chapter 17 Syncing Methods
Autosyncing Clips . . . . . . . . . . . . . . . . . . . . . . . . . . . . . . . . . . . . . . . . . 635
Managing Sync Breaks
Editing to Avoid Sync Breaks
Displaying Sync Breaks
Fixing Sync Breaks
Fixing Sync in Trim Mode
Fixing Sync in Source/Record Mode
. . . . . . . . . . . . . . . . . . . . . . . . . . . . . . . . . . . . . 637
. . . . . . . . . . . . . . . . . . . . . . . . . . . . 638
. . . . . . . . . . . . . . . . . . . . . . . . . . . . . . . . . 638
. . . . . . . . . . . . . . . . . . . . . . . . . . . . . . . . . . . . . 639
. . . . . . . . . . . . . . . . . . . . . . . . . . . 640
. . . . . . . . . . . . . . . . . . 640
22
Page 23

Fixing Sync in Segment Mode. . . . . . . . . . . . . . . . . . . . . . . . 641
Managing Sync with Multiple Tracks
Using Sync Lock
Syncing with Tail Leader
Syncing with Locators
Using Add Edit When Trimming
Using Sync Point Editing
Ganging Footage in Monitors
Using Match Frame
Performing a Match Frame
Performing a Reverse Match Frame
Matchframing Tracks
Using Match Frame to Find Sources
. . . . . . . . . . . . . . . . . . . . . . . . . . . . . . . . . . . . . . . 642
. . . . . . . . . . . . . . . . . . . . . . . . . . . . . . . . . . . . . . . . 649
Chapter 18 Multicamera Editing
Developing a Postproduction Model . . . . . . . . . . . . . . . . . . . . . . . . . 652
Tape Classification Schemes
Production Paths
Managing Audio
Digitizing W orkflow
Digitizing Methods
Logging Tips
Autodigitizing Tips
Storage Tips
Checking the Bins
Replacing Missing Clips
Deleting Extra Clips
Checking Audio and Image Quality
Additional Offline Editing Aids
Grouping and Multigrouping Clips
Creating Group Clips
Creating Multigroup Clips
Multicamera Edit Modes
. . . . . . . . . . . . . . . . . . . . . . . . . . . . . . . . . . . . . . . . 659
. . . . . . . . . . . . . . . . . . . . . . . . 641
. . . . . . . . . . . . . . . . . . . . . . . . . . . . . . . . 643
. . . . . . . . . . . . . . . . . . . . . . . . . . . . . . . . . . 644
. . . . . . . . . . . . . . . . . . . . . . . . . 645
. . . . . . . . . . . . . . . . . . . . . . . . . . . . . . . . . . . 646
. . . . . . . . . . . . . . . . . . . . . . . . . . . . . . . 648
. . . . . . . . . . . . . . . . . . . . . . . . . . . . . . 649
. . . . . . . . . . . . . . . . . . . . . . 650
. . . . . . . . . . . . . . . . . . . . . . . . . . . . . . . . . . . 650
. . . . . . . . . . . . . . . . . . . . . . 651
. . . . . . . . . . . . . . . . . . . . . . . . . . . . . 653
. . . . . . . . . . . . . . . . . . . . . . . . . . . . . . . . . . . . . . . 654
. . . . . . . . . . . . . . . . . . . . . . . . . . . . . . . . . . . . . . . 655
. . . . . . . . . . . . . . . . . . . . . . . . . . . . . . . . . . . 656
. . . . . . . . . . . . . . . . . . . . . . . . . . . . . . . . . . . . . 657
. . . . . . . . . . . . . . . . . . . . . . . . . . . . . . . . . . . . . . . 658
. . . . . . . . . . . . . . . . . . . . . . . . . . . . . . . . . 658
. . . . . . . . . . . . . . . . . . . . . . . . . . . . . . . . . . . . . . 660
. . . . . . . . . . . . . . . . . . . . . . . . . . . . 660
. . . . . . . . . . . . . . . . . . . . . . . . . . . . . . . . 661
. . . . . . . . . . . . . . . . . . 661
. . . . . . . . . . . . . . . . . . . . . . . . . 662
. . . . . . . . . . . . . . . . . . . . . . . . . . 662
. . . . . . . . . . . . . . . . . . . . . . . . . . . . . . . . . . . 663
. . . . . . . . . . . . . . . . . . . . . . . . . . . . . . 665
. . . . . . . . . . . . . . . . . . . . . . . . . . . . . . . . . . . . 666
23
Page 24

Full-Monitor Display . . . . . . . . . . . . . . . . . . . . . . . . . . . . . . . . . . . 666
Quad Split
MultiCamera Mode
Multicamera Editing Techniques
Switching Shots with the Arrow Keys
Cutting On-the-Fly with Quad Keys
Using the Add Edit Button
Using the Group Menu
Using the Quad Menus
Using Match Frame in Multicamera Editing
Workflow Options
Selective Camera Cutting
Cutting On-the-Fly
Combination Cutting
. . . . . . . . . . . . . . . . . . . . . . . . . . . . . . . . . . . . . . . . . . . . . 668
Chapter 19 Output Options
Preparing for Output. . . . . . . . . . . . . . . . . . . . . . . . . . . . . . . . . . . . . . . 682
Establishing Sync for Output
Calibrating for Video Output
Using the Factory Presets
Basic Video Output Calibration
Advanced Video Output Calibration
Preparing for Audio Output
Setting the Calibration Tone
Calibrating Global Output Levels
Adjusting Output on Eight-Channel Audio
Board Systems . . . . . . . . . . . . . . . . . . . . . . . . . . . . . . . . . . . . . 695
Preparing Record Tapes
Frame-Accurate Recording
Manual Recording
Recording Bars and Tone
Enabling Assemble-Edit Recording
Using the Digital Cut Tool
. . . . . . . . . . . . . . . . . . . . . . . . . . . . . . . . . . . . . 669
. . . . . . . . . . . . . . . . . . . . . . . . . . . . 671
. . . . . . . . . . . . . . . . . . . . 672
. . . . . . . . . . . . . . . . . . . . . . 672
. . . . . . . . . . . . . . . . . . . . . . . . . . . . . . 673
. . . . . . . . . . . . . . . . . . . . . . . . . . . . . . . . . 674
. . . . . . . . . . . . . . . . . . . . . . . . . . . . . . . . . 676
. . . . . . . . . . . . . . . 677
. . . . . . . . . . . . . . . . . . . . . . . . . . . . . . . . . . . . . . . . . 677
. . . . . . . . . . . . . . . . . . . . . . . . . . . . . . . 677
. . . . . . . . . . . . . . . . . . . . . . . . . . . . . . . . . . . . . 678
. . . . . . . . . . . . . . . . . . . . . . . . . . . . . . . . . . . 680
. . . . . . . . . . . . . . . . . . . . . . . . . . . . . . . 682
. . . . . . . . . . . . . . . . . . . . . . . . . . . . 683
. . . . . . . . . . . . . . . . . . . . . . . . . . . . 683
. . . . . . . . . . . . . . . . . . . . . . 684
. . . . . . . . . . . . . . . . . . 688
. . . . . . . . . . . . . . . . . . . . . . . . . . . . . 693
. . . . . . . . . . . . . . . . . . . . . . . . . 693
. . . . . . . . . . . . . . . . . . . . 694
. . . . . . . . . . . . . . . . . . . . . . . . . . . . . . . . . 696
. . . . . . . . . . . . . . . . . . . . . . . . . . . 697
. . . . . . . . . . . . . . . . . . . . . . . . . . . . . . . . . . 697
. . . . . . . . . . . . . . . . . . . . . . . . . . . . 698
. . . . . . . . . . . . . . . . . . . . . . 698
. . . . . . . . . . . . . . . . . . . . . . . . . . . . . . . . . . 700
24
Page 25

Selecting a Deck . . . . . . . . . . . . . . . . . . . . . . . . . . . . . . . . . . . . . . . 702
Previewing a Digital Cut
Creating a Custom Countdown Display
Recording a Digital Cut to Tape (Remote Mode)
Recording a Digital Cut to Tape (Local Mode)
Accessing EDL Manager
Using the Matchback Option
VTR Play Emulation
. . . . . . . . . . . . . . . . . . . . . . . . . . . . . . . . . . . . . . . 712
. . . . . . . . . . . . . . . . . . . . . . . . . . . . . . . . 703
. . . . . . . . . . . . . . . . . . . . . . . . . . . . . . . . . . . . 710
. . . . . . . . . . . . . . . . . . . . . . . . . . . . . . . . 711
Chapter 20 Exporting and Exchanging Material
About Exporting Files . . . . . . . . . . . . . . . . . . . . . . . . . . . . . . . . . . . . . . 716
Creating and Using Export Settings
Export Options Settings
Video Compression Options
Additional Export Options Settings
Preparing to Export a Sequence
Mixing Down Video Tracks
Exporting Frames, Clips, or Sequences
Using Drag-and-Drop Method to Export Frames, Clips, and
Sequences. . . . . . . . . . . . . . . . . . . . . . . . . . . . . . . . . . . . . . . . . . . . . . . . . 743
About OMF Interchange
Choosing an OMFI Transfer Method
Using the Avid
About the Avid
Installing the Avid
Exporting with the Avid
Exporting with Other Supported
Exporting from a Third-Party
Application . . . . . . . . . . . . . . . . . . . . . . . . . . . . . . . . . . . . . . . . . . . . 756
Transferring a Project Between
(Macintosh) Systems . . . . . . . . . . . . . . . . . . . . . . . . . . . . . . . . . . . . . . . 757
Methods for Transferring Files Between
Media Composer Systems. . . . . . . . . . . . . . . . . . . . . . . . . . . . . . . 758
QuickTime Codec . . . . . . . . . . . . . . . . . . . . . . . . . . . 746
QuickTime Codec. . . . . . . . . . . . . . . . . . . . . . . . 746
. . . . . . . . . . . . . . . . . . . . . . . . . . . . . . . . . 724
. . . . . . . . . . . . . . . . . . . . . . . . . . . . . . . . . . . . 744
QuickTime Codec on Other Systems . . . . 747
QuickTime Codec. . . . . . . . . . . . . . . . 748
. . . . . . . . . . . . . . . . . . . . . . . . . . 717
. . . . . . . . . . . . . . . . . . . . . . . . . . . . . 728
. . . . . . . . . . . . . . . . . . . . . . . . . . . . . . 737
. . . . . . . . . . . . . . . . . . . . . . . . . . . . . 738
QuickTime Codecs . . . . . . . 756
QuickTime Codec
Media Composer
. . . . . . . . . . . . . . . . . . 704
. . . . . . . . . . . . . . . 706
. . . . . . . . . . . . . . . . . 708
. . . . . . . . . . . . . . . . . . . . . . 733
. . . . . . . . . . . . . . . . . . . . . . . 740
. . . . . . . . . . . . . . . . . . . . . 745
25
Page 26

Compatibility Requirements for Transfer . . . . . . . . . . . . . . . . . 759
Transferring a Project and Associated Media Files
Transferring Projects, User Profiles, and Site Settings
Appendix A Using AudioSuite Plug-Ins
Supported AudioSuite Plug-Ins . . . . . . . . . . . . . . . . . . . . . . . . . . . . . 763
Core AudioSuite Plug-Ins
Additional Supported Plug-Ins
Digidesign D-FX™ Plug-Ins
Digidesign D-Fi™ Plug-Ins
Core Plug-In Descriptions
. . . . . . . . . . . . . . . . . . . . . . . . . . . . . . . . . . . . . . . . . . . . . . . . . 766
Invert
Duplicate
Normalize
Gain
Reverse
DC Offset Removal
Time Compression/Expansion
Pitch Shift
. . . . . . . . . . . . . . . . . . . . . . . . . . . . . . . . . . . . . . . . . . . . . . 766
. . . . . . . . . . . . . . . . . . . . . . . . . . . . . . . . . . . . . . . . . . . . . 766
. . . . . . . . . . . . . . . . . . . . . . . . . . . . . . . . . . . . . . . . . . . . . . . . . . 767
. . . . . . . . . . . . . . . . . . . . . . . . . . . . . . . . . . . . . . . . . . . . . . . 768
. . . . . . . . . . . . . . . . . . . . . . . . . . . . . . . . . . . . . . . . . . . . . 772
. . . . . . . . . . . . . . . . . . . . . . . . . . . . . . . . . . 766
. . . . . . . . . . . . . . . . . . . . . . . . . . . . . . . . . . . . . 768
. . . . . . . . . 759
. . . . . . 761
. . . . . . . . . . . . . . . . . . . . . . . . . . . . . . . 764
. . . . . . . . . . . . . . . . . . . . . . . . . . 765
. . . . . . . . . . . . . . . . . . . . . . . . . 765
. . . . . . . . . . . . . . . . . . . . . . . . . . 765
. . . . . . . . . . . . . . . . . . . . . . . . . . . 768
Appendix B File Format Specifications
Graphics (Image) Files. . . . . . . . . . . . . . . . . . . . . . . . . . . . . . . . . . . . . . 776
Preparing Graphics Files for Import
Graphics File Import Specifications
Animation Files
Audio File Formats
OMF Files
Two-Field Media Files and Field Dominance
. . . . . . . . . . . . . . . . . . . . . . . . . . . . . . . . . . . . . . . . . . . 784
. . . . . . . . . . . . . . . . . . . . . . . . . . . . . . . . . . . . . . . . . 787
. . . . . . . . . . . . . . . . . . . . . . . . . . . . . . . . . . . . . . . . . . . . . . . . . 787
. . . . . . . . . . . . . . . . . . . . . . 779
. . . . . . . . . . . . . . . . . . . . . . 779
. . . . . . . . . . . . . . . . . . 790
Appendix C Compression Ratios and Storage Requirements
Screen Resolution. . . . . . . . . . . . . . . . . . . . . . . . . . . . . . . . . . . . . . . . . . 793
Compression Ratios
Compression Groups and Image Quality
. . . . . . . . . . . . . . . . . . . . . . . . . . . . . . . . . . . . . . . . 793
. . . . . . . . . . . . . . . . . 794
26
Page 27

Video Streams . . . . . . . . . . . . . . . . . . . . . . . . . . . . . . . . . . . . . . . . . 795
Compression Specifications
Mixing Ratios
Storage Requirements
Estimating Drive Space Requirements
Maximizing Drive Space
Managing Storage to Improve Playback Performance
. . . . . . . . . . . . . . . . . . . . . . . . . . . . . . . . . . . . . . . . . . 797
. . . . . . . . . . . . . . . . . . . . . . . . . . . . . . . . . . . . . . 798
. . . . . . . . . . . . . . . . . . . . . . . . . . . . . . . . . . . . 804
Appendix D Avid Log Specifications
Understanding Avid Log Specifications . . . . . . . . . . . . . . . . . . . . . . 806
Describing an Avid Log File
Global Headings
Column Headings
. . . . . . . . . . . . . . . . . . . . . . . . . . . . . . . . . . . . . . . . . . . . . . . . . . 812
Data
Sample Avid Log
. . . . . . . . . . . . . . . . . . . . . . . . . . . . . . . . . . . . . . . 808
. . . . . . . . . . . . . . . . . . . . . . . . . . . . . . . . . . . . . . 810
. . . . . . . . . . . . . . . . . . . . . . . . . . . . . . . . . . . . . . . . . . 816
Index
. . . . . . . . . . . . . . . . . . . . . . . . . . . . . 795
. . . . . . . . . . . . . . . . . . . . 798
. . . . . . 804
. . . . . . . . . . . . . . . . . . . . . . . . . . . . . . . . . 807
27
Page 28

Figures
Figure 3-1 Sample Data File. . . . . . . . . . . . . . . . . . . . . . . . . . . . . . . . 97
Figure 3-2
Figure 6-1
Figure 8-1
Figure 14-1
Figure 14-2
Sample Spreadsheet Form . . . . . . . . . . . . . . . . . . . . . . . 99
Digitize Tool . . . . . . . . . . . . . . . . . . . . . . . . . . . . . . . . . . 164
Batch Import Dialog Box. . . . . . . . . . . . . . . . . . . . . . . . 254
Timeline Window. . . . . . . . . . . . . . . . . . . . . . . . . . . . . . 475
Track Selector Panel. . . . . . . . . . . . . . . . . . . . . . . . . . . . 505
28
Page 29

Tables
Table 2-1 Help Topic Buttons . . . . . . . . . . . . . . . . . . . . . . . . . . . . . 59
Table 3-1
Table 3-2
Table 3-3
Table 3-4
Table 3-5
Table 5-1
Table 6-1
Table 6-2
Table 6-3
Table 6-4
Table 7-1
Table 7-2
Table 7-3
Table 8-1
Table 9-1
Table 9-2
Settings Scroll List . . . . . . . . . . . . . . . . . . . . . . . . . . . . . . 77
Bin Settings Dialog Box Options . . . . . . . . . . . . . . . . . . 81
General Settings Dialog Box Options . . . . . . . . . . . . . . 82
User Interface Settings Dialog Box Options . . . . . . . . 83
Displaying Groups of Settings . . . . . . . . . . . . . . . . . . . 84
Modifying Bin Information Options . . . . . . . . . . . . . 145
Deck Settings Options . . . . . . . . . . . . . . . . . . . . . . . . . 157
Deck Preferences Options . . . . . . . . . . . . . . . . . . . . . . 160
General Digitize Settings Options . . . . . . . . . . . . . . . 176
Luminance Settings for Video Input . . . . . . . . . . . . . 203
Function Keys Available When Digitizing. . . . . . . . . 210
Locators Mapped to Function Keys . . . . . . . . . . . . . . 212
Batch Digitize Settings Options . . . . . . . . . . . . . . . . . . 230
Import Settings Options . . . . . . . . . . . . . . . . . . . . . . . . 242
Object Icon Descriptions . . . . . . . . . . . . . . . . . . . . . . . 268
Range Menu Items for Explicit Ranges . . . . . . . . . . . 282
Table 9-3
Table 9-4
Table 9-5
Table 9-6
Table 11-1
Table 12-1
Table 12-2
Table 12-3
Range Menu Items for Implicit Ranges. . . . . . . . . . . . 283
Direct Modification Headings . . . . . . . . . . . . . . . . . . . 297
Modify Command Options . . . . . . . . . . . . . . . . . . . . . 299
Bin Column Selection . . . . . . . . . . . . . . . . . . . . . . . . . . 304
Script Settings Options . . . . . . . . . . . . . . . . . . . . . . . . 347
Timecode Display Options . . . . . . . . . . . . . . . . . . . . . 394
Composer Window Settings Options . . . . . . . . . . . . . 395
Color Framing Options . . . . . . . . . . . . . . . . . . . . . . . . . 397
29
Page 30

Table 12-4 Miscellaneous Composer Options . . . . . . . . . . . . . . . 397
Table 12-5
Table 14-1
Table 15-1
Table 19-1
Table 19-2
Table 19-3
Table 20-1
Table 20-2
Table 20-3
Table 20-4
Table 20-5
Table B-1
Table B-2
Table B-3
Table B-4
Table B-5
Fast Forward and Rewind Options . . . . . . . . . . . . . . 399
Timeline Settings Options . . . . . . . . . . . . . . . . . . . . . . 473
Trim Settings Options . . . . . . . . . . . . . . . . . . . . . . . . . . 525
Video Format Output Parameters . . . . . . . . . . . . . . . 685
Luminance Settings for Video Output . . . . . . . . . . . . 687
VTR Emulation Settings Options . . . . . . . . . . . . . . . . 712
Export Settings Dialog Box Options . . . . . . . . . . . . . . 719
Export Options Settings . . . . . . . . . . . . . . . . . . . . . . . . 724
Video Compression Options . . . . . . . . . . . . . . . . . . . . 729
Additional Export Options Settings . . . . . . . . . . . . . . 733
Transfer Devices for Transferring Projects. . . . . . . . . 758
Graphics File Import Specifications . . . . . . . . . . . . . . 780
Animation File Import Specifications . . . . . . . . . . . . 785
QuickTime Import and Export Specifications . . . . . 786
OMF File Import Specifications . . . . . . . . . . . . . . . . . 788
Recommended Field Dominance Settings for
Two-Field Import/Export. . . . . . . . . . . . . . . . . . . . . 791
Table C-1
Table C-2
Table D-1
Table D-2
Table D-3
Table D-4
Compression Ratio Specifications . . . . . . . . . . . . . . . . 796
Estimated Storage Requirements . . . . . . . . . . . . . . . . 801
Compatible Log Formats . . . . . . . . . . . . . . . . . . . . . . . 806
Avid Log Global Headings . . . . . . . . . . . . . . . . . . . . . 809
Avid Log Column Headings . . . . . . . . . . . . . . . . . . . . 810
Avid Log Data Headings . . . . . . . . . . . . . . . . . . . . . . . 813
30
Page 31

CHAPTER 1
Desktop Basics
For information on the
System Folder and
other Macintosh® features, such as the desktop and icons, see your
Macintosh documentation.
The Avid drive—the computer’s internal hard drive—contains a number of files and utilities you can use to organize and optimize your
work. The desktop elements directly related to the Media Composer
system (also referred to at times as the Avid system) are stored in the
Avid Projects, Avid Users, Utilities, and Media Composer folders. The
System Folder also contains essential extensions and control panels.
This chapter describes the location of the various project files. For
information about moving a project from one Media Composer
(Macintosh) system to another, see “Transferring a Project Between
Media Composer (Macintosh) Systems” on page 757.
For information on moving projects to other Avid systems, see the
Avid Products Collaboration Guide.
The following sections describe basic procedures involving the Avid
Projects, Avid Users, Attic, and Media Composer folders:
• About the Media Composer Folder
• Managing Avid Project and Avid User Folders
• Retrieving Bin Files from the Attic Folder
• Starting the Media Composer Application
31
Page 32

About the Media Composer Folder
The Media Composer folder contains essential operational files and
supporting files. You should not touch any of these files, except where
noted in the following descriptions.
• Help folder: This folder contains the online help files. For infor-
mation on using the Help, see “Using Help” on page 54
• Media Composer application: The application icon resides here.
Procedures for starting the application are described in “Starting
the Media Composer Application” on page 37.
• Settings folder: In addition to Project and User settings, the sys-
tem maintains two settings files in this folder that apply to all
users and all projects on the system. You can copy or move the
Site Settings file to other Media Composer (Macintosh) systems,
using the procedure described in “Transferring Projects, User
Profiles, and Site Settings” on page 761.
• Supporting Files: These are a series of files that add functionality
to the application. The system accesses most of these files from
within the application. You can add third-party effects to the 3rd
Party Plug-Ins folder and AVX_Plug_Ins folder from programs
such as Avid Visual Extensions (AVX™) for use in effects editing,
as described in the Avid Media Composer Effects Guide.
.
Managing Avid Project and Avid User Folders
Managing projects, user profiles, and settings involves moving, copying, or deleting files and folders, and changing project or user names.
32
Page 33

About Avid Projects and Avid Users Folders
The Avid Projects and Avid Users folders allow you to move entire
projects or selected project and user settings between systems by copying and moving files on your desktop. When you copy or move a
project, the bins for that project are also moved or copied. For more
information on transferring projects, see “Transferring a Project
Between Media Composer (Macintosh) Systems” on page 757.
When you create a new project or user profile, the system creates the
following files and folders:
• When you create a new user, the system creates three items:
- User profile file
- User settings file
- User folder containing the two files
Each item is given the user name you provide. This new folder is
stored in the Avid Users folder on the top level of the Avid drive.
• When you create a new project, the system creates three items:
- Project file
- Project settings file
- Project folder containing the two files
Each item is given the project name you provide. This new folder
is stored in a location separate from the media files. The default
location is the Avid Projects folder at the top level of the Avid
drive.
Your settings are initially set to the default values. As you work, the
files maintain current settings, and the project folder fills with bin files.
33
Page 34

Changing Project and User Names
You cannot change project or user names from within the
Media Composer application. You must change the name from your
desktop before starting the application.
c
n
When you change a user name or project name, make sure you
change the name of the folder and all the files in the folder that have
the old name. The system does not automatically change the names
of corresponding files in the folder.
To change a project or user name:
1. Double-click the Avid drive to open it.
2. Double-click the Avid Users or the Avid Projects folder to open it.
3. Click the name of the folder you want to change.
The name is highlighted for text entry, and the arrow changes to
an I-beam.
4. Change the name of the folder.
5. Double-click the folder with the new name to open it.
The folder contains profiles, settings, and project files with the old
names.
6. Change the old name of each file to the new name.
Do not change the name of the file MCState in the user folder.
7. Close the windows and restart the Media Composer application.
The new project or user name appears in the Open Project dialog
box.
34
Page 35

Deleting Projects and User Profiles
Digitized media related
to a deleted project is
not eliminated with the
project folder . For more
information on deleting media files, see
“Deleting Clips and
Sequences” on
page 275 and“Deleting
Media Files with the
Media Tool” on
page 324.
You cannot delete projects and user profiles from within the Media
Composer application. You must make the change from your desktop
before starting the application.
To delete a project or user profile:
1. Double-click the Avid drive to open it.
2. Double-click the Avid Users or the Avid Projects folder to open it.
3. Drag the project or user folder you want to delete to the Trash.
Empty the Trash to remove the files from the system.
Deleting a project also deletes any bins that are in that project.
c
4. Close the windows and restart the Media Composer application.
The deleted project or user no longer appears in the Open Project
dialog box.
Retrieving Bin Files from the Attic Folder
The Attic folder, located at the top level of the Avid drive, contains
backup files of each bin in a project. For information on setting automatic save features, see “Reviewing Basic Settings” on page 80
.
You retrieve files from the Attic folder in the following circumstances:
• When you want to replace current changes to a sequence or clip
with a previous version
• When the current bin file becomes corrupt
The Attic folder contains a folder for each project. When a bin is saved,
a copy of the bin file is stored in the project folder in the Attic folder.
The system adds the file name extension .bak plus a version number to
the bin name. The bin file with the highest version number represents
35
Page 36

the latest copy of the bin file. When you view a project folder in the
Attic folder in List view, you can also identify the most recent backup
file based on the name and timestamp of creation displayed in the
Date Modified column.
n
The oldest backup file is overwritten only if the second oldest backup file is
more than 2 hours old.
To retrieve a file from the Attic folder:
1. Quit the Media Composer application. See “Quitting the Avid
Application” on page 50.
2. From the desktop, double-click the Attic folder at the top level of
the Avid drive.
The Attic folder opens and displays project folders that contain the
backup files.
3. Double-click the project folder that contains the files you want to
retrieve.
4. Choose List from the View menu, if the project folder is not
already in List view.
The project folder displays the file names and their creation dates.
5. Shift+click the bin files you want to retrieve.
6. Option+drag the selected backup bin files to the desktop.
This makes a copy of the files, leaving the original files i n the Attic
folder .
n
7. Click a Media Composer window to activate the Media Composer
application.
8. Click the Project window to activate it, and click Bins to display
the Bins list.
The Avid application does not allow a bin and a copy of a bin to be open at the
same time. You must keep all other bins closed, and open the backup bins one
at a time.
36
Page 37

9. Choose Open Bin from the File menu. Select one of the backup bin
files you copied to the desktop and click Open.
When you open the backup bin, a link to the backup bin on the
desktop is created in the Other Bins folder.
10. Create a new bin if you do not plan to overwrite existing files.
11. Open the new bin and open the backup bin in the Other Bins
folder.
12. Select the material you want to keep from the backup bin, and
drag the files to the new bin.
Repeat steps 9 through 12 for any other backup bin files you copied to the desktop.
13. Select and delete the backup bins in the Other Bins folder.
14. Drag the backup bin files on the desktop to the Trash.
Once you have moved the files, modify their creation dates so they are
considered newest by the system. The creation date is modified whenever you make a change to an object and then save the bin. Since there
is no conflict with sequences, there is no need to modify the creation
date of a sequence.
Starting the Media Composer Application
The Media Composer application icon is located in the Media
Composer folder on the Avid drive. For most users, the desktop or the
Apple menu is a more convenient location for starting the application.
c
The application will not start properly if the application icon is
moved from the Media Composer folder. To start the application
from a convenient location, Avid recommends that you create an
alias and place it in a convenient location.
37
Page 38

For more information
on making an alias and
using the Apple menu,
see your Macintosh
documentation.
To start the application, do one of the following:
• Double-click the application icon.
• Double-click the alias icon.
• Choose the application from the Apple menu.
After the application starts, the Open Project dialog box appears, as
described in “Opening a Project” on page 40
.
n
If your system includes the AvidNet™ Transfer Tool, you can prevent
AvidNet from starting automatically by using the AvidNet settings.
See Table3-1 on page77
.
38
Page 39

CHAPTER 2
Starting a Work Session
Your work in Media Composer begins when you turn on the system,
start the application, and open an existing project or create a new
project. This chapter describes these and other procedures for starting
a work session. There are also several techniques you can use to safeguard and restore your work if necessary. These topics are covered in
the following sections:
• Opening a Project
• Backing Up Your Project Information
• Ending a Work Session
• Mounting and Ejecting Media Drives
• Using Context Menus
• Using Help
This chapter also provides a session check list.
For information about turning on your system, see the Avid Media
Composer Getting Started Guide.
39
Page 40

Opening a Project
Each time you start the Media Composer application, the Open Project
dialog box appears.
Use the procedures described in the following sections to establish
your identity as a user with the system and to select or create a project
to open. You can also create additional folders within which to store
projects, or you can quit the application from the Open Project dialog
box.
Identifying a User
To identify a user for the project, you can either create and identify a
new user or select one from a list of existing users. This user name represents the user profile, which includes the settings associated with
that user. New users begin with default user settings. When you
Users scroll list
Projects scroll list
40
Page 41

customize the user settings in the Avid application, these customized
settings are associated with the user name.
The Avid Users folder, at the top level of the Avid drive, is the default
location for user profile files.
Setting Up a New User
To create a new user profile:
1. Click the New User button.
The New User dialog box appears.
n
2. Type your name and click OK.
If you plan to move bins and projects from one platform to another , do not use
the following characters / \ : * ? “ < > |when naming projects, bins, and
users. You can set the Use Windows® compatible File Names option in the
General Settings dialog box to prevent the system from accepting these
restricted characters in a bin, project, or user name.
The Open Project dialog box reappears with your user name highlighted in the list of users.
You are ready to select a project. See “Selecting a Project” on
page 43.
41
Page 42

Selecting an Existing User
T o s elect fr om the list of existi ng users, click the user name to highlight
it in the user scroll list on the left side of the Open Project dialog box.
This user profile is used when you open a project.
The Avid Users folder is the default location for user profile files.
Directory pop-up menu
User name
Parent folder
To change the location
of user profiles outside
the Avid Users folder,
you must use the
Macintosh desktop.
Parent folders containing collections of users appear with a dot preceding them. If the needed user name is stored inside a parent folder
within the Avid Users folder:
1. Double-click the folder to open it and display the user names.
2. Click a user name to select it.
If the user profile you want is stored on your system outside the Avid
Users folder (in another folder or on a network, for example), you can
locate it by using the Open Project dialog box.
42
Page 43

To search for another user profile folder:
1. Click the Directory pop-up menu to display a list of other locations on the system.
2. Select a drive from the Volumes submenu if necessary, and locate
the folder.
3. Double-click the selected folder to open it. Continue to open any
additional folders until the user scroll list displays the appr opriate
user file name.
4. Click the user name to select it.
Selecting a Project
To open a project, you can either create and open a new project, or
open an existing project.
Creating a New Project
To create a new project:
1. Click New Project in the Open Project dialog box.
You are ready to select a project. See “Selecting a Project” on
page 43.
43
Page 44

The New Project dialog box appears.
2. Type the name of your new project in the highlighted text box.
n
If you plan to move bins and projects from one platform to another , do not use
the following characters / \ : * ? “ < > |when naming projects, bins, and
users. You can set the Use Windows® compatible File Names option in the
General Settings dialog box to prevent the system from accepting these
restricted characters in a bin, project, or user name.
3. Select either NTSC or PAL from the Format pop-up menu.
4. (Option) Click Matchback Options and choose a film format from
the pop-up menu. The Matchback Options item appears only if
your Avid system includes the Matchback option.
For more information about matchback, see “Using the Match-
back Option” on page 711.
5. Click OK.
The system creates the new project files and folder, and returns
you to the Open Project dialog box. The project name is high-
44
Page 45

lighted in the projects scroll list. You are ready to open the project.
See “Opening the Project” on page 47
Selecting an Existing Project
Existing projects appear in the projects scroll list in the Open Project
dialog box.
The Avid Projects folder is the default location for project files.
.
Directory pop-up menu
Projects scroll list
To select an existing project, do one of the following:
• Click an existing project name to highlight it.
• Press the first letter of the project name on the keyboard to highlight it. (If there are multiple projects that begin with the same letter, the first project in the list that begins with that letter will be
highlighted.)
45
Page 46

If the project is nested in a folder:
1. Double-click the folder name to open it and display the contents in
the project scroll list.
2. Click the project name to select it.
If the project is stored outside the Avid Projects folder (in another
folder or on a network, for example), you can locate it by using the
Directory pop-up menu.
To locate a project in another folder:
1. Click the Directory pop-up menu and choose a drive from the
Volumes submenu.
The Open Project dialog box displays all the stored folders.
2. Double-click a folder name to open it. Continue opening folders
until the project scroll list displays the project folder you want.
3. Click the project name to highlight it.
You are ready to open the project. See “Opening the Project” on
page 47.
Nesting Projects in Folders
You can create folders in the Open Project dialog box for storing
related projects. To nest a folder, you must first create a folder.
To create a folder:
1. Click the New Folder button in the Open Project dialog box.
The New Folder dialog box appears.
2. Type a name for the folder, and click OK.
The folder appears with a dot preceding it in the project scroll list.
3. Double-click the folder name to open the folder.
Any new projects you create now are displayed and stored in this
folder.
46
Page 47

You can also nest projects by using the desktop to move existing
projects into folders that display in the Open Project dialog box. For
more information about moving existing projects, see “Transferring
Projects, User Profiles, and Site Settings” on page 761.
Opening the Project
After you select the appropriate user and project names in the scroll
lists of the Open Project dialog box, you can open the project with the
selected user settings in one of the following ways:
•Click OK.
• Double-click the highlighted project name in the project scroll list.
• Double-click the highlighted user name in the user scroll list.
For more information
about the Project window, see Chapter 3
more information about
the Composer window,
see Chapter 12
. For
.
Project window
Close box
The Composer window opens on the Edit monitor, and the Project
window opens on the Bin monitor with the selected user settings
loaded.
The title bar of the Project window contains the project name and user
name you selected in the Open Project dialog box.
Project name
User name
47
Page 48

Closing a Project
T o close the Pr oject window and r eturn to the Open Project dialog box,
do one of the following:
• Click the close box in the Project window.
• With the Project window active, choose Close Pr oject fr om the File
menu.
The Project window and all open bins close, and the Open Project dialog box appears.
Backing Up Your Project Information
Although the Avid system automatically saves your bins, projects, and
settings, you should back up these items frequently to avoid losing
any of your project information due to a hard drive crash or corruption of the files. Because the storage requirements are minimal, you
can back up these files easily to a variety of storage devices, such as:
• Floppy disk or equivalent drive
• Removable storage device
• Network storage device
n
To back up the larger media files that are created when you digitize footage,
you must use a high-capacity storage device. For information on backing up
media files, see “Backing Up Media Files” on page 334
Saving Your Project Information
To save your work on a floppy disk or equivalent device:
1. Open a window containing the destination storage folder.
48
.
Page 49

a. Mount the storage drive or insert the floppy disk as
appropriate.
b. Double-click the icon for the destination storage drive or
floppy drive to open it. Double-click any folders to target the
appropriate storage location.
2. Open a window containing the folder you want to save.
a. Double-click the Avid drive to open it.
b. Double-click the appropriate folder to open it:
Folder Contains
Avid Projects Project folders
Avid Users User folders
Media Composer:Settings Site Settings file
3. Drag the project folder, user folder, or site settings file to the desti-
nation storage location.
4. When the system finishes copying the files, eject the floppy disk
and store it as appropriate.
Restoring from a Backup
To restore a project, user profile, or settings from a backup storage
device:
1. Open a window containing the backup files.
a. Mount the storage drive or insert the backup floppy disk as
appropriate.
b. Double-click the icon for the storage drive or floppy disk to
open it.
49
Page 50

2. Open a window containing the folder where you want to restore
the files.
a. Double-click the Avid drive to open it.
b. Double-click the appropriate folder to open it.
• Project folders and settings files go in the Avid Projects folder.
• User folders and settings files go in the Avid Users folder.
• Site Settings files go in the Media Composer:Settings folder.
3. Drag the backup copies from the storage device to the appropriate
folder on the Avid drive.
When you start the A v id application, the restor ed pr oject and user pr ofile appear in the Open Project dialog box.
Ending a Work Session
To end the work session, you must first quit the application, and then
turn off your equipment in the order described in this section.
Quitting the Avid Application
There are two ways to quit the Avid application, depending upon
whether you have a project open or you are between projects:
• If you are working on an open project and want to quit Media
Composer quickly, choose Quit from the File menu.
The project closes and the application quits.
• If you are between projects, from the Open Project dialog box:
a. Click the Quit button. The system asks if you want to leave
the application.
50
Page 51

b. Click Leave to quit the application. Click Cancel to return to
the Open Project dialog box and select another project.
Turning Off Your Equipment
When you finish using your system and want to turn it off completely,
follow these steps to avoid damaging your system or media storage
drives:
1. Choose Shut Down from the Special menu. This turns off your
Macintosh system. The screens on the Bin and Edit monitors
become dark.
2. Turn off your speakers and monitors.
3. Turn of f each external drive in the chassis, then turn off the chassis
itself.
4. Turn off all other hardware.
c
Never remove media drives from your Avid system when it is
turned on. Shut down the computer and then remove the drives.
51
Page 52

Mounting and Ejecting Media Drives
You can eject one or several drive volumes mounted on the desktop at
any time from within the Avid application. You can also remount all
the drives and return them to the desktop.
This is useful in several circumstances:
• If you work with drives for the backup and retrieval of lowresolution material, you can eject these drives and mount them as
needed to avoid cluttering the desktop during normal use.
• If you work with an extensive array of fixed-storage drives, which
can involve many partitions divided among several projects, you
can selectively mount and eject drives as needed.
• If you work with the Avid Unity™ MediaNet, you might have to
eject and remount icons on the desktop. See the Avid Unity
MediaNet documentation for more information.
Ejecting Drives
To eject one or several drive icons from the desktop:
1. With the Avid application active, choose Eject from the File menu.
52
Page 53

A dialog box appears.
The scroll list displays all drives and partitions currently mounted.
2. Select one or more drives to eject. Shift+click additional drives.
3. Click Eject. The system removes the drives from the desktop and
can no longer access them.
Mounting All Drives
Because the system cannot interface with ejected drives individually,
you cannot mount selected drives. You can mount all drives connected
to the system, however, including those previously ejected.
To mount all drives, choose Mount All from the File menu.
The system mounts all partitions and drives that are turned on and
connected to the system.
53
Page 54

Using Context Menus
Your Avid system allows you to access frequently used commands by
using the Ctrl+Shift keys and clicking an object. For example,
Ctrl+Shift+click in a window to access a context menu that shows the
most frequently used commands for that window.
You can also Ctrl+Shift+click a screen object to access What’s This?
Help for the object.
Using Help
You can get help and background information for tasks, windows, dialog boxes, and screen objects through the Media Composer Help system.
Opening and Closing the Help System
The Help system is also
included on the Avid
Media Composer Online
Publications CD-ROM.
T o open the Help system, choose Media Composer Help fr om the Help
menu. The Help Topics dialog box appears. Use the Contents, Index,
and Find tabs to access the information you need.
T o close the Help system, click the close box in each Help window. The
Help system automatically closes when you close the last open Help
window.
Getting Help for Windows and Dialog Boxes
The Help system provides you with context-sensitive help for windows and dialog boxes, such as tools and settings.
54
Page 55

To get help for windows and dialog boxes:
1. Make sure the Avid application is active.
2. Position the mouse pointer in the window or dialog box for which
you want help.
3. Press the Help key on the keyboard.
If there is no information about a window or dialog box, the Help
Topics dialog box appears.
n
For most dialog boxes that require an OK or Cancel response, you cannot
move or click in a Help window until you close the dialog box. If you want to
view the Help window while the dialog box is open, move the Help window to
a part of the screen not used by Media Composer. Then open the dialog box
again.
Getting Help for Screen Objects
Y ou can use What’s This? Help to learn about buttons and other screen
objects.
To get help for screen objects:
1. Ctrl+Shift+click the screen object (for example, a button).
A pop-up menu appears.
2. Choose What’s This? from the menu.
The system displays a pop-up window that explains how you use
the item. Many pop-up windows include hypertext links (marked
by underlined text) to more information.
55
Page 56

Finding Information with the Help Topics Dialog Box
You see the Help Topics dialog box when you open Help from the
Help menu. A topic is a single page of the Help system. The Help
Topics dialog box includes three different methods for finding topics:
• Using the Contents Tab
• Using the Index Tab
• Using the Find Tab
To keep the Help Topics dialog box open and retain your search category, make sure the option Close Window When Displaying Topics is
not checked. This option is located at the bottom of the Help Topics
dialog box.
Using the Contents Tab
The Contents tab provides a list of books that contain topics covering
the entire Help system. The list is organized by book. Each book opens
to display a list of topics.
Use the Contents tab as follows:
Using the Index Tab
• To view the Contents, choose Media Composer Help from the
Help menu and click the Contents tab, or click the Contents button
in a Help topic.
• T o open a book and display a list of topics, select the book title and
click Open, or double-click the book title.
• To open a Help window, select the topic and click Display, or
double-click the topic title.
The Index tab provides an alphabetized list of entries, like the index of
a printed book.
56
Page 57

Using the Find Tab
To find topics by using the Index tab:
1. Choose Media Composer Help from the Help menu and click the
Index tab, or click the Index button in a Help topic.
2. In the text box at the top, type a keyword for the topic that you
want to find (for example, type “audio” to jump to index entries
listed under audio).
3. Open the topic in the list:
• If the typed keyword brings you to the topic you are seeking,
click the Display button, or double-click the index entry.
• If you do not immediately arrive at the topic, scroll through
the list and double-click an entry that makes sense, or try an
alternative keyword in the text box. When you find the subject
you are looking for, click the Display button or double-click
the entry to view the topic.
The Find tab lets you search the entire Help system for words or
phrases and then lists topics that include those words or phrases.
To search for topics by using the Find tab:
1. Choose Media Composer Help from the Help menu and click the
Find tab, or click the Find button in a Help topic.
2. In the text box, type the word or phrase you want to find and click
Search.
To find an exact phrase:
a. Type the first word of the phrase in the text box.
b. Click More Choices.
c. In the new line, choose “followed by” from the first pop-up
menu and type the second word of the phrase in the text box.
d. To add a third word, click More Choices and repeat step c.
e. Click Search.
57
Page 58

A list shows the topics that contain the words you searched for.
n
Do not type quotation marks or asterisks in the text box.
3. To change the way in which you search for a word or words, click
the Options button and choose your preferences from the Find
Options dialog box.
Deselect the Word Stemming check box if you want a more complete search.
n
4. Select a topic in the list and then click the Display button or
double-click the topic. The topic is displayed, and the words you
searched for are highlighted.
How Help Windows Work
The Help system consists of the Help T opics dialog box and four types
of windows:
• The Help Topics dialog box opens in the center of your screen by
default. The Contents tab page contains a list of overview topics
covered in the Help system. Double-click any book icon to see
additional topics. Double-click a topic or select a topic and click
the Display button to open a window containing the information
you seek.
•The Media Composer How To window opens on the right side of
your screen. It displays step-by-step information for completing
tasks. You can close this window, or leave it open as you work.
Each time you click a new How To topic, the window displays the
new information. You can cycle back through the topics by clicking the Go Back button. Click on a hypertext link (marked by
underlined text) to open a window with related information.
•The Media Composer Reference window opens on the left side of
your screen. It contains background information, tables of options,
or other information that helps you understand system features
and tools. Each time you click a new Reference topic, the window
58
Page 59

displays the new information. You can cycle back through topics
by clicking the Go Back button. Click on a hypertext link (marked
by underlined text) to open a window with related information.
•The Media Composer Illustration window opens on the left cen-
tral part of your screen. It contains a graphic illustration of a feature that you can view while you read about it. Each time you click
a new Illustration button, the window displays the new information.
•The pop-up windows open from screen objects. They also open
from defined terms in the text, and from “hot spots” in illustrations. In illustrations, the pointer changes to a hand pointer when
placed over an area that has a pop-up window associated with it.
You cannot move or resize pop-up windows. Many pop-up windows include a hypertext link (marked by underlined text) to
more information.
Using Buttons in a Help Topic
Each Help topic contains buttons to help you navigate through the
system and perform basic functions. Table 2-1
buttons.
describes the Help topic
Table 2-1 Help Topic Buttons
Button Description
Contents Opens the Contents tab
Index Opens the Index tab
Find Opens the Find tab
Go Back Returns to the topic previously displayed in the window
Print Opens the Printer dialog box, from which you can
print the current topic
Glossary Opens a glossary of terms
59
Page 60

Printing Help Topics
You can print a single Help topic or a group of topics listed in
the Contents.
To print a Help topic:
1. Open or click the topic to make it active.
2. Click the Print button in the topic window.
3. Select the print options. When you are ready to print the topic,
click Print.
To print a Help topic from the Contents tab, select the topic you want
to print, and click the Print Topics button at the bottom of the tab.
To print a book of related topics from the Contents tab:
1. Select the book you want to print.
2. Click the Print Topics button.
If you select a book, all topics within that book, and all topics in other
books contained in that book, will be printed. The system sends each
topic as a separate print job to the printer, so this method can take a
long time to print. You can more easily print large sections of user
information from the Avid Media Composer Online Publications
CD-ROM.
n
Do not use the Print All Topics command from the File menu. Choosing this
command causes the system to print the entire Media Composer Help system,
which consists of more than 2000 topics.
60
Page 61

Copying from a Help Topic
To copy information from a Help topic into another document:
1. In the topic window, select the text that you want to copy.
To select discontinuous text, press and hold the k key while you
drag the mouse pointer. To extend a selection that you have
already highlighted, press and hold the Shift key while you drag
the mouse pointer.
2. Choose Copy from the Edit menu.
3. Place the mouse pointer in another open application, such as a
word processor.
4. Choose Paste from the Edit menu to paste copied text into a
document.
You can also paste the text into the keyword text box in the Index
tab or into the text box in the Find tab.
n
You cannot paste text from one topic into another.
Changing the Font Size of Help Topics
To change the font size of Help topics:
1. Open or click a How To or Reference window to make it active.
2. Choose Small, Normal, or Large from the Font submenu in the
Options menu.
Transferring Help to Another Macintosh System
You can copy the Help files to another Macintosh system, such as a
PowerBook
®
computer, and then use the Help independently of the
61
Page 62

Media Composer system. To do this, you need 12 MB of hard disk
space.
n
You can also copy these
files from the Avid
Media Composer Online
Publications CD-ROM.
If colors on your monitor flash or look unusual while viewing Help, choose
Use System Colors from the Options menu. The quality of some illustrations
might be affected, however, when this option is turned on.
To copy Help from the Media Composer system to another Macintosh
system:
1. Create a new folder on the Macintosh system to which you are
copying the Help.
2. Copy the following files from the Help folder in the Media Composer folder to the new folder:
• mchelp.hlp
• mchelp.cnt
3. Copy the QuickHelp file from the System folder on the Media
Composer system to the System folder on the other Macintosh
system.
4. Start Help by double-clicking the mchelp.hlp icon.
If you have a problem starting Help:
1. Start QuickHelp by double-clicking the QuickHelp icon.
2. Choose Open from the File menu.
3. Navigate to find mchelp.hlp, then click Open.
62
Page 63

Session Check List
Turn on your equipment in the proper order: storage first, peripherals
second, system last. For more information, see the Avid Media Composer
Getting Started Guide.
On your desktop, move any settings files, project folders, or user folders from another system into the Avid folders if necessary before starting the application.
Start the application.
Create new projects or user profiles or select existing ones in the Open
Project dialog box.
After finishing your work for the session, quit the application.
Back up your work before shutting down the equipment.
Turn off your equipment in the opposite order from which you turned
it on: system, peripherals, and finally storage.
63
Page 64

CHAPTER 3
Working with the Project Window
The Project window provides controls in thr ee differ ent display modes
for structuring and viewing important information about your current
project. These include a display of bins and folders associated with the
project, a list of all settings, and basic information about the format of
the project and use of system memory. These topics are described in
the following sections:
• Opening and Closing the Project Window
• Using the Bins Display
• Using the Settings Display
• Using the Info Display
• Customizing Your Workspace
64
Page 65

Opening and Closing the Project Window
The Project window opens automatically when you select a project in
the Open Project dialog box.
Project window
Close box
T o close the Pr oject window and r eturn to the Open Project dialog box,
do one of the following:
• Click the close box in the Project window.
• With the Project window active, choose Close Project from
the File menu.
Because the Project window remains open the entire time you are
working within a project, it might be hidden from view by several
open bins or tools on the Bin monitor.
To locate and redisplay the Project window, do one of the following:
• Choose Project from the Tools menu.
• Click any unobstructed piece of the Project window to bring it
forward.
65
Page 66

Using the Bins Display
Bins contain the master clips that are created when you digitize source
material. (The master clips are linked to the media files.) Bins also contain the sequences, subclips, group clips, and effect clips that you create during a project. From the Project window, you can view a list of
bins associated with the project, and open, close, and create bins. You
can also open bins created for another project.
To view a list of bins associated with the project, click the Bins button
in the Project window.
Bins button
Bin icon
Bins list
Fast Menu button
From the Bins list you can examine the number, names, size, and location of bins.
66
Page 67

Displaying Bins
Open/Close triangle
New folders
Trash icon
Fast Menu button
You can add folders to the Bins list in the Project window to help organize your project. You can drag bins into folders, or drag folders into
folders. See “Managing Folders and Bins” on page 72
.
Click the triangle next to a folder icon to display the folder’s contents
in the Bins list of the Project window. Click the triangle again to close
the display.
To view a list of only the folder contents and not the folders, select Flat
View from the Fast menu.
Creating a Folder in a Project
To create a folder in a project:
1. Click Bins in the Project window.
2. Choose New Folder from the Fast menu.
A new untitled folder appears.
3. Click the untitled folder name in the Bins list and rename it.
67
Page 68

Creating a New Bin
T o cr eate a new bin in a project, with the Project window active , do one
of the following:
• Choose New Bin from the File menu.
• Click the New Bin button in the Project window.
Performing either of these procedures opens a new (empty) bin that is
given the name of the project as displayed in the title bar of the Project
window. The new bin appears in the Bins list of the Project window. A
corresponding file is placed in the project folder in the Avid Projects
folder, and a backup copy is placed in the Attic folder.
You can keep the default name of the bin or rename the bin immediately. For more information, see “Renaming a Bin” on page 68
Renaming a Bin
Each new bin that you create takes the name of the project that appears
in the title bar of the Project window, numbered incrementally.
.
To change the name of a bin, click the bin name in the Bins list of the
Project window and type a new name.
Project name
Default bin name
68
Page 69

Opening and Closing a Bin
To open a bin:
1. Click the Project window to make it active.
2. Click Bins in the Project window.
3. Double-click the Bin icon next to a bin name.
The bin opens in a separate window. The Bin icon becomes dimmed,
indicating the bin is open.
Bin window
Opening Selected Bins
To open several bins at once:
1. Click the name of one of the bins in the Bins list.
2. Shift+click each additional bin you want to open.
3. Choose Open Selected Bins from the File menu.
Opening Bins from Other Projects
To open a bin from another project:
1. Choose Open Bin from the File menu.
The Select a Bin dialog box appears.
69
Page 70

2. Find and select the bin you want.
c
Closing a Bin
n
Never open a bin that is stored on a floppy disk; otherwise, the system will not be able to save your work. Always copy the bin to a
project folder on the system drive before you open it. For information, see “Transferring a Project Between Media Composer (Macin-
tosh) Systems” on page 757.
3. Click the Open button.
The bin appears in the Bins list in the Project window in a folder called
Other Bins. The name Other Bins appears in italics. You can rename
this folder. This option is especially useful when you want to open a
bin not currently displayed in the Project window.
The Other Bins folder disappears from the Bins list when you delete all the
bins in the Other Bins folder.
To close a bin, do one of the following:
• Click the close box in the upper left corner of the bin.
• Choose Close Bin from the File menu to close the active bin.
Deleting a Bin or Folder
To delete a bin or folder:
1. Select the bin or the folder you want to delete in the Bins list.
2. Press the Delete key.
A Trash icon appears in the Bins list in the Project window. It con-
tains the deleted item.
70
Page 71

c
Clips, subclips, and effects that are in a bin appear in the T rash after
you delete the bin. However, if you select a clip, subclip, or effect
directly and press the Delete key, the item does not appear in the
Trash.
Viewing Contents in the Trash
If you need to view the contents in the Trash or decide you do not
want to delete those items in the Trash, you must first move the bins
and folders from the Trash.
To view items in the Trash:
1. Double-click the Trash icon in the Bins list to list the contents of
the Trash.
2. Click the bins or folders you want to keep (or view) and drag them
from the Trash to the Bins list in the Project window.
3. Double-click the bin or folder to view it.
Emptying the Trash in the Bins List
c
n
You can empty the contents in the Trash that is located in the Bins list.
Emptying the trash permanently removes the bins or folders from
the drive.
If you change the name of the Trash icon, you cannot empty the Trash.
To empty the Trash in the Bins list:
1. Choose Empty Trash from the Fast menu.
71
Page 72

An alert box appears.
2. Click Empty Trash to delete the bins or folders from the Trash and
from your system disk.
Managing Folders and Bins
You can use the Project window to create hierarchies of folders and
bins that reflect the specific workflow of the current project. This str ucture should provide both simplicity and backup security. Although the
specifics can vary depending upon your production needs and habits,
the following are a few basic principles that can help you get started:
• Limit the number of sequences you create in each project. For
instance, consider creating one new project for each show, episode,
spot, or scene.
• Limit the number and complexity of clips in each bin by creating
and organizing bins in three groups, as follows:
- Create a set of bins for the digitizing stage.
For example, you can create one bin for each source tape to be
digitized to avoid slowing the system with large bins and
causing confusion between tapes.
- Create a second set of bins for organizing your project.
For example, you can create a separate bin for each segment of
a video project, depending upon the preferences of the editor.
72
Page 73

- Create a third set of bins for the editing stage, including:
A current cut bin for storing each work in progr ess (sequence)
An archive bin for keeping the original version of each cut
(sequence)
A selects or storyboard bin for scr eening selected clips or cuts
gathered from the source bins
A format cuts bin for storing the final cuts with added format
elements such as segment breaks, color bars and tone, slate, or
countdown
n
For information on creating Script windows using scripts for your projects,
see Chapter 11
• (Option) Create additional folders at the desktop level for better
organization.
For example, you can create one folder for each digitizing bin and
show cut bin, or a folder to contain all shot logs to be imported.
• Save these files as a template for future productions of a similar
nature.
This hierarchy allows you to have one set of bins available in the
Project window during the digitizing and organizing phase, and
another set of bins available during editing to reduce clutter.
.
Saving Bins Automatically
The Avid system automatically saves changes to your work on a regular basis during each session. You can modify the frequency of the
automatic backups by using the Bin settings in the Settings scroll list in
the Project window.
73
Page 74

Two things happen when auto-save occurs:
• Any open bins are updated with changes made since the last autosave.
• Copies of these bins are placed in the Attic folder as backup.
The system automatically places copies of all bins into the Attic folder
at regular intervals for backup. The procedure for recovering bin files
from the Attic folder is described in “Retrieving Bin Files from the
Attic Folder” on page 35.
To adjust the frequency of automatic saves:
1. Click the Settings button in the Project window.
The Settings scroll list appears in the Project window.
2. Double-click Bin in the Settings scroll list.
The Bin Settings dialog box appears.
3. Type a number in the minutes text box for the Auto-save interval
option.
4. Click OK.
You can manually save bins for added security — for example, immediately after an important edit. When your work is lost, or when you
want to recover an earlier version of a bin or sequence, you can
retrieve files from the Attic folder.
Saving Bins Manually
n
The Save Bin command appears dimmed if there have been no changes since
the last time the active bin was saved.
There are three ways to save bins manually:
• To save a specific bin:
a. Click the bin to activate it.
b. Choose Save Bin from the File menu.
74
Page 75

• To save selected bins:
a. Activate the Project window by choosing Project from the
Tools menu or by clicking anywhere in the window.
b. Click a Bin icon to select it. Shift+click any additional bins.
c. Choose Save from the File menu.
The system saves all the selected bins.
• To save all the bins :
a. Click the Project window to activate it but do not select any
individual bins listed in the Bins list.
b. Choose Save All from the File menu.
The system saves all the bins for the project.
Using the Settings Display
From the Settings display of the Project window, you can view , select,
open, and alter various User, Project, and Site settings, as described in
this section.
Settings scroll list
To view the Settings display, click the Settings button in the Project
window.
Settings button
Setting type
75
Page 76

About Settings
Three types of settings are displayed in the Settings scroll list: User,
Project, and Site settings.
• User settings are specific to a particular editor. User settings
reflect individual preferences for adjusting the user interface in the
Avid application. Individual User settings are stored in each user
folder within the Avid Users folder at the top level of the Avid
drive.
• Project settings are directly related to individual projects. When a
Project setting is changed, it affects all editors working on the
project. Specific Project settings are stored in each project folder
within the Avid Projects folder at the top level of the Avid drive.
• Site settings establish default parameters for all new users and
projects on a particular system. These can apply to particular configurations of equipment installed at the site (for example, specification and node settings for an external switcher). They can also
include other User or Project settings that you copy into the Site
Settings window. Site settings are stored in a separate Settings
folder in the Media Composer:Settings folder on the Avid drive.
Table 3-1
list. The table also lists where you can find additional information on a
particular item, and indicates whether the item has an associated dialog box (or window) that you can access from the Settings scroll list.
contains a brief description of each item in the Settings scroll
76
Page 77

Table 3-1 Settings Scroll List
Setting Name Description For More
Information
Audio Sets the default audio pan; contains
audio scrub options and audio setup
parameters.
AvidNet Sets preference for opening the
AvidNet Transfer Tool on startup.
Bin Sets the Auto-save and Double-click
preferences for bins.
Bin View Selects and formats the information
displayed in bins in the Project
window.
Composer Configures the display and behavior
of buttons and information in the
Source and Record monitors.
Deck Configuration Configures channels and decks into
the system.
Deck Preferences Sets preferences that affect all decks
configured into the system.
See Chapter 16
“Adjusting Audio
Settings” on page 181.
See AvidNet Transfer
Tool User’s Guide.
See “Bin Settings” on
page 80.
See “Bin Column
Headings” on
page 303.
See “Composer Win-
dow Settings
Options” on page 395.
See “Deck Configura-
tion Settings” on
page 152.
See “Setting Deck
Preferences” on
page 159.
and
Access to
Dialog Box?
Yes
Yes
Yes
Yes
Yes
Yes
Yes
Digital Cut Sets parameters for previewing or
recording a digital cut to tape.
Appears in the Settings scroll list to
facilitate copying settings.
Digitize Defines how the Avid system
digitizes and batch digitizes in
specific situations.
Export Sets parameters for file export. See “Export Options
77
See “Using the Digi-
tal Cut Tool” on
page 700.
See “General Digitize
Settings Options” on
page 176.
Settings” on page 724.
No; choose Digital Cut from the
Output menu.
Yes
Yes
Page 78

Table 3-1 Settings Scroll List (Continued)
Setting Name Description For More
Information
General Defines several default values such as
the default starting timecode for your
project.
Grid Defines the grid to use when you
create effects.
Import Sets parameters for file import. See “Import Settings
Interface Defines the appearance and function
of certain interface elements.
Keyboard Maps commands from the Command
palette to the keyboard.
Render Controls the size of imported graphics
and rendered effects to ensur e that the
graphic or effect will be playable.
Script Sets the default display options
for scripts imported using script
integration.
See “General Set-
tings” on page 82.
See Media Composer
Effects Guide.
Options” on page 242.
See “Interface Set-
tings” on page 83.
See “Using the Key-
board” on page 412.
See Media Composer
Effects Guide.
See “Script Settings
Options” on page 347.
Access to
Dialog Box?
Yes
Yes
Yes
Yes
Yes
Yes
Yes
Serial Ports Configures the serial ports on your
system for deck control, controllers,
and VTR emulation.
Timecode window Displays various timecodes in an
adjustable window
Timeline Contains the latest Timeline settings. See “Timeline Set-
78
See “Using the Serial
Ports Tool” on
page 123.
See “Displaying T ime-
code” on page 393.
tings Options” on
page 473.
Yes
Yes
Yes
Page 79

Table 3-1 Settings Scroll List (Continued)
Setting Name Description For More
Information
Timeline View If you save your Timeline settings,
Timeline View appears in the Settings
scroll list to facilitate copying settings.
Title Style Sheet If you save a title style while you are
using the Title too l, Title Style appears
in the Settings scroll list.
Trim Customizes the Trim mode
environment.
Video Input The Video Input tool enables you to
calibrate composite or component
video when digitizing. Appears in the
Settings scroll list to facilitate copying
settings.
Video Output The Video Output tool enables you to
calibrate output for composite or component video in a digital cut. Appears
in the Settings scroll list to facilitate
copying settings.
See “Customizing
Timeline Views” on
page 463.
See Media Composer
Effects Guide.
See “Trim Settings
Options” on page 525.
See “Preparing for
Video Input” on
page 194.
See “Calibrating for
Video Output” on
page 683.
Access to
Dialog Box?
No; select saved
setting files from
within the
Timeline.
Yes
Yes
No; choose
Video Input Tool
from the Tools
menu.
No; choose
Video Output
Tool from the
Tools menu.
VTR Emulation Sets parameters when using the Avid
system to emulate a VTR.
Workspace Enables you to associate settings and
windows with a workspace.
Defining Settings
You can use the Settings display to establish a hierarchy of settings
that address the specific needs of each production phase.
79
See “VTR Play Emula-
tion” on page 712.
See“Linking User Set-
tings and Workspaces” on page 105.
Yes
Yes
Page 80

For example, you can establish:
• User settings for the assistant editor: Facilitate logging, digitiz-
ing, and organizing projects.
• User settings for the editor: Include editing interface preferences.
• Project settings: Reflect the specific needs of the project.
• Bin View settings: Display useful columns of information for each
of the bins described in “Managing Folders and Bins” on page 72
By establishing these settings once, and selecting the appropriate setting or bin view in context, you can save time and effort that would be
spent searching for information or adjusting bin headings on-the-fly.
You can also save these settings along with your template (as
described in “Managing Folders and Bins” on page 72
similar projects.
Reviewing Basic Settings
The following list describes basic system settings to revi ew at the start
of your project:
.
) for use on
Bin Settings
• Bin settings
• General settings
• Interface settings
Double-click each setting in the Settings scroll list of the Project window to view the dialog boxes.
The Bin Settings dialog box controls the Avid system’s automatic save
features, including the number of backups saved in the Attic folder.
Table 3-2
results of double-clicking an object in a bin.
describes the Automatic Save and Backup options, and the
80
Page 81

Table 3-2 Bin Settings Dialog Box Options
Option Description
Auto-save interval Specifies the length of time between attempts to auto-save project files.
The default is 15 minutes.
To avoid interrupting an edit, the Avid system waits until the system is
inactive before auto-saving. Use the “Force auto-save at” option to
specify an interval at which the system will interrupt an edit to autosave.
Inactivity period Specifies the length of time the Avid system waits while the system is
inactive before automatically saving the project files. The default is 0
seconds.
Force auto-save at Specifies the maximum length of time between auto-saves. When the
system reaches this time, it will auto-save the pro ject files even if it must
interrupt an edit to do so. The def a ult is 15 minutes.
Maximum files in attic Specifies the total number of files stored in the Attic folder. When a bin
is saved, the A vid system copies the previous version of the bin to a special folder called the Attic. The default is 30 files.
Keep more files if there are many editors working on the system. This
ensures that all the bins are backed up.
When there are multiple editors working on one system, store Bin settings as Site or Project settings. This will ensure that another user does
not override your settings and delete your backups.
Max versions of any
one bin
The Double-Click options determine what happens when you double-click an object in a bin.
Opens new monitor for clip. Creates a new pop-up monitor and automatically loads the clip when
Loads clip into Source or
Record monitor.
Specifies the total number of single-bin copies stored in the Attic folder.
This setting prevents filling the Attic with too many copies of one bin, at
the risk of losing the others. The default is five copies.
you double-click an object in the bin.
Loads the clip or sequence into the Source or Record monitor when you
double-click an object in a bin.
81
Page 82

General Settings
Table 3-3 describes the General Settings options.
Table 3-3 General Settings Dialog Box Options
Option Description
Drive Filtering Based
on Resolution
Default Starting Timecode Specifies the timecode value you want the system to use as the
NTSC Has Setup Allows systems using NTSC-EIAJ
Project Format Displays the format currently selected for the project (NTSC or
Audio File Format Choose the file format for the audio:
Prevents digitizing high-resolution media to drives that do not
have sufficient speed to play the resolution. If you select this
option, the drives affected by drive filtering are
unavailable when you try to access them with the Digitize tool.
Drive filtering does not verify the drive speed when you select a
drive while rendering effects. Be sure when selecting your target
drive for rendering that it is fast enough to play the media.
default starting timecode for each new sequence.
(used primarily in Japan) to
use the correct color mapping. NTSC-EIAJ users should not select
this box. All other users should select this box.
PAL). This option cannot be changed.
• OMF (WAVE): Compatible with Windows applications
• OMF (AIFF-C): Compatible with many third-party
applications, including Pro Tools®
• SDII (Sound Designer II): Compatible with AudioVision®
Use Windows® compatible
File Names
Prevents you from using the characters /\:*?<>| in b in, proje ct, or
user names. These characters are not allowed in Windows file
names. This option is useful for moving bins and projects from
Macintosh to Windows NT platforms.
82
Page 83

Interface Settings
The Interface settings determine the level of basic information displayed in the interface. Table 3-4
describes the User Interface Settings
options.
Table 3-4 User Interface Settings Dialog Box Options
Option Description
Show Labels in
Tool Palette
Show Tool Tips When this option is selected, the system displays
Delay _ seconds
before showing
Show Graphics on
Client Display
When this option is selected, the system displays
text labels with the icons in tool palettes. To tear off
the T ool palett e, click anywher e on the palette, hold
the mouse button, and drag the palette to the location you want.
labels for buttons and icons when you position the
pointer over them.
If you select Show T ool T ips, you can delay the label
display by entering a value in this field. A delay
enables you to move the pointer across the interface
without displaying the labels on items between the
starting point and the destination of the pointer.
When this option is selected and you have a third,
full-screen monitor, the system displays graphics
such as grid lines in the third, full-screen monitor as
well as in the Record monitor.
83
Page 84

Displaying Project Settings
You can display the Settings scroll list of the Project window in different groups, depending on what you need to view. Table 3-5
the different settings display groups.
Table 3-5 Displaying Groups of Settings
Option Description
All Settings Displays all settings available in the
Base Settings Displays Project, User, and Site settings only; no
Bin Views Displays all the Bin View settings you cr eated
Timeline Views Displays all the Timeline View settings you cre-
Title Styles Displays all the templates you created for the Title
describes
Media Composer system
views are displayed
ated
tool
Video Tool Settings Displays all the Video Tool settings
Import Settings Displays all the Import settings
Export Settings Displays all the Export settings
Workspaces Displays all the Workspace settings you created
Workspace Links Displays all the workspace links you created
To change the Settings scroll list display of the Project window:
1. Click the Settings button in the Project window.
The Settings scroll list appears in the Project window.
84
Page 85

2. Choose a settings display group from the Fast menu or from the
Settings menu.
Settings menu
Fast Menu button
The Settings menu displays the settings group selected and the
Settings scroll list displays only the settings in that group.
Working with Settings
You can view and modify most of your current settings by
double-clicking them in the Settings scroll list of the Project window
and by selecting new options. You can duplicate, rename, copy, and
move settings among files or systems.
Selecting Another User
Because User settings are not project or site specific, you can display
another set of User settings within the Project window.
85
Page 86

User pop-up menu
Modifying Settings
To select another user, choose another name from the User pop-up
menu.
The previous user’s settings are saved, and the new user’s settings are
loaded into the Avid system and the Project window.
You can alter the default options for various settings to reflect the specific needs of a project or to customize the system based on personal
preferences.
There are three types of settings you cannot modify. They are:
• Settings that require the presence of standalone peripherals, such
as the Digidesign® 888
• Settings that can be modified only from within the tools in which
they are used, such as Timeline views
• Film settings when you are working in nonfilm projects
To modify avai lable settings:
1. Double-click the name of a chosen setting in the Settings scroll list
to open a settings dialog box.
86
Page 87

Settings
scroll list
A dialog box or window opens.
2. Enter new values or select new options for the settings.
3. Click OK, Save, Apply, Cancel, or the close box.
The system saves changes in the appropriate User, Project, or Site
settings file.
Working with Multiple Settings
Y ou can have multiple versions of settings in your Settings scroll list in
the Project window that apply to several users at various stages of
production.
For example, you can have:
• Two Bin settings: one that automatically saves more often when
you are editing intensively, and one that automatically saves less
often when you are doing organizational work in the bins
• Multiple Digitize settings for digitizing various types of source
material
87
Page 88

Duplicating Settings
Naming Settings
• Multiple Keyboard and Composer settings to use for various
activities such as digitizing, offline editing, or online effects editing
• Multiple Deck Preferences settings for various types of digitizing
or for output
To create a new version of a setting:
1. Click the Settings button in the Project window to display a list of
your current settings.
2. Click the setting you want to copy. Shift+click any additional settings you want to copy.
3. Choose Duplicate from the Edit menu.
A copy of each setting appears in the window. Duplicate settings
with custom settings names followed by a period and a version
number in the second column appear with each custom setting
name. Name your settings to indicate their functions.
Custom setting
name column
You can add a custom name to a setting to differentiate it among more
than two copies or to indicate a specific use.
To enter a custom setting name:
1. Click the Custom setting name column in the Settings scroll list of
the Project window.
88
Page 89

2. Type a new name and press Return.
The new name appears in the list and is saved in the settings file.
Selecting Among Multiple Settings
With multiple settings, only one setting at a time is active. Settings that
are currently active have a check mark to the left of the setting name.
To change the active setting, click in the space to the left of the setting
you want to select as the active setting.
A check mark indicates that the setting is active.
Deleting Settings
You can delete settings from the Settings scroll list in the Project window at any time. For example, you might choose to delete one or more
among multiple versions of a particular setting. Or you might want to
delete all but a few settings to transfer into another Settings window.
For information on transferring settings, see “Copying Settings
Between Settings Files” on page 90.
c
To delete a setting:
1. Click a setting to highlight it. Shift+click each additional setting
you want to delete.
2. Press the Delete key or choose Delete from the Edit menu.
The selected settings are immediately removed.
You cannot undo the deletion. You can, however, restore the default
settings, or you can transfer settings from other files, as described i n
the following sections.
89
Page 90

Restoring Default Settings
You can restore your settings to the default values at any time by
doing the following:
1. Click a setting to highlight it. Shift+click each additional setting
you want to select.
2. Choose Restore to Default from the Special menu.
An alert box asks whether you want to save the settings.
3. Click Copy & Restore to copy the current settings before restoring
the default settings, or click Restore to discar d the current settings.
The system restores the default values for the selected settings.
Copying Settings Between Settings Files
You can copy selected settings:
• Between existing settings files
• Into a new settings file for use in other projects
• To change one type of setting to another
• Into the Settings folder in the Media Composer folder on the Avid
drive to establish standard system settings fo r all new projects and
users. See “Using Site Settings” on page 92
You can also transfer settings files to another Media Composer
(Macintosh) system. See “Transferring Projects, User Profiles, and
Site Settings” on page 761.
90
.
Page 91
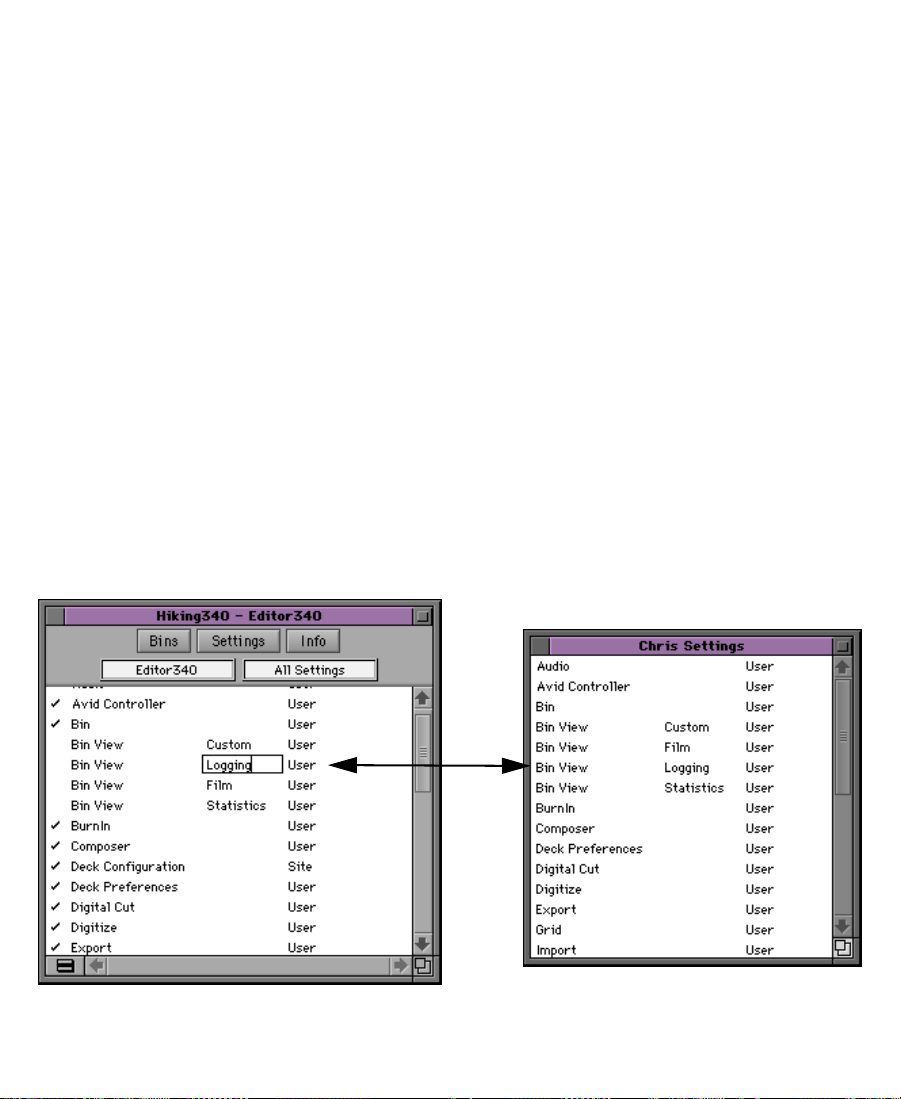
Settings scroll list
To copy settings between files:
1. With the Settings display active, open the destination settings file
in one of the following ways:
• Create and open a new settings file by choosing New Setting
File from the File menu.
An untitled settings window opens.
• Open an existing settings file by choosing Open Setting File
from the File menu.
The Open dialog box appears.
Locate and select a settings file in the Avid Projects or Avid
Users folder and click Open. The settings file window opens.
2. Click the setting you want to copy in the Settings scroll list of the
Project window. Shift+click any additional settings that you want
to copy.
3. Drag the highlighted settings to the new destination Settings window.
New target settings window
91
Page 92

4. You can also drag settings from the Settings window into the Settings scroll list in the Project window. When you copy a setting
into the Settings scroll list and the setting is active, an alert box
appears.
5. Do one of the following:
• Click Add to add the new settings to the project without
affecting the project’s current settings.
• Click Replace to replace the current version of each setting
with the new settings. Additional versions of each setting are
not affected.
The copied settings are saved when you close or save the file or
project.
Using Site Settings
When the system opens a new project, it first searches the Site Settings
file in the Media Composer:Settings folder on the A vid drive and loads
any settings placed here. The system then proceeds to l oad any Proje ct
and User settings not included in the Site Settings file.
This feature is useful if you need to establish gl obal settings for all new
users and projects, such as switcher settings, a specific start timecode
for all sequences, or various customized features of the interface.
92
Page 93

To load settings into the SiteSettings file:
1. Open a project with the settings you would like to establish as site
settings. If a project does not already exist with the settings you
want, create a project and make adjustments to the default settings
as needed.
2. Choose Site Settings from the Special menu.
The Site Settings window opens.
3. Click a setting in the Settings scroll list of the Project window or
Shift+click multiple settings and drag them into the Site Settings
window.
Copies appear in the Site Settings window.
4. Close the Site Settings window.
All new users and projects opened from the Open Project dialog box
use these settings as the default settings.
Using the Info Display
The Info display in the Project window allows you to view basic
project information, such as the video format (NTSC, for example).
93
Page 94

To activate Info display, click the Info button in the Project window.
Fast Menu button
The items listed in this view are for information only and cannot be
changed from the Info list.
The Fast Menu button at the bottom of the Info display in the Project
window displays four menu items: Profile, Usage, Memory, and
Hardware.
Displaying a Project Profile
Info button
The Profile displays basic project information, such as the video
format (NTSC or PAL).
To display the Profile information:
1. Click the Info button in the Project window.
2. Click the Fast Menu button.
3. Choose Profile from the Fast menu.
Basic project information is displayed.
94
Page 95

Displaying Usage Information
The statistics feature gathers and reports information on system usage.
You can use this information to support business functions such as
resource management.
All statistics are gathered and reported by project. The file that contains this information is formatted so that you can use it as input to
software programs such as analysis applications, spreadsheets, or
report generators.
c
Fast Menu button
Do not rely on the statistics feature for billing or other financial
purposes.
To view statistics for an open project:
1. Click the Info button in the Project window.
2. Click the Fast Menu button.
3. Choose Usage from the Fast menu.
You see a dis play similar to the following:
4. Click the Info button again to update the Usage window to reflect
any changes you made to the project.
To print this file, choose Print Usage from the File menu.
95
Page 96

File Structure and Layout
A new statistics file is created each time you open the project. The files
are stored in a Statistics folder inside each project folder.
The file name has the following format:
Statistics.
where:
Variable Description
yy Indicates the last two digits of the year
mm Indicates the month
dd Indicates the day
HH Indicates the hour
MM Indicates the minutes
SS Indicates the seconds
yymmdd.HHMMSS
The statistics file is formatted as comma-separated ASCII text, so it can
be accepted by a variety of software programs. Each line in the file is
tagged with indicators for identifying content and data type to assist
in programming custom applications. Figure 3-1
shows a sample
data file.
96
Page 97

Figure 3-1 Sample Data File
Description of Data File Values
The values in the first column indicate the content of the line.
Values are:
01 title1
02 title2
03 heading
100 project info
101 Time Project open
102 Digitize tool open
104 Digitize tool active
97
Page 98

105 Digitized Media bytes used
106 Rendered Effects bytes used
110 Effects rendering time
111 Title tool open
113 Title tool active
114 Title tool rendering
115 Digitize tool digitizing
116 Digitize tool logging
117 user comments
The value in the second column indicates the type of data in the line.
Values are:
01 project info
02 time used
03 bytes used
04 text string
Importing the Statistics File into a Spreadsheet
You can import the statistics file into spreadsheet or other programs as
an ASCII file and use the application to set up the proper format. For
example, to create a statistics file in Microsoft® Excel™:
1. Start Microsoft Excel.
2. Choose Open from the File menu and navigate to the statistics file
you want to import.
3. Click Open.
After you open the file, the Text Import Wizard starts.
To complete the steps for the Text Import Wizard:
1. Choose Delimited for the Original Data Type and click Next.
2. Choose Comma for Delimiters and click Next.
98
Page 99

3. Choose General for Column Data Format.
4. Click Finish.
The statistics file appears in spreadsheet format.
Spreadsheet Form of Statistics Data File
Figure 3-2
is the same sample file as it appears when you import into a
spreadsheet.
Figure 3-2 Sample Spreadsheet Form
99
Page 100

Displaying Disk Space Statistics
To improve system performance, statistics for disk space (digitized
media and rendered effects) are not calculated and are not displayed
in the Usage window, unless you issue a Console command.
To display disk space statistics in the Usage window:
1. Choose Console from the Tools menu.
2. In the command entry text box, type:
toggleStatSpace
3. Press Return.
4. Choose Load Media Database from the File menu.
After the media database is loaded, the Usage window displays the
number of files and disk space used for digitized media and rendered
effects. To update the display, click the Info button on the Project window. To prevent recalculation, reenter the toggleStatSpace command.
Viewing Memory
To display system memory information:
1. Click the Info button in the Project window.
2. Click the Fast Menu button.
3. Choose Memory from the Fast menu.
The Memory window opens.
100
 Loading...