

Page 1

Avid® Media Composer
and Film Composer
Effects Guide
Release 7.0
tools for storytellers™
®
Page 2

© Copyright Avid Technology, Inc. 2/98. All rights reserved. Printed in USA.
Avid Media Composer and Film Composer Effects Guide • Part 0130-01217-01 Rev. A • 2/98
ii
Page 3

Contents
Chapter 1
Preparing to Work with Effects
Effect Types
Effects Creation Tools
Understanding Real-Time and Downstream Key Effects
About Downstream Key Effects
About Real-Time Effects
Playing Real-Time Effects
Displaying the Effect Palette
Resizing the Effect Palette
Understanding the Color Coding
Displaying Effect Templates
Installing Third-Party Plug-in Effects
Installing Photoshop-Compatible Plug-in Effects
Installing AVX Plug-in Effects
Troubleshooting AVX Plug-Ins
Settings for Effects
Effect Settings
Render Settings
Timeline View Settings
. . . . . . . . . . . . . . . . . . . . . . . . . . . . . . . . . . . . . . . . . . . . . . . . 23
. . . . . . . . . . . . . . . . . . . . . . . . . . . . . . . . . . . . . . . 25
. . . . . . . . . . . . . . . . . . . . . . . . . . . 26
. . . . . . . . . . . . . . . . . . . . . . . . . . . . . . . . . 26
. . . . . . . . . . . . . . . . . . . . . . . . . . . . . . . . 27
Overlapping Real-Time Effects on the Same Track
Overlapping Real-Time Effects and
Non-Real-Time Effects
Overlapping Real-Time Effects on Multiple Tracks
Overlapping Real-Time Effects with
Downstream Key Titles and Graphics
. . . . . . . . . . . . . . . . . . . . . . . . . . . . . . . . . . . . . . . . . . 41
. . . . . . . . . . . . . . . . . . . . . . . . . . . . . . . . . . . . . . . . . . 41
. . . . . . . . . . . . . . . . . . . . . . . . . . . . . . . . . . . . . . . . . 42
. . . . . . . . . . . . . . . . . . . . . . . . . . . . . . . 28
. . . . . . . . . . . . . . . . . . 29
. . . . . . . . . . . . . . . . . . . . . . . . . . . . . . . . . 30
. . . . . . . . . . . . . . . . . . . . . . . . . . . . . . . . 32
. . . . . . . . . . . . . . . . . . . . . . . . . . 33
. . . . . . . . . . . . . . . . . . . . . . . . . . . . . . 34
. . . . . . . . . . . . . . . . . . . . . . . . . 35
. . . . . . . . . . . 36
. . . . . . . . . . . . . . . . . . . . . . . . . . . . 37
. . . . . . . . . . . . . . . . . . . . . . . . . . . . 39
. . . . . . . . . . . . . . . . . . . . . . . . . . . . . . . . . . 43
. . . . . . . . 26
. . . . . . . 27
. . . . . . 28
3
Page 4

Trim Settings
. . . . . . . . . . . . . . . . . . . . . . . . . . . . . . . . . . . . . . . . 45
Chapter 2 Basics of Effects Editing
Applying Effects to a Sequence
Displaying Effect Icons
Applying a Single Effect
Applying Multiple Effects
Selecting Multiple Transitions
Selecting Multiple Segments
Selecting Multiple Layers
Applying a Third-Party Plug-in Effect
Deleting Effects in a Sequence
Using the Fade Effect Button
Working with Transition Effects
Types of Transition Effects
Applying a Dissolve Effect
Using the Effect Palette
Using the Transition Parameters
Using the Add Dissolve Button
Sizing the Effect to Fit the Media
Trimming a Transition Effect
Adjusting Transitions in the Timeline
Creating Motion Effects
Creating a Freeze Frame
Creating a Rolling Clip That Freezes
Creating a Variable Speed Effect
Creating a Strobe Motion Effect
. . . . . . . . . . . . . . . . . . . . . . . . . . . . . . . . . . . . . 64
. . . . . . . . . . . . . . . . . . . . . . . . . . . . . . . 46
. . . . . . . . . . . . . . . . . . . . . . . . . . . . . . . . . . 47
. . . . . . . . . . . . . . . . . . . . . . . . . . . . . . . . . 47
. . . . . . . . . . . . . . . . . . . . . . . . . . . . . . . . 49
. . . . . . . . . . . . . . . . . . . . . . . . . . . . 52
. . . . . . . . . . . . . . . . . . . . . . . . . . . . . . . 55
. . . . . . . . . . . . . . . . . . . . . . . . . . . . . . . . . 56
. . . . . . . . . . . . . . . . . . . . . . . . . . . . . . 58
. . . . . . . . . . . . . . . . . . . . . . . . . . . . . . . 58
. . . . . . . . . . . . . . . . . . . . . . . . . . . . . . . 58
. . . . . . . . . . . . . . . . . . . . . . . . . . . . . . . 58
. . . . . . . . . . . . . . . . . . . . . . . . . . . . . 63
. . . . . . . . . . . . . . . . . . . . . . . . . . . . . . . . . . 64
. . . . . . . . . . . . . . . . . . . . . . . . . . . 69
. . . . . . . . . . . . . . . . . . . . . . . . 49
. . . . . . . . . . . . . . . . . . . . . . . . . . 51
. . . . . . . . . . . . . . . . . . . . . 53
. . . . . . . . . . . . . . . . . . . . . . . 59
. . . . . . . . . . . . . . . . . . . . . . . 60
. . . . . . . . . . . . . . . . . . . . . . . . . . 62
. . . . . . . . . . . . . . . . . . . . . . . . . 63
. . . . . . . . . . . . . . . . . . . 66
. . . . . . . . . . . . . . . . . . . . . . . . . . 67
Chapter 3 Working in Effect Mode
Entering Effect Mode
Understanding the Effect Preview Monitor
Navigating in Effect Mode
Changing Position
. . . . . . . . . . . . . . . . . . . . . . . . . . . . . . . . . . . . . . . . 73
4
. . . . . . . . . . . . . . . . . . . . 74
. . . . . . . . . . . . . . . . . . . . . . . . . . . . . . . 75
. . . . . . . . . . . . . . . . . . . . . . . . . . . . . . . . . . . 75
Page 5

Using Single-Field Step
Using Big Effect Mode
. . . . . . . . . . . . . . . . . . . . . . . . . . . . . . . . . . . . . . . 76
Working with the Effect Grid
Setting the Effect Grid Options
. . . . . . . . . . . . . . . . . . . . . . . . . . . . . . 76
. . . . . . . . . . . . . . . . . . . . . . . . . . . . . . . . . 78
. . . . . . . . . . . . . . . . . . . . . . . . . . . 79
Setting Up the Effect Grid in a Film Project
Grid Options
. . . . . . . . . . . . . . . . . . . . . . . . . . . . . . . . . . . . . . . . . . . 81
Displaying the Position Coordinates in Effect Mode
Using the Effect Grid in a Film Project
. . . . . . . . . . . . . . . . . . . . . 84
Position Information for the Blowup Effect
Position Information for the Paint and
AniMatte Effects
. . . . . . . . . . . . . . . . . . . . . . . . . . . . . . . . . . . . . 86
Displaying the Safe Title and Safe Action Guidelines
Displaying the Aspect Ratio Grid for Film Projects
Using the Effect Editor
Effect Editor Buttons
Moving an Enlarged Image in Effect Mode
Selecting a Parameter
Changing a Parameter
Reversing an EffectÕs Direction
. . . . . . . . . . . . . . . . . . . . . . . . . . . . . . . . . . . . . . 90
. . . . . . . . . . . . . . . . . . . . . . . . . . . . . . . . . . . . . 91
. . . . . . . . . . . . . . . . . 94
. . . . . . . . . . . . . . . . . . . . . . . . . . . . . . . . . . . . 96
. . . . . . . . . . . . . . . . . . . . . . . . . . . . . . . . . . . 96
. . . . . . . . . . . . . . . . . . . . . . . . . . . 97
Accessing an EffectÕs Additional Parameters
Replacing an Effect
Using Key Frames
Adding a Key Frame
Selecting a Key Frame
Moving a Key Frame
Changing a Key FrameÕs Parameters
. . . . . . . . . . . . . . . . . . . . . . . . . . . . . . . . . . . . . . 98
. . . . . . . . . . . . . . . . . . . . . . . . . . . . . . . . . . . . . . . . . . . 99
. . . . . . . . . . . . . . . . . . . . . . . . . . . . . . . . . . . . 100
. . . . . . . . . . . . . . . . . . . . . . . . . . . . . . . . . . 100
. . . . . . . . . . . . . . . . . . . . . . . . . . . . . . . . . . . . 101
. . . . . . . . . . . . . . . . . . . . . . 101
Copying and Pasting Key-Frame Parameters
Deleting a Key Frame
Adjusting Basic Parameters
Adjusting the Level Between Key Frames
Adjusting a Color Parameter
Using the Eyedropper
Using the Macintosh Color Picker
. . . . . . . . . . . . . . . . . . . . . . . . . . . . . . . . . . . 102
. . . . . . . . . . . . . . . . . . . . . . . . . . . . . . . . . 103
. . . . . . . . . . . . . . . . . 103
. . . . . . . . . . . . . . . . . . . . . . . . . . . . . 104
. . . . . . . . . . . . . . . . . . . . . . . . . . . . . . . 104
. . . . . . . . . . . . . . . . . . . . 105
. . . . . . . . . . . . . 80
. . . . . . . . 83
. . . . . . . . . . . . . 84
. . . . . . . 87
. . . . . . . . . 89
. . . . . . . . . . . . . . . . 97
. . . . . . . . . . . . . . 101
5
Page 6

Adjusting the EffectÕs Position
Using the Position Sliders to Adjust the Position
Changing the Position of the Effect Directly
Adjusting the EffectÕs Scale
Cropping an Effect
Adjusting the Acceleration
Using an Effect Template
Saving an Effect Template
Applying an Effect Template
Playing an Effect
Playing an Effect in a Continuous Loop
Playing a Preview of an Effect
Rendering an Effect
Selecting the Render Setting for a Project
Combining Real-Time Effects and Rendered Effects
Overlapping Real-Time Effects
Overlapping Real-Time and Rendered Effects
Speed Considerations
Displaying Effects On-the-Fly
Rendering a Single Effect
Rendering Multiple Effects
Rendering Third-Party Plug-in Effects
Managing Your Media Files
Locating and Deleting Effect Media Files
. . . . . . . . . . . . . . . . . . . . . . . . . . . . . . . . . . . . . 109
. . . . . . . . . . . . . . . . . . . . . . . . . . . . . . . . . . . 112
. . . . . . . . . . . . . . . . . . . . . . . . . . . . . . . . . . . . . . . . . . . 114
. . . . . . . . . . . . . . . . . . . . . . . . . . . . . . . . . . . . . . . . 116
. . . . . . . . . . . . . . . . . . . . . . . . . . . 106
. . . . . . . . . . . . . . . . . . . . . . . . . . . . . . 109
. . . . . . . . . . . . . . . . . . . . . . . . . . . . . . 110
. . . . . . . . . . . . . . . . . . . . . . . . . . . . . . . 112
. . . . . . . . . . . . . . . . . . . . . . . . . . . . 113
. . . . . . . . . . . . . . . . . . . 115
. . . . . . . . . . . . . . . . . . . . . . . . . . . 115
. . . . . . . . . . . . . . . . . 116
. . . . . . . . . . . . . . . . . . . . . . . 116
. . . . . . . . . . . . . . . . . . . . . . . . . . . . . . . 117
. . . . . . . . . . . . . . . . . . . . . . . . . . . 117
. . . . . . . . . . . . . . . . . . . . . . . . . . . . . . . 118
. . . . . . . . . . . . . . . . . . . . . . . . . . . . . . 119
. . . . . . . . . . . . . . . . . . . . 121
. . . . . . . . . . . . . . . . . . . . . . . . . . . . . . . . . 121
. . . . . . . . . . . . . . . . . 121
. . . . . . . 107
. . . . . . . . . . . 107
. . . . . . . . 116
. . . . . . . . . 117
Chapter 4 Creating Vertical and Nested Effects
Creating a Chroma Key or Luma Key Effect
Creating a Matte Key Effect . . . . . . . . . . . . . . . . . . . . . . . . . . . . . . . . . 127
Using the Color Effect to Prepare a High-Contrast Image . . . 128
Working with Imported Graphics and Animation . . . . . . . . . . . . . 128
Editing with Imported Matte Key Clips. . . . . . . . . . . . . . . . . . . 129
Editing with Imported Master Clips . . . . . . . . . . . . . . . . . . . . . . 131
Nesting Effects . . . . . . . . . . . . . . . . . . . . . . . . . . . . . . . . . . . . . . . . . . . . 132
6
. . . . . . . . . . . . . . . . . . . 125
Page 7

Nesting a Split Screen . . . . . . . . . . . . . . . . . . . . . . . . . . . . . . . . . . 133
Another Nesting Technique . . . . . . . . . . . . . . . . . . . . . . . . . . . . . 135
Expanding Nested Effects in the Timeline. . . . . . . . . . . . . . . . . 135
Nesting a Title Within a Picture-in-Picture . . . . . . . . . . . . . . . . 135
Submaster Editing . . . . . . . . . . . . . . . . . . . . . . . . . . . . . . . . . . . . . . . . . 138
Submaster Editing of Multiple Clips . . . . . . . . . . . . . . . . . . . . . 138
Submaster Editing of Multiple Effects . . . . . . . . . . . . . . . . . . . . 139
Collapsing Layers into One Submaster Effect . . . . . . . . . . . . . 141
Performing a Video Mixdown . . . . . . . . . . . . . . . . . . . . . . . . . . . 143
Chapter 5 Creating Titles and Graphic Objects
Task Overview Ñ Creating and Editing Titles . . . . . . . . . . . . . . . . . 146
Downstream Keying of Titles and Graphics . . . . . . . . . . . . . . . . . . 146
Opening the Title Tool . . . . . . . . . . . . . . . . . . . . . . . . . . . . . . . . . . . . . 147
Understanding the Title Tool Window. . . . . . . . . . . . . . . . . . . . . . . . 148
Understanding the Tool Bar . . . . . . . . . . . . . . . . . . . . . . . . . . . . . 149
Using the Selection Tool . . . . . . . . . . . . . . . . . . . . . . . . . . . . . . . . 151
Setting Up the Drawing Environment . . . . . . . . . . . . . . . . . . . . . . . . 152
Previewing Titles. . . . . . . . . . . . . . . . . . . . . . . . . . . . . . . . . . . . . . . 152
Using Title and Action Guidelines . . . . . . . . . . . . . . . . . . . . . . . 152
Using Safe Colors . . . . . . . . . . . . . . . . . . . . . . . . . . . . . . . . . . . . . . 153
Selecting a Background . . . . . . . . . . . . . . . . . . . . . . . . . . . . . . . . . 153
Using a Video Background. . . . . . . . . . . . . . . . . . . . . . . . . . . 153
Updating the Video Background . . . . . . . . . . . . . . . . . . . . . 154
Creating a Color Background . . . . . . . . . . . . . . . . . . . . . . . . 154
Displaying a Grid . . . . . . . . . . . . . . . . . . . . . . . . . . . . . . . . . . . . . . 155
Snapping to a Grid. . . . . . . . . . . . . . . . . . . . . . . . . . . . . . . . . . 155
Bringing the Title Tool Window to the Foreground. . . . . . . . . 155
Working with Text . . . . . . . . . . . . . . . . . . . . . . . . . . . . . . . . . . . . . . . . . 156
Creating Text . . . . . . . . . . . . . . . . . . . . . . . . . . . . . . . . . . . . . . . . . . 156
Resizing Text Objects . . . . . . . . . . . . . . . . . . . . . . . . . . . . . . . . . . . 157
Repositioning Text Objects . . . . . . . . . . . . . . . . . . . . . . . . . . . . . . 157
Editing a Text String . . . . . . . . . . . . . . . . . . . . . . . . . . . . . . . . . . . . 158
7
Page 8

Formatting the Text . . . . . . . . . . . . . . . . . . . . . . . . . . . . . . . . . . . . . 158
Setting the Default Text Attributes . . . . . . . . . . . . . . . . . . . 159
Selecting a Font . . . . . . . . . . . . . . . . . . . . . . . . . . . . . . . . . . . . 160
Adjusting Point Size . . . . . . . . . . . . . . . . . . . . . . . . . . . . . . . . 160
Making Text Bold or Italic . . . . . . . . . . . . . . . . . . . . . . . . . . . 161
Justifying the Text . . . . . . . . . . . . . . . . . . . . . . . . . . . . . . . . . . 161
Kerning the Text . . . . . . . . . . . . . . . . . . . . . . . . . . . . . . . . . . . . 162
Adjusting Leading . . . . . . . . . . . . . . . . . . . . . . . . . . . . . . . . . . 164
Creating Graphic Objects . . . . . . . . . . . . . . . . . . . . . . . . . . . . . . . . . . . 165
Drawing a Square or Rectangle . . . . . . . . . . . . . . . . . . . . . . . . . . 165
Drawing a Circle or Oval. . . . . . . . . . . . . . . . . . . . . . . . . . . . . . . . 166
Drawing a Line
. . . . . . . . . . . . . . . . . . . . . . . . . . . . . . . . . . . . . . . . 166
Selecting Line Attributes. . . . . . . . . . . . . . . . . . . . . . . . . . . . . . . . 167
Rounding Corners . . . . . . . . . . . . . . . . . . . . . . . . . . . . . . . . . . 167
Selecting a Line or Border Width . . . . . . . . . . . . . . . . . . . . . 167
Adding Arrowheads . . . . . . . . . . . . . . . . . . . . . . . . . . . . . . . . 169
Changing Arrowhead Size . . . . . . . . . . . . . . . . . . . . . . . . . . . 169
Creating Rolling or Crawling Titles . . . . . . . . . . . . . . . . . . . . . . . . . . 170
Page Count Limits for Rolling or Crawling Titles . . . . . . . . . . 171
Using Auto Size Mode . . . . . . . . . . . . . . . . . . . . . . . . . . . . . . . . . . 172
Setting Up Text Formatting for Rolling Titles. . . . . . . . . . . . . . 172
Workßow Options for Creating Crawling Titles . . . . . . . . . . . 172
Typing the Rolling or Crawling Text. . . . . . . . . . . . . . . . . . . . . . 173
Resizing a Rolling or Crawling Title. . . . . . . . . . . . . . . . . . . . . . 174
Scrolling Through a Title. . . . . . . . . . . . . . . . . . . . . . . . . . . . . . . . 174
Going to a Page . . . . . . . . . . . . . . . . . . . . . . . . . . . . . . . . . . . . . . . . 175
Adding Pages . . . . . . . . . . . . . . . . . . . . . . . . . . . . . . . . . . . . . . . . . . 175
Deleting Additional Pages . . . . . . . . . . . . . . . . . . . . . . . . . . . . . . 176
Formatting Rolling or Crawling Titles . . . . . . . . . . . . . . . . . . . . 176
Choosing Colors and Setting Transparency . . . . . . . . . . . . . . . . . . . 177
Adjusting the Color . . . . . . . . . . . . . . . . . . . . . . . . . . . . . . . . . . . . 178
Blending Two Colors in an Object. . . . . . . . . . . . . . . . . . . . . . . . 179
Adjusting the Transparency . . . . . . . . . . . . . . . . . . . . . . . . . . . . . 181
8
Page 9

Blending Transparency . . . . . . . . . . . . . . . . . . . . . . . . . . . . . . 182
Working with Shadows. . . . . . . . . . . . . . . . . . . . . . . . . . . . . . . . . . . . . 183
Applying Shadows . . . . . . . . . . . . . . . . . . . . . . . . . . . . . . . . . . . . . 184
Adjusting Shadow Color and Transparency . . . . . . . . . . . . . . . 184
Manipulating Objects . . . . . . . . . . . . . . . . . . . . . . . . . . . . . . . . . . . . . . 185
Viewing Titles Full Frame . . . . . . . . . . . . . . . . . . . . . . . . . . . . . . . 185
Basic Manipulation Operations . . . . . . . . . . . . . . . . . . . . . . . . . . 185
Layering Text and Objects . . . . . . . . . . . . . . . . . . . . . . . . . . . . . . . 186
Grouping and Ungrouping Objects . . . . . . . . . . . . . . . . . . . . . . 187
Locking and Unlocking Objects. . . . . . . . . . . . . . . . . . . . . . . . . . 188
Aligning Objects . . . . . . . . . . . . . . . . . . . . . . . . . . . . . . . . . . . . . . . 189
Distributing Objects
Saving Titles and Title Styles. . . . . . . . . . . . . . . . . . . . . . . . . . . . . . . . 192
Matching Resolutions . . . . . . . . . . . . . . . . . . . . . . . . . . . . . . . . . . 192
Using the Fast Save Option. . . . . . . . . . . . . . . . . . . . . . . . . . . . . . 193
Saving a Title and Exiting the Title Tool . . . . . . . . . . . . . . . . . . 194
Saving Multiple Titles in a Session. . . . . . . . . . . . . . . . . . . . . . . 195
Revising a Title in a Bin. . . . . . . . . . . . . . . . . . . . . . . . . . . . . . . . . 196
Saving Title Styles. . . . . . . . . . . . . . . . . . . . . . . . . . . . . . . . . . . . . . 197
Recalling a Title Style . . . . . . . . . . . . . . . . . . . . . . . . . . . . . . . 198
Applying Title Styles to Text Objects . . . . . . . . . . . . . . . . . 199
Managing Title Styles . . . . . . . . . . . . . . . . . . . . . . . . . . . . . . . 199
Exporting a Title as a Graphics File . . . . . . . . . . . . . . . . . . . . . . . . . . 200
. . . . . . . . . . . . . . . . . . . . . . . . . . . . . . . . . . . . 190
Chapter 6 Editing with Titles
Task Overview Ñ Editing with Titles . . . . . . . . . . . . . . . . . . . . . . . . 202
Before You Begin . . . . . . . . . . . . . . . . . . . . . . . . . . . . . . . . . . . . . . . . . . 203
Downstream Keying of Titles and Graphics . . . . . . . . . . . . . . . 203
Restrictions of Downstream Key Titles . . . . . . . . . . . . . . . . . . . 204
Converting Downstream Key Titles . . . . . . . . . . . . . . . . . . . . . . 205
Restrictions of Non-Downstream Key Titles. . . . . . . . . . . . . . . 206
Playback Capabilities of DSK and Non-DSK Titles . . . . . . . . 207
About Title Effect Clips . . . . . . . . . . . . . . . . . . . . . . . . . . . . . . . . . 208
9
Page 10

Editing a Title into a Sequence . . . . . . . . . . . . . . . . . . . . . . . . . . . . . . 209
About Setting Marks in Rolling and Crawling Titles . . . . . . . 209
Adding a Video Track. . . . . . . . . . . . . . . . . . . . . . . . . . . . . . . . . . . 210
Splicing or Overwriting a Title into a Sequence. . . . . . . . . . . . 210
Dragging and Dropping a Title into a Sequence . . . . . . . . . . . 212
Trimming the Duration of Rolling and Crawling Titles. . . . . . . . . 213
Removing Titles . . . . . . . . . . . . . . . . . . . . . . . . . . . . . . . . . . . . . . . . . . . 214
Replacing Titles . . . . . . . . . . . . . . . . . . . . . . . . . . . . . . . . . . . . . . . . . . . 214
Fading a Title. . . . . . . . . . . . . . . . . . . . . . . . . . . . . . . . . . . . . . . . . . . . . . 215
Adjusting Title Effect Parameters . . . . . . . . . . . . . . . . . . . . . . . . . . . . 216
Using Title Key Frames . . . . . . . . . . . . . . . . . . . . . . . . . . . . . . . . . 217
Adjusting the Ef
Adjusting Foreground Level. . . . . . . . . . . . . . . . . . . . . . . . . . . . . 218
Adjusting Acceleration . . . . . . . . . . . . . . . . . . . . . . . . . . . . . . . . . 218
Adjusting Position . . . . . . . . . . . . . . . . . . . . . . . . . . . . . . . . . . . . . 219
Cropping Titles . . . . . . . . . . . . . . . . . . . . . . . . . . . . . . . . . . . . . . . . 219
Softening Edges on Rolling Titles. . . . . . . . . . . . . . . . . . . . . . . . 222
Saving a Title Effect Template . . . . . . . . . . . . . . . . . . . . . . . . . . . 222
Revising a Title in a Sequence. . . . . . . . . . . . . . . . . . . . . . . . . . . . . . . 223
Replacing Fill Tracks . . . . . . . . . . . . . . . . . . . . . . . . . . . . . . . . . . . . . . . 226
Rendering Titles . . . . . . . . . . . . . . . . . . . . . . . . . . . . . . . . . . . . . . . . . . . 227
Re-creating Title Media. . . . . . . . . . . . . . . . . . . . . . . . . . . . . . . . . . . . . 227
Promoting a 2D Title to 3D. . . . . . . . . . . . . . . . . . . . . . . . . . . . . . . . . . 228
Troubleshooting Titles . . . . . . . . . . . . . . . . . . . . . . . . . . . . . . . . . . . . . 229
No Title and Video Background Display . . . . . . . . . . . . . . . . . . 229
Downstream Key Error Messages . . . . . . . . . . . . . . . . . . . . . . . . 230
Wrong Title Format . . . . . . . . . . . . . . . . . . . . . . . . . . . . . . . . . . . . . 231
fect ProÞle. . . . . . . . . . . . . . . . . . . . . . . . . . . . . . 217
Chapter 7 Intraframe Editing
Editing with Intraframe Capability . . . . . . . . . . . . . . . . . . . . . . . . . . 233
Using an Optional Pen Tool . . . . . . . . . . . . . . . . . . . . . . . . . . . . . . . . . 234
Editing with Single-Field Step . . . . . . . . . . . . . . . . . . . . . . . . . . . . . . 234
Rendering Intraframe Effects. . . . . . . . . . . . . . . . . . . . . . . . . . . . . . . . 234
10
Page 11

Rendering Paint Effects . . . . . . . . . . . . . . . . . . . . . . . . . . . . . . . . . 235
Rendering AniMatte Effects . . . . . . . . . . . . . . . . . . . . . . . . . . . . . 235
Applying the Paint Effect to a Sequence . . . . . . . . . . . . . . . . . . . . . . 235
Applying an AniMatte Effect to a Sequence. . . . . . . . . . . . . . . . . . . 236
Working with the Intraframe Editing Interface . . . . . . . . . . . . . . . . 237
Using the Effect Editor with the Paint Effect. . . . . . . . . . . . . . . 238
Using the Effect Editor with the AniMatte Effect. . . . . . . . . . . 240
Using Effect Templates with the Intraframe Effects . . . . . . . . . . . . 242
Working with Intraframe Editing Parameters . . . . . . . . . . . . . . . . . 242
Using the Selection Tool . . . . . . . . . . . . . . . . . . . . . . . . . . . . . . . . 242
Global and Key-Frame Parameters . . . . . . . . . . . . . . . . . . . . . . . 243
Global Parameters
. . . . . . . . . . . . . . . . . . . . . . . . . . . . . . . . . . 243
Key-Frame Parameters . . . . . . . . . . . . . . . . . . . . . . . . . . . . . . 244
Opacity . . . . . . . . . . . . . . . . . . . . . . . . . . . . . . . . . . . . . . . . . . . . . . . 244
Object Visibility . . . . . . . . . . . . . . . . . . . . . . . . . . . . . . . . . . . . . . . 245
Feathering . . . . . . . . . . . . . . . . . . . . . . . . . . . . . . . . . . . . . . . . . . . . . 246
Bias . . . . . . . . . . . . . . . . . . . . . . . . . . . . . . . . . . . . . . . . . . . . . . . 247
Horizontal and Vertical Parameters . . . . . . . . . . . . . . . . . . . 248
Anti-Aliasing . . . . . . . . . . . . . . . . . . . . . . . . . . . . . . . . . . . . . . 248
Acceleration . . . . . . . . . . . . . . . . . . . . . . . . . . . . . . . . . . . . . . . . . . . 249
Brush . . . . . . . . . . . . . . . . . . . . . . . . . . . . . . . . . . . . . . . . . . . . . . . . . 249
Path . . . . . . . . . . . . . . . . . . . . . . . . . . . . . . . . . . . . . . . . . . . . . . . 250
Using Path to Create a Signature Effect. . . . . . . . . . . . . . . . 250
Soft . . . . . . . . . . . . . . . . . . . . . . . . . . . . . . . . . . . . . . . . . . . . . . . 251
Size . . . . . . . . . . . . . . . . . . . . . . . . . . . . . . . . . . . . . . . . . . . . . . . 251
Shape . . . . . . . . . . . . . . . . . . . . . . . . . . . . . . . . . . . . . . . . . . . . . 251
Creating a Custom Brush Head from a Template . . . . . . . 252
Spin. . . . . . . . . . . . . . . . . . . . . . . . . . . . . . . . . . . . . . . . . . . . . . . 253
Saving a Brush Template . . . . . . . . . . . . . . . . . . . . . . . . . . . . 254
Working with Vector-Based Objects. . . . . . . . . . . . . . . . . . . . . . . . . . 255
The Elements of Vector-Based Objects . . . . . . . . . . . . . . . . . . . . 255
Getting Started with Bezier Curves. . . . . . . . . . . . . . . . . . . . . . . 257
Transforming a Rectangle into a Circle . . . . . . . . . . . . . . . . 257
11
Page 12

Experimenting with Direction Handles . . . . . . . . . . . . . . . 259
Creating a Corner Join. . . . . . . . . . . . . . . . . . . . . . . . . . . . . . . 261
Modifying Lines and Curves Summarized . . . . . . . . . . . . . . . . 263
Painting a New Object with Bezier Curves . . . . . . . . . . . . . . . . 264
Moving a Control Point . . . . . . . . . . . . . . . . . . . . . . . . . . . . . . . . . 265
Adding a Control Point . . . . . . . . . . . . . . . . . . . . . . . . . . . . . . . . . 265
Moving to Adjacent Control Points. . . . . . . . . . . . . . . . . . . . . . . 266
Moving Control Points and Objects in Small Increments . . . 267
Removing a Control Point . . . . . . . . . . . . . . . . . . . . . . . . . . . . . . . 267
Using the Paint Tools . . . . . . . . . . . . . . . . . . . . . . . . . . . . . . . . . . . . . . . 268
Brush Tool . . . . . . . . . . . . . . . . . . . . . . . . . . . . . . . . . . . . . . . . . . . . . 268
Rectangle T
ool . . . . . . . . . . . . . . . . . . . . . . . . . . . . . . . . . . . . . . . . . 269
Oval Tool . . . . . . . . . . . . . . . . . . . . . . . . . . . . . . . . . . . . . . . . . . . . . . 270
Polygon Tool. . . . . . . . . . . . . . . . . . . . . . . . . . . . . . . . . . . . . . . . . . . 271
Creating Polygons with Straight-Line Segments . . . . . . . 272
Creating Polygons with Curved Segments . . . . . . . . . . . . . 273
Creating a Straight Line Following a Curve . . . . . . . . . . . . 275
Curve Tool. . . . . . . . . . . . . . . . . . . . . . . . . . . . . . . . . . . . . . . . . . . . . 277
Previsualization Marker Tool for Film Projects . . . . . . . . . . . . 277
Applying the Marker Effect . . . . . . . . . . . . . . . . . . . . . . . . . . . . . 279
Creating a Cut List with Effect Grid Information . . . . . . . . . . 279
Moving and Manipulating Painted Objects and Mattes . . . . . . . . 282
Reshape . . . . . . . . . . . . . . . . . . . . . . . . . . . . . . . . . . . . . . . . . . . . . . . 282
Selecting an Object or Matte with the Reshape Tool . . . . 282
Changing the Shape of an Object or Matte with the
Reshape Tool . . . . . . . . . . . . . . . . . . . . . . . . . . . . . . . . . . . . . . . 283
Editing Objects and Mattes Created with the
Curve Tool . . . . . . . . . . . . . . . . . . . . . . . . . . . . . . . . . . . . . . . . . 284
Z-Rotation. . . . . . . . . . . . . . . . . . . . . . . . . . . . . . . . . . . . . . . . . . . . . 284
Scaling Paint Objects and Mattes . . . . . . . . . . . . . . . . . . . . . . . . 285
Moving Painted Objects . . . . . . . . . . . . . . . . . . . . . . . . . . . . . . . . 287
Layering Objects and Matte Keys . . . . . . . . . . . . . . . . . . . . . . . . 287
Layering with the Paint Effect. . . . . . . . . . . . . . . . . . . . . . . . 287
12
Page 13

Layering with the AniMatte Effect. . . . . . . . . . . . . . . . . . . . 288
Using the Outline/Path Button to Locate
Layered Objects and Mattes. . . . . . . . . . . . . . . . . . . . . . . . . . 288
Bringing Objects and Mattes Forward by One Layer. . . . 288
Sending Objects and Mattes Backward by One Layer. . . 289
Bringing Objects and Mattes to the Front. . . . . . . . . . . . . . 289
Sending Objects or Mattes to the Back . . . . . . . . . . . . . . . . 290
Grouping and Ungrouping Objects or Mattes . . . . . . . . . . . . . 290
Locking and Unlocking Objects and Mattes . . . . . . . . . . . . . . . 291
Chapter 8 Using the Paint and AniMatte Effects
Using the Paint Effect . . . . . . . . . . . . . . . . . . . . . . . . . . . . . . . . . . . . 8-293
Getting Started with the Paint Effect . . . . . . . . . . . . . . . . . . . 8-293
Painting with the Brush . . . . . . . . . . . . . . . . . . . . . . . . . . . 8-294
Painting Using Different Effect Parameters . . . . . . . . . . 8-294
Changing the Parameters of a Painted Object . . . . . . . . 8-296
Paint Effect Parameters . . . . . . . . . . . . . . . . . . . . . . . . . . . . . . . 8-297
Paint Modes. . . . . . . . . . . . . . . . . . . . . . . . . . . . . . . . . . . . . . 8-297
Choosing a Color. . . . . . . . . . . . . . . . . . . . . . . . . . . . . . . . . . . . . 8-299
Using the Eyedropper . . . . . . . . . . . . . . . . . . . . . . . . . . . . . 8-300
Selecting a Color with the Color Sliders . . . . . . . . . . . . . 8-300
Selecting a Color from the Macintosh Color Picker . . . 8-301
Shortcut for Selecting a Color with the Brush Tool . . . 8-301
Using Magic Mask with the Paint Effect . . . . . . . . . . . . . . . . 8-301
Getting Started with Magic Mask and the
Paint Effect . . . . . . . . . . . . . . . . . . . . . . . . . . . . . . . . . . . . . . 8-303
Magic Mask Hue, Saturation, and
Luminance Parameters . . . . . . . . . . . . . . . . . . . . . . . . . . . . 8-305
Gain . . . . . . . . . . . . . . . . . . . . . . . . . . . . . . . . . . . . . . . . . . . . 8-305
Softness . . . . . . . . . . . . . . . . . . . . . . . . . . . . . . . . . . . . . . . . . 8-306
Using the AniMatte Effect . . . . . . . . . . . . . . . . . . . . . . . . . . . . . . . . 8-307
Getting Started with the AniMatte Effect . . . . . . . . . . . . . . . 8-307
Creating a Multitrack Matte Key . . . . . . . . . . . . . . . . . . . 8-308
13
Page 14

Animating the AniMatte Effect. . . . . . . . . . . . . . . . . . . . . 8-310
Creating a Single-Layer Organic Matte Wipe . . . . . . . . . . . . 8-312
Adding a Soft Edge to the Organic Matte Wipe. . . . . . . 8-314
AniMatte Effect Parameters . . . . . . . . . . . . . . . . . . . . . . . . . . . 8-315
Key Modes. . . . . . . . . . . . . . . . . . . . . . . . . . . . . . . . . . . . . . . 8-315
Using Magic Mask with the AniMatte Effect . . . . . . . . . . . . 8-317
Getting Started with Magic Mask and the
AniMatte Effects. . . . . . . . . . . . . . . . . . . . . . . . . . . . . . . . . . 8-317
Hue, Saturation, and Luminance Parameters . . . . . . . . . 8-320
Gain . . . . . . . . . . . . . . . . . . . . . . . . . . . . . . . . . . . . . . . . . . . . 8-321
Softness . . . . . . . . . . . . . . . . . . . . . . . . . . . . . . . . . . . . . . . . . 8-322
Exporting a Matte PICT File
Chapter 9 Working with 3D Effects
About the 3D Effects Option . . . . . . . . . . . . . . . . . . . . . . . . . . . . . . . . 327
Turning the 3D Effects Option On and Off . . . . . . . . . . . . . . . . 328
Accessing 3D Effects . . . . . . . . . . . . . . . . . . . . . . . . . . . . . . . . . . . . . . . 330
Applying a 3D Warp Effect . . . . . . . . . . . . . . . . . . . . . . . . . . . . . . 330
Promoting 2D Effects to 3D Effects . . . . . . . . . . . . . . . . . . . . . . . 331
Using Matte Keys with 3D Effects . . . . . . . . . . . . . . . . . . . . 332
Understanding the 3D Effects Interface. . . . . . . . . . . . . . . . . . . . . . . 333
Moving in 3D Space . . . . . . . . . . . . . . . . . . . . . . . . . . . . . . . . . . . . 333
The 3D Coordinate System . . . . . . . . . . . . . . . . . . . . . . . . . . 333
Rotation Axes . . . . . . . . . . . . . . . . . . . . . . . . . . . . . . . . . . . . . . 334
About 3D Effects Parameters . . . . . . . . . . . . . . . . . . . . . . . . . . . . 336
Opening Parameter Panes . . . . . . . . . . . . . . . . . . . . . . . . . . . 337
Using the Enable Button. . . . . . . . . . . . . . . . . . . . . . . . . . . . . 337
Resetting Default Values . . . . . . . . . . . . . . . . . . . . . . . . . . . . 338
Using Effect Templates . . . . . . . . . . . . . . . . . . . . . . . . . . . . . . 338
The Hierarchy of Parameters . . . . . . . . . . . . . . . . . . . . . . . . . 338
Effect Parameters with 2D and 3D Versions . . . . . . . . . . . . 340
Manipulating 3D Effects in the Effect Preview Monitor. . . . . 341
Zooming In or Out on the Effect Preview Monitor. . . . . . 341
. . . . . . . . . . . . . . . . . . . . . . . . . . . 8-322
14
Page 15

Manipulating Effect Handles . . . . . . . . . . . . . . . . . . . . . . . . 341
Using the Motion Path Editor . . . . . . . . . . . . . . . . . . . . . . . . 342
Creating Custom 3D Effects . . . . . . . . . . . . . . . . . . . . . . . . . . . . . . . . . 343
Some Tips for Creating 3D Effects. . . . . . . . . . . . . . . . . . . . . . . . 343
Creating a Page Curl Transition . . . . . . . . . . . . . . . . . . . . . . . . . . 346
A Simple Variation on the Page Turn Transition . . . . . . . . 348
Creating a Splash Dissolve . . . . . . . . . . . . . . . . . . . . . . . . . . . . . . 349
Turning a Splash into a Flat Image . . . . . . . . . . . . . . . . . . . . . . . 352
Creating a Scaled Picture-in-Picture . . . . . . . . . . . . . . . . . . . . . . 354
Using the Spline Parameters. . . . . . . . . . . . . . . . . . . . . . . . . . . . . 356
Corner Pinning an Image. . . . . . . . . . . . . . . . . . . . . . . . . . . . . . . . 358
Creating a Stamp
Using Axis for a Transition . . . . . . . . . . . . . . . . . . . . . . . . . . . . . . 362
Applying a Chroma Key . . . . . . . . . . . . . . . . . . . . . . . . . . . . . . . . 364
Using Avid Xpress 3D Effects . . . . . . . . . . . . . . . . . . . . . . . . . . . . . . . 365
. . . . . . . . . . . . . . . . . . . . . . . . . . . . . . . . . . . . . . . 360
Chapter 10 2D Effects Reference
2D Effect Parameters Reference. . . . . . . . . . . . . . . . . . . . . . . . . . . . . . 367
Acceleration Parameter . . . . . . . . . . . . . . . . . . . . . . . . . . . . . . . . . 368
AniMatte Parameters . . . . . . . . . . . . . . . . . . . . . . . . . . . . . . . . . . . 369
Background Parameter . . . . . . . . . . . . . . . . . . . . . . . . . . . . . . . . . . 369
Border Parameters . . . . . . . . . . . . . . . . . . . . . . . . . . . . . . . . . . . . . . 370
Color Effect Parameters . . . . . . . . . . . . . . . . . . . . . . . . . . . . . . . . . 372
Crop Parameters . . . . . . . . . . . . . . . . . . . . . . . . . . . . . . . . . . . . . . . 372
Foreground Parameter . . . . . . . . . . . . . . . . . . . . . . . . . . . . . . . . . . 373
Key Control Parameters . . . . . . . . . . . . . . . . . . . . . . . . . . . . . . . . . 374
Matrix Parameters . . . . . . . . . . . . . . . . . . . . . . . . . . . . . . . . . . . . . . 376
Motion Effect Parameters . . . . . . . . . . . . . . . . . . . . . . . . . . . . . . . . . . . 377
Freeze Frame Parameters . . . . . . . . . . . . . . . . . . . . . . . . . . . . 377
Variable Speed and Strobe Motion Parameters . . . . . . . . . 379
Paint Effect Parameters . . . . . . . . . . . . . . . . . . . . . . . . . . . . . . . . . 381
Position Parameters . . . . . . . . . . . . . . . . . . . . . . . . . . . . . . . . . . . . 381
Blowup Parameters . . . . . . . . . . . . . . . . . . . . . . . . . . . . . . . . . . . . . 382
15
Page 16

ProÞle. . . . . . . . . . . . . . . . . . . . . . . . . . . . . . . . . . . . . . . . . . . . . . . . . 383
Adjusting Foreground Level in the ProÞle Window. . . . . 383
Scaling Parameters . . . . . . . . . . . . . . . . . . . . . . . . . . . . . . . . . . . . . 384
Transition Parameters . . . . . . . . . . . . . . . . . . . . . . . . . . . . . . . . . . . 385
Plug-in Effects. . . . . . . . . . . . . . . . . . . . . . . . . . . . . . . . . . . . . . . . . . . . . 386
Blend Effects . . . . . . . . . . . . . . . . . . . . . . . . . . . . . . . . . . . . . . . . . . . . . . 386
Dip to Color . . . . . . . . . . . . . . . . . . . . . . . . . . . . . . . . . . . . . . . . . . . 387
Dissolve. . . . . . . . . . . . . . . . . . . . . . . . . . . . . . . . . . . . . . . . . . . . . . . 388
Fade from Color. . . . . . . . . . . . . . . . . . . . . . . . . . . . . . . . . . . . . . . . 389
Fade to Color . . . . . . . . . . . . . . . . . . . . . . . . . . . . . . . . . . . . . . . . . . 389
Picture-in-Picture. . . . . . . . . . . . . . . . . . . . . . . . . . . . . . . . . . . . . . . 390
Superimpose
. . . . . . . . . . . . . . . . . . . . . . . . . . . . . . . . . . . . . . . . . . 391
Conceal Effects . . . . . . . . . . . . . . . . . . . . . . . . . . . . . . . . . . . . . . . . . . . . 393
Bottom Left to Top Right . . . . . . . . . . . . . . . . . . . . . . . . . . . . . . . . 393
Bottom Right to Top Left . . . . . . . . . . . . . . . . . . . . . . . . . . . . . . . . 394
Bottom to Top . . . . . . . . . . . . . . . . . . . . . . . . . . . . . . . . . . . . . . . . . . 395
Left to Right . . . . . . . . . . . . . . . . . . . . . . . . . . . . . . . . . . . . . . . . . . . 395
Right to Left . . . . . . . . . . . . . . . . . . . . . . . . . . . . . . . . . . . . . . . . . . . 396
Top Left to Bottom Right . . . . . . . . . . . . . . . . . . . . . . . . . . . . . . . . 397
Top Right to Bottom Left . . . . . . . . . . . . . . . . . . . . . . . . . . . . . . . . 398
Top to Bottom . . . . . . . . . . . . . . . . . . . . . . . . . . . . . . . . . . . . . . . . . . 399
Film Effects . . . . . . . . . . . . . . . . . . . . . . . . . . . . . . . . . . . . . . . . . . . . . . . 400
1:1.66 Mask . . . . . . . . . . . . . . . . . . . . . . . . . . . . . . . . . . . . . . . . . . . . 400
1:1.85 Mask . . . . . . . . . . . . . . . . . . . . . . . . . . . . . . . . . . . . . . . . . . . . 401
1:2.35 Mask . . . . . . . . . . . . . . . . . . . . . . . . . . . . . . . . . . . . . . . . . . . . 402
16 x 9 Mask . . . . . . . . . . . . . . . . . . . . . . . . . . . . . . . . . . . . . . . . . . . . 402
Blowup . . . . . . . . . . . . . . . . . . . . . . . . . . . . . . . . . . . . . . . . . . . . . . . 403
Film Dissolve . . . . . . . . . . . . . . . . . . . . . . . . . . . . . . . . . . . . . . . . . . 404
Film Fade. . . . . . . . . . . . . . . . . . . . . . . . . . . . . . . . . . . . . . . . . . . . . . 405
Mask . . . . . . . . . . . . . . . . . . . . . . . . . . . . . . . . . . . . . . . . . . . . . . . . . 406
Image Effects . . . . . . . . . . . . . . . . . . . . . . . . . . . . . . . . . . . . . . . . . . . . . . 407
Color Effect. . . . . . . . . . . . . . . . . . . . . . . . . . . . . . . . . . . . . . . . . . . . 407
Luminance (Luma Adjust) . . . . . . . . . . . . . . . . . . . . . . . . . . . 408
16
Page 17

Luma Range. . . . . . . . . . . . . . . . . . . . . . . . . . . . . . . . . . . . . . . . 409
Luma Clip . . . . . . . . . . . . . . . . . . . . . . . . . . . . . . . . . . . . . . . . . 411
Chrominance (Chroma Adjust) . . . . . . . . . . . . . . . . . . . . . . . 411
Color Style. . . . . . . . . . . . . . . . . . . . . . . . . . . . . . . . . . . . . . . . . 412
Color Gain . . . . . . . . . . . . . . . . . . . . . . . . . . . . . . . . . . . . . . . . . 413
Flip . . . . . . . . . . . . . . . . . . . . . . . . . . . . . . . . . . . . . . . . . . . . . . . . . . . 414
Flip-Flop . . . . . . . . . . . . . . . . . . . . . . . . . . . . . . . . . . . . . . . . . . . . . . 414
Flop . . . . . . . . . . . . . . . . . . . . . . . . . . . . . . . . . . . . . . . . . . . . . . . . . . 415
Mask . . . . . . . . . . . . . . . . . . . . . . . . . . . . . . . . . . . . . . . . . . . . . . . . . 415
Paint Effect . . . . . . . . . . . . . . . . . . . . . . . . . . . . . . . . . . . . . . . . . . . . 416
Resize. . . . . . . . . . . . . . . . . . . . . . . . . . . . . . . . . . . . . . . . . . . . . . . . . 417
Submaster
. . . . . . . . . . . . . . . . . . . . . . . . . . . . . . . . . . . . . . . . . . . . . 418
Key Effects . . . . . . . . . . . . . . . . . . . . . . . . . . . . . . . . . . . . . . . . . . . . . . . . 418
AniMatte . . . . . . . . . . . . . . . . . . . . . . . . . . . . . . . . . . . . . . . . . . . . . . 419
YUV Chroma Key . . . . . . . . . . . . . . . . . . . . . . . . . . . . . . . . . . . . . . 420
Luma Key . . . . . . . . . . . . . . . . . . . . . . . . . . . . . . . . . . . . . . . . . . . . . 421
Matte Key . . . . . . . . . . . . . . . . . . . . . . . . . . . . . . . . . . . . . . . . . . . . . 423
L-Conceal Effects . . . . . . . . . . . . . . . . . . . . . . . . . . . . . . . . . . . . . . . . . . 425
Bottom Left . . . . . . . . . . . . . . . . . . . . . . . . . . . . . . . . . . . . . . . . . . . . 425
Bottom Right . . . . . . . . . . . . . . . . . . . . . . . . . . . . . . . . . . . . . . . . . . 426
Top Left . . . . . . . . . . . . . . . . . . . . . . . . . . . . . . . . . . . . . . . . . . . . . . . 426
Top Right. . . . . . . . . . . . . . . . . . . . . . . . . . . . . . . . . . . . . . . . . . . . . . 427
Motion Effects. . . . . . . . . . . . . . . . . . . . . . . . . . . . . . . . . . . . . . . . . . . . . 428
Freeze Frame. . . . . . . . . . . . . . . . . . . . . . . . . . . . . . . . . . . . . . . . . . . 428
Variable Speed and Strobe Motion . . . . . . . . . . . . . . . . . . . . . . . 429
Peel Effects. . . . . . . . . . . . . . . . . . . . . . . . . . . . . . . . . . . . . . . . . . . . . . . . 429
Bottom Left Corner . . . . . . . . . . . . . . . . . . . . . . . . . . . . . . . . . . . . . 430
Bottom Right Corner . . . . . . . . . . . . . . . . . . . . . . . . . . . . . . . . . . . 430
Bottom to Top . . . . . . . . . . . . . . . . . . . . . . . . . . . . . . . . . . . . . . . . . . 431
Left to Right . . . . . . . . . . . . . . . . . . . . . . . . . . . . . . . . . . . . . . . . . . . 432
Right to Left . . . . . . . . . . . . . . . . . . . . . . . . . . . . . . . . . . . . . . . . . . . 432
Top Left Corner . . . . . . . . . . . . . . . . . . . . . . . . . . . . . . . . . . . . . . . . 433
Top Right Corner . . . . . . . . . . . . . . . . . . . . . . . . . . . . . . . . . . . . . . . 434
17
Page 18

Top to Bottom . . . . . . . . . . . . . . . . . . . . . . . . . . . . . . . . . . . . . . . . . . 435
Push Effects . . . . . . . . . . . . . . . . . . . . . . . . . . . . . . . . . . . . . . . . . . . . . . . 435
Bottom Left to Top Right . . . . . . . . . . . . . . . . . . . . . . . . . . . . . . . . 436
Bottom Right to Top Left . . . . . . . . . . . . . . . . . . . . . . . . . . . . . . . . 437
Bottom to Top . . . . . . . . . . . . . . . . . . . . . . . . . . . . . . . . . . . . . . . . . . 437
Left to Right . . . . . . . . . . . . . . . . . . . . . . . . . . . . . . . . . . . . . . . . . . . 438
Right to Left . . . . . . . . . . . . . . . . . . . . . . . . . . . . . . . . . . . . . . . . . . . 439
Top Left to Bottom Right . . . . . . . . . . . . . . . . . . . . . . . . . . . . . . . . 440
Top Right to Bottom Left . . . . . . . . . . . . . . . . . . . . . . . . . . . . . . . . 441
Top to Bottom . . . . . . . . . . . . . . . . . . . . . . . . . . . . . . . . . . . . . . . . . . 441
Spin Effects . . . . . . . . . . . . . . . . . . . . . . . . . . . . . . . . . . . . . . . . . . . . . . . 443
X Spin
. . . . . . . . . . . . . . . . . . . . . . . . . . . . . . . . . . . . . . . . . . . . . . . . 443
Y Spin . . . . . . . . . . . . . . . . . . . . . . . . . . . . . . . . . . . . . . . . . . . . . . . . 444
Z Spin . . . . . . . . . . . . . . . . . . . . . . . . . . . . . . . . . . . . . . . . . . . . . . . . 445
Squeeze Effects . . . . . . . . . . . . . . . . . . . . . . . . . . . . . . . . . . . . . . . . . . . . 447
Bottom Centered . . . . . . . . . . . . . . . . . . . . . . . . . . . . . . . . . . . . . . . 448
Bottom Left . . . . . . . . . . . . . . . . . . . . . . . . . . . . . . . . . . . . . . . . . . . . 448
Bottom Right . . . . . . . . . . . . . . . . . . . . . . . . . . . . . . . . . . . . . . . . . . 449
Bottom to Top . . . . . . . . . . . . . . . . . . . . . . . . . . . . . . . . . . . . . . . . . . 450
Centered Zoom . . . . . . . . . . . . . . . . . . . . . . . . . . . . . . . . . . . . . . . . 450
Vertical Centered . . . . . . . . . . . . . . . . . . . . . . . . . . . . . . . . . . . . . . . 451
Left Centered . . . . . . . . . . . . . . . . . . . . . . . . . . . . . . . . . . . . . . . . . . 452
Left to Right . . . . . . . . . . . . . . . . . . . . . . . . . . . . . . . . . . . . . . . . . . . 452
Right Centered. . . . . . . . . . . . . . . . . . . . . . . . . . . . . . . . . . . . . . . . . 453
Right to Left . . . . . . . . . . . . . . . . . . . . . . . . . . . . . . . . . . . . . . . . . . . 454
Top Centered . . . . . . . . . . . . . . . . . . . . . . . . . . . . . . . . . . . . . . . . . . 454
Top Left . . . . . . . . . . . . . . . . . . . . . . . . . . . . . . . . . . . . . . . . . . . . . . . 455
Top Right. . . . . . . . . . . . . . . . . . . . . . . . . . . . . . . . . . . . . . . . . . . . . . 456
Top to Bottom . . . . . . . . . . . . . . . . . . . . . . . . . . . . . . . . . . . . . . . . . . 457
Horizontal Centered . . . . . . . . . . . . . . . . . . . . . . . . . . . . . . . . . . . . 457
Wipes. . . . . . . . . . . . . . . . . . . . . . . . . . . . . . . . . . . . . . . . . . . . . . . . . . . . . 459
Box Wipes . . . . . . . . . . . . . . . . . . . . . . . . . . . . . . . . . . . . . . . . . . . . . 459
Bottom Box . . . . . . . . . . . . . . . . . . . . . . . . . . . . . . . . . . . . . . . . 460
18
Page 19

Left Box . . . . . . . . . . . . . . . . . . . . . . . . . . . . . . . . . . . . . . . . . . . 460
Lower Left Corner . . . . . . . . . . . . . . . . . . . . . . . . . . . . . . . . . . 461
Lower Right Corner . . . . . . . . . . . . . . . . . . . . . . . . . . . . . . . . . 462
Right Box . . . . . . . . . . . . . . . . . . . . . . . . . . . . . . . . . . . . . . . . . . 462
Top Box. . . . . . . . . . . . . . . . . . . . . . . . . . . . . . . . . . . . . . . . . . . . 463
Upper Left Corner . . . . . . . . . . . . . . . . . . . . . . . . . . . . . . . . . . 464
Upper Right Corner . . . . . . . . . . . . . . . . . . . . . . . . . . . . . . . . . 465
Edge Wipes . . . . . . . . . . . . . . . . . . . . . . . . . . . . . . . . . . . . . . . . . . . . 465
Vertical . . . . . . . . . . . . . . . . . . . . . . . . . . . . . . . . . . . . . . . . . . . . 466
Vertical Open . . . . . . . . . . . . . . . . . . . . . . . . . . . . . . . . . . . . . . 467
Lower Left Diagonal . . . . . . . . . . . . . . . . . . . . . . . . . . . . . . . . 467
Lower Right Diagonal
. . . . . . . . . . . . . . . . . . . . . . . . . . . . . . . 468
Upper Left Diagonal . . . . . . . . . . . . . . . . . . . . . . . . . . . . . . . . 469
Upper Right Diagonal. . . . . . . . . . . . . . . . . . . . . . . . . . . . . . . 469
Horizontal . . . . . . . . . . . . . . . . . . . . . . . . . . . . . . . . . . . . . . . . . 470
Horizontal Open. . . . . . . . . . . . . . . . . . . . . . . . . . . . . . . . . . . . 471
Matrix Wipes . . . . . . . . . . . . . . . . . . . . . . . . . . . . . . . . . . . . . . . . . . 471
Block Spiral. . . . . . . . . . . . . . . . . . . . . . . . . . . . . . . . . . . . . . . . 472
Grid. . . . . . . . . . . . . . . . . . . . . . . . . . . . . . . . . . . . . . . . . . . . . . . 472
One-Way Row . . . . . . . . . . . . . . . . . . . . . . . . . . . . . . . . . . . . . . 474
Speckle . . . . . . . . . . . . . . . . . . . . . . . . . . . . . . . . . . . . . . . . . . . . 474
Zig-Zag . . . . . . . . . . . . . . . . . . . . . . . . . . . . . . . . . . . . . . . . . . . . 475
Saw Tooth Wipes . . . . . . . . . . . . . . . . . . . . . . . . . . . . . . . . . . . . . . . 476
Vertical Open Saw Tooth . . . . . . . . . . . . . . . . . . . . . . . . . . . . 477
Vertical Saw Tooth . . . . . . . . . . . . . . . . . . . . . . . . . . . . . . . . . . 477
Horizontal Open Saw Tooth . . . . . . . . . . . . . . . . . . . . . . . . . 478
Horizontal Saw Tooth . . . . . . . . . . . . . . . . . . . . . . . . . . . . . . . 479
Shape Wipes. . . . . . . . . . . . . . . . . . . . . . . . . . . . . . . . . . . . . . . . . . . 480
Center Box . . . . . . . . . . . . . . . . . . . . . . . . . . . . . . . . . . . . . . . . . 480
Circle. . . . . . . . . . . . . . . . . . . . . . . . . . . . . . . . . . . . . . . . . . . . . . 481
Clock. . . . . . . . . . . . . . . . . . . . . . . . . . . . . . . . . . . . . . . . . . . . . . 482
Diamond . . . . . . . . . . . . . . . . . . . . . . . . . . . . . . . . . . . . . . . . . . 483
Ellipse. . . . . . . . . . . . . . . . . . . . . . . . . . . . . . . . . . . . . . . . . . . . . 483
19
Page 20

Four Corners . . . . . . . . . . . . . . . . . . . . . . . . . . . . . . . . . . . . . . . 484
Vertical Bands . . . . . . . . . . . . . . . . . . . . . . . . . . . . . . . . . . . . . . 485
Vertical Blind . . . . . . . . . . . . . . . . . . . . . . . . . . . . . . . . . . . . . . 485
Horizontal Blind. . . . . . . . . . . . . . . . . . . . . . . . . . . . . . . . . . . . 486
Comparison of Similar Effects. . . . . . . . . . . . . . . . . . . . . . . . . . . . . . . 487
Box Wipe Ð Upper Left Corner . . . . . . . . . . . . . . . . . . . . . . . . . . . 487
Conceal Ð Top Left to Bottom Right. . . . . . . . . . . . . . . . . . . . . . . 488
Push Ð Top Left to Bottom Right . . . . . . . . . . . . . . . . . . . . . . . . . 488
Squeeze Ð Top Left . . . . . . . . . . . . . . . . . . . . . . . . . . . . . . . . . . . . . 488
Chapter 11 3D Effects Reference
Basic 3D Effects Parameters . . . . . . . . . . . . . . . . . . . . . . . . . . . . . . . . . 490
Setup Versus Key-Frame Parameters. . . . . . . . . . . . . . . . . . . . . . 490
Corner Pinning . . . . . . . . . . . . . . . . . . . . . . . . . . . . . . . . . . . . . . . . 491
Crop Ñ Cropping the Image. . . . . . . . . . . . . . . . . . . . . . . . . . . . . 491
Scaling Ñ Changing the Size . . . . . . . . . . . . . . . . . . . . . . . . . . . . 492
Axis Ñ Moving the Center of Rotation. . . . . . . . . . . . . . . . . . . . 493
Skew Ñ Tilting the Image. . . . . . . . . . . . . . . . . . . . . . . . . . . . . . . 494
Rotation Ñ Rotating an Effect . . . . . . . . . . . . . . . . . . . . . . . . . . . 495
Position Ñ Moving the Image . . . . . . . . . . . . . . . . . . . . . . . . . . . 496
Acceleration Ñ Smoothing Out Key-Frame Transitions . . . . . 497
Spline Ñ Moving the Image Along a Smooth Path . . . . . . . . . 498
Tension (Tens.) . . . . . . . . . . . . . . . . . . . . . . . . . . . . . . . . . . . . . 499
Continuity (Cont.) . . . . . . . . . . . . . . . . . . . . . . . . . . . . . . . . . . 500
Difference Between Tension and Continuity . . . . . . . . . . . 500
Bias . . . . . . . . . . . . . . . . . . . . . . . . . . . . . . . . . . . . . . . . . . . . . . . 501
Adding a New Point to a Spline Curve . . . . . . . . . . . . . . . . 502
Perspective Ñ Moving the Perspective Point . . . . . . . . . . . . . . 503
Target Ñ Post-Transformation Position and Scaling . . . . . . . . 503
Border . . . . . . . . . . . . . . . . . . . . . . . . . . . . . . . . . . . . . . . . . . . . . . . . 505
Highlight. . . . . . . . . . . . . . . . . . . . . . . . . . . . . . . . . . . . . . . . . . . . . . 506
Defocus Ñ Controlling the Sharpness of Focus . . . . . . . . . . . . 508
Shadow . . . . . . . . . . . . . . . . . . . . . . . . . . . . . . . . . . . . . . . . . . . . . . . 508
20
Page 21

Trail Ñ Adding a Trail to a Moving Image. . . . . . . . . . . . . . . . . 509
Stamp. . . . . . . . . . . . . . . . . . . . . . . . . . . . . . . . . . . . . . . . . . . . . . . . . 509
Foreground Ñ Selecting Between Full, Chroma, and
Luma Keys . . . . . . . . . . . . . . . . . . . . . . . . . . . . . . . . . . . . . . . . . . . . 510
Full Key . . . . . . . . . . . . . . . . . . . . . . . . . . . . . . . . . . . . . . . . . . . 511
Luma Key. . . . . . . . . . . . . . . . . . . . . . . . . . . . . . . . . . . . . . . . . . 512
Chroma Key. . . . . . . . . . . . . . . . . . . . . . . . . . . . . . . . . . . . . . . . 515
Background Ñ Add a Background Color . . . . . . . . . . . . . . . . . . 518
ProÞle. . . . . . . . . . . . . . . . . . . . . . . . . . . . . . . . . . . . . . . . . . . . . . . . . 519
Adjusting Foreground Level in the ProÞle Window. . . . . 519
3D Shape Effects. . . . . . . . . . . . . . . . . . . . . . . . . . . . . . . . . . . . . . . . . . . 520
urns. . . . . . . . . . . . . . . . . . . . . . . . . . . . . . . . . . . . . . . . . . . . . 521
Page T
Page Turn Parameters . . . . . . . . . . . . . . . . . . . . . . . . . . . . . . . 522
Page Fold Angle Values . . . . . . . . . . . . . . . . . . . . . . . . . . . . . 523
Splitting a Page Turn or Page Fold Effect . . . . . . . . . . . . . . 524
Manipulating the Flap and Bottom of a Page Fold . . . . . . 527
Highlight Options . . . . . . . . . . . . . . . . . . . . . . . . . . . . . . . . . . 528
Splashes. . . . . . . . . . . . . . . . . . . . . . . . . . . . . . . . . . . . . . . . . . . . . . . 529
Limitations to Splashes. . . . . . . . . . . . . . . . . . . . . . . . . . . . . . 530
Ball . . . . . . . . . . . . . . . . . . . . . . . . . . . . . . . . . . . . . . . . . . . . . . . . . . . 531
Limitations to Ball Shapes . . . . . . . . . . . . . . . . . . . . . . . . . . . 532
Offset Shapes . . . . . . . . . . . . . . . . . . . . . . . . . . . . . . . . . . . . . . . . . . 532
Slats. . . . . . . . . . . . . . . . . . . . . . . . . . . . . . . . . . . . . . . . . . . . . . . 534
Arrow . . . . . . . . . . . . . . . . . . . . . . . . . . . . . . . . . . . . . . . . . . . . . 534
One Burst. . . . . . . . . . . . . . . . . . . . . . . . . . . . . . . . . . . . . . . . . . 535
Center Burst. . . . . . . . . . . . . . . . . . . . . . . . . . . . . . . . . . . . . . . . 535
Saw Tooth . . . . . . . . . . . . . . . . . . . . . . . . . . . . . . . . . . . . . . . . . 536
Sine Wave . . . . . . . . . . . . . . . . . . . . . . . . . . . . . . . . . . . . . . . . . 537
Bumps. . . . . . . . . . . . . . . . . . . . . . . . . . . . . . . . . . . . . . . . . . . . . 537
Scaling Shapes . . . . . . . . . . . . . . . . . . . . . . . . . . . . . . . . . . . . . . . . . 538
Hour Glass. . . . . . . . . . . . . . . . . . . . . . . . . . . . . . . . . . . . . . . . . 541
Bow Tie. . . . . . . . . . . . . . . . . . . . . . . . . . . . . . . . . . . . . . . . . . . . 541
Octagon . . . . . . . . . . . . . . . . . . . . . . . . . . . . . . . . . . . . . . . . . . . 542
21
Page 22

Hexagon . . . . . . . . . . . . . . . . . . . . . . . . . . . . . . . . . . . . . . . . . . . 542
Rain Drop . . . . . . . . . . . . . . . . . . . . . . . . . . . . . . . . . . . . . . . . . 543
Hour Glass 2 . . . . . . . . . . . . . . . . . . . . . . . . . . . . . . . . . . . . . . . 543
Hex Medium . . . . . . . . . . . . . . . . . . . . . . . . . . . . . . . . . . . . . . . 544
Hex Wide . . . . . . . . . . . . . . . . . . . . . . . . . . . . . . . . . . . . . . . . . . 544
Circle. . . . . . . . . . . . . . . . . . . . . . . . . . . . . . . . . . . . . . . . . . . . . . 545
Ellipse. . . . . . . . . . . . . . . . . . . . . . . . . . . . . . . . . . . . . . . . . . . . . 545
Goblet. . . . . . . . . . . . . . . . . . . . . . . . . . . . . . . . . . . . . . . . . . . . . 546
Avid Xpress 3D Effects . . . . . . . . . . . . . . . . . . . . . . . . . . . . . . . . . . . . . 546
Xpress 3D Effects Parameters . . . . . . . . . . . . . . . . . . . . . . . . . . . . 547
Index
22
Page 23

CHAPTER 1
Preparing to Work with Effects
The Avid Composer system offers many effects that you can apply to
your sequences. This chapter describes some of the concepts you must
become familiar with before you begin creating and editing effects into
sequences.
¥ Effect Types
¥ Effects Creation Tools
¥ Understanding Real-Time and Downstream Key Effects
¥ Displaying the Effect Palette
¥ Installing Third-Party Plug-in Effects
Effect Types
¥ Settings for Effects
There is much overlapping that occurs between the various types of
effects you can create, as well as the methods used to create them.
Roughly speaking, there are four basic types of effects:
23
Page 24

¥ Transition effects (dissolves, wipes, and so forth) are applied at
the cut point between two video clips that are on the same video
track (that is, the same video layer). Chapter 2 and Chapter 3
describe techniques for creating transition effects.
¥ Segment effects (both single-layer and multilayer) are applied to
an entire clip or group of clips. There are two types of segment
effects:
- A single-layer segment effect, such as a Mask, is applied to a
segment on one video track. Single-layer segment effects use
one stream of video. Chapter 2 and Chapter 3 describe tech-
niques for creating single-layer segment effects.
- A multilayer segment effect, such as a Picture-in-Picture effect,
is applied to the top layer or a middle layer of segments that
contain two or more video tracks that will be played simulta-
neously. Chapter 4
layer effects.
¥ Title effects are created with the Title Tool and edited onto their
own layers in a sequence. Chapter 5 and Chapter 6 describe techniques for creating and editing title effects.
¥ Motion effects (freeze frame, variable speed, and strobe) are cre-
ated by manipulating the playback characteristics of a clip of footage. Chapter 2 describes techniques for creating motion effects.
describes techniques for creating multi-
n
A number of effects across these categories have both 2D (two-dimensional) and 3D (three-dimensional) versions on systems equipped
with the 3D Effects option.
For a list of effects for each model, see the Avid Media Composer Products
Reference Guide.
24
Page 25
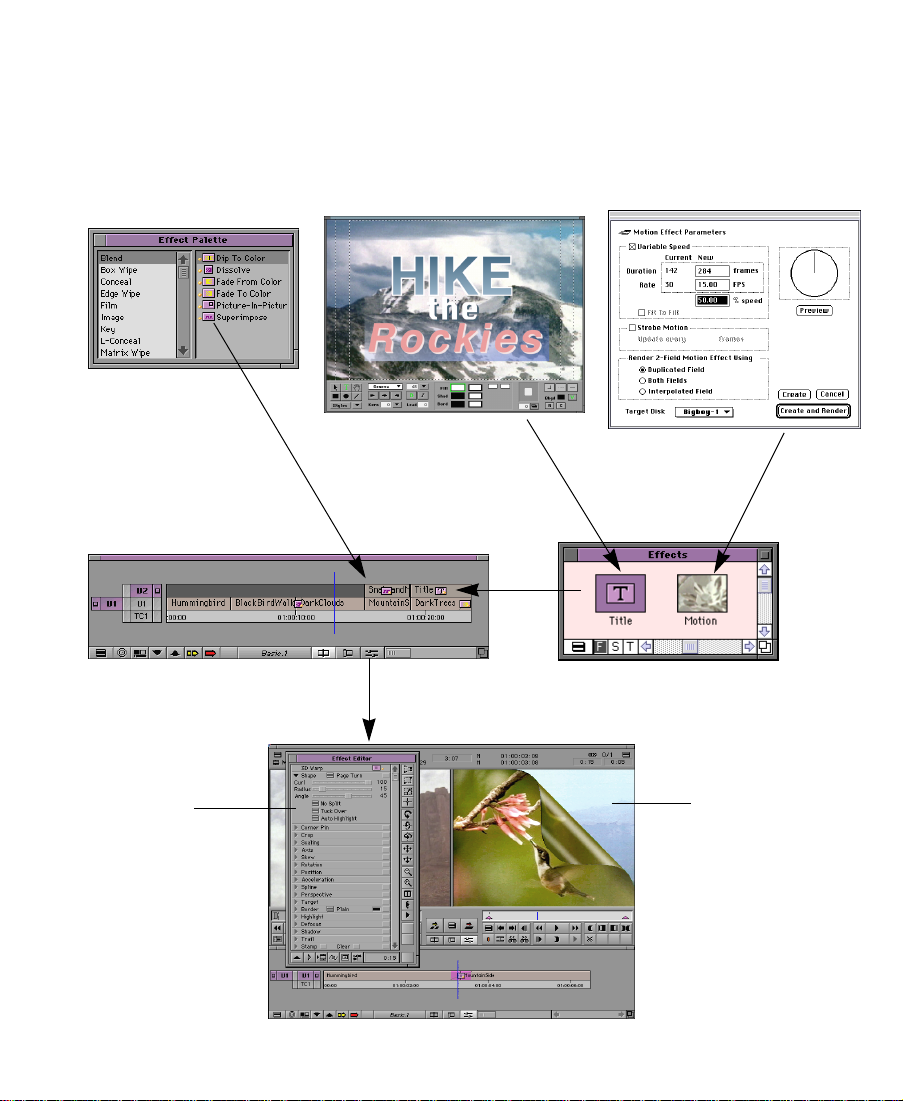
Effects Creation Tools
The following chart presents the basic tools used to create effects.
Sources of
effects:
Effect Palette
Apply transition
and segment effects
directly to tracks.
Title Tool
Motion Effect Parameters dialog box
Effects editing in Source/
Record mode:
Effects adjustment
in Effect mode:
Effect Editor:
Allows you to
adjust effect
parameters.
Edit effect clips
into the Timeline.
25
Title and motion
effects appear first
as clips in the bin.
Effect Preview monitor:
Allows you to preview
an effect, manipulate
key frames, and
manipulate wire-frame
representations of the
effect.
Page 26

Understanding Real-Time and Downstream Key
Effects
Many effects are real time, which means you do not have to render
them before you play them. You can preview effects that are not real
time before rendering. In addition, titles and graphic elements
imported with an alpha channel display as downstream key (DSK)
effects. When you establish Effect settings and Render settings, you
determine how the Avid Composer system will play real-time effects
and non-real-time effects. For more information, see ÒSettings for
EffectsÓ on page 41.
About Downstream Key Effects
By default, all titles are created using the Avid Composer systemÕs
DSK capabilities. Graphic elements imported with an alpha channel
are also created as DSK clips.
Downstream keying allows you to add uncompressed titles or
graphics over multiple streams of compressed media and continue to
play the sequence in real time. The real beneÞts of downstream keying
are seen during editing of Title Effect clips into sequences.
n
For information about editing with DSK titles, including descriptions of various restrictions and playback capabilities, see Chapter 6.
About Real-Time Effects
A real-time effect is an effect that you can apply to a sequence and play
without having to render it Þrst (rendering takes time and disk space).
A real-time effect has a small orange dot within the effect icon in the
Timeline. Effects that must be rendered have a small green or blue dot
within the effect icon in the Timeline. For more information, see
ÒUnderstanding the Color CodingÓ on page 33.
26
Page 27

n
Because real-time effects require an Advanced JPEG compression board and
on some systems a DVE daughter board, not all Avid Composer systems have
real-time effects. For a list of the Avid Composer systems that have real-time
effects, see the ÒTable of Effects in Media Composer ProductsÓ in the
Avid Media Composer Products Reference Guide.
Playing Real-Time Effects
Although you can create a sequence that has any number of real-time
and non-real-time effects, the Avid Composer system can play only
one real-time effect at a time. The following sections explain how the
Avid Composer system handles situations with overlapping real-time
effects. In any case, if you want to play two overlapping effects, you
must render one of the effects.
n
If you have a real-time Title effect and a real-time Dissolve effect, render the
Dissolve effect because it takes less time.
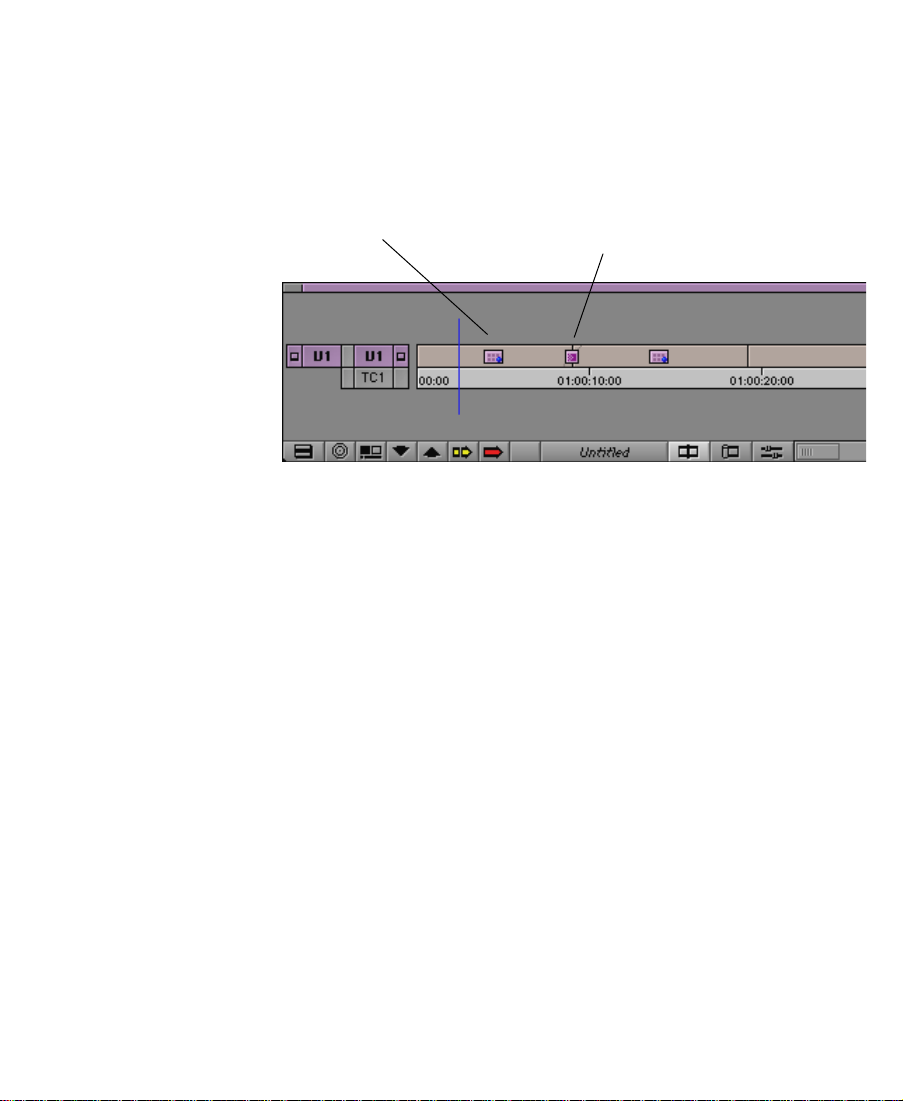
Overlapping Real-Time Effects on the Same Track
If your sequence contains overlapping real-time effects on the same
video track, only one effect can be played in real time. For example, if
you have two real-time effects on the same track (for example, a Dissolve overlaps video with a Mask effect), the Avid Composer system
will play the real-time Mask effect and play the real-time Dissolve as
a cut.
Real-time
Dissolve transition effect
Real-time
Mask segment effect
27
Page 28
Overlapping Real-Time Effects and Non-Real-Time Effects
The combination of real-time and non-real-time effects on the same
video track can show different results, depending on when you render
the non-real-time effects.
Non-real-time
Matrix Wipe segment effect
Real-time
Edge Wipe transition effect
¥ If you render the non-real-time segment effects after you apply the
real-time transition effect, the sequence will play in real time.
¥ If you render the non-real-time segment effects and then apply the
real-time transition effect, the transition effect will play as a cut.
Overlapping Real-Time Effects on Multiple Tracks
If your sequence contains overlapping real-time effects on multiple
video tracks, only the effect on the highest numbered track can be
played in real time. For example, if you have a real-time Superimpose
segment effect on track V2 over a real-time Edge Wipe transition effect
on track V1, the system plays the Superimpose effect in real time and
plays the Edge Wipe effect as a cut.
28
Page 29
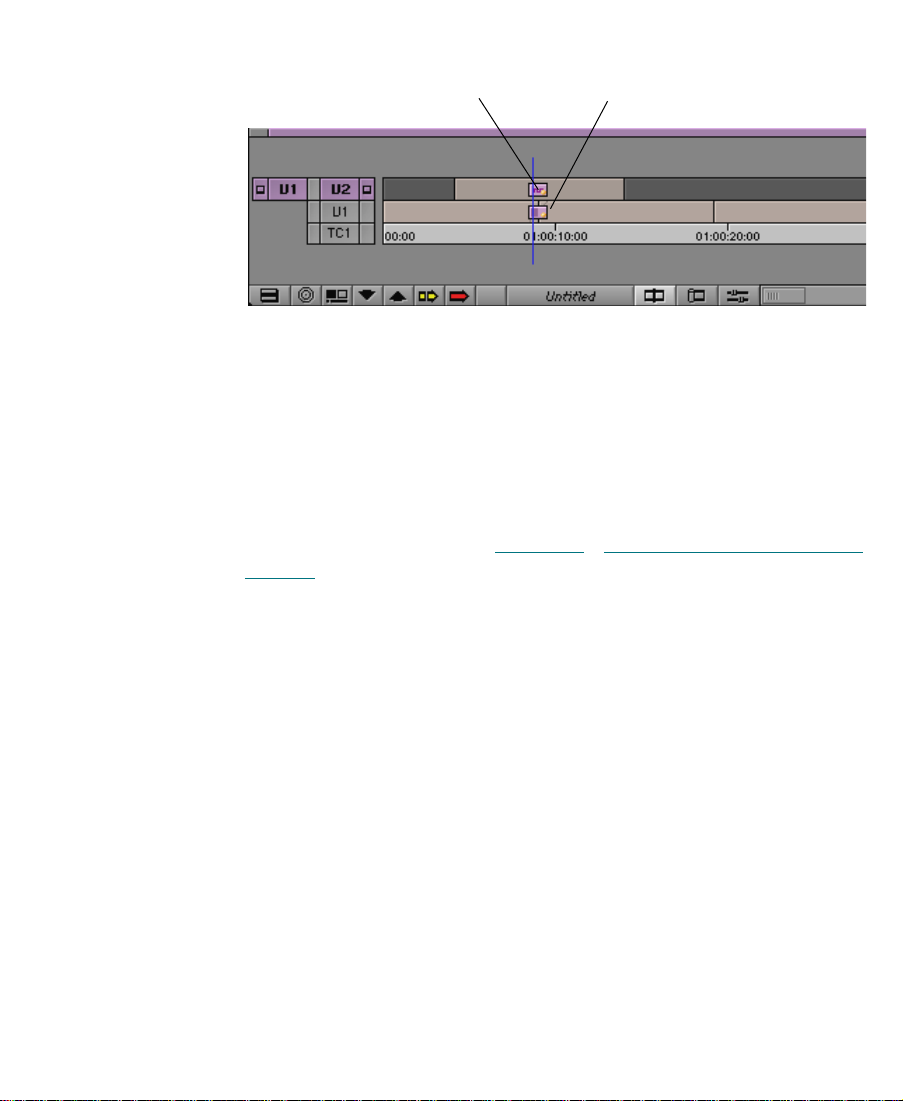
Real-time Superimpose
segment effect
Real-time Edge Wipe
transition effect
In this example, the fastest way to play both effects is to render the
Edge Wipe effect.
Overlapping Real-Time Effects with Downstream Key Titles and Graphics
You can stack a DSK title or graphic over a real-time effect, and both
the title and the effect will play in real time. For more information on
DSK titles and graphics, see Chapter 5, ÒCreating Titles and Graphic
Objects.Ó
29
Page 30

Displaying the Effect Palette
The Effect Palette is a window that lists all the effects that are available
on your Avid Composer system. The effects that are available on your
Avid Composer system depend on the model and options that you
purchased. For the list of effects available for your model, see the
ÒTable of Effects in Media Composer ProductsÓ in the Avid Media
Composer Products Reference Guide.
You select transition and segment effects from the Effect Palette. The
effects in the Effect Palette are grouped by category:
¥ Blend
¥ Box Wipe
¥ Conceal
¥ Edge Wipe
¥ Film
¥ Image
¥ Key
¥ L-Conceal
¥ Matrix Wipe
¥ Peel
¥ Push
¥ Saw Tooth Wipe
¥ Shape Wipe
¥ Spin
¥ Squeeze
¥ Xpress 3D Effect
Each of these effect categories contains multiple effects. Use the following procedure to display the Effect Palette.
30
Page 31
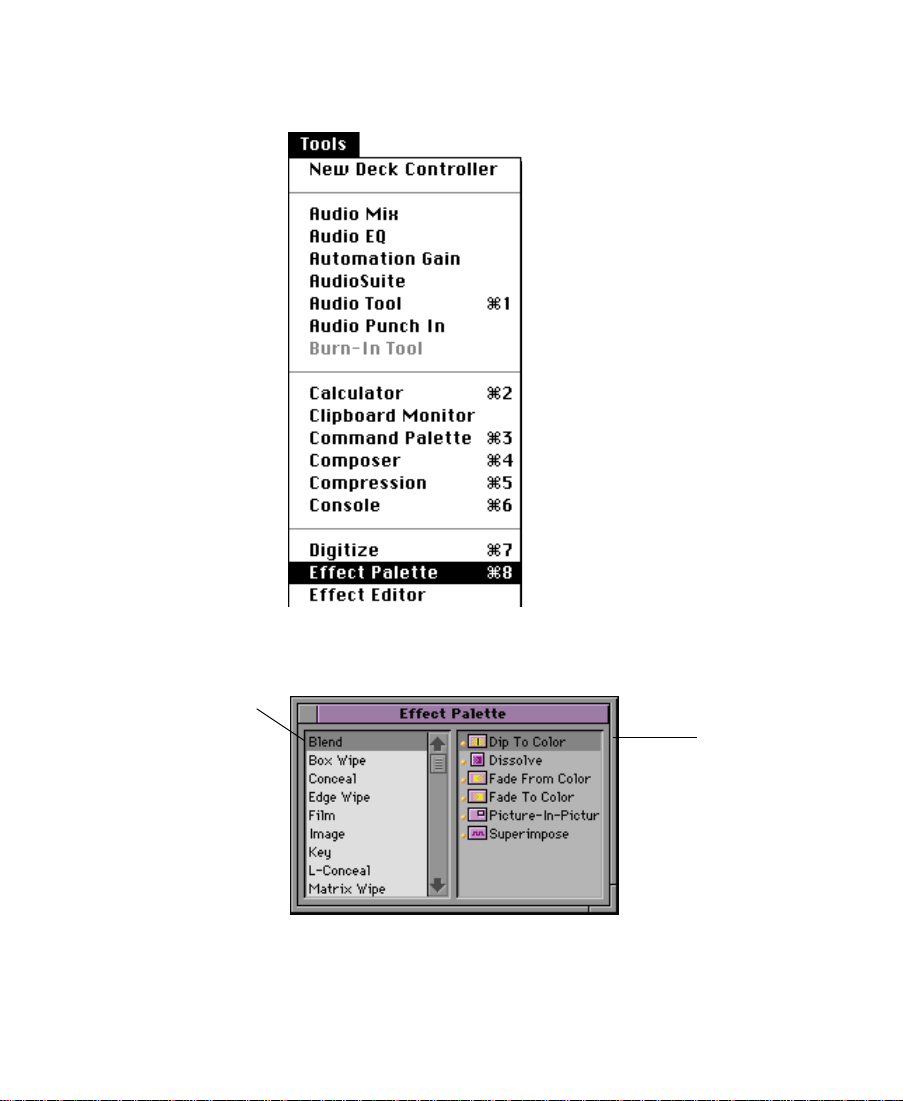
To display the Effect Palette:
1. Either choose Effect Palette from the Tools menu, or press kÐ8.
Scrollable list of effect
categories
The palette for the Þrst effect category, Blend, appears:.
Blend effect choices
The left side of the Effect Palette displays a scrollable list of effect
categories. The right side shows the various effects that are available for the currently selected effect category.
31
Page 32

2. Click an effect category to select it.
Note that the 3D Warp effect is available only on systems with the 3D
Effects option. For information on 3D effects, see Chapter 9, ÒWorking
with 3D Effects.Ó The Paint effect and AniMatte effect are available
only on Avid Composer systems with the Intraframe Editing option.
Resizing the Effect Palette
You can resize the Effect Palette to display more effects when a particular category includes a long list of icons.
To resize the Effect Palette, click and drag the lower right corner of the
palette to the size you want, and release the mouse button.
32
Page 33

Understanding the Color Coding
Effect icons in the Effect Palette and in the Timeline display colorcoded dots to help you determine whether an effect is real-time or
non-real-time. After opening the Effect Palette, you will notice that:
¥ Real-time effects are preceded by an orange dot.
¥ Real-time effects that might not be playable in real time due to
their position in a sequence or the options chosen in the Effect
settings are preceded by a green dot. These effects take advantage
of fast rendering.
¥ Non-real-time effects have no dot. In the Timeline, the effect icon
contains a blue dot until the effect is rendered.
Orange dot indicates a
real-time effect.
Green dot indicates a
real-time effect that might
not be playable in real time.
No dot (as in Matte Key above) indicates a non-real-time effect;
in the Timeline, the eff ect icon contains a b lue dot until the effect is rendered.
33
Page 34

A real-time effect might not be playable in real time for one of the following reasons:
¥ There are two effect categories, Wipes and Keys, that contain
effects that are mutually exclusive as real-time effects. If you have
both effect categories in a sequence, only one can be real time. The
other must be rendered.
n
n
The current Effect settings for the project determine which type of effect is real
time during editing. For more information, see ÒEffect SettingsÓ on
page 41.
¥ A real-time transition effect has been applied on top of another
effect.
¥ There is more than one real-time overlapping effect.
When you edit a non-real-time effect into a sequence, the effect icon appears
with a blue dot in the Timeline, which indicates that you must render the
effect to play it in real time. After you render the effect, the effect icon appears
in the Timeline without a dot.
For more information on real-time effects, see ÒUnderstanding Real-
Time and Downstream Key EffectsÓ on page 26.
Displaying Effect Templates
Effect templates allow you to save the parameters of an effect to a bin
and use them again to create or modify other effects.
In addition to allowing you to view all the standard effects, the Effect
Palette allows you to view and access effect templates that are stored
in open bins. The names of open bins containing effects appear in a list
below the effect categories. To view the effect templates in the bin,
click the bin name. The list appears in the right side of the Effect Palette. For example, in the following illustration the bin contains two
effect templates named Matte Key: Avid Logo (With Alpha) and Title:
34
Page 35

Show Open, which also appear in the right-hand list in the Effect
Palette.
Whenever you open or close a bin or whenever you drop an effect into
a bin, both lists automatically update.
Once a template appears in the right side of the Effect Palette, you can
apply it like any other effect. See ÒUsing an Ef
page 112 for more information.
fect TemplateÓ on
Installing Third-Party Plug-in Effects
You can use third-party plug-in effects that are compatible with the
Adobe Photoshop plug-in architecture and with the Avid Visual
Extension (AVXª) standard. After you install these plug-ins, the
effects appear in the Effect Palette. After you create an effect, you can
save it as an effect template and reapply the template to other transitions or segments in your sequence. Effect templates also appear in a
special section at the bottom of the Effect Palette.
35
Page 36

Installing Photoshop-Compatible Plug-in Effects
The Avid Composer system can use many plug-in effects that are compatible with Adobe Photoshop Version 2.5. You purchase these plugins directly from a third-party vendor.
To install Photoshop-compatible plug-ins:
1. Copy the plug-in Þles from the software vendorÕs folder to the
3rd Party Plug-Ins folder in the Supporting Files folder in your
Composer folder located on the Avid drive. You must place the
plug-ins directly in this folder. They cannot be inside another
folder within this folder or elsewhere on the Avid Composer system. If they are, the system will not recognize them.
2. If the Avid Composer application is open, you must close it and
reopen it before the third-party plug-in effects will appear in the
Effect Palette.
The following is an example of how Photoshop-compatible plug-in
effects appear in the Effect Palette.
The Avid Composer
system creates a new
effect category for the
plug-ins
Third-party plug-in effects
For information on applying third party effects, see ÒApplying a
Third-Party Plug-in EffectÓ on page 53.
36
Page 37

Installing AVX Plug-in Effects
AVX (Avid Visual Extension) is a plug-in standard for integrating various third-party effects with the Avid Composer system. AVX is a crossplatform software architecture designed to allow software effect modules to be dynamically linked with a host application such as Media
Composer or Film Composer.
You can purchase these plug-ins directly from a third-party vendor.
The following lists three of the current vendors, the plug-in product
names, and the vendorÕs web address:
¥ Ultimatte¨ Corporation (Ultimatteª)
http://www.ultimatte.com
¥ Artel Software (Boris FXª)
http://artelsoft.com
¥ ICE (Integrated Computing Engines, Inc.) (ICEfxª for Avid)
http://www.iced.com
AVX Plug-ins usually come complete with any necessary documentation. This section describes how to install the plug-ins and how to
access them from the Avid Composer system.
c
To install AVX plug-ins:
1. Exit the Avid Composer application.
Do not add or remove plug-ins while the Avid Composer application is running.
1. Copy the plug-in Þles from the software vendorÕs folder to the
AVX Plug-Ins folder on your Avid drive.
37
Page 38

Place AVX plug-ins in
this folder
c
Effect category
You must place the plug-ins directly in this folder. They cannot be
inside another folder within this folder or elsewhere on the Avid
Composer system. If they are, the system will not recognize them.
2. Restart the Avid Composer application and open the Effect Palette.
The AVX plug-in effects will appear in the Effect Palette.
The following is an example of how AVX plug-in effects appear in
the Effect Palette. This example shows several Boris effects.
Effects
38
Page 39

For information on applying third party effects, see ÒApplying a
Third-Party Plug-in EffectÓ on page 53.
n
Some plug-in effects come with their own installation program. In that case,
follow the directions supplied with the package.
Troubleshooting AVX Plug-Ins
This section describes solutions to problems that you may encounter
with AVX Plug-ins.
Blank Effect Icons in the Timeline
AVX Plug-ins have a plug icon in the Effect Palette and in the Timeline.
If the Effect icon in the Timeline is blank, the Avid Composer system
either could not Þnd the plug-in or the plug-in version doesnÕt match
the version of software that you used to create the plug-in.
To determine the cause of the problem, open the Console window
(choose Console from the Tools menu) and look for the message ÒCan't
Þnd effect.Ó The message will identify the plug-in that can't be displayed.
The following are the most common problems:
¥ The plug-in may be missing from the AVX_Plug-Ins folder. Open
the AVX_Plug-Ins folder (located in the SupportingFiles folder)
and look for your plug-in. If it is missing, replace it. This may
involve reinstalling the plugiIn.
¥ The plug-in in the AVX Plug-ins folder may be incompatible with
the effect in the Timeline. This might happen if you update the
Plug-ins on your system. For example, if you create an effect with
Version 1.1 of the plug-in software and then update your plug-ins
to Version 2.5, the new software may not be compatible with the
old effect.
39
Page 40

Plug-ins should be compatible with minor releases but not necessarily with major releases of the Plug-in software. For example,
Version 1.0 of a Plug-in should be compatible with Version 1.1 or
1.2 (minor revision). But Version 1.0 may not be compatible with
Version 2.0 (major revision change).
If the plug-in is correctly installed, contact the plug-in vendor and ask
if there are any known version compatibility problems with the plugin.
Missing Effect Categories in the Effect Palette
If the plug-in categories are not visible in the Effect Palette, they are
either not installed correctly or you may have an incorrect version of
the AVXLibrary. In this case, check the Console window for a message
that states that AVX was disabled. If it was not disabled, quit the Avid
Composer application, reinstall the plug-ins, and restart the application.
If the message in the Console states that AVX software was disabled,
call Avid Customer Support to determine whether you need a new
version of the AVXLibrary.
The Avid Composer System Cannot Render the Plug-In
If the Avid Composer system cannot render the plug-in, check the
Console window. Some plug-ins write more information about the
failure to the Console window. Also, some plug-ins may report the
problem as a message in the Bin or Edit monitor. In general, contact
the plug-in vendor if a plug-in doesnÕt work as expected.
40
Page 41

Settings for Effects
The Avid Composer system has settings that control how you use
effects. Some of these settings are User settings and some are menu
selections. This section describes the User settings. The menu selections are described in ÒRendering an EffectÓ on page 116.
n
Effect Settings
n
n
For information about other settings in the system, see the ÒSettings Scroll
ListÓ chapter in the Avid Media Composer Products Reference.
There are two effect categories, Wipes and Keys, that contain effects
that are mutually exclusive as real-time effects. If you have both effect
categories in a sequence, only one can be real time. The other must be
rendered.
Your Avid Composer system must have an Advanced JPEG compression board to have real-time effects.
Use the Effect Settings dialog box to specify which effect category will
be real time. Make this decision based on whether you will be creating
more wipes or keys in your sequence.
Because wipes and keys are real-time effects on Avid Composer systems with
the 3D Effects option, the Effect settings do not apply to these systems.
To change the Effect settings:
1. Click the Settings button in the Project window.
2. Double-click the Effects setting.
The Effect Settings dialog box appears.
41
Page 42

Render Settings
3. Select which effect category you want to be real time. The change
takes place immediately in the Effect Palette.
You can control the size of an imported graphic and a rendered effect
by changing the Render settings. This setting is intended to prevent
playback pauses caused by PICT images, QuickTime¨ Þles, or rendered composites that are too complex.
To change the Render settings:
1. Click the Settings button in the Project window.
2. Double-click the Render setting.
The Render Settings dialog box appears.
42
Page 43

3. Enter the following parameters:
- Select Show Intermediate Results if you want the Avid Com-
poser system to display the rendering of the effect as it
progresses in the third, full-screen monitor.
- Limit rendered frame size to n% of default limit Ñ This is a
percent of the Avid Video ResolutionÕs (AVR) default limit for
the frame size. The effectÕs AVR is the same as the sequenceÕs
AVR. Enter a percent. The default is 100%.
- If frame size exceeds threshold Ñ The threshold is established
by the above percent. Select an action. The default is ÒAsk
me.Ó
If you select ÒAsk me,Ó and the threshold is exceeded during
rendering, a dialog box appears:
If you select ÒDonÕt Soften,Ó you might get an error message,
such as a video underrun, when you play the rendered Þle.
If you do not respond within 30 seconds, the system automatically selects Soften.
Timeline View Settings
All effect icons are displayed in the Timeline by default. You can
change the Timeline settings to display all effect icons, all effect icons
except Dissolve icons, or no effect icons. If you have changed the setting to display no effect icons, you have to reset it before you begin
applying effects. The fewer effect icons you display, the faster the
screen refreshes.
43
Page 44

To change the Timeline settings:
1. Click the Fast Menu button in the Timeline window.
The Timeline settings pop-up menu appears.
2. To display all effect icons in the Timeline, choose Effect Icons.
3. To display all effect icons except Dissolve icons, choose Effect
Icons and deselect Dissolve Icons.
4. To display no effects icons, deselect Effect Icons. Dissolve Icons is
automatically dimmed.
5. To save your Timeline settings, click the Timeline View Name button, select Save As, and enter a view name.
Timeline View Name button
44
Page 45

Trim Settings
When you are in Trim mode, you can control whether or not the effects
you apply are computed immediately on the screen (that is, on-the-ßy)
or rendered later when you select the Render Effect function; viewing
a transition as a cut can facilitate the trimming process. This setting is
deÞned in the Trim Settings dialog box.
To change the Trim settings:
1. Click the Settings button in the Project window.
2. Double-click the Trim setting.
The Trim Settings dialog box appears.
Use the Render On-TheFly selection to determine
when the Avid Composer
system computes effects.
n
For information on changing the Trim settings, see the ÒWorking in Trim
ModeÓ chapter in the Avid Media Composer UserÕs Guide or Avid Film Composer UserÕs Guide.
45
Page 46

CHAPTER 2
Basics of Effects Editing
This chapter explains how to create basic transition and single-layer
segment effects, including motion effects.
¥ Applying Effects to a Sequence
¥ Deleting Effects in a Sequence
¥ Working with Transition Effects
¥ Adjusting Transitions in the Timeline
¥ Creating Motion Effects
Applying Effects to a Sequence
This section explains how to apply an effect to a sequence in the
Record monitor. Some effects can be applied only to transitions, other
effects can be applied only to segments (clips in the sequence), and
some effects can be applied to both transitions and segments.
You can apply an effect:
¥ To one transition or segment on a single video layer
¥ To multiple transitions or segments on a single video layer
¥ To multiple transitions or segments on multiple video layers
46
Page 47

The effect type (transition or segment) determines where you can
place the effect in the sequence. For an explanation of the effect types,
see ÒEffect TypesÓ on page 23.
After you apply an effect, the next step is to adjust the effectÕs parameters. To understand how to adjust the effect parameters, see
ÒChanging a ParameterÓ on page 96.
Displaying Effect Icons
The default setting in the Timeline menu is to always display effect
icons in the Timeline. If you have changed the setting, you have to
reset it before you begin applying effects. For more information, see
imeline View SettingsÓ on page 43.
ÒT
Applying a Single Effect
Use the following procedures to apply an effect to one transition or
segment on a single video layer.
47
Page 48

To apply a single effect:
1. Create a sequence in the Record monitor using the standard Avid
Composer editing procedures. For information about editing a
sequence, see the ÒFirst Edits in Source/Record ModeÓ chapter in
the Avid Media Composer UserÕs Guide or Avid Film Composer UserÕs
Guide.
2. Choose Effect Palette from the Tools menu.
For an explanation of the Effect Palette, see ÒEffect TypesÓ on
page 23.
3. To apply an effect, do one of the following:
¥ Click and drag the desired effect to the segment or transition
in the Timeline, and release the mouse button.
¥ Use the Segment Mode button to highlight the segment in the
Timeline where you want to apply the effect, and double-click
the effectÕs icon in the Effect Palette.
The effect icon appears in the Timeline as shown in the following example.
Effect Palette
48
Timeline
Page 49

n
While you are applying an effect, if the effect is a segment effect, one segment
at a time is highlighted as you drag the effect within the Timeline. If the effect
is a transition effect, one transition at a time is highlighted as you drag the
effect within the Timeline. Some effects can be both a transition and a segment
effect, in which case transitions and segments are highlighted in the Timeline.
Applying Multiple Effects
You can apply an effect to multiple transitions, segments, or video
layers in a single step. First, select the sections in the sequence using a
lasso and then apply the effect. The speciÞc procedures are explained
below.
Selecting Multiple Transitions
To select multiple transitions:
1. Make sure that you have not selected any transitions or segments
in the sequence, and click the Effect Mode button to enter Effect
mode.
2. Click a transition in the Timeline.
3. Move the cursor above the Timeline, and click and drag the cursor
to the right or left of the transition to activate a selection box.
4. Lasso any additional transitions you want to select.
49
Page 50

5. Release the mouse button when you have lassoed all the desired
transitions.
The transitions that you selected are highlighted, and the position
indicator moves to the Þrst transition.
6. If the desired transitions are not contiguous, Shift-click a transition
to deselect it.
Transition is deselected.
7. Open the Effect Palette and double-click the effectÕs icon that you
want to apply to the transitions Ñ in this example, the Fade from
Color Effect icon.
The effect is applied to the highlighted transitions in the Timeline.
50
Page 51
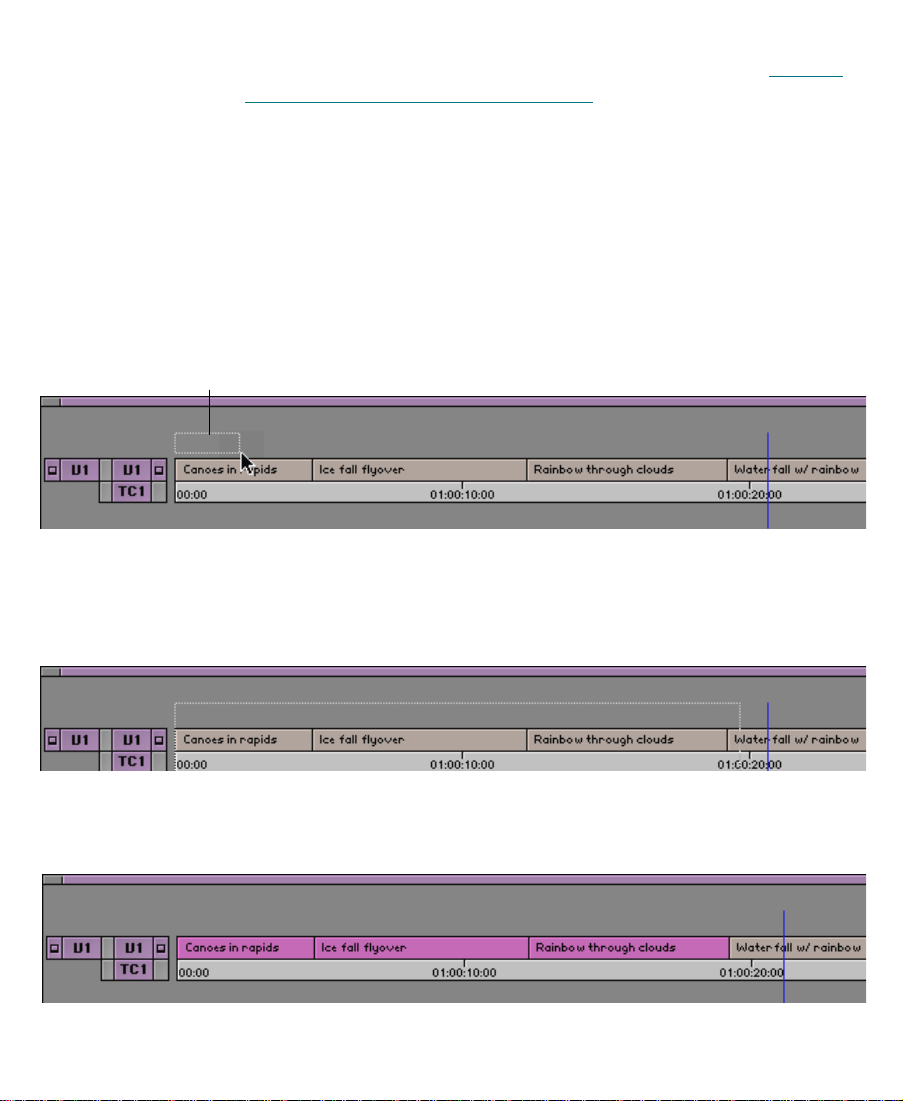
If there is not enough incoming or outgoing media to apply the transition effect, a dialog box appears. For more information, see ÒSizing
the Effect to Fit the MediaÓ on page 62.
Selecting Multiple Segments
To select multiple segments in the same video layer:
1. In Source/Record mode or Effect mode, move the cursor above
the Timeline and to the left of the leftmost transition that you want
to select. Click and drag the cursor to the right and down to activate
a selection box.
Cursor selection box
2. Continue to drag the selection box to the right until you lasso the
rightmost segment that you want to select.
Three segments are lassoed.
3. Release the mouse button when you have lassoed all the desired
segments. The segments that you selected are highlighted.
51
Page 52

4. If the desired segments are not contiguous, Shift-click a segment to
deselect it.
5. Open the Effect Palette and double-click the effectÕs icon that you
want to apply to the segments Ñ in this example, the Mask Effect
icon.
n
Selecting Multiple Layers
To nest all clips inside one effect, Option-double-click the effect icon in the
Effect Palette.
The effect is applied to the highlighted segments in the Timeline.
You can select transitions or segments on multiple layers using the
same procedures described in ÒSelecting Multiple TransitionsÓ on
page 49 and ÒSelecting Multiple SegmentsÓ on page 51.
52
Page 53

Applying a Third-Party Plug-in Effect
Third-party plug-in effects are applied to a sequence using procedures
that are similar to those used for an Avid Composer system effect. The
only difference is that parameters for third-party plug-in effects
appear automatically in dialog boxes apart from the Effect Editor.
Third-party plug-in effects you can apply to a sequence include plugins compatible with Adobe Photoshop Version 2.5, AVX plug-ins, and
Digidesign AudioSuite Plug-Ins.
n
Effect category
When a segment contains a third-party plug-in effect, the effectÕs parameter
dialog box appears the Þrst time you move the position indicator to another
frame in that segment.
Applying a plug-in effect is similar to applying a standard
Avid Composer system effect.
1. Choose Effect Palette from the Tools menu.
The Effect Palette appears.
2. Choose the effect category that contains the plug-in. For example,
the following illustration shows the Ultimatte plug-ins.
Effects
3. Drag the effect onto your clip or transition in the Timeline.
53
Page 54
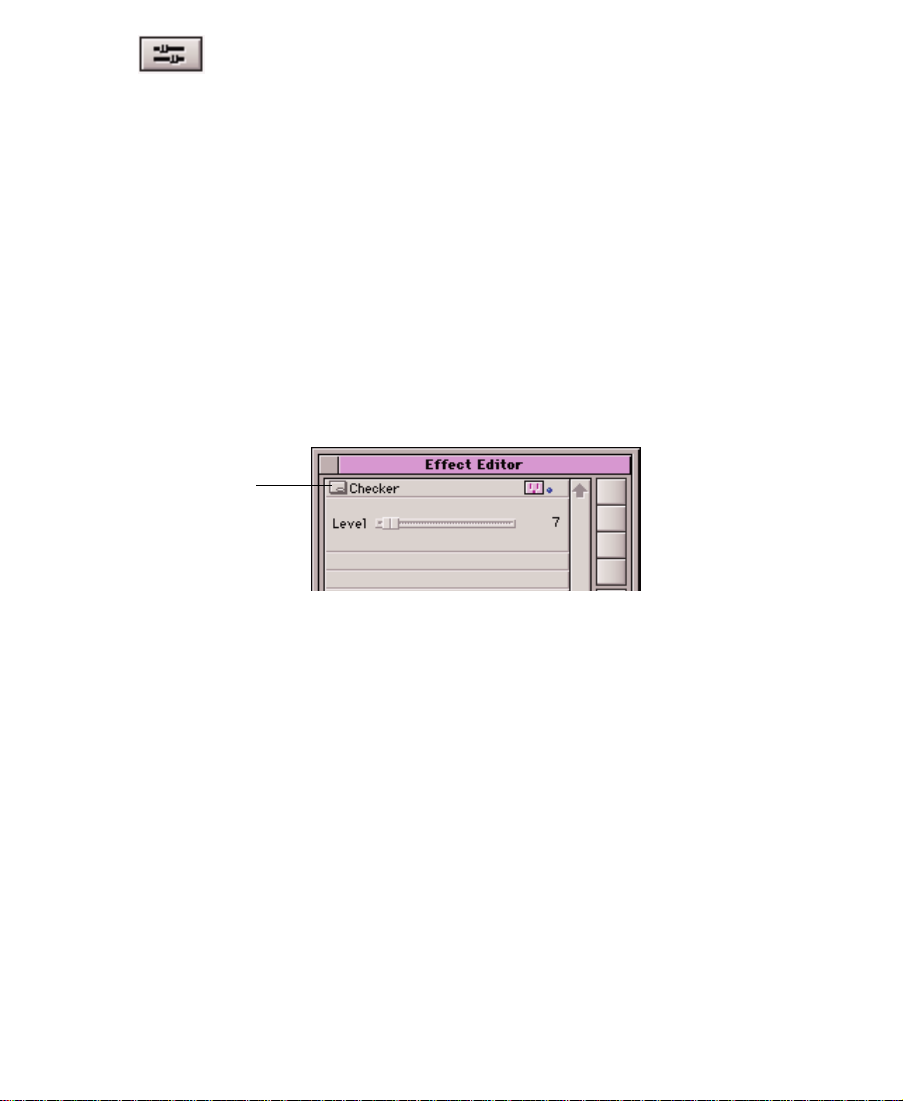
Other Options
button
4. Click the Effect Mode button.
The Effect Editor appears. One of the following styles of dialog
boxes appears:
¥ Avid Composer Effect Editor controls only. This means that
you only see controls in the Effect Editor window.
¥ Custom dialog box only. In this case, when you click the Effect
Mode button, the Effect Editor is empty except for the Other
Options button. Click the button to open the plug-in dialog
box.
¥ Combination of Avid Composer and custom. In this case, Avid
Composer controls appear and you also see the Other Options
button to access the custom options. Click the button to see the
additional dialog box.
5. Adjust and preview the effect, depending on the controls in the
dialog box. The plug-in vendor usually supplies documentation
on how to adjust the effect.
c
n
6. When it is appropriate, render the effect.
Applying a third-party plug-in to a clip can cause the clip levels to
be illegal by NTSC standards. Use an external vectorscope to check
if the chroma and luma levels are still appropriate. If they are not,
correct the levels by adjusting the parameters of the plug-in effect or
by applying the Color Effect.
Third-party effects can require longer rendering times than do native Avid
Composer effects.
54
Page 55

Deleting Effects in a Sequence
Transition effects can be deleted from a sequence in Source/Record
mode, Trim mode, or Effect mode. Segment effects can be deleted in
Source/Record mode or Effect mode. Use the following procedures to
either delete a single effect from a sequence or delete effects in multiple segments.
To delete a single effect:
1. Place the blue position indicator on the effectÕs icon in the
Timeline.
In this example, the segment effect for the Þrst clip on video track
V1 is being deleted.
Record monitor track
selector
c
2. If there are multiple tracks that contain effects at the same position
in the Timeline, select only the track where the effect to be deleted
resides.
In this example, only video track V1 is selected, because the Title
effect on video track V2 should not be deleted.
If you are deleting a segment effect and the segment contains a transition effect, the transition effect will be deleted also, because the
transition effect resides Òon top ofÓ the segment effect. If necessary,
you will have to reapply the transition effect.
55
Page 56

3. In Source/Record mode, click the Remove Effect button located on
the Fast menu above the Record monitor or in the second row of
buttons below the Record monitor.
In Trim mode Ñ for transition effects only Ñ either press the
Delete key or click the Remove Effect button.
In Effect mode, select the effect and press the Delete key.
n
When you delete an effect from a sequence, the associated media Þle is NOT
deleted. In order to delete the effectÕs media Þle, you must manually remove it
from the drive. The system operates this way so that you will be able to undo
the deletion of an effect or undo the change you made to an effect. To delete an
effectÕs media Þle, see ÒManaging Your Media FilesÓ on page 121.
To delete multiple segment effects:
1. In either Source/Record mode or Effect mode, click either Segment Mode button below the Timeline and Shift-click each segment that contains a segment effect to be deleted.
2. Click the Remove Effect button, or press the Delete key.
Using the Fade Effect Button
You can use the Fade Effect button to fade segment effects quickly and
easily. A dialog box appears that allows you to enter the number of
frames to fade up and fade down.
The Fade Effect feature automatically creates key frames for the effect.
You can access the key frames in the Effect Editor.
To fade a segment effect:
1. Load the sequence if you havenÕt already done so.
2. To fade a single segment effect, place the blue position indicator in
the segment.
56
Page 57
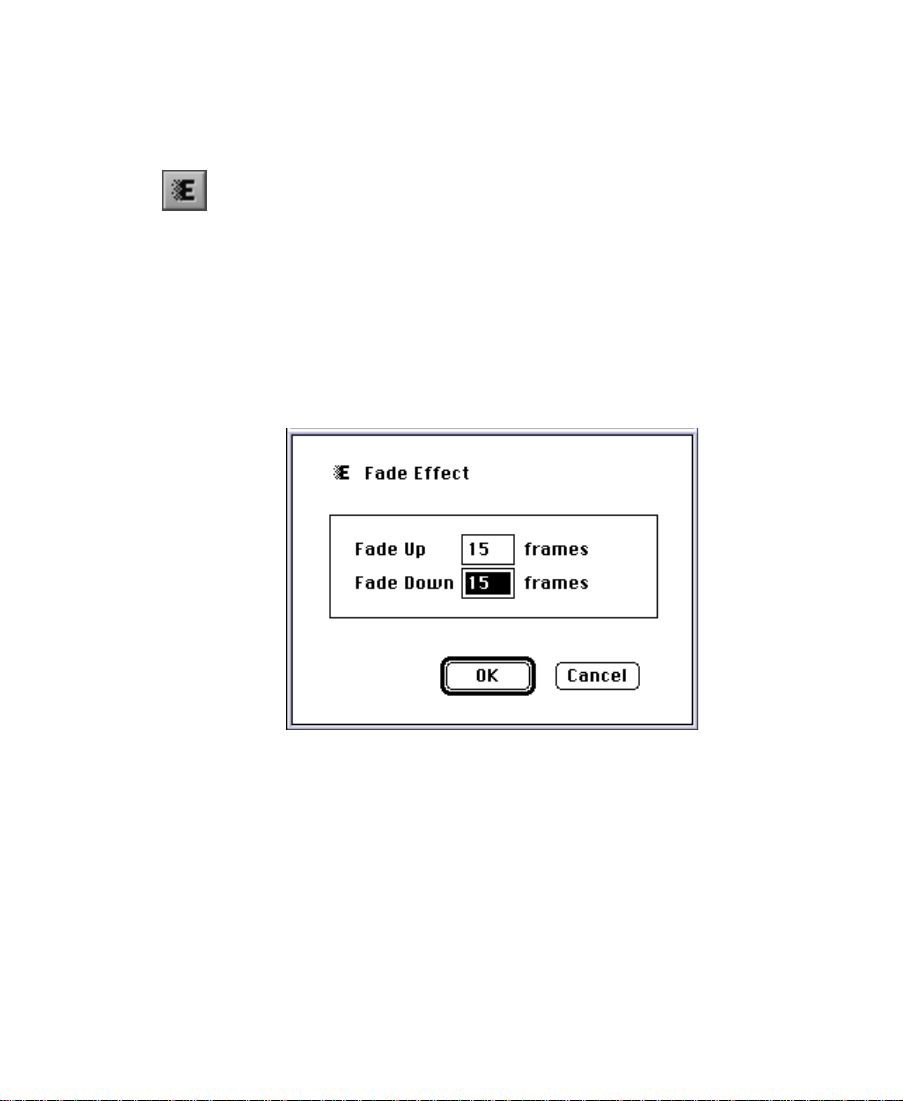
To fade multiple segment effects, click either the yellow Extract/
Splice-in button or the red Lift/Overwrite button at the bottom of
the Timeline window to enter Segment mode; then press and hold
the Shift key and click the segments in the Timeline.
3. Click the Fade Effect button.
n
You can map the Fade Effect button to the Record monitor or the User Command Palette. For more information on mapping buttons, see the Avid Media
Composer UserÕs Guide or the Avid Film Composer UserÕs Guide.
4. In the dialog box that appears, enter the number of frames to fade
up and fade down, and click OK.
You can immediately view the Fade effect by playing the segment
or segments.
57
Page 58
Working with Transition Effects
You apply a transition effect to the cut point between two clips on the
same video track. After you apply a transition effect, you can adjust its
alignment and duration. Depending on the speciÞc effect, other effect
parameters may apply.
Types of Transition Effects
Transition effects are included in all effect categories on the Effect Palette, except the Image effect category.
For an explanation of the transition effects in each effect category,
see Chapter 10, Ò2D Effects Reference,Ó and Chapter 11 , Ò3D Effects
Reference.Ó
Applying a Dissolve Effect
One of the most common transition effects is a Dissolve. The Avid
Composer system has three methods you can use to apply a Dissolve
effect:
¥ Select the Dissolve effect from the Effect Palette.
¥ Type a duration in the Transition parameters.
¥ Click the Add Dissolve button.
This section describes each of these methods.
Using the Effect Palette
To apply a Dissolve effect using the Effect Palette:
1. Create a sequence in the Record monitor using the standard Avid
Composer editing procedures. For information about editing a
58
Page 59

sequence, see the ÒFirst Edits in Source/Record ModeÓ chapter in
the Avid Media Composer UserÕs Guide or Avid Film Composer UserÕs
Guide.
2. Choose Effect Palette from the Tools menu.
3. From the Blend category of the Effect Palette, drag the Dissolve
effect icon to the transition in the Timeline and release the mouse
button.
The Dissolve Effect icon appears in the Timeline.
When there is not enough incoming or outgoing media to apply a transition effect, a dialog box appears. See ÒSizing the Effect to Fit the
MediaÓ on page 62.
Using the Transition Parameters
You can create a Dissolve effect using the Transition parameters displayed in Trim mode and Effect mode. Simply enter the duration for
which the effect will play, and the system adds the Dissolve to the
sequence.
To create a Dissolve effect using the Transition parameters:
Transition Effect Alignment
button
Transition Effect Alignment
pop-up menu
1. In Trim mode or Effect mode, click a transition in the Timeline.
2. In the Transition Duration parameter, enter the DissolveÕs duration. The Duration format is determined by the Duration setting
above the Record monitor, for example, seconds:frames.
Duration
This adds the Dissolve effect at the transition, and a Dissolve
Effect icon appears in the Timeline.
59
Page 60

3. Click the Transition Effect Alignment menu button, and select the
effectÕs position relative to the cut point from the pop-up menu.
For an explanation of the Transition Alignment menu selections,
see ÒTransition ParametersÓ on page 385.
Using the Add Dissolve Button
Another way to create a transition effect is to click the Add Dissolve
button. This button allows you to apply a Dissolve or any other transition effect listed below without having to access the Effect Palette:
¥ Dissolve
¥ Film Dissolve
¥ Film Fade
¥ Fade to Color
¥ Fade from Color
¥ Dip to Color
To create an effect using the Add Dissolve button:
1. In Source/Record mode, Trim mode, or Effect mode, move the
position indicator to the transition in the Timeline.
2. Click the Add Dissolve button located either below the Record
monitor, in the monitor Fast menu, or in the Command Palette.
60
Page 61

A dialog box appears.
3. Click the Add Dissolve parameter and choose a transition effect
from the pop-up menu.
For an explanation of individual effects, see Chapter 10
Effects Reference.Ó
4. Enter the Duration of the transition effect in frames.
61
, Ò2D
Page 62
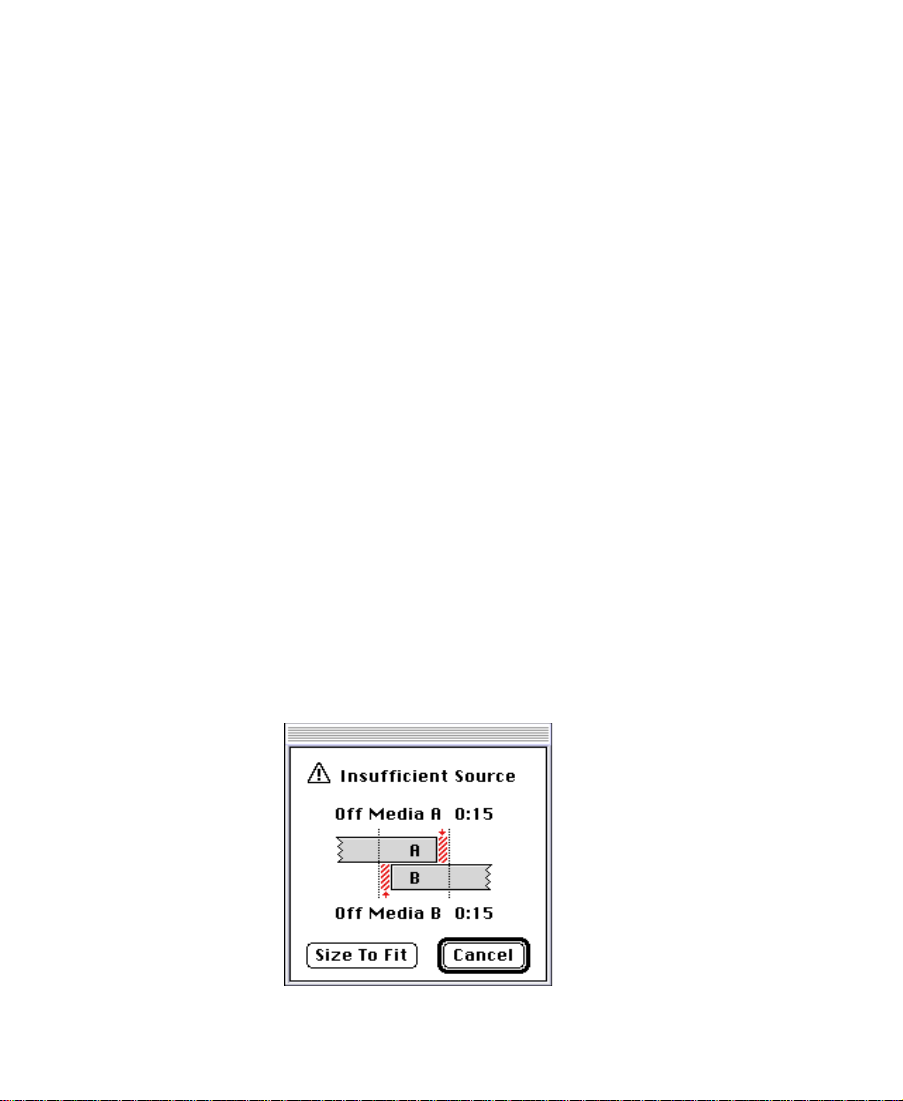
5. Click the Position parameter and choose the effectÕs alignment to
the cut point from the pop-up menu.
6. If you select Custom Start, in the Starts parameter you must enter
the number of frames before the cut to start the effect.
7. Click Target Disk and from the pop-menu choose a disk on which
to store the effect if you choose to render it.
The Effect Source Disk is the disk where the media on the outgoing
shot of a transition resides.
8. If the effect you selected is real time on your Avid Composer system, select the DonÕt Render Real-time Effects parameter to prevent real-time effects from being rendered.
9. To add the effect without rendering it, click the Add button.
Or, to add the effect and render it, click the Add and Render
button.
This adds the selected effect to the transition in the sequence.
Sizing the Effect to Fit the Media
When you select a transition effect from the Effect Palette, such as a
Dissolve, and there is not enough source media to apply the effect, the
following message appears:
62
Page 63

¥ Off Media A Ñ Refers to the number of frames by which the out-
going media is short.
¥ Off Media B Ñ Refers to the number of frames by which the
incoming media is short.
To automatically size the effect to Þt the media:
¥ Click the Size To Fit button in the dialog box.
The system sets the duration of the effect to Þt the available media; if
you have selected an alignment, the system attempts to preserve it.
To change the alignment or duration of the transition effect, see
ÒUsing the Transition ParametersÓ on page 59.
Trimming a Transition Effect
You can trim a transition effect using the standard transition trim procedures or the Transition Corner Display function in Trim mode.
For more information, see the ÒWorking in Trim ModeÓ chapter in the
Avid Media Composer UserÕs Guide or Avid Film Composer UserÕs Guide.
Adjusting Transitions in the Timeline
You can change the duration of Dissolve effects just by dragging them
in the Timeline. You must be in Transition Corner Display in Trim
mode to use this feature.
To adjust a transition using the Transition Corner Display:
1. Click on the transition in the Timeline.
2. Enter Trim mode.
3. Click the Transition Corner Display button.
63
Page 64

The button turns bright green, and the display is enabled. As you
position the cursor over the transition, it changes to look like a
Þlm clip that has been cut for a splice.
4. Lengthen or shorten the transition effect by clicking and dragging
to the desired length.
¥ To shorten a transition, drag toward the transition point.
¥ To lengthen a transition, drag away from the transition point.
The cursor changes to a hand that moves as you drag. You can
adjust either the outgoing or the incoming video.
5. To review your edit, click the Play Loop button.
n
To customize transition effect parameters, see ÒTransition ParametersÓ on
page 385.
Creating Motion Effects
A motion effect, applied to a clip in the Source monitor, allows you to
alter the playback characteristics of the clip. Motion effects include
freeze frame, variable speed (such as slow motion or fast motion), and
strobe motion effects. You can also combine variable speed and strobe
effects in a single clip.
n
Creating a Freeze Frame
When you use a motion effect to slow down a clip, the effect is real time. When
you use a motion effect to speed up a clip, the effect is non-real-time and must
be rendered before it can be played.
A Freeze Frame effect is a still image based on a chosen frame from a
clip that continues to display for the duration that you choose. When
combined with the original clip, the footage plays and then ÒfreezesÓ
and holds on the frame that you speciÞed.
64
Page 65
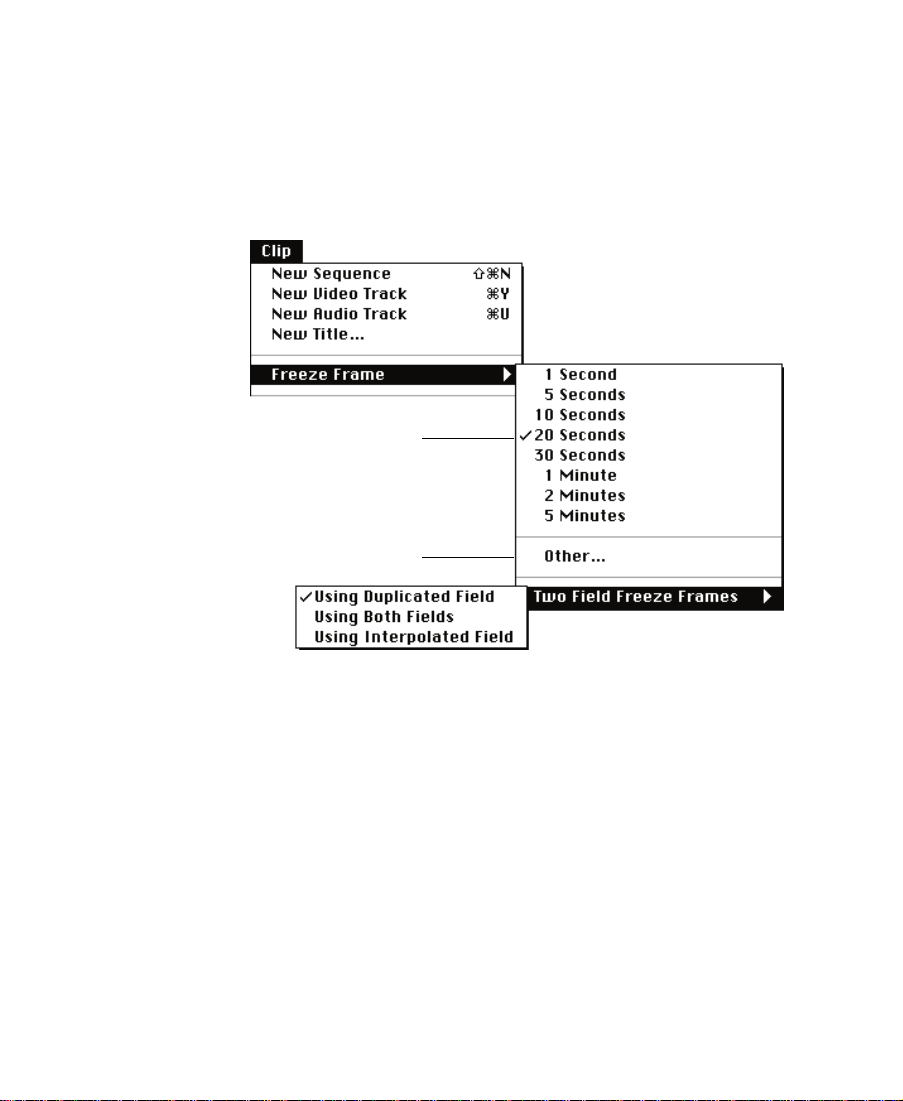
To create a Freeze Frame effect:
1. Load a clip into the Source monitor.
2. Cue the clip to the frame that you want to freeze.
3. Choose Freeze Frame from the Clip menu.
A pop-up menu appears.
Duration
Custom duration
4. If you are using two-Þeld media (AVRs 70, 75, or 77), choose
Freeze Frame from the Clip menu and choose an option from the
Two Field Freeze Frames pop-up menu:
¥ Using Duplicated Field Ñ A single Þeld is displayed in the
effect.
¥ Using Both Fields Ñ Both Þelds are used to create the effect.
¥ Using Interpolated Field Ñ A second Þeld is created for the
effect by combining scan line pairs from the Þrst Þeld in the
original media.
The chosen option becomes the default until you choose another
option.
65
Page 66

5. Choose Freeze Frame from the Clip menu and choose a duration:
¥ Choose a preconÞgured duration from the list.
¥ Choose Other and type a custom duration into the dialog box;
then click OK to enter the new duration.
A dialog box appears, prompting you to choose a target drive for
the freeze frame media.
6. Choose a drive from the pop-up menu and click OK.
A new clip appears in the Source monitor and in the current bin
preceded by a Motion Effect icon. The new clip has the original
clip name followed by the letters FF.
Creating a Rolling Clip That Freezes
One common use for freeze frames is to create a segment that plays
normally and then freezes, either to superimpose text information or
to add emphasis to the end of a sequence before fading.
To create a rolling clip that freezes:
1. Load the original source clip from which you created the freeze
frame.
2. Edit the clip into the sequence.
3. Place an IN mark in the sequence at the frame used to create the
freeze frame.
4. Load the Freeze Frame clip into the Source monitor.
5. (Option) Mark the clip if necessary to shorten the duration of the
clip.
66
Page 67

6. Click the Splice-in button to edit the freeze frame into the
sequence.
When you play the sequence, the footage plays full-motion and then
freezes at the chosen frame.
Creating a Variable Speed Effect
Variable Speed effects involve changing the rate of playback to achieve
fast-motion or slow-motion effects. The Avid Composer system creates
slow-motion effects by duplicating frames in the original media. It creates fast-motion effects by eliminating frames from the original media.
The resulting motion might appear to be jerky.
To create a Variable Speed effect:
1. (Option) If you require a Þxed duration for the clip based on a segment in the sequence, mark the segment in the Timeline with IN
and OUT marks.
2. Click the Motion Effect button.
n
The Motion Effect button does not appear on the interface by default. You can
map the Motion Effect button from the Command Palette to the Edit monitor
or to the keyboard. For more information, see the Avid Media Composer
UserÕs Guide or the Avid Film Composer UserÕs Guide.
67
Page 68

Variable Speed
option
The Motion Effect Parameters dialog box appears.
3. Select the Variable Speed option.
4. Specify the play speed for the Variable Speed Motion effect in one
of the following ways:
¥ Type a number of frames into the frames Þeld.
¥ Type a frame rate into the FPS Þeld. To indicate reverse
motion, enter a negative number for the play rate.
¥ Type a percentage of the current play rate into the % speed
Þeld. To indicate reverse motion, enter a negative number for
the percentage.
¥ Select the Fit To Fill option to automatically set the Variable
Speed parameters so that the duration of the motion effect will
match the IN to OUT duration marked in the Record monitor.
When one of these is set, all values change to reßect the speciÞed
play rate.
68
Page 69

5. (Option) If your clip was digitized in one of the two-Þeld AVRs
(AVRs 70, 75, or 77), choose a Render 2-Field Motion Effect option:
¥ Duplicated Field Ñ A single Þeld is displayed in the effect.
¥ Both Fields Ñ Both Þelds are displayed in the effect.
¥ Interpolated Field Ñ A second Þeld is created for the effect by
combining scan line pairs from the Þrst Þeld in the original
media.
6. Complete the effect by doing one of the following:
¥ Click Create to create the new clip and close the dialog box.
n
An unrendered Variable Speed Effect clip displays a green dot when edited
into a sequence to indicate that the clip might not play in real time in certain
circumstances. For more information, see ÒUnderstanding Real-T
Downstream Key EffectsÓ on page 26.
¥ Click Create and Render to render the clip Ñ creating new
media Þles Ñ and close the dialog box.
A new clip is created in the Source monitor and in the current bin.
The clip is named with the original clip name followed by the
frame rate in parentheses. This clip can then be edited into your
sequence like any other clip.
Creating a Strobe Motion Effect
ime and
Strobe motion results in a stuttering effect during playback of a clip.
You determine the degree of the ÒstutterÓ or strobe when you create
the effect.
69
Page 70

n
You can also combine strobe motion with the Variable Speed effect. For more
information on the Variable Speed effect, see ÒCreating a Variable Speed
EffectÓ on page 67.
To create a Strobe Motion effect:
1. Click the Motion Effect button.
n
Strobe Motion
option
The Motion Effect button does not appear on the interface by default. You can
map the Motion Effect button from the Command Palette to the Edit monitor
or to the keyboard. For more information, see the Avid Media Composer
UserÕs Guide or the Avid Film Composer UserÕs Guide.
The Motion Effect Parameters dialog box appears.
2. Select the Strobe Motion option.
70
Page 71

3. Specify the update rate in frames for the Strobe Motion effect. For
example, a rate of 5 causes every Þfth frame to be displayed in the
Strobe Motion effect.
4. (Option) If your clip was digitized in one of the two-Þeld AVRs
(AVRs 70, 75, or 77), choose a Render 2-Field Motion Effect option:
¥ Duplicated Field Ñ A single Þeld is displayed in the effect.
¥ Both Fields Ñ Both Þelds are displayed in the effect.
¥ Interpolated Field Ñ A second Þeld is created for the effect by
combining scan line pairs from the Þrst Þeld in the original
media.
5. Click Create and Render to render the clip and close the dialog
box.
n
You must render a Strobe Motion effect in order to play it back in real time.
A new clip appears in the Source monitor and in the current bin
preceded by a Motion Effect icon. The clip includes the original
clip name followed by the word Strobe and the number of update
frames in parentheses.
71
Page 72

CHAPTER 3
Working in Effect Mode
After you have created an effect and applied it to a transition or segment in your sequence, you can adjust its appearance and operation
by changing its effect parameters. This chapter explains how to go to
Effect mode and use the Effect Preview monitor and the Effect Editor,
and how to adjust the most common effect parameters.
¥ Entering Effect Mode
¥ Understanding the Effect Preview Monitor
¥ Using Big Effect Mode
¥ Working with the Effect Grid
¥ Using the Effect Editor
¥ Using Key Frames
¥ Adjusting Basic Parameters
¥ Using an Effect Template
¥ Playing an Effect
¥ Rendering an Effect
¥ Managing Your Media Files
72
Page 73

Entering Effect Mode
After you add an effect to a sequence, you must enter Effect mode to
change the parameters of the effect. Entering Effect mode transforms
the Source/Record monitor into the Effect Preview monitor and opens
the Effect Editor.
To enter Effect mode:
1. Place the blue position indicator on the effectÕs icon in the
Timeline.
2. Click the Effect Mode button.
The Record monitor is transformed into the Effect Preview monitor, and the Effect Editor, which includes buttons and parameter
panes to change effects, appears in the Bin monitor.
Effect Editor
Effect
Preview
monitor
73
Page 74
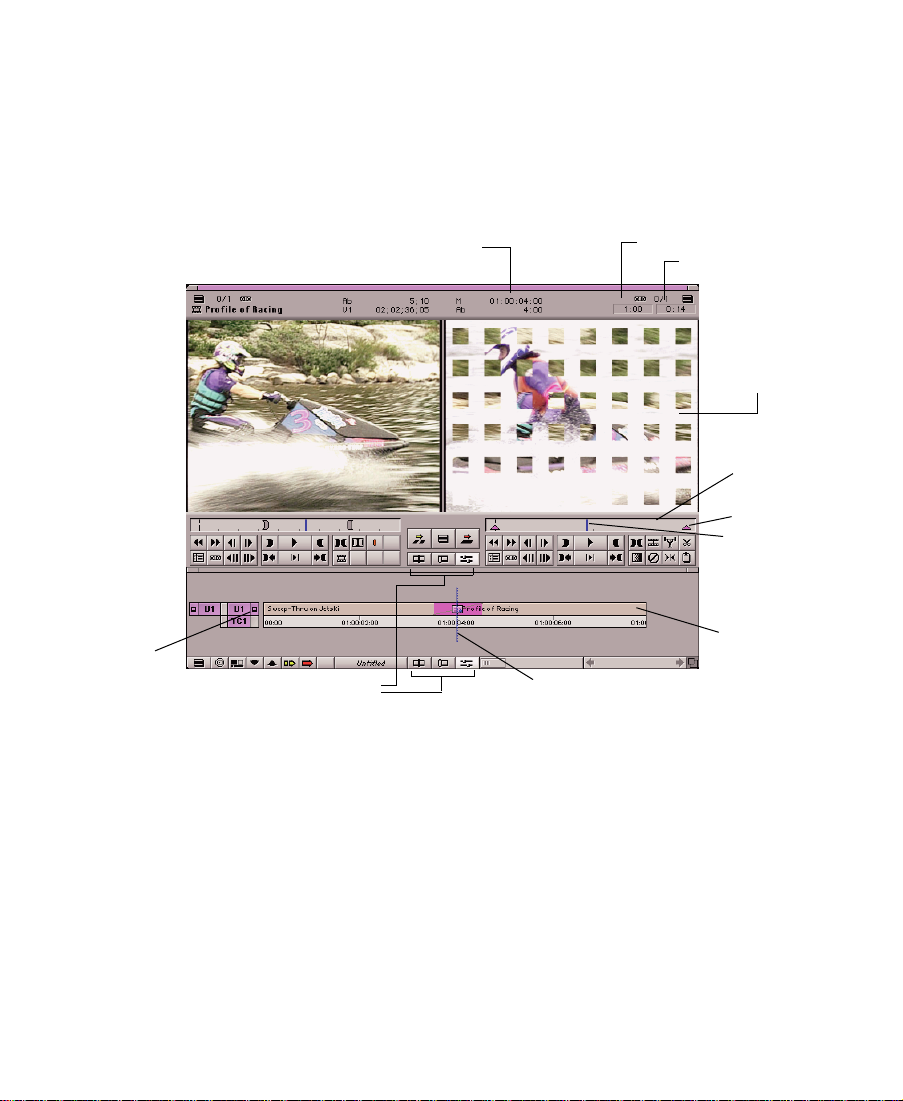
Understanding the Effect Preview Monitor
The Effect Preview monitor displays the selected effect in the sequence
where the position indicator is located in the Timeline. The effectÕs
position bar, located directly below the Effect Preview monitor, represents only the selected effect, not the entire sequence.
Monitor icon
n
Press and hold mouse button
for tracking information.
Edit Mode buttons
Position indicator
Length of effect
Current position in effect
Effect Preview
monitor
Effect’s position
bar
Key frame
Effect’s position
indicator
Timeline
If the effect you expect does not appear in the Effect Preview monitor, make
sure that you have activated the monitor in the monitor column of the effectÕs
track. If a black frame appears in the Effect Preview monitor, the position indicator might be at a location in the Timeline where an effect has not been
applied to the sequence.
The two boxes above the Effect Preview monitor display the length of
the effect in seconds and frames and the current position in the effectÕs
Timeline. In Effect mode, these boxes replace the name of the sequence
that appears in this area when you are in Source/Record mode.
74
Page 75

You can press and hold the mouse button to display a menu for viewing and changing the tracking information. For information on displaying tracking information, see the ÒViewing and Marking FootageÓ
chapter in the Avid Media Composer UserÕs Guide or Avid Film Composer
UserÕs Guide.
n
If the position information boxes do not appear above the Effect Preview monitor, increase the size of the window.
The following buttons appear below the Effect Preview monitor and
below the Timeline.
Source/Record mode
Trim mode
¥ Source/Record mode Ñ Use this button to go to Source/Record
mode.
¥ Trim mode Ñ Use this button to go to Trim mode.
¥ Effect mode Ñ This button is highlighted, to indicate that you are
in Effect mode. If you are using a high-resolution monitor, click
this button once to enter Big Effect mode. For more information on
Big Effect mode, see ÒUsing Big Ef
Navigating in Effect Mode
Effect mode
fect ModeÓ on page 76.
Changing Position
The following sections describe helpful techniques for moving
through footage in Effect mode.
You can change your position in the effect either by dragging the position indicator in the effectÕs position bar or by typing the timecode in
the same way you do in Source/Record mode. The type of timecode
75
Page 76

you enter (master timecode or absolute timecode) depends on the top
row of tracking information you are displaying. The position information boxes above the Effect Preview monitor update as you change
position. For more information on entering timecode to change the
current position, see the ÒViewing and Marking FootageÓ chapter in
the Avid Media Composer UserÕs Guide or Avid Film Composer UserÕs
Guide.
Using Single-Field Step
Single-Þeld step enables you to view Þeld 1 and Þeld 2 of each frame
of video. This feature is useful when you want to locate a defect on a
speciÞc Þeld and use an effect to correct the defect. Any effect edits
you make affect both Þeld 1 and Þeld 2 of each frame.
When you enter Effect mode, the tracking display above the Effect Preview monitor indicates the currently displayed Þeld by adding Ò.01Ó
to the tracking number for the Þrst Þeld, or Ò.02Ó for the second Þeld.
To step through the footage one Þeld at a time, press the Option key
and click either the Step Forward or the Step Backward button. As you
step, the tracking number updates to reßect the currently displayed
Þeld.
Using Big Effect Mode
Once you choose the Effect Editor, if you have a high-resolution monitor, you can click the Effect Mode button again to bring up Big Effect
mode, which offers you a larger Effect Preview monitor.
Big Effect mode provides an enlarged window that makes working
with effects easier. The Source monitor disappears, and the Effect Preview monitor transforms into a larger working space that makes it easier to create effects and make changes to them.
76
Page 77

n
You must be using a high-resolution monitor as the Edit monitor to enter Big
Effect mode.
To enable Big Effect mode:
1. In Source/Record mode, click and drag the Source/Record window so that it Þlls the width of your high-resolution Edit monitor.
2. Enter Effect mode by clicking the Effect Mode button.
3. Click the Effect Mode button again.
The Avid Composer system enables Big Effect mode. You can click
and drag the Effect Editor to the left of the enlarged Effect Preview
monitor.
Length of effect
Current position in effect
77
Page 78

4. To return to normal Effect mode, click the Effect Mode button at
the bottom of the screen.
n
If you do not return to normal Effect mode, Big Effect mode remains the
default state when you enter Effect mode in the future.
Working with the Effect Grid
The Effect Grid provides a variety of ways to position effects with
accuracy and previsualize them in the Effect Preview monitor. The
grid coordinates can be expressed in traditional Þelds or XÐY pixels
in any resolution. The following illustration shows a 12-Þeld grid
displayed in a video project.
Grid
Coordinates
(at cursor
position)
Grid points
Axis with
tick marks
Safe title area
78
Page 79

In video and Þlm projects, you can use the Effect Grid to:
¥ Display Safe Title and Safe Action guidelines.
¥ Display the aspect ratios for Þlm categories such as standard Þlm,
Academy, Super 35 mm, and Anamorphic, as well as the 4 x 3
safety area for the 16 x 9 aspect ratio.
¥ Show coordinate information to track the exact location of an
effect in the frame.
¥ Use the snap-to-grid feature to easily position effects.
In Þlm projects only, you can use the Effect Grid to:
¥ View the results of a Blowup, Paint, or AniMatte effect.
¥ Interpret the path of a Paint or AniMatte effect over a series of
frames using key frames. The coordinates show up when you generate a cut list, which enables the editor at the optical facility to
track your effects accurately.
Setting the Effect Grid Options
To set the default grid values on your system, choose Grid from the
Settings scroll list in the Project window. The following illustration
shows the Grid Settings dialog box.
79
Page 80
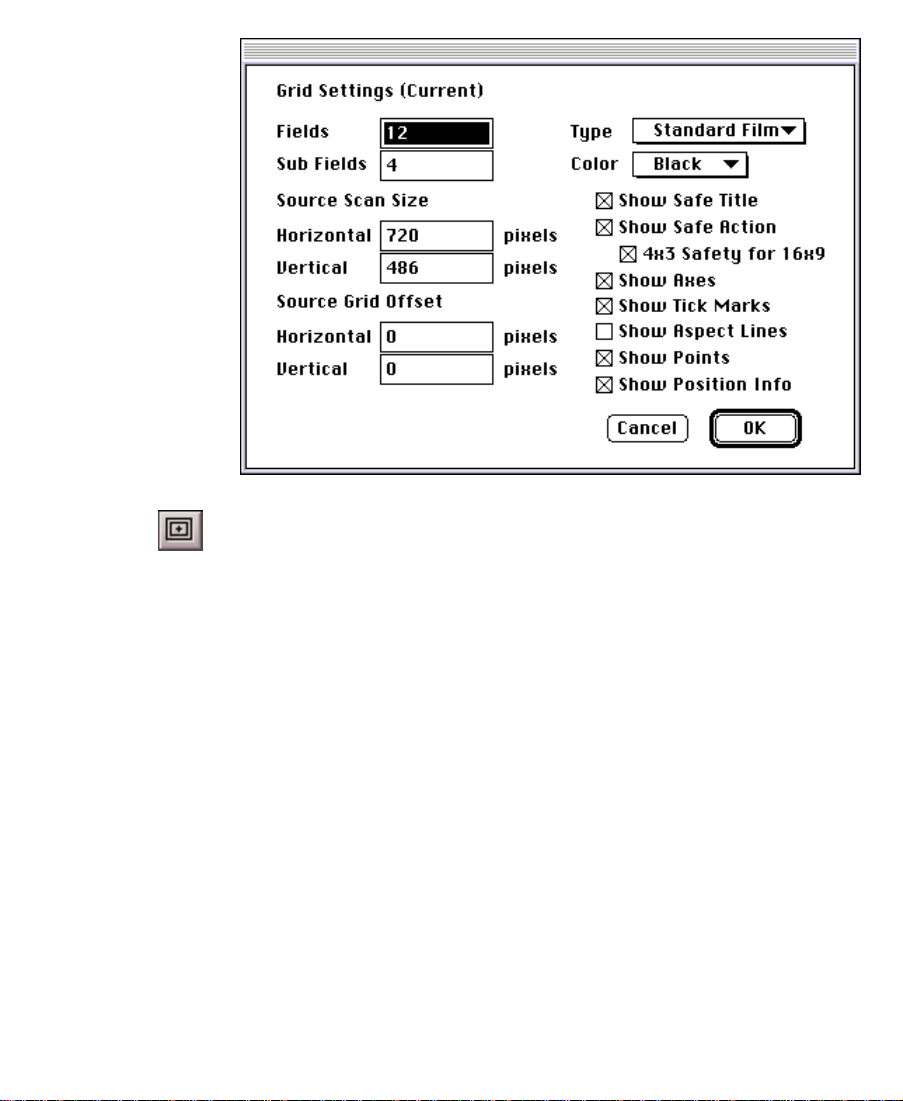
You can turn the Effect Grid on or off by clicking the Grid button in
either Source/Record or Effect mode.
n
Setting Up the Effect Grid in a Film Project
If you are working in a video project and want to see only the Safe Action and
Safe Title guidelines, Option-click the Grid button; the Effect Grid options
now default to Safe Action and Safe Title guidelines. To toggle the display
back to the full range of Effect Grid options, Option-click the Grid button.
In a Þlm project, the Grid parameter pane values in Effect mode deÞne
a local grid effect that allows you to set the grid differently for each
effect. If you save the effect as a template, the Avid Composer system
automatically saves the local grid parameters as part of the template.
80
Page 81

Other Options button
(opens Grid Settings)
Grid parameter
pane
Transfer fast
menu
Grid Enable button
Use the Grid Enable button to turn the local Grid effect on or off. If you
disable the local Grid effect, the Avid Composer system uses the global
settings deÞned by the Grid dialog box. You can display the dialog box
from two locations:
¥ Choose Grid from the Settings scroll list in the Project window.
¥ Click the Other Options button in the Effect Editor.
The Transfer Fast menu values appear on the parameter pane but do
not appear in the Grid Settings dialog box. The Fast menu enables you
to specify how the Þlm was transferred to video as follows:
Grid Options
¥ Full Aperture Ñ Transferred everything that is visible in the frame
¥ Academy Ñ Did not transfer the sound track area that appears on
the left-hand side of the Þlm
Table 3-1 describes the features of the Grid Settings dialog box.
81
Page 82

Table 3-1 Grid Settings Dialog Box Options
Heading Description
Fields Determines the number of tick marks along the grid axes as well as the number of visi-
ble grid points. Since different optical houses expect different Fields and Sub Fields values, you should check with your optical house before deÞning your grid.
Sub Fields Determines the snap-to-grid feature between visible grid points. The value determines
how many jumps are in between each visible point. A value of 1 snaps only to visible
points. A value of 2 provides 1/2 Þeld jumps. A value of 4 provides 1/4 Þeld jumps,
and so on. A value of 0 turns off the snap-to-grid feature.
Source Scan
Size
Source Grid
Offset
Type Selects a different grid for each of the standard Þlm types:
Color Enables you to choose a color for the grid axes and the grid points.
Show Safe
Title
Use these values if an optical house will use a Þlm scanner to process your Þlm (and
add visual effects). Match the values to those used by your effects house.
These values enable you to move the grid on the image. They are typically applied for
reference purposes after the Þlm has been scanned at the optical house. The offset
allows you to sync up the telecine version with the scanned version. For example, you
can add a marker to identify a speciÞc location on one frame. If the optical house has
different coordinate values for that point, you can offset the grid on the Avid Composer
system to match the optical houseÕs coordinates.
Square
Standard
Film
Academy
Super 35
Anamorphic
Displays the safe title area. Create Þlm titles within this area.
Used for video projects
For 1.85, 1.77, and 1.66 and aspect ratios
For 1.85, 1.77, and 1.66 aspect ratios with guides for the loss
soundtrack area
For 2.35 aspect ratio (pixel values count the entire frame)
For 2.35 aspect ratio (pixel values count only in 2.35 area)
Show Safe
Action
Displays the safe action area for video display. This box is self-adjusting for PAL and
NTSC projects.
82
Page 83

Table 3-1 Grid Settings Dialog Box Options (Continued)
Heading Description
4 x 3 Safety for
16 x 9
Show Axes Displays the axes.
Show Tick
Marks
Show Aspect
Lines
Show Points Shows the grid points. Use the Fields parameter to set the number of grid points.
Show Position
Info
Displays the safe area for the 4 x 3 aspect ratio when you are working in a 16 x 9 aspect
ratio project.
Shows tick marks along the axes. Use the Fields parameter to set the number of tick
marks.
Displays the aspect-ratio lines. Each grid type has different aspect-ratio lines.
Enables you to display the coordinates of any point in the Record monitor.
Displaying the Position Coordinates in Effect Mode
The Avid Composer system uses compass coordinates and X, Y coordinates to describe the position of an effect. To view the coordinates, you
must choose the Show Position Info option in the Grid Settings dialog
box and enable the Effect Grid. For compass coordinates, the point
(0, 0) is the center of the axes. For X, Y coordinates, the point (0, 0) is
the upper-left corner of the Source monitor. X values increase to the
right, and Y values increase as you move up.
The compass coordinates describe the effectÕs position in terms of optical house standards. Each compass coordinate begins with a direction
(N, S, E, or W, the abbreviations for North, South, East, or West)
followed by a numerical value. This numerical component reßects the
Fields and Sub Fields parameters you choose in the Grid Settings dialog box or the Grid parameter pane.
83
Page 84

The X, Y coordinates describe position in terms of the Source Scan Size
parameters you choose in the Grid Settings dialog box or the Grid
parameter pane.
To display the coordinates in Source/Record mode, press and hold the
mouse button, and drag the cursor in the Record monitor.
To display the coordinates in Effect mode:
1. Deselect all tools in the Effect Editor (including the Selection Tool
and the Outline/Path button).
2. Press and hold the mouse button and drag the cursor in the Effect
Preview monitor.
Using the Effect Grid in a Film Project
You can use the Effect Grid to include position information in a cut list
for the Paint and AniMatte effects on a key-frame-by-key-frame basis.
Additionally, you can display the position information for the Þrst key
frame of a Blowup effect in a cut list. You must enable the Effect Grid
before you generate the cut list to display the coordinate information
in the cut list.
Position Information for the Blowup Effect
The event section of the cut list displays the compass coordinates of
the effect at the Þrst key frame in the segment. Additionally, the Fields
parameter you have chosen for the effect appears before the position
coordinates.
84
Page 85
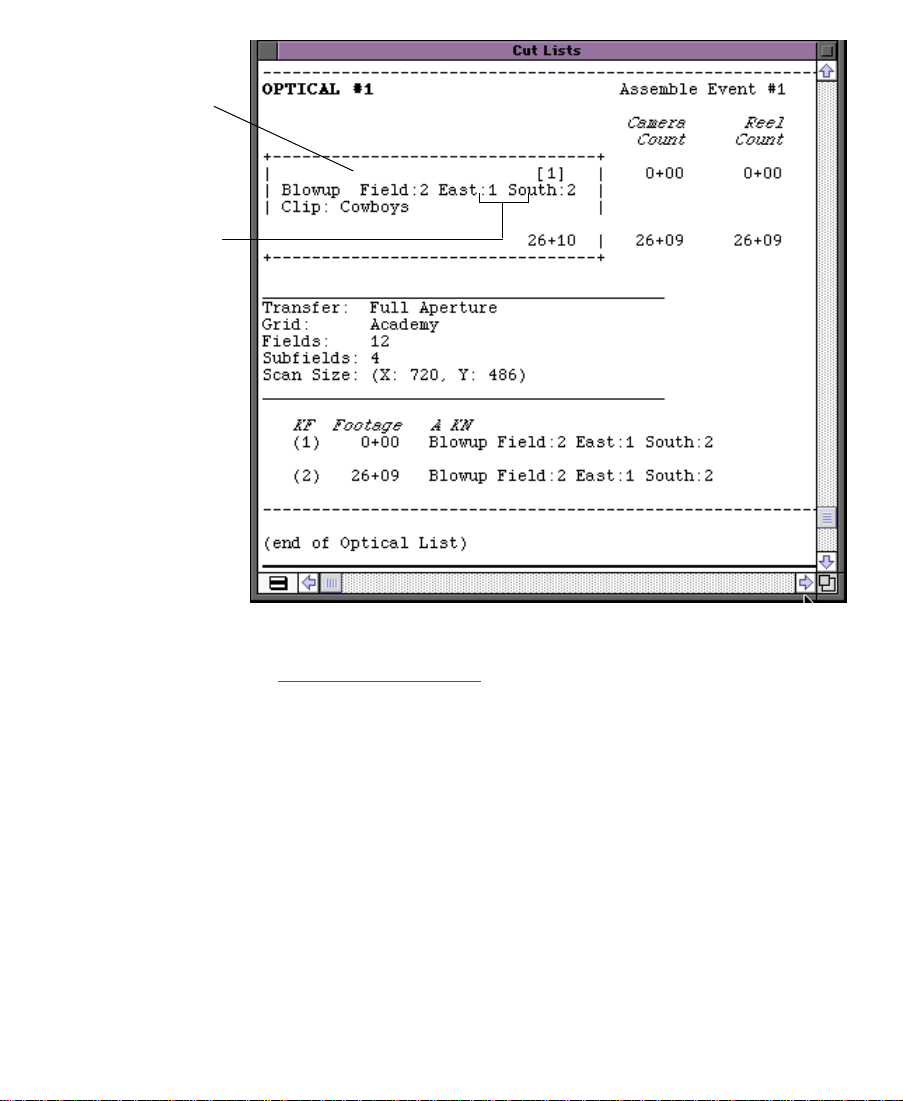
Field
parameter
X, Y
coordinates
For information on the parameters available with the Blowup effect,
see ÒBlowupÓ on page 403.
85
Page 86

Position Information for the Paint and AniMatte Effects
By enabling Key Frames in the Cut List Tool options for optical lists,
you can track the position of each Paint and AniMatte effect on a keyframe-by-key-frame basis. You must enable the Effect Grid before you
generate the cut list, or the coordinate information will not appear in
the cut list. The following illustration shows a cut list that includes
coordinates for a Paint effect.
Compass coordinates X, Y coordinates
86
.
Page 87

The compass coordinates for Paint and AniMatte effects indicate the
position of each corner of the effect for each key frame. For example, a
pentagon you create with the Paint effect shows Þve associated compass coordinates. The X, Y coordinates in the cut list indicate the position of the center of the effect at each key frame.
For information on getting started with the Effect Grid and the Paint
and AniMatte effects, see ÒPrevisualization Marker Tool for Film
ProjectsÓ on page 277. For information on generating a cut list that
shows the position coordinates, see ÒCreating a Cut List with Effect
Grid InformationÓ on page 279.
Displaying the Safe Title and Safe Action Guidelines
Many effects can utilize the outer edges of the viewing screen area. If
you are editing material that will be viewed on screens with more limited viewing areas, such as standard televisions, you can use the Safe
Title and Safe Action options to provide visual guidelines in the Effect
Preview monitor that replicate the actual viewable area on a standard
television screen.
For example, you can use the Safe Title option as a template for the
area in which you want the effect to operate. In this way, you can
avoid the appearance of the effect ßoating off into a nonviewable area
of a standard television screen.
Activate the Safe Title and Safe Action options in the Grid Settings dialog box as described in ÒSetting the Effect Grid OptionsÓ on page 79.
To display the Safe Title and Safe Action guidlelines in Source/Record
mode or Effect mode, Option-click the Grid button.
87
Page 88

Two outlined boxes appear in the Effect Preview monitor. The inner
box is the safe title area. All text and objects should remain within the
inner box. The outer box is the safe action area for video display.
Effect Preview
monitor
Safe title area
Safe action area
88
Page 89

Displaying the Aspect Ratio Grid for Film Projects
The Effect Grid displays several guidelines to show you where you
could crop the top or bottom of your frame to achieve the Òletter-boxÓ
effect. Use this feature to determine if an undesired element can be
seen during screening, if an alternate take should be used, or if a resize
is required. The following illustration shows the Standard Film aspect
ratios.
1.66 aspect ratio
1.77 (16 x 9)
aspect ratio
1.85 aspect ratio
Activate the Þlm aspect ratio options as described in ÒSetting the
Effect Grid OptionsÓ on page 79. To display the aspect ratios in Effect
mode or Source/Record mode, click the Grid button.
If you want to apply a Mask effect, select one of the Film masks from
the Effect Palette. For more information about applying effects, see
ÒApplying Effects to a SequenceÓ on page 46.
89
Page 90

Using the Effect Editor
When an effect is selected and the Effect Editor is active, the selected
effect displays in the Effect Preview monitor. The Effect Preview monitorÕs position bar represents only the selected effect, not the entire
sequence.
n
Other Options button
Effect name
Triangular
opener
Parameter pane
Slider used to adjust
parameter
If you are in Effect mode already, the Effect Editor is open and active. You can
just select the segment or transition effect to display the effectÕs parameters in
the Effect Editor.
When you click the Effect Mode button to enter Effect mode, the
Effect Editor appears.
Effect icon
90
Page 91

This example shows the Grid Wipe effect parameters.
Not all effect parameters apply to all effects. Parameters that do not
apply to an effect do not appear in the Effect Editor for that effect. To
determine which parameters pertain to an effect, refer to the effectÕs
description in Chapter 10, Ò2D Effects Reference,Ó and Chapter 11,
Ò3D Effects Reference.Ó
n
If the position indicator is not on an effectÕs icon in the Timeline or the track
that contains the effect is not selected, then the Effect Editor is blank.
Effect Editor Buttons
This section describes the buttons in the Effect Editor, starting from the
top-left button in the window. Not all buttons apply to each effect. If a
button is not applicable, it does not appear in the Effect Editor for that
effect. For more information about using each of the buttons, refer to
the associated topic in this chapter.
Additional buttons appear in the Effect Editor, depending on which
effect you are using. For example, if you are working with a 3D effect,
a set of 3D-speciÞc buttons appear on the right side of the Effect
Editor.
¥ Other Options
matrix effects, third-party plug-in effects, and the Title Tool.
¥ Triangular opener Ñ Click to display or hide the parameter pane.
A downward-pointing triangle displays the parameter pane; a
right-pointing triangle displays only the parameter name.
button Ñ Click to access additional parameters for
91
Page 92

Triangle
Parameter pane
¥ Other Options button Ð Click the Other Options button next to the
Color Preview window to display the color wheel palette when
selecting a color. The Color Preview window displays the selected
color. For more information, see ÒAdjusting a Color ParameterÓ
on page 104.
Other Options button Color Preview window
The following buttons appear along the right side of the Effect Editor.
Play Loop
button
Dual Split button
Reduce button
Enlarge button
Play button
¥ Play Loop button Ñ Plays back a transition or segment effect in a
loop. Click the button again to stop the looped playback.
¥ Dual Split button Ñ Splits the Effect Preview monitor in half to
show the image with and without effects applied to it.
¥ Reduce button Ñ Reduces the image in the Effect Preview
monitor.
92
Page 93
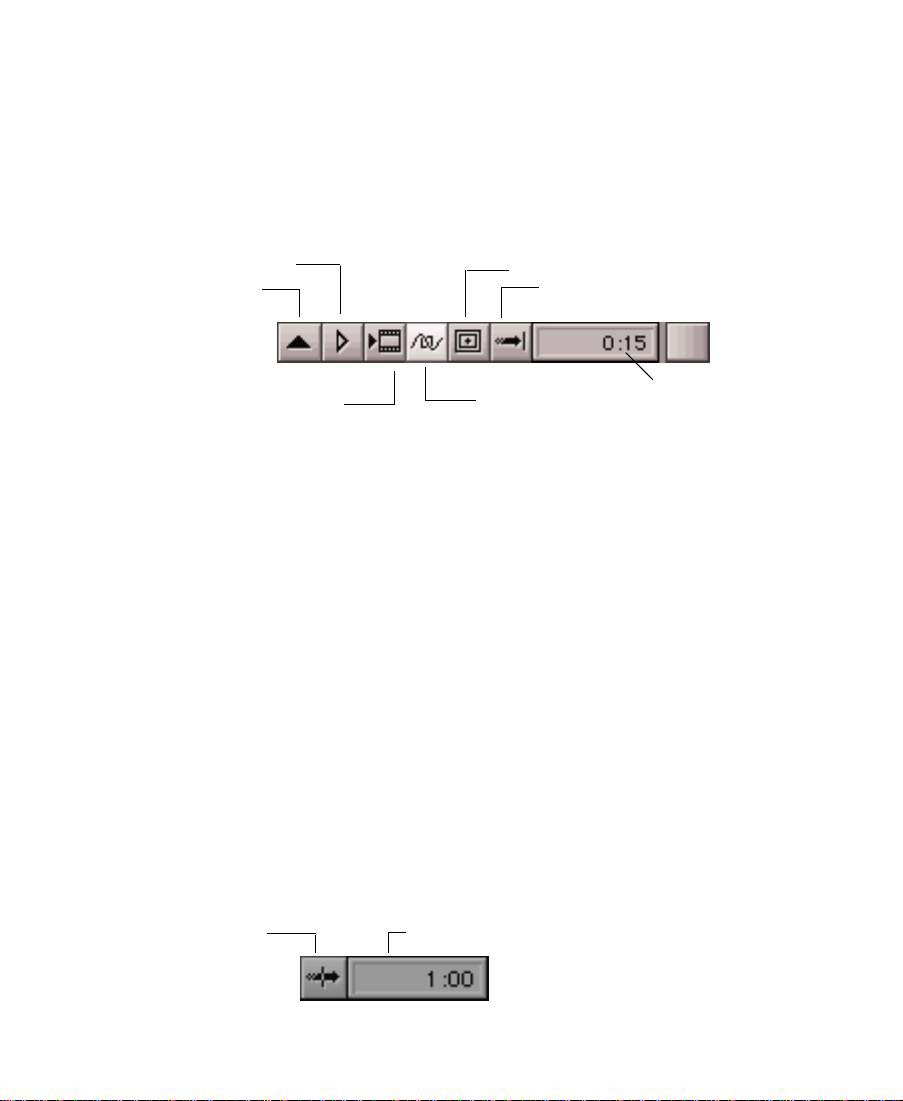
¥ Enlarge button Ñ Enlarges the image in the Effect Preview
monitor.
¥ Play button Ñ Plays the effect from the current position in the
effectÕs Timeline for most 2D and 3D effects.
The following buttons appear at the bottom of the Effect Editor.
Play Preview button
Add Key Frame button
Render Effect button
Grid button
Transition Effect Alignment pop-up menu
Outline/Path button
Transition Effect Duration
box
¥ Add Key Frame button Ñ Creates a key frame at the frame in the
effectÕs Timeline where you place the position indicator. Optionclicking this button deletes a key frame.
The Add Key Frame button on the Command Palette is mapped to
the double quote key (Ò) on the keyboard. You can map the button
from the Command Palette to another key, or you can map the
button to an existing button in the Source/Record monitor.
¥ Play Preview button Ñ Plays back a preview of an unrendered
effect.
¥ Render Effect button Ñ Renders the effect.
¥ Outline/Path button Ñ Displays a wire-frame representation to
illustrate the movement of an effect from the Þrst key frame
through the last key frame.
Transition Effect
Alignment
pop-up menu
¥ Grid button Ñ Displays the Safe Title and Safe Action guidelines,
and enables the Effect Grid for precise placement of effects.
Transition Effect Duration box
93
Page 94

¥ Transition Effect Alignment menu Ñ Use this menu button to
select the alignment of a transition effect to the cut point.
¥ Transition Effect Duration box Ñ Click in this display to enter
a duration for the transition effect other than the duration
displayed.
For a detailed explanation of the above two parameters, see
ÒUsing the Transition ParametersÓ on page 59.
¥ 3D Promotion Ñ This button appears when you use a 2D effect on
systems with the 3D Effects option installed. You can click the button to promote the effect to a 3D effect. For example, you can promote a 2D Picture-in-Picture effect to a 3D effect and make use of
the 3D Effects parameters. Before you promote the effect to 3D,
you may want to save a 2D copy as a template so you can go back
to it again at a later time. For more information, see ÒPromoting
2D Effects to 3D EffectsÓ on page 331.
Moving an Enlarged Image in Effect Mode
When you use the Enlarge button to increase the size of the image in
the Effect Preview monitor, you cannot view the entire frame all at
once. When you are creating an effect that requires great detail, you
can reposition the enlarged frame in the monitor to view the sections
that need your attention.
n
This feature applies only to an enlarged image in tbe Effect Preview monitor,
not a standard-sized or reduced image.
To move the image within the Effect Preview monitor:
1. Click within the boundaries of the Effect Preview monitor.
2. Press and hold kÐOption.
The cursor becomes a hand.
94
Page 95
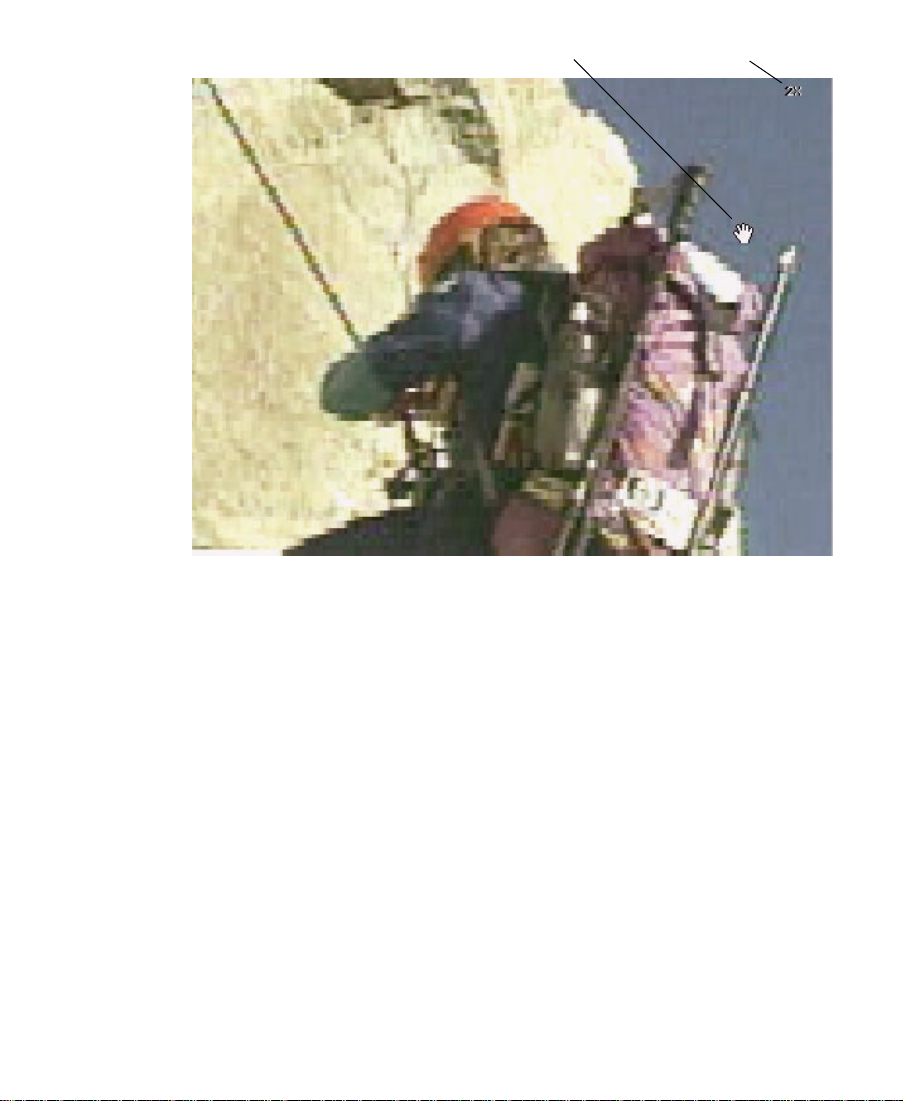
Cursor Pixel Size display
3. Drag the hand in any direction to reposition the image within the
Effect Preview monitor.
n
Similarly, you can enlarge the frame in the Source monitor when you are
working in Source/Record mode and move the frame around by pressing
and holding kÐOption. To access the Enlarge and Reduce buttons in
Source/Record mode, you must map the buttons to your keyboard or to
the user-selectable palettes.
95
Page 96
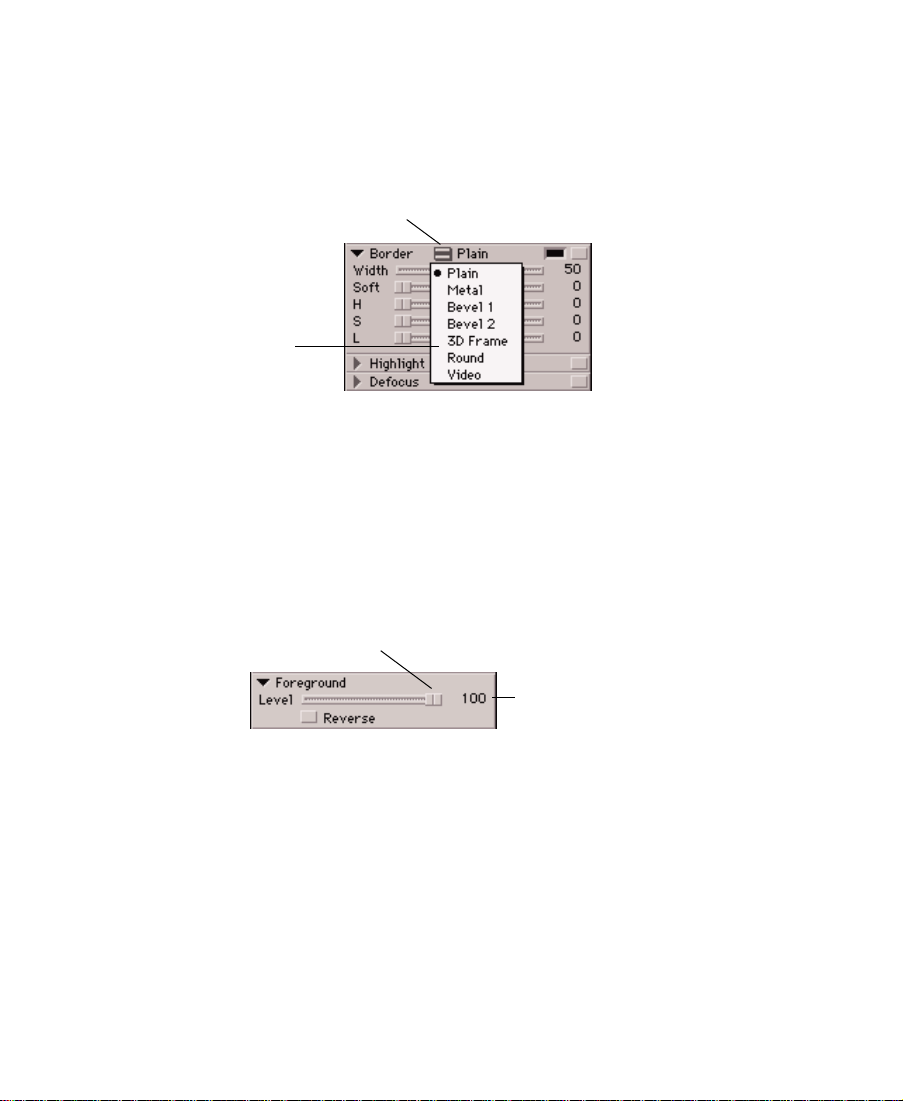
Selecting a Parameter
Some effects have additional parameters that you select from the current parameterÕs Fast menu. For example, border types for 3D effects
are on the same Fast menu.
Fast Menu button
Pop-up menu
showing other
parameters
Changing a Parameter
To change a parameter that has a slider, you must click its slider. When
a slider is activated, it turns pink. Use the Tab key to move from one
slider to the next slider.
Parameter’s slider
Parameter’s numeric value
Use any of the following methods to change the value of a parameter
that has a slider.
¥ Move the slider with the mouse.
¥ Type a new value using the numeric keypad, and, if you entered
less than 3 digits, press Enter.
96
Page 97
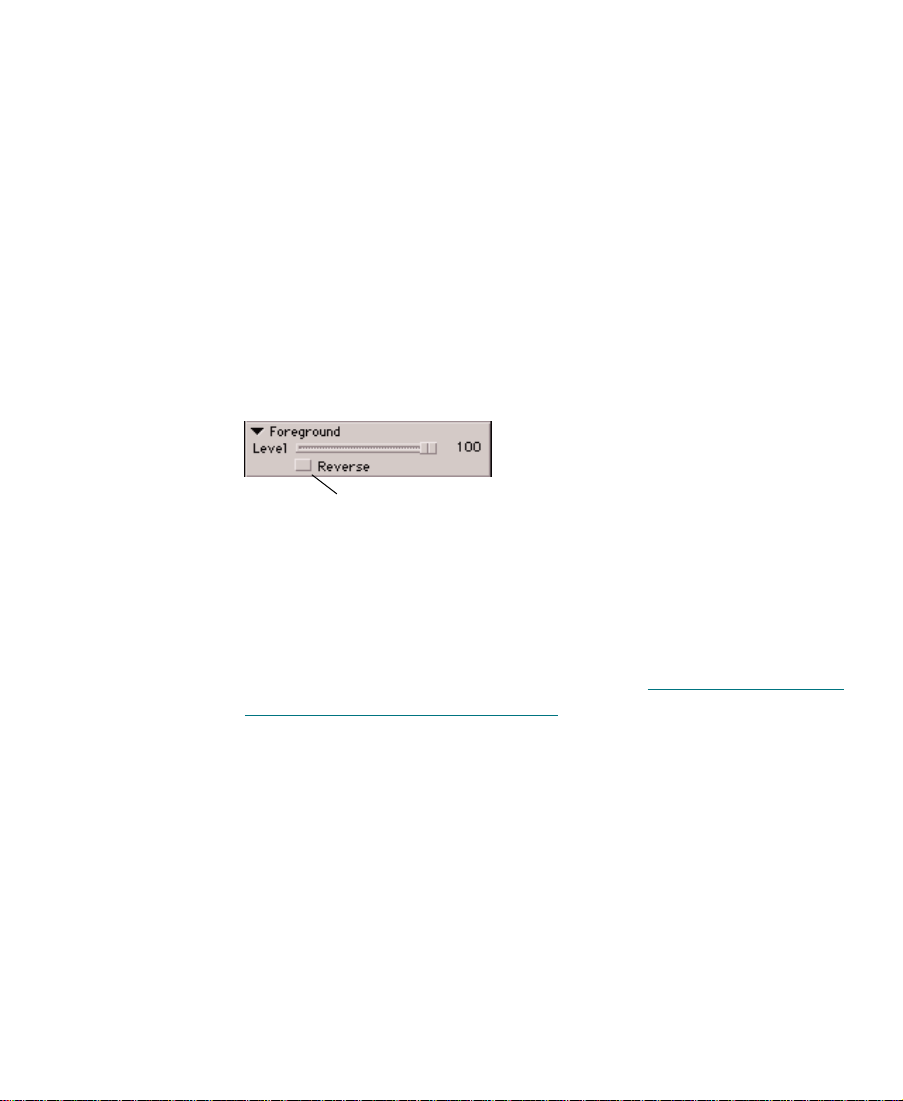
¥ Use the Left Arrow and Right Arrow keys to change the value by Ð
1 or +1.
¥ Press the Shift key and use the Left Arrow and Right Arrow keys
to change the value by Ð10 or +10.
Reversing an Effect’s Direction
You can set many of the effects in the Effect Palette to operate in
reverse. When you operate the effect in reverse, in most cases the
incoming (B) video changes places with the outgoing (A) video. The
reversal changes the positions of the A and B video only for the duration of the effect.
Reverse button
To reverse an effectÕs direction, click the Reverse button in the Foreground parameter pane.
When the Reverse button is selected, the effect operates in reverse;
when the button is deselected, the effect operates normally. For an
explanation of changing the effectÕs level, see ÒAdjusting the Level
Between Key FramesÓ on page 103.
Accessing an Effect’s Additional Parameters
Some effects have additional parameters that control their operation.
For example, the Grid Wipe effect has additional parameters in which
you set the number of columns and rows in the wipe. When an effect
has additional parameters, the Other Options button appears next to
the effect name in the Effect Editor. The Other Options button also
appears in a parameter pane in the Effect Editor if the pane can access
additional parameters.
97
Page 98

To access an effectÕs additional parameters, click the Other Options
button next to the effect name or in a parameter pane.
A dialog box appears in which you set the additional parameters.
n
You also use the Other Options button to access the parameters for thirdparty plug-in effects and for the Macintosh Color Picker in the
Title Tool and other effects that allow you to change color parameters.
Replacing an Effect
While in Effect mode, you can replace an existing effect.
To add a replacement effect:
1. Choose Effect Palette from the Tools menu.
2. Choose an effect category.
3. Use one of the following methods to replace the effect:
- Drag the new effectÕs icon to the Timeline. To replace an exist-
- Drag the new effectÕs icon to the Effect Preview monitor.
- Highlight the effect in the Timeline, and double-click the new
ing effect, place the new effectÕs icon on top of the existing
effectÕs icon.
effectÕs icon in the Effect Palette.
4. Set the applicable effect parameters in the Effect Editor.
98
Page 99

Using Key Frames
A key frame is a point in the effectÕs Timeline at which you can set
parameters. Key-frame indicators appear as triangles in the effectÕs
Timeline below the Effect Preview monitor.
Starting key frame
By default, the Avid Composer system always provides the starting
and ending key frames of an effect. These key frames are selected by
default and thus any parameter changes are constant throughout the
99
Ending key frame
Page 100

effect. By using techniques for adding, deleting, moving, selecting,
and deselecting key frames, you can begin to change the appearance
and operation of the effect over time by applying parameter changes
to speciÞc key frames.
Adding a Key Frame
You can create a key frame at any point in the effectÕs Timeline.
To create a key frame:
1. Click the position in the effectÕs Timeline below the Effect Preview
monitor where you want to add the key frame. The position indicator moves to that frame.
2. Click the Add Key Frame button to add the key frame.
Selecting a Key Frame
You can select a key frame or multiple key frames using the following
procedures. A key frame turns pink when selected.
n
¥ To select one key frame, click the key-frame indicator in the
effectÕs Timeline.
¥ To select multiple key frames, hold down the Shift key and click
the desired key-frame indicators in the effectÕs Timeline.
¥ To select all key frames in the effectÕs Timeline, press kÐA, or kÐ
click on one key frame.
For a fast way to jump to the previous or next key frame, you can map the
Fast Forward and Rewind buttons from the Command Palette to your keyboard.
100
 Loading...