

Page 1

Pinnacle MediaCenter
Page 2

Table Of Contents
Introduction...........................................................................................................1
Welcome ............................................................................................................1
Pinnacle MediaCenter / TVCenter.................................................................1
Pinnacle hardware ..........................................................................................2
PCTV MediaCenter remote control ...............................................................2
Pinnacle Mobile Media Organizer (only with the Pinnacle MediaCenter)....2
Configuration Wizard for the Basic Settings.....................................................3
Pinnacle MediaCenter ...........................................................................................5
Pinnacle MediaCenter User Interfaces ..............................................................5
PC View..........................................................................................................5
TV View (Remote View) ...............................................................................6
Pinnacle MediaCenter TV View Functions ...................................................7
PC View (optimized for use with a mouse).......................................................8
Pinnacle MediaCenter PC View Overview....................................................8
General Operating Controls............................................................................9
TV Operating Controls.................................................................................14
DVD Playback Operating Controls..............................................................20
File Playback Operating Controls ................................................................24
Teletext.........................................................................................................27
Electronic Program Guide (EPG) and Recording........................................33
Picture-in-Picture Function (PIP).................................................................39
Pinnacle MediaCenter Window Formats .....................................................42
Pinnacle MediaCenter Operating Shortcuts.................................................45
Advanced Settings...............................................................................................47
Advanced Settings Dialog Overview...............................................................47
"Apply" button..............................................................................................47
Advanced General Settings..............................................................................48
Appearance...................................................................................................48
Check for updates.........................................................................................48
Control bar....................................................................................................48
Skip buttons..................................................................................................48
Advance TV Channel Settings.........................................................................49
Advanced Channel Settings Overview.........................................................49
iii
Page 3

Pinnacle MediaCenter
Advanced Analog TV Reception Settings ...................................................51
Advanced DVB-T Reception Settings .........................................................52
Advanced DVB-S Reception Settings..........................................................53
Advanced Channel Settings - Modifying Channels.....................................54
Advanced Analog-Digital and Internet Radio Reception Settings..................57
Available radio channels ..............................................................................57
My favorite radio channels...........................................................................57
Visualisation.................................................................................................57
Channel Details ............................................................................................58
Load / save channel lists...............................................................................58
Channel Scan................................................................................................58
Advanced Settings - Program Guide EPG - epgData.com Service.................59
epgData.com, the Electronic Program Guide (Premium Program Guide)...59
Advanced Capture Settings..............................................................................61
Capture folder...............................................................................................61
Hard disk capture formats ............................................................................61
Direct to DVD recording..............................................................................62
Advanced Timeshift Settings...........................................................................64
Default TimeShifting....................................................................................64
Advanced Playback Settings............................................................................65
Music playback.............................................................................................65
Photo slide show...........................................................................................66
CD/DVD start...............................................................................................66
Movies and DVD playback..........................................................................66
Advanced Display Settings..............................................................................68
On Screen Display (OSD)............................................................................68
Preferred output device ................................................................................69
Screen saver..................................................................................................69
Preferred video aspect ratio..........................................................................69
Hardware acceleration..................................................................................69
Video display................................................................................................69
Advanced Audio Settings ................................................................................70
Preferred audio language..............................................................................70
Audio output device .....................................................................................70
SPDIF enabled or disabled...........................................................................71
Preferred playback format............................................................................72
iv
Page 4

Table Of Contents
Analog audio input.......................................................................................72
Advanced Remote Control Settings.................................................................73
Remote control selection..............................................................................73
Remote control receiver ...............................................................................73
Advanced Hardware Settings...........................................................................74
Hardware to configure..................................................................................74
Antenna inputs..............................................................................................74
Preview.........................................................................................................74
Analog video inputs......................................................................................74
Advanced System Information Settings ..........................................................75
MediaCenter 4 install information ...............................................................75
MediaCenter 4 features.................................................................................75
System information ......................................................................................76
More information..........................................................................................76
Technical Support................................................................................................77
Getting Technical Support...............................................................................77
1. Frequently Asked Questions ....................................................................77
2. Ask a Question and Get an Answer .........................................................77
3. E-mail Support..........................................................................................77
4. Discussion Forum.....................................................................................78
License Information ............................................................................................79
Pinnacle End User License Agreement ...........................................................79
Glossary...............................................................................................................83
Index....................................................................................................................91
v
Page 5

Introduction
Welcome
Your new Pinnacle product offers you a whole new world of multimedia
entertainment. Starting today, you can sit at your computer or comfortably on
the couch and conveniently access, manage and process all sorts of media such
as television, radio, movies, music and photos:
You can watch both analog and digital TV (optional) on your computer monitor
or TV screen.
This TV viewing fun has been enhanced even more with numerous additional
functions. Thanks to spur-of-the-moment or scheduled recording to your hard
drive and modern timeshift recording technology, you can watch television
flexibly and not miss a minute of your favorite shows. In connection with this,
quick-to-open teletext provides you with the latest news any time you want it,
and an Electronic Program Guide (EPG) guarantees you an overview of the TV
schedule as well as quick and uncomplicated recording scheduling.
Now you also have the option of listening to radio any time you want and of
recording your favorite broadcasts quickly and easily. In addition, your Pinnacle
product lets your receive Internet radio stations.
The following components of your new Pinnacle product let you access all these
functions:
Pinnacle MediaCenter / TVCenter
The Pinnacle MediaCenter / TVCenter installed on your computer plays back
your media.
Use the Pinnacle MediaCenter / TVCenter to watch and record television, play
back recordings as well as open teletext. You can also listen to and record radio
broadcasts. Music, movies and photos from CD, DVD or your hard drive are
played back in the Pinnacle MediaCenter / TVCenter. To open media sorted
according to specific criteria, access your categories created in the Pinnacle
Mobile Media Organizer, and then select the appropriate medium for your mood
or a specific occasion whenever you want, depending on regional availability.
Various Pinnacle PCTV hardware variants are delivered only with the Pinnacle
TVCenter. However, the TVCenter has a limited range of functions. Throughout
this manual, the term Pinnacle MediaCenter is used, since all of the functions
included in the program are explained in this context.
1
Page 6

Pinnacle MediaCenter
The following functions are not available in the TVCenter:
1. Recording DVDs
2. Burning DVDs and CDs
3. TV View (Remote View)
4. Pinnacle Mobile Media Organizer
5. Dolby decoding
6. PSP/iPod recording
7. MPEG2 recording when using analog PCTV hardware
The TV View (Remote View) in the Pinnacle MediaCenter is not included with
Pinnacle PCTV hardware variants that include the TVCenter. The TV View
(Remote View) is not described in this manual.
Pinnacle hardware
If your new Pinnacle product comes with the optional reception device, you can
receive TV and radio (optional) and take advantage of, for example, the teletext
or timeshift functions.
PCTV MediaCenter remote control
You can use the remote control to easily operate the menu displayed on your
monitor from any point in the room - and you don't even have to get up and go
over to the computer.
Pinnacle Mobile Media Organizer (only with the Pinnacle
MediaCenter)
The Pinnacle Mobile Media Organizer installed on your computer is used
to import music files, movies and digital photos into the constantly updated
MediaManager database as well as to manage and keep your files in order. If
you want, you can create playlists of your favorite music, movies and photos
according to your own organizational criteria.
The media files on your computer can, for instance, come from the Internet,
from your own audio CDs or from your digital camera.
And now have fun with your Pinnacle product!
2
Page 7
Introduction
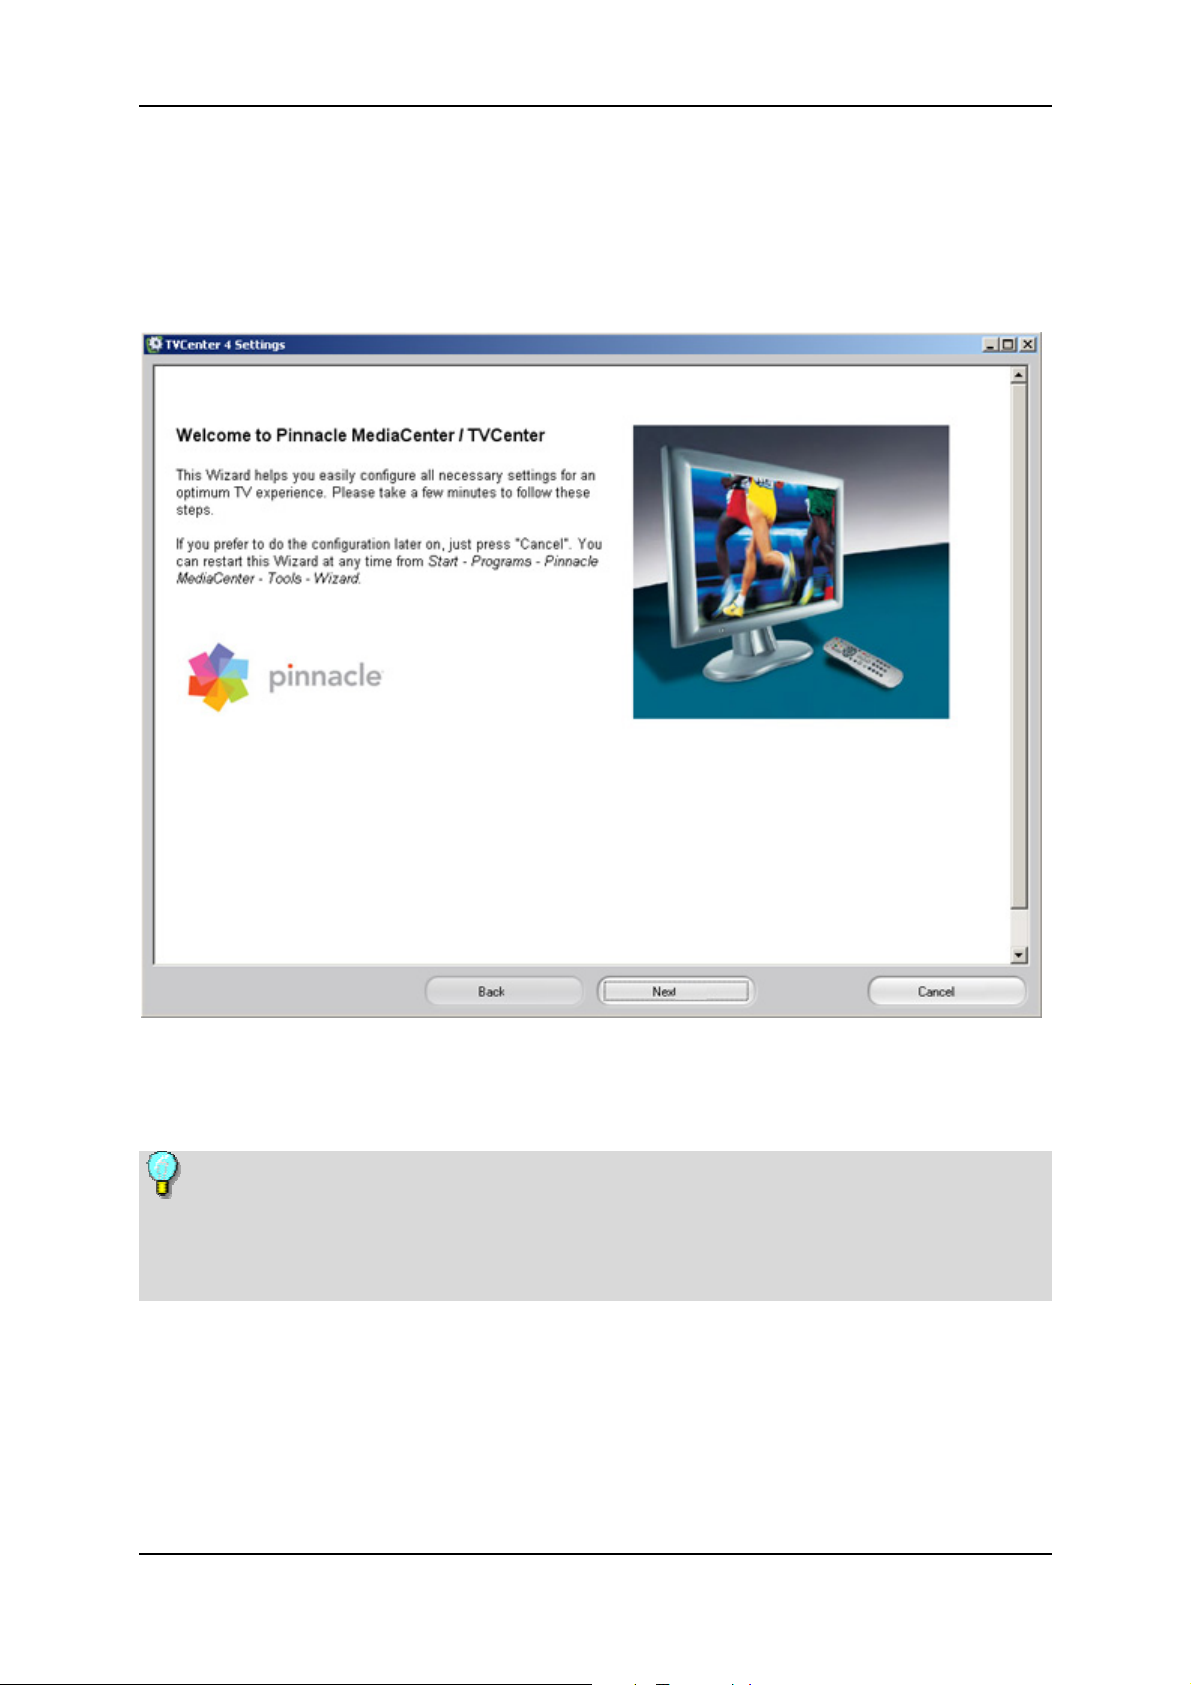
Configuration Wizard for the Basic Settings
During the software installation of the Pinnacle MediaCenter, the wizard leads
you through several areas in the Advanced Settings dialog where you can
configure the most important settings for the Pinnacle MediaCenter.
The wizard appears automatically after the Pinnacle MediaCenter has been
installed. You can now configure your PCTV hardware using the wizard. Here
are some of your settings options:
The individual settings dialogs are explained in detail in the "Advanced
Settings" section. You can start the Settings dialog by clicking the Settings icon
in the Pinnacle program group or by double-clicking the Settings link on the
desktop.
You can start the wizard at any time via the program group
Start/Programs/Pinnacle Media Center/Tools/Wizard.
3
Page 8
Pinnacle MediaCenter
Pinnacle MediaCenter User Interfaces
In the Pinnacle MediaCenter, you can select between two different user
interfaces. Each user interface is optimized for the different ways of using the
Pinnacle MediaCenter:
PC View
The PC View is optimized for use with your mouse or keyboard. This
interface is especially useful when you use the Pinnacle MediaCenter while
working at your desk (for example, for watching TV while working on the
computer).
The bar-shaped menu buttons are arranged to the side of the Pinnacle
MediaCenter window and are easily activated with a click of the mouse.
Since you will be mainly using this view when working at your computer, PC
View menus are only displayed if necessary so that as little screen space as
possible is used.
5
Page 9
Pinnacle MediaCenter
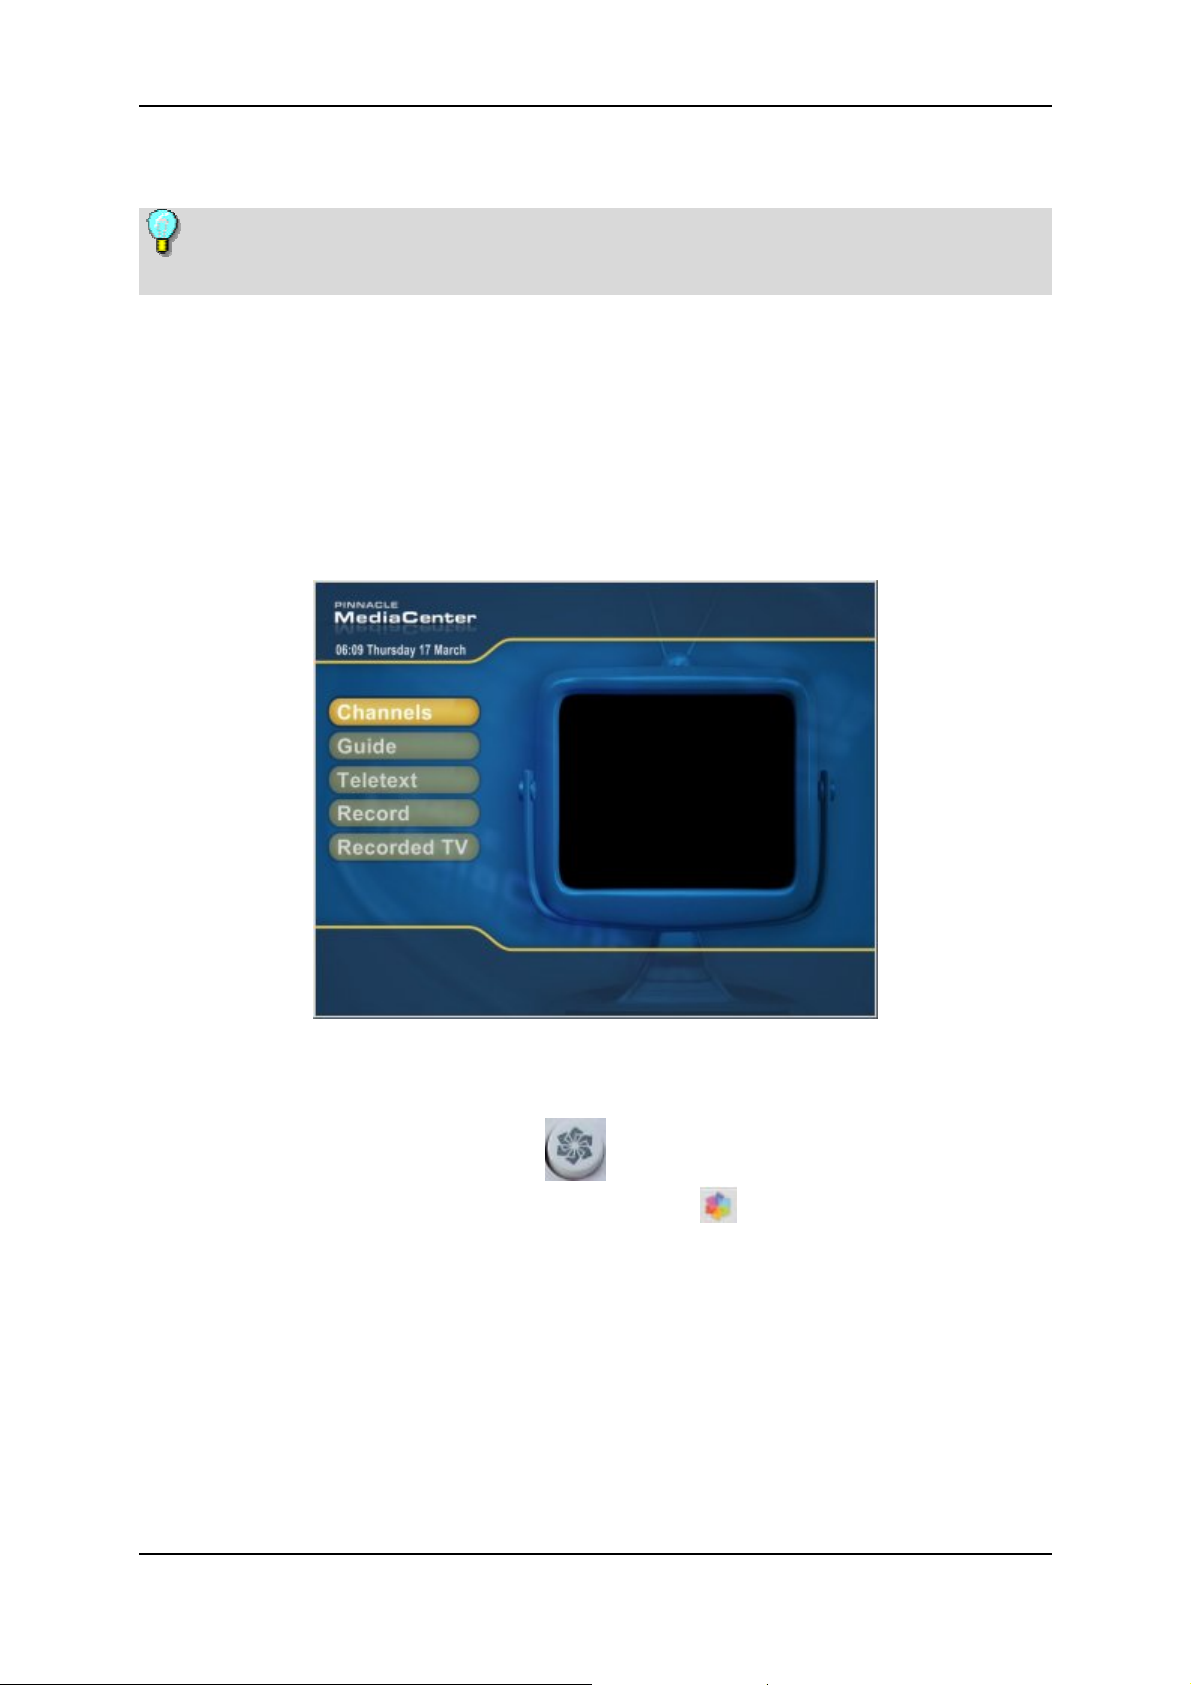
TV View (Remote View)
The TV View is thoroughly described in a separate manual. The TV View is
not available for several PCTV hardware variants.
The TV View is optimized for navigating using your remote control: The entire
menu is accessible from the Pinnacle MediaCenter window and each menu
option is easy to read even from a distance. This lets you use your remote
control to play back and edit media from the comfort of your own sofa.
Of course, you can still operate the Pinnacle MediaCenter with your mouse or
keyboard while in the Remote View. You can also display the PC View menu
bars in the Remote View and use them to navigate in the Pinnacle MediaCenter.
You can switch between the TV View and the PC View at any time when using
the Pinnacle MediaCenter:
To go to the TV View, press the
(depending on the remote control) or click the
bar.
If you double-click in the preview or information window when you are in
the Remote View, this window opens in full screen and takes you to the PC
View.
or Menu button on the remote control
button in the top control
6
Page 10

Pinnacle MediaCenter
Pinnacle MediaCenter TV View Functions
The Pinnacle MediaCenter gives you the extensive and diverse functions of a
modern multi-media program. Its convenient and easy-to-use displays let you
enjoy a wide variety of media such as television, radio, music, movies, and
photos as well as access the products offered by various online services:
In the TV area, you can keep track of the current TV schedule and the shows
you have recorded not only directly on your PC, but also from the comfort of
your armchair or sofa thanks to full screen mode and the remote control
included. In addition, you can use the teletext function and the Electronic
Program Guide (EPG) to get quick and comprehensive information about the
TV schedule as well as all the latest news.
Want to record a TV show? With a simple push of a button, you can start
recording the current TV program at any time. Use the EPG function to
quickly and simply program your machine to record upcoming shows. You
won't have to miss any of your favorite TV programs again.
Even annoying interruptions while watching TV are no longer a bother
because you can delay watching a program by using the timeshift function.
In the Radio area, you can receive any available FM radio station or digital
radio station (depending on PCTV hardware used). You can also create radio
playlists in the "Advanced Settings" so that you can receive the radio stations
assigned to a certain category at any time. Recording FM radio broadcasts is
quick and easy with the Pinnacle MediaCenter - either press a button to
record the current program immediately or schedule an upcoming radio
program for later enjoyment.
In addition, the Pinnacle MediaCenter lets your receive Internet radio.
In the Movies area, you can view movies from a CD/DVD or from your hard
disk - all this from the comfort of your sofa using the remote control. No
need to get up and fiddle with the PC. If you have previously categorized
your movies in the Pinnacle MediaManager, you can easily access these
categories and select movies according to certain criteria.
In the Music area, you can access CDs or files created in the Pinnacle
MediaManager. Play back your music according to any criteria you set (for
example, according to music genre or artist) and select just the right music to
suit your mood or the occasion.
In the Photos area, you can view photos saved on your hard disk or on CD.
Photos can also be categorized in the Pinnacle MediaManager (for example,
the pictures from your last vacation or that one party or simply those taken on
a certain date) so that you see only those photos that you really want to see quickly and hassle-free. If you want to show off your photos, you can also set
up a slide show to display them as a group.
7
Page 11

Pinnacle MediaCenter
In the Settings area, you can access the options available for the various
categories via this menu option. You have the option of configuring the most
important settings for the following menu options: General, TV, Movies,
Recording, Music and Photos.
PC View (optimized for use with a mouse)
Pinnacle MediaCenter PC View Overview
The Pinnacle MediaCenter PC View is optimized for use with a mouse.
While you are sitting at your desk doing other things on your PC, you can access
your personal media directly with the mouse. For this purpose, you can
seamlessly adjust the Pinnacle MediaCenter window in the PC View to any size
you want and move it anywhere you find most convenient.
The control bars can be configured in such a way that they are only displayed if
necessary so only the minimum amount of screen space for media playback is
used.
Control Bars
To navigate the Pinnacle MediaCenter in the PC View, you have two control
bars, one at the top and one at the bottom of the Pinnacle MediaCenter window.
For more information, refer to the chapter General Operating Controls
Size of the Pinnacle MediaCenter window in the PC View
The Pinnacle MediaCenter window in the PC View can be adjusted to any size
you want:
To do this, left-click and hold the mouse button down on the corner of the
Pinnacle MediaCenter window and then drag the corner until the window is the
size you want.
If the window exceeds normal size, the control bars can no longer be displayed.
You can resize the Pinnacle MediaCenter window by either dragging the corner
with your mouse to enlarge it or double-clicking the window with your mouse.
This automatically sets the Pinnacle MediaCenter to normal size and the control
bars can again be displayed.
Positioning the Pinnacle MediaCenter window in the PC View
.
To position the Pinnacle MediaCenter window in the PC View to the area on
your screen you want, left-click in the top or bottom control bar and move the
window while holding down the mouse button.
8
Page 12
Pinnacle MediaCenter
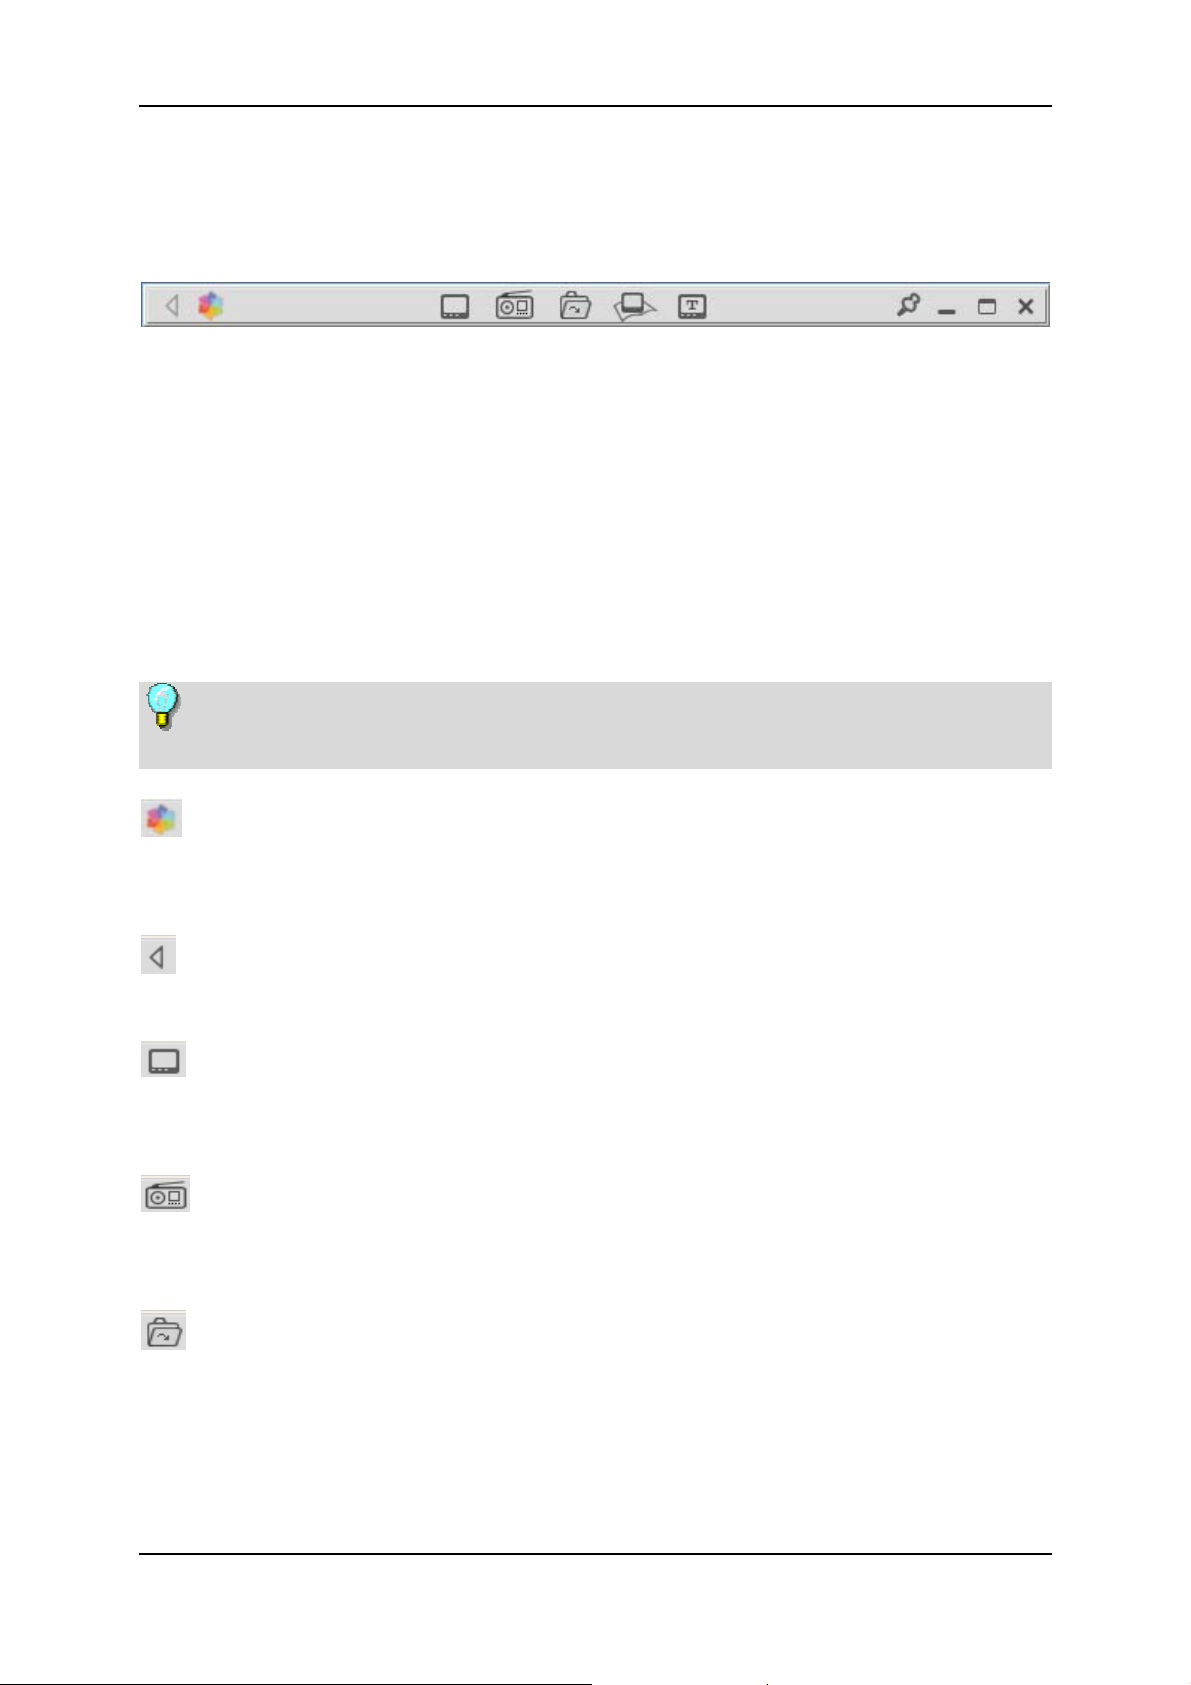
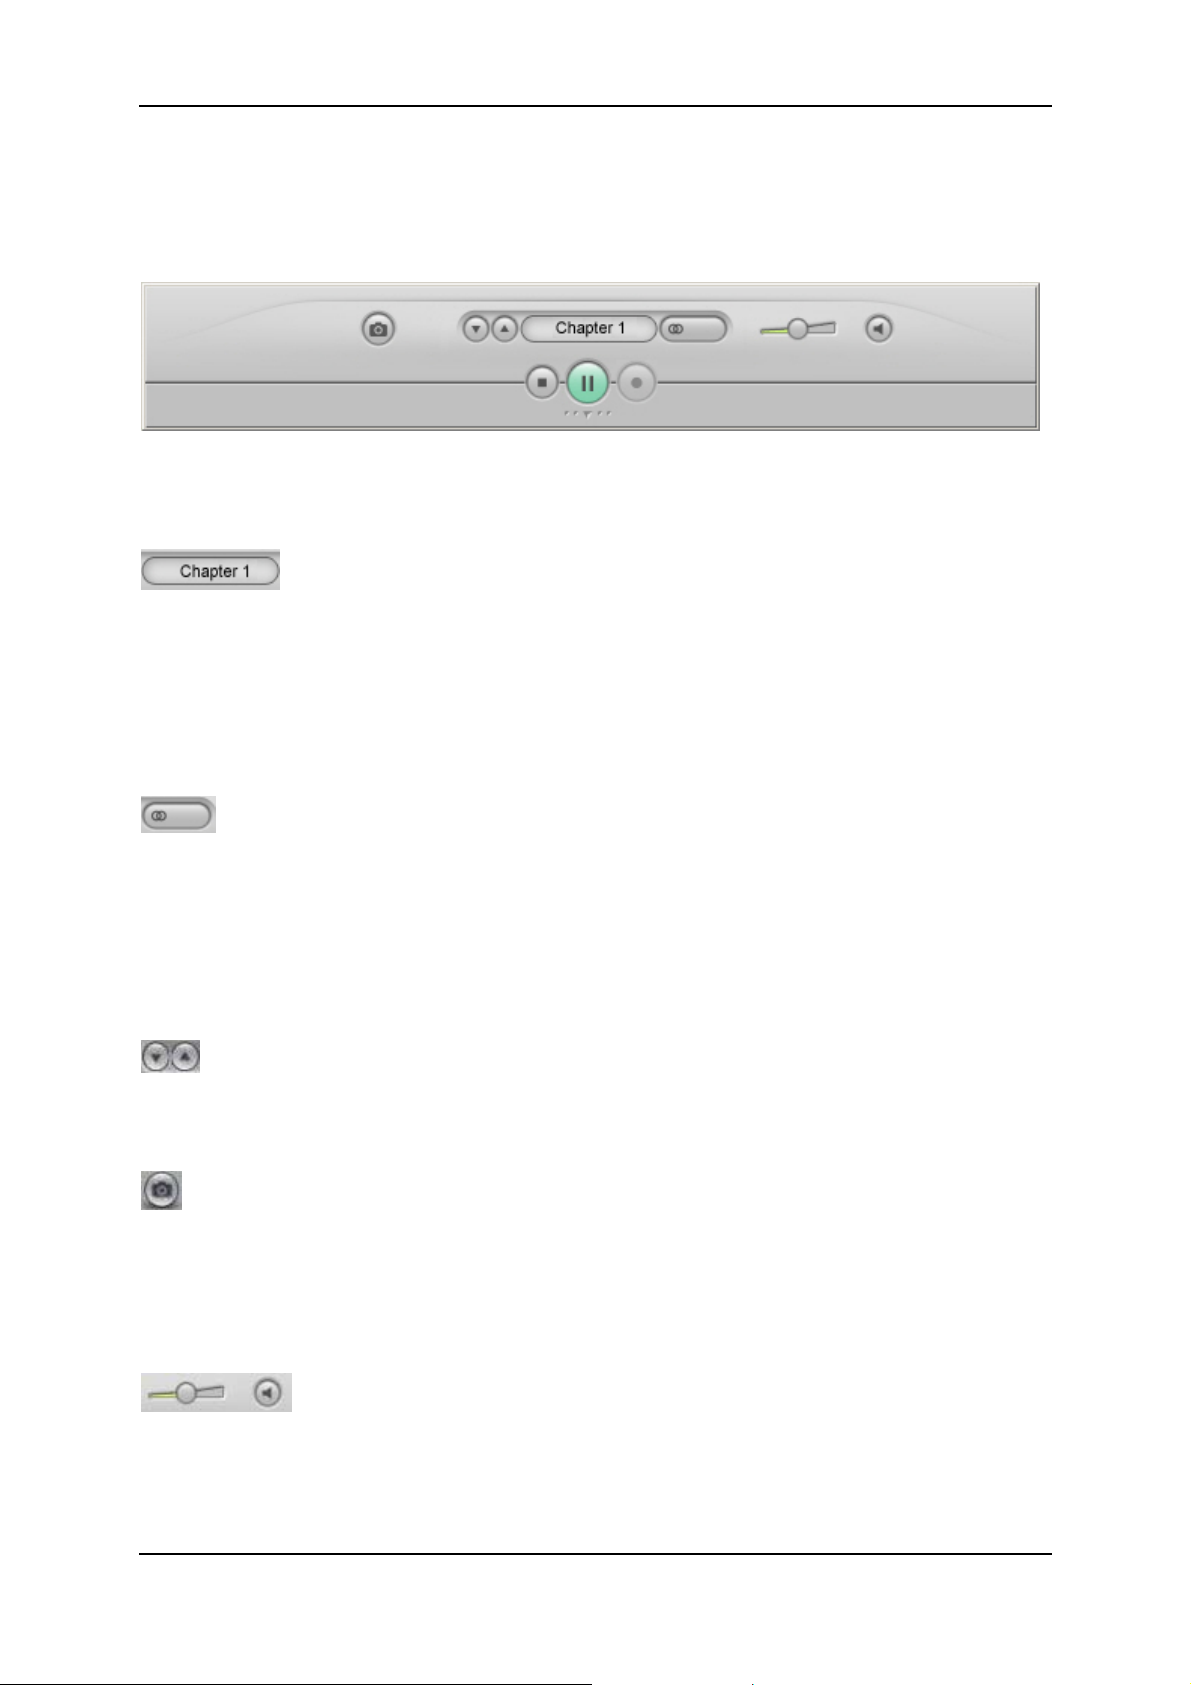
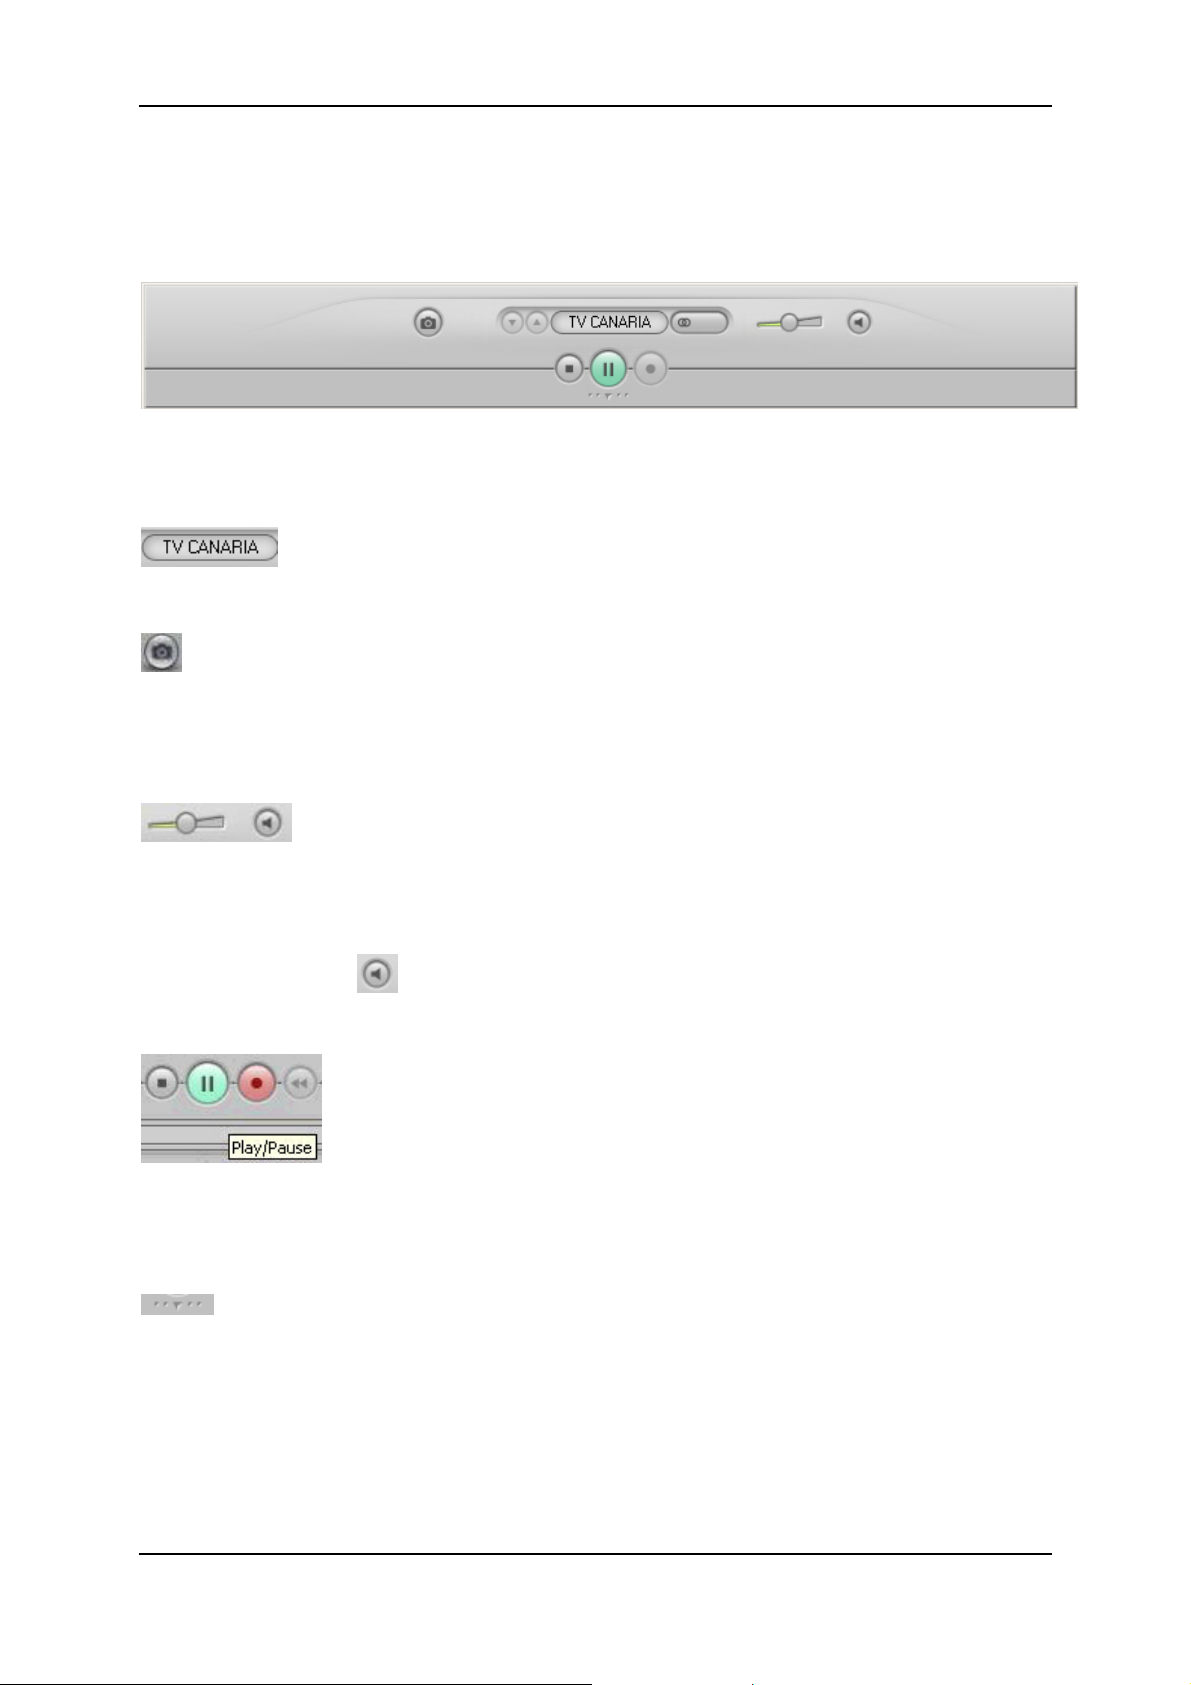
General Operating Controls
Top Control Bar
The top control bar in the PC View contains various buttons for operating the
Pinnacle MediaCenter - independent of the media type currently selected. For
example, you can modify the size and behavior of the Pinnacle MediaCenter
window, switch to the TV View or access various types of media.
The control bars can be configured in Advanced Settings in such a way that
they are not always visible but are only displayed when you move your mouse
over the Pinnacle MediaCenter window. They automatically disappear again
when you move your mouse out of the Pinnacle MediaCenter window or if the
cursor does not move for a few seconds.
Note that depending on your hardware and the current reception area, some
buttons and their functions may be temporarily unavailable.
Menu
If you click this button, you return to the main screen of the Pinnacle
MediaCenter Remote View.
Back
Clicking this button will take you back to the previous page or menu selection.
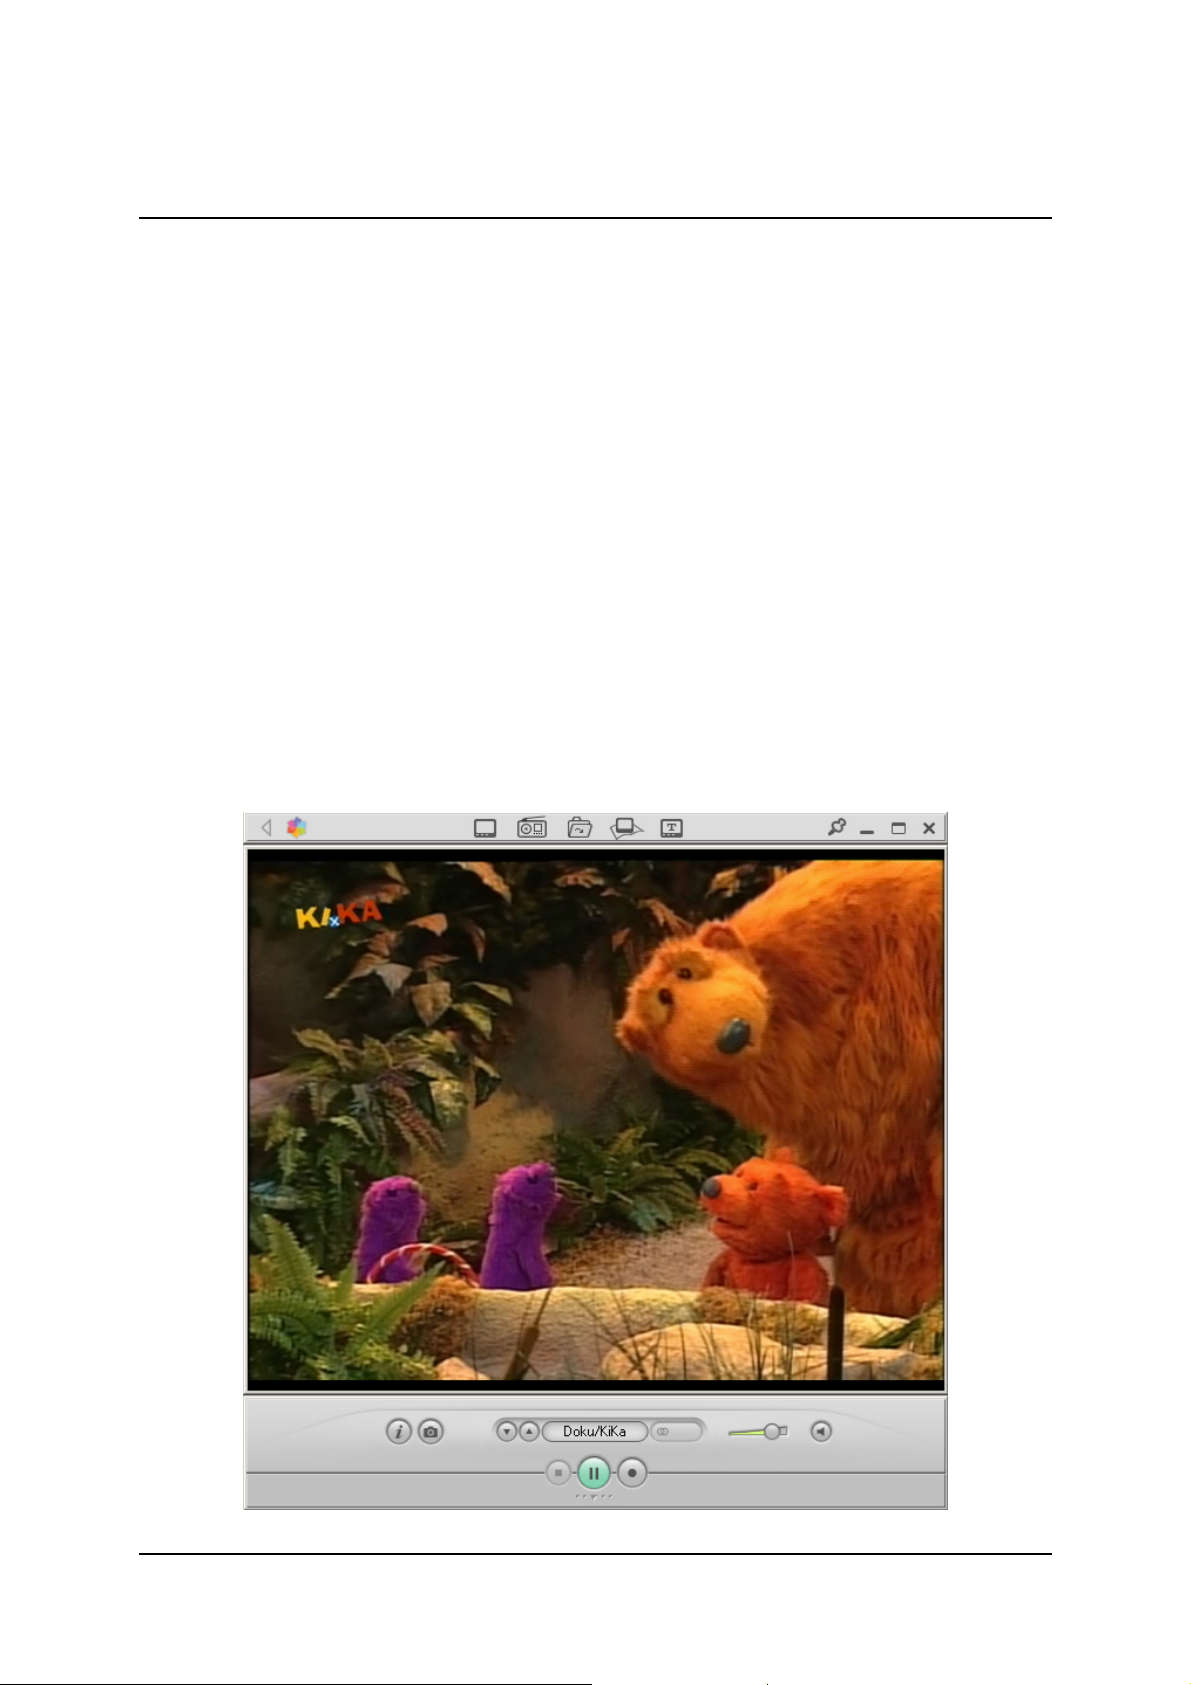
TV
When you click this button, TV mode is activated, and the current TV program
on the channel last selected is displayed in the PC View.
Radio
When you click this button, you switch to radio mode for listening to the current
broadcast on the station last selected.
Browse
Click this button to open a drop-down menu where you can browse to the
following and playback media files or recordings:
Files on your hard drive
Folders on your hard drive
Your CD/DVD drives
9
Page 13

Pinnacle MediaCenter
Teletext
Clicking this button opens the teletext window in the PC View (if teletext is
available).
EPG
Click this button to open the Electronic Program Guide (EPG) in the PC View
(if EPG is available). In addition, you can also schedule recordings manually
with the timer.
Always on top
When this button is activated, the Pinnacle MediaCenter window is always
displayed in front of all the other windows on the screen.
Minimize
Clicking this button minimizes the Pinnacle MediaCenter window into the
taskbar.
Full Screen/Normal Screen
Clicking this button lets you switch the Pinnacle MediaCenter window back and
forth from full screen to a normal-sized screen.
Close
This button closes the Pinnacle MediaCenter or a subwindow (for example, the
teletext or EPG window).
Bottom Control Bar
The bottom control bar in the Pinnacle MediaCenter PC View is dependent on
the media type you have selected: Depending on whether you are currently
watching TV or listening to radio or playing a DVD or a file, the buttons
available will vary.
The control bars can be configured in Advanced Settings in such a way that
they are not always visible but are only displayed when you move your mouse
over the Pinnacle MediaCenter window. They automatically disappear again
when you move your mouse out of the Pinnacle MediaCenter window or if the
cursor does not move for a few seconds.
Since the bottom control bar can contain different operating controls
depending on the media type, detailed descriptions of the buttons are provided in
the following chapters.
10
Page 14
Pinnacle MediaCenter
Open and closed bottom control bar in the MediaCenter PC View
The bottom control bar can be opened by clicking the button. This also
gives you access to additional buttons. Or you can also open the control bar by
clicking the Play/Pause or Record buttons.
Clicking the
Positioning the bottom control bar
If the bottom control bar is docked on the Pinnacle MediaCenter window, you
can move them both around or change their size as a single unit.
Or you can also position the bottom control bar separately. This means you can
put it anywhere on the screen independent of the rest of the Pinnacle
MediaCenter window. To do this, click the bottom control bar and hold down
your left mouse button. While holding down your left mouse button, drag the
control bar to the position on the screen your want.
If the bottom control bar is positioned separately, it will not disappear and
cannot be resized.
You can also put the control bars in the taskbar with the following setting.
Right-click the live TV image and then in the shortcut menu that appears, select
Send to taskbar.
button closes the bottom control bar.
You should now receive a message that the PMC panel needs to be activated in
the taskbar.
1. With your right mouse button, click the Windows taskbar.
2. Select the Toolbars / PMC taskbar option.
11
Page 15
Pinnacle MediaCenter
The PMC control bar is now displayed in the Windows taskbar.
Click the
button in the taskbar to move the control bars back to their original
location.
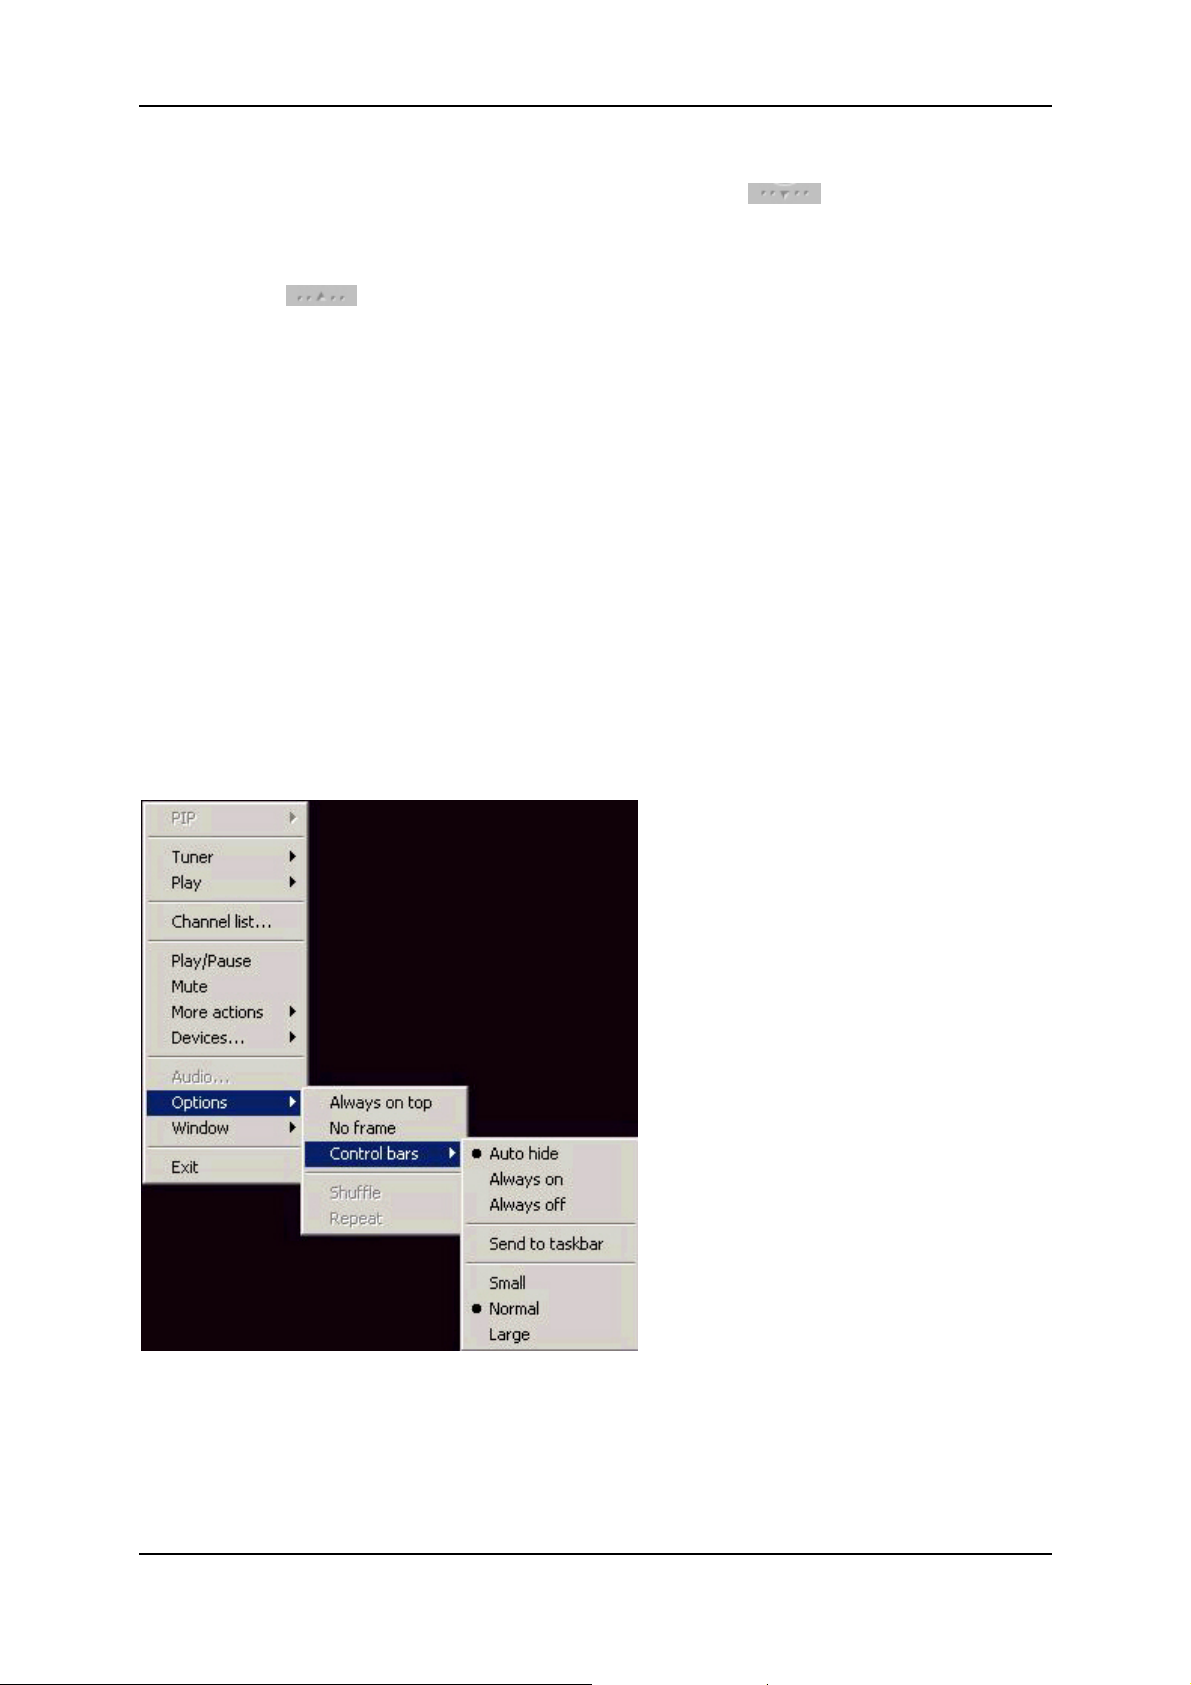
Shortcut menu
When you right-click in the PC View of the Pinnacle MediaCenter window, a
shortcut menu opens where you can make the following changes:
Direct to start page
When you click Direct to start page, you arrive at the Pinnacle MediaCenter
start page in the Remote View.
PIP (activate Picture-in-Picture function)
The PIP option lets you open a second TV View if you are using a dual-tuner
TV card.
Tuner / TV, Radio, Teletext or EPG
Click the Tuner option to open the TV, Radio, Teletext or EPG options.Here
you can activate the media type you want.
Play
When you click the Play button, a drop-down menu opens where you can
browse to the following and playback media files or recordings:
• Files on your hard drive
• Folders on your hard drive
• Your CD/DVD drives.
12
Page 16

Pinnacle MediaCenter
Channel list...
Use the Channel list option to open the channel list where all the TV/radio
channels are displayed.
Play/Pause
Use this option to start or pause live TV.
Mute
The Mute option turns off the volume.
More actions
Under More actions, you have access to functions such as Forward, Stop,
Continue, Rewind, Fast Forward, Snapshot, Record as well as Active
Recording....
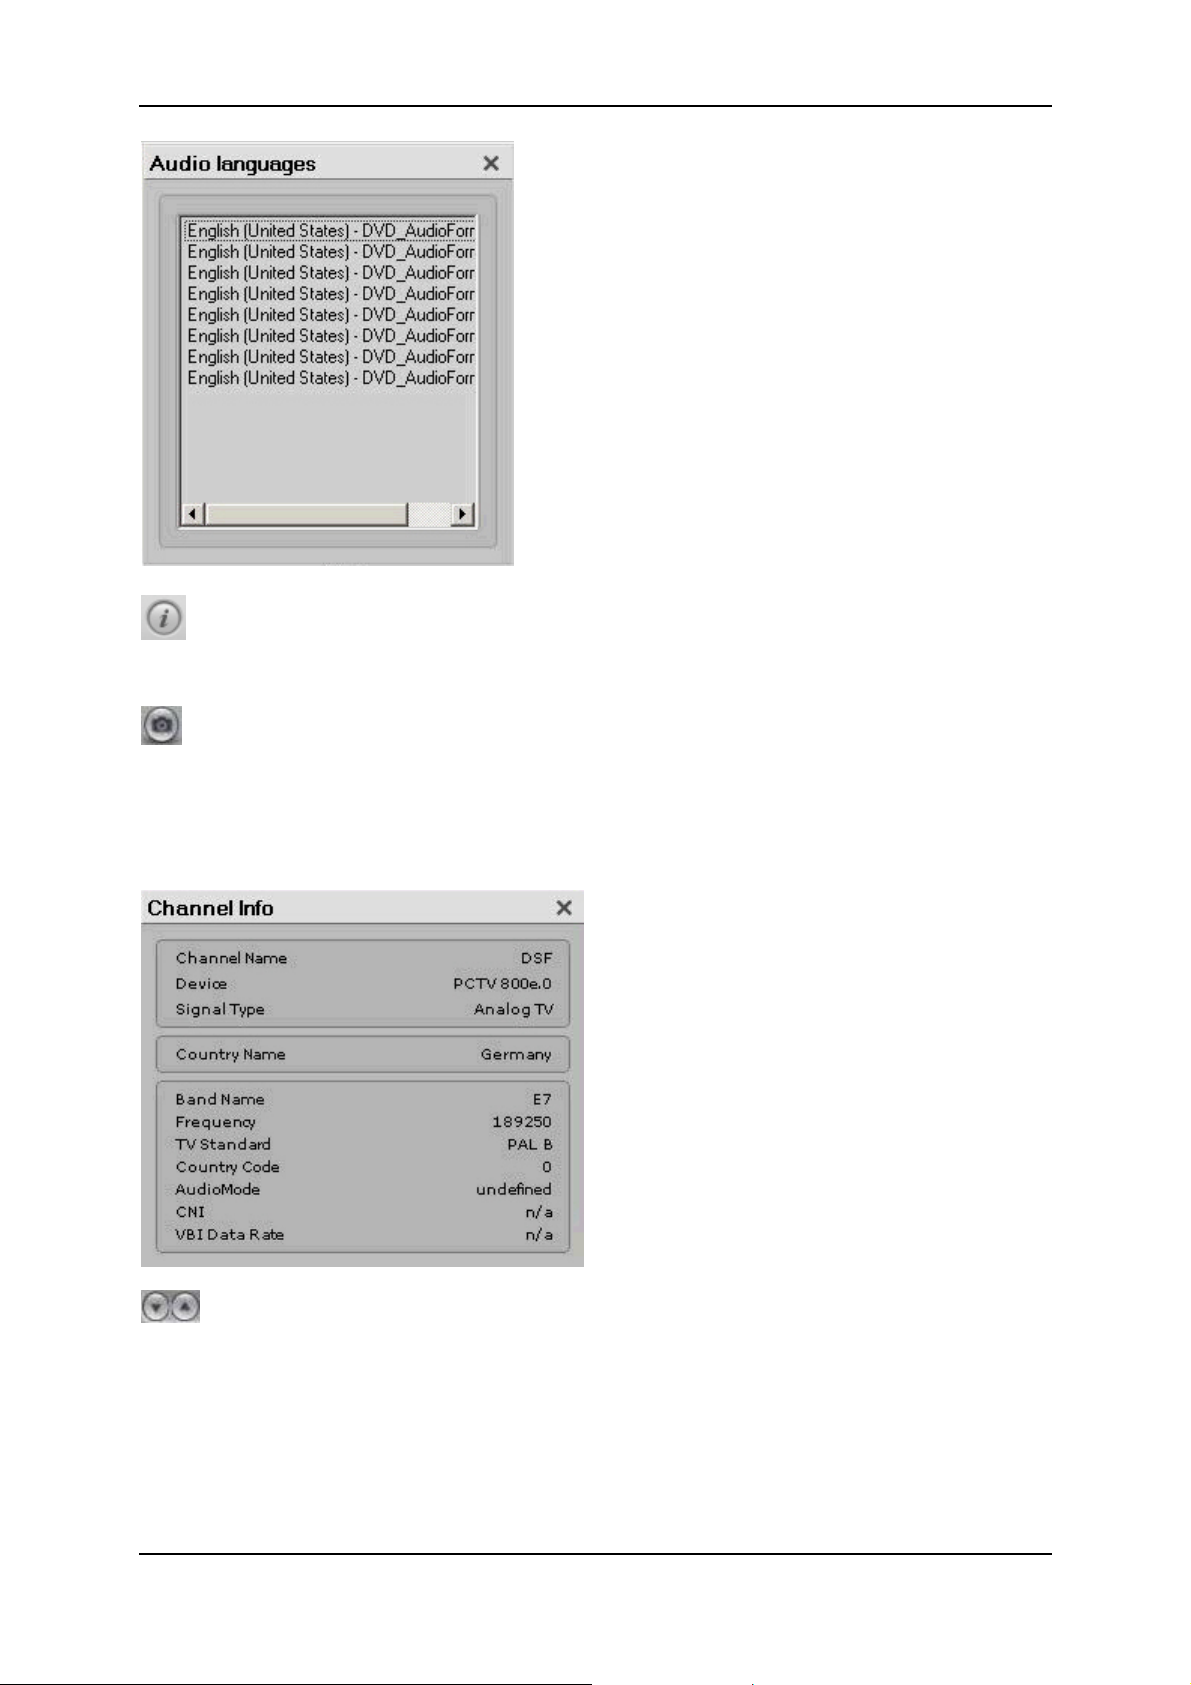
Audio
Another option is Audio (active during DVD playback). After clicking this
button, a dialog window opens where you can set the language for the
soundtrack, the subtitles, and the menus of your DVD.
Options
Under Options, you can select Always on top, No frame, Toolbars as well as
Shuffle playlist and Repeat playlist options for playback.
Window
Under the Window option, you can select Size and Aspect ratio. Here you can
decide which size and aspect ratio your Pinnacle MediaCenter window should
have.
Exit
The Exit option closes the Pinnacle MediaCenter window.
13
Page 17
Pinnacle MediaCenter
TV Operating Controls
Closed Bottom Control Bar
The closed bottom control bar gives you access to the following buttons while
you watch TV:
Channel
The currently set channel is displayed in this field. You can also switch channels
here:
To do this, click the Channel button.
If you have not created channel lists in the Advanced Settings, a pop-up
window displays all the available channels. Clicking a channel will take you
to its currently running program.
If you have created channel lists in the Advanced Settings, a pop-up window
displays all the available channel lists. If you click a specific channel list, all
the channels assigned to this group appear on the right side of the window.
Clicking a channel will take you to its currently running program.
In addition, you can switch between composite and S-video input in the
lower part of the pop-up window. To do this, click the corresponding button.
Audio Mode
The currently set audio mode is displayed in this field. If more than one audio
mode is available, you can select between them here:
To do this, click the Audio Mode button. This opens a pop-up window
displaying all the available audio modes.
Click a specific audio mode (for example, MPEG audio or AC3 audio) to set
it.
14
Page 18
Pinnacle MediaCenter
Channel information
Here you find the following information about the selected channel:
Snapshot
If you click this button, a snapshot of the currently playing TV program is taken
as a single image and saved in the previously indicated directory in "Advanced
Settings". The file name is automatically created from the date, time, channel
name, and any available EPG information.
Previous/Next channel
Clicking these buttons switches you to the previous or to the next channel in the
currently selected channel list. In addition, you can switch between composite
and S-video input.
15
Page 19
Pinnacle MediaCenter
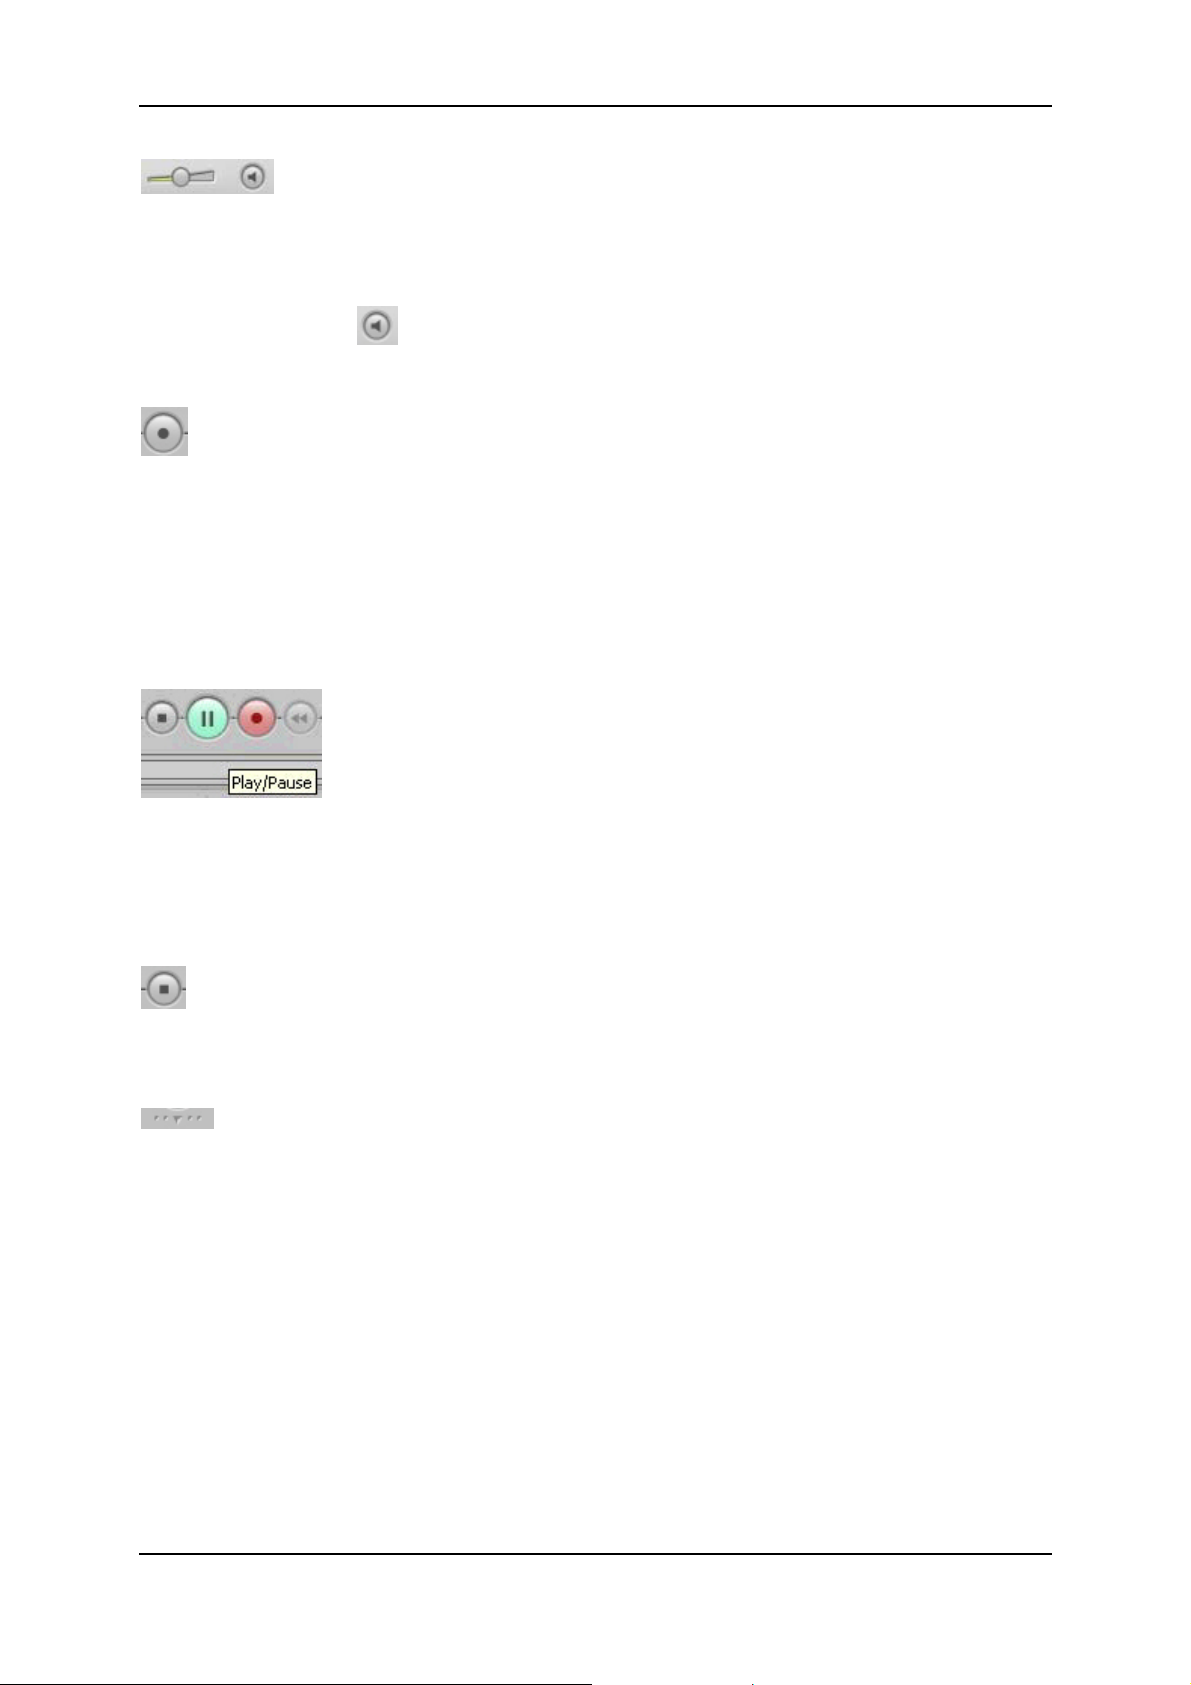
Volume
You can adjust the volume of your TV show individually with this slider. To do
this, click the slider button and while holding the mouse button down, slide it to
the position you want.
Clicking the Mute
button mutes the TV show soundtrack. You can turn the
soundtrack back on by clicking the button again.
Record
If you click this button, the TV program currently playing is recorded and saved
in the directory previously indicated in "Advanced Settings". The file name is
automatically created from the date, time, channel name, and any available EPG
information.
The recording can be paused by clicking the Record button again or by clicking
the Stop button.
Play / Pause
If a timeshift recording is not currently taking place, you can start a timeshift
recording by clicking the Play/Pause button.
During a timeshift recording, playback is paused by clicking the Play/Pause
button. Click the button again to continue the recording.
Stop
In timeshift or playback mode, you can use the Stop function to stop
timeshifting or file playback. This button is not active during live TV.
Open the bottom control bar
Clicking this button opens the bottom control bar.
16
Page 20
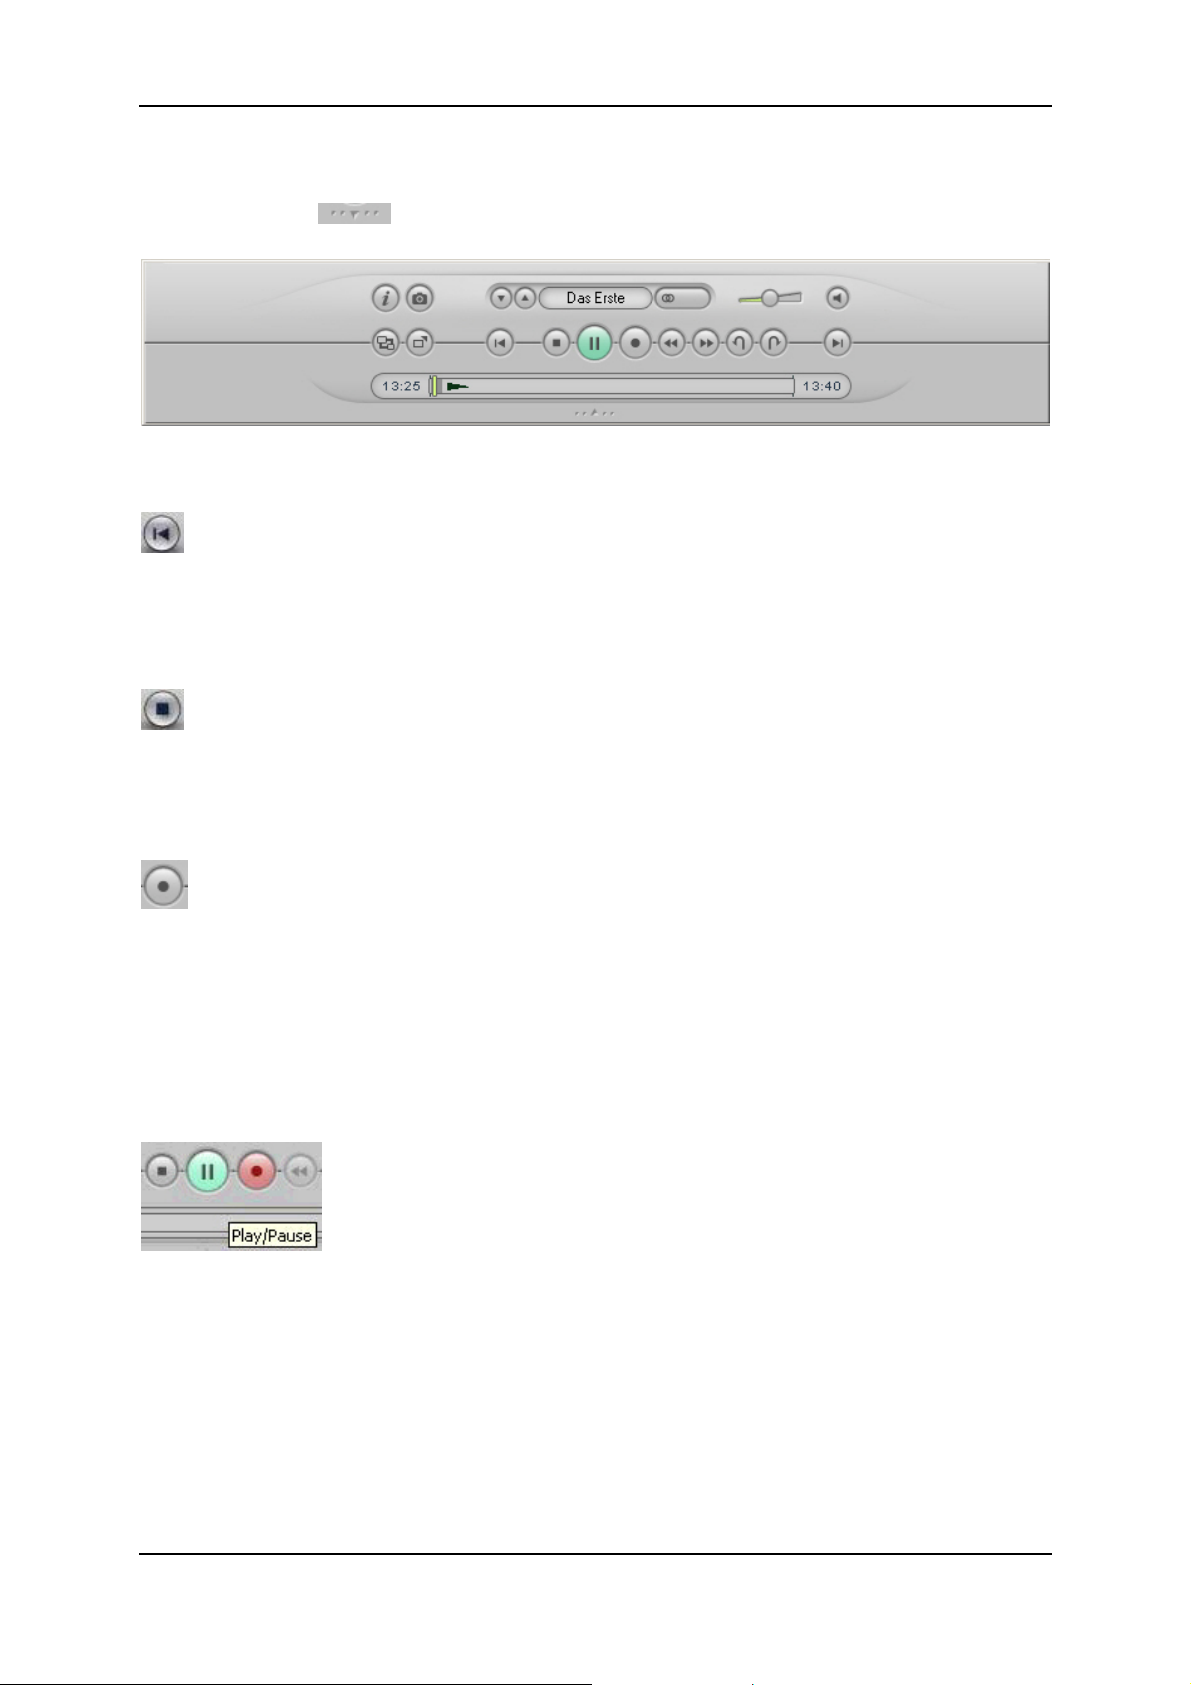
Opened Bottom Control Bar
Pinnacle MediaCenter
If you click the
button while watching TV, the bottom control bar opens:
The following additional functions are now available:
Back
This button can only be activated if a timeshift recording is currently running.
Clicking the Back button starts the playback of the timeshift recording from the
beginning.
Stop
This button is only available if a recording is currently being made or you are in
timeshift mode. You can then end the currently running recording by clicking
Stop.
Record
If you click this button, the TV program currently playing is recorded and saved
in the directory previously indicated in Advanced Settings. The file name is
automatically created from the date, time, channel name, and any available EPG
information.
The recording can be paused by clicking the Record button again or by clicking
the Stop button.
Play/Pause
If a timeshift recording is not currently taking place, you can start a timeshift
recording by clicking the Play/Pause button.
During a timeshift recording, playback of the timeshift recording is paused by
clicking the Play/Pause button. Click the button again to continue the recording.
17
Page 21
Pinnacle MediaCenter
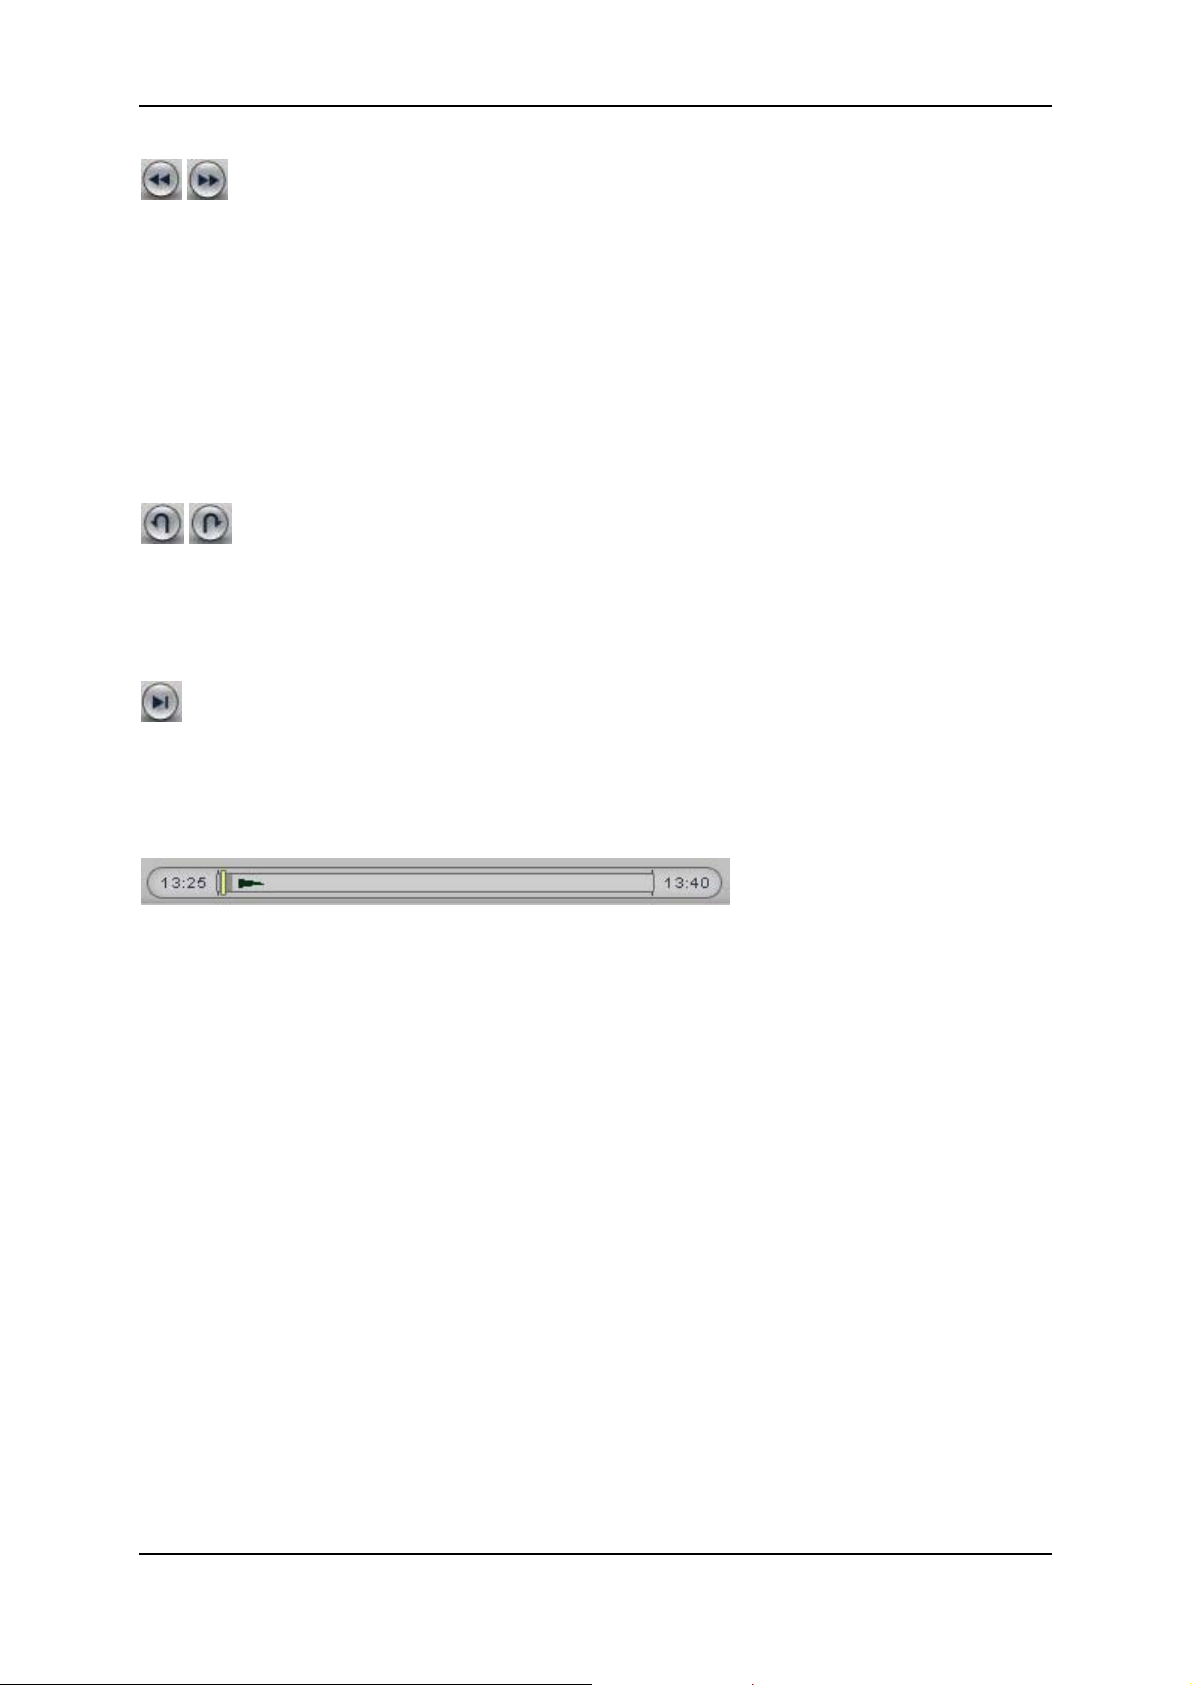
Rewind/Forward
These buttons are only available if a timeshift recording is currently running.
Clicking the Rewind and Fast Forward buttons allows you to move back and
forth within the timeshift recording: If you click once, the recording runs at
double speed. If you click twice, the recording runs at quadruple speed. Three
clicks results in 8x speed, and four clicks in 16x speed. One more click lets the
recording run at normal speed again.
To pause rewind/fast forward, click the corresponding button until the recording
plays at normal speed or click the Play/Pause button.
Skip back/Skip forward
These buttons are only available if a timeshift recording is currently running.
With the Skip back and Skip forward buttons, you can jump back and forth in
the timeshift recording within a time interval set in the "Advanced Settings".
Live TV
This buttons is only available if a timeshift recording is currently running.
Click this button to return to the live position in the current program. The
timeshift recording continues to be recorded and can be played back at any time.
Timeshift timeline
This field tells you the following information:
The start time of the timeshift recording, rounded up to the next half hour
(here: 13:25 pm)
The maximum timeshift position, at which the timeshift recording will pause
or start from the beginning (here: 13:40 pm). This is dependent on the
maximum available disk space that you can set for timeshift recordings in
"Advanced Settings".
The end of the status bar marks the current position of live TV. You can also
see how much disk space has already been used for the timeshift recording or
how much free disk space is still left.
The current position of the timeshift playback (approx. 13:26 PM)
In addition, you can jump to any position within the timeshift recording: To do
this, click and hold your mouse button on the position indicator for the timeshift
playback and drag it to the position you want within the recording.
18
Page 22
Pinnacle MediaCenter
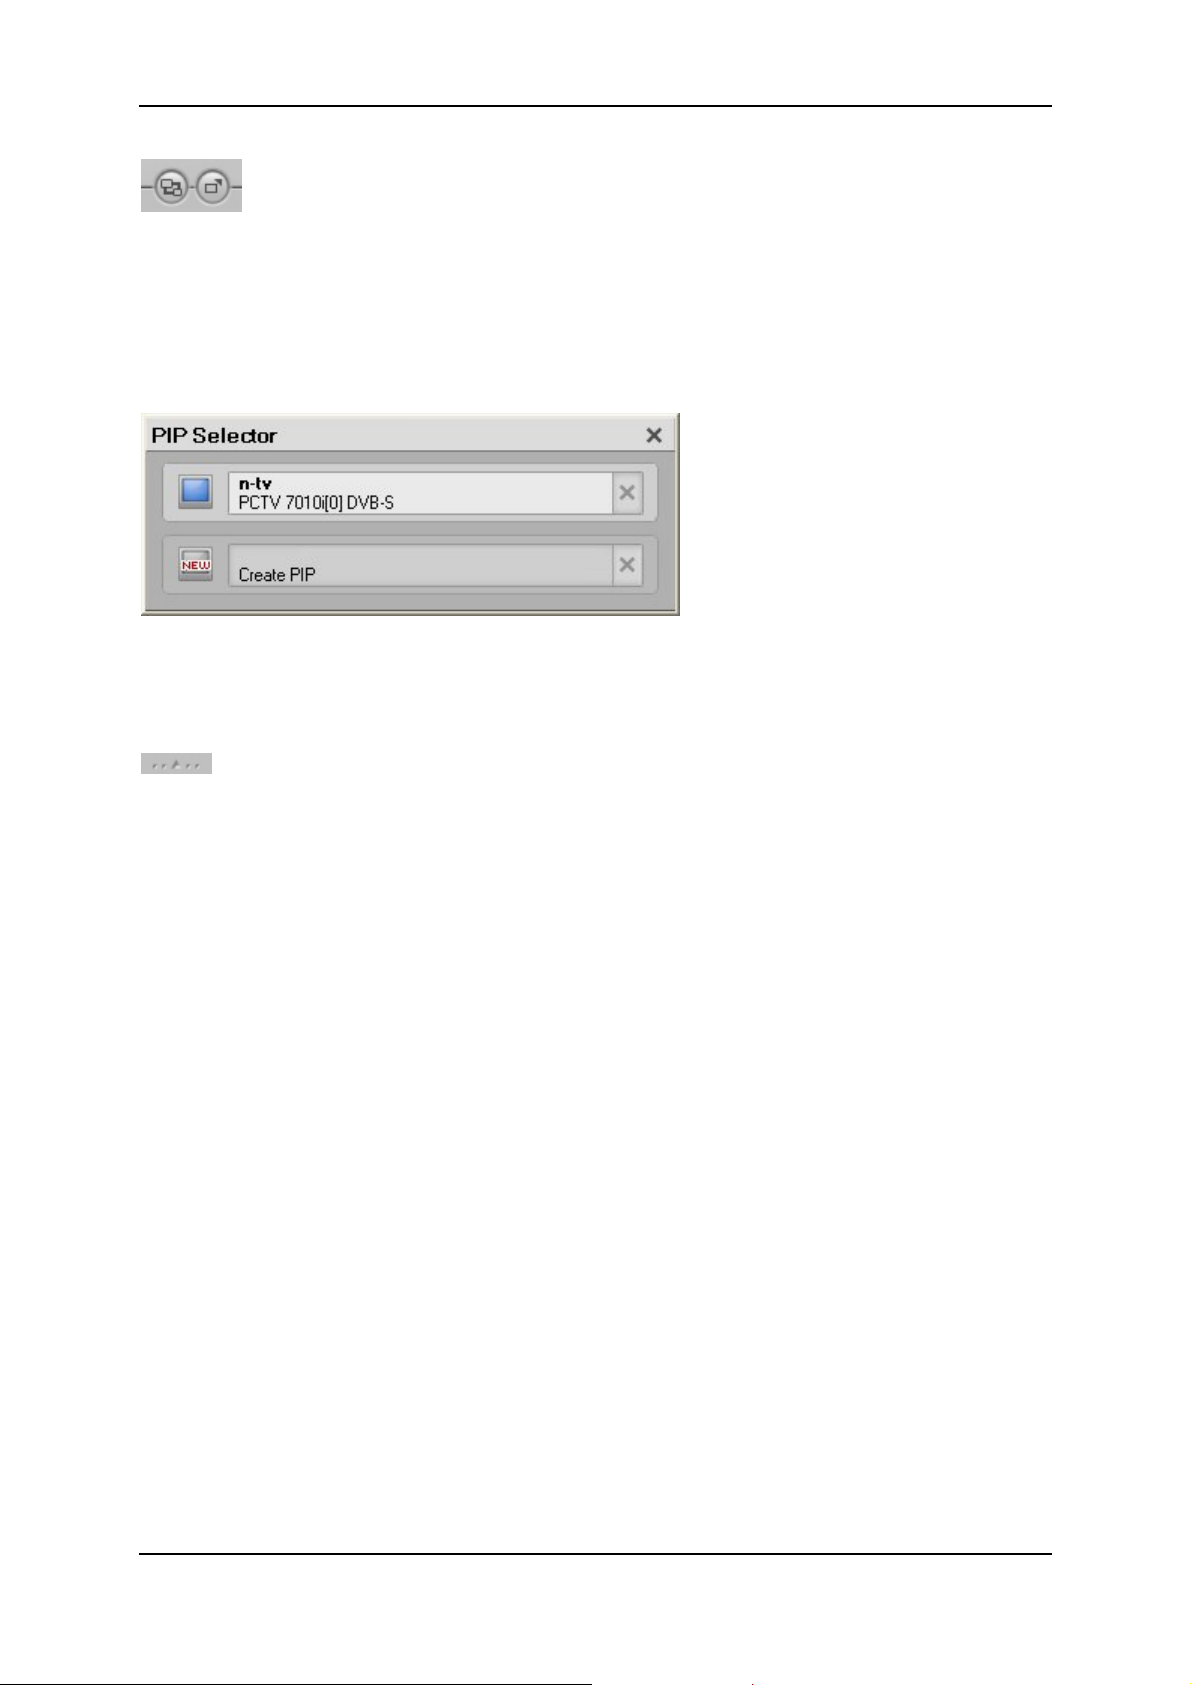
PIP Selector / Create PIP (Picture-in-Picture function)
1.PIP Selector (only active if a dual-tuner TV card or 2 TV cards are installed)
When you click this button, the PIP window appears; here click Create PIP.
Another Pinnacle MediaCenter window now opens in which the other TV
channel is displayed. The TV channels displayed can be turned on and off
independently of each other.
2.Create PIP (only active if a dual-tuner TV card or 2 TV cards are installed)
When you click this button, another Pinnacle MediaCenter window immediately
appears, in which another TV channel is displayed.
Close bottom control bar
Clicking this button closes the bottom control bar.
19
Page 23
Pinnacle MediaCenter
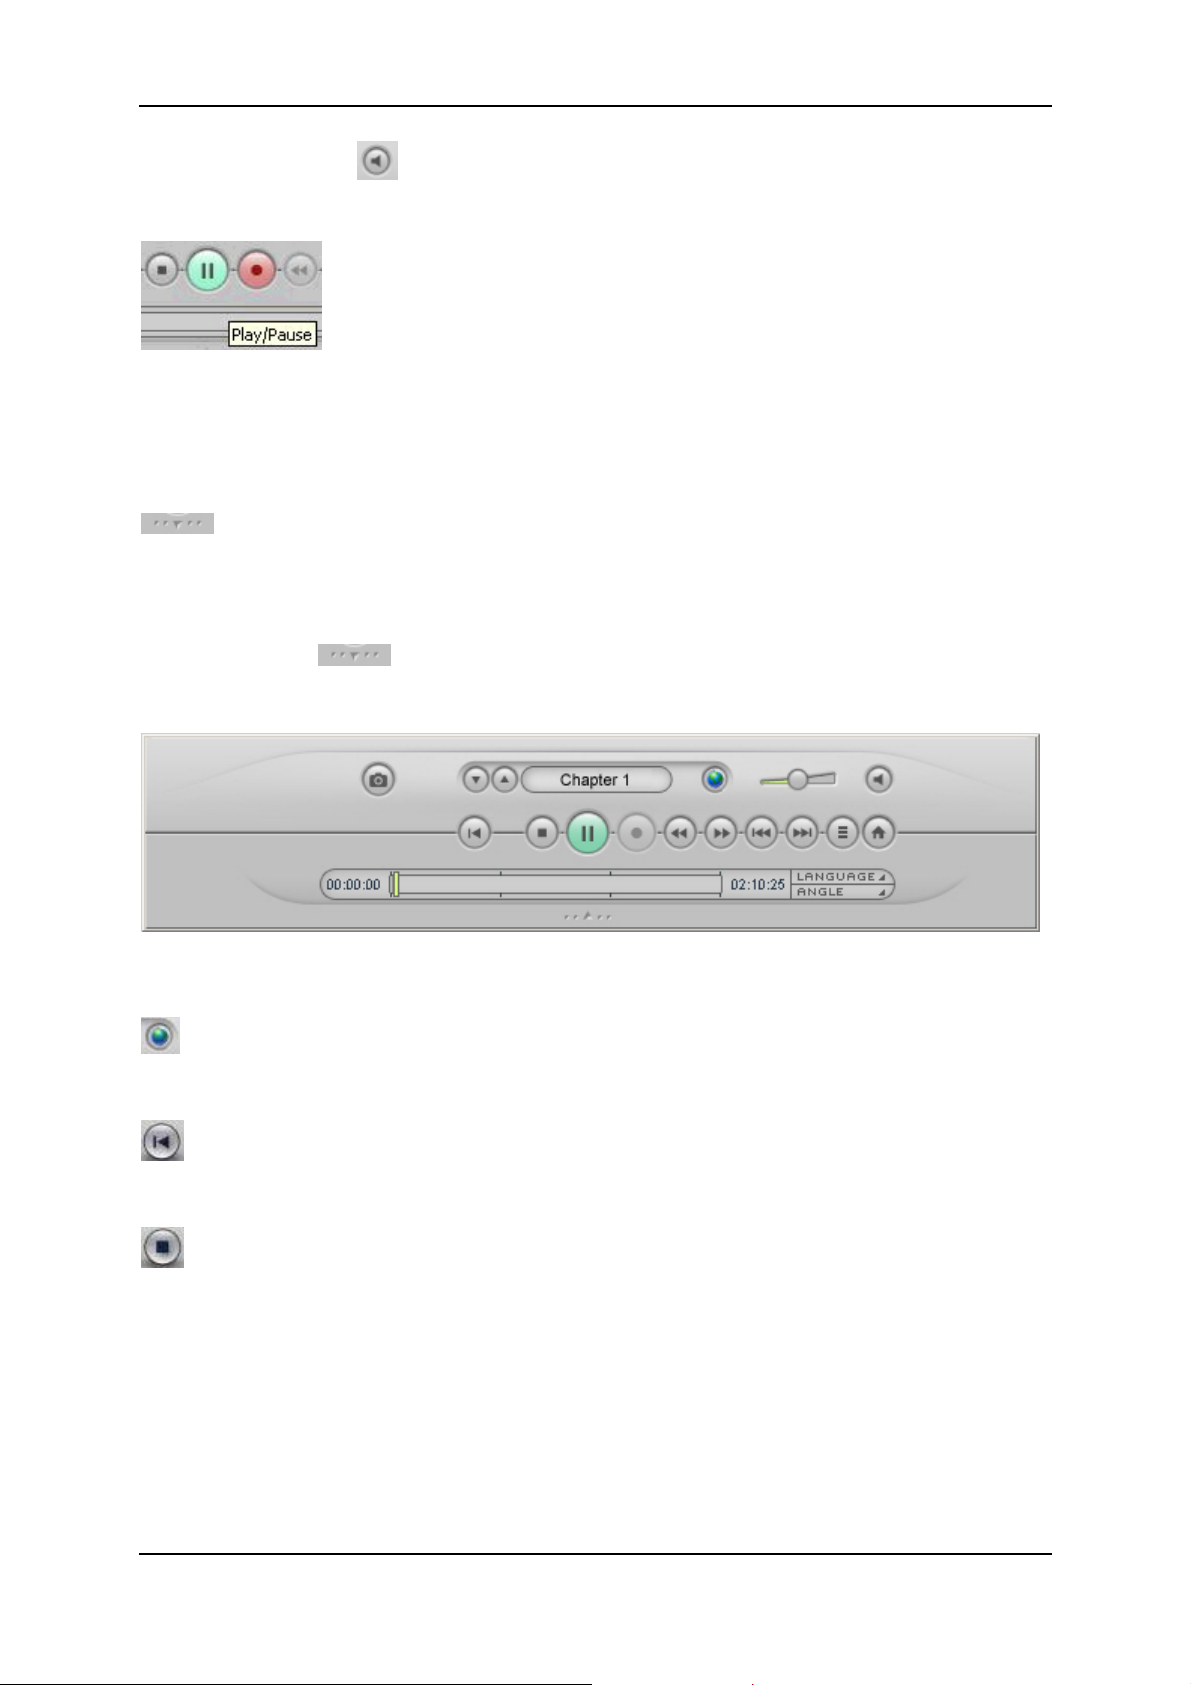
DVD Playback Operating Controls
Closed Bottom Control Bar
The closed bottom control bar gives you access to the following buttons while
you play a DVD:
DVD title
The title of the currently playing DVD is displayed in this field. You can also
switch to a specific chapter on the DVD from here:
To do this, click the DVD title button with your mouse.
Now, all the chapters on the DVD currently inserted are listed in a pop-up
window. When you click a chapter, playback of the selected chapter starts.
Audio Mode
The currently set audio mode of the DVD is displayed in this field. If more than
one audio mode is available, you can select between them here:
To do this, click the Audio Mode button. This opens a pop-up window
displaying all the available audio modes.
Clicking a specific audio mode sets it.
Drive
Clicking these buttons lets you switch between the DVD and the CD-ROM
drive. If only one drive is present, these buttons are not available.
Snapshot
If you click this button, a snapshot of the currently playing DVD is taken as a
single image and saved in the directory previously indicated in "Advanced
Settings". The file name is automatically created from the date, time, and DVD
title.
Volume
You can adjust the volume of the DVD playback with this slider. To do this,
click the slider button and while holding the mouse button down, slide it to the
position you want.
20
Page 24
Pinnacle MediaCenter
Clicking the Mute button turns off the sound of the DVD playback. You can
turn the soundtrack back on by clicking the button again.
Play / Pause
Clicking the Play button starts the playback of a DVD. This button then changes
to a Pause button.
You can pause DVD playback by clicking the Pause button. Clicking it again
resumes playback.
Open the bottom control bar
Clicking this button opens the bottom control bar.
Opened Bottom Control Bar
If you click the
button while watching a DVD, the bottom control bar
opens:
The following additional functions are now available:
Audio Mode
Use this button to select the language you would like on a multi-language DVD.
Back
Click this button to playback the currently running DVD from the beginning.
Stop
Click this button to pause the current DVD playback and return to the main
menu on the DVD.
21
Page 25
Pinnacle MediaCenter
Play / Pause
Clicking the Play button starts the playback of a DVD. This button then changes
to a Pause button.
You can pause DVD playback by clicking the Pause button. Clicking it again
resumes playback.
Rewind/Fast forward
Clicking the Rewind and Fast Forward buttons lets you move back and forth in
a DVD at an increased speed and therefore lets you access different areas within
the DVD: If you click once, the DVD runs at double speed. If you click twice,
the DVD runs at quadruple speed. Three clicks results in 8x speed, and four
clicks in 16x speed. One more click lets the DVD run at normal speed again.
To pause rewind/fast forward, click the corresponding button until the DVD
plays at normal speed or click the Play/Pause button.
Previous Chapter/Next Chapter
Use the Previous Chapter/Next Chapter buttons to jump back and forth
between consecutive chapters.
Clicking this button opens the main menu of the current DVD.
Main Menu
Clicking this button opens the main menu of the current DVD.
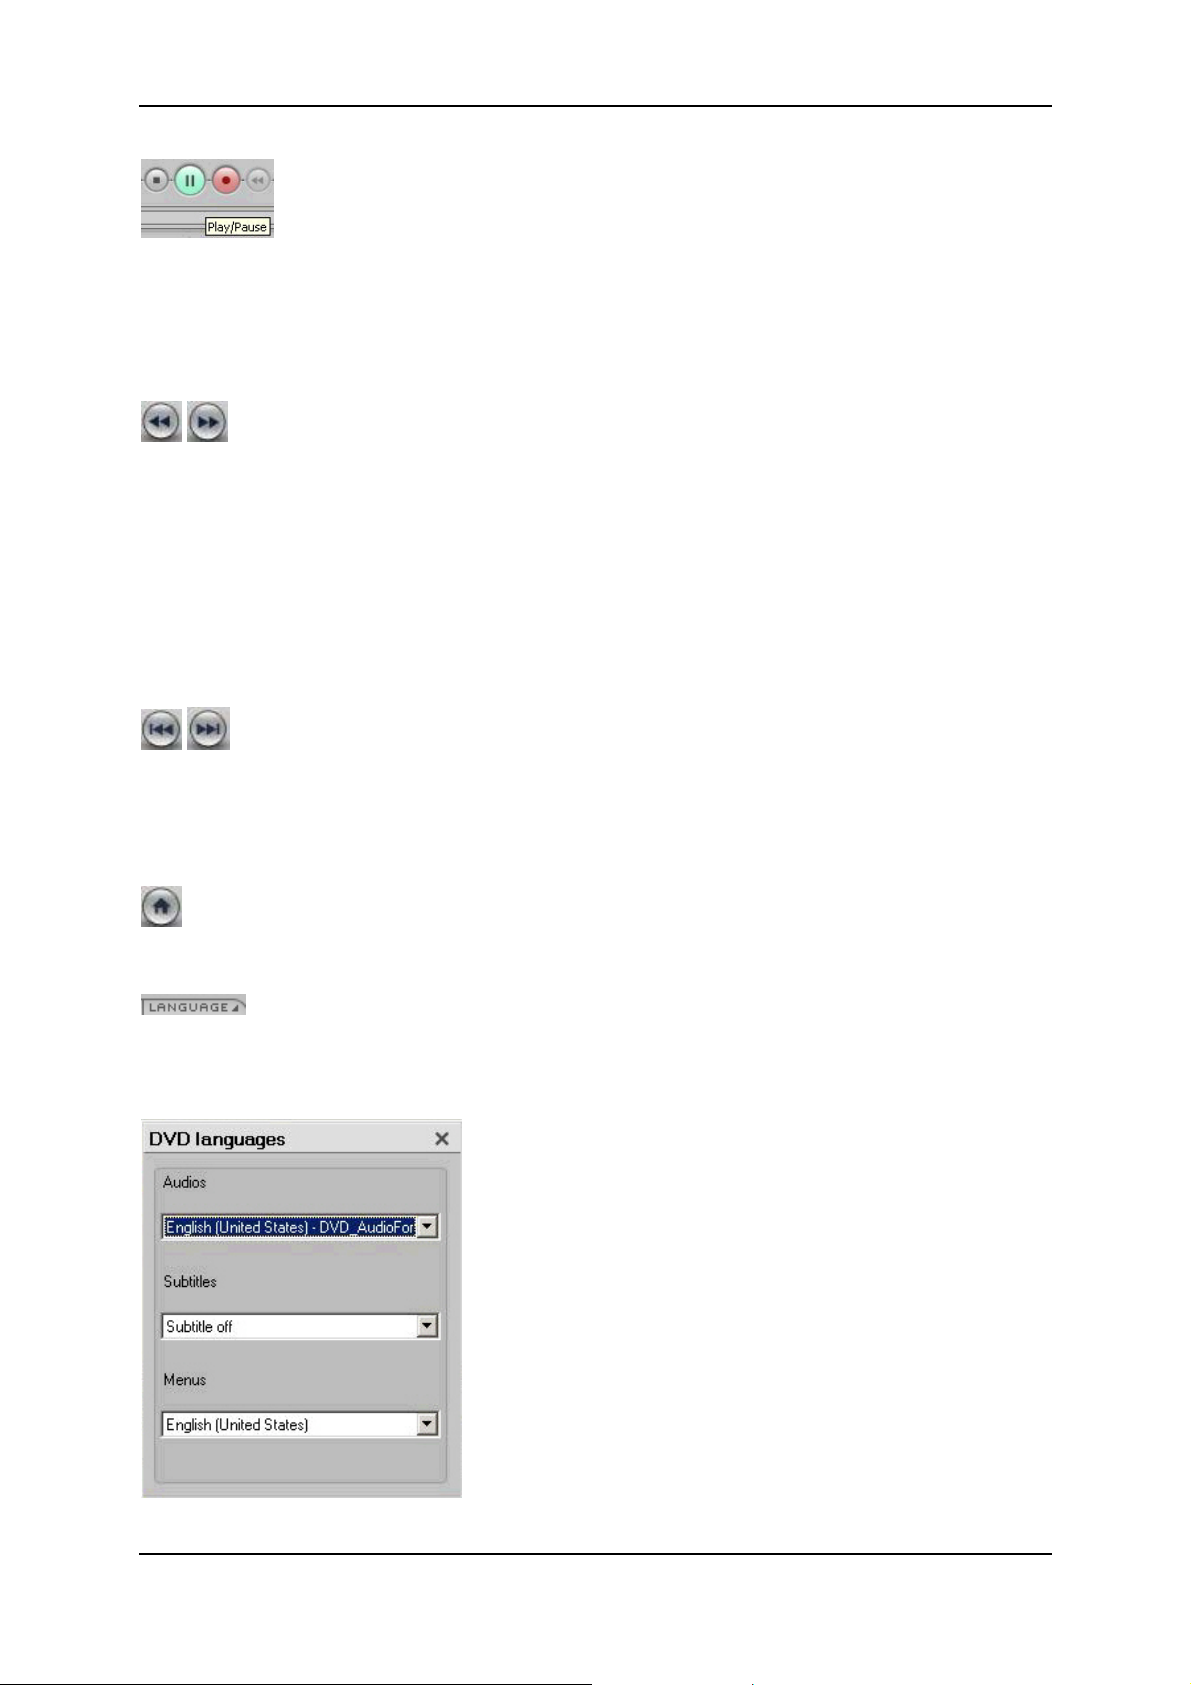
Language
After clicking this button, a dialog window opens where you can set the
language for the soundtrack, the subtitles, and the menus of your DVD.
22
Page 26
Pinnacle MediaCenter
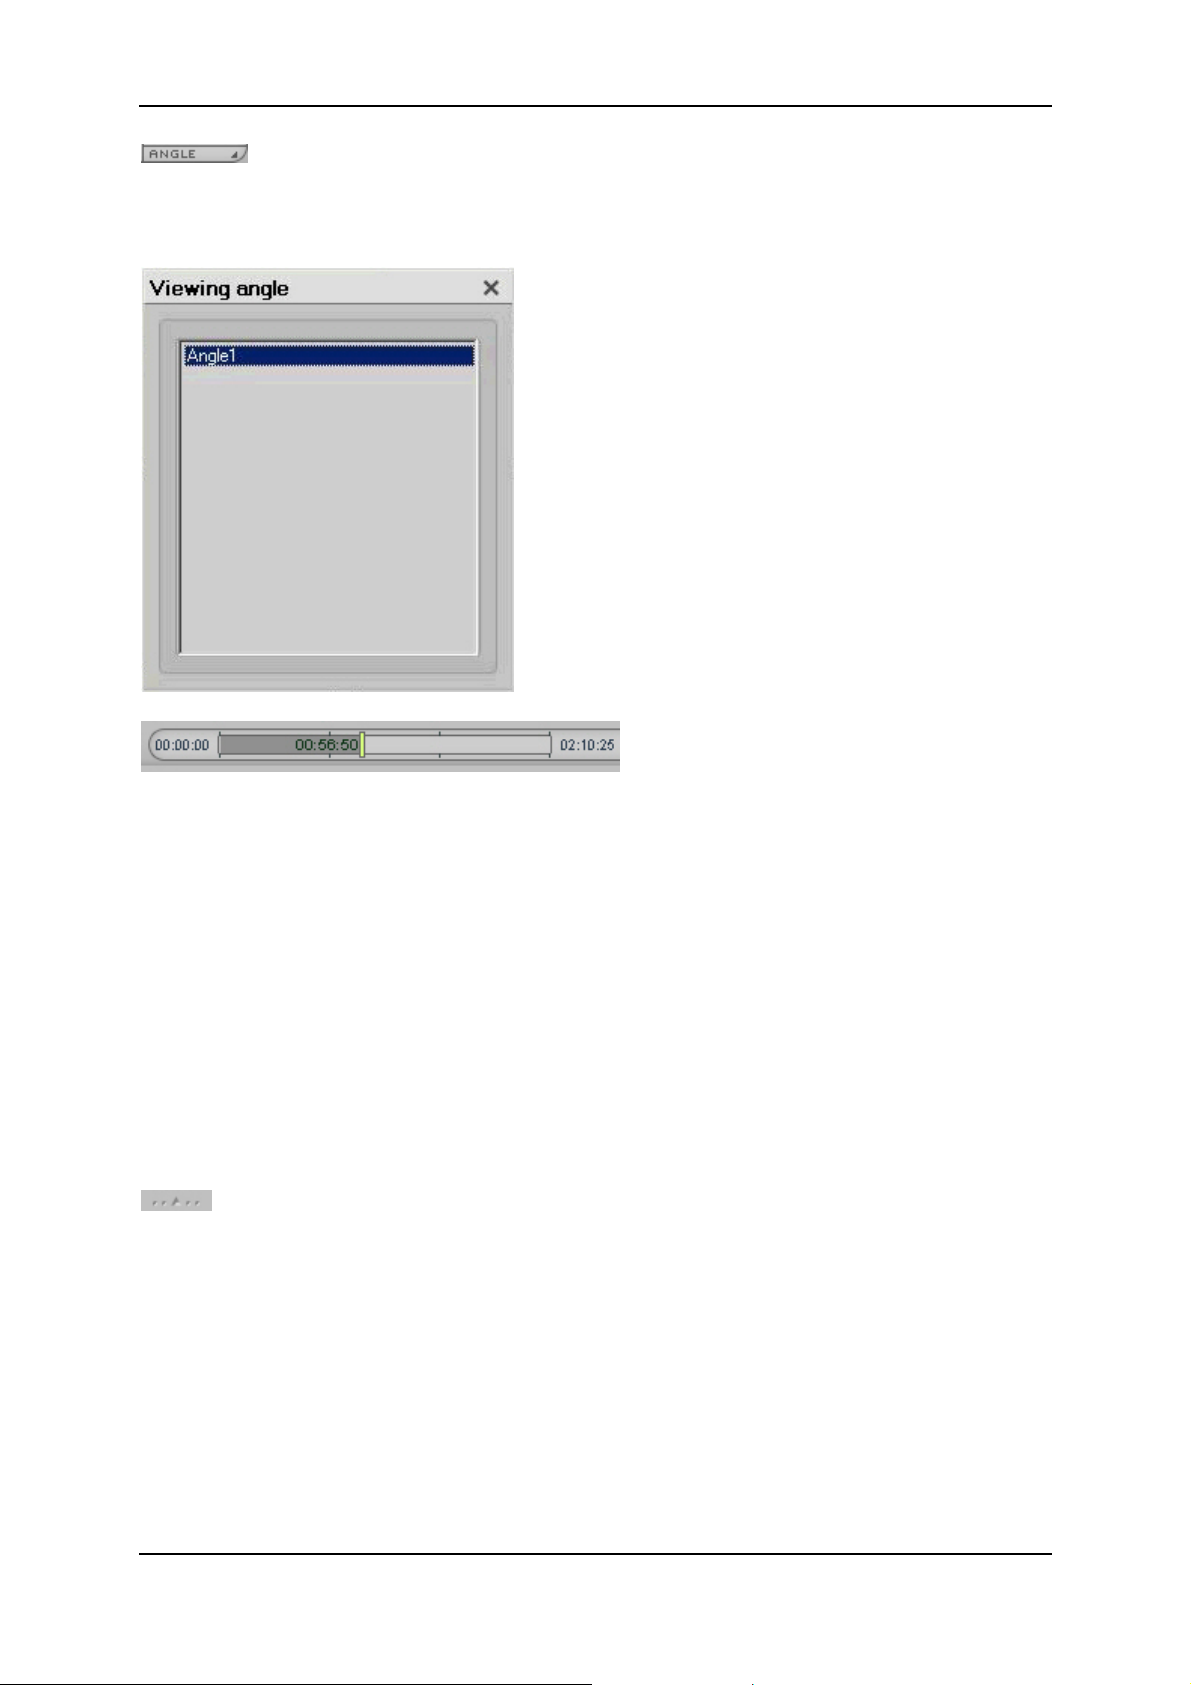
Viewing Angle
If your DVD offers different viewing angles, click this button to open a pop-up
menu where you can select between the viewing angles available.
Timeline
This field tells you the following information:
The beginning of DVD playback (here: 00:00:00).
The end of the DVD (here: 02:10:25)
The current position within the DVD (here: 00:56:50) as well as the current
chapter. You can see here how much of the DVD has already been played
back or how much is still left.
The marks within the time status bar indicated the transitions between the
individual chapters.
In addition, you can jump to any position within the DVD: To do this, click and
hold your mouse button on the position indicator and drag it to the position you
want within the timeline.
Close the bottom control bar
Clicking this button closes the bottom control bar.
23
Page 27
Pinnacle MediaCenter
File Playback Operating Controls
Closed Bottom Control Bar
The closed bottom control bar gives you access to the following buttons while
you play an audio or video file:
File title
The title of the currently playing file is displayed in this field.
Snapshot
Click this button to take a snapshot of the currently playing file as a single
image and save it in the directory previously indicated in Advanced Settings.
The file name is automatically created from the date, time, and title of the file.
Volume
You can adjust the volume of file playback with this slider. To do this, click the
slider button and while holding the mouse button down, slide it to the position
you want.
Clicking the Mute
button turns off the sound of the file playback. You can
turn the soundtrack back on by clicking the button again.
Play / Pause
Clicking the Play button starts the playback of an audio or video file. This
button then changes to a Pause button. You can pause file playback by clicking
the Pause button. Clicking it again resumes playback.
Open the bottom control bar
Clicking this button opens the bottom control bar.
24
Page 28
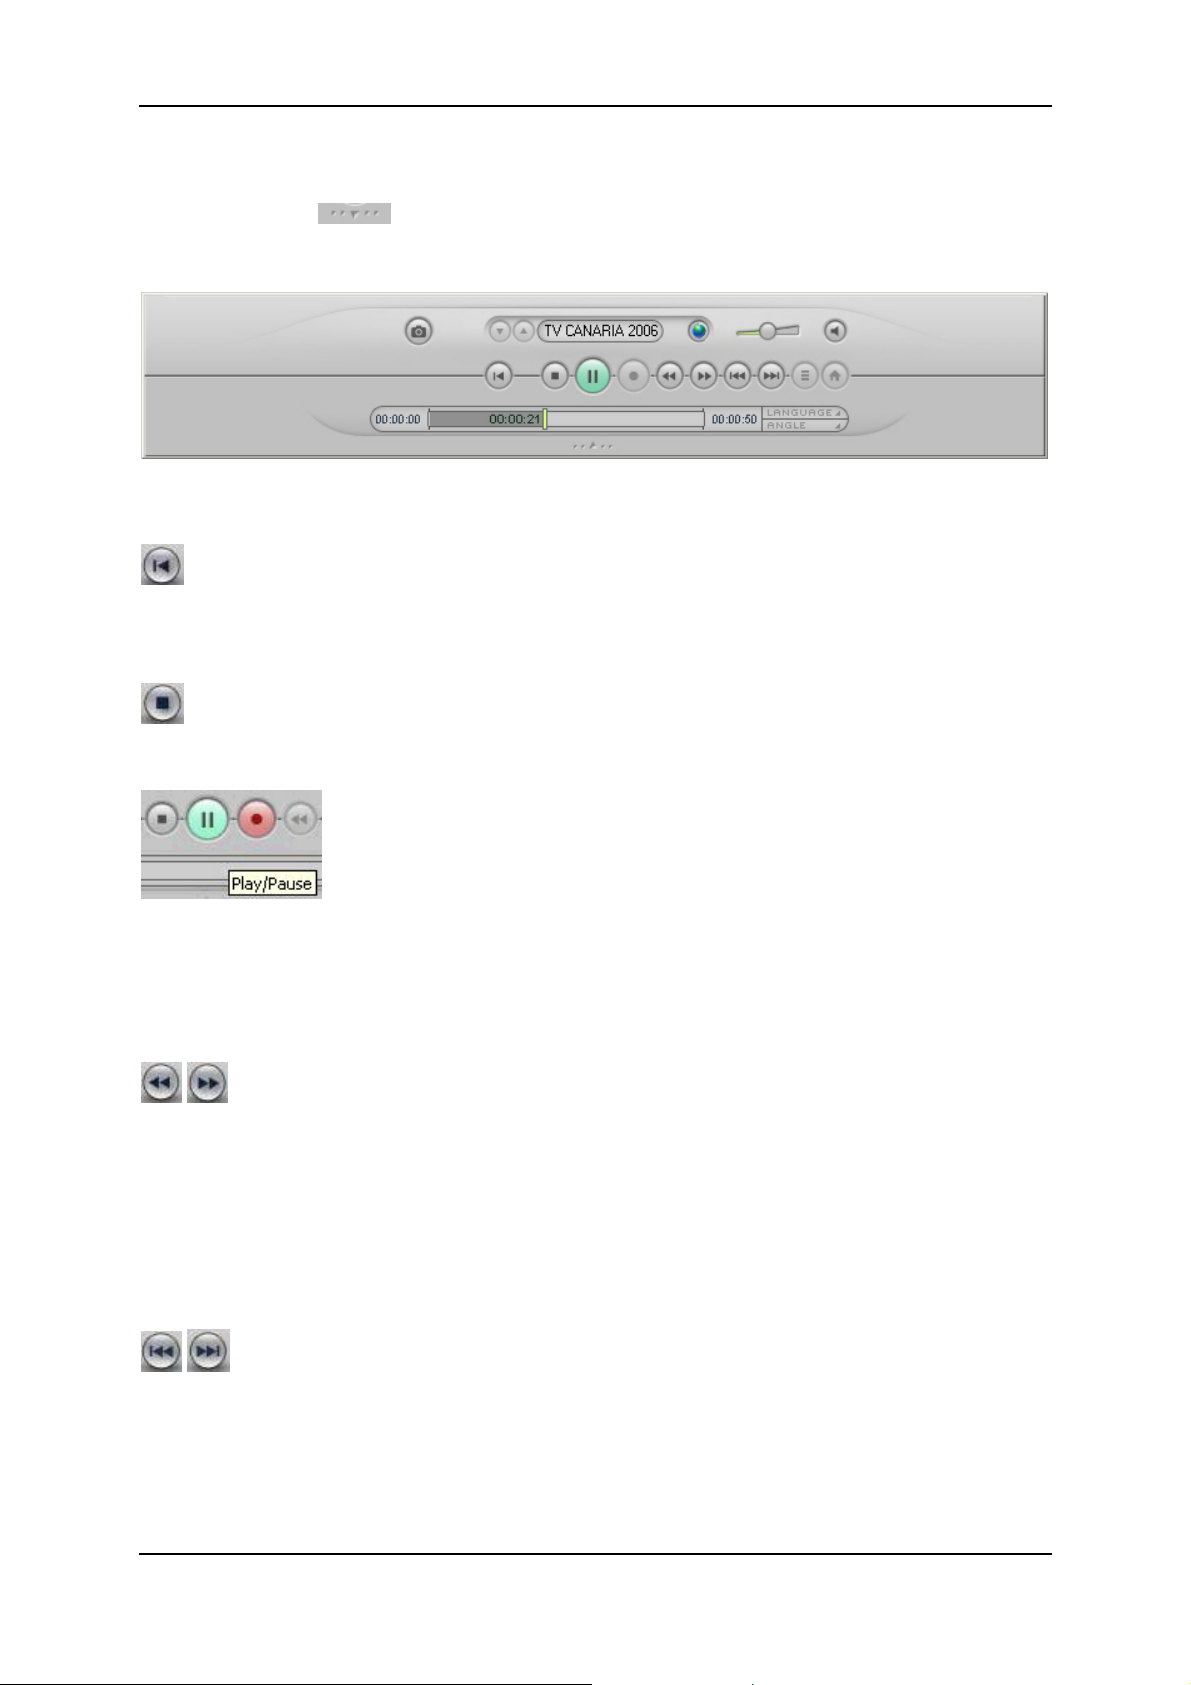
Opened Bottom Control Bar
Pinnacle MediaCenter
If you click the
button while watching a DVD, the bottom control bar
opens:
The following additional functions are now available:
Back
Click this button to playback the currently running audio or video file from the
beginning.
Stop
Use this button to stop the current playback.
Play / Pause
Clicking the Play button starts the playback of a file. This button then changes
to a Pause button.
You can pause file playback by clicking the Pause button. Clicking it again
resumes playback.
Rewind/Fast forward
Clicking the Rewind and Fast forward buttons lets you move back and forth in
a video file at an increased speed, therefore letting you access different areas
within the video file: If you click once, the video file runs at double speed. If
you click twice, the video file runs at quadruple speed. Three clicks results in 8x
speed, and four clicks in 16x speed. One more click lets the video file run at
normal speed again.
Previous Chapter/Next Chapter
Use the Previous Chapter/Next Chapter buttons to move between chapters in the
current directory
25
Page 29

Pinnacle MediaCenter
Title Menu
When playing back a recorded file (for example, in MPEG1 VCD quality), the
button is inactive. This means that the Title Menu function is only available
when playing back a DVD.
Main Menu
When playing back a recorded file (for example, in MPEG1 VCD quality), the
button is inactive. This means that the Main Menu function is only available
when playing back a DVD.
Language
If subtitles are available for the current file and you click this button, a dialog
window appears where you can set the language for the subtitles.
Timeline
This field tells you the following information:
The beginning of playback (here: 00:00:00)
The end of the file (here: 00:00:50)
The current position within the file (here: 00:00:18). You can see here how
much of the file has already been played back and how much is still left to
play back.
In addition, you can jump to any position in the file. To do this, click and hold
your mouse button on the position indicator and drag it to the position you want
within the timeline.
Close the bottom control bar
Clicking this button closes the bottom control bar.
26
Page 30

Pinnacle MediaCenter
Teletext
Teletext - Overview (Teletext not available in the USA)
If you click the Teletext
opens in the PC View (if teletext is available):
button in the top control bar, the teletext window
Teletext can consist of two windows: In the right window, you will see the TOP
Text and the operating controls for navigating in teletext. To the left is the
teletext window where the teletext pages and subpages are displayed.
When there is enough space on the screen, the TV program showing on the
current channel is displayed next to the teletext area. This lets you read teletext
and watch TV at the same time.
Positioning the teletext window
Both the teletext window as well as the TV window (if this is displayed) can be
coupled to each other and then moved together on the screen as a single unit.
Or you can also position the windows separately. This means you can put one of
the windows anywhere on your computer monitor independent of the other
window. To do this, click the corresponding window and hold down your mouse
button. While holding down your mouse button, drag the window to the position
on your computer screen you want.
If the teletext windows can be moved separately, you can also resize them: To
do this, left-click and hold the mouse button down on the corner of the window
and then drag the corner until the window is the size you want.
27
Page 31

Pinnacle MediaCenter
Bottom Control Bar
In teletext mode, the buttons for operating the TV are located in the bottom
control bar so that you can keep track of both the teletext and your TV program
at the same time.
Closing a teletext window
When you close the teletext navigation window by clicking the Close button in
the top control bar, the teletext window will continue to be displayed.
When you close the teletext window by clicking the Close button in the top
control bar, both the entire teletext and the Pinnacle MediaCenter window are
closed.
If you have the teletext navigation window, the teletext window (this is active in
a separate window, if the TV Display option in the Overlay area of the TOP
text window is switched off) and the Pinnacle MediaCenter with Live TV open,
teletext then closes completely when you click the Close button in the teletext
window. The Pinnacle MediaCenter window with Live TV remains open.
Navigating Teletext (Teletext not available in the USA)
Navigating teletext using TOP Text
TOP Text lets you quickly and effectively navigate through teletext: After
clicking a TOP Text entry, the corresponding page is displayed in the teletext
window.
If no TOP Text is available, a selection of possible teletext pages that you can
also click for access is listed in the TOP Text window.
If a topic in TOP Text has additional subtopics (indicated by a "+" before the
topic title), you can open the list of all subtopics by clicking the "+". If you click
the "+" again, the list of all the subtopics is hidden.
Navigating teletext using the operating controls
In the right part of the teletext navigation window, there are several buttons that
you can use to navigate teletext:
Page
The page number of the current teletext page is displayed in this field.
To change the teletext page, click the
button or button to access either
the previous or the next teletext page.
Or you can click the teletext page number display and enter the desired page
number directly using your keyboard.
28
Page 32

Pinnacle MediaCenter
Subpage
If the currently selected teletext page has subpages, the page number of the
current teletext subpage is displayed in this field.
To change the teletext subpage, click the
either the previous or the next teletext subpage.
Or you can click the teletext subpage number display and enter the desired page
number directly using your keyboard.
Channel
Use the channel settings directly in the teletext navigation window to set a TV
channel for which you would like the teletext pages displayed. Use the
following buttons navigate upwards and downwards in the Channel list
button or button to access
.
Character set
Use this option to select the character set used in the teletext window. Auto is
the default option.Since the teletext signal can contain national language
information, the corresponding character set is therefore set automatically based
on the language information selected. In most cases, this means that you should
select the Auto option from the list of available character sets.
However, there are a few cases where the language information is supported. In
such cases, we recommend setting the appropriate character set specifically.
29
Page 33

Pinnacle MediaCenter
Overlay TV
In the Overlay TV area, you can set where the teletext window should be
displayed. If the display over TV option is selected, then the teletext is
displayed directly in the Pinnacle MediaCenter window. The transparent
option displays live TV in the background of the teletext.
If the display over TV option is cleared, teletext is started in a separate window.
Live TV therefore continues to run in the Pinnacle MediaCenter window.
Further configuration options for extended teletext are available in the lower
part of the teletext navigation window.
More teletext options
1.display hidden chars, In addition to the information in the teletext window,
the teletext signal (for certain TV programs) can also contain additional
information that is by default not displayed.
This additional information can, for instance, notify you that one of the TV
programs running has been delayed. If you wanted to record this TV program,
you would be notified of this change.
In some games, the answers to certain questions might remain hidden.
In either case, you can display the hidden text by selecting the display hidden
chars option in the teletext navigation window.
2.automatically update, selecting this option allows teletext to be automatically
updated. Clearing this option prevents teletext pages from being quickly
updated. A quick update could result in new text being displayed before you
have read the page completely.
3.teletext follows PIP, this option is available if a dual TV card has been
installed on your computer and both tuners have been opened using PIP. If you
now open the teletext window in a separate window (to do this, deactivate the
display over TV option in the Overlay area of the teletext navigation window),
the teletext display automatically switches parallel when the Pinnacle
MediaCenter window (in PIP mode) switches and the associated channels
change.
30
Page 34

Pinnacle MediaCenter
A single mouse click switches the Pinnacle MediaCenter window (in PIP mode).
The now active Pinnacle MediaCenter window is framed in green and the
teletext for the active Pinnacle MediaCenter window and the selected TV
channel is displayed.
4.show TOP, this function hides TOP Text; however, the settings dialog for the
TOP Text window remains available.
Save Page
When you click this button, an Open File dialog opens where you can save the
current teletext page as an ASCII text file. The file name is created by default
from the current date, time, channel name, and teletext page number.
Entering pages directly
To access a teletext page or subpage, you can also enter the page number
directly with your keyboard.
Opening pages in the teletext window
You can open any of the teletext pages whose numbers (see (1) in the image
above) are displayed at a specific point of time in the teletext window. To do
this, simply click the page number you want with your mouse. The page you
select then opens and the selected page number is shown in the upper left side of
the teletext area.
If you would like to return to the main page (identified as page 100), simply
click the dot in the upper left corner of the teletext window without entering the
page number (see (2) in the image above). The point behaves like the Home
button in your Internet browser.
31
Page 35

Pinnacle MediaCenter
To navigate through any available subpages, simply use the << and >> arrows
that are found on the subpage display (see (3) in the image above).
Navigating in TOP Text
TOP Text is displayed to the left in the teletext navigation window. All of the
teletext pages are available here for quick access. Double-click page 100 - the
Start page in the page navigation area. The associated subpages (101, 111, etc.)
now appear in the TOP Text dialog. Single-click a subpage (for example, subpage 101) and it appears immediately in the teletext window.
A quick listing of the available text pages appears in the TOP Text dialog. These
pages are always accessible.
32
Page 36

Pinnacle MediaCenter
Electronic Program Guide (EPG) and Recording
Electronic Program Guide (EPG)
This menu is only available if you have access to an EPG service.
If you click the EPG button in the top control bar, the Electronic Program Guide
opens in the PC View:
The Electronic Program Guide offers you a complete overview not only of the
current but also of the future TV schedule. This also lets you record TV shows
quickly and simply.
EPG program list
In the middle part of the window, you see the EPG program list, which is sorted
either by time or by channel.
Colored symbols indicate the status of a program: Currently running recordings,
shows scheduled to be recorded, already recorded shows or TV shows currently
being broadcast are marked using different symbols.
33
Page 37

Pinnacle MediaCenter
An information box on the lower edge of the screen displays information about
the selected show.
Sorting an EPG program list
You can sort the EPG program list by time or by channel:
Sorting the EPG program list by time
When you click the Time button, the current time is displayed in the Time field
and all the programs scheduled to be broadcast at that time are listed in the
program list.
You can now adjust the time information and then display the TV listings of all
the available TV stations at one of the times you have indicated:
To do this, click the
buttons next to the Time field: The time is changed
by hour increments and the shows, which are to be broadcast at the newly
selected time, are now included on the EPG list.
To view the TV schedule of a different day, click the
button: If you click on
a specific day in the Calendar window which opens, the program that will be
broadcast at the indicated time on the day you have selected appears in the EPG
list (if this information is available).
Sorting the EPG program list by channel
After you click the Channel button, the current channel is displayed on the
upper edge of the screen and the schedule of the current channel appears in the
program list, beginning at the current time.
You can now select another channel and display the schedule for this channel.
To do this, click the Channel field or use the Select Up/Down
Accessing a schedule in the EPG program list
buttons.
If you would like to see a program currently being broadcast, click the
corresponding schedule in the EPG list, and the program will be displayed in the
PC View.
Recording a program from the EPG program list
Using the EPG function, it is easy to record a program.
To do this, click the desired program in the EPG program list and then click the
Record button: A program that is currently being shown is recorded
immediately. The recording for a future program is scheduled.
You can tell whether a show is currently being recorded or if a show is
scheduled to be recorded by the Record icon in the EPG channel list.
34
Page 38

Pinnacle MediaCenter
Pausing, editing or deleting recordings in the EPG program list
You can edit or delete recordings being made right now or recordings scheduled
in the future directly in the EPG menu.
To do this, click the program you want and then click the Edit button: In the
window that now appears, you can pause, edit or delete the recording (refer to
the chapter
Manual Recording).
Manual Recording
To schedule a recording manually, click the EPG button in the top control bar
and click the Manual Record tab in the window that now appears:
Enter the following information for scheduling a recording:
Channel
Enter the channel of the program to be recorded in this field. To do this, click
the Channel field or use the Select Up/Down
Day
buttons.
In this field, enter the day your recording should take place.
35
Page 39

Pinnacle MediaCenter
..
Start time
Here, enter the time the scheduled recording should start.
End time
In this field, enter at what time the scheduled recording should end.
Duration
Here, you decide how long the scheduled recording should last.
Note that after entering the start time and the end time, the duration is
automatically calculated. After entering the start time and the duration of a
recording, the end time is automatically calculated.
Frequency
Here you can select the frequency your recording should be repeated (for
example, once, daily or weekly).
Destination
Here, select whether you would like to save your recording on your hard drive
or on DVD.
Format
In this field, select the recording format you want.
Device
In this field, select the TV hardware which should provide the input to be
recorded. If you have multiple Pinnacle TV cards installed, they will be
displayed here.
36
Page 40

Pinnacle MediaCenter
Minutes to start in advance
Selecting this option starts the recording of a TV show, for example, 5 min.
before the set start time. The Pinnacle MediaCenter can also start up the
computer in time to start recording; This advantage of this is that when a
recording has been scheduled in the future, the computer can be turned off
immediately after scheduling the recording. This means you also do not need to
be present for the recording because the computer will now be automatically
turned on before must recording starts. The show you scheduled will then be
recorded.
Extra minutes to allow to complete
This option lets you take the end time of a recording into account if the start of a
recording must be postponed for any reason. The time set pushes the end of the
recording back.
Shutdown Windows when completed
Activate this function if the computer should be turned off after the recording is
complete You can also schedule future recordings and use this option to shut the
computer down in between recordings; before each further recording, the
computer is started up again depending on the pre-start time set (for example, 5
min. beforehand).
Save
Click the Save button to apply the recording settings you just configured.
The detailed recording data day, date, start time, channel and video format
are immediately displayed in the Scheduled / Scheduled Recordings tab.The
recording settings can changed or deleted here.
37
Page 41

Pinnacle MediaCenter
Recording
To get an overview of all the previous and saved recordings, click the EPG
button in the top control bar and then the Recorded tab:
Here, you see all the currently available recordings including information about
the recording date and time.
You also see further information for each selected recording in the information
box on the lower edge of the screen.
If you would like to delete a recording, click the corresponding recording and
then click the Delete button. If you click Yes in the dialog window that now
appears, the recording will be deleted.
38
Page 42

Pinnacle MediaCenter
Picture-in-Picture Function (PIP)
Picture-in-Picture Overview (PIP)
Picture-in-Picture (PIP) lets you watch or record more than one TV program at
the same time by displaying two or more TV windows.
The prerequisite is that you have installed one or more sets of Dual PCTV
hardware or at least 2 PCTV hardware variants (internally or externally, each
with a tuner).
Pinnacle MediaCenter offers you PIP support in each of the available views
(Program Mode, also called PC View and TV Mode also called TV View).
39
Page 43

Pinnacle MediaCenter
Picture-in-Picture Function in the PC View
Create PIP
To create a picture in a picture (PIP), select one of the following options:
• Click the button in the lower control bar.
• Open the PIP Selector window by clicking the corresponding button
in the lower control bar. The PIP Selector dialog then opens.
• Open the shortcut menu and select the Create PIP option in the PIP
submenu.
The TV program, which follows the program last open in the TV program list. It
is displayed in a small window. The new window now becomes active.
Activate Picture
In PC View, you have three options for activating the TV window:
• Left-click the window with the picture that should be activated.
• In the PIP Selector window, click the entry whose picture you would like
to set as active.
• Open the shortcut menu and then in the PIP submenu, select the TV
program whose picture you would like to activate.
40
Page 44

Pinnacle MediaCenter
Also in the PIP Selector window, the active picture is marked as selected. The
selection is highlighted with a lighter-colored background.
Switching picture contents
Double-click the second TV window (PIP window) to switch the picture
contents with the main window; the active TV window is framed in green.
Close active window
If you do not see the title bar, there could be several reasons for this:
• The title bar is invisible. Then you need to move your cursor over the
window.
• The width of the window is too small. In this case, you need to increase
the size of the window in order to display the title bar. To do this, move
your cursor onto one of the window corners, and while holding down your
left mouse button, pull the window to make it bigger.
There are several ways so close the active window:
• Click the (Close) button in the title bar of the PIP window.
• Open the PIP Selector window and select the (Close) option for
the window that you would like to close.
If you no longer need any of the TV windows, you can close them all at the
same time. To do this, open the shortcut menu for the TV window and select the
Close All option in the PIP submenu.
41
Page 45

Pinnacle MediaCenter
Pinnacle MediaCenter Window Formats
The Pinnacle MediaCenter lets you switch between various window sizes and
window types. These options let you customize the Pinnacle MediaCenter
window according to your needs:
For example, would you rather play back media directly from your desk while
working at you PC or from your TV chair? Do you want your Pinnacle
MediaCenter window to take up the entire screen so that you can read all the
menu options well even at a distance or do you want to minimize the window so
that you can continue working on the PC during playback? Would you like to
watch TV or movies or view photos in full screen mode or should the menu
remain visible?
The Pinnacle MediaCenter is very flexible in accommodating your wishes.
The following explains how to display the various types of windows:
Pressing the "Full Screen" button on the remote control displays a normalsized window without a preview or information window
If you have opened the Pinnacle MediaCenter in normal size and there is no
preview or information window in the current menu (for example, the main
screen in the TV View) (1), you can switch between the normal-sized Pinnacle
MediaCenter window and full screen (2) by pressing the Full Screen button on
your remote control.
Pressing the "Full Screen" button on your remote control in a full screen
window with preview or information window.
42
Page 46

Pinnacle MediaCenter
If you have opened the Pinnacle MediaCenter in full screen size and the menu
displayed contains a preview or information window (for example, the TV menu
in the Remote View) (1), you can switch between the entire Pinnacle
MediaCenter window in full screen and the preview/information window in full
screen (2) by pressing the Full Screen button on your remote control.
Pressing the "Full Screen" button on your remote control in a normal-sized
window with preview or information window.
If you have opened the Pinnacle MediaCenter in normal size and the menu
displayed contains a preview or information window (for example, the TV menu
in the Remote View) (1), you can display the entire Pinnacle MediaCenter
window in full screen (2) by pressing the Full Screen button on your remote
control.
If you press the Full Screen button again, only the preview/information window
is displayed in full screen (3).
If you press the Full Screen button a third time, you are taken back to the
original window, that is, the entire Pinnacle MediaCenter window in normal size
(1).
Clicking the mouse in a normal-sized window with preview or information
window.
43
Page 47

Pinnacle MediaCenter
If you have opened the Pinnacle MediaCenter in normal size and the menu
displayed contains a preview or information window (for example, the TV menu
in the Remote View) (1), double-clicking will only display the
preview/information window in normal size (2).
If you double-click again, you are taken back to the entire Pinnacle MediaCenter
window in normal size (1).
If you have opened the Pinnacle MediaCenter in normal size and the menu
displayed contains a preview or information window (for example, the TV menu
in the Remote View) (1), you can display the entire Pinnacle MediaCenter
window in full screen (4) by clicking the Maximize button in the top control bar
or double-clicking the top control bar.
If only the TV window is displayed in normal size (2), you can enlarged it to full
screen by clicking the Maximize button in the top control bar or double-clicking
the top control bar (3).
If you double-click again or click the Minimize button, the TV window returns
to normal size (2).
If you double-click the TV window in full screen (3), you display the entire
Pinnacle MediaCenter window in full screen (4). If you double-click again, the
TV window appears again in full screen (3).
If you click the Minimize button or double-click the top control bar when the
Pinnacle MediaCenter is in full screen (4), the Pinnacle MediaCenter window
will switch to the original normal size (1).
44
Page 48

Pinnacle MediaCenter
Pinnacle MediaCenter Operating Shortcuts
Function PC Function Keys
Exit the PMC ALT+F4
Switch between full screen and
preview window
OSD channel list Enter (while watching TV)
Channel info/Help (depending on
remote control)
Mute On/Off M
Switching between the last two
channels
Volume +/- +/- or CTRL+Cursor Up/Down
Channel +/- Page Up/Page Down
OK/Confirm Enter
Start page/Menu (P key; depending on
remote control)
Jump to live position during timeshift
playback
Record C
ALT+F or ALT+Enter
ALT+I
ALT+L
Esc
F5
Pause
In TV mode: Start timeshift recording
Previous Track/Next Track Pos1/End
Back (depending on remote control) Back
Play P
Stop S
Rewind/Fast forward
In teletext mode: Display
previous/Next subpage
TV F5
Teletext F6
Radio (depending on remote control) F7
EPG F8
Enter numbers 1/2/3/4/5/6/7/8/9
0/AV (switch video input) 0
Space bar
R/F
45
Page 49

Pinnacle MediaCenter
Selection of on-screen menu buttons Cursor
In teletext mode: Display
previous/Next page
Switch between letters and numbers
(C/N)
Delete entry Del
Cursor Up/Down
CTRL+C
46
Page 50

Advanced Settings
Advanced Settings Dialog Overview
Note that the Advanced Settings dialog can only be operated with your
keyboard or your mouse.
"Apply" button
After configuring settings in any particular dialog, click the Apply button before
going to the next dialog in Advanced Settings. Doing this applies the settings
immediately. After configuring all the settings you want, you can leave
Advanced Settings by clicking OK.
47
Page 51

Pinnacle MediaCenter
Advanced General Settings
In this menu option, you can set various general settings.
Appearance
Language
In this area, you can set the language for the Pinnacle MediaCenter.
Check for updates
If you click the Check for updates button, you will automatically be taken to
the Pinnacle Systems Web site where all the available Pinnacle MediaCenter
updates are listed for download.
Control bar
Here you can define the appearance and size of the MediaCenter control bar.
The control bar is located in the lower area of the MediaCenter and is used to
control all the functions (Capture, Playback, Timeshifting, etc.).
Skip buttons
In the Skip buttons area, you can define how much time (in seconds) is skipped
when you Skip back and Skip forward. These settings help control DVD
playback, file playback or timeshifting with the remote control (Skip back or
Skip forward) in the Pinnacle MediaCenter.
48
Page 52

Advance TV Channel Settings
Advanced Channel Settings Overview
Advanced Settings
Available TV channels
Source
This is where you select the installed PCTV hardware for which you would like
to configure the TV channels.
All the available channels are displayed in the list field which appears
underneath. Click the New button to add channels, and click Delete to delete
them.
My favorite TV channels
You can also watch TV using the Pinnacle MediaCenter without having to
create your own Favorites list. After a channel scan, you can watch all the
channels in the Available TV channels area. However, in order to select the
channels you want, you need to create a Favorites list in this dialog. Organize
your favorite TV channels in Favorites lists in different Favorites folders (for
example, News, Sports or Movies). This is the way to access your favorite TV
channels quickly.
How do I set up my Favorites?
• In the Available TV channels area, select, for example, your favorite
sports channels that you would like to organize in a Favorites list. Then
49
Page 53

Pinnacle MediaCenter
click the New button beneath the My favorite TV channels area and
name the new Favorites folder now displayed (for example, Sports TV).
Now with your left mouse button pressed, drag the selected TV channels
into the newly created Favorites folder Sports TV.
• If you would like to create further Favorites lists (for example, for news or
movies), repeat the procedure.
• Double-click a TV channel in the Favorites list and a preview with
various types of information about the channel displayed in the Preview
area becomes visible.
Use the Delete button to delete Favorites from the list or the Favorites folder.
Preview
Here a preview of the currently selected TV channel is displayed.
Channel Details
Various parameters for the currently selected TV channel are displayed. Click
the Edit button to modify the currently selected channel station.
Load / save channel lists
In the this area, you can use the Load button to import previously created
channel lists. Click the Load button to import a channel list. You can also save
channel lists.
Channel Scan
Now click the Start button in the Channel Scan area.
The Scan dialog appears. Now all of the PCTV hardware variants installed on
the computer are displayed. Select the PCTV hardware you would like to use to
receive television. To confirm, click the Start button.
50
Page 54

Advanced Settings
Advanced Analog TV Reception Settings
After selecting the analog PCTV hardware (for example, PCTV Analog PCI),
the following settings are available.
Settings
Country
Select the Country where you are located, and select the corresponding video
standard (for example, PAL, NTSC, SECAM). The standard setting in the
drop-down menu is the country set last.
Scan Mode
Here you can select a Scan Mode. You can choose between Quick, Best
Quality and Normal. Here you can set how the channel scan should be
performed: Do you want the quickest possible channel scan or would you like a
very precise channel scan, or should the scan run at a normal pace and reliably
include all the channels that can be received?
Input Type
In the Input Type drop-down menu, select whether you are using a cable
connection or an antenna.
Start channel scan
Finally start the scan by clicking the Scan button.
51
Page 55

Pinnacle MediaCenter
Advanced DVB-T Reception Settings
After selecting the analog PCTV hardware (for example, PCTV Hybrid Pro
Stick DVB-T), the following settings are available.
Settings
Country
Select the Country where you are located, and select the corresponding video
standard (for example, PAL, NTSC, SECAM). The standard setting in the
dropdown menu is the country set last.
Scan Mode
Here you can select a Scan Mode. You can choose between Quick, Best
Quality and Normal. Here you can set how the channel scan should be
performed: Do you want the quickest possible channel scan or would you like a
very precise channel scan, or should the scan run at a normal pace and reliably
include all the channels received?
Start channel scan
Finally start the scan by clicking the Scan button.
52
Page 56

Advanced Settings
Advanced DVB-S Reception Settings
After selecting the analog PCTV hardware (for example, PCTV Sat USB DVBS), the following settings are available.
Settings
Satellite
Select the satellites you want from the drop-down menu (for example, Astra).
Now you have set the satellites from which you would like to receive audio and
video signals.
DiSEqC Configuration
Activate the A or 1 option in the drop-down menu.
What is DiSEqC ?
DiSEqC (Digital Satellite Equipment Control) is a data transmission method for
controlling complex satellite systems with motors or multiple LNCs. DiSEqC is
more flexible than 14/18-Volt and 22 KHz technology that can only transmit 2
switch statuses; in this case, the maximum possible would be a switch between 4
signal streams. DiSEqC is not needed until two or more SAT lines are
controlled. This is unnecessary for simple SAT systems.
Start channel scan
To start the scan, now click the Scan button.
53
Page 57

Pinnacle MediaCenter
Advanced Channel Settings - Modifying Channels
After you have performed a scan, you have the option in the Edit Channels
menu to change already existing channel lists or individual channels according
to your desires or to export channel lists from the Pinnacle MediaCenter:
Viewing the Channel and Favorites list
In the middle part of the dialog, you will find the channel list containing all the
available channels sorted according to various criteria (for instance, All radio
stations, All TV channels).
In order to list the channels in a specific grouping, click the corresponding entry.
Modifying a channel
If you would like to edit a channel in the channel list, click the corresponding
channel. Now under Channel Details, the station logo (if available) and the
channel name as well as further information are displayed.
If you click the Edit button after selecting a channel, a dialog appears where you
can change the settings for the channels selected:
54
Page 58

Advanced Settings
Note that depending on the channels selected (TV channels or radio stations,
analog or digital), only a few to the settings listed as follows can be configured.
Adding a channel
After clicking the New button, a window opens which displays the channel list
where you can add a new channel.
55
Page 59

Pinnacle MediaCenter
Depending on your TV hardware, the settings available in this menu option
may vary.
In the Select device dialog, for example, select the PCTV Analog PCI analog
device and click OK. A dialog appears where you can configure the following
settings for the new channel.
56
Page 60

Advanced Settings
Advanced Analog-Digital and Internet Radio
Reception Settings
Available radio channels
Source
Here you can select the PCTV hardware installed for radio reception.
All the available channels are displayed in the list field which appears
underneath. Click the New button to add channels, and click Delete to delete
them.
My favorite radio channels
The current Favorites are displayed in the list field. Click the New button to add
a channel to your Favorites list; click Delete to delete them. To organize your
radio stations in a Favorites list, follow the same procedure as for creating a
Favorites list for your TV channels, as described in the chapter Advanced
Channel Settings Overview.
Visualisation
Here a type of preview called a visualisation is displayed.
57
Page 61

Pinnacle MediaCenter
Channel Details
Various parameters for the currently selected radio station are displayed. Click
the Edit button to modify the currently selected radio station.
Load / save channel lists
In the this area, you can use the Load button to import previously created
channel lists. Click the Load button to import a channel list. You can also save
channel lists.
Channel Scan
To confirm, click the Start button. Now all of the PCTV hardware variants with
radio reception installed on the computer are displayed. Select the PCTV
hardware with radio reception for performing the channel scan. The search
starts.
58
Page 62

Advanced Settings
Advanced Settings - Program Guide EPG epgData.com Service
There are two services available in the Program Guide dialog. The descriptions
provided in this chapter focus on the Premium program guide. Use of the second
program guide (Free broadcast program guide) consists of data from the TV
signal (if available) and is free.
Being able to manually assign TV channels is dependent on your region.
epgData.com, the Electronic Program Guide (Premium
Program Guide)
The Electronic Program Guide EPG shows you the TV schedule for up to 2
weeks in advance. In this menu, you can request a test license from
epgData.com at no charge. After the test license has expired, you can subscribe
to the electronic program guide for a small fee.
To be able to use epgData.com, you need an Internet connection. It is not
available in all regions.
To obtain the test license, click the Settings button. The epgData.com
configuration wizard appears, which guides you step-by-step through the
required settings.
59
Page 63

Pinnacle MediaCenter
Click Continue. In the following dialog, click the Request test license button.
After going through the various dialogs for obtaining the epgData test license,
the epgData.com Channel assignment dialog appears. If the automatic TV
channel assignment does not function flawlessly, you can make corrections here.
Click Continue and then to finish up, click Exit.
60
Page 64

Advanced Capture Settings
Advanced Settings
In this menu option, you can configure all of the settings for recording with the
Pinnacle MediaCenter.
Capture folder
After clicking the Browse button, you can select where a recording should be
saved on your hard drive.
Hard disk capture formats
Source
Here you can select the PCTV hardware installed on your computer for
recording video files.
Video format
Select the recording format you want for your video recordings on your hard
drive. Depending on the version of your Pinnacle Media Center / TVCenter
software, you may not be able to select all the following formats.
Native format
61
Page 65

Pinnacle MediaCenter
The quality is dependent on the signal type. For digital signals (ATSC, DVB-T
or DVB-S), the MPEG data received are not further compressed, but are
recorded in the format received. For analog signals, you can use the DVD Long
format if you have an MPEG-2 license, or the VCD format, if you don't have
this license.
DivX
Select Hometheater Quality for DVD/DivX players, and Handheld and
Portable qualities for portable devices such as smartphones and/or PDAs.
Apple iPod
This format is used for iPod® video devices. Two qualities are offered, high and
low.
Sony PSP
This format is used for Sony PSP® video devices. One preset quality is offered.
MPEG
There are two categories, depending on whether you have an MPEG-2 license or
not. If you have a license, you can use each of the four formats supported: VCD,
SVCD, DVD and DVD Long. Otherwise you can only use the VCD format.
Video quality
In this field, select the default quality for your video recordings. The available
qualities depend on the previously selected recording format.
Audio format
Select the audio format you want for your recordings on your hard drive.
Audio quality
In this field, select the default audio quality for your video recordings. The
available qualities depend on the previously selected recording format.
Direct to DVD recording
The Pinnacle MediaCenter lets you simply and quickly burn files directly onto a
DVD - without having to take the time to save the files on your hard drive
beforehand.
If your computer is equipped with a suitable DVD recorder, this is listed in the
Direct to DVD recording area under DVD Recorder. If you have more than one
DVD burner installed on your computer (or connected to the computer via
USB), they can be selected here.
If the Pinnacle MediaCenter cannot find a suitable DVD recorder for direct to
DVD recording on your system or if no suitable medium has been inserted into
the recorder, the directory where the recorded files will be saved on your hard
drive is indicated in this field.
62
Page 66

Advanced Settings
Would you like to create chapters?
Use this option to define whether the recorded file should be saved to DVD with
or without chapter divisions. If you would like chapter divisions, enter the length
of the individual chapters.
Video quality
Here you can select the quality of the direct to DVD recording.
Audio format
Select the audio format you want for direct to DVD recordings.
Audio quality
Here you can select the audio quality of the direct to DVD recording.
Note that lower video quality requires less memory and therefore the
maximum recording time is also dependent on the video quality: Better and best
quality therefore reduces the possible recording time.
63
Page 67

Pinnacle MediaCenter
Advanced Timeshift Settings
This dialog is not available in every version of PMC software.
Default TimeShifting
Automatically enable Timeshifting at TV startup
When this option is selected, every time your watch TV, the current program is
recorded to the temporary area of your hard drive. The recording can be played
back at any time from any location at the same time live television is still being
recorded. Therefore, not even unexpected interruptions can cause your to miss a
second of the current TV show.
TimeShifting file path
After clicking the Browse button, you can select where temporary timeshift
recordings should be saved on your hard drive. Free disc space: indicates how
much memory is still available for recording. (This value is dependent on your
hard disk capacity as well as on the previously set maximum duration for
timeshift recordings.)
Maximum duration / TimeShifting file size
In this field, you can set the maximum duration of your timeshift recording in
minutes. Since the maximum size of the timeshift file depends on this value, the
resulting maximum file size is displayed after entering the maximum recording
time.
64
Page 68

Advanced Playback Settings
Advanced Settings
In this menu, you can configure the settings for playing back music, photos and
movies.
Music playback
Displaying MP3 information
Activating this option displays different types of information during MP3
playback, for example, artist and title.
Repeat playlist
In this field, you can activate or deactivate repeat mode.
When repeat mode is active, all the selected music titles in the category (from a
playlist or album, for example) are played repeatedly.
You can activate or deactivate repeat mode for the music you are playing at any
time in the Music menu.
Shuffle playlist
In this field, you can activate or deactivate shuffle mode.
When shuffle mode is active, all of the selected music titles in a category (from
a playlist or album, for example) are played in random order.
65
Page 69

Pinnacle MediaCenter
You can activate or deactivate shuffle mode at any time in the music menu to
modify playback.
Photo slide show
Slide duration
In this field, you can enter how long a photo should be displayed during a slide
show.
Show photo captions
Selecting this option displays the name of the current photo during photo
playback.
Background music playlist
If you would like to enhance your slide show with a bit of background music,
select the music you want under this menu option.
Repeat playlist
In this field, you can activate or deactivate repeat mode.
When repeat mode is on, all the photos in the selected category (for example, the
playlist or album) are displayed repeatedly.
You can activate or deactivate repeat mode at any time in the Photo menu.
Shuffle playlist
In this field, you can activate or deactivate shuffle mode.
When shuffle mode is on, all the photos in the category you selected (for
example, in the playlist or the photo album) are displayed in random order.
You can activate or deactivate shuffle mode at any time in the Photo menu.
CD/DVD start
Select the Auto playback option to start playing a CD/DVD automatically when
you put it in your CD-ROM/DVD drive.
Movies and DVD playback
Audio language
Here, you can set the default language for the soundtrack of your DVDs.
Menu language
Here, you can set the default language for the menu of your DVDs.
Subtitle language
Here, you can set the default language for the subtitles on your DVDs.
66
Page 70

Advanced Settings
Enable subtitles
When you activate this option, subtitles are displayed by default when you play
your DVDs.
Repeat playlist
In this field, you can activate or deactivate repeat mode.
When repeat mode is on, all the movies in the category you selected (for
example, in the playlist) are played back repeatedly.
You can activate or deactivate repeat mode at any time in the Movie menu.
Shuffle playlist
In this field, you can activate or deactivate shuffle mode.
When shuffle mode is on, all the movies in the category you selected (for
example, in the playlist) are played back in random order.
You can activate or deactivate shuffle mode at any time in the Movie menu.
67
Page 71

Pinnacle MediaCenter
Advanced Display Settings
In this menu, you can configure all the display settings for the Pinnacle
MediaCenter:
On Screen Display (OSD)
Enable OSD
When this option is selected, OSD displays with detailed information about the
current TV or radio program, the current music, the movie showing or the
current photo are displayed in the Pinnacle MediaCenter.
Hi Resolution OSD
If the OSD is displayed, you can select the picture quality you want. If
transparency is set to 0, the higher resolution (Hi Resolution OSD) is used by
default. Otherwise you can set the best applicable resolution.
Duration
This option lets you set how long an On Screen Display should be displayed on
screen.
68
Page 72

Advanced Settings
Transparency
Use a slider to set the degree of transparency (as a % value) to which the On
Screen Display in the Pinnacle MediaCenter interface should appear.
Preferred output device
Use this option to set where the Pinnacle MediaCenter should be displayed (for
example, on TV and Monitor 1).
The OSD function is dependent on the performance of your computer and
your graphics card. If TV playback jiggles, reduce the OSD resolution or
deactivate this option.
Screen saver
It can be annoying if the screen saver comes on while you are watching
television or a video. If this is the case, you can deactivate the screen saver.
Preferred video aspect ratio
Here you can select the picture size in which the Pinnacle MediaCenter should
be displayed.
Hardware acceleration
Here you can activate the graphics card acceleration for optimizing the overlay
in the Pinnacle MediaCenter.
Video display
Optimize your live TV viewing in the Pinnacle MediaCenter using the sliders
for Brightness, Contrast, Saturation, Blur and Crop. You still have the option of
activating the options of de-interlacing and de-blocking.
69
Page 73

Pinnacle MediaCenter
Advanced Audio Settings
In this menu option, you can configure the audio settings for the hardware
equipment connected to your computer.
Preferred audio language
Select the language you want (for example, English).
Audio output device
First select your audio output device (for example, your sound card).
The output setting SPDIF or analog OUT continues to be displayed. Here set
whether AC3 Sound should be used. Note the following configurations when
using AC3 Sound:
If SPDIF has been selected in the audio configuration, the AC3 Sound is
forwarded to the sound card; however, the prerequisite for this is the additional
selection of AC3 Sound by clicking the Audio Mode
Pinnacle MediaCenter. MPEG audio is always the default setting, but can be
selected as a part of a template (for example, if broadcast from the channel).
button in the
70
Page 74

Advanced Settings
Now AC3 Sound is transmitted via the existing SPDIF output, for example,
from a receiver with a SPDIF input. AC3 Sound is played back using a Surround
Sound system connected to the receiver. The computer loud speakers are then
switched to mute.
SPDIF enabled or disabled
If SPDIF has been enabled or disabled and no receiver is connected to the
SPDIF output of your sound card, check in the About the Pinnacle
MediaCenter menu in the MediaCenter 4 functions area, whether the Dolby 2
Channel Downmix option has been released.
If the function is highlighted in red, it is disabled. Now you can't here any sound
from your computer loud speakers. Register under Start/Programs/Pinnacle
MediaCenter/Registration. After this, the Dolby 2 Channel Downmix function
is released. Now you hear stereo sound over the computer loud speakers (but no
AC3 Sound). The free activation is dependent on the version of the PMC
software.
71
Page 75

Pinnacle MediaCenter
Use the Volume slider to set the output volume. In addition, you can use the
level display for the right and left audio channel.
Preferred playback format
Here you can select audio output format you want (for example, Dolby digital
2.0).
Analog audio input
TV Tuner device
In this area, select the audio input source. Choose between your PCTV hardware
and your sound card.
Use the Volume slider to set the input volume. In addition, you can use the level
display for the right and left audio channel.
72
Page 76

Advanced Remote Control Settings
Advanced Settings
Remote control selection
Here, please click the type of remote control you received in the package.
If you do not wish to use the remote control, select the no remote option.
Remote control receiver
Use the Run IR receiver service at startup option to set whether the IR service
will start directly after the computer is started.
In the IR receiver device drop-down menu, select the PCTV hardware that you
would like to control remotely.
73
Page 77

Pinnacle MediaCenter
Advanced Hardware Settings
Use this dialog to configure your PCTV hardware. Depending on the hardware
selected, the Settings options in the dialog may vary slightly.
Hardware to configure
Select the PCTV hardware you want. In this area, all of the PCTV hardware
variants installed are listed.
Antenna inputs
Here you can activate the power supply to the antennas (for example, for an
active room antenna).
Preview
In the Preview area, you can switch between and display the TV channels. You
can also select S-video and Composite if the hardware has this input.
Analog video inputs
Optimize your live TV viewing in the Pinnacle MediaCenter using the sliders
for Brightness, Contrast and Saturation. Under Video standard, select the video
standard (PAL, NTSC or SECAM).
74
Page 78

Advanced Settings
Advanced System Information Settings
MediaCenter 4 install information
In this area contains important information about the Pinnacle MediaCenter that
you will need if you ever have to contact Pinnacle Systems Support. You also
have the option of checking for PMC updates or starting registration.
MediaCenter 4 features
In this part of the menu, you can see whether the following functions have been
enabled or disabled (marked in green or red).
75
Page 79

Pinnacle MediaCenter
If SPDIF has been enabled or disabled (see Audio settings) and no receiver
is connected to the SPDIF output of your sound card, check in the About the
Pinnacle MediaCenter menu in the MediaCenter 4 functions area whether the
Dolby 2 Channel Downmix option has been released. If the function is
highlighted in red, it is disabled. Now you can't here any sound from your
computer loud speakers. Register under Start/Programs/Pinnacle
MediaCenter/Registration. After this, the Dolby 2 Channel Downmix function
is released. Now you hear sound over the computer loud speakers (but no AC3
Sound). The free activation is dependent on the version of the PMC software.
The function must be purchased if used with the TVCenter.
System information
To obtain a summary of the system information, click the Start button in the
System information area to display the details of the computer being used. You
can save and print the system information.
More information
You will find more information on the Pinnacle Web site:
www.pinnaclesys.com or www.pinnaclesys.com/support.
76
Page 80

Technical Support
Getting Technical Support
If problems should occur with your Pinnacle Systems product, please first
make sure that the latest version of the software has been installed on your
computer system.
Pinnacle Systems provides a free, round-the-clock service, which enables users
to rectify problems themselves. You will be able to find answers to your
questions seven days a week, right around the clock.
You will find this technical support at:
http://www.pinnaclesys.com
Click Support and select your product from the product list. Select your product
again in the Interactive Support category. You will then be able to choose from
the following support options:
1. Frequently Asked Questions
This is the best way of obtaining answers to your questions. Here you will find
hundreds of technical problems and their solutions sorted by subject areas.
These are shown in the order of the 20 most frequently read questions. In
addition, you can also sort the documents according to problem categories. To
do this, use the pull-down Category menu.
Please use the search function to obtain answers to special questions.
2. Ask a Question and Get an Answer
Simply enter your question or the symptoms of your problem and you will
obtain a list of the most obvious solutions. If you do not obtain a satisfactory
solution, please rephrase your question. For example, instead of "I get error
messages" you could enter "I get error messages when installing the software".
Instead of entering a specific question, you can select one of the main functions
listed for your product or a general subject area from the pull-down Category
list. The ten most frequently asked questions and the appropriate solutions in the
category that you have selected will then be displayed.
3. E-mail Support
If you are unable to find an answer to your questions with the help of our Web
site, Pinnacle Systems also offers technical support by e-mail. E-mails will be
answered as quickly as possible. Please use the Ask a Question box for this
77
Page 81

Pinnacle MediaCenter
purpose. Before the e-mail is submitted, five solutions to your problem will be
suggested. Please read these carefully, as more than 70% of customers find
suitable answers in these proposed solutions.
4. Discussion Forum
More than 100,000 registered users make use of this free service. Visit the
Pinnacle Systems online discussion forum to see whether your question has
already been asked and a suitable answer found. To use the service, ask your
question in the discussion forum and you will receive help from Pinnacle
Systems or other users.
A search function is provided in the discussion forum. If you enter "poor
picture", for example, contributions on this subject will be displayed.
When you make use of Pinnacle Systems technical support, you should have
all the technical information about your computer configuration ready at hand.
78
Page 82

License Information
Pinnacle End User License Agreement
This End User License Agreement (“License”) is a legal agreement between you
and Pinnacle Systems (“Pinnacle”) regarding Pinnacle’s software and the
accompanying documentation (collectively, the “Software”). CAREFULLY
READ THE FOLLOWING LICENSE. USING THIS SOFTWARE
INDICATES YOUR ACCEPTANCE OF THIS LICENSE. IF YOU DO NOT
ACCEPT OR UNDERSTAND THE TERMS OF THIS LICENSE, YOU
SHOULD NOT INSTALL THE SOFTWARE AND PROMPTLY RETURN
THIS PRODUCT TO YOUR VALUE-ADDED RESELLER.
1. License Grant. Subject to the restrictions set forth below, this License grants
you a non-exclusive, perpetual license to (a) install the Software on only one
computer; (b) use or authorize use of the Software on only one computer; (c)
make one copy of the Software, in machine-readable form, solely for backup
purposes; provided you include all copyright and other proprietary rights notices
on the copy and (d) transfer the Software and this License to another party if the
other party agrees to accept the terms and conditions of this License. If you
transfer the Software, you must at the same time either transfer all copies to the
same party or destroy any copies not transferred. If you transfer possession of
any copy of the Software to another party, your License is automatically
terminated.
2. License Restrictions. You may not, or allow any third party to, (a) rent,
lease, sell, loan or otherwise transfer the Software or any of your rights and
obligations under this License; (b) install the Software on a network for use by
multiple users, unless each user has purchased a license; (c) reverse-engineer,
decompile or disassemble the Software or hardware in whole or in part; (d)
remove or destroy any copyright notices or other proprietary markings of the
Software or any third-party software; (e) modify or adapt the Software, merge
the Software into another program or create derivative works based on the
Software; (f) make copies of or distribute, for profit or otherwise, the Software,
except as expressly provided above; (g) make any alteration, modification,
connection, disconnection, improvement or adjustment of any kind to or use the
Software except as explicitly contemplated in the enclosed documentation and in
this License and (h) sublicense, transfer or assign this License or any of the
rights and obligations granted under this License, except as explicitly
contemplated in this License. Any purported transfer or assignment will be
void.
79
Page 83

Pinnacle MediaCenter
3. Export Restrictions. The export and re-export of Pinnacle software products
are controlled by the United States Export Administration Regulations and such
software may not be exported or re-exported to any country to which the United
States embargoes goods. In addition, Pinnacle software may not be distributed
to persons on the Table of Denial Orders, the Entity List, or the List of Specially
Designated Nationals. By downloading or using a Pinnacle software product
you are certifying that you are not a national of any country to which the United
States embargoes goods and that you are not a person on the Table of Denial
Orders, the Entity List, or the List of Specially Designated Nationals.
4. Ownership. The license granted hereunder does not constitute a transfer or
sale of ownership rights in or to the Software. Except for the license rights
granted above, Pinnacle retains all right title and interest in and to the Software
including all intellectual property rights therein. The Software is protected by
applicable intellectual property laws, including United States copyright laws and
international treaties.
5. Third Party Proprietary Property. This Software may contain the
proprietary property of others, which has been licensed to Pinnacle, your use of
the Software is expressly conditioned on your agreement not to remove any
copyright notices or other proprietary markings of the third party software.
6. Security. You acknowledge and agree that in order to protect the integrity of
certain third party content, Pinnacle and/or its licensors may provide for
Software security related updates that will be automatically downloaded and
installed on your computer. Such security related updates may impair the
Software (and any other software on your computer which specifically depends
on the Software) including disabling your ability to copy and/or play "secure"
content, i.e. content protected by digital rights management. In such an event,
Pinnacle and/or its licensors shall use reasonable efforts to promptly post notices
on Pinnacle’s web site explaining the security update and providing instructions
to end-users for obtaining new versions or further updates of the Software that
restore access to secure content and related features.
7. Term and Termination. This License shall be effective upon installation of
the Software and shall terminate upon the earlier of (a) your failure to comply
with any term of this License; (b) return, destruction or deletion of all copies of
the Software in your possession or (c) transfer of the Software and this License
to another party in accordance with Section 1(d). Pinnacle’s rights and your
obligations shall survive termination of this License.
8. Limited Warranty. Pinnacle warrants to the original licensee that the
Software, as delivered, will perform in accordance with the accompanying
documentation for a period of 30 days from the date of the original purchase
(“Limited Warranty”). Pinnacle’s entire liability and your exclusive remedy for
breach of the preceding Limited Warranty shall be, at Pinnacle’s sole option,
repair or replacement of the Software that does not meet the warranty set forth
80
Page 84

License Information
herein and that is returned to Pinnacle. This limited warranty shall be void if
failure of the Software has resulted from any accident, abuse, misuse or
misapplication by you. Any replacement Software will be warranted for the
remainder of the original warranty period or 30 days, whichever is longer.
9. NO OTHER WARRANTIES. EXCEPT AS SET FORTH ABOVE, THE
SOFTWARE IS PROVIDED ON AN “AS IS” BASIS. YOU ASSUME ALL
RESPONSIBILITIES FOR THE QUALITY AND PERFORMANCE OF THE
SOFTWARE. TO THE MAXIMUM EXTENT PERMITTED BY
APPLICABLE LAW, PINNACLE DISCLAIMS ALL WARRANTIES,
EITHER EXPRESS OR IMPLIED, INCLUDING BUT NOT LIMITED TO
IMPLIED WARRANTIES OF MERCHANTABILITY,
NONINFRINGEMENT, AND FITNESS FOR A PARTICULAR
PURPOSE. LICENSOR DOES NOT WARRANT THAT THE FUNCTIONS
CONTAINED IN THE SOFTWARE WILL MEET YOUR REQUIREMENTS,
BE UNINTERRUPTED OR ERROR FREE.
10. LIMITATION OF LIABILITY. YOU AGREE THAT IN NO EVENT
WILL PINNACLE BE LIABLE FOR ANY CONSEQUENTIAL, SPECIAL,
INDIRECT, INCIDENTAL OR PUNITIVE DAMAGES WHATSOEVER,
EVEN IF PINNACLE HAS BEEN ADVISED OF THE POSSIBILITY OF
SUCH DAMAGES. IN NO EVENT SHALL PINNACLE’S LIABILITY
EXCEED THE TOTAL AMOUNT OF THE FEES PAID FOR THE
SOFTWARE. Some states/jurisdictions do not allow the limitation or exclusion
of incidental or consequential damages in certain circumstances, so the above
limitations may not apply in some circumstances.
11. General. This License is governed by the laws of the State of California and
by the federal laws of the United States, without reference to conflict of laws
principles. The federal and state courts within the County of Santa Clara,
California shall have excusive jurisdiction to adjudicate any dispute arising out
of this License and you hereby consent to the personal jurisdiction of the federal
and state courts within the County of Santa Clara, California. This License is
the entire agreement between you and Pinnacle and supersedes any other
communication with respect to the Software. No modification of or amendment
to this License will be effective unless in writing signed by both parties. If any
provision of this License is held invalid or unenforceable, the remainder of this
License will continue in full force and effect.
81
Page 85

Glossary
#
16:9-Format: Also called widescreen. Television format where the width-toheight ratio of the display area is 16:9 instead of 4:3. When broadcast for
television, part of the picture is broadcast in black (black bars on top and bottom
of the picture) to make it compatible with the traditional 4:3 format. The first
line of the TV picture contains additional code that instructs any 16:9 television
to enlarge the picture (see also "4:3 format")
4:3 format: This is the traditional television format. The width-to-height ratio of
the display area is 4:3.(see also "16:9 format")
A
Aspect ratio: The width-to-height ratio of one pixel. Some video formats must
have this ratio in order to display the picture properly. If the aspect ratio is 1, the
pixel will be square. If the aspect ratio is not 1, the pixel will be rectangular.
When rectangular pixels are used without adjustment, circles are displayed as
ovals. This distortion can be eliminated by factoring in the aspect ratio. (see also
"Pixel")
AVI: Abbreviation for "Audio Video Interleaved", the standard format for
digital video on PCs. (see also "Video for Windows")
B
BMP: Abbreviation for "BitMaP". Microsoft Windows standard format for
pixel graphics.
C
Client: A system (computer or program) in a network or on the Internet that
requests files or services. The system (computer or program) that provides the
files or services is called a server. The client can request a data transfer or a print
job from the server.
CoDec: Acronym for Compressor/Decompressor, compresses (packs) and
decompresses (unpacks) image data.
Composite Video: The encoding of color and brightness information into a
single signal. (see also "S-Video")
Content: Content is the information contained in a message or a Web site that
does not consist of structures or formats. This term applies to all media,
including texts, data and images to audio information and videos.
83
Page 86

Pinnacle MediaCenter
D
Data rate: The data rate is also known as the bit rate. The bit rate measures how
fast bits of data can be transferred over a medium in a given period of time. This
rate is listed in bits per second (bps).
DHCP: Abbreviation for "Dynamic Host Configuration Protocol". WindowsServer software that assigns an IP address to each computer in a network. (see
also "IP Address")
Dial-up connection: A dial-up connection is the most common type of
consumer Internet connection. A modem connects the computer to the Internet
provider's system via the telephone line. The provider's system is normally
connected to the Internet via an ISDN line. (see also "Modem" and "ISDN")
Digital Television: See also "DVB" or "DTVB". Digital television transmission
standard. Describes the transmission of video, audio and additional information
as digital data signals.
Digital video: Digital video stores information as bits in a file. This differs from
the method used by analog storage media such as VCRs.
DSL: Short for "Digital Subscriber Line". This technology allows users with
DSL modems to download up to 6 Mbps and upload 0.6 Mpbs over short
distances of 3 miles or less. DSL connects using copper landlines.
DTVB: Abbreviation for "Digital TeleVision Broadcasting". (see also "Digital
Television" or "DVB")
DVB: Abbreviation for "Digital Video Broadcasting". Transmission standard for
digital television. Classified as "DVB-C", "DVB-S", and "DVB-T" depending
on the transmission medium.
DVB-C: Abbreviation for "Digital Video Broadcasting Cable". Transmission
standard for digital television in the cable network. (see also "DVB")
DVB-S: Abbreviation for "Digital Video Broadcasting Satellite". Transmission
standard for digital television via satellite. (see also "DVB")
DVB-T: Abbreviation for "Digital Video Broadcasting Terrestrial".
Transmission standard for digital television via antenna. (see also "DVB")
DVD: Short for "Digital Versatile Disc", formerly known as "Digital Video
Disc". An optical storage medium with more capacity and bandwidth than a CDROM. DVDs are commonly used for multimedia and data-storage applications.
E
Ethernet: The most common type of local-area network. Each node (computer
or server) in the network checks whether any other computer is transmitting
data. It then waits for the other computers to finish with their transmissions
before it starts its own transmission. (see also "LAN")
84
Page 87

Glossary
F
Field: A video image consists of horizontal lines divided into two fields. All the
odd-numbered lines make up one field; the even-numbered lines make up the
other field.
Filesharing: Filesharing refers to any exchange of data between two or more
computers over the Internet. There are currently many filesharing programs
available on the Internet, many of which can be used for free.
Firmware: Firmware is system software stored in ROM or Flash memory.
Firmware is not deleted when the system has been turned off.
Flash memory: Re-writable permanent memory that behaves like a hybrid of
RAM and a hard drive. Flash memory does not lose data even when its power
supply has been turned off. (see also "RAM")
G
GIF: Abbreviation for Graphics Interchange Format. This graphics format was
developed by CompuServe as a high-compression format for transmitting
images without losing any data. The most important graphics element on the
Internet. The GIF format only has 256 colors because only 8 bits go into storing
each dot. GIFs are ideal formats for animations.
H
HTML: Abbreviation for "HyperText Markup Language". A document standard
developed during the World Wide Web project that provides a simple logical
structure for titles, headings, paragraphs, numbering, forms, tables and
mathematical formulas as well as a language for defining hypertext links.
HTTP: Abbreviation for "HyperText Transfer Protocol". A standard mechanism
used on the Internet to share documents between servers and clients.
I
IDE: Abbreviation for "Integrated Drive Electronics". IDE is a parallel interface
used to connect hard-disk drives, CD drives, tape devices and floppy drives.
Advanced IDE hard drives have a IDE controller built into the hard-drive
housing.
Interlace: A method of creating an image used in PAL and other systems.
Interlacing uses fields. Each field has 312 1/2 lines that are inserted one after
another. (see also "Field")
IP Address: Abbreviation for "Internet Protocol". Every computer connected to
the Internet receives a unique identification number that consists of four
sections. This number is called an IP address. This allows other computers in the
network to identify it, send data packets to it and to process data they have
85
Page 88

Pinnacle MediaCenter
received from it. IP addresses make sure that the right data packets are sent to
the right recipient via the right path.
ISDN: Abbreviation for "Integrated Services Digital Network". A digital
telephone network that, unlike analog modems, transmits digital data. With bit
rates of 64 bps, ISDN transmits data much faster and more accurately than
modems.
J
JPEG: Abbreviation for Joint Photographic Experts Group. The data extension
is "JPG". Graphics-compression method developed by C-Cube Microsystems.
This pixel image format offers 24-bit color depth and is especially suited for
photos and photorealistic images with many different shades and hues. Because
it exploits some of the physiological characteristics of human sight and permits
data losses that are invisible to the naked eye, it attains extremely high
compression rates.
JPG: See "JPEG".
L
LAN: Abbreviation for "Local-Area Network". A local network located in a
building or on company premises that is based on private transmission media
and equipment. Ethernet and Token Ring are common LAN technologies.
Letterbox: The letterbox format is created when an image recorded in 16:9
format (or wider) is displayed on a normal television (4:3). This format typically
displays the picture between black bars on the top and bottom of the screen. This
term was probably derived from the wide, thin format that looks a lot like the
slot of a letterbox.
M
M3U Format: M3U (file extension ".m3u") is the standard data format in which
Winamp and other playlists are saved.
Modem: Abbreviation for "MOdulator DEModulator". A device that converts
digital signals ("the computer's language") to analog signals ("the telephone's
language") and vice versa. Modems are used to connect to the Internet using a
dial-up connection.
MOV: Name given to Quicktime-formatted videos.
MP3: MP3 is an audio format that provides relatively good sound (compared to
the uncompressed original) and very high compression rates. It is an excellent
way to store and share music data over the Internet. Many MP3 players support
this format and allow users to store hours of sound at almost full-range HiFi
quality in just a few megabytes.
86
Page 89

Glossary
MPEG: Abbreviation for Motion Pictures Experts Group. Video-compression
standard. There are different formats for different types of compression, such as
MPEG 1, MPEG 2, etc.
MPEG 4 AVI: Video format with extremely high compression.
N
NTSC: Abbreviation for "National Television Standards Committee". A
television standard with 525 lines and 60 fields per second that is used in North
and Central America. (see also "PAL", "SECAM", "Field")
P
PAL: Abbreviation for "Phase Alternation Line". Television standard developed
in Germany that uses 625 lines and 50 fields per second. This is the main TV
standard in Europe. (see also "NTSC", "SECAM", "Field")
PCMCIA: Abbreviation for "Personal Computer Memory Card International
Association". A PCMCIA card is a lightweight, removable module about the
size of a credit card that provides additional functionality to a portable
computer. The module may expand existing RAM or hard-drive space or
provide network functionality.
Peer-to-peer (P2P): Peer-to-peer filesharing sites are Internet forums that offer
freely available media files. There are more than 70 such forums online.
PHP: The abbreviation PHP officially stands for "Hypertext Preprocessor". PHP
is a widely used scripting language designed for general use. It can be embedded
in HTML and is ideal for Web applications. PHP is easy to learn, offers
excellent database and Internet-Protocol interfaces and supports many additional
function libraries. PHP is the ideal development tool for creating dynamic Web
content.
PIN: Abbreviation for "Personal Identification Number". A PIN is a secret code
comprising several digits that identifies a given user.
PiP: Abbreviation for "Picture in Picture."
Pixel: Also known as a "picture element" or "pel". In a video-recording device
(such as a camera) or a playback device (such as a monitor), a pixel is a lightsensitive or light-emitting surface with a specified height and width. When
stored electronically, pixels contain brightness and color information for a given
image element. The aspect ratio, which also plays a key role in video playback,
is stored separately in the files for some data formats. (see also "Aspect ratio")
PNG: Abbreviation for Portable Network Graphics. Graphics format for bitmapped images that supports interlacing and offers 24-bit color depth and
lossless compression. (see also "Interlace")
87
Page 90

Pinnacle MediaCenter
R
RAM: Abbreviation for "Random Access Memory". The main memory of the
computer. The RAM temporarily stores data and runs programs at the same
time.
RGB: Abbreviation for "Red Green Blue". RGB values can be used to define a
particular hue. The color is calculated based on the amount of red, blue and
green in each pixel.
Ripping: Files or parts of files on an audio CD or movie DVD are "read in" and
stored on the PC's hard drive, where they can be played back or processed
further.
ROM: Abbreviation for "Read Only Memory". A memory chip that can be read
from, but not written to.
Router: Routers, also known as "Intermediate Systems (IS)", are linking
elements that interconnect two or more subnetworks. In addition to acting as a
bridge, routers can expand the boundaries of a network (number of nodes,
physical extension). Routers also control data traffic by not forwarding defective
data packets.
S
S-VHS: Improved version of VHS based on the S-Video standard, but with
better image definition. (see also "S-Video", "VHS")
S-Video: S-Video signals deliver brightness and color information separately
through several cables. This means that the video does not need to be modulated
and demodulated and image quality is not impaired as a result. (see also
"Composite Video")
SCART: Type designation for the EuroAV plug, a 21-pin, standardized
connector for all video and audio lines. Signals are not converted prior to
transmission, which makes for a high quality standard.
SD: Abbreviation for "Standard Definition". When a resolution consists of up to
720 x 480 (NTSC) or 720 x 576 (PAL), we are talking about "Standard
Definition". (see also "HD")
SECAM: Abbreviation for "Sequential Couleur à Mémoire". A color-television
standard developed in France and Eastern Europe based on the PAL system.
SECAM uses 625 lines and 50 fields per second. (see also "NTSC", "PAL",
"Field")
Server: A computer or a program that offers storage, data-transfer and other
services in a network or on the Internet. Servers often provide services for
requestors (clients) located on other computers.
Set-top box: A set-top box is an additional device that receives digital television
stations and data. It can be hooked up to any standard television set.
88
Page 91

Glossary
Streaming: The act of transferring compressed video and audio files over the
Internet. Streaming does not download all the data at once, but downloads it in
stages using a store-and-forward method. The data does not arrive as a
continuous file, but is cached in the buffer, which can create delays at the start
of transmission. The data can be transmitted live or it can be downloaded later.
The computer receiving the data stream must have a program (player) installed
on it that decompresses the data. Players are usually installed in browsers such
as Internet Explorer. The speed and quality of the data depend heavily on how
much bandwidth is available. In order to ensure smooth playback, the Internet
connection should offer at least 300 Kbps in bandwidth. There are various file
formats for audio and video streaming. The most popular formats are MP3,
RealAudio and WMA.
SVCD: Expanded Video-CD standard. This image format offers a higher line
resolution and uses MPEG-2 instead of MPEG-1 to compress the video data.
(see also "VCD")
T
TIF: Abbreviation for "Tagged Image File Format". Standard format for
professional printed images developed by Aldus.
V
VCD: Abbreviation for "Video CD". A standard for writing MPEG-1-formatted
videos to CDs. A Video CD can hold up to an hour of digital video and stereoquality sound. The data rate of the MPEG-1 stream is constant - around 170 kB
per second (224 kpbs sound, 138 kB video, PAL). This standard offers image
and sound quality that is comparable to that of a HiFi VCR. (see also "SVCD")
VHS: Abbreviation for "Video Home System". System used by many VCRs for
recording and playing back sound and video from magnetic tape. It uses a
composite signal that combines brightness and color information into one signal.
(see also "Composite Video", S-VHS)
Video-on-Demand (Vod): A multimedia application that allows users to access
a video server and view photos/images or videos/movies.
Video for Windows: Video for Windows, a Microsoft Windows system
expansion, allows users to record, store and play back digital video sequences.
(see also "AVI")
W
Web Server: A computer on which HTML pages and network software are
stored. Web servers constantly deliver content via the Internet or a network to
Web browsers, where it is displayed on the user's monitor.
89
Page 92

Pinnacle MediaCenter
Wi-Fi: Abbreviation for "Wireless Fidelity". Wi-Fi is an 802.11-compliant
certification for wireless local-area networks (LANs) issued by the WECA
(Wireless Ethernet Compatibility Alliance). This certification confirms that all
wireless network products that comply with the standard are interoperable.
WIA: Abbreviation for "Windows Imaging Architecture". An imaging
architecture introduced by Microsoft for Windows Millennium Edition and
Windows XP. WIA allows image-processing programs to communicate with,
and receive data from, digital cameras, scanners and other devices.
Widescreen: See "16:9 format".
WLAN: Abbreviation for "Wireless Local Area Network". (see also "LAN")
WMA: Abbreviation for "Windows Media Audio". Microsoft's audio playback
method that, unlike its rival, MP3, has an integrated rights-management system.
(see also "MP3")
WMV: Abbreviation for "Windows Media Video". Video-file format developed
by Microsoft.
X
XviD: Another version of the MPEG 4 AVI video-media format. (see also
"MPEG 4 AVI")
90
Page 93

Index
A
AC3 Sound ....................................70
Advanced Analog TV Reception
Settings.......................................51
Advanced Audio Settings..............70
Advanced Capture Settings ...........61
Advanced Channel Settings
Overview....................................49
Advanced Display Settings ...........68
Advanced DVB-S Reception
Settings.......................................53
Advanced DVB-T Reception
Settings.......................................53
Advanced General Settings ...........48
Advanced Playback Settings .........65
Advanced Remote Control Settings
....................................................73
Advanced Settings Dialog Overview
....................................................47
C
Channel list ................................... 54
Chapters......................................... 61
Closed Bottom Control Bar .......... 24
Configuration Wizard .....................3
Control Bars .............. 8, 9, 10, 17, 20
D
Default TimeShifting ....................64
Dialog Overview ........................... 47
Direct to DVD recording .............. 61
DiSEqC .........................................53
Display .......................................... 68
Displaying MP3 information ........65
DivX.............................................. 61
Dolby 2 Channel Downmix .......... 70
Dual PCTV.................................... 39
Advanced Timeshift Settings ........64
Analog and digital TV.....................1
Analog video inputs.......................74
Analog-Digital Reception .............57
Antenna inputs...............................74
Apple iPod.....................................61
ATSC.............................................61
Audio .............................................70
Audio configuration ......................70
Audio language..............................70
Audio quality.................................61
B
Basic Settings ..................................3
Bottom Control Bar .......................10
DVB-S........................................... 53
DVB-T........................................... 52
DVD .............................................. 61
DVD Long format.........................61
E
Edit Channels ................................ 54
Electronic Program Guide (EPG) .. 1,
33
EPG ............................................... 33
epgData.com Service ....................59
F
Free broadcast program guide....... 59
Full Screen button ......................... 42
91
Page 94

Pinnacle MediaCenter
H
Hard disk capture formats .............61
Hardware acceleration...................68
Hardware Settings .........................74
I
Internet Radio ................................57
M
Manual Recording .........................35
MediaCenter 4 ...............................75
Modify Channels ...........................54
Modifying Channels ......................54
Movies .............................................5
Movies and DVD playback ...........65
MPEG ............................................61
Multimedia entertainment ...............1
Music ...............................................5
Music playback..............................65
N
NTSC.............................................74
O
On Screen Display.........................68
Opened Bottom Control Bar .........25
OSD ...............................................68
Output device ................................68
P
PAL................................................74
PC Function Keys..........................45
PC View.......................................5, 8
PCTV Analog PCI.........................51
PCTV Hybrid Pro Stick DVB-T ...53
PCTV Sat USB DVB-S ................ 53
Photo slide show ........................... 65
Photos.............................................. 5
Picture-in-Picture .................... 39, 40
Pinnacle End User License
Agreement ................................. 79
Pinnacle Hardware .......................... 1
Pinnacle MediaCenter ..................... 1
Pinnacle MediaCenter User
Interfaces ..................................... 5
Pinnacle MediaCenter Window
Formats ...................................... 42
Pinnacle MediaManager .................1
Pinnacle PCTV................................ 1
Pinnacle TVCenter.......................... 1
Pinnacle Web site.......................... 75
PIP ................................................. 39
PIP Selector................................... 40
Playback ........................................ 65
Playlists ......................................... 65
Premium program guide ............... 59
R
Radio ............................................... 1
Recording ...................................... 38
Remote control.......................... 1, 73
Remote View................................... 5
S
Scan Mode..................................... 51
Screen saver ..................................68
SECAM......................................... 74
Settings............................................ 5
Shortcut Menu............................... 12
Shortcuts........................................ 45
Sony PSP....................................... 61
92
Page 95

Index
SPDIF ............................................70
Subtitles .........................................65
SVCD ............................................61
System Information .......................75
T
Technical Support..........................77
Teletext ....................................27, 28
Timeshift........................................64
Top Control Bar...............................9
TOP Text .......................................28
TV channels...................................49
TV Tuner device............................70
TV View ..........................................5
U
User Interfaces ................................5
V
VCD format................................... 61
Video aspect ratio.......................... 68
Video display ................................68
Video quality................................. 61
Video Standard.............................. 51
W
Window Formats........................... 42
93
 Loading...