

Page 1

®
Mbox Mini User Guide
Version 9.0
Page 2

Legal Notices
This guide is copyrighted ©2010 by Avid Technology, Inc.,
(hereafter “Avid”), with all rights reserved. Under copyright
laws, this guide may not be duplicated in whole or in part
without the written consent of Avid.
003, 96 I/O, 96i I/O, 192 Digital I/O, 192 I/O, 888|24 I/O,
882|20 I/O, 1622 I/O, 24-Bit ADAT Bridge I/O, AudioSuite,
Avid, Avid DNA, Avid Mojo, Avid Unity, Avid Unity ISIS,
Avid Xpress, AVoption, Axiom, Beat Detective, Bomb Factory,
Bruno, C|24, Command|8, Control|24, D-Command, D-Control,
D-Fi, D-fx, D-Show, D-Verb, DAE, Digi 002, DigiBase,
DigiDelivery, Digidesign, Digidesign Audio Engine, Digidesign
Intelligent Noise Reduction, Digidesign TDM Bus, DigiDrive,
DigiRack, DigiTest, DigiTranslator, DINR, D-Show, DV Toolkit,
EditPack, Eleven, EUCON, HD Core, HD Process, Hybrid,
Impact, Interplay, LoFi, M-Audio, MachineControl, Maxim,
Mbox, MediaComposer, MIDI I/O, MIX, MultiShell, Nitris, OMF,
OMF Interchange, PRE, ProControl, Pro Tools M-Powered,
Pro Tools, Pro Tools|HD, Pro Tools LE, QuickPunch, Recti-Fi,
Reel Tape, Reso, Reverb One, ReVibe, RTAS, Sibelius,
Smack!, SoundReplacer, Sound Designer II, Strike, Structure,
SYNC HD, SYNC I/O, Synchronic, TL Aggro, TL AutoPan,
TL Drum Rehab, TL Everyphase, TL Fauxlder, TL In Tune,
TL MasterMeter, TL Metro, TL Space, TL Utilities, Transfuser,
Trillium Lane Labs, Vari-Fi, Velvet, X-Form, and XMON are
trademarks or registered trademarks of Avid Technology, Inc.
Xpand! is Registered in the U.S. Patent and Trademark Office.
All other trademarks are the property of their respective
owners.
Product features, specifications, system requirements, and
availability are subject to change without notice.
Guide Part Number 9329-65069-00 REV A 9/10
Documentation Feedback
At Avid, we are always looking for ways to improve our
documentation. If you have comments, corrections, or
suggestions regarding our documentation, email us at
techpubs@avid.com.
Page 3

contents
Chapter 1. Welcome to Mbox Mini . . . . . . . . . . . . . . . . . . . . . . . . . . . . . . . . . . . . . . . . . . . . 1
Mbox Mini Features . . . . . . . . . . . . . . . . . . . . . . . . . . . . . . . . . . . . . . . . . . . . . . . . . . . . . . . 1
System Requirements and Compatibility . . . . . . . . . . . . . . . . . . . . . . . . . . . . . . . . . . . . . . . . 2
Conventions Used in This Guide . . . . . . . . . . . . . . . . . . . . . . . . . . . . . . . . . . . . . . . . . . . . . . 2
About www.avid.com . . . . . . . . . . . . . . . . . . . . . . . . . . . . . . . . . . . . . . . . . . . . . . . . . . . . . . 3
Chapter 2. Mbox Mini Hardware Overview . . . . . . . . . . . . . . . . . . . . . . . . . . . . . . . . . . . . . 5
Mbox Mini Front Panel Features . . . . . . . . . . . . . . . . . . . . . . . . . . . . . . . . . . . . . . . . . . . . . . 5
Mbox Mini Back Panel Features . . . . . . . . . . . . . . . . . . . . . . . . . . . . . . . . . . . . . . . . . . . . . . 7
Chapter 3. Installing and Connecting Mbox Mini. . . . . . . . . . . . . . . . . . . . . . . . . . . . . . . . 9
Chapter 4. Making Studio Connections . . . . . . . . . . . . . . . . . . . . . . . . . . . . . . . . . . . . . . . 11
Connecting Outputs . . . . . . . . . . . . . . . . . . . . . . . . . . . . . . . . . . . . . . . . . . . . . . . . . . . . . . 11
Connecting Audio Inputs . . . . . . . . . . . . . . . . . . . . . . . . . . . . . . . . . . . . . . . . . . . . . . . . . . 12
Connecting a Microphone to Mbox Mini . . . . . . . . . . . . . . . . . . . . . . . . . . . . . . . . . . . . . . . . 13
Connecting Instruments to the Mbox Mini . . . . . . . . . . . . . . . . . . . . . . . . . . . . . . . . . . . . . . 13
Chapter 5. Using the Driver Control Panel. . . . . . . . . . . . . . . . . . . . . . . . . . . . . . . . . . . . . 15
Setting Sample Rate and Buffer Size . . . . . . . . . . . . . . . . . . . . . . . . . . . . . . . . . . . . . . . . . 16
Viewing Firmware and Installer Information . . . . . . . . . . . . . . . . . . . . . . . . . . . . . . . . . . . . . 16
Appendix A. Using Third-Party Applications . . . . . . . . . . . . . . . . . . . . . . . . . . . . . . . . . . . 17
Configuring Mbox Mini for Third-Party Applications . . . . . . . . . . . . . . . . . . . . . . . . . . . . . . . . 17
Configuring the Apple Sound Preferences . . . . . . . . . . . . . . . . . . . . . . . . . . . . . . . . . . . . . . 17
Contents iii
Page 4

Appendix B. Compliance Information . . . . . . . . . . . . . . . . . . . . . . . . . . . . . . . . . . . . . . . . . 19
Environmental Compliance . . . . . . . . . . . . . . . . . . . . . . . . . . . . . . . . . . . . . . . . . . . . . . . . 19
EMC (Electromagnetic Compliance) . . . . . . . . . . . . . . . . . . . . . . . . . . . . . . . . . . . . . . . . . . 20
Safety Compliance . . . . . . . . . . . . . . . . . . . . . . . . . . . . . . . . . . . . . . . . . . . . . . . . . . . . . . 20
Index . . . . . . . . . . . . . . . . . . . . . . . . . . . . . . . . . . . . . . . . . . . . . . . . . . . . . . . . . . . . . . . . . . . . . 23
Mbox Mini User Guideiv
Page 5

chapter 1
Welcome to Mbox Mini
Welcome to the Mbox®Mini USB audio interface from Avid
Mbox Mini provides your USB-equipped computer with two channels of analog audio input,
two analog monitor outputs, and one headphone output. Mbox Mini includes one professional-quality mic preamp and 24-bit analog-todigital and digital-to-analog converters.
Mbox Mini integrates with Pro Tools
and is compatible with third-party audio applications that support the CoreAudio (Mac) or
ASIO (Windows) standard.
®
.
®
software,
Mbox Mini Features
The Mbox Mini provides the following:
• Two channels of analog audio input:
• Combo connector with XLR (microphone)
input and 1/4-inch (line-level) input and
switchable 48V phantom power
• Two 1/4-inch TRS (Tip-Ring-Sleeve) connectors. One input is switchable between
Line and DI level devices. The other is DI
only and switchable with the Combo connector for Input 1
• Gain control with –20 dB pad available separately on each input channel
• Two 1/4-inch TRS analog monitor outputs
• 1/4-inch (TRS) stereo headphone output with
adjustable level control
• Mon (Monitor) Mute switch for muting monitor outputs, without muting headphone output. This switch does not affect recording
• 24-bit A/D and D/A converters, supporting
sample rates of 44.1 kHz and 48 kHz
• Zero-latency analog record monitoring with
Mix (ratio) knob for adjustable balance between input and playback
• USB-powered operation
Mbox Mini may not function properly if connected to a USB hub. Connect Mbox Mini to a
separate, dedicated USB port.
Chapter 1: Welcome to Mbox Mini 1
Page 6
System Requirements and Compatibility
Conventions Used in This Guide
Mbox Mini can be used with a qualified Windows or Mac computer running Pro Tools software 8.0.4 or higher.
For Pro Tools installation instructions, see
the Pro Tools Installation Guide.
Mbox Mini can be also be used with a qualified
Mac or Windows computer running any other
Core Audio- or ASIO-compliant software.
Mbox Mini hardware drivers must be installed
before you can connect and use your
Mbox Mini.
For Mbox hardware drivers installation instructions, see Chapter 3, “Installing and
Connecting Mbox.”
A DVD drive is required to use the Drivers Installer disc (included with your Pro Tools software package).
Avid can only assure compatibility and provide
support for hardware and software it has tested
and approved.
For complete system requirements and a list of
qualified computers, operating systems, hard
drives, and third-party devices, visit:
www.avid.com/compatibility
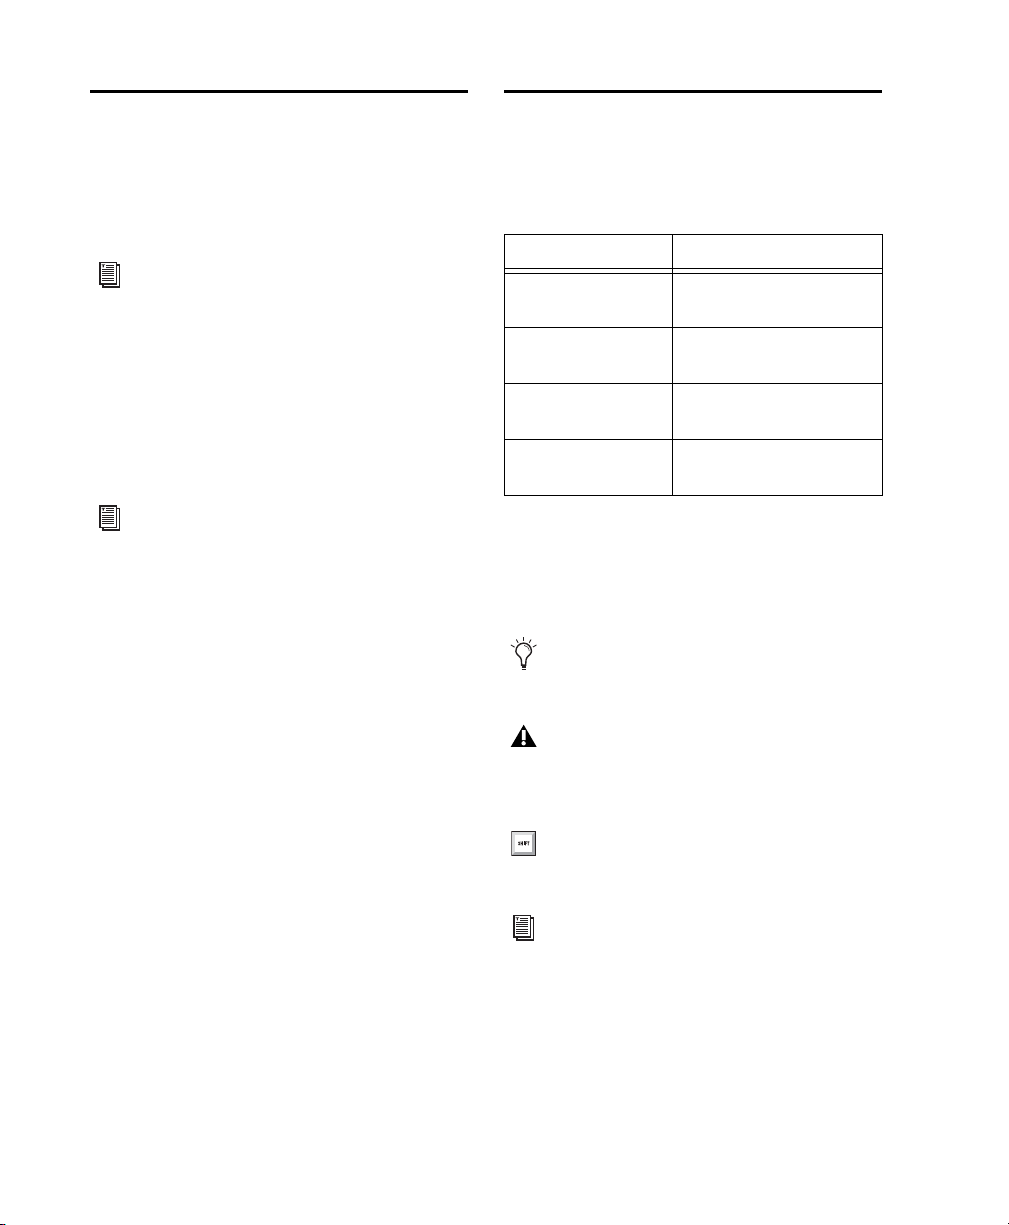
All of our guides use the following conventions
to indicate menu choices and key commands:
:
Convention Action
File > Save Choose Save from the
File menu
Control+N Hold down the Control key
Control-click Hold down the Control key
Right-click Click with the right
The names of Commands, Options, and Settings
that appear on-screen are in a different font.
The following symbols are used to highlight
important information:
and press the N key
and click the mouse button
mouse button
User Tips are helpful hints for getting the
most from your system.
Important Notices include information that
could affect your data or the performance of
your system.
Shortcuts show you useful keyboard or
mouse shortcuts.
Cross References point to related sections in
this guide and other Pro Tools guides.
Mbox Mini User Guide2
Page 7

About www.avid.com
The Avid website (www.avid.com) is your best
online source for information to help you get
the most out of your Pro Tools system. The following are just a few of the services and features
available.
Product Registration Register your purchase
online.
Support and Downloads Contact Avid Customer
Success (technical support); download software
updates and the latest online manuals; browse
the Compatibility documents for system requirements; search the online Knowledge Base
or join the worldwide Pro Tools community on
the User Conference.
Training and Education Study on your own using
courses available online or find out how you can
learn in a classroom setting at a certified
Pro Tools training center.
Products and Developers Learn about Avid
products; download demo software or learn
about our Development Partners and their
plug-ins, applications, and hardware.
News and Events Get the latest news from Avid
or sign up for a Pro Tools demo.
Chapter 1: Welcome to Mbox Mini 3
Page 8

Mbox Mini User Guide4
Page 9
chapter 2
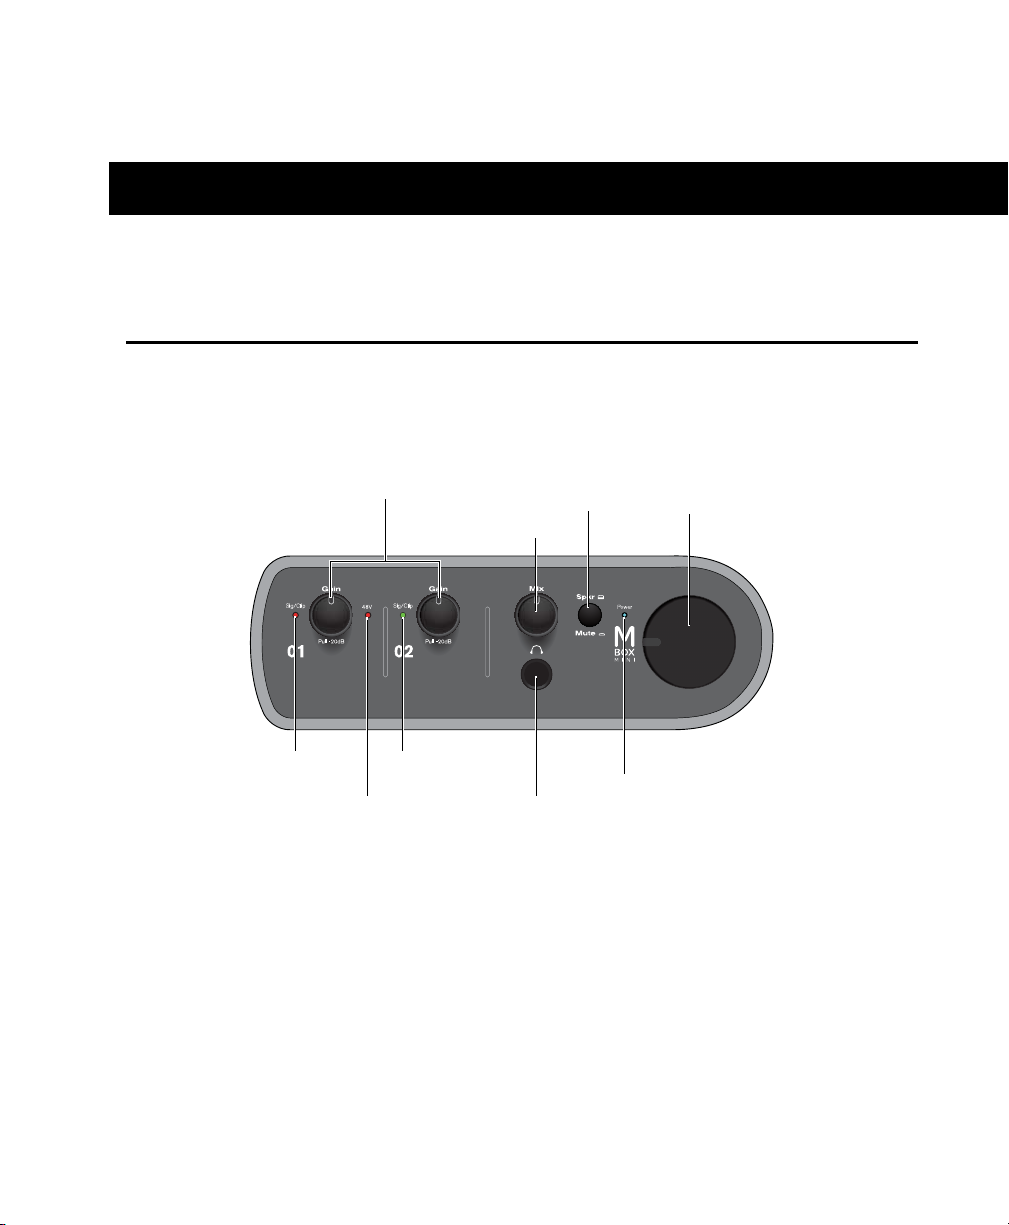
Signal Clip
Headphone
output
LEDs
Signal Clip
LEDs
Gain/
–20 dB pad switches 1–2
Mon/Mute
switch
Master monitor
knob
Power
LED
Mix (Ratio)
Phantom power
(+48V) LED
Mbox Mini Hardware Overview
Mbox Mini Front Panel Features
Figure 1 identifies controls, indicators, and input and output ports on the front panel on the
Mbox Mini.
Figure 1. Mbox Mini front panel
Gain/–20 dB Pad Switches 1
This knobs adjusts the gain level for Inputs 1
(Mic/Line or DI) depending on which input is
enabled by the back panel Combo/DI switch.
Turn the knob clockwise to increase gain, and
counter-clockwise to decrease gain. If your input
signal is too hot even with the Gain knob at a
low setting, pull the Gain knob out to engage a
“pad” that attenuates the signal by -20dB.
Gain/–20 dB Pad Switch 2
This knob adjusts the input gain level of Input 2
(Line/DI) depending on which input is enabled
by the back panel Line/DI switch. Turn the knob
clockwise to increase gain, and counter-clockwise to decrease gain. If your input signal is too
hot even with the Gain knob at a low setting,
pull the Gain knob out to engage a “pad” that
attenuates the signal by –20dB.
Chapter 2: Mbox Mini Hardware Overview 5
Page 10

Signal/Clip LEDs
Speaker/Mute Switch
These LEDs illuminate green in the presence of
audio signal, and illuminate red if the input signal has clipped (overloaded) the input of the
Mbox. Clipping the input can result in audible
distortion.
Phantom Power (48V) LED
When lit, the phantom power 48V LED indicates that phantom power is engaged. The
switch for phantom power is on the back of the
device. See “Phantom Power (48V) Switch” on
page 8.
Mix (Ratio)
Mbox Mini gives you the ability to monitor
your analog input signals while recording, without the delay incurred by analog-to-digital and
digital-to-analog converters and host-based processing.
This zero-latency analog monitoring is controlled with the Mix knob, which you can use to
blend and adjust the monitor ratio between
Mbox Mini analog inputs and playback from
your audio application.
To listen to just the source input signal, turn the
Mix knob fully left to Input. To listen your audio
application’s output only, turn the knob fully
right.
This switch mutes the Monitor Outputs, without muting the Headphone Output. This switch
does not affect recording.
Master Monitor Knob
The Master Monitor knob controls the Monitor
output and headphone output levels.
In Pro Tools, this is the signal that is routed
to Outputs 1–2. For more information on
signal routing in Pro Tools, see the Intro to
Pro Tools Guide or the Pro Tools Reference
Guide.
Headphone Output
Use the Headphone Output to connect stereo
headphones with a 1/4-inch stereo connector.
The headphone outputs mirror the signal sent
to the Monitor Outputs.
Power LED
The Power LED indicates that the Mbox Mini
has received power from its USB connection.
Once the Power LED light is on, audio can pass
in or out of the system.
The output from the Mix control is routed directly to the Monitor Outputs, and is mirrored
in the Headphone output.
This ability to blend and control the relative levels of playback from your DAW and latency-free
live analog inputs can be particularly effective
when overdubbing.
Mbox Mini User Guide6
Page 11

Mbox Mini Back Panel Features
USB port
Mic/Line input 1
Phantom power (+48V) switch
Monitor outputs
Line/DI switch
Line/DI
Input 2
Combo/DI switch
DI input
The Mbox Mini back panel has the following features:
Figure 2. Mbox Mini back panel
Mic/Line (Input 1)
The channel 1 Mic/Line input on the back panel
provides Mic (XLR) and Line (1/4-inch Tip-RingSleeve) on a combination jack. Switch between
channel 1 Mic/Line and channel 1 DI using the
Combo/DI switch on the back panel.
DI (Input 1)
The DI input accepts instrument-level 1/4-inch
TS (Tip-Sleeve) connections.
On the front panel, the input signal is adjusted
by the Input 1 Gain control. The source
(Mic/Line or DI) is chosen using the Combo/DI
switch on the back panel.
Combo/DI Switch
This switch selects either the Mic/Line input for
channel 1 or the DI input for channel 1. When
pressed in, the channel 1 DI input is selected.
When not pressed in, the channel 1 combination jack connector is selected.
Line/DI (Input 2)
The Line/DI input accepts line level signals, instruments, and other 1/4-inch TRS or TS connections.
On the front panel, the input signal is adjusted
by the Input 2 Gain control. The source (Line or
DI) is chosen using the Line/DI switch on the
back panel.
Chapter 2: Mbox Mini Hardware Overview 7
Page 12

Line/DI Switch
About Phantom Power
This switch selects either the line-level input or
instrument-level input for channel 2. When
pressed in, the instrument-level input (DI) is enabled. When not pressed in, line-level input is
enabled.
Monitor Outputs
These outputs support balanced TRS or unbalanced TS 1/4-inch connections. To monitor
your mix, these outputs can be connected to a
mixing board, directly to a monitoring system
such as a powered speakers or a power amp, or
another destination.
When using Pro Tools, these outputs receive
the signal that is routed to Ou tp ut s 1–2. Fo r
more information on signal routing in
Pro Tools, see the Intro to Pro Tools Guide
or the Pro Tools Reference Guide.
Phantom Power (48V) Switch
When pressed in, 48V phantom power is active
on the Mic XLR input. Phantom power is provided for microphones that require it to operate.
Dynamic microphones (such as a Shure SM57 or
an M-Audio Aries) do not require phantom
power to operate, but are not harmed by it. Most
condenser microphones (like an M-Audio Solaris)
do require phantom power to operate.
Although phantom power can be used
safely with most microphones, it is possible
to damage some ribbon microphones with
it. Always turn off phantom power and wait
at least ten seconds before connecting or disconnecting a ribbon microphone.
If you are not sure about the phantom power requirements for your microphone, consult your
microphone’s documentation or contact the
manufacturer.
When using phantom power, Mbox Mini’s
maximum current per microphone is 4 mA.
USB Port
This standard USB connector is used to connect
your computer to the Mbox Mini. One standard
USB cable is included with your system.
Mbox Mini User Guide8
Page 13

chapter 3
Installing and Connecting Mbox Mini
To use Mbox Mini with Pro Tools or any other
CoreAudio- or ASIO-compatible applications,
you must install the Mbox Mini hardware drivers on your computer.
This chapter provides instructions on installing
the drivers on Mac and Windows, and connecting the Mbox Mini to your computer.
Do not start this procedure with your Mbox
connected to your computer.
Before installing the hardware drivers, refer
to the Read Me information included with
the drivers installer for your device.
To install the drivers and connect the Mbox Mini:
1 Make sure you are logged in as an Administra-
tor for the account where you want to install the
drivers.
For details on Administrator privileges, see
the documentation for your computer.
2 Do one of the following:
• Insert the Drivers Installer disc that came
with your Pro Tools software package into
your computer.
– or –
• Download the Mbox Mini drivers installer
for your computer platform from
www.avid.com. After downloading, make
sure the installer is uncompressed (.dmg on
Mac or .ZIP on Windows).
3 Do one of the following:
• On Mac, locate and double-click
Avid Mbox Mini.mpkg.
– or –
• On Windows, locate and double-click
Install Avid Mbox Mini.exe.
4 Follow the on-screen instructions to proceed
with installation.
5 When installation is complete, click Restart.
Chapter 3: Installing and Connecting Mbox Mini 9
Page 14

6 After the computer has restarted, connect the
small end of the included USB cable to the USB
port on Mbox Mini and connect the other end
to any available USB port on your computer.
If the USB LED on the front panel of the
Mbox Mini does not illuminate, try unplugging the USB cable from the Mbox USB port,
and plugging it back in. If the USB LED still
does not illuminate, shut down the computer, disconnect Mbox and start the computer. Once the computer has fully restarted, reconnect Mbox.
Mbox Mini may not function properly if
connected to a USB hub. If you need to use a
hub for other USB peripherals, connect the
hub to a separate USB port; Mbox must be
connected to a dedicated port on the computer in order to function properly.
You can now use your Mbox Mini with
Pro Tools or any other CoreAudio- or ASIO-compatible applications.
For Pro Tools installation instructions, see
the Pro Tools Installation Guide.
Mbox Mini User Guide10
Page 15

chapter 4
1/4-inch
Headphone jack
Headphone level
Making Studio Connections
This chapter provides step-by-step instructions
for connecting mics, instruments, mixers,
headphones, speakers, and other devices to
Mbox Mini.
Connecting Outputs
To hear audio from Mbox Mini, you need to
connect headphones or an external sound system (such as powered monitors or a home stereo) to Mbox Mini.
Connecting Headphones
You can use headphones equipped with a
1/4-inch stereo jack to monitor your audio.
To connect headphones:
1 Connect headphones with a 1/4-inch stereo
connector (or adapter) to the Headphone jack.
2 Adjust the volume using the Headphone Vol-
ume knob on the front panel.
The headphone outputs mirror the signal sent
to the Monitor Outputs.
Headphone jack on front of Mbox Mini
Chapter 4: Making Studio Connections 11
Page 16

Connecting a Sound System
Line Out Left
Line Out Right
The Monitor Outputs on the back of Mbox Mini
support 1/4-inch plugs. These connections can
be balanced, TRS (Tip-Ring-Sleeve) style connectors, or unbalanced TS (Tip-Sleeve) connectors
(such as those on instrument cables). To listen
to your to audio, connect these outputs to any
amplification system: powered speakers, a home
stereo system, or an audio mixer.
Stereo output from the Mbox Mini (back panel)
To connect a sound system:
For stereo monitoring, connect Monitor Out-
puts 1 and 2 to the inputs of your main left and
right speakers.
To connect to a stereo system:
When connecting to a stereo system, connect
the left channel of the stereo (often the white
plug) to Monitor Output 1, and the right channel of the stereo (often the red plug) to
Monitor Output 2.
Home stereo systems often use RCA connectors. You can use an adaptor or a special cable to convert from the 1/4-inch TRS connectors used by Mbox to the RCA connectors on
your home stereo.
Connecting Audio Inputs
Mbox Mini inputs (sources) support microphones, guitars, keyboards, and other types of
instruments. For information about connecting
specific audio sources, see “Connecting a Microphone to Mbox Mini” on page 13, and “Connecting Instruments to the Mbox Mini” on
page 14.
Overview of Analog Inputs
Mbox Mini provides a total of two channels of
analog input on the back panel. These jacks are
labeled Mic/Line and DI (input 1) and Line/DI
(input 2).
Mic/Line (Input 1)
Input 1 provides Mic/Line and DI input connectors. Inputs are selectable with the back panel
Combo/DI switch. When the Combo/DI switch
is pressed in, the DI input is selected (the DI input jack is located above the Line/DI jack.).
When not pressed in, the combo connector
jacks (XLR, 1/4-inch) are selected.
Mic For XLR microphone cables.
Line (TRS or TS) For 1/4-inch Tip-Ring-Sleeve or
Tip-Sleeve cables from keyboards, mixers, and
other line-level sources.
Line/DI (Input 2)
Input 2 provides a Line/DI input connector. The
input is selectable with the back panel Line/DI
switch (located to the upper-left of the input).
This input appears as Analog In (2) in Pro Tools.
DI For 1/4-inch Tip-Sleeve cables from guitar,
bass, or similar sources.
Mbox Mini Setup Guide12
Page 17

Connecting a Microphone to Mbox Mini
Mic Cables and Connectors
Use a microphone with an XLR connector to
connect the microphone to the Mbox Mini.
The Mbox Mini can only supply power through
a microphone cable with an XLR connector. If
you are not sure about the phantom power requirements for your microphone, refer to your
microphone’s documentation or contact the
manufacturer.
Using a Mic that Has an XLR
Connector
To use a microphone that has an XLR connector:
1 Plug your microphone cable into the Mic/Line
input on the back of Mbox Mini.
2 Set the Combo/DI switch on the back to
Combo (or “microphone”) position. The button
should be out, not pressed in.
3 If your microphone requires phantom power,
make sure the microphone is connected, then
press the Phantom Power switch (labeled 48V)
on the back of the Mbox Mini. 48V phantom
power is enabled when the switch is pressed in.
4 On the front of the Mbox Mini, turn the Mix
control fully left to Input.
5 On the front of the Mbox Mini, carefully turn
the Input 1 Gain control to the right to increase
the input level of your microphone signal.
XLR connector
Phantom Power
Some microphones require power to operate.
This power, called phantom power, is supplied either by a battery in the microphone, or through
an audio interface (such as Mbox Mini) that can
supply power through the microphone cable.
Most condenser microphones (such as an
M-Audio Solaris) require phantom power to operate. Dynamic microphones (such as a Shure
SM57 or M-Audio Aries) do not require phantom power to operate, but are not harmed by it.
Although phantom power can be used
safely with most microphones, it is possible
to damage some ribbon microphones with
it. Always turn off phantom power and wait
at least ten seconds before connecting a ribbon microphone.
6 If the incoming signal is too loud, pull the
Gain knob out to engage the –20 dB pad.
Chapter 4: Making Studio Connections 13
Page 18

Connecting Instruments to the Mbox Mini
Mbox Mini provides Line/DI inputs that support direct instruments (such as electric guitar
and electric bass), and line level devices (including electronic audio sources such as mixers,
samplers, keyboards, turntables, and synthesizers).
To use a guitar with Mbox Mini:
1 On the back of the Mbox Mini, plug your gui-
tar cable into one of the DI inputs (in this example, input 2).
2 On the back panel, make sure the Line/DI
switch is in the “in” position.
3 On the front of the Mbox Mini, turn the Mix
control fully left to Input.
4 On the front of the Mbox Mini, carefully turn
the input’s Gain control to the right to increase
the input level of your guitar.
5 If the incoming signal is too loud, pull the
Gain knob out to engage the –20 dB pad.
To use a keyboard or mixer with Mbox Mini:
1 Plug your keyboard, mixer, or other audio
source into either the Input 1 or Input 2 (TRS)
inputs on your Mbox Mini. If your source is stereo (such as a stereo keyboard or the stereo output from a mixer), connect the left channel
(often the white plug) to Input 1, and right
channel (often the red plug) to Input 2.
2 If you are using Input 1 (Mic/Line), set the
Combo/DI switch on the back panel to Combo,
by pressing the switch out.
If using Input 2 or if using both inputs
(1 and 2) in a stereo configuration, make sure
the Line/DI button for Input 2 is in the “out”
(Line) position.
3 On the front of the Mbox Mini, turn the Mix
control fully left to Input.
4 Set your instrument’s volume to its optimal
level. For example, the optimal level for most
keyboards is between 80% and 100% of maximum volume.
5 On the front of the Mbox Mini, carefully turn
the input’s Gain control to the right to increase
the input level of your keyboard.
6 If the incoming signal is too loud, pull the
Gain knob out to engage the –20 dB pad.
Mbox Mini Setup Guide14
Page 19

chapter 5
Web links
Sample Rate menu
Status indicators
Buffer Size menu
Using the Driver Control Panel
The Mbox Mini Driver Control Panel lets you
configure settings for your audio interface for
use with Pro Tools or other audio applications
that support the CoreAudio Drivers (Mac) or
ASIO Audio Drivers (Windows) standard.
The Driver Control Panel also features convenient links to driver updates, downloadable
manuals, FAQs, tech support, product registration, and our website (www.avid.com).
To open the Driver Control Panel:
On Mac, launch System Preferences (Apple
menu > System Preferences), then double-click
Avid Mbox Mini. (You can also open the Driver
Control Panel from the Applications menu.)
– or –
On Windows, choose Start > All Programs >
Avid > Mbox Mini > Mbox Mini Control Panel
.
Mbox Mini Driver Control Panel in stand alone mode
To open the Driver Control Panel from Pro Tools:
1 Choose Setup > Hardware in the Edit window.
2 Click launch control panel.
: 15
Page 20

Setting Sample Rate and Buffer Size
From the Driver Control Panel, you can change
the Sample Rate or Buffer Size setting or access
the Hardware Setup dialog for your Mbox Mini
or third-party application.
To set the Sample Rate:
Click the Sample Rate pop-up menu (located
in the upper part of the Driver Control Panel)
and choose the Sample Rate you want.
Sample Rate
You may select from the following sample rates:
• 44100
• 48000
To set the Buffer Size:
Click the Buffer Size pop-up menu and choose
the number of samples you want.
Using the Status Indicators
Along the bottom-left of the Driver Control
Panel are the following status indicators:
Hardware Connected
This indicates if a properly installed, poweredon Mbox Mini is connected to the computer.
Streaming
This indicates if audio from a Digital Audio
Workstation or a media player (such as iTunes or
foobar) is currently streaming within Pro Tools.
Viewing Firmware and Installer Information
Directly above the status indicators, you can
view the firmware version of the Mbox Mini
hardware, and the package version of the
Mbox Mini driver installer.
Buffer Size (Windows Only)
You may select from the following number of
samples:
• 128 samples
• 256 samples
• 512 samples
• 1024 samples
• 2048 samples
• 4096 samples
Mbox Mini User Guide16
Accessing the Web Links
Along the bottom-right of the Driver Control
Panel you can easily access helpful online resources on our Avid website (www.avid.com) by
clicking on the following pop-up menus:
•Manual
•Updates
• Support
•FAQs
•Register
Clicking on any of the “Web links” will
open your web browser. Your computer must
have Internet access for these pages to load.
Page 21

appendix a
Using Third-Party Applications
The Mbox Mini hardware drivers allow you to
use third-party audio and MIDI applications
that support the CoreAudio (Mac) or ASIO (Windows) standard with your Mbox Mini.
For driver installation instructions, see
Chapter 3, “Installing and Connecting
Mbox Mini.”
Configuring Mbox Mini for Third-Party Applications
When using Mbox Mini with third-party applications (such as Apple GarageBand), you may be
able configure hardware settings through the
audio preference settings available in that application.
You can also configure your hardware using the
Control Panel. See “Using the Driver Control
Panel” on page 15.
Configuring the Apple Sound Preferences
(Mac Only–Required for Using Qualified
Pro Tools Interface with Apple iTunes or
QuickTime Player)
To use your Mbox Mini with certain CoreAudiocompatible playback applications (such as Apple
iTunes or QuickTime Player), you need to configure Sound Preferences.
To configure the Apple Sound Preferences:
1 Launch System Preferences (Apple menu > Sys-
tem Preferences)
2 Click Sound.
3 Click Output and select your Pro Tools hard-
ware as the device for sound output.
4 Click Input and select your Pro Tools hardware
as the device for sound input.
5 Quit System Preferences.
Appendix a: Using Third-Party Applications 17
Page 22

Mbox Mini User Guide18
Page 23

appendix b
Compliance Information
Environmental Compliance
Disposal of Waste Equipment by Users
in the European Union
This symbol on the product or its packaging indicates that this
product must not be disposed of with other waste. Instead, it
is your responsibility to dispose of your waste equipment by
handing it over to a designated collection point for the recycling
of waste electrical and electronic equipment. The separate
collection and recycling of your waste equipment at the time of
disposal will help conserve natural resources and ensure that
it is recycled in a manner that protects human health and the
environment. For more information about where you can drop
off your waste equipment for recycling, please contact your
local city recycling office or the dealer from whom you
purchased the product.
Proposition 65 Warning
This product contains chemicals, including lead,
known to the State of California to cause cancer and
birth defects or other reproductive harm. Wash hands
after handling.
Perchlorate Notice
This product may contain a lithium coin battery. The State of
California requires the following disclosure statement:
“Perchlorate Material – special handling may apply, See
www.dtsc.ca.gov/hazardouswaste/perchlorate.”
Recycling Notice
Appendix b: Compliance Information 19
Page 24

EMC (Electromagnetic
Avid
Compliance)
Avid declares that this product complies with the following
standards regulating emissions and immunity:
• FCC Part 15 Class B
• EN 55022 Class B
• EN 55204 Class B
• AS/NZS 3548 Class B
• CISPR 22 Class B
FCC Compliance for United States
Radio and Television Interference
This equipment has been tested and found to comply with the
limits for a Class B digital device, pursuant to Part 15 of the
FCC Rules.
DECLARATION OF CONFORMITY
We, Avid, 2001 Junipero Serra Boulevard
Daly City, CA 94014-3886, USA
650-731-6300
declare under our sole responsibility that the product
Mbox Mini
complies with Part 15 of FCC Rules.
Operation is subject to the following two conditions:
(1) this device may not cause harmful interference, and
(2) this device must accept any interference received,
including interference that may cause undesired operation.
Australian Compliance
Canadian Compliance
This Class B digital apparatus complies with Canadian
ICES-003
Cet appareil numérique de la classe A est conforme à la norme
NMB-003 du Canada
CE Compliance
(EMC and Safety)
Avid is authorized to apply the CE (Conformité Europénne)
mark on this compliant equipment thereby declaring conformity
to EMC Directive 89/336/EEC and Low Voltage Directive
73/23/EEC.
Communication Statement
NOTE: This equipment has been tested and found to comply
with the limits for a Class B digital device, pursuant to Part
15 of the FCC Rules. These limits are designed to provide
reasonable protection against harmful interference in a
residential installation. This equipment generates, uses,
and can radiate radio frequency energy and, if not installed
and used in accordance with the instructions, may cause
harmful interference to radio communications. However,
there is no guarantee that interference will not occur in a
particular installation. If this equipment does cause harmful
interference to radio or television reception, which can be
determined by turning the equipment off and on, the user is
encouraged to try and correct the interference by one or
more of the following measures:
• Reorient or locate the receiving antenna.
• Increase the separation between the equipment and
receiver.
• Connect the equipment into an outlet on a circuit
different from that to which the receiver is connected.
• Consult the dealer or an experienced radio/TV technician
for help.
Any modifications to the unit, unless expressly approved by
Avid, could void the user's authority to operate the
equipment.
Mbox Mini User Guide20
Safety Compliance
Safety Statement
This equipment has been tested to comply with USA and
Canadian safety certification in accordance with the
specifications of UL Standards: UL60065 7th /IEC 60065 7th
and Canadian CAN/CSA C22.2 60065:03. Avid Inc., has been
authorized to apply the appropriate UL & CUL mark on its
compliant equipment.
War ning
Page 25

Important Safety Instructions
1) Read these instructions.
2) Keep these instructions.
3) Heed all warnings.
4) Follow all instructions.
5) Do not use this equipment near water.
6) Clean only with dry cloth.
7) Do not block any ventilation openings. Install in accordance
with the manufacturer’s instructions.
8) Do not install near any heat sources such as radiators, heat
registers, stoves, or other equipment (including amplifiers)
that produce heat.
9) Do not defeat the safety purpose of the polarized or
grounding-type plug. A polarized plug has two blades with one
wider than the other. A grounding type plug has two blades and
a third grounding prong. The wide blade or the third prong are
provided for your safety. If the provided plug does not fit into
your outlet, consult an electrician for replacement of the
obsolete outlet.
10) Protect power cords from being walked on or pinched
particularly at plugs, convenience receptacles, and the point
where they exit from the equipment.
11) Only use attachments/accessories specified by the
manufacturer.
12) For products that are not rack-mountable: Use only with a
cart, stand, tripod, bracket, or table specified by the
manufacturer, or sold with the equipment. When a cart is used,
use caution when moving the cart/equipment combination to
avoid injury from tip-over.
13) Unplug this equipment during lightning storms or when
unused for long periods of time.
14) Refer all servicing to qualified service personnel. Servicing
is required when the equipment has been damaged in any way,
such as power-supply cord or plug is damaged, liquid has been
spilled or objects have fallen into the equipment, the
equipment has been exposed to rain or moisture, does not
operate normally, or has been dropped.
15) For products that are a Mains powered device:
The equipment shall not be exposed to dripping or splashing
and no objects filled with liquids (such as vases) shall be
placed on the equipment.
Warning! To reduce the risk of fire or electric shock, do not
expose this equipment to rain or moisture.
16) For products containing a lithium battery:
CAUTION! Danger of explosion if battery is incorrectly
replaced. Replace only with the same or equivalent type.
17) The equipment shall be used at a maximum ambient
temperature of 40° C.
Appendix b: Compliance Information 21
Page 26

Mbox Mini User Guide22
Page 27

index
C
compatibility 2
connecting instruments 13
connecting keyboards or mixers 14
connecting Mbox Mini to computer 9
connecting outputs 11
D
DI Input
Combo/DI Switch 7
connecting guitars 13
DI (Input 1) 7
Line/DI (Input 2) 7
G
Gain
adjusting gain for instruments 13
Gain knob 5
H
Hardware drivers
installing 9
Headphones
Connecting Headphones 11
Headphone Output 6
I
indicators
peak level 6
Signal/Clip LEDs 6
installing hardware drivers 9
L
Line Inputs
connecting keyboards or mixers 14
Line/DI (Input 2) 7
Mic/Line (Input 1) 7
M
Master Monitor knob 6
Master Volume 6
Mbox Mini
back panel 7
Mic Inputs
connecting a mic 13
Mic/Line (Input 1) 7
Mix (Ratio) knob 6
O
outputs
Monitor outputs 8
P
Pad 5
peak indicators 6
Phantom Power
Phantom Power (48V) LED 6
Switch 8
when to use 13
S
Signal Clip LEDs 6
Speaker/Mute Switch 6
system requirements 2
U
USB connection 9
V
volume control
headphones 6
monitor outputs 6
Index 23
Page 28

Avid
2001 Junipero Serra Boulevard
Daly City, CA 94014-3886 USA
Technical Support (USA)
Visit the Online Support Center at
www.avid.com/support
Product Information
For company and product information,
visit us on the web at www.avid.com
 Loading...