

Page 1

ID:41005895
Avid Liquid
Liquid for
Pinnacle Studio Users
Page 2

© 2005 Pinnacle Systems GmbH. All rights reserved.
November 2005 / Pinnacle Systems Documentation, Munich, Germany
liquid.documentation@pinnaclesys.com
Copyright and Protective Rights
This manual or the software described herein, in whole or in part, may not be reproduced, translated or reduced to
any machine readable form without prior written approval from Pinnacle Systems GmbH.
Pinnacle Systems GmbH AG PROVIDES NO WARRANTY WITH REGARD TO THIS MANUAL, THE SOFT-
WARE OR OTHER INFORMATION CONTAINED HEREIN AND HEREBY EXPRESSLY DISCLAIMS ANY
IMPLIED WARRANTIES OF MERCHANTABILITY OR FITNESS FOR ANY PARTICULAR PURPOSE WITH
REGARD TO THIS MANUAL, THE SOFTWARE OR SUCH OTHER INFORMATION. IN NO EVENT SHALL
INNACLE SYSTEMS GMBH BE LIABLE FOR ANY INCIDENTAL, CONSEQUENTIAL OR SPECIAL DAMAGES,
P
WHETHER BASED ON TORT, CONTRACT, OR OTHERWISE, ARISING OUT OF OR IN CONNECTION
WITH THIS MANUAL, THE SOFTWARE OR OTHER INFORMATION CONTAINED HEREIN OR THE USE
THEREOF.
Pinnacle Systems GmbH reserves the right to make any modification to this manual or the information contained
herein at any time without notice.
The software described herein may also be governed by the terms of a separate user license agreement.
YOU MAY USE THIS SOFTWARE TO ASSIST YOU IN COPYING MATERIAL IN WHICH YOU OWN THE
COPYRIGHT OR HAVE OBTAINED PERMISSION TO COPY FROM THE COPYRIGHT OWNER. IF YOU DO
NOT OWN THE COPYRIGHT OR YOU HAVE NOT OBTAINED PERMISSION TO COPY FROM THE COPY-
RIGHT OWNER, YOU MAY BE VIOLATING COPYRIGHT LAW AND YOU MAY BE SUBJECT TO CLAIMS
FOR DAMAGES AND/OR CRIMINAL PENALTIES.
2
Page 3

Trademarks
© Avid Liquid,
Liquid
Systems, Inc.
Pinnacle Systems and the Pinnacle Systems logo are registered trademarks of Pinnacle Systems, Inc.
Sony, ClipLink, DV, DVCAM, Digital Betacam, Betacam SP, Betacam SX, Hi8, Video8, HDCAM, D2, Digital8, D8,
i.LINK and the i.LINK logo are trademarks of Sony Corporation; D3, D5, Panasonic and DVCPRO are trademarks
of Matsushita Electric Industrial Company; D9, Digital-S and D-VHS are trademarks of JVC; Dolby A, B, C, SR
and Dolby Surround are trademarks of Dolby Laboratories; Manufactured under license from Dolby Laboratories.
© 1992-2003 Dolby Laboratories. All rights reserved. Dolby is a trademark of Dolby Laboratories; OMF
Medi aLog are trademarks of Avid Technology, Inc.; Media Cleaner is trademark of Terran Interactive - a subsid-
iary of Media 100, Inc.; FaderMaster Pro is trademark of JL Cooper - a department of Sound Technology; Java is
trademark of Sun Microsystems; Photo CD is trademark of Eastman Kodak Company; Acrobat Reader and Adobe
AfterEffects are trademarks of Adobe Systems, Inc.; Microsoft
MS-DOS
ness Machines Corporation; Intel
mark of Matrox Electronic Systems Ltd.
Parts of this product have been produced using LEADTOOLS
RIGHTS RESERVED. Parts of this product are based on the work of the independent JPEG-Group.
All other nationally and internationally recognized trademarks and trade names are hereby acknowledged and are
the property of their respective owners.
Avid Liquid Chrome HD, Avid Liquid Blue, Avid
,
Avid Liquid PRO
and Intellimouse are trademarks of Microsoft Corporation; VGA is trademark of International Busi-
and Pentium are trademarks of Intel Corporation; Matrox DigiSuite is trade-
are logos and trademarks of Pinnacle Systems GmbH and Pinnacle
, Avid,
, Windows XP
, Wind ows
, Windows 2000,
©1991-2000, LEAD Technologies Inc. ALL
3
Page 4

4
Page 5

CONTENT
Manual
Part 1
Part1
Upgrading to Avid Liquid.................................... 7
1 Avid Liquid: Brief Overview........................... 8
2 Initial Contact with Avid Liquid................... . 10
3 EZ Capture.................................................12
4 Album and Project...................................... 14
5 Collecting, Sorting, Viewing and Finding
Clips............................................................16
6 Importing Clips, Titles, Graphics and Stills.18
7 DVD Menus, Titles and Effects..... ..............20
8 Film Window and Timeline: Basics............. 22
9 Inserting Clips on the Timeline...................24
10 Inserting/Deleting Clips on the Timeline.....26
11 Trimming Clips on the Timeline .................. 28
12 Moving Clips Horizontally and Vertically.....30
13 Effects: Basics.... .................................. ......32
14 Effects: Transitions .......... ... .. ...................... 34
15 Effects: Clip FX (Video Effects) .................. 36
16 Effects: Render or Realtime?.....................38
17 Timeline Settings........................................ 40
18 Audio: Basics............................. .................42
19 Fast Audio Fade-ins and Fade-outs............44
20 Making a Movie: Options............................ 46
21 Recording to DV Tape...... ... ........................ 48
22 Burning Disks / Exporting Files .................. 50
23 The Most Import a nt Set tin g s ......................52
Part2
1 Recording from DV/HDV Video Tapes
(Capture).................................................... 56
2 Comparison of Recording Instruments.......58
3 Recording Clips with Mark-Ins and
Mark-Outs................................................... 60
4 Recording or Logging Clips “on the Fly”.....62
5 Automatic Scene Detection........................ 64
6 Recording Audio: Stereo/Mono and Level.. 66
7 Naming and Numbering Clips while
Recording................................................... 68
8 Recording/Digitizing Tips ........................... 70
9 Scene Detection in the Clip Viewer............ 72
10 Protecting and Muting Tracks..................... 74
11 Trimming with the Trim Editor..................... 76
12 Trimming Video and Audio: Split Editing .... 78
13 Moving Clips Horizontally and Vertically.....80
14 Good to Know.................................... ......... 82
15 Effects: Working with Key Frames.............. 84
16 Audio Scrubbing......................................... 86
17 The Audio Editor......................................... 88
18 Audio Mixer and Volume Lines................... 90
19 Output Mapping.......................................... 92
20 Audio: Settings Tab.................................... 94
21 Recording Voice Over................................. 96
22 Live Mixing of Audio Tracks........................ 98
23 Sound Effects........................ ...................100
24 Surround Sound ....................................... 102
Page 6

6
Page 7

Upgrading to Avid Liquid
This document was written for Pinnacle Studio users who want to upgrade to Avid Liquid and achieve
demonstrable results as quickly as possible. We’d like to help you find the functions you already know
from Studio in Avid Liquid. In many cases there is no one-to-one correspondence - after all, they are
two different programs. But Avid Liquid can do a lot more than Studio, which we assume is why you
purchased it.
Wherever practical and possible, we’ve arranged procedures from Studio side-by-side with similar procedures in Avid Liquid and explained the various technical terms. For example, what Studio calls a
“scene”, Avid Liquid calls a “clip”. Expressions used in the Avid Liquid user interface are written in italics: Sequence (“Film”). Keys on the keyboard are represented as follows:
This manual has two parts: The first part contains the most important things you need to know for
quick startup. The second part describes more advanced functions.
To a large extent, each user can configure his or her own Avid Liquid user interface. For the purposes of
this document, however, we assume that the software is still in its “original state” as it was when first
installed; for example, the tool buttons are in their original locations and the function keys execute the
original commands.
If you click a wrong tool button when working with Avid Liquid, simply use the Undo/Redo buttons,
which look like this: , .
When you want to know more about a subject in Avid Liquid, press
contains the text of the printed Reference Manual. You can also use the Help index (key icon) to quickly
find an explanation of unknown functions or tools.
Have fun learning about Avid Liquid!
F7 or SPACEBAR.
F1. This opens Online Help, which
7
Page 8

1 Avid Liquid: Brief Overview
First of all, we’d like to introduce the most important modules in Avid Liquid. To the right you see the
user interface after a standard installation (single computer monitor).
Timeline
The Timeline is where the Sequence (in Studio: Film) is assembled from the clips (scenes). Any type of
clip (video, audio, graphic, title) can be positioned on the Tra c k s .
The Timeline appearance, clip display and Audio/Video Playback are all managed in the Track Header
area to the left of the Timeli ne.
Project Browser
The Project Browser contains the elements of your film, i.e. the video and audio clips and the effects. It’s
functioning is similar to that of the Windows Explorer, with its folders and subfolders.
Source Viewer (Player) or Project Window
The Source Viewer is where you view your source material, meaning the clips (scenes). In terms of an
analog tape-based editing suite, this would be your player and monitor. You can drag clips from the
Project Browser to the Source Viewer with the mouse.
You can also select a screen layout in which the Project window is displayed in this spot (Single Monitor
View; see page 14).
Master Viewer (Recorder)
The Master Viewer displays the current image from the Timeline, i.e. it is the master video output for the
recorder or for output to DVD, etc. The red Playline identifies the current position.
Toolbars
The To o l b a r s contain the most important tools (buttons) and commands. You can customize these toolbars individually (right-click > Customize).
Menu bar
The most important commands are arranged here in typical Windows style.
Taskbar
The taskbar contains valuable information and functions you need to have on hand while editing,
including an audio level, the Render Viewer, the Key Caps icon, etc.
8
8
Page 9
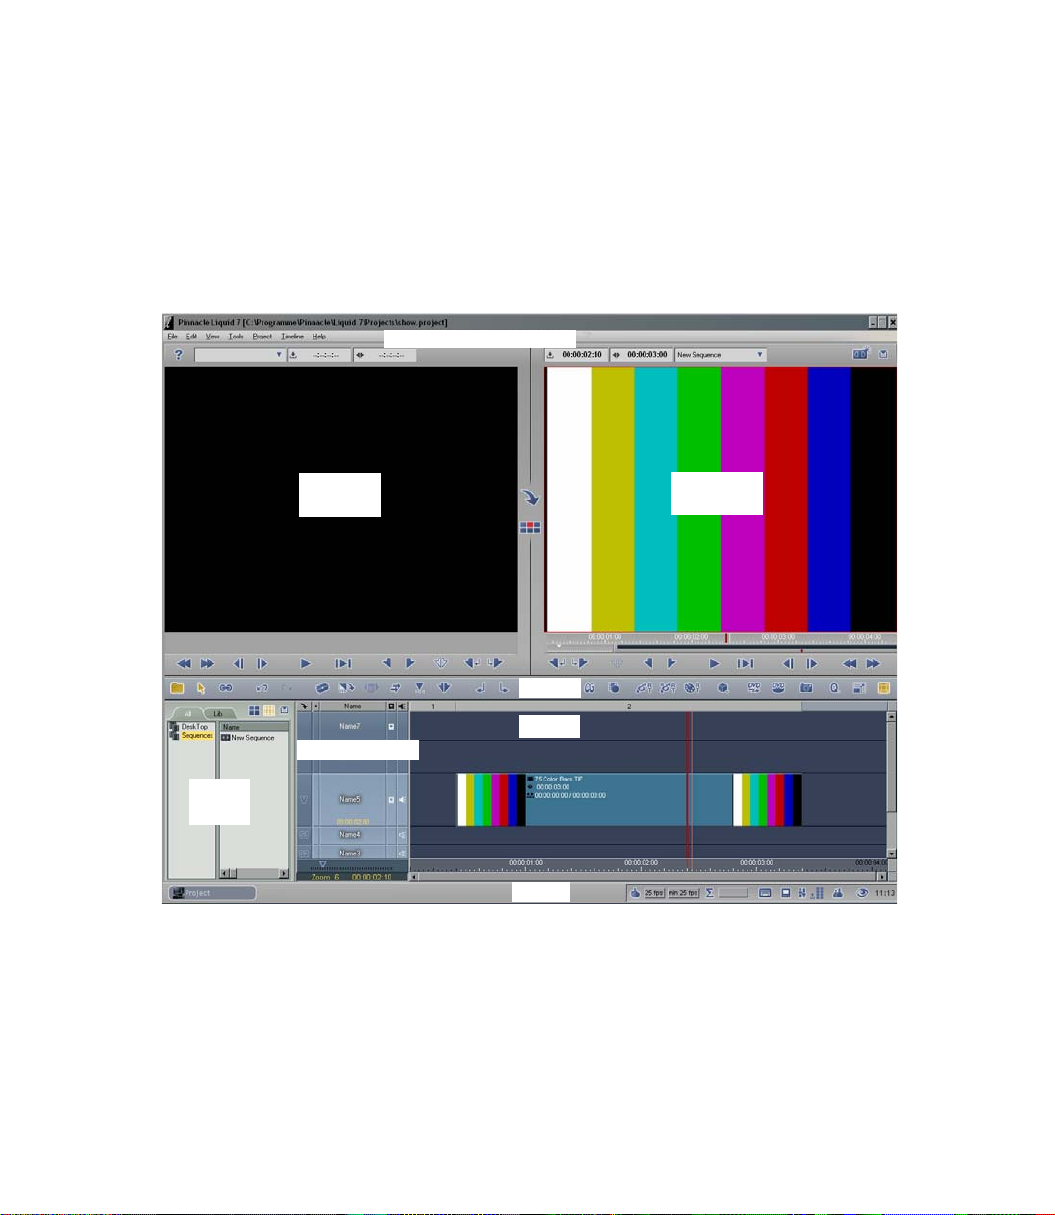
Menu Bar
Project
Browser
Source Viewer
(Player)
Track Header Area
Master Viewer
(Recorder)
Toolbars
Timeline
Taskb ar
9
Page 10

2 Initial Contact with Avid Liquid
After installing the program, you’ll find the Avid Liquid icon on your computer’s desktop. Connect your
DV or HDV camera to an IEEE-1394 interface (Firewire, DV In) on the computer, switch on the device
and insert a tape.
STUDIO
Starting up
Studio is “empty” when you start it up. You can
then open an existing project or create a new one.
Saving and backup
Performed manually by selecting: File > Save
Project (As).
1-2-3 user interface
Studio distributes the basic video editing operations over three tabs: 1 Capture / 2 Edit / 3 Make
Movie.
LIQUID
Starting up
Unless you enter a different user name or are
starting the program for the very first time (in
which case, a sample or standard Project
appears), Avid Liquid opens with the last Project
that was worked on.
Select File > New > Project to create a new,
“e mp t y” Project.
Saving and backup
Avid Liquid automatically saves each individual
operation (Instant Save). Should your computer
ever crash, you can retrieve your work (Sequence,
“Movie”) from the Sequences Rack.
Modular user interface
In single-monitor mode, Avid Liquid appears
either as shown on the right (initial startup) or as
it did when you last exited the program.
You can access functional areas such as “1 Capture (= EZ Capture/Logging)” or “3 Make Movie
(= Export > Record to Tape)” as needed by means
of menus, the keyboard or tool buttons.
All the toolbars are freely configurable and the
layout of the user interface can be customized
using the Eye icon located at the bottom right
on the taskbar.
10
Page 11
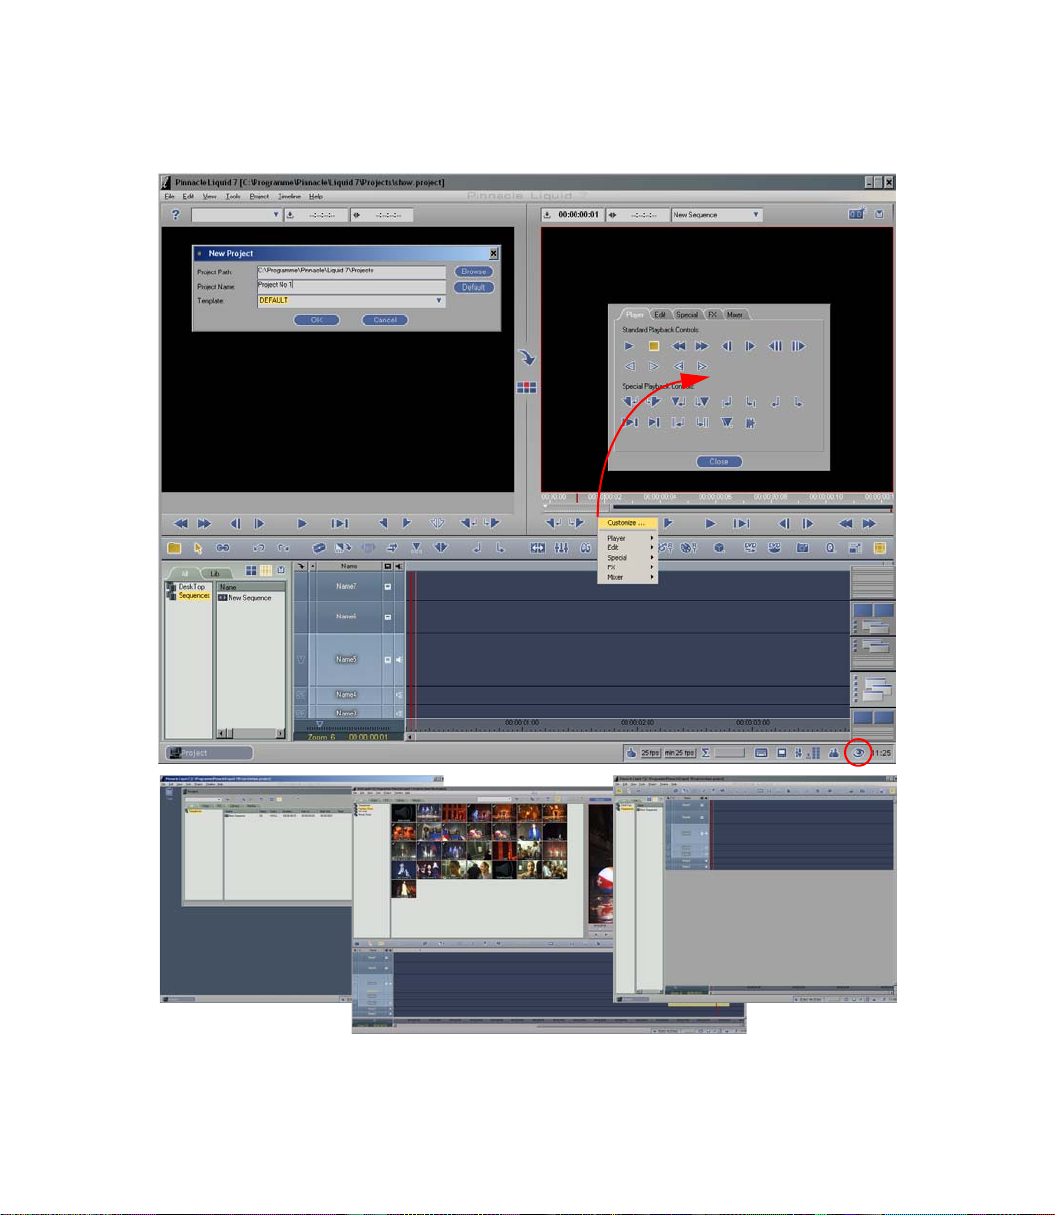
Project only
Timeline only
Single Monitor View
11
Page 12

3 EZ Capture
EZ Capture is a file-based capture tool for recording clips from digital sources (DV, HDV) and analog
inputs (if you have a breakout box). You can record to various formats.
STUDIO
Recording a movie
Camcorder control via DV and the recording
options are described in the record mode field.
With Avid Liquid, you can also record in “preview quality” (MJPEG) (File > EZ Capture > Set-
tings > Codec Settings.
LIQUID
Recording using EZ Capture
First check whether the camcorder is properly
connected and switched on.
1 Select File > EZ Capture.
2 In the lower left, enter a name for the clip.
Above it next to the capacity indicator,
select a location for storing the data.
3 Start the tape by pressing the Play button,
or directly by clicking the Capture button.
4 The camcorder starts recording.
To stop recording, click the Capture button once again.
To select a different video input or a par-
ticular recording format, open the Settings dialog box.
In the Extended Dialog Box, you can
adjust the audio and influence the video
(analog input).
You will find your recorded clips in a Project Rack
(automatically created or previously selected).
12
Page 13
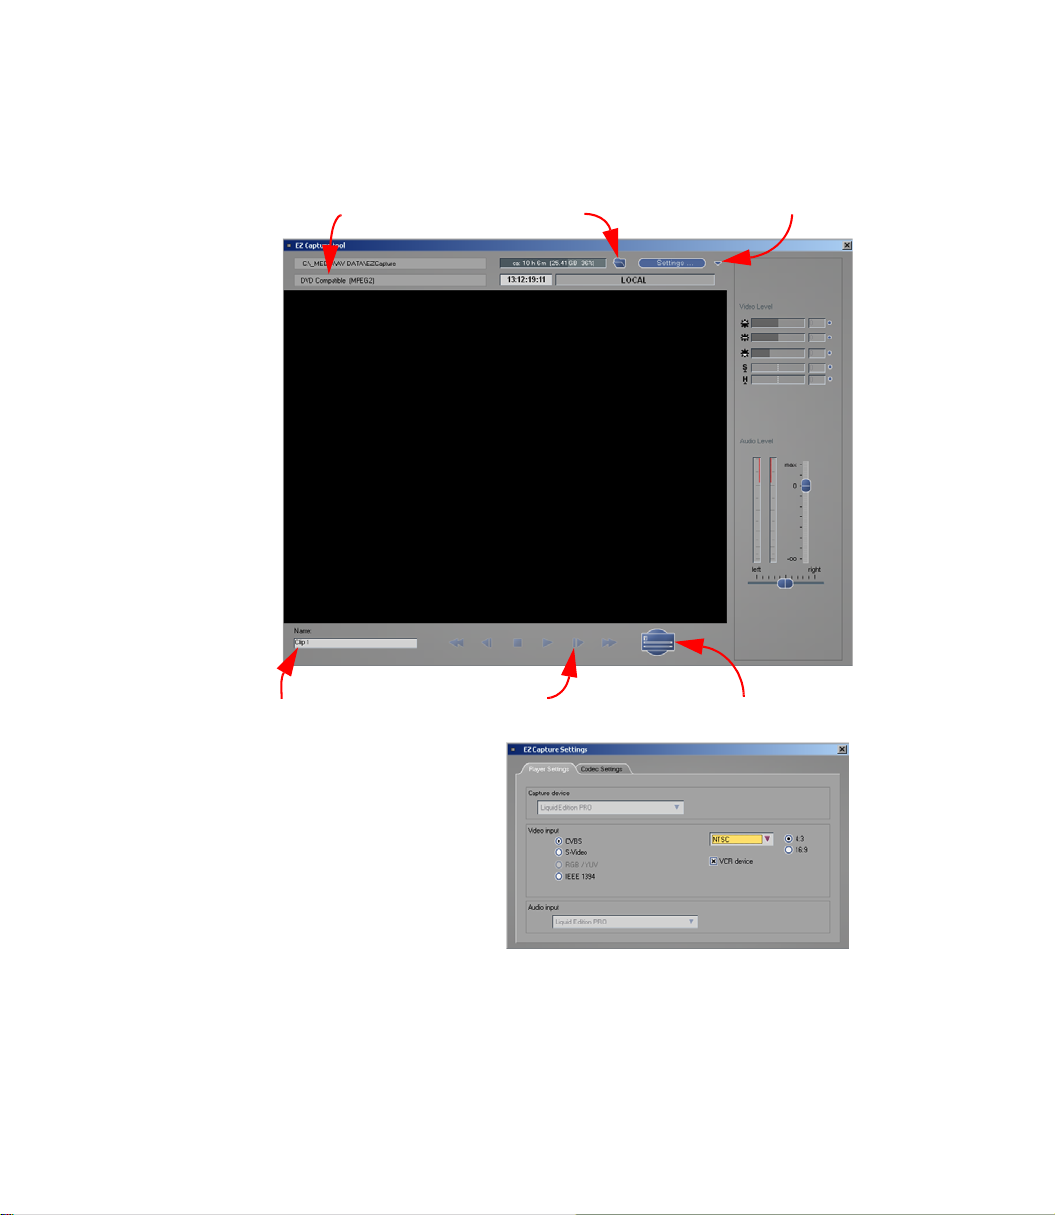
Extend dialog boxSelect directoryRecording format
Enter clip name Player control buttons Start/stop recording
Settings for
EZ Capture
13
Page 14

4 Album and Project
The Album and Project serve the same purpose: To manage all the elements necessary for making a film
and keep them within easy reach. Avid Liquid does this in the Project window.
STUDIO
Album
Here you can page through your existing material. The tabs on the side separate the areas into
video scenes, effects, etc.
LIQUID
Project and Tabs
Click the Eye icon ( , bottom right on the taskbar) and select the view with the large Project
Window : .
The Project includes all the elements of your work
and, more importantly, the actual work you’ve
already done: the edited Sequences (=Films). You
can create and output any number of Sequences
from a Project’s clips.
The Project Window has five tabs for organizing
the objects, several tools for copying, pasting,
etc., and a simple search window for ferreting out
clips. Like any other window, it can be resized
and moved.
When you delete objects from a Project, they are
placed in the Tra s h on the Liquid desktop (and
can be retrieved from there).
Project Browser
Click the button to the left of the Timeline
header to show/hide the Project Browser. This is a
miniature version of the larger window.
14
Single Monitor View
In place of the Source Viewer, you can also display
the Project window. Click the button to select
this Single Monitor View.
Page 15
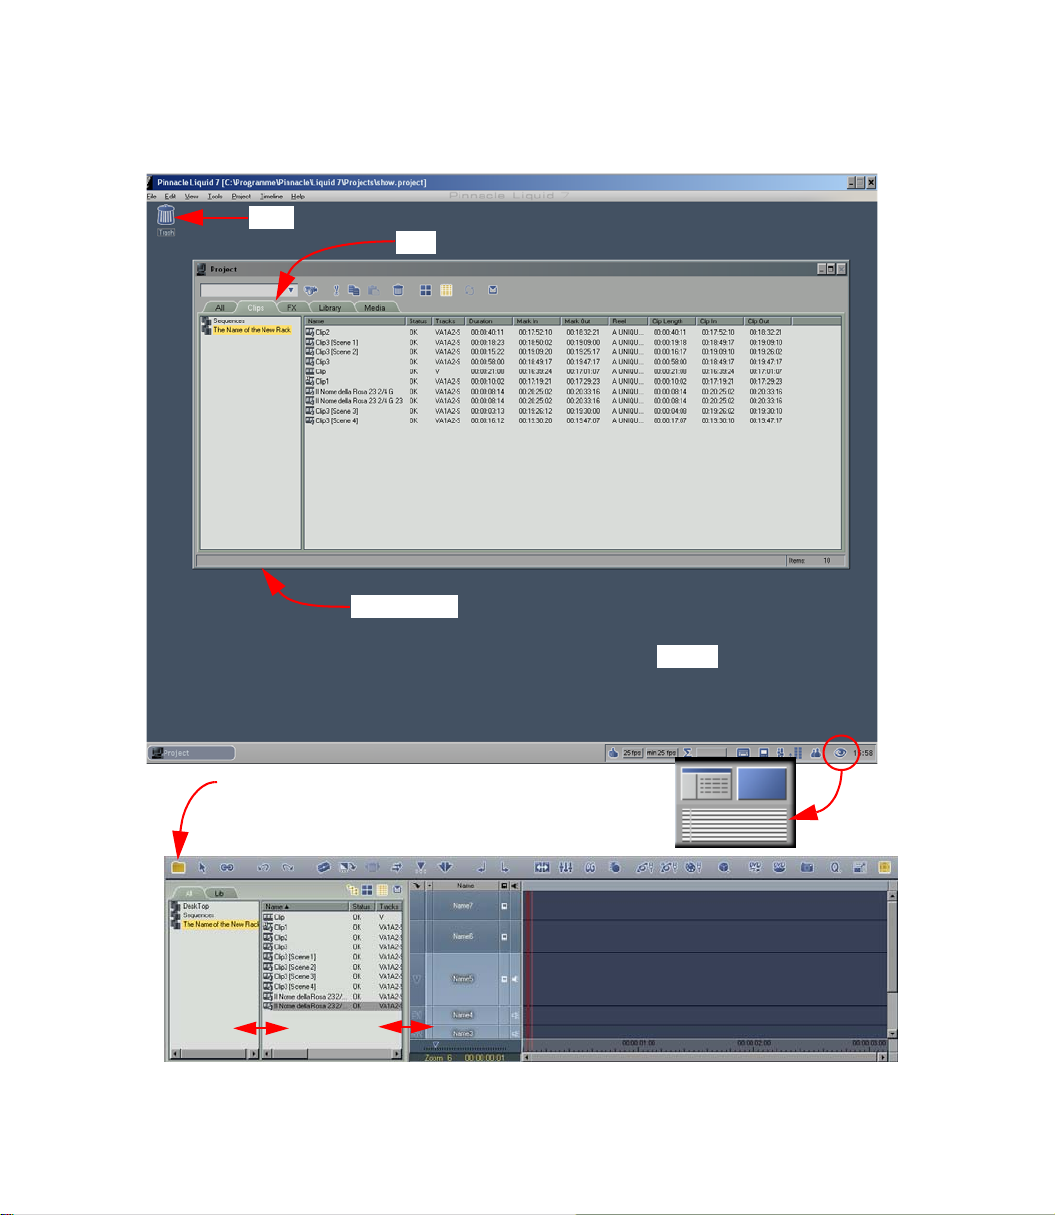
Trash
Tabs
Project Window
Desktop
Click here to show/hide the Project
Browser.
Drag the separating lines to resize the
fields.
Single Monitor View
(Project window in place
of the Source Viewer)
15
Page 16

5 Collecting, Sorting, Viewing and Finding Clips
Even ver y large Projects with thousands of objects (clips, etc.) can be effectively managed in Avid Liquid.
The following are the most important tools:
STUDIO
Windows folders
The Studio Album displays the contents of Windows folders, i.e. it directly accesses your computer’s directories.
Scene or Comment View
A miniature image is displayed with or without
the scene name and scene length.
Player
The player provides a quick preview of image and
sound.
Selecting a scene by name
Searches the current directory in the Album.
LIQUID
Racks and folders
The Racks in Avid Liquid ser ve as “cont ainers” for
clips. You can combine Racks in Rack Folders and
move or copy clips from Rack to Rack.
When you click a Rack in the Rack/Folder Area,
its contents are displayed on the right.
Picon View or Detail View
Detail View displays a detailed, editable list.
Picon View displays miniature images with
their names.
Sorting
If Detail View is activated, you can sort and
display the clips in the Rack in alphanumeric
order. Click (repeatedly) the header of the column you want to sort by.
Viewing clips in the Clip Viewer
To o pen th e Clip Viewer, double-click a graphics/
video/audio clip.
Quick clip finder
Enter the name of the clip you’re looking for and
click . This searches all the Racks.
16
Page 17
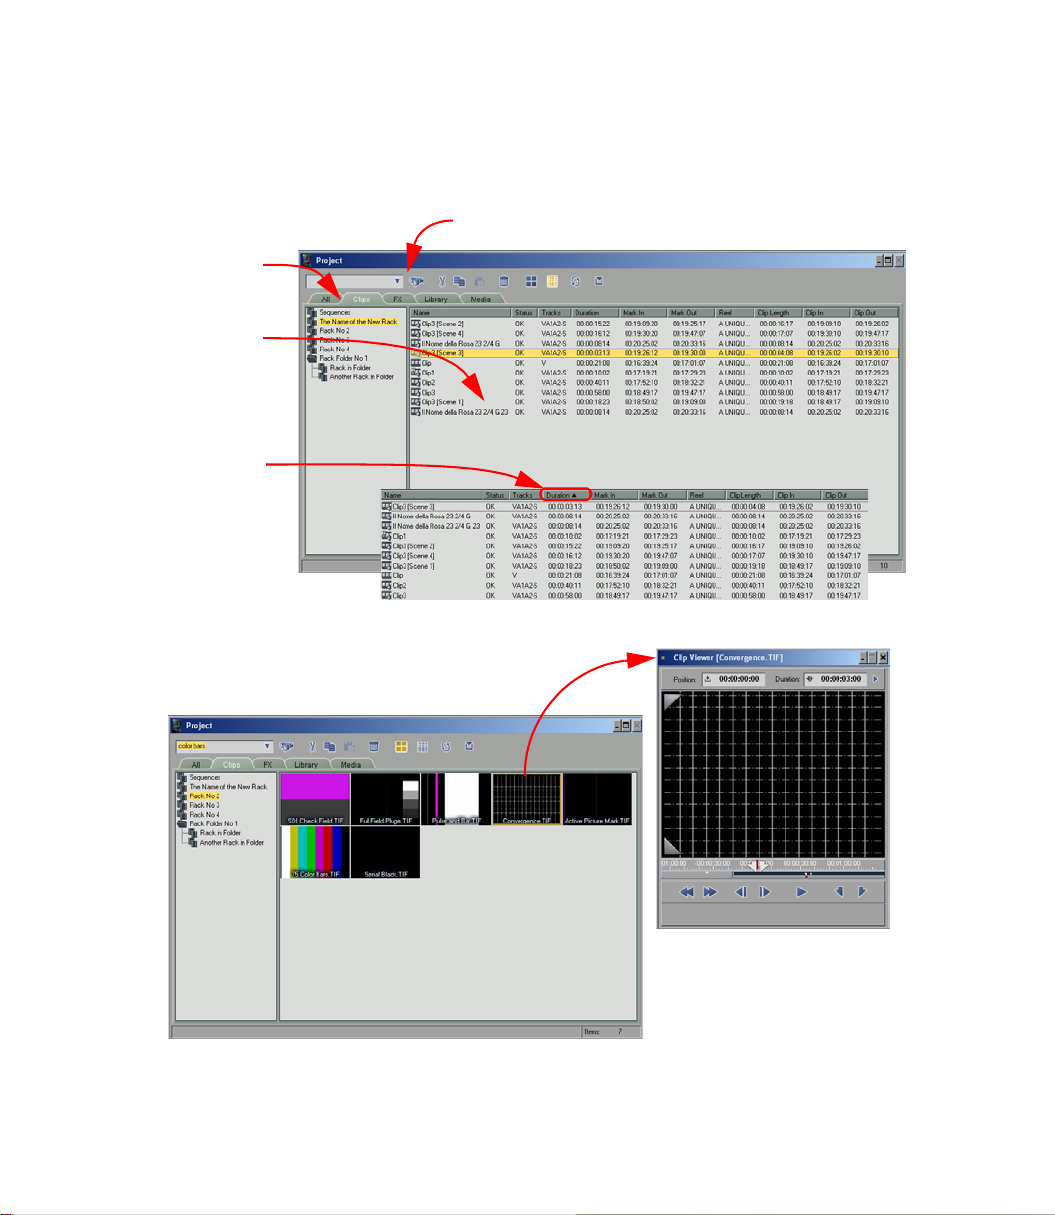
The left-hand
area contains the
Racks and Rack
folders.
The right-hand
area shows the
contents of the
current Rack
(here in Detail
View)
To sort the list
alphanumerically,
click the header
of the
relevant column.
Below is a Rack in Picon View.
Double-click a clip to view it in the Clip
Viewer.
Quick Finder
17
Page 18

6 Importing Clips, Titles, Graphics and Stills
Avid Liquid lets you import clips in a variety of formats. You can use Racks to organize your Project:
Title Rack, Audio Rack, Sound Track Rack, Video Rack, etc.
STUDIO
Select tab, open directory
In Studio, you first select the relevant tab and
then display the Open dialog box from Windows.
With Avid Liquid, you can fill any Rack with any
clips. You alone determine the structure.
Displaying audio files
Studio has a separate Album tab for audio files.
Avid Liquid has no such tab but you can, of
course, create Racks specifically for audio files as
described on the right.
LIQUID
Creating Racks
Clips or All tab:
Right-click in the left-hand area of the Project
Window to display the shortcut menu and select
New Rack.
Naturally, you can also use an existing Rack (see
“Importing objects” below).
Naming Racks
You can immediately name the newly created
Rack, or right-click an existing Rack and select
Rename.
Importing objects
Menu bar > File > Import > Media.
The possible formats are listed in the File Type list
box.
Now select the files you want to import. The clips
then appear in the currently selected (flashing)
Rack.
Linking, copying and moving
These are three types of import. Copy creates a
copy of the media file in Avid Liquid’s media
directory (recommended).
18
Page 19
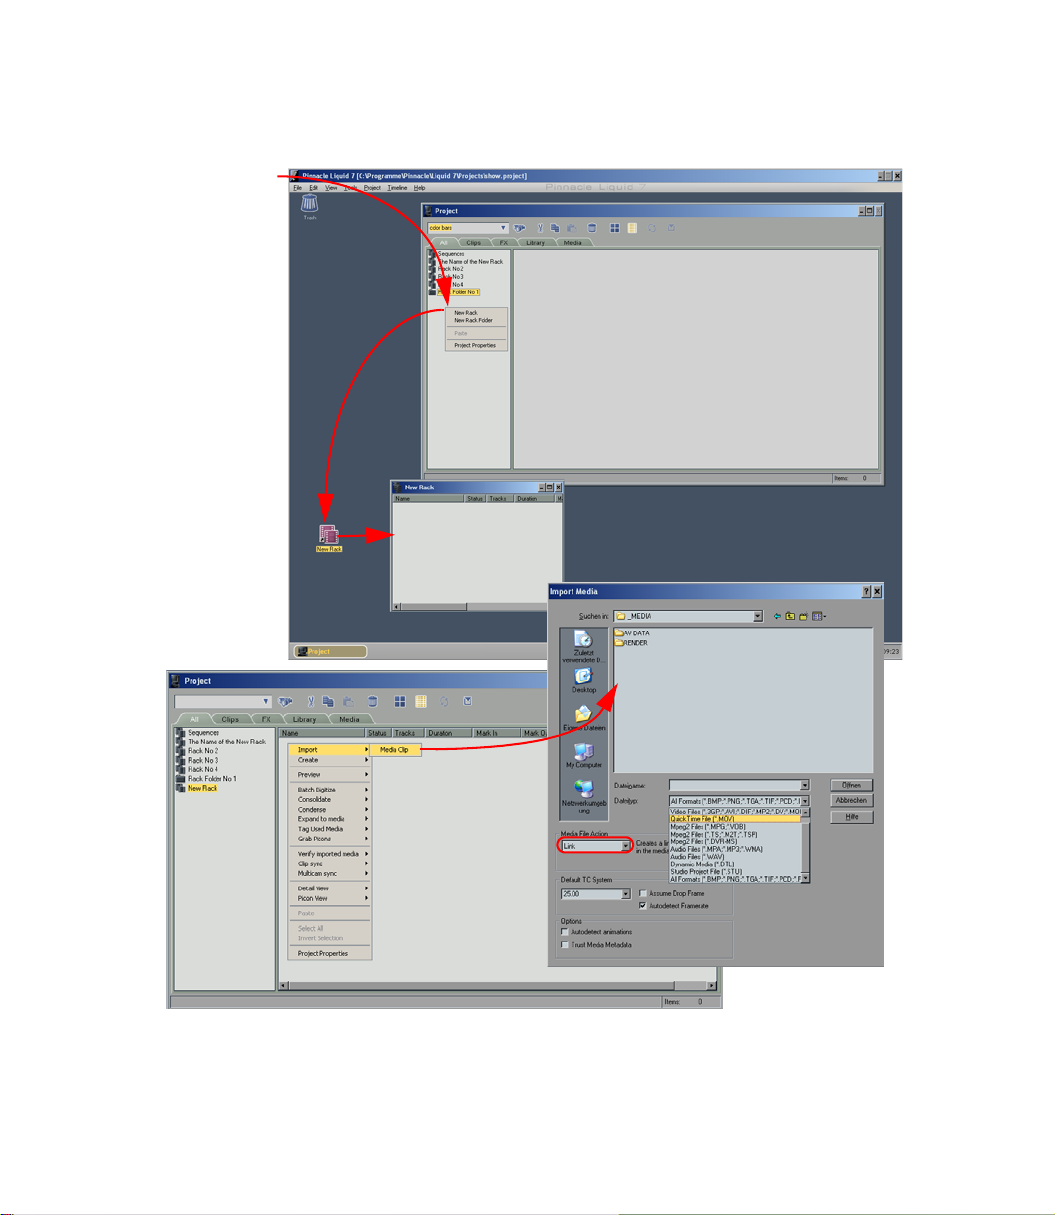
Right-click here:
You can open sev-
eral Racks simulta-
neously: Drag them
from the Rack area
to the desktop and
double-click.
Importing objects: Right-click to open the Rack’s shortcut menu.
Select an import type: Link, Move or Copy.
Or use the menu bar File > Import > Media command.
19
Page 20

7 DVD Menus, Titles and Effects
Video clips aren’t the only design elements of a film. The following is an overview of the options available from Avid Liquid; for more detailed information, see the next section.
STUDIO
DVD menus
The DVD menus are located in the Album. You
can either use standard menus and edit them or
load additional menus.
Creating titles
Select a template from the Album and transfer it
to the film window. Then open the Title Editor. In
Avid Liquid, the order is reversed.
Effects
In Avid Liquid, video effects are called Clip FX.
LIQUID
DVD menus
In the Project Window or Browser, select the
Library tab. The menus are located in the DVD
Menus Rack.
When you drag a DVD menu from the Rack to
the Timelin e, a special DVD Tra c k is automatically configured.
Double-click a DVD menu on the Tim eline to
open the DVD E ditor. This is where the DVD’s
menu structure is created, including chapters,
jump markers, animated buttons, etc.
The DVD menus themselves can be edited using
the same tool as in Studio.
Creating titles
Activate a Rack (which is where the finished title
is stored) and select Tools > CG Editor (or press
F2).
The Title Editor is very similar to the one in Studio.
When you’re finished, select CG Editor File > Save
as new in Liquid. The title clip is now located in
the previously selected Rack.
20
Effects
All the effects supplied with the product are
stored on the Library tab of the Project Window/
Browser.
Page 21
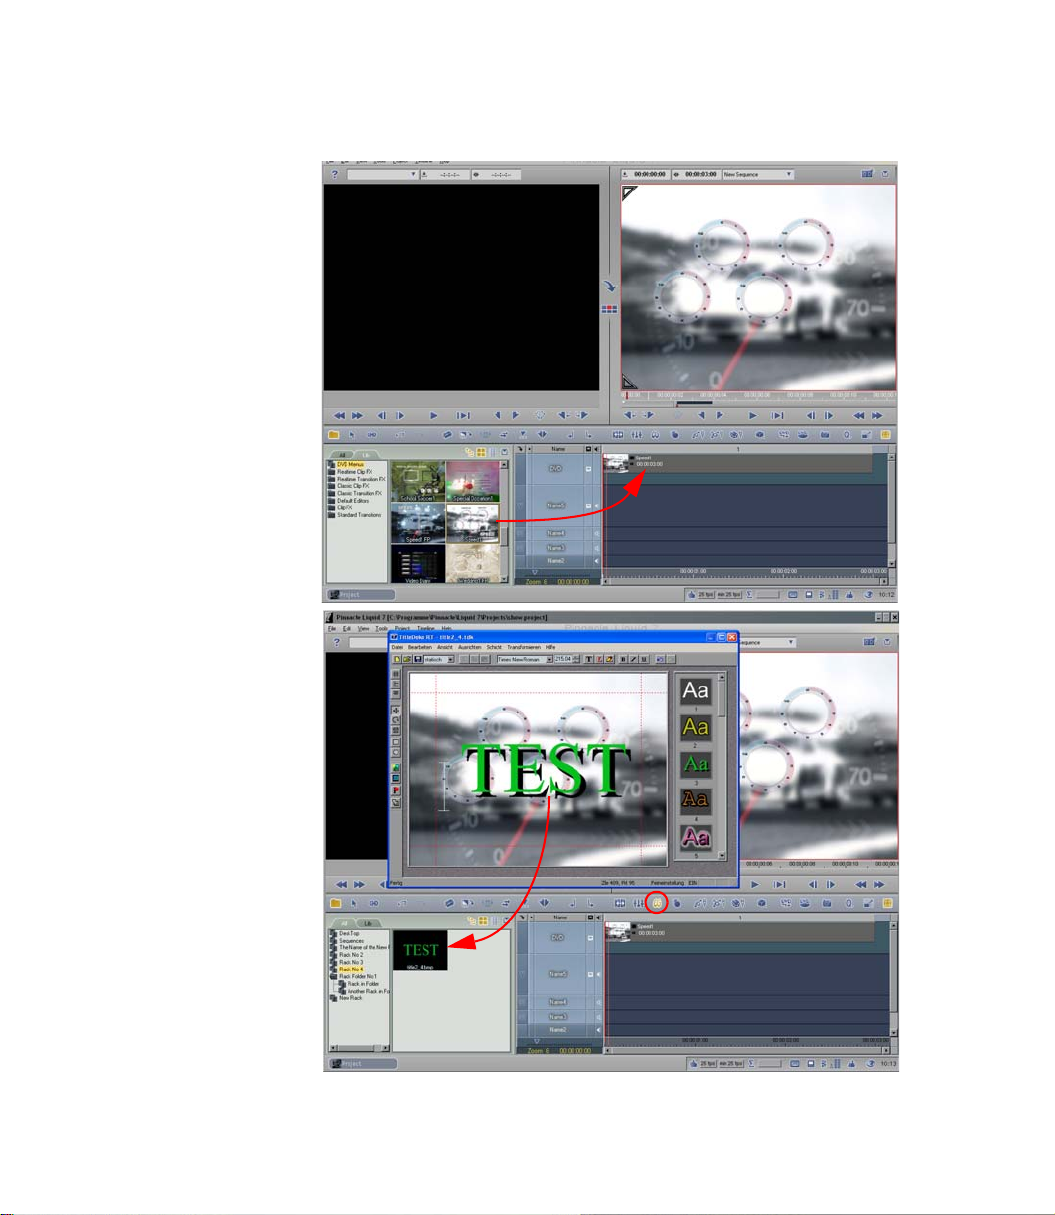
DVD menus are located
on the Lib(rary) tab in
the DVD Menus Rack.
Drag a menu to the
Timeline. The “DVD”
Track is automatically
configured at the very
The new titles are
stored in the current
Rack. The frame on
which the playline is
currently positioned
(Timeline) serves as
the background in the
top.
Title Editor.
21
Page 22

8 Film Window and Timeline: Basics
This section provides the most important information on the Avid Liquid Timeline and on creating a
film.
STUDIO
Film window
In Studio, the film window can appear in three
forms: Storyboard, Timeline and List. Specific
tracks are reserved for certain types of scene.
Edit line and edit mode
You can move this line only by means of the slider
above the film window. With Avid Liquid in
Scrub Mode (the button is not highlighted),
you can use the mouse pointer to move the Play-
line across the Time line; the mouse pointer then
looks like this: . In Edit Mode ( highlighted), you can click on clips.
LIQUID
Timeline
The Timelin e is the “foundation” for Sequences
(Avid Liquid’s term for films).
The Timelin e comprises any number of horizontal Tra c k s on which the clips are positioned. The
Tr ac k s are all the same; there are no specific
“au dio Tr a c k s ” or “title Tra c k s ”.
To the left of the Timeline is the header area.
Right-click this area to perform a number of customizations and disable video and/or mute the
audio.
From top to bottom
In Avid Liquid, higher Tr a c k s have priority over
lower Tra c k s , i.e. a video clip on a Tra c k overrides
a video clip on the Tra c k below it. The same does
not apply to audio clips.
Playline
The vertical red line indicates the current edit
position in the Sequence and the current frame in
the Master Viewer.
The Position Bar is located below the Timeline;
the current Timecode is specified to the left and
below the Trac k He a de r area.
22
Page 23
Edit Mode
is enabled
Track Header
Video and
audio
playback
Zoom (Timeline scale)
Example of a complex Timeline
Playline
Track
Track
Track
Track
Track
Timecode bar
23
Page 24

9 Inserting Clips on the Timeline
Basically, this function works the same in Avid Liquid and Studio: Drag a clip from the Album/Project to
the Timeline.
STUDIO
Assembling scenes
As soon as a scene is dragged to the Timeline, the
clip dimensions are indicated by green start and
end markers.
Inserting a clip between two other clips
Simply position the scene with its beginning
between two other clips. The subsequent clips
and their synchronous audio will be shifted.
LIQUID
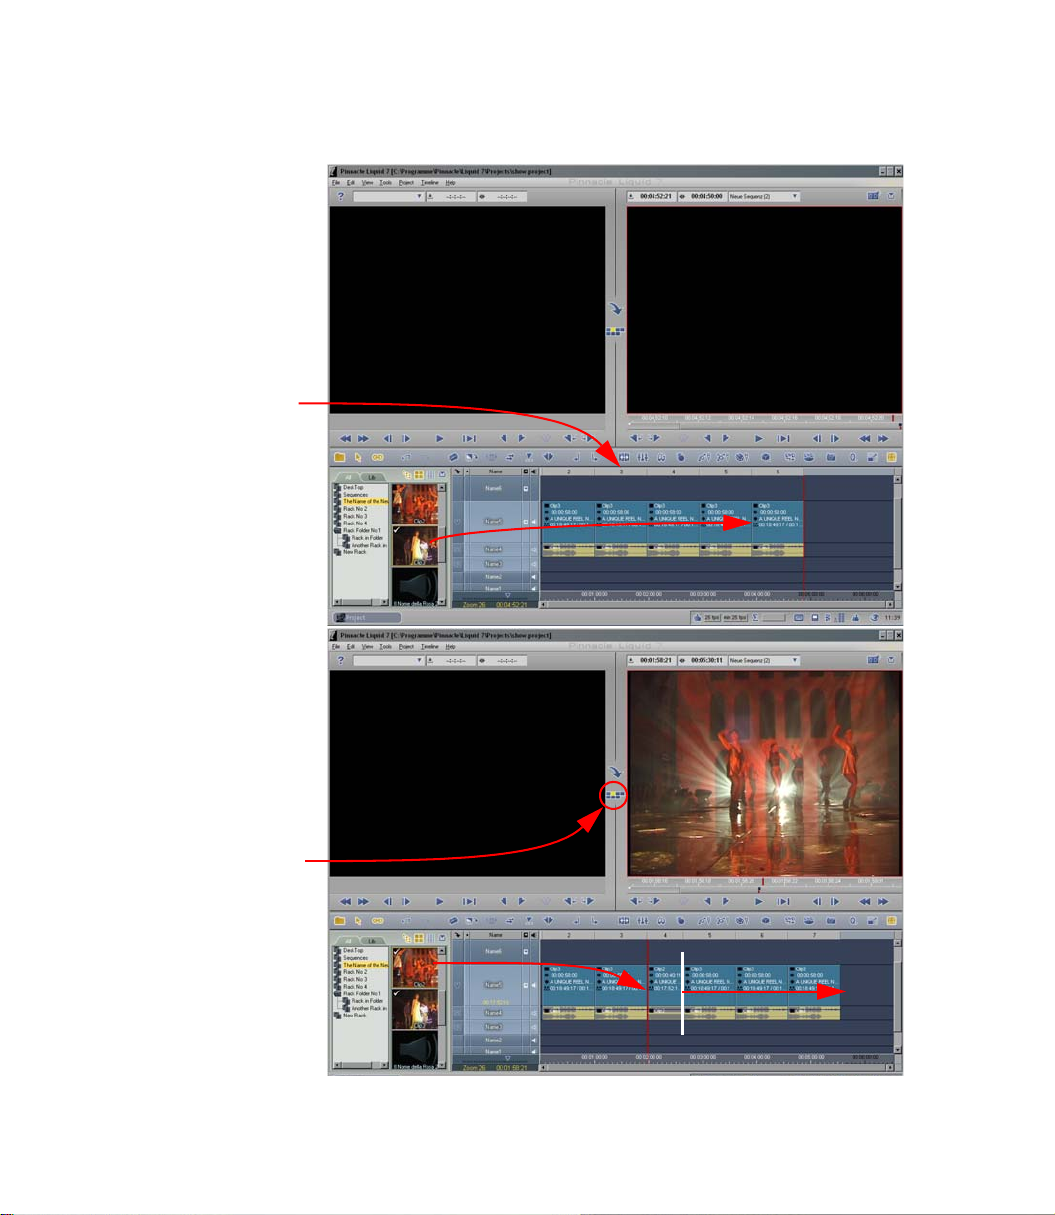
Assembling clips
Click to select a screen layout in which you
can view the Project (Browser), Timeline and
Source/Master Viewer.
1 As in Studio, drag a video clip to the
Time line and drop it on the Tr a c k labelled
V.
2 Drag another clip close to the end of the
first clip. It is “magnetically” attracted.
Repeat this several times.
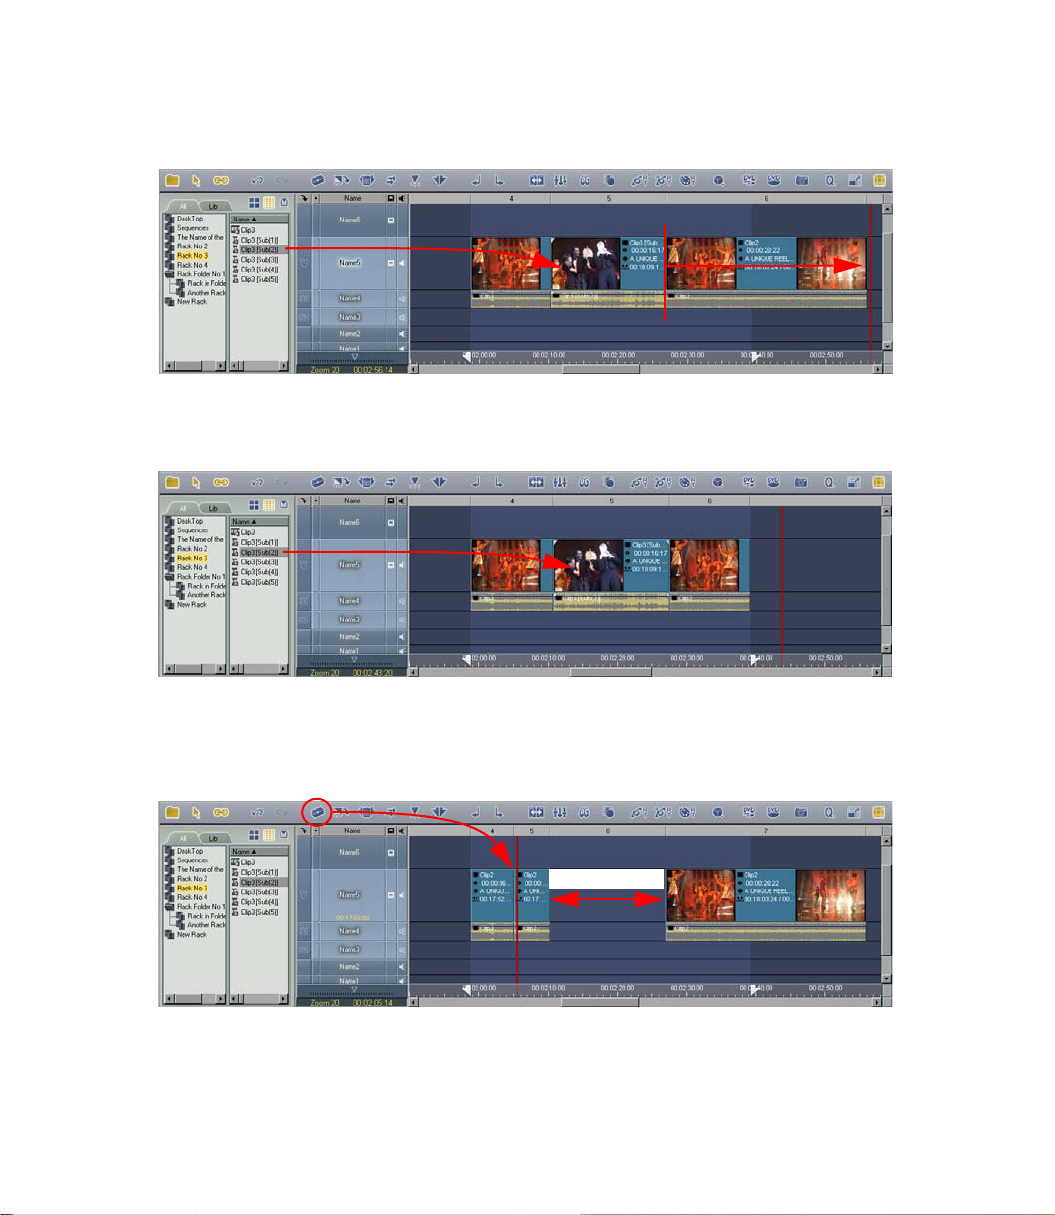
Inserting a clip between two other clips
First check the Edit Style. An icon between the
Source and Master Viewers indicates the current
status: Avid Liquid recognizes Overwrite Style
() and Film (Insert) Style ( ). To insert a clip,
Film Style must be activated.
1 Drag a video clip to the point between
two clips on the Timeline.
2 The clip is inserted and all subsequent
clips are shifted to the right.
24
Page 25
These are the “slices”
- each edit is assigned
a consecutive number.
The clip’s audio is
automatically posi-
tioned on a Track
below the video clip.
Make sure Film Style is
activated
(yellow icon).
Click the icon to
change the style.
The clips following the
inserted clip are
shifted to the right.
25
Page 26

10 Inserting/Deleting Clips on the Timeline
In contrast to Studio, Avid Liquid has two methods for inserting clips on the Timeline: One method
overwrites clips and gaps and the other shifts whatever follows it.
STUDIO
Razor (insert edit with audio)
To insert one scene into another, you must first
create an edit with the razor tool.
The scene is then inserted and subsequent scenes
are shifted to the right.
Deleting a clip
Select the clip and press DEL (or use the trash
icon). All subsequent clips are shifted to the left.
LIQUID
Inserting
You don’t need the Razor, but the Edit Style does
matter:
Film (Insert) Style () -
Drag a clip to the Timeline clip. The existing clip is cut at the insert point (Play-
line), the new clip is inserted and the rest
of the clip is shifted to the right along with
all subsequent clips.
Overwrite Style () -
The existing clip is cut at the insert point
but everything else on the Tr a c k is overwritten for the length of the inserted clips.
Razor (Add Edit)
This tool is also available in Avid Liquid: . It’s
generally used to cut an area out of a clip or
divide a clip so that a gap can be created.
Deleting a clip
Select the clip and press DEL. In Overwrite Style, a
gap is opened up; in Film Style, the clips shift to
close the gap.
26
Page 27
Insertion in Film Style: The inserted clip cuts the existing clip and shifts the remainder of this clip to the right.
Insertion in Overwrite Style: The overall length remains the same; the inserted clip overwrites the center portion
of the existing clip.
Gap
The razor tool cuts the clips at the playline position.
A deleted clip (in Overwrite Style) leaves a gap.
27
Page 28
11 Trimming Clips on the Timeline
The most important work of the editor is to trim the edits between clips: Each frame counts.
STUDIO
Trimming on the Timeline
First click the clip you want to trim. When the
mouse pointer nears the edit, it turns into an
arrow. You can now change the length of the clip.
Any gaps produced are immediately closed.
LIQUID
Activating Edit Mode
Make sure that the Edit Mode icon ( ) is yellow
and that the mouse pointer looks like this: (on
a clip) or this: (on an empty area of the Time-
line).
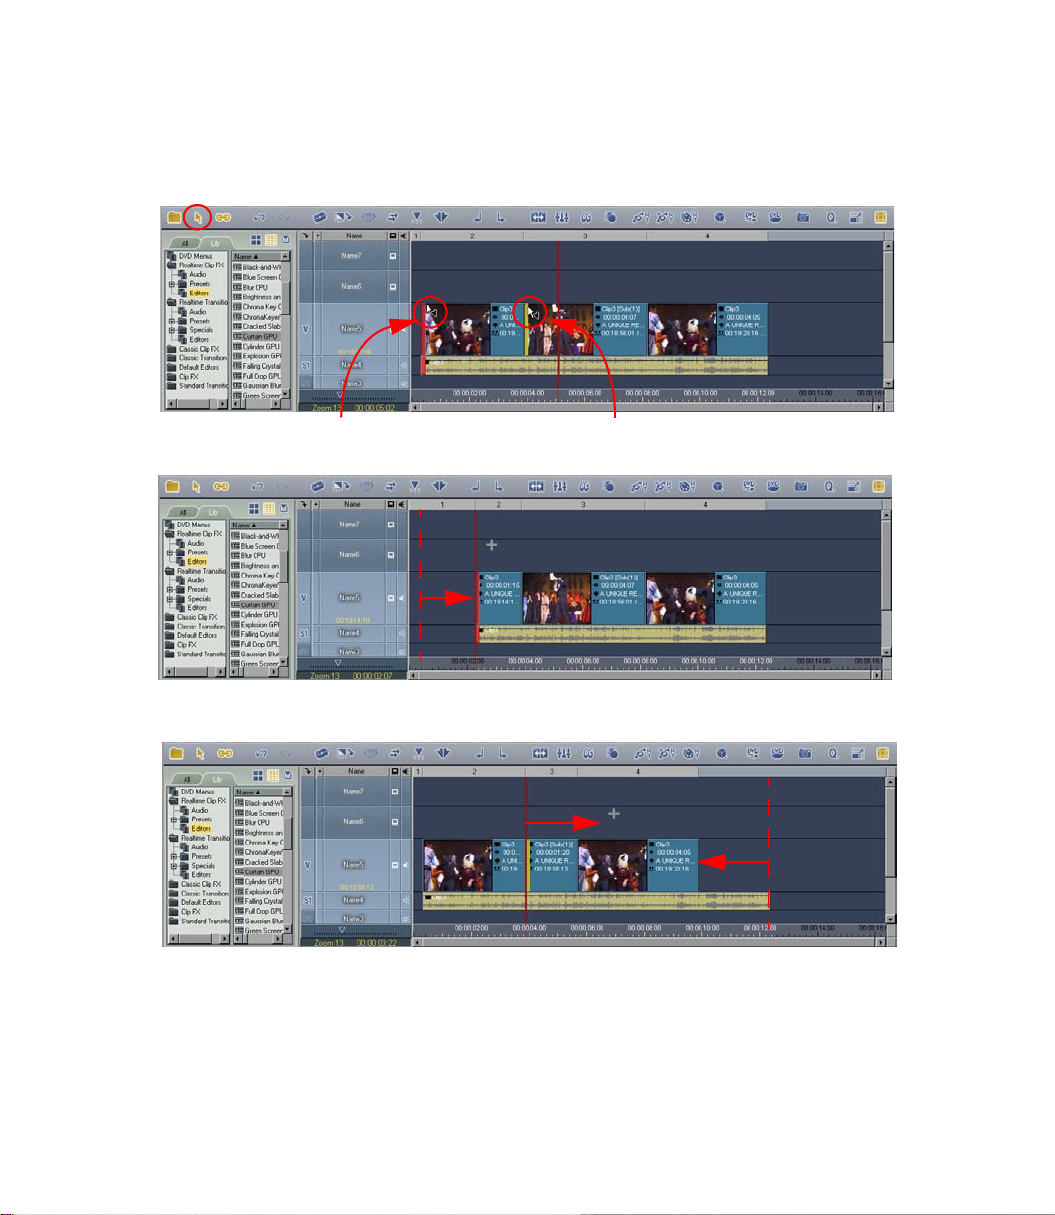
Trimming on the Timeline
1 Example: Position the mouse pointer on
the mark-in for a clip. Its shape changes
to: .
2 Left-click. The clip now has a red edge
(handle) if the Overwrite Style is acti-
vated or a yellow edge if the Film Style
is activated.
3 Drag the handle to the left or right. The
following happens:
In Overwrite Style , this simply length-
ens or shortens the clip. Either a gap
opens up or other clips are overwritten.
In Film Style , subsequent clips are
shifted. When you drag the mark-in, it
remains at its Timeline position.
Careful: the synchronicity of video and
audio clips can easily be lost. Make sure
that a video clip and its original audio
clip(s) all have yellow handles before you
trim.
28
Page 29
Edit Style
Trimming in Edit Style = Overwrite:
Red “handle”
Trimming in Edit Style = Overwrite:
The clip is shortened. Its mark-in shifts to the right.
Trimming in Edit Style = Film:
The clip is shortened but its mark-in remains at the master position and the mark-out shifts to the left.
Trimming in Edit Style = Film:
Yellow “handle”
29
Page 30

12 Moving Clips Horizontally and Vertically
Even when clips are already positioned on the Time line, they can be moved to new positions.
STUDIO
Swapping positions
When you move clips, the gaps created are closed
automatically.
Avid Liquid: Active tracks?
Click a Tra c k ’s Name field. If it’s highlighted, the
Tr a c k is “active”, i.e. certain actions are applied to
this Tra c k , such as the selection command
described on the right.
This is especially important when working with
the Insert Arrow (three-point editing; see the Reference Manual).
LIQUID
Selecting a clip or clips
This is the first step in moving one or more clips.
Activate Edit mode ( must glow yellow) and, if
necessary, (de)activate linked mode ( ) so that
you can select the video and audio clips together
or separately. The Overwrite Style must also
be activated.
Click a clip to select it (hold down the
CTRL or
SHIFT key to select multiple clips).
You can also drag a lasso around the relevant
clips.
Another practical method it is to use the Select
after playline ( ) command. All clips on active
Tr ac k s (- see also page 74) at and to the right of
the Playline are selected. This is an easy way to
create a gap in the Sequence.
Moving a clip or clips
Once you’ve selected a clip or clips, drag them
while holding down the left mouse button.
To move clips vertically, we recommend the following procedure: Select the clips and press
and the UP/DOWN ARROW key. The clip then
retains its exact same TC position on the Timeline.
CTRL
30
Page 31

Select using the lasso: Beginning in an empty area on the Timeline, drag the lasso until it either surrounds the
Custom selection: Hold down the CTRL key and click the relevant clips. You can now, for example, move the
selected clips as a group. Or open the Clip Properties dialog box (right-click > Properties) in order, for example,
relevant clips or its outline touches them.
Edit mode pointer
to rename multiple clips.
Deactivated
tracks
Selection as of the playline: In this case, the Track status is important; the command is applied only to clips on
active tracks. To activate or deactivate tracks, click on the Track names. Deactivated tracks are dark and active
tracks are light-blue.
Selected
Not selected because tracks are deactivated
Selected
31
Page 32

13 Effects: Basics
Avid Liquid provides a huge number of effects that you can combine and edit as desired. Using these
effects is as easy as it is in Studio.
STUDIO
Album and Video Toolbox
The effects are located on the Album’s Transitions
tab or in the Video Toolbox (“Video Effects”).
Effects are positioned on either a video Track or
the overlay Track. Because Avid Liquid allows you
to layer any number of clips on any number of
Tr a c k s , you can construct highly complex effects:
Tru e c omp os it ing .
LIQUID
Library tab
All effects are located on the Library tab in the
Project Window (or on the Lib tab in the Project
Browser) in various Racks and folders.
“Video Effects” are called Clip FX.
What are Effect Editors?
As in Studio, each effect in Avid Liquid can be
edited by means of its parameters, which vary in
number depending on the effect.
Realtime effects (RT, Realtime)
These effects are processed by the graphics card
(GPU) or the computer’s processor (CPU) and
do not have to be computed for the preview.
Classic effects
Classic effects include, for example, the powerful
Color Correction Editor and the Timewarp Editor
for dynamic changes in clip speed.
32
PlugIn effects
Here you can access and manage PlugIns, i.e.
third-party effects (if installed).
Page 33

Effect Editors
View of the “Library” tab with the
Parameters such as Size and Position are configured on the left; parameter curves (for dynamic changes) are in
the middle; the inlay on the right contains the clip image (here it’s the default preview image because no clip is
different effect types.
Example of an Effect Editor (Magnify GPU).
loaded yet).
33
Page 34

14 Effects: Transitions
Position a few video clips consecutively on the Timeline so you can experiment with Tra n s i t i o n s . Don’t
leave any gaps between the clips.
STUDIO
Selecting and dropping
Regardless of which transition effects you select,
they will always be positioned so that the effect
ends at the start of the next clip. At the end of the
film, a transition effect changes to black. An
effect positioned on the first clip in the film functions as a fade-in.
Avid Liquid requires “leeway”
Tr a n s i t i o n s always combine video material from
two clips/scenes (fade-in/fade-out: one video
source + black). Wherever two clips border one
another horizontally without a Tr a n si t i o n , they
form an end/beginning, i.e. a hard cut from A to
B.
If a Tr a n si t i o n is positioned on the edit, however,
it takes a little material from each clip so it can
mix the video in the desired manner (e.g. a dissolve). Both of the clips are automatically
extended beyond their mark-in or mark-out to
provide leeway. If the clips have already been
extended to their final frames, this isn’t possible
because no media data is available. You then need
to trim=shorten the clips.
Studio automatically supplies this leeway but, if
necessary, will shorten your film to do so.
LIQUID
Positioning a transition on the edit
An Edit is where two clips on the same Tra c k are
seamlessly joined. A Tr a n s it i o n must cover this
edit.
For example, select Realtime Transition FX > Edi-
tors and drag the Dissolve GPU Tra n s i t i on with a
default length of one second to an Edit. The fol-
lowing can occur:
Transition gray, full length
Everything’s okay: Enough leeway is available
(see right).
Transition gray, reduced length
A message was displayed and the Tra n s i t i o n was
automatically shortened to the available leeway.
Remedy: Trim the clip (Film Style, ).
Transition partially or completely red
The red area indicates insufficient video material.
Trim the clips until the red disappears (Film Style,
).
Trimming/positioning a transition
Drag the transition with the mouse or select a
command from the Tra n s i t i o n shortcut menu.
34
Page 35

Transition (Wipe) positioned on an edit. Sufficient leeway (overlap) is available on both clips - therefore, the
Not enough leeway available - Liquid automatically trims the transition to the usable length.
Transition is partially red: In this case, the clip on the right doesn’t have enough leeway. In Film Style, trim in the
direction of the arrow until the red disappears from the transition. Figure below: With A/B editing, the transition
transition is gray.
would look like this:
35
Page 36

15 Effects: Clip FX (Video Effects)
These effects, called “video effects” in Studio, are usually applied to individual clips. However, they can
also be applied to entire Tra c k s and all the clips they contain.
STUDIO
Drag and drop onto a clip
Here there is hardly any difference between the
two applications. You can drop as many effects as
necessary onto a clip. At some point, however, the
realtime capacity of even the most powerful system will be exhausted. This doesn’t matter, however, because rendering is then performed.
The green star
In Avid Liquid, the star is gray and appears on the
Picon if the clip is in the Project Rack. A blue star
indicates, for example, that the Playback Level
was changed during capture.
LIQUID
Drag and drop onto a clip
1 Drag a Clip FX (e.g. Lens Flare GPU from
Realtime Clip FX > Editors) to a video
clip.
A purple line appears along the top of the
clip and an effect icon is displayed next to
the right-hand clip picon (not immediately visible, depending on the Timeline
zoom level).
2 Right-click the purple line and then select
[Effect Name] > Edit.
3 The effect’s editor now opens, containing
all the available parameters.
4 Adjust the parameters until the effect
suits you.
5 Click the running man in the top right-
hand corner to exit the editor.
Drag and drop onto a Track
Drag the effect to the Tr a c k name in the Tra c k
Header Area, then continue as of step 2 above.
Important: This affects all
Key Frames (see page 84) are not possible.
the clips on the Tra c k .
36
Page 37

Simply drag clip FX to the video clip: The purple line and the effect icon indicate that at least one effect is
Right-click the line or effect icon and select the effect to be edited. The Effect Editor now appears.
This effect is applied to the entire “Video” Track, i.e. to all the clips on this Track.
applied to the clip.
37
Page 38

16 Effects: Render or Realtime?
With Avid Liquid’s intelligent background rendering, this in not really an either/or question.
STUDIO
Render options/preview
If your system has sufficient capacity, Studio
shows you a preview of realtime effects.
You can set various render options in the Setup
area. With Avid Liquid, you can activate or deactivate background rendering. We recommend
that you leave it activated. Then all your effects
will probably already be rendered by the time
you’re ready to output your film.
LIQUID
Yellow and red slices
The color of the Slices above the Timeline indicates the status of clips and effects:
Ye l l o w means that these segments can be
played back in real time. If the effects are
beyond your computer’s performance
capabilities, Avid Liquid reduces the
frame rate for playback and indicates that
it is doing so below on the taskbar.
Red indicates that Classic Effects are being
applied. These are rendered automatically.
Green identifies segments that have
already been rendered.
“Render yellow slices”
In other words, activate background rendering
for realtime effects. Select this option from the
Render menu in the taskbar ( ) or from the
menu bar > Timeline > Render yellow slices.
For output via IEEE 1394, yellow Slices must be
rendered.
38
Page 39

Colored slices mean:
Yellow = playback in realtime; Green = already rendered; Red = needs rendering (Classic Effect);
Dark red = media data not available.
Render menu in the taskbar: Click the sigma character to
open the Render Viewer (right). This allows you to monitor the rendering process.
Select “Render yellow slices” to activate background rendering (or deactivate if checkbox is empty).
To manually re-render, select “Delete Render Files”
(Timeline shortcut menu).
39
Page 40

17 Timeline Settings
Avid Liquid can handle clips in all formats on the Timeline. Consider the output (tape, DVD, stream)
and select a specific video format for the Timeline .
STUDIO
Timeline settings as of Version 10
As of Studio Version 10, you can select advanced
settings (for example, for HDV).
LIQUID
Selecting a Timeline format
When you start a new movie (in Avid Liquid:
Sequence), select a Timeline Format, such as.
NTSC or HDV 1080/50i, either because you
recorded everything to HDV 1080i or because
you want to output everything in this format.
Select File > New > Sequence > Preset and
then the appropriate format (usually the
format in which your clips were
recorded).
When mixing material that has different frame
rates (fps), aspect ratios (4:3/16:9) and image
sequence (progressive/interlaced), you will have
to compromise. For example, scaling between 4:3
and 16:9 means stretching or squeezing the
image, black bars on the screen or parts of the
image being cut off.
The great advantage of Avid Liquid is that you
can combine material from all sources into one
Sequence and output it in any format and to any
medium.
Avid Liquid automatically adapts the frame rate
and resolution.
40
Page 41

New Sequence dialog box
(File > New > Sequence)
Select Timeline format here
Advanced settings - usu-
ally, you will not change
them.
(right-click Clip > Properties)
Clip properties
All the facts about the clip
at a glance.
Select an option here to scale
one or more clips to a different
format (aspect ratio).
41
Page 42

18 Audio: Basics
When inserting, trimming, deleting, moving, etc. on the Timeline , Avid Liquid handles audio clips
exactly like video clips.
STUDIO
Special audio tracks
Certain tracks are reserved for certain types of
audio.
Activating/muting the audio stream
Click the icon to the right of the particular audio
Track to mute playback.
LIQUID
Sorting audio clips by type
Although audio clips can be positioned on any
Tr ac k , we recommend that you set up a particular
structure: Separate Tra c k s for original audio,
interview audio, noises, background music, narration, etc.
Naming/inserting tracks
Right-click a Tr ac k ’s Name field to open a shortcut menu that allows you to name the Tra c k and,
if necessary, generate additional Tra c k s .
Activating audio playback
If you also want to hear the audio, you must activate the Track for Audio Playback (see figure on
the right): The Loudspeaker icon must be visible.
Displaying the audio waveform
This function makes the audio “visible”. Rightclick the Loudspeaker icon to activate/deactivate
the waveform.
42
Page 43

Example of a useful Timeline structure:
“SOT 1” (Sound on Tape) and “2” for interview audio, original audio on tape;
“Music” for background music;
“Ambient 1/2” for ambient noise;
“Sound FX” for special sound effects.
Make sure audio playback is activated: The loudspeaker icons must be visible.
Waveform display in the
clip:
To activate, right-click
the audio column in the
Track header and select
Wave Form from the
shortcut menu
Originally synchronous
audio/video became
asynchronous:
Red line and amount of
shift specified in frames
(+/-).
(Sync Break function)
Precision work with the waveform in the
Clip Viewer:
Double-click an audio clip on the Timeline
Here you can also adjust the volume of the
entire clip.
.
43
Page 44

19 Fast Audio Fade-ins and Fade-outs
This frequently needed application takes just a few clicks in Avid Liquid.
STUDIO
Fading out/in
In the Audio Tool (fader), you can fade sound in
and out for each audio Track.
LIQUID
Fade-in and fade-out
In Avid Liquid, as in Studio, the empty Time line
(no clips on the Tra c k ) is “silent”. Consequently,
fade-ins start with an empty Timeline and fadeouts end on an empty Tr a c k .
Create a Cross Fade at the mark-in and
mark-out of a Timeline clip (Library tab >
Realtime Transition FX > Audio > etc.)
Audio crossfade
As with a video dissolve, the audio signals of two
adjacent clips are mixed; one is gradually faded
out while the other is simultaneously faded in to a
corresponding degree.
Automatic fades/dissolves
For clips (video/audio) on active Tra c k s
(see page 30), you can automatically insert fadeins/fade-outs/crossfades/dissolves:
Position the Playline near an Edit and click the
following icon: . You can also insert multiple
fades/dissolves within a selected Timeline range.
44
Page 45

Louder
Fade-in and fade-out with crossfade
Audio crossfade: Audio from the two clips is mixed.
Constant Softer
Mix
Automatic audio crossfade: Applied to all edits within the selected range (active Track(s)).
45
Page 46

20 Making a Movie: Options
Both programs permit numerous output formats for a finished film, from recording to tape to DVD
authoring. Overview:
STUDIO
Make Movie
This area contains all the output options.
Ta p e
For output to a DV camcorder.
AV I
For output to an AVI file.
MPEG
For output as an MPEG file (MPEG 1, 2
or 4, S-VCD-compatible, DVD-compatible, etc.).
We b
Output in Windows Media or Real Video
format.
Upl oad
For publishing on the Pinnacle Studio
Community website. Not a feature of
Avid Liquid.
Disc
For burning to CD (VCD, SVCD) or
DVD.
LIQUID
Menu bar > File > Record to Tape
Displays the dialog box for output to a connected
recorder that is controllable via i.Link (Firewire).
File > Burn to Disc
DVD, VCD, SVCD, Image, VOB, with/
without burning
File > Export to File
Displays various dialog boxes for outputting a
Sequence as one or more files:
Images and graphics (single frames)
Fuse (downmix to a file)
MPEG1,2,4 (elementary/program
stream, DVD-compatible, etc.)
Windows Media (audio and video)
AVI, QuickTime, DivX, RealMedia
You can define output formats and save them for
later use (Edit presets).
For more information on output formats, see
below.
46
Page 47

Export format
Select an
exporter preset
Information on the
preset selected
Select export source
Create a custom preset
47
Page 48

21 Recording to DV Tape
This version is recommended especially for subsequent viewing on a TV or for the long-term archiving
of films and raw material.
STUDIO
Make tape
Before the tape is made, the film’s effects and
transitions must be rendered (wherever necessary).
You can connect an analog recorder downstream
from the DV device (signals looped through).
With both Studio and Avid Liquid, make sure the
recording device is activated for DV input.
LIQUID
Record to Tape
For this function, you need a recorder that is controllable either via IEEE 1394 (DV) or via an RS422 interface (professional version).
The Sequence on the Timelin e must be completely
rendered for output via the DV output. If this
hasn’t already been done, it’s performed in the
Record to Tape module. Tip: Always activate
background rendering (see page 38).
1 Menu bar > File > Record to Tape >
Record tab.
2 Select Mark-In to Mark-Out only if you
want to output a specific range of the current Tim eline .
3 Click Record. If necessary, rendering is
now performed; a progress bar lets you
monitor the process. Recording starts at
the current tape position and stops automatically.
48
HDV output
This basically works in the same way as DV output, except that before you start recording, make
sure the Timeline Format ( page 40) matches the
device’s recording format. For more information,
see the Reference Manual in the chapter on high
definition (“High Definition at the Output”).
Page 49

Timecode from the tape
Recording
options
Current
recording device
Record to Tape:
If the recording device is controlled via IEEE 1394, the dialog box appears as
shown.
In the case of an RS-422-controlled recorder, you can also choose to edit in
Insert or Assemble mode.
Stripe Tape:
This function writes a continuous timecode and, if desired, a frame Sequence
to the tape. The tape is automatically rewound before recording.
49
Page 50

22 Burning Disks / Exporting Files
Use the Export to File and Burn to Disc functions to generate files for sharing on the Internet and DVDs.
STUDIO
Make Movie
This area contains all Studio’s output options.
Avid Liquid displays them in three different dialog boxes.
LIQUID
Burning / Exporting
1 Select one or more Sequences or clips that
you want to export/burn from the Rack.
If you don’t select any, the Sequence currently on the Timel ine will be burned/
exported.
2 Select File > Export.../Burn ... to open the
appropriate dialog box.
3 Select a burn or export format, such as
DVD or MPEG1.
4 Select a Preset (this is a subcategory of the
export/burn format selected).
5 Select the Source for exporting/burning.
6 When burning: Make sure the burner
contains a suitable medium and with a
large enough capacity.
7 Click Ok.
8 Various dialog boxes appear (Location,
Select Codec, progress bar).
9 The system informs you when the process
is completed.
50
Page 51

Export format
Select preset
Select source
Burner and medium
information
Capacity indicator
Exporting a file
51
Page 52

23 The Most Important Settings
The presets are enough to get you going the first time you start up the program and when you work with
DV/HDV devices. If you need to change them, here’s a brief overview:
STUDIO
Specifying a default directory for recording
Use the folder icon in the Diskometer.
Player
Select Setup > Capture source > Capture devices.
LIQUID
Specifying a storage location for video/
audio media files
You already defined this location during installation. To change it, select: Edit > Settings > Site >
Media Management > Media Volumes: Add or
Edit.
The default recording drive is identified by an
“X”. Right-click the narrow column next to Alias
in front of
it as “Primary”.
the desired drive/directory and define
Specifying a player
The player/recorder and signal inputs are managed under Edit > Settings > Site > Player Set-
tings.
MPEG or DV player/recorder: Click i.Link DV
and select the Connections tab. All the fields must
contain IEEE 1394.
Other connection combinations are possible with
an analog breakout box and Live input (see the
Product Manual).
Effect preview/monitor
You can connect a video monitor/TV to the
player (recorder) (signal looped through) but you
will not be able to preview the effects. The Timeline must be rendered before output (“Make
Movie”).
52
Effect preview/monitor
With an analog breakout box: Click the monitor
icon to the right on the taskbar and select the
port to which the video monitor/TV is connected.
Page 53

Define or verify the
storage location of the
media files
Select player and
verify connection
Select analog
monitor output
53
Page 54

5454
Page 55

Part 2
Learning More about
Avid Liquid
Page 56

1 Recording from DV/HDV Video Tapes (Capture)
In Avid Liquid, transferring images from tape to the hard disk of the editing computer is called “capture” or “digitizing”. This process generates media files and clips, which are the most important elements of your film.
STUDIO
Recording mode
In Studio, you work with the Record tab.
In Avid Liquid, the “Album” is called a Rack.
“Scenes” are called “Clips” in Avid Liquid.
In Studio, the tape name has no significance.
LIQUID
Logging Tool (Capture)
You can use the Logging Tool to view tapes and
digitize audio/video.
1 Select File > Logging Tool.
2 Enter a name for the tape (=Reel) cur-
rently loaded in the camera.
IMPORTANT: Never use the same Reel
name more than once in a Project.
3 Click the filmstrip button to open a dia-
log box and create a new Rack (see illustration on the right).
A Rack is a “container” for the clips.
4 You can now start generating clips. In the
simplest case (preset), click the Play but-
ton to start the tape. Then click the
Digitize button to begin the transfer.
5 Click the Digitize button once again to
stop. The clip is stored in the Rack.
56
Page 57

Important: Enter a different
reel name for every tape in a
project.
Logging Tool above the
Timeline in the
standard view
Create a Rack
57
Page 58

2 Comparison of Recording Instruments
This set of pages describes the most important areas of the Logging Tool as compared to the capture area
in Studio.
STUDIO
Scenes and Album
Each time a new scene is created, it’s stored in the
Album.
In Avid Liquid, a scene is called a “clip”.
Player and Camcorder Controller
The current video is displayed in the player.
The Diskometer
You can capture either in full DV quality or in
preview quality.
In Avid Liquid, this is possible only in EZ Capture
(MJPEG).
LIQUID
Clips, Racks and Project Browser
Each new clip is placed in the currently active
Rack. The current Rack is highlighted in yellow
on the bottom left in the Project Browser.
Video inlay and control functions
The video image played appears in the “Inlay”
(Viewer). The camcorder or player is controlled
by means of the usual buttons. The timecode field
is located above the viewer.
In Avid Liquid, the functions of the Studio Diskometer are distributed over three menus:
Player/Source
i.Link DV should appear here. If it doesn’t, click
the small Player icon and continue as described
on page 52.
Select media format
Native Transfer (AVI) should appear here (Excep-
tion: You’re playing an analog signal).
58
Display capacity/location
The hard disk used for recording is specified here
(position mouse pointer on top or click a number) along with its available capacity.
Page 59

Timecode display
Player status display
Video Inlay
Current player/source
Current Reel and Rack
Player control buttons
Active Rack
in the Project
Browser
Media format/capture
format
Capacity available on the
current drive
59
Page 60

3 Recording Clips with Mark-Ins and Mark-Outs
You can also use the Logging Tool to view tapes and separate the successful scenes from the failures.
Then you won’t have to transfer the entire tape to the hard disk.
STUDIO
Starting capture
Using the Camcorder controls, rewind the tape to
the beginning and click Start Capture. Then enter
a file name and click Start Capture once again.
Stopping capture
Capture stops when you click Stop Capture. A
clip is stored in the Album.
LIQUID
Setting a mark-in
The mark-in identifies the beginning of a clip
(scene, setting, etc.). Always position mark-ins
several seconds before the actual action begins.
Using the control buttons, shuttle the player to a
particular position and click this button: .
Setting a mark-out
The mark-out identifies the end of a clip. Click
this button: .
The clip is now defined and you can either log or
digitize it.
Logging
You can’t play a clip on the Timeline if it has only
been logged, because it doesn’t (yet) have any
media data. Clips are logged (usually in large
quantities) so that a Batch Capture can be per-
formed later on.
Click the Log button to transfer the clip to the
current Rack.
60
Digitizing (= capturing, recording)
Click the Digitize button to record the clip.
The system cues up to the mark-in and records
up to the mark-out. The clip is stored in the Rack
and is immediately available for editing.
Page 61

Mark-In:
Beginning of clip
Active Rack
in the Project
Browser
Clip length
Mark-Out:
End of clip
Log:
Clip is placed in the
Rack but not saved
to the hard disk
Digitize:
Clip is placed in the
Rack AND saved to
the hard disk
61
Page 62

4 Recording or Logging Clips “on the Fly”
With this method, mark-ins and mark-outs are set while the tape is running or recording (Capture) is in
progress.
STUDIO
LIQUID
No comparable function. Logging “on the fly”
1 Start tape playback. Click the Log button
once to set a mark-in.
2 At the end of the scene click the Log but-
ton once again to set the mark-out and
transfer the clip to the Rack.
... and so on ...
Digitizing (recording) “on the fly”
1 Start tape playback. Click the Digitize
button to set a mark-in.
The system transfers the clip to the hard
disk.
2 At the end of the scene click the Digitize
button once again to set the mark-out
and transfer the clip to the Rack.
... and so on ...
Do not click the “X” to finish the capture or logging process: this discards the current clip, markin and mark-out are cleared.
62
Page 63

Status: Digitizing in progress
2
1
If activated, all the clips are sent directly to the Timeline
Direct Insert function:
(and to the Rack) and are available for immediate editing
(but not in the case of clips that have only been logged).
63
Page 64

5 Automatic Scene Detection
Scene detection saves you from having to define all the clips manually. Avid Liquid recognizes two
types: Scene detection based on DV timestamps and scene detection based on video content (although
the latter is not available in the Logging Tool).
STUDIO
Selecting the scene detection type
You can select various types of scene detection
under Setup > Capture Source.
Scene detection based on video content
In Avid Liquid, scene detection based on video
content can be found in the Clip Viewer.
With DV input only
Note the following for both Studio and Avid Liquid: Scene detection based on timestamps works
only with DV material played via the DV (IEEE
1394) interface. It does not work with analog signal inputs.
LIQUID
Scene detection based on timestamps
In DV form at, it is possible to mark t he begi nning
and end of recording on the tape (depending on
the type of camera). Avid Liquid uses these
markings to identify the individual clips.
Activating scene detection
With the Logging Tool open: Click the
button on the top right and select Properties > General > Automation > Scene
detection. Select Masterclips to activate
scene detection.
Or from the menu bar: Select Edit > Set-
tings > User > Logging / Batch > and con-
tinue as described above.
Scene detection activated
After activating scene detection, start playing
back a tape in the Logging Tool and click the Digi-
tize button to begin transferring material to
the hard disk. The system continuously monitors
scene changes. When you click again to stop
capturing, it stores the detected scenes in the
Rack. With many clips detected, this may take a
while. Do not forget to stop the player.
64
Page 65

Following scene detection, the
detected clips are numbered and
stored in the Rack.
65
Page 66

6 Recording Audio: Stereo/Mono and Level
While recording, you can’t adjust DV audio but you can adjust analog audio signals.
STUDIO
Audio faders in the Diskometer
During analog recording, the Diskometer sprouts
two “ears” with the appropriate faders.
Balance slider
This slider lets you adjust the level of the recorded
signal (for analog input only).
LIQUID
Audio tab in the Logging Tool
This tab is always visible but, as in Studio, you
can’t adjust the audio during DV recording.
Audio can be adjusted for playback by means of
the Audio Playback fader. It allows you to determine the volume at which the recorded clips are
played back on the Timeline. You can also turn
down loud ambient noises in advance (instead of
having to do it later for each individual clip).
Stereo or mono
In Avid Liquid, “Stereo” and “Mono” are clip
properties. A stereo clip has two sound channels,
one to the left speaker and one to the right. A
mono clip has one sound channel that plays at the
same volume on both speakers.
For DV recording, you should generally select
stereo: Click the or button to toggle
between the two states.
Audio recording only
If you only want to record an audio clip, click the
button to deactivate the video source. Deacti-
vating the audio channels results in “mute” clips.
66
Page 67

At the digital audio input (e.g. DV),
meaning the volume at which the clips
will later be played back on the Time-
The clips are written to the hard disk
you can adjust only the
Audio Playback,
line.
Stereo/Mono button
Analog audio can already be
adjusted at the input.
at a higher or lower volume.
When recording audio
only, the
V button is
deactivated.
The loudspeaker icon
appears in the Inlay.
67
Page 68

7 Naming and Numbering Clips while Recording
Avid Liquid has several options for naming and adding comments to clips while recording.
STUDIO
File name is the clip name
After selecting the Start Capture command, enter
a file name that also serves as the name of the clip
and is stored in the Album. You can find the clip
under this name in the Windows Explorer.
LIQUID
Clip name is independent of the media file
name
Avid Liquid’s Media Management automatically
name files and manages file names. However, you
can also name each clip individually (for example, “Amusement Park 01”) in the Logging Tool as
well as afterwards.
Clip tab
Fill in the text fields to describe the particular
clip. Use the Scene and Ta ke /S ho t fields if you’re
working with a screenplay.
The Clip Name is formed from the active fields
(checkmark visible).
Click the plus sign to manually increment the
number by +1; if the double plus sign is activated, numbering is automatically incremented
for each new clip.
Textual clip presets
You can fill the text fields with textual presets that
will reappear for each new clip and can be
expanded and edited.
68
With the Logging Tool open, click to open the
Properties menu and select General > Textual Clip
Presets. Exit the Logging Tool and reopen it. The
text presets now appear in the appropriate fields.
Page 69

The clip name
is formed by
combining the
activated fields.
This button positions the
cursor in the title field
(if necessary, retrieve it from
the Tool Library)
Manual and
automatic
numbering
Use textual clip presets so
you won’t have to fill in all
the fields every time.
69
Page 70

8 Recording/Digitizing Tips
With these tips, you’ll have no problem importing clips to the system.
STUDIO
LIQUID
Timecode and reel name
Avid Liquid’s Media Management, i.e. the management of clips and their media files, is based on
timecode data and Reel names. This is why it’s
important that
all tapes have a continuous timecode
without breaks,
the same Reel (=tape) name never be
used more t han once in a Project. The Reel
description together with TC data is part
of the media file name. Recurrent Reel
names and identical TC data cause existing files to be overwritten.
Tapes with a lot of TC problems should be copied
to another tape before digitizing. However, the
Logging Tool Properties also contain several
options for working with TC breaks.
EZ Capture Clips
EZ Capture clips are file- and directory-based,
thus following the logic of Studio. For more complex Projects, generate the clips using the Logging
To o l , especially if you want to perform a Batch
Capture later on.
70
HDV
Always use the highest quality tapes available for
HDV recording.
Page 71

The timecode options in
the Logging Tool options
define what will happen
when timecode breaks
occur.
Another possibility for
problematic tapes is
LIVE capture.
71
Page 72

9 Scene Detection in the Clip Viewer
This section describes how to split your recordings into scenes/clips in Avid Liquid, either manually or
using automatic scene detection.
STUDIO
Detect Scenes by Video Content
Select this command under Album > Scene
Detection.
Split/Combine scenes
Studio’s Combine command corresponds most
closely to the Fuse or Container function in Liquid (see the Reference Manual).
LIQUID
Scene detection in the Clip Viewer
A clip with lots of different takes can be divided
into scenes (clips) automatically in the Clip
Viewer.
1 The clip must be digitized. Double-click
the clip in the Project, click the triangle
button to open the extended dialog
box in the Clip Viewer, and then select the
Scenes tab.
2 Select the method (Metadata = based on
DV timestamp; or Video Content).
3 Start the procedure.
Check the results, especially when analyzing video content; if necessary, repeat
detection at a different Sensitivity.
4 Then click Create clips. The (sub)clips are
stored in the Rack.
Creating subclips
Load a clip in the Clip Viewer and select a range
by setting a mark-in (A key) and a mark-out (S
key). Press the U key to generate a subclip.
72
Page 73

Detected scene clips
Green marker for each new scene
A subclip is part of a larger clip. Be careful when deleting the media
file for a subclip: This will cause all the other subclips and the mas-
ter clip to lose their media data.
“Create Subclip” button
73
Page 74

10 Protecting and Muting Tracks
In Avid Liquid, you can make Tra c k s immune against almost all operations. You can also deactivate
audio and/or video playback.
STUDIO
Inserting a video-only scene
The original audio Track is disabled.
Muting audio tracks
Click the loudspeaker icons to the right of the
corresponding Timeline tracks.
LIQUID
Inserting a video-only clip
If you’re working with a video-only clip without
original audio: Simply drag the clip to the Time-
line video clip. The video clip’s original audio is
unaffected.
Inserting an audio/video clip
Protect the Tr a c k with the original audio clip:
Right-click the Tr a ck name to display the shortcut
menu and select Protected. Continue as described
above and then disable protection.
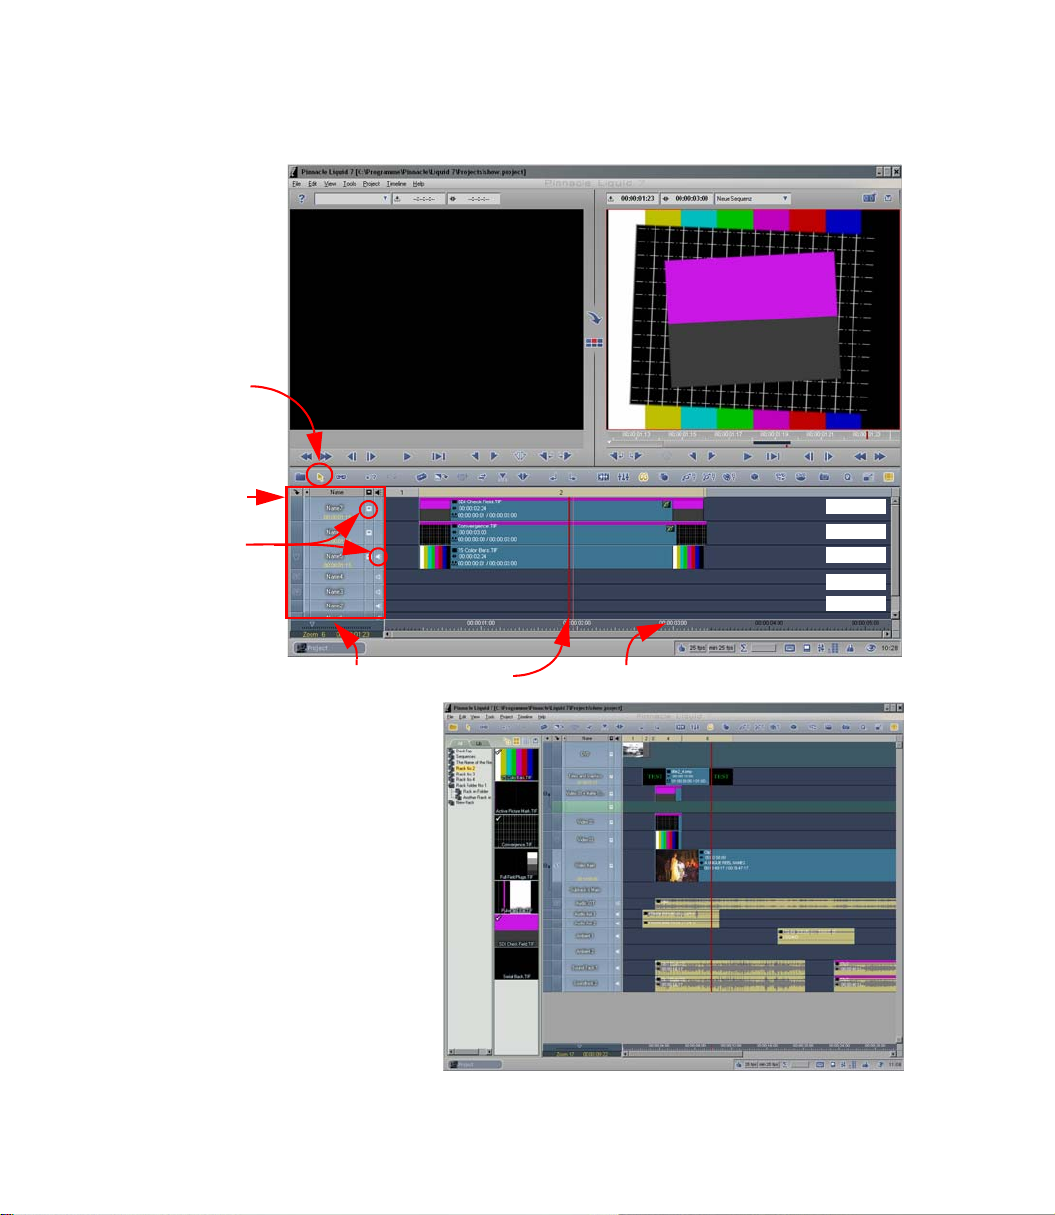
Protected tracks
Clips on protected Tr a c k s can’t be moved,
deleted, overwritten, etc., nor can additional clips
be inserted.
Deactivating/activating video and/or audio
playback
Each Tra c k has two columns in its header area:
one for Video Playback (monitor icon) and one
for Audio Playback (loudspeaker icon). Left-click
in the relevant area to activate/deactivate audio/
video playback for each individual Tr a c k .
74
Page 75

The monitor icon represents video playback.
The loudspeaker icon represents audio playback.
Simply position a video-only clip on the existing video clip.
Because the “Name 4” Track is protected, the audio of the existing clip is unaffected. Only the video portion of
The following icons identify the clip and its status (in the
Rack in Detail View):
Digitized video/audio
Undigitized video/audio
Digitized video
Undigitized video
Subclip
Digitized audio
Undigitized audio
Sequence
Video effects
Clip 3 [Sub (1)] is inserted. Protected tracks are behind a “gray shroud”.
Audio effects
Graphics (title, image)
Graphics (roll title)
Graphics (crawl title)
Animation
Realtime video effects
DVD menu
75
Page 76

11 Trimming with the Trim Editor
The Trim Editor is the ideal tool for precision trimming, especially of transitions (edits), because you
always have both frames in view. This section provides a brief introduction.
STUDIO
Clip Properties Tool
This tool is opened from the Video Toolbox and
allows you to trim the mark-in and mark-out of
the scene currently selected. In Avid Liquid, on
the other hand, both clips are always trimmed at
the selected edit.
In Avid Liquid, click the and buttons to
jump from edit to edit.
LIQUID
Opening the Trim Editor
Position the Playline at the edit between two adjacent clips. Click the button or press
open the Trim Editor.
Ye ll o w h a nd l es ap p ea r at t he v id e o Edit and at the
edits of any associated audio clips: The Trim Ed i-
tor always operates in Film Style.
You can now precision-trim using the , ,
and buttons:
F5 to
Trimming both clips
(Preset) Click the area between the two inlays.
The mark-out of the left-hand clip and the markin of the right-hand clip are shifted by the same
amount. The total Sequence length remains the
same.
Trimming the outgoing (left-hand) clip
Click the left inlay. The mark-out of the left-hand
clip shifts and the overall length changes.
Trimming the incoming (right-hand) clip
Click the right inlay. The mark-in of the righthand clip shifts and the overall length changes.
76
Page 77

This is the last frame of the left-hand
(=outgoing) clip.
This is the first frame of the right-hand
(=incoming) clip.
Edit with outgoing and incoming clipsTrim tools and frame counters (above)
77
Page 78

12 Trimming Video and Audio: Split Editing
What are known in Studio as “L-cuts” and “J-cuts” are no problem for Avid Liquid. You simply need to
unlink the video and audio clips.
STUDIO
Performing L- and J-cuts
To perform these cuts, lock the audio Track.
As in Studio, audio fades can also be subsequently applied in Avid Liquid to create smooth
audio fade-ins, fade-outs or transitions.
See page 44.
LIQUID
Unlinking audio and video clips
Until now, you’ve been editing video and audio
together on the Timeline (for example, when
trimming). Now click the button so it’s no
longer yellow. Video and audio clips that actually
belong together (original audio) can then be
selected and edited separately.
Audio clips on separate tracks
You don’t have to do this but it helps improve
clarity: Click (and unlink) one of the audio clips
involved and press
CTRL+UP/DOWN ARROW.
Trimming audio clips
Make sure Overwrite Style is activated. Drag
one of the clips by the red handle until you’ve
achieved the desired J or L overlap.
Can’t trim (drag) the audio?
Then you’ll first have to trim the entire clip (video
and audio) a little (if desired, in the Trim Editor).
Or trim the video and shift the video and audio
( activated) together to create the overlap.
78
Page 79

Edit mode is activated, clips are unlinke
d
L
In this case, the audio from the left-hand clip was simply dragged to the right, over the audio of the right-hand
clip (just like an L-cut in Studio). However, this does mean the audio of the right-hand clip is simply deleted.
L
J
First the right-hand audio clip is shifted on the bottom Track. The two audio clips are then extended in opposite
directions so that the audio overlaps.
This is a combined L- and J-cut including overlap.
Disband stereo audio clip(s): Right-click a stereo audio clip (recognizable by the two waveforms and the S1 desig-
nation in front of the Track) and select Disband Clip(s). The two audio tracks are divided into separate clips as
shown in the screenshot.
79
Page 80

13 Moving Clips Horizontally and Vertically
Even when clips are already positioned on the Time line, they can be moved to new positions.
STUDIO
Swapping positions
Simply drag a clip to another position. The overall length of the film remains the same and no
gaps are created.
Avid Liquid: Active Tracks?
Click a Tra c k ’s Name field. If it’s highlighted, the
Tr a c k is “active”, i.e. certain actions are applied to
this Tra c k , such as the selection command
described on the right.
This is especially important when working with
the Insert Arrow (three-point editing; see the Reference Manual).
LIQUID
Selecting a clip or clips
This is the first step in moving one or more clips.
Activate Edit mode ( must glow yellow) and, if
necessary, (de)activate linked mode ( ) so that
you can select the video and audio clips together
or separately. The Overwrite Style must also
be activated.
Click a clip to select it (hold down the
CTRL or
SHIFT key to select multiple clips).
You can also drag a lasso around the relevant
clips.
Another practical method it is to use the Select
after playline ( ) command. All clips on active
Tr ac k s (!) at and to the right of the Playline are
selected. This is an easy way to create a gap in the
Sequence.
Moving a clip or clips
Once you’ve selected a clip or clips, drag them
while holding down the left mouse button.
To move clips vertically, we recommend the following procedure: Select the clips and press
and the UP/DOWN ARROW key. The clip then
retains its exact same TC position on the Timeline.
CTRL
80
Page 81

Select using the lasso: Beginning in an empty area on the Timeline, drag the lasso until it either surrounds the
Custom selection: Hold down the CTRL key and click the relevant clips. You can now, for example, move the
selected clips as a group. Or open the Clip Properties dialog box (right-click > Properties) in order, for example,
relevant clips or its outline touches them.
Edit mode pointer
to rename multiple clips.
Deactivated
tracks
Selection as of the playline: In this case, the Track status is important; the command is applied only to clips on
active tracks. To activate or deactivate tracks, click on the Track names. Deactivated tracks are dark and active
tracks are light-blue.
Selected
Not selected because tracks are deactivated
Selected
81
Page 82

14 Good to Know...
Here are three more functions frequently used in Studio that have corresponding functions in Avid Liquid.
STUDIO
Find Scene in Album
This command from the shortcut menu for a
Timeline scene lets you find the scene in the
Album.
Mark scenes used
Album scenes that are used one or more times on
the Timeline/Storyboard are marked with a green
checkmark.
Grab a frame of video (Film)
This command from the Video Toolbox generates a bitmap either from the current film or from
a connected player.
LIQUID
Match Frame
This command loads a Timeline clip into the
Source Viewer.
1 Position the Playline on a Timeline clip
and right-click this same clip.
2 Select the Match Frame command.
The Source Viewer now contains the exact
same image as in the Master Viewer, i.e.
the “match frame”.
Mark clips used in current Sequence
The same function as in Studio except that the
checkmark is gray (Edit > Settings > User >
Project > Mark clips used in current Sequence).
Snapshot (Timeline)
This command ( on the Time line toolbar) creates a still at the current Playline position and
stores the image as a “Snapshot” in the currently
active Rack (if you don’t see this button, rightclick the toolbar and select Customize > Special
tab).
82
Page 83

The clip TC on the Timeline
and in the Source Viewer
are identical
Match Frame loads a Timeline clip into
the Source Viewer and displays the exact
same image as the Master Viewer.
Snapshot from the
playline position
Clips used in the current Sequence are
identified by a checkmark in picon view.
83
Page 84

15 Effects: Working with Key Frames
Key Frames can be used to dynamically shape the course of an effect, such as initiating an abrupt change
but ending it more slowly.
STUDIO
Key frames in Studio 10
This option has become available as of Studio
version 10. With key frames, the course of the
effect is defined for the duration of a clip or transition.
Static effect, no key frames
If you want to work in Avid Liquid without key
frames, i.e. want to create a static effect, open the
Effect Editor and Select Options tab > Key
Frames: Deactivate Key Frames. Any change will
be applied for the entire length of the clip.
LIQUID
Inserting key frames
First you need a clip with a clip effect as described
on page 36.
1 Open the Effect Editor. The position bar
below the video inlay contains one Key
Frame at the beginning of the clip and
one at the end by default.
2 A Key Frame stores effect parameter val-
ues. The values change from one Key
Frame to the next, either at a continuous
rate or an accelerating rate.
3 Position the Playline in the middle of the
clip. Click the button to insert a new
Key Frame.
4 Change any of the effect’s parameters
(e.g. Size) and view the results in the preview ( ).
5 Play around with the Parameter Cur ves.
They affect the temporal sequence
between Key Frames.
84
Page 85

Curve for the change in size
Key frames
Clip effect with key frames: The image becomes smaller and then larger.
Each of the four key frames was defined at a specific size - the curve pre-
cisely defines the course of the change between the key frames.
You can also insert key frames directly in the curve (by clicking it) and
Each key frame in a curve has a shortcut menu (right-click to open). You
can use this menu, for example, to define the interpolation between the
key frames: Linear, Bezier, Constant.
move existing key frames.
Deactivate key frames:
Options tab in the Effect Editor
85
Page 86

16 Audio Scrubbing
One of the key features in Avid Liquid is precision audio editing. This section introduces an extremely
useful tool.
STUDIO
Scrubbing as of Version 10
Audio scrubbing is available in Studio Version 10
and later.
LIQUID
Audio scrubbing
To listen to audio frame by frame (e.g. to cut an
“ummm” from an interview), use the Audio S crub
function in Avid Liquid.
1 Press the SCROLL LOCK key (this key also
deactivates Audio Scrub).
2 Act ivate Audio Playback for the Tr a c k
containing the clip. Then hold down the
SHIFT key and click the Loudspeaker icon
to display it as a contour.
Audio Scrub is now activated for this
Tr a c k .
3 Move the Playline (using the mouse, key-
board, tool buttons or jog/shuttle).
4 Right-click the button on the task-
bar to toggle between Analog Scrub and
Digital Scrub.
5 Analog Scrub sounds like a decelerated
tape; Digital Scrub plays only a few frames
in a loop.
86
Any number of Tr ac k s can be selected at one time
for audio scrubbing.
Page 87

The SOT 1 and SOT 2 tracks are activated for audio scrubbing (as indicated the transparent loudspeaker icons).
Press SCROLL LOCK and select one of the two scrub modes: Digital or Analog. You can toggle between the two in
the Audio Tool menu at the bottom right on the taskbar (first right-click, then left-click).
Digital audio scrub can be precisely cus-
tomized (Edit > Settings > User > Audio).
A small auxiliary level on the taskbar helps
you keep an eye on the audio level.
Click it to open the Audio Tool. You can then
adjust the master audio output.
87
Page 88

17 The Audio Editor
Avid Liquid’s counterpart to Studio’s Audio Toolbox is the Audio Editor. This module must always be
open during complex audio editing.
STUDIO
Audio Toolbox
The Audio Toolbox contains the faders necessary
for your four audio tracks.
LIQUID
Audio Editor
The Audio Editor (press F4 or click to open)
comprises three areas:
Mixer
When Audio Playback is activated
speaker icon visible), a Fader is configured here for each Tr ac k . You can use
these Fader s to edit the volume, pan/balance and effects.
(loud-
Output Mapping
Here the signals from the Time line are
combined on Output Busses and routed to
the actual system outputs.
Settings
Here you can activate or deactivate specific segments for the Mixer.
Any changes you make in the Audio Editor (with
the exception of Output Mappings) are saved with
the current Sequence. In the case of a new
Sequence, the Audio Editor is set to the default settings.
88
Page 89

Volume line (clips)
Audio Editor with Mixer: A fader unit is displayed for every Track for which audio playback is activated. “Stereo” is
the output bus. All audio signals are finally mixed together on this dual-channel bus (in this example).
89
Page 90

18 Audio Mixer and Volume Lines
As in Studio, Avid Liquid lets you to edit the Vo l um e L i ne s while the Audio Editor is open (F4, )
using the mouse. This is called “rubberbanding”.
STUDIO
Volume lines
These lines represent the rise and fall of the volume in a clip. As a balance indicator for a stereo
audio clip, the lines identify the left/right dominance in the signal.
Avid Liquid also has Pan lines (for mono clips)
and Balance lines.
You can adjust the volume for the entire Tra c k
(activate Output Level/Input Level segments of the
Mixer). You can also set the Pan and Balance for
the entire Tra c k . To set Pan/ Balance for a single
clip, activate Classic Routing (see Settings tab).
Virtual mixing console
Each of the audio tracks represented has a fader
and several other buttons.
LIQUID
Rubberbanding
Normally, the clip Vo lum e L in es are immediately
visible as light-blue lines when the Audio E ditor is
opened. (If not: Right-click the Audio Playback
column in the Track Header Area to activate the
line).
To edit the line:
Click the line to set an Audio Ke y Frame.
Drag this Key Frame to the desired posi-
tion.
Note: The Undo Key Frame command is always
applied to the clip currently selected (clicked).
Audio Mixer
When you set Audio Key Frames on the Vo l u m e
Line, the slider in the Fader belonging to the
Tr ac k moves.
When you click the slider, an Audio Key Frame is
set at the Playline position and on the audio clip.
Additional functions are described with the
screenshot on the right.
90
Page 91

Mute/Solo: Mutes Track/
plays audio for this Track
only.
Track balance: Distributes
audio between the left and
right output channels.
Key frame and fader
are linked
Stereo output bus: Sum of
the audio signals from
active Tracks.
Key frame buttons in the
Audio Editor.
Drag Key frame
with the mouse
The Audio Mixer is the most important audio editing tool in Avid Liquid.
Green line:
Track ba lance
91
Page 92

19 Output Mapping
Yo u c a n ha ve a ny n um b e r o f “a u di o Tra c k s” on the Timeline but at some point, all the audio signals must
(for example) end up on the left/right channels of the DV output.
STUDIO
Stereo output
Studio has no advanced configuration options.
The signal is output in two-channel stereo,
regardless of whether it’s to DV tape, to DVD or
exported to a file.
LIQUID
From clip to fader
The clip’s audio signal is routed to the Fader
belonging to the Tr a c k on which the clip is positioned.
From fader to bus
Each Fader in the Audio Mixer outputs its signal(s) to an Output Bus, usually the Stereo Output
Bus.
From bus to output
In this case (Output Mapping tab), the signals on
the bus or busses are distributed to your system’s
“real” outputs: e.g. sound card, breakout box or
DV (IEEE 1394) output. The dots in the boxes
represent active assignments. Click the fields to
set or delete dots.
System settings
The Output Mapping settings are applied system-
wide, meaning they are accessed for each new
Sequence.
92
Page 93

Fader Output bus
Audio Tool
(master output)
Output bus DV and analog* output
Track
The audio signal’s path through the Mixer, output bus and Output Mapping.
Timeline audio clip
* Optional
93
Page 94

20 Audio: Settings Tab
This tab is important mainly because it lets you determine the appearance of the Mixer. In other words,
it lets you enable and disable certain segments of the Faders.
STUDIO
Fixed user interface
You can’t alter the appearance of the mixer tool.
Additional audio tips for
working with Avid Liquid
Internally, Avid Liquid works with 32-bit
floating-point audio files. This special
audio format is extremely resistant to
overload and clipping, but you should
still keep an eye on connected recording
devices to make sure you don’t go too far
into the red zone.
Arrangement on the Tra c k s -
Audio editing is much easier if you
reserve specific Tr a c k s for specific types of
audio, such as positioning all the music
on a Tr a ck called “Music”.
Activate the Audio Tool (F3) so you can
view the audio master output at all times.
Knob or slider? Right-click below the “+”
sign next to the fader (in the Audi o
Mixer).
LIQUID
Activating Mixer segments
Click the checkbox to display the desired segments in the Faders, such as Input Level (Track).
The fewer the segments, the more straightforward the display.
Tooltips
The tooltips for specific areas of the Audio Mixer
can be very detailed. If you find the text fields to
be too large, disable the function here.
Mix Automation/Voice Over
These options are for the live mixing of audio
Tr ac k s and for recording Voice Over (see next set
of facing pages).
Display fader for Track volume
Affects all the clips on the Tra c k . Activate the
Input Level (Track) (or the output level).
94
Page 95

Settings: On this tab, you can change the functions
For greater clarity, activate only as many segments as
You can hide the detailed tooltips as soon as you’re
and appearance of the Audio Editor.
you need for your purposes.
familiar with the functions.
All the vertical sliders can also be displayed as knobs,
but then you lose the level indicators.
To change, right-click the +/- area.
95
Page 96

21 Recording Voice Over
This tool, which records a voice over in sync with the image, is also available in Avid Liquid. To record
sound, you need a microphone and a sound card.
STUDIO
The Voice-over Tool
Make yourself comfortable behind the microphone of your virtual sound recording studio ...
Voice Over tips
Be careful not to overwrite any clips on
the selected Tra c k (voice over is always in
Overwrite Style). It’s best to configure a
separate Tra c k for Voice Over clips.
Divide the voice over recording into man-
ageable segments.
LIQUID
Checking audio settings
Click the menu bar > Edit > Settings > User >
Audio Settings. Look under Preferred device to see
whether it contains the soundcard to which the
microphone is connected. Then select Preferred
quality. In the extended area, test whether the system is picking up the audio.
Recording a voice over
1 Open the Audio Editor (F4, ).
2 Set a Timelin e mark-in at the point where
you want to start recording (if desired,
you can also set a mark-out at the end).
3 Select a Tra ck for a Voice Over clip: Acti-
vate the pale red box below the Clip Fader
belonging to the Tra c k to act ivate (the box
must now glow bright red).
4 Click the microphone icon . Follow-
ing a brief preroll time, recording begins
at the mark-in
.
5 Press the SPACEBAR or click to stop
recording.
6 The Voice Over clip is inserted on the
Tr a c k selected.
96
Page 97

Here you can test the microphone input, select the soundcard to
be used (if more than one is available) and define the preroll and
Audio Properties:
postroll for recording.
Select Track for
voice over clips
Voice over Rack
Start & Stop
Beginning and end of recording
Dialog box after
recording
97
Page 98

22 Live Mixing of Audio Tracks
In Avid Liquid, this function is called Audio Mix Automation. As in Studio, you can use it to set the various audio sources to the correct volume ratio during playback.
STUDIO
Playing and changing settings
Start playback and alternately adjust the various
sliders. This sets audio Key Frames that you can
later edit manually.
LIQUID
Audio Mix Automation
1 Open the Audio Editor (F4, ).
2 Set a Timelin e mark-in at the point where
you want to start mixing (if desired, you
can also set a mark-out at the end).
3 Select one or more Tr a c ks for Mix Auto-
mation: Click the pale red box(es) below
the Clip Fader(s) belonging to the
Tr a c k ( s ) to activate (box(es) must glow
red).
4 Click to start mixing. Adjust the
sliders.
5 Click or press the SPACEBAR to stop
mixing. A dialog box is now displayed in
which you can confirm your action and
define the resolution (number) of the
Audio Ke y Frames.
Linking faders
To move more than one Fader at a time, you can
link Faders. Click the Padlock and select the same
color from the color field for all the linked Faders.
98
Page 99

Fader Name4 controls the live mix.
When mixing is completed, define the density
of Audio Keyframes for the volume line.
99
Page 100

23 Sound Effects
Avid Liquid lets you apply sound effects directly to the Timelin e clips or as “insert effects” in the Aud io
Mixer.
STUDIO
Audio Effects
This area of the Audio Toolbox is your gateway to
audio effect editing.
Some of the Studio VST effects can also be found
in Avid Liquid.
LIQUID
Audio clip effects
These effects are applied in the same way as video
clip effects (see page 36 and Library tab > Real-
time Clip FX > Audio, etc.)
Insert effects
1 Open the Audio Editor (F4, ). On the
Settings tab, activate Insert FX/Send FX.
2 A new segment appears in the Mixer (if
necessary, click the small “+” sign to dis-
play it in its entirety).
3 Click the dotted line and select an Audi o
Effect for the Fader (=audio channel,
Tr a c k ).
4 Click the small “e” to open the audio
Effect Editor.
5 Use the procedure above to insert addi-
tional effects.
Note that Insert Effects are applied to the entire
Tr ac k . For information on Send Effects, see the
Reference Manual.
100
 Loading...