

Page 1
Installation Considerations:
See the Setup Guide for any details related to the steps in this guide; such as power
requirements, rack mounting considerations, and other more in-depth instructions.
The Setup Guide is available in the software kit, or via download at: http://www.avid.
com/US/support. Click the link titled Knowledgebase on the right side of the screen
and search for ISIS 5000 Setup Guide. You will need to download Adobe’s Acrobat
Reader® or a similar PDF viewer before viewing the guide.
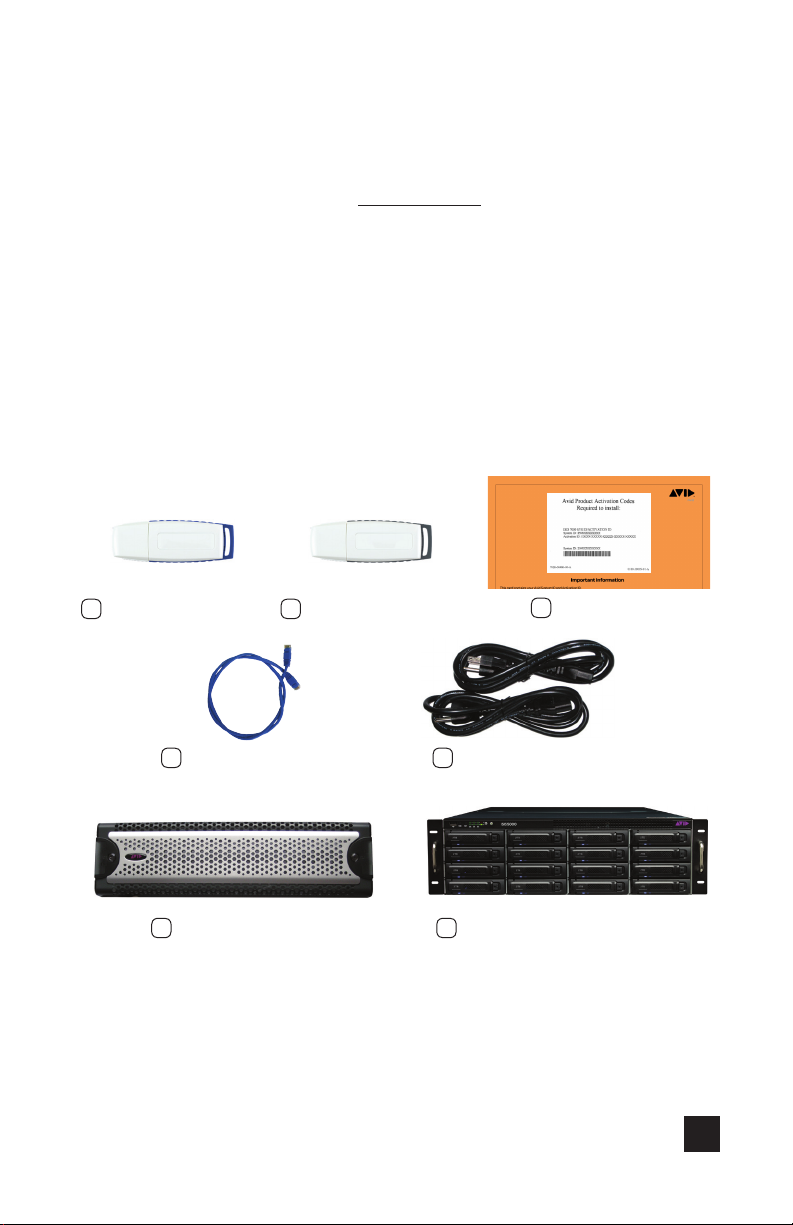
Unpack and make sure you have all of the components detailed in the section below
before you continue. A second person is recommended for lifting and securing the
system in place.
Included:
4 GB USB Drive (1) 16 GB USB Drive (1)
Power Cables (2)Ethernet Cables (4)
Front Bezel (1)
Engine (1) and Drives (16)
License (1)
Not Included:
USB Keyboard, USB Mouse, Monitor, Workstation or Laptop (PC or Macintosh).
1
Page 2
Hardware Setup
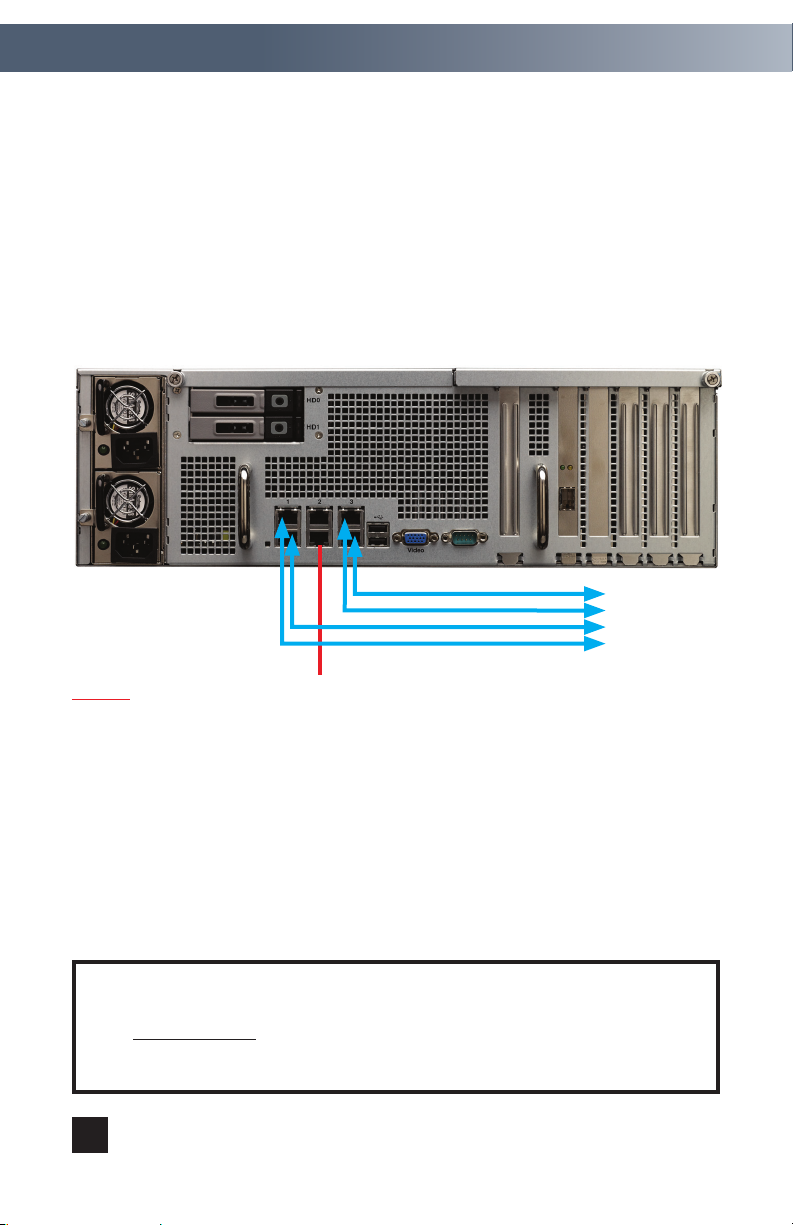
Step 1a (Direct Connect)
• Place the Engine in its physical location. (E.g. Rack mount).
• Connect power cables, keyboard, monitor, and mouse.
• Connect Ethernet network cables to the ISIS using the diagram below.
• Continue with Step 2 (page 5).
Rear view of the ISIS Engine.
x
x
Connect four
Ethernet cables to
the outside ports.
To Clients
Do not use the middle two Ethernet ports. They are reserved for Storage
Engine Resiliency.
If you have purchased the optional 4-port Ethernet board, see the
ISIS 5000 Setup Guide for installation instructions.
For different wiring topologies please refer to the Setup Guide located in the
software kit, or via download at: http://www.avid.com/US/support. Click the link
titled Knowledgebase on the right side of the screen and search for ISIS 5000
Setup Guide.
2
Page 3
Hardware Setup
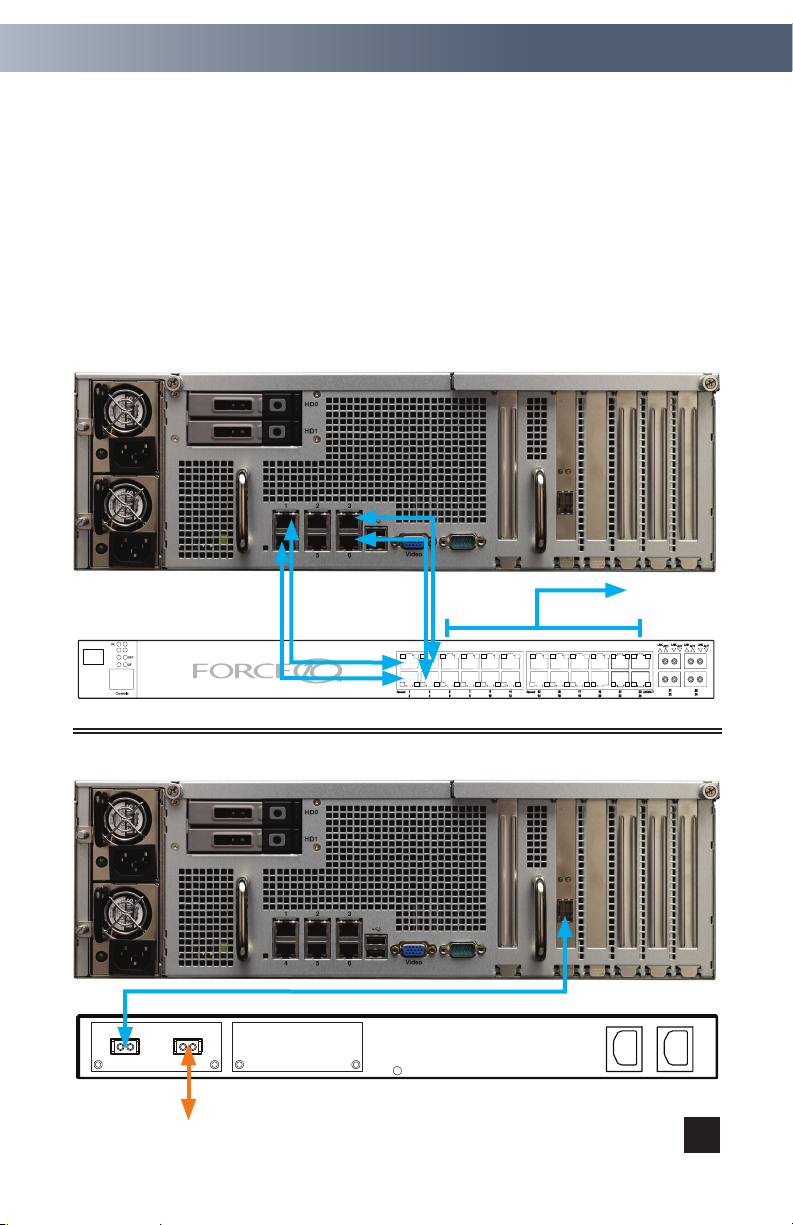
Step 1b (Single Switch):
• Place the Engine and Switch in their physical locations. (E.g. Rack mount.)
• Connect power cables, keyboard, monitor, and mouse.
• Insert Transceivers and connect network cables: Use Diagram A for 4 x 1 Gb
Ethernet; or, use Diagram B for 1 x 10 Gb Ethernet.
• Continue with Step 2 (page 5).
Diagram A: Use this diagram for single switch, 1 Gb Ethernet connection.
x
x
Rear view of the
To Clients
ISIS Engine
Alarm
AC
DC
XFP25
P2827XFP26
STACK ID
S25-01-GE-24V
Front view of the Force10 S25 switch
Diagram B: Use this diagram for single switch, 10 Gb Ethernet connection.
Rear view of the Force10 S25 switch
To 2nd Engine (optional)
3
Page 4
Hardware Setup
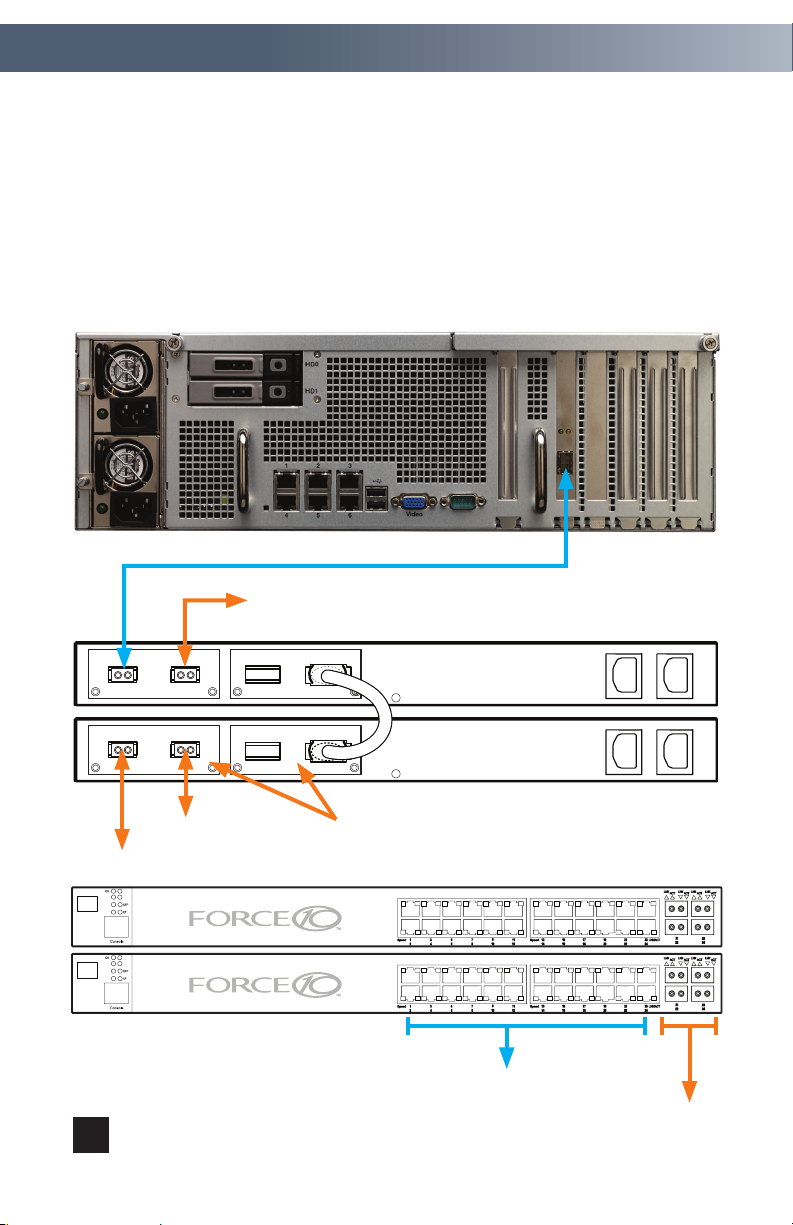
Step 1c (Stacked Switches)(10 Gb Module):
• Place the Engine and Switch in their physical locations. (E.g. Rack mount.)
• Connect power cables, keyboard, monitor, and mouse.
• Insert Transceivers and connect network cables using the diagram below.
• Continue with Step 2 (page 5).
To 1st Engine, or System Director
To 2nd Engine (optional)
To 4th Engine (optional)
To 3rd Engine (optional)
Alarm
AC
DC
XFP25
P2827XFP26
STACK ID
Rear view of the ISIS Engine
Rear view of two stacked Force10 S25 switches.
(See the ISIS 5000 Setup Guide for proper
installation of 10 Gb and stacking modules.)
S25-01-GE-24V
Alarm
AC
DC
XFP25
P2827XFP26
STACK ID
Front view of two Force10
S25 stacked switches.
4
S25-01-GE-24V
To Ethernet Clients
To Optical Clients
(SFP required)
Page 5

Hardware Setup
Step 2 (Installing the Drives):
• Insert the 16 drives into the Engine’s drive bays. Start from the bottom of the
Engine and work your way up for better visibility during install.
• Make sure the latch on the front of the drive is in the open position, before
insertion, by pushing the locking button on the front.
• Repeat this step for each additional Engine.
Insert the drives from
the bottom up.
Insert the drives with
the latch open.
The drive once inserted should not
move or wiggle at all. Make sure
the latch is closed and the drive is
properly seated before continuing
on to the next drive.
5
Page 6

Hardware Setup
Step 3 (Connecting to Clients and Powering Up):
• Connect the Ethernet cables to the appropriate clients.
• Press the power button on the Engine.
• Repeat this step for each additional Engine.
Power Button
Front view of the ISIS Engine.
You are finished with the Hardware Setup. The next steps will guide you through
the Software Installation. For more detailed help with any of the steps in this
section, problems, or questions, please reference the ISIS 5000 Setup Guide
which is available in the software kit, or via download at: http://www.avid.com/
US/support. Click the link titled Knowledgebase on the right side of the screen
and search for ISIS 5000 Setup Guide.
6
Page 7

Software Installation
Step 1 (Installing the Software From the USB Drive):
• Login to Windows on each ISIS 5000 Engine using the following:
Username: Administrator
Password: is-admin
Avid recommends changing the defaults as soon as possible.
• Drag the contents of the 4 GB USB Drive on to the ISIS 5000 System and
click the file named “Autorun.exe.”
Click the file named “Autorun.exe” to begin installation.
7
Page 8

Software Installation
Step 2 (Installing the Software)
• Choose whether the Engine you are setting up will be a System Director or not.
If you only have one Engine you must make it the System Director. If you have
multiple Engines; make the first one you set up the System Director. For Dual
System Directors please refer to the ISIS 5000 Setup Guide.
• Click “Apply.”
Select ISIS 5000 Engine/System Director to make this Engine a System Director.
This column shows what
action will be taken when
the “Apply” button is
clicked.
8
Avid strongly encourages you to make a
System Restore backup after you complete
the installation. Follow the instructions in the
Setup Guide, using the 16 GB USB drive,
and the “Create Recovery USB Drive” link in
the installer.
Page 9

Software Installation
Step 3 (Network Configuration Tool):
• During the installation you will be prompted to configure your IP addresses.
First, choose a configuration. (This panel can also be accessed anytime after
installation from the “Launch Pad” menu located at the top-right corner of the
System Director desktop; or, from the following path: D:\Program Files\Avid\ISIS
Storage Manager\.)
1 Gb Ethernet Setup
Select your network
configuration.
Choose IP Addresses.
10 Gb Setup
These fields auto-populate
with default IPs if the
“Populate with defaults”
button is pressed.
These two fields are reserved
for System Director Resiliency,
see the ISIS 5000 Setup
Guide for more information.
• Use the populate with defaults button to use the Avid Default Configuration. If
you wish to use your own IP scheme, contact your system administrator.
• Click “OK.” Let the installation finish and quit the installer.
• Remove any USB drives still connected to the system.
9
Page 10

Software Installation
System Configuration
System Configuration
Step 4 (Activating the Avid Software License):
• Go to, Start/Programs/Avid/Utilities/Avid License Control.
• Click “Activate” in the Activation tab of Avid License Control window.
• If connected to the Internet, select “I am connected to the Internet and will use
this computer” and click “Continue.”
For additional help or instructions for activating the license without the Internet
please refer to the ISIS 5000 Setup Guide.
• Enter the System ID and Activation ID numbers included with your new
ISIS 5000 and follow the screen prompts to complete the activation.
10
Page 11

Software Installation
System Configuration
System Configuration
Step 5 (Creating a File System):
After you activate the Avid license, click the “Control Panel” button in the “ISIS
Launch Pad” at the top-right corner of the System Director desktop.
• In the Control Panel, click the “Stop System Director” button.
• Click the “Configure File System” button.
• Select the “Create Active File System” option.
• Click “OK.” A warning will pop up.
• Click “OK.” Wait until the process completes.
• The System Director will restart itself. You can now close the
Control Panel window.
Control Panel
Button
Press the “Stop System
Director” button first...
You are finished with the Software Installation. The next steps will guide you
through the System Configuration. For more detailed help with the steps in this
section, problems, or questions, please reference the ISIS 5000 Setup Guide.
...then press the button labeled
“Configure File System...”
11
Page 12

System Configuration
Software Installation
Step 1 (Binding Storage to the System Director):
For additional help in the next few steps (or for any help with the Management
Console) please refer to the ISIS Administration Guide. This Guide is available
in the software kit, or via download at: http://www.avid.com/US/support. Click
the link titled Knowledgebase on the right side of the screen and search for ISIS
Administration Guide.
• From the ISIS System Launch Pad at the top-right corner of the System Director
desktop, click the “Management Console” button.
• Log in using the Administrator user name and leave the password field blank.
(Changing the default password once you log in is recommended).
• Click the icon labeled “Storage Managers” from the
main menu, or the “Home” menu pull-down.
• You should see a list of all of the ISIS 5000 Engines that
you have set up and configured in the previous steps.
Select them all and click the “Bind” Button
• Click “yes” when prompted. You must click the “Refresh” button to see the
change take effect.
Select by clicking on available storage.
Click “Refresh” to see changes.
Storage Managers
Click the“Bind” button
to assign storage to this
System Director.
12
Page 13

System Configuration
Step 2 (Creating Storage Groups):
• In the Management Console, click on the “Storage Groups”
icon from the home screen, quick menu, or the “Home”
pull down menu.
• Click “New” in the top section of the Management Console.
• In the Details section on the right side of the screen, enter the
name for your new storage group.
• Select the ISIS Engine you just bound in the previous step from the “Storage
Elements” list.
• Click the “Add” button.
• Click the “Apply” button.
Hide/Show Details
Pane button.
Select the storage elements
you want to add to this group.
Storage Groups
Name your new
Storage Group here.
Click the “Add” button.
Click the “Apply” button.
13
Page 14

System Configuration
Step 3 (Creating Workspaces):
• In the Management Console, click on the “Workspaces”
icon from the Home screen, quick menu or the “Home”
pull-down menu.
• Click “New” in the top section of the Management Console.
• In the Details section on the right side of the screen, enter the
name for your new workspace.
• Enter a capacity, or leave it at the default. You can always resize a
Workspace later.
• Choose from the “user access” list any users that you want to have access
to this workspace. You can always use “Guest,” or “Administrator” user if you
choose not to create users.
• Click the “Apply” button.
Workspaces
Hide/Show Details
Pane button.
Give users access to
this Workspace and set
14
Name your new
Workspace here.
Click the “Apply” button.
permissions.
Page 15

System Configuration
Step 4 (Adding Users) (optional):
• In the Management Console, click on the “Users” icon
from the home screen, quick menu, or the “Home”
pull down menu.
• Click “New” in the top section of the Management Console.
• Type the name of the user you want to have access in the name field.
• Type a password in the password field and verify that it is correct.
(Passwords are not required.)
• Set any permissions and select the Workspace(s) you want users to access.
• Click the “Apply” button.
Users
Enter your new
user’s name here.
Assign your new user to
specific workspaces, and
assign access.
Click the “Apply” button.
15
Page 16

System Configuration
Step 5 (Installing the Client Manager Software):
At this point your workspaces are available for client machines to access. You will
need to install the ISIS Client Manager on each client machine in order to connect
to those workspaces.
• Open a browser on any workstation you want to use as a client.
• Access the Management Console by typing, in your browser’s URL field, the
System Director’s IP address. (E.g. http://192.168.11.10/)
• Enter your username and password to login. If you choose not to
create users, you can use the Administrator or Guest accounts.
• Click on the “Installers” icon from the home screen, or the
“Home” pull-down menu.
Installers
• Click on the Client Manager software appropriate to your clients
workstation and download the installer.
• Double-click the Client Manager Installer to launch it and follow the on-screen
instructions. (You will need to restart your workstation after install for the
changes to take effect.)
16
Choose the correct Client Manager install for your workstation.
Page 17

System Configuration
Step 6 (Connecting to ISIS):
• You will need to set your client machine to the same IP range and subnet as the
ISIS 5000. Please refer to the ISIS Client Guide for more detailed information.
• The Client Manager should auto-launch after installation. If not,
click the Client Manager icon in the System Tray (Windows)
or Dock (Macintosh).
• The ISIS System in the subnet should be listed, double click the
ISIS System name to Login.
Double-click the
System name.
Client Manager
• To connect your client to the System Director:
enter a username, enter a password and click the
Connect button.
Enter username
and password.
Click the
Connect button.
17
Page 18

System Configuration
Step 7 (Connecting to a Workspace):
• You should see a list of workspaces available to you. To mount a workspace, double
click the workspace name.
• A drive letter appears (Windows), or a path (Macintosh).
Double-click the
Workspace name.
All
accessible
systems
appear in
this list.
All
accessible
workspaces
appear in
this list.
Congratulations, you can start reading and writing to the ISIS System. Three
important manuals were referenced to create this guide. Please refer to them for in
depth explanations or additional help: ISIS 5000 Setup Guide, ISIS Administration
Guide, and the ISIS Client Guide. All three are accessible at: http://www.avid.
com/US/support.
18
 Loading...