

Page 1

Avid Interplay® Pulse
User’s Guide
Version 1.3
Page 2

Legal Notices
Product specifications are subject to change without notice and do not represent a commitment on the part of Avid Technology, Inc.
This product is subject to the terms and conditions of a software license agreement provided with the software. The product may
only be used in accordance with the license agreement.
This product may be protected by one or more U.S. and non-U.S patents. Details are available at www.avid.com/patents
This document is protected under copyright law. An authorized licensee of Interplay Central may reproduce this publication for the
licensee’s own use in learning how to use the software. This document may not be reproduced or distributed, in whole or in part, for
commercial purposes, such as selling copies of this document or providing support or educational services to others. This document
is supplied as a guide for Interplay Central. Reasonable care has been taken in preparing the information it contains. However, this
document may contain omissions, technical inaccuracies, or typographical errors. Avid Technology, Inc. does not accept
responsibility of any kind for customers’ losses due to the use of this document. Product specifications are subject to change without
notice.
Copyright © 2014 Avid Technology, Inc. and its licensors. All rights reserved.
The following disclaimer is required by Apple Computer, Inc.:
APPLE COMPUTER, INC. MAKES NO WARRANTIES WHATSOEVER, EITHER EXPRESS OR IMPLIED, REGARDING THIS
PRODUCT, INCLUDING WARRANTIES WITH RESPECT TO ITS MERCHANTABILITY OR ITS FITNESS FOR ANY PARTICULAR
PURPOSE. THE EXCLUSION OF IMPLIED WARRANTIES IS NOT PERMITTED BY SOME STATES. THE ABOVE EXCLUSION
MAY NOT APPLY TO YOU. THIS WARRANTY PROVIDES YOU WITH SPECIFIC LEGAL RIGHTS. THERE MAY BE OTHER
RIGHTS THAT YOU MAY HAVE WHICH VARY FROM STATE TO STATE.
The following disclaimer is required by Sam Leffler and Silicon Graphics, Inc. for the use of their TIFF library:
Copyright © 1988–1997 Sam Leffler
Copyright © 1991–1997 Silicon Graphics, Inc.
Permission to use, copy, modify, distribute, and sell this software [i.e., the TIFF library] and its documentation for any purpose is
hereby granted without fee, provided that (i) the above copyright notices and this permission notice appear in all copies of the
software and related documentation, and (ii) the names of Sam Leffler and Silicon Graphics may not be used in any advertising or
publicity relating to the software without the specific, prior written permission of Sam Leffler and Silicon Graphics.
THE SOFTWARE IS PROVIDED “AS-IS” AND WITHOUT WARRANTY OF ANY KIND, EXPRESS, IMPLIED OR OTHERWISE,
INCLUDING WITHOUT LIMITATION, ANY WARRANTY OF MERCHANTABILITY OR FITNESS FOR A PARTICULAR PURPOSE.
IN NO EVENT SHALL SAM LEFFLER OR SILICON GRAPHICS BE LIABLE FOR ANY SPECIAL, INCIDENTAL, INDIRECT OR
CONSEQUENTIAL DAMAGES OF ANY KIND, OR ANY DAMAGES WHATSOEVER RESULTING FROM LOSS OF USE, DATA OR
PROFITS, WHETHER OR NOT ADVISED OF THE POSSIBILITY OF DAMAGE, AND ON ANY THEORY OF LIABILITY, ARISING
OUT OF OR IN CONNECTION WITH THE USE OR PERFORMANCE OF THIS SOFTWARE.
The following disclaimer is required by the Independent JPEG Group:
This software is based in part on the work of the Independent JPEG Group.
This Software may contain components licensed under the following conditions:
Copyright (c) 1989 The Regents of the University of California. All rights reserved.
Redistribution and use in source and binary forms are permitted provided that the above copyright notice and this paragraph are
duplicated in all such forms and that any documentation, advertising materials, and other materials related to such distribution and
use acknowledge that the software was developed by the University of California, Berkeley. The name of the University may not be
used to endorse or promote products derived from this software without specific prior written permission. THIS SOFTWARE IS
PROVIDED ``AS IS'' AND WITHOUT ANY EXPRESS OR IMPLIED WARRANTIES, INCLUDING, WITHOUT LIMITATION, THE
IMPLIED WARRANTIES OF MERCHANTABILITY AND FITNESS FOR A PARTICULAR PURPOSE.
Copyright (C) 1989, 1991 by Jef Poskanzer.
Permission to use, copy, modify, and distribute this software and its documentation for any purpose and without fee is hereby
granted, provided that the above copyright notice appear in all copies and that both that copyright notice and this permission notice
appear in supporting documentation. This software is provided "as is" without express or implied warranty.
Copyright 1995, Trinity College Computing Center. Written by David Chappell.
.
2
Page 3

Permission to use, copy, modify, and distribute this software and its documentation for any purpose and without fee is hereby
granted, provided that the above copyright notice appear in all copies and that both that copyright notice and this permission notice
appear in supporting documentation. This software is provided "as is" without express or implied warranty.
Copyright 1996 Daniel Dardailler.
Permission to use, copy, modify, distribute, and sell this software for any purpose is hereby granted without fee, provided that the
above copyright notice appear in all copies and that both that copyright notice and this permission notice appear in supporting
documentation, and that the name of Daniel Dardailler not be used in advertising or publicity pertaining to distribution of the software
without specific, written prior permission. Daniel Dardailler makes no representations about the suitability of this software for any
purpose. It is provided "as is" without express or implied warranty.
Modifications Copyright 1999 Matt Koss, under the same license as above.
Copyright (c) 1991 by AT&T.
Permission to use, copy, modify, and distribute this software for any purpose without fee is hereby granted, provided that this entire
notice is included in all copies of any software which is or includes a copy or modification of this software and in all copies of the
supporting documentation for such software.
THIS SOFTWARE IS BEING PROVIDED "AS IS", WITHOUT ANY EXPRESS OR IMPLIED WARRANTY. IN PARTICULAR,
NEITHER THE AUTHOR NOR AT&T MAKES ANY REPRESENTATION OR WARRANTY OF ANY KIND CONCERNING THE
MERCHANTABILITY OF THIS SOFTWARE OR ITS FITNESS FOR ANY PARTICULAR PURPOSE.
This product includes software developed by the University of California, Berkeley and its contributors.
The following disclaimer is required by Paradigm Matrix:
Portions of this software licensed from Paradigm Matrix.
The following disclaimer is required by Ray Sauers Associates, Inc.:
“Install-It” is licensed from Ray Sauers Associates, Inc. End-User is prohibited from taking any action to derive a source code
equivalent of “Install-It,” including by reverse assembly or reverse compilation, Ray Sauers Associates, Inc. shall in no event be liable
for any damages resulting from reseller’s failure to perform reseller’s obligation; or any damages arising from use or operation of
reseller’s products or the software; or any other damages, including but not limited to, incidental, direct, indirect, special or
consequential Damages including lost profits, or damages resulting from loss of use or inability to use reseller’s products or the
software for any reason including copyright or patent infringement, or lost data, even if Ray Sauers Associates has been advised,
knew or should have known of the possibility of such damages.
The following disclaimer is required by Videomedia, Inc.:
“Videomedia, Inc. makes no warranties whatsoever, either express or implied, regarding this product, including warranties with
respect to its merchantability or its fitness for any particular purpose.”
“This software contains V-LAN ver. 3.0 Command Protocols which communicate with V-LAN ver. 3.0 products developed by
Videomedia, Inc. and V-LAN ver. 3.0 compatible products developed by third parties under license from Videomedia, Inc. Use of this
software will allow “frame accurate” editing control of applicable videotape recorder decks, videodisc recorders/players and the like.”
The following disclaimer is required by Altura Software, Inc. for the use of its Mac2Win software and Sample Source
Code:
©1993–1998 Altura Software, Inc.
The following disclaimer is required by 3Prong.com Inc.:
Certain waveform and vector monitoring capabilities are provided under a license from 3Prong.com Inc.
The following disclaimer is required by Interplay Entertainment Corp.:
The “Interplay” name is used with the permission of Interplay Entertainment Corp., which bears no responsibility for Avid products.
This product includes portions of the Alloy Look & Feel software from Incors GmbH.
This product includes software developed by the Apache Software Foundation (http://www.apache.org/
© DevelopMentor
).
This product may include the JCifs library, for which the following notice applies:
JCifs © Copyright 2004, The JCIFS Project, is licensed under LGPL (http://jcifs.samba.org/). See the LGPL.txt file in the Third Party
Software directory on the installation CD.
3
Page 4

Avid Interplay contains components licensed from LavanTech. These components may only be used as part of and in connection
with Avid Interplay.
This product includes FFmpeg, which is covered by the GNU Lesser General Public License.
This product includes software that is based in part of the work of the FreeType Team.
This software is based in part on the work of the Independent JPEG Group.
This product includes libjpeg-turbo, which is covered by the wxWindows Library License, Version 3.1.
Portions copyright 1994, 1995, 1996, 1997, 1998, 1999, 2000, 2001, 2002 by Cold Spring Harbor Laboratory. Funded under Grant
P41-RR02188 by the National Institutes of Health.
Portions copyright 1996, 1997, 1998, 1999, 2000, 2001, 2002 by Boutell.Com, Inc.
Portions relating to GD2 format copyright 1999, 2000, 2001, 2002 Philip Warner.
Portions relating to PNG copyright 1999, 2000, 2001, 2002 Greg Roelofs.
Portions relating to gdttf.c copyright 1999, 2000, 2001, 2002 John Ellson (ellson@lucent.com).
Portions relating to gdft.c copyright 2001, 2002 John Ellson (ellson@lucent.com).
Portions relating to JPEG and to color quantization copyright 2000, 2001, 2002, Doug Becker and copyright (C) 1994, 1995, 1996,
1997, 1998, 1999, 2000, 2001, 2002, Thomas G. Lane. This software is based in part on the work of the Independent JPEG Group.
See the file README-JPEG.TXT for more information. Portions relating to WBMP copyright 2000, 2001, 2002 Maurice Szmurlo and
Johan Van den Brande.
Permission has been granted to copy, distribute and modify gd in any context without fee, including a commercial application,
provided that this notice is present in user-accessible supporting documentation.
This does not affect your ownership of the derived work itself, and the intent is to assure proper credit for the authors of gd, not to
interfere with your productive use of gd. If you have questions, ask. "Derived works" includes all programs that utilize the library.
Credit must be given in user-accessible documentation.
This software is provided "AS IS." The copyright holders disclaim all warranties, either express or implied, including but not limited to
implied warranties of merchantability and fitness for a particular purpose, with respect to this code and accompanying
documentation.
Although their code does not appear in gd, the authors wish to thank David Koblas, David Rowley, and Hutchison Avenue Software
Corporation for their prior contributions.
This product includes software developed by the OpenSSL Project for use in the OpenSSL Toolkit (http://www.openssl.org/)
Interplay Central may use OpenLDAP. Copyright 1999-2003 The OpenLDAP Foundation, Redwood City, California, USA. All Rights
Reserved. OpenLDAP is a registered trademark of the OpenLDAP Foundation.
Avid Interplay Pulse enables its users to access certain YouTube functionality, as a result of Avid's licensed use of YouTube's API.
The charges levied by Avid for use of Avid Interplay Pulse are imposed by Avid, not YouTube. YouTube does not charge users for
accessing YouTube site functionality through the YouTube APIs.
Avid Interplay Pulse uses the bitly API, but is neither developed nor endorsed by bitly.
Attn. Government User(s). Restricted Rights Legend
U.S. GOVERNMENT RESTRICTED RIGHTS. This Software and its documentation are “commercial computer software” or
“commercial computer software documentation.” In the event that such Software or documentation is acquired by or on behalf of a
unit or agency of the U.S. Government, all rights with respect to this Software and documentation are subject to the terms of the
License Agreement, pursuant to FAR §12.212(a) and/or DFARS §227.7202-1(a), as applicable.
Trademarks
003, 192 Digital I/O, 192 I/O, 96 I/O, 96i I/O, Adrenaline, AirSpeed, ALEX, Alienbrain, AME, AniMatte, Archive, Archive II, Assistant
Station, AudioPages, AudioStation, AutoLoop, AutoSync, Avid, Avid Active, Avid Advanced Response, Avid DNA, Avid DNxcel, Avid
DNxHD, Avid DS Assist Station, Avid Ignite, Avid Liquid, Avid Media Engine, Avid Media Processor, Avid MEDIArray, Avid Mojo, Avid
Remote Response, Avid Unity, Avid Unity ISIS, Avid VideoRAID, AvidRAID, AvidShare, AVIDstripe, AVX, Beat Detective, Beauty
Without The Bandwidth, Beyond Reality, BF Essentials, Bomb Factory, Bruno, C|24, CaptureManager, ChromaCurve,
ChromaWheel, Cineractive Engine, Cineractive Player, Cineractive Viewer, Color Conductor, Command|24, Command|8,
Control|24, Cosmonaut Voice, CountDown, d2, d3, DAE, D-Command, D-Control, Deko, DekoCast, D-Fi, D-fx, Digi 002, Digi 003,
4
Page 5

DigiBase, Digidesign, Digidesign Audio Engine, Digidesign Development Partners, Digidesign Intelligent Noise Reduction,
Digidesign TDM Bus, DigiLink, DigiMeter, DigiPanner, DigiProNet, DigiRack, DigiSerial, DigiSnake, DigiSystem, Digital
Choreography, Digital Nonlinear Accelerator, DigiTest, DigiTranslator, DigiWear, DINR, DNxchange, Do More, DPP-1, D-Show, DSP
Manager, DS-StorageCalc, DV Toolkit, DVD Complete, D-Verb, Eleven, EM, Euphonix, EUCON, EveryPhase, Expander,
ExpertRender, Fader Pack, Fairchild, FastBreak, Fast Track, Film Cutter, FilmScribe, Flexevent, FluidMotion, Frame Chase, FXDeko,
HD Core, HD Process, HDpack, Home-to-Hollywood, HYBRID, HyperSPACE, HyperSPACE HDCAM, iKnowledge, Image
Independence, Impact, Improv, iNEWS, iNEWS Assign, iNEWS ControlAir, InGame, Instantwrite, Instinct, Intelligent Content
Management, Intelligent Digital Actor Technology, IntelliRender, Intelli-Sat, Intelli-sat Broadcasting Recording Manager, InterFX,
Interplay, inTONE, Intraframe, iS Expander, iS9, iS18, iS23, iS36, ISIS, IsoSync, LaunchPad, LeaderPlus, LFX, Lightning, Link &
Sync, ListSync, LKT-200, Lo-Fi, MachineControl, Magic Mask, Make Anything Hollywood, make manage move | media, Marquee,
MassivePack, Massive Pack Pro, Maxim, Mbox, Media Composer, MediaFlow, MediaLog, MediaMix, Media Reader, Media
Recorder, MEDIArray, MediaServer, MediaShare, MetaFuze, MetaSync, MIDI I/O, Mix Rack, Moviestar, MultiShell, NaturalMatch,
NewsCutter, NewsView, NewsVision, Nitris, NL3D, NLP, NSDOS, NSWIN, OMF, OMF Interchange, OMM, OnDVD, Open Media
Framework, Open Media Management, Painterly Effects, Palladium, Personal Q, PET, Podcast Factory, PowerSwap, PRE,
ProControl, ProEncode, Profiler, Pro Tools, Pro Tools|HD, Pro Tools LE, Pro Tools M-Powered, Pro Transfer, QuickPunch,
QuietDrive, Realtime Motion Synthesis, Recti-Fi, Reel Tape Delay, Reel Tape Flanger, Reel Tape Saturation, Reprise, Res Rocket
Surfer, Reso, RetroLoop, Reverb One, ReVibe, Revolution, rS9, rS18, RTAS, Salesview, Sci-Fi, Scorch, ScriptSync,
SecureProductionEnvironment, Serv|GT, Serv|LT, Shape-to-Shape, ShuttleCase, Sibelius, SimulPlay, SimulRecord, Slightly Rude
Compressor, Smack!, Soft SampleCell, Soft-Clip Limiter, SoundReplacer, SPACE, SPACEShift, SpectraGraph, SpectraMatte,
SteadyGlide, Streamfactory, Streamgenie, StreamRAID, SubCap, Sundance, Sundance Digital, SurroundScope, Symphony, SYNC
HD, SYNC I/O, Synchronic, SynchroScope, Syntax, TDM FlexCable, TechFlix, Tel-Ray, Thunder, TimeLiner, Titansync, Titan, TL
Aggro, TL AutoPan, TL Drum Rehab, TL Everyphase, TL Fauxlder, TL In Tune, TL MasterMeter, TL Metro, TL Space, TL Utilities,
tools for storytellers, Transit, TransJammer, Trillium Lane Labs, TruTouch, UnityRAID, Vari-Fi, Video the Web Way, VideoRAID,
VideoSPACE, VTEM, Work-N-Play, Xdeck, X-Form, Xmon and XPAND! are either registered trademarks or trademarks of Avid
Technology, Inc. in the United States and/or other countries.
Adobe and Photoshop are either registered trademarks or trademarks of Adobe Systems Incorporated in the United States and/or
other countries. Apple and Macintosh are trademarks of Apple Computer, Inc., registered in the U.S. and other countries. Windows
is either a registered trademark or trademark of Microsoft Corporation in the United States and/or other countries. All other
trademarks contained herein are the property of their respective owners.
Footage
Hell’s Kitchen - Courtesy of Upper Ground Enterprises/Hell's Kitchen post team.
Avid Interplay Pulse User’s Guide • Part Number 9329-65403-00 • January 2014 • Created 1/31/14 • This document
is distributed by Avid in online (electronic) form only, and is not available for purchase in printed form.
5
Page 6

Contents
Using This Guide. . . . . . . . . . . . . . . . . . . . . . . . . . . . . . . . . . . . . . . . . . . . . 1
Chapter 1 Avid Interplay Pulse . . . . . . . . . . . . . . . . . . . . . . . . . . . . . . . . . . . . . . . . . . 1
Setting Up a System Profile . . . . . . . . . . . . . . . . . . . . . . . . . . . . . . . . . . . . . . . . . . . . 2
Setting Up a User Profile. . . . . . . . . . . . . . . . . . . . . . . . . . . . . . . . . . . . . . . . . . . . . . . 3
Using the Interplay Pulse Layout . . . . . . . . . . . . . . . . . . . . . . . . . . . . . . . . . . . . . . . . 5
Publish to Social Media. . . . . . . . . . . . . . . . . . . . . . . . . . . . . . . . . . . . . . . . . . . . . . . . 7
Exporting as an AAF File . . . . . . . . . . . . . . . . . . . . . . . . . . . . . . . . . . . . . . . . . . . . . 13
Publish to the Web . . . . . . . . . . . . . . . . . . . . . . . . . . . . . . . . . . . . . . . . . . . . . . . . . . 15
Review and Approval . . . . . . . . . . . . . . . . . . . . . . . . . . . . . . . . . . . . . . . . . . . . . . . . 20
Chapter 1 Workflows for Avid Interplay Pulse . . . . . . . . . . . . . . . . . . . . . . . . . . . . . . 1
Media Flow from Ingest to Publication . . . . . . . . . . . . . . . . . . . . . . . . . . . . . . . . . . . . 1
Interplay Pulse Roles . . . . . . . . . . . . . . . . . . . . . . . . . . . . . . . . . . . . . . . . . . . . . . . . . 4
Index . . . . . . . . . . . . . . . . . . . . . . . . . . . . . . . . . . . . . . . . . . . . . . . . . . . . . . 10
Page 7

Using This Guide
This guide is intended for users of an Avid Interplay Central system with the Interplay Pulse
feature. This guide describes product features and basic user procedures, such as Interplay Pulse
multi-platform publishing.
For initial installation and configuration of Interplay Pulse, see the Avid Interplay Pulse
Installation and Configuration Guide. For administrative information for Interplay Central, see
the Avid Interplay Central Administration Guide.
Page 8

1 Avid Interplay Pulse
Avid Interplay Pulse allows users to publish news stories and audio and video content directly
from the Interplay Central interface to multiple outlets:
• Corporate and broadcast Web sites and Web content management systems
• Social media services such as Facebook
• Online video platforms such as YouTube™ and Brightcove
Before you can use Interplay Pulse to publish to these services and platforms, you need to
configure profiles in Interplay Central for specific targets, such as personal or corporate Twitter
or YouTube accounts. You then create a multimedia package — a collection of text (messages or
stories), images, video, and audio, all associated with a common iNEWS story and Interplay
Production master clip or sequence. And you can distribute the package to multiple targets in a
single process using the Interplay Pulse layout in Interplay Central.
Interplay Pulse also requires a separate license and installation. For more information on
installing Interplay Pulse, see Avid Interplay Pulse Installation and Configuration Guide.
As part of Interplay Central, Interplay Pulse includes many of the processes described in the
n
Avid Interplay Central User’s Guide and Avid Interplay Central Administration Guide. For more
information, see your Interplay Central documentation.
®
and Twitter
®
®
See the following topics for more information about Interplay Pulse:
Setting Up a System Profile
•
• Setting Up a User Profile
• Using the Interplay Pulse Layout
• Publish to Social Media
• Publish to the Web
• Review and Approval
Page 9
Setting Up a System Profile
Before you publish a package to a Web site, social media service, or video platform, you must set
up user or system profiles for Interplay Pulse. A system profile contains credentials for a target
associated with a corporate or group house account and accessible by multiple users — for
example, @Avid for the Avid corporate Twitter account.
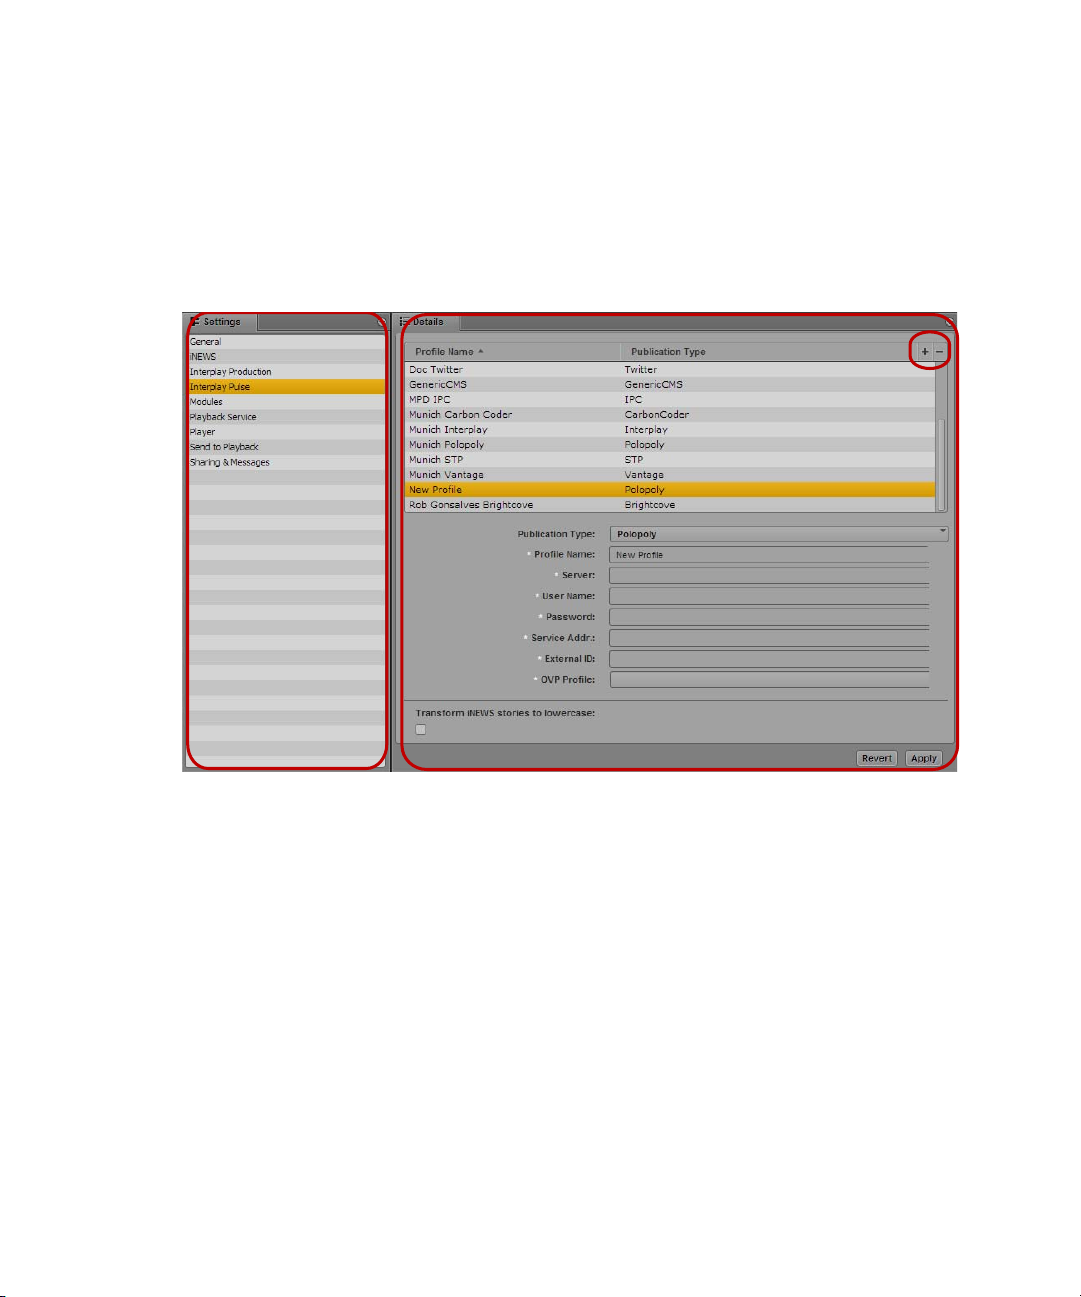
Setting Up a System Profile
Interplay Central Settings layout: Settings pane, Details pane, and Add Profile and Delete Profile buttons.
After you set up the system profiles for each target, you can configure the roles and permissions
that allow users to access the profiles. For more information, see “Interplay Central User
Management” in the Interplay Central Administration Guide.
To create a profile for a publishing target:
1. Sign in to Interplay Central as an administrator.
2. Select System Settings from the Layout selector.
The System Settings layout opens.
3. In the Settings pane select Interplay Pulse.
The Details pane displays the Interplay Pulse settings.
4. In the Details pane, click the Publication Type menu and select a platform.
2
Page 10

5. Click the Add Profile button.
A new profile appears in the profile list, displaying your publication type.
6. Type a name for the profile in the Profile Name text box.
7. Type the appropriate text for each of the remaining parameter fields. The publication type
determines which fields display. For more information, see your platform documentation.
8. Click Apply.
The profile list displays the new profile.
To delete a profile, do the following:
t Select the profile, and then click the Delete Profile button.
Setting Up a User Profile
When you want to publish a package to a user-defined Web site, social media service, or video
platform, you must set up user profile. A user profile contains credentials for a specific target and
associated with a specific user — for example, @jounralist1 for Journalist One’s Twitter
account.
Setting Up a User Profile
After you set up the user profiles for each target, you can configure the roles and permissions that
allow users to access the profiles. For more information, see “Interplay Central User
Management” in the Interplay Central Administration Guide.
To create a user profile for a publishing target:
1. Select Home > User Settings.
The User Settings dialog box opens.
2. In the Name column, select Interplay Pulse.
3
Page 11
The User Settings dialog box displays the Interplay Pulse settings.
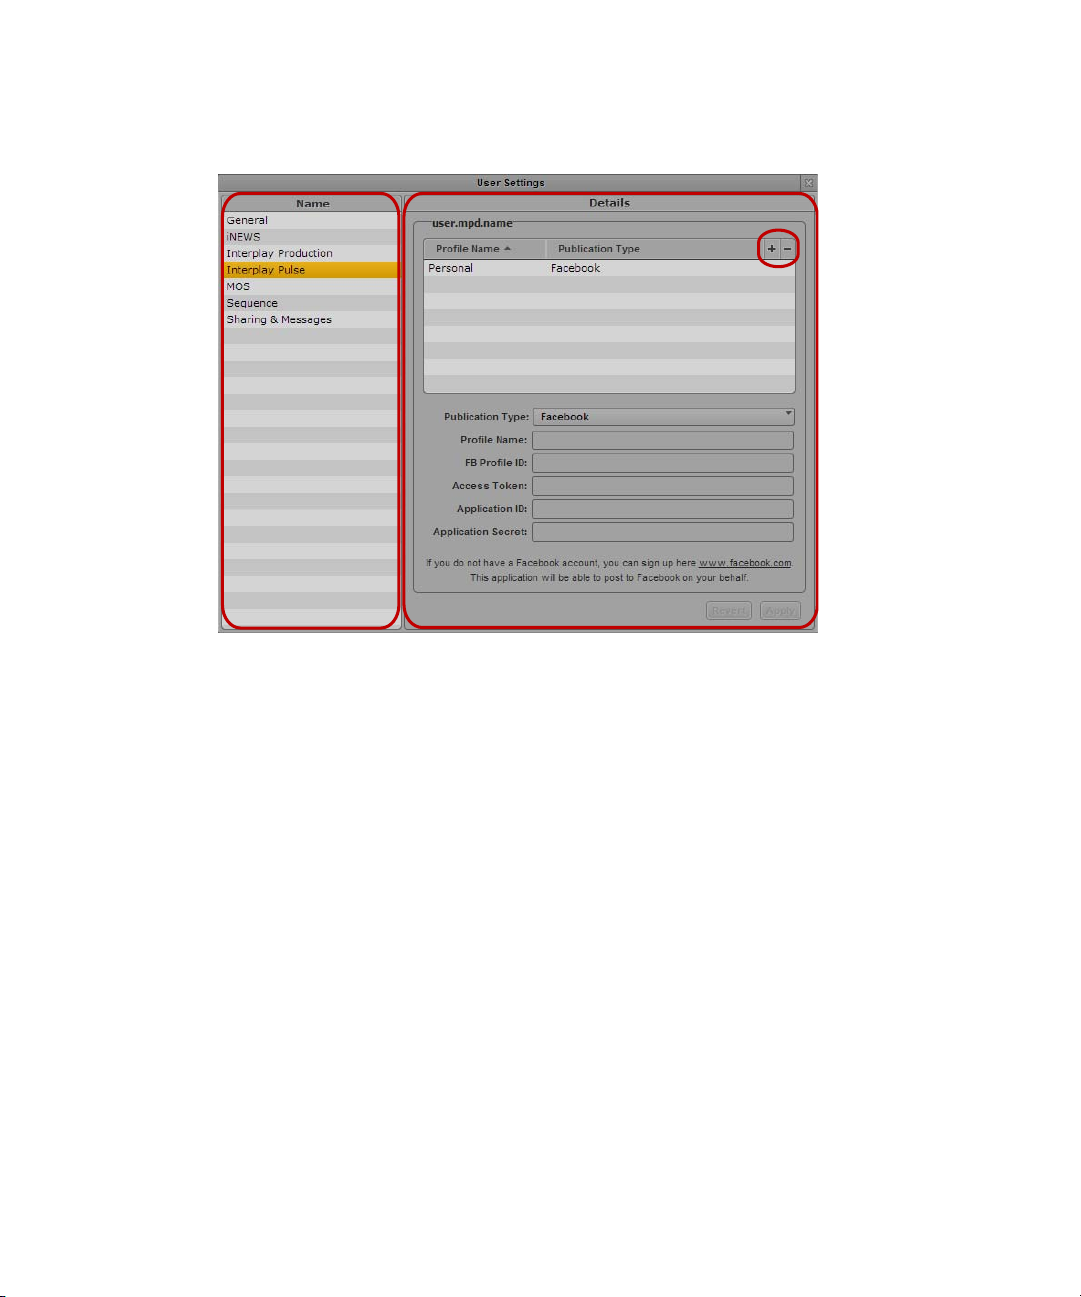
Setting Up a User Profile
User Settings: Name column, Interplay Pulse settings, Add/Delete Profile button
3. Select a target from the Publication Type menu.
4. Click the Add Profile button.
A new profile appears in the profile list, displaying your publication type.
5. Type a name for the profile in the Profile Name text box.
6. Type the appropriate text for each of the remaining parameter fields. The publication type
determines which fields display. For more information, see your platform documentation.
7. Click Apply.
The profile list displays the new profile.
To delete a profile, do the following:
t Select the profile, and then click the Delete Profile button.
4
Page 12
Using the Interplay Pulse Layout
12 3
4
5
When you have created your system and user profiles, you can create and publish your packages
using the Interplay Pulse layout in Interplay Central. The Interplay Pulse layout displays
different options when you select Social Message, Web Story, or Packages in the Platform pane.
The following illustration shows the Interplay Pulse layout with Social Message selected in the
Platform pane. For information on the Web Story and the Packages panes, see
Web” on page 15
You can customize Interplay Central by adjusting a layout’s areas and panes. A single area can
n
contain one or more panes. When an area contains more than one pane, the panes are displayed
in a tabular format, with one pane on top of the others.
and “Review and Approval” on page 20.
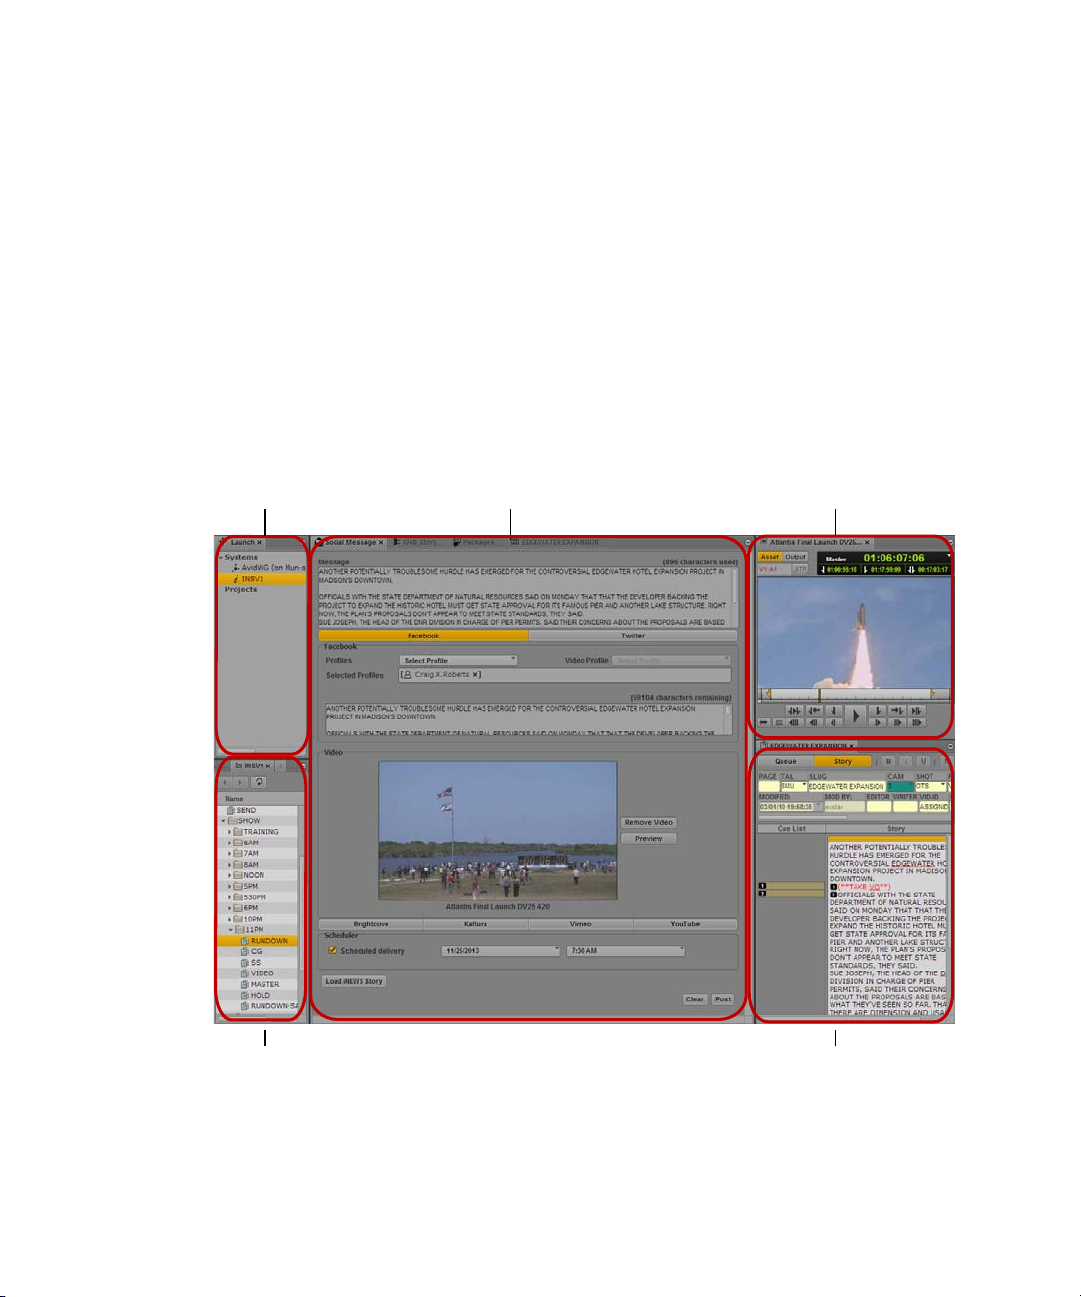
Using the Interplay Pulse Layout
“Publish to the
5
Page 13

Using the Interplay Pulse Layout
Pane or Area Description
1 Launch A pane from which you navigate to various locations. This pane displays remote
file systems, local file systems, and other locations for assets.
2 Interplay Pulse
Creation area
3 Media A pane in which you can view and edit media assets. The controls that are
4 Assets A pane that displays assets. These assets can result from a search or from
5 Queue/Story
(iNEWS users
only)
An area in which you can select a platform for your package or review and
confirm specific packages for the available targets.The options that display in the
area change when you select one of the following panes:
• Social Message — You use this pane to create packages for publication to
social media sites. You can also schedule packages for delivery at a specific
time.
• Web Story — You use this pane to create packages for publication to Web
Content Management Systems (CMS). The options available in this pane
depend on which Web CMS settings your Interplay Central administrator has
configured.
• Packages — You use this pane to review and approve packages submitted for
publication. The pane also displays a history of packages ready for
publication and already published, which allows you to search all submitted
and published packages.
displayed depend on the selected asset.
browsing. Assets are displayed in a folder hierarchy, if applicable to the assets
displayed.
A pane that displays the contents of a queue with the contents of a selected story
in the queue, including the story form and any production cues. It can only be
opened from the Assets pane, and is therefore not listed as part of the Panes
menu.
To open the Interplay Pulse layout, do the following:
t Click the Layout selector and select Interplay Pulse.
To open a new pane:
1. Select the Panes menu.
2. Select the menu option corresponding to the pane you want to open.
The pane you select opens in the active area. For more information, see “Working with
Areas and Panes” in the Avid Interplay Central User’s Guide.
6
Page 14

Publish to Social Media
Interplay Pulse allows you to create your package, including text and media, and then to manage
the flow of assets and metadata through the transcode process and the delivery of the package to
online, mobile, and social media platforms. The integration of these processes with the Interplay
Central interface makes publishing your content to multiple outlets simple and efficient.
The workflow for publishing your package to a social media service such as Facebook depends
on whether or not you want to start with an iNEWS story as your source. Working from an
existing story, you can use the Social Message pane to select a profile, modify the content
appropriately for a particular target, edit and add video, and then publish to one or more service.
If you start with media located in Interplay Production, you can use the Social Message pane to
select your profile, create a message to accompany your material, edit and add media content,
and then deliver your message and video to multiple channels in the right format for each
platform.
You do not need iNEWS or Interplay Production to publish messages to social media services
n
using Interplay Pulse.
You can also schedule the publication of your multimedia package to a social media service.
Publish to Social Media
Publishing from iNEWS to Social Media
You use the Interplay Pulse layout to create your package and deliver it to one or more social
media targets.
To prepare an iNEWS story for publishing to a social media or video service:
1. Click the Layout selector and select Interplay Pulse.
The Interplay Pulse layout opens.
2. Do the following to open a story in the Queue/Story pane.
a. Double-click an iNEWS server in the Launch pane.
The folder hierarchy of the iNEWS database displays in the Assets pane.
b. Double-click a queue in the Asset pane.
The queue’s contents open in the Queue/Story pane.
c. Select the story in the queue you want to view and click the Story button to display the
story in the bottom half of the Queue/Story pane.
7
Page 15

3. Click the Social Message pane.
The Social Message pane opens.
Publish to Social Media
Social Message pane: iNEWS story loaded in the Message box; target buttons; Profiles and Video Profiles
menus; selected profile; Attach/Remove Video button; Scheduler, Load iNEWS Story button
4. Click Load iNEWS Story.
The Message text box displays the iNEWS story, with all production cues removed and the
character count listed below the text box. If you selected the option to transform iNEWS
stories to lowercase in the System Settings, all text changes to lowercase characters.
5. (Option) Add, delete, or modify story text in the Message text box.
Changes you make in the Message text box apply globally to all social media targets you
select. You can also modify the story text for individual targets in the text boxes for those
targets.
8
Page 16

Publish to Social Media
6. Select a social media target — for example, Facebook. You can select multiple targets.
Settings display in the Social Message tab for each target you select. The text in the Message
text box automatically displays in the message box for each target.
If the story text exceeds the maximum length for a social media target, the story appears
truncated in the message box.
7. Click the Profiles menu, and select a profile. You can select multiple profiles for each target.
Profiles display in the Selected Profiles area.
System profile
User profile
If you want to delete a profile, click the “x” next to the profile name.
8. (Option) In the target message box, edit the text for the applicable platform. For example,
you can edit your story to fit Twitter’s 140-character limit.
When you embed video in a message, the text of the Web link, the Uniform Resource Locator
n
(URL), is included in any character limit for the selected platform.
9. To add a video to your package, do the following:
a. Double-click a video asset in the Asset pane or drag the video asset to the Media viewer.
The video asset displays in the Media pane. You can select a master clip, a subclip, or a
sequence.
b. If you do not want to add the entire video to your package, set In and Out points in the
Media pane and create a subclip and then load the subclip in the Media viewer.
You can also add a sequence to your package. For information on creating sequences, see
n
“Creating a Sequence” in the Interplay Central User’s Guide.
c. Click the Video Profiles menu, and select a profile. You can select multiple profiles for
each target.
When you publish a package that includes video to a social media platform, the
published content includes a link to the video on the Web site specified in the Video
Profile menu.
d. If necessary, add or update any metadata to the profile fields that require information.
9
Page 17

e. Click Attach Video.
The video displays in the Video area of the Social Media pane and a sequence is
automatically created. The Attach Video button changes to the Remove Video button.
10. Click Post.
The story is sent for approval and the Social Media pane clears all fields. For information on
approving stories for publishing, see “Review and Approval” on page 20
If your package does not include video and your target uses a user profile — for example, if
you publish the package to your personal Twitter account — the package does not require
review or approval and is posted automatically to your account.
Publishing from Interplay Production to Social Media
In addition to creating a media package from an iNEWS story, you can also start directly with
media stored in your Interplay environment and then add the text and tags you want for your
story.
To prepare a video from Interplay Production for publishing to a social media service:
1. Click the Layout selector and select Interplay Pulse.
The Interplay Pulse layout opens.
Publish to Social Media
.
2. Do the following to load an asset in the Media pane.
a. Double-click an Interplay Production server in the Launch pane.
The folder hierarchy of the Interplay database displays in the Assets pane.
b. Navigate to a video asset in the Asset pane, and then double-click the asset or drag it to
the Media viewer.
The asset opens in the Media pane. You can select a master clip, a subclip, or a
sequence.
For information on opening media in the Asset pane, see “Navigating the Interplay
Production Database” in the Interplay Central User’s Guide.
c. If you do not want to add the entire video to your package, set In and Out points in the
Media pane and create a subclip and then load the subclip in the Media viewer.
10
Page 18

3. Click the Panes Menu button and select Social Message.
The Social Message pane opens.
Publish to Social Media
Social Message pane: Social media target buttons; Profiles and Video Profiles menus with selected profile;
Attach/Remove Video button; video target buttons, Scheduler
4. In the Message text box, type the text for the applicable platform. The text in the Message
text box automatically displays in the message box for each target.
5. Click Attach Video.
The video displays in the Video area of the Social Media pane and a sequence is
automatically created. The Attach Video button changes to the Remove Video button.
6. Select a social media target — for example, Facebook. You can select multiple targets.
Settings display in the Social Message tab for each target you select.
11
Page 19

7. Click the Profiles menu, and select a profile. You can select multiple profiles for each target.
Profiles display in the Selected Profiles area.
System profile
User profile
If you want to delete a profile, click the “x” next to the profile name.
8. Click Post.
The story is sent for approval and the Social Media pane clears all fields. For information on
approving stories for publishing, see “Review and Approval” on page 20
Scheduling the Delivery of Content for Publication
If you want to deliver your package to a social media platform at a specific time, you can set the
date and time for publication using the Scheduler on the Social Message pane.
Publish to Social Media
.
To schedule the publication of a media package:
1. In the Scheduler area, select Scheduled Delivery.
The Date text box displays the current date by default.
2. (Option) Click the Date menu and select another date from the calendar. You can also type a
date in the Date text box. Dates must be in the format of mm/dd/yyyy.
3. Click the Time menu and select a time. You can also type a time in the Time text box. As you
type, a list of available times appears. You can continue typing or select the appropriate time
from the list.
If you do not select a time, the default time is 12:00 AM. You cannot select a time earlier than the
n
current time.
12
Page 20

Exporting as an AAF File
If you want to create a reference media file to be transcoded by another encoding application —
for example, Telestream Vantage — you can export your sequence as an AAF file and send it to
a folder destination designated for passing the file to your encoder. Interplay Central creates a
simplified AAF file that reduces a sequence to a single video track, a data track, and a minimum
number of audio tracks determined by the Audio Mix option selected for your AAF profile.
To export a sequence as an AAF file:
1. Click the Layout selector and select Interplay Pulse.
You can also export an AAF file using the Video layout.
n
The Interplay Pulse layout opens.
2. Do the following to load an asset in the Media pane.
a. Double-click an Interplay Production server in the Launch pane.
The folder hierarchy of the Interplay database displays in the Assets pane.
b. Navigate to a sequence in the Asset pane, and then double-click the sequence or drag it
to the Media viewer.
Exporting as an AAF File
The sequence opens in the Media pane.
For information on opening media in the Asset pane, see “Navigating the Interplay
Production Database” in the Interplay Central User’s Guide.
3. Click the Pane Menu button and select Export.
The Export Settings dialog box opens.
13
Page 21

Exporting as an AAF File
4. Type a name to use for the Video ID in the text box.
5. Click the Profile menu and select an AAF profile.
The AAF Settings dialog box displays the options associated with the selected AAF export
profile. For information on creating an AAF profile, see “Configuring an AAF Profile” in
the Avid Interplay Pulse Installation and Configuration Guide.
6. If you want the export operation to replace a media file with the same filename in the file
export location, select Overwrite.
7. If you want to assign a high priority status to the export operation, select High Priority.
8. Click Export.
The Progress pane opens, and a progress bar indicates the status of the export operation.
If you create an invalid file export path in an AAF Profile in the Interplay Pulse settings of the
n
System Settings layout, your AAF export from Interplay Central fails but might create an export
folder. For example, if you specify the File Export Path as
\\systemdirector\ISISdrive\folder1\<VIDEOID, the system verifies the profile setting even though
it contains a syntax error. This causes the AAF export to fail, but the operation does create the
“folder1” export folder.
14
Page 22

Publish to the Web
Interplay Pulse allows you to create your package and publish it to a corporate or broadcast Web
site. The workflow for publishing your package to the Web depends on whether or not you want
to start with an iNEWS story as your source. If you work from an existing story, you can
automatically add text from the story to your package. If you start with media located in
Interplay Production, you can use the text editor in the Web Story pane to create and modify your
message.
Publishing from iNEWS to the Web
If you want to publish an iNEWS story to a Web site, you can load the story from your iNEWS
queue. This automatically removes production cues, and adds text to some of the fields for your
package. You can then modify your story, select a profile, add a video clip, and send the story out
for approval for publication.
If you selected the option to transform iNEWS stories to lowercase in the System Settings, all
text changes to lowercase characters.
To prepare an iNEWS story for publishing to the Web:
1. Click the Layout selector and select Interplay Pulse.
Publish to the Web
The Interplay Pulse layout opens.
2. Do the following to open a story in the Queue/Story pane.
a. Double-click an iNEWS server in the Launch pane.
The folder hierarchy of the iNEWS database displays in the Assets pane.
b. Double-click a queue in the Asset pane.
The queue’s contents open in the Queue/Story pane.
c. Select the story in the queue you want to view and click the Story button to display the
story in the bottom half of the Queue/Story pane.
15
Page 23

Publish to the Web
3. Click the Panes Menu button and select Web Story.
The Web Story pane opens. The options available depend on which Web CMS settings your
Interplay Central administrator has configured.
Web Story pane: Title, Lead, and Body text boxes; Selected Profiles
4. Click Load iNEWS Story.
The Title and Lead text boxes display the story slug, and the Body text box displays the
iNEWS story. If you selected the option to transform iNEWS stories to lowercase in the
System Settings, all text changes to lowercase characters.
5. (Option) Add, delete, or modify text in the text boxes for the story title or headline and any
other text boxes. The fields requiring text depend on your Web CMS configuration.
The Body text box includes a rich text editor that allows you to edit your content and to
format text to match the styles used on your Web site.
16
Page 24

6. Click the Profiles menu, and select a profile. You can select multiple profiles for each target.
Profiles display in the Selected Profiles area.
System profile
User profile
If you want to delete a profile, click the “x” next to the profile name.
7. To add a video to your package, do the following:
a. Double-click a video asset in the Asset pane or drag the video asset to the Media viewer.
The video asset displays in the Media pane. You can select a master clip, a subclip, or a
sequence.
b. If you do not want to add the entire video to your package, set In and Out points in the
Media pane and create a subclip and then load the subclip in the Media viewer.
You can also add a sequence to your package. For information on creating sequences, see
n
“Creating a Sequence” in the Interplay Central User’s Guide.
Publish to the Web
c. If your CMS supports video profiles, click the Video Profiles menu, and select a profile.
You can select multiple profiles for each target.
d. If necessary, add or update any metadata to the Web Story fields that require
information, depending on your Web CMS configuration — for example, associated
links or alternative text for graphics.
e. Click Add Video.
The video displays in the Video or Image area of the Web Story pane. The position
indicator in the Media viewer determines the video poster frame that appears on your
Web page.
f. (Option) If you want to change the frame that displays in the Video area as the poster
frame for you video, move the position indicator in the Media viewer and then click
Update Poster Frame or Update Image.
g. (Option) If you want to use a separate image to display in the Video area as the poster
frame for you video, load a new video in the Media viewer and then click Add Image.
This allows you to use a poster frame that does not appear in the video for your package.
h. If your CMS supports additional graphics content — for example, branding, header, or
Story Body graphics — you can move the position indicator in the Media viewer and
then add the new image to the appropriate field in the Web Story pane.
17
Page 25

8. Click Send draft.
The story is sent for approval and the Web Story pane clears all fields. For information on
approving stories for publishing, see “Review and Approval” on page 20
Publishing from Interplay Production to the Web
You can also publish your package to a Web site without using an iNEWS story by selecting
video from Interplay Production, adding and modifying the text for the story, and submitting the
package for approval.
To prepare a video for publishing to the Web:
1. Click the Layout selector and select Interplay Pulse.
The Interplay Pulse layout opens.
2. Do the following to load an asset in the Media pane.
a. Double-click an Interplay Production server in the Launch pane.
The folder hierarchy of the Interplay database displays in the Assets pane.
b. Navigate to a video asset in the Asset pane, and then double-click the asset or drag it to
the Media viewer.
Publish to the Web
.
The asset opens in the Media pane. You can select a master clip, a subclip, or a
sequence.
For information on opening media in the Asset pane, see “Navigating the Interplay
Production Database” in the Interplay Central User’s Guide.
c. If you do not want to add the entire video to your package, set In and Out points in the
Media pane and create a subclip and then load the subclip in the Media viewer.
18
Page 26

Publish to the Web
3. Click the Panes Menu button and select Web Story.
The Web Story pane opens. The options available depend on which Web CMS settings your
Interplay Central administrator has configured.
Web Story pane: Selected Profiles; Add/Remove Video button; Update Poster Frame button; Add/Remove
Image button; Update Image button
4. Click Add Video.
The video displays in the Video or Image area of the Web Story pane. The position indicator
in the Media viewer determines the video poster frame that appears on your Web page.
5. (Option) If you want to change the frame that displays in the Video area as the poster frame
for you video, move the position indicator in the Media viewer and then click Update Poster
Frame or Update Image.
6. (Option) If you want to use a separate image to display in the Video area as the poster frame
for you video, load a new video in the Media viewer and then click Add Image. This allows
you to use a poster frame that does not appear in the video for your package.
19
Page 27

Review and Approval
7. (Option) Add, delete, or modify text in the text boxes for the story title or headline and any
other text boxes. The fields requiring text depend on your Web CMS configuration.
Some text boxes — for example, the Body or Story Body text box — include a rich text
editor that allows you to edit your content and to format text to match the styles used on your
Web si t e .
8. If necessary, add or update any metadata to the Web Story fields that require information,
depending on your Web CMS configuration — for example, associated links or alternative
text for graphics.
9. If your CMS supports video profiles, click the Video Profiles menu, and select a profile. You
can select multiple profiles for each target.
Profiles display in the Selected Profiles area.
System profile
User profile
If you want to delete a profile, click the “x” next to the profile name.
10. If your CMS supports additional graphics content — for example, branding, header, or Story
Body graphics — you can move the position indicator in the Media viewer and then add the
new image to the appropriate field in the Web Story pane.
11. Click Send draft.
The story is sent for approval and the Web Story pane clears all fields. For information on
approving stories for publishing, see “Review and Approval” on page 20
Review and Approval
Most media packages created in the Social Media and Web Story panes require approval before
they can be published, although packages published to personal accounts might not require
approval. You can view all of the packages submitted for approval in the Packages pane.
You must have an Interplay Pulse Producer role to approve stories. You can use other roles to
n
view the messages displayed in the Packages pane, but you cannot approve packages without an
Interplay Pulse Producer role.
.
20
Page 28
The Packages pane allows you to do the following:
• View and sort a list of all packages submitted for publication. You can also delete packages
from the list.
• Filter the list based on a range of dates, or filter the list by users, status, and online service or
platform.
• Select a package to edit, allowing you to modify the story or the associated video.
• Approve and publish packages to any available target.
• Recall a package scheduled for delivery before the scheduled date.
Reviewing Media Packages
Before publishing a package, your Interplay Pulse Producer can review and edit the package to
prepare it for publication.
You must have an Interplay Pulse Producer role to approve stories.
n
To view the submitted packages:
1. Click the Layout selector and select Interplay Pulse.
The Interplay Pulse layout opens.
Review and Approval
2. Click the Panes Menu button and select Packages.
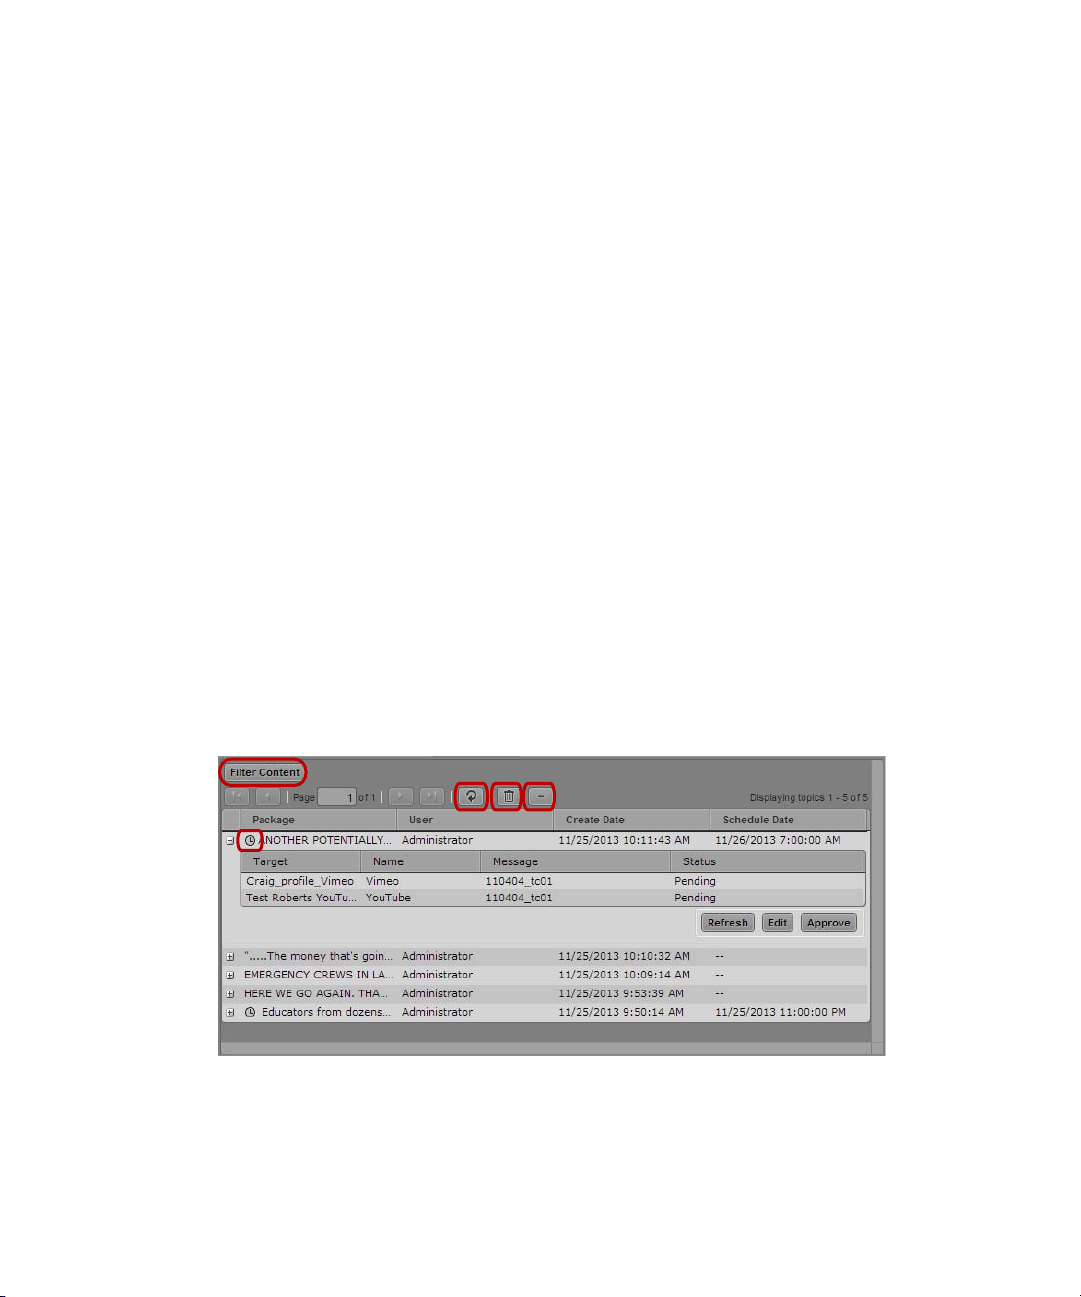
The Packages pane opens and displays all packages.
Packages pane, listing all media packages: Filter Content button; Refresh button; Delete button; Collapse
button, Scheduled delivery icon
3. If you want to view only a list of the packages, click the Collapse button. To expand the list,
click the Expand button next to the package you want to view.
4. To refresh the list to see newly submitted packages, click the Refresh button.
21
Page 29

Review and Approval
5. To sort the list, click the Sort arrow at the top of each column in the Packages pane.
6. If you want to review or edit one of the packages, do the following:
a. In the item listing you want to review, click Edit.
The selected package opens in either the Social Messages pane or the Web Story pane.
b. Make the changes you want, and then click Update.
The application saves your changes and opens the Packages pane.
To filter the list of messages:
1. Click Filter Content.
The Add Criteria menu displays.
Filter Content button with filter criteria: User and User text box; Date and Date Range slider; Status and Add
Status menu; Target and Add Service menu; Search button
2. Do one of the following:
a. To filter by user name, select User, and then type in an Interplay Central user name.
b. To filter by the creation date, select Date and then adjust the Date slider to specify a
range of dates.
c. To filter by the current status of the packages, select Status and then choose a status
from the Add Status menu.
d. To filter by online, mobile, and social media platforms, select Target and then choose an
output from the Add Target menu.
3. Click the Search button.
The Packages pane displays the filtered list of media packages.
Approving and Publishing Media Packages
Users logged in to Interplay Central with as an Administrator or with an Interplay Pulse
Producer role can approve and publish packages.You can publish packages to multiple targets
from the Packages pane.
22
Page 30

To review and approve media packages:
1. Click the Panes Menu button and select Packages.
The Packages pane opens and displays all packages.
Review and Approval
Packages pane, listing all media packages: Refresh button; Edit/View button; Approve/Publish button
2. To approve and publish the package to an online target, do one of the following:
t To publish an unscheduled package, click Publish.
t To approve a scheduled package, click Approve.
The status displays as Published or, for scheduled packages, Approved. When a scheduled
package is published, the status changes from Approved to Published.
If the package contains video content, the status indicates the mixdown and transcode
process before publishing it to your target. Mixdown and transcode processes must complete
before a scheduled package can be published.
3. If you want to cancel a package scheduled for delivery, click Recall.
The status displays as Pending and the Recall button changes to the Approve button. You can
approve the package or remove it from the list of packages in the Packages pane.
23
Page 31

1 Workflows for Avid Interplay Pulse
The following topics provide an overview of the workflows possible in Interplay Pulse in an
Avid Interplay Production environment that includes Avid iNEWS.
Media Flow from Ingest to Publication
•
• Interplay Pulse Roles
Media Flow from Ingest to Publication
Interplay Production and Interplay Central Workflow
Interplay Central delivers workflow tools for media professionals using either Avid iNEWS or
Interplay Production, or both. You can add different media formats to your projects, create and
edit sequences, add rich media to your iNEWS stories, and then send the finished product
directly to a playout device.
Page 32

Media Flow from Ingest to Publication
Airspeed 5000
Tapes
Studio
Recordi ngs
ISIS
Capture
Server
File ingest
Interplay Capture
Workstation
Editing Client (NC, MC)
SEND TO
PLAYBACK
NewsCutter & Media Composer
Material flow
tapes , forms ...
A/V Media File flow Metadata flow
Airspeed 5000
Ingest operator
Video edit or
Journalist
iNews
server
Show Producer
News Show
Story
1
1
1
1
1
1
1
1
1
1 2
3
4
4
4
Interplay
Database
Interplay Central
1 An ingest operator brings in media using the standard ingest process in Interplay Production.
2 A video creator puts together sequences (either using Interplay Central or an Avid editing
application).
3 A journalist or a producer creates an iNEWS rundown and writes scripts with production cues.
4 When finished, packages are sent to air (using the Send to Playback features of Interplay Central).
2
Page 33

Interplay Pulse Content Creation and Distribution
iNews
server
Interplay
Database
Journalist
Stories
Material and edits
5
6
Soci al media produc er
Publish to CMS
Publish to
Social media
7
8
Review &
Approval
9
ISIS
3rdParty Transcode
H.264
OVP
Video
Web C MS
Soci al media
Web Story
Social message
Story
Story
Central Server
With Pulse
10
10 10
11
12
Web Producer
Review &
Publish
14
13
Interplay Central with
Interplay Pulse
Avid Interplay Pulse allows users to publish news stories and audio and video content directly
from the Interplay Central interface to multiple outlets, including corporate and broadcast Web
sites, social media services, and online video platforms. The workflow described here covers
both the content creation within Interplay Pulse and the distribution process for publication to the
Web and social media sites.
Media Flow from Ingest to Publication
5 Users create Web and social media content using an iNEWS story as baseline.
6 Journalists, editors, and producers enrich Web and social media content with Interplay
Production video assets.
3
Page 34

Interplay Pulse Roles
7 When the iNEWS stories with their associated media are finished, journalists or producers create
Web packages in Interplay Central and send them to a Web-based Content Management System
(CMS). Packages can contain the following:
•Text
• Pictures (created from a video frame)
• Links to video, stored on the Online Video Platform (OVP) by Interplay Pulse.
8 Social media packages can also be created for publication, containing the following:
•Text
• Links to video, stored on OVP
9 The Multi-Platform Distribution (MPD) Producer reviews and approves all packages before
publication. The producers can also edit the story before final approval.
10 The publication process sends video content to a supported third-party transcoder in the
background, which reformats the video (into selected format configured in Transcoding Profile
for the customer’s OVP for the Web CMS or social media sites.
11 The producer sends the package with all the appropriate components to media distribution
sites — for example, Twitter or Facebook.
12 The package is sent to a Web CMS and can include the following:
13 The Web Producer reviews, modifies and publishes the Web story.
14 If video was added to the story in Interplay Pulse, a link to the video sent to the OVP by Interplay
Pulse is embedded in the package in the Social Message and Web Story panes in Interplay
Central.
Interplay Pulse Roles
In Interplay Central, a role is a set of features, privileges, and layouts that are assigned to a user
by an Interplay Central administrator. The roles for the Interplay Pulse workflow include the
following:
• iNEWS journalist — creates iNEWS stories in iNEWS and publishes stories and teasers to
social media.
• Advance Journalist — creates video sequences, combines them with iNEWS stories, and
then sends them to air, social media, and Web CMS.
4
Page 35

• News Producer — reviews and approves Web and social media packages prior to posting,
iNews
server
JournalistStory
1
Post to Twitter
2
Interplay Central w ith
Interplay Pulse
and views final posts from the link created in the Packages pane.
• Web Producer — receives raw Web package in a CMS Inbox and then modifies it for Web
publication. The Web Producer also views the final post with the link created in the
Packages pane.
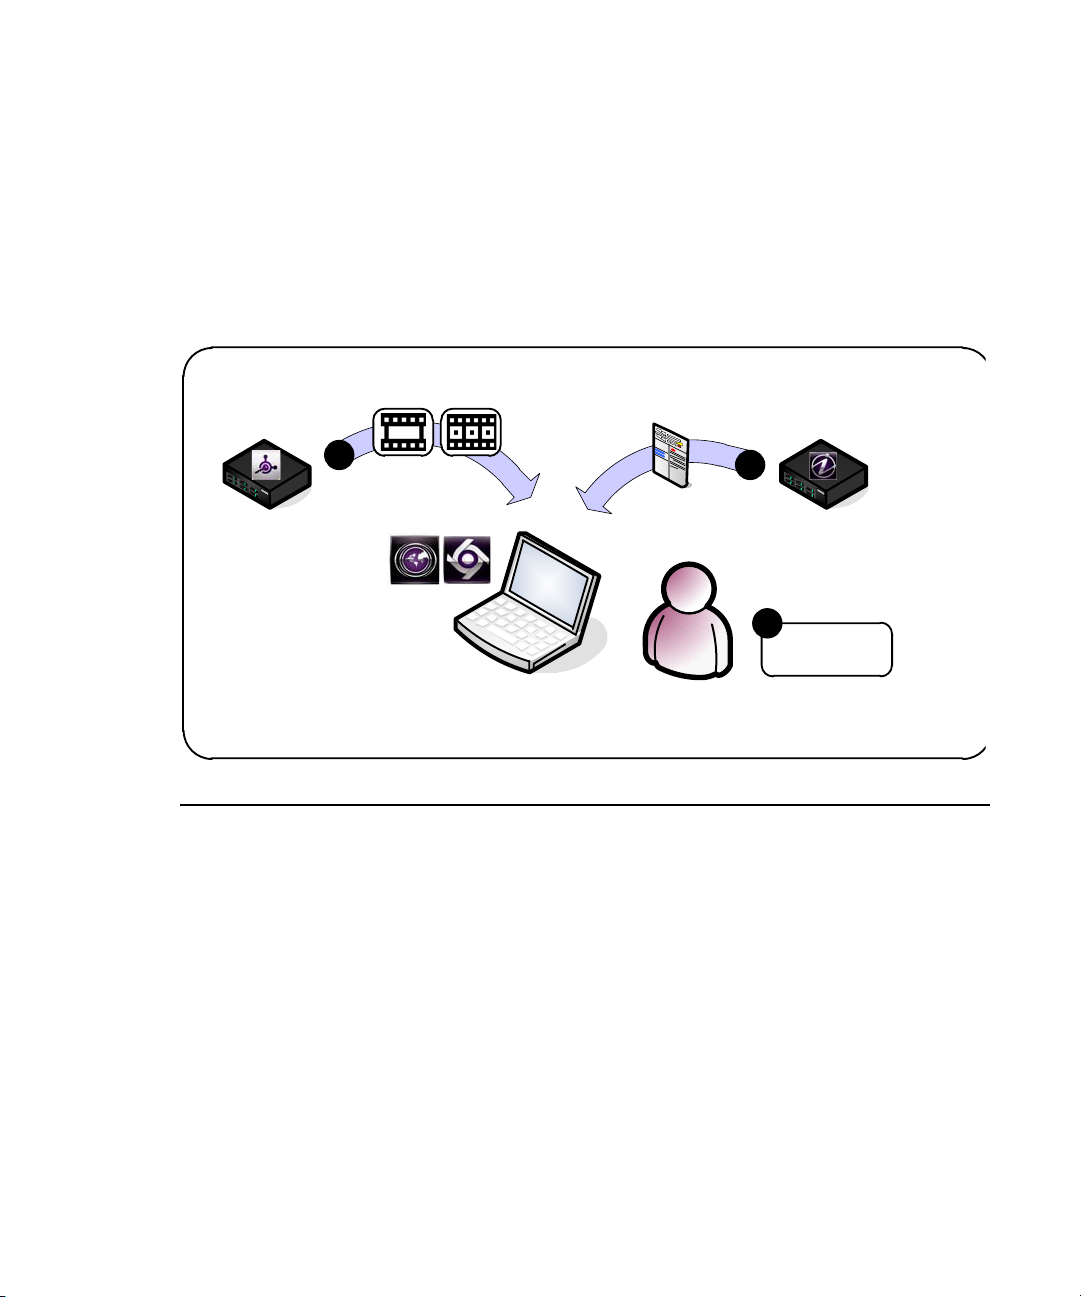
iNEWS Journalist
In this role, a reporter working for a news station has the task of creating stories within iNEWS
and then posting the story to social media sites. The reporter follows a workflow performed
entirely within Interplay Central or by working with both iNEWS and Interplay Central.
Interplay Pulse Roles
1 The iNEWS Journalist writes the story within iNEWS in Interplay Central (or in iNEWS
directly). Once the story is completed, the Journalist uses Interplay Central to publish this story to
a house account and to personal social media sites.
In Interplay Central, the Journalist opens the Interplay Pulse layout (if not already in it), and then
opens the Social Messages pane (part of the Interplay Pulse layout). This provides the Journalist
with the options required to post to the selected social media site..
The Journalist can choose to load the story from iNEWS and then modify it. Selecting the Twitter
option automatically reduces the text to 140 characters.
2 When the message is ready to post, the Journalist chooses a social media profile (multiple
profiles can be used), checks the story, and then posts it for the social media producer to approve.
Personal account publication does not require review/approval.
n
5
Page 36
Advance Journalist
iNews
server
Interplay
Database
Journalist
Stories
Material and edits
1
2
Publish to
Social media
3
Interplay Central w ith
Interplay Pulse
In this role, a reporter creates both the text and video elements for the story which get published
to various social media and Web site platforms. The Advance Journalist can complete this
workflow entirely within Interplay Central, again using the Interplay Pulse layout.
If the reporter has already created the story using the Video layout, then the reporter should
n
switch to the Interplay Pulse layout to enable the social media publishing part of the workflow.
Interplay Pulse Roles
1 The Advance Journalist writes the story within the Story pane of Interplay Central, and then uses
the Media and Sequence panes to build the video associated with the story. When the story is
complete, the journalist saves the assets and, if necessary, sends it to playback.
2 Once the video is complete, the journalist publishes it to social media or to a Web site. In the
Interplay Pulse layout, the Advance Journalist enables the Social Message and Web Story panes.
To publish to social media, such as Twitter or Facebook, the initial workflow mirrors that of the
iNEWS Journalist role, except this time the Advance Journalist also adds video content. The
Advance Journalist chooses a profile (multiple profiles can be used), and then adds video, which
can be previewed if necessary.
When you publish to Twitter, the text of the tweet itself is truncated to accommodate the
n
link to the video clip.
6
Page 37

Interplay Pulse Roles
3 The journalist chooses an OVP — for example, YouTube or Brightcove — and provides any
additional information, such as tags or categories, for the video provider's site to help Web users
find the story.
Then the journalist clicks Post to forward the item for approval by the social media producer. As
before, the item does not get posted until the News Producer approves it.
For publishing to a Web site, the journalist uses the Web Story pane. The journalist can choose to
load the iNEWS story to automatically, which moves the text from the Story pane to the Message
text box. This is the text that eventually is published to the Web site, although the text of the story
typically changes depending on whether it is designed for broadcast or for a Web site.
The journalist must give the story a Title and a Lead. The Message text box provides a full text
editor for creating new text for the story or modifying existing text. Links to related Web sites
can be added, if necessary.
The journalist can add video and select images from the video feed for the Web content. Adding
a poster frame or image entails scrolling through the video content to get the right image, and
then clicking the Update Poster Frame or the Add Image buttons. These provide images for the
story on the Web page.
When the story is complete, the journalist clicks the Send Draft button to submit the story to the
Web producer for approval. The item does not get posted to the Web site until the appropriate
team member approves it.
7
Page 38

News Producer
Social media
producer
Publish
2
Review &
Approval
1
OVP
Video
Social media
Story
Central Server
With Pulse
Interplay Central with
Interplay Pulse
Web CMS
Story
The News Producer reviews all content submitted for social media or Web publication. The
News Producer can be multiple people or a single person, depending on the size and scale of the
organization.
Interplay Pulse Roles
1 For this role, the News Producer uses the Packages pane of the Interplay Pulse layout. This
allows the producer to review content created by reporters in the iNews Journalist and the
Interplay Central Advance Journalist roles.
The News Producer can sort the content in the Packages pane by clicking any of the column
headers. For example, to view the most recent content the producer can refresh the view and
click the Create Date column.
Items submitted for approval appear with a description of “Pending.” The producer then reviews
the item by clicking the View button, which shows the producer that the content has been
submitted. The producer can then choose to make changes to the content (by performing some of
the tasks as the iNEWS Journalist or the Advance Journalist role) and resubmit it for approval.
8
Page 39

2 The producer selects Publish to approve the content. The publishing operation triggers the
Web Producer
Review &
Publish
1
Web CMS
Story
Web Producer
The Web Producer takes the raw content submitted using the Advance Journalist and News
Producer roles and publishes it to the customer's CMS system — for example, to the broadcast
station’s Web CMS.
Interplay Pulse Roles
background transcoding processes required for video publication to the OVP. The producer can
monitor the progress of the action c by refreshing the view.
For social media messaging, the producer posts messages after the transcode process completes.
Once the producer posts the message, it can be viewed by clicking the link posted in the
Packages pane.
For Web publication, this step submits the item to the Web producer for final publication within
the customer's own Web CMS.
If the story includes video, a link to the video published to the OVP is embedded in the sOcial
Message and Web Story panes.
1 After items have been submitted for publication in Interplay Central, the Web producer receives
notification that items are available in the Web CMS. The Web producer then accesses these items
and then publishes them directly to the online system.
9
Page 40

Index
A C I L N P R S U W
A
Advance Journalist 6
C
Combined Messages pane 20
I
iNEWS Journalist 5
Interplay Pulse
Advance Journalist
approving media packages
Combined Messages pane
Content creation and distribution workflow
described
iNEWS Journalist
Interplay Production and Interplay Central workflow
News Producer
publishing from iNEWS to social media
publishing from iNEWS to the Web
publishing from Interplay Production to social media
publishing from Interplay Production to the Web
publishing media packages
review and approval
reviewing media packages
roles
social media
Social Message pane
system profiles
user profiles
Web Producer
Web stories
1
1
10
4
6
22
20
5
8
7
15
22
20
21
7
7
2
3
9
15
Web Story pane
workflows
Interplay Pulse layout
15
1
5
L
Layouts
Interplay Pulse
5
N
News Producer 8
P
3
Profiles
Interplay Pulse system profiles
Interplay Pulse user profiles
2
3
R
Roles
6
5
8
9
18
Advance Journalist
iNEWS Journalist
News Producer
Web Producer
S
Social Message pane 7
System profile
Interplay Pulse
2
Page 41

U
User profile
Interplay Pulse
W
Web Producer 9
Web Story pane
A C I L N P R S U W Index
3
15
11
Page 42

Avid
75 Network Drive
Burlington, MA 01803-2756 USA
Technical Support (USA)
Visit the Online Support Center at
www.avid.com/support
Product Information
For company and product information,
visit us on the web at www.avid.com
 Loading...