

Page 1

Avid® Interplay® Media Services
Setup and User’s Guide
Version 2.7
Page 2

Legal Notices
Product specifications are subject to change without notice and do not represent a commitment on the part of Avid Technology, Inc.
This product is subject to the terms and conditions of a software license agreement provided with the software. The product may
only be used in accordance with the license agreement.
Avid products or portions thereof are protected by one or more of the following United States Patents: 5,309,528; 5,355,450;
5,396,594; 5,440,348; 5,467,288; 5,513,375; 5,528,310; 5,557,423; 5,577,190; 5,584,006; 5,640,601; 5,644,364; 5,654,737;
5,724,605; 5,726,717; 5,745,637; 5,752,029; 5,754,851; 5,799,150; 5,812,216; 5,828,678; 5,842,014; 5,852,435; 5,986,584;
5,999,406; 6,038,573; 6,141,007; 6,211,869; 6,532,043; 6,546,190; 6,596,031; 6,747,705; 6,763,523; 6,766,357; 6,847,373;
7,081,900; 7,403,561; 7,433,519; 7,555,557; 7,562,099; D352,278; D372,478; D373,778; D392,267; D392,268; D392,269;
D395,291; D396,853; D398,912; and 8,082,226. Other patents are pending.
Avid products or portions thereof are protected by one or more of the following European Patents: 0506870; 0635188; 0674414;
0752174; 1111910; 1629675. Other patents are pending.
Avid products or portions thereof are protected by one or more of the following United States Patents: 5,309,528; 5,355,450;
5,396,594; 5,440,348; 5,467,288; 5,513,375; 5,528,310; 5,557,423; 5,577,190; 5,584,006; 5,640,601; 5,644,364; 5,654,737;
5,715,018; 5,724,605; 5,726,717; 5,745,637; 5,752,029; 5,754,851; 5,799,150; 5,812,216; 5,828,678; 5,842,014; 5,852,435;
5,987,501; 6,223,211; 6,532,043; 6,546,190; 6,747,705; 6,763,523. Other patents are pending.
Avid products or portions thereof are protected by one or more of the following European Patents: 0506870; 0635188; 0674414;
0752184; 1111910. Other patents are pending.
This document is protected under copyright law. An authorized licensee of Avid Interplay Media Services may reproduce this
publication for the licensee’s own use in learning how to use the software. This document may not be reproduced or distributed, in
whole or in part, for commercial purposes, such as selling copies of this document or providing support or educational services to
others. This document is supplied as a guide for Avid Interplay Media Services. Reasonable care has been taken in preparing the
information it contains. However, this document may contain omissions, technical inaccuracies, or typographical errors. Avid
Technology, Inc. does not accept responsibility of any kind for customers’ losses due to the use of this document. Product
specifications are subject to change without notice.
Copyright © 2012 Avid Technology, Inc. and its licensors. All rights reserved.
The following disclaimer is required by Sam Leffler and Silicon Graphics, Inc. for the use of their TIFF library:
Copyright © 1988–1997 Sam Leffler
Copyright © 1991–1997 Silicon Graphics, Inc.
Permission to use, copy, modify, distribute, and sell this software [i.e., the TIFF library] and its documentation for any purpose is
hereby granted without fee, provided that (i) the above copyright notices and this permission notice appear in all copies of the
software and related documentation, and (ii) the names of Sam Leffler and Silicon Graphics may not be used in any advertising or
publicity relating to the software without the specific, prior written permission of Sam Leffler and Silicon Graphics.
THE SOFTWARE IS PROVIDED “AS-IS” AND WITHOUT WARRANTY OF ANY KIND, EXPRESS, IMPLIED OR OTHERWISE,
INCLUDING WITHOUT LIMITATION, ANY WARRANTY OF MERCHANTABILITY OR FITNESS FOR A PARTICULAR PURPOSE.
IN NO EVENT SHALL SAM LEFFLER OR SILICON GRAPHICS BE LIABLE FOR ANY SPECIAL, INCIDENTAL, INDIRECT OR
CONSEQUENTIAL DAMAGES OF ANY KIND, OR ANY DAMAGES WHATSOEVER RESULTING FROM LOSS OF USE, DATA OR
PROFITS, WHETHER OR NOT ADVISED OF THE POSSIBILITY OF DAMAGE, AND ON ANY THEORY OF LIABILITY, ARISING
OUT OF OR IN CONNECTION WITH THE USE OR PERFORMANCE OF THIS SOFTWARE.
The following disclaimer is required by the Independent JPEG Group:
This software is based in part on the work of the Independent JPEG Group.
This Software may contain components licensed under the following conditions:
Copyright (c) 1989 The Regents of the University of California. All rights reserved.
Redistribution and use in source and binary forms are permitted provided that the above copyright notice and this paragraph are
duplicated in all such forms and that any documentation, advertising materials, and other materials related to such distribution and
use acknowledge that the software was developed by the University of California, Berkeley. The name of the University may not be
used to endorse or promote products derived from this software without specific prior written permission. THIS SOFTWARE IS
PROVIDED ``AS IS'' AND WITHOUT ANY EXPRESS OR IMPLIED WARRANTIES, INCLUDING, WITHOUT LIMITATION, THE
IMPLIED WARRANTIES OF MERCHANTABILITY AND FITNESS FOR A PARTICULAR PURPOSE.
Copyright (C) 1989, 1991 by Jef Poskanzer.
2
Page 3

Permission to use, copy, modify, and distribute this software and its documentation for any purpose and without fee is hereby
granted, provided that the above copyright notice appear in all copies and that both that copyright notice and this permission notice
appear in supporting documentation. This software is provided "as is" without express or implied warranty.
Copyright 1995, Trinity College Computing Center. Written by David Chappell.
Permission to use, copy, modify, and distribute this software and its documentation for any purpose and without fee is hereby
granted, provided that the above copyright notice appear in all copies and that both that copyright notice and this permission notice
appear in supporting documentation. This software is provided "as is" without express or implied warranty.
Copyright 1996 Daniel Dardailler.
Permission to use, copy, modify, distribute, and sell this software for any purpose is hereby granted without fee, provided that the
above copyright notice appear in all copies and that both that copyright notice and this permission notice appear in supporting
documentation, and that the name of Daniel Dardailler not be used in advertising or publicity pertaining to distribution of the software
without specific, written prior permission. Daniel Dardailler makes no representations about the suitability of this software for any
purpose. It is provided "as is" without express or implied warranty.
Modifications Copyright 1999 Matt Koss, under the same license as above.
Copyright (c) 1991 by AT&T.
Permission to use, copy, modify, and distribute this software for any purpose without fee is hereby granted, provided that this entire
notice is included in all copies of any software which is or includes a copy or modification of this software and in all copies of the
supporting documentation for such software.
THIS SOFTWARE IS BEING PROVIDED "AS IS", WITHOUT ANY EXPRESS OR IMPLIED WARRANTY. IN PARTICULAR,
NEITHER THE AUTHOR NOR AT&T MAKES ANY REPRESENTATION OR WARRANTY OF ANY KIND CONCERNING THE
MERCHANTABILITY OF THIS SOFTWARE OR ITS FITNESS FOR ANY PARTICULAR PURPOSE.
This product includes software developed by the University of California, Berkeley and its contributors.
The following disclaimer is required by Nexidia Inc.:
© 2010 Nexidia Inc. All rights reserved, worldwide. Nexidia and the Nexidia logo are trademarks of Nexidia Inc. All other
trademarks are the property of their respective owners. All Nexidia materials regardless of form, including without limitation,
software applications, documentation and any other information relating to Nexidia Inc., and its products and services are the
exclusive property of Nexidia Inc. or its licensors. The Nexidia products and services described in these materials may be covered
by Nexidia's United States patents: 7,231,351; 7,263,484; 7,313,521; 7,324,939; 7,406,415, 7,475,065; 7,487,086 and/or other
patents pending and may be manufactured under license from the Georgia Tech Research Corporation USA.
The following disclaimer is required by Paradigm Matrix:
Portions of this software licensed from Paradigm Matrix.
The following disclaimer is required by Ray Sauers Associates, Inc.:
“Install-It” is licensed from Ray Sauers Associates, Inc. End-User is prohibited from taking any action to derive a source code
equivalent of “Install-It,” including by reverse assembly or reverse compilation, Ray Sauers Associates, Inc. shall in no event be liable
for any damages resulting from reseller’s failure to perform reseller’s obligation; or any damages arising from use or operation of
reseller’s products or the software; or any other damages, including but not limited to, incidental, direct, indirect, special or
consequential Damages including lost profits, or damages resulting from loss of use or inability to use reseller’s products or the
software for any reason including copyright or patent infringement, or lost data, even if Ray Sauers Associates has been advised,
knew or should have known of the possibility of such damages.
The following disclaimer is required by Videomedia, Inc.:
“Videomedia, Inc. makes no warranties whatsoever, either express or implied, regarding this product, including warranties with
respect to its merchantability or its fitness for any particular purpose.”
“This software contains V-LAN ver. 3.0 Command Protocols which communicate with V-LAN ver. 3.0 products developed by
Videomedia, Inc. and V-LAN ver. 3.0 compatible products developed by third parties under license from Videomedia, Inc. Use of this
software will allow “frame accurate” editing control of applicable videotape recorder decks, videodisc recorders/players and the like.”
The following disclaimer is required by Altura Software, Inc. for the use of its Mac2Win software and Sample Source
Code:
©1993–1998 Altura Software, Inc.
3
Page 4

The following disclaimer is required by Ultimatte Corporation:
Certain real-time compositing capabilities are provided under a license of such technology from Ultimatte Corporation and are
subject to copyright protection.
The following disclaimer is required by 3Prong.com Inc.:
Certain waveform and vector monitoring capabilities are provided under a license from 3Prong.com Inc.
The following disclaimer is required by Interplay Entertainment Corp.:
The “Interplay” name is used with the permission of Interplay Entertainment Corp., which bears no responsibility for Avid products.
This product includes portions of the Alloy Look & Feel software from Incors GmbH.
This product includes software developed by the Apache Software Foundation (http://www.apache.org/).
© DevelopMentor
This product may include the JCifs library, for which the following notice applies:
JCifs © Copyright 2004, The JCIFS Project, is licensed under LGPL (http://jcifs.samba.org/). See the LGPL.txt file in the Third Par ty
Software directory on the installation CD.
Avid Interplay contains components licensed from LavanTech. These components may only be used as part of and in connection
with Avid Interplay.
Portions © Copyright 2003-2007 of MOG Solutions.
Attn. Government User(s). Restricted Rights Legend
U.S. GOVERNMENT RESTRICTED RIGHTS. This Software and its documentation are “commercial computer software” or
“commercial computer software documentation.” In the event that such Software or documentation is acquired by or on behalf of a
unit or agency of the U.S. Government, all rights with respect to this Software and documentation are subject to the terms of the
License Agreement, pursuant to FAR §12.212(a) and/or DFARS §227.7202-1(a), as applicable.
Trademarks
003, 192 Digital I/O, 192 I/O, 96 I/O, 96i I/O, Adrenaline, AirSpeed, ALEX, Alienbrain, AME, AniMatte, Archive, Archive II, Assistant
Station, AudioPages, AudioStation, AutoLoop, AutoSync, Avid, Avid Active, Avid Advanced Response, Avid DNA, Avid DNxcel, Avid
DNxHD, Avid DS Assist Station, Avid Liquid, Avid Media Engine, Avid Media Processor, Avid MEDIArray, Avid Mojo, Avid Remote
Response, Avid Unity, Avid Unity ISIS, Avid VideoRAID, AvidRAID, AvidShare, AVIDstripe, AVX, Axiom, Beat Detective, Beauty
Without The Bandwidth, Beyond Reality, BF Essentials, Bomb Factory, Boom, Bruno, C|24, CaptureManager, ChromaCurve,
ChromaWheel, Cineractive Engine, Cineractive Player, Cineractive Viewer, Color Conductor, Command|24, Command|8, Conectiv,
Control|24, Cosmonaut Voice, CountDown, d2, d3, DAE, Dazzle, Dazzle Digital Video Creator, D-Command, D-Control, Deko,
DekoCast, D-Fi, D-fx, Digi 003, DigiBase, DigiDelivery, Digidesign, Digidesign Audio Engine, Digidesign Development Partners,
Digidesign Intelligent Noise Reduction, Digidesign TDM Bus, DigiLink, DigiMeter, DigiPanner, DigiProNet, DigiRack, DigiSerial,
DigiSnake, DigiSystem, Digital Choreography, Digital Nonlinear Accelerator, DigiTest, DigiTranslator, DigiWear, DINR, DNxchange,
DPP-1, D-Show, DSP Manager, DS-StorageCalc, DV Toolkit, DVD Complete, D-Verb, Eleven, EM, Euphonix, EUCON, EveryPhase,
Expander, ExpertRender, Fader Pack, Fairchild, FastBreak, Fast Track, Film Cutter, FilmScribe, Flexevent, FluidMotion, Frame
Chase, FXDeko, HD Core, HD Process, HDPack, Home-to-Hollywood, HYBRID, HyperControl, HyperSPACE, HyperSPACE
HDCAM, iKnowledge, Image Independence, Impact, Improv, iNEWS, iNEWS Assign, iNEWS ControlAir, Instantwrite, Instinct,
Intelligent Content Management, Intelligent Digital Actor Technology, IntelliRender, Intelli-Sat, Intelli-sat Broadcasting Recording
Manager, InterFX, Interplay, inTONE, Intraframe, iS Expander, ISIS, IsoSync, iS9, iS18, iS23, iS36, ISIS, IsoSync, KeyRig,
KeyStudio, LaunchPad, LeaderPlus, LFX, Lightning, Link & Sync, ListSync, LKT-200, Lo-Fi, Luna, MachineControl, Magic Mask,
Make Anything Hollywood, make manage move | media, Marquee, MassivePack, Massive Pack Pro, M-Audio, M-Audio Micro,
Maxim, Mbox, Media Composer, MediaFlow, MediaLog, MediaMatch, MediaMix, Media Reader, Media Recorder, MEDIArray,
MediaServer, MediaShare, MetaFuze, MetaSync, MicroTrack, MIDI I/O, Midiman, Mix Rack, MixLab, Moviebox, Moviestar,
MultiShell, NaturalMatch, NewsCutter, NewsView, Nitris, NL3D, NLP, Nova, NRV-10 interFX, NSDOS, NSWIN, Octane, OMF, OMF
Interchange, OMM, OnDVD, Open Media Framework, Open Media Management, Ozone, Ozonic, Painterly Effects, Palladium,
Personal Q, PET, Pinnacle, Pinnacle DistanTV, Pinnacle GenieBox, Pinnacle HomeMusic, Pinnacle MediaSuite, Pinnacle Mobile
Media, Pinnacle Scorefitter, Pinnacle Studio, Pinnacle Studio MovieBoard, Pinnacle Systems, Pinnacle VideoSpin, Podcast Factory,
PowerSwap, PRE, ProControl, ProEncode, Profiler, Pro Tools LE, Pro Tools M-Powered, Pro Transfer, Pro Tools, QuickPunch,
QuietDrive, Realtime Motion Synthesis, Recti-Fi, Reel Tape Delay, Reel Tape Flanger, Reel Tape Saturation, Reprise, Res Rocket
Surfer, Reso, RetroLoop, Reverb One, ReVibe, Revolution, rS9, rS18, RTAS, Salesview, Sci-Fi, Scorch, Scorefitter, ScriptSync,
SecureProductionEnvironment, Serv|LT, Serv|GT, Session, Shape-to-Shape, ShuttleCase, Sibelius, SIDON, SimulPlay,
SimulRecord, Slightly Rude Compressor, Smack!, Soft SampleCell, Soft-Clip Limiter, Solaris, SoundReplacer, SPACE, SPACEShift,
SpectraGraph, SpectraMatte, SteadyGlide, Streamfactory, Streamgenie, StreamRAID, Strike, Structure, Studiophile, SubCap,
Sundance Digital, Sundance, SurroundScope, Symphony, SYNC HD, Synchronic, SynchroScope, SYNC I/O, Syntax, TDM
4
Page 5

FlexCable, TechFlix, Tel-Ray, Thunder, Titansync, Titan, TL Aggro, TL AutoPan, TL Drum Rehab, TL Everyphase, TL Fauxlder, TL In
Tune, TL MasterMeter, TL Metro, TL Space, TL Utilities, tools for storytellers, Torq, Torq Xponent, Transfuser, Transit, TransJammer,
Trigger Finger, Trillium Lane Labs, TruTouch, UnityRAID, Vari-Fi, Velvet, Video the Web Way, VideoRAID, VideoSPACE, VideoSpin,
VTEM, Work-N-Play, Xdeck, X-Form, Xmon, XPAND!, Xponent, X-Session, and X-Session Pro are either registered trademarks or
trademarks of Avid Technology, Inc. in the United States and/or other countries.
Adobe and Photoshop are either registered trademarks or trademarks of Adobe Systems Incorporated in the United States and/or
other countries. Apple and Macintosh are trademarks of Apple Computer, Inc., registered in the U.S. and other countries. Windows
is either a registered trademark or trademark of Microsoft Corporation in the United States and/or other countries. All other
trademarks contained herein are the property of their respective owners.
28/12
Avid Interplay Media Services Setup and User’s Guide • 0130-07633-05 Rev G • August 2012 • Created 8/
ributed by Avid in online (electronic) form only, and is not available for purchase in printed form.
dist
• This document is
5
Page 6

Contents
Using This Guide. . . . . . . . . . . . . . . . . . . . . . . . . . . . . . . . . . . . . . . . . . . . . . . 15
Symbols and Conventions . . . . . . . . . . . . . . . . . . . . . . . . . . . . . . . . . . . . . . . . . . . . . . . 16
If You Need Help. . . . . . . . . . . . . . . . . . . . . . . . . . . . . . . . . . . . . . . . . . . . . . . . . . . . . . . 17
Viewing Help and Documentation on the Interplay Portal. . . . . . . . . . . . . . . . . . . . . . . . 17
Avid Training Services . . . . . . . . . . . . . . . . . . . . . . . . . . . . . . . . . . . . . . . . . . . . . . . . . . 18
Chapter 1 Working with the Avid Interplay Media Services System . . . . . . . . . . . . . . 19
Understanding the Interplay Media Services System . . . . . . . . . . . . . . . . . . . . . . . . . . . 19
Media Services Engine Components . . . . . . . . . . . . . . . . . . . . . . . . . . . . . . . . . . . . . . . 19
Understanding the Media Services Engine . . . . . . . . . . . . . . . . . . . . . . . . . . . . . . . 20
Understanding the Avid Interplay Media Services and Transfer Status Tool . . . . . . 21
Understanding the Various Media Services . . . . . . . . . . . . . . . . . . . . . . . . . . . . . . . . . . 22
Check Lists for Setting Up and Using Service Providers . . . . . . . . . . . . . . . . . . . . . . . . 24
Configuration Requirements . . . . . . . . . . . . . . . . . . . . . . . . . . . . . . . . . . . . . . . . . . . . . . 25
Chapter 2 Interplay Media Services Engine Installation and Configuration . . . . . . . . 26
Check List for Setting Up the Media Services Engine. . . . . . . . . . . . . . . . . . . . . . . . . . . 26
Registering the Media Services Engine in an Avid Interplay Workgroup . . . . . . . . . . . . 27
Configuring the Media Services Engine . . . . . . . . . . . . . . . . . . . . . . . . . . . . . . . . . . . . . 29
Starting the Interplay Media Services Engine . . . . . . . . . . . . . . . . . . . . . . . . . . . . . . . . . 33
Chapter 3 Using the Media Services and Transfer Status Tool . . . . . . . . . . . . . . . . . . 34
Opening the Media Services and Transfer Status Tool . . . . . . . . . . . . . . . . . . . . . . . . . 34
Media Services and Transfer Status Tool User Interface . . . . . . . . . . . . . . . . . . . . . . . . 36
Using the Jobs Page . . . . . . . . . . . . . . . . . . . . . . . . . . . . . . . . . . . . . . . . . . . . . . . . . . . . 37
Jobs Page Information . . . . . . . . . . . . . . . . . . . . . . . . . . . . . . . . . . . . . . . . . . . . . . . 38
Customizing the Reporting of Service Job Status . . . . . . . . . . . . . . . . . . . . . . . . . . 39
Customizing the Jobs Page Columns . . . . . . . . . . . . . . . . . . . . . . . . . . . . . . . . . . . 41
Filtering the Jobs List . . . . . . . . . . . . . . . . . . . . . . . . . . . . . . . . . . . . . . . . . . . . . . . . 42
Viewing Details About a Job. . . . . . . . . . . . . . . . . . . . . . . . . . . . . . . . . . . . . . . . . . . 43
Page 7

Job Details Window . . . . . . . . . . . . . . . . . . . . . . . . . . . . . . . . . . . . . . . . . . . . . . . . . 44
Purging the Jobs List . . . . . . . . . . . . . . . . . . . . . . . . . . . . . . . . . . . . . . . . . . . . . . . . 45
Prioritizing a Job. . . . . . . . . . . . . . . . . . . . . . . . . . . . . . . . . . . . . . . . . . . . . . . . . . . . 46
Canceling a Job . . . . . . . . . . . . . . . . . . . . . . . . . . . . . . . . . . . . . . . . . . . . . . . . . . . . 46
Deleting a Job . . . . . . . . . . . . . . . . . . . . . . . . . . . . . . . . . . . . . . . . . . . . . . . . . . . . . 47
Retrying a Job . . . . . . . . . . . . . . . . . . . . . . . . . . . . . . . . . . . . . . . . . . . . . . . . . . . . . 47
Exporting the Jobs List . . . . . . . . . . . . . . . . . . . . . . . . . . . . . . . . . . . . . . . . . . . . . . . 48
Using the Providers Page . . . . . . . . . . . . . . . . . . . . . . . . . . . . . . . . . . . . . . . . . . . . . . . . 48
Opening the Providers Page . . . . . . . . . . . . . . . . . . . . . . . . . . . . . . . . . . . . . . . . . . 48
Customizing the Providers Display. . . . . . . . . . . . . . . . . . . . . . . . . . . . . . . . . . . . . . 49
Viewing Details About a Provider . . . . . . . . . . . . . . . . . . . . . . . . . . . . . . . . . . . . . . . 50
Deleting Providers . . . . . . . . . . . . . . . . . . . . . . . . . . . . . . . . . . . . . . . . . . . . . . . . . . 50
Using the Services Page. . . . . . . . . . . . . . . . . . . . . . . . . . . . . . . . . . . . . . . . . . . . . . . . . 51
Opening the Services Page . . . . . . . . . . . . . . . . . . . . . . . . . . . . . . . . . . . . . . . . . . . 51
Displaying Details About a Service . . . . . . . . . . . . . . . . . . . . . . . . . . . . . . . . . . . . . 52
Deleting a Media Services Service. . . . . . . . . . . . . . . . . . . . . . . . . . . . . . . . . . . . . . 53
Using the Users Page . . . . . . . . . . . . . . . . . . . . . . . . . . . . . . . . . . . . . . . . . . . . . . . . . . . 53
Opening the Users Page . . . . . . . . . . . . . . . . . . . . . . . . . . . . . . . . . . . . . . . . . . . . . 54
Setting Up User Accounts . . . . . . . . . . . . . . . . . . . . . . . . . . . . . . . . . . . . . . . . . . . . 55
Reassigning Passwords . . . . . . . . . . . . . . . . . . . . . . . . . . . . . . . . . . . . . . . . . . . . . . 56
Deleting User Accounts . . . . . . . . . . . . . . . . . . . . . . . . . . . . . . . . . . . . . . . . . . . . . . 56
Chapter 4 Installing Services and Registering Providers . . . . . . . . . . . . . . . . . . . . . . . 57
Understanding Service Descriptions and Service Packages . . . . . . . . . . . . . . . . . . . . . 57
Installing a Service Description . . . . . . . . . . . . . . . . . . . . . . . . . . . . . . . . . . . . . . . . . . . . 58
Registering the Provider . . . . . . . . . . . . . . . . . . . . . . . . . . . . . . . . . . . . . . . . . . . . . . . . . 61
Connecting a Provider to the Media Services Engine. . . . . . . . . . . . . . . . . . . . . . . . . . . 63
Starting the Service Provider . . . . . . . . . . . . . . . . . . . . . . . . . . . . . . . . . . . . . . . . . . . . . 66
Verifying That a Service Provider Is Connected . . . . . . . . . . . . . . . . . . . . . . . . . . . . . . . 67
Rules for Upgrading a Service and Preserving Profiles . . . . . . . . . . . . . . . . . . . . . . . . . 68
Chapter 5 Working with Media Services Profiles. . . . . . . . . . . . . . . . . . . . . . . . . . . . . . 70
Understanding Media Services Profiles . . . . . . . . . . . . . . . . . . . . . . . . . . . . . . . . . . . . . 70
Creating a Service Provider Profile . . . . . . . . . . . . . . . . . . . . . . . . . . . . . . . . . . . . . . . . . 71
Modifying Multiple Profiles . . . . . . . . . . . . . . . . . . . . . . . . . . . . . . . . . . . . . . . . . . . . . . . 73
7
Page 8

Modifying Changed or New Options in a Profile . . . . . . . . . . . . . . . . . . . . . . . . . . . . . . . 74
Chapter 6 Working with the Transcode Service . . . . . . . . . . . . . . . . . . . . . . . . . . . . . . 76
Understanding the Transcode Service . . . . . . . . . . . . . . . . . . . . . . . . . . . . . . . . . . . . . . 76
Check List for Transcoding Assets . . . . . . . . . . . . . . . . . . . . . . . . . . . . . . . . . . . . . . . . . 77
Installing and Registering the Transcode Service Provider . . . . . . . . . . . . . . . . . . . . . . 78
Installing the Transcode Service Description . . . . . . . . . . . . . . . . . . . . . . . . . . . . . . 79
Registering the Transcode Provider. . . . . . . . . . . . . . . . . . . . . . . . . . . . . . . . . . . . . 81
Connecting the Transcode Provider to the Media Services Engine. . . . . . . . . . . . . 83
Starting the Transcode Provider . . . . . . . . . . . . . . . . . . . . . . . . . . . . . . . . . . . . . . . . . . . 86
Creating an Interplay Transcode Service Profile. . . . . . . . . . . . . . . . . . . . . . . . . . . . . . . 87
Transcode Profile Parameters . . . . . . . . . . . . . . . . . . . . . . . . . . . . . . . . . . . . . . . . . 89
Mapping Audio Tracks in MIXDOWN, DUALMIXDOWN, and
CROSSRATE Modes . . . . . . . . . . . . . . . . . . . . . . . . . . . . . . . . . . . . . . . . . . . . . . 92
Mapping Multichannel Audio Tracks in MIXDOWN, DUALMIXDOWN, and
CROSSRATE Modes . . . . . . . . . . . . . . . . . . . . . . . . . . . . . . . . . . . . . . . . . . . . . . 95
Support for Surround Sound Audio Tracks . . . . . . . . . . . . . . . . . . . . . . . . . . . . . . . 96
Understanding the Transcode Services Modes . . . . . . . . . . . . . . . . . . . . . . . . . . . . . . . 98
Understanding MIXDOWN Mode . . . . . . . . . . . . . . . . . . . . . . . . . . . . . . . . . . . . . . . 99
Understanding DUALMIXDOWN Mode . . . . . . . . . . . . . . . . . . . . . . . . . . . . . . . . . 101
Understanding DUALMIXDOWN Mode with Two Workspaces . . . . . . . . . . . . . . . 102
Understanding CROSSRATE Mode. . . . . . . . . . . . . . . . . . . . . . . . . . . . . . . . . . . . 104
Transcoding an Asset from Avid Interplay Access . . . . . . . . . . . . . . . . . . . . . . . . . . . . 106
Transcoding an Asset from an Avid Editing Application . . . . . . . . . . . . . . . . . . . . . . . . 108
Transcoding OMF Clips . . . . . . . . . . . . . . . . . . . . . . . . . . . . . . . . . . . . . . . . . . . . . . . . 109
Working with an Auto Transcode Folder . . . . . . . . . . . . . . . . . . . . . . . . . . . . . . . . . . . . 112
Preparing the Workgroup for Auto Transcode . . . . . . . . . . . . . . . . . . . . . . . . . . . . 112
Identifying an Auto Transcode Folder . . . . . . . . . . . . . . . . . . . . . . . . . . . . . . . . . . 115
Transcoding Avid Assets Using an Auto Transcode Folder . . . . . . . . . . . . . . . . . . 116
Location of Automatically Transcoded Files. . . . . . . . . . . . . . . . . . . . . . . . . . . . . . 117
Stereoscopic 3D Support in Interplay Transcode . . . . . . . . . . . . . . . . . . . . . . . . . . . . . 118
Chapter 7 Working with the Archive and Restore Services . . . . . . . . . . . . . . . . . . . . 120
Understanding Archive and Restore Services . . . . . . . . . . . . . . . . . . . . . . . . . . . . . . . 120
Check List for Archiving and Restoring Assets . . . . . . . . . . . . . . . . . . . . . . . . . . . . . . . 122
8
Page 9

Archive Configuration and Setup . . . . . . . . . . . . . . . . . . . . . . . . . . . . . . . . . . . . . . . . . 124
Installing and Registering the Archive Service Provider and Restore Service Provider 126
Installing the Archive and Restore Service Descriptions . . . . . . . . . . . . . . . . . . . . 126
Registering the Archive Provider or the Restore Provider . . . . . . . . . . . . . . . . . . . 129
Connecting the Archive Provider or Restore Provider to the Media Services Engine . .
131
Starting the Archive Provider or the Restore Provider . . . . . . . . . . . . . . . . . . . . . . . . . 134
Configuring the Archive Service . . . . . . . . . . . . . . . . . . . . . . . . . . . . . . . . . . . . . . . . . . 135
Specifying the Archive Server, Segment Size, and Restore Process . . . . . . . . . . 135
Archiving Duplicate Versions of Media. . . . . . . . . . . . . . . . . . . . . . . . . . . . . . . . . . 136
Adding AAF Metadata to an Archive . . . . . . . . . . . . . . . . . . . . . . . . . . . . . . . . . . . 138
Defining the Maximum Number of Simultaneous Jobs for Archive and Restore . . 138
Overriding Metadata When You Archive an Asset. . . . . . . . . . . . . . . . . . . . . . . . . 139
Connecting to the Archive Database and Creating Folders in Interplay Access. . . . . . 139
Working with Interplay Archive and Interplay Restore Profiles . . . . . . . . . . . . . . . . . . . 142
Creating an Interplay Archive or Interplay Restore Profile . . . . . . . . . . . . . . . . . . . 143
Interplay Archive Profile and Interplay Restore Profile Options . . . . . . . . . . . . . . . 144
Locating the Partition Value for an Archive Profile . . . . . . . . . . . . . . . . . . . . . . . . . 145
Archiving Assets from an Avid Editing Application . . . . . . . . . . . . . . . . . . . . . . . . . . . . 147
Consolidating Clips and Sequences Before an Archive Operation . . . . . . . . . . . . 149
Deleting Online Media After an Archive Operation. . . . . . . . . . . . . . . . . . . . . . . . . 151
Archiving Assets Using Avid Interplay Access . . . . . . . . . . . . . . . . . . . . . . . . . . . . . . . 151
Working with an Auto Archive Folder . . . . . . . . . . . . . . . . . . . . . . . . . . . . . . . . . . . . . . 155
Preparing the Workgroup for Auto Archive. . . . . . . . . . . . . . . . . . . . . . . . . . . . . . . 156
Configuring Auto Archive Using the Avid Service Configuration . . . . . . . . . . . . . . 156
Verifying That the Auto Archive Service is Running . . . . . . . . . . . . . . . . . . . . . . . 159
Setting Up an Auto Archive Folder. . . . . . . . . . . . . . . . . . . . . . . . . . . . . . . . . . . . . 161
Archiving Assets Using an Auto Archive Folder . . . . . . . . . . . . . . . . . . . . . . . . . . . 162
Location of Automatically Archived Files . . . . . . . . . . . . . . . . . . . . . . . . . . . . . . . . 163
Searching the Archive Database. . . . . . . . . . . . . . . . . . . . . . . . . . . . . . . . . . . . . . . . . . 164
Restoring a Clip from the Archive Database . . . . . . . . . . . . . . . . . . . . . . . . . . . . . . . . . 166
Working with Partial Restore. . . . . . . . . . . . . . . . . . . . . . . . . . . . . . . . . . . . . . . . . . . . . 168
Performing a Partial Restore . . . . . . . . . . . . . . . . . . . . . . . . . . . . . . . . . . . . . . . . . 169
9
Page 10

Viewing Partially Restored Reference Tracks in Interplay Access. . . . . . . . . . . . . 170
How the System Defines the Size of a Partially Restored File. . . . . . . . . . . . . . . . 171
Chapter 8 Working with the Copy Service . . . . . . . . . . . . . . . . . . . . . . . . . . . . . . . . . . 173
Understanding the Copy Service . . . . . . . . . . . . . . . . . . . . . . . . . . . . . . . . . . . . . . . . . 173
Workflow for Copying Metadata and Media Files . . . . . . . . . . . . . . . . . . . . . . . . . . . . . 174
Check List for Copying Assets to Another Workgroup . . . . . . . . . . . . . . . . . . . . . . . . . 178
Installing and Registering the Copy Service Provider . . . . . . . . . . . . . . . . . . . . . . . . . . 180
Installing the Copy Service Description . . . . . . . . . . . . . . . . . . . . . . . . . . . . . . . . . 180
Registering the Copy Provider . . . . . . . . . . . . . . . . . . . . . . . . . . . . . . . . . . . . . . . . 183
Connecting the Copy Provider to the Media Services Engine . . . . . . . . . . . . . . . . 185
Starting the Copy Provider . . . . . . . . . . . . . . . . . . . . . . . . . . . . . . . . . . . . . . . . . . . . . . 188
Using an Interplay Copy Service Profile . . . . . . . . . . . . . . . . . . . . . . . . . . . . . . . . . . . . 189
Creating an Interplay Copy Service Profile . . . . . . . . . . . . . . . . . . . . . . . . . . . . . . 189
Interplay Copy Service Profile Definitions . . . . . . . . . . . . . . . . . . . . . . . . . . . . . . . 191
Copying Assets and Media to Another Workgroup Using Interplay Access . . . . . . . . . 192
Copying Assets and Media to Another Workgroup Using an Avid Editing Application . 195
Copying Assets During Ingest. . . . . . . . . . . . . . . . . . . . . . . . . . . . . . . . . . . . . . . . . . . . 196
Setting Registry Keys for Copying During Ingest . . . . . . . . . . . . . . . . . . . . . . . . . . 200
Defining the Maximum Number of Simultaneous Jobs for Copy. . . . . . . . . . . . . . . . . . 201
Chapter 9 Automatically Copying Assets to Another Workgroup . . . . . . . . . . . . . . . 202
Understanding the Auto-Copy Service . . . . . . . . . . . . . . . . . . . . . . . . . . . . . . . . . . . . . 202
Check List for the Auto-Copy Process . . . . . . . . . . . . . . . . . . . . . . . . . . . . . . . . . . . . . 203
Installing the Avid Interplay Auto-Copy Service . . . . . . . . . . . . . . . . . . . . . . . . . . . . . . 204
Configuring the Auto-Copy Service . . . . . . . . . . . . . . . . . . . . . . . . . . . . . . . . . . . . 205
Verifying the Auto-Copy Service is Running . . . . . . . . . . . . . . . . . . . . . . . . . . . . . 208
Understanding the Auto-Copy Folder Process . . . . . . . . . . . . . . . . . . . . . . . . . . . . . . . 209
Rules of Auto-Copy Service . . . . . . . . . . . . . . . . . . . . . . . . . . . . . . . . . . . . . . . . . . 209
Identifying an Auto-Copy Folder. . . . . . . . . . . . . . . . . . . . . . . . . . . . . . . . . . . . . . . 210
Auto-Copying of Subfolders . . . . . . . . . . . . . . . . . . . . . . . . . . . . . . . . . . . . . . . . . . 211
Automatically Copying Assets To Another Workgroup Using an Auto-Copy Folder . . . 213
Automatically Backing Up the Complete Database and Media. . . . . . . . . . . . . . . . . . . 214
Changing the Number of Auto-Copy Replication Jobs Submitted . . . . . . . . . . . . . 215
Resetting the Auto-Copy Replication Scan . . . . . . . . . . . . . . . . . . . . . . . . . . . . . . 215
10
Page 11

Chapter 10 Working with the Move Service . . . . . . . . . . . . . . . . . . . . . . . . . . . . . . . . . . 218
Understanding the Move Service . . . . . . . . . . . . . . . . . . . . . . . . . . . . . . . . . . . . . . . . . 218
Workflow for Moving Media to Another Workspace . . . . . . . . . . . . . . . . . . . . . . . . . . . 220
Check List for Moving Assets to Another Workspace . . . . . . . . . . . . . . . . . . . . . . . . . . 222
Installing and Registering the Move Service Provider. . . . . . . . . . . . . . . . . . . . . . . . . . 223
Installing the Avid Interplay Move Service Description. . . . . . . . . . . . . . . . . . . . . . 223
Registering the Move Provider. . . . . . . . . . . . . . . . . . . . . . . . . . . . . . . . . . . . . . . . 225
Connecting the Move Provider to the Media Services Engine . . . . . . . . . . . . . . . . 227
Starting the Move Provider . . . . . . . . . . . . . . . . . . . . . . . . . . . . . . . . . . . . . . . . . . . . . . 230
Creating a Avid Interplay Move Service Profile. . . . . . . . . . . . . . . . . . . . . . . . . . . . . . . 232
Moving Media to Another Workspace Using Interplay Access . . . . . . . . . . . . . . . . . . . 234
Defining the Maximum Number of Simultaneous Jobs for Move . . . . . . . . . . . . . . . . . 238
Chapter 11 Working with the Delivery Service. . . . . . . . . . . . . . . . . . . . . . . . . . . . . . . . 240
Understanding the Delivery Service and Delivery Receiver Service. . . . . . . . . . . . . . . 240
Check List for the Delivery Service . . . . . . . . . . . . . . . . . . . . . . . . . . . . . . . . . . . . . . . . 241
Registering the Delivery Receiver in an Avid Interplay Workgroup. . . . . . . . . . . . . . . . 243
Installing and Registering the Delivery Service Provider . . . . . . . . . . . . . . . . . . . . . . . 245
Installing the Delivery Service Description . . . . . . . . . . . . . . . . . . . . . . . . . . . . . . . 245
Registering the Delivery Provider. . . . . . . . . . . . . . . . . . . . . . . . . . . . . . . . . . . . . . 248
Connecting the Delivery Provider to the Media Services Engine . . . . . . . . . . . . . . 250
Starting the Delivery Provider . . . . . . . . . . . . . . . . . . . . . . . . . . . . . . . . . . . . . . . . . . . . 253
Creating an Avid Interplay Delivery Profile . . . . . . . . . . . . . . . . . . . . . . . . . . . . . . . . . . 254
Creating Profiles for Specific Delivery Providers and Specific Delivery Receivers . . . . 257
Transferring Assets Through Interplay Access . . . . . . . . . . . . . . . . . . . . . . . . . . . . . . . 259
Transferring Assets through an Avid Editing System . . . . . . . . . . . . . . . . . . . . . . . . . . 260
Viewing the Transfer Status . . . . . . . . . . . . . . . . . . . . . . . . . . . . . . . . . . . . . . . . . . . . . 260
Verifying the Delivery Receiver Service is Running Using Avid Service Framework . . 263
Monitoring the Health of the Interplay Delivery Receiver Service . . . . . . . . . . . . . . . . . 264
Overriding Delivery of Already Existing Media Files . . . . . . . . . . . . . . . . . . . . . . . . . . . 266
Allowing Third-Party Providers to Directly Connect to the Interplay Delivery Service. . 266
Defining the Maximum Number of Simultaneous Jobs for Delivery . . . . . . . . . . . . . . . 267
Chapter 12 Exporting and Transferring Long GOP OP1a Media in the Background . 268
Understanding Long GOP OP1a and STP Encode . . . . . . . . . . . . . . . . . . . . . . . . . . . 268
11
Page 12

Workflow for Background Processing of Long GOP Splicing and Transferring of
Long GOP OP1a Media. . . . . . . . . . . . . . . . . . . . . . . . . . . . . . . . . . . . . . . . . . . . . . . 269
Check List for Transferring Long GOP OP1a Media in the Background. . . . . . . . . . . . 272
Installing and Registering the STP Encode Service Provider . . . . . . . . . . . . . . . . . . . . 274
Installing the Interplay STP Encode Service Description . . . . . . . . . . . . . . . . . . . . 274
Registering the Interplay STP Encode Provider. . . . . . . . . . . . . . . . . . . . . . . . . . . 276
Connecting the STP Encode Provider to the Media Services Engine . . . . . . . . . . 278
Starting the STP Encode Provider . . . . . . . . . . . . . . . . . . . . . . . . . . . . . . . . . . . . . . . . 281
Connecting to the Media Services Engine From Interplay Assist or an Avid
Editing Application . . . . . . . . . . . . . . . . . . . . . . . . . . . . . . . . . . . . . . . . . . . . . . . . . . . 282
Connecting to the Media Services Engine from Interplay Assist . . . . . . . . . . . . . . 282
Connecting to the Media Services Engine from an Avid Editing Application . . . . . 282
Performing Send-to-Playback as a Background Process from Interplay Assist . . . . . . 283
Performing Send-to-Playback as a Background Process from an Avid
Editing Application . . . . . . . . . . . . . . . . . . . . . . . . . . . . . . . . . . . . . . . . . . . . . . . . . . . 285
Chapter 13 Working with the ProEncode Service . . . . . . . . . . . . . . . . . . . . . . . . . . . . . 287
Understanding ProEncode . . . . . . . . . . . . . . . . . . . . . . . . . . . . . . . . . . . . . . . . . . . . . . 287
Check List for Using ProEncode . . . . . . . . . . . . . . . . . . . . . . . . . . . . . . . . . . . . . . . . . . 288
Setting Up ProEncode Client and Providers . . . . . . . . . . . . . . . . . . . . . . . . . . . . . . . . . 289
Configuring the ProEncode Provider. . . . . . . . . . . . . . . . . . . . . . . . . . . . . . . . . . . . . . . 290
ProEncode Provider Settings . . . . . . . . . . . . . . . . . . . . . . . . . . . . . . . . . . . . . . . . . 291
Creating an Interplay ProEncode Provider Profile . . . . . . . . . . . . . . . . . . . . . . . . . . . . 292
Setting Up a ProEncode Client . . . . . . . . . . . . . . . . . . . . . . . . . . . . . . . . . . . . . . . . . . . 293
Installing the ProEncode Client Software . . . . . . . . . . . . . . . . . . . . . . . . . . . . . . . . 293
Configuring a ProEncode Client on an Avid Editing Application . . . . . . . . . . . . . . 294
Setting up a Standalone ProEncode Client . . . . . . . . . . . . . . . . . . . . . . . . . . . . . . 296
Encoding a Clip or a Sequence. . . . . . . . . . . . . . . . . . . . . . . . . . . . . . . . . . . . . . . . . . . 296
Sharing Folders in an Avid Shared-Storage Environment . . . . . . . . . . . . . . . . . . . 296
Sending a Clip or Sequence to ProEncode from an Avid Editing
Application . . . . . . . . . . . . . . . . . . . . . . . . . . . . . . . . . . . . . . . . . . . . . . . . . . . . . 296
Adding a File to ProEncode . . . . . . . . . . . . . . . . . . . . . . . . . . . . . . . . . . . . . . . . . . 300
Monitoring the Encoding . . . . . . . . . . . . . . . . . . . . . . . . . . . . . . . . . . . . . . . . . . . . . . . . 303
ProEncode Provider Post-to-Web . . . . . . . . . . . . . . . . . . . . . . . . . . . . . . . . . . . . . . . . . 303
Check List for ProEncode Provider Post-to-Web . . . . . . . . . . . . . . . . . . . . . . . . . . 303
12
Page 13

Configuring Telestream FlipFactory . . . . . . . . . . . . . . . . . . . . . . . . . . . . . . . . . . . . 307
Creating a FlipFactory Administrator Account for ProEncode . . . . . . . . . . . . . . . . 307
Creating a Factory for the ProEncode Account . . . . . . . . . . . . . . . . . . . . . . . . . . . 308
Preparing Java for Avid NewsPoller . . . . . . . . . . . . . . . . . . . . . . . . . . . . . . . . . . . 313
Chapter 14 HD 23.976p and HD 24p Support . . . . . . . . . . . . . . . . . . . . . . . . . . . . . . . . . 314
Interplay Support for Native HD 23.976p and HD 24p Formats . . . . . . . . . . . . . . . . . . 314
Interplay Support for HD 23.976p and HD 24p Proxy Resolutions . . . . . . . . . . . . . . . . 318
Appendix A Installing Encoding Applications. . . . . . . . . . . . . . . . . . . . . . . . . . . . . . . . . 320
Anystream Agility Workgroup . . . . . . . . . . . . . . . . . . . . . . . . . . . . . . . . . . . . . . . . . . . . 320
Check List for Installing Anystream Agility Workgroup. . . . . . . . . . . . . . . . . . . . . . 321
Installing the Anystream Agility Workgroup Software. . . . . . . . . . . . . . . . . . . . . . . 322
Uninstalling the GLOBEtrotter FlexID and Sentinel Drivers . . . . . . . . . . . . . . . . . . 322
Telestream FlipFactory . . . . . . . . . . . . . . . . . . . . . . . . . . . . . . . . . . . . . . . . . . . . . . . . . 323
Installing Telestream FlipFactory . . . . . . . . . . . . . . . . . . . . . . . . . . . . . . . . . . . . . . 323
Configuring Telestream FlipFactory for Avid Shared-Storage . . . . . . . . . . . . . . . . 323
Appendix B Troubleshooting Interplay Media Services . . . . . . . . . . . . . . . . . . . . . . . . . 325
General Troubleshooting for Media Services . . . . . . . . . . . . . . . . . . . . . . . . . . . . . . . . 325
Checking Media Services Log Files . . . . . . . . . . . . . . . . . . . . . . . . . . . . . . . . . . . . . . . 327
Troubleshooting Using Avid Diagnostics. . . . . . . . . . . . . . . . . . . . . . . . . . . . . . . . . . . . 328
Archive and Restore Troubleshooting. . . . . . . . . . . . . . . . . . . . . . . . . . . . . . . . . . . . . . 330
Finding Solutions to Specific Archive and Restore Problems . . . . . . . . . . . . . . . . 330
Compatibility of Archive and Restore Services and Third-Party Software . . . . . . . 331
Getting Information About an Archive Job from the Jobs Page . . . . . . . . . . . . . . . 331
Getting Information About an Archive Job from the Log File . . . . . . . . . . . . . . . . . 332
How the Media Services Status Tool Reports Archive and Restore Operations . . 332
Archive and Restore Error Messages . . . . . . . . . . . . . . . . . . . . . . . . . . . . . . . . . . 334
Manually Updating the Status of Media Files. . . . . . . . . . . . . . . . . . . . . . . . . . . . . 336
ProEncode Troubleshooting . . . . . . . . . . . . . . . . . . . . . . . . . . . . . . . . . . . . . . . . . . . . . 340
Using a HOSTS File for Media Services . . . . . . . . . . . . . . . . . . . . . . . . . . . . . . . . . . . . 343
Understanding the HOSTS File (Windows) . . . . . . . . . . . . . . . . . . . . . . . . . . . . . . 343
Updating the HOSTS File (Windows). . . . . . . . . . . . . . . . . . . . . . . . . . . . . . . . . . . 344
Appendix C Media Supported by Partial Restore and Interplay Delivery . . . . . . . . . . . 345
Appendix D AVC-Intra Resolutions Supported by the Interplay Media Services. . . . . 347
13
Page 14

Appendix E Target Resolutions for Media Services Transcode, Version 2.7. . . . . . . . 349
Appendix F Maximum Number of Simultaneous Jobs. . . . . . . . . . . . . . . . . . . . . . . . . . 353
Appendix G Working with the Stream Publish Service . . . . . . . . . . . . . . . . . . . . . . . . . 354
Understanding the Stream Publish Service . . . . . . . . . . . . . . . . . . . . . . . . . . . . . . . . . 354
Workflows for Creating Streaming Media . . . . . . . . . . . . . . . . . . . . . . . . . . . . . . . . . . . 355
Workflow for Creating Streaming Media from MPEG-4 Proxy Media. . . . . . . . . . . 355
Workflow for Creating Streaming Media from H.264 Proxy Media. . . . . . . . . . . . . 359
Check List for Stream Publish Workflow . . . . . . . . . . . . . . . . . . . . . . . . . . . . . . . . . . . . 362
Installing and Registering the Stream Publish Service Provider . . . . . . . . . . . . . . . . . . 364
Installing the Stream Publish Service Description . . . . . . . . . . . . . . . . . . . . . . . . . 364
Registering the Stream Publish Provider . . . . . . . . . . . . . . . . . . . . . . . . . . . . . . . . 367
Connecting the Stream Publish Provider to the Media Services Engine . . . . . . . . 368
Starting the Stream Publish Provider . . . . . . . . . . . . . . . . . . . . . . . . . . . . . . . . . . . . . . 371
Creating a Stream Publish Service Profile . . . . . . . . . . . . . . . . . . . . . . . . . . . . . . . . . . 372
Manually Creating QuickTime Reference Movies . . . . . . . . . . . . . . . . . . . . . . . . . . . . . 375
Deleting QuickTime Reference Movies. . . . . . . . . . . . . . . . . . . . . . . . . . . . . . . . . . . . . 375
Stream Publishing Media During Ingest . . . . . . . . . . . . . . . . . . . . . . . . . . . . . . . . . . . . 376
Automatically Publishing Streaming Media During Ingest . . . . . . . . . . . . . . . . . . . 376
Manually Publishing Streaming Media During Ingest. . . . . . . . . . . . . . . . . . . . . . . 378
Setting the Maximum Number of Concurrent Stream Publish Jobs . . . . . . . . . . . . . . . 378
Appendix H Automating the Stream Publish Service . . . . . . . . . . . . . . . . . . . . . . . . . . . 379
Understanding the Auto Publish Workflow . . . . . . . . . . . . . . . . . . . . . . . . . . . . . . . . . . 379
Check List for Auto Publish Workflow . . . . . . . . . . . . . . . . . . . . . . . . . . . . . . . . . . . . . . 380
Verifying the Workflow Engine Database . . . . . . . . . . . . . . . . . . . . . . . . . . . . . . . . . . . 381
Allowing Internet Explorer to Access the Avid Interplay Workflow Engine Server . 383
Importing Auto-Publish Flow Charts . . . . . . . . . . . . . . . . . . . . . . . . . . . . . . . . . . . . . . . 384
Modifying the Flow Chart Settings . . . . . . . . . . . . . . . . . . . . . . . . . . . . . . . . . . . . . . . . 388
Index . . . . . . . . . . . . . . . . . . . . . . . . . . . . . . . . . . . . . . . . . . . . . . . . . . . . . . . . 392
14
Page 15

Using This Guide
Congratulations on your purchase of the Avid® Interplay® Media Services system consisting of
the Interplay Media Services Engine, the Interplay Media Services and Transfer Status Tool, and
the media services.
The Media Services Engine lets you take advantage of a network environment and pass
compute-intensive tasks to other workstations on your network. This allows video editors to stay
focused on their editing tasks.
For example, today’s production houses face a rising demand for translating media into formats
suitable for distribution via the Web, DVD, or CD-ROM — often at the same time. The encoding
operation is a critical part of this work. By moving or distributing this operation to lower cost,
dedicated workstations, editing workstations are free to perform other tasks allowing you to
generate two streams of revenue-producing work in parallel.
The Interplay Media Services Engine and its Media Services and Transfer Status Tool are the
keys to managing these resource-intensive process. This software infrastructure manages all of
the Interplay Media Services. As Avid develops new Media Services services, the
Media Services Engine will manage those services as well.
This guide is intended for all Interplay Media Services users, from beginning to advanced.
®
Unless noted otherwise, the material in this document applies to the Windows
operating systems. The majority of screen shots in this document were captured on a Windows
system, but the information applies to both Windows and Mac OS X systems. Where differences
exist, both Windows and Mac OS X screen shots are shown.
The documentation describes the features and hardware of all models. Therefore, your system
n
might not contain certain features and hardware that are covered in the documentation.
and Mac OS® X
Page 16

Symbols and Conventions
Avid documentation uses the following symbols and conventions:
Symbol or Convention Meaning or Action
Symbols and Conventions
n
c
w
> This symbol indicates menu commands (and subcommands) in the
(Windows), (Windows
only), (Macintosh), or
(Macintosh only)
Bold font Bold font is primarily used in task instructions to identify user interface
Italic font Italic font is used to emphasize certain words and to indicate variables.
Courier Bold font
A note provides important related information, reminders,
recommendations, and strong suggestions.
A caution means that a specific action you take could cause harm to
your computer or cause you to lose data.
A warning describes an action that could cause you physical harm.
Follow the guidelines in this document or on the unit itself when
handling electrical equipment.
order you select them. For example, File > Import means to open the
File menu and then select the Import command.
This symbol indicates a single-step procedure. Multiple arrows in a list
indicate that you perform one of the actions listed.
This text indicates that the information applies only to the specified
operating system, either Windows or Macintosh OS X.
items and keyboard sequences.
Courier Bold font identifies text that you type.
Ctrl+key or mouse action Press and hold the first key while you press the last key or perform the
mouse action. For example, Command+Option+C or Ctrl+drag.
16
Page 17

If You Need Help
If you are having trouble using your Avid product:
1. Retry the action, carefully following the instructions given for that task in this guide. It is
especially important to check each step of your workflow.
2. Check the latest information that might have become available after the documentation was
published:
- If the latest information for your Avid product is provided as printed release notes, they
are shipped with your application and are also available online.
- If the latest information for your Avid product is provided as a ReadMe file, it is
supplied on your Avid installation media as a PDF document (README_product.pdf)
and is also available online.
You should always check online for the most up-to-date release notes or ReadMe
because the online version is updated whenever new information becomes available. To
view these online versions, select ReadMe from the Help menu, or visit the Knowledge Base
at www.avid.com/readme.
3. Check the documentation that came with your Avid application or your hardware for
maintenance or hardware-related issues.
If You Need Help
4. Visit the online Knowledge Base at www.avid.com/onlinesupport. Online services are
available 24 hours per day, 7 days per week. Search this online Knowledge Base to find
answers, to view error messages, to access troubleshooting tips, to download updates, and to
read or join online message-board discussions.
Viewing Help and Documentation on the Interplay Portal
You can quickly access the Interplay Help, PDF versions of the Interplay guides, and useful
external links by viewing the Interplay User Information Center on the Interplay Portal. The
Interplay Portal is a web site that runs on the Interplay Engine.
You can access the Interplay User Information Center through a browser from any system in the
Interplay environment. You can also access it through the Help menu in Interplay Access and the
Interplay Administrator.
17
Page 18

Avid Training Services
The Interplay Help combines information from all Interplay guides in one Help system. It
includes a combined index and a full-featured search. From the Interplay Portal, you can run the
Help in a browser or download a compiled (.chm) version for use on other systems, such as a
laptop.
To open the Interplay User Information Center through a browser:
1. Type the following line in a web browser:
http://Interplay_Engine_name
For Interplay_Engine_name substitute the name of the computer running the Interplay
Engine software. For example, the following line opens the portal web page on a system
named docwg:
http://docwg
2. Click the “Avid Interplay Documentation” link to access the User Information Center web
page.
To open the Interplay User Information Center from Interplay Access or the Interplay
Administrator:
t Select Help > Documentation Website on Server.
Avid Training Services
Avid makes lifelong learning, career advancement, and personal development easy and
convenient. Avid understands that the knowledge you need to differentiate yourself is always
changing, and Avid continually updates course content and offers new training delivery methods
that accommodate your pressured and competitive work environment.
For information on courses/schedules, training centers, certifications, courseware, and books,
please visit www.avid.com/support and follow the Training links, or call Avid Sales at
800-949-AVID (800-949-2843).
18
Page 19

1 Working with the Avid Interplay Media
Services System
The following topics provide an overview of the Interplay Media Services system:
• Understanding the Interplay Media Services System
• Media Services Engine Components
• Understanding the Various Media Services
• Check Lists for Setting Up and Using Service Providers
• Configuration Requirements
Understanding the Interplay Media Services System
The Interplay Media Services system is a software infrastructure on which media services are
layered. Interplay Media Services uses the concept of service providers. A service provider (or
provider) is a software program that can perform a particular service, such as transcoding media
or archiving assets. The Interplay Media Services Engine serves as a broker for services in an
Interplay workgroup.
Avid editing applications allow you to work with clips of any frame rate or field motion type
n
(interlaced or progressive) in a project. Clips that do not match the frame rate or field motion
type of the project are known as mixed-rate clips. Avid Interplay supports working with
mixed-rate clips and sequences with mixed-rate clips.
Media Services Engine Components
The software used to manage service providers is composed of two major components: the
Media Services Engine and the Media Services and Transfer Status tool.
The following topics describe these components:
• Understanding the Media Services Engine
• Understanding the Avid Interplay Media Services and Transfer Status Tool
Page 20
Understanding the Media Services Engine
The Media Services Engine matches jobs and their corresponding settings with suitable
providers. The Media Services Engine is a repository of job and provider information. Individual
providers select jobs that they are able to process according to the service they provide.
For example, a Media Composer system (a client) needs a clip transcoded. It sends a request to
the Media Services Engine (the server) with information about the job. The Media Services
Engine places the information in a queue. When a Transcode provider is available to do the
transcoding, it selects the job, gets the information from the Media Services Engine, and
transcodes the media. The Media Services Engine provides status on the job through the
Media Services and Transfer Status tool.
The Media Services Engine should not reside on the same computer as an Avid editing
application. A provider can be installed on the same computer as the Media Services Engine,
depending on the individual provider and the workload and memory usage of the particular
computer.For specific information on configuration requirements, see the Avid Interplay
Software Installation and Configuration Guide.
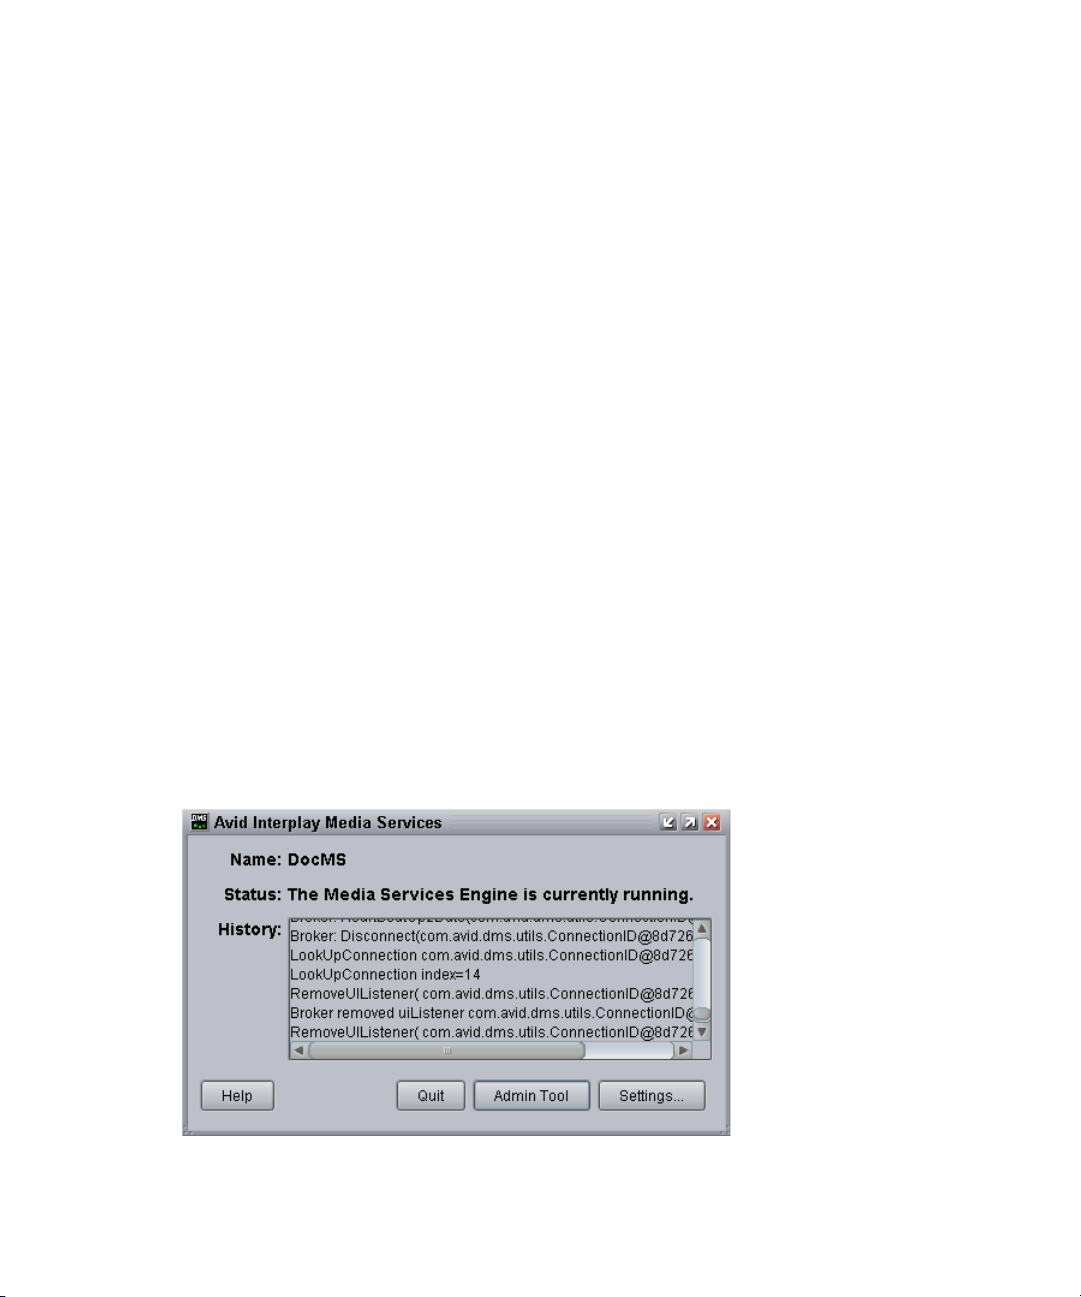
The Avid Interplay Media Services window opens when you start the Media Services Engine.
The window displays current information about the status of the Media Services Engine,
including the host name for the system on which the Media Services Engine resides. The Media
Services Engine uses the host name to identify itself on the network.
Media Services Engine Components
The following illustration of the Avid Media Services window shows the host name DocMS,
which is the host name of the computer on which the Interplay Media Services Engine is
installed.
20
Page 21
Media Services Engine Components
The Avid Interplay Media Services window provides access to the Media Services and Transfer
Status tool through the Admin Tool button. See “Understanding the Avid Interplay
Media Services and Transfer Status Tool” on page 21.
The Avid Interplay Media Services window also provides access to Interplay Media Services
settings through the Settings button. See “Configuring the Media Services Engine” on page 29.
For information on starting the Interplay Media Services Engine, see “Starting the Interplay
Media Services Engine” on page 33.
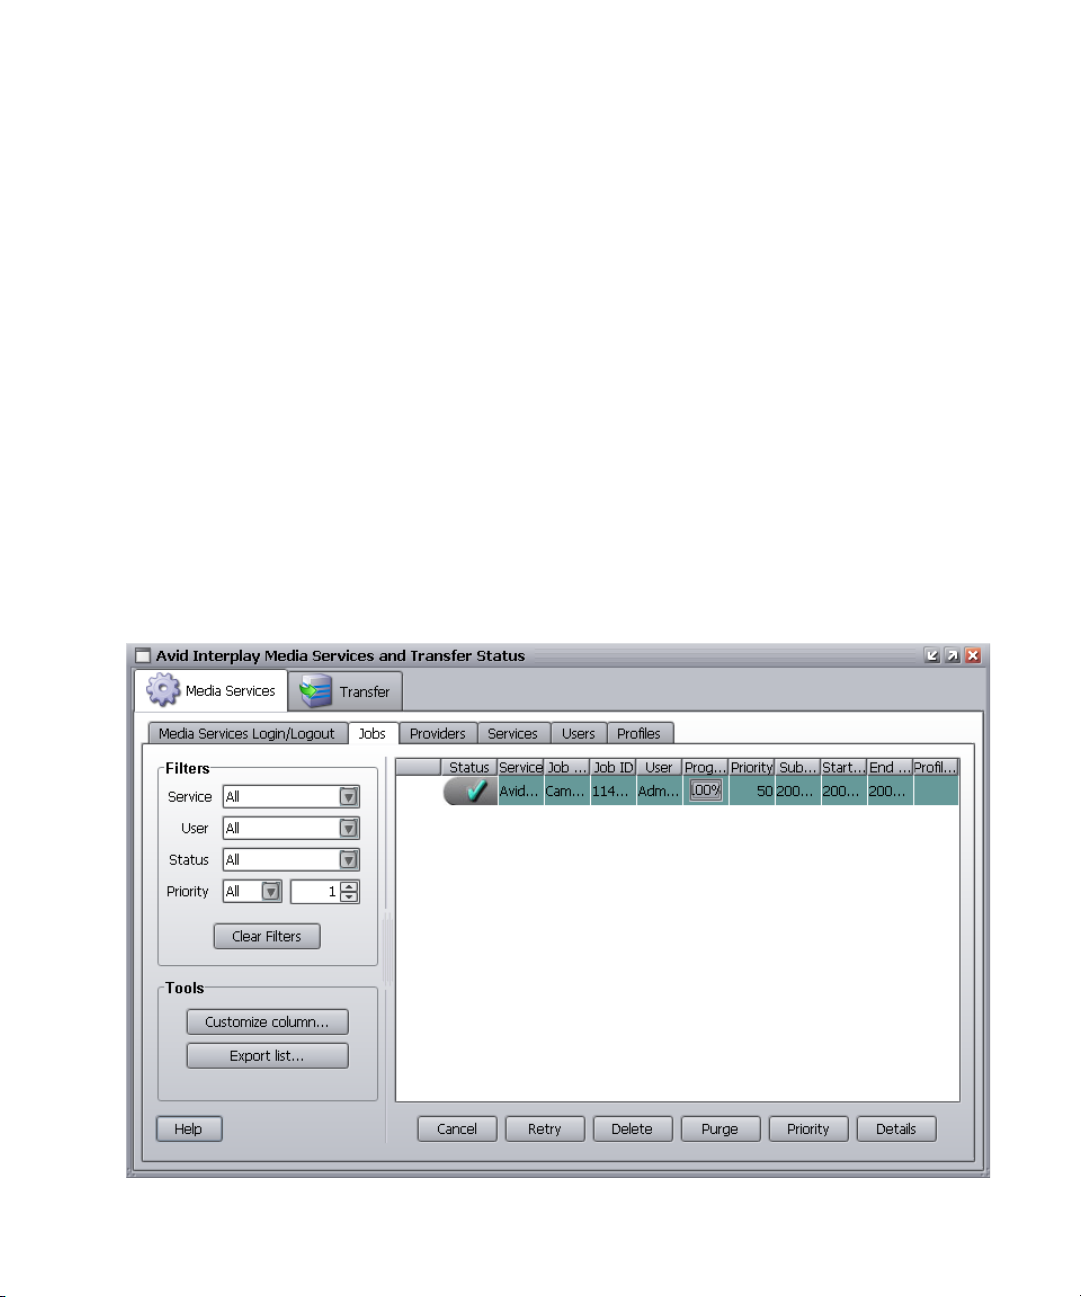
Understanding the Avid Interplay Media Services and Transfer Status Tool
The Avid Interplay Media Services and Transfer Status tool communicates with the Avid
Interplay Media Services Engine to let you manage media services. The Media Services and
Transfer Status tool is installed with the Interplay Media Services Engine software.
The Media Services and Transfer Status tool also includes a tab for monitoring transfers that use
Interplay Transfer. For more information, see the Avid Interplay Transfer Setup and User’s
Guide.
21
Page 22

Understanding the Various Media Services
The Media Services and Transfer Status tool is installed with the Media Services Engine. You
can install it on another computer from the Individual Optional Installers page of the Interplay
Server Installer or the Interplay Client Installer, so that you can manage Interplay Media Services
from that computer. The tool is also installed with Interplay Access, but you need to open the
Media Services Status tab and the Transfer Status tab as separate windows.
The Media Services and Transfer Status tool performs three types of functions:
• Provides detailed information about Media Services, based on lists of jobs, encoders,
profiles, and users.
• Provides controls for managing services and registering providers.
• Provides controls for managing Media Services such as canceling jobs, deleting provider
software, creating or deleting profiles, and creating or deleting users.
The functions you can perform depends on your user rights (see “Using the Users Page” on
page 53). Administrators can perform the following tasks:
• Register and delete providers
• View details on any job
• Delete jobs submitted by any user
• Purge the jobs list
Regular users can perform administrative tasks only on their own jobs.
For more information, see “Using the Media Services and Transfer Status Tool” on page 34.
Understanding the Various Media Services
Interplay Media Services can be distributed to dedicated workstations in a networked
environment, thereby freeing computer resources to perform other tasks.
When you install a Media Services service on a computer, the installation program installs
provider software for that service. You can install the same service on more than one computer in
an Interplay workgroup, and as a result have multiple providers for the same service.
After you install a service, you use the Media Services and Transfer Status tool to register the
provider of the service. In a workgroup with multiple providers, you need to register each
provider.
The following table lists the services managed by the Media Services Engine.
The services managed by the Media Services Engine are not limited to the services listed in this
n
table.
22
Page 23

Understanding the Various Media Services
Interplay Media Services Service Providers
Service Description
Avid Interplay Transcode service Lets you transcode Avid assets from one Avid-supported
resolution to another. For example, you can use the Avid
Interplay Transcode service to create a low-resolution version of
a sequence or master clip. For more information, see “Working
with the Transcode Service” on page 76.
Avid Interplay Archive service
Avid Interplay Restore service
Avid Interplay Stream Publish service (Not applicable to Interplay v2.4 and later) Lets you create
Avid Interplay Copy service Lets you copy assets (metadata) and their media files from one
Avid Interplay Move service Lets you move media files from one Avid ISIS workspace to
Avid Interplay Delivery service Lets you transfer a clip and its media files or only the portion that
Avid Interplay Auto Media Service
• Auto Archive
• Auto Transcode
• Auto Transfer
• Auto Copy
Provides access to archive and restore features. The Avid
Interplay Archive and Restore services manage the process of
moving data, instead of using the Avid Interplay Transfer Engine.
For more information, see “Working with the Archive and
Restore Services” on page 120.
QuickTime reference movies that refer to proxy video files
(MPEG-4 or H.264) and MPEG1 Level 2 audio files. The files
are checked into the Interplay database so you can play the assets
in the Interplay Access. For more information, see “Working with
the Stream Publish Service” on page 354 and “Automating the
Stream Publish Service” on page 379.
workgroup to another. For more information, see “Working with
the Copy Service” on page 173.
another. For more information, see “Working with the Move
Service” on page 218.
is used in a subclip or a sequence. For more information, see
“Working with the Delivery Service” on page 240.
Lets you configure folders and subfolders to perform tasks
automatically. You can use the Avid Service Configuration
settings to configure the various auto media services.
An auto archive and auto transcode operation includes
n
subfolders. An auto transfer operation does not include
subfolders. An auto copy operation maintains the same
folder structure as the source workgroup.
For installation instructions, see the Avid Interplay Software
Installation and Configuration Guide.
23
Page 24

Check Lists for Setting Up and Using Service Providers
Interplay Media Services Service Providers (Continued)
Service Description
Avid Interplay STP Encode service Lets you offload time-consuming processing involved in
exporting and transferring of Long GOP OP1a media, during a
send-to-playback request from the Avid editing application or
Avid Interplay Assist. For more information, see “Exporting and
Transferring Long GOP OP1a Media in the Background” on
page 268.
Avid Interplay ProEncode
™
service Provides integration to AnyStream™ and Telestream for non-Avid
format transcode services (for example, transcoding from an Avid
resolution to Windows Media File format). For more information,
see “Working with the ProEncode Service” on page 287.
Check Lists for Setting Up and Using Service
Providers
The following table provides a list of the various Media Services service providers with a
reference to the specific check list for each service. These check lists provide a list of the steps to
set up and use the various services.
For a check list for setting up the Interplay Media Services Engine, see “Check List for Setting
Up the Media Services Engine” on page 26.
Media Services Service
Provider Documentation
Interplay Transcode service “Check List for Transcoding Assets” on page 77
Interplay Archive service
Interplay Restore service
Interplay Copy service “Check List for Copying Assets to Another Workgroup” on
Interplay Move service “Check List for Moving Assets to Another Workspace” on page 222
Interplay Delivery service “Check List for the Delivery Service” on page 241
Interplay STP Encode service “Check List for Transferring Long GOP OP1a Media in the
Interplay ProEncode Provider “Check List for Using ProEncode” on page 288
“Check List for Archiving and Restoring Assets” on page 122
page 178
Background” on page 272
24
Page 25

Configuration Requirements
An Interplay workgroup enables collaborative workflows by allowing multiple editors to share
media. For diagrams showing typical shared-storage workgroup configurations, see
Avid Interplay Best Practices.
For specific information on configuration requirements, see the Avid Interplay Software
Installation and Configuration Guide.
For any configuration issues that are not included in the published documents, see the Avid
n
Interplay Media Services ReadMe or the Avid Interplay ReadMe.
Configuration Requirements
25
Page 26

2 Interplay Media Services Engine
Installation and Configuration
The following topics describe installation and configuration of the Media Service Engine:
• Check List for Setting Up the Media Services Engine
• Registering the Media Services Engine in an Avid Interplay Workgroup‘
• Configuring the Media Services Engine
• Starting the Interplay Media Services Engine
For details on setting up the Media Services system in an Interplay workgroup environment, see
the Avid Interplay Software Installation and Configuration Guide.
Check List for Setting Up the Media Services Engine
The following table provides a list of steps to perform when setting up the Media Services
Engine in an Interplay workgroup.
Setting up the Media Services Engine Check List
Task Section Reference
Add the Interplay Media Services server to the
Interplay workgroup.
Make sure an Interplay Media Services
administrator account is set up on Avid
shared-storage.
Make sure the Interplay Media Services
application key is connected to the server.
See the Avid Interplay Software Installation and
Configuration Guide.
See the Avid Interplay Software Installation and
Configuration Guide.
Page 27

Registering the Media Services Engine in an Avid Interplay Workgroup
Setting up the Media Services Engine Check List (Continued)
Task Section Reference
Install the Interplay Media Services Engine
software and the supporting software.
• Avid Service Framework for Client
• Avid Interplay Access
• Avid Interplay Media Services
Register the Media Services Engine in the
Interplay workgroup.
Configure the Media Service Engine.
• Setup e-mail notifications
• Identify the workgroup’s Interplay Engine
system
• Setup auto-purging of jobs
Start the Avid Interplay Media Services
Engine software.
Install and configure any Media Services
service providers.
See the Avid Interplay Software Installation and
Configuration Guide.
See “Registering the Media Services Engine in an
Avid Interplay Workgroup” on page 27.
See “Configuring the Media Services Engine” on
page 29.
See “Starting the Interplay Media Services
Engine” on page 33.
See “Check Lists for Setting Up and Using
Service Providers” on page 24.
After you set up the Media Services Engine, install and configure the Media Services service
providers. See “Check Lists for Setting Up and Using Service Providers” on page 24.
Registering the Media Services Engine in an Avid
Interplay Workgroup
Before you can use any Media Services Engine services, you must register the Media Services
Engine in an Interplay workgroup by opening the Avid Interplay Administrator and identifying
the system that runs the Media Services Engine. After you register the Media Services Engine,
the Media Services and Transfer Status tool automatically connects to the Media Services
Engine.
If you are performing an upgrade, you do not have to register existing Media Services Engines.
n
27
Page 28
Registering the Media Services Engine in an Avid Interplay Workgroup
To register the Media Services Engine in an Interplay workgroup:
1. Click Start and select Programs > Avid > Avid Interplay Access Utilities > Avid Interplay
Administrator.
The Avid Interplay Administrator opens.
2. Log in to the server for the workgroup in which you want to register the Media Services
Engine.
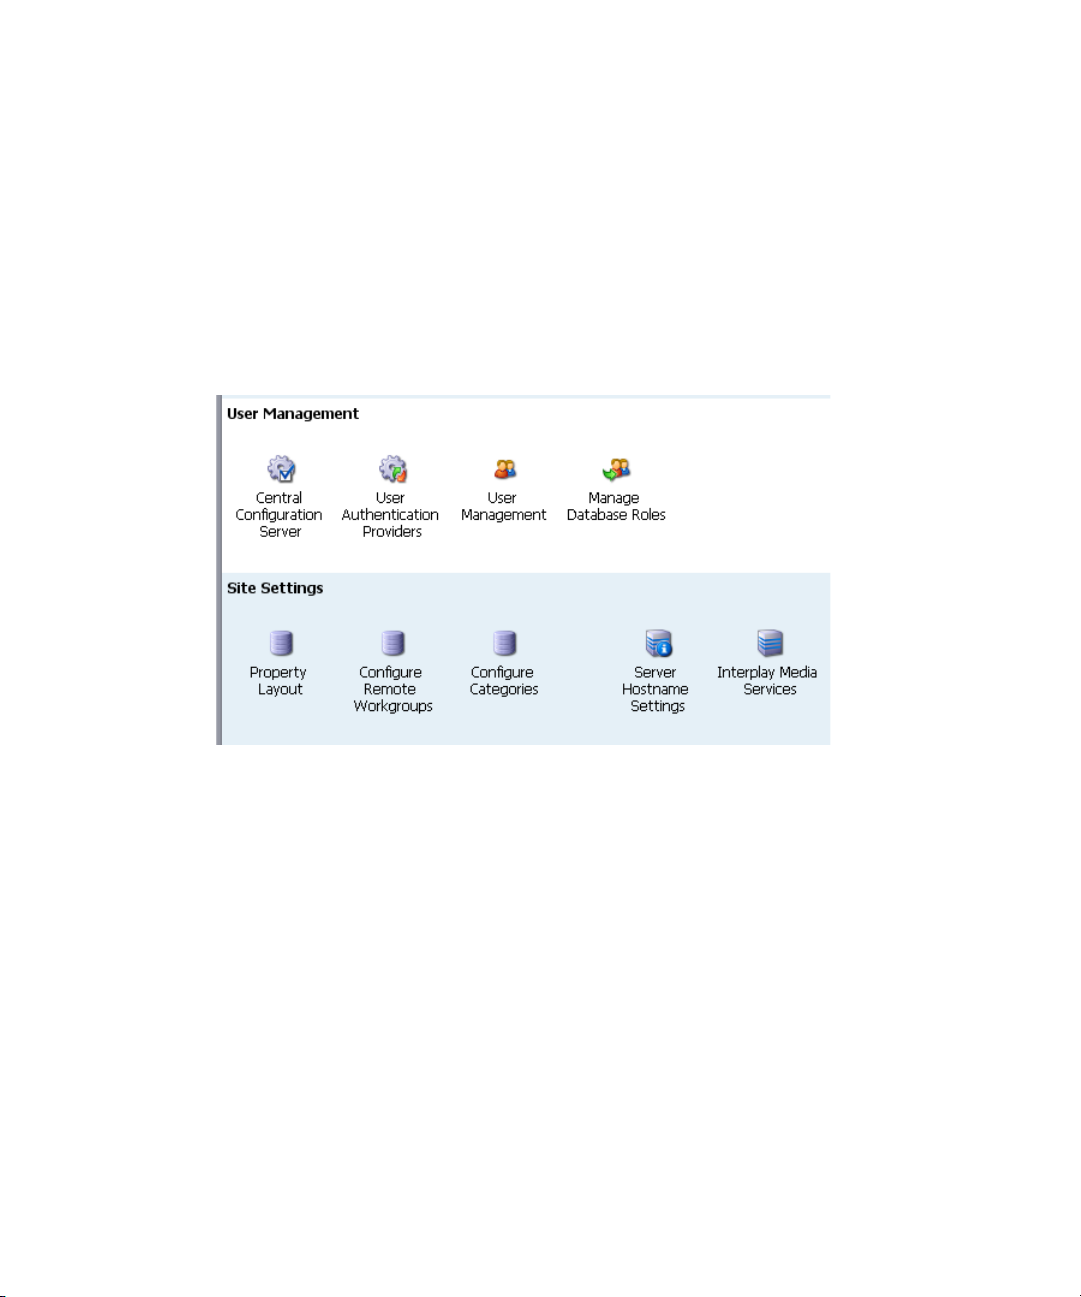
3. Click Server Hostname Settings in the Site Settings area.
The following illustration shows the Site Settings area of the Avid Interplay Administrator.
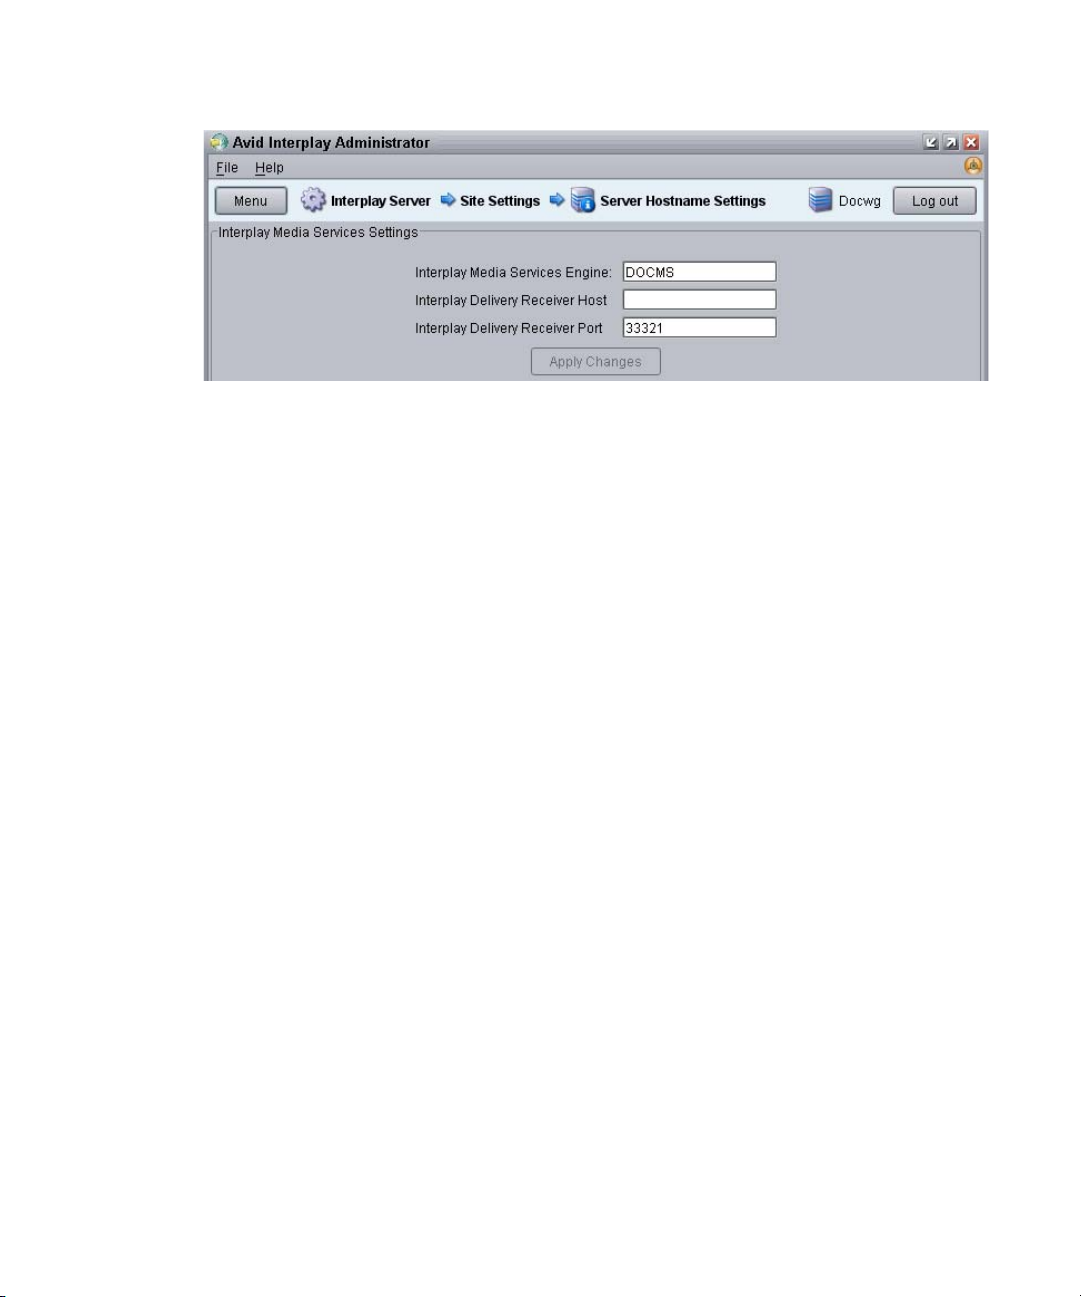
The Server Hostname Settings window opens.
4. In the Interplay Media Services Settings area, type the name of the system that runs the
Media Services Engine and click Apply Changes.
If your Interplay environment includes the Interplay Delivery workflow, to receive transfers you
n
must add the hostname and the port number of the system where the Delivery Receiving service
is installed. For more information, see “Registering the Delivery Receiver in an Avid Interplay
Workgroup” on page 243.
28
Page 29
Configuring the Media Services Engine
5. (Option) While you have the Server Hostname Settings window open, it is a good time to
check whether you have entered the name of the workgroup in the Workgroup and
MediaIndexer Settings area of the window. The Avid Instinct and Avid Interplay Assist
applications use this setting to locate the Media Indexer that is used to monitor shared
storage.
a. Near the center of the Server Hostname Settings window, make sure your Workgroup
name is in the Workgroup Name field. Type the workgroup name if necessary. This field
is case sensitive.
b. Click Check MediaIndexer to check whether the Media Indexer that monitors shared
storage is running.
If the Media Indexer is running, the system displays the message “Connected to Media
Indexer successfully.”
6. Click Log out and close the Avid Interplay Administrator.
Configuring the Media Services Engine
After installing the Media Services Engine software, you can configure the Media Services
Engine for the following optional settings:
• Send e-mail notifications about the status of jobs.
• Identify the workgroup’s Avid Interplay Engine system.
29
Page 30

Configuring the Media Services Engine
By identifying the Avid Interplay Engine system, when you log in to the Media Services
Engine, the Media Services user information is updated with the user information in the
Avid Interplay Administrator. As a result, you do not need to manage a separate user
database for Media Services. See “Using the Users Page” on page 53.
• Automatically purge Media Services jobs to improve the performance of the Avid Interplay
Media Services and Transfer Status tool. There are two different types of auto-purge
processes you can set:
- An auto-purge process that runs once a day based on the start time and types of jobs that
you select. You can set a start time for the auto-purge to begin within 15 minute
intervals.
- An auto-purge process that starts at an interval that you select, checks the number of
jobs, and purges the jobs based on the job count and types of jobs that you select.
You can select either process or both processes. The auto-purge settings take effect
immediately; you do not have to restart the Interplay Media Services Engine. If you want to
cancel a scheduled auto-purge process, you must cancel the process before it starts. After an
auto-purge process begins you cannot cancel the process.
c
n
When scheduling the auto-purge process, you should choose a low activity time. The
auto-purge process might impact the server’s performance and the ability to connect.
The History area on the Avid Interplay Media Services Engine window provides information
about the auto-purge settings, such as any changes made to the settings.
To configure the Interplay Media Services Engine settings:
1. Click Start and select Programs > Avid > Avid Interplay Media Services.
The Avid Interplay Media Services window opens.
2. Click the Settings button.
The Avid Interplay Media Services Engine Settings dialog box opens.
30
Page 31

Configuring the Media Services Engine
3. Type the computer name of the local host in the Database Computer Name text box.
4. In the SMTP (Simple Mail Transfer Protocol) Server text box, type the name of your local
mail server (for example, mail.mycompany.com). If you don’t know the name of your local
mail server, ask your network administrator.
5. In the From Address text box, type an e-mail address for the Media Services Engine. For
example, broker@mycompany.com.
6. (Option) You can configure an SMTP Username and SMTP Password if your network
supports secure e-mail. These settings give the Media Services Engine a name and password
so that is can successfully send e-mail notification. If a network does not use secure e-mail,
the settings do not apply and are disregarded.
The Clean Start option is reserved for future use. Make sure it is set to No.
n
31
Page 32

Configuring the Media Services Engine
7. In the Interplay Engine Hostname text box, type the host name of the Avid Interplay Engine
system.
If this text box is left blank, the Media Services user information in the Avid Interplay
Administrator is not used for authentication during login.
8. (Option) If you want to use the once-a-day auto-purge, select On from the auto-purge
Enabled list, then select the following settings:
- Purge Start Time—Select a time to start the auto-purge (15 minute intervals).
- Purge PENDING Jobs?—Yes, purges all pending jobs for all service providers.
- Purge CANCELLED Jobs?—Yes, purges all cancelled jobs for all service providers.
- Purge COMPLETED Jobs?—Yes, purges all completed jobs including jobs with the
Warning status (question mark icon) for all service providers.
- Purge ERROR Jobs?—Yes, purges all error jobs for all service providers.
For the chosen job type, all jobs for all service providers, and for all users are purged. Therefore,
n
you cannot purge jobs for a specific service provider, such as Interplay Transcode.
9. (Option) If you want to schedule an interval auto-purge, select On from the Interval Auto
Purge list, then select the following settings.
- Purge PENDING Jobs?—Does not apply to interval auto-purge.
- Purge CANCELLED Jobs?—Yes, purges all cancelled jobs for all service providers.
- Purge COMPLETED Jobs?—Yes, purges all completed jobs including jobs with the
Warning status (question mark icon) for all service providers.
- Purge ERROR Jobs?—Yes, purges all error jobs for all service providers.
- Purge Interval Time: Enter the number of minutes between runs of the auto-purge
interval timer. The auto-purge interval timer checks if there are a sufficient number of
jobs to purge (see the next option). For example, if you enter 50, the auto-purge interval
timer starts every fifty minutes. The default value is 60. The minimum value is 15 and
the maximum value is 1,440 minutes (24 hours).
- Purge Job Count: Enter the number of jobs that cause an auto-purge process to run. If
the number of jobs in the Media Services queue is greater than or equal to this number
when the interval timer runs, Media Services will purge the jobs you have selected for
purging (cancelled jobs, completed jobs, or error jobs - pending jobs are not included).
The default value is 5000. The minimum value is 100 and the maximum value is 15,000.
For both these options, if you enter a number below the minimum value, the Media
Services Engine will use the minimum value. If you enter a number above the maximum
value, the engine will use the maximum value. If you enter nothing or enter an invalid
value in the field, the engine will use the default value.
32
Page 33

Starting the Interplay Media Services Engine
For the chosen job type, all jobs for all service providers, and for all users are purged. Therefore,
n
you cannot purge jobs for a specific service provider, such as Interplay Transcode.
10. Click OK.
The Avid Interplay Media Services Engine Settings dialog box closes.
Starting the Interplay Media Services Engine
To start the Interplay Media Services Engine:
t Click Start and select Programs > Avid > Avid Interplay Media Services.
The Avid Interplay Media Services window opens.
33
Page 34

3 Using the Media Services and Transfer
Status Tool
The following topics explain how to use the Media Services and Transfer Status tool:
• Opening the Media Services and Transfer Status Tool
• Media Services and Transfer Status Tool User Interface
• Using the Jobs Page
• Using the Providers Page
• Using the Services Page
• Using the Users Page
For an overview of the Media Services and Transfer Status tool, see “Understanding the Avid
Interplay Media Services and Transfer Status Tool” on page 21.
Opening the Media Services and Transfer Status Tool
The Media Services and Transfer Status tool can be used on any computer that has an internet
connection to a computer running the Media Services Engine.
The Media Services and Transfer Status tool is installed with the Media Services Engine. You
can install it on another computer from the Individual Optional Installers page of the Interplay
Server Installer or the Interplay Client Installer. The tool is also installed with Interplay Access,
but you need to open the Media Services Status tab and the Transfer Status tab as separate
windows.
To open the Media Services and Transfer Status tool:
1. Do one of the following:
t From the Avid Interplay Media Services window, click Admin Tool.
t For a standalone application, click Start and select Programs > Avid > Avid Media
Services and Transfer Status.
t From Avid Interplay Access, select View > Interplay Media Services Status.
Page 35

Opening the Media Services and Transfer Status Tool
t From the Avid Interplay Administrator, in the Site Settings area, click the Interplay
Media Services icon.
2. Type your username and password. See “Using the Users Page” on page 53.
If you opened Media Services Status from Interplay Access or the Interplay Administrator,
access is controlled by the information you used when you logged into Interplay Access or
the Interplay Administrator.
3. Type the host name of the system on which the Media Services Engine resides in the Media
Services Host text box.
The Media Services host name is the name of the computer that the Media Services Engine
runs on. You can find the host name in the Name field of the Avid Interplay Media Services
window. Previously typed host names are available from the Media Services Host menu.
4. Click the Login button.
If the username and password are accepted, the Jobs page opens.
35
Page 36

Media Services and Transfer Status Tool User Interface
Media Services and Transfer Status Tool User
Interface
The Media Services and Transfer Status tool user interface is made up of five pages. The tab
selected determines which page of the Media Services and Transfer Status tool is displayed. The
page displayed determines the Media Services and Transfer Status tool’s functional mode and
which of the mode-related controls — also referred to as pages — are displayed. The pages are
described in the following table:
Media Services Status Administration Tool Pages
Page Description Section Reference
Jobs Displays the status and other information about jobs
submitted to the Media Services Engine. Lets you
cancel or retry jobs, depending on your level of
privilege.
See “Using the Jobs Page” on
page 37.
36
Page 37

Using the Jobs Page
Media Services Status Administration Tool Pages
Page Description Section Reference
Providers Displays information about systems that are running
Media Services provider software. Lets you register
and delete providers, depending on your level of
privilege.
Services Displays a list of services and service information.
Lets you install and delete services.
Users Displays a list of user accounts. Lets you create and
delete accounts, depending on your level of privilege.
Profiles Lets you create templates to use when performing an
operation.
Using the Jobs Page
The Jobs page displays information about Media Services jobs and lets you cancel, delete, and
retry jobs. The Jobs page opens by default after you log in to the Media Services and Transfer
Status tool.
The following topics describe the options available from the Jobs page:
• Jobs Page Information
• Customizing the Reporting of Service Job Status
See “Using the Providers Page”
on page 48.
See “Using the Services Page” on
page 51.
See “Using the Users Page” on
page 53.
See “Working with Media
Services Profiles” on page 70.
• Customizing the Jobs Page Columns
• Filtering the Jobs List
• Viewing Details About a Job
• Purging the Jobs List
• Prioritizing a Job
• Canceling a Job
• Deleting a Job
• Retrying a Job
• Exporting the Jobs List
For information about the Auto-Purge feature, see “Configuring the Media Services Engine” on
page 29.
37
Page 38

Jobs Page Information
The Jobs page displays information about jobs submitted to the Media Services Engine. You can
specify how the status of the various service jobs are reported, see “Customizing the Reporting
of Service Job Status” on page 39.
The following table describes the information displayed on the Jobs page.
Jobs Page
Column Description
Status The colors and icons in the display indicate the status of the job:
• Yellow bar with no icon = Job is processing.
• Green bar with Check Mark icon = Job is completed.
• Gray bar with Stop icon = Job has been canceled.
• Caution icon = Job has failed with an error.
• Gray bar with no icon = Job is pending or is in a queue.
For information on changing the status reporting of jobs, see “Customizing the
Reporting of Service Job Status” on page 39.
Using the Jobs Page
Service The name of the service to which the job was sent.
Job Name The file name submitted by the client to the Media Services Engine. This might have a
suffix — determined by the particular service — appended to it.
Administrators can view information about all jobs. Users without
n
administrator privileges can view all jobs, but can see only the user name and
job name of their own jobs.
Job ID A number automatically generated by the Media Services Engine.
User The name of the user who submitted the job.
Administrators can view information about all jobs. Users without
n
administrator privileges can view all jobs, but can see only the user name and
job name of their own jobs.
Progress (%) The percentage of the job completed.
Priority The priority of the job, as submitted by the client.
Submit Time The date and time the job was submitted by the client to the Media Services Engine.
Start Time The date and time that the provider started the job.
End Time The date and time that the provider reports the job is complete.
38
Page 39

Jobs Page
Column Description
Profile Name Indicates if a profile was used and displays the profile’s name.
Customizing the Reporting of Service Job Status
You can customize the status reporting for the following Media Services services:
• Archive service
•Restore service
• Copy service
• Move service
•Delivery service
For example, during an archive operation, if one of the media files cannot be found, you can set
the reporting to the Jobs tab of the Media Services and Transfer Status Tool to display one of the
following status indicators:
Using the Jobs Page
Job Status Display Description
Green with check mark icon Job completed
Green with question mark icon Job completed with a warning
Caution icon Job failed with an error
This section describes how to use the Avid Service Configuration tool to set which reporting
status displays with the various conditions of service jobs.
Avid Service Configuration is an application that is included with the Avid Service Framework
services. It lets you set and change parameters for each of the different Avid services and
applications in your workgroup environment. For more information about Avid Service
Framework, see the Avid S ervice Framework Us er’s Guide.
To customize the job status displays for various Media Services services:
1. On any system running the Avid Service Framework services, click Start and select
Programs > Avid > Avid Service Framework > Avid Service Configuration.
The Select Workgroup dialog box opens.
39
Page 40

Using the Jobs Page
The Select Workgroup dialog box does not open if the check box specifying to always select and
n
use this workgroup option was previously selected. When you select this option, the Select
Workgroup dialog box no longer opens when you start the application. The default workgroup is
selected, and the Avid Service Configuration window opens. To change this option and display
the Select Workgroup dialog box, click the Login tab of the Avid Framework Workgroup
Properties application and clear the check box for the option.
2. (Option) If the Select Workgroup dialog box opens, select the workgroup you want to
connect to and click Select.
The Avid Service Configuration window opens.
3. In the Directory pane, click the Processes tab and verify that the service is running.
If the service does not appear in the Avid Service Configuration window, the service is not
n
running or the system it runs on is not properly connected to the workgroup. Click the Hosts tab
and make sure that the Avid Service Framework services displays the name of the system that the
service is running on.
4. On the Processes tab, expand the service entry, such as Archive Service.
The system displays the name of the computer running the service.
5. Click the computer name.
The Administrator Password Needed dialog box opens.
6. Type the Avid Service Framework Administrator password and click OK.
By default, Avid Service Framework does not require a password. When a password is used, it is
n
set through the System Configuration Service. Check with your system administrator for the
correct password.
The system displays the setting tab for the service.
Depending on the service you selected, different conditions are available for you to customize.
n
The following example shows the Archive Service settings.
40
Page 41

7. Select the type of status you want to display for each job condition.
Option Job Status Display / Description
OK Green with check mark icon / Job completed
Warning Green with question mark icon / Job completed with a warning
Error Caution icon / Job failed with an error
Using the Jobs Page
8. Click Apply.
Customizing the Jobs Page Columns
The Media Services and Transfer Status tool provides options to customize the columns
displayed on the Jobs page.
To customize which columns display on the Jobs page:
1. Open the Media Services and Transfer Status tool. For more information, see “Opening the
Media Services and Transfer Status Tool” on page 34.
The Jobs page opens by default after you log in to the Media Services and Transfer Status
tool.
2. In the Tools area, click Customize columns.
The Choose Columns dialog box opens.
3. Select the name of the columns you want to display.
4. Click OK.
The columns change to show the selections.
5. (Option) Click a column heading and drag it to a new location.
41
Page 42

Filtering the Jobs List
By default, the Jobs list displays all jobs that the Media Services Engine is currently monitoring.
You can customize your view to show only your jobs, to show jobs for a specific service, or to
show only jobs in a selected state.
Users with Administrator privileges are allowed to cancel or delete any job. Users without
n
administrator privileges can only cancel or delete jobs submitted by that user.
To customize the Jobs list:
1. Open the Media Services and Transfer Status tool. For more information, see “Opening the
Media Services and Transfer Status Tool” on page 34.
The Jobs page opens by default after you log in to the Media Services and Transfer Status
tool.
2. In the Filters area, click the Service menu, and select a service.
3. In the Filters area, click the User menu, and select All Users or a specific user name.
4. In the Filters area, click the Status menu, and select one of the following:
- All — Displays all jobs with their current status.
- Processing — Displays only jobs that are currently being processed.
Using the Jobs Page
- Completed — Displays only jobs that have been successfully processed.
- Canceled — Displays only jobs that have been canceled by a user with administrator
privileges.
- Error — Displays only jobs that have stopped with an error.
- Pending — Displays only jobs that are waiting to be processed.
5. In the Filters area, click the Priority and select one of the following:
- ALL — Displays all priority jobs.
- > — Displays all priority jobs greater than the number indicated.
- < — Displays all priority jobs fewer than the number indicated.
- = — Displays all priority jobs equal to the number indicated.
The Jobs page displays jobs that meet the criteria you selected.
42
Page 43

Viewing Details About a Job
You must be logged in as the job owner or as an administrator to view a job’s details.
To view details about a job:
1. Open the Media Services and Transfer Status tool. For more information, see “Opening the
Media Services and Transfer Status Tool” on page 34.
2. On the Jobs page, select the job that you want details about.
3. Click the Details button.
The Job Details window opens.
Using the Jobs Page
43
Page 44

Job Details Window
The following table provides descriptions of the type of job information displayed in the Job
Details window.
Entry Description
Job Information
Name The name of the file submitted by a client to Media Services Engine. It might
Service The Media Services service for which the job was submitted; for example,
State The current state of the job.
Submitted By: The user name associated with the job, as submitted by the client.
Priority The priority of the job, as submitted by the client.
Provider The name of the provider, as registered with the Media Services Engine.
Using the Jobs Page
include information appended to the file name, depending on the service
requirements.
Avid Interplay Archive Service.
Requested Provider The name of the provider requested (not currently supported)
Job ID A number automatically generated by the Media Services Engine.
Batch ID The number of the batch containing the job.
Profile Name The name of the profile used for the job, if a profile is used.
Submit Time The date and time the job was submitted by the client to the Media Services
Engine.
Start Time The date and time the provider picked up the job.
End Time The date and time the job was reported as complete by the provider.
Progress The percentage of the job that has been processed.
Notification Displays whether notification of job completed or job error is enabled or
disabled.
Input Parameters The list of Input parameters varies for each service.
44
Page 45

Purging the Jobs List
The purge function is available only to users with administrator privileges.
You can set the Media Services settings to allow for auto-purging of jobs. See “Configuring the
n
Media Services Engine” on page 29.
To purge the Jobs list:
1. Open the Media Services and Transfer Status tool and log in as a user with administrator
privileges. For more information, see “Opening the Media Services and Transfer
Status Tool” on page 34.
2. On the Jobs page, click the Purge button.
The Purge Jobs dialog box opens.
Using the Jobs Page
3. Click the Service menu, and select the applicable service.
4. Click the Submitted By menu, and select a particular user or All, depending on the jobs you
want to purge.
5. Select which states of jobs you want to purge.
6. Click the Purge button.
The Jobs list no longer contains the jobs you selected. If a purge fails, a dialog box opens
with a list of the jobs that failed to delete and a reason for the failure.
45
Page 46

Prioritizing a Job
You can prioritize the order of the pending jobs. The priority number assigned to a job indicates
the job’s position in the queue for a specific provider. This setting lets you order jobs in a desired
sequence and also move a job to the top of the queue. Priority numbers range from 1 (highest
priority) through 100 (lowest priority). The default priority number assigned to each job is 50.
When you assign a priority number to a job, the actual order in the queue depends on the
following:
• Priority numbers are relative only to jobs within a given service. For example, a transcode
job set with priority 1 might not execute before an archive job with priority 100.
• If the same priority number is assigned to several jobs of a specific provider, then all these
jobs have an equal chance of executing.
To prioritize a job:
1. Open the Media Services and Transfer Status tool as described in “Opening the
Media Services and Transfer Status Tool” on page 34.
2. On the Jobs page, select the job you want to prioritize.
3. Click the Priority button.
Using the Jobs Page
The Set Job Priority dialog box opens.
4. Click the arrow button to select a priority number.
The default is 50. The priority range is 1 (highest priority) through 100 (lowest priority).
5. Click OK.
The Priority column displays the new priority for the job.
Canceling a Job
Jobs can be canceled during the Pending or the Processing state. A user can cancel only jobs that
have been submitted under his or her Media Services user name. An administrator can cancel any
job.
Providers periodically check the Media Services Engine for jobs that might need to be canceled.
When a job is canceled, it might take a short time for the job to actually stop and the status
change to be reflected. It is also possible that a job might finish before it can be canceled. In this
case, a dialog box might open stating that the Media Services Engine was unable to cancel the
job.
46
Page 47

To cancel a job:
1. Open the Media Services and Transfer Status tool as described in “Opening the
Media Services and Transfer Status Tool” on page 34.
2. On the Jobs page, select the job that you want to cancel.
3. Click the Cancel button. A dialog box opens and asks if you are sure you want to cancel the
job.
4. Click OK to cancel the job.
The job remains in the Jobs list, but the state changes to canceled.
Deleting a Job
To delete a specific job or all jobs on the Jobs page:
1. Open the Media Services and Transfer Status tool as described in “Opening the
Media Services and Transfer Status Tool” on page 34.
2. On the Jobs page, select the specific job you want to delete.
3. Click the Delete button. A dialog box opens and asks if you are sure you want to delete the
job.
4. Click OK to delete the job.
Using the Jobs Page
Retrying a Job
You can retry a job that is in the canceled state or error state.
To retry a job:
1. Open the Media Services and Transfer Status tool as described in “Opening the
Media Services and Transfer Status Tool” on page 34.
2. On the Jobs page, select the job you want to retry.
3. Click the Retry button.
The Media Services Engine changes the state to Pending and places the job in the queue for
the next available provider.
47
Page 48

Exporting the Jobs List
You can export the current Jobs list from the Media Services and Transfer Status tool.
To export the Jobs list:
1. Open the Media Services and Transfer Status tool. For more information, see “Opening the
Media Services and Transfer Status Tool” on page 34.
The Jobs page opens by default after you log in to the Media Services and Transfer Status
tool.
2. In the Tools area, click Export list.
A Save dialog box opens.
3. Select a location for the Jobs list file.
4. Type a name for the Jobs list file.
5. Click Save.
Using the Providers Page
The Providers page displays information about computers that are running provider software and
are registered with the Media Services Engine. You can also view specific provider details and
capabilities.
Using the Providers Page
The following topics provide information about using the Providers page:
• Opening the Providers Page
• Customizing the Providers Display
• Viewing Details About a Provider
• Deleting Providers
For information about using the Providers page to register a provider, see “Registering the
Provider” on page 61.
Opening the Providers Page
To open the Providers page:
1. Open the Media Services and Transfer Status tool as described in “Opening the
Media Services and Transfer Status Tool” on page 34.
2. Click the Providers tab.
The Providers page opens.
48
Page 49

Using the Providers Page
The following table describes the information displayed on the Providers page.
Providers Page Description
Status Indicates whether or not the provider is connected to the Media Services Engine.
Provider The name of the service provider, as registered with the Media Services Engine.
Service The Media Services service for which the provider has been registered.
Host The computer name of the provider.
Application The name of the service provider application.
IP The IP address of the computer of the provider.
Customizing the Providers Display
By default, the Providers page displays all providers that are registered with the Media Services
Engine. You can customize your view to show only the connected providers or providers of a
particular service.
To customize the Providers display:
1. Open the Media Services and Transfer Status tool as described in “Opening the
Media Services and Transfer Status Tool” on page 34.
2. Click the Providers tab. The Providers page opens.
3. In the Filters area, click the Service menu, and select the applicable service.
49
Page 50

4. In the Filters area, click the Status menu, and select the applicable condition.
The Providers page displays providers that match your selections.
Viewing Details About a Provider
To view details about a provider:
1. Open the Media Services and Transfer Status tool as described in “Opening the
Media Services and Transfer Status Tool” on page 34.
2. On the Providers page, select the provider that you want details about.
3. Click the Details button.
The Provider Details window opens.
The following table provides descriptions of the type of provider information displayed in
the Provider Details window.
Providers Page Description
Name The name of the service provider, as registered with the Media Services Engine.
Service The Media Services service for which the provider has been registered.
Using the Providers Page
Host Name The computer name of the provider.
Application The name of the service provider application.
IP Address The IP address of the computer of the provider.
Connected Indicates whether or not the provider is connected to the Media Services Engine.
Deleting Providers
If a provider is connected to the Media Services Engine, the provider cannot be deleted until it
has been disconnected and all processing jobs are stopped. You must be logged in as an
administrator to delete any providers.
To delete a service, see “Deleting a Media Services Service” on page 53.To delete the provider
software, use the Add/Remove Programs in the Windows Control Panel on the provider system.
To delete a provider:
1. Open the Media Services and Transfer Status tool as described in “Opening the
Media Services and Transfer Status Tool” on page 34.
2. Click the Providers tab. The Providers page opens.
3. Select the provider, and click Delete.
50
Page 51

A dialog box opens and asks if you are sure you want to delete the provider.
4. Click OK.
The provider is no longer registered with the Media Services Engine. To register it again, see
“Registering the Provider” on page 61.
Using the Services Page
The Services page displays information about the services that are installed and lets the user
install new services, upgrade existing services, or delete services that were previously installed.
For information about installing a service, see “Installing a Service Description” on page 58.
The following topics provide information about the Servers page:
• Opening the Services Page
• Displaying Details About a Service
• Deleting a Media Services Service
Opening the Services Page
Using the Services Page
To open the Services page:
1. Open the Media Services and Transfer Status tool as described in “Opening the
Media Services and Transfer Status Tool” on page 34.
2. Click the Services tab.
The Services page opens.
51
Page 52

Displaying Details About a Service
To display information about a specific service:
1. Open the Media Services and Transfer Status tool as described in “Opening the
Media Services and Transfer Status Tool” on page 34.
2. Click the Services tab. The Services page opens.
3. Select the service about which you want information.
4. Click Details.
The Service Details page opens.
Using the Services Page
The specific information displayed on the Service Details page differs for each
installed service.
52
Page 53

Deleting a Media Services Service
Deleting a Media Services service from the Services page deletes the information required for
the service to operate. If one or more providers have been registered for the service on the
Providers page, you must first delete the providers for the service. For more information, see
“Deleting Providers” on page 50.
To delete the provider software, use the Add/Remove Programs in the Windows Control Panel on
the provider system.
To delete a service:
1. Open the Media Services and Transfer Status tool and log in as a user with administrator
privileges. For more information, see “Opening the Media Services and Transfer
Status Tool” on page 34.
2. Make sure all providers for the services that you are deleting have been deleted prior to
deleting the services themselves. See “Deleting Providers” on page 50.
3. Click the Services tab. The Services page opens.
4. Select the service you want to delete.
5. Click Delete.
Using the Users Page
The service is removed. To add the service again, see “Installing a Service Description” on
page 58.
Using the Users Page
The Users page lets you create and manage user accounts. The default login for the
Media Services and Transfer Status tool is the user name Administrator, without a password.
Avid recommends assigning a password to this account after installing the Media Services
Engine. For more information, see “Reassigning Passwords” on page 56.
The Users page displays information based on the user’s login profile. A user logged in as an
Administrator can view information about all jobs, whereas users without administrator
privileges can view all jobs, but can only see the username and clip names of their own jobs.
There are two methods for managing Media Services users:
• Using Avid Interplay authentication
If you set a host name in the Avid Interplay Media Services Engine Settings dialog box, the
Media Services Engine authenticates user names and passwords with the Avid Interplay
Engine (see “Configuring the Media Services Engine” on page 29). As a result, you do not
need to manage a separate user database for Media Services. If a host name is set, when you
53
Page 54

Using the Users Page
attempt to log in to the Interplay Media Services Engine, and the login is successful, the user
name and password are added to or updated in the Media Services database user’s table. The
user name and password appear on the Users page.
Adding or changing users on the Users page has no effect if a host name is set in the
Interplay Engine Hostname setting in the Avid Interplay Media Services Engine Settings
dialog box.
• Managing a separate user database
Managing Media Services users through a separate database can be useful if you want to
give administrator privileges to users who do not have administrator privileges in the
Interplay database. However, if you do not use Avid Interplay authentication, make sure any
user name and password exactly matches a user name and password in the Interplay
database, because Media Services operations usually require login by a valid Interplay user.
The following topics describe the Users page:
• Opening the Users Page
• Setting Up User Accounts
• Reassigning Passwords
• Deleting User Accounts
Opening the Users Page
To open the Media Services Users page:
1. Open the Media Services and Transfer Status tool as described in “Opening the
Media Services and Transfer Status Tool” on page 34.
2. Click the Users tab.
The Users page opens with user accounts listed in the User name column.
54
Page 55

Setting Up User Accounts
To set up a user account:
1. Open the Media Services and Transfer Status tool as described in “Opening the
Media Services and Transfer Status Tool” on page 34.
Using the Users Page
2. Click the Users tab. The Users page opens.
3. Click the Add button. A dialog box opens.
4. Type a user name in the Username text box.
User names and passwords are case sensitive and can contain only letters, numbers, and
underscores. They can be up to 255 characters.
5. (Option) You can assign a password by typing a password in the Password text box, then
typing it again in the Retype Password text box. Passwords are not required.
6. Type the applicable information about the user in the other text boxes.
7. (Option) If this user is an administrator, select the “is Administrator” option.
8. Click Save.
55
Page 56

Reassigning Passwords
If a user forgets his or her password, a new one must be assigned. If you forget the
Administration password, it must be reset. Contact Avid Customer Support.
To reassign a user password:
1. Open the Media Services and Transfer Status tool and log in as a user with administrator
privileges. For more information, see “Opening the Media Services and Transfer
Status Tool” on page 34.
2. Click the Users tab. The Users page opens.
3. Select the user that you want to change the password.
4. Click the Edit button. A dialog box opens.
5. Type a new password in the Password text box, then type it again in the Retype Password
text box.
6. Click Save.
Deleting User Accounts
You must be logged in as an administrator to delete user accounts.
Using the Users Page
The user “Administrator” cannot be deleted. If you try to delete Administrator, you receive an
n
error message.
To delete a user account:
1. Open the Media Services and Transfer Status tool and log in as a user with administrator
privileges. For more information, see “Opening the Media Services and Transfer
Status Tool” on page 34.
2. Click the Users tab. The Users page opens.
3. Select the User Name for each account you want to delete.
4. Click the Delete button.
A dialog box opens and asks if you are sure you want to delete the user account.
5. Click OK.
The user account is deleted.
To re-create user accounts, see “Setting Up User Accounts” on page 55.
56
Page 57

4 Installing Services and Registering
Providers
This chapter provides general procedures for installing a service, registering a provider, and
connecting it to the Media Services Engine. For specific information about each service, see
“Understanding the Various Media Services” on page 22 and the chapter that provides
information about the service.
The following topics provide information about the required tasks:
• Understanding Service Descriptions and Service Packages
• Installing a Service Description
• Registering the Provider
• Connecting a Provider to the Media Services Engine
• Starting the Service Provider
• Verifying That a Service Provider Is Connected
• Rules for Upgrading a Service and Preserving Profiles
Understanding Service Descriptions and Service Packages
Before you can use a service or register a provider, you must install the service description.
When you install the provider software on a provider system, a .zip file is also installed. This .zip
file (or service package) contains a service description file, which tells the Media Services
Engine the parameters for a given service and allows providers to be configured. In some cases it
may also contain other supporting files for the service.
You only need to install the service description once for each service, even if you are configuring
multiple providers.
The following table provides a list of Media Services services and the name of each service
package.
Page 58

Installing a Service Description
Service File Name of Service Package
Avid Interplay Transcode TranscodeService.zip
Avid Interplay Archive Archive.zip
Avid Interplay Restore Restore.zip
Avid Interplay Copy CopyMedia.zip
Avid Interplay Move MoveMedia.zip
Avid Interplay Delivery PTFService.zip
Avid Interplay ProEncode ProEncode.zip
Avid Interplay STP Encode LongGOPExport.zip
You do not use the Media Services Engine to configure the Auto Archive, Auto Transcode, and
n
Auto Copy services. Instead, use the Avid Interplay Administrator and the Avid Service
Framework services. For more information, see “Configuring Auto Archive Using the Avid
Service Configuration” on page 156.
Installing a Service Description
You use the Media Services and Transfer Status tool to install the service description (see
“Understanding Service Descriptions and Service Packages” on page 57).
You only need to install a service description once, even if you configure multiple providers.
Before you upgrade a service, see “Rules for Upgrading a Service and Preserving Profiles” on
n
page 68
For the Avid Interplay ProEncode service installation, you must install the service description
n
using the Media Services and Transfer Status tool on the Interplay Media Services server. You
cannot use a remote system. This allows the appropriate files that are needed for communication
through port 8080 and http to be placed on the Interplay Media Services server. You can install
the Interplay ProEncode provider software on a server other than the Media Services server. You
must, however, have access to the location of the ProEncode.zip file, which is installed with the
provider software. You can also copy the ProEncode.zip file from the provider system to the
Interplay Media Services server before you install the ProEncode service.
58
Page 59

Installing a Service Description
To install a Media Services service description:
1. Open the Media Services and Transfer Status tool and log in as administrator, as described in
“Opening the Media Services and Transfer Status Tool” on page 34.
2. Click the Services tab.
The Services page displays the currently configured services.
3. Click Install/Upgrade.
The Install/Upgrade Service dialog box opens.
4. Click the Browse button and navigate to the folder containing the service package (.zip file).
Make sure you have access to the folder.
The following is an example of the location of a service package. In this case, the service
package is for the Transcode service.
- C:\Program Files\Avid\Avid Interplay Transcode\TranscodeService
59
Page 60

Installing a Service Description
You can use the Microsoft Windows Search tool to help you locate the folder that contains
the service package. For a list of package file names, see “Understanding Service
Descriptions and Service Packages” on page 57.
5. In the folder, select the service.zip file.
The following illustration shows the TranscodeService.zip file selected.
6. Click Save.
The path to the file appears in the Install/Upgrade Service dialog box.
7. Click Install/Upgrade.
The service and its description appear on the Services page. The following illustration shows
the Transcode Service added to the Services page.
60
Page 61

Registering the Provider
Registering the Provider
After you install a service description, you need to register the provider.
The Provider page on the Media Services and Transfer Status tool is used to register a provider
for a particular service. The provider receives information about jobs and supplies the Media
Services Engine with information about the provider, job status, and other information
depending on the service. In some cases it passes the information to other applications.
To register the provider with the Media Services Engine:
1. Open the Media Services and Transfer Status tool and log in as administrator, as described in
“Opening the Media Services and Transfer Status Tool” on page 34.
2. Click the Providers tab.
The Providers page displays all of the currently registered providers.
61
Page 62

3. Click Register.
The Register Provider dialog box opens.
4. Do the following:
Registering the Provider
a. Service menu — Select a service. For a list of services, see “Understanding Service
Descriptions and Service Packages” on page 57.
b. Provider Name — Type the name that you want to use to identify this particular
provider. You can have several providers on your workgroup for the same service, so
you should use a meaningful name.
c. Application Name — For future use. Leave this text box blank.
As an example, the following illustration shows the Register Provider dialog box with the
values filled in for a Transcode Service.
5. Click Register.
62
Page 63

Connecting a Provider to the Media Services Engine
The provider appears on the Providers page. If the service is not connected to the Media
Services Engine, a Stop icon is displayed in the Status column. In this case, you must
connect the provider to the Media Services Engine. See “Connecting a Provider to the Media
Services Engine” on page 63.
Connecting a Provider to the Media Services Engine
After you install a service description and register the provider, you need to connect the provider
to the Media Services Engine. You can use the following procedure as an example. For specific
procedures for the various services, see “Understanding the Various Media Services” on page 22.
The following procedure uses the Transcode service as an example.
To connect a provider to the Media Services Engine:
1. Depending on the service, click Start and select Programs > Avid > Avid Interplay Service,
for example, Avid Interplay Transcode.
The service dialog box opens.
The following example shows the Transcode Service dialog box.
63
Page 64

2. Click Settings.
The Provider Settings dialog box opens.
Connecting a Provider to the Media Services Engine
3. Do the following:
a. Provider Name — Type the name of the provider you specified in “Registering the
Provider” on page 61. In this example, the name is Transcode_01.
b. Media Services Engine Host Name — Type the name of the system running the Media
Services Engine application.
c. Automatically Connect — Select either Yes or No (default) to automatically connect to
the Media Services Engine when the application starts.
The following illustration shows the Provider Settings dialog box with the values filled in for
a Transcode Service.
4. Click OK.
64
Page 65

Connecting a Provider to the Media Services Engine
5. Click Connect in the service dialog box.
The following example shows the Transcode Service.
The Transcode Service dialog box now shows that the service is connected and shows the
provider you selected to connect to. This example shows Transcode_01 as the provider.
The Provider page in the Media Services and Transfer Status tool now shows that the service
is connected, indicated by a check mark in the Status column.
65
Page 66

Starting the Service Provider
To start the service, you need to start the service provider.
Auto services, such as Auto Archive, start automatically.
n
To start the service provider:
t Click Start and select Programs > Avid > Avid Interplay service.
Depending on the service settings, one of the following happens:
- Automatically Connect—Yes, the service dialog box opens for the service you selected
and is connected to the service.
- Automatically Connect—No, the service dialog box opens for the service you selected
and displays Idle. Click the Connect button to connect to the service.
The service provider dialog box displays the start date and start time of the providers based on
n
the Microsoft® Windows® time.
After the connection is made, the Status line in the service dialog box reads “Checking for
Jobs,” and the History window displays the message “Connection Established.” The Connect
button changes to a Disconnect button.
Starting the Service Provider
The following example shows the Transcode Service dialog box as connected.
66
Page 67

Verifying That a Service Provider Is Connected
If the provider cannot connect to the Media Services Engine, the Status line reads “Connection
n
Error.” Ensure the Media Services Engine is running, the service is installed, the provider is
properly registered, and then click Connect again.
Verifying That a Service Provider Is Connected
To verify that a service provider is running and connected:
1. Open the Media Services and Transfer Status tool. See “Opening the Media Services and
Transfer Status Tool” on page 34.
2. Click the Providers tab.
The system displays the status of the Media Services providers. In the following illustration,
the Transcode service is connected, indicated by a check mark in the Status column. If the
provider is not connected (indicated by a stop sign), see “Starting the Service Provider” on
page 66.
Auto services, such as Auto Archive, do not appear in this list. Use the Avid Service Framework
n
Configuration window to verify that an Auto service is running. See “Verifying That the Auto
Archive Service is Running” on page 159.
67
Page 68

Rules for Upgrading a Service and Preserving Profiles
Rules for Upgrading a Service and Preserving
Profiles
When you are upgrading a Media Services service you need to perform the same procedures as a
new installation, such as installing the service description, registering the service provider and
connecting the provider to the Media Services Engine. However, before and after you upgrade a
service you need to follow a few rules:
• You need to log in with a user account that has administrator privileges.
• You should perform the upgrade of the service during a low usage time or when the Media
Services engine is offline.
• You can only install a newer version of an existing service.
• The Media Service Engine only supports one version of a service at a time.
• When upgrading a the ProEncode service, you must install the service using the Media
Services and Transfer Status tool on the Interplay Media Services server. For other services,
you can use the tool remotely. See “Installing a Service Description” on page 58.
• Make sure the service providers are disconnected, by verifying the Interplay Media Services
and Transfer Status tool’s Providers page shows Stop in the Status column.
You do not need to delete the service profiles or unregister the service before performing the
n
upgrade, as was required in versions prior to v2.0. However, if you want to delete a service
completely, you need to first delete all the profiles and providers, and then delete the service.
• During the service upgrade, you cannot cancel the upgrade, however you can continue to
work.
• When upgrading any of the Media Services services, all existing profiles are saved.
However, because the new version of the service might contain new or modified profile
settings, you must review your profiles after the upgrade. New and modified settings are
marked with a caution icon in the Parameters area of the profile. These marked settings
require you to either set a valid value or leave the text box blank, depending on the
requirements for the new or modified profile setting.
For information about the various profile settings, see “Working with Media Services
Profiles” on page 70.
You can modify multiple profile setting values using the Profiles page. For information, see
n
“Modifying Multiple Profiles” on page 73.
68
Page 69

Rules for Upgrading a Service and Preserving Profiles
• On the Profiles page, after the service is upgraded, a caution icon displays next to any profile
settings that were removed in the new version of the service. You need to check each
existing profile to make sure it meets your needs. The existing profile retains the older
profile settings to provide backward compatibility, however these older settings are not used
with the new version of the service.
• On the Profiles page, after the service is upgraded, a caution icon displays next to any profile
settings that the values were modified by the new version of the service. You need to check
each existing profile to make sure it meets your needs. The existing profile retains the older
profile setting values to provide backward compatibility, however these older setting values
are not used with the new version of the service.
69
Page 70

5 Working with Media Services Profiles
The following topics provide information about working with Media Services profiles:
• Understanding Media Services Profiles
• Creating a Service Provider Profile
• Modifying Multiple Profiles
• Modifying Changed or New Options in a Profile
Understanding Media Services Profiles
Profiles let you set up templates to use when performing an operation. For example, you can
create a profile to use with the Interplay Transcode service. When you select the profile, the
Transcode service automatically performs the transcode operation using the specified target
resolution, stores the new media on the specified workspace, and stores the new asset in the
designated target folder, as defined in the profile.
Profiles are required if you request a service from an Avid editing application. If you request a
service from Interplay Access, some services require a profile, and others provide the option of
using a profile or setting the parameters for the current operation.
You can update the values set in multiple profiles at the same time by using the Multiple Profile
Select mode. To use this mode, the profiles must be of the same type. For example, you can
select multiple Transcode service profiles and then change the Workspace value to update the
values in all the selected Transcode service profiles. For more information, see “Modifying
Multiple Profiles” on page 73.
Before you upgrade a service you can preserve existing profiles by following the rules listed in
“Rules for Upgrading a Service and Preserving Profiles” on page 68.
This chapter provides an example of how to create a profile. For specific procedures to create
profiles for the various services, see the references in the following table.
Page 71

Creating a Service Provider Profile
Service name Documentation
Interplay Transcode Service “Creating an Interplay Transcode Service Profile” on page 87
Interplay Archive Service
Interplay Restore Service
Interplay Copy Service “Using an Interplay Copy Service Profile” on page 189
Interplay Move Service “Creating a Avid Interplay Move Service Profile” on page 232
Interplay Stream Publish Provider (Not applicable to Interplay v2.4 or later) “Creating a Stream
Interplay Delivery Provider “Creating an Avid Interplay Delivery Profile” on page 254
Interplay ProEncode Provider “Creating an Interplay ProEncode Provider Profile” on page 292
You do not need to create a Media Services profile for the STP Encode service. The service
n
requests profile information directly from the Transfer Engine during the STP Encode workflow.
If a profile includes a target workspace on an ISIS system that is configured in a multiple ISIS
workgroup, and the workspace is on a remote ISIS system, the workspace path must include the
hostname of the ISIS System Director and the name of the workspace, in the standard UNC
format:
\\hostname\workspace_name
For more information, see “Workgroups with Multiple ISIS Systems” in the Avid Interplay
Software Installation and Configuration Guide.
“Creating an Interplay Archive or Interplay Restore Profile” on
page 143
Publish Service Profile” on page 372
Creating a Service Provider Profile
This section gives an example of how to create a service provider profile. It uses the Transcode
service as an example.
To create a profile:
1. Open the Media Services and Transfer Status tool. For more information, see “Opening the
Media Services and Transfer Status Tool” on page 34.
2. Click the Profiles tab.
3. In the Service menu, select a service, for example, Avid Interplay Transcode Service.
71
Page 72

4. Click Add in the Profiles area.
The Add Profile dialog box opens.
Creating a Service Provider Profile
5. Type a descriptive name for the new profile in the Add Profile dialog box. This is the name
that users see when they right-click an asset and select a service, for example Transcode.
6. Click OK.
The name appears in the Profiles list and an empty template appears in the Parameters area.
7. In the Parameters area, set a value for each option as needed.
8. Click Save in the Parameters area.
The Save Profile dialog box opens.
9. Click Yes to save your changes.
72
Page 73

You can define several operations under one main profile name. For example, you can add
subjobs to transcode several resolutions using one profile. The system processes each subjob
in turn.
To add subjobs:
t Click Add in the Sub Jobs area.
Modifying Multiple Profiles
From the Profiles page of the Avid Interplay Media Services and Transfer Status tool, you can
select multiple profiles to batch modify option values at the same time. When you select more
than one profile in the Profiles list, the Parameters area changes to multi-select mode with the
title “Parameters for All Selected Profiles.”
For example, you can select several Transcode profiles, and then change the Workspace value
once in the parameters area for all the selected profiles.
This feature is useful after you upgrade a service provider and you need to modify your existing
profiles to correct any values that are not supported with the new version of the service provider.
In the Parameters area of the profile, a caution icon indicates which profile settings require
attention. This feature is also useful for setting the parameters of multiple profiles after installing
a new Media Services service.
Modifying Multiple Profiles
To modify multiple profiles at the same time:
1. Open and log in to the Media Services and Transfer Status tool:
t From the Avid Interplay Media Services window, click Admin Tool.
t From the Avid Interplay Administrator, in the Site Settings area, click the Interplay
Media Services icon.
When you open the Media Services and Transfer Status tool from the Avid Interplay
n
Administrator, the name is “Interplay Media Services.”
2. Click the Profiles tab.
3. In the Service menu, select a service. For example, Avid Interplay Transcode Service.
4. In the Profiles list, select all the profiles you want to batch modify the setting values.
The Parameters for All Selected Profiles displays in the parameters area.
73
Page 74

Modifying Changed or New Options in a Profile
5. In the Parameters for All Selected Profiles area, click the option with the value you want to
change.
The option’s value field displays.
6. Type or select a new value for the option.
7. Click Save All.
Only the options displaying their value field are updated for all of the selected profiles.
Modifying Changed or New Options in a Profile
If you upgrade a service provider, you might need to modify your existing profiles to correct any
values that are not supported with the new version of the service provider, or to add a value for a
new option. In the Parameters area of the profile, a caution icon indicates which profile settings
require attention.
74
Page 75

Modifying Changed or New Options in a Profile
To remove the Caution icon for a new profile value:
t Make any change to the option value.
In some cases, you might need to enable and then disable an option to remove the icon.
75
Page 76

6 Working with the Transcode Service
The following topics provide information about working with the Transcode service:
• Understanding the Transcode Service
• Check List for Transcoding Assets
• Installing and Registering the Transcode Service Provider
• Starting the Transcode Provider
• Creating an Interplay Transcode Service Profile
• Understanding the Transcode Services Modes
• Transcoding an Asset from Avid Interplay Access
• Understanding CROSSRATE Mode
• Transcoding an Asset from an Avid Editing Application
• Transcoding OMF Clips
• Wo rkin g with a n Au to Transcode Folder
• Stereoscopic 3D Support in Interplay Transcode
Understanding the Transcode Service
Transcoding Avid assets from one resolution to another resolution is available with the Avid
Interplay Transcode service and Avid Interplay Auto Transcode service. For example, you can
use the Avid Interplay Transcode service to create a low-resolution version of a sequence or
master clip. You can also use the Interplay Transcode process to mix down the video and audio
tracks during the transcode.
If you are using the Transcode service to transcode a clip with multiple resolutions, the
Transcode service relinks to the Highest Quality resolution and then performs the transcode. The
Highest Quality resolution is determined by the Dynamic Relink feature of the Avid editing
system. For more information, see “Using MultiRez and Dynamic Relink” in the Interplay Help
or in the documentation for your Avid editing application.
Page 77

Before you can use the Transcode service, you need to check that the Transcode service is
installed and connected. For a list of the steps to prepare for transcoding, see “Check List for
Transcoding Assets” on page 77.
To transcode non-Avid assets, use the Avid Interplay ProEncode provider. For more information,
n
see “Working with the ProEncode Service” on page 287.
When accessing an Interplay Transcode system remotely, you should use the Microsoft Windows
n
Remote Desktop Connect command instead of VNC. The Remote Desktop Connect feature
requires setup on the Interplay Transcode system. For information, see the Microsoft Windows
documentation.
Check List for Transcoding Assets
For the transcode process, the following table provides a check list of steps for installing and
configuring the Interplay Media Services system in an Avid shared-storage environment, and
configuring an Avid editing system. The check list also provides references where to find more
information about each step.
Transcoding Assets Check List
Check List for Transcoding Assets
Task Section Reference
Check your configuration. See “Configuration Requirements” on page 25.
Make sure the Interplay Media Services application key
is connected to a USB port. If a Transcode provider is not
running on the Interplay Media Services server, you must
also connect an application key to a USB port on the
server running the Transcode provider.
Make sure the Interplay Media Services Engine software
and the supporting software are installed and configured
in the workgroup.
• Avid Service Framework for Client
• Avid Interplay Access
• Avid Interplay Media Services
• Avid Interplay Transcode service (install this on each
server used as a provider)
(Option) Install the Interplay Auto Media Services
service, which includes the Interplay Auto Transcode
software.
See Avid Interplay Software Installation and
Configuration Guide and “Interplay Media
Services Engine Installation and Configuration”
on page 26.
See “Preparing the Workgroup for Auto
Transcode” on page 112.
77
Page 78

Transcoding Assets Check List (Continued)
Task Section Reference
Install and register the Interplay Transcode service
provider.
Connect the Interplay Transcode service provider to the
Media Service Engine.
Start the Interplay Transcode service provider. See “Starting the Transcode Provider” on page 86.
Verify the Interplay Transcode service is connected. See “Verifying That a Service Provider Is
(Option) Create a Interplay Transcode profile. See “Creating an Interplay Transcode Service
Perform a transcode using Interplay Access. See “Transcoding an Asset from Avid Interplay
Perform a transcode using an Avid editing system. See “Transcoding an Asset from an Avid Editing
Installing and Registering the Transcode Service Provider
See “Installing and Registering the Transcode
Service Provider” on page 78.
See “Connecting the Transcode Provider to the
Media Services Engine” on page 83.
Connected” on page 67.
Profile” on page 87.
Access” on page 106.
Application” on page 108.
Installing and Registering the Transcode Service
Provider
Before you can use the Transcode service provider, you must install the provider software
needed by the service from the Avid Interplay Server Installer. Then install the service
description in the Media Services Engine, register the provider, and start and connect the service.
These tasks are explained in the following topics:
• Installing the Transcode Service Description
• Registering the Transcode Provider
• Connecting the Transcode Provider to the Media Services Engine
78
Page 79

Installing and Registering the Transcode Service Provider
You do not use the Media Services Engine to configure the Auto Archive, Auto Transcode, and
n
Auto Copy services. Instead, use the Avid Interplay Administrator and the Avid Service
Framework services. For more information, see “Configuring the Auto Transcode Service” on
page 112.
Installing the Transcode Service Description
You use the Media Services and Transfer Status tool to install the Transcode service description.
For more information, see “Understanding Service Descriptions and Service Packages” on
page 57.
You only need to install a service description once, even if you configure multiple providers.
To install the Transcode service description:
1. Make sure the Interplay Transcode provider software is installed.
2. Open the Media Services and Transfer Status tool and log in as an administrator, as
described in “Opening the Media Services and Transfer Status Tool” on page 34.
3. Click the Services tab.
The Services page displays the currently configured services.
4. Click Install/Upgrade.
The Install/Upgrade Service dialog box opens.
79
Page 80

Installing and Registering the Transcode Service Provider
5. Click the Browse button and navigate to the folder containing the Transcode service package
(TranscodeService.zip file). Make sure you have access to the folder. By default the service
package is installed in the following folder:
C:\Program Files\Avid\Avid Interplay Transcode\TranscodeService
You can use the Microsoft Windows Search tool to help you locate the folder that contains
the TranscodeService.zip file. Make sure you have access to the folders.
6. In the folder, select the TranscodeService.zip file.
The following illustration shows the TranscodeService.zip file selected.
7. Click Save.
The path to the file appears in the Install/Upgrade Service dialog box.
80
Page 81
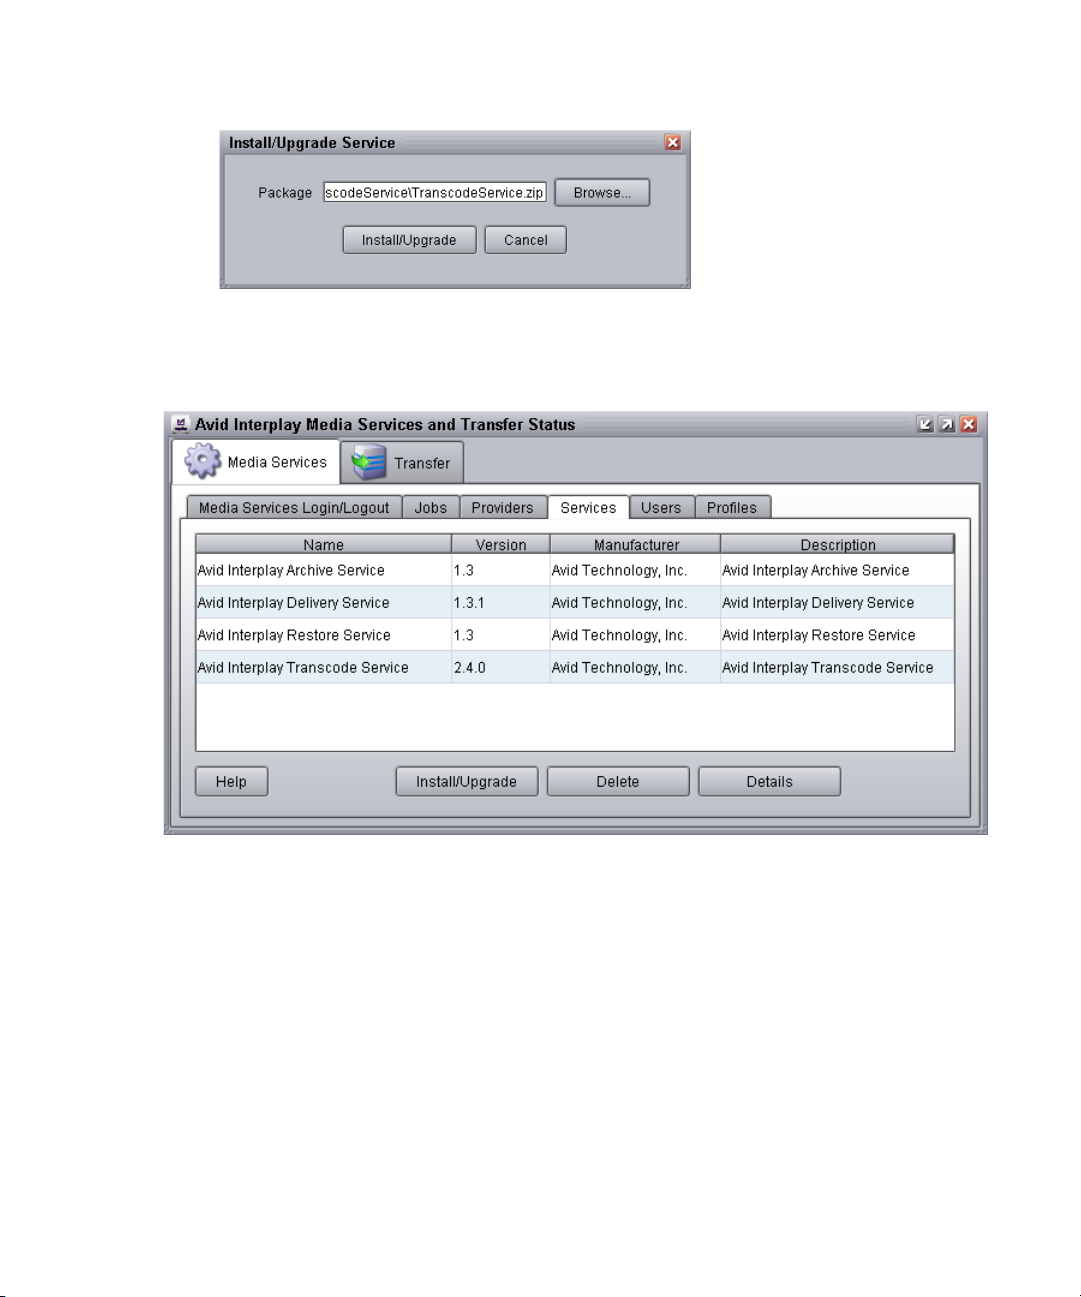
Installing and Registering the Transcode Service Provider
8. Click Install/Upgrade.
The Avid Interplay Transcode Service appears on the Services page.
Registering the Transcode Provider
After you install the Transcode service description, you need to register the Transcode provider
with the Media Services Engine. If you are configuring multiple providers, you need to register
each provider.
The Provider page on the Media Services and Transfer Status tool is used to register the
Transcode provider for the Transcode service. The provider receives information about jobs and
supplies the Media Services Engine with information about the provider, job status, and other
information depending on the service. In some cases it passes the information to other
applications.
81
Page 82

Installing and Registering the Transcode Service Provider
To register the Transcode provider with the Media Services Engine:
1. Open the Media Services and Transfer Status tool and log on as an administrator, as
described in “Opening the Media Services and Transfer Status Tool” on page 34.
2. Click the Providers tab.
The Providers page displays all of the currently registered providers.
3. Click the Register button.
The Register Provider dialog box opens.
4. Do the following:
a. Service menu — Select Avid Interplay Transcode Service
b. Provider Name — Type the name that you want to use to identify this particular
provider. You can have multiple providers on your workgroup for the same service, so
you should use a meaningful name.
c. Application Name — For future use. Leave this text box blank.
The following illustration shows the Register Provider dialog box with the values filled in
for a Transcode service.
82
Page 83

Installing and Registering the Transcode Service Provider
5. Click Register.
The Transcode provider appears in the Providers page. If the service is not connected to the
Media Services Engine, a Stop icon is displayed in the Status column. In this case, you must
connect the Transcode provider to the Media Services Engine software. See “Connecting the
Transcode Provider to the Media Services Engine” on page 83.
Connecting the Transcode Provider to the Media Services Engine
After you install the Transcode service description and register the Transcode provider, you need
to connect the Transcode provider to the Media Services Engine software.
To connect the Transcode provider to the Media Services Engine:
1. Click Start and select Programs > Avid > Avid Interplay Transcode.
The Transcode Service dialog box opens.
83
Page 84

2. Click Settings.
The Provider Settings dialog box opens.
Installing and Registering the Transcode Service Provider
3. Do the following:
a. Provider Name — Type the name of the provider you specified in “Registering the
Transcode Provider” on page 81. In this example, the name is Transcode_01.
b. Media Services Engine Host Name — Type the name of the system running the Media
Services Engine application.
c. Automatically Connect — Select either Yes or No (default) to automatically connect to
the Media Services Engine when the application starts.
The following illustration shows the Provider Settings dialog box with the values filled in for
the Transcode provider.
84
Page 85

Installing and Registering the Transcode Service Provider
4. Click OK.
5. Click Connect in the Service window.
The Transcode Service dialog box now shows that the service is connected and shows the
name of the provider you connected.
The Provider page in the Media Services and Transfer Status tool now shows that the service
is connected, indicated by a check mark in the Status column.
85
Page 86

Starting the Transcode Provider
To start the Transcode provider:
1. Click Start and select Programs > Avid > Avid Interplay Transcode.
Depending on the service settings, one of the following happens:
- Automatically Connect—Yes, the service dialog box opens for the service you selected
and is connected to the service.
- Automatically Connect—No, the service dialog box opens for the service you selected
and displays Idle. Click the Connect button to connect to the service.
The service provider dialog box displays the start date and start time of the providers based on
n
the Microsoft Windows time.
After the connection is made, the Status line in the service dialog box reads “Checking for
Jobs,” and the History window displays the message “Connection Established.” The Connect
button changes to a Disconnect button.
The following example shows the Transcode Service dialog box as connected.
Starting the Transcode Provider
If the provider cannot connect to the Media Services Engine, the Status line reads “Connection
n
Error.” Ensure the Media Services Engine is running, the service description is installed, the
provider is properly registered, and then click Connect again.
86
Page 87

Creating an Interplay Transcode Service Profile
Creating an Interplay Transcode Service Profile
You must create a profile to use when performing a Transcode or an Auto Transcode operation.
You select a Transcode profile after selecting an asset in Interplay Access or in an Avid editing
application.
Transcode profiles let you define the following:
• The portion of the Avid asset that is transcoded
• Job priority
• Resolution and format
• Workspace for the media files
To create a transcode profile:
1. Open and log in to the Media Services and Transfer Status tool as described in “Opening the
Media Services and Transfer Status Tool” on page 34.
2. Click the Profiles tab.
3. In the Service menu, select Avid Interplay Transcode Service.
87
Page 88

Creating an Interplay Transcode Service Profile
4. Click Add in the Profiles area.
The Add Profile dialog box opens.
5. Type a descriptive name for the new profile in the Add Profile dialog box. This is the name
that users see when they right-click an asset and select Transcode.
6. Click OK.
The name appears in the Profiles list and an empty template appears in the Parameters area.
88
Page 89

Creating an Interplay Transcode Service Profile
7. In the Parameters area, select a Mode as follows:
- WHOLE: Transcodes the entire clip.
- CONSOLIDATE: Transcodes only the portion of a clip used to create a subclip or
portions of clips used to create a sequence.
- MIXDOWN: Transcodes and mixes down the video and audio to create one master clip.
- DUALMIXDOWN — Transcodes the selected asset twice to create a single master clip
with two resolutions associated with it.
- CROSSRATE — Creates a master clip in a project format different from the project
format of the original clip.
For more information, see “Understanding the Transcode Services Modes” on page 98.
8. In the Parameters area, define the other values you want in the profile for the selected mode.
See “Transcode Profile Parameters” on page 89.
9. Click Save in the Parameters area.
The Save Profile dialog box opens.
10. Click Yes to save your changes.
You can define several transcode operations under one main profile name. For example, you
can add subjobs to transcode several resolutions using one profile. The system processes
each subjob in turn.
To add subjobs:
t Click Add in the Sub Jobs area.
Transcode Profile Parameters
All transcode profile parameters are displayed for any mode that you select, but some parameters
are applicable only to particular modes. The following table describes all parameters with notes
about specific modes.
89
Page 90

Creating an Interplay Transcode Service Profile
Transcode Profile Settings
Parameter Description
Mode • WHOLE: Transcodes the entire clip. See “Understanding
the Transcode Services Modes” on page 98.
• CONSOLIDATE: Transcodes only the portion of a clip
used to create a subclip or portions of clips used to create
a sequence. See “Understanding the Transcode Services
Modes” on page 98.
• MIXDOWN: Transcodes and mixes down the video and
audio of a sequence to create one master clip. See
“Understanding MIXDOWN Mode” on page 99.
• DUALMIXDOWN: Transcodes and mixes down the
video and audio of a sequence to create a one master clip
with two resolutions associated with it. See
“Understanding DUALMIXDOWN Mode” on page 101.
• CROSSRATE: Creates a master clip in a project format
different from the project format of the original clip. See
“Understanding CROSSRATE Mode” on page 104.
Priority Select a priority. This value allows you to assign job priorities
to different profiles. Priority numbers range from 1 (highest
priority) through 100 (lowest priority). The default priority
number assigned to each job is 50.
TargetAudioQuality Select an audio resolution for the transcode or select None.
• None
(MIXDOWN or DUALMIXDOWN mode only) The
mixed-down clip does not include the audio tracks.For
example, if you select None from the TargetAudioQuality
menu, then the audio tracks are not mixed down during
the Interplay Transcode operation.
• MPEG1 Layer 2: Digital audio compressed to the
MPEG1 Layer 2 specification at 96 Kb/s.
• Uncompressed PCM: 16-bit 48-kHz digital audio
• Uncompressed PCM 24-bit: 24-bit 48-kHz digital audio
90
Page 91

Creating an Interplay Transcode Service Profile
Transcode Profile Settings (Continued)
Parameter Description
TargetAudioQualityDual (DUALMIXDOWN mode only) Select an audio resolution
for the second transcode.
•None
The mixed-down clip does not include the audio tracks.
For example, if you select None from the
TargetAudioQualityDual menu, then the audio tracks are
not mixed down during the Interplay Transcode operation.
• MPEG1 Layer 2 - digital audio compressed to the
MPEG1 Layer 2 specification at 96 Kb/s.
• Uncompressed PCM: 16-bit 48-kHz digital audio
• Uncompressed PCM 24-bit: 24-bit 48-kHz digital audio
If you select a dual target, you should also select a
n
primary target.
This parameter is ignored for other Transcode modes.
TargetAudioTrackMapping (MIXDOWN or DUALMIXDOWN mode only) Lets you
identify the mapping of source audio tracks to the output
(target) audio tracks. See “Mapping Audio Tracks in
MIXDOWN, DUALMIXDOWN, and CROSSRATE Modes”
on page 92. This parameter is ignored for other Transcode
modes.
TargetProjectType (CROSSRATE mode only) Select the project type to which
you want to transcode. See “Understanding CROSSRATE
Mode” on page 104. Select None if you do not want to
transcode to a different project type. This parameter is
ignored for other Transcode modes.
TargetVideoQuality Select a video resolution for the transcode. Select None if you
do not want the transcoded clip to include a video track.
TargetVideoQualityDual (DUALMIXDOWN mode only) Select a video resolution for
the second transcode. Select None if you do not want the
transcoded clip to include a video track.
This parameter is ignored for other Transcode modes.
If you select a dual target, you should also select a
n
primary target.
VideoTimeCodeFormat Not used - for future use.
91
Page 92

Creating an Interplay Transcode Service Profile
Transcode Profile Settings (Continued)
Parameter Description
Workspace Type the name of the Avid shared-storage workspace that will
hold the new media files.
If the workspace is part of a multiple-ISIS worksgroup:
Existing profiles will work correctly with the workspaces as
currently defined, but new or edited profiles that specify a
workspace on a remote ISIS system must include the
hostname of the ISIS System Director.
\\hostname\workspace_name
WorkspaceDual (DUALMIXDOWN mode only) Type the name of a second
Avid shared-storage workspace that will hold the new media
files. See “Understanding DUALMIXDOWN Mode with Two
Workspaces” on page 102.
This parameter is ignored for other Transcode modes.
Mapping Audio Tracks in MIXDOWN, DUALMIXDOWN, and CROSSRATE Modes
When you create a Avid Interplay Transcode profile for mixing down the source audio (in
MIXDOWN, DUALMIXDOWN, and CROSSRATE modes), you can also specify how the
source audio tracks map to the target audio tracks. The TargetAudioTrackMapping text box lets
you identify the source audio tracks and how you want them mapped to the target audio tracks.
Use the following rules in the TargetAudioTrackMapping text box:
AudioMode[S or A]TargetAudioTrack=SourceAudioTrack+SourceAudioTrack;
For example, S1=1+2; performs a stereo mapping of the source audio track 1 to the target audio
track 1 and the source audio track 2 to the target audio track 2.
If you leave the TargetAudioTrackMapping text box blank, then the default audio track mapping
is used: S1=0; which is stereo mode with all source audio tracks mapping to target audio tracks 1
and 2.
You can enter a series of output (target) track mapping specifications. The following table
explains the specifications:
92
Page 93

Creating an Interplay Transcode Service Profile
TargetAudioTrackMapping
Text Box Rule
AudioMode Type S for stereo mode that uses two target audio tracks and
applies balancing.
Type A for mono mode that uses one target audio track and does
not include balancing.
Type O to specify surround sound 5.1
Type Q to specify surround sound 7.1. For more information, see
“Support for Surround Sound Audio Tracks” on page 96.
The letters S, A, O, and Q are not case sensitive.
n
TargetAudioTrack Type the target audio track number.
• For stereo mode the target audio track must be an odd
number. The second stereo target audio track is automatically
set using the number you type +1. For example, if you type S1
then the target audio tracks are audio track 1 and audio
track 2.
= You must type an equal sign after the Target Audio Track before
specifying the source audio tracks.
SourceAudioTrack Type a source audio track number.
• Type a specific source audio track number or a series of track
numbers separated by a + (plus sign).
• Type 0 to include all available source audio tracks.
• Type -1 to include all odd numbered source audio tracks.
• Type -2 to include all even numbered source audio tracks.
; You must type a ; (semicolon) as a terminator after the source
audio track numbers.
93
Page 94

Creating an Interplay Transcode Service Profile
The following table provides some common uses of the audio track mapping process.
TargetAudioTrackMapping
Text Box Explanation
A0=0; Mono mode, all available source audio tracks are mapped to
equal number of target audio tracks, such as source audio track 1
maps to target audio track 1, source audio track 2 maps to target
audio track 2, and so on.
A1=0; Mono mode, all available source audio tracks are mapped to
target audio track 1.
A1=-1; Mono mode, all available odd numbered source audio tracks are
mapped to target audio track 1.
A2=-2; Mono mode, all available even numbered source audio tracks are
mapped to target audio track 2.
S1=0; Stereo mode, all available source audio tracks are mapped to
target audio track 1 and target audio track 2. This is the default
result if the text box is left blank.
The following table provides an example of using audio track mapping with multi-language
source clips.
TargetAudioTrackMapping
Source Audio Tracks
Track 1 and 2 - music
Track 3 and 4 - English
voice over
Track 5 and 6 - French
voice over
text box Results
S1=1+2+3+4; Stereo mode
• source audio track 1 is mapped to target
audio tracks 1 (music odd track)
• source audio track 2 is mapped to target
audio tracks 2 (music even track)
• source audio track 3 is mapped to target
audio target track 1 (English odd track)
• source audio track 4 is mapped to target
audio track 2 (English even track)
94
Page 95

Creating an Interplay Transcode Service Profile
V1
A1
A2
Clip 1 Clip 2
TargetAudioTrackMapping
Source Audio Tracks
text box Results
S3=1+2+5+6; Stereo mode
• source audio track 1 is mapped to target
audio track 3 (music odd track)
• source audio track 2 is mapped to target
audio track 4 (music even track)
• source audio track 5 is mapped to target
audio track 3 (French odd track)
• source audio track 6 is mapped to target
audio track 4 (French even track)
Override for default panning in Transcode mixdowns: The default audio panning behavior
for stereo mixdowns is center pan. This has been the behavior since Interplay v2.5 and matches
the behavior of Avid editing applications. (Previously the default panning was odd tracks left and
even tracks right.)
You can override this default to pan all odd tracks left and all even tracks right. To use this
override, enter P0=0; in a profile's TargetAudioTrackMapping text box, followed by the desired
track mapping. For example, to pan all odd tracks stereo left and all even tracks stereo right,
enter P0=0;S1=0;
If you enter only P0=0; the following error message is displayed: “No output track descriptors
n
found.”
Mapping Multichannel Audio Tracks in MIXDOWN, DUALMIXDOWN, and CROSSRATE Modes
Avid editing applications let users create and work with multichannel audio tracks. For example,
for a clip, you can combine audio tracks A1 and A2 into a single stereo track.The Interplay
Transcode Mixdown option (in MIXDOWN, DUALMIXDOWN, and CROSSRATE modes) lets
you specify how stereo tracks map to target audio tracks.
For example, you might want to transcode and mixdown a sequence that includes two tracks (A1
and A2), each of which is a stereo pair.
95
Page 96

Creating an Interplay Transcode Service Profile
V1
A1
A2
A1 & A2
A3 & A4
V1Clip 1 Clip 2
Clip 1.new
Transcode
Mixdown
V1
A1
A2
A1
A2
V1
Clip 1 Clip 2
Clip 1.new
Transcode
Mixdown
If you are using the Transcode Mixdown option, and you want to preserve the two tracks as
stereo pairs, use the following mapping:
S1 = 1;S3 = 2;
This mapping specifies that:
• For stereo output track 1 (S1), use source track 1
• For stereo output track 3 (S3), use source track 2
For stereo mode, the target track must be an odd number, because it represents two stereo tracks.
The transcoded, mixed-down sequence preserves the two tracks as stereo pairs, as shown in the
following illustration:
Other mappings will combine the stereo pair to a single track. For example, A0 = 0 will create
two mono tracks, as shown in the following illustration.
c
If you are using the Transcode Mixdown option with stereo tracks, make sure that your
audio track mapping is correct for the output that you want. The Transcode Mixdown
service uses the track information as labeled in the sequence, not as labeled in the original
master clips.
Support for Surround Sound Audio Tracks
Interplay v2.5 supports an end-to-end workflow for clips and sequences that include surround
sound audio tracks. Track groups are preserved when you check objects in and out of the
Interplay database and process them Interplay Media Services and Interplay Transfer.
96
Page 97

Creating an Interplay Transcode Service Profile
If you want to use the Transcode MIXDOWN, DUAL-MIXDOWN, or CROSSRATE mode with
surround sound audio, you need to create a profile that includes mapping information in the
TargetAudioTrackMapping text box. For information about creating a Transcode profile, see the
Avid Interplay Media Services Setup and Users Guide or the Avid Interplay Help.
Interplay Media Services v2.5 includes two new letters to use for mapping surround-sound
audio:
• Use the letter O to specify surround sound 5.1
• Use the letter Q to specify surround sound 7.1
You use an Avid editing system to configure audio tracks for the surround sound mix. By default,
the Avid editing system arranges the surround sound mix as follows. Tracks are relative to the
output starting track number.
Track 5:1 7:1
First Left Front Left Front
Second Center Center
Third Right Front Right Front
Fourth Left Rear Left Center
Fifth Right Rear Right Center
Sixth Low Frequency Left Rear
Seventh Right Rear
Eighth Low Frequency
For additional information on surround sound, see the What’s New guide for your Avid editing
application.
You can create a Transcode profile that specifies which tracks to use in the mixdown. The
surround sound mix is preserved in the mixdown. The following table shows several examples of
what to type in the TargetAudioTrackMapping text box.
Format Result
O1=0;
Q1=0;
All source tracks are included in a 5.1 mix and are mixed down to tracks
1through 6.
All source tracks are included in a 7.1 mix and are mixed down to tracks
1 through 8.
97
Page 98

Format Result
Understanding the Transcode Services Modes
O1=3+4+5+6+7+8;
Q1=2+3+4+5+6+7+8+9;
Limitation
Interplay Assist cannot play sequences created in an Avid editing system that contain surround
sound clips if the Audio Monitoring Mix Mode is set to Direct Out. Workaround: Set the Audio
Monitoring Mix Mode to Mono or Stereo.
Interplay Assist can play surround sound clips as Direct Out, and can create and play shotlists
n
that contain surround sound clips.
Tracks 3 through 8 are included in a 5.1 mix and are mixed down to
tracks 3 through 8. Use this if there are tracks that are not included in
the surround sound mix. In this example tracks 1 and 2 are not included.
Tracks 2 through 9 are included in a 7.1 mix and are mixed down to
tracks 2 through 9. Use this if there are tracks that are not included in
the surround sound mix. In this example, track 1 is not included.
Understanding the Transcode Services Modes
The Transcode profile lets you select various modes to perform different types of transcodes.
• WHOLE — The transcode process creates new media for an entire clip. For sequences or
subclips, the complete source clips that make up the sequence or subclip are transcoded. All
audio tracks and video track V1 are transcoded. Effects are not transcoded. No new clip is
created.
• CONSOLIDATE — For subclips, the transcode process creates new media only for the
portion of the clip that makes up the subclip. For sequences, the transcode process creates
new media only for the portion of the clips that are contained in the sequence. This process
creates partially online media for the related clips. Relevant portions of all audio tracks and
video track V1 are transcoded. Effects are not transcoded. No new clip is created.
• MIXDOWN — The transcode process mixes down the audio and video of a sequence to
create new media and a new master clip. Profile settings let you control if the audio and
video are included in the mixed-down master clip. See “Understanding MIXDOWN Mode”
on page 99.
The new master clip is named clipname,xcode mix,n, where n is the number of Transcode
jobs run since the last start of the service (for example, MyClip,xcode mix,2). It is created in
the same folder as the source sequence.
• DUALMIXDOWN — The transcode process mixes down the audio and video of a sequence
to create two sets of new media and a new master clip associated with both sets of media.
Profile settings let you control if audio and video are included in the mixed-down master clip
98
Page 99

and if resolutions are stored in separate workspaces. See “Understanding DUALMIXDOWN
Mode” on page 101 and “Understanding DUALMIXDOWN Mode with Two Workspaces”
on page 102.
The new master clip is named clipname,xcode mix,n, where n is the number of Transcode
jobs run since the last start of the service (for example, MyClip,xcode mix,2). It is created in
the same folder as the source sequence.
• CROSSRATE — The transcode process creates new media and a new master clip in a
project format different from the project format of the original clip. See “Understanding
CROSSRATE Mode” on page 104.
The new master clip is named clipname,crossrate,n, where n is the number of Transcode jobs
run since the last start of the service (for example, MyClip,transcode,3). It is created in the
same folder as the source master clip.
Understanding MIXDOWN Mode
The Interplay Transcode service can mix down the audio and video during the transcode process
of sequences. You can set up an Interplay Transcode profile in the Avid Interplay Media Services
and Transfer Status window for the type of mixdown you want to perform. Then you can use
Interplay Access or an Avid editing system to select the items to transcode and select the profile
to use for the transcode and mixdown.
Understanding the Transcode Services Modes
When performing a mixdown the following items are preserved in the mixed-down master clips,
if they are available in the original sequence:
• Locators and column property values
• Restrictions on any portion of the sequence
• Headframes are generated if the source sequence contained them
The metadata of the newly created mixed-down master clip contains a reference to the original
sequence.
Video mixdown supports all target resolutions available in the TargetVideoQuality list in the
Transcode profile tab. Audio mixdown supports all target formats in the TargetAudioQuality list.
See “Creating an Interplay Transcode Service Profile” on page 87.
You can set up the Interplay Transcode profile to map the source audio tracks to various target
audio tracks. For information about mapping the audio tracks, see “Mapping Audio Tracks in
MIXDOWN, DUALMIXDOWN, and CROSSRATE Modes” on page 92.
An Interplay Transcode profile that is set up for audio mixdown can be used with sequences or
n
clips that do not contain audio. Therefore, you do not need a specific profile for video-only
mixdowns. This is also true for video mixdowns: a profile set for video mixdown can be used with
sequences that do not contain video. In both cases, the mixdown finishes as expected.
99
Page 100

Understanding the Transcode Services Modes
Effects Support
If the sequence you send to the Transcode Mixdown service contains Avid real-time effects
(including RTAS audio effects), the effects are rendered as part of the Transcode Mixdown
process.
If the sequence you send to the Transcode Mixdown service includes any of the following
effects, you need to render them in your Avid editing application before starting the Transcode
Mixdown process:
• Non-real-time effects (blue-dot effects)
• Third-party 3D effects
• AudioSuite plug-in effects
• Third-party audio plug-in effects
If you revise the sequence after transcoding, you might need to render the effects again.
To make sure all effects are transcoded and mixed down correctly, consider rendering all effects
before starting the Transcode Mixdown process.
Interplay Transcode Mixdown and Avid Editing Mixdown
The Mixdown mode in the Interplay Transcode service functions differently from the Avid
editing application’s mixdown features. The following table lists the differences between the
Interplay Transcode Mixdown mode and an Avid editing application’s mixdown feature.
When selecting the target audio quality in the profile, Uncompressed PCM is for 16 bits/sample
n
rate.
100
 Loading...