

Page 1

Avid® Interplay™ Engine and
Avid Interplay Archive Engine
Administration Guide
make manage move | media
™
Avid
®
Page 2

Copyright and Disclaimer
Product specifications are subject to change without notice and do not represent a commitment on the part of Avid Technology,
Inc.
The software described in this document is furnished under a license agreement. You can obtain a copy of that license by
visiting Avid's Web site at www.avid.com. The terms of that license are also available in the product in the same directory as
the software. The software may not be reverse assembled and may be used or copied only in accordance with the terms of the
license agreement. It is against the law to copy the software on any medium except as specifically allowed in the license
agreement.
Avid products or portions thereof are protected by one or more of the following United States Patents: 4,746,994; 4,970,663;
5,045,940; 5,267,351; 5,309,528; 5,355,450; 5,396,594; 5,440,348; 5,452,378; 5,467,288; 5,513,375; 5,528,310; 5,557,423;
5,577,190; 5,584,006; 5,640,601; 5,644,364; 5,654,737; 5,715,018; 5,724,605; 5,726,717; 5,729,673; 5,745,637; 5,752,029;
5,754,851; 5,799,150; 5,812,216; 5,828,678; 5,842,014; 5,852,435; 5,987,501; 6,061,758; 6,223,211; 6,301,105; 6,532,043;
6,546,190; 6,636,869; 6,747,705, 6,763,523; 6,813,622. Other patents are pending.
This document is protected under copyright law. An authorized licensee of Avid Interplay may reproduce this publication for the
licensee’s own use in learning how to use the software. This document may not be reproduced or distributed, in whole or in
part, for commercial purposes, such as selling copies of this document or providing support or educational services to others.
This document is supplied as a guide for Avid Interplay. Reasonable care has been taken in preparing the information it
contains. However, this document may contain omissions, technical inaccuracies, or typographical errors. Avid Technology,
Inc. does not accept responsibility of any kind for customers’ losses due to the use of this document. Product specifications
are subject to change without notice.
Copyright © 2007 Avid Technology, Inc. and its licensors. All rights reserved.
The following disclaimer is required by Sam Leffler and Silicon Graphics, Inc. for the use of their TIFF library:
Copyright © 1988–1997 Sam Leffler
Copyright © 1991–1997 Silicon Graphics, Inc.
Permission to use, copy, modify, distribute, and sell this software [i.e., the TIFF library] and its documentation for any purpose
is hereby granted without fee, provided that (i) the above copyright notices and this permission notice appear in all copies of
the software and related documentation, and (ii) the names of Sam Leffler and Silicon Graphics may not be used in any
advertising or publicity relating to the software without the specific, prior written permission of Sam Leffler and Silicon
Graphics.
THE SOFTWARE IS PROVIDED “AS-IS” AND WITHOUT WARRANTY OF ANY KIND, EXPRESS, IMPLIED OR
OTHERWISE, INCLUDING WITHOUT LIMITATION, ANY WARRANTY OF MERCHANTABILITY OR FITNESS FOR A
PARTICULAR PURPOSE.
IN NO EVENT SHALL SAM LEFFLER OR SILICON GRAPHICS BE LIABLE FOR ANY SPECIAL, INCIDENTAL, INDIRECT
OR CONSEQUENTIAL DAMAGES OF ANY KIND, OR ANY DAMAGES WHATSOEVER RESULTING FROM LOSS OF USE,
DATA OR PROFITS, WHETHER OR NOT ADVISED OF THE POSSIBILITY OF DAMAGE, AND ON ANY THEORY OF
LIABILITY, ARISING OUT OF OR IN CONNECTION WITH THE USE OR PERFORMANCE OF THIS SOFTWARE.
The following disclaimer is required by the Independent JPEG Group:
This software is based in part on the work of the Independent JPEG Group.
This Software may contain components licensed under the following conditions:
Copyright (c) 1989 The Regents of the University of California. All rights reserved.
Redistribution and use in source and binary forms are permitted provided that the above copyright notice and this paragraph
are duplicated in all such forms and that any documentation, advertising materials, and other materials related to such
distribution and use acknowledge that the software was developed by the University of California, Berkeley. The name of the
University may not be used to endorse or promote products derived from this software without specific prior written
permission. THIS SOFTWARE IS PROVIDED ``AS IS'' AND WITHOUT ANY EXPRESS OR IMPLIED WARRANTIES,
INCLUDING, WITHOUT LIMITATION, THE IMPLIED WARRANTIES OF MERCHANTABILITY AND FITNESS FOR A
PARTICULAR PURPOSE.
Copyright (C) 1989, 1991 by Jef Poskanzer.
Permission to use, copy, modify, and distribute this software and its documentation for any purpose and without fee is hereby
granted, provided that the above copyright notice appear in all copies and that both that copyright notice and this permission
notice appear in supporting documentation. This software is provided "as is" without express or implied warranty.
Copyright 1995, Trinity College Computing Center. Written by David Chappell.
2
Page 3

Permission to use, copy, modify, and distribute this software and its documentation for any purpose and without fee is hereby
granted, provided that the above copyright notice appear in all copies and that both that copyright notice and this permission
notice appear in supporting documentation. This software is provided "as is" without express or implied warranty.
Copyright 1996 Daniel Dardailler.
Permission to use, copy, modify, distribute, and sell this software for any purpose is hereby granted without fee, provided that
the above copyright notice appear in all copies and that both that copyright notice and this permission notice appear in
supporting documentation, and that the name of Daniel Dardailler not be used in advertising or publicity pertaining to
distribution of the software without specific, written prior permission. Daniel Dardailler makes no representations about the
suitability of this software for any purpose. It is provided "as is" without express or implied warranty.
Modifications Copyright 1999 Matt Koss, under the same license as above.
Copyright (c) 1991 by AT&T.
Permission to use, copy, modify, and distribute this software for any purpose without fee is hereby granted, provided that this
entire notice is included in all copies of any software which is or includes a copy or modification of this software and in all
copies of the supporting documentation for such software.
THIS SOFTWARE IS BEING PROVIDED "AS IS", WITHOUT ANY EXPRESS OR IMPLIED WARRANTY. IN PARTICULAR,
NEITHER THE AUTHOR NOR AT&T MAKES ANY REPRESENTATION OR WARRANTY OF ANY KIND CONCERNING THE
MERCHANTABILITY OF THIS SOFTWARE OR ITS FITNESS FOR ANY PARTICULAR PURPOSE.
This product includes software developed by the University of California, Berkeley and its contributors.
The following disclaimer is required by Paradigm Matrix:
Portions of this software licensed from Paradigm Matrix.
The following disclaimer is required by Ray Sauers Associates, Inc.:
“Install-It” is licensed from Ray Sauers Associates, Inc. End-User is prohibited from taking any action to derive a source code
equivalent of “Install-It,” including by reverse assembly or reverse compilation, Ray Sauers Associates, Inc. shall in no event be
liable for any damages resulting from reseller’s failure to perform reseller’s obligation; or any damages arising from use or
operation of reseller’s products or the software; or any other damages, including but not limited to, incidental, direct, indirect,
special or consequential Damages including lost profits, or damages resulting from loss of use or inability to use reseller’s
products or the software for any reason including copyright or patent infringement, or lost data, even if Ray Sauers Associates
has been advised, knew or should have known of the possibility of such damages.
The following disclaimer is required by Videomedia, Inc.:
“Videomedia, Inc. makes no warranties whatsoever, either express or implied, regarding this product, including warranties with
respect to its merchantability or its fitness for any particular purpose.”
“This software contains V-LAN ver. 3.0 Command Protocols which communicate with V-LAN ver. 3.0 products developed by
Videomedia, Inc. and V-LAN ver. 3.0 compatible products developed by third parties under license from Videomedia, Inc. Use
of this software will allow “frame accurate” editing control of applicable videotape recorder decks, videodisc recorders/players
and the like.”
The following disclaimer is required by Altura Software, Inc. for the use of its Mac2Win software and Sample
Source Code:
©1993–1998 Altura Software, Inc.
The following disclaimer is required by Interplay Entertainment Corp.:
The “Interplay” name is used with the permission of Interplay Entertainment Corp., which bears no responsibility for Avid
products.
This product includes portions of the Alloy Look & Feel software from Incors GmbH.
This product includes software developed by the Apache Software Foundation (http://www.apache.org/).
© DevelopMentor
This product may include the JCifs library, for which the following notice applies:
JCifs © Copyright 2004, The JCIFS Project, is licensed under LGPL (http://jcifs.samba.org/). See the LGPL.txt file in the Third
Party Software directory on the installation CD.
3
Page 4

Avid Interplay contains components licensed from LavanTech. These components may only be used as part of and in
connection with Avid Interplay.
Attn. Government User(s). Restricted Rights Legend
U.S. GOVERNMENT RESTRICTED RIGHTS. This Software and its documentation are “commercial computer software” or
“commercial computer software documentation.” In the event that such Software or documentation is acquired by or on behalf
of a unit or agency of the U.S. Government, all rights with respect to this Software and documentation are subject to the terms
of the License Agreement, pursuant to FAR §12.212(a) and/or DFARS §227.7202-1(a), as applicable.
Trademarks
888 I/O, Adrenaline, AirPlay, AirSPACE, AirSPACE HD, AirSpeed, ALEX, AniMatte, AudioSuite, AudioVision, AutoSync, Avid,
Avid Advanced Response, Avid DNA, Avid DNxcel, Avid DNxHD, AVIDdrive, AVIDdrive Towers, Avid DS Assist Station,
Avid ISIS, Avid Learning Excellerator, Avid Liquid, Avid Mojo, AvidNet, AvidNetwork, Avid Remote Response, AVIDstripe,
Avid Unity, Avid Unity ISIS, Avid Xpress, AVoption, AVX, CamCutter, ChromaCurve, ChromaWheel, DAE, Dazzle, Deko,
DekoCast, D-Fi, D-fx, DigiDelivery, Digidesign, Digidesign Audio Engine, Digidesign Intelligent Noise Reduction, DigiDrive,
Digital Nonlinear Accelerator, DigiTranslator, DINR, DNxchange, do more, D-Verb, Equinox, ExpertRender, Face Robot,
FACE ROBOT, FASTBREAK, Fast Track, FieldPak, Film Composer, FilmScribe, FluidMotion, FXDeko, HIIP, HyperSPACE,
HyperSPACE HDCAM, IllusionFX, Image Independence, iNEWS, iNEWS ControlAir, Instinct, Interplay, Intraframe, iS9, iS18,
iS23, iS36, IsoSync, LaunchPad, Lightning, Lo-Fi, Magic Mask, make manage move | media, Marquee, Matador, Maxim,
MCXpress, Media Browse, Media Composer, MediaDock, MediaDock Shuttle, Media Fusion, Media Illusion, MediaLog,
Media Reader, Media Recorder, MEDIArray, MediaShare, MediaStream, Meridien, MetaFuze, MetaSync, MicroTrack,
MissionControl, NaturalMatch, Nearchive, NetReview, NewsCutter, Nitris, OMF, OMF Interchange, OMM,
Open Media Framework, Open Media Management, PCTV, Pinnacle MediaSuite, Pinnacle Studio, Pinnacle Systems,
ProEncode, Pro Tools, QuietDrive, Recti-Fi, RetroLoop, rS9, rS18, Sci-Fi, ScriptSync, SecureProductionEnvironment,
Show Center, Softimage, Sound Designer II, SPACE, SPACEShift, SpectraGraph, SpectraMatte, SteadyGlide, Symphony,
TARGA, Thunder, Thunder Station, TIMELINER, Trilligent, UnityRAID, Vari-Fi, Video RAID, Video Slave Driver, VideoSPACE,
Xdeck, and X-Session are either registered trademarks or trademarks of Avid Technology, Inc. in the United States and/or
other countries.
Adobe and Photoshop are either registered trademarks or trademarks of Adobe Systems Incorporated in the United States
and/or other countries. Apple and Macintosh are trademarks of Apple Computer, Inc., registered in the U.S. and other
countries. Windows is either a registered trademark or trademark of Microsoft Corporation in the United States and/or other
countries. All other trademarks contained herein are the property of their respective owners.
Footage
News material provided by WFTV Television Inc.
GOT FOOTAGE?
Editors — Filmmakers — Special Effects Artists — Game Developers — Animators — Educators — Broadcasters — Content
creators of every genre — Just finished an incredible project and want to share it with the world?
Send us your reels and we may use your footage in our show reel or demo!*
For a copy of our release and Avid’s mailing address, go to www.avid.com/footage.
*Note: Avid cannot guarantee the use of materials submitted.
Avid Interplay Engine and Avid Interplay Archive Engine Administration Guide • 0130-07640-02 Rev B •
September 18, 2007
4
Page 5

Contents
Using This Guide . . . . . . . . . . . . . . . . . . . . . . . . . . . . . . . . . . . . . . . . . . . . 11
Symbols and Conventions . . . . . . . . . . . . . . . . . . . . . . . . . . . . . . . . . . . . . . . . . . . . 11
If You Need Help. . . . . . . . . . . . . . . . . . . . . . . . . . . . . . . . . . . . . . . . . . . . . . . . . . . . 12
Viewing Documentation on the Avid Interplay Portal . . . . . . . . . . . . . . . . . . . . . . . . 13
Avid Interplay Documentation . . . . . . . . . . . . . . . . . . . . . . . . . . . . . . . . . . . . . . . . . . 13
Accessing the Online Library . . . . . . . . . . . . . . . . . . . . . . . . . . . . . . . . . . . . . . . . . . 14
How to Order Documentation . . . . . . . . . . . . . . . . . . . . . . . . . . . . . . . . . . . . . . . . . . 14
Avid Training Services . . . . . . . . . . . . . . . . . . . . . . . . . . . . . . . . . . . . . . . . . . . . . . . 15
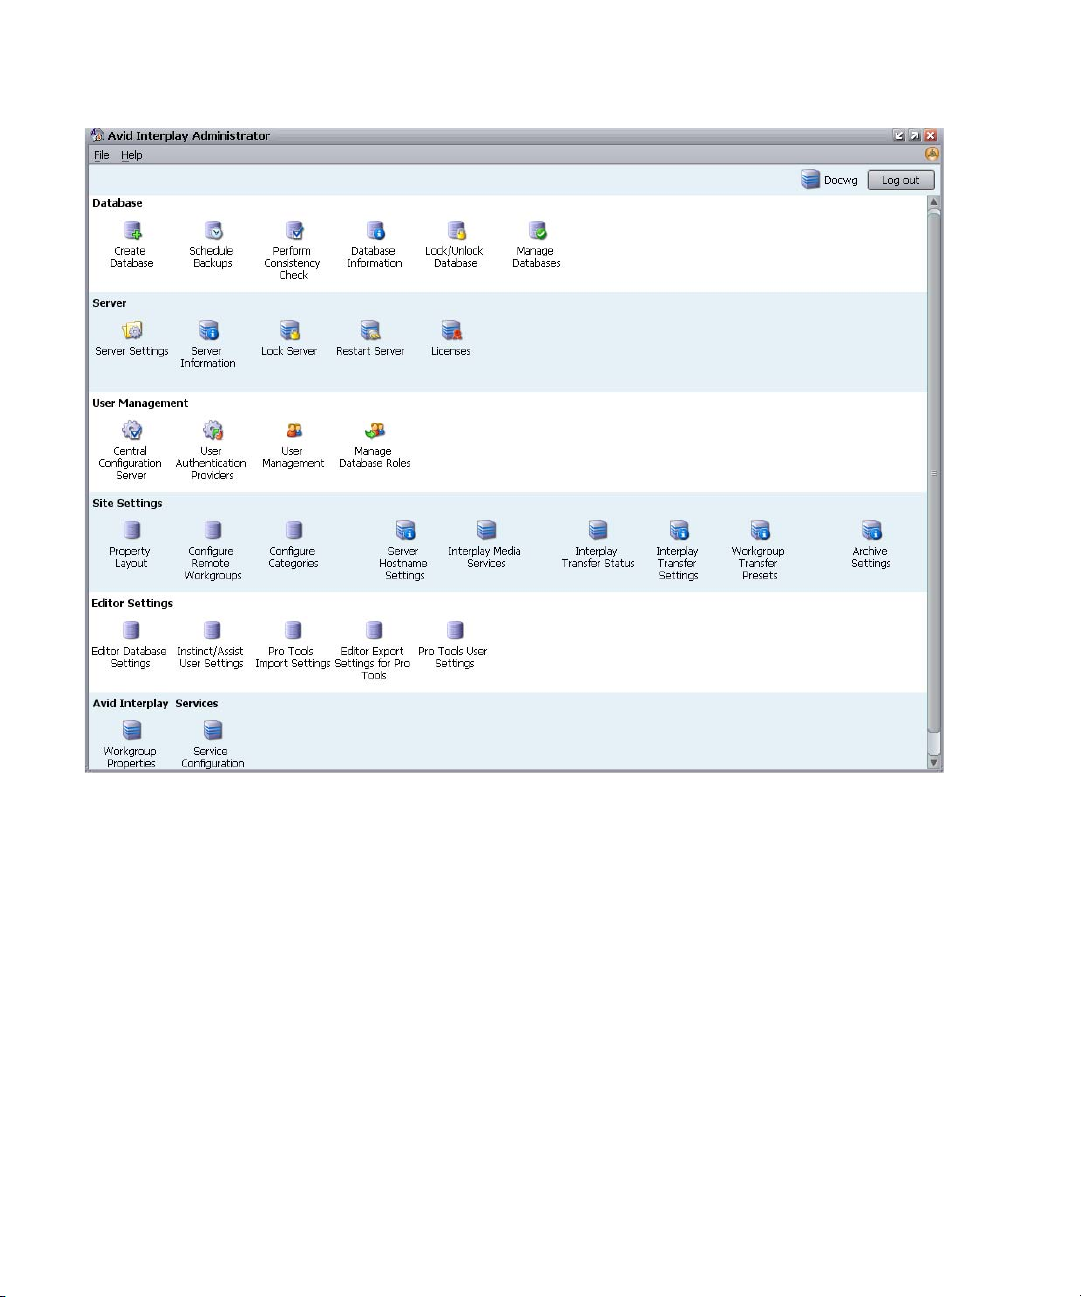
Chapter 1 Getting Started with the Avid Interplay Administrator . . . . . . . . . . . . . . 17
Understanding the Interplay Engine and Interplay Workgroups . . . . . . . . . . . . . . . . 17
Using the Avid Interplay Administrator . . . . . . . . . . . . . . . . . . . . . . . . . . . . . . . . . . . 21
Starting the Avid Interplay Administrator. . . . . . . . . . . . . . . . . . . . . . . . . . . . . . . . . . 22
Using the Avid Interplay Administrator Window . . . . . . . . . . . . . . . . . . . . . . . . . . . . 23
Opening an Interplay Administrator View . . . . . . . . . . . . . . . . . . . . . . . . . . . . . . . . . 25
Opening Interplay Administrator Help . . . . . . . . . . . . . . . . . . . . . . . . . . . . . . . . . . . . 25
Exiting the Avid Interplay Administrator . . . . . . . . . . . . . . . . . . . . . . . . . . . . . . . . . . 26
Chapter 2 Database Settings . . . . . . . . . . . . . . . . . . . . . . . . . . . . . . . . . . . . . . . . . . . 27
Creating an Interplay Database . . . . . . . . . . . . . . . . . . . . . . . . . . . . . . . . . . . . . . . . 27
Avid Interplay Database Directories and Files . . . . . . . . . . . . . . . . . . . . . . . . . . . . . 29
Scheduling and Restoring Database Backups . . . . . . . . . . . . . . . . . . . . . . . . . . . . . 31
Scheduling Database Backups . . . . . . . . . . . . . . . . . . . . . . . . . . . . . . . . . . . . . 31
Recommendations for Automatic Backup Configuration . . . . . . . . . . . . . . . . . . 34
Restoring an Earlier Version of a Database. . . . . . . . . . . . . . . . . . . . . . . . . . . . 35
Using the InterplayRestore Tool on a Local Machine . . . . . . . . . . . . . . . . . 36
Database Restore Session Example. . . . . . . . . . . . . . . . . . . . . . . . . . . . . . 38
Using the InterplayRestore Tool to Restore Backups Remotely . . . . . . . . . 39
Backing Up and Restoring the Interplay Users Database . . . . . . . . . . . . . . . . . 40
Performing a Consistency Check . . . . . . . . . . . . . . . . . . . . . . . . . . . . . . . . . . . . . . . 41
Viewing Database Information . . . . . . . . . . . . . . . . . . . . . . . . . . . . . . . . . . . . . . . . . 41
5
Page 6

Locking and Unlocking Databases. . . . . . . . . . . . . . . . . . . . . . . . . . . . . . . . . . . . . . 42
Managing Databases: Deactivating, Activating, and Migrating . . . . . . . . . . . . . . . . 44
Deactivating a Database . . . . . . . . . . . . . . . . . . . . . . . . . . . . . . . . . . . . . . . . . . 44
Activating a Deactivated Database . . . . . . . . . . . . . . . . . . . . . . . . . . . . . . . . . . 45
Migrating a Database . . . . . . . . . . . . . . . . . . . . . . . . . . . . . . . . . . . . . . . . . . . . 48
Moving a Database to Another Server . . . . . . . . . . . . . . . . . . . . . . . . . . . . . . . . . . . 50
Moving a Database and Users to Another Server . . . . . . . . . . . . . . . . . . . . . . . . . . 51
Moving a Database Under Low Disk Space Conditions. . . . . . . . . . . . . . . . . . . . . . 53
Renaming a Database . . . . . . . . . . . . . . . . . . . . . . . . . . . . . . . . . . . . . . . . . . . . . . . 54
Chapter 3 Server Settings . . . . . . . . . . . . . . . . . . . . . . . . . . . . . . . . . . . . . . . . . . . . . . 55
Changing the Database and Data Locations . . . . . . . . . . . . . . . . . . . . . . . . . . . . . . 55
Viewing Server Information . . . . . . . . . . . . . . . . . . . . . . . . . . . . . . . . . . . . . . . . . . . 57
Locking and Unlocking the Server . . . . . . . . . . . . . . . . . . . . . . . . . . . . . . . . . . . . . . 58
Restarting the Server . . . . . . . . . . . . . . . . . . . . . . . . . . . . . . . . . . . . . . . . . . . . . . . . 59
Managing Licenses . . . . . . . . . . . . . . . . . . . . . . . . . . . . . . . . . . . . . . . . . . . . . . . . . 60
License Key Info Tool . . . . . . . . . . . . . . . . . . . . . . . . . . . . . . . . . . . . . . . . . . . . 62
Getting a Permanent License . . . . . . . . . . . . . . . . . . . . . . . . . . . . . . . . . . . . . . 62
License Types and Usage. . . . . . . . . . . . . . . . . . . . . . . . . . . . . . . . . . . . . . . . . 63
Exporting a License. . . . . . . . . . . . . . . . . . . . . . . . . . . . . . . . . . . . . . . . . . . . . . 63
Troubleshooting Licensing Problems . . . . . . . . . . . . . . . . . . . . . . . . . . . . . . . . 64
Chapter 4 User Management . . . . . . . . . . . . . . . . . . . . . . . . . . . . . . . . . . . . . . . . . . . 65
Understanding the Central Configuration Server . . . . . . . . . . . . . . . . . . . . . . . . . . . 65
Moving the CCS to Another Server . . . . . . . . . . . . . . . . . . . . . . . . . . . . . . . . . . 66
Viewing and Changing the CCS for a Server . . . . . . . . . . . . . . . . . . . . . . . . . . 67
Adding Users to a Central Configuration Server . . . . . . . . . . . . . . . . . . . . . . . . . . . 69
Setting User Authentication Providers and Importing Users . . . . . . . . . . . . . . . . . . 70
Setting Avid Unity Authentication . . . . . . . . . . . . . . . . . . . . . . . . . . . . . . . . . . . 72
Setting Windows Domain Authentication and Importing Users . . . . . . . . . . . . . 73
Setting LDAP Authentication and Importing Users . . . . . . . . . . . . . . . . . . . . . . 75
LDAP Server Configuration Settings . . . . . . . . . . . . . . . . . . . . . . . . . . . . . . . . . 76
Managing Users, User Groups, and User Rights. . . . . . . . . . . . . . . . . . . . . . . . . . . 76
Understanding Default User Groups, Users, and Roles . . . . . . . . . . . . . . . . . . 77
Adding Users and User Groups Manually . . . . . . . . . . . . . . . . . . . . . . . . . . . . . 78
6
Page 7

Viewing and Setting Attributes . . . . . . . . . . . . . . . . . . . . . . . . . . . . . . . . . . . . . . 79
Understanding Standard Roles and Default Rights . . . . . . . . . . . . . . . . . . . . . . 80
Viewing and Changing Roles . . . . . . . . . . . . . . . . . . . . . . . . . . . . . . . . . . . . . . . 81
Viewing and Setting Authentication Providers for Individual Users . . . . . . . . . . 83
Deleting Users and User Groups . . . . . . . . . . . . . . . . . . . . . . . . . . . . . . . . . . . . 84
Removing Users from User Groups . . . . . . . . . . . . . . . . . . . . . . . . . . . . . . . . . . 84
Managing Database Roles . . . . . . . . . . . . . . . . . . . . . . . . . . . . . . . . . . . . . . . . . . . . 85
Viewing General Role Assignments. . . . . . . . . . . . . . . . . . . . . . . . . . . . . . . . . . 85
Setting or Changing a General Role Assignment. . . . . . . . . . . . . . . . . . . . . . . . 88
Blocking Access by a Group or User . . . . . . . . . . . . . . . . . . . . . . . . . . . . . . . . . 91
Managing Special Access Folders . . . . . . . . . . . . . . . . . . . . . . . . . . . . . . . . . . . 91
Guidelines for User Management . . . . . . . . . . . . . . . . . . . . . . . . . . . . . . . . . . . . . . . 94
Chapter 5 Site Settings . . . . . . . . . . . . . . . . . . . . . . . . . . . . . . . . . . . . . . . . . . . . . . . . 97
Defining Property Layouts. . . . . . . . . . . . . . . . . . . . . . . . . . . . . . . . . . . . . . . . . . . . . 97
Creating Custom Properties . . . . . . . . . . . . . . . . . . . . . . . . . . . . . . . . . . . . . . . . . . . 99
Configuring Remote Workgroups . . . . . . . . . . . . . . . . . . . . . . . . . . . . . . . . . . . . . . 100
Configuring Categories . . . . . . . . . . . . . . . . . . . . . . . . . . . . . . . . . . . . . . . . . . . . . . 102
Adding Categories . . . . . . . . . . . . . . . . . . . . . . . . . . . . . . . . . . . . . . . . . . . . . . 103
Removing Categories. . . . . . . . . . . . . . . . . . . . . . . . . . . . . . . . . . . . . . . . . . . . 104
Setting the Server Hostname and Workgroup Name . . . . . . . . . . . . . . . . . . . . . . . 105
Interplay Media Services View . . . . . . . . . . . . . . . . . . . . . . . . . . . . . . . . . . . . . . . . 106
Interplay Transfer Status View . . . . . . . . . . . . . . . . . . . . . . . . . . . . . . . . . . . . . . . . 106
Interplay Transfer Settings View . . . . . . . . . . . . . . . . . . . . . . . . . . . . . . . . . . . . . . . 107
Workgroup Transfer Presets View . . . . . . . . . . . . . . . . . . . . . . . . . . . . . . . . . . . . . 107
Specifying Archive Settings. . . . . . . . . . . . . . . . . . . . . . . . . . . . . . . . . . . . . . . . . . . 107
Archiving Duplicate Versions of Media. . . . . . . . . . . . . . . . . . . . . . . . . . . . . . . 107
Specifying the Archive Server and Segment Size . . . . . . . . . . . . . . . . . . . . . . 109
Chapter 6 Editor Settings . . . . . . . . . . . . . . . . . . . . . . . . . . . . . . . . . . . . . . . . . . . . . 111
Setting Editor Database Options. . . . . . . . . . . . . . . . . . . . . . . . . . . . . . . . . . . . . . . 111
Editor Database Settings . . . . . . . . . . . . . . . . . . . . . . . . . . . . . . . . . . . . . . . . . 113
Setting Instinct/Assist User Options . . . . . . . . . . . . . . . . . . . . . . . . . . . . . . . . . . . . 117
Instinct/Assist User Settings. . . . . . . . . . . . . . . . . . . . . . . . . . . . . . . . . . . . . . . 119
7
Page 8

Pro Tools Plug-Ins Settings . . . . . . . . . . . . . . . . . . . . . . . . . . . . . . . . . . . . . . . . . . 119
Installing the Pro Tools Plug-Ins for Interplay . . . . . . . . . . . . . . . . . . . . . . . . . 120
Configuring the Pro Tools Import Plug-In . . . . . . . . . . . . . . . . . . . . . . . . . . . . 120
Configuring the Pro Tools Export Plug-In . . . . . . . . . . . . . . . . . . . . . . . . . . . . 122
Configuring the Pro Tools User Settings Plug-In. . . . . . . . . . . . . . . . . . . . . . . 124
Chapter 7 Avid Interplay Services . . . . . . . . . . . . . . . . . . . . . . . . . . . . . . . . . . . . . . 125
Chapter 8 Troubleshooting . . . . . . . . . . . . . . . . . . . . . . . . . . . . . . . . . . . . . . . . . . . . 127
Troubleshooting Log-In Problems . . . . . . . . . . . . . . . . . . . . . . . . . . . . . . . . . . . . . 127
Troubleshooting Client Connection Problems . . . . . . . . . . . . . . . . . . . . . . . . . . . . 128
Optimizing Avid Interplay Performance . . . . . . . . . . . . . . . . . . . . . . . . . . . . . . . . . 128
Troubleshooting Firewalls and Avid Interplay. . . . . . . . . . . . . . . . . . . . . . . . . . . . . 129
Troubleshooting the Server Execution User Account. . . . . . . . . . . . . . . . . . . . . . . 130
Understanding the Server Execution User Account . . . . . . . . . . . . . . . . . . . . 130
Recreating the Server Execution User . . . . . . . . . . . . . . . . . . . . . . . . . . . . . . 131
Shutting Down or Locking the Server Process. . . . . . . . . . . . . . . . . . . . . . . . . . . . 132
Chapter 9 Recommendation for Database Storage . . . . . . . . . . . . . . . . . . . . . . . . 133
Understanding a Split Database. . . . . . . . . . . . . . . . . . . . . . . . . . . . . . . . . . . . . . . 133
Supported Configurations. . . . . . . . . . . . . . . . . . . . . . . . . . . . . . . . . . . . . . . . . . . . 135
Preparing for a Split Database . . . . . . . . . . . . . . . . . . . . . . . . . . . . . . . . . . . . . . . . 135
Splitting a Database for New Interplay Installations. . . . . . . . . . . . . . . . . . . . . . . . 136
Splitting a Database for Existing Interplay Installations . . . . . . . . . . . . . . . . . . . . . 138
Configuring the workgroup.xml File. . . . . . . . . . . . . . . . . . . . . . . . . . . . . . . . . 141
Identifying the Root Folder of the Interplay Server Database . . . . . . . . . . . . . 142
Restoring a Split Database. . . . . . . . . . . . . . . . . . . . . . . . . . . . . . . . . . . . . . . . . . . 142
Appendix A Installed Components and Services. . . . . . . . . . . . . . . . . . . . . . . . . . . . 145
Avid Interplay Engine Directory: Folders and Files . . . . . . . . . . . . . . . . . . . . . . . . 145
Apache Folder . . . . . . . . . . . . . . . . . . . . . . . . . . . . . . . . . . . . . . . . . . . . . . . . . 146
Activating Creation of the access.log File. . . . . . . . . . . . . . . . . . . . . . . . . 147
Data Folder . . . . . . . . . . . . . . . . . . . . . . . . . . . . . . . . . . . . . . . . . . . . . . . . . . . 147
Logs. . . . . . . . . . . . . . . . . . . . . . . . . . . . . . . . . . . . . . . . . . . . . . . . . . . . . . . . . 148
Preview Server Folder. . . . . . . . . . . . . . . . . . . . . . . . . . . . . . . . . . . . . . . . . . . 148
Server Folder. . . . . . . . . . . . . . . . . . . . . . . . . . . . . . . . . . . . . . . . . . . . . . . . . . 149
Required TCP/IP Ports. . . . . . . . . . . . . . . . . . . . . . . . . . . . . . . . . . . . . . . . . . . . . . 149
8
Page 9

Avid Interplay Engine Servers and Services. . . . . . . . . . . . . . . . . . . . . . . . . . . . . . 149
Avid Interplay Engine Server . . . . . . . . . . . . . . . . . . . . . . . . . . . . . . . . . . . . . . 150
Avid Workgroup HTTP Server . . . . . . . . . . . . . . . . . . . . . . . . . . . . . . . . . . . . . 151
Avid Workgroup Server Browser Service. . . . . . . . . . . . . . . . . . . . . . . . . . . . . 152
Avid Workgroup Preview Server Service . . . . . . . . . . . . . . . . . . . . . . . . . . . . . 152
Avid Workgroup TCP/COM Bridge Service . . . . . . . . . . . . . . . . . . . . . . . . . . . 156
Appendix B Interplay Engine Configuration Files . . . . . . . . . . . . . . . . . . . . . . . . . . . 157
Configuring the Server Event Manager. . . . . . . . . . . . . . . . . . . . . . . . . . . . . . . . . . 157
Config.xml File . . . . . . . . . . . . . . . . . . . . . . . . . . . . . . . . . . . . . . . . . . . . . . . . . 157
Supported Actions in Config.xml . . . . . . . . . . . . . . . . . . . . . . . . . . . . . . . . . . . 159
Supported Events in Config.xml. . . . . . . . . . . . . . . . . . . . . . . . . . . . . . . . . . . . 160
Server Event Configuration Example . . . . . . . . . . . . . . . . . . . . . . . . . . . . . . . . 162
LogWatch.xml. . . . . . . . . . . . . . . . . . . . . . . . . . . . . . . . . . . . . . . . . . . . . . . . . . 163
Sending Email Notifications . . . . . . . . . . . . . . . . . . . . . . . . . . . . . . . . . . . . . . . 164
Configuring Client Access. . . . . . . . . . . . . . . . . . . . . . . . . . . . . . . . . . . . . . . . . . . . 165
Setting the Filetransfer Server . . . . . . . . . . . . . . . . . . . . . . . . . . . . . . . . . . . . . . . . 169
Appendix C Valid and Invalid Characters in Avid Interplay . . . . . . . . . . . . . . . . . . . 171
Appendix D System Metadata Properties . . . . . . . . . . . . . . . . . . . . . . . . . . . . . . . . . . 173
Appendix E Server Error Codes . . . . . . . . . . . . . . . . . . . . . . . . . . . . . . . . . . . . . . . . . 185
Appendix F Consistency Check Codes . . . . . . . . . . . . . . . . . . . . . . . . . . . . . . . . . . . 201
Consistency Check Critical Errors. . . . . . . . . . . . . . . . . . . . . . . . . . . . . . . . . . . . . . 201
Consistency Check Errors. . . . . . . . . . . . . . . . . . . . . . . . . . . . . . . . . . . . . . . . . . . . 202
Consistency Check Warnings . . . . . . . . . . . . . . . . . . . . . . . . . . . . . . . . . . . . . . . . . 204
Index . . . . . . . . . . . . . . . . . . . . . . . . . . . . . . . . . . . . . . . . . . . . . . . . . . . . . 205
9
Page 10

10
Page 11

Using This Guide
Congratulations on your purchase of Avid® Interplay™, a powerful system for managing
media in a shared storage environment.
This guide is intended for all Avid Interplay administrators who are resp
installing, configuring and maintaining an Avid Interplay Engine or Avid Interplay Archive
Engine (datab
workgroup. This guide includes a detailed description of each of the Avid Interplay
Administrator task groups and how you can use them to administer your server and
databases. Some of the settings that you are able to change affect the server itself, while
others only affect the database stored on the server.
The documentation describes the features and hardware of all models. Therefore, your
n
system might not contain certain features and hardware that are covered in the
documentation.
ase, server, and all related client connections and user rights) in an Interplay
Symbols and Conventions
Avid documentation uses the following symbols and conventions:
Symbol or Convention Meaning or Action
n
c
A note provides important related information, reminders,
recommendations, and strong suggestions.
A caution means that a specific action you take could cause harm to
your computer or cause you to lose data
onsible for
w
> This symbol indicates menu commands (and subcommands) in the
t This symbol indicates a single-step procedure. Multiple arrows in a list
AVID CONFIDENTIAL DRAFT VERSION 9/18/07
A warning describes an action that could cause you physical harm.
Follow the guidelines in this document or on the unit itself when
handling electrical equipment.
order you select them. For example, File > Import means to open the
File menu and then select the Import command.
indicate that you perform one of the actions listed.
Page 12

Symbol or Convention Meaning or Action
(Windows), (Windows
only), (Macintosh), or
(Macintosh only)
Bold font Bold font is primarily used in task instructions to identify user interface
Italic font Italic font is used to emphasize certain words and to indicate variables.
Courier Bold font
Ctrl+key or mouse action Press and hold the first key while you press the last key or perform the
If You Need Help
If you are having trouble using your Avid product:
1. Retry the action, carefully following the instructions give
is especially important to check each step of your workflow.
2. Check the latest information that might hav
was published:
- If the latest information for your Avid produc
they ship with your application and are also available online.
This text indicates that the information applies only to the specified
operating system, either Windows XP or Macintosh OS X.
items and keyboard sequences.
Courier Bold font identifies text that you type.
mouse action. For example, Command+Option+C or Ctrl+drag.
n for that task in this guide. It
e become a
vailable after the documentation
t is prov
ided as printed release notes,
- If the latest information for your Avid product is provided as a ReadMe file, it is
supplied on your Avid installation CD or DVD as a PDF document and is also
available online.
You should always check online for the most up
-to-date release notes or
because the online version is updated whenever new information becomes
available. To view these online versions, select ReadMe from the Help menu, or visit
the Knowledge Base at www.avid.com/readme.
3. Check the documentation that came with
your Avid application or your hardware for
maintenance or hardware-related issues.
4. Visit the online Knowledge Base at www.avid.com/onlinesupport. Online services are
available 24 hours per day, 7 days per week. Search this onl
answers, to view error messages, to access troubleshooting tips, to download updates,
and to read or join online message-board discussions.
12 AVID CONFIDENTIAL DRAFT VERSION 9/18/07
ine Know
ReadMe
ledge Base to find
Page 13

Viewing Documentation on the Avid Interplay Portal
Viewing Documentation on the Avid Interplay
Portal
You can quickly access PDF versions of the Avid Interplay user guides from any system in
the Avid Interplay environment.
To open the Avid Interplay Portal web page:
1. Type the following line in your web browser:
http://Interplay_Engine_name
For
Interplay_Engine_name
Interplay Engine software.
substitute the name of the computer running the
For example, the following line opens the
http://docwg
2. Click the “Avid Interplay User Documentation” link to access the User Information
Center page.
portal web pag
Avid Interplay Documentation
The following documents describe how to use Avid Interplay:
• Avid Interplay Best Practices — prov
components, shows sample configuration diagrams, and describes several of the key
features, such as setting up a user database and using the Avid Interplay Archive Engine.
vid Interplay Software Installation and Configuration Guide — describes ho
• A
the Avid Interplay Installer DVD to install and configure software on the various
systems that make up a Interplay environment.
vid Interplay Engine Failo
• A
for the Avid Interplay Engine and the Avid Interplay Archive engine.
vid Interplay Engine and Avid Interplay Arch
• A
describes how to administer your Avid Interplay Engine or Avid Interplay Archive
Engine and Avid Interplay database.
• Avid Interplay Access User’s Guide — describes how to use Interplay Access to
search, and work with assets in the Avid Interplay database.
ver Guide — describes how to set up a cluster configuration
ides an overview of the major Interplay
e on a system named
ive Engine Administration Guide —
docwg
w to use
browse,
:
• Avid Interplay Assist User’s Guide — descri
archiving, and sending to Playback material in an Interplay environment.
• Avid Interplay Framework User’s Guide — describes how to
monitoring, and management features of the Avid Interplay Framework applications.
AVID CONFIDENTIAL DRAFT VERSION 9/18/07 13
bes how to use Interplay Assist for logging,
use the logging,
Page 14

• Avid CaptureManager User’s Guide — describes how to use CaptureManager™ in a
newsroom environment to coordinate video feeds, schedule feed captures at both high
and low resolutions, and record late breaking events instantly.
vid Low Res Encode Setup and Configuration — describes ho
• A
an Avid Low Res Encode system. Includes information on updating the bootset, root
disk image, and configuring a Low Res Encode system to work with CaptureManager.
• Avid Interplay Transfer Setup and User’s Guide — describes how to u
Transfer to transfer media to and from another workgroup, send finished sequences to a
configured playback device, ingest media from a configured ingest device, and perform
standalone transfers between workstations.
vid Interplay Media Services Setup and User’s Guide — Avid Interplay Media
• A
Services lets you control and automate Transcode, Archive, and ProEncode services.
vid iNEWS Instinct User’s Guide — describes ho
• A
application to write iNEWS stories and put together simple audio and video sequences.
Accessing the Online Library
The Avid Interplay Online Library DVD contains all the Avid Interplay product
documentation in PDF format.The Online Library includes a Master Glossary of all
specialized terminology used in the documentation for Avid products.
Most Avid online libraries also include multimedia
This multimedia content is an excellent first resource for learning how to use your
application or for helping you understand a particular feature or workflow.
w to set up and configure
se Interplay
w to use the Avid iNEWS Instinct
content suc
h as feature presentations.
You need Adobe® Reader® to view the documentation online. You can download the latest
n
version from the Adobe web site.
To access the online library from the Online Library DVD:
1. Insert the Online Library DVD into the drive.
2. Double-click the Mainmenu file.
How to Order Documentation
To order additional copies of this documentation from within the United States, call Avid
Sales at 800-949-AVID (800-949-2843). If you are placing an order from outside the United
States, contact your local Avid representative.
14 AVID CONFIDENTIAL DRAFT VERSION 9/18/07
Page 15

Avid Training Services
Avid makes lifelong learning, career advancement, and personal development easy and
convenient. Avid understands that the knowledge you need to differentiate yourself is always
changing, and Avid continually updates course content and offers new training delivery
methods that accommodate your pressured and competitive work environment.
To learn about Avid's new online learning environment, Avid Learning Excellerator
LEX), visit http://learn.avid.com.
(A
For information on courses/schedules, training centers, certifications, courseware, and
books, please visit www.avid.com/training or call Avid Sales at 800-949-AVID
(800-949-2843).
Avid Training Services
AVID CONFIDENTIAL DRAFT VERSION 9/18/07 15
Page 16

16 AVID CONFIDENTIAL DRAFT VERSION 9/18/07
Page 17

1 Getting Started with the Avid Interplay
Administrator
The Avid Interplay Administrator provides database administrators and maintenance
engineers with the tools required to configure the Avid Interplay Engine and to manage the
database on th
e server.
The following topics provide basic information for using the Interplay Ad
• Understanding the Interplay Engine and Interplay
• Using the Avid Interplay Administrator
• Starting the Avid Interplay Admi
• Usin
• Opening an Interplay Administrator View
• Opening Interplay Administrator Help
• Exiting the Avid Interplay Administrator
For an overview of all Avid Interplay components, see the A
Guide.
g the Avid Interplay Administrator Window
nistrator
Workgroups
vid Interplay Be
ministrator:
st Practices
Understanding the Interplay Engine and Interplay Workgroups
The Avid Interplay Engine forms the backbone of the Interplay environment. The Interplay
Engine is a server that combines an asset database with workflow management software,
both of which are integrated with Avid shared storage and Avid archive solutions. This topic
provides basic information about the functions and components of the Interplay Engine.
One Interplay Engine, One Interplay Database, One Shared Storage Network
The Interplay Engine is one component of an Interplay workgroup. At a minimum, an
Interplay workgroup is composed of one Interplay Engine, one Interplay database, one Avid
Unity shared storage network (Avid Unity ISIS, Avid Unity MediaNetwork, or Avid Unity
LANshare), and associated softw
are and services.
Page 18
1 Getting Started with the Avid Interplay Administrator
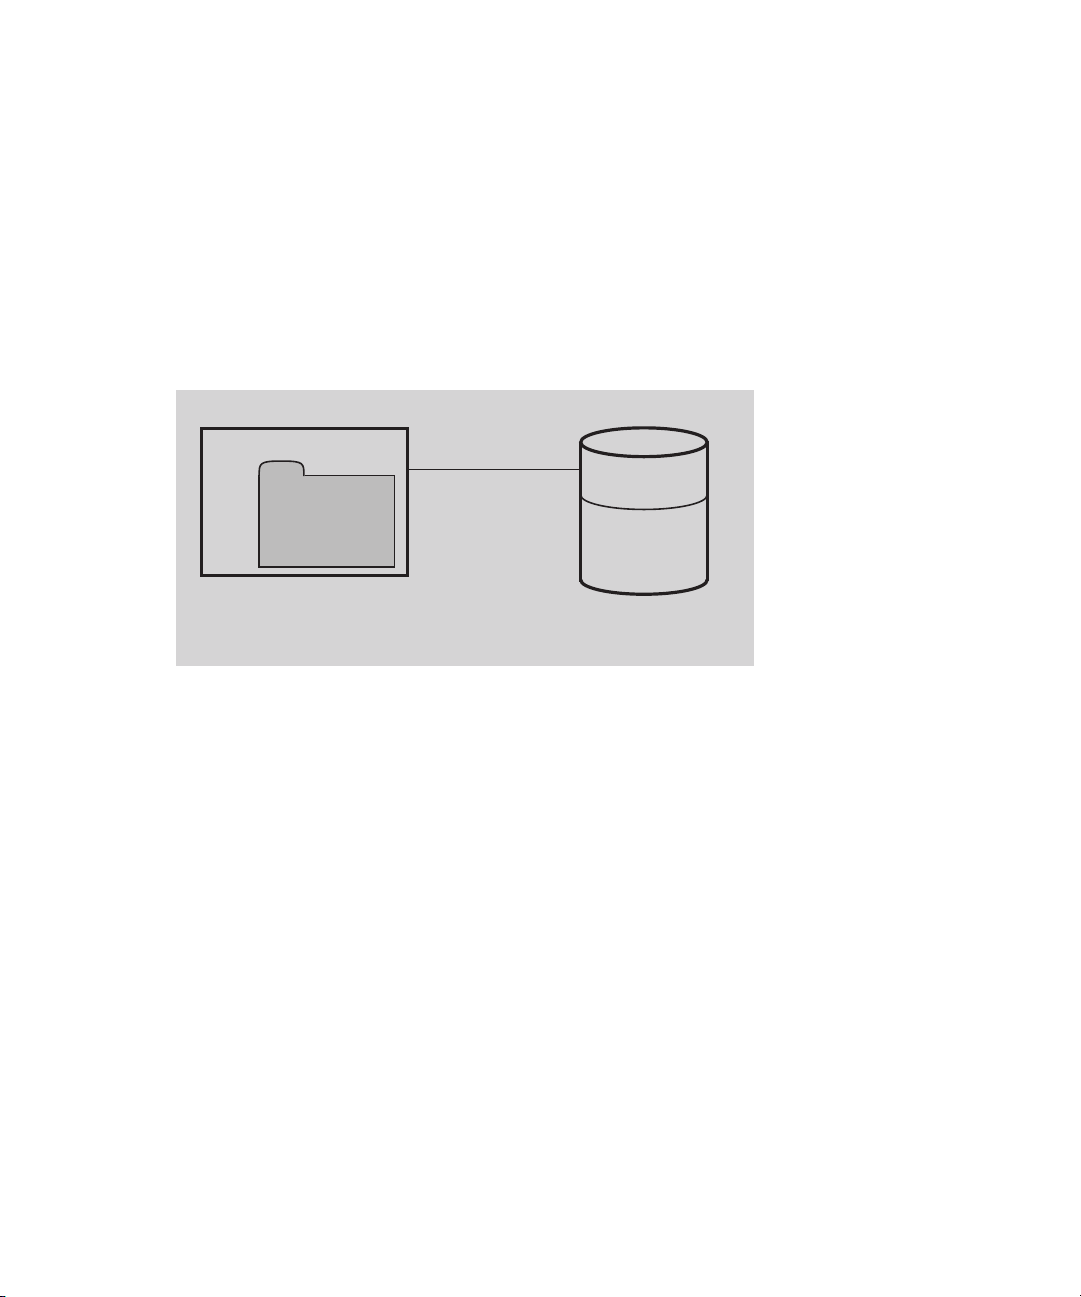
An Interplay database consists of two parts:
• A metadata database, which holds informatio
n about the assets, or metadata. The
metadata database is always stored on the Interplay Engine server.
• Source files for the assets, for example, graphics files or Av
id media files. The source
files for the assets are usually stored on an Avid Unity shared storage system.
The following illustration shows the metadata database store
d on the internal drive of the
Interplay Engine server and the sources for the assets stored on an Avid Unity shared storage
workspace.
Files for
Metadata
Database
Avid Interplay Engine
File Assets
Media for
Avid Assets
Avid Unity
Shared Storage
For information about all Interplay components and detailed sample configurations, see Avid
Interplay Best Practices.
18
Avid Assets, File Assets, and Splitting the Database
Interplay manages two different kids of assets. Avid assets are assets that are created by Avid
applications through capture, ingest, import, or transfer. Avid assets include:
• Master clips
• Subclips
•Sequences
• Effects
• Motion effects
• Rendered effects
• Group clips
File assets ar
e any asse
ts that are not created by an Avid application. Any file you can create
on your workstation, through applications such as Adobe Photoshop or Microsoft Word, can
be added to the Interplay database and managed by Interplay as a file asset.
Page 19

Understanding the Interplay Engine and Interplay Workgroups
Media files for Avid assets are always stored on an Avid Unity shared storage system.
Source files for file assets can be stored on the Interplay Engine or on an Avid Unity shared
storage wo
Avid Unity shared storage workspace. This locati
rkspace. Avid recommends that you store the source files for file assets on an
on is sometimes called the file repository.
When you first install Interplay Engine software, the installation program re
quires you to set
one root folder for the database on a local drive. By default, this root folder holds both the
metadata database and files for file assets. To avoid filling this local drive with files for file
assets, you can configure the Interplay Engine to store the metadata database on the local
drive and store the file repository on a shared-storage workspace. This is called splitting the
database. For more information, see “Recommendation for Database Storage” on page 133.
Multiple Workgroups
A large production facility can have more than one Interplay workgroup. Each workgroup
must have its own Interplay Engine, database, and shared storage network. Users on
Interplay Access can view and access assets from more than one workgroup and can transfer
them from one to another using a file copy procedure for file assets and Avid Interplay
Transfer for Avid assets.
Interplay Archive Engine
A facility might also include an Interplay Archive Engine. An Interplay Archive Engine is
configured similarly to an Interplay Engine. An Archive Engine is integrated with a
third-party archive system. An Interplay Archive database is always named AvidAM. An
Interplay database is always named AvidWG.
An Interplay Archive database and an Interplay database use different icons, as shown in the
owing illustration from Interplay Access. The archive database is represented by a safe,
foll
and archive folders are represented by boxes.
19
Page 20
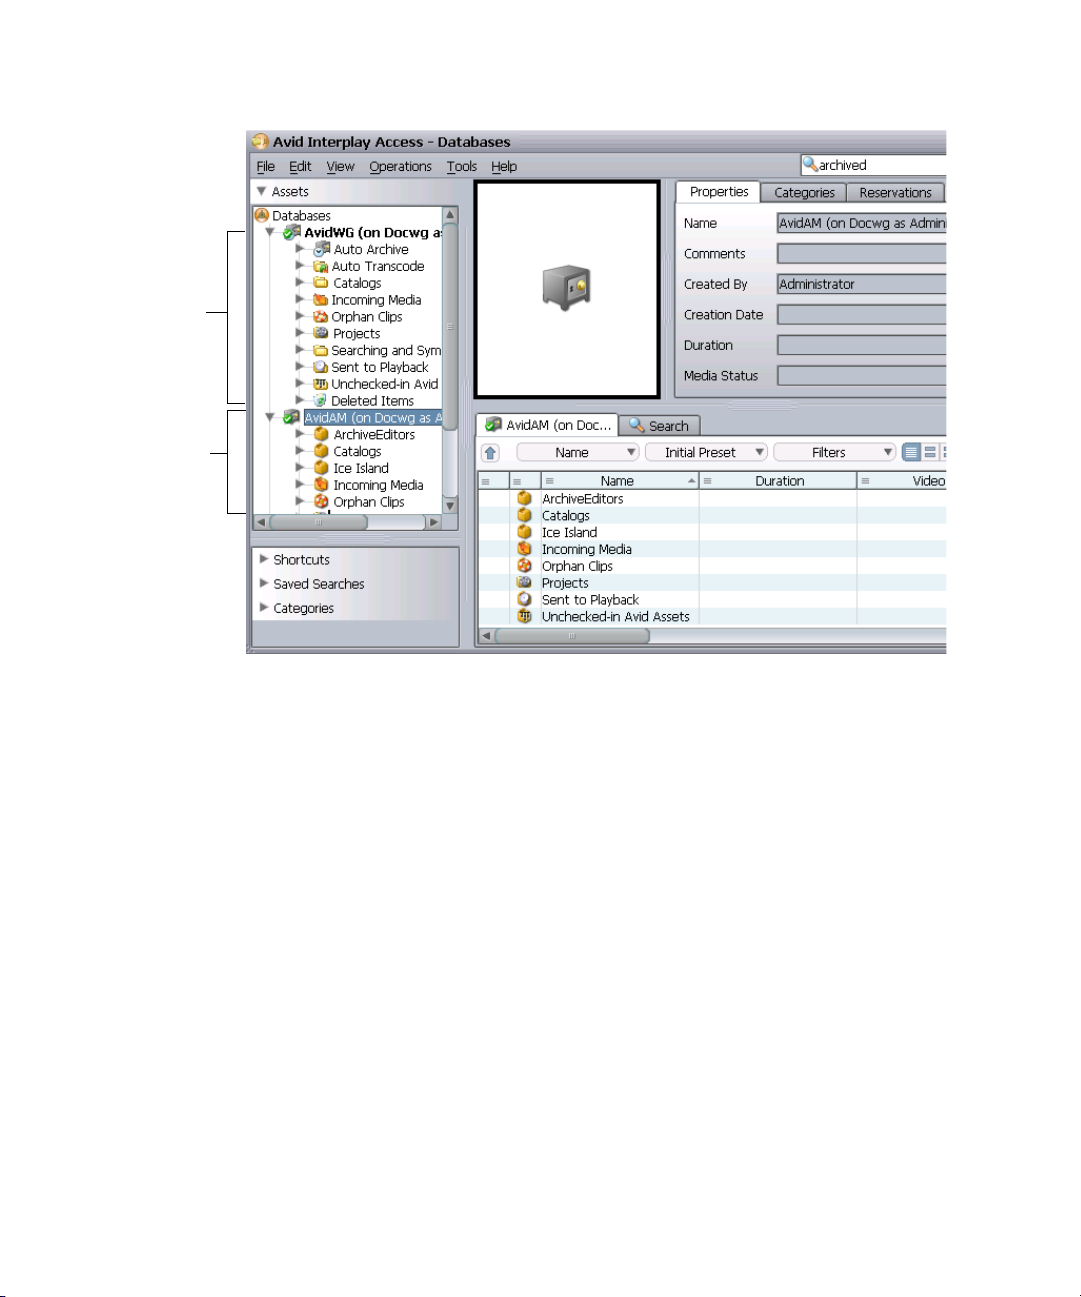
1 Getting Started with the Avid Interplay Administrator
Interplay online
database
Interplay
Archive Engine
database
20
For more information about the Interplay Archive Engine, see Avid Interplay Best Practices.
In this guide, references to the Interplay Engine also refer to the Archive Engine, unless
n
otherwise noted.
Central Configuration Server
If a production facility includes more than one Interplay workgroup, you can specify one
Interplay Engine as the Central Configuration Server (CCS). The CCS is an Interplay
Engine module that stores information that is common to all other Interplay Engines. The
CCS provides a means to manage user accounts across multiple workgroups. For more
information, see “Understanding the Central Configuration Server” on page 65.
Server Execution User
The Server Execution User is a Windows operating system user that runs the Interplay
Engine processes. You specify the user name and password for the Server Execution User
when you install the Interplay Engine on the server. The Server Execution User needs local
administrator rights on the operating system for the Interplay Engine server and read/write
access to the Avid Unity shared storage file system.
Page 21

Using the Avid Interplay Administrator
For more information, see “Troubleshooting the Server Execution User Account” on
page 130.
Avid Interplay as a Client-Server Application
Avid Interplay is designed as a client-server application. The Interplay Engine is configured
to run on a central machine that is accessible to all users through a network. An Avid
Interplay application that runs on a client machine is a client of the Avid Interplay Engine
server. Avid Interplay client applications, such as Interplay Access, Interplay Assist,
id iNEWS Instinc
Av
access and browse multiple databases. The Interplay Administrator is also a client
application.
t, and Avid editing applications that use the Interplay W
indow can
Avid Inte
TCP/IP must be installed on all machines. Since TCP/IP is used to access the Internet, most
users already have this component installed. See “Required TCP/IP Ports” on page 149 for
more information.
rplay uses TCP/IP and related protocol
s for its netw
ork communication. Therefore,
Using the Avid Interplay Administrator
The Avid Interplay Administrator is a client application that you use to manage either the
Interplay Engine or the Interplay Archive Engine. The Interplay Administrator is installed at
the same time that you install Interplay Access. You can install the Interplay Administrator
as a client on any computer in your network and then use it to manage any Interplay Engine
or Interplay Archive Engine that is available on the network. For information on installing
the Interplay Administrator, see the Avid Interplay Software Installation and Configuration
Guide.
The Interplay Administrato
tasks:
• Setting up a new database. See “Creating an Interplay Database” on page 27.
• Backing up the database. Backing up the database regularly protects your data, allowing
restore the database to a saved state in the event of failure. See “Scheduling and
you to
Restoring Database Backups” on page 31.
• Maintenance tasks, such as locking, unlocki
Settings” on page 55.
r provides yo
u with the tools you need for the following major
ng, and restarting the server. See “Server
• Creating, editing, and deleting user accounts
“User Management” on page 65.
• Configuring client applications and th
e workgroup. See “Site Settings” on page 97.
and managing user authorization. See
21
Page 22
1 Getting Started with the Avid Interplay Administrator
• Configuring the Interplay Archive Engine. See “Specifying Archive Settings” on page
107. For more information on archivin
Interplay Media Services Setup and User’s Guide.
• Configuring Editor Settings and Avid Interplay Services. See “Editor Settings” on page
111 and “Avid Interplay Services” on page 125.
g, see Avid Interplay Best Practices and the Avid
Starting the Avid Interplay Administrator
To start the Avid Interplay Administrator:
1. Do one of the following:
t Click the Start button and then select All Programs > Avid >
Avid Inte
t From Interplay Access, select Tools > Open Interplay Administrator.
rplay Access Utilities > Avid Interplay Administrator.
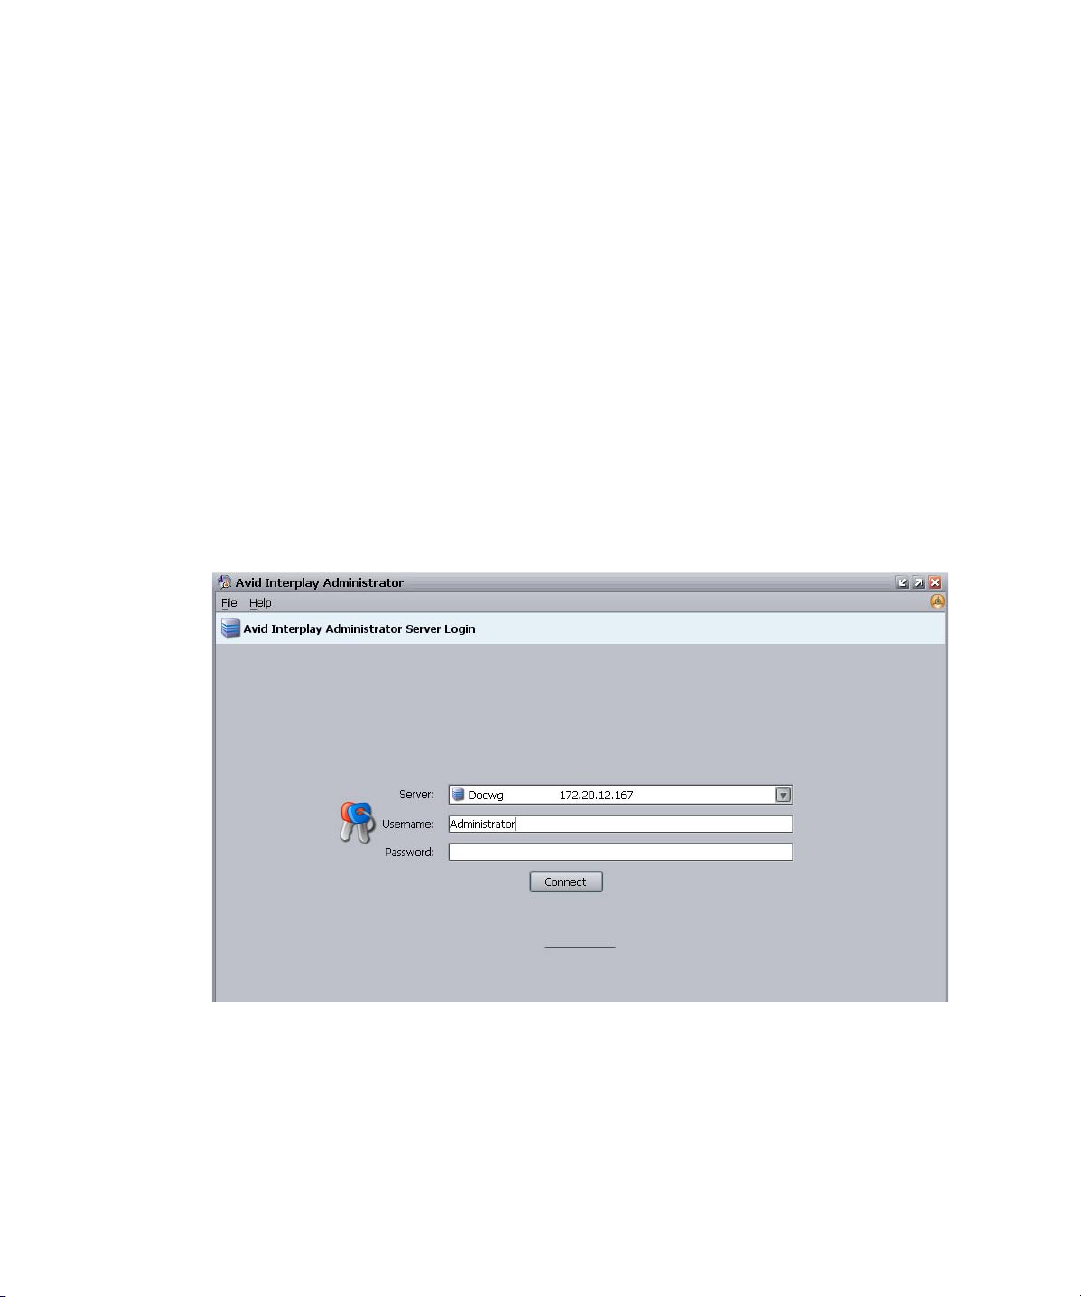
The Avid Interplay Administrator Serv
The first time you open the Interplay Administrator, the Server text box is empty. If you
have already logged into a server, the text box shows the last server you logged in to.
2. Select the server you want to work with by doing one of the following:
er Login scre
en appears.
22
t Accept the server that is displayed.
t Type the name of the server that you want to log in to. You can also use an IP
address.
Page 23
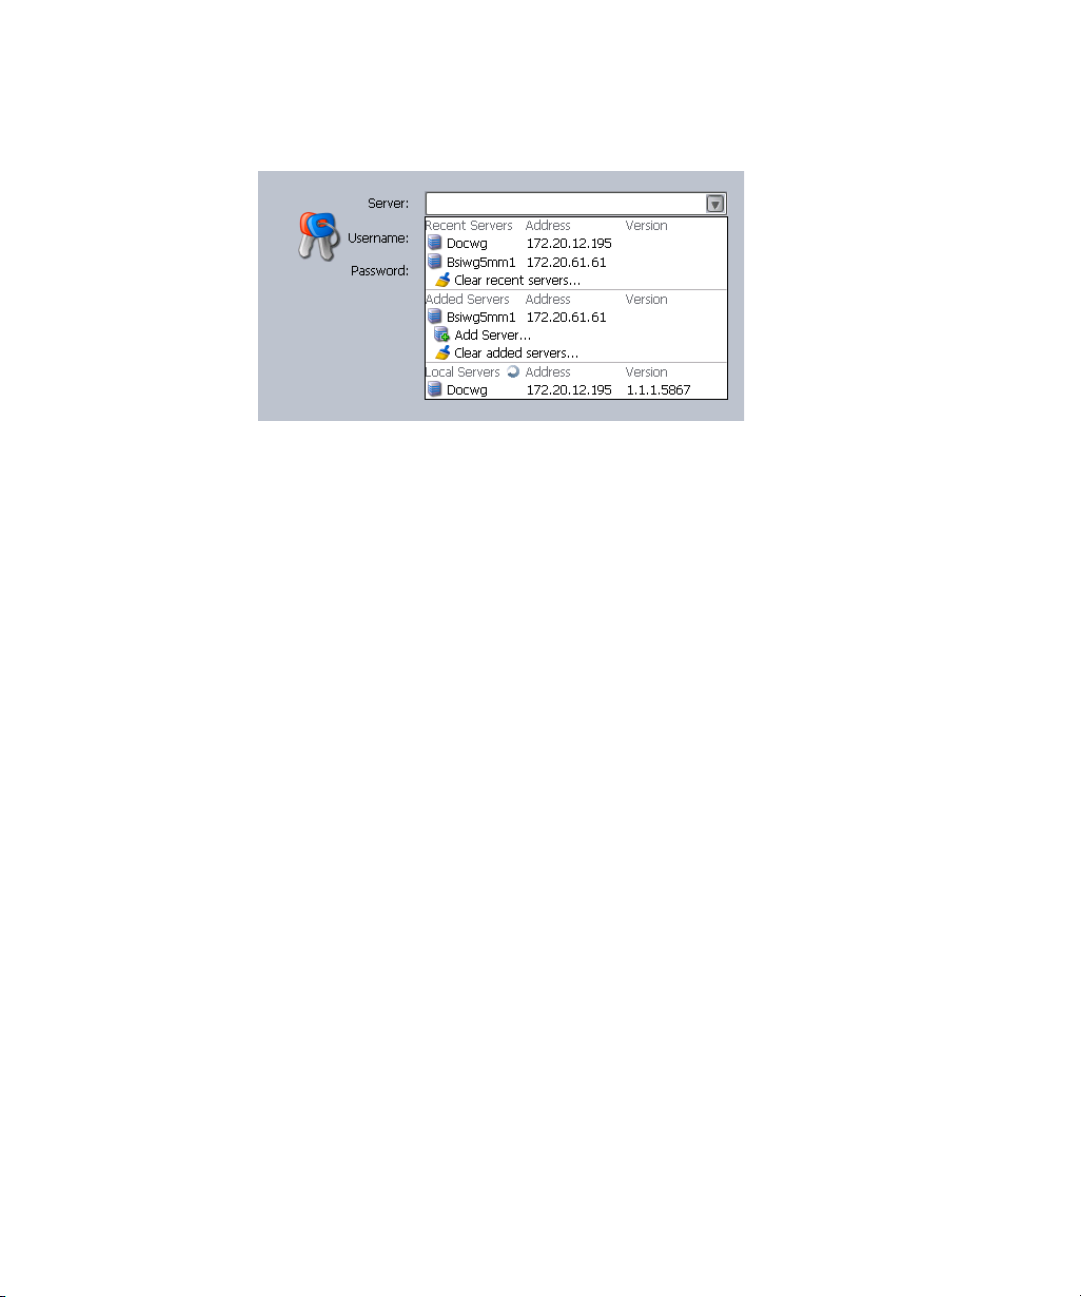
Using the Avid Interplay Administrator Window
t Click the arrow for the Server list and select the server name from the list.
The first part of the list shows recent servers, the second part of
servers that were added manually (not on a local area network), and the third part
shows servers available on your local area network.
t Click the arrow for the se
3. Type a user name with administration rights.
On the first start after installing the Avid Interplay Engine, only the user Administrator
xists. Typ
e
Change the password of the Administrator as soon as possible (see “Viewing and
Setting Attributes” on page 79).
The Interplay Administrator account is different from the Server Execution User account.
n
The Interplay Administrator account is used to manage users and the database. The Server
Execution User account is used to run the Interplay Engine processes.
4. Click Connect.
The Interplay Administrator windo
If you have any problems logging in, see “Troubleshoo
127.
e “Administrator” in the dialog box. The password is empty by default.
rver list and select Add Server. Type a new server name.
w opens.
ting Log-In Problems” on page
the list shows
Using the Avid Interplay Administrator Window
The Avid Interplay Administrator window is divided into six groups: Database, Server, User
Management, Site Settings, Editor Settings, and Avid Interplay Services. The name of the
Interplay Engine server you are connected to is displayed in the upper right of the window.
23
Page 24
1 Getting Started with the Avid Interplay Administrator
24
Each group contains views for managing components of the Avid Interplay Engine. Each
group is described in a separate section of this guide:
• “Database Settings” on page 27
• “Server Settings” on page 55
• “User Management” on page 65
• “Site Settings” on page 97
• “Editor Settings” on page 111
• “Avid Interplay Services” on page 125
Page 25
Opening an Interplay Administrator View
Opening an Interplay Administrator View
To open an Interplay Administrator view:
t In the Interplay Administrator window, click an icon.
The view you select replaces the Interplay Administrator win
path that shows the relative location of that view. The following illustration shows part
of the Create Database view. In this example, the path shows that the Create Database
view is included in the Database section of the Interplay Administrator window
(referred to as the Interplay Server).
To return to the Interplay Administrator window:
t Click the Menu button in the upper left of the view.
Opening Interplay Administrator Help
The Interplay Administrator includes a hyperlinked Help system that provides all the
information that is included in the Avid Interplay Engine and Avid Interplay Archive Engine
Administration Guide (this document).
dow. Each view includes a
To open Help:
t Select Help > Interplay Administrator Help.
For information on using Help, click the Contents tab a
nd double-click “Using Help.”
25
Page 26

1 Getting Started with the Avid Interplay Administrator
Exiting the Avid Interplay Administrator
When you are finished using the Avid Interplay Administrator, you should log out or close
the application.
To log out:
t Click the Log out button in the upper right of the Interplay Administrator window.
The window remains open.
To close the Interplay Administrator, do one of the following:
t Select File > Exit.
t Click the close button in the upper right of the window.
indow
The Interplay Administrator w
closes.
26
Page 27

2 Database Settings
The Database Settings allow you to create, configure, and manage the Interplay database.
The following topics describe how to use these settings:
• Creating an Interplay Database
• Avid Interplay Database Directories and Files
• Scheduling and Restoring Database Backups
• Performing a Consistency Check
• Viewing Database Information
• Locking and Unlocking Databases
• Managing Databases: Deactivating, Activating, and Migrating
• Moving a Database to Another Server
• Moving a Database and Users to Another Server
• Moving a Database Under Lo
• Renaming
a Database
w Disk Space Conditions
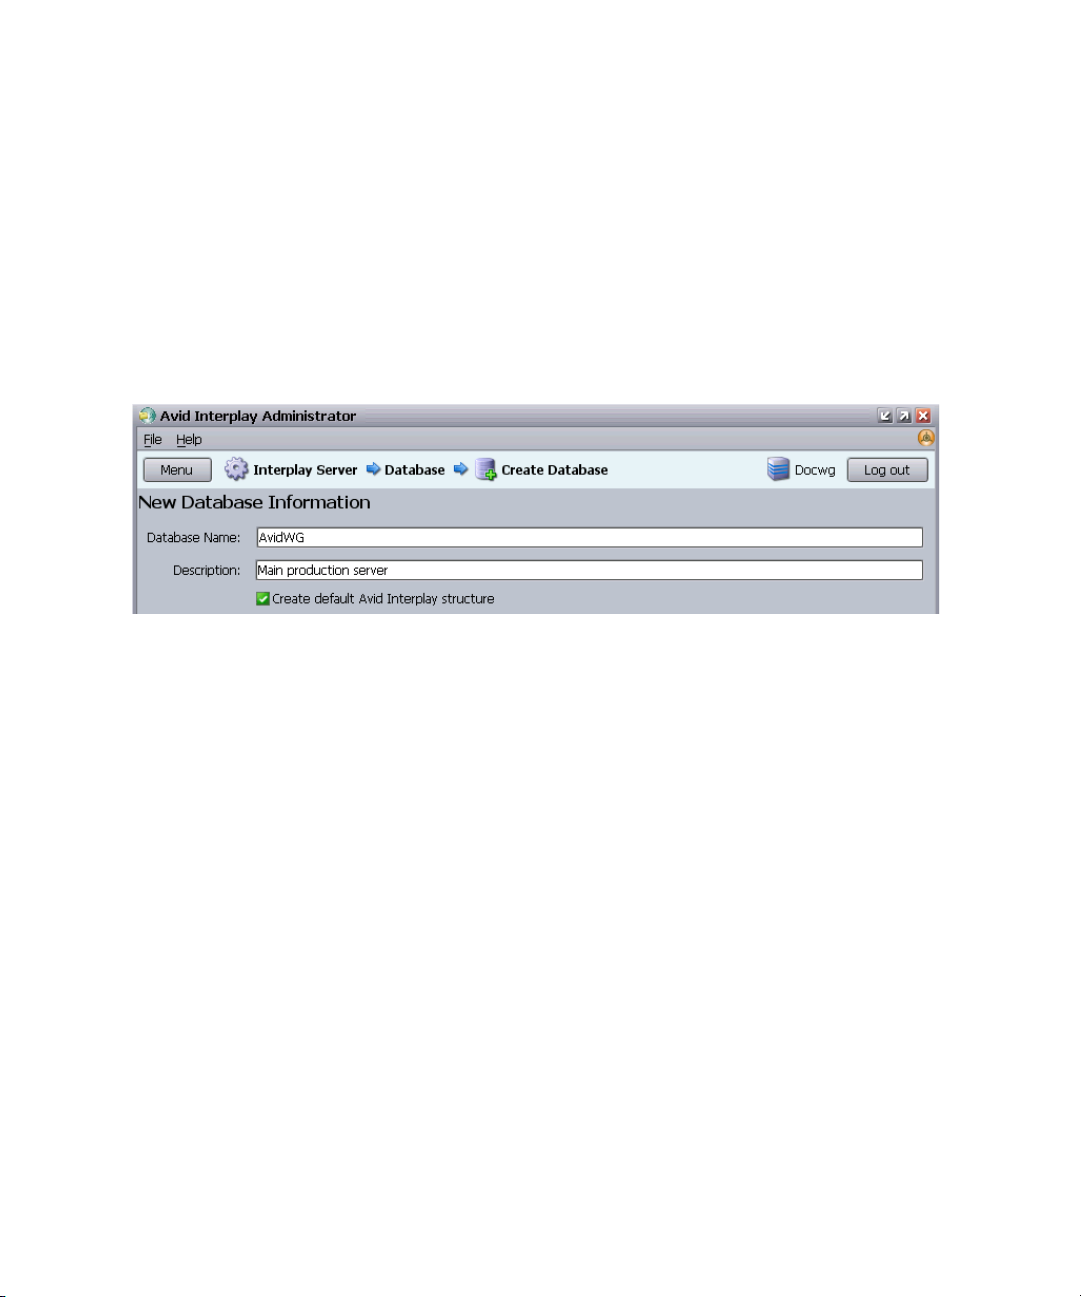
Creating an Interplay Database
The Create Database view lets you name and create a new Interplay database. You need to
create an Interplay database after you install the Interplay Engine and Interplay Access
software.
c
Avid supports only one database for each Interplay Engine. The database must be
named AvidWG, or for an Archive Engine database, AvidAM.
The root folder for a new database is set during the installation of the Interplay Engine
software. By def
database and the source files for file assets (the file repository). The default location is the
D:\Workgroup_Databases folder, which is represented by the administrative share name
WG_Database$. The $ indicates a hidden share.
To identify the actual folder, open a Command Prompt window and type
n
ault, the installation program creates one shared folder for both the metadata
net share
.
Page 28
2 Database Settings
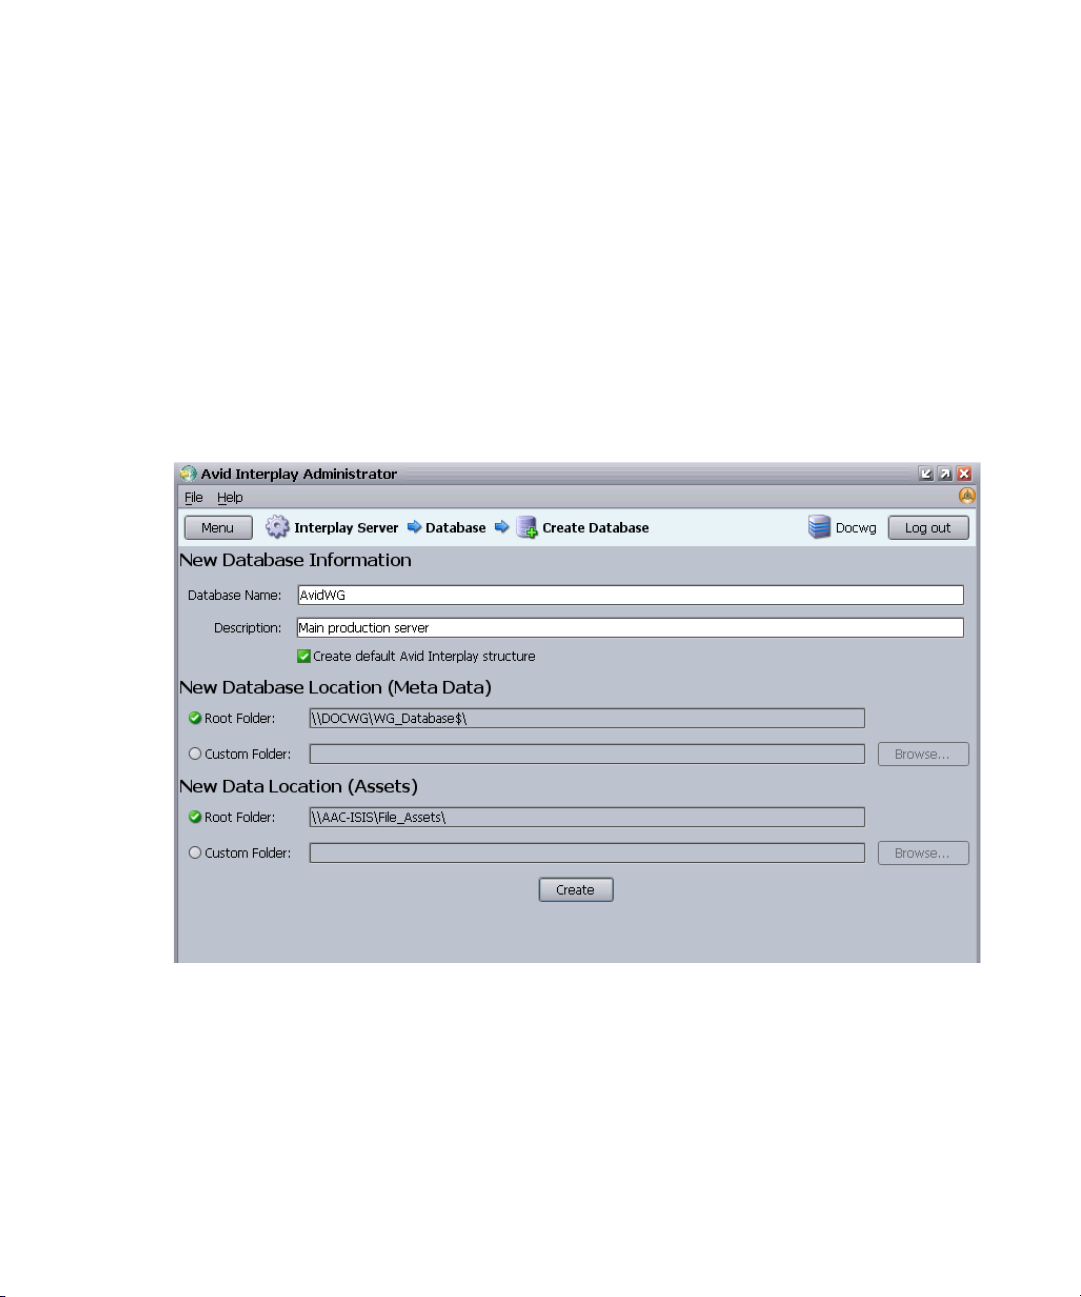
Avid recommends that you divide an Interplay database so that the metadata database
remains on the Interplay Engine server (the only supported setup) and the file repository
resides on an Avid Unity shared storage workspace. The most efficient approach is to
specify how to divide the database before you create it. You specify the locations in the
Server Settings view (see “Changing the Database and Data Locations” on page 55) and then
create the database in the Create Database view.
The following illustration shows the Create Database view
with two locations specified:
• The metadata database will be installed in \\DOCWG\WG_Dat
a folder on the Interplay Engine (by default, D:\Workgroup_Databases).
• The file repository will be installed in \\AAC-I
SIS\File_Assets\, which is a shared
storage workspace that was set in the Server Settings view.
abase$, which represents
28
For complete information on configuring a split database, see “Recommendation for
Database Storage” on page 133.
To create an Interplay database:
1. In the Database section of the Interplay Administrator window, click the Create
Database icon.
The Create Database view opens.
Page 29

Avid Interplay Database Directories and Files
2. In the New Database Information section, leave the default “AvidWG” in the Database
Name text box. For an archive database, leave the default “AvidAM.” These are the only
two supported database names.
3. Type a description for the database in t
Production Server.”
4. Select “Create default Avid Interplay structure.”
After the database is created, a set of default fo
Interplay Access and other Interplay clients. For more information about these folders,
see the Avid Interplay Access User’s Guide.
5. Keep the root folder for the Ne
The metadata database must reside on the Interplay Engine server.
Keep the root folder for the New Data Location
6.
If you are creating a split database, this entry should show
that you set in the Server Settings view (see “Changing the Database and Data
Locations” on page 55).
7. Click Create to create directories and files for the database.
The Interplay database is created.
w Database Location (Meta Data)
he Description text
lders wi
(Assets).
box, such as “Main
thin the database are visible in
.
the Avid Unity workspace
Avid Interplay Database Directories and Files
When the Interplay Engine creates a database, it creates a set of directories and files in the
locations you specified in the Create Database view (see “Creating an Interplay Database”
on page 27). If you configured your system to create a split database, only the _Database
folder is created on the local Interplay Engine se
storage workspace.
rver. Other fol
ders are created on the shared
n
c
The default location for the database is the administrative share that was set during the
Interplay Engine installation. By default, this administrative share is named WG_Database$
and it is associated with the folder D:\Workgroup_Databases. The “$” indicates a hidden
share. To identify the actual folder, open a Command Prompt window and type
During normal work, users or administrators do not need
directories and files listed in the following table. All access for normal work is through Avid
Interplay products. You need to work with these files when splitting a database or possibly
when troubleshooting a problem.
The _Database and _PropertyStore folders of each database should be excluded from
any kind of virus checking (virus checking tools might try to lock the database files).
to work directly with the
net share
29
.
Page 30

2 Database Settings
Database Directories and Files
Directory or File Directory or File Description
_Database The main database directory, which contains database files and the database
journal. These files contain the database structure and all metadata. All files
within this folder contain binary information and cannot be viewed or edited
with a text editor.
If you are working with a split database, this directory is located on the Interplay
Engine server and other directories are located on a shared storage workspace.
mor, .mos, .dor, .dos, .dps, .dep
(Located in _Database)
.jrn
(Located in _Database)
_Master The main data directory, which contains the source files for file assets that are
Handover Directories:
_Import, _CheckIn,
_PropertyHandover,
_Handover
The main database files. They contain the metadata for all versions of assets
managed by Avid Interplay. The overall size of these files can be expected to
grow linearly with the number of versions in your database. As a rough size
estimate, expect about 0.5 to 1 KB per asset (independent of its number of
versions) plus 0.5 to 1 KB per version. The exact numbers depend on the
amount of custom metadata attached to the assets.
Files that contain the journal data. Whenever a change to the database is
performed (ex: after check in, import, check out, rollback, or just setting a
property), the updated metadata is first written into the journal, which is then
periodically integrated into the main database files. Because journal files are
created automatically when necessary and deleted when no longer needed, they
are assigned random number that is part of the file name. These files are not
backed up.
managed by the database (the file repository). This directory contains source
files for all versions of the file assets.
Source files for Avid assets are always stored in Avid media folders on
n
shared storage.If you are working with a split database, this directory is
located on a shared storage workspace.
Whenever a file is copied from the client to the server, the file is first copied
into one of these directories, depending on what operation (check in, import,
and so on) was performed. The server then moves the file from these handover
directories into the _Master directory.
_PropertyStore The database directory that contains files holding the contents of streamed
properties. Streamed properties include metadata about Avid assets, such as
head frames and AAF information.
_Backup The data folder that contains backup versions of the _Database folder.
AvidWG.pro, AvidAM.pro A cookie file representing the database. It contains no vital information, but can
be used to set databases active.
30
Page 31

Scheduling and Restoring Database Backups
Database Directories and Files (Continued)
Directory or File Directory or File Description
Folderlocations.xml A file that informs the server about the location of the _Database directory. If
you set a new location for the file assets, you might need to edit this file. See
“Splitting a Database for Existing Interplay Installations” on page 138.
_Buckets Not currently used.
Scheduling and Restoring Database Backups
The Schedule Backups view lets you schedule and manage backups of the Interplay
database. These backups create copies of metadata files, but do not create copies of the
assets. You need to use another method to back up your assets.
You can schedule two kinds of backups:
• Complete (or Full) backup: Creates copies of d
and streamed properties files (in the _PropertyStore folder). Streamed properties include
metadata about Avid assets, such as head frames and AAF information.
• Fast backup: Creates copies of database files
properties files in the _PropertyStore folder. As the number of streamed properties
grows, the time it takes to run a Complete backup also grows, so you can save time by
scheduling Fast backups.
For more information about database
Files” on page 29.
You cannot restore parts of a backup, for example, a specific
restore only a Complete backup or a Fast backup.
c
Only _Database and _PropertyStore are backed up through the Interplay
Administrator backup process. Other directories, such as _Master, need to be backed
up through a different process. See “Recommendations for Automatic Backup
Configuration” on page 34.
Scheduling Database Backups
Use the Schedule Backups view to schedule the type and frequency of your backups.
You can also use this view to run a one-time manual backup. In this case, use this procedure
and schedule a compl
ete backup at the next available time.
atabase files (in the _Database folder)
in the _Database folder
files, see “Avid Interplay Database Directories and
sequence or folder. You can
, but not streamed
31
Page 32

2 Database Settings
For recommendations on developing a backup strategy, see “Recommendations for
Automatic Backup Configuration” on page 34.
To schedule database backups:
1. In the Database section of the Interplay Administrator window, click the Schedule
Backups icon.
The Schedule Backups view opens.
32
Page 33

Scheduling and Restoring Database Backups
2. In the list on the left side of the view, select the database for which you want to view or
specify automatic backup settings. The current settings are displayed.
3. (Option) In the Backup Information section, c
“Backup only if modified” is selected by defa
hange your preferences if necessary.
ult to save space and avoid duplicate
identical copies. The default number of versions to keep is 10. To avoid deleting your
last Complete backup, make sure that the “number of backups to keep” is higher than
the number of Fast backups that you schedule between Complete backups. For more
information, see “Recommendations for Automatic Backup Configuration” on page 34.
4. (Option) In the Backup Location preference, cha
The default is the backups folder _Backup, which is located in the f
nge the path if desired.
ile repository
location (a shared storage workspace if you split the database). To change this, select
Custom and then select Browse to go to another location. This folder can have a
different name. Make sure the Server Execution User has write access this folder. See
“Troubleshooting the Server Execution User Account” on page 130.
5. (Option) In the Fast Meta Data Bac
kup section, select “Fast Meta Data Backup enabled”
(disabled by default). A Fast backup backs up only the Interplay metadata, and relies on
subsequent Complete backups for restoring streamed properties.
6. (Option) If Fast Meta Data Backup is enabled, you can change the F
ast backup
frequency. The default is set to Daily. You can select any number of days you would like
to perform Fast backups or you can set a Fast backup for one day a month.
7. (Option) If Fast Meta Data Backup is
enabled, you can change t
he Fast backup time as
follows.
- Select Once at and change the hour and minut
es (within 10 minute int
ervals) on
which it occurs using the up and down arrows.
- Select Every and set the backup to occur at regular intervals starting at midnight.
Use the down arrow to select the interval.
- Select Custom and specify custom backup times. Use the up and down arrows to
select the time, and then select Add. Repeat to add more times to perform the
backup. Select a time and then Remove to cancel a backup.
The Backup time is the Interplay En
gine server's local time.
8. In the Complete Meta Data Backup section, make sure the option “Complete Meta Data
Backup Enable
d” is selected (default).
At a minimum, you should schedule one regular Complete backup.
9. (Option) Change the Complet
e backup frequency. Complete backups can take a long
time and Avid recommends that you perform Complete backups when the server is not
being used or when usage is lowest. The default is set to Sunday. You can select any
number of days you would like to perform Complete backups or you can set a Complete
backup for one day a month.
33
Page 34

2 Database Settings
10. (Option) Change the Backup time by selecting one of the following:
t Select Once at and change the hour and minutes (within 10 minute intervals) on
which it occurs
t Select Every and set the backup to occur at regular intervals starting at midnight.
Use the down arrow to select the interval.
t Select Custom and specify custom backup times. Use the up and down arrows to
select the time, and then select Add. Repeat to add more times to perform the
backup. Select a time and then Remove to cancel a backup.
11. Click the Apply Changes button.
using the up and down arrows.
Recommendations for Automatic Backup Configuration
A backup of the entire database requires two different processes:
• Automatic backup through the Administrator tool, as described in “Scheduling
Database Backups” on page 31. This process backs up the _Data
_PropertyStore folders.
•
Another backup process, such as tape. This process needs to back up the file assets by
acking u
b
p all other folders, such as the _Backup and _Master folders.
base and
34
c
The _Master folder is not included in the database backup, which includes only
metadata; therefore it must be backed up by another backup mechanism regularly.
It is extremely important to
Interplay Administrator instead of just a tape backup for b
_PropertyStore folders. Tape backups can be:
• Inconsistent: A tape backup of the _Database fol
to inconsistent backup files because the server might not have applied all the
transactions to the database yet.
• Inconvenient: Because it is not safe to make tape bac
the server is running, the server must be completely shut down during tape backup,
causing inconvenience.
• Unpredictable and dangerous: The backup might lock the database
the server from reading and writing those files. The database could become damaged.
Automatic backup, however, ensures d
use the automatic backup process
der while the server is running c
atabase consistency.
available through the
acking up the _Database and
kups of th
e _Database folder while
files. This prevents
an lead
Page 35

Scheduling and Restoring Database Backups
Recommended Backup Configuration
Avid recommends the following backup configuration:
• Enable a daily Avid Interplay database backup, as described in “Scheduling Database
Backups” on page 31. The backup should be set to run once daily at night, when
server is not being used or usage is lowest.
the
• Decide whether to schedule the daily backup as a Comp
you have a very large database, you can save time by scheduling a Fast backup daily and
a Complete backup every few days. For information about Fast and Complete backups,
see “Scheduling and Restoring Database Backups” on page 31.
• To avoid deleting your last Complete backup, mak
keep” is higher than the number of Fast backups that you schedule between Complete
backups. If the “number of Backups to keep” is smaller than the scheduled Fast
backups, you will lose your last full backup and the associated _PropertyStore.
The number of backups to keep includes Complete and Fast backups. When the number
of backups to k
you schedule full backups once a week and schedule partial backups every day, your
number of backups to keep must be larger than 6. Otherwise, on the 6th day the system
will delete your last full backup.
• Ensure that the backups are working and actually creating backups. T
check that the backup subfolders databasename_date_time are being created at the
specified times (according to the backup configuration) and that these subfolders are not
empty. Every backup should create its own subfolder
For example, your backup folders might be
\\UnityServer\WorkspaceName\Avi
A backup subfolder might be named AvidWG_2007-05-22_03-00.
• Enable a different backup mechanism, such as t
_Database and _PropertyStore folders. The _Backup and the _Master folder of each
database are the most important for the tape backup. Do not include the _Database and
_PropertyStore folders of each database in the tape backup.
eep is exceeded, the system deletes the oldest backup. For example, if
created in the following location:
dWG\_Backup
ape backup, for all folders e
lete backup
e sure that the “number
or Fast backup. If
of backups to
o test the backup,
xcept the
c
The _Database and _PropertyStore folders of each database should be excluded from
any kind of virus checking (virus checking tools might try to lock the database files).
Restoring an Earlier Version of a Database
Restoring a backup version of the _Database folder returns a database to the state it was in
when the backup was created. Before restoring a database, make sure that it is
really necessary, because changes since the back
up could be lost.
35
Page 36

2 Database Settings
To restore a backup, you need to run the InterplayRestore tool in a Command Prompt
window. The InterplayRestore tool is installed in the C:\Program Files\Avid\Avid Interplay
Engine\Server directory and includes in-line help for using the tool. For an example of how
the tool works, see “Database Restore Session Example” on
page 38.
You can restore either a Complete backup or a Fast ba
ckup. The InterplayRestore tool
identifies the type of backup for you to select. You can determine whether a backup is
Complete or Fast by opening the folder. A Complete backup contains a _Database folder and
a _PropertyStore folder. A Fast backup contains only a _Database folder.
You cannot restore parts of a backup, for exampl
e, a specific sequence or folder. You can
restore only a Complete backup or a Fast backup.
How the Restore Tool Renames Files
When the tool begins the restore, it locks the database and then renames the existing
directory _Database to _Database.1. If you are performing a restore from a Complete
backup, the tool renames _PropertyStore to _PropertyStore.1.
If the backup restore is not completed (you kill
and so o
n), you can restore the system to its previous state by deleting the _Database (and
the process, system crashes, error message,
possibly _PropertyStore) directories that the tool created, and renaming _Database.1 to
_Database (and also possibly _PropertyStore.1 to _PropertyStore).
If a directory _Database.1 already exists, the tool creates _Database.2, and so on up to
Database.9. If there are more than nine such directories, the tool exits with an error stating
_
that you should clean up these old temporary directories from previous restores.
After you make sure the database is correctly restored, you can delete the _Database.1 and
_PropertyStore.1 directories.
Using the InterplayRestore Tool on a Local Machine
You can run the InterplayRestore tool in interacti
information) or as a command line.
To restore an earlier version of a database from a backup using interactive mode:
1. On the Interplay Server, click Programs and select Accessories > Command Prompt.
2. At the command line, navigate to the folder that cont
type:
cd C:\Program Files\Avid\Avid Interplay Engine\Server
and press Enter.
36
ve mode (w
ains InterplayRestore. For example,
hich prompts you for
Page 37

Scheduling and Restoring Database Backups
3. Type:
InterplayRestore
and press Enter.
4. InterplayRestore prompts you for the database root directory. Type the path and press
Enter.
You can
D:\Workgroup_Databases\AvidWG
\\IEServer\WG_Database$\AvidWG
use a local path or a UNC path. For example:
You can use the administrative share name WG_Database$ only in a UNC path.
5. At the next prompt, type the backup home directory and press Enter. For example:
D:\Workgroup_Databases\AvidWG\_Backup
If you are working with a split database, this location will be on the shared storage
server. For example:
\\UnityServer\WorkspaceName\AvidWG\_Backup
6. At the next prompt, select the correct backup from the numbered list of available
backups and press Enter.
The restore process begins. For an e
xample o
f the process, see “Database Restore
Session Example” on page 38. At the end of the process, a message informs you that
you need
to restore the _Master directory manually.
7. Restore your _Master folder through whatever mechanism you use for backup.
The _Master database is not backed up by the automated backup feature of Interplay. See
n
“Recommendations for Automatic Backup Co
8. Unlock the database by using the Lock/Unlock Data
nfiguration” on page 34.
base view in the Interplay
Administrator.
9. Check to make sure you can access the restored database from Interplay Access, and
that yo
u can preview clip headframes.
10. Delete the _Database.1 and _PropertyStore.1 directories.
To restore an earlier version of a database from a backup using the command line, do
one of the following:
t Navigate to the folder that holds InterplayRestore, type the following, and press Enter:
InterplayRestore <database root dir> <database backup dir>
For example:
InterplayRestore d:\Workgroup_Databases\AvidWG\
d:\Workgroup_Databases\AvidWG\_Backup
37
Page 38

2 Database Settings
InterplayRestore prompts you to choose from a numbered list of available backups and
then performs the restore.
t Navigate to the folder that holds InterplayRestore, type the following, and press Enter:
InterplayRestore <database root dir> <database backup dir> <backup
folder for restore>
For example:
InterplayRestore d:\Workgroup_Databases\AvidWG\
d:\Workgroup_Databases\AvidWG\_Backup
d:\Workgroup_Databases\AvidWG\_Backup\AvidWG_2007-08-20_01-00
InterplayRestore performs the restore.
Database Restore Session Example
Here is an example interactive session, which b
egins with the command
for starting the
InterplayRestore tool.
C:\>”C:\Program Files\Avid\Avid Interplay
Engine\Server\InterplayRestore”
********************************************************************
InterplayRestore - Restore Interplay databases from backup
A non interactive mode is also available.
Run "InterplayRestore.exe /?" for help
Enter the Interplay database root directory:
D:\Workgroup_Databases\AvidWG
Enter the backup root directory: D:\Workgroup_Databases\AvidWG\_Backu
Choose a backup to restore from:
[1] Tuesday, September 12, 2007
[2] Thursday, September 14, 2007 3:04:00 AM Fast
[3] Friday, September 15, 2007 3:05:00 AM Full
3:05:00 AM Full
p
38
[4] Saturday, September 16, 2007 3:00:00 AM Full
Choose an entry ( 1 - 4 ):
Page 39

Scheduling and Restoring Database Backups
Assume you choose 1. The tool locks the project so that no one can access the database and
then copies the files:
Beginning restore from
d:\Workgroup_Databases\avidwg\_Backup\AvidWG_2006-09-12_03-05\
This is a Full backup
Restoring to d:\Workgroup_Databases\avidwg\
Locked project AvidWG
Copying files into d:\Workgroup_Databases\avidwg\_Database
Copying file AvidWG.dor
...
It leaves the database locked and gives you the following message:
Database AvidWG is still locked because you need to restore _Master
manually, or through your existing tape backup mechanism.
When you are done restoring _Master, use the Lock/Unlock Database view
in Interplay Administrator to unlock the AvidWG database. This will
complete your restore operation.
Using the InterplayRestore Tool to Restore Backups Remotely
Restoring backups remotely is the most advanced restore
mechanism. This feature is
recommended for experienced administrators who have a number of Interplay Engines to
maintain and do not want to log in locally on each server.
However, you must lock the database by using the Interplay Administrator before you can
the backup. The Interpla
restore
yRestore tool cannot lock the database when operating
remotely. If the database is not locked, the Interplay Engine will block access to the files in
the _Database and _PropertyStore directories and the restore will fail.
You can run the InterplayRestore tool from any system t
hat includes the InterplayRestore
tool and two DLLs. You do not need to install the Interplay Engine on the local system, but
you do need to copy the necessary files from an Interplay Engine server.
To prepare a local system to run the InterplayRestore tool:
t Copy the following files from an Interplay Engine server to the same locations on the
local system:
- C:\Program Files\Avid\Avid Interplay Engine\Server\InterplayRestore.exe
39
Page 40

2 Database Settings
- C:\WINDOWS\system32\nxn_workgroup_eem.dll
- C:\WINDOWS\system32\nxn_workgroup_library_129.dll
Alternatively, you can keep all three files in the same folder.
To remotely restore an earlier version of a database from a backup:
1. Open Interplay Administrator, log in to the Interplay Engine whose database you want
to restore, and lock the database. For more information, see “Locking and Unlocking
Databases” on page 42.
The InterplayRestore tool cannot loc
k the da
tabase when operating remotely.
2. On a local system, click Programs and select Accessories > Command Prompt.
3. At the command line, navigate to the folder that contains InterplayRestore.
For example, type:
cd C:\Program Files\Avid\Avid Interplay Engine\Server
and press Enter.
4. Type:
InterplayRestore /nolock
and press Enter.
5. Continue the procedure as described in “Restoring an Earlier Version of a Database” on
page 35.
You can use a
xample, the Interplay Engine resi
e
command line call to restore a database remotely. In the following
des on a machine called “remote-server” and the
backups reside on another server called “backup-server.”
InterplayRestore.exe /nolock
\\remote-server\Workgroup_Databases\AvidWG\
\\backup-server\backups\AvidWG\_Backup
\\backup-server\backups\AvidWG\_Backup\AvidWG_2007-02-13_18-40
Backing Up and Restoring the Interplay Users Database
40
The Interplay users database (_InternalData folder) is not backed up as part of the automated
backup process. You can back up this database by copying it to another location. By default,
the _InternalData folder is located on the server that is configured as the Central
Configuration Server (see “Understanding the Central Configuration Server” on page 65), in
\\IEServer\
WG_Database$ (usually D:\Workgroup_Databases).
Page 41

Performing a Consistency Check
To back up the Interplay users database
1. Lock the server in the Lock Server view. For more information, see “Locking and
Unlocking the Server” on page 58.
2. Copy the _InternalData folder
3. Unlock the server.
To restore the Interplay users database:
1. Lock the server.
2. Copy the _InternalData folder from the backup location to the i
\\IEServer\WG_Database$ (usually D:\Workgroup_Databases).
If an _InternalData folder exists in the
rename it and then copy the backup file.
3. Unlock the server.
to a backup location, suc
location, o
verwrite it with the backup file or
Performing a Consistency Check
The database Consistency Check compares the version of the database or databases on the
master directory with the current database file. The Perform Consistency Check view
provides a useful tool for checking if all references are correct, seeing if all necessary files
are on the disk, and other database checks.
c
The Consistency Check is for support purposes. You should perform this check only if
requested by Avid Technical Support.
h as a shared storage workspace.
nstalled location
Viewing Database Information
Use the Database Information view to display information about an Interplay database,
including information about the connected users.
c
Avid recommends storing file assets on Avid Unity shared storage. See
“Recommendation for Database Storage” on page 133.
To view the information about a database:
1. In the Database section of the Interplay Administrator window, click the Database
Information icon.
The Database Informat
ion view
opens.
41
Page 42

2 Database Settings
2. Select the database name from the list.
A summary of information about the database appears:
- Name and description: Either AvidWG (Interplay Engine) or AvidAM (Interplay
ve Engine)
Archi
- Root folder for database (Meta Data): see “Creating an Interplay Database” on
page 27.
- Root folder for data (Assets): see “Creating an Interplay Database” on page 27.
- Connected user information: see “Managing Licenses” on page 60.
with a description supplied when the database was first created.
Locking and Unlocking Databases
If you need to make changes to a database, use the Lock/Unlock Databases view to prevent
users from connecting to the database. By default, the database is unlocked.
42
Page 43

Locking and Unlocking Databases
To lock a database:
1. In the Database section of the Interplay Administrator window, click the Lock/Unlock
Database icon.
The Lock/Unlock database view opens.
2. Select the database in the Unlocked Databases list.
3. (Option) Type a Lock comment explaining why you are locking the database. This
information appea
rs in the Locked Database Information section for the database.
4. Click Lock Database.
Your user ID and the time at which you locked the database are filled in, and the
tabase is displayed
da
To unlock a database:
in Locked Databases.
1. Select the database in the Locked Databases list.
2. Click Unlock Database.
The database is displayed in Unlocked Databases.
43
Page 44

2 Database Settings
Managing Databases: Deactivating, Activating, and Migrating
Use the Managing Databases view to remove a database from the list of active databases
(deactivate) or to restore it to the list (activate). This view also lets you migrate a database to
a new Central Configuration Server (CCS) when necessary.
activa
The following topics provide more information about
databases:
• Deactivating a Database
• Activating a Deactivated Database
• Migrating a Database
Deactivating a Database
You might want to prevent users from connecting to a database if the database has been
“retired” and the files have been moved elsewhere. In other cases, such as when you are
backing up or moving databases, you might need to ensure that no connections can be made
to the database to avoid interference. Deactivating the database removes it from the list of
active databases.
ting, deactivating, and migrating
44
c
Deactivating a database does not delete the database files. It makes the database
inactive so that users cannot connect to it until it is activated again. The database data
is kept at the location that was specified when the database was created.
To deactivate a database:
1. In the Database section of the Interplay Administrator window, click the Manage
Databases icon.
The Manage Databases view opens.
Page 45

Managing Databases: Deactivating, Activating, and Migrating
2. Select the database name in the Databases list.
3. Click Deactivate.
The database name is removed fr
om the Databases list.
Activating a Deactivated Database
If a specific database is not listed in the Databases view, it means that it is unknown to the
Interplay Engine and users cannot connect to it.
To add an existing but inactive database to the list of active databases:
1. In the Database section of the Interplay Administrator window, click the Manage
Databases icon.
The Manage Databases view opens.
2. Do one of the following:
t In the “Database (.pro) file to activate” text box, type the full UNC path to the .pro
file. For example:
\\IEServer\WG_Database$\AvidWG\AvidWG.pro
45
Page 46

2 Database Settings
t Click the Browse button, log in if prompted, navigate to the .pro file, select the file,
and click Open.
The following illustration shows the path to AvidWG.
smb network and the administrative share.
Avid recommends keeping the default share name WG_Database$. If you decide on a
n
different share name, consider that if the name is longer than 12 characters, you cannot
browse to it graphically. If a share name is longer than 12 characters, you need to type the
complete path in the “Database (pro) file to activate” text box.
pro, using the Microsoft Windows
46
Make sure to navigate through the network to select the file. You must use a UNC path.
This is es
.pro file is located on the shared storage server. The following illustration shows the path
to AvidWG.pro, using an Avid Unity ISIS network and the workspace where the
AvidWG folder is stored. In an Avid Unity MediaNetwork, the network name is “Avid
Unity Network.”
pecially important if you are working with a split database. In this case, the
Page 47

Managing Databases: Deactivating, Activating, and Migrating
The .pro file is displayed in the Activate Database dialog box.
47
Page 48

2 Database Settings
3. Make sure the option “Load Database on Activation” is selected. Deselect this option
only if directed by Avid support.
4. Click Activate.
The database is activated and loaded. The database name is displayed in the Databases
list and users can connec
Migrating a Database
You usually need to perform a database migration under the following circumstances:
• When you want to remove all users and group-related data from a database. This allows
you to start
database.
with new users and groups and maintain the metadata and the data inside the
t to the database.
c
c
• When troubleshooting a problem with customer su
might ask you to provide a copy of your database.
• If you changed the Central Configuration Serv
moving the _InternalData folder. If a database needs to be migrated, the State reads
“Database Requires Migration.”
Do not use a database that requires migration; always mi
cannot administer an unmigrated database.
If a database needs migration, the database icon shows a red box with an X and a yellow
arrow. The da
including the Manage Database Roles view.
When you migrate a database, the system deletes all the information inside the
database that was stored from the old CCS, including users, user settings and local
administration settings.
If you plan to migrate an Interplay Engine or Interplay Archive Engine database, turn
off the database backup process before you perform the migration. If you do not turn
off the backup process and it coincides with the migration, your backup will write out
an inconsistent state of the database (half current and half migrated).
tabase icon appears in several views in the Interplay Administrator,
(Red box with X and yellow arrow) Database needs migration.
pport. Fo
er (CCS) for a database without f
r example, customer support
irst
grate a database to a CCS. You
48
Page 49

Managing Databases: Deactivating, Activating, and Migrating
To migrate a database to a new CCS:
1. In the Database section of the Interplay Administrator window, click the Manage
Databases icon.
The Manage Databases view opens.
2. In the Manage Databases view, click the name of the database that needs migration. The
State reads “Database Requires Migration.”
A warning explains the consequences of a database migration.
3. Click Migrate Database.
After the migration, the State reads “OK.” The database now has the CCS users and
adm
inistratio
n properties of the new CCS you have set.
49
Page 50

2 Database Settings
Moving a Database to Another Server
Under special circumstances, you might need to move a database to a different server.
Avid recommends that you have telephone support from Avid during the process in case
n
complications arise.
c
If you move a database to a server that points to a different CCS, all the old CCS
information that was stored, including users, user settings, and local administration
settings for the database, will be lost because you will have to migrate the database (see
“Migrating a Database” on page 48). If you move a database to
move the CCS, however, this information is preserved. To move both a database and a
CCS, see
To move a database to another server:
1. Install the Interplay Engine on a new server (the target server).
2. Disconnect all clients from the existing server (the source
3. On the source server, lock the database by using
4. Deactivate the database using the Manage Databases view (see “Deactivating a
5. Make sure the database is unloaded from
“Moving a Database and Users to Another Server” on page 51.
Make sure the configuration is the same on both systems. Fo
system uses a split database, the new system should also use a split database (see
“Recommendation for Database Storage” on page 133).
clients will connect to the server.
Make sure the number of connected clients is 0 in the
“Locking and Unlocking Databases” on page 42).
Database” on page 44).
the server by opening th
Administrator, opening the Restart Server view, and clicking Restart.
Server Information vie
the Lock/Unlock Database view (see
another ser
r example, if the original
server) and make
e Interplay
ver and also
sure no
w.
50
6. Locate the database folder on the source server.
The default path is D:\WG_Database$\AvidWG (or A
By default, the administrative share WG_Database$ refers to D:\Workgroup_Databases.
For more information, see “Identifying the Root Folder of the Interplay Server
tabase” on page 142.
Da
7. Pack the database folder into a zip file or us
Resource Kit for path names longer than 256 characters.
To save time and storage you do not need t
D:\WG_Database$\AvidWG\_Backup folder. One complete backup and the most recent
Fast backup are sufficient.
8. Copy the zipped file to a network ser
e Robocopy
o cop
ver, remov
vidAM for an Archive Manager).
from the Microsoft Windows
y all the backups in the
able media, or a laptop.
Page 51

Moving a Database and Users to Another Server
9. On the target server, make sure no clients attempt to connect to the server.
10. Copy the zipped file to the target server and unzip the file to the database folder. Make
sure the path on th
11. Activate the database by using the Manage Databases view (see “Activating a
Deactivated Database” on page 45).
e target server matches the path on the source server.
12. On a client system, connect to the database, load A
available.
13. On all client systems, remove the old database from Interp
the database name and then clicking Remove Databases.
14. On all client systems, reinsert the database by selecting Databases > Connect to
Database.
15. (Option) On the source server
future access.
, ren
ame the original database folder to avoid unwanted
vidWG, and verify that all data is
lay Access by right-clicking
Moving a Database and Users to Another Server
Under special circumstances, you might need to move a database and users to a different
server.
c
If you move a database to a server that points to a different CCS, all the old CCS
information that was stored, including users, user settings, and local administration
settings for the database, will be lost because you will have to migrate the database (see
“Migrating a Database” on page 48). If you move a database to another server and also
move the CCS, however, this information is preserved. To move both a database and a
use this procedure. For more information about a CCS, see “Understanding the
CCS,
Central Configuration Server” on page 65.
To move a database and users to another server:
1. Install the Interplay Engine on a new server (the target server).
Make sure the configuration is the sa
system uses a split database, the new system should also use a split database (see
“Recommendation for Database Storage” on
2. On the source server, lock the database by using the Lock/U
“Locking and Unlocking Databases” on page 42).
3. Deactivate the database using the Manage Databases view (see “Deactivating a
Database” on page 44).
4. Disconnect all clients from the existing server (the source server) and make sure no
clients will connect to the server.
me on both systems. For example, if the original
page 133).
nlock Database view (see
51
Page 52

2 Database Settings
Make sure the number of connected clients is 0 in the Server Information view.
5. Make sure the database is unloaded from the server by opening th
e Interplay
Administrator, opening the Restart Server view, and clicking Restart.
6. Locate the database folder on the source server.
The default path is D:\WG_Database$\AvidWG (or AvidAM fo
r an Archive Manager).
By default, the administrative share WG_Database$ refers to D:\Workgroup_Databases.
For more information, see “Identifying the Root Folder of the Interplay Server
tabase” on page 142.
Da
7. Pack the database folder into a zip file or us
e Robocopy
from the Microsoft Windows
Resource Kit for path names longer than 256 characters.
o cop
To save time and storage you do not need t
y all the backups in the
D:\WG_Database$\AvidWG\_Backup folder. One complete backup and the most recent
Fast backup are sufficient.
on the source server.
8. Locate the user folder _Internal
Data
The default path is D:\Workgroup_Databases\_InternalData.
9. Copy the zipped file and the _InternalData folder to
a network server
, removable media,
or a laptop.
10. On the target server, make sure no clients attempt to connect
11. Make sure the _InternalData database is unloaded from the server by
to the server.
opening the
Interplay Administrator, opening the Restart Server view, and clicking Restart.
12. Rename the existing _InternalData folder _InternalData_old.
52
If you get an error message that the server loaded the data
connecte
d from a client, go back to step 8.
13. Copy the zipped file to the target server and unzip
the fi
base because someone
le to the database folder. Copy
the _InternalData folder to the Workgroup_Databases folder. Make sure the path on the
target server matches the path on the source server.
14. Verify that all users are on the system by opening the User Management view and
wing th
vie
15. Activate the database by using
e lists of user groups.
the Man
age Databases view (see “Activating a
Deactivated Database” on page 45).
16. On a client system, connect to the database, l
oad Avi
dWG, and verify that all data is
available.
17. On all client systems, remove the old database fr
om Interplay Access by right-clickin
the database name and then clicking Remove Databases.
18. On all client systems, reinsert the database
by selectin
g Databases > Connect to
Database.
g
Page 53

Moving a Database Under Low Disk Space Conditions
19. (Option) On the source server, rename the original database folder to avoid unwanted
future access.
Moving a Database Under Low Disk Space
Conditions
If disk space on the server is critically low, the Interplay Engine refuses client connections
and displays an error message. In this situation, the administrator cannot log in and shut
down the server, and move a database by normal means (as described in “Moving a Database
to Another Server” on page 50 and “Moving a Database and Users to Another Server” on
page 51). In the Server installation directory (b
Interplay Engine\Server), there are tools provided to solve
• NxNServerLock.exe
• NxNServerUnlock.exe
• NxNServerShutdown.exe
y default, C:\Program Files\Avid\Avid
such problems:
c
Before beginning this procedure, be sure to make a backup of the database. See
“Scheduling and Restoring Database Backups” on page 31 for information on running
a backup. Temporarily change the Backup time field to “Once at” and enter or
from the list the time in the future closest to the current time.
To move a database under low disk space conditions:
1. Lock the server using NxNServerLock.exe.
2. Shut down the server using NxNServerShutdown.exe, if necessary.
3. Move the database folder (AvidWG or AvidAM) to another drive or free up some disk
ce.
spa
4. Unlock the serve
t Use the Interplay Administrator’s Lock Server view (see “Locking
the Server” on page 58).
t Use NxNServerUnlock.exe.
5. Deactivate the moved database using the Manage Datab
Database” on page 44).
6. Activate the moved database in the correct location using the Manage Databases view
e “Act
(se
ivating a Deactivated Database” on page 45).
r by doing
one of the follow
ing:
and Unlocking
ases view (see “Deactivating a
select
53
Page 54

2 Database Settings
Renaming a Database
Under some circumstances you might need to rename a database For example, if you need to
create a new database with the same name, you can rename the original database. You can
keep the original database as an archive for searching.
c
Before beginning this procedure, be sure to make a backup of the database. See
“Scheduling and Restoring Database Backups” on page 31 for information on running
a backup. Temporarily change the Backup time field to “Once at” and
from the list the time in the future closest to the current time.
To rename a database:
1. In the Database section of the Interplay Administrator window, click the Manage
Databases icon.
The Manage Databases view opens.
2. Select the database and click the Deactivate Database button to ensure that the database
is not in use.
the server or at the database location, use the Windows desktop to rename the
3. On
abase folde
dat
is, replace the old <DatabaseName> with the new name for all files fitting the following
mask:
<DatabaseName>\<DatabaseName>.pro
<DatabaseName>\<DatabaseName>.nif
<DatabaseName>\<DatabaseName>\_*.pro.jrn
<DatabaseName>\_Database\<DatabaseName>.*
<DatabaseName>\_Database\<DatabaseName>_*.jrn
r, .pro file, and .nif directory, and all files within the _Database folder, that
enter or select
54
Do not forget to rename the .jrn files correctly: make sure there are no typos in the
database name, and that they are followed by the underscore and the numeric id.
4. In the Interplay Administrator, click the Manage
database (see “Activating a Deactivated Database” on page 45).
Databases ic
on and activate the
Page 55

3 Server Settings
The Server Settings enable you to configure and change server settings and shutdown and
restart the server. The following topics describe how to use these settings:
• Changing the Database and Data Locations
• Viewing Server Information
• Locking and Unlocking the Server
• Restarting the Server
• Managing Licenses
Changing the Database and Data Locations
The Server Settings view lets you change the default locations for a new database.
c
n
Do not change the location for the metadata database. The metadata database must be
stored directly on the local Interplay Engine server because permanent access to these
files is required. This is the only supported setup. Avid recommends that you store the
source files for file assets on an Avid Unity shared storage workspace. This
configuration is known as a split database.
Changing the root folder for file assets is part of the proce
more information and instructions, see “Recommendation for Database Storage” on page
133
.
The root folder for a new database is set during the installation of the Interplay Engine
ftware
so
root folder for both the metadata database and the source files for file assets (the file
repository). The default location is the D:\Workgroup_Databases folder, which is
represented by the administrative share name WG_Database$. The $ indicates a hidden
share.
To identify the actual folder, open a Command Prompt window and type
If you need to create a new database, changing these set
databases.
. By default, the installation program creates a shared folder that functions as the
ss of creating a split database. For
net share
tings will not affect any existing
.
Page 56

3 Server Settings
To change the root folders for a new database:
1. In the Server section of the Interplay Administrator window, click the Server Settings
icon.
The Server Settings view opens.
2. For the root folder of the database (metadata), keep the folder that was set during the
installation of the server (the default is \\IEServer\WG_Database$\).
3. For the root folder of the data (file assets), Avid recommends that yo
u change the folder
to a workspace on Avid Unity shared storage (see “Recommendation for Database
Storage” on page 133). Type a UNC path or browse through the Avid Unity Network or
Avid Unity ISIS Network to the workspace.
You might need to provide proper credentials to bro
wse and access the shared storage
workspaces.
4. Click Apply Changes to change the setting for new databases.
5. If you changed the root folder for the file assets, complete the tasks described in
“Splitting a Database for New Interp
lay Installations” o
n page 136 or “Splitting a
Database for Existing Interplay Installations” on page 138.
56
Page 57

Viewing Server Information
The Server Information view has two sections:
• The Server Information section displays information about the following:
- The version of the Avid Interplay Engine software
- The number of connected clients (through Interplay Access and other client
cations)
appli
- The number of databases on the server
• The Connected User Information section displays information about the following:
- Which database users are connected to
- Which user is connected to which database
Viewing Server Information
- Which machine the user
What time a user has been connected since
-
• The type of licenses in use (see “License Types and Usage” on page 63)
To view information about the Interplay Engine server:
t In the Server section of the Interplay Administrator window, click the Server
Information icon.
The Server Information view opens.
is connected from
57
Page 58

3 Server Settings
Locking and Unlocking the Server
The Lock Server view allows the administrator to lock the Interplay Engine server for a
specific period of time by shutting down the server process. Locking the server is useful
when carrying out tasks such as:
• Server maintenance or upgrading the server software.
• Maintaining or rebooting the Avid Unity server (File Manager or System D
Whenever
server.
If the database becomes corrupt, the serv
When the server is locked, all the clients that are connected to it are disconnec
database is saved, and the server process is shut down so that no data is lost. While the server
remains locked, users are unable to connect to the database that is stored on that server.
If possible, use the database lock instead of the server lock. Use the server lock if you want
n
to do maintenance on the server machine itself or the shared storage system. Use the
database lock if you need to do maintenance on a database or its related files (for example,
moving a database to another server). Using the database lock provides more security and is
also preferable since it avoids making the entire server inaccessible. See “Locking and
Unlocking Databases” on page 42.
To lock the server:
1. In the Server section of the Interplay Administrator window, click the Lock Server icon.
The Lock Server view opens.
a database or data location is unavailable, you should lock the database or the
er might be loc
ked automatically.
irector).
ted, the
58
Page 59

2. Select one of the following for the locking duration:
Restarting the Server
- Indefinitely: An indefinite shutdown. This is a good choice wh
server to carry out any vital maintenance, for example replacing hard drives, or
making the first backup of a new database. The server needs to be manually
unlocked after maintenance work.
- Minutes: Allows you to stipulate when to restart the server (short time frame). It is
useful when you are making routine backups and you know how much time you
need. Specify the time period by clicking the Up and Down arrows.
- Lock until: Allows you to stipulate when to restart the server (longer time frame).
Specify the time period by clicking the Up and Down arrows.
3. In the Lock Details text box,
comment is displayed when clients try to connect to the server.
4. Click Lock Server.
The Lock Server view changes to display lock informatio
Interplay Administrator window by clicking the Menu button. You can log out of the
Interplay Administrator tool and then log in again.
To manually unlock the server:
1. If necessary, log in to the Interplay Administrator.
The Lock Server view opens.
2. Click Unlock Server.
type a comment as to why y
ou are locking the server. This
n. You cannot return to the
en shutting down the
The Server Login window opens.
3. Log in to the Interplay Administrator.
Restarting the Server
Restarting the server disconnects any clients and shuts down the database before the server
process is restarted. You will rarely need to restart the server. Typically you restart the server
if you want to disconnect all clients and want to make sure no one is connected to the server
so that you can perform maintenance. For example, you might restart the server and then
lock the database as part of the process of moving the database.
Restarting only restarts the server process and not the server machine itself.
c
Depending on the size of the database, this process can take several minutes. Do not
attempt to reboot the server under any circumstances before this process is completed.
59
Page 60

3 Server Settings
To restart the server process:
1. In the Server section of the Interplay Administrator window, click the Restart Server
icon.
The Restart Server view opens.
2. Click Restart.
Managing Licenses
Avid Interplay needs a valid license in order to function. A license consists of a hardware ID
and a license key. The hardware ID is associated with the physical application key, or
dongle. The license key is created by a license file and includes information about the
license types for individual applications.
60
The Licenses view has two sections:
• The License Types section displays informa
- Your current license types (see “License Types and Usage” on page 63).
- Number of license types available.
- License types used.
- Time limit (days): the total days included i
license loaded that includes the same license type, only one time limit is stored for
each type.
- Days remaining: the number of days until e
license loaded that includes the same license type, only one value for the days
remaining is stored for each type.
• The Server Information section displ
- Customer ID. The customer name or ID number.
- The permitted number of databases.
ays information about
tion about the foll
license. If you have more than one
n the
xpiration. If yo
owing:
u have more than one
the following:
Page 61

Managing Licenses
- Hardware ID, obtained from the physical application key (dongle). The Hardware
ID is required to obtain technical support.
- License mode: All Interplay licenses are nodelocked.
Lock timeout: The lock timeout is the time the server freezes a license
-
on the server
before it is freed for use by another user or machine. All Interplay licenses use a
setting of 0 hours, 0 minutes, and 0 seconds.
To view information about your licenses:
t In the Server section of the Interplay Administrator window, click the Licenses icon.
The Licenses view opens.
For information about importing a license file, see “Getting a Permanent License” on
page 62. For information about exporting a license f
ile, see “Exporting a License” on
page 63.
61
Page 62

3 Server Settings
License Key Info Tool
You can use the LicenseKeyInfo.exe tool to display and print out the license information for
an Interplay Engine or Interplay Archive Engine.
To examine the license key information for an Interplay Engine:
1. Navigate to the following folder:
C:\Program Files\Avid\Avid Interplay Engine\Server
2. Double-click LicenseKeyInfo.exe
The Interplay License Inf
o dialog box opens.
3. Click Get License Info.
4. Select the License file and click OK.
The system displays the license info.
5. (Option) Click Save License Info or Prin
instructions.
Getting a Permanent License
During Interplay Engine installation a temporary license for one user is activated
automatically so that you can administer and install the system. There is no time limit for
this license. A permanent license is provided by Avid in the form of a file (*.nxn) on a
CD-ROM.
If you purchase additional licenses, the licenses are additive
with 2 Access and 2 Assist users and an additional license key with 2 Access and 3 Assist
users yields a total of 4 Access and 5 Assist clients.
To set up your permanent license:
1. Insert the Avid Interplay Licenses CD-ROM into a CD drive.
2. In the Server section of the Interplay Administrator,
t Licens
e Info and follow the on-screen
. For example, one license key
click the Licenses icon.
62
3. Click the Import license button.
4. Browse for the .nxn file on the CD-ROM.
5. Select the file and click Open.
You should see information about the permane
nt license i
n the License Types section.
Page 63

License Types and Usage
The following table describes the license types displayed in the Licenses view. Each license
type is associated with a particular license key.
License Types Used for Avid Applications
Key Product
KEY_X Interplay Access
KEY_XL Interplay Assist
KEY_XE Avid Editing Applications
KEY_XI Avid Instinct
KEY_AM Interplay Archive Engine
KEY_XP Digidesign™ Pro Tools
All Interplay applications running on the same machine share can share the same license in
the following ways:
®
Integration
Managing Licenses
• If Interplay Assist has been st
same machine. If Interplay Assist is started after Interplay Access is started, KEY-X will
be released and KEY-XL will be used instead.
• If an Avid editing application has been started, KEY-XE
Access on the same machine. If the editing application is started after Interplay Access
is started, KEY-X will be released and KEY-XE will be used instead. The same behavior
applies to a Digidesign Pro Tools Integration license.
If an Avid editing client, an Interplay Assist client
ten minutes, its license is released and can be used by another client. Interplay Access does
not time out, so its license is not released until you close the application.
Exporting a License
You might need to export your license information for support purposes.
Export functionality is intended for support purposes. An exported license might not be able
n
to be reimported.
arted, KEY-XL will al
, or Avid iNEWS Instinct client is idle for
so cover Interplay Access on the
will also cover Interplay
63
Page 64

3 Server Settings
To export your license to a file:
1. Click the Export license button in the Licenses view.
2. Type or browse to a .nxn file name.
3. Select Save.
Troubleshooting Licensing Problems
If you previously attached one application key (dongle) and loaded the registration file for
that dongle, and then attach a different dongle and try to load a new registration file, the
registration file will not load. You need to delete the Windows registry key for the dongle.
To delete the registry key for a dongle:
1. Click Start, then click Run.
2. In the Open text box, type regedit and click OK.
The Registry Editor view opens.
3. Locate the registry key for the original dongle, found here:
HKEY_LOCAL_MACHINE\SOFTWARE\Avid
Techno
logy\Workgroup\Avid
Workgroup Server\FeatureKeys\Permanent
4. Delete the Permanent folder.
5. Close the Registry Editor window.
6. Reload the new registration file as described in “Getting a Permanent License” on page
62.
64
Page 65

4 User Management
An administrator controls access to Avid Interplay through user accounts and user roles. The
following topics provide information about how to manage user accounts and access to the
database:
• Understanding the Central Configuration Server
• Adding Users to a Central Configuration Server
• Setting User Authentication Providers and Importing Users
• Managing Users, User Groups, and User Rights
• Managing Database Roles
• Guidelines for User Management
For specific examples of how to manage user role
Avid Interplay Best Practices.
s, see “Se
tting Up a User Database” in the
Understanding the Central Configuration Server
The Central Configuration Server (CCS) is an Interplay Engine with a special module that is
useful if you are working in an environment that includes more than one Interplay Engine
(including an Interplay Archive Engine). The CCS uses this module to store information that
is common to all other Interplay Engines. Cross-database management of administrative
tasks is possible because all of the Interplay Engines under the CCS inherit its settings by
default. A Central Configuration Server is especially useful for user management tasks.
You set a CCS whenever you install an Interplay Engine. At that tim
as the server on which you are installing, or you can specify a previously installed Interplay
Engine, including an Interplay Archive Engine. The Interplay Engine acts as the CCS as
soon as it is started after the installation. Each Interplay Engine must be associated with a
CCS. An Interplay Engine can be its own CCS.
Depending on the number of Interplay Engines that are
are possible:
• One Interplay Engine: Configure t
his server as
installed, sev
the CCS.
e, you can set the CCS
eral CCS configurations
Page 66

4 User Management
• Several Interplay Engines: Normally, configure only one Interplay Engine as the CCS.
The use of more than one CCS in a company might be useful if there are several
independent domains, departments, or sites where there is no need to share users or
other settings in Avid Interplay. In the case where several sites are located in different
locations, having one CCS for each site could be practical.
If necessary, you can use the Central Configuratio
set during the Interplay Engine installation.
c
Do not reset the CCS unless there is real need to do so, such as a space issue. All the
information that was stored on the old CCS, including users and local administration
settings, is lost when the CCS is changed to another server unless you first move the
_InternalData folder to the server that will be used as the new CCS. If you do not or
cannot move the _InternalData folder to the new CCS, and you set the new CCS for the
database, you must migrate the database through the Manage Databases view. In this
case, all previous CCS-related information will be lost.
The following procedures describe how to change the CSS:
• “Moving the CCS to Another Server” on page 66
• “Viewing and Changing the CCS for a Server” on page 67.
Specifying an incorrect CCS
page 127.
can prev
ent login. See “Troubleshooting Log-In Problems” on
Moving the CCS to Another Server
c
Before beginning the following procedure, be sure to make a backup of the database.
See “Scheduling and Restoring Database Backups” on page 31 for information on
running a backup. Temporarily change the Backup
or select from the list the time in the future closest to the current time.
n Serve
time f
r view to change the CCS that you
ield to “Once at” and enter
66
c
The following procedure is based on these assumptions:
• Server A is the CCS.
• You want to keep the CCS settings and user information that exist on server A, but move
m to server B.
the
•
You do not want to keep the original CCS information that exists server B.
Server B should be created by a clean installation and should serve as its own CCS. No
other database should point to Server B as a CCS, because any existing user data on
Server B will be lost.
Page 67

Understanding the Central Configuration Server
To move a CCS to another server:
1. Back up the database. See “Scheduling and Restoring Database Backups” on page 31.
2. Make sure that the Interplay Engine on both servers is the same version.
Server Information” on page 57.
3. Start Interplay Administrator and log in to server A (which is the
4. Lock server A. See “Locking and Unlocking the Server” on page 58.
5. In Interplay Administrator, log out of server A.
6. Log in to server B.
7. Lock server B.
8. Log out of server B.
9. Use Windows Explorer to delete the _InternalData folder on server B.
The folder is located by default in \\IESe
D:\Workgroup_Databases\). See “Identifying the Root Folder of the Interplay Serv
Database” on page 142.
10. Copy the _InternalData folder from server A to the defa
11. In Interplay Administrator, log in to server A, unlock the server, and log out.
12. Log in to server B a
13. Make sure the CCS for server B is set as server B itself. If necessary
and Changing the CCS for a Server” on page 67.
14. Log out of server B.
nd unlock the serve
rver\WG_Database$ (u
ult database location of server B.
r.
sually
See “Viewing
current CCS).
, complete “Viewing
er
15. On server A, change the CCS for server A to ser
CCS for a Server” on page 67.
Viewing and Changing the CCS for a Server
c
Before beginning the following procedure, be sure to make a backup of the database.
See “Scheduling and Restoring Database Backups” on page 31 for information on
running a backup. Temporarily change the Backup
or select from the list the time in the future closest to the current time.
The following procedure is based on these assumptions:
• Server A is the CCS.
• You want server B to be the CCS for server A. You want to use the settings and user
informa
• You do not want to keep the CCS information that e
tion that
exists on server B.
ver B using “Viewing and Changing the
time
field to “Once at” and enter
xists on server A.
67
Page 68

4 User Management
To change the CCS for a server:
1. Back up the database. See “Scheduling and Restoring Database Backups” on page 31.
2. Make sure that server A and server B are the same
version, otherwise the CCS will not
be reset. See “Viewing Server Information” on page 57.
3. Start the Interplay Administrator on server A,
4. In the User Management section, click the Central Configur
and log in to Server A.
ation Server icon.
The Central Configuration Server view opens.
5. Use the arrow in the Central Configuration Server list to select server B to use as the
CCS.
A warning appears explaining the consequences if you have not followed the procedure
“Moving the CCS to Another Server” on page 66 and moved the _InternalData folder to
server B.
68
Moving the _InternalData folder is usually recommend
local administration settings will be lost.
ed. If you do not, all users and
Page 69

6. Do one of the following:
Adding Users to a Central Configuration Server
t To keep the original CCS, click Cancel
t To change to a new CCS, click Change CCS.
7. If you have not moved the original CCS server (see “Moving the CCS to Another
Server” on page 66) you need to migrate the database to the new CCS and all of your
CCS-related data (such as users and local admini
databases should not be used; databases should always be migrated to a CCS.
Unmigrated databases cannot be administered. For more information, see “Migrating a
Database” on page 48.
.
stration) will
be lost. Unmigrated
Adding Users to a Central Configuration Server
There are several ways to add users to a Central Configuration Server:
• Automatically adding Avid Unity users. These users are added to the CCS the f
they log in. They log in using their Avid Unity username and password. For more
information, see “Setting Avid Unity Authentication” on page 72.
Importing users from a Windows domain or LDAP directory
•
Authentication Providers view to import these users. They log in using their Windows or
LDAP username and password. For more information, see “Setting Windows Domain
Authentication and Importing Users” on page 73 and “Setting LDAP Authentication
and Importing Users” on page 75.
. You need to use the User
irst time
69
Page 70

4 User Management
• Individually creating users. You need to use the User Management view to create
individual users. They log in using the username and password that you set. For more
information, see “Adding Users and User Groups Manually” on page 78.
Setting User Authentication Providers and Importing Users
The User Authentication Providers view lets you set the type of authentication users need to
provide when logging in to Avid Interplay. You can select one or more of the following
authentication providers:
• Avid Unity
• Windows Domain
•LDAP
Selecting these providers lets users log in with
additional password for Avid Interplay. However, you can create individual users
specifically for Avid Interplay (see “Adding Users and User Groups Manually” on page 78).
The User Authentication Providers view also lets yo
or LDAP server. You do not need to explicitly import Avid Unity users; they are imported at
the time they log in.
Information from this view is sa
Configuration Server” on page 65).
ved in the CC
out havi
S (see “Understanding the Central
ng to remember and enter an
u import users fro
m a Windows domain
70
Page 71

Setting User Authentication Providers and Importing Users
All special characters are allowed in user names except for “\”, “/”, “|” and quotes (" and
n
'). When LDAP and Windows Domain users are imported, these characters are replaced with
“_”. If two users have different user names that are mapped to the same converted name (for
example, dann/o and dann\o become dann_o), only one converted user name will be
imported. These users currently cannot be authorized through LDAP or Windows Domain;
they can only be imported.
The users are added to the Imported Users folder in the User
respective subfolder for LDAP, Microsoft, or Avid Unity. Users are also added to the
Everyone folder. For more information, see
Rights” on page 76.
“Managing Users, User Groups, and User
Management page, under the
71
Page 72

4 User Management
These types of user authentication and how users are imported are described in the following
topics.
Setting Avid Unity Authentication
If you select the Unity Authentication option, a user can log in to the Avid Interplay database
using a valid Avid Unity password. The authentication mechanism always checks this User
Authentication Provider first.
This method of authorization is implicit. In other w
the time the Avid Unity authentication is enabled. Instead, the first time that an Avid Unity a
user logs in to Avid Interplay, the user is added to the UNITY user group subfolder. By
default, this user group has Read
72
rights.
ords, there is no active import of users at
Page 73

Setting User Authentication Providers and Importing Users
To enable Avid Unity authentication:
1. In the User Management section of the Avid Interplay Administrator, click the User
Authentication Providers icon.
The User Authentication Providers view opens.
2. Click Avid Unity Authentication.
3. Type the Avid Unity server name with which
r authentication.
fo
In an Avid Unity MediaNetwork environment, type the File Manager name. In an
id Unity ISIS enviro
Av
4. Click Apply.
When an Avid Unity user logs into Inte
UNITY user group under Imported Users, with Read rights by default.
To reassign an Avid Unity user’s Interplay rights:
t Move the user to a different user group later if you want to give the user a different role.
See “Managing Database Roles” on p
nment, type the System Director’s name.
age 85.
the CCS should cross-check
rplay, the user is a
dded to the CCS as part of the
Setting Windows Domain Authentication and Importing Users
If you activate Windows Domain authentication, a user is able to log in to an Avid Interplay
database with a Windows domain user name and password. If the user is logged in to the
same domain as the server on a Windows NT, Windows 2000, or Windows XP machine, the
user can reuse the login to that domain. This means that the user does not need to enter a
password. If the user is not logged in to the same domain, the user can use a domain user
name and password to log in.
Mac OS X users who are logging in with Windows domain credentials need to enter a
n
username and password.
Any time a user tries to access an Avid Inte
login information to authenticate the user and in turn to check which databases the user can
access. To be able to log in to an Avid Interplay database with Avid Interplay Access, a user
needs to provide a domain user name and password in the Avid Interplay database login
dialog box.
If you want to run the Avid Interplay Engine within your domain and also want to
n
automatically make use of domain user management, such as Windows Domain or LDAP,
you need to specify a domain user as the Server Execution User.
rplay database, t
he CCS can use the Windows
73
Page 74

4 User Management
To enable Windows domain authentication:
1. In the User Management section of the Avid Interplay Administrator, click the User
Authentication Providers icon.
The User Authentication Providers view opens.
2. Select the Windows Domain Authentication option.
3. Click Import Windows Domain Users.
4. The Import User Groups dialog box opens. Do one of the following:
lect the user groups you want to import into the Av
t Se
t Click Select All to import all the user groups into the Avid Interplay system.
5. Click OK.
The import operation might take a while and no one can log in or work on the server during
n
the import.
Upon import, Interplay creates a new user group and subfolder called MICROSOFT
under Imported Users in the User Management vie
authenticated on the Windows domain that are not currently in the Avid Interplay user
database. These users are imported to the MICROSOFT group and have the default role
of No Access. Users can then be moved to different groups to gain a new user role. See
“Managing Database Roles” on page 85.
Users that are already in the Avid Interplay
User import are re-added to the MICROSOFT group but retain the group placement and
role they already had.
New users added to the Windows domain are not continually imported to the CCS. You need
n
to add them manually. See “Adding Users and User Groups Manually” on page 78.
user datab
id Interplay system.
w, It imports all the users
ase during a Windows Domain
74
Page 75

Setting User Authentication Providers and Importing Users
Setting LDAP Authentication and Importing Users
If you select the LDAP Authentication option, a user can log in to Avid Interplay databases
with an LDAP user name and password.
If you want to run the Avid Interplay Engine within your domain and also want to
n
automatically make use of domain user management, such as Windows Domain or LDAP,
you need to specify a domain user as the Server Execution User.
To enable LDAP authentication:
1. In the User Management section of the Avid Interplay Administrator, click the User
Authentication Providers icon.
The User Authentication Providers view opens.
2. Select the LDAP Authentication option.
3. Type the information in the edit fields that
your LDAP server.
The settings are described in “LD
4. Click Apply.
5. Click Import LDAP Users to add all the LDAP users to the user group “LDAP Users”
or the Interplay CCS.
f
The Impo
6. Select the groups that you want to import.
7. Click OK.
Upon import, Interplay creates a new user group and subfolder called LDAP under
Importe
currently available in the Avid Interplay user database. These users are imported to the
LDAP group and have the default role of No Access. Users can then be moved to
different groups to gain a new user role. See “Managing Database Roles” on pa
Users that are already in the Avid Interplay user database during an LDAP User import
are re-added to the LDAP group bu
already have.
New users added to the LDAP server are not continually imported to the CCS.You need to
n
add them manually. See “Adding Users and User Groups Manually” on page 78.
rt User Groups dialog box opens.
d Users an
d imports all the users authenticated on the LDAP server that are not
AP Serv
t retain the additional group placement and role they
specifies
er Configuration Settings” on page 76.
the individual LDAP settings of
ge 85.
75
Page 76

4 User Management
LDAP Server Configuration Settings
The following table describes the LDAP server settings. Depending on your local LDAP,
some of the settings might be necessary and some might not.
Setting Description
LDAP Server IP address of the LDAP Server.
LDAP Port Port of LDAP Service (leave empty for Standard Port).
User DN for Searches User DN for User to use for searches.
Password for Searches User Password for User to use for searches.
Search Root DN DN root for Searches in LDAP database.
User Object Class Object class attribute of a User.
User Name Attribute Attribute for User DN, for example, if DN of user is
"uid=tgawlik,cn=users,dc=nxnzonemunich" set User Name Attribute to
"uid".
User DN Suffix Distributed name part which must be added to the User DN part, for
example, if DN of user is "uid=tgawlik,cn=users,dc=nxnzonemunich" set
User DN Suffix to "cn=users,dc=nxnzonemunich".
Managing Users, User Groups, and User Rights
The User Management view lets you create, modify, manage and delete users and user
groups. It also lets you define user roles and authentication protocols. If you are working in
an environment that includes more than one Interplay Engine, you should manage users
through a CCS (see “Understanding the Central Configuration Server” on page 65).
roups.
access to all the
76
Managing users through a CCS lets you manage users across multiple workg
If you work at a relatively small site where all editors and assistants have
current projects, then you can set all user roles by user groups. If you work at a site where
you need to limit access to some projects, you can set roles for users on specific folders. See
“Managing Database Roles” on page 85.
For more information about managing user roles, with spe
cific examples, see “Setting Up a
User Database” in the Avid Interplay Best Practices Guide.
The following illustration shows the User Management vie
w with the Administrators group
selected. In this example, there are three custom user groups: Assistants, Editors, and
Graphic Artists.
Page 77

Managing Users, User Groups, and User Rights
Understanding Default User Groups, Users, and Roles
The User Management view displays all user groups and users. The user groups created
during the server installation are as follows:
• Administrators, with the user Administrator: Users with
first log in after the first installation, if you have not yet imported Windows Domain or
LDAP server users, the only user displayed is the user “Administrator” with
administrator rights. This user cannot be deleted, nor can the user rights be restricted in
any way.
administrator rights. Wh
en you
77
Page 78

4 User Management
• Everyone: All users. This group contains the master user for every user in all the other
groups. The master user in the Everyone group is the original user object. Instances of a
user in other groups are linked to the master user. By default, the group role is set to No
Access. The following illustration shows the master user for Administrator in the
Everyone group and a link to the master user in the Administrators group. The icon for
the linked user includes a link symbol.
• Imported Users: Users imported from Avid Unity, Windows Domain or LDAP (see
“Setting User Authentication Providers and Importing Users” on
the group roles are set as follows:
- LDAP: No Access.
Link to Administrator master
Administrator master user
(in the Everyone group)
page 70). By default,
- MICROSOFT: No Access.
- UNITY: Read Access.
• Migrated Users: The group for users migrated from an Avid Unity MediaManager
vironment to an
en
Avid Interplay environment. By default, the group role is set to No
Access. For more information on migrating users from an Avid Unity MediaManager
environment to an
Interplay environment, see your Avid representative.
Adding Users and User Groups Manually
To create a new user or user group manually:
1. In the User Management section of the Avid Interplay Administrator window, click the
User Management icon.
The User Management view opens.
2. In the Users pane, select the group into which you want to add a new user or user group.
3. Do one of the following:
t Press Ctrl+U for a new user.
t Press Ctrl+G for a new user group.
t Click the Create User button or the Create User Group button.
78
Page 79

Managing Users, User Groups, and User Rights
4. Add attributes for the new user or group.
- For a user, add a name, description (inherited from the user group by default),
passwo
rd, password confirmation, and email.
- For a user group, add a name and a description.
All special characters are allowed in user and group name
quotes (" and '). For more information, see “Viewing and Setting Attributes” on
page 79.
5. (Option) Select a role for the new
Roles are inherited from the group in which you create the user or group. For more
informatio
n, see “Viewing and Changing Roles” on page 81.
6. Select an authentication provider.
For more information, see “V
Users” on page 83.
7. Click Apply.
Viewing and Setting Attributes
To view attributes for a user group or a user:
t In the Users list of the User Management view, select the user group or user.
Attributes for the selected group or user are displ
If you select a group, the name and description are displayed. For an existing group, you
can add or ed
If you select a user, the name is displayed, plus a description (inherited from the user
up by d
gro
entered them.
it a description.
efault), password, password confirmation, and email address, if you have
user or group.
iewing and Sett
s except “\”, “/”, “|” and
ing Authentication Providers for Individual
ayed in the Attributes pane.
By default, the password field in the Attributes text box shows asterisks. If you choose
to allow the user to log in to the server with Internal Authentication, then you need to set
the password in the Attributes text box. For users that log in through other providers,
you do not need to specify the password. For more information, see “Viewing and
Setting Authentication Providers for Individual Users” on page 83.
79
Page 80

4 User Management
The password should only include characters from the ASCII the character set. Multibyte
n
passwords might cause login problems, and the administrator then has to reset the
password.
To set the internal password:
1. In the Users list, select a user.
2. Type the password and the confirmation in the text box.
3. Click Apply.
The user can change his or her password anytime in the login dialog box.
c
If you select the Internal Authentication option and do not set a password, anyone can
log in with that user name and no password.
Understanding Standard Roles and Default Rights
After you have created the user groups and individual users, you can review and if necessary
change their roles. The role determines the rights or permissions that the user groups and
individual users have. If you assign a role to a user group, all the users in that group inherit
the group rights. If you add a user to a user group, the user inherits the group rights.
A user might have different roles, depending on the group in which the user belongs. The
rall accumulated inherited role for a user is the highest role (the role with the most
ove
rights) that the user has in any one user group or set on the user himself. This is the role that
is displayed in the User Management view.
The five standard roles and their def
• Administrator: An Administrator has Read/Write/Delete ri
out administrative tasks such as adding users, managing groups, and so on. Only
Administrators can see all items in the Deleted Items folder in Interplay Access.
• Read/Write/Delete: Users are allowed to view, import, ed
any item in the database. They can view items they have deleted themselves in the
Deleted Items folder in Interplay Access.
• Read/Write: This role allows users to view,
ault rights are as follows:
import, and edit it
ghts plus the right to carry
it, delete, rename, and move
ems in the database.
80
• Read: These users can copy files to their local disk, but c
item into the database. Read-only users cannot change properties.
• No Access: This role takes away all user rights, but the user is not removed. This is
useful if y
selected folders in the database.
ou know that you do not want a particular set of users to be able to view
annot delete, edit or import any
Page 81

You can assign rights for specific users on specific folders in the Manage Database Roles
view (see “Managing Database Roles” on page 85).
Viewing and Changing Roles
By default, all users in a group inherit the role assigned to the group. You cannot assign
rights to specific users in the User Management view. If you want to change a user’s rights,
you can move the user to a different group.
Managing Users, User Groups, and User Rights
For more information about sett
ing up roles correctly
, see “Managing Database Roles” on
page 85.
To view the role of a group or user:
t In the Users list of the User Management view, select the group or user.
The role is displayed in the Roles pane. If a user has more than one role, the User
Management vie
w displays the accumulated inherited role, the highest role (the role
with the most rights) that the user has in any one user group.
The groups to which a user or group belongs are shown in the Part of Group(s) pane.
These entries also display the
role inherited from each group.
The following illustration shows information about the user NewsCutter1. This user ha
Read/Write/Delete access that is inherited from the Editors group.
s
81
Page 82

4 User Management
82
To navigate to the Users tree from the Part of Group(s) pane:
1. Select the user group in the Part of Group(s) pane.
2. For any user group other than the Users group, right-click and select one of the
following:
t Se
t “Go To” to switch the focus of the Users tree to th
lec
e group you selected.
t Select “Go to user in this group” to switch the focus of the Users tree to the selected
user in the selected user group. The Part of Group(s) dialog box focus does not
update.
To change the role for a user group:
1. In the Users list of the User Management view, select the user group for which you want
to change the role.
2. In the Roles section, select the appropriate role.
3. Click Apply.
Page 83

Managing Users, User Groups, and User Rights
To change the role for a user, do one of the following:
t Right-click the user and select Cut, select the group, right-click the group and select
Paste. This action moves the user from one group to another. You can also drag the user
from one group to another.
t Right-click the user and select Copy, select the group, right-click the group and select
Paste. This action removes the user from one group and adds it to another. You can also
hold down the Ctrl key and drag the user from one group to another.
Viewing and Setting Authentication Providers for Individual Users
You set an authentication method in the User Authentication Providers view and these
settings carry over to all users by default. See “Setting User Authentication Providers and
porting Users” on page 70 for details.
Im
You can change the methods by which individual users can be authenticated. The method
must be enabled in the
before it is available for the individual user. If you set an authentication method for an
individual user, and later change the global authentication method, the individual user does
not inherit the global settings.
You can select more than one a
logon and if one provider authenticates the user, the user can log on.
User Authentication Providers view (a global authentication method)
uthenti
cation provider. The list of providers is checked on
c
The following table provides information about
Type of Authentication Description
Avid Unity Authentication The user can log in to the Interplay database using a valid Avid
Unity password.
Internal Authentication The user can log in to the Interplay database using the password
you set in the User Management view. By default, the password
field in the Attributes pane is empty. The user can change this
password anytime in the Interplay login dialog box.
LDAP Authentication The user can log in to the Interplay database using an LDAP user
name and password.
Windows Domain Authentication The user can log in to the Interplay database using a Windows
domain user name and password.
the auth
entication providers you can select:
If you do not select an authentication method for a user, the user cannot log in.
83
Page 84

4 User Management
To change or add an authentication provider:
1. In the Users list of the User Management view, select the user.
2. In the Authentication Providers pa
appropriate options.
3. Click Apply to make the change, or Revert to discard your changes.
Deleting Users and User Groups
You can delete any user except Administrator and you can delete any user group except
Administrators, Migrated Users, and Everyone.
Avid recommends that a user check in all fi
c
Deleting a user or user group deletes it from all groups in the Users list and from the
Central Configuration Server.
ne of the User Management view, select the
les and log off before you delete the user.
To delete a user group or a user:
1. Select the user group or user in the Users pane.
2. Click the Delete User/Group button.
A user remains in all other user groups it is in, if any.
Removing Users from User Groups
You can remove any user except Administrator from any user group except the Everyone
group. Removing a user does not delete the user from other groups.
84
Page 85

To remove a user from a user group:
1. Select the user in the group from which you want it removed.
2. Do one of the following:
Managing Database Roles
t Pre
t Click the Re
ss the Delete key.
move User button.
Managing Database Roles
You set and manage global roles for users in the User Management view (see “Managing
Users, User Groups, and User Rights” on page 76). You have the option of limiting or
granting rights for specific users on specific folders. Use the Manage Database Role
manage rights on specific folders.
For example, you might have editors and graphic artists that are w
projects. To avoid confusion, you might want to prevent editors on one project from having
write and delete rights on projects that they are not working on. For information about the
five standard roles, see “Understanding Standard Roles and Default Rights” on page 80.
There are two different ways to assign roles to folders:
• General role assignments (see “Viewing General Role Assignments” on page 85 and
“Setting or Changing a General Role Assign
•
Special access folders (see “Managing Special Access Folders” on page 91)
s view to
orking on different
ment” on page 88)
For more examples of setting up rights on folders, see
Avid Interplay Best Practices Guide.
Viewing General Role Assignments
To view assigned roles for users of the database or a folder:
1. In the User Management section of the Avid Interplay Administrator window, click the
Manage Database Roles icon.
The Manage Database Roles view opens.
“Setting Up a User
Database” in the
85
Page 86

4 User Management
86
2. Select the General Role Assignment option.
General Role Assignment option
Page 87

Managing Database Roles
3. In the Database pane, select the database or a folder for which you want to view roles.
If the database icon has a red X, you are not connected. Clic
k the database icon to
connect. The database icon shows a green check mark when you are connected. The
following table describes three different states of the database icon.
Icon Meaning
(Green circle with check mark) Database you are connected to.
(Red box with X) Database you are not connected to.
(Red box with X and yellow arrow) Database needs migration.
See “Migrating a Database” on page 48.
4. In the User/Group pane, select the user or group.
t To view roles for all users of the selected folder,
select All Users and Groups.
t To view roles for a particular user or user group of the selected folder, select that
user or user group.
5. In the Roles pane, select the role you want to view:
o view all roles for the selected users of the selected fol
t T
der, select “All roles.”
t To view particular roles for the selected users of the selected folder, select a role.
The path in the middle of the view displays a formula
for what is displayed
in the lower
panel.
The Node (item in the database), User, and corresponding role are displayed in the lower
anel. Ro
p
les that are inherited from a group are grayed out. Roles that have been
assigned directly are black.
the Editors group, and All roles
The following illustration shows the Projects fol
der,
selected. All roles are listed in the lower panel.
87
Page 88

4 User Management
Setting or Changing a General Role Assignment
Use the Manage Database Roles view to set or change rights to a particular folder. Note the
following:
the folder, even
88
• To delete items, the user must have deletion rights for
owner of the item to be deleted.
• To move items, the user must have write rights on the object, the folder the object is
eing mov
b
ed out of, and the target folder.
• All users are automatically assigned the Read role for the folder Un
Assets (but not the contents), and the Read/Write/Delete role for their private folder
within the Unchecked-in Avid Assets folder. All users are automatically assigned the No
if the user is the
checked-i
n Avid
Page 89

Managing Database Roles
Access role for Orphan Clips. Administrators have full access to all folders. For more
information about the Unchecked-in Avid Assets folder and the Orphan Clips folder, see
the Avid Interplay Access User’s Guide.
To set or change a role for users of the database or a folder:
1. In the User Management section of the Avid Interplay Administrator window, click the
Manage Database Roles icon.
The Manage Database Roles view opens.
2. Select the General Role Assignment option.
3. In the Database pane, select the database or a folder for which you want to set a role.
4. In the User/Group column, select the user or user group.
5. In the Roles column, select the role you want to set.
The formula in the middle of the view shows your selection. For example, in the
ollowin
f
g illustration, you are going to give Editors the Read role (read-only access) for
the Antarctica folder.
89
Page 90

4 User Management
6. Click Set Role.
The role appears in the lower panel.
90
To change a role:
t Select the entry in the lower pane, right-click, and select Set Role > role name.
To remove a role for users of the database or a folder:
1. Select the database or a folder in the Database column.
2. Select an entry in the list in the lower pane.
Page 91

3. Do one of the following:
t Click the Remove Role button.
Managing Database Roles
t Right-clic
k and select Remove Role.
The role for the users on that item is inherited
Blocking Access by a Group or User
When you are trying to block access by a whole group, it is not sufficient to change the user
rights for the user group to NoAccess; individual users who have rights assigned to them
specifically or through memberships in other user groups could still log in.
To block members of an entire group:
1. In the Manage Database Roles view, in the Database pane, select the project from which
you want to block users.
2. In the User/Group pane, expand the group.
3. Select each user, and in the Roles pane
4. Click Set Role.
To prevent a user from accessing all databases:
t In the User Management view, deselect all authentication providers available to a user.
Managing Special Access Folders
If necessary, you can allow a user to access a specific folder that they otherwise would not
have access to. For example, if a new user is assigned the No Access role for the Projects
folder, you can allow access to a particular project within the folder.
from the paren
select No Access.
t user group again.
To allow access to a Special Access folder:
1. In the Manage Database Roles view, set the No Access role for the specific user on the
top-level folder that you want to be hidden (see “Setting or Changing a General Role
Assignment” on page 88).
2. On the item for which the user needs access, set the role
The “Folder is not visible” dialog box opens, telling you how applyin
to Read (or higher).
g the role to the
selected location will affect the user’s rights on other folders.
91
Page 92

4 User Management
3. Click the Apply button for the option “Mark as Special Access Folder: Grant path
access and allow to view path.”
This option allows users to log in to the database and naviga
te to the specified location.
The tree structure above the folder will be visible, but not the contents of the other
folders in the structure. The first option makes the contents of the tree structure
accessible as well (not recommended).
After you set the special access, when users
connect to the database, they see the
structure of the database above the special access folder, but not the contents of the
individual folders. Only the contents of the folder for which they have Read or higher
rights are available.
To view who has been assigned access to Special Access folders:
1. Select the Special Access Folders option.
Special Access
Folders option
2. In the Database pane, select the entire database or the folder for which you want to
check for Special Access folder rights.
92
3. In the User/Group pane, select All Users to see all users who have
folders you selected, or select a specific user.
special access to the
Page 93

Managing Database Roles
4. The bottom panel displays the users who have special access according to your
selections.
The following illustration shows that the user jeditor has special access to the folder
/Outside Productions/Graphics. T
o view what specific role jeditor has, select the folder
in the Database pane.
Special
Access
Folder
User who
can access
Special
Access
Folders
To remove a role assigned for Special Access folders:
1. Click the Special Access Folders option.
2. Select the appropriate folder.
3. Select the user in the list in the lower pane.
4. Do one of the following:
t Cli
t Right-clic
The role for the user on that item is inherited
ck Remove Role.
k the user and select Remove Role.
from
the parent user groups again.
93
Page 94

4 User Management
Guidelines for User Management
This section provides information and suggestions that can help you manage users and
access. For more information about managing user roles, with specific examples, see
“Setting Up a User Database” in Avid Interplay Best Practices.
• The fundamental rule of user management is that explicit rights override inherited
rights, an
(set in the User Management view and stored in the CCS). The exception to this rule is
the user who is a global Administrator set through the User Management view. This
Administrator always has Administrative rights on all folders, even if rights are set
otherwise in the Manage Database Roles view.
d database rights (set in the Database Management view) override CCS rights
c
• By default, the root group Users is assigned the
subgroups (Everyone, Imported Users, Migrated Users and any other groups you add)
except for the Administrators and UNITY (under the Imported Users) have the role
NoAccess through inheritance. NoAccess means that a user cannot even log in to the
server.
To override the NoAccess role, create another user group with a
the user into that group.
Changing the role for the Users group or the Everyone group (from No Access to Read,
for example) makes it impossible to take away this role from individual users. Avid
recommends that you do not change the role of the Users group or the Everyone group.
• You can assign a user to more than one
Role Assignment” on page 88) and each group can have a different role. As a result, the
user inherits different roles, which can be useful if a user
projects in different ways.
• In the User Management view, you can set on
individual users in the Manage Database Roles view. See “Managing Database Roles”
on page 85.
How the Interplay Engine Determines Access
The following steps describe how the Interplay Engine server determines access to an object
(usually a folder). This process can help you understand how to assign roles and access:
user group (see “Setting
NoAccess role. That means that all user
different role and copy
or Changing a General
contributes to different
ly group
roles. You can set roles for
94
1. The server checks on the object in question to see
assigned a role on the object, the evaluation stops and the server grants the user only the
role allowed and the accompanying rights, if any.
2. If no explicit permissions were found on t
rights on the object in question.
he obje
if explici
ct, the server checks the inherited
t rights are set. If a user is
Page 95

Guidelines for User Management
3. If there are no inherited permissions, the server checks the global user rights. In this
case, the server determines what role the user has from the CCS settings.
4. In case of a conflict where the evaluation sees a user wi
th multiple roles, for example:
- the user has the read role through one group
- the user has the read/write role through another group
then the highest ranking role wi
This is an example of an accumul
ns. In this case, the user gets the read/write role.
ated inherited role. The user’s overall role for the database
is the highest role he or she is assigned to in any group, unless otherwise specified in the
Manage Database Roles view. For example: If User A is in Group 1 (which is assigned a
Read role) and User A is also in Group 2 (which is assigned a No Access role), then User A
has the accumulated inherited role Read. When you select User A in the User Management
view, this role is displayed in the Roles pane.
95
Page 96

4 User Management
96
Page 97

5 Site Settings
Site settings include configuration options for various Interplay components. The following
topics provide information about site settings:
• Defining Property Layouts
• Configuring Remote Workgroups
• Configuring Categories
• Setting the Server Hostname and Workgroup Name
• Interplay Media Services View
• Interplay Transfer Status View
• Interplay Transfer Settings View
• Workgroup Transfer Presets View
• Specifying Archive Settings
Defining Property Layouts
The Property Layout view lets an administrator define which properties are shown by default
when an Interplay Access client connects to the database. In Interplay Access, these
properties appear in the Content tab and the Object Inspector Property tab. These properties
are sometimes referred to as system metadata. However, it is only part of the metadata
included in an Avid Interplay database.
The administrator can also use the Property Layout view to create cu
By default, a set of properties categorized as Broadcast is
customize this set or you can display an alternative set of properties: either Post or Film, and
then customize these sets. For a complete list of available properties, see “System Metadata
Properties” on page 173.
To set the properties displayed in Interplay Access:
1. In the Site Settings section of the Interplay Administrator window, click the Property
Layout icon.
The Property Layout view opens.
selected and displayed. You can
stom columns.
Page 98

5 Site Settings
98
2. Select the database for which you want to set properties.
3. From the Active Layout options, select one of the follo
wing layouts:
- Broadcast
-Post
lm
-Fi
This setting determines which set of properties is displayed in the client
cations.
appli
4. Select and deselect properties as follows:
t (Option) To include the property in the Content tab, select properties in the Content
Default Column.
t (Option) To include the property in the Object Inspector’s Properties tab, select
properties in the Inspector Default column.
Page 99

Creating Custom Properties
t (Option) To make the property available for users to add into Interplay Access
displays on their own, and use these fields in an Extended Search, select properties
in the Available column.
If a property is not selected in the Available column, the property is not displayed in the
n
Object Inspector or the Content tab, even if it is selected to be displayed in them.
5. (Option) Click Revert to rese
6.
Click Apply to save the changes.
The changes appear the next time you
The following illustration is an example of properties d
the Interplay Access Object Inspector.
The properties can be further modified on the individual clients. For details, see the Avid
Interplay Access User's Guide.
t properties to the defaults.
log in to
Creating Custom Properties
Interplay Access.
isplayed in the Properties tab of
To add a custom property, do the following:
1. In the Site Settings section of the Interplay Administrator window, click the Property
Layout icon.
The Property Layout view opens.
2. Select the database for which
3. From the Active Layout options, select one of the follo
-Broadcast
-Post
lm
-Fi
This setting determines which set of prope
you want to set pr
operties.
wing layouts:
rties will include the custom property.
99
Page 100

5 Site Settings
4. Click Custom Meta Data to open the custom options area.
5. In the Add Custom Meta Data text box, type a name for the custom property.
6. Click the green plus sign (+).
7. Select whether to include the property
Properties tab, as needed.
8. (Option) To make a custom property available for users to add into Interplay Access
lays on their o
disp
the user performs an All Custom search, only the available Custom properties are used
in the search.
Clear the check box in the Available column to turn off custom properties that you do not
n
want displayed in the Interplay Access properties lists. You cannot delete custom properties
for this release but you can turn off their display.
wn, and to use in an Extended Search, select the Available column. If
in the Content tab or
Configuring Remote Workgroups
A large site can include more than one workgroup. When a workflow requires searching
across remote workgroups or performing workgroup-to-workgroup transfers through
Interplay Access, you must set up the local workgroup so that a user can access a remote
workgroup. You set up this access in the Configure Remote Workgroups view.
After access to a workgroup is properly configured, an Int
a list of remote workgroups when performing a search or a transfer. For example, databases
for properly configured remote workgroups are listed in the Interplay Access Send to
Workgroup dialog box.
the Object Inspector’s
erplay Access user can select from
100
Configuring a remote workgroup in this view is not needed for transfer from Interplay Assist,
n
Interplay Instinct, or Avid editors.
 Loading...