

Page 1

Avid® iNEWS® Command
Administration Guide
™
make manage move | media
™
Avid
®
Page 2

Copyright and Disclaimer
Product specifications are subject to change without notice and do not represent a commitment on the part of
Avid Technology, Inc.
The software described in this document is furnished under a license agreement. You can obtain a copy of that license by
visiting Avid's Web site at www.avid.com. The terms of that license are also available in the product in the same directory as
the software. The software may not be reverse assembled and may be used or copied only in accordance with the terms of the
license agreement. It is against the law to copy the software on any medium except as specifically allowed in the license
agreement.
Avid products or portions thereof are protected by one or more of the following United States Patents: 4,746,994; 4,970,663;
5,045,940; 5,267,351; 5,309,528; 5,355,450; 5,396,594; 5,440,348; 5,452,378; 5,467,288; 5,513,375; 5,528,310; 5,557,423;
5,577,190; 5,583,496; 5,584,006; 5,627,765; 5,640,601; 5,644,364; 5,654,737; 5,715,018; 5,719,570; 5,724,605; 5,726,717;
5,729,673; 5,745,637; 5,752,029; 5,754,851; 5,799,150; 5,812,216; 5,828,678; 5,842,014; 5,852,435; 5,999,406; 6,038,573;
6,061,758; 6,141,007; 6,211,869; 6,532,043; 6,546,190; 6,596,031; 6,636,869; 6,747,705; 6,763,523; 6,766,357; 6,813,622;
6,847,373; D352,278; D372,478; D373,778; D392,267; D392,268; D392,269; D395,291; D396,853; D398,912.
Other patents are pending.
This document is protected under copyright law. An authorized licensee of Avid iNEWS Command may reproduce this
publication for the licensee’s own use in learning how to use the software. This document may not be reproduced or
distributed, in whole or in part, for commercial purposes, such as selling copies of this document or providing support or
educational services to others. This document is supplied as a guide for Avid iNEWS Command. Reasonable care has been
taken in preparing the information it contains. However, this document may contain omissions, technical inaccuracies, or
typographical errors. Avid Technology, Inc. does not accept responsibility of any kind for customers’ losses due to the use of
this document. Product specifications are subject to change without notice.
Copyright © 2007 Avid Technology, Inc. and its licensors. All rights reserved.
The following disclaimer is required by Sam Leffler and Silicon Graphics, Inc. for the use of their TIFF library:
Copyright © 1988–1997 Sam Leffler
Copyright © 1991–1997 Silicon Graphics, Inc.
Permission to use, copy, modify, distribute, and sell this software [i.e., the TIFF library] and its documentation for any purpose
is hereby granted without fee, provided that (i) the above copyright notices and this permission notice appear in all copies of
the software and related documentation, and (ii) the names of Sam Leffler and Silicon Graphics may not be used in any
advertising or publicity relating to the software without the specific, prior written permission of Sam Leffler and Silicon
Graphics.
THE SOFTWARE IS PROVIDED “AS-IS” AND WITHOUT WARRANTY OF ANY KIND, EXPRESS, IMPLIED OR
OTHERWISE, INCLUDING WITHOUT LIMITATION, ANY WARRANTY OF MERCHANTABILITY OR FITNESS FOR A
PARTICULAR PURPOSE.
IN NO EVENT SHALL SAM LEFFLER OR SILICON GRAPHICS BE LIABLE FOR ANY SPECIAL, INCIDENTAL, INDIRECT
OR CONSEQUENTIAL DAMAGES OF ANY KIND, OR ANY DAMAGES WHATSOEVER RESULTING FROM LOSS OF USE,
DATA OR PROFITS, WHETHER OR NOT ADVISED OF THE POSSIBILITY OF DAMAGE, AND ON ANY THEORY OF
LIABILITY, ARISING OUT OF OR IN CONNECTION WITH THE USE OR PERFORMANCE OF THIS SOFTWARE.
The following disclaimer is required by the Independent JPEG Group:
Portions of this software are based on work of the Independent JPEG Group.
The following disclaimer is required by Paradigm Matrix:
Portions of this software licensed from Paradigm Matrix.
The following disclaimer is required by Ray Sauers Associates, Inc.:
“Install-It” is licensed from Ray Sauers Associates, Inc. End-User is prohibited from taking any action to derive a source code
equivalent of “Install-It,” including by reverse assembly or reverse compilation, Ray Sauers Associates, Inc. shall in no event be
liable for any damages resulting from reseller’s failure to perform reseller’s obligation; or any damages arising from use or
operation of reseller’s products or the software; or any other damages, including but not limited to, incidental, direct, indirect,
special or consequential Damages including lost profits, or damages resulting from loss of use or inability to use reseller’s
products or the software for any reason including copyright or patent infringement, or lost data, even if Ray Sauers Associates
has been advised, knew or should have known of the possibility of such damages.
The following disclaimer is required by Videomedia, Inc.:
“Videomedia, Inc. makes no warranties whatsoever, either express or implied, regarding this product, including warranties with
respect to its merchantability or its fitness for any particular purpose.”
2
Page 3

“This software contains V-LAN ver. 3.0 Command Protocols which communicate with V-LAN ver. 3.0 products developed by
Videomedia, Inc. and V-LAN ver. 3.0 compatible products developed by third parties under license from Videomedia, Inc. Use
of this software will allow “frame accurate” editing control of applicable videotape recorder decks, videodisc recorders/players
and the like.”
The following disclaimer is required by Altura Software, Inc. for the use of its Mac2Win software and Sample
Source Code:
©1993–1998 Altura Software, Inc.
Attn. Government User(s). Restricted Rights Legend
U.S. GOVERNMENT RESTRICTED RIGHTS. This Software and its documentation are “commercial computer software” or
“commercial computer software documentation.” In the event that such Software or documentation is acquired by or on behalf
of a unit or agency of the U.S. Government, all rights with respect to this Software and documentation are subject to the terms
of the License Agreement, pursuant to FAR §12.212(a) and/or DFARS §227.7202-1(a), as applicable.
Trademarks
888 I/O, Adrenaline, AirPlay, AirSPACE, AirSPACE HD, AirSpeed, AniMatte, AudioSuite, AudioVision, AutoSync, Avid,
Avid DNA, Avid DNxcel, Avid DNxHD, AVIDdrive, AVIDdrive Towers, Avid ISIS, Avid Learning Excellerator, Avid Liquid,
Avid Mojo, AvidNet, AvidNetwork, AVIDstripe, Avid Unity, Avid Unity ISIS, Avid Xpress, AVoption, AVX, CamCutter,
ChromaCurve, ChromaWheel, DAE, Dazzle, Deko, DekoCast, D-Fi, D-fx, DigiDelivery, Digidesign, Digidesign Audio Engine,
Digidesign Intelligent Noise Reduction, DigiDrive, Digital Nonlinear Accelerator, DigiTranslator, DINR, DNxchange, do more,
D-Verb, Equinox, ExpertRender, Face Robot, FieldPak, Film Composer, FilmScribe, FluidMotion, HIIP, HyperSPACE,
HyperSPACE HDCAM, IllusionFX, Image Independence, iNEWS, iNEWS ControlAir, Instinct, Intraframe, iS9, iS18, iS23,
iS36, LaunchPad, Lightning, Lo-Fi, Magic Mask, make manage move | media, Marquee, Matador, Maxim, MCXpress,
Media Browse, Media Composer, MediaDock, MediaDock Shuttle, Media Fusion, Media Illusion, MediaLog, Media Reader,
Media Recorder, MEDIArray, MediaShare, MediaStream, Meridien, MetaSync, MissionControl, NaturalMatch, Nearchive,
NetReview, NewsCutter, Nitris, OMF, OMF Interchange, OMM, Open Media Framework, Open Media Management, PCTV,
Pinnacle MediaSuite, Pinnacle Studio, Pinnacle Systems, ProEncode, Pro Tools, QuietDrive, Recti-Fi, RetroLoop, rS9, rS18,
Sci-Fi, SecureProductionEnvironment, Show Center, Softimage, Sound Designer II, SPACE, SPACEShift, SpectraGraph,
SpectraMatte, SteadyGlide, Symphony, TARGA, Thunder, Trilligent, UnityRAID, Vari-Fi, Video RAID, Video Slave Driver,
VideoSPACE, and Xdeck are either registered trademarks or trademarks of Avid Technology, Inc. in the United States and/or
other countries.
Adobe and Photoshop are either registered trademarks or trademarks of Adobe Systems Incorporated in the United States
and/or other countries. Apple and Macintosh are trademarks of Apple Computer, Inc., registered in the U.S. and other
countries. Windows is either a registered trademark or trademark of Microsoft Corporation in the United States and/or other
countries. All other trademarks contained herein are the property of their respective owners.
Footage
Arizona Images — KNTV Production — Courtesy of Granite Broadcasting, Inc.,
Editor/Producer Bryan Foote.
Canyonlands — Courtesy of the National Park Service/Department of the Interior.
Tornados + Belle Isle footage — Courtesy of KWTV News 9.
WCAU Fire Story — Courtesy of NBC-10, Philadelphia, PA.
Women in Sports – Paragliding — Courtesy of Legendary Entertainment, Inc.
GOT FOOTAGE?
Editors — Filmmakers — Special Effects Artists — Game Developers — Animators — Educators — Broadcasters — Content
creators of every genre — Just finished an incredible project and want to share it with the world?
Send us your reels and we may use your footage in our show reel or demo!*
For a copy of our release and Avid’s mailing address, go to www.avid.com/footage.
*Note: Avid cannot guarantee the use of materials submitted.
Avid iNEWS Command v1.0 Administration Guide • 0130-07913-01 Rev. A • June 2007
3
Page 4

4
Page 5

Contents
Using This Guide . . . . . . . . . . . . . . . . . . . . . . . . . . . . . . . . . . . . . . . . . . . . . 7
Who Should Use This Guide. . . . . . . . . . . . . . . . . . . . . . . . . . . . . . . . . . . . . . . . . . . . 7
About This Guide . . . . . . . . . . . . . . . . . . . . . . . . . . . . . . . . . . . . . . . . . . . . . . . . . . . . 7
Symbols and Conventions . . . . . . . . . . . . . . . . . . . . . . . . . . . . . . . . . . . . . . . . . . 8
If You Need Help. . . . . . . . . . . . . . . . . . . . . . . . . . . . . . . . . . . . . . . . . . . . . . . . . . . . . 9
How to Order Documentation. . . . . . . . . . . . . . . . . . . . . . . . . . . . . . . . . . . . . . . . 9
Avid Educational Services . . . . . . . . . . . . . . . . . . . . . . . . . . . . . . . . . . . . . . . . . . 9
Chapter 1 Introduction to iNEWS Command . . . . . . . . . . . . . . . . . . . . . . . . . . . . . . 11
Overview of the System Architecture . . . . . . . . . . . . . . . . . . . . . . . . . . . . . . . . . . . . 12
Architecture and Workflow . . . . . . . . . . . . . . . . . . . . . . . . . . . . . . . . . . . . . . . . . 12
Features . . . . . . . . . . . . . . . . . . . . . . . . . . . . . . . . . . . . . . . . . . . . . . . . . . . . . . . 14
Security via Administrator Password. . . . . . . . . . . . . . . . . . . . . . . . . . . . . . . . . . . . . 16
Starting Command at a Workstation . . . . . . . . . . . . . . . . . . . . . . . . . . . . . . . . . . . . . 17
Overview of the User Interface . . . . . . . . . . . . . . . . . . . . . . . . . . . . . . . . . . . . . . . . . 18
Playlist Viewer . . . . . . . . . . . . . . . . . . . . . . . . . . . . . . . . . . . . . . . . . . . . . . . . . . 18
Panels . . . . . . . . . . . . . . . . . . . . . . . . . . . . . . . . . . . . . . . . . . . . . . . . . . . . . . . . 18
Menu Bar . . . . . . . . . . . . . . . . . . . . . . . . . . . . . . . . . . . . . . . . . . . . . . . . . . . . . . 18
Disabling a Command Workstation’s Keyboard . . . . . . . . . . . . . . . . . . . . . . . . . . . . 21
Chapter 2 iNEWS Command Services. . . . . . . . . . . . . . . . . . . . . . . . . . . . . . . . . . . . 23
Main Services . . . . . . . . . . . . . . . . . . . . . . . . . . . . . . . . . . . . . . . . . . . . . . . . . . . . . . 24
Device Services . . . . . . . . . . . . . . . . . . . . . . . . . . . . . . . . . . . . . . . . . . . . . . . . . . . . 25
Redundancy/Failover . . . . . . . . . . . . . . . . . . . . . . . . . . . . . . . . . . . . . . . . . . . . . . . . 25
Non-redundant services . . . . . . . . . . . . . . . . . . . . . . . . . . . . . . . . . . . . . . . . . . . 26
Viewing Status of Services . . . . . . . . . . . . . . . . . . . . . . . . . . . . . . . . . . . . . . . . . . . . 27
Starting and Stopping Services. . . . . . . . . . . . . . . . . . . . . . . . . . . . . . . . . . . . . . . . . 28
Chapter 3 System Settings . . . . . . . . . . . . . . . . . . . . . . . . . . . . . . . . . . . . . . . . . . . . . 31
Viewing System Settings. . . . . . . . . . . . . . . . . . . . . . . . . . . . . . . . . . . . . . . . . . . . . . 32
Channel Settings. . . . . . . . . . . . . . . . . . . . . . . . . . . . . . . . . . . . . . . . . . . . . . . . . . . . 33
Groups . . . . . . . . . . . . . . . . . . . . . . . . . . . . . . . . . . . . . . . . . . . . . . . . . . . . . . . . 33
5
Page 6

Creating Channel Groups. . . . . . . . . . . . . . . . . . . . . . . . . . . . . . . . . . . . . . 35
Editing Channel Groups . . . . . . . . . . . . . . . . . . . . . . . . . . . . . . . . . . . . . . . 39
Deleting Channel Groups . . . . . . . . . . . . . . . . . . . . . . . . . . . . . . . . . . . . . . 41
Indices . . . . . . . . . . . . . . . . . . . . . . . . . . . . . . . . . . . . . . . . . . . . . . . . . . . . . . . . 42
Programming the X-keys . . . . . . . . . . . . . . . . . . . . . . . . . . . . . . . . . . . . . . 45
Assigning Channel-Specific Actions. . . . . . . . . . . . . . . . . . . . . . . . . . . . . . 47
Device Channels . . . . . . . . . . . . . . . . . . . . . . . . . . . . . . . . . . . . . . . . . . . . . . . . 47
MOS Settings . . . . . . . . . . . . . . . . . . . . . . . . . . . . . . . . . . . . . . . . . . . . . . . . . . . . . . 50
Playlist Settings . . . . . . . . . . . . . . . . . . . . . . . . . . . . . . . . . . . . . . . . . . . . . . . . . . . . 55
Environments . . . . . . . . . . . . . . . . . . . . . . . . . . . . . . . . . . . . . . . . . . . . . . . . . . 56
Playout Settings . . . . . . . . . . . . . . . . . . . . . . . . . . . . . . . . . . . . . . . . . . . . . . . . . . . . 57
Autocue . . . . . . . . . . . . . . . . . . . . . . . . . . . . . . . . . . . . . . . . . . . . . . . . . . . . . . . 58
Behavior . . . . . . . . . . . . . . . . . . . . . . . . . . . . . . . . . . . . . . . . . . . . . . . . . . . . . . 59
As-run Log. . . . . . . . . . . . . . . . . . . . . . . . . . . . . . . . . . . . . . . . . . . . . . . . . . . . . 61
Inventory Manager . . . . . . . . . . . . . . . . . . . . . . . . . . . . . . . . . . . . . . . . . . . . . . . . . . 61
GPI Settings . . . . . . . . . . . . . . . . . . . . . . . . . . . . . . . . . . . . . . . . . . . . . . . . . . . . . . . 63
Mapping GPI Events . . . . . . . . . . . . . . . . . . . . . . . . . . . . . . . . . . . . . . . . . . . . . 64
Enabling the GPI . . . . . . . . . . . . . . . . . . . . . . . . . . . . . . . . . . . . . . . . . . . . . . . . 67
Importing and Exporting System Settings . . . . . . . . . . . . . . . . . . . . . . . . . . . . . . . . 68
Chapter 4 Troubleshooting . . . . . . . . . . . . . . . . . . . . . . . . . . . . . . . . . . . . . . . . . . . . . 71
Support Dialog Box . . . . . . . . . . . . . . . . . . . . . . . . . . . . . . . . . . . . . . . . . . . . . . . . . 72
Standard Information to Include Regardless of Issue . . . . . . . . . . . . . . . . . . . . 72
Failover and Recovery . . . . . . . . . . . . . . . . . . . . . . . . . . . . . . . . . . . . . . . . . . . . . . . 73
Miscellaneous Issues . . . . . . . . . . . . . . . . . . . . . . . . . . . . . . . . . . . . . . . . . . . . . . . . 75
Appendix A Avid Interplay Framework . . . . . . . . . . . . . . . . . . . . . . . . . . . . . . . . . . . . . 77
Index . . . . . . . . . . . . . . . . . . . . . . . . . . . . . . . . . . . . . . . . . . . . . . . . . . . . . . 79
6
Page 7

Using This Guide
Congratulations on your purchase of your Avid iNEWS Command system.
Avid iNEWS Command offers a considerable amount of functionality for the state-of-the-art
newsroom, including newsroom system integration and playout control. With Command,
newsroom personnel can easily create and manage playlists.
This publication provides information on how to use the Command system.
n
The documentation describes the standard features of a basic system configuration.
Therefore, your system might contain certain features and hardware that are not covered in
the documentation.
Who Should Use This Guide
This guide is written for system administrators and various technical personnel responsible
for managing the Command system in a broadcast newsroom. This guide is intended for
advanced users.
It is strongly recommended that system users have prior experience in or classroom
knowledge of Windows-based operating systems and networking.
About This Guide
This guide leads you through even the most complex procedures with task-oriented
instructions, illustrated for a more realistic presentation of the actual icons and images you
encounter. The information provides basic user procedures, while adding a complete
explanation of all the tools and techniques required to create, apply, and adjust various
settings, including useful tips, shortcuts, and custom options.
The Contents lists all topics included in the book. They are presented with the following
overall structure:
• The Introduction helps you get oriented with beginning concepts and general workflow
and provides valuable pointers to keep in the back of your mind as you proceed.
Page 8

Using This Guide
• The main body of the guide follows the natural flow of your work, with clear and
comprehensive step-by-step procedures.
• Finally, a detailed Index helps you quickly locate specific topics.
This guide provides instruction for your system in the following areas:
• An overview of system architecture, services, and workflow
• Various administrative procedures for iNEWS Command as well as other systems and
devices with which it interfaces
Symbols and Conventions
Avid documentation uses the following symbols and conventions:
Symbol or Convention Meaning or Action
n
c
w
> This symbol indicates menu commands (and subcommands) in the
t
Italic font Italic font is used to emphasize certain words and to indicate variables.
Courier Bold font
Ctrl+key or mouse action Press and hold the first key while you press the last key or perform the
A note provides important related information, reminders,
recommendations, and strong suggestions.
A caution means that a specific action you take could cause harm to
your computer or cause you to lose data.
A warning describes an action that could cause you physical harm.
Follow the guidelines in this document or on the unit itself when
handling electrical equipment.
order you select them. For example, File > Import means to open the
File menu and then select the Import command.
This symbol indicates a single-step procedure. Multiple arrows in a
list indicate that you perform one of the actions listed.
Courier Bold font identifies text that you type.
mouse action. For example, Ctrl+drag or Ctrl+S. This also applies to
Alt and Shift keys.
8
Page 9

If You Need Help
If you are having trouble using the Avid iNEWS Command system:
1. Retry the action, carefully following the instructions given for that task in this guide. It
is especially important to check each step of your workflow.
2. Check for the latest information in one of two locations:
- If release notes are available, they ship with your application.
- If ReadMe files are available, they are supplied in your Avid application folder.
If You Need Help
n
n
Release notes and ReadMe files are also available on the Avid Knowledge Base.
3. Check any printed documentation that came with your Avid application or your
hardware for maintenance or hardware-related issues.
4. Visit the online Knowledge Base at
are available 24 hours per day, 7 days per week. Search this online Knowledge Base to
find answers, to view error messages, to access troubleshooting tips, to download
updates, and to read/join online message-board discussions.
5. For Technical Support, call 800-800-AVID (800-800-2843).
For Broadcast On-Air Sites and Call Letter Stations, call
800-NEWSDNG (800-639-7364).
For the latest product information, see the Avid Knowledge Base:
www.avid.com/onlinesupport
How to Order Documentation
To order additional copies of any Avid documentation from within the United States, call
Avid Sales at 800-949-AVID (800-949-2843). If you are placing an order from outside the
United States, contact your local Avid representative.
Avid Educational Services
www.avid.com/onlinesupport
. Online services
For information on courses/schedules, training centers, certifications, courseware, and
books, visit
(800-949-2843).
www.avid.com/training
or call Avid Sales at 800-949-AVID
9
Page 10

Using This Guide
10
Page 11

Chapter 1
Introduction to iNEWS Command
Avid iNEWS Command is a device automation system that integrates with any iNEWS or
MOS-enabled newsroom computer system (NRCS) and provides broadcasters precise
control over a range of playout devices, including video servers, still stores, and character
generators in a broadcast news environment. Backup services and mirrored playout make
this system reliable while the user interface allows you to control multiple production
devices. Avid iNEWS Command also works with Avid Interplay Framework applications
and services to ensure you always have the best system performance.
This chapter contains the following main sections:
• Overview of the System Architecture
- Architecture and Workflow
- Features
• Security via Administrator Password
• Starting Command at a Workstation
• Overview of the User Interface
Page 12

Chapter 1 Introduction to iNEWS Command
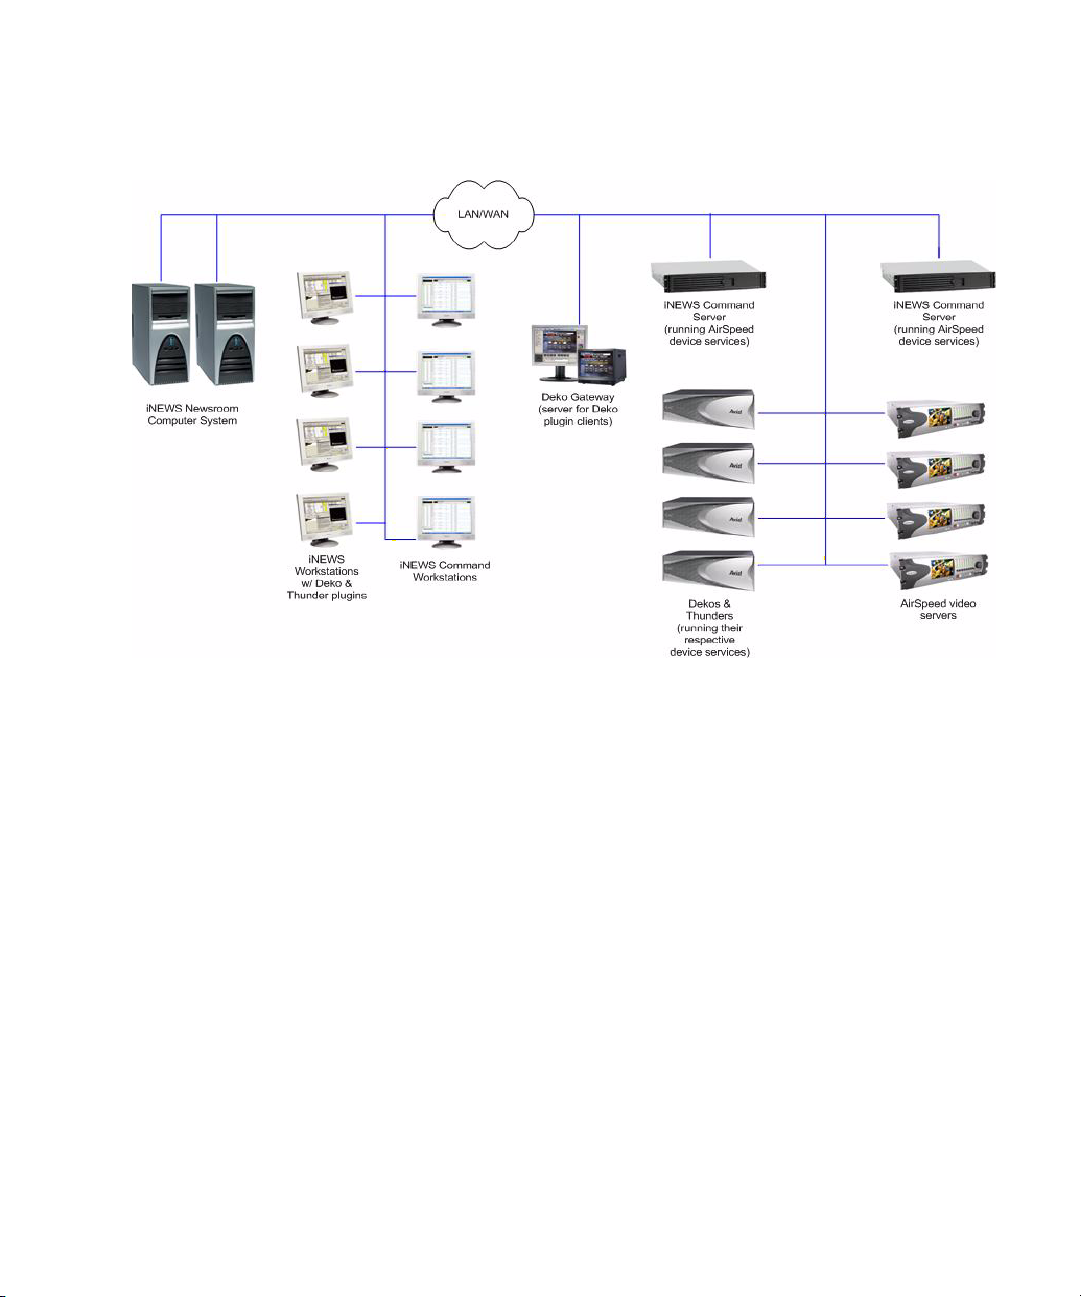
Overview of the System Architecture
The basic iNEWS Command system is comprised of iNEWS Command Servers,
workstations that run the client software, and devices, such as Avid AirSpeed video servers,
Thunder production servers and Deko character generators. The system is designed to be an
extension of your current Avid system. It allows you to receive playlists from Avid iNEWS
while controlling your video and graphics devices. The iNEWS Command system supports
industry standard protocols making it compatible with many other products.
For newscast control your iNEWS Command system provides automated playlists, tracks
script changes, and automates control of production and playback devices including video
servers, still stores, and character generators. It integrates with the iNEWS rundown—or any
other MOS-enabled newsroom computer system—allowing a producer to change a show
while it is on air, and reflecting those changes in their iNEWS Command system. MOS
commands are supported so that journalists can use MOS plug-ins within the newsroom
computer system script. Production playout devices, including Avid Deko and Avid
Thunder on-air graphics solutions and AirSpeed video servers, are triggered based on the
events in the rundown.
News graphic and text templates for news elements can include logos and station IDs,
lower-third captions or superimposed graphics, and full-screen backgrounds with text.
Journalists, using iNEWS newsroom computer system, fill in the templates and insert them
into their stories either manually, by using a macro, or by using the iNEWS Title Entry tool.
They may also include clips and stills in their script by entering the ID of the of the graphic
in the story as a production cue. At air time an iNEWS Command operator triggers the
graphics playlist, which is synchronized with the iNEWS rundown.
Architecture and Workflow
Avid iNEWS Command is scalable and can adapt to work in traditional newsroom-based
playlist creation to production-centric workflows where running orders are created inside the
Command Workstation. All of the components can run on a single computer, or they can be
spread out across multiple computers with redundant services configured to take control if
the primary services should become unavailable.
12
Page 13
Overview of the System Architecture
An example of a basic Command system architecture is shown in the following illustration:
In the most common news workflow, playlists are created using the iNEWS newsroom
computer system and the video and graphic assets are referenced in stories using their IDs or
by dragging and dropping them from an Active-X plugin.
Standalone playlists can be created and saved for later use. Multiple playlists can be
embedded in a single running order. You can set assets within a playlist to playback at a
specified time, or you can set groups of assets to play in follow-on mode.
13
Page 14
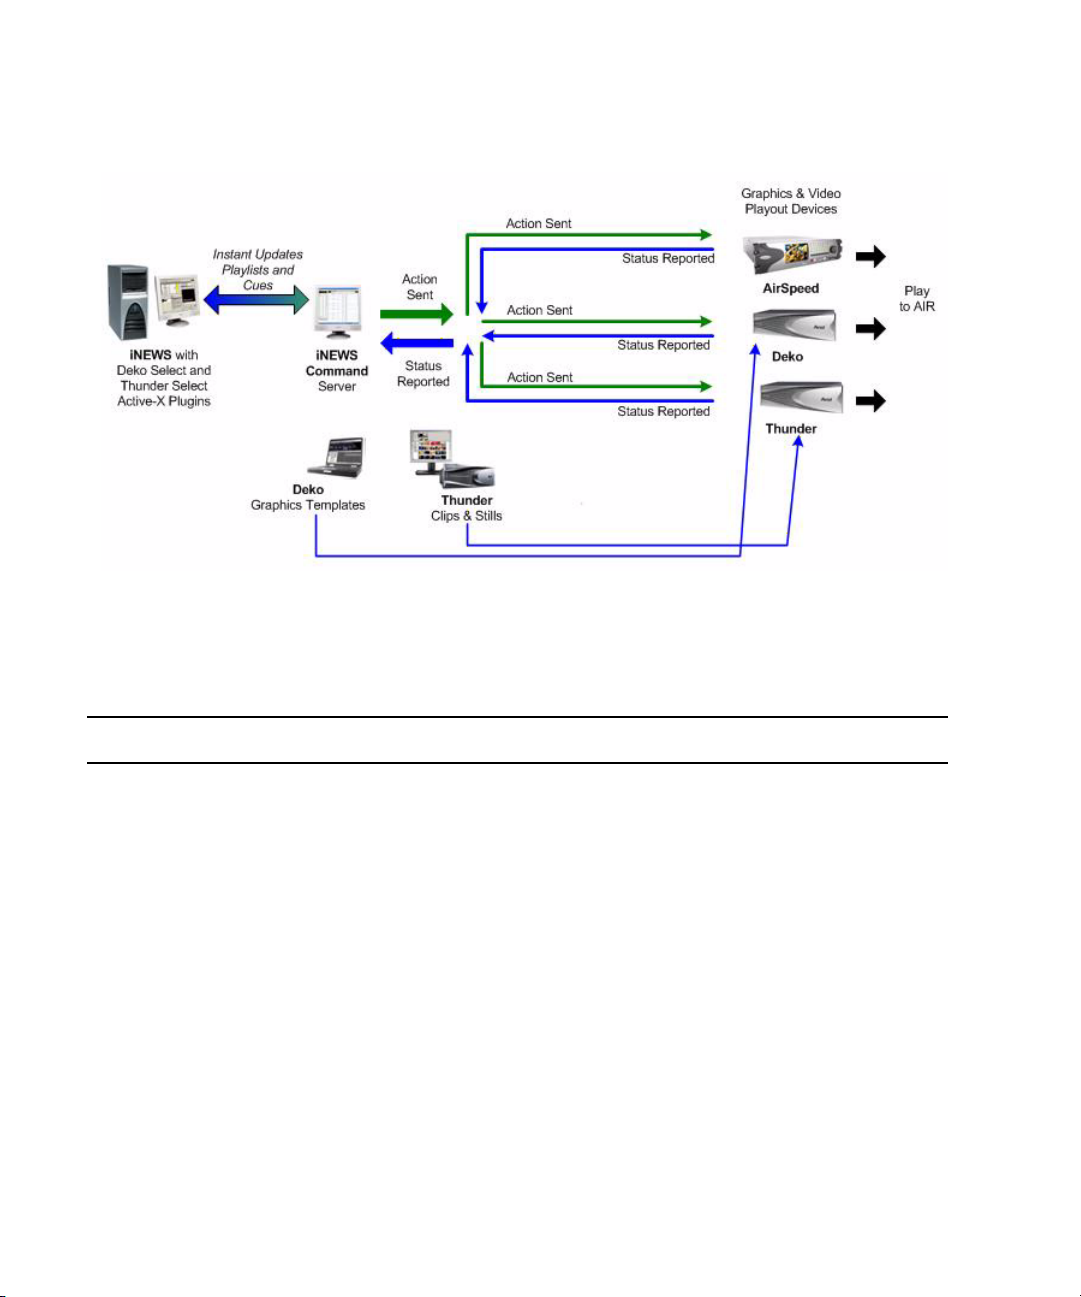
Chapter 1 Introduction to iNEWS Command
A basic workflow is shown in the following illustration.
Features
The Avid iNEWS Command system provides the features described in the following table.
Feature Description
Playlist Functionality You can load a playlist from the newsroom computer system, or create the
playlist manually within Avid iNEWS Command. This provides the
flexibility to control event playout locally, at the desktop, or from a
rundown. You can also embed playlists within other playlists, which allows
for seamless transitions between shows or segments produced by separate
editorial teams.
Manual and Automated
Triggering
Mirrored Playout This allows a single Play command to initiate playback on two channels
Advanced Playback Feature You can cue items as needed if and when playlists change, and provide
14
Items can be played back manually by the operator, triggered via GPI, or
automatically played based on the time of day. This provides total
integration with the facility, its systems, processes, and staff.
simultaneously. This functionality is essential for redundancy/failover
operations.
simultaneous playback while video files are still being transferred,
saving time.
Page 15

Overview of the System Architecture
Feature (Continued) Description (Continued)
Flexible Integration You can configure the Avid iNEWS Command system to control any
combination of Avid Thunder, Avid AirSpeed, and Avid Deko systems that
are operating in an Avid iNEWS, ENPS, or other MOS environment.
User Interface The intuitive user interface provides visual tools, including clocks that show
time elapsed and time remaining, channel assignments for easy
identification of transmission paths, and color-coded status indicators that
illustrate the inventory of assets based on availability and playability on all
devices. This improves operation, reduces training time, and ensures
complete synchronization of devices with the playlist
Status Updates Reflects playability status of inventory assets; display of playout and
channel group lock status; and status-based colors and fonts for stories and
items at a glance. These status updates speed up decision-making saving
time, while maintaining accuracy.
15
Page 16
Chapter 1 Introduction to iNEWS Command
Security via Administrator Password
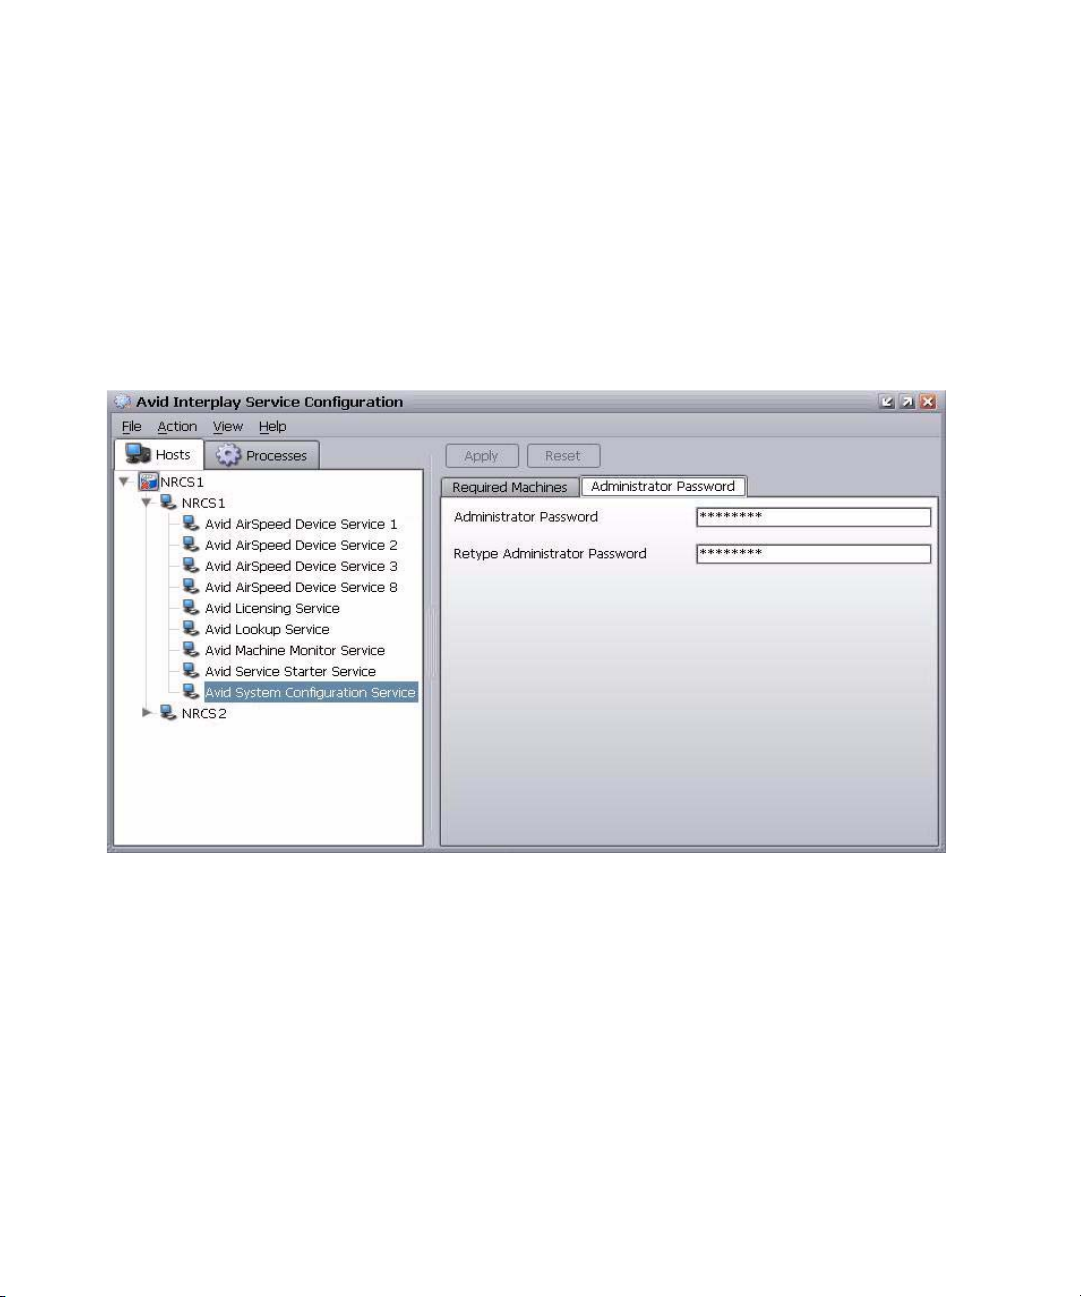
Modifying system settings in Avid iNEWS Command requires an administrator password (if
set), which is configured through the Service Configuration application of Avid Interplay
Framework. For more information about Avid Interplay Framework, see Appendix A.
To set up or change the system administration password:
1. Click the Start button and select Programs > Avid > Interplay Framework > Avid
Interplay Service Configuration.
n
16
2. On the Hosts tab, navigate to and select the Avid System Configuration Service.
3. Select the Administrator Password tab.
4. Type in an alpha-numeric password and retype it.
5. Click Apply.
Click the Reset button to restore the default “blank” password.
Page 17
Starting Command at a Workstation
Starting Command at a Workstation
While some administration tasks require a password—if the administrator password is set
up—the Avid iNEWS Command client application at a workstation requires no password to
log in and is easy to start.
To start iNEWS Command at a workstation:
1. Do one of the following:
t Double click the iNEWS Command icon on the desktop.
t Click the Start button and select Programs > Avid > Avid iNEWS Command.
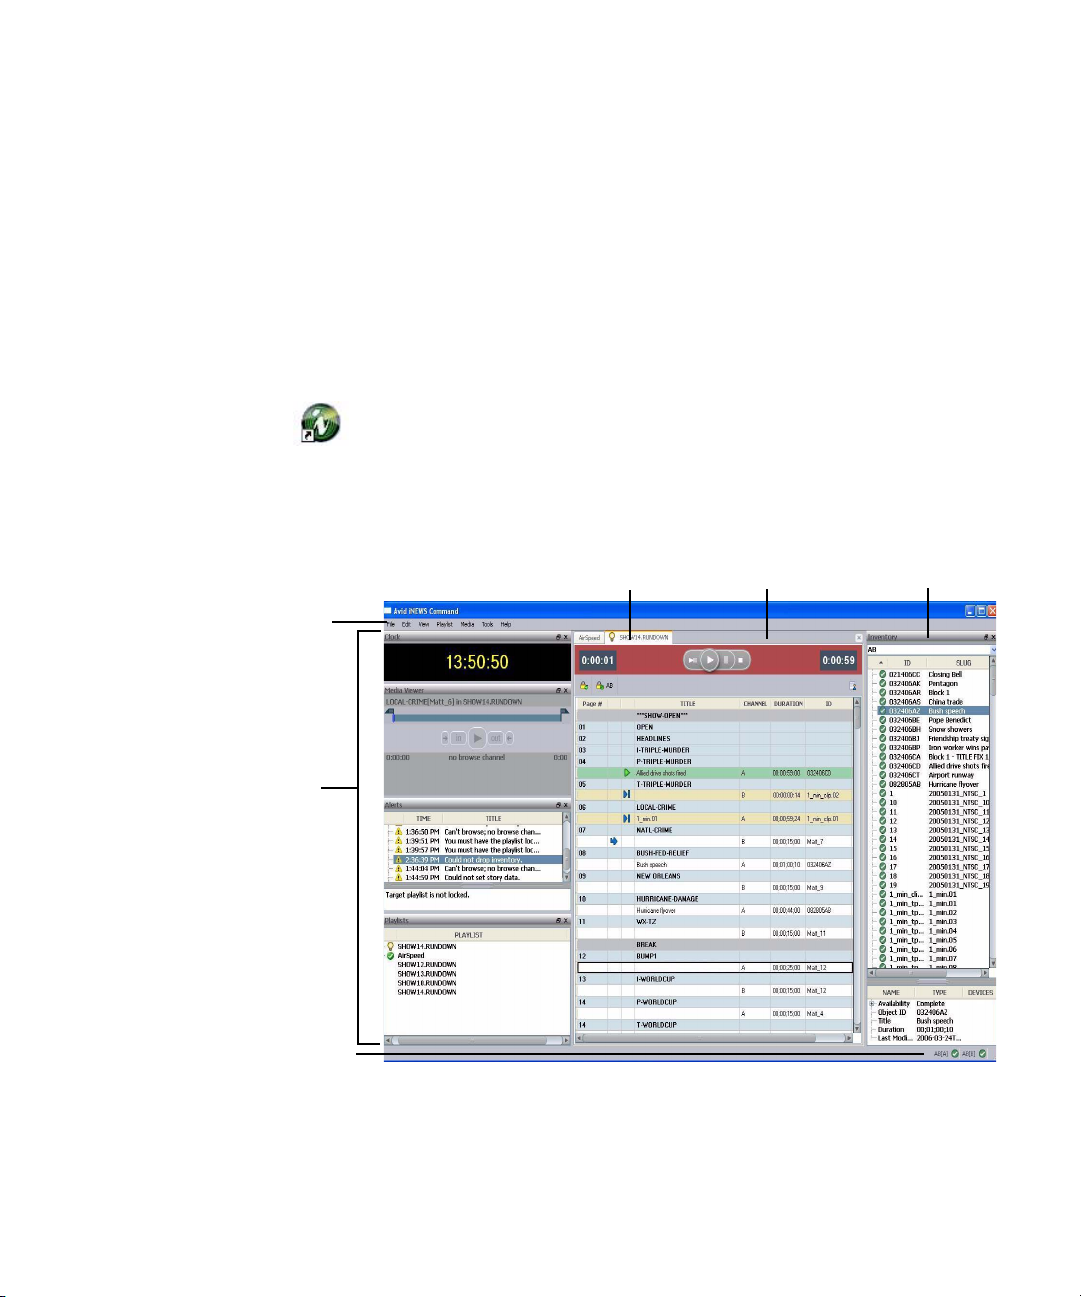
The iNEWS Command window opens as shown in the following illustration:
Menu bar
Panels
Status bar
Playlist Viewer
Workspace
Inventory Explorer
17
Page 18

Chapter 1 Introduction to iNEWS Command
Overview of the User Interface
The Avid iNEWS Command window is the graphical user interface that contains , the
Playlist Viewer, panels, a menu bar, status bar, and a workspace area.
Playlist Viewer
The Playlist Viewer is a customizable area of the window used to view and manage playlists
for on-air playout. The window can also have different playlists open simultaneously. All are
accessible through tabs located at the top of the Playlist Viewer.
For more information about the Playlist Viewer used in iNEWS Command, see Avid iNEWS
Command User’s Guide.
Panels
Panels are components that provide information in various ways.The iNEWS Command
window contains panels that you can dock, undock, move, resize, or even hide from view.
Each panel is easily identified by the name appearing in its title bar.
For more information about the panels, including the Inventory panel and Playlist Explorer,
used in iNEWS Command, see Avid iNEWS Command User’s Guide.
Menu Bar
The menu bar for iNEWS Command contains the following:
•File
•Edit
•View
• Playlist
•Item
• Tools
•Help
Each menu, its options and descriptions are described in the following tables:
Menu Submenu Menu Option Description
File New Playlist Opens the Create New Playlist dialog box.
18
Page 19

Overview of the User Interface
Menu Submenu Menu Option Description (Continued)
Story Opens a Create New Story dialog box.
File Exit Closes the Command program.
Edit Cut Cut selection.
Copy Copy selection.
Paste Paste selection.
Delete Delete selection.
View Playlist Explorer Displays or closes the Playlist Explorer.
Inventory Displays or closes the Inventory.
Shotbox Displays or closes the Shotbox displayed at the top
of the Workspace.
Clock Displays or closes the Clock.
Media Viewer Displays or closes the Media Viewer.
Alerts Displays or closes the Alerts.
Playlist View Next Displays next playlist
Previous Displays previous playlist
Set Focus Sets the keyboard focus to the active view.
Close Closes the current playlist.
Close All Closes all playlists.
Playlist Select Next item Select next item in current playlist.
Previous Item Select previous item in current playlist.
Next Row Select next item in current playlist.
Item After Story Select next item after story.
Playlist Edit Edit Selection Edit current selection in playlist.
Edit Story Edit story in playlist.
Playlist Insert New Story Insert new ptory.
New Break Insert new break.
Playlist Channel Assign Assign channel.
19
Page 20

Chapter 1 Introduction to iNEWS Command
Menu Submenu Menu Option Description (Continued)
Playlist Playout Cue Cue media in a playlist.
Play Play media in a playlist.
Pause Pause media playing in a playlist.
Stop Stops media from playing.
Media Go To Mark In Go to the marked In point.
Go To Mark Out Go to marked Out point.
Set Mark In Mark the In point.
Set Mark Out Mark the Out point.
Forward One Frame Move forward one frame.
Forward One
Move forward one second.
Second
Forward ten
Move forward ten seconds.
Seconds
Backward One
Move backward one frame.
Frame
Backward One
Move backward one second.
Second
Backward Ten
Move backward ten seconds.
Seconds
Restart Restart media.
Tools Options Opens the Options dialog box.
Settings Opens the System Settings dialog box.
Help About Display information about iNEWS Command.
Contents Displays help information for users.
Support Opens the Support dialog box.
20
Page 21
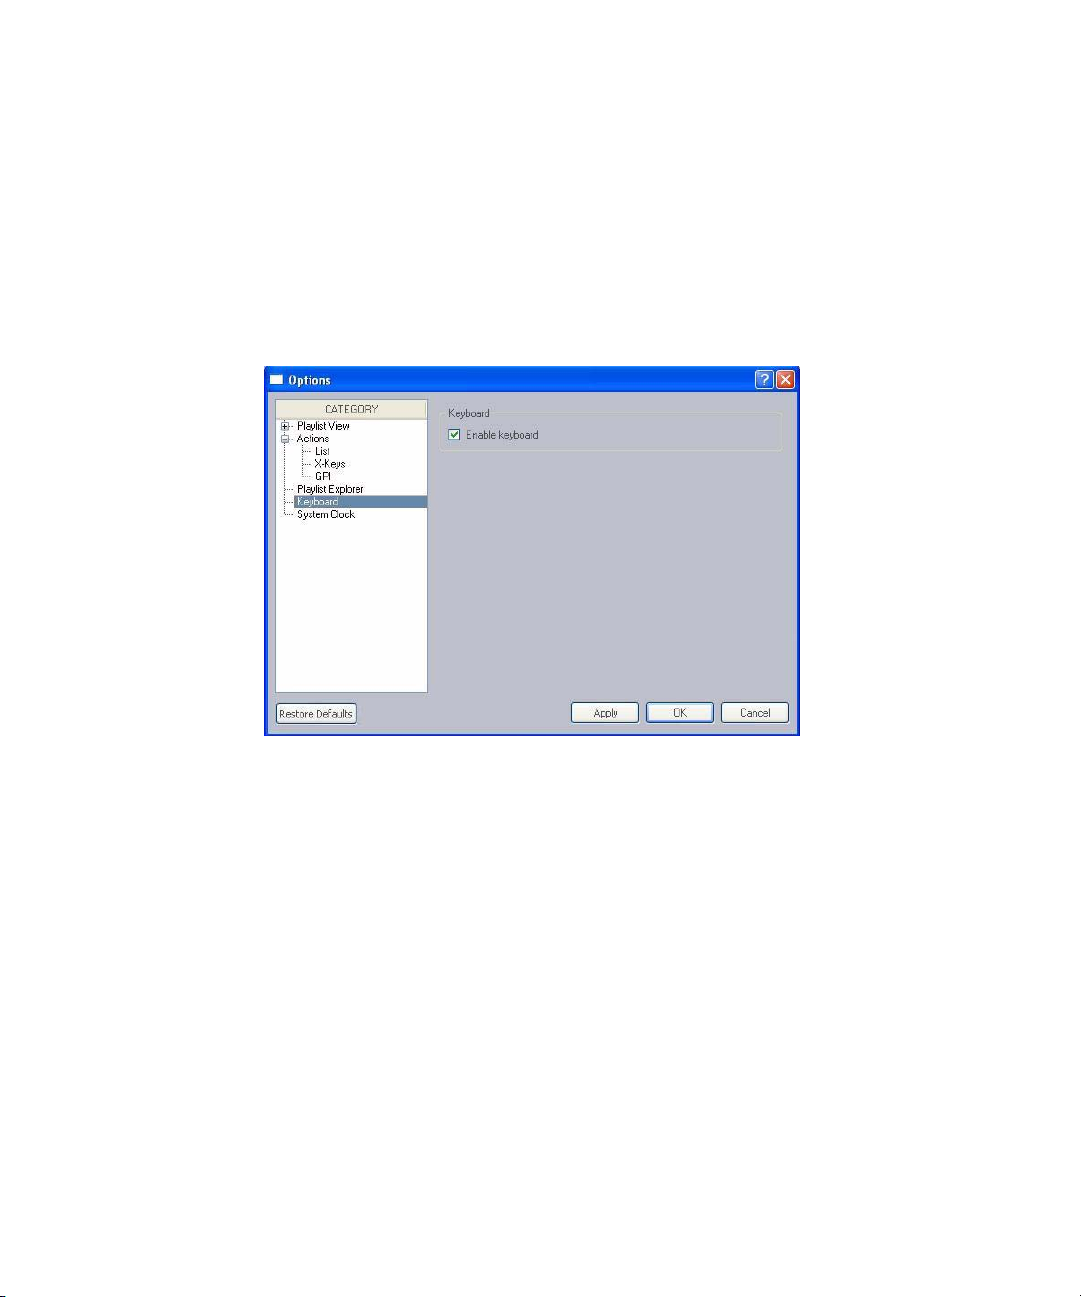
Disabling a Command Workstation’s Keyboard
Disabling a Command Workstation’s Keyboard
Some sites use alternative devices to control playout from Command, such as a GPI device
or an X-keys USB keypad, and therefore do not want the computer keyboard at the
workstation enabled.
To enable or disable the keyboard:
1. Select Tools > Options.
n
2. In Category, select Keyboard.
3. Do one of the following:
t Select Enable keyboard.
t Deselect Enable keyboard.
4. Click Apply.
5. Click OK.
If the keyboard is disabled, the numeric keypad cannot be used to control playout from the
Command Workstation. Disabling the keyboard does not affect the use of the keyboard for
software on the workstation PC unrelated to the Command client software.
21
Page 22

Chapter 1 Introduction to iNEWS Command
22
Page 23

Chapter 2
iNEWS Command Services
The services for iNEWS Command enable it to interface with newsroom computer systems
as well as providing for playlist control. Some of the services can be defined as Main
services—those responsible for communicating with newsroom computer systems and for
playlist control. Other services are known as Device services—those responsible for
controlling other devices, such as video servers, still stores, and character generators in a
broadcast news environment.
n
Avid iNEWS Command uses Avid Interplay Framework applications and services to monitor
and manage Command services.
This chapter contains the following main sections:
• Main Services
• Device Services
• Redundancy/Failover
• Viewing Status of Services
• Starting and Stopping Services
Page 24

Chapter 2 iNEWS Command Services
Main Services
The main services are vital components that enable interfacing with a newsroom system, as
well as playlist control.
n
It is best to dedicate a computer to be a Command Server. Avid does not recommend running
the main services on a workstation, Thunder, or Deko. See “Redundancy/Failover” on
page 25 for more information.
The two services that pertain to newsroom computer system interfacing are:
• Avid iNEWS Communication Service—An iNEWS Command system uses this
service as the communication portal to load and unload iNEWS rundowns from an
iNEWS workstation. The service receives playlist messages from iNEWS, distributes
them to the appropriate Command components, and reports item status and inventory
messages back to iNEWS. A single iNEWS Command system can have multiple
Communication services for redundancy.
• Avid MOS Communication Service—An iNEWS Command system uses this service
to load and unload rundowns from a MOS-compliant newsroom system, such as ENPS.
The service receives MOS playlist messages from the newsroom computer system,
distributes them to the appropriate Command components, and reports item status and
inventory messages back to newsroom computer system. A single iNEWS Command
system can have multiple MOS services. This service is server specific, meaning that
services on different computers act independently. In a failover scenario, if the
Command playlist becomes disconnected, users can continue playout functions. To get
an updated playlist, the user must perform a MOS redirection in the MOS-based
newsroom computer system to the Command Server running the now primary MOS
Communcation service.
24
The services related to playlist control are:
• Avid Playlist Controller—The playlist controller drives playout of the media on a
locked channel group from the playlist it controls. When one or more channel groups
are locked, a playlist controller is allocated by the Playlist Manager. A single iNEWS
Command system can have multiple primary playlist controllers and several backups.
One playlist controller is necessary for each concurrently loaded playlist. Separate
controllers are not needed to control embedded playlists.
• Avid Playlist Manager—This service assigns a playlist controller (and its backup, if
any) to a playlist when the first channel group is locked. It also manages the locks on
channel groups. Playlists that have locked channel groups are prevented from being
deleted. An iNEWS Command system can only have one primary Playlist Manager, but
might have others as backups.
Page 25

• Avid Pl a y l ist Store—This service is the data store or respository for all loaded
(newsroom) playlists and standalone playlists. It communicates playlist changes to other
Command components. An iNEWS Command system can only have one primary
Playlist Store, but might have others as backups.
The services related to inventory are:
• Avid Inventory Manager—This service maintains an inventory of media metadata for
all physical devices connected to any channel group in an iNEWS Command system.
This inventory is sent to the Inventory Manager via the individual device services. An
iNEWS Command system can only have one active Inventory Manager, but might have
backups.
Device Services
The Device services are those services responsible for controlling other devices, such as
video servers, still stores, and character generators in a broadcast news environment.
• Avid AirSpeed Device Service—This service provides control of a single AirSpeed
high resolution video server. One is required for each AirSpeed, but a site can also have
multiple backups. It runs on the iNEWS Command servers, not on the device like other
device services.
Device Services
• Avid Deko Device Service—This service provides control of a single Deko device. One
is required for each Deko device. It runs on the device (Deko Server).
• Avid Thunder Device Service—This service provides control of a single Thunder
device. One is required for each Thunder device. It runs on the device (Thunder Server).
• Avid GPI Device Service—This service interfaces to a GPI input card on the server.
• Avid Maney Panel Service—This service interfaces to a Maney panel.
Redundancy/Failover
Avid iNEWS Command services operate on a primary/backup basis. There can be only one
primary service, but there can be several backup services. Avid does not recommend running
the Command services on a workstation, Deko, or Thunder. It is best to have a dedicated
computer be a Command Server and, for additional system integrity, use multiple Command
Servers—one running all of the primary services while the backup services run on other
backup servers.
Command determines primary and backup based on the length of time the service has been
running. The server that has been running longer is the primary. Therefore, to get all primary
services on one server, it is necessary to start the primary server first; when all services have
25
Page 26

Chapter 2 iNEWS Command Services
started, start the backup servers. This is the only way to ensure all services on the primary
server take on the primary role, which allows for more consistent behavior during times
when redundancy is needed, and it helps simplify any necessary troubleshooting efforts.
When a primary service goes down, Command conducts an election, and changes the
backup service to primary. The new primary service will remain primary until it goes down.
When the old primary service comes back up, it becomes the backup service. If the primary
Command Server were to go down, all of the services on the backup server would become
primary.
If you were to lose network connectivity to the primary Command Server, the services do
not actually go down, and so their duration remains longer than the backup. After the
network connection is restored, those services become primary again.
n
If you have an on-air failover on the primary Command Server due to a loss of network
connectivity, you must stop the services on the primary server. Otherwise, those services will
once again become primary when the connection is restored, which will interrupt on-air
playability. After the connection is restored, and at a non-crucial time, you should start
those services again.
Non-redundant services
There are some services that are not redundant:
• Lookup Service — This Command service acts independently. If a second one is
running, it is doing the same work; they basically work as two primary services. In a
failover scenario, the second lookup service is already working, and services would
continue seamlessly.
• iNEWS Communication Service— This Command service is server specific, meaning
that services on different computers act independently. In a failover scenario, the
Command playlist will become disconnected, users can continue playout functions. To
get an updated playlist, the user can reload the iNEWS rundown to the second
Command Server and continue.
• Deko & Thunder Device Services— These Command services must run on the Deko
and Thunder respectively, and you cannot install a second service on a device.
• Service Starter Service, Machine Monitor Service, Time Synchronization— These Avid
Interplay Framework services are computer specific, so redundancy does not apply.
26
Page 27

Viewing Status of Services
Avid iNEWS Command uses Avid Interplay Framework as its structure for discovering and
communicating with services. For more information, see “Avid Interplay Framework” on
page 77.
To view status of services:
1. Click the Start button and select > All Programs > Avid > Interplay Framework > Avid
Interplay Workgroup Properties.
The Avid Interplay Workgroup Properties window opens.
Viewing Status of Services
When you start the Interplay Workgroup Properties application, the Services tab appears by
default displaying the name of the workgroup, to which this computer belongs, in the
Workgroup text box. Also shown, in the Status text box, is the status of all Avid services
running on the local computer.
The Interplay Workgroup Properties application uses colored icons—in combination with
text—on the Services tab to show the status of all Avid services. A user can click the
Advanced button to see more information about individual services. The icons displayed
provide fast, easy identification of the current status of an Avid service.
27
Page 28

Chapter 2 iNEWS Command Services
Status Icon Status Icon Description
When all of the enabled Avid components are running on the local machine a green
circle with a check mark in the center is shown next to the Status text box and the
sentence—All enabled services are running—is displayed.
When some of the enabled Avid components are running on the local machine a
caution symbol (yellow triangle with an exclamation mark in the center) is shown
next to the Status text box and the sentence—Some services are enabled
but not running—is displayed.
When none of the enabled Avid components are running on the local machine a red
square is shown next to the Status text box and the sentence—No services are
running—is displayed.
For more information on viewing Avid services using the Interplay Workgroup Properties
application, see the Avid Interplay Framework User’s Guide.
Starting and Stopping Services
The Services tab allows you to edit the workgroup to which the computer belongs, view the
status of all the Avid services running on the local computer, or start, stop, and restart the
local Avid workgroup services.
28
The Advanced button on the Services tab opens the Avid Interplay Services dialog box. This
dialog box allows you to stop, start, enable, or disable individual or multiple Avid services
running on the local computer.
Page 29

Starting and Stopping Services
To stop, start, enable, or disable Avid services:
1. From the Services tab in the Avid Interplay Workgroup Properties window, click the
Advanced button.
The Avid Interplay Services dialog box opens.
2. Select a service to stop, start or enable.
Multiple rows can be selected.The Start button changes to Restart if all of the services
are running.
3. Do one of the following:
t Click Start to start the selected service(s).
t Click Stop to stop the selected service(s).
t Click Enable to enable the selected service(s).
For more information on starting and stopping services using the Interplay Workgroup
Properties application see the Avid Interplay Framework User’s Guide.
To disable a service:
1. Click the Start button, and then select All Programs > Avid > Interplay Framework >
Avid Interplay Workgroup Properties.
2. Click the Advanced button.
29
Page 30

Chapter 2 iNEWS Command Services
The Avid Interplay Services dialog box opens.
3. Select the service you want to disable and click Stop.
4. After the service stops, click the Disable button to disable the service.
5. Click Exit to close the Avid Interplay Services dialog box.
6. Click OK to close the Avid Interplay Workgroup Properties window.
30
Page 31

Chapter 3
System Settings
System settings can be accessed through the Command user interface at any Command
Workstation. System settings are used to configure channel groups, GPI keypads, MOS
integration with third-party newsroom systems such as ENPS, and so forth.
n
Modifying system settings in Avid iNEWS Command requires an administrator password (if
set). For more information, see “Security via Administrator Password” on page 16.
This chapter contains the following main sections:
• Viewing System Settings
• Channel Settings
• MOS Settings
• Playlist Settings
• Playout Settings
• Inventory Manager
• GPI Settings
• Viewing System Settings
Page 32

Chapter 3 System Settings
Viewing System Settings
The system settings for Command can be accesses at any Command Workstation.
To view system settings:
1. Select Tools > System Settings. The System Settings dialog box appears.
32
2. Click any category to access the settings related to that part of the Command system.
3. When finished, click the X button to close the dialog box.
Page 33

Channel Settings
The first category in the System Settings dialog box pertains to channels. It is used to map
device channels to channel names, as well as configuring indices and channel groups.
This section covers the three sub-categories in the order they appear within the software:
• Groups
• Indices
• Device Channels
Before you assign groups, the actual device channels should be mapped to a channel name.
This is done in the System Settings dialog box. See “Device Channels” on page 47 for more
information.
Groups
A channel group is a cluster configured with one or more device channels composed from
compatible video servers or character generators. Many channel groups can be created from
the same pool of resources, and different groups can use the same resources to serve
different operational needs.
Channel Settings
n
Each channel group must contain a single “type” of device. For instance, a channel group
called AS is a grouping of channels from two or more AirSpeed video servers, while a
different channel group named CG is a grouping of channels on a Deko character generator.
All channel names within a single device type must be unique.
AirSpeed channels provide one of the best examples of the way in which channel groups
provide control configurations; they do not guarantee media availability, which is the role of
the AirSpeed studio configuration. For example, a station has two AirSpeed video servers,
each with two channels that are numbered 2 and 3. (With AirSpeed video servers, the first
channel is reserved for ingest.) Let’s call the first AirSpeed AS1 and the second one AS2.
With channel groups on Command, the station’s system administrator can set up numerous
different channel groups and call them anything, such as:
Channel Group Channel Names Actual Device Channels Purpose
AS-Noon A
B
C
AS1 - channel 2
AS1 - channel 3
AS2 - channel 2
Playout
Playout
Browse
33
Page 34

Chapter 3 System Settings
Channel Group Channel Names Actual Device Channels Purpose
AS-5PM A
B
C
D
AS-10PM A
C
B
D
AS1 - channel 2
AS1 - channel 3
AS2 - channel 2
AS2 - channel 3
AS1 - channel 2
AS2 - channel 2
AS1 - channel 3
AS2 - channel 3
Playout
Playout
Playout
Playout
Playout
Mirrored
Playout
Mirrored
The following graphic shows a more visual example of how multiple channel groups can be
created from the same four AirSpeed video server channels.
34
The first group shows a single channel group configured to create four playback channels
called A, B, C, and D. The next set shows two groups, representing control rooms, with two
playback channels each. Alternatively, the groups can be created from any combination of
channels and used to support simultaneous two-channel playout from two control rooms
sharing the same resources. The last set shows four channel groups, each controlling a single
channel.
Page 35

Channel Settings
The following graphic shows a more visual example of how channel groups are used to
mirror playout for redundancy.
The first group creates a two channel playout solution with both channels mirrored on a
secondary video server for maximum reliability. Whenever a video clip is cued and played
on either of the primary channels, the same clip is also cued and played on the corresponding
secondary channels. The other two groups depict single channel solutions with redundancy.
All of these channel groups can exist at the same time, although they cannot necessarily all
be used simultaneously.
Creating Channel Groups
Channels must be created before they can be assigned to channel groups. For more
information on how to create channels, see “Device Channels” on page 47.
n
The first eight (8) characters of a channel group’s name must be unique to match the eightcharacter device name in the iNEWS newsroom computer system. For instance, a channel
group name in Command that is ASNoonMirrored will appear as ASNoonMi in iNEWS.
35
Page 36

Chapter 3 System Settings
System administrators can create channel groups via the System Settings dialog box.
36
To create channel groups:
1. Select Tools > System Settings. The System Settings dialog box appears.
2. Expand Channel.
3. Select Groups.
4. Click Add.
Page 37

The Add New Channel Group to Playlist dialog box opens.
Channel Settings
n
5. Enter the name of the new channel group and any notes you want. Names of channel
groups can be upper or lowercased and contain any alpha-numeric character. Avoid
using spaces before or after the name.
6. Click Add to add a channel to the group.
If channels have not been created, they cannot be assigned to channel groups; therefore, the
Add button will be disabled if no channels exist in the system. For more information on how
to create channels, see “Device Channels” on page 47.
37
Page 38

Chapter 3 System Settings
7. In the Channel Detail section, select the following:
Channel Detail Description
Channel Type Select the appropriate channel type, based on:
Primary Select the channel designated as the primary playout channel for the
Mirrored (Optional) If mirrored playout is necessary, select the device’s channel
Preview (Optional) Select which device channel to use for displaying the
8. Repeat steps 6 and 7 as needed. You can use the Up and Down buttons to rearrange the
order of channels in the group.
Standard - This is the channel type selected for playout.
Browse - This is the channel type selected for changing In and Out points
of pre-existing clips for preview or editing purposes only. This does not
apply to playout operations.
Hotswap - This is the channel type selected for emergency backup
channel assignment.
device.
designated for mirrored playout.
headframe of the next media event in the playlist.
c
38
9. Click OK. This will close the Add New Channel Group to Playlist dialog box. The new
channel group will appear in the System Settings dialog box.
10. Click Apply (if you want the System Settings dialog box to remain open after settings
are applied) or OK. The system will prompt you for the administrator password.
11. Enter the administrator password and click OK.
Until the Apply or OK button is clicked and administrator password supplied, the
channel group(s) are not created.
12. Close all workstation sessions and restart all Command and Avid Interplay Framework
services throughout the environment.
Page 39

Editing Channel Groups
Should it become necessary to modify a channel group, you can do so from any Command
Workstation via the System Settings dialog box.
To edit a channel group:
1. Select Tools > System Settings. The System Settings dialog box appears.
Channel Settings
2. Expand Channel.
3. Select Groups.
4. Select the channel group from the list on the right.
5. Click Edit. The Edit Channel Group dialog box appears.
39
Page 40

Chapter 3 System Settings
40
6. You can rename the channel group, add notes, rearrange the order of channels by using
the Up and Down buttons, add or delete channels, or alter the channel details for each
channel in the group.
7. After editing the channel group, click OK.
8. Click Apply (if you want the System Settings dialog box to remain open after settings
are applied) or OK. The system will prompt you for the administrator password.
9. Enter the administrator password and click OK.
Page 41

Channel Settings
c
Deleting Channel Groups
Until the Apply or OK button is clicked and administrator password supplied, the
changes in the system settings are not saved.
Should it become necessary to delete a channel group, you can do so from any Command
Workstation via the System Settings dialog box.
To delete a channel group:
1. Select Tools > System Settings. The System Settings dialog box appears.
2. Expand Channel.
3. Select Groups.
4. Select the channel group from the list on the right.
5. Click Delete.
41
Page 42

Chapter 3 System Settings
6. Click Apply (if you want the System Settings dialog box to remain open after settings
are applied) or OK. The system will prompt you for the administrator password.
7. Enter the administrator password and click OK.
c
Indices
Until the Apply or OK button is clicked and administrator password supplied, the
channel group(s) are not deleted from the system settings.
Channel indices are a configuration feature used to map an index integer (1-16) to a channel
name, which can be alpha or numeric, to enable assignment of channel-specific actions to
certain keys on a keypad.
This pre-configuration can be done before assigning the channel-specific actions to any keys
on playout control keypads, such as the X-keys
connects to the USB port the Command Workstation and offers up to twenty userreprogrammable keys for one-button access to playout functionality.
®
USB keypad. An X-keys USB keypad
n
42
X-keys is an optional third-party hardware solution, so for more information on the X-keys
USB keypad, see that manufacturer’s documentation on www.xkeys.com.
Page 43

Ensuring the successful integration of an X-keys keypad to control playout through
Command requires the completion of the following tasks:
Tasks Refer to...
!
Channel Settings
"
"
"
"
"
n
(Optional) Disable the keyboard at the Command
Workstation.
Verify installation of the keypad on the Command
Workstation.
Map Indices to Channel Names. See procedure on page 44.
Program the keypad. “Programming the X-keys” on page 45
(Optional) Assign channel-specific actions to
keys.
“Disabling a Command Workstation’s Keyboard”
on page 21
See the Avid iNEWS Command Installation and
Configuration Guide.
“Assigning Channel-Specific Actions” on page 47
Another alternative keypad is one that connects to a GPI card. For more information on GPI
integration, see “GPI Settings” on page 63.
43
Page 44

Chapter 3 System Settings
To map an index to a channel name:
1. Log in to a Command Workstation.
2. Select Tools > System Settings. The System Settings dialog box appears.
n
44
3. Expand Channel.
4. Select Indices.
5. Enter the channel’s name in the Name column next to the appropriate index.
Avid recommends that if a channel name must be numeric, such as is the case whenever the
ActiveX plug-in Avid Deko Select is used, assign it to the same Index number to avoid
confusion.
Page 45

6. Click Apply (if you want the System Settings dialog box to remain open after settings
are applied) or OK. The system will prompt you for the administrator password.
7. Enter the administrator password and click OK.
Programming the X-keys
The following procedure should be conducted at the Command Workstation to which the
X-keys USB keypad is installed.
To program the X-keys from the Command Workstation:
1. Select Tools > Options.
2. In Category, expand Actions and select X-keys.
Channel Settings
3. Select Enable X-keys.
45
Page 46

Chapter 3 System Settings
4. Set the de-bounce period. Designed to avoid inadvertent repetition, this is the span of
time (in milliseconds) during which the system should ignore duplicated signals.
n
n
If you find that you are having problems with “double-hits” when you press a key, increase
the de-bounce period.
5. Click on a gray box that represents (or corresponds to) the key on the keypad.
Some sites might use key caps that cover 2 or 4 buttons on the keypad, turning a set of
buttons into a single key. If that is the case, select the left box to set the “2-button” key. For
4-button keys, select the upper left box.
6. Assign an action to the key by selecting it from the list of those available in the Choose
Action dialog box. The most commonly used actions will appear open for your selection
already.
- The Playlist > Channel Group actions refer to channel group commands.
- The Playlist > Selection actions refer to selected items on the playlist.
- The Playlist > Channel actions refer to specific channels that correspond to a
particular index as configured in the procedure on page 44 and explained in
“Assigning Channel-Specific Actions” on page 47.
46
7. Click OK.
8. Repeat steps 5-7 as needed.
9. Click Apply.
Page 47

10. Click OK.
The following graphic shows a closeup of the first row of keys after they were assigned to
the four playout control options of play, cue, pause, and stop.
Assigning Channel-Specific Actions
Keys can also be assigned to an action associated with a specific channel on a device. An
example of this would be for a key to initiate a play command on a single channel. Assigning
the channel-specific actions affects only the keypad attached to the workstation at which the
assignments are programmed.
To assign channel-specific actions to a key:
1. Complete steps 1 - 5 of the procedure to program X-keys on page 45.
Channel Settings
2. In Category, expand Actions and select Playlist, then Channel.
3. Select the action, such as Play.
4. Select the index, such as 01, that corresponds to the device channel.
5. Click Apply.
6. Click OK.
Device Channels
The Device Channels section of the System Settings dialog box enables system
administrators to map actual channels from a device, such as an Avid Deko or AirSpeed
video server to a name of your chosing. This name can then be used to create channel groups
or assign channel-specific actions to keys on a USB keypad at the Command Workstation.
For more information on channel groups, see “Groups” on page 33. Also, see “Assigning
Channel-Specific Actions” on page 47 for more information on assigning channel-specific
actions to keypad keys.
To map device channels to names:
1. Log in to a Command Workstation.
2. Select Tools > System Settings. The System Settings dialog box appears.
47
Page 48

Chapter 3 System Settings
48
3. Expand Channel.
4. Select Device Channels.
5. Click Add.
6. Enter the channel’s name, which can be any alpha-numeric character(s), based on the
following guidelines:
Page 49

Channel Settings
Device Type Channel Index Channel Name Description
Deko 0 1 Avid Deko devices begin channel designations
Deko 1 2
Both channel names must be numeric, though, to match the channel selection available
n
through the Deko Select plug-in inside of the iNEWS newsroom computer system.
AirSpeed 2 A AirSpeed video servers begin channel
AirSpeed 3 B
Thunder 1 aPlay Avid Thunder begins channel designations at
Thunder 2 bPlay
at zero (0); however, the name of the first
channel can be one.
designations at one (1); however, the first
channel is reserved for video ingest. So the first
available channel for playout or browse
purposes would be channel 2.
one (1). The channel names must be in the
following format: aPlay, bPlay, cPlay, and so
forth. Although it is possible to name the
channels 1, 2...8, or pgm (for program), Avid
recommends against using numeric names to
avoid confusion with channel names for any
Avid Deko device.
7. Select the name and type of the device from the lists. The device name is the machine
name for the device, such as deko3000. If it does not appear in the list, you must enter it.
If the device is on a different subnet, you will need to enter the full domain name for the
device, such as deko3000.avid.com.
8. Select the channel, using the Channel index spinbox.
9. Enter any notes you want, which can help identify the device should future alterations
be necessary.
10. Click OK.
11. Repeat steps 5 through 10 for each device, as needed.
12. Click Apply (if you want the System Settings dialog box to remain open after settings
are applied) or OK. The system will prompt you for the administrator password.
49
Page 50

Chapter 3 System Settings
13. Enter the administrator password and click OK.
MOS Settings
The MOS category in the System Settings dialog box allows system administrators to
configure the Command system to integrate with a MOS-enabled newsroom computer
system, such as ENPS. A MOS-enabled newsroom computer system can send playlists to
Command.
MOS (Media Object Server) is an industry-standard, XML-based protocol that is primarily
used by a newsroom computer system (NRCS) to maintain running orders on a video server.
MOS also enables servers to update the newsroom computer system with changes to the
server’s media inventory. Command’s MOS support enables communication between the
newsroom computer system and AirSpeed video servers, as shown in the following
illustration.
n
50
NRCS
MOS
messages
MOS does not provide a means of controlling playout from a video server. Command
supplies this function.
Under the MOS category are three subcategories:
• General - used to configure MOS and graphics environment settings.
• Channel Groups - used to create channel groups for integration with MOS-based
newsroom computer systems.
• Advanced - used for advanced MOS feature configuration.
Avid strongly recommends contacting Customer Support before altering any of the advanced
settings.
Command
AirSpeed
Page 51

MOS Settings
To configure Command’s system settings to work with a MOS-based newsroom
computer system:
1. Select Tools > System Settings.
2. Expand the MOS category.
3. Select General.
4. Edit the MOS settings accordingly:
MOS Setting Description
iNEWS Command MOS IDThe ID that enables enables bidirectional communications between a
MOS-based newsroom computer system and Command. The ID must be
all lowercased and adhere to the following format:
the Command system>.mos
For instance:
Newsroom NCS ID Usually, this is set to the host name of the newsroom computer system’s
server.
avid.command1.mos
or
avid.command2.mos
avid.<name of
51
Page 52

Chapter 3 System Settings
MOS Setting Description
Newsroom Host Name Host name of the newsroom computer system’s server. The name entered
Newsroom BuddyID Usually, this is set to host name of the newsroom computer system’s
in this field must be resolvable via the Domain Name Service (DNS);
otherwise, an IP address can be used instead.
“buddy” or backup server. The name entered in this field must be
resolvable via the Domain Name Service (DNS); otherwise, an IP address
can be used instead.
n
Newsroom Buddy Host
Name
MOS version Determines which version of MOS protocol Command will use.
Host name of the newsroom computer system’s “buddy” or backup
server.
5. Set the default graphics environment for playlists loaded from a MOS-based newsroom
computer system, if necessary.
Graphics environments, known as styles in Avid Deko, are added via the Playlist category in
the System Settings dialog box. If none are added, then the list in the MOS > General
category will appear blank. See “Playlist Settings” on page 55 for more information.
6. Select Channel Groups.
7. Click Add. The Channel Groups dialog box appears.
52
8. Select a channel group.
Page 53

MOS Settings
9. Click OK.
The chosen channel group will appear in the list on the right side of the System Settings
dialog box.
10. Click Apply (if you want the System Settings dialog box to remain open after settings
are applied) or OK. The system will prompt you for the administrator password.
11. Enter the administrator password and click OK.
53
Page 54

Chapter 3 System Settings
To view advanced MOS settings:
1. Select Tools > System Settings.
2. Expand the MOS category.
3. Select Advanced.
n
54
While a newsroom computer system can use non-standard ports for the incoming and
outgoing sockets and the advanced settings can be customized, Avid recommends that the
default settings be used.
Avid strongly recommends contacting Customer Support before altering any of the advanced
settings.
The first four settings specify the port numbers for the sockets used to communicate with the
MOS-based newsroom computer system. The defaults, as defined in the MOS protocol
specifications, are: 10541 (upper) and 10540 (lower).
Page 55

Playlist Settings
Playout of items in a playlist can be set to either to manual playout or to automatically occur
immediately following the completion of the previous item. This latter functionality is called
follow-on playout and is indicated by an icon that looks like a bent blue arrow in the playlist
at a Command Workstation.
While a user at a Command Workstation can change individual items in a playlist from one
playout type to another, the system administrator can set the default condition for items
added to playlists in the System Settings dialog box. This default applies to both standalone
and newsroom playlists.
To set the playout default for new items:
1. Select Tools > System Settings.
2. Select Playlist.
Playlist Settings
3. Ensure the checkbox called New items are follow-on by default is selected.
55
Page 56

Chapter 3 System Settings
4. Click Apply (if you want the System Settings dialog box to remain open after settings
are applied) or OK. The system will prompt you for the administrator password.
5. Enter the administrator password and click OK.
Environments
Graphics environments, known as styles in Avid Deko, are added to the system via the
Playlist category in the System Settings dialog box. This category allows you to specify the
set of graphics environments that will appear as options in various parts of the user interface,
such as: the Default environment list (shown below), in the MOS category of the System
Settings dialog box (see page 51), and in the Playlist Properties dialog box .
56
To add an environment:
1. Select Tools > System Settings.
2. Select Playlist.
3. Click the Add button. An environment will appear in the list as shown:
Click here to rename
the environment.
After multiple
environments are
added, use this list to
select which one the
system should use as
a default.
Click here to add
an environment.
Page 57

Playout Settings
4. By default, the name of any added environment is
changed. To do so, double-click on the name in the list and retype the new name.
5. Click Apply (if you want the System Settings dialog box to remain open after settings
are applied) or OK. The system will prompt you for the administrator password.
6. Enter the administrator password and click OK.
For more information on environments, known as styles, see the Avid Deko Select User’s
Guide.
Playout Settings
The Playout category of the System Settings dialog box provides a variety of settings related
to autocueing of items, channel assignment, playout behaviors, and the as-run log.
Environment
, but that can be
To access the playout settings:
1. Select Tools > System Settings.
2. Select Playout.
57
Page 58

Chapter 3 System Settings
Autocue
58
The Playout category contains settings in three distinct sections:
• Autocue
• Behavior
• As-run Log
Options in the Autocue section are described as follows:
Autocue enabled When autocue is enabled, video clips are cued
automatically whenever the playlist’s channel groups are
locked and when the preceding item is played. If this
checkbox is not selected, events must be cued manually.
When the Autocue enabled checkbox is selected, the other
options in the Autocue section are enabled for selection as
well; when it’s not, the rest appear grayed out.
Page 59

Playout Settings
Single channel Applies autocue to single channels only.
For example, the first three items (1, 2, and 3) in a playlist
are cued in order on channels A, B, and C, respectively
when the playlist’s channel group is locked. The next four
items (4, 5, 6, and 7) are assigned to A, B, C, and A. If
this setting is enabled, then should a user manually play
item 4 on channel A, item 7 instead of item 1 would then
be cued on A, while items 2 and 3 would remain cued on
B and C.
If this setting is not enabled, then when item 4 is played
on channel A, items 5, 6, and 7 would be cued on
channels B, C, and A respectively, while items 1, 2, and 3
would no longer be cued for playout.
Skip items that are not playable If selected, the system will skip over any items that are
unavailable for playout.
Cue automatically after playlist changes Expands the autocue functionality to include automatic
cueing of items whenever the playlist is altered by the
newsroom computer system.
Auto-assign channels If selected, channels are assigned automatically whenever
the channel groups are locked.
Strong channel assignment If selected, channels are also re-assigned automatically
n
When strong channel assignment is enabled, any channel assignment made by the newsroom
computer system is ignored.
Behavior
The Behavior section supplies configuration options for integration between Command and
playback devices, such as the automated graphic triggering functionality available through
the Avid Deko Select plug-in that opens inside the iNEWS newsroom computer system.
With the plug-in, a user can set a character-generated graphic to automatically go on-air at a
specific time and for a specific duration during a video event. This is known as Totally
Automated Graphics (TAG). Timecode information specified in the plug-in is forwarded to
the Command Workstation and appears in the playlist so that the operator knows when this
automatic event will occur.
Administrators at sites that want to take such events to air manually can turn off the
automatic functionality by modifying the system setting in Avid iNEWS Command. This
when a playlist is altered to maintain their sequence, such
as ABAB, etc. Assignment only applies to unplayed items
in the playlist or below any manually cued item.
59
Page 60

Chapter 3 System Settings
does not disable the ability of a user to enter an start time or duration in the Deko Select
plug-in. If entered, the times would still appear as information only for the Command
operator.
To turn on or off automatic graphic triggering:
1. Select Tools > System Settings.
2. Select Playout.
3. Do one of the following:
t Ensure the Automatic Graphic Triggering checkbox is selected to turn it on.
t Uncheck the Automatic Graphic Triggering checkbox to turn it off.
4. Click Apply (if you want the System Settings dialog box to remain open after settings
are applied) or OK. The system will prompt you for the administrator password.
60
5. Enter the administrator password and click OK.
The other settings available in the Behavior section of the System Settings dialog box are
explained in the following table:
Hold last frame time Sets a delay that determines how long the last frame of a
clip is held on the channel before it is ejected. When using
clips that are less than 10 seconds in duration, specify a
value that is less than the duration of the events in the
playlist. For example, when using clips that are five
seconds in duration, specify the value to any positive
integer less than five.
Page 61

Eject previous items Stops an item that would normally continue to play after a
As-run Log
The As-run log is used to keep records of playout data for traffic-related purposes.
To enable the as-run log:
1. Select Tools > System Settings.
2. Select Playout.
3. Select the As-run log enabled check box.
Inventory Manager
new item is sent to air. For example, a two-minute clip is
playing in channel A but, after only one minute, you play
the next item on air on channel B. Without this setting
enabled, the clip on channel A would continue to play for
the remaining minute, unless you manually stop it. If you
set the Eject previous item time greater than zero, any
events that are playing when you send the next item to air
are stopped automatically after the designated time
interval has elapsed.
4. Enter a network-shared location accessible to the Command Servers running the Avid
Playlist Controller services.
Inventory Manager
Avid iNEWS Command supports placeholders that can be used to associate media with a
newsroom story before the media is actually available.
The iNEWS newsroom computer system can request placeholders from the Command
system. Placeholder creation is also a feature of MOS-based ENPS systems and is invoked
as part of the AutoCreate feature.
Each placeholder must have a unique ID to avoid playback of the wrong media. In Avid
iNEWS Command, the prefix for such placeholders can be configured.
61
Page 62

Chapter 3 System Settings
To configure placeholder defaults:
1. Select Tools > System Settings.
2. Expand the Inventory Manager category.
3. Select Placeholder.
62
4. Set the prefix.
The format for placeholders, by default, is:
<prefix>MMDDYY-<8digits>
The prefix can be set by a system administrator to any alpha-numeric sequence of digits,
$W
such as a station’s call letters. If set to
of the week is used based on the day when the placeholder was created, such as
TUE, WED, THU, FRI, SAT
, or
SUN. MMDDYY
, a three letter, all-cap representation of the day
MON
,
represents the month, day, and year. It is
followed by a hyphen (-) and 8 randomly generated, lowercased alpha-numeric digits.
5. Set the number of days after which any unused placeholders are deleted from the
system. To disable this feature, set the number to zero (0).
6. Click Apply (if you want the System Settings dialog box to remain open after settings
are applied) or OK. The system will prompt you for the administrator password.
Page 63

7. Enter the administrator password and click OK.
GPI Settings
A GPI panel is another alternative keypad device that can be used to control playout through
Command. The GPI panel, such as a Maney panel (shown below), connects to a GPI card
installed in the Command Server.
GPI Settings
The GPI panel allows a user to select up to four channels, with each channel having its own
set of Control buttons for play, cue, pause, and stop functionality.
Configuring the system to work with a GPI panel requires defining certain parameters
through the system settings in Command and through the Avid Interplay Service
Configuration application.
63
Page 64

Chapter 3 System Settings
To ensure successful GPI integration, complete the following tasks in the order that they are
listed. If you are viewing this checklist online, you can easily link to a topic that provides
procedural details for the task. Return to this main checklist after you have completed each
task.
Tasks Refer to...
!
Verify installation of Avid Interplay Framework,
"
as well as installation of the GPI card and GPI
device service on the Command Server.
Verify proper configuration of the GPI card. The Avid iNEWS Command Installation and
"
The Avid iNEWS Command Installation and
Configuration Guide and the installation
instructions that came with your GPI card
Configuration Guide
" Ensure that the GPI device service is running. The Avid iNEWS Command Installation and
Configuration Guide
Map Indices to Channel Names. The procedure on page 44
"
" Map events to an actions. “Mapping GPI Events” on page 64
" Enable the GPI panel for playout. “Enabling the GPI” on page 67
Mapping GPI Events
After you configure the GPI card and restart the device service, the GPI events must be
mapped to playout actions. This is done at a Command Workstation in the System Settings
dialog box.
n
The channel number selected in step 6 of the following procedure corresponds to an index,
which must be configured for this mapping to work. For more information on mapping
indices, see the procedure on page 44.
64
To map GPI events to actions:
1. Log in to a Command Workstation.
2. Select Tools > System Settings. The System Settings dialog box appears.
Page 65

GPI Settings
n
3. Select GPI.
4. Expand the panels to view each panel’s GPI events.
5. Double-click on an event. The Choose Action dialog box appears with the GPI options
expanded by default.
Users can select any of the actions in the dialog box, such as selecting Playlist > Selection >
Next Item, which would configure a GPI button to advance the cursor in the user interface.
However, Avid recommends mapping GPI events to GPI > Channel actions because these
actions are communicated directly to the Playlist Controller, bypassing the user interface.
Similar actions, such as Cue, Pause, Play, and Stop, also appear under Playlist > Channel,
but those are provided for USB keypads, such as X-keys.
65
Page 66

Chapter 3 System Settings
66
6. Expand the action, such as Play, and select a channel number, such as 01.
7. Click OK.
8. Repeat steps 5 through 7 as needed.
9. Click Apply (if you want the System Settings dialog box to remain open after settings
are applied) or OK. The system will prompt you for the administrator password.
Page 67

10. Enter the administrator password and click OK.
Enabling the GPI
After configuration of the GPI card for the Avid iNEWS Command system is complete, the
GPI panel must still be enabled to control a playlist. A user can do this at any Command
Workstation.
To enable a GPI panel to control a playlist:
1. At the Command Workstation, select Tools > Options.
2. In Category, expand Actions and select GPI.
GPI Settings
n
3. Select a GPI panel from the list.
4. Click Apply.
5. Click OK.
System administrators must configure system settings to provide a list of GPI panels in the
Options dialog box. For more information, see “Mapping GPI Events” on page 64.
67
Page 68

Chapter 3 System Settings
Importing and Exporting System Settings
Should it become necessary to change computers, Command offers a way to export system
settings from one PC to another. It’s located on the System Settings dialog box in Command.
To import or export system settings:
1. Select Tools > System Settings. The System Settings dialog box appears.
68
2. Do one of the following:
t Click Export to export the current system settings as an XML file. Go to step 3.
t Click Import to import system settings. Go to step 4.
3. When the Export Studio Settings dialog box appears (as shown below), type a name for
the XML file and select a directory where you want the file to be saved. Then click Save.
You can disregard the rest of this procedure, which applies to importing settings.
Page 69

Importing and Exporting System Settings
4. The system will prompt you for the administrator password.
5. Enter the administrator password and click OK.
6. Navigate to and select the XML file you want to import. Then click OK.
69
Page 70

Chapter 3 System Settings
70
Page 71

Chapter 4
Troubleshooting
Avid iNEWS Command is a system that offers redundancy in case of failover and a method
for system administrators or users to keep track of issues for troubleshooting purposes.
When attempting to troubleshoot any problem, it is best to have the latest version of release
notes available, which are available as free downloads on Avid’s Knowledge Base at:
http://www.avid.com/onlineSupport/browse.asp?productID=203&topicID=301
This chapter contains the following main sections:
• Support Dialog Box
• Failover and Recovery
• Miscellaneous Issues
Page 72

Chapter 4 Troubleshooting
Support Dialog Box
The Support dialog box is provided for Command users to log information about any issues
encountered that might require contacting Avid Customer Support.
To log support information at a Command Workstation:
1. Select Help > Support.
2. Enter a description of the issue in the Support dialog box.
For instance, the following example shows a sentence regarding a GPI device:
3. Click Save.
4. Select the location where you want the zipped file to be saved.
5. Click OK.
The system saves your comments inside a zipped file that also contains other vital
information, such as system settings and event logs, which enable support personnel to
troubleshoot the issue. This file can then be sent to Avid Customer Support. For more
information, see “If You Need Help” on page 5.
Standard Information to Include Regardless of Issue
The following is a list of information you should have when contacting Avid Customer
Support, regardless of the type of issue your system is experiencing:
• The version of Avid iNEWS Command
72
Page 73

• The version of Avid Interplay Framework
• The Command system name
• How many and what type of devices are being controlled by Command
• Detailed summary of the problem.
Failover and Recovery
This section provides various failover scenarios, the symptoms seen at a Command
Workstation that would indicate such problems, and the recommended procedures for
recovery.
Failover Scenario Symptoms Recovery Procedure
Failover and Recovery
Primary device channel
failure
Mirrored device channel
failure
If the hotswap channel is
needed due to device
channel failure
Status bar indicator for that device
channel shows disconnected and
playability icon appears as shown:
Status bar indicator for that device
channel shows disconnected and
the playability icon appears as
shown:
Alert message is sent to the
workstation, playability should
remain available, and the user can
continue to play.
The person running the switcher
must take the mirrored channel to
air.
No recovery needed.
The person running the switcher
must take the hotswap channel to
air.
73
Page 74

Chapter 4 Troubleshooting
Failover Scenario Symptoms Recovery Procedure
Power outage or a restart of
the server with the primary
Command services.
Power outage or a restart of
the server with the backup
Command services.
Loss of network connectivity
on the server with the
primary Command services.
Alert message is sent to the
workstation saying that it can’t
find the Playlist Store and other
services. Any video playing at
present will continue to play, but
there is no playout control.
Nothing seen. No recovery needed.
Alert message is sent to the
workstation saying that it can’t
find the Playlist Store and other
services following a loss of
playout control.
Wait. The services running in a
backup role will trigger an
election and take over as primary
and resume functionality. Alerts
will appear when the services are
back online. If the alerts
recommend closing and reopening
the Playlist Viewer, do that, after
which you can resume playout
control.
If a newsroom playlist was being
controlled at the time, the
rundown will need to be reloaded
to the redundant server now
running primary services;
however, the disconnected playlist
can be played out prior to loading
the newsroom playlist.
The services running in a backup
role will take over as primary and
resume functionality.
If a newsroom playlist was being
controlled at the time, the
rundown will need to be reloaded
to the redundant server now
running primary services.
74
Loss of network connectivity
on the server with the
backup Command services.
If possible, have someone restart the server before network
n
connectivity is restored. After the show, the system
administration might want to restart services so the original
primary server is again running the service in a primary role.
No effect when connectivity is
lost.
No effect when connectivity is
lost. Allow Command to
automatically recover if and when
the network connectivity is
restored.
Page 75

Miscellaneous Issues
Failover Scenario Symptoms Recovery Procedure
If the network disconnection is discovered and connectivity has
n
yet to be restored, it’s best to turn the server with the backup
services off until any on-air newscasts are complete to avoid
the potential for playout interruption. For instance, after the
network connection is restored, playlist items will be
unavailable and playout control lost before normal
functionality automatically returns.
iNEWS loses connectivity
with the primary Avid
iNEWS Communication
service where the monitor
server is loaded at present.
iNEWS loses connectivity
with the backup Avid
iNEWS Communication
service.
ENPS loses connectivity
with the primary Avid MOS
Communication service.
ENPS loses connectivity
with the backup Avid MOS
Communication service.
The iNEWS Workstation shows
the monitor server in an ERROR
state. Command shows the
playlist as disconnected (red bar
across top of Playlist Viewer).
Any updates to the Avid iNEWS
rundown while disconnected will
not be reflected in Command.
Nothing seen. No recovery needed.
Command shows the playlist as
disconnected (red bar across top
of Playlist Viewer). Any updates
to the ENPS running order while
disconnected will not be reflected
in Command.
Nothing seen. No recovery needed.
Reload the monitor server to the
Command Server running the
redundant Avid iNEWS
Communication service.
Afterwards, when convenient,
unlock the channel groups in the
disconnected playlist and lock
them for the reloaded playlist,
then continue playing to air.
In ENPS, perform MOS
redirection to the Command
Server running the redundant Avid
MOS Communication service.
Miscellaneous Issues
This section provides various troubleshooting scenarios and the recommended procedures
for recovery.
75
Page 76

Chapter 4 Troubleshooting
Scenario Recovery Procedure
Failed communication
between Interplay
Framework and Command
services
Dual network card enabled
on server
Ensure that the DNS entries are accurate and have reverse lookup
enabled. Also verify that your TCP/IP settings have the correct
primary and alternate DNS addresses.
Avoid using host files.
You must disable the unused connection.
76
Page 77

Appendix A
Avid Interplay Framework
Avid Interplay Framework consists of applications and services which provide dynamic
discovery and lookup mechanisms, a scalable notification system, a centralized
configuration tool, diagnostic logging for workgroup-enabled applications and services,
system health monitoring, and so on. Some of the services are known collectively as Support
services. The Support services are viewed, monitored, and configured using the Interplay
Framework applications. Those most vital to iNEWS Command are:
Major Services Description Installed on
Server
Core Components These services run behind the scenes and are
required for any computer or device running any
service in the Avid Interplay environment.
Avid Lookup Service This service enables communication between all
Command and Interplay services running in the
workgroup. Without it, there is no
communication between services. At least two
should be installed in a workgroup.
System Configuration This service sets the configuration settings for all
configurable services. The Avid Interplay
Service Configuration application is used to
enter configuration information that the System
Configuration service will carry out and set in
the registry. Without it, the workgroup cannot
function. At least two should be installed in a
workgroup.
For more information, see the Avid Interplay Framework User’s Guide.
!!
!
!
Installed on
Workstation
Page 78

Appendix A Avid Interplay Framework
The following table includes additional applications and services that are installed on the
server—since they do not take up any overhead and are useful in troubleshooting situations.
Applications and
Services
Configuration Utility This selection installs the Avid Interplay Service Configuration
Health Viewer This selection installs the Avid Interplay Health Monitor application,
Diagnostic Log Viewer This selection installs the Avid Interplay Diagnostics application, which is
Machine Monitor This service reports machine information to the Health Monitor, including
Time Synchronization This service should be configured to synchronize the PC clocks of
Description
application, which is used to configure settings and host names for
Interplay and Command services in the workgroup. For instance,
configuring the Command system to work with a GPI panel requires
defining certain parameters through the Avid Interplay Service
Configuration application. Avid recommends installing this application on
the Command Server.
which allows you to see the status of Command and Interplay services
health statistics throughout the workgroup. Avid recommends installing
this application on the Command Server.
.aif
used to view Avid log files (
recommends installing this application on the Command Server.
disk, memory, and network status. You can also monitor specific services
on that local machine. Avid recommends installing this service on the
Command Server.
machines in the workgroup.
) when troubleshooting. Avid
78
The following table describes some minor services that are generally considered optional.
These minor services are usually not installed on systems when overhead is a concern.
Minor Services Description
Multicast Repeater This service is required when a workgroup must span subnets or domains.
It is seldom installed on the Command Server.
Email Alerter This service sends a notification email if one of the services in the
workgroup has a warning or critical status. It is seldom installed on the
Command Server.
SNMP Gateway This service provides an interface to send health monitoring information to
industry standard SNMP manager applications. It is seldom installed on
the Command Server.
Page 79

A B C D E F G H I J K L M N O P Q R S T U V W X Y Z Index
Index
A
AirSpeed
channel designations 49
channel groups 33
device service, defined 25
As-run log 61
Auto-assign channels 59
Autocue 58
Automated graphic triggering 59
Avid
educational services 9
Knowledge Base 9
Avid Deko
channel designations 49
device service, defined 25
styles aka environments 56
Avid documentation 9
Avid GPI Device Service 25
Avid iNEWS
Communication service 24
Avid Interplay Diagnostics 78
Avid Interplay Framework 27, 77
core components 77
Diagnostic Log Viewer 78
Email Alerter 78
Lookup Service 77
Machine Monitor 78
Multicast Repeater 78
nonredundant services 26
Service Configuration 78
Services dialog box 28
SNMP Gateway 78
System Configuration service 77
Time Synchronization 78
Avid Interplay Health Monitor 78
Avid Interplay Service Configuration application 77,
78
Avid Inventory Manager 25
Avid MOS Communication Service 24
Avid Playlist Controller 24
Avid Playlist Manager 24
Avid Playlist Store 25
Avid Thunder Device Service 25
B
Backup server 52
Behavior, configuring 59
C
Channel groups
creating 36
defined 33
deleting 41
examples of 33
redundancy 35
Channel-specific actions 47
assigning 47
Choose Action dialog box 66
Command Server
GPI card 63
services for 24
Command Workstation
alternative keypad device 63
disabling keyboard 21
starting application 17
using X-keys 42
Core components 77
Customer Support
contact information 9
logging support issues 72
D
Deko 26
device service, defined 25
79
Page 80

Index A B C D E F G H I J K L M N O P Q R S T U V W X Y Z
Deko Select
tagged events 59
Device services 25
viewing status of 27
Diagnostic log viewer 78
Dialog boxes
Avid Interplay Services 28
Choose Action 46, 66
System Settings 36, 64
E
Eject previous items 61
Email Alerter service 78
F
Failover 25
scenarios and recovery 73
G
GPI card 63
GPI device service 25
GPI events, mapping 64
GPI integration checklist 64
GPI panel, configuring 63
Graphics environments 56
setting default 52
H
Health Monitor 78
Hold last frame time 60
Hotswap 73
I
iNEWS Command
defined 11
features of 14
MOS ID 51
MOS support 50
overview of system 12
overview of user interface 18
services 23
starting software 17
system architecture 13
training 9
workflow 12
workflow illustration 14
iNEWS Communication Service 24, 26
Interplay Framework 77
Interplay Workgroup Properties 27
Inventory Manager 25
K
Keyboard, disabling 21
Keyboard alternative 63
Keypad, GPI device 63
Knowledge Base 9
L
Lookup Service 26, 77
M
Machine Monitor service 26, 78
Maney panel 25, 63
Maney panel service 25
Mapping GPI events to actions 64
Menus, described 18
Mirrored playout 14, 38
channel groups 35
MOS Communication Service 24
MOS protocol
described 50
version 52
MOS settings 54
editing 51
MOS version 52
MOS, defined 50
Multicast Repeater service 78
N
Newsroom buddy host name 52
Newsroom buddyID 52
Newsroom host name 52
Newsroom NCS ID 51
Non-redundant services 26
80
Page 81

A B C D E F G H I J K L M N O P Q R S T U V W X Y Z Index
O
Online support 9
P
Panels, defined 18
Placeholders 61
Playlist Controller 24
Playlist Manager 24
Playlist settings 55
Playlist Store 25
Playlist Viewer 18
Playout settings 57
Procedures
access the playout settings 57
add an environment 56
assign channel specific actions to a key 47
configure placeholder defaults 62
configuring Command for MOS-based NRCS 51
create channel groups 36
delete a channel group 41
disable a service 29
edit a channel group 39
enable a GPI panel to control a playlist 67
enable or disable Avid services 29
enable or disable the keyboard 21
enable the as-run log 61
import or export system settings 68
log support information 72
map an index to a channel name 44
map GPI events to actions 64
programming X-keys 45
set the playout default for new items 55
start iNEWS Command at a workstation 17
stop or start Avid services 29
turn on or off automatic graphic triggering 60
view advanced MOS settings 54
view status of services 27
view system settings 32
S
Service Starter Service 26
Services
defined 23
Interplay Framework 77, 78
starting and stopping 28
types of 24
viewing status 27
SNMP Gateway 78
Strong channel assignment 59
System Configuration service 77
System settings 31
device channels 47
import and export 68
System Settings dialog box 36, 64
T
TAG 59
Thunder 26
device service defined 25
Time Synchronization 26
Time Synchronization service 78
Totally Automated Graphics 59
Training, ordering courses 9
Troubleshooting 9, 71
information to send Avid 72
logging support issues 72
miscellaneous issues 75
U
USB keypad 42
V
Video server
channel designations 49
channel groups 33
R
Recovering from failovers 73
Redundancy 25
channel groups 35
W
Workflow, illustration 14
Workgroup Properties
starting the application 27
status icons 27
81
Page 82

Index A B C D E F G H I J K L M N O P Q R S T U V W X Y Z
X
X-keys 42, 65
channel-specific actions 47
integration checklist 43
XML-based protocol 50
82
 Loading...