

Page 1

Avid
iNEWS™ Newsroom Computer System
Setup and Configuration Manual
Version 2.0
®
make manage move | media
™
Avid
®
Page 2

Copyright and Disclaimer
Product specifications are subject to change without notice and do not represent a commitment on the part
of Avid Technology, Inc.
The software described in this document is furnished under a license agreement. You can obtain a copy of
that license by visiting Avid's Web site at www.avid.com. The terms of that license are also available in the
product in the same directory as the software. The software may not be reverse assembled and may be
used or copied only in accordance with the terms of the license agreement. It is against the law to copy the
software on any medium except as specifically allowed in the license agreement.
Avid products or portions thereof are protected by one or more of the following United States patents:
4,746,994; 4,970,663; 5,045,940; 5,267,351; 5,309,528; 5,355,450; 5,396,594; 5,440,348; 5,452,378;
5,467,288; 5,513,375; 5,528,310; 5,557,423; 5,568,275; 5,577,190; 5,584,006; 5,640,601; 5,644,364;
5,654,737; 5,715,018; 5,724,605; 5,726,717; 5,729,673; 5,745,637; 5,752,029; 5,754,851; 5,781,188;
5,799,150; 5,812,216; 5,852,435; 5,905,841; 5,929,836; 5,929,942; 5,930,445; 5,930,797; 5,946,445;
5,987,501; 5,999,190; 6,016,152; 6,018,337; 6,023,531; 6,023,703; 6,031,529; 6,058,236; 6,061,758;
6,091,778; 6,105,083; 6,118,444; 6,128,001; 6,134,607; 6,137,919; 6,141,691; 6,157,929; 6,160,548;
6,167,404; 6,198,477; 6,201,531; 6,223,211; 6,249,280; 6,269,195; 6,317,158; 6,317,515; 6,330,369;
6,351,557; 6,353,862; 6,357,047; 6,392,710; 6,404,435; 6,407,775; 6,417,891; 6,426,778; 6,449,019;
6,473,094; 6,477,271; 6,489,969; 6,512,522; 6,532,043; 6,539,163; D396,853; D398,912. Additional U.S.
and foreign patents pending.
No part of this document may be reproduced or transmitted in any form or by any means, electronic or
mechanical, including photocopying and recording, for any purpose without the express written permission
of Avid Technology, Inc.
Copyright © 2004 Avid Technology, Inc. and its licensors. All rights reserved. Printed in USA.
The following disclaimer is required by Sam Leffler and Silicon Graphics, Inc. for the use of their TIFF
library:
Copyright © 1988–1997 Sam Leffler
Copyright © 1991–1997 Silicon Graphics, Inc.
Permission to use, copy, modify, distribute, and sell this software [i.e., the TIFF library] and its
documentation for any purpose is hereby granted without fee, provided that (i) the above copyright notices
and this permission notice appear in all copies of the software and related documentation, and (ii) the
names of Sam Leffler and Silicon Graphics may not be used in any advertising or publicity relating to the
software without the specific, prior written permission of Sam Leffler and Silicon Graphics.
THE SOFTWARE IS PROVIDED “AS-IS” AND WITHOUT WARRANTY OF ANY KIND, EXPRESS,
IMPLIED OR OTHERWISE, INCLUDING WITHOUT LIMITATION, ANY WARRANTY OF
MERCHANTABILITY OR FITNESS FOR A PARTICULAR PURPOSE.
IN NO EVENT SHALL SAM LEFFLER OR SILICON GRAPHICS BE LIABLE FOR ANY SPECIAL,
INCIDENTAL, INDIRECT OR CONSEQUENTIAL DAMAGES OF ANY KIND, OR ANY DAMAGES
WHATSOEVER RESULTING FROM LOSS OF USE, DATA OR PROFITS, WHETHER OR NOT ADVISED
OF THE POSSIBILITY OF DAMAGE, AND ON ANY THEORY OF LIABILITY, ARISING OUT OF OR IN
CONNECTION WITH THE USE OR PERFORMANCE OF THIS SOFTWARE.
The following disclaimer is required by the Independent JPEG Group:
Portions of this software are based on work of the Independent JPEG Group.
The following disclaimer is required by Paradigm Matrix:
Portions of this software licensed from Paradigm Matrix.
The following disclaimer is required by Ray Sauers Associates, Inc.:
“Install-It” is licensed from Ray Sauers Associates, Inc. End-User is prohibited from taking any action to
derive a source code equivalent of “Install-It,” including by reverse assembly or reverse compilation, Ray
Sauers Associates, Inc. shall in no event be liable for any damages resulting from reseller’s failure to
perform reseller’s obligation; or any damages arising from use or operation of reseller’s products or the
software; or any other damages, including but not limited to, incidental, direct, indirect, special or
consequential Damages including lost profits, or damages resulting from loss of use or inability to use
reseller’s products or the software for any reason including copyright or patent infringement, or lost data,
Page 3

even if Ray Sauers Associates has been advised, knew or should have known of the possibility of such
damages.
The following disclaimer is required by Videomedia, Inc.:
“Videomedia, Inc. makes no warranties whatsoever, either express or implied, regarding this product,
including warranties with respect to its merchantability or its fitness for any particular purpose.”
“This software contains V-LAN ver. 3.0 Command Protocols which communicate with V-LAN ver. 3.0
products developed by Videomedia, Inc. and V-LAN ver. 3.0 compatible products developed by third parties
under license from Videomedia, Inc. Use of this software will allow “frame accurate” editing control of
applicable videotape recorder decks, videodisc recorders/players and the like.”
The following disclaimer is required by Altura Software, Inc. for the use of its Mac2Win
software and Sample Source Code:
©1993–1998 Altura Software, Inc.
Attn. Government User(s). Restricted Rights Legend
U.S. GOVERNMENT RESTRICTED RIGHTS. This Software and its documentation are “commercial
computer software” or “commercial computer software documentation.” In the event that such Software or
documentation is acquired by or on behalf of a unit or agency of the U.S. Government, all rights with
respect to this Software and documentation are subject to the terms of the License Agreement, pursuant to
FAR §12.212(a) and/or DFARS §227.7202-1(a), as applicable.
Trademarks
888 I/O, AirPlay, AirSPACE, AirSPACE HD, AniMatte, AudioSuite, AudioVision, AutoSync, Avid, AVIDdrive,
AVIDdrive Towers, AvidNet, AvidNetwork, AVIDstripe, Avid Unity, Avid Xpress, AVoption, AVX, CamCutter,
ChromaCurve, ChromaWheel, DAE, D-Fi, D-fx, Digidesign, Digidesign Audio Engine, Digidesign Intelligent
Noise Reduction, DigiDrive, DigiTranslator, DINR, D-Verb, Equinox, ExpertRender, FieldPak,
Film Composer, FilmScribe, FluidMotion, HIIP, HyperSPACE, HyperSPACE HDCAM, IllusionFX,
Image Independence, Intraframe, iS9, iS18, iS23, iS36, Lo-Fi, Magic Mask, make manage move | media,
Marquee, Matador, Maxim, MCXpress, Media Composer, MediaDock, MediaDock Shuttle, Media Fusion,
Media Illusion, MediaLog, Media Reader, Media Recorder, MEDIArray, MediaShare, Meridien, MetaSync,
NaturalMatch, Nearchive, NetReview, NewsCutter, OMF, OMF Interchange, OMM,
Open Media Framework, Open Media Management, ProEncode, Pro Tools, QuietDrive, Recti-Fi,
RetroLoop, rS9, rS18, Sci-Fi, Softimage, Sound Designer II, SPACE, SPACEShift, Symphony, the Avid|DS
logo, Trilligent, UnityRAID, Vari-Fi, Video Slave Driver, VideoSPACE, and Xdeck are either registered
trademarks or trademarks of Avid Technology, Inc. in the United States and/or other countries.
iNEWS, iNEWS ControlAir, and Media Browse are trademarks of iNews, LLC.
All other trademarks contained herein are the property of their respective owners.
Footage
Arizona Images — KNTV Production — Courtesy of Granite Broadcasting, Inc.,
Editor/Producer Bryan Foote.
Canyonlands — Courtesy of the National Park Service/Department of the Interior.
WCAU Fire Story — Courtesy of NBC-10, Philadelphia, PA.
Women in Sports – Paragliding — Courtesy of Legendary Entertainment, Inc.
Avid® iNEWS™ Newsroom Computer System Setup and Configuration Manual
Part # 0130-06339-01 Rev B • 25 October 2004
Page 4

Page 5

Contents
Using This Guide
Who Should Use This Manual . . . . . . . . . . . . . . . . . . . . . . . . . . . . . . . . . 1
About This Manual . . . . . . . . . . . . . . . . . . . . . . . . . . . . . . . . . . . . . . . . . . 2
Symbols and Conventions . . . . . . . . . . . . . . . . . . . . . . . . . . . . . . . . . . . . 3
If You Need Help . . . . . . . . . . . . . . . . . . . . . . . . . . . . . . . . . . . . . . . . . . . 4
...With the Syntax of Console Commands . . . . . . . . . . . . . . . . . . . . . 5
Related Information . . . . . . . . . . . . . . . . . . . . . . . . . . . . . . . . . . . . . . . . . 6
If You Have Documentation Comments . . . . . . . . . . . . . . . . . . . . . . . . . . 6
How to Order Documentation. . . . . . . . . . . . . . . . . . . . . . . . . . . . . . . . . . 7
Avid Educational Services . . . . . . . . . . . . . . . . . . . . . . . . . . . . . . . . . . . . 7
Chapter 1 Introduction
What is Avid Unity for NEWS? . . . . . . . . . . . . . . . . . . . . . . . . . . . . . . . . 10
iNEWS NRCS . . . . . . . . . . . . . . . . . . . . . . . . . . . . . . . . . . . . . . . . . 11
Third-Party Connectivity and Open Integration . . . . . . . . . . . . . . . . 12
System Administrator Tasks. . . . . . . . . . . . . . . . . . . . . . . . . . . . . . . . . . 13
Basic Tasks . . . . . . . . . . . . . . . . . . . . . . . . . . . . . . . . . . . . . . . . . . . 13
User Tasks. . . . . . . . . . . . . . . . . . . . . . . . . . . . . . . . . . . . . . . . . . . . 14
Database Tasks . . . . . . . . . . . . . . . . . . . . . . . . . . . . . . . . . . . . . . . . 14
Security Tasks . . . . . . . . . . . . . . . . . . . . . . . . . . . . . . . . . . . . . . . . . 15
Customizing the System . . . . . . . . . . . . . . . . . . . . . . . . . . . . . . . . . 15
Storage Maintenance Tasks . . . . . . . . . . . . . . . . . . . . . . . . . . . . . . 15
Device Tasks . . . . . . . . . . . . . . . . . . . . . . . . . . . . . . . . . . . . . . . . . . 16
Reviewing Default Settings . . . . . . . . . . . . . . . . . . . . . . . . . . . . . . . 17
Troubleshooting . . . . . . . . . . . . . . . . . . . . . . . . . . . . . . . . . . . . . . . . 17
Chapter 2 The iNEWS Console
Overview. . . . . . . . . . . . . . . . . . . . . . . . . . . . . . . . . . . . . . . . . . . . . . . . . 20
The Console Display . . . . . . . . . . . . . . . . . . . . . . . . . . . . . . . . . . . . 21
Standard Console Operations . . . . . . . . . . . . . . . . . . . . . . . . . . . . . . . . 22
i
Page 6

Starting the Console . . . . . . . . . . . . . . . . . . . . . . . . . . . . . . . . . . . . . 22
The System Operator . . . . . . . . . . . . . . . . . . . . . . . . . . . . . . . . . . . . 23
The Console Superuser . . . . . . . . . . . . . . . . . . . . . . . . . . . . . . . . . . 23
Entering Superuser Mode . . . . . . . . . . . . . . . . . . . . . . . . . . . . . 24
Exiting Superuser Mode. . . . . . . . . . . . . . . . . . . . . . . . . . . . . . . 24
Changing System Administration Passwords. . . . . . . . . . . . . . . . . . 25
Exiting the Console. . . . . . . . . . . . . . . . . . . . . . . . . . . . . . . . . . . . . . 26
Troubleshooting a Frozen Console . . . . . . . . . . . . . . . . . . . . . . . . . 27
Types of Console Commands. . . . . . . . . . . . . . . . . . . . . . . . . . . . . . . . . 28
Server Commands . . . . . . . . . . . . . . . . . . . . . . . . . . . . . . . . . . . . . . 29
Console Control Commands. . . . . . . . . . . . . . . . . . . . . . . . . . . . . . . 30
Console Function Keys. . . . . . . . . . . . . . . . . . . . . . . . . . . . . . . . . . . 31
Assigning a Command to a Function Key . . . . . . . . . . . . . . . . . 32
Changing the Assignment of a Function Key . . . . . . . . . . . . . . . 32
Deleting the Definition of a Function Key . . . . . . . . . . . . . . . . . . 32
Displaying Function Key Assignments. . . . . . . . . . . . . . . . . . . . 32
Selecting Servers . . . . . . . . . . . . . . . . . . . . . . . . . . . . . . . . . . . . . . . . . . 33
Selecting One or More Servers . . . . . . . . . . . . . . . . . . . . . . . . . . . . 33
Zooming in on One Server . . . . . . . . . . . . . . . . . . . . . . . . . . . . . . . . 34
Console History. . . . . . . . . . . . . . . . . . . . . . . . . . . . . . . . . . . . . . . . . . . . 35
Viewing Recent Console History . . . . . . . . . . . . . . . . . . . . . . . . . . . 37
Viewing Logged Console History . . . . . . . . . . . . . . . . . . . . . . . . 38
Using the Remote Console . . . . . . . . . . . . . . . . . . . . . . . . . . . . . . . . . . . 40
Dialing in to the Console. . . . . . . . . . . . . . . . . . . . . . . . . . . . . . . . . . 40
Executing Commands Remotely . . . . . . . . . . . . . . . . . . . . . . . . . . . 41
Logging out from a Remote Console . . . . . . . . . . . . . . . . . . . . . . . . 42
Logging out a Remote User from the Main Console. . . . . . . . . . . . . 42
The Console Configuration File. . . . . . . . . . . . . . . . . . . . . . . . . . . . . . . . 42
Viewing the Configuration File . . . . . . . . . . . . . . . . . . . . . . . . . . . . . 43
Sample Console Configuration File . . . . . . . . . . . . . . . . . . . . . . 43
Editing the Console Configuration File . . . . . . . . . . . . . . . . . . . . . . . 44
Console Configuration Keywords . . . . . . . . . . . . . . . . . . . . . . . . . . . 45
Chapter 3 Getting Started
Starting the System. . . . . . . . . . . . . . . . . . . . . . . . . . . . . . . . . . . . . . . . . 50
ii
Page 7

Shutting Down the System . . . . . . . . . . . . . . . . . . . . . . . . . . . . . . . . . . . 53
Starting a System in Single-Server Mode. . . . . . . . . . . . . . . . . . . . . . . . 56
Chapter 4 Users
Viewing User Accounts. . . . . . . . . . . . . . . . . . . . . . . . . . . . . . . . . . . . . . 60
Modifying User Traits . . . . . . . . . . . . . . . . . . . . . . . . . . . . . . . . . . . . . . . 62
User Traits . . . . . . . . . . . . . . . . . . . . . . . . . . . . . . . . . . . . . . . . . . . . 63
Changing a User’s Password. . . . . . . . . . . . . . . . . . . . . . . . . . . . . . 68
User Preferences . . . . . . . . . . . . . . . . . . . . . . . . . . . . . . . . . . . . . . . 69
Simplified Users . . . . . . . . . . . . . . . . . . . . . . . . . . . . . . . . . . . . . . . . 78
Creating New Users . . . . . . . . . . . . . . . . . . . . . . . . . . . . . . . . . . . . . . . . 81
Creating a New User Area in the News Database. . . . . . . . . . . . . . 82
Adding a New User Account . . . . . . . . . . . . . . . . . . . . . . . . . . . . . . 84
Enabling a New User to Receive Mail . . . . . . . . . . . . . . . . . . . . . . . 87
Searching for User Information. . . . . . . . . . . . . . . . . . . . . . . . . . . . . . . . 87
Removing User Accounts . . . . . . . . . . . . . . . . . . . . . . . . . . . . . . . . . . . . 91
User ID and User Name . . . . . . . . . . . . . . . . . . . . . . . . . . . . . . 63
Type. . . . . . . . . . . . . . . . . . . . . . . . . . . . . . . . . . . . . . . . . . . . . . 63
Edit Mode . . . . . . . . . . . . . . . . . . . . . . . . . . . . . . . . . . . . . . . . . 64
Queues . . . . . . . . . . . . . . . . . . . . . . . . . . . . . . . . . . . . . . . . . . . 65
Read Rate . . . . . . . . . . . . . . . . . . . . . . . . . . . . . . . . . . . . . . . . . 65
Session/Configuration/Queue Features . . . . . . . . . . . . . . . . . . 66
Password. . . . . . . . . . . . . . . . . . . . . . . . . . . . . . . . . . . . . . . . . . 67
User Preferences... . . . . . . . . . . . . . . . . . . . . . . . . . . . . . . . . . . 67
Get from Template... . . . . . . . . . . . . . . . . . . . . . . . . . . . . . . . . . 67
Session Tab. . . . . . . . . . . . . . . . . . . . . . . . . . . . . . . . . . . . . . . . 70
Confirmations Tab . . . . . . . . . . . . . . . . . . . . . . . . . . . . . . . . . . . 71
Backup Tab . . . . . . . . . . . . . . . . . . . . . . . . . . . . . . . . . . . . . . . . 73
Refresh Tab. . . . . . . . . . . . . . . . . . . . . . . . . . . . . . . . . . . . . . . . 73
Layout Tab. . . . . . . . . . . . . . . . . . . . . . . . . . . . . . . . . . . . . . . . . 75
Search Results Tab . . . . . . . . . . . . . . . . . . . . . . . . . . . . . . . . . . 78
Workspaces Section . . . . . . . . . . . . . . . . . . . . . . . . . . . . . . . . . 79
Application Section . . . . . . . . . . . . . . . . . . . . . . . . . . . . . . . . . . 80
Copying User Traits to Another User Account. . . . . . . . . . . . . . 84
Creating a New User Account . . . . . . . . . . . . . . . . . . . . . . . . . . 86
iii
Page 8

The User Manager Account . . . . . . . . . . . . . . . . . . . . . . . . . . . . . . . . . . 92
The Database Manager Account . . . . . . . . . . . . . . . . . . . . . . . . . . . . . . 93
Logging Out All Users . . . . . . . . . . . . . . . . . . . . . . . . . . . . . . . . . . . . . . . 94
Chapter 5 Stories Queues, and Directories
Overview . . . . . . . . . . . . . . . . . . . . . . . . . . . . . . . . . . . . . . . . . . . . . . . . . 98
Adding a Directory or Queue. . . . . . . . . . . . . . . . . . . . . . . . . . . . . . . . . . 99
A Few Restrictions: . . . . . . . . . . . . . . . . . . . . . . . . . . . . . . . . . . 99
Creating a New Directory . . . . . . . . . . . . . . . . . . . . . . . . . . . . . . . . 101
Creating a New Queue . . . . . . . . . . . . . . . . . . . . . . . . . . . . . . . . . . 103
Setting up the Outgoing Mail Queue . . . . . . . . . . . . . . . . . . . . 104
Setting up the Dead Letter Queue . . . . . . . . . . . . . . . . . . . . . . 106
Creating a New Story . . . . . . . . . . . . . . . . . . . . . . . . . . . . . . . . . . . 106
Removing a Directory or Queue. . . . . . . . . . . . . . . . . . . . . . . . . . . 107
Renaming a Directory or Queue. . . . . . . . . . . . . . . . . . . . . . . . . . . 107
Viewing Database Traits . . . . . . . . . . . . . . . . . . . . . . . . . . . . . . . . . . . . 110
From the iNEWS Workstation... . . . . . . . . . . . . . . . . . . . . . . . . . . . 110
From the iNEWS Console. . . . . . . . . . . . . . . . . . . . . . . . . . . . . . . . 111
Sending Output from the List Command to a Printer . . . . . . . . 112
Getting Information about Stories . . . . . . . . . . . . . . . . . . . . . . 112
Finding out Who Moved, Duplicated, or Killed a Story. . . . . . . 114
Recovering a Killed Story. . . . . . . . . . . . . . . . . . . . . . . . . . . . . 116
Changing Database Traits . . . . . . . . . . . . . . . . . . . . . . . . . . . . . . . . . . 117
Database Traits Summary . . . . . . . . . . . . . . . . . . . . . . . . . . . . . . . . . . 120
Directory/Queue Properties Dialog Box . . . . . . . . . . . . . . . . . . . . . 121
Forms Tab . . . . . . . . . . . . . . . . . . . . . . . . . . . . . . . . . . . . . . . . 122
Groups Tab . . . . . . . . . . . . . . . . . . . . . . . . . . . . . . . . . . . . . . . 129
Abstract Tab. . . . . . . . . . . . . . . . . . . . . . . . . . . . . . . . . . . . . . . 131
Maintain Tab . . . . . . . . . . . . . . . . . . . . . . . . . . . . . . . . . . . . . . 133
User Interface Tab . . . . . . . . . . . . . . . . . . . . . . . . . . . . . . . . . . 138
Locks Tab. . . . . . . . . . . . . . . . . . . . . . . . . . . . . . . . . . . . . . . . . 141
Locking and Unlocking . . . . . . . . . . . . . . . . . . . . . . . . . . . . . . . . . . . . . 142
Identifying Locked Queues and Stories . . . . . . . . . . . . . . . . . . . . . 142
From the iNEWS Workstation... . . . . . . . . . . . . . . . . . . . . . . . . 142
From the Console... . . . . . . . . . . . . . . . . . . . . . . . . . . . . . . . . . 143
iv
Page 9

Types of Locks. . . . . . . . . . . . . . . . . . . . . . . . . . . . . . . . . . . . . . . . 146
Unbusy Stories and Queues . . . . . . . . . . . . . . . . . . . . . . . . . . . . . 149
Chapter 6 Groups
Overview. . . . . . . . . . . . . . . . . . . . . . . . . . . . . . . . . . . . . . . . . . . . . . . . 154
Viewing Group Information. . . . . . . . . . . . . . . . . . . . . . . . . . . . . . . . . . 154
From the Console... . . . . . . . . . . . . . . . . . . . . . . . . . . . . . . . . . . . . 154
From a Workstation.... . . . . . . . . . . . . . . . . . . . . . . . . . . . . . . . . . . 155
Creating a New Group . . . . . . . . . . . . . . . . . . . . . . . . . . . . . . . . . . . . . 156
Step 1 - Choosing a Group Name . . . . . . . . . . . . . . . . . . . . . . . . . 156
Step 2 - Create New Group at Console . . . . . . . . . . . . . . . . . . . . . 157
Step 3 - Specifying Members of a New Group. . . . . . . . . . . . . . . . 157
Group Checker . . . . . . . . . . . . . . . . . . . . . . . . . . . . . . . . . . . . . . . . . . . 158
Group Checker Error Messages . . . . . . . . . . . . . . . . . . . . . . . . . . 160
Renaming a Group . . . . . . . . . . . . . . . . . . . . . . . . . . . . . . . . . . . . . . . . 163
Step 1 - Change Group Name in System . . . . . . . . . . . . . . . . . . . 163
Step 2 - Change Group Name in SYSTEM.GROUPS . . . . . . . . . . 164
Deleting a Group . . . . . . . . . . . . . . . . . . . . . . . . . . . . . . . . . . . . . . . . . 164
Creating or Modifying Multiple Groups . . . . . . . . . . . . . . . . . . . . . . . . . 165
Adding Members to an Existing Group. . . . . . . . . . . . . . . . . . . . . . . . . 166
Users as Members of a Group. . . . . . . . . . . . . . . . . . . . . . . . . . . . 166
Groups as Members of Other Groups . . . . . . . . . . . . . . . . . . . . . . 166
Workstations as Members of Groups. . . . . . . . . . . . . . . . . . . . . . . 168
Group Access and Usage Restrictions. . . . . . . . . . . . . . . . . . . . . . . . . 171
Access and Usage Examples . . . . . . . . . . . . . . . . . . . . . . . . . . . . 172
Group Traits for the Database . . . . . . . . . . . . . . . . . . . . . . . . . . . . . . . 172
Read Group . . . . . . . . . . . . . . . . . . . . . . . . . . . . . . . . . . . . . . . . . . 174
Write Group . . . . . . . . . . . . . . . . . . . . . . . . . . . . . . . . . . . . . . . . . . 175
Edit Lock . . . . . . . . . . . . . . . . . . . . . . . . . . . . . . . . . . . . . . . . . 146
User Lock . . . . . . . . . . . . . . . . . . . . . . . . . . . . . . . . . . . . . . . . 147
Order Lock. . . . . . . . . . . . . . . . . . . . . . . . . . . . . . . . . . . . . . . . 149
Production Lock. . . . . . . . . . . . . . . . . . . . . . . . . . . . . . . . . . . . 149
Avoiding Recursion . . . . . . . . . . . . . . . . . . . . . . . . . . . . . . . . . 166
Combining Permissions. . . . . . . . . . . . . . . . . . . . . . . . . . . . . . 169
Setting an Automatic Timeout . . . . . . . . . . . . . . . . . . . . . . . . . 170
v
Page 10

Notification Group . . . . . . . . . . . . . . . . . . . . . . . . . . . . . . . . . . . . . . 176
Restricted Group . . . . . . . . . . . . . . . . . . . . . . . . . . . . . . . . . . . . . . 177
Restricting Both Reading and Writing. . . . . . . . . . . . . . . . . . . . . . . 177
Transferring Group Assignments . . . . . . . . . . . . . . . . . . . . . . . . . . 178
Hiding Queues and Directories. . . . . . . . . . . . . . . . . . . . . . . . . . . . 178
Mail Aliases . . . . . . . . . . . . . . . . . . . . . . . . . . . . . . . . . . . . . . . . . . . . . . 179
Creating a Mail Alias. . . . . . . . . . . . . . . . . . . . . . . . . . . . . . . . . . . . 180
Mail Aliases for Other Machines or the Internet . . . . . . . . . . . . . . . 181
Chapter 7 Keyboards and Macros
Understanding Macros and Keyboards. . . . . . . . . . . . . . . . . . . . . . . . . 184
Customizing Workstation Keyboards . . . . . . . . . . . . . . . . . . . . . . . . . . 184
Creating a New Keyboard Story . . . . . . . . . . . . . . . . . . . . . . . . . . . 185
Creating a Macro. . . . . . . . . . . . . . . . . . . . . . . . . . . . . . . . . . . . . . . . . . 187
Adding Comments . . . . . . . . . . . . . . . . . . . . . . . . . . . . . . . . . . . . . 188
Assigning Macros to Keys . . . . . . . . . . . . . . . . . . . . . . . . . . . . . . . 188
Predefined System Function Keys. . . . . . . . . . . . . . . . . . . . . . 189
State Keys . . . . . . . . . . . . . . . . . . . . . . . . . . . . . . . . . . . . . . . . 191
Using Plain Text in Macros. . . . . . . . . . . . . . . . . . . . . . . . . . . . . . . 192
Repeating Macros . . . . . . . . . . . . . . . . . . . . . . . . . . . . . . . . . . . . . 192
Notes of Caution for Creating Macros . . . . . . . . . . . . . . . . . . . 193
Keyboard Checker . . . . . . . . . . . . . . . . . . . . . . . . . . . . . . . . . . . . . . . . 194
Error Messages . . . . . . . . . . . . . . . . . . . . . . . . . . . . . . . . . . . . . . . 195
Warning Messages . . . . . . . . . . . . . . . . . . . . . . . . . . . . . . . . . 197
Assigning a Default Keyboard to a User . . . . . . . . . . . . . . . . . . . . . . . . 198
Chapter 8 Forms
Form Names, Locations and Guidelines. . . . . . . . . . . . . . . . . . . . . . . . 204
Guidelines for Designing Forms . . . . . . . . . . . . . . . . . . . . . . . . . . . 204
Creating Forms . . . . . . . . . . . . . . . . . . . . . . . . . . . . . . . . . . . . . . . . . . . 204
Customizing Forms. . . . . . . . . . . . . . . . . . . . . . . . . . . . . . . . . . . . . 207
Label Borders. . . . . . . . . . . . . . . . . . . . . . . . . . . . . . . . . . . . . . 212
Assigning a Form as a Queue or Story Form . . . . . . . . . . . . . . . . . . . . 213
Form Field Types and Definitions . . . . . . . . . . . . . . . . . . . . . . . . . . . . . 214
iNEWS MCS/ControlAir Fields and Forms. . . . . . . . . . . . . . . . 226
vi
Page 11

Standard iNEWS Forms . . . . . . . . . . . . . . . . . . . . . . . . . . . . . . . . . . . . 228
Account Queue Form . . . . . . . . . . . . . . . . . . . . . . . . . . . . . . . . . . . 229
Mail Form . . . . . . . . . . . . . . . . . . . . . . . . . . . . . . . . . . . . . . . . . . . . 230
Print Form . . . . . . . . . . . . . . . . . . . . . . . . . . . . . . . . . . . . . . . . . . . 230
Find All Form . . . . . . . . . . . . . . . . . . . . . . . . . . . . . . . . . . . . . . . . . 231
Wire Story Form. . . . . . . . . . . . . . . . . . . . . . . . . . . . . . . . . . . . . . . 232
Chapter 9 Character Generator Title Entry
Overview of CG Title Entry. . . . . . . . . . . . . . . . . . . . . . . . . . . . . . . . . . 234
Title Entry Setup and Configuration . . . . . . . . . . . . . . . . . . . . . . . . . . . 236
Understanding CG Templates . . . . . . . . . . . . . . . . . . . . . . . . . . . . 236
CG Template Backgrounds . . . . . . . . . . . . . . . . . . . . . . . . . . . . . . . . . 238
Required Bitmaps . . . . . . . . . . . . . . . . . . . . . . . . . . . . . . . . . . . . . 239
Capture Tool . . . . . . . . . . . . . . . . . . . . . . . . . . . . . . . . . . . . . . . . . 240
Hardware Requirements for Capture Tool. . . . . . . . . . . . . . . . 240
Installation of Capture Tool . . . . . . . . . . . . . . . . . . . . . . . . . . . 240
Using the Capture Tool . . . . . . . . . . . . . . . . . . . . . . . . . . . . . . 241
CG Template Editor . . . . . . . . . . . . . . . . . . . . . . . . . . . . . . . . . . . . . . . 243
Edit Title Entry Template Window . . . . . . . . . . . . . . . . . . . . . . . . . 244
Creating a New Template . . . . . . . . . . . . . . . . . . . . . . . . . . . . 248
Using Font PreSets . . . . . . . . . . . . . . . . . . . . . . . . . . . . . . . . . 253
Title Entry Security . . . . . . . . . . . . . . . . . . . . . . . . . . . . . . . . . . . . . . . . 255
Access to CG Template Editor. . . . . . . . . . . . . . . . . . . . . . . . . . . . 255
Access to CG Title Entry . . . . . . . . . . . . . . . . . . . . . . . . . . . . . . . . 256
Chapter 10 System Configuration Files
Overview. . . . . . . . . . . . . . . . . . . . . . . . . . . . . . . . . . . . . . . . . . . . . . . . 260
Making a Backup File. . . . . . . . . . . . . . . . . . . . . . . . . . . . . . . . . . . 261
Viewing System Files . . . . . . . . . . . . . . . . . . . . . . . . . . . . . . . . . . . 262
Printing a Copy of a File. . . . . . . . . . . . . . . . . . . . . . . . . . . . . . . . . 263
Licensing of iNEWS Components . . . . . . . . . . . . . . . . . . . . . . . . . . . . 264
Devices. . . . . . . . . . . . . . . . . . . . . . . . . . . . . . . . . . . . . . . . . . . . . . . . . 265
Viewing Information About Devices . . . . . . . . . . . . . . . . . . . . . . . . 266
List C Message Columns. . . . . . . . . . . . . . . . . . . . . . . . . . . . . 267
Configuration File . . . . . . . . . . . . . . . . . . . . . . . . . . . . . . . . . . . . . . . . . 269
vii
Page 12

Changing the Configuration File . . . . . . . . . . . . . . . . . . . . . . . . . . . 273
Testing the Site Configuration File After Changing. . . . . . . . . . . . . 273
Incorporating Configuration Changes. . . . . . . . . . . . . . . . . . . . . . . 274
Hosts File . . . . . . . . . . . . . . . . . . . . . . . . . . . . . . . . . . . . . . . . . . . . . . . 275
System Profiles Files. . . . . . . . . . . . . . . . . . . . . . . . . . . . . . . . . . . . . . . 276
Changing the System Profile . . . . . . . . . . . . . . . . . . . . . . . . . . . . . 277
Listing Parameter Settings . . . . . . . . . . . . . . . . . . . . . . . . . . . . . . . 278
System Profile Parameters. . . . . . . . . . . . . . . . . . . . . . . . . . . . . . . 279
Adding Devices to Your iNEWS System . . . . . . . . . . . . . . . . . . . . . . . . 285
Adding a PCU or PC-PCU . . . . . . . . . . . . . . . . . . . . . . . . . . . . . . . 285
PCU Device Numbering . . . . . . . . . . . . . . . . . . . . . . . . . . . . . . 290
Adding a Workstation . . . . . . . . . . . . . . . . . . . . . . . . . . . . . . . . . . . 291
Adding a Printer . . . . . . . . . . . . . . . . . . . . . . . . . . . . . . . . . . . . . . . 292
Adding a Wire . . . . . . . . . . . . . . . . . . . . . . . . . . . . . . . . . . . . . . . . . 298
Alternative Editing of the Site Configuration File. . . . . . . . . . . . . . . . . . 299
Intersystem Messaging . . . . . . . . . . . . . . . . . . . . . . . . . . . . . . . . . . . . . 301
Sending Intersystem Messages . . . . . . . . . . . . . . . . . . . . . . . . . . . 301
Receiving Intersystem Messages. . . . . . . . . . . . . . . . . . . . . . . . . . 303
Database Change . . . . . . . . . . . . . . . . . . . . . . . . . . . . . . . . . . 306
iNEWS Workstation Session Behavior. . . . . . . . . . . . . . . . . . . 306
viii
Chapter 11 Printers
System Printing . . . . . . . . . . . . . . . . . . . . . . . . . . . . . . . . . . . . . . . . . . . 308
The Printer Profile Files in /site/printers . . . . . . . . . . . . . . . . . . . . . 308
Customizing Print Effects (Fonts) . . . . . . . . . . . . . . . . . . . . . . . . . . 310
Defining a Font. . . . . . . . . . . . . . . . . . . . . . . . . . . . . . . . . . . . . 310
Combining Print Effects . . . . . . . . . . . . . . . . . . . . . . . . . . . . . . 311
Defining Print Forms . . . . . . . . . . . . . . . . . . . . . . . . . . . . . . . . . . . . 311
Defining a Form . . . . . . . . . . . . . . . . . . . . . . . . . . . . . . . . . . . . 312
Combining Setup Options . . . . . . . . . . . . . . . . . . . . . . . . . . . . 312
Font and Form Space Available. . . . . . . . . . . . . . . . . . . . . . . . 313
Printer Profile Options . . . . . . . . . . . . . . . . . . . . . . . . . . . . . . . . . . 313
Profile-Only Options . . . . . . . . . . . . . . . . . . . . . . . . . . . . . . . . . 314
Profile and Style Options . . . . . . . . . . . . . . . . . . . . . . . . . . . . . 318
Standard Header and Footer Options . . . . . . . . . . . . . . . . . . . 320
Page 13

User-Selected Headers and Footers. . . . . . . . . . . . . . . . . . . . 321
Profile Option Defaults. . . . . . . . . . . . . . . . . . . . . . . . . . . . . . . 322
Using Special Characters in a Profile . . . . . . . . . . . . . . . . . . . . . . 323
Using Nonprinting Characters . . . . . . . . . . . . . . . . . . . . . . . . . 323
Avoiding Characters Used by the System . . . . . . . . . . . . . . . . 324
Creating and Using Print Styles . . . . . . . . . . . . . . . . . . . . . . . . . . . . . . 327
Creating a Style Story . . . . . . . . . . . . . . . . . . . . . . . . . . . . . . . . . . 328
Changing System Profile Options . . . . . . . . . . . . . . . . . . . . . . 328
Selecting Forms. . . . . . . . . . . . . . . . . . . . . . . . . . . . . . . . . . . . 329
Identifying and Selecting Fonts . . . . . . . . . . . . . . . . . . . . . . . . 330
Local Printing . . . . . . . . . . . . . . . . . . . . . . . . . . . . . . . . . . . . . . . . . . . . 333
Local Printing Dialog Box. . . . . . . . . . . . . . . . . . . . . . . . . . . . . . . . 334
Local Print Style Options . . . . . . . . . . . . . . . . . . . . . . . . . . . . . . . . 340
Banner Format Options . . . . . . . . . . . . . . . . . . . . . . . . . . . . . . 346
Example Style Story . . . . . . . . . . . . . . . . . . . . . . . . . . . . . . . . 348
Managing Printers . . . . . . . . . . . . . . . . . . . . . . . . . . . . . . . . . . . . . . . . 350
Removing a Pending Print Request. . . . . . . . . . . . . . . . . . . . . . . . 350
Restarting the Current Print Request. . . . . . . . . . . . . . . . . . . . . . . 351
Reordering a Pending Print Request . . . . . . . . . . . . . . . . . . . . . . . 351
Cancelling a Runaway Print Job . . . . . . . . . . . . . . . . . . . . . . . . . . 351
Responding to a “Printer Offline” Problem . . . . . . . . . . . . . . . . . . . 352
Chapter 12 Wires
Adding a Wire – Avid Data Receiver . . . . . . . . . . . . . . . . . . . . . . . . . . 354
Phase 1 . . . . . . . . . . . . . . . . . . . . . . . . . . . . . . . . . . . . . . . . . . . . . 354
Phase 2 . . . . . . . . . . . . . . . . . . . . . . . . . . . . . . . . . . . . . . . . . . . . . 355
Phase 3 . . . . . . . . . . . . . . . . . . . . . . . . . . . . . . . . . . . . . . . . . . . . . 357
Phase 4 . . . . . . . . . . . . . . . . . . . . . . . . . . . . . . . . . . . . . . . . . . . . . 357
Adding a Wire – PCU Port . . . . . . . . . . . . . . . . . . . . . . . . . . . . . . . . . . 358
Phase 1 . . . . . . . . . . . . . . . . . . . . . . . . . . . . . . . . . . . . . . . . . . . . . 358
Phase 2 . . . . . . . . . . . . . . . . . . . . . . . . . . . . . . . . . . . . . . . . . . . . . 359
Phase 3 . . . . . . . . . . . . . . . . . . . . . . . . . . . . . . . . . . . . . . . . . . . . . 363
Phase 4 . . . . . . . . . . . . . . . . . . . . . . . . . . . . . . . . . . . . . . . . . . . . . 364
Wire Profile Files . . . . . . . . . . . . . . . . . . . . . . . . . . . . . . . . . . . . . . . . . 366
Wire Profile Options . . . . . . . . . . . . . . . . . . . . . . . . . . . . . . . . . . . . . . . 368
ix
Page 14

Using Special Characters in a Profile . . . . . . . . . . . . . . . . . . . . . . . . . . 382
Entering Nonprinting Characters . . . . . . . . . . . . . . . . . . . . . . . . . . 382
Entering Characters by Alias . . . . . . . . . . . . . . . . . . . . . . . . . . 382
Entering Characters by Decimal Value . . . . . . . . . . . . . . . . . . 382
Avoiding Characters Used by the System . . . . . . . . . . . . . . . . . . . 383
Converting Text with Accents and Diacritical Marks. . . . . . . . . . . . 384
Distributing Stories from the Wire . . . . . . . . . . . . . . . . . . . . . . . . . . . . . 386
Defining Distribution of Wire Stories. . . . . . . . . . . . . . . . . . . . . . . . 386
Creating a Distribution Name. . . . . . . . . . . . . . . . . . . . . . . . . . 387
Identifying a Destination Queue. . . . . . . . . . . . . . . . . . . . . . . . 388
Changing Notification Priority. . . . . . . . . . . . . . . . . . . . . . . . . . 389
Setting the Transmit or Always Options . . . . . . . . . . . . . . . . . . 389
Adding a Distribution Line. . . . . . . . . . . . . . . . . . . . . . . . . . . . . . . . 390
Avoiding Hidden Categories. . . . . . . . . . . . . . . . . . . . . . . . . . . . . . 390
Using the WIRES.ALL Notification Priority . . . . . . . . . . . . . . . . . . . 391
Distributing Unknown Wires . . . . . . . . . . . . . . . . . . . . . . . . . . . . . . 392
Maximum Number of Lines. . . . . . . . . . . . . . . . . . . . . . . . . . . . . . . 393
Mailboxes . . . . . . . . . . . . . . . . . . . . . . . . . . . . . . . . . . . . . . . . . . . . 393
Purge Intervals . . . . . . . . . . . . . . . . . . . . . . . . . . . . . . . . . . . . . . . . 393
Internationalization . . . . . . . . . . . . . . . . . . . . . . . . . . . . . . . . . . . . . 394
Operating Wire Keyword Searches. . . . . . . . . . . . . . . . . . . . . . . . . . . . 394
Setting up Keyword Searching . . . . . . . . . . . . . . . . . . . . . . . . . . . . 394
Additional Information about Search Jobs . . . . . . . . . . . . . . . . . . . 397
Suppressing a Search . . . . . . . . . . . . . . . . . . . . . . . . . . . . . . . 397
Default Entry . . . . . . . . . . . . . . . . . . . . . . . . . . . . . . . . . . . . . . 397
Keyword Limitations . . . . . . . . . . . . . . . . . . . . . . . . . . . . . . . . . 398
Keyword Searching . . . . . . . . . . . . . . . . . . . . . . . . . . . . . . . . . . . . 398
Using Parentheses in Searches. . . . . . . . . . . . . . . . . . . . . . . . 400
Tips on Building Search Rules. . . . . . . . . . . . . . . . . . . . . . . . . 401
User Notification. . . . . . . . . . . . . . . . . . . . . . . . . . . . . . . . . . . . 402
Removing a Rule Set . . . . . . . . . . . . . . . . . . . . . . . . . . . . . . . . 402
Sending a Story to More Than One Queue . . . . . . . . . . . . . . . 402
Default Directory Paths . . . . . . . . . . . . . . . . . . . . . . . . . . . . . . 402
The Keyword Mailbox. . . . . . . . . . . . . . . . . . . . . . . . . . . . . . . . 403
Keyword Checker Messages . . . . . . . . . . . . . . . . . . . . . . . . . . . . . . . . 403
x
Page 15

Chapter 13 Servers
Overview. . . . . . . . . . . . . . . . . . . . . . . . . . . . . . . . . . . . . . . . . . . . . . . . 408
Adding a Server Program to the System . . . . . . . . . . . . . . . . . . . . . . . 409
Job Lists: Queues, Stories, and Commands . . . . . . . . . . . . . . . . . . . . 412
Defining Tasks for Servers. . . . . . . . . . . . . . . . . . . . . . . . . . . . . . . 413
Defining Mailbox Tasks . . . . . . . . . . . . . . . . . . . . . . . . . . . . . . . . . 419
Defining Timed-Interval Tasks . . . . . . . . . . . . . . . . . . . . . . . . . . . . 423
Action Servers . . . . . . . . . . . . . . . . . . . . . . . . . . . . . . . . . . . . . . . . . . . 425
Adding an Action Server . . . . . . . . . . . . . . . . . . . . . . . . . . . . . . . . 427
Assigning Field Validation . . . . . . . . . . . . . . . . . . . . . . . . . . . . . . . 430
Mirroring Rundowns . . . . . . . . . . . . . . . . . . . . . . . . . . . . . . . . . . . . 434
Distribution Servers . . . . . . . . . . . . . . . . . . . . . . . . . . . . . . . . . . . . . . . 440
Assigning Distribution Codes. . . . . . . . . . . . . . . . . . . . . . . . . . . . . 441
Adding a Distribution Server . . . . . . . . . . . . . . . . . . . . . . . . . . . . . 446
Parallel Wire Servers . . . . . . . . . . . . . . . . . . . . . . . . . . . . . . . . . . . . . . 450
Adding a Parallel Wire Server . . . . . . . . . . . . . . . . . . . . . . . . . . . . 451
Keyword Servers . . . . . . . . . . . . . . . . . . . . . . . . . . . . . . . . . . . . . . . . . 458
Adding a Keyword Server . . . . . . . . . . . . . . . . . . . . . . . . . . . . . . . 462
System Servers . . . . . . . . . . . . . . . . . . . . . . . . . . . . . . . . . . . . . . . . . . 468
Adding a Scan Line in a Job List Story . . . . . . . . . . . . . . . . . . 414
Defining a Server Command Set. . . . . . . . . . . . . . . . . . . . . . . 415
Using Mailboxes . . . . . . . . . . . . . . . . . . . . . . . . . . . . . . . . . . . 419
Assigning a Mailbox to a Queue . . . . . . . . . . . . . . . . . . . . . . . 422
Background and Possible Uses of Validation . . . . . . . . . . . . . 430
Using Validation with Action Servers or Tx Links . . . . . . . . . . 431
Using the Validation Feature . . . . . . . . . . . . . . . . . . . . . . . . . . 431
Validation Job List Commands . . . . . . . . . . . . . . . . . . . . . . . . 433
Polling for Action Servers/Tx Links . . . . . . . . . . . . . . . . . . . . . 435
Configuring Rundown Mirroring. . . . . . . . . . . . . . . . . . . . . . . . 436
Using Wildcards and the Destination Queue. . . . . . . . . . . . . . 442
From the Command Line. . . . . . . . . . . . . . . . . . . . . . . . . . . . . 443
Using an Action Server or Tx Link. . . . . . . . . . . . . . . . . . . . . . 443
Instructions in the Wire Distribution Story . . . . . . . . . . . . . . . . 444
Matching and Case . . . . . . . . . . . . . . . . . . . . . . . . . . . . . . . . . 445
Matching and Order. . . . . . . . . . . . . . . . . . . . . . . . . . . . . . . . . 445
xi
Page 16

Seek Servers . . . . . . . . . . . . . . . . . . . . . . . . . . . . . . . . . . . . . . . . . 468
Installing a Seek Server . . . . . . . . . . . . . . . . . . . . . . . . . . . . . . 469
Fast Text Search (FTS) Servers. . . . . . . . . . . . . . . . . . . . . . . . . . . 471
FTS Workflow. . . . . . . . . . . . . . . . . . . . . . . . . . . . . . . . . . . . . . 471
Installing FTS Components . . . . . . . . . . . . . . . . . . . . . . . . . . . . . . 474
...On the Windows-based Server . . . . . . . . . . . . . . . . . . . . . . . 475
...On iNEWS Servers (Linux) . . . . . . . . . . . . . . . . . . . . . . . . . . 478
Batch Indexing . . . . . . . . . . . . . . . . . . . . . . . . . . . . . . . . . . . . . 482
Archival and Backup . . . . . . . . . . . . . . . . . . . . . . . . . . . . . . . . 484
Print Servers. . . . . . . . . . . . . . . . . . . . . . . . . . . . . . . . . . . . . . . . . . 485
Adding a Print Server. . . . . . . . . . . . . . . . . . . . . . . . . . . . . . . . 486
Mail Servers . . . . . . . . . . . . . . . . . . . . . . . . . . . . . . . . . . . . . . . . . . 488
Disabling Mail to All Users . . . . . . . . . . . . . . . . . . . . . . . . . . . . 488
Using Network Mail . . . . . . . . . . . . . . . . . . . . . . . . . . . . . . . . . 488
Using 8-Bit Characters in Mail . . . . . . . . . . . . . . . . . . . . . . . . . 489
Character Conversion Table for Underscore-Prefix Format. . . 490
Monitor Servers. . . . . . . . . . . . . . . . . . . . . . . . . . . . . . . . . . . . . . . . . . . 495
Configuring Monitor Servers. . . . . . . . . . . . . . . . . . . . . . . . . . . . . . 496
Configuration Summary . . . . . . . . . . . . . . . . . . . . . . . . . . . . . . 496
Configuration Details . . . . . . . . . . . . . . . . . . . . . . . . . . . . . . . . 497
Styles . . . . . . . . . . . . . . . . . . . . . . . . . . . . . . . . . . . . . . . . . . . . . . . 519
Creating Styles. . . . . . . . . . . . . . . . . . . . . . . . . . . . . . . . . . . . . 521
Using the Monitor Server . . . . . . . . . . . . . . . . . . . . . . . . . . . . . . . . 526
Network iNEWS Systems Using Rx/Tx Links . . . . . . . . . . . . . . . . . . . . 528
Sending Story Forms . . . . . . . . . . . . . . . . . . . . . . . . . . . . . . . . . . . 528
Setting Automatic Update . . . . . . . . . . . . . . . . . . . . . . . . . . . . 529
Updating Queue Considerations . . . . . . . . . . . . . . . . . . . . . . . 530
Changing Queue Order . . . . . . . . . . . . . . . . . . . . . . . . . . . . . . 531
Adding Rx/Tx Links. . . . . . . . . . . . . . . . . . . . . . . . . . . . . . . . . . . . . 531
Adding Network Links . . . . . . . . . . . . . . . . . . . . . . . . . . . . . . . 532
xii
Chapter 14 Web Publishing and Access
Web Publishing . . . . . . . . . . . . . . . . . . . . . . . . . . . . . . . . . . . . . . . . . . . 542
Setting Up Txnet to Send HTML. . . . . . . . . . . . . . . . . . . . . . . . . . . 542
Default HTML Export Template and Queue. . . . . . . . . . . . . . . 545
Page 17

Creating an HTML Export Template . . . . . . . . . . . . . . . . . . . . . . . 545
Adding Story Entity References. . . . . . . . . . . . . . . . . . . . . . . . 545
NSML to HTML Conversion. . . . . . . . . . . . . . . . . . . . . . . . . . . 548
Using Optional Format Strings . . . . . . . . . . . . . . . . . . . . . . . . 552
A Sample HTML Export Template. . . . . . . . . . . . . . . . . . . . . . 555
Web Access . . . . . . . . . . . . . . . . . . . . . . . . . . . . . . . . . . . . . . . . . . . . . 559
The Web Server. . . . . . . . . . . . . . . . . . . . . . . . . . . . . . . . . . . . . . . 559
Web Access Login . . . . . . . . . . . . . . . . . . . . . . . . . . . . . . . . . . . . . 559
Web Access Story Templates . . . . . . . . . . . . . . . . . . . . . . . . . . . . 560
Web Access Directory and Queue Templates . . . . . . . . . . . . . . . . 563
Template Entities. . . . . . . . . . . . . . . . . . . . . . . . . . . . . . . . . . . 564
Web Access Configuration. . . . . . . . . . . . . . . . . . . . . . . . . . . . . . . 572
Appendix A Command References
Programs Invoked by iNEWS. . . . . . . . . . . . . . . . . . . . . . . . . . . . . . . . 578
Commands Used by Avid Personnel Only . . . . . . . . . . . . . . . . . . . . . . 578
Linux Commands Used in iNEWS . . . . . . . . . . . . . . . . . . . . . . . . . . . . 579
Console Control Commands . . . . . . . . . . . . . . . . . . . . . . . . . . . . . . . . 580
Console Server Commands . . . . . . . . . . . . . . . . . . . . . . . . . . . . . . . . . 584
Job List Commands . . . . . . . . . . . . . . . . . . . . . . . . . . . . . . . . . . . . . . . 627
Dialog Commands . . . . . . . . . . . . . . . . . . . . . . . . . . . . . . . . . . . . . . . . 633
Appendix B System Files
/etc/dhcpd.conf . . . . . . . . . . . . . . . . . . . . . . . . . . . . . . . . . . . . . . . . . . . 642
/etc/hosts . . . . . . . . . . . . . . . . . . . . . . . . . . . . . . . . . . . . . . . . . . . . . . . 642
/site/config . . . . . . . . . . . . . . . . . . . . . . . . . . . . . . . . . . . . . . . . . . . . . . 643
/site/printers/hplaser1 . . . . . . . . . . . . . . . . . . . . . . . . . . . . . . . . . . . . . . 647
/site/system. . . . . . . . . . . . . . . . . . . . . . . . . . . . . . . . . . . . . . . . . . . . . . 647
/site/wires/anpa7. . . . . . . . . . . . . . . . . . . . . . . . . . . . . . . . . . . . . . . . . . 648
console.cfg . . . . . . . . . . . . . . . . . . . . . . . . . . . . . . . . . . . . . . . . . . . . . . 649
SYSTEM.CLIENT.WINDOWS . . . . . . . . . . . . . . . . . . . . . . . . . . . . . . . 650
SYSTEM.CONFIGURE.301-ACTION . . . . . . . . . . . . . . . . . . . . . . . . . 651
SYSTEM.MAP . . . . . . . . . . . . . . . . . . . . . . . . . . . . . . . . . . . . . . . . . . . 652
SYSTEM.RESOURCE . . . . . . . . . . . . . . . . . . . . . . . . . . . . . . . . . . . . . 654
SYSTEM.WIRES.DISTRIBUTION . . . . . . . . . . . . . . . . . . . . . . . . . . . . 656
xiii
Page 18

SYSTEM.WIRES.KEYWORDS. . . . . . . . . . . . . . . . . . . . . . . . . . . . . . . 657
SYSTEM.WIRES.KEYWORDS-AP. . . . . . . . . . . . . . . . . . . . . . . . . . . . 657
SYSTEM.WIRES.KEYWORDS-AP2. . . . . . . . . . . . . . . . . . . . . . . . . . . 658
Appendix C Standard Dictionaries
Using Dictionaries to Define Messages and Commands . . . . . . . . . . . 660
Customizing Dictionaries. . . . . . . . . . . . . . . . . . . . . . . . . . . . . . . . . . . . 662
Changing Default Dictionary Values. . . . . . . . . . . . . . . . . . . . . . . . 662
Restoring Dictionary Defaults . . . . . . . . . . . . . . . . . . . . . . . . . . . . . 666
Utility Messages Dictionary (/site/dict/messages) . . . . . . . . . . . . . . . . . 667
DBServer Program Messages . . . . . . . . . . . . . . . . . . . . . . . . . . . . 669
Disconnect Program Messages . . . . . . . . . . . . . . . . . . . . . . . . . . . 669
Category and Keyword Check Program Messages . . . . . . . . . . . . 670
Keyboard Check Program Messages. . . . . . . . . . . . . . . . . . . . . . . 671
Keyboard Check Program Messages for Macros . . . . . . . . . . . . . . 671
Grpcheck Messages . . . . . . . . . . . . . . . . . . . . . . . . . . . . . . . . . . . . 673
Wire Program Messages . . . . . . . . . . . . . . . . . . . . . . . . . . . . . . . . 675
Mail Server Messages . . . . . . . . . . . . . . . . . . . . . . . . . . . . . . . . . . 676
Validation (Action) Server. . . . . . . . . . . . . . . . . . . . . . . . . . . . . . . . 676
Seek Server Messages . . . . . . . . . . . . . . . . . . . . . . . . . . . . . . . . . 676
Last Login Messages . . . . . . . . . . . . . . . . . . . . . . . . . . . . . . . . . . . 677
Messages for Print Server . . . . . . . . . . . . . . . . . . . . . . . . . . . . . . . 678
Message for the Sony Barcode Printer. . . . . . . . . . . . . . . . . . . . . . 678
dbtraits Messages . . . . . . . . . . . . . . . . . . . . . . . . . . . . . . . . . . . . . 678
ccumsgs Dictionary (/site/dict/ccumsgs) . . . . . . . . . . . . . . . . . . . . . . . . 678
PCU Messages. . . . . . . . . . . . . . . . . . . . . . . . . . . . . . . . . . . . . . . . 679
Commands Dictionary (/site/dict/ccucmds). . . . . . . . . . . . . . . . . . . . . . 682
Job List Commands . . . . . . . . . . . . . . . . . . . . . . . . . . . . . . . . . . . . 687
Queues Dictionary (/site/dict/queues) . . . . . . . . . . . . . . . . . . . . . . . . . . 688
Words Dictionary (/site/dict/words) . . . . . . . . . . . . . . . . . . . . . . . . . . . . 691
Connect Dictionary (/site/dict/doac) . . . . . . . . . . . . . . . . . . . . . . . . . . . 695
Telex Dictionary (/site/dict/telex) . . . . . . . . . . . . . . . . . . . . . . . . . . . . . . 699
Dial Dictionary (/site/dict/dial) . . . . . . . . . . . . . . . . . . . . . . . . . . . . . . . . 701
Keyboard Macros Dictionary (/site/dict/keymacros) . . . . . . . . . . . . . . . 702
Printer Messages Dictionary (/site/dict/printmsgs) . . . . . . . . . . . . . . . . 704
xiv
Page 19

Case-shifting Dictionary (/site/dict/shift) . . . . . . . . . . . . . . . . . . . . . . . . 705
MCS Dictionary (/site/dict/mcs) . . . . . . . . . . . . . . . . . . . . . . . . . . . . . . 707
Device Types Used by Monitor Servers and Drivers . . . . . . . . . . . 707
Special Strings Recognized by the Monitor Server . . . . . . . . . . . . 708
Error Messages for the Monitor Server . . . . . . . . . . . . . . . . . . . . . 708
Error Messages Shared by Monitor Servers and Drivers . . . . . . . 711
Driver Errors Sent to MCT Only. . . . . . . . . . . . . . . . . . . . . . . . . . . 711
Driver Errors Sent to MCT and Possibly to Console & Mon User . 711
Driver Errors Sent to User Only . . . . . . . . . . . . . . . . . . . . . . . . . . . 712
Status Reported in Device Status Field . . . . . . . . . . . . . . . . . . . . . 712
Appendix D PCU Reference
Overview. . . . . . . . . . . . . . . . . . . . . . . . . . . . . . . . . . . . . . . . . . . . . . . . 714
PCUs . . . . . . . . . . . . . . . . . . . . . . . . . . . . . . . . . . . . . . . . . . . . . . . . . . 714
Resetting a PCU . . . . . . . . . . . . . . . . . . . . . . . . . . . . . . . . . . . . . . 715
PCU LED Displays. . . . . . . . . . . . . . . . . . . . . . . . . . . . . . . . . . . . . 715
Connecting Devices to a PCU . . . . . . . . . . . . . . . . . . . . . . . . . . . . 717
Locating Ports . . . . . . . . . . . . . . . . . . . . . . . . . . . . . . . . . . . . . 717
Connecting a PCU to the System . . . . . . . . . . . . . . . . . . . . . . . . . 717
Appendix E Character Maps
ASCII (7-bit) Character Set. . . . . . . . . . . . . . . . . . . . . . . . . . . . . . . . . . 719
IBM Character Set . . . . . . . . . . . . . . . . . . . . . . . . . . . . . . . . . . . . . . . . 725
dbrestore Character Map (Arabic) . . . . . . . . . . . . . . . . . . . . . . . . . . . . 732
Sample Arabic Wire Profile. . . . . . . . . . . . . . . . . . . . . . . . . . . . . . . . . . 733
Appendix F Environment Variables
Registry Editor . . . . . . . . . . . . . . . . . . . . . . . . . . . . . . . . . . . . . . . . . . . 738
Environment Variables (Registry Values). . . . . . . . . . . . . . . . . . . . . . . 739
CCColor . . . . . . . . . . . . . . . . . . . . . . . . . . . . . . . . . . . . . . . . . . . . . 740
DestinationOrder . . . . . . . . . . . . . . . . . . . . . . . . . . . . . . . . . . . . . . 742
MailLookup. . . . . . . . . . . . . . . . . . . . . . . . . . . . . . . . . . . . . . . . . . . 743
MsgMailAlert . . . . . . . . . . . . . . . . . . . . . . . . . . . . . . . . . . . . . . . . . 744
PIColor . . . . . . . . . . . . . . . . . . . . . . . . . . . . . . . . . . . . . . . . . . . . . . 746
RGB Hexadecimal Color Chart . . . . . . . . . . . . . . . . . . . . . . . . 747
xv
Page 20

ShowTimingBar . . . . . . . . . . . . . . . . . . . . . . . . . . . . . . . . . . . . . . . 748
SyncToServer . . . . . . . . . . . . . . . . . . . . . . . . . . . . . . . . . . . . . . . . . 752
Delete_Notify . . . . . . . . . . . . . . . . . . . . . . . . . . . . . . . . . . . . . . . . . 754
Environmental Variables for Servers. . . . . . . . . . . . . . . . . . . . . . . . . . . 755
Appendix G Managing Traits at the Console
Viewing User Traits from the Console. . . . . . . . . . . . . . . . . . . . . . . . . . 760
Modifying User Traits from the Console . . . . . . . . . . . . . . . . . . . . . . . . 761
Changing a Users’ Password . . . . . . . . . . . . . . . . . . . . . . . . . . . . . 762
Listing Users Who Do Not Have Passwords . . . . . . . . . . . . . . 764
User Traits Console Command Summary . . . . . . . . . . . . . . . . . . . . . . 768
Managing Database Traits from the Console . . . . . . . . . . . . . . . . . . . . 773
Getting Basic Information . . . . . . . . . . . . . . . . . . . . . . . . . . . . . . . . 773
Getting Detailed Information. . . . . . . . . . . . . . . . . . . . . . . . . . . . . . 774
Changing Database Traits from the Console . . . . . . . . . . . . . . . . . . . . 775
Changing a Parent Directory Only . . . . . . . . . . . . . . . . . . . . . . . . . 775
Database Traits Console Command Summary. . . . . . . . . . . . . . . . . . . 776
Sortfield . . . . . . . . . . . . . . . . . . . . . . . . . . . . . . . . . . . . . . . . . . 785
Purge Interval. . . . . . . . . . . . . . . . . . . . . . . . . . . . . . . . . . . . . . 787
Abstract Printing. . . . . . . . . . . . . . . . . . . . . . . . . . . . . . . . . . . . 788
Mailbox. . . . . . . . . . . . . . . . . . . . . . . . . . . . . . . . . . . . . . . . . . . 790
The dis Column . . . . . . . . . . . . . . . . . . . . . . . . . . . . . . . . . . . . 791
Managing Group Traits at the Console . . . . . . . . . . . . . . . . . . . . . . . . . 793
Groups . . . . . . . . . . . . . . . . . . . . . . . . . . . . . . . . . . . . . . . . . . . . . . 793
Restricting Access Using Read and Write Limitations . . . . . . . . . . 795
Removing Directory or Queue Restrictions . . . . . . . . . . . . . . . . . . 796
Appendix H The Line Editor, ed
Launching ed. . . . . . . . . . . . . . . . . . . . . . . . . . . . . . . . . . . . . . . . . . . . . 798
Editing Commands . . . . . . . . . . . . . . . . . . . . . . . . . . . . . . . . . . . . . 801
Saving Changes . . . . . . . . . . . . . . . . . . . . . . . . . . . . . . . . . . . . . . . 804
Quitting ed . . . . . . . . . . . . . . . . . . . . . . . . . . . . . . . . . . . . . . . . . . . 805
Index
xvi
Specifying Lines to Edit . . . . . . . . . . . . . . . . . . . . . . . . . . . . . . 798
Searching the File . . . . . . . . . . . . . . . . . . . . . . . . . . . . . . . . . . 800
Page 21

Using This Guide
Congratulations on your purchase of an Avid iNEWS newsroom computer
system. It is a vital part of the Avid Unity for News system solution that
integrates with other Avid systems and third-party equipment to provide an
ideal nonlinear workflow and optimize the news production process.
This manual provides information on how to manage the iNEWS
newsroom computer system, consisting of:
•A console
• One or more servers
• Various clients, such as iNEWS Workstations and printers
n
The documentation describes software features and hardware related to
the iNEWS newsroom computer system, which is extremely customizable.
Your system may not contain certain features and/or parts that are
mentioned in the documentation.
Who Should Use This Manual
This manual is written for system administrators who are managing the
iNEWS newsroom computer system (NRCS). It is strongly recommended
that system administrators have prior experience in or classroom
knowledge of Red Hat Linux system administration. All iNEWS system
administrators need to:
• Manage user accounts, security and permissions
• Start up and shut down iNEWS NRCS
• Perform file system maintenance, backup, and recovery
Page 22

Using This Guide
• Maintain disks
• Monitor processes
• Configure and monitor the network
About This Manual
This manual is part of a two-book set designed to keep pace with current
advances in the Avid system’s news production capabilities. The
set—made up of this book and the Avid iNEWS Operations and
Troubleshooting Manual—is a comprehensive resource of all the
information you will need to take advantage of the many options available
to you. This manual will lead you through even the most complex
procedures with task-oriented instructions. The information provided here
builds on basic news production procedures described in the help system
and other user-based guides, while adding a complete explanation of all the
tools and techniques required to manage the newsroom computer system,
including useful tips, shortcuts, and custom options.
The Contents lists all topics included in this guide. They are presented with
the following overall structure:
• The Introduction helps you get oriented with beginning concepts and
general workflow and provides valuable pointers to keep in mind as
you proceed.
• The main body of this guide follows the natural flow of your work,
with clear and comprehensive step-by-step procedures.
• Finally, a detailed Index helps you quickly locate specific topics.
2
Page 23

Symbols and Conventions
Avid documentation uses the following symbols and conventions:
Symbol or Convention Meaning or Action
Symbols and Conventions
n
c
w
> This symbol indicates menu commands (and
t
Margin tips In the margin, you will find tips that help you
Italic font Italic font is used to emphasize certain words and to
A note provides important related information,
reminders, recommendations, and strong
suggestions.
A caution means that a specific action you take could
cause harm to your computer or cause you to lose
data.
A warning describes an action that could cause you
physical harm. Follow the guidelines in this
document or on the unit itself when handling
electrical equipment.
subcommands) in the order you select them. For
example, File > Import means to open the File menu
and then select the Import command.
This symbol indicates a single-step procedure.
Multiple arrows in a list indicate that you perform
one of the actions listed.
perform tasks more easily and efficiently.
indicate variables.
Courier Bold font
Courier Bold font identifies text that you type, such
as commands entered at the console multiplexor.
Output displayed on the console screen will appear
in regular Courier font.
3
Page 24

Using This Guide
Symbol or Convention Meaning or Action
Lengthy console displays may be edited to emphasize only the most
n
important information in this manual. An ellipsis (...) represents portions of
the console display not shown in the text. The console can display each
server’s prompt based on the system ID (typically a station’s call letters)
and the server’s name. Examples in this manual use NRCS as the fictional
station and system ID. For instance, the following is the console prompt for
server A on the NRCS system: NRCS-A$
Click Quickly click and release the left mouse button.
Double-click Click the left mouse button twice rapidly.
Right-click Quickly click and release the right mouse button.
Drag Click and hold the left mouse button while you move
the mouse.
Ctrl+key Press and hold the first key, such as Ctrl, Alt, or
Shift, while you press the second key.
If You Need Help
If you are having trouble using iNEWS:
1. Retry the action, carefully following the instructions given for that task in this guide. It is especially important to check each step of your workflow.
2. Check for the latest information that might have become available after the documentation was published in one of two locations:
- If release notes are available, they ship with your application CD,
- If ReadMe files are available, they are supplied in your Avid
n
4
Release notes and ReadMe files are also available on the Avid Knowledge
Center.
are in PDF format, and may be viewed from the CD using Adobe
Reader, a program freely available on the Internet.
application folder. ReadMe files are also available from Help.
®
Page 25

3. Check the documentation that came with your Avid application or your hardware for maintenance or hardware-related issues.
4. Visit the Knowledge Center at www.avid.com/support. Online support
services are available 24 hours per day, 7 days per week. Search this
online Knowledge Center to find answers, to view error messages, to
access troubleshooting tips, to download updates, and to read/join
online message-board discussions.
5. For Technical Support, please call 800-800-AVID (800-800-2843). For Broadcast On-Air Sites and Call Letter Stations, call
800-NEWSDNG (800-639-7364).
...With the Syntax of Console Commands
If you are at the console, and are unsure about the function of a console
command, use the help command.
To view instructions about using a command, type help followed by the
name of the command. For instance, type help dbvisit for an
explanation of the dbvisit command. The following data appears:
dbvisit -<d or v or i> -{r or m name] -[s] [block# ...]
‘r’ for read only
‘s’ for
‘m’ for machine name to disconnect
‘i’ to just validate isam files
“
slow” to eliminate cache usage
If You Need Help
n
Because of the margin limitations of this manual, console command lines
may appear wrapped to multiple lines. This does not necessarily indicate
the need to press an Enter key. Unless otherwise indicated, console
commands should be typed on a single line, allowing the computer to wrap
the text whenever the command line stretches beyond the screen margin.
See “Types of Console Commands” on page 28 for more information.
5
Page 26

Using This Guide
Related Information
The following documents provide more information about the iNEWS
newsroom computer system:
• iNEWS NRCS Prep, Installation, and Upgrade Manual
• iNEWS NRCS Training Guide
• iNEWS NRCS Release Notes
The following documents provide more information about some of the
other Avid products that integrate with the iNEWS newsroom computer
system:
• iNEWS ControlAir Installation and Operations Manual
• iNEWS ControlAir User Manual
• iNEWS ControlAir Release Notes
• Avid Data Receiver Installlation and Operations Manual
• MOS Gateway Installation and Operations Manual
• MOS Gateway Release Notes
• Media Browse Installation and Operations Manual
• Media Browse Training Manual
• Media Browse Release Notes
n
For the latest information on all Avid products and documentation on other
Unity for News products, such as the Avid AirSPACE video server, Avid
Active ContentManager, or the Avid NewsCutter nonlinear editing system,
see the Avid Knowledge Center: http://support01.avid.com.
If You Have Documentation Comments
We’d appreciate any comments or suggestions you may have about this
document or any other piece of documentation. Please restrict your
comments to documentation issues.
6
Page 27

Please e-mail your documentation comments to:
TechPubs-WI@avid.com
Include the title of the document, its part number, and the specific section
you are commenting on in all correspondence.
How to Order Documentation
To order additional copies of this documentation from within the
United States, call Avid Sales at 800-949-AVID (800-949-2843). If you are
placing an order from outside the United States, contact your local
Avid representative.
Avid Educational Services
For information on courses/schedules, training centers, certifications,
courseware, and books, please visit www.avid.com/training or call
Avid Sales at 800-949-AVID (800-949-2843).
How to Order Documentation
7
Page 28

Using This Guide
8
Page 29

Chapter 1
Introduction
As part of the Avid Unity for News broadcast solution, the iNEWS
newsroom computer system is an integrated, digital news creation, and
production system. It provides journalists, producers, directors, writers,
and technical personnel in a newsroom with an array of tools to make their
jobs easier.
This chapter contains the following main sections:
• What is Avid Unity for NEWS?
• System Administrator Tasks
Page 30

Chapter 1 Introduction
What is Avid Unity for NEWS?
The Avid Unity for News system is a nonlinear shared storage media
network that enables the immediate and simultaneous availability of
footage upon acquisition to both journalists and editors; the sharing of
footage among teams for shot selection, script writing, and production; the
parallel editing of news packages and promotions; and on-air playout,
without dubbing back to tape, within moments of story completion. It is a
truly integrated broadcasting solution that minimizes lag between
processes, where even activities such as asset management and Web
updating become concurrent tasks that facilitate production, without
interfering with the primary objective of putting the news on the air.
In the Avid Unity for News workflow, the Avid iNEWS newsroom
computer system provides up-to-date news data throughout the newsroom
and seamlessly links all tasks in the production process, such as wire
service, assignment desk, script writing, browse, editing, rundown,
playout, and device control tasks.
10
The Avid Unity for News environment consists of integration between
several Avid products, such as:
• The Avid iNEWS newsroom computer system
• The Avid Media Browse system, including Avid Capture Manager
• The Avid iNEWS ControlAir system
• The Avid NewsCutter nonlinear editing system
• Avid Active ContentManager
• Avid AirSPACE video server(s)
Your newsroom may have any one or all of these products and others not
mentioned in this brief summary.
Page 31

What is Avid Unity for NEWS?
The figure below shows a typical high- and low-resolution workflow, from
capture to playout, in a shared storage environment with an iNEWS
newsroom computer system:
iNEWS NRCS
An iNEWS newsroom computer system (NRCS) provides:
• News gathering from video, audio, and text sources
• News production, including:
- Story creation and script editing
- Show planning and creation
11
Page 32

Chapter 1 Introduction
• News to air, including:
- On-air playback control
- File exporting
- Internet publishing
In an Avid Unity for News environment, Web production processes can
occur in parallel with newcast production.
For more information,
see “NRCS
Components” in
Chapter 1 of the
iNEWS Installation and
Upgrade Manual.
Some primary components of iNEWS NRCS include:
• Linux-based computers running the iNEWS Server software. In this
manual, these host computers are referred to as the iNEWS Servers, or
individually as server A, server B, and so forth.
• An IBM/Intel-compatible personal computer (PC) running the iNEWS
console multiplexor program. This PC is known as the console. See
Chapter 2, “The iNEWS Console” for more information.
• Windows-based computer running the iNEWS client software. These
PCs are known as iNEWS Workstations
• Other clients, such as printers.
Third-Party Connectivity and Open Integration
Avid’s commitment to open integration and conformance with industrystandard technologies is clearly demonstrated as a major feature of the
Unity for News product set. Avid supports open integration by, among
other methods, offering no fewer than 13 Applications Programming
Interfaces (APIs) for Avid products to interact with third-party devices,
software, and custom development, such as the general NRCS-MOS
protocol agreement, or Transfer Manager APIs.
12
The iNEWS system is capable of interfacing with a wide variety of major
control systems and servers with dedicated device interfaces, including
Omnibus
™
and Sony®. The iNEWS system has an efficient Active-X
implementation of the MOS protocol, which greatly extends its interfacing
abilities. For instance, in conjunction with iNEWS, ControlAir provides a
Page 33

System Administrator Tasks
central point of control for up to 32 production devices, such as video
servers, character generators, and still store machines from third-party
manufacturers; a sample of which is provided in Table 1.
Table 1 Third-Party Integration
Device Type Manufacturers
Video Servers Sony, Grass Valley
Character Generators Chyron, Aston, Pinnacle, Abekas, Quantel, and Pixel
Power
Still Store Machines Leitch
The Avid Unity Transfer Manager productivity tool synchronizes with the
iNEWS rundown to determine file transfer priority—the story that appears
sooner in the rundown will automatically be ranked higher in the queue,
and playout order of the newscast matches the rundown precisely.
In addition to conforming to accepted, standard file formats, such as Open
Media Framework (OMF), Avid systems accept media in more than 30
other file formats, allowing them to accept, use, track, and present any
media, images, graphics, audio, scripts, or notes.
System Administrator Tasks
The following sections introduce many system administrator
responsibilities and the system’s capabilities and functions.
®
and Quantel
™
, and Quantel
Basic Tasks
Before you can customize or maintain the iNEWS newsroom computer
system, you must learn several basic tasks, which include:
• Start up or shut down iNEWS NRCS, which includes logging out users
and taking the system offline.
13
Page 34

Chapter 1 Introduction
User Tasks
• Backing up a site file before making file modifications.
• Send system administrator commands from the console to one or more
of your system’s computers.
• Be a console superuser, capable of setting up special superuser
permissions.
A user is anyone who can log in to the database and use iNEWS NRCS.
Your responsibilities regarding users are:
• Monitor user information, such as users’ access privileges and which
users are currently logged in.
• Customize the traits of users’ accounts to enable users to more
effectively use the system.
• Provide a new employee access to the information stored in the
iNEWS NRCS database by creating a new user account.
Database Tasks
14
• Remove user accounts of former employees to prevent improper
access to the iNEWS NRCS database.
The iNEWS system database contains the information your oganization
needs to function. A system administrator’s tasks associated with the
database include:
• Design forms (that is, story templates) to display important
information about stories in a queue.
• Monitor changes to files and queues in the database.
• Unlock or delete any item in the database, and recover items that were
accidentally deleted or corrupted.
• Create new folders or queues in the iNEWS system database to meet
your organization’s expanding needs.
• Remove a directory or queue from the database, if it is no longer used.
• Change the name or traits of an existing directory or queue.
Page 35

Security Tasks
System Administrator Tasks
• Assign the mailbox trait to queues for configuring automatic story
distribution into and out of queues.
There are many ways to ensure the security of your iNEWS system. Your
responsibilities regarding system security include:
• Monitor and change passwords or force users to change them by
setting up system checks and modifications.
• Monitor user login activity to guard against unauthorized use of the
iNEWS system.
• Assign security to a directory or queue, limiting access to a specific
group of users.
• Restrict database access by placing users into security groups based on
job roles and need for information.
Customizing the System
Your responsibilities regarding customization include:
• Customize command names, message text, and other items by
changing their entries in your system’s dictionary files.
• Remove your custom dictionary translations by reverting to the default
settings for command names, message text, and other items.
• Create templates for the CG Title Entry tool.
• Design and assign custom keyboards for users with a unique set of
keyboard macros.
Storage Maintenance Tasks
You will want to monitor the database regularly to ensure adequate storage.
Storage maintenance tasks include:
15
Page 36

Chapter 1 Introduction
Device Tasks
• Monitor how much free space is available in the database and, if
necessary, increase the amount to prevent the system from running out
of space.
• Perform preventive database maintenance by periodically running
certain utility programs that can find and fix minor problems before
they become serious.
• Backup the entire database or portions of it onto tape, so if necessary,
the information can be restored to the database later.
• Make a backup copy of files, such as the site file, on tape any time you
make important changes.
A device is any kind of hardware or software that performs a specific
function when it is set up on the iNEWS system. Your responsibilities
regarding devices include:
• List the parameters of any device running on your system or list all
devices of one type.
16
• Add any type of device to your system, if you have the capacity and
license permission.
• Edit site-specific files, to change the setup information for a device in
your system’s configuration file.
• Reconfigure the system so it recognizes any changes you make to your
system’s devices.
• Setup printer styles so that different tasks can be printed in predesignated formats.
• Setup servers which are utility programs that automatically perform
various actions on the stories in your database.
• Change wire distribution and sorting of data coming into your database
from a wire service to queues based on their category codes or content.
• Write dialogs (lists of instructions) for each service to automate the
connection process. A service is a device that connects a user to a
remote computer system.
Page 37

Reviewing Default Settings
Your responsibilities regarding system profiles, default settings, and
command syntax include:
• Changing a system profile setting to change your system’s operation.
• Reviewing default settings of all system profile parameters.
• Reviewing command syntax for edit, console, and job list commands.
Troubleshooting
Your troubleshooting responsibilities include:
• Transfer system activities from a halted computer to other system
computers. If a computer connected to the system has been halted,
bring the system back to operation using the remaining computers.
• Reconnect a computer that has been halted. Following routine
maintenance, reintegrate a computer into your system’s operation.
System Administrator Tasks
17
Page 38

Chapter 1 Introduction
18
Page 39

Chapter 2
The iNEWS Console
The iNEWS console multiplexor serves as a “command center” that
enables system administrators to monitor and maintain the iNEWS
newsroom computer system.
This chapter contains the following main sections:
•Overview
- The Console Display
• Standard Console Operations
- Starting the Console
- The System Operator
- The Console Superuser
- Exiting the Console
- Troubleshooting a Frozen Console
• Types of Console Commands
- Server Commands
- Console Control Commands
- Console Function Keys
• Selecting Servers
• Console History
• Using the Remote Console
• The Console Configuration File
Page 40

Chapter 2 The iNEWS Console
Overview
The iNEWS console multiplexor—commonly known as the console—is an
IBM/Intel-compatible personal computer (PC) running custom-created
Avid software. The console PC connects—via a serial link—to computers
running the iNEWS Server software, and communicates with each server
simultaneously.
With an external analog modem line, the console also provides a secure
remote console feature, that allows a system administrator or Avid
Customer Support personnel, if necessary, to do routine maintenance and
diagnostic work while away from the computer room. See “Using the
Remote Console” on page 40 for more information.
Figure 1 shows a sample layout for a dual-server newsroom computer
system.
20
Console
Multiplexor
Figure 1 Layout of iNEWS NRCS Console and Servers
Modem
Two Mirrored
iNEWS Servers
Page 41

The Console Display
Although the console can control multiple servers, your console has one
screen, which is often divided into regions to separate the output from each
server. The user can alter the display to show multiple regions or a single
region.
Figure 2 shows a console display for a dual-server system; the console
screen is divided into two regions. Your console screen has as many
regions as there are host servers in your system.
Overview
“A” computer
region
“B” computer
region is
selected.
n
Figure 2 Console Screen for a Dual-Server System
To identify which region belongs to which server, the console displays the
name of the server that a region represents in that region’s lower right
corner.
Each server’s name is based on the system ID (typically a station’s call
letters) and the server’s name (usually a single letter, such as A, B, or C).
Examples in this manual use NRCS as the fictional station and system ID,
as shown in Figure 2.
21
Page 42

Chapter 2 The iNEWS Console
In Figure 2, the top region displays the output from server A, and the
bottom region displays the output from server B. The wavy lines (^^^) to
the left of the identifier for server B indicate that it is currently selected or
active. Each region will have its own server and command prompts, after
which you may enter various commands. See “Types of Console
Commands” on page 28 for more information.
Should data shown in a region extend beyond the size of the screen, the
user may temporarily pause the display output. See “To pause the screen
display:” on page 35 for more information.
Standard Console Operations
The following section contains information about basic console operations,
such as starting the console, logging in, entering console superuser mode,
and troubleshooting.
Starting the Console
If your console has been turned completely off, it should start the console
program automatically when it boots up. If not, it may be started from the
operating system prompt.
To start up the console from your operating system prompt:
1. Type: console
2. Press Enter.
The console display will appear with multiple regions—as shown in
Figure 2 on page 21—each region associated with a server and showing
the following prompt:
login:
22
Page 43

The System Operator
System administrators must log in to iNEWS NRCS at the console
differently than other users who log in at an iNEWS Workstation.
Ordinarily, system administrators always remain logged in on each of your
system’s servers as the system operator.
To log in as the system operator:
1. Select the server(s) displaying the login prompt. See “Selecting
Servers” on page 33 for more information.
2. Type: so
3. Press Enter.
Standard Console Operations
To keep the password
confidential, the
console does not
display what you type.
4. If your system has a password for this account—and most do—then
type in the password when prompted, and press Enter.
The system operator password is set during installation of the iNEWS
Server software on the iNEWS Servers. For information about
changing the system operator password, see “Changing System
Administration Passwords” on page 25.
The Console Superuser
A console superuser has special system privileges that allow more
powerful (and therefore potentially more dangerous) commands.
The console’s server prompt is the visual indicator for whether you are
logged in as a system operator or a superuser. The server prompt for a
system operator login ends with a dollar sign ($). The server prompt while
in superuser mode ends in a pound sign (#).
The system operator prompt looks like this:
NRCS-A$
The superuser prompt looks like this:
NRCS-A#
23
Page 44

Chapter 2 The iNEWS Console
n
Entering Superuser Mode
To keep the password
confidential, the
console does not
display what you type.
If a command example in this manual shows the superuser prompt
—ending in a pound sign (#)—you must be a superuser to use the
command.
Follow the procedures explained in the next section to get to the superuser
prompt.
A console superuser password is required for entering superuser mode.
This password is the same as the root user password, which is set during
installation of the Linux operating system on the iNEWS Servers. See
“Changing System Administration Passwords” on page 25 for more
information.
To enter console superuser mode:
1. If you are not already logged in, then log in as a system operator, by
typing: so
2. Type: su
3. Press Enter.
4. Type the superuser password at the password prompt, and press Enter.
After you type the password correctly, the console shows that you are a
console superuser by changing the dollar sign ($) at the end of the server
prompt to a pound sign (#). If you enter an incorrect password, the console
displays an error message and lets you try again.
c
Exiting Superuser Mode
24
To prevent users from typing unauthorized commands, never leave the
console unattended when in superuser mode. You should log in as
superuser only when you need to type a superuser command, and exit
console superuser mode immediately after typing the command.
To exit from console superuser mode and return to system operator
mode:
t Press Ctrl+D.
Page 45

The console shows that you are a console system operator by changing the
pound sign (#)at the end of the console’s server prompt to a dollar sign ($).
Changing System Administration Passwords
When logging in to the console as either a system operator or console
superuser, a password is needed. These system administration passwords
are typically set by Avid Customer Support technicians during the
installation of either the iNEWS Server software or the Linux operating
system (OS). However, they may be changed later by system
administrators at the console.
Keep a confidential record of password changes. Knowing the passwords is
critical. If you forget your passwords, the operating system may need to be
reinstalled from scratch by Avid Customer Support technicians.
Standard Console Operations
n
n
For more information on changing the password for the remote console,
see “Editing the Console Configuration File” on page 44.
To change the system operator password:
1. Log in as a system operator, using the current password.
2. At the server prompt, type the password command, as shown:
NRCS-A$ passwd
3. Press Enter.
4. When prompted, type a new password, and press Enter.
If the system operator password is fewer than six characters or is based on
a word in the dictionary, the system will issue a “BAD PASSWORD...”
message, but it will accept such passwords. The system will not accept a
blank password.
5. When prompted to confirm, retype the new password, and press Enter.
25
Page 46

Chapter 2 The iNEWS Console
To change the superuser password:
1. Enter superuser mode, using the current password.
Changing the superuser
password also changes
the Linux root user
password, which if set
during the Linux OS
installation, must be
more than six
characters, initially.
n
2. At the superuser prompt, type the password command, as shown:
NRCS-A# passwd
3. Press Enter.
4. When prompted, type a new password, and press Enter.
5. When prompted to confirm, retype the new password, and press Enter.
If the password does not match, the system displays an error message. Start
over by retyping the new password in step 4. Also, if the superuser
password is fewer than six characters or is based on a word in the
dictionary, the system will issue a “BAD PASSWORD...” message, but it
will accept such passwords. The system will not accept a blank password.
6. Press Ctrl+D to exit console superuser mode.
Exiting the Console
You should leave the console on at all times while the iNEWS system is
running. However, the following situations may require you to exit the
console:
• You need to edit the console’s configuration file. See “The Console
Configuration File” on page 42 for more information.
26
• The console is frozen, and you are unable to unfreeze it using the
methods described in “Troubleshooting a Frozen Console” on page 27.
To exit the console:
1. Press the Command key, as shown in Figure 3 on page 31.
2. Press Ctrl+E.
3. When COMMAND EXIT appears, press Enter.
After the console software completely shuts down, the prompt for your
operating system will appear.
Page 47

Troubleshooting a Frozen Console
If the servers on your system are not responding to commands and are not
displaying messages, there are several possible procedures you can do to
identify and resolve the problem:
To check and restart scrolling:
1. Ensure that you or someone else has not stopped scrolling. If that is the
case, XOFF is displayed under the region where scrolling has stopped,
as shown in Figure 5 on page 36.
2. Press Ctrl+Q to start scrolling.
It may also be possible that the server ports have stopped sending and
receiving.
To restart sending and receiving from server ports:
Standard Console Operations
See “Console Control
Commands” on page
30 for more
information.
n
1. Press the Command key, as shown in Figure 3 on page 31.
2. Type: x
3. Press Enter.
If this does not restore the console, static electricity may have frozen one
or more of the servers’ I/O ports.
In the previous two procedures, the XON command is shown being issued
in two ways: first, by pressing Ctrl+Q and second, by pressing the
Command key and typing x. Either way will accomplish the exact same
thing.
To reset the servers’ I/O ports:
1. Select the affected server(s). See “Selecting Servers” on page 33 for
more information.
2. Press the Command key, as shown in Figure 3 on page 31.
3. Type: r (for reset).
4. Press Enter.
27
Page 48

Chapter 2 The iNEWS Console
Another possible cause of a frozen console is an application program that
will not stop running. If you suspect this problem, you can stop the
program, and log in again to the console.
To stop a runaway program:
1. Select the affected server(s). See “Selecting Servers” on page 33 for
more information.
2. Hold down the Control key and press the backslash key (Ctrl+\).
This stops the program on the selected server(s).
If this does not stop the program so that the console displays a system
prompt, suspend the program by pressing Ctrl+Z—or whatever the
suspend (susp) character is. The default is Ctrl+Z.
You can use the jobs command to list suspended programs and kill
suspended programs by using the kill command along with a percent sign
(%) and the job number, such as: kill %1.
If the console still does not respond, exit the console program and restart it
as described in “Exiting the Console” on page 26 and “Starting the
Console” on page 22.
Types of Console Commands
You can type two kinds of commands at the console:
• Server commands are sent to the iNEWS Servers.
• Console control commands are sent to the iNEWS console software
that communicates with the servers.
Some examples of server and console control commands appear as part of
procedures in “Standard Console Operations” on page 22. Further
information on these commands are provided in the next two sections of
this chapter. Also, see “If You Need Help...With the Syntax of Console
Commands” on page 5 for more information.
28
Page 49

Server Commands
The iNEWS system will not recognize server commands entered in upper
case. Type server commands at the console in lower case after the prompt
for the server to which you want the command sent. For instance, if you
want to send a command to server A, type the command after the server
prompt associated with server A.
Types of Console Commands
n
The console displays each server’s prompt based on the system ID and the
server’s name, separated by a hyphen. Examples in this manual use NRCS
as the system ID and single letters—such as A, B, or C—as the server
name.
For instance, the server prompt may appear like this:
NRCS-A$
The appearance of the server prompt varies, depending on how the system
administrator is logged in to the console. See “The Console Superuser” on
page 23 for more information.
An example of a server command is the
list s command—which when sent to an iNEWS Server will return
information about who is logged in.
To send a server command to multiple servers simultaneously:
t Type the command followed by a pound sign (#).
The # character acts as a place holder for each server name. It is replaced
with each server’s computer name, such as A or B, before the console
sends the server command to all servers in the system. This allows system
administrators to send commands to multiple servers without having to
select each server and send commands individually. For instance, the
connect # command sends connect a to server A, connect b to
server B, and so forth.
list sessions command—or
To stop a server command:
t Press Delete.
29
Page 50

Chapter 2 The iNEWS Console
If that does not work, press Ctrl+C—the stty interrupt character. Doing so
will interrupt the command’s execution. As a last resort, pressing the
Control and Backslash keys (Ctrl+\—the stty quit character) will stop the
command’s execution. Avid recommends you should attempt to “interrupt”
before trying to “quit” the execution.
If the server sends a message while you are typing a command, the console
stops displaying your keystrokes to display the message. However, it
continues to record what you type. After it has displayed the message, then
the console will display the data you typed in its entirety.
If you are interrupted by a console display or have mistyped a command,
you can cancel the entire command line and start over by typing Ctrl+U.
n
The character used to issue the command that cancels an entire command
line—known as the “kill” character—may be customized, using the stty
command. For instance, to set it to “at” character, you would type:
stty kill @. To reset it to the default Ctrl+U, type:
stty kill ^U.
The same customization capability applies to the “intr” or “interrupt”
character, which is used to interrupt a running program. For instance, to
set it to the Delete key, type: stty intr ^?. To reset it to the default
Ctrl+C, type: stty intr ^C.
To clarify, the ^U and ^C —shown above— mean to hold the Shift key
down and press the 6 key, to get the ^ character, and then the U or C letter
key respectively. The same applies to the ^?. You can view these settings by
entering the server command: stty -a
Console Control Commands
The Enter key on the
numeric keypad will be
called the Command
key throughout this
manual to prevent
confusion with the
Enter key on the
keyboard.
The Enter key on the numeric keypad is the console’s Command (CMD)
key. See Figure 3. When you press it, the console displays the command
prompt—also called the command line—from which you can type in
commands.
The command prompt appears as shown:
COMMAND^
30
Page 51

Types of Console Commands
To enter console control commands:
1. Press the Command key, as shown in Figure 3.
2. Type the console control command.
Some of the most common console control commands are those used
to activate a region of the console display—by selecting an iNEWS
Server(s)—and those commands used to view a record of messages
displayed on the console, known as the console history. These
commands are explained in “Selecting Servers” on page 33 and
“Console History” on page 35. For a complete list of console control
commands, see “Console Control Commands” on page 580.
3. Press Enter—also called the Return key—on the standard keyboard for
the command to be executed.
Figure 3 shows the location of the two keys on a typical console keyboard.
Function keys
Return key
CMD key
Figure 3 Typical iNEWS Console Keyboard
If you make a mistake when typing a command, use the Backspace key to
move the cursor back and then type over the error.
Console Function Keys
The system administrator may preprogram the keyboard function keys to
execute commands. For instance, you may program F1 to select server A,
F2 to select server B, and F7 to move up 200 lines in the console history
buffer.
Standard keyboard
Numeric keypad
31
Page 52

Chapter 2 The iNEWS Console
Assigning a Command to a Function Key
To assign a command to a function key:
1. Press the Command key.
2. Type the name of the function key you want to use, followed by the
equal sign (=) and the command the key is supposed to execute. The
following example assigns the command of choosing server A to the
F1 key: f1=c a
3. Press Enter.
To assign a command sequence to a function key—that is, include the
Command and Enter keys in the definition—use the open brace ({) to
represent Command, and the close brace (}) to represent Enter. For
example, to program the complete command sequence (press Command
key, type computer command to select all servers, and press Enter) to
function key F10, you would type: f10={c *}
Changing the Assignment of a Function Key
To change a command assigned to a function key:
t Assign a new definition to the key.
Deleting the Definition of a Function Key
To delete a function key’s command assignment:
t Assign it a null value.
Displaying Function Key Assignments
To find out the command (if any) assigned to a key:
1. Press the Command key.
2. Type the name of the key, such as, F9.
3. Press Enter.
Press Command again to clear the command assignment from the console
screen.
32
Page 53

Selecting Servers
On the console, you can select one server or multiple servers at the same
time. For instance, some commands must be executed on all servers
simultaneously, so on a two-server system, you must select both server A
and B before typing in the command.
Selecting One or More Servers
To select only server A:
1. Press the Command key, as shown in Figure 3 on page 31.
2. Do one of the following:
t Type : computer a
t Type : c a
3. Press Enter.
Selecting Servers
To select both the A and B servers:
1. Press the Command key, as shown in Figure 3 on page 31.
2. Do one of the following:
t Type : computer ab
t Type : c ab
3. Press Enter.
To select all servers in the iNEWS system:
1. Press the Command key, as shown in Figure 3 on page 31.
2. Type: c *
3. Press Enter.
Selecting all servers enables you to send a command to all of them
simultaneously. When you select all servers, each server region’s bottom
line changes to a wavy line of caret symbols (^^^). Only one cursor
appears, usually in the top region; however, the console commands you
type appear simultaneously in each region of the console screen.
33
Page 54

Chapter 2 The iNEWS Console
Zooming in on One Server
In addition to the computer command, you can also use the zoom
command to select a server. Unlike the computer command, which
operates in multiple region mode, zoom selects one server at a time and
devotes the entire console screen to that server (or region).
To zoom in on one server, such as server B:
1. Press the Command key, as shown in Figure 3 on page 31.
2. Do one of the following:
t Type: zoom b
t Type: z b
3. Press Enter.
Figure 4 shows the console screen after “zooming in” on server B’s region.
34
Figure 4 “Zooming In” On Server B
Page 55

To restore the screen to its former multiple region state, use the
computer command to select any server. It does not matter which one
you select; the console screen will revert to a multiple region display, and
the region for the selected server will have the cursor.
Console History
When output from a server command consists of more lines than can fit in
a region, lines will be scrolled off the screen. To view this data—known as
console history—in screen-sized chunks, you must pause the screen
display.
Console History
n
n
The system may also be configured to log console history for viewing at a
later time.
To pause the screen display:
t Press Ctrl+S. The console screen temporarily stops scrolling.
Pressing Ctrl+-S does not have any effect if you are using a remote
console. A remote console is connected by a modem dial-in from an
external location. See “Using the Remote Console” on page 40 for more
information.
35
Page 56

Chapter 2 The iNEWS Console
When the screen is full of text, XOFF appears at the bottom of the selected
region, as shown in Figure 5.
36
Figure 5 XOFF Message Indicating Scrolling Is Paused
To manually resume scrolling:
t Press Ctrl+Q.
Even if you do not press Ctrl+Q, the console automatically resumes
scrolling after a pause of 60 seconds.
Page 57

Viewing Recent Console History
The console maintains a history buffer containing messages that have
appeared on the screen. You can go back in “console history” to review
prior activity on any of the iNEWS Servers.
Console
Screen
Console History
Top of History
(Oldest Portion)
Bottom of History
(Newest Portion)
Pressing Enter is
equivalent to down 1
Figure 6 Console History
As shown in Figure 6, the “top” of the buffer contains the oldest
information; the “bottom” of the buffer contains the most current.
To view recent history on a particular server:
1. Zoom in to the server whose history you want to review.
2. Press the Command key, as shown in Figure 3 on page 31.
3. Type one of the console history commands: up, down, top, or
bottom.
The top and bottom commands move the console screen to the top
or bottom of the history.
The up and down commands by themselves move the console screen
up or down one line in the history. If you follow the up or down
commands with a number, the console screen will move up or down
that number of lines in the history. For instance, up 10, moves up—or
back in the console history—10 lines. If you follow the up or down
37
Page 58

Chapter 2 The iNEWS Console
commands with a word, the console screen will search from the current
position backward or forward for that word, and if found, moves to the
line containing that word. The commands are not case sensitive.
n
n
Viewing Logged Console History
The pound character (#) is a wild card that can be included in the word to
be searched for with the up and down commands. It is also used to search
for numbers. For instance, up 10# is a numerical search, and is not the
same as up 10, which will move up 10 lines in the console history.
4. Press Enter.
The print command may also be used to view lines of console history.
When the command is followed by a number, the screen will display that
number of lines of history, starting from the current position. When the
print command is followed by the word, all, the screen will display all
lines from the current position scrolling to the bottom of the history, or
newest line of information.
The print command does not send console history text to the printer. The
command for printing lines of history is list, followed by either a
number or the word, all. See “Console Control Commands” on page 580
for more information.
You can configure iNEWS to log console history to disk for later review.
The logs are written to the hard drive on your console PC, traditionally in
the C:\Console directory. The logs are named as shown in Table 2.
38
Table 2 Log Names
Contains the following
File for server A: File for server B:
log.a1 log.b1 Most recent console history
log.a2 log.b2 Old console history
log.a3 log.b3 Older console history
information:
Page 59

Console History
Table 2 Log Names
Contains the following
File for server A: File for server B:
log.a4 log.b4 Oldest console history
The log.a1 file is the most recent console history; you can also view it as
shown in prior examples using the up command.
As the log.a1 file fills up, old files are renamed and a new log.a1 file is
created as follows:
• log.a1 is renamed log.a2
• log.a2 is renamed log.a3
• log.a3 is renamed log.a4
• A new log.a1 is created
information:
n
The log files are ASCII text files that can be read with any word processing
program. You must exit the console program if you want to edit the logs in
any way.
You can use the console view command to view the log files without editing
or exiting to DOS, but view only lets you start at the top of the file and
scroll down. You cannot move back or search for words.
Both the presence or absence of disk logging and the size of the log files
can be configured in the console.cfg file. See “The Console
Configuration File” on page 42 for more information..
39
Page 60

Chapter 2 The iNEWS Console
Using the Remote Console
The console should have a modem attached to it. This enables someone in
another location to call up the console and log in, thereby turning the
remote computer into a remote console. The primary use for a remote
console is to enable Avid Customer Support technicians or system
administrators to perform diagnostic and maintenance work on the iNEWS
system from a remote location.
This section explains how to dial in over a modem line, what you can
expect to see on the remote screen, and how to execute commands
remotely.
Dialing in to the Console
To dial in to the console, you must have a computer that transmits and
receives ASCII characters. You must also have set the following modem
options:
If you do not see the
prompt immediately,
pressing Enter should
display it.
n
40
• Eight data bits
• No Parity
• One stop bit
• Any baud rate supported by your console’s modem
To prevent unauthorized people from dialing in to the console, remote
access is protected with a password. When you dial in, you see a
PASSWORD prompt on the screen. After you type the correct modem
password, the console connects you to the first server listed in the console
configuration file, usually server A.
The modem password is set in the console’s configuration file. See
“Editing the Console Configuration File” on page 44 for more
information.
Page 61

At the console, MDM is displayed at the bottom of the region representing
the server that was selected from the remote console. Commands typed at
the remote console are sent to that server and displayed on its console
region. Likewise, output from that server are displayed both on the console
and the remote console.
Executing Commands Remotely
After logging in, you can type commands and review history almost as if
you were seated at the console itself. All commands except zoom are
available from the remote console. Just as at the console, these commands
can be abbreviated using the first letter in each command.
There are also some differences when using a remote console:
• The remote console displays screen input and output for only one
server at a time, even if you have more than one selected.
When you select two or more servers, the order in which you list the
servers in the computer command determines which server’s display
you see. For instance, if you type c ab to select servers A and B, you
see output only from server A on the remote console, even though
what you type is sent to both A and B.
Using the Remote Console
n
• Use the Escape character instead of the Command key to display the
console command prompt.
The Escape character, by default, is set to the Escape (Esc) key; however,
the character may be customized, using the escape command in the
following format: escape <char>
For instance, to set the Escape character to the keystroke combination of
the Control and Y keys (Ctrl+Y), type: escape Ctrl+Y
The Ctrl in the above command means to hold down the Control key
while pressing the Y letter key. It is important to remember that the escape
command can only be used from a remote console and there must be a
space after the escape command.
To reset the Escape character to its default, type the escape command,
space, then press the Escape key. For instance: escape Esc
41
Page 62

Chapter 2 The iNEWS Console
Logging out from a Remote Console
To log out after you finish using the remote console:
1. Press the Escape character.
The lowercased L in
step 2 stands for logout.
2. Type: l
3. Press Enter.
4. When the remote console redisplays the PASSWORD prompt, hang up
your modem.
Logging out a Remote User from the Main Console
If you are at the main console and discover that you or someone else has
been using the remote console but did not log out when they were done,
you can log them out from the main console.
To log out a remote console user from the main console:
1. Press the Command key.
The m in step 2 stands
for modem.
n
2. Type: m
3. Press Enter.
Always follow this procedure before disconnecting the modem on the main
console.
The Console Configuration File
The console uses information from its own configuration file—a text file
called console.cfg—to set a number of parameters, such as:
• Whether or not disk logging is enabled
• Information about each of the servers connected to the console
• Information about the remote console
42
Page 63

This section contains a sample configuration file, and defines the console
configuration keywords and their parameters.
Viewing the Configuration File
To view the configuration file:
1. Zoom in on one server, such as server A:
a. Press the Command key.
b. Type: z a
c. Press Enter.
2. Press the Command key.
3. Do one of the following:
t Type : view console.cfg
t Type : v console.cfg
4. Press Enter to display the first line in the console configuration file.
The Console Configuration File
5. Continue pressing Enter to scroll through the file.
Sample Console Configuration File
Here is a sample console configuration file:
log c:log * 32768
computer ;
name a
label NEWS
irq 3
hostess 2c0
speed 9600
;
“A”
server
43
Page 64

Chapter 2 The iNEWS Console
computer ;“B” server
name b
label NEWS
irq 3
hostess 2c8
speed 9600
;
computer ;“C” server
name c
label NEWS
irq 3
hostess 2d0
speed 9600
;
modem ;Remote console
password turtle
irq 3
hostess 2d8
speed 1200
The configuration file consists of a list of keywords, such as name and
label. Most keywords are followed by parameters, such as a and NEWS.
The keyword modem identifies the start of the modem (remote console)
section. The keyword computer identifies a server section. Each
server—including the archive server, if your system has one—and the
modem must have its own section in the console configuration file.
All keywords and their parameters are described in detail in Table 3.
Editing the Console Configuration File
Probably the only modification you will ever need to make to the console’s
configuration file is to change the modem password, used when logging in
from a remote console.
44
Page 65

The Console Configuration File
n
The console configuration file is stored on a DOS PC, so you need to use a
DOS editing tool, such as edit to change it. You could also copy the file
to a diskette and take it to another location to edit using Microsoft’s
program, NOTEPAD, on a Windows-based PC.
Console Configuration Keywords
Table 3 lists all the configuration keywords and their parameters, if they
have any.
Table 3 Console Configuration Keywords
Keyword Explanation
computer Indicates the beginning of a server section. Must appear at the
top of each server section on the configuration file.
hostess <port-address> Indicates which port address (in hex) the console uses to
communicate with a particular device (that is, a server or the
modem). This information, which is dictated by the hardware,
was placed in the configuration file when your system was
installed and should not be changed.
irq <interrupt-request-number> To get the attention of the console, each device (that is, the
servers and the modem) connected to the console must have
its own interrupt request with which it can signal the console.
The irq keyword tells the console which interrupt request to
expect from each device.
This information, which is dictated by the hardware, was
placed in the configuration file when your system was
installed and should not be changed.
label <region-name> Defines a label that the console uses to identify each server’s
region of the console screen. The label can be up to 15
alphanumeric characters long, and is typically the system ID,
a hyphen, and the server letter—A, B, C, or D.
45
Page 66

Chapter 2 The iNEWS Console
Table 3 Console Configuration Keywords (Continued)
Keyword Explanation
log <drive:filename> [server(s)]
[max size]
Enables disk logging. No matter what filename (for example,
history) you designate here, the system always uses
extensions like A1, A2, and B1, as indicated in “Viewing
Logged Console History” on page 38. If you do not follow the
filename with a list of the servers for which you want history
to be recorded, the console records history for all servers. If
you omit a log size it defaults to 16,384 bytes.
This example creates a history file on drive B for servers A
and B: log b:history ab
modem Indicates the beginning of a modem section of the
configuration file.
name <computer-name> Names the server described in that section of the
configuration file. Each server must have A, B, C, or D as its
name.
password <password> The modem password that must be typed when someone logs
in at a remote console. The password can have up to eight
alphanumeric characters and is case sensitive.
portaddress <port> Selects the DOS address (in hex) the console should use to
communicate with a particular device, such as a modem. This
information which is dictated by the hardware, is placed in the
configuration file during installation and should not be
changed. Each device must have a port address defined in its
section. The portaddress keyword is used instead of
hostess when your system has four servers and a modem.
In that case, the modem must use com1 as its port. The port
parameter should always be defined as 3f8.
speed <baud-rate> Sets the baud rate for communication between the console and
the server. The baud rate is the only communication parameter
you can alter; the console ports always communicate at 9600
baud, eight data bits, no parity, and one stop bit.
46
Page 67

The Console Configuration File
Table 3 Console Configuration Keywords (Continued)
Keyword Explanation
timeout <minutes:seconds> Allows you to set a time-out value for any modem connection.
The system automatically logs out a modem connection if
there is no activity for a specified amount of time. For
instance, a value of 6:00 would automatically log out a
modem connection after six minutes of inactivity. This
keyword, which should only be used in the modem section,
provides added protection should a user forget to logout from
a modem connection to the console.
With a value of 0:00—the default value—the feature is
disabled, which means the system will not log out a modem
connection regardless of inactivity length. The maximum
value is 546 minutes and 7 seconds (546:07).
47
Page 68

Chapter 2 The iNEWS Console
48
Page 69

Chapter 3
Getting Started
System Administrators are responsible for knowing how to start up and
shut down the iNEWS system. This requires logging in at the console
multiplexor, which is done differently than other iNEWS users and
provides access to features that others do not. Information on using the
console, including logging in, is covered in Chapter 2. This chapter
provides specifics on starting up and shutting down the newsroom
computer system.
This chapter contains the following main sections:
• Starting the System
• Shutting Down the System
• Starting a System in Single-Server Mode
Page 70

Chapter 3 Getting Started
Starting the System
The following procedure shows you how to reboot your servers and
synchronize them. This is primarily for dual or triple-server systems. For
steps on starting a system in single-server mode, see “Starting a System in
Single-Server Mode” on page 56.
n
Because the following procedure applies to an entire system that has been
shut down, you must perform all the steps on all servers, except where
otherwise indicated.
To start your iNEWS system, do the following:
1. Power up or reboot servers in one of the following ways, depending on
how you shut down your system:
a. If you turned off the servers when you shut down your system,
boot them to the login prompt by turning them on.
b. If you halted the servers when you shut down your system, boot
each server from the console. Servers that have their operating
systems halted will display the following line ten times—one per
second:
Press any key to continue.
If no key is pressed, the bootup will continue normally after ten
seconds. If a key is pressed, the system displays a message similar
to the following:
GRUB version 0.93 (640K lower/523256K upper memory)
+----------------------------------------------+
| Red Hat Linux (2.4.20-6smp) |
| Red Hat Linux-up (2.4.20-6) |
| Red Hat Linux (2.4.20-6smp) SERIAL CONSOLE |
+----------------------------------------------+
Use the ^ and v keys to select which entry is highlighted.
Press Enter to boot the selected OS, ‘e’ to edit the
commands before booting, ‘a’ to modify the kernel
arguments before booting, or ‘c’ for a command line.
50
Page 71

Starting the System
The default is the SERIAL CONSOLE option, for booting to the
iNEWS console. The other options should not be used for any
reason, unless instructed to do so by Avid Customer Support
personnel. Press Enter to continue.
c
If the system was not shut down as described in “Shutting Down the
System” on page 53, check the console history for messages indicating
that all servers shut down at the same time. Do not connect servers
unless you are sure their databases are mirrored. If you cannot find
messages indicating simultaneous shutdown, or are otherwise unsure
whether the disks are mirrored, call Avid Customer Support for
assistance before proceeding. If the servers are not mirrored, it will be
necessary to bring the system up as a single-server system and go
through the re-mirroring process. See “Starting a System in SingleServer Mode” on page 56 for more information.
If the system was taken through a normal shut down according to
instructions, the databases would still be mirrored and you can
continue the normal startup procedure.
2. Select all servers. See “Selecting Servers” on page 5 for more
information.
3. Log in as a system operator by typing: so
4. When prompted, type the password.
5. Type: connect #
The # character acts as a place holder for each server name, allowing
you to send a single command to multiple servers simultaneously. So,
typing connect # will send connect a to server A, connect b
to server B, and so forth.
When connected, each server displays status messages and the system
prompt returns.
6. Messages similar to the following appear:
connect successful for NRCS-A, starting servers...
A is OFFLINE. ID is NRCS.
System is A. Master is A.
Disk status is OK. The database is OPEN.
51
Page 72

Chapter 3 Getting Started
Connecting servers provides each server with a unique name and
causes each one to read and interpret the system profile. The servers
can work together as a system after reading the system profile
information.
7. (Optional) Check for edit and order locks if you are restarting the
system after a power failure.
During a power failure, the system may not have had time to remove
edit and order locks from the database before shutting down. When
you restart the system, remove these locks.
n
Checking for edit and order locks may take time depending on the size of
the database. In an emergency, bypass this step to get the system running.
Go back later and remove locks to provide system access. The system can
detect invalid locks and will ignore them.
To remove edit and order locks:
a. Select one server.
b. Type: dbclean -x .
-x
The
option tells dbclean to skip queues or directories marked
with a skip flag, reducing the time it takes to run.
.
The period (
) after the -x causes dbclean to start at the root
directory of the database, so that it does not miss any part of the
database not marked with a skip flag.
8. Select all servers. See “Selecting Servers” on page 5 for more
information.
9. Type: startup
Information similar to the following appears:
Checking free space...
Sep 10 15:42:51 NRCS msg: System is being configured
database size 10002352,free 9955000=100%,freelist 1991
Starting NRCS programs...
booting device 100 on port 1
booting server 130
52
Page 73

Shutting Down the System
The Startup command does the following:
• Causes the master computer (usually server A) to read the
configuration file
• Brings each server online so users can log in
• Checks database free space (dbfree)
• Starts all devices and utility programs—called servers
The console displays device-ready messages (Hot-to-go) as each
device starts up, indicating that the device is online and available.
n
Resources used for iNEWS Workstation sessions do not print any messages
until a workstation establishes a connection.
Shutting Down the System
If you need to turn off your servers or reboot the system, first shut down
the system. Shutting down the system:
• Saves any open stories
• Removes any remaining edit and order locks
• Ensures that each server’s copy of the database is the same
n
Because the system requires that you shut down all servers at the same
time, most steps in this procedure are performed on all servers
simultaneously. Except where instructed to do otherwise, ensure that you
have selected all servers before performing each step. See “Selecting
Servers” on page 33 for more information.
53
Page 74

Chapter 3 Getting Started
To shut down your iNEWS system:
1. Log out all users, according to the procedures provided in “Logging
Out All Users” on page 94.
c
c
You must ensure that all users are logged out if shutting down the
system. If a user is in a connect session when the system is shut down,
the user’s workstation stops, the session is disconnected, and any
unsaved work is lost. Ensure any connect session users have logged out
before you continue the shutdown procedure.
2. Ensure all servers are selected, then type: status
This will display the systems current configuration status; verify that
the servers are still connected to each other and running in the normal
AB configuration for dual-server systems or ABC configuration for
triple-server systems. If they are, you may continue with normal
shutdown procedures.
If the servers do not all display the same configuration settings—such
as “System is AB”—then the databases on the servers are most likely
not mirrored and must not be brought back up using normal startup
procedures. Contact Avid Customer Support before proceeding.
3. Type: shutdown
A message similar to the following appears:
WARNING! This will stop all devices on this
computer, and close the database.
To prevent loss of work in progress, 'logout all'
first.
Do you really want to do this (y/n)?
54
4. To continue, type: y
Press Enter. The screen appears similar to the following:
Do you really want to do this (y/n)? y
/exc/shutdown: Stopping all devices
/exc/shutdown: Closing database
Page 75

Shutting Down the System
The shutdown process stops all workstations, wires, and other devices,
and no further changes can be made to the database.
5. Enter superuser mode by typing: su
6. When prompted, enter the password.
The screen appears similar to the following
NRCS-A$ su
password:
SU: so/dev/console
NRCS-A#
When the superuser prompt appears, shut down the system by using a
form of the init command, as shown:
NRCS-A# halt
Broadcast message from root (ttySO) (Fri ...)
The system is going down for system halt NOW!
INIT: Stopping atd: [ OK ]
Stopping keytable: [ OK ]
...
Turning off swap:
Turning off quotas:
Unmounting file systems:
Halting system...
flushing ide devices: hda
System halted.
7. Turn off each server.
To start up the system again, follow the procedure in “Starting the System”
on page 50.
55
Page 76

Chapter 3 Getting Started
Starting a System in Single-Server Mode
If the servers were not operating in their normal system configuration, such
as AB in dual-server systems, or if they were not shutdown using normal
procedures according to instructions in this manual, the databases on the
servers may not be mirrored.
c
n
If the databases are not mirrored, you must not bring the system up
using normal start up procedures as instructed in “Starting the
System” on page 50 or you will risk database corruption.
If non-mirrored servers, the system administrator must bring the system up
in single-server mode and then go through the database re-mirroring
process. This section provides the steps for starting a system in singleserver mode.
Contact Avid Customer Support for assistance with triple-server systems.
It may be possible to start these systems in a dual-server mode, depending
on the circumstances of the shutdown.
To start the iNEWS system in single-server mode:
1. Power up or reboot the server that you want the system to run on.
2. Select that server. See “Selecting Servers” on page 5 for more
information.
3. Log in as a system operator by typing: so
4. When prompted, type the password.
5. Do one of the following:
56
t To connect server A as a single system, enter the following
command:
connect a single=a
t To connect server B as a single system, enter the following
command:
connect b single=b
Page 77

Starting a System in Single-Server Mode
Notice in the sample
message that the
“System is A” not AB
or ABC.
n
Messages similar to the following appear:
Sep 10 16:25:52 inews-a last message repeated 15 times
...
Sep 10 16:26:44 inews-a work:[2034]workserver Hot-to-go
connect successful for NRCS-A, starting servers...
A is OFFLINE. ID is NRCS
System is A. Master is A.
Disk status is OK. The database is OPEN.
NRCS-A$
6. (Optional) Check for edit and order locks if you are restarting the
system after a power failure.
During a power failure, the system may not have had time to remove
edit and order locks from the database before shutting down. When
you restart the system, remove these locks.
Checking for edit and order locks may take time depending on the size of
the database. In an emergency, bypass this step to get the system running.
Go back later and remove locks to provide system access. The system can
detect invalid locks and will ignore them.
To remove edit and order locks:
a. Select one server.
b. Type: dbclean -x .
-x
The
option tells dbclean to skip queues or directories marked
with a skip flag, reducing the time it takes to run.
.
The period (
) after the -x causes dbclean to start at the root
directory of the database, so that it does not miss any part of the
database not marked with a skip flag.
7. Type: startup
57
Page 78

Chapter 3 Getting Started
Checking free space...
Sep 10 15:42:51 NRCS msg: System is being configured
database size 10002352,free 9955000=100%,freelist 1991
Starting NRCS programs...
booting device 100 on port 1
booting server 130
The entire newsroom computer system will now be run off the single
server. The commands entered on a single-server system for shutting down
are the same as those used to shut down a dual-server or triple-server
system. To return to a dual or triple-server system, it will be necessary to
complete the database re-mirroring process.
Information similar to the following appears:
58
Page 79

Chapter 4
Users
People in your newsroom must have user accounts to use the iNEWS
newsroom computer system. Each user account has various user traits
associated with it that capture information about the user’s interaction with
the system—information such as passwords, keyboard preferences, and
permissions for story editing.
This chapter tells how the system administrator can access and change user
account information from any iNEWS Workstation. However, user traits
can also be viewed and modified at the console. The procedures for using
the console is covered in Appendix G.
This chapter contains the following main sections:
• Viewing User Accounts
• Modifying User Traits
• Changing a User’s Password
• User Preferences
• Simplified Users
• Creating New Users
• Removing User Accounts
• The User Manager Account
• The Database Manager Account
• Logging Out All Users
Page 80

Chapter 4 Users
Viewing User Accounts
You must be logged on as a superuser or user manager (umanager) to
change user traits. For an explanation of the umanager account and
privileges, see “The User Manager Account” on page 92.
To view traits associated with a particular user account:
1. Select Tools > Options > Users.
The Manage User Accounts dialog box appears.
60
n
2. Enter the user name in the User ID field.
An asterisk (*) in the User ID field will result in all user accounts listed
when you click Search or press Enter. To search for all users with names
that start with a certain letter, type that letter followed by an asterisk.
3. Do one of the following:
t Click Search.
t Press Enter.
Page 81

Viewing User Accounts
The results of the search appear in the User List field located in the
center of the dialog box. The data provided in the field includes: User
ID and Name, last time the user logged in, whether the user account
has superuser privileges, and so forth. The scroll bar at the bottom of
the field may be used to view the rest of the User Account data.
n
n
The Print User List button will send the User Account data for the results
appearing in the User List field to the printer. There is no option to
selectively limit what data is printed.
4. Do one of the following:
t Double-click the user name in the User List field.
t Click the name once to select it, and then click the Modify/Display
button.
The Modify button will appear with the word Display on it if you do not
have authority to modify user accounts. This applies to user managers
(umanager) who cannot alter superuser accounts. Also, the traits shown in
the dialog box will appear gray to indicate that the information is for
viewing only.
The Modify User Account dialog box appears.
61
Page 82

Chapter 4 Users
The dialog box shows user traits associated with the account you chose,
such as the user’s name, read rate, and mail queue name. All user traits
shown in the various sections of the Modify User Account dialog box are
explained in detail in “User Traits” on page 63.
Modifying User Traits
You must be logged on as a superuser or user manager (umanager) to
change user traits. The superuser account is an iNEWS user account with
superuser type access privileges. It is not the same as the superuser mode
used at the console. See “User Traits” on page 63 for more information.
For an explanation of the umanager account and privileges, see “The User
Manager Account” on page 92
To modify a user’s traits from an iNEWS Workstation, do the
following:
1. Access the Modify User Account dialog box as explained in “Viewing
User Accounts” on page 60. An example of the dialog box is shown in
Figure 7 on page 63.
n
The Cancel button
closes the dialog box
without saving
changes.
62
2. Select or deselect check boxes, as required. Fill in the fields in the
Queues section of the dialog box. See “User Traits” on page 63 for
more information.
You can click the Get from Template button to copy traits from another predefined user account. The template must be selected prior to the start of
account modification or the button will be inaccessible (grayed out). See
“Copying User Traits to Another User Account” on page 84 for more
information.
3. Create or change the password, as explained in “Changing a User’s
Password” on page 68.
4. Click User Preferences and modify settings, as explained in “User
Preferences” on page 69.
5. Click OK to save modifications.
Page 83

User Traits
Modifying User Traits
The Modify User Account dialog box—shown in Figure 7—divides each
user’s traits into sections, such as Type, Edit Mode, Queues, and so forth.
These sections are explained in the following summary of all user traits.
Figure 7 Modify User Account Dialog Box
User ID and User Name
The User Name field contains the user’s real name. It should not be
confused with the User ID, which the system uses to identify account
activity. For instance, a user may have an account with a User ID
danielmi; his real User Name is Daniel Mitchell, but he will type
danielmi, his User ID, to log on to iNEWS.
Type
The Type section contains the check boxes that determine what type of
user account is assigned to the user, and consequently, what privileges. If
the check box is selected, the type is applied to that user account.
63
Page 84

Chapter 4 Users
Edit Mode
• Superuser – A superuser account allows the user complete
access to administration features, such as user
accounts, the database, the System directory, and
connect sessions to the console that controls the
servers.
• Black Listed – A black listed account cannot be used to log in to
an iNEWS Workstation. This type is used for
special accounts, such as umanager and
dbmanager. It is not intended for standard user
accounts. Another practical use for this trait is to
quickly disable an account of someone leaving or
someone who works intermittently.
• Simplified – A simplified account sets certain access limits,
such as the maximum number of iNEWS
Workspaces allowed. See “Simplified Users” on
page 78 for more information.
64
The Edit Mode section’s radio buttons set up the condition of the PC
keyboard’s Insert key at log in.
• Insert – The Insert editing mode, when selected, means if a
user types text between two characters, the text is
inserted at the cursor position without overwriting
the character to the right of the cursor.
• Overwrite – The Overwrite editing mode, when selected,
means each character a user types replaces the
next character to the right of the cursor as the
cursor moves through the text.
Page 85

Queues
Modifying User Traits
The iNEWS system provides a People directory in the database file
structure that allows system administrators to set up a personal directory
and two queues for each user as data storage. The Queues fields in the
Modify User Account dialog box indicate the navigation paths (or
locations) of the user’s personal directory and queues.
Read Rate
n
The actual directory and queues are not created here. See “Creating a New
User Area in the News Database” on page 82 for more information.
• Home – The Home field contains the path to the directory
(folder) where the Destination and Mail queues
are stored in the database file structure.
• Destination – The Destination field contains the path to the
queue provided for the user as a storage location,
such as Notes.
• Mail – The Mail field contains the path to the user’s Mail
queue, which is where all e-mail to that user is
kept in the database.
The Read Rate is the user’s spoken reading rate in words per minute. The
average English reading rate is 180 words per minute. The iNEWS system
uses the read rate of the designated user (presenter) to determine the audio
(air) time of a story.
65
Page 86

Chapter 4 Users
Session/Configuration/Queue Features
There are three sections of the Modify User Account dialog box pertaining
to features.
The Session Features section defines access to other parts of the system.
• Media Browse – The Media Browse check box determines access to
• Broadcast Control– The Broadcast Control check box is a non-
• Connect Services– The Connect Services check box determines
the Media Browse application.
functioning option, reserved for future
development.
access to Connect to Service.
66
The Configuration Features section pertains to the look of the iNEWS
Workspace.
• Toolbars – The Toolbars check box determines whether the
user can create custom toolbars.
• Color Highlights– The Color Highlights check box determines
whether the user can customize the highlighting
status colors in the queue.
• Highlight Read ...– The Highlight Read Stories check box specifies
that unread stories in the queue are highlighted on
the user’s screen. The highlight is removed when
the cursor is positioned on the story.
The Queue Features section pertains to access privileges in the Queue
panel of the iNEWS Workspace.
• Reorder Stories – The Reorder Stories check box determines
authority to alter the order of the stories in a
queue.
Page 87

Password
Modifying User Traits
• Create/Kill ... – The Create/Kill Folders/Queues check box
determines authority to create or delete queues and
folders (directories) in the database file structure,
as seen in the Directory panel of the iNEWS
Workspace.
• Kill All Stories – The Kill All Stories check box determines
authority to delete all stories from a queue at one
time. The data is actually moved from the selected
queue to the DEAD queue where it remains (and
can be accessed) until purged.
See “Changing a User’s
Password” on page 68
for more information.
User Preferences...
Get from Template...
• Password – The Password button opens a dialog box that you
can use to set up or change the password
protecting access to the user account.
• Force Change – The Force Change check box determines whether
the user is forced to change the assigned password
the next time he logs on.
The User Preferences button is used to view and/or modify a user’s
preferences, such as keyboard, printer, and confirmation settings. See
“User Preferences” on page 69 for more information.
The Get from Template button is only used when copying the traits of one
user’s account to another. See “Adding a New User Account” on page 84
for more information.
67
Page 88

Chapter 4 Users
Changing a User’s Password
To change a user’s password:
1. Click the Password button in the Modify User Account dialog box,
shown in Figure 7 on page 63.
The Change User’s Password dialog box appears:
2. Type the password in the New password field.
3. Confirm the new password by retyping it in the Confirm new password
field.
68
n
The password must be a minimum of five alphanumeric characters (and a
maximum of 12 characters) with no spaces. Use the system profile to set or
change a required length for all passwords for your site.
4. Do one of the following:
t Click OK to store the password for saving after all modifications
to the user’s account are done. This will close the dialog box. The
process of saving the password is only completed after the OK
button on the Modify User Account dialog box is also clicked.
t Click Cancel to close the dialog box without saving changes.
Page 89

User Preferences
To change user preferences:
Modifying User Traits
1. Click the User Preferences button in the Modify User Account dialog
box, shown in Figure 7 on page 63.
The Preferences dialog box will appear, containing several tabs.
n
System administrators can use the Preferences dialog box to set up default
preferences for users, such as a default printer. However, the Preferences
dialog box is—by default—accessible to users, so they can alter these
settings at any time. To learn how the system administrator can limit
access to this dialog box and its features, see “Simplified Users” on
page 78.
2. Modify the preference settings on each tab as needed. The settings are
described in detail in the next sections of this chapter.
3. Do one of the following:
t Click OK to store the preferences for saving after all modifications
to the user’s account are done. This will close the dialog box. The
process of saving the preferences is only completed after the OK
button on the Modify User Account dialog box is also clicked.
t Click Cancel to close the dialog box without saving preference
changes.
69
Page 90

Chapter 4 Users
Session Tab
The Session tab has two sections, which system administrators can use to
set up default user preferences.
70
• Keyboard – The keyboard drop-down list contains a list of
keyboards (or sets of macros) that can be assigned
to the user account as a default for when he logs
in. The Reload button allows the keyboard
assignment to take effect without having the user
log off and back on.
• Printing – The Printing drop-down lists contain two lists: one
of Printers and another of pre-defined Styles that
can be assigned to the user account as defaults for
when he prints data from an iNEWS Workstation.
Page 91
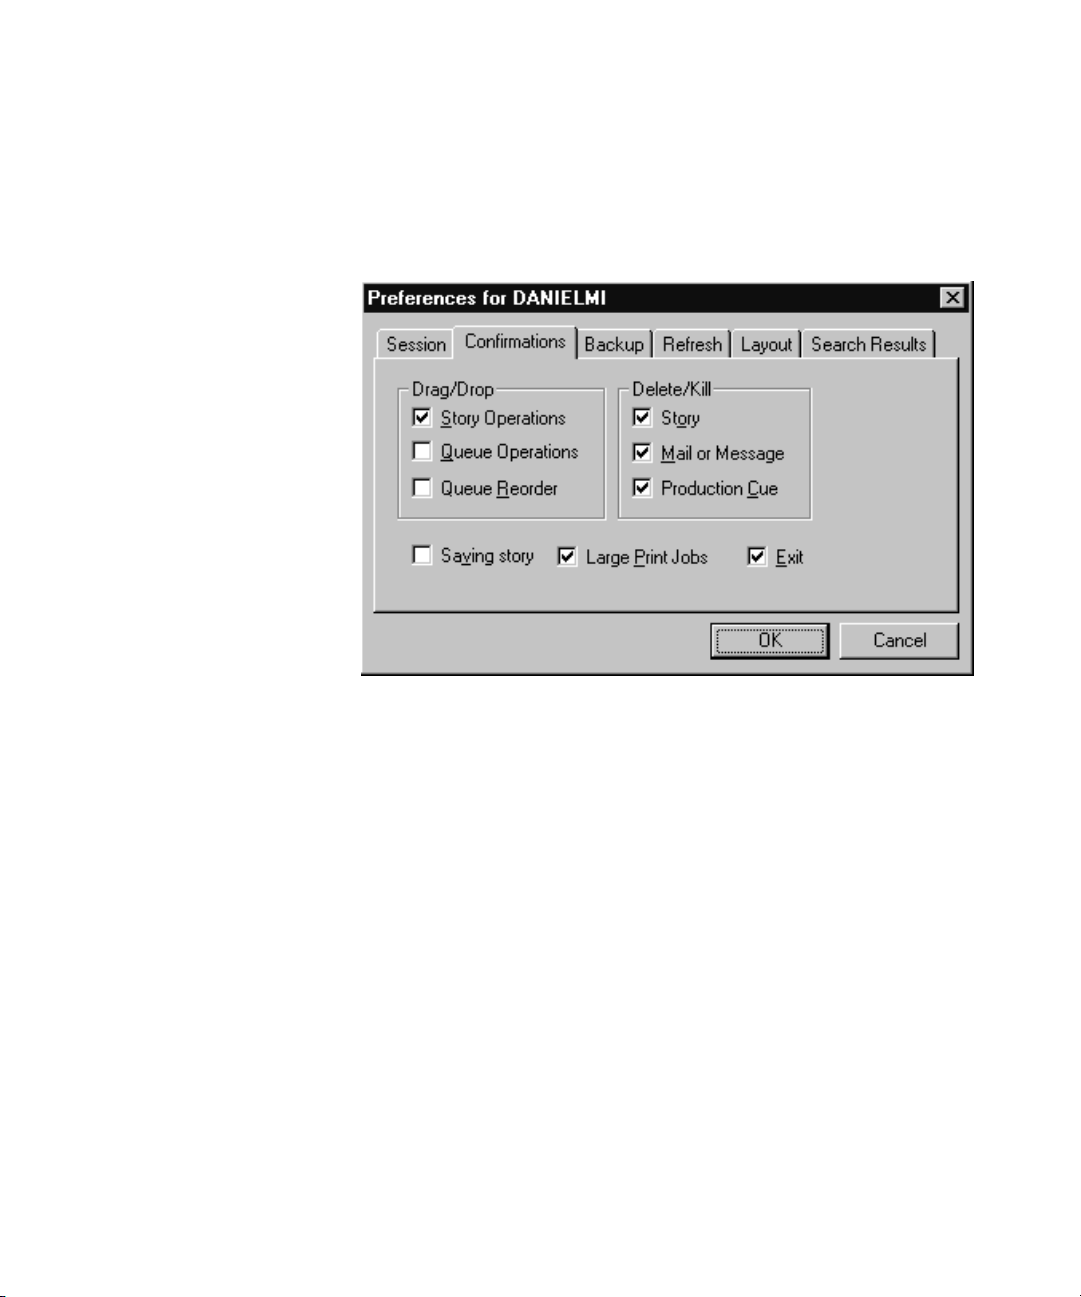
Confirmations Tab
Modifying User Traits
The Confirmations tab is divided into sections and contains check boxes
that determine whether iNEWS NRCS prompts the user to confirm a
request before completing the command.
• Saving Story – When Saving Story is checked, iNEWS
Workstation will display a confirmation message
to save changes before closing an edited story. If
you do not select the Saving Story check box, the
system automatically saves changes before closing
stories.
• Large Print Jobs– When Large Print Jobs is checked, iNEWS
Workstation will display a confirmation message
before sending potentially large print jobs to the
printer, such as the text of all stories in a queue.
• Exit – When Exit is checked, iNEWS Workstation will
display a confirmation message when the user
attempts to close the iNEWS NRCS program at
the workstation.
71
Page 92

Chapter 4 Users
Drag/Drop section
• Story Operations– When Story Operations is checked, iNEWS
Workstation will display a confirmation message
before moving a story when you use the mouse to
drag it to its new position.
• Queue Operations– When Queue Operations is checked, iNEWS
Workstation will display a confirmation message
before moving all stories in a queue when you use
the mouse to drag them to their new position.
• Queue Reorder – When Queue Reorder is checked, iNEWS
Workstation will display a confirmation message
before moving a story to a new location in the
same queue.
Delete/Kill section
• Story – When Story is checked, iNEWS Workstation will
display a confirmation message before deleting a
story or stories.
A production
cue marker
(shown here)
appears in the Story
Text panel. These
markers are also known
as grommets.
72
• Mail or Message – When Mail or Message is checked, iNEWS
Workstation will display a confirmation message
before deleting e-mail or instant messages.
• Production Cue – When Production Cue is checked, iNEWS
Workstation will display a confirmation message
before deleting a production cue and its marker
from a story.
Page 93
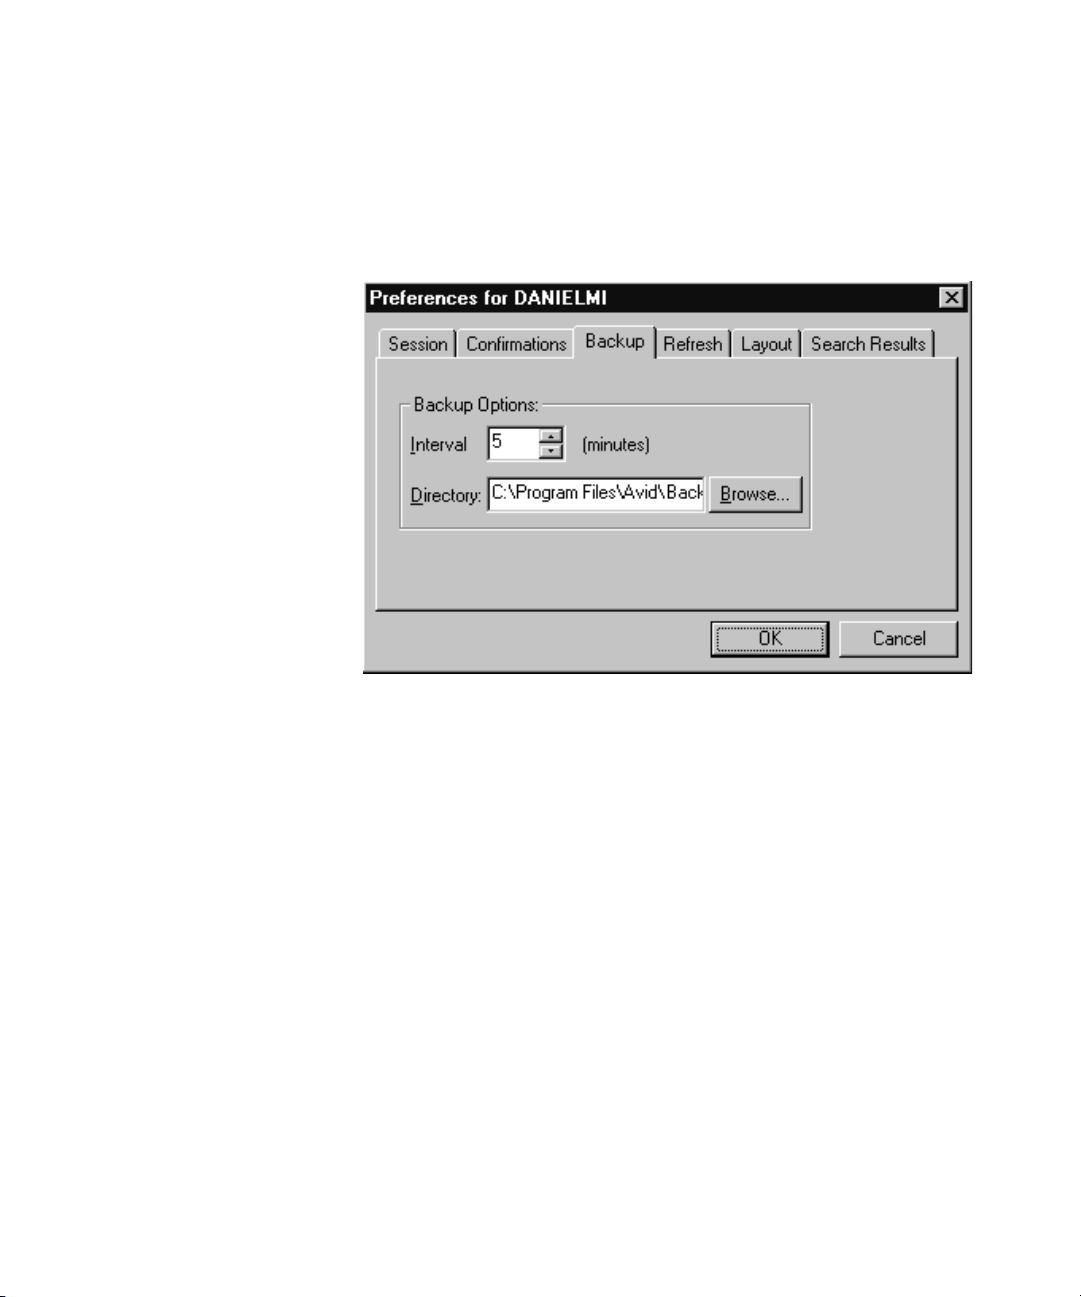
Backup Tab
Modifying User Traits
The Backup tab defines the settings for the iNEWS Workstation to
automatically back up work in a current session to a specified location at
specific time intervals.
Refresh Tab
• Interval – Interval specifies the number of minutes between
story backups. The default is 10 minutes. Set the
interval to 0 (zero) minutes to turn off the
automatic backup feature.
• Directory – Directory specifies the path name—the location in
which iNEWS Workstation should store backup
copies of stories. The location should be a
directory (folder) on the harddrive of the local
PC/workstation. You can type the path in
manually, or click the Browse button to select the
directory from the Browse dialog box.
The Refresh tab sets the seconds for refreshing the screen at the
workstation.
73
Page 94

Chapter 4 Users
n
This preference is unique because it only affects the workstation on which
it is set.
Set the number to zero (0) for instant updating—that is, if you do not want
to delay refreshes.
74
Page 95

Layout Tab
Modifying User Traits
The Layout tab is divided into sections and contains buttons and check
boxes that determine the layout of panels and workspaces in the iNEWS
Workstation main window.
• Start in Session – The Start in Session field specifies the default
session that will appear on screen when the user
logs in to iNEWS Workstation.
• Get Current – The Get Current button will reset the preferences
on the Layout tab to what was set when the dialog
box opened.
Arrangement section
•
– iNEWS Workstation, depending on which
Arrangement button is selected, will display
the panels of the iNEWS Workspace accordingly.
• Zoom – When Zoom is checked, iNEWS Workstation will
display the iNEWS Workspace in zoom
mode—that is, zoomed into one of the three
panels: Directory, Queue or Story.
75
Page 96

Chapter 4 Users
• Hide Form – When Hide Form is checked, iNEWS Workstation
will display the Story panel with its Story Form
panel hidden. The user can choose to show the
Story Form panel by selecting the option to show
the form from the Story drop-down menu.
Gridlines section
• Horizontal – When Horizontal is checked, iNEWS Workstation
will display horizontal gridlines between rows in
the Queue panel.
• Ve rt ic al – When Vertical is checked, iNEWS Workstation
will display vertical gridlines between columns in
the Queue panel.
Preview Lines
• Use Default – When Use Default is checked, iNEWS
Workstation will display the default number of
preview lines for each story in the Queue panel as
defined by the queue’s properties. When Use
Default is not checked, every queue will display
only one line of information per story in the Queue
panel.
76
n
Users can manually override the Preview Lines setting by selecting the
Story Preview option in the View drop-down menu. In the Story Preview
dialog box, the user can override the default setting by typing in a number
in the Lines to preview field. This overrides the setting for the queue while
displayed. Once the user exits the queue, the queue’s default setting is
reinstated. If the user wants to return to the default setting manually (as
defined in the queue’s properties), the user can click the Default button in
the Story Preview dialog box.
Page 97

Modifying User Traits
The following figures show the difference between Queue panel displays
with and without Preview lines. The first is the display using the default of
seven preview lines, as defined in the queue’s properties.
The second figure shows the Queue panel display without preview lines.
This is the view when “Use Default” is unchecked, unless otherwise
specified.
77
Page 98

Chapter 4 Users
Search Results Tab
The Search Results tab allows you to set the default form used in the
Queue panel of the Search Results workspace.
Simplified Users
78
• Use form – iNEWS Workstation will use the form selected
from the Use form drop-down list when displaying
the results from searches in iNEWS NRCS. The
forms you can choose from are those created and
stored in SYSTEM.FORMS. See “Creating Forms”
on page 204 for more information.
A simplified user is one that has certain limitations pertaining to the
iNEWS Workstation. As the system administrator, you can define the
limitations and then assign them to users. Only one set of limitations can
be defined, which is then applied to all user accounts with the simplified
user trait. In other words, either a user account has the simplifed user trait,
with its designated limitation settings, or it does not.
Some of the Simplified User Settings lock the user’s preferences to those
defined by the system administrator using the Preferences dialog box. See
“User Preferences” on page 69 for more information.
Page 99

Modifying User Traits
To set up or modify the simplified user limitations:
1. Access the Modify User Account dialog box as explained in “Viewing
User Accounts” on page 60. An example of the dialog box is shown in
Figure 7 on page 63.
2. Click the Simplified UI button.
The Simplified User Settings dialog box appears.
n
Workspaces Section
The dialog box divides the settings into two sections, which are
explained in the next sections of this chapter.
3. Select or deselect check boxes, as required.
4. Click the OK button to save the settings and close the Simplified User
Settings dialog box.
Use the Reset button to discard changes and reset the check box settings to
what they were when the dialog box opened.
The Workspaces section of the dialog box provides settings that pertain to
the arrangement and quantity of workspaces within the iNEWS
Workstation’s main window.
• Limit Number to:– When Limit Number to is checked, iNEWS
Workstation will prevent the user from opening
more workspaces than the number specified. This
limit does not apply to the workspaces opened
using the Urgent Wire and Mail buttons. However,
79
Page 100

Chapter 4 Users
this does lock the Urgent Wire workspace so the
user is unable to navigate to other queues or
directories in that workspace.
• Lock Arrange – When Lock Arrange is checked, iNEWS
Workstation will prevent the user from altering the
arrangement of panels in the Workspace. This
disables the Arrangement buttons on the standard
Layout toolbar. The setting is locked into the
default arrangement as defined in the user’s User
Account Preferences.
• Lock Layout – When Lock Layout is checked, iNEWS
Workstation will prevent the user from altering the
layout of workspaces in the iNEWS Workstation
main window. This disables the Layout buttons on
the standard Layout toolbar. The setting is locked
into the default layout as defined in the user’s User
Account Preferences.
• Lock Zoom – When Lock Zoom is checked, iNEWS
Workstation will prevent the user from altering the
zoom of panels in the iNEWS Workspace. The
setting is locked into the default as defined in the
user’s User Account Preferences.
Application Section
80
The Application section of the dialog box provides settings that pertain to
accessing certain iNEWS features at any workstation.
• Lock Toolbars – When Lock Toolbars is checked, iNEWS
Workstation will prevent the user from altering the
display of toolbars.
• Lock Sessions – When Lock Sessions is checked, iNEWS
Workstation will prevent the user from creating or
altering sessions. The user will be locked to
sessions created prior to the Lock Sessions being
applied to the user account.
 Loading...