

Page 1

Introduction
Thank you for purchasing Pinnacle Systems’ HollyÂ-wood FX. Hollywood FX is a powerful editor
of 3D transitions, titles and animated effects. Since 1994 this product has provided many of the same
capabilities as broadcast television equipment and high-end compositors. It gives you an incredible
collection of 3D transitions that you can quickly add to your video productions, and completely
customize to your needs. The topics below will introduce you to Hollywood FX, provide instructions for
installation and give contact information for customer support.
This is a general guide to using Hollywood FX. If you received Hollywood FX as part of a complete
Pinnacle Systems’ solution, you should first read the Hollywood FX
documentation accompanying that solution.
ð What is Hollywood FX?
ð Hollywood FX levels
ð Before you start
ð Installing Hollywood FX
ð Licensing and registration
ð Customer support
Page 1
Page 2

What is Hollywood FX?
Hollywood FX is an incredible collection of true 3D transitions and effects that you can add to any video
production. Hollywood FX works as an integrated plugin to your video editing software (the “host
application―). Hollywood FX is:
·
True 3D: Hollywood FX uses OpenGL to provide hardware accelerated, high quality 3D rendering.
·
Easy to use: Simply drag-and-drop Hollywood FX into your timeline like any other transition or filter.
The Hollywood FX window will appear and you can select a transition, change your options, or
customize an effect.
·
Organized: Transitions are organized into conveniÂ-ent bin categories with icons that let you find the
transition you want quickly.
·
Convenient: With every transition you can quickly change the flight direction, lighting, shadows, shine
and antialiasing with the click of your mouse.
·
MultiWindow excitement: Hollywood FX supÂ-ports unlimited video sources to create multi-layer 3D
composites. Create cubes with different video sources on each side, and much more.
·
Expandable: Additional theme packs of 3D transitions, effects, plug-ins and more are available through
Pinnacle Online, and Hollywood FX PRO lets you share your own creations with other users. Visit
Pinnacle Online at:
hollywoodfx.pinnaclesys.com
Page 2
Page 3

Hollywood FX levels
There are two levels of Hollywood FX for Edition:
· Plus: This version is included with Edition 5 and includes 300 FX plus advanced control over
lighting, light direction, shadows, shine, motion blur, trails, antialiasing and more. Plus
lets you customize any transition with full keyframe editing of flight paths, object shape (morphing) and
transparency of objects.
· PRO: Gives you more than 100 additional transitions (over 400 total) and gives you complete
control over all 3D rendering options. PRO
provides a complete suite of 3D tools to create your own 3D transitions and effects:
·
Complete keyframe editing of all object, surface, light and camera attributes in a full 3D editing
environment.
·
Includes a suite of image filters including: Blurs, Directional Wipe, Edge Wipe, Gradient Wipe and
Luma and Chroma key.
·
Includes a powerful suite of 3D warp plugins including: Alpha Particles, Displace, Explode, Peel,
PolyShrink, Swirl and Twirl.
·
Adds an incredible 3D text generator that lets you create amazing 3D text fly-ons.
·
Import your own 3D objects (Lightwave 5 format) to create completely unique 3D effects.
·
Share your customized effects with others by exporting a simple self-installing compressed file that
contains the effect and all objects and images needed for that effect.
You can easily and instantly upgrade between these levels over the Internet at Pinnacle Online or
purchase packaged upgrades from your video reseller.
This is a complete guide for both the Plus and PRO levels of Hollywood FX. Sections and features only
available in PRO are marked with
PRO .
Page 3
Page 4

Before you start
Before getting started with Hollywood FX you should have a good working knowledge of your
Windows system. You should be able to use the mouse to select menu options and should understand
and be able to use the common controls.
You should also be thoroughly familiar with your video editing software. You should be able to use clips
in the timeline and understand how to add and modify transitions and filters.
Throughout this document we use the term FX
to refer to the transitions and effects in Hollywood FX. This term generically describes the following
types of transitions and effects:
·
Transition: These are standard A-B transitions, where one video source transitions into a second.
· Transition+: These are also A-B transitions; however, they may have additional video channels that
can be mapped with video. For example, the FlipOver FX
features the first video source flipping over like a card to reveal the second video source. There is a third
video source that is visible in the background as the “card― flips over.
·
MultiWindow: These effects are not transitions at all. Instead, windows of video may fly on or off the
screen into various positions while playing your video.
·
AniComps: These are effects that frame a picture, provide 3D titles and accentuate a video segment
through animated composites.
Page 4
Page 5

Installing Hollywood FX
If Hollywood FX was included in a Pinnacle Systems’ solution, it will be installed automatically with
that product, and you can skip this section.
Before installing Hollywood FX, verify that you have the correct minimum requirements:
·
PC-compatible computer with at least a 300 MHz (Intel Celeron/Pentium II, or AMD Duron/Athlon
class processor).
·
Windows 98 Second Edition, Windows ME, Windows 2000, or Windows XP.
·
64 MB RAM (more may be required by your video editing software). For multi-window effects, 128
to 256 MB (or more) is recommended.
·
At least 200 MB hard disk space.
·
16-bit or 24-bit display adapter. A 3D OpenGL accelerator is recommended.
To install Hollywood FX:
1.
Insert the Hollywood FX CD into your CD-ROM drive. The main installation menu for your
software will appear.
2. Select Install Hollywood FX
. The Language Selection dialog will appear.
3. Select your preferred language then click OK
. The Serial Number dialog will appear.
4. Enter the serial number that came with your software (normally found on the first page of this
guide or on the CD-ROM sleeve). Enter the serial number exactly as shown, including dashes, then click
OK
.
5. Click Next
to continue. The Setup Path dialog will appear.
Normally you should accept the default path for installation. Do not select your non-linear editor’s
plug-in path for installation; the installer will automatically install the files needed into your non-linear
editor’s folders. Click Next
to continue. Hollywood FX will be installed on your system.
After installation, the LicenseTool dialog will appear. You have the option to register online immediately
(see Licensing and Registration
).
After installation, you may be required to restart your system.
Page 5
Page 6
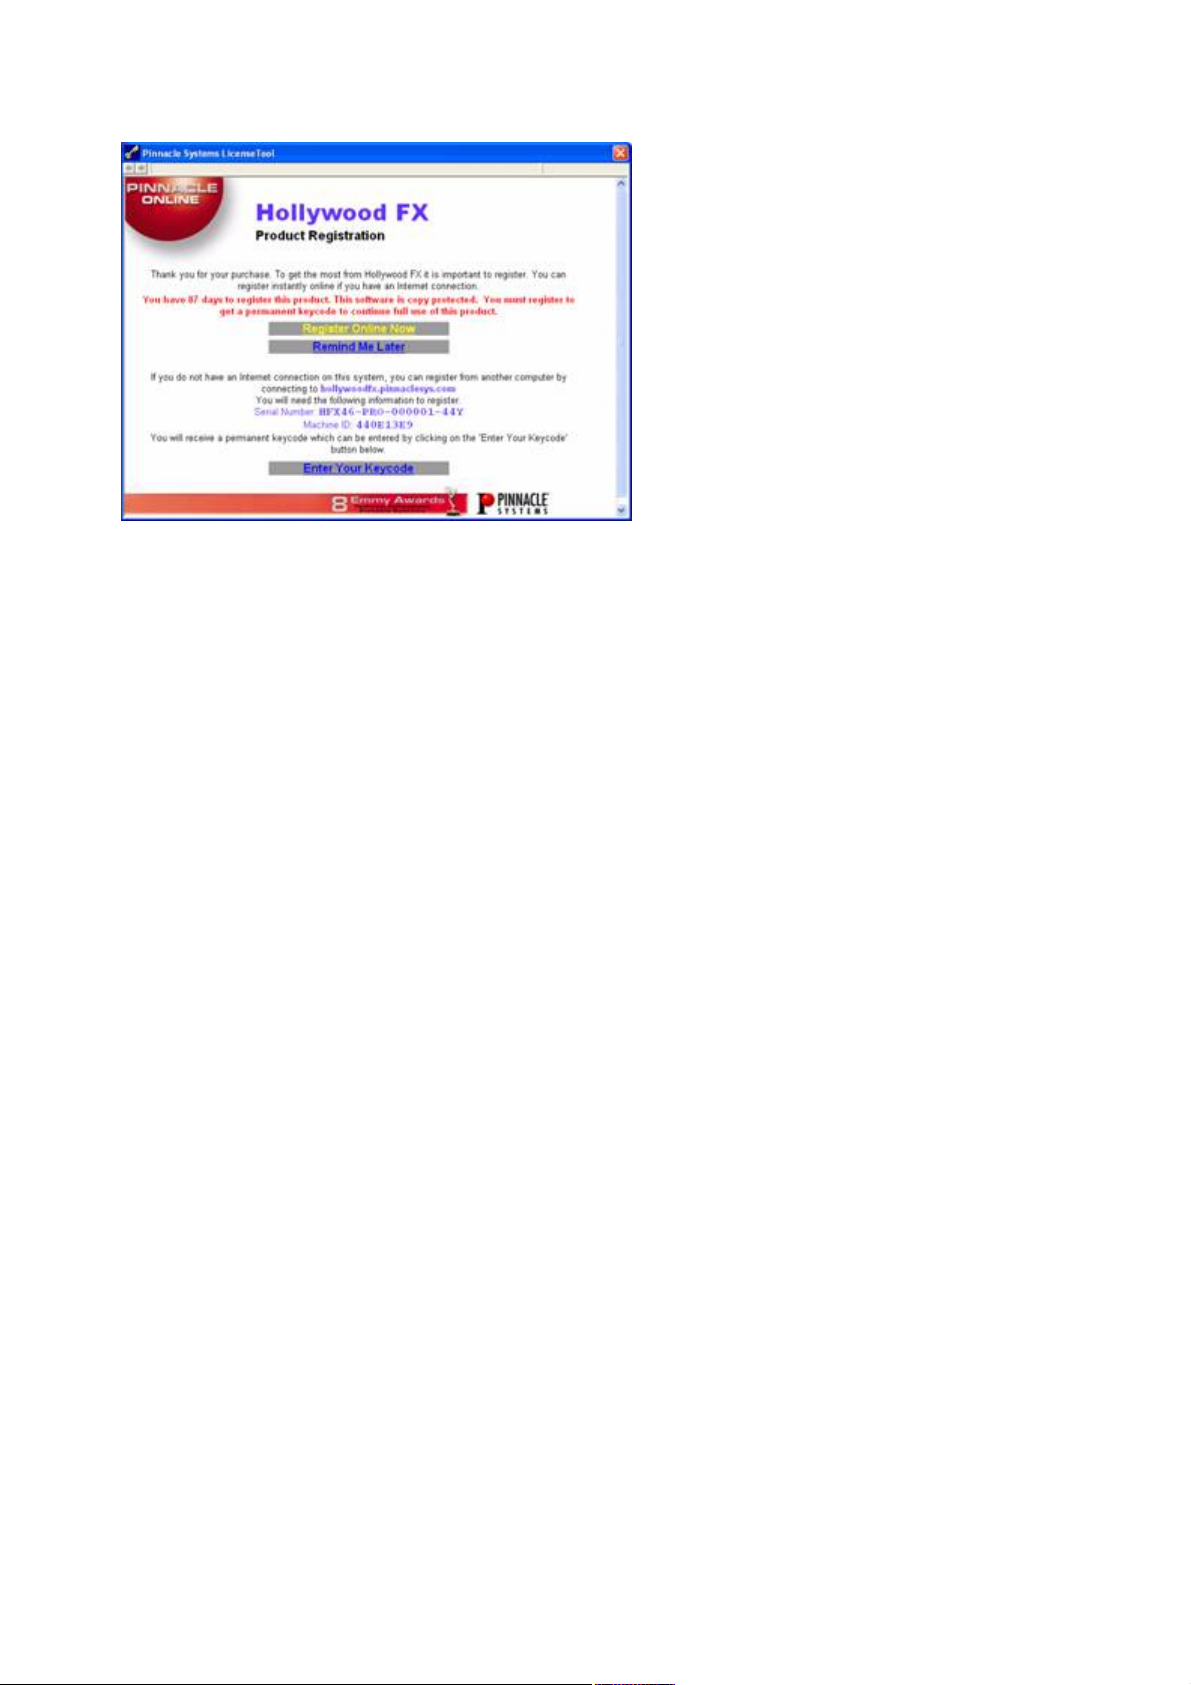
Licensing and registration
The License Tool
Registering your software gives you access to important benefits including current updates, support,
upgrade promotions, and information on exciting new products from Pinnacle Systems.
Hollywood FX Basic and Plus
do not require registration, but will continue to remind you until you have registered your software.
Hollywood FX PRO is copy protected, and users must
register within 90 days to continue using the software.
When you register a Hollywood FX product, you will receive a permanent keycode that fully enables
Hollywood FX on a particular computer and stops the registration reminders.
You can register from any Internet-enabled computer by connecting to hollywoodfx.pinnaclesys.com
. If you do not have your own Internet-enabled computer, you can register from any computer that is
connected to the Internet (from a library or Internet café for example).
If you reformat your system drive and reinstall the operating system or move Hollywood FX to a new
computer, you will need a new permanent keycode, which you can obtain at
hollywoodfx.pinnaclesys.com
.
Page 6
Page 7

Customer support
Pinnacle Systems is dedicated to providing the best products and the best customer support.
For fastest support, point your browser to:
http://www.pinnaclesys.com/support
Please note: Pinnacle Systems cannot provide support for using your non-Pinnacle video editing
software. You should first make sure you fully understand the operation of your other software before
calling. You should also look through the read-me file and the Troubleshooting
section of this guide before contacting customer support.
Page 7
Page 8

Getting started
The topics linked below will help you get started using Hollywood FX in Pinnacle’s Edition and
Liquid – the “host applications―. The basic procedure for adding and modifying Hollywood FX
transitions and filters is described, along with hints and tips.
After this brief introduction, first-time users should continue with the tutorials
.
ð Hollywood FX in the application
ð Adding a Hollywood transition
ð Changing an existing HFX transition
ð Using Hollywood FX as a filter
Page 8
Page 9

Hollywood FX in the application
The Hollywood FX effects can be found and inserted into a host application project in various ways.
One way is by selecting the ALL button just below the central bar. This will reveal the tree of various
filters and plugins offered. From here you can either select the primary Hollywood FX icon from the
PlugIn Transition FX if you want to use an FX for transitions. To use an FX as a filter, select the
Hollywood FX icon from Plugin Clip Fx
.
Another way is under RealtimeTransition FX/Specials
. Here, every transition has its own icon that you can simply drag and drop it between two video
sources.
Page 9
Page 10
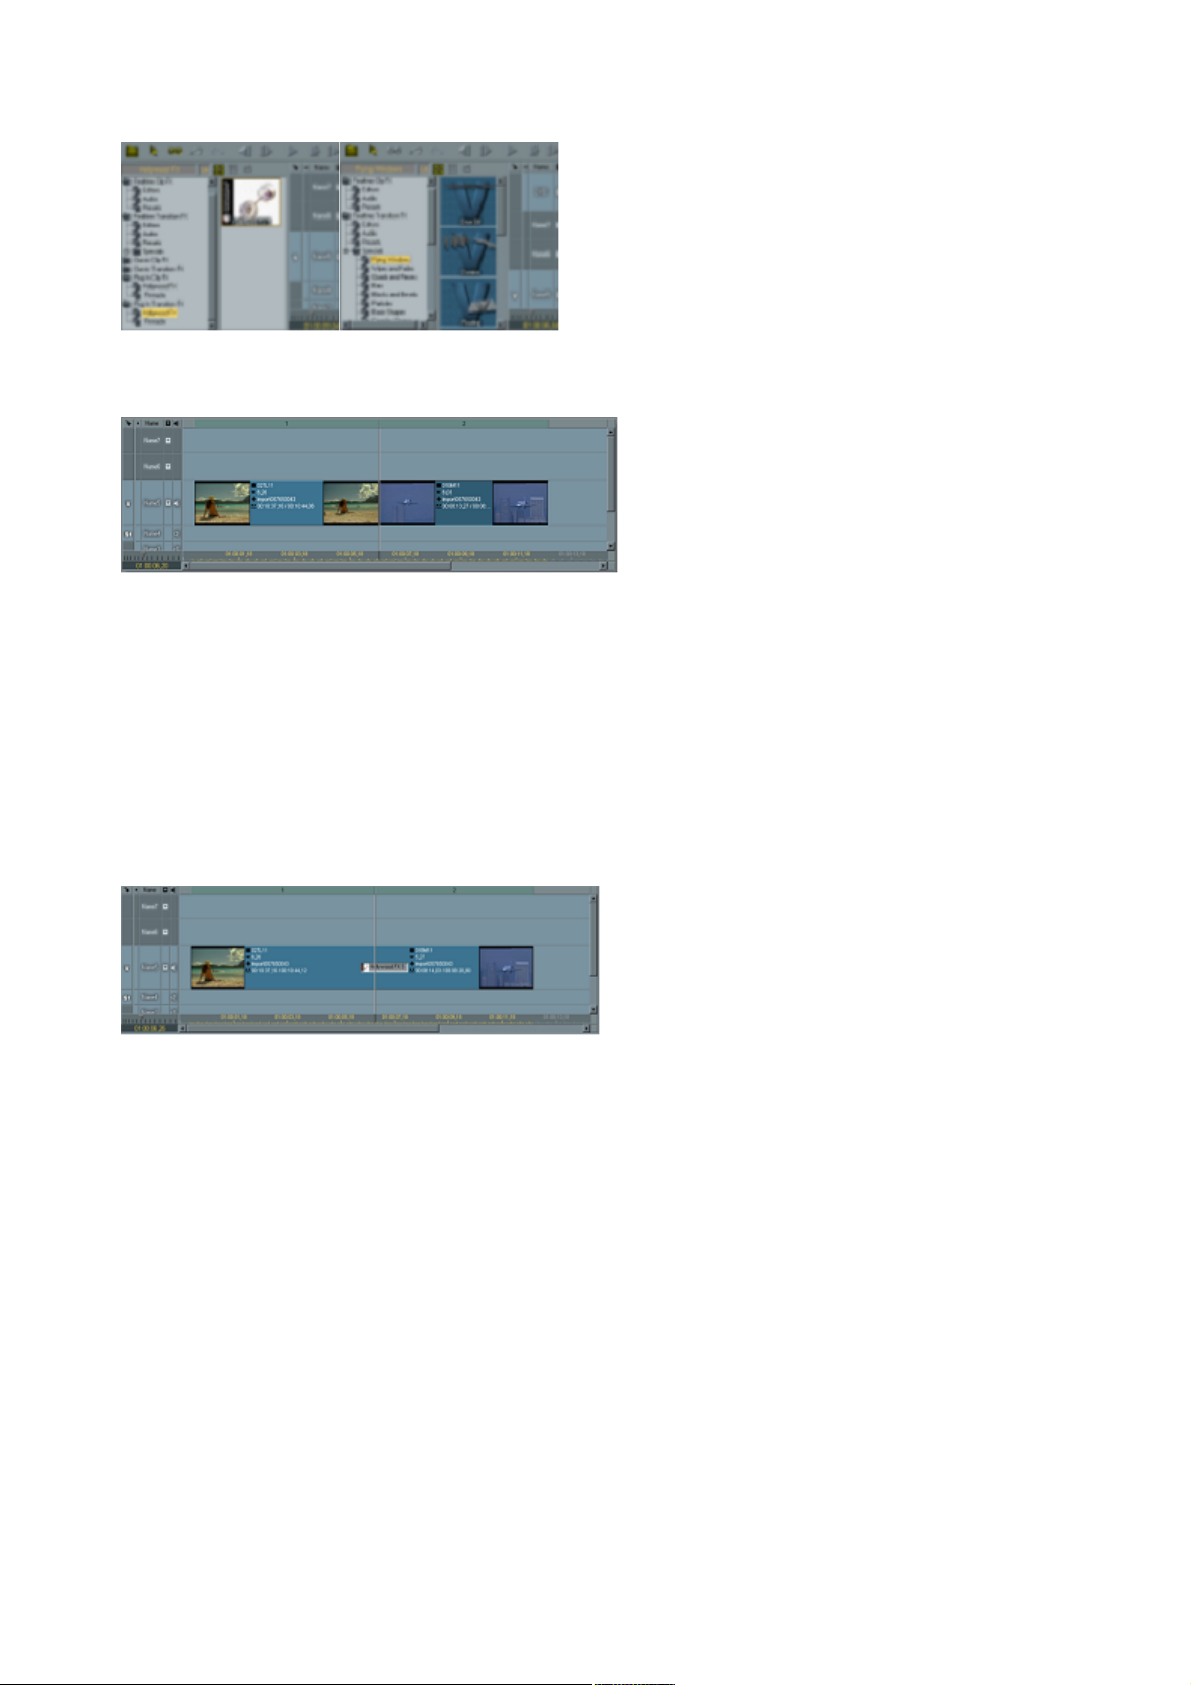
Adding a Hollywood transition
Multiple ways to select a Hollywood FX
Before adding a Hollywood FX transition, prepare two video sources on the A and B tracks of the
timeline, so that there is some overlap between the two video clips.
Timeline prepared for Hollywood FX Transition
To add a transition to the timeline:
1. Click on the Edition.FX tab in the Project window, then double-click on the Plugin Transition
FX folder, and the Pinnacle
group.
2. Drag Hollywood FX
from the Project window into the timeline, between the two video clips.
3. Double-click on the transition block or Right-click on the transition and choose the Edit
... command from the popup menu.
The Hollywood FX dialog will appear, letting you choose a specific transition, and change options for
your transition.
A Hollywood FX Transition in the timeline
Page 10
Page 11

Changing an existing HFX transition
You can modify a transition that is already in the timeline, changing the selected effect or any options at
any time.
To change an existing transition in the timeline:
· Double-click on the transition block; or
,
· Right-click on the transition and choose the Edit
... command from the popup menu.
The Hollywood FX window will appear, letting you choose a specific transition, and change options for
your transition.
Page 11
Page 12
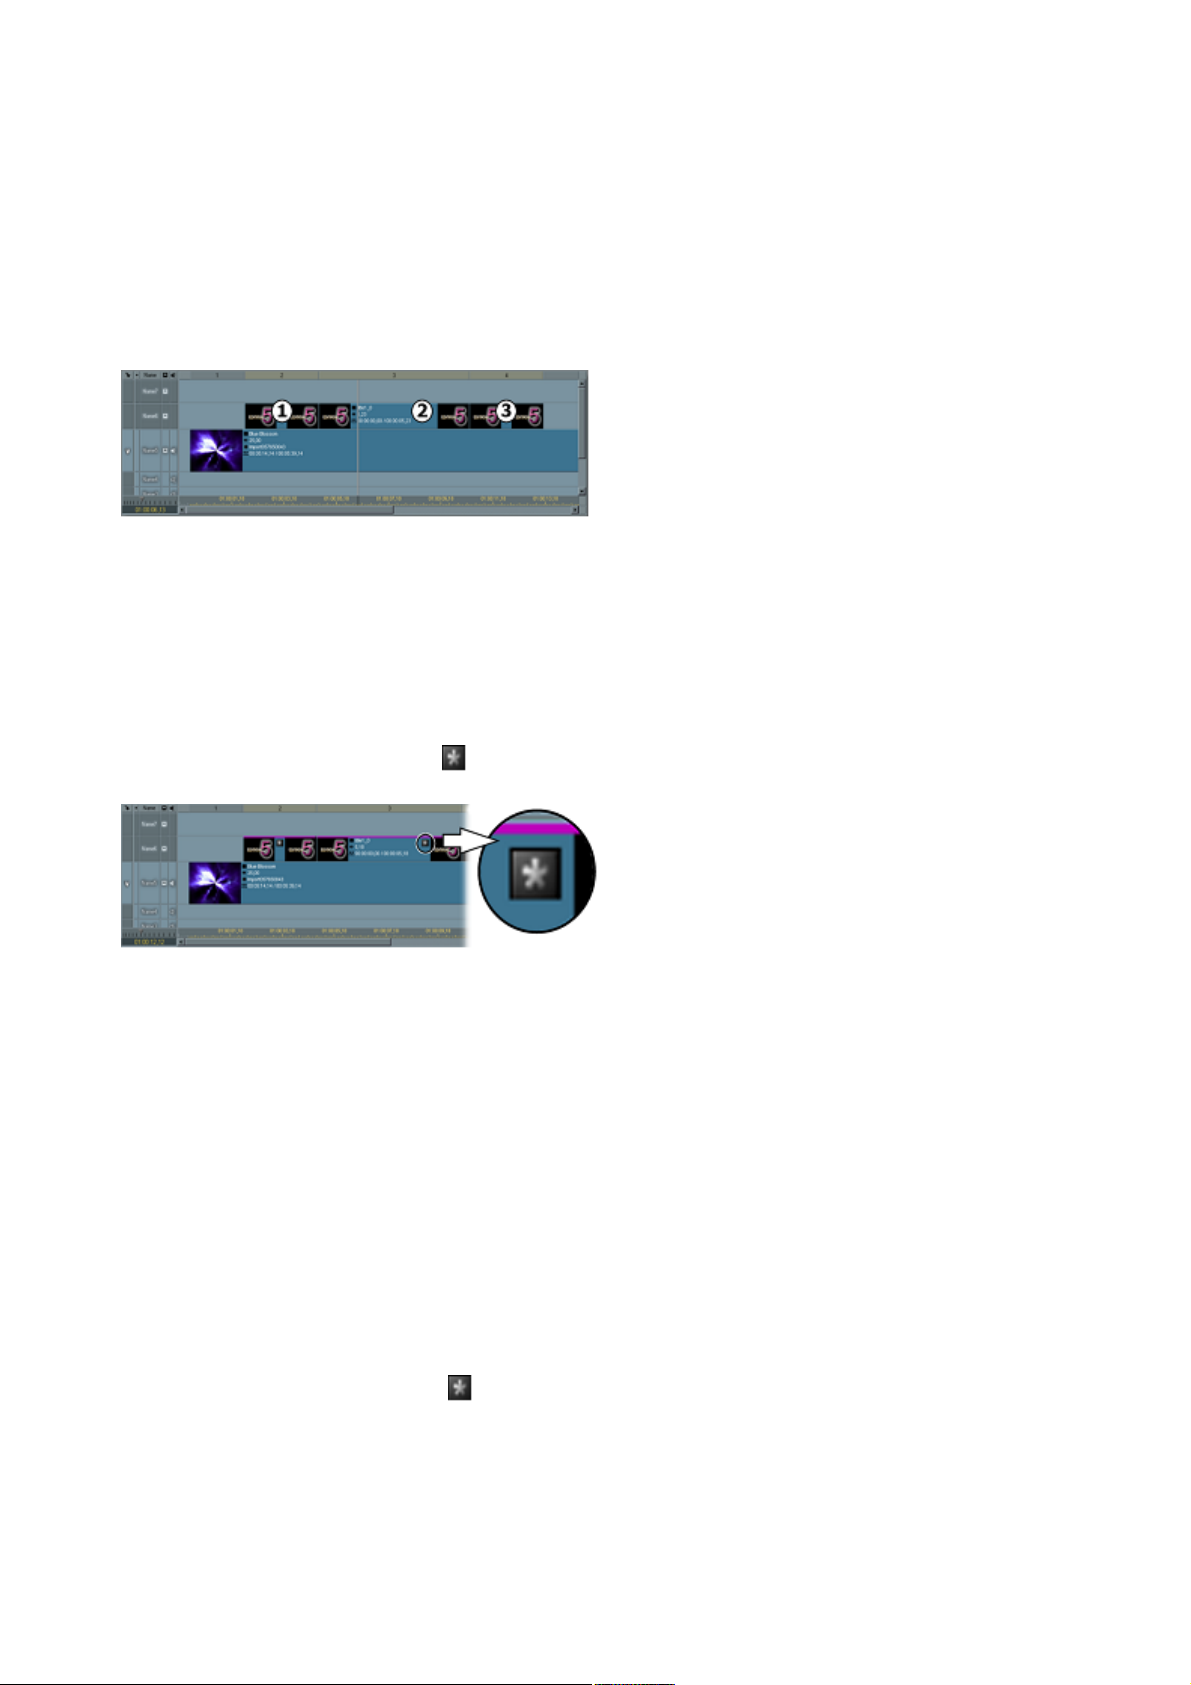
Using Hollywood FX as a filter
Hollywood FX can be used as a filter on a graphic, title, or video clip. Hollywood FX is great for flying
on or off titles over video.
To prepare:
1.
Start a new sequence and drag a video clip into the first video track.
2.
Select a title and drag three copies of it into the timeline, on the video track immediately above the
video clip you dragged into the first track.
The Timeline, ready for a Hollywood FX Filter. (1) The first copy of the title will fly on over the
video clip; (2) The second will simply be overlaid on the clip; and (3) The third will fly off the
screen.
To fly on the title with Hollywood FX:
1. In the Project window, click on the Edition.FX tab, then double-click on the Plug In Clip Fx
folder.
2. Drag the Hollywood FX 5.0 Filter
from the Project window into the timeline on top of the first copy of the title.
3. Double-click on the asterisk (
) icon on the title clip to display the Hollywood FX window.
The Hollywood FX Filter has been added to the first title clip. Double-click the icon (circled) to
display the Hollywood FX dialog. Right: The icon is shown in a magnified view.
4. Click on the Domino
effect in the first row of the FX Album.
5. Click on Basic Options
in the Properties panel on the left.
6. Check the Reverse Flight
checkbox (this will make the effect fly on instead of fly off).
7. Click OK
to close the Hollywood FX window.
After background rendering is complete, you can play the sequence back and see the title fly on with the
effect selected.
To fly off with Hollywood FX:
1. Drag the Hollywood FX 5.0 Filter from the Project window into the timeline on top of the last
copy of the title.
2. Double-click on the asterisk (
) icon on the title clip to display the Hollywood FX window.
3. Select the Dive Off
effect from the first row of the FX Album.
4. Click OK
to close the Hollywood FX window.
Page 12
Page 13

When background rendering is complete, you can play the sequence back, and you will now see the title
fly on, hold, then fly off.
Page 13
Page 14

Tutorials
Here we present three tutorials that will help you get oriented quickly to using Hollywood FX. Each
tutorial focuses on a different FX
type: Transitions, Transitions+ and MultiWindow.
ð Tutorial 1: Transitions and options
ð Tutorial 2: Transition+
ð Tutorial 3: MultiWindow FX
Page 14
Page 15
Tutorial 1: Transitions and options
This tutorial will take you through the basics of selecting a Transition FX
and setting Effect Options.
To prepare for this tutorial: Set up two video clips in your host application and add Hollywood FX as
described in Getting Started
. When the Hollywood FX window appears, you are ready to begin.
The Hollywood FX window
The Hollywood FX window is organized into panels and menus. The first panel is the Properties
panel (by default this panel may be closed upon first use after install). This is where all detail controls are
found.
The second panel is the Monitor panel that displays the preview of the current FX
(the above image shows the monitor selected in Tri-View mode).
Finally, the lower half provides access to the Album folders. One is for selecting property controls for
Objects, Plug-ins, Media, Camera and Lights. The other is for selecting from the many categories of FX
.
ð Tutorial 1.1: Selecting an FX
ð Tutorial 1.2: The Monitor panel
ð Tutorial 1.3: Basic effect options
ð Tutorial 1.4: Basic flight options
ð Tutorial 1.5: Basic lighting, shadows and shine
ð Tutorial 1.6: Basic render options
Page 15
Page 16
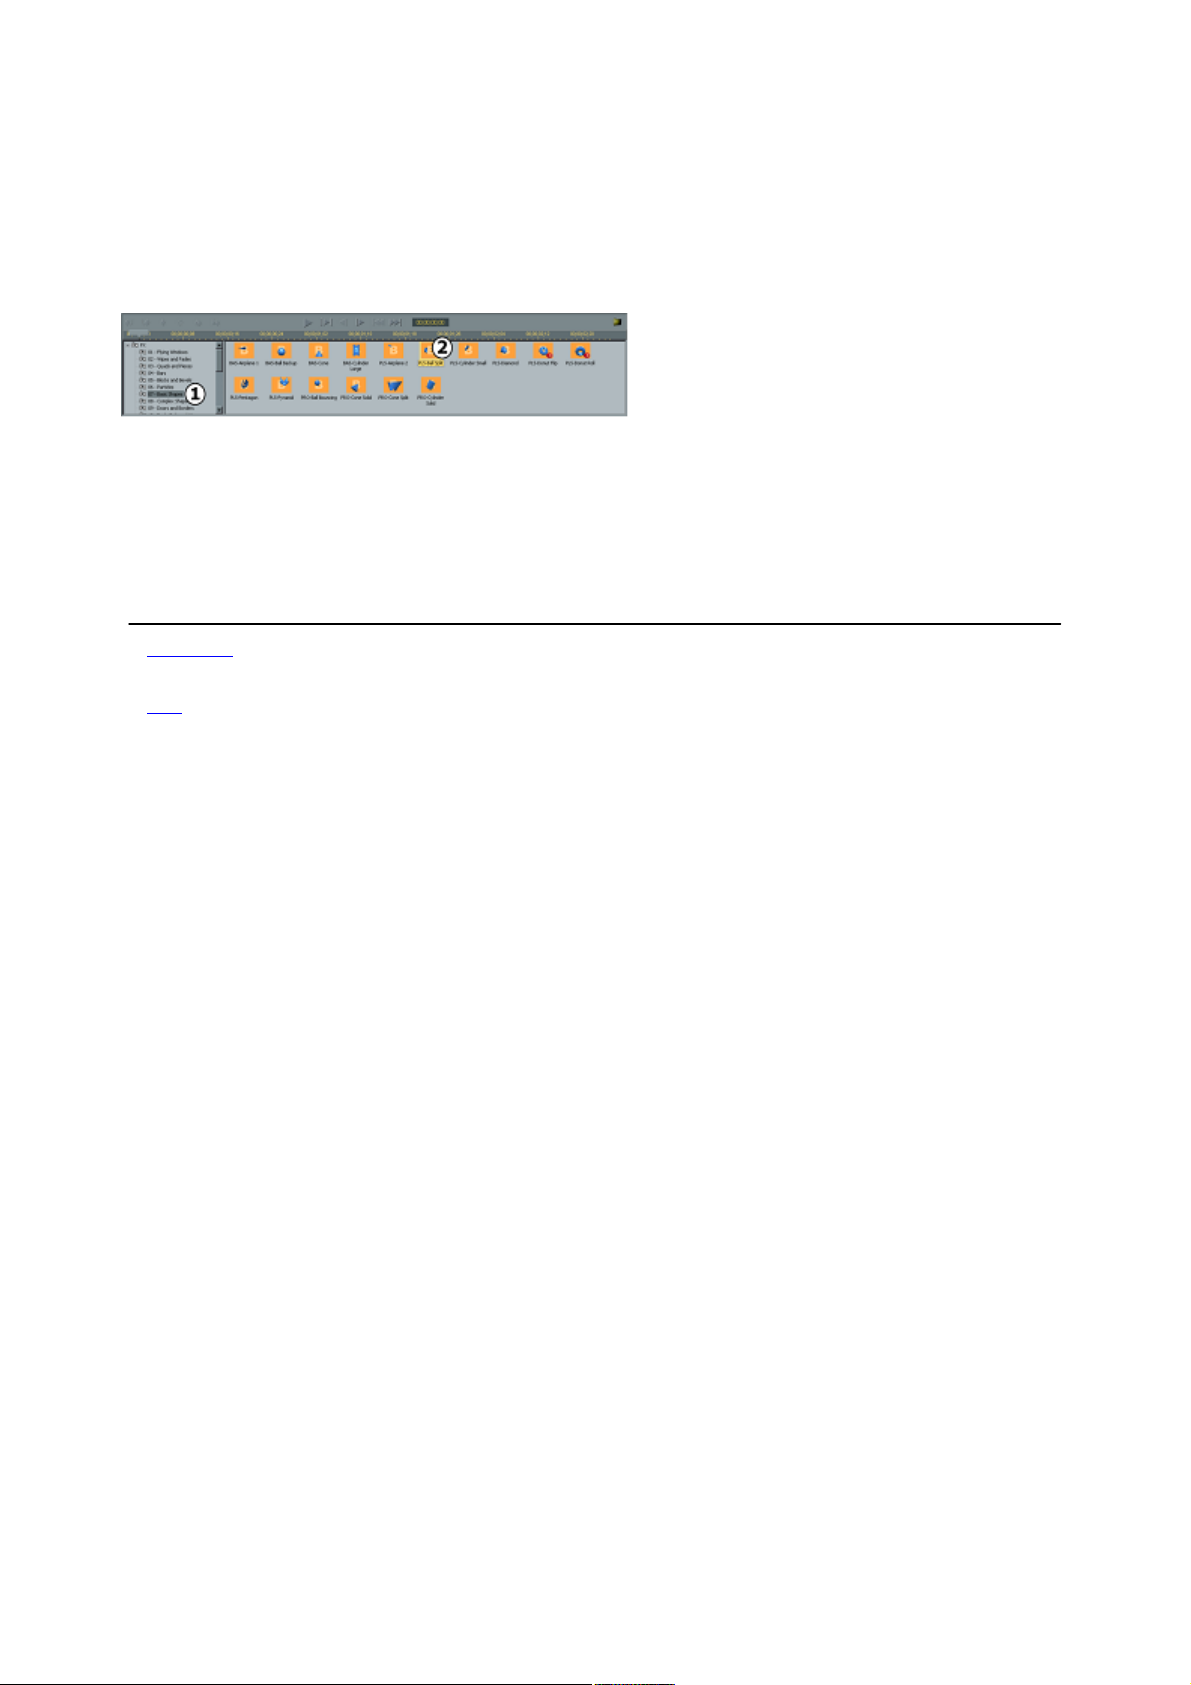
Tutorial 1.1: Selecting an FX
When the Hollywood FX window is displayed, you will immediately see the FX Album Folders (the
FX you chose and the FX Folder it is a part of should be highlighted). The FX Album has two major
panels: the FX Album Folder tree showing the different FX Folders and the panel showing the FX Album
Items of the FX Folders allows you to select one of the many FX available. For this tutorial you will
select an interesting transition called Ball Split. This FX is in the Basic Shape
group.
Selecting a folder (1) and an item (2) in the FX Album.
To select the Ball Split FX
:
1. Select Basic Shapes
from the FX Group popup list.
2. Click on the Ball Split FX
icon.
ð Forward
to Tutorial 1.2
ð Up
to Tutorial 1
Page 16
Page 17
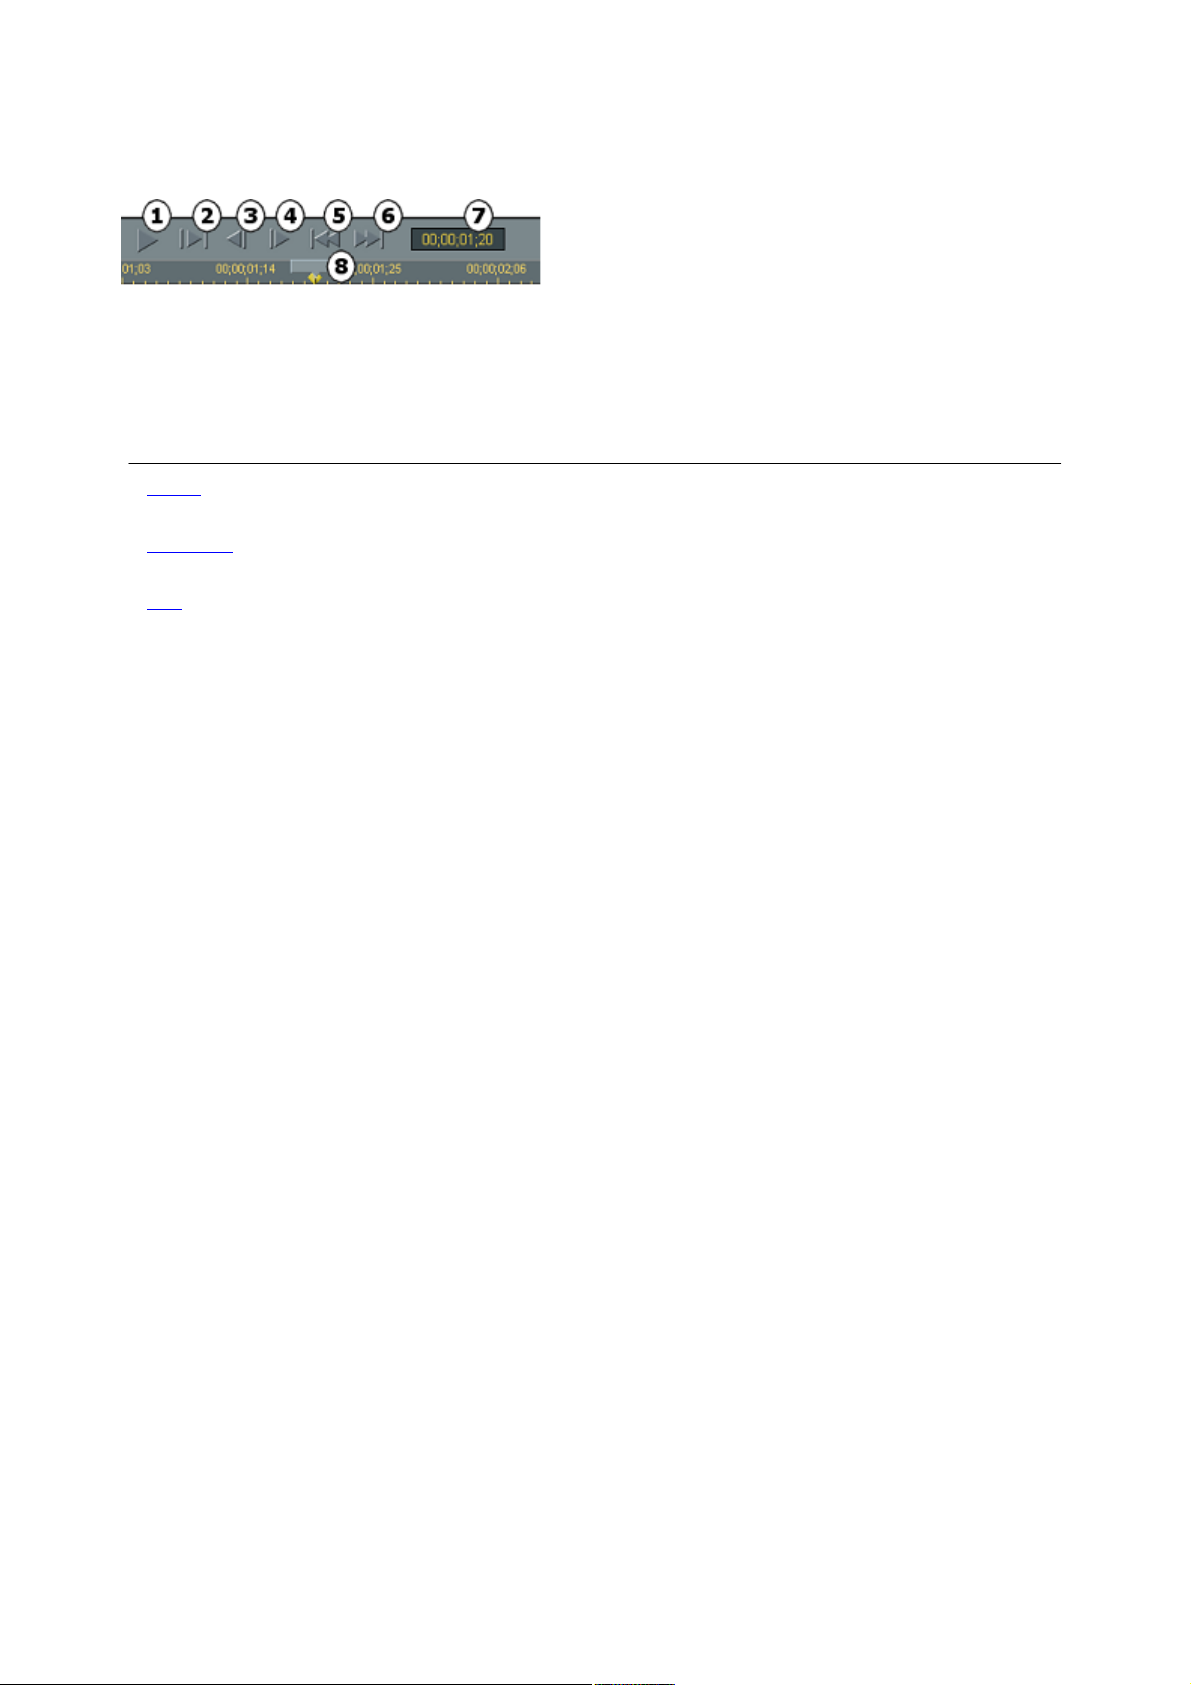
Tutorial 1.2: The Monitor panel
Whenever you make changes in Hollywood FX, the preview window in the Monitor panel is updated.
Try dragging the slider directly below the preview to view different frames of the preview.
Monitor panel: 1) Play entire FX preview once; 2) Loop play: preview continuously as you work (press
again to stop preview); 3) Step backward one frame; 4) Step forward one frame; 5) Go to first frame; 6)
Go to last frame; 7) Frame counter; 8) Timeline slider.
To turn on continuous playback of the preview: click on the Loop Play button below the preview
window in the Monitor
panel.
ð Back
to Tutorial 1.1
ð Forward
to Tutorial 1.3
ð Up
to Tutorial 1
Page 17
Page 18
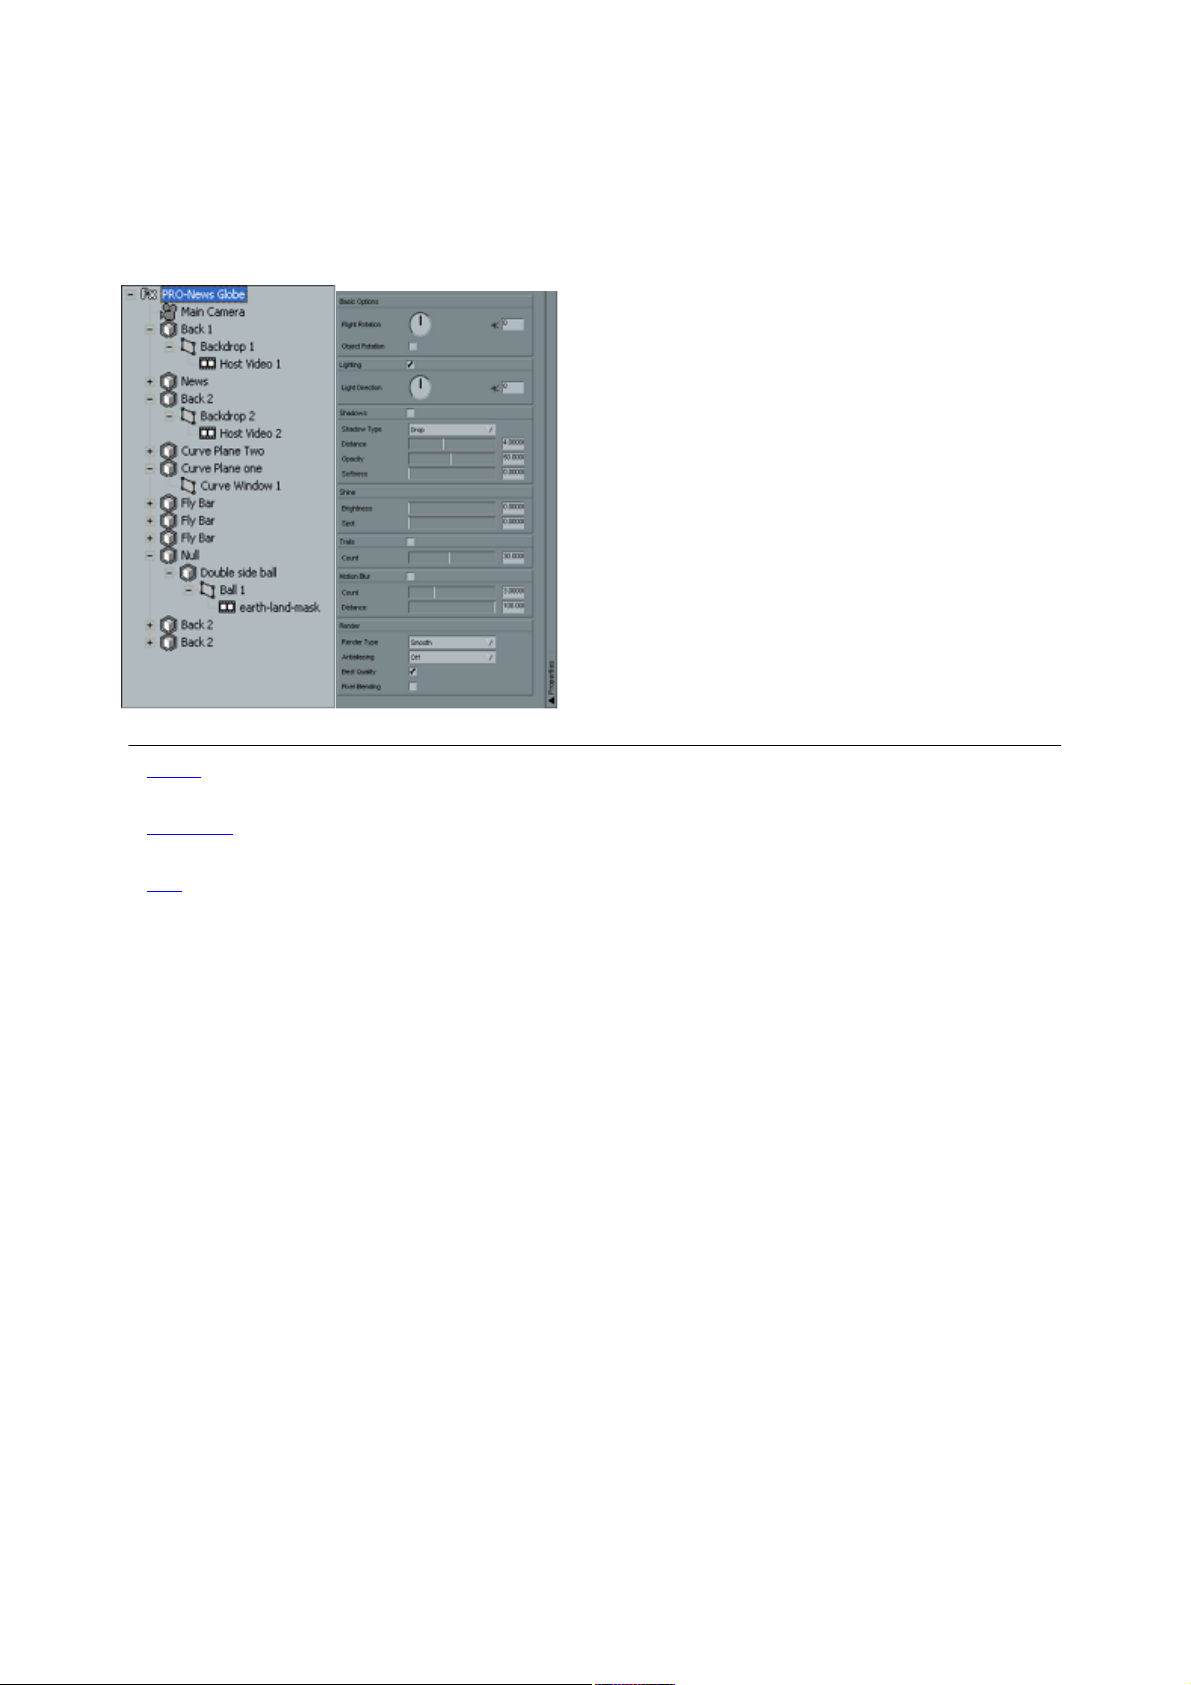
Tutorial 1.3: Basic effect options
Hollywood FX gives you quick and easy control over many FX options. You can create new and
exciting results without having to re-keyframe the entire FX
.
To view the basic effect options: Click on the name at the top of the FX Tree
.
Left: The FX tree. Right: The Basic Options selected in the Properties Panel.
ð Back
to Tutorial 1.2
ð Forward
to Tutorial 1.4
ð Up
to Tutorial 1
Page 18
Page 19
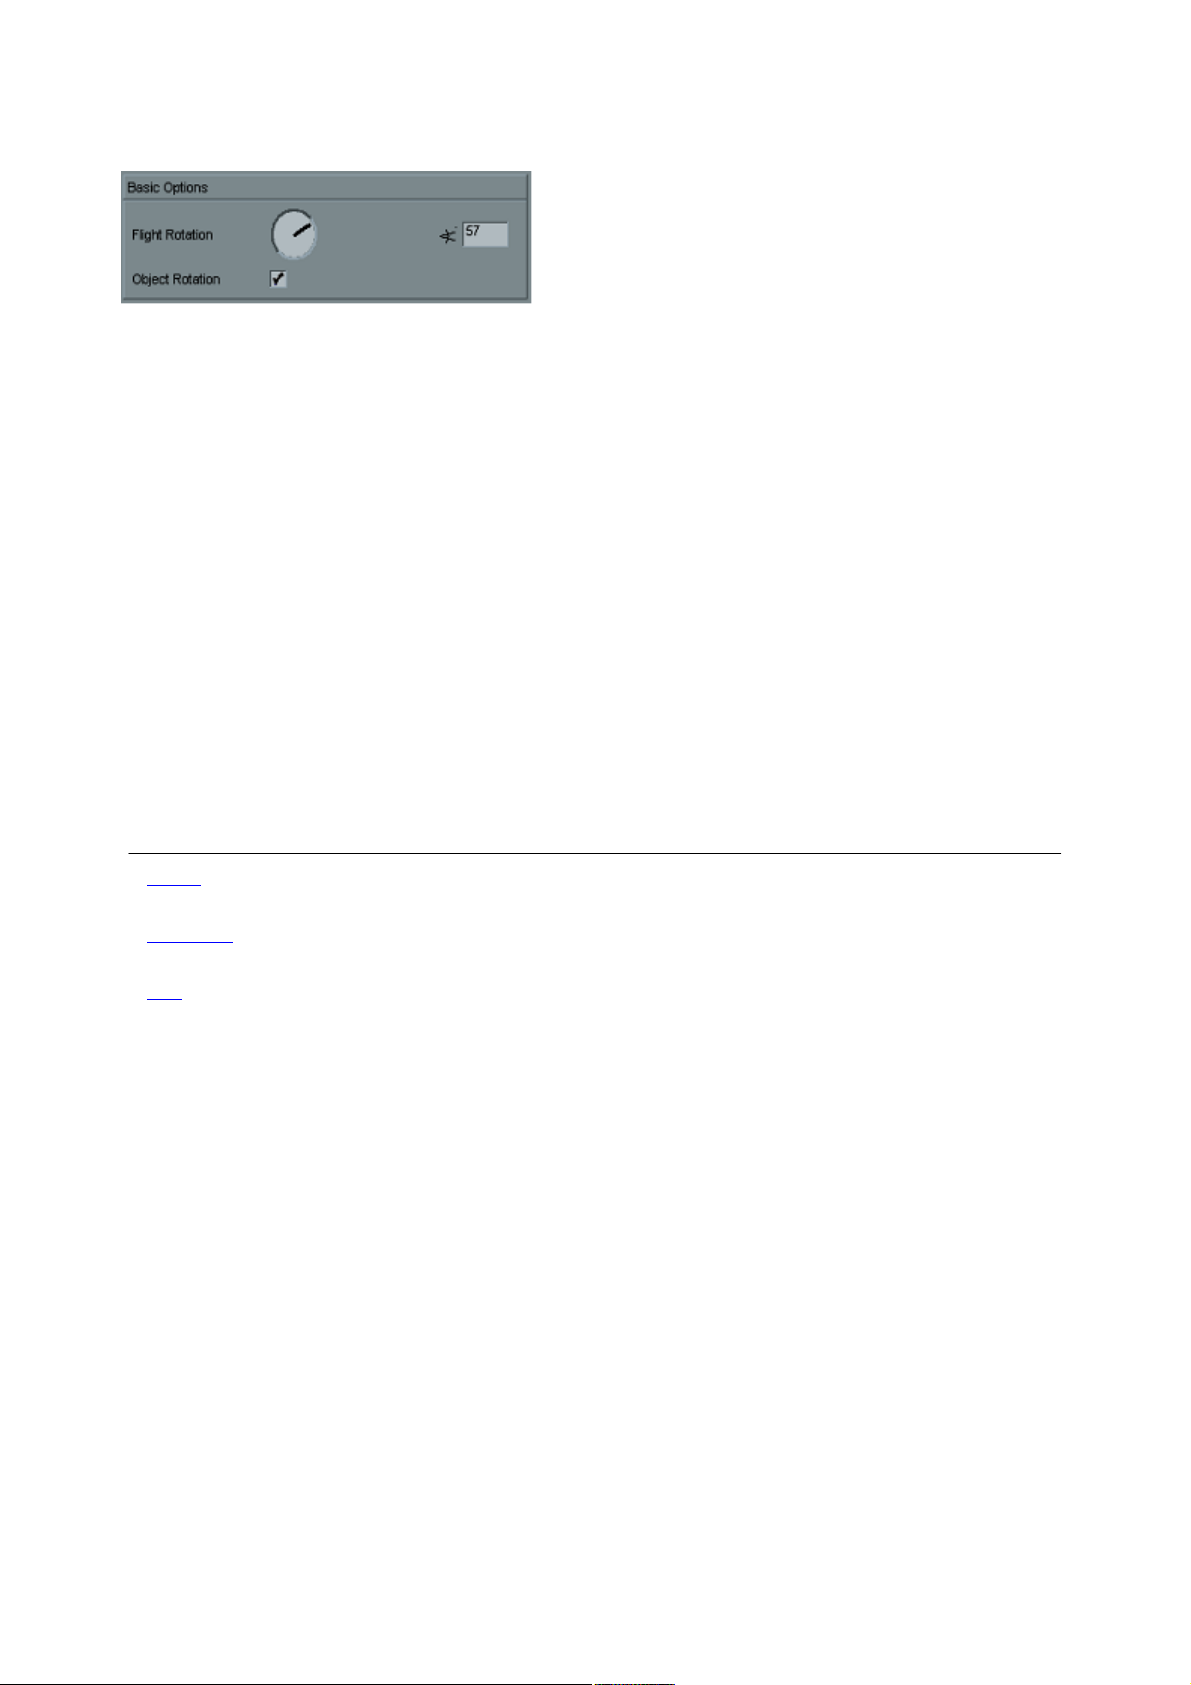
Tutorial 1.4: Basic flight options
You can quickly change the flight path of an object in useful ways using the Basic Options controls.
Basic flight options
Watch the preview now. You will see that instead of the first video source flying off and revealing the
second video source, the second video source will fly on and cover the first video source.
Flight path try-out:
· Click-and-drag the Flight Rotation dial so that it reads 45
. Watch the preview.
· Click on the Object Rotation
checkbox so it is checked. Watch the preview.
· Click-and-drag the Flight Path dial so that it reads 90
. Watch the preview.
· Click-and-drag the Flight Path dial so that it reads 0
. You can also use the arrow keys to change the dial by one degree increments.
The Flight Path dial rotates the entire flight path of the 3D objects in the FX
, giving you a different result quickly and easily. When you change the Flight Path, it does not rotate the
object itself. Checking the Rotate Object checkbox will cause the object itself to rotate and “follow―
the new path.
Note: Some FX
were not designed to be compatible with the basic flight options. So this feature may be disabled for
those effects.
ð Back
to Tutorial 1.3
ð Forward
to Tutorial 1.5
ð Up
to Tutorial 1
Page 19
Page 20
Tutorial 1.5: Basic lighting, shadows and shine
Lighting, shadows and shine add incredible 3D realism to an FX
. By default all of these features are turned on. Try turning them off to see the difference it makes.
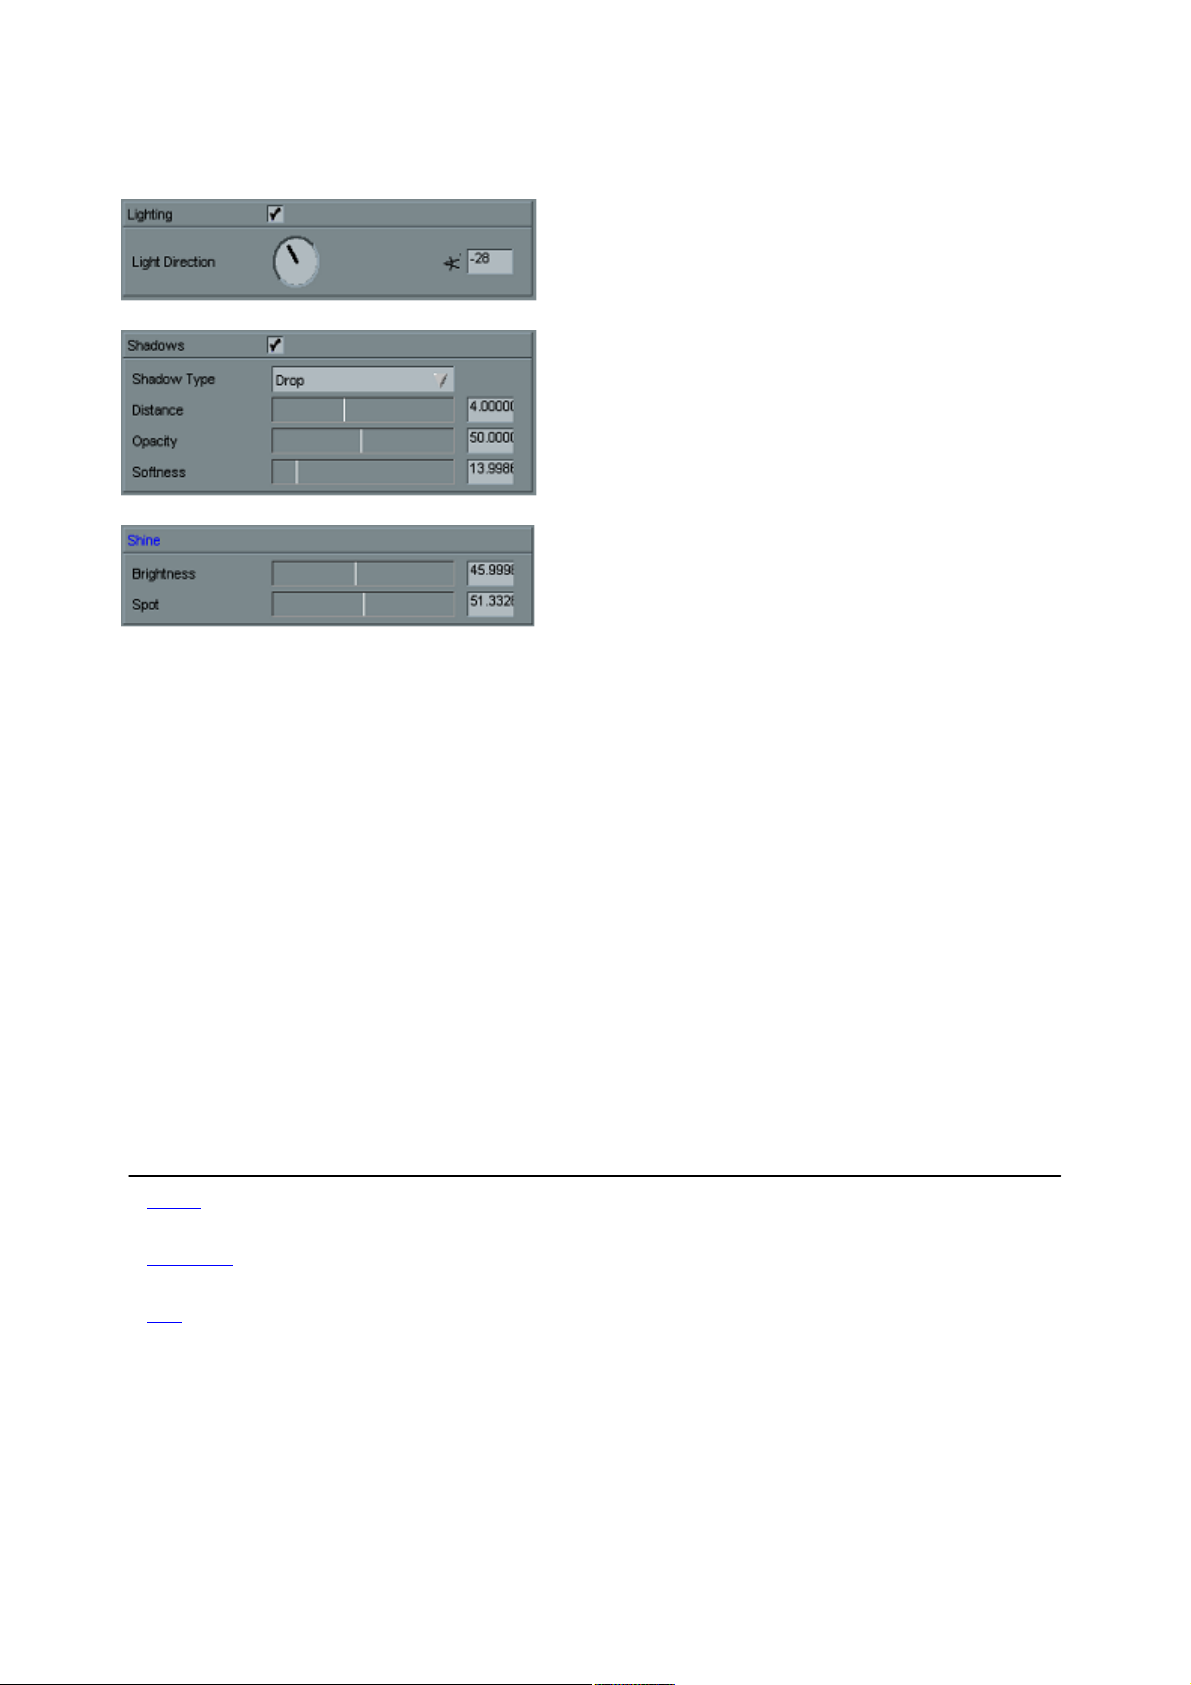
Basic lighting options
Basic shadow options
Basic shine options
To turn off Lighting and Shadows:
· Click on the Shadows
checkbox to clear it. Notice that the shadow disappears.
· Click on the Lighting
checkbox to clear it. Notice that the 3D ball is no longer shaded.
· Click on Shadows and Lighting
to turn these features back on.
In addition to being able to control which lighting features are used, you can also control the light
direction. By default, light comes from the top center of the 3D “world―. When you adjust the light
direction, it automatically adjusts the shine and shadow position as well.
Light direction try-out:
· Click-and-drag the Light Direction dial so that it reads 90
. Watch the preview.
· Click-and-drag the Light Direction dial so that it reads 180
. Watch the preview.
· Click-and-drag the Light Direction dial so that it reads 0
. You can also use the arrow keys to change the dial by one degree increments.
Changing the light direction to 180 degrees gives a very unique, almost sinister appearance.
ð Back
to Tutorial 1.4
ð Forward
to Tutorial 1.6
ð Up
to Tutorial 1
Page 20
Page 21
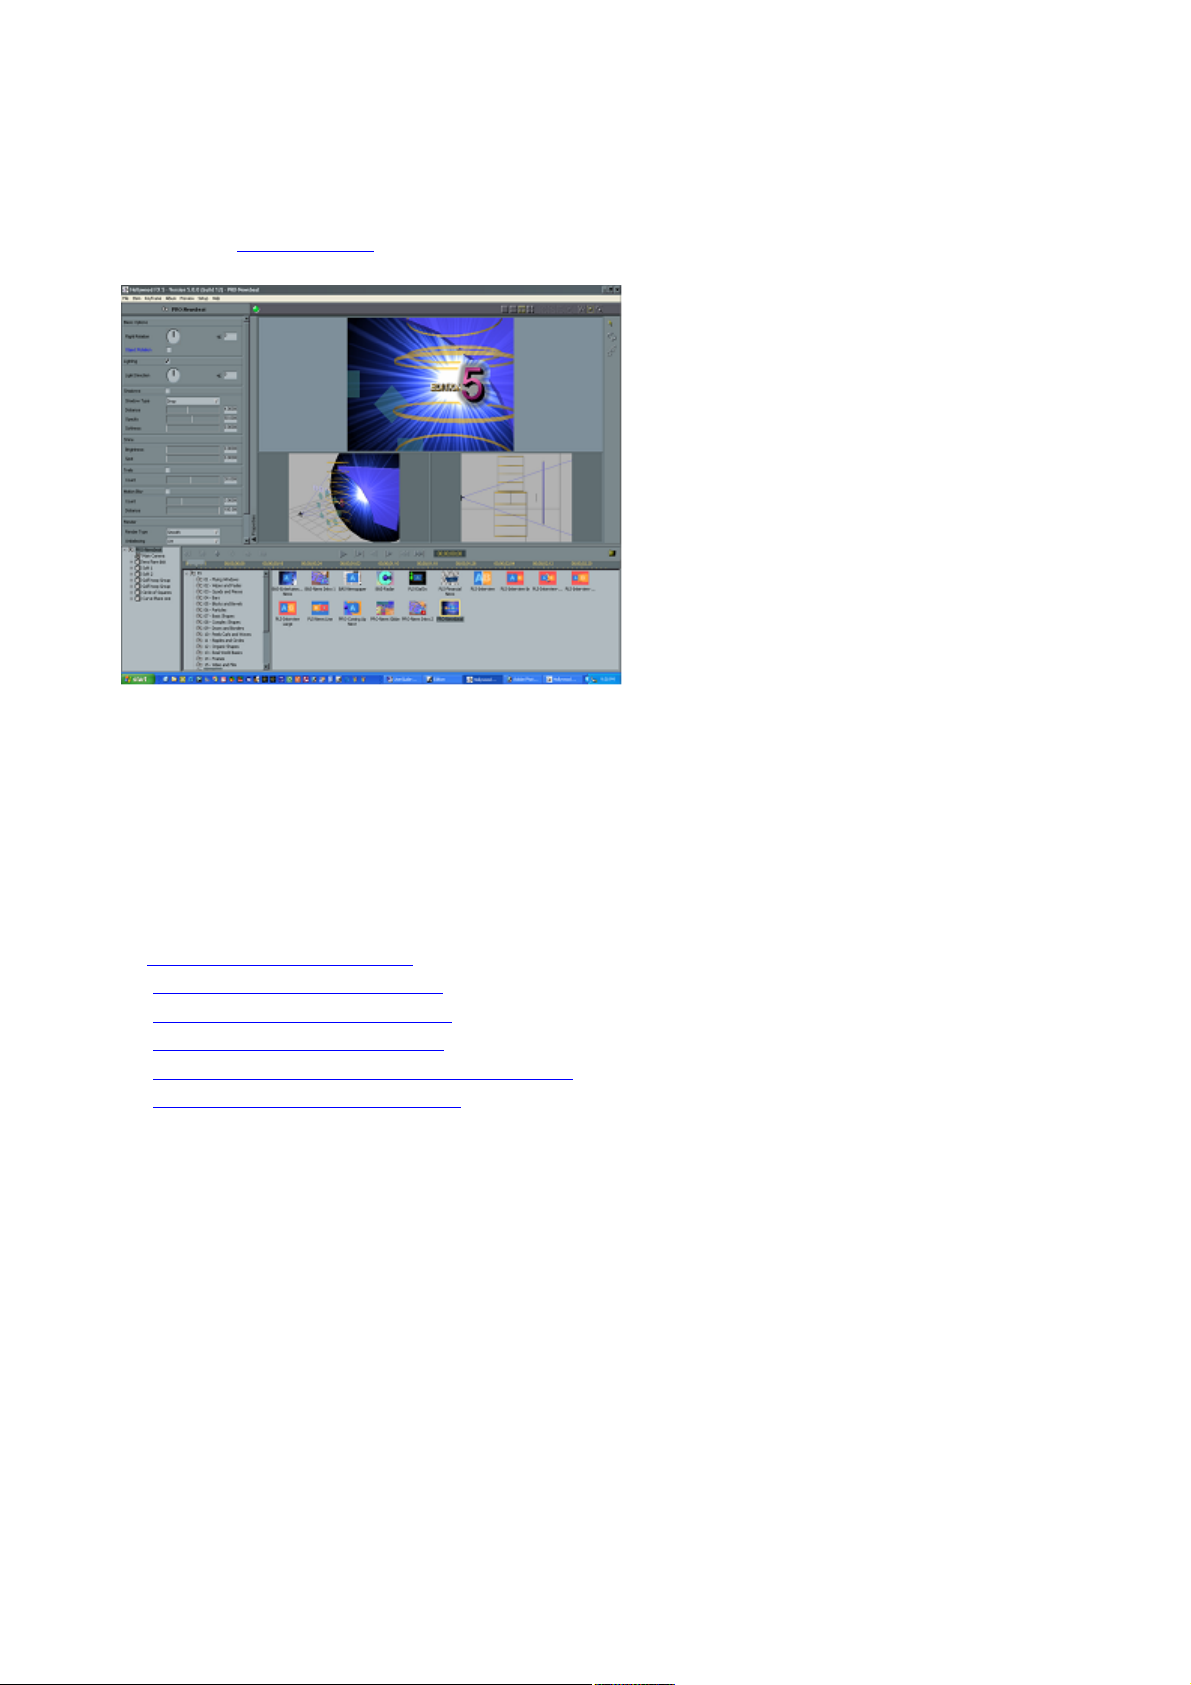
Tutorial 1.6: Basic render options
The Basic Options Render controls let you adjust special rendering features of the 3D engine.
Render type
Normally objects with curves are rendered with smooth surfaces. You can use the render type to change
to faceted or wire surfaces.
To change the render type:
· Select Flat from the Render
dropdown. Notice that the object no longer appears smooth.
· Select Wire from the Render
dropdown. Notice that the object is now rendered as a wire-frame rather than a solid object.
· Select Smooth from the Render
dropdown to return to smooth solid rendering.
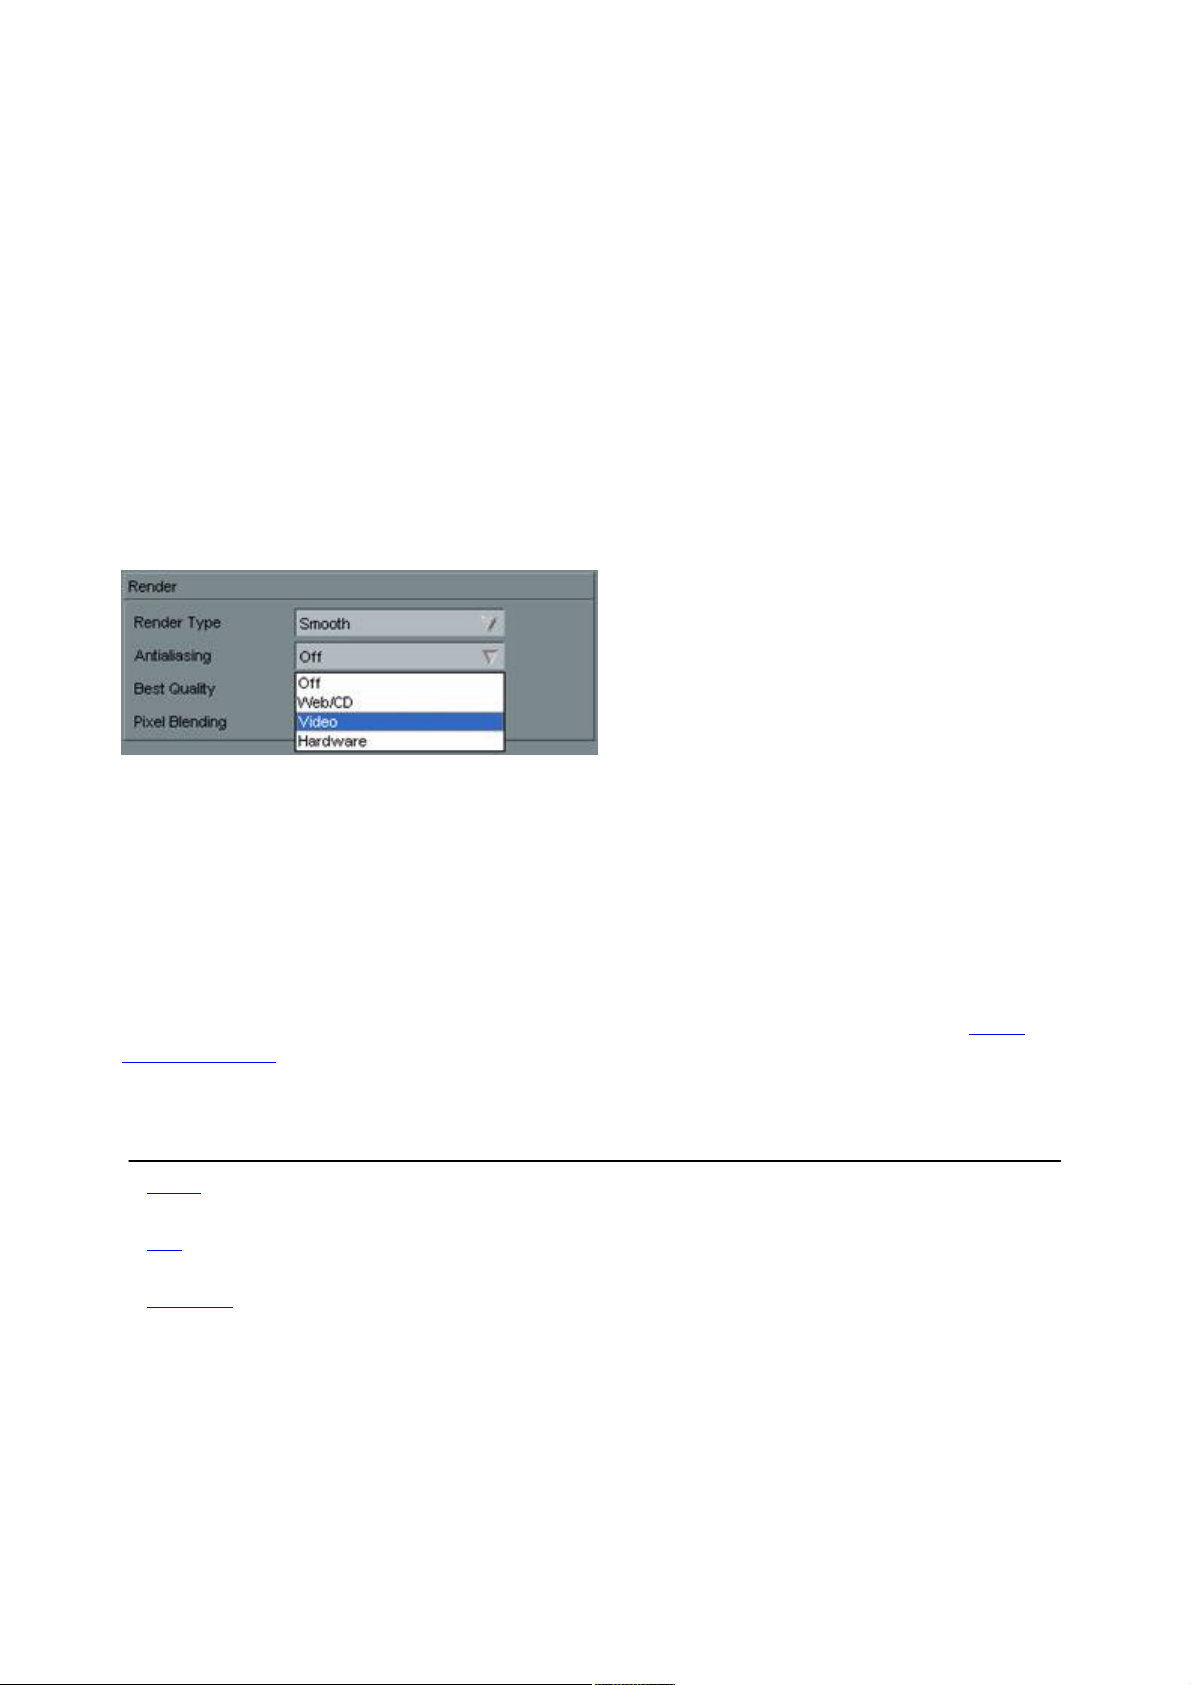
Antialiasing
Because of the low resolution of video, sharp edged 3D effects will often exhibit blocky stairstepping
along the edges of objects. Antialiasing eliminates much of this problem. Hollywood FX includes three
methods of antialiasing (although the preview generally displays only edge antialiasing).
Selecting render options
Antialiasing first look:
· Select Web/CD under Antialiasing
and notice how the edges of the 3D ball are smoothed.
· Select Video under Antialiasing
to switch to scene antialiasing. This generally will not change the preview, but during final rendering full
Scene antialiasing will be used.
· Select Hardware under Antialiasing
to take advantage of some of today’s high-end graphics chips.
The additional checkboxes and advanced shadow controls are described in more detail under Quick
Lighting Controls
.
When you are ready, click OK
in the Hollywood FX dialog to exit, then render your project to see the results.
ð Back
to Tutorial 1.5
ð Up
to Tutorial 1
ð Forward
to Tutorial 2
Page 21
Page 22

Tutorial 2: Transition+
In Tutorial 1 you worked with a Transition FX that had only two video sources. In the present tutorial
you will use a Transition+ FX
that also performs a transition but has additional video sources you can use.
When you are finished with this tutorial, you will know:
· How to use a Transition+ FX
with extra video sources.
·
Some of the features on the Settings menu.
To prepare for this tutorial: Set up two video clips in your host application and add Hollywood FX as
described in Getting Started
, creating a two-second transition. When the Hollywood FX window appears, you are ready to begin.
ð Tutorial 2.1: Selecting the Transition+
ð Tutorial 2.2: Mapping a video clip to Source 3
Page 22
Page 23

Tutorial 2.1: Selecting the Transition+
To select the transition:
1. Select Wipes and Fades
from the FX Group popup list at the top of the page.
2. Click on the FlipOver
icon.
3. Click the Play Once preview button on the Monitor
.
Watch the preview. Notice that while the video is flipping over, you can see black in the background.
There is a backdrop that is currently not visible, because no video source has been mapped to it. The
next step is to map that third video source
.
ð Forward
to Tutorial 2.2
ð Up
to Tutorial 2
Page 23
Page 24
Tutorial 2.2: Mapping a video clip to Source 3
Continuing Tutorial 2
, we will now add a video clip to Source 3 so that the background is no longer black.
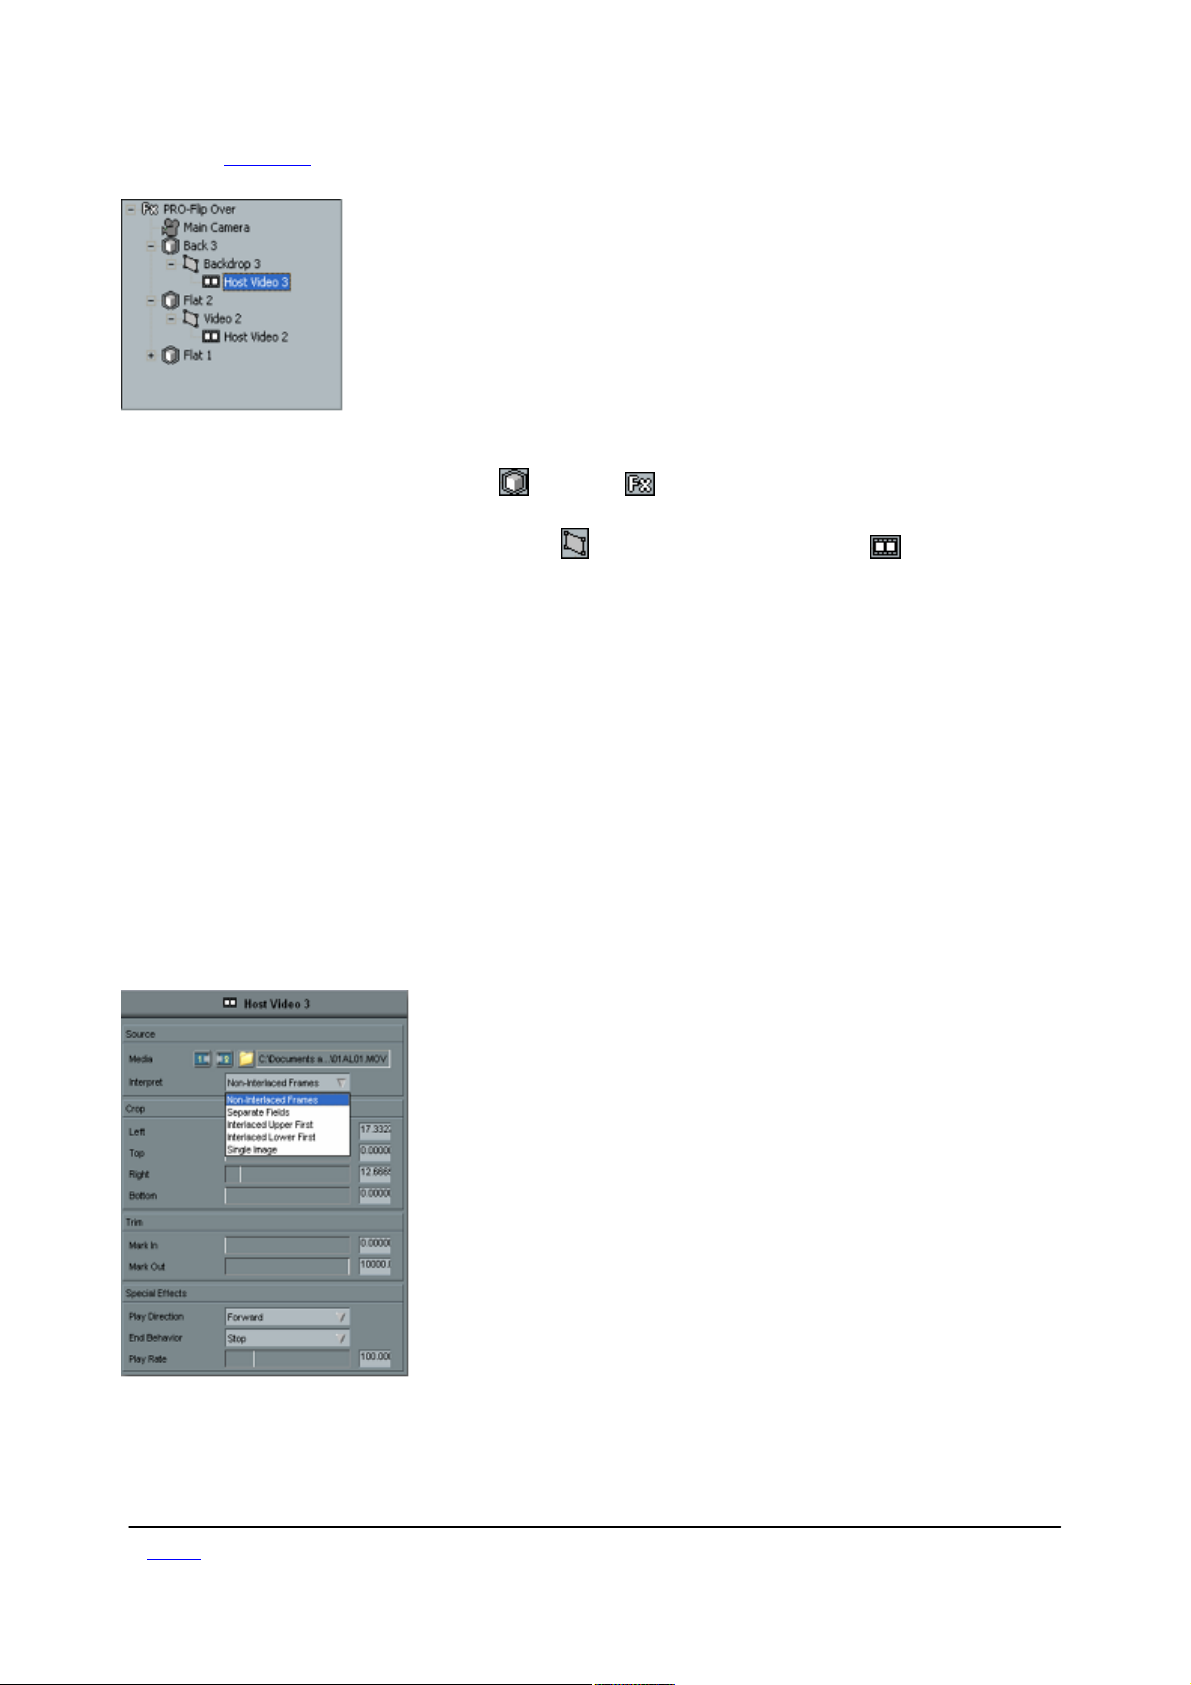
Selecting media options
To add a video clip to Source 3:
1. Double click on the Back 3 Object icon in the Tree
panel.
2. Double click on the Backdrop 3 Surface Icon to expand out the Media
file.
3. Click on the Select File
button in the Media Options panel.
4.
Using the file requester, select a video clip to use for Source 3.
5. Click on the Play Once
button in the Monitor window.
You have selected a new video source and should be able to see it in the background as Source 1 flips
over to Source 2. You should also make sure the field interpretation is correct for this video.
To change field Interpretation: Click on the Interpret popup, and select the proper field interpretation
for your video. For most video capture cards you will select Interlaced – Upper First or Interlaced
– Lower First.
While correct interpretation is not important in the preview, it will be important for final rendering. If
interpretation is not set correctly, the video in the background will playback incorrectly (it will jitter rather
than playing smoothly).
Media Options panel, showing the Interpret
field
From now on, when you select a video file, the Interpret value will be defaulted to the last option
selected. You will only need to change Interpret if you select a single image file, or video captured using a
different video card.
ð Back
Page 24
Page 25

to Tutorial 2.1
ð Up
to Tutorial 2
ð Forward
to Tutorial 3
Page 25
Page 26
Tutorial 3: MultiWindow FX
Tutorials 1 and 2 introduced you to Transition and Transition+ FX respectively. The third type of FX in
Hollywood FX is the MultiWindow FX. MultiWindow FX do not perform a transition from one video
source to another. Instead, they feature multiple video windows that fly on or off screen in various ways.
For this tutorial we will use the Flip 4
effect, where four video windows fly off after playing over a backdrop.
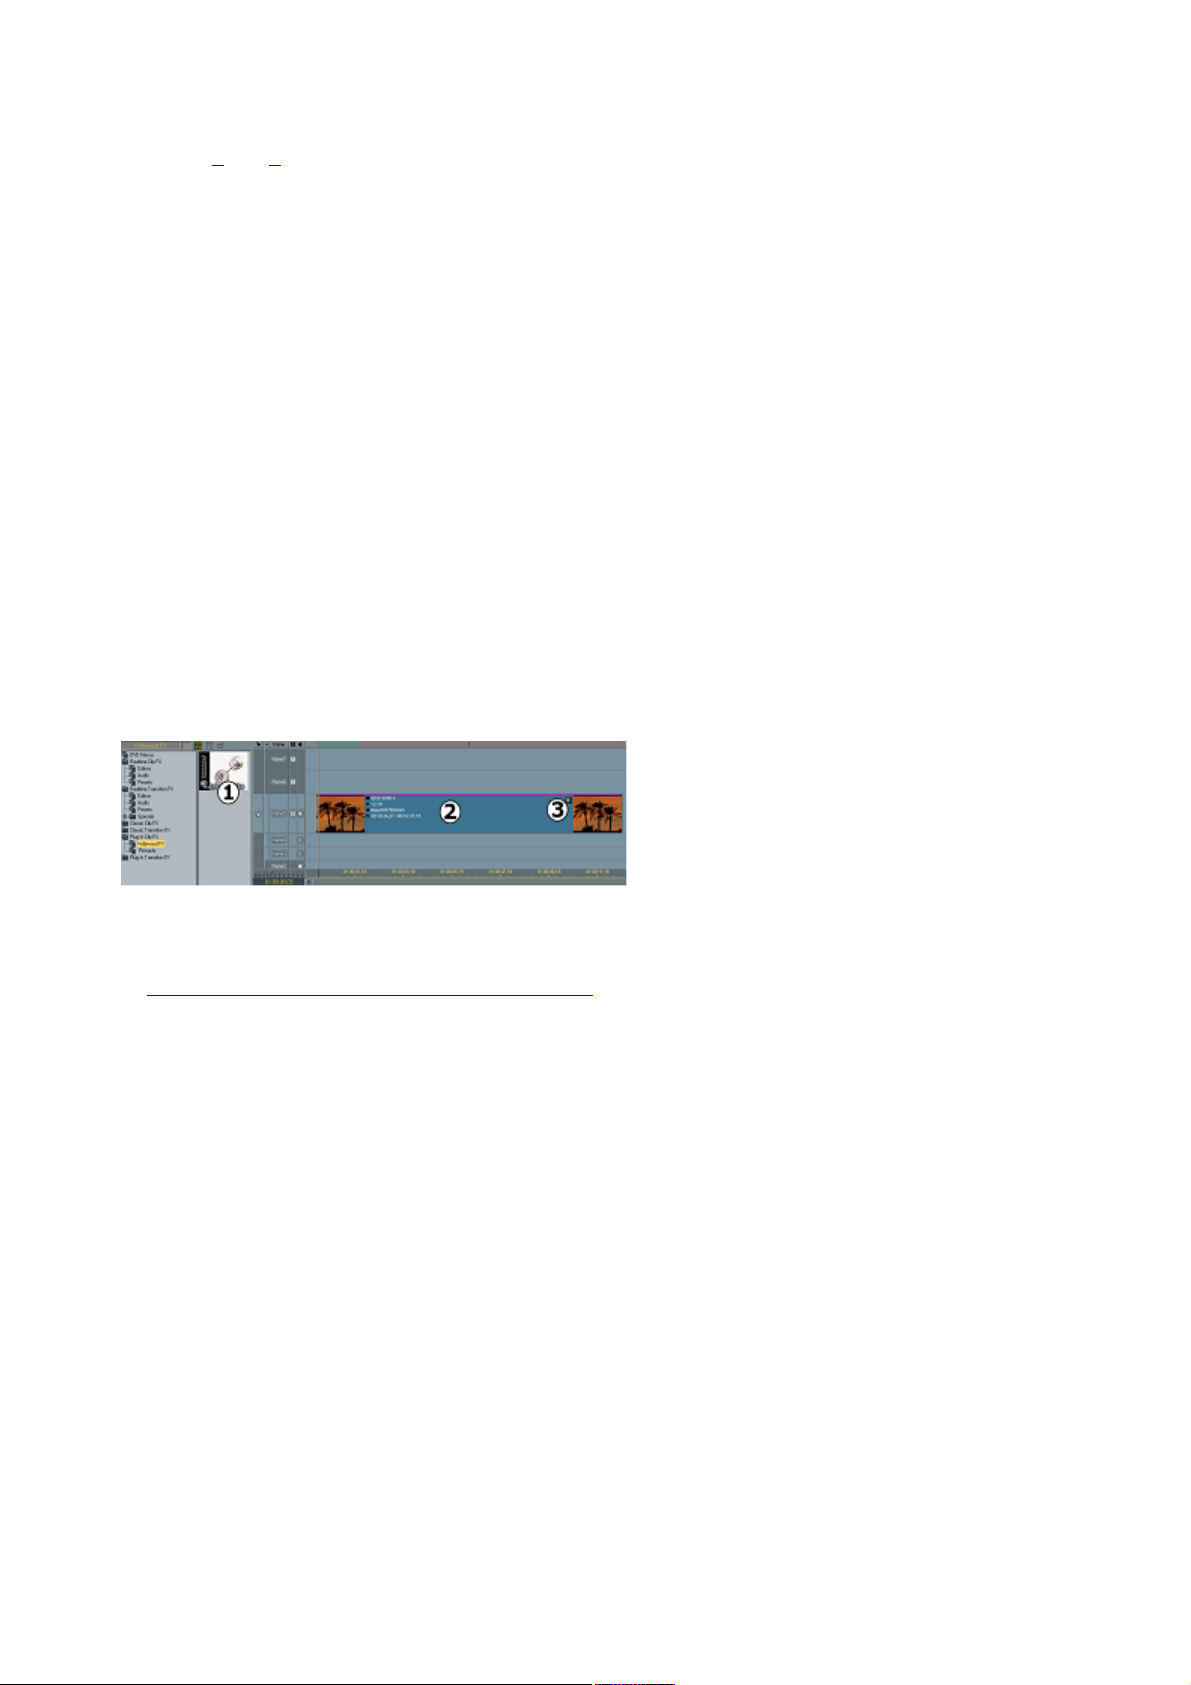
Prepare for the tutorial
MultiWindow FX are designed differently from Transitions. In a MultiWindow FX, the Source A video
from the host application is always used as the backdrop video. This makes it easy to lay out the timeline
so that you can have the backdrop video continue before or after the FX
.
To prepare for the tutorial:
1.
Start a new project.
2.
Place the video you want to use as the backdrop on video track 5, so that it starts at the beginning of
the project, and runs for about five seconds.
3. Insert the Hollywood FX filter plug-in from the Plug-In Clip FX
onto the video in Track 5.
4.
Double click on the asterisk next to the thumbnail at the end of the video clip to open the Hollywood
FX window to select the effect.
The Hollywood FX transition in Edition, ready for a MultiWindow FX. 1) Drag and drop the Hollywood
FX filter from the Plug-In Clip FX; 2) Place the filter on this video, as it will be the backdrop for the FX;
3) Double-click asterisk here to open Hollywood FX.
ð Tutorial 3.1: Selecting the FX and setting options
Page 26
Page 27
Tutorial 3.1: Selecting the FX
and setting options
To select the Flip 4 FX and set options:
1. Select Multiwindow Effects
from the FX Album.
2. Select Flip 4
from the FX icons.
3. Click on the Play Once
button in the Monitor panel.
Notice that the video source from the timeline plays in the background. We will now select video clips for
the remaining video windows.
The Hollywood FX transition selected and ready to map additional video. 1) Select folder to map
additional sources; 2) Selected FX – Flip 4; 3) How Flip 4 should look after mapping additional
sources.
To map the additional video sources:
1. Click on the FX Tree
panel.
2. Click on the Flat 3
object.
3. Click on the Host Video 3 to reveal the Media Properties
panel.
4. Click on Select Media File folder in the Properties
panel.
5.
Select a video clip using the file requester.
6. Now you’re ready to do the same for the other Host Medias, except for Back 1
.
7. Click on the Play Once
button in the Monitor panel to see the preview.
Because you set up the default Interpret value in Tutorial 2
, you should not have to change it for each video source you selected above.
ð Up
to Tutorial 3
Page 27
Page 28

Pinnacle Online
When you register Hollywood FX online to get your permanent keycode, you will also receive a userid
and password for Pinnacle Online, where you can purchase and instantly download upgrades and
add-on packs of FX
.
To use Pinnacle Online you will need a web browser (like Microsoft Internet Explorer 5.0 or higher), and
a connection to the Internet. Simply connect to:
http://hollywoodfx.pinnaclesys.com
Follow the instructions there to access and use your Pinnacle Online account.
Page 28
Page 29

Troubleshooting
This section provides a list of common problems and their solutions. If you can’t find an answer to
your problem in this list, or in the ReadMe file that is created during setup, then contact Hollywood FX
customer support
for more help.
Hollywood FX does not show up in my host application.
During installation Hollywood FX will attempt to find all compatible host applications and install the
proper plug-in files for each. If Hollywood FX does not show up in Pinnacle Edition/Liquid, try copying
the plug-in files from the Host Plugins folder (in Hollywood FX
) as follows:
· Copy Edition\HfxEdt5.vfx
to:
Edition\Plugins\Transitions
· Copy EditionFilter\Fl-HfxEdt5.vfx
to:
Edition\Plugins\Filter
My video editor crashes when I try to use Hollywood FX.
This usually indicates a conflict with your 3D graphics card. You should download and install the very
latest drivers for your graphics card.
I never get a rendered transition, I just get the Hollywood FX Logo.
This indicates that Hollywood FX was not able to use OpenGL to render the effect. Check the following
items to resolve this problem:
· Check to make sure the files Opengl32.dll and Glu32.dll are in your Windows\System folder (
Winnt\System32
). If they are not present, Windows 95 users should download the OpenGL libraries from the Support
area of the Hollywood FX website. Windows 98, NT, and 2000 users should check their operating
system installation, and reinstall any service packs.
·
Make sure you are using the very latest drivers for your graphic display card.
· Change the preview engine under Render Engine in the Preview
menu.
When I select video or images in the Media Options panel I get a white object instead of video.
Generally this indicates you have run low on memory. If you are doing MultiWindow effects with more
than 3 video sources, you should have a minimum of 128 MB of RAM (with at least 256 MB highly
recommended). If you are using images you scanned in, you should lower the resolution of those scanned
images.
I get color/brightness jumps at the start and end of my effect.
This is normally because the rendered effect is being recompressed while the surrounding video is not.
Many non-linear editors have an option to Recompress Always or to turn off Smart Rendering. If your
non-linear editor does not have a Recompress Always option, you can usually solve the shift by adding
a Brightness/Contrast
filter to both the incoming video and outgoing video clips, but leave the Brightness/Contrast settings
unchanged. This will cause the video to be recompressed, but not changed.
Page 29
Page 30

Performance
Hollywood FX uses OpenGL, which is the industry standard 3D graphics language for high performance
high quality rendering. Over the past few years the 3D accelerators and their OpenGL graphics drivers
have improved dramatically, however there are still times that the graphics drivers cause incompatibilities
with Hollywood FX. For this reason, Hollywood FX defaults to software-only rendering for the highest
degree of compatibility, at the cost of slower previews and rendering.
The topics below describe the steps you can take to improve 3D rendering performance. You should
only try these changes once you are familiar with Hollywood FX and have successfully rendered some
effects in your projects.
ð CPU speed, bus speed and memory
ð Graphics card drivers
ð Adjusting preview rendering performance
Page 30
Page 31

CPU speed, bus speed and memory
Your system configuration can make a dramatic difference in performance. By upgrading your CPU to a
faster speed, upgrading to a new motherboard that has a 133MHz (or faster) bus, and by increasing
memory to 256MB or more, you can dramatically improve the performance of Hollywood FX, whether
you have a 3D graphic accelerator or not.
Page 31
Page 32

Graphics card drivers
The most important aspect to 3D performance from your graphics accelerator is the driver software you
are using. You should regularly check your graphics accelerator manufacturer’s website for updated
drivers. Here are the website addresses of the most popular graphics cards.
· 3D-Labs (Wildcat, Oxygen) – www.3dlabs.com
· ATI (Radeon) – www.ati.com
· Matrox (G450, Parahelia) – www.matrox.com/mga
· Nvidia (GeForce, Quadro) – www.nvidia.com
Page 32
Page 33

Adjusting preview rendering performance
Almost any good 3D accelerator will dramatically improve the performance in the Preview Monitor
window. However, we highly recommend a graphics card with at least 128 megabytes of memory on
board.
You must enable OpenGL Hardware in the Preview Settings to benefit from your accelerator.
To enable accelerated preview rendering: In the Preview menu, move down to select the Accelerated
OpenGL from the Render Engine
sub menu.
If you encounter problems with the preview after enabling on-screen rendering, you should immediately
return to Preview menu Render Engine and select the Software
engine.
Notice: It is recommended to test these rendering changes using the Easy FX editor that you can launch
from the Start Menu.
Adjusting preview rendering performance
Page 33
Page 34

Advanced tutorials
The tutorials presented here assume that you are familiar with the basic usage of Hollywood FX covered
in the three starter tutorials
.
ð Tutorial 4: Keyframe editing with envelopes
ð Tutorial 5: Flight path editing
ð Tutorial 6: Creating new FX from existing FX
ð Tutorial 7: Warp plugins
ð Tutorial 8: 3D text generation
Page 34
Page 35

Tutorial 4: Keyframe editing with envelopes
This tutorial demonstrates the way you can keyframe any option in Hollywood FX to create advanced
results.
Hollywood FX uses the term Envelope
to designate a set of keyframes that describe how an option’s value will change over time in
Hollywood FX.
Prepare for the tutorial and select the FX:
1.
Create a new project in your host application.
2.
Add two video clips and create a two-second transition between them.
3.
Add Hollywood FX as a transition between the two video clips.
4. From the Hollywood FX window, select the Tumble 2 transition in the Flying Windows
group.
Before continuing, please change to Percent settings. This will make it easier to follow the tutorial.
To change to percent settings: With the Hollywood FX window open, go to the Setup menu, move
down to Timecode and change to Percent
.
ð Tutorial 4.1: The Envelope Editor
ð Tutorial 4.2: Selecting an object and option
ð Tutorial 4.3: Creating the envelope
ð Tutorial 4.4: Setting up the first keyframe
ð Tutorial 4.5: Adding a keyframe
ð Tutorial 4.6: Other envelope controls
Page 35
Page 36

Tutorial 4.1: The Envelope Editor
Hollywood FX uses the term Envelope
to designate a set of keyframes that describe how an option’s value will change over time in
Hollywood FX.
The Envelope Editor is normally hidden when you first begin using Hollywood FX (to keep life simple).
To display the Envelope Editor: Click on the Show/Hide Album button to hide the Album and make the
Envelope Editor visible.
The Show/Hide Album Button
The Envelope Editor will appear. We are going to modify the Tumble 2 transition by making the
tumbling video dissolve as it tumbles into the distance. We will do this by creating an envelope for the
object’s Dissolve
option.
ð Forward
to Tutorial 4.2
ð Up
to Tutorial 4
Page 36
Page 37

Tutorial 4.2: Selecting an object and option
In this step, we specify the object (“SoftFB 1―) and option (dissolve) that will be controlled by the
envelope we are creating.
To select the Object and Option:
1. Click on the SoftFB 1 object in the FX Tree
panel.
2. Click on the Dissolve slider in the Object Properties
panel so that it is highlighted.
Notice that the word Dissolve
under the slider is highlighted in green. This is an indicator that it is the current option that can be
modified in the Envelope Editor. Whenever you select a control that can have an envelope in Hollywood
FX, it will be highlighted in green.
ð Back
to Tutorial 4.1
ð Forward
to Tutorial 4.3
ð Up
to Tutorial 4
Page 37
Page 38

Tutorial 4.3: Creating the envelope
Hollywood FX makes it extremely easy to create envelopes by simply clicking and dragging in the
envelope window. We want to create an envelope for dissolve that makes the object disappear over the
entire length of the transition.
To create a simple envelope: Click-and-drag the slider in the envelope window to the end of the timeline
and click on the keyframe
button. Drag the keyframe you create all the way to 100% value and release the mouse.
The envelope after creating the first keyframe. 1) Click here to create your first keyframe; 2) A second
keyframe is created automatically at time 0%; 3) Make sure your slider is here; 4) Resulting keyframe.
Notice that there are two keyframes (indicated by blocks). The one at the end is the one you created.
The keyframe at 00:00:00 is created automatically, since all envelopes in Hollywood FX must at a
minimum have keyframes at each end of the envelope editor.
Also notice that the preview and the current time slider at the top of the envelope window have moved
left to right, from beginning to end. Notice that the keyframe at the end is highlighted in yellow to indicate
that it is the current keyframe.
ð Back
to Tutorial 4.2
ð Forward
to Tutorial 4.4
ð Up
to Tutorial 4
Page 38
Page 39

Tutorial 4.4: Setting up the first keyframe
The way the envelope is currently designed, the value of Dissolve
will remain 100% for the entire effect. What we want is for the value to start at 0%, so let’s change
the first keyframe.
Dissolve slider
To change the first keyframe:
1.
Click-and-drag on the time slider and move it to beginning in time 0%.
2.
Drag the dissolve slider and you will see the yellow block move to the bottom of the envelope
window (value 0%). Its value is “tied― to the current envelope.
3.
Release the mouse button.
The first keyframe is adjusted: 1) Click here to create keyframe; 2) Keyframe is created at 00:00:00:00.
Now our envelope will work correctly, causing the object to dissolve over the entire length of the
transition. Try playing the preview to see the results.
ð Back
to Tutorial 4.3
ð Forward
to Tutorial 4.5
ð Up
to Tutorial 4
Page 39
Page 40

Tutorial 4.5: Adding a keyframe
Let’s add one more keyframe to this envelope, so that the object becomes transparent more quickly.
We will create this key in a different way.
To create the new keyframe:
1.
Drag the dissolve slider until it is at the middle of the timeline.
2. Now drag the Dissolve slider in the Shapes & Dissolve panel over to 90%
.
After creating the new keyframe
The new keyframe is created automatically when you change the value of Dissolve
. This shows how the original value slider for Dissolve and the Envelope Editor are tied together. This
feature makes it extremely easy to create keyframes for any value in Hollywood FX.
ð Back
to Tutorial 4.4
ð Forward
to Tutorial 4.6
ð Up
to Tutorial 4
Page 40
Page 41

Tutorial 4.6: Other envelope controls
Before concluding this tutorial, let’s play around with some of the other envelope controls. First,
let’s move quickly between the keyframes in this envelope.
To move between keyframes:
1. Click on the Prev button in the Envelope Editor. The current time slider (and preview) will
move to the keyframe at 0%
.
2. Click on the Next button in the Envelope Editor. The current time slider will move to the
keyframe at 50%
.
3. Click on the Next button. The current time slider will move to the keyframe at 100%
.
4. Finally, click on the Prev button to return to the 50%
keyframe.
Using the Prev and Next buttons can quickly get you to the keyframe you need, especially when you
have keyframes close together and one of them is hard to select by clicking on it with the mouse.
Deleting a keyframe
Now let’s say we don’t really like having the keyframe at 50%, so we will get rid of it.
To delete the current keyframe: Click on the Delete
button in the Envelope Editor.
The keyframe at 50% disappears, and the envelope returns to a straight line between 0% and 100%.
Remember, envelopes can be created for almost any value in Hollywood FX. If a control is highlighted in
green when you use it, that means you can control that value with an envelope and create exciting results.
ð Back
to Tutorial 4.5
ð Up
to Tutorial 4
Page 41
Page 42

Tutorial 5: Flight path editing
You can edit the paths of any 3D object to create unique results. A set of tools on the Object Options
panel along with the Envelope Editor give you complete flexibility to create new flight paths for objects.
In this tutorial we will take the Ball Backup FX, and create a new path so that the ball bounces up and
down on the screen. We use the term path
to mean the envelope for an object’s position, rotation, and scale.
To prepare for the tutorial and select the FX:
1.
Create a new project in your host application.
2.
Add two video clips and create a two second transition between them.
3.
Add Hollywood FX as a transition between the two video clips.
4. Select the Ball Backup transition in the Basic Shapes
group.
5. Click on the Sphere object in the FX Tree
panel.
Let’s start by looking at the keyframes in the Ball Backup FX. The picture above shows each
keyframe in the Ball Backup FX. For each keyframe you can see the position, rotation and scale values,
as well as a camera preview and a perspective preview of the FX at that time. You can follow along
yourself by using the Next and Prev
buttons in the Envelope Editor.
Keyframe notes
At the first keyframe, the object is not morphed, and is positioned at 0, 0, 0 on the X, Y, and Z axis. It is
not rotated at all (0, 0, 0), and is scaled at 100% of normal size (1, 1, 1).
At the second keyframe, the object is moved down a small amount along the Y axis (-0.123) and farther
away from the camera (-0.37 along the Z axis). The sphere object is also scaled smaller (0.39, 0.39,
0.39) in all directions.
The third keyframe continues the object’s movement away from the camera (-1.36 on Z), and is
smaller again (0.25, 0.25, 0.25 for scale).
In the fourth keyframe, notice that the sphere is rotated 118 degrees around the X axis, and has moved
offscreen.
In the last keyframe, the object has been scaled so small it is no longer visible, and is far offscreen.
ð Tutorial 5.1: Modifying the path
Page 42
Page 43

Tutorial 5.1: Modifying the path
We are going to create a path where the sphere moves up and away from the camera, then drops down
and bounces up and over background video. We will begin by altering the current path. (As in Tutorial 4,
we use the term path
to mean the envelope for an object’s position, rotation, and scale.)
Before you start, switch to a Multiview:
· Make sure you have at least Split view mode selected so you can see the Perspective
view.
· If you cannot see above the top of the backdrop in the Perspective view, click on the Zoom
button above the Monitor panel and move your mouse left or right to see more or less.
Split view (L) and the Zoom button (R)
To alter the current path:
1. Click on the Next
key button to go to the keyframe at 40%.
2. Click on the Move
button to the right of the monitor and proceed to move the ball up high in the Monitor panel by sliding the
mouse forward several times until it is halfway off the top of the monitor.
This will create the illusion that the ball has been thrown up and in the next keyframe it will come down.
To change the next keyframe:
1. Click the Next
button in the Envelope Editor, so that you’re at keyframe 70%.
2. Click on the Scale
tool button at the right of the Monitor panel.
3. Click-and-drag in the Monitor
window to interactively scale the sphere object smaller. Drag to the left until the object is about half its
original size (you can watch the scale values and stop scaling when the scale values reach about 0.45).
4. Click on the Move
tool, then click-and-drag in the monitor to interactively move the sphere. Move the sphere towards the
bottom of the Monitor, also move it slightly backwards.
5.
Now click-and-drag the timeline slider back and forth to view the path of the ball. In the perspective
view you will notice at the end that the ball passes through the background. This is OK because from the
camera view you cannot see this.
To create the bottom of the bounce:
1. Move the current time slider to 40%
.
Note: If the timeline is not in percentages, you can switch from timecode/frames etc. to percent from the
Setup/Timecode menu.
2. Click on the Move
tool on the right side of the Monitor.
3.
Click-and-drag down in the preview until the object is at the very bottom of the preview.
Page 43
Page 44

How things should look after everything is keyframed.
ð Up
to Tutorial 5
ð Forward
to Tutorial 6
Page 44
Page 45
Tutorial 6: Creating new FX from existing FX
PRO
The easiest way to create new FX is by changing an existing FX to meet your needs rather than starting
from scratch. In this example, we will take the Flyoff FX and replace the flying window with a morphing
shape, plus we will use an image filter plugin to dissolve the shape in an exciting way.
Prepare for the tutorial and select the FX:
1.
Create a new project in your host application.
2.
Add two video clips and create a two second transition between them.
3.
Add Hollywood FX as a transition between the two video clips.
4. The FlyOff
transition should already be selected.
5.
For ease of training, switch to Percent by clicking on the Setup menu, then Timecode, then click on
Percent.
Switching to Percent for training purposes
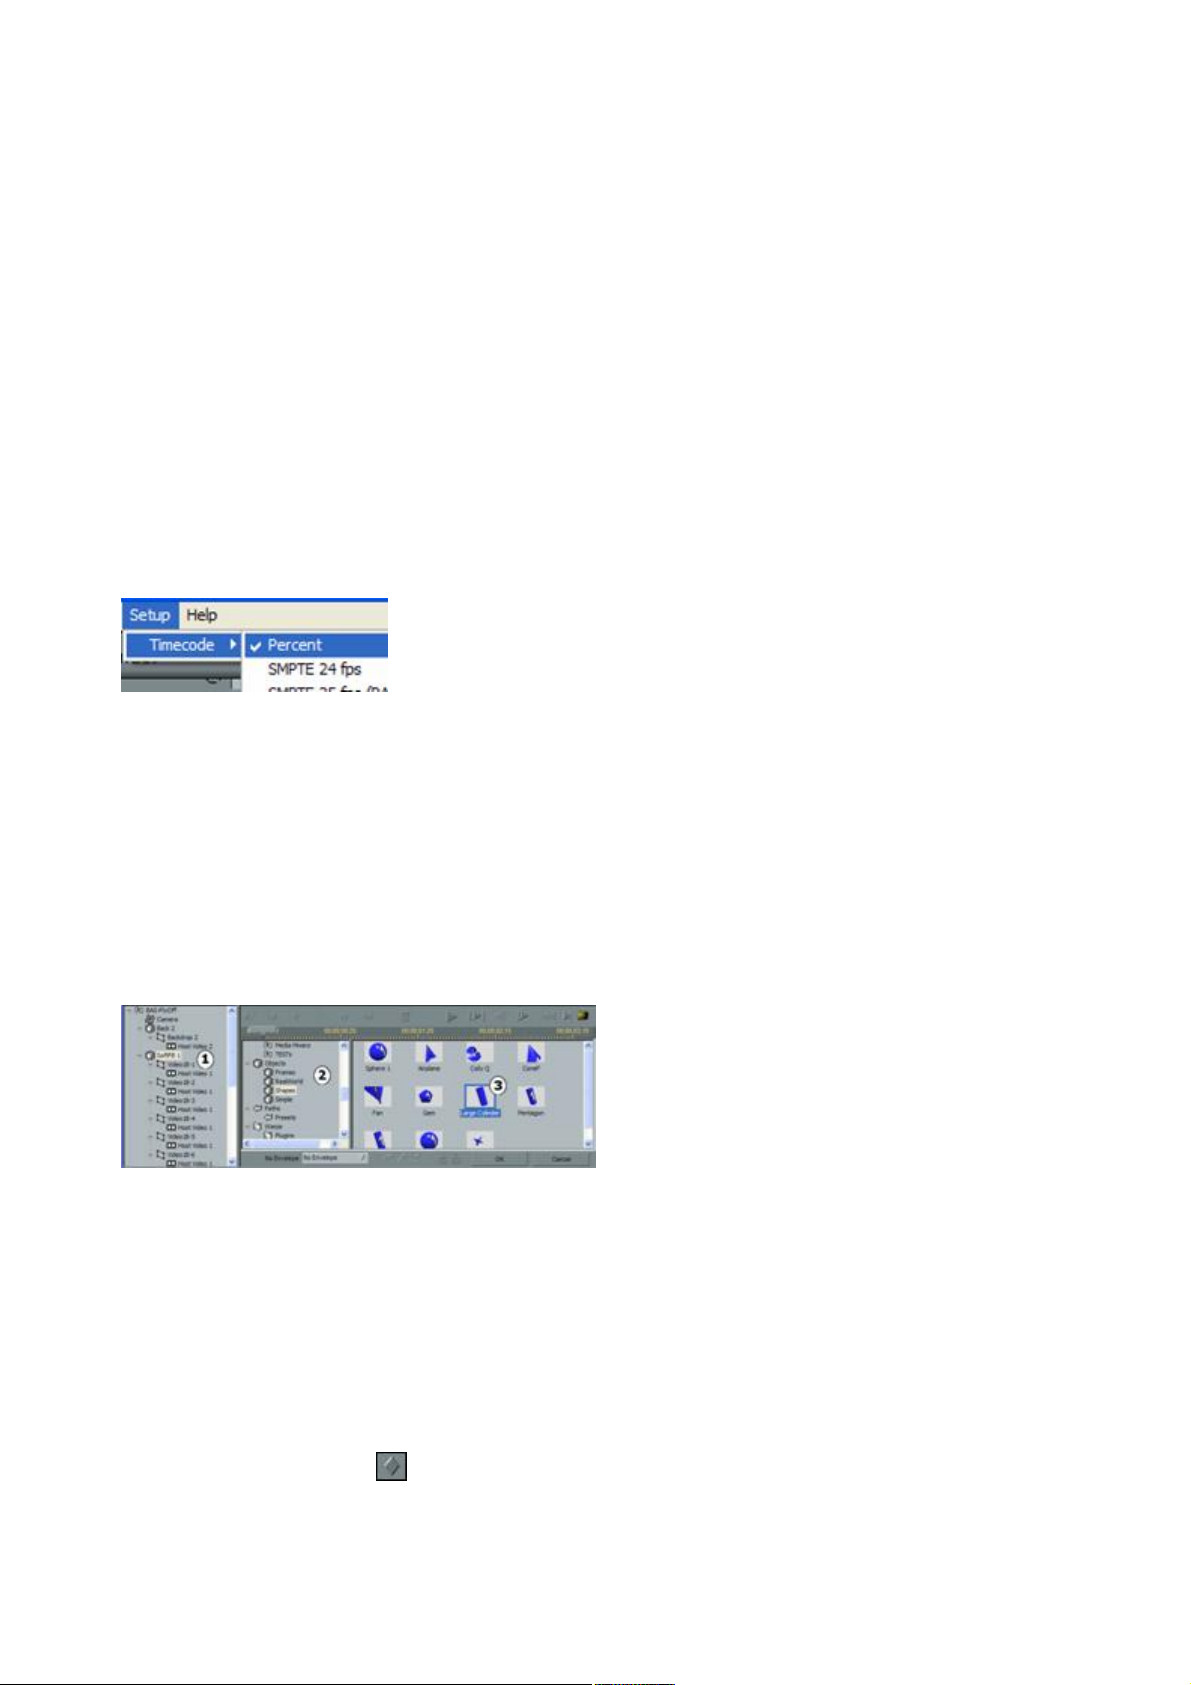
The first thing we want to do is replace this simple flat window with a more interesting shape. We will
choose a Large Cylinder shape to replace the flat window.
To replace the Flat Window (SoftFB 1):
1.
Select the object SoftFB 1 in the FX Tree.
2.
Drag the Album Tree slider and move it down until you see the Objects Albums, and select the
Shapes Album.
3. In the Album panel to the right, hold the shift key down and drag the Large Cylinder
icon over and drop it on top of the SoftFB 1 object.
Replacing SoftFB 1: 1) SoftFB 1 selected in the FX Tree; 2) the Shapes Album selected in the
Album Tree; Large Cylinder selected to drag and drop on SoftFB 1.
The flat window has now been replaced with a large cylinder. If you play the preview, the cylinder flies
off; however, it does not start flat. This is because we have not morphed the cylinder from its flat shape
to its fully morphed cylinder shape. To do this, we will create an envelope that will morph it from flat to
cylinder during the first 10% of the FX duration.
To create the initial keyframes:
1. Click-and-drag the Morph slider in the Object Options panel so that it is high-lighted and its value
is 0 at 00:00:00:00
.
2. Click Create a Key
in the Envelope window to create a new envelope for the Morph value.
3. Click in the Envelope window at 10% time, then drag the new keyframe up to 100%
in value and let go of the mouse button.
Page 45
Page 46

To adjust the 100% time keyframe:
1. Click-and-drag on the keyframe at 100%
time.
2. Drag it up to 100%
value and let go of the mouse button.
3. Click on the Linear
button at the bottom of the Envelope Editor.
Creating Morph Keys: 1) Set at 0% so the object is flat 2) 100% morphed to Large Cylinder 3)
Holding at 100% morphed till end of effect.
We now have an envelope where the Morph starts at 0% and moves up to 100% during the first 10%
of the duration of the FX. Then it stays at 100 % morphed for the remainder of the FX. If you play the
preview you will see the results.
Your new morphing cylinder effect.
ð Tutorial 6.1: Saving your custom FX
ð Tutorial 6.2: Adding a filter plugin
Page 46
Page 47

Tutorial 6.1: Saving your custom FX
Next we will make some more changes to this FX, but let’s save it as a new FX right now. If you are
creating a custom FX for a specific project, you don’t need to save it. All of your customizations will
be saved as part of the host application’s project file. However, if you want to use the customized
FX again and again you will want to save it to disk and add it to the FX Album.
To save your custom FX:
1. Make sure the current time slider in the Envelope Editor panel is at a point in time that will be best
represent the FX
as an icon, since Hollywood FX takes a picture at that moment in time and makes an icon of it.
2.
First in the Album Tree, either select one of the existing Albums or create a new Album.
3. Now, pull down the Menu to Save As
(notice that the folder you selected is auto inserted into the Save in: field).
4. Type a new name in the file requestor and click OK
.
After a few moments, the FX Album will appear with your new FX Album
and your new FX icon visible.
Your new morphing cylinder FX saved in a new album.
ð Forward
to Tutorial 6.2
ð Up
to Tutorial 6
Page 47
Page 48

Tutorial 6.2: Adding a filter plugin
Now, let’s make our cylinder do a cool dissolve over time using the Gradient Wipe filter. Hollywood
FX includes a number of plugins for filtering media video and for warping 3D objects.
The Gradient Wipe plugin uses a grayscale gradient image to dissolve a Media item using the
“shape― of the gradient as the shape of the dissolve.
To add the Gradient Wipe plugin:
1. Scroll down to the Filters and click on the Plugins
2. Click on the Gradient icon and drag it to the FX Tree and drop it on Host Video 1 of the
Large Cylinder
object
Adding Plugins: 1) Gradient Filter attached to Video; 2) Plugins Album selected; 3) Gradient
Wipe plugin selected.
The new plugin will be added directly below (and indented) the Host Video 1 Media item, and the item
Properties panel will change to show the Gradient Wipe options.
The Gradient Wipe options
We will now select a gradient image and set some options.
To set the options for Gradient Wipe:
1. Click on the Select Gradient…
button. A file requester will appear.
2. Change the current folder to the Hollywood FX\Images\Gradients
folder (this should be the default).
3. Double-click on the Clouds1.tga
file.
4. Make sure Wipe % From Transition
is checked.
5. Change the Softness
slider to 80.
6. Change the Border Size
slider to 30.
7. Click on the Border Color
button and select a yellow color from the color requester.
8.
Page 48
Page 49

Try playing the preview. Now the cylinder looks as though it’s being eaten away by acid as it
flies off screen. Rather than tie the transition amount to the FX duration, you could have keyframed your
own transition amount to have the object partially dissolve then reappear, and you could envelope
softness, border size, and color to create a more dynamic and interesting dissolve.
Same cylinder, now with gradient wipe
To conclude this tutorial, save your modified FX one more time.
To resave:
· Select Save
from the File Menu. The current folder should default to the last folder you saved an FX in. The name will
also default to the original FX name.
When you are finished, try rendering this FX in your Host application to see the final results.
As you can see, by modifying existing FX and using plugins you can create dramatic and exciting new
FX.
ð Back
to Tutorial 6.1
ð Forward
to Tutorial 7
ð Up
to Tutorial 6
Page 49
Page 50

Tutorial 7: Warp plugins
PRO
Hollywood FX includes a number of 3D plugins called Warps. These Warps mathematically change the
shape of a 3D object and can be keyframed over time. This tutorial will demonstrate the use of one of the
most common Warp plugins called Peel
. Unlike more limited effect software, Hollywood FX allows you to attach a Peel to any object (not just a
flat plane) and allows you to attach multiple peels to the same object.
Prepare for the tutorial and select the FX:
1.
Create a new project in your host.
2.
Add two video clips and create a two second transitions between them.
3. Add Hollywood FX
as a transition between the two video clips.
4. Select the Specialty Effects
album from the Album Tree
5. Select the PRO Warp Template FX
for the Specialty Effects album.
Note:
The Warp Template FX contains a high-polygon object, ready for use with Warp Plugins, and has no
motion.
To attach the Peel Plugin:
1. Click on the High Mesh object in the FX Tree
.
2. Click on the Warps and then Plugins icon in the Album Tree
.
3. Drag the Peel plugin from the Album and drop it on the High Mesh 1
object. The dialog will appear.
You should immediately see that the object has peeled. By default, the Peel time is keyed to the total
transition time, and the direction of the Peel is tied to the Flight Direction spinner (under Effect Options).
This makes it simple to quickly add a Peel to an effect. Most plugins work this same way, providing
default options that make it easy to quickly get the results you want.
Adding Warps: 1) Peel attached to object; 2) Warps Album selected; 3) Gradient Wipe plugin selected.
Page 50
Page 51

Peel Options
ð Tutorial 7.1: Changing Peel options
ð Tutorial 7.2: Keyframing the angle of peel
Page 51
Page 52

Tutorial 7.1: Changing Peel options
Let’s try changing some options to see what they do.
To modify Percent of peel completed and Angle of Peel:
1. Clear the Peel % From Transition checkbox (the Peel %
slider will appear).
2. Clear the Direction From Transition checkbox (the Angle of Peel
spinner will appear).
3. Change the Angle of Peel spinner to -45 and the Peel % slider to 50
.
Angle of Peel showing (L) -45 and (R)180. (Note: The lighting was adjusted on each and Full Shadows
was turned on so that the object would cast a shadow on itself.)
The Peel %
controls how far the peel has progressed. This can simply be tied to the total transition time, or can be
keyframed individually to create interesting effects, like partial peels. Now let’s play with the Peel
Radius.
To modify the radius of the Peel:
· Move the Radius slider back and forth to see the result. When finished, leave the Radius at
approximately .10
.
Radius of Peel of .10 (L) and 1(R)
Finally, there is a checkbox that controls whether to perform a roll (which is the default) or to actually
peel without rolling.
To Peel instead of Roll:
· Click on the Peel instead of roll
checkbox.
Roll (L) and Peel (R)
ð Forward
to Tutorial 7.2
ð Up
to Tutorial 7
Page 52
Page 53

Tutorial 7.2: Keyframing the angle of peel
Now let’s quickly create an interesting keyframed effect where the peel spins around the object as it
peels.
To start keyframing the Angle of Peel:
1.
Click on the Peel instead of roll checkbox.
2. Check the Peel % From Transition
checkbox.
3. Move the Angle of Peel spinner to 0
.
4. Move the current time slider in the envelope window to 0%
.
5. Click on the Create button in the Envelope Window to create a keyframe at time 0% with the
Angle of Peel currently at 0
.
You have now created the first keyframe, with the angle starting at 0 degrees.
To complete the keyframing:
1. Move the current time slider in the Envelope Window to 100%
.
2. Move the Angle of Peel spinner to 180
degrees.
You have now created the second keyframe, and if you play the preview you will see the object peel as it
flies off, and the peel rotates around the object.
Combining plugins
Remember that plugins in Hollywood FX can be combined. You could attach a Ripple at the same time
the object is peeling, or even attach a second peel to the same object.
Two Peels attached to the same object: 1) showing the result; 2) showing two plugins applied in the FX
Tree.
ð Back
to Tutorial 7.1
ð Forward
to Tutorial 8
ð Up
to Tutorial 7
Page 53
Page 54

Tutorial 8: 3D text generation
PRO
Hollywood FX includes an easy-to-use 3D text generator. This feature is best used within the Filter
format of Hollywood FX. It allows you to create text that is extruded in 3D with bevels. You can assign
different colors to the sides, face and bevel edges of the text. You can also generate the text as a single
block or with each letter being it’s own separate object. This tutorial will demonstrate the use of 3D
text in its most common uses. Unlike more limited effects software, Hollywood FX allows you to attach a
warp plug-in
to 3D text, so you could even explode your text or have it surface-wipe away.
Prepare for the tutorial:
1. Create a new project in your host application and put on clip in the timeline so that it can have a
filter attached to it and make sure it is set for Alpha Channel
transparency.
2. Add Hollywood FX as a filter
and bring up the Hollywood FX dialog for the filter.
3. Within Hollywood FX select New from the File
menu.
To applying the 3D Text plugin:
1.
From the Album Tree, scroll down to the 3D Text Plugin.
2.
Drag the 3D Text Plugin over to the FX Tree and let go.
The 3D Text Options will show above in the Properties panel.
1) FX Tree with Text Added; 2) Album Tree with 3D Text plugin album selected; 3) 3D Text icon
in Album selected.
To set 3D Text options:
1.
Now type any word in the Text field of the 3D Text options.
Font field and 3D Text field
2.
Select the yellow Font folder to choose another font style.
Page 54
Page 55

Font Style dialog
3.
Now change the colors of the text by selecting the four color sides.
3D Text color buttons for each side of the text
Resulting 3D Text
4.
Next we want to apply a preset flight path and watch our word fly off the monitor. Move down the
Album Tree to the Presets Album.
5.
Drag and drop the Spin Off icon over to the 3D Text icon in the FX Tree
Adding Flight Path: 1) Dropping the preset flight onto the 3D text object; 2) Album of flight
presets; 3) Spin Off flight path selected.
You can change the word any time by selecting the 3D Text plugin attached to the 3D Text object. You
can also apply plugins like Explode and make your 3D text blow apart. Experiment and have fun with this
valuable tool of Hollywood FX.
Page 55
Page 56

The Hollywood FX window
The Hollywood FX window gives you quick and easy access to all of your 3D transitions, and lets you
quickly change rendering options and edit flight paths and other attributes of FX. The window is made up
of a number of panels
. These panels group together the different features of Hollywood FX so that you can quickly and easily
select effects and make changes.
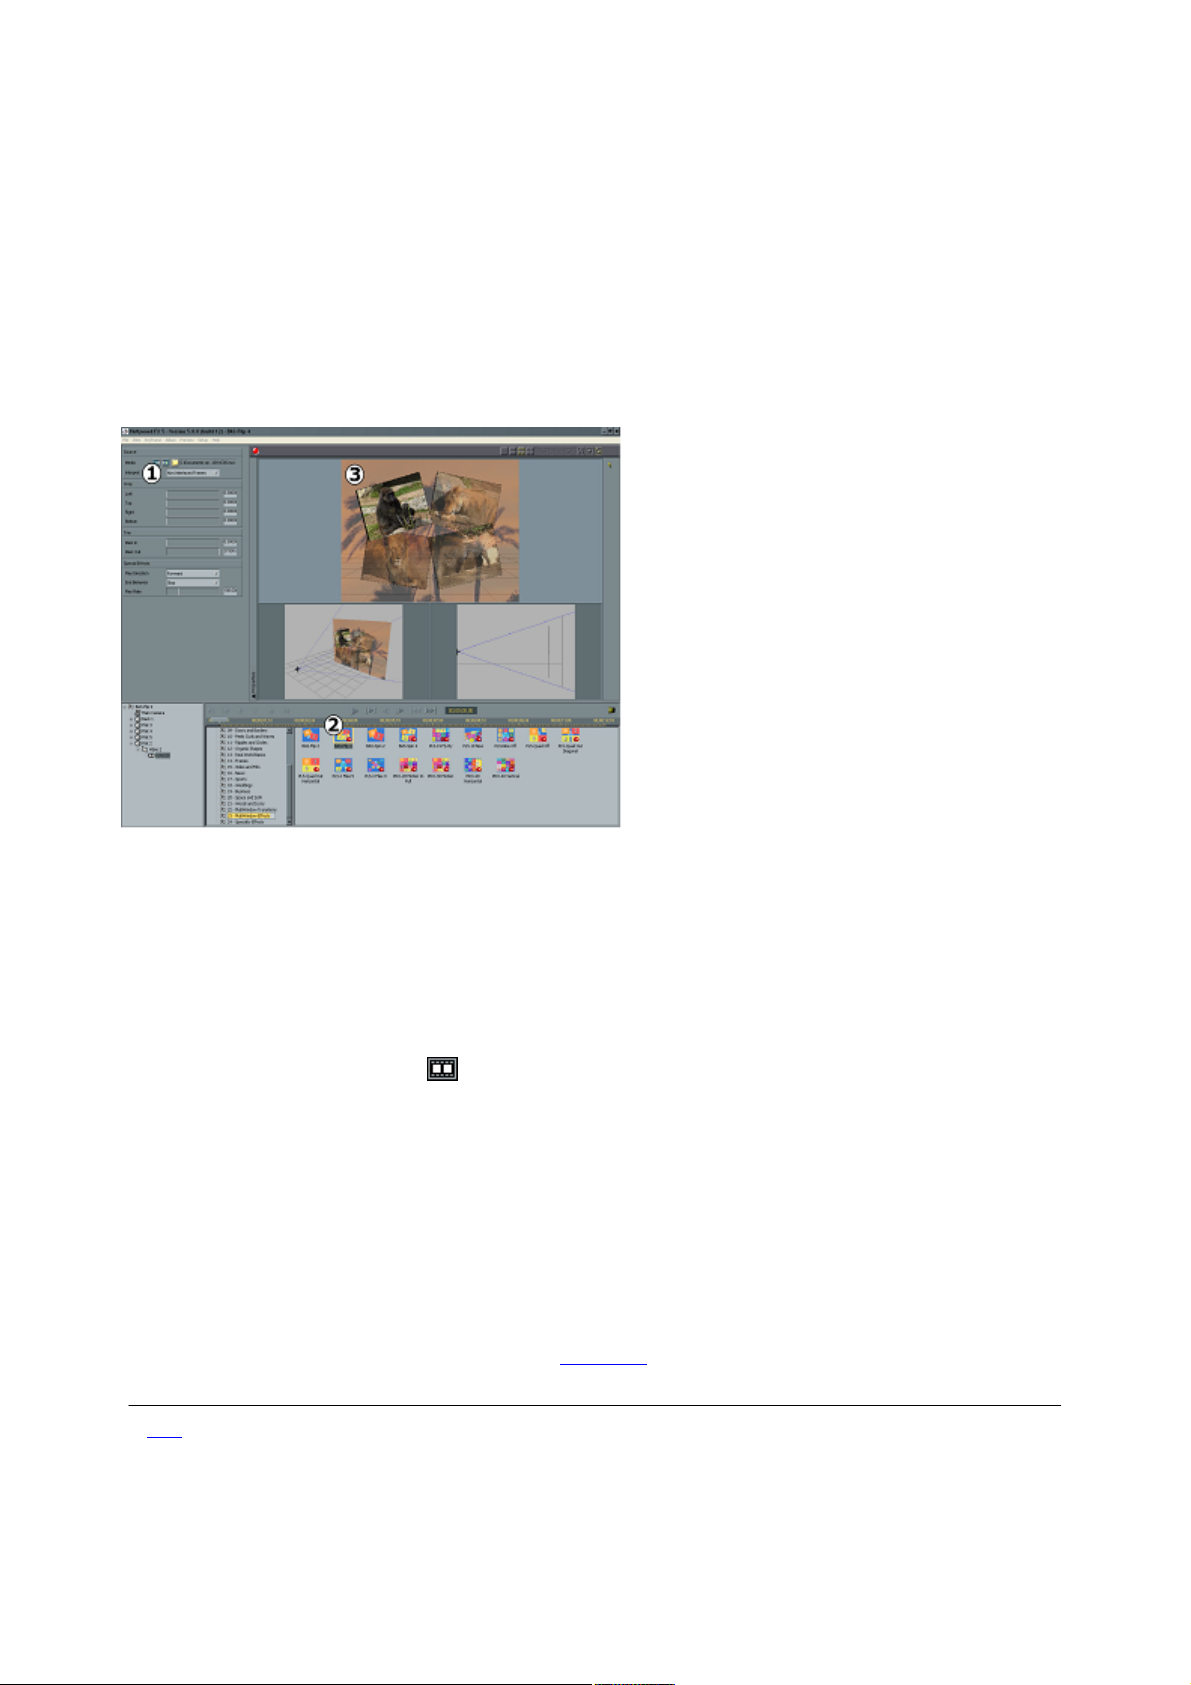
1) Menus provide extra functionality; 2) Properties panel - select items to be changed; 3) Monitor panel
– instant preview; 4) FX Tree panel – customize FX motion, media, surfaces, etc; 5) Album Folder
tree – access groups of album elements; 6) Album item panel – select individual FX; 7) Click to
show/hide Album (to view Envelope Editor).
Hiding the Album (by clicking on the button at
in the illustration above) reveals the Envelope Editor.
Page 56
Page 57

Menus and panels
This topic covers core areas of the Hollywood FX user interface: the menus, the FX Tree panel, and the
Monitor panel.
ð Menus
ð The FX Tree panel
ð FX Tree Advanced Features PRO
ð The Monitor panel and associated controls
Page 57
Page 58

Menus
The menus allow for extended functionality. You can perform any of the following:
File – New
PRO
This command will clear (not delete) any FX selected and start a new FX from scratch.
File – Save to Album Preset
PRO
Use this command to save the FX you are editing to the last preset you created in the Album. To create a
new preset in the album simply drag the FX from the Tree panel into the Album.
The icon created for the FX will match exactly what is currently scene in the preview, so set the preview
slider appropriately to create a useful icon.
File – Export HFZ
PRO
This command will allow you to package up your custom effects for easy sharing with other users. They
are saved to a folder in:
My Documents/Pinnacle Hollywood FX
File – Close
This command will close the Hollywood FX dialog. You need to save any options selected before
choosing this option if you want to permanently keep what you have worked on.
Item – Undo/Redo
PRO
As you make changes, the Undo menu will become available, letting you undo the last action performed.
You can select Undo again and again to undo previous actions. The Undo menu will change to show a
description of what action will be undone by selecting the menu item.
If you mistakenly Undo an action, you can redo it by selecting the Redo menu item. Each time you select
Undo, the action that was undone is added to the Redo list, letting you move back and forth through all
of the changes you have made since displaying the Hollywood FX editor.
Item – Rename
PRO
Select this to rename the current item in the Tree panel. When you select this, the item will be highlighted
and you can type a new name for the item.
Item – Clone
PRO
Select Clone to create a copy of an Object, Light or Plugin in the Tree panel.
Item – Delete
PRO
This will delete the selected item from the FX. Only objects, plugins, and lights can be deleted.
Item – Move Up/Down
PRO
Select these menu items to quickly change the rendering order of objects (you can also drag-and-drop
items within the Tree panel to re-order them). The feature is particularly useful for effects you design that
have a keyhole or transparency need.
The unique nature of this feature would be to create some 3D text and set the surface opacity on the face
of the text to 0.001
. Then have that text sorted above Source 1 video in the objects list. This will cause the face of the text
as it passes by the screen to key out and show the background source 2. Take a look at the “Wow―
effect example in the ‘Words and Icons’ group.
Page 58
Page 59

Wow Effect: 1) Showing keying style wipe resulting from sorting object layers; 2) Moving the object
down will turn it off.
Item – Add Null Object
PRO
Selecting this item creates a new Null Object in the scene. Null objects are not rendered, but are used to
create motion hierarchies and as reference positions for certain plugins.
Item – Add Light
PRO
This allows you to add a spot, point or fill light to enhance a composite.
The Keyframe menu
The commands on this menu include Previous, Next, New, Copy, Paste, Delete and Key Type. See
The Envelope Editor
for information on these commands.
Album – Import 3D
When you select this item, a file requester will appear allowing you to select 3D objects to import into the
Album. You can import Hollywood FX objects (.hfo) and Lightwave 5.x format objects (.lwo). When
importing objects that have morph targets, you should name the targets with sequential numbers to
indicate that they are morph targets (for example if you selected Airplane.lwo, Airplane1.lwo,
Airplane2.lwo
, then Hollywood FX will import Airplane.lwo as the master object, with Airplane1.lwo and
Airplane2.lwo as the morph targets.
Album – Import Media
When you select this item, a file requester will appear, allowing you to import media files into the Album,
which you can then drag-and-drop into FX. You can select multiple files to import from the file requester.
Hollywood FX can import AVI files, Quicktime files, and TGA, BMP, and PNG images.
Album – Display Album
This command will show or hide the Album so that you can view the Envelope Editor.
Album – Separate Album Window
This command will separate the FX Album into its own floating dialog so if you have a dual monitor or
large monitor you can keep your Envelope Editor open and also display all of your FX Albums.
Album – Delete
This command will delete the current item from the FX. Only media and object items can be deleted, and
media items can only be deleted from an FX if they are not used by any surfaces. You must first reassign
the media for any surfaces or delete any objects that use that media before deleting the media itself.
Preview – Play Once, Play Loop, Step Forward & Back, Goto Start, Goto End
This menu provides the same functions as the MoniÂ-tor’s playback control buttons.
Preview – Layout - Single, Split, Tri & Quad Views
This menu provides the same functions as the MoniÂ-tor’s view control buttons.
Preview – Video Sources – Proxy, Still & Actual
This menu provides the same functions as the MoniÂ-tor’s Video Source control buttons.
·
Proxy (fast): Instead of video from the host timeline, simple proxy images with a source number are
used. This generally provides the fastest preview.
·
Still (normal): This is the default selection. A single frame for each video source is used during the
Page 59
Page 60

entire preview. This will generally give you a good idea of how the final FX will look while rendering very
quickly.
·
Actual (slowest): The correct video is used for each frame of the transition. This is the most accurate
and also the slowest preview option, since for each frame of the preview; Hollywood FX must get the
correct video frame from the host application.
Render Engine – Accelerated OpenGL vs. Software
Almost any good 3D accelerator will dramatically improve the performance in the Preview Monitor
window. However, we highly recommend a graphics card with at least 128 megabytes of memory on
board.
Select Accelerated OpenGL from the Preview-Render Engine menu to speed up your preview display.
If you encounter problems with the preview after enabling on-screen rendering, you should immediately
return to Preview menu Render Engine and select the Software
engine.
Notice: It is recommended that you to test these rendering changes using the Easy FX editor, which you
can launch from the Start Menu.
Setup – Time Code
This menu will allow you to select the timecode settings for the format you are working with (e.g. NTSC
vs PAL). It also is where you can select the percent
option, which although not required can make working with Envelopes easier.
·
Percent: When selected, the timecode is simply a percent of the total time.
· SMPTE 24 fps: This option is used primarily for film editing at 24 frames per second. Time is
shown in the format HH:MM:SS:ff
.
· SMPTE 25 fps: This option is used primarily on PAL editing systems for editing video at 25 frames
per second. Time is shown in the format HH:MM:SS:ff
.
· SMPTE 30 fps drop-frame (NTSC 29.97): This is used for standard NTSC editing, where specific
frame numbers are dropped to maintain the NTSC 29.97 frame frame. Time is shown in the format
HH;MM;SS;ff
.
· SMPTE 30 fps non drop-frame: This option is used when you want to edit at 30 frames per second
without worrying about the NTSC 29.97 fps timing. Time is shown in the format HH:MM:SS:ff
.
· Number of Samples: This timecode simply displays sequential frame numbers. The format is #####
.
· Feet+Frames 16 mm: This timecode is used for editing 16mm film. The format is FF + ff
where FF is feet and ff is frames.
· Feet+Frames 35mm: This timecode is used for editing 35mm film. The format is FF + ff
where FF is feet and ff is frames.
Help – Help Topics
This menu will allow you to display the Help Topics dialog to search the resource database.
Register/Upgrades & Add-Ons
If you haven’t yet registered and entered your permanent keycode, you can select this to display the
registration information dialog, and register online instantly, or enter a keycode you received after
registering from another system. If you have already registered, click on this button to find out about
upgrade options.
Technical Support
This will allow you to go directly to Pinnacle’s Tech support forums if you have an Internet
connection.
Page 60
Page 61

About
The About dialog displays the version number, serial number, and machine ID of your Hollywood FX.
You can also quickly connect to Pinnacle Online through the Internet from the About dialog.
Page 61
Page 62

The FX Tree panel
The FX Tree
panel is the central control for the Hollywood FX window. It lists all of the options, objects, surfaces,
and media for the current effect. When you click on one of these items, the Properties Panel above
changes to show the options for the selected item.
The FX Tree panel
Page 62
Page 63

FX Tree Advanced Features
PRO
The FX Tree panel has some advanced features in Hollywood FX PRO: the main camera controls and
the lighting controls.
Camera controls
The camera controls allow you to actually rotate the camera 360 degrees around, making it possible to
create a new look for any effect.
Another use of the camera controls would be to fly the camera into an object, rather than flying the
object to the camera. For instance, you might have several objects rotating in the middle of the screen,
but want to give the illusion of all of them moving in one direction. Instead of having to animate the
multiple objects, you can simply animate the camera.
Camera controls and Monitor set to quadview to see adjustments. Notice the camera in the lower left
view.
Lighting controls
Adding another light and using its controls can be done either from the Item Menu or from within the
Album Tree.
To add a light:
1. Select any FX with a high polygon level, such as 12-Organic Shapes – BAS-Sliding In
.
2.
Move the slider in the Album Tree down to the Lights Album.
The Lights Album selected.
3.
Click on the Spot light.
4.
Drag the Bright Soft light from the Light Album and drop it into the FX Tree under the Main
Camera.
The Lights Album with Bright Spot selected (L); Bright Spot added to the FX Tree (R).
5.
View the results in the Monitor (shown here in split view):
Page 63
Page 64

The result of an added spotlight
You can make various adjustments to the spot light in the Properties panel. Control the direction, the
size and softness of the spot light ring, and the brightness. Play with these options to master the art of
adding lights.
The spotlight control panel
Page 64
Page 65

The Monitor panel and associated controls
The Monitor panel provides a preview of your chosen FX and options. The preview is generated on the
fly as you make changes. A number of controls are provided to adjust the preview itself.
The Monitor panel: 1) Choose from single view to quad view to see your FX from all angles for editing;
2) Click these to select proxy images, still image or moving sequences of your video; 3) Use this slider to
move back and forth through the frames of the preview; 4) Click this button to play the entire preview
one time; 5) Click this button to start and stop looping playback of the preview; 6) Use Skip and Step
buttons to jump to start or end of the preview and single frame step.
Looping Playback button
The looping playback button starts and stops looping playback of the preview. When the button is
pressed in, the preview will playback continuously. You can continue to change options or select a
different transition while the preview is playing.
Reverse Effect button
The Reverse Effect button is a real time saver. It allows you to reverse all flight directions with one click.
So now your video window will fly on, instead of flying off..
Single Playback button
Click the single playback button to play the entire transition one time. This is useful when you’ve
made some changes and want to see the entire effect quickly.
Step buttons
Step forward one frame or step backward one frame.
Skip buttons
Jump to the beginning frame of the effect or to the last frame in the effect.
The Timeline slider
The preview slider lets you manually move to any frame of the preview. Simply move the slider back and
forth to see different frames of the preview. If the preview is playing (either the looping playback is
Page 65
Page 66

selected, or the single playback was just pressed), you will not be able to use the preview slider.
Layout buttons
Normally, the preview shows the view from the camera in the FX. The camera view is what is used for
rendering the actual FX. Sometimes, particularly when editing an object’s flight path, you will want to
see the other views of the FX from at different angles. These buttons allow you to see multiple views,
such as side, top and perspective.
View sources
These buttons allow you to switch between Proxy, Still and Actual. Actual shows and update of the
video from the timeline, but will slow down performance.
Layout control buttons
These buttons allow you to change the way the multiple views display. You can change a side view and
rotate it to a perspective angle, then zoom out or move it off center to gain a better editing view.
The Timecode counter
The timecode counter shows the current position of the FX in conjunction with its Host’s timeline.
Select button
Use the Select button to click in the various areas you want to edit.
Flight Rotation button
The Flight Rotation button is a quick way to rotate the flight path of the transition object.
Light Direction button
The Light Direction button is a quick way to change the FX scene is lighted. You can easily create a
creepy FX by simply changing the light direction to shine upward from below.
Green light
This means that the FX will preview in Real-Time and Final Render will be considerably fast.
Red light
This means that the FX is more complex than the hardware can handle. It will have to render its Preview
and Final Render time will be slower.
Page 66
Page 67

The Album
The Album is where you can browse through the FX available in Hollywood FX.
The FX Album: 1) Select from the different groups of FX; 2) Double-click on an icon to select that FX.
The current selected FX is highlighted in purple.
If you have HFX Basic or Plus, you will see some of the icons with a Plus or PRO
watermark to indicate that you need to upgrade to a particular level to use that effect.
FX are organized into groups that make it easy to find the FX you want quickly and easily.
To change to a different group: Click on the Folders in the Album Folder Tree
to select from the different FX icons. The icons for each FX in an album will help you find the effect you
want.
To select an FX: Double-click on the icon for the FX you wish to select. The selected effect will be
highlighted yellow, and the preview will be updated.
Renaming
Click on your FX Album name once, then again to rename the group, object name, media name, surface
names etc.
Renaming mode
Organizing FX
You can create new FX by dragging the FX item from the Tree panel into an FX folder in the Album.
You can reorganize existing FX into different albums by simply dragging the FX icons themselves
between albums.
Page 67
Page 68

FX properties
Once you have selected an FX from the FX Album, you can change rendering options for that FX.
To display the Properties panel: Click on the name of the FX in the FX Tree
panel.
The FX Tree
Hollywood FX makes it easy to quickly customize an FX to your needs with a series of simple controls.
The Basic Options panel
ð Quick Flight Controls
ð Quick Lighting Controls
Page 68
Page 69

Quick Flight Controls
Flight Path
For most transitions, you can quickly change the direction in which the video flies off (or on) using the
Flight Path dial. Simply click and drag in the dial to change the flight direction and create a very different
result.
Rotate Object
When you use the Flight Path dial, you are changing the direction the object flies, but the object itself
stays oriented in its original direction. When you check the Rotate Object
checkbox, the object will rotate to follow the Flight Direction, often giving a more interesting result.
Page 69
Page 70

Quick Lighting Controls
Lighting
Use this checkbox to turn on or off lighting in the FX. Turning off lighting will eliminate the realistic
shading, but will speed up rendering.
Light Direction
Use the dial to change the direction of the light in the scene. You can create interesting results by having
light come from the bottom of the screen instead of the top. Light Direction affects the shading, shine, and
shadows of 3D objects in an FX.
Shadows
Use this checkbox to turn on or off shadows in the FX. Turning off shadows will speed up rendering.
Having shadows on can add a sense of 3D realism to an FX. Shadows can be controlled in more detail
using Shadow Type, Opacity, Distance and Softness.
Shadow Type
These radio buttons control the type of shadow that is generated.
·
Cast: Cast shadows treat the backdrop image like a piece of paper that all other objects cast shadows
onto. The closer an object is to the backdrop, the closer its shadow is to the object.
·
Drop: When drop shadows are selected, shadows are always drawn at a specified distance from an
object.
·
Full: Turn on full scene shadowing. With this option objects shadow themselves and each other for the
most realistic look.
Opacity
This slider controls the darkness of the shadows. The higher the value, the darker and more opaque the
shadows are. The lower the value, the more transparent the shadows are. Generally a value from 30% to
50% produces a very realistic shadow.
Distance
This slider controls the distance of shadows from their objects. The greater the distance, the farther the
shadow is drawn from the object. This slider is particularly useful for Drop shadows. Remember, the
direction of the shadow is controlled by the Light Direction dial.
Softness
Hollywood FX lets you create soft-edged shadows. Simply increase the softness value to create a softer
shadow. Note however, that the higher the softness value, the greater the rendering time.
Shine
Many FX have a glossy shine on the 3D objects that fly on or off screen. This checkbox controls shine.
Clear this checkbox to turn off the glossy shine.
You can also control the brightness of the shine and the size of the shine spot using the sliders.
Motion Blur
This checkbox will turn on realistic motion blur for an FX. Motion blur mimics the blur that is seen when
objects move quickly across a camera’s view. When motion blur is turned on, you can control the
Page 70
Page 71

specific look of the blur using the Length and Count. Note: Motion blur can greatly increase rendering
time.
Distance
This determines how far the blur “smears―. This value is the percent of the total distance from one
frame to another in the FX. The higher the value, the longer the smear. Hollywood FX always renders an
accurate intraframe blur, unlike other products which simply create a fixed distance blur.
Count
This determines how many copies of the object are drawn to create the blur. The higher the number the
smoother the blur appears. Increasing this number also greatly increases rendering time.
Trails
Checking this will turn on trails. Any moving objects will leave trails behind them as they move.
Trail Count
Determines the number of trails that are drawn behind each object when trails are turned on.
Render
You can change the 3D rendering of the FX:
· Smooth
is the normal setting. Curved surfaces will have a realistic smooth appearance.
· Flat
will render all surfaces as flat polygons. Surfaces that are normally smooth will have a faceted
appearance.
· Wire
will render all 3D objects as wireframes rather than solid surfaces.
Antialiasing
Some FX will exhibit aliasing (blocky stair stepping along the edge of a 3D object). Turn on antialiasing
to reduce aliasing.
·
Off: No antialiasing is used. Fastest option.
·
Web/CD: Antialiasing is slower, but provides good results for all FX.
·
Video: Highest level of antialiasing, slowest rendering.
·
Hardware: Good results and very fast if you have a graphics display card that supports hardware
based anti-aliasing.
Best Quality
Turning on this feature will cause the rendering engine to render at the highest possible quality.
Pixel Blending
Turning on this feature will cause the rendering engine to perform advanced pixel blending, smoothing out
images in the FX. This feature is especially useful when you “zoom― in on a piece of video. Pixel
Blending will eliminate the normal blockiness of the zoom.
Page 71
Page 72

Media properties
When you select a Media item in the FX Tree
panel, the Media Options will be displayed in the Item panel. The Media Options panel gives you the
ability to map video and image files onto the 3D objects in an FX.
Usually, Source 1 and 2 come from the host applicaÂ-tion’s timeline and normally you will not
remap those. The Media items are most often used to map additional video sources for MultiWindow
FX, when the host application does not provide that video.
The Media Options panel: 1) Use the Select buttons to replace any Media with video from the host
application, or from an image or video file; 2) Different video/image files can have different field/frame
orders; 3) Use cropping to remove video blanking or create interesting results; 4) Use the slider and In
and Out buttons to trim a video source; 5) Create interesting playback effects with these controls.
ð Media Selection
ð Trimming
ð Cropping controls
Page 72
Page 73

Media Selection
Use Transition Source
Click on these buttons to select one of the video sources from the host application.
Select File
This button displays a file requester, letting you select a single image, a sequence of images, or a video
file. To select a sequence of images, simply select the first image in the sequence (each file of the
sequence must be numbered sequentially). Hollywood FX currently supports Targa, Bitmap, and PNG
images, as well as Video for Windows and Quicktime video files. Note that you can also select media by
dragging-and-dropping media from the Album onto the Media item in the FX tree
Interpret
When you select a video file, you should also set the Interpretation for that video file so that fields and
frames are correctly rendered.
· Frames
- If the video sequence consists of video frames that are not interlaced fields, then you should select this
option.
· Separate Fields
– If the video is stored as separate fields, select this option (most video is stored interlaced however).
·
Interlaced – Upper First: This option is used when the video source consists of interlaced frames
(consisting of two fields), where the upper field is rendered first in time.
·
Interlaced – Lower First: This option is used when the video source consists of interlaced frames
(consisting of two fields), where the lower field is rendered first in time.
·
Single Image: Use this option when you are mapping an individual image, or you only want to use a
single image from a sequence of images or video file.
For most video, one of the Interlaced interpretations will be used. Generally this should be the same field
order as you set in your host application. Hollywood FX will remember the last Interpret setting for each
type of media.
Page 73
Page 74

Trimming
In
Click the In button to set the in-point of the video source. The current time shown below the slider will be
used as the first frame in the FX.
Out
Click the Out button to set the out-point of the video source. The current time shown below the slider
will be used as the last frame in the FX.
Page 74
Page 75

Cropping controls
These controls adjust the number of pixels that are cropped on each side of the video source. This is
most often used to remove blanking information from captured video, but may also be used to create
some unique results where you only display a small portion of a video source.
Page 75
Page 76

Object properties When an object is selected in the FX Tree panel, the Object Properties panel is displayed. The Object Properties panel gives you controls to keyframe a new path for an object or to adjust its morphing or dissolve level during an FX. Using the Object Properties and the Envelope Editor, you can completely customize any FX to create an entirely new and unique result.
Object Properties: Interactively adjust object’s position (1), rotation (2) and scale (4) in the Monitor
window; 3) These fields show the pitch and yaw of the object’s rotation; 5) Adjust an object’s
shape and dissolve over time using these sliders along with the Envelope Editor; 6) Adjust the pivot point
of an object; 7) These Flags define whether an object casts/receives shadows and will be a transition
object.
There are two types of objects in Hollywood FX:
· A null object is a special object that is invisible and is used only to position and control other
objects (see Object Hierarchies). A null object is represented in the preview window by a white cross,
and in the FX Tree
panel by a box.
· A normal object is one that has rendered polygons and is usually visible in the FX. This is
represented by a box in the FX Tree
panel.
ð Object hierarchies
ð Positioning controls
ð Shape and dissolve
ð Object flags
Page 76
Page 77

Object hierarchies
Hollywood FX is a true 3D animation system and uses object hierarchies to create complex multi-object
movements. An object hierarchy is when one object is the child of another object. When the parent
object moves, the child object moves with it. In the FX Tree
panel you will often see an object’s icon indented directly below another object. This indicates that
the indented object is the child of the object above it. You can change the hierarchy by changing the
parent object for any object.
An object hierarchy in the Scroll2 FX. The Scroll Parent Null is an invisible null object that is used to
control the movement of all of the pieces of the wooden scroll (Stick, Stick, and Scroll
).
Page 77
Page 78

Positioning controls
The positioning controls are used to quickly keyframe new flight paths for an object in the FX. You can
simply move the preview slider to a particular time in the FX, then use these controls to move an object,
and you will have created a new path. For more advanced keyframing of paths, you will use these
controls together with the Envelope Editor.
The edit fields
For each tool, there are also text fields where you can enter a specific value for each axis rather than
using the interactive tools in the Monitor panel. These fields will change to show the current values when
you are using the interactive tools.
Properties positioning tools
These tool buttons let you select a tool to use in the Monitor panel. When one of these tools is selected,
you can click-and-drag in the Monitor
panel to interactively edit the position, rotation, size, and pivot point of the selected object. These tools
are also affected by the Axis buttons described below.
Move
When the move tool is selected, clicking-and-dragging with the left mouse button in the Monitor
panel will let you move the object along the X axis by moving left and right, and along the Y axis by
moving up and down. Using the right mouse button, you can move the mouse back and forth along the Z
axis by moving the mouse up and down.
Rotate
When the rotate tool is selected, clicking-and-dragging with the left mouse button in the Monitor
panel will let you rotate the object around the Y axis by moving left and right and around the X axis by
moving the mouse up and down. Clicking-and-dragging with the right mouse button will rotate the object
around the Z
axis.
Scale
When the scale tool is selected, clicking-and-dragging within the Monitor panel will resize the
object along all axis simultaneously. If you want to scale the object along a single axis, hold the Shift key
while clicking-and-dragging. The left button controls scaling along the X and Y axis, while the right mouse
button scales the object along the Z
axis.
Pivot
The pivot tool lets you adjust the pivot point of an object. The pivot point indicates the point in space that
an object rotates around. Moving the pivot point can create entirely new results when rotating an object.
Page 78
Page 79

The pivot point is indicated by a light blue X shape for the selected object. Use the left mouse button to
move the pivot point along the X and Y axis. Use the right mouse button to move the pivot point along
the Z
axis.
Page 79
Page 80

Shape and dissolve
Morph Shape
Many of the 3D objects in Hollywood FX can change shape from the original flat screen video to a
unique 3D shape. This slider is used to control that shape change. At 0% the object is not morphed at all
(and usually will be flat). At 100%
the object is fully morphed into its final shape. Anywhere in between, the object will be partially
morphed between the original flat shape and the final shape. Use this slider along with the Envelope
Editor to create interesting new shape changes. For example, with the Small Cylinder FX, you could
have the object morph back and forth between flat and cylinder to create a flapping FX.
Dissolve
This slider lets you adjust the transparency of an object. At 0% the object is completely opaque. At
100%
the object will be invisible. Use this slider with the Envelope Editor to create interesting results like
dissolves or fade-ins.
Page 80
Page 81

Object flags
These flags control special capabilities of each object.
Cast Shadows
If checked, this object will cast a shadow. If cleared, the object will not cast a shadow.
Receive shadows
This flag is intended for full-scene shadowing which is not currently implemented.
Transition Object
If checked, the current object is considered to be a transition object. Only transition objects change their
flight path when the Flight Direction or Rotate Object (Effect Options) is changed. When you create
your own FX, you will normally make sure that any objects that fly on or off the screen are set to
Transition Object
, while the background object and any other objects that remain still have their Transition Object flag
cleared.
Page 81
Page 82

Surface options
Surfaces describe the color and texture properties of polygons in an object. A surface can describe a
simple color or can indicate that a Media item is to be mapped on the object. An object may have
multiple surfaces (for example the stopwatch object in the Clockers FX has a surface for the gold
colored watch and a separate surface for the area that is mapped with video.
Surface options: 1) Control the basic color properties of the surface here; 2) Select a media item to map
to this surface.
ð Basic color attributes
Page 82
Page 83

Basic color attributes
Double-sided
If checked, this surface is double-sided, and both the front and back of the polygons in the object are
visible. If cleared, only the front side of each polygon is drawn. This option is used both for textured and
color-only surfaces.
Smooth
If checked, the polygons of this surface are drawn with a smooth appearance. When clear, the polygons
are drawn flat and have a faceted appearance. This option is used both for textured and color-only
surfaces.
Base Color
This RGBA value determines the base color of the surface. It is only used if the Media item is set to
<none> (a color-only surface). You can enter individual values for the Red, Green, Blue, and Alpha
channels individually in the edit fields (the values must be between 0 and 1), or you can click on the Base
Color button to display a color requester and select a specific color. Adjusting the Alpha channel below
1
will create a semi-transparent object.
Opacity
This slider determines how transparent a surface is. The highest value of 1.000 is completely opaque,
while the lowest value of 0.000 is completely transparent. This will only make the surface transparent and
not the entire object, unless the entire object is a single surface. If your object has multiple surfaces and
you want the entire object to fade out, then use Dissolve in the Object Options.
Shine Color
A surface can have a specular shine on it (a bright spot that makes it look glossy). This value determines
the color of that specular shine. It is used along with the Shine Spot value which determines the size of
the specular shine spot. Normally, for a glossy appearance, this value should be set to 1, 1, 1, 1 (pure
white), but you can use any color to create interesting results. You can enter individual vales for the Red,
Green, Blue, and Alpha channels individually in the edit fields (the values must be between 0 and 1
), or you can click on the Base Color button to display a color requester and select a specific color.
Shine Spot
This slider along with the Shine color determines how glossy a surface looks. The higher the value, the
tighter the specular spot (and the glossier the surface looks). With a smaller value the spot is spread out
and the surface looks less glossy. At 0
, no Shine is drawn for the surface.
Luminosity
This RGBA value determines the luminous color of the surface. It is only used if the Media item is set to
<none> (a color-only surface). You can enter individual vales for the Red, Green, Blue, and Alpha
channels individually in the edit fields (the values must be between 0 and 1
), or you can click on the Base Color button to display a color requester and select a specific color.
When a surface has a luminous color, it looks like it is emitting that color of light. It will no longer be
shaded based on light direction. This can be useful to create effects like neon tubes.
Surface Adjustment Properties
PRO
Page 83
Page 84

These texture adjustment tools let you create interÂ-estÂ-ing effects by changing how media is mapped
onto the polygons of an object. Click on any of the tool buttons to activate that tool, then click-and-drag
in the Monitor window to adjust the tool’s values. You can also manÂ-ually enter values for position,
rotation or scale using the sliders or entering values into the text fields.
Move
When this is selected you can move the mouse up and down to adjust the Y position of the texture and
move the mouse left and right to adjust the X position of the texture. You can create interesting results by
moving a texture across an object (keyframe the position over time).
Rotate
Use the left mouse button to rotate on the X and Y axes. Use the right mouse button to rotate around the
Z axis. Rotating a texture can create unique results.
Scale
When selected you can move the mouse up-and-down to adjust the Y scale of the texture and move the
mouse right-and-left to adjust the X scale of the texture. Using Scale you can shrink or grow the texture
on the object.
Page 84
Page 85

The Envelope Editor
The Envelope Editor is used for advanced keyframing of flight paths and individual options in Hollywood
FX. When you first use Hollywood FX, the Envelope Editor is hidden to keep things simple. When you
are ready to begin using the Envelope Editor, open it by clicking on the Show/Hide Album tool in the
middle-right of the Hollywood FX window.
The Envelope Editor is used to create keyframes for whatever control is currently active in the
Hollywood FX window. The current control’s name is highlighted in green to indicate that it is the
current control, and that the Envelope Editor can be used to create keyframes for that control.
There are two basic types of envelope: the Single-value envelope and the Multiple value
envelope.
ð The single-value envelope
ð Multiple-value envelope
ð The Envelope window
ð Key Type controls
ð Keyframe controls
ð Keyframing example
ð Saving and loading envelopes
ð Exiting Hollywood FX
Page 85
Page 86

The single-value envelope
When you are working with a single value in Hollywood FX (like Morph
percent), the envelope editor will show that value over time and will let you edit the envelope by clicking
and dragging in the envelope window.
1) Next, Previous, Copy, Paste, Create and Delete keyframe buttons; 2) Percent or Timecode counter;
3) The ruler shows the Transition percent or duration if you have the Setup/Timecode set to NTSC, PAL
etc; 4) Use the current time slider to move to a new frame in the FX. This works like the preview slider,
but is more accurate; 5) The mark of a created keyframe; 6) Any key can have values curve through it,
go straight, or jump from the previous key’s value.
When you click and drag in the Monitor panel, it will at the same time automatically adjust the current
control. When you adjust the current control, that will affect the envelope window.
Page 86
Page 87

Multiple-value envelope
When you are editing the flight path of the object using the object tools, you are actually adjusting
keyframes for the position, rotation and scale simultaneously for a keyframe. You edit the values for
those keyframes using the tools in the Properties panel.
Page 87
Page 88

The Envelope window
Click the Envelope button to access the Envelope window, which displays the current envelope and lets
you quickly click and drag to create new keyframes for an envelope.
The Current Time slider
At the top of the envelope window you will find the current time slider. Like the preview slider, it lets you
move back and forth to different times in the FX. Left-click and drag the slider back and forth to move it.
As you move it, the preview slider in the Monitor window will move also. If you move the time over a
keyframe, that keyframe will be highlighted in red to indicate that it is the current keyframe.
The Time ruler (timecode divisions)
At the top of the window is the Time Ruler. The Time Ruler shows the total time of the FX. This is
controlled entirely by changing the duration of the FX in your host application. The timecode used in this
ruler can be adjusted in the Settings menu.
The Transition ruler (percentage divisions)
All keyframe information in Hollywood FX is stored as percent values of the total transition. This allows
Hollywood FX to handle true intraframe editing.
Normally the values in this ruler run from 0% to 100%
coinciding with the Time Ruler above it. However, this can be affected by certain Effect Options
settings.
Page 88
Page 89

Key Type controls
When the current time is on a keyframe (the keyframe block will be highlighted yellow), you can use the
following buttons to control the type of keyframe at that time.
Spline Curve
When Spline Curve is selected, the envelope will be a smooth curve through the keyframe.
Linear
The envelope will be a straight line to the current keyframe.
Value Jump
When this is selected, the value will remain at the previous keyframe’s value until the exact
moment of the current keyframe, then it will jump to the new value. This is great when you want an object
to disappear at a specific point in time. You can set up an envelope for the object’s Dissolve value
where the first keyframe is 0%, and the second keyframe is a Value Jump keyframe to 100%
. This will guarantee that the object will disappear instantaneously rather than fading out over time.
Page 89
Page 90

Keyframe controls
Copy…
This button lets you copy a range of keyframes from one time to another.
Create
Clicking this button creates a keyframe at the current time in the envelope window, using the current
value. Usually you will create new keyframes by simply clicking in the envelope window, however, this
button lets you manually create a keyframe when you already have the current time slider at the proper
position, and your current control is set to the value you want for the keyframe you are creating.
Delete
This button will delete the current keyframe from the envelope. You cannot delete the keyframes at 0%
and 100% in time.
Previous Key
This button will move the current time slider to the previous keyframe in the envelope.
Next Key
This button will move the current time slider to the next keyframe in the envelope.
Page 90
Page 91

Keyframing example
Here is an example of keyframing, to create a Dissolve
envelope where the object dissolves in and out, you could start by creating the following simple
envelope. Choose any Flying Window FX and then click on the object you want to dissolve, then drag
the slider in the envelope window to 10% time and drag the Dissolve slider to 1% value.
A new dissolve envelope, created by dragging the dissolve slider.
After creating the initial envelope, click on Copy then move the slider to 30 for the Paste value. Click
Paste
. This will copy the keys from 10% and paste it at 30%, to create the following:
The envelope after copying the keys from 10% to 30%.
Now move the slider back to 0% and click on Copy then move the slider to 20% for the Paste value.
Click Paste
. This will copy the keys from 0% and paste it at 20%, to create the following:
The envelope keys ready to Copy & Paste.
Now do this several times to create a loop:
The final envelope after several alternating Copy and Paste operations.
Page 91
Page 92

Saving and loading envelopes
Save…
This button displays a dialog that lets you save the current envelope to disk under a name of your
choosing. Normally you should save all envelopes in the Envelopes
folder (the default) so that you can find them again easily. This is useful when you might want to reuse a
complex envelope in a different FX or for a different value. For example, you might create a complex
bouncing ball path that you could save to disk and load later in an FX with a different shaped object.
Load…
Click this button to replace the current envelope with a previously saved envelope. Only envelopes
that have the same range of values can replace an existing envelope. So you could use an envelope you
saved for an object’s Morph as an envelope for an object’s Dissolve value since they both
have a range from 0 to 100. But you couldn’t use that Morph envelope for Flight Direction
, since Flight Direction requires an envelope that uses values from 0 to 360 degrees.
Page 92
Page 93

Exiting Hollywood FX
OK
Click OK to save your changes and exit the Hollywood FX window. When you click OK you are
returned to your host application. Clicking the close button at the top right of the window has the same
effect as clicking OK.
Cancel
If you wish to discard the changes you have made since the Hollywood FX window was displayed, click
Cancel. This will discard your current changes and return to the host application.
Page 93
Page 94

Plugins
PRO
Hollywood FX is a remarkably expandable program. You can add new FX, new objects to create FX,
and new plugins that expand Hollywood FX’s capabilities in many ways.
A plugin is basically a special program that can be “attached― to an item in an FX, modifying the item
in some way. There are two basic types of plugins currently available for Hollywood FX.
Image Filters: These are the traditional plugins you will find in non-linear editors and older effects
programs. These plugins are used to modify Media items. They can be used to adjust colors, blur an
image, create keying effects for compositing and much more. In Hollywood FX, Image Filters can be
attached to any Media item, or to the Effect Options item. When you attach an Image Filter to the Effect
Options item, it will filter the output video rather than one of the media items.
Warps: Warps are true 3D object plugins that are unique to Hollywood FX. These Warp plugins modify
3D objects in some way, such as twisting the object, exploding it, or doing a page-peel on it.
ð Managing Plugins
Page 94
Page 95

Managing Plugins
Plugins are added to items, modified and deleted from the Album Plug-ins and FX Tree
.
To attach a plugin to an item:
1.
Click and drag the slider down to the bottom of the Album Tree. There you will see the Warps, 3D
Text and Filter plugins. Click on one and the Album will display folders or icons to the right containing
various plugin presets.
2.
Drag and Drop the plugin that you wish to add to the item. The plugin will be added, and the Plug-ins
options will appear in the Properties panel.
To change the options for a plugin:
1.
Click on the plugin in the FX Tree. The options will appear in the Properties panel.
2.
Change options and see the results in the Monitor panel.
To remove a plugin from an item
1.
Click on the plugin in the FX Tree.
2.
Select Delete from the Item menu or right click menu and select Delete.
The topics linked below provide individual documentation for each plugin included in Hollywood FX.
ð Filter - Blur
ð Filter - Chroma Key
ð Filter - Luma Key
ð Filter - Directional Wipe
ð Filter – Edge Wipe
ð Filter - Gradient Wipe
ð Warp – AlphaParticles
ð Warp – Displacement Map
ð Warp – Explode
ð Warp – Peel
ð Warp – Polyshrink
ð Warp – Ripple
ð Warp – Swirl
ð Warp - Twist
Page 95
Page 96

Filter - Blur
The Blur filter lets you blur incoming video using a number of different options.
Blur options
Box, Gaussian and Directional blur
Blur Type
Use this dropdown to select different types of blur. The remaining options will change based on which
blur type you select.
· Box
– This is a quick blur that provides good results.
· Gaussian
– A slower blur, produces finer results.
· Directional – Allows blurring in a specific direction using the Direction
spinner.
Blur Channel
You can select an individual color channel to blur. This can create interesting color effects on the
incoming video.
Mix with original %
This slider allows you to overlay the blur on top of the original image to produce more interesting results.
The higher the number, the more of the original image you will see.
Percentage From Transition
When checked, this option automatically keyframes the blur so that the object blurs more over time as
the transition progresses. If this option is checked, the blur amount sliders will not be visible.
Box: Horizontal
Controls the amount of blur in the horizontal direction.
Box: Vertical
Page 96
Page 97

Controls the amount of blur in the horizontal direction.
Directional: Direction From Transition
If checked, then the blur direction will be based on the Flight Rotation spinner in the FX options. If
cleared, then the Direction spinner will appear.
Directional: Make directional blur one-sided
When checked the blur is calculated from the center in one direction. When cleared, the blur is calculated
in both directions from the center.
Directional: Direction
This spinner controls the direction of a directional blur. The image will blur in the same direction as the
spinner.
Directional: Blur percentage
This slider controls the amount of blur that is calculated and is only visible if the Percentage From
Transition
is cleared.
Gaussian: Blur percentage
This slider controls the amount of blur that is calculated and is only visible if the Percentage From
Transition
is cleared.
Page 97
Page 98

Filter - Chroma Key
The Chroma key filter is a simple keyer that allows you to quickly key out green or blue backdrops from
video to allow keying of video that is mapped onto 3D objects in Hollywood FX.
Chroma Key options
Type
Select Blue or Green
to key out blue or green backdrops.
Threshold
This slider controls how much of the picture is keyed out. The higher the number the greater the range of
color that is keyed out.
Fine Adjust
This slider controls the fine adjustment of the key around edges of differing colors.
Reverse Key
This checkbox will reverse the key, so that everything except
the blue or green areas is removed.
Page 98
Page 99

Filter - Luma Key
The Luma key filter is a simple keyer that allows you to quickly key out dark or light areas of a video
source.
Luma Key options
Cutoff
This slider controls how much of the picture is keyed out. The higher the number the greater the range of
brightness that is keyed out.
Softness
This slider controls the fine adjustment at the edge of the cutoff brightness, giving a softer edge to the
key.
Reverse Key
This checkbox will reverse the key, so that light areas are keyed out rather than dark areas.
Page 99
Page 100

Filter - Directional Wipe
This filter allows you to quickly “wipe away― a source image in any direction you choose. It can be
especially interesting on video that is mapped onto complex objects.
Directional Wipe options and example
Wipe % From Transition
When checked (the default) the Wipe % is automatically tied to the total transition time, so that the wipe
will finish at the same time as the transition. When cleared, you will be able to use the Wipe Percentage
control manually to control the wipe.
Wipe %
This will only appear if Wipe % From Transition is cleared. With this slider you can manually control and
keyframe the Wipe amount.
Direction From Transition
When checked, the Wipe Direction is controlled by the Flight Rotation
spinner in FX Options.
Wipe Direction
This spinner controls the direction in which the image is “wiped away―.
Softness
This slider controls the softness at the edge of the wipe. The higher the value the softer the edge of the
wipe.
Border Size
This slider controls the size of the colored border. At 0, there is no border at all. The higher the value, the
larger the border.
Border Color
Click this button to select the color of the border. The border is only visible if the border size is not 0.
Page 100
 Loading...