

Page 1

Uss
U
Release 4.5 For Windows
Pinnacle Systems, Inc.
280 N. Bernardo Ave
Mountain View, CA 94043
www.pinnaclesys.com
www.hollywoodfx.com
err’’ss
e
Guuii
G
Revision A
d
d
e
e
Page 2

Page 3

LLiicce
CAREFULLY READ THE FOLLOWING TERMS AND CONDITIONS BEFORE USING THIS PROGRAM. USING
THIS PROGRAM INDICATES YOUR ACCEPTANCE OF THESE TERMS AND CONDITIONS. IF YOU DO NOT
ACCEPT OR UNDERSTAND THEM, YOU SHOULD PROMPTLY RETURN THIS PRODUCT TO YOUR VALUEADDED RESELLER OR DEALER.
The export and re-export of Pinnacle software products are controlled by the United States Export
Administration Regulations and such software may not be exported or re-exported to any country to
which the United States embargoes goods. In addition, Pinnacle software may not be distributed to
persons on the Table of Denial Orders, the Entity List, or the List of Specially Designated Nationals.
By downloading or using a Pinnacle software product you are certifying that you are not a national of any
country to which the United States embargoes goods and that you are not a person on the Table of Denial
Orders, the Entity List, or the List of Specially Designated Nationals.
ennss
e
e
Aggrr
A
e
e
e
e
m
m
enntt
e
PPrroopprriieettaarryy PPrrooppeerrttyy
This product, Pinnacle Systems’ trademarks, product names, user manuals, documentation and other
support materials are either patented, copyrighted, trademarked, constitute valuable trade secrets
(whether or not they or any portion thereof may be copyrighted or patented) or are otherwise proprietary
to Pinnacle Systems. In addition, this program may contain the proprietary property of others which has
been licensed to Pinnacle Systems (such as utility or plug-in software or programs, clip art and sample
files). You agree not to remove any product identification or notices of the proprietary restrictions from
Pinnacle Systems’ products or manuals.
LLiicceennssee aanndd PPrroohhiibbiittiioonnss
You may:
(a) use the enclosed program and accompanying written materials (“programming materials”) in
connection with a single computer. A copy of the program is being furnished to you along with this
license agreement. If you wish to use this program on more than one computer, you must license
additional copies of the program;
(b) use the program and accompanying written materials on a licensed computer network. A “computer
network” is any combination of two or more terminals or computers that are electronically linked and
capable of sharing the use of a single software program. A “licensed computer network” is a
computer network for which you have purchased from Pinnacle Systems, or its dealer, sufficient
copies of this program so that the number of concurrent users of this program on the computer
network at any given time is not greater than that number of copies of the program so purchased;
(c) Copy the program once only solely for backup purposes in support of your use of the program so long
as you prominently label the backup copy with the appropriate copyright notice;
(d) use the program for your personal use or in your business or profession. Permitting unauthorized
users access to the program and program materials is a violation of this license agreement; and
3
Page 4

HHoollllyywwoooodd FFXX UUsseerr’’ss GGuuiiddee
(e) transfer the program and license to another party if the other party agrees to accept the terms and
conditions of this agreement. If you transfer the program, you must at the same time either transfer
all copies to the same party or destroy any copies not transferred. If you transfer possession of any
copy of the program to another party, your license is automatically terminated.
PPrroohhiibbiitteedd UUsseess
You may not, without explicit prior written permission from Pinnacle Systems:
(a) use, modify or transfer the program, or copy the program in whole or in part, except as expressly
provided herein;
(b) reverse-engineer, decompile or otherwise recreate the program or hardware in whole or in part;
(c) make copies of or distribute, for profit or otherwise, or authorize the copying or distribution of the
program, hardware, or materials related thereto, except as herein provided;
(d) make alterations to the program or merge it into any other software;
(e) grant sublicenses and leases or other rights in the program or program materials to others;
(f) make verbal or media translations of the program, in whole or in part, or of the program materials;
(g) modify the program for use on non-compatible hardware;
(h) make telecommunications data transmissions of the program in whole or in part;
(i) distribute the program on either a permanent or temporary basis to others;
(j) make available any part of the program or program materials to any third party, other than your own
properly authorized employees; or
(k) make any alteration, modification, connection, disconnection, improvement or adjustment of any kind
to or use the Pinnacle Systems software except as explicitly contemplated in the enclosed
programming materials.
It is agreed that the violation by you of any of the prohibitions described above shall be a material
breach by you of this license agreement, and any attempt to sublicense, assign, or transfer any of
the rights, duties, or obligations under this agreement, except as expressly provided herein, is void.
TTeerrmm
The license is effective until terminated. You may terminate it at any time by destroying the program
together with all copies in any form. It will also terminate upon conditions set forth elsewhere in this
agreement or if you fail to comply with any term or condition of this agreement. You agree that upon such
termination you will destroy the program together with all copies in any form.
LLiimmiitteedd WWaarrrraannttyy
The program is provided „as is“ without warranty of any kind, either expressed or implied, including but
not limited to the implied warranties of merchantability and fitness for a particular purpose, with the sole
exception of defective CD(s) and Pinnacle Systems software, described below. The entire risk as to the
quality and performance of the program is assumed by you. If the program proves defective, you (and not
Pinnacle Systems, its Licensors, or its dealers) assume the entire cost of all necessary servicing, repair or
correction.
4
Page 5

LLiicceennssee AAggrreeeemmeenntt
Pinnacle Systems warrants to the original licensee that Pinnacle Systems software shall be free from
defects in material and workmanship only for a period of thirty (30) days from the date of original
purchase. If a defect covered by this warranty occurs during this period, and it is returned to the dealer
from whom it was purchased not later than five (5) days after the end of such period, the dealer shall, at
its option, either repair or replace the item. This warranty is in lieu of all other express or statutory
warranties, and the duration of any implied warranty, including but not limited to the implied warranties
of merchantability and fitness for a particular purpose, is hereby limited to said thirty (30) day period.
Pinnacle Systems warrants to the original licensee that Pinnacle Systems software shall be free from
defects in material and workmanship only for a period of one (1) year from the date of original purchase.
If a defect covered by this warranty occurs during this period, the licensee may request a Return Material
Authorization (RMA) number from Pinnacle Systems. Upon receipt of the returned item(s), Pinnacle
Systems shall, at its option, either repair or replace the item(s). Items returned to Pinnacle Systems
without RMA numbers will not be accepted. This warranty is in lieu of all other express or statutory
warranties, and the duration of any implied warranty, including but not limited to the implied warranties
of merchantability and fitness for a particular purpose, is hereby limited to said one (1) year period.
Pinnacle Systems’ and its Licensors’ liability is limited solely to the repair or replacement of the enclosed
media and Pinnacle Systems software, as set out above, and shall not in any event include damages for
loss of use or loss of anticipated profits, savings, costs, expenses or other incidental or consequential
damages arising out of the use or inability to use the program, including without limitation, any damages
arising from data or information lost or rendered inaccurate, regardless of the form of action whether in
contract, tort (including negligence), strict product liability or otherwise, even if Pinnacle Systems, its
Licensors, or its dealer has been advised of the possibility of such damages.
Pinnacle Systems and its Licensors do not warrant, guarantee or make any representations that the
functions contained in the program will meet your requirements or that the use or operation of the
program or that the results of such use will be correct, accurate, reliable, current, uninterrupted or error
free; and you rely on the program and results of its use solely at your own risk.
Some jurisdictions do not allow the exclusion or limitation of implied warranties, so the above exclusion
and limitation may not apply to you. Some jurisdictions do not allow the exclusion of liability for incidental
or consequential damages so the above exclusion may not apply to you. This warranty gives you specific
rights and you may also have other rights which vary from jurisdiction to jurisdiction.
UUppddaatteess
Periodically Pinnacle Systems may introduce new versions or releases of the software. All new versions or
releases which are provided to you shall become part of the program and shall be governed by the terms
of this license agreement.
5
Page 6

Page 7

T
a
T
LICENSE AGREEMENT.............................................................................................3
Proprietary Property................................................................................................3
License and Prohibitions .........................................................................................3
Prohibited Uses.......................................................................................................4
Term........................................................................................................................4
Limited Warranty.....................................................................................................4
Updates...................................................................................................................5
TABLE OF CONTENTS.............................................................................................7
INTRODUCTION.......................................................................................................15
What is Hollywood FX?...........................................................................................16
Before You Start......................................................................................................17
Installation for Windows 98, NT 4, Windows 2000................................................18
Customer Support..................................................................................................20
HOST APPLICATIONS.............................................................................................21
Adobe Premiere......................................................................................................22
Changing an Existing Transition.............................................................................23
Avid Media Composer, Xpress, Xpress DV and Symphony.................................24
Adding A Hollywood FX Transition..........................................................................24
Changing an Existing Transition.............................................................................24
Adding A Hollywood FX Filter.................................................................................25
Changing an Existing Filter ....................................................................................25
Adding A Hollywood FX MultiWindow Effect...........................................................26
a
bll
b
e
e
Off
O
Coonntt
C
ennttss
e
TUTORIAL: TRANSITIONS & OPTIONS...............................................................27
Selecting An FX.......................................................................................................28
The Monitor Panel...................................................................................................28
Basic Effect Options...............................................................................................29
Easy Flight Options.................................................................................................29
Easy Lighting ..........................................................................................................30
Easy Options...........................................................................................................31
Render Type..........................................................................................................31
7
Page 8

HHoollllyywwoooodd FFXX UUsseerr’’ss GGuuiiddee
Antialiasing............................................................................................................31
TUTORIAL: TRANSITION+.....................................................................................33
Selecting the Transition+........................................................................................33
Mapping A Video Clip to Source 3 .........................................................................33
TUTORIAL: MULTIWINDOW FX.............................................................................37
Prepare for the Tutorial..........................................................................................37
Selecting the FX and Setting Options....................................................................38
Using Hold At End...................................................................................................39
TUTORIAL: HOLLYWOOD FX PREMIERE FILTER..........................................41
Prepare for the Tutorial..........................................................................................41
CLUB HOLLYWOOD................................................................................................45
TROUBLESHOOTING .............................................................................................47
PERFORMANCE.......................................................................................................49
CPU Speed, Bus Speed, and Memory...................................................................49
Graphic Card Drivers..............................................................................................49
Preview Performance .............................................................................................50
Final Rendering Performance................................................................................50
ADVANCED TUTORIALS........................................................................................53
TUTORIAL: USING TITLEDEKO WITH HOLLYWOOD FX.................................55
TUTORIAL: ENVELOPES........................................................................................59
TUTORIAL: PATH EDITING....................................................................................63
TUTORIAL: CREATING NEW FX FROM EXISTING FX ......................................69
TUTORIAL: WARP PLUGINS.................................................................................75
TUTORIAL: 3D TEXT GENERATION....................................................................79
TUTORIAL: LIGHTWAVE OBJECT IMPORT .......................................................81
8
Page 9

TTaabbllee OOff CCoonntteennttss
REFERENCE GUIDE................................................................................................83
THE HOLLYWOOD FX DIALOG.............................................................................85
The Control Panel...................................................................................................87
Move Up/Move Down….........................................................................................88
Rename….............................................................................................................89
Clone….................................................................................................................89
Delete....................................................................................................................90
Save FX….............................................................................................................90
Plugins…...............................................................................................................92
The Monitor Panel...................................................................................................93
Looping Playback Button.......................................................................................94
Single Playback Button..........................................................................................94
Step Buttons..........................................................................................................94
Skip Buttons ..........................................................................................................94
The Preview Slider ................................................................................................94
View Buttons .........................................................................................................94
The Envelope Editor Panel.....................................................................................95
The Buttons Panel..................................................................................................95
Register Now/Upgrade Now...................................................................................95
Undo......................................................................................................................95
Redo .....................................................................................................................95
Settings.................................................................................................................95
About.....................................................................................................................96
Ok .........................................................................................................................96
Cancel...................................................................................................................96
THE FX CATALOG...................................................................................................97
Organizing FX..........................................................................................................98
BASIC OPTIONS.......................................................................................................99
Easy Flight Controls ...............................................................................................99
Reverse Flight.......................................................................................................99
Flight Path...........................................................................................................100
Rotate Object......................................................................................................100
Easy Lighting Controls.........................................................................................100
Lighting................................................................................................................100
Shadows .............................................................................................................100
Shine...................................................................................................................100
Light Direction.....................................................................................................100
9
Page 10

HHoollllyywwoooodd FFXX UUsseerr’’ss GGuuiiddee
Easy Options Controls..........................................................................................100
Render ................................................................................................................100
Antialiasing..........................................................................................................101
Motion Blur ..........................................................................................................101
Trails ...................................................................................................................101
Pixel Blending......................................................................................................101
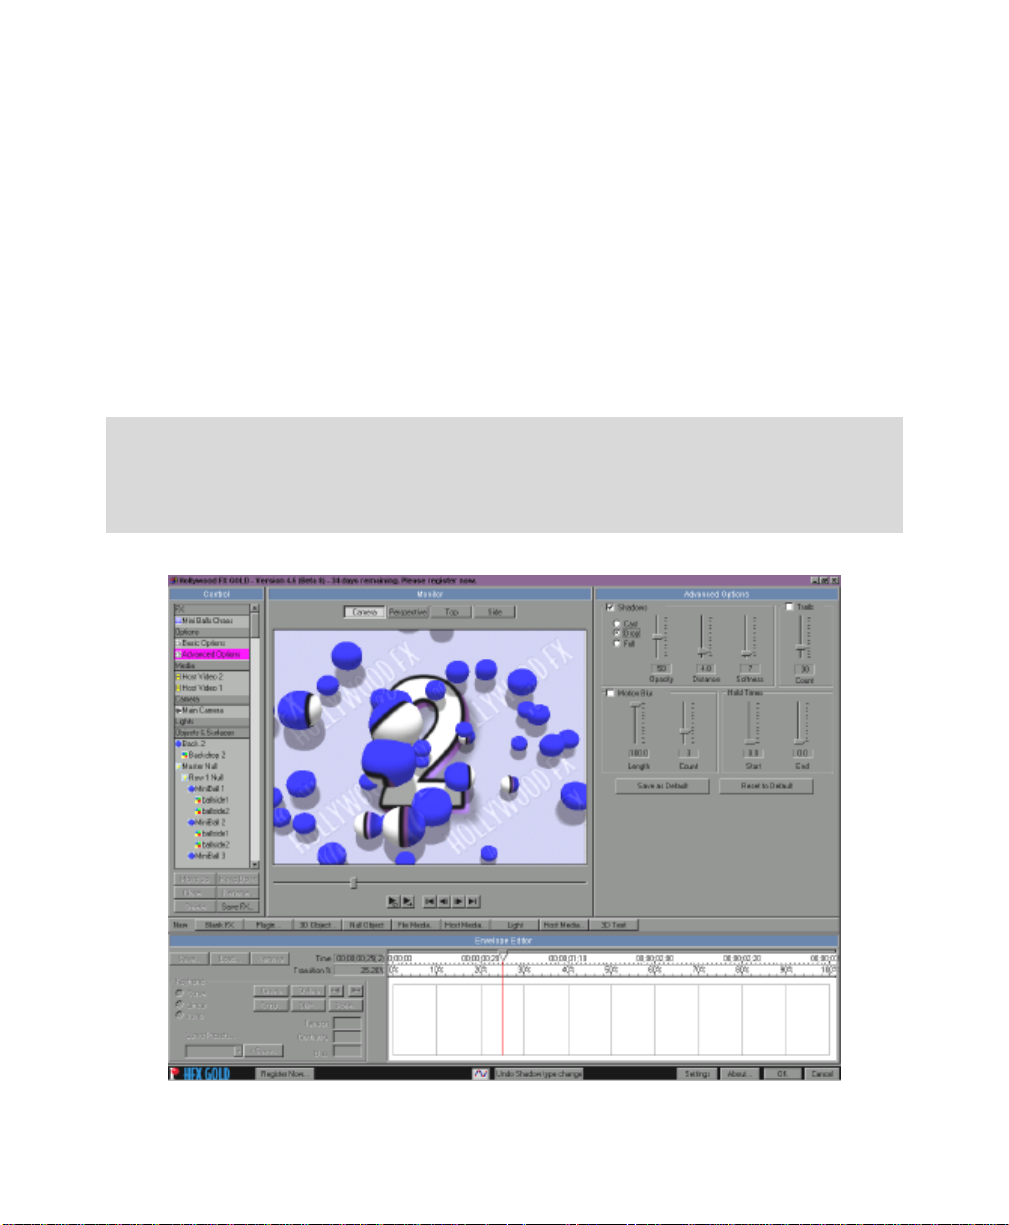
ADVANCED OPTIONS..........................................................................................103
Shadow Controls...................................................................................................103
Shadow Type.......................................................................................................104
Opacity................................................................................................................104
Distance..............................................................................................................104
Softness..............................................................................................................104
Motion Blur Controls.............................................................................................104
Length.................................................................................................................104
Count...................................................................................................................105
Hold Times.............................................................................................................105
Start....................................................................................................................105
End......................................................................................................................105
MEDIA OPTIONS................................................................................................... 107
Media Selection.....................................................................................................108
Select Track........................................................................................................108
Select File ...........................................................................................................108
Preview and Trimming..........................................................................................108
The Preview Slider ..............................................................................................108
In.........................................................................................................................108
Out ......................................................................................................................108
Information............................................................................................................108
Playback Control...................................................................................................109
Interpret...............................................................................................................109
Playback Rate.....................................................................................................109
Direction..............................................................................................................109
End Behavior.......................................................................................................110
Cropping Controls ................................................................................................110
OBJECT OPTIONS................................................................................................ 111
Types of Objects...................................................................................................111
Object Hierarchies.................................................................................................112
Select File…...........................................................................................................112
Positioning Controls.............................................................................................112
10
Page 11

TTaabbllee OOff CCoonntteennttss
Tool Buttons ........................................................................................................112
The Axis Buttons..................................................................................................113
The Edit Fields.....................................................................................................113
Size To Full..........................................................................................................114
Position To Full....................................................................................................114
Morph & Dissolve..................................................................................................114
Morph..................................................................................................................114
Dissolve..............................................................................................................114
Parent Object ........................................................................................................114
Object Flags..........................................................................................................115
Shadow Cast.......................................................................................................115
Shadow Receive.................................................................................................115
Transition Object .................................................................................................115
SURFACE OPTIONS............................................................................................. 117
Texture Options....................................................................................................117
Media..................................................................................................................117
X, Y, Z Axis Buttons.............................................................................................118
Move, Rotate, Scale............................................................................................118
Width Repeat, Height Repeat..............................................................................118
Reset Values.......................................................................................................118
Color Options........................................................................................................119
Double-Sided.......................................................................................................119
Smooth................................................................................................................119
Base Color..........................................................................................................119
Opacity................................................................................................................119
Shine Color..........................................................................................................119
Shine Spot...........................................................................................................120
Luminosity...........................................................................................................120
THE ENVELOPE EDITOR..................................................................................... 121
The Single Value Envelope...................................................................................121
Multiple Value Envelope .......................................................................................122
The Envelope Window..........................................................................................122
The Current Time Slider.......................................................................................122
The Time Ruler....................................................................................................123
The Transition % Ruler........................................................................................123
The Envelope ......................................................................................................123
The Envelope Buttons..........................................................................................123
Save…................................................................................................................123
Load… ................................................................................................................124
11
Page 12

HHoollllyywwoooodd FFXX UUsseerr’’ss GGuuiiddee
Remove...............................................................................................................124
Key Type Controls ................................................................................................124
Spline Curve........................................................................................................124
Linear..................................................................................................................124
Value Jump..........................................................................................................124
Keyframe Controls................................................................................................125
Copy…................................................................................................................125
Shift.....................................................................................................................126
Scale...................................................................................................................127
Create.................................................................................................................128
Delete..................................................................................................................128
Previous Key.......................................................................................................129
Next Key..............................................................................................................129
Spline Controls......................................................................................................129
Presets Dropdown...............................................................................................129
Save…................................................................................................................129
Tension...............................................................................................................129
Continuity............................................................................................................129
Bias.....................................................................................................................130
PLUGINS................................................................................................................. 131
Managing Plugins .................................................................................................131
Filter - Blur.............................................................................................................133
Tie Blur Percentage to transition..........................................................................133
Tie the horizontal and vertical together ................................................................133
Direction..............................................................................................................134
Blur Percentage...................................................................................................134
Mix with original percentage.................................................................................134
Blur Type.............................................................................................................134
Blur Channel........................................................................................................134
Filter - Chroma Key...............................................................................................134
Type....................................................................................................................135
Reverse Key.......................................................................................................135
Threshold.............................................................................................................135
Fine Adjust...........................................................................................................135
Filter - Luma Key...................................................................................................135
Reverse Key.......................................................................................................136
Cutoff ..................................................................................................................136
Softness..............................................................................................................136
Filter - Directional Wipe ........................................................................................136
Wipe Direction.....................................................................................................137
12
Page 13

TTaabbllee OOff CCoonntteennttss
Tie wipe percentage to transition.........................................................................137
Tie direction to light direction...............................................................................137
Enable a border on the wipe ................................................................................137
Border Color........................................................................................................137
Wipe Percentage.................................................................................................137
Softness..............................................................................................................138
Border Size..........................................................................................................138
Filter – Edge Wipe.................................................................................................138
Border Color........................................................................................................138
Tie to transition....................................................................................................138
Enable Borders....................................................................................................139
Wipe Percentage.................................................................................................139
X and Y Offset.....................................................................................................139
Softness..............................................................................................................139
Border Size..........................................................................................................139
Corner Radius .....................................................................................................139
Filter - Gradient Wipe............................................................................................139
Select Gradient....................................................................................................140
Tie transition amount to effect transition..............................................................140
Transition Amount................................................................................................140
Softness..............................................................................................................140
Border Size..........................................................................................................140
Border Color........................................................................................................140
Warp – Advanced Explode ..................................................................................141
Reset ..................................................................................................................141
Time ....................................................................................................................141
Tie Time To Transition.........................................................................................141
Enable Velocity Decay.........................................................................................141
Enable Random Sliders........................................................................................142
Jagged Pieces.....................................................................................................142
Enable Rotation...................................................................................................142
Enable Gravity.....................................................................................................142
Decay Affects Rotation........................................................................................142
Maximum Number of Pieces.................................................................................142
Velocity ...............................................................................................................142
Velocity Decay....................................................................................................142
Rotation of Fragments.........................................................................................143
Gravity Spinner....................................................................................................143
Gravity Slider.......................................................................................................143
Plane of Gravity...................................................................................................143
Warp – Peel...........................................................................................................143
Peel Plane...........................................................................................................144
13
Page 14

HHoollllyywwoooodd FFXX UUsseerr’’ss GGuuiiddee
Tie Transition Amount to effect transition.............................................................144
Tie peel direction to flight direction.......................................................................144
Peel Instead of Roll .............................................................................................144
Reverse Radius of Peel.......................................................................................144
Percentage of Peel Completed............................................................................144
Radius Of Peel....................................................................................................144
Angle of Peel.......................................................................................................144
Warp – Advanced Ripple......................................................................................145
Height..................................................................................................................145
Tie X and Y frequency together ...........................................................................145
Frequency...........................................................................................................145
Offset (X and Y)...................................................................................................146
Tie Phase to transition.........................................................................................146
Phase..................................................................................................................146
Function..............................................................................................................146
Default Settings...................................................................................................147
Clear all values to 0.0..........................................................................................147
Warp - Twist ..........................................................................................................147
Twist Axis............................................................................................................147
Twist....................................................................................................................147
THE SETTINGS DIALOG...................................................................................... 149
Preview Settings...................................................................................................149
Maximum Resolution............................................................................................150
Preview Type ......................................................................................................150
Antialiasing In Preview.........................................................................................150
Edit Settings..........................................................................................................150
Editing TimeCode ................................................................................................150
Render Performance ............................................................................................151
Render Type........................................................................................................151
Sources Dropdown..............................................................................................151
14
Page 15

IInnttrrood
Thank you for purchasing Hollywood FX. Hollywood FX gives you an incredible
collection of 3D transitions that you can quickly add to your video productions, and
customize completely for your needs. This chapter will introduce you to Hollywood
FX, provide instructions for installation and give contact information for customer
support.
This Getting Started Guide is provided for Hollywood FX Gold. This guide will
provide you the information you need to get started with Hollywood FX in your host
application, as well as provide tutorials and reference materials to get you started.
duuccttiioonn
15
Page 16

HHoollllyywwoooodd FFXX UUsseerr’’ss GGuuiiddee
WWhhaatt iiss HHoollllyywwoooodd FFXX??
Hollywood FX is an incredible collection of true 3D transitions and effects that you
can quickly use in any video production. Hollywood FX works as an integrated
plugin to your non-linear editing software (host application). With Hollywood FX
you get easy controls, powerful customization, and great features:
• True 3D. Hollywood FX uses OpenGL to provide hardware accelerated,
high quality 3D rendering.
• Easy To Use. Simply drag-and-drop Hollywood FX into your timeline like
any other transition. The Hollywood FX dialog will appear and you can
select a transition and change your options.
• Organized. Transitions are organized into convenient categories with icons
that let you find the transition you want quickly.
• Convenient Control. With every transition you can change the flight
direction, lighting, shadows, shine and antialiasing with the click of your
mouse.
• Keyframe Editing. Edit individual object flight paths, and dozens of
parameters with the powerful keyframe editor. Hollywood FX Gold provides
incredibly advanced keyframe editing features.
• Create Your Own FX. Completely customize any existing FX or start from
scratch to create entirely new FX.
• Advanced Animation. You have full editing control over the camera, lights,
texturing, and much more.
• 3D Compositing. Hollywood FX Gold includes a complete complement of
plugins for advanced compositing and 3D object warping for amazing
results.
• MultiWindow Excitement. Hollywood FX Gold supports unlimited video
sources. Create cubes with different video sources on each side, and much
more.
• Expandable. Add new transitions at any time with our Club Volume CD-
ROMs and from Club Hollywood, our Internet effects mall. In addition
Hollywood FX Gold can be expanded with image filter and 3D object
warping plugins and more. The possibilities are infinite.
16
Page 17

IInnttrroodduuccttiioonn
BBeeffoorree YYoouu SSttaarrtt
Before getting started with Hollywood FX you should have a good working
knowledge of your Windows system. You should be able to use the mouse to
select menu options and should understand and be able to use the common
controls.
You should also be thoroughly familiar with your video editing software. You
should be able to use clips in the timeline and understand how to add and modify
transitions.
Throughout this document we use the term FX to refer to the transitions and
effects in Hollywood FX. This term generically describes the following types of
transitions and effects:
• Transition. These are standard A-B transitions, where one video source
transitions into a second.
• Transition+ These are also A-B transitions; however, they may have
additional video channels that can be mapped with video. For example, the
FlipOver FX features the first video source flipping over like a card to reveal the
second video source. There is a third video source that is visible in the
background as the “card” flips over.
• MultiWindow These effects are not transitions at all. Instead, windows of
video may fly on or off the screen into various positions while playing your
video.
17
Page 18

HHoollllyywwoooodd FFXX UUsseerr’’ss GGuuiiddee
IInnssttaallllaattiioonn ffoorr WWiinnddoowwss 9988,, NNTT 44,, WWiinnddoowwss 22000000
Before installing Hollywood FX, verify that you have the correct minimum
requirements:
• PC compatible with at least a Pentium 166 MHz processor (or compatible
equivalent).
• Windows NT 4.0 with Service Pack 3 or higher, Windows 98, or Windows
2000.
• 64 MB RAM (more may be required by your video editing software). For
multi-window effects, 128 to 256 MB (or more) is recommended.
• At least 40 MB Hard Disk space.
• 16 or 24 bit display adapter. 3D Accelerator recommended.
·· TToo iinnssttaallll HHoollllyywwoooodd FFXX::
F Insert the Hollywood FX CD into your CD-ROM drive. The CD-ROM Welcome dialog will
appear.
F Enter the serial number that came with your software (it can be found on the first page
of this guide or on the CD-ROM sleeve). Enter the serial number exactly as shown,
including dashes, then click Ok.
F The Main Installation menu for your software will appear.
F Select Install Hollywood FX. The installer will load, and the Setup Welcome dialog will
appear.
F Click Next to continue. The Setup Path dialog will appear.
F Normally you should accept the default path for installation. Do not select your non-
linear editor’s plug-in path for installation; the installer will automatically install the files
needed into your non-linear editor’s folders. Click Next to continue. The Select Host
Plugins dialog will appear.
F Click on the checkboxes for any host applications that the installer should search for and
install a Hollywood FX plugin. Click Next to continue. Hollywood FX will be installed on
your system.
F At the end of the installation, you will be required to enter your Serial Number. You will
find the serial number on the first page of this Getting Started Guide, or on the paper
sleeve that the Hollywood FX CD-ROM was packaged in.
18
Page 19

IInnttrroodduuccttiioonn
F After clicking OK, the Licensing Tool will open. This is where you can join Club Hollywood
and get your permanent Keycode.
F After installation, you may be required to restart your system.
If you have an Internet connection on the system Hollywood FX is installed on, you
will also have the option of registering your software and joining Club Hollywood
quickly and easily from the Hollywood FX application.
19
Page 20

HHoollllyywwoooodd FFXX UUsseerr’’ss GGuuiiddee
CCuussttoommeerr SSuuppppoorrtt
Pinnacle Systems is dedicated to providing the best products and the best
customer support.
For fastest support, point your browser to www.hollywoodfx.com.
Please note Pinnacle Systems cannot provide support for using your video editing
software. You should first make sure you fully understand the operation of your
other software before calling. You should also look through the Readme file and
the Troubleshooting section of this guide before contacting customer support.
For drivers, FAQ’s and the latest e-mail support addresses: www.hollywoodfx.com
Email: hfxgoldsupport@pinnaclesys.com
Phone (North & South America): 1-317-577-8788
Austria & Switzerland = +31-411-619-919
Belgium = 0902-88-101
France = 0836-687-512
Germany = 0190 510 083 or +31 411 619 577
Italy = 02 754 19 604
Netherlands = 0900 202 8 202
Scandinavia = +31 411 619 069
Spain = 91 375 4511
United Kingdom = 0640 701 111
20
Page 21

Hoosstt
H
This chapter provides quick-start documentation for each video editor (host
application) that Hollywood FX plugs into. For each host application, the basic
procedure is described for adding and modifying Hollywood FX transitions, as well
as hints and tips specific to that video editor. After reading the section describing
your video editor, you should continue to the tutorials in the following sections.
Apppplliicc
A
attiioonnss
a
21
Page 22
HHoollllyywwoooodd FFXX UUsseerr’’ss GGuuiiddee
AAddoobbee PPrreemmiieerree
Hollywood FX appears in the Pinnacle Folder in Adobe Premiere. If it does not
appear see Troubleshooting for more information.
Before adding a Hollywood FX transition, prepare two video sources on the A and B
tracks of the timeline, so that there is some overlap between the two video clips.
·· TToo aadddd aa ttrraannssiittiioonn ttoo tthhee ttiimmeelliinnee::
F Make sure the Transitions window is visible. If not, select Transitions from the Windows
menu.
F Drag Hollywood FX 4 from the Transitions window into the Transition track of the
Construction window so that it is between the two video clips (the transition should
automatically snap to fill the time between the two clips.
Two video clips ready for a Hollywood FX transition
A Hollywood FX transition in the timeline
F Double-click on the transition block. The Hollywood FX dialog should appear.
22
Page 23
HHoosstt AApppplliiccaattiioonnss
The Hollywood FX dialog will appear, letting you choose a specific transition, and
change options for your transition.
F Now choose the desired effect. For now choose only a 2 source transition.
F Then click OK
F Now render that section of your project to see the results.
The Hollywood FX dialog – FX Catalog where you choose your transition
CChhaannggiinngg aann EExxiissttiinngg TTrraannssiittiioonn
You can modify a transition that is already in the timeline, changing the selected
gradient or any options.
·· TToo cchhaannggee aa ttrraannssiittiioonn iinn tthhee ttiimmeelliinnee::
F Double-click on the representation of the transition in the Transition track to display the
Hollywood FX dialog.
F Make your changes in the Hollywood FX dialog.
23
Page 24
HHoollllyywwoooodd FFXX UUsseerr’’ss GGuuiiddee
AAvviidd MMeeddiiaa CCoommppoosseerr,, XXpprreessss,, XXpprreessss DDVV aanndd SSyymmpphhoonnyy
Avid’s AVX plugin structure allows for the ultimate in flexibility with Hollywood FX.
Hollywood FX can be used as a single image filter, a transition, or for MultiWindow
effects directly within the timeline. The following sections describe the process for
using Hollywood FX in Avid AVX compatible products.
AAddddiinngg AA HHoollllyywwoooodd FFXX TTrraannssiittiioonn
To add a Hollywood FX transition to the Avid timeline, first add two video sources
that you want to transition between, and trim as necessary to create time for the
transition.
·· TToo aadddd aa ttrraannssiittiioonn ttoo tthhee ttiimmeelliinnee::
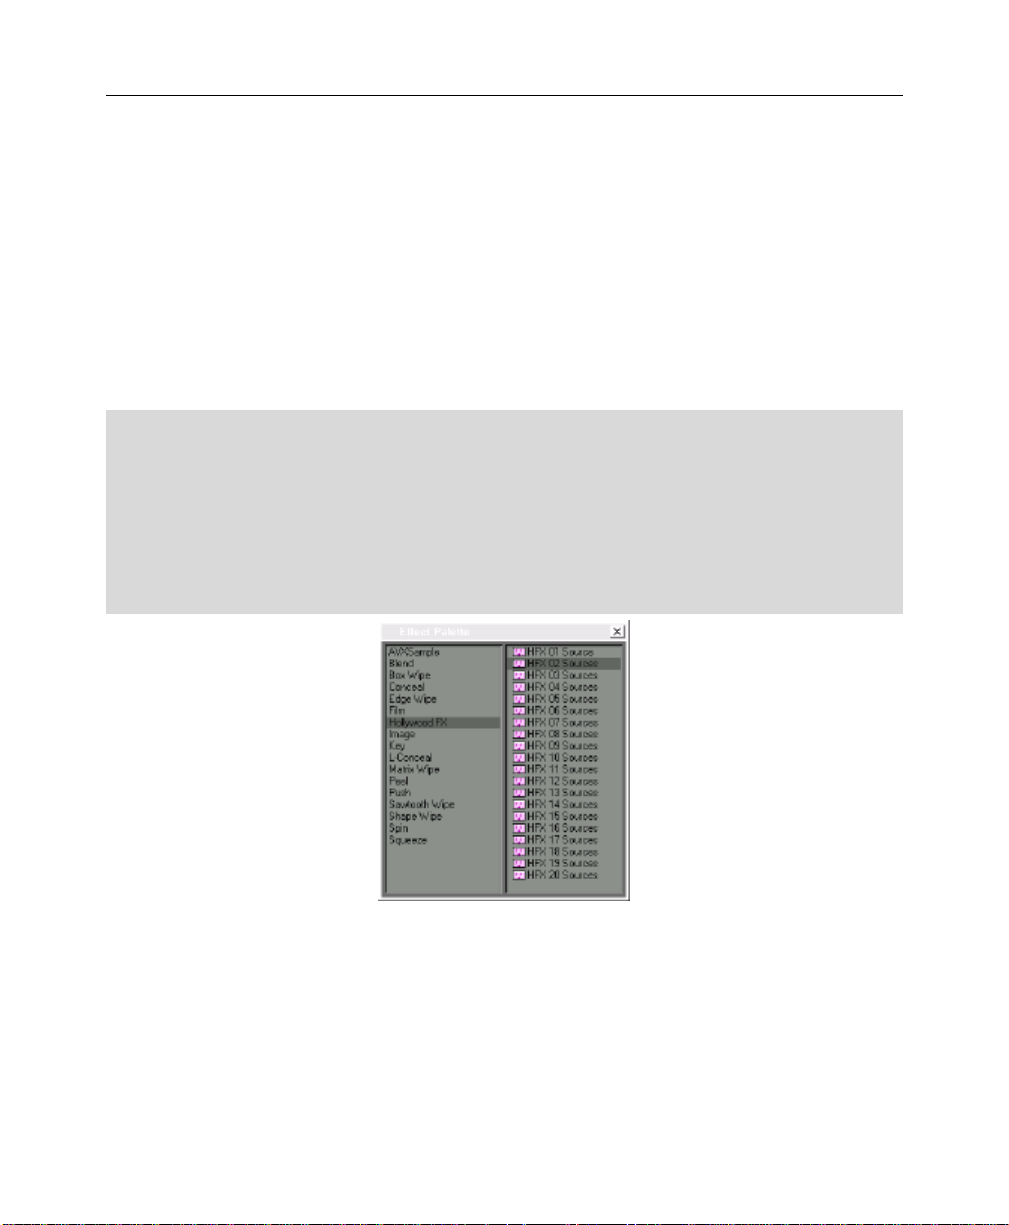
F Open the Effect Palette (Ctrl-8).
F Select the Hollywood FX group from the left side of the Effect Palette.
F Drag HFX 02 Sources from the right side of the Effect Palette into the timeline,
between the two video clips.
F Once dropped into the timeline, switch to Effect Mode (so that the Effect Editor window
is open, and click on the small button icon to the right of HFX 02 Sources.
Hollywood FX in the Avid Effect Palette
The Hollywood FX dialog will appear, letting you choose a specific FX, and set the
options for rendering that FX.
CChhaannggiinngg aann EExxiissttiinngg TTrraannssiittiioonn
You can modify a transition that is already in the timeline, changing the selected
FX or any options.
24
Page 25
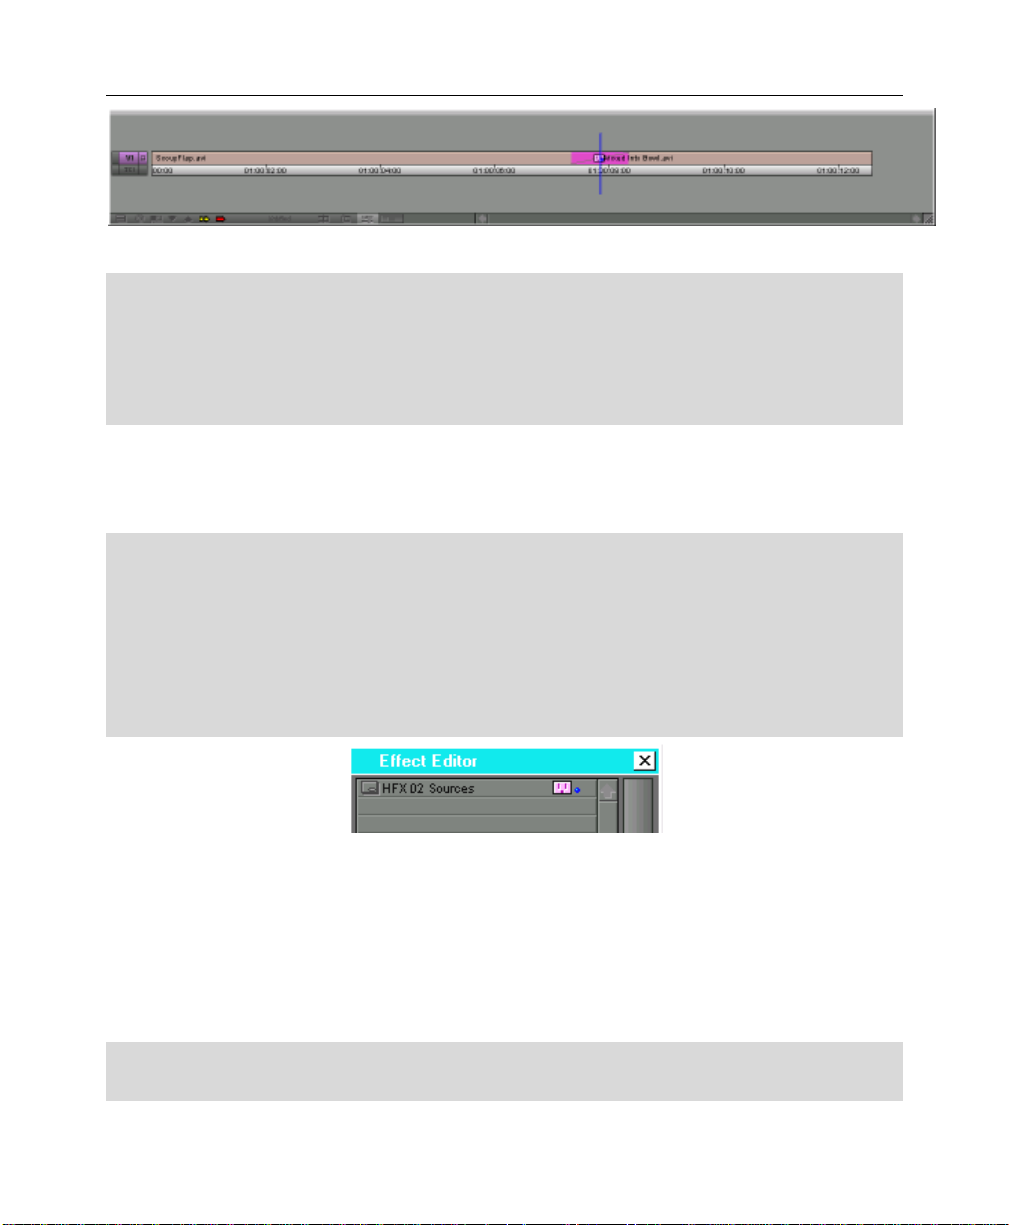
HHoosstt AApppplliiccaattiioonnss
A Hollywood FX transition in the Avid Timeline
·· TToo cchhaannggee aa ttrraannssiittiioonn iinn tthhee ttiimmeelliinnee::
F Switch to Effect Mode.
F Click on the plugin icon in timeline.
F Click on the button icon to the right of HFX 02 Sources in the Effect Editor window.
F Make your changes in the Hollywood FX Selection dialog.
AAddddiinngg AA HHoollllyywwoooodd FFXX FFiilltteerr
Hollywood FX can also be used as a filter for a single video source in Avid AVX
compatible products.
·· TToo aadddd aa ffiilltteerr ttoo tthhee ttiimmeelliinnee::
F Open the Effect Palette (Ctrl-8).
F Select the Hollywood FX group from the left side of the Effect Palette.
F Drag HFX 01 Source from the right side of the Effect Palette into the timeline, on top
of the video you wish to filter.
F Once dropped into the timeline, make sure the Effect Editor window is open, and click on
the small button icon to the right of HFX 01 Source.
Hollywood FX in the Avid Effect Editor
The Hollywood FX dialog will appear, letting you choose a specific FX, and set the
options for rendering that FX.
CChhaannggiinngg aann EExxiissttiinngg FFiilltteerr
You can modify a filter that is already in the timeline, changing the selected FX or
any options.
·· TToo cchhaannggee aa ffiilltteerr iinn tthhee ttiimmeelliinnee::
F Switch to Effect Mode (opening the Effect Editor window).
25
Page 26

HHoollllyywwoooodd FFXX UUsseerr’’ss GGuuiiddee
F Click on the plug icon that represents the filter in the timeline.
F Click on the button icon to the right of HFX 01 Source in the Effect Editor window.
F Make your changes in the Hollywood FX Selection dialog.
AAddddiinngg AA HHoollllyywwoooodd FFXX MMuullttiiWWiinnddooww EEffffeecctt
Avid’s nested track capability makes it simple to use Hollywood FX’s MultiWindow
effects in your projects.
·· TToo aadddd aa MMuullttiiWWiinnddooww ttoo tthhee ttiimmeelliinnee::
F Open the Effect Palette (Ctrl-8).
F Select the Hollywood FX group from the left side of the Effect Palette.
F Drag HFX XX Source which matches the number of sources in the effect you will use
from the right side of the Effect Palette into the timeline, on top of a piece of video in
timeline which will serve as the backdrop of the effect. For example, if you wanted to
create the Box6srce effect, you would drag the HFX 07 Source effect onto your video
clip.
F Once dropped into the timeline, make sure the Effect Editor window is open, and click on
the small button icon to the right of HFX XX Source.
F The Hollywood FX Selection dialog will appear. Select the effect you wish to use and set
any rendering options, then click Ok.
F Next, double-click on the plugin icon on the timeline to open up the nested tracks.
F Switch to Source/Record mode or Trim mode, then drag additional video clips into the
nested tracks. The nested track number corresponds to the Source number in HFX.
Hollywood FX in the Avid Effect Editor
26
Page 27
Tuuttoorrii
T
all::
a
Trr
T
annssiittiioonnss
a
&
&
This tutorial will take you through the basics of selecting a Transition FX and
setting Effect Options.
·· TToo pprreeppaarree ffoorr tthhiiss ttuuttoorriiaall::
F Set up two video clips in your host application and add Hollywood FX as described in
Getting Started.
F When the Hollywood FX dialog appears, you are ready to begin.
Oppttiioonnss
O
The Hollywood FX dialog
27
Page 28

HHoollllyywwoooodd FFXX UUsseerr’’ss GGuuiiddee
The Hollywood FX dialog is organized into panels. The first panel is the Control
panel, which is the central control for working with FX. Selecting items in the
Control panel brings up different Item panels on the right side of the dialog. The
second panel is the Monitor panel that displays the preview of the current FX.
Finally, the Item panel changes to show different options for the selected item in
the Control panel.
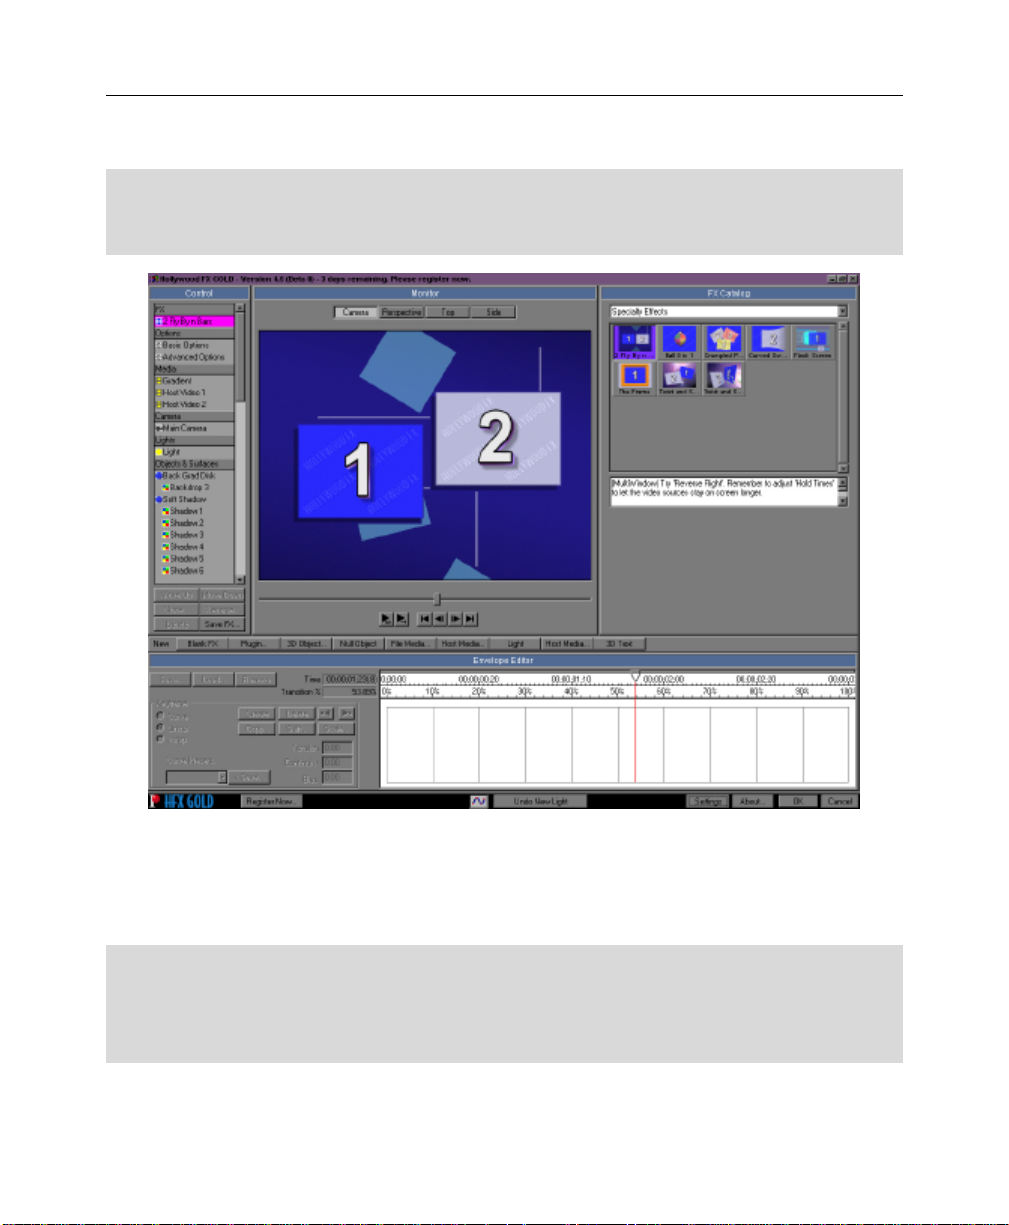
SSeelleeccttiinngg AAnn FFXX
When the Hollywood FX dialog is displayed, you will immediately see the FX
Catalog (this is displayed when the current FX name is selected in the Control
panel). The FX Catalog has two major controls. The FX Group popup list at the
top of the page allows you to select one of the many groups of FX. Below the FX
Group list are the icons for each FX in the group. For this tutorial you will select
an interesting transition called Ball Split. This FX is in the Basic Shape
Transitions group.
·· TToo sseelleecctt tthhee BBaallll SSpplliitt FFXX::
F Select 2 – Basic Shape Transitions from the FX Group popup list.
F Click on the Ball Split FX icon.
When you select this FX, hints and tips for that effect appear at the bottom of the
FX Catalog panel.
TThhee MMoonniittoorr PPaanneell
Whenever you make changes in Hollywood FX, the preview window in the Monitor
panel is updated. Try dragging the slider directly below the preview to view
different frames of the preview.
You can also play the entire FX once by clicking on the play once button.
You can have the preview play continuously as you work, by depressing the loop
play button. Press the loop play button a second time to stop the looping playback.
Jump to the beginning frame of the effect.
Jump to the last frame in the effect.
Step forward one frame.
Step backward one frame.
The other controls on the Monitor panel will be described in later tutorials.
28
Page 29
TTuuttoorriiaall:: TTrraannssiittiioonnss && OOppttiioonnss
BBaassiicc EEffffeecctt OOppttiioonnss
Hollywood FX gives you quick and easy control over many FX options. You can
create new and exciting results without having to re-keyframe the entire FX.
·· TToo vviieeww tthhee BBaassiicc EEffffeecctt OOppttiioonnss::
F Click on the Basic Effect Options item in the Control panel.
The Effect Options panel selected
Turn on continuous playback of the preview before we continue.
·· TToo ttuurrnn oonn ccoonnttiinnuuoouuss ppllaayybbaacckk ooff tthhee pprreevviieeww::
F Click on the Loop Play button below the preview window in the Monitor panel.
EEaassyy FFlliigghhtt OOppttiioonnss
You can quickly change the flight path of an object in useful ways using the Easy
Flight controls.
·· RReevveerrssee FFlliigghhtt::
F Click on the Reverse Flight checkbox. Watch the changes in the preview.
F Click on the Reverse Flight checkbox to clear it.
29
Page 30

HHoollllyywwoooodd FFXX UUsseerr’’ss GGuuiiddee
Watch the preview now. You will see that instead of the first video source flying
off and revealing the second video source, the second video source will fly on and
cover the first video source.
·· FFlliigghhtt PPaatthh::
F Click-and-drag the Flight Path dial so that it reads 45. Watch the preview.
F Click on the Rotate Object checkbox so it is checked. Watch the preview.
F Click-and-drag the Flight Path dial so that it reads 90. Watch the preview.
F Click-and-drag the Flight Path dial so that it reads 0. You can also use the arrow keys to
change the dial by one degree increments.
The Flight Path dial rotates the entire flight path of the 3D objects in the FX, giving
you a different result quickly and easily. When you change the Flight Path, it does
not rotate the object itself. Checking the Rotate Object checkbox will cause the
object itself to rotate and “follow” the new path.
NOTE: Some FX were not designed to be compatible with Easy Flight options. So
this feature may be disabled for those effects.
EEaassyy LLiigghhttiinngg
Lighting, shadows and shine add incredible 3D realism to an FX. By default all of
these features are turned on. Try turning them off to see the difference it makes.
·· TToo ttuurrnn ooffff LLiigghhttiinngg,, SShhaaddoowwss,, aanndd SShhiinnee..
F Click on the Shine checkbox to clear it. Notice that the glossy shine disappears.
F Click on the Shadows checkbox to clear it. Notice that the shadow disappears.
F Click on the Lighting checkbox to clear it. Notice that the 3D ball is no longer shaded.
F Click on Shine, Shadows, and Lighting to turn back on all of these features.
In addition to being able to control which lighting features are used, you can also
control the light direction. By default, light comes from the top center of the 3D
“world”. When you adjust the light direction, it automatically adjusts the shine and
shadow position as well.
·· LLiigghhtt DDiirreeccttiioonn::
F Click-and-drag the Light Direction dial so that it reads 90. Watch the preview.
F Click-and-drag the Light Direction dial so that it reads 180. Watch the preview.
F Click-and-drag the Light Direction dial so that it reads 0. You can also use the arrow keys
to change the dial by one degree increments.
30
Page 31

TTuuttoorriiaall:: TTrraannssiittiioonnss && OOppttiioonnss
Changing the light direction to 180 degrees gives a very unique, almost sinister
appearance.
EEaassyy OOppttiioonnss
The Easy Options controls let you adjust special rendering features of the 3D
engine.
RReennddeerr TTyyppee
Normally objects with curves are rendered with smooth surfaces. You can use the
Render Type to change to faceted or wire surfaces.
·· RReennddeerr TTyyppee::
F Click on the Flat radio button under Render. Notice that the object no longer appears
smooth.
F Click on the Wire radio button under Render. Notice that the object is now rendered as
a wireframe rather than a solid object.
F Click on the Smooth radio button under Render to return to smooth solid rendering.
AAnnttiiaalliiaassiinngg
Because of the low resolution of video, sharp edged 3D effects will often exhibit
blocky stairstepping along the edges of objects. Antialiasing eliminates much of
this problem. Hollywood FX includes three methods of antialiasing (however the
preview generally only displays edge antialiasing.
·· AAnnttiiaalliiaassiinngg::
F Click on Web/CD under Antialiasing and notice how the edges of the 3D ball are
smoothed.
F Click on Video under Antialiasing to switch to scene antialiasing. This generally will not
change the preview, but during final rendering full Scene antialiasing will be used.
The additional checkboxes and advanced shadow controls are described in more
detail in the Reference Chapter.
When you are ready, click Ok in the Hollywood FX dialog to exit, then render your
project to see the results.
31
Page 32

Page 33

Tuuttoorrii
T
In the previous tutorial you worked with a Transition FX which had only two video
sources. In this tutorial you will use a Transition+ FX that performs a transition,
but has additional video sources you can use.
NOTICE: Avid AVX users will want to follow the directions in the Host Applications
section for setting up Transition+, since Avid provides special features for
Transition+.
When you are finished with this tutorial, you will know:
• How to use a Transition+ FX with extra video sources.
• You will also learn some of the features on the Settings dialog.
all::
a
Trr
T
annssiittiioonn
a
+
+
·· TToo pprreeppaarree ffoorr tthhiiss ttuuttoorriiaall::
F Set up two video clips in your host application and add Hollywood FX as described in
Getting Started, creating a two second transition.
F When the Hollywood FX dialog appears, you are ready to begin.
SSeelleeccttiinngg tthhee TTrraannssiittiioonn++
·· TToo sseelleecctt tthhee ttrraannssiittiioonn::
F Select MultiWindow Transitions from the FX Group popup list at the top of the page.
F Click on the FlipOver 1to2 icon.
F Click the Play Once preview button on the Monitor.
Watch the preview. Notice that while the video is flipping over, you can see black
in the background. There is a backdrop that is currently not visible, because no
video source has been mapped to it. We will now map that 3rd video source.
MMaappppiinngg AA VViiddeeoo CClliipp ttoo SSoouurrccee 33
Now add a video clip to Source 3 so that the background is no longer black.
·· TToo aadddd aa vviiddeeoo cclliipp ttoo SSoouurrccee 33::
33
Page 34

HHoollllyywwoooodd FFXX UUsseerr’’ss GGuuiiddee
F Click on the Host Video 3 media item in the Control panel.
F Click on the Select File button.
F Using the file requester, select a video clip to use for Source 3.
F Click on the Play Once button in the Monitor window.
You have selected a new video source and should be able to see it in the
background as Source 1 flips over to Source 2. You should also make sure the field
interpretation is correct for this video.
·· TToo cchhaannggee ffiieelldd IInntteerrpprreettaattiioonn::
F Click on the Interpret popup, and select the proper field interpretation for your video.
For most video capture cards you will select Interlaced – Upper First or Interlaced –
Lower First.
While correct interpretation is not important in the preview, it will be important for
final rendering. If interpretation is not set correctly, the video in the background
will playback incorrectly (it will jerk rather than playing smoothly).
The Media Options panel selected, field interpret shown
34
Page 35

TTuuttoorriiaall:: TTrraannssiittiioonn++
From now on, when you select a video file, the Interpret value will be defaulted to
the last option selected. You will only need to change Interpret if you select a
single image file, or video captured using a different video card.
35
Page 36

Page 37

Tuuttoorrii
T
all::
a
Muullttii
M
The final type of FX in Hollywood FX is the MultiWindow FX. MultiWindow FX do
not perform a transition from one video source to another. Instead, they feature
multiple video windows that fly on or off screen in various ways. For this tutorial
we will use the Flip 4 effect and we will reverse it, so that we have four video
windows that fly on, and play over a backdrop.
NOTICE: Avid AVX users will want to follow the directions in the Host Applications
section for setting up MultiWindow FX, since Avid provides special features for
MultiWindow FX.
When you are finished with this tutorial, you should know:
• How to select video sources for a MultiWindow FX.
• How to use Hold at Start and Hold at End.
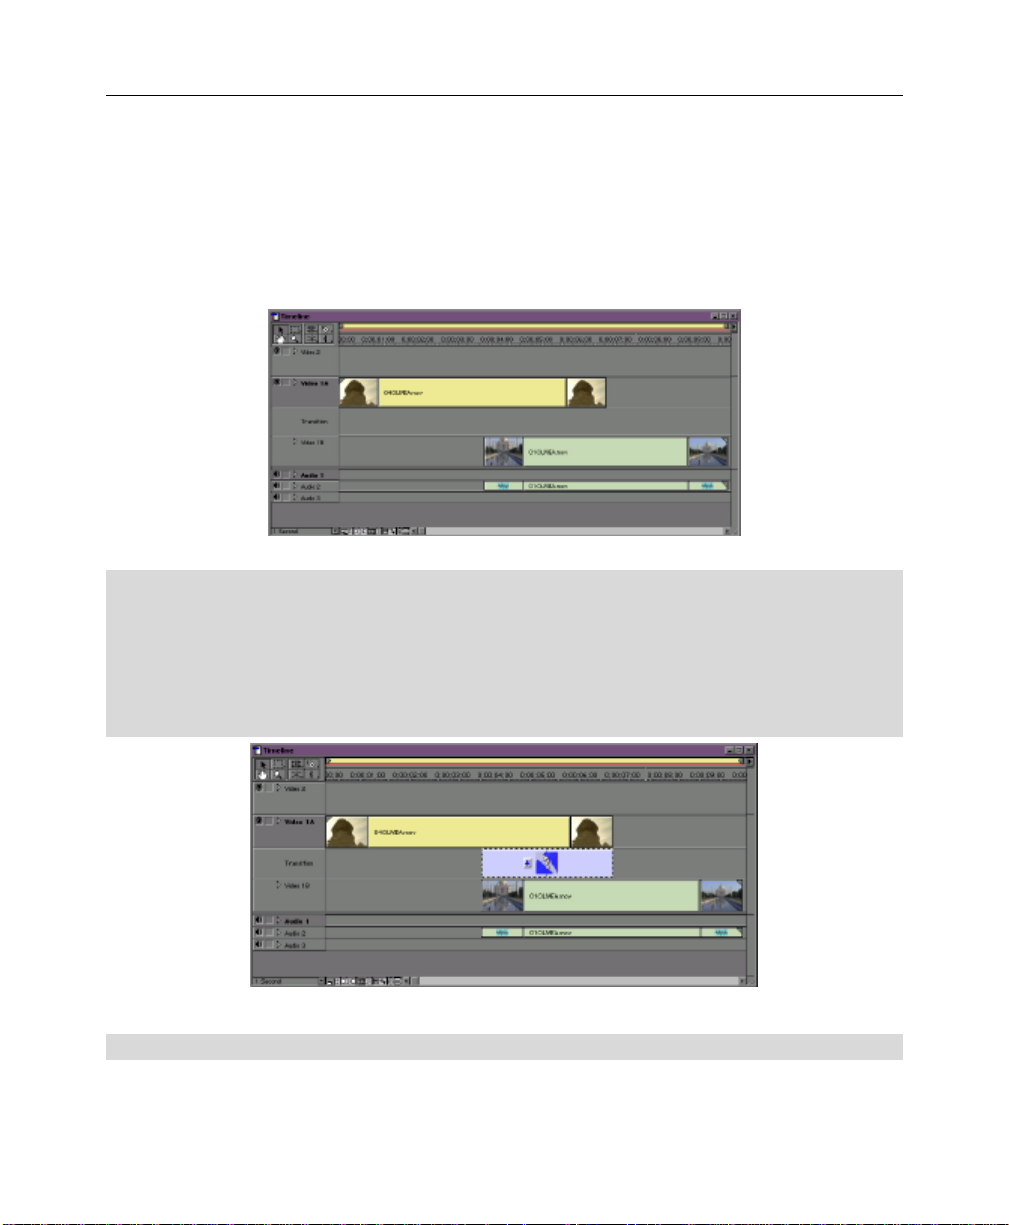
PPrreeppaarree ffoorr tthhee TTuuttoorriiaall
MultiWindow FX are designed differently from Transitions. In a MultiWindow FX,
the Source A video from the host application is always used as the backdrop video.
This makes it easy to layout the timeline so that you can have the backdrop video
continue before or after the FX.
·· TToo pprreeppaarree ffoorr tthhee ttuuttoorriiaall::
F Start a new project.
F Place the video you want to use as the backdrop on you’re A video track, so that it starts
at the beginning of the project, and runs for about five seconds.
F Place a second video source on the B video track, so that it starts about one second into
the project, and has a duration of about three seconds.
F Insert a Hollywood FX transition between the two clips so that the transition is from A to
B.
Wiinn
W
doo
d
w
w
F
F
X
X
37
Page 38

HHoollllyywwoooodd FFXX UUsseerr’’ss GGuuiiddee
be the backdrop
mapped to the top
This video will
for the FX.
This video will be
left video window.
The Hollywood FX transition in Premiere, ready for a MultiWindow FX
SSeelleeccttiinngg tthhee FFXX aanndd SSeettttiinngg OOppttiioonnss
For this tutorial, you will select an effect called Flip 4, where four video sources fly
off over a backdrop video. We want the video sources to fly on, so we will reverse
the FX.
·· SSeelleeccttiinngg tthhee FFlliipp 44 FFXX aanndd sseettttiinngg ooppttiioonnss::
F Select Multiwindow Effects 2 from the FX Group popup menu.
F Select Flip 4 from the FX icons.
F Click on the Effect Options item in the Control panel.
F Click on the Reverse checkbox.
F Click on the Play Once button in the Monitor panel.
Notice that the A video source plays in the background, and the B video source is
mapped to the top left video window. We will now select video clips for the three
remaining video windows.
·· TToo mmaapp tthhee aaddddiittiioonnaall vviiddeeoo ssoouurrcceess::
F Click on the Host Video 3 media item in the Control panel.
F Click on Select File in the Media Options panel.
F Select a video clip using the file requester.
F Click on the Play Once button to see the preview with the new video source.
F Click on the Host Video 4 media item in the Control panel.
F Click on Select File in the Media Options panel.
38
Page 39

TTuuttoorriiaall:: MMuullttiiWWiinnddooww FFXX
F Select a video clip using the file requester.
F Click on the Host Video 5 media item in the Control panel.
F Select a video clip using the file requester.
F Click on the Play Once button in the Monitor panel to see the preview.
Because you set up the default Interpret value in the previous tutorial, you should
not have to change it for each video source you selected above.
UUssiinngg HHoolldd AAtt EEnndd
The way the FX is currently set up, the four
video windows will fly on screen, and as soon as
the last one is on screen, the FX will end, and all
of the video windows will disappear. Instead of
this, we would like the video windows to remain
on screen for a longer time while they play
video. The Effect Options panel has two sliders,
Hold at Start and Hold at End, that allow you to
quickly change the amount of time spent on the
first and last frame of the FX. This is exactly
what we need.
The Hold Time as shown in relation to the Envelope Editor
·· TToo cchhaannggee tthhee HHoolldd aatt EEnndd::
F Click on the Effect Options item in the Control panel.
F Drag the End slider (under Hold Times) to 30%.
F Click the Play Once button in the Monitor panel to see the preview.
Now all of the video windows will fly on during the first 70% of the total FX time,
and will hold at their final position for the last 30% of the total time.
Now exit the Hollywood FX dialog and render the FX to see the final results.
39
Page 40

Page 41

Tuuttoorrii
T
all::
a
Hoollllyy
H
e
mii
m
PPrre
Another way to use Hollywood FX is as a Filter. As a filter you can perform multilayer transitions within Premieres timeline. For example, you could have a
transition happening, but over that transition takes place a page curl on some Title
Deko text, in the track above that a PIP and still in the track above that an
exploding ball of video or gradient wipe on some video. The options are limitless
and it really is one of the more powerful uses of Hollywood FX.
NOTICE: Avid AVX users will want to follow the directions in the Host Applications
section for setting up as a filter, since Avid provides special features for filter use of
Hollywood FX.
When you are finished with this tutorial, you should know:
• How to apply a Hollywood FX filter to any track.
PPrreeppaarree ffoorr tthhee TTuuttoorriiaall
woooo
w
err
e
e
e
d
d
Fiilltt
F
F
F
X
X
err
e
Hollywood FX as a filter is designed differently from Transitions. As a filter, there is
only one video source to be pulled from the timeline. This makes it easy to layout
the timeline because only the video in the track the filter is applied to is affected.
·· TToo pprreeppaarree ffoorr tthhee ttuuttoorriiaall::
F Start a new project.
F Now place some footage on Video 1A
F Then above in Video 2, place your video sized slightly shorter in length at the start and
end.
41
Page 42

HHoollllyywwoooodd FFXX UUsseerr’’ss GGuuiiddee
Premiere prepped for Hollywood FX filter
Now select Video 2 then check the Transparency setting in Adobe’s Effects Control.
This will bring up a requester. Here switch the key type to Alpha Channel, click
OK.
Premiere’s Transparency Dialog
F From the Video Tab, drag and drop the HFX 4 GOLD filter onto the Video 2 timeline.
The GOLD filter within the Video Tab
F Now click the Setup button next to the Hollywood FX GOLD in the Effect Control panel;
the Hollywood FX dialog will appear.
42
Page 43

TTuuttoorriiaall:: HHoollllyywwoooodd FFXX PPrreemmiieerree FFiilltteerr
Access to the GOLD dialog through the Effect Controls
F You can leave it on Fly Off or choose another effect, then click OK.
The way a Filter shows in GOLD, note that the 2nd source will simply not show up in the final
render
F Now render the segment to see the results.
Final render of the filter overlaying the Video 1A track, note shadow was maintained.
43
Page 44

Page 45

Clluu
C
When you register Hollywood FX online at www.hollywoodfx.com to get your
permanent keycode, you will also receive a userid, password, and some initial
credit that you can use in Club Hollywood, the Internet FX mall. Browse through
and order new FX, plug-ins and more, either individually or in libraries that open a
new world for Hollywood FX. Once you have used your initial credit, you can
purchase additional credit at any time and continually expand your Hollywood FX.
You can also purchase and instantly download upgrades to Hollywood FX through
Club Hollywood.
To use Club Hollywood you will need a web browser (like Microsoft Internet
Explorer or Netscape Navigator), and a connection to the Internet. Simply connect
to the Hollywood FX website at http://www.hollywoodfx.com, then click on the
Club option. Follow the instructions there to access and use your Club Hollywood
account.
b
b
Hoollllyy
H
woooo
w
d
d
45
Page 46

Page 47

Trroouu
T
This section provides a list of common problems and their solutions. If you can’t
find an answer to your problem in this list, or in the ReadMe file that is created
during setup, then contact Hollywood FX customer support for more help.
Hollywood FX does not show up in my host application.
During installation Hollywood FX will attempt to find all compatible host
applications and install the proper plugin files for that application. If Hollywood FX
does not show up, try copying the files listed below from the Host Plugins folder
(in Hollywood FX GOLD) into the folder listed.
Host Application Plugin File Copy To Folder
Adobe Premiere 6.0 Premiere6\Fx-5Hfx4GLD.prm Premiere 6.0\Plug-Ins
Avid AVX AVX\Hfx4GLD.avx Symphony\AVX_Plug-Ins or
My video editor crashes when I try to use Hollywood FX.
This usually indicates a conflict with your 3D graphics card. You should download
and install the very latest drivers for your graphics card.
I never get a rendered transition, I just get the Hollywood FX Logo.
bll
b
ess
e
hoooottiinngg
h
Xpress\AVX_Plug-Ins etc.
This indicates that Hollywood FX was not able to use OpenGL to render the effect.
Check the following items to resolve this problem:
• Check to make sure the files Opengl32.dll and Glu32.dll are in your
Windows\System folder (Winnt\System32). If they are not present,
Windows 95 users should download the OpenGL libraries from the Support
area of the Hollywood FX website. Windows 98, NT, and 2000 users should
check their operating system installation, and reinstall any service packs.
• Make sure you are using the very latest drivers for your graphic display
card.
• Click on the Settings button in the Hollywood FX dialog and try changing
the Render Type to OpenGL Software Engine. If it is already set to
OpenGL Software change it to Portable Software.
47
Page 48

HHoollllyywwoooodd FFXX UUsseerr’’ss GGuuiiddee
When I select video or images in the Media Options panel I get a white
object instead of video.
Generally this indicates you have run low on memory. If you are doing
MultiWindow effects with more than 3 video sources, you should have a minimum
of 128 MB of RAM (with at least 256 MB highly recommended). If you are using
images you scanned in, you should lower the resolution of those scanned images.
I get color/brightness jumps at the start and end of my effect.
This is normally because the rendered effect is being recompressed while the
surrounding video is not. Many non-linear editors have an option to Recompress
Always or to turn off Smart Rendering. If your non-linear editor does not have a
Recompress Always option, you can usually solve the shift by adding a
Brightness/Contrast filter to both the incoming video and outgoing video clips,
but leave the Brightness/Contrast settings unchanged. This will cause the video to
be recompressed, but not changed.
48
Page 49

PPe
Hollywood FX uses OpenGL, which is the industry standard 3D graphics language
for high performance high quality rendering. Over the past few years the 3D
accelerators and their OpenGL graphics drivers have improved dramatically,
however there are still times that the graphics drivers cause incompatibilities with
Hollywood FX. For this reason, Hollywood FX defaults to software-only rendering
for the highest degree of compatibility, at the cost of slower previews and
rendering.
This section describes the steps you can take to improve 3D rendering
performance. You should only try these changes once you are familiar with
Hollywood FX and have successfully rendered some effects in your projects.
errffoorr
m
m
anncc
a
e
e
CCPPUU SSppeeeedd,, BBuuss SSppeeeedd,, aanndd MMeemmoorryy
Your system configuration can make a dramatic difference in performance. By
upgrading your CPU to a faster speed, upgrading to a new motherboard that has a
133MHz (or faster) bus, and by increasing memory to 256MB or more, you can
dramatically improve the performance of Hollywood FX, whether you have a 3D
graphic accelerator or not.
GGrraapphhiicc CCaarrdd DDrriivveerrss
The most important aspect to 3D performance from your graphic accelerator is the
driver software you are using. You should regularly check your graphic accelerator
manufacturer’s website for updated drivers. Here are the website addresses of the
most popular graphic cards.
Nvidia (Riva TNT, GeForce, Quadro) – www.nvidia.com
ATI (Rage, Radeon) – www.ati.com
49
Page 50

HHoollllyywwoooodd FFXX UUsseerr’’ss GGuuiiddee
PPrreevviieeww PPeerrffoorrmmaannccee
Almost any good 3D accelerator will dramatically improve the performance in the
Preview Monitor window. You must enable OpenGL Hardware in the Preview
Settings to benefit from your accelerator.
·· TToo eennaabbllee aacccceelleerraatteedd pprreevviieeww rreennddeerriinngg::
F Click on the Hollywood FX Settings button at the bottom of the Hollywood FX window.
F In the Preview Settings area, select the OpenGL Hardware Engine from the Preview
Type dropdown menu.
F Click OK to return to the Hollywood FX window and try the new settings.
If you encounter problems with the preview after enabling on-screen rendering,
you should immediately return to Hollywood FX Settings and select the OpenGL
Software or Portable Software Engine.
NOTICE: It is recommended to perform test these rendering changes using the
Easy FX editor that you can launch from the Start Menu.
FFiinnaall RReennddeerriinngg PPeerrffoorrmmaannccee
Most accelerator cards were designed for game performance, where textures are
fixed and do not need to be quickly loaded into the accelerator’s memory. With
50
Page 51

PPeerrffoorrmmaannccee
Hollywood FX, were are re-loading large textures into the accelerator for every field
or frame that is rendered. Because of this, most graphic accelerators to date have
provided no performance improvement for final rendering of FX.
This is changing. As an example, the latest Detonator 3 drivers for Nvidia
GeForce cards provided a 9X performance improvement in our benchmark for full
rendering, and showed more than a 2X performance rendering from Premiere.
This is because Nvidia optimized the data transfer between system memory and
the graphic card.
To enable acceleration for final rendering, you must change to Hardware
rendering.
·· TToo eennaabbllee aacccceelleerraatteedd FFiinnaall RReennddeerriinngg PPeerrffoorrmmaannccee::
F Click on the Hollywood FX Settings button at the bottom of the Hollywood FX window.
F In the Render Performance area, select the OpenGL Hardware Engine from the Render
Type dropdown menu.
F Click OK to return to the Hollywood FX window and try the new settings.
If, after making this change, your effects do not render properly, you should
immediately return to Settings and change the Render Type back to OpenGL or
Portable Software.
51
Page 52

Page 53

A
A
Before following these tutorials, you should fully read and understand the previous
portion of this guide.
dvv
d
anncc
a
e
e
d
d
Tuuttoorrii
T
allss
a
53
Page 54

Page 55

Tuuttoorrii
T
all::
a
Ussiinngg
U
Tiittll
T
Hoollllyy
H
With just a little effort, Hollywood FX can easily be used to fly on and fly off
TitleDeko titles. To use TitleDeko titles with Hollywood FX you must save a copy of
the title as a Targa image, then use the Targa image within Hollywood FX. This
tutorial will describe the exact steps. This tutorial assumes that you are using
TitleDeko and Adobe Premiere with Hollywood FX.
The first step will be to create a title in TitleDeko and save it as a Targa file.
·· TToo CCrreeaattee aa ttiittllee aanndd pprreeppaarree tthhee ttiimmeelliinnee::
F In Adobe Premiere, select Create TitleDeko from the Project menu.
F In TitleDeko, click on the Set Background button and make sure the background is set to
Transparent.
F Select a font and style and type in a few lines of text to create your title.
F Press F12 to save out the title in TitleDeko format. Save the title as test.tdk.
F Load a video clip to use as a background for the title into Adobe Premiere.
F Add the background video clip to Track 1B, and add two copies of the test.tdk title to
track 1A as shown in the figure below.
e
e
D
ekkoo
D
e
woooo
w
wiitt
w
d
d
F
F
h
h
X
X
The timeline ready with background video and titles for flying on and flying off
The first effect we will add will have the title fly on and hold for a time.
55
Page 56

HHoollllyywwoooodd FFXX UUsseerr’’ss GGuuiiddee
·· TToo ccrreeaattee tthhee ffllyy oonn eeffffeecctt::
F Drag and drop Hollywood FX from the Transition window into the Transition track so that
it matches in time with the first title clip, and so that it transitions from 1B to 1A.
The fly on effect in the timeline.
Now we will open Hollywood FX, and select an effect.
·· TToo sseelleecctt aann eeffffeecctt::
F Double-click on the Hollywood FX transition in the timeline to open the Hollywood FX
window.
F Select the Panel Fold effect from the 1 – Flying Window Transitions group.
F Click on Effect Options in the Control panel and check the Reverse Flight checkbox.
Now the title looks great and even has a shadow.
As a last touch, we will change the Hold time at the end of the effect so that once
the title flies on, it will stay on for some time.
·· TToo cchhaannggee tthhee HHoolldd ttiimmee::
F Select Effect Options from the Control panel.
F Change the End Hold Time to approximately 25%.
Now the title will fly on during the first 75% of the total transition time, then sit in
its final position for the last 25% of the total time.
56
Page 57

TTuuttoorriiaall:: UUssiinngg TTiittlleeDDeekkoo wwiitthh HHoollllyywwoooodd FFXX
To finish up this tutorial, you will have the title fly off using the Crumple and
Throw effect.
·· TToo aadddd tthhee ffllyy ooffff ttrraannssiittiioonn::
F Click Ok to exit the Hollywood FX window.
F Drag another Hollywood FX transition from the Transition Window into the Transition
track in Premiere so that it matches in time with the second title clip, and so that it
transitions from 1A to 1B.
The fly off transition added to the timeline
·· TToo pprreeppaarree tthhee eeffffeecctt::
F Double-click on the second Hollywood FX transition in the timeline.
F Select the Crumple and Throw transition from group 3 – Complex Shape Transitions.
F Click Ok to exit Hollywood FX.
You are now ready to render your project. Your title will unfold to appear
onscreen and will sit onscreen for a few moments, then it will crumple and fly off
screen.
57
Page 58

Page 59

Tuuttoorrii
T
This tutorial demonstrates the way you can keyframe any option in Hollywood FX to
create advanced results.
Hollywood FX uses the term Envelope to describe a set of keyframes that describe
how an option’s value will change over time in Hollywood FX.
all::
a
Ennvv
E
elloopp
e
ess
e
·· PPrreeppaarree ffoorr tthhee TTuuttoorriiaall aanndd SSeelleecctt tthhee FFXX::
F Create a new project in your host application.
F Add two video clips and create a two second transition between them.
F Add Hollywood FX as a transition between the two video clips.
F From the Hollywood FX dialog, select the Tumble 2 transition in the Flying Window
Transitions group.
The Envelope Editor is normally hidden when you first begin using Hollywood FX
(to keep life simple).
·· TToo ddiissppllaayy tthhee EEnnvveellooppee EEddiittoorr::
F Click on the Envelope Editor button at the bottom of the Hollywood FX dialog.
The Envelope Editor Button
The Envelope Editor will appear. We are going to modify the Tumble 2 transition
by making the tumbling video dissolve as it tumbles into the distance. We will do
this by creating an envelope for the object’s Dissolve option.
·· SSeelleecctt tthhee OObbjjeecctt aanndd OOppttiioonn::
F Click on the Flat Window object in the Control panel.
F Click on the Dissolve slider in the Object Options panel so that it is highlighted.
Notice that the word Dissolve under the slider is highlighted in green. This is an
indicator that it is the current option that can be modified in the Envelope Editor.
Whenever you select a control that can have an envelope in Hollywood FX, it will be
highlighted in green.
59
Page 60

HHoollllyywwoooodd FFXX UUsseerr’’ss GGuuiiddee
Hollywood FX makes it extremely easy to create envelopes by simply clicking and
dragging in the envelope window. We want to create an envelope for dissolve that
makes the object disappear over the entire length of the transition.
·· TToo ccrreeaattee aa ssiimmppllee eennvveellooppee::
F Click-and-drag in the envelope window at 100% in time, and 100% in value. Drag the
keyframe you create all the way to 100% value and release the mouse.
A second keyframe is
created automatically
at time 0%
The envelope after creating the first keyframe
Click here to
create your
first keyframe.
Notice that there are two keyframes (indicated by blocks). The one at 100% is the
one you created. The keyframe at 0% is created automatically, since all envelopes
in Hollywood FX must at a minimum have keyframes at 0% and 100%.
Also notice that the preview and the current time slider at the top of the envelope
window both moved to 100%, and that the keyframe at 100% is highlighted in red
to indicate that it is the current keyframe.
The way the envelope is currently designed, the value of Dissolve will remain
100% for the entire effect. What we want is for the value to start at 0%, so lets
change the first keyframe.
·· TToo cchhaannggee tthhee ffiirrsstt kkeeyyffrraammee::
F Click-and-drag on the blue block that represents the keyframe at time 0%.
F Drag the blue block to the bottom of the envelope window (value 0%). Notice the Dissolve
slider (in the Object Options panel) while you are dragging. Its value is “tied” to the
current envelope.
F Release the mouse button.
60
Page 61

Click and drag
the keyframe
at time 0%.
TTuuttoorriiaall:: EEnnvveellooppeess
The first keyframe is adjusted
Now our envelope will work correctly, causing the object to dissolve over the entire
length of the transition. Try playing the preview to see the results.
Let’s add one more keyframe to this envelope, so that the object becomes
transparent more quickly. We will create this key in a different way.
·· TToo ccrreeaattee tthhee nneeww kkeeyyffrraammee::
F Drag the current time slider at the top of the envelope window until it is at 50%.
F Now drag the Dissolve slider in the Object Options panel up to 90%.
After creating the new keyframe
The new keyframe is created automatically when you change the value of
Dissolve. This shows how the original value slider for Dissolve and the Envelope
Editor are tied together. This feature makes it extremely easy to create keyframes
for any value in Hollywood FX.
Before concluding this tutorial, lets play around with some of the other envelope
controls. First, let’s move quickly between the keyframes in this envelope.
·· TToo mmoovvee bbeettwweeeenn kkeeyyffrraammeess::
F Click on the Prev button in the Envelope Editor. The current time slider (and preview) will
move to the keyframe at 0%.
F Click on the Next button in the Envelope Editor. The current time slider will move to the
keyframe at 50%.
F Click on the Next button. The current time slider will move to the keyframe at 100%.
61
Page 62

HHoollllyywwoooodd FFXX UUsseerr’’ss GGuuiiddee
F Finally, click on the Prev button to return to the 50% keyframe.
Using the Prev and Next buttons can quickly get you to the keyframe you need,
especially when you have keyframes close together and one of them is hard to
select by clicking on it with the mouse.
Now, let’s save our current envelope to disk. If you create an interesting envelope
that you might want to use again, you can save it to disk.
·· TToo ssaavvee tthhee eennvveellooppee::
F Click on the Save… button in the Envelope Editor.
F Type tutorial for the filename in the file requester.
F Click Ok in the file requester to save the envelope.
Now let’s say we don’t really like having the keyframe at 50%, so we will get rid of
it.
·· TToo ddeelleettee tthhee ccuurrrreenntt kkeeyyffrraammee::
F Click on the Delete button in the Envelope Editor.
The keyframe at 50% disappears, and the envelope returns to a straight line
between 0% and 100%.
If we decide we don’t want the envelope at all (we want to return to a single value
for the entire duration of the FX), then we can remove the envelope.
·· TToo rreemmoovvee tthhee eennvveellooppee::
F Click on the Remove button at the top of the Envelope Editor.
The envelope will disappear, and the Dissolve slider now controls the dissolve value
for the entire duration of the FX.
For our final trick, let’s load back in the envelope we saved above.
·· TToo llooaadd aann eennvveellooppee::
F Click on the Load button in the Envelope Editor.
F Double-click the tutorial file in the file requester.
Our envelope is back. Exit the Hollywood FX dialog and try rendering the FX with
the dissolve envelope.
Remember, envelopes can be created for almost any value in Hollywood FX. If a
control is highlighted in green when you use it, that means you can control that
value with an envelope and create exciting results.
62
Page 63

Tuuttoorrii
T
When you want to customize an FX, you can edit the paths of any 3D object to
create unique results. A set of tools on the Object Options panel along with the
Envelope Editor give you complete flexibility to create new flight paths for objects.
In this tutorial, we will take the Ball Backup FX, and create a new path so that the
ball bounces up and down on the screen. We use the term path to mean the
envelope for an object’s position, rotation, and scale.
all:: PP
a
E
diittiinngg
E
d
att
a
h
h
·· PPrreeppaarree ffoorr tthhee TTuuttoorriiaall aanndd SSeelleecctt tthhee FFXX::
F Create a new project in your host application.
F Add two video clips and create a two second transition between them.
F Add Hollywood FX as a transition between the two video clips.
F Select the Ball Backup transition in the Basic Shape Transitions group.
F Click on the Sphere object in the Control panel.
The Positioning group should be highlighted in green, indicating that object
positioning is currently being edited in the Envelope Editor. This is exactly what we
want, since the positioning tools are what we use to create a path for an object.
In the case of path editing, each keyframe of the envelope (or path) indicates the
position, rotation and scale of the object at that time in the FX. Hollywood FX then
automatically determines the positioning of the object between each keyframe, so
that the object moves smoothly from the position at one keyframe to the position at
the next keyframe. Let’s start by looking at the keyframes in the Ball Backup FX.
63
Page 64

HHoollllyywwoooodd FFXX UUsseerr’’ss GGuuiiddee
The picture above shows each keyframe in the Ball Backup FX. For each keyframe
you can see the position, rotation and scale values, as well as a camera preview
and a perspective preview of the FX at that time. You can follow along yourself by
using the Next and Prev buttons in the Envelope Editor, and using the View
buttons in the Monitor panel to switch between camera and perspective view.
At the first keyframe, the object is not morphed, and is positioned at
0, 0, 0 on the X, Y, and Z axis. It is not rotated at all
(0, 0, 0), and is scaled at 100% of normal size (1, 1, 1).
At the second keyframe, the object is moved down a small amount along the Y axis
(-0.123) and farther away from the camera (-0.37 along the Z axis). The sphere
object is also scaled smaller (0.39, 0.39, 0.39) in all directions.
The third keyframe continues the object’s movement away from the camera (-1.36
on Z), and is smaller again (0.25, 0.25, 0.25 for scale).
In the fourth keyframe, notice that the sphere is rotated 118 degrees around the X
axis, and has moved offscreen.
64
Page 65

TTuuttoorriiaall:: PPaatthh EEddiittiinngg
In the last keyframe, the object has been scaled so small it is no longer visible, and
is far offscreen.
By looking at the existing keyframes, you will better understand what is needed to
create a new path. We are going to create a path where the sphere moves away
from the camera, then bounces up and down.
We will begin by removing the current path.
·· TToo rreemmoovvee tthhee ccuurrrreenntt ppaatthh::
F First make sure the current time slider is at time 0% (so that the first keyframe is
highlighted).
F Click on the Remove button to remove the path envelope.
By first making sure we are positioned at time 0%, the object will be left at its
fullscreen size and position when we remove the envelope this will make it easy to
start a new path.
Try playing the preview now. The object still morphs into a sphere, but it doesn’t
move anywhere. We are now ready to make it move the way we want it to.
Often, the easiest way to create a path is to create the first and last keyframes,
then fill in the middle.
·· TToo ccrreeaattee aa nneeww ppaatthh::
F Click on the Create button in the Envelope Editor
Two keyframes get created, both with the object at the fullscreen position.
Hollwood FX must always have at least two keyframes (one at time 0% and one at
time 100%) in a path, so it creates the second keyframe automatically. If you play
the preview again, you will notice that nothing has changed. Since our two
keyframes are at the same position, the object still does not move. Let’s change the
100% keyframe so that the object will be in its final position. You will actually
move and adjust the sphere object by clicking and dragging in the preview
window, so read the following directions very carefully.
·· TToo cchhaannggee tthhee llaasstt kkeeyyffrraammee::
F Click the Next button in the Envelope Editor, so that the 100% time keyframe is selected.
F Click on the Scale tool button in the Object Options panel.
F Click-and-drag in the Monitor window to interactively scale the sphere object. Drag to
the left until the object is about one quarter its original size (you can watch the scale
values and stop scaling when the scale values reach about 0.25).
F Click on the Move tool button in the Object Options panel.
65
Page 66

HHoollllyywwoooodd FFXX UUsseerr’’ss GGuuiiddee
F Click-and-drag in the preview window to interactively move the sphere. Move the sphere
towards the top of the preview until it is offscreen.
F Click on the Persp button in the Monitor panel to switch to perspective view.
F Right Click-and-drag in the preview window to move the sphere along the Z axis. Move the
mouse up until the object on the screen moves all the way behind the backdrop video
object, and the shadow is no longer visible.
F Click the Cam button in the Monitor panel to return to camera view.
Now if you play the preview, you will see that the sphere simply shrinks and
disappears towards the top of the screen.
How your keyframes should look after modifying the last keyframe
Now we will create two more keyframes for the top and bottom of our bounce
(then we will use the Envelope Editor’s copy function to duplicate the bounce).
First let’s create the top of the bounce.
·· TToo ccrreeaattee aa nneeww kkeeyyffrraammee::
F Move the current time slider to time 10%.
F Click on the Scale tool button in the Object Options panel.
F Click-and-drag to the left in the preview until the object’s scale values are around 0.25.
F Click on the Move tool button in the Object Options panel.
F Click-and-drag up in the preview until the object is at the very top of the preview.
66
Page 67

TTuuttoorriiaall:: PPaatthh EEddiittiinngg
created automatically at
The new keyframe is
the current time when
you change the
positioning.
Notice that a new keyframe was automatically created for you as soon as you
began changing the object’s positioning. This eliminates the tedious process of
manually creating keyframes that some programs require. You simply move the
current time slider to the time you want, and begin editing. ANow, let’s create the
bottom of the bounce.
·· TToo ccrreeaattee tthhee bboottttoomm ooff tthhee bboouunnccee::
F Move the current time slider to 20%.
F The Move tool should already be selected in the Object Options tab, if not, click on it.
F Click-and-drag down in the preview until the object is at the very bottom of the preview.
Right now, at the bottom of the bounce, the keyframe is set to move smoothly
through that time, so it won’t look much like a bounce. Let’s change that by
How things should look at the top of the bounce
67
Page 68

HHoollllyywwoooodd FFXX UUsseerr’’ss GGuuiiddee
making the spline curve to perform a bounce instead of a smooth curve. We will
use the Presets feature in Hollywood FX.
·· TToo mmaakkee tthhee ccuurrrreenntt kkeeyyffrraammee aa bboouunnccyy kkeeyyffrraammee::
F Click on the Presets dropdown in the Spline Control group at the bottom of the Envelope
Editor.
F Select Bounce from the list of presets. This will adjust the Tension, Continuity and Spline
values for the current keyframe to create a bouncy motion.
Now we have a single bounce, but we would like the sphere to bounce again and
again. We will use the copy function to easily reproduce our bounce. We will copy
two keyframes that are at 10% and 20%, and paste them so that we have a new
bounce from 30% to 40%.
·· TToo ccooppyy aa sseett kkeeyyss::
F Click on the Copy button in the Envelope Editor.
F Type in 9 for Start and 21 for end (this makes sure we get the keyframes even if they
aren’t exactly at 10% and 20%).
F Type in 30 for paste.
F Click Ok.
The keys at 10% and 20% will now be duplicated, and you should have a second
bounce at 30% and 40%. Let’s make one more copy, this time of our original
bounce, and the first copy we made.
·· TToo ccooppyy tthhee kkeeyyss::
F Click on the Copy button in the Envelope Editor
F Type in 9 for Start and 45 for End.
F Type in 50 for Paste.
F Click Ok to make the copies.
Now you will have four bounces before the object flies off screen. Try playing the
preview to see the results.
Before leaving, you might want to save this path for future use.
·· TToo ssaavvee yyoouurr ppaatthh::
F Click on Save… in the Envelope Editor.
F Type the name bouncy as the filename in the file requester.
When you are finished try rendering your creation in your host application.
68
Page 69

Tuuttoorrii
T
N
e
N
The easiest way to create new FX is by changing an existing FX to meet your needs
rather than starting from scratch. In this example, we will take the Flyoff FX and
replace the flying window with a morphing shape, plus we will use an image filter
plugin to dissolve the shape in an exciting way.
e
w
w
F
X ffrroo
F
X
all::
a
m
m
Crr
C
E
xiissttiinngg
E
e
attiinngg
e
a
x
F
F
X
X
·· PPrreeppaarree ffoorr tthhee TTuuttoorriiaall aanndd SSeelleecctt tthhee FFXX::
F Create a new project in your host application.
F Add two video clips and create a two second transition between them.
F Add Hollywood FX as a transition between the two video clips.
F The FlyOff transition should already be selected.
F Select the Flat Window object in the Control panel.
The first thing we want to do is replace this simple flat window with a more
interesting shape. We will choose a Large Cylinder shape to replace the flat
window.
·· TToo rreeppllaaccee tthhee FFllaatt WWiinnddooww::
F Click on the Select File button in
the Object Options panel. A file
requester will appear.
F In the file requester the Objects folder within Hollywood FX GOLD should be the
current folder (if it is not, make it so).
F Open on the Basic Shapes folder.
F Double-click on the Large Cylinder.hfo file.
69
Page 70

HHoollllyywwoooodd FFXX UUsseerr’’ss GGuuiiddee
The flat window has now been replaced with a large cylinder, but if you play the
preview, it looks like nothing has changed. That is because we have not morphed
the cylinder from its flat shape to its fully morphed cylinder shape. To do this, we
will create an envelope that will change its morph to 100% during the first 10% of
the FX duration.
·· TToo ccrreeaattee tthhee iinniittiiaall kkeeyyffrraammeess::
F Click-and-drag the Morph slider in the Object Options panel so that it is highlighted and
its value is 0.
F Click-and-drag in the Envelope window at 10% time and 0% value (see picture below), then
drag the new keyframe up to 100% in value and let go of the mouse button.
Click-and-drag
up from here.
Creating the first keyframes.
Let go of the
mouse button
here.
·· AAddjjuusstt tthhee 110000%% ttiimmee kkeeyyffrraammee::
F Click-and-drag on the keyframe at 100% time.
F Drag it up to 100% value and let go of the mouse button.
F Click on the Linear checkbox in the Key Type group in the Envelope Editor.
70
Page 71

TTuuttoorriiaall:: CCrreeaattiinngg NNeeww FFXX ffrroomm EExxiissttiinngg FFXX
After adjusting the 100% time keyframe
We now have an envelope where the Morph starts at 0% and moves up to 100%
during the first 10% of the duration of the FX. Then it stays at 100% morphed for
the remainder of the FX. If you play the preview you will see the results.
Your new morphing cylinder effect
In a moment we will make some more changes to this FX, but lets save it as a new
FX right now. If you are creating a custom FX for a specific project, you don’t
need to save it. All of your customizations will be saved as part of the host
application’s project file. However, if you want to use the customized FX again and
again you will want to save it to disk and add it to the FX Catalog.
·· TToo SSaavvee YYoouurr CCuussttoomm FFXX::
F Make sure the current time slider in the Envelope Editor window is at 10% tim e (the
current preview frame will be used as the icon for the FX, so we want a nice time for the
icon).
F Click on the Save FX button in the Control panel. A save file requester will appear.
71
Page 72

HHoollllyywwoooodd FFXX UUsseerr’’ss GGuuiiddee
F The current folder in the file requester should be 1 – Flying Window Transitions.
F Click on the parent folder button to move up one folder to the Effects folder.
F Click on the Create a New Folder button to create a new FX group. Name the new
folder Custom FX.
F Double-click on the Custom FX folder to open it.
F Change the filename to cylinder1 as the filename for the new FX and click Ok.
After a few moments, the FX Catalog will appear with your new Custom FX group
and your cylinder1 FX icon visible.
Your new morphing cylinder effect saved in a custom group
Now, let’s make our cylinder do a cool dissolve over time using the Gradient Wipe
plugin. Hollywood FX includes a number of plugins for filtering media video and
for warping 3D objects (for more information see Plugins in the Reference
Guide) and new plugins can be added from Club Hollywood to further extend the
limitless capabilities of Hollywood FX.
The Gradient Wipe plugin uses a grayscale gradient image to dissolve a Media item
using the “shape” of the gradient as the shape of the dissolve. This plugin is a
simplified example of the product Alpha Magic also available from Hollywood FX.
Before attaching the plugin we will make two small changes so that everything
looks great while we are working.
·· TToo pprreeppaarree ffoorr tthhee pplluuggiinn::
F Click on the Basic Effect Options item in the Control panel.
F Clear the Shine checkbox to turn off shadows.
F In the Monitor panel, change the Sources dropdown to Live.
Now you are ready to add the Gradient Wipe plugin and set its options. We will
use a sample gradient included with Hollywood FX.
·· TToo aadddd tthhee GGrraaddiieenntt WWiippee PPlluuggiinn::
F Select the Host Video 1 Media item in the Control panel.
F Click on the Plugins… button in the Tool Bar.
F Double-click on Gradient Wipe in the list of plugins that appears.
72
Page 73

TTuuttoorriiaall:: CCrreeaattiinngg NNeeww FFXX ffrroomm EExxiissttiinngg FFXX
The new plugin will be added directly below (and indented) the Host Video 1 Media
item, and the Item Options panel will change to show the Gradient Wipe options.
The Gradient Wipe Options
We will now select a gradient image and set some options.
·· TToo sseett tthhee ooppttiioonnss ffoorr GGrraaddiieenntt WWiippee::
F Click on the Select Gradient… button. A file requester will appear.
F Change the current folder to the Hollywood FX GOLD\Images\gradients folder (in a
normal installation you will find the Hollywood FX GOLD folder within the Program Files
folder of your hard drive).
F Double-click on the Clouds1.tga file.
F Check the Tie transition amount to effect transition checkbox.
F Change the Softness slider to 80.
F Change the Border Size slider to 30.
F Click on the Border Color button and select a yellow color from the color requester.
Try playing the preview. Now the cylinder looks like its being eaten away by acid
as it flies off screen. Rather than tie the transition amount to the FX duration, you
could have keyframed your own transition amount to have the object partially
dissolve then reappear, and you could envelope softness, border size, and color to
create a more dynamic and interesting dissolve.
73
Page 74

HHoollllyywwoooodd FFXX UUsseerr’’ss GGuuiiddee
Same cylinder, now with gradient wipe
To conclude this tutorial, save your modified FX one more time.
·· TToo SSaavvee YYoouurr CCuussttoomm FFXX::
F Make sure the current tim e slider in the Envelope Editor window is at 40% time (for the
icon).
F Click on the Save FX button in the Control panel. A save file requester will appear.
F The current folder should already be Custom FX and the filename should be cylinder1.
F Click Ok to replace the FX we saved earlier with our current changes.
When you are finished try rendering this FX in your host application to see the final
results.
As you can see, by modifying existing FX and using plugins you can create
dramatic and exciting new FX.
74
Page 75

Tuuttoorrii
T
all::
a
W
W
arrpp
a
PPlluuggiinnss
Hollywood FX Gold includes a number of 3D plugins called Warps. These Warps
mathematically change the shape of a 3D object and can be keyframed over time.
This tutorial will demonstrate the use of one of the most common Warp plugins
called Peel. Unlike more limited effect software, Hollywood FX allows you to attach
a Peel to any object (not just a flat plane) and allows you to attach multiple peels
to the same object.
·· PPrreeppaarree ffoorr tthhee TTuuttoorriiaall aanndd SSeelleecctt tthhee FFXX::
F Create a new project in your host application.
F Add two video clips and create a two second transition between them.
F Add Hollywood FX as a transition between the two video clips.
F The FlyOff transition should already be selected.
F Select the Flat Window object in the Control panel.
The flat window in FlyOff has a very small number of polygons, so it would not peel
very well. We will it with an higher polygon object.
·· TToo rreeppllaaccee tthhee FFllaatt WWiinnddooww::
F Click on the Select File button in the Object Options panel. A file requester will appear.
F In the file requester the Objects folder within Hollywood FX GOLD should be the
current folder (if it is not, make it so).
F Open on the Specialty Effects folder.
F Double-click on the High Mesh 1.hfo file.
Lets attach the Peel plugin and experiment with its options.
·· TToo aattttaacchh tthhee PPeeeell PPlluuggiinn::
F Verify that the Flat Window object is selected.
F Click on the Plugins button in the Tool Bar.
F Double-click on the Peel plugin in the Plugin Selection dialog that appears.
75
Page 76

HHoollllyywwoooodd FFXX UUsseerr’’ss GGuuiiddee
You should immediately see that the object has peeled. By default, the Peel time is
keyed to the total transition time, and the direction of the Peel is tied to the Flight
Direction spinner (under Effect Options). This makes it simply to quickly add a Peel
to an effect. Most plugins work this same way, providing default options that make
it easy to quickly get the results you want.
Peel Options
Let’s try making some options changes to see what they do.
·· TToo mmooddiiffyy PPeerrcceenntt ooff ppeeeell ccoommpplleetteedd aanndd AAnnggllee ooff PPeeeell::
F Clear the Tie transition amount to effect transition checkbox.
F Clear the Tie peel direction to flight direction checkbox.
F Change the Angle of Peel spinner to –45 and the Percent of peel completed slider to
50.
Angle of Peel of –45 and 180
76
Page 77

TTuuttoorriiaall:: WWaarrpp PPlluuggiinnss
The Percent of peel completed controls how far the peel has progressed. This
can simply be tied to the total transition time, or can be keyframed individually to
create interesting effects, like partial peels. Now let’s play with the Peel Radius.
·· TToo mmooddiiffyy RRaaddiiuuss ooff tthhee PPeeeell::
F Move the Radius of Peel slider back and forth to see the result. When finished, leave
the Radius at approximately .25.
Radius of Peel of .10 and .50.
Finally, there is a checkbox that controls whether to perform a roll (which is the
default) or to actually peel without rolling.
·· TToo PPeeeell iinnsstteeaadd ooff RRoollll::
F Click on the Peel instead of roll checkbox.
Roll and Peel
Now lets quickly create an interesting keyframed effect where the peel spins
around the object as it peels.
·· TToo ssttaarrtt kkeeyyffrraammiinngg tthhee AAnnggllee ooff PPeeeell::
F Clear the Peel instead of roll checkbox.
F Check the Tie Transition Amount to Effect Transition checkbox.
77
Page 78

HHoollllyywwoooodd FFXX UUsseerr’’ss GGuuiiddee
F Move the Angle of Peel spinner to 0.
F Move the current time slider in the envelope window to 0%.
F Click on the Create button in the Envelope Window to create a keyframe at time 0% with
the Angle of Peel currently at 0.
You have now created the first keyframe, with the angle starting at 0 degrees.
·· TToo ccoommpplleettee tthhee kkeeyyffrraammiinngg::
F Move the current time slider in the Envelope Window to 100%.
F Move the Angle of Peel spinner to 180 degrees.
You have now created the second keyframe, and if you play the preview you will
see the object peel as it flies off, and the peel rotates around the object.
Remember that plugins in Hollywood FX can be combined. You could attach a
Ripple at the same time the object is peeling, or even attach a second peel to the
same object.
Two Peels attached to the same object
78
Page 79

Tuuttoorrii
T
Hollywood FX Gold includes an easy-to-use 3D text generator. This feature is best
used within the Filter format of Hollywood FX. It allows you to create text that is
extruded in 3D with bevels. You can assign different colors to the sides, face and
bevel edges of the text. You can also generate the text as a single block or with
each letter being it’s own separate object. This tutorial will demonstrate the use of
3D text in its most common uses. Unlike more limited effect software, Hollywood FX
allows you to attach a warp plug-in(described earlier) to 3D text, so you could even
explode your text or have it surface wipe away (see plug-ins tutorials).
all::
a
G
enn
G
e
3
3
D
D
err
e
T
e
T
attiioonn
a
xtt
e
x
·· PPrreeppaarree ffoorr tthhee TTuuttoorriiaall aanndd SSeelleecctt tthhee GGeenneerraattee TTeexxtt::
F Create a new project in your host application.
F Drop a piece of video or still image into the Video 2 (superimpose track above V1 A/B)
This will be used a only a placeholder for determining the length of time you have to
animate in.
F Now within the Effect Controls of Premiere, set the transparency for this media to Alpha
Channel.
F Then within the Video tab, find the Pinnacle folder and drag and drop the Gold Filter on
top of the proxy source.
F Now click Setup for the Gold filter.
F Within Hollywood FX click the Blank FX button on the Tool Bar. This will start a new FX
from scratch where we will add our 3D text.
F Click the 3D Text button.
79
Page 80

HHoollllyywwoooodd FFXX UUsseerr’’ss GGuuiiddee
surface of the
of the bevel
F Choose a font you like by clicking Select Font, then type in WOW!
F Click OK.
This allows for
each letter to
be individually
moved and
rotated.
These buttons
determine the
offset of the
text to its parent
Determines how
tightly the text
follows the
original font
These buttons
determine the
color settings
for each
These control
depth of the
text and depth
and inner shift
3D Text Generator interface
Here you
can still
make color
changes to
the surface
End result of generated 3D text
80
Page 81

Tuuttoorrii
This example shows an
object that will morph.
The master object and
T
Hollywood FX Gold includes an easy-to-use 3D object conversion utility for import
Lightwave 3D objects into Hollywood FX.
all:: LLiigg
a
O
O
bjj
b
ecctt II
e
htt
h
w
avv
w
a
mppoorrtt
m
e
e
·· PPrreeppaarree ffoorr tthhee TTuuttoorriiaall aanndd CCoonnvveerrtt aann oobbjjeecctt::
F After creating a 3D object in Lightwave modeler, make sure that it only has 3 point
polygons (4 points or more will cause and error). Also currently only .lwo 5.5 format is
accepted.
F Now from the Start Menu under the Gold menu, start the Object Importer
All targets must be
included during
conversion.
Lightwave 3D object converter utility
its target morphs
become a single
81
Page 82

HHoollllyywwoooodd FFXX UUsseerr’’ss GGuuiiddee
F Then click the Add Object button and select the object you want to import. If you are
converting a series of morph targets, add them also at this time. Hollywood FX will
compacts them into a single file.
F Now choose the Output File to provide a name and location (defaults to Hollywood FX
folder) of the new object to be created in the .hfo (Hollywood FX) format.
F Click convert – you will see messages stating reading object, building object and writing to
disk. Then is should state “Object Converted”.
F Now enter Hollywood FX and you can load the object into a Blank composite you plan to
build or into an existing FX.
82
Page 83

R
R
eff
e
err
e
enncc
e
e
e
Guuii
G
d
d
e
e
83
Page 84

Page 85

T
T
h
h
e
e
Hoollllyy
H
woooo
w
d
d
F
F
X
X
Dii
D
The Hollywood FX dialog gives you quick and easy access to all of your 3D
transitions, and lets you quickly change rendering options and edit flight paths and
other attributes of FX. This chapter describes the Hollywood FX dialog and all of its
controls.
alloogg
a
85
Page 86

HHoollllyywwoooodd FFXX UUsseerr’’ss GGuuiiddee
panel
changes
panel
select items to be
keyframes for flight
for individual
TThhee HHoollllyywwoooodd FFXX DDiiaalloog
g
The Hollywood FX dialog is made up of a number of panels. These panels group
together the different features of Hollywood FX so that you can quickly and easily
select effects and make changes.
The Control
panel lets you
changed.
The Monitor
provides an
instant preview
that lets you see
The Item panel
changes to provide
options for the
selected item in the
The Envelope Editor
panel is where you
work with
paths and envelopes
Click here to
open or close
the Envelope
Editor.
The Buttons panel
provides buttons to
accept or cancel
changes, and to display
the Settings and About
dialogs.
86
Page 87

TThhee HHoollllyywwoooodd FFXX DDiiaalloogg
Click on the current
options like lighting,
the host application or
image files.
Click on Surface items
to disk.
added, select this to
TThhee CCoonnttrrooll PPaanneell
The Control panel is the central control for the Hollywood FX dialog. It contains
items to select the current FX, set options for the FX, and edit individual media
items and objects. When you click on one of these items, the Item Panel on the
right side of the Hollywood FX dialog changes to show the options for the selected
item.
Click on Effect
Options to change
shadows, shine,
motion blur, and
more.
Click on the Camera
item to edit Camera
position, FOV and
Ambient Lighting
When additional
Lights have been
FX name to display
the FX Catalog and
select a new FX.
If you have added a
2D plug-in, select the
plug-in icon to edit it’s
attributes.
Click on Media items
to change video
sources in an FX.
Media can come from
Click on Object items to
change objects, alter
rendering options for
each 3D object in an FX.
edit them.
flight paths and
Use these buttons
to remove or clone
items, sort media,
and save a new FX
The Control panel
87
from video or still
to change texture
mapping or colored
surfaces.
If you have added a 3D
plug-in, select the plug-in
icon to edit it’s attributes.
Page 88

HHoollllyywwoooodd FFXX UUsseerr’’ss GGuuiiddee
MMoovvee UUpp//MMoovvee DDoowwnn……
Click either of these buttons to change the rendering order of objects. The feature
is particularly useful for effects you design that have a keyhole or transparency
need.
Examples of effects using this technique are: Spotlight and 00HFX in the Video
& Film group. In order to create the illusion of a disk keying through source one,
we need to have it rendering before source one.
Try turning off the effect by selecting the Simple Disk object within the Spotlight
effect, then click the Move Down button. When you click this button, the disk will
no longer cut a hole in the rendered video.
The unique nature of this feature would be to create some 3D text and set the
surface opacity on the face of the text to 0.001. Then have that text sorted above
Source 1 video in the objects list. This will cause the face of the text as it passes
by the screen to key out and show the background source 2. Take a look at the
“Wow” effect example in the ‘Words and Icons’ group.
Spotlight Effect: Showing keying style wipe resulting from sorting object layers
88
Page 89

TThhee HHoollllyywwoooodd FFXX DDiiaalloogg
Keying Text example, a common broadcast effect
RReennaammee……
Click this button to rename an item in the Control panel (you cannot rename the
FX or the Effect Options items). When you click this button, the rename dialog will
appear, letting you type in a new name for the current item.
CClloonnee……
Click this button to copy the current item. Only Media, Object, and Plugin items
can currently be cloned. When you clone a Media or Plugin item, the new cloned
item is created immediately, and you can change its options. When you a clone an
Object, the Clone dialog appears, letting you create multiple clones, and adjust the
position and media for each new clone. See the Advanced-Tutorials guide for a
complete tutorial that shows how the Clone tool can be used to create incredible
effects quickly and easily. Within the Clone dialog you will find the following
controls.
• Clone Count. This is the number of clones of the current object that will
The Rename dialog
be created.
• Distance. Each clone can be offset a certain distance from the previous
clone. You can enter values for the X, Y, and Z axis. This makes it easy to
create a set of clones that are all placed at different positions from the
original.
• Rotation. Each clone can be rotated around any axis by entering a
rotation amount for X, Y, or Z.
• Scale. Each clone can be scaled as it is created by entering a scale amount
(between 0 and 1) for the X, Y, and Z axis.
• Clone Surfaces and Media. When this is not checked, the clones will use
the same surfaces and media as the original object. With this option
89
Page 90

HHoollllyywwoooodd FFXX UUsseerr’’ss GGuuiiddee
checked, clones for each surface and media will be created for each object
clone.
• Create New Media For Each Clone. When this option is selected
Hollywood FX will create a unique new Media item for each clone created,
using a different host track for each surface. Use the Starting Host
Track control to set the first host track used by the clones.
• Starting Host Track. When Create New Media For Each Clone is selected,
you can enter a starting track number to use for the clones. The clone tool
will begin by using the track number entered here, then increment the
track for each successive clone.
The Clone dialog
DDeelleettee
This button will delete the current item from the FX (only Media and Object items
can be deleted). Media items can only be deleted from an FX if they are not used
by any Surfaces (so you must first reassign the media for any surfaces or delete
any objects that use that media before deleting the media itself).
SSaavvee FFXX……
Click on this button to save a new FX to disk and add its icon to the FX Catalog. A
file requester will appear letting you select a folder and type in a name for the new
FX. You must create the new FX within a subfolder of the Effects folder for its
icon to appear properly in a group within the FX Catalog (see the FX Catalog
chapter for more information on organizing FX). The icon created for the FX will
90
Page 91

TThhee HHoollllyywwoooodd FFXX DDiiaalloogg
match exactly what is currently scene in the preview, so set the preview slider
appropriately to create a useful icon.
91
Page 92

HHoollllyywwoooodd FFXX UUsseerr’’ss GGuuiiddee
Tool Bar…
The Tool Bar is an area of buttons allowing for incredible functionality. You can
create any of the following.
• Blank FX. Select this item to start a new FX from scratch. The new FX will
be named Untitled until you save it with a new name.
• 3D Object. Click this to add a new 3D object to the current FX. A file
requester will appear, letting you choose from the 3D objects available to
Hollywood FX. These are found within the Objects folder within the
Hollywood FX GOLD folder. All objects have a .hfo extension. Hollywood
FX will also read 3D object files from certain 3D modeling programs.
Please view the Readme file from the Start menu for more information on
the formats supported.
• Null Object. Selecting this item creates a new Null Object in the scene.
Null objects are not rendered, but are used to create motion hierarchies
and as reference positions for certain plugins.
• File Media. Selecting this lets you create a new Media item and select the
image or video file immediately. A file requester will appear letting you
select a media file, then the new Media item will be created, and you can
modify its options.
• Host Media. This lets you create a new Media item using a video track
from the host application. A requester will appear with the available host
tracks.
• Light. This allows you to add a spoint, point or fill light to enhance a
composite.
• 3D Text. This allows you to generate a 3D text object. You control
extrusion, beveling and surface attributes. You can generate each letter in
a word to be a separate moveable object.
PPlluuggiinnss……
Hollywood FX supports extended functionality through plugins. You can attach a
plugin to the current item by clicking on this button, then selecting a plugin from
the Plugins dialog. Different sets of plugins will be available for different items.
For more detail about plugins, see the Plugins chapter.
92
Page 93

TThhee HHoollllyywwoooodd FFXX DDiiaalloogg
start and stop looping
Use this slider to move
through the frames of
frame step.
views while editing
TThhee MMoonniittoorr PPaanneell
back and forth
the preview.
The 3D Plugins dialog
Change camera
flight paths.
Click this button to
playback of the
preview.
Click this button to
play the entire
preview one time.
93
Use Skip and Step
buttons to jump to
start or end of the
preview and single
Page 94

HHoollllyywwoooodd FFXX UUsseerr’’ss GGuuiiddee
The Monitor Panel provides a preview of your chosen FX and options. The preview
is generated on the fly as you make changes. A number of controls are provided
to adjust the preview itself.
LLooooppiinngg PPllaayybbaacckk BBuuttttoonn
The looping playback button starts and stops looping playback of the preview.
When the button is pressed in, the preview will playback continuously. You can
continue to change options or select a different transition while the preview is
playing.
SSiinnggllee PPllaayybbaacckk BBuuttttoonn
Click the single playback button to play the entire transition one time. This is
useful when you’ve made some changes and want to see the entire effect quickly.
SStteepp BBuuttttoonnss
Step forward one frame or step backward one frame.
SSkkiipp BBuuttttoonnss
Jump to the beginning frame of the effect or to the last frame in the effect.
TThhee PPrreevviieeww SSlliiddeerr
The preview slider lets you manually move to any frame of the preview. Simply
move the slider back and forth to see different frames of the preview. If the
preview is playing (either the looping playback is selected, or the single playback
was just pressed), you will not be able to use the preview slider.
VViieeww BBuuttttoonnss
Normally, the preview shows the view from the camera in the FX. The camera
view is what is used for rendering the actual FX. Sometimes, particularly when
editing an object’s flight path, you will want to change views to see the FX from a
different angle. These buttons allow you to quickly change views.
94
Page 95

TThhee HHoollllyywwoooodd FFXX DDiiaalloogg
The Item Panel
The Item Panel changes to display options for the current selection in the Control
panel. The different Item Panels are discussed in the following chapters.
TThhee EEnnvveellooppee EEddiittoorr PPaanneell
The Envelope Editor is used for advanced keyframe editing of object flight paths
and option envelopes. This panel is discussed in detail in the chapter titled The
Envelope Editor.
TThhee BBuuttttoonnss PPaanneell
Along the bottom of the Hollywood FX dialog are buttons that provide a number of
functions.
RReeggiisstteerr NNooww//UUppggrraaddee NNooww
If you haven’t yet registered and entered your permanent keycode, you can click
on this button to display the registration information dialog, and register online
instantly, or enter a keycode your received after registering from another system.
If you have already registered, click on this button to find out about upgrade
options.
UUnnddoo
As you make changes, you will see an Undo button appear, letting you undo the
last action performed. You can press the Undo button again and again to undo
previous actions. The Undo button will change to show a description of what
action will be undone by pressing the button.
RReeddoo
If you mistakenly Undo an action, you can redo it by clicking this button. Each
time you click Undo, the action that was undone is added to the Redo list, letting
you move back and forth through all of the changes you have made since
displaying the Hollywood FX dialog.
SSeettttiinnggss
Click on the Settings button to display the Settings dialog, which contains a
number of global settings for Hollywood FX. These settings are described in detail
below.
95
Page 96

HHoollllyywwoooodd FFXX UUsseerr’’ss GGuuiiddee
AAbboouutt
Click on this button to display the About dialog. The About dialog displays the
version number, serial number, and machine id of your Hollywood FX. You can also
quickly connect to Club Hollywood through the Internet from the About dialog.
OOkk
Click Ok to save your changes and exit the Hollywood FX dialog. When you click Ok
you are returned to your host application. Clicking the close button at the top right
of the dialog has the same effect as clicking Ok.
CCaanncceell
If you wish to discard the changes you have made since the Hollywood FX dialog
was displayed, click Cancel. This will discard your current changes and return to
the host application.
96
Page 97

When the Hollywood FX dialog is first displayed, and whenever you click on the
click on an icon
highlighted in purple.
the FX for your changes
current FX name in the Control panel, the FX Catalog is displayed on the right
side of the Hollywood FX dialog.
Left-
to select that FX.
The current
selected FX is
T
T
h
h
e
e
F
F
X
X
C
C
att
a
alloogg
a
Select from the
different groups
of FX using this
dropdown.
Hints and tips for
getting interesting
results are shown here.
You can add to this by
clicking in here and
typing. You must save
to be saved.
The selected FX is shown with a purple border, and hints and tips for the current
effect are shown below the FX icons.
FX are organized into groups that make it easy to find the FX you want quickly and
easily.
·· TToo CChhaannggee TToo AA DDiiffffeerreenntt GGrroouupp
F Click on the Groups dropdown list above the FX icons.
F Use the dropdown list to select a new group. The FX icons for the selected group will
appear.
The icons for each FX in a group will help you find the effect you want.
The FX Catalog
97
Page 98

HHoollllyywwoooodd FFXX UUsseerr’’ss GGuuiiddee
·· TToo SSeelleecctt AAnn FFXX
F Left-click on the icon for the FX you wish to select. A blue border will appear around the
icon, the hints and tips will be shown for the selected FX, and the preview will be updated.
OOrrggaanniizziinngg FFXX
You can create new FX (by using the Save FX button described in the previous
chapter), and you can reorganize existing FX into different groups by simply
reorganize the effect files (.hfx) themselves), using standard operating system tools
like Windows Explorer.
A list of the current groups and FX within those groups is maintained in the file
effects.org within the Hollywood FX GOLD\Orgs folder. This list is updated
automatically when you use the Save FX button, but must be deleted if you want to
rebuild the list after reorganizing effect files.
Within the Effects folder in Hollywood FX GOLD you will find a set of folders
that are in fact the groups in the FX catalog. Within these folders you will find the
.hfx files that are the FX for that group. You can create new groups by creating
new folders within the Effects folder, and you can move or copy .hfx files from
one group folder to another. Hollywood FX only recognizes one level of folders
within the Effects folder.
Remember, after making any changes, you must delete the Hollywood FX
GOLD\Orgs\effects.org file so that the FX catalog will be rebuilt the next time
you use Hollywood FX.
FX file organization
98
The Flying Window
Transitions group.
The FX files that are a
part of the Flying
Window Transitions
group.
Page 99

B
B
Once you have selected an FX from the FX Catalog, you can change rendering
options for that FX.
assiicc
a
Oppttiioonnss
O
·· TToo DDiissppllaayy tthhee BBaassiicc OOppttiioonnss PPaanneell
F Click on the Basic Options item in the Control panel
The Basic Options Panel
Hollywood FX Gold makes it easy to quickly customize an FX to your needs with a
series of simple controls.
EEaassyy FFlliigghhtt CCoonnttrroollss
RReevveerrssee FFlliigghhtt
In most transitions, the Source 1 (A) video flies off screen revealing the Source 2
(B) video. By clicking on the Reverse Flight checkbox, Hollywood FX will
automatically adjust the FX so that the Source 2 (B) video flies on and covers the
Source 1 (A) video. If you have the Envelope Editor open, you will be able to see
how this reverses the transition percent values.
99
Page 100

HHoollllyywwoooodd FFXX UUsseerr’’ss GGuuiiddee
FFlliigghhtt PPaatthh
For most transitions, you can quickly change the direction in which the video flies
off (or on) using the Flight Path dial. Simply click and drag in the dial to change
the flight direction and create a very different result.
RRoottaattee OObbjjeecctt
When you use the Flight Path dial, you are changing the direction the object flies,
but the object itself stays oriented in its original direction. When you check the
Rotate Object checkbox, the object will rotate to follow the Flight Direction, often
giving a more interesting result.
EEaassyy LLiigghhttiinngg CCoonnttrroollss
LLiigghhttiinngg
Use this checkbox to turn on or off lighting in the FX. Turning off lighting will
eliminate the realistic shading, but will speed up rendering.
SShhaaddoowwss
Use this checkbox to turn on or off shadows in the FX. Turning off shadows will
speed up rendering. Having shadows on can add a sense of 3D realism to an FX.
Shadows can be controlled in more detail using the Shadow Controls described
below.
SShhiinnee
Many FX have a glossy shine on the 3D objects that fly on or off screen. This
checkbox controls shine. Clear this checkbox to turn off the glossy shine.
LLiigghhtt DDiirreeccttiioonn
Use the dial to change the direction of the light in the scene. You can create
interesting results by having light come from the bottom of the screen instead of
the top. Light Direction affects the shading, shine, and shadows of 3D objects in
an FX.
EEaassyy OOppttiioonnss CCoonnttrroollss
RReennddeerr
You can change the 3D rendering of the FX
100
 Loading...