

Page 1

®
Owner’s Manual For:
TM
Quantum Plasma-3
We appreciate your choosing Pinnacle’s Quantum Plasma speakers for use in your
Home Theater & audio system. These unique speakers will provide you with
surprisingly powerful and satisfying sound from an ultra stylish & compact package.
Please read this manual completely to ensure the best possible performance from
your Home Theater or sound system.
SPEAKER PROTECTION:
One special feature of the Quantum Plasma speakers is an overload protection circuit
designed to help protect the speaker from accidental overload. This protection circuit
will automatically attenuate the overall output of a speaker when it senses excessive
volume level. If you hear this protection circuit engaging, (and it will be obvious when
this occurs), please turn down your receiver’s volume. Your speaker will quickly return
to its normal operation.
CONNECTIONS:
Complete all wire connections in your Home Theater/Sound system before powering
up your receiver. Be sure to observe proper polarity for all speaker wire connections:
TM
Quantum Plasma-5
receiver PLUS (red terminal) to speaker PLUS, receiver MINUS (black terminal) to
speaker minus. For the best results, we recommend 12, 14 or 16 gauge wire; consult
your dealer for options.
To connect your speaker wire to your speaker's binding posts, twist the bare wire
strands together tightly, then insert through the hole which becomes visible when the
2003 PINNACLE LOUDSPEAKERS
knurled knob is screwed counterclockwise. The wire must then be secured by
screwing the knob back clockwise until snug. Remember, loose strands of wire may
cause short circuits. Upon completion, gently tug at all connections to ensure they are
fastened securely and re-check for correct polarity.
Page 2

HOME THEATER SETUP: (5 Quantum Plasma Speakers)
All Quantum Plasma Speakers can be used in front, center or rear speaker positions.
• Connect your left & right speakers to your receiver's left & right main (front
speaker) outputs.
• Connect your center channel speakers to your receiver’s center channel speaker
output.
• Connect your left & right surround channel speakers to your receiver’s left & right
surround (rear) channels’ speaker outputs.
VERY IMPORTANT!
Be sure your receiver’s center, main & surround channel modes are all set to SMALL
(NORMAL). This will allow for the greatest bass impact from your system.
RECOMMENDED MAIN AND CENTER SPEAKER PLACEMENT:
• The best distance between the main speakers is dependent upon room
conditions, size, and the proximity of the listening area to the speakers; usually 6 -
12 feet is appropriate. A bit of experimentation is in order, but smaller rooms will
better tolerate closer spacing between the speakers.
• We recommend you place your center speaker horizontally on top of (or just
below) your TV.
RECOMMENDED SURROUND SPEAKER PLACEMENT:
• Behind you, equally spaced to your left and right.
One general rule of thumb: try to position speakers so that the tweeter's level is fairly
close to your ear level in your normal listening position. High frequencies are much
more directional than lows so it is best that your ears are within a fairly direct path to
the tweeter's output.
GRILLES:
Your Quantum Plasma speaker comes with two grilles. One silver, one black. If you
would like to change grilles please read the following instructions.
• Using an awl or similar tool, carefully pry the grill off of one side of the speaker by
catching it by one of its holes near the edge. Slowly pull the grill completely out of
it’s groove o n that side of the cabinet. Remove grill from speaker.
• Slide the left side of the other grill into the groove on the left side of the cabinet.
Bend the grill slightly until it’s right side pops into the right hand groove.
ON -WALL MOUNTING INSTRUCTIONS:
INSTALLATION NOTES:
The hanging methodology employed with this product is intended for mounting on
walls of standard construction, which includes most residential environments. Such
environments are typically constructed with wooden studs behind the walls that will
securely accept the enclosed screws. If you do not notice resistance behind the wall
when drilling the pilot hole you probably do not have a stud in that location and will
then need to use the enclosed wall anchors. In installations with concrete, brick,
cinder block or stone walls we recommend the use of 1.5” to 2" concrete nails.
TOOLS REQUIRED:
• #2 Philips head screwdriver bit or hand screwdriver.
• Stud Finder
• Drill - electric or cordless, with 1/8” bit. Note: If you do not have access to a drill
and you know there is a stud in the wall at your desired mounting location you
may use nails to attach the speaker’s mounting bracket to the wall. We
recommend 'common nail 10D'.
Page 3
MOUNTING INSTRUCTIONS:
1) Determine where you want to mount your speaker and then find the closest stud.
2) Place the speaker on the wall centered over the stud. If this location is not
acceptable use wall anchors to wall mount the speaker where there is no stud.
For Vertical Orientation: Make a small mark on the wall at the bottom center of the
speaker.
For Horizontal Orientation: Make a small mark on the wall at the top center of the
speaker.
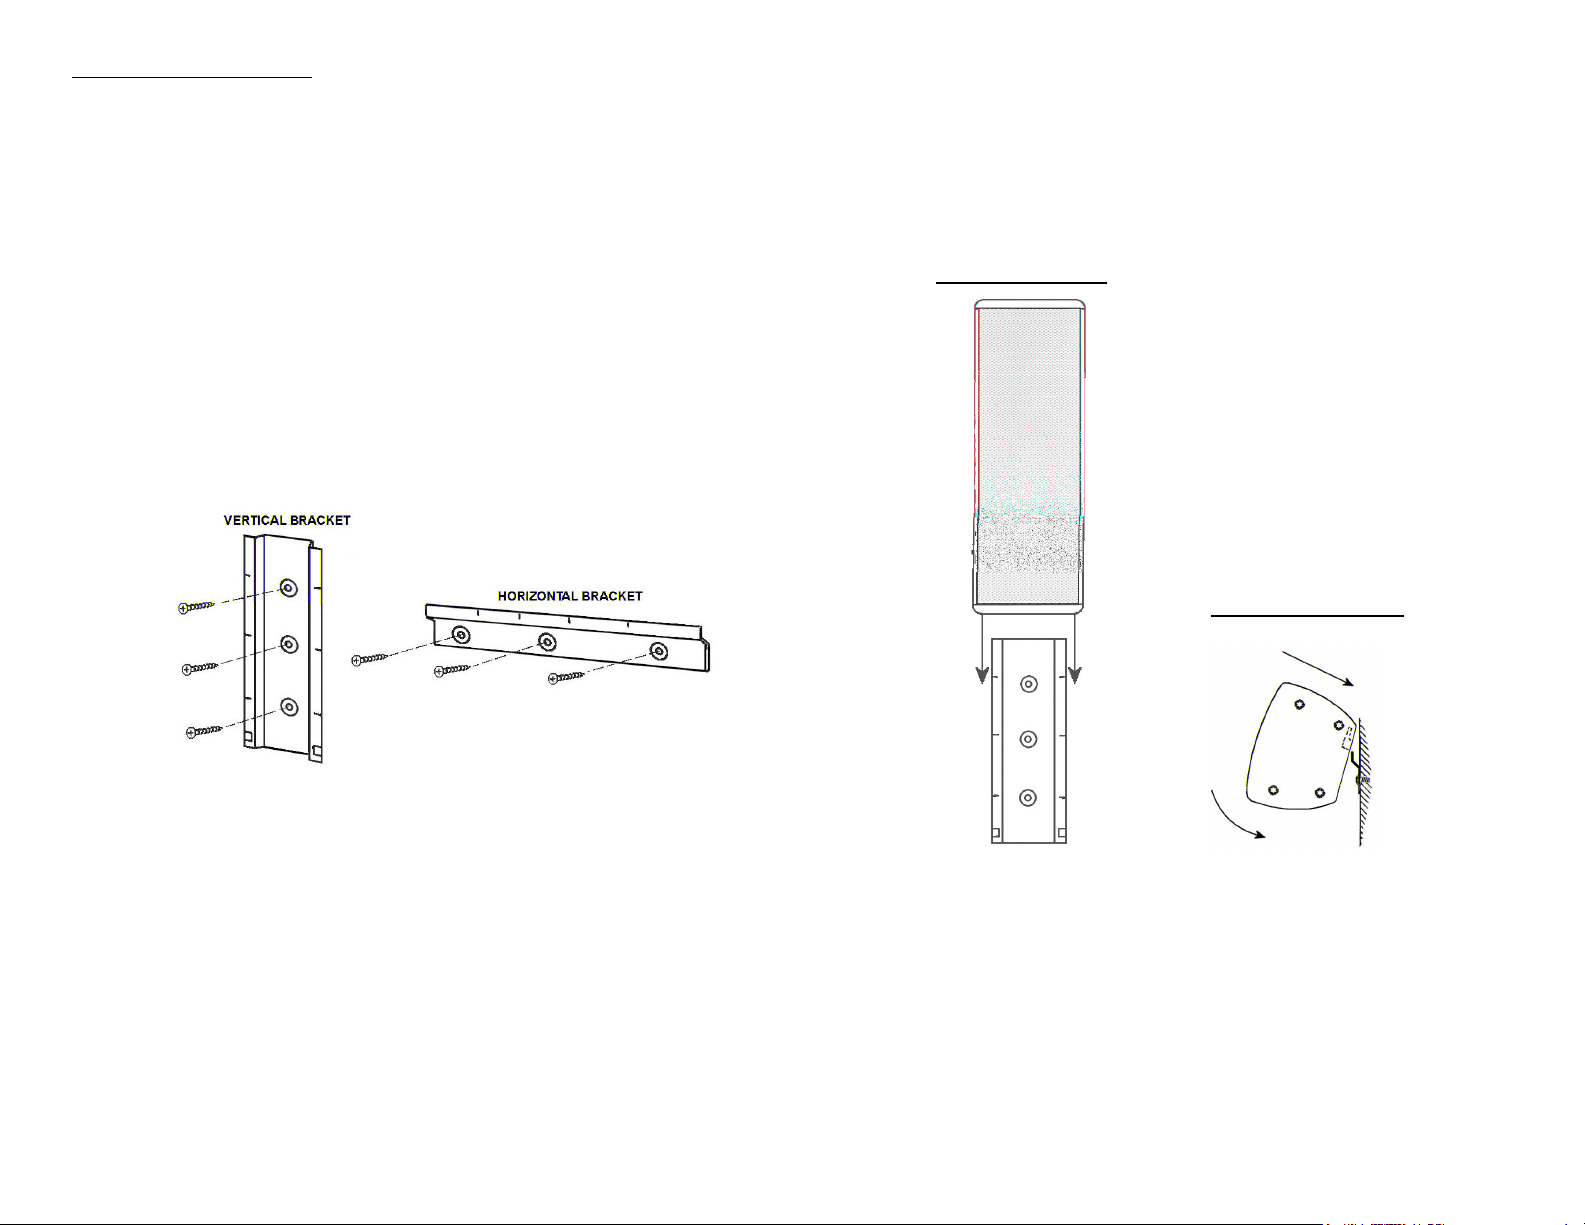
3) Remove the speaker from the wall and place the appropriate wall mount bracket:
For Vertical Orientation: so that the mark on the wall lines up with the bottom
center of the bracket.
For Horizontal Orientation: so that the mark on the wall lines up with the top center
of the bracket.
7) Attach your speaker wires to the speaker, being sure to observe proper polarity
(amplifier speaker output positive (+) to the red terminal, amplifier speaker output
negative (-) to the black terminal).
8) Holding the speaker carefully above the bracket, lower it slowly until the bracket is
fully inserted into the groove on the back of the cabinet.
VERTICAL MOUNTING
HORIZONTAL MOUNTING
4) Orient the bracket so that it is level. Mark on the wall the locations for the bracket’s
mounting screws. Remove the mounting bracket from the wall.
5) Using a drill with a 1/8" bit, drill a 2" deep pilot hole at each of the mounting
screwhole marks on the wall.
6) Place the bracket back on the wall lining up the screw holes of the bracket with
the pilot holes on the wall. For horizontal installations you should use wall
anchors for the mounting screws not attached to a stud. For vertical installations
be s ure to orient the bracket with the large ‘stop’ indentations at the bottom.
Screw the included mounting screws fully into the pilot holes. The bracket should
now be securely attached to the wall.
After completing all connections, turn the system on, then GRADUALLY increase th e
volume level. If there is no sound, distorted sound, or if the amplifier shuts itself down
after a few seconds, IMMEDIATELY TURN THE VOLUME DOWN and turn the system
off. Then re-check your wiring for accuracy and for possible shorts at the connecting
terminals (adjacent bare wires touching each other). When everything sounds fine,
keep the volume reasonably low while you familiarize yourself with your system's
various controls and operations modes.
Page 4

LIMITED TRANSFERABLE WARRANTY
WHAT IS COVERED: All Pinnacle Quantum Plasma speakers are covered by this
warranty for a period of ten (10) years from the date of the original purchase. The
warranty covers all necessary parts and labor to return the speaker to proper working
order. Cabinet surfaces, grille assembly, and other exterior parts subject to normal
wear and tear are not covered except where an inherent structural defect becomes
evident. Parts replacement and labor will be performed at the discretion of the
company (Pinnacle Loudspeakers) and will be provided free of charge unless (in the
opinion of our service department, service representatives, or engineering
department) the speaker system has failed due to abuse or negligent operation. Any
latent defect attributable to error in manufacture will always be covered by this
warranty.
WHAT IS NOT COVERED: This warranty will be void and no free services performed if
we or any party acting as our agent determines that the speaker system in question
has had any of its loudspeaker elements (woofer, midrange, tweeter, etc.) or internal
circuitry removed or tampered with in any way whatsoever without express prior
authorization from Pinnacle. Furthermore, if the speaker system is not found to be
defective a service charge will be levied. In either case the minimum charge will be
$30.00. An additional charge will be applicable for same day service if requested
(subject to feasibility). This charge will always be in effect even if the actual parts and
labor are covered by this warranty. Any damage caused to the speaker system from
improper use is not covered by warranty. Pinnacle Loudspeakers reserves the right to
make the final determination of whether or not a particular speaker system has been
damaged by abuse or excessive overload.
Please note that a natural property of the aluminum is some striations which vary from
sheet to sheet. These striations are not defects and cannot be controlled. Similar to
graining in wood or other natural substances, the aluminum has its own inherent
characteristics.
TO OBTAIN SERVICE: To obtain service under this warranty, either contact your
Pinnacle dealer or us directly at (516) 576-9052 or service@pinnaclespeakers.com.
You may also write us at 170 Express St., Plainview, NY 11803. If you ship your
speakers you are responsible for packing and shipping insurance. The freight must
be prepaid. We will, however, pay return freight charges on any returned speaker that
qualifies for in-warranty service. Sorry, we cannot accept any collect freight charges.
You must include a note, attached to the unit, with your name, phone number or email
address, and return shipping address (no Post Office boxes), indicating the nature of
the problem you are experiencing. For warranty service you must also include a copy
of your sales receipt. If the speaker returned to us or our agents for service proves not
eligible for warranty repairs or is not found to be defective, then you will have to pay
return freight charges. Please be sure to pack any items you ship us carefully since
we cannot be held responsible for damages incurred during shipping. This warranty
may be transferred to a subsequent owner, but will not be in effect for a period greater
than ten (10) years from the date of the original purchase. SAVE THIS CERTIFICATE
AND YOU R SALES RECEIPT. YOU MAY NEED THEM TO OBTAIN SERVICE UNDER
THE PROVISIONS OF THIS LIMITED WARRANTY.
®
Sonically Superior Since 1976
170 Express Street
Plainview, NY 11803
Tel. (516) 576 9052, Fax. (516) 576 0826
E-mail: pinnacle@pinnaclespeakers.com
Website: Http://www.pinnaclespeakers.com
PR LIT PLASMA
Page 5

®
Sonically Superior Since 1976
Subwoofer Owner’s Manual:
SubsonicTM, Baby BoomerTM, Baby Boomer PlusTM,
Digital SubTM 600 & Supersonic
TM
2003 PINNACLE LOUDSPEAKERS
Page 6

We congratulate and thank you for choosing a PINNACLE® subwoofer. Our subwoofers exemplify
the best in modern audio technology, and are designed to produce tremendous amounts of deep bass.
Please read this manual completely to ensure the best possible performance from your Home Theater or
sound system.
SOLID BRASS ISOLATION CONES:
Please make sure to install the solid brass isolation cones into the bottom of your subwoofer cabinet.
They are an important part of the performance of the product and will improve the bass definition.
With the cabinet on its side, simply screw the cones into their receptacles on the bottom of the
cabinet. Then, with the cabinet upright, adjust the cones individually as needed to level the cabinet. When
the cones have been adjusted to the proper height, screw each nut up the threaded shaft flush with the
bottom of the cabinet to secure the height setting. If you intend to place your subwoofer on wooden or vinyl
floors, we suggest placing a penny under each cone to prevent any indentations.
PLACEMENT:
Recommended Subwoofer Placement:
a) within a few inches of the room corner closest to your left or right front speaker (maximum low
bass output);
b) against the wall between your left and right front speakers (strong low bass output with optimal
blending to front speakers);
c) near any other room corner or wall.
Other locations will provide varying degrees of low bass impact and blending with your front
speakers. We recommend listening to your system, with the subwoofer in different room positions, to obtain
a location with an optimum response.
A Special Note to Subsonic
TM
, Baby BoomerTM & Baby Boomer PlusTM owners: Due to the bipole
configuration of your subwoofer be sure to leave at least an inch or two between the rear woofer and your
wall.
If you must place your subwoofer near baseboard heaters or forced hot air vents try to leave at least
4” of clearance for proper ventilation. Do not place your subwoofer outdoors, or in any wet or excessively
damp environment.
Note: Because of your subwoofer’s powerful magnet, be sure to place your subwoofer far enough
away from your TV (approximately 2-3 feet) to avoid color distortion and any other anomalies in the picture. If
you experience picture distortion, simply move the subwoofer away from the TV until the picture becomes
distortion free. We also recommend keeping magnetic media such as audio/videotapes and computer disks
at least 2-3 feet away from your subwoofer to prevent damaging them.
1
Page 7

CONNECTIONS:
Complete all wire connections in your Home Theater/Sound system before powering up your
subwoofer or your receiver (amplifier). Be sure to observe proper polarity for all speaker wire connections (+
to +, - to -). Use only speaker wire of 12, 14, or 16 gauge (available from your dealer) to obtain the best
performance. Lightweight speaker wire (20, 22 gauge, etc.) will result in degraded performance; 18 gauge
wire may be used for short runs of about 15 feet or less.
OPTION #1 - Using The Line Input:
To use the subwoofer’s LINE INPUT your receiver must have a dedicated phono (RCA) subwoofer output
jack (sometimes called Sub Out, Low Pass or LFE). If your receiver has this output jack you may connect
your subwoofer via a standard phono cable (the same kind of audio cable used to connect your CD, tape
deck, etc.). This method is generally the easiest to hook-up. Note: Do not connect the subwoofer to the tape
loop outputs from your receiver as they will overdrive the subwoofer’s circuitry!
2
Page 8

• Simply connect your subwoofer, using either the L or R Line Input jack, to the subwoofer output jack on
your receiver.
• If you have a Dolby Digital (AC-3) or DTS receiver or processor place the subwoofer's Crossover
Bypass switch in the ON position (this bypasses the Low Pass Filter in the subwoofer).
• If you do not have a Dolby Digital (AC-3) or DTS receiver or processor place the subwoofer's Crossover
Bypass switch in the OFF position (this activates the Low Pass Filter in the subwoofer).
• If your receiver or processor has no subwoofer output jack you can connect your subwoofer, using its L
& R input jacks, to your receiver or processor's pre-amp left & right channel outputs. If your receiver or
processor uses jumpers to connect its pre-amp outputs with its inputs you will need to acquire two
splitter cables (Radio Shack #42-2435) to be able to hookup your sub while continuing to provide a signal
to your receiver or processor's inputs.
• Lastly, wire your left and right front speakers directly to your receiver’s speaker outputs. Please refer to
the Option #1 wiring diagram for further clarification.
OPTION #2 - Using The Binding Post Inputs:
3
Page 9

There are two reasons to use this connection option. The first is if your receiver has no RCA
subwoofer output jack! The second is if your system would benefit from having the bass filtered out of the
main speakers. (If you have a Dolby Digital or DTS receiver you can achieve the same results electronically
simply by configuring your main speakers as SMALL and connecting your sub via a Phono cable - See
Option #1). If you have large main speakers that are capable of reproducing a great deal of bass on their
own then this connection option may not be advantageous to you. If however you have small main speakers
4
Page 10

• Adjust the PHASE switch on the subwoofer’s control panel to determine which position sounds the most
natural. The difference should be most audible in the mid-bass. If you cannot detect a difference, leave
the PHASE switch in the 0° (in-phase) position.
• If you have placed your subwoofer's Crossover Bypass switch in the OFF position adjust the
FREQUENCY ADJUST knob and determine what position sounds best. This feature controls the output
level of the mid and upper bass frequencies. Please note that if you have put your subwoofer's
Crossover Bypass switch in the ON position, due to the low pass filter already in your receiver, the
subwoofer's frequency adjust control is unnecessary, will have no effect, and its position can therefore
be ignored.
• The best VOLUME level, PHASE switch and FREQUENCY ADJUST positions will mostly be determined
by your room acoustics and the mid and upper bass frequency response characteristics of your front
speakers. The source material will also play a significant role as its bass level may vary considerably.
• After your initial adjustments you may want to go back and “tweak” these controls. Their effects are
acoustically interrelated. Re-adjusting them may be necessary to obtain optimal performance. Generally,
once you are satisfied with your subwoofer's settings, you can use your receiver’s tone, equalizer,
volume and subwoofer output level controls to optimize your whole system’s performance.
VERY IMPORTANT!
• If you have a Dolby Pro-Logic Home Theater system, make sure that your receiver’s center
channel mode is in the NORMAL position. This will ensure that all low bass information is sent
to your subwoofer.
• If you have a Dolby Digital (AC-3) or DTS Home Theater system, make sure that you have
correctly configured your receiver's Bass Management System so that all of your speakers are
properly categorized as either SMALL
information is sent to your subwoofer. As a general rule, a speaker with an 8" or greater
diameter woofer may be considered LARGE. Conversely, a speaker with a woofer less than 8"
in diameter may be considered SMALL. Please note that the bass output of a dual woofer
speaker could be comparable to that of a larger single woofer speaker. Example: A dual 6.5"
woofer system would generally be considered LARGE since its woofer area approximates that
of a single 10" woofer system.
or LARGE. This will ensure that all appropriate low bass
5
Page 11

• With high volume levels of certain types of signals, the subwoofer may be audibly strained. If
you hear the subwoofer “breaking-up” or distorting, turn the volume level down.
®
• If you have any problems or questions please contact your PINNACLE
dealer for further assistance.
TROUBLESHOOTING:
No Sound only from Subwoofer - Check subwoofer power/volume settings and all connections. Ensure that
the center channel mode on the receiver is in the NORMAL or SMALL position. If you have connected the
subwoofer via RCA cable and if your receiver has a subwoofer on/off or variable subwoofer output level
control, ensure that the subwoofer option is turned on and that the output level is at maximum. Make sure
the RCA cable is connected to the receiver's subwoofer output and not the subwoofer input jack that some
receivers have. If the problem persists, refer to the TO OBTAIN SERVICE section of your warranty at the
end of this manual.
No Sound only from Left and Right Front Speakers
speaker channel A or B is switched on. Note: You must connect your speakers to your receiver’s
- Check all connections. Ensure that your receiver’s
speaker
outputs if you connected the subwoofer via the LINE INPUT.
Too Much Bass - Check: subwoofer volume/phase/frequency controls; receiver bass/loudness controls;
program material; move subwoofer further out of corner or away from wall.
Too Little Bass - Check: subwoofer volume/frequency/phase control positions; all speaker wire phase (+ to
+, - to -); receiver tone controls; program material; ensure that the center channel mode on the receiver is in
the NORMAL or SMALL position. If your receiver has a variable subwoofer output level control, ensure that
the output level is at maximum. Try moving the subwoofer further into a corner or towards the wall. If you
have connected the subwoofer via a single phono cable you may want to try using a cable splitter (Radio
Shack part #42-2435). This will allow you to use both line inputs which will increase the input signal strength
to the subwoofer.
6
Page 12

Hum: Check for faulty phono connecting cable. Try to separate phono cables from power cords (they can
induce hum into the system). If that doesn't work we recommend you turn off your subwoofer when it is not
in use. This is most easily accomplished by either connecting its powercord to a switched power outlet on
the back of your receiver (if it has them) or by using a Remote Controlled Switched Outlet like Radio Shack
part #61-2667.
Subsonic
TM
, Baby BoomerTM, Baby Boomer PlusTM, Digital SubTM 600 & SupersonicTM Specifications:
Woofer(s) :
SubsonicTM : (2) 6.5" heavyweight fibercone woofers 2" voice coils and 30-ounce magnets
Baby BoomerTM & Baby Boomer PlusTM : (2) 8" heavyweight fibercone woofers with rubber surrounds,
2" voice coils and 40-ounce magnets
Digital Sub
TM
600 & SupersonicTM : (2) 12" heavyweight polycone woofer with rubber surrounds,
2” voice coils and 40-ounce magnets
Subwoofer Low End Frequency Response: SubsonicTM : -3 dB @ 28 Hz
Baby BoomerTM & Baby Boomer PlusTM : - 3 dB @ 27 Hz
Digital SubTM 600 & SupersonicTM : - 3 dB @ 23 Hz
Variable Subwoofer Low Pass Filter: Fourth Order from 50 - 150 Hz
TM
System: Subsonic
& Baby BoomerTM& Baby Boomer PlusTM- Acoustic Suspension / Bipole Configuration
Digital SubTM 600 & SupersonicTM- Compound Compression
TM
Dimensions: Subsonic
: 7 7/8" wide x 7 7/8" high x 7 7/8" deep (without grills)
Baby BoomerTM& Baby Boomer PlusTM : 9 7/8" wide x 9 7/8" high x 9 7/8" deep (without grills)
Digital SubTM 600 & SupersonicTM : 14 1/4" wide x 15" high x 15" deep (with grill)
TM
Weight: Subsonic
- 22 lbs. / Baby BoomerTM & Baby Boomer PlusTM- 30 lbs.
Digital SubTM 600 & SupersonicTM- 50 lbs.
TM
Amplifier Power: Subsonic
- 350 Watts
Baby BoomerTM & Digital SubTM 600 - 600 Watts
Baby Boomer PlusTM & SupersonicTM- 800 Watts
Power Requirements: AC 120 V, 60 Hz, 800 Watts Maximum
7
Page 13

LIMITED WARRANTY:
What Is Covered
Your Pinnacle® subwoofer features a limited warranty as follows. The subwoofer driver(s) and all assembly
and construction aspects are covered by this warranty for a period of seven (7) years from the date of
original purchase. Your subwoofer amplifier is covered by this warranty for a period of two (2) years from the
date of original purchase. The warranty covers all necessary parts and labor to return the subwoofer to
proper working order. Cabinet surfaces, grill assembly, and other exterior parts subject to normal wear and
tear are not covered except where an inherent structural defect becomes evident.
Parts replacement and labor will be performed at the discretion of Pinnacle Loudspeakers and will be
provided free of charge unless (in the opinion of our service department, service representatives, or
engineering department) the system has failed due to abuse or negligent operation.
What Is Not Covered
This warranty will be void and no free services performed if we or any party acting as our agent determines
that the system has had any of its elements (amplifier, woofer, etc.) removed or tampered with in any way
whatsoever. Furthermore, if your subwoofer is not found to be defective a service charge will be levied. In
either case the minimum charge will be $30.00. An additional charge will be applicable for same day service
where possible and this charge will always be in effect even if the actual parts and labor are covered by this
warranty. Pinnacle Loudspeakers reserves the right to make the final determination of whether or not the
system has been damaged by abuse or negligent operation.
To Obtain Service
To obtain service under this warranty, either contact your Pinnacle
®
dealer or us directly at (516) 576-9052 or
service@pinnaclespeakers.com. You may also write us at 170 Express St., Plainview, NY 11803. If you
ship your subwoofer you are responsible for packing and shipping insurance. The freight must be prepaid.
We will, however, pay return freight charges on any returned subwoofer that qualifies for in-warranty service.
Sorry, we cannot accept any collect freight charges. You must include a note, attached to the unit, with your
name, phone number or email address, and return shipping address (no Post Office boxes), indicating the
nature of the problem you are experiencing. For warranty service you must also include a copy of your sales
receipt. YOU MUST FIRST CONTACT US FOR THE CUSTOMER SERVICE SHIPPING ADDRESS IN
YOUR AREA IF YOUR DEALER IS NOT EQUIPPED FOR THIS SERVICE. Please be sure to pack any
items you ship us carefully since we cannot be held responsible for damages incurred during shipping.
This warranty may be transferred to a subsequent owner.
SAVE YOUR ORIGINAL SHIPPING CARTON AND PACKING MATERIALS, AS WELL AS THIS WARRANTY
AND YOUR SALES RECEIPT. YOU WILL NEED THEM TO OBTAIN SERVICE UNDER THE PROVISIONS
OF THIS LIMITED WARRANTY.
8
Page 14

®
Sonically Superior Since 1976
170 Express Street
Plainview, NY 11803
Tel. (516) 576 9052, Fax. (516) 576 0826
Http://www.pinnaclespeakers.com
PR MAN QB
Page 15

Page 16

Page 17

 Loading...