

Page 1
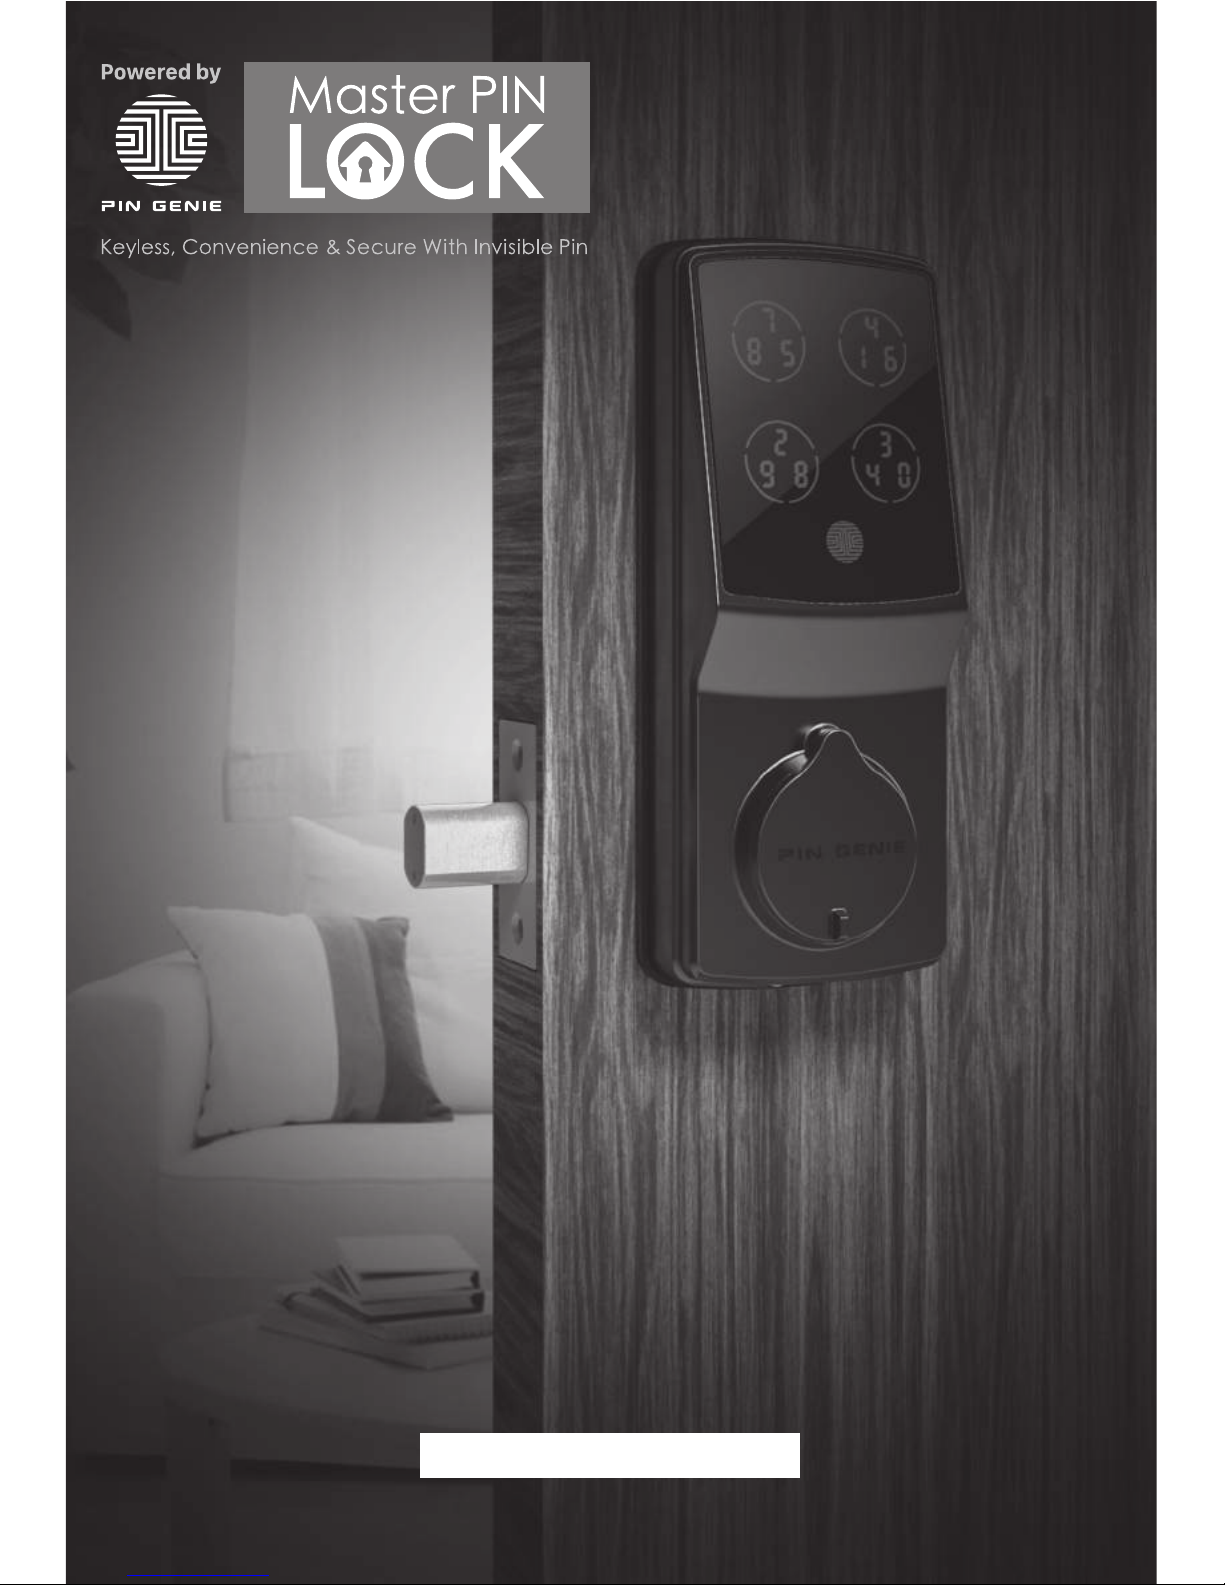
Thank you for choosing our PIN Genie product.
Please read this manual carefully to ensure the Smart Lock is used safely and reliably.
You should keep it for future reference and maintenance.
U.S. Patent No. 9,665,706
PIN Genie Smart Lock
User Manual
Model No. PGD718 / PGD728
Page 2
Patented Anti-Peep PIN Pad
Random digits shown on the Pin Genie display keypad ensure passcodes
won’ t be detectable to intruders after repeated use.
Intruder prevention
PGD718 / PGD728 smart lock has a built-in audible alarm mode that alerts
you for any intrusion for your house. With the alarm mode on, our lock
reacts against any external physical shock and vibration. The owner can
immediately be notified with the intrusion.
Do not Disturb
The exterior display keypad can be locked and turned off using the
tailor-made design ON/OFF toggle button from inside. The owner can prevent others trying to input the passcode from outside and go into the house.
Automatic lock
No longer have to worry about forgetting to lock the door. With Auto Lock
enabled, PGD718 /PGD728 can automatically relock the door 30 seconds
after unlocking.
With mechanical key and 9V battery socket as backup
The door can be opened via the mechanical keys. There is also 9V battery
connection socket for the users to use the 9V battery for power supply if the
lock battery is running out..
PGD 718 / PGD728 Smart Lock is keyless and equipped with the patented innovative
PIN Genie Pad, which is peep proof and hidden camera proof. It is with a high security
level that even when people watch you entering your PIN, they will not be able to know
it. PIN Genie Smart Lock makes your life safer and better.
About PGD718 / PGD728 Smart Lock
Page 3
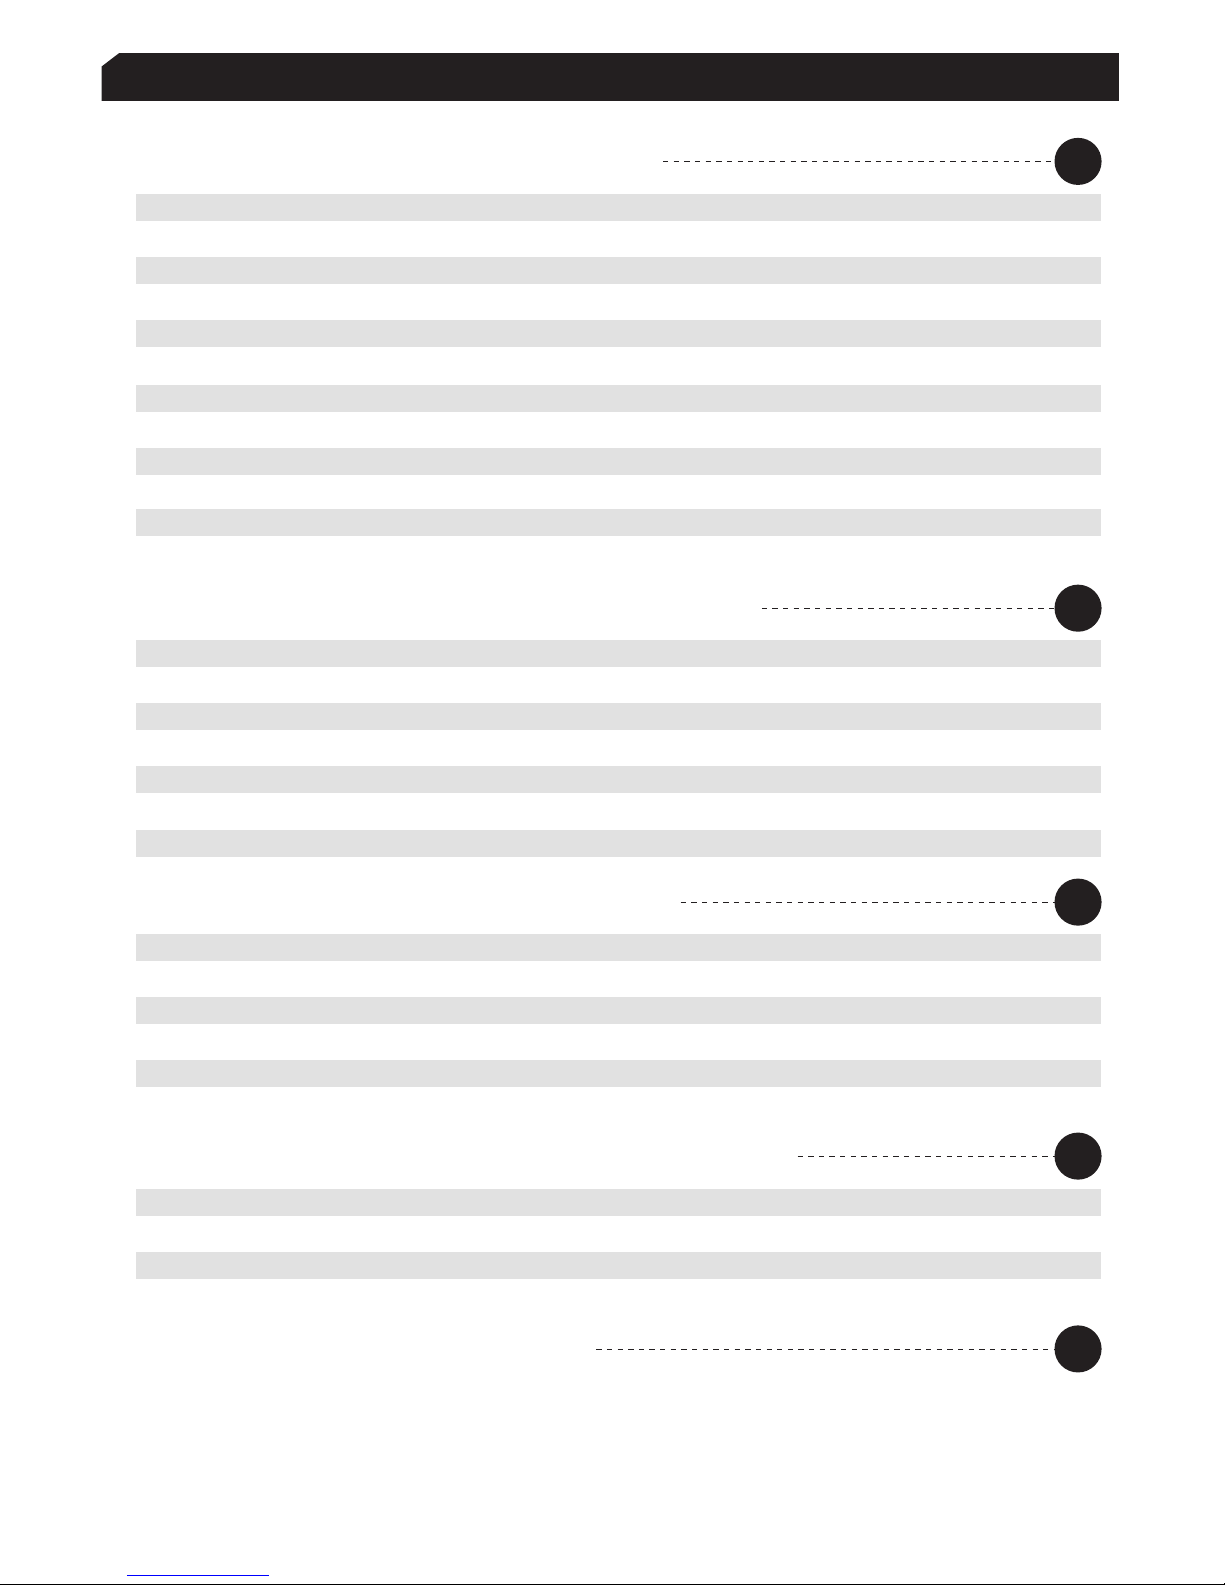
Contents
Section 1 Installation Instruction
1.1 Installation overview
1.2 Assembly parts
1.3 Prepare door and check dimensions
1.4 Adjust the backset of latch
1.5 Extend the bolt
1.6 Install latch
1.7 Prepare exterior assembly
1.8 Install exterior assembly
1.9 Install interior assembly
1.10 Install batteries
1.11 Install strike
1.12 Install battery cover
1
1
2
2
3
3
3
4
5
6
6
6
11
12
12
13
14
15
17
17
19
19
7
8
9
9
10
10
10
2.1 Components
2.2 Setting switch
2.3 Reset
2.4 Display keypad switch
2.5 Restart
2.6 PIN GENIE button
2.7 Changing the battery
3.1 Passcode information
3.2 How to enter settings
3.3 Add Passcode
3.4 Delete Passcode
3.5 Check Passcode / BTSwitcher (PGD728)
3.6 Alarm Sensitivity
4.1 Unlock from outdoor
4.1.1 Safe mode
4.2 Unlock & Lock from indoor
4.3 Lock from outdoor
01
07
11
17
19
Section 2 Introduction of the smart lock
Section 4 Locking and unlocking the door
Section 3 Programming Passcode
Section 5 Safety Precautions
R
Page 4
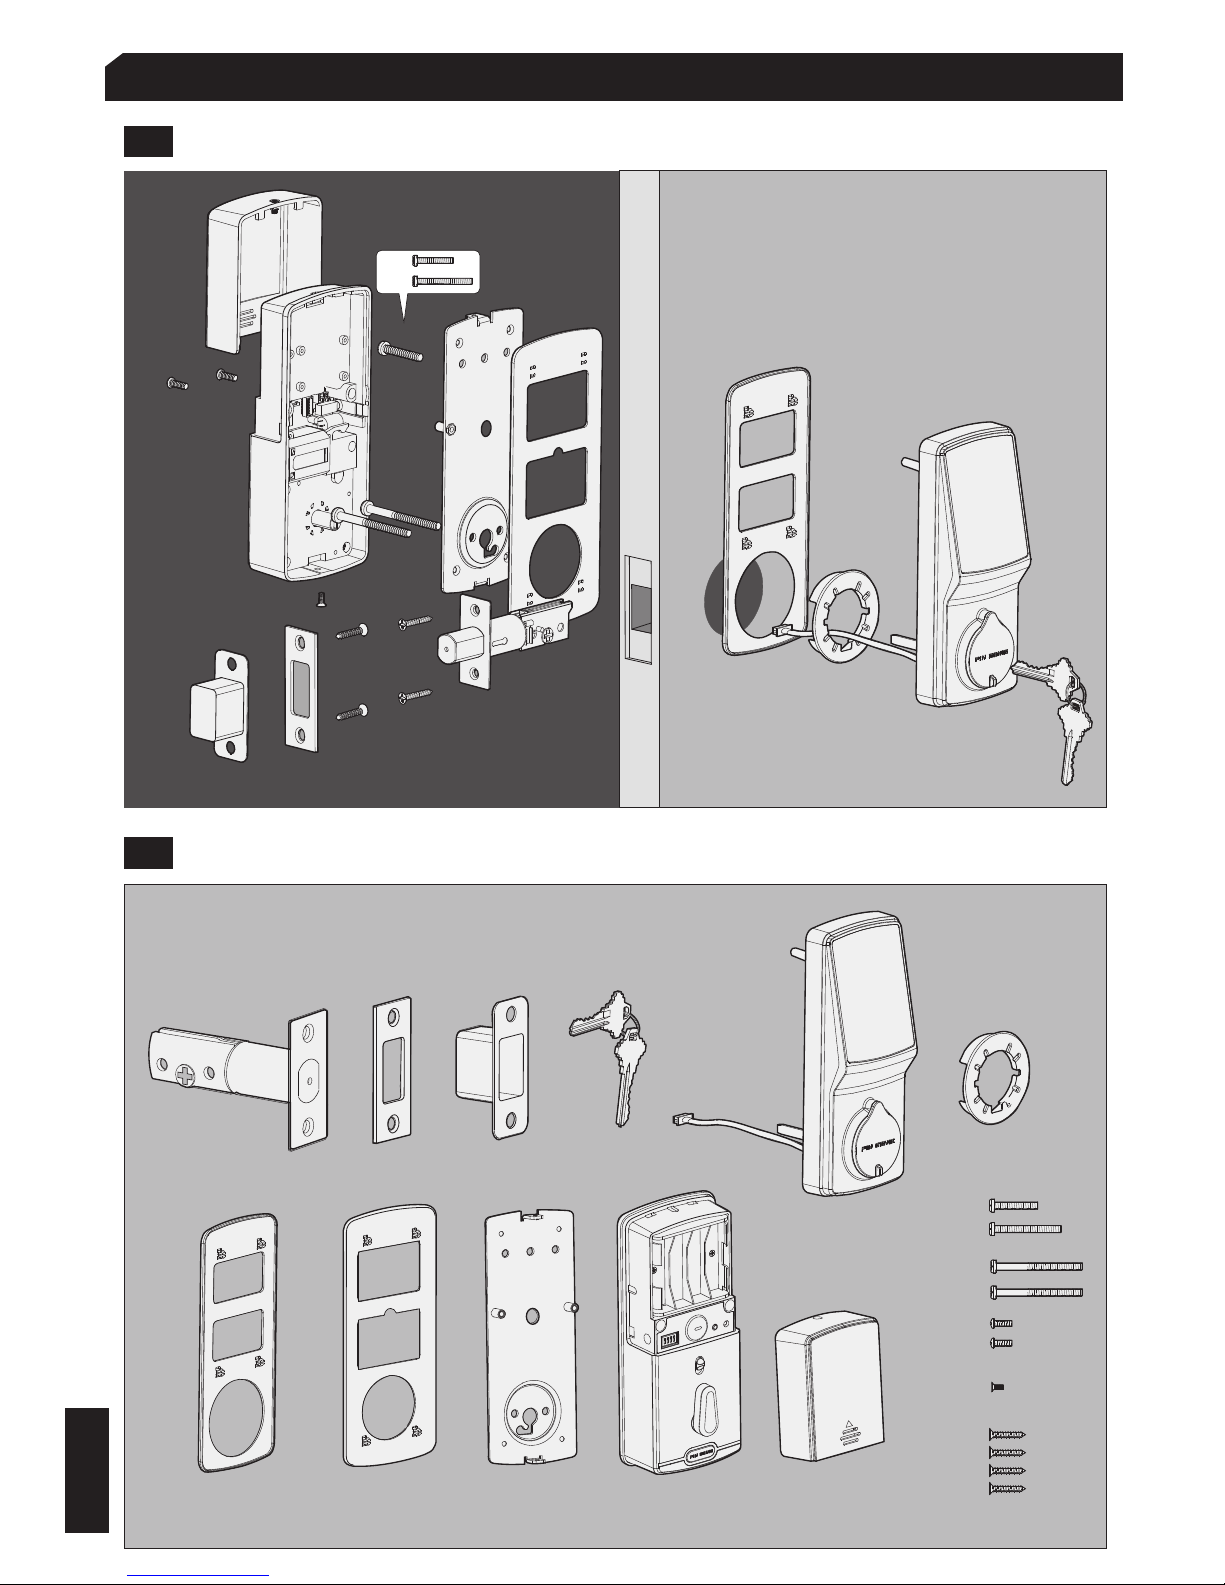
Section 1 --Installation Instruction
A
O
D F G J K
H1
H2
I
M
N
P
Q R A
B
C
B
C
D
F
I
N
P
Q
P
O
J
M
1.1 Installation overview
1.2
Assembly parts
H
H1
H2
1
Page 5
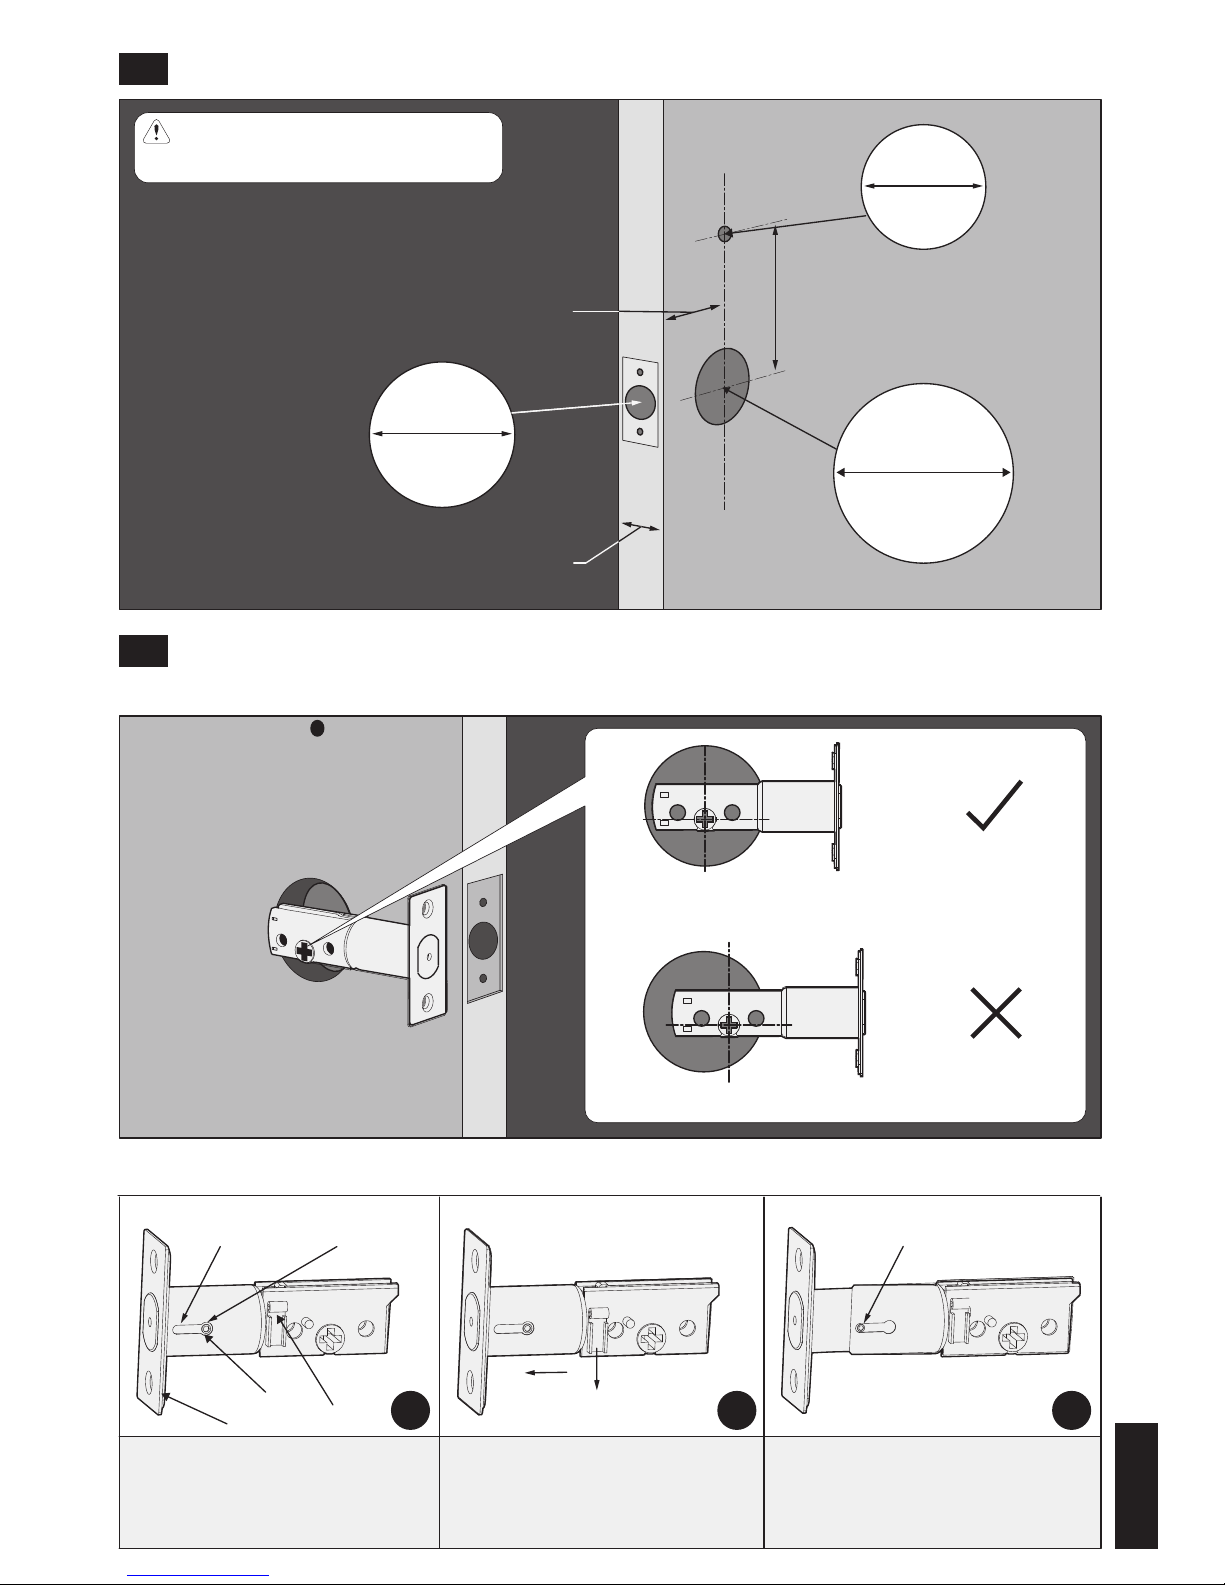
1"
25mm
1/2"
12mm
* Drill hole
* Drill hole
2-1/8"
54mm
3-109/127"(98mm)
2-3/8"(60mm) 2-3/4"(70mm)Or
1-3/8"—2" (35mm—50mm)
Push toggle button “a”
downwards and pull part “b”
outwards.
Initial position of c: 2-3/8"
Pull “c” to 2-3/4” and release
button “a” . Now the backset
has been adjusted to 2-3/4” .
Adjust as shown below (only if needed)
Hold the latch in front of the drilled hole as shown below.
31 2
2-3/8"
b
a
c
2-3/4"2-3/4"
1.3 Prepare door and check dimensions
1.4 Adjust the backset of latch
If drilling a new door, please use
the template supplied.
If the latch holes are centered in the drilled
hole, no adjustment is needed.
If NOT, adjust the latch.
2
Page 6
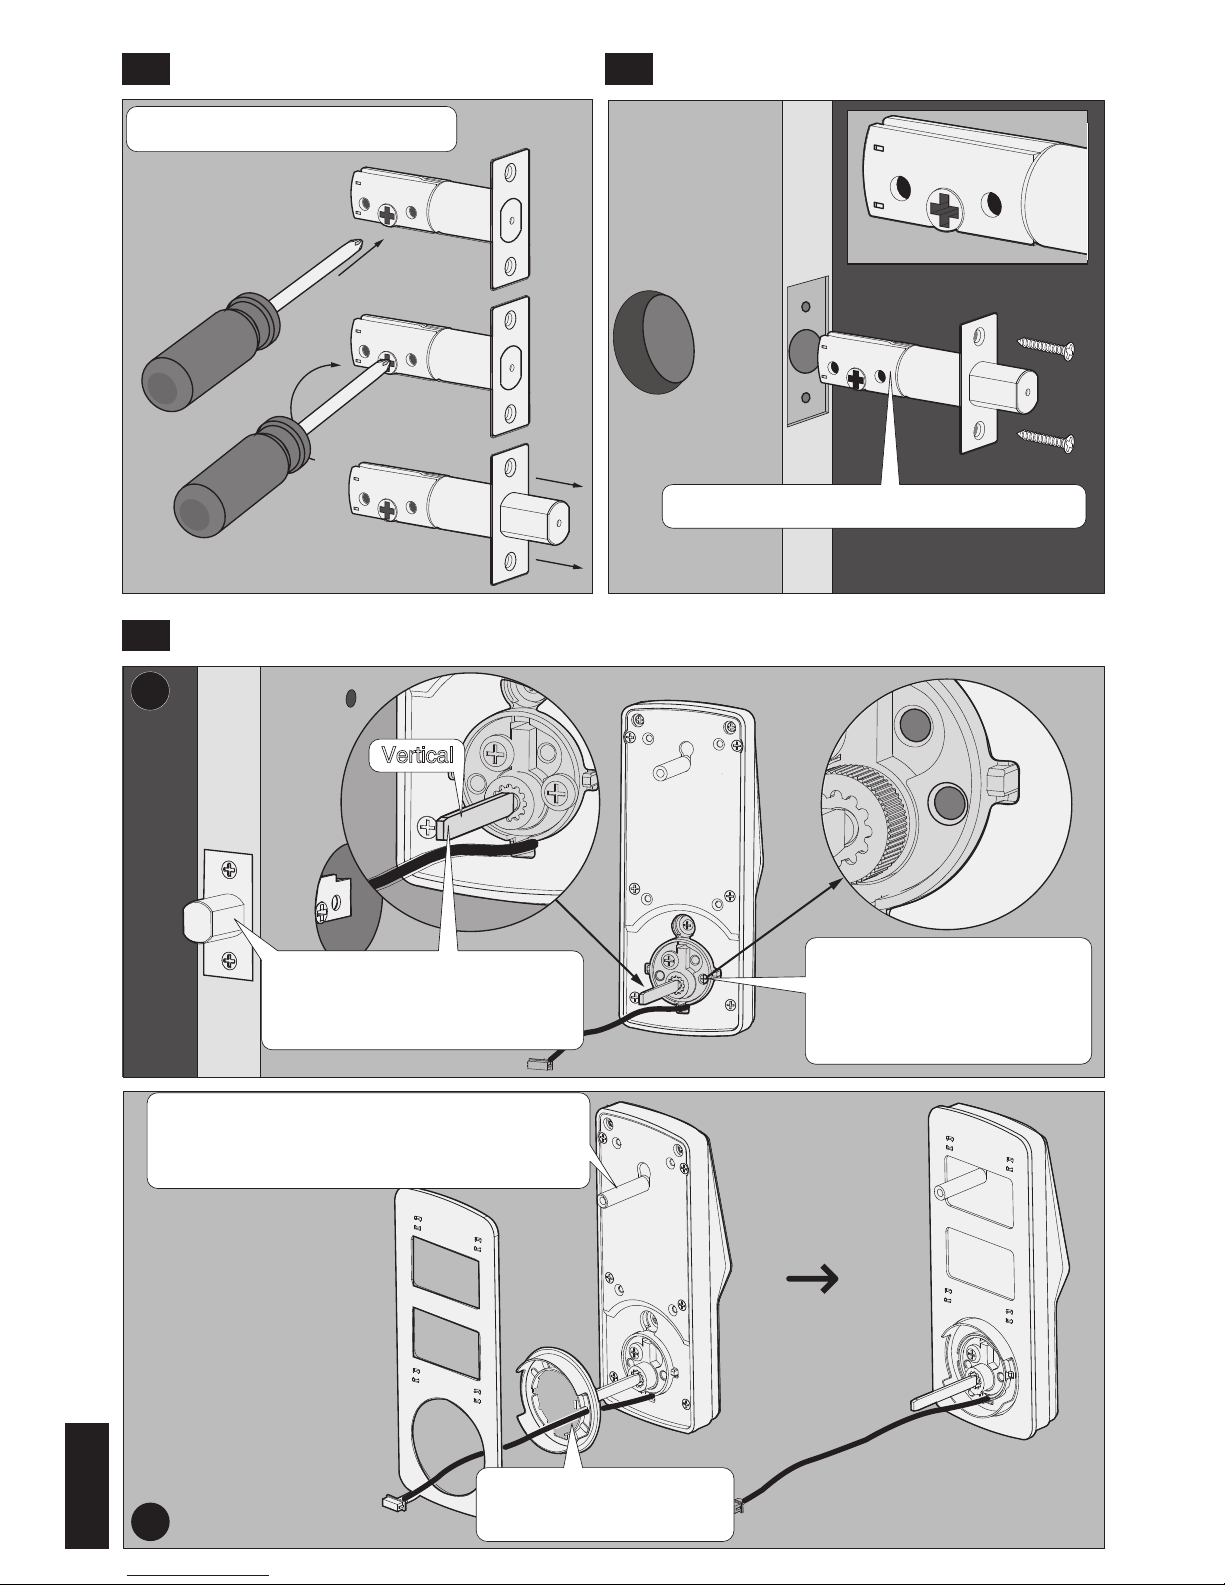
1
2
O
B
C
D
1.5 Extend the bolt
1.7 Prepare exterior assembly
1.6 Install latch
O
P(2X)
Vertical
Pay attention to the direction of the latch.
Extend the latch bolt as shown.
When the bolt is extended, the
torque blade should be kept in
a vertical position.
Take out the screw which
is being used for fixing
the cylinder during transit
and discard it.
Install “D” & “C” on “B”
in order as shown.
You can attach this fixed column (optional)
to the lock body. It is recommended to
have it for the lock's fixity.
3
Page 7
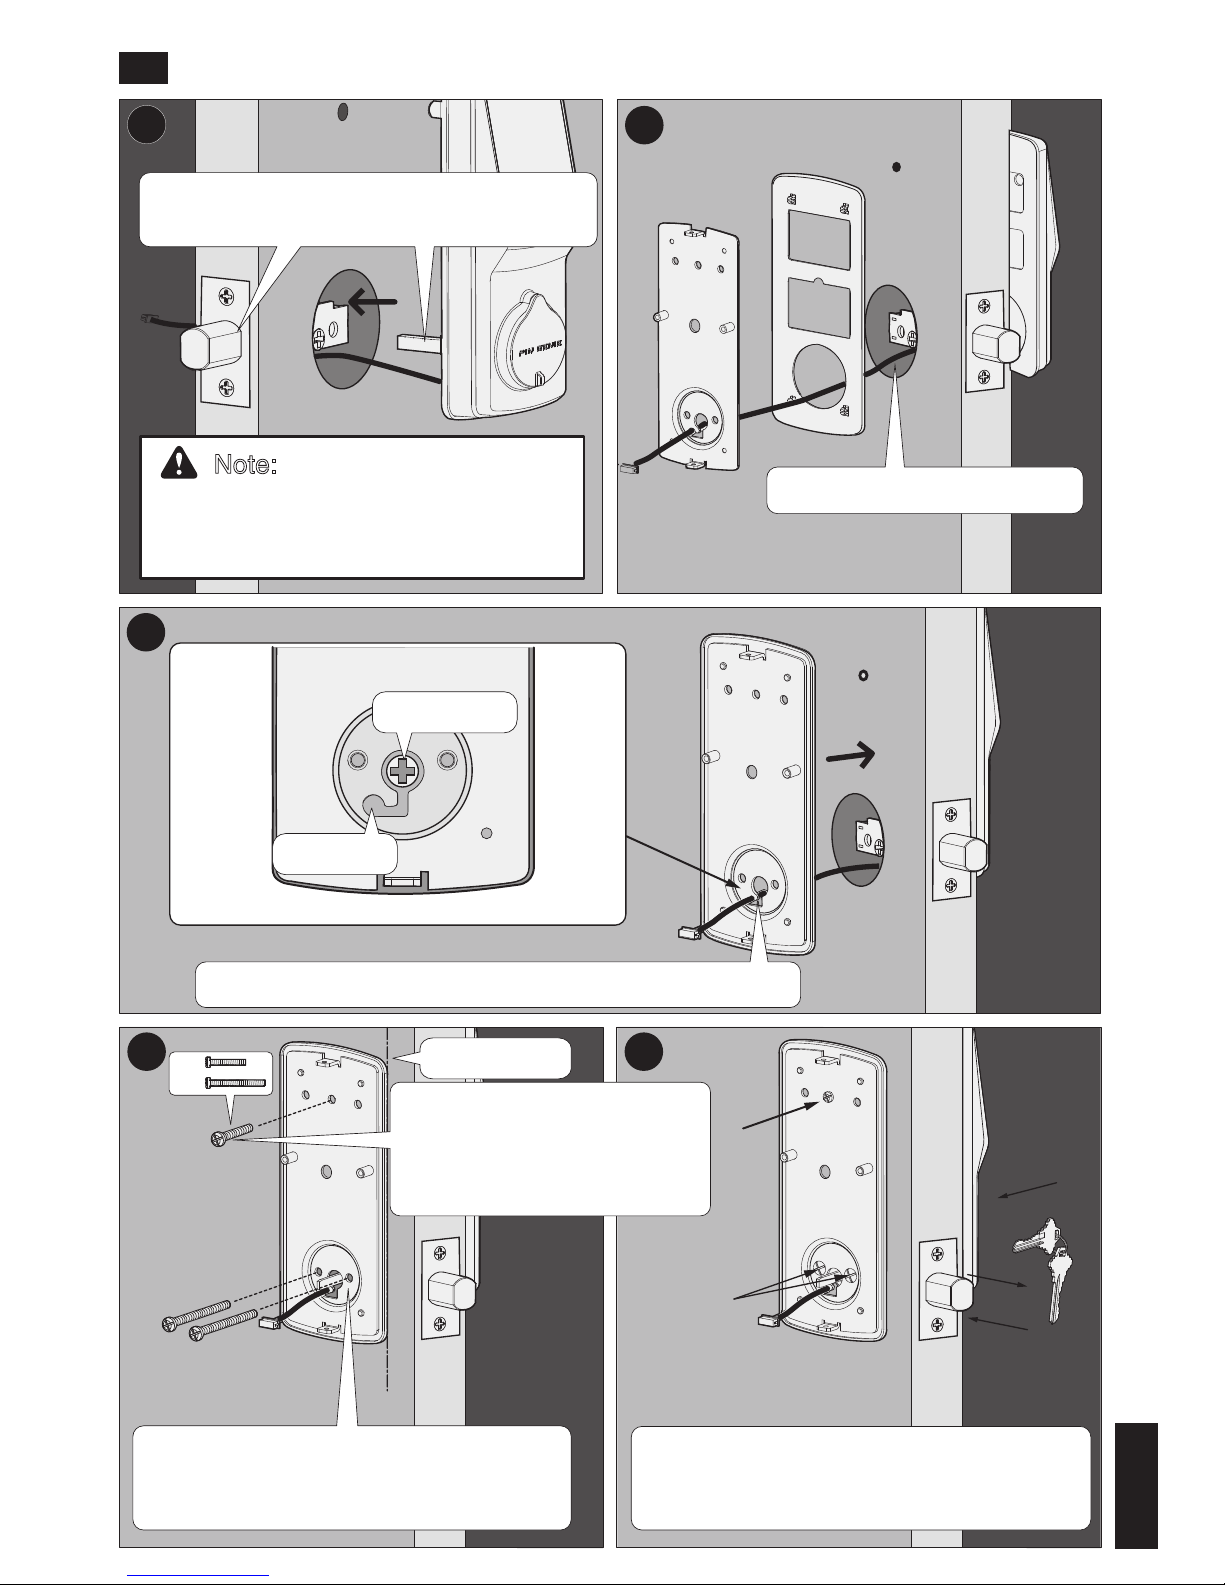
1
2
3
B
1.8 Install exterior assembly
G
F
Cable goes underneath latch
Side hole
Center hole
Route cable through center hole, then push it into side hole.
I(2X)
H
I(2X)
H
Keep parallel
Before screwing, check the vertical alignment for the mounting plate and exterior
assembly.
After installation, use back-up key to test
the latch. If the latch does not retract or
extend smoothly, adjust screws.
54
When the bolt is extended, the torque blade
should be kept in a vertical position.
A
H1
H2
Please use the "H1 screw" for
the door thickness 35-43mm.
Or use the "H2 screw" for the
door thickness 43-50mm.
4
Note: Please use the physical
key to rotate the torque blade
in vertical position and then
pull out the key.
Page 8
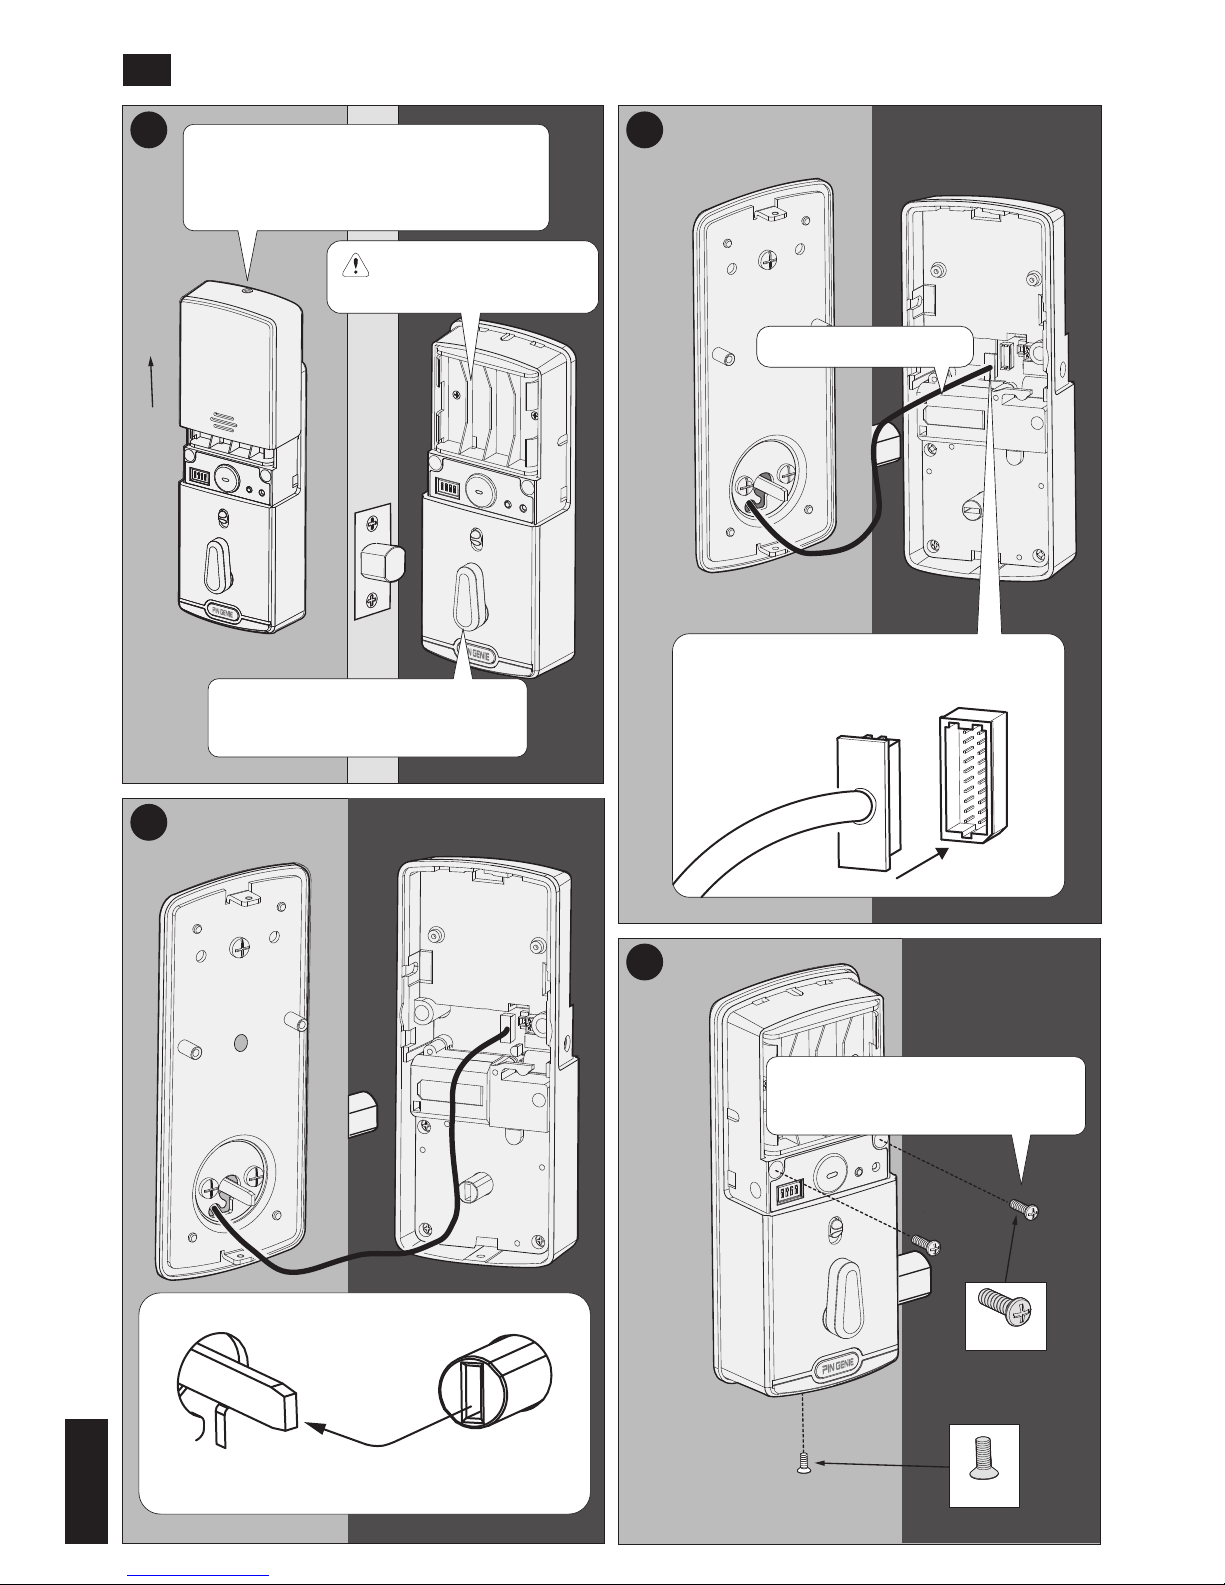
J
N
Pay attention to the direction and
ensure tight cable connection.
1 2
3
4
1.9 Install interior assembly
Open the battery compartment by
unscrewing the screw and remove
the cover.
Note: Do not install
batteries yet!
Fix the interior assembly with
screws provided.
Push the thumbturn shaft onto the torque
blade.
M
Connect the cable.
torque blade thumbturn shaft
Make sure thumbturn is in the
vertical position.
5
Page 9
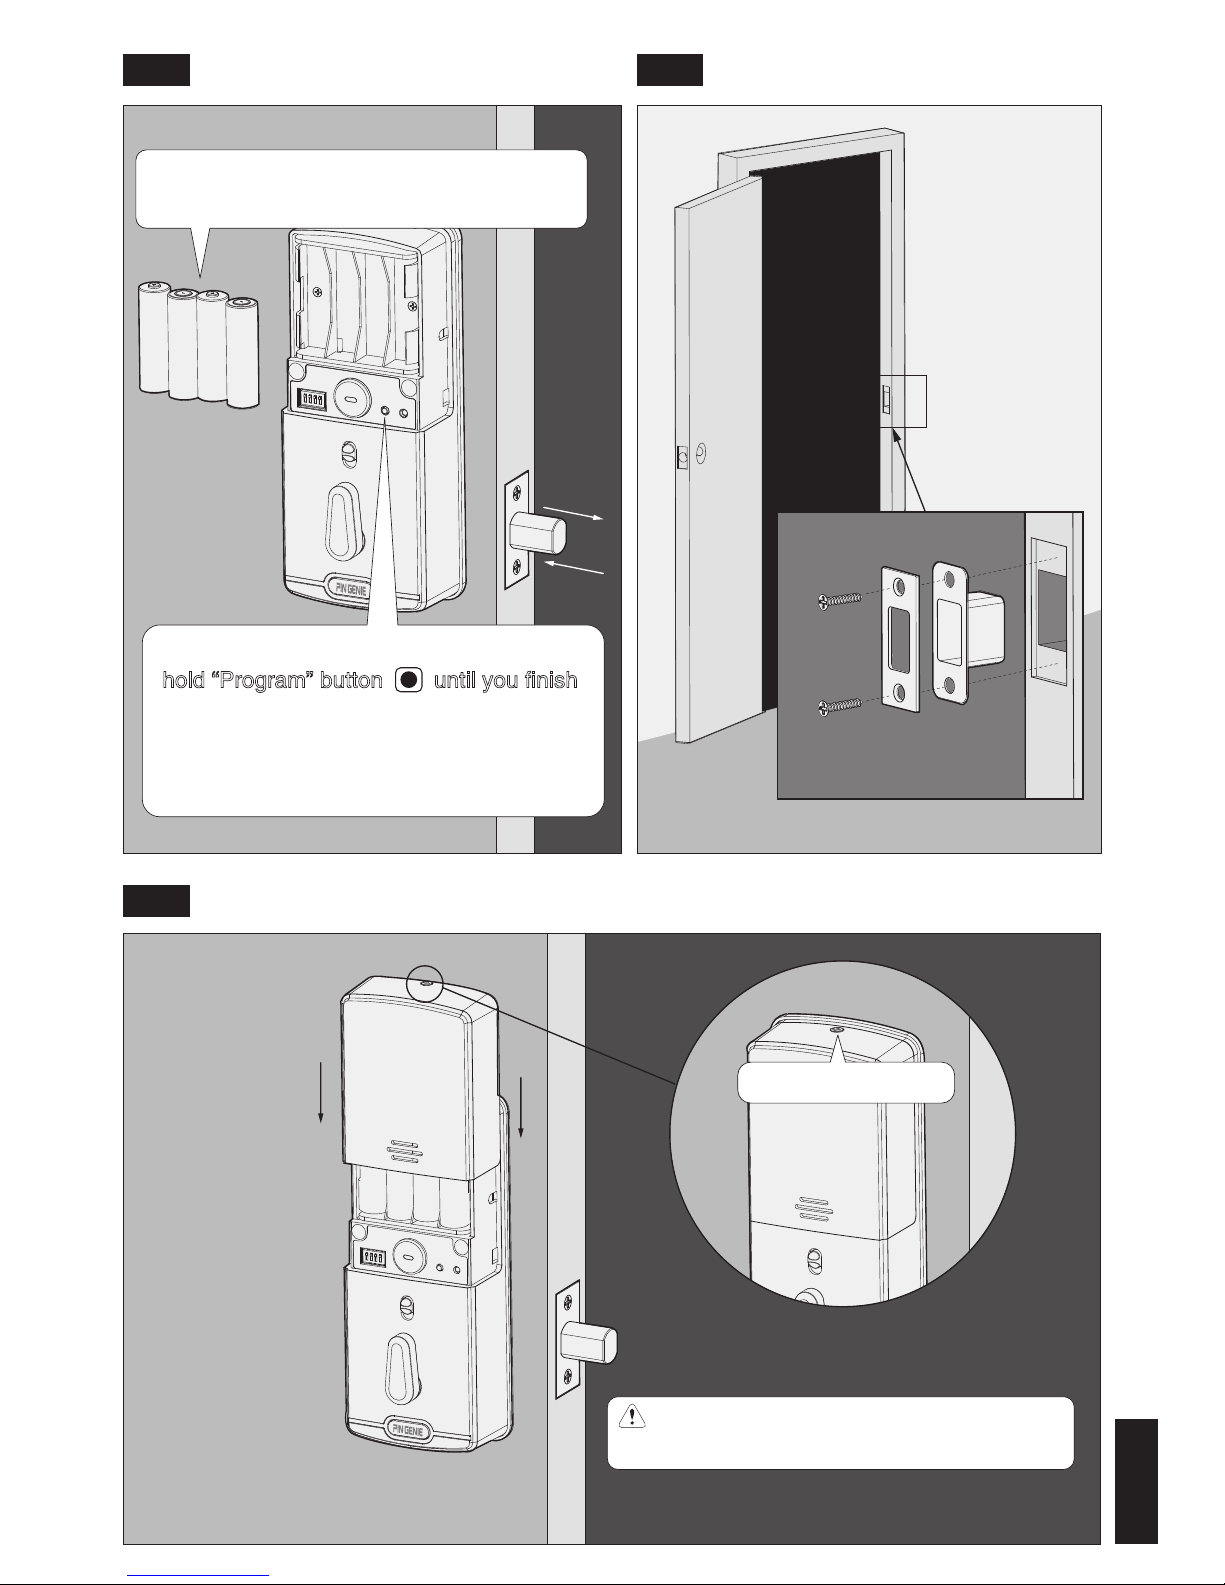
K
1.10 Install batteries
1.12 Install battery cover
1.11 Install strike
Install 4 new AA batteries. Make sure
batteries are correctly oriented.
Before installing the last battery, press and
hold “Program” button until you finish
,
then you will hear a long beep. Once you
release the button, the latch will automatically do a self-check and the display keypad
will play boot animation.
+
+
-
+
-
-
+
-
Q
P(2X)
R
Note: Program passcode before installing
battery cover. See Section 3.
Tighten the screw.
6
Page 10
Section 2 --Introduction of the smart lock
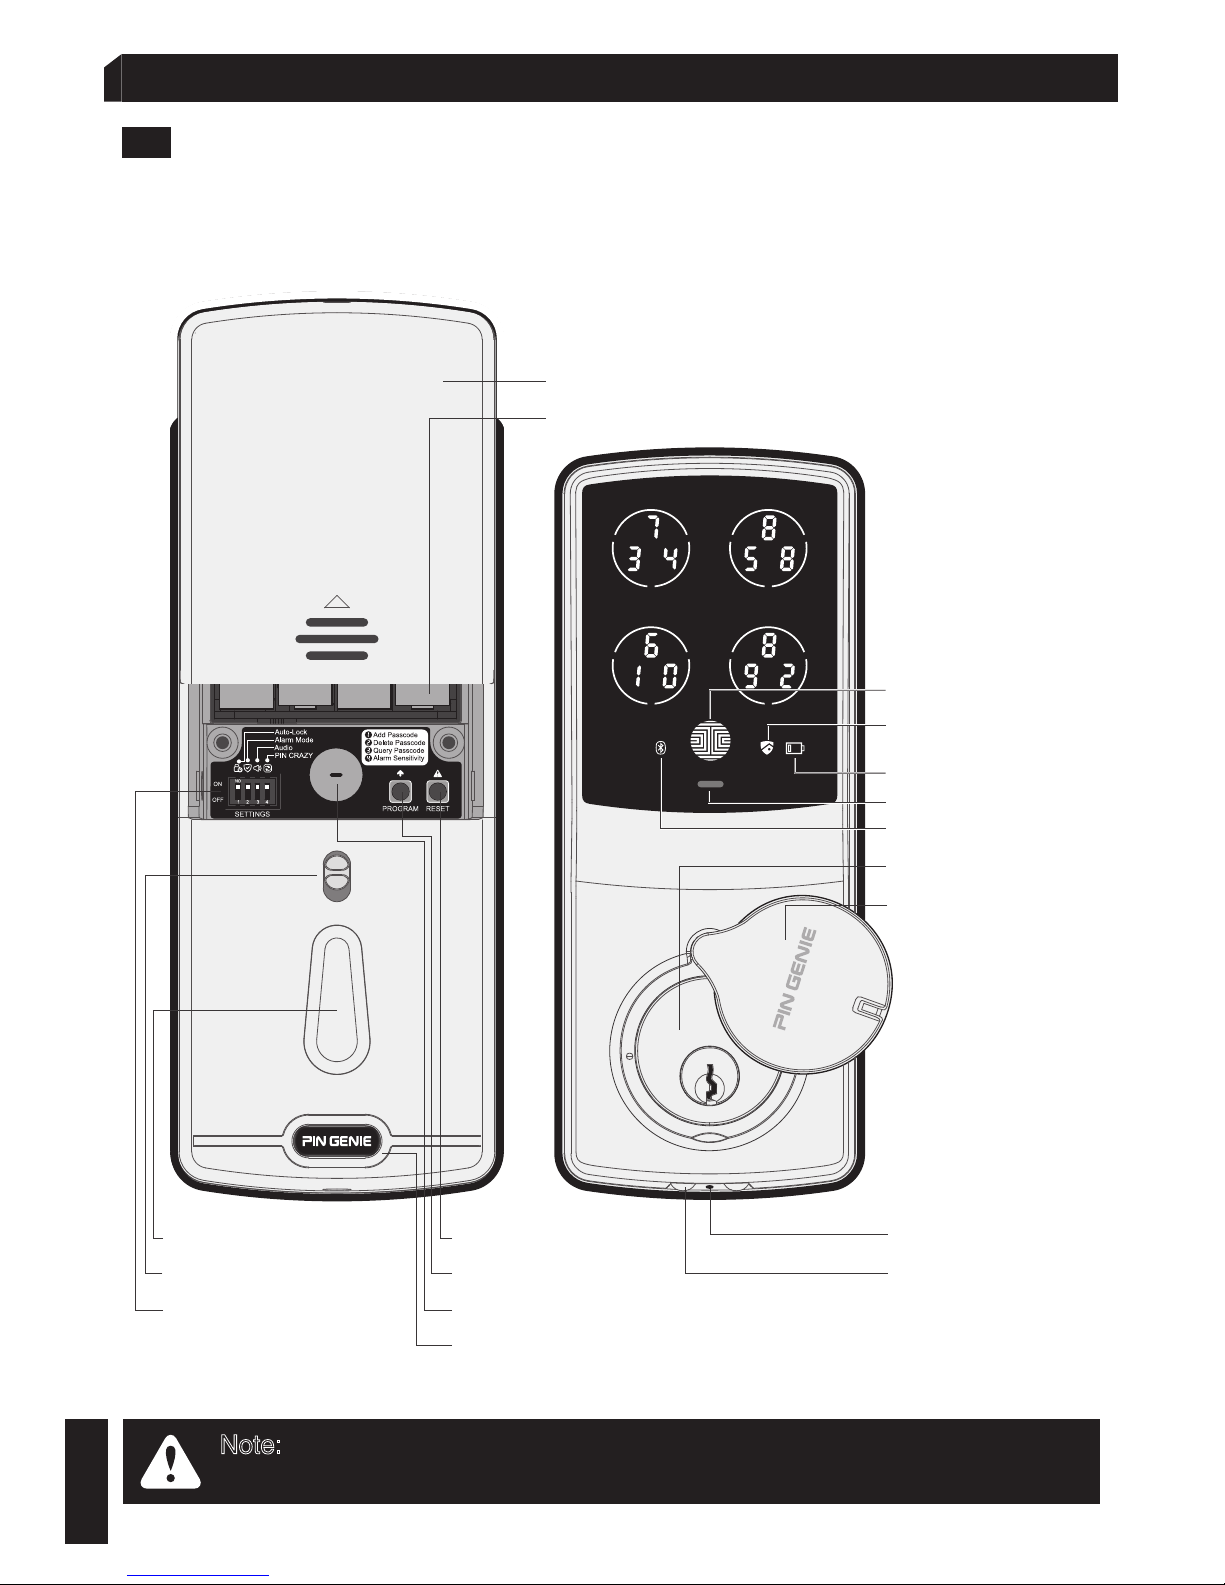
2.1 Components
Note: When Model728 APP is enabled, the RESET, PROG will be disabled
and controlled by APP.
Battery compartment
Restart Button
Lock Status icon
Bluetooth light-PGD728
Power Status
Bluetooth icon-PGD728
OK Button
Key Hole Cover
Back-up Battery
Socket
Front (Front Body)Back (Main Body)
Battery Compartment Cover
Key Hole
Display Keypad Switch
Thumbturn
PIN GENIE Button
Siren
Reset Button
Setting Switch
Program Button
7
Page 11
Finishes: Polished brass, Bronze, Satin Nickel
Function:
Single cylinder deadbolt
Door Prep:
2 1⁄8” diameter face hole & 1” diameter
latch hole
Door Handing:
Reversible
Door Thickness:
1 3⁄8” – 2” automatic adjustment
Backset:
Adjustable 2 3⁄8” or 2 3⁄4”
Bolt:
1” throw, steel deadbolt
Latch:
For 2 3⁄8” or 2 3⁄4” (steel or stainless steel)
Back-up Keys:
3 keys
Working environment temperature:
Indoor use:
0~45℃,Outdoor use: -25~60℃
FCC Certified
This device complies with Part 15 of the
FCC Rules. Operation is subject to the
following two conditions:
(1) this device may not cause harmful interference, and
(2) this device must accept any interference
received, including interference that may
cause undesired operation.
Specifications Certifications
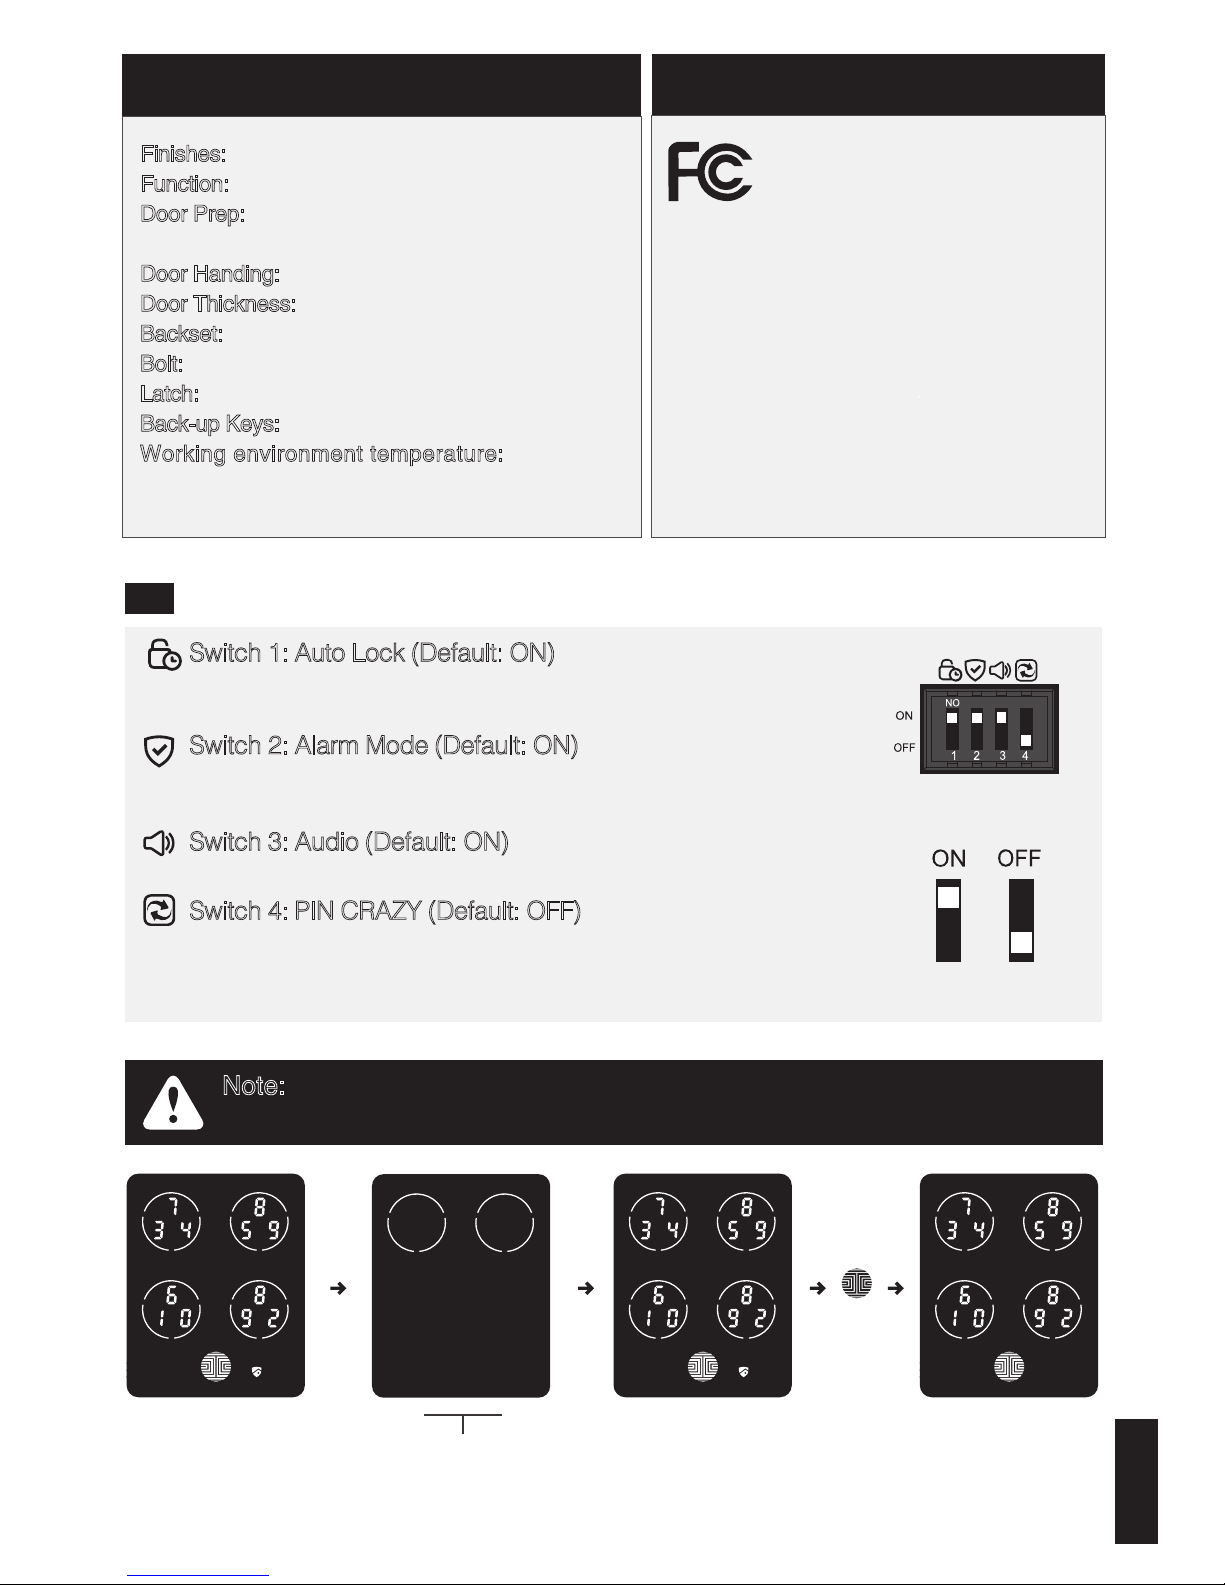
2.2 Setting switch
With PIN CRAZY mode on, every time you input a digit
while entering passcode, the display keypad will be
refreshed.
With Auto Lock enabled, the smart lock will automatically
relock the door 30s after unlocking.
Switch 1: Auto Lock (Default: ON)
Switch 2: Alarm Mode (Default: ON)
Switch 3: Audio (Default: ON)
Switch 4: PIN CRAZY (Default: OFF)
Setting Switch
报警功能开启状态
OK
Alarm mode ON
Input passcode to disarm
报警功能开启状态
Successfully disarm.
Alarm mode OFF
Press and hold any two circles on the screen
for 1.5 seconds. The circles you pressed will
flash and you will hear a long BEEP.
Note: Even when the Alarm mode switch is turned ON, you can manually
disarm or arm the smart lock via the specified operation as shown below.
Enables the Audio sound (Beeper) when in the ON position.
8
With Alarm Mode on, the door reacts against external
activity according to the sensitivity level that has been set.
Page 12
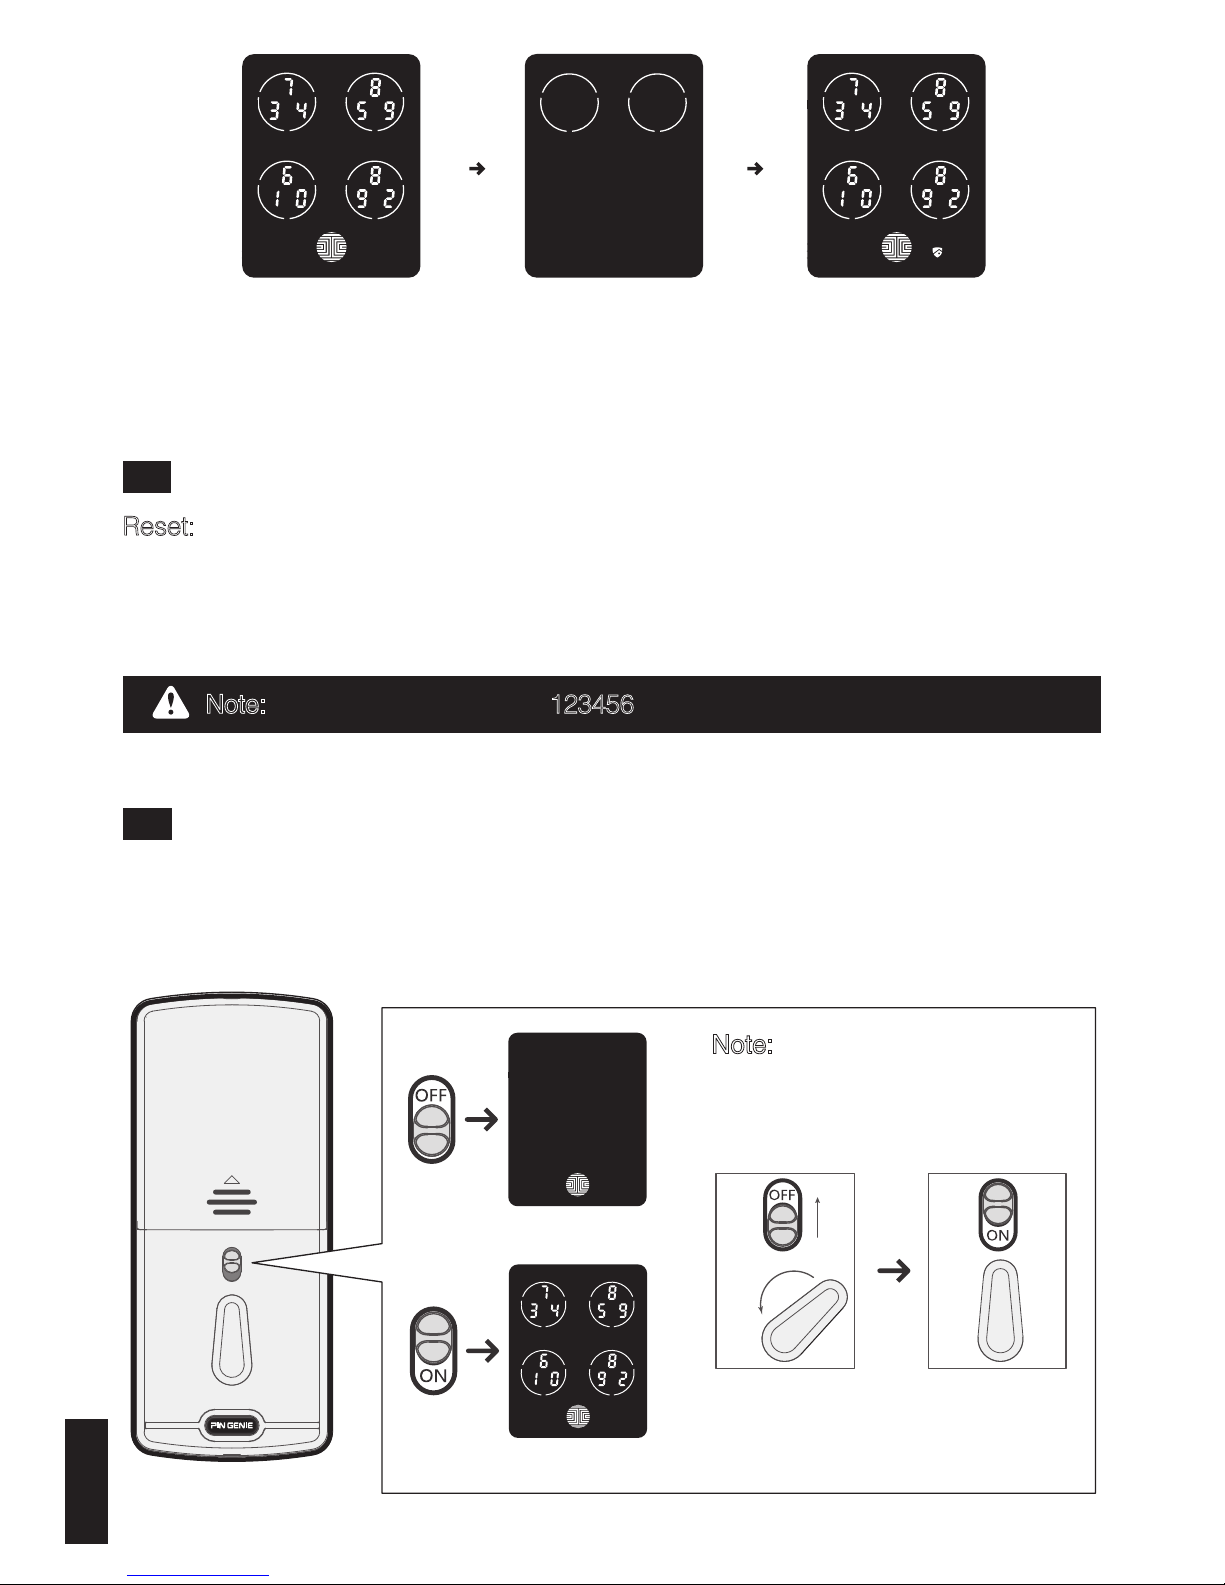
2.3 Reset
2.4 Display keypad switch
Reset: Restore the smart lock to factory default setting. Use a stick-like object such as
a clip, toothpick etc. to push the reset button at the back panel of the smart lock for
about 2 seconds. After that, you will hear a beep. The display keypad will play the boot
animation and the smart lock is now restored to factory default setting and all the programmed data has been deleted.
The exterior display keypad can be locked and turned off using the display keypad
switch at the back panel of the smart lock. With the display keypad switch off, people
outside cannot input passcode to unlock the door.
Display keypad blocked
Display keypad enabled
报警功能开启状态
Alarm mode ON
报警功能开启状态
Successfully disarm.
Alarm mode OFF
Press and hold any two circles
on the screen for 1.5 seconds.
The circles you pressed will flash
and you will hear a long BEEP.
Note: The default passcode is 123456.
Note: When you open the door
from inside and leave home,
the display keypad switch will
be automatically ON.
9
Page 13
2.7 Changing the battery
2.6 PIN GENIE button
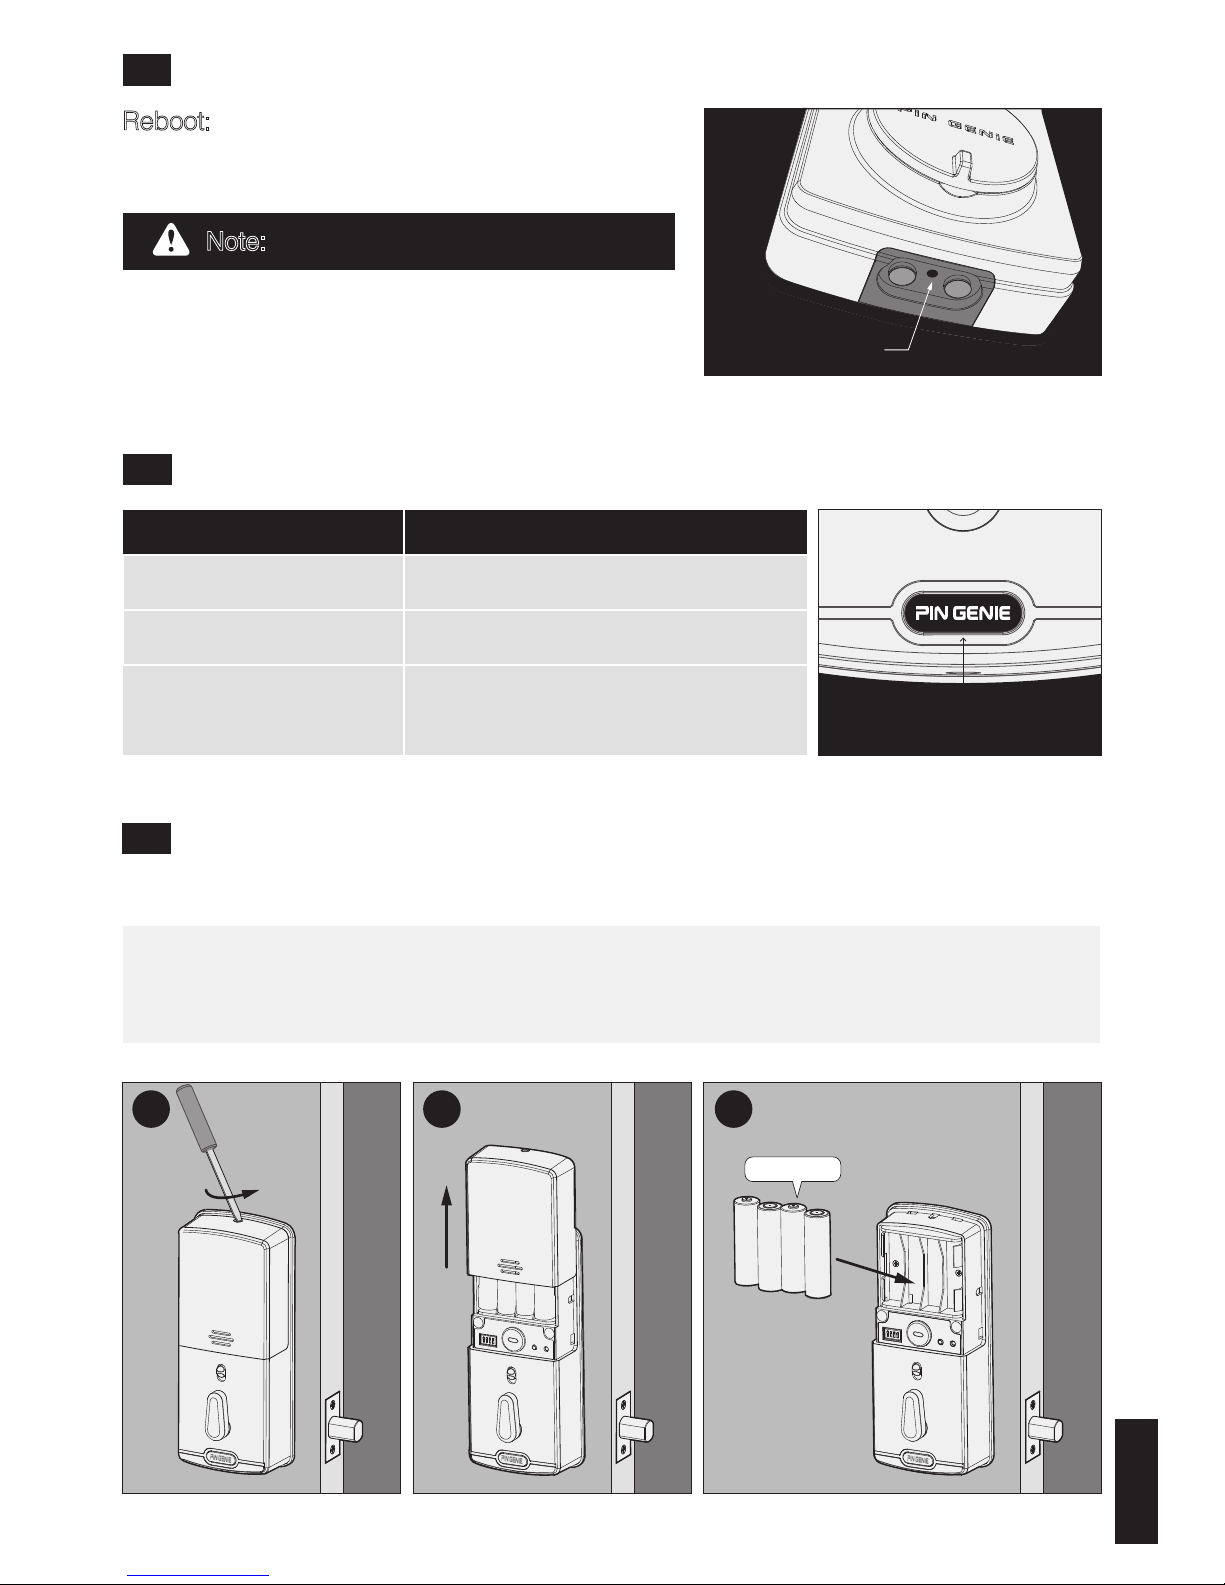
Status Indicator
Alarm system triggered
Quick flashing green and red light
Low battery Slow flashing red light
Alarm mode on
Flashes green when you press PIN
GENIE button
Open the battery compartment cover and insert 4* AA batteries as shown below.
• Make sure the batteries are correctly oriented.
• Replacement of batteries does not affect programmed data.
• To avoid setting loss, please insert new batteries within 15mins.
2.5 Reboot
Reboot: Press and release the restart button. The
smart lock will beep once and restart. The smart
lock is ready for use again.
PIN GENIE Button
Note: No setting will be changed.
+
+
-
+
-
-
+
-
AA 1.5V X 4
1 2 3
10
Restart Button
Page 14
Section 3 --Programming Passcode
3.1 Passcode information
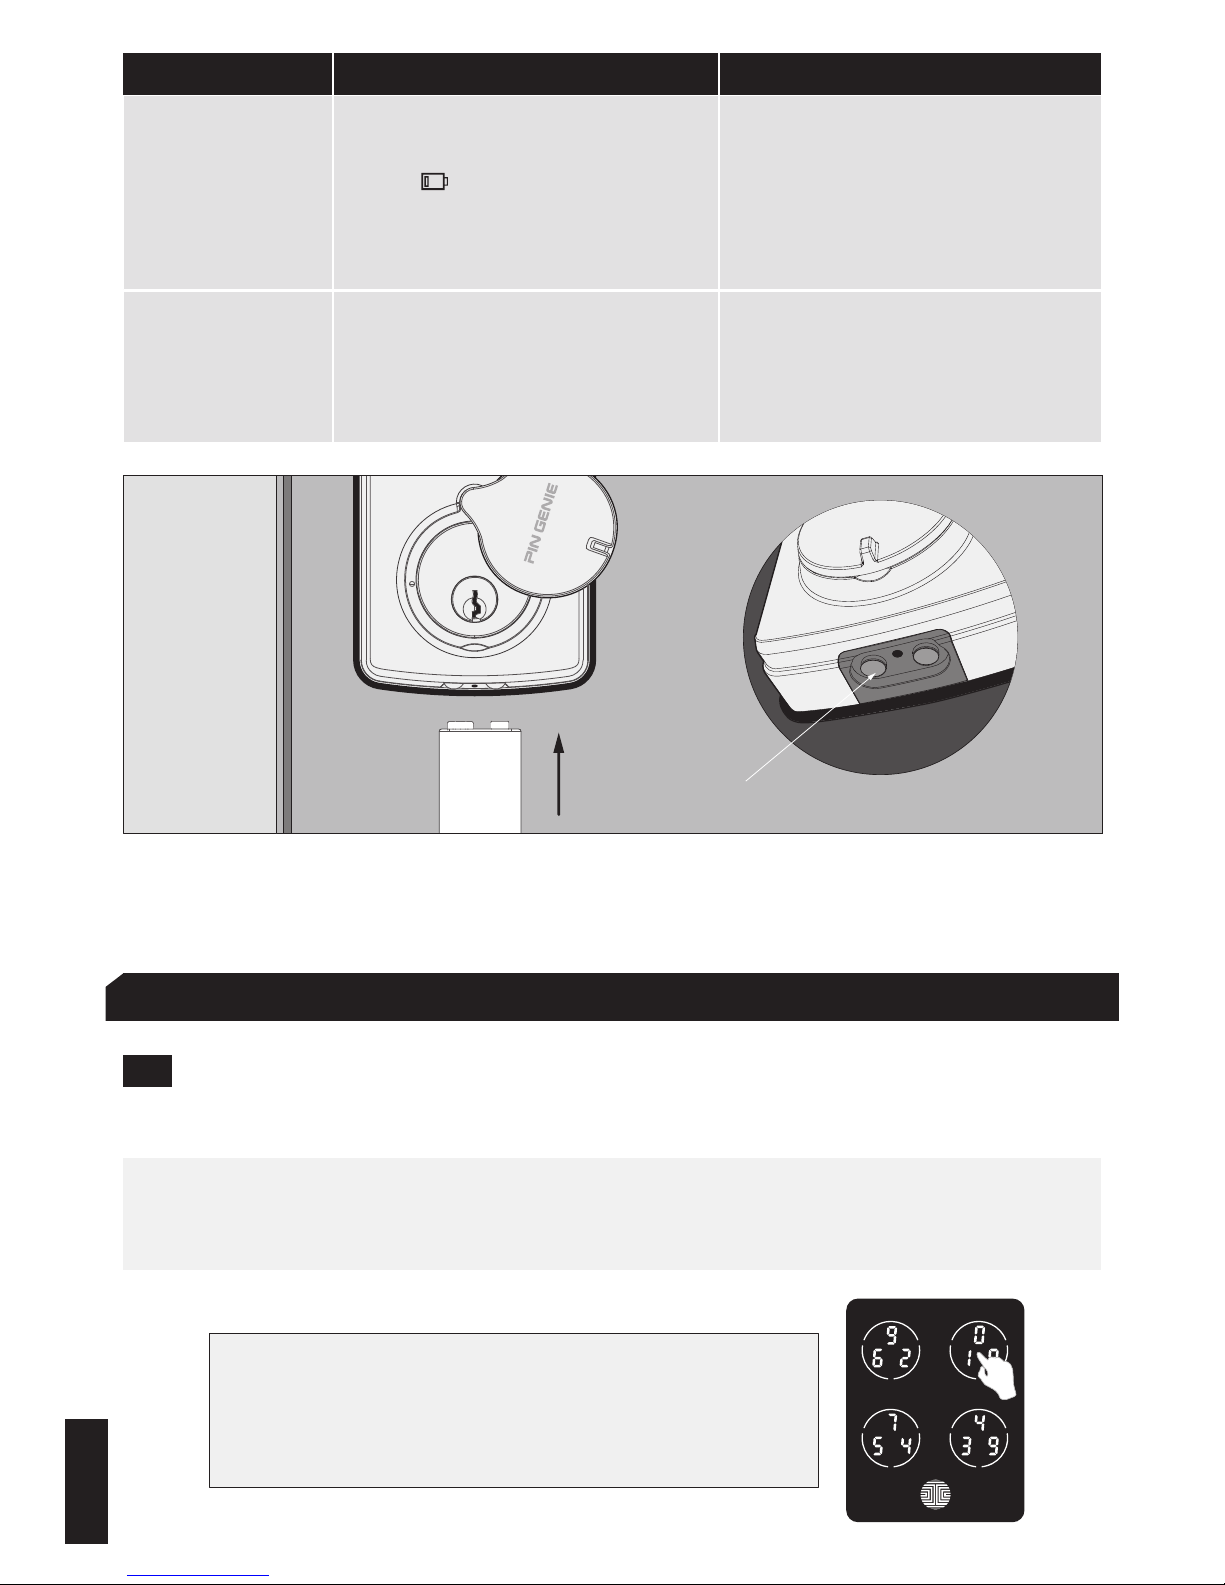
Battery failure
No LED or beeps.The display keypad
is invalid.
Replace batteries immediately.Mechanical keys can be used to unlock
the door or insert a 9V back up
battery as shown to activate the
display keypad.
Condition Indicator Solution
Batteries low
Replace batteries immediately to
avoid battery failure. Smart lock can
still be operated for approximately
300 cycles in low battery condition.
• The default passcode is 123456. Once you add a new passcode, the default one
would become invalid.
• A maximum 8 sets of passcodes can be set for family use.
The Passcode can be any combination of 6~8 digits.
How to use the keypad!
There are 5 touch keys on the keypad as shown
on the right. To input a digit, press the circle
where the number lies.
Back-up Battery Socket
11
9V
_
+
Battery Icon on the display keypad
outside will light up to indicate low
battery . The PIN GENIE button
on the back will flash red at the same
time. The lock will beep twice every
time you open or close the door.
Page 15
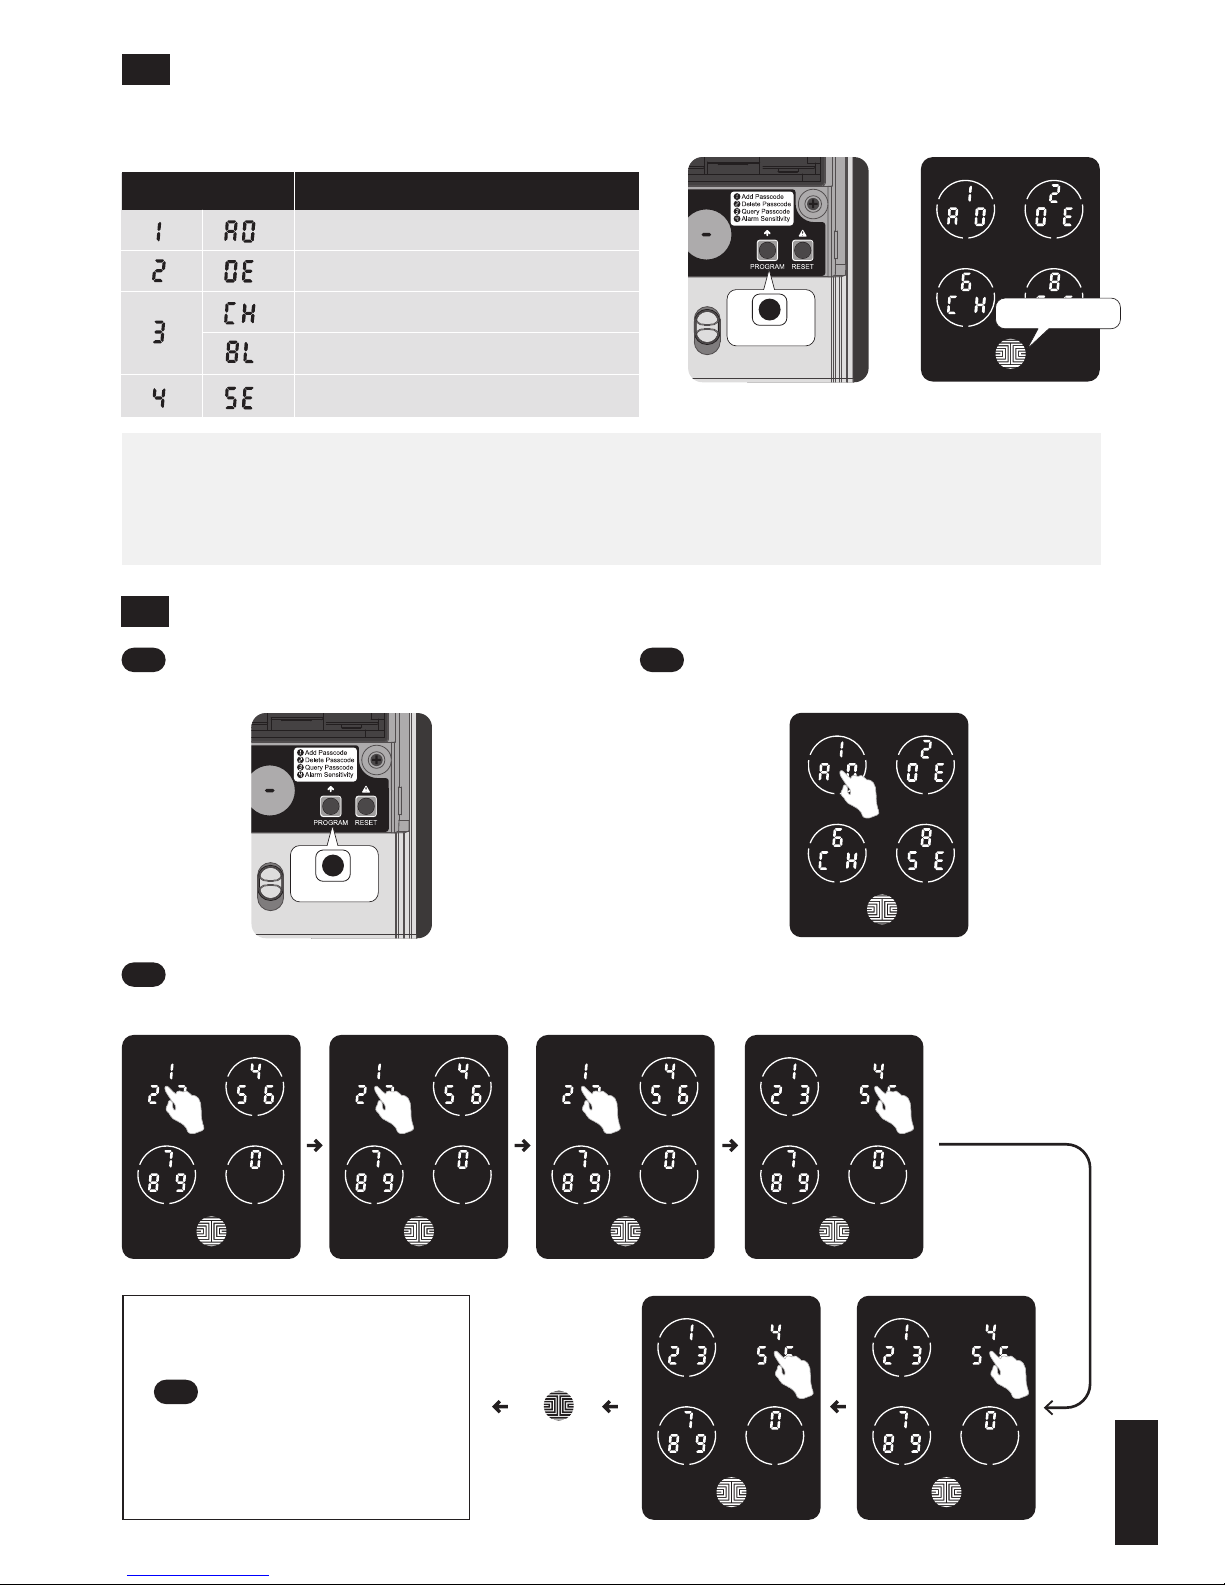
3.2 How to enter settings
3.3
Add Passcode
Press the “Program” button and the
screen will be activated.
• To end, press the “Program” button at any time.
• To finish with Settings, press the “Program” button again to quit.
• Settings will automatically shut down if inactive for more than 30 seconds.
Press the “Program” button and the screen will be activated. The setting page is as
shown below.
Input 2
Add Passcode
ModeNumber
Delete Passcode
Check Passcode
BTSwitcher (PGD728)
1
Input a new passcode of 6~8 digits. Then press “OK” .For example: Input 1,
input 2, input 3, input 4, input 5, input 6,Press “OK”
3
Press "1" to enter Add passcode
mode.
2
Input your passcode
again, Press “OK”
4
Input 1 Input 3
Input 6
Input 4
Input 5
OK
Alarm Sensitivity
OK Button
PROGRAM
PROGRAM
12
Page 16
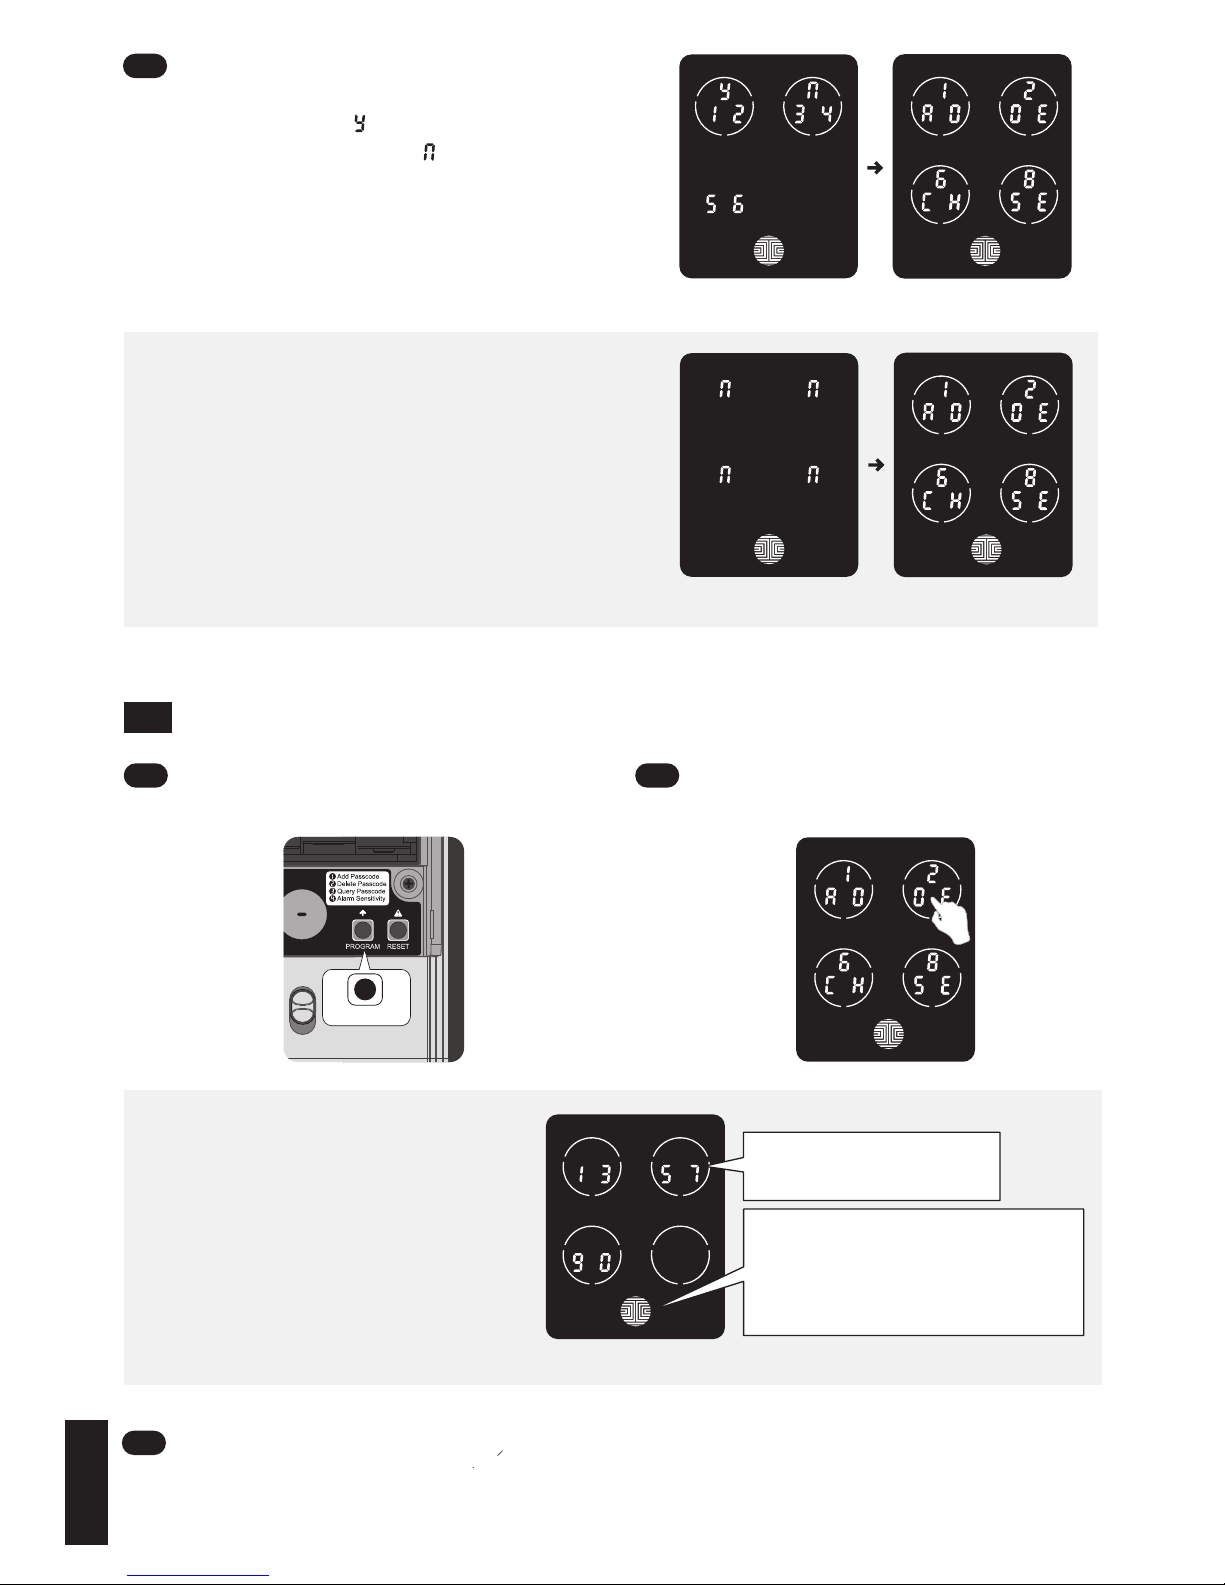
3.4 Delete Passcode
• If the passcode entered twice does
not match, an error message will
appear for a second. Return to the
setting page and try again.
Input Y to confirm Setting page
Error message Setting page
If the passcode you entered twice match,
it will be displayed on the screen for your final
confirmation. Press . Your passcode is now
set. To quit, press "OK" or .
5
The passcode will be shown on
the screen in sequence (from
left to right & top to bottom. For
example, the passcode shown
on the screen is 1-3-5-7-9-0.
Every time you touch the
screen, it will display the next
set of passcodes.
Delete passcode mode
Press the “Program” button and the
screen will be activated.
1
Press "2" to enter Delete passcode
mode.
2
Continue pressing any digit on the screen until the passcode you want to delete is
displayed. Hold the “OK” button for 1 second to enter the delete confirmation page.
For example, to delete the second set passcode (1-2-3-4-5-6)
3
Press any digit to
switch to the next set.
Press the button down briefly
to return to setting page.
Hold the button down for 1
second to delete the passcode.
PROGRAM
13
Page 17
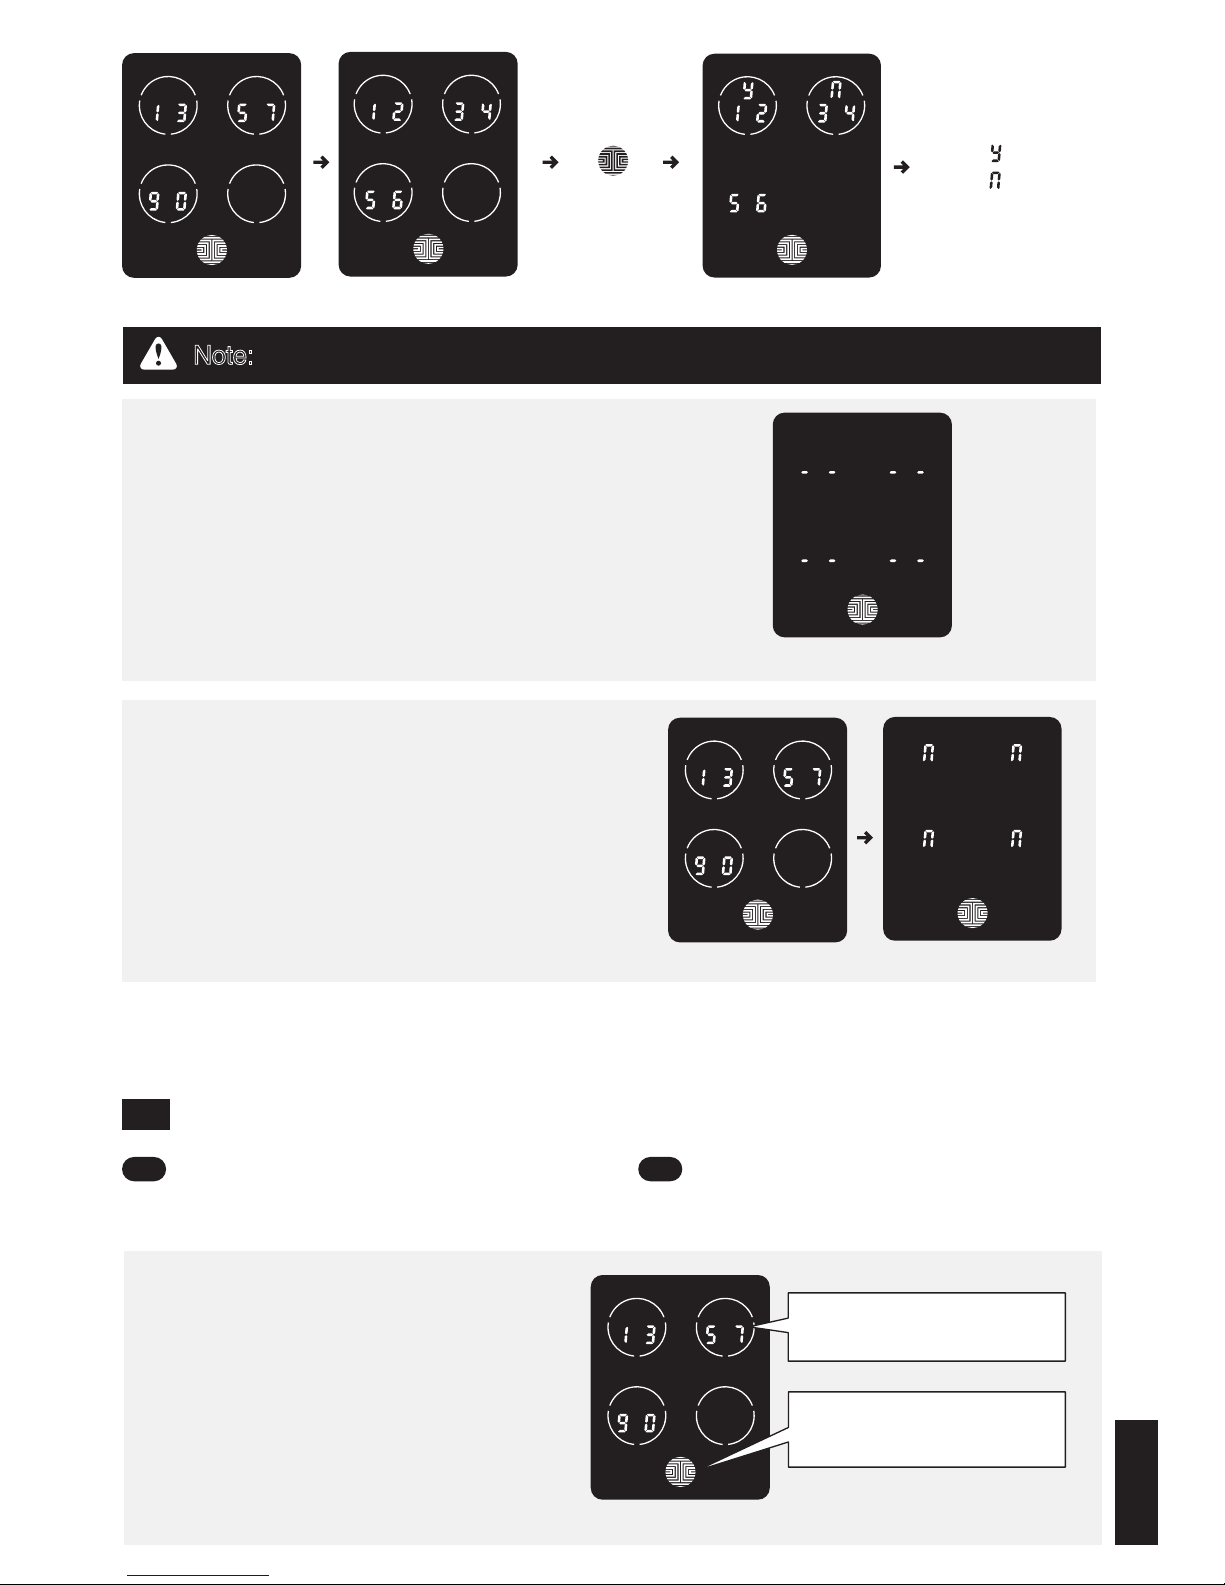
• If there is no passcode preset, the
delete passcode mode will be invalid.
The default passcode will not be shown
on the display key pad. You can add a
new passcode to override the default
one.
• If there is only one set of passcode
preset, the delete passcode mode will
also be invalid. For example, there is
only one set of passcode (1-3-5-7-9-0).
When you hold down the OK button,
there will be an error message. The
smart lock will beep twice.
Press to switch
Confirm deletion
No passcode preset
Error message
Press to delete.
Press to end.
Hold down the
OK button
Note: There are two situations that users could not delete passcode.
3.5
Check Passcode / BTSwitcher (PGD728)
Press the “Program” button and the
screen will be activated.
1
Press “3" to enter check passcode
mode.
2
Passcode will be shown on the
screen in sequence (from left to
right & up to down top to bottom).
For example, the passcode
shown on the screen is
1-3-5-7-9-0. Every time you touch
the screen, it will switch to the
next set of passcode.
Check passcode mode
Press any digit to switch
to next set of numbers.
Press briefly to return to
setting page.
14
Page 18
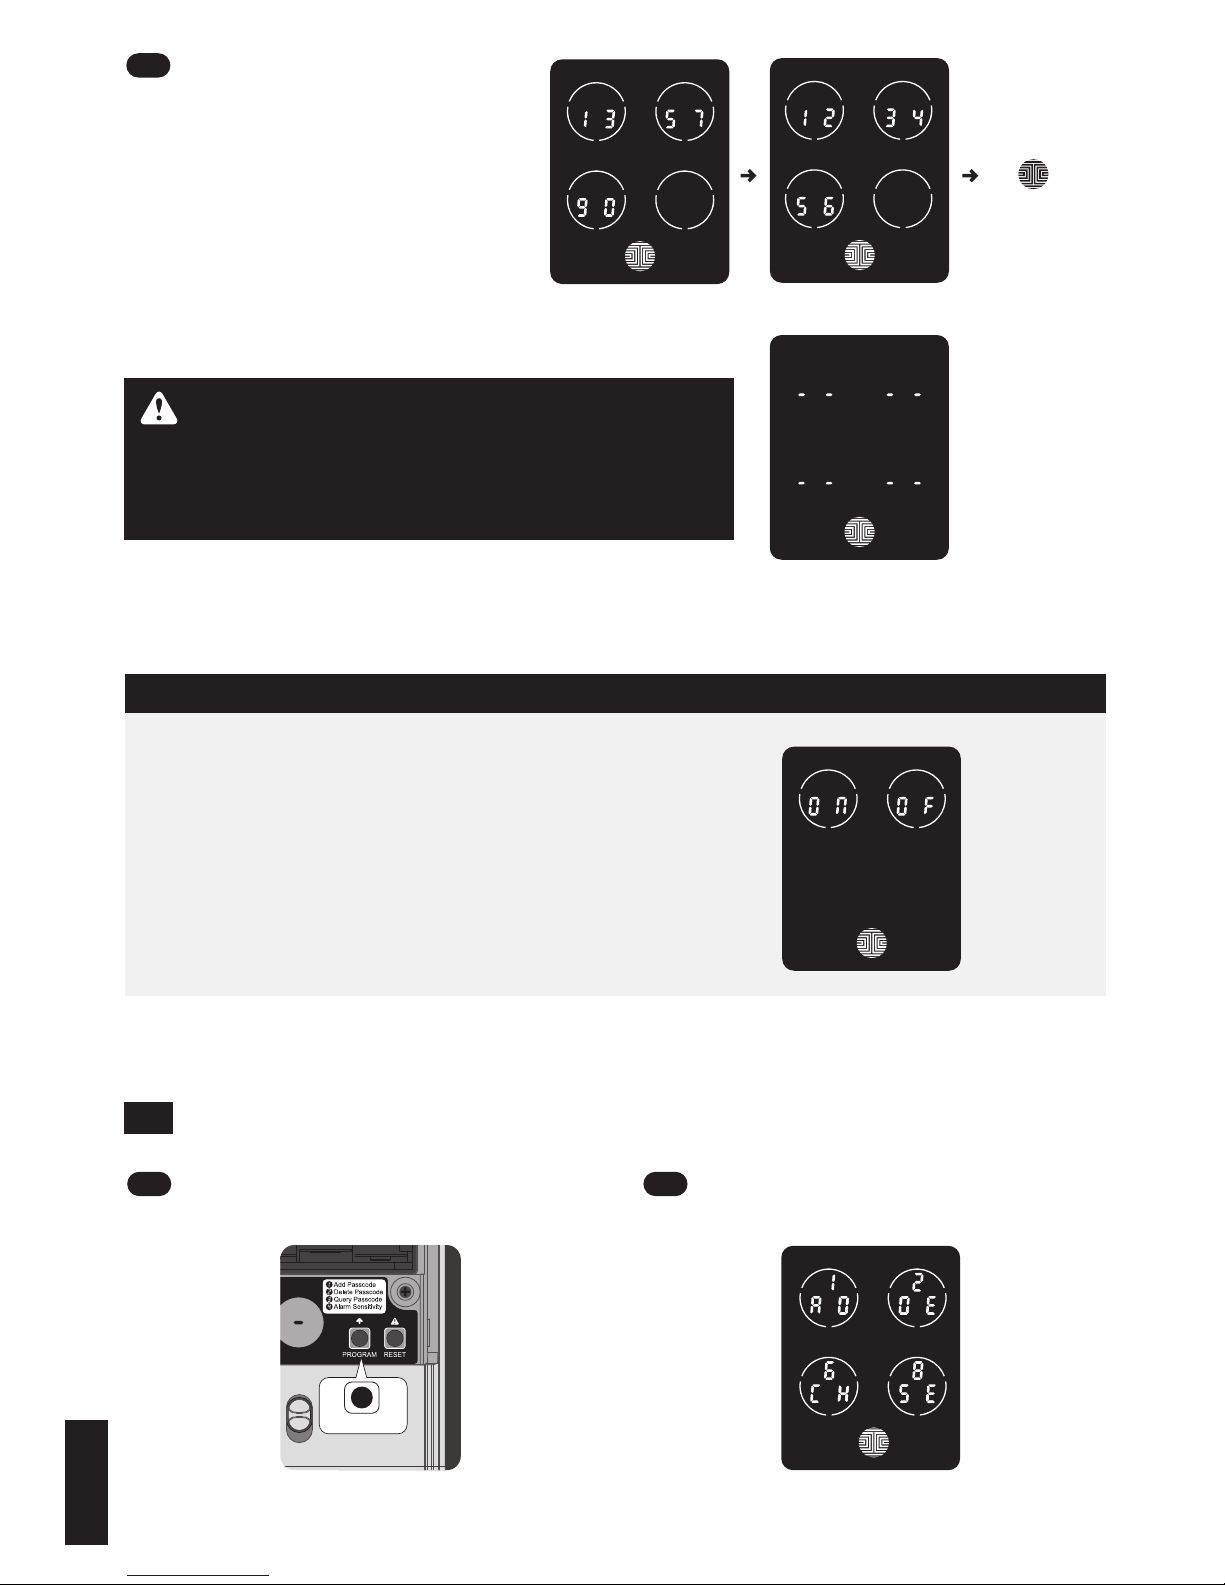
Passcode enquiry function valid only on
PGD718. On PGD728, this menu is for
BlueTooth ON/OFF switch through OK
button. Touch OK to exit this menu.
Press to finish
Note: If there is no passcode preset, the
check passcode mode will be invalid. The
default passcode will not be shown on the
display key pad.
BTSwitcher (PGD728)
Continue pressing any digit
on the screen to check other passcodes. After all sets of passcode
are displayed, the screen will automatically return to the setting page.
For example: to check the second
set passcode (1-2-3-4-5-6)
3
3.6 Alarm Sensitivity
Press “Program” button and the
screen will wake up.
1
Press "4" to enter Alarm Sensitivity
mode.
2
Press to switch Query Result
No passcode preset
PROGRAM
15
Page 19
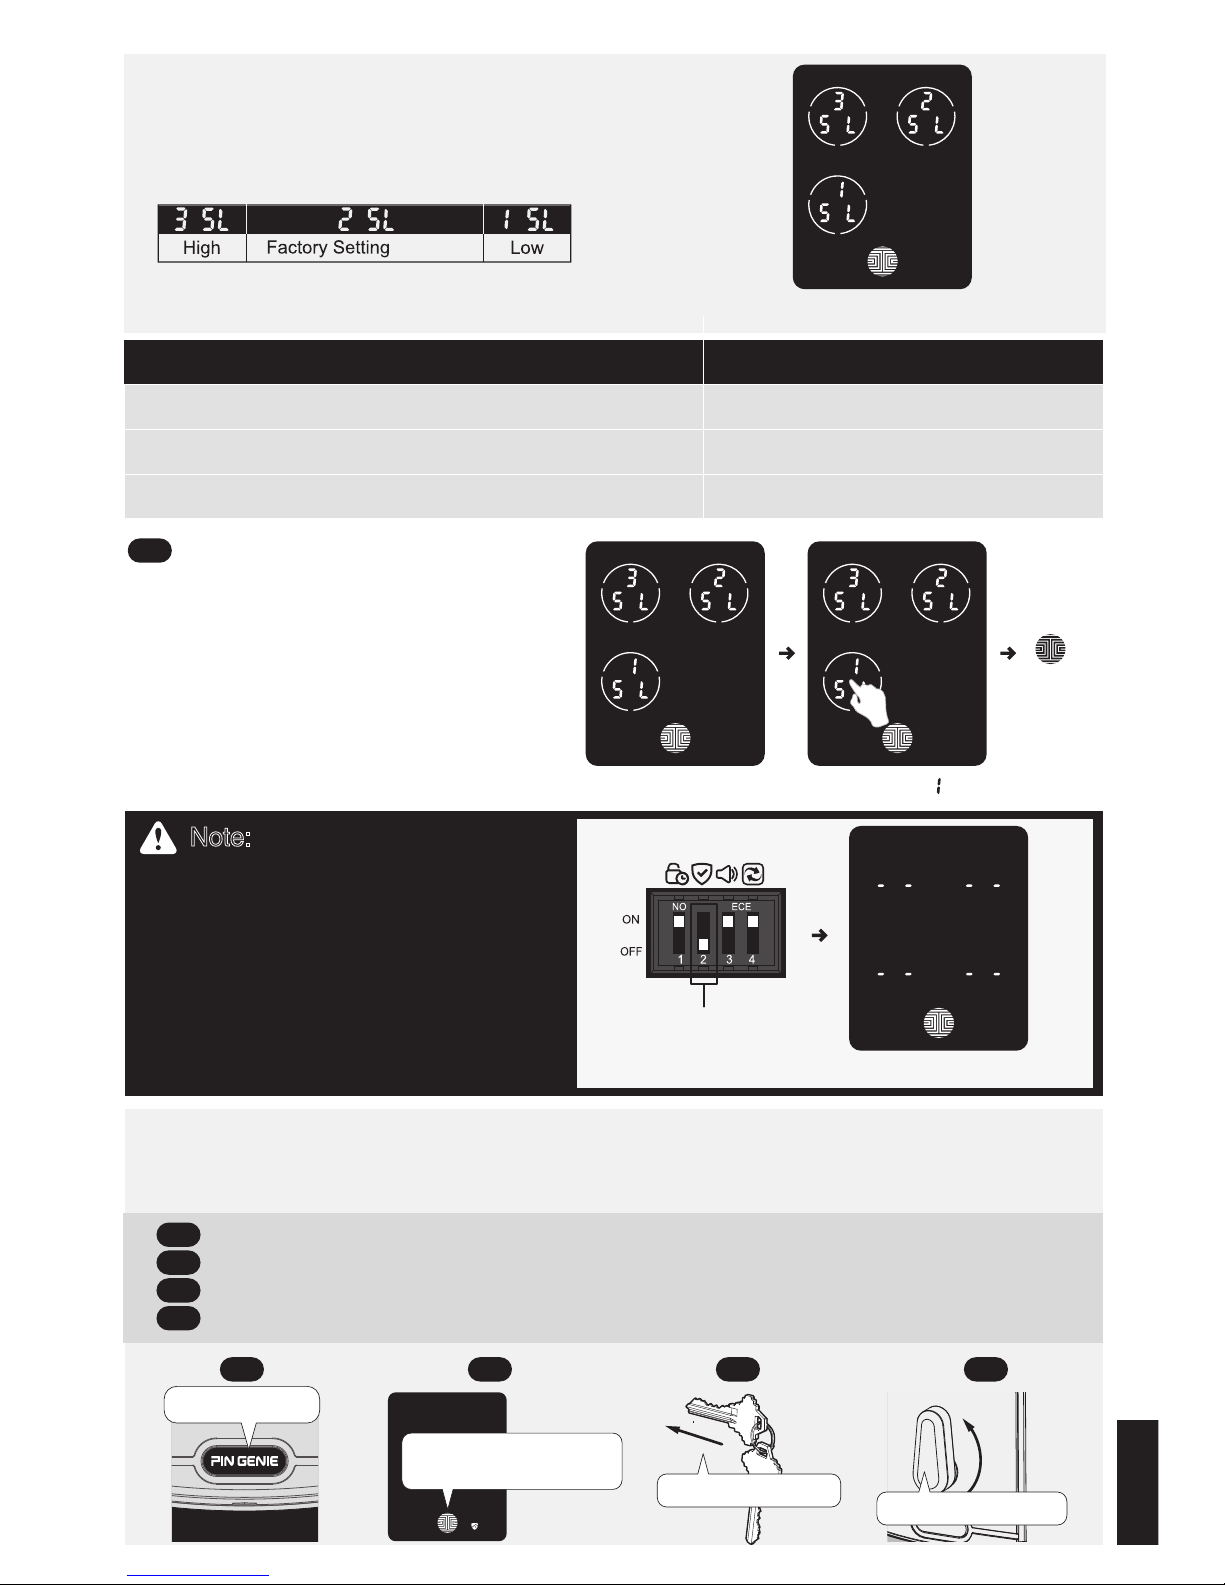
Level Indication
Knock (Low)
Beep*2
Open & Close the door (Middle/Factory) Alarm*15seconds
Force open(High) Alarm*3Minutes
OK
Alarm Sensitivity mode
There are three levels of sensitivity.
The flashing circle represents the current sensitity
level.
Choose the required level and
press "OK". For example, to switch
from Factory setting to Low.
When the alarm system is triggered, the OK button will begin to flash. At the same
time, the PIN GENIE button on the back will rapidly flash a green and red light. To
deactivate the alarm, you can:
3
1
1 2 3 4
2
3
4
Press
Note: If the setting switch of the
Alarm Mode has been turned
off, when you enter the Alarm
Sensitity mode, it cannot be
chosen. Press "OK" to return to
Setting page.
No passcode preset
Alarm Mode turned off
(Middle)
Long press
Press OK to wake
up the screen
Mechanical keys
Rotate thumbturn
Press and hold the PIN GENIE button on the back panel for 3 seconds, or
Enter the passcode, or
Use mechanical keys, or
Rotate the inside thumbturn.
16
Page 20
Section 4 --Locking and unlocking the door
4.1 Unlock from outdoor
4.1.1 Safe mode
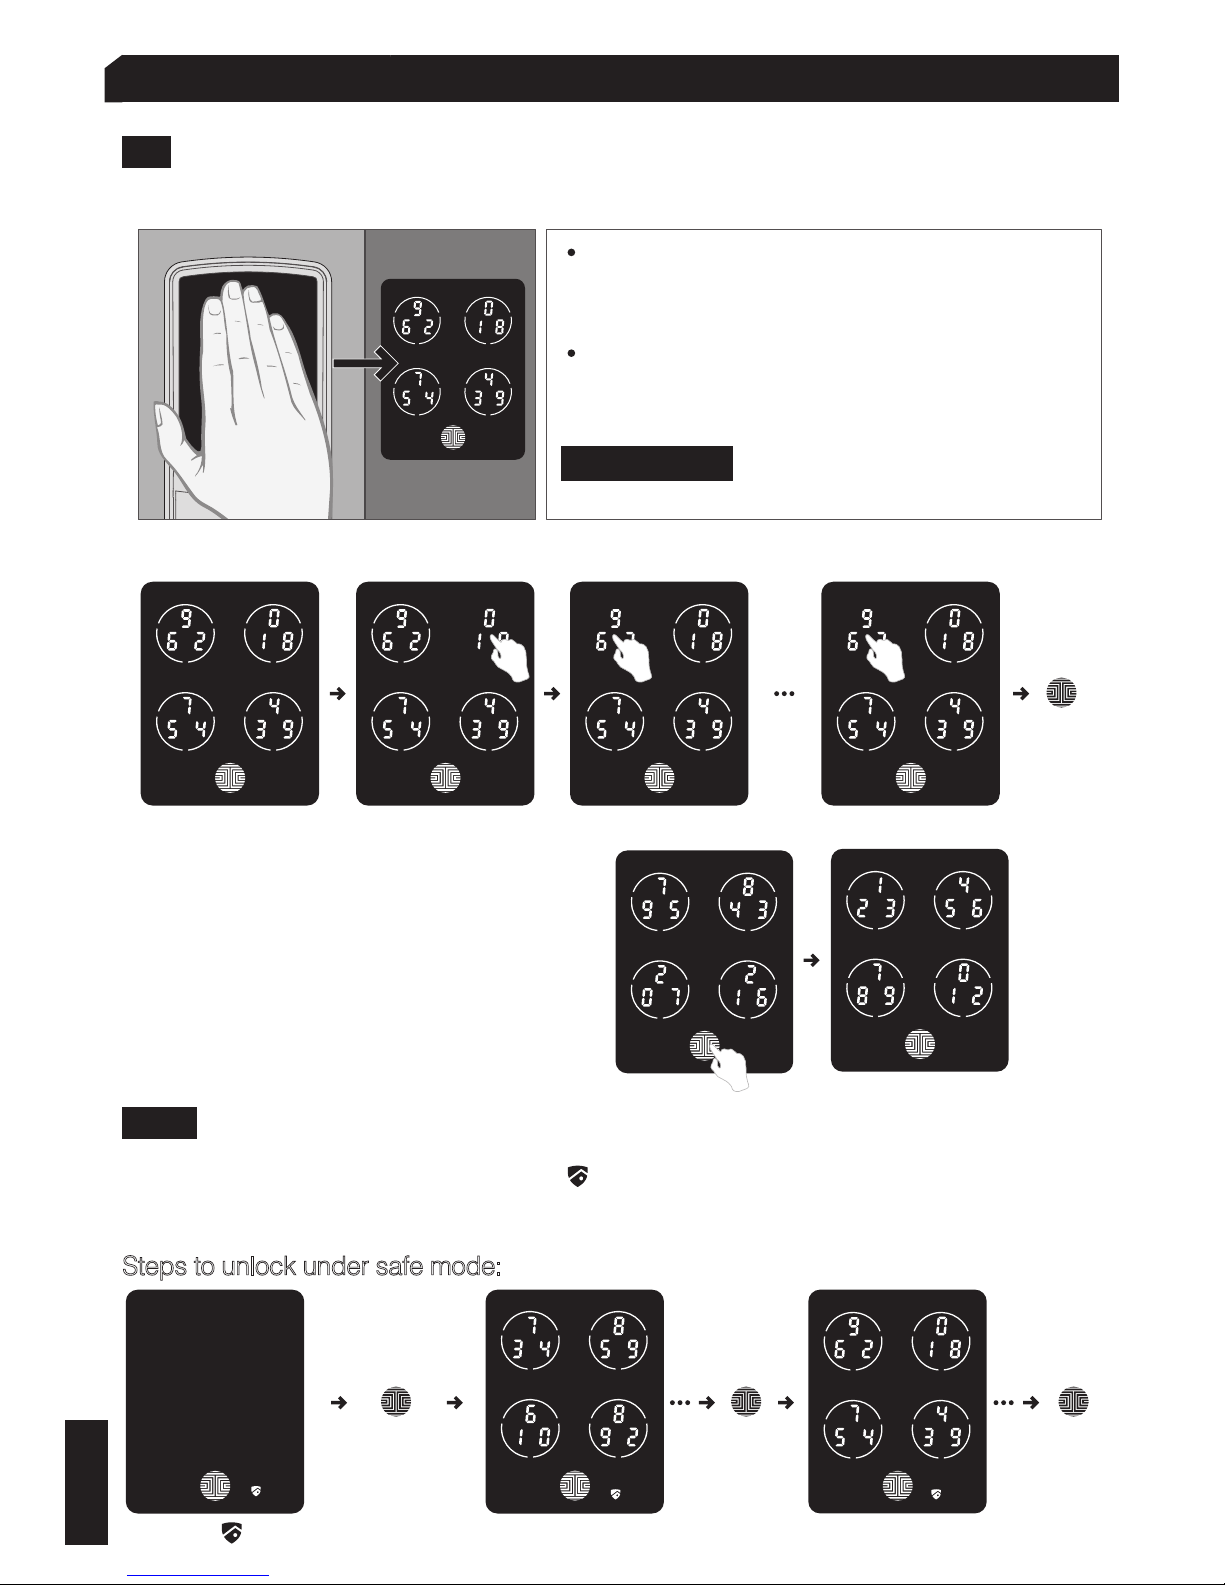
1. Slide your hand across the screen to activate it.
2. Input the Passcode and press “OK” (For example:1-2-3-4-5-6, under normal mode)
3. The PG and fix digit input mode can
be toggled through pressing OK for 2 or
more seconds.
Enter Safe mode: The lock status icon will start flashing. Under safe mode, you will
have to enter the passcode twice (in crazy mode keypad) to unlock the door.Each time
followed by “OK” or simply use the mechanical key to exist the Safe mode.
Input 1 Input 2
OK
Input 6
· Enter the passcode within 1 minute. If you
mistakenly enter the wrong digits, press OK
to re-enter.
· If the passcode entered is correct, the door
will be unlocked. If not, the smart lock will
beep twice. Try again.
IMPORTANT: 3 consecutive wrong attempts
will lead to the "Safe mode" .
Safe mode flashes
OK OK
Enter passcode
Press and hold
OK for 3s to
activate the
screen
Re-enter passcode
Steps to unlock under safe mode:
17
Page 21
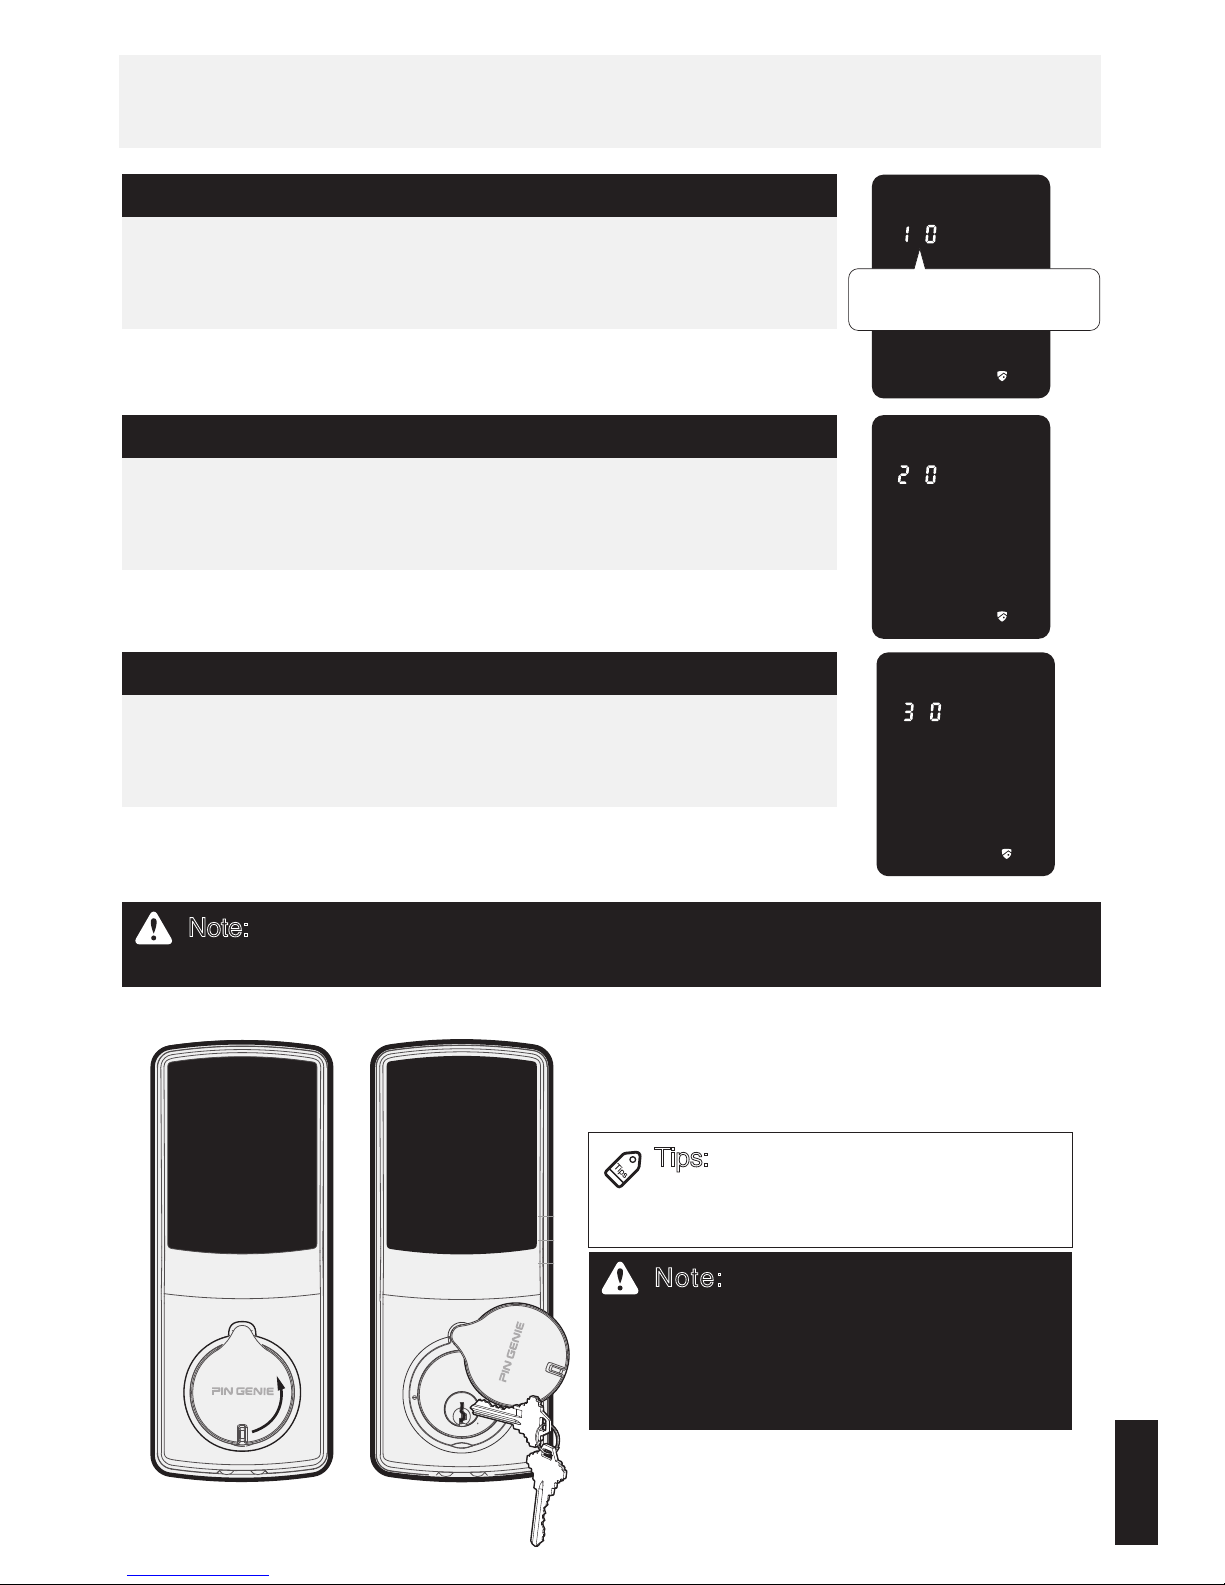
• If the code entered twice is correct, the door will be unlocked. If not, it will lead to
a 10-minute disabling period.
First wrong attempt: leads to a 10-minute disabling period.
• After 10 minutes, it will go back to safe mode again.
Repeat steps to unlock under safe mode. This time, wrong
attempts will lead to a 20-minute disabling period.
Second wrong attempt: leads to a 20-minute disabling period.
• After 20 minutes, it will go back to safe mode again.
Repeat steps to unlock under safe mode. This time, wrong
attempts will lead to a 30-minute disabling period.
Third wrong attempt: leads to a 30-minute disabling period.
• After 30 minutes, safe mode will automatically end. Normal
Mode will resume. Users can input a passcode to unlock the
door.
Note: In order to save power, the countdown prompt will only be displayed for 3
seconds. If needed, slide your hand across the screen to reactivate it.
The countdown prompt
(minute)
Note:Energy saving mode. The
screen will not be activated by using
the mechanical key or locking the
door inside the house with the
thumb-turn.
Tips: The door can also be opened
using the mechanical keys. Open
the key hole cap as shown below.
18
Page 22
Section 5 --Safety Precautions
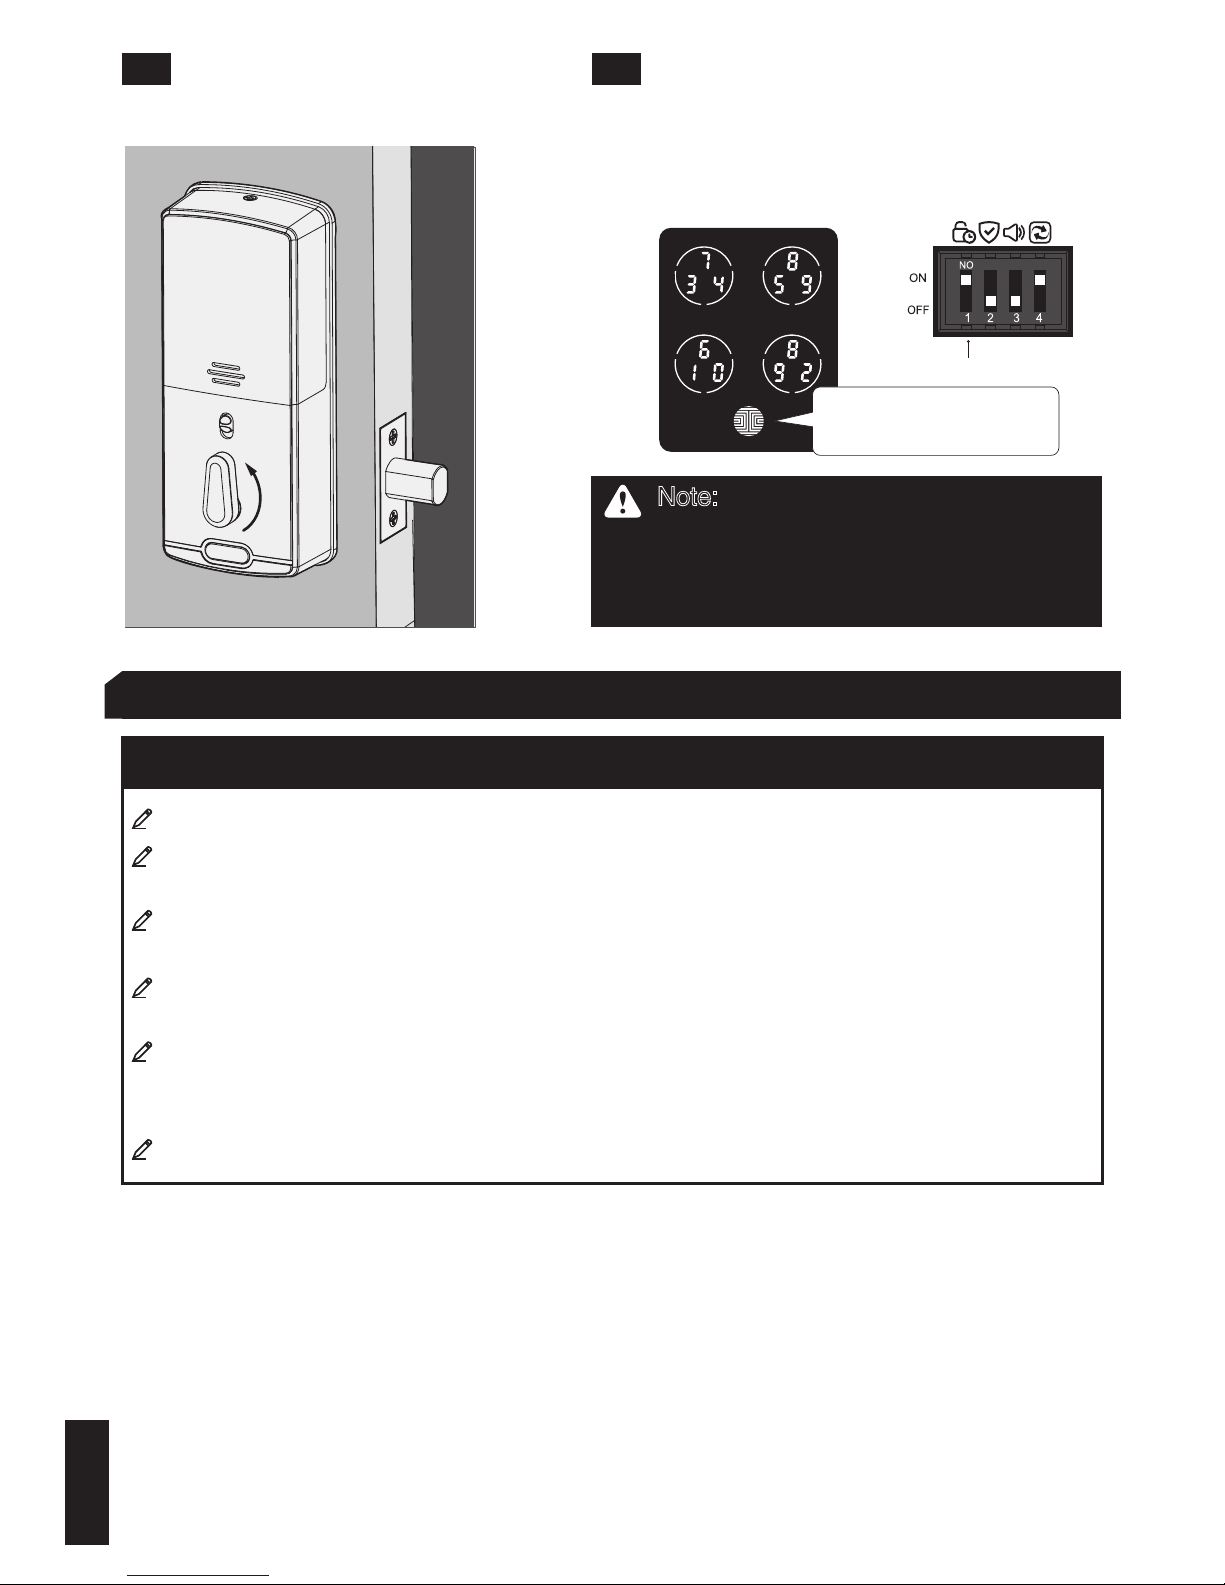
Rotate the inside thumbturn as below. Under Auto Lock mode, the smart lock will
automatically relock the door 30s after
unlocking. Alternatively you can press the OK
button to lock the door.
Please read this carefully for your own safety!
4.2 Unlock & Lock from indoor 4.3 Lock from outdoor
Automatic lock
Carefully read all instructions. Remind all family members of the safety precautions.
Do not attempt to disassemble the unit by yourself. It can cause product damage
and self-injury.
Do not use an inappropriate tool that can cause damage or malfunction of the
product.
Make sure the Door is securely locked whenever you leave your house in order to
prevent unauthorized entry.
Please keep your passcode safely. Restrict access to the back panel of your
smart lock and regularly check your settings to ensure passcodes have not been
altered without your knowledge.
Dispose of used batteries according to local laws and regulations. DO NOT BURN.
Use warm water and mild dish soap to properly clean the display keypad of built-up dirt, oils,
and other contaminates.Follow the general rules below:
• Do rinse the touchscreen with warm water prior to the cleaning process.
• Do use the application of soap with a damp, lukewarm cloth
• Don't use abrasives, high alkaline cleaners, or gasoline
• Don't leave cleaning detergent on the display keypad for long periods; wash immediately.
• Don't apply cleaners in direct sunlight or at elevated temperatures.
• Don't use scrapers, squeegees or razors.
To clean the bolt, you could use a mild dish soap and warm water. It may help improving the performance of the lock.
Note: Once the latch is blocked and cannot
lock the door smoothly, it will have the alert
sound and try to auto-lock the door again in
30 seconds. It will repeat a total of 3 times
with the above steps and then stop.
press the OK button to
lock the door.
19
 Loading...