

Page 1
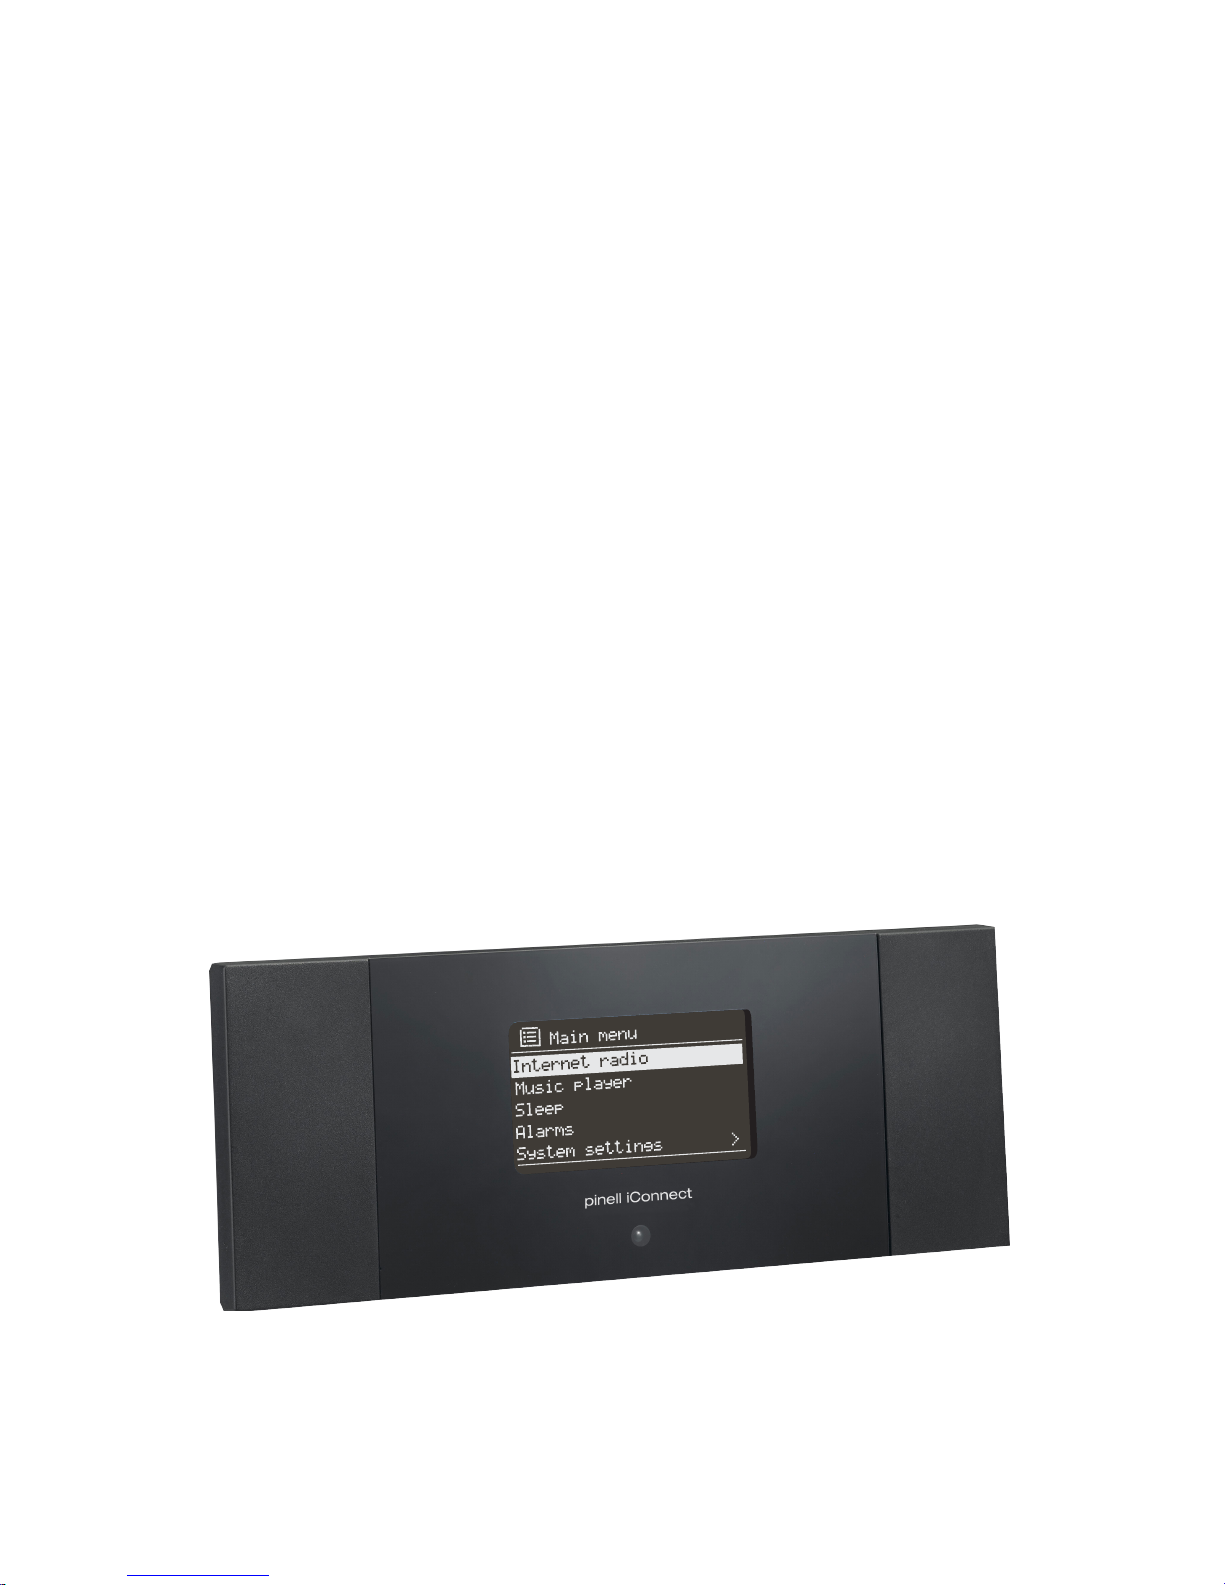
Internet, DAB and FM radio
ADAPTOR
Instructions Manual
Pinell iConnect
Page 2
1
C A U T I O N
TO PREVENT FIRE OR SHOCK HAZARD, DO NOT USE THIS PLUG WITH AN
EXTENSION CORD, RECEPTACLE OR OT HER OUTLET UNLESS THE BLADES
CAN BE FULLY INSERTED TO PREVENT BLADE EXPOSURE. TO PREVENT FIRE OR
SHOCK HAZARD, DO NOT EXPOSE THIS APPLIANCE TO RAIN OR MOISTURE.
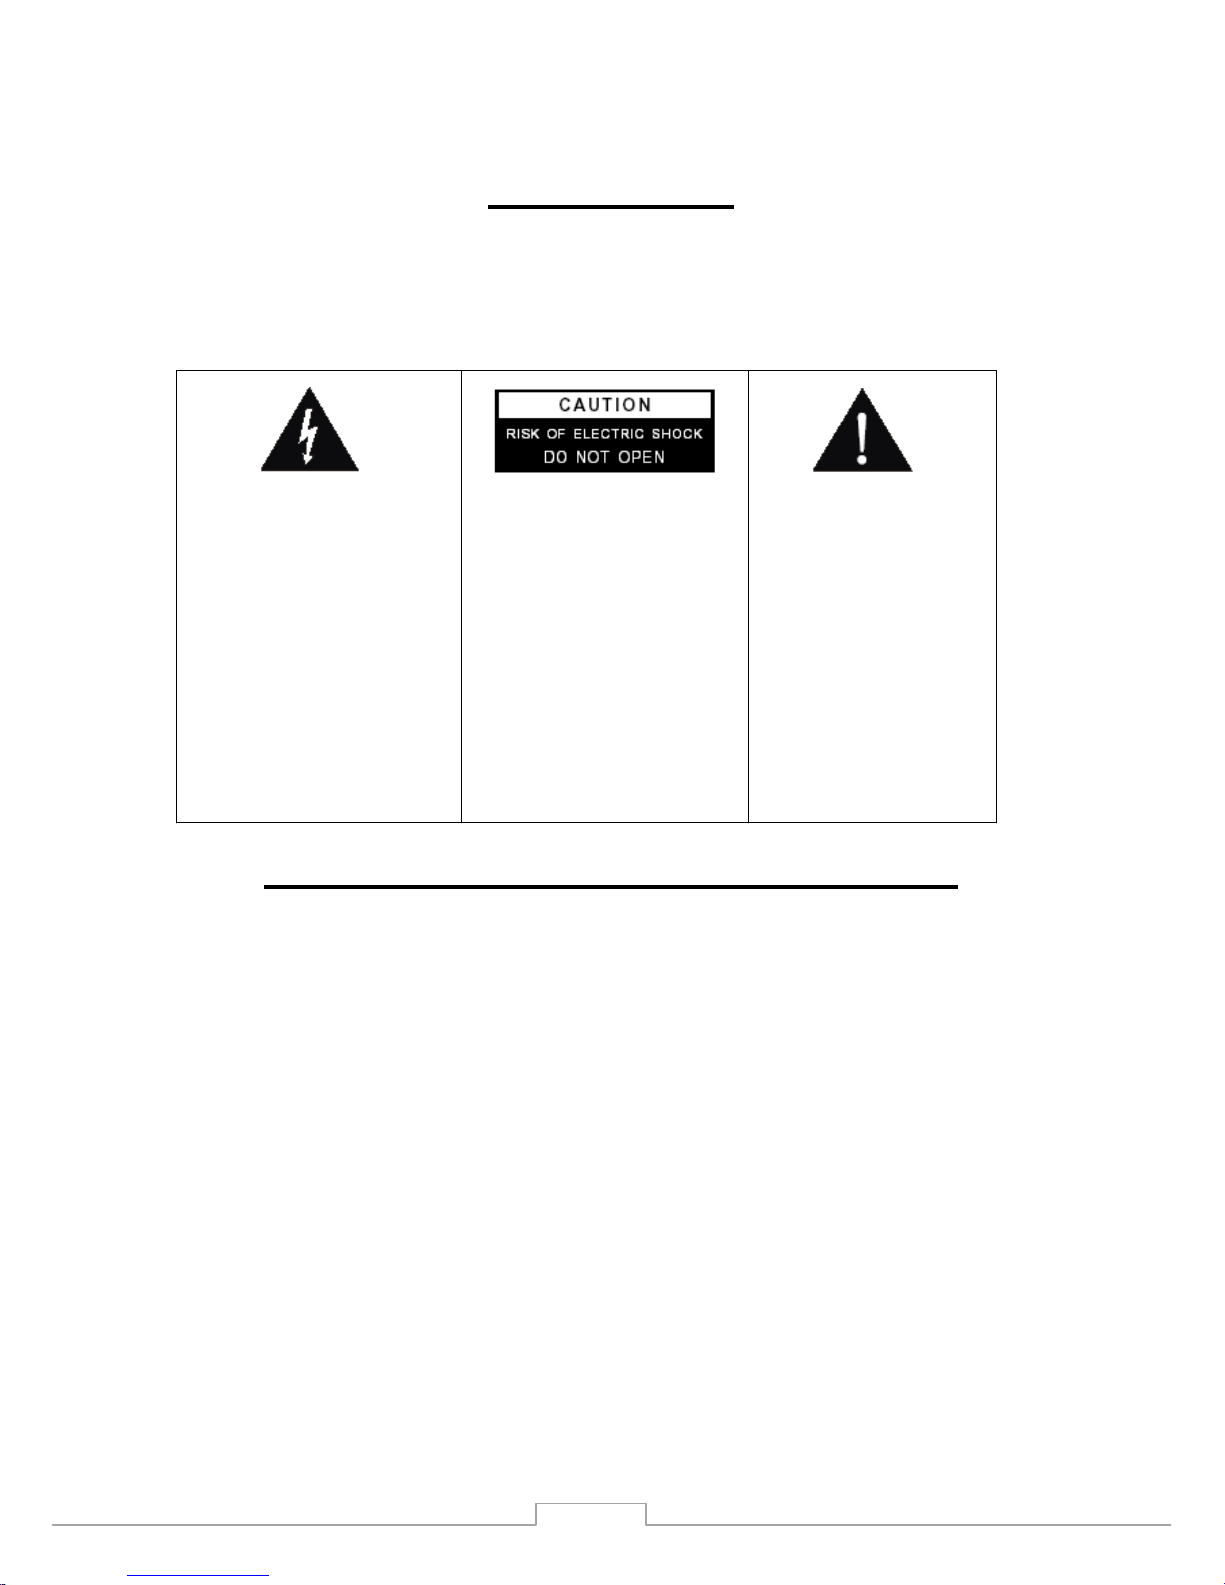
The lightning flash with
arrowhead symbol, within
an equilateral triangle is
intended to alert the user
to the presence of insulated
‘dangerous voltage’ within
the
product’s enclosure
that may be of sufficient
magnitude to constitute a
risk of electric shock to
persons.
IMPORTANT SAFETY INSTRUCTIONS
1.) Read these instructions.
2.) Keep these instructions.
3.) Rea d all warnings.
4.) Follow all instructions.
5.) Do not use this apparatus near water.
6.) Clean only with dry cl oth.
7.) Do not block any ventilation openings. Install in accordance with the manufacturer’s
instructions.
8.) Do not install near any heat sources such as radiators, heat registers, stoves, or
other apparatus (including amplifiers) that produce heat.
9.
) Protect the power cord from being walked on or pinched particularly at plugs,
convenience receptacles, and the point where they exit from the apparatus.
10.) Only use attachments / accessories specified by the manufacturer.
11.) Unplug this apparatus duri ng lightning storms or when unused for long periods of
time.
12.) Refer all servicing to qualified service personnel. Servicing is required when the
apparatus has been dam
aged in any way, such as power - supply cord or plug is
damaged, liquid has been spille d or objects have fallen into the apparatus, the apparatus
has been exposed to rain or moisture, does not operate normally, or has been dropped.
13.) This appliance shall not be exposed to dripping or splashing water and no object
filled with liquids such as vases shall be placed on the apparatus.
14.) Do not overload wall outlet. Use only power source
as indicated.
15.) Use replacement parts as specified by the manufacturer.
WARNING:
T o reduce the risk of
electric shock, do not
remove cover (o r back). No
user serviceable parts are
inside. Refer servicing to
qualified personnel.
The exclamation point
within an equilateral
triangle is intended to
alert the user to the
presence of important
operating and
maintenance
(servicing) instructions
i n the literature
acco
mpanying
the appliance.
Page 3

Welcome
Thank you for purchasing iConnect. Your iConnect is designed as a digital music adaptor to
add to your existing Audio system and to provide you with hours of music enjoyment with
simple, convenient access to thousands of Internet radio stations worldwide and furthermore
music streaming options. No matter whether you are in Zürich and want to listen to Brazilian
music, or select a genre such as classical music, hard rock or jazz, the iConnect brings you
home the
radio station of your choice.
Table of contents
1. Content of package··············································································· Page 3
2. Before you start ··················································································· Page 3
2.1 Difference between the Internet Radio Portal and Radio Station················ Page 4
3. Overview of iConnect ············································································ Page 4
3.1 Front panel ······································································ Page 4
3.2 Remote control ································································ Page 5
3.3 Back panel······································································· Page 6
4. General menu navigation / Menu Structure·············································· Page 6
5. Menu structure····················································································· Page 7
6. General info and settings······································································· Page 8
7. Turning on iConnect ·············································································· Page 9
8. Setting up the
iConnect ········································································· Page 9
8.1 Setting up the language ···················································· Page 9
8.2 Setting up the time and date············································ Page 10
8.3 Connecting to a network·················································· Page 11
8.4 Internet radio portal registration ······································ Page 13
8.5 Setting up Music server ··················································· Page 14
8.6 Sharing media from Windows Media Player ························ Page 14
8.7 Sharing folders on a Windows PC ······································ Page 15
8.8 Sharing folders on a non-Windows computer······················ Page 16
8.9 Setting up iConnect to work with shared folders ·················· Page
16
9. Internet radio mode············································································ Page 16
9.1 Last listened ·································································· Page 17
9.2 Presets·········································································· Page 17
9.3 Favourites ····································································· Page 17
9.4 Browse·········································································· Page 18
9.5 Search ·········································································· Page 19
9.6 My added stations ·························································· Page 19
9.7 Now playing information ·················································· Page 20
10. Music player mode ············································································ Page 20
10.1 Shared Media (from media server)·································· Page 20
10.2 Shared Folders (from media server) ································ Page 21
10.3 Now playing information ················································ Page 22
13. In
fo and Error Messages ···································································· Page 26
14. Troubleshooting – connecting to an internet station ······························ Page 27
15. FAQ ································································································ Page 28
2
11. DAB mode························································································ Page 23
12. FM mode·························································································· Page 25
Page 4
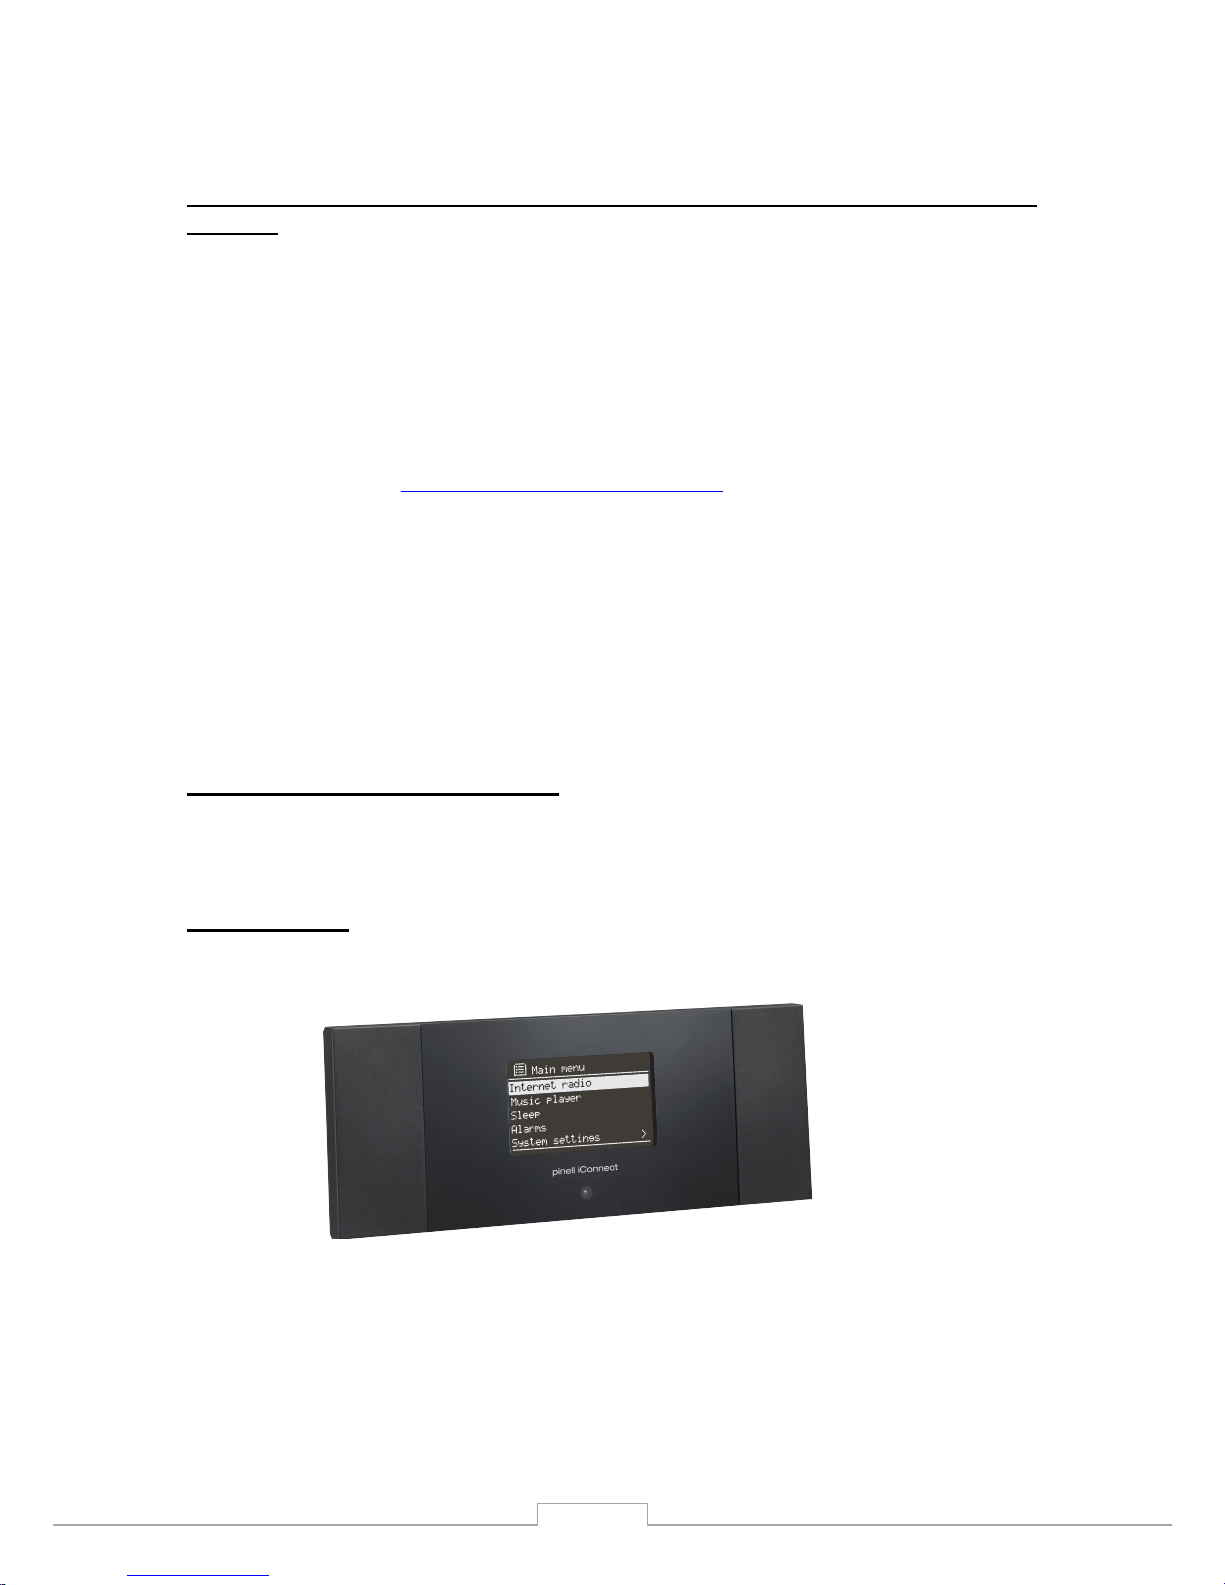
1. A broadband internet connection.
2. B efore you start
Before you can use your internet radio and/or the music streaming function , you ne ed
the following:
2. A wireless access point connected to your broadband internet. Via a router is
recommended.
3. If you r wireless network is configured to use WEP (Wired Equivalent Privacy) or
WPA (Wi - Fi Protected Access) data encryption, it is important that you know your
WEP or WPA code to connect to your network.
4. PC
• Windows Media Player (WMP) 11
can be set up to enable
streaming music files from the PC to the radio.
• Alternatively, Windows shared folders can be used if WMP is
not installed in the PC.
• The PC can also be used to customise the radio’s favourites
via the Frontier Silicon internet radio portal.
3
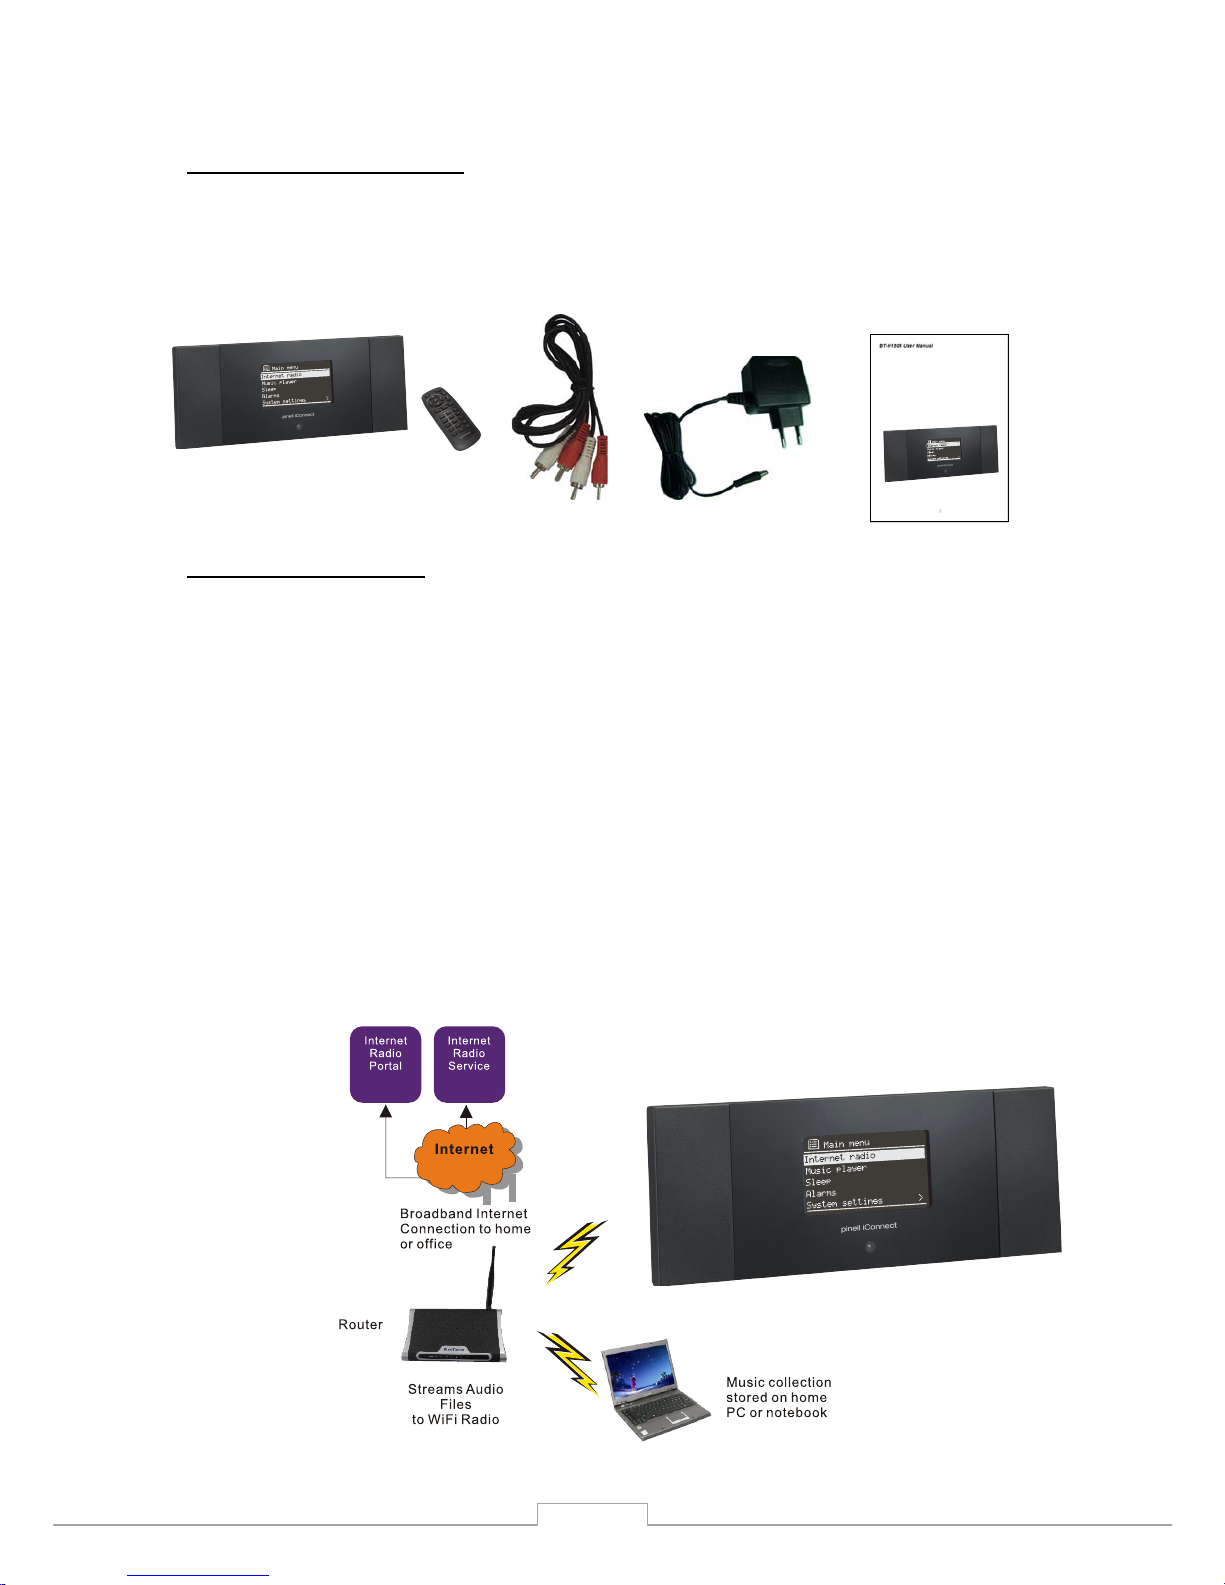
1. iConnect - Main unit
1. Content of package
Please make sure that the following content s are in cluded in the package:
2. Power supply
3. Remote control
4. iConnect User Manual
Page 5
2.1 Difference between the Internet Radio Portal and Radio
Station
There might be some confusion with regards to the d ifference between the Internet radio
portal and the actual internet radio stations.
Internet Radio Portal The portal is the content aggregator which maintains links to
all the available internet radio stations. It can be considered to be
an ‘address book’ , listing the address of all the internet radio
stations and regularly updated with new ones. When a user
navi
gates through the radio menus, the list of stations is returned
by the Portal. The portal used is :
http://www.wifiradio - frontier.com
Internet Radio Station The station is the actual website which contains the selected
station audio stream. Once a user has selected a station through
the Portal, the ra dio then connects directly to the station.
Depending on your wireless router the internet radio should work anywhere within up to
20 - 30 meters of the wireless access point.
Before continuing, make sure that your wireless access point is turned on and conn
ected
to your broadband internet. Please refer to your wireless access point manual to get this
part working.
3. Overview of your iConnect
After taking your iConnect out of the package, please spend some time to familiarize
yourself with its features.
3.1 Front P anel
There is no ke ypad or buttons on your iConnect. All is working entirely from the enclosed
remote control. The design is made simple and user - friendly so all na vigation is handling
by the R/C.
4
Page 6
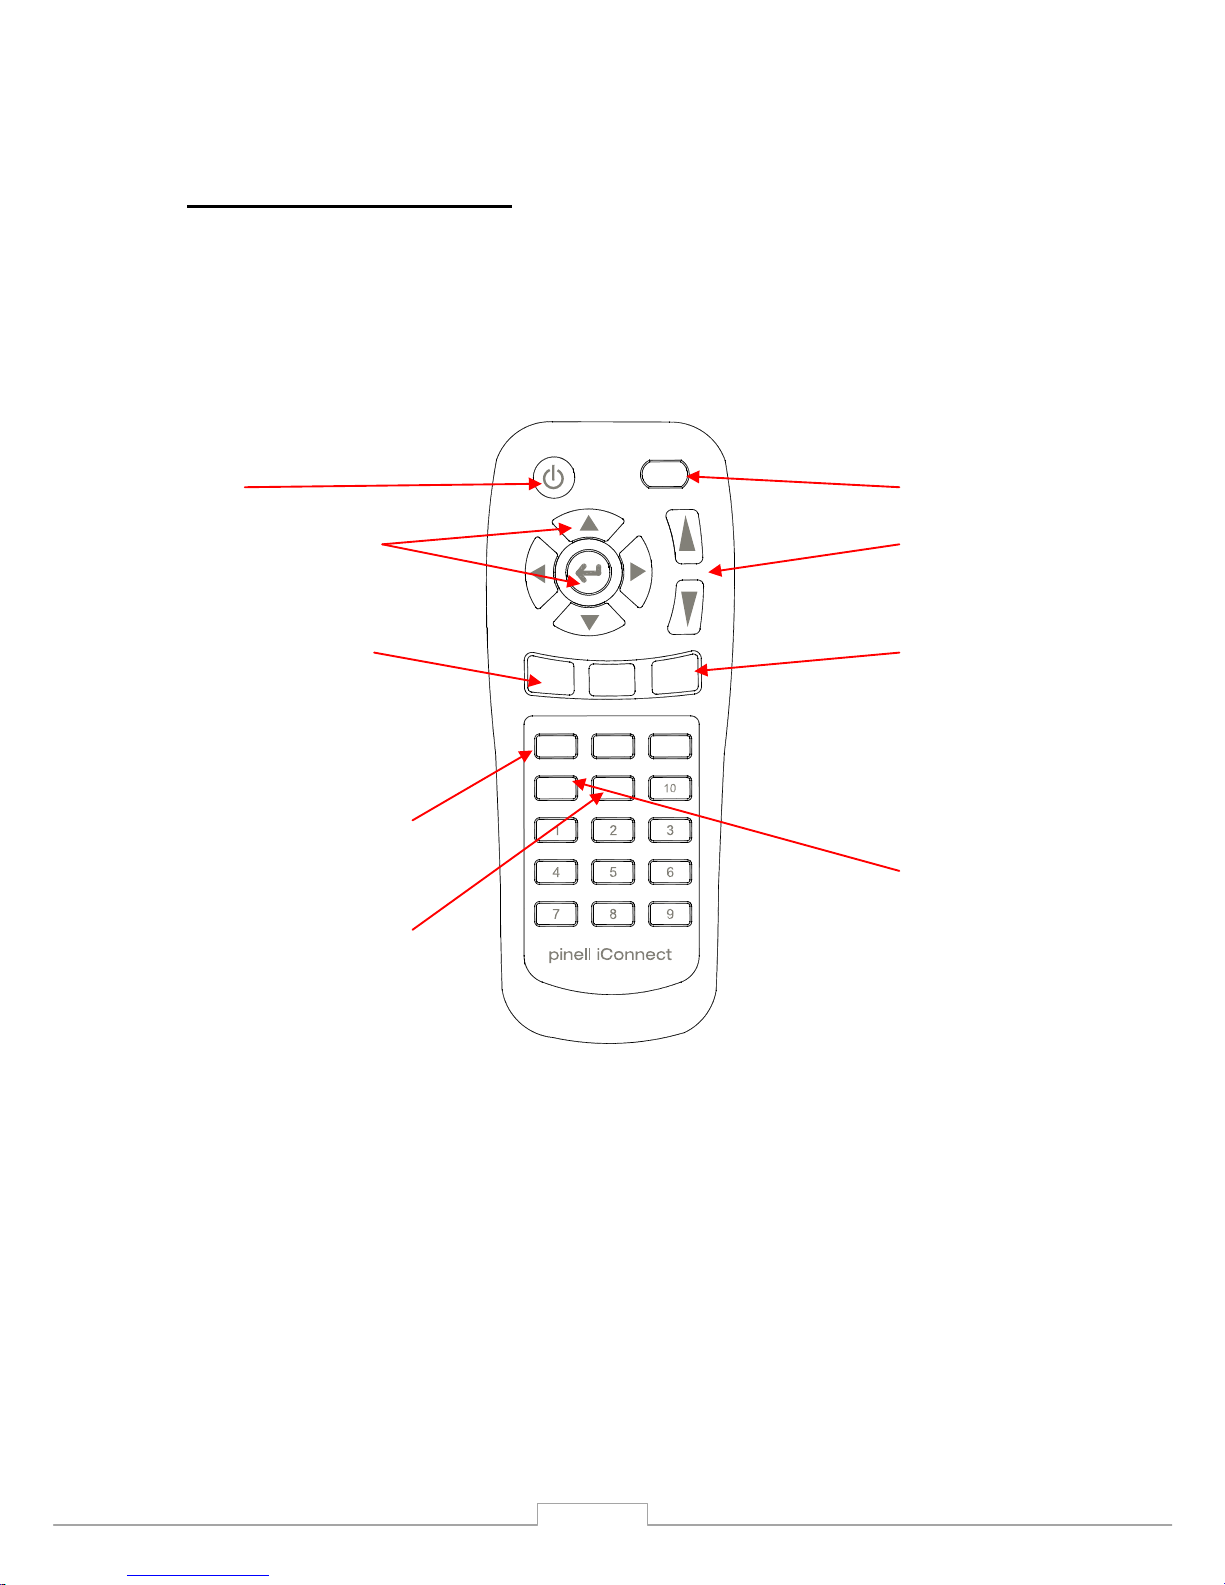
3.2 Remote control (R/C)
5
Your Pinell iConnect Audio team
Power On/Off
Mute (Sound On/Off)
Navigaon and select buon
Volume Up/Down
Menu buon (Enters Menu)
Mode buon (select
DAB/FM/Internet/Music
Player funcon)
Snooze, Alarm and me sengs
Scan buon (start scan)
Info Buon (changes radio info)
SCAN INFO
SNOOZE ALARM TIME
MENU
LIGHT
MODE
VOLUME
MUTE
Page 7
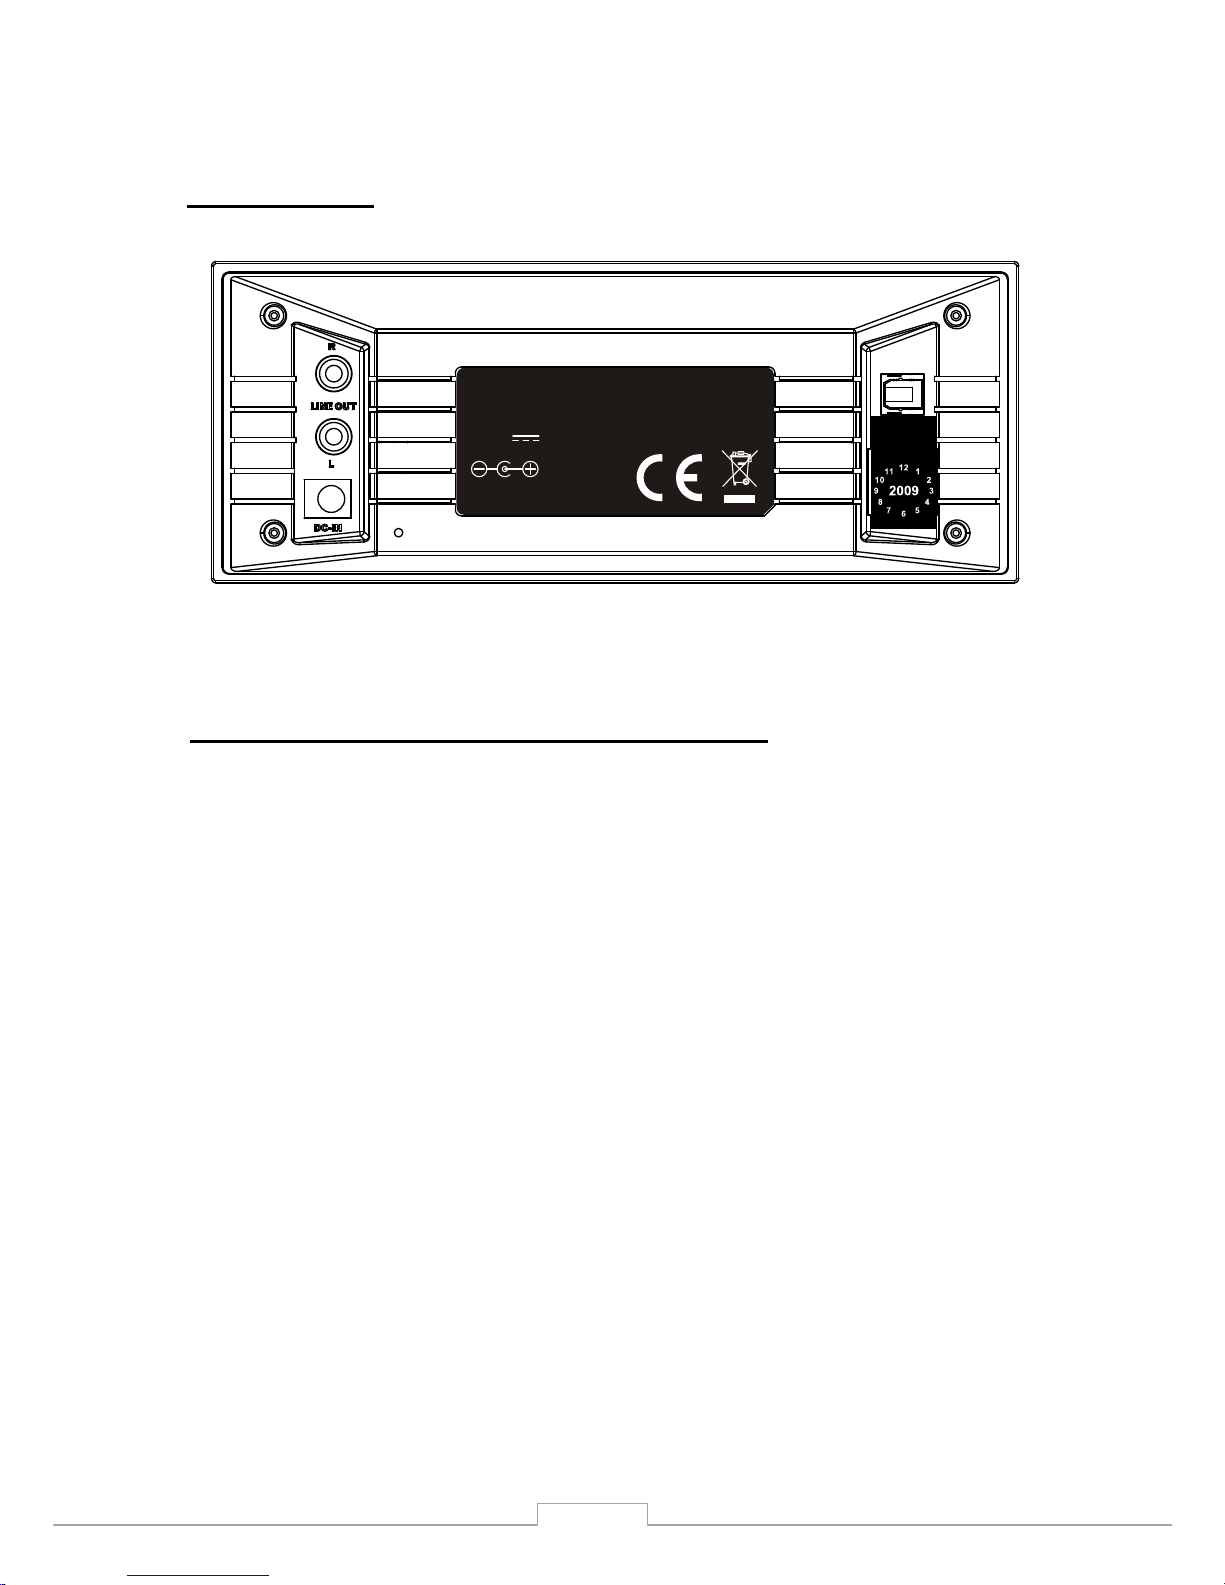
3.3 Back Panel
Connectors on this current model is: 2 x Stereo RCA, Optical output and power connector
Connect RCA (phono) cable to your existning audio system.
4 . General menu navigation / Menu Structure
The Wi - Fi radio features three types of menu. These are:
• The Main menu
This is the top level menu which allows users to enter the different mo des, setup
the radio, and view information about the radio (for example software version,
product ID).
• The Internet Radio Station List menu
This is the menu that allows users to access the different internet radio services.
This menu comes direct from the Internet Radio portal.
• Th
e Mode menus for the various modes
The mode menus are so called because they s how the functions available within
the context of each of the modes. Pressing the MENU button anytime will take
you the mode menu of the relevant mode the radio is currently in. Each context
menu provides an entry called main menu which takes you back to t he MAIN
menu.
To navigate to the different menus you must use the ARROW buttons on th
e remote
control . This is general for all menu items. Use ARROW keys to find the menu you wish
to navigate to the desired menu item. Then press ENTER to select. When menu item is
selected pressing right ARROW key will also confirm selection.
F or ex ample to navigate to the MAIN MENU while in INTERNET RADIO MODE press left
ARROW button and the Menu is showing on display. Turn the keys UP/DOWN until MAIN
MENU is selected. Pr ess ENTER K
ey to select MAIN MENU.
Pressing MENU on front panel will take you to the Context Menu of the present mode of
iConnect(Internet radio,etc.)
6
Model:Pinell iConnect
FM/DAB/DAB+ Internet Adapter
9.0V 1000mA
ANT TT Micro, Norway
OPTICAL
Page 8
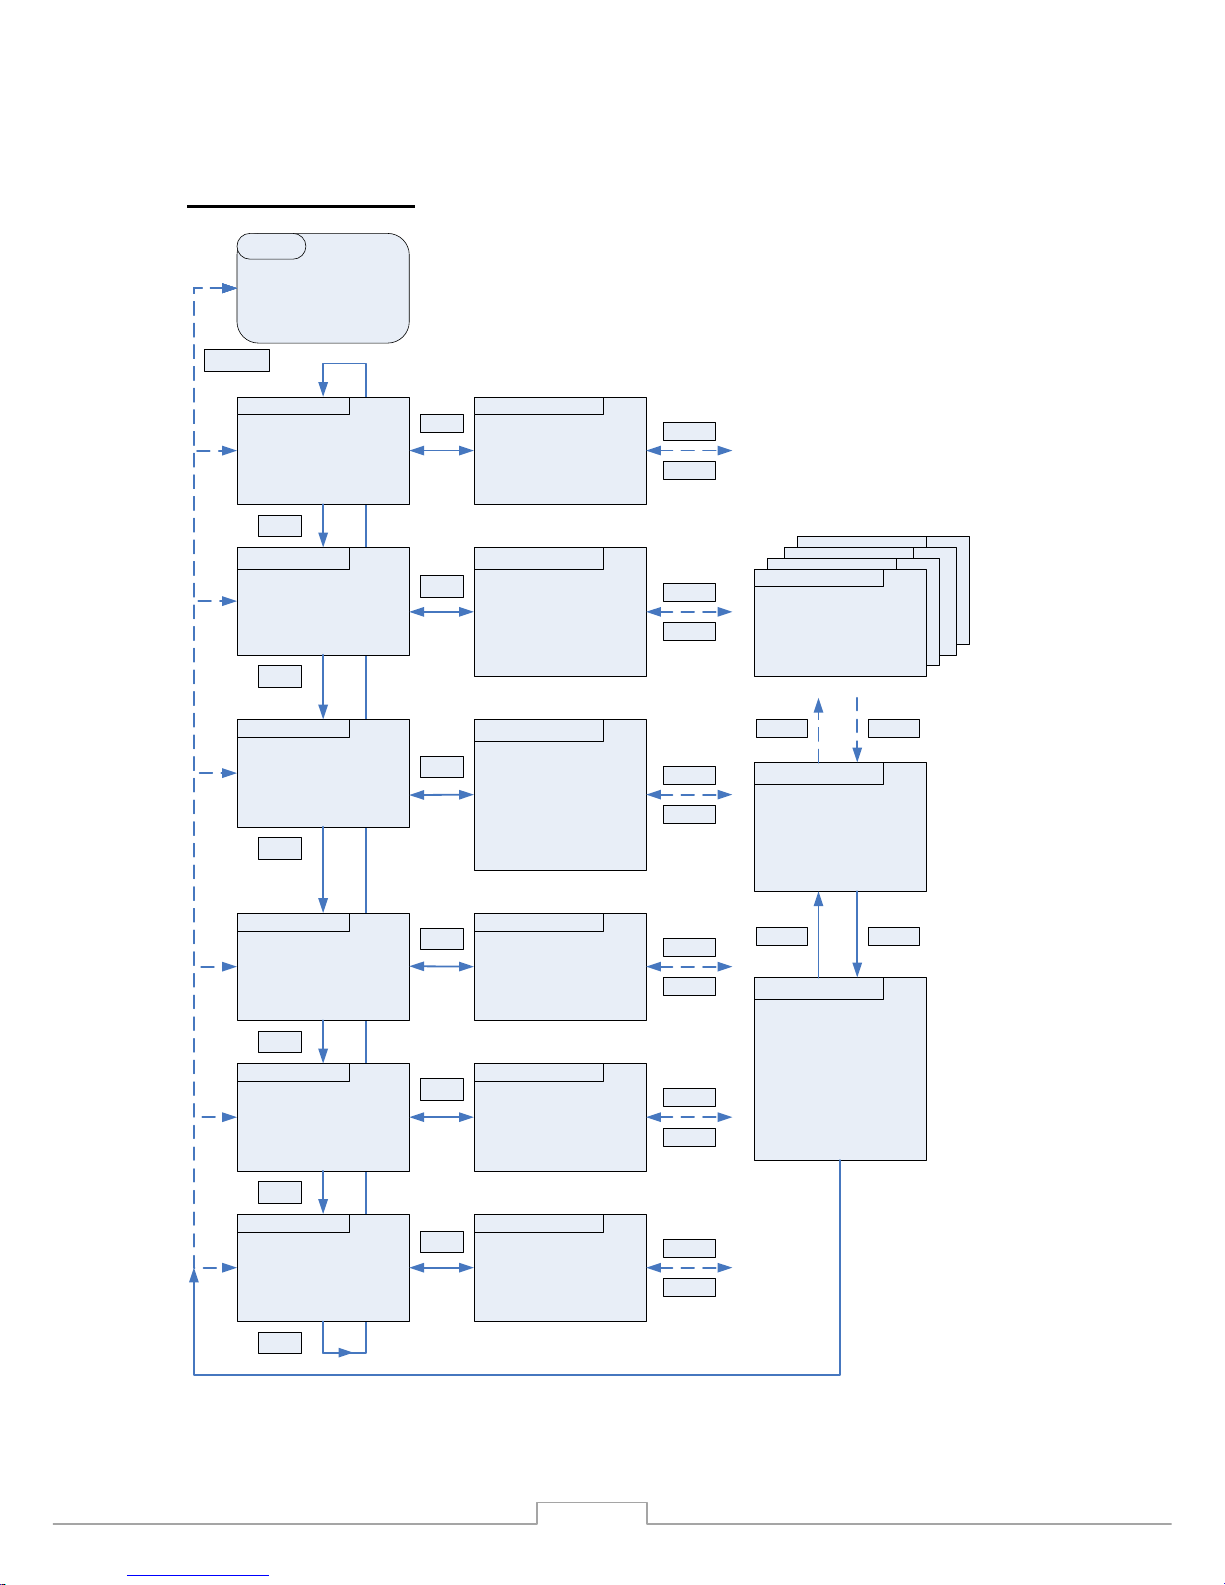
5. Menu Structure
(not all features shown are available for this model)
Clock / alarms
Splash /
Now playing
Internet radio
Standby
Splash /
Now playing
Music player
Mode
Splash /
Now playing
DAB radio
Mode
Splash /
Now playing
FM radio
Mode
Splash /
Now playing
Aux in
Mode
Splash /
Now playing
iPod
Mode
Last listened
Station list >
System settings >
Main menu >
IR Mode menu
Menu
Shared media >
Shared folders >
USB
PC setup >
System settings >
Main menu >
MP Mode menu
Menu
Station list >
Local scan
Full scan
Manual tune >
DRC >
Station order >
System settings >
Main menu >
DAB Mode menu
Menu
Scan settings
Audio settings
System settings >
Main menu >
FM Mode menu
Menu
System settings >
Main menu >
iPod Mode menu
Menu
System settings >
Main menu >
Aux in Mode menu
Menu
Mode
Network >
Time / date >
Languages >
Factory reset
Software update >
Info
System settings
Internet radio
Music player
DAB
FM
iPod
Aux in
Sleep
Alarms
System settings >
Main menu
Select
Back
Select
Back
Select
Back
Select
Back
Select
Back
Select
Back
Option
Option
Menu >
Menu >
Option
Option
Menu >
Menu >
Option
Option
Menu >
Menu >
Option
Option
Menu >
Menu >
Submenus
Select
Back
Select Back
Modes and menus overview map
Standby
Alarm / snooze
7
Page 9
6. GENERAL INFO and SETTINGS
Conventions used in this manual
Button (press) Physical button on the keypad
Option (select) Menu option shown on the display
Name Menu, screen or oth er name
iConnect has numerous features which require a small degree of setup before users are able
to fully use all the functionalities of the radio. The Main Menu System Setup menu has a
series of options that allow system - wide settings to be altered.
The se settings are:
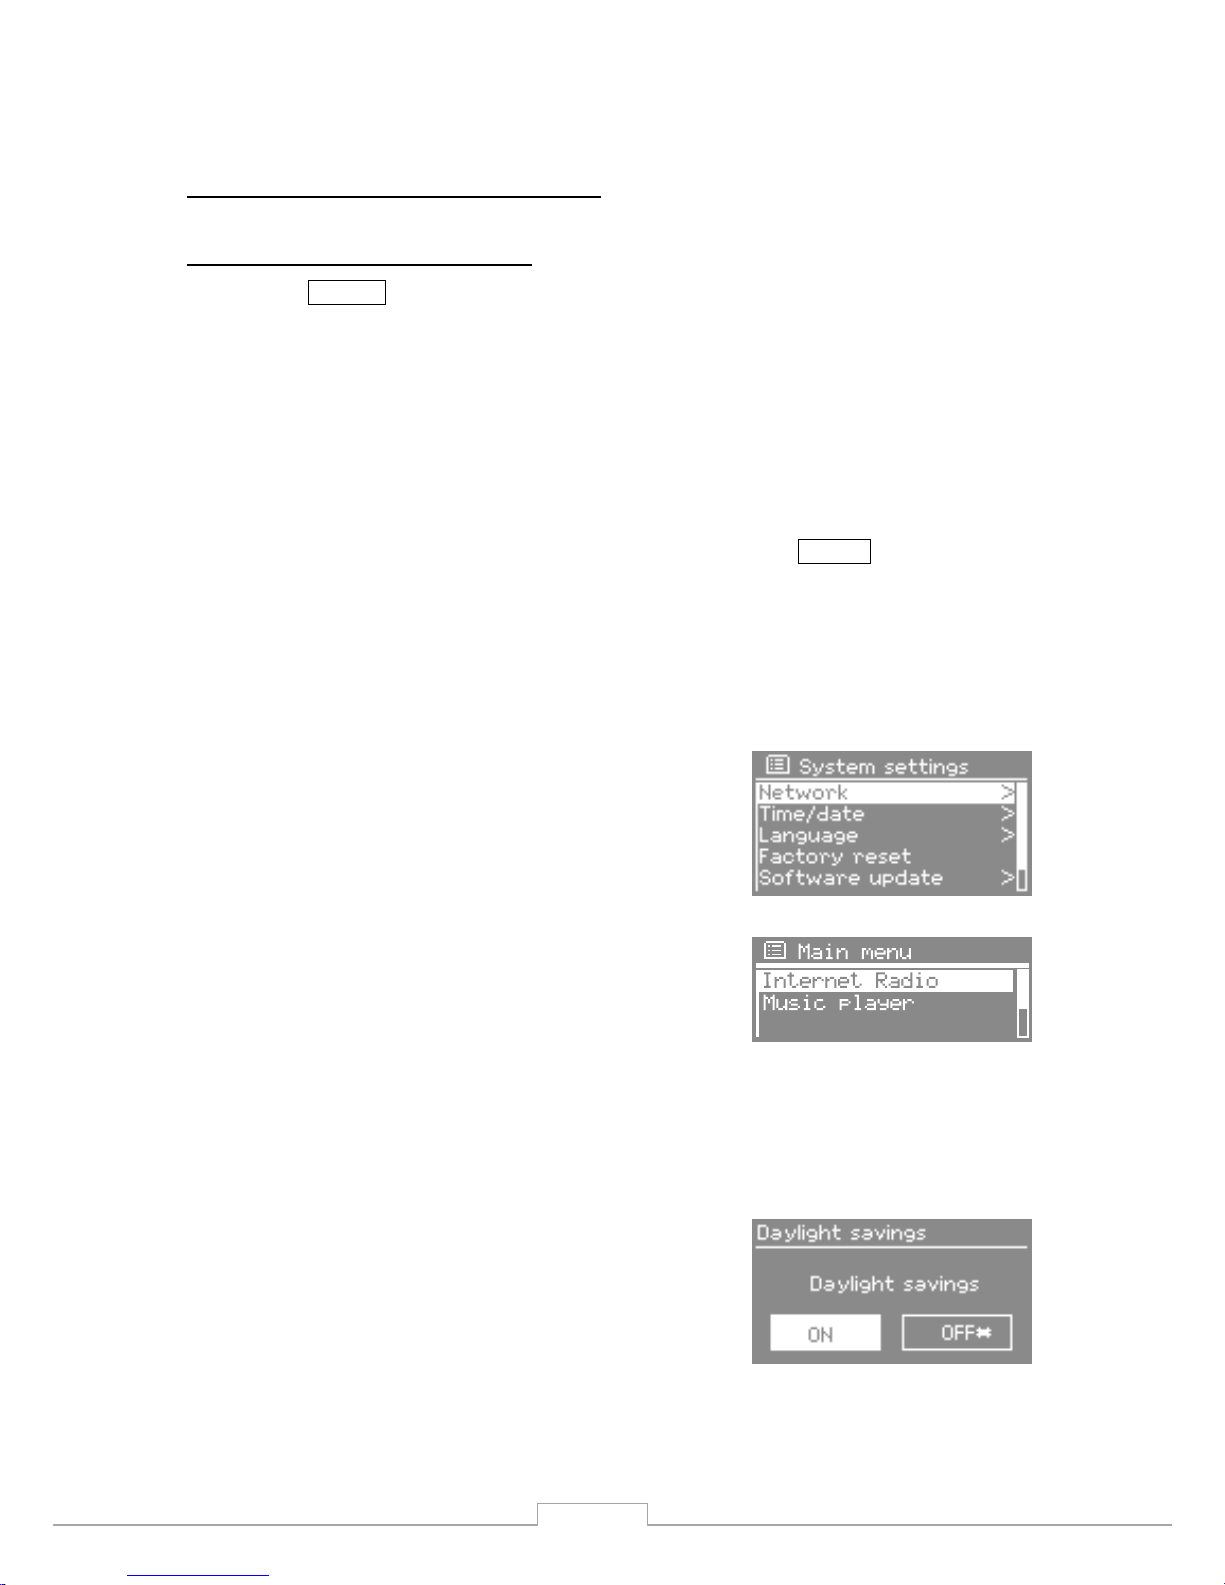
Adaptor
has basically three types of menu. Use the Select control to step
through and select options. A scroll bar on the right of the screen shows if
there are further options above or below those visible.
In addition, each mode menu has tw o final
options: System settings > and Main
menu > . The ‘ > ’ indicates options leading
to further menus.
The System settings menu allows access
to system settings and information such as
network, time, language and software
update.
Menus with more option s than will fit on
one
screen have a scroll bar to the right.
The Main menu allows access to all
modes plus sleep and timer functions.
Some menus, for example the System settings menu, have several
submenus.
Dialogue screens
Dialogue screens are shown to allow the
user to change settings. They vary in
complexity from simple Yes/No options up
to the scrollable network password input
screen.
As with menus, the selected item is shown
with a white background.
Dialogue screens mark the current setting
with
an asterisk (*).
8
Page 10
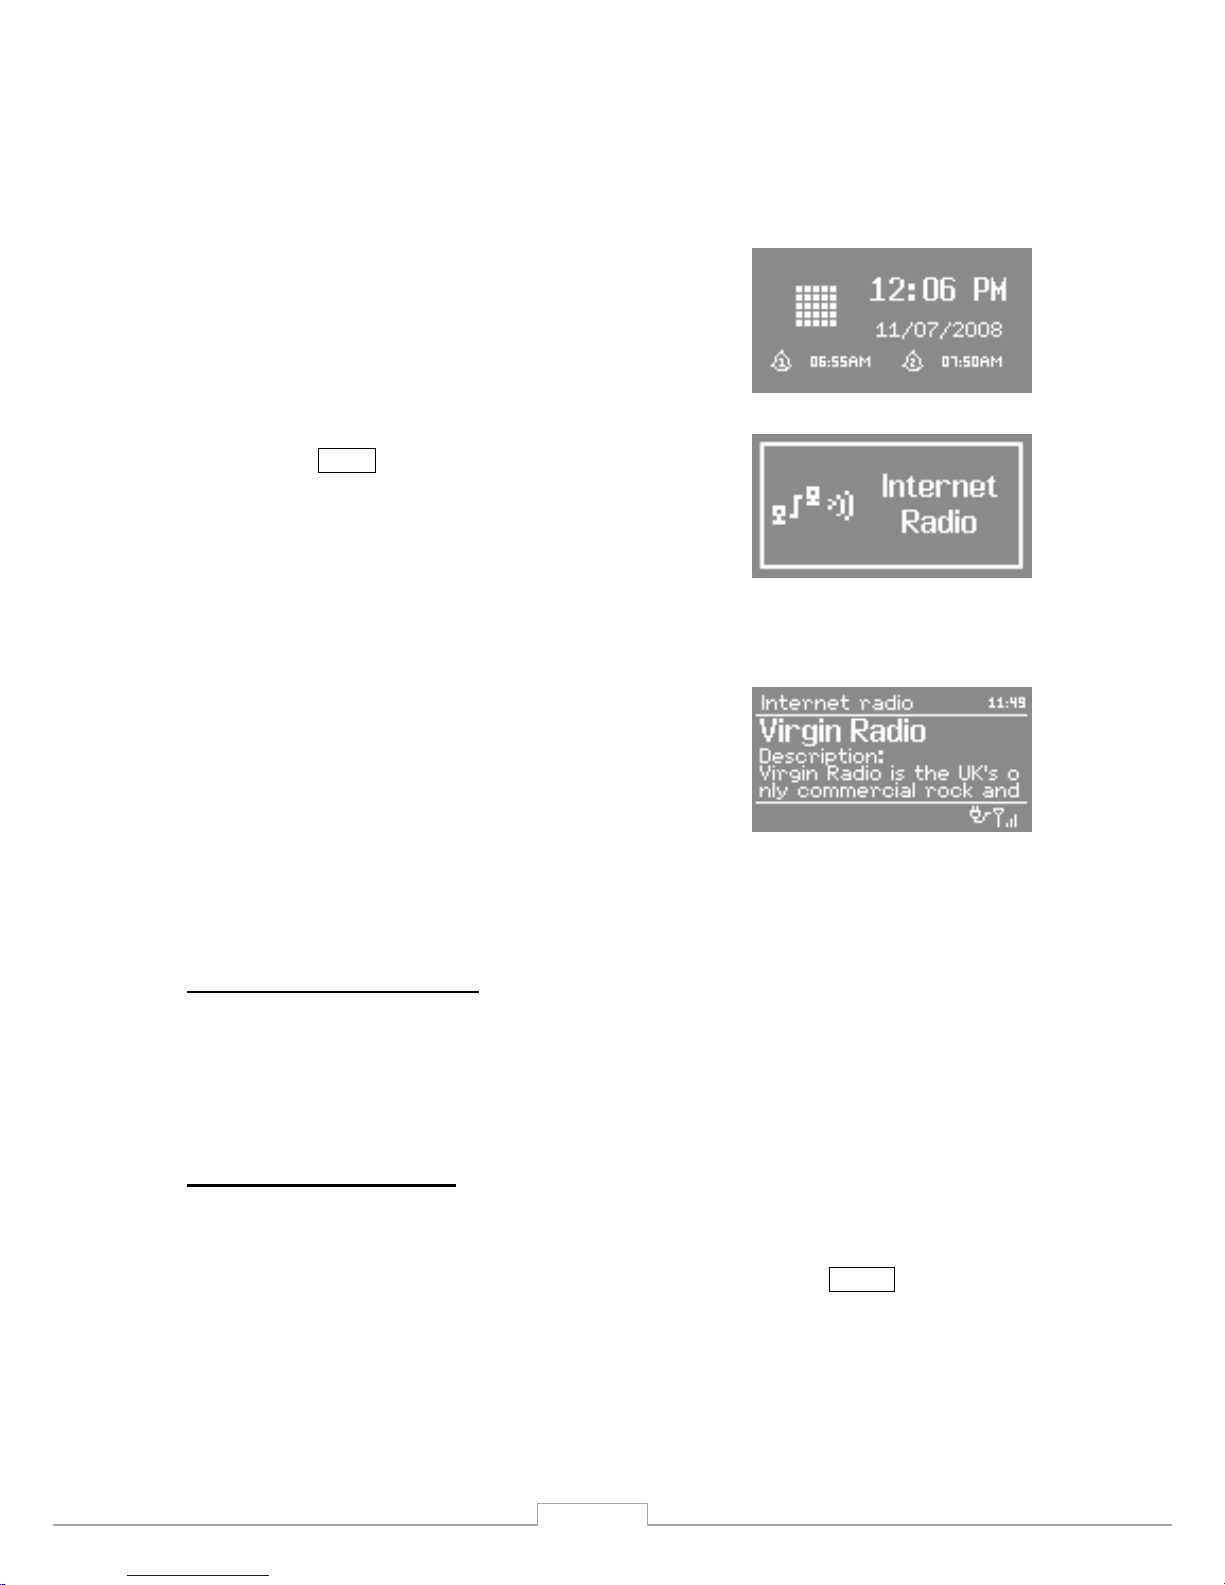
Display screens
iConnect has basically three types of display screen:
The Standby screen shows the time,
date and any active alarm times.
As you cycle through the play modes using
Mode , iConnect shows a splash screen
foreach mode. After one second,iConnect
enters the selected mode and tries to start
playing the last station or track that was
playing in that mode. If this is not possible,
iConnect will try to connect to the selected
source by scanning for stations,networks,
or prompting for user input as appropriate.
The Now playing screen shows
information about the audio source and
track now playing, where available.
In addition, there are screens for information such as volume, mute and
information/error messages.
7 . Turning on iConnect
Preparing iConnect for operation:
1. Place iConnect on a flat surface.
2. Connect power cable and turn on the radio.
8. Setup the iConnect
8.1 Setting the language
The default language is English. To change this, select Menu > System
settings > Languages > then select your language.
9
Page 11
8.2 Setting the time/date
The time and date can be updated manually or automatically.
Setting manually is simpler, but the time and date are lost when power is
removed.
Setting to update automatically is a little more complicated at first, but the
time and date are automatically synchronised with external clocks, so it
should only need to be done once. Auto update is generally more accurate.
To enter the Time settings menu, select
Menu > System settings >
Time/date >
Manual update
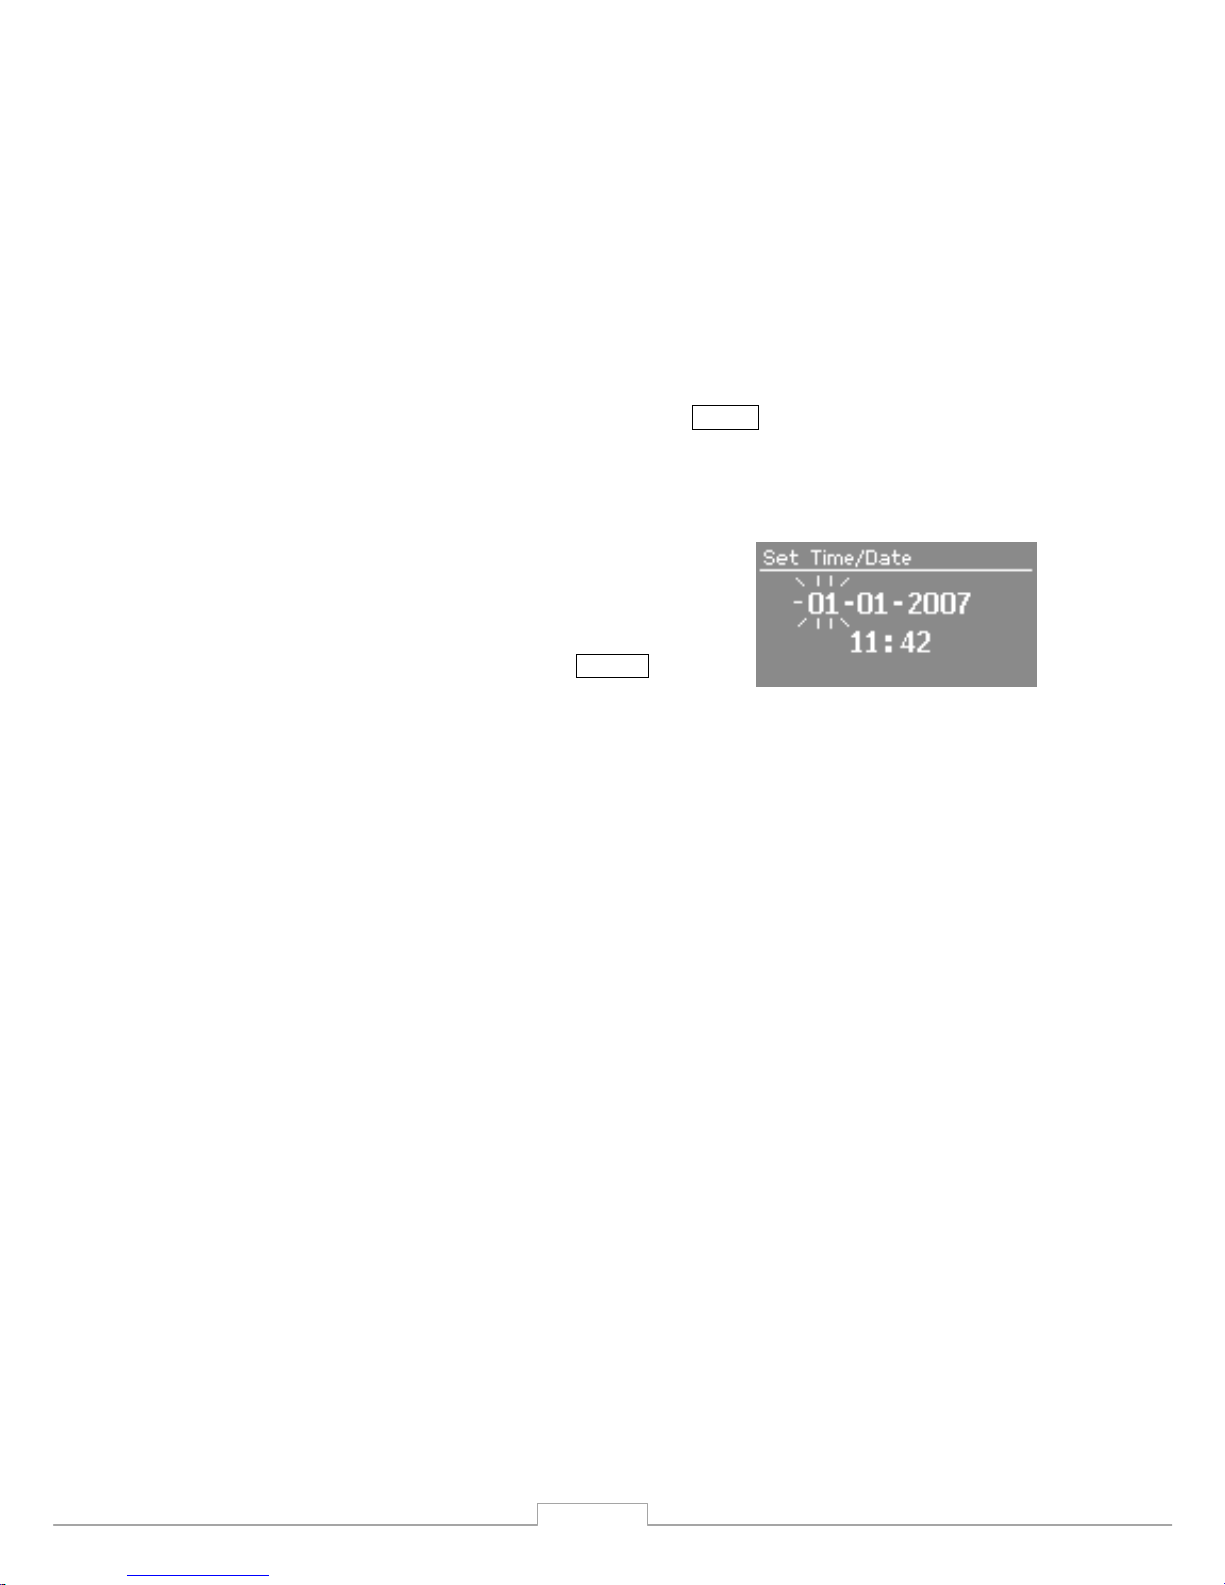
Select Set time/date >
The date and time are displayed as dd - mm yyyy and hh:mm AM/PM with the first
value, dd active (flashing).
Adjust each value with the Select control.
As each value is adjusted, the next value
becomes active and flashes.
When you select the final value (minutes or
AM/PM, depending on whether the clock is
set to 12 or 24 hour mode), the display
reverts to the now playing screen and
shows the newly updated time.
Auto update
Auto update works with data sent over the network (This function is only
available in specific models) . The clock is only updated when in a
corresponding mode, so it is best to select a mode you use regularly.
o Network uses a time signal sent from the Frontier Silicon Internet
radio portal when in Internet radio or Music p layer modes.
1. Select Auto update > then select Update from Network .
2. Set your time zone through Set time
zone > .
3. If your country uses daylight saving, the automatically updated time
may be wrong by one hour. When daylight savings are in effect (during
the sum mer), turn on the Daylight savings option through
Daylight savings > ON
iConnect will auto-update from the selected source when time information is
available.
12/24 hour display
To change between 12 and 24 hour display, select Set 12/24 hour and
then select your preference.
10
Page 12
8.3 Connecting to a network
For Internet radio and Music player modes, you need a network connection.
To connect iConnect to your network, you need a Wi-Fi wireless router,
together with password key if set.
For Internet radio, Internet software a nd automatic time/date updates, the
router must have a broadband Internet connection.
When you select Internet radio or Music player mode, iConnect tries to connect
to a network. If this is the first tim
e it has tried to connect, or if the stored
networks are no t accessible, the Network wizard starts. To run the Network
wizard manually, select Menu > System settings > Network >
Network wizard .
Once the wizard starts, enter the following information:
o If not already set, WLAN region (select country/region from li st),
o Network name (select your network from the list),
o If connecting to an encrypted wireless network, the key (password).
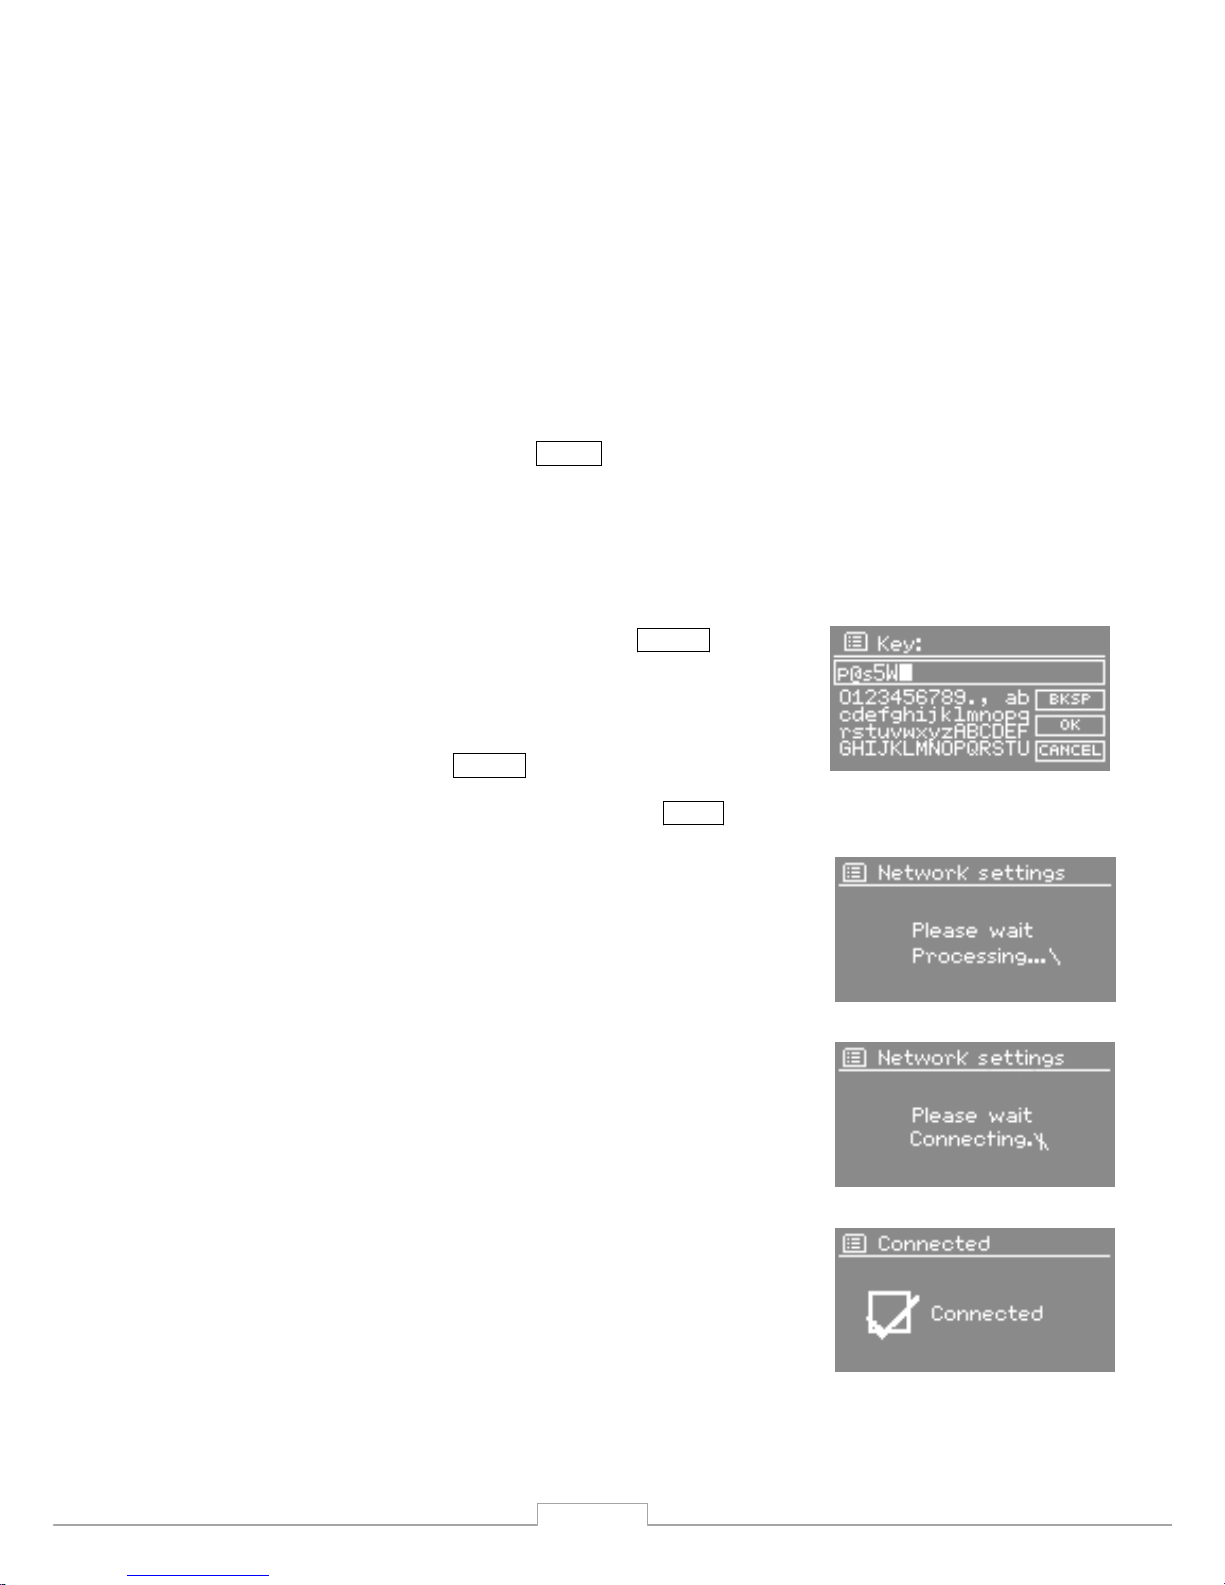
To enter your key, use the Select control to
move the cursor through the characters and
select. As each character is selected, the key
is built up near the top of the display.
There are three options accessible by
turning Select back before the first
characters (0123…) – Backspace , OK and
Cancel . You can also use the Back button
to erase characters.
Once you have completed ente ring the key,
select OK , and iConnect will try to connect
to the selected network.
If connecting fails, iConnect returns to the
password entry screen.
If the network connection is lost, iConnect automatically tries to reconnect.
11
Page 13

Network profiles
iConnect remembers the last four wireless networks it has connected to, and
automatically tries to connect to whichever one of them it can find.
You can see the list of registered networks through Menu > System
settings > Network > Network profile > . From here you can de lete
unwanted networks by turning and pressing Select then confirming delete
Yes .
Other options
There are also other options for viewing and manually altering network
settings from Menu > System settings > Network > . These options are
not normally nec essary, but users experienced with networking may find
them useful for diagnosing and fixing network problems.
12
Page 14
8.4 Internet radio portal registration
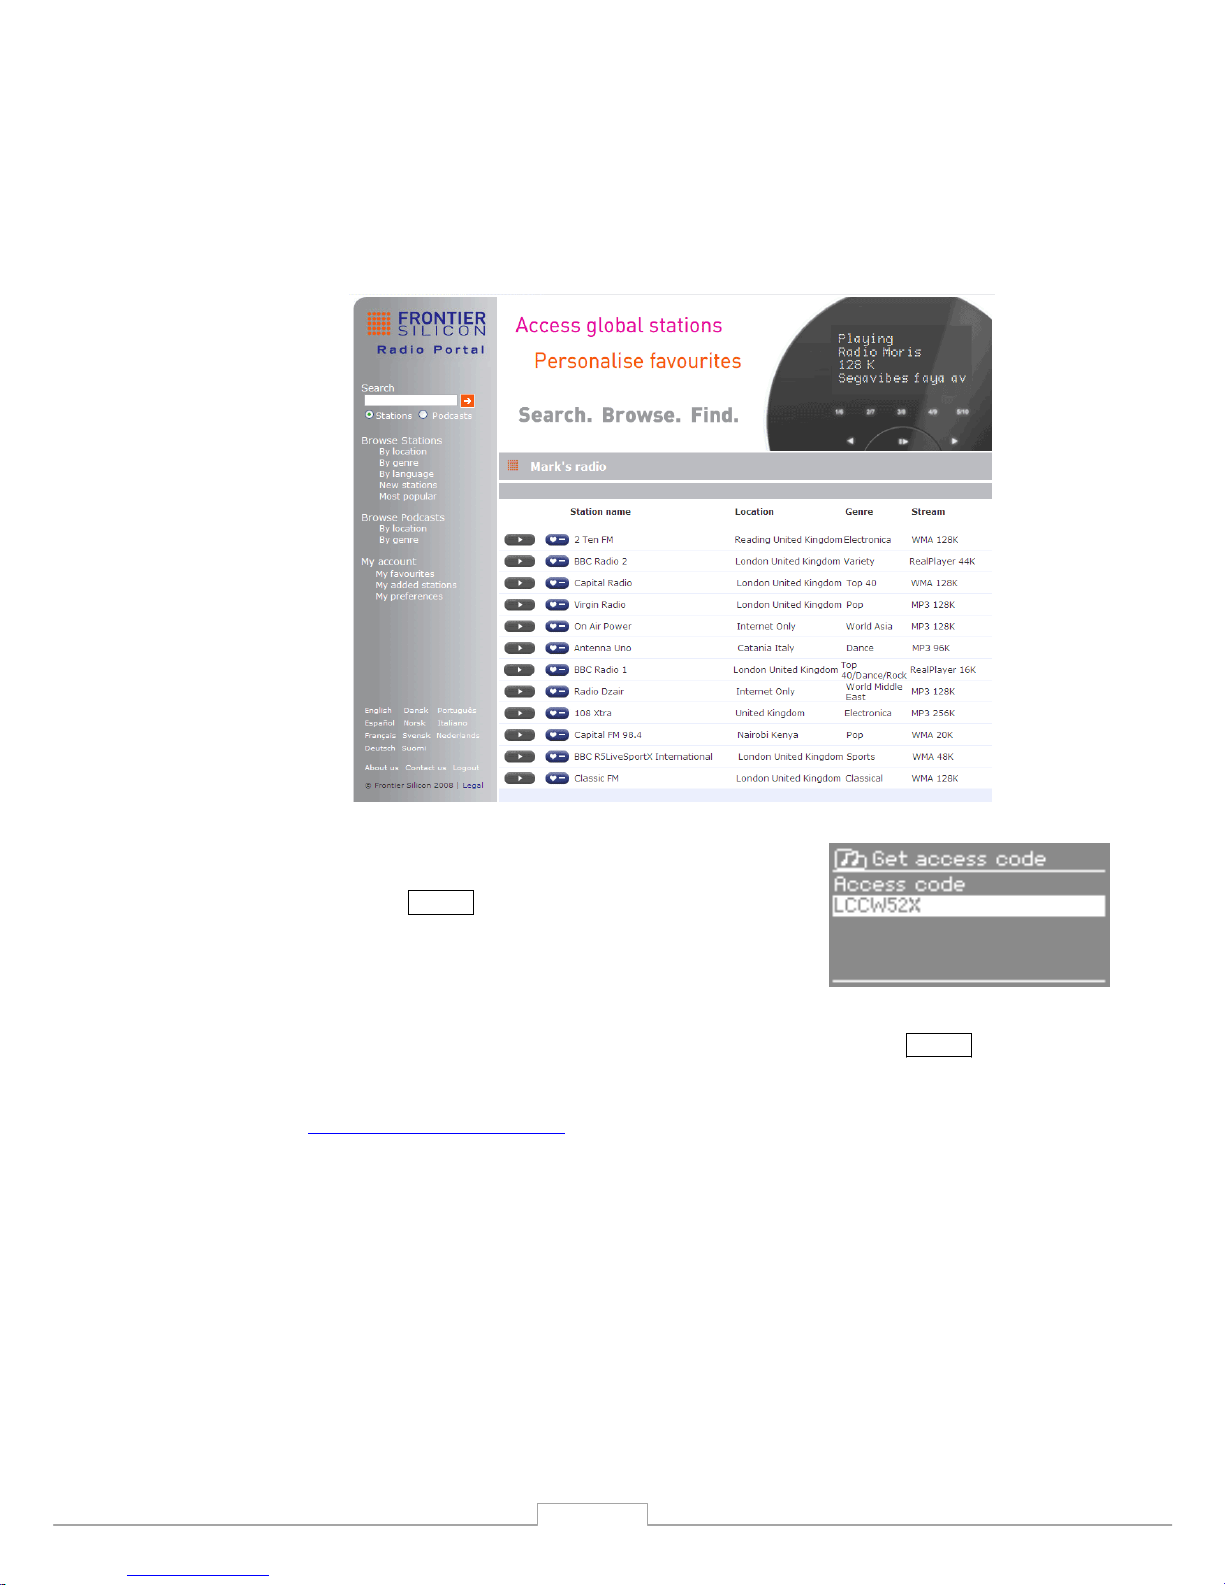
iConnect operates with The Frontier Silicon Internet radio portal website which
allows you to organise your fav ourites lists and also listen to Internet radio on
a computer.
To register your iConnect with the portal, first get
your radio’s unique portal access code by
selecting Menu > Internet Radio > Station list >
Help > Get access code >.
Write down the access code.
Note: Do not confuse the portal access code with the Radio ID (from Menu >
System settings > Info .)
On an internet - connected computer, access the portal website at
www.wifiradio - frontier.com
.
If this is your first v isit to the portal, register for a new account, entering
the following information:
o access code,
o your e - mail address,
o password,
o radio model ( iConnect).
If you already have an account and wish to add an additional radio, log in to
your account and select My prefe rences > Add another Wi - Fi radio .
Once your radio is registered with the portal, you can immediately use the
favourites and added stations features.
13
Page 15
8.5 Setting up a music server
In order for iConnect to play music files from a computer, the computer must
be set up to share files or media.
UPnP media sharing allows devices like iConnect to play music from a
shared media library, navigating through tag menus such as Artist, Album
or Genre. If you are running a suitable server system such as a PC with
Windows Media Play er 10 or later (WMP), and your music library is well tagged, then it is recommended to use m
edia sharing. Only the UPnP server
needs to be set up.
Note: iTunes does not currently work as a UPnP media server, but there are add -
ons available to work with an iTunes library.
Folder sharing (CIFS) allows devices like iConnect to browse folders on a
network drive for audio files. This is a good alternative if you cannot use
media sharing, and an alternative way to find files even if you have media
sharing set up. The c omputer needs to be se
t up to share folders, and if this
is done with password control, you also need to enter the user name and
password into iConnect.
8.6 Sharing media with Windows Media Player
The most common UPnP server is Windows Media Player (10 or later) . To
set up WMP for media sharing, perform the following steps:
1. Ensure that the PC is connected to the network.
2. Ensure that the radio is powered on and connected to the same
network.
3. In WMP, add to t
he media library the audio files and folders you want
to share with iConnect(Library > Add to Library…).
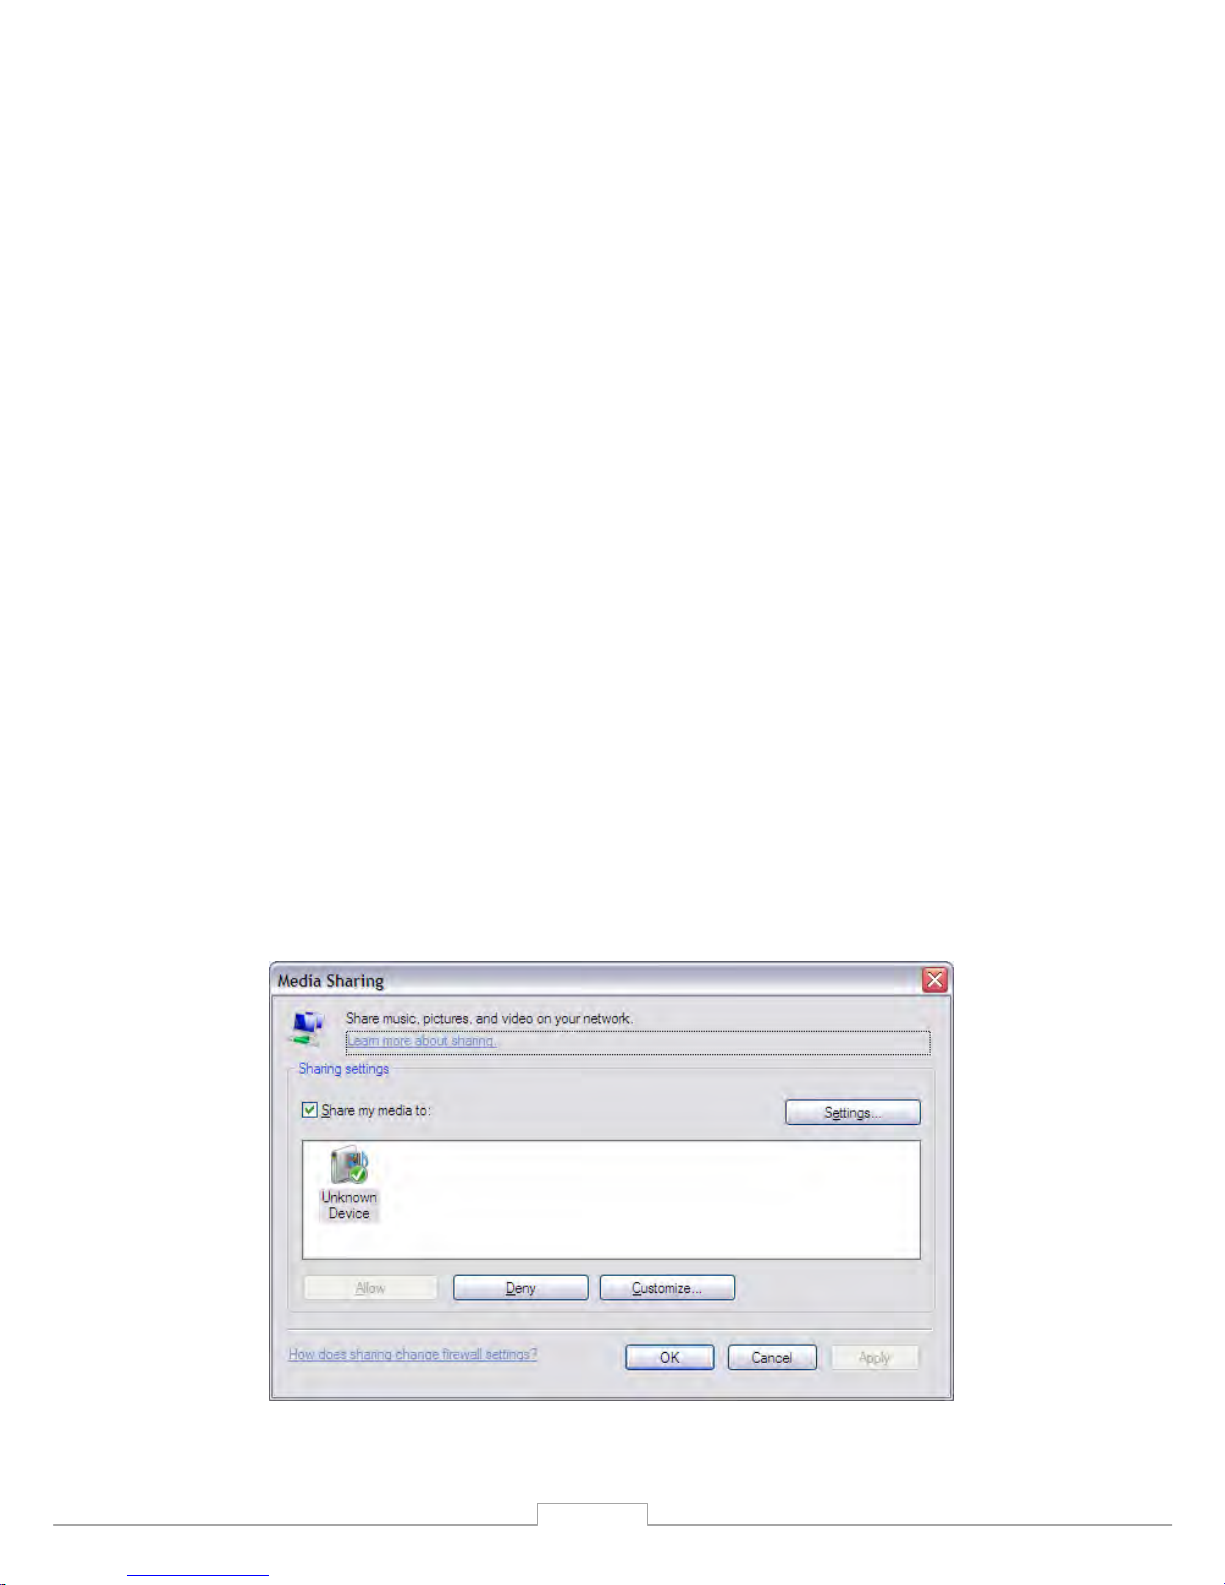
4. In WMP, enable media sharing ( Library > Media sharing… ).
14
Page 16

iConnect is listed as “Unknown Device”. Make sure that the radio has access
to the shared media by selecting it and clicking Allow. You can also set a
name f or the shared media in Settings… Click OK to close the dialogue
boxes.
The PC is now ready to stream the music to the radio.
8.7 Sharing folders on a Windows PC
To share folders in Windows, the PC must first be a member of a domain or
workgroup. Once this is setup, folders can be sh
ared from Windows Explorer
(My Computer).
Domain/workgroup configuration
The Domain configuration item can be found on a Windows XP machine as
follows:
1. From the start menu, select Control Panel > System > Computer
Name tab.
The Computer’s Domain or Workgroup is displayed in this tab.
2. If the PC is not a member of any Domain or Workgroup then one must
be joined. To do this click on the change button and enter the name of
the domain (the d
efault for Windows XP is MSHOME).
3. A reboot o f the PC may be prompted if the Domain or Workgroup has
been changed.
Setting up a new user account (Windows XP)
The Wi - Fi Radio requires a user account to be set up on each PC that you
wish to browse. By default most PCs have at least one user account. Th e
user name and password (optional) need to be the same on each PC, as the
Internet Radio only stores one user name and one p
assword. For windows
XP this can be set up as follows:
1. From the start menu, select Control Panel > User accounts .
2. From this screen click ‘ Add … ’, and enter the new user name and the
Domain/Workgroup setting noted above. Select the type of user
(restricted) and then select finish.
3. Select the user just created, select ‘ Reset Password … ’ and enter a
password for this user.
4. Note the user name and password.
Note: For Windows Vista: Use
rs have to turn on the Guest account via manage
user accounts in the control panel, then add access to either ‘Everyone’ or
‘Guest’ on the shared drive. You could create a new account for the internet
radio, with a password, if you are concerned about security. The Guest
account has no password by default, so iConnect will connect to it from its
factory default settings.
15
Page 17
Configuring a shared drive
From the Start menu select My Computer or Windows Explorer and nav igate
to the directory you wish to share. Right click on the folder and select
Sharing and Security. Configure the shared drive as read - only, and ensure
that the user created above has read access to the share.
8.8 Sharing folders on non - Windows computers
It is beyond the scope of this manual to describe how to share folders on al
l
computer systems. Please refer to your operating system documentation to
find out how to share folders on non - Windows computer systems. If you
configure shared folders with user name and password security, note these
values.
8.9 Setting up iConnect to work with shared folders
To set up iConnect to playback audio stored on password-protected shared
network drives, you need to enter a user name and password. To do this,
from Music player mod
e, select Menu > PC settings > Username and
enter the user name then PC settings > Password and enter the
password.
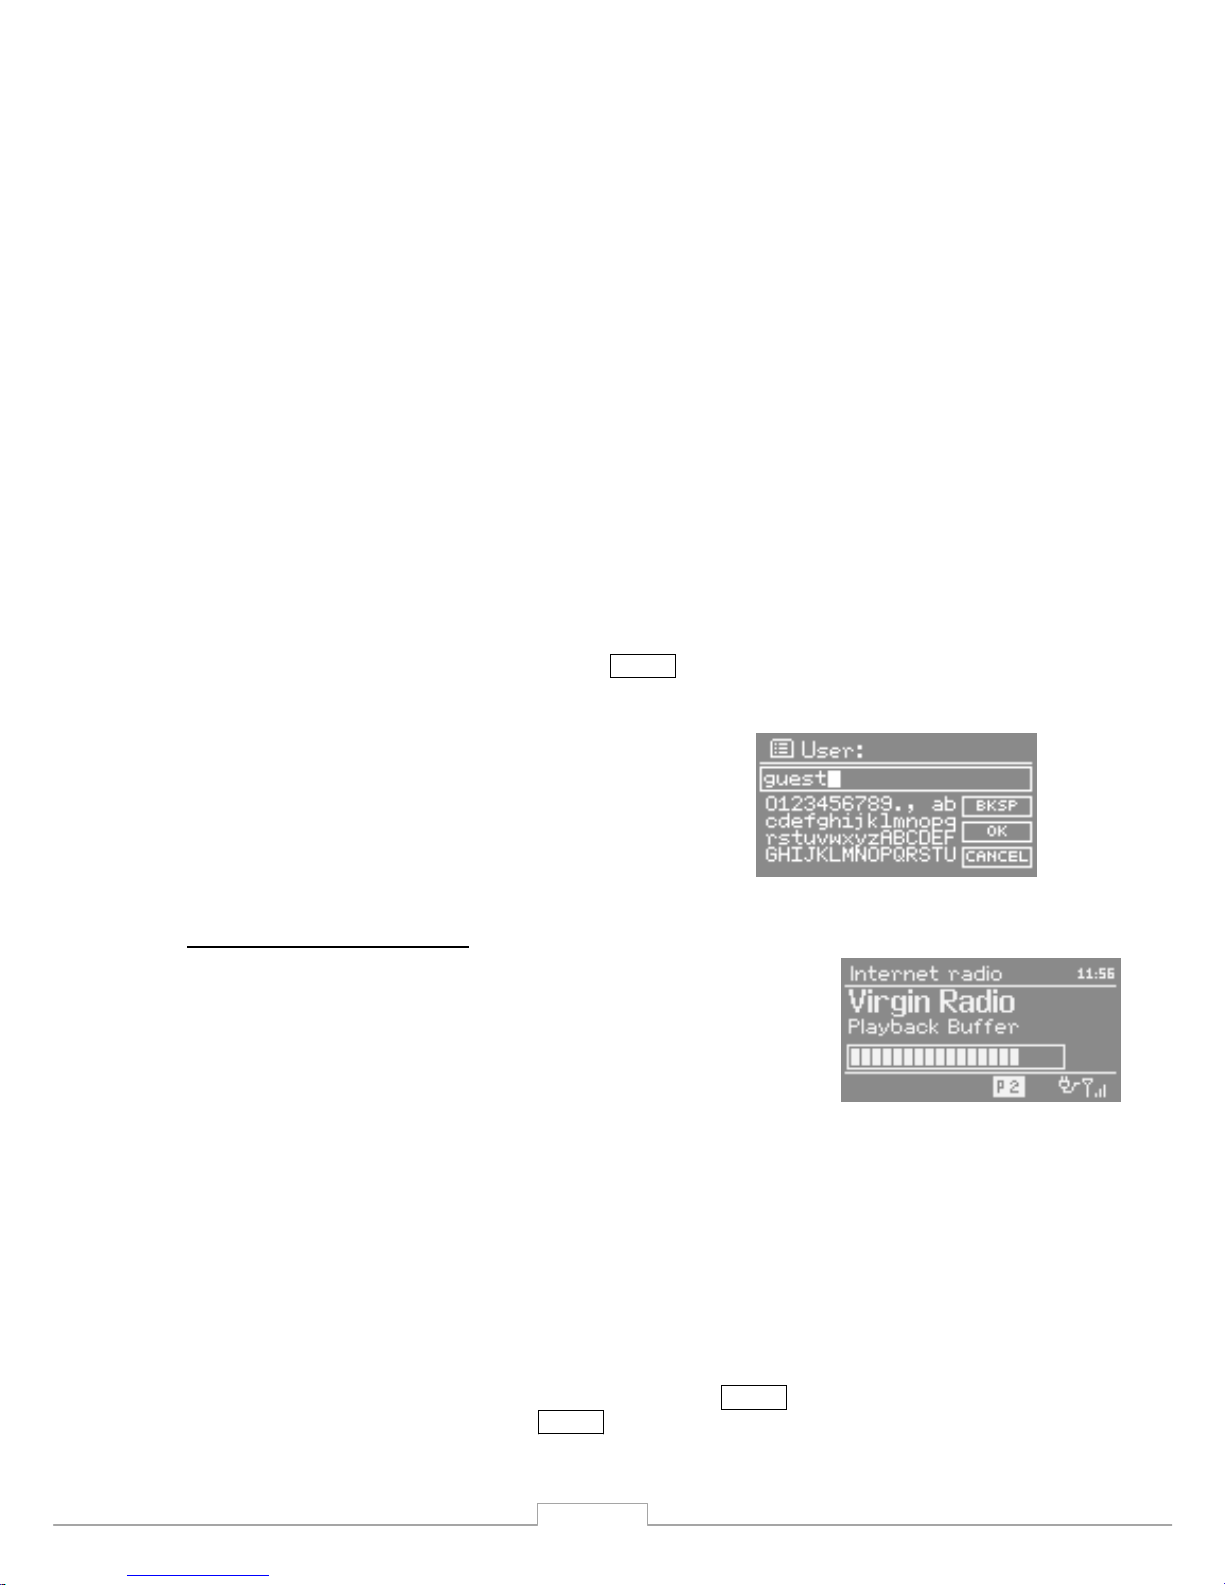
Enter a keyword by selecting characters
then OK . The user name and password
entry screens are similar in operation to the
Wi - Fi password ent ry screen.
The default user name is ‘guest’.
9. Internet radio mode
iConnect can play thousands of radio stations and
podcasts from around the world though a broadband
Internet connection. When you select Internet radio
mode, iConnect contacts the Frontier Silicon Internet
radio portal to get a list of stations, organised into
different categories like Country , Most popular and
Genre . Once you select a station, iConnect connects
directly to that station.
The portal also enables multiple lists of favourite stations that you can
personalise, for example Andy’s stations , Jo’s favourites , Talkshows . To use
the favourites feature, register your radio with the portal website as
described on page 14 . If you have several Frontier Silicon opeat ed radios,
you can register them all on the same account so that each radio has access
to your favourites lists. It is possible to add favourites
either directly
through iConnect or through any computer with a web browser.
To enter Internet Radio mode, either pr ess Mode until the display shows
Internet Radio or select Menu > Main menu > Internet Radio .
16
Page 18
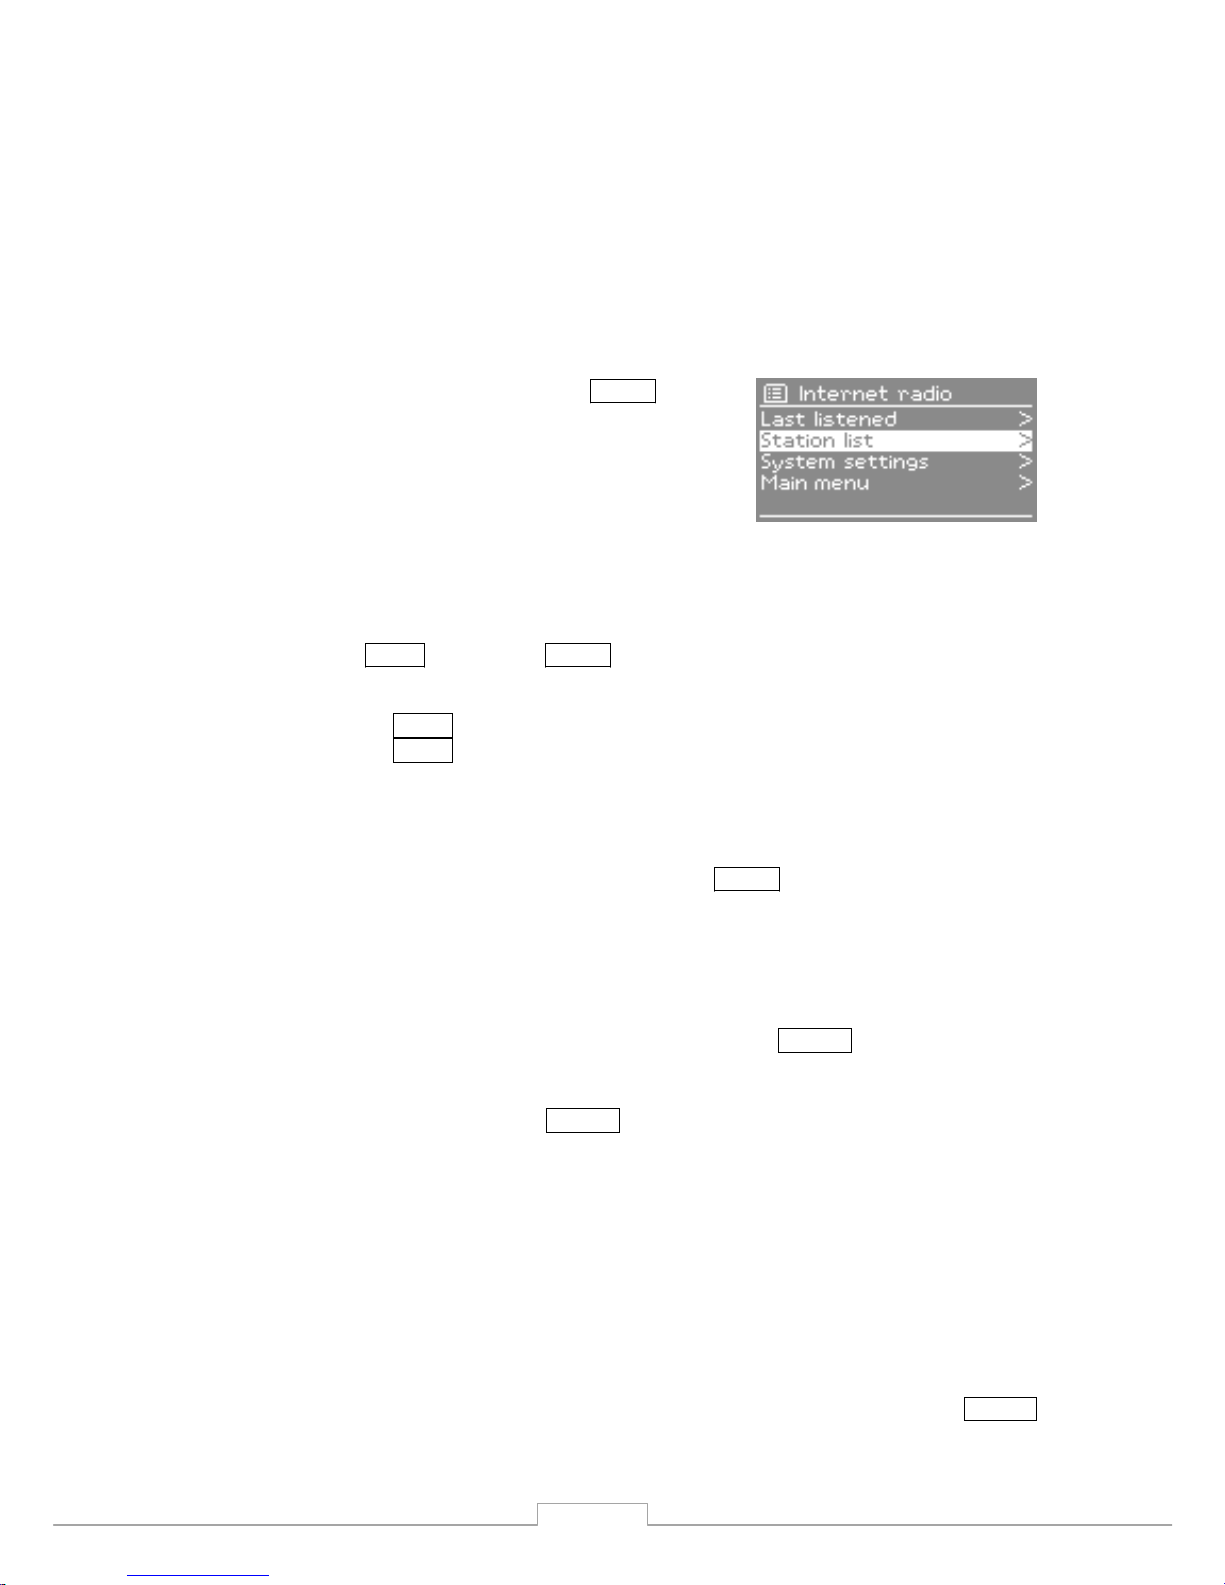
Note: The station list menu is provided from the Internet radio portal, so it is only
accessible when iConnect is connected to the Internet. Station lists and
submenus may change from time to time.
There are several ways of selecting stations.
Directly from the radio:
o Last listened,
o Presets.
From the portal through the Menu >
Station list > menu:
o Favourites lists,
o Browse by Country, Genre, Most
popular, Newest,
o Se arch by keyword,
o My added stations.
If you are already listening to an Internet radio station, you can
press Back rather than Menu to quickly return to the last visited branch
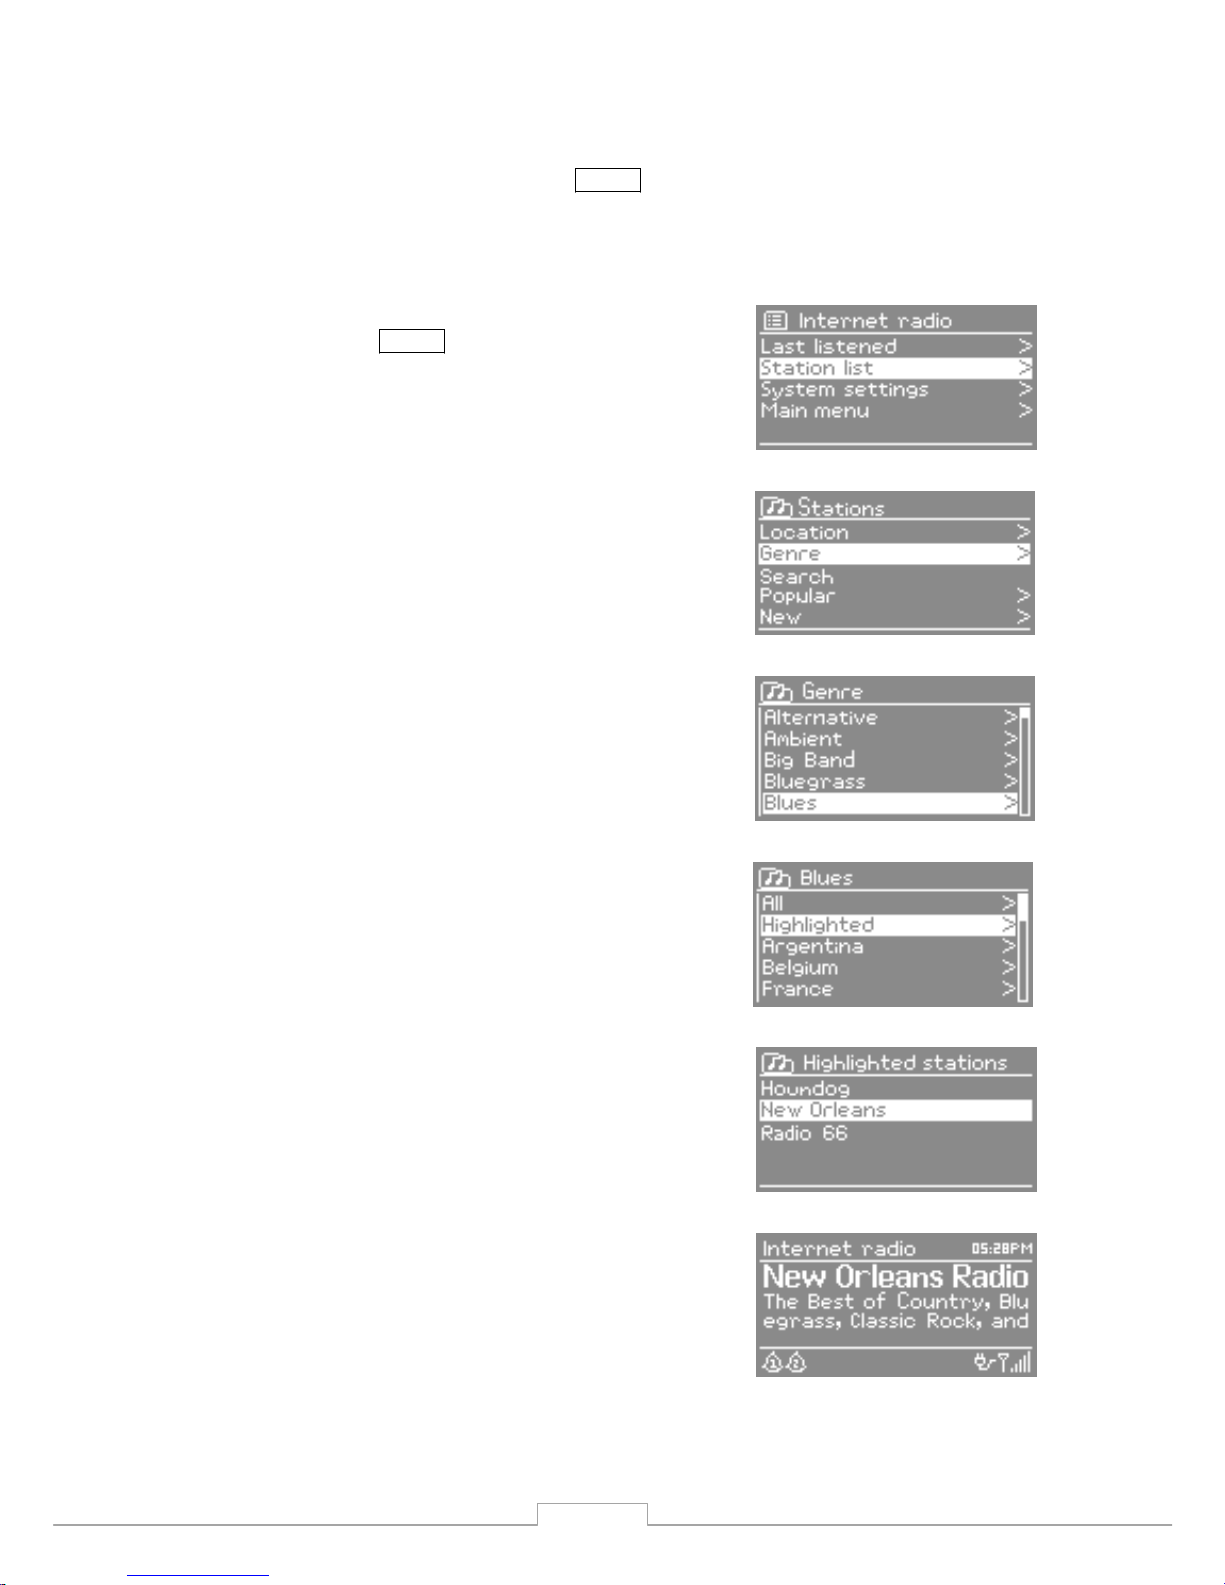
of the menu tree. For example, suppose you were listening to New Orleans
Radio through the browse facility as described in section 0 under .
Pressing Back would return you to the Highlighted Blues stations menu.
Pressing Back again wou ld return you to the Blues menu, and so on.
9.1 Last listened
When Internet radio mode restarts, the last - listened station is selected. To
select another recenly used station, select Menu > Last listened then one
of the stations listed. Most recent stati ons appear at the top of the list.
9.2 Presets
Presets are stored in the radio and cannot be accessed from other radios.
To store an Internet radio preset, press and hold Preset until the display
shows the Save preset screen. Select one of the 10 presets to save the
currently playing station.
To select a preset, press Preset briefly, then select one of the listed preset
stations. When a preset station is playing, it shows P n (P1, P2 etc) in the
bottom of the screen.
Note: Operation of presets is identi cal for Internet radio, DAB and FM.
9.3 Favourites
Favourites are stored with the Internet radio portal, and are available
through all Internet radios registered on the same account. Before
favourites can be used, the radio has to be registered with the Internet
radio portal (see page 14
).
T
o store a playing station as a favourite from iConnect, simply press Select .
The selected station appears in the default favourites list Stations.
17
Page 19
To select a favourite, select Menu > S tation list > My favourites >
[ Favourites list ] > [ Station ] .
9.4 Browse
To browse Internet broadcasts,
select Menu > Station list > then either
Stations > or Podcasts > .
Browse through the menus to find
broadcasts.
18
Page 20
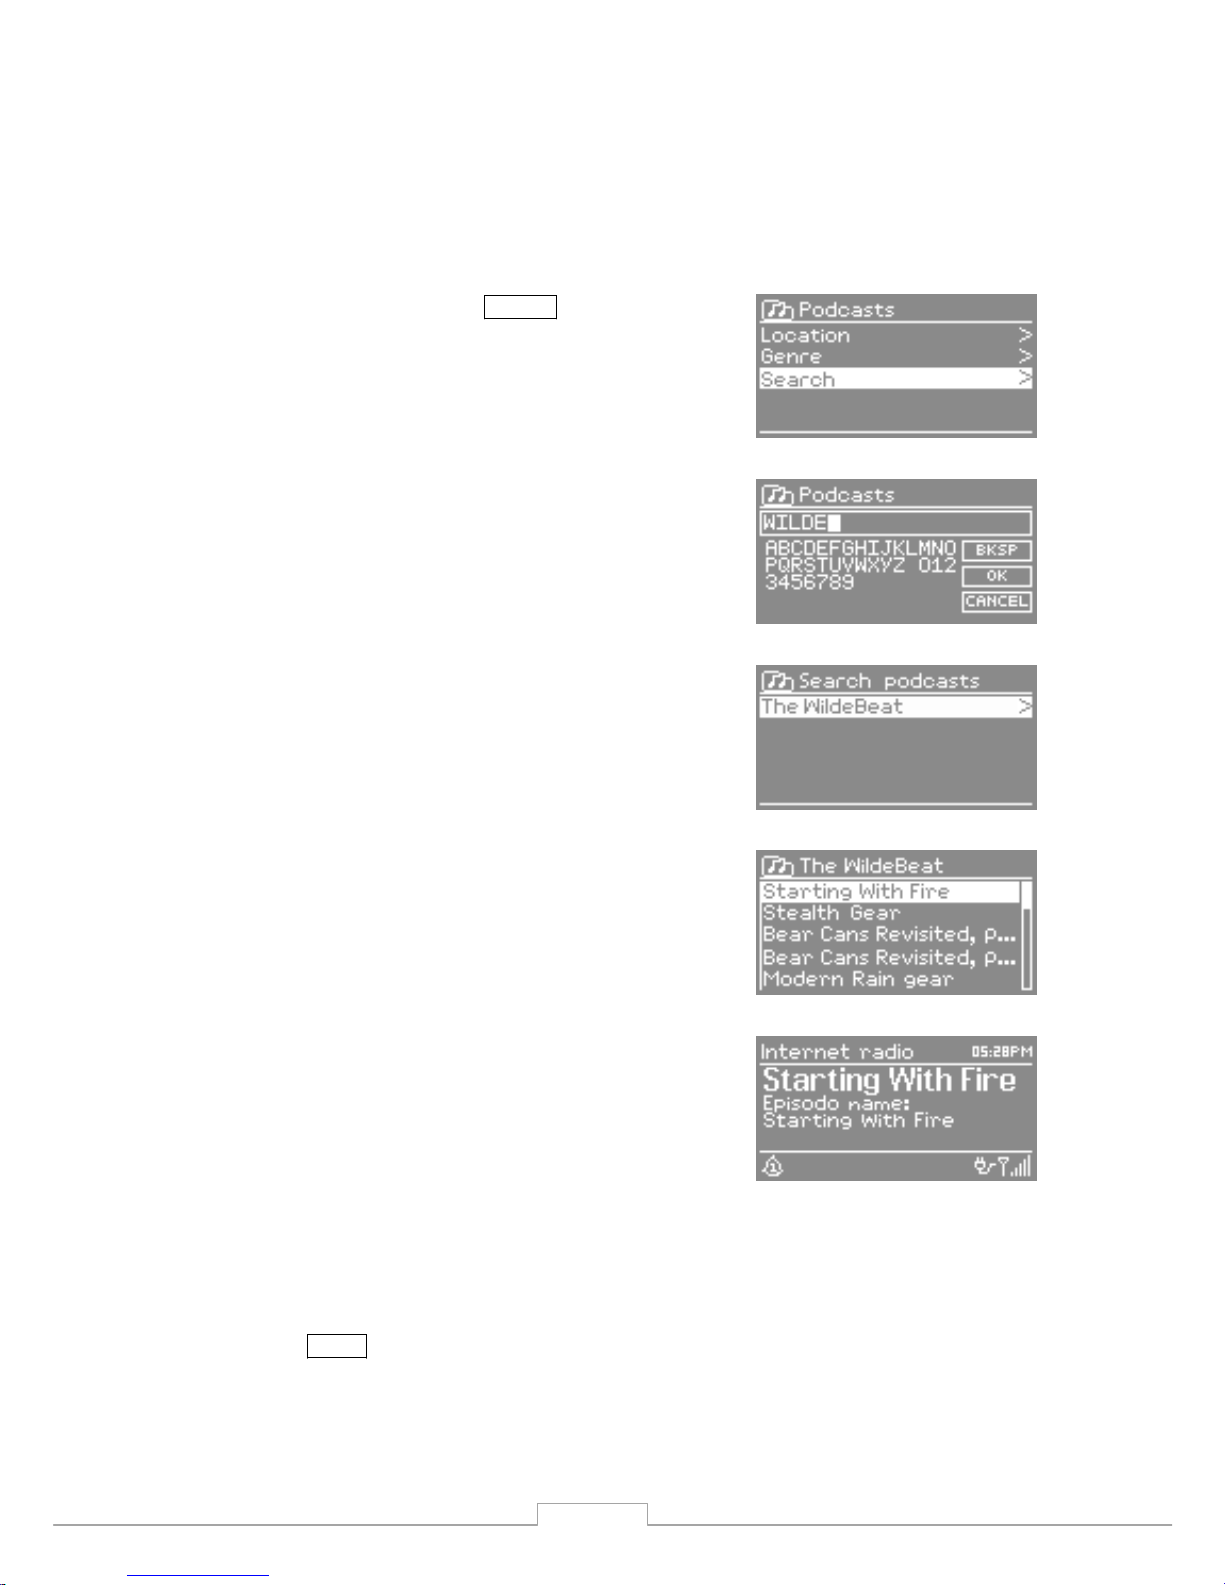
9.5 Searc h
You can also search through Internet broadcasts for stations or podcasts
with particular keywords in their title.
To search, select Menu > Station list >
then either Stations > or Podcasts >
Enter a keyword by selecting characters
then OK . The se arch entry screens are
similar in operation to the Wi - Fi password
entry screen.
Select a broadcast from the list.
For podcasts, you may be able to select a
particular episode.
9.6 My added stations
Even though the Internet radio portal con tains thousands of stations, you
may want to listen to stations not listed. You can add your own stations via
the portal. These added stations are accesible from iConnect by selecting
Menu
> Station list > My added stations > [Station].
19
Page 21
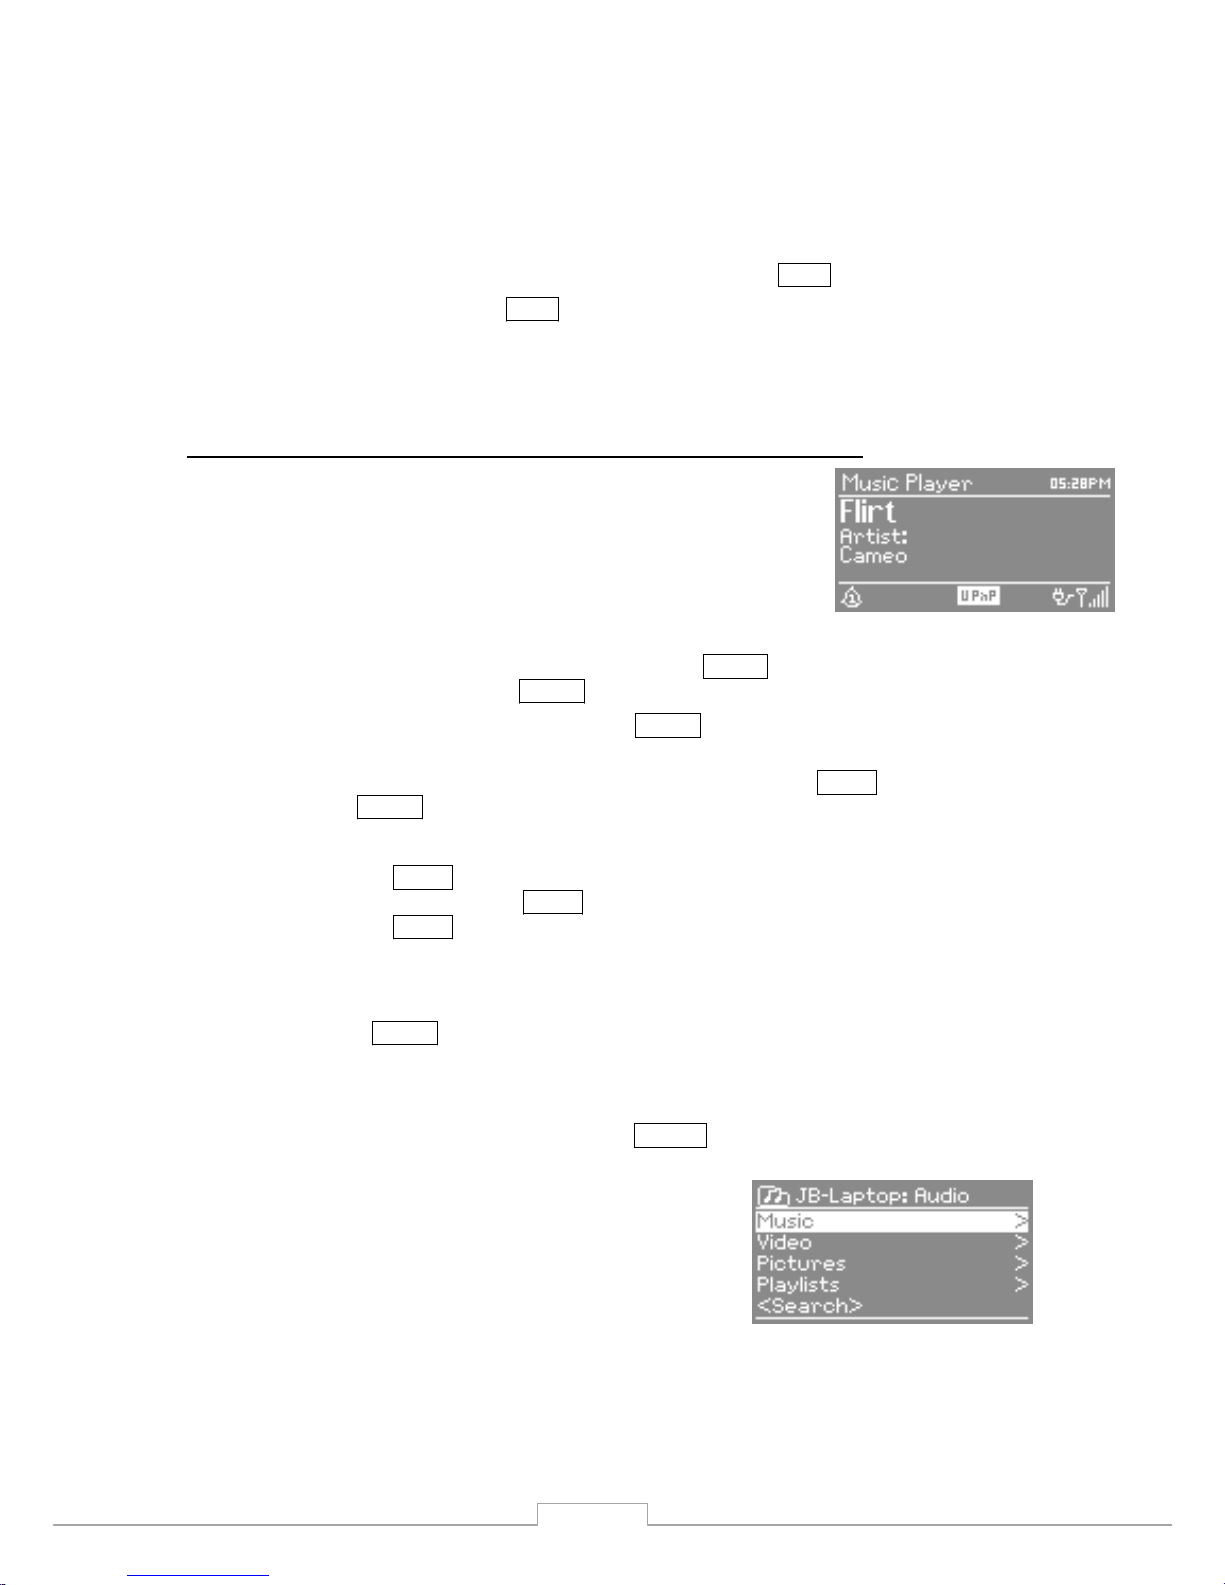
9.7 Now playing inform ation
While the stream is playing, the screen shows its name and description. To
view further information about the stream, press Info .
Each time you press Info , another set of information is displayed, cycling
through description, format/location, rel iability, bit rate/codec/sampling
rate, playback buffer and today’s date.
10. Music player mode (network and USB if available )
Music player mode plays audio files such as MP3s
or WMAs from a computer on the local network, or
from a USB Flash stick or hard drive.
To enter Music player mode, either press Mode until the display shows
Music player or select Menu > Main menu > Music player .
Once in music player mode, press Menu , then select either Shared
media , Shared folders or USB mass storage .
If you are already playing a music file, you can press Back rather
than Menu to quickly return to the last visited branch of the menu tree.
For example, suppose you were listening to the track Heat by the artist 50
Cent through browsing shared media as de scribed in section 0 under .
Pressing Back would return you to the track listing for the album Get Rich
or Die Tryin’ . Pressing Back again would list all 50 Cent a lbums.
Pressing Back again would list all album artists, and so on.
10.1 Shared media (from media server)
Select Menu > Shared media >
If you have set up shared media (as described on page 15 ), you should see
an entry cons isting of <computer name> : <Shared media name> , for
example JB - Laptop: Audio . If you have more than one computer sharing
media, the alternatives are listed. Select the shared media you want to
play.
From this point on, the menus are
generated from the sh ared media server
(typically Windows Media Player). The first
menu shows a list of media types, for
example Music, Video, Pictures and
Playlists. iConnect can only play music and
playlists.
There is also a search function, which finds
tracks in a similar way to Internet radio
search ( please see specific paragraph for
this issue).
20
Page 22
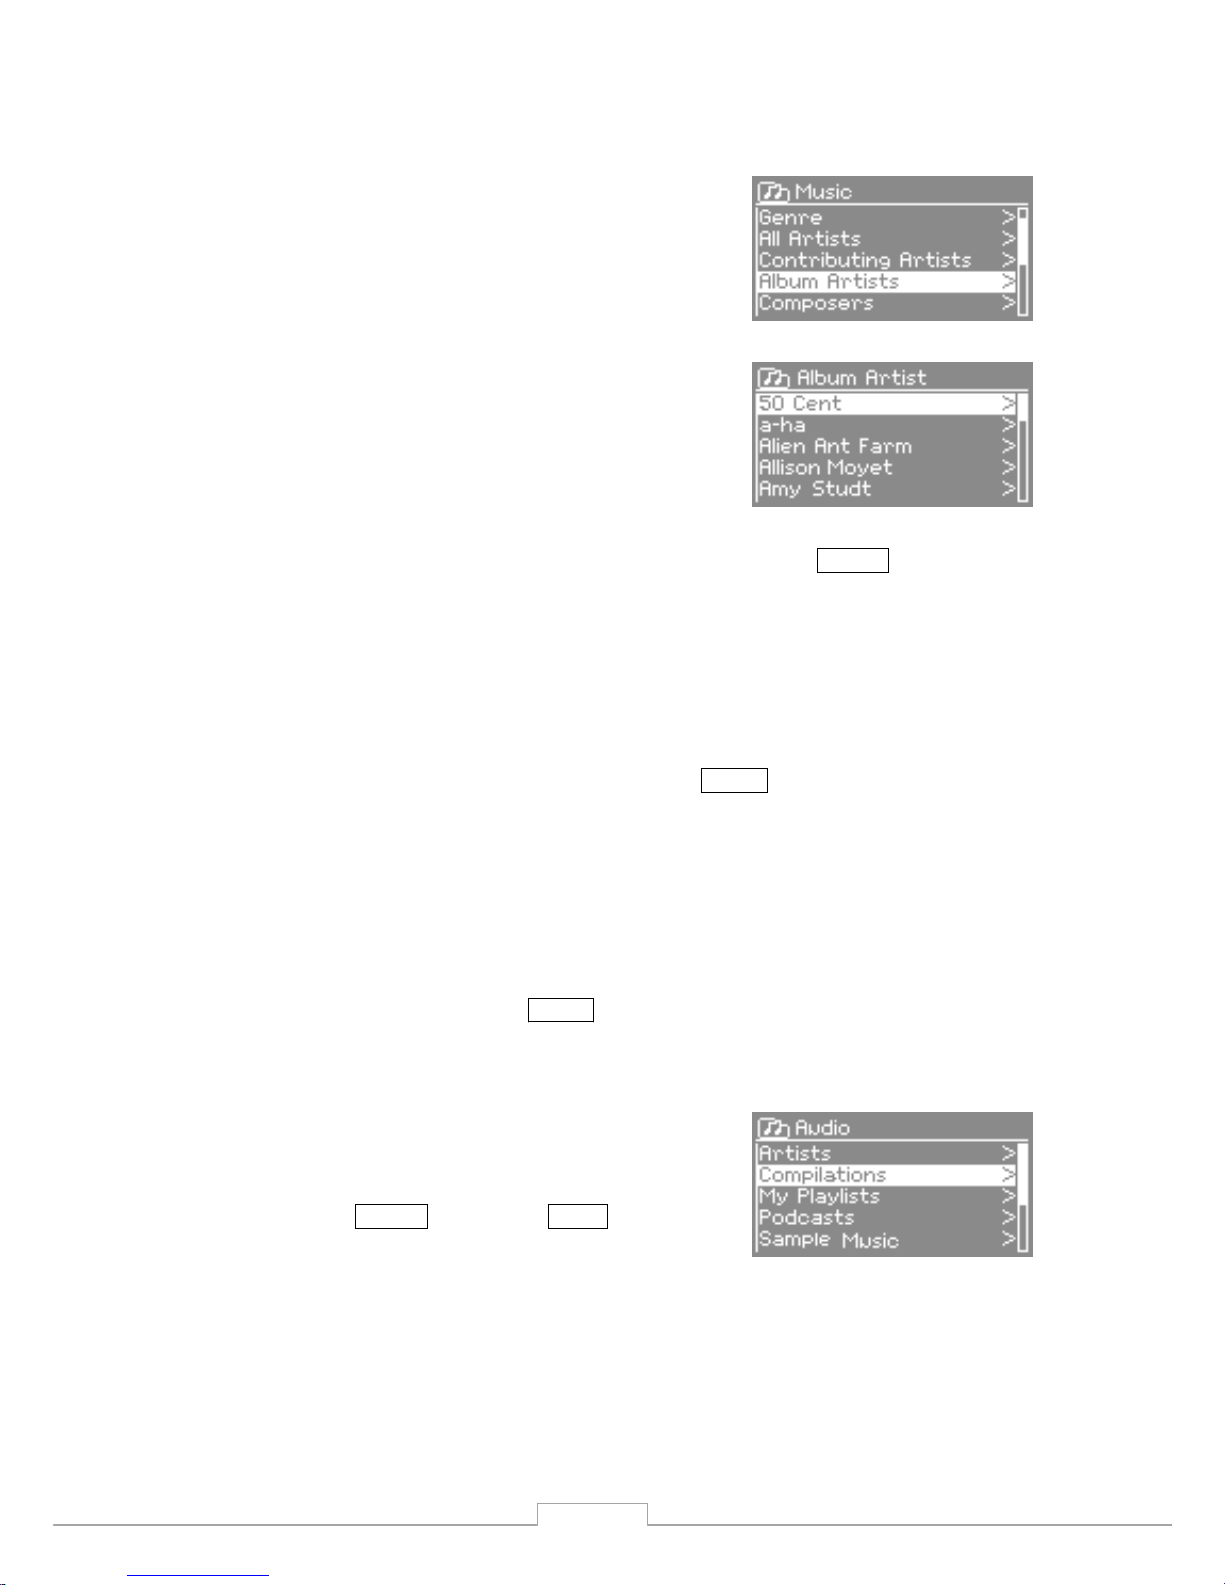
From Music, there are numerous ways of
selecting tracks, including:
o Genre,
o Artist,
o Album,
o Composer,
o Rating.
Once you have found a track you want to play, press Select . iConnect will
play the selected track, then any further tracks that were listed on the same
screen; usually this is the rest of the album.
10.2 Shared folders (from network or USB mass - storage device)
Selecting shared folders
To play audio from shared folders, sel ect Menu > Shared folders >
If you have set up shared folders you should see an entry consisting of
<Computer name> : <Shared folder name> , for example JB - Laptop: Audio .
If you have more than one shared folder, the alternatives are listed. Select
the shar ed folder you want to browse.
Selecting a USB mass - storage device
To play audio from a USB mass - storage device such as a USB Flash stick or
USB hard drive, Select Menu > USB Mass Storage .
Browsing folders
From this point on, the menus are
generated from the shared folders on the
remote computer.You can browse the
music library through its folder tree with
the Select control and Back button. The
display shows folder and file names (not
necessarily track names).
21
Page 23
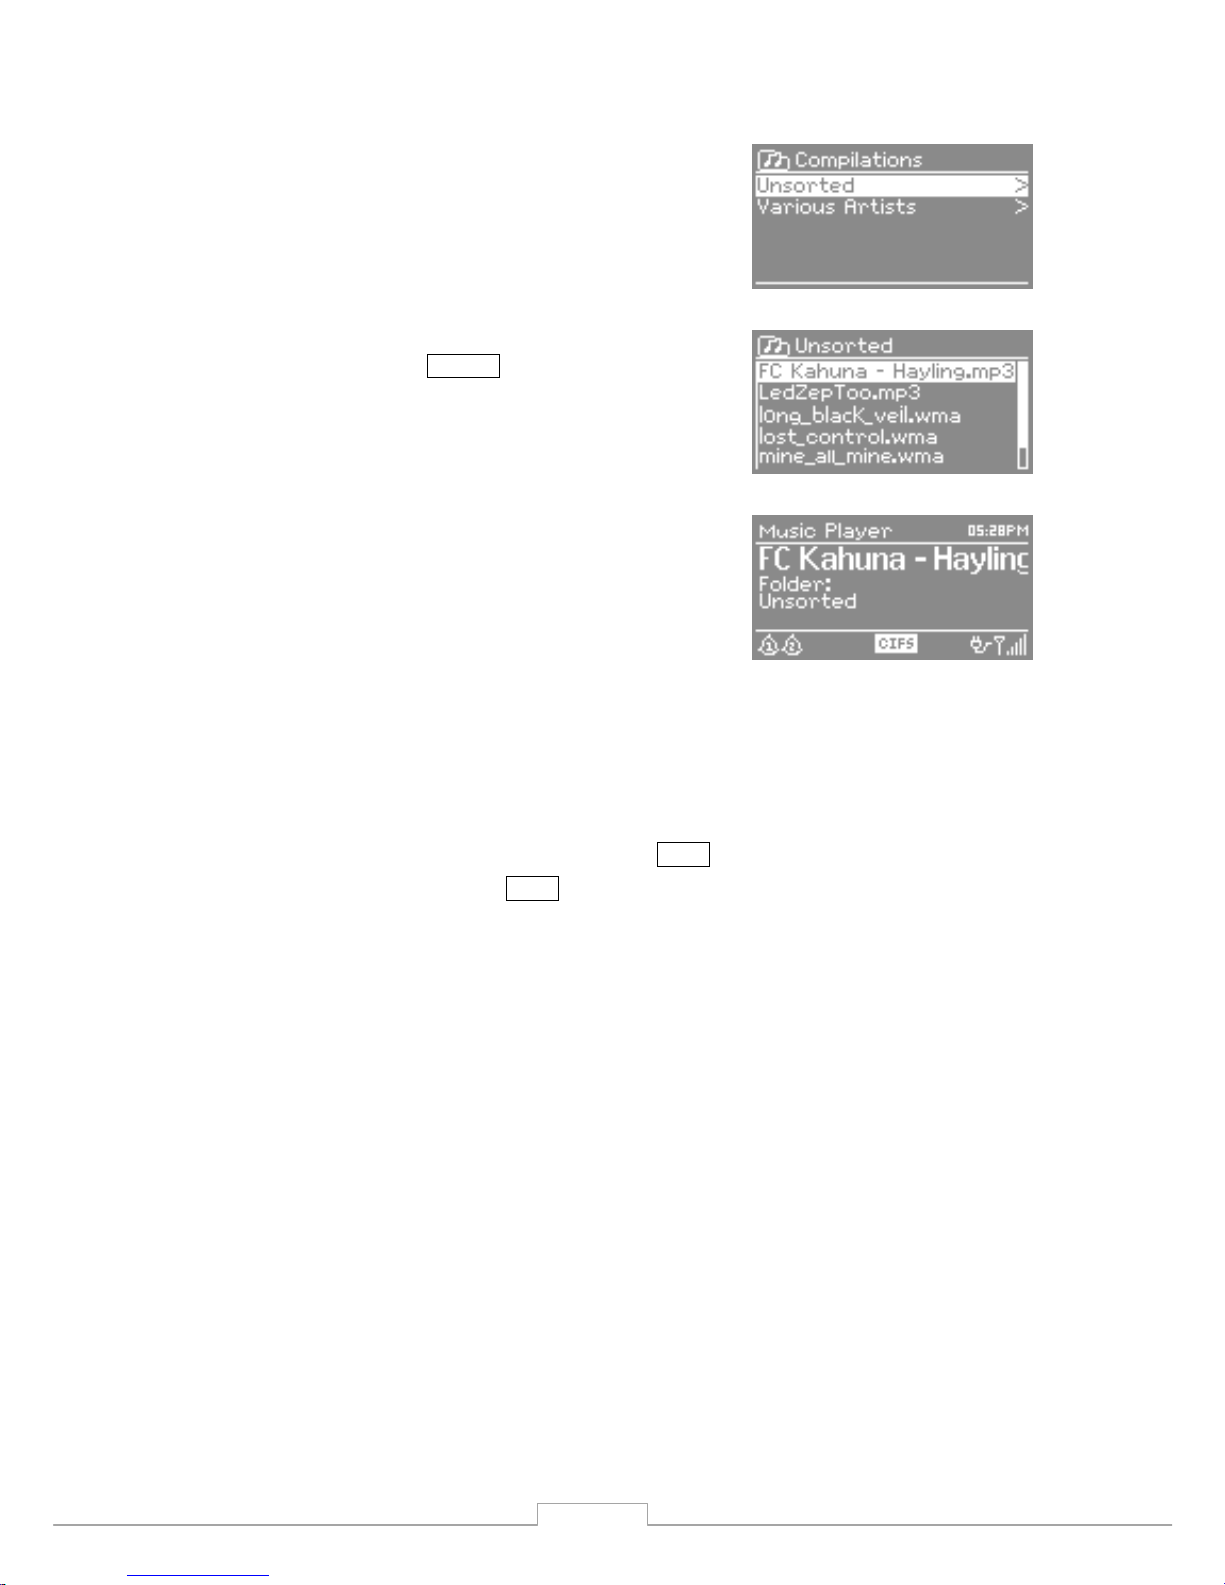
Once you have found a track you want to
play, press Select . iConnect will play the
selected track, then any further tracks in
the same directory, in alphanumeric order.
10.3 Now playing information
While the track is playing, the screen shows its track and artist (UPnP) or
file nam e and folder (CIFS/USB). At the bottom of the screen, an icon
indicates UPnP , CIFS or USB depending on the source. To view further
information about the stream, press Info .
Each time you press Info , another set of information is displayed, cycling
thro ugh:
o UPnP: artist, album, URL, bit rate/codec/sampling rate, playback
buffer and today’s date,
o CIFS/USB: folder, path, bit rate/codec/sampling rate, playback buffer
and today’s date.
22
Page 24
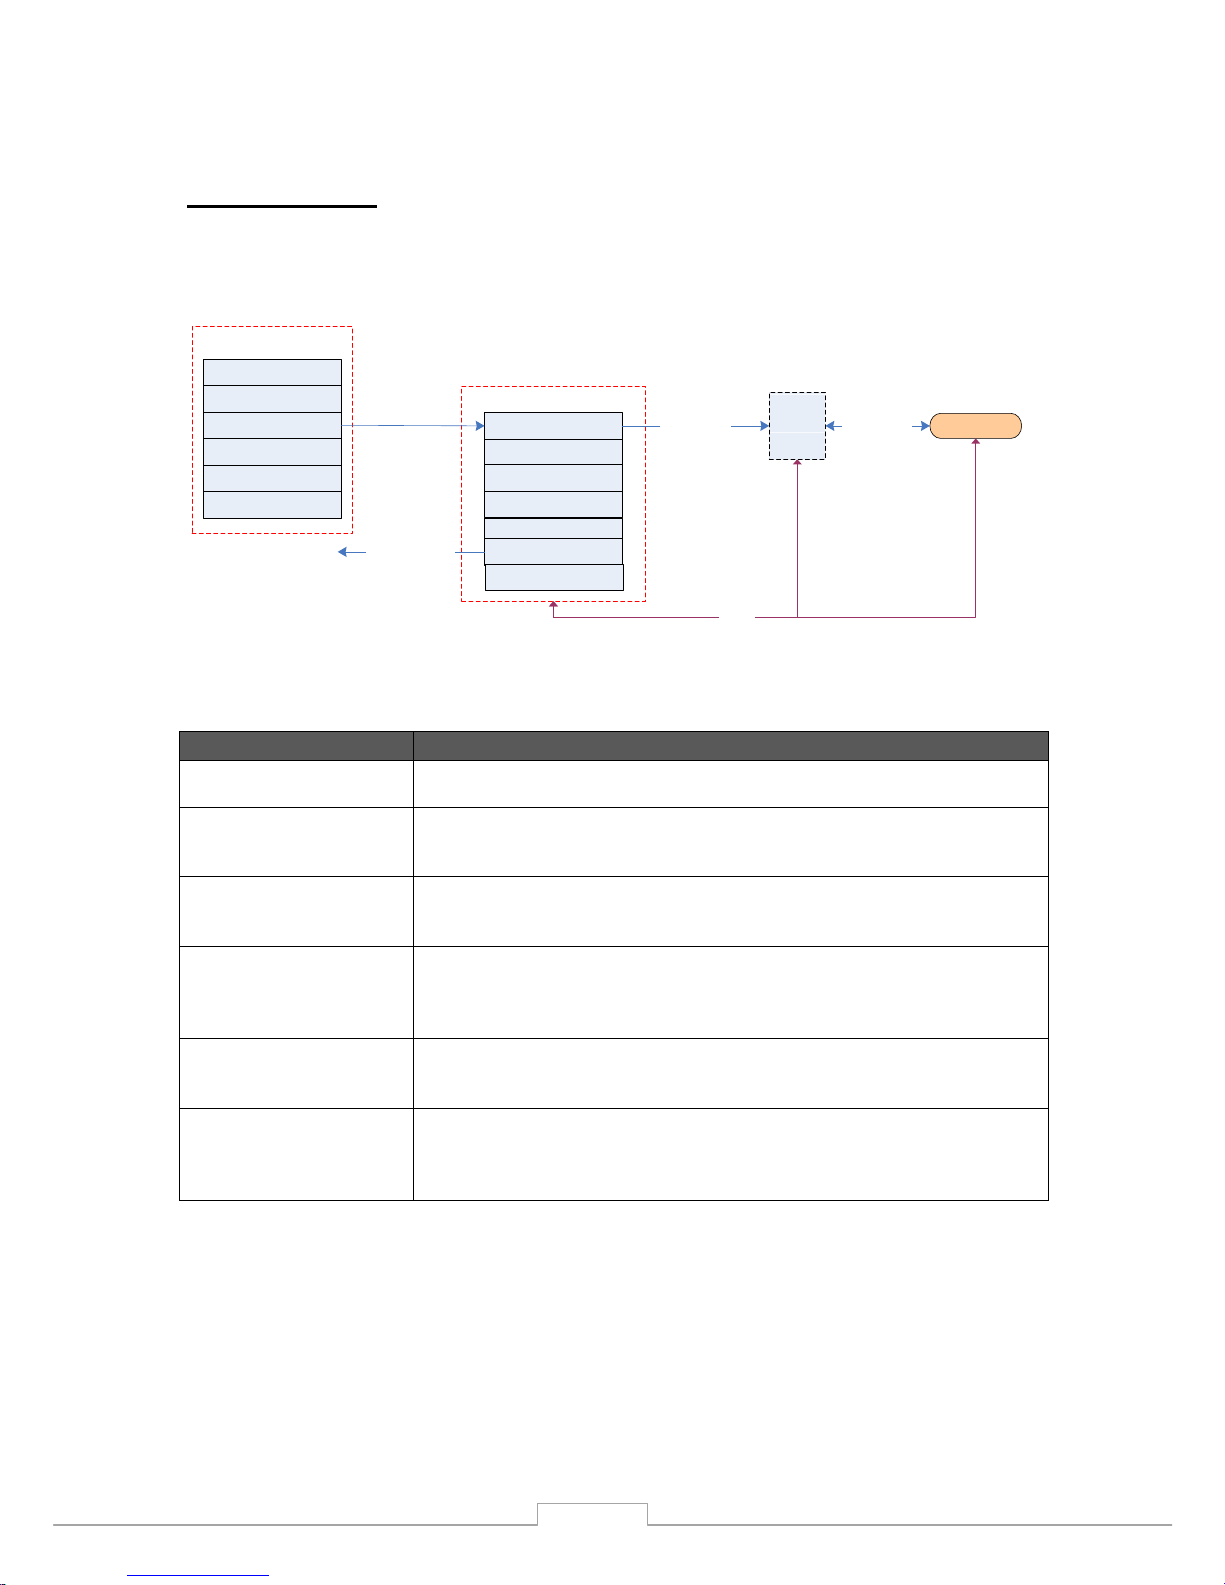
1 1 . DAB mode
23
The first time DAB mode is selected a Scanning of available stations is performed. Turn
TUNE knob to choose a DAB station. Press TUNE knob to confirm.
Manual tune
Local scan
Station list
DRC
Station order
DAB mode menu
Playing
<Fwd> / <Back>
Full scan
<menu>
Internet radio
Music player
DAB
FM
System setup
Info
Main Menu
<Fwd> / <back>
Station
List
<fwd>
(back to Main Menu)
Main Menu
The DAB context menu provides the following functionalities:
Name Description
Station list Shows a list of all available DAB stations.
Local scan Performs a scan of the local DAB ensemble range(for example, a
product designed for the UK will scan ensemble 11B to 12D).
Full scan Performs a scan of the whole DAB ensemble range
Manual tune
list of frequencies displayed is dependant on the currently-set
frequency band and contains all of the frequencies within that
band. It starts with the short name of the frequency. for
example 12B, and is followed by the actual frequency in MHZ
DRC Allows users to set the Dynamic Range Control for the DAB
audio decoder.
Station order Allows the station list to be sorted in alphanumeric order, by
ensemble, or by validity (station which are off-air will be moved
to the end of the list).
Page 25
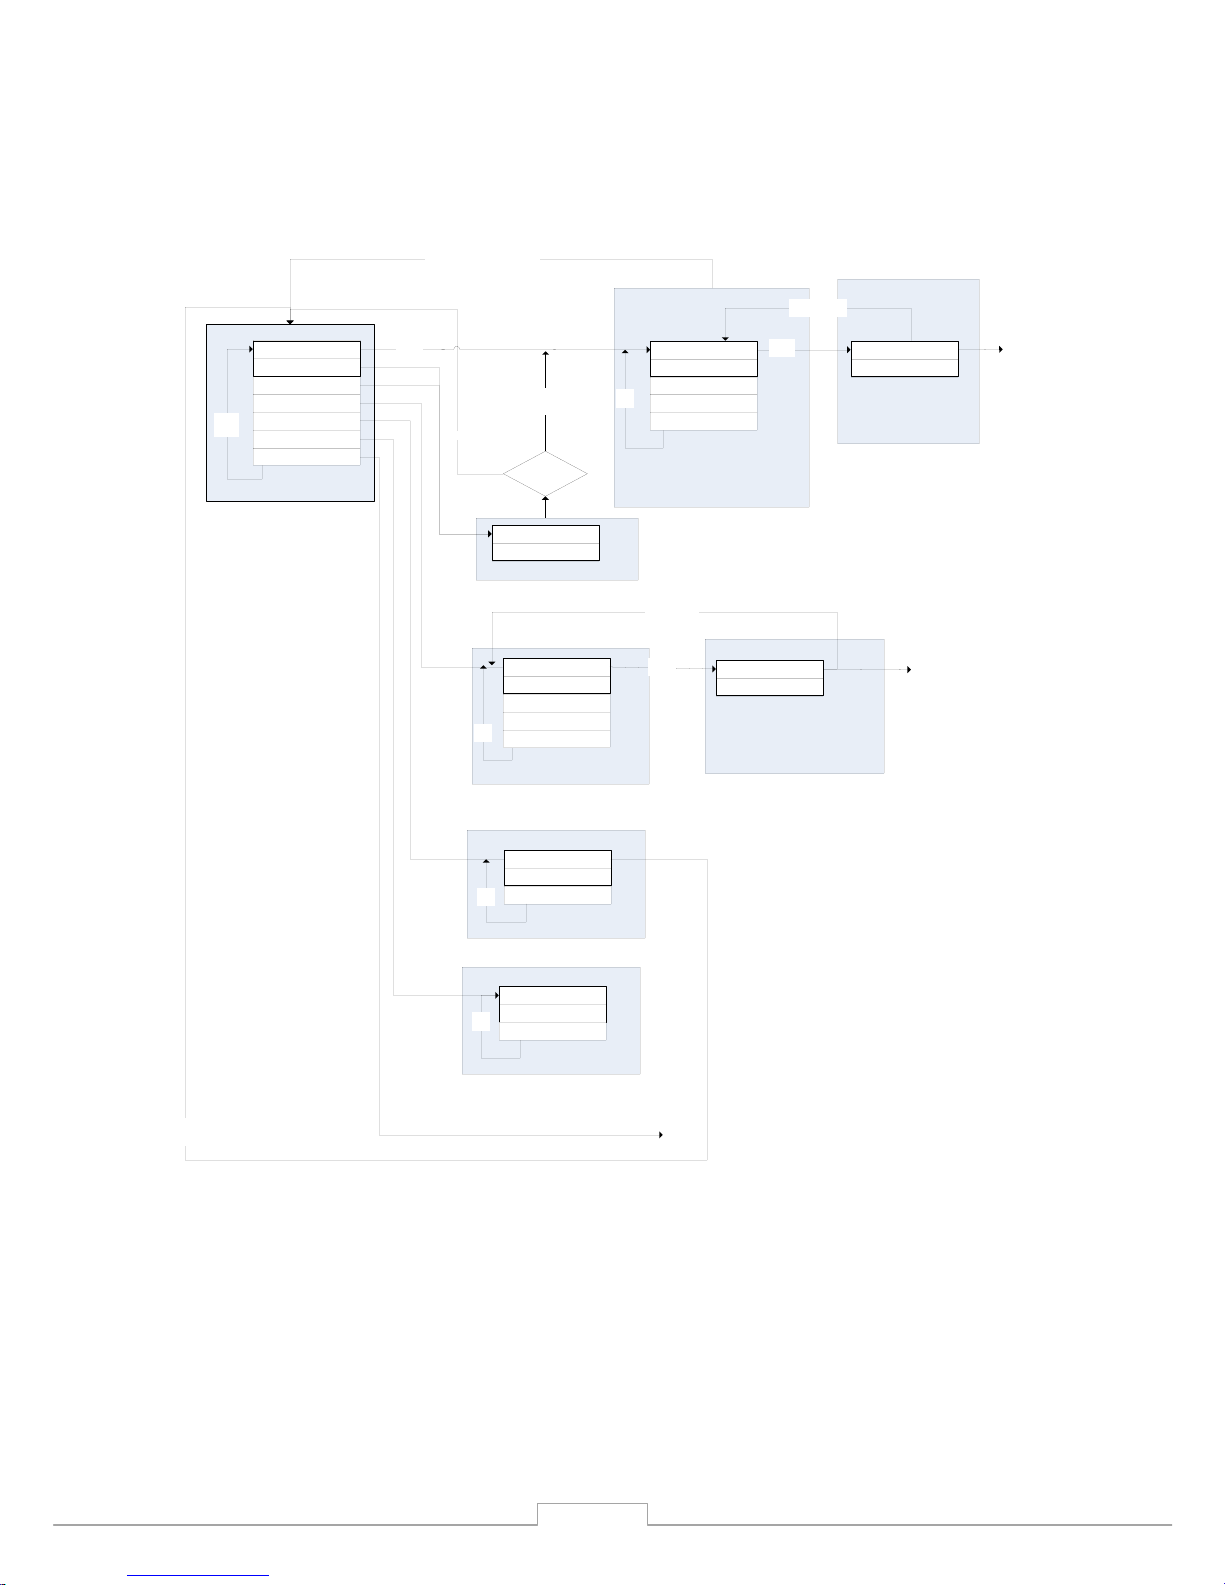
24
DAB Context menu
>Station List
Manual Tune
Local Scan
Full Scan
DRC
Main Menu
Up /
down
Station Order
DRC Selection screen
Station Selecting screen
Station list menu
6 Music
>1Xtra
...
Q103
Virgin
Select /
Forward
Up / down scrolls through all the currently-
known services in the list.
If there are no services, ‘No service
available’ is displayed for a period before
going back to the DAB context menu
Select /
forward
Attempt to tune to service. If
successful, goes to ‘DAB
station’ screen.
If not successful, go back to
service list
Scroll up / down, menu pressed or
No services in list
Service could not
be selected
Performs a scan
of the currently-
set frequency
band
Enter
service
list
Scan fails
>DRC High
DRC Low
DRC Off
Set DRC, effective
immediately,
and store in NVS
Up /
down
Enter the Main menu
DAB Playing
screen
Scan successful?
Up /
down
Connecting
1Xtra
Scanning screen
■ ■ ■ ■ ■
Scanning 27
Manual Tune Selection screen
Manual Tune screen
■ ■ ■□■
Up /
down
12B 225.640MHz B
Back or Menu key to stop,
System will attempt to select
last listened / first service.
Frequency is followed by
ensemble name, both scrolling
11C 220.352MHz
>11B 218.640MHz
...
12C 227.360MHz
12D 229.072MHz
Select /
Forward
Scroll up / down
DAB Playing
screen
DAB Station Order menu
>Alphanumeric
Ensemble
Validity
Up /
down
DAB Mode menu structure
Page 26
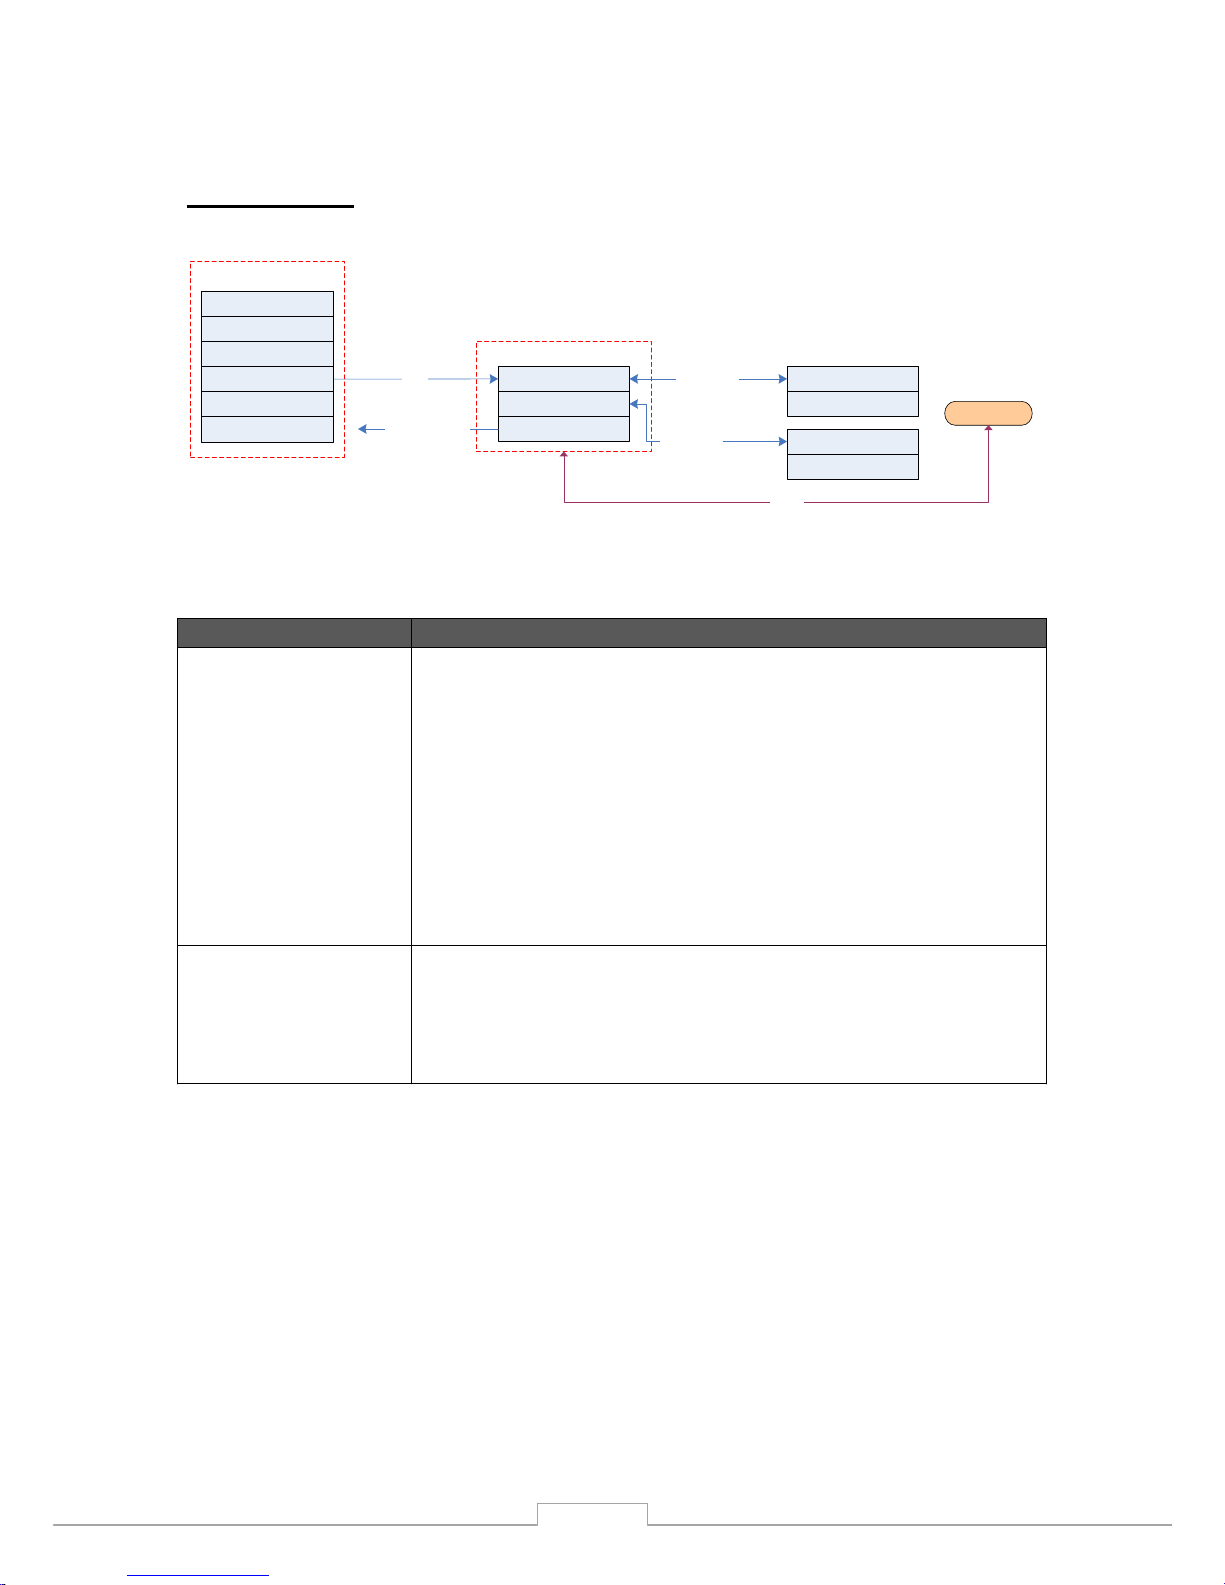
1 2. FM mode
25
Scan setting
Main Menu
FM mode menu
Playing
<fwd>
<menu>
Internet radio
Music player
DAB
FM
System setup
Info
Main Menu
Audio setting
Strong stations only
All stations
Stereo or Mono
Mono Only
<fwd> / <back>
<fwd> / <back>
<fwd>
(back to Main Menu)
The FM context menu allows you to set up the following:
Name Description
Scan setting
The Scan settings menu allows the user to set how an FM search
(started by a long-hold press of the Up/Down keys in the FM
Playing screen) behaves.
Stop on strong signals only' will only stop under strong signal
strengths if other objectives are also meant. This means that
the audio quality of services that it stops on should be good,
there is also the chance that desired services may be missed.
Stop on all signals' will s
top under many more circumstances,
including Carrier Wave and other non-broadcast interference.
Whilst this means that there will be more stops, it reduces the
chances of missing a desired service.
Audio setting The Audio setting menu allows the user to set whether to always
play stereo stations in mono mode, or whether to switch stereo
stations to mono when the signal quality gets below a certain
threshold
To search for a stations press TUNE knob to automatically search for a station. Turn
TUNE knob to manually set frequency.
Page 27

1 3. Info and Error Messages
The following is a descr iption of the info and error messages that the Wi - Fi radio could
possibly display.
Massage Type Description
Failed to
connect
Error Seen when a Wi - Fi network related error occurs. Some examples
of circumstances which will trigger a ‘failed to connect’ ar e :
- radio fails to connect to Wi - Fi network
- wrong network security key entered
Network
error
Error Seen when a server/connection related error occurs. Some
examples of circumstances which will trigger a ‘network error’ are
:
- radio fails to connect to W i - Fi network
- radio fails to connect to internet radio portal
- radio fails to connect to a radio station
- radio’s was streaming a station and connection fails
midway through the streaming
- radio fails to connect to a PC for streaming music
Format error Error Seen when the radio has problem playing the media due to
unsupported format type. Some examples of circumstances
which will trigger a ‘format error’ are :
- R adio tunes to a internet radio station which is being
transmitted using an audio codec not supporte d by the
radio (i.e. AAC+).
- Radio tries to play a music file from a PC which is in a
format not supported
Connecting… Info Seen when the radio tries to establish connection with a network,
server, portal, station.
Loading… Info Seen once the radio has established connection, and starts
buffering the station/stream.
Playing Info Seen once the radio has completed connecting, and loading, and
starts playing the stream. This is the point when the station
becomes audible.
26
Page 28
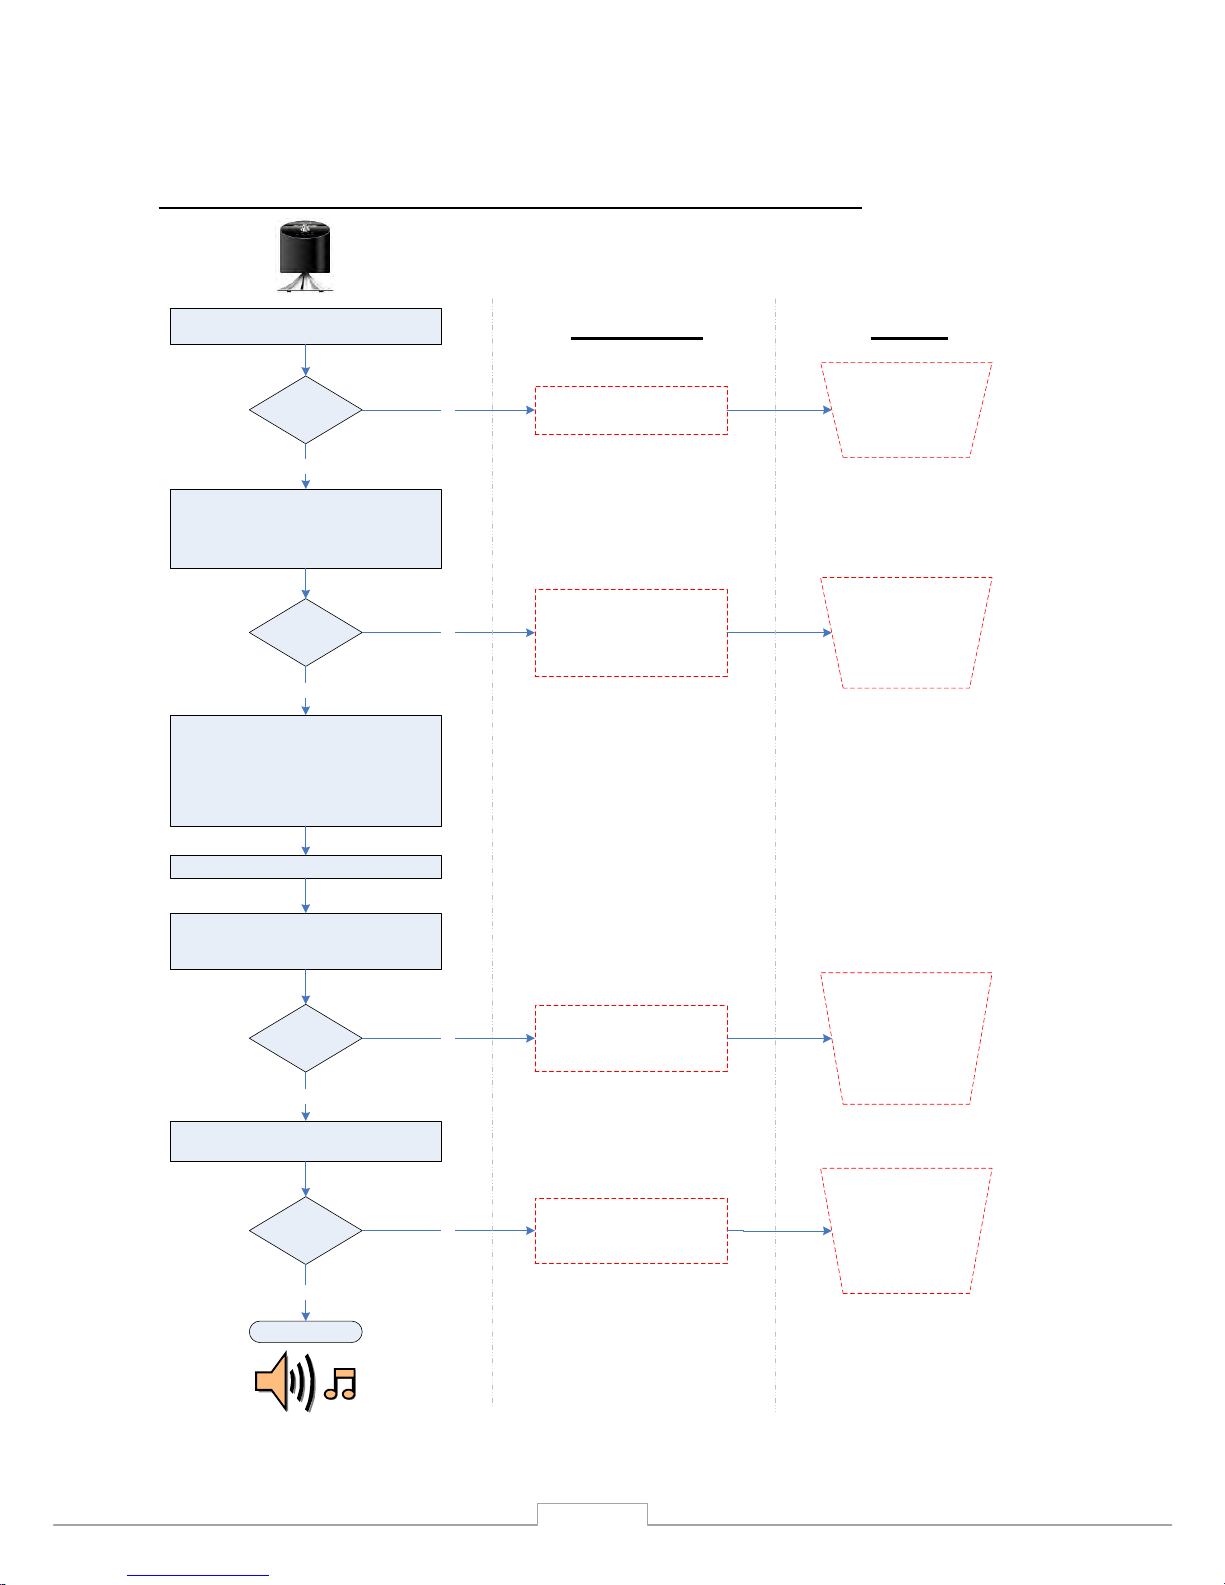
1 4. Troubleshooting – connecti ng to an internet station
Radio attempts to connect to the wifi network
[ Connecting… ]
Connected ?
Radio attempts to connect to internet portal to
get internet radio listings
[ Please Wait ]
[ Loading… ]
Connected ?
Show Internet radio top - level menu
------------------My Favourites
Stations
Podcast
My Added Stations
-------------------
User selects a station to be played
Radio attempts to connect to the internet radio
station
[ Connecting… ]
Connected ?
yes
yes
Failed to connect
1 . Wifi router might be down
2 . Wrong network key entered
no
Check if PC is able
to connect to the wifi
network and the
network key ( if in
use ) is correct
Network error
1 . Broadband internet
connection might be down .
2 . Internet portal ( fs . vtuner . com )
might be down
Check if PC is able
to access the
internet radio portal
( http :// wifiradio -
frontier . com ) when
connected to the
same wifi network
no
Radio attempts to play the radio stream
[ Loading… ]
yes
Successful ?
Network error
1 . Selected internet radio station
might be down
Go to the internet
radio portal ( http ://
fs . vtuner . com ) and
try to play the station
from the PC to see if
problem is due to the
station or your
network
[ Playing ]
yes
no
Format error
1 . Radio does not support the
format used by the internet radio
station
Go to the internet
radio portal ( http ://
wifiradio -
frontier . com ) and try
to play the station
from the PC to see if
problem is due to the
station or the radio
no
Possible Cause Checklist
27
Page 29

1 5. FAQ
Question: Answer:
What do I need to start using the Radio?
To access Internet radio mode, use the
“ MODE ” key to set it to Internet radio mode.
Then follow the on - screen instruction to
choose either GENRE or LOCATION to select.
Important: You would need a ADSL
broadband connection to use the Internet
Radio mode. And you would need to have
a Wireless router/Acess Point to connect
wirelessly.
How do I connect the radio to my wireless
network?
On initial power up the radio will prompt you
to “Scan for network”. After a brief scan a list
of all available networks will occur and allow
you to select which one you wish to use.
If the selected network is not configured to
request a password, you can immediately
access your wireless network.
If the selected network is configured to
request a password ( WEP key ) , you w
ill be
asked to enter
the key at this point.
It will not acknowledge my encryption key? Remember to write it with capital letters if
n eeded.
It will not connect to my wireless network? It is worth checking the following if you are
experiencing problems connecting to your
wireless network:
Check that you are using the correct WEP Key
/ passphrase, remember this will be case
sensitive .
Check if your router connected to the
internet. The easiest way to check this is if
you have a computer on the same network, if
it can access the internet we know the router
is connected to
the internet.
Check that your WIFI network allows other
devices to get access. Then reboot radio and
try again.
Can I receive Radio on my Radio if no
Internet connection is available?
No. Since this is an internet radio only this is
not unfortunately not possible.
28
Page 30

Why won’t my Radio playback my media
files?
If you are experiencing difficulties in playing
media files, it is worth checking the following:
• If you are logged in as a guest, you
may not have access privileges to all
shared files which may include media
files.
• If the files you are trying to access are
the correct file type, remember that
this radio will only playback MP3, WMA
& AAC files.
• If you are using Mac OS X, please
en
sure you have Windows files sharing
activated.
I can see my music listed on the Radio’s
album list but cannot play it back?
Please ch eck that the media you are trying to
access is not copy protected. Our Radio will
not play DRM or copy protected media files.
Does the Radio have memory presets to hold
my favourite stations?
Yes, It allows you to store 8 internet radio
stations, ( 8 DAB r adio stations and 8 FM
stations. )
I am getting an error when entering Radio ID
on http://www.wifiradio - frontier.com?
This is because it is not the Radio ID that
needs to be entered but the Access Code
instead. To get the Access Code please start
playback of an internet radio station and
press MENU. Turn SELECT knob and choose
Station List. Turn SELECT knob and choose
Help. Choose Get Access code. This is the
code to enter on http://www.wifiradio -
frontier.com
I have manually entered IP etc. but I get no
co nnection?
It is sometimes necessary to unplug the
power of the radio after manually settings.
Please re - start radio.
I am using a MAC. How can I stream music
from MAC to the radio?
You are able to stream music from your
MAC/iTunes to your radio through th e “shared
folders” library. Please also check that your
music folder on your MAC is “shared”. For
guideline how to share your folders please
check your MAC instruction booklet.
NOTE: If you are still having problems you
can also install the third - party sof tware like
Twonky Media.
Is this Radio compatible with Windows PCs
and Apple Macs?
Yes it can access PCs or Macs that are
connected to your wireless network. Meaning
that MP3, WMA and AAC media files can be
played back.
Additionally, if you are running a PC with
Windows XP or Vista, you can use Windows
Media Player 11 (WMP11) as a UPnP server.
This allows Pico Wi - Fi to access albums,
genres, tracks and playlists as listed on
WMP11.
Can I Use a MAC Airport router? If you are connecting to a Mac Airport
29
Page 31

w ireless network, make sure the password
you are using is for non Mac devices . This
password is likely to differ from the password
used for other devices on your Airport
network. Your non Mac devices password can
be checked in the Applications folder. Under
Utilities, select Airport Admin where you can
then click on the Password icon to view the
password.
Firewall preventing access?
Check the following ports are open: UDP and
TCP ports 80 and 123;
DNS port 53.
Windows shares: ports 135 – 139 and 445.
Window s Media Player: varies – non - Microsoft
firewalls may require configuration for UPnP.
Cannot play particular Internet radio station?
(Station not broadcasting, overloaded or
insufficient bandwidth. Station broadcasting
using unknown codec. Link out of date .)
Try other stations; try listening on computer
via Internet radio portal website; try later
30
 Loading...