

Page 1
RX/N-406 LED Keypad
for
Ver .5
Alarm System
User Manual
5 Hatzoref Street, Holon 58856, Israel
℡
+972-3-5587722
PIMA Electronic Systems Ltd.
+972-3-5500442
http://www.pima-alarms.com
Page 2

2
User manual RXN-406 Keypad for CAPTAIN-i Alarm System
PIMA Electronic Systems Ltd. does not represent that its Product may not be
compromised and/or circumvented, or that the Product will prevent any death, personal
and/or bodily injury and/or damage to property resulting from burglary, robbery, fire or
otherwise, or that the Product will in all cases provide adequate warning or protection.
The User understands that a properly installed and maintained equipment may only
reduce the risk of events such as burglary, robbery, and fire without warning, but it is not
insurance or a guarantee that such will not occur or that there will be no death, personal
damage and/or damage to property as a result.
PIMA Electronic Systems Ltd. shall have no liability for any death, personal and/or
bodily injury and/or damage to property or other loss whether direct, indirect,
incidental, consequential or otherwise, based on a claim that the Product failed to
function.
Warning: The user should follow the installation and operation instructions and among
other things test the Product and the whole system at least once a week. For various
reasons, including, but not limited to, changes in environment conditions, electric or
electronic disruptions and tampering, the Product may not perform as expected. The
user is advised to take all necessary precautions for his/her safety and the protection of
his/her property.
This document may not be duplicated, circulated, altered, modified, translated, reduced
to any form or otherwise changed, unless PIMA’s prior written consent is granted.
All efforts have been made to ensure that the content of this manual is accurate. Pima
retains the right to modify this manual or any part thereof, from time to time, without
serving any prior notice of such modification.
Please read this manual in its entirety before attempting to program or operate your
system. Should you misunderstand any part of this manual, please contact the supplier
or installer of this system.
Copyright 2005 by PIMA Electronic Systems Ltd. All rights reserved.
You can contact us at:
PIMA Electronic Systems Ltd.
5 Hatzoref Street, Holon 58856, Israel http://www.pima-alarms.com
Page 3

User manual RXN-406 Keypad for CAPTAIN-i Alarm System
3
SAFETY INSTRUCTIONS
Your CAPTAIN-i alarm system has been registered in accordance with EN60950 and its
rules. EN 60950 requires us to advise you the following information:
1. In this alarm system exists hazards of fire and electric shock. To reduce the risk of fire
or electric shock, do not expose this alarm system to rain or moisture. Pay attention:
Telephone cords could be a good conductor for lightings energy.
2. Do not open the door of the alarm system. Dangerous high voltages are present inside
of the enclosure. Refer servicing to qualified personnel only.
3. This alarm system should be used with AC 230V50Hz, protected by anti electric
shock breaker. To prevent electric shocks and fire hazards, do NOT use any other
power source.
4. Do not spill liquid of any kind onto the unit. If liquid is accidentally spilled onto the
unit, immediately consult a qualified service.
5. Install this product in a protected location where no one can trip over any line or
power cord. Protect cords from damage or abrasion.
6. Disconnect all sources of power supply before proceeding with the installation. Pay
attention: do not install low voltage wires near by AC power wires they should be
separated.
7. Connect the AC transformer output to the terminal block on the control panel as
marked.
8. Connect the AC line cord to line power terminals as marked. (GND; N; L)
Page 4

4
Congratulations on your purchase of the CAPTAIN-i Alarm System.
Much care has been taken in developing the CAPTAIN-i alarm
system, which will provide you with unprecedented peace of mind.
The CAPTAIN-i user-friendly operation and advanced features will
professionally protect your home or business. It is important to
familiarize yourself with the CAPTAIN-i Alarm System in order to take
full advantage of the complete range of the CAPTAIN-i features. To
assure optimum safety and security, you should test the CAPTAIN-i
Alarm System once a week.
User manual RXN-406 Keypad for CAPTAIN-i Alarm System
I
NTRODUCTION
Main Features of CAPTAIN-i
♦
6 programmable zones
♦
Two partitions
♦
Dialer: Up to three preset private telephone numbers and four
Monitoring Station numbers
♦
Various modes of arming and disarming: keypad, key, remote
control, automatic
♦
Four types of keypads: A simple LED keypad (RX/N-406), a
seven segment and LED display keypad (RX-180), LCD keypads
(RX/N-400 or RX/N-410) and Anti-vandal keypad RX-200
♦
Up to six different keypads, connected in parallel
♦
Two operating modes: Full or Home
♦
System Events is registered in memory
♦
Various operating codes: Master Code, up to eight User Codes,
and Short Code
♦
User Code #8 can function as DURESS code
♦
Optional temporary bypass of zones
♦
“Chime” mode per zone: operates the keypad buzzer when a
zone is opened (e.g., to monitor a back door when system is
disarmed)
Page 5
User manual RXN-406 Keypad for CAPTAIN-i Alarm System
♦
Monitoring Station Communicator: built-in dialer, integrated
5
Long-Range Radio and Cellular Transmitters
♦
Inhibit system from arming in case of failure (optional)
♦
Short-keys for DURESS and FIRE codes
Access and Operation Codes
The following codes are used to access and operate the CAPTAIN-i
Alarm System:
♦
Master Code:
parameters. The default factory Master Code is 5555. For
security reasons, it is not recommended to use the default
Use this code when programming system
code to arm or disarm the system.
IMPORTANT!
For better protection, the default factory
changed.
♦
User Code:
be programmed, User Code 1 to User Code 8.
♦
Short Code:
arm the system.
♦
Duress Code:
system:
If the system is armed, the code will disarm the system and
send a duress event to the MS
If the system is disarmed, the code will send a silent duress
event to the MS
4-6 digit code. Up to eight User Codes can
A convenient, two-digit code used only to
4-6 digit code used for disarming the
Master Code
must be
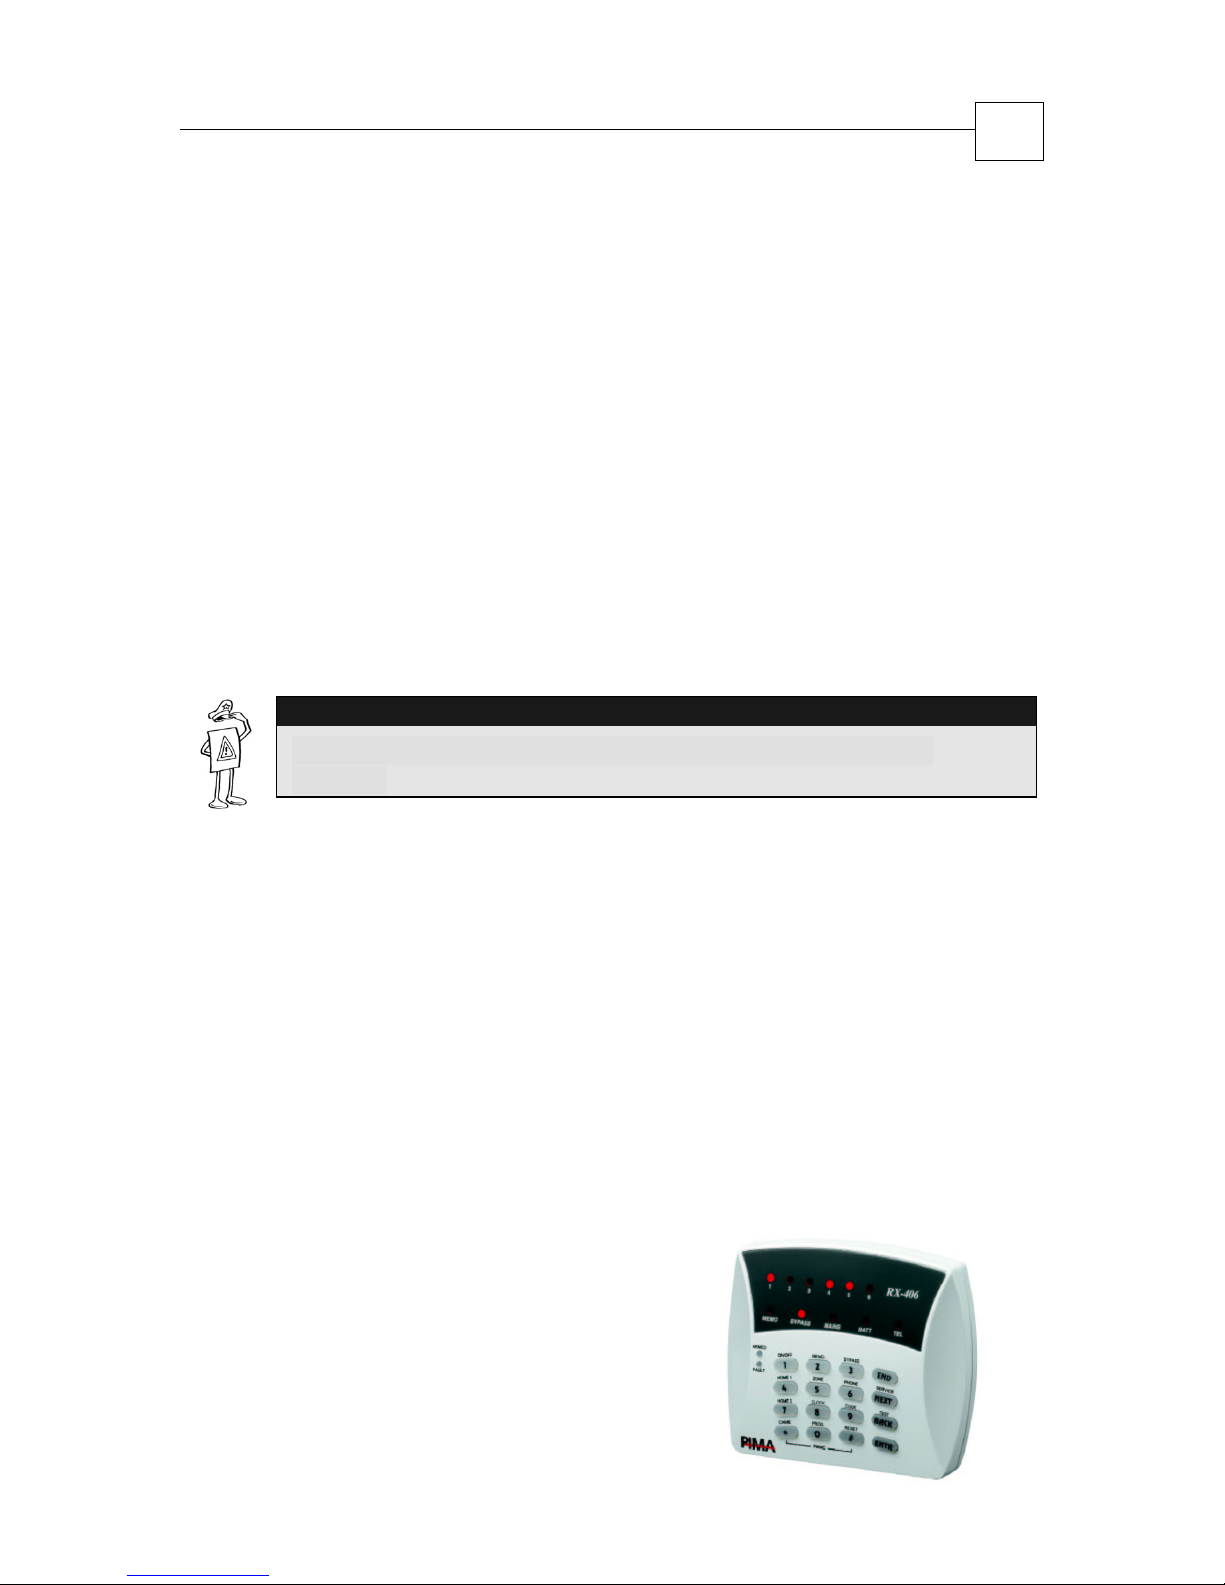
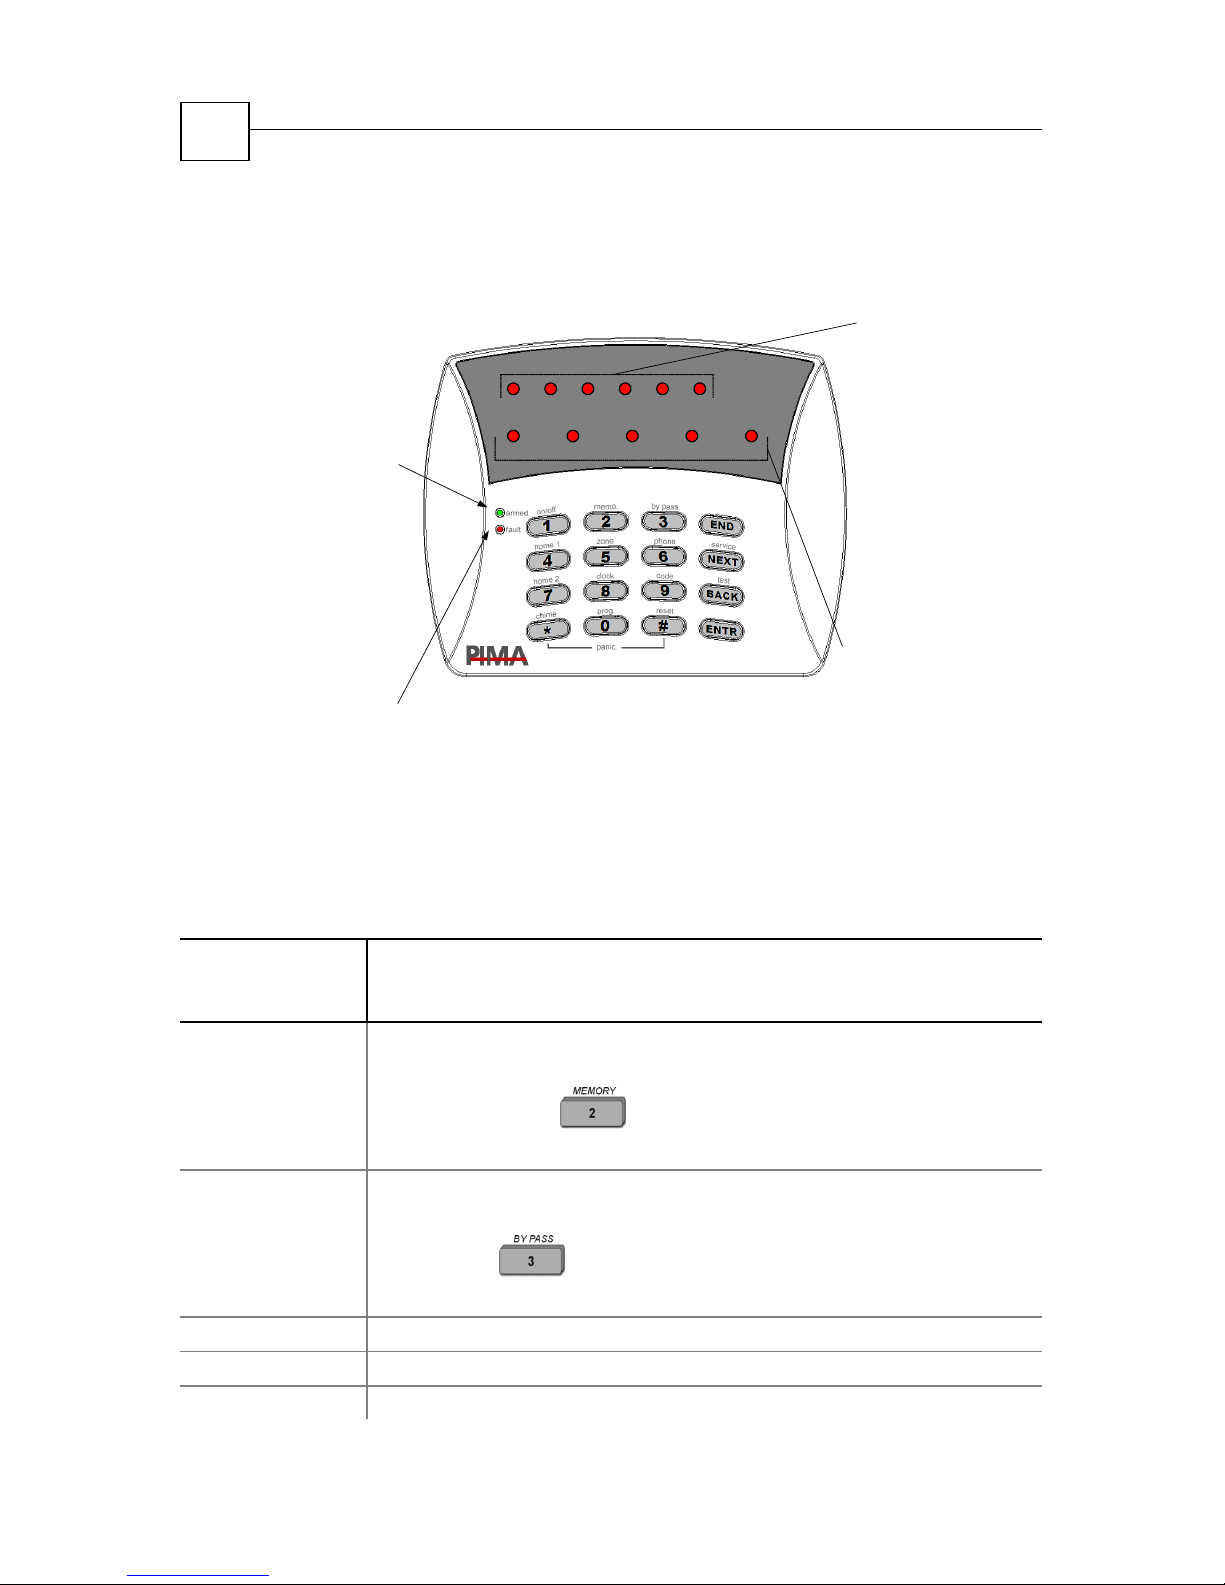
The RX/N-406 keypad features 6 zone
LEDs and 7 information LEDs as
described in the following drawing
and table (next page). These LEDs
provide zone status information, as
well as system status & fault
information.
Page 6
6
User manual RXN-406 Keypad for CAPTAIN-i Alarm System
LED Description
Follow the drawing below, and the successive table.
Armed Indicator:
The green ARMED light
provides the system Arm
status as follows:
Off: System is
disarmed.
Blinks once every
four seconds:
Partition #1 armed
Blinks twice every
four seconds:
Partition #2 armed
Blinking: System is in
Entry or Exit Delay
Time.
Lit constantly: Entire
system armed (both
partitions)
System Fault LED:
The red FAULT light
blinks when a fault is
detected.
123456
MEMO BYPASS MAINS BATT TEL
RX-406
Zone Status:
The six red lights in the
display area of the keypad
provide the zone status
information for the six
corresponding numbered
zones, as follows:
Off: Zone is closed.
On: An alarm was
triggered while the
system was previously
armed, and this event
has been stored in
memory.
Blinking: Zone is open.
Status & Faults Indicator:
When there is a Fault in the
system, each light
corresponds to a particular
system status or fault (see
table below).
Status and Faults Indicator: When a fault or system status change
occurs, a corresponding Status/Fault LED is turned ON, as follows:
Status/Fault
LED
MEMO
BYPASS
MAINS
BATT
TEL
Description
Indicates an alarm in one of the zones during the last
system ARM period; To view which zone was alarmed,
press and hold
key until the corresponding
alarmed zone LED is turned ON.
Indicates that one or more of the zones have been
bypassed To view which zone/s were bypassed, hold
and press
key until the corresponding bypassed
zone LED is turned ON.
Indicates a failure in the Mains power supply (AC fail).
Indicates a failure in the battery & low voltage.
Indicates line failure or communication fault.
Page 7
User manual RXN-406 Keypad for CAPTAIN-i Alarm System
IMPORTANT!
If the system’s red Fault LED is fleshing but NONE of the Fault LEDs
in on (i.e. Memo, Bypass, Mains etc), it means the system’s clock isn’t
set.
NOTE:
Resetting the keypad LEDs/ zones in alarm/ system memory, is
possible only after the system is re-armed.
7
Page 8
8
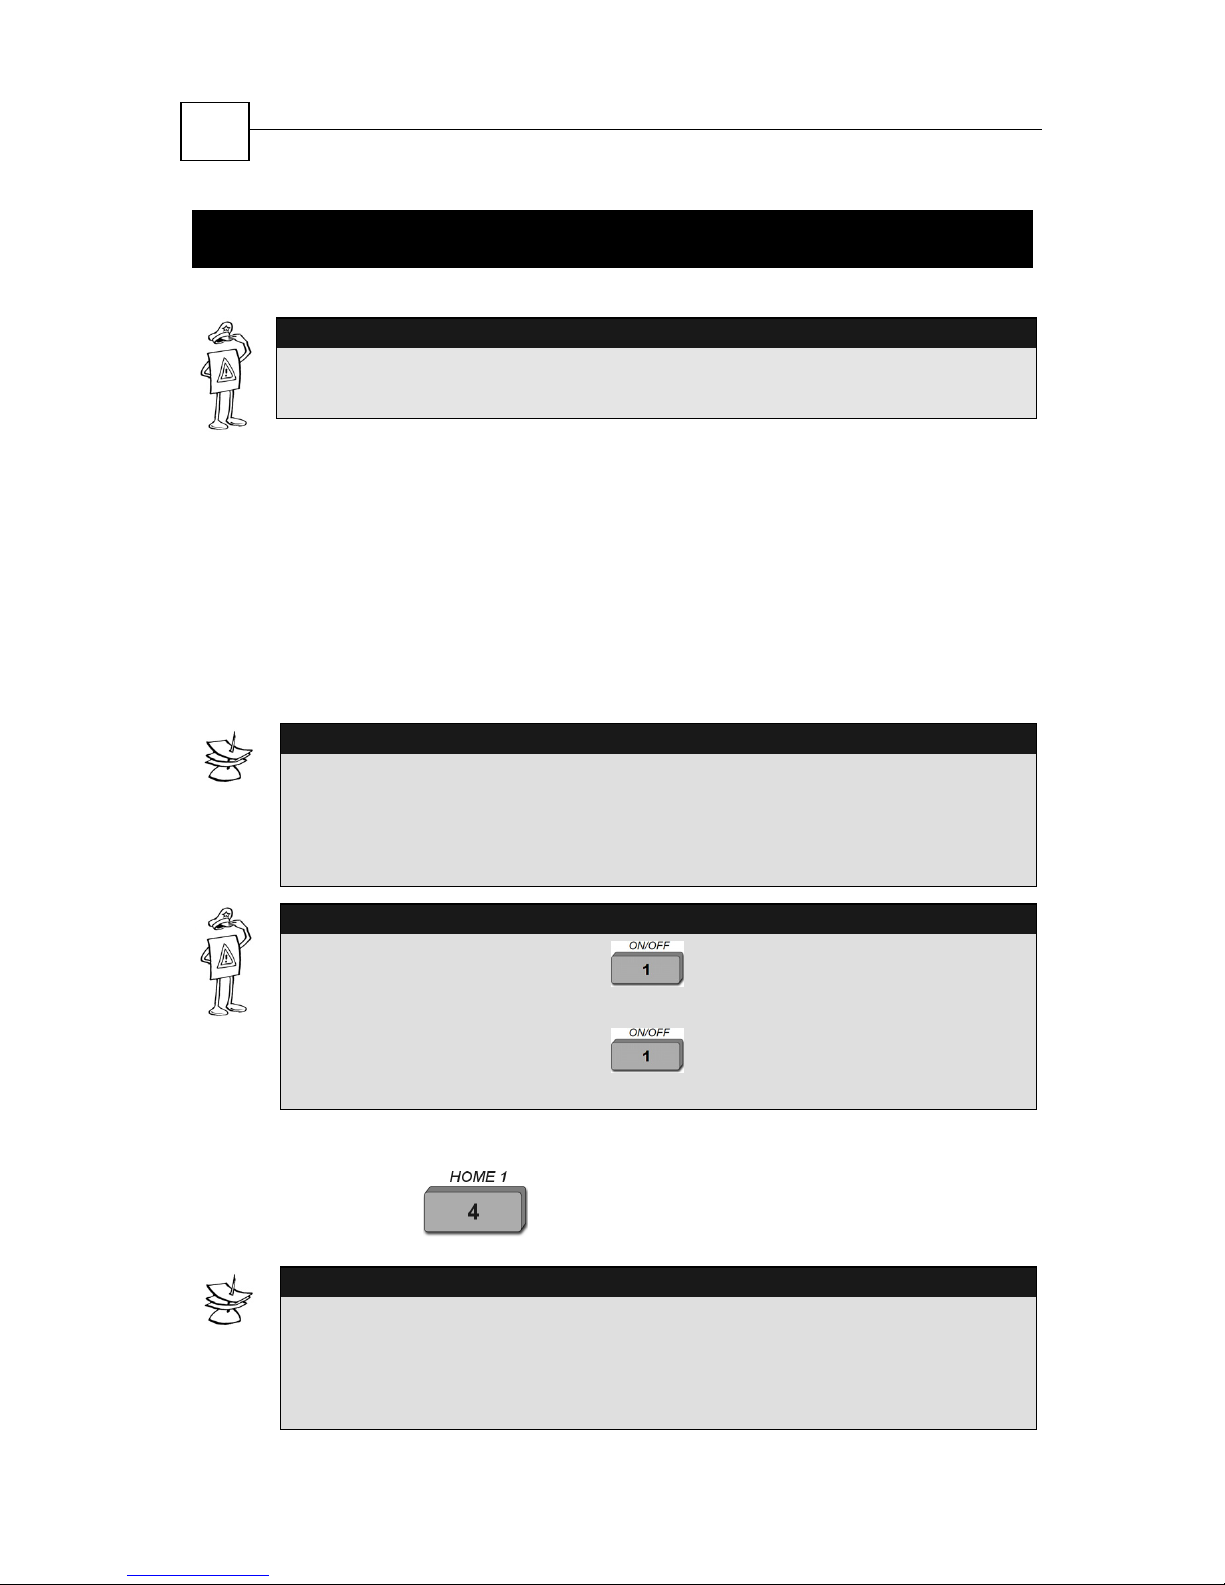
IMPORTANT!
The
[
symbol indicates information that you must enter.
User manual RXN-406 Keypad for CAPTAIN-i Alarm System
To arm/disarm Partition #1:
To arm/disarm Partition #2:
To arm
/disarm
the entire Alarm System:
S
YSTEM FUNCTIONS
[User Code
[User Code
[
Any User Code
that belongs to both partitions OR
NOTE:
To arm the alarm system in HOME mode:
Press and hold
A users can arm/disarm only partitions allocated to him/her by the
technician (partitions #1, #2, or both).
All keypads connected to the system share the same display, even
if they are allocated to different partitions.
IMPORTANT!
Entering the Master Code + when one of the partitions is
armed will arm the other partition as well.
Entering the Master Code + when both partitions are armed
will disarm the entire system.
[
any User Code OR Short Code.
[
Short Code.
NOTES:
Since CAPTAIN-i has only one HOME state, pressing either key 7
or 4 makes no difference.
When the FAULT LED is blinking and there is no other indication
LED blinking simultaneously, the fault is ‘Clock not set’.
Page 9
User manual RXN-406 Keypad for CAPTAIN-i Alarm System
9
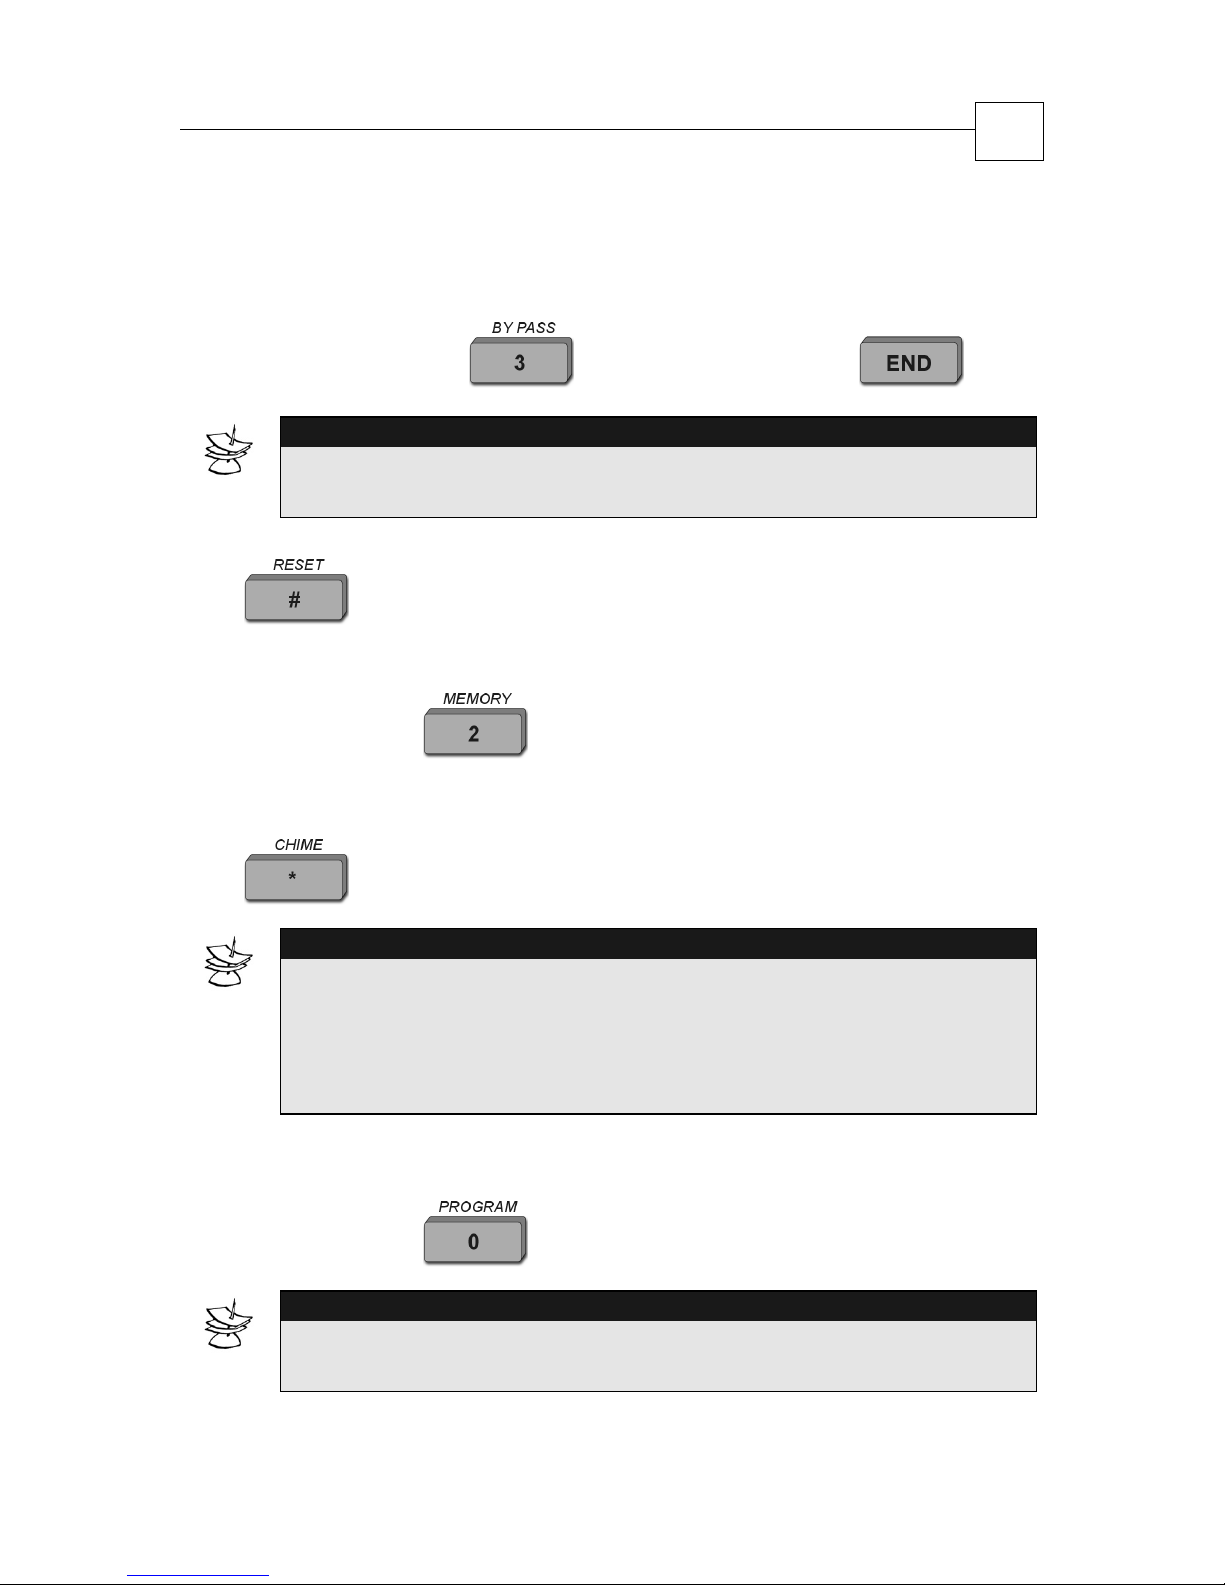
To disarm the alarm system in HOME mode:
[
any User Code
To bypass/re-arm a bypassed alarm zone:
[
Primary Code
NOTE:
When Bypass mode is executed, it is effective until you disarm the
system.
To reset the smoke or fire detector: Press and hold
for three seconds till confirmation beep.
To identify the last zone(s) that caused an alarm:
Press and hold . You will hear a beep, and the
corresponding zone light(s) will be lit for 10 seconds.
[
zone number
[
To enable/disable the Chime mode: Press and hold
for three seconds till confirmation beep.
NOTE:
This mode activates a buzzer in the keypad when a chime zone is
triggered. This feature can be used to monitor unauthorized entry or
exit in the defined zone when the system is not armed. To learn how
to program a Chime Zone see section “To Program Chime Zone”,
page12.
To temporarily cancel the Entry Delay Time:
Press and hold
NOTE:
When this feature is enabled, it is effective until you disarm the
system.
for three seconds till confirmation beep.
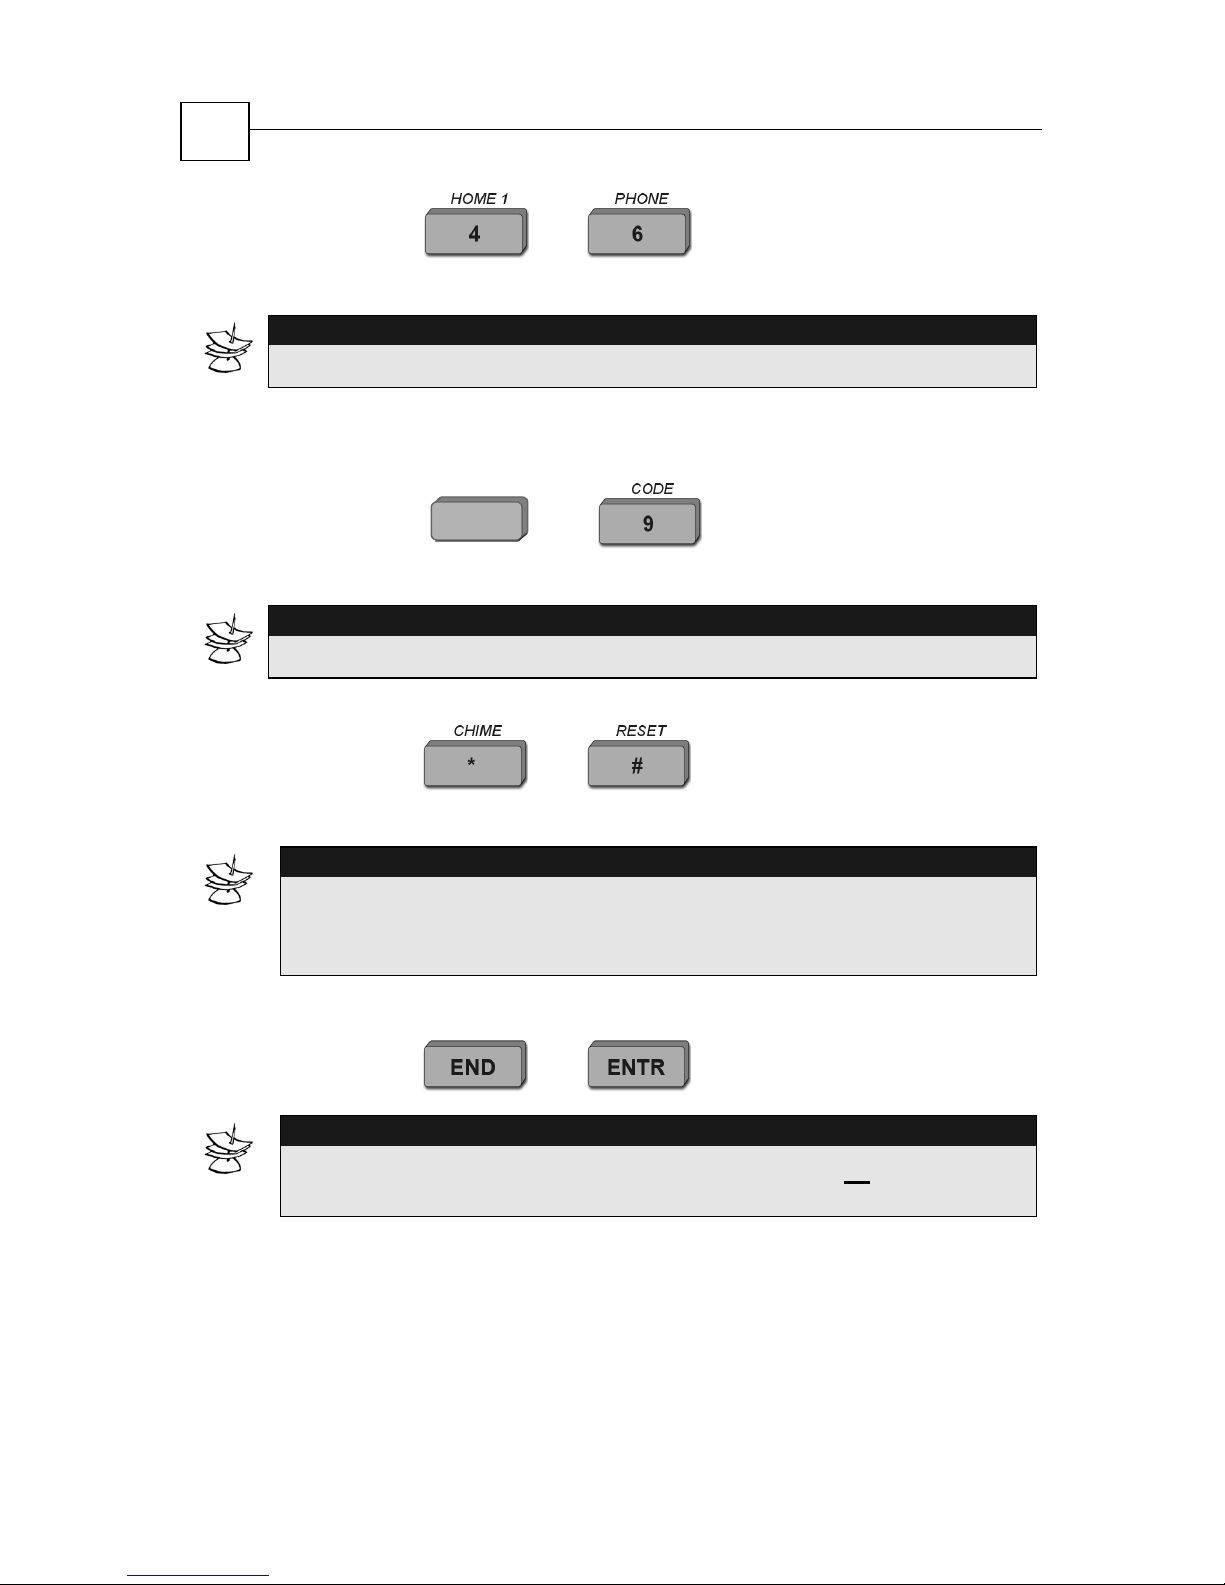
Reporting DURESS Event to CMS/Private Dialer:
Page 10
10
Press and hold and simultaneously until a
conformation beep from keypad.
NOTE:
The event is logged in memory as “Duress” and includes time and date.
Reporting Fire Event to CMS:
Press and hold
conformation beep from keypad.
NOTE:
User manual RXN-406 Keypad for CAPTAIN-i Alarm System
7
and simultaneously until a
The event is logged in memory as “Fire” and includes time and date.
To initiate a PANIC Response:
Press and hold and simultaneously for two
seconds.
NOTE:
You can customize your system's response to a panic event, for
example, calling the Monitoring Station or your private telephone
number. Consult your installer about programming a Panic Response.
To disable/enable keypad audible tone:
Press and hold and simultaneously.
NOTE:
When the keypad's Audible Tone feature is disabled,
and indications, with that keypad, are silenced.
all
audible tones
Page 11
User manual RXN-406 Keypad for CAPTAIN-i Alarm System
P
ROGRAMMING FUNCTIONS
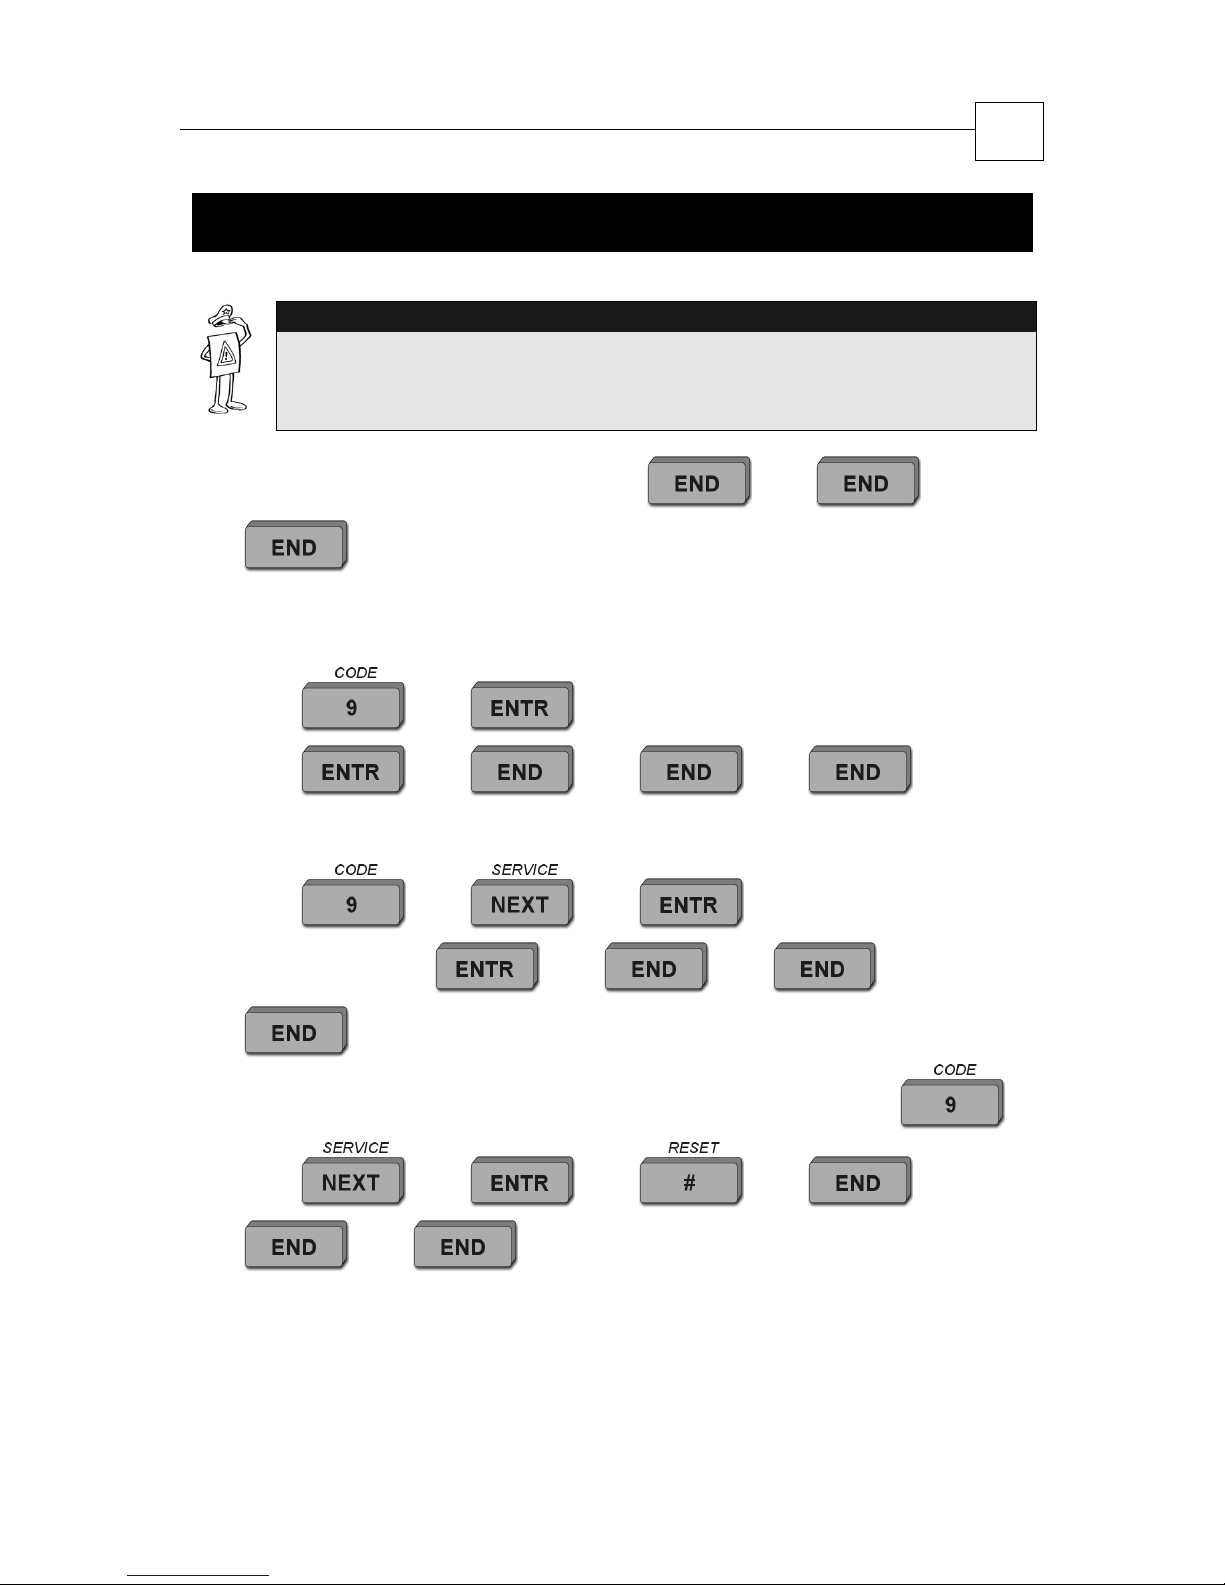
IMPORTANT!
Before beginning to program the CAPTAIN Alarm System, you must
first enter the Primary Code (the default factory code is 5555). There is
no special indication that you are in Programming Mode.
To cancel a command:
, then start the programming procedure from the
beginning.
[
[
[
11
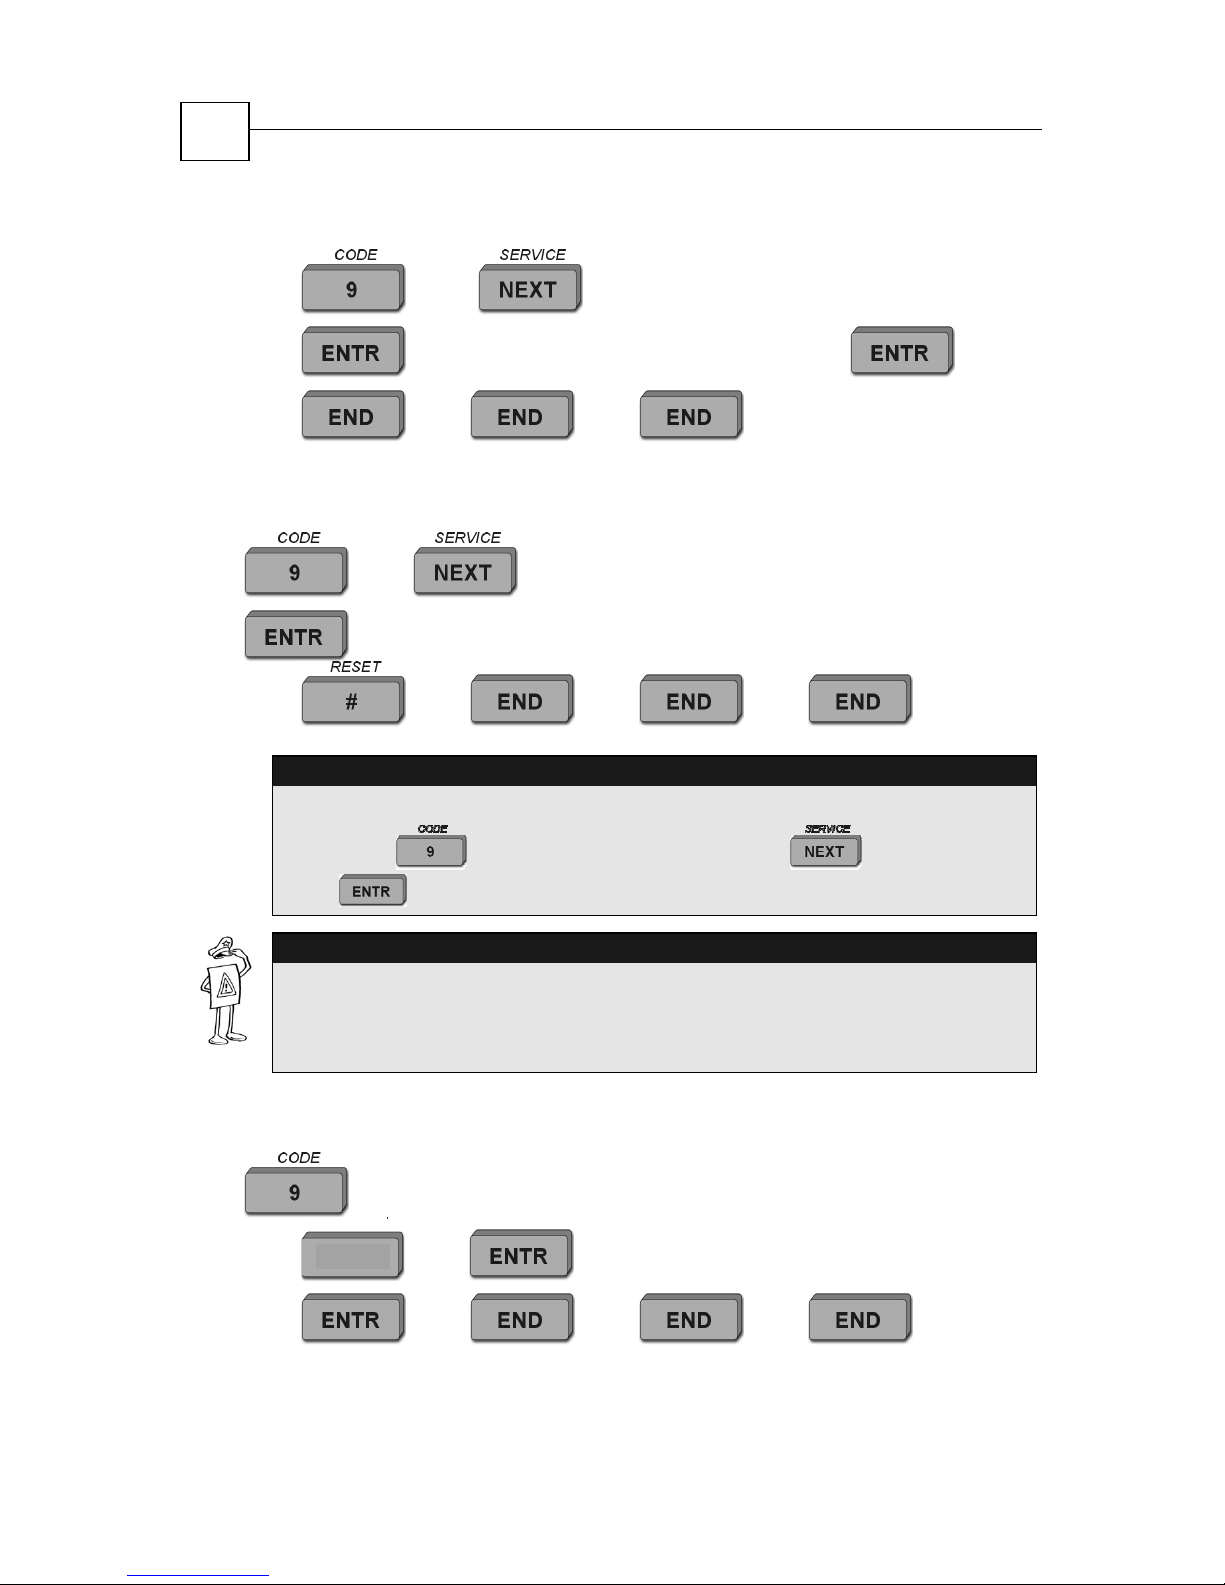
To program a Primary Code:
[
[
To program User Code #1:
[
(4-6 digits)
.
To delete User Code #1:
[
[
[
[
[
[
[
[
Initial Primary Code
[
new Primary Code (4-6 digits)
[
[
[
[
[
Primary Code
[
.
New Primary Code
[
new User Code
[
[
[
[
[
[
.
Page 12
K
12
To program User Codes #2 to #8:
[
[
[
To delete User Code #2 to #8:
[
User manual RXN-406 Keypad for CAPTAIN-i Alarm System
[
(as many as the User Code number)
[
new User Code (4-6 digits)
[
[
.
(as many as the User Code number)
[
[
Primary Code
[
Primary Code
[
[
[
Example:
g
When programming or deleting User Code #6, enter the Primary Code,
press the key, followed by pressing the key six times,
then .
IMPORTANT!
There is no indication of which code is programmed.
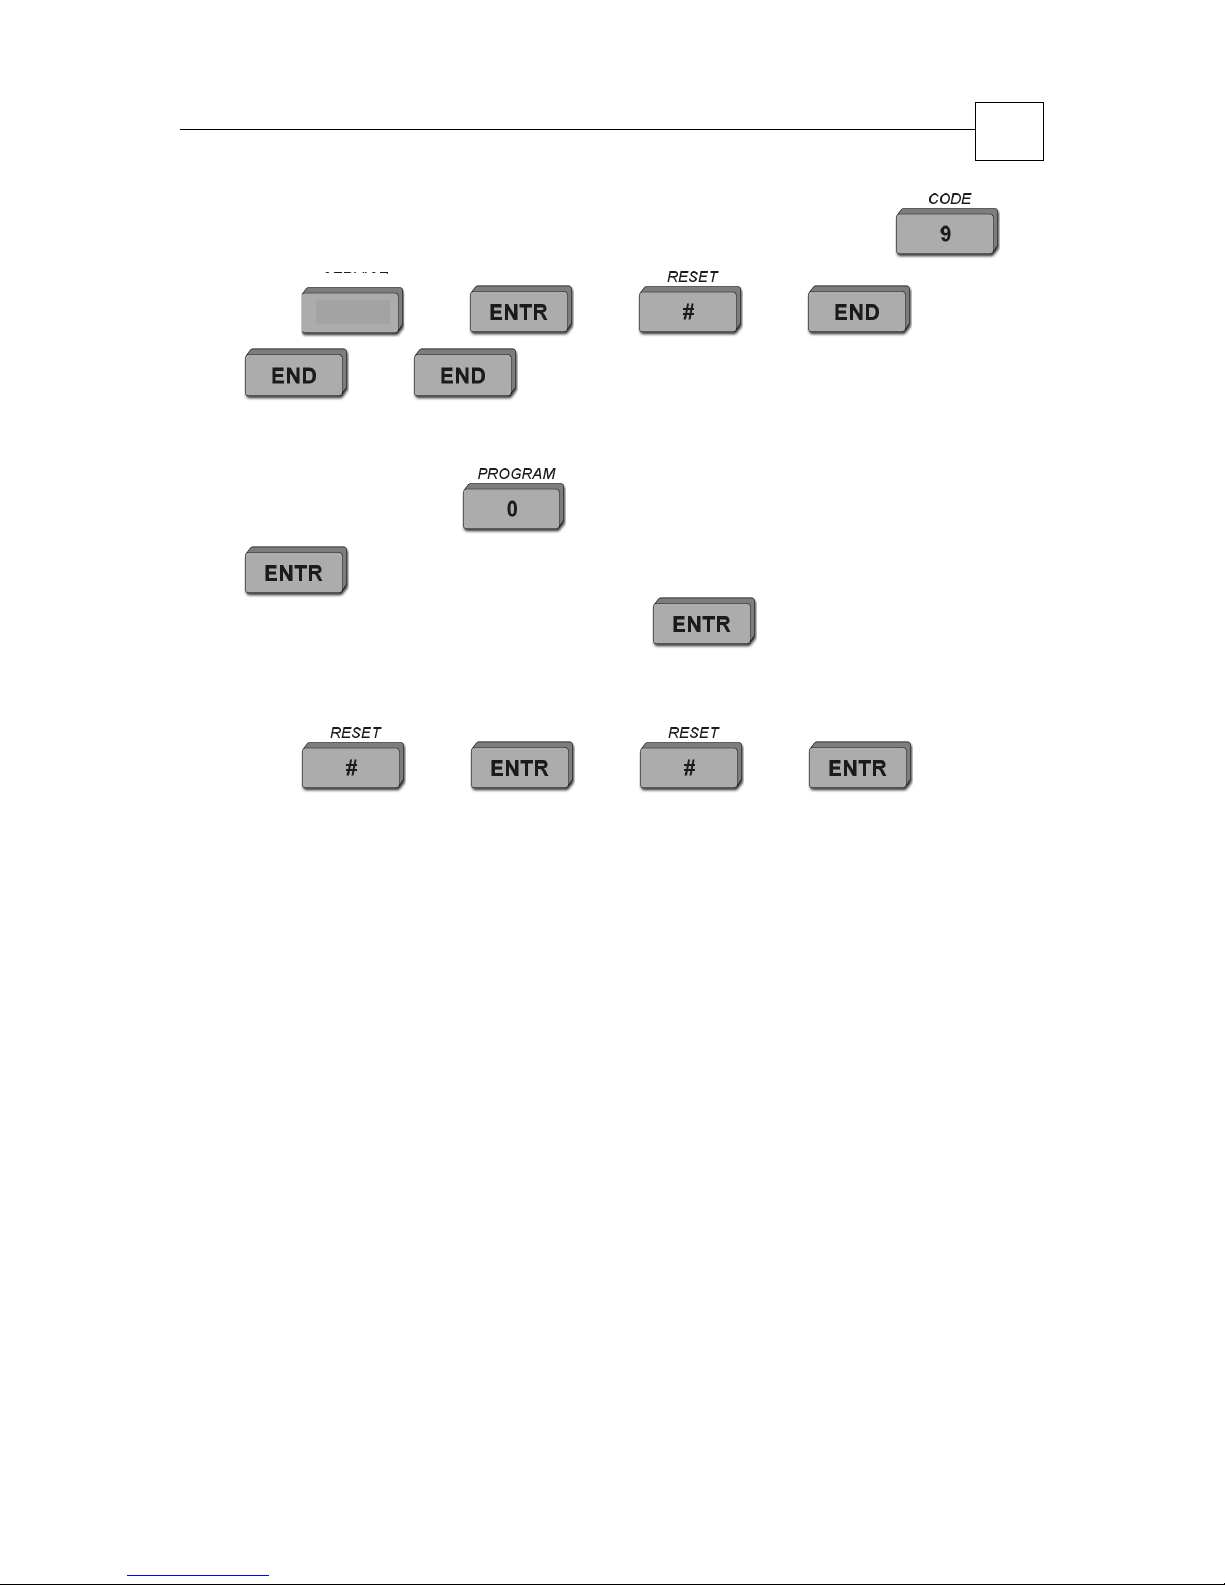
To program a Short Code:
After deleting a User Code, confirm its deletion by entering the old
code and getting no response from the system.
[
[
[
[
Primary Code
.
[
BAC
[
[
[
[
[
new Short Code (2 digits)
[
[
.
Page 13
K
User manual RXN-406 Keypad for CAPTAIN-i Alarm System
To delete a Short Code:
[
Primary Code
[
13
BAC
[
To program system’s automatic arming time:
Primary Code
[
To cancel system’s automatic arming:
[
Minutes (in MM format)
[
[
.
[
[
[
[
[
[
Hour (in HH format)
[
[
[
[
[
Page 14
14
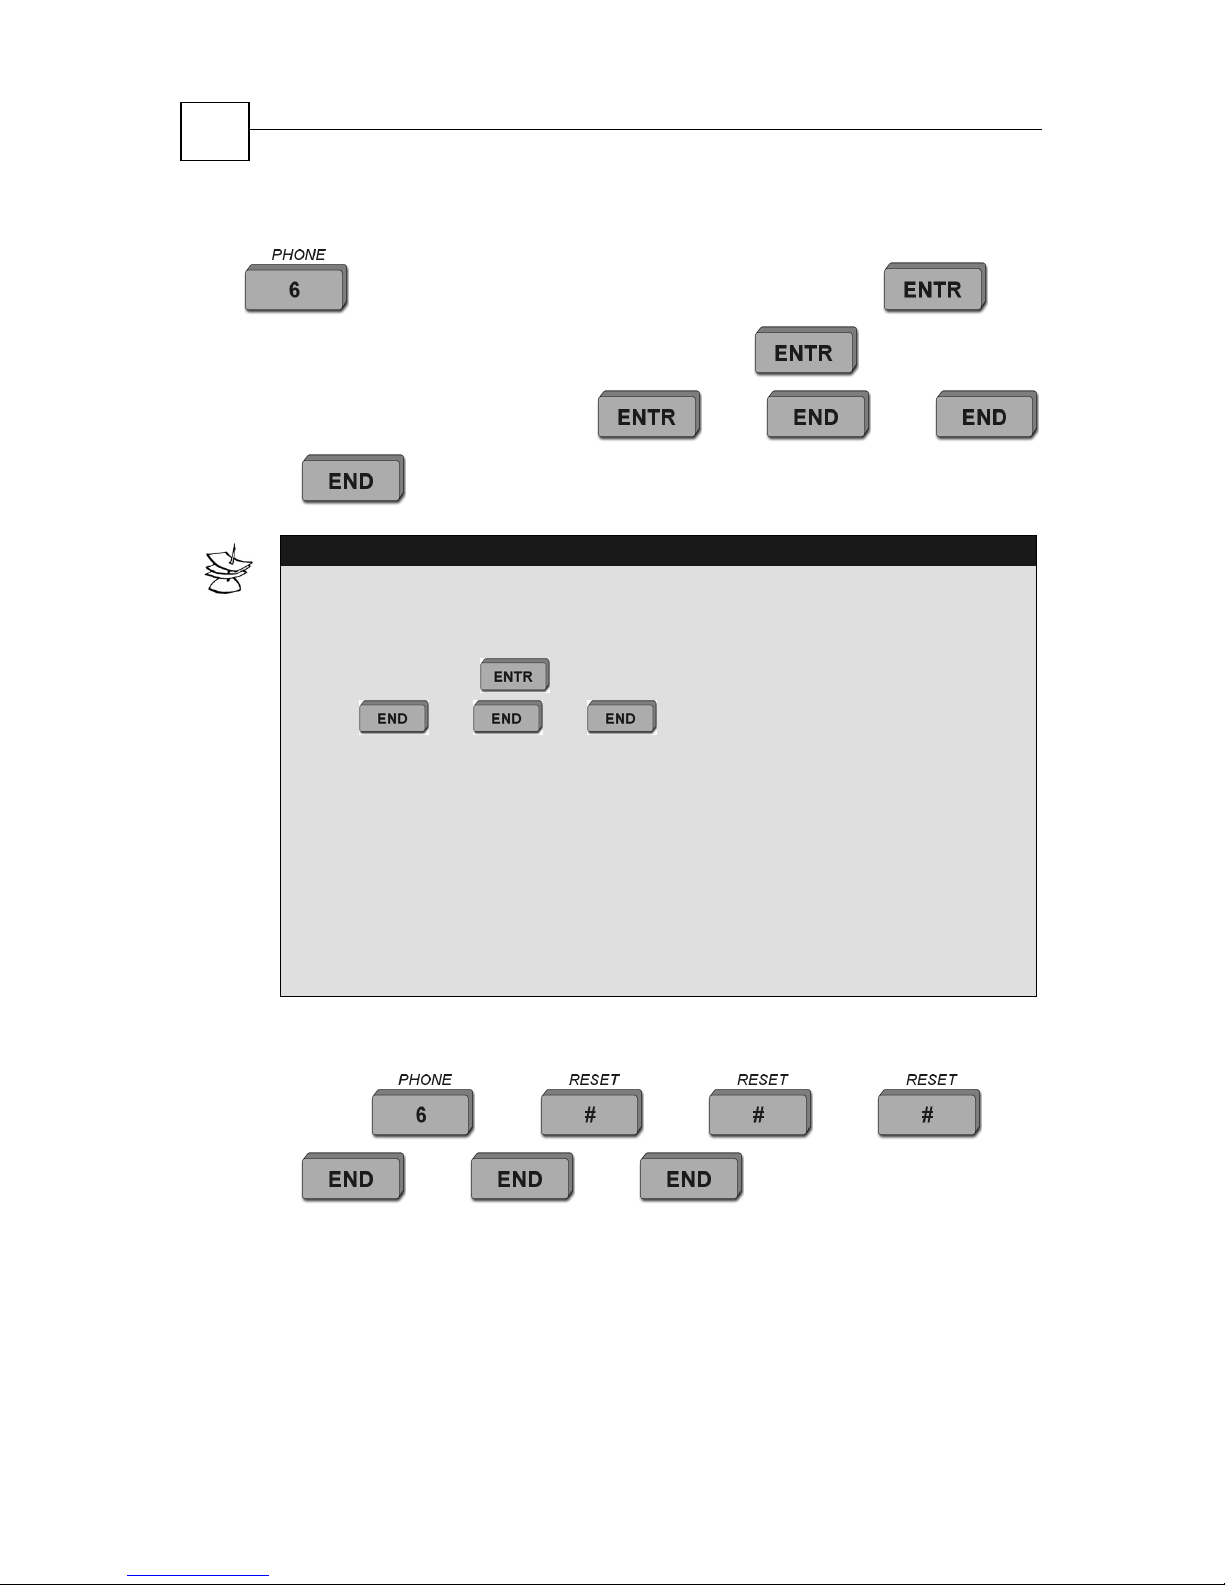
To program telephone numbers:
[
second (area code) telephone number
User manual RXN-406 Keypad for CAPTAIN-i Alarm System
first (area code) telephone number
[
[
Primary Code
[
[
third (area
[
[
code) telephone number
[
.
NOTES:
You can program up to three telephone numbers into the system
memory, which will be called in an emergency or when in Alarm
Mode. If you want to program only one or two telephone numbers,
then press [
[
[ [ after you have programmed the
final telephone number.
If the CAPTAIN Alarm System is connected behind a PBX, you
must enter the outside line prefix digit and an asterisk before the
telephone number. For example: 9*555-5555.
When the CAPTAIN Alarm System calls to one of the programmed
phone numbers, a siren tone is heard on the subscriber telephone.
For playing a pre-recorded message, a VU-20 unit (optional) is
required. Consult your installer for this option.
[
[
[
To delete all private telephone numbers:
[
Code
[
[
[
[
[
.
[
[
Primary
Page 15
User manual RXN-406 Keypad for CAPTAIN-i Alarm System
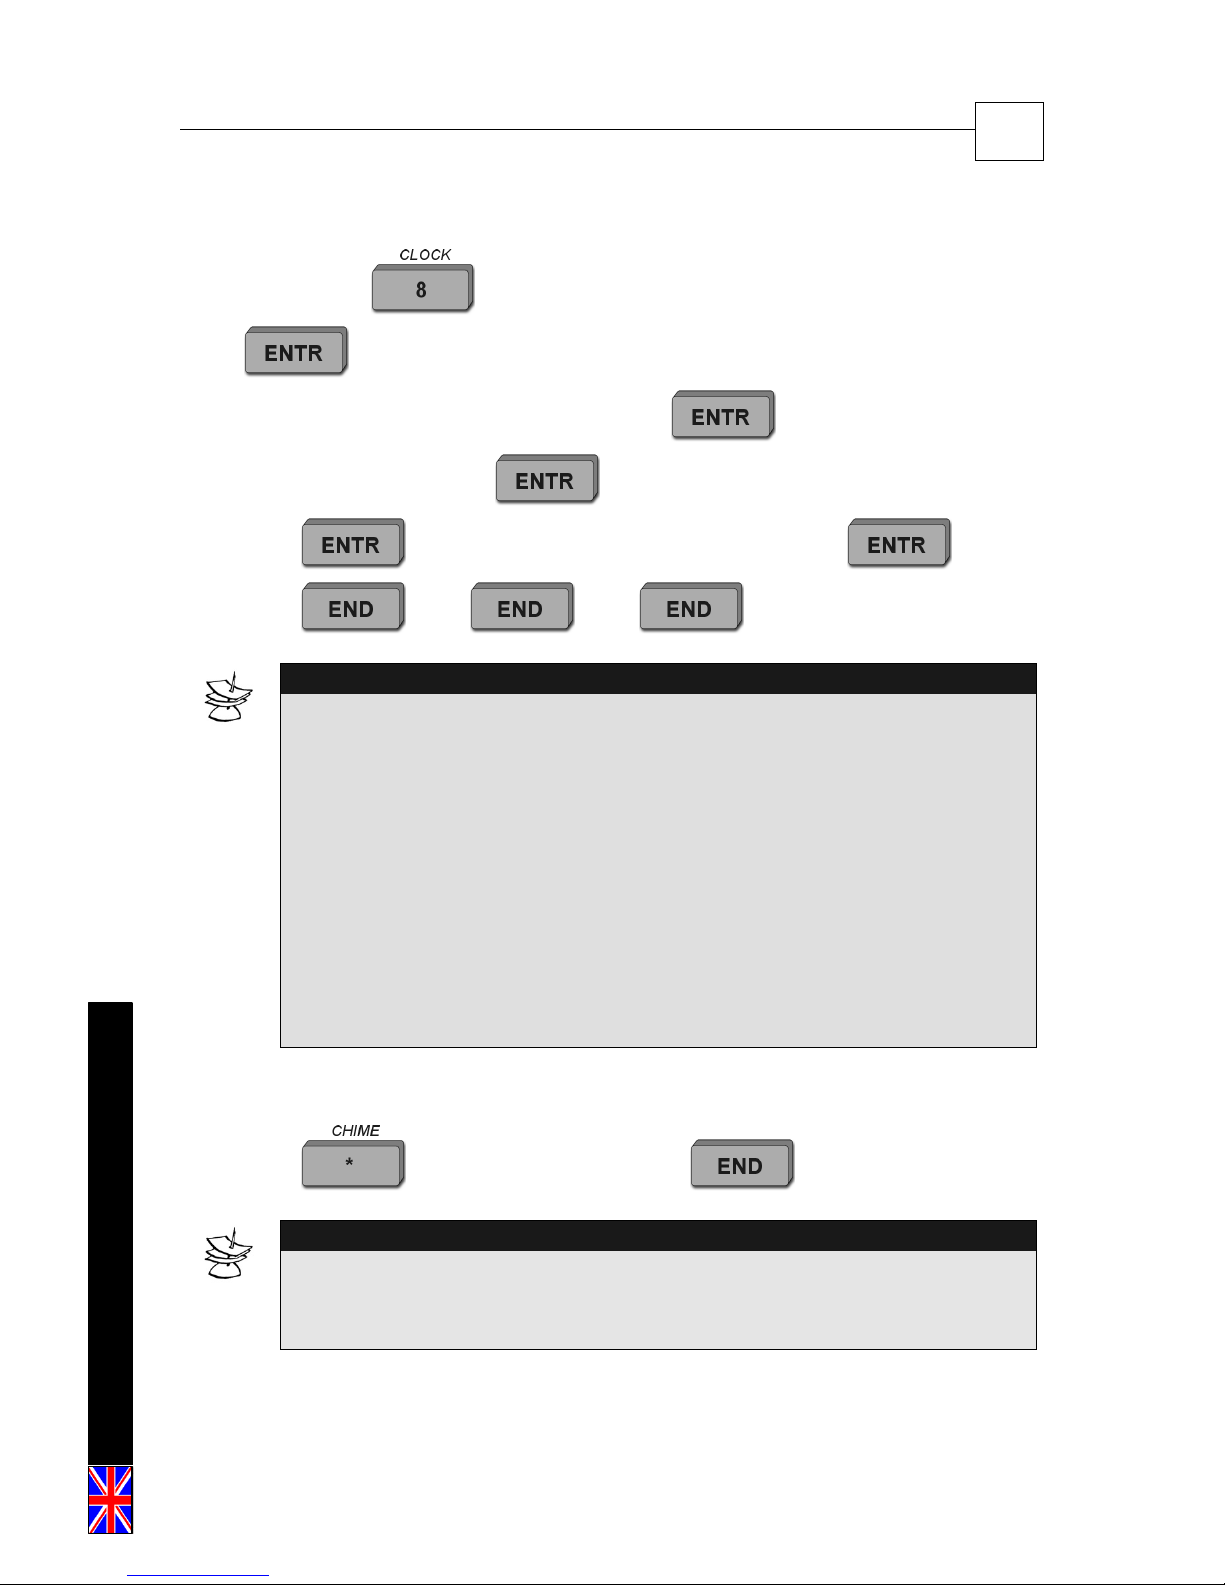
To set the time and date for the system:
[
Code
[
[
2 digits for the current hour
[
[
Primary
15
P/N 4410164 Rev. A (Apr-2005)
2 digits for the current minutes
the current year
[
[
NOTES:
The time should be in HH:MM 24 hours format (e.g., 22:35).
It is important to set the correct time and date to ensure proper
functioning of your CAPTAIN Alarm System.
The system time is not visible but it will be recorded with events in
the system’s memory.
If NO time is entered, the CAPTAIN Alarm System shall report
a failure
The CAPTAIN Alarm System will not accept meaningless data.
For example, if you enter 25:25 for the hour, the programming will
be stopped automatically, and you will have to start the procedure
from the beginning.
[
[
2 digits for the current day
[
.
[
[
[
2 digits for the current month
.
[
last 2 digits of
[
To program/cancel a Chime Zone:
[
NOTE:
This mode activates a buzzer in the keypad when a Chime Zone is
triggered. There is no visible indication of Chime Zones on the RXN406 Keypad.
[
zone number
[
.
[
Primary Code
 Loading...