

Page 1
12
3
6
PC2
PC4
PC6
Completely read and fully understand this
manual before starting your golf cart.
PILOTCAR golf cart
shall not be used outside the areas which
are closed to trafc and safely secured !
CAUTION! Disregarding the instructions
may cause serious injury or death for the
driver, by standers, or the maintenance
personnel.
USER MANUAL
Page 2

PILOTCAR GOLF CART USER MANUAL
2016 by Özkılıç Otomotiv
4rd Edition
All rights reserved
Unauthorized duplication, use is prohibited
Published in TÜRKİYE
Congratulations for purchasing PILOTCAR golf cart. This
manual contains the information required for proper
operation, maintenance and repairment of your golf cart. Fully
understanding these simple instructions will enable you to get
the maximum pleasure from your new PILOTCAR.
Please contact with your PILOTCAR authorized dealer for any
questions you may have on the operation or maintenance of
your golf cart.
Page 3

Congratulations for purchasing PILOTCAR golf cart. This
manual contains the information required for proper
operation, maintenance and repairment of your golf cart. Fully
understanding these simple instructions will enable you to get
the maximum pleasure from your new PILOTCAR.
Please contact with your PILOTCAR authorized dealer for any
questions you may have on the operation or maintenance of
your golf cart.
Page 4

4
The most important information contained in this manual is as set forth
below.
Safety Warning Symbol:
CAUTION, BE ALERT! YOUR SAFETY IS AT STAKE !
-----------------------------------------
ATTENTION
CAUTION! Disregarding the instructions may cause serious injury or death
for the driver, by standers, or the maintenance personnel
-----------------------------------------
CAUTION !
This message symbol notifies you the special measures to be taken to
prevent any damages be given to the golf cart.
-----------------------------------------
NOTE :
This message provides important additional information.
-----------------------------------------
IMPORTANT NOTICE CONCERNING THE MANUAL
5
IMPORTANT LABELS
DRIVER SAFETY
SAFETY RELATED ISSUES
CONTROLS
PRE-OPERATION CONTROLS
OPERATION
REPAIRING
MAINTENANCE
TECHNICAL SPECIFICATIONS
NOTES
TABLE OF CONTENTS
Page
7
11
13
17
41
23
44
27
29
39
Page 5

5
IMPORTANT LABELS
DRIVER SAFETY
SAFETY RELATED ISSUES
CONTROLS
PRE-OPERATION CONTROLS
OPERATION
REPAIRING
MAINTENANCE
TECHNICAL SPECIFICATIONS
NOTES
TABLE OF CONTENTS
Page
7
11
13
17
41
23
44
27
29
39
Page 6
6
SAFETY AND EXPLANATION LABELS
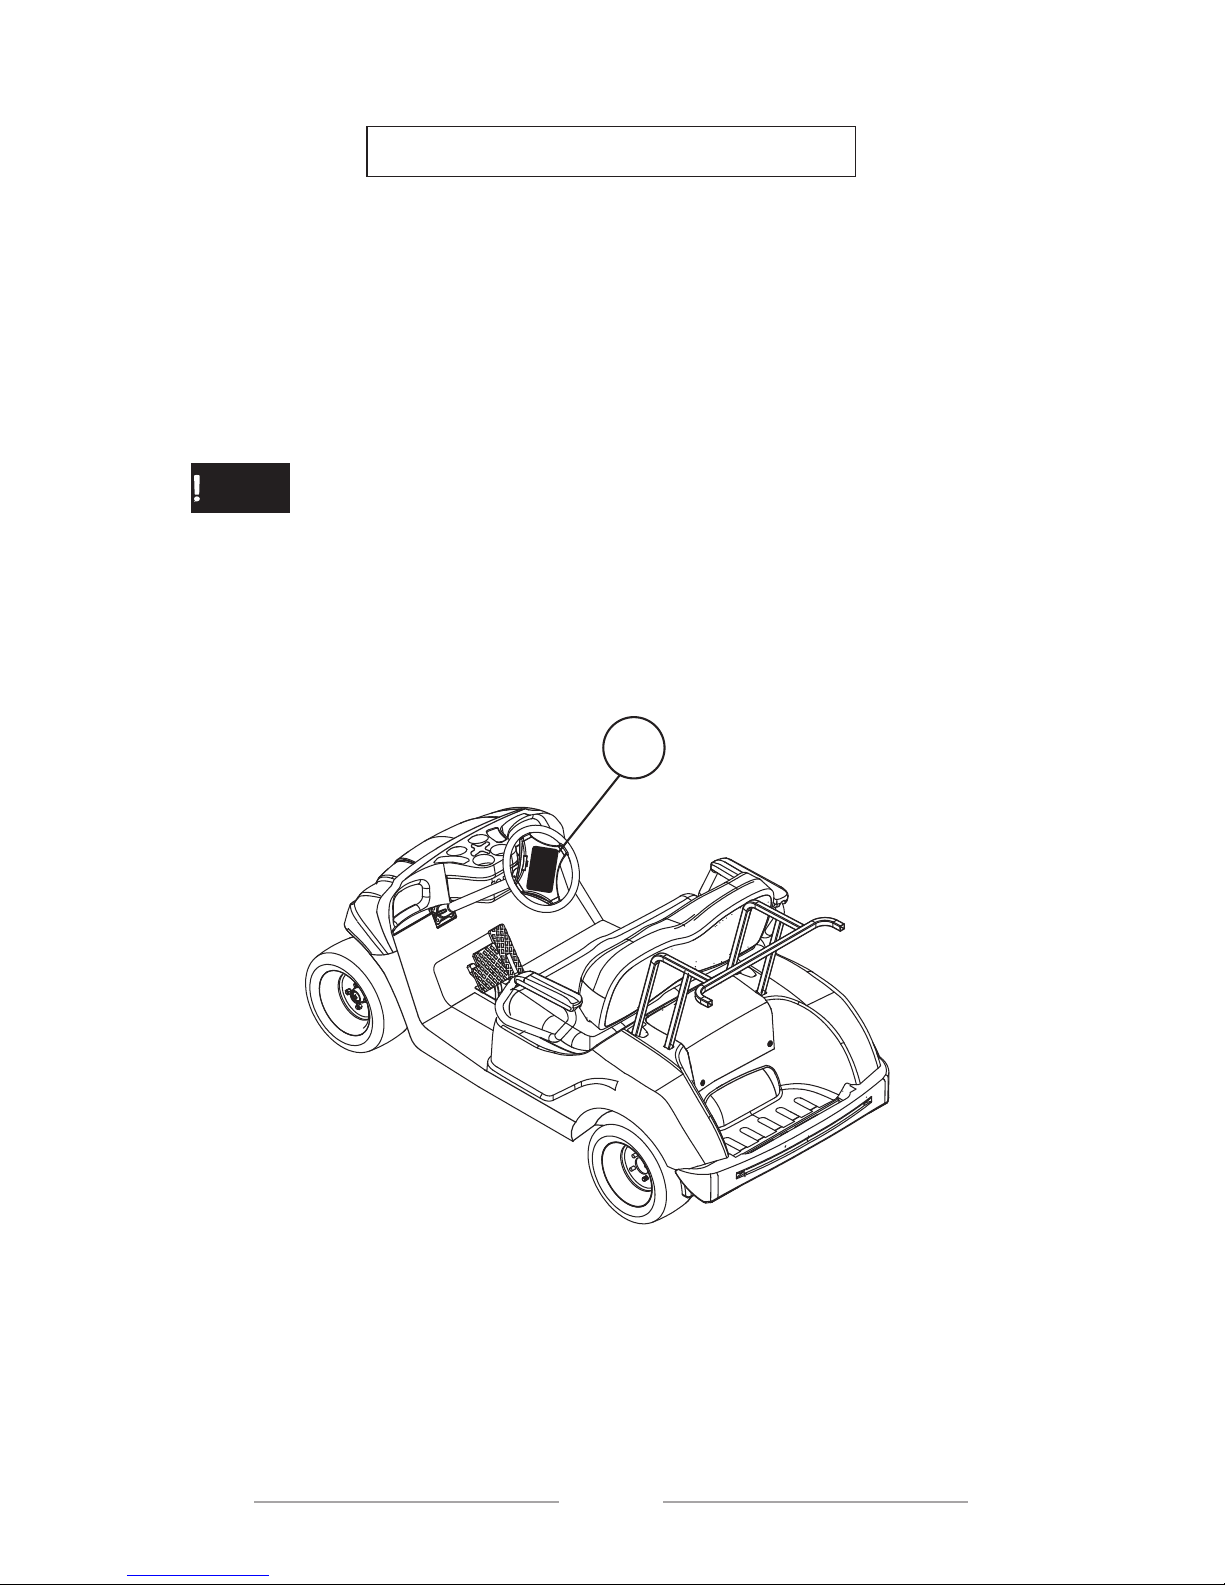
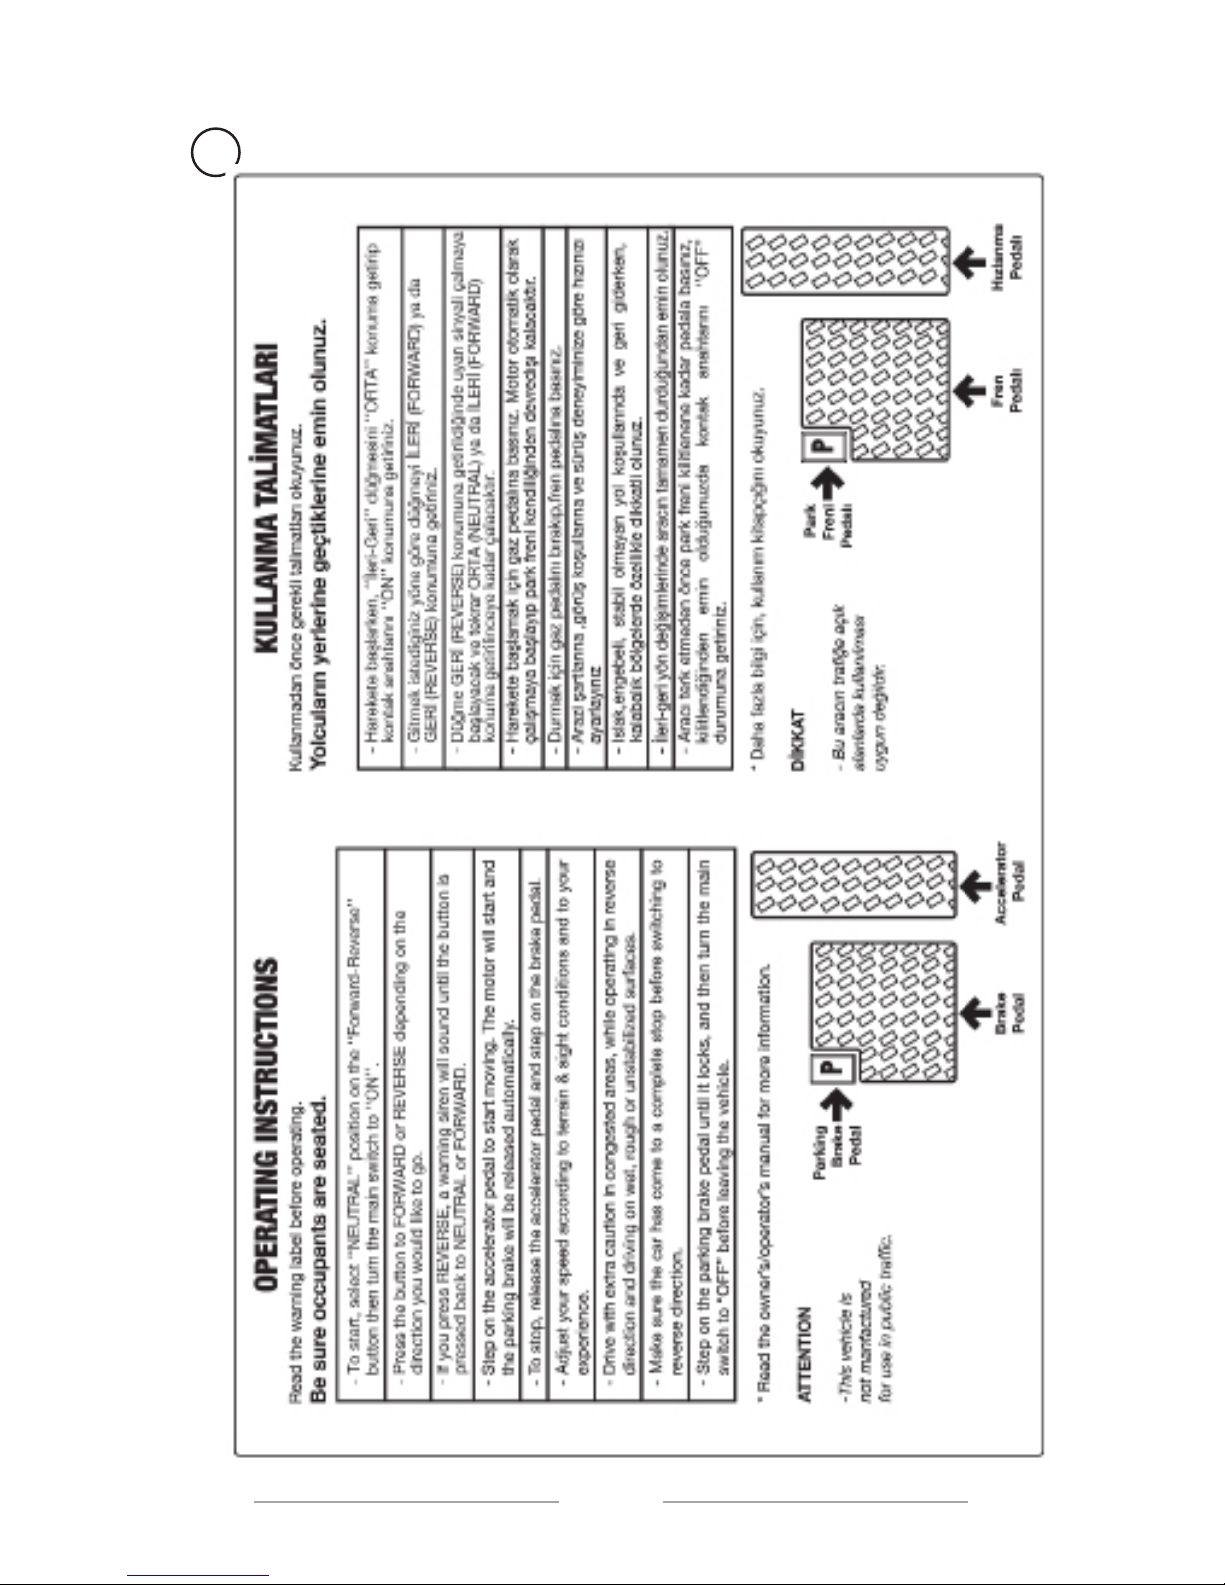
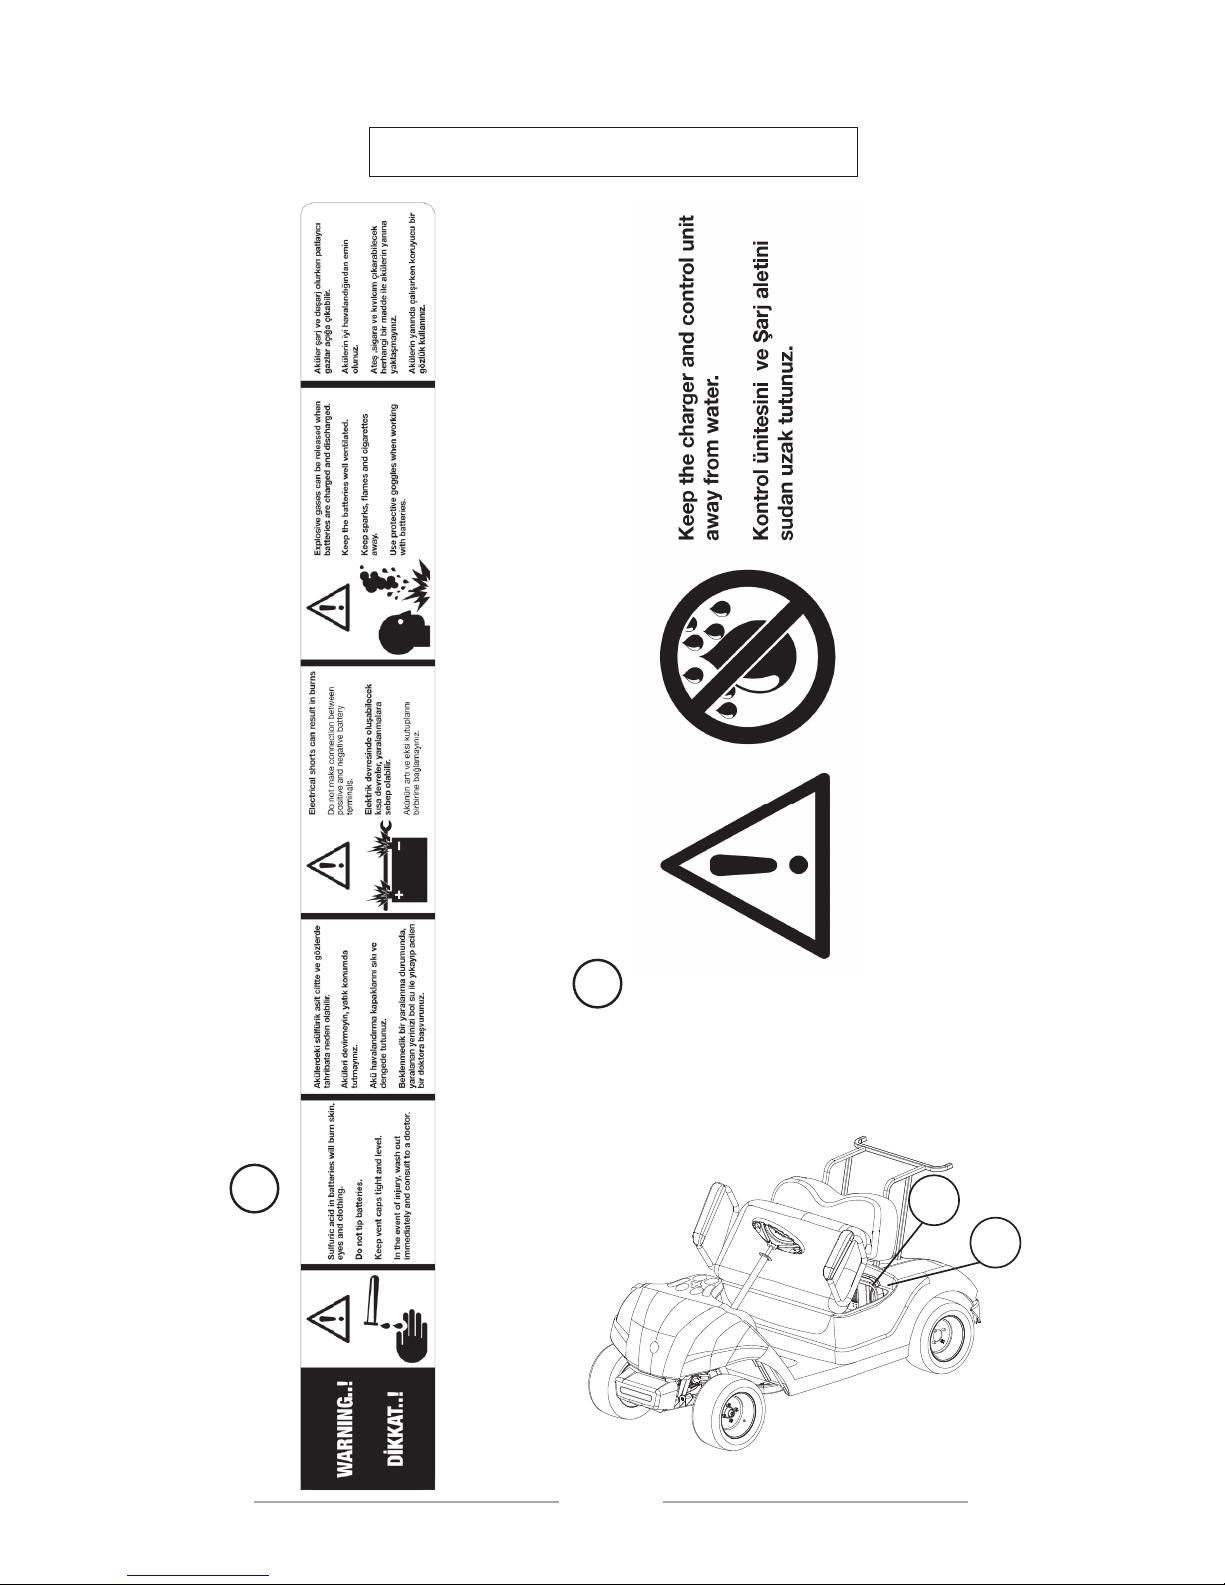
ATTENTION
Please read the below labels carefully before starting your golf cart and
immediately renew the damaged or removed labels.
IMPORTANT LABELS
1
7
1
Page 7
7
1
Page 8
8
IMPORTANT LABELS
2
3
2
3
9
IMPORTANT LABELS
GOLF CART SERIAL
NUMBER
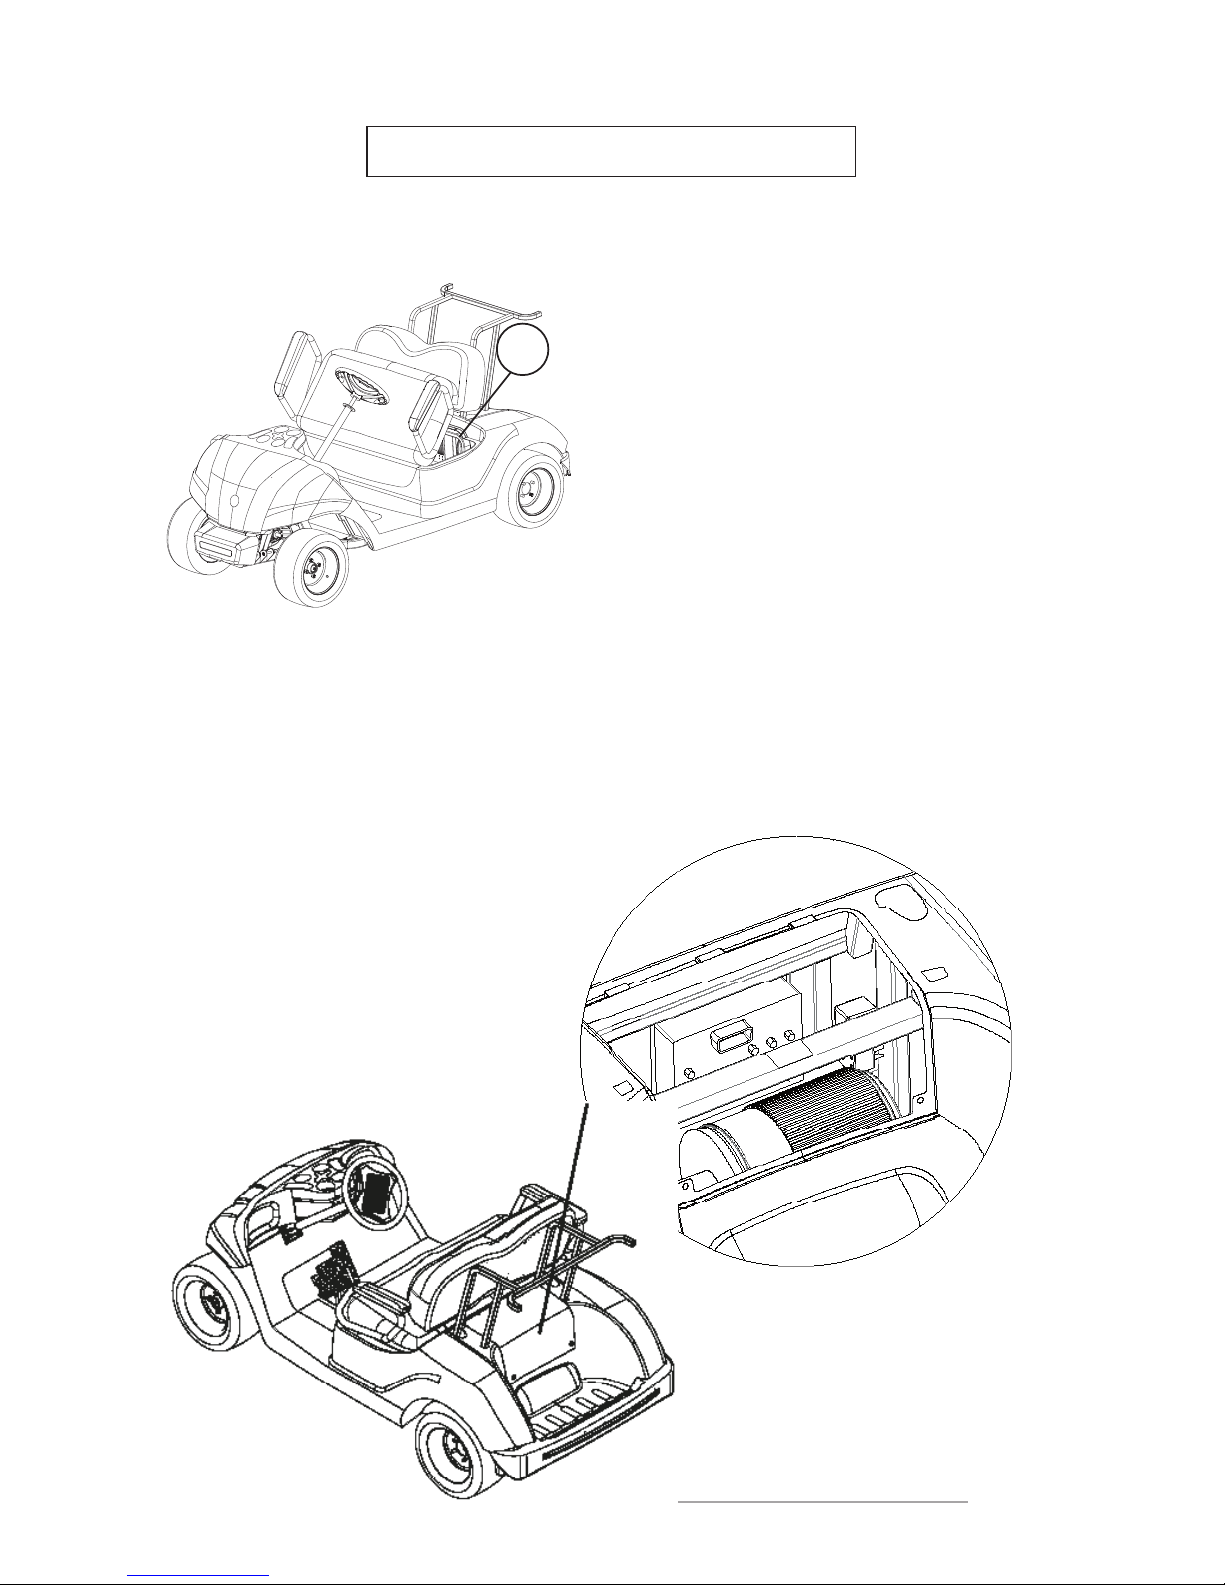
The serial number of the golf cart
is attached to the point indicated in
numbers 2.
-----------------------------------
NOTE :
First three digits of the serial
number are model identification
numbers, other digits are the unit
manufacturing numbers. Please note
these numbers in order to use when
ordering spare parts from Pilotcar
Authorized Technical Service.
-----------------------------------
1
Page 9
9
IMPORTANT LABELS
GOLF CART SERIAL
NUMBER
The serial number of the golf cart
is attached to the point indicated in
numbers 2.
-----------------------------------
NOTE :
First three digits of the serial
number are model identification
numbers, other digits are the unit
manufacturing numbers. Please note
these numbers in order to use when
ordering spare parts from Pilotcar
Authorized Technical Service.
-----------------------------------
1
Page 10

10
11
DRIVER SAFETY
Pilotcar golf carts are designed for easy
start up. However, please make sure that the
following issues are complied with.
BEFORE START UP;
• Before starting the golf cart, please
make sure that you read the entire user manual
and the safety and explanation labels attached
on the golf cart.
• Please make sure you fulfill the pre-start
controls mentioned in page 23 of this manual.
• The golf cart shall be used solely by
authorized persons and solely by the driver and
only in the allocated areas.
• Do not allow more than two persons on
each seat. This golf cart is for
two persons unless it has a rear seat fitted.
• Do not use the golf cart when you are
drunk or under the influence of medicines; the
impact on the sight and judgment may cause the
golf cart being used become more dangerous.
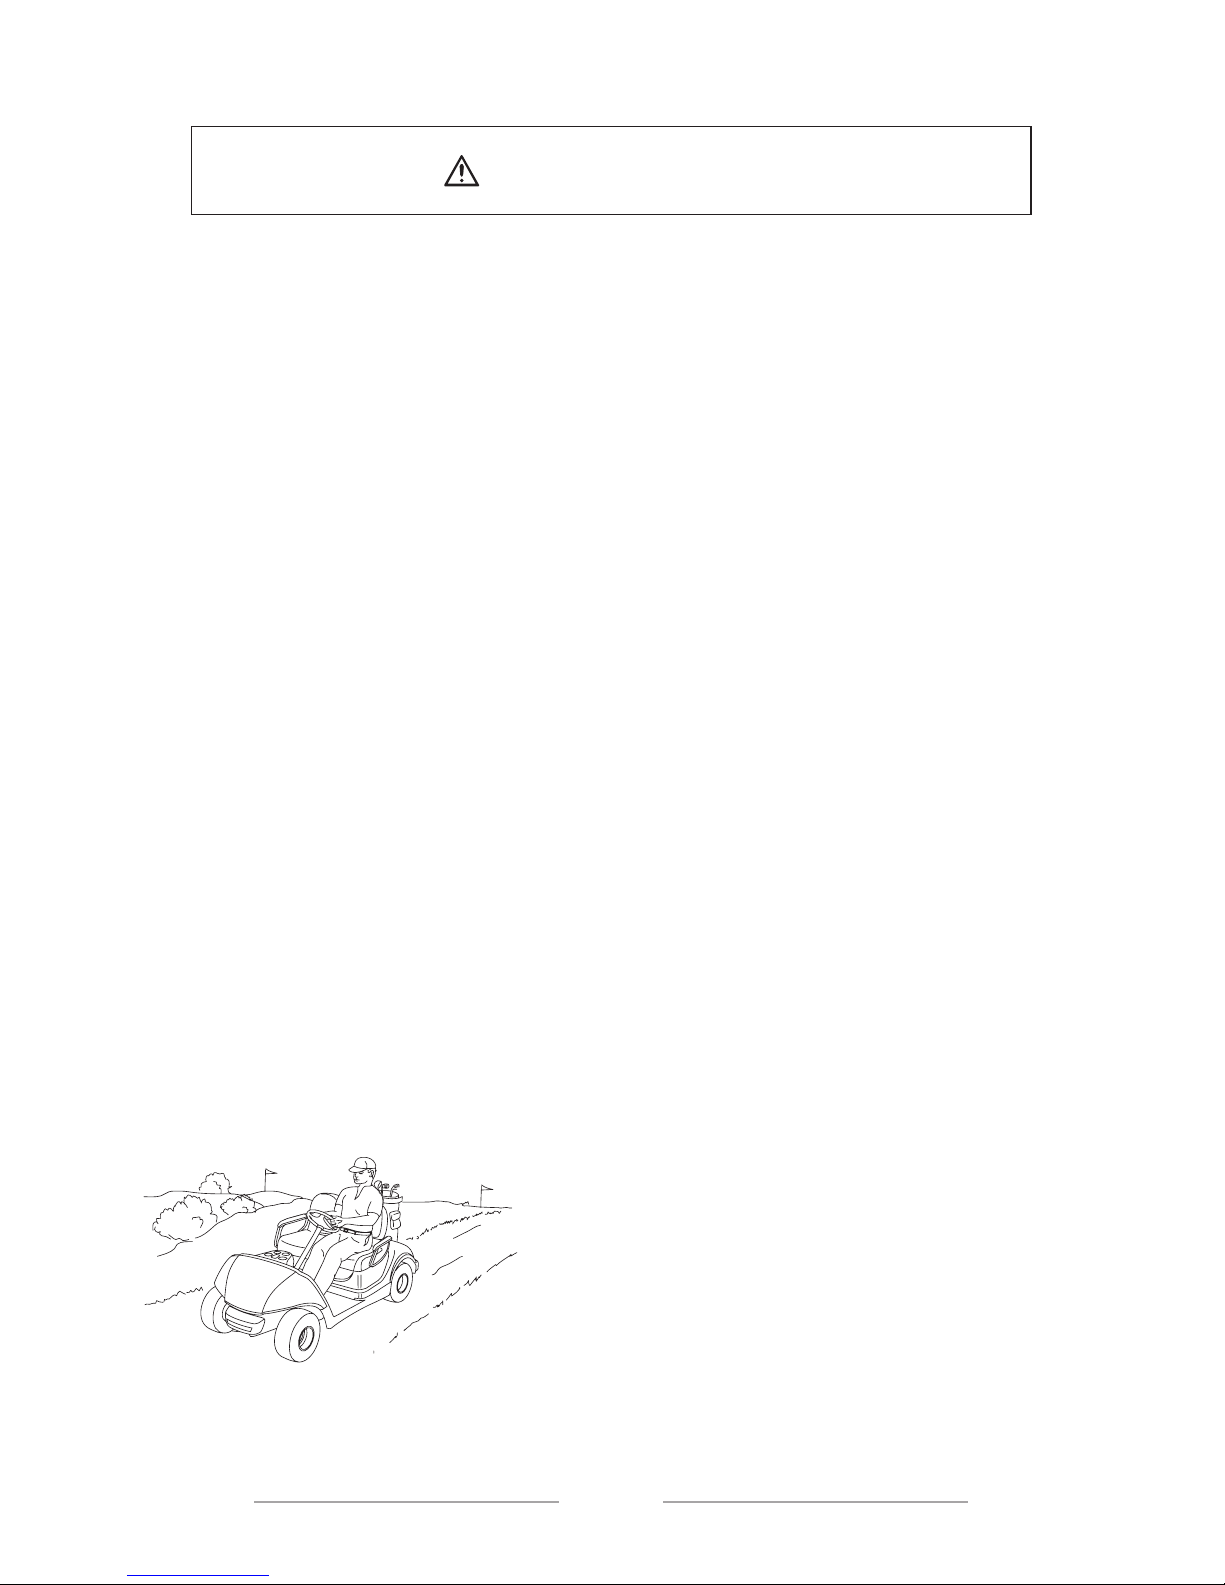
• Unless allowed by the laws and local
regulations, do not use the golf cart on roads
open for traffic, main roads or highways.
WHEN STARTING
• Please keep your entire body inside the
vehicle when moving.
• Please, do not start the vehicle before
the passengers are seated.
• Please do not take your hands off the
steering wheel and keep your eyes on the
road in front of you.
Page 11
11
DRIVER SAFETY
Pilotcar golf carts are designed for easy
start up. However, please make sure that the
following issues are complied with.
BEFORE START UP;
• Before starting the golf cart, please
make sure that you read the entire user manual
and the safety and explanation labels attached
on the golf cart.
• Please make sure you fulfill the pre-start
controls mentioned in page 23 of this manual.
• The golf cart shall be used solely by
authorized persons and solely by the driver and
only in the allocated areas.
• Do not allow more than two persons on
each seat. This golf cart is for
two persons unless it has a rear seat fitted.
• Do not use the golf cart when you are
drunk or under the influence of medicines; the
impact on the sight and judgment may cause the
golf cart being used become more dangerous.
• Unless allowed by the laws and local
regulations, do not use the golf cart on roads
open for traffic, main roads or highways.
WHEN STARTING
• Please keep your entire body inside the
vehicle when moving.
• Please, do not start the vehicle before
the passengers are seated.
• Please do not take your hands off the
steering wheel and keep your eyes on the
road in front of you.
Page 12
12
DRIVER SAFETY
• Please be utmost careful at crowded
places and while moving in reverse. While
moving in reverse, please go slowly, be
careful and avoid sudden starts and stops.
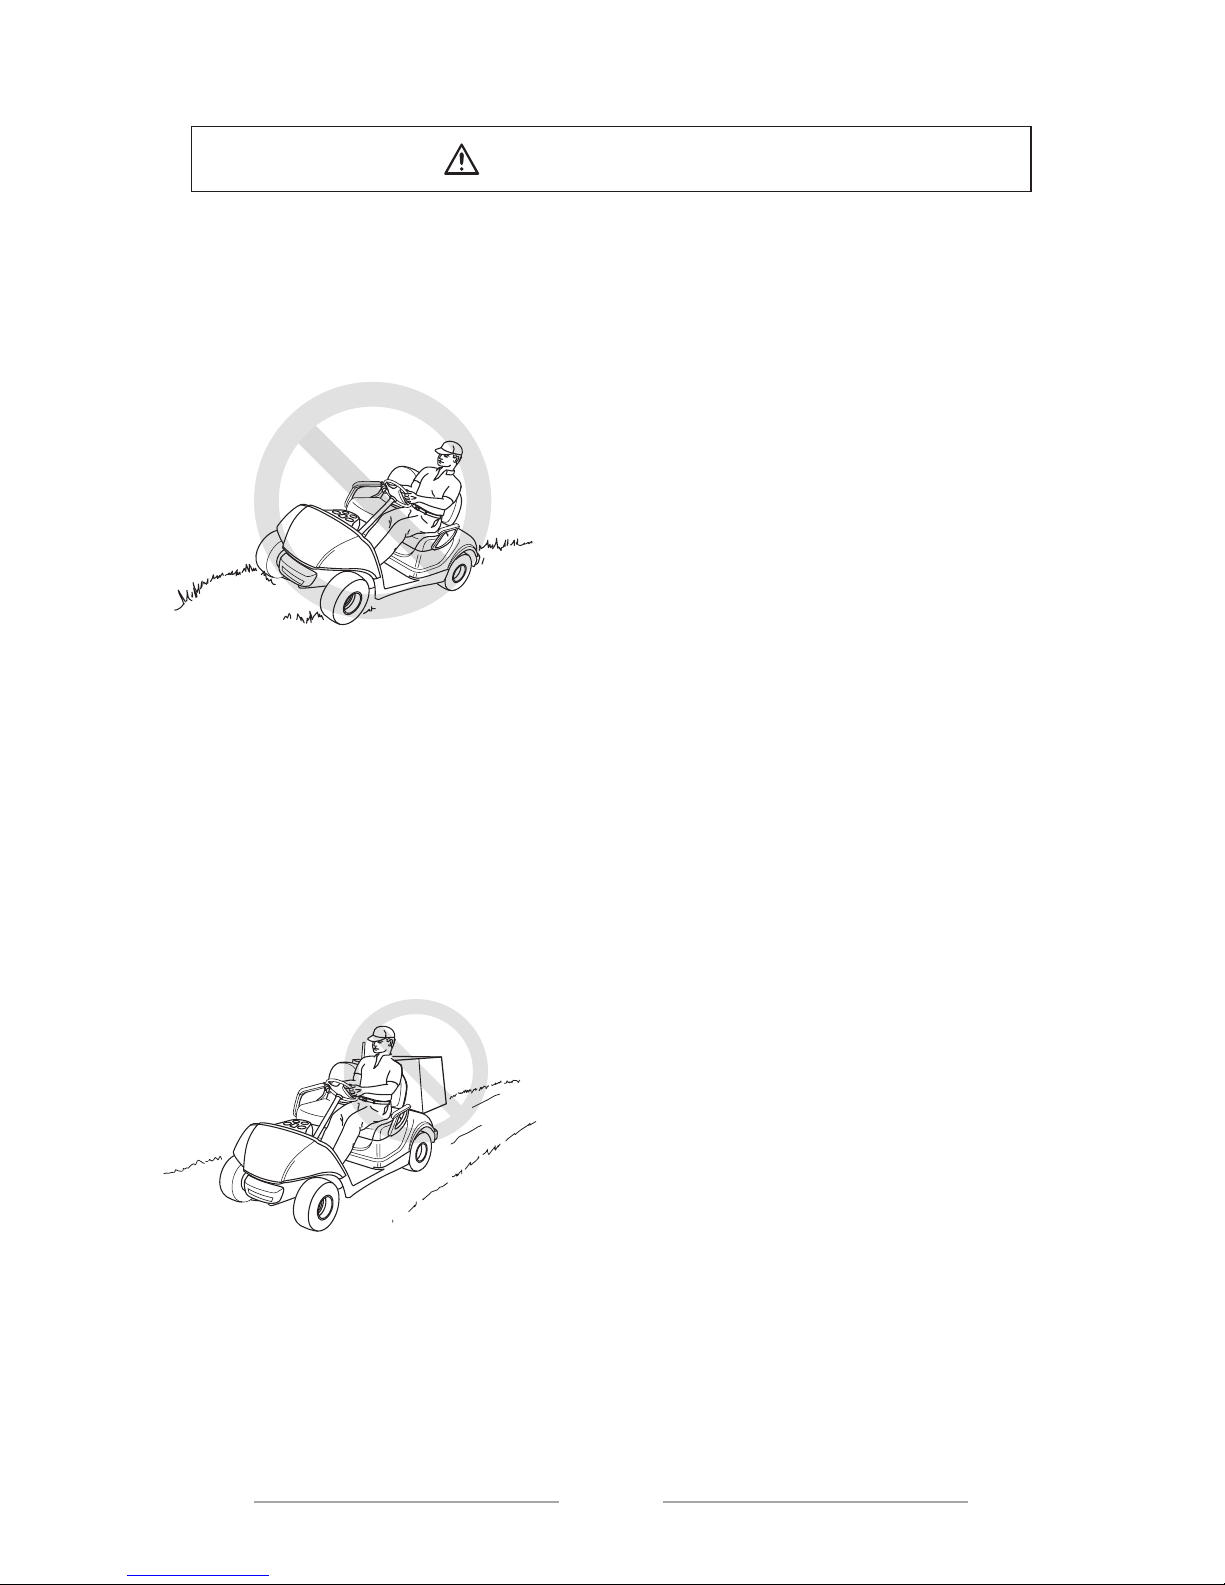
• Please adjust the speed of the golf cart
according to the land specific conditions of
the area.
• Please avoid turning the wheel hard at
high speeds.
• Please drive slowly and follow a flat line
while climbing up hills or going down the
hills.
• Do not make any modifications or
additions which may have effect on capacity
and safe use and not in compliance with the
operating manual.
13
SAFETY RELATED ISSUES
As all other machinery, if the golf carts
are used in an inappropriate manner, this
may cause injuries. This section contains
all the general safety implementations
required to safely operate the golf
cart. Before starting the golf carts,
the personnel responsible for the golf
area determines the additional safety
precautions which may be required for
safer use by the golf area personnel.
The experiences indicate that the golf
carts are safe when they are operated
according to the safety warnings
attached on each vehicle. This safe
operation will be strengthened when the
golf carts are operated according to the
safety rules and practices identified in a
manner to be fit for the field conditions
where the golf carts are used.
The information contained herein is
prepared for the personnel responsible
for the safety of the golf carts. If you
are responsible for the operation
and maintenance of the golf cart, we
recommend you to implement the golf
cart safety programme.
DRIVER QUALITIES
Please allow solely the authorized
persons to operate the golf carts. It is
recommended that the golf carts are
operated solely by the persons those
who have a valid motor vehicle driving
license.
Please locate the operation and safety
instructions recommended by the golf
cart manufacturer together with the golf
field safety rules to a notable place on
the golf cart hiring area or car park.
Furthermore, it is also recommended
that the following warnings are located
at a notable place.
Please do not operate the golf
carts when you are under the
influence of alcohol or drugs…!
GOLF FIELD SAFETY
INVESTIGATION
Please perform regular safety
investigations to determine the
dangerous areas where the golf carts
shall not be used.
HAZARD PREVENTION IN
THE GOLF FIELD
The following hazardous areas shall be
made secure in the golf field.
Steep Hills. Please restrict the golf
carts as much as possible with the
roads allocated for golf carts in places
where there are steep hills. Moreover,
please indicate steep hills with a proper
warning as set below.
ATTENTION
----------------------------------
Steep Hill, please go down the hill slowly
by keeping your foot on the brakes.
----------------------------------------------
Hairpin Turns: Blind spots,
Bridgeheads. Please circumscribe
these areas with potential hazard with
chains or ropes or please locate proper
warnings describing the quality of the
hazard and the precautions to be taken
to prevent the hazard.
Wet Areas: Wet grass may cause the
golf cart to lose grip and may affect the
balance. Please slowdown in wet areas
or in stormy weather.
Page 13

13
SAFETY RELATED ISSUES
As all other machinery, if the golf carts
are used in an inappropriate manner, this
may cause injuries. This section contains
all the general safety implementations
required to safely operate the golf
cart. Before starting the golf carts,
the personnel responsible for the golf
area determines the additional safety
precautions which may be required for
safer use by the golf area personnel.
The experiences indicate that the golf
carts are safe when they are operated
according to the safety warnings
attached on each vehicle. This safe
operation will be strengthened when the
golf carts are operated according to the
safety rules and practices identified in a
manner to be fit for the field conditions
where the golf carts are used.
The information contained herein is
prepared for the personnel responsible
for the safety of the golf carts. If you
are responsible for the operation
and maintenance of the golf cart, we
recommend you to implement the golf
cart safety programme.
DRIVER QUALITIES
Please allow solely the authorized
persons to operate the golf carts. It is
recommended that the golf carts are
operated solely by the persons those
who have a valid motor vehicle driving
license.
Please locate the operation and safety
instructions recommended by the golf
cart manufacturer together with the golf
field safety rules to a notable place on
the golf cart hiring area or car park.
Furthermore, it is also recommended
that the following warnings are located
at a notable place.
Please do not operate the golf
carts when you are under the
influence of alcohol or drugs…!
GOLF FIELD SAFETY
INVESTIGATION
Please perform regular safety
investigations to determine the
dangerous areas where the golf carts
shall not be used.
HAZARD PREVENTION IN
THE GOLF FIELD
The following hazardous areas shall be
made secure in the golf field.
Steep Hills. Please restrict the golf
carts as much as possible with the
roads allocated for golf carts in places
where there are steep hills. Moreover,
please indicate steep hills with a proper
warning as set below.
ATTENTION
---------------------------------Steep Hill, please go down the hill slowly
by keeping your foot on the brakes.
---------------------------------------------Hairpin Turns: Blind spots,
Bridgeheads. Please circumscribe
these areas with potential hazard with
chains or ropes or please locate proper
warnings describing the quality of the
hazard and the precautions to be taken
to prevent the hazard.
Wet Areas: Wet grass may cause the
golf cart to lose grip and may affect the
balance. Please slowdown in wet areas
or in stormy weather.
Page 14

14
SAFETY RELATED ISSUES
• Soft Ground: Soft ground may
cause the golf cart lose grip and
may affect the balance. Please
reinforce the soft ground and
circumscribe such areas with
chains or ropes or please indicate
soft ground with proper warning.
• Meeting of the pedestrians with
the golf cart:
Please direct the golf cart or pedestrian
traffic as much as possible to different
areas to prevent accidents in crowded
areas. If directing the traffic is not
convenient, please locate warning
signals that warn the pedestrians
against golf cart traffic and the golf cart
drivers to drive slowly, be careful and
monitor the pedestrians carefully.
MAINTENANCE REQUIRED
FOR SAFETY OF THE GOLF
CART
Please comply with the below issues
to secure the safety of the golf cart
drivers.
• Protective Maintenance: Please
perform all scheduled maintenances according to the recommendations of the golf cart manufacturer to
provide a safe and properly operating golf cart in the golf field.
• Personnel: Please allow solely the
qualified, trained and authorized
personnel to check, adjust and
repair the golf carts.
• Spare parts and Materials: Please
use solely the spare parts and
materials recommended by the
manufacturer.
• Ventilation: Please ventilate all the
maintenance and storing areas in
conformity with the fire prevention
rules and regulations to prevent
risk of fire, ventilation is required to
discharge the inflammable gases
and fumes from the storage areas
of gasoline-powered vehicles. Ventilation is also required to discharge
hydrogen from the vehicle storage
areas while the accumulator is
being charged.
The amount of hydrogen diffused during
charging of the electrical golf carts may
vary depending on many elements such
as the status of the accumulators, the
output power of the accumulator charger
and the charging duration of the accumulators. Due to the fact that hydrogen
is extremely volatile and convects and
accumulates in forms of air bubbles at
the ceiling, at least five air changes per
hour is recommended. Please review
the applicable fire and safety rules for
the specific ventilation level requirements and operation requirements of
the explosion proof electrical devices.
15
SAFETY RELATED ISSUES
SAFETY PRECAUTIONS
TO BE TAKEN DURING
MAINTENANCE
Please perform all the safety
instructions set forth in the
operation and service manuals of
the manufacturer and also please
implement the following safety
procedures.
• Please properly fix the golf
cart prior to starting any maintenance
operations.
• Please properly block the
chassis prior to starting any works
beneath the golf cart.
• Please prevent fire risk and
keep proper fire protection equipment
readily available.
• Please deactivate the electrical
system of an electric golf cart according
to the manufacturer’s instructions before
starting any work on the golf cart.
• Please use only properly
isolated materials while working in
the electric gold carts or around the
accumulators.
• Please perform the
maintenances of all the safety
devices including brakes, steering
wheel mechanisms, warning devices
and governors under safe working
conditions. Please leave such devices
as provided for by the manufacturer and
do not make any modifications.
• The cart shall be tested in
an area closed to pedestrian traffic
by a qualified, trained and authorized
personnel after each and every
maintenance or repairment work to
make sure that it operates properly and
accurately adjusted.
• Please register all the
maintenance works in a maintenance
logbook in terms of date, service man
and type of maintenance. Please check
the maintenance logbook periodically to
make sure that the records are complete
and accurate.
• Please provide user
commentary cards to determine non-
periodic maintenance needs of some
golf carts.
• Please make sure that all the
name plates, warnings and instructions
made available by the manufacturer
remain legible.
• In case new name plates,
warnings or instructions are required,
please contact with Pilotcar Authorized
Dealer.
STORING AND CHARGING
THE ACCUMULATOR
In order to provide safety of the
service personnel, please take below
precautions:
• Please use only the
accumulator charging facilities and
procedures which comply with the
rules and regulations.
• Please periodically check the
charging facilities and procedures
to make sure that all the safety
codes, rules and procedures are
implemented.
Page 15

15
SAFETY RELATED ISSUES
SAFETY PRECAUTIONS
TO BE TAKEN DURING
MAINTENANCE
Please perform all the safety
instructions set forth in the
operation and service manuals of
the manufacturer and also please
implement the following safety
procedures.
• Please properly fix the golf
cart prior to starting any maintenance
operations.
• Please properly block the
chassis prior to starting any works
beneath the golf cart.
• Please prevent fire risk and
keep proper fire protection equipment
readily available.
• Please deactivate the electrical
system of an electric golf cart according
to the manufacturer’s instructions before
starting any work on the golf cart.
• Please use only properly
isolated materials while working in
the electric gold carts or around the
accumulators.
• Please perform the
maintenances of all the safety
devices including brakes, steering
wheel mechanisms, warning devices
and governors under safe working
conditions. Please leave such devices
as provided for by the manufacturer and
do not make any modifications.
• The cart shall be tested in
an area closed to pedestrian traffic
by a qualified, trained and authorized
personnel after each and every
maintenance or repairment work to
make sure that it operates properly and
accurately adjusted.
• Please register all the
maintenance works in a maintenance
logbook in terms of date, service man
and type of maintenance. Please check
the maintenance logbook periodically to
make sure that the records are complete
and accurate.
• Please provide user
commentary cards to determine nonperiodic maintenance needs of some
golf carts.
• Please make sure that all the
name plates, warnings and instructions
made available by the manufacturer
remain legible.
• In case new name plates,
warnings or instructions are required,
please contact with Pilotcar Authorized
Dealer.
STORING AND CHARGING
THE ACCUMULATOR
In order to provide safety of the
service personnel, please take below
precautions:
• Please use only the
accumulator charging facilities and
procedures which comply with the
rules and regulations.
• Please periodically check the
charging facilities and procedures
to make sure that all the safety
codes, rules and procedures are
implemented.
Page 16

16
17
12
3
6
7
8
9
10
13
11
12
4
5
CONTROLS
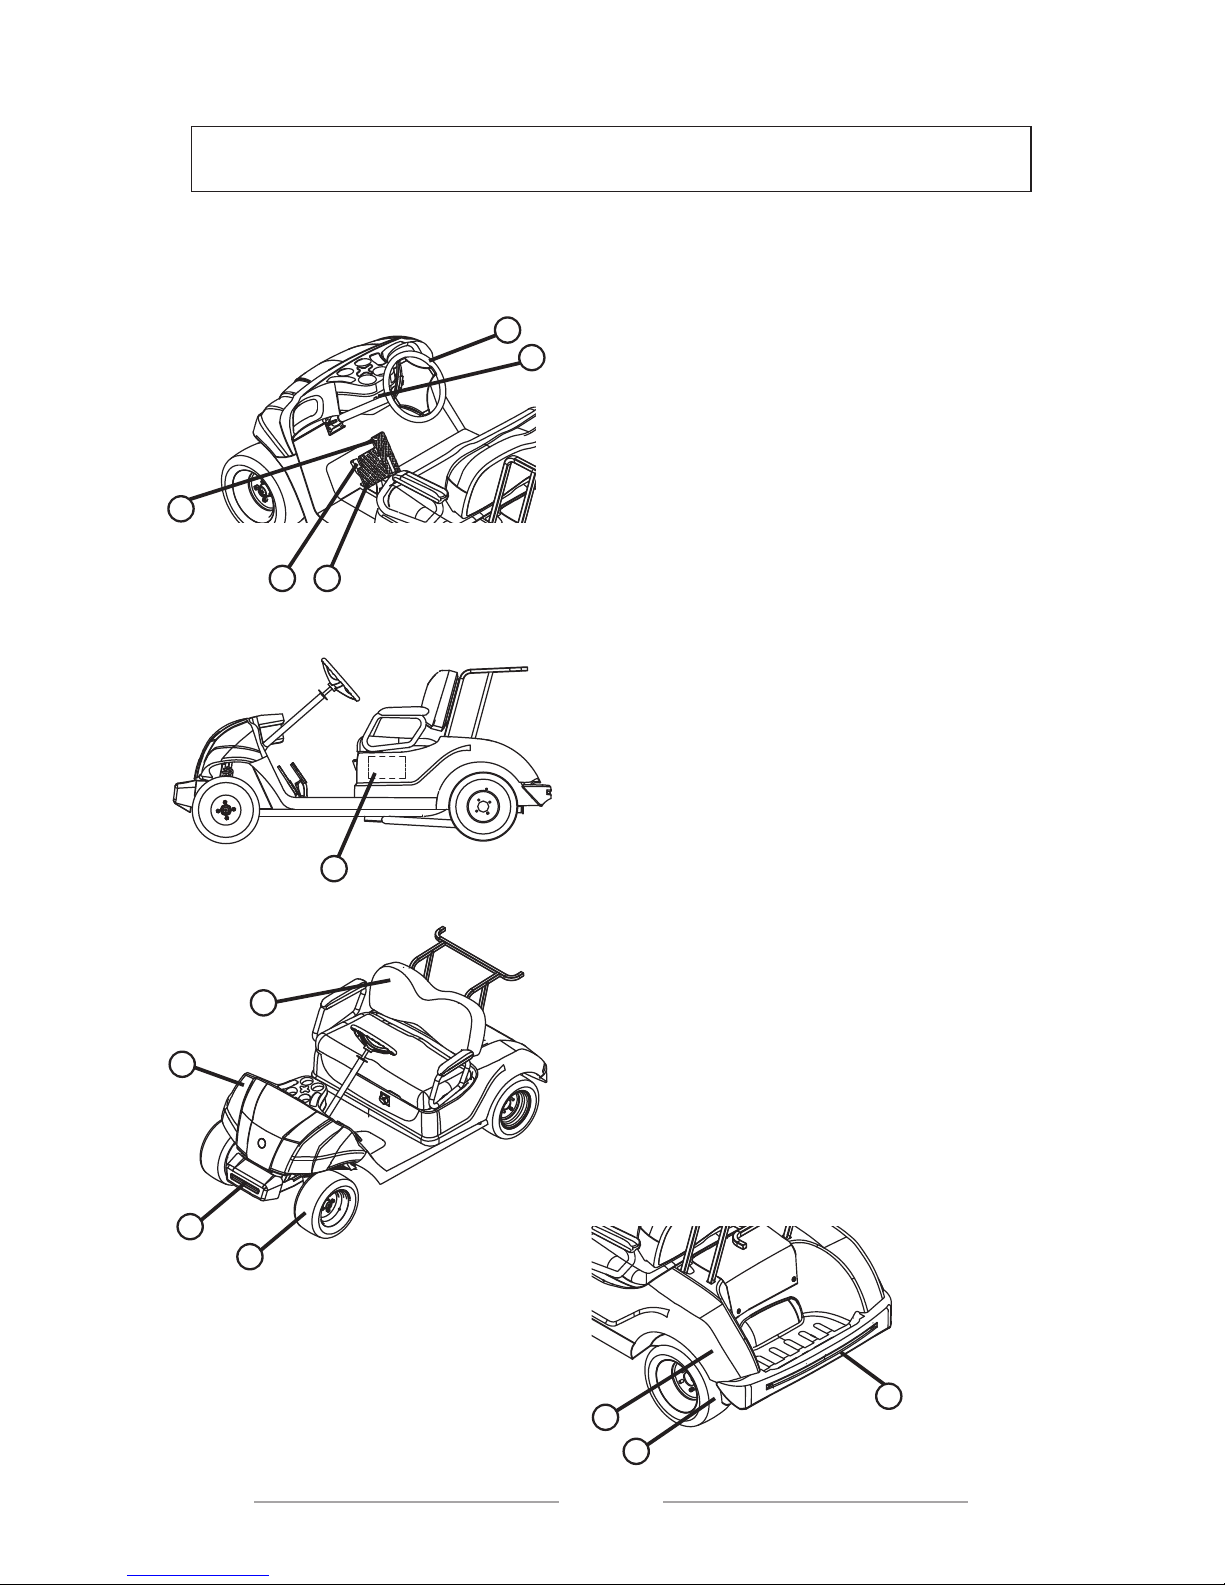
SPECIFICATIONS
1. Brake pedal
2. Parking brake pedal
3. Accelerator pedal
4. Steering wheel
5. Ignition key and
BACK AND FORTH button.
6. Batteries
7. Seat
8. Dash board
9. Front tires
10. Front bumper
11. Rear Housing
12. Rear tires
13. Rear bumper
Page 17
17
12
3
6
7
8
9
10
13
11
12
4
5
CONTROLS
SPECIFICATIONS
1. Brake pedal
2. Parking brake pedal
3. Accelerator pedal
4. Steering wheel
5. Ignition key and
BACK AND FORTH button.
6. Batteries
7. Seat
8. Dash board
9. Front tires
10. Front bumper
11. Rear Housing
12. Rear tires
13. Rear bumper
Page 18
18
CONTROLS
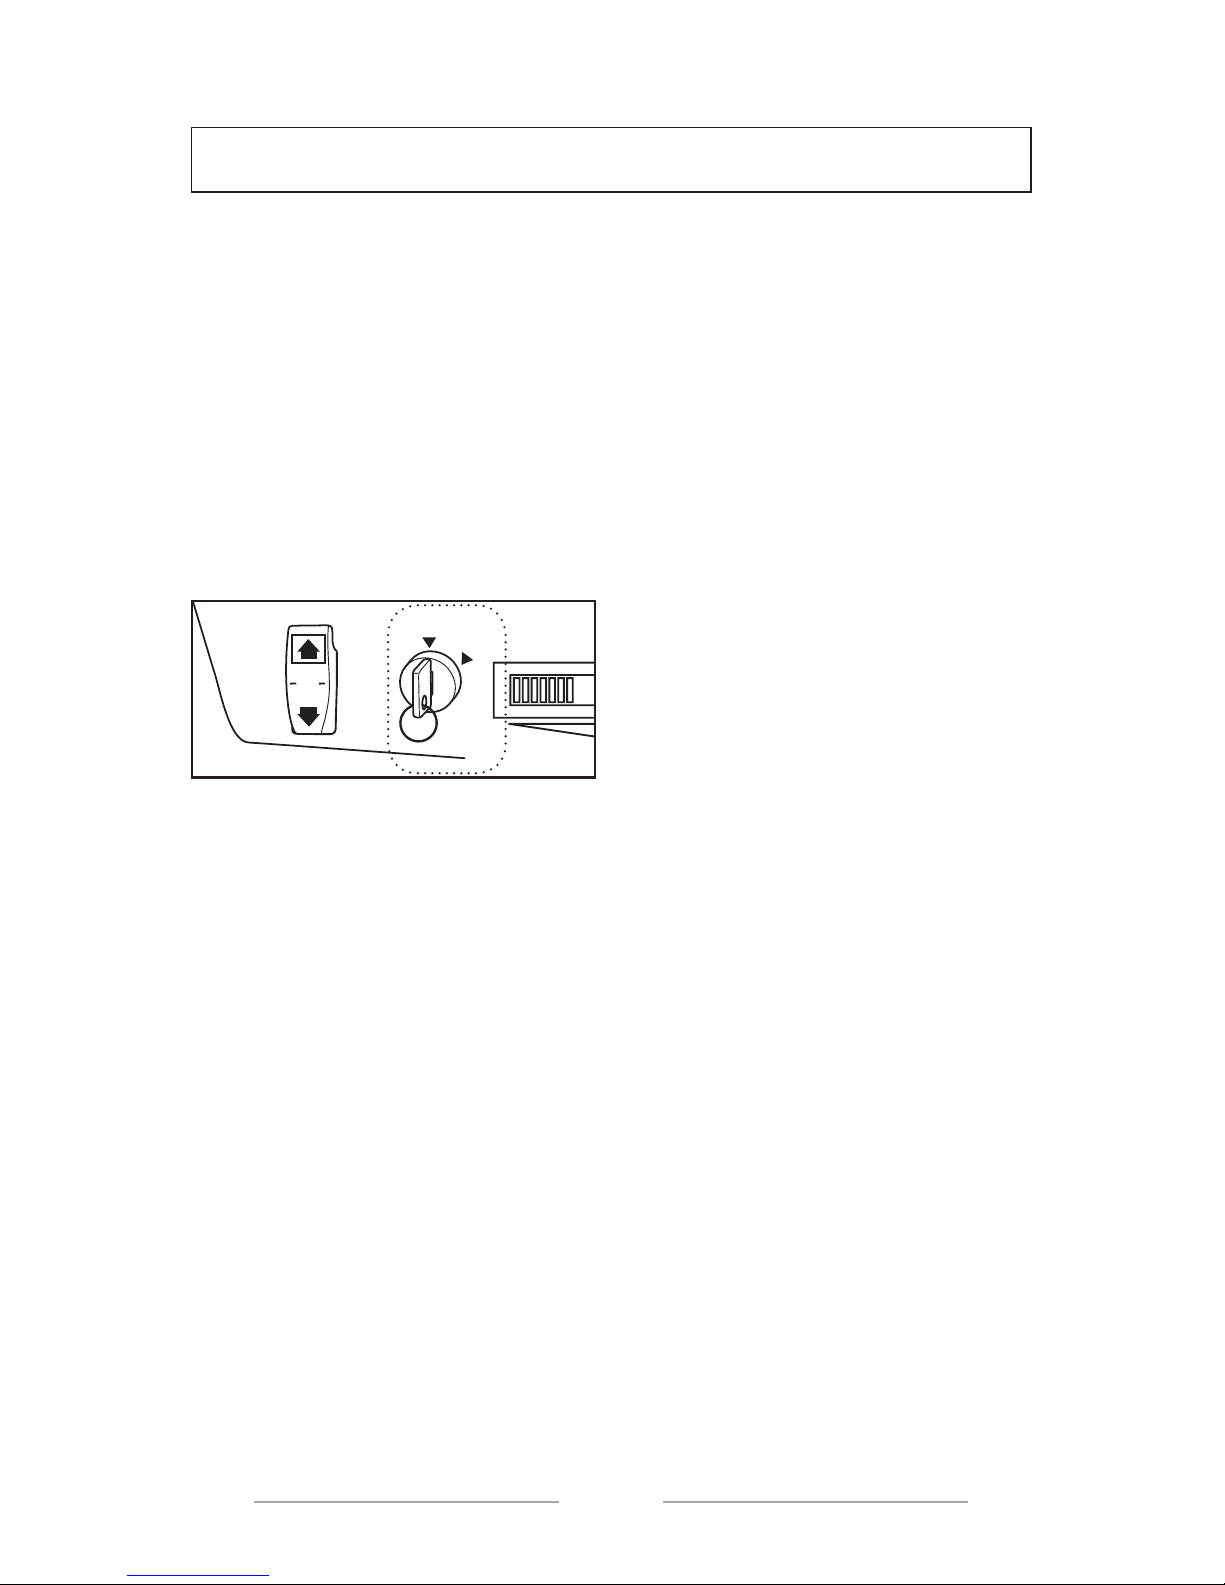
IGNITION KEY
The ignition key controls the
following:
OFF (INACTIVE): Electric supply is
interrupted. The key may be taken
out only in this position.
ON (ACTIVE): Electric supply is
activated. The golf cart may be
operated.
O
FF
ON
REV
N
FW
D
0
1
19
CONTROLS
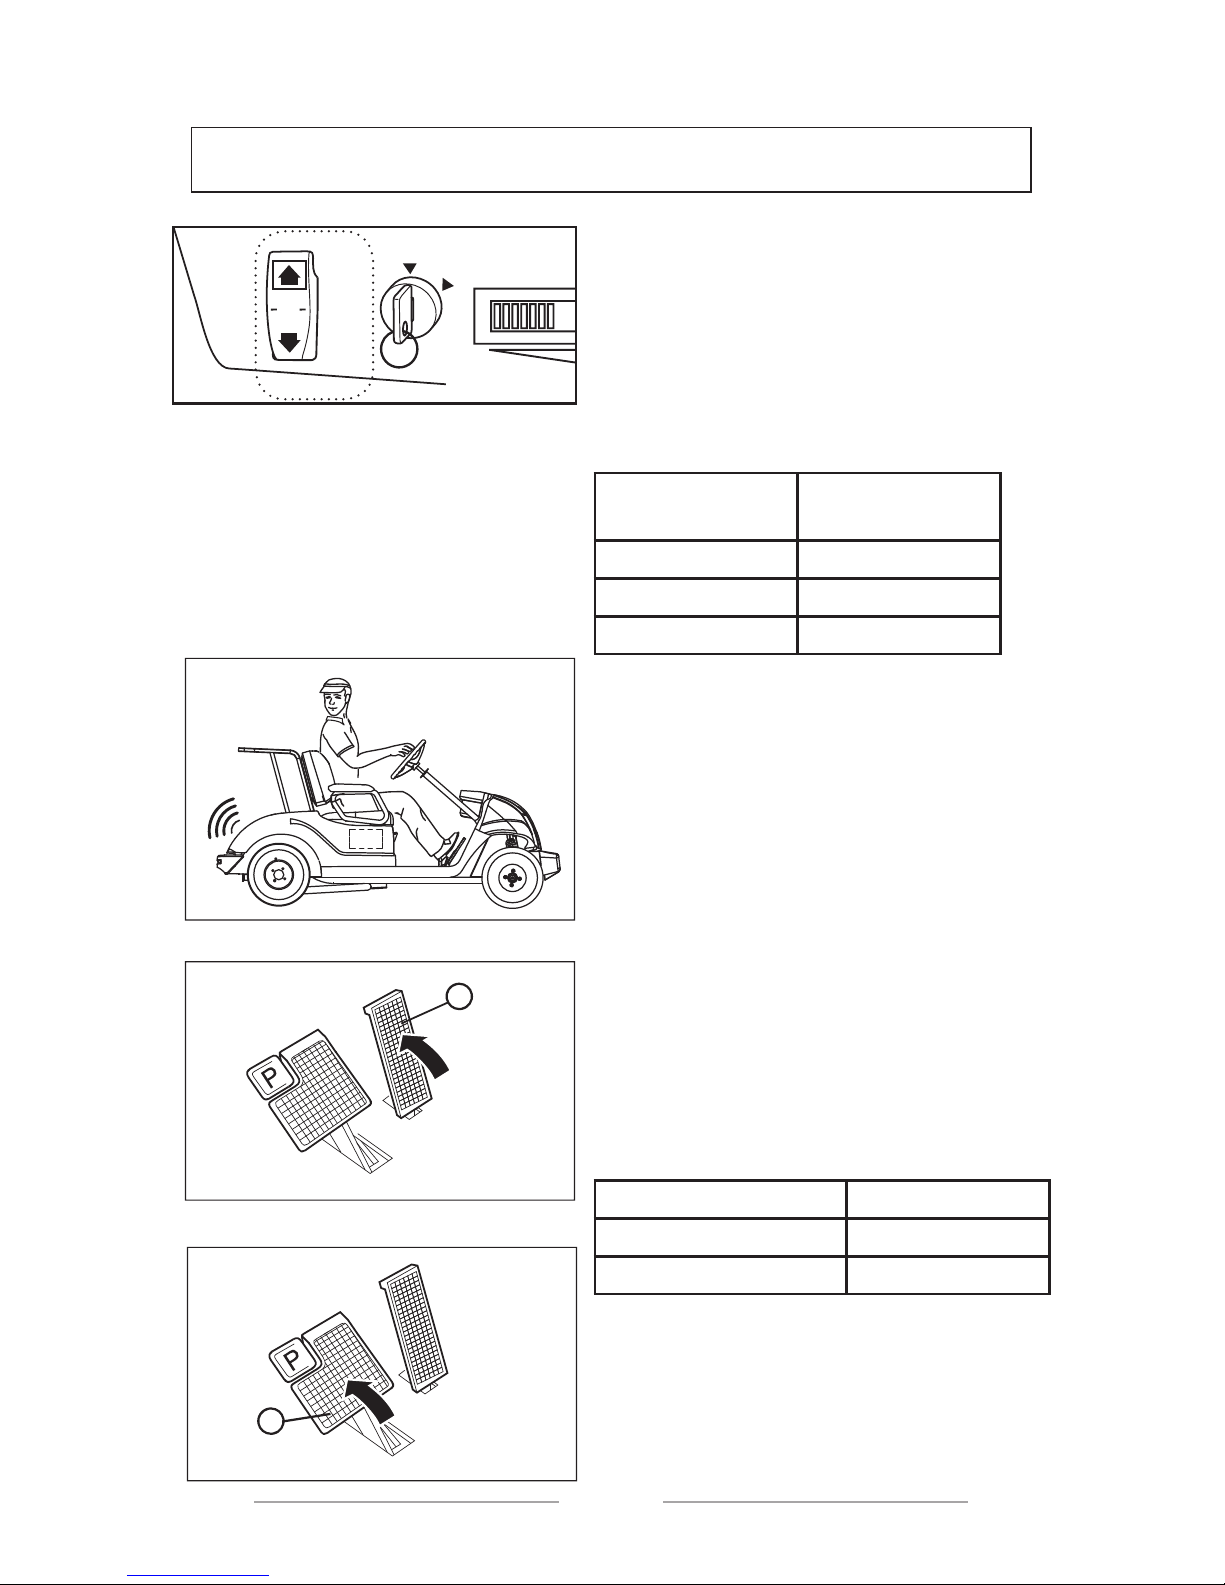
DIRECTION SELECTOR
BUTTON
The direction selector button is used
for back and forth movement of the golf
cart. When the cart is entirely immobile,
please set the arm to desired position.
GEAR
POSITION
VEHICLE
MOVEMENT
FWD Forward
REV Backwards
N Neutral
NOTE:--------------------------------
When the Direction selector button is set
to REV, BEEP sound alarm will be heard
as a backwards movement warning.
NOTE:--------------------------------
The vehicle shall certainly be started
in N (neutral) position and the desired
direction shall be selected after 2
seconds.
--------------------------------------
ACCELERATOR PEDAL
The accelerator pedal controls the speed
of your cart. A
Operation Speed
Press the pedal Increase
Release the pedal Decrease
BRAKE PEDAL
Please press the brake pedal to stop the
golf cart. B
O
FF
ON
REV
N
FW
D
0
1
BEEP
B
A
Page 19
19
CONTROLS
DIRECTION SELECTOR
BUTTON
The direction selector button is used
for back and forth movement of the golf
cart. When the cart is entirely immobile,
please set the arm to desired position.
GEAR
POSITION
VEHICLE
MOVEMENT
FWD Forward
REV Backwards
N Neutral
NOTE:--------------------------------
When the Direction selector button is set
to REV, BEEP sound alarm will be heard
as a backwards movement warning.
NOTE:-------------------------------The vehicle shall certainly be started
in N (neutral) position and the desired
direction shall be selected after 2
seconds.
--------------------------------------
ACCELERATOR PEDAL
The accelerator pedal controls the speed
of your cart. A
Operation Speed
Press the pedal Increase
Release the pedal Decrease
BRAKE PEDAL
Please press the brake pedal to stop the
golf cart. B
O
FF
ON
REV
N
FW
D
0
1
BEEP
B
A
Page 20
20
CONTROLS
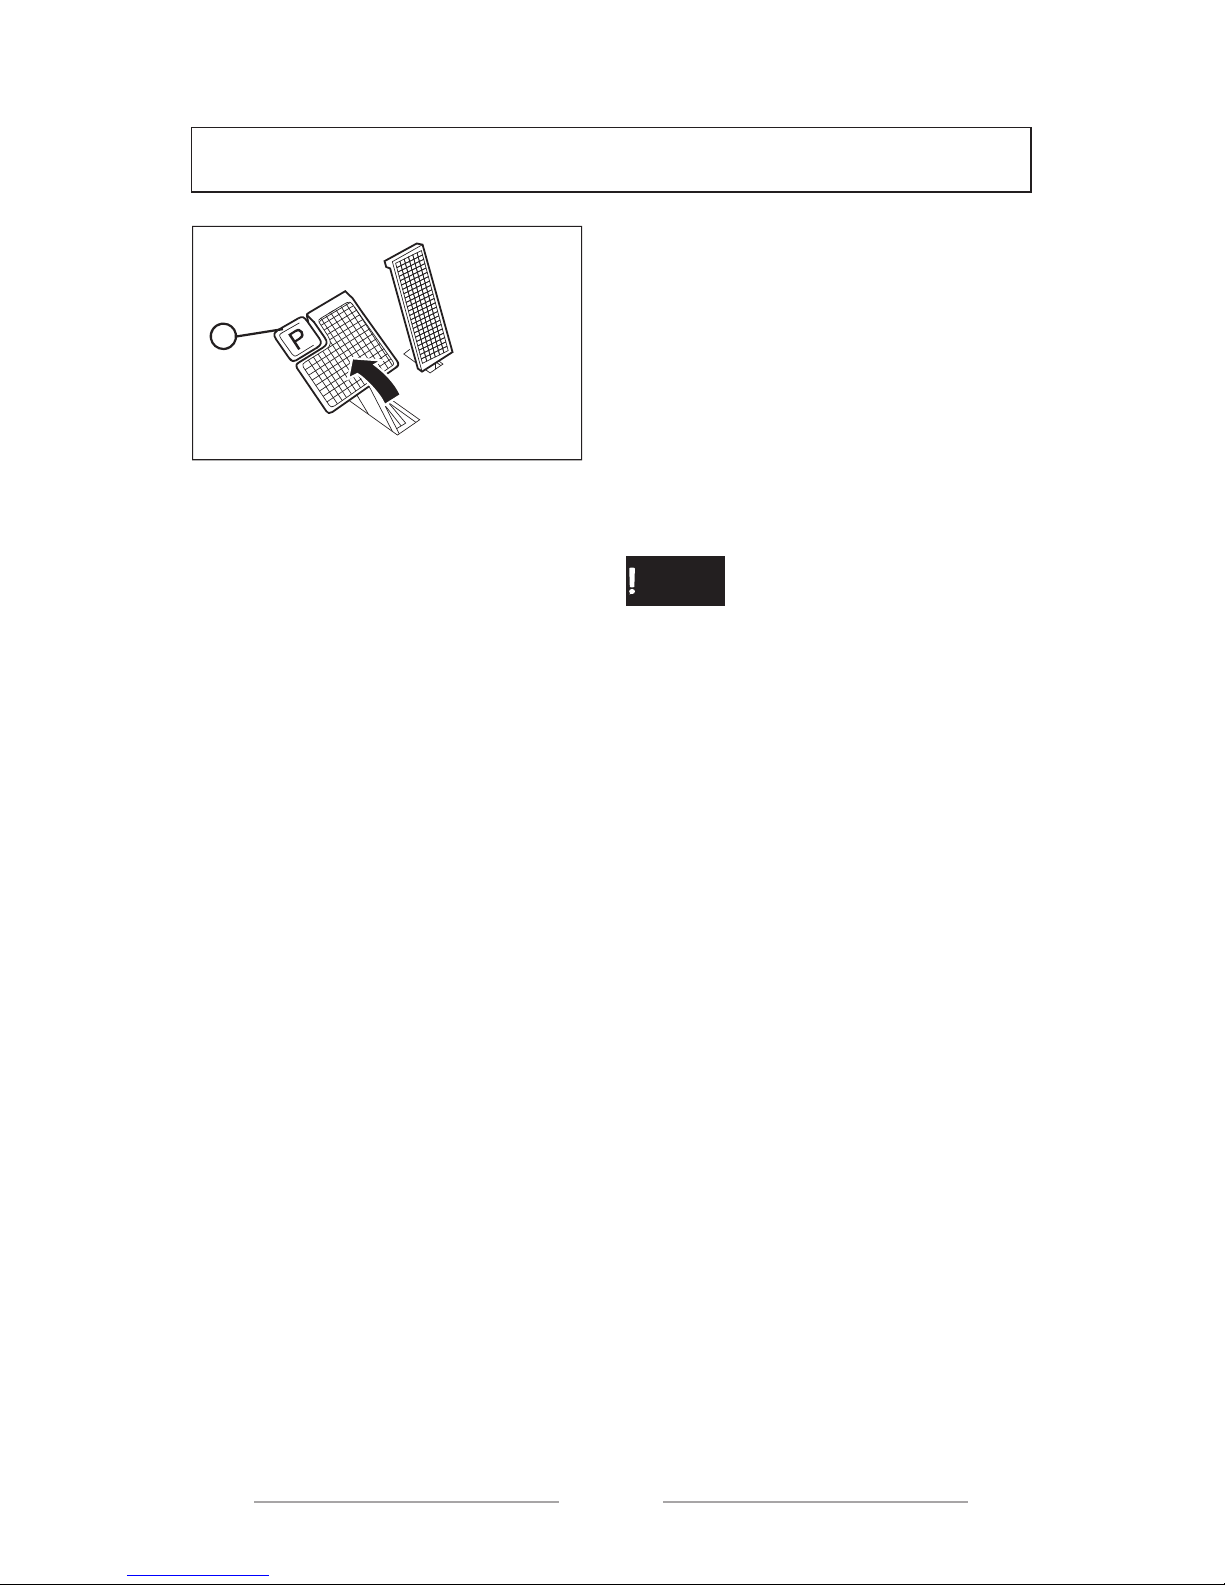
PARKING BRAKE PEDAL
Please press parking brake pedal
during parking the golf cart.
NOTE:-------------------------------Please press accelerator pedal and
release the parking brake.
--------------------------------------
--------------------------------------
ATTENTION
When the accelerator pedal is pressed,
the parking brake pedal is automatically
released. If the ignition key is set to
“ON”, the golf cart may suddenly move
when the accelerator pedal is pressed.
--------------------------------------
C
21
CONTROLS
DURING TOWING
Please make sure that the ignition key is set to close position and direction
selector button is set to N (neutral).
Otherwise, towing may cause propulsion system damage.
-----------------------------------------
CAUTION !
Please do not sit on the cart during towing.
Please use chain or suitable equipment for towing during operation. Do not
use other types of ropes, lashing or cables.
Please do not tow on the main roads.
Please limit your speed to 20 km/h (12 mph) during towing.
Do not tow more than one vehicle at a time.
-----------------------------------------
Page 21

21
CONTROLS
DURING TOWING
Please make sure that the ignition key is set to close position and direction
selector button is set to N (neutral).
Otherwise, towing may cause propulsion system damage.
-----------------------------------------
CAUTION !
Please do not sit on the cart during towing.
Please use chain or suitable equipment for towing during operation. Do not
use other types of ropes, lashing or cables.
Please do not tow on the main roads.
Please limit your speed to 20 km/h (12 mph) during towing.
Do not tow more than one vehicle at a time.
-----------------------------------------
Page 22
22
23
PRE-OPERATION CONTROLS
The control and maintenace operations set in the table shall certainly be
implemented before each drive. Please make it a habit to perform such controls in a
similar way.
--------------------------------------
ATTENTION
Please take off the ignition key to prevent accidental start of the vehicle
before commencing the preoperation controls and please pull the park brakes to
prevent movement of the vehicle.
--------------------------------------
PRE-OPERATION CHECK LIST
Please check the below before each operation.
• Batteries
• Tire condition
• Handle bar system
• Backward movement sound alarm
• Pedal working
• Body and chassis
•
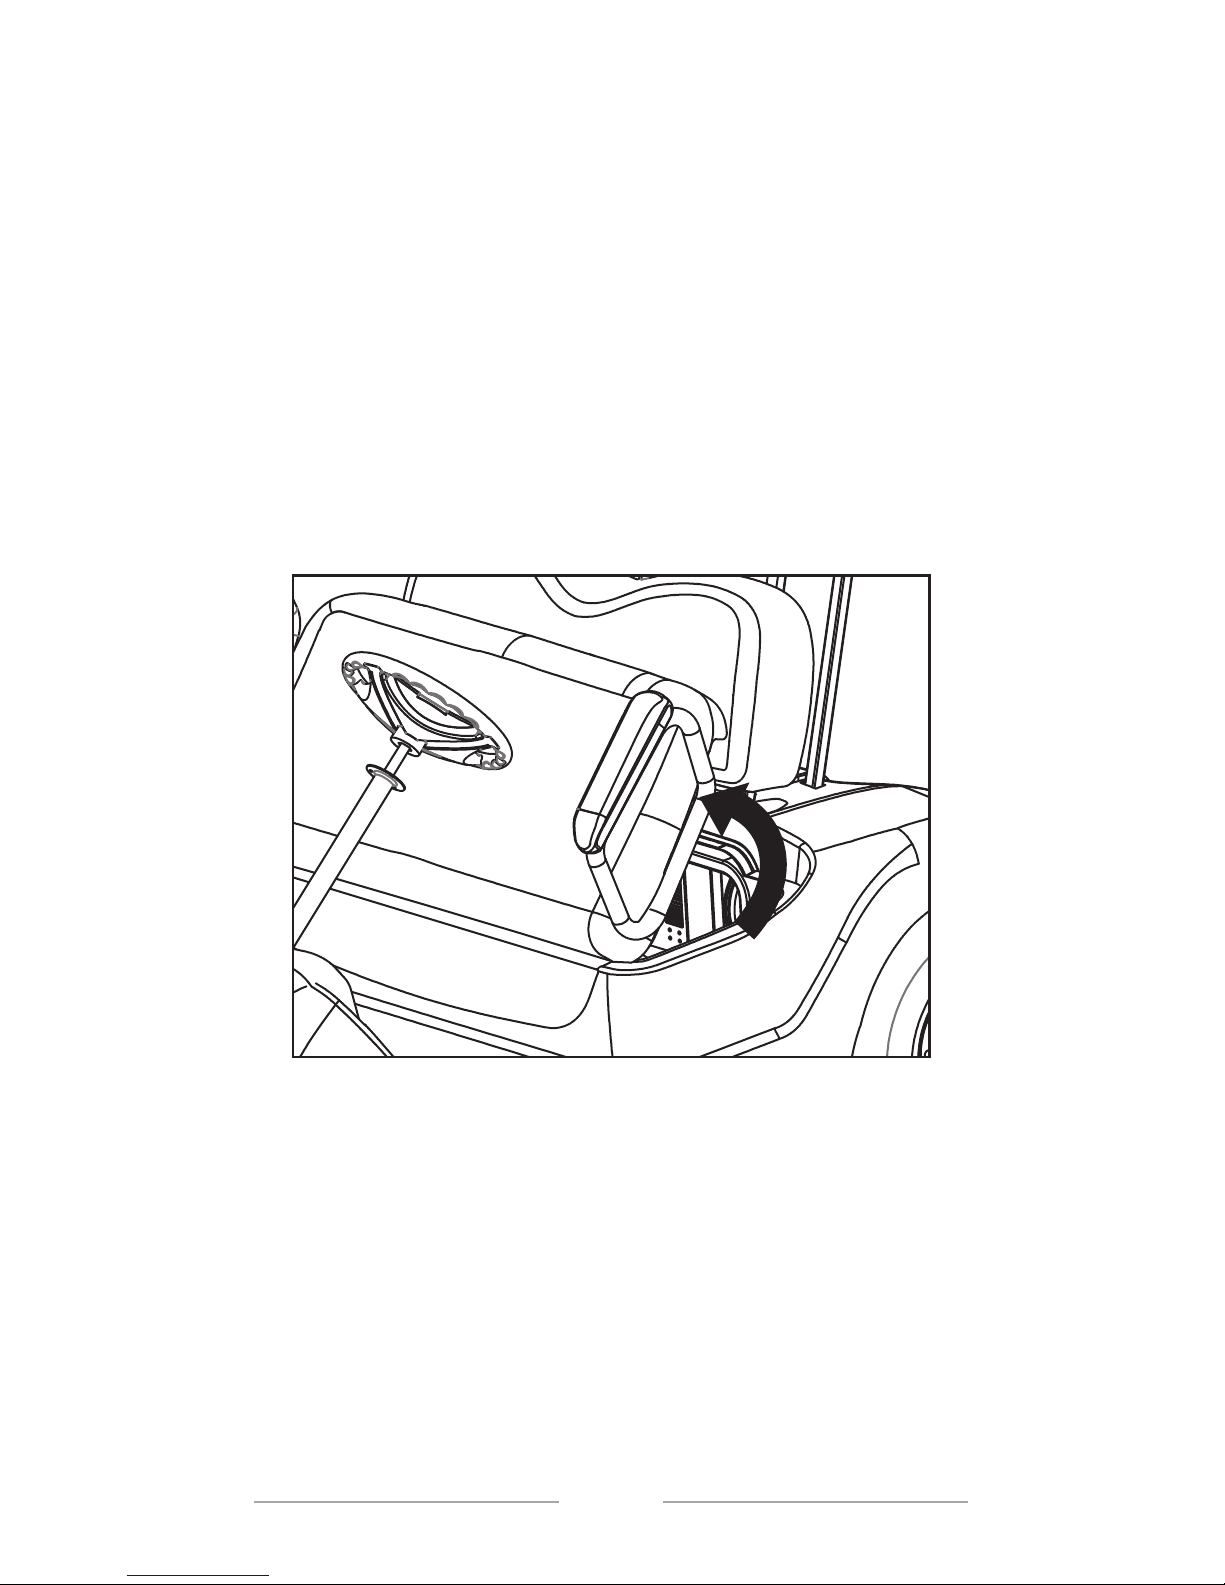
SE AT
Please lift the seat for control and maintenance.
Page 23

23
PRE-OPERATION CONTROLS
The control and maintenace operations set in the table shall certainly be
implemented before each drive. Please make it a habit to perform such controls in a
similar way.
--------------------------------------
ATTENTION
Please take off the ignition key to prevent accidental start of the vehicle
before commencing the preoperation controls and please pull the park brakes to
prevent movement of the vehicle.
--------------------------------------
PRE-OPERATION CHECK LIST
Please check the below before each operation.
• Batteries
• Tire condition
• Handle bar system
• Backward movement sound alarm
• Pedal working
• Body and chassis
•
SE AT
Please lift the seat for control and maintenance.
Page 24
24
PRE-OPERATION CONTROLS
BATTERIES
In order to prevent battery damage due
to vibration or shocks, please check
whether they are properly placed or not.
Moreover, please make sure that none
of the lids are lost to prevent battery
acids to spill out. Please check for
oxidation on baterry terminals.
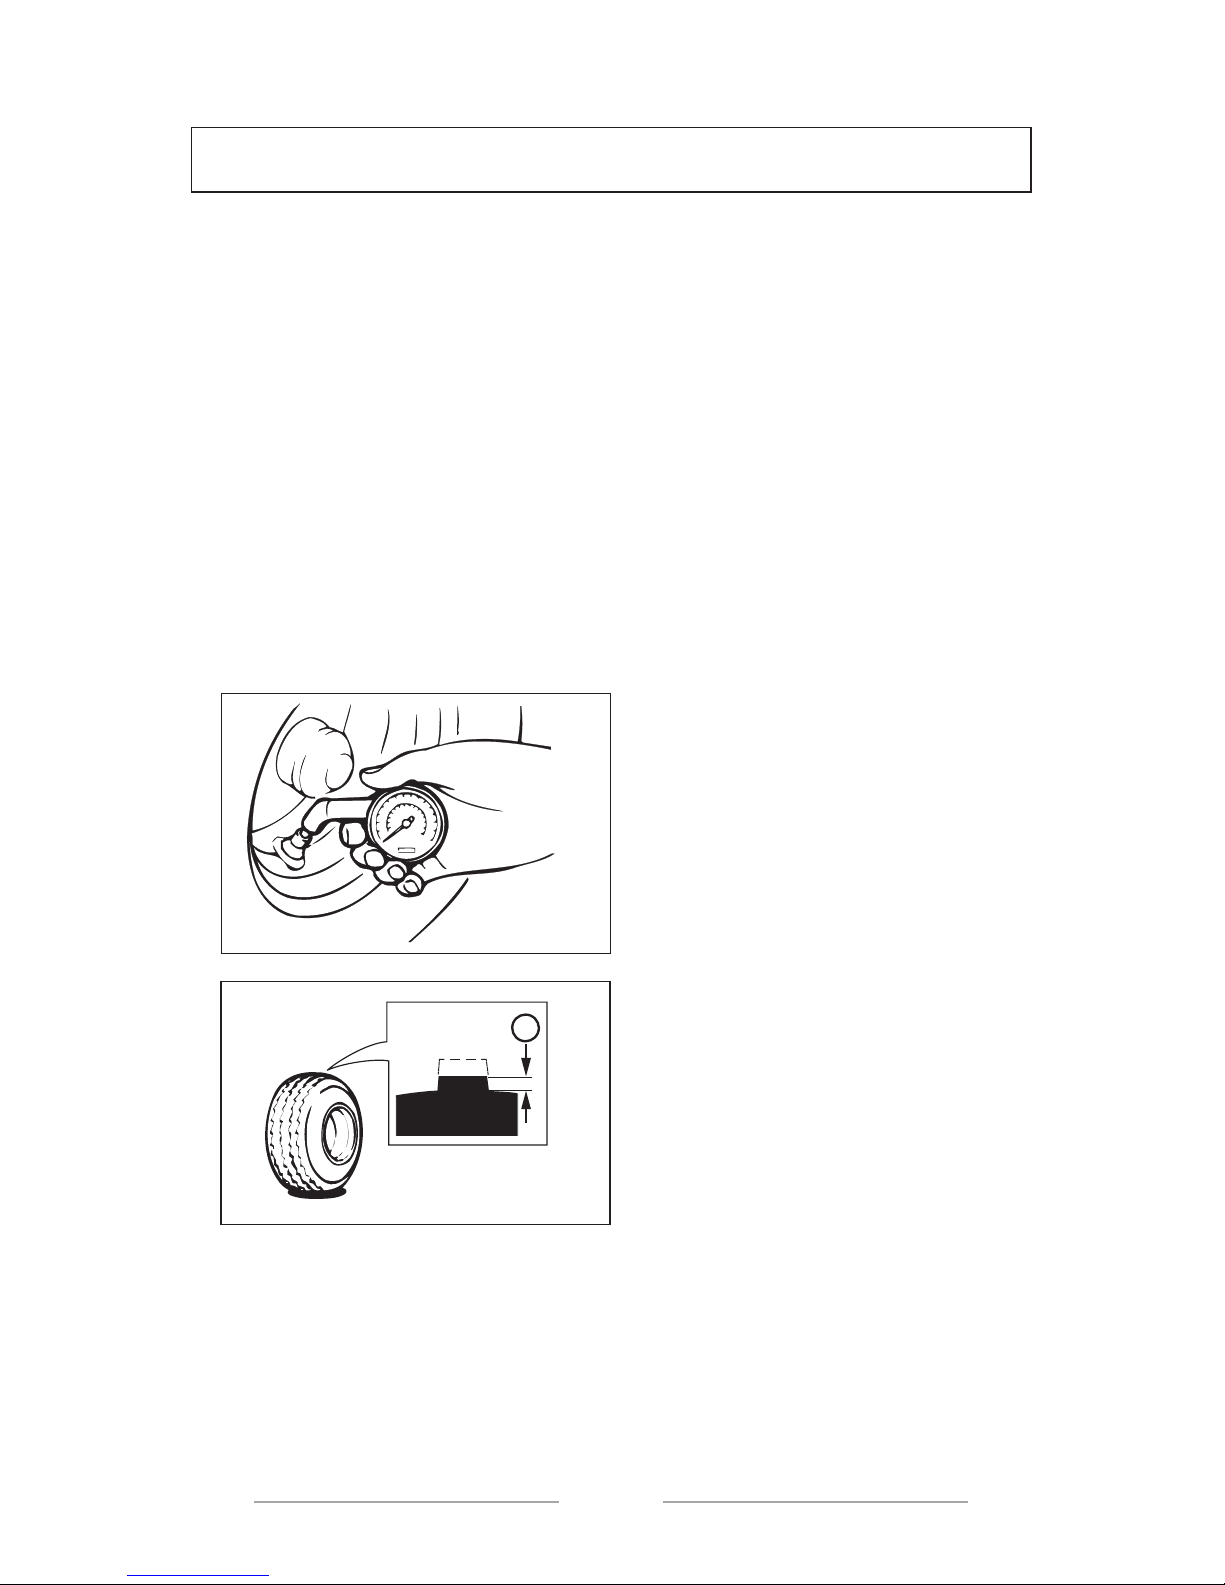
TYRE CONDITION
Tyre Pressue
Please check the tire pressure before
starting the golf cart.
Tyre Pressure:
20 PSI
(138 kPa, 1,4 kgf/cm2)
TYRE WEAR
Check the surfaces of the tires for any
damage, cracks or pricked materials.
Please change the tyre when the treads
are worn and decrease to 1 mm. (A)
A
25
PRE-OPERATION CONTROLS
STEERING WHEEL SYSTEM
Please check the steering wheel system as follows for excessive steering play.
• Move the steering wheel upwards and downwards and back and forth
• Turn the steering wheel to right and left.
If you feel excessive play or hear voices of clicks indicating looseness of steering
wheel parts, please apply to your Pilotcar service.
BACKWARD MOVEMENT SOUND ALARM
Please check the backward movement sound alarm by setting the directon selector
button to REV. The sound alarm shall be apparently heard.
PEDAL FUNCTION
Check whether the pedals are properly working or not. If one the pedals do not work
properly, please apply to your Pilotcar service.
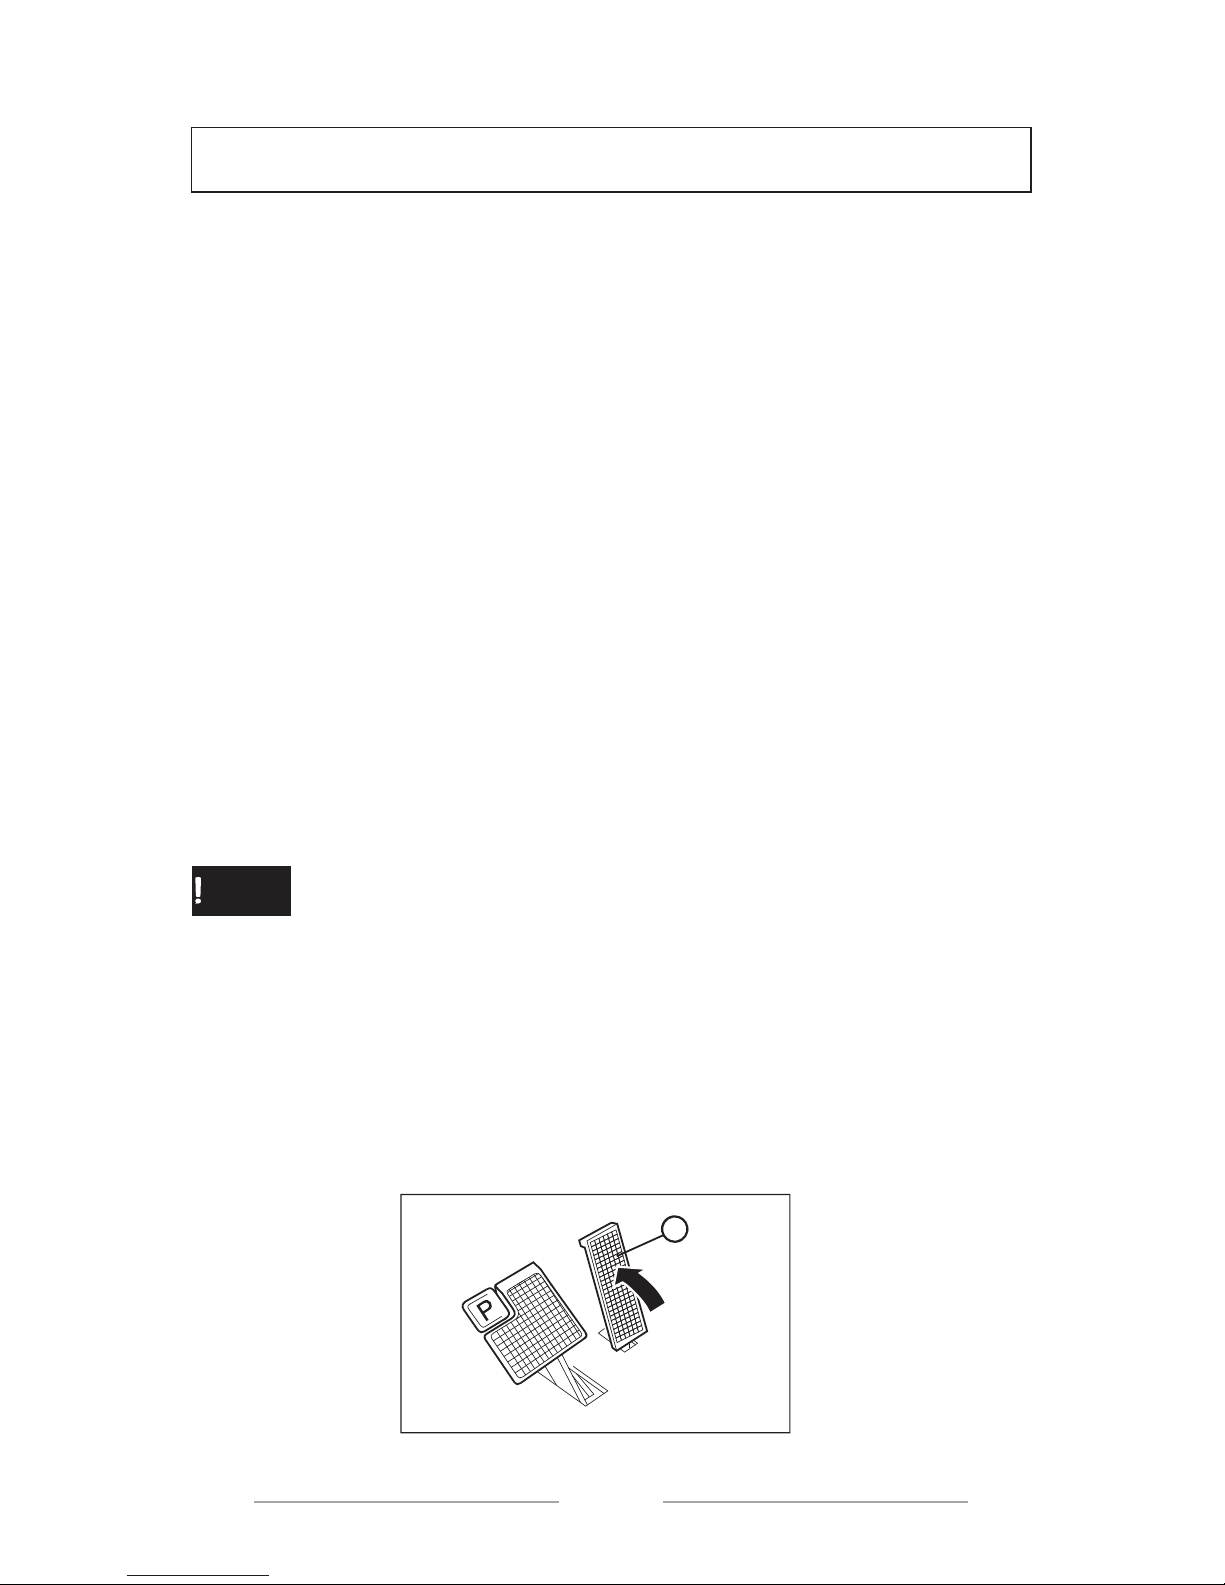
ACCELERATOR PEDAL
--------------------------------------
ATTENTION
• Please make sure that the ignition key is set to OFF before checking the
working of the accelerator pedal.
--------------------------------------
Please make sure that the accelerator pedal works properly.
A Accelerator pedal
A
Page 25
25
PRE-OPERATION CONTROLS
STEERING WHEEL SYSTEM
Please check the steering wheel system as follows for excessive steering play.
• Move the steering wheel upwards and downwards and back and forth
• Turn the steering wheel to right and left.
If you feel excessive play or hear voices of clicks indicating looseness of steering
wheel parts, please apply to your Pilotcar service.
BACKWARD MOVEMENT SOUND ALARM
Please check the backward movement sound alarm by setting the directon selector
button to REV. The sound alarm shall be apparently heard.
PEDAL FUNCTION
Check whether the pedals are properly working or not. If one the pedals do not work
properly, please apply to your Pilotcar service.
ACCELERATOR PEDAL
--------------------------------------
ATTENTION
• Please make sure that the ignition key is set to OFF before checking the
working of the accelerator pedal.
--------------------------------------
Please make sure that the accelerator pedal works properly.
A Accelerator pedal
A
Page 26
26
PRE-OPERATION CONTROLS
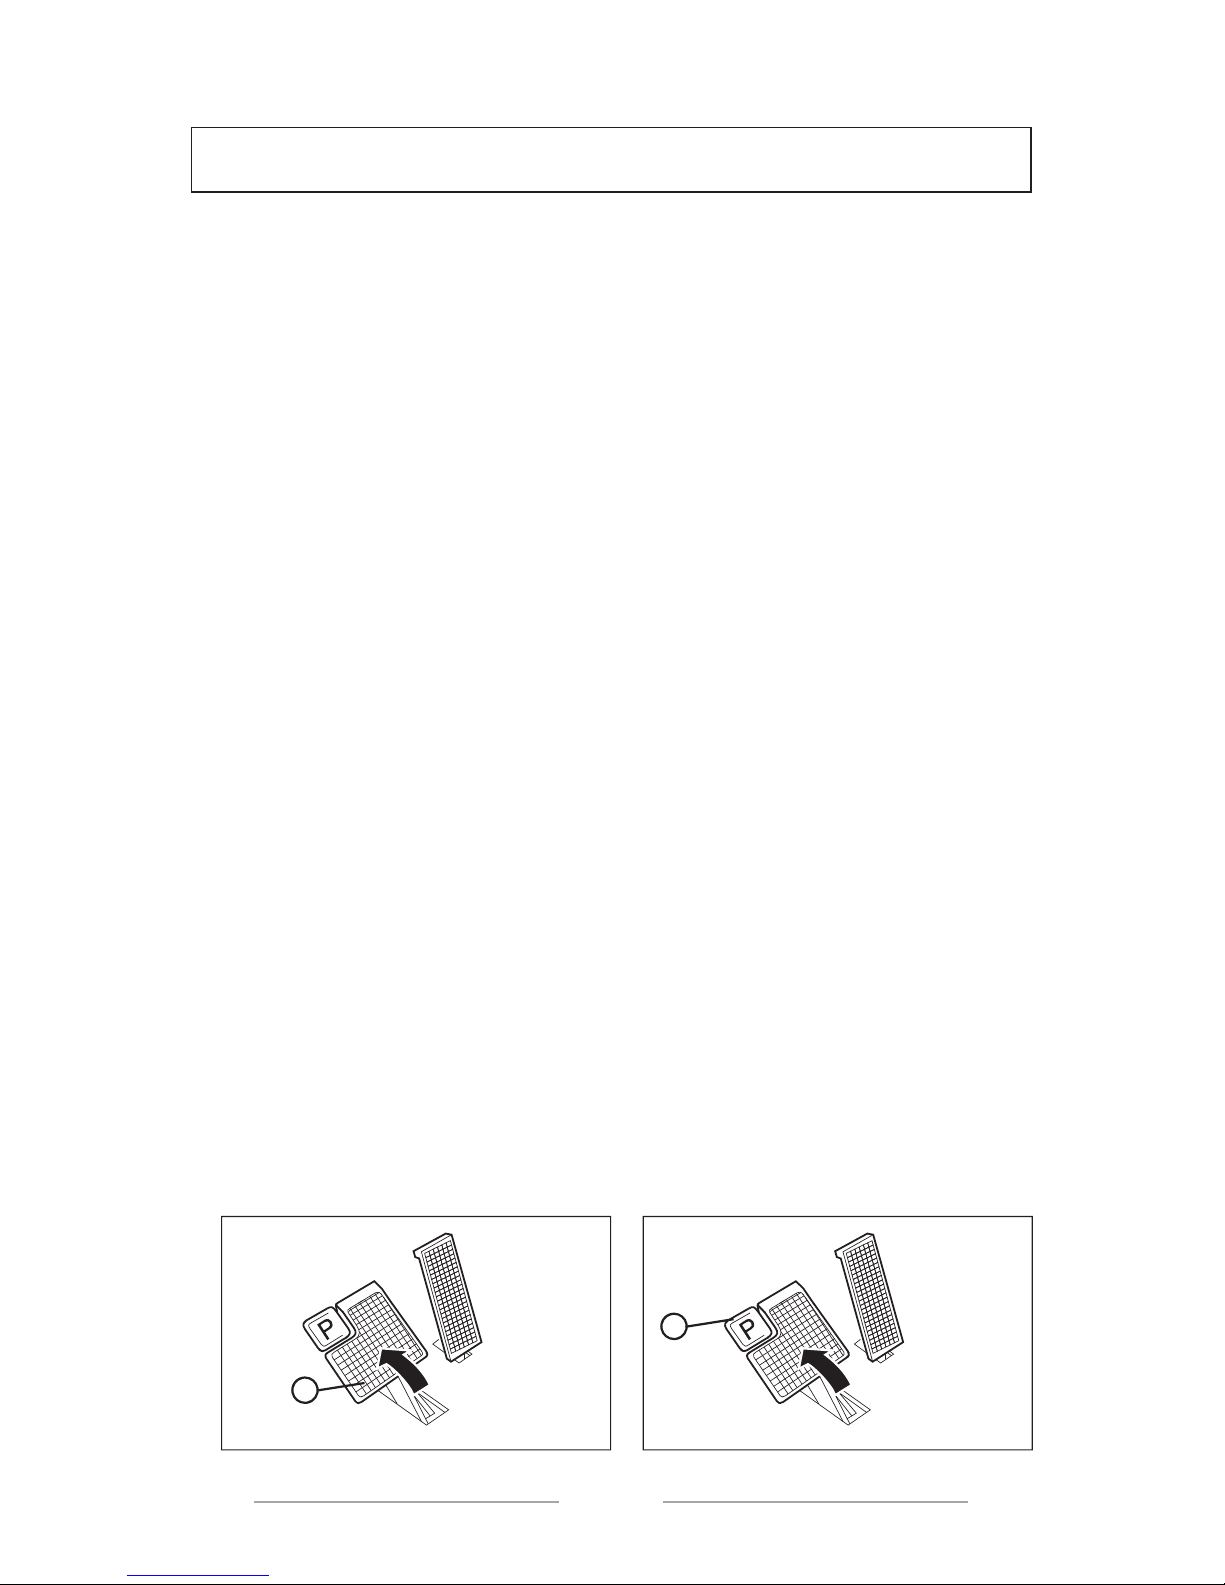
BRAKE PEDAL
Press the brake pedal and feel that it is tight and check whether it returns to original
posiiton after being released.
PARKING BRAKE PEDAL
Please check whether the parking brake pedal is locked to its’ position with a clear
click sound and is relased when the accelerator pedal is pressed.
NOTE:-------------------------------release the parking brake pedal by pressing the accelerator pedal.
--------------------------------------
BODY AND CHASSIS
Please control the body and chassis of the golf cart against damage and/ or lost
parts before each use.
B
C
27
OPERATION
MOVING THE VEHICLE
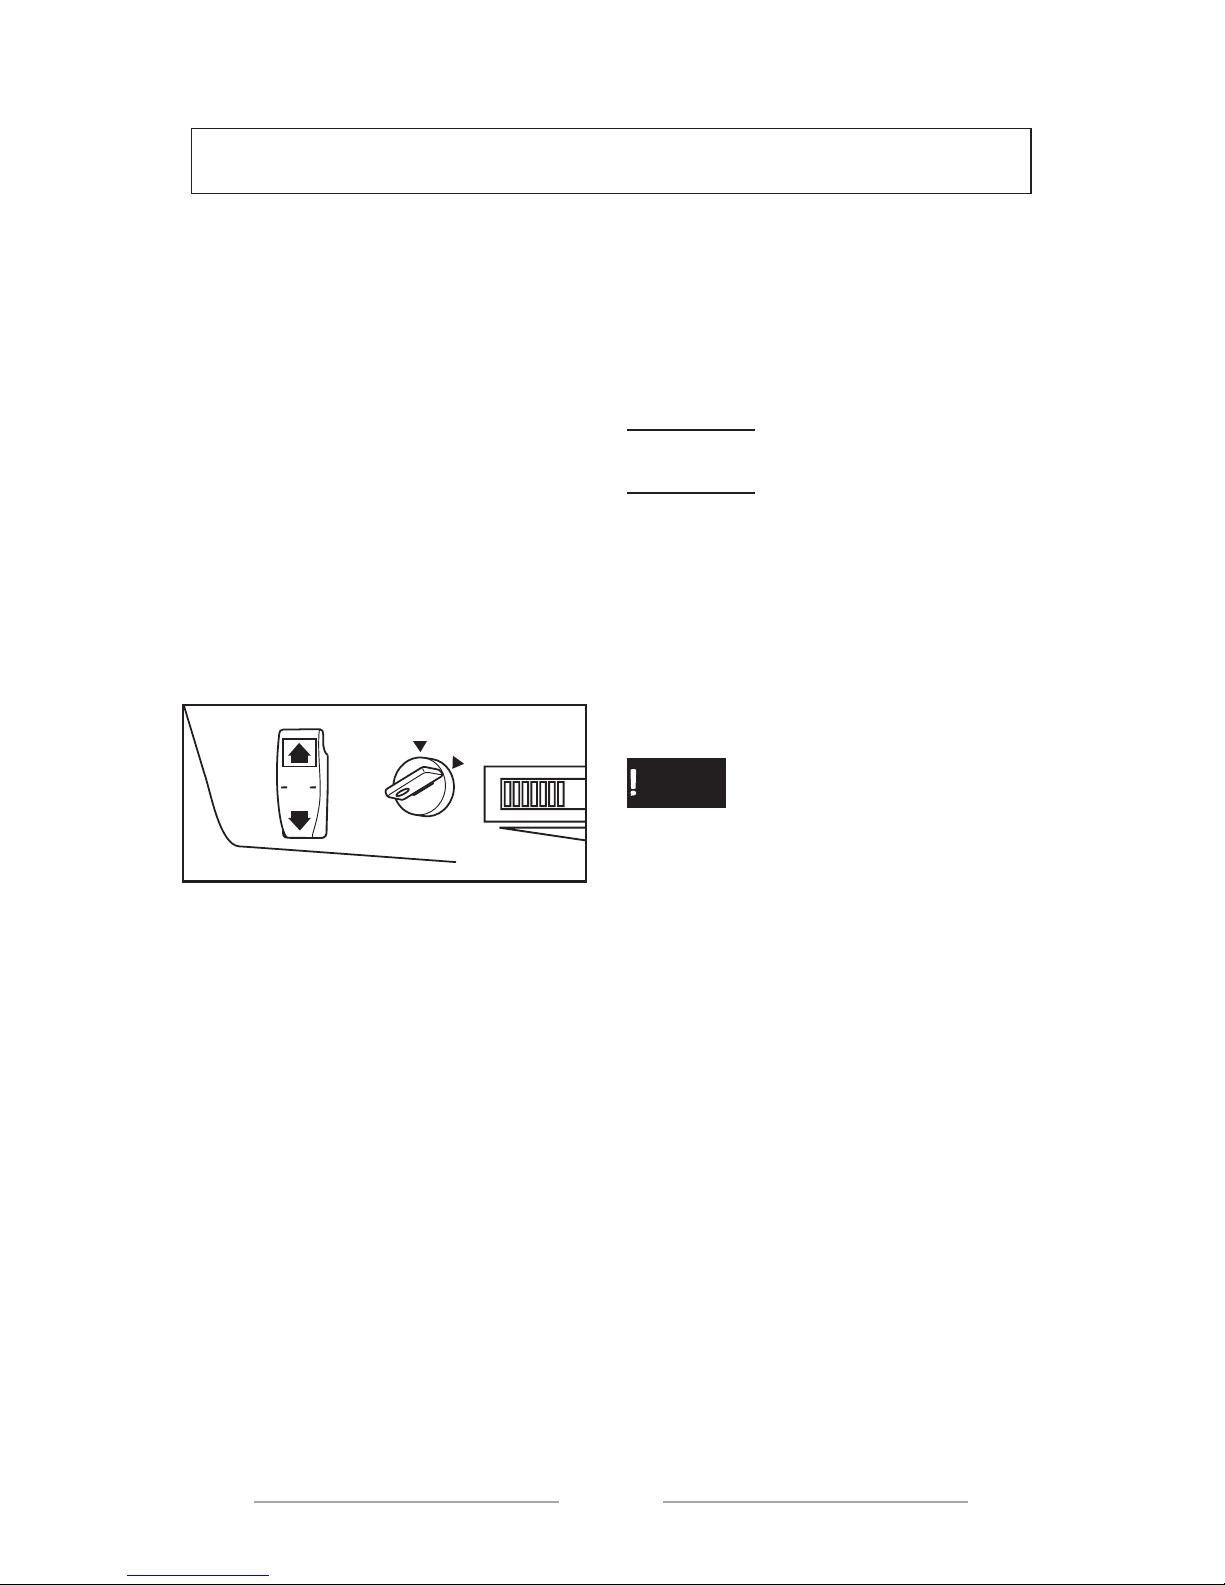
1. Please set the direction
selector button to FWD to go forward
and REV to go backwards when the
park brake is activated.
-----------------------------------------
CAUTION !
When the golf cart is moving, do not
set the direction selector arm from
FWD to REV position.
--------------------------------------
2. Please turn the ignition key
to ON position.
--------------------------------------
ATTENTION
• While turning the ignition key,
please do not press the accelerator
pedal otherwise the golf cart may
suddenly move.
--------------------------------------
3. Please check whether the
road in your direction is convenient
or not and slowly press the
accelerator pedal. The golf cart will
move.
NOTE:--------------------------------
The park brake pedal will be
automatically released when the
accelerator pedal is pressed. .
--------------------------------------
O
FF
ON
REV
N
FW
D
0
1
Page 27
27
OPERATION
MOVING THE VEHICLE
1. Please set the direction
selector button to FWD to go forward
and REV to go backwards when the
park brake is activated.
-----------------------------------------
CAUTION !
When the golf cart is moving, do not
set the direction selector arm from
FWD to REV position.
--------------------------------------
2. Please turn the ignition key
to ON position.
--------------------------------------
ATTENTION
• While turning the ignition key,
please do not press the accelerator
pedal otherwise the golf cart may
suddenly move.
--------------------------------------
3. Please check whether the
road in your direction is convenient
or not and slowly press the
accelerator pedal. The golf cart will
move.
NOTE:--------------------------------
The park brake pedal will be
automatically released when the
accelerator pedal is pressed. .
--------------------------------------
O
FF
ON
REV
N
FW
D
0
1
Page 28
28
OPERATION
STOPPING THE VEHICLE
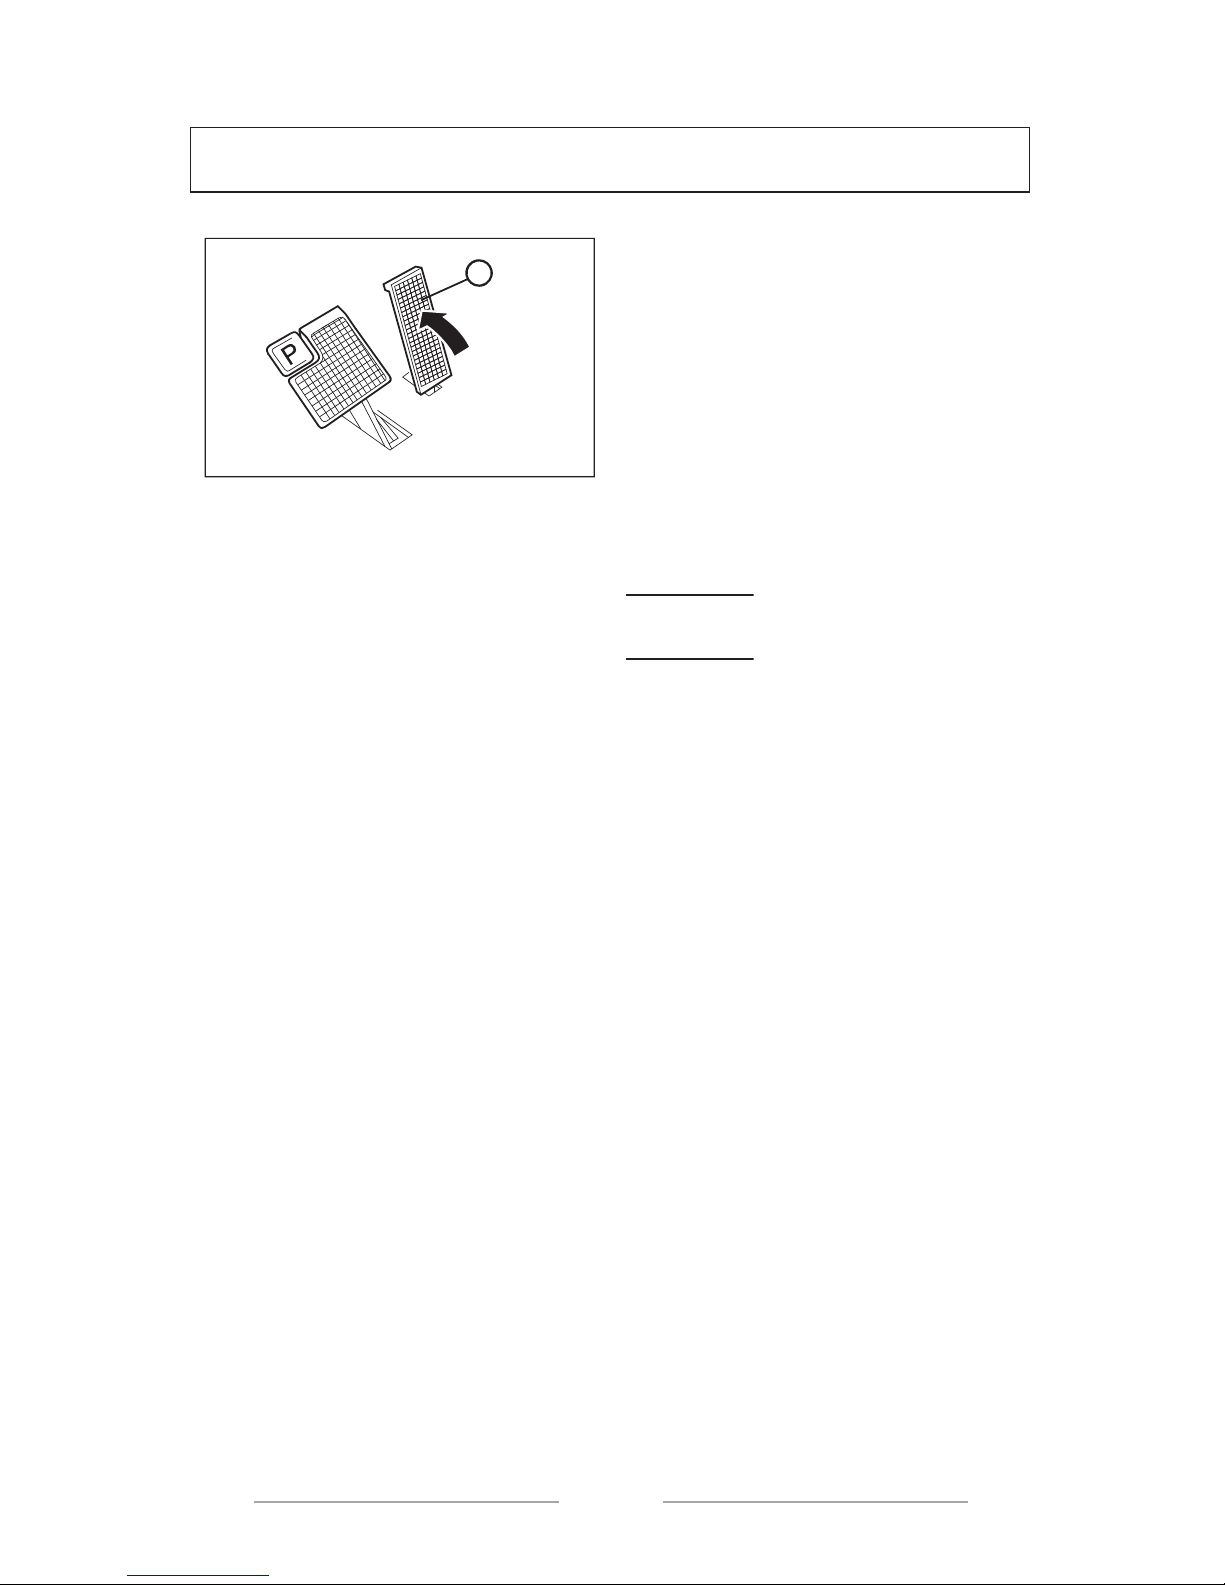
Press the brake pedal gradually to stop
the golf cart.
When the vehicle stops, press the park
brake pedal and turn the ignition key to
OFF position.
-----------------
CAUTION !
Please do not press the accelerator
pedal on a slopy ground, use the
brakes.
--------------------------------------
A
29
MAINTENANCE
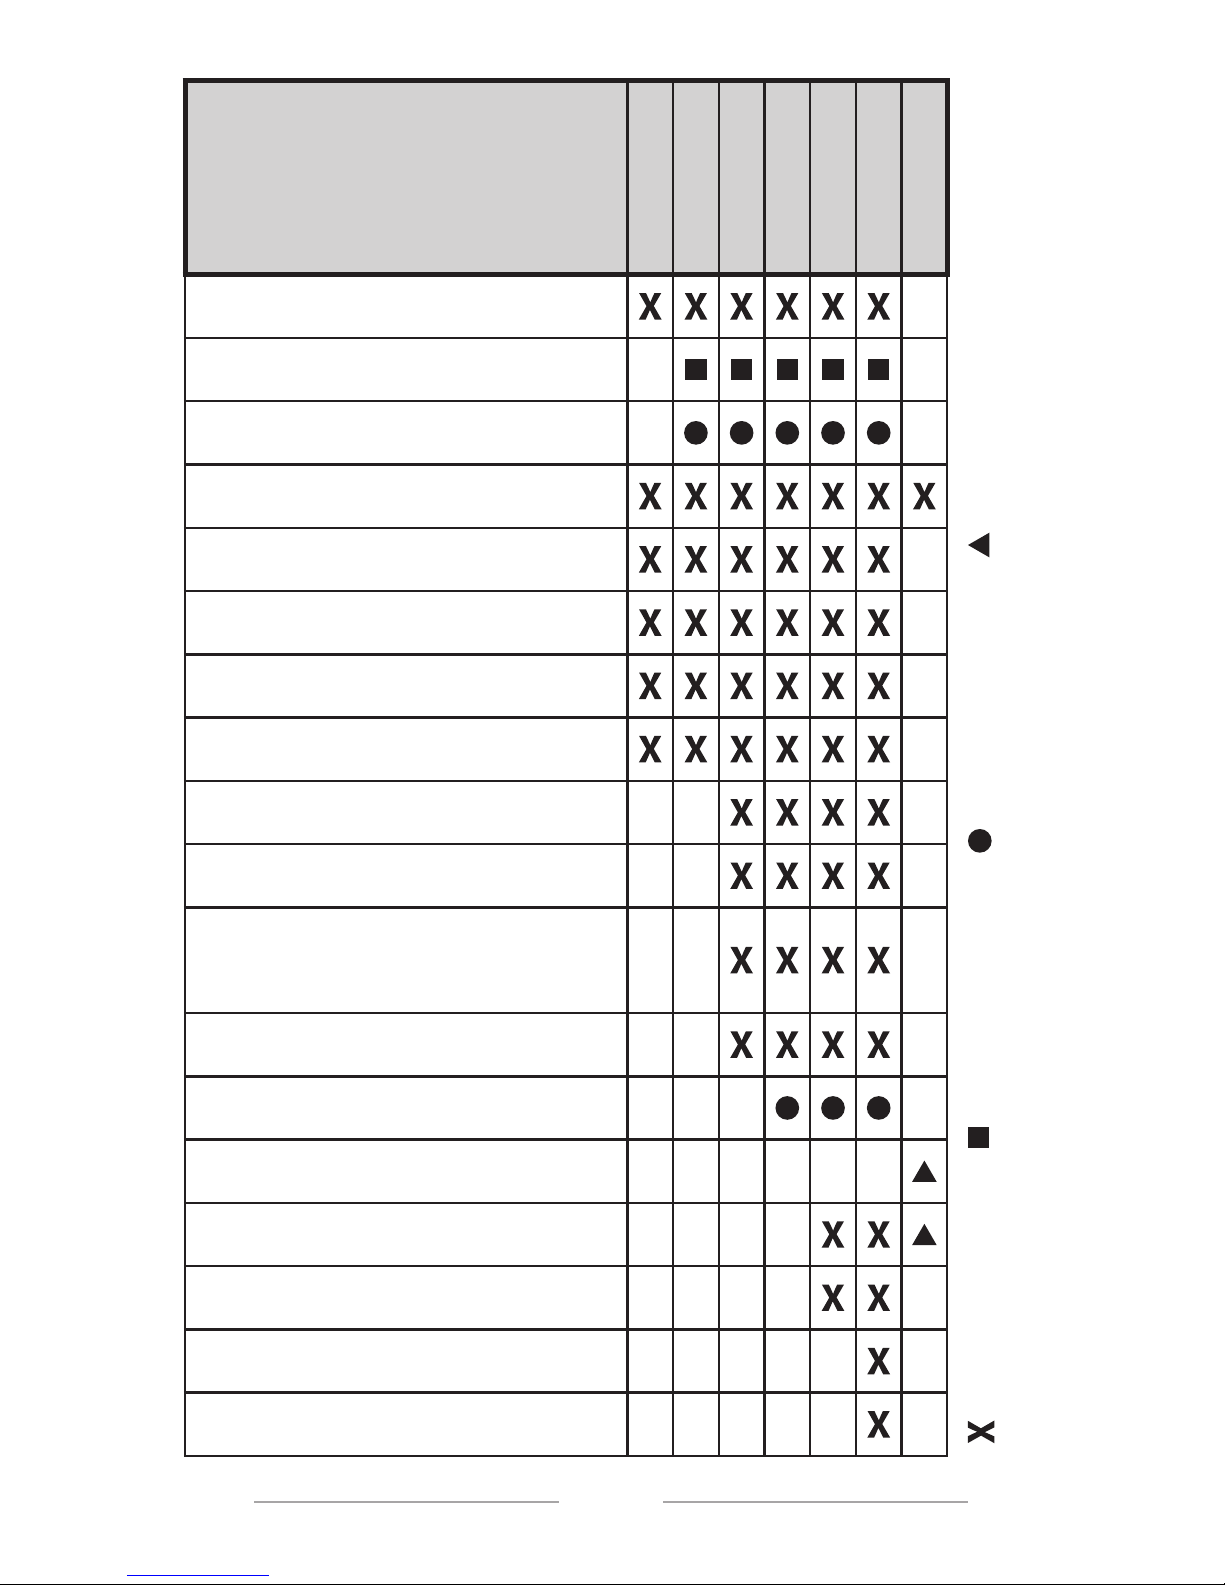
PERIODICAL MAINTENANCE TABLES
Regular maintenace is required for your golf cart to performs perfectly and operate
safely.
ATTENTION
• Unless otherwise stated, turn the ignition key off and use
park brakes while performing maintenance. If the owner
is not familiar with maintenance, this shall be done by a
Pilotcar uthorized Service or another qualified technician.
Page 29

29
MAINTENANCE
PERIODICAL MAINTENANCE TABLES
Regular maintenace is required for your golf cart to performs perfectly and operate
safely.
ATTENTION
• Unless otherwise stated, turn the ignition key off and use
park brakes while performing maintenance. If the owner
is not familiar with maintenance, this shall be done by a
Pilotcar uthorized Service or another qualified technician.
Page 30
30
MAINTENANCE
DAILY
WEEKLY
MONTHLY
QUARTERLY
SEMI ANNUAL
ANNUAL
QUADRIENNIAL
CHECKING THE CHARGE STATUS OF THE VEHICLE
CHECKING THE COROSION OF BATTERY TERMINALS OR LOOSENESS OF NUTS
ACCUMULATOR - ELECTROLIT STATUS OF THE
ACCUMULATORS AND ADDITION IF REQUIRED
CHECKING THE WORKING OF THE STEERING
WHEEL
CHECKING THE OPERATION OF BRAKE PEDAL,
CHECKING THE BRAKING DISTANCE
CHECKING THE OPERATION OF ACCELERATOR
PEDAL
TYRE STATUS, CHECKING THE TYRE PRESSUES
CHECKING THE REVERSING GEAR SOUND ALARMS
CHECK WHETHER THERE ARE LOOSE OR BROKEN
CONNECTIONS
CHECKING THE ISOLATION OF ALL THE CABLES,
REPLACEMENT OF CRACKED AND WORN ONES.
CHECKING THE PROPER AND SOFT OPERATION OF
STEERING WHEEL MECHANISM, REPLACEMENT OF
MISSING OR WORN PARTS
CHECKING THE DIFFERENTIAL OIL, REPLACEMENT
OF WORN AND MISSING PARTS
TYRE - CHECKING THE TYRE WEARINGS,
DIFFERENTIAL OIL REMOVAL AND REPLACEMENT
CHECKING THE REAR DRUMS AND REPLACEMENT
IF NECESSARY
OIL LEAKAGE IN THE SHOCK ABSORBERS OR
SPRING BREAKAGE
PERFORM DISCHARGE TEST
CHECKING THE HUB BEARINGS
CONTROL
ADJUST
CHANGE
LEVEL CHECK
31
MAINTENANCE
For the maintenance of the batteries,
1. Clean the corrosion on the upper
part of the batteries with mixture
of baking powder and water as
required.
-----------------------------------------
CAUTION !
Do not allow the cleaning water
penetrate into batteries cells
--------------------------------------
2. Check the hydraulic level before anf
after charging.
Page 31

31
MAINTENANCE
For the maintenance of the batteries,
1. Clean the corrosion on the upper
part of the batteries with mixture
of baking powder and water as
required.
-----------------------------------------
CAUTION !
Do not allow the cleaning water
penetrate into batteries cells
--------------------------------------
2. Check the hydraulic level before anf
after charging.
Page 32
32
MAINTENANCE
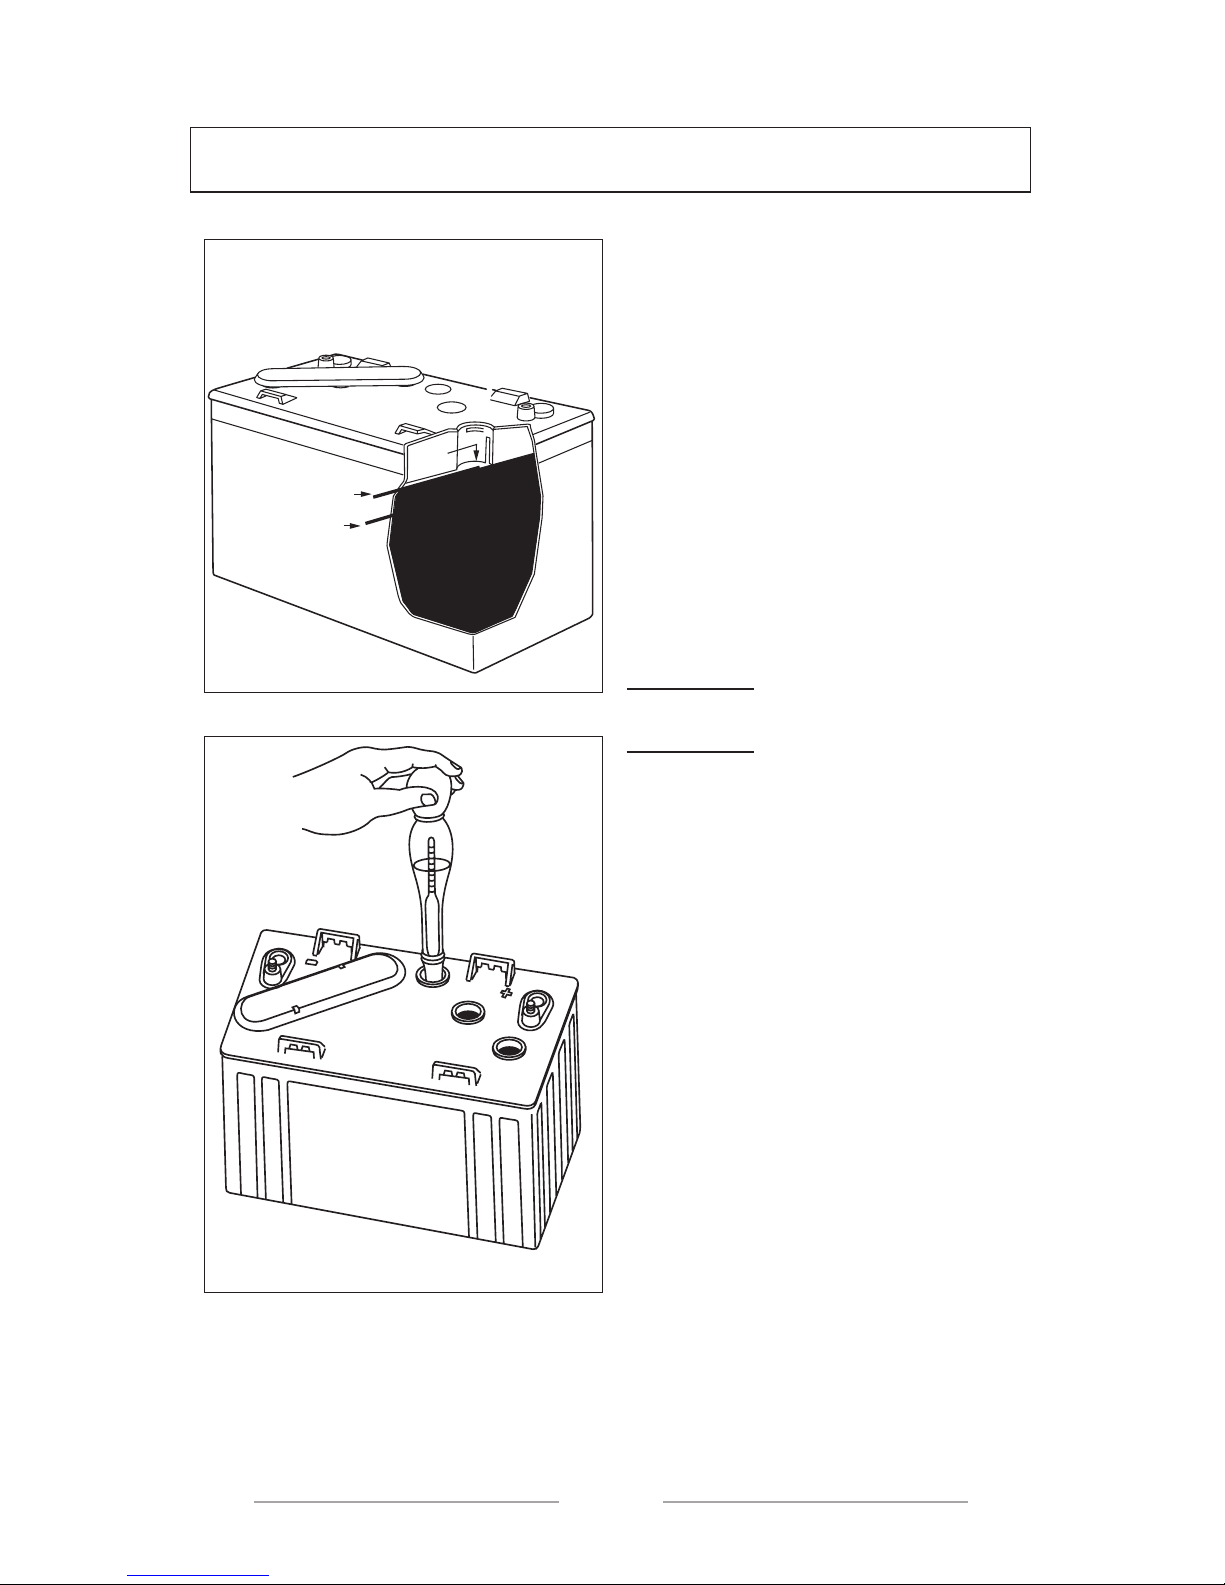
Before charging:
If the hydraulic is below the upper plates
just add pure water sufficient enough to
cover the plates.
After charging:
Open the ventilaiton lids and look into
the filling holes. Add pure water until the
level of electrolytes recah below the 3
mm bottom filling hole. A piece of plastic
may be used as an oil rod to determine
this level. Clean, replace and tight all the
ventilaiton lids.
-----------------------------------------
CAUTION !
Normal tap water may contain minerals
which may damage the battery therefore
only use pure water.
--------------------------------------
Check the specific gravity of the
battery water from the table by using
hydrometer. If any low level is detected
or the readings vary more than one
point between the cells, call a Pilotcar
Authorized Service.
P
OS
NE
G
(3 mm)
33
MAINTENANCE
Charging the Battery
ATTENTION
While the bateries are being charged,
hydrogen gas which has an explosive
characteristic is formed. Charge the
batteries solely in finely ventilated
places. (minimum 5 air change per hour
is required)
--------------------------------------
In order to charge the batteries on
your golf cart, the battery charger
is mounted on your vehicle.
The below section contains the
summary of charging stages.
--------------------------------------
1. Turn the ignition key to OFF
(CLOSED) position.
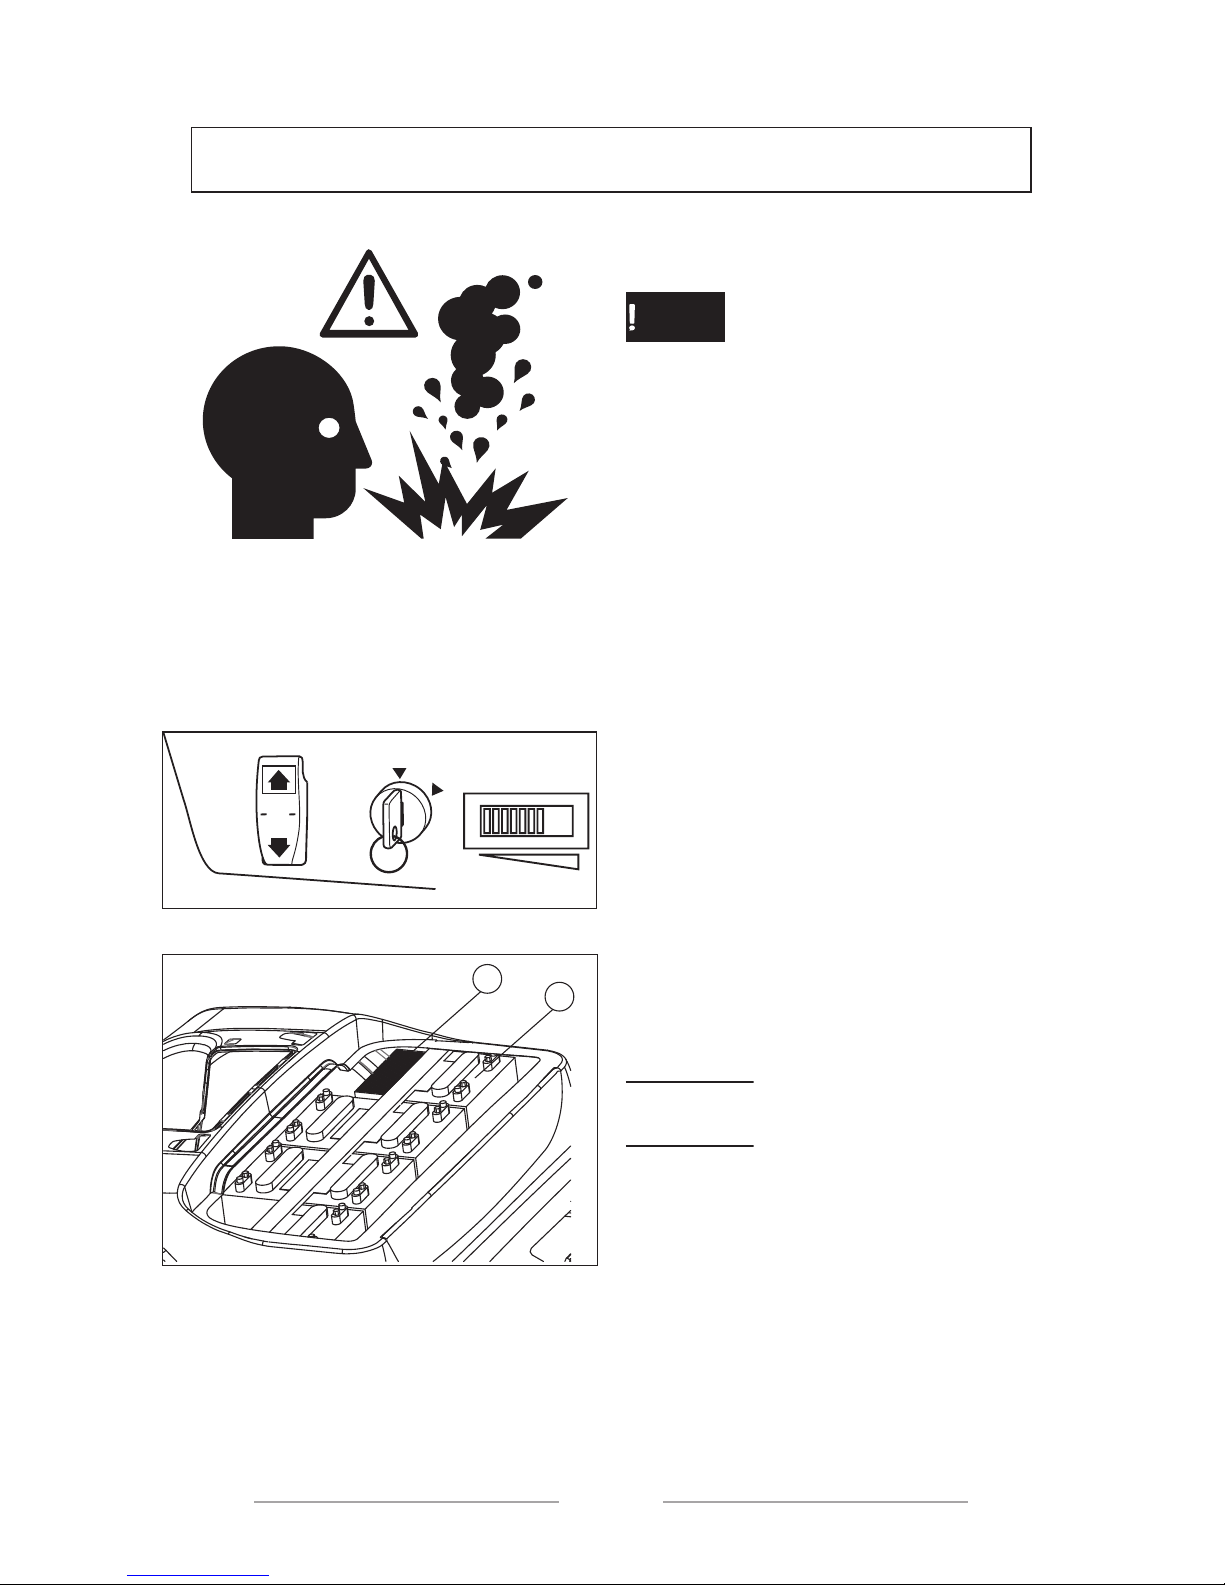
2. The ONBOARD charging unit
is below the seat at the left hand side as
shown.
3. Plug the DC out put of the
charging unit into the normal socket
(220V)
--------------------------------------
CAUTION !
Battery charging operation carries high
electrical risks. Please seek help if you
are not experienced.
--------------------------------------
Check the specific gravity of the
battery water from the table by usimg
hydrometer. If any low level is detected
or the reradings vary more than one
point between the cells, call a Pilotcar
Authorized Service.
O
FF
ON
REV
N
FW
D
0
1
1
2
1. Battery charging unit (ONBOARD)
2. Battery
Page 33
33
MAINTENANCE
Charging the Battery
ATTENTION
While the bateries are being charged,
hydrogen gas which has an explosive
characteristic is formed. Charge the
batteries solely in finely ventilated
places. (minimum 5 air change per hour
is required)
--------------------------------------
In order to charge the batteries on
your golf cart, the battery charger
is mounted on your vehicle.
The below section contains the
summary of charging stages.
--------------------------------------
1. Turn the ignition key to OFF
(CLOSED) position.
2. The ONBOARD charging unit
is below the seat at the left hand side as
shown.
3. Plug the DC out put of the
charging unit into the normal socket
(220V)
--------------------------------------
CAUTION !
Battery charging operation carries high
electrical risks. Please seek help if you
are not experienced.
--------------------------------------
Check the specific gravity of the
battery water from the table by usimg
hydrometer. If any low level is detected
or the reradings vary more than one
point between the cells, call a Pilotcar
Authorized Service.
O
FF
ON
REV
N
FW
D
0
1
1
2
1. Battery charging unit (ONBOARD)
2. Battery
Page 34
34
MAINTENANCE
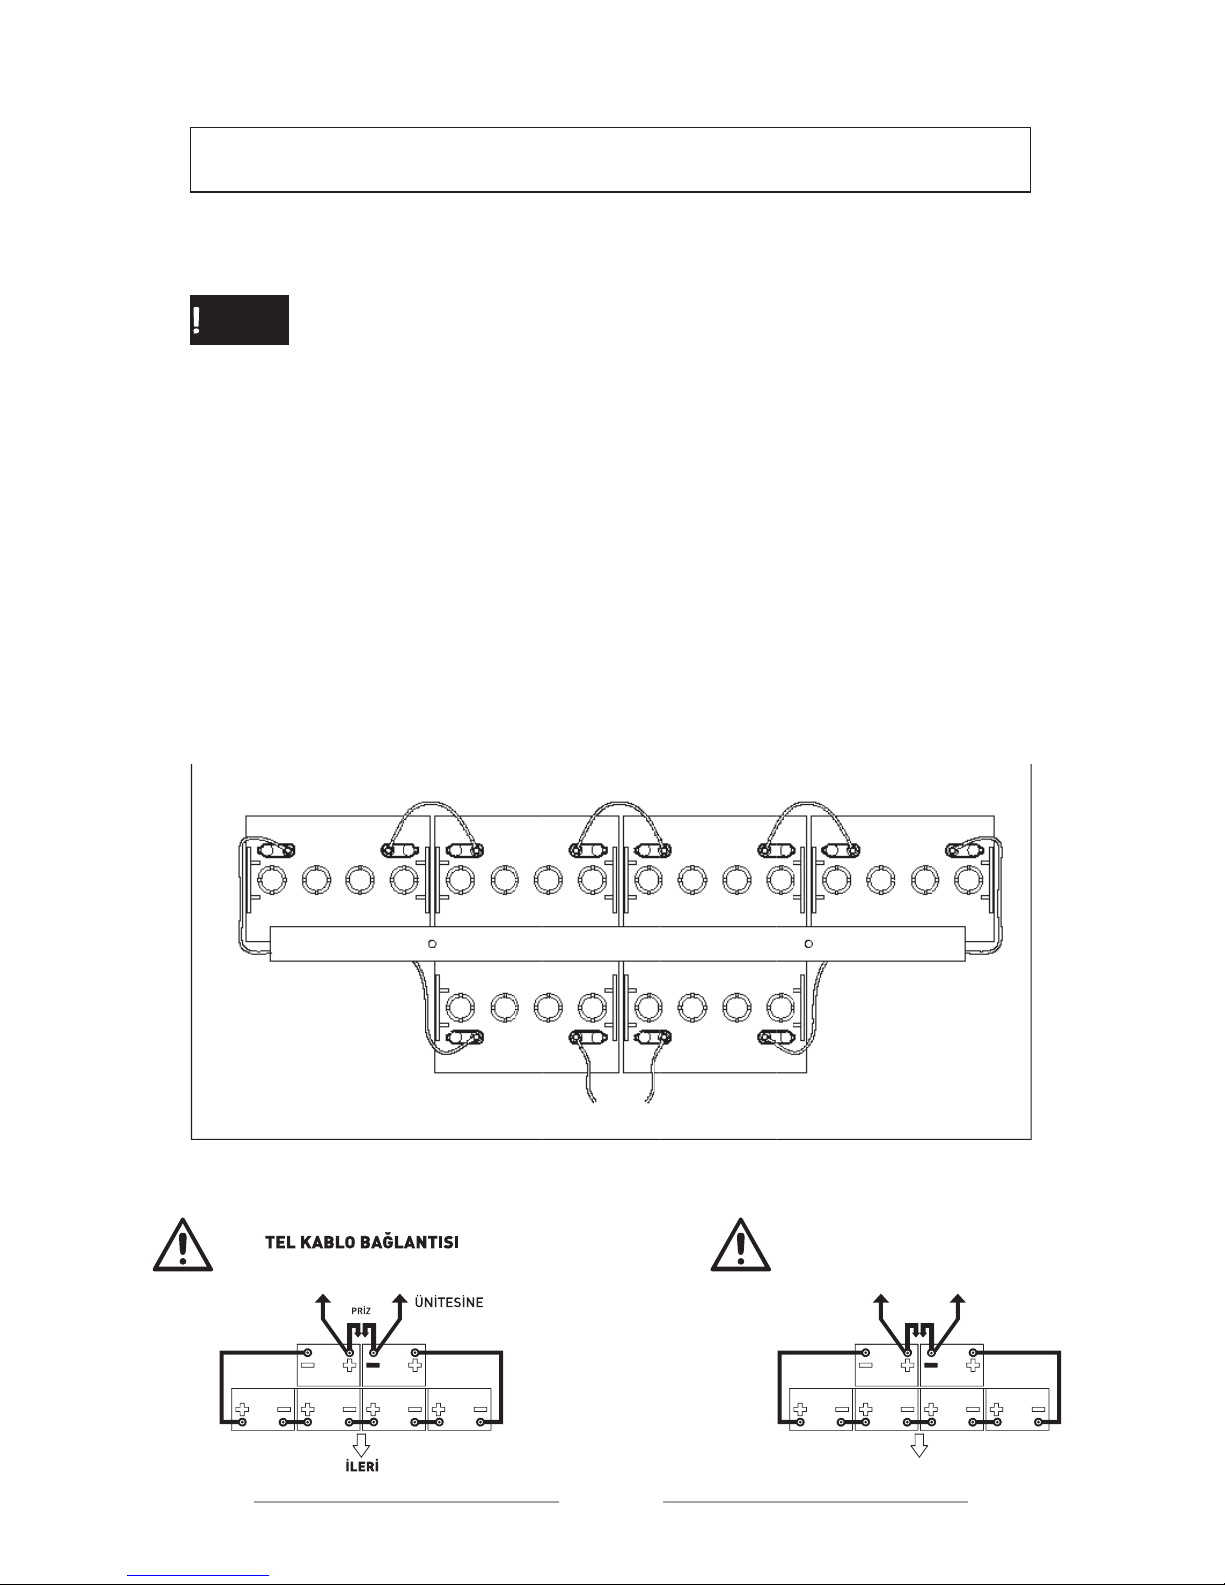
Mounting the battery
--------------------------------------
ATTENTION
While working with the batteries, do not put key or similar materials on accumulator
terminals. Sparkings may cause battery to explode.
--------------------------------------
1. Place the battery holding plates and tighten with 7-9 Nm torque as shown.
A FORWARD GEAR
B B AT TERY
C BATTERY HOLDING PLATE
2. Place the conductor wires and tighten with 7-9 Nm torque as shown.
AKÜ MONTAJI VE
KONTAKTÖRE
(+)
MOTOR
KONTROL
(B-)
BATTERY INSTALLATION AND
WIRE LEAD CONNECTION
TO CONTACTOR
(+)
FORWARD
TO MOTOR
CONTROL UNIT
ASSY.
(B-)
RECEPTACLE
35
MAINTENANCE
--------------------------------------
ATTENTION
While working with the batteries, do
not put key or similar materials on
accumulator terminals. Sparkings may
cause battery to explode
--------------------------------------
-----------------------------------------
CAUTION !
Do not excessively tighten the battery
holding screws. Excessive power may
damage battery case.
--------------------------------------
Changing the Fuse
--------------------------------------
ATTENTION
Make sure to use the identified fuse.
Use of incorrect fuse may damage the
electric system and risk of fire may
arise.
--------------------------------------
CAUTION !
While chaging the fuse, in order
to prevent accidental short circuit
formation, make sure that the ignition
key is turned off.
--------------------------------------
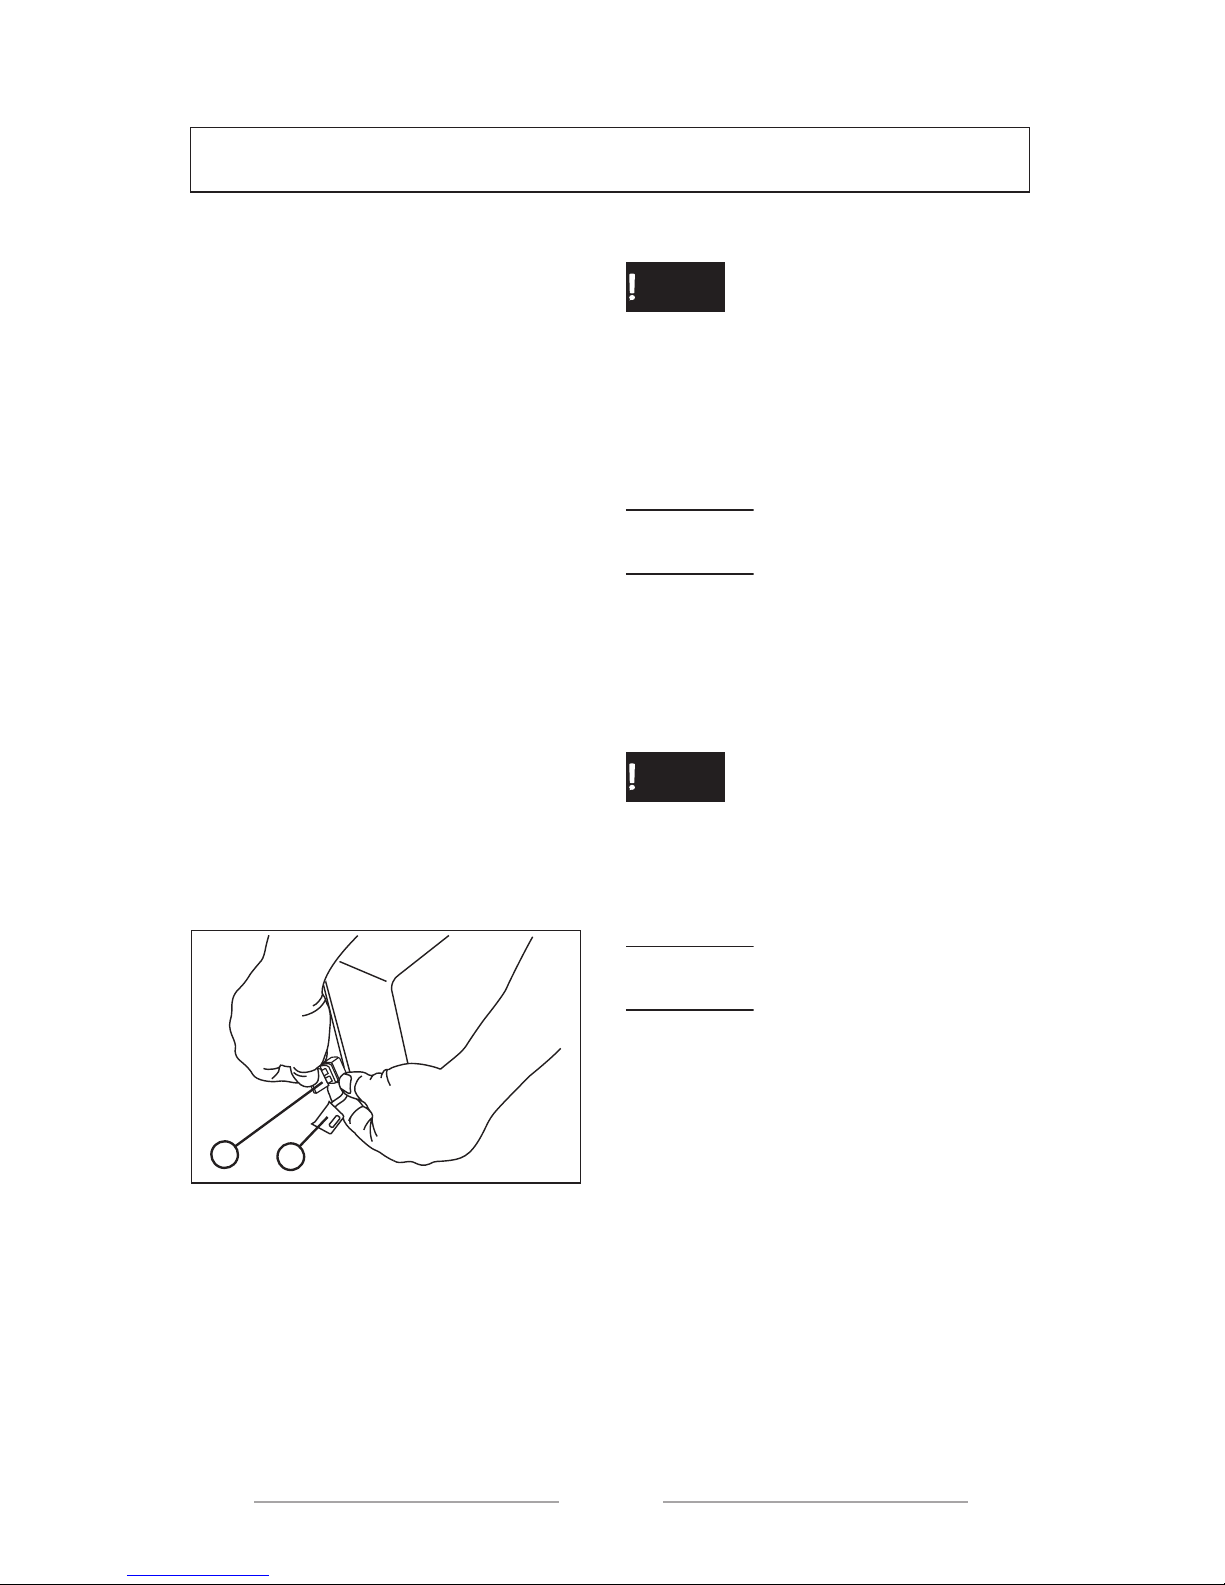
1. Place the serial fuse holder on the
main wiring harness next to the
pulling button.
2. Remove the fuse holder cover.
3. Pull the fuse outside, control
and replace with a new one if
necessary.
A
B
A Fuse Holder
B Fuse
Page 35
35
MAINTENANCE
--------------------------------------
ATTENTION
While working with the batteries, do
not put key or similar materials on
accumulator terminals. Sparkings may
cause battery to explode
--------------------------------------
-----------------------------------------
CAUTION !
Do not excessively tighten the battery
holding screws. Excessive power may
damage battery case.
--------------------------------------
Changing the Fuse
--------------------------------------
ATTENTION
Make sure to use the identified fuse.
Use of incorrect fuse may damage the
electric system and risk of fire may
arise.
--------------------------------------
CAUTION !
While chaging the fuse, in order
to prevent accidental short circuit
formation, make sure that the ignition
key is turned off.
--------------------------------------
1. Place the serial fuse holder on the
main wiring harness next to the
pulling button.
2. Remove the fuse holder cover.
3. Pull the fuse outside, control
and replace with a new one if
necessary.
A
B
A Fuse Holder
B Fuse
Page 36
36
MAINTENANCE
Transaxle Oil
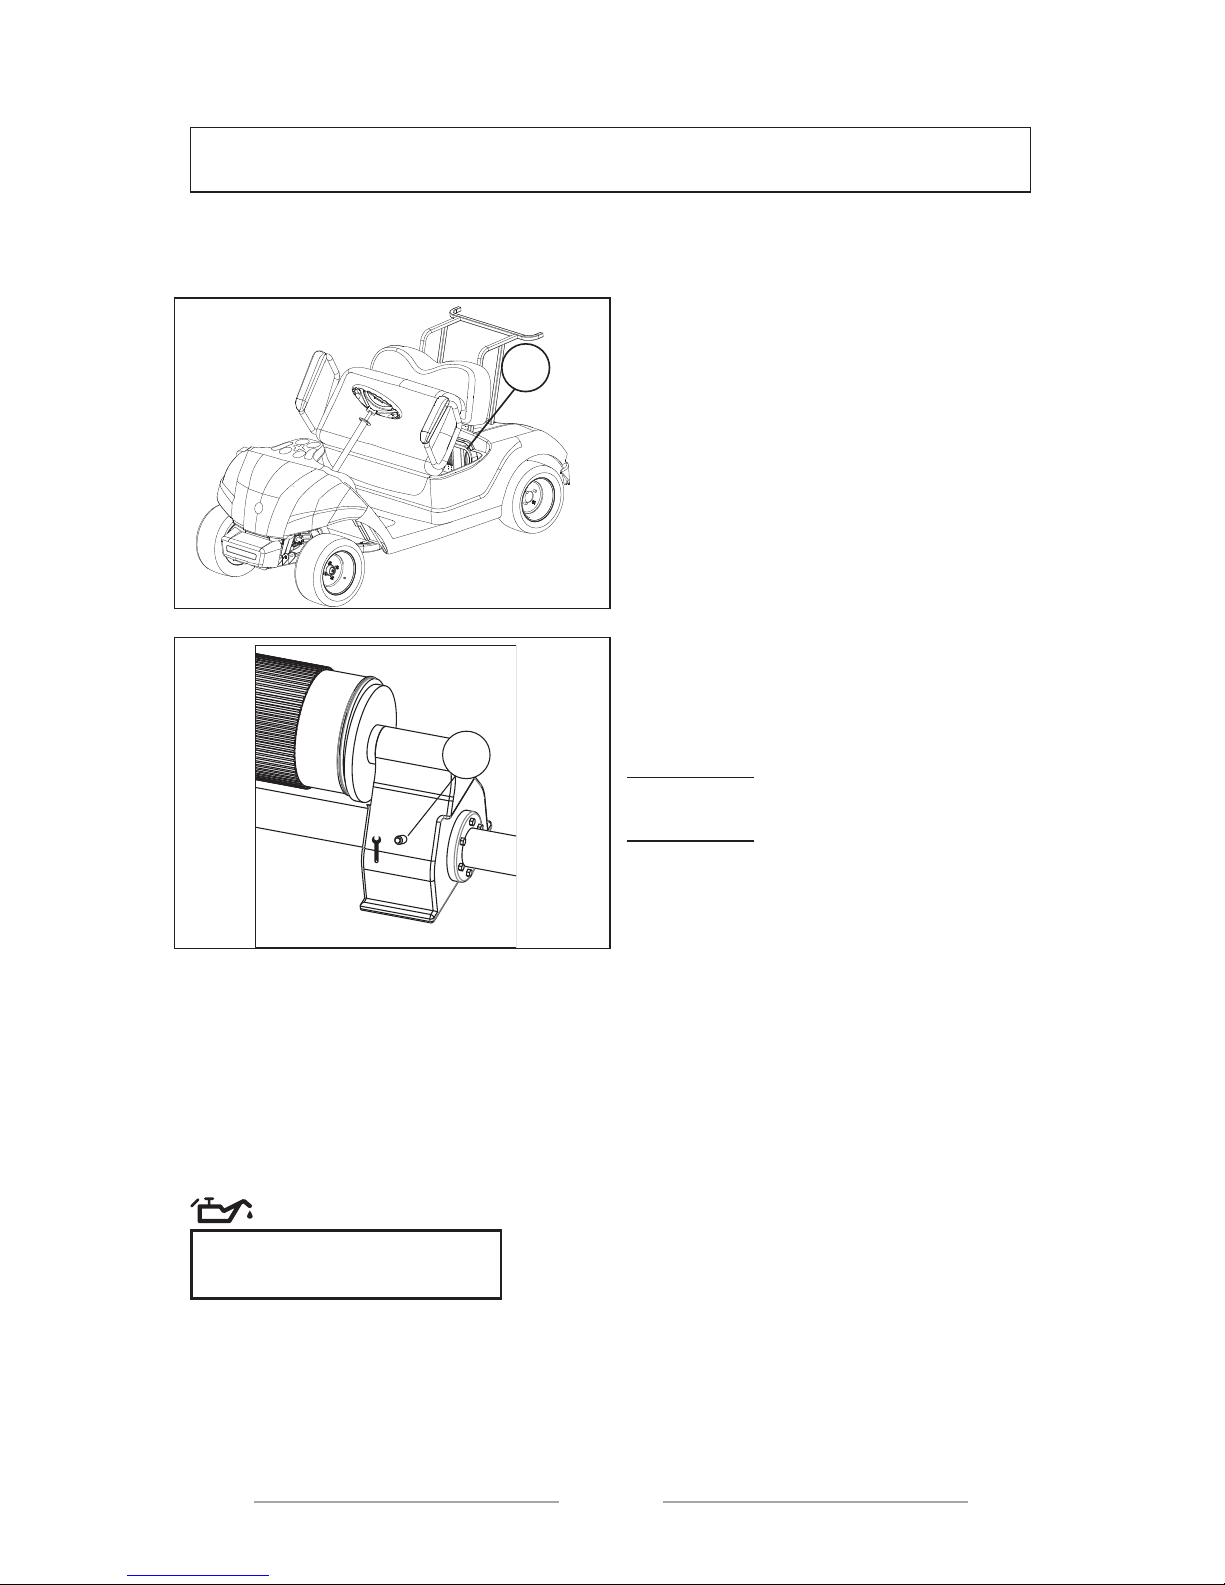
In order to control the transaxle oil
and its level:
1. Place the vehicle on a smooth
surface.
2. Make sure the ignition key is off.
3. Differential oil case may be reached
by setting the seats on upright
position.(1)
4. Place and oil collecting box under
the transaxle case.
5. Clean the area around the tap.
6. By using a 17 mm. fork spanner,
unscrew the transaxle oil service
tap on the rear transaxle case. (2)
7. Check for sufficient amount of oil.
--------------------------------------
CAUTION !
Prevent foreign substances to penetrate
into transaxle.
--------------------------------------
8. If required, sliding restrictive high
performance gear oil SAE80 W90
API GL-5 until the level of the oil
reaches the top of the tap hole or
outlet of the service hole.
9. Place the transaxle service tap and
tighted with 66 Nm.
Transaxle Oil TYPE
SAE80 W90 API GL-5
1
2
17 mm
37
MAINTENANCE
Chaging the tyres
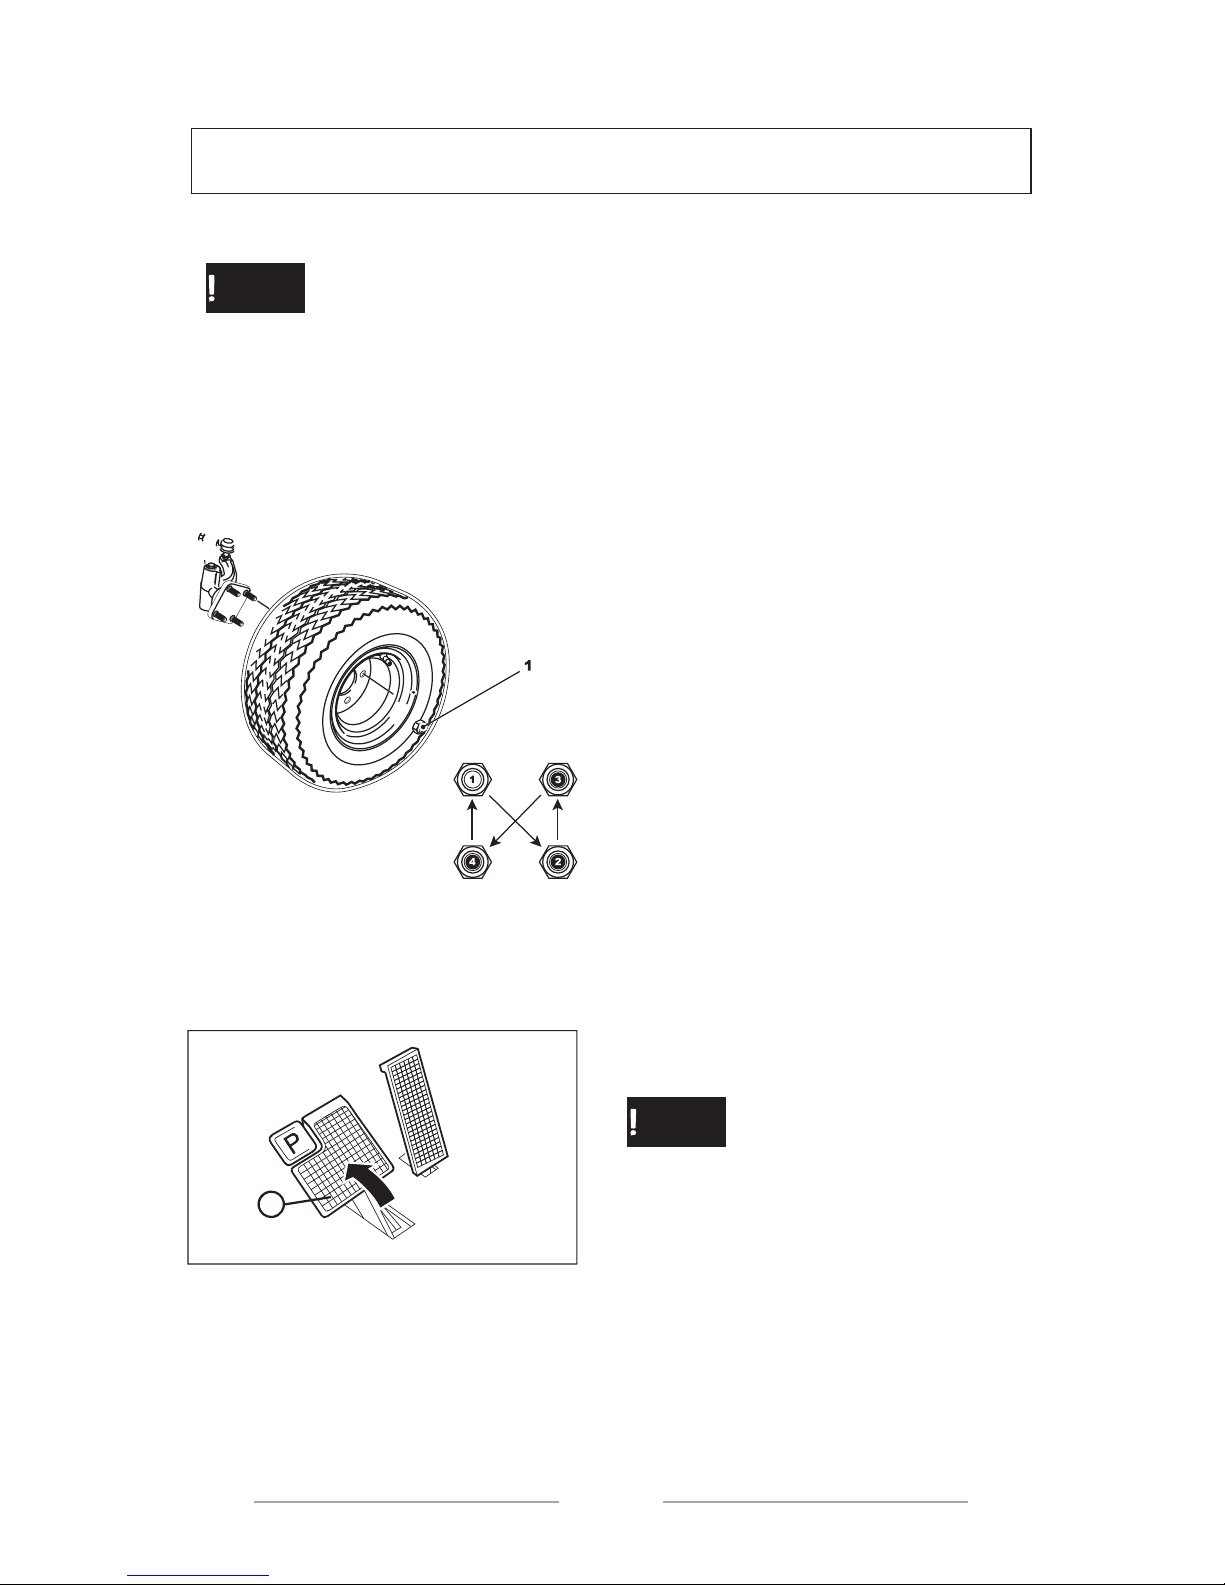
In order to remove and mount the tyres
on the golf cart,
1. Place a wedge in front of the tyres
to prevent sliding and loosen the
wheel nuts (1)
2. Lift the golf cart by means of a
lever jack and dismount the tyre by
removing the nuts.
3. While mounting the tyre, apply the
dismounting stages in a reversed
order.
Wheel nut tightening torque value:
80 Nm, 8.0 m*kg
Brake Adjustments
The brakes of your golf cart are
automatically adjusted.
Before starting the vehicle, press the
brake pedal for a few times to make sure
the brakes function properly. (B)
--------------------------------------
ATTENTION
If you have a concern for a problem
in the brakes, please apply to your
Pilotcar Service before using the cart.
Brake malfunction may cause serious
accidents.
--------------------------------------
--------------------------------------
ATTENTION
Before the tyre or brake maintenance,
make sure that the ignition key is set to
OF F.
--------------------------------------
BEEP
B
A
Page 37
37
MAINTENANCE
Chaging the tyres
In order to remove and mount the tyres
on the golf cart,
1. Place a wedge in front of the tyres
to prevent sliding and loosen the
wheel nuts (1)
2. Lift the golf cart by means of a
lever jack and dismount the tyre by
removing the nuts.
3. While mounting the tyre, apply the
dismounting stages in a reversed
order.
Wheel nut tightening torque value:
80 Nm, 8.0 m*kg
Brake Adjustments
The brakes of your golf cart are
automatically adjusted.
Before starting the vehicle, press the
brake pedal for a few times to make sure
the brakes function properly. (B)
--------------------------------------
ATTENTION
If you have a concern for a problem
in the brakes, please apply to your
Pilotcar Service before using the cart.
Brake malfunction may cause serious
accidents.
--------------------------------------
--------------------------------------
ATTENTION
Before the tyre or brake maintenance,
make sure that the ignition key is set to
OF F.
--------------------------------------
BEEP
B
A
Page 38
38
MAINTENANCE
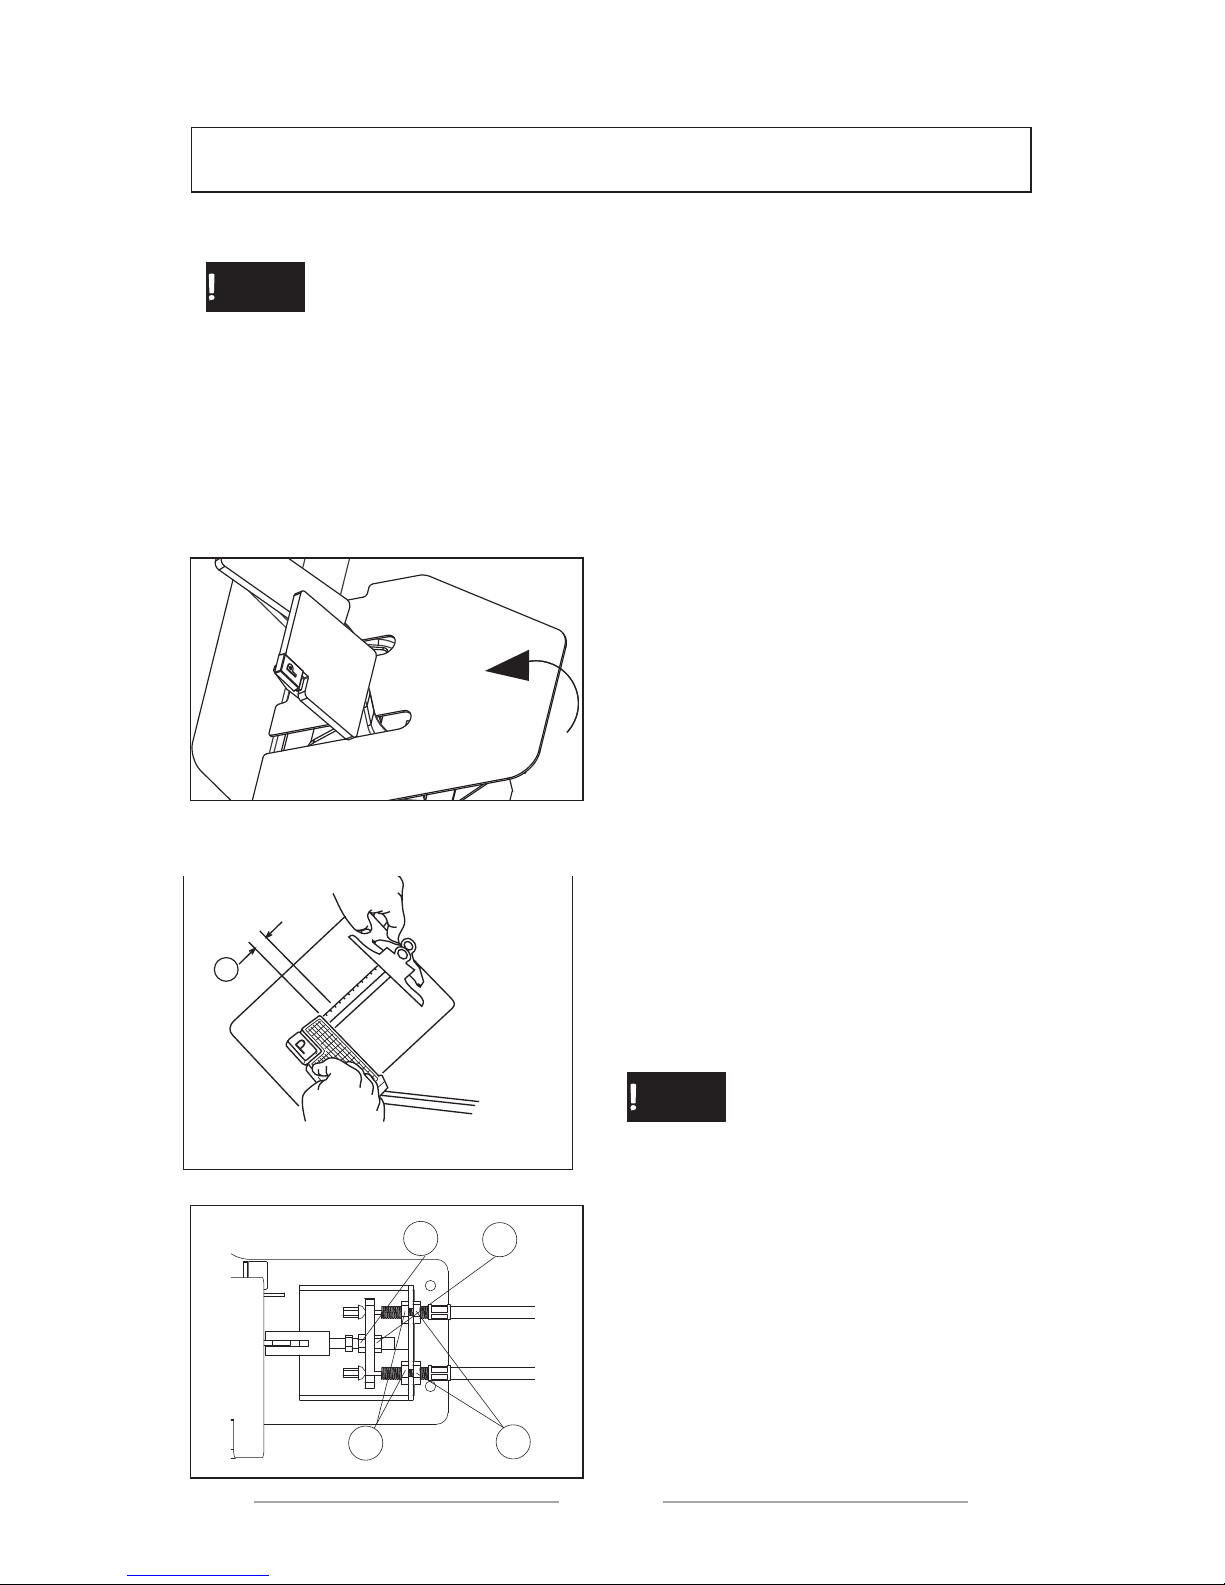
Adjusting brake pedal
1. Remove the mat on the surface of
the golf cart and maintenance lid.
2. Check the brake pedal free travel
by pushing the brake pedal with two
fingers ( by applying slight force) by
measuring the distance the pedal
moves until a resistance is felt. (a)
Brake pedal slack 45-50 mm.
3. If the brake pedal slack is to be
adjusted, loosen the lock nut (A)
and turn the adjusting nut (B) to
inwards and outwards directions
until the determined pedal slack is
eleminated and then fix the locking
nut in its place.
4. In case the right or left rear tyres
of your cart do not perform equal
brakes turn the C and D nuts
inwards and outwards and make
sure both brakes perform the same.
Tighten and fix the adjustment nut
after adjustment is completed.
--------------------------------------
ATTENTION
Do not excessively tighten the brake
wirings. Excessive tightening may
increase brake wear and the entire
performance of the car will be effected.
--------------------------------------
--------------------------------------
ATTENTION
Before adjusting brake pedal free travel,
press the brakes pedals by pumping a
few times for the brakes automatically
be adjusted.
--------------------------------------
7
1
8
17
1
6
15
14
1
3
1
2
11
10
9
8
a
A
B
C
D
39
MAINTENANCE
Carry out the following preparations if the golf cart is not
to be used for a long time:
-----------------------------------------
NOTE :
Set the ignition key to OFF, remove the key and keep in safe place.
-----------------------------------------
Preparing the chassis
1. Make sure the tyre pressure is 20 psi.
2. Clean the outside of the golf cart and apply anti corrosive material.
3. Cover the golf cart with a porous cover.
Preparing the batteries
1. Remove the batteries from the golf cart and keep in a cool and dry place
between 0ºC and 30 ºC.
2. In order to keep the batteries fully charged, recharge in every 60-90 days. The
batteries shall be maintained fully charged to prevent damage.
3. Clean the top of the batteries with a mixture of baking powder and water as
required.
Page 39

39
MAINTENANCE
Carry out the following preparations if the golf cart is not
to be used for a long time:
-----------------------------------------
NOTE :
Set the ignition key to OFF, remove the key and keep in safe place.
-----------------------------------------
Preparing the chassis
1. Make sure the tyre pressure is 20 psi.
2. Clean the outside of the golf cart and apply anti corrosive material.
3. Cover the golf cart with a porous cover.
Preparing the batteries
1. Remove the batteries from the golf cart and keep in a cool and dry place
between 0ºC and 30 ºC.
2. In order to keep the batteries fully charged, recharge in every 60-90 days. The
batteries shall be maintained fully charged to prevent damage.
3. Clean the top of the batteries with a mixture of baking powder and water as
required.
Page 40
40
This manual contains important safety and operating instructions – read before
using charger.
Warning: Use charger only with an algorithm selected that is appropriate
to the specic battery type. Other usage may cause personal injury and
damage. Lead acid batteries may generate explosive hydrogen gas dur-
ing normal operation. Keep sparks, ames, and smoking materials away
from batteries. Provide adequate ventilation during charging. Never charge
a frozen battery. Study all battery manufacturers’ specic precautions, ie.
maximum charge rates and if cell caps should be removed while charging.
Danger: Risk of electric shock. Connect charger power cord to an outlet that has
been properly installed and grounded in accordance with all local codes and ordinances. A grounded outlet is required to reduce risk of electric shock – do not use
ground adapters or modify plug. Do not touch uninsulated portion of output connector or uninsulated battery terminals. Disconnect the AC supply before making
or breaking the connections to the battery. Do not open or disassemble charger.
Do not operate this charger if the AC supply cord is damaged or if the charger
has received a sharp blow, been dropped, or otherwise damaged in any way –
refer all repair work to the manufacturer, or qualied personnel. This appliance
is not intended for use by persons (including children) with reduced physical,
sensory or mental capabilities, or lack of experience and knowledge, unless they
have been given supervision or instruction concerning use of the appliance by a
person responsible for their safety. Children should be supervised to ensure that
they do not play with the appliance.
Operating Instructions
CAUTION: Charger enclosure may be hot during charging. Use hand protection if handling the
charger while charging.
1. Extension cords must be 3-wire cord no longer than 30m(100’) at 10AWG or 7.5m
(25’ at 16AWG per UL guidelines.
2. Only connect ONE QuiQ charger to a single 15A circuit or the circuit may become overloaded.
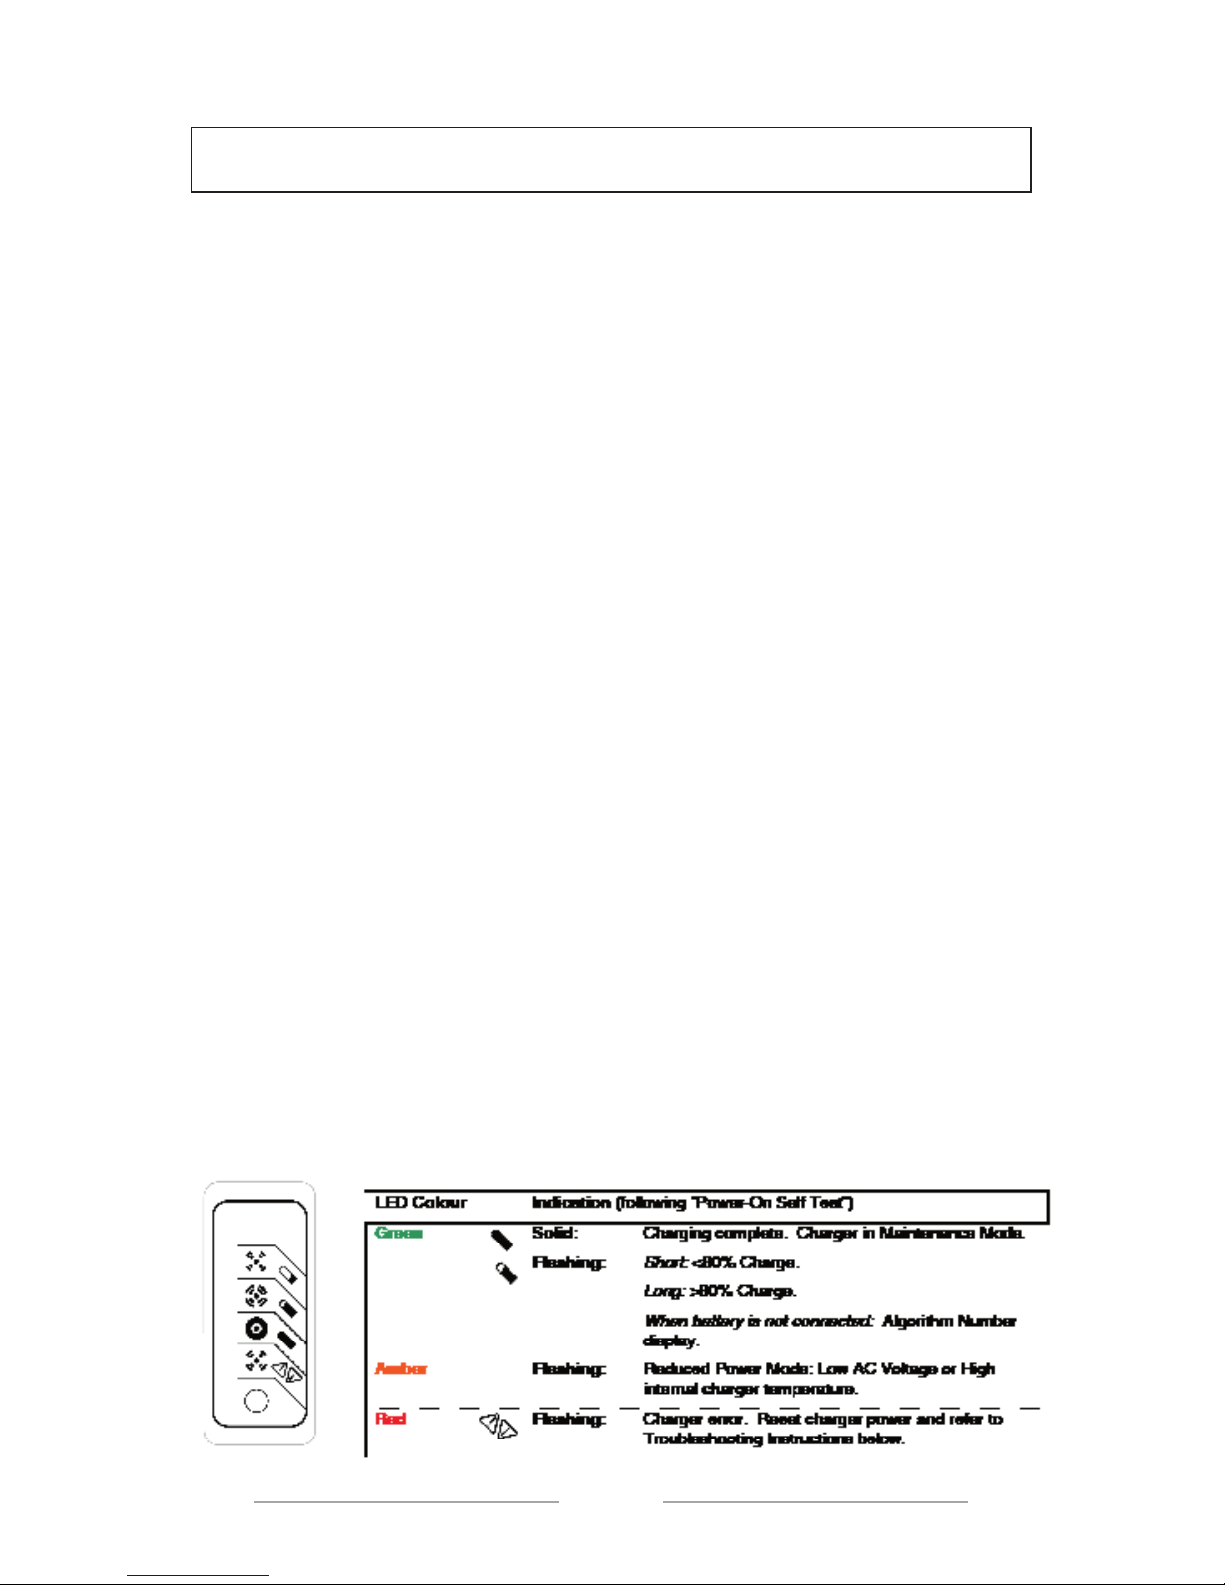
3. Charger 10-LED Display:
4. Optional Charger Single-LED Display (internal or external)
CHARGER UNIT USER MANUAL
41
CHARGER UNIT USER MANUAL
Page 41
41
CHARGER UNIT USER MANUAL
Page 42
42
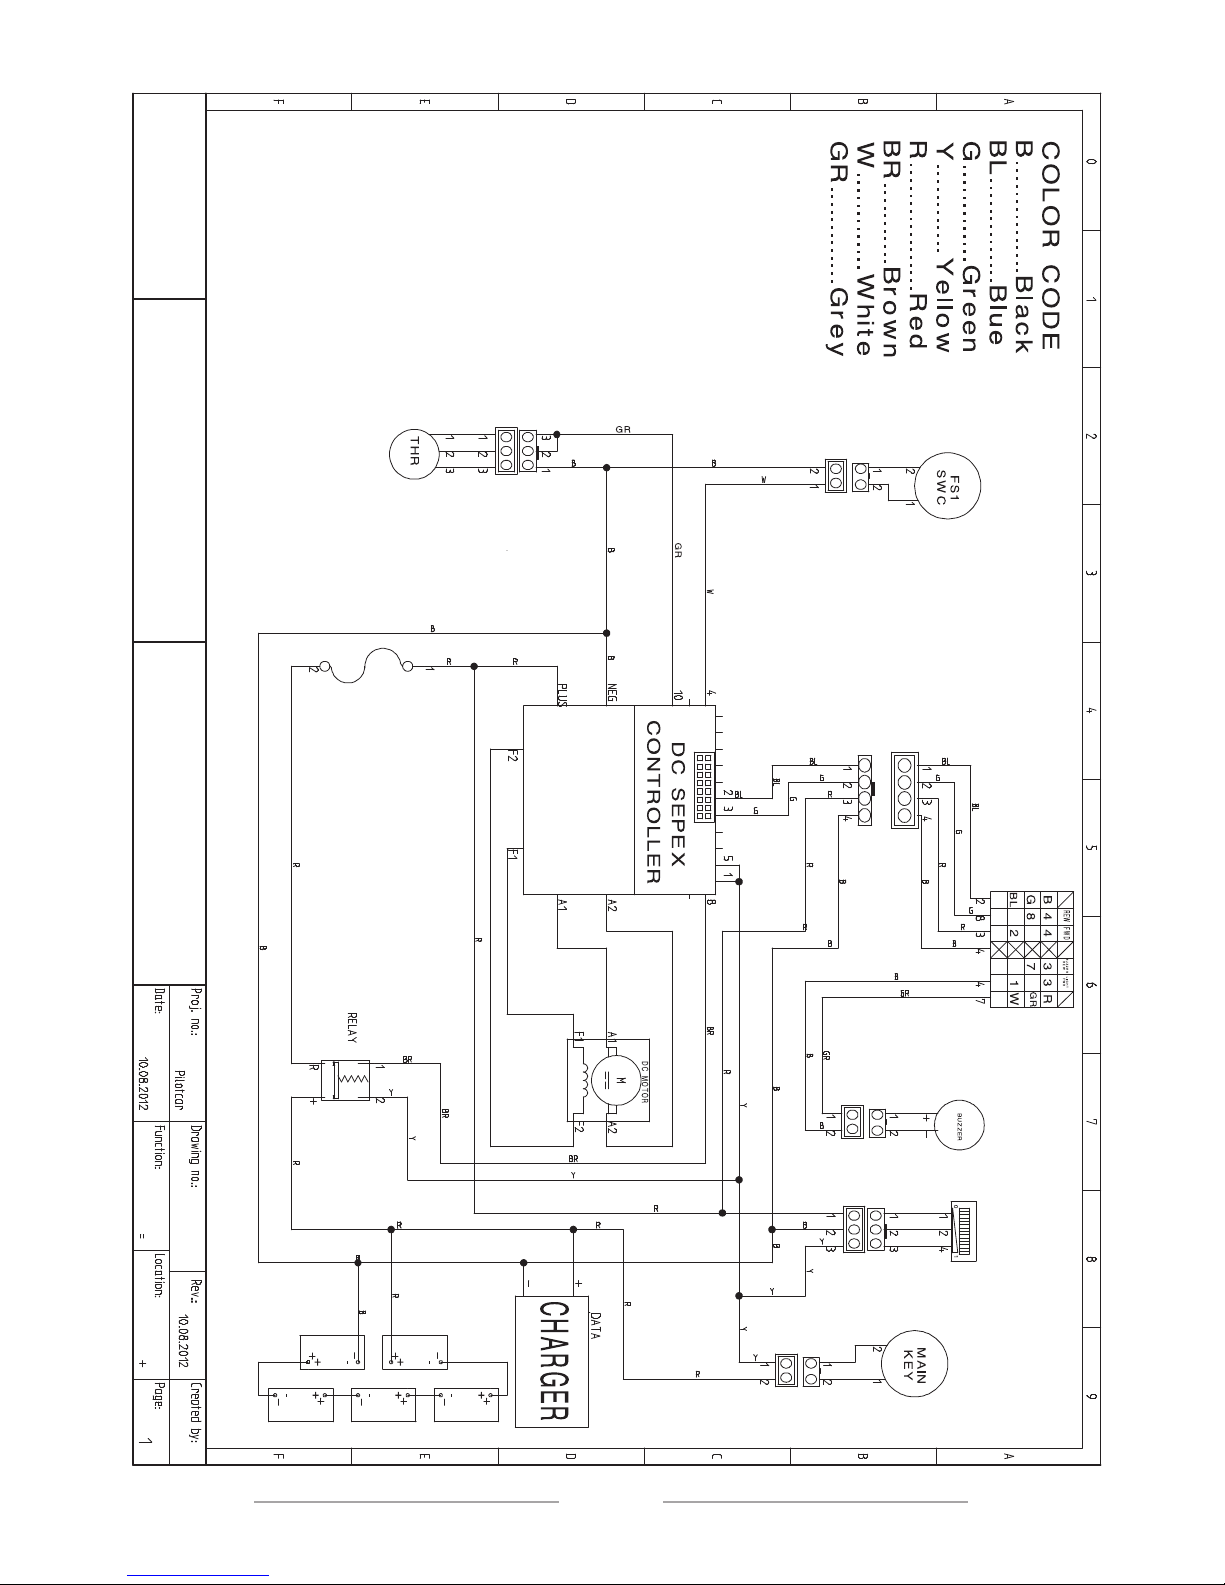
ELECTRICAL DIAGRAM
Page 43

Overall length 2385 / 2865* mm
Overall width 1200 mm
Height (with suntop) 1910 mm
Height (without suntop) 1200 mm
Seating capacity 2 Passengers
+2 Passengers (Optional)
Turning radius 3,0 mt
Weight (without batteries) 305 kg
Weight (with batteries) 475 kg
Wheelbase 1640 mm
Maximum speed (forward) 24 km/h
Maximum speed (reverse) 8 km/h
Battery 6 pcs x 8V
Parking brake Foot-operated multi-lock
Electro-magnetic (Optional)
Motor type High Eciency AC motor
Motor power 4kW,6kW
Chassis Steel Construction
Towing Capacity 500 kgs
Tires
Front 18x8,5-8 6-ply**
Rear 18x8,5-8 6-ply**
Maximum slope 25%
Charger 220 VAC@8 1A /48 V
Ground clearance 100 mm
Standard warranty 2 Years
* Overall lenght of vehicle equipped with extended suntop
** Turf or road type tires
PC-2 Technical Specication
Page 44

Overall length 3225 / 3635* mm
Overall width 1200 mm
Height (with suntop) 1910 mm
Height (without suntop) 1200 mm
Seating capacity 4 Passengers
+2 Passengers (Optional)
Turning radius 4,3 mt
Weight (without batteries) 430 kg
Weight (with batteries) 655 kg
Wheelbase 2480 mm
Maximum speed (forward) 24 km/h
Maximum speed (reverse) 8 km/h
Battery 8 pcs x 6V
Parking brake Foot-operated multi-lock
Electro-magnetic (Optional)
Motor type High Eciency AC motor
Motor power 6kW, 10kW
Chassis Steel Construction
Towing Capacity 1000 kgs
Tires
Front 18x8,5-8 6-ply**
Rear 18x8,5-8 6-ply**
Maximum slope 25%
Charger 220 VAC@8 1A /48 V
Ground clearance 100 mm
Standard warranty 2 Years
* Overall lenght of vehicle equipped with extended suntop
** Turf or road type tires
PC-4 Technical Specication
Page 45

PC-6 Technical Specication
Overall length 4065 / 4175* mm
Overall width 1300 mm
Height (with suntop) 1990 mm
Height (without suntop) 1200 mm
Seating capacity 6 Passengers
+2 Passengers (Optional)
Turning radius 5,6 mt
Weight (without batteries) 525 kg
Weight (with batteries) 750 kg
Wheelbase 3320 mm
Maximum speed (forward) 24 km/h
Maximum speed (reverse) 8 km/h
Battery 8 pcs x 6V
Parking brake Foot-operated multi-lock
Electro-magnetic (Optional)
Motor type High Eciency AC motor
Motor power 10kW
Chassis Steel Construction
Towing Capacity 1000 kgs
Tires
Front 20,5x8-10 6-ply**
Rear 20,5x8-10 6-ply**
Maximum slope 25%
Charger 220 VAC@8 1A /48 V
Ground clearance 150 mm
Standard warranty 2 Years
* Overall lenght of vehicle equipped with extended suntop
** Road type tires
Page 46

46
NOTES
Page 47

Page 48
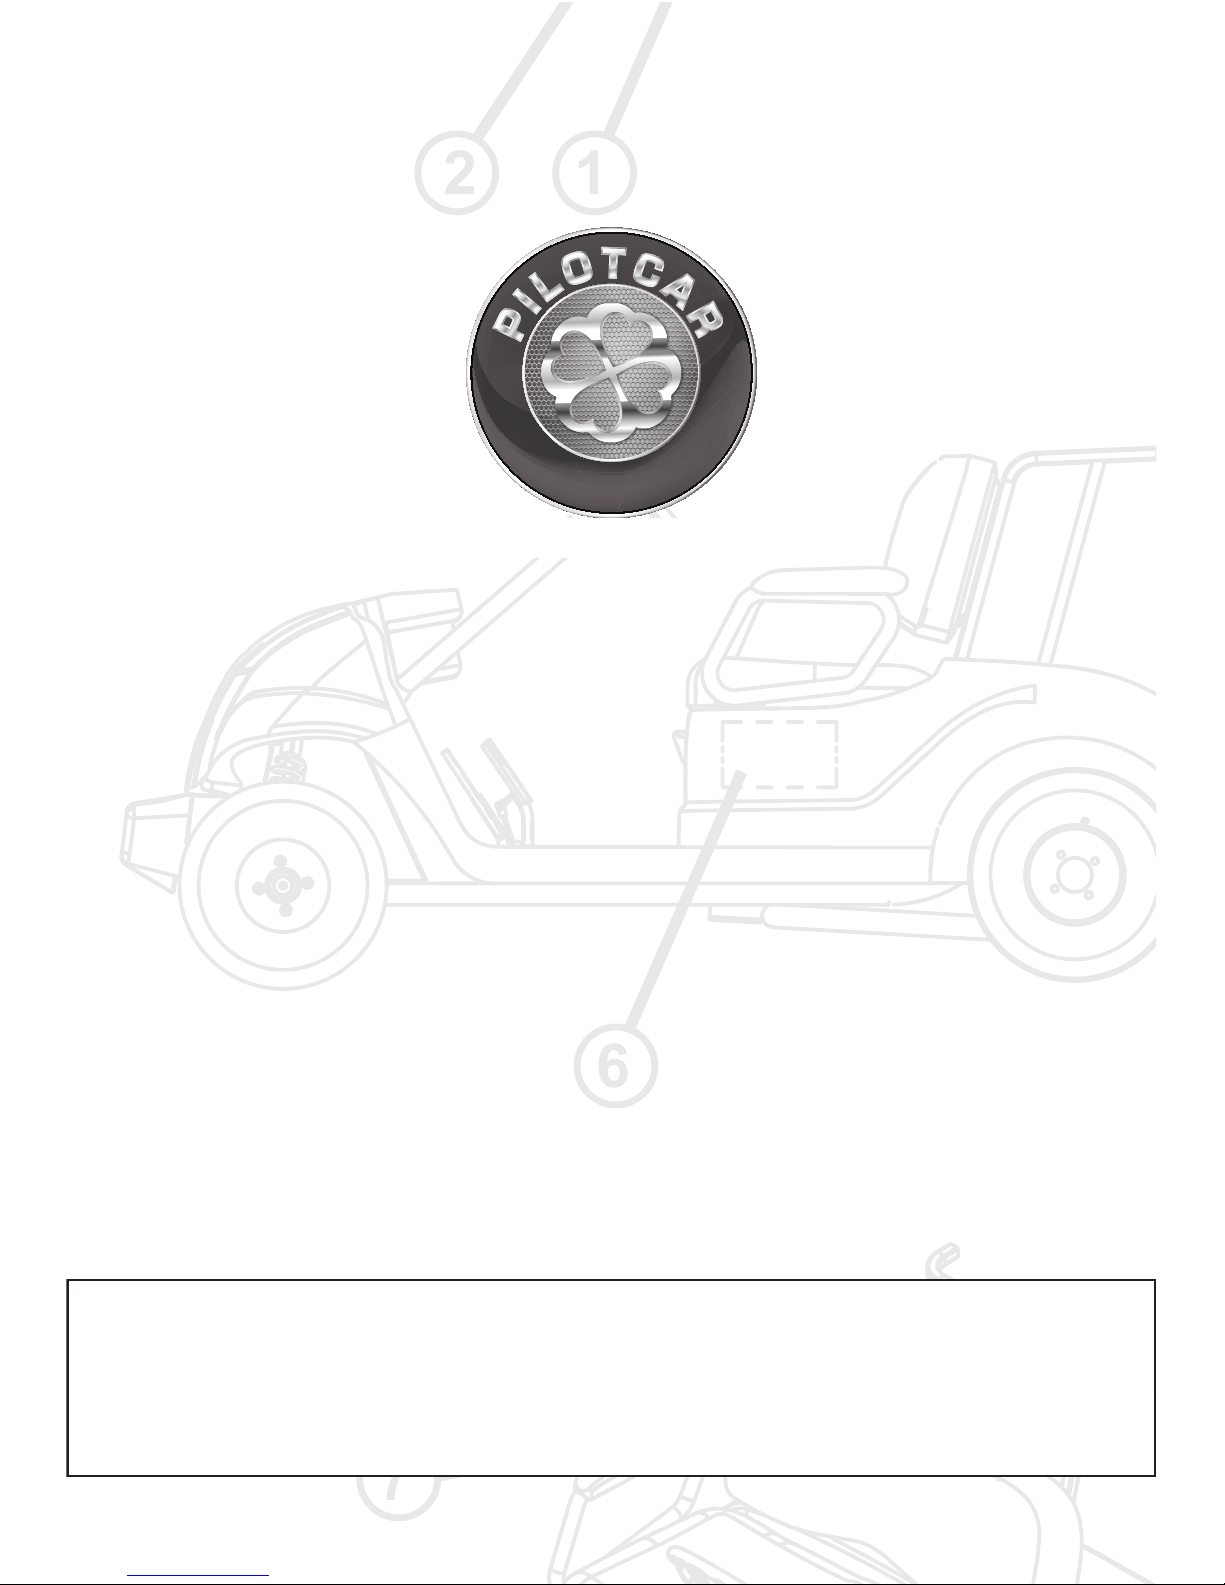
12
6
7
Manufacturer
ÖZKILIÇ OTOMOTİV SAN. ve TİC. LTD. ŞTİ.
Organize Sanayi Bölgesi Kırmızı Cad. No: 8 Nilüfer BURSA
Phone: +90 224 242 40 00
Fax: +90 224 242 40 01
e.mail: [email protected]
www.pilotcar.com.tr
PC-KEK-ENG-20-09-16 / 20
 Loading...