


User’s Guide
Version 1.6
dated 10/10/16
Gregor Schlechtriem
webmaster@pikoder.com
www.pikoder.com

picCAR U ser’s Guide
ii
Contents
Overview 3
Commissioning 5
User Interface 7
Button Control ................................................................................................... 7
Touch Control .................................................................................................... 8
Accelerometer Control...................................................................................... 8
Wheel Control .................................................................................................... 9
Settings 11
APP Settings ..................................................................................................... 12
SSC Settings ...................................................................................................... 13

1
Overview
With the „picCAR“ app and a PiKoder/SSC RX bluetooth-receiver you
control your models with your Android smart phone or tablet using intuitive and very efficient user interfaces.
The remote function employs the smart phone’s build-in bluetooth module.
Depending on the module’s spec your control range could be up to 50 m.
The core function of the app is build around the well known miniSSC protocol. Therefore the App can be used with a number of serial servo controllers besides the PiKoder family. However, more advanced features such as
e.g. the „fail-safe“-function are exclusively supported by the PiKoder receiver.
Commissioning the app requires two simple steps:
- Install the app through the Google Play Store and
- Pair your Android device with the bluetooth transceiver module fol-
lowing standard Android procedures
These initial steps are described in section 2; after commissioning the app
you simply start the app like any other app on your device. Section 3 presents the user interface and section 4 illustrates the preferences and settings
of the app.


2
Commissioning
The picCAR app is available free of charge in the Play Store; the installation
is started after hitting the button and does not require any user interference.
Please bear in mind though that you have to grant Bluetooth priveliges for
the app.
The second and filnal step requires the pairing of your Android device with
the receiver’s bluetooth module (a standard HC-06 transceiver).
To do this, enter the Bluetooth menu inside Settings, then search for new
devices. After a moment the device "HC06" will appear. Tap the HC06 in

picCAR U ser’s Guide
6
the list, and you will then be asked for the PIN - it is 1234. This completes
the setup of app.
3
User Interface
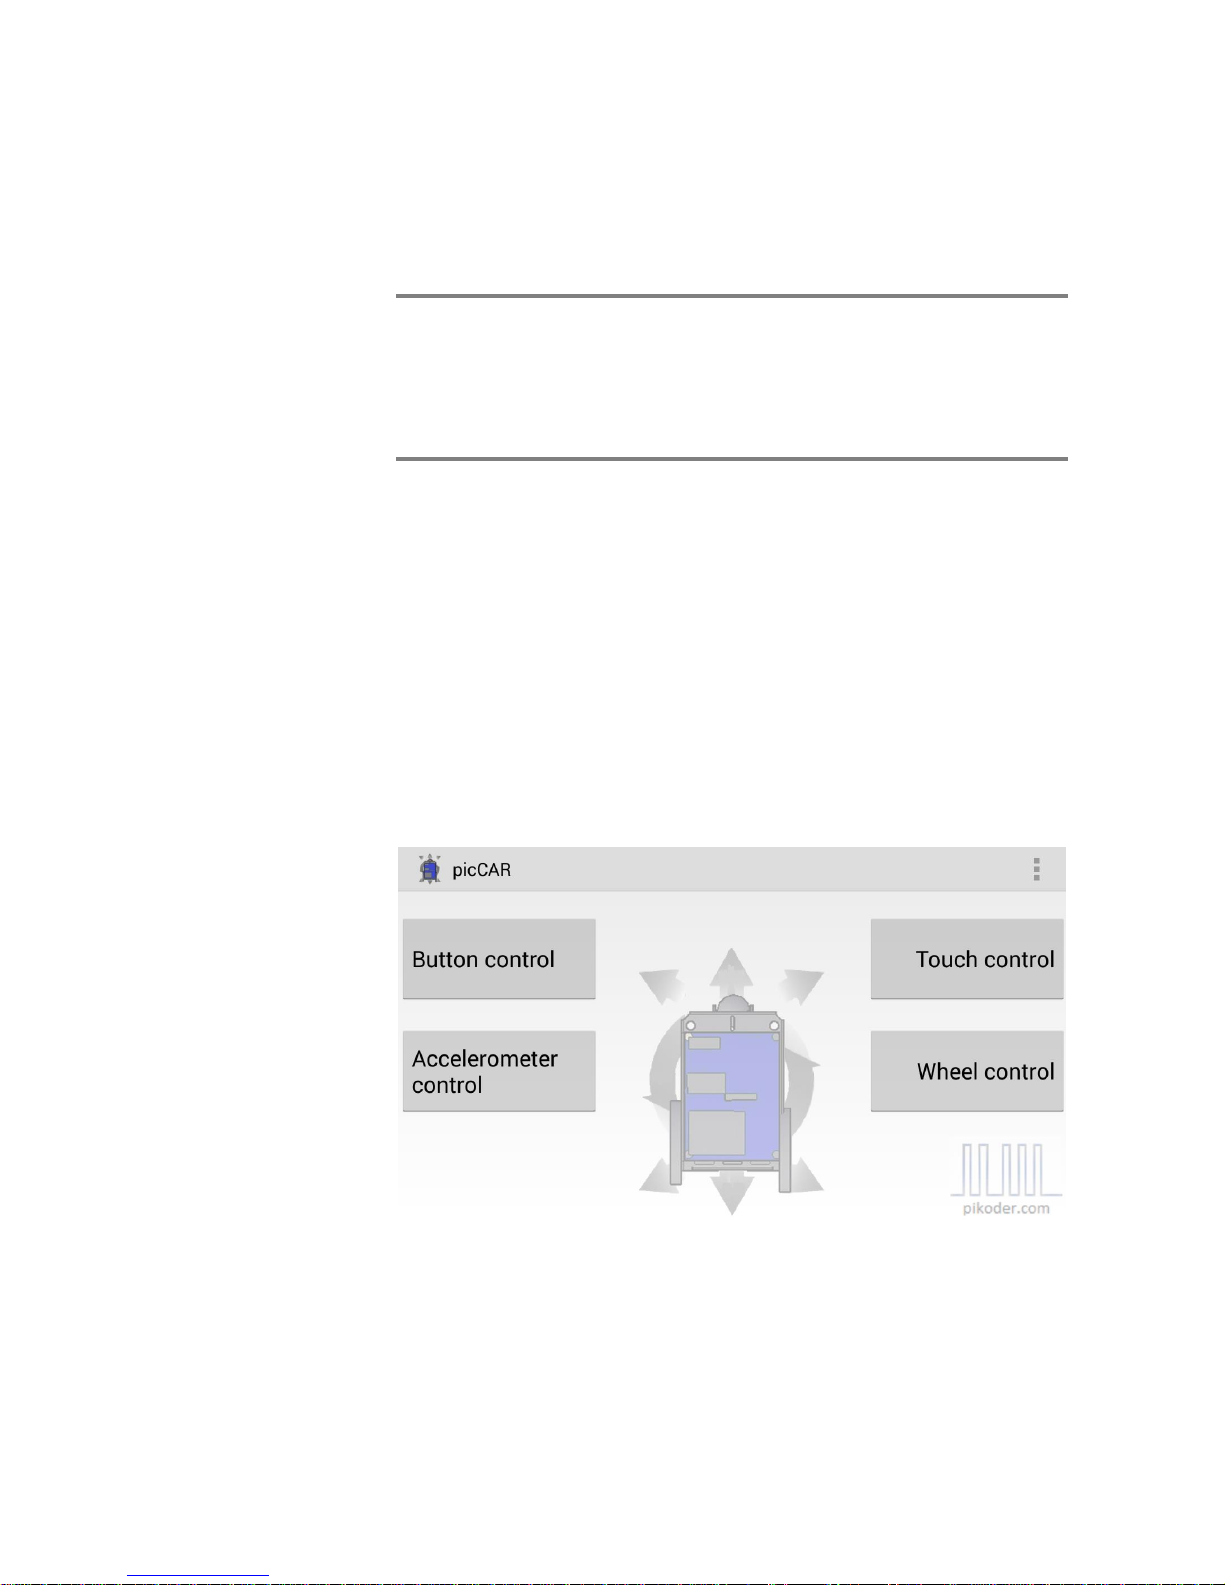
After starting the app you will be seeing the main screen which allows you
to select from different user interfaces. Additionaly, this screen would be
your starting point for specific settings. Please note that all control related
screens are fixed to a landscape format to simplify model control.
To start contolling your model you would hit one of the four buttons selcting your prefered interface.
Button Control
Button Control offers a very simple user interface: you would control your
model by simply hitting the command button.

picCAR U ser’s Guide
8
Touch Control
Touch Control implements a virtual thumbstick: you would control your
model by touching and moving the red button.
Accelerometer Control
In selecting this user interface you would move your device to control your
model; the app does evaluate these movements and translates them into the
respective commands.

9
Wheel Control
Wheel Control represents a combination of the Accelerometer and the
Touch Control: directional control is based on movement of your device
similar tot he Accelerometer Control and speed is controlled by a slider.


11
4
Settings
Your starting point for settings would also be the main screen (s. red arrow).
After activating the preference menue you are presented another menue
offering APP Settings, SSC Settings, and the general help link to the
PiKoder web page.

picCAR U ser’s Guide
12
APP Settings
In this section you would be able to review basic settings of the app. The
most relevant settings cover the bluetooth receiver device name and the
setting for mixing.
The default device name would be “HC-06” reflecting the PiKoder/SSC
RX standard configuration. If you are employing another device then you
can adapt the device name by tapping the field. Please note that the device
which you are using has to be paired with your Android device.

13
Mixing is a specific feature required to control „two motor models“ such as
tanks („Mixing Active“); if your model requires a conventional control (one
channel for direction, one channel for speed control), then uncheck the
box.
SSC Settings
SSC Settings are receiver specific settings and are therefore stored in the
PiKoder/SSC’s EEPROM.
The picCAR app features a „fail-safe“-function (in combination with the
PiKoder/SSC RX): if within a given time frame no new command would be
received then all channels will be set to a neutral position. Since you can
pre-program these neutral positions for your model (refer to PiKoder/SSC
RX User’s Manual for mode details), you can ensure that a safe status is
warranted (e.g. motors shut off).

picCAR U ser’s Guide
14
The monitoring cycle can stretch from 0.1 to 99.9 seconds. To read the
current receiver setting, you would hit the “Read data” key (s. above). This
command will read the value from the PiKoder store and display it; the
checkbox will be set automatically when a time out value > 0 is found. If
you want to maintain this value then simply hit “Write data”. This will sync
the app and the receiver starting the fail safe function.
If you want to change the value then hit the input filed and the keyboard
would appear allowing you to edit the field content. For disabeling the time
out you would have to uncheck the box. Please note that a change only becomes effective after hitting the „Write data“-button.
For enabling the „fail-safe“-funktion you would check the box and then
enter the time out value. As with all other changes you would have to hit
the „Write data“-button to put this change into effect.
 Loading...