

Page 1

Ringmaster
analog multiplier
User’s Guide
All contentscAbsara Audio LLC 2018
Page 2

1
Page 3

CONTENTS 2
Contents
Contents 2
1 Welcome to The Ringmaster 3
1.1 Safety Precautions . . . . . . . . . . . . . . . . . . . . 4
Thank You . . . . . . . . . . . . . . . . . . . . . . . . 4
2 Anatomy and Functions 5
2.1 The Interface . . . . . . . . . . . . . . . . . . . . . . 5
Jacks . . . . . . . . . . . . . . . . . . . . . . . . . . . 5
Knobs and Switches . . . . . . . . . . . . . . . . . . . 7
3 Getting Started 9
3.1 Basic Hook Up . . . . . . . . . . . . . . . . . . . . . . 9
3.2 Guided Tour . . . . . . . . . . . . . . . . . . . . . . . 10
CARRIER Jack . . . . . . . . . . . . . . . . . . . . . 11
CV OUT . . . . . . . . . . . . . . . . . . . . . . . . . 12
4 Ringmaster and Mothership 2 12
5 Pigtronix Limited Warranty 14
Page 4

1. Welcome to The Ringmaster
Thank you for entering the realm of Pigtronix. The Ringmaster is a
monophonic, pitch-tracking analog multiplier. This pedal is capable
of tracking both guitar and bass guitar as well as keyboards, vocals,
horns, drums and virtually any other monophonic sound source.
The Pigtronix Ringmaster is an effect known as Ring modulation.
Ring modulation is the multiplication of two signals resulting in the
sum and difference of all of their frequencies. The two signals for the
Ringmaster are your instrument signal, and a sine wave carrier produced internally. While the Ringmaster will track only one note at a
time, it tracks that one note very well. The Ringmaster’s analog pitch
recognition system controls the sine wave carrier that can be combined
to output a huge variety of sounds. The Ringmaster’s sonic signature
can be further animated with a variable source control, external carrier
input jack, SAMPLE + HOLD, and pitch tracking (FOLLOW) functionality.
Experiment with the placement of your Ringmaster device in your
signal chain. The pitch tracking system performs best when a cleaner
instrument signal is used.
In keeping with Pigtronix tradition, the controls on the Ringmaster
have been tuned to provide the fattest possible tone and the widest
range of musical possibilities. The Ringmaster was born out of a
passion for versatile, expressive musical effects; it is built to last and
designed to inspire.
We hope that the Ringmaster will provide you with years of creative
satisfaction.
3
Page 5

1.1 Safety Precautions
The safety precautions listed below are intended to ensure your safety whenever you use the Ringmaster.
NEVER OPEN THE CASE - Never try to separate the two pieces of the
chassis from one another and/or modify the equipment. Opening this device will effectively void the warranty.
STOP USE IN CASE OF PROBLEM - Stop using the equipment if ever you
should notice smoke or a strange odor coming from it. Contact Koltai@pigtronix.com
for service.
AVOID HIGH TEMPERATURES & HEAT BUILD UP - Never cover the
power supply with cloth or other objects. Built up heat creates a danger of
equipment deformation and fire. Do not expose the Ringmaster to direct
sunlight, heating devices, or other extreme temperatures.
USE SPECIFIED POWER ADAPTER ONLY - Be sure to use only the 18Volt DC 300mA Adapter that came with your Pigtronix Ringmaster.
DO NOT EXPOSE TO WATER/BEER - To reduce the risk of fire or electric shock, do not expose your Ringmaster to rain or moisture. If water gets
inside the unit, turn off the power.
Thank You
The Ringmaster represents a decade of continuous R&D involving some of
the top minds in the audio industry. Pigtronix would like to formally thank
the following individuals for their help in creating the Ringmaster: Thomas
Elliott, Nick Cote, Cyril Lance, Howard Davis, Ben Artes, Ray Heasman,
Steve Turnidge, David Buchter, Andy Pitcher, Fischer Mao, Vernon Reid,
Doug Wimbish, Fredrick Thordendal and Teddy Kumpel.
−Pigtronix
4
Page 6

CHAPTER 2. ANATOMY AND FUNCTIONS 5
2. Anatomy and Functions
2.1 The Interface
Jacks
Page 7

CHAPTER 2. ANATOMY AND FUNCTIONS 6
1. DC 18V - Use only the 18-Volt, 300mA, negative tip power
supply that came with your Pigtronix Ringmaster. Using the
wrong power supply is likely to result in a damaged pedal.
2. CV OUT - This jack is an auxiliary output for the summed
control voltage (CV) content from the tracking and modulation sources. The CV OUT can be sent to other pedal CV IN
jacks that use the Hz/V tracking standard, such as the Pigtronix
Mothership 2.
3. OUTPUT - Effect output. Plug in your amp, mixer, or DI box
here.
4. CARRIER - This jack is an auxiliary input for external carrier
signals. When using the CARRIER input, the external signal
will multiply with the internal sine wave carrier in place of your
instrument signal.
Note: The internal sine wave carrier signal can be obtained from
the ring of the CARRIER jack. Using a TRS (Stereo) splitter,
the CARRIER jack can double as an external carrier input, on
the TIP, and output for the internal tracking sine wave carrier,
on the RING.
5. INPUT - Effect input. Plug in your instrument here.
Page 8
CHAPTER 2. ANATOMY AND FUNCTIONS 7
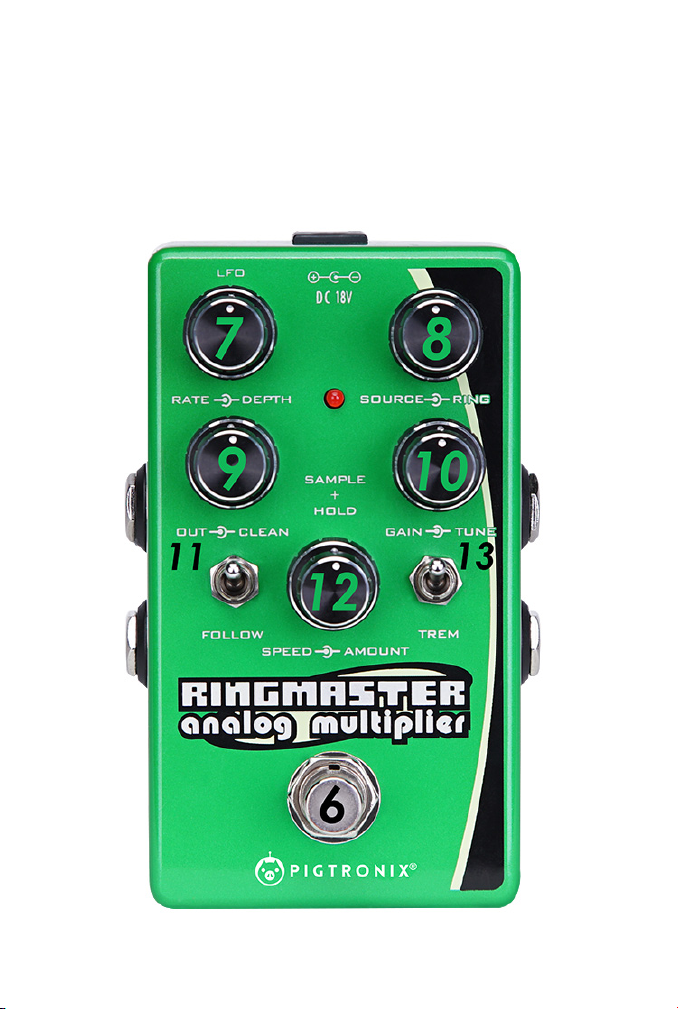
Knobs and Switches
Page 9

CHAPTER 2. ANATOMY AND FUNCTIONS 8
6. ENGAGE - This footswitch turns the entire Ringmaster on and
off. When the engage light is turned off, the Ringmaster is true
bypassed.
7. LFO RATE and DEPTH - This is a low frequency oscillator
(LFO) which modulates the pitch of the sine wave carrier.
RATE - This knob determines how fast the LFO modulates
the pitch of the sine wave carrier.
DEPTH - This knob determines how much the LFO signal
modulates the pitch of the sine wave carrier.
8. SOURCE and RING
SOURCE - This knob determines the source of the internal
carrier signal. Counterclockwise is a tunable sinewave, while
clockwise is the fundamental squarewave.
RING - This knob determines the volume of the ring modulated signal (RING) voice. This is the multiplied signal.
9. OUT and CLEAN
OUT - This knob determines the master output volume of
all your blended voices.
CLEAN - This knob determines the volume of your clean
signal voice.
10. GAIN and TUNE
GAIN - This knob determines the amount of gain of the
internal sine wave carrier. Turning this control up will add harmonic distortion to the internal carrier, and increase the volume
of the RING voice.
TUNE - This knob determines the tuning of the sine wave
carrier.
11. FOLLOW - This toggle turns on the FOLLOW feature in the
down position. When engaged, the sine wave carrier follows your
instruments pitch using the internal pitch tracking.
Page 10

12. SAMPLE + HOLD - This is a random pitch generator for the
sine wave carrier.
SPEED - This knob determines how fast the SAMPLE +
HOLD modulates the pitch of the sine wave carrier.
AMOUNT - This knob determines how much the SAM-
PLE + HOLD modulates the pitch of the sine wave carrier.
13. TREM This toggle turns on the low frequency mode of the
sine wave carrier in the down position. When engaged, the
TREM mode causes the ring modulator to sound like a tremolo
effect. When TREM is combined with the FOLLOW function,
the Ringmaster’s internal pitch tracking changes the tremolo
speed in response to your instruments pitch.
3. Getting Started
3.1 Basic Hook Up
1. Unpack your Ringmaster and place it on a flat, stable surface.
2. Make sure you are using the 18-Volt DC (negative center)
power supply that came with your Pigtronix Ringmaster.
3. Plug the power cord into the 18VDC jack on the back of the
Ringmaster and then plug the power adapter into an electrical
socket.
The Ringmaster is now powered up. To turn the device off, unplug it from the wall or turn off the power going to the 18VDC
supply.
We recommend that you do not leave your Ringmaster powered up for long periods of time when it is not in use.
4. Plug your instrument into the INPUT jack and plug your amplifier into the OUTPUT jack.
9
Page 11

CHAPTER 3. GETTING STARTED 10
3.2 Guided Tour
The following steps will guide you through the sonic palette of the
Ringmaster and show you how to access the range of tones that it has
to offer.
1. Set all of the controls fully counter-clockwise, and set each toggle in the up position. Make sure the LED is off. The Ringmaster
is in bypass mode. Play your instrument and make sure a clean
sound is passing through the pedal.
2. Turn the OUT, CLEAN, and RING knobs up to 12:00. Click the
Engage footswitch to turn the Ringmaster on. The LED will
turn on.
3. Play the highest string on your instrument and adjust the TUNE
control so that the pitch of the ring modulator is in tune with
the pitch of the clean signal. Once it is in tune, play your
instrument in all registers. The sine wave carrier is not currently
tracking the pitch of your instrument, this results in encouraged
dissonance.
4. Turn the RATE and DEPTH knobs up to 12:00 to modulate the
sine wave carrier with the internal LFO. Listen to the vibrato
effect and how the pitch modulates at a consistent rate. Explore
the range of the RATE and DEPTH knobs.
5. Return the RATE and DEPTH knobs to zero.
6. Turn the SPEED and AMOUNT knobs up to 12:00 to modulate
the sine wave carrier with the internal SAMPLE + HOLD. Notice
the effect plays itself by randomly choosing pitches for the sine
wave carrier. Explore the range of the SPEED and AMOUNT
knobs.
7. Return the SPEED and AMOUNT knobs to zero.
Page 12

CHAPTER 3. GETTING STARTED 11
8. Turn the FOLLOW toggle down to activate pitch tracking, the
sine wave carrier will now follow the pitch of your instrument.
9. Play the highest string on your instrument and adjust the TUNE
control so that the pitch of the ring modulator is in tune with the
pitch of the clean signal. Once it is in tune, play your instrument
in all registers. The sine wave carrier is currently tracking the
pitch of your instrument, this is an intelligent ring modulator
and is less harmonically dissonant.
10. Turn up the GAIN knob to 11:00 to hear its effect on the RING
voice. Explore the range of the GAIN knob. Higher settings will
introduce more distortion to the sine wave.
11. Turn up the SOURCE knob to 12:00 to hear its effect on the
RING voice. Explore the range of the SOURCE knob. This knob
will blend between a tunable sine wave and the fundamental
square wave.
12. Turn the TREM toggle down to active the tremolo effect. TREM
lowers the frequency range of the sine wave carrier and effectively gives you a tracking tremolo. Notice the speed of the
tremolo increases with your instruments pitch when FOLLOW
is on. Adjust the range of the TREM speed when FOLLOW
is on with the TUNE knob. When FOLLOW is off the TREM
speed is static and is adjusted with the TUNE knob.
CARRIER Jack
1. Plug a TS (Mono) cable into CARRIER. The signal will replace
your instrument signal and multiply with the internal sine wave
carrier. It is recommended that a sine, triangle, or square wave
be used as the external carrier signal. These can be obtained
from the Pigtronix Mothership 2.
Page 13

2. Plug a TRS (Stereo) cable into CARRIER. The signal on the
Tip will replace your instrument signal and multiply with the
internal sine wave carrier. The signal on the Ring is an output
for the internal sine wave carrier, this can be used as a sine wave
output that tracks the pitch of your instrument when FOLLOW
is on.
CV OUT
1. Plug a TS (Mono) cable into CV OUT. The Tip is now carrying the summed CV signals of the Ringmasters FOLLOW pitch
tracking, LFO, and SAMPLE + HOLD. These CV signals can be
sent to another pedal or system that interfaces with the Hz/V
CV standard, such as the Pigtronix Mothership 2.
4. Ringmaster and Mothership 2
The Ringmaster is designed to interface with the Pigtronix Mothership
2. When combined, these two units provide the complete set of voices
from the first Mothership pedal with modulation and tracking performance that go far beyond the capabilities of the original Pigtronix
Mothership Analog Synthesizer.
The Ringmaster can be used solely as a CV modulation box by sending CV signals to the Mothership 2. Connect the Ringmaster CV OUT
jack to the Mothership 2 EXPRESSION jack. When the Ringmaster is
disengaged, the CV OUT jack is as well. This can be useful to control
when the Ringmaster sends CV modulation to the Mothership 2.
Pitch Modulation - Use the Ringmaster’s LFO section with the Moth-
12
Page 14

CHAPTER 4. RINGMASTER AND MOTHERSHIP 2 13
ership 2 for some sweeping tones. Connect the Ringmaster CV OUT
jack to the Mothership 2 EXPRESSION jack and play with the RATE
and DEPTH knobs. With the Mothership 2 is in SYNC mode, sweeping overtones are produced.
Random Tone - The Ringmaster’s SAMPLE + HOLD can be used as
a random tone generator for the Mothership 2. Connect the Ringmaster CV OUT jack to the Mothership 2 EXPRESSION jack and play
with the SPEED and AMOUNT knobs.
Sync Sweep - The Ringmaster’s SAMPLE + HOLD and LFO circuits
can be used to create moving overtones when the Mothership 2 is in
SYNC mode. Connect the Ringmaster CV OUT jack to the Mothership 2 EXPRESSION jack and play with the SPEED and AMOUNT
knobs.
External Carrier - Connect your instrument into the Mothership 2
INPUT jack and take the Mothership 2 OUTPUT jack and connect it
to the Ringmaster CARRIER jack. Then take the SUB OUT jack and
connect it to the INPUT of the Ringmaster. This will produce a wide
range of sounds depending on the waveform sent by the Mothership
2, or if SYNC is engaged.
Bass Tone - Swap the location of where the Mothership 2 SUB OUT
and OUTPUT jacks are going to the Ringmaster for the External Carrier setting for a deep bass tone.
FM Synthesis - Use a TRS splitter to access the Ring of the CARRIER jack on the Ringmaster and send the internal sine wave carrier
to the Mothership 2 EXPRESSION jack for FM synthesis (Frequency
Modulation).
Page 15

GO FOR IT!
5. Pigtronix Limited Warranty
Your Pigtronix effect pedal comes with a 1-year limited warranty on
parts and workmanship. During the warranty period we will repair
or replace, at our option, defective parts or pedals free of charge,
and return them to the owner. Warranty service does not include
damaged, modified, or misused pedals and such pedals will be subject
to a standard repair charge.
What you must do: First, contact us directly via email and describe
the problem to us. If the problem cannot be resolved we will have you
send the pedal directly to us for servicing.
How to contact us for warranty service:
Email: tech@pigtronix.com
Phone: 631-331-PIGS (7447)
Warranty Limitations: This warranty does not cover defects resulting
from improper or unreasonable use, accident, unauthorized tampering
or modifications; and, warranty shall be considered void if Ringmaster
chassis has been opened. Please consult the instructions and warnings
in this manual for proper use. Warranty is only valid if your Ringmaster has been properly registered within 30 days of original purchase
date, and upon warranty registration, will be valid for 12 months from
original purchase.
To validate your 1-year, limited warranty, please register
your Ringmaster, within 30 days of purchase, on the
web at:
www.pigtronix.com/warranty
14
Page 16

 Loading...